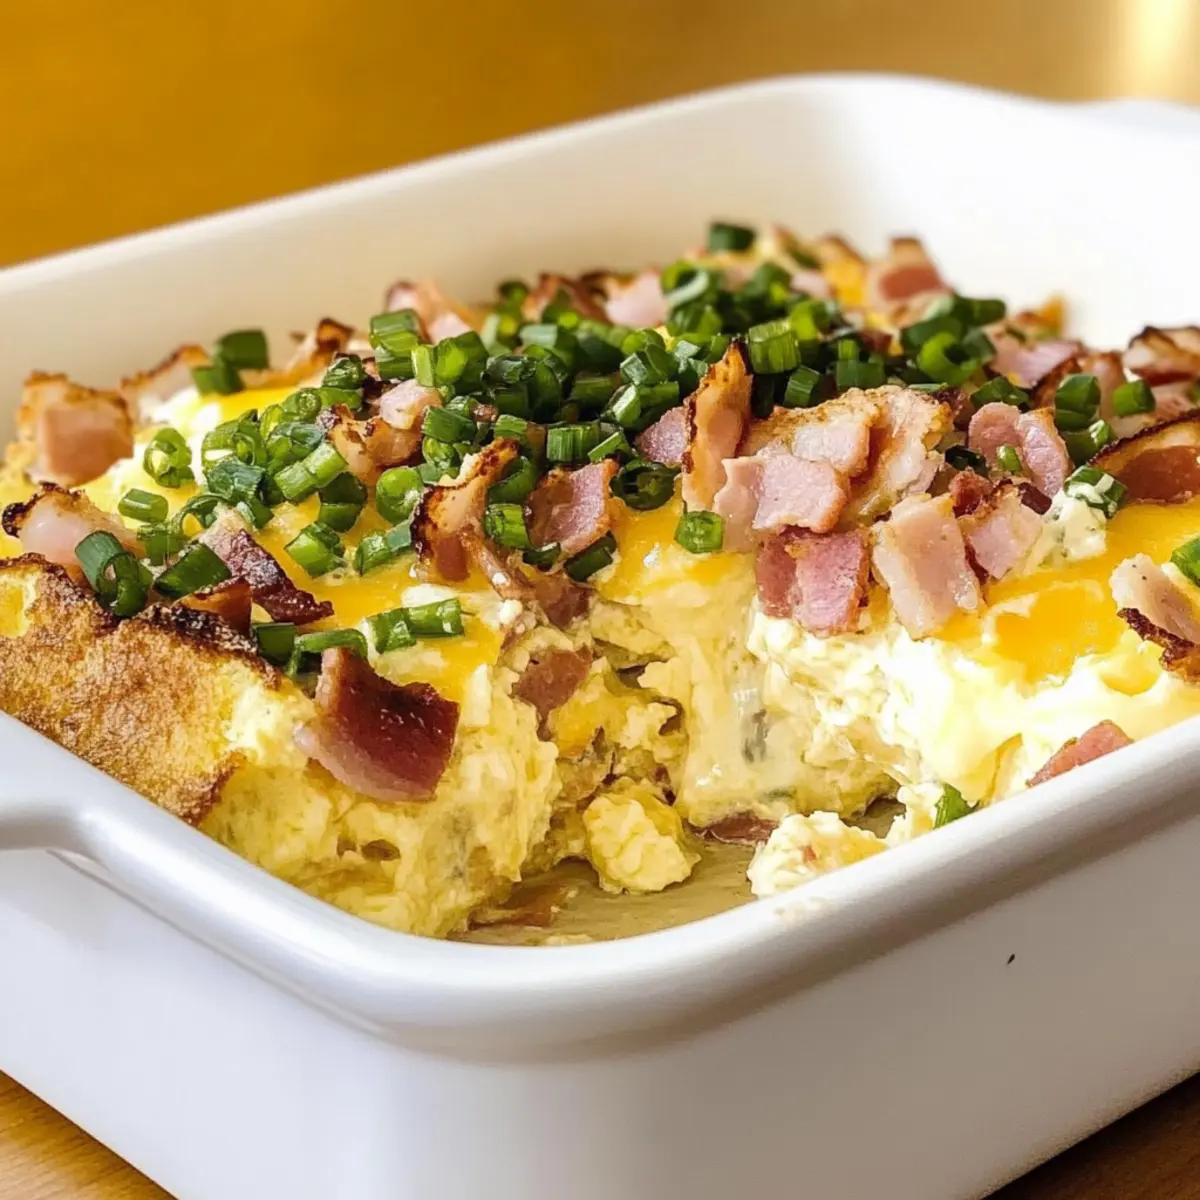
As I whisk together the eggs and cream for this Bacon and Cheese Crustless Quiche, the fragrant aroma of melting cheese fills my kitchen, stirring up memories of lazy Sunday brunches with friends. This no-crust quiche is a fantastic twist on a beloved classic, offering a decadently fluffy texture without the fuss of pastry. It’s not only gluten-free and low-carb, making it a smart choice for those mindful of their diets, but it’s also incredibly quick to prepare—perfect for busy mornings! Plus, you can easily swap the bacon for savory mushrooms or crisp veggies to delight your vegetarian friends. Curious about how this delightful dish can elevate your breakfast game? Let’s dive into the details!

Why Is This Quiche So Irresistible?
Simplicity at Its Finest: This Bacon and Cheese Crustless Quiche is super easy to whip up, making it a go-to recipe for any home cook, whether you’re experienced or just starting out.
Crowd-Pleasing Delight: Its creamy, cheesy goodness is sure to impress family and friends, making it perfect for brunch gatherings or casual dinners.
Versatile Options: Swap the bacon for mushrooms or veggies and create a delicious vegetarian version that doesn’t skimp on flavor.
Time-Saving Marvel: Ready in just 35 minutes, this dish fits perfectly into even the busiest of schedules.
Healthy Indulgence: Naturally gluten-free and low-carb, this quiche allows you to indulge without any guilt! Pair it with a fresh salad or some seasonal fruit, and you’ve got a meal that satisfies cravings and dietary needs, just like this Chickpea Spinach Curry.
Bacon and Cheese Crustless Quiche Ingredients
For the Filling
• 6 large eggs – Provides structure and richness; perfect for a fluffy texture.
• 1 cup heavy cream – Adds a creamy richness that enhances the quiche's flavor.
• 1 cup shredded cheddar cheese – Contributes a deeply savory flavor and gooey texture; try different cheeses for a twist.
• ½ cup cooked bacon, crumbled – Gives a smoky flavor and protein kick; swap with mushrooms or plant-based bacon for a vegetarian option.
• ½ cup milk – Helps achieve a creamy consistency; for a lighter choice, use skim or almond milk.
• Salt and pepper – Elevates the overall flavor; adjust to your personal taste preference.
For Baking
• Butter or cooking spray – Greasing the dish to prevent sticking is essential; olive oil spray can be used for a dairy-free variation.
Now that you have the ingredients, you’re well on your way to making this delectable Bacon and Cheese Crustless Quiche that’s sure to delight every bite!
Step‑by‑Step Instructions for Bacon and Cheese Crustless Quiche
Step 1: Preheat the Oven
Begin by preheating your oven to 350°F (175°C). This ensures a perfectly cooked Bacon and Cheese Crustless Quiche with a golden, fluffy texture. While the oven heats, gather your ingredients and equipment, like a large mixing bowl and a 9-inch pie dish, to streamline your workflow.
Step 2: Whisk the Wet Ingredients
In a large mixing bowl, whisk together 6 large eggs, 1 cup of heavy cream, and ½ cup of milk until the mixture is smooth and well-combined. The rich, creamy consistency is key for a delightful quiche. Feel free to incorporate a whisk or an electric mixer for an effortless blending experience.
Step 3: Add Cheese and Bacon
Fold in 1 cup of shredded cheddar cheese and ½ cup of crumbled, cooked bacon gently into the egg mixture. As you mix, watch the cheese melt into the batter, creating a luscious filling for your quiche. The flavors blend beautifully, ensuring each slice is savory and satisfying.
Step 4: Season the Filling
Sprinkle salt and pepper into the mixture according to your taste preference, stirring gently to combine. This step enhances the overall flavor profile of your Bacon and Cheese Crustless Quiche. Give it a final whisk to ensure that all ingredients are evenly seasoned and distributed.
Step 5: Prepare the Pie Dish
Grease your 9-inch pie dish generously with butter or cooking spray to prevent sticking. This is crucial for easy removal and clean presentation once your quiche is baked. Make sure to coat the bottom and sides thoroughly, ensuring even cooking and browning.
Step 6: Pour the Mixture
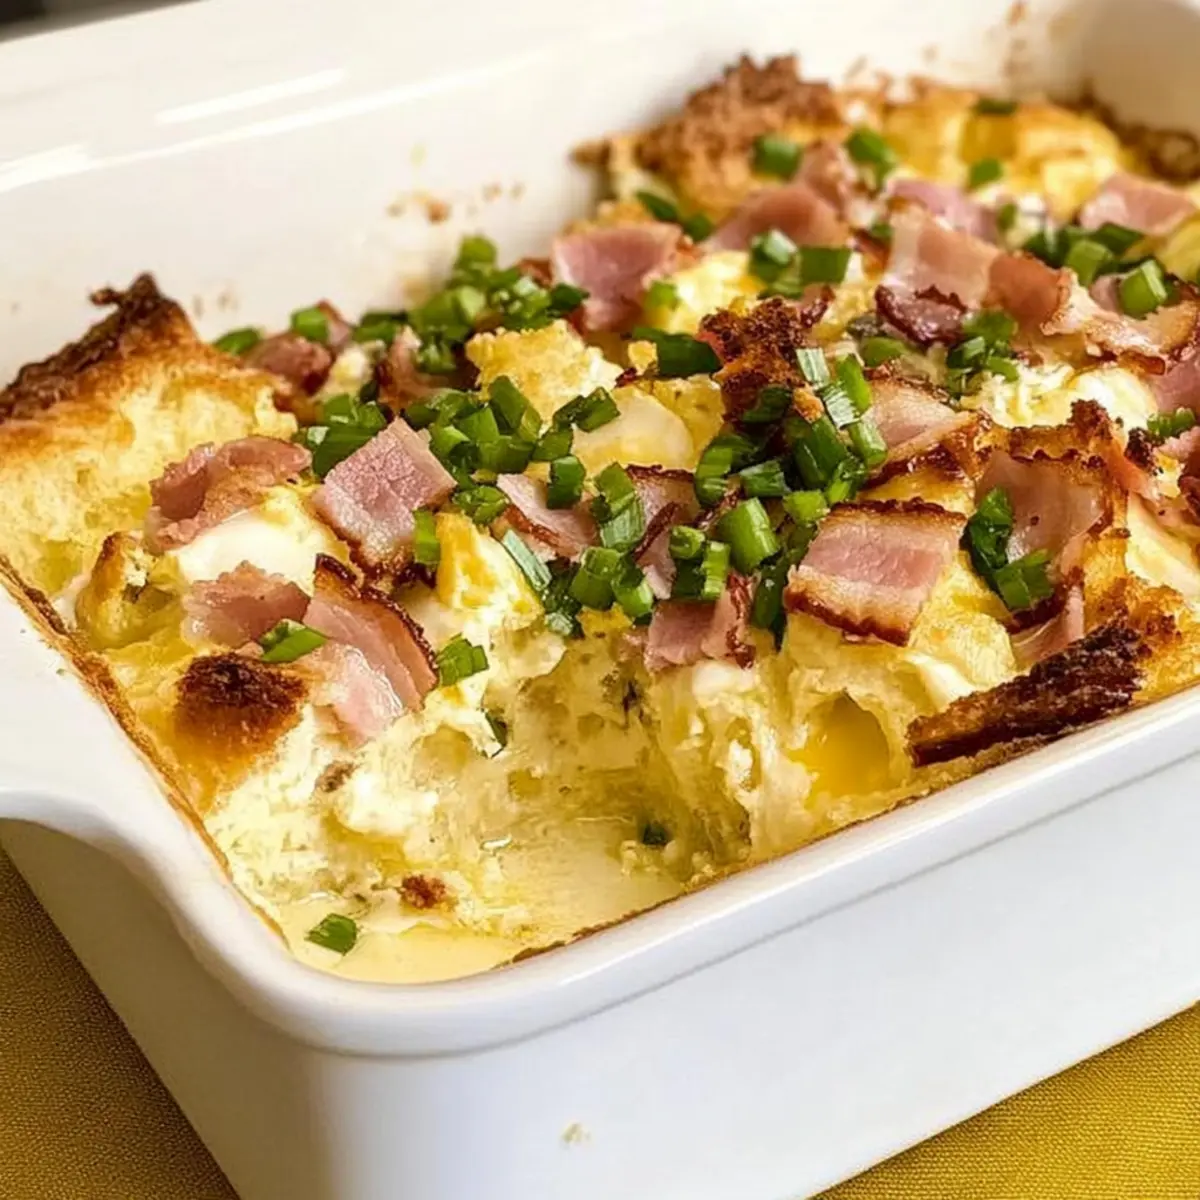
Carefully pour the egg and cheese mixture into your prepared pie dish, spreading it evenly with a spatula. As you do this, marvel at how deliciously rich and inviting it looks. The unbaked quiche should fill the dish about three-quarters full for the best texture once baked.
Step 7: Bake to Perfection
Place the quiche in the preheated oven and bake for 30–35 minutes. Keep an eye on it as it bakes; the top should turn golden brown and slightly puffed, while the center will be set. If you gently shake the pie dish, there should be minimal movement in the center.
Step 8: Cool and Serve
Once baked, remove the quiche from the oven and let it cool for about 5 minutes. This resting period allows the flavors to settle and makes slicing easier. Cut into wedges or slices and serve warm, or let it cool completely for serving at room temperature for a stunning presentation.

What to Serve with Bacon and Cheese Crustless Quiche
When it comes to enjoying this delightful quiche, the right accompaniments can elevate your meal from delicious to downright unforgettable.
- Fresh Garden Salad: The crispness of a mixed green salad with a zesty vinaigrette adds a vibrant contrast to the rich, creamy quiche. Toss in some cherry tomatoes and sliced cucumbers for extra freshness.
- Roasted Asparagus: Tender, roasted asparagus with a sprinkle of lemon zest brings a touch of brightness that complements the savory flavors. The slight char enhances the overall taste, making it a perfect pairing.
- Sliced Avocado: Creamy avocado slices provide a luxurious texture and a buttery flavor that enhances the quiche experience. Drizzle with balsamic glaze for an extra kick that awakens your palate.
- Garlic Bread: A side of warm, crusty garlic bread is always a winning choice. The garlic and herb flavors play beautifully against the cheesy quiche, making each bite even more enjoyable.
- Fresh Fruit Platter: A medley of seasonal fruits adds sweetness and balance to your meal, creating a delightful contrast to the savory quiche. Consider including berries, melon, or citrus segments for variety.
- Chilled White Wine: A glass of chilled Chardonnay or Sauvignon Blanc can turn your brunch into a celebration. These wines offer crispy acidity that pairs well with the rich cheese, enhancing the entire experience.
Storage Tips for Bacon and Cheese Crustless Quiche
Fridge: Store leftover quiche in an airtight container in the refrigerator for up to 3 days to keep it fresh and tasty.
Freezer: Freeze slices of the Bacon and Cheese Crustless Quiche for up to 2 months. Be sure to wrap them tightly in plastic wrap and then in aluminum foil to prevent freezer burn.
Reheating: To reheat, thaw the quiche slices in the fridge overnight and warm them gently in the oven at 350°F (175°C) for about 15-20 minutes, or until heated through.
Serving: Enjoy your quiche warm, or for a refreshing twist, serve it chilled with a side salad!
Expert Tips for Bacon and Cheese Crustless Quiche
- Fresh Cheese: Use freshly shredded cheddar cheese for optimal melting and a superior texture in your Bacon and Cheese Crustless Quiche.
- Bacon Drainage: Ensure your bacon is well-drained to prevent excess grease from making your quiche soggy. Pat cooked bacon with a paper towel if necessary.
- Puffing is Normal: Don't worry if the quiche puffs up during baking! It will settle as it cools, ensuring a delightful fluffy texture.
- Prep Ahead: Prepare the filling in advance and refrigerate; simply pour it into the dish and bake when ready to serve.
- Freezing Strategy: Cool completely before freezing slices; wrap them tightly to maintain freshness and flavor when reheating.
Make Ahead Options
These Bacon and Cheese Crustless Quiche are perfect for busy home cooks looking to streamline their morning routine! You can whisk together the egg mixture and store it in the refrigerator for up to 24 hours before baking; this allows the flavors to meld beautifully while saving you precious minutes. Additionally, you can pre-cook the bacon (or sauté mushrooms for a vegetarian twist) and refrigerate it for up to 3 days in an airtight container. When you're ready to bake, simply mix in the prepped ingredients, pour it into your greased dish, and bake as directed. Trust me, this will yield a quiche that's just as delicious, with minimal effort on the day of serving!
Bacon and Cheese Crustless Quiche Variations
Feel free to get creative and customize your Bacon and Cheese Crustless Quiche with these delightful twists that will entice your taste buds and elevate your meals!
-
Vegetarian Delight: Replace bacon with sautéed mushrooms or a mix of vibrant bell peppers for a hearty vegetarian option. The earthy flavors will complement the creamy filling beautifully.
-
Spicy Kick: Add diced jalapeños or a dash of hot sauce to the egg mixture for those who enjoy a little heat. It’s a fantastic way to invigorate the dish and awaken your palate!
-
Cheese Variety: Experiment with different cheeses like pepper jack for a spicy twist, or mozzarella for a milder option. Mixing in some Gruyère can bring an elegant touch that’s simply irresistible.
-
Herbed Twist: Stir in fresh herbs such as chives, parsley, or thyme to introduce an aromatic freshness that lifts the quiche. Each bite will burst with vibrant flavors!
-
Nutty Crunch: Top the quiche with a sprinkle of crushed nuts like walnuts or pecans before baking for a delightful crunch. The added texture contrasts perfectly with the creamy filling.
-
Mediterranean Flair: Incorporate olives, sun-dried tomatoes, or feta cheese for a Mediterranean twist that adds a unique depth of flavor. It’s like a vacation on your plate!
-
Savory Ham: Swap bacon with diced ham or prosciutto for a different meaty taste. This variation offers a savory profile that pairs wonderfully with the cheese.
-
Beefy Addition: Add cooked ground sausage into the filling for a heartier dish that’s perfect for satisfying hungry appetites. It takes the quiche to a whole new level of satisfaction!
Each variation offers a delicious way to personalize your dish, much like how you might enjoy a comforting bowl of Beans Greens Stew. Embrace the joy of cooking and make this quiche your own!

Bacon and Cheese Crustless Quiche Recipe FAQs
What type of eggs should I use for the quiche?
Absolutely! Using large fresh eggs is key to providing both structure and richness. You can also opt for organic or free-range eggs if you prefer, as they often have a richer flavor which can take your quiche to the next level.
How do I store leftovers of the Bacon and Cheese Crustless Quiche?
Store any leftover quiche in an airtight container in the refrigerator for up to 3 days. If you want to keep it fresh longer, you can freeze it, but make sure it has cooled completely before wrapping it tightly in plastic wrap followed by aluminum foil.
Can I freeze the Bacon and Cheese Crustless Quiche? How do I do that?
Certainly! To freeze, first let the quiche cool completely. Then, cut it into individual portions and wrap each piece in plastic wrap, followed by a layer of aluminum foil to prevent freezer burn. It can be stored in the freezer for up to 2 months. When you're ready to enjoy it, simply thaw overnight in the refrigerator and reheat in the oven at 350°F (175°C) for about 15–20 minutes.
What should I do if my quiche seems too runny after baking?
If your quiche is running, this could be due to undercooking it or using too much liquid. To troubleshoot, be sure to bake until the center is set and only slightly jiggly. If you want to adapt it for future bakes, consider reducing the amount of heavy cream or milk slightly to achieve a firmer texture.
Is this recipe suitable for someone with dairy allergies?
Not entirely, as this Bacon and Cheese Crustless Quiche contains heavy cream and cheese. However, you can make a dairy-free version by substituting almond milk for the milk, using dairy-free cream, and replacing cheese with a plant-based alternative. Make sure to also use olive oil for greasing instead of butter.
Can I use vegetables instead of the bacon?
Very! To create a vegetarian version, simply swap out the crumbled bacon for your choice of sautéed vegetables like mushrooms, spinach, or bell peppers. Just make sure to season them well so they complement the cheesy filling perfectly!

Bacon and Cheese Crustless Quiche That Delights Every Bite
Ingredients
Equipment
Method
- Preheat your oven to 350°F (175°C). Gather your ingredients and equipment, like a large mixing bowl and a 9-inch pie dish.
- In a large mixing bowl, whisk together 6 large eggs, 1 cup of heavy cream, and ½ cup of milk until smooth and well-combined.
- Fold in 1 cup of shredded cheddar cheese and ½ cup of crumbled, cooked bacon gently into the egg mixture.
- Sprinkle salt and pepper into the mixture according to your taste preference, then give it a final whisk.
- Grease your 9-inch pie dish generously with butter or cooking spray.
- Carefully pour the egg and cheese mixture into your prepared pie dish, spreading it evenly.
- Place the quiche in the preheated oven and bake for 30–35 minutes until the top is golden brown.
- Remove the quiche from the oven and let it cool for about 5 minutes before slicing and serving.