tastytrendingredients

  • Home
  • Recipes
    • Appetizers
    • Breakfast
    • Dessert
    • Dinner
    • Drinks
    • Salads
    • Snacks
    • Soups
  • About me
  • Contact
menu icon
go to homepage
  • Home
  • Recipes
    • Appetizers
    • Breakfast
    • Dessert
    • Dinner
    • Drinks
    • Salads
    • Snacks
    • Soups
  • About me
  • Contact
search icon
Homepage link
  • Home
  • Recipes
    • Appetizers
    • Breakfast
    • Dessert
    • Dinner
    • Drinks
    • Salads
    • Snacks
    • Soups
  • About me
  • Contact
×

Broccoli Chickpea Pasta with Garlic Olive Oil: Quick & Delicious

April 19, 2026 by Grace Snow Leave a Comment

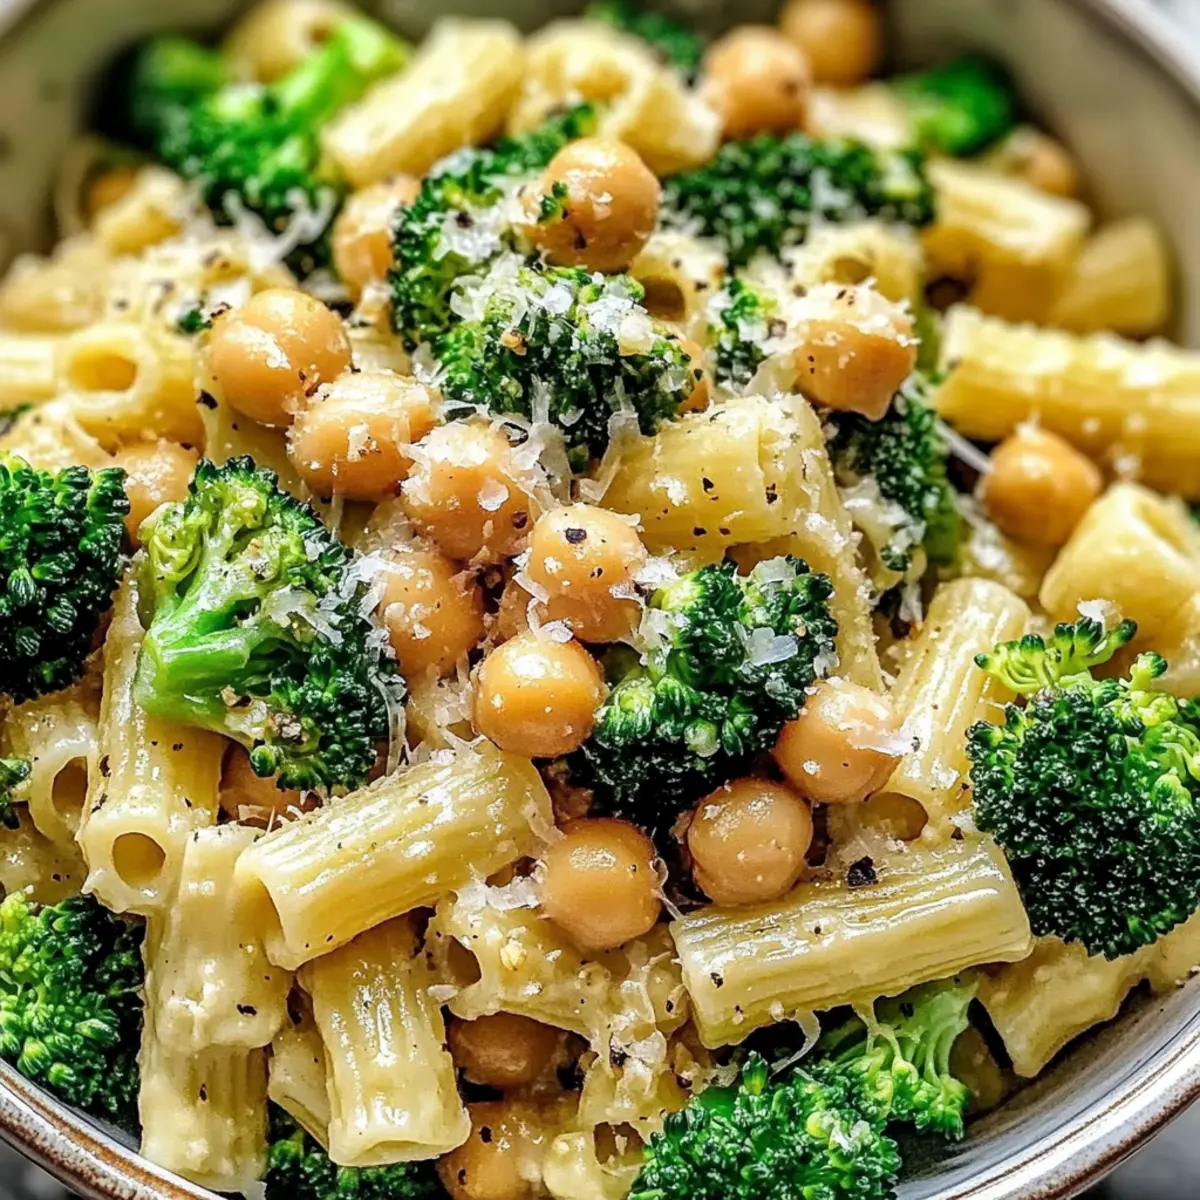
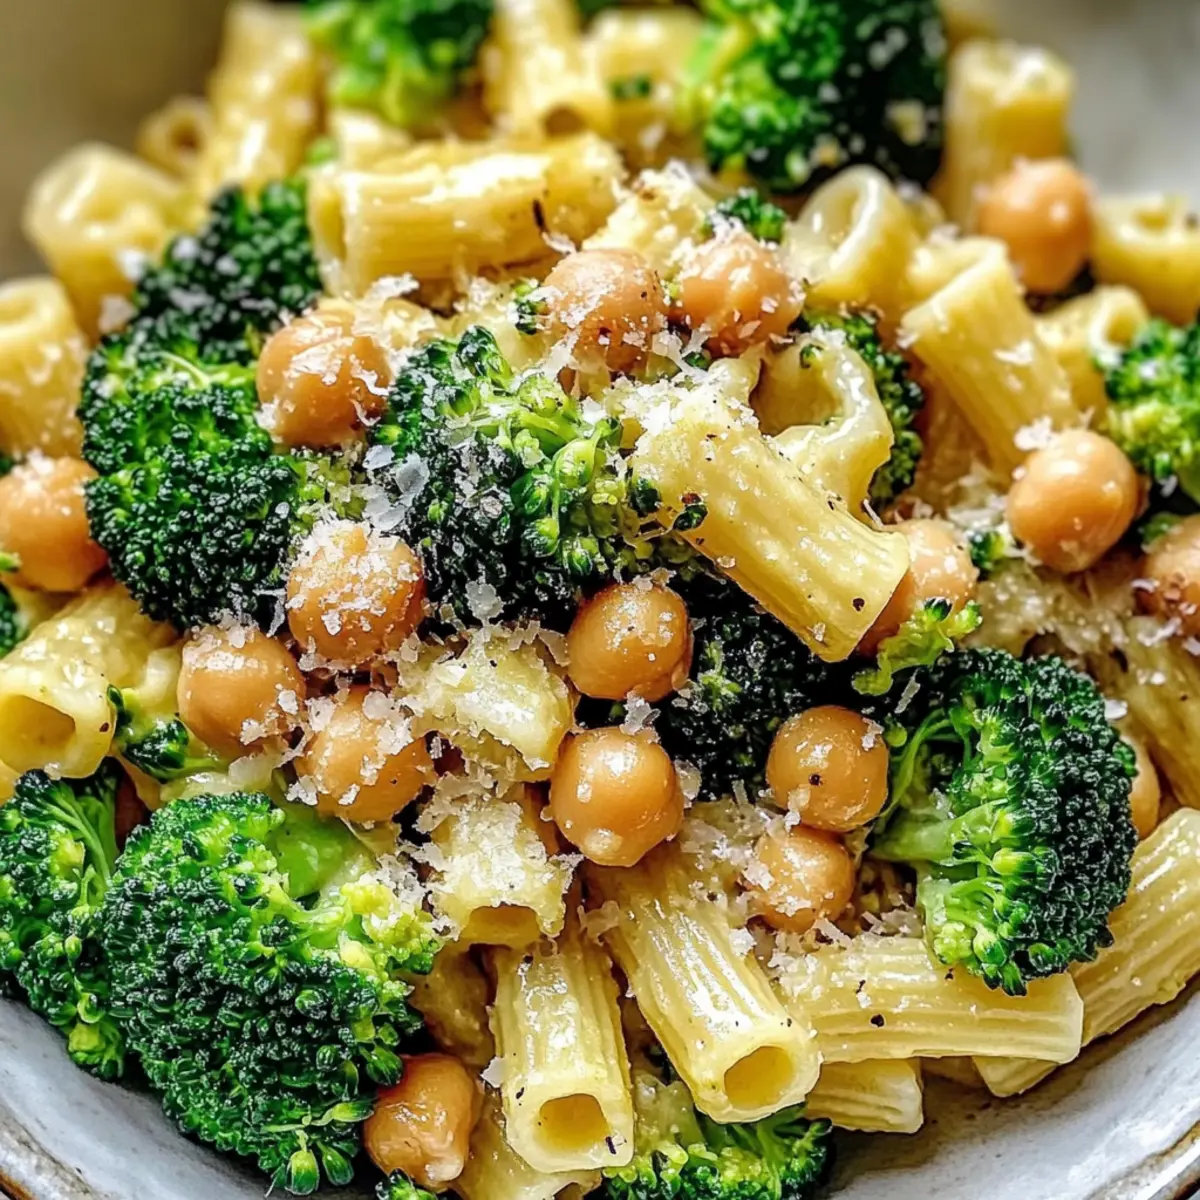
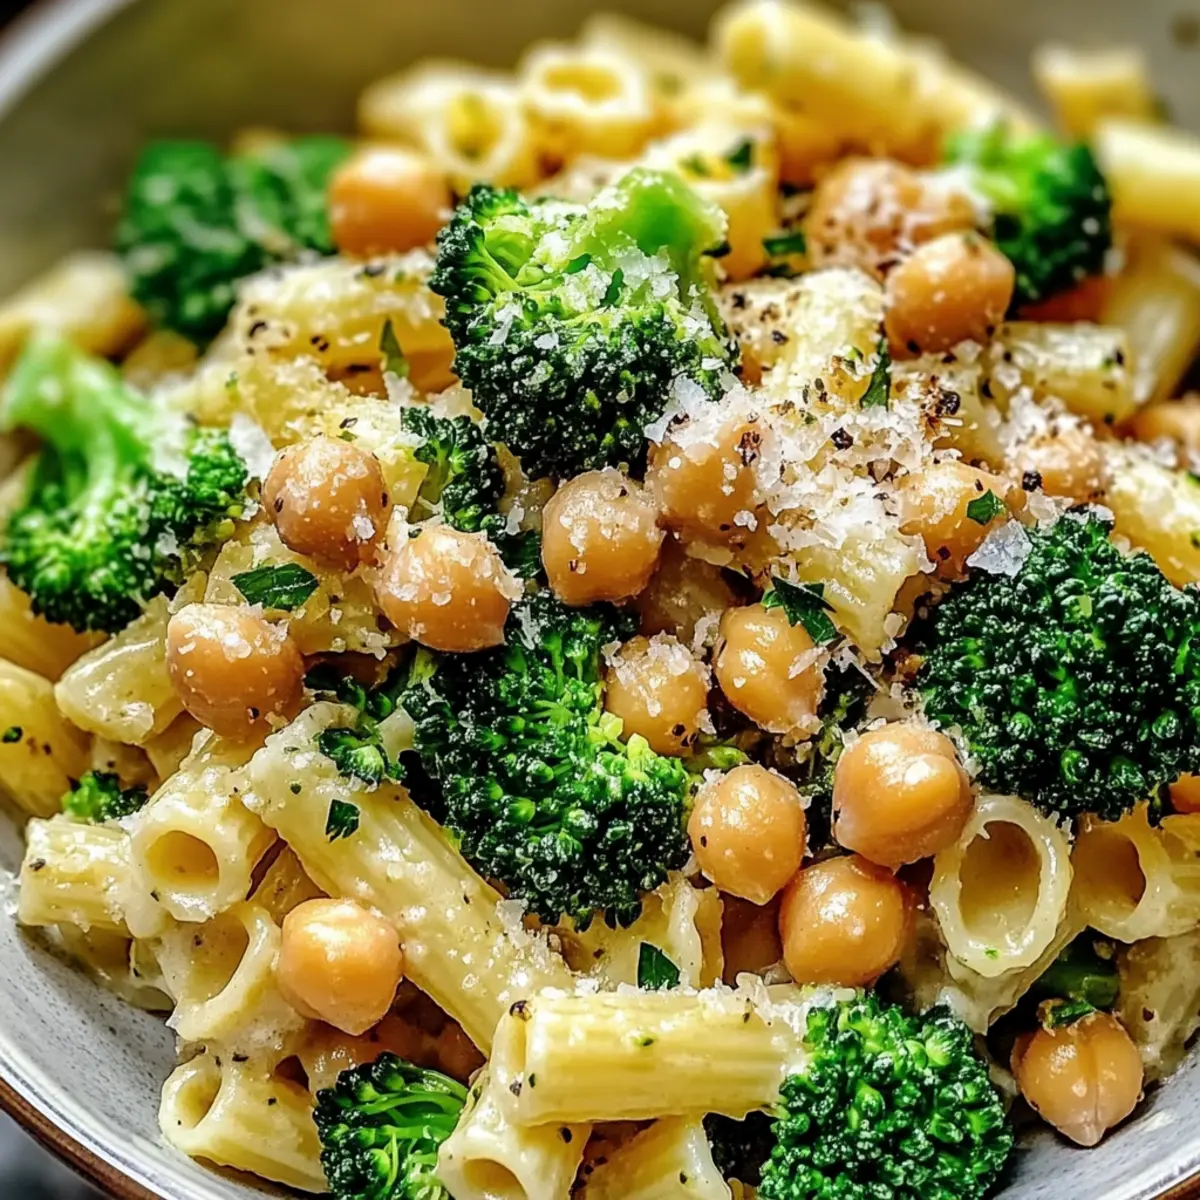
As I was stirring the vibrant green broccoli and golden chickpeas in my frying pan, the enticing aroma of garlic wafted through my kitchen, instantly transporting me to my favorite Italian trattoria. This 30-Minute Broccoli Chickpea Pasta with Garlic Olive Oil is my go-to recipe during those busy weeknights when I crave something quick yet satisfying. Not only does it come together in just half an hour, but it also packs a hearty punch of plant-based nutrition. The combination of tender pasta, crisp broccoli, and protein-rich chickpeas creates a comforting meal that delights everyone at the table, whether they follow a vegan lifestyle or simply want a healthier option. Are you ready to elevate your weeknight dinners with this easy, delicious dish? Let's dive in!

Why is Broccoli Chickpea Pasta Irresistible?

Simplicity: This dish is a breeze to prepare, making it the perfect choice for busy weeknights. You only need basic cooking skills!

Nutrient-Packed: Rich in fiber and vitamins, chickpeas and broccoli create a healthy, satisfying meal without sacrificing flavor.

Versatile: Swap out ingredients easily; substitute zucchini for a fresh twist or try our Skillet Pasta Sun for a different flair.

Crowd-Pleaser: Whether you're hosting friends or cooking for the family, this vibrant plate promises to impress everyone at the table.

Quick Dinner Fix: At just 30 minutes, you can enjoy a delicious, balanced meal, allowing you more time to relax after a hectic day!

Broccoli Chickpea Pasta Ingredients

For the Pasta
• Pasta – Use any pasta type; gluten-free pasta works well for those avoiding gluten.

For the Vegetables
• Broccoli – This adds a fresh crunch; you can substitute with asparagus or zucchini for variety.
• Garlic – Minced fresh garlic is ideal for flavor; garlic powder is a backup but won’t be as robust.

For the Hearty Base
• Chickpeas – They bring protein and substance; white beans or lentils are great alternatives if needed.
• Red Pepper Flakes – These add a delightful kick; adjust to your spice preference or try cayenne pepper for more heat.

For the Sauce
• Olive Oil – Extra virgin is best for maximum richness while sautéing.
• Vegetable Broth – Enhances the depth of flavor; choose low-sodium broth for a healthier option.
• Lemon Juice – Fresh juice brightens the dish; bottled can work in a pinch but lacks the same freshness.

For Seasoning
• Salt and Pepper – Essential for balancing flavors; adjust to taste for the perfect seasoning.
• Parmesan (optional) – Adds a savory note; omit or substitute with nutritional yeast to keep it vegan.

This Broccoli Chickpea Pasta with Garlic Olive Oil is not just quick to make—it’s packed with nutritious goodness, ready to please everyone around your table!

Step‑by‑Step Instructions for Broccoli Chickpea Pasta with Garlic Olive Oil

Step 1: Cook Pasta
Begin by bringing a large pot of salted water to a boil over high heat. Once boiling, add your pasta and cook according to package instructions until al dente, usually around 8–10 minutes. Before draining, reserve ½ cup of the starchy pasta water to help adjust the sauce later. Drain the pasta and set it aside.

Step 2: Sauté Garlic
In a large skillet, pour in about 3 tablespoons of extra virgin olive oil and turn the heat to medium. Once the oil is warm, add minced garlic and a pinch of red pepper flakes, sautéing for about 1 minute or until the garlic becomes fragrant and golden, being careful not to let it burn. This aromatic base will infuse your Broccoli Chickpea Pasta with wonderful flavor.

Step 3: Add Broccoli
Stir in the broccoli florets into the skillet, ensuring they are coated with the flavored oil. Continue to sauté for 5–7 minutes, until the broccoli is tender-crisp and a bright green color. This step brings the vibrant freshness to the dish, perfectly complementing the garlic and olive oil.

Step 4: Incorporate Chickpeas
Next, add in 1 can of drained chickpeas along with ½ cup of vegetable broth and squeeze in the juice of one lemon. Stir everything together and allow it to simmer for about 2–3 minutes until heated through. The chickpeas add protein, making this Broccoli Chickpea Pasta both hearty and nutritious.

Step 5: Combine with Pasta
Gently fold the drained pasta into the skillet, tossing everything together. If the sauce feels too thick, gradually add the reserved pasta water until you reach your desired consistency. Ensure every piece of pasta is coated in that luscious garlic olive oil sauce for a delightful bite.

Step 6: Season and Serve
Taste your dish and adjust the seasoning with salt and pepper as needed. For an optional indulgence, sprinkle grated Parmesan cheese over the top before serving. This will enhance the flavors even further, adding a creamy touch to your Broccoli Chickpea Pasta with Garlic Olive Oil.

Storage Tips for Broccoli Chickpea Pasta

Fridge: Store leftover Broccoli Chickpea Pasta in an airtight container for up to 3 days. Make sure it cools down before sealing for optimal freshness.

Freezer: For longer storage, freeze in freezer-safe bags or containers for up to 3 months. Divide into individual portions for easy meals later on.

Reheating: When ready to enjoy, thaw overnight in the fridge if frozen. Reheat on the stovetop or in the microwave with a splash of water to maintain moisture.

Airtight Guidance: Always ensure the pasta is cooled and stored in an airtight container to prevent it from drying out or absorbing unwanted odors.

What to Serve with Broccoli Chickpea Pasta with Garlic Olive Oil

Creating a remarkable meal is all about harmonious pairings that enhance the vibrant flavors of your main dish.

  • Garden Salad: A fresh mix of greens with a light vinaigrette complements the richness of the pasta, adding a refreshing crunch to each bite. The coolness of the salad balances the warmth of the garlic-infused pasta perfectly.

  • Crusty Garlic Bread: Serve alongside golden, toasted garlic bread for a satisfying crunch and familiar flavor that makes this meal feel complete. It's a classic pairing that complements the dish's aromatic garlic notes.

  • Roasted Vegetables: A medley of seasonal roasted vegetables adds layers of flavor and texture, bringing earthy sweetness to the meal. They offer a great contrast to the bright broccoli and creamy mouthfeel of the pasta.

  • Mashed Sweet Potatoes: Creamy and slightly sweet, mashed sweet potatoes create a comforting contrast, elevating the meal to delicious new heights. Their warmth and softness bring a delightful balance to the dish’s hearty elements.

  • Chickpea Salad: Continue the chickpea theme with a simple chickpea salad flavored with lemon and herbs. It introduces a lightness to the menu, perfect for tantalizing taste buds while matching the main dish's rich flavors.

  • Light White Wine: Pair with a crisp white wine, such as Sauvignon Blanc, that complements the acidity of the lemon juice, enhancing the overall experience of your meal. The bright, fruity undertones heighten the freshness of the pasta.

  • Sorbet for Dessert: Keep dessert light with a refreshing sorbet that cleanses the palate after the savory main course. The fruity notes add a sweet finish to your meal, keeping it balanced and satisfying.

Expert Tips for Broccoli Chickpea Pasta

• Watch the Garlic: Sauté on medium heat to prevent burning; burnt garlic can ruin the flavor of your Broccoli Chickpea Pasta.

• Reserve Pasta Water: Don't forget to save some starchy pasta water—this helps loosen the sauce if it thickens too much during cooking.

• Broccoli Perfectness: Aim for tender-crisp broccoli; overcooking makes it mushy. It should keep that vibrant green color!

• Spice It Up: Adjust red pepper flakes according to your taste; start with less and add more if you prefer extra heat in your Broccoli Chickpea Pasta.

• Season Well: Always taste your dish before serving! Adjust salt and pepper as needed to enhance the overall flavor.

Make Ahead Options

These Broccoli Chickpea Pasta with Garlic Olive Oil are ideal for meal prep enthusiasts! You can prepare the chickpeas, garlic, and broccoli mix up to 3 days in advance, storing them in an airtight container in the refrigerator to maintain freshness. To do this, sauté the garlic and red pepper flakes as directed, then add the broccoli and chickpeas along with the broth. Cool completely before refrigerating. When you're ready to serve, simply reheat the mixture in a skillet, add freshly cooked pasta along with a splash of reserved pasta water to adjust the sauce consistency, and finish with lemon juice and seasoning. This ensures you enjoy this delicious dish with minimal effort during your busy week!

Broccoli Chickpea Pasta Variations

Feel free to make this delightful dish your own by exploring these fun and flavorful tweaks!

  • Gluten-Free: Swap pasta with gluten-free options for a hearty, gluten-sensitive meal that still delivers on taste.

  • Extra Veggies: Incorporate diced bell peppers or spinach for an added layer of color and nutrition, enhancing the dish's visual appeal and health benefits.

  • Creamy Texture: Add a splash of coconut milk for a delicious creaminess, harmonizing beautifully with the garlic and lemon flavors.

  • Herb Infusion: Introduce fresh herbs like basil or oregano for a fragrant twist, elevating the flavor profile and giving the dish a garden-fresh essence.

  • Spicy Kick: Increase red pepper flakes or incorporate a dash of sriracha or harissa to amp up the heat and excite your taste buds. Allow your palate to dance with joy!

  • Protein-Rich: For a heartier meal, fold in some cooked chicken or shrimp—both options will elevate the protein factor while complementing the chickpeas perfectly.

  • Nutty Goodness: Toss in some toasted pine nuts or walnuts for extra texture and a delightful crunch—plus, they carry a wonderful roasted flavor!

  • Zesty Lemon-Herb Dressing: Whisk together olive oil, lemon juice, and fresh herbs to drizzle over the dish before serving. This finishing touch brings a burst of brightness that is simply irresistible!

With these variations, your Broccoli Chickpea Pasta with Garlic Olive Oil can be tailored to suit any occasion or personal preference, making each meal a new adventure in flavor! If you crave a different flavor profile, try our Chickpea Spinach Curry for a warm, aromatic experience. Enjoy your cooking journey!

Broccoli Chickpea Pasta with Garlic Olive Oil Recipe FAQs

How do I choose the best broccoli for this recipe?
Absolutely! When selecting broccoli, look for firm, vibrant green florets without any dark spots or yellowing. The stems should be crisp and the entire head should feel solid when you squeeze it. If possible, buy from a local farmer's market to get the freshest produce!

What’s the best way to store leftovers?
Store any leftover Broccoli Chickpea Pasta in an airtight container in the fridge for up to 3 days. Allow the pasta to cool down before sealing it to keep it fresh and prevent condensation. If you notice the pasta absorbing too much moisture, consider adding a splash of olive oil before storing.

Can I freeze Broccoli Chickpea Pasta?
Yes, you can freeze this dish! After cooking, let it cool completely, then portion it into freezer-safe bags or containers. Press out as much air as possible to avoid freezer burn and label with the date. It can be kept in the freezer for up to 3 months. When you're ready to enjoy it, simply thaw it in the fridge overnight and reheat on the stovetop, adding a bit of water to maintain its texture.

What should I do if my pasta sauce is too thick?
Very! If your sauce thickens too much, just add a bit of the reserved pasta water—start with a tablespoon at a time—until it reaches your desired consistency. This starchy water not only adjusts the thickness but also helps marry the flavors beautifully.

Is this dish safe for individuals with common allergies?
Definitely! This Broccoli Chickpea Pasta is vegan and free from common allergens like dairy and eggs. However, if allergic to gluten, make sure to use gluten-free pasta. For those with chickpea allergies, white beans or lentils can be used as substitutes, creating a delightful variation without compromising flavor.

How do I adjust the spice level in this recipe?
Absolutely! Start with a pinch of red pepper flakes for a subtle warmth, and taste as you go. If you prefer more heat, gradually add more. You can also sprinkle in a pinch of cayenne pepper for an extra kick. The more the merrier when it comes to seasoning!

Broccoli Chickpea Pasta with Garlic Olive Oil

Broccoli Chickpea Pasta with Garlic Olive Oil: Quick & Delicious

This Broccoli Chickpea Pasta with Garlic Olive Oil is a quick, healthy dish that delights with vibrant flavors and hearty nutrition.
Print Recipe Pin Recipe
Prep Time 10 minutes mins
Cook Time 20 minutes mins
Total Time 30 minutes mins
Servings: 4 servings
Course: Dinner
Cuisine: Italian
Calories: 350
Ingredients Equipment Method Nutrition Notes

Ingredients
  

For the Pasta
  • 8 oz Pasta Use any pasta type; gluten-free works well.
For the Vegetables
  • 2 cups Broccoli florets Can substitute with asparagus or zucchini.
  • 3 cloves Garlic Minced fresh garlic is ideal.
For the Hearty Base
  • 1 can Chickpeas Drained; can substitute with white beans or lentils.
  • 1/2 teaspoon Red Pepper Flakes Adjust to your spice preference.
For the Sauce
  • 3 tablespoons Olive Oil Extra virgin is best.
  • 1/2 cup Vegetable Broth Choose low-sodium for a healthier option.
  • 1 tablespoon Lemon Juice Fresh juice for brightness.
For Seasoning
  • to taste Salt Essential for balancing flavors.
  • to taste Pepper Essential for balancing flavors.
  • optional Parmesan Omit or substitute with nutritional yeast to keep it vegan.

Equipment

  • Large pot
  • Large skillet

Method
 

Step-by-Step Instructions
  1. Cook pasta in a large pot of salted boiling water according to package instructions until al dente, about 8-10 minutes. Reserve 1/2 cup starchy pasta water before draining.
  2. In a skillet, heat olive oil over medium heat, add minced garlic and red pepper flakes, sauté for 1 minute until fragrant.
  3. Add broccoli florets to the skillet, sauté for 5-7 minutes until tender-crisp.
  4. Stir in chickpeas, vegetable broth, and lemon juice. Simmer for 2-3 minutes until heated through.
  5. Fold in the drained pasta, adding reserved pasta water as needed for consistency.
  6. Season with salt and pepper to taste. Optional: sprinkle grated Parmesan cheese before serving.

Nutrition

Serving: 1servingCalories: 350kcalCarbohydrates: 55gProtein: 15gFat: 10gSaturated Fat: 1.5gPolyunsaturated Fat: 2gMonounsaturated Fat: 7gSodium: 300mgPotassium: 600mgFiber: 10gSugar: 5gVitamin A: 500IUVitamin C: 80mgCalcium: 50mgIron: 3mg

Notes

Store leftovers in an airtight container for up to 3 days or freeze for up to 3 months. Reheat with a splash of water to maintain moisture.

Tried this recipe?

Let us know how it was!

Savory Baked Recipe with Ground Beef and Eggplant Delight

April 14, 2026 by Grace Snow Leave a Comment

As I stood in my kitchen, the delightful aroma of baked ground beef and eggplant wafted through the air, transforming my home into a haven of warmth and comfort. This Baked Recipe with Ground Beef and Eggplant isn’t just a meal; it’s a gathering, lovingly layered with tender eggplant, savory ground beef, and a bubbly blanket of cheese that’s sure to satisfy everyone at the dinner table. The best part? It's a crowd-pleaser that can be prepped in no time, making it the perfect solution for those busy weeknights when you crave something hearty yet wholesome. Whether you're cooking for family or just treating yourself, this dish embodies the essence of Mediterranean comfort food. Are you ready to dive into layers of flavor and texture that will leave your taste buds dancing?

Why Is This Recipe So Beloved?

Simplicity is the key to this recipe, making it accessible for both seasoned chefs and home cooks alike. Wholesome ingredients combine to create a nourishing dish that satisfies without complexity. Versatile variations mean you can easily adjust to whatever ingredients you have at hand, whether swapping ground beef for turkey or adding your favorite veggies. Rich, savory flavors burst through in every bite, thanks to the carefully layered eggplant and gooey cheese. Crowd-pleasing appeal guarantees happy faces at the dinner table, and it pairs beautifully with a fresh salad or crusty bread. Don't miss out on this delightful Mediterranean classic!

Baked Recipe with Ground Beef and Eggplant Ingredients

• Your journey to comfort food begins here!

For the Meat Mixture

  • 1 lb lean ground beef – Provides a savory base; ground turkey can be an excellent leaner alternative.
  • 1 medium onion, finely chopped – Enhances aroma and flavor; shallots work just as well!
  • 3-4 garlic cloves, minced – Adds depth and umami; use garlic powder if you're in a pinch.
  • 2 cups tomato sauce – Moistens and balances flavors; any good marinara will do!
  • 2 tsp Italian seasoning – Infuses the dish with classic Italian herbs; mix basil and oregano if needed.
  • Salt and pepper to taste – Essential for bringing out the best flavors; adjust to your preference.

For the Eggplant Base

  • 2 medium eggplants, sliced into ½-inch rounds – Adds texture and acts as a veggie layer; zucchini is a nice substitute for a twist.
  • 2 tbsp olive oil – Used for sautéing; feel free to swap with vegetable oil if necessary.

For the Cheese Topping

  • 1 cup shredded mozzarella cheese (or Parmesan) – Creates a deliciously creamy topping; try goat cheese for a tangy flair!

Each ingredient plays a vital role in making this Baked Recipe with Ground Beef and Eggplant a comforting family favorite, ensuring every bite is full of rich, satisfying flavor.

Step‑by‑Step Instructions for Baked Recipe with Ground Beef and Eggplant

Step 1: Preheat the Oven
Begin by preheating your oven to 375°F (190°C). This ensures that your Baked Recipe with Ground Beef and Eggplant will cook evenly and achieve that glorious golden crust. While the oven heats, gather your ingredients so that everything is in reach for smooth preparation.

Step 2: Prepare the Eggplant
Slice the eggplants into ½-inch thick rounds. Sprinkle them lightly with salt and set aside for 20 minutes to draw out moisture and reduce bitterness. After 20 minutes, rinse the slices under cold water and pat them dry with paper towels, ensuring they’re ready for layering.

Step 3: Sauté Onions and Garlic
In a large skillet, heat 2 tablespoons of olive oil over medium heat. Add the finely chopped onions and sauté for about 5 minutes until they turn translucent and fragrant. Then, stir in the minced garlic, continuing to cook for another minute until aromatic, making sure the garlic does not burn.

Step 4: Brown the Ground Beef
Add the 1 lb of lean ground beef to the skillet. Break it up with a spatula as it cooks, browning it thoroughly for about 8-10 minutes. The beef should no longer be pink when it's ready; this will create a rich base for your baked dish.

Step 5: Mix in Tomato Sauce and Seasoning
Stir in 2 cups of tomato sauce and 2 teaspoons of Italian seasoning into the browned beef mixture. Allow this to simmer on low heat for approximately 5 minutes. This melds the flavors together, creating a fragrant, savory filling for your Baked Recipe with Ground Beef and Eggplant.

Step 6: Layer the Dish
In a baking dish, start by layering half of the eggplant slices at the bottom. Follow with half of the meat mixture, spreading it evenly. Repeat this process, adding another layer of eggplant and then the remaining meat mixture, creating beautiful layers of flavor.

Step 7: Add the Cheese Topping
Finish by generously sprinkling 1 cup of shredded mozzarella cheese over the top of the final meat layer. This cheesy topping will melt and bubble beautifully, forming a delightful crust that complements the layers underneath.

Step 8: Bake to Perfection
Place the baking dish in your preheated oven and bake for 30-35 minutes. Look for the cheese to turn bubbly and golden brown, signaling that your Baked Recipe with Ground Beef and Eggplant is ready to be enjoyed. The aromas will surely capture everyone's attention as it bakes.

Expert Tips for Baked Recipe with Ground Beef and Eggplant

  • Salt the Eggplant: Lightly salting the eggplant draws out moisture and bitterness, ensuring tender slices after baking. Don't skip this step!

  • Dry Thoroughly: After salting, make sure to rinse and pat the eggplant dry. This prevents excess moisture, avoiding a soggy bottom for your baked dish.

  • Layer Thoughtfully: Be mindful of your layering technique. Alternate eggplant and meat evenly to ensure every bite is balanced and delicious.

  • Watch the Cheese: Keep an eye on the cheese while baking. If it starts browning too quickly, lightly tent the dish with foil to prevent burning.

  • Customize Your Cheese: Feel free to experiment with cheeses like feta or cheddar to create unique flavors in your Baked Recipe with Ground Beef and Eggplant.

  • Storage Savvy: Leftovers can be stored for up to three days in an airtight container. Reheat in the oven for the best texture, as the microwave can make it rubbery.

Make Ahead Options

These Baked Recipe with Ground Beef and Eggplant is ideal for busy home cooks looking to save time during the week! You can prepare the meat mixture and layer the eggplant up to 24 hours in advance, simply cover it tightly with plastic wrap or foil and refrigerate. To maintain quality, make sure to dry the eggplant thoroughly after salting to prevent excess moisture. When it’s time to serve, take it out of the fridge, sprinkle on the cheese, and bake as directed, allowing an extra 5-10 minutes if cooking straight from the fridge. This way, you can enjoy a comforting, homemade meal without the last-minute rush!

How to Store and Freeze Baked Ground Beef and Eggplant

Fridge: Store leftovers in an airtight container for up to 3 days. Make sure to cool the casserole completely before sealing to retain freshness.

Freezer: For longer storage, freeze the Baked Ground Beef and Eggplant in an airtight container for up to 3 months. Portion it out for easy meals!

Reheating: To reheat, bake in a preheated oven at 350°F (175°C) until heated through, about 20-25 minutes. This helps maintain the cheesy texture and prevent sogginess.

Make-Ahead Tip: You can assemble the dish a day in advance and keep it in the fridge, covered. Simply pop it in the oven when you're ready to enjoy!

What to Serve with Baked Ground Beef and Eggplant?

Creating a complete meal around this delightful dish opens up a world of flavor and comfort.

  • Creamy Mashed Potatoes: Their rich, buttery texture is the perfect companion to absorb the savory sauce, adding a homey touch to your dinner table.

  • Fresh Garden Salad: A crisp, vibrant salad brings a refreshing contrast to the baked richness, featuring greens like arugula, cherry tomatoes, and a tangy vinaigrette.

  • Garlic Bread: Warm and crusty, garlic bread allows you to soak up every last bit of the delicious sauce, enriching the overall experience.

  • Roasted Vegetables: Seasonal veggies like zucchini and bell peppers add a wonderful roasted flavor and extra nutrition, creating a colorful, wholesome meal.

  • Couscous or Rice: These options provide a subtly flavored base that complements the dish. Choose fluffy couscous for added texture or fragrant rice to soak in flavors.

  • Red Wine: A smooth glass of red wine enhances the Mediterranean essence of the meal, elevating your dining experience.

Pairing any of these vibrant sides will transform your dinner into a heartwarming feast, appealing to both the palate and the soul!

Baked Recipe with Ground Beef and Eggplant Variations

Feel free to get creative and customize this dish to suit your taste preferences—your kitchen, your rules!

  • Lean Option: Swap out ground beef for ground turkey or chicken. Enjoy a lighter take without sacrificing flavor while keeping it deliciously hearty.

  • Zucchini Twist: Replace the eggplant with zucchini slices. This fresh vegetable brings a mild taste that pairs beautifully with the seasoned meat mixture.

  • Cheesy Delight: Experiment with different cheeses, such as feta or sharp cheddar. Each cheese creates a unique flavor experience that will elevate your dish!

  • Veggie Boost: Add in chopped bell peppers or mushrooms to the meat mixture. These will not only amplify the nutrition but also introduce exciting new textures every bite.

  • Spicy Kick: Stir in red pepper flakes or diced jalapeños for a spicy twist. This addition will create a zesty kick that is sure to please spicy food lovers!

  • Herb Infusion: Fresh herbs like basil or parsley can be added to the layers. Their aromatic qualities will enhance the Mediterranean vibe of your dish.

  • Saucy Variation: Swap the tomato sauce for a homemade marinara or arrange thin slices of fresh tomatoes between the layers. This brings a burst of freshness and brightness to your meal.

  • Grainy Base: Serve over cooked quinoa or farro for a hearty base. This adds a delightful chewiness while making the dish even more filling and nutritious.

Looking for a salad to accompany this? You might enjoy pairing it with a fresh, mixed greens salad or even a side of crispy roasted veggies! Try serving it with Skillet Pasta Sun for a delightful spread that impresses.

Baked Ground Beef and Eggplant Recipe FAQs

How do I choose ripe eggplants for this recipe?
Absolutely! Look for eggplants that are firm to the touch, with smooth, shiny skin. Avoid any that have dark spots or wrinkles, as this can indicate overripeness. The eggplant should feel heavy for its size and have a green stem that’s fresh-looking.

How should I store leftovers of Baked Ground Beef and Eggplant?
Leftovers can be stored in an airtight container for up to 3 days. Be sure to let the dish cool completely before sealing to keep it fresh. When you're ready to enjoy it again, reheat in the oven to maintain that delicious texture.

Can I freeze Baked Ground Beef and Eggplant?
Yes, you can freeze it! For best results, place the assembled and cooled dish in an airtight container or wrap it tightly with plastic wrap and then foil. It can be stored in the freezer for up to 3 months. To reheat, simply bake in a preheated oven at 350°F (175°C) for about 20-25 minutes until heated through.

What should I do if my eggplant is bitter?
Very! If you find your eggplant tasting bitter, make sure to salt the slices properly and let them sit for about 20 minutes. This process draws out bitterness. Rinse thoroughly afterward and then dry with paper towels before layering in the dish. Proper salting and rinsing go a long way to ensure a delicious outcome!

Are there any dietary considerations for this recipe?
Absolutely! If you have an allergy to eggplants, consider substitutes like zucchini, which can give a similar texture without the allergens. For a gluten-free option, just check that your tomato sauce is gluten-free. And if you're making this for pets, remember that onions and garlic are toxic to dogs, so it’s best to separate a portion for them before adding those ingredients.

Can I make variations to the meat in this dish?
The more the merrier! You can swap the ground beef for ground turkey or chicken for a leaner option. You might also try adding sausage for a more robust flavor. The beauty of this Baked Recipe with Ground Beef and Eggplant lies in its versatility, so don’t hesitate to customize it to suit your taste!

Baked Recipe with Ground Beef and Eggplant

Savory Baked Recipe with Ground Beef and Eggplant Delight

This Baked Recipe with Ground Beef and Eggplant is a comforting Mediterranean dish, layered with savory ground beef, tender eggplant, and cheesy goodness.
Print Recipe Pin Recipe
Prep Time 20 minutes mins
Cook Time 35 minutes mins
Total Time 55 minutes mins
Servings: 6 servings
Course: Dinner
Cuisine: Mediterranean
Calories: 350
Ingredients Equipment Method Nutrition Notes

Ingredients
  

For the Meat Mixture
  • 1 lb lean ground beef Ground turkey can be an excellent leaner alternative.
  • 1 medium onion, finely chopped Shallots work just as well!
  • 3-4 cloves garlic, minced Use garlic powder if you're in a pinch.
  • 2 cups tomato sauce Any good marinara will do!
  • 2 tsp Italian seasoning Mix basil and oregano if needed.
  • Salt and pepper to taste Adjust to your preference.
For the Eggplant Base
  • 2 medium eggplants, sliced into ½-inch rounds Zucchini is a nice substitute for a twist.
  • 2 tbsp olive oil Feel free to swap with vegetable oil if necessary.
For the Cheese Topping
  • 1 cup shredded mozzarella cheese (or Parmesan) Try goat cheese for a tangy flair!

Equipment

  • Oven
  • Large skillet
  • Baking Dish

Method
 

Step-by-Step Instructions
  1. Preheat your oven to 375°F (190°C). Gather your ingredients for smooth preparation.
  2. Slice the eggplants into ½-inch thick rounds. Sprinkle lightly with salt and set aside for 20 minutes. Rinse and pat dry before layering.
  3. Heat 2 tablespoons of olive oil in a large skillet over medium heat. Sauté finely chopped onions for about 5 minutes until translucent. Add minced garlic and cook for another minute.
  4. Add 1 lb of lean ground beef to the skillet, breaking it up as it cooks for about 8-10 minutes until thoroughly browned.
  5. Stir in 2 cups of tomato sauce and 2 teaspoons of Italian seasoning into the beef mixture. Simmer on low for approximately 5 minutes.
  6. In a baking dish, layer half of the eggplant slices at the bottom, followed by half of the meat mixture. Repeat with remaining eggplant and meat mixture.
  7. Sprinkle 1 cup of shredded mozzarella cheese over the top of the final meat layer.
  8. Bake for 30-35 minutes until the cheese is bubbly and golden brown.

Nutrition

Serving: 1servingCalories: 350kcalCarbohydrates: 15gProtein: 25gFat: 20gSaturated Fat: 8gPolyunsaturated Fat: 1gMonounsaturated Fat: 10gCholesterol: 70mgSodium: 800mgPotassium: 600mgFiber: 4gSugar: 5gVitamin A: 500IUVitamin C: 7mgCalcium: 200mgIron: 3mg

Notes

Expert Tips: Salting the eggplant draws out moisture; be sure to rinse and dry thoroughly. Customize your cheese for unique flavors. Leftovers can be stored for up to three days in an airtight container.

Tried this recipe?

Let us know how it was!

Baked Eggplant and Tomato Stacks for a Cozy Night In

April 14, 2026 by Grace Snow Leave a Comment

As I stood in my kitchen, the intoxicating aroma of garlic wafting through the air, a lightbulb moment struck me: it was time for something extraordinary yet uncomplicated—Baked Eggplant and Tomato Stacks. This delightful dish marries creamy, roasted eggplant with the bright zing of tomatoes, and just a touch of melted cheese brings everything together beautifully. Not only is this recipe a stunning centerpiece for dinner parties, but it also shines on busy weeknights when you crave comfort without the fuss. With its vegetarian and gluten-free options, it accommodates a variety of dietary needs, making it an inviting choice for everyone at your table. Ready to elevate your dinner routine and impress your loved ones? Let’s dive in and create this delicious masterpiece together!

Why Make Baked Eggplant Stacks?

Simplicity and Elegance: This recipe combines effortless preparation with a stunning presentation, making it perfect for impressing dinner guests or enjoying a cozy night in.
Flavor Explosion: The fusion of creamy eggplant, zesty tomatoes, and melty cheese yields an unforgettable taste sensation that will tantalize your taste buds.
Versatile Options: Easily adaptable for vegan and gluten-free diets, inviting everyone to join your table. Check out our helpful tips for substitutions if you’re considering alternatives!
Hearty and Healthy: Packed with nutrients and fiber, these stacks are a guilt-free indulgence that satisfies your cravings without sacrificing flavor, unlike typical fast food offerings.
Perfect for Leftovers: The Baked Eggplant and Tomato Stacks store well, making them ideal for meal prep or next-day lunches! Enjoy them cold or reheated for a quick, delicious fix.

Baked Eggplant and Tomato Stacks Ingredients

For the Eggplant

  • Eggplant – The star of the show, providing creaminess and depth; remember to salt it beforehand to draw out moisture.
  • Salt – Essential for flavoring and reducing bitterness; don’t skip this step for perfect texture.

For the Tomatoes

  • Tomatoes – Choose firm, ripe varieties for brightness and acidity; they’ll enhance the overall dish while preventing sogginess.

For the Cheese

  • Mozzarella Cheese – Adds a delightful creaminess; for a vegan alternative, try using vegan mozzarella.
  • Parmesan Cheese – Brings a rich, nutty flavor; nutritional yeast works great for a dairy-free alternative.

For the Crunchy Topping

  • Panko Breadcrumbs – Ensure a satisfying crunch; feel free to swap in gluten-free breadcrumbs for a suitable option.

For the Flavors

  • Garlic – Freshly minced garlic elevates the flavor profile; don’t hesitate to add more for extra zest!
  • Olive Oil – Adds richness to the dish; reduce the amount for a lighter option if desired.

This delicious setup prepares you for creating the perfect Baked Eggplant and Tomato Stacks that will surely become a family favorite!

Step‑by‑Step Instructions for Baked Eggplant and Tomato Stacks

Step 1: Prepare the Eggplant
Start by slicing the eggplant into ½-inch thick rounds. Sprinkle both sides generously with salt to draw out moisture and reduce any bitterness. Place the slices in a colander and allow them to sit for about 30 minutes. This process is crucial for achieving that perfect creamy texture in your Baked Eggplant and Tomato Stacks.

Step 2: Rinse and Dry
After 30 minutes, rinse the salt off the eggplant slices under cold water to remove excess salt. Pat each slice dry with a clean towel, ensuring they are well-drained. This step is vital to prevent unwanted moisture from creating a soggy base in your stacks, allowing for a beautifully layered dish.

Step 3: Roast the Eggplant
Preheat your oven to 400°F (200°C). Arrange the dried eggplant slices on a parchment-lined baking sheet and brush both sides lightly with olive oil. Roast them in the oven for 20–25 minutes, flipping halfway through, until they are tender and slightly golden. This roasting will enhance the eggplant's flavor, setting a perfect foundation for the Baked Eggplant and Tomato Stacks.

Step 4: Prepare the Topping and Tomatoes
While the eggplant is roasting, mix together the mozzarella and Parmesan cheeses in a bowl, adding in the panko breadcrumbs for a delightful crunch. Next, slice your tomatoes into ¼-inch thick rounds, ensuring they are firm and fresh. These layers will contribute brightness and acidity to the Baked Eggplant and Tomato Stacks.

Step 5: Assemble the Stacks
In a greased baking dish, begin layering your ingredients. Start with a slice of roasted eggplant, follow it with a slice of tomato, and then a sprinkle of the cheese and breadcrumb mixture. Repeat this layering until all ingredients are used, finishing with a layer of cheese on top for that golden, bubbly finish when baked.

Step 6: Bake the Stacks
Place the assembled baking dish in the preheated oven at 400°F (200°C). Bake for 25-30 minutes, or until the cheese is melted, bubbly, and golden brown. Keep an eye on the stacks, as the visual cue of bubbling cheese is your signal that these delicious Baked Eggplant and Tomato Stacks are almost ready to serve.

Step 7: Rest and Serve
Once baked, remove the dish from the oven and let the stacks rest for about 5–10 minutes. This resting period is essential for the cheese to set and the layers to stabilize, ensuring your stacks hold together beautifully when serving. Enjoy the warm and inviting flavors of your freshly made Baked Eggplant and Tomato Stacks!

What to Serve with Baked Eggplant and Tomato Stacks

Looking to elevate your dining experience? Pair the Baked Eggplant and Tomato Stacks with these delicious accompaniments!

  • Garden Salad: A fresh mix of greens adds a crisp contrast, balancing the creamy stacks with bright, tangy flavors.
  • Garlic Bread: Perfectly toasted with hints of garlic and parsley, it's ideal for scooping up every last bit of goodness from your plate.
  • Roasted Vegetables: Seasonal veggies like zucchini and bell peppers enhance the meal's wholesome nature while providing extra color and flavor.
  • Herbed Quinoa: Nutty and rich, quinoa infused with herbs complements the stacks beautifully, offering a hearty base without overshadowing the main dish.
  • Chilled White Wine: A crisp Pinot Grigio refreshes the palate, perfectly pairing with the richness and tang of the stacks.
  • Lemon Sorbet: A refreshing, light dessert to cleanse the palate, it's a delightful way to end your meal on a bright note.
  • Stuffed Grape Leaves: These savory bites bring a Mediterranean flair, adding a delightful mix of textures and flavors to your table.
  • Tzatziki Sauce: A cool and creamy yogurt sauce, it’s perfect for dipping or drizzling, enhancing the overall flavor experience.

Storage Tips for Baked Eggplant and Tomato Stacks

Fridge: Store leftovers in an airtight container in the fridge for up to 3-4 days to maintain flavor and texture.

Freezer: For longer storage, freeze assembled stacks before baking. Wrap tightly in plastic wrap and foil, keeping for up to 2 months.

Reheating: Reheat baked stacks in the oven at 350°F (175°C) for about 15-20 minutes. This restores the cheesy goodness of your Baked Eggplant and Tomato Stacks.

Make-Ahead Tips: Fully assemble the stacks a day in advance without baking. Cover and refrigerate until ready to bake, providing convenience for busy weeknights.

Make Ahead Options

Preparing the Baked Eggplant and Tomato Stacks in advance is a fantastic way to save time on busy nights! You can fully assemble the stacks (without baking) and refrigerate them for up to 24 hours. To do this, layer the roasted eggplant, sliced tomatoes, and cheese mixture in your baking dish, cover tightly with plastic wrap or foil to seal in freshness, and store it in the fridge. When you're ready to serve, simply uncover and bake in the preheated oven at 400°F (200°C) for 25-30 minutes until bubbly and golden. This method ensures your stacks are just as delicious while allowing for stress-free meal planning.

Baked Eggplant and Tomato Stacks Variations

Feel free to explore these delightful twists that will elevate your Baked Eggplant and Tomato Stacks!

  • Vegan Option: Swap out mozzarella and Parmesan for vegan mozzarella and nutritional yeast to make a creamy, dairy-free delight. You'll still enjoy all the fantastic flavors without the cheese!

  • Gluten-Free Crunch: Use gluten-free breadcrumbs in place of standard panko for a crunchy topping that everyone can enjoy. They’ll keep the stack deliciously crispy and safe for those avoiding gluten.

  • Herb Infusion: Add fresh herbs like basil or oregano between the layers for an aromatic burst. This simple addition elevates the taste and brings a classic Italian touch to your dish.

  • Zucchini Substitute: Replace eggplant with slices of zucchini or yellow squash for a lighter, yet equally flavorful base. This swap offers a refreshing twist while maintaining that creamy texture.

  • Spicy Kick: Sprinkle red pepper flakes or add diced jalapeños between layers for a bit of heat. It’s the perfect way to turn up the flavor if you crave a little spice in your life!

  • Rich Caramelization: Before assembling, consider roasting the tomatoes briefly until they caramelize slightly. This technique concentrates their natural sugars and amplifies their flavor in the stacks.

  • Layer with Spinach: Incorporate fresh spinach or other leafy greens as a layer between eggplant and tomatoes for added nutrition and vibrant color. It complements the dish beautifully while making it even healthier.

  • Creamy Sauce Drizzle: Top your stacks with a drizzle of tahini or a cashew cream sauce before serving for added creaminess and a unique flavor profile. It’s an elegant finish that will impress your guests!

If you're interested in more delicious vegetarian options, check out these recipes for Coconutty Beans and Greens Stew or a delightful Chickpea and Spinach Curry. Enjoy creating your perfect Baked Eggplant and Tomato Stacks!

Expert Tips for Baked Eggplant and Tomato Stacks

  • Salting Before Cooking: Ensure you salt the eggplant generously to draw out moisture. This crucial step prevents sogginess in your Baked Eggplant and Tomato Stacks.

  • Choose the Right Tomatoes: Opt for firm, low-water tomatoes like Roma or vine-ripened. These will enhance texture and flavor, preventing a mushy outcome.

  • Layering Technique: When assembling the stacks, ensure even layering of eggplant, tomatoes, and cheese. This not only adds visual appeal but also ensures that every bite is full of flavor.

  • Resting Period: Allow the stacks to rest after baking for 5-10 minutes. This cooling time helps the cheese set and keeps your stacks from toppling over when served.

  • Baking Time Variations: Keep an eye on your oven as baking times may differ. Look for a golden, bubbly cheese topping as an indication that your Baked Eggplant and Tomato Stacks are ready.

Baked Eggplant and Tomato Stacks Recipe FAQs

What type of eggplant should I use for this recipe?
Absolutely! For the best results, choose firm, glossy eggplants that feel heavy for their size. Look for ones with smooth skin and no dark spots; these will have the best texture and sweetness. If you can't find eggplant, zucchini or yellow squash can be used as delicious substitutes without extensive salting.

How do I store leftover Baked Eggplant and Tomato Stacks?
Very easily! Store any leftover Baked Eggplant and Tomato Stacks in an airtight container in the fridge for up to 3-4 days. Just be sure to allow the stacks to cool completely before sealing to prevent condensation. When you’re ready to enjoy them again, reheat in the oven to restore that delightful texture.

Can I freeze Baked Eggplant and Tomato Stacks?
Of course! Freezing is a fantastic option for meal prep. To freeze, fully assemble your stacks (without baking), then tightly wrap them in plastic wrap, followed by foil. They can be stored in the freezer for up to 2 months. When you’re ready to cook them, simply remove from the freezer, unwrap, and bake directly from frozen, adding an extra 10-15 minutes to the cook time.

What should I do if my eggplant becomes soggy?
If you find that your eggplant is soggy, using a good salting technique is essential. Remember to salt the slices generously before letting them sit for about 30 minutes; this process draws out excess moisture. Rinse and dry thoroughly afterward. If you’re still struggling, consider choosing firmer varieties of tomatoes and letting them drain a bit before adding them into your stacks for better texture.

Are Baked Eggplant and Tomato Stacks suitable for dietary restrictions?
Absolutely! This recipe is highly adaptable. For vegan versions, simply substitute dairy cheeses with plant-based versions like vegan mozzarella and nutritional yeast for Parmesan. If gluten is a concern, swap standard panko breadcrumbs for gluten-free options. It’s fantastic how a little creativity can make this dish accessible for everyone!

How can I enhance the flavors of my Baked Eggplant and Tomato Stacks?
To kick it up a notch, try incorporating fresh herbs like basil or oregano between the layers. A sprinkle of red pepper flakes will add a subtle kick, while drizzling some balsamic reduction on top before serving can infuse a delightful sweetness. Feel free to experiment—cooking is all about creativity and taste!

Baked Eggplant and Tomato Stacks

Baked Eggplant and Tomato Stacks for a Cozy Night In

Baked Eggplant and Tomato Stacks combine creamy eggplant, zesty tomatoes, and melted cheese for a delightful and comforting dish.
Print Recipe Pin Recipe
Prep Time 30 minutes mins
Cook Time 30 minutes mins
Resting Time 10 minutes mins
Total Time 1 hour hr 10 minutes mins
Servings: 4 servings
Course: Dinner
Cuisine: Italian
Calories: 250
Ingredients Equipment Method Nutrition Notes

Ingredients
  

For the Eggplant
  • 2 large Eggplant Slice into ½-inch rounds and salt before use.
  • 1 teaspoon Salt Essential for flavoring and reducing bitterness.
For the Tomatoes
  • 4 medium Tomatoes Choose firm, ripe varieties.
For the Cheese
  • 1 cup Mozzarella Cheese For a vegan alternative, use vegan mozzarella.
  • ½ cup Parmesan Cheese Nutritional yeast works for a dairy-free alternative.
For the Crunchy Topping
  • 1 cup Panko Breadcrumbs Use gluten-free breadcrumbs for a suitable option.
For the Flavors
  • 2 cloves Garlic Freshly minced for enhanced flavor.
  • 2 tablespoons Olive Oil Can reduce for a lighter option.

Equipment

  • Baking Dish
  • Colander
  • Parchment Paper
  • Oven

Method
 

Preparation Steps
  1. Slice the eggplant into ½-inch thick rounds and sprinkle with salt. Let sit for 30 minutes.
  2. Rinse the salt off the eggplant and pat dry.
  3. Preheat oven to 400°F (200°C) and roast eggplant slices for 20-25 minutes.
  4. Mix mozzarella and Parmesan cheeses with panko breadcrumbs in a bowl. Slice tomatoes into ¼-inch thick rounds.
  5. Layer eggplant, tomato, and cheese mixture in a greased baking dish until all ingredients are used.
  6. Bake assembled dish for 25-30 minutes until cheese is melted and bubbly.
  7. Let the dish rest for 5-10 minutes before serving.

Nutrition

Serving: 1servingCalories: 250kcalCarbohydrates: 30gProtein: 10gFat: 10gSaturated Fat: 5gPolyunsaturated Fat: 1gMonounsaturated Fat: 2gCholesterol: 20mgSodium: 500mgPotassium: 600mgFiber: 7gSugar: 4gVitamin A: 1000IUVitamin C: 15mgCalcium: 200mgIron: 2mg

Notes

Great for meal prep and leftovers; can be enjoyed cold or reheated.

Tried this recipe?

Let us know how it was!

Savor the Flavor: Quick Thai Basil Eggplant Stir-Fry

April 14, 2026 by Grace Snow Leave a Comment

A hint of spice dances through the air as I flip open my favorite cookbook, landing on a vibrant dish that never fails to ignite my culinary imagination: Thai Basil Eggplant. This quick and flavorful stir-fry whisks me away from the traditional takeout scene, delivering a satisfying, healthy twist that’s perfect for any night of the week. With tender, caramelized eggplant wrapped in a sticky, sweet-salty sauce enriched by garlic and ginger, it comes together in under 30 minutes—a total win for busy weeknights! Plus, it’s a fantastic vegan option, ensuring everyone at the table feels right at home. Are you ready to unleash some deliciousness in your kitchen? Let’s get cooking!

Why is Thai Basil Eggplant a must-try?

Flavorful and Aromatic: This dish bursts with the fragrant notes of fresh Thai basil, garlic, and ginger, offering a comforting yet invigorating culinary experience.

Quick Prep Time: In under 30 minutes, you’ll have a delicious meal on the table, making it perfect for those hectic weeknights.

Versatile Ingredients: Feel free to swap in your favorite veggies or proteins, whether you prefer tofu, shrimp, or even chicken. The possibilities are endless!

Healthy and Satisfying: With a low-calorie count yet rich in fiber, this dish satisfies those comfort food cravings while keeping things nutritious. Pair it with jasmine rice for a complete meal!

Catering to Dietary Needs: It’s not just vegan; with simple substitutions, this recipe caters to gluten-free diets too. Everyone can enjoy a plate of this tasty stir-fry!

Get ready to elevate your home dining experience with this delightful Thai classic!

Thai Basil Eggplant Ingredients

For the Sauce
• Tamari or Soy Sauce – Provides savory depth; use gluten-free tamari for a gluten-free version.
• Dark Soy Sauce – Adds richness and color; can substitute with more regular soy sauce if needed.
• Vegetarian Oyster Sauce – Contributes umami flavor; substitute with additional soy sauce if unavailable.
• Rice Vinegar – Offers acidity and balance; substitute with apple cider vinegar if needed.
• Maple Syrup or Coconut Sugar – Adds sweetness to balance savory flavors; substitute with sugar if necessary.
• Cold Water – Used for cornstarch slurry.
• Cornstarch – Thickens the sauce; can substitute with arrowroot powder for a similar effect.

For the Stir-Fry
• Neutral Oil (Avocado or Grape Seed) – Used for stir-frying; any high smoke point oil can be used.
• Japanese Eggplants – Soft, tender, and less bitter; cut into bite-sized pieces; can substitute with globe eggplants but consider peeling for texture.
• Red & Yellow Bell Peppers – Adds sweetness and crunch; you can use other bell peppers or omit for a simpler dish.
• Onion – Provides savory base flavor; can substitute with shallots.
• Garlic – Offers aromatic depth; use fresh for best flavor.
• Ginger – Fresh ginger enhances aromatic notes; use ground ginger in a pinch.
• Red Thai Chili – Adds heat; adjust quantity according to spice preference or omit entirely for a milder dish.
• Thai Basil – Imparts a unique, peppery aroma; substitute with Italian basil if Thai is unavailable.

For Serving
• Jasmine or Basmati Rice – Complements the stir-fry; can substitute with quinoa for a different base.

This Thai Basil Eggplant recipe packs in rich flavors and vibrant ingredients, making it a delightful choice for hearty home-cooked meals!

Step‑by‑Step Instructions for Thai Basil Eggplant

Step 1: Prepare the Sauce
In a medium bowl, whisk together tamari, dark soy sauce, vegetarian oyster sauce, rice vinegar, and maple syrup until well combined. In a separate small bowl, mix cornstarch with cold water until smooth to create a slurry. This sauce will infuse your Thai Basil Eggplant with a rich, savory flavor that sets the stage for the stir-fry.

Step 2: Cook the Eggplant
Heat 1 tablespoon of neutral oil in a large skillet over medium-high heat. Once the oil shimmers, add the bite-sized Japanese eggplant and toss to coat in the oil. Cover the skillet, sprinkle in a little water, and cook for 4-5 minutes until the eggplant is tender but still slightly firm. Remove the eggplant from the skillet and set it aside as you prepare the rest of the vegetables.

Step 3: Stir-fry Peppers and Onions
In the same skillet, add the remaining oil, and heat over medium-high. Once hot, toss in chopped onion and diced red and yellow bell peppers. Sauté these colorful veggies for 5-6 minutes until they soften and become slightly caramelized, enhancing their natural sweetness. The vibrant hues will signal that it's time to move on to the next aromatic step.

Step 4: Add Aromatics
Stir in minced garlic, grated ginger, and sliced red Thai chili to the skillet, cooking for about 1 minute until fragrant. The aroma of these ingredients will fill your kitchen, adding an irresistible depth to your Thai Basil Eggplant. Make sure to keep the heat at medium-high to celebrate their bold flavors without burning them.

Step 5: Combine Sauce with Veggies
Pour the previously prepared sauce and cornstarch slurry into the skillet, stirring to combine with the sautéed vegetables. Bring this mixture to a gentle simmer, allowing the sauce to thicken slightly and coat the vegetables evenly. The bubbling sound will assure you that the flavors are melding beautifully in your dish.

Step 6: Return Eggplant to Skillet
Gently add the cooked eggplant back into the skillet, stirring to combine with the thickened sauce and vegetable medley. Cook for an additional 2 minutes, ensuring the eggplant heats through and absorbs the delicious flavors of the sauce. You’ll notice the sauce becoming glossy and sticky, enhancing the overall presentation of your Thai Basil Eggplant.

Step 7: Add Thai Basil & Serve
Finally, stir in fresh Thai basil just before serving, allowing it to wilt slightly and infuse the dish with its aromatic essence. Serve your Thai Basil Eggplant hot over a bed of jasmine or basmati rice, garnishing with extra basil for a beautiful finish. This quick and flavorful stir-fry is now ready to enjoy and impress your family!

What to Serve with Quick and Flavorful Thai Basil Eggplant Stir-Fry

Imagine a colorful spread of dishes that perfectly complements the aromatic and savory Thai Basil Eggplant, creating a fulfilling and hearty meal.

  • Steamed Jasmine Rice: This fluffy rice acts as a perfect backdrop, absorbing the rich flavors of the stir-fry while adding a comforting texture.

  • Fresh Cucumber Salad: A bright, crisp salad drizzled with lime juice adds a refreshing contrast, cutting through the savory sweetness of the eggplant.

  • Thai Spring Rolls: Crunchy and filled with fresh herbs, these rolls offer a delightful textural contrast and amplify the Thai theme.

  • Grilled Tofu Skewers: Adding protein, these marinated grill marks entice with smoky flavors, enriching your meal without overpowering the dish.

  • Mango Sticky Rice: For dessert, this sweet treat balances the savory eggplant beautifully, leaving you with a satisfying sweet ending.

  • Coconut Water: Light and refreshing, this drink complements the dish while enhancing the tropical experience of your meal.

  • Peanut Sauce: A creamy dip for vegetables or spring rolls will add a touch of nutty goodness, enhancing each bite with rich flavors.

  • Thai Iced Tea: The sweet and creamy layers in this iconic drink have an elegantly cooling effect that rounds out the spiced notes from the eggplant.

Indulging in these delightful pairings opens a world of flavors, celebrating the harmony of this quick and flavorful Thai Basil Eggplant stir-fry!

Make Ahead Options

These Thai Basil Eggplant stir-fry ingredients are perfect for meal prep, saving you valuable time on busy weeknights! You can chop the vegetables and prepare the sauce up to 24 hours in advance, storing them separately in airtight containers in the refrigerator to maintain freshness. To keep the eggplant from browning, store it in a bowl of salted water until ready to use. When it’s time to enjoy your dish, simply stir-fry the prepped veggies, add the sauce, and cook the eggplant until heated through — in just a few minutes, you'll have a delicious meal on the table, just as satisfying as if made fresh!

Storage Tips for Thai Basil Eggplant

Fridge: Store leftovers in a sealed container for up to 3 days to maintain freshness and flavor.

Reheating: When ready to enjoy, reheat in a skillet over medium heat for best results. You may add a splash of water to retain moisture while heating.

Freezer: Avoid freezing this dish as the eggplant’s texture can become mushy upon thawing, compromising the overall experience.

Airtight Storage: Ensure your container is airtight to prevent the absorption of other odors and maintain the vibrant taste of your Thai Basil Eggplant.

Thai Basil Eggplant Variations & Substitutions

Feel free to explore these delightful twists and tweaks to customize your Thai Basil Eggplant to your taste!

  • Veggie Swap: Substitute Japanese eggplants for zucchini or mushrooms to enjoy a different veggie flavor and texture.

  • Protein Boost: Add sautéed tofu, shrimp, or chicken during the stir-fry step for an extra protein kick that melds beautifully with the sauce.

  • Mild & Sweet: If you prefer a milder dish, replace red Thai chilies with sweet bell pepper strips. You can also control the sweetness by adjusting maple syrup to taste.

  • Seasonal Touch: Experiment with seasonal vegetables like snap peas or baby corn to give your stir-fry a fresh and vibrant twist.

  • Substitute Oils: Use sesame oil instead of neutral oil to add a nutty flavor that complements the dish's authenticity.

  • Herb Alternatives: If Thai basil isn't available, Italian basil or even mint can be good substitutes to impart freshness in unique ways.

  • Different Rice Base: Serve your stir-fry over quinoa or cauliflower rice for a low-carb alternative that still delivers on flavor.

  • Heat It Up: For an extra kick, consider adding a pinch of red pepper flakes alongside the aromatics for an additional layer of spice.

Remember, cooking is all about personal expression, so follow your taste buds and enjoy creating your version of this delicious dish! For more inspiration, check out our delectable Vegan Pad Thai or dive into a delightful Green Curry to further enrich your weeknight meals.

Expert Tips for Thai Basil Eggplant

• Perfect Eggplant Texture: Avoid overcooking the eggplant; it should be tender yet firm. This ensures a delightful bite in your stir-fry.

• Adjusting Spice Levels: Modify the heat from Thai chilies based on your preference—remove seeds for milder flavor or add more for a spirited kick!

• Protein Boost: Want more protein? Add tofu or tempeh during the stir-frying process. This complements the Thai Basil Eggplant perfectly!

• Sauce Consistency: Ensure your cornstarch slurry is smooth to prevent clumping in the sauce. This results in a beautifully shiny finish!

• Fresh Ingredients Matter: Use fresh garlic and ginger for the best flavor. Dried alternatives simply won't compare in this vibrant dish!

Thai Basil Eggplant Recipe FAQs

How do I choose the right eggplant for this recipe?
Absolutely! Look for Japanese eggplants that are glossy, firm, and free of dark spots or blemishes. The skin should be smooth, indicating freshness. If you prefer globe eggplants, that's fine too—just peel them to reduce bitterness and enhance the texture.

What’s the best way to store leftovers of Thai Basil Eggplant?
Very good question! Store any leftovers in an airtight container in the refrigerator for up to 3 days. Make sure it’s sealed well to keep the flavors intact. When you're ready to eat, reheat it in a skillet over medium heat and add a splash of water to prevent it from drying out.

Can I freeze Thai Basil Eggplant?
I would advise against that! Freezing this dish can compromise the eggplant's texture, making it mushy when thawed. Instead, enjoy it fresh or keep your leftovers in the fridge for a delicious quick meal later!

What should I do if my sauce doesn’t thicken properly?
No worries! If your sauce is too thin, return it to a gentle simmer and stir in a little extra cornstarch mixed with cold water to create a slurry. Add it slowly while stirring, and allow it to cook for a few minutes to see if it thickens. Patience is key here!

Is this Thai Basil Eggplant recipe suitable for a gluten-free diet?
Absolutely! To make this dish gluten-free, simply use tamari sauce instead of traditional soy sauce. Most sauces like vegetarian oyster sauce come in gluten-free versions, so always check the labels. Your gluten-free friends will appreciate the effort!

Can I add protein to this stir-fry?
Of course! For a protein boost, consider adding cubed tofu or tempeh during the stir-frying process. You can also toss in cooked shrimp or chicken for a different take. Just adjust cooking times slightly to ensure everything is cooked perfectly!

Thai Basil Eggplant

Savor the Flavor: Quick Thai Basil Eggplant Stir-Fry

A quick and flavorful Thai Basil Eggplant stir-fry rich in spices, perfect for a healthy and satisfying dinner.
Print Recipe Pin Recipe
Prep Time 10 minutes mins
Cook Time 20 minutes mins
Total Time 30 minutes mins
Servings: 4 servings
Course: Dinner
Cuisine: Thai
Calories: 220
Ingredients Equipment Method Nutrition Notes

Ingredients
  

Sauce Ingredients
  • 3 tablespoons Tamari or Soy Sauce Use gluten-free tamari for a gluten-free version.
  • 1 tablespoon Dark Soy Sauce Can substitute with more regular soy sauce if needed.
  • 2 tablespoons Vegetarian Oyster Sauce Substitute with additional soy sauce if unavailable.
  • 1 tablespoon Rice Vinegar Substitute with apple cider vinegar if needed.
  • 1 tablespoon Maple Syrup or Coconut Sugar Substitute with sugar if necessary.
  • 1/2 cup Cold Water Used for cornstarch slurry.
  • 1 tablespoon Cornstarch Can substitute with arrowroot powder for a similar effect.
Stir-Fry Ingredients
  • 1 tablespoon Neutral Oil (Avocado or Grape Seed) Any high smoke point oil can be used.
  • 2 medium Japanese Eggplants Cut into bite-sized pieces.
  • 1 each Red & Yellow Bell Peppers Adds sweetness and crunch.
  • 1 medium Onion Can substitute with shallots.
  • 3 cloves Garlic Use fresh for best flavor.
  • 1 teaspoon Ginger Use fresh ginger for aromatic notes.
  • 1 each Red Thai Chili Adjust quantity according to spice preference.
  • 1 cup Thai Basil Substitute with Italian basil if Thai is unavailable.
Serving Ingredients
  • 2 cups Jasmine or Basmati Rice Can substitute with quinoa for a different base.

Equipment

  • Skillet
  • medium bowl
  • small bowl

Method
 

Preparation Instructions
  1. In a medium bowl, whisk together tamari, dark soy sauce, vegetarian oyster sauce, rice vinegar, and maple syrup until well combined. In a separate small bowl, mix cornstarch with cold water until smooth to create a slurry.
  2. Heat 1 tablespoon of neutral oil in a large skillet over medium-high heat. Add the bite-sized Japanese eggplant and cook for 4-5 minutes until tender but still slightly firm. Remove the eggplant and set aside.
  3. In the same skillet, add more oil and toss in chopped onion and diced bell peppers. Sauté for 5-6 minutes until they soften and caramelize.
  4. Stir in minced garlic, grated ginger, and sliced red Thai chili, cooking for about 1 minute until fragrant.
  5. Pour the prepared sauce and cornstarch slurry into the skillet, stirring to combine and simmer to thicken.
  6. Gently add the cooked eggplant back to the skillet, stirring to combine with sauce and cook for an additional 2 minutes.
  7. Stir in fresh Thai basil just before serving and serve hot over a bed of rice.

Nutrition

Serving: 1plateCalories: 220kcalCarbohydrates: 34gProtein: 4gFat: 8gSaturated Fat: 1gPolyunsaturated Fat: 3gMonounsaturated Fat: 3gSodium: 600mgPotassium: 500mgFiber: 5gSugar: 6gVitamin A: 1000IUVitamin C: 60mgCalcium: 40mgIron: 2mg

Notes

Serve garnished with extra basil for a beautiful finish. Adjust spice levels based on preference and store leftovers properly in the fridge.

Tried this recipe?

Let us know how it was!

Crispy Eggplant Schnitzel with Tomato Sauce for Comfort Food Bliss

April 14, 2026 by Grace Snow Leave a Comment

As I stood in my kitchen, the aroma of roasted garlic and sweet cherry tomatoes lingered in the air, instantly whisking me away to sun-drenched Mediterranean shores. If you’re on the lookout for a delightful dinner that’s not only a feast for the eyes but also a treat for your taste buds, this Crispy Eggplant Schnitzel with Savory Roasted Cherry Tomato Sauce is just the ticket. This vegetarian gem doesn’t skimp on comfort food vibes, combining crispy, tender eggplant with a vibrant and tangy sauce that sings all the right notes. Plus, it’s a quick prep you can whip up on any busy evening, which has quickly made it a staple in my home. Intrigued by how this comforting dish can elevate your dinner table? Let’s dive into the magic of flavors in this wonderful recipe!

Why is Eggplant Schnitzel a Must-Try?

Flavorful Fusion: This dish brings together crispy eggplant and savory roasted cherry tomato sauce for a mouthwatering experience that is hard to resist. Vegetarian-Friendly: It's a fantastic way to enjoy comfort food without compromising your dietary choices. Quick and Easy: With simple steps and common ingredients, you can whip it up even on a busy weeknight. Versatile Delight: Pair it with a refreshing salad or creamy mashed potatoes, making it suitable for any occasion. Plus, it’s a fun crowd-pleaser that will impress both family and guests. Looking for more vegetarian inspiration? Check out this delicious Fried Shrimp Cabbage or Tagliatelle Asparagus Peas for your next meal!

Eggplant Schnitzel Ingredients

For the Eggplant
• Eggplants – Use smaller or medium-sized eggplants for better results.
• Salt – Enhances the natural flavors of eggplants and tomatoes; adjust to taste.
• Pepper – Freshly ground pepper adds a delightful, spicy hint.
• Olive Oil – Essential for roasting veggies, or swap for avocado oil.
• Flour – Helps create a crispy coating; gluten-free flour can be used as a substitute.
• Eggs – Acts as a binder for breadcrumbs; can use a flax egg for a vegan twist.
• Mayonnaise – Adds richness to the egg wash; opt for vegan mayo if needed.
• Mustard – Brings tanginess; Dijon works best; can be omitted if sensitive.

For the Coating
• Panko Breadcrumbs – Offers a light and crispy texture; regular breadcrumbs are an option too.
• Parsley – Adds freshness; substitute with dried herbs if fresh isn't available.
• Sesame Seeds – Contributes crunch and nuttiness; can replace with extra breadcrumbs.
• Cumin & Paprika Powder – Infuses warmth; adjust according to spice preference.

For the Sauce
• Cherry Tomatoes – The base of the sauce, offering sweetness and acidity; any seasonal tomato will work.
• Heads of Garlic – Adds sweetness when roasted; substitute with garlic powder if in a hurry.
• Italian Herbs – Enhances flavor; consider using dried basil, oregano, and thyme.
• Basil Leaves – Fresh herbs provide bright contrast; dried basil works too.
• Parmesan Cheese – For garnish, adding savory flavor; omit for a vegan option or use nutritional yeast.

This Eggplant Schnitzel with Tomato Sauce is bound to impress with its crispy texture and vibrant flavors!

Step‑by‑Step Instructions for Eggplant Schnitzel with Tomato Sauce

Step 1: Preheat the Oven
Begin your culinary journey by preheating your oven to 210°C (410°F) with the fan on. This step ensures that your Eggplant Schnitzel gets that irresistible crispiness. A hot oven is crucial for roasting the vegetables effectively, so while it warms up, gather your ingredients and line a baking tray with parchment paper.

Step 2: Roast the Vegetables
Once the oven is ready, place the eggplant slices, cherry tomatoes, and whole heads of garlic on the lined tray. Drizzle generously with olive oil and sprinkle with salt and pepper. Roast everything for about 20 minutes, turning the cherry tomatoes halfway to ensure even cooking. Look for a golden-brown hue on the eggplants and softened, charred tomatoes for that rich flavor.

Step 3: Prepare the Egg Wash
While the veggies are roasting, whisk together the eggs, mayonnaise, and mustard in a medium bowl until well-combined. This egg wash will help the breadcrumbs adhere to your eggplant, forming a crispy coating. Set aside the mixture for later, allowing the flavors to meld as you prepare the next steps.

Step 4: Make the Breadcrumb Mixture
On a plate, combine panko breadcrumbs, sesame seeds, chopped parsley, cumin, and paprika. Mix thoroughly, ensuring the spices are evenly distributed. This breadcrumb mixture will add a delightful crunch and extra flavor to the Eggplant Schnitzel, enhancing its overall taste.

Step 5: Prepare the Eggplants
Once roasted, allow the eggplants to cool slightly before peeling off the skin. Gently flatten each slice with a fork and season them with salt and pepper. This preparation will highlight the eggplant’s natural flavor while ensuring they are tender and ready for that crispy coating.

Step 6: Bread the Eggplants
Now it’s time to coat the eggplants for your Eggplant Schnitzel! Dredge each slice in flour, making sure to coat it evenly. Dip it into the egg wash, allowing excess to drip off, then coat with the breadcrumb mixture, pressing gently to ensure it adheres well. Repeat this process until all slices are breaded and ready for frying.

Step 7: Pan-Fry the Coated Eggplants
Heat a generous amount of oil in a large frying pan over medium heat. Once the oil is shimmering, carefully place the breaded eggplants in the pan and fry them for about 3-4 minutes on each side or until they turn golden brown and crispy. As they fry, resist the urge to move them too much to maintain the integrity of the crust.

Step 8: Make the Roasted Tomato Sauce
In a bowl, combine the roasted cherry tomatoes and garlic with a sprinkle of Italian herbs, salt, and pepper. Use a hand mixer to blend until smooth, creating a vibrant sauce that will perfectly accompany your Eggplant Schnitzel. Taste and adjust seasonings as needed for a flavor that sings.

Step 9: Serve the Dish
To plate, spread a generous amount of the silky Roasted Cherry Tomato Sauce on each plate, creating a beautiful base. Place your crispy Eggplant Schnitzel on top, and finish with a sprinkle of grated Parmesan and fresh parsley for a touch of brightness. This delightful presentation will elevate your dining experience!

Expert Tips for Eggplant Schnitzel

  • Choosing Eggplants: Select medium-sized eggplants for optimal texture. Smaller eggplants have fewer seeds and a creamier texture, making them perfect for schnitzel.

  • Avoid Sogginess: Always heat the oil properly before frying. It should be shimmering but not smoking. This prevents the breading from getting soggy and ensures a delightful crisp.

  • Breadcrumb Coating: Press the breadcrumbs firmly onto the eggplant slices so they adhere well during frying. This helps create a thicker, crunchier crust for your Eggplant Schnitzel.

  • Baking Option: For a healthier twist, bake your schnitzels instead of frying. Use the same temperature and roast until golden brown, which can enhance the flavors without excess oil.

  • Sauce Adjustments: Feel free to tweak the tomato sauce by adding red pepper flakes for heat or extra herbs for freshness. Balancing the sauce enhances the overall experience of the Eggplant Schnitzel.

  • Prep Ahead: You can prepare the breaded eggplant and sauce components in advance. Just assemble and cook them right before serving to maintain that crispy texture.

Eggplant Schnitzel Variations & Substitutions

Feel free to mix things up and customize this dish to suit your taste buds. The world of flavors awaits!

  • Cheesy Delight: Top your schnitzel with slices of mozzarella before baking for a gooey, cheesy finish.
  • Gluten-Free: Substitute regular breadcrumbs with gluten-free panko or crushed rice crackers for the same crunch without gluten.
  • Vegan Twist: Replace eggs with a flax egg or aquafaba and use vegan mayonnaise for an entirely plant-based option.
  • Herb Infusion: Experiment by adding different herbs and spices like rosemary or oregano to the breadcrumb mixture for added complexity.
  • Spicy Kick: Toss a pinch of red pepper flakes into the breadcrumb mixture for an exciting heat level that will tingle your taste buds.
  • Parmesan Swap: Use nutritional yeast instead of parmesan for a cheesy flavor without dairy in your garnishing.
  • Sauce Boost: Blend in a splash of balsamic vinegar or a hint of chili paste to your Roasted Cherry Tomato Sauce for a punch of acidity and depth.
  • Side Pairings: Alongside your schnitzel, serve creamy mashed potatoes or a crisp green salad for a restaurant-quality meal at home. You could even prepare a vibrant dish like Smoky Sweet Potatoes to add extra excitement to the table!

Make Ahead Options

These Crispy Eggplant Schnitzel with Roasted Cherry Tomato Sauce are perfect for meal prep enthusiasts! You can prepare the roasted cherry tomato sauce up to 3 days in advance by blending it and storing it in the refrigerator. Additionally, bread the eggplant slices ahead and keep them in the fridge for up to 24 hours in an airtight container to maintain their crispiness. When you’re ready to serve, simply pan-fry the breaded eggplants until golden brown, which takes just about 6-8 minutes, and reheat the sauce gently. This ensures the dish is just as delicious and saves you precious time on busy weeknights!

How to Store and Freeze Eggplant Schnitzel

Fridge: Store leftover Eggplant Schnitzel in an airtight container for up to 3 days. Recrisp in a hot pan or oven for the best texture.

Freezer: Freeze unbaked or fully cooked schnitzels for up to 2 months. For easier reheating, place between layers of parchment paper and wrap tightly.

Reheating: To reheat from frozen, bake at 200°C (392°F) straight from the freezer until heated through and crispy, about 15-20 minutes.

Prep Ahead: You can also store the Roasted Cherry Tomato Sauce separately in the fridge for up to 5 days, making it easy to whip up this dish anytime!

What to Serve with Crispy Eggplant Schnitzel with Roasted Cherry Tomato Sauce

Savoring each bite of crispy eggplant paired with a rich sauce is only the beginning of a delightful meal.

  • Creamy Mashed Potatoes: The velvety texture complements the crispy schnitzel, creating a warm contrast on your plate.
  • Greek Salad: Fresh tomatoes, cucumbers, and olives offer a refreshing burst of flavors, perfectly balancing the dish's richness.
  • Garlic Bread: Crunchy, buttery bread pairs wonderfully, ideal for soaking up that luscious roasted cherry tomato sauce.
  • Roasted Vegetables: Seasonal veggies like zucchini and bell peppers add a colorful medley, enhancing both nutrition and flavor harmony.
  • Quinoa Pilaf: A light, nutty pilaf with herbs feels delightful beside crispy eggplant, elevating the entire dining experience.
  • Wine Pairing: A chilled Sauvignon Blanc works wonders with this dish; its acidity contrasts beautifully with the savory elements.
  • Fruit Sorbet: End on a sweet note with a refreshing sorbet; its brightness cleanses the palate after the rich main course.
  • Steamed Asparagus: Tender asparagus adds elegance and offers a fresh crunch that complements the hearty schnitzel beautifully.

With these pairings, you’re set for a meal that celebrates vibrant flavors and delightful textures!

Eggplant Schnitzel with Roasted Cherry Tomato Sauce Recipe FAQs

How do I select the best eggplant for this recipe?
Absolutely! When selecting eggplants, look for smaller to medium-sized ones with smooth, shiny skin. Avoid any that have dark spots or are overly soft, as these indicate overripeness. Firmness is key, and if the eggplant feels heavy for its size, that's a great sign!

How should I store leftovers of the Eggplant Schnitzel?
For best results, store leftover Eggplant Schnitzel in an airtight container in the refrigerator for up to 3 days. If you want to maintain that crunch, reheating in a hot oven or a skillet is best; just say goodbye to the microwave if you can.

Can I freeze Eggplant Schnitzel?
Yes, you can! If you want to freeze unbaked schnitzels, stack them between layers of parchment paper, wrap them tightly in plastic, and store for up to 2 months. For fully cooked schnitzels, simply do the same. When ready to enjoy, bake them straight from the freezer at 200°C (392°F) for about 15-20 minutes until heated through and crispy.

Why is my breading falling off during frying?
Very common! Ensure you've pressed the breadcrumbs firmly onto the eggplant slices before frying. Also, wait until the oil is shimmering hot before adding the breaded eggplants. Undercooking the oil can lead to soggy breading, which won't hold up in the pan.

Are there any dietary considerations I should keep in mind?
Definitely! This Eggplant Schnitzel is vegetarian-friendly, but if you need it to be vegan, swap the eggs for a flax egg and use vegan mayonnaise. Additionally, check your breadcrumbs for any potential allergens if serving to guests with food sensitivities.

How do I know if my roasted tomato sauce is seasoned perfectly?
When making your Roasted Cherry Tomato Sauce, it's all about balance! Start with a sprinkle of salt and pepper and taste as you combine the ingredients. If it feels too acidic, a pinch of sugar can help balance things out. Add fresh basil or Italian herbs to elevate the flavor, and feel free to adjust according to your taste preference. Enjoy the flavorful journey!

Eggplant Schnitzel with Tomato Sauce Recipe FAQs

Eggplant Schnitzel with Tomato Sauce

Crispy Eggplant Schnitzel with Tomato Sauce for Comfort Food Bliss

Enjoy a delicious Eggplant Schnitzel with Tomato Sauce that's quick, crispy, and perfect for comfort food.
Print Recipe Pin Recipe
Prep Time 25 minutes mins
Cook Time 30 minutes mins
Cooling Time 5 minutes mins
Total Time 1 hour hr
Servings: 4 servings
Course: Dinner
Cuisine: Mediterranean
Calories: 320
Ingredients Equipment Method Nutrition Notes

Ingredients
  

For the Eggplant
  • 2 medium Eggplants Use smaller or medium-sized for better results.
  • to taste Salt Enhances natural flavors.
  • to taste Pepper Freshly ground adds a spicy hint.
  • 3 tablespoons Olive Oil Essential for roasting.
  • 1 cup Flour Helps create a crispy coating.
  • 2 large Eggs Acts as a binder.
  • 2 tablespoons Mayonnaise Opt for vegan mayo if needed.
  • 1 tablespoon Mustard Dijon works best.
For the Coating
  • 1 cup Panko Breadcrumbs Offers a light and crispy texture.
  • 1 tablespoon Parsley Fresh or dried herbs.
  • 2 tablespoons Sesame Seeds Contributes crunch.
  • 1 teaspoon Cumin Adjust according to spice preference.
  • 1 teaspoon Paprika Powder Adjust according to spice preference.
For the Sauce
  • 2 cups Cherry Tomatoes The base of the sauce.
  • 1 head Garlic Adds sweetness when roasted.
  • 1 teaspoon Italian Herbs Enhances flavor.
  • 1 tablespoon Basil Leaves Fresh provides bright contrast.
  • 1/4 cup Parmesan Cheese For garnish.

Equipment

  • Oven
  • Baking tray
  • medium bowl
  • Plate
  • frying pan
  • hand mixer

Method
 

Step‑by‑Step Instructions
  1. Preheat the oven to 210°C (410°F) with the fan on.
  2. Roast the eggplant slices, cherry tomatoes, and garlic on a baking tray for about 20 minutes.
  3. Prepare the egg wash by whisking together eggs, mayonnaise, and mustard in a bowl.
  4. Make the breadcrumb mixture by combining panko, sesame seeds, parsley, cumin, and paprika.
  5. Peel and flatten the roasted eggplants, seasoning with salt and pepper.
  6. Dredge eggplants in flour, dip in the egg wash, and coat with the breadcrumb mixture.
  7. Pan-fry the coated eggplants in oil for about 3-4 minutes on each side until golden brown.
  8. Blend roasted tomatoes and garlic with Italian herbs for the sauce.
  9. Serve by spreading tomato sauce on plates and placing crispy eggplant on top.

Nutrition

Serving: 1servingCalories: 320kcalCarbohydrates: 40gProtein: 9gFat: 14gSaturated Fat: 2gPolyunsaturated Fat: 3gMonounsaturated Fat: 8gCholesterol: 70mgSodium: 600mgPotassium: 600mgFiber: 4gSugar: 6gVitamin A: 500IUVitamin C: 20mgCalcium: 100mgIron: 2mg

Notes

Choose medium-sized eggplants for the best texture. Baking the schnitzels can provide a healthier alternative.

Tried this recipe?

Let us know how it was!

Savory Provençal Eggplant Tomato Gratin for Summer Comfort

April 14, 2026 by Grace Snow Leave a Comment

On a sun-drenched afternoon in Provence, I stumbled upon a charming little bistro where the air was filled with the intoxicating aroma of baked vegetables and herbs. Inspired by that moment, I’ve crafted this Irresistible Provençal Eggplant Tomato Gratin, a dish that echoes the fresh and vibrant spirit of Mediterranean cooking. With its simple yet elegant layers of tender eggplant, juicy tomatoes, and aromatic garlic, all blanketed under a gooey cheese crown, this recipe is a fantastic way to elevate your summer gatherings or bring comfort to a cozy weeknight dinner. Plus, it’s a delightful vegetarian option that’s sure to satisfy everyone at the table! Are you ready to embrace the flavors of summer right in your kitchen? Let’s dive in!

Why is This Gratin a Must-Try?

Layered Comfort: The Provençal Eggplant Tomato Gratin offers a warm embrace of summer flavors that’s both comforting and satisfying.
Mediterranean Freshness: With ingredients like ripe tomatoes and fresh herbs, every bite bursts with the essence of the Mediterranean.
Easy to Prepare: Its straightforward steps make this dish accessible to any home cook, ensuring that gourmet flavor doesn’t require a culinary degree.
Crowd-Pleasing: Perfect for dinner parties or family meals, this recipe appeals to vegetarians and meat-lovers alike, akin to our Skillet Pasta Sun experience.
Versatile Options: Feel free to enhance it with zucchini or bell peppers for added flair, catering to diverse palates.
Make Ahead-Friendly: Prepare it in advance, allowing the flavors to meld beautifully—saving you time while entertaining friends or family!

Provençal Eggplant Tomato Gratin Ingredients

For the Gratin

  • Eggplants – The primary ingredient that provides structure; don't forget to salt them to draw out moisture.
  • Tomatoes – Fresh, ripe tomatoes are a must for adding juiciness and sweetness to your Provençal Eggplant Tomato Gratin.
  • Garlic – Fresh minced garlic offers an aromatic depth; using it will elevate your dish's flavor.
  • Onion – Sweet onions work best when sautéed, providing a flavorful base for the gratin.
  • Extra Virgin Olive Oil – Essential for sautéing vegetables, it adds richness and enhances the dish's Mediterranean flair.
  • Fresh Thyme and Basil – These herbs are key to bolstering the Mediterranean flavor profile; dried herbs can be used if fresh isn’t available.
  • Grated Gruyère or Parmesan Cheese – This will create a beautifully melted topping; consider mozzarella as a substitute for a different twist.
  • Salt – Adjust to taste, ensuring you highlight all the magnificent flavors in the gratin.

Step‑by‑Step Instructions for Provençal Eggplant Tomato Gratin

Step 1: Preheat the Oven
Begin by preheating your oven to 375°F (190°C). This step is crucial for achieving a beautifully baked, bubbly Provençal Eggplant Tomato Gratin. While the oven warms up, gather your baking dish and prepare it by lightly greasing it with olive oil to prevent sticking.

Step 2: Prepare the Eggplants
Slice the eggplants into 1/2-inch rounds and lay them on paper towels. Generously sprinkle salt over the slices and let them sit for about 30 minutes. This process draws out excess moisture and bitterness, ensuring each layer of your gratin is full of flavor. As the eggplants "sweat," prepare your other ingredients.

Step 3: Sauté the Aromatics
In a skillet over medium heat, combine 2 tablespoons of extra virgin olive oil and add diced onion. Sauté for 5-7 minutes until the onion turns translucent and fragrant. Next, add minced garlic to the skillet and cook for another minute, stirring constantly to prevent burning. Set aside this aromatic mixture, enticing you with its delicious aroma.

Step 4: Layer the Gratin
In your greased baking dish, start layering your ingredients. Begin with a layer of eggplant, followed by a layer of sliced tomatoes. Sprinkle some of the sautéed onion and garlic mixture over the tomatoes, then add fresh thyme and basil for that Mediterranean touch. Repeat the layering process until you run out of ingredients, ensuring even distribution for a flavorful Provençal Eggplant Tomato Gratin.

Step 5: Add the Cheese Topping
Once all layers are assembled, generously top your final layer with grated Gruyère or Parmesan cheese. The cheese will melt beautifully and develop a lovely golden crust as it bakes. This step brings the dish together, creating a stunning and mouth-watering finish that you'll savor.

Step 6: Bake to Perfection
Slide the baking dish into your preheated oven and bake uncovered for 35-40 minutes. Keep an eye on the gratin; it should turn golden brown and become bubbly, signaling that it’s ready to emerge from the oven. The enticing aroma will fill your kitchen, making it hard to resist.

Step 7: Let it Rest
After baking, carefully remove the dish from the oven and allow the Provençal Eggplant Tomato Gratin to rest for at least 10 minutes. This resting period lets the flavors meld together and helps the gratin set up nicely for serving. Enjoy the anticipation as you prepare to dig in!

How to Store and Freeze Provençal Eggplant Tomato Gratin

Fridge: Store leftovers in an airtight container for up to 3-4 days to maintain freshness and flavor.

Freezer: If you want to enjoy it later, freeze the gratin before baking. Wrap it tightly in plastic wrap and foil; it can last up to 3 months.

Reheating: To reheat, thaw in the fridge overnight, then bake at 350°F (175°C) for about 20-25 minutes until heated through and cheese is bubbly.

Lifting Flavor: For best results, let the gratin rest for a bit after baking; this enhances the flavors and makes serving easier!

What to Serve with Irresistible Provençal Eggplant Tomato Gratin

Nothing complements the rich flavors of this Mediterranean dish quite like a few well-chosen sides!

  • Crusty French Bread: The perfect tool for scooping up every cheesy, flavorful bite. Plus, it adds a satisfying crunch alongside the soft gratin.
  • Mixed Green Salad: A fresh, light salad with a zesty vinaigrette helps cut through the richness, bringing balance to your meal. Consider adding slices of ripe avocado for creaminess!
  • Grilled Zucchini: Tender, lightly charred zucchini adds a smoky flavor and enhances the Mediterranean vibe of your dinner table.
  • A Glass of Rosé: The bright acidity of a chilled rosé wine beautifully complements the dish, enhancing the overall dining experience.
  • Herbed Couscous: This fluffy, light side dish contrasts nicely with the gratin’s creamy texture while infusing a touch of herbaceous goodness.
  • Sautéed Spinach with Garlic: Just a quick sauté with olive oil and fresh garlic elevates simple spinach, adding another green element to your meal.
  • Lemon Tart: For dessert, a refreshing lemon tart offers a sweet and tangy end note that will leave everyone satisfied.
  • Chilled Gazpacho: This cold, refreshing Spanish soup pairs well with the warm gratin, making for a delightful combination on hot summer days.

Provençal Eggplant Tomato Gratin Variations

Ready to make this fabulous dish your own? With just a few tweaks, you can elevate the flavor profile and make it even more delicious!

  • Flavor Boost: Add Smoked Paprika to the sautéed onions for a hint of warmth and smokiness.
  • Extra Creaminess: Incorporate Ricotta Cheese between the layers for a rich, creamy texture that complements the eggplant beautifully.
    Unlock a delightful surprise as you dig into creamy pockets of ricotta amidst the savory layers.
  • Herb Forward: Use Fresh Oregano and Rosemary instead of thyme and basil, offering a different aromatic dimension that will transport you straight to the Mediterranean!
  • Spicy Kick: Toss in Chili Flakes with the sautéed onions for those who love a bit of heat in their dishes.
    It’s the perfect little twist for spice lovers, transforming this comforting gratin into a more lively affair.
  • Zucchini Substitute: Swap the eggplants for Zucchini or Bell Peppers for a lighter take that still packs a punch of flavor.
  • Vegan Upgrade: Omit cheese and replace it with Nutritional Yeast for a cheesy flavor without the dairy, keeping it plant-based and guilt-free.
    Each slice will still deliver that satisfying taste, providing a delicious alternative for vegan eaters.
  • Hearty Addition: Mix in Chickpeas for a boost of protein that makes this gratin even more filling and nutritious.
    Their subtle nuttiness adds another layer of texture that complements the dish perfectly.

Enhancing this Provençal Eggplant Tomato Gratin provides tons of options for creativity! Plus, if you're interested in more tasty variations, don’t miss out on our Skillet Pasta Sun or explore other inventive twists you can try!

Make Ahead Options

These Provençal Eggplant Tomato Gratin layers are perfect for meal prep, allowing your flavors to meld beautifully while saving you time during busy weeknights. You can slice and salt the eggplants up to 24 hours in advance, storing them in an airtight container in the refrigerator to maintain their integrity. Additionally, you can prepare the sautéed onion and garlic mixture up to 3 days ahead and refrigerate it until you’re ready to assemble. When it’s time to cook, just layer the eggplant, tomatoes, and prepped ingredients in the baking dish, top with cheese, and bake as directed. This way, you’ll enjoy a delightful dish with minimal effort that’s just as delicious as freshly made!

Expert Tips for Provençal Eggplant Tomato Gratin

  • Salt Correctly: Salting the eggplants is essential to reduce bitterness; ensure to rinse and pat them dry thoroughly to avoid a watery dish.
  • Layer Wisely: Alternate layers of vegetables and aromatics for even flavor distribution, ensuring each bite of your Provençal Eggplant Tomato Gratin is equally delicious.
  • Monitor Baking: Avoid covering the dish with foil during baking to achieve a beautifully browned and bubbly cheese topping that is visually appealing.
  • Resting Time: Don’t skip the resting period after baking; it helps the flavors meld and makes serving easier, preventing the gratin from falling apart.
  • Add Variations: Feel free to mix in olives or roasted peppers for an extra flavor boost, making your Provençal Eggplant Tomato Gratin unique each time you prepare it.

Provençal Eggplant Tomato Gratin Recipe FAQs

How do I choose the right eggplants for the Provençal Eggplant Tomato Gratin?
Absolutely! Look for eggplants that are firm and shiny with smooth skin; avoid any that have dark spots or wrinkles, which indicate overripeness. For the best flavor, select medium-sized eggplants as they tend to have fewer seeds and a milder taste.

Can I store leftovers of the Provençal Eggplant Tomato Gratin?
Very much! Store any leftovers in an airtight container in the refrigerator for up to 3-4 days. When you’re ready to enjoy them again, simply reheat in the oven at 350°F (175°C) for about 20 minutes, or until heated through.

What are the best ways to freeze Provençal Eggplant Tomato Gratin?
Absolutely! To freeze, it's best to do so before baking. Wrap the unbaked gratin tightly in plastic wrap and then foil to avoid freezer burn. It can be stored in the freezer for up to 3 months. When you're ready, simply thaw it in the fridge overnight and bake it as directed.

Why did my eggplant turn out bitter in my Provençal Eggplant Tomato Gratin?
Great question! The bitterness usually comes from not salting the eggplants correctly. Be sure to slice them, sprinkle with salt, and let them sit for at least 30 minutes to draw out moisture and bitterness. Always rinse and pat dry before cooking to avoid a watery dish.

Are there any dietary considerations for making Provençal Eggplant Tomato Gratin?
Yes! This dish is vegetarian-friendly, making it suitable for a range of dietary preferences. However, always check for individual allergies, particularly to dairy if using Gruyère or Parmesan cheese. For a vegan variation, try a dairy-free cheese alternative or omit cheese altogether.

Provençal Eggplant Tomato Gratin

Savory Provençal Eggplant Tomato Gratin for Summer Comfort

Enjoy this Provençal Eggplant Tomato Gratin, a delicious vegetarian dish perfect for summer gatherings.
Print Recipe Pin Recipe
Prep Time 30 minutes mins
Cook Time 40 minutes mins
Resting Time 10 minutes mins
Total Time 1 hour hr 20 minutes mins
Servings: 6 servings
Course: Dinner
Cuisine: Mediterranean
Calories: 250
Ingredients Equipment Method Nutrition Notes

Ingredients
  

For the Gratin
  • 2 medium Eggplants Salted to draw out moisture.
  • 4 medium Tomatoes Fresh, ripe.
  • 3 cloves Garlic Minced.
  • 1 medium Onion Sweet, diced.
  • 2 tablespoons Extra Virgin Olive Oil For sautéing.
  • 1 tablespoon Fresh Thyme Or dried if not available.
  • 1 tablespoon Fresh Basil Or dried if not available.
  • 1 cup Grated Gruyère or Parmesan Cheese Mozzarella can be a substitute.
  • to taste Salt Adjust to taste.

Equipment

  • Baking Dish
  • Skillet
  • Cutting Board
  • Knife
  • Paper towels

Method
 

Step-by-Step Instructions
  1. Preheat your oven to 375°F (190°C) and prepare the baking dish by greasing with olive oil.
  2. Slice the eggplants into 1/2-inch rounds, sprinkle with salt, and let sit for 30 minutes.
  3. In a skillet, heat olive oil and sauté diced onion for 5-7 minutes until translucent. Add minced garlic and cook for another minute.
  4. Layer the ingredients in the greased baking dish starting with eggplant, followed by tomatoes, sautéed onion, and garlic.
  5. Top the last layer with grated cheese, then bake uncovered for 35-40 minutes.
  6. Let the gratin rest for at least 10 minutes before serving.

Nutrition

Serving: 1sliceCalories: 250kcalCarbohydrates: 18gProtein: 7gFat: 18gSaturated Fat: 7gPolyunsaturated Fat: 1gMonounsaturated Fat: 6gCholesterol: 25mgSodium: 350mgPotassium: 600mgFiber: 4gSugar: 5gVitamin A: 1200IUVitamin C: 16mgCalcium: 200mgIron: 2mg

Notes

Salting the eggplants reduces bitterness. Let the gratin rest after baking for better flavor and easier serving.

Tried this recipe?

Let us know how it was!

Creamy Steakhouse Potatoes Romanov for Ultimate Comfort

April 14, 2026 by Grace Snow Leave a Comment

As I savored the last bite of dinner last week, the thought struck me: what could make this even better? Enter my new favorite side dish: Steakhouse Potatoes Romanov, a creamy dream that takes comfort food to a whole new level. Imagine tender Yukon Gold potatoes nestled in a luscious cheesy sauce, baked to a golden perfection that contrasts beautifully with its smooth interior. This hearty side not only elevates any casual weeknight meal but also adds an extra sprinkle of love to celebratory feasts. Plus, it’s surprisingly quick to make, freeing up your time to engage with family and friends. Are you ready to indulge in this creamy comfort? Let’s dive into the recipe!

Why Are These Potatoes So Irresistible?

Creamy Indulgence: Each spoonful transports you to comfort food heaven with a delightful blend of flavors and textures.

Quick & Easy: In just over 30 minutes, you can whip up a gourmet side that impresses without the fuss, leaving you more time to enjoy with loved ones.

Versatility Galore: Perfect with everything from grilled steaks to herb-crusted chicken, these potatoes adapt to any meal.

Crowd-Pleasing Appeal: Loved by kids and adults alike, they're destined to be the star of your dinner table! If you're a fan of scrumptious sides, check out our delicious Smoky Sweet Potatoes or Roasted Sweet Potatoes for more culinary inspiration!

Steakhouse Potatoes Romanov Ingredients

For the Potatoes
• Yukon Gold Potatoes – The creamy base of this dish; their buttery flavor elevates the entire recipe.

For the Cream Mixture
• Sour Cream – Adds a tangy creaminess; Greek yogurt can be a light alternative if desired.
• Heavy Cream – Provides richness; consider half-and-half for a lighter option.
• Minced Garlic – Infuses depth; use garlic powder if fresh isn’t on hand.
• Smoked Paprika – Brings a smoky note; swap with regular paprika for a milder flavor.
• Salt – Essential for balancing flavors; adjust based on dietary needs.
• Black Pepper – Adds a hint of heat; substituting cayenne can kick it up a notch.

For the Cheesiness
• Cheddar Cheese – Delivers sharp flavor; Gruyère or a dairy-free cheese are good alternatives.
• Butter – Enhances richness and moisture; omit for a lighter dish if preferred.

For Garnishing
• Chives or Green Onions – Provide a fresh finish; you can replace them with parsley or skip if desired.

Dive into these ingredients and experience the magic of Steakhouse Potatoes Romanov that brings ultimate comfort to any meal!

Step‑by‑Step Instructions for Steakhouse Potatoes Romanov

Step 1: Prep the Potatoes
Begin by washing and peeling the Yukon Gold potatoes until they're bright and clean. Cut them into even chunks, about 1 inch each, to ensure they cook uniformly. This will set the stage for creamy Steakhouse Potatoes Romanov that everyone will love!

Step 2: Boil the Potatoes
Place the chopped potatoes in a large pot and cover them with cold water, adding a generous pinch of salt. Bring the pot to a rolling boil over high heat and cook until the potatoes are fork-tender, roughly 15-20 minutes. You’ll know they’re ready when a fork easily pierces them.

Step 3: Mash the Potatoes
Once boiled, carefully drain the potatoes and return them to the pot. While still warm, mash the potatoes using a potato masher or ricer, aiming for a creamy yet slightly textured consistency. This acts as the perfect base for the indulgent topping of your Steakhouse Potatoes Romanov.

Step 4: Combine Cream Mixture
In a separate bowl, whisk together the sour cream, heavy cream, minced garlic, smoked paprika, salt, and black pepper until smooth and well combined. Pour this creamy mixture into the mashed potatoes and fold gently with a spatula until the flavors meld beautifully, creating a luscious blend.

Step 5: Add Cheese and Butter
Stir in the shredded cheddar cheese, allowing it to melt into the warm potatoes. Next, add half of the butter, cutting it into small pieces for easier incorporation. Give everything a good mix, and taste to adjust seasoning as needed. This will enhance the rich flavors of the Steakhouse Potatoes Romanov.

Step 6: Bake
Transfer the creamy potato mixture into a greased baking dish, spreading it out evenly and smoothing the top. Dot the surface with the remaining butter, and then place it in a preheated oven at 350°F (175°C). Bake for 25-30 minutes, or until the top is golden brown and bubbly, tantalizing the senses.

Step 7: Garnish and Serve
Allow the dish to cool slightly before serving to enhance its creaminess. For a pop of color and fresh flavor, garnish with freshly chopped chives or green onions. These finishing touches elevate your Steakhouse Potatoes Romanov, making it a delightful centerpiece on your table.

How to Store and Freeze Steakhouse Potatoes Romanov

Fridge: Store leftovers in an airtight container for up to 3-4 days. This keeps your creamy Steakhouse Potatoes Romanov fresh and delicious for easy reheating.

Freezer: For longer storage, freeze your dish for up to 2 months. To prevent freezer burn, wrap the container tightly or use a freezer-safe bag.

Reheating: Reheat portions in the oven covered with foil to maintain creaminess, or microwave individual servings for a quick meal. Enjoy them just as much as when freshly baked!

Steakhouse Potatoes Romanov Variations

Feel free to get creative and put your own spin on this delicious dish to make it uniquely yours!

  • Herb-Infused: Add fresh herbs like thyme or rosemary instead of smoked paprika for a fragrant twist. The herby aroma will tantalize your senses and provide a garden-fresh taste.

  • Cheesy Garlic: Mix in some roasted garlic for a rich, savory boost. Roasting mellows the garlic’s intensity, adding depth to the creamy potatoes that will have everyone asking for seconds.

  • Vegetable Delight: Incorporate sautéed vegetables like spinach or mushrooms to sneak in extra nutrition. This adds delightful textures, turning your comfort dish into a colorful, hearty meal.

  • Spicy Kick: For those who love heat, add diced jalapeños or pepper jack cheese in the mix. The spice will complement the creamy texture, creating an exciting flavor dance in every bite.

  • Dairy-Free Option: Use coconut milk and a dairy-free cheese substitute for a creamy yet dairy-free version. This way, everyone can indulge in the comforting flavors without dietary concerns.

  • Sweet Potato Variation: Swap out Yukon Gold potatoes for sweet potatoes to give it a hint of sweetness. The natural sugars caramelize beautifully during baking, adding a delightful contrast to the savory elements.

  • Asian-Inspired: Add soy sauce and sesame oil, and top with green onions for an Asian twist on this classic dish. This unexpected combination will leave your taste buds cheering!

  • Flavor Burst: Sprinkle in some feta cheese before baking for a tangy surprise. Feta crumbles add a delightful sharpness that beautifully complements the rich, creamy potatoes.

Incorporate these variations to your Steakhouse Potatoes Romanov, and let your creativity shine in the kitchen! For more delicious potato ideas, check out our Smoky Sweet Potatoes and Roasted Sweet Potatoes.

Make Ahead Options

Steakhouse Potatoes Romanov are perfect for meal prep enthusiasts! You can mash the Yukon Gold potatoes and prepare the creamy cheese mixture up to 24 hours in advance, storing them separately in the refrigerator to maintain freshness. When you're ready to serve, simply combine the two mixtures in your baking dish, dot with butter, and bake as instructed. This helps save precious time during busy weeknights while ensuring that each bite remains just as delicious. To elevate the flavors, consider letting the baked dish rest for a few minutes before garnishing with chives or green onions. Enjoy the convenience of a gourmet side dish with minimal effort!

What to Serve with Steakhouse Potatoes Romanov?

Imagine the warmth of a gathering, mouthwatering aromas swirling around as you prepare a memorable meal with beloved sides.

  • Grilled Ribeye Steak: Juicy and flavorful, it pairs beautifully with the creamy potatoes, creating a quintessential steakhouse experience at home.
  • Roasted Asparagus: The crisp-tender bites offer a fresh contrast, balancing the rich indulgence of the potatoes with their vibrant greens.
  • Honey-Glazed Carrots: Sweet and tender, these complement the cheesy comfort, adding a lovely touch of sweetness to your hearty dinner.
  • Garlic Bread: Golden and buttery, this crowd favorite draws everyone in, perfect for mopping up creamy sauce left on the plate.
  • Caesar Salad: Crisp romaine and tangy dressing provide a bright, zesty counterpoint that enhances the overall richness of the meal.
  • Chardonnay: A chilled glass of this white wine features bright acidity, enhancing the flavors of both the steak and the cheesy potatoes.
  • Chocolate Mousse: For dessert, this light yet rich treat rounds off the meal, leaving everyone satisfied and smiling.
  • Sparkling Water with Lime: Refreshing and slightly tart, this beverage cleanses the palate, complementing the savory flavors beautifully.

Expert Tips for Steakhouse Potatoes Romanov

  • Perfect Potato Choice: Use Yukon Gold potatoes for their buttery flavor and creamy texture; avoid waxy potatoes that can become mushy.

  • Even Cutting: Cut potatoes into uniform chunks to ensure they cook evenly; uneven cuts can lead to some potatoes being over or undercooked.

  • Mash While Hot: Mash the potatoes while they are still warm to achieve a creamy consistency without lumps; cold potatoes can be challenging to blend smoothly.

  • A Golden Top: For a deliciously crispy top, resist the urge to cover the baking dish with foil while baking; this ensures the heat surrounds the potatoes for a perfect crisp.

  • Taste as You Go: Adjust seasoning and flavors at each step, especially before baking; a little tweak can elevate your Steakhouse Potatoes Romanov to perfection.

Steakhouse Potatoes Romanov Recipe FAQs

How do I choose the right potatoes for this recipe?
Absolutely! For the best results, I recommend using Yukon Gold potatoes because of their naturally creamy texture and buttery flavor. Look for those that are firm, with smooth skin, and avoid any with dark spots, blemishes, or signs of sprouting. Choosing quality potatoes will elevate your Steakhouse Potatoes Romanov!

What’s the best way to store leftovers?
Store your leftover Steakhouse Potatoes Romanov in an airtight container in the refrigerator for up to 3-4 days. Make sure they are completely cooled before sealing to prevent moisture buildup, which can make them soggy. Reheating them is as easy as placing a portion in the microwave or warming them up in the oven to restore that creamy goodness.

Can I freeze Steakhouse Potatoes Romanov?
Yes, you can freeze them! To preserve the dish, allow it to cool completely, then transfer it to a freezer-safe container or tightly wrap it in foil or plastic wrap. It can be frozen for up to 2 months. When you’re ready to enjoy them, just thaw overnight in the fridge and reheat in the oven to maintain the creamy texture.

What should I do if my mashed potatoes seem lumpy?
If your mashed potatoes have lumps, don’t worry! Simply return them to the pot over low heat and use a potato masher or ricer to blend them further while they’re warm. This will create that smooth, creamy consistency you’re looking for in your Steakhouse Potatoes Romanov. Just make sure not to overwork the potatoes!

Are these potatoes suitable for people with dietary restrictions?
Indeed! This recipe can be easily adapted for various dietary needs. For a healthier twist, replace sour cream with Greek yogurt and use half-and-half instead of heavy cream. If dairy is a concern, opt for dairy-free cheese and skip the butter, and ensure that the other ingredients are free from allergens. You can still enjoy the creamy deliciousness without compromising!

What if I want to spice things up a bit?
If you want to add some spice to your Steakhouse Potatoes Romanov, consider mixing in sautéed jalapeños or swapping out the cheddar for pepper jack cheese. These simple adjustments can enliven the dish and create a fun twist that your family and friends will love. Don’t be afraid to experiment!

Steakhouse Potatoes Romanov

Creamy Steakhouse Potatoes Romanov for Ultimate Comfort

Steakhouse Potatoes Romanov, a creamy delight that elevates any meal with buttery Yukon Gold potatoes baked in a cheesy sauce.
Print Recipe Pin Recipe
Prep Time 10 minutes mins
Cook Time 30 minutes mins
Total Time 40 minutes mins
Servings: 4 servings
Course: Dinner
Cuisine: American
Calories: 350
Ingredients Equipment Method Nutrition Notes

Ingredients
  

For the Potatoes
  • 2 pounds Yukon Gold Potatoes peeled and cut into 1-inch chunks
For the Cream Mixture
  • 1 cup Sour Cream Greek yogurt can be substituted
  • 1 cup Heavy Cream or half-and-half for a lighter option
  • 3 cloves Minced Garlic or garlic powder if needed
  • 1 teaspoon Smoked Paprika can use regular paprika
  • 1 teaspoon Salt adjust based on dietary needs
  • 1/2 teaspoon Black Pepper substitute cayenne for more heat
For the Cheesiness
  • 1 cup Cheddar Cheese shredded, Gruyère or dairy-free cheese are alternatives
  • 4 tablespoons Butter cut into small pieces
For Garnishing
  • 2 tablespoons Chives or Green Onions freshly chopped, can substitute parsley or omit

Equipment

  • Large pot
  • Baking Dish
  • Mixing Bowl
  • potato masher

Method
 

Step-by-Step Instructions
  1. Wash and peel the Yukon Gold potatoes. Cut them into even chunks, about 1 inch each.
  2. Place the chopped potatoes in a large pot and cover with cold water. Add salt and bring to a boil. Cook until fork-tender, about 15-20 minutes.
  3. Drain the potatoes and return them to the pot. Mash the potatoes until creamy but slightly textured.
  4. In a separate bowl, whisk together sour cream, heavy cream, minced garlic, smoked paprika, salt, and black pepper until smooth.
  5. Pour the cream mixture into the mashed potatoes and fold until well combined.
  6. Stir in the shredded cheddar cheese and half of the butter. Mix well and adjust seasoning as needed.
  7. Transfer the mixture into a greased baking dish, dot with remaining butter, and bake at 350°F (175°C) for 25-30 minutes.
  8. Allow to cool slightly, then garnish with chopped chives or green onions before serving.

Nutrition

Serving: 1servingCalories: 350kcalCarbohydrates: 30gProtein: 6gFat: 24gSaturated Fat: 14gPolyunsaturated Fat: 1gMonounsaturated Fat: 2gCholesterol: 60mgSodium: 500mgPotassium: 700mgFiber: 3gSugar: 2gVitamin A: 500IUVitamin C: 20mgCalcium: 200mgIron: 1mg

Notes

Use Yukon Gold potatoes for the best flavor and texture. Always taste and adjust seasoning throughout the process.

Tried this recipe?

Let us know how it was!

Savor the Flavor: Quick and Easy Taco Bowl That's Customizable

April 13, 2026 by Grace Snow Leave a Comment

What if I told you that taco night could be exciting, customizable, and ready in less than 30 minutes? Enter my Quick and Easy Taco Bowl, a vibrant dish that hits all the right notes. This recipe features a hearty blend of seasoned ground beef, fluffy brown rice, and crisp veggies, making it perfect for busy weeknights or casual family dinners. The best part? You can easily adapt it for gluten-free, vegetarian, or low-carb diets, ensuring everyone at the table is satisfied. With endless topping options, this bowl brings a fun twist to traditional Tex-Mex flavors, allowing you to create a meal that feels personalized and comforting. Are you ready to discover how to turn your kitchen into a taco fiesta?

Why make a Taco Bowl tonight?

Versatility at its Best: This Quick and Easy Taco Bowl can be customized for various diets, offering options from gluten-free to vegetarian.

Flavor Explosion: The vibrant mix of seasoned ground beef, fresh veggies, and zesty pico de gallo delivers a satisfying taste that pleases everyone.

Speedy Preparation: Ready in under 30 minutes, you can easily whip up this meal on busy weeknights without sacrificing flavor or quality.

Interactive Dining Experience: With a buffet-style assembly, each family member can personalize their bowl, making dinner fun and engaging.

Nutrient-Rich Ingredients: Packed with protein, fiber, and healthy fats, this dish is a wholesome choice for a nourishing dinner alternative to fast food.

Try pairing your bowl with an Acai Bowl Nutritious for a refreshing dessert option after your meal!

Quick and Easy Taco Bowl Ingredients

For the Bowl Base
• Ground Beef – Classic taco filling, seasoned to perfection; substitute with ground turkey or plant-based crumbles for a leaner option.
• Brown Rice – Hearty base adding fiber and nuttiness; switch to cauliflower rice for low-carb alternatives.

For the Toppings
• Romaine Lettuce – Adds crunch and freshness; use iceberg lettuce for a milder taste.
• Black Beans – Source of plant-based protein; remember to drain and rinse for optimal texture.
• Shredded Cheddar Cheese – Melts beautifully over your bowl; opt for dairy-free cheese for a vegan option.
• Avocado – Provides creaminess and healthy fats; dice just before serving to keep it fresh.
• Pico de Gallo – Bright and zesty topping that adds a burst of flavor; feel free to use store-bought for convenience.
• Sour Cream – Adds creaminess and tang; Greek yogurt makes a healthier alternative.
• Fresh Cilantro – Enhances flavors and provides a fresh garnish; parsley works well if cilantro isn't preferred.

For the Seasoning
• Taco Seasoning – Essential for flavoring the beef; consider homemade spices for customization.

With these vibrant ingredients in hand, you're well on your way to creating a delightful Quick and Easy Taco Bowl that everyone will love!

Step‑by‑Step Instructions for Quick and Easy Taco Bowl

Step 1: Brown the Beef
In a large skillet over medium-high heat, add your ground beef and cook for 5–7 minutes, breaking it apart with a spatula until it's browned and no longer pink. Make sure to drain any excess fat, leaving behind just enough to retain flavor. The seasoned meat will be the hearty base of your Quick and Easy Taco Bowl.

Step 2: Season and Simmer
Stir in your taco seasoning along with 1/4 cup of water, and let it simmer for about 5 minutes. Stir occasionally to ensure even coverage of the seasoning, and keep an eye out for a thickened sauce that clings to the beef. This step is essential to develop the vibrant flavors that make your Quick and Easy Taco Bowl so delicious.

Step 3: Prepare the Rice
While the beef is simmering, cook your brown rice according to package instructions, which usually takes about 20 minutes. Alternatively, warm up leftover rice in a microwave-safe bowl for 1–2 minutes. The fluffy texture of the rice is a perfect contrast to the seasoned beef and fresh toppings in your taco bowl.

Step 4: Chop the Veggies
As your rice cooks, take a moment to chop your romaine lettuce into bite-sized pieces and set it aside in a bowl. Dice your avocado just before assembly to keep it fresh and vibrant. The crunch of the lettuce and the creaminess of the avocado will add great textures to your Quick and Easy Taco Bowl.

Step 5: Heat the Beans
Drain and rinse your black beans, then place them in a saucepan over medium heat for about 3–5 minutes until warm. For an added flavor boost, consider lightly seasoning the beans with a pinch of salt or cumin. This step brings protein into your bowl, making it both satisfying and nutritious.

Step 6: Assemble the Bowls
Now, it's time to build your Quick and Easy Taco Bowl! Start by layering the fluffy brown rice and crisp lettuce as the base in serving bowls. The bright base will set the stage for the hearty and vibrant ingredients that follow.

Step 7: Add the Toppings
Top your rice and lettuce with the seasoned ground beef and warm black beans. Sprinkle generous amounts of shredded cheddar cheese over the top, allowing it to melt slightly from the warmth below. Add pico de gallo for a fresh burst of flavor, followed by diced avocado and a dollop of sour cream to enrich the bowl.

Step 8: Finish and Serve
As a final touch, garnish your taco bowls with fresh cilantro and a squeeze of lime juice to brighten the flavors. If desired, you can also add crunchy tortilla strips or hot sauce for an extra kick. Enjoy this customizable Quick and Easy Taco Bowl with your family, savoring both the delicious flavors and the fun of building your own meals!

What to Serve with Quick and Easy Taco Bowl

Elevate your taco night with these delicious pairings that add extra flavor, texture, and joy to your meal.

  • Creamy Guacamole: A fresh, creamy dip made with ripe avocados, lime, and cilantro that adds a buttery richness to the bowl.

  • Spicy Corn Salsa: A zesty mix of corn, jalapeños, and bell peppers providing a delightful crunch that complements the warm fillings perfectly.

  • Crispy Tortilla Chips: Golden and crunchy, these chips are perfect for scooping up any leftover toppings while adding a satisfying crunch.

  • Chilled Mexican Street Corn Salad: A refreshing, tangy side that brings a burst of sweetness and creamy texture, enhancing your taco experience.

  • Zesty Lime Rice: Fluffy rice infused with lime juice and zest brightens your meal, providing a fresh contrast to the savory taco bowl.

  • Fiesta Black Bean Salad: This colorful blend of black beans, tomatoes, and bell peppers adds protein and fiber, creating a wholesome sidekick.

  • Coconut Lemonade: A sweet, tangy drink that balances the tacos' savory flavors, offering a refreshing sip between bites.

  • Homemade Churros: Don’t forget dessert! These warm, sugary treats are a delightful way to round out a fun and flavorful meal.

How to Store and Freeze Quick and Easy Taco Bowl

Fridge: Keep cooked beef and rice in airtight containers for up to 4 days. This helps maintain their flavors and textures, making mealtime easy throughout the week.

Freezer: Store any leftover beef and rice in freezer-safe containers for up to 3 months. Thaw in the fridge overnight before reheating for a quick meal.

Toppings Storage: For optimal freshness, store toppings like lettuce, avocado, and pico de gallo separately in the fridge. Use them within 1–2 days for best quality in your Quick and Easy Taco Bowl.

Reheating: To reheat, warm the beef and rice in the microwave, stirring occasionally until hot. Add fresh toppings right before serving for an enjoyable experience!

Expert Tips for Quick and Easy Taco Bowl

  • Prep Ahead: Prepare ingredients in advance, like chopping veggies and cooking the beef, to save time on busy nights.

  • Stay Fresh: Always dice your avocado just before serving to avoid browning and maintain that creamy texture in your Quick and Easy Taco Bowl.

  • Perfect Seasoning: Avoid over-seasoning your beef by tasting as you go; remember, you can always add more taco seasoning, but you can’t take it away!

  • Mix It Up: Feel free to experiment by substituting ingredients that your family prefers. Using cauliflower rice is a great way to make it low-carb!

  • Serving Suggestions: Make it fun! Serve ingredients buffet-style so everyone can build their Quick and Easy Taco Bowl to their liking.

  • Leftover Love: Store extra ingredients separately in airtight containers. This way, you can enjoy your taco bowl components for up to four days!

Make Ahead Options

These Quick and Easy Taco Bowls are perfect for meal prep enthusiasts! You can prepare the seasoned ground beef and brown rice up to 3 days in advance, storing them separately in airtight containers in the refrigerator to maintain their quality. If you're planning to serve them later, simply reheat the beef and rice in the microwave or on the stovetop before assembly. While you can chop romaine lettuce and prepare pico de gallo ahead of time, it’s best to store them separately and assemble the bowls just before serving. This way, your meal retains its fresh crunch and vibrant flavors, ensuring your taco night is just as delicious as the first time!

Quick and Easy Taco Bowl Variations

Feel free to unleash your creativity and make this dish your own with these exciting substitutions!

  • Dairy-Free: Swap shredded cheddar cheese for dairy-free cheese to keep it vegan-friendly. You won't miss a beat in flavor!
  • Low-Carb Delight: Use cauliflower rice instead of brown rice for a light yet satisfying base, perfect for a keto-friendly meal. Enjoy the texture without the carbs!
  • Vegetarian Option: Replace ground beef with seasoned black beans or roasted sweet potatoes for a hearty but meatless alternative. This twist is packed with flavor and nutrition!
  • Spicy Kick: Add sliced jalapeños or a drizzle of hot sauce on top for an extra burst of heat. It's a surefire way to elevate the flavor profile!
  • Crunch Factor: Toss in some crushed tortilla chips or roasted corn to add a delightful crunch to your bowl. Your tacos will become a texture extravaganza!
  • Fresh Salad Twist: Turn this bowl into a refreshing rice salad by cooling all ingredients before assembly and mixing with lime juice. Perfect for warm weather dining!

Looking for more delicious spins on your favorite meals? Check out these delightful recipes like Fish Taco Bowls or Taco Spaghetti Cheesy for more culinary inspiration!

Quick and Easy Taco Bowl Recipe FAQs

How do I choose the right ground beef?
Absolutely! Look for lean ground beef, around 80% lean, which has enough fat to keep the meat moist and flavorful. Check for a bright red color without any dark spots or an off smell, indicating freshness. If you're leaning toward healthier options, ground turkey or even plant-based crumbles work wonderfully as substitutes.

How should I store the leftover taco bowl ingredients?
Very! After cooking, store the beef and rice separately in airtight containers in the fridge for up to 4 days. Keep fresh toppings like avocado, lettuce, and pico de gallo in separate containers as well to maintain their quality. This makes assembling your Quick and Easy Taco Bowl a breeze on busy nights!

Can I freeze the cooked beef and rice?
For sure! Place your leftover cooked beef and rice in freezer-safe containers. They can last up to 3 months in the freezer. When you're ready to enjoy them again, simply thaw them overnight in the fridge and reheat in the microwave, ensuring you're stirring occasionally for even warming.

What can I do if the taco seasoning is too spicy?
Oh no! If your Quick and Easy Taco Bowl ends up spicier than you'd like, consider adding a spoonful of sour cream or Greek yogurt to balance the heat. You can also mix in a little more cooked rice to dilute the flavor. Lastly, adding a sprinkle of sugar or honey can mitigate spiciness.

Is this recipe suitable for vegetarians or those with allergies?
Absolutely! To cater to vegetarians, swap the meat for roasted sweet potatoes or seasoned black beans. If watching for allergens, be mindful of your cheese choice and opt for dairy-free options, and ensure canned beans are gluten-free. With these adjustments, everyone can enjoy a delicious serving!

How do I prevent my avocado from browning?
I often recommend dicing the avocado just before serving your Quick and Easy Taco Bowl. To go the extra mile, sprinkle some lime juice over the cut avocado; the acid helps to prevent browning and keeps it looking fresh. This way, your taco bowl stays vibrant and appealing!

Quick and Easy Taco Bowl

Savor the Flavor: Quick and Easy Taco Bowl That's Customizable

Discover the Quick and Easy Taco Bowl, a customizable meal ready in under 30 minutes.
Print Recipe Pin Recipe
Prep Time 10 minutes mins
Cook Time 20 minutes mins
Total Time 30 minutes mins
Servings: 4 bowls
Course: Dinner
Cuisine: Tex-Mex
Calories: 550
Ingredients Equipment Method Nutrition Notes

Ingredients
  

For the Bowl Base
  • 1 pound Ground Beef Seasoned to perfection; substitute with ground turkey or plant-based crumbles for a leaner option.
  • 1 cup Brown Rice Switch to cauliflower rice for low-carb alternatives.
For the Toppings
  • 2 cups Romaine Lettuce Use iceberg lettuce for a milder taste.
  • 1 can Black Beans Drain and rinse for optimal texture.
  • 1 cup Shredded Cheddar Cheese Opt for dairy-free cheese for a vegan option.
  • 1 medium Avocado Dice just before serving to keep it fresh.
  • 1 cup Pico de Gallo Feel free to use store-bought for convenience.
  • 1/2 cup Sour Cream Greek yogurt makes a healthier alternative.
  • 1/4 cup Fresh Cilantro Parsley works well if cilantro isn't preferred.
For the Seasoning
  • 2 tablespoons Taco Seasoning Consider homemade spices for customization.

Equipment

  • Large skillet
  • Saucepan
  • Cutting Board
  • Knife

Method
 

Step-by-Step Instructions
  1. In a large skillet over medium-high heat, add your ground beef and cook for 5–7 minutes, breaking it apart with a spatula until it's browned and no longer pink. Drain any excess fat.
  2. Stir in your taco seasoning along with 1/4 cup of water, and let it simmer for about 5 minutes.
  3. Cook your brown rice according to package instructions, which usually takes about 20 minutes.
  4. Chop your romaine lettuce into bite-sized pieces and set it aside in a bowl. Dice your avocado just before assembly.
  5. Drain and rinse your black beans, then place them in a saucepan over medium heat for about 3–5 minutes until warm.
  6. Layer the fluffy brown rice and crisp lettuce in serving bowls.
  7. Top your rice and lettuce with the seasoned ground beef and warm black beans. Sprinkle cheddar cheese, add pico de gallo, diced avocado, and sour cream.
  8. Garnish with fresh cilantro and a squeeze of lime juice.

Nutrition

Serving: 1bowlCalories: 550kcalCarbohydrates: 50gProtein: 30gFat: 25gSaturated Fat: 10gPolyunsaturated Fat: 5gMonounsaturated Fat: 10gCholesterol: 70mgSodium: 800mgPotassium: 600mgFiber: 10gSugar: 2gVitamin A: 10IUVitamin C: 15mgCalcium: 30mgIron: 15mg

Notes

Feel free to experiment with substitutes that your family prefers and store extra ingredients separately in airtight containers for up to four days.

Tried this recipe?

Let us know how it was!

Grilled Shrimp Caesar Wraps: A Tasty Twist on a Classic

April 13, 2026 by Grace Snow Leave a Comment

As I flipped through my recipe notes, a culinary epiphany struck: why not combine the glorious simplicity of a classic Caesar salad with the irresistible allure of smoky grilled shrimp? That's how my Grilled Shrimp Caesar Wraps came to life—a quick meal that's not only protein-packed but also incredibly satisfying. Perfect for those busy weekdays when you crave something healthy without sacrificing flavor, these wraps wrap up all the goodness of a Caesar salad in a convenient tortilla. Imagine tender shrimp, crisp romaine, and creamy dressing dancing together in delightful harmony. Whether it's a midday lunch or a relaxed dinner, this recipe delivers all the taste and texture excitement you're looking for. Curious to know how to assemble this tantalizing treat? Let’s dive in!

Why are Grilled Shrimp Caesar Wraps a must-try?

Versatile and Fun: These wraps easily adapt to your dietary preferences; swap shrimp for grilled chicken or even tofu for a twist!
Quick and Easy: Perfect for busy evenings, you can whip these up in under 30 minutes, making them an ideal choice for a satisfying meal without the wait.
Fresh, Crunchy Ingredients: Each bite bursts with the vibrant flavors of romaine and the savory richness of Caesar dressing, offering a delightful contrast that will please your palate.
Crowd-Pleasing Appeal: Whether it’s a family dinner or a casual get-together, everyone will love the fun and flavors of these wraps. Consider pairing them with garlic butter potatoes or a refreshing side salad for a complete meal! If you enjoy these, you’ll also love experimenting with variations like Turmeric Dill Shrimp or our zesty Shrimp Tacos.

Grilled Shrimp Caesar Wraps Ingredients

For the Shrimp
• Shrimp – Use fresh or frozen for the best flavor; thaw completely if frozen before grilling.
• Cajun Seasoning – Adds a spicy kick; substitute with paprika for a milder option.

For the Wraps
• Tortilla – Whole wheat or gluten-free tortillas provide a healthy base for your wraps.
• Romaine Lettuce – Adds a refreshing crunch; feel free to swap with green leaf or iceberg.

For the Dressing
• Caesar Dressing – The creamy and tangy star of the show; opt for a lighter version to keep it healthy.
• Parmesan Cheese – Grated for savory depth; consider vegan cheese for a dairy-free alternative.

Optional Toppings
• Bacon Bits/Croutons – Add for extra crunch; you can easily omit these for a lighter wrap.

These Grilled Shrimp Caesar Wraps are a delightful blend of flavors and textures, and they're so easy to prepare! Enjoy your delicious culinary adventure!

Step‑by‑Step Instructions for Grilled Shrimp Caesar Wraps

Step 1: Prepare the Shrimp
Start by preheating your grill to medium heat, around 350°F (175°C). While it's heating, season your shrimp with Cajun seasoning for a zesty kick. Once the grill is ready, place the shrimp on the grill grates and cook for 5–7 minutes, turning occasionally, until they are opaque and have nice grill marks.

Step 2: Prepare the Tortillas
While the shrimp grill, warm your tortillas for better flexibility. You can do this on a dry skillet over medium heat for about 30 seconds on each side. This step ensures they stay soft and pliable, making it easier to wrap your delicious shrimp and toppings in the tortillas.

Step 3: Assemble the Wraps
Once the shrimp are grilled to perfection, it’s time to assemble your Grilled Shrimp Caesar Wraps. Start with a warm tortilla, laying down a generous layer of romaine lettuce, followed by the smoky shrimp, a drizzle of creamy Caesar dressing, and freshly shaved Parmesan. Don’t forget any optional toppings like croutons or bacon bits for extra crunch!

Step 4: Roll and Serve
To finish your wraps, carefully fold in the sides of the tortilla and roll it tightly from the bottom up. Once rolled, slice each wrap in half diagonally for an appealing presentation. Serve your Grilled Shrimp Caesar Wraps immediately, enjoying the flavorful combination of ingredients that make every bite a delight!

Expert Tips for Grilled Shrimp Caesar Wraps

  • Don’t Overcook: Shrimp should be opaque and firm but still juicy. Avoid grilling them too long to keep their tenderness intact.

  • Prep Ahead: If making these wraps ahead of time, store components separately. This helps maintain freshness and crunch until mealtime.

  • Seasoning Variations: If Cajun isn’t your style, try different spices like Old Bay or lemon pepper to customize the flavor of your grilled shrimp.

  • Tortilla Warmth: Warming your tortillas makes them more pliable, ensuring a neat and easy roll for your Grilled Shrimp Caesar Wraps.

  • Fresh Ingredients: Opt for fresh romaine lettuce for the best crunch, and choose high-quality Caesar dressing to elevate the flavors in every bite.

Grilled Shrimp Caesar Wraps Variations

Get ready to explore new layers of flavor with these delightful twists on Grilled Shrimp Caesar Wraps!

  • Protein Swap: Swap shrimp for grilled chicken or tofu to tailor this recipe to your dietary preferences. Both options ensure a satisfying and protein-rich meal.

  • Dressing Change: Opt for ranch or Italian dressing for a new flavor profile that adds freshness. Your taste buds will thank you when that creamy richness meets the crunchy vegetables!

  • Add Veggies: Toss in grilled bell peppers or zucchini for additional texture and nutrition. These veggies not only add color but infuse a smoky sweetness that enhances the whole wrap.

  • Heat Level: For a spicier kick, sprinkle in some jalapeños or sriracha to your wrap. The heat will balance beautifully with the creamy dressing, giving your taste experience a fiery edge.

  • Texture Twist: Incorporate crunchy slaw made from cabbage and carrots for extra crunch. Mixing this fresh slaw into your wrap elevates the texture while adding a delightful zing.

  • Herb Boost: Fresh basil or cilantro can replace romaine for a fragrant burst of flavor. Imagine biting into your wrap, where every taste is bright and aromatic!

  • Wrap It Differently: Instead of a classic tortilla, try using lettuce wraps for a lighter, low-carb version. These wraps provide a unique crunch while keeping it fresh and crisp.

  • Flavor Enhancer: Top with balsamic glaze for a deliciously tangy and sweet finish that complements the savory elements beautifully. Just a drizzle can elevate your wrap into a gourmet treat!

Enjoy diving into these variations, and don’t forget to pair your delicious wraps with a side of Garlic Butter Potatoes for an unforgettable meal. Each twist offers a delightful new way to love your Grilled Shrimp Caesar Wraps!

How to Store and Freeze Grilled Shrimp Caesar Wraps

  • Room Temperature: Best enjoyed fresh, these wraps can be left out for up to 2 hours before they should be refrigerated to maintain food safety.

  • Fridge: Store assembled wraps in an airtight container for up to 3 days. However, it's best to keep components separate to keep the tortilla crisp and the shrimp fresh.

  • Freezer: To freeze, wrap each prepared but unassembled Grilled Shrimp Caesar Wrap tightly in plastic wrap and place in a freezer-safe bag for up to 2 months. Thaw in the fridge before reheating.

  • Reheating: For optimal quality, reheat grilled shrimp gently in a skillet over low heat. Enjoy the wraps fresh, but if you need to reheat, warm the wrapped tortillas in the oven for a few minutes at 350°F (175°C).

Make Ahead Options

Grilled Shrimp Caesar Wraps are a fantastic choice for meal prep, allowing you to save time on busy weeknights! You can prepare the shrimp up to 24 hours in advance by seasoning and grilling them, then storing them in an airtight container in the fridge. Additionally, wash and chop your romaine lettuce and store it separately to maintain its crispness, keeping it fresh for up to 3 days. When you're ready to serve, simply warm the tortillas and assemble your wraps with the prepped shrimp, lettuce, Caesar dressing, and Parmesan. This way, you’ll have a delicious, homemade meal in just minutes, full of flavor and freshness!

What to Serve with Grilled Shrimp Caesar Wraps

As you enjoy these delicious wraps, consider adding delightful side dishes that elevate your meal experience.

  • Garlic Butter Potatoes: The creamy, rich flavors of garlic butter complement the smokiness of the shrimp beautifully, adding a comforting twist.
  • Crisp Side Salad: A light mix of greens tossed with lemon vinaigrette enhances the freshness of the wraps, offering a textural contrast.
  • Grilled Asparagus: The slight char and tenderness of grilled asparagus pairs nicely with the wraps, enhancing the healthy profile of your meal.
  • Fruit Salad: A refreshing medley of seasonal fruits can cleanse the palate, providing a sweet contrast to the savory flavors.
  • Coleslaw: Crunchy, tangy coleslaw brings a delightful crunch and creaminess, making every bite of the wrap even more satisfying.
  • Sparkling Lemonade: Refreshing and bubbly, it acts as a palate cleanser that pairs well with the savory richness of the wraps.
  • Chips and Salsa: For an added crunch, serve some tortilla chips with zesty salsa. The spice will complement the flavors of the grilled shrimp.
  • Chocolate Mousse: This rich and creamy dessert is a luxurious finish to a flavorful meal, providing a sweet contrast to the main course.

Grilled Shrimp Caesar Wraps Recipe FAQs

What type of shrimp should I use for my Grilled Shrimp Caesar Wraps?
Absolutely! For the best flavor, I recommend using fresh shrimp, but frozen shrimp works just as well if you thaw it completely before grilling. Choose large or jumbo shrimp for a satisfying bite—look for those that are firm and have a slight ocean smell, avoiding any with dark spots.

How long can I store Grilled Shrimp Caesar Wraps in the fridge?
You can keep your assembled wraps in the fridge for up to 3 days. However, to maintain their freshness and texture, I suggest storing the components separately, especially the tortilla, shrimp, and dressing. This way, your wrap stays crispy and delicious!

Can I freeze Grilled Shrimp Caesar Wraps?
Yes, you can freeze them! To do this, wrap each prepared but unassembled Grilled Shrimp Caesar Wrap tightly in plastic wrap and place them in a freezer-safe bag. They can stay in the freezer for up to 2 months. When you're ready to enjoy them, thaw in the fridge overnight and reheat the shrimp gently before assembling.

What are some common troubleshooting tips for grilled shrimp?
Very! One common issue is overcooking, which can lead to tough and rubbery shrimp. Make sure to grill them for just 5–7 minutes until they turn opaque. If you find your shrimp sticking to the grill, try lightly oiling the grill grates beforehand or using skewers. Always ensure your grill is preheated to a medium temperature of about 350°F (175°C) for the best results.

Are there any dietary considerations for Grilled Shrimp Caesar Wraps?
Yes! If you're dealing with allergens, ensure that your shrimp hasn’t been processed with gluten and check the Caesar dressing to keep it gluten-free if necessary. For those with dairy sensitivities, you can swap out the regular Parmesan cheese for a vegan alternative, and if you're managing a shellfish allergy, feel free to use grilled chicken or tofu instead for a tasty alternative.

How should I prepare my ingredients for the wraps?
The more the merrier! To prepare, start by seasoning your shrimp as desired; I often use Cajun seasoning for a spicy kick. Make sure to warm your tortillas on a skillet for about 30 seconds on each side. This helps prevent tearing and ensures they’re flexible for rolling. Once everything is cooked and prepped, layer your ingredients in this order: lettuce, shrimp, dressing, and any toppings. This keeps the wrap balanced and delightful!

Grilled Shrimp Caesar Wraps

Grilled Shrimp Caesar Wraps: A Tasty Twist on a Classic

A quick and healthy meal featuring grilled shrimp and Caesar salad wrapped in tortilla.
Print Recipe Pin Recipe
Prep Time 15 minutes mins
Cook Time 10 minutes mins
Total Time 25 minutes mins
Servings: 4 wraps
Course: Dinner
Cuisine: American
Calories: 350
Ingredients Equipment Method Nutrition Notes

Ingredients
  

For the Shrimp
  • 1 pound Shrimp, fresh or frozen Thaw completely if frozen
  • 1 tablespoon Cajun Seasoning Substitute with paprika for a milder option
For the Wraps
  • 4 pieces Tortilla Whole wheat or gluten-free
  • 2 cups Romaine Lettuce Can swap with green leaf or iceberg
For the Dressing
  • 1/2 cup Caesar Dressing Opt for a lighter version
  • 1/4 cup Parmesan Cheese Grated; consider vegan cheese for a dairy-free alternative
Optional Toppings
  • 1/4 cup Bacon Bits or Croutons Add for extra crunch; omit for lighter wraps

Equipment

  • Grill
  • Skillet

Method
 

Step-by-Step Instructions for Grilled Shrimp Caesar Wraps
  1. Preheat your grill to medium heat, around 350°F (175°C). Season shrimp with Cajun seasoning. Grill shrimp for 5–7 minutes until opaque.
  2. Warm tortillas on a dry skillet over medium heat for about 30 seconds on each side for flexibility.
  3. Assemble wraps with a warm tortilla, romaine lettuce, smoky shrimp, Caesar dressing, and Parmesan. Add optional toppings.
  4. Fold in the sides and roll the tortilla tightly from the bottom up. Slice in half diagonally and serve immediately.

Nutrition

Serving: 1wrapCalories: 350kcalCarbohydrates: 30gProtein: 25gFat: 15gSaturated Fat: 5gPolyunsaturated Fat: 1gMonounsaturated Fat: 3gCholesterol: 160mgSodium: 800mgPotassium: 470mgFiber: 4gSugar: 2gVitamin A: 1200IUVitamin C: 10mgCalcium: 150mgIron: 2mg

Notes

Enjoy your delicious culinary adventure! Keep ingredients fresh for the best taste.

Tried this recipe?

Let us know how it was!

Creamy Tuscan Salmon Pasta: A Quick & Cozy Dinner Delight

April 13, 2026 by Grace Snow Leave a Comment

As I stood in my kitchen, the aroma of sautéed garlic and fresh tomatoes wafting through the air, I was reminded of the sun-drenched hills of Tuscany. The recipe for Creamy Tuscan Salmon Pasta had become my go-to for those bustling weeknights when I crave a comforting Italian dish without spending hours slaving away. With just a handful of ingredients, this easy weeknight dinner comes together in a mere 30 minutes, transforming simple salmon and pasta into a luxurious meal that feels indulgent yet approachable. It’s a delightful way to impress guests or treat yourself after a long day—all while keeping lactose sensitivity in mind. Who could resist the allure of silky pasta enveloped in a rich, garlicky cream sauce? Join me in exploring this quick culinary escape that’s sure to become a beloved addition to your dinner repertoire. What’s your favorite way to elevate a busy weeknight meal?

Why is this the perfect pasta dish?

Simplicity at its best: This Creamy Tuscan Salmon Pasta is incredibly quick to whip up, thanks to its straightforward preparation that requires minimal cooking skills.

Irresistible flavor balance: The rich cream, savory salmon, and fresh spinach perfectly complement the sweet burst of cherry tomatoes, creating an explosion of taste.

Versatile ingredient swaps: Feel free to substitute salmon with shrimp or integrate sun-dried tomatoes for an exciting twist!

Low lactose option: Keeping dietary needs in mind, this comforting dish can easily accommodate low lactose preferences without compromising on flavor.

Crowd-pleaser appeal: Impress your family or guests with this elegant dish; it’s fancy enough for a special occasion yet simple enough for a casual weeknight meal.

Time-saving magic: Ready in just 30 minutes, this delicious recipe lets you enjoy an amazing meal without the usual time constraints—perfect after a busy day!

Creamy Tuscan Salmon Pasta Ingredients

For the Pasta
• Pasta of choice – Use your favorite variety, such as fettuccine or penne, for the best texture.

For the Salmon
• Salmon fillets – Opt for fresh salmon for superior flavor; frozen is fine if thawed properly.

For the Sauce
• Heavy cream – Provides the luxurious texture of the creamy sauce; consider half-and-half for a lighter option.
• Parmesan cheese – Grate it fresh from a block for a smoother sauce; substitute with Grana Padano if needed.
• Fresh spinach – Adds vibrant color and nutrition; feel free to swap it with baby kale or arugula if you prefer.
• Cherry tomatoes – These offer a wonderful sweetness; sun-dried tomatoes (oil-packed) can enhance flavor depth brilliantly.

For the Seasoning
• Garlic – Freshly minced garlic is key for the aromatic base of the sauce.
• Salt and pepper – Essential for enhancing the overall flavor; adjust to your taste preferences.

When you whip up this Creamy Tuscan Salmon Pasta, every bite will transport you to a lovely Italian evening!

Step‑by‑Step Instructions for Creamy Tuscan Salmon Pasta

Step 1: Prepare Ingredients
Begin by gathering all your ingredients for the Creamy Tuscan Salmon Pasta. Chop the cherry tomatoes in half, mince three cloves of garlic, and grate about a cup of fresh Parmesan cheese. Having everything ready will streamline your cooking process and ensure that you can whip this delicious dish together in just about 30 minutes.

Step 2: Cook Salmon
Season the salmon fillets generously with salt and pepper. In a large skillet, heat a tablespoon of olive oil over medium-high heat for about 2 minutes. Once the oil is hot, carefully add the salmon skin-side down. Sear the salmon for 4-5 minutes until golden brown and cooked through. Flip it over to cook the other side for an additional 2-3 minutes. Remove from the skillet and set aside.

Step 3: Make Sauce
In the same skillet, reduce the heat to medium and add the minced garlic. Sauté for about 30 seconds until fragrant, stirring continuously, then pour in 1 cup of heavy cream. Stir well and bring the mixture to a gentle simmer for about 2 minutes. Add the grated Parmesan cheese, stirring until it melts smoothly into the creamy sauce, transforming it into a luxurious texture.

Step 4: Incorporate Vegetables
Add the halved cherry tomatoes and about 2 cups of fresh spinach to the cream sauce. Stir gently for 2-3 minutes until the spinach has wilted and the tomatoes are slightly blistered. You’ll notice vibrant colors emerging as the ingredients meld together beautifully. Ensure the heat stays low to avoid boiling, which could affect the sauce's consistency.

Step 5: Combine Pasta and Sauce
Meanwhile, cook your pasta of choice in a large pot of salted boiling water according to package instructions. Reserve about a cup of pasta water, then drain the pasta once al dente. Quickly toss the cooked pasta into the skillet with the creamy sauce, stirring well to coat the noodles evenly. If the sauce seems too thick, add a splash of the reserved pasta water to achieve your desired consistency.

Step 6: Serve
Plate the creamy Tuscan salmon pasta generously. Place the seared salmon fillet on top of each serving, and if desired, sprinkle more grated Parmesan cheese and a dash of freshly cracked black pepper for added flavor. You’ve now created a stunning dish that brings the essence of Tuscany right to your table!

Make Ahead Options

These Creamy Tuscan Salmon Pasta ingredients are perfect for meal prep! You can chop the cherry tomatoes, mince the garlic, and grate the Parmesan cheese up to 24 hours in advance, storing them in airtight containers in the refrigerator to maintain their freshness and quality. The salmon can be seasoned and stored in the fridge for one day; just be sure to pat it dry before cooking to achieve that perfect sear. When you're ready to serve, simply sauté the salmon, make the creamy sauce, and combine everything with freshly cooked pasta for delightful results that feel just as gourmet as if made from scratch in the moment.

What to Serve with Creamy Tuscan Salmon Pasta

Transform your pasta night into a complete dining experience that delights every sense.

  • Roasted Asparagus: The tender yet crisp texture and lightly charred flavor perfectly balance the richness of the creamy sauce. Plus, the vibrant green adds a pop of color to your plate.

  • Garlic Bread: This classic side is ideal for soaking up any extra sauce left behind. The warm, buttery bread brings an inviting aroma and enhances the Italian essence of your meal.

  • Crisp Side Salad: A fresh mix of greens, cherry tomatoes, and a tangy vinaigrette adds a refreshing contrast to the indulgent pasta, making each bite a delightful experience.

  • Seared Brussels Sprouts: Their nutty taste and crispy edges offer a contrast to the creamy salmon pasta, bringing depth to the meal. Don’t forget to toss them with a hint of balsamic for added zing!

  • White Wine: A glass of chilled Pinot Grigio or Sauvignon Blanc complements the dish wonderfully, enhancing the flavors while the acidity brightens the richness of the sauce.

  • Tiramisu: End your meal on a sweet note with this classic Italian dessert. Its light, coffee-infused layers beautifully contrast the savory pasta dish and leave you with a delightful finish.

Creamy Tuscan Salmon Pasta Variations

Feel free to play around with this creamy delight—your next family dinner will sing with flavor!

  • Seafood Swap: Try shrimp instead of salmon for a delightful twist; just adjust the cooking time to ensure perfect tenderness.
  • Low-Fat Option: Use light cream or a non-dairy alternative like coconut cream to craft a guilt-free version, while still retaining a rich taste.
  • Cheesy Goodness: Add crumbled goat cheese or feta for an extra layer of tangy flavor that complements the creaminess beautifully.
  • Veggie Boost: Toss in seasonal vegetables like asparagus or zucchini to amp up the nutrition and add delightful crunch.
  • Herb Infusion: Sprinkle fresh basil or parsley just before serving for an aromatic lift that brightens each bite.
  • Spicy Kick: Add a pinch of red pepper flakes or a drizzle of chili oil for warmth that balances the creamy sauce; it’s sure to excite your taste buds!
  • Pasta Alternatives: Swap traditional pasta for whole grain or even gluten-free options for a hearty yet wholesome meal. If you love veggie-based twists, try zucchini noodles or cauliflower pasta for a light touch.
  • Sun-Dried Tomato Touch: Incorporate sun-dried tomatoes for a burst of intensity, enhancing the overall flavor profile of this already delicious dish.

No matter how you choose to adapt it, your Creamy Tuscan Salmon Pasta will remain a comforting staple that brings joy to your kitchen!

Expert Tips for Creamy Tuscan Salmon Pasta

Pat the Salmon Dry: Ensure the salmon is patted dry before searing to achieve a beautifully crisp exterior.

Don’t Overcook the Sauce: Keep a close eye on the sauce; letting it boil can cause it to separate. Stir gently to maintain the creamy texture.

Reserve Pasta Water: Always set aside some pasta water before draining; it’s a miracle worker for adjusting sauce consistency without losing flavor.

Use Fresh Ingredients: Fresh spinach and garlic significantly enhance the flavor; skip pre-minced garlic or wilted spinach for best results in your Creamy Tuscan Salmon Pasta.

Experiment with Proteins: Swap out salmon for shrimp or cod for a delightful twist; just adjust cooking times accordingly for perfect results!

Taste as You Go: Make sure to taste and adjust seasonings; the balance of salt and pepper can elevate your dish significantly!

Storage Tips for Creamy Tuscan Salmon Pasta

Fridge: Store leftovers in airtight containers for up to 2 days. Keep the salmon and pasta separate to maintain texture.

Freezer: For longer storage, freeze portions in airtight containers for up to 1 month. It’s best to avoid freezing the creamy sauce to preserve its texture.

Reheating: Reheat gently on the stovetop, adding a splash of reserved pasta water or a bit of cream to restore creaminess to your creamy Tuscan salmon pasta.

Serving: For best taste and quality, consume thawed and reheated pasta within 24 hours after defrosting.

Creamy Tuscan Salmon Pasta Recipe FAQs

How do I choose the right salmon?
When selecting salmon for this recipe, fresh is always preferred for its rich flavor and texture. Look for fillets with a vibrant color and minimal dark spots. If you opt for frozen salmon, ensure it’s fully thawed overnight in the refrigerator before cooking to maintain quality.

How should I store leftovers?
To store your Creamy Tuscan Salmon Pasta, place it in airtight containers in the fridge. Keep the salmon and pasta separate to preserve texture, and enjoy within 2 days. If you find yourself with more leftovers, you can freeze portions in airtight containers for up to 1 month. Just be cautious, as the creamy sauce doesn’t freeze well.

Can I freeze the Creamy Tuscan Salmon Pasta?
Yes, you can freeze it! To freeze, allow the dish to cool completely, then portion it into airtight containers or freezer bags. Be mindful to leave some space for expansion. When you're ready to enjoy it again, thaw it in the fridge overnight and reheat slowly on the stovetop with a splash of reserved pasta water or cream to revive its creamy texture.

What can I do if the sauce separates?
If your sauce breaks and appears separated, don’t worry! Simply remove it from the heat and whisk in a few tablespoons of cold butter or a splash of reserved pasta water until it emulsifies and comes back together. Stir gently to reintegrate the sauce, and you’ll have that silky consistency you’re looking for!

Are there any dietary considerations for this recipe?
Absolutely! If you're catering to lactose sensitivity, use lactose-free cream and cheese to keep all the creamy goodness without the discomfort. Additionally, you can replace the salmon with shrimp or a non-seafood protein to accommodate various dietary restrictions while keeping the rich flavors intact.

What should I do if my tomatoes aren’t sweet enough?
If your cherry tomatoes aren't bursting with sweetness, consider adding a pinch of sugar while sautéing them in the sauce. Alternatively, using sun-dried tomatoes can enhance the flavor profile and provide that delicious sweetness. Adding fresh basil at the end can also brighten the dish beautifully!

Creamy Tuscan Salmon Pasta

Creamy Tuscan Salmon Pasta: A Quick & Cozy Dinner Delight

Creamy Tuscan Salmon Pasta is a comforting Italian dish made with salmon, pasta, and a rich, garlicky cream sauce, ready in just 30 minutes.
Print Recipe Pin Recipe
Prep Time 15 minutes mins
Cook Time 15 minutes mins
Total Time 30 minutes mins
Servings: 4 servings
Course: Dinner
Cuisine: Italian
Calories: 600
Ingredients Equipment Method Nutrition Notes

Ingredients
  

For the Pasta
  • 8 ounces pasta of choice such as fettuccine or penne
For the Salmon
  • 4 fillets salmon fresh or properly thawed frozen salmon
For the Sauce
  • 1 cup heavy cream consider half-and-half for a lighter option
  • 1 cup Parmesan cheese grated fresh for smooth sauce
  • 2 cups fresh spinach can substitute with baby kale or arugula
  • 1 cup cherry tomatoes halved, can substitute with sun-dried tomatoes
For the Seasoning
  • 3 cloves garlic freshly minced
  • to taste salt
  • to taste pepper

Equipment

  • Large skillet
  • Pot for boiling pasta

Method
 

Step‑by‑Step Instructions
  1. Gather all your ingredients. Chop the cherry tomatoes, mince the garlic, and grate the Parmesan cheese.
  2. Season the salmon fillets with salt and pepper. In a skillet, heat olive oil over medium-high heat. Sear the salmon skin-side down for 4-5 minutes, flip, and cook for another 2-3 minutes. Remove and set aside.
  3. In the same skillet, reduce the heat, add minced garlic, and sauté until fragrant. Pour in heavy cream and bring to a gentle simmer. Add grated Parmesan and stir until melted.
  4. Add halved cherry tomatoes and fresh spinach to the sauce. Stir gently until the spinach wilts and tomatoes blister, about 2-3 minutes.
  5. Cook your pasta in a pot of salted boiling water till al dente, then drain, reserving some pasta water. Toss cooked pasta with the sauce, adding pasta water to achieve desired consistency.
  6. Plate the pasta, top with salmon fillet, and sprinkle with more Parmesan and black pepper if desired.

Nutrition

Serving: 1servingCalories: 600kcalCarbohydrates: 45gProtein: 30gFat: 30gSaturated Fat: 15gPolyunsaturated Fat: 5gMonounsaturated Fat: 10gCholesterol: 90mgSodium: 500mgPotassium: 800mgFiber: 3gSugar: 4gVitamin A: 2000IUVitamin C: 30mgCalcium: 350mgIron: 2mg

Notes

For best results, use fresh ingredients and adjust seasonings to taste.

Tried this recipe?

Let us know how it was!
  • « Previous Page
  • 1
  • …
  • 21
  • 22
  • 23
  • 24
  • 25
  • …
  • 87
  • Next Page »

Welcome!

Hi, I’m Grace, a Sydney-based home cook with a passion for bold flavors and trending ingredients. Whether you’re a busy beginner or a seasoned foodie, you’ll find dishes here that are fresh, fun, and full of flavor.

More about me

Popular Recipes

  • One Pot Keto Tuna Casserole
    One Pot Keto Tuna Casserole: Creamy Comfort in Minutes
  • Ultimate Jalapeno Popper Chicken Salad
    Ultimate Jalapeno Popper Chicken Salad That'll Wow Your Tastebuds
  • Green Chile Cheese Dip
    Mouthwatering Green Chile Cheese Dip for Cozy Gatherings
  • Easy Chimichurri Sauce
    Fresh and Zesty Easy Chimichurri Sauce in Just Minutes

Footer

↑ back to top

About

  • Privacy Policy
  • Disclaimer
  • Terms & Conditions

Newsletter

  • Sign Up! for emails and updates

Contact

  • About me
  • Contact me

Copyright © 2025 TastyTrendIngredients