tastytrendingredients

  • Home
  • Recipes
    • Appetizers
    • Breakfast
    • Dessert
    • Dinner
    • Drinks
    • Salads
    • Snacks
    • Soups
  • About me
  • Contact
menu icon
go to homepage
  • Home
  • Recipes
    • Appetizers
    • Breakfast
    • Dessert
    • Dinner
    • Drinks
    • Salads
    • Snacks
    • Soups
  • About me
  • Contact
search icon
Homepage link
  • Home
  • Recipes
    • Appetizers
    • Breakfast
    • Dessert
    • Dinner
    • Drinks
    • Salads
    • Snacks
    • Soups
  • About me
  • Contact
×

Irresistibly Soft Classic French Toast for Cozy Mornings

May 23, 2026 by Grace Snow Leave a Comment

Did you know that making Classic French Toast at home can elevate your breakfast game to new heights? This recipe brings together the lusciousness of custardy brioche with the enticing warmth of vanilla and cinnamon, creating a delightful dish that feels like a hug on a plate. It’s not just a simple breakfast; this soft and golden Classic French Toast is a versatile superstar, making it perfect for everything from leisurely Sunday brunches to quick weekday indulgences. With easy-to-find ingredients and minimal prep time, you can serve up a comforting plate that rivals your favorite café's offerings. Ready to transform your mornings? Let’s dive into a breakfast experience you won't forget!

Why is Classic French Toast a must-try?

Versatile Delight: Whether you're hosting brunch or enjoying a quiet morning, this recipe fits any occasion perfectly.

Effortless Preparation: With just a few ingredients and straightforward steps, you can whip this up in no time, making it an ideal choice for busy weekdays.

Luscious Flavor: The rich brioche combined with warm cinnamon and sweet vanilla creates a flavor profile that dances on your palate.

Culinary Creativity: Feel free to experiment! Add toppings like fresh berries or whipped cream for a twist, or try using different bread types like cinnamon-raisin for an exciting variation. Try making it alongside our delightful Mini Tropical Pavlovas for a sweet breakfast spread!

Crowd-Pleaser: This Classic French Toast is sure to impress family and friends, turning a simple meal into a cherished experience.

Classic French Toast Ingredients

For the Custard

  • Brioche – Soft and rich bread that adds luxury and structure; substitute with Challah or day-old white bread for a similar texture.
  • Eggs – Provides essential structure and richness; always use fresh eggs for the best results.
  • Milk – Adds creaminess to the custard; for a lactose-free option, use almond or soy milk.
  • Heavy Cream – Enhances richness for a decadent touch; can be replaced with half-and-half to cut down on fat.
  • Sugar – Sweetens the custard; using brown sugar will give you a deeper, richer flavor.
  • Vanilla Extract – Adds warmth and depth; substitute with vanilla bean paste for an even stronger flavor.
  • Cinnamon – Infuses the dish with spice and warmth; can be omitted for a more neutral taste.
  • Salt – A small amount is essential to balance out the sweetness.

Optional Toppings

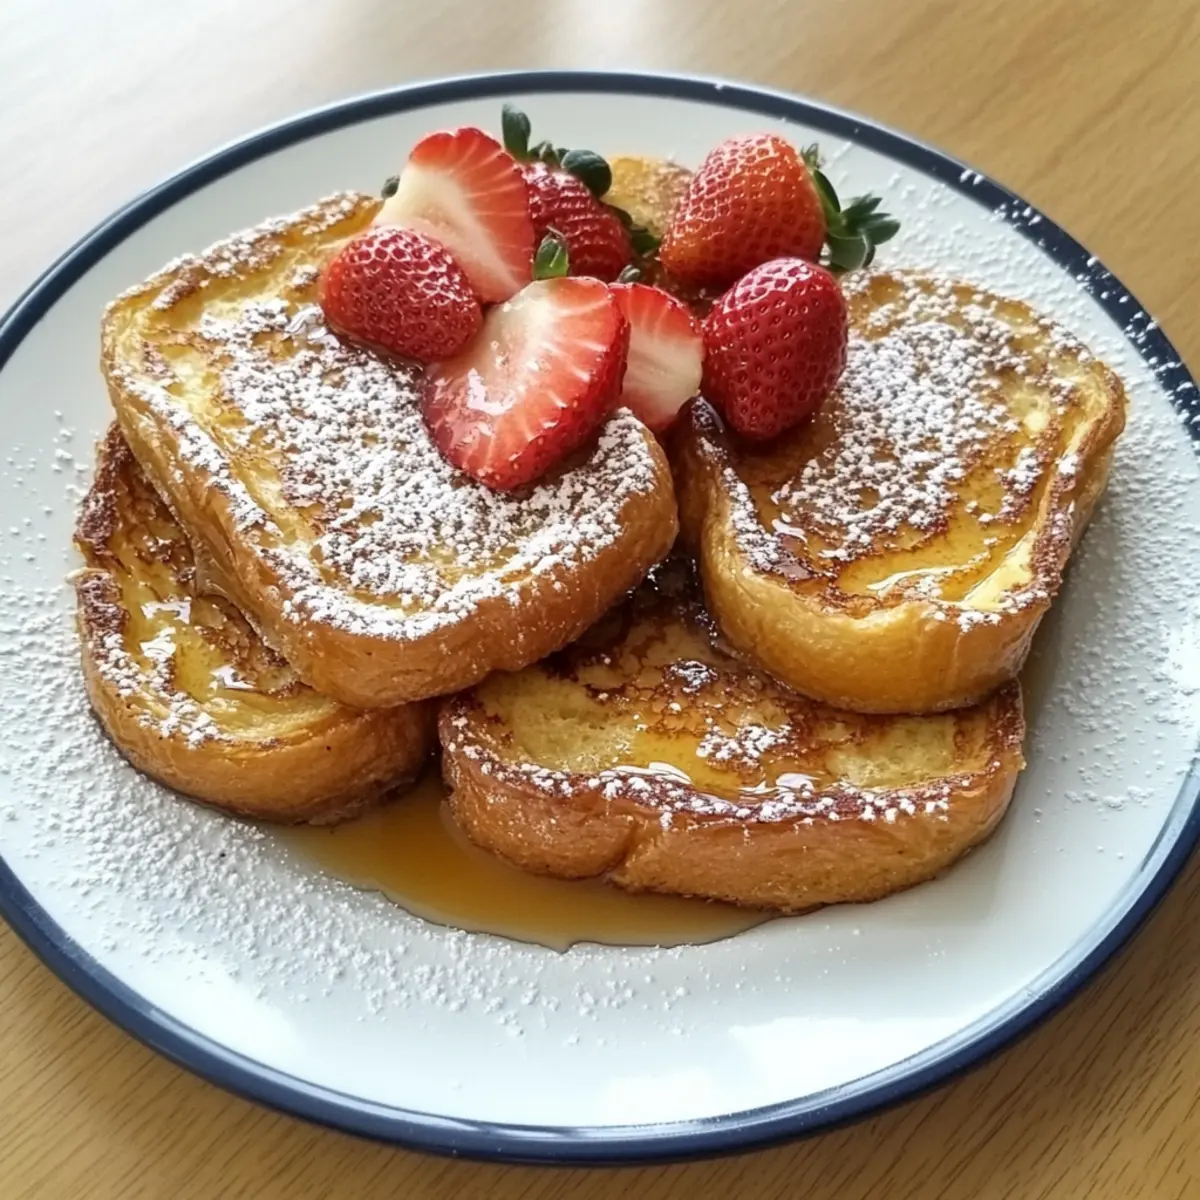
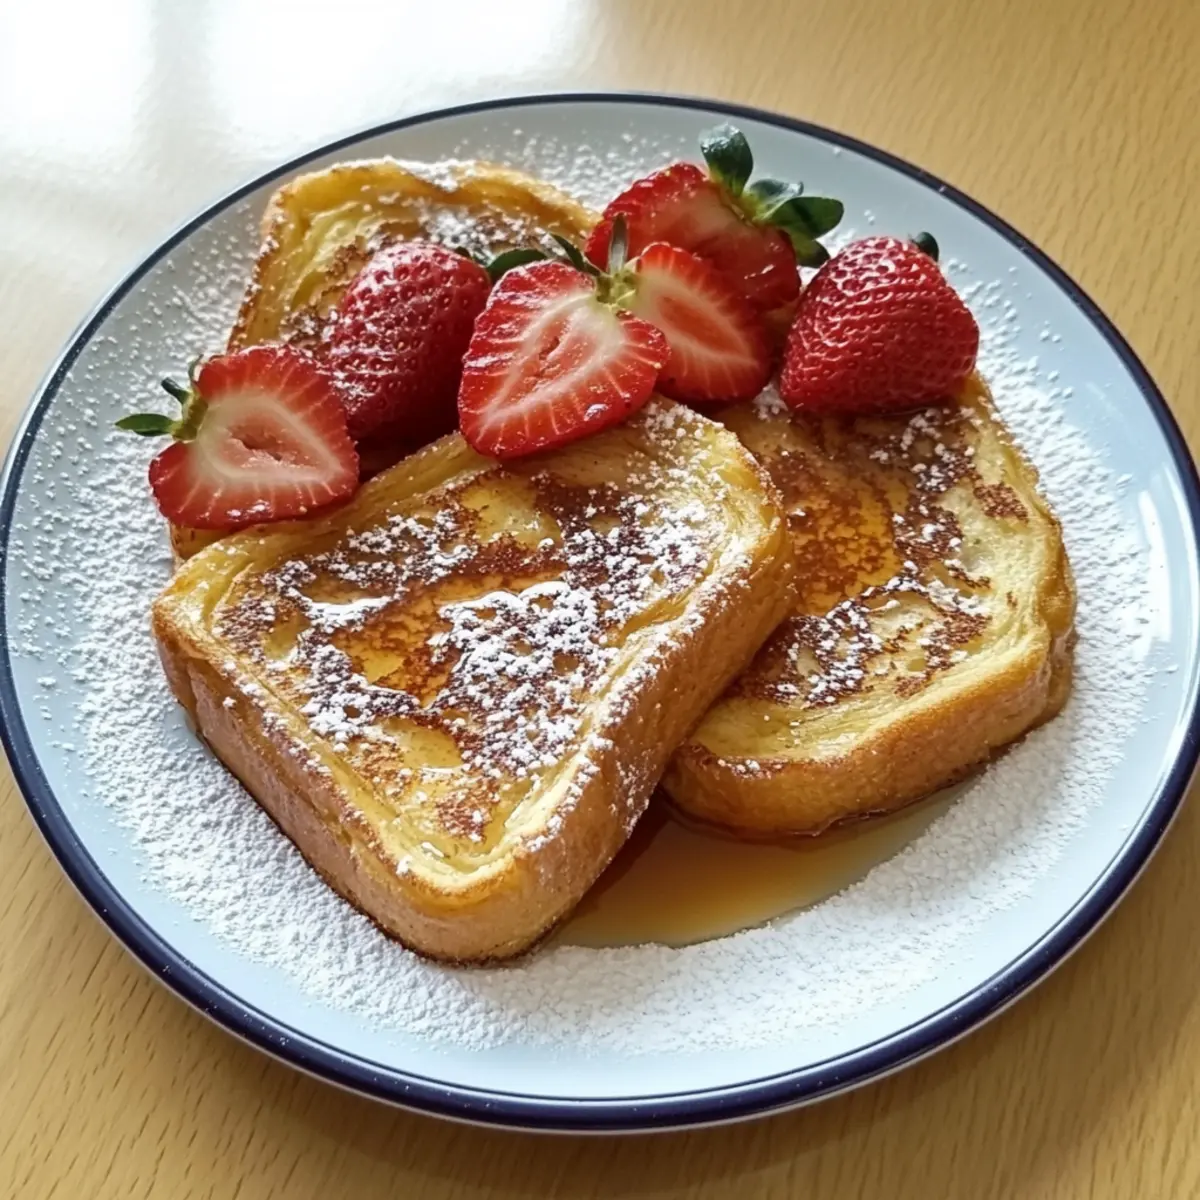
  • Maple Syrup – The classic accompaniment that enhances sweet flavors and adds a lovely finish.
  • Fresh Strawberries – Brightens your plate and adds freshness; feel free to mix in other seasonal fruits.
  • Powdered Sugar – For a final touch of sweetness and a beautiful presentation; dust lightly before serving.

Get ready to elevate your morning with this delightful Classic French Toast recipe that’s bound to impress!

Step‑by‑Step Instructions for Soft and Golden Classic French Toast

Step 1: Prepare the Bread
Start by cutting your brioche into thick slices, about 1-inch each, and lay them flat in a shallow dish. This will allow for ample soaking without the risk of breaking apart. Ensure that the slices are uneven; this adds character to your Classic French Toast.

Step 2: Whisk the Custard
In a mixing bowl, combine the eggs, milk, heavy cream, sugar, vanilla extract, cinnamon, and salt. Whisk the mixture until smooth and all ingredients are well incorporated, about 2–3 minutes. The custard should be creamy and slightly frothy. This step is crucial for creating that delicious soft center in your Classic French Toast.

Step 3: Soak the Bread
Carefully pour the custard over the brioche slices, ensuring each slice is evenly coated. Allow the bread to soak for about 5–10 minutes, turning each slice occasionally to absorb the mixture without falling apart. Look for the custard to be visibly absorbed yet not overly soggy, ensuring your Classic French Toast has the right texture.

Step 4: Heat the Skillet
Place a non-stick skillet or griddle over medium heat and add a generous pat of butter, about 1 tablespoon. Let the butter melt until it bubbles but does not brown, coating the pan evenly. This hot skillet sets the stage for a perfectly golden exterior on your Classic French Toast.

Step 5: Cook the Toast
Carefully place the soaked brioche slices in the skillet, avoiding overcrowding to prevent steaming. Cook each side for about 3–4 minutes or until golden brown and crispy. Keep an eye on them to prevent burning; you want that rich, golden color for your Classic French Toast.

Step 6: Check for Doneness
Flip each slice once the bottom is beautifully browned. Cook the second side for another 3 minutes. To check if they’re ready, gently press the center; it should feel set but still soft. This perfect texture is what makes your Classic French Toast so irresistible.

Step 7: Serve Immediately
Once cooked, transfer the Classic French Toast to a warm serving plate. Drizzle generously with maple syrup and garnish with fresh strawberries and a dusting of powdered sugar. The warmth, aroma, and vibrant colors make this a delightful dish to enjoy immediately, ensuring a cozy start to your day.

Classic French Toast Variations & Substitutions

Feel free to get creative with this recipe and make it your own, introducing new flavors and textures that tantalize your taste buds!

  • Gluten-Free: Use gluten-free bread to enjoy this classic without wheat. Many options available mimic the texture and taste of traditional bread.

  • Dairy-Free: Substitute the milk and heavy cream with almond or coconut milk for a deliciously light version that's still creamy and satisfying.

  • Sweetener Swap: Experiment with maple syrup, agave nectar, or honey for natural sweetness instead of refined sugar. Each sweetener brings its own unique flavor profile.

  • Flavor Boost: Try adding a splash of orange or almond extract along with the vanilla for an aromatic twist that elevates the flavor.

  • Fruit-Packed: Incorporate mashed bananas or pureed pumpkin into your custard mixture for added flavor and nutrition. These fruit additions bring moisture and sweetness!

  • Nutty Crunch: Add crushed nuts, such as pecans or walnuts, either to the custard or as a topping for an enticing crunch that contrasts the soft bread.

  • Chocolate Lovers: Mix in some cocoa powder to the custard or sprinkle chocolate chips on top before serving to create a decadent dessert-style French toast experience.

As you experiment, consider serving this alongside our delightful Quinoa Tabbouleh Vibrant for a nutritious and enjoyable brunch spread. The possibilities are endless, so let your culinary creativity shine!

What to Serve with Soft and Golden Classic French Toast

Elevate your breakfast or brunch experience by pairing this Classic French Toast with complementary flavors and textures.

  • Crispy Bacon: The savory crunch of crispy bacon adds a delightful contrast to the sweetness of French Toast, creating a balanced flavor profile.

  • Fresh Berries: Bright, juicy strawberries, blueberries, or raspberries bring a refreshing burst of color and tartness that cuts through the richness of the dish.

  • Whipped Cream: Fluffy whipped cream adds a luxurious touch and a creamy mouthfeel, perfect for an indulgent breakfast. You can even flavor it with a hint of vanilla.

  • Maple Syrup: Nothing beats the classic drizzle of warm maple syrup that seeps into every nook and cranny of the toast, enhancing its sweet notes beautifully.

  • Cinnamon Sugar Dusting: A light sprinkle of cinnamon sugar gives a sweet, aromatic finish while amplifying the warm spice notes already present in your French Toast.

  • Greek Yogurt: A dollop of creamy Greek yogurt adds a tangy contrast to the sweetness, plus it brings a nice creamy texture that perfectly complements the dish.

  • Fruit Compote: A homemade fruit compote made from seasonal fruits simmered with a touch of sugar can elevate your French Toast to a gourmet treat.

  • Coffee or Tea: A steaming cup of coffee or an herbal tea pairs wonderfully, balancing the sweetness and rounding out the meal for a perfect morning experience.

Tips for the Best Classic French Toast

Stale Bread Advantage: Use slightly stale brioche for optimal custard absorption; fresh bread can become too soggy.

Watch for Color: Cook until each side is golden brown; undercooking can leave the center too soft, while overcooking results in dryness.

Gentle Handling: Carefully soak and flip the bread slices; being too rough can cause them to fall apart.

Adjust Soaking Time: If using thicker slices, increase soaking time to ensure they absorb the custard evenly without breaking down.

Butter Temperature: Make sure the butter is hot but not browning before adding the soaked slices for an ideal crisp exterior on your Classic French Toast.

Make Ahead Options

These Classic French Toast slices are perfect for meal prep, allowing you to enjoy a delicious breakfast even on your busiest mornings! You can soak the brioche in the custard mixture up to 24 hours in advance by placing it in the refrigerator. This will help the flavors meld and ensure each slice is perfectly custardy. When it’s time to cook, simply heat a skillet with butter and fry the soaked slices until golden brown. If you have leftovers, store them in a covered container in the fridge for up to 3 days. Reheat them in a skillet to maintain that delightful crispness, ensuring your breakfast remains just as delicious!

How to Store and Freeze Classic French Toast

Fridge: Store leftover Classic French Toast in an airtight container for up to 3 days to keep it fresh.

Freezer: Freeze individual slices separated by parchment paper in a freezer-safe bag for up to 2 months. Reheat directly from the freezer for a quick treat!

Reheating: For the best texture, reheat in a skillet over medium heat until warmed through, about 3-5 minutes per side.

Make-Ahead: You can prepare the custard and soak the bread in advance; just cover and refrigerate overnight for quick cooking in the morning!

Classic French Toast Recipe FAQs

How do I choose the best brioche for Classic French Toast?
Absolutely! Look for brioche that feels soft and slightly stale, as this helps absorb the custard without becoming overly soggy. If you’re in a pinch, day-old brioche or even Challah can work well as substitutes, providing similar textures.

What’s the best way to store leftovers of Classic French Toast?
You can store leftover Classic French Toast in an airtight container in the fridge for up to 3 days. Just be sure to reheat it gently; I recommend using a skillet over medium heat to restore its lovely crispness.

Can I freeze Classic French Toast for later?
Definitely! To freeze, place individual slices between sheets of parchment paper in a freezer-safe bag, ensuring they don’t stick together. They can be frozen for up to 2 months. When you're ready, just reheat them directly from the freezer in a skillet for about 3-5 minutes per side, and you'll have a quick, delightful breakfast!

What should I do if my Classic French Toast is too soggy?
If you find your Classic French Toast is turning out too soggy, it may be due to soaking time or bread freshness. For thicker slices, increase the soaking time slightly but make sure to monitor them carefully. Using slightly stale bread can also prevent excessive sogginess, as it absorbs the custard beautifully without falling apart.

Are there any dietary considerations for Classic French Toast?
Certainly! You can cater to different dietary needs by switching out ingredients like using almond or soy milk for lactose-free options and substituting heavy cream with half-and-half for a lighter result. Plus, if you're cooking for pets, it's best to avoid using sugar or certain toppings like chocolate; stick with plain toast for furry friends!

How do I avoid burning my Classic French Toast?
Very good question! To avoid burning, always cook over medium heat, ensuring your butter is bubbling but not browning too much before adding the soaked slices. If you notice the edges are browning too quickly, reduce the heat. Cooking times may vary depending on the thickness of your bread, so keep a close eye as you flip!

Classic French Toast

Irresistibly Soft Classic French Toast for Cozy Mornings

Elevate your breakfast game with this Classic French Toast recipe featuring custardy brioche, warm vanilla, and cinnamon.
Print Recipe Pin Recipe
Prep Time 10 minutes mins
Cook Time 20 minutes mins
Total Time 30 minutes mins
Servings: 4 slices
Course: Breakfast
Cuisine: French
Calories: 300
Ingredients Equipment Method Nutrition Notes

Ingredients
  

For the Custard
  • 4 slices Brioche Can substitute with Challah or day-old white bread
  • 2 Eggs Use fresh eggs for best results
  • 1 cup Milk Use almond or soy milk for lactose-free option
  • 1/2 cup Heavy Cream Can replace with half-and-half
  • 2 tablespoons Sugar Brown sugar can be used for richer flavor
  • 1 teaspoon Vanilla Extract Vanilla bean paste can be substituted
  • 1 teaspoon Cinnamon Can be omitted for neutral taste
  • 1/4 teaspoon Salt Essential to balance sweetness
Optional Toppings
  • 1/4 cup Maple Syrup
  • 1 cup Fresh Strawberries Can mix in other seasonal fruits
  • powdered sugar Powdered Sugar Dust lightly before serving

Equipment

  • non-stick skillet
  • Mixing Bowl
  • Shallow dish

Method
 

Step-by-Step Instructions
  1. Prepare the Bread: Cut brioche into thick slices, about 1-inch each, and lay flat in a shallow dish.
  2. Whisk the Custard: In a mixing bowl, combine eggs, milk, heavy cream, sugar, vanilla extract, cinnamon, and salt. Whisk for 2–3 minutes until smooth.
  3. Soak the Bread: Pour custard over brioche slices, ensuring even coating. Soak for 5–10 minutes, turning slices occasionally.
  4. Heat the Skillet: Place a non-stick skillet over medium heat and melt about 1 tablespoon of butter.
  5. Cook the Toast: Place soaked brioche slices in the skillet, cooking each side for 3–4 minutes until golden brown.
  6. Check for Doneness: Flip slices once brown; cook the second side for 3 minutes until set but soft.
  7. Serve Immediately: Transfer to a warm plate, drizzle with maple syrup, and garnish with strawberries and powdered sugar.

Nutrition

Serving: 1sliceCalories: 300kcalCarbohydrates: 40gProtein: 8gFat: 15gSaturated Fat: 9gPolyunsaturated Fat: 1gMonounsaturated Fat: 5gCholesterol: 90mgSodium: 250mgPotassium: 150mgFiber: 1gSugar: 5gVitamin A: 500IUCalcium: 150mgIron: 1mg

Notes

Use slightly stale brioche for better custard absorption; ensure butter is hot but not browning before adding bread.

Tried this recipe?

Let us know how it was!

Best Crepes Recipe: Quick, Silky Treats for Every Craving

May 23, 2026 by Grace Snow Leave a Comment

As I flipped my first crepe, the sizzling sound followed by the delightful aroma of buttery goodness enveloped my kitchen—what a mini triumph! This Best Crepes Recipe is a game-changer, transforming simple pantry staples into elegant French creations in just 20 minutes. They’re wonderfully versatile, perfect for breakfast, lunch, or a sweet indulgence, making them a fantastic addition to your culinary repertoire. Plus, these delicate, thin wonders can be both wallet-friendly and easy to whip up, ensuring you’re never at the mercy of fast food again. Whether you enjoy filling them with sweet strawberries and whipped cream or savory scrambled eggs and cheese, these crepes cater to every craving. Ready to discover just how fulfilling homemade crepes can be? Let’s dive into the recipe!

Why Are These Crepes So Special?

Quick and Easy: With just 20 minutes of prep, you can whip up these delectable crepes that rival any café. Versatile creations await you as they serve beautifully with sweet or savory fillings.

Budget-Friendly Delight: Crafted from pantry staples, this recipe means no special trips to the grocery store.

Impressive Crowd-Pleaser: Perfect for gatherings, these delicate treats are sure to impress your friends and family. Serve them with a sprinkle of powdered sugar or Nutella for a sweet finish!

Decadent Textures: The combination of a crispy edge and tender center creates a delightful bite that complements every filling option.

Once you try these, you’ll be inspired to explore variations; consider savory options like herbs to elevate your meals even further! Enjoy the wonder of homemade goodness while saying goodbye to fast food.

Best Crepes Recipe Ingredients

For the Batter

  • All-Purpose Flour – Provides structure and forms the base of the crepe; can substitute with gluten-free flour for dietary needs.
  • Eggs – Essential for binding and creating a tender texture; use large eggs for consistent results.
  • Whole Milk – Adds richness and moisture; feel free to swap with skim or plant-based alternatives, though it may change the texture slightly.
  • Water – Lightens the batter for thin crepes; can replace with additional milk if you prefer.
  • Unsalted Butter (melted and cooled) – Adds flavor and helps prevent sticking; vegetable oil or margarine can work as substitutes.
  • Fine Sea Salt – Enhances flavor perfectly; kosher salt is a good alternative if needed.
  • Granulated Sugar – Sweetens the batter for dessert crepes; you can reduce or omit for savory variations.
  • Vanilla Extract – Provides aromatic sweetness; an almond extract can give a delightful twist as a substitute.

With these ingredients, you’re on your way to mastering the best crepes recipe that will surely tantalize your taste buds!

Step‑by‑Step Instructions for Best Crepes Recipe

Step 1: Prepare the Batter
In a high-speed blender, combine whole milk, water, large eggs, melted and cooled unsalted butter, fine sea salt, granulated sugar, and vanilla extract. Blend on high for about 30 seconds until the mixture is smooth and frothy. This creamy base is essential for the silky texture of the best crepes recipe, ensuring a delightful experience for your palate.

Step 2: Incorporate the Flour
Add the all-purpose flour to the blender last to prevent clumping. Blend on high for another 20-30 seconds, stopping occasionally to scrape down the sides to combine evenly. The batter should be thin and pourable, resembling heavy cream, which will create those beautifully lacy edges when cooked. Let the batter rest for at least 10 minutes to enhance its texture.

Step 3: Preheat the Skillet
Heat a non-stick skillet over medium heat for about 5 minutes, ensuring it’s hot enough for the crepes to cook evenly. Just before pouring the batter, brush a thin layer of melted butter into the skillet to prevent sticking. This first step is crucial for achieving that perfect golden-brown color found in the best crepes recipe.

Step 4: Cook the Crepes
Pour 1/4 cup of the prepared batter into the center of the skillet, tilting the pan quickly in a circular motion to coat the bottom evenly. Cook the crepe for 1-2 minutes, watching for the edges to turn golden and lacy. These visual cues indicate it’s time to flip the crepe and cook for an additional 30 seconds to ensure it’s tender yet slightly crisp.

Step 5: Repeat the Process
Transfer the cooked crepe to a plate and repeat the process with the remaining batter, reapplying a small amount of butter to the skillet as needed. Allow each crepe to cool slightly before stacking them on top of one another, creating a warm, inviting tower of crepes ready for your favorite fillings. Enjoy the fruits of your labor with the best crepes recipe, made in your kitchen!

Best Crepes Recipe Variations

Feel free to have a little fun customizing your crepes with these delicious variations—they're sure to elevate your culinary experience!

  • Savory Swap: Omit sugar and vanilla; add fresh herbs like chives or basil for a herbaceous twist.

  • Breakfast Delight: Fill with scrambled eggs, cheese, and sautéed vegetables for a hearty morning meal. These stuffed crepes will energize your day!

  • Sweet Indulgence: Drizzle with a homemade berry compote or seasonal fruits to enhance dessert crepes. The vibrant colors and flavors will tantalize your taste buds.

  • Chocolate Lovers: Spread a layer of Nutella or chocolate ganache inside before rolling for a rich dessert experience. It’s decadence wrapped in thin, tender crepes!

  • Batter Boost: Try adding almond flour for a unique nutty flavor and texture. This twist adds a lovely depth to your crepes!

  • Healthy Twist: Use Greek yogurt instead of butter for a lighter version that maintains creaminess. It’s perfect for a guilt-free treat!

  • Gluten-Free Option: Substitute the all-purpose flour with a gluten-free flour blend to be inclusive for all diets. Enjoy the same fantastic crepe qualities without worry.

  • Spicy Kick: Add a pinch of cayenne pepper or chili flakes to the batter for an unexpected heat that pairs beautifully with savory fillings. Spice it up and enjoy every bite!

Explore these options and discover how easy it is to turn the ordinary into extraordinary! And if you want more flavor inspiration, don’t miss the delightful twists in Chicken Adobo Again or the rich Spatchcock Chicken Flavor. Happy cooking!

What to Serve with The Best Crepes Recipe

As you savor the delightful layers of your homemade crepes, consider these wonderful accompaniments to create a complete meal bursting with flavors and textures.

  • Fresh Berries: A vibrant medley of strawberries, blueberries, and raspberries adds a refreshing tartness that balances the richness of the crepes.
  • Whipped Cream: Light and fluffy, this classic topping provides a creamy contrast, enhancing the sweet flavors of dessert crepes.
  • Nutella Swirl: This indulgent chocolate-hazelnut spread brings a decadent sweetness, transforming your crepes into a dreamy dessert.
  • Savory Spinach and Cheese: For a hearty twist, fill your crepes with sautéed spinach and melted cheese, offering a satisfying savory option.
  • Maple Syrup: Drizzling warm maple syrup over your crepes adds a comforting sweetness that pairs beautifully with any filling.
  • Citrus Zest: A sprinkle of lemon or orange zest brightens up the dish, adding a refreshing zing that elevates sweet or savory crepes.
  • Coffee or Tea: Pairing with a warm cup of coffee or herbal tea brings warmth to the meal and complements the delicate flavors of the crepes.
  • Coconut Yogurt: A dollop of creamy coconut yogurt adds a tropical flair, offering a smooth and tangy counterpoint to sweet variations.

Make Ahead Options

These Best Crepes Recipe are perfect for meal prep enthusiasts! You can prepare the batter up to 24 hours in advance by combining the milk, water, eggs, melted butter, salt, sugar, vanilla, and flour, then blending until smooth. Once blended, refrigerate the batter in an airtight container to keep it fresh. Additionally, you can cook the crepes and store them in the fridge for up to 3 days, layering parchment paper between each crepe to prevent sticking. When you're ready to serve, simply reheat them in a skillet over low heat or in the microwave for a few seconds. This method ensures that your crepes remain just as delicious and light, saving you valuable time in those busy weeknights!

Expert Tips for the Best Crepes Recipe

  • Rest the Batter: Allow the crepe batter to rest for at least 10 minutes; this helps improve texture and ensures a silkier finish.

  • Medium Heat is Key: Keep your skillet on medium heat. Too high and you'll get chewy crepes; too low and they won’t cook properly.

  • First Crepe Trick: Don’t fret if your first crepe doesn’t turn out perfect! It’s often a “test crepe” for taste; use it in a savory dish.

  • Thickness Control: Adjust the amount of batter for your preferred crepe thickness. A little less batter will yield thinner, more delicate crepes.

  • Use a Non-Stick Skillet: A good non-stick skillet will make flipping and cooking a breeze, preventing your delicious creations from sticking.

These tips will guide you in crafting the best crepes recipe that’s perfect for impressing family or friends!

How to Store and Freeze Best Crepes Recipe

Room Temperature: Crepes can be kept at room temperature for up to 2 hours if they are covered to prevent drying out.

Fridge: Store cooked crepes in an airtight container or wrapped in plastic wrap for up to 3 days in the fridge. This helps maintain their delicate texture.

Freezer: For longer storage, freeze crepes by placing parchment paper between each one and wrapping tightly in plastic wrap. They can last up to 2 months in the freezer.

Reheating: To reheat, simply warm crepes in a skillet over low heat for about 30 seconds per side, or microwave for 15-20 seconds until warm, bringing back that silky goodness of the best crepes recipe.

Best Crepes Recipe FAQs

How do I choose the right eggs for my crepes?
Absolutely! For the best crepes recipe, I recommend using large eggs, as they provide the perfect balance of moisture and binding for a tender texture. They’re simply essential for achieving that silky finish we all love.

How should I store leftover crepes?
You can store cooked crepes in an airtight container, separated by parchment paper, in the fridge for up to 3 days. If you'd like them to last longer, simply wrap them tightly in plastic wrap and freeze for up to 2 months! This method maintains their delicate texture and makes reheating a breeze.

Can I freeze crepes? If so, how?
Absolutely! To freeze your crepes, place a piece of parchment paper between each one, preventing them from sticking together. Once stacked, wrap them tightly in plastic wrap or place them in a freezer bag. When you’re ready to enjoy them, you can reheat from frozen directly in a skillet or microwave!

What should I do if my crepes are sticking to the pan?
Very! If your crepes are sticking, a couple of things might help. Ensure your skillet is properly preheated and lightly brushed with melted butter before cooking each crepe. If you continue to experience sticking, consider using a bit more butter or oil on your pan, and double-check that you’re using a non-stick skillet for the best results.

Can I use alternatives to the ingredients for dietary restrictions?
Certainly! For a gluten-free option, replace all-purpose flour with a gluten-free blend. You can also swap whole milk with almond, soy, or oat milk; just note it may slightly change the texture. Always ensure your substitutions align with any allergies or dietary needs, and don't hesitate to experiment!

How can I make my crepes even more flavorful?
To truly elevate your best crepes recipe, feel free to add herbs like chives or a pinch of nutmeg to the batter for a savory twist. For sweet variations, a hint of cinnamon or a splash of orange zest can turn your crepes into a delightful treat. The more the merrier when it comes to adding personal touches to your creations!

Best Crepes Recipe

Best Crepes Recipe: Quick, Silky Treats for Every Craving

Discover the best crepes recipe, a quick and versatile dish perfect for any craving.
Print Recipe Pin Recipe
Prep Time 20 minutes mins
Cook Time 10 minutes mins
Resting Time 10 minutes mins
Total Time 40 minutes mins
Servings: 4 crepes
Course: Breakfast
Cuisine: French
Calories: 120
Ingredients Equipment Method Nutrition Notes

Ingredients
  

For the Batter
  • 1 cup All-Purpose Flour Can substitute with gluten-free flour
  • 2 large Eggs Use large eggs for consistent results
  • 1 cup Whole Milk Can swap with skim or plant-based alternatives
  • 1/2 cup Water Can replace with additional milk if preferred
  • 2 tbsp Unsalted Butter (melted and cooled) Vegetable oil or margarine can work as substitutes
  • 1/4 tsp Fine Sea Salt Kosher salt is a good alternative
  • 2 tbsp Granulated Sugar Reduce or omit for savory variations
  • 1 tsp Vanilla Extract Almond extract can be used as a substitute

Equipment

  • Blender
  • non-stick skillet

Method
 

Step-by-Step Instructions for Best Crepes Recipe
  1. In a high-speed blender, combine whole milk, water, large eggs, melted and cooled unsalted butter, fine sea salt, granulated sugar, and vanilla extract. Blend on high for about 30 seconds until the mixture is smooth and frothy.
  2. Add the all-purpose flour to the blender last. Blend on high for another 20-30 seconds, stopping occasionally to scrape down the sides. The batter should be thin and pourable, resembling heavy cream.
  3. Heat a non-stick skillet over medium heat for about 5 minutes. Brush a thin layer of melted butter into the skillet just before pouring the batter.
  4. Pour 1/4 cup of the prepared batter into the center of the skillet, tilting the pan quickly in a circular motion to coat the bottom evenly. Cook for 1-2 minutes and flip.
  5. Transfer the cooked crepe to a plate and repeat the process with the remaining batter, reapplying a small amount of butter to the skillet as needed.

Nutrition

Serving: 1crepeCalories: 120kcalCarbohydrates: 18gProtein: 3gFat: 5gSaturated Fat: 3gPolyunsaturated Fat: 0.5gMonounsaturated Fat: 1.5gCholesterol: 70mgSodium: 180mgPotassium: 80mgFiber: 0.5gSugar: 1gVitamin A: 300IUCalcium: 100mgIron: 1mg

Notes

These crepes can be enjoyed with various fillings such as sweet strawberries or savory scrambled eggs. Resting the batter is key for a silky texture.

Tried this recipe?

Let us know how it was!

Sausage French Toast Roll-Ups: A Fun, Flavorful Breakfast Treat

May 23, 2026 by Grace Snow Leave a Comment

Early one Saturday morning, as the sun peeked through my kitchen window, a tantalizing aroma wafted through the air, transporting me to a cozy brunch spot I once visited. That’s when I realized the perfect recipe for a delightful twist on breakfast: Savory-Sweet Sausage French Toast Roll-Ups. These roll-ups blend the heartiness of sausage with the fluffiness of French toast, creating a versatile breakfast that’s both quick to prepare and customizable for any palate. The crispy exterior combined with the warm, flavorful filling is an absolute crowd-pleaser, making it ideal for busy weekdays or fun family gatherings. Ready to impress breakfast enthusiasts of all ages? Let’s dive into this delicious recipe that promises comfort and creativity on your plate! What fun variations will you try?

Why try Sausage French Toast Roll-Ups?

Versatile and Customizable: These roll-ups can cater to various tastes, whether you prefer sweet fruit fillings or savory cheese options.
Quick Preparation: Perfect for busy mornings, you can whip up these delicious treats in just a few minutes.
Crowd-Pleaser: The unique combination delights both kids and adults, making them a hit for family brunches or gatherings.
Flavor Fusion: Enjoy the harmony of crispy sausage and fluffy French toast that elevates your breakfast experience.
Meal Prep Friendly: Prepare in advance, freeze, and cook them fresh when you need a comforting breakfast option.
Consider trying out variations like Cherry Clafoutis French for dessert inspiration or add your favorite flavors to these delightful roll-ups!

Sausage French Toast Roll-Ups Ingredients

For the Roll-Ups
• Bread – Use white, whole wheat, or brioche for varied textures.
• Sausage Links – Choose pork, turkey, or vegetarian sausages to match dietary preferences.
• Eggs – Essential for the French toast batter, providing binding and flavor.
• Milk – Adds creaminess; substitute with almond milk or oat milk for a dairy-free option.

For the Batter
• Cinnamon – Imparts warmth and depth; adjust according to your taste.
• Vanilla Extract – Enhances sweetness and aroma; optional for flavor complexity.

For Frying
• Butter – Adds flavor and crispiness; vegetable oil can be a lighter alternative.

For Toppings
• Maple Syrup / Powdered Sugar – Optional for sweetness; feel free to get creative with fruits or flavored syrups!

With these simple ingredients, you can create delightful Sausage French Toast Roll-Ups that are sure to become a breakfast favorite!

Step‑by‑Step Instructions for Sausage French Toast Roll-Ups

Step 1: Cook Sausage
Begin by heating a skillet over medium heat. Add the sausage links and cook them for about 8-10 minutes, turning them occasionally, until they are fully browned and cooked through. Once done, remove them from the skillet and let them cool on a paper towel-lined plate, allowing the excess grease to drain.

Step 2: Prepare Batter
In a shallow bowl, whisk together 2 eggs, ½ cup of milk, 1 tsp of cinnamon, and 1 tsp of vanilla extract. Mix until smoothly combined and the eggs are fully incorporated. This rich batter will create the perfect coating for your delicious Sausage French Toast Roll-Ups.

Step 3: Prep Bread
Take your slices of bread and trim off the crusts to create a uniform rectangle. Using a rolling pin, flatten each slice slightly to make it easier to roll. This will give your Sausage French Toast Roll-Ups a delightful texture and help them hold their shape during cooking.

Step 4: Assemble Roll-Ups
At one end of each flat bread slice, place a cooked sausage link. Gently roll the bread tightly around the sausage to form a log shape, making sure to seal the seam well by pinching the edges together. Repeat for all slices, creating a batch of savory-filled roll-ups that are ready for frying.

Step 5: Fry Roll-Ups
In the same skillet, melt 2 tablespoons of butter over medium heat. Dip each assembled roll-up into the batter, allowing it to soak briefly, then place seam-side down in the skillet. Cook for about 2-3 minutes on each side until golden brown and crispy. Ensure each roll-up is nicely browned and heated through.

Step 6: Serve
Once cooked, remove the Sausage French Toast Roll-Ups from the skillet and drain any excess butter on a paper towel. Serve warm, drizzling with maple syrup or dusting with powdered sugar for extra sweetness. Feel free to add fresh fruits or top with cheese for an extra twist on this delightful breakfast treat!

Make Ahead Options

These Sausage French Toast Roll-Ups are perfect for meal prep enthusiasts! You can assemble the roll-ups up to 24 hours in advance and refrigerate them, ensuring they stay fresh and delicious. To prepare ahead, simply cook the sausage links, then flatten and roll the bread around them, sealing each roll tightly. Store in an airtight container in the fridge to maintain their quality. When ready to serve, dip the chilled roll-ups in the batter and fry them as directed, achieving that golden, crispy exterior with a warm interior. This prep method saves you precious time on busy mornings, delivering delightful results with minimal effort!

Sausage French Toast Roll-Ups Variations

These scrumptious Sausage French Toast Roll-Ups can be customized to fit your unique taste preferences, keeping breakfast exciting and delicious.

  • Sweet Fruit Fillings: Add slices of fresh strawberries or bananas inside the roll-ups for a fruity burst of flavor.
    Imagine the sweetness complementing the savory sausage—it's like a breakfast party in every bite!

  • Cheesy Twist: Incorporate shredded cheese, such as cheddar or pepper jack, to elevate the savory aspects.
    Melty cheese will add an extra layer of richness that everyone will love.

  • Herbed Sausage: Opt for flavored sausage, like garlic or herb-infused links, to enhance the overall depth of flavor.
    This simple swap will take your roll-ups to another level of deliciousness!

  • Cinnamon Crunch: Sprinkle brown sugar and cinnamon on the batter for a sweet, crusty exterior after frying.
    The delightful caramelization will bring a comforting sweetness reminiscent of cinnamon rolls.

  • Nutty Addition: Incorporate finely chopped nuts (like pecans or walnuts) into your filling for some extra crunch.
    This delightful texture contrasts beautifully with the soft bread and sausage.

  • Spicy Kick: Choose spicy sausage or add a dash of hot sauce to the batter for a zesty breakfast surprise.
    A little heat will excite your taste buds while maintaining those comforting breakfast flavors.

  • Savory Veggie Mix: Include sautéed spinach, bell peppers, or mushrooms with the sausage for added nutrition.
    This twist not only boosts flavor but also gives the dish a vibrant boost of color!

  • Flavored Syrups: Drizzle with different flavored syrups, such as berry or maple pecan, for a unique finishing touch.
    Personalize your roll-ups with an array of delicious toppings for a wonderful breakfast experience.

Feel free to explore and mix these variations into your next batch of Sausage French Toast Roll-Ups to create the perfect breakfast that suits your family’s palate!

Storage Tips for Sausage French Toast Roll-Ups

Fridge: Store cooked Sausage French Toast Roll-Ups in an airtight container for up to 3 days. Reheat in a skillet over medium heat for a few minutes until warm.

Freezer: These roll-ups can be frozen uncooked for up to 3 months. Place them in a single layer on a baking sheet, freeze until solid, then transfer to a freezer bag.

Reheating: To reheat frozen roll-ups, allow them to thaw in the refrigerator overnight. Cook in a skillet, seam-side down, until heated through and crispy, about 5-7 minutes.

Meal Prep: Prepare roll-ups in advance for ideal convenience. They can be assembled ahead and stored in the fridge for up to 24 hours before cooking.

Tips for the Best Sausage French Toast Roll-Ups

  • Use Stale Bread: Slightly stale bread holds its shape and prevents sogginess, ensuring a perfect texture for your Sausage French Toast Roll-Ups.
  • Don’t Over-Soak: Quickly dip the roll-ups in the batter to avoid them becoming too soggy, which can lead to a messy frying experience.
  • Preheat Your Skillet: Make sure your skillet is hot and well-buttered before adding the roll-ups for a beautifully golden and crispy exterior.
  • Experiment with Fillings: Try different sausage flavors, cheeses, or even add fruits like bananas to customize your Sausage French Toast Roll-Ups to your liking.
  • Meal Prep Friendly: Prepare roll-ups ahead of time and store in the fridge for up to 24 hours or freeze for up to 3 months for a quick breakfast option!

What to Serve with Sausage French Toast Roll-Ups?

Elevate your breakfast experience by pairing these delightful roll-ups with complementary sides and drinks that tantalize the taste buds.

  • Fresh Fruit Salad: A mix of berries, melons, and citrus adds brightness, offering a refreshing contrast to the savory richness of the roll-ups. The natural sweetness and juiciness will enhance every bite.

  • Scrambled Eggs: Simple yet satisfying, creamy scrambled eggs provide additional protein and a luxurious texture that pairs beautifully with the crunchy exterior of the roll-ups.

  • Crispy Hash Browns: Golden-brown, crispy hash browns deliver a satisfying crunch and comforting warmth alongside the Sausage French Toast Roll-Ups, creating a well-rounded breakfast spread.

  • Greek Yogurt Parfait: Layer creamy yogurt with granola and fresh fruit for a delightful and nutritious touch. The tangy yogurt cuts through the sweetness, making for a balanced meal.

  • Maple Pecan Coffee: A warm cup of maple-infused coffee compliments the sweet notes of maple syrup served with your roll-ups, creating a cozy morning atmosphere.

  • Chocolaty Banana Smoothie: Blend ripe bananas with cocoa powder and your milk of choice for a creamy, indulgent drink that pairs perfectly with the savory and sweet flavors of the roll-ups.

  • Savory Cheese Platter: A selection of cheeses introduces a savory element that contrasts nicely with the sweetness of the roll-ups, making for an elegant brunch offering.

  • Fruity Mimosa: For those special brunch occasions, pour a glass of sparkling mimosa made with orange juice and prosecco to bring a festive flair to your meal.

Explore these delightful pairings to create a breakfast that’s not just filling but also a feast for the senses!

Sausage French Toast Roll-Ups Recipe FAQs

What type of bread works best for Sausage French Toast Roll-Ups?
Absolutely! Use white, whole wheat, or even brioche bread to add a lovely texture. Stale bread is preferred as it holds up better during the rolling and cooking process.

How should I store leftover Sausage French Toast Roll-Ups?
For best results, store cooked roll-ups in an airtight container in the fridge for up to 3 days. When reheating, place them in a skillet over medium heat for a few minutes until they're warm and crispy again.

Can I freeze Sausage French Toast Roll-Ups?
Yes! These delightful roll-ups can be frozen uncooked for up to 3 months. Place the assembled roll-ups in a single layer on a baking sheet to freeze them solid. Once firm, transfer them to a freezer bag. When you're ready to enjoy, let them thaw in the refrigerator overnight before cooking.

What do I do if my roll-ups become soggy while cooking?
Very! Prevent sogginess by quickly dipping the roll-ups in the batter rather than soaking them. If you find they are still too soggy, you might want to ensure your skillet is well-heated before adding them, which will help achieve that crispy, golden exterior.

Are there any dietary considerations for Sausage French Toast Roll-Ups?
Yes! You can easily cater to dietary preferences. For a vegetarian option, choose plant-based sausage links. Additionally, use almond or oat milk instead of regular milk for a dairy-free version. Always check labels if there are concerns about allergies, particularly with bread and sausage.

Sausage French Toast Roll-Ups

Sausage French Toast Roll-Ups: A Fun, Flavorful Breakfast Treat

Sausage French Toast Roll-Ups blend the heartiness of sausage with the fluffiness of French toast for a delightful breakfast twist.
Print Recipe Pin Recipe
Prep Time 10 minutes mins
Cook Time 15 minutes mins
Total Time 25 minutes mins
Servings: 4 roll-ups
Course: Breakfast
Cuisine: American
Calories: 350
Ingredients Equipment Method Nutrition Notes

Ingredients
  

For the Roll-Ups
  • 8 slices Bread white, whole wheat, or brioche
  • 4 links Sausage Links pork, turkey, or vegetarian
  • 2 large Eggs essential for the batter
  • 1/2 cup Milk dairy or dairy-free options available
For the Batter
  • 1 tsp Cinnamon adjust according to your taste
  • 1 tsp Vanilla Extract optional
For Frying
  • 2 tbsp Butter or vegetable oil for a lighter option
For Toppings
  • Maple Syrup / Powdered Sugar optional for sweetness

Equipment

  • Skillet
  • Whisk
  • Shallow Bowl
  • Rolling Pin

Method
 

Step-by-Step Instructions
  1. Cook the sausage links in a skillet over medium heat for about 8-10 minutes until fully browned and cooked through. Remove and cool on a paper towel.
  2. In a shallow bowl, whisk together eggs, milk, cinnamon, and vanilla extract until smooth.
  3. Trim off the crusts of the bread slices and flatten each slice with a rolling pin.
  4. Place a cooked sausage link at one end of each flat bread slice and roll the bread tightly around the sausage, sealing the seam.
  5. Melt butter in the skillet over medium heat. Dip each roll-up in the batter and place seam-side down in the skillet. Cook for about 2-3 minutes until golden brown.
  6. Remove roll-ups from the skillet and drain any excess butter. Serve warm with maple syrup or powdered sugar.

Nutrition

Serving: 1roll-upCalories: 350kcalCarbohydrates: 30gProtein: 12gFat: 20gSaturated Fat: 8gPolyunsaturated Fat: 2gMonounsaturated Fat: 8gCholesterol: 100mgSodium: 600mgPotassium: 300mgFiber: 2gSugar: 4gVitamin A: 10IUCalcium: 6mgIron: 8mg

Notes

Use stale bread for better texture and avoid over-soaking the roll-ups. Experiment with different fillings and toppings.

Tried this recipe?

Let us know how it was!

Irresistibly Fluffy Mini Dutch Baby Pancakes for Easy Mornings

May 23, 2026 by Grace Snow Leave a Comment

As I whisked together the ingredients, the enticing aroma of vanilla began to fill my kitchen, a prelude to breakfast magic. Mini Dutch Baby Pancakes are a delightful twist on traditional pancakes that are not only easy to make but also serve as a whimsical treat for the whole family. Imagine light, airy bites puffing dramatically in the oven, their tender custard base inviting toppings of your choice. With minimal prep time and simple pantry staples, these kid-friendly morsels come together in mere minutes—perfect for those busy mornings or leisurely brunches with friends. Plus, they’re versatile enough for both sweet and savory variations! Are you ready to discover the joy of these charming pancakes? Let’s dive into the recipe together!

Why are Mini Dutch Baby Pancakes Perfect?

Whimsical Fun: These pancakes puff up like magic, creating a delightful presentation that kids and adults will love.

Effortless Prep: With just a quick whirl in the blender, you can whip up this batter in no time, perfect for busy mornings!

Endless Customization: Top with fresh berries, a drizzle of jam, or even savory options like cheese and herbs—your choice will impress every time.

Light & Airy Texture: Indulge in a sweet yet guilt-free breakfast treat that feels like a special occasion, even on a regular Tuesday.

Perfect for Any Occasion: From family brunches to playdates, these charming pancakes are crowd-pleasers that everyone will enjoy.

Why not pair these with your favorite toppings or try making Ricotta Protein Pancakes for another delicious twist?

Mini Dutch Baby Pancakes Ingredients

Unlock the magic of these delightful bites!

  • Vegetable Oil: – Used to grease the muffin tin for easy release; you can substitute with coconut oil or any high-heat oil.
  • Large Eggs (4): – Essential for structure and richness; remember to use room temperature eggs for better emulsion.
  • All-Purpose Flour (2/3 cup or 80g): – This is your main structure-building ingredient; if gluten-free, opt for a gluten-free flour blend.
  • Whole Milk (1/2 cup): – Adds moisture and richness; feel free to substitute with almond milk for a dairy-free alternative.
  • Granulated Sugar (1/4 cup or 50g): – Sweetens the batter; for a healthier twist, consider honey or maple syrup.
  • Kosher Salt (1/2 tsp): – A key ingredient to balance sweetness and enhance flavor.
  • Vanilla Bean Paste (1/4 tsp) or Pure Vanilla Extract: – Infuses aromatic flavor; the paste offers an even richer note and lovely little specks.
  • Fresh Berries, Jam, and/or Confectioners’ Sugar: – Perfect for serving; they enhance both flavor and visual appeal of your Mini Dutch Baby Pancakes.

Step‑by‑Step Instructions for Mini Dutch Baby Pancakes

Step 1: Preheat Oven & Prepare Tin
Begin by placing a rack in the upper third of your oven and preheating it to 375°F (190°C). While it warms, grease a standard 12-cup muffin tin with vegetable oil, ensuring each cup is well-coated to facilitate easy removal later. Once greased, carefully place the muffin tin in the oven to heat; this step is crucial for achieving those magical, puffed-up Mini Dutch Baby Pancakes.

Step 2: Blend Batter
In your blender, add the large eggs, all-purpose flour, whole milk, granulated sugar, kosher salt, and vanilla. Blend the mixture on high speed for about 30-45 seconds until it becomes smooth and airy. To enhance the texture, allow the batter to rest for 5-10 minutes before using. This brief pause will let the flavors meld and improve the consistency of your Mini Dutch Baby Pancakes.

Step 3: Fill Muffin Cups
Once the oven has reached temperature, carefully remove the hot muffin tin, taking care to avoid burns. Quickly pour the rested batter into each muffin cup, filling them about halfway full. Listen for that satisfying sizzle as the batter meets the hot tin, which is key for achieving a delightful puff as they bake—your anticipation for the Mini Dutch Baby Pancakes will rise!

Step 4: Bake
Return the filled muffin tin to the oven and bake for 20-25 minutes without opening the door. Keep an eye on them as they bake, watching for their stunning transformation; they should puff significantly and turn a beautiful golden brown when done. Resist the urge to peek, as this could deflate the pancakes before they achieve their lofty, airy form.

Step 5: Serve
After baking, carefully transfer your Mini Dutch Baby Pancakes to a serving platter. They will deflate slightly as they cool, so serve immediately to retain that cloud-like charm. Top them generously with fresh berries, a dollop of jam, and a dusting of confectioners’ sugar for an eye-catching and delicious presentation. Get ready to delight everyone at the table!

Mini Dutch Baby Pancakes Variations & Substitutions

Feel free to get creative with your Mini Dutch Baby Pancakes; the possibilities are endless!

  • Savory Twist: Omit the sugar and vanilla; top with cheese, sautéed veggies, or crispy bacon for a delicious breakfast alternative.
  • Gluten-Free: Substitute all-purpose flour with a gluten-free flour blend for a delightful, gluten-free version everyone can enjoy.
  • Dairy-Free: Use almond milk or oat milk instead of whole milk to create a lighter, dairy-free pancake option that’s just as fluffy.
  • Sweetener Swap: Try using maple syrup or honey in place of granulated sugar for a more natural sweetness that enhances the flavor.
  • Flavor Boost: Add a pinch of cinnamon or nutmeg to the batter for a warm, aromatic twist that transforms your breakfast experience.
  • Fruit-Filled: Fold in blueberries, raspberries, or even chocolate chips before baking for a delicious burst of flavor in every bite.
  • Lemon Zest: Brighten your pancakes with a little lemon zest in the batter; it adds a refreshing citrus note that pairs perfectly with berries.
  • Herb Infusion: Experiment with fresh herbs like chopped rosemary or thyme in the savory version to elevate the flavor profile and impress your guests.

Whether you’re switching things up or trying a new twist, you could also consider pairing these delightful pancakes with a side of Mini Tropical Pavlovas for an unforgettable brunch! Enjoy discovering your favorite combinations!

What to Serve with Magical Mini Dutch Baby Pancakes

Elevate your breakfast experience with delightful accompaniments that bring out the charm of these fluffy bites.

  • Fresh Berries: – Juicy and vibrant, fresh berries provide a burst of color and natural sweetness, balancing the lightness of the pancakes beautifully.

  • Maple Syrup: – A drizzle of rich maple syrup enhances the warm flavors with its sweet, caramel notes, turning each bite into a comforting delight.

  • Greek Yogurt: – Creamy and tangy, Greek yogurt adds a delightful creaminess and protein boost, making your breakfast even more substantial.

  • Whipped Cream: – Light and airy, whipped cream can elevate your pancakes into a lovely dessert option—perfect for brunch parties or a special treat.

Pair with a cup of herbal tea or fresh-squeezed orange juice, and you've got a breakfast that feels luxurious yet is effortlessly simple!

Make Ahead Options

These Mini Dutch Baby Pancakes are fantastic for meal prep, allowing you to enjoy a delightful breakfast with minimal morning effort! You can prepare the batter up to 24 hours in advance; simply blend all the ingredients and store it in an airtight container in the refrigerator. Additionally, you can grease the muffin tin and preheat it, so when you're ready to bake, just pour the batter into the hot cups. For optimal quality, make sure to give the batter a gentle stir before filling to reincorporate any settled ingredients. When it’s time to enjoy, bake them straight from the refrigerator for about 20-25 minutes, and you’ll have cloud-like Mini Dutch Baby Pancakes that are just as delicious as if made fresh!

Expert Tips for Mini Dutch Baby Pancakes

  • Room Temperature Ingredients: Ensure eggs and milk are at room temperature for a smoother batter. This helps create the best texture for your Mini Dutch Baby Pancakes.

  • Preheat the Tin: Don’t skip heating the muffin tin! This step is crucial to achieve that impressive puff. A hot tin ensures your pancakes rise beautifully.

  • No Peeking While Baking: Resist opening the oven door while they bake. Each peek can release steam and cause the pancakes to deflate, ruining the airy texture.

  • Uniform Filling: Evenly distribute the batter in your muffin cups for consistent puffing. Aim for about half full to give them room to expand without overflowing.

  • Experiment with Toppings: Explore various toppings! Sweet options like fresh fruits, whipped cream, or savory alternatives like cheese and herbs can bring new flavors to your Mini Dutch Baby Pancakes.

How to Store and Freeze Mini Dutch Baby Pancakes

Fridge: Store leftover Mini Dutch Baby Pancakes in an airtight container for up to 2 days. Ensure they are completely cooled before sealing to prevent moisture buildup.

Freezer: For longer storage, freeze the pancakes individually, then place them in a freezer bag or container for up to 2 months. This helps retain their fluffy texture when thawed.

Reheating: To reheat, pop the pancakes in a preheated oven at 350°F (175°C) for about 5-10 minutes, or until warmed through. Avoid microwaving, as this can make them chewy.

Serving Fresh: While they can be stored, Mini Dutch Baby Pancakes are best enjoyed fresh from the oven for that delightful puff and airy texture!

Mini Dutch Baby Pancakes Recipe FAQs

What type of oil should I use for greasing the muffin tin?
Absolutely! Vegetable oil is a great choice for greasing the muffin tin, ensuring easy release of your Mini Dutch Baby Pancakes. If you prefer alternatives, coconut oil or any high-heat oil also works well.

How can I tell if my eggs are at room temperature?
Very! Room temperature eggs should not feel chilly to the touch. To quickly warm them up, place the eggs in a bowl of warm water for about 5-10 minutes, allowing you to whip up that creamy batter even faster.

How should I store leftover Mini Dutch Baby Pancakes?
Leftover Mini Dutch Baby Pancakes should be stored in an airtight container in the fridge. They can be kept for up to 2 days. Be sure to let them cool completely before sealing to prevent any moisture buildup.

Can I freeze Mini Dutch Baby Pancakes? How?
Yes, and it's quite easy! To freeze, first, let the pancakes cool completely. Then, place them in a single layer on a baking sheet and freeze for about 1-2 hours until solid. After that, transfer them to a freezer bag or airtight container and store for up to 2 months. When you're ready to enjoy, simply reheat them in a preheated oven at 350°F (175°C) for about 5-10 minutes.

What toppings can I use for Mini Dutch Baby Pancakes?
Endless customization! Sweet toppings like fresh berries, jam, or whipped cream make for delightful options. If you're in the mood for something savory, try adding cheese, herbs, or crispy bacon for a unique twist that'll make your breakfast truly special.

Are Mini Dutch Baby Pancakes suitable for kids with food allergies?
Very! You can easily adapt the recipe for dietary considerations. For gluten-free options, just substitute regular flour with a gluten-free blend. If you're catering for dairy allergies, almond milk can replace whole milk, and you can skip the powdered sugar when serving. Always check for any specific allergies with your family and friends!

Mini Dutch Baby Pancakes

Irresistibly Fluffy Mini Dutch Baby Pancakes for Easy Mornings

Mini Dutch Baby Pancakes are a delightful twist on traditional pancakes, easy to make and perfect for family breakfasts.
Print Recipe Pin Recipe
Prep Time 10 minutes mins
Cook Time 25 minutes mins
Resting Time 10 minutes mins
Total Time 45 minutes mins
Servings: 4 pancakes
Course: Breakfast
Cuisine: American
Calories: 100
Ingredients Equipment Method Nutrition Notes

Ingredients
  

  • 2 tbsp Vegetable Oil Used to grease the muffin tin; substitute with coconut oil or any high-heat oil.
  • 4 large Eggs Use room temperature eggs for better emulsion.
  • 2/3 cup All-Purpose Flour For gluten-free, use a gluten-free flour blend.
  • 1/2 cup Whole Milk Substitute with almond milk for a dairy-free option.
  • 1/4 cup Granulated Sugar For a healthier twist, consider honey or maple syrup.
  • 1/2 tsp Kosher Salt Balances sweetness.
  • 1/4 tsp Vanilla Bean Paste or Pure Vanilla Extract Infuses flavor; paste offers richer notes.
  • Fresh Berries, Jam, and/or Confectioners’ Sugar For serving.

Equipment

  • Blender
  • Muffin tin
  • Oven

Method
 

  1. Preheat the oven to 375°F (190°C) and grease a 12-cup muffin tin.
  2. In a blender, combine the eggs, flour, milk, sugar, salt, and vanilla. Blend until smooth and airy.
  3. Let the batter rest for 5-10 minutes before pouring into the heated muffin cups halfway.
  4. Bake the pancakes for 20-25 minutes without opening the oven door.
  5. Remove and serve immediately, topped with berries, jam, or confectioners’ sugar.

Nutrition

Serving: 1pancakeCalories: 100kcalCarbohydrates: 12gProtein: 4gFat: 4gSaturated Fat: 1gMonounsaturated Fat: 2gCholesterol: 90mgSodium: 100mgPotassium: 100mgSugar: 5gVitamin A: 200IUCalcium: 50mgIron: 1mg

Notes

Best served fresh but can be stored in the fridge for up to 2 days or frozen for 2 months.

Tried this recipe?

Let us know how it was!

Creamy Savory Oatmeal Bowl for a Cozy, Nutritious Start

May 22, 2026 by Grace Snow Leave a Comment

The enticing scent of toasted oats and savory goodness wafts through my kitchen, making it impossible to resist. I’ve traded sugary cereals for something far more comforting: my Creamy Savory Oatmeal Bowl. This 5-ingredient marvel is more than just a warm meal; it’s a nourishing breakfast delight that seamlessly fits into busy mornings or relaxed brunches alike. Packed with protein and fiber, this healthy spin on oatmeal is easily customizable—so you can use whatever ingredients you have on hand. Whether you’re in need of a quick, hassle-free breakfast or looking to impress brunch guests with something unique, this recipe has got you covered. Are you ready to transform your mornings with a bowl that’s not just filling but also flavorful? Let’s get cooking!

Why is This Oatmeal Bowl Unforgettable?

Simplicity at its Core: Only 5 key ingredients make this creamy savory oatmeal bowl a breeze to whip up any day of the week.

Warm, Comforting Dish: The silky texture is like a warm hug for your morning routine—perfect for cozying up before the day begins.

Nutritious & Filling: With high protein and fiber content, this dish provides lasting energy without the sugar rush.

Versatile Delight: Feel free to customize with your favorite veggies, proteins, or spices. From a poached egg to sautéed spinach, the options are endless!

Crowd-Pleasing Appeal: Whether you’re treating yourself or impressing guests, this bowl transforms breakfast into an inviting experience that everyone will love.

If you're interested in more nutritious breakfast ideas, check out our Acai Bowl Nutritious or Pitaya Smoothie Bowl for refreshing options!

Creamy Savory Oatmeal Bowl Ingredients

For the Oat Base
• Rolled Oats – The backbone of your dish, providing essential fiber and a comforting texture. Substitute with steel-cut oats for a chewier bite, but increase cooking time.
• Broth or Water – This liquid is vital for cooking the oats; use vegetable or chicken broth for added flavor, creating a tasty Creamy Savory Oatmeal Bowl.

For the Creaminess
• Cream Cheese – The star ingredient for that indulgent, creamy texture; swap for a dairy-free cream cheese to keep it light.
• Parmesan Cheese – Adds umami richness and boosts protein content; for a dairy-free version, nutritional yeast works beautifully.

For Flavor Enhancement
• Garlic Powder – A pinch brings a burst of flavor without adding calories; fresh minced garlic can also be used for a robust kick.

Step‑by‑Step Instructions for Creamy Savory Oatmeal Bowl

Step 1: Prep Oats
In a medium saucepan, combine 1 cup of rolled oats and 2 cups of broth or water over medium heat. Stir the mixture gently to ensure the oats are evenly distributed. As the heat rises, the liquid will begin to bubble, indicating that it’s time to move on to the next step in making your Creamy Savory Oatmeal Bowl.

Step 2: Cook Oats
Bring the mixture to a gentle simmer, stirring frequently to prevent sticking. Cook for about 5 to 10 minutes, until the oats have absorbed most of the liquid and have a creamy consistency. You’ll know it’s done when the oats become plump and tender, providing a delightful base for your savory breakfast.

Step 3: Incorporate Creaminess
Once the oats reach the desired creamy texture, remove the saucepan from heat. Stir in 2 tablespoons of cream cheese and a teaspoon of garlic powder. Keep stirring until the cream cheese is fully melted and the mixture is silky smooth. This step is crucial for achieving the rich essence of your Creamy Savory Oatmeal Bowl.

Step 4: Adjust Consistency
After mixing in cream cheese, evaluate the thickness of your oatmeal. If it seems too thick for your liking, add a splash of water or broth to reach your desired consistency. Stir well and return to low heat for another minute if needed, ensuring every bite of the Creamy Savory Oatmeal Bowl is perfect for your palate.

Step 5: Serve Warm
Transfer the creamy oatmeal into a serving bowl and enjoy it warm. Feel free to elevate your dish by adding toppings such as a soft-boiled egg, sautéed spinach, or a sprinkle of chili flakes. Each addition enhances the experience, making your Creamy Savory Oatmeal Bowl a delightful and nutritious start to your day.

Make Ahead Options

These Creamy Savory Oatmeal Bowls are perfect for busy weeknights or rushed mornings! You can prepare the oat base with broth or water up to 24 hours in advance; just refrigerate it in an airtight container. Additionally, you can whisk in the cream cheese and garlic powder just before serving to maintain that silky texture. To avoid any clumping, store the oats separately from liquid and stir in a splash of water or broth when reheating. When you’re ready to enjoy your meal, simply warm the oatmeal on the stovetop or in the microwave, and savor a nutritious bowl that feels just as comforting as when you first made it.

What to Serve with Creamy Savory Oatmeal Bowl

Transform your breakfast into a hearty feast by pairing this savory delight with complementary dishes that enhance its comforting flavors.

  • Sautéed Spinach: The earthiness of sautéed spinach adds a nutritious burst to your bowl, balancing its creamy texture.

  • Soft-Boiled Eggs: A perfectly cooked soft-boiled egg introduces a rich, velvety layer that enhances the overall experience. The melding of flavors is simply divine.

  • Avocado Toast: Creamy avocado on crunchy bread echoes the textures and provides healthy fats, making for a lovely contrast in both flavor and bite.

  • Roasted Cherry Tomatoes: Sweet, tangy roasted tomatoes can add brightness and color, elevating the dish while introducing a hint of acidity.

  • Chili Flakes: For those who enjoy a bit of heat, a sprinkle of chili flakes brings a zesty kick that beautifully contrasts the creamy bowl.

  • Fruit Salad: A fresh fruit salad can provide a refreshing end to your breakfast, cleansing the palate with natural sweetness and juicy textures.

  • Fresh Herbs: Topping the oatmeal bowl with fresh herbs like chives or parsley elevates its profile, adding freshness and a touch of green.

  • Herbal Tea: Complement your meal with a soothing cup of herbal tea, creating a warm, welcoming atmosphere that invites relaxation.

Creamy Savory Oatmeal Bowl Adaptations

Indulge your culinary creativity and transform this recipe into a personalized masterpiece that speaks to your taste buds.

  • Dairy-Free: Substitute cream cheese with vegan cream cheese for a luscious, dairy-free delight.

  • Extra Protein: Mix in a soft-boiled egg or sautéed tofu for an added protein punch that brings heartiness to each bite.

  • Herb Infusion: Add fresh herbs like chives or parsley to brighten the flavor profile and elevate your oatmeal bowl with garden-fresh vibrance.

  • Spice It Up: Incorporate chili flakes or a dash of hot sauce for those who crave a delightful kick in their breakfast.

  • Veggie-Licious: Toss in sautéed greens such as spinach or kale, or even roasted bell peppers, for a nutritious textural twist.

  • Flavor Variations: Experiment with different broths—chicken, beef, or vegetable—and discover how each one adds its own unique flavor layer to your bowl.

  • Savory Toppings: Sprinkle the bowl with crispy bacon or spicy sausage for a satisfying crunch and meaty richness—perfect for meat lovers!

If you're eager for more delicious breakfast ideas, consider trying out our Seafood Pasta Savory or warming up with Fish Taco Bowls. Your mornings deserve an upgrade!

Tips for the Best Creamy Savory Oatmeal Bowl

  • Use Rolled Oats: Opt for rolled oats since they create the best texture. Instant oats will turn mushy, ruining your creamy savory oatmeal bowl.

  • Flavorful Liquid: For richer flavor, cook your oats in broth instead of water. This small change elevates the entire dish.

  • Stir Frequently: Avoid scorching by stirring the oats often during cooking. This keeps them smooth and prevents sticking to the pot.

  • Customize Wisely: Don’t hesitate to add toppings! Soft-boiled eggs or sautéed veggies complement the creamy savory oatmeal bowl perfectly.

  • Adjust Thickness: If your oatmeal is too thick after mixing in cream cheese, add a splash of warm broth or water to achieve your desired consistency.

How to Store and Freeze Creamy Savory Oatmeal Bowl

Fridge: Store leftover creamy savory oatmeal bowl in an airtight container for up to 2 days. Reheat by adding a splash of water or broth to maintain its creamy texture.

Freezer: For longer storage, freeze portions in airtight containers for up to 2 months. Thaw in the refrigerator overnight before reheating.

Reheating: When reheating, add a little liquid to restore creaminess, stirring as you heat on the stove or in the microwave.

Notes: Avoid freezing if you’ve added delicate toppings, such as eggs or greens, as they may not retain their texture once thawed.

Creamy Savory Oatmeal Bowl Recipe FAQs

How do I choose the best ingredients for my Creamy Savory Oatmeal Bowl?
Absolutely! When selecting your rolled oats, opt for regular rolled oats over instant ones to avoid a mushy texture. For creaminess, I recommend using full-fat cream cheese or a vegan alternative if you prefer dairy-free. The broth or water should be fresh and flavorful—using broth adds a fantastic richness to the oatmeal. Always feel free to taste-test your broth before cooking to ensure it complements the dish well!

What’s the best way to store leftovers of the Creamy Savory Oatmeal Bowl?
Very! Transfer any leftover oatmeal into an airtight container and store it in the refrigerator. It will stay fresh for up to 2 days. When reheating, always add a splash of water or broth to rejuvenate its creamy texture. Give it a good stir as you heat it up on the stovetop or in the microwave to bring back that silky consistency.

Can I freeze the Creamy Savory Oatmeal Bowl?
Certainly! To freeze your oatmeal, portion it out into airtight containers and ensure you have no toppings added, as they might not freeze well. You can store it for up to 2 months. When you’re ready to enjoy it, simply thaw in the refrigerator overnight, then reheat on the stove, adding a bit of liquid to get that creaminess back!

What if my oatmeal turns out too thick or lumpy?
It happens to the best of us! If you find that your Creamy Savory Oatmeal Bowl has become too thick after mixing in the cream cheese, don’t worry. Just add a splash of warm broth or water and gently stir over low heat until you reach your desired consistency. This little adjustment can transform an overly thick bowl into a luscious, creamy delight again!

Are there any dietary considerations I should be aware of for this recipe?
Absolutely! This Creamy Savory Oatmeal Bowl is versatile. To accommodate gluten sensitivities, ensure that your rolled oats are certified gluten-free. If you're catering to dietary preferences, try substituting the cream cheese with vegan options and using nutritional yeast instead of Parmesan for a dairy-free version. Always taste-test ingredients like broth, as some varieties can contain allergens or ingredients that may not suit everyone's dietary needs.

Creamy Savory Oatmeal Bowl

Creamy Savory Oatmeal Bowl for a Cozy, Nutritious Start

This Creamy Savory Oatmeal Bowl offers a nutritious and comforting start to your day with just 5 ingredients.
Print Recipe Pin Recipe
Prep Time 5 minutes mins
Cook Time 10 minutes mins
Total Time 15 minutes mins
Servings: 1 bowl
Course: Breakfast
Cuisine: American
Calories: 350
Ingredients Equipment Method Nutrition Notes

Ingredients
  

For the Oat Base
  • 1 cup Rolled Oats Substitute with steel-cut oats for a chewier bite.
  • 2 cups Broth or Water Use vegetable or chicken broth for added flavor.
For the Creaminess
  • 2 tablespoons Cream Cheese Swap for dairy-free cream cheese if desired.
  • 1 teaspoon Parmesan Cheese Nutritional yeast can be used for a dairy-free version.
For Flavor Enhancement
  • 1 teaspoon Garlic Powder Fresh minced garlic can also be used.

Equipment

  • Medium saucepan

Method
 

Step‑by‑Step Instructions for Creamy Savory Oatmeal Bowl
  1. In a medium saucepan, combine 1 cup of rolled oats and 2 cups of broth or water over medium heat.
  2. Bring the mixture to a gentle simmer, stirring frequently to prevent sticking. Cook for about 5 to 10 minutes, until the oats have absorbed most of the liquid.
  3. Once the oats are creamy, remove from heat and stir in 2 tablespoons of cream cheese and 1 teaspoon of garlic powder.
  4. Evaluate the thickness; if too thick, add a splash of water or broth. Stir well and return to low heat if needed.
  5. Transfer the creamy oatmeal into a serving bowl and enjoy it warm, adding toppings if desired.

Nutrition

Serving: 1bowlCalories: 350kcalCarbohydrates: 40gProtein: 12gFat: 15gSaturated Fat: 8gPolyunsaturated Fat: 2gMonounsaturated Fat: 5gCholesterol: 30mgSodium: 600mgPotassium: 300mgFiber: 7gSugar: 2gVitamin A: 500IUCalcium: 150mgIron: 2mg

Notes

Store leftover oatmeal in an airtight container for up to 2 days. For longer storage, freeze portions for up to 2 months. Reheat by adding a splash of liquid to restore creaminess.

Tried this recipe?

Let us know how it was!

Creamy Cinnamon Roll Overnight Oats for a Cozy Breakfast

May 22, 2026 by Grace Snow Leave a Comment

As I stood in my kitchen one busy morning, the allure of cinnamon rolls danced through my thoughts, tempting me for a sweet breakfast escape. With my love for a wholesome meal that doesn’t require hours of prep, I decided to transform that craving into something even better: Creamy Cinnamon Roll Overnight Oats. This delightful recipe offers a quick and nourishing breakfast option, ideal for those hectic days when time is scarce. Not only is it effortlessly customizable to suit your dietary needs—think gluten-free or vegan—but it also delivers that creamy, indulgent texture we all adore. It’s like waking up to the comforts of freshly baked pastries without the fuss! Are you ready to create a cozy breakfast that feels like a warm hug?

Why Will You Love This Recipe?

Effortless Preparation: Just mix, refrigerate, and enjoy! This recipe is perfect for busy individuals looking for a quick yet satisfying breakfast solution.

Creamy Indulgence: The combination of Greek yogurt or cottage cheese with rolled oats creates a luscious texture that mimics your favorite cinnamon roll, but in a wholesome format.

Versatile Options: Feel free to tailor the flavors by adding pumpkin puree in fall or adjusting sweeteners to your taste—your creativity knows no bounds!

Healthy Choice: Packed with fiber, protein, and good-for-you ingredients, these oats are a nutritious twist on a classic treat, making them suitable for many dietary preferences, including gluten-free and vegan.

Crowd-Pleasing Appeal: With a comforting cinnamon flavor, these oats are sure to become a family favorite, making breakfast an enjoyable affair for everyone!

Creamy Cinnamon Roll Overnight Oats Ingredients

For the Oats Base
• Rolled Oats – Use rolled oats for the best texture as they absorb liquid without becoming mushy.
• Greek Yogurt or Cottage Cheese – Adds a creamy texture and protein boost; blend cottage cheese for a smoother consistency.
• Almond Milk – The main liquid for soaking; any milk (dairy or non-dairy) works great as a substitute.

For Sweetness and Flavor
• Maple Syrup – A natural sweetener that enhances flavor; feel free to adjust to your liking or use honey for a different taste.
• Cinnamon – The heart of this recipe; opt for fresh ground cinnamon for optimal flavor reminiscent of cinnamon rolls.
• Vanilla Extract – Elevates the flavor; choose pure vanilla for a more robust taste.
• Pinch of Salt – Balances sweetness and boosts the overall flavor profile of the oats.

With these Creamy Cinnamon Roll Overnight Oats ingredients, you're on your way to enjoying a cozy breakfast that’s both delightful and easy to make!

Step‑by‑Step Instructions for Creamy Cinnamon Roll Overnight Oats

Step 1: Mix Ingredients
In a medium bowl or a mason jar, thoroughly combine rolled oats, Greek yogurt or cottage cheese, almond milk, maple syrup, cinnamon, vanilla extract, and a pinch of salt. Stir until all ingredients are well-blended, ensuring the oats are evenly coated. This creates a creamy mixture that will transform overnight, taking just a few minutes to prep.

Step 2: Blend for Smoothness
If you opt for cottage cheese for added creaminess, blend it briefly in a food processor before adding it to the oats mixture. This step is key to achieving that silky texture reminiscent of a delicious cinnamon roll. Blend until smooth and then incorporate it into your oats, merging flavors seamlessly for the ultimate creamy consistency.

Step 3: Refrigerate
Seal the jar or cover your bowl tightly with plastic wrap, then place it in the refrigerator for at least 6 hours, or preferably overnight. This resting period allows the oats to absorb the liquid, becoming tender and exceptionally creamy. When you return, you’ll find a thick, pudding-like breakfast waiting for you, ready to be enjoyed.

Step 4: Serve
The next morning, give your Creamy Cinnamon Roll Overnight Oats a good stir. If the mixture is thicker than you prefer, feel free to add more almond milk to reach your desired consistency. Portion it into serving bowls or enjoy directly from the jar, adding any toppings like fresh fruit, nuts, or a sprinkle of extra cinnamon for an appealing finish.

Make Ahead Options

These Creamy Cinnamon Roll Overnight Oats are a fantastic option for meal prep, allowing you to savor a delicious breakfast while saving valuable time in your busy mornings. You can prepare the oats mixture up to 3 days in advance, simply combining rolled oats, Greek yogurt or cottage cheese, almond milk, maple syrup, cinnamon, vanilla extract, and salt in a jar or bowl. Just seal it tightly to maintain freshness. When you're ready to enjoy, stir well, adding a splash of milk if needed to achieve your desired consistency. By prepping these oats ahead of time, you'll wake up to a creamy, satisfying breakfast that tastes just as delightful as freshly baked cinnamon rolls!

Expert Tips for Creamy Cinnamon Roll Overnight Oats

  • Use Rolled Oats: The best texture comes from rolled oats; quick oats can get mushy and ruin your creamy experience.

  • Blending is Key: If using cottage cheese, blending it before adding ensures a silky smooth mixture. Don’t skip this step!

  • Sweetness Balance: Carefully adjust your maple syrup to enhance the cinnamon flavor without overwhelming it. Less is more!

  • Microwave Option: For a warm breakfast, microwave your oats for a minute with a splash of almond milk. Stir and enjoy!

  • Stay Organized: Store your Creamy Cinnamon Roll Overnight Oats in sealed containers to keep them fresh for up to 3 days.

What to Serve with Creamy Cinnamon Roll Overnight Oats

As you prepare to savor the creamy goodness of cinnamon roll overnight oats, let’s build an unforgettable breakfast spread.

  • Fresh Fruit Medley: A bright mix of strawberries, blueberries, and bananas adds a refreshing burst of sweetness that contrasts beautifully with the creamy texture.

  • Crunchy Granola: Sprinkle some homemade or store-bought granola on top to introduce a delightful crunch, enhancing the overall mouthfeel of your dish.

  • Nut Butter Swirl: Drizzles of almond or peanut butter offer a rich, nutty taste that complements the cinnamon flavors and packs in healthy fats.

  • Greek Yogurt Parfait: Serve alongside a Greek yogurt parfait layered with honey and nuts for an extra dose of protein and creamy indulgence.

  • Maple Pecan Scones: These warm scones add a touch of sweetness and a flaky texture, making your breakfast something truly special.

  • Spiced Chai Tea: A steaming cup of spiced chai perfectly matches the cinnamon notes, wrapping you in warmth and comfort.

Each suggestion enhances the café-like experience of your breakfast, ensuring every bite feels like a moment of indulgence. Embrace the rich flavors, textures, and aromas that will make your morning truly magical!

How to Store and Freeze Creamy Cinnamon Roll Overnight Oats

Fridge: Store your Creamy Cinnamon Roll Overnight Oats in an airtight container in the refrigerator for up to 3 days. The flavors will develop and deepen as they sit, offering even more deliciousness.

Make-Ahead: Prepare your oats in advance and portion them into jars for easy grab-and-go breakfasts throughout the week. Just be sure to consume them within the 3-day window.

Freezer: If you want to enjoy this creamy treat later, consider freezing individual portions. Pack into freezer-safe containers, and they can last for up to 2 months. Thaw overnight in the fridge before enjoying.

Reheating: For a warm version of your oats, microwave for about 1-2 minutes. Add a splash of almond milk before reheating to achieve that silky, creamy texture once again.

Creamy Cinnamon Roll Overnight Oats Variations

Feel free to explore these tempting twists that will elevate your breakfast experience!

  • Pumpkin Spice: Stir in pumpkin puree and a dash of pumpkin spice for autumnal warmth.

  • Berry Bliss: Add fresh or frozen berries for a pop of color and fruity flavor—think raspberries or blueberries!

  • Nutty Crunch: Mix in chopped nuts or seeds for added texture and nutrients; almonds and walnuts are great choices.

  • Coconut Cream: Replace almond milk with coconut milk and top with toasted coconut for a tropical flair.

  • Chocolate Lover's Twist: Add cocoa powder or chocolate chips for a delightful chocolatey surprise.

  • Sweet and Spicy: Incorporate a touch of chai spice for a fragrant variation with a warming kick.

  • Maple Pecan Delight: Mix in chopped pecans and use maple syrup to enhance the nutty flavor profile.

For more delightful twists these Creamy Cinnamon Roll Overnight Oats, you can think about variations inspired by other popular recipes, like trying a cozy Pumpkin Cinnamon Roll flavor. Unleash your creativity with these options and make breakfast a fun culinary adventure every day!

Creamy Cinnamon Roll Overnight Oats Recipe FAQs

How do I know if my rolled oats are fresh enough to use?
Absolutely! Fresh rolled oats should have a pleasant aroma and a smooth, dry texture. If you notice any off-smells or if the oats have visible signs of moisture or mold, it’s best to toss them. Always store oats in a cool, dry place to keep them fresh longer.

What’s the best way to store my leftover Creamy Cinnamon Roll Overnight Oats?
Very good question! Keep your leftovers in an airtight container in the refrigerator for up to 3 days. The oats actually get creamier and more flavorful as they sit, making the next-day breakfast even more delicious!

Can I freeze my Creamy Cinnamon Roll Overnight Oats?
Absolutely! You can freeze individual portions of your overnight oats in freezer-safe containers for up to 2 months. When you’re ready to enjoy them, simply thaw them overnight in the fridge, then give them a good stir and add a splash of almond milk to restore the creamy texture.

What if my mixture is too thick after refrigerating?
Don’t worry, this happens to the best of us! If your oats are thicker than you’d like, simply add a splash of almond milk and stir well until you reach your desired consistency. Try to adjust the amount of liquid you use next time based on the thickness you prefer.

Are there any dietary restrictions I should be aware of with this recipe?
Great point! This recipe is quite versatile, but if you’re concerned about allergies, always double-check the label of your almond milk for potential allergens. For gluten-free options, ensure that the oats are certified gluten-free, and for vegan choices, use dairy-free yogurt alternatives instead of Greek yogurt or cottage cheese.

How can I add variety to my Creamy Cinnamon Roll Overnight Oats?
The more the merrier! You can create endless variations by adding a dollop of pumpkin puree and pumpkin spice in the fall, or mixing in seasonal fruits like berries or bananas for added flavor and nutrition. Don't hesitate to switch up sweeteners like honey or agave syrup as well!

Creamy Cinnamon Roll Overnight Oats

Creamy Cinnamon Roll Overnight Oats for a Cozy Breakfast

Enjoy a quick and nourishing morning meal with Creamy Cinnamon Roll Overnight Oats, ideal for busy days.
Print Recipe Pin Recipe
Prep Time 10 minutes mins
Refrigeration Time 6 hours hrs
Total Time 6 hours hrs 10 minutes mins
Servings: 2 bowls
Course: Breakfast
Calories: 350
Ingredients Equipment Method Nutrition Notes

Ingredients
  

For the Oats Base
  • 1 cup rolled oats Use rolled oats for best texture.
  • 1 cup Greek yogurt or cottage cheese Blend cottage cheese for smoother consistency.
  • 1 cup almond milk Any milk (dairy or non-dairy) works.
For Sweetness and Flavor
  • 2 tbsp maple syrup Adjust for sweetness to your liking.
  • 1 tbsp cinnamon Opt for fresh ground cinnamon.
  • 1 tsp vanilla extract Choose pure vanilla for robust flavor.
  • 1 pinch salt Balances sweetness.

Equipment

  • medium bowl
  • mason jar
  • Food Processor

Method
 

Step-by-Step Instructions
  1. In a medium bowl or a mason jar, thoroughly combine rolled oats, Greek yogurt or cottage cheese, almond milk, maple syrup, cinnamon, vanilla extract, and a pinch of salt.
  2. Blend cottage cheese briefly in a food processor before adding it to the oats mixture for a silky texture.
  3. Seal the jar or cover your bowl tightly with plastic wrap, then place it in the refrigerator for at least 6 hours or overnight.
  4. The next morning, give your oats a good stir and add more almond milk if needed to reach your desired consistency.

Nutrition

Serving: 1bowlCalories: 350kcalCarbohydrates: 60gProtein: 12gFat: 9gSaturated Fat: 2gCholesterol: 10mgSodium: 150mgPotassium: 300mgFiber: 8gSugar: 15gVitamin A: 200IUVitamin C: 1mgCalcium: 200mgIron: 2mg

Notes

Store in airtight containers for up to 3 days. You can freeze individual portions for up to 2 months.

Tried this recipe?

Let us know how it was!

Cottage Cheese Banana Bread for a Guilt-Free Indulgence

May 21, 2026 by Grace Snow Leave a Comment

When I first sliced into my Cottage Cheese Banana Bread, I was greeted by the mouthwatering aroma of baked bananas and warm spices that filled my kitchen. This delightful gluten-free creation is perfect for breakfast or a midday snack, boasting a unique twist with the addition of cottage cheese for extra moisture and protein. Not only does this recipe keep the sugar content low, making it a guilt-free indulgence, but it’s also incredibly easy to whip up—just mix, pour, and bake! Whether you're a seasoned home-chef or a kitchen newbie, this high-protein banana bread will satisfy your cravings while you embrace healthier eating habits. Curious how such a simple loaf can be so satisfying? Let’s get baking!

Why is Cottage Cheese Banana Bread a Must-Try?

Unique Twist: Cottage cheese adds a delightful creaminess and boosts the protein content, making this bread more filling than traditional recipes.
Guilt-Free Indulgence: With lower sugar and gluten-free ingredients, you can enjoy a sweet treat without the extra calories.
Quick and Easy: Minimal prep and no yeast required—just mix, pour, and bake!
Versatile Variations: Feel free to add chocolate chips, nuts, or even swap banana for applesauce for different flavors.
Perfect for Any Occasion: Whether for breakfast, a snack, or even dessert, this Cottage Cheese Banana Bread fits every craving gracefully!

Cottage Cheese Banana Bread Ingredients

For the Batter

  • Ripe Bananas – Use overripe bananas for the best sweetness and moisture in your Cottage Cheese Banana Bread.
  • Cottage Cheese – Enhances moisture and adds protein, making it a nutritious choice for guilt-free baking.
  • Eggs – Binds ingredients together; make sure they’re at room temperature for even mixing.
  • Maple Syrup – A natural sweetener that adds rich flavor; honey can be swapped if preferred.
  • Vanilla Extract – Use pure extract for an aromatic touch that elevates the flavor.
  • Almond Flour – Serves as the gluten-free base; remember it’s not a direct 1:1 substitute for all-purpose flour.
  • Baking Soda – Acts as a leavening agent, allowing your bread to rise without yeast.
  • Cinnamon – Infuses warm spice notes; feel free to adjust according to your taste.

Optional Add-ins

  • Chocolate Chips – For a sweet touch; they add texture and indulgence to the bread.
  • Nuts – Walnuts or pecans provide crunch and richness; toss them in for extra flavor.
  • Applesauce – A tasty banana substitute for a different fruity twist and moisture.
  • Nutmeg or Vanilla Bean Paste – Add these for an extra layer of deliciousness to your batter.

With these simple ingredients, you’ll create a delightful loaf that’s sure to impress—get ready to enjoy your Cottage Cheese Banana Bread!

Step‑by‑Step Instructions for Cottage Cheese Banana Bread

Step 1: Preheat the Oven
Start by preheating your oven to 350°F (175°C). While the oven warms up, prepare a standard loaf pan by greasing it with butter or lining it with parchment paper. This will ensure that your Cottage Cheese Banana Bread slides out smoothly after baking.

Step 2: Mash the Bananas
In a large mixing bowl, take your ripe bananas and mash them using a fork or a potato masher until you achieve a smooth consistency with no lumps. This should take about 2-3 minutes. The riper the bananas are, the sweeter your bread will be, creating a delightful base for the flavors to shine.

Step 3: Mix Wet Ingredients
Add the cottage cheese, eggs, maple syrup, and vanilla extract to the mashed bananas. Using a whisk, mix these ingredients together until they are thoroughly combined and creamy, which should take about 2 minutes. The cottage cheese adds moisture and a protein boost, enriching the Cottage Cheese Banana Bread’s texture.

Step 4: Combine Dry Ingredients
In a separate bowl, sift together the almond flour, baking soda, and cinnamon. Stir these dry ingredients gently to distribute the baking soda evenly. This step is crucial as it helps the bread rise properly and ensures the flavors meld together beautifully in your Cottage Cheese Banana Bread.

Step 5: Incorporate Dry and Wet Mixtures
Gradually add your dry mixture to the wet ingredients, folding them together with a spatula. Mix just until combined; be careful not to overmix, as this can lead to a denser bread. The batter should remain slightly lumpy, ensuring a light texture in your Cottage Cheese Banana Bread.

Step 6: Transfer to Loaf Pan
Pour the batter into your prepared loaf pan, using a spatula to smooth the top. Make sure to scrape the sides of the bowl to capture every bit of the delicious mixture. This will give your Cottage Cheese Banana Bread a nice even surface to brown beautifully as it bakes.

Step 7: Bake the Bread
Place the loaf pan in the preheated oven and bake for approximately 50-60 minutes. Check for doneness by inserting a toothpick into the center; it should come out clean or with a few moist crumbs. The top should be golden brown and slightly springy to the touch, signaling a perfectly baked loaf.

Step 8: Cool and Serve
Once baked, remove the loaf from the oven and let it cool in the pan for about 10 minutes. Then, carefully transfer it to a wire rack to cool completely. This allows the Cottage Cheese Banana Bread to set nicely, making it easy to slice and enjoy either warm or at room temperature!

How to Store and Freeze Cottage Cheese Banana Bread

Room Temperature: Store leftover Cottage Cheese Banana Bread in an airtight container at room temperature for up to 3 days to maintain its moistness.

Fridge: For longer freshness, you can refrigerate the bread in an airtight container for up to 5 days. Be sure to let it cool completely before storing.

Freezer: Wrap individual slices in plastic wrap and place them in a freezer-safe bag to freeze. They can be stored for up to 3 months; just thaw overnight in the fridge before enjoying.

Reheating: To enjoy warm slices, simply microwave for 10-15 seconds or toast in a toaster oven for a few minutes for that fresh-baked taste.

Helpful Tricks for Cottage Cheese Banana Bread

  • Banana Selection: Use very ripe bananas with brown spots for maximum sweetness and moisture. This ensures your Cottage Cheese Banana Bread is perfectly flavorful.

  • Smooth Texture: If you prefer a creamier texture, blend the cottage cheese until smooth before adding it to the batter. This minimizes lumps and enhances the overall mouthfeel.

  • Mixing Gently: Be cautious not to overmix your batter. Mixing until just combined keeps the Cottage Cheese Banana Bread fluffy and light.

  • Check for Doneness: Start checking your bread 5-10 minutes before the minimum bake time. An overbaked loaf can become dry instead of moist and tender.

  • Cooling Time: Allow the bread to cool in the pan for a bit before transferring it to a wire rack. This helps maintain its structure and makes slicing easier.

What to Serve with Cottage Cheese Banana Bread

Creating a delightful meal doesn’t stop at just baking—let your Cottage Cheese Banana Bread shine by pairing it with scrumptious sides and sips.

  • Creamy Yogurt Parfait: Layer yogurt with fresh fruits and a sprinkle of granola for a refreshing contrast to the sweet bread.

  • Nut Butter Spread: A rich spread of almond or peanut butter adds protein and a nutty flavor that perfectly complements the sweetness.

  • Fresh Fruit Salad: Juicy berries and citrus fruits brighten up the plate, bringing a burst of freshness alongside your warm loaf.

  • Coffee or Tea: A steaming cup of your favorite brew elevates the experience, providing warmth and depth to the sweet flavors.

  • Honey Drizzle: A light drizzle of honey enhances the sweetness, creating an inviting finish to every slice of banana bread.

  • Maple Syrup Dip: Serve a small dish of maple syrup as a dip, adding a touch of autumn sweetness that pairs beautifully with each bite.

Let these combinations inspire you to turn a single slice into a delightful, complete meal that invites warmth and comfort into your kitchen!

Make Ahead Options

These Cottage Cheese Banana Bread preparations are a fantastic way to simplify meal planning, especially for busy home cooks! You can mash the ripe bananas and mix them with the cottage cheese and other wet ingredients up to 24 hours in advance; just cover and refrigerate. The dry ingredients can be mixed and stored in an airtight container for up to 3 days at room temperature. When you're ready to bake, simply combine the wet and dry mixtures, pour the batter into the prepared loaf pan, and bake as directed. This method ensures that your Cottage Cheese Banana Bread is just as delicious and fresh, making your life easier without sacrificing flavor!

Cottage Cheese Banana Bread Variations

Feel free to let your creativity shine as you explore the fun and delicious twists you can add to your Cottage Cheese Banana Bread!

  • Nutty Addition: Toss in a handful of chopped walnuts or pecans to add texture and a delightful crunch. The nuts not only enhance the flavor but also contribute healthy fats.

  • Choco-Lover's Dream: Add half a cup of dark chocolate chips to the batter for a rich, indulgent twist. The result will be a sweet fusion that will satisfy your chocolate cravings!

  • Applesauce Swap: Substitute half of the mashed bananas with unsweetened applesauce for a unique flavor variation and a slightly different texture in your loaf. It keeps the moistness while dialing down the banana flavor.

  • Zesty Citrus: Incorporate the zest of one orange or lemon to the batter for a refreshing citrus note, transforming your banana bread into a zesty delight. Pair it with a light glaze for a lovely finish!

  • Dairy-Free Version: Instead of cottage cheese, use a vegan yogurt alternative to create a dairy-free version without sacrificing moisture or taste! Your friends will never guess it's dairy-free.

  • Spice It Up: Include a teaspoon of nutmeg or cardamom alongside the cinnamon for an aromatic profile that elevates the bread's flavor beyond the ordinary. It’s like a warm hug in loaf form!

  • Cream Cheese Swirl: For a decadent touch, mix softened cream cheese with a bit of honey and swirl it into your batter before baking. This addition will create delightful creamy pockets in every slice.

  • Hot & Spicy: If you enjoy a kick, add a pinch of cayenne pepper or some finely chopped jalapeños for a surprising heat that pairs beautifully with sweet bananas.

By incorporating these variations, you can create endless delightful versions of your Cottage Cheese Banana Bread! And while you’re at it, why not try pairing your slices with a side of Cheesy Garlic Bread or enjoy it with a bowl of fresh fruit akin to a Breakfast Banana Split? The possibilities are endless!

Cottage Cheese Banana Bread Recipe FAQs

What kind of bananas should I use for the best results?
Absolutely! For the sweetest and most flavorful Cottage Cheese Banana Bread, it's best to use overripe bananas. They should be soft with plenty of brown spots, which indicates high sugar content and enhanced flavor. This will significantly improve the sweetness of your bread without the need for additional sugar.

How should I store leftover Cottage Cheese Banana Bread?
For optimal freshness, I recommend storing leftover Cottage Cheese Banana Bread in an airtight container at room temperature for up to 3 days. If you prefer it a bit longer, refrigerate it for up to 5 days. Just make sure the bread is completely cool before wrapping it up to maintain its moist texture.

Can I freeze Cottage Cheese Banana Bread?
Yes, you can absolutely freeze Cottage Cheese Banana Bread! To do this, wrap individual slices tightly in plastic wrap and place them in a freezer-safe bag. It can be stored like this for up to 3 months. When you’re ready to enjoy, simply thaw a slice overnight in the fridge and reheat it in the microwave for about 10-15 seconds or toast it in a toaster oven for that freshly-baked experience.

What if my bread is too dense?
If your Cottage Cheese Banana Bread turns out dense, it could be from overmixing the batter. Remember to mix the wet and dry ingredients just until combined—some lumps are perfectly fine! Additionally, double-check that your baking soda is fresh, as old leavening agents won't help the bread rise properly.

Are there any dietary considerations with this recipe?
Very! This Cottage Cheese Banana Bread is gluten-free, as it uses almond flour instead of wheat flour. However, if you're serving it to those with dairy allergies or lactose intolerance, consider using a lactose-free cottage cheese or an alternative like Greek yogurt for moisture. Always be mindful of potential nut allergies as well since almond flour is the main ingredient.

Cottage Cheese Banana Bread

Cottage Cheese Banana Bread for a Guilt-Free Indulgence

Enjoy this Cottage Cheese Banana Bread, a gluten-free and low-sugar delight that boosts protein and moisture.
Print Recipe Pin Recipe
Prep Time 15 minutes mins
Cook Time 1 hour hr
Cooling Time 10 minutes mins
Total Time 1 hour hr 25 minutes mins
Servings: 10 slices
Course: Breakfast
Cuisine: American
Calories: 150
Ingredients Equipment Method Nutrition Notes

Ingredients
  

Batter
  • 3 medium ripe bananas Use overripe for best sweetness.
  • 1 cup cottage cheese Enhances moisture and adds protein.
  • 2 large eggs At room temperature for even mixing.
  • 1/3 cup maple syrup Natural sweetener; honey can be swapped.
  • 1 teaspoon vanilla extract Use pure extract for best flavor.
  • 1 cup almond flour Gluten-free base, not 1:1 substitute for all-purpose flour.
  • 1 teaspoon baking soda Leavening agent for rise.
  • 1 teaspoon cinnamon Adjust to taste.
Optional Add-ins
  • 1/2 cup chocolate chips For sweetness and texture.
  • 1/2 cup nuts Walnuts or pecans for crunch.
  • 1/2 cup applesauce Banana substitute for moisture.
  • 1/2 teaspoon nutmeg or vanilla bean paste For added flavor.

Equipment

  • Loaf pan
  • Mixing Bowl
  • Whisk
  • Spatula
  • Fork or potato masher

Method
 

Preparation
  1. Preheat the oven to 350°F (175°C) and prepare a loaf pan by greasing or lining it.
  2. Mash the ripe bananas until smooth using a fork or potato masher.
  3. Add cottage cheese, eggs, maple syrup, and vanilla extract to the mashed bananas; whisk until creamy.
  4. In a separate bowl, sift together almond flour, baking soda, and cinnamon.
  5. Gradually fold the dry mixture into the wet ingredients until just combined.
  6. Pour the batter into the prepared loaf pan and smooth the top.
  7. Bake in the preheated oven for 50-60 minutes; check for doneness.
  8. Let the bread cool in the pan for 10 minutes before transferring to a wire rack.

Nutrition

Serving: 1sliceCalories: 150kcalCarbohydrates: 20gProtein: 5gFat: 5gSaturated Fat: 1gCholesterol: 20mgSodium: 150mgPotassium: 200mgFiber: 2gSugar: 8gVitamin A: 50IUVitamin C: 5mgCalcium: 50mgIron: 1mg

Notes

For a creamier texture, blend the cottage cheese until smooth before adding to the batter. Use very ripe bananas for maximum sweetness and moisture. Avoid overmixing to keep the bread light and fluffy.

Tried this recipe?

Let us know how it was!

Delicious Cottage Cheese Crustless Quiche: Easy & Customizable

May 21, 2026 by Grace Snow Leave a Comment

“Guess what? A crustless quiche can be the ultimate breakfast hero!” When I first tried my Cottage Cheese Crustless Quiche, I was astonished by how easy it was to whip up this nutritious dish that fits right into my busy mornings. In less than an hour, you can savor a creamy, protein-rich delight that feels indulgent but is bursting with goodness. The beauty of this recipe lies in its versatility—customize it with your favorite fillings for a flavor experience tailored just for you. Whether you’re meal prepping for the week ahead or seeking a quick yet satisfying dinner option, this quiche has got you covered. Are you ready to elevate your breakfast game with this delightful, hassle-free recipe?

Why is Cottage Cheese Quiche a Must-Try?

Nutritious and Filling: Loaded with protein from cottage cheese and eggs, this quiche is a smart choice for a nourishing breakfast or brunch.

Quick Prep Time: You can whip this dish together in under an hour, making it an excellent option for busy mornings or impromptu dinners.

Customizable Flavor: Whether you’re leaning towards a veggie-packed delight or a meaty treat, simply switch out the fillings to suit your taste, just like with my Jello Salad Cottage recipe!

Hassle-Free Cooking: By skipping the crust, you save time and enjoy a lighter dish reminiscent of a frittata, but oh-so-creamy!

Meal Prep Champion: Make it ahead and enjoy leftovers throughout the week; it’s delicious warm or cold, perfect for those on-the-go moments.

Cottage Cheese Crustless Quiche Ingredients

For the Base

  • 6 large eggs – Provides structure and protein; consider using egg substitutes for a lighter option.
  • 1 cup whole milk cottage cheese – Adds creaminess and protein; try low-fat cottage cheese for a healthier twist.
  • 1/4 tsp salt – Enhances flavor; you can adjust to taste or omit for sodium-restricted diets.
  • 1/4 tsp ground black pepper – Adds depth to flavor; substitute with white pepper for a milder taste.

For the Cheese

  • 1/2 cup grated cheese – Contributes richness and flavor; cheddar or mozzarella are great choices, or omit for a dairy-free version.

For the Fillings

  • Up to 1 cup any additional ingredients (e.g., vegetables or cooked meats) – Customizes flavor and texture; consider spinach, bell peppers, or ham for varied deliciousness.

The Cottage Cheese Crustless Quiche is not just quick to make but highly versatile, allowing you to bring your unique flair to each delicious bite!

Step‑by‑Step Instructions for Cottage Cheese Crustless Quiche

Step 1: Preheat the Oven
Begin by preheating your oven to 350°F (175°C). This ensures that your Cottage Cheese Crustless Quiche cooks evenly, resulting in a beautifully set center and golden edges. While the oven is heating, you can prepare your baking dish, allowing for a smooth transition to the next step.

Step 2: Prepare Baking Dish
Lightly spray a 9-inch baking dish with cooking oil or grease it with butter. This will prevent your quiche from sticking and make for easy slicing once baked. Make sure to cover the entire surface evenly, setting up your dish to cradle the delicious mixture you’ll soon create.

Step 3: Blend the Base
In a food processor, combine the 6 large eggs, 1 cup of cottage cheese, 1/4 teaspoon of salt, and 1/4 teaspoon of ground pepper. Blend until the mixture is smooth and creamy, which should take about 1-2 minutes. This step creates the light and airy base for your Cottage Cheese Crustless Quiche, ensuring a fluffy texture in every bite.

Step 4: Mix Fillings
Transfer the blended mixture into a large bowl and stir in 1/2 cup of grated cheese along with any additional ingredients of your choice, up to 1 cup. This could include cooked vegetables or meats for a flavor boost. Mix thoroughly until everything is well combined, allowing each ingredient to contribute to the quiche’s satisfying taste.

Step 5: Bake
Pour the mixture into the prepared baking dish, spreading it evenly with a spatula. Place the dish into the preheated oven and bake for approximately 45 minutes. You’ll know the Cottage Cheese Crustless Quiche is done when the center is set and the edges are golden brown, creating an inviting visual appeal.

Step 6: Cool and Serve
Once baked, remove the quiche from the oven and let it cool for about 10 minutes. This allows it to firm up slightly for easier slicing. Once cooled, cut it into wedges and serve warm. If you have leftovers, store them appropriately to enjoy this delectable meal later in the week.

Expert Tips for Cottage Cheese Crustless Quiche

Balance Your Fillings: Avoid adding too many ingredients; stick to the recommended 1 cup total to prevent your Cottage Cheese Crustless Quiche from becoming soggy.

Blend Well: Ensure the egg and cottage cheese mixture is smoothly blended for a fluffy texture, which is key to a delightful quiche experience.

Watch the Baking Time: Keep an eye on the baking process and check for doneness; the center should be set without a jiggle, indicating a perfectly baked quiche.

Season to Taste: Don’t underestimate the impact of seasoning! A pinch of salt and pepper can elevate your quiche, while blandness is a common pitfall.

Use Fresh Ingredients: Utilize high-quality, fresh ingredients for maximum flavor and texture in your Cottage Cheese Crustless Quiche; it makes all the difference!

What to Serve With Cottage Cheese Crustless Quiche

A warm slice of quiche pairs beautifully with sides that elevate your meal into something truly special.

  • Fresh Green Salad: A light salad with mixed greens, cherry tomatoes, and a zesty vinaigrette complements the quiche's creaminess with a refreshing crunch.
  • Roasted Vegetables: Sweet and savory roasted veggies like bell peppers and zucchini bring a delightful texture contrast while enhancing the dish’s wholesome appeal.
  • Crispy Hash Browns: Golden brown and crispy hash browns are the perfect side for those who love a hearty breakfast vibe. They add a satisfying crunch to your plate.
  • Fruit Medley: A bowl of assorted fresh fruits provides a sweet and juicy counterbalance to the savory quiche, making for a balanced and colorful meal.
  • Savory Scones: Flaky, herb-infused scones add a delightful buttery touch that pairs wonderfully with the creamy flavor of the quiche, making it more indulgent.
  • Flavored Yogurt: A small bowl of Greek yogurt topped with honey or fruit offers a creamy, protein-rich option that harmonizes with the richness of the quiche.
  • Sparkling Water or Mimosa: A refreshing drink, like sparkling water or a light mimosa, can really elevate this meal and add a festive touch to your dining experience.

With these perfect pairings, you’ll create a memorable meal around your Cottage Cheese Crustless Quiche that your family will adore!

Cottage Cheese Crustless Quiche Variations

Get ready to unleash your culinary creativity with these delightful twists on the classic quiche!

  • Dairy-Free: Swap cottage cheese for silken tofu blended with nutritional yeast. It’ll give you creaminess without the dairy.

  • Herb-Infused: Toss in fresh herbs like basil or thyme to elevate the flavor. A touch of greenery can transform your quiche into a garden-fresh treat!

  • Spicy Kick: Add diced jalapeños or a sprinkle of cayenne pepper for heat. It's a fantastic way to energize your breakfast or brunch!

  • Vegetable Power: Incorporate seasonal veggies like zucchini or asparagus. This ensures every slice bursts with vibrant taste and texture, making it a hearty meal.

  • Meat Lovers: For a protein-packed option, mix in cooked bacon, sausage, or turkey. Pair a meaty twist with your favorite cheese for a filling delight.

  • Cheese Variety: Experiment with different cheeses like feta or gouda. Each brings its unique flavor profile, adding depth and richness, similar to my “Potato Blue Cheese” recipe.

  • Greek Style: Mix in sun-dried tomatoes and olives for a Mediterranean flair. Each bite will transport you to a sunny café!

Feel free to explore any of these suggestions, and discover the luscious possibilities of this versatile dish!

Storage Tips for Cottage Cheese Crustless Quiche

Fridge: Store leftovers in an airtight container for up to 3 days to maintain freshness and taste.

Freezer: Freeze individual slices wrapped tightly in plastic wrap and aluminum foil for up to 2 months. This makes thawing and reheating easy!

Reheating: Reheat in the oven at 350°F (175°C) for about 15-20 minutes, or microwave on medium power until heated through. Enjoy your Cottage Cheese Crustless Quiche anytime!

Make Ahead Options

These Cottage Cheese Crustless Quiches are a game-changer for busy home cooks! You can prepare the filling mixture, including the eggs, cottage cheese, and any desired fillings, up to 24 hours in advance. Simply blend the base and mix in your chosen ingredients, then store the mixture in an airtight container in the refrigerator. When you’re ready to bake, just pour the mixture into a prepared baking dish and cook as directed. This not only saves time but ensures you have a delicious and nutritious meal ready to go. To maintain quality, avoid overfilling with wet ingredients, and enjoy restaurant-quality results with minimal effort!

Cottage Cheese Crustless Quiche Recipe FAQs

What type of cottage cheese should I use?
I recommend using whole milk cottage cheese for its creamy texture and richness. However, if you're looking for a lighter option, low-fat cottage cheese works wonderfully too, offering the same nutritional benefits without the added creaminess.

How should I store leftovers of the Cottage Cheese Crustless Quiche?
Store any leftovers in an airtight container in the refrigerator for up to 3 days. Make sure it’s completely cooled before sealing it to keep it fresh. This way, you can enjoy a quick, nutritious meal without any hassle!

Can I freeze the Cottage Cheese Crustless Quiche?
Absolutely! To freeze, cut the quiche into individual slices and wrap each slice tightly in plastic wrap, followed by aluminum foil. It can be frozen for up to 2 months. When you’re ready to enjoy, just thaw it overnight in the fridge, and reheat in the oven or microwave until warmed through.

What should I do if my quiche doesn’t set properly?
If your quiche is still jiggly in the center after the baking time, simply return it to the oven and continue baking for an additional 5-10 minutes. Monitor closely to avoid overbaking, which can dry it out. Make sure to blend the egg and cottage cheese mixture until completely smooth; this helps achieve a fluffy and cohesive texture.

Are there any dietary considerations I should keep in mind?
If you have dietary restrictions, opting for low-fat cottage cheese can reduce the calorie content. You can also customize the ingredients; for instance, use dairy-free cheese alternatives if you're lactose intolerant. Just remember to consider any allergies related to the additional filling ingredients, especially if including vegetables or meats.

Cottage Cheese Crustless Quiche

Delicious Cottage Cheese Crustless Quiche: Easy & Customizable

Cottage Cheese Crustless Quiche is the ultimate protein-rich breakfast that is quick, easy, and customizable to your taste.
Print Recipe Pin Recipe
Prep Time 15 minutes mins
Cook Time 45 minutes mins
Cooling Time 10 minutes mins
Total Time 1 hour hr 10 minutes mins
Servings: 6 slices
Course: Breakfast
Cuisine: American
Calories: 210
Ingredients Equipment Method Nutrition Notes

Ingredients
  

Base
  • 6 large eggs Provides structure and protein; consider using egg substitutes for a lighter option.
  • 1 cup whole milk cottage cheese Adds creaminess and protein; try low-fat cottage cheese for a healthier twist.
  • 1/4 tsp salt Enhances flavor; you can adjust to taste or omit for sodium-restricted diets.
  • 1/4 tsp ground black pepper Adds depth to flavor; substitute with white pepper for a milder taste.
Cheese
  • 1/2 cup grated cheese Contributes richness and flavor; cheddar or mozzarella are great choices, or omit for a dairy-free version.
Fillings
  • up to 1 cup additional ingredients (e.g., vegetables or cooked meats) Customizes flavor and texture; consider spinach, bell peppers, or ham for varied deliciousness.

Equipment

  • Oven
  • Food Processor
  • 9-inch baking dish

Method
 

Instructions
  1. Preheat your oven to 350°F (175°C) to ensure even cooking.
  2. Lightly spray a 9-inch baking dish with cooking oil or grease with butter to prevent sticking.
  3. In a food processor, combine eggs, cottage cheese, salt, and ground pepper. Blend until smooth and creamy.
  4. Transfer the mixture to a large bowl, stir in grated cheese and any additional ingredients, and mix thoroughly.
  5. Pour the mixture into the prepared baking dish and bake for approximately 45 minutes until set and golden brown.
  6. Cool for about 10 minutes before slicing and serving warm; store leftovers appropriately.

Nutrition

Serving: 1sliceCalories: 210kcalCarbohydrates: 5gProtein: 16gFat: 15gSaturated Fat: 8gPolyunsaturated Fat: 1gMonounsaturated Fat: 6gCholesterol: 180mgSodium: 300mgPotassium: 300mgFiber: 1gSugar: 2gVitamin A: 5IUVitamin C: 2mgCalcium: 150mgIron: 1mg

Notes

This Cottage Cheese Crustless Quiche is versatile and can be customized with various fillings while being quick to prepare.

Tried this recipe?

Let us know how it was!

Loaded Breakfast Stuffed Croissants for a Cheesy Morning Boost

May 18, 2026 by Grace Snow Leave a Comment

As I opened my fridge one bustling morning, a wave of culinary inspiration washed over me—what if I could transform those buttery croissants into something sensational? That's how these Loaded Breakfast Stuffed Croissants were born! With a flaky, warm exterior enveloping a scrumptious, cheesy egg filling, these croissants are the ultimate breakfast hack. Not only do they come together in a flash, but they also let you customize the fillings to match your taste and pantry staples. Whether you're a fan of savory sausage, vibrant veggies, or gooey melted cheese, these croissants cater to every craving. So, are you ready to elevate your breakfast game and impress your loved ones with this delightful treat? Let's dive into the recipe!

Why are Loaded Breakfast Stuffed Croissants amazing?

Versatile: You can easily customize these croissants to fit your own tastes—swap in your favorite veggies, proteins, or cheeses!

Quick & Easy: Prepared in just 30 minutes, they’re perfect for busy mornings or a lazy brunch.

Comforting Flavor: The warm, flaky croissants paired with a creamy egg filling create a delightful contrast that satisfies every palate.

High-Protein Boost: With eggs and your choice of sausage or bacon, these croissants pack a protein punch to kickstart your day.

Crowd-Pleaser: Whether serving them at a family gathering or a cozy brunch with friends, they are sure to impress everyone at the table—like my go-to Breakfast Egg Muffins that never fail to delight!

Loaded Breakfast Stuffed Croissants Ingredients

For the Croissants
• Large Croissants – Use fresh bakery-style croissants for the best flaky texture.

For the Filling
• Large Eggs – Create a rich, protein-packed filling that sets the stage for our loaded breakfast stuffed croissants.
• Milk – Makes the eggs softer and creamier, giving your filling a luscious texture.
• Shredded Cheddar Cheese – Best if freshly grated to melt smoothly and enhance flavor.
• Cooked Breakfast Sausage or Bacon – Adds a hearty, savory flavor to keep everyone coming back for seconds!
• Diced Bell Peppers – Introduces a burst of freshness; swap with spinach or mushrooms for a veggie kick.
• Chopped Green Onions – Enhances flavor with a mild onion touch that complements the eggs beautifully.
• Salt and Black Pepper – Essential for balancing and enhancing the flavors in the filling.
• Butter – Prevents eggs from sticking during cooking and adds richness.

These ingredients will combine to create the irresistible Loaded Breakfast Stuffed Croissants that will become a beloved addition to your breakfast repertoire!

Step‑by‑Step Instructions for Loaded Breakfast Stuffed Croissants

Step 1: Preheat the Oven
Start by preheating your oven to 350°F (175°C). This temperature will ensure that your Loaded Breakfast Stuffed Croissants bake evenly and become beautifully golden. While the oven warms up, take a moment to gather all your ingredients and equipment, including a baking dish and a mixing bowl.

Step 2: Prepare the Croissants
Carefully slice each croissant in half horizontally using a serrated knife. This will create a pocket perfect for stuffing. Arrange the croissant halves standing up in a baking dish, leaving enough space between them to allow for even cooking. This setup will help the croissants hold their shape during baking.

Step 3: Whisk the Egg Mixture
In a mixing bowl, whisk together the large eggs, milk, salt, and pepper until the mixture is smooth and slightly bubbly. Aim for a light, fluffy consistency that indicates air has been incorporated. This step is crucial for a rich filling in your Loaded Breakfast Stuffed Croissants that has that perfect creamy texture.

Step 4: Cook the Eggs
Melt a tablespoon of butter in a skillet over medium heat. Once the butter is melted and bubbly, pour in the egg mixture. Stir gently with a spatula, cooking the eggs until they are softly set, about 3-4 minutes. You want a slightly creamy texture since the eggs will continue to cook as the croissants bake.

Step 5: Add the Fillings
Remove the skillet from the heat and stir in the cooked sausage or bacon, diced bell peppers, and chopped green onions. Make sure all ingredients are well combined, as each bite of your Loaded Breakfast Stuffed Croissants should be bursting with flavor and varied textures.

Step 6: Stuff the Croissants
Spoon the egg and filling mixture evenly into each croissant half. Don’t be shy; make sure to fill them generously! Once filled, sprinkle a handful of shredded cheddar cheese over the top of each croissant. This will create a deliciously gooey layer that melts beautifully while baking.

Step 7: Bake the Croissants
Place the baking dish in the preheated oven and bake for 10-15 minutes. Keep an eye on them; they should be golden and the cheese perfectly melted. The croissants will become slightly crisp, providing a wonderful texture contrast to the creamy filling.

Step 8: Cool and Serve
Once baked, remove the Loaded Breakfast Stuffed Croissants from the oven and let them cool for a few minutes. This resting period allows the filling to set slightly for easier serving. Serve them warm and enjoy a delightful start to your day!

Expert Tips for Loaded Breakfast Stuffed Croissants

  • Use Fresh Croissants: Start with fresh bakery-style croissants for the best texture; day-old ones may work but can become soggy if overfilled.

  • Don't Overcook Eggs: Cook the eggs just until they’re soft and creamy in the skillet—overcooking will lead to dry filling, affecting your Loaded Breakfast Stuffed Croissants.

  • Grate Cheese Fresh: Opt for freshly grated cheese instead of pre-shredded; it melts better and adds more flavor to your delicious croissants.

  • Customize Fillings: Feel free to swap ingredients! Use different meats, veggies, or cheeses to tailor the recipe to your taste preferences or what's in your pantry.

  • Allow to Rest: Let the stuffed croissants cool slightly after baking; this helps the flavors meld together and makes them easier to handle.

Make Ahead Options

These Loaded Breakfast Stuffed Croissants are perfect for meal prep enthusiasts! You can prepare the filling up to 24 hours in advance by cooking the eggs, sausage or bacon, and veggies, then storing them in an airtight container in the fridge. When you're ready to enjoy your breakfast, simply stuff the croissants with the mixture, sprinkle with cheese, and bake for about 10-15 minutes until golden and bubbly. To ensure they’re just as delicious, use slightly day-old croissants for better structure and refrigerate the filling without adding the cheese until you're ready to bake. This way, you can serve a gourmet breakfast with minimal effort, even on your busiest mornings!

What to Serve with Loaded Breakfast Stuffed Croissants

Brighten your breakfast or brunch spread with delightful accompaniments that elevate the experience.

  • Fresh Fruit Salad: A medley of seasonal fruits adds a refreshing contrast to the rich croissants while balancing flavors perfectly.

  • Honey Butter Skillet Corn: Sweet and savory, this dish complements the croissants’ creaminess and brings a touch of comfort.

  • Roasted Baby Potatoes: Crispy on the outside and fluffy inside, these potatoes offer a hearty crunch that pairs wonderfully with the soft croissant filling.

  • Mixed Green Salad: Light and crisp greens drizzled with a tangy vinaigrette create a refreshing palate cleanser between bites.

  • Herbed Yogurt Dip: This cool and creamy dip enhances the savory flavors of the croissants and adds an exciting layer of texture.

  • Mimosas: A bubbly, citrusy drink that perfectly matches the luxurious nature of the stuffed croissants, making every bite feel festive.

Whether sharing with loved ones or enjoying solo, these pairings make for a breakfast or brunch experience that’s both satisfying and delightful!

Storage Tips for Loaded Breakfast Stuffed Croissants

• Fridge: Store leftovers in an airtight container for up to 3 days. Reheat in the oven for 10 minutes at 350°F (175°C) to restore crispness.

• Freezer: Wrap individually in plastic wrap and store in a freezer bag for up to 1 month. Reheat directly from frozen in the oven until heated through and the croissant is crispy.

• Make-Ahead: Prepare the filling a day in advance and store it in the fridge. Assemble and bake just before serving for a hot and fresh breakfast experience.

• Room Temperature: If serving immediately, Loaded Breakfast Stuffed Croissants can be kept at room temperature for up to 2 hours before they should be refrigerated.

Loaded Breakfast Stuffed Croissants Variations

Feel free to explore new flavors and textures with these exciting ideas to personalize your croissants!

  • Vegetarian: Replace sausage or bacon with sautéed mushrooms, spinach, or zucchini to create a delicious meat-free option.

  • Cheesy Twist: Use a mix of cheeses like pepper jack for a spicy kick or mozzarella for a milder experience; both melt beautifully!

  • Herb-Infused: Add fresh herbs like basil, cilantro, or chives to the egg mixture for an aromatic touch that will elevate your croissants' flavor profile.

  • Spicy Kick: Toss in some diced jalapeños or a sprinkle of chili flakes in the filling to awaken your taste buds with a fiery twist.

  • Sweet Option: For a sweeter variation, try adding a spoonful of jam or fresh fruit on top before baking, balancing sweet and savory in each bite.

  • Breakfast Classic: Stuff the croissants with classic breakfast items like crispy fried potatoes or hash browns for extra heartiness, reminiscent of a diner-style plate.

  • Creamy Addition: Mixing in a splash of cream cheese into the egg mixture creates an even richer filling, ensuring each bite oozes with delight.

  • Savory Swap: For a truly loaded option, consider adding crumbled feta cheese and sun-dried tomatoes for a Mediterranean flair—perfect for brunch gatherings!

As you experiment, don’t forget to check out other delightful recipes like my Herby Ricotta Stuffed and Cornbread Breakfast Casserole for more ways to make your breakfast special!

Loaded Breakfast Stuffed Croissants Recipe FAQs

How do I choose the best croissants for my Loaded Breakfast Stuffed Croissants?
Absolutely! For the best results, look for fresh bakery-style croissants, as they provide that perfect flaky and buttery texture. If you can, aim for croissants that are slightly day-old; they hold up better when stuffed and won’t become too soggy during baking. Avoid any croissants with dark spots or signs of staleness, as those can affect the final taste.

What is the best way to store leftovers from Loaded Breakfast Stuffed Croissants?
Very! Store any leftovers in an airtight container in the refrigerator for up to 3 days. To reheat, simply place them in a preheated oven at 350°F (175°C) for about 10 minutes. This will help to restore their crispiness while warming the filling. Alternatively, if you’re looking to make a batch ahead of time, wrap each croissant tightly in plastic wrap and freeze them individually for up to 1 month.

Can I freeze Loaded Breakfast Stuffed Croissants? How do I do that properly?
Absolutely! Freezing cooked Loaded Breakfast Stuffed Croissants is a great way to have a quick meal ready at your fingertips. Once cooked and cooled, wrap each croissant tightly in plastic wrap. Place wrapped croissants into a freezer bag, removing as much air as possible. They can be stored in the freezer for up to 1 month. When ready to enjoy, simply reheat directly from frozen in the oven until warmed through and crispy, which usually takes about 15-20 minutes.

What should I do if my egg filling ends up too dry while cooking?
Oh, don’t worry; it happens to the best of us! If your egg filling becomes dry in the skillet, try reducing the cooking time during Step 4 of the instructions. You want to cook the eggs until they are creamy, not fully set, since they will continue to cook in the oven. If you notice they are drying, whisk in a bit of additional milk to loosen the texture before combining with your other ingredients.

Are there any dietary considerations for making Loaded Breakfast Stuffed Croissants?
Very! When preparing these croissants, you can make modifications to suit dietary needs. For instance, if you’re accommodating a vegetarian diet, simply omit the sausage or bacon and load up on more veggies or even cheese. Additionally, keep in mind any allergies—common ingredients like eggs, cheese, or gluten in croissants should be replaced with suitable alternatives, such as egg substitutes or gluten-free croissants. Just be sure to check the labels on all products used.

Loaded Breakfast Stuffed Croissants

Loaded Breakfast Stuffed Croissants for a Cheesy Morning Boost

Loaded Breakfast Stuffed Croissants are a delicious breakfast hack, featuring flaky croissants and a cheesy egg filling.
Print Recipe Pin Recipe
Prep Time 10 minutes mins
Cook Time 15 minutes mins
Cooling Time 5 minutes mins
Total Time 30 minutes mins
Servings: 4 croissants
Course: Breakfast
Cuisine: American
Calories: 350
Ingredients Equipment Method Nutrition Notes

Ingredients
  

For the Croissants
  • 4 large Croissants Use fresh bakery-style croissants for the best flaky texture.
For the Filling
  • 4 large Eggs Create a rich, protein-packed filling.
  • 1/4 cup Milk Makes the eggs softer and creamier.
  • 1 cup Shredded Cheddar Cheese Best if freshly grated to melt smoothly.
  • 1 cup Cooked Breakfast Sausage or Bacon Adds a hearty, savory flavor.
  • 1/2 cup Diced Bell Peppers Introduces a burst of freshness.
  • 1/4 cup Chopped Green Onions Enhances flavor with a mild onion touch.
  • 1 teaspoon Salt Essential for balancing flavors.
  • 1/2 teaspoon Black Pepper Essential for balancing flavors.
  • 1 tablespoon Butter Prevents eggs from sticking during cooking.

Equipment

  • Baking Dish
  • Mixing Bowl
  • Skillet
  • Serrated knife

Method
 

Step‑by‑Step Instructions
  1. Preheat the oven to 350°F (175°C).
  2. Carefully slice each croissant in half horizontally to create a pocket.
  3. In a mixing bowl, whisk together the eggs, milk, salt, and pepper until smooth.
  4. Melt butter in a skillet over medium heat, pour in the egg mixture, and cook gently until softly set.
  5. Stir in cooked sausage or bacon, diced bell peppers, and chopped green onions.
  6. Spoon the egg mixture into each croissant half and sprinkle cheese on top.
  7. Place the baking dish in the oven and bake for 10-15 minutes until golden and cheese is melted.
  8. Let cool for a few minutes before serving.

Nutrition

Serving: 1croissantCalories: 350kcalCarbohydrates: 20gProtein: 15gFat: 25gSaturated Fat: 10gPolyunsaturated Fat: 1gMonounsaturated Fat: 12gCholesterol: 150mgSodium: 500mgPotassium: 250mgFiber: 1gSugar: 1gVitamin A: 600IUVitamin C: 5mgCalcium: 200mgIron: 2mg

Notes

These croissants can be customized with different meats, vegetables, or cheeses based on personal preference.

Tried this recipe?

Let us know how it was!

Cheesy Sausage Egg Breakfast Roll-Ups for Quick Mornings

May 18, 2026 by Grace Snow Leave a Comment

As I took my first bite of a Cheesy Sausage Egg Breakfast Roll-Up, I was wrapped in a comforting blend of flavors—savory sausage, fluffy scrambled eggs, and melted cheese all snuggled in a warm tortilla. Mornings can often feel rushed, but these delightful roll-ups transform breakfast into a cozy moment of satisfaction, all in just 30 minutes. Not only are they quick to prepare, but their customizable nature makes them perfect for everyone at the table, whether you prefer spicy sausage or fresh veggies. Plus, they’re an excellent make-ahead option, ready to help you conquer the day without the hassle of fast food. Curious about how to whip these up in your own kitchen? Let’s dive into the deliciousness!

Why Are Breakfast Roll-Ups So Great?

Customization is key with these roll-ups, allowing you to tailor flavors to individual preferences. Quick prep means you can whip them up in just 30 minutes, making breakfast a breeze. Crowd-pleasing and perfect for all ages, they transform any morning into a satisfying experience. For added fun, why not toss in some veggies like in my Cheesy Zucchini Bake or use a twist on flavors with Breakfast Egg Muffins? Meal prep is simple too—make a batch ahead and store them for an effortless morning. Enjoy the rich, savory flavor that combines comfort and ease in every bite!

Cheesy Sausage Egg Breakfast Roll-Ups Ingredients

For the Egg Mixture
• Eggs – Use large eggs at room temperature for a fluffier scramble.
• Milk – A splash of milk adds creamy richness to the eggs.
• Salt – Adjust to taste for enhanced flavor.
• Pepper – Freshly ground black pepper adds a delightful seasoning kick.

For the Fillings
• Pre-cooked Breakfast Sausage Links – The star of the roll-ups; opt for turkey sausage for a lighter twist or plant-based sausage for a vegetarian option.
• Shredded Cheddar Cheese – The gooey goodness that brings everything together; consider substituting with pepper jack for a spicy kick.

For the Wrap
• Flour Tortillas – Soft, pliable tortillas hold all the deliciousness together; gluten-free tortillas are available if needed.
• Butter – Adds flavor and helps achieve a beautiful golden-brown finish; non-stick cooking spray is a handy alternative.

Feel free to get creative with these Cheesy Sausage Egg Breakfast Roll-Ups and customize them to suit your taste!

Step‑by‑Step Instructions for Cheesy Sausage Egg Breakfast Roll-Ups

Step 1: Whisk Eggs
Begin by cracking 6 large eggs into a mixing bowl, adding a splash of milk, salt, and pepper to taste. Use a whisk to blend the mixture until it becomes frothy and uniform in color, which should take about 1-2 minutes. This egg mixture will create a fluffy base for your Cheesy Sausage Egg Breakfast Roll-Ups.

Step 2: Scramble Eggs
In a non-stick skillet, melt 2 tablespoons of butter over medium heat until it starts to bubble. Pour in your egg mixture and carefully stir with a spatula, cooking for 5-7 minutes. Stir gently until the eggs are fluffy and just set—avoid overcooking, as they will continue to cook slightly once removed from the heat.

Step 3: Toast Tortillas
To prepare your tortillas, lightly toast them in a skillet or briefly warm them in the microwave for about 15-20 seconds. You want them pliable enough to roll without tearing. This step ensures your tortillas will hold the filling beautifully in your Cheesy Sausage Egg Breakfast Roll-Ups.

Step 4: Fill Tortillas
Lay each warmed tortilla flat and place a pre-cooked breakfast sausage link in the center. Spoon a generous portion of scrambled eggs over the sausage and sprinkle with shredded cheddar cheese. Aim for even distribution to ensure that every bite of your roll-up is packed with flavor.

Step 5: Roll Up
Carefully fold the sides of each tortilla over the filling and then roll it up tightly from the bottom to the top. Make sure to tuck in the ends as you go to seal in the delicious ingredients. This step is crucial for the integrity of your Cheesy Sausage Egg Breakfast Roll-Ups.

Step 6: Cook Roll-Ups
Wipe down the skillet and apply a light layer of non-stick cooking spray. Place the roll-ups seam side down and cook for 2-3 minutes on each side, until golden brown and crisp. Keep an eye on them to prevent burning, as they should achieve a beautiful crust while heating through.

Step 7: Serve
Once they’re golden and crispy, remove the roll-ups from the skillet and plate them warm. These Cheesy Sausage Egg Breakfast Roll-Ups pair perfectly with a side of salsa or hot sauce for a little extra kick, enhancing their flavor and making for a satisfying breakfast experience.

Expert Tips for Cheesy Sausage Egg Breakfast Roll-Ups

  • Warm Tortillas: Ensure your tortillas are warmed properly to avoid tearing while rolling. This step helps in crafting perfect Cheesy Sausage Egg Breakfast Roll-Ups.
  • Egg Consistency: Avoid overcooking your scrambled eggs; they should be just set and fluffy when removed from heat for the best texture.
  • Customize Flavors: Feel free to experiment with different sausage types and cheeses. Try spicy sausage or pepper jack for added flavor in your roll-ups!
  • Add Veggies: Incorporating sautéed veggies like bell peppers or spinach can enhance nutrition and flavor, making your breakfast even more delightful.
  • Perfect Crunch: For extra crispiness, ensure the roll-ups are thoroughly cooked on each side until golden brown—this gives them that irresistible crunch!

Make Ahead Options

These Cheesy Sausage Egg Breakfast Roll-Ups are a fantastic choice for meal prep, making your busy mornings smoother and more enjoyable! You can prepare the egg mixture and fill the tortillas up to 24 hours in advance by storing them in an airtight container in the refrigerator. To maintain quality and prevent the tortillas from becoming soggy, wrap each roll-up tightly with plastic wrap. When you're ready to serve, simply cook them in a skillet for 2-3 minutes on each side until they’re golden brown and heated through. This way, you can enjoy a delicious breakfast with minimal effort!

How to Store and Freeze Cheesy Sausage Egg Breakfast Roll-Ups

Fridge: Store roll-ups in an airtight container for up to 3-4 days. Just reheat in the microwave or skillet for a quick breakfast solution.

Freezer: Individually wrap each roll-up in plastic wrap and then foil. They can be frozen for up to 2-3 months, perfect for busy mornings!

Reheating: To reheat from frozen, simply microwave for 1-2 minutes or place in a skillet over medium heat, cooking until warmed through and crisp.

Serving Tip: Enjoy them with salsa or avocado—these additions can elevate the flavor and make your Cheesy Sausage Egg Breakfast Roll-Ups even more satisfying!

Cheesy Sausage Egg Breakfast Roll-Ups Variations

Feel free to get creative with your roll-ups, adapting flavors to match your cravings or dietary needs!

  • Vegetarian: Swap out the sausage for sautéed mushrooms and spinach for a hearty spin.
  • Spicy Kick: Use spicy sausage or add jalapeños for a fiery flavor boost.
  • Gluten-Free: Choose gluten-free tortillas to make this delicious breakfast accessible to everyone.
  • Cheese Swap: Switch cheddar for feta or Swiss cheese to explore different flavor profiles.
  • Herb-Infused: Mix fresh herbs like chives or cilantro into the scrambled eggs for a fresh, aromatic taste.
  • BBQ Flavor: Brush a bit of barbecue sauce on the sausage before assembling for a smoky flair.
  • Extra Crunch: Add crushed tortilla chips to the filling for a delightful texture.
  • Breakfast in a Bowl: Try creating a deconstructed version by layering ingredients in a bowl instead of rolling them up for those at home.

There are countless ways to enjoy these Cheesy Sausage Egg Breakfast Roll-Ups! And if you're looking for more inspiration, you might like my Corn Fried Egg or Cornbread Breakfast Casserole recipes, which offer another layer of yummy breakfast options.

What to Serve with Cheesy Sausage Egg Breakfast Roll-Ups

A delightful breakfast is just the beginning when you pair these comforting roll-ups with the right sides and drinks.

  • Fresh Salsa: This zesty addition provides a burst of flavor and balances the richness of the roll-ups beautifully.
  • Sliced Avocado: Creamy avocado adds a smooth texture, making your meal feel luxurious and extra satisfying.
  • Fruit Salad: A refreshing side of mixed fruit brings sweetness and lightness, perfect for brightening up a savory breakfast.
  • Greek Yogurt: This tangy, creamy option pairs well with the roll-ups and boosts your protein intake for a fulfilling start to the day.
  • Coffee or Tea: Enjoy a steaming cup of your favorite brew for that cozy morning touch; a splash of cream or milk enhances each sip.
  • Smoothie: A berry or green smoothie contributes freshness and nutrients, complementing the filling nature of the roll-ups while keeping your morning vibrant.

Cheesy Sausage Egg Breakfast Roll-Ups Recipe FAQs

How do I select the best eggs for my roll-ups?
Absolutely! For the fluffiest scrambled eggs, choose large eggs that are fresh and at room temperature. This temperature allows for better blending with milk and gives a more consistent scramble.

How should I store leftover roll-ups?
You can easily store your Cheesy Sausage Egg Breakfast Roll-Ups in an airtight container in the fridge for up to 3-4 days. Just give them a quick reheat in the microwave or skillet when you're ready to enjoy them again!

Can I freeze these breakfast roll-ups?
Yes, indeed! To freeze, wrap each roll-up tightly in plastic wrap, then in foil, and store in a freezer-safe bag. They're great for up to 2-3 months. For reheating, simply microwave for 1-2 minutes or heat in a skillet until warm and crispy.

What if my tortillas tear while rolling?
Don't worry! If they tear, it’s likely they're too cold. I recommend warming them properly before filling, either in a skillet or microwave. This will make them more pliable and prevent tearing, ensuring a beautiful roll-up.

Are there any dietary concerns to consider?
Certainly! If you're preparing these for anyone with specific dietary needs, opt for gluten-free tortillas for those avoiding gluten. Additionally, using turkey or plant-based sausage can cater to lighter diets or vegetarian preferences. Always check ingredient labels for allergens!

Cheesy Sausage Egg Breakfast Roll-Ups

Cheesy Sausage Egg Breakfast Roll-Ups for Quick Mornings

Indulge in Cheesy Sausage Egg Breakfast Roll-Ups that combine savory sausage, fluffy eggs, and cheese, transforming rushed mornings into a cozy breakfast moment.
Print Recipe Pin Recipe
Prep Time 10 minutes mins
Cook Time 20 minutes mins
Total Time 30 minutes mins
Servings: 4 roll-ups
Course: Breakfast
Cuisine: American
Calories: 300
Ingredients Equipment Method Nutrition Notes

Ingredients
  

For the Egg Mixture
  • 6 large Eggs Use large eggs at room temperature for a fluffier scramble.
  • 1 splash Milk A splash of milk adds creamy richness to the eggs.
  • to taste Salt Adjust to taste for enhanced flavor.
  • to taste Pepper Freshly ground black pepper adds a delightful seasoning kick.
For the Fillings
  • 4 links Pre-cooked Breakfast Sausage Opt for turkey sausage for a lighter twist or plant-based sausage for a vegetarian option.
  • 1 cup Shredded Cheddar Cheese Consider substituting with pepper jack for a spicy kick.
For the Wrap
  • 4 large Flour Tortillas Soft, pliable tortillas hold all the deliciousness together; gluten-free tortillas are available if needed.
  • 2 tablespoons Butter Adds flavor and helps achieve a beautiful golden-brown finish; non-stick cooking spray is a handy alternative.

Equipment

  • non-stick skillet
  • Mixing Bowl
  • Whisk
  • Spatula

Method
 

Step-by-Step Instructions
  1. Begin by cracking 6 large eggs into a mixing bowl, adding a splash of milk, salt, and pepper to taste. Whisk until frothy and uniform in color, about 1-2 minutes.
  2. In a non-stick skillet, melt 2 tablespoons of butter over medium heat. Pour in your egg mixture and carefully stir, cooking for 5-7 minutes until fluffy and just set.
  3. Lightly toast tortillas in a skillet or warm briefly in the microwave for about 15-20 seconds, ensuring they're pliable.
  4. Lay each warmed tortilla flat, place a pre-cooked sausage link in the center, spoon scrambled eggs over the sausage, and sprinkle with shredded cheddar cheese.
  5. Fold the sides of each tortilla over the filling and roll tightly from the bottom to the top, tucking in the ends.
  6. Wipe the skillet, apply a light layer of non-stick cooking spray, and cook the roll-ups seam side down for 2-3 minutes on each side until golden brown and crisp.
  7. Remove from the skillet and plate warm. Serve with salsa or hot sauce for added flavor.

Nutrition

Serving: 1roll-upCalories: 300kcalCarbohydrates: 30gProtein: 15gFat: 15gSaturated Fat: 7gPolyunsaturated Fat: 2gMonounsaturated Fat: 2gCholesterol: 220mgSodium: 600mgPotassium: 300mgFiber: 2gSugar: 1gVitamin A: 800IUVitamin C: 1mgCalcium: 200mgIron: 2mg

Notes

Customize flavors with different sausage types or cheeses, and add sautéed veggies for enhanced nutrition.

Tried this recipe?

Let us know how it was!
  • « Previous Page
  • 1
  • 2
  • 3
  • 4
  • …
  • 24
  • Next Page »

Welcome!

Hi, I’m Grace, a Sydney-based home cook with a passion for bold flavors and trending ingredients. Whether you’re a busy beginner or a seasoned foodie, you’ll find dishes here that are fresh, fun, and full of flavor.

More about me

Popular Recipes

  • One Pot Keto Tuna Casserole
    One Pot Keto Tuna Casserole: Creamy Comfort in Minutes
  • Ultimate Jalapeno Popper Chicken Salad
    Ultimate Jalapeno Popper Chicken Salad That'll Wow Your Tastebuds
  • Green Chile Cheese Dip
    Mouthwatering Green Chile Cheese Dip for Cozy Gatherings
  • Easy Chimichurri Sauce
    Fresh and Zesty Easy Chimichurri Sauce in Just Minutes

Footer

↑ back to top

About

  • Privacy Policy
  • Disclaimer
  • Terms & Conditions

Newsletter

  • Sign Up! for emails and updates

Contact

  • About me
  • Contact me

Copyright © 2025 TastyTrendIngredients