tastytrendingredients

  • Home
  • Recipes
    • Appetizers
    • Breakfast
    • Dessert
    • Dinner
    • Drinks
    • Salads
    • Snacks
    • Soups
  • About me
  • Contact
menu icon
go to homepage
  • Home
  • Recipes
    • Appetizers
    • Breakfast
    • Dessert
    • Dinner
    • Drinks
    • Salads
    • Snacks
    • Soups
  • About me
  • Contact
search icon
Homepage link
  • Home
  • Recipes
    • Appetizers
    • Breakfast
    • Dessert
    • Dinner
    • Drinks
    • Salads
    • Snacks
    • Soups
  • About me
  • Contact
×

Decadent Black Velvet Cupcakes for a Spooky Sweet Treat

October 17, 2025 by Grace Snow Leave a Comment

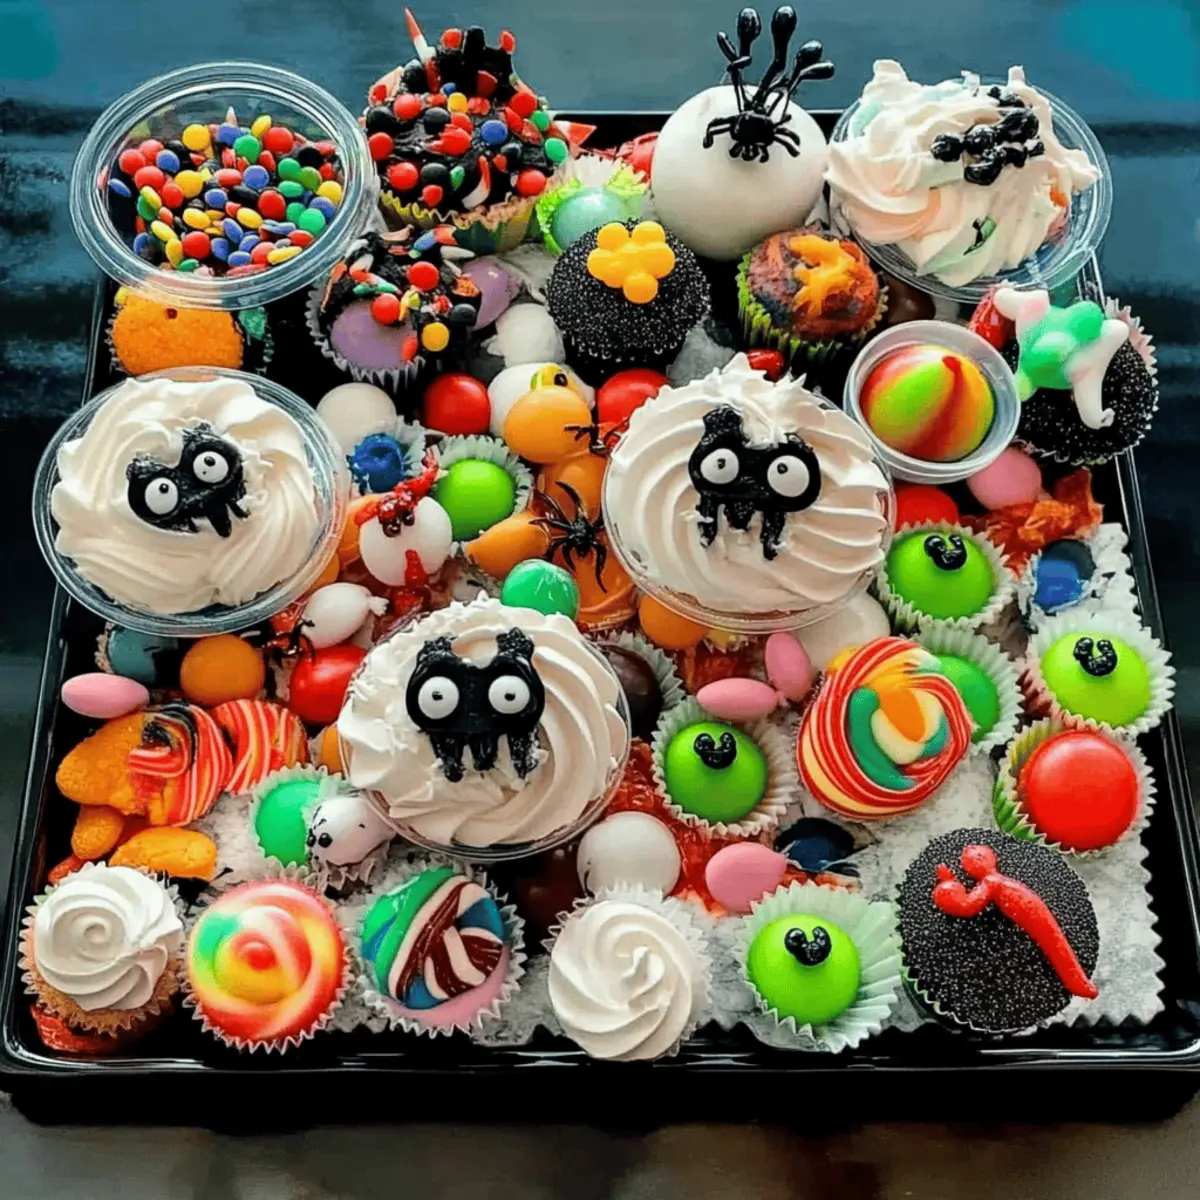
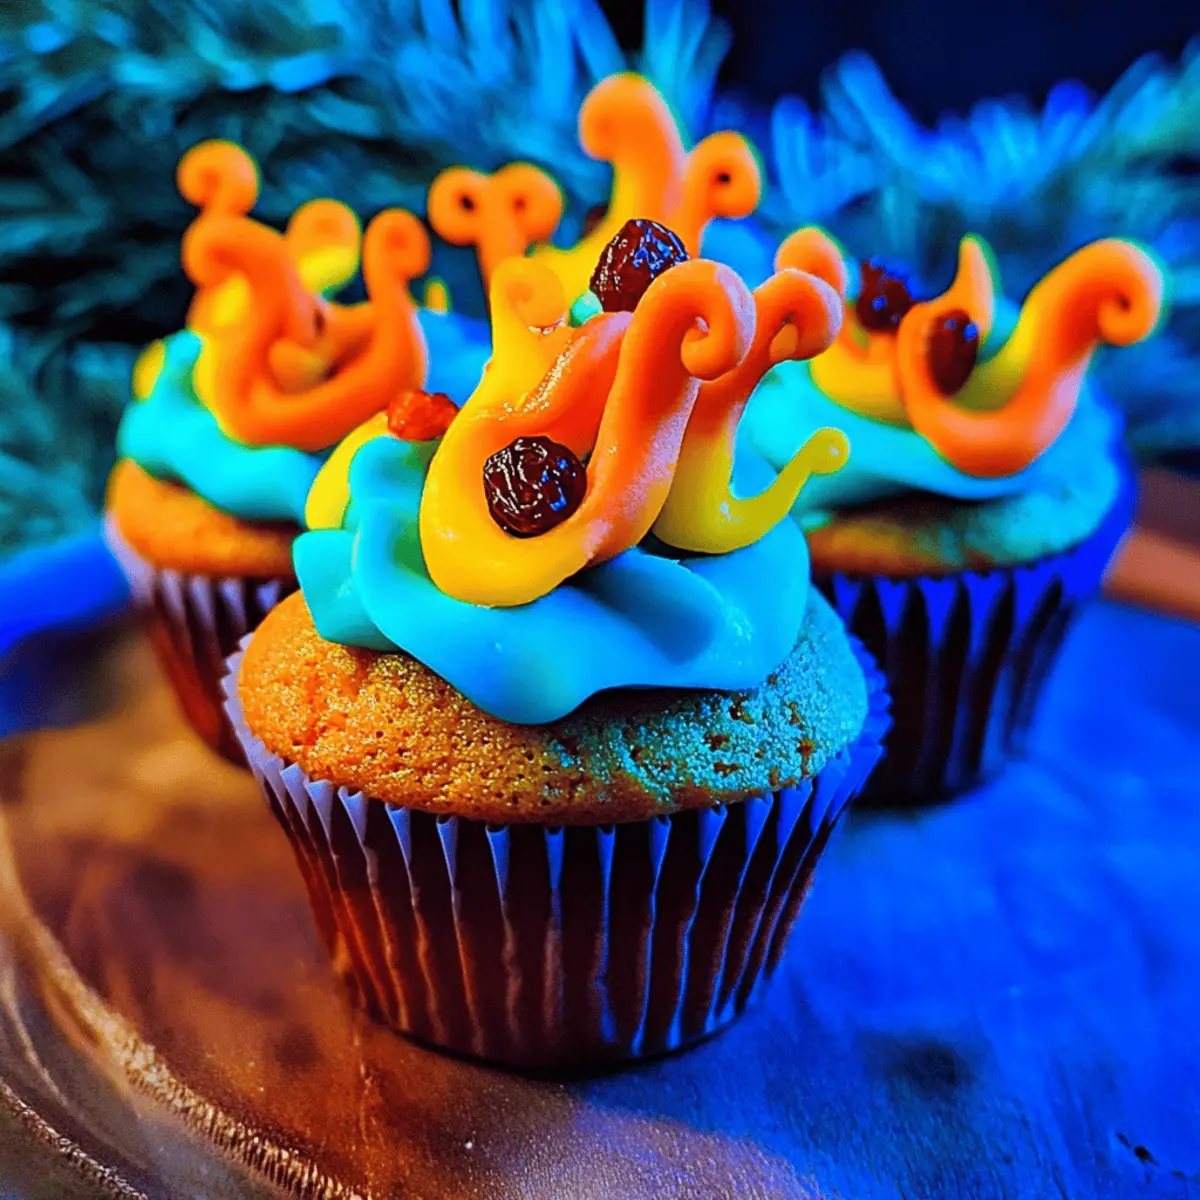
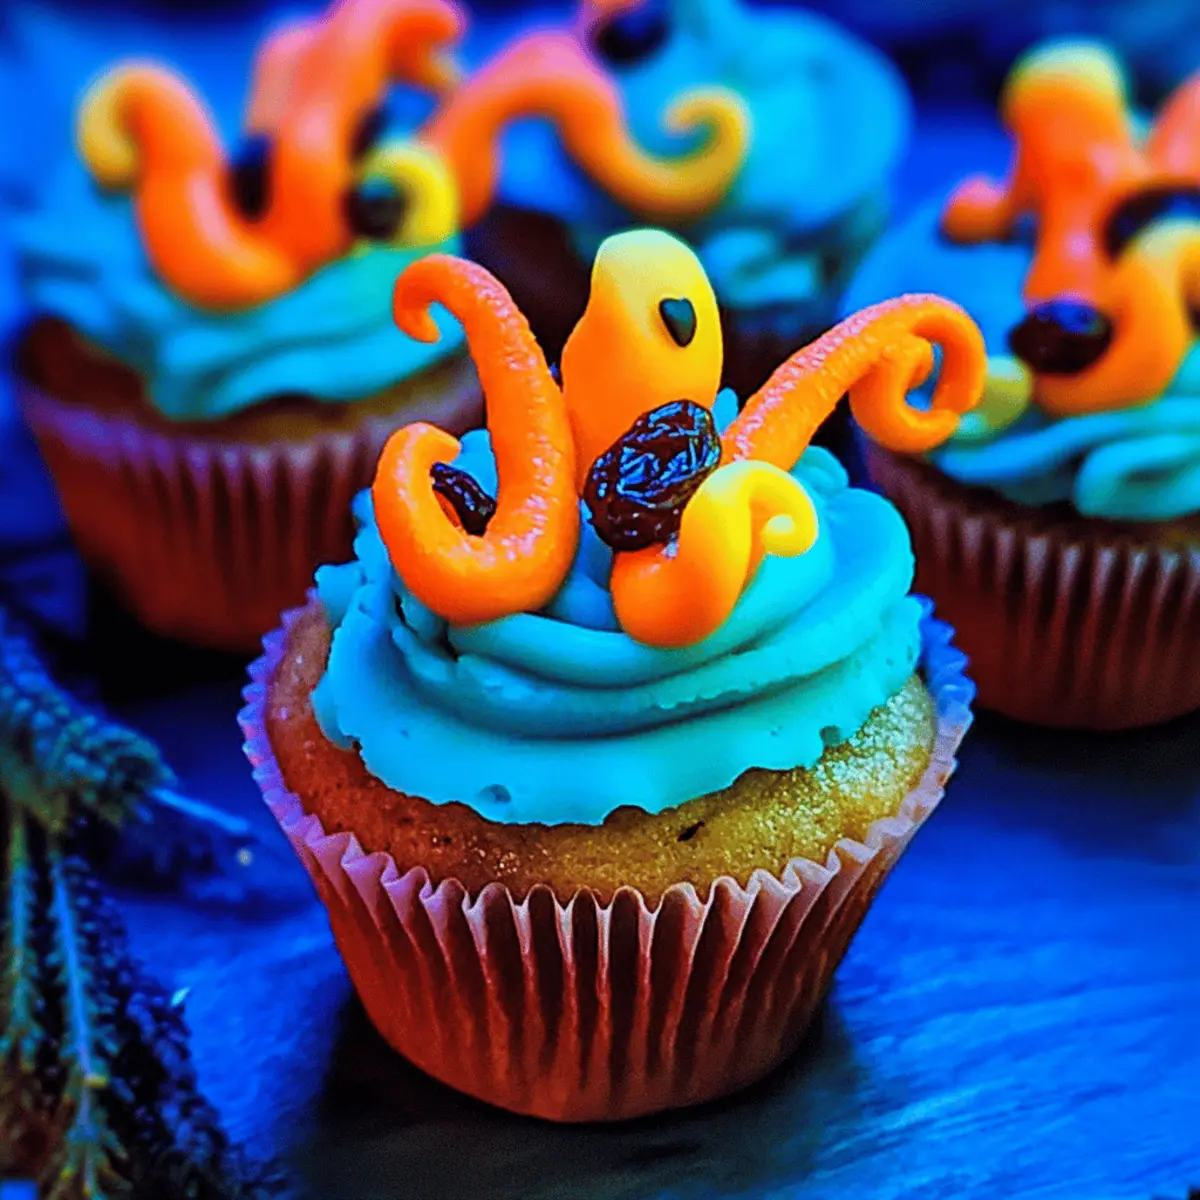
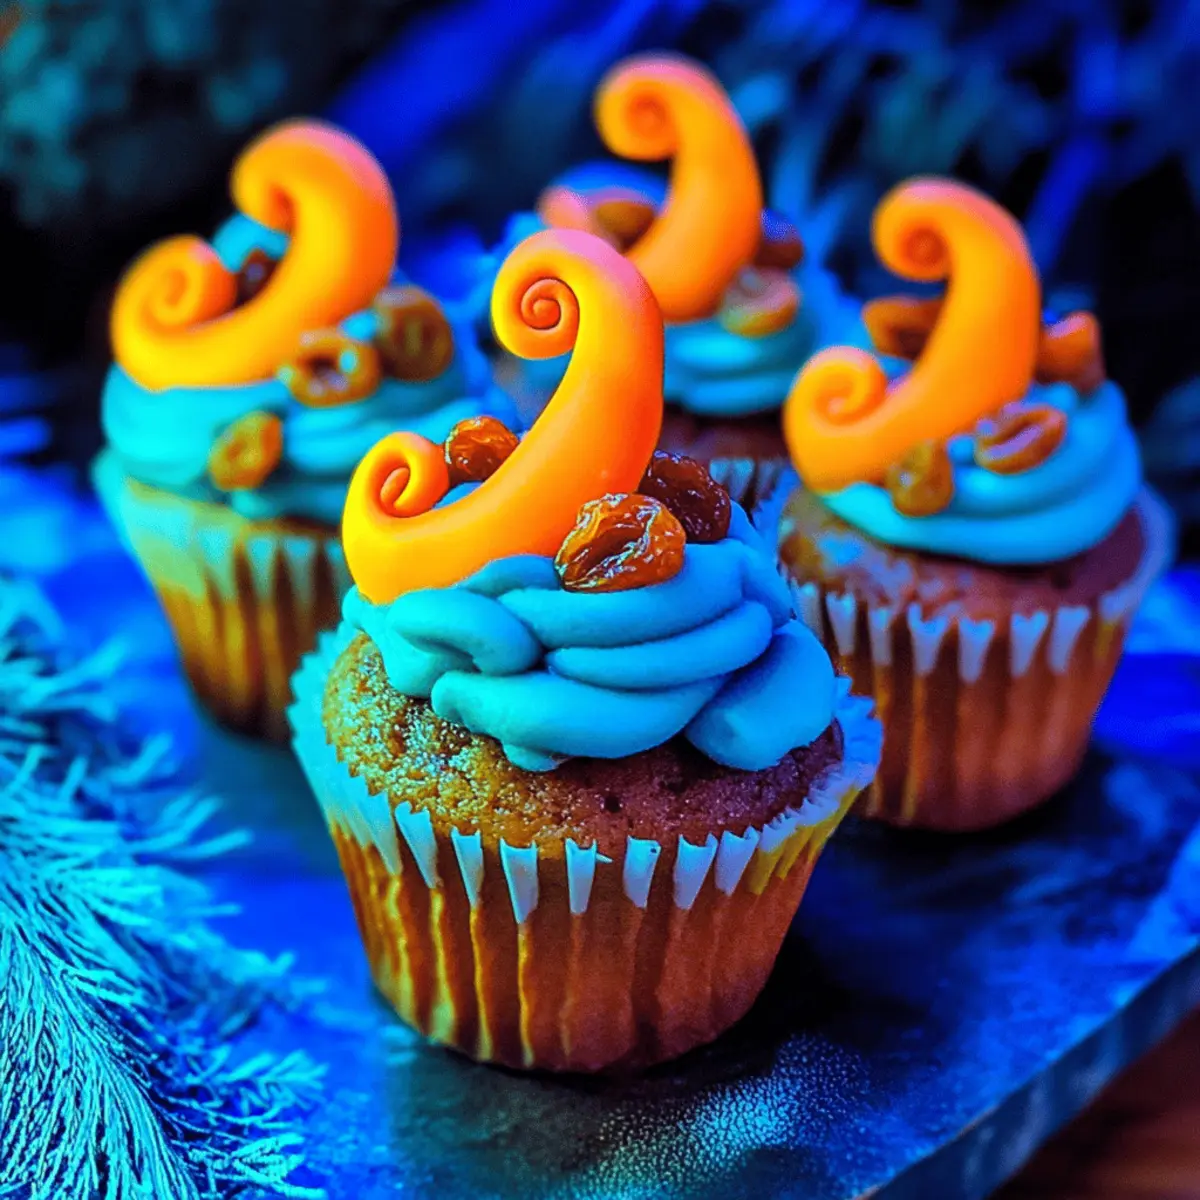
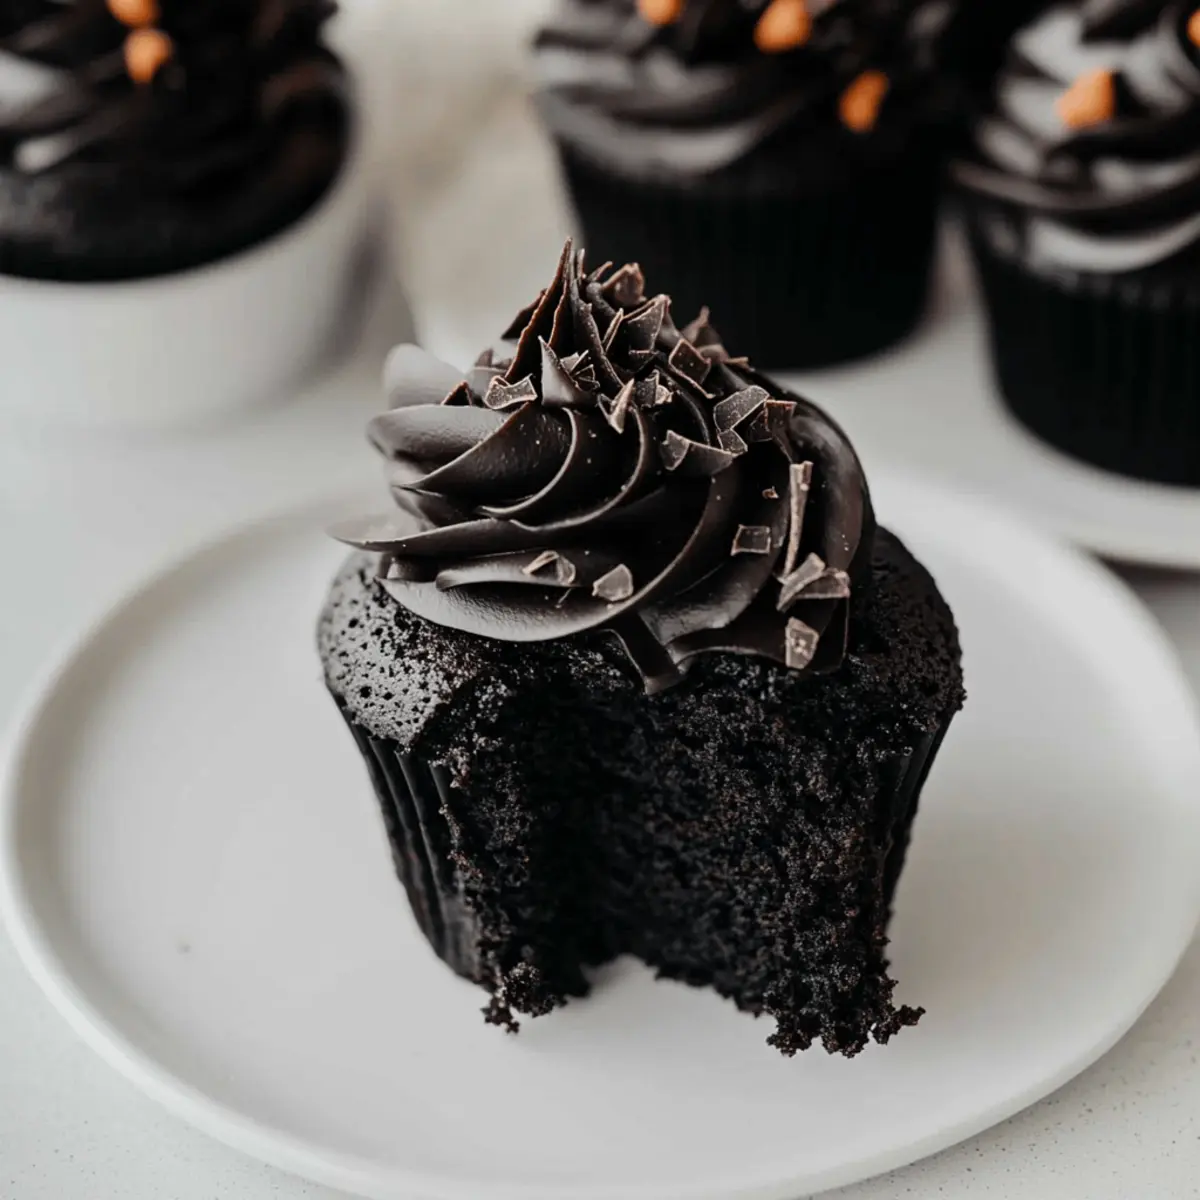
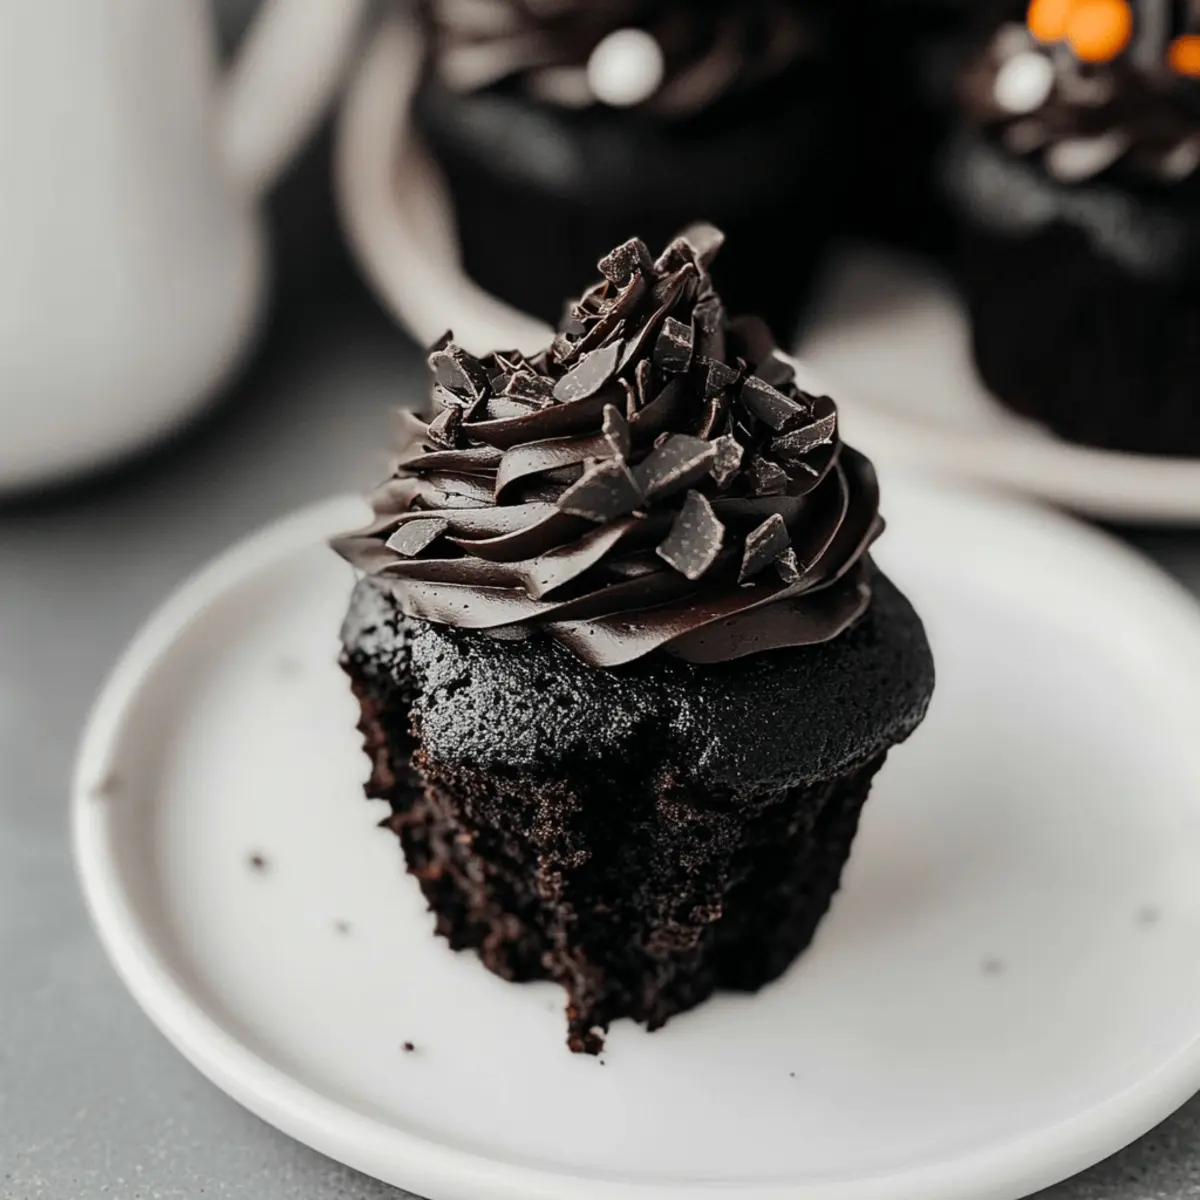
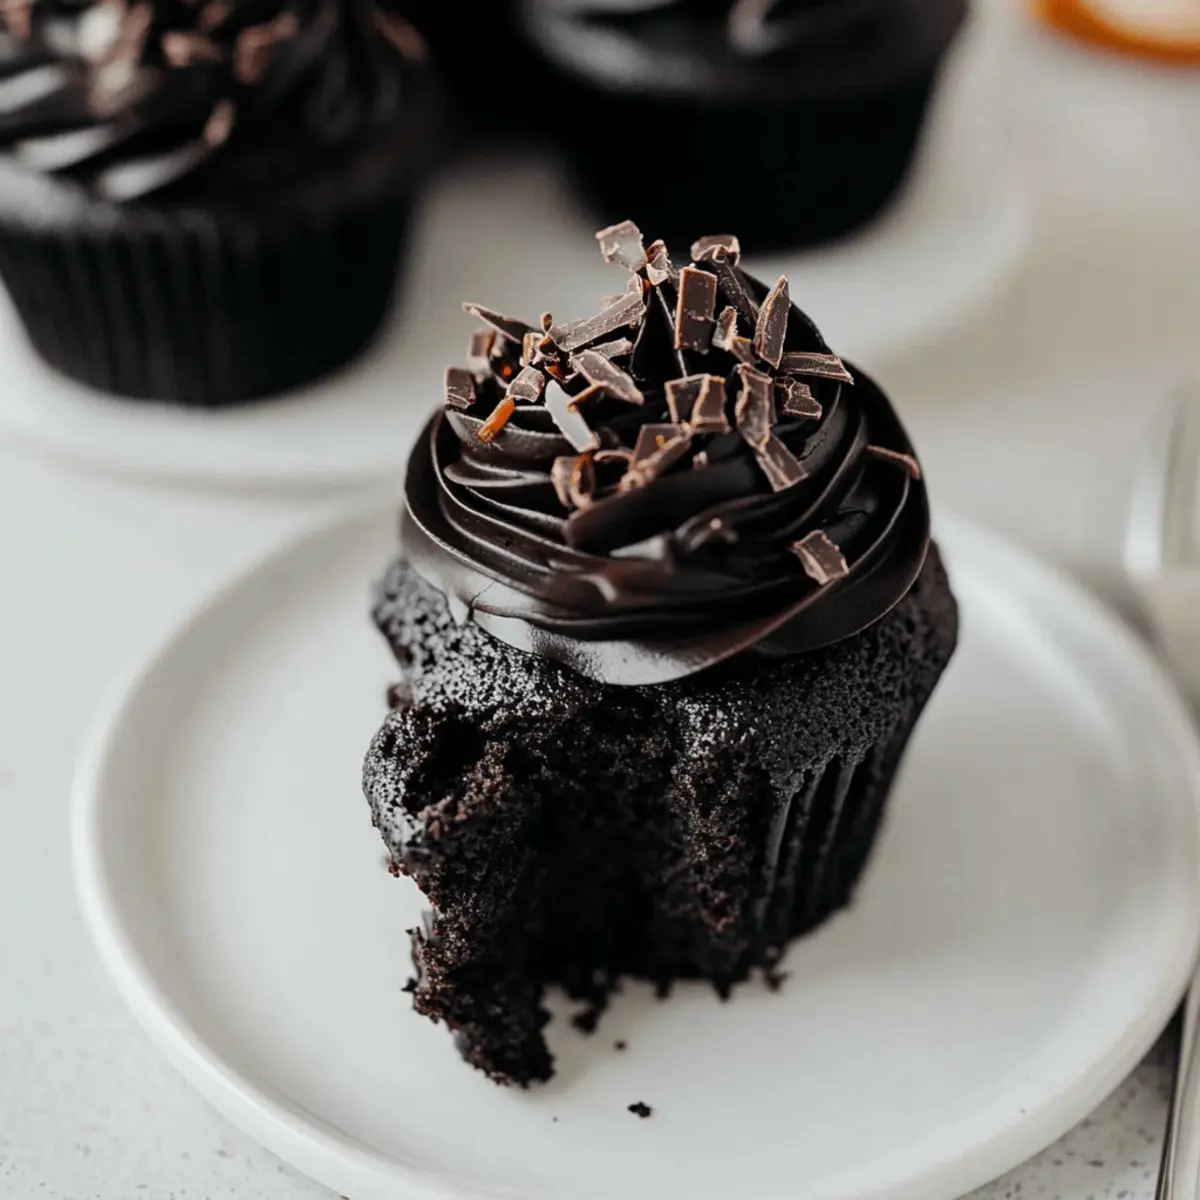
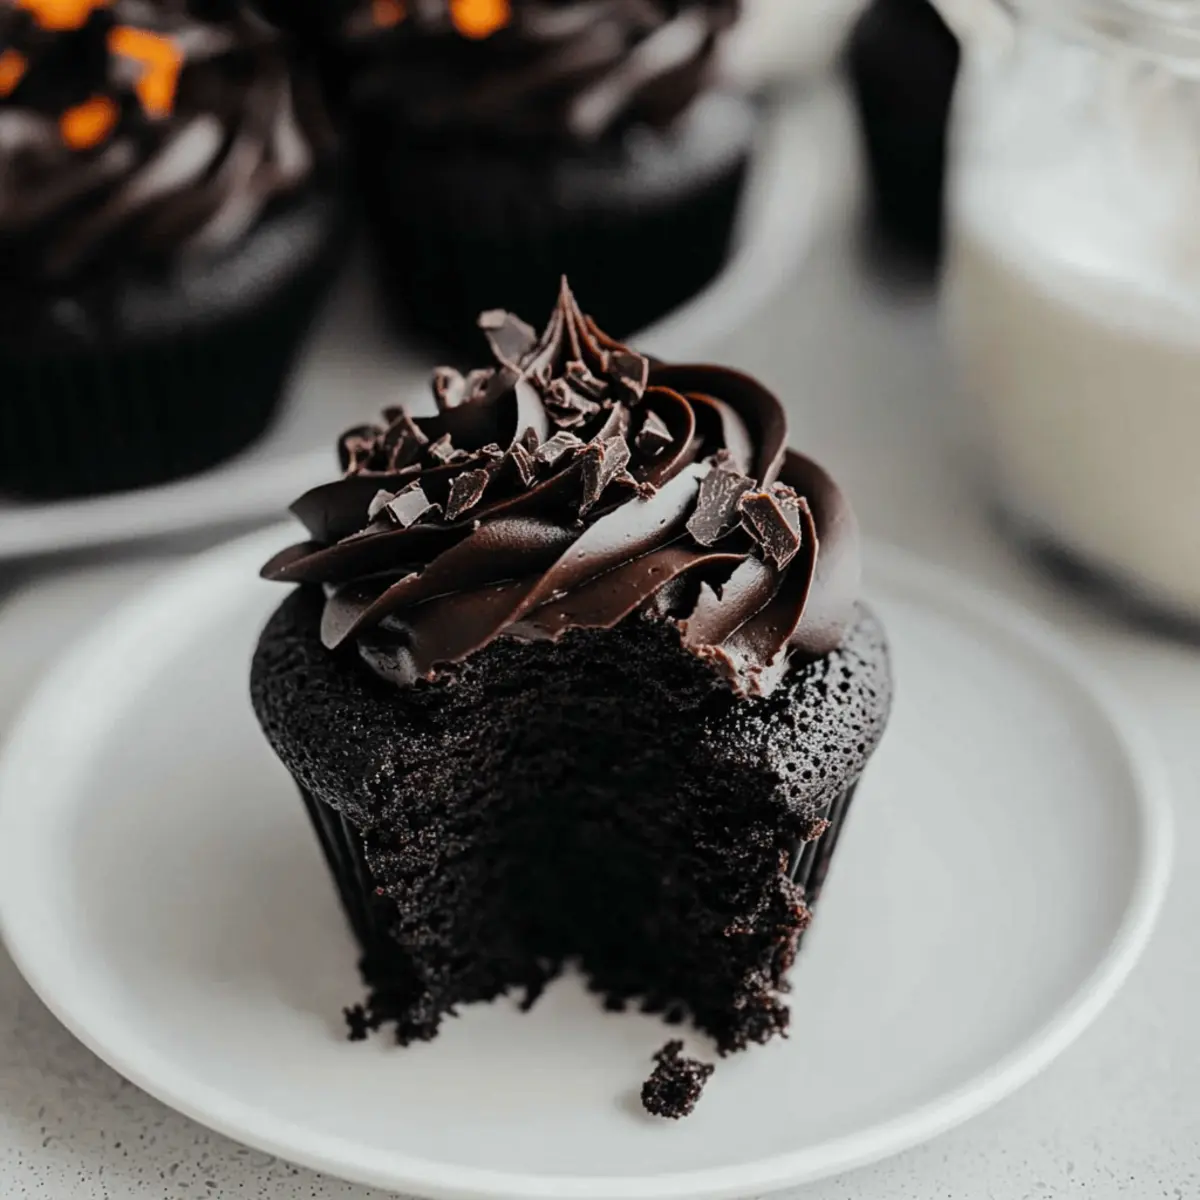
As autumn whispers its arrival, I'm reminded of the bewitching allure of Halloween sweets. These Black Velvet Cupcakes are your perfect companion for the season, blending a striking dark color with a delightful chocolate taste that’ll enchant everyone at your gathering. Made with black cocoa powder, these moist cupcakes are easily whipped up in just 20 minutes, making them a quick yet impressive treat. Topped with a rich cocoa buttercream, they strike the right balance—not overly sweet but irresistibly decadent. Whether you're hosting a spooky soirée or simply indulging in a cozy baking day at home, these cupcakes will surely steal the show. Are you ready to bring a little magic to your kitchen?

Why are Black Velvet Cupcakes so special?

Colorful Display: Their eye-catching black hue makes these cupcakes a standout at any gathering, perfect for Halloween or any festive event.
Quick and Easy: With just 20 minutes of prep, you can dive into baking your new favorite treat without the fuss!
Moist and Fluffy: Thanks to black cocoa powder, these cupcakes are incredibly moist and flavorful, reminiscent of classic Oreos.
Delightfully Rich Frosting: The creamy cocoa buttercream adds a luxurious touch and balances the not overly sweet base perfectly.
Versatile Options: You can easily switch up the toppings or sprinkles depending on the occasion—be it Halloween themed or a cozy gathering with friends. For more delicious ideas, don’t miss our Sweet Potatoes Black for savory contrasts or that indulgent Blackberry Crisp Amp for dessert inspiration.

Black Velvet Cupcake Ingredients

• Note: Gather these essential ingredients to create the moist and flavorful Black Velvet Cupcakes.

For the Cupcakes

  • All-Purpose Flour – Provides structure and stability; substituting with cake flour can make them softer.
  • Black Cocoa Powder – Gives the cupcakes their dark color and rich chocolate flavor; consider Dutch-process cocoa for a lighter color, but the flavor will vary.
  • Baking Soda – Helps the cupcakes rise to a fluffy texture; ensure it’s fresh for the best results.
  • Kosher Salt – Balances sweetness and enhances flavor; use half the amount if you have fine salt on hand.
  • Large Eggs – Adds moisture and acts as a leavening agent; room temperature eggs mix better into the batter.
  • Sugar – Sweetens the batter; reducing sugar might alter the overall sweetness of your cupcakes.
  • Vegetable Oil – Keeps the cupcakes moist; melted coconut oil can be a flavorful substitute.
  • Vanilla Extract – Adds depth to the flavor; opt for pure vanilla for the best taste.
  • Buttermilk – Contributes to a tender crumb; if unavailable, mix milk with a teaspoon of vinegar or lemon juice for a substitute.
  • White Vinegar – Partners with baking soda for rising action; best not to substitute for optimal results.

For the Frosting

  • Unsalted Butter – Provides creaminess and rich flavor in frosting; European-style butter offers a more luxurious texture.
  • Heavy Cream – Creates smoothness in frosting; avoid using milk, as it won’t achieve the desired consistency.
  • Confectioners' Sugar – Adds sweetness and thickness to your frosting; sift before use for a smoother texture.

These ingredients blend together to create the enchanting Black Velvet Cupcakes that are sure to impress!

Step‑by‑Step Instructions for Black Velvet Cupcakes

Step 1: Preheat and Prepare
Begin by preheating your oven to 350°F (175°C). While it warms, line a muffin tray with 12 cupcake liners to prevent sticking. This ensures that your Black Velvet Cupcakes will bake evenly and showcase their delightful shape, ready for filling once the batter is mixed.

Step 2: Mix Dry Ingredients
In a medium bowl, whisk together the all-purpose flour, black cocoa powder, baking soda, and kosher salt until thoroughly combined. This step is crucial for the even distribution of ingredients the Black Velvet Cupcakes need to rise perfectly. Set the dry mixture aside to focus on the wet ingredients next.

Step 3: Combine Wet Ingredients
In a separate large mixing jug, crack in the large eggs and add the vegetable oil, buttermilk, vanilla extract, white vinegar, and sugar. Mix them together until smooth and creamy. This blend of ingredients is what will help your cupcakes achieve that moist, tender texture that everyone loves.

Step 4: Combine Mixtures
Gently fold the wet mixture into the dry ingredients using a spatula or wooden spoon. Be careful not to overmix the batter; a few lumps are okay. This is an important step because overmixing can lead to dense Black Velvet Cupcakes, which we want to avoid for optimal fluffiness.

Step 5: Fill and Bake
Spoon the cupcake batter into the prepared liners, filling them about halfway. Place the tray in the preheated oven and bake for 18-20 minutes or until a toothpick inserted in the center comes out clean. Keep an eye on them; they should rise beautifully and develop a firm top.

Step 6: Cool the Cupcakes
Once baked, allow the Black Velvet Cupcakes to cool in the muffin tray for 15 minutes. After that, gently transfer them to a wire rack to cool completely. This process helps maintain their moisture while preventing them from becoming too dense as they cool.

Step 7: Prepare the Frosting
While the cupcakes are cooling, prepare the rich cocoa buttercream frosting. Beat room temperature unsalted butter and sifted confectioners' sugar in a bowl until thick. Then, add a pinch of salt, vanilla extract, and black cocoa powder, mixing until fully blended before gradually adding the heavy cream to achieve a smooth, spreadable consistency.

Step 8: Frost the Cupcakes
Once your Black Velvet Cupcakes have completely cooled, use a piping bag to frost them with the creamy cocoa buttercream. You can decorate with fun Halloween-themed sprinkles if desired. This final touch elevates your cupcakes to an irresistible treat that is both spooky and delightful!

What to Serve with Black Velvet Cupcakes?

Elevate your cupcake experience by pairing these enchanting treats with delightful side companions!

  • Glass of Milk: A classic choice, milk enhances the cupcake's rich chocolate flavor while balancing its sweetness.
  • Hot Coffee: The warm bitterness of coffee contrasts beautifully with the sweetness of the cupcakes, creating a perfect morning treat.
  • Vanilla Bean Ice Cream: Creamy ice cream melts over warm cupcakes, creating a comforting dessert that’s divine!
  • Pumpkin Spice Latte: Embrace the fall vibes with a cozy pumpkin spice latte; its spices complement the rich chocolate perfectly.
  • Chocolate Ganache: Drizzle some warm ganache over your cupcakes for an indulgent twist that adds even more chocolatey goodness.
  • Spiced Apple Cider: This warm, fragrant drink adds a cozy touch that pairs beautifully with the festive flavors of the cupcakes.
  • Cinnamon Sugar Doughnuts: For a delightful brunch spread, serve alongside airy doughnuts for a sweet treat combination.
  • Fresh Berries: A handful of raspberries or blackberries adds a refreshing touch that cuts through the richness of the cupcakes.
  • Caramel Sauce: A drizzle of caramel sauce not only makes for a delectable topping but also adds a hint of sweet sophistication.

Black Velvet Cupcakes: Fun Variations

Let your creativity shine by customizing these delicious Black Velvet Cupcakes to suit any occasion or dietary preference!

  • Dairy-Free: Substitute buttermilk with soy milk mixed with lemon juice, and use dairy-free butter for the frosting. Enjoy a delightful version that's just as rich and fluffy!

  • Gluten-Free: Replace all-purpose flour with a gluten-free blend, ensuring your cupcakes remain wonderfully moist and satisfying for those with dietary restrictions.

  • Spicy Twist: Add a teaspoon of cayenne pepper to the batter for a surprising kick. This unexpected heat pairs beautifully with the sweet cocoa.

  • Tropical Flavors: Incorporate coconut cream instead of some heavy cream in the frosting for a tropical twist that transports your taste buds to an island paradise.

  • Festive Sprinkles: Top your cupcakes with vibrant sprinkles or themed decorations—think orange for Halloween or pastel for spring events! This simple touch can make your treats even more inviting.

  • Cocoa and Coffee: For a mocha flavor, replace a tablespoon of the hot water with brewed espresso in the frosting. This adds a delightful depth to the overall taste experience!

  • Vibrant Fillings: Consider filling your cupcakes with a surprise raspberry or strawberry jam for a burst of fruity flavor in every bite, pairing beautifully with the chocolate base.

  • Angelic Touch: For a lighter frosting option, whip up some whipped cream cheese instead of traditional buttercream. It’s less sweet but brings a lovely tang that complements the rich chocolate.

With these variations, your Black Velvet Cupcakes will charm everyone, no matter their preferences! And if you’re looking for more delicious inspiration, don’t forget to check out our Sweet Potatoes Black for savory contrasts or indulge in a delightful Blackberry Crisp Amp for dessert ideas.

Storage Tips for Black Velvet Cupcakes

Room Temperature: Store cupcakes at room temperature in an airtight container for up to 2 days. This keeps them moist and ready to enjoy anytime.

Fridge: If you plan to keep them longer, refrigerate the cupcakes in an airtight container for up to 5 days. Allow them to sit at room temperature for about 30 minutes before serving for the best flavor.

Freezer: Freeze the unfrosted cupcakes in an airtight container or freezer bag for up to 3 months. Thaw in the fridge overnight before frosting and serving.

Reheating: If you prefer warm cupcakes, reheat in the microwave for about 10 seconds, ensuring they don’t dry out. These Black Velvet Cupcakes are delicious even warmed!

Tips for the Best Black Velvet Cupcakes

  • Room Temperature Ingredients: Ensure all ingredients are at room temperature for better mixing and a smoother batter. This helps the Black Velvet Cupcakes achieve that light and fluffy texture.

  • Avoid Overmixing: Mix the batter gently until just combined. Overmixing can lead to dense cupcakes, which is a common mistake to avoid for a perfect rise.

  • Testing for Doneness: Use a toothpick to check for doneness; it should come out clean when inserted into the center. Keep an eye on baking time to prevent dryness.

  • Frost When Cool: Allow cupcakes to cool completely before frosting to prevent the buttercream from melting—this is key for a beautifully decorated cupcake!

  • Upgrade Your Cocoa: Opt for premium quality black cocoa powder for a richer flavor and deeper color. It makes a noticeable difference in your Black Velvet Cupcakes!

Make Ahead Options

These Black Velvet Cupcakes are perfect for meal prep enthusiasts! You can prepare the cupcake batter up to 24 hours ahead by mixing the dry and wet ingredients separately, then refrigerating them. Just remember, when you're ready to bake, you should let the wet ingredients come to room temperature before combining them with the dry mix to maintain a fluffy texture. The baked cupcakes can be stored in an airtight container for up to 3 days, keeping them moist and fresh. For the frosting, make it in advance and store it in the fridge; simply rewhip it before spreading. This way, you’ll enjoy delicious Black Velvet Cupcakes with minimal effort on busy days!

Black Velvet Cupcakes Recipe FAQs

What type of cocoa powder should I use for Black Velvet Cupcakes?
For the best results, use black cocoa powder, as it provides the deep color and rich chocolate flavor that sets these cupcakes apart. If you don’t have black cocoa powder, you can substitute with Dutch-process cocoa powder, but be aware that the color will be lighter and the flavor will change slightly.

How can I store my Black Velvet Cupcakes?
To keep them fresh, store the cupcakes at room temperature in an airtight container for up to 2 days. For longer storage, refrigerate them for up to 5 days in an airtight container. Before serving, let them sit at room temperature for about 30 minutes to enhance their flavor.

Can I freeze Black Velvet Cupcakes?
Absolutely! To freeze, place unfrosted Black Velvet Cupcakes in an airtight container or freezer bag for up to 3 months. When you're ready to enjoy them, simply thaw in the fridge overnight. Once thawed, frost and serve as you normally would!

What should I do if my cupcakes don’t rise properly?
If your Black Velvet Cupcakes don’t rise well, check that your baking soda is fresh, as expired leavening agents can result in dense cupcakes. Also, ensure that you didn’t overmix the batter, as this can create a denser texture, preventing them from rising as they should. Gently folding the wet and dry ingredients together helps maintain that perfect fluffy texture.

Are there any dietary considerations I should keep in mind?
Yes! If you're cooking for someone with dietary restrictions, check that all ingredients are safe. For those with egg allergies, you can substitute 1 egg with 1/4 cup unsweetened applesauce or a commercial egg replacer. Ensure your cocoa powder is allergen-free, especially if baking for individuals with specific sensitivities.

How do I know when my cupcakes are done baking?
The best way to test for doneness is to insert a toothpick into the center of one of the cupcakes. It should come out clean or with a few moist crumbs attached. If there's wet batter clinging to the toothpick, give the cupcakes a few more minutes in the oven, but keep a close eye on them to avoid overbaking.

Black Velvet Cupcakes

Decadent Black Velvet Cupcakes for a Spooky Sweet Treat

Indulge in delectable Black Velvet Cupcakes, perfect for Halloween gatherings, combining dark cocoa flavor with a fluffy texture.
Print Recipe Pin Recipe
Prep Time 20 minutes mins
Cook Time 20 minutes mins
Cooling Time 15 minutes mins
Total Time 55 minutes mins
Servings: 12 cupcakes
Course: Dessert
Cuisine: American
Calories: 250
Ingredients Equipment Method Nutrition Notes

Ingredients
  

For the Cupcakes
  • 1 1/2 cups All-Purpose Flour Substituting with cake flour can make them softer.
  • 3/4 cup Black Cocoa Powder Dutch-process cocoa can be used for a lighter color.
  • 1 tsp Baking Soda Ensure it’s fresh for best results.
  • 1/2 tsp Kosher Salt Use half the amount if using fine salt.
  • 2 large Eggs Use room temperature eggs.
  • 1 cup Sugar Reducing sugar may alter flavor.
  • 1/2 cup Vegetable Oil Melted coconut oil can be used as a substitute.
  • 1 tsp Vanilla Extract Opt for pure vanilla for best taste.
  • 1 cup Buttermilk Mix milk with vinegar or lemon juice for a substitute.
  • 1 tsp White Vinegar Do not substitute for optimal results.
For the Frosting
  • 1/2 cup Unsalted Butter European-style butter offers a luxurious texture.
  • 1/4 cup Heavy Cream Avoid milk to achieve desired frosting consistency.
  • 2 cups Confectioners' Sugar Sift before use for a smoother texture.

Equipment

  • Oven
  • Muffin tray
  • Cupcake liners
  • Mixing bowls
  • Spatula
  • Whisk
  • piping bag

Method
 

Instructions
  1. Preheat your oven to 350°F (175°C) and line a muffin tray with 12 cupcake liners.
  2. In a medium bowl, whisk together the all-purpose flour, black cocoa powder, baking soda, and kosher salt.
  3. In a large mixing jug, combine large eggs, vegetable oil, buttermilk, vanilla extract, white vinegar, and sugar.
  4. Gently fold the wet mixture into the dry ingredients until just combined; do not overmix.
  5. Spoon the batter into prepared liners, filling them halfway. Bake for 18-20 minutes until a toothpick comes out clean.
  6. Allow cupcakes to cool in the tray for 15 minutes, then transfer to a wire rack to cool completely.
  7. Prepare frosting by beating unsalted butter and confectioners' sugar until thick. Add salt, vanilla extract, black cocoa powder, and heavy cream; mix until smooth.
  8. Frost the cooled cupcakes with the cocoa buttercream and decorate with Halloween-themed sprinkles if desired.

Nutrition

Serving: 1cupcakeCalories: 250kcalCarbohydrates: 30gProtein: 3gFat: 13gSaturated Fat: 8gPolyunsaturated Fat: 1gMonounsaturated Fat: 4gCholesterol: 40mgSodium: 200mgPotassium: 150mgFiber: 1gSugar: 15gVitamin A: 200IUCalcium: 50mgIron: 1mg

Notes

Ensure all ingredients are at room temperature for better mixing and a smoother batter. Avoid overmixing the batter to maintain fluffiness.

Tried this recipe?

Let us know how it was!

Delicious Pumpkin Apricot and Macadamia Balls for Kids

October 17, 2025 by Grace Snow Leave a Comment

As the crisp autumn air settles in, I find myself longing for festive flavors that capture the essence of the season. Enter the delightful Pumpkin Apricot and Macadamia Balls! These little bites are not only a healthy Halloween snack option, but also a no-bake treat, making them a hit with both kids and parents alike. With their chewy texture and a savory crunch from the macadamia nuts, they are perfect for those moments when you crave something sweet yet nourishing. Whipping up these energy balls is surprisingly simple and quick, making them an easy addition to your holiday celebrations. Ready to swap out those sugary treats for a more wholesome option that still feels like a celebration? Let’s dive into this delightfully easy recipe together!

Why are these Pumpkin Apricot Balls amazing?

Healthy: Packed with nutritious ingredients, these balls offer a guilt-free way to indulge during Halloween.

No-Bake: Enjoy an effortless preparation process—just blend, roll, and chill!

Kid-Friendly: Kids will love these chewy, sweet bites that resemble tiny pumpkins, making snacking fun.

Versatile: Feel free to mix in your favorite nuts or spices to customize these treats.

Quick: Whip them up in minutes, perfect for busy parents looking for healthy snack options.

With just a few simple steps, you'll have a delightful batch of Pumpkin Apricot and Macadamia Balls to enjoy!

Pumpkin Apricot and Macadamia Balls Ingredients

For the Base

  • Dried Sulphate-Free Apricots – Provide natural sweetness and moisture to bind the mixture; opt for unsweetened for a healthier choice.
  • Pumpkin Puree – Adds vibrant flavor and moisture; homemade puree can elevate freshness.
  • Vanilla Extract – Enhances the overall flavor; use pure extract for a more robust taste.

For the Crunch

  • Macadamia Nuts – Contribute a rich, crunchy texture; can be swapped with cashews or almonds for a different experience.
  • Sultanas – Add little bursts of sweetness; they are optional for those avoiding added sugars.

These delightful Pumpkin Apricot and Macadamia Balls come together with these wholesome ingredients for a healthy Halloween snack that your kids will love!

Step‑by‑Step Instructions for Pumpkin Apricot and Macadamia Balls

Step 1: Blend the Base
Start by placing the dried sulphate-free apricots and pumpkin puree in a high-speed food processor. Blend on medium until the mixture is finely chopped and well combined, about 1-2 minutes. You want it to reach a sticky consistency that binds together without any large chunks remaining. This step ensures the base for your Pumpkin Apricot and Macadamia Balls is flavorful and cohesive.

Step 2: Add Flavor Enhancements
Next, scrape down the sides of the processor to collect any mixture. Pour in the vanilla extract and the macadamia nuts, then blend again for another 1-2 minutes. The goal here is to achieve a uniform texture where the macadamia nuts are chopped evenly but still provide some crunch. This will add depth and richness to your energy balls, bringing out the delightful flavors of pumpkin and apricot.

Step 3: Shape the Balls
Once the mixture is well-blended, use a clean spoon to scoop out about one teaspoon of the mixture. With your hands, roll it into a small ball shape. Repeat this process, placing each ball on a parchment-lined tray, until all the mixture is formed into Pumpkin Apricot and Macadamia Balls. Ensure they are tightly packed and uniform in size for consistency in every bite.

Step 4: Create Pumpkin Features
To give your energy balls a festive touch, take a toothpick and gently press an indentation on top of each ball, resembling the shape of a pumpkin. Next, place a sultana in the center of each indentation to act as the pumpkin stem. This added detail not only enhances presentation but makes these treats visually appealing for kids during Halloween.

Step 5: Chill to Set
Finally, refrigerate the tray of Pumpkin Apricot and Macadamia Balls for at least 30 minutes. This allows them to firm up and makes them easier to handle. Once chilled, you can serve them immediately or store them in an airtight container. Chilling helps to bring out the flavors and gives them a perfect chewy texture, ready to be enjoyed by kids and adults alike.

Make Ahead Options

These Pumpkin Apricot and Macadamia Balls are perfect for busy home cooks looking to simplify meal prep! You can prepare the mixture up to 24 hours in advance by blending the dried apricots, pumpkin puree, vanilla extract, and macadamia nuts as directed. Once blended, simply shape the balls and refrigerate them for later use. To maintain their quality, store the balls in an airtight container in the fridge, or freeze them for up to 3 months. When you're ready to serve, just take them out of the fridge or freezer, add the final touches like the sultana "stems," and enjoy these tasty treats that are just as delicious!

Expert Tips for Pumpkin Apricot and Macadamia Balls

  • Evenly Sized Balls: Use a measuring spoon to scoop exact amounts; this ensures uniform size for even texture and consistency in your Pumpkin Apricot and Macadamia Balls.

  • Texture Troubles: If the mixture is too crumbly, add a little more pumpkin puree; conversely, if too sticky, a sprinkle of coconut flour can help firm it up.

  • Mix It Up: Don’t hesitate to experiment! Substitute macadamia nuts with walnuts or pecans for different flavors while keeping the healthy essence intact.

  • Storing Secrets: For optimal freshness, store the energy balls in an airtight container in the refrigerator for up to one week; they also freeze well for longer-term enjoyment.

  • Festive Fun: Enhance the Halloween spirit by decorating your Pumpkin Apricot and Macadamia Balls with colored sultanas or edible glitter to make them more exciting for kids!

Pumpkin Apricot and Macadamia Balls Variations

Feel free to enhance your Pumpkin Apricot and Macadamia Balls with these delightful twists that will tantalize your taste buds!

  • Nut-Free: Replace macadamia nuts with sunflower seeds for a nut-free option that still offers crunch.
  • Spicy Kick: Add a pinch of cayenne or chili powder to the mixture for a surprising heat that contrasts with the sweetness.
  • Chocolate Lovers: Fold in dairy-free chocolate chips to the mixture for an indulgent twist perfect for chocolate enthusiasts.
  • Extra Fruit: Mix in dried cranberries or raisins to add bursts of flavor and an extra chewy texture.
  • Herbal Infusion: Incorporate fresh herbs like mint or basil for a refreshing flavor that balances the sweetness of the energy balls.
  • Coconut Delight: Roll the finished balls in shredded coconut for an added layer of flavor and visual appeal, enhancing their festive look.
  • Protein Packed: Add a scoop of your favorite protein powder to the mixture to boost nutritional value without compromising taste.
  • Pumpkin Spice Boost: Stir in a teaspoon of pumpkin spice mix for a heightened flavor that celebrates the season.

These variations allow you to adjust the recipe according to your preferences while maintaining the joy and healthiness of this festive treat. Looking for more pumpkin-inspired ideas? Check out my delicious Pumpkin Brownies Decadent or try these cozy Pumpkin Cinnamon Roll recipes for a perfect autumn experience!

What to Serve with Pumpkin Apricot and Macadamia Balls

As you prepare to treat your family to these delightful snacks, consider pairing them with complementary dishes that enhance their flavors and satisfy your guests.

  • Fresh Fruit Platter: A colorful assortment of seasonal fruits will add vibrant flavor contrasts and refreshing textures to your snack spread. Juicy slices of apple or pear, alongside berries, provide a sweet balance to the chewy energy balls.

  • Yogurt Dip: A creamy yogurt dip offers a lovely tanginess that complements the nuttiness of the macadamia and the sweetness of the apricot. Consider a hint of honey and cinnamon for an autumn twist.

  • Nutty Granola: Sprinkling a handful of crunchy granola around your Pumpkin Apricot and Macadamia Balls can add a delightful texture while reinforcing the nutty flavors. It transforms your healthy snack into a fun, interactive treat.

  • Herbal Tea: A warm cup of chamomile or mint tea serves as a soothing beverage to accompany your energy balls, creating a cozy atmosphere. The herbal notes pair beautifully with the natural sweetness of the ingredients.

  • Mini Pumpkin Muffins: These mini muffins echo the flavors of your energy balls while offering a fluffy texture. They provide another great option for sweet snacking that children will love.

  • Dark Chocolate Squares: For those who appreciate a touch of indulgence, pairing with a couple of squares of dark chocolate can be heavenly. The rich cocoa enhances the overall experience and feels festive for the season.

  • Vegetable Sticks: Offer some crudité alongside the energy balls for a refreshing crunch. Carrots, celery, and bell peppers provide a healthy, crisp contrast that rounds out your snack options.

  • Apple Cider: A glass of warm or chilled apple cider perfectly captures the essence of autumn and complements the sweet and nutty notes of the energy balls, creating a delightful festive vibe.

How to Store and Freeze Pumpkin Apricot and Macadamia Balls

Fridge: Store in an airtight container in the refrigerator for up to one week to maintain freshness and flavor.

Freezer: For longer storage, freeze the pumpkin apricot and macadamia balls in a single layer; transfer to an airtight container after solidifying. They can be frozen for up to three months.

Reheating: Enjoy them directly from the fridge or freezer; no need to thaw! Just give them a minute at room temperature for optimal texture.

Tip: Label your containers with the date to ensure you know when they were made, keeping your wholesome treats organized and enjoyable!

Pumpkin Apricot and Macadamia Balls Recipe FAQs

What should I look for when selecting dried apricots?
Absolutely! When choosing dried apricots, look for ones that are sulphate-free and unsweetened. They should be pliable and have a vibrant orange color. Avoid apricots with dark spots or a hard texture, as these may indicate they are over-dried or past their prime.

How long can I store these energy balls?
You can store your Pumpkin Apricot and Macadamia Balls in an airtight container in the refrigerator for up to one week. This keeps them fresh and delicious, making them a perfect go-to snack throughout the week!

Can I freeze Pumpkin Apricot and Macadamia Balls?
Yes! To freeze them, lay the balls out in a single layer on a baking sheet until firm, usually about 1-2 hours. Then, transfer them to an airtight container or a freezer bag, where they can stay fresh for up to three months. When you're ready to enjoy, simply take them out and let them sit at room temperature for about a minute.

What if my mixture is too sticky when forming the balls?
No worries! If the mixture feels too sticky, you can sprinkle in a little coconut flour or add a few more chopped macadamia nuts, then blend again. This should help firm up the mixture, making it easier to roll into neat balls. It’s all about finding that perfect consistency!

Can my kids eat these energy balls if they're allergic to nuts?
Important consideration! If your kids have nut allergies, simply substitute the macadamia nuts with seeds like sunflower or pumpkin seeds. You’ll still get that delightful crunch without compromising on health or safety. Always check for any other allergies related to the ingredients used, such as dried fruits.

What's the best way to serve these for Halloween?
For a festive touch, serve your Pumpkin Apricot and Macadamia Balls on a colorful platter alongside seasonal fruits. You can even set up a DIY decorating station where kids can add embellishments like edible glitter or sprinkles to their energy balls. It’s a fun and engaging way to make healthy snacking exciting!

Pumpkin apricot and macadamia balls

Delicious Pumpkin Apricot and Macadamia Balls for Kids

These healthy Pumpkin Apricot and Macadamia Balls make for a perfect no-bake Halloween snack option for kids.
Print Recipe Pin Recipe
Prep Time 10 minutes mins
Chilling Time 30 minutes mins
Total Time 40 minutes mins
Servings: 12 balls
Course: Snacks
Cuisine: American
Calories: 100
Ingredients Equipment Method Nutrition Notes

Ingredients
  

For the Base
  • 1 cup Dried Sulphate-Free Apricots Opt for unsweetened for a healthier choice.
  • 1 cup Pumpkin Puree Homemade puree can elevate freshness.
  • 1 teaspoon Vanilla Extract Use pure extract for a more robust taste.
For the Crunch
  • 1/2 cup Macadamia Nuts Can be swapped with cashews or almonds.
  • 1/4 cup Sultanas Optional for those avoiding added sugars.

Equipment

  • High-speed food processor

Method
 

Step-by-Step Instructions
  1. Blend the dried apricots and pumpkin puree in a food processor on medium until finely chopped and sticky, about 1-2 minutes.
  2. Add vanilla extract and macadamia nuts, blend until uniform but still crunchy, about 1-2 minutes.
  3. Scoop out about one teaspoon, roll into a ball, and place on a parchment-lined tray.
  4. Use a toothpick to make an indentation on top of each ball and place a sultana in the center as a stem.
  5. Refrigerate for at least 30 minutes to firm up, then serve or store in an airtight container.

Nutrition

Serving: 1ballCalories: 100kcalCarbohydrates: 15gProtein: 2gFat: 4gSaturated Fat: 1gPolyunsaturated Fat: 0.5gMonounsaturated Fat: 2gSodium: 1mgPotassium: 100mgFiber: 2gSugar: 8gVitamin A: 200IUVitamin C: 1mgCalcium: 20mgIron: 0.5mg

Notes

For uniform size, use a measuring spoon. Adjust pumpkin puree or coconut flour if the mixture is too crumbly or sticky.

Tried this recipe?

Let us know how it was!

Creamy Pumpkin Pie with Almond Flour Crust to Delight Keto Lovers

October 17, 2025 by Grace Snow Leave a Comment

As I peeled back the foil from my freshly baked pie, the warmth of autumn wafted through my kitchen, transforming it into a cozy haven. This Easy Keto Pumpkin Pie with Almond Flour Crust has quickly become a staple in my home, especially as Thanksgiving approaches. With its deliciously creamy filling and tender crust, it’s the perfect dessert for anyone craving a low-carb, gluten-free treat that doesn’t skimp on flavor. Not only is this pie quick to prepare, but it also balances nostalgia with health—making it an irresistible choice for family gatherings. Whether you’re following a keto lifestyle or simply seeking a comforting classic that pleases everyone, this pumpkin pie hits all the right notes. Curious about the secret to achieving that perfect texture? Let’s dive in and bring this scrumptious slice of fall to your table!

Why is this pumpkin pie a must-try?

Creamy, Rich Filling: The luscious blend of pumpkin puree and cream cheese creates a velvety texture that’s simply irresistible.

Low-Carb Delight: With only 3.3 net carbs per slice, you can indulge without guilt—perfect for keto lovers!

Easy Preparation: Quick to whip up, this pie allows you to spend less time in the kitchen and more time enjoying the festivities.

Almond Flour Crust: The flaky almond flour crust offers a gluten-free alternative that’s both buttery and satisfying, complementing the filling beautifully.

Versatile Options: Want to switch things up? Try a coconut flour crust or explore different keto-friendly sweeteners to suit your taste!

Make this pumpkin pie your new holiday favorite and serve with a dollop of whipped cream for an extra touch of decadence!

Pumpkin Pie with Almond Flour Crust Ingredients

For the Crust

  • Almond Flour – Provides a low-carb base for the crust, offering a delightful nutty flavor.
  • Butter – Binds the crust ingredients together, ensuring a flaky texture; use unsalted for better control over salt levels.
  • Erythritol – Sweetens the crust while keeping it keto-friendly; adjust for your preferred sweetness.

For the Filling

  • Pumpkin Puree – The star of the pie, delivering rich flavor and moisture; canned is ideal for a thicker consistency.
  • Cream Cheese – Adds a creamy richness; ensure it’s softened for easy blending.
  • Heavy Whipping Cream – Imparts a luxurious texture to the filling; critical for keeping it low-carb, no substitutes recommended.
  • Cinnamon – Enhances the pumpkin flavor beautifully; can substitute with nutmeg for a twist.
  • Pumpkin Pie Spice – Complements the filling’s taste; use a blend or make your own with common spices.
  • Salt – Balances the sweetness, enhancing flavors; opt for sea salt for better taste.
  • Vanilla Bean – Adds aromatic sweetness; replace with vanilla extract if needed.

This delicious pumpkin pie with almond flour crust is sure to be a hit at your Thanksgiving table!

Step‑by‑Step Instructions for Pumpkin Pie with Almond Flour Crust

Step 1: Preheat the Oven
Begin by preheating your oven to 350°F (175°C). This will ensure a perfectly baked crust and filling. While the oven heats up, gather all your ingredients and equipment, including a 9-inch pie pan. This step sets the stage for a delightful Pumpkin Pie with Almond Flour Crust.

Step 2: Make the Crust Mixture
In a mixing bowl, combine almond flour, erythritol, and melted unsalted butter. Stir these ingredients together until you achieve a crumbly texture, ensuring everything is well incorporated. This mixture will form the base of your pumpkin pie. Set aside for a moment as the oven reaches the desired temperature.

Step 3: Press the Crust into the Pan
Next, take the crumbly crust mixture and press it evenly into the bottom and sides of your ungreased 9-inch pie pan. Make sure it’s nicely packed to create a sturdy base for your pie. Bake the crust in the preheated oven for 5–8 minutes, until it turns lightly golden brown. Once done, remove it and allow it to cool completely.

Step 4: Prepare the Filling
In a clean mixing bowl, combine pumpkin puree, softened cream cheese, and erythritol. Using a hand mixer, beat the mixture on medium-high speed for about 1 minute until it's smooth and well blended. This will form the creamy filling for your Pumpkin Pie with Almond Flour Crust, so take care to achieve a lump-free consistency.

Step 5: Blend in Additional Ingredients
To the pumpkin mixture, add heavy whipping cream, cinnamon, pumpkin pie spice, salt, and vanilla bean. Mix all these ingredients thoroughly using your hand mixer for an additional 3–5 minutes until thick and creamy. This step enhances the flavors, ensuring a delightful filling that complements your crust perfectly.

Step 6: Assemble the Pie
Once your crust has cooled and your filling is ready, carefully pour the creamy pumpkin mixture into the cooled almond flour crust. Use a spatula to spread it evenly for a smooth top. This assembly combines the nutty crust with the rich filling, creating a harmonious Pumpkin Pie that is sure to impress.

Step 7: Chill Before Serving
After assembling the pie, place it in the refrigerator to chill for 2–3 hours. This chilling time allows the flavors to meld beautifully and the filling to set. Once chilled, your Pumpkin Pie with Almond Flour Crust will be ready to slice and serve, revealing a creamy filling that stays true to the traditional taste with a low-carb twist.

Expert Tips for Perfect Pumpkin Pie

  • Use Canned Puree: Opt for canned pumpkin puree instead of fresh for a thicker texture; fresh can lead to a watery filling in your pumpkin pie with almond flour crust.

  • Pre-Bake the Crust: Always pre-bake the almond flour crust briefly to avoid sogginess; a firm base provides the best foundation for your delicious filling.

  • Ensure Full Chilling: Chill the pie for the full 2-3 hours after assembling; this helps it set and enhances the flavors, making each slice easier to cut and serve.

  • Mix Thoroughly: Beat the filling ingredients until completely smooth; lumps can disrupt the creamy texture that defines a great pumpkin pie with almond flour crust.

  • Adjust Sweetness Wisely: If you like it sweeter, adjust the erythritol gradually; start with less and add more to taste, ensuring the perfect sweetness for your design.

Make Ahead Options

These Easy Keto Pumpkin Pie with Almond Flour Crust are perfect for busy home cooks looking to save time during the holidays! You can prepare the crust up to 24 hours in advance by baking it, allowing it to cool completely, and then storing it wrapped in plastic wrap to maintain its crisp texture. The filling can also be made up to 3 days ahead; simply mix all the ingredients and refrigerate in an airtight container. When you’re ready to serve, pour the chilled filling into the pre-baked crust and let it set in the fridge for 2-3 hours. This way, your pumpkin pie will taste just as delicious, letting you enjoy the festive moments without the last-minute rush!

Pumpkin Pie with Almond Flour Crust Variations

Feel free to make this delicious pumpkin pie your own with these delightful variations!

  • Coconut Flour Crust: Substitute almond flour with coconut flour for a unique twist; note that you'll need to adjust liquid ratios for the crust.

  • Sweetener Swap: If erythritol isn't your favorite, try monk fruit or stevia to tailor the sweetness to your taste without compromising the keto profile.

  • Nutty Crust: Add in ground pecans to the crust mixture for a richer, nuttier flavor, elevating the texture and taste.

  • Spiced Up Filling: For an extra kick, mix in a pinch of cayenne or black pepper to the filling for a delightful warmth within your pumpkin pie.

  • Chocolate Drizzle: Melt some sugar-free chocolate and drizzle it on top before serving; it adds a stunning visual and taste that pairs beautifully with pumpkin.

  • Cream Cheese Swirl: Gently swirl extra cream cheese into your filling for pockets of creamy goodness and a more decadent texture.

  • Lactose-Free Option: Use coconut cream instead of heavy whipping cream for a dairy-free and lactose-free pumpkin pie without losing richness.

  • Whipped Cream Topping: Elevate your serving by topping each slice with fresh whipped cream or coconut whip; it's the perfect finishing touch!

Feel inspired to switch up your approach and make this pumpkin pie with almond flour crust a truly memorable addition to your holiday spread! For another festive treat, consider adding Pumpkin Brownies Decadent to your menu!

What to Serve with Easy Keto Pumpkin Pie with Heavy Cream & Almond Flour Crust

As you slice into this dreamy pumpkin pie, consider these delightful accompaniments to elevate your holiday feast.

  • Whipped Cream: The light, airy texture of freshly whipped cream adds a touch of indulgence to every slice, enhancing the creamy filling beautifully.

  • Coffee or Espresso: A warm, rich cup of coffee or espresso complements the sweetness of pumpkin pie and balances its flavors with comfort.

  • Spiced Pecans: Crunchy and slightly sweet, spiced pecans offer a delightful contrast in texture while enhancing the fall flavors of the pie.

  • Vanilla Ice Cream: A scoop of smooth vanilla ice cream brings a creamy chill that melts into the warm pie, creating a heavenly taste sensation.

  • Fall Fruit Salad: A colorful medley of apples, pears, and pomegranate offers a refreshing, sweet-tart contrast that brightens up the rich pumpkin flavors.

  • Chai Latte: This spiced tea perfectly complements the warm spices in the pie, creating a cozy pairing that feels like fall in a cup.

  • Dark Chocolate Shavings: A sprinkle of dark chocolate over the pie adds a hint of bitterness that beautifully balances the sweet and creamy filling.

Creating moments of joy with these pairings will make your Easy Keto Pumpkin Pie a centerpiece at gatherings, loved by all!

How to Store and Freeze Pumpkin Pie with Almond Flour Crust

Fridge: Store your pumpkin pie covered with plastic wrap or in an airtight container for up to 4 days. This will keep it fresh and delicious without compromising flavor.

Room Temperature: Your pie can sit at room temperature for up to 2 hours. After that, it’s best to refrigerate to prevent spoilage.

Freezer: For longer storage, wrap the pie tightly in plastic wrap and aluminum foil, then freeze for up to 2 months. Thaw in the fridge overnight before serving.

Reheating: To enjoy a slice warm, reheat in a preheated oven at 350°F (175°C) for about 10-15 minutes. This helps maintain the texture of your pumpkin pie with almond flour crust.

Pumpkin Pie with Almond Flour Crust Recipe FAQs

How do I choose the best pumpkin puree?
Absolutely! When selecting pumpkin puree, I recommend opting for canned options, which tend to have a thicker and creamier texture. Look for brands without added sugars or spices for the best results. If you prefer fresh pumpkin, be sure to cook and puree it thoroughly before using, ensuring it’s not too watery.

What is the best way to store leftover pumpkin pie?
To keep your pumpkin pie fresh, store it in the fridge tightly covered with plastic wrap or in an airtight container for up to 4 days. If you leave it at room temperature, be mindful that it should not sit out for longer than 2 hours to prevent spoilage.

Can I freeze this pumpkin pie with almond flour crust?
Yes, you can! Wrap the entire pie tightly with plastic wrap followed by aluminum foil and freeze it for up to 2 months. When you're ready to enjoy, simply transfer it to the refrigerator to thaw overnight. For an immediate treat, you can also slice it and reheat individual pieces in a preheated oven at 350°F (175°C) for about 10-15 minutes.

What should I do if my filling is too runny?
Very important! If your filling turns out runny, it may be due to extra moisture in the pumpkin puree. Make sure to use canned pumpkin puree designed for pie, as it is less watery. You can also bake the mixed filling briefly in the pie crust to help set it. For future batches, ensure all ingredients are well combined and let them chill adequately before serving.

Are there any dietary considerations I should know about?
Definitely! The pumpkin pie with almond flour crust is gluten-free and is suitable for those following a keto diet, with only 3.3 net carbs per slice. However, be cautious with erythritol if you have specific sensitivities or allergies, as some individuals may react to sugar alcohols. Always consult your doctor if unsure about dietary needs for pets too, especially with the use of sweeteners.

Pumpkin Pie with Almond Flour Crust

Creamy Pumpkin Pie with Almond Flour Crust to Delight Keto Lovers

Enjoy a creamy Pumpkin Pie with Almond Flour Crust that is low-carb and gluten-free, perfect for the holidays.
Print Recipe Pin Recipe
Prep Time 15 minutes mins
Cook Time 25 minutes mins
Chilling Time 3 hours hrs
Total Time 3 hours hrs 40 minutes mins
Servings: 8 slices
Course: Dessert
Cuisine: American
Calories: 240
Ingredients Equipment Method Nutrition Notes

Ingredients
  

For the Crust
  • 2 cups Almond Flour Provides a low-carb base for the crust, offering a delightful nutty flavor.
  • 1/2 cup Butter Binds the crust ingredients together; use unsalted for better control over salt levels.
  • 1/4 cup Erythritol Sweetens the crust while keeping it keto-friendly; adjust for your preferred sweetness.
For the Filling
  • 1 can (15 oz) Pumpkin Puree The star of the pie, delivering rich flavor and moisture; canned is ideal.
  • 8 oz Cream Cheese Adds a creamy richness; ensure it’s softened for easy blending.
  • 1/2 cup Heavy Whipping Cream Imparts a luxurious texture to the filling; critical for keeping it low-carb.
  • 1 teaspoon Cinnamon Enhances the pumpkin flavor beautifully; can substitute with nutmeg.
  • 1 teaspoon Pumpkin Pie Spice Complements the filling’s taste; use a blend or make your own.
  • 1/4 teaspoon Salt Balances the sweetness, enhancing flavors; opt for sea salt.
  • 1 bean Vanilla Bean Adds aromatic sweetness; replace with vanilla extract if needed.

Equipment

  • 9-inch pie pan
  • Mixing Bowl
  • hand mixer

Method
 

Preparation Steps
  1. Preheat your oven to 350°F (175°C) and gather all ingredients and equipment.
  2. In a mixing bowl, combine almond flour, erythritol, and melted unsalted butter until crumbly.
  3. Press the crust mixture into the bottom and sides of a 9-inch pie pan. Bake for 5-8 minutes until lightly golden brown.
  4. In a clean mixing bowl, combine pumpkin puree, softened cream cheese, and erythritol. Mix until smooth.
  5. Add heavy whipping cream, cinnamon, pumpkin pie spice, salt, and vanilla bean to the pumpkin mixture. Blend until thick and creamy.
  6. Pour the creamy pumpkin mixture into the cooled almond flour crust and spread evenly.
  7. Chill the pie in the refrigerator for 2-3 hours before serving.

Nutrition

Serving: 1sliceCalories: 240kcalCarbohydrates: 3.3gProtein: 4gFat: 22gSaturated Fat: 12gPolyunsaturated Fat: 1gMonounsaturated Fat: 9gCholesterol: 50mgSodium: 200mgPotassium: 150mgFiber: 2gSugar: 1gVitamin A: 2500IUVitamin C: 1mgCalcium: 50mgIron: 1mg

Notes

Serve with a dollop of whipped cream for an extra touch of decadence. Adjust sweetness of the pie as preferred.

Tried this recipe?

Let us know how it was!

Toxic Waste Cocktail: A Spooky Sip for Halloween Fun

October 17, 2025 by Grace Snow Leave a Comment

As the moon hangs high and the air grows crisp, Halloween approaches like a vibrant green potion bubbling over with delight. The Toxic Waste Cocktail perfectly embodies all the fun and spookiness of this festive season. With its eye-catching hue and refreshing blend of bold citrus flavors—thanks to a spirited mix of vodka, sour apple schnapps, and a splash of club soda—this cocktail makes for a show-stopping centerpiece at any haunted gathering. Plus, it’s a breeze to whip up in just five minutes, ensuring you can mingle with your guests rather than spend hours behind the bar. Are you ready to concoct a drink that'll be the talk of the night? Let's dive into this bewitching recipe together!

Why is the Toxic Waste Cocktail a Must-Try?

Vibrant, Eye-Catching Color: The striking green hue makes this cocktail a showstopper at any Halloween gathering.

Quick and Easy: With just five minutes of prep time, this drink is perfect for those unexpected party moments!

Bold, Refreshing Flavor: The combination of vodka, sour apple schnapps, and club soda creates a delightful citrusy experience that’s simply irresistible.

Versatile Ingredients: Feel free to switch up the citrus juices or add that splash of cranberry for a festive twist!

Crowd Pleaser: This cocktail is sure to impress your guests and become a Halloween favorite. Unleash your inner mixologist and elevate your spooky soirée with the Toxic Waste Cocktail!

Toxic Waste Cocktail Ingredients

Get ready to mix up some Halloween magic!

For the Base

  • Vodka – A neutral spirit that forms the heart of the Toxic Waste Cocktail; feel free to swap it for white rum if you prefer a different flavor profile.
  • Sour Apple Schnapps – Provides a delightful sweetness and tangy flavor, infusing the drink with a crisp apple essence; no direct substitutes here, but other fruity schnapps can work in a pinch.
  • Orange Juice – Adds an essential burst of freshness and acidity; always opt for fresh-squeezed for the best taste.
  • Blue Curacao – It brings a captivating color and a hint of orange flavor; you can substitute with another blue liqueur, but the vibrant hue might change.
  • Citrus Bitters – This ingredient enhances the drink's complexity, elevating its overall profile; it's highly recommended for that extra depth.

For the Fizz

  • Club Soda – Lightens the drink and adds delightful bubbles; add just before serving for optimal freshness.

Unleash the spirit of Halloween with this mesmerizing Toxic Waste Cocktail recipe. Your guests will love the spooky flavor and striking appearance!

Step‑by‑Step Instructions for Toxic Waste Cocktail

Step 1: Prepare Your Glass
Begin by filling a tall glass with ice cubes, filling it about halfway. This will chill your Toxic Waste Cocktail, ensuring it's refreshingly cool when served. The ice should clink pleasantly as you add it, creating a vibrant backdrop for the vivid colors of the drink to come.

Step 2: Measure and Pour the Spirits
In a measuring jigger, pour 1.5 ounces of vodka, 1 ounce of sour apple schnapps, and 1 ounce of orange juice. Carefully layer each liquid into the glass over the ice, allowing the bold green and orange colors to merge beautifully. The vodka acts as the cocktail's neutral base, while the schnapps and juice add zest.

Step 3: Add the Blue Curacao
Next, introduce 0.5 ounces of blue curacao into the glass. Gently pour it along the side of the glass to create a visually striking layer. This will infuse your Toxic Waste Cocktail with an enticing deep green shade, reminiscent of bubbling potions, enhancing both its look and taste.

Step 4: Incorporate Citrus Bitters
Add 2 dashes of citrus bitters to the mixture. This step is crucial for adding depth to your cocktail's flavor profile. As you add the bitters, you might notice the aromas elevating the drink’s complexity, transforming your creation from delicious to extraordinary.

Step 5: Stir to Combine
Using a long straw or a cocktail stirrer, gently stir the mixture for about 10-15 seconds. This will blend the ingredients harmoniously while keeping the vibrant colors visible. Look for the vivid green hue to become more uniform, indicating that your Toxic Waste Cocktail is ready for the next step.

Step 6: Add Fizz with Club Soda
Just before serving, top off the glass with a splash of club soda. This adds a delightful fizz to your Toxic Waste Cocktail, enhancing its refreshment factor. Watch as tiny bubbles rise through the layers, creating a visually stunning effect that’s sure to impress your guests.

Step 7: Garnish and Serve
To finish, garnish your cocktail with a slice of green apple or a citrus wheel perched on the rim of the glass. This final touch adds an inviting aroma and a pop of color, making your Toxic Waste Cocktail not just delicious but also a feast for the eyes. Serve immediately to enjoy the best fizziness!

Expert Tips for the Toxic Waste Cocktail

  • Fresh Ingredients Matter: Use fresh-squeezed orange juice instead of bottled for a vibrant, zesty flavor that elevates the drink's profile.

  • Layered Look: Pour the blue curacao slowly along the glass's edge to maintain the stunning layers, making your Toxic Waste Cocktail visually appealing.

  • Citrus Bitters Essential: Don’t skip the citrus bitters; they add complexity that transforms your cocktail from ordinary to extraordinary.

  • Chill It Right: Make sure to fill your glass with plenty of ice to keep the cocktail refreshingly cold and enjoyable.

  • Make Ahead: For gatherings, prepare the non-carbonated mix ahead of time, letting guests add club soda just before serving to keep it fizzy.

What to Serve with Toxic Waste Cocktail

Elevate your Halloween festivities with delightful pairings that will complement this spooky cocktail.

  • Crispy Chicken Wings: The savory crunch of wings adds a satisfying contrast to the sweet and tangy cocktail. Opt for a spicy buffalo sauce to balance the flavors beautifully.

  • Pumpkin Soup: A warm and creamy pumpkin soup balances the boldness of the Toxic Waste Cocktail, creating a cozy, autumnal vibe. Serve with a drizzle of cream and a sprinkle of nutmeg for an elegant touch.

  • Caramel Popcorn: The sweet crunch of caramel popcorn pairs perfectly with the cocktail's vibrant flavors, making for a playful and festive snack. Guests will love nibbling on this treat as they sip their drinks!

  • Cheese Platter: Include a variety of cheeses, such as brie and sharp cheddar, alongside some crackers. This adds a rich texture that complements the refreshing notes of the cocktail.

  • Spooky Fruit Skewers: Fresh fruit skewers featuring grapes, melon, and orange slices bring a refreshing, juicy element to the table. The sweetness harmonizes elegantly with the Toxic Waste Cocktail's fruity notes.

  • Dark Chocolate Truffles: Indulge your guests with rich dark chocolate truffles. The smooth cocoa flavors beautifully contrast with the cocktail's sweetness, making it a decadent finale.

With these pairings, your Halloween gathering will be not just festive, but truly unforgettable!

Make Ahead Options

The Toxic Waste Cocktail is perfect for busy home cooks looking to save time during the Halloween festivities! You can prepare the cocktail mixture (vodka, sour apple schnapps, orange juice, blue curacao, and bitters) up to 24 hours in advance, just refrigerate it in an airtight container to maintain freshness. When it's time to serve, simply fill your glasses with ice and pour the pre-mixed cocktail over the ice before topping with club soda for that desired fizz. This method allows you to enjoy your gathering without the stress of last-minute mixing, while the flavors remain just as delicious and refreshing!

Toxic Waste Cocktail Variations & Substitutions

Feel free to get creative with the Toxic Waste Cocktail and make it your own delightfully spooky concoction!

  • Dairy-Free: Swap the club soda with a flavored sparkling water for a refreshing twist that keeps the drink crisp and bubbly.
  • Fruit-Infused: Add a splash of passion fruit juice to enhance the tropical flavor profile! The hint of sweetness will pair perfectly with the tangy components.
  • Berry Burst: Try using raspberry or blueberry schnapps for a vibrant alternative that will give your drink a berrylicious twist. It's a fun way to surprise your guests!
  • Less Sweet: If you prefer a less sweet cocktail, reduce the amount of sour apple schnapps and increase the orange juice for a more balanced taste.
  • Warm Spice: For a cozy feel, infuse the drink with a dash of cinnamon or nutmeg. This playful addition will give an unexpected yet delightful warm note.
  • Add a Jolt: Increase the fun by adding a splash of energy drink just before serving – it gives a color boost and a lively twist that fits perfectly for a party atmosphere!
  • Heat it Up: For an adventurous kick, mix in some jalapeño-infused vodka to give your Toxic Waste Cocktail a fiery surprise that will tingle your senses!

Remember, experimenting is half the fun! With these easy substitutions, you can whip up a memorable cocktail every time while keeping the spirit of the season alive. Speaking of exciting drinks, don’t forget to check out our Crispy Tortilla Chips and Spicy Guacamole for the perfect Halloween snack pairing that complements this drink!

How to Store and Freeze Toxic Waste Cocktail

Fridge: Keep any prepared mixture of the Toxic Waste Cocktail (minus club soda) in an airtight container in the fridge for up to 3 days. When ready to serve, just add the soda for that bubbly finish.

Room Temperature: It's best to serve this cocktail fresh, but if you happen to have leftovers, it can sit at room temperature for up to 2 hours before it loses its effervescence.

Freezer: Avoid freezing the Toxic Waste Cocktail as the ingredients will not maintain their texture or flavor once thawed. Instead, prep the individual components in advance for fresh mixing later.

Reheating: Not applicable for cocktails, but if you prepare the mix ahead of time, ensure it's stored properly to maintain its vibrant flavor and color when you serve it!

Toxic Waste Cocktail Recipe FAQs

What should I look for when selecting the best vodka?
Absolutely! When choosing vodka for your Toxic Waste Cocktail, opt for a high-quality brand that is both smooth and neutral in flavor. Look for vodka that is distilled multiple times for purity, which helps in preventing any off-flavors from affecting your delicious blend. If you're open to experimenting, consider selecting a flavored vodka that complements the apple notes in this cocktail.

How long can I store the Toxic Waste Cocktail mix without the soda?
You can store the prepared mixture (vodka, sour apple schnapps, orange juice, blue curacao, and bitters) in an airtight container in the fridge for up to 3 days. Just remember to add the club soda right before serving to keep the fizz intact and ensure a refreshing experience for you and your guests!

Can I freeze any part of the Toxic Waste Cocktail?
It's not recommended to freeze the Toxic Waste Cocktail once mixed, as freezing can alter the flavor and texture of the ingredients. Instead, consider preparing the individual components ahead of time. Freeze freshly squeezed orange juice in ice cube trays, and keep the schnapps and vodka in the liquor cabinet, allowing for a quick and easy mix when you're ready to serve.

What can I do if my cocktail isn't bubbly enough?
If your Toxic Waste Cocktail lacks fizz, the most likely culprit is insufficient club soda. Ensure you add it just before serving for the best carbonation. If it’s been sitting for a while after mixing, stir gently to bring some air back into the drink, or feel free to top it off with a bit more club soda to refresh those bubbles!

Are there any dietary considerations for guests with allergies?
While the Toxic Waste Cocktail is a fun and festive drink, it's crucial to consider any allergies your guests may have. The primary ingredients include vodka (which is gluten-free), sour apple schnapps, and citrus juices. However, be cautious with bitters, as some recipes may contain various flavorings and additives. Always check labels and speak with your guests beforehand to ensure they can safely enjoy this spooky sip!

Toxic Waste Cocktail

Toxic Waste Cocktail: A Spooky Sip for Halloween Fun

The Toxic Waste Cocktail is a vibrant and refreshing drink perfect for Halloween gatherings.
Print Recipe Pin Recipe
Prep Time 5 minutes mins
Total Time 5 minutes mins
Servings: 1 cocktail
Course: Drinks
Cuisine: Halloween
Calories: 200
Ingredients Equipment Method Nutrition Notes

Ingredients
  

Base
  • 1.5 ounces Vodka Neutral spirit; can substitute with white rum.
  • 1 ounce Sour Apple Schnapps Provides sweetness and tang.
  • 1 ounce Orange Juice Use fresh-squeezed.
  • 0.5 ounces Blue Curacao For color and a hint of orange flavor.
  • 2 dashes Citrus Bitters Enhances complexity.
Fizz
  • 1 splash Club Soda Add just before serving for freshness.

Equipment

  • Tall Glass
  • measuring jigger
  • Long Straw or Cocktail Stirrer

Method
 

Preparation
  1. Step 1: Prepare Your Glass - Fill a tall glass with ice cubes halfway.
  2. Step 2: Measure and Pour the Spirits - Pour vodka, sour apple schnapps, and orange juice into the glass over the ice.
  3. Step 3: Add the Blue Curacao - Pour blue curacao gently along the side of the glass.
  4. Step 4: Incorporate Citrus Bitters - Add 2 dashes of citrus bitters.
  5. Step 5: Stir to Combine - Stir gently for 10-15 seconds.
  6. Step 6: Add Fizz with Club Soda - Top with a splash of club soda just before serving.
  7. Step 7: Garnish and Serve - Garnish with a slice of green apple or a citrus wheel and serve immediately.

Nutrition

Serving: 1cocktailCalories: 200kcalCarbohydrates: 15gSodium: 10mgPotassium: 100mgSugar: 12gVitamin C: 15mg

Notes

Use fresh ingredients for the best flavor and maintain the layered look by pouring slowly.

Tried this recipe?

Let us know how it was!

Decadent Pumpkin Caramel Chocolates You’ll Love to Make

October 17, 2025 by Grace Snow Leave a Comment

As I was rummaging through my pantry, a hidden can of pumpkin puree caught my eye, sparking a delicious idea: Pumpkin Caramel Chocolates! These delightful morsels not only satisfy my sweet tooth, but they also cater to a variety of dietary needs—vegan, gluten-free, and dairy-free. Perfect for Halloween celebrations or anytime you crave a treat, this recipe is incredibly simple yet looks absolutely impressive. With a rich, spiced pumpkin filling enveloped in luxurious chocolate, you’ll find these treats not only quick to prepare but also a fantastic way to impress family and friends. Are you ready to bring some fun and flavor into your kitchen? Let’s dive in!

Why Are Pumpkin Caramel Chocolates Amazing?

Deliciously Unique: These chocolates bring a wholesome twist to traditional candy, combining rich pumpkin flavor with a creamy texture.
Diet-Friendly: Perfect for everyone, they’re vegan, gluten-free, and free from common allergens like dairy and eggs.
Fun Variations: Use fascinating molds like skulls or hearts to create festive surprises for any occasion!
Quick & Simple: With just a few steps, you can enjoy gourmet-style treats in no time at all.
Impressive Presentation: Whether for Halloween or just because, these chocolates will wow your guests and make any gathering special!

Pumpkin Caramel Chocolates Ingredients

For the Chocolate Shell
• Vegan Chocolate – Choose high-quality vegan chocolate for a rich outer shell that complements the pumpkin filling.

For the Pumpkin Filling
• Pumpkin Puree – Make sure to use pure pumpkin for the best flavor and texture in your Pumpkin Caramel Chocolates.
• Coconut Cream – This adds a velvety richness; nut cream can be a delightful substitute if desired.
• Maple Syrup – Sweeten your filling naturally; agave syrup or coconut sugar works well if you prefer a different sweetness.

For the Spices
• Cinnamon – A warm spice that enhances the pumpkin flavor; adjust according to your taste preference.
• Nutmeg – Offers a lovely hint of earthiness to the filling; perfect for that fall vibe.

These delectable Pumpkin Caramel Chocolates will surely be a hit, satisfying sweet cravings while catering to various dietary needs!

Step‑by‑Step Instructions for Pumpkin Caramel Chocolates

Step 1: Melt Chocolate
Begin by creating a double boiler with a heatproof bowl set over a pot of simmering water. Add your high-quality vegan chocolate and stir consistently for about 5-7 minutes, or until fully melted and smooth. Keep a close eye on the chocolate to prevent burning, aiming for a luscious, glossy consistency ideal for your Pumpkin Caramel Chocolates.

Step 2: Coat Molds
Once your chocolate is melted, carefully remove the bowl from the heat. Using a spoon or a small ladle, fill your chosen molds halfway with the warm chocolate. Gently tap the molds against the countertop to remove any air bubbles and ensure an even coating. Allow the chocolate to set at room temperature for about 10-15 minutes, or until it firms up slightly.

Step 3: Prepare Filling
While the chocolate sets, it’s time to whip up the filling for your Pumpkin Caramel Chocolates. In a mixing bowl, combine the pumpkin puree, coconut cream, maple syrup, cinnamon, and nutmeg. Using a whisk or a hand mixer, blend the ingredients for about 2-3 minutes until the mixture is smooth and creamy. This filling should be rich and fragrant, perfect for your chocolates.

Step 4: Fill Molds
Now that both the chocolate shells and filling are ready, return to your molds. Carefully spoon the creamy pumpkin filling into each mold, filling them almost to the top. Use a small spatula to smooth out the filling for an even surface. This step is crucial as it will create a delightful contrast with the chocolate shell.

Step 5: Seal
With the molds filled, it’s time to seal in that delicious filling. Use the remaining melted chocolate to spooningly cover each mold with a layer until the filling is fully enclosed. Ensure the tops are smooth and well-sealed to prevent any leakage. Aim for a nice, even coating to match the elegance of your Pumpkin Caramel Chocolates.

Step 6: Chill
Place your filled molds in the refrigerator and allow them to chill for at least 45 minutes, or until the chocolate is fully set. To speed up the process, you can pop them into the freezer for about 20-30 minutes. When done, the chocolates should have a firm texture and a beautiful, shiny exterior.

Step 7: Unmold
Once your Pumpkin Caramel Chocolates have set, gently remove them from the molds. Start by flexing the mold slightly to loosen the chocolates, then carefully push them out. Take your time to avoid breaking them; they should easily release and showcase their delightful pumpkin filling. Enjoy the satisfying moment of unveiling your creations!

What to Serve with Pumpkin Caramel Chocolates?

Savoring these sweet treats opens the door to delightful pairing possibilities that enhance their rich pumpkin flavor.

  • Spiced Chai Latte: The warm spices in chai elevate the autumnal notes in the chocolates, creating a cozy beverage pairing.

  • Toasted Coconut Macaroons: The chewy texture and nutty flavor of macaroons beautifully complement the creamy filling, adding a lovely contrast.

  • Pumpkin Soup: A bowl of savory pumpkin soup can provide a delightful, warm contrast, enhancing the tasting experience of the chocolates.

  • Cinnamon Sugar Cookies: The sweetness of cinnamon cookies ties perfectly with the chocolates, promising a nostalgic and comforting flavor combination.

  • Fresh Fruit Salad: Bright and refreshing fruits like apples and pears can cut through the richness of the chocolates, adding a light touch to the meal.

  • Vegan Ice Cream: A scoop of vanilla or spiced ice cream will create a decadent dessert experience, with each spoonful harmonizing beautifully.

  • Herbal Tea: A calming herbal tea, perhaps with lemongrass or mint, serves as a refreshing palate cleanser between bites.

  • Maple Pecan Pie: For those who love indulgence, a slice of pecan pie enhances the autumnal theme while offering a deliciously sweet finish.

  • Caramel Drizzle: Drizzling some extra maple or date caramel on top can intensify the flavors and add a touch of elegance to your presentation.

Make Ahead Options

These Pumpkin Caramel Chocolates are perfect for busy home cooks looking to save time without sacrificing flavor! You can prepare the chocolate shells and the pumpkin filling up to 24 hours in advance. Simply melt the chocolate, coat the molds, and refrigerate them. For the filling, mix the pumpkin puree, coconut cream, maple syrup, and spices, then store it in an airtight container in the fridge. When you're ready to finish your Pumpkin Caramel Chocolates, just spoon in the filling, seal with more chocolate, and chill for at least 45 minutes before unmolding. This way, you'll have scrumptious treats ready to impress, with minimal last-minute effort!

Expert Tips for Pumpkin Caramel Chocolates

• Quality Matters: Use high-quality vegan chocolate to ensure a smooth and rich exterior; it greatly affects your Pumpkin Caramel Chocolates' final taste.

• No Overheating: Be patient when melting chocolate; overheating can cause it to seize up, ruining the texture of your delicious treats.

• Chill Smartly: If you're short on time, chilling the molds in the freezer can speed up the setting process, but avoid leaving them too long to prevent cracking.

• Don’t Rush the Filling: Make sure your pumpkin filling is smooth before filling the molds; any lumps can compromise the mouthfeel and aesthetic of the chocolates.

• Experiment with Molds: Feel free to get creative with molds—using fun shapes can make your Pumpkin Caramel Chocolates a festive hit at any gathering!

Pumpkin Caramel Chocolates: Delicious Variations

Feel free to explore different flavors and textures with these delightful twists on Pumpkin Caramel Chocolates!

  • Nut-Free: Substitute coconut cream with sunflower seed butter for a creamy filling that remains allergen-friendly yet full of flavor.

  • Chocolate Variations: Experiment with dark, white, or even flavored vegan chocolates for unique taste profiles and eye-catching colors in your molds.

  • Spiced Delight: Boost the flavor by adding a pinch of ginger or clove to the pumpkin filling for an extra layer of warmth.

  • Crunchy Surprise: Fold in finely chopped pecans or walnuts into the pumpkin filling for a delightful crunch that contrasts the smooth chocolate.

  • Seasonal Shapes: Use holiday-themed molds like pumpkins or ghosts for Halloween, while heart shapes make perfect gifts for Valentine's Day.

  • Caramel Drizzle: After unmolding, drizzle with a homemade vegan caramel sauce for an elegant finish and an extra sweet treat.

  • Mini Versions: Create bite-sized chocolates by using mini molds, perfect for sharing at gatherings or gifting!

The versatility of these chocolates means you can tailor them to your taste preferences. Whether you’re feeling adventurous or beautifully classic, there’s a perfect bite waiting for you. For more delectable pumpkin-themed treats, don’t miss our Pumpkin Brownies Decadent or try our charming Pumpkin Cinnamon Roll for a cozy brunch!

How to Store and Freeze Pumpkin Caramel Chocolates

Fridge: Store your Pumpkin Caramel Chocolates in an airtight container in the refrigerator for up to two weeks, ensuring they stay fresh and delicious.

Freezer: For longer storage, freeze the chocolates in a single layer laid on parchment paper, then transfer to an airtight container; they can last for up to three months.

Thawing: When ready to enjoy, move the frozen chocolates to the fridge and allow them to thaw slowly for best texture before serving.

Reheating: If you find yourself needing to soften any chocolate, place them at room temperature for about 10-15 minutes until slightly warmed for an irresistible bite!

Pumpkin Caramel Chocolates Recipe FAQs

What type of pumpkin puree should I use?
Absolutely! Be sure to use pure pumpkin puree without any additives for the best flavor in your Pumpkin Caramel Chocolates. Canned pumpkin works perfectly, as does homemade puree made from roasted pumpkin. Just avoid the spiced varieties as they might alter the intended taste.

How should I store my Pumpkin Caramel Chocolates?
To keep your delightful chocolates fresh, store them in an airtight container in the refrigerator for up to two weeks. This way, they’ll maintain their luscious texture and flavor, making it easy to enjoy them whenever you have a sweet craving!

Can I freeze Pumpkin Caramel Chocolates?
Very much so! To freeze, place your chocolates in a single layer on a parchment-lined tray and put them in the freezer until solid. Once frozen, transfer them to an airtight container for storage. They can last up to three months! To thaw, gently move the chocolates to your fridge and let them slowly come to temperature before indulging.

What common issues might I encounter while making these chocolates?
If you find your chocolate is seizing or becoming grainy, it may have overheated. Always melt chocolate carefully using a double boiler, keeping the heat low. Also, make sure your filling mixture is smooth before spooning it into the molds to avoid lumps that could disrupt the texture of your Pumpkin Caramel Chocolates.

Are these chocolates suitable for people with dietary restrictions?
Absolutely! These Pumpkin Caramel Chocolates are vegan, gluten-free, dairy-free, egg-free, and soy-free, making them a wonderful treat for those with various dietary needs. However, always check your chocolate’s ingredient list to ensure it's free from allergens that may affect you or your loved ones.

Pumpkin Caramel Chocolates

Decadent Pumpkin Caramel Chocolates You’ll Love to Make

Delight in these delicious Pumpkin Caramel Chocolates that cater to vegan, gluten-free, and dairy-free diets, perfect for Halloween or any treat craving.
Print Recipe Pin Recipe
Prep Time 15 minutes mins
Cook Time 15 minutes mins
Chilling Time 45 minutes mins
Total Time 1 hour hr 15 minutes mins
Servings: 12 chocolates
Course: Dessert
Cuisine: American
Calories: 80
Ingredients Equipment Method Nutrition Notes

Ingredients
  

For the Chocolate Shell
  • 8 ounces Vegan Chocolate Choose high-quality for best flavor.
For the Pumpkin Filling
  • 1 cup Pumpkin Puree Use pure pumpkin for best flavor.
  • 1/2 cup Coconut Cream Can substitute with nut cream.
  • 1/4 cup Maple Syrup Agave syrup or coconut sugar can be used.
For the Spices
  • 1 teaspoon Cinnamon Adjust according to taste.
  • 1/2 teaspoon Nutmeg Provides a lovely fall flavor.

Equipment

  • Double Boiler
  • Mixing Bowl
  • Whisk
  • Spatula
  • Chocolate molds

Method
 

Step-by-Step Instructions
  1. Melt chocolate using a double boiler, stirring consistently for about 5-7 minutes until fully melted and smooth.
  2. Coat molds halfway with the warm chocolate, tap to remove air bubbles, and let set for about 10-15 minutes.
  3. Prepare filling by mixing pumpkin puree, coconut cream, maple syrup, cinnamon, and nutmeg in a bowl for 2-3 minutes.
  4. Fill molds with pumpkin filling, smoothing the surface with a spatula.
  5. Seal molds with remaining melted chocolate until the filling is fully enclosed.
  6. Chill in the refrigerator for at least 45 minutes until chocolate is set.
  7. Unmold chocolates gently by flexing the mold and pushing them out carefully.

Nutrition

Serving: 1chocolateCalories: 80kcalCarbohydrates: 10gProtein: 1gFat: 4gSaturated Fat: 3gMonounsaturated Fat: 1gSodium: 5mgPotassium: 50mgFiber: 1gSugar: 6gVitamin A: 2500IUVitamin C: 1mgCalcium: 10mgIron: 0.5mg

Notes

Store in an airtight container in the refrigerator for up to two weeks or freeze for up to three months. Thaw in the fridge before serving.

Tried this recipe?

Let us know how it was!

Monster Cakes: Irresistibly Fun Treats to Wow Kids

October 17, 2025 by Grace Snow Leave a Comment

The air is filled with excitement as Halloween approaches, making it the perfect time for some spooky baking! There’s something wonderfully creative about making Mini Monster Cakes that both kids and adults will adore. These aren't just any treats; they’re dreamy bites packed with richness and moisture that elevate your Halloween celebrations. With especially vibrant colors and whimsical designs, these cakes promise to be a hit at any kids' party. Plus, the decorating techniques I'll share will invigorate your baking game and provide a delightful way to bond with loved ones. Ready to unleash your inner pastry monster? Let’s dive into the fun!

Why Are Monster Cakes So Fun?

Creativity Unleashed: Decorating Mini Monster Cakes allows you to express your playful side while involving kids in the fun!
Deliciously Fudgy: These cakes boast a moist texture that’s irresistibly rich, making them a favorite among kids and adults alike.
Vibrant Colors: With the use of gel colors, each cake can become a colorful monster masterpiece!
Easy to Personalize: Swap out designs to match different themes or preferences—think pastel monsters for a softer touch!
Memorable Moments: Baking and decorating together creates lasting memories, perfect for building family traditions.
Perfect for Any Occasion: While great for Halloween, these cakes can brighten up any celebration, just like Ricotta Protein Pancakes or delightful Crab Cakes Forget.

Monster Cakes Ingredients

For the Cake

  • Unsalted Butter – Provides richness and moisture in the cake; substitute with margarine for a dairy-free version.
  • Oil – Enhances moisture and tenderness; can be replaced with applesauce for a healthier option.
  • White Sugar – Sweetens the cake and helps with the moist texture; brown sugar can be used for a deeper flavor.
  • Eggs – Acts as a binder and adds richness; for a vegan substitute, use flax eggs (1 tbsp flaxseed meal + 2.5 tbsp water per egg).
  • Milk – Adds moisture and richness to the batter; substitute with almond milk or oat milk for a dairy-free version.
  • Vanilla Extract – Provides flavor depth; using pure vanilla gives the best results.
  • Sea Salt – Balances sweetness and enhances flavors.
  • Black Cocoa Powder – Adds color and a rich chocolate flavor; Dutch cocoa can be used with some black food coloring to achieve the desired shade.
  • All-Purpose Flour – Provides structure; a gluten-free flour blend can be used for a gluten-free version.
  • Baking Powder – This leavening agent ensures the cake is fluffy.

For the Frosting

  • Vanilla Buttercream (made from butter, confectioner’s sugar, salt, heavy cream, and vanilla extract) – Offers sweetness and stability for decorating.

For Coloring

  • Gel Colors (Orange, Yellow, Teal, Blue, Purple) – Used to color buttercream; recommended for vibrant hues without altering frosting texture.

For Decoration

  • Candy Eyes, Gum Paste/Fondant – Perfect for adding whimsical monster faces and playful features.

These delightful ingredients come together to create the perfect base for your Monster Cakes, ensuring each bite is as fun to make as it is to eat!

Step‑by‑Step Instructions for Mini Monster Cakes

Step 1: Prepare the Cake
Begin by preheating your oven to 325°F (163°C). In a large mixing bowl, combine the melted unsalted butter, oil, and white sugar, mixing until well combined. Next, whisk in the eggs, milk, vanilla extract, and salt until smooth. In a separate bowl, sift together the all-purpose flour, black cocoa powder, and baking powder. Gradually mix the dry ingredients into the wet mixture, ensuring not to over-mix. Pour the batter into lined cake pans and bake for 20-30 minutes, or until springy to the touch and a toothpick inserted in the center comes out clean. Allow the cakes to cool before chilling them in the refrigerator.

Step 2: Cut and Shape Cakes
Once your Mini Monster Cakes have cooled, use a pastry cutter to slice the cakes into rounds. This step is crucial for creating your monster shapes. Gather any leftover cake scraps and crush them to form dough for cake pops. Use the cake pop dough to mold half-spheres that will add extra character to your monster creations later. Ensure the shapes are uniform for a polished look.

Step 3: Make and Color Buttercream
Next, whip the softened butter in a clean bowl until it's fluffy and light. Gradually add the confectioner’s sugar, mixing well, then pour in the heavy cream and vanilla extract, blending until smooth. Once the buttercream is ready, divide the frosting into separate bowls, adding gel colors such as orange, yellow, teal, blue, and purple to create vibrant shades. Mix thoroughly to achieve the desired hues, preparing for the fun decorating process ahead.

Step 4: Assemble and Decorate Cakes
Start assembling your Mini Monster Cakes by stacking the layers with a layer of buttercream in between each. After stacking, apply a crumb coat of frosting around the outside to seal in any crumbs, then chill the cakes for about 15 minutes to set the layers. Once chilled, use the colored buttercream to decorate your cakes. Employ various piping techniques to create monster features like fur, scales, or spikes, bringing your monster designs to life. Finally, use candy eyes and gum paste or fondant to add whimsical faces, ensuring every Mini Monster Cake looks unique and fun.

Make Ahead Options

These Mini Monster Cakes are perfect for busy home cooks looking to save time and stress during Halloween festivities! You can bake the cakes up to 2 days in advance and store them in an airtight container in the refrigerator to maintain their moist, fudgy texture. Additionally, you can prepare the colored buttercream and refrigerate it for an overnight chill, ensuring easy assembling when you’re ready to decorate. To finish, simply allow the cake layers to come to room temperature, apply a crumb coat, and then decorate with the buttercream and fun monster features. This way, you’ll delight your little ones with delightful cakes that are just as fresh and fun as if made the same day!

Expert Tips for Mini Monster Cakes

  • Room Temperature Buttercream: Ensure your buttercream is at room temperature for easy mixing and smooth piping. Cold frosting is harder to work with and can lead to decorating frustrations.

  • Use Gel Food Colors: Stick to gel colors rather than liquid food coloring; they provide vibrant hues without altering the texture of your frosting, making your Monster Cakes pop visually.

  • Chill After Crumb Coating: After applying the crumb coat, chill the cakes for 15 minutes before finishing decoration. This helps set the design and prevents smudging during the decorating process.

  • Involve the Kids: Get kids involved in decorating their own Mini Monster Cakes; it's a wonderful way to bond and give them a sense of creativity in the kitchen.

  • Experiment with Texture: Don't hesitate to mix different cake textures! For instance, combine the fudgy Mini Monster Cakes with lighter whipped toppings or fluffy decorations for an exciting mouthfeel.

  • Customizable Designs: Personalize each monster to reflect different personalities! Swap decorations and colors to match the theme or preferences of your party, making each Monster Cake unique and fun.

What to Serve with Mini Monster Cakes

The spooky season beckons moments of laughter and joy as you whip up these vibrant treats, making every bite feel like a celebration.

  • Witch’s Brew Punch: A fizzy, fruity concoction that adds a fun twist, enhancing the playful spirit of Halloween parties.
  • Spooky Fruit Skewers: Fresh apple and banana slices adorned with eyes bring a healthy touch while maintaining a festive theme.
  • Goblins’ Green Salad: Crisp romaine lettuce topped with a tangy dressing and fun toppings brings a refreshing crunch to the sweet treats.
  • Ghostly Vanilla Ice Cream: A scoop of creamy vanilla complements the fudgy texture, perfectly celebrating the sweet and spooky combination.
  • Pumpkin Spice Cookies: Share the flavors of fall with soft, spiced cookies to balance the richness of your monster cakes.
  • Candy Corn Cupcakes: Adorable mini cupcakes with candy corn sprinkles echo the sweet fun, ensuring all festive vibes are captured.
  • Candy Apple Bar: Let guests create their own loaded candy apples, combining fun textures and colors alongside the adorable monster cakes.
  • Chilling Hot Chocolate: Warm drinks with a hint of cinnamon create a cozy pairing, perfect for satisfying sweet cravings on chilly nights.
  • Caramel Flavored Popcorn: Old-fashioned popcorn drizzled with caramel brings a crunchy bite that plays beautifully with the cake's soft texture.
  • Mummy Dogs: Fun, savory treats wrapped in crescent rolls that add a savory contrast, making the perfect addition to any kids' Halloween feast.

Monster Cakes Variations & Substitutions

Get ready to unleash your creativity with these fun adaptations that will elevate your Mini Monster Cakes and delight everyone around the table!

  • Vegan Option: Use flax eggs and substitute milk with almond or oat milk for a delicious vegan-friendly version. These tweaks keep the monster magic alive without the animal products!
  • Gluten-Free: Swap all-purpose flour for a gluten-free flour blend to cater to gluten-sensitive friends. You won’t lose any of the fudginess or flavor with this easy adaptation!
  • Flavor Infusions: Try adding a tablespoon of coffee or espresso powder to the batter for an unexpected layer of flavor. The subtle coffee notes work beautifully with chocolate – a real treat for adults!
  • Decorative Themes: Customize the colors and designs according to holidays or themes! Imagine vibrant pastel monsters for springtime or classic black and orange for Halloween.
  • Sprinkles Galore: Add a fun twist by mixing in colorful sprinkles to the batter before baking for a confetti-effect cake that packs even more visual delight.
  • Different Toppings: Instead of candy eyes, use mini marshmallows, chocolate chips, or fruit to create unique monster expressions. This keeps the decorating playful and gives kids a chance to let their imaginations run wild!
  • Texture Variations: For a delightful crunch, sprinkle toasted nuts or crushed cookies in between the cake layers. This creates an exciting texture that contrasts beautifully with the moist cake.
  • Heat It Up: Add a dash of cayenne pepper or chili powder to the batter for a spicy kick that will keep your guests guessing and intrigued!

By incorporating some of these variations, you can create an array of delectable Monster Cakes that cater to every palate. So, round up your little helpers and dive into this creative baking adventure!

Storage Tips for Monster Cakes

  • Room Temperature: Monster Cakes can be kept at room temperature for up to 1 day. Make sure they are covered with plastic wrap or in a cake dome to retain moisture and freshness.
  • Fridge: For longer storage, place the cakes in an airtight container in the refrigerator for up to 3 days. This helps maintain their fudgy texture and flavor.
  • Freezer: To freeze Monster Cakes, wrap individual pieces tightly in plastic wrap, then place them in a freezer-safe bag. They can be frozen for up to 2 months. Allow to thaw in the fridge before decorating or serving.
  • Reheating: If desired, you can lightly warm the cakes in the microwave for about 10-15 seconds for a freshly baked taste. Enjoy your delicious Monster Cakes any time!

Mini Monster Cakes Recipe FAQs

How do I choose the right ripeness of ingredients for my Mini Monster Cakes?
Absolutely! When selecting ingredients, ensure that your eggs are fresh—check for a clean shell and no cracks. For the butter, it should be softened but not melted, which helps achieve that creamy texture in your batter. As for your milk, using it at room temperature will blend better with the rest of the ingredients, ensuring a smooth cake batter.

How should I store my Mini Monster Cakes?
Very! You can keep your Mini Monster Cakes covered at room temperature for one day. If you're planning to enjoy them later, place them in an airtight container in the fridge for up to 3 days. This way, the moist, fudgy center remains intact! Just remember to bring them back to room temperature before serving for the best flavor.

Can I freeze Mini Monster Cakes, and if so, how?
Of course! Freezing is a great way to save your delicious creations. To freeze them, first wrap individual cakes tightly in plastic wrap to prevent freezer burn. Next, place each wrapped cake in a freezer-safe bag. They can be frozen for up to 2 months. When you're ready to enjoy them, simply thaw in the fridge overnight before decorating or serving.

What if my Mini Monster Cakes don't rise properly?
Oh no! If your cakes don't rise, it could be due to old baking powder. Make sure your baking powder is fresh and stored in a cool, dry place. Also, don’t over-mix your batter; it can lead to dense cakes. For best results, combine wet and dry ingredients until just mixed; it’s okay if there are a few lumps—these will bake out perfectly!

Are Mini Monster Cakes suitable for kids with allergies?
Absolutely! These cakes can be made accommodating by using substitutes. For example, you can replace the dairy with non-dairy milk (like almond or oat milk) and use flax eggs for an egg-free version. Always double-check the specific brands of ingredients, particularly for allergen information, to ensure they meet dietary restrictions.

Can I use different colors or decorating techniques for my Monster Cakes?
The more the merrier! Customize your Monster Cakes using a variety of gel colors for the buttercream and explore different piping techniques. From fur to scales, let your imagination run wild! You can also experiment with sprinkles and edible glitter to make them even more festive and fun for your Halloween gatherings.

Monster Cakes

Monster Cakes: Irresistibly Fun Treats to Wow Kids

These Monster Cakes are creatively decorated treats that are perfect for Halloween, offering a moist and rich dessert that kids will love.
Print Recipe Pin Recipe
Prep Time 30 minutes mins
Cook Time 25 minutes mins
Chilling Time 15 minutes mins
Total Time 1 hour hr 10 minutes mins
Servings: 12 cakes
Course: Dessert
Cuisine: American
Calories: 350
Ingredients Equipment Method Nutrition Notes

Ingredients
  

For the Cake
  • 1 cup Unsalted Butter Provides richness and moisture; substitute with margarine for dairy-free.
  • 1/2 cup Oil Enhances moisture; can replace with applesauce for healthier option.
  • 2 cups White Sugar Sweetens cake; brown sugar can deepen flavor.
  • 4 large Eggs Acts as binder; use flax eggs for vegan.
  • 1 cup Milk Adds moisture; substitute with almond milk or oat milk.
  • 2 teaspoons Vanilla Extract Provides flavor depth; use pure vanilla for best results.
  • 1/4 teaspoon Sea Salt Balances sweetness.
  • 1/2 cup Black Cocoa Powder Adds color and rich chocolate flavor.
  • 2 cups All-Purpose Flour Provides structure; gluten-free blend can be used.
  • 1 tablespoon Baking Powder Leavening agent for fluffy cake.
For the Frosting
  • 1 batch Vanilla Buttercream Made from butter, confectioner's sugar, salt, heavy cream, and vanilla.
For Coloring
  • 5 colors Gel Colors Includes Orange, Yellow, Teal, Blue, Purple for vibrant hues.
For Decoration
  • 1 cup Candy Eyes For whimsical monster faces.
  • 1 cup Gum Paste/Fondant For playful features.

Equipment

  • Mixing Bowl
  • Whisk
  • Pastry cutter
  • Cake Pans
  • Electric mixer

Method
 

Prepare the Cake
  1. Preheat your oven to 325°F (163°C). In a bowl, mix melted butter, oil, and sugar. Whisk in eggs, milk, vanilla, and salt. In another bowl, sift flour, cocoa, and baking powder. Gradually mix dry ingredients into wet. Pour into cake pans and bake for 20-30 minutes.
Cut and Shape Cakes
  1. Once cooled, slice cakes into rounds. Use scraps to form dough for cake pops, molding half-spheres for character.
Make and Color Buttercream
  1. Whip softened butter until fluffy. Gradually add confectioner’s sugar, then cream and vanilla until smooth. Divide frosting and mix with gel colors.
Assemble and Decorate Cakes
  1. Stack layers with buttercream between, apply a crumb coat, and chill for 15 minutes. Decorate with colored buttercream and add candy eyes for unique monster features.

Nutrition

Serving: 1cakeCalories: 350kcalCarbohydrates: 45gProtein: 3gFat: 18gSaturated Fat: 10gPolyunsaturated Fat: 1gMonounsaturated Fat: 5gCholesterol: 85mgSodium: 200mgPotassium: 100mgFiber: 1gSugar: 25gVitamin A: 300IUCalcium: 50mgIron: 1mg

Notes

These cakes can be customized to reflect different personalities by changing decorations and colors for your event.

Tried this recipe?

Let us know how it was!

Create an Inviting Halloween Candy Charcuterie Board Delight

October 17, 2025 by Grace Snow Leave a Comment

As the crisp autumn breeze whispers through the trees, I find myself enchanted by the idea of creating a Spooky Halloween Candy Charcuterie Board. This whimsical creation not only serves as a stunning centerpiece for your gatherings, but it also offers a delightful and flexible way to indulge in your favorite treats. With a mishmash of colorful candies, playful cupcakes, and fun surprises, this board transforms any Halloween celebration into a sweet adventure. Plus, it’s super easy to assemble, allowing you to focus more on enjoying the company around you and less on the kitchen chaos. Curious about how to craft this festive delight that’s sure to impress your guests? Let’s dive in!

Why is this Halloween Candy Board special?

Impressive Presentation: With its vibrant array of colors and textures, your board will be the talk of the party!

Simple Assembly: Easy to put together—this recipe requires no baking, making it perfect for last-minute gatherings.

Creative Customization: Tailor it to your taste by mixing in favorite candies or themed decorations, letting your personality shine through!

Fun for All Ages: This festive board invites both kids and adults to enjoy, ensuring smiles all around.

Versatile Enjoyment: Perfect for Halloween parties, movie nights, or even as a whimsical treat at home.

By following my expert tips, you can elevate your presentation and impress every guest with this delightful treat!

Halloween Candy Charcuterie Board Ingredients

For the Candy Selection

  • Gummy Worms – A classic Halloween candy that adds a squiggly, spooky touch to your board.
  • Chocolate Bars – Perfect for those chocolate lovers; choose fun-sized varieties to mix and match.
  • Candy Corn – This iconic seasonal treat brings nostalgia and vibrant colors, enhancing the festive feel.
  • Skittles – Their fruity flavors and bright colors create a lively and cheerful addition to balance out the chocolate.
  • Seasonal Treats – Consider including themed candies like pumpkin-shaped chocolates or ghost gummies for extra flair.

For the Cupcakes

  • Mini Cupcakes – Opt for a mix of flavors and decorate with Halloween-themed icing like orange and black.
  • Sprinkles – Choose spooky sprinkles (like bats and pumpkins) to sprinkle on top of your cupcakes for that festive touch.

For Serving

  • Small Bowls – Ideal for serving smaller candies like M&Ms, which keep your board organized and visually appealing.
  • Large Tray or Board – Make sure it’s spacious enough to fit all your treats. A black tray works beautifully for the Halloween vibe!

For Decorations

  • Spooky Toppers – Think plastic spiders, mini skeletons, or festive cake toppers to enhance the Halloween theme.
  • Themed Containers – Use Halloween-themed tins or jars for certain candies to add character and charm to your setup.

With these ingredients in hand, your Halloween Candy Charcuterie Board will not only look impressive but also taste scrumptious! Get ready to create a fun, festive centerpiece that guests of all ages will love!

Step‑by‑Step Instructions for Halloween Candy Charcuterie Board

Step 1: Prepare Your Board
Start by selecting a large black tray or board that complements the Halloween theme. Ensure the surface is clean and dry, which helps to showcase the treats beautifully. Lay it on a flat surface, such as your dining table or countertop, where guests can easily access the goodies.

Step 2: Layer Larger Items
Begin by arranging bowls of candy and larger treats like chocolate bars and gummy worms on the board. Aim for a balanced distribution across the surface, making sure to create focal points with these eye-catching items. Leave enough space in the center for additional items that will add texture and contrast.

Step 3: Add Variety with Small Bowls
Once larger items are in place, fill small bowls with candies like M&Ms and candy corn, then place them strategically around the board. This not only keeps the presentation organized but also adds height and dimension. Play with colors and shapes to draw the eye and keep guests excited about what’s next.

Step 4: Fill Gaps with Smaller Treats
Next, fill any gaps on the board by adding smaller candies and treats, like mini cupcakes adorned with Halloween-themed icing. Use these delightful bites to create layers, making the board look fuller and more inviting. Mix in seasonal treats like pumpkin-shaped chocolates for a whimsical touch.

Step 5: Create a Cohesive Look
As you continue building your Halloween Candy Charcuterie Board, focus on mixing different shapes and sizes. Place softer items next to crunchier treats to create a pleasing contrast. Play with the arrangement until each element feels perfectly placed, inviting guests to indulge.

Step 6: Add Decorative Touches
Incorporate themed decorations like plastic spiders, mini skeletons, or spooky toppers to enhance the board's festive vibe. Tuck these decorations between treats or place them as a centerpiece to create visual interest. This final touch emphasizes the Halloween spirit and makes your board a true conversation starter.

Step 7: Final Arrangement and Adjustments
Step back and assess your Halloween Candy Charcuterie Board. Adjust the positions of the candies and treats as needed, ensuring a beautiful flow that is both appealing and fun. Don’t hesitate to rearrange elements until everything feels balanced and harmonious, creating a delightful presentation that will impress your guests.

Expert Tips for Halloween Candy Charcuterie Board

Visual Balance: Ensure a well-distributed color palette to create a visually appealing board that draws guests in instantly.

Layering Matters: Build with larger candies and containers first, then fill in with smaller treats for a structured and inviting arrangement.

Texture Variety: Combine different textures—soft, chewy candies with crunchy items—while creating your Halloween Candy Charcuterie Board to keep it interesting.

Keep It Fresh: Use airtight containers for leftover candies to maintain freshness, allowing your board to last throughout the festivities.

Theme Integration: For added fun, customize your board with decorations based on your favorite Halloween movies or characters.

What to Serve with Spooky Halloween Candy Charcuterie Board

Indulging in a whimsical Halloween Candy Charcuterie Board opens the door to endless pairing possibilities that enhance the festive experience.

  • Spooky Punch: A vibrant drink mixed with fruit juices and colorful candies echoes the fun of the board, providing a refreshing sip between treats.

  • Popcorn Monster Munch: Sweet and salty popcorn mixed with candy corn and chocolate drizzles creates a crunchy contrast that kids will love. It's easy to grab and enjoy between bites!

  • Mini Pumpkin Pies: These bite-sized desserts offer a rich, spiced flavor, bringing a classic autumn taste to your spread that guests will savor.

  • Caramel Apples: The sweet and tart combination of crispy apples coated in gooey caramel fits perfectly with the theme and adds a surprisingly healthy option to your dessert table.

  • Chocolate-Covered Pretzels: Their salty crunch contrasts beautifully with the sweetness of the board, making them the perfect snack to balance the sugar rush.

  • Witch’s Brew Hot Chocolate: Serve this rich and creamy drink in cauldron-shaped mugs for a festive touch. It pairs wonderfully with the fun flavors on the board and keeps spirits high during chilly October nights.

Creating a full Halloween experience through these delightful pairings will enhance your Spooky Halloween Candy Charcuterie Board, leaving guests enchanted and happy.

Make Ahead Options

Creating a Halloween Candy Charcuterie Board in advance is a fantastic time-saver for busy home cooks! You can prep your decorative elements, such as themed toppers and small bowls, up to 24 hours ahead. For optimal freshness, arrange the candies into their respective bowls, but leave the cupcakes to be added just before serving to maintain their delightful texture. When ready to impress your guests, all you need to do is assemble the prepped items on the board and add any last-minute decorations. With this approach, your Halloween Candy Charcuterie Board will still look just as festive and inviting, allowing you to spend more time enjoying the festivities!

Storage Tips for Halloween Candy Charcuterie Board

Fridge: Store any leftovers in airtight containers in the refrigerator for up to a week to keep them fresh and flavorful.

Room Temperature: Unwrapped candies can stay at room temperature in a cool, dry place for about 3 days, but be sure to cover or seal them to prevent them from hardening.

Freezer: If you want to save any leftover cupcakes or soft candies, you can freeze them for up to 2 months. Make sure they are well-wrapped to prevent freezer burn.

Reheating: When ready to serve again, allow the frozen items to thaw in the fridge overnight. Avoid reheating the candies; instead, let the board come back to room temperature to maintain the best texture for your Halloween Candy Charcuterie Board.

Halloween Candy Charcuterie Board Variations

Embrace the spirit of creativity and make this festive board your own with some delightful customizations!

  • Healthier Swap: Substitute candies with fresh fruits like apple slices or grapes for a refreshing twist.
    This not only adds nutrition but also a pop of color that harmonizes beautifully with the Halloween theme.

  • Nutty Crunch: Incorporate assorted nuts or trail mix for a delightful crunch and unique flavor profile.
    Mixed nuts provide a great contrast to the sweetness of candies, perfect for those who enjoy both sweet and savory tastes.

  • Spicy Surprise: Add a few spicy snacks like chili-lime popcorn or spicy chocolate for a thrilling heat level.
    This unexpected kick can tantalize your taste buds and surprise your guests, stirring up a delicious adventure in every bite.

  • Themed Containers: Use festive containers shaped like pumpkins or ghosts to hold your treats.
    This not only adds charm but enhances the visual appeal, encouraging guests to indulge without hesitation.

  • Cupcake Variety: Experiment with cupcake flavors—try red velvet or pumpkin spice to match the occasion!
    These seasonal flavors can elevate your board into a true festive showcase everyone will adore.

  • Movie Magic: Base your board's theme on a favorite Halloween movie, like "Hocus Pocus," featuring candies that represent the film.
    This personalized touch will resonate with fans and ignite wonderful conversations among guests.

  • Gourmet Touch: Replace standard chocolates with gourmet options, like artisan truffles or flavored caramels for a sophisticated flair.
    Your guests will appreciate this elevated experience, adding a touch of elegance to your festive board.

  • Decorative Edibles: Incorporate edible flowers or spooky-themed chocolate-covered fruits for a whimsical look that’s truly unique.
    This will make your board not just a treat to eat, but also a feast for the eyes!

Let your imagination run wild as you explore these variations! Check out some expert tips to enhance your presentation even further and ensure your Halloween Candy Charcuterie Board is a showstopper at your next gathering.

Halloween Candy Charcuterie Board Recipe FAQs

What kinds of candies should I choose for my Halloween Candy Charcuterie Board?
Absolutely! Aim for a mix of textures and flavors to please every palate. Seasonal favorites like gummy worms, candy corn, chocolate bars, and Skittles are excellent choices. You can also spice up your board by incorporating themed treats like pumpkin-shaped chocolates or ghost gummies for that extra festive flair!

How should I store leftovers from my Halloween Candy Charcuterie Board?
Keep your delicious extras fresh by placing them in airtight containers. You can store them in the fridge for up to a week, which helps maintain their flavor and texture. If you’re dealing with unwrapped candies, keep them in a cool, dry spot at room temperature for around 3 days. Just remember to seal them to prevent any hardening!

Can I freeze items from my Halloween Candy Charcuterie Board?
Absolutely! If you have leftover cupcakes or soft candies, you can freeze them for up to 2 months. To freeze, make sure they’re wrapped tightly to prevent freezer burn. When you’re ready to enjoy them again, simply let them thaw in the fridge overnight, and they'll be ready to go!

What if my board looks too empty or disorganized?
Very common concern! If your board feels sparse or chaotic, just rearrange to your heart’s content. Start by layering larger items first, followed by smaller treats to add dimension. Play around with colors and textures—mixing soft candies with crunchier options adds visual balance. Trust your instincts, and don't hesitate to shift things until it looks just right!

Are there any dietary considerations I should keep in mind?
Definitely! While this board is a fun treat, consider your guests' dietary needs. Always be mindful of allergies; for example, nut allergies are common, so select candies carefully. If you want to substitute some treats for a healthier option, try adding fruits or nuts. This way, everyone can join in the fun and enjoy your Halloween Candy Charcuterie Board!

Halloween Candy Charcuterie Board

Create an Inviting Halloween Candy Charcuterie Board Delight

This Halloween Candy Charcuterie Board is a festive and flexible centerpiece for your gatherings, showcasing a delightful array of treats.
Print Recipe Pin Recipe
Prep Time 15 minutes mins
Total Time 15 minutes mins
Servings: 10 pieces
Course: Snacks
Cuisine: American
Calories: 250
Ingredients Equipment Method Nutrition Notes

Ingredients
  

For the Candy Selection
  • 1 bag Gummy Worms
  • 5 pieces Chocolate Bars Fun-sized varieties
  • 1 cup Candy Corn
  • 1 cup Skittles
  • 1 cup Seasonal Treats Pumpkin-shaped chocolates or ghost gummies
For the Cupcakes
  • 12 pieces Mini Cupcakes Mix of flavors with Halloween-themed icing
  • 1 cup Sprinkles Spooky sprinkles like bats and pumpkins
For Serving
  • 3 pieces Small Bowls For serving smaller candies like M&Ms
  • 1 piece Large Tray or Board A black tray works beautifully
For Decorations
  • 3 pieces Spooky Toppers Plastic spiders or mini skeletons
  • 2 pieces Themed Containers Halloween-themed tins or jars

Equipment

  • Large black tray or board
  • Small bowls

Method
 

Step-by-Step Instructions
  1. Prepare Your Board: Select a large black tray and ensure it's clean and dry.
  2. Layer Larger Items: Arrange bowls of candy and larger treats like chocolate bars and gummy worms.
  3. Add Variety with Small Bowls: Fill small bowls with candies and place them around the board.
  4. Fill Gaps with Smaller Treats: Add smaller candies and treats to create layers.
  5. Create a Cohesive Look: Mix different shapes and sizes for a balanced arrangement.
  6. Add Decorative Touches: Incorporate themed decorations to enhance the festive vibe.
  7. Final Arrangement and Adjustments: Assess and rearrange elements for a delightful presentation.

Nutrition

Serving: 1board pieceCalories: 250kcalCarbohydrates: 30gProtein: 2gFat: 12gSaturated Fat: 7gCholesterol: 5mgSodium: 100mgPotassium: 100mgFiber: 1gSugar: 20gCalcium: 2mgIron: 4mg

Notes

This board is perfect for Halloween parties, movie nights, or as a whimsical treat at home.

Tried this recipe?

Let us know how it was!

Creepy Halloween Brain Dip Appetizer: 3 Ingredients for Fun

October 17, 2025 by Grace Snow Leave a Comment

As the Halloween season creeps closer, I'm always on the hunt for the perfect appetizer that balances fun and flavor. Enter the Creepy Brain Dip: a wonderfully eerie treat that transforms your gathering into a spooky sensation. With just three simple ingredients, this Halloween Brain Dip Appetizer makes preparation a breeze, allowing you to whip up something spectacular with minimal fuss. Not only does it look downright fabulous, but it’s also a make-ahead dish that can save you from last-minute stress. Imagine your guests' delighted reactions as they dive into this creamy, delightfully unsettling creation, drizzled with red pepper jelly for that extra wow factor. Are you ready to add a touch of mischief to your Halloween spread?

Why Will You Love This Dip?

Simplicity: With only three ingredients, you can effortlessly create this spooky sensation. Make-Ahead: Prepare it days in advance to save time and ensure a stress-free Halloween party. Creamy Delight: The blend of Boursin and cream cheese results in a wonderfully smooth texture that your guests won't forget. Unique Presentation: Its brain-like shape, topped with red pepper jelly, adds an eye-catching element to any table. Plus, it pairs perfectly with crackers or veggies for a crowd-pleasing experience! For those who love themed treats, check out our ideas on Halloween-themed snacks that will complement this dip beautifully.

Halloween Brain Dip Ingredients

• Just three ingredients for spook-tacular fun!

For the Dip

  • Boursin cheese – Provides a creamy, flavorful base; can be replaced with any soft, herbed cheese for variety.
  • Cream cheese – Adds creaminess and structure; opt for low-fat cream cheese if you're looking for a lighter option.
  • Red pepper jelly – Introduces a sweet and spicy touch; substitute with any sweet jelly, and try adding hot sauce for a kick!

Enjoy making this Halloween Brain Dip Appetizer that's sure to impress your guests!

Step‑by‑Step Instructions for Creepy Brain Dip Appetizer

Step 1: Prepare the Cheese Mixture
In a mixing bowl, combine 8 ounces of Boursin cheese and 8 ounces of softened cream cheese using an electric mixer on medium speed. Beat until the mixture is smooth and creamy, taking about 2-3 minutes. This will create a rich base for your Halloween Brain Dip Appetizer, so ensure there are no lumps, and the texture is fluffy.

Step 2: Mold the Dip
Once your cheese mixture is fully combined, scoop it into a brain-shaped mold, using a spatula to press it down gently and remove any air pockets. Make sure to fill the mold completely, smoothing the top for an even surface. Cover the mold tightly with plastic wrap, and place it in the refrigerator to firm up for at least 4 hours or preferably overnight.

Step 3: Release from the Mold
After the chilling period, carefully remove the mold from the refrigerator. Take off the plastic wrap and gently invert the mold onto a serving platter. Tap the mold lightly on the counter to help the brain dip release easily. If you used a silicone mold, it should pop out effortlessly, ensuring your Halloween Brain Dip Appetizer retains its spooky shape.

Step 4: Add the Topping
Thinning the red pepper jelly is crucial for the perfect presentation. In a small bowl, mix 1/4 cup of red pepper jelly with a tablespoon of warm water until it reaches a drizzling consistency. Once your dip is displayed, pour the thinned jelly over the top, allowing it to cascade down the curves, creating a visually delightful effect resembling the brain's crevices.

Step 5: Serve and Enjoy
Set the creepy brain dip out along with an assortment of crackers, veggie sticks, or even toasted bread for added crunch. Allow the dip to sit at room temperature for about 10 minutes before serving to enhance the flavors. This Halloween Brain Dip Appetizer is sure to be the centerpiece of your festive gathering, inviting everyone to dig in!

Halloween Brain Dip Appetizer Variations

Feel free to put your own twist on this spooky creation and surprise your guests with unique flavors and textures!

  • Dairy-Free: Substitute Boursin and cream cheese with cashew cream for a creamy, plant-based alternative that’s just as delightful.
  • Spicy Kick: Mix in some sriracha or finely chopped jalapeños for an extra punch of heat that will set taste buds tingling.
  • Herb Infusion: Add fresh herbs like chives or dill to the cheese mixture for a refreshing burst of flavor that brightens each bite.
  • Veggie Boost: Fold in finely diced bell peppers or olives for added crunch and flavor, transforming your dip into a hearty surprise!
  • Sweet & Savory: Swap out the red pepper jelly for a fig or olive tapenade, creating a sweet-savory duo that complements the cheese beautifully.
  • Crunchy Topping: Top the dip with crushed nuts or seeds like toasted pumpkin seeds for an interesting texture that brings the dish to life.
  • Berry Blast: Instead of jelly, drizzle the dip with a warm berry compote for a sweet twist that adds beautiful color and a burst of fruity goodness.
  • Smoky Flavor: Incorporate smoked paprika into the cheese mixture for a subtle yet rich flavor that takes your Halloween Brain Dip to the next level.

Remember, the magic of cooking lies in making it your own! Pair it with ideas from our Halloween-themed snacks for a truly haunting spread.

Expert Tips for Creepy Brain Dip

  • Room Temperature Release: Allow the dip to sit at room temperature for 10 minutes before serving. This makes it easier to remove from the mold without disturbing its shape.

  • Jelly Consistency: Thin the red pepper jelly carefully with warm water for a smooth drizzle. Too thick, and it won’t cascade beautifully down the dip.

  • Flavor Fun: Experiment with different flavored Boursin cheeses, like garlic or herb, to elevate your Halloween Brain Dip Appetizer with unexpected flavors.

  • Assembly Aid: Use a spatula to press the cheese mixture firmly into the mold, which prevents air pockets that might cause it to fall apart when inverted.

  • Prepare in Advance: Make your dip up to three days ahead and keep it refrigerated. This gives the flavors time to meld, making your appetizer even tastier!

Make Ahead Options

These Creepy Brain Dip Appetizers are the perfect solution for busy home cooks looking to save time during the Halloween festivities! You can prepare the creamy cheese mixture up to 3 days in advance. Simply combine the Boursin cheese and cream cheese, mold it, and refrigerate it covered until you're ready to serve. To ensure optimal texture and flavor, tightly wrap the mold in plastic wrap to prevent any drying out. When it’s time to impress your guests, simply remove the mold, let it sit for about 10 minutes, and drizzle the thinned red pepper jelly over the top for that mesmerizing effect. With this make-ahead plan, you'll have a fun and spooky centerpiece ready in no time!

How to Store and Freeze Halloween Brain Dip Appetizer

Fridge: Store the dip in an airtight container for up to 3 days. Cover it tightly to keep it fresh and delicious until your Halloween gathering.

Freezer: If you want to prepare well in advance, you can freeze the molded dip for up to 2 months. Wrap it tightly in plastic wrap and foil to prevent freezer burn.

Thawing: To serve, thaw the Halloween Brain Dip Appetizer overnight in the fridge. Allow it to come to room temperature for about 10 minutes before adding the jelly topping, ensuring it releases easily from the mold.

Reheating: This dip is best served cold, so there’s no need to reheat. Just top with red pepper jelly right before serving for the perfect spooky touch!

What to Serve with Creepy Brain Dip?

Imagine a table filled with delightful dishes, each one ready to complement the spooky charm of your Halloween gathering.

  • Crunchy Veggie Sticks: Fresh carrots, celery, and cucumbers add a vibrant crunch, balancing the creaminess of the dip while providing a healthy contrast.

  • Savory Crackers: A variety of crackers, from whole grain to herb-infused, make the perfect vehicle for scooping up the brain dip and enhance its flavors.

  • Toasted Baguette Slices: Crispy and warm, toasted baguette slices bring a comforting texture that pairs beautifully with the dip's creaminess, allowing for a delightful bite.

  • Spicy Salsa: A fruity or roasted salsa adds a tangy punch that complements the sweetness of the red pepper jelly, introducing a lively contrast to each mouthful.

  • Chilled White Wine: A glass of chilled Sauvignon Blanc or Pinot Grigio can elevate the entire dining experience, its crisp acidity cutting through the richness of the dip.

  • Halloween-Themed Fruit Platter: Bright, seasonal fruits like oranges and blackberries can add a festive touch, refreshing the palate after each dip.

  • Pumpkin Spice Cookies: For dessert, these whimsical cookies provide a deliciously sweet finish to your Halloween feast, balancing the savory starter perfectly.

With these delightful pairings, your Halloween Brain Dip Appetizer will shine at the center of your festive table!

Creepy Brain Dip: A Spooky 3-Ingredient Halloween Appetizer Recipe FAQs

What type of Boursin cheese should I use for the dip?
I recommend using garlic or herb-flavored Boursin cheese for added flavor, but any soft, herbed cheese will work beautifully. It really enhances the creamy texture and provides an extra layer of taste that pairs wonderfully with the red pepper jelly!

How should I store the Creepy Brain Dip after making it?
Store the dip in an airtight container in the refrigerator for up to 3 days. Make sure to cover it tightly to keep it fresh and maintain its delicious creamy texture until your Halloween festivities.

Can I freeze the Halloween Brain Dip Appetizer?
Absolutely! You can freeze the molded dip for up to 2 months. Wrap it tightly in plastic wrap followed by aluminum foil to prevent freezer burn and ensure it stays fresh. When you’re ready to serve, thaw it in the fridge overnight.

What should I do if my dip falls apart when I remove it from the mold?
If your dip struggles to release from the mold smoothly, try not to panic! Make sure you let it sit at room temperature for about 10 minutes before flipping it out. You can also run a thin knife along the edge to loosen it, or gently tap the mold on the counter to help it along.

Is this recipe allergy-friendly?
Since this dip contains dairy, it may not be suitable for those with lactose intolerance or dairy allergies. However, you can substitute with dairy-free cream cheese and a vegan soft cheese alternative to accommodate different dietary needs. Always check jelly labels for any potential allergens as well!

How can I make this dip spicier?
For an extra kick, mix some prepared horseradish into the red pepper jelly before drizzling it over the dip. You could also substitute the red pepper jelly with a spicy pepper jelly or add a few dashes of hot sauce to the cream cheese mixture for more heat!

Halloween Brain Dip Appetizer

Creepy Halloween Brain Dip Appetizer: 3 Ingredients for Fun

Enjoy a spooky yet delicious Halloween Brain Dip Appetizer with just three simple ingredients that will impress your guests.
Print Recipe Pin Recipe
Prep Time 15 minutes mins
Chilling Time 4 hours hrs
Total Time 4 hours hrs 15 minutes mins
Servings: 8 servings
Course: Appetizers
Cuisine: American
Calories: 150
Ingredients Equipment Method Nutrition Notes

Ingredients
  

For the Dip
  • 8 ounces Boursin cheese Can be replaced with any soft, herbed cheese
  • 8 ounces Cream cheese Opt for low-fat for a lighter option
  • 1/4 cup Red pepper jelly Thin with warm water for drizzling

Equipment

  • Mixing Bowl
  • Electric mixer
  • brain-shaped mold
  • Spatula
  • small bowl

Method
 

Step-by-Step Instructions
  1. Combine Boursin cheese and softened cream cheese in a mixing bowl using an electric mixer on medium speed until smooth and creamy.
  2. Scoop the cheese mixture into a brain-shaped mold, pressing it down gently to remove air pockets. Cover with plastic wrap and refrigerate for at least 4 hours or overnight.
  3. Remove the mold from the refrigerator, take off the plastic wrap, and gently invert the mold onto a serving platter.
  4. Mix red pepper jelly with a tablespoon of warm water until it reaches drizzling consistency, then pour it over the dip.
  5. Serve the creepy brain dip with crackers, veggie sticks, or toasted bread, allowing it to sit at room temperature for 10 minutes before serving.

Nutrition

Serving: 1servingCalories: 150kcalCarbohydrates: 5gProtein: 3gFat: 13gSaturated Fat: 8gPolyunsaturated Fat: 0.5gMonounsaturated Fat: 4.5gCholesterol: 30mgSodium: 200mgPotassium: 50mgSugar: 3gVitamin A: 10IUVitamin C: 2mgCalcium: 60mgIron: 0.5mg

Notes

Make ahead for best results, allowing flavors to meld. Ensure the jelly is thinned for the best presentation.

Tried this recipe?

Let us know how it was!

Kraken Cupcakes: Whimsical Rum-Raisin Delights for Halloween

October 16, 2025 by Grace Snow Leave a Comment

While preparing for Halloween, I stumbled upon a charming idea that whisked me away to mythical pirate adventures! These Kraken Cupcakes are not just your average treats; they are soft, rum-infused delights, filled with juicy raisins and topped with playful fondant tentacles that spark creativity. Perfect for family baking sessions, this recipe offers a fun way to engage your kids in the kitchen and create lasting memories. Plus, they make a stunning centerpiece at any Halloween gathering, ensuring a festive atmosphere that delights young and old alike. So why not dive into these whimsical cupcakes and surprise your guests with a spooky sweet treat?

Why are Kraken Cupcakes a must-try?

Whimsical design: These cupcakes are not only delicious but also an eye-catching centerpiece for your Halloween festivities, sure to start conversations!
Moist texture: Each bite is bursting with rum and juicy raisins, delivering a delightful flavor experience that's anything but ordinary.
Kid-friendly fun: Engage the whole family in decorating the playful fondant tentacles, making it a perfect baking project for young aspiring chefs.
Collective creativity: The unique pirate theme allows for a variety of decorating possibilities, making every batch uniquely yours.
Easy to make: With straightforward instructions, you can whip up these treats without complicated techniques—ideal for busy bakers to enjoy!
So, gather your ingredients and explore this fun-filled recipe that introduces a taste of adventure right in your kitchen.

Kraken Cupcakes Ingredients

For the Cupcake Batter

  • Raisins – Add natural sweetness and chewiness; can substitute with chopped dates for a different texture.
  • Spiced Rum – Infuses the cake with flavor reminiscent of pirate voyages; substitute with vanilla extract for a non-alcoholic version.
  • Unsalted Butter (softened) – Provides richness and moisture; no substitution necessary for flavor.
  • Dark Brown Soft Sugar – Adds depth and moisture to the cupcakes; can replace with light brown sugar if needed.
  • Medium Eggs (lightly beaten) – Acts as a binder for structure; ensure they are at room temperature for best results.
  • Vanilla Extract – Enhances and balances flavors; no direct substitute, although imitation vanilla can be used.
  • Self-Raising Flour – Gives cupcakes their lift and fluffy texture; measure carefully or adapt with all-purpose flour and baking powder (1 cup flour + 1.5 tsp baking powder).

For the Decoration

  • Orange Fondant Icing – Used for decorative tentacles; alternatively, use colored buttercream for ease of use.
  • Yellow Fondant Icing – Used for detailing tentacles; no direct substitution, but edible gel colors can enhance chocolate or frosting.
  • Icing Sugar (sifted) – Forms the base for the frosting and decor; substitution not recommended as it's needed for structure.
  • Blue Food Colouring Gel – Used to color the icing; substitute with natural food coloring if desired.

Step‑by‑Step Instructions for Kraken Cupcakes

Step 1: Prepare Oven & Cupcake Liners
Preheat your oven to 350°F (175°C) while you line a cupcake tray with colorful cupcake liners. This step is essential to ensure even baking of your Kraken cupcakes, so make sure your oven is fully heated by the time your batter is ready to go in.

Step 2: Mix Dry Ingredients
In a large mixing bowl, combine the self-raising flour, dark brown soft sugar, and a pinch of salt. Whisk together until the mixture is uniform and lump-free, ensuring a smooth batter for your Kraken cupcakes. This step sets the foundation for your moist and fluffy treats.

Step 3: Beat Butter & Sugar
In a separate bowl, cream together the softened unsalted butter and the remaining dark brown sugar. Use a hand mixer on medium speed for about 3-4 minutes until the mixture is light and fluffy, indicating that the butter is well aerated, which will help your cupcakes rise beautifully.

Step 4: Incorporate Eggs & Rum
Add the lightly beaten eggs, spiced rum, and vanilla extract to the butter and sugar mixture. Beat everything together until smooth and creamy, taking care to scrape down the sides of the bowl as needed. This adds richness and flavor to your Kraken cupcakes, making them a delightful treat.

Step 5: Combine Wet & Dry Mixtures
Gradually fold the dry ingredient mixture into the wet batter using a spatula. Mix gently until just combined; over-mixing can lead to dense cupcakes. The batter should be thick but smooth, ready to rise into fluffy Kraken cupcakes once baked.

Step 6: Stir in Raisins
Gently fold in the plump raisins into the batter, ensuring they're evenly distributed. This step adds sweetness and a chewy texture to your Kraken cupcakes, reminiscent of treasure found in a pirate’s trove.

Step 7: Fill Liners & Bake
Spoon the prepared batter into the lined cupcake cups, filling them about two-thirds full to allow for rising. Place the tray in the preheated oven and bake for 20-25 minutes. They're ready when a toothpick inserted in the center comes out clean and the tops bounce back when lightly pressed.

Step 8: Cool & Decorate
Once baked, remove the Kraken cupcakes from the oven and let them cool in the tray for about 5 minutes before transferring them to a wire rack. Allow them to cool completely before frosting with your buttercream and adding artistic fondant tentacles for that whimsical Halloween touch.

Make Ahead Options

These Kraken Cupcakes are perfect for busy cooks looking to save time during the Halloween rush! You can prepare the cupcake batter up to 24 hours in advance and refrigerate it in an airtight container. This way, when you're ready to bake, simply spoon the batter into lined cupcake cups and bake as directed. Furthermore, the cooled cupcakes can be stored in an airtight container for up to 3 days—just remember not to frost them until you're ready to serve, as this will keep the decorations fresh and fun. With these make-ahead options, you can easily whip up a batch of delightful Kraken Cupcakes without the stress of last-minute baking!

What to Serve with Kraken Cupcakes?

These whimsical treats are perfect as a festive centerpiece, elevating your Halloween celebrations with delightful flavors and visual charm.

  • Pirate Punch: A fruity blend of tropical juices with a splash of ginger ale, this drink captures the adventurous pirate spirit and pairs wonderfully with the rich flavors of the cupcakes.
  • Spiced Apple Cider: Warm spiced apple cider can enhance the autumn vibe, offering a cozy, aromatic experience that complements the rum in the cupcakes.
  • Chocolate-Dipped Pretzels: The salty crunch of chocolate-dipped pretzels creates a delightful contrast to the sweet icing, adding a fun texture to your dessert table. Engage your guests by letting them decorate their own!
  • Pumpkin Flavored Popcorn: Sweet and salty popcorn tossed with pumpkin spices provides a playful snack that harmonizes with the Halloween theme while keeping guests munching happily.
  • Vanilla Ice Cream: A scoop of creamy vanilla ice cream can temper the sweetness of the cupcakes, offering a delightful contrast that rounds out the dessert experience.
  • Themed Cheese Platter: A selection of cheeses paired with crackers and seasonal fruits adds a savory element to the sweet, balancing the flavors beautifully—a great way to keep your party versatile!
  • Apple Crisp: This warm, cinnamon-scented dessert evokes the essence of fall and makes a comforting duo with the moist rum-infused cupcakes.
  • Hocus Pocus Cocktail: An imaginative cocktail featuring green apple schnapps and vodka gives a spirited boost to your celebration, inviting guests to sip and enjoy the festive theme.

How to Store and Freeze Kraken Cupcakes

Room Temperature: Keep uniced Kraken cupcakes in an airtight container for up to 2 days. This prevents them from drying out while allowing their soft texture to shine.

Fridge: If you've already iced the cupcakes, store them in the fridge in a sealed container for up to 3 days. This helps maintain the freshness of the fondant decorations.

Freezer: You can freeze uniced Kraken cupcakes for up to 3 months. Wrap each cupcake individually in plastic wrap and then in foil before placing them in a freezer bag.

Reheating: To enjoy cupcakes from the freezer, thaw them in the fridge overnight. Serve at room temperature, or pop them in the microwave for about 10-15 seconds to enjoy a warm, moist treat!

Expert Tips for Kraken Cupcakes

  • Room Temperature Eggs: Ensure your eggs are at room temperature to help create a better emulsion, resulting in a moist cake.
  • Measuring Flour: Spoon and level the flour when measuring to avoid dense cupcakes; too much flour can lead to dryness.
  • Rum for Flavor: For a more pronounced rum flavor, let the batter sit for about 10 minutes before baking, allowing the flavors to meld nicely.
  • Watch the Bake Time: Every oven is different; start checking your Kraken cupcakes at the 20-minute mark to prevent over-baking.
  • Cooling Time: Always cool cupcakes completely before decorating to ensure the frosting doesn’t melt—patience is key for beautiful presentation!

Kraken Cupcakes Variations & Substitutions

Feel free to play around with these Kraken Cupcakes and let your imagination sail into the delicious unknown!

  • Chocolate Chip Delight: Substitute raisins with chocolate chips for a decadent, gooey twist that chocolate lovers will adore. You could even add a sprinkle of sea salt on top for that perfect sweet-salty contrast!
  • Non-Alcoholic Option: Replace spiced rum with vanilla extract or apple juice to retain flavor while making it kid-friendly. Everyone can enjoy these festive treats without worry!
  • Festive Color Swaps: Use vibrant colored buttercream instead of fondant for a burst of color. Pink for cotton candy sea creatures or purple for a mystical ocean vibe—let your themed fantasies flow!
  • Flavored Rums: Experiment with flavored rums like coconut or pineapple for a tropical flair. This small change can transport your guests to a breezy tropical getaway!
  • Gluten-Free Goodness: Use a gluten-free flour blend instead of self-raising flour to make these cupcakes gluten-free. They’ll still rise and taste fabulous, keeping everyone happy at your gathering.
  • Nutty Texture: Gently fold in some chopped nuts, like walnuts or pecans, for added crunch and flavor. It’ll give your Kraken Cupcakes an interesting texture that resembles hidden treasures.
  • Higher Spice Level: Introduce pumpkin spice or cinnamon to your batter for a warm, spicy note that complements the rum beautifully. It's a perfect twist for fall baking!
  • Lemon Zest Twist: Add some lemon zest to the batter for a refreshing zing. This brightens the flavor and gives a lovely contrast to the rich rum and sweet raisins.

Let your creativity shine through these variations and make each cupcake batch uniquely yours! If you’re seeking more inspiration, check out our Christmas Rum Cake for festive ideas or try our Easy Vanilla Buttercream to top off your treats!

Kraken Cupcakes Recipe FAQs

How do I select the best raisins for my cupcakes?
Look for plump, moist raisins without any dark spots all over, which can indicate they are overly dried out. If possible, opt for organic raisins to avoid preservatives. Soaking them in warm water for about 10-15 minutes prior to mixing them into your batter can also enhance their texture and moisture content.

How should I store my Kraken Cupcakes?
Uniced Kraken cupcakes can be stored in an airtight container at room temperature for up to 2 days. If they are already frosted, keep them in the refrigerator in a sealed container for up to 3 days. This helps preserve the texture and flavor of the icing.

Can I freeze my Kraken Cupcakes?
Absolutely! To freeze uniced Kraken cupcakes, wrap each individually in plastic wrap and then in foil before placing them in a freezer bag. They can be frozen for up to 3 months. When you're ready to enjoy, simply thaw them in the refrigerator overnight, and they’ll be as fresh as when you baked them!

What should I do if my cupcakes are dense or don't rise?
If your Kraken cupcakes turn out dense, it might be due to over-mixing the batter or using too much flour. Be sure to measure flour carefully by fluffing it up first, spooning it into your measuring cup, and leveling it off with a knife. Remember to fold your dry ingredients gently into the wet until just combined to encourage that light, fluffy texture.

Are these cupcakes suitable for kids with dietary restrictions?
If you're catering to kid-friendly dietary needs, you can make these cupcakes non-alcoholic by substituting spiced rum with vanilla extract. For allergies, ensure ingredients like butter and eggs are substituted with safe alternatives (like applesauce or dairy-free options) while adapting the recipe to maintain the desired texture and flavor.

What can I use instead of fondant for decorating?
If you're not comfortable working with fondant, feel free to use colored buttercream instead. It's easier to work with and still delicious! Just pipe on the tentacles and swirl designs to create a similar whimsical effect without the fuss.

Kraken cupcakes

Kraken Cupcakes: Whimsical Rum-Raisin Delights for Halloween

Delight in these Kraken cupcakes, whimsical treats infused with rum and raisins, perfect for Halloween festivities.
Print Recipe Pin Recipe
Prep Time 30 minutes mins
Cook Time 25 minutes mins
Cooling Time 5 minutes mins
Total Time 1 hour hr
Servings: 12 cupcakes
Course: Dessert
Cuisine: American
Calories: 200
Ingredients Equipment Method Nutrition Notes

Ingredients
  

Cupcake Batter
  • 1 cup Raisins Can substitute with chopped dates
  • 0.5 cup Spiced Rum Can substitute with vanilla extract
  • 0.5 cup Unsalted Butter (softened)
  • 1 cup Dark Brown Soft Sugar Can replace with light brown sugar
  • 2 medium Eggs (lightly beaten) At room temperature
  • 1 tbsp Vanilla Extract Imitation can be used
  • 1.5 cups Self-Raising Flour Or 1 cup flour + 1.5 tsp baking powder
Decoration
  • 1 cup Orange Fondant Icing Or colored buttercream
  • 0.5 cup Yellow Fondant Icing Edible gel colors can enhance it
  • 2 cups Icing Sugar (sifted) Substitution not recommended
  • 1 tbsp Blue Food Colouring Gel Can substitute with natural food coloring

Equipment

  • Mixing bowls
  • Cupcake tray
  • hand mixer
  • Spatula
  • wire rack

Method
 

Baking Instructions
  1. Preheat your oven to 350°F (175°C) and line a cupcake tray with colorful liners.
  2. In a large bowl, mix self-raising flour, dark brown soft sugar, and a pinch of salt.
  3. Cream together softened butter and remaining dark brown sugar until light and fluffy.
  4. Add eggs, spiced rum, and vanilla extract to the mixture, then beat until smooth.
  5. Gradually fold dry ingredients into the wet mixture until just combined.
  6. Gently fold in the raisins until evenly distributed.
  7. Fill cupcake liners two-thirds full and bake for 20-25 minutes.
  8. Cool in the tray for 5 minutes before transferring to a wire rack to cool completely.
Decoration Instructions
  1. Once cooled, decorate with frosting and add fondant tentacles for a whimsical touch.

Nutrition

Serving: 1cupcakeCalories: 200kcalCarbohydrates: 30gProtein: 2gFat: 9gSaturated Fat: 5gCholesterol: 30mgSodium: 120mgPotassium: 120mgFiber: 1gSugar: 15gVitamin A: 2IUCalcium: 2mgIron: 4mg

Notes

Ensure eggs are at room temperature for best results. Measure flour correctly to avoid dryness.

Tried this recipe?

Let us know how it was!

Spooky Chorizo Hand Pies That Will Wow Your Halloween Guests

October 16, 2025 by Grace Snow Leave a Comment

Every October, as the leaves turn crisp and the air fills with excitement, my kitchen transforms into a hub of spooky creativity. This year, I’m thrilled to share my Spooky Chorizo Hand Pies—fun, savory snacks that are sure to delight both kids and adults. With a flaky, golden crust enveloping a perfectly spicy and cheesy filling, these hand pies not only bring a festive flair to any Halloween gathering but also make for an enjoyable cooking project to tackle with family. They're easy to whip up and can even be made ahead of time, allowing you to focus on the fun of trick-or-treating and spooky celebrations. Curious to learn how to bring a little Halloween magic into your kitchen? Let’s dive into this delicious recipe!

Why Are Spooky Chorizo Hand Pies Delicious?

Savory Satisfaction: The rich combination of spicy chorizo and creamy cheese makes for a filling snack that is bursting with flavor.

Fun to Make: It's a fantastic cooking project to share with kids or friends—shaping the pies into festive pumpkin faces adds playful creativity!

Perfect for Sharing: These hand pies are best served warm, making them a crowd-pleaser during Halloween parties, and they pair wonderfully with your favorite dipping sauces like salsa or guacamole.

Make Ahead Convenience: They can be prepared in advance, allowing you to save time on the big night—just bake fresh before serving for the ultimate crispy texture.

Versatile Choices: Feel free to experiment with various fillings or cheese alternatives, making these hand pies suitable for any palate.

Embrace the spirit of the season and check out other delicious Halloween recipes, like easy homemade empanada dough, to keep the festivities rolling!

Spooky Chorizo Hand Pie Ingredients

For the Dough
• All-Purpose Flour – Provides structure to the dough; can substitute with gluten-free flour for a gluten-free version.
• Sea Salt – Enhances overall flavor, making each bite more satisfying.
• Unsalted Butter – Contributes to a flaky texture; use chilled butter for best results.
• Chilled Water – Essential for forming the dough; adjust water amount as needed for the right consistency.
• Egg – Acts as a binding agent and helps achieve a golden-brown finish when used for egg wash.
• Apple Cider Vinegar or Lemon Juice – Adds slight acidity which improves the dough's texture.

For the Filling
• Ground Chorizo – The key ingredient that adds spice and flavor to the filling; choose beef or pork chorizo based on preference.
• Minced Pork – Adds texture and protein; can easily be swapped with beef, chicken, or turkey if desired.
• Paprika – Deepens the flavor of the filling, enhancing its savory profile.
• Onion – Provides a base flavor; finely chop for even cooking and distribution.
• Garlic – Complements the chorizo with aromatic notes.
• Cayenne Pepper (optional) – Adds an extra kick; adjust the amount based on your spice preference.
• Oaxaca Cheese – Delivers a creamy, melty texture; substitute with Monterey Jack if needed.
• Manchego Cheese – Offers a nutty flavor; can be replaced with any aged cheese that shares a similar flavor profile.

For Assembly
• Room Temperature Water – Used for sealing the edges of the pies to ensure a tight closure.

With these ingredients ready to go, you'll be well on your way to creating delightful Spooky Chorizo Hand Pies that will impress your guests this Halloween!

Step‑by‑Step Instructions for Spooky Chorizo Hand Pies

Step 1: Prepare the Dough
In a large mixing bowl, whisk together 2 cups of all-purpose flour and 1 teaspoon of sea salt. Cut in 1 cup of chilled unsalted butter using a pastry cutter until the mixture resembles coarse crumbs. In a separate bowl, combine 1 beaten egg, 6 tablespoons of chilled water, and a splash of apple cider vinegar. Create a well in the flour mixture and pour in the egg mixture, mixing gently until a dough forms. Wrap the dough in plastic and chill for at least 1 hour.

Step 2: Make the Filling
While the dough chills, heat a skillet over medium heat. Add 1 finely chopped onion and sauté until translucent, about 5 minutes. Next, stir in 6 ounces of ground chorizo and ½ cup of minced pork, cooking until browned, approximately 7-10 minutes. Add 1 teaspoon of paprika, 2 minced garlic cloves, and optional cayenne pepper to taste, mixing well. Remove from heat and let the filling cool.

Step 3: Assemble the Hand Pies
Once the dough is chilled, preheat your oven to 375°F (190°C) and prepare a baking tray lined with parchment paper. Roll out the dough on a floured surface to about ¼ inch thick. Using a pumpkin-shaped cookie cutter, cut out shapes, reserving half for the tops. On each base shape, place a spoonful of the chorizo filling and a sprinkle of Oaxaca and Manchego cheese. Moisten the edges with water, then top with a cutout and press to seal tightly. Crimp the edges for an extra touch!

Step 4: Bake the Hand Pies
Arrange the assembled Spooky Chorizo Hand Pies on the prepared baking tray. For a beautiful golden finish, brush them with egg wash made from 1 beaten egg. Bake in the preheated oven for 20-30 minutes, or until the tops are golden brown and flaky. Keep an eye on them to ensure they don’t over-bake. Once done, remove them from the oven and let cool slightly before serving.

Step 5: Serve Warm
Serve the Spooky Chorizo Hand Pies warm, showcasing their crispy, flaky crust and spicy filling. Pair them with your favorite dipping sauces like salsa or sour cream for added flavor. These delightful hand pies make a perfect Halloween treat, ready to be enjoyed by kids and adults alike.

Make Ahead Options

These Spooky Chorizo Hand Pies are perfect for meal prep, making your Halloween festivities smoother! You can prepare the dough and filling up to 3 days in advance. Simply follow the initial steps for making the dough and storing it wrapped in plastic in the refrigerator. For the filling, cool it thoroughly before placing it in an airtight container. Then, when it’s time to bake, roll out the chilled dough, assemble the hand pies, and brush them with egg wash. Bake them fresh for 20-30 minutes until golden and flaky, ensuring they remain just as delicious as if they were made on the spot!

How to Store and Freeze Spooky Chorizo Hand Pies

Room Temperature: Store baked hand pies at room temperature in an airtight container for up to 2 days. This keeps them fresh without losing their delightful crispiness.

Fridge: If you have leftovers, refrigerate the hand pies in an airtight container for up to 3 days. Reheat in the oven to regain their flaky texture.

Freezer: These Spooky Chorizo Hand Pies can be frozen before or after baking. Wrap each pie in plastic wrap and store in a freezer-safe bag for up to 3 months.

Reheating: To reheat, place frozen pies directly in a preheated oven at 375°F (190°C) for about 25-30 minutes, or until heated through and crispy. Enjoy these savory snacks any time!

Spooky Chorizo Hand Pies Variations

Feel free to unleash your creativity in the kitchen with these fun twists and substitutions to personalize your hand pies!

  • Shredded Chicken: Swap chorizo for shredded chicken mixed with taco seasoning for a milder, yet flavorful filling.

  • Vegetarian Option: Use spiced black beans or lentils instead of meat for a delicious veggie-packed alternative that’s satisfying and wholesome.

  • Cheese Combo: Try pepper jack cheese in place of Oaxaca for a zesty kick that adds extra excitement to each bite.

  • Add Veggies: Incorporate finely chopped bell peppers or corn into the filling for a burst of color and texture; it rounds out the flavors beautifully!

  • Gluten-Free Dough: Substitute all-purpose flour with a gluten-free blend to keep these tasty hand pies accessible for everyone at your gathering.

  • Heat Boost: Add jalapeños or crushed red pepper flakes to the filling to turn up the heat and excite taste buds—perfect for spice lovers!

  • Sweet Twist: For a sweeter version, mix in a dollop of pumpkin puree or applesauce with your chorizo filling for a delightful autumn-inspired twist.

  • Nutty Flavor: Opt for aged Gouda instead of Manchego to introduce a unique, nutty flavor that complements the spiciness of the chorizo.

With these variations, there’s a Spooky Chorizo Hand Pie for everyone! And for more culinary inspirations, don’t miss out on other:easy homemade empanada dough to keep the festivities rolling.

Expert Tips for Spooky Chorizo Hand Pies

  • Chilled Ingredients: Always use chilled butter and water for your dough to achieve that flaky texture everyone loves in Spooky Chorizo Hand Pies.

  • Don’t Overfill: Avoid the temptation to fill your pies too much! Overfilling can lead to bursting during baking, so stick to a spoonful for the best results.

  • Creative Shapes: Use various cookie cutters to create fun shapes, not just pumpkins. This will elevate your presentation and keep your family engaged in the cooking process.

  • Watch the Bake: Keep an eye on your hand pies as they bake. The baking time can vary, so look for a beautiful golden brown to ensure they don’t overcook.

  • Adjust Spice Levels: If you're cooking with kids, consider reducing the cayenne pepper so everyone can enjoy the smoky chorizo flavor without too much heat.

  • Make Ahead: These hand pies can be made in advance! Assemble them and freeze until you're ready to bake for a fresh, crowd-pleasing snack whenever you need it.

What to Serve with Spooky Chorizo Hand Pies

Transform your Halloween celebration into a culinary feast by pairing these delightful hand pies with complementary bites and sips!

  • Creamy Guacamole: This smooth avocado dip adds a cool, creamy contrast to the spicy filling of the hand pies, enhancing every bite.

  • Salsa Verde: A zesty green salsa packs a punch of flavor that balances the richness of the chorizo, making for a refreshing accompaniment.

  • Crispy Tortilla Chips: Perfect for dipping into salsa or guacamole, crunchy tortilla chips add a satisfying texture that enhances the overall snacking experience.

  • Sweet Corn Salad: This fresh, sweet salad brings contrasting flavors to the savory pies, with bursts of sweetness that play beautifully off the spices.

  • Roasted Vegetables: A medley of sweetness from roasted bell peppers, zucchini, and onions offers a colorful and flavorful side that rounds out your meal.

  • Hot Apple Cider: Warm, spiced apple cider is a comforting drink choice, infusing the spirit of fall into your Halloween gathering and providing a lovely contrast to the hand pies.

Serving these delightful options alongside your Spooky Chorizo Hand Pies creates a festive and memorable Halloween feast that everyone will enjoy!

Spooky Chorizo Hand Pies Recipe FAQs

What should I look for when selecting chorizo?
Absolutely! When choosing chorizo, look for quality brands with a high meat content. The color should be vibrant red, indicating good seasoning. Avoid chorizo with excessive fat or fillers. Fresh chorizo can also have a softer texture, while cured Spanish chorizo will be firmer and ready to eat.

How should I store my Spooky Chorizo Hand Pies?
To enjoy your hand pies at their best, store them in an airtight container at room temperature for up to 2 days. If you have leftovers, place them in the refrigerator for up to 3 days. To maintain their crispiness, it's best to reheat them in the oven!

Can I freeze the Spooky Chorizo Hand Pies?
Yes! You can freeze them before or after baking. For freezing before baking, wrap each assembled pie in plastic wrap and place them in a freezer-safe bag. They’ll stay fresh for up to 3 months. When you're ready to bake, remove the plastic wrap and bake directly from frozen, adding an extra 5-10 minutes to the baking time.

What if my dough is too crumbly?
If your dough is too crumbly, don't worry! Add a tablespoon of chilled water gradually while mixing to help bring it together. Make sure the butter is cold and you're mixing just until combined to achieve that flaky texture.

Are these hand pies suitable for gluten-free diets?
Absolutely! To make these Spooky Chorizo Hand Pies gluten-free, simply substitute the all-purpose flour with a 1:1 gluten-free flour blend. I highly recommend checking the label to ensure it includes xanthan gum for the best results in texture.

Can I make these in advance?
Very! You can prepare the hand pies ahead of time. Assemble them, then either freeze them for later baking or refrigerate them for baking the next day. Bake just before your gathering for that fresh, warm deliciousness!

Spooky Chorizo Hand Pies

Spooky Chorizo Hand Pies That Will Wow Your Halloween Guests

These Spooky Chorizo Hand Pies are fun, savory snacks perfect for Halloween gatherings, bursting with spice and flavor.
Print Recipe Pin Recipe
Prep Time 1 hour hr
Cook Time 30 minutes mins
Chilling Time 1 hour hr
Total Time 2 hours hrs 30 minutes mins
Servings: 12 pies
Course: Snacks
Cuisine: American
Calories: 250
Ingredients Equipment Method Nutrition Notes

Ingredients
  

For the Dough
  • 2 cups All-Purpose Flour Can substitute with gluten-free flour.
  • 1 teaspoon Sea Salt Enhances flavor.
  • 1 cup Unsalted Butter Chilled for best results.
  • 6 tablespoons Chilled Water Adjust amount as needed.
  • 1 large Egg For binding and egg wash.
  • 1 tablespoon Apple Cider Vinegar or Lemon Juice Adds slight acidity.
For the Filling
  • 6 ounces Ground Chorizo Choice of beef or pork.
  • ½ cup Minced Pork Can substitute with any protein.
  • 1 teaspoon Paprika Enhances the flavor.
  • 1 medium Onion Finely chopped.
  • 2 cloves Garlic Minced.
  • 1 teaspoon Cayenne Pepper Optional, adjust to taste.
  • 1 cup Oaxaca Cheese Can substitute with Monterey Jack.
  • ½ cup Manchego Cheese Substitute with any similar aged cheese.
For Assembly
  • 3 tablespoons Room Temperature Water For sealing the edges.

Equipment

  • Mixing Bowl
  • Skillet
  • Rolling Pin
  • Baking tray
  • Parchment Paper

Method
 

Dough Preparation
  1. In a large mixing bowl, whisk together flour and sea salt. Cut in chilled unsalted butter until mixture resembles coarse crumbs. In another bowl, combine beaten egg, chilled water, and vinegar. Pour into flour mixture and mix gently until dough forms. Wrap in plastic and chill for at least 1 hour.
Filling Preparation
  1. Heat a skillet over medium heat. Sauté finely chopped onion until translucent, about 5 minutes. Add ground chorizo and minced pork, cooking until browned, approximately 7-10 minutes. Mix in paprika, minced garlic, and cayenne pepper to taste. Remove from heat and let cool.
Assembly
  1. Preheat oven to 375°F (190°C). Roll out chilled dough on floured surface to about ¼ inch thick. Cut out pumpkin shapes, reserving half for tops. On each base, place a spoonful of filling and a sprinkle of cheeses. Moisten edges, top with cutout, and seal tightly.
Baking
  1. Arrange hand pies on baking tray. Brush with egg wash made from beaten egg. Bake for 20-30 minutes until tops are golden brown and flaky. Let cool slightly before serving.
Serving
  1. Serve warm with favorite dipping sauces like salsa or sour cream.

Nutrition

Serving: 1pieCalories: 250kcalCarbohydrates: 30gProtein: 12gFat: 12gSaturated Fat: 7gPolyunsaturated Fat: 1gMonounsaturated Fat: 4gCholesterol: 50mgSodium: 400mgPotassium: 200mgFiber: 2gSugar: 1gVitamin A: 300IUVitamin C: 2mgCalcium: 150mgIron: 2mg

Notes

Use chilled ingredients for a flaky texture. Avoid overfilling the pies to prevent bursting during baking. Assemble and freeze hand pies for later use for convenience.

Tried this recipe?

Let us know how it was!
  • « Previous Page
  • 1
  • …
  • 185
  • 186
  • 187
  • 188
  • 189
  • …
  • 244
  • Next Page »

Welcome!

Hi, I’m Grace, a Sydney-based home cook with a passion for bold flavors and trending ingredients. Whether you’re a busy beginner or a seasoned foodie, you’ll find dishes here that are fresh, fun, and full of flavor.

More about me

Popular Recipes

  • Delicious Keto Philly Cheesesteak Bowls You’ll Crave Daily
  • twice baked potato casserole
    Indulge in This Creamy Twice Baked Potato Casserole Delight
  • Red Potato Casserole
    Irresistible Red Potato Casserole with Crunchy Topping
  • Cowboy Potato Casserole
    Comforting Cowboy Potato Casserole for Cozy Nights

Footer

↑ back to top

About

  • Privacy Policy
  • Disclaimer
  • Terms & Conditions

Newsletter

  • Sign Up! for emails and updates

Contact

  • About me
  • Contact me

Copyright © 2025 TastyTrendIngredients