tastytrendingredients

  • Home
  • Recipes
    • Appetizers
    • Breakfast
    • Dessert
    • Dinner
    • Drinks
    • Salads
    • Snacks
    • Soups
  • About me
  • Contact
menu icon
go to homepage
  • Home
  • Recipes
    • Appetizers
    • Breakfast
    • Dessert
    • Dinner
    • Drinks
    • Salads
    • Snacks
    • Soups
  • About me
  • Contact
search icon
Homepage link
  • Home
  • Recipes
    • Appetizers
    • Breakfast
    • Dessert
    • Dinner
    • Drinks
    • Salads
    • Snacks
    • Soups
  • About me
  • Contact
×

Easy Cinnamon Dolce Latte: Your Cozy Café Moment at Home

October 22, 2025 by Grace Snow Leave a Comment

As the first whiffs of cinnamon swirl through the air, I can't help but smile at the thought of a cozy morning with my favorite cup. This Easy Cinnamon Dolce Latte is my at-home version of that warm, indulgent drink you typically crave from Starbucks. With just a handful of ingredients, you can whip up this delightful latte, which combines the comforting notes of sweet cinnamon and robust coffee for a truly heartwarming experience. Plus, it's ridiculously easy to make, allowing you to relish in café vibes without breaking the bank. Whether you enjoy it as a weekend treat or a cheerful pick-me-up during busy mornings, this drink brings a sense of warmth and joy that’s hard to replicate. Ready to discover the secret to crafting your own delicious cup? Let's dive in!

Why make your own Cinnamon Dolce Latte?

Convenience at Home: Why spend extra bucks at Starbucks when you can easily whip this up in your own kitchen?

Rich, Aromatic Flavors: The blend of cinnamon and coffee creates a cozy drink that comforts the soul—perfect for chilly mornings.

Endless Customization: Whether it’s a sprinkle of nutmeg or a dairy-free milk alternative, this recipe invites you to get creative with every cup.

Quick and Easy: With just a few simple steps, you can have your latte ready in under 15 minutes!

Perfect for Any Occasion: Pair it with pastries for breakfast or savor it alone as a soothing afternoon treat.

Taste for yourself how this Easy Cinnamon Dolce Latte can elevate your mornings!

Easy Cinnamon Dolce Latte Ingredients

For the Cinnamon Syrup
• Water – Essential for creating the cinnamon syrup base.
• Cinnamon Sticks – Fresh sticks infuse a delightful flavor; ground cinnamon can be used in a pinch, but texture may differ.
• Brown Sugar – Adds sweetness and depth; light brown sugar will give a milder taste, while dark brown sugar deepens the flavor.

For the Latte
• Strong Coffee – Use espresso or brewed coffee for a robust flavor; adjust strength to your liking.
• Milk (frothy) – Provides a creamy texture; feel free to substitute with whole, skim, or non-dairy alternatives for personalized richness.

Taste the comforting blend of this Easy Cinnamon Dolce Latte—an inviting way to start your day!

Step‑by‑Step Instructions for Easy Cinnamon Dolce Latte

Step 1: Prepare the Cinnamon Syrup
In a small saucepan, combine 1 cup of water with 2 broken cinnamon sticks. Bring this mixture to a gentle boil over medium heat, watching for small bubbles. Once boiling, reduce the heat to low and let it simmer for about 5 minutes, allowing the fragrant aroma to fill your kitchen.

Step 2: Steep the Cinnamon
After simmering, remove the saucepan from heat and cover it with a lid. Let the cinnamon sticks steep in the hot water for 10 minutes. This step is crucial—the longer they steep, the more intense the cinnamon flavor will be in your Easy Cinnamon Dolce Latte. Keep an eye on the time and enjoy the warm, inviting scent as it infuses.

Step 3: Make the Syrup
Once the cinnamon has steeped, carefully remove the cinnamon sticks from the saucepan. Stir in 1/2 cup of brown sugar into the infused water, mixing until it fully dissolves. The syrup will have a warm, rich color, and a sweet aroma that complements the cinnamon beautifully. Set the syrup aside to cool for a few minutes.

Step 4: Cool and Store the Syrup
Allow the cinnamon syrup to cool completely before transferring it to a sealed jar. You can store this syrup in the refrigerator for up to 2 weeks, making it easy to whip up your Easy Cinnamon Dolce Latte whenever the craving strikes. Just be sure to give it a quick shake before using as some separation might occur.

Step 5: Brew the Coffee
While the cinnamon syrup cools, brew your favorite cup of strong coffee or espresso. Aim for about 1/2 cup for each serving of the Easy Cinnamon Dolce Latte you plan to make. The robust flavor of the coffee will balance the sweetness of the syrup and create a comforting drink.

Step 6: Froth the Milk
In a separate saucepan, heat 1 cup of your chosen milk over medium heat, ensuring it doesn’t boil. Use a frother, whisk, or even a mason jar to froth the milk once heated. The goal is to achieve a creamy, velvety texture, which will perfectly blend with the strong coffee and sweet cinnamon syrup.

Step 7: Assemble the Latte
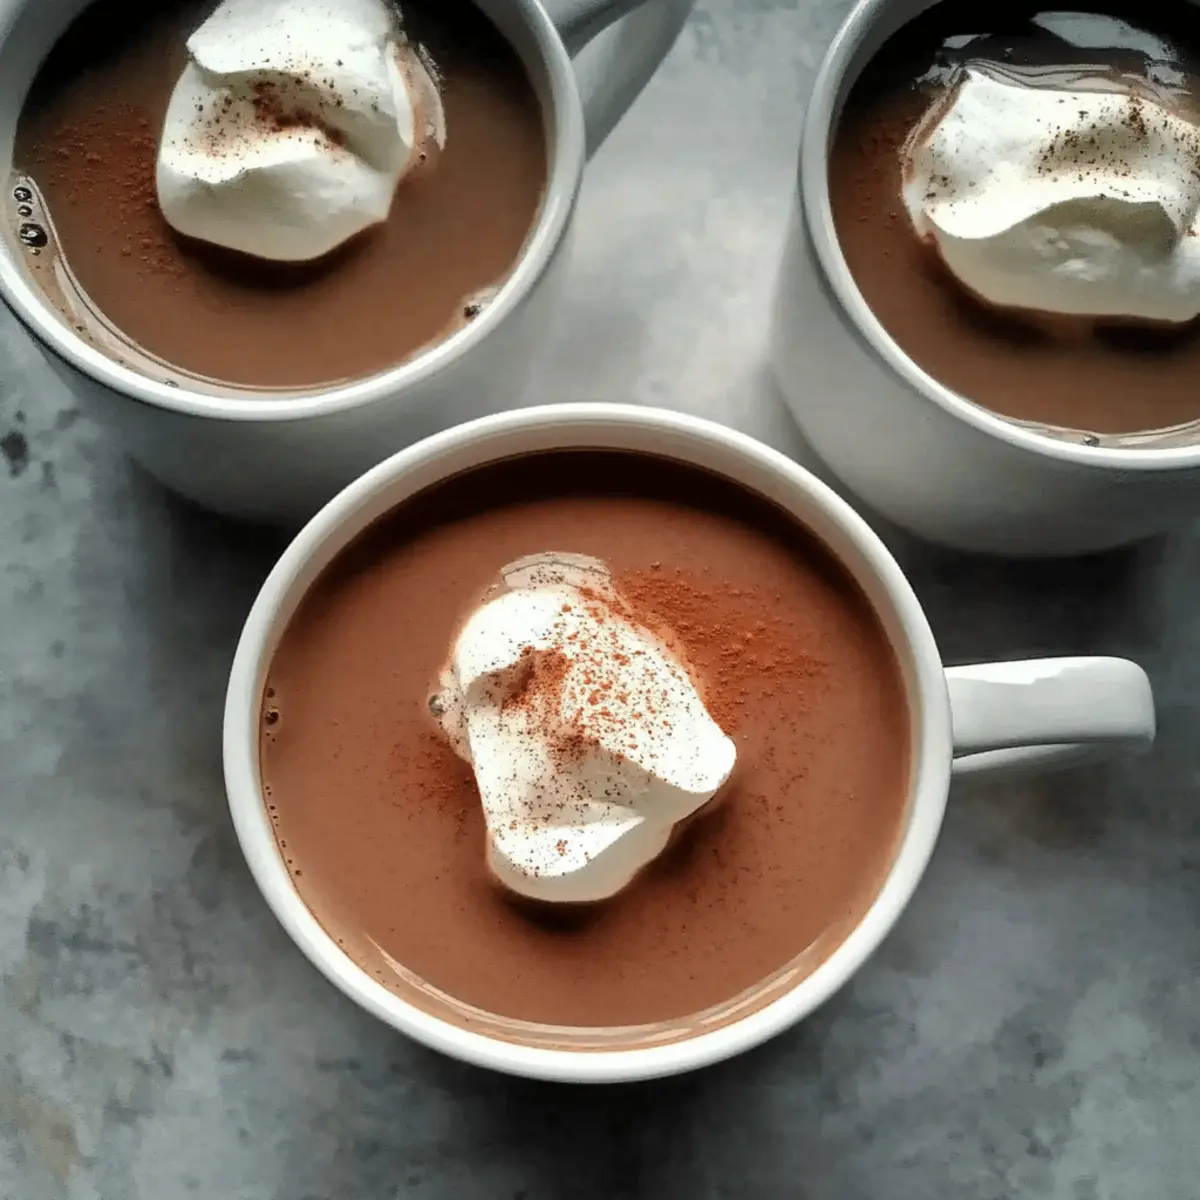
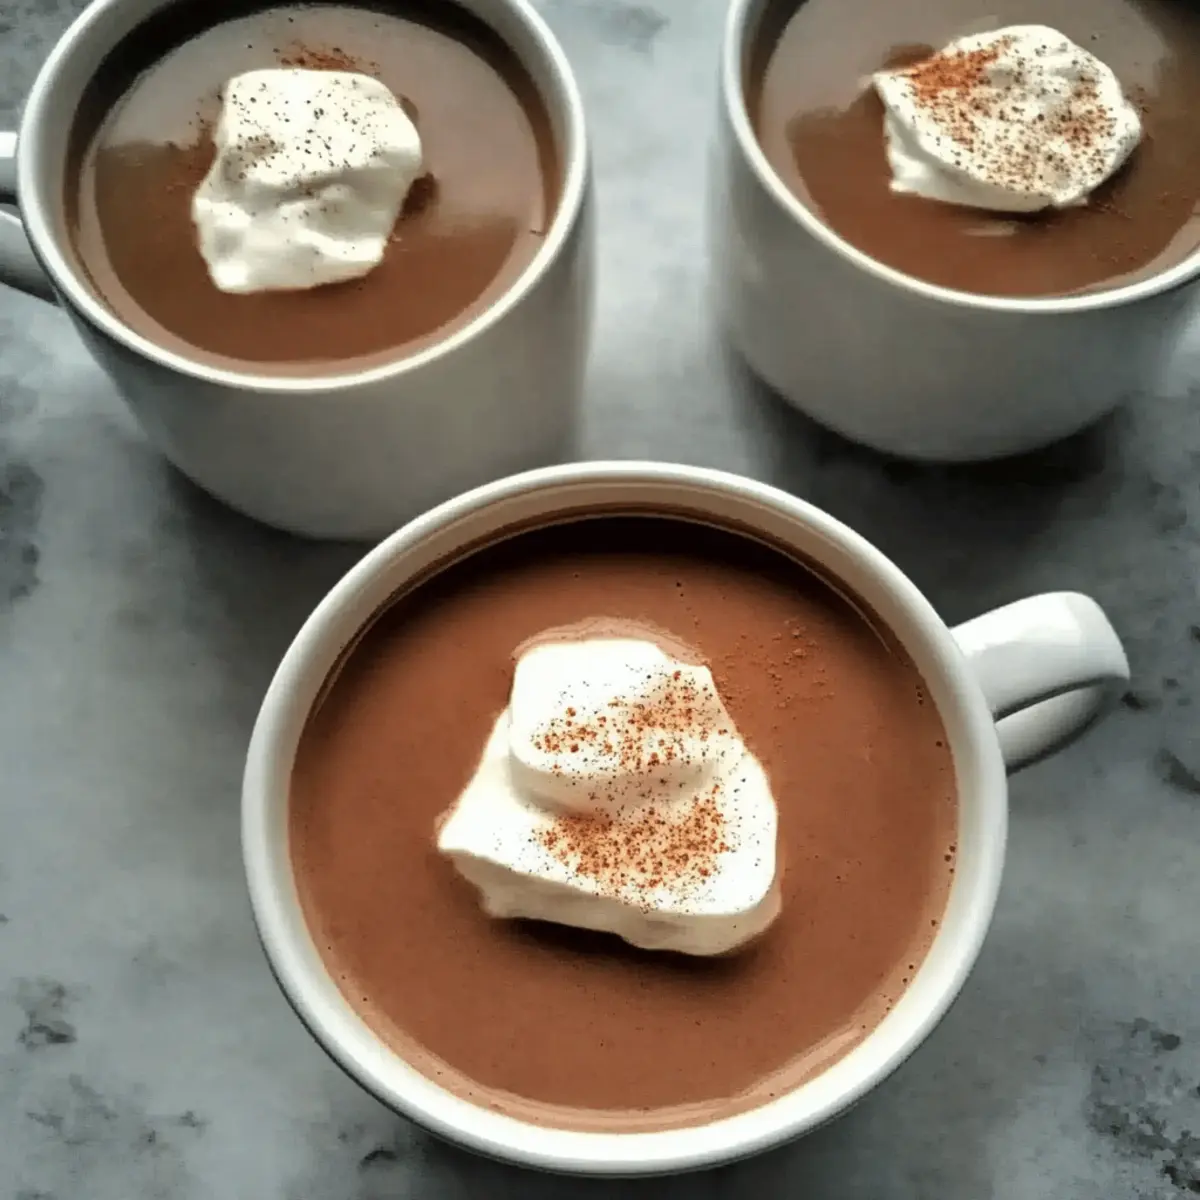
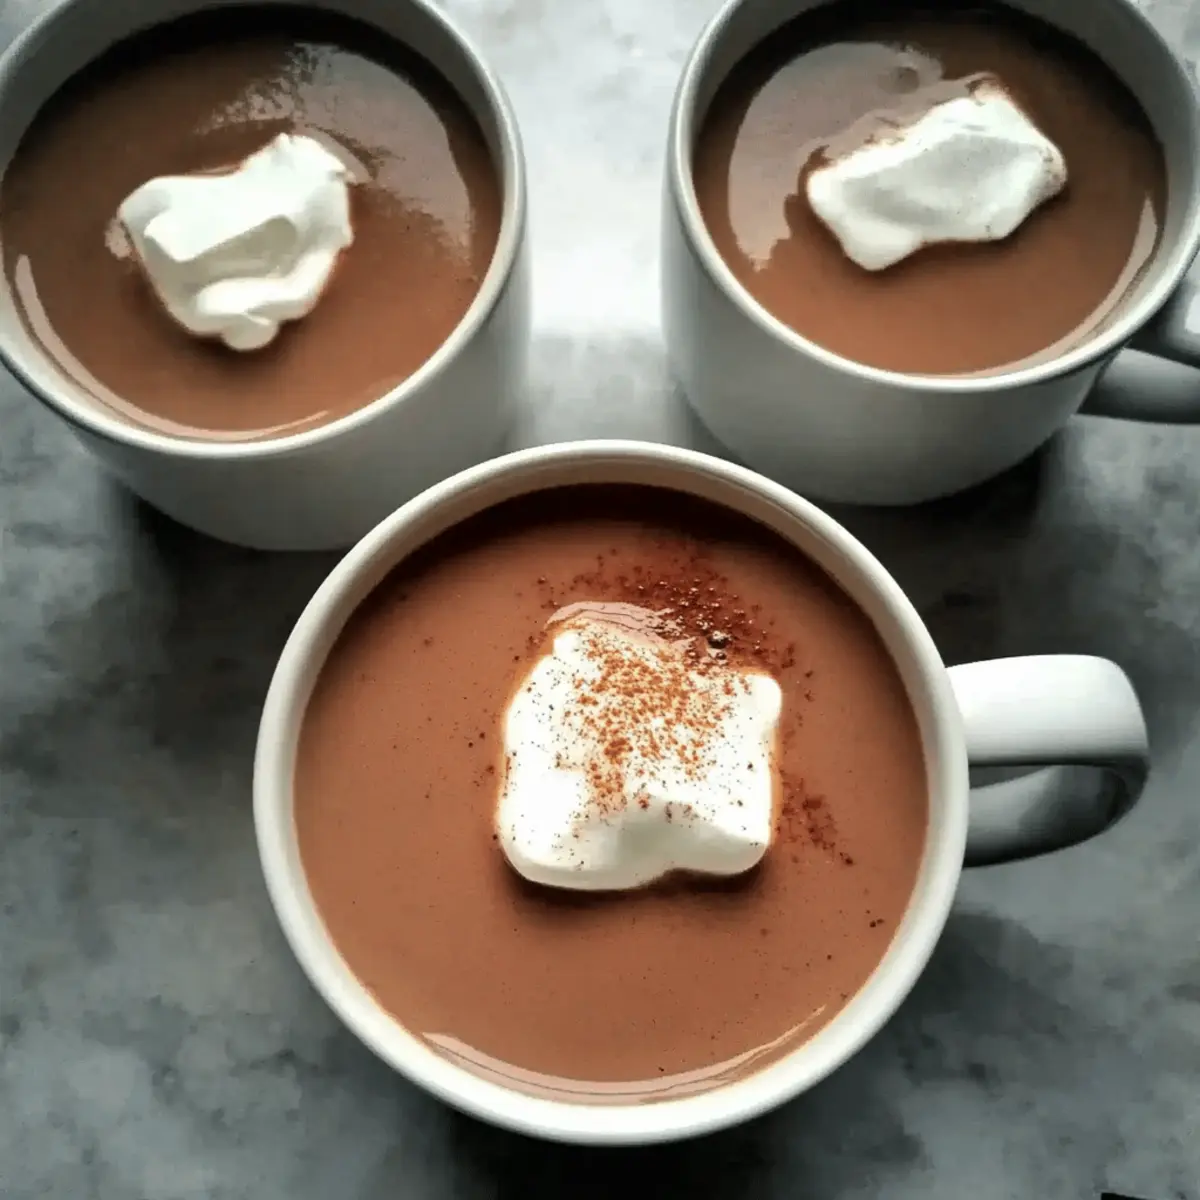
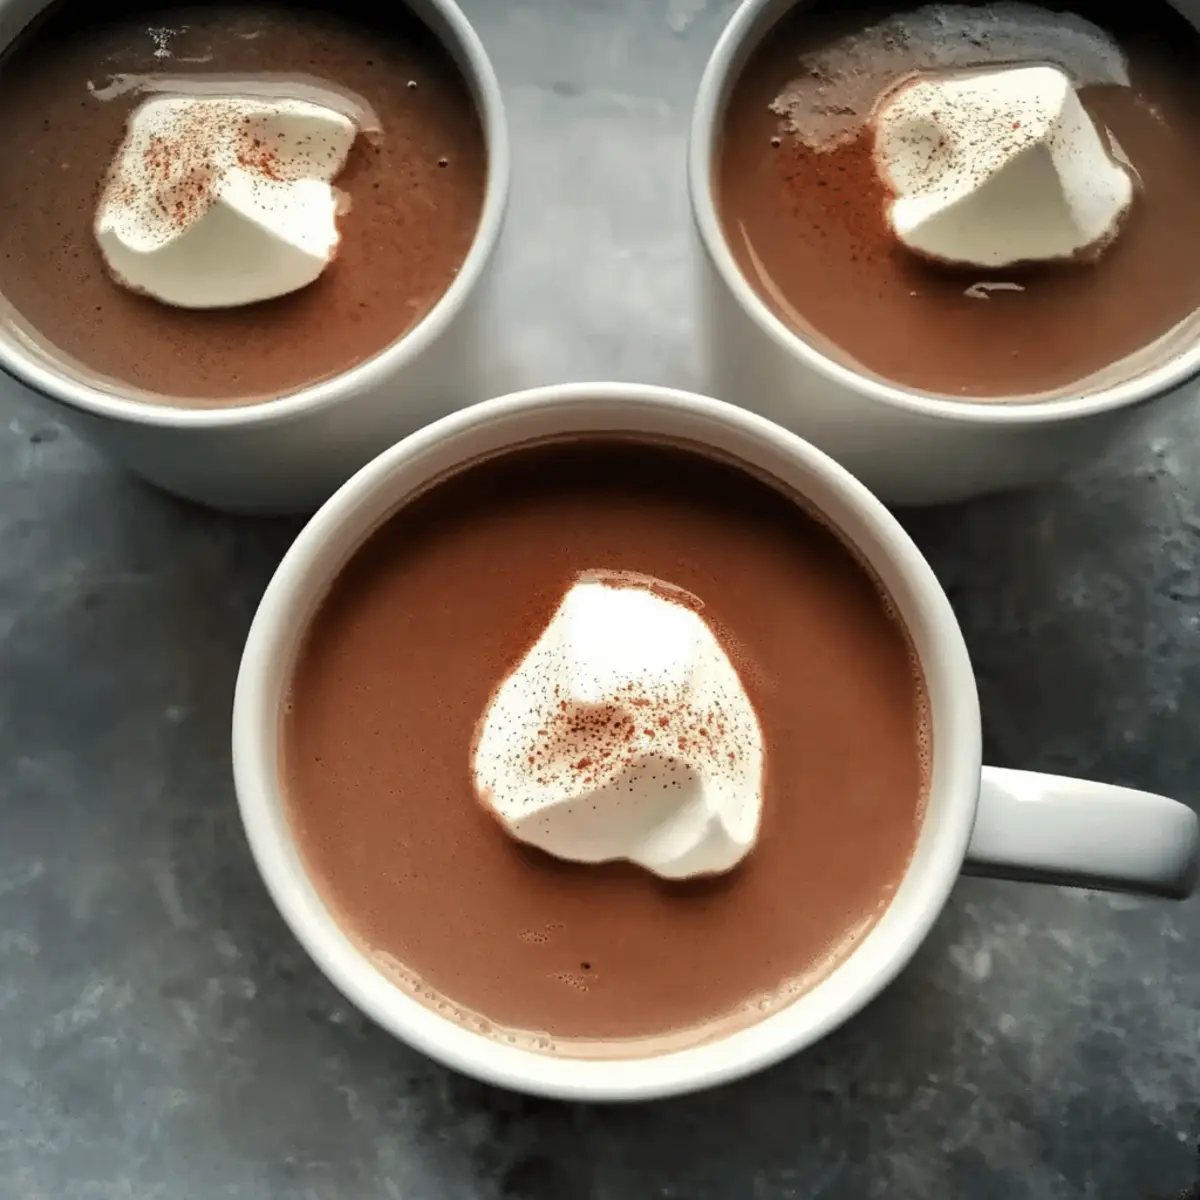
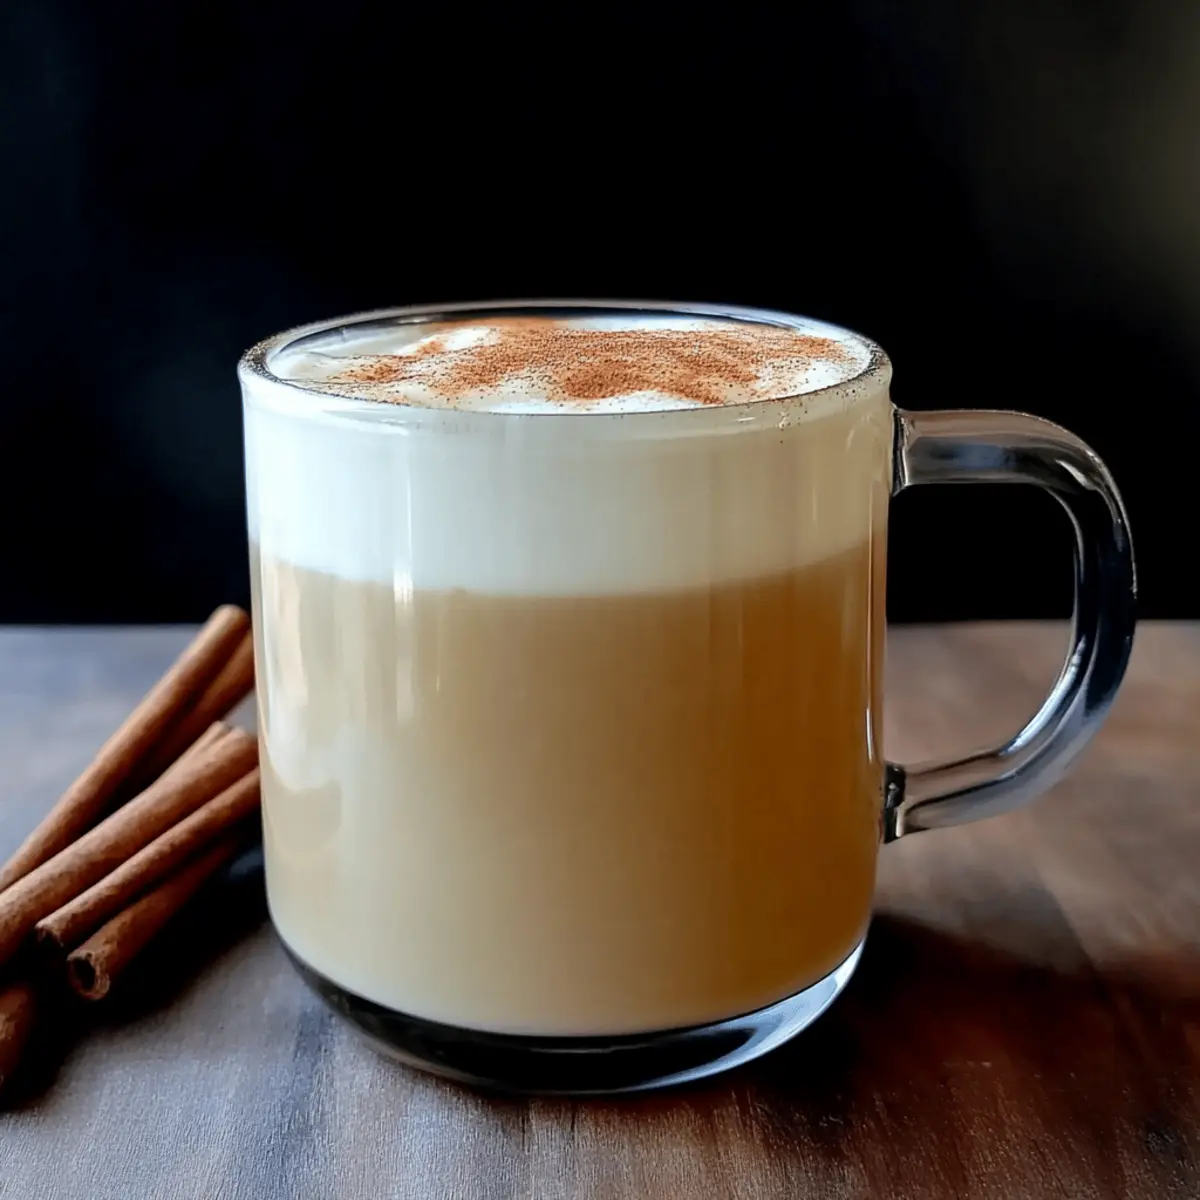
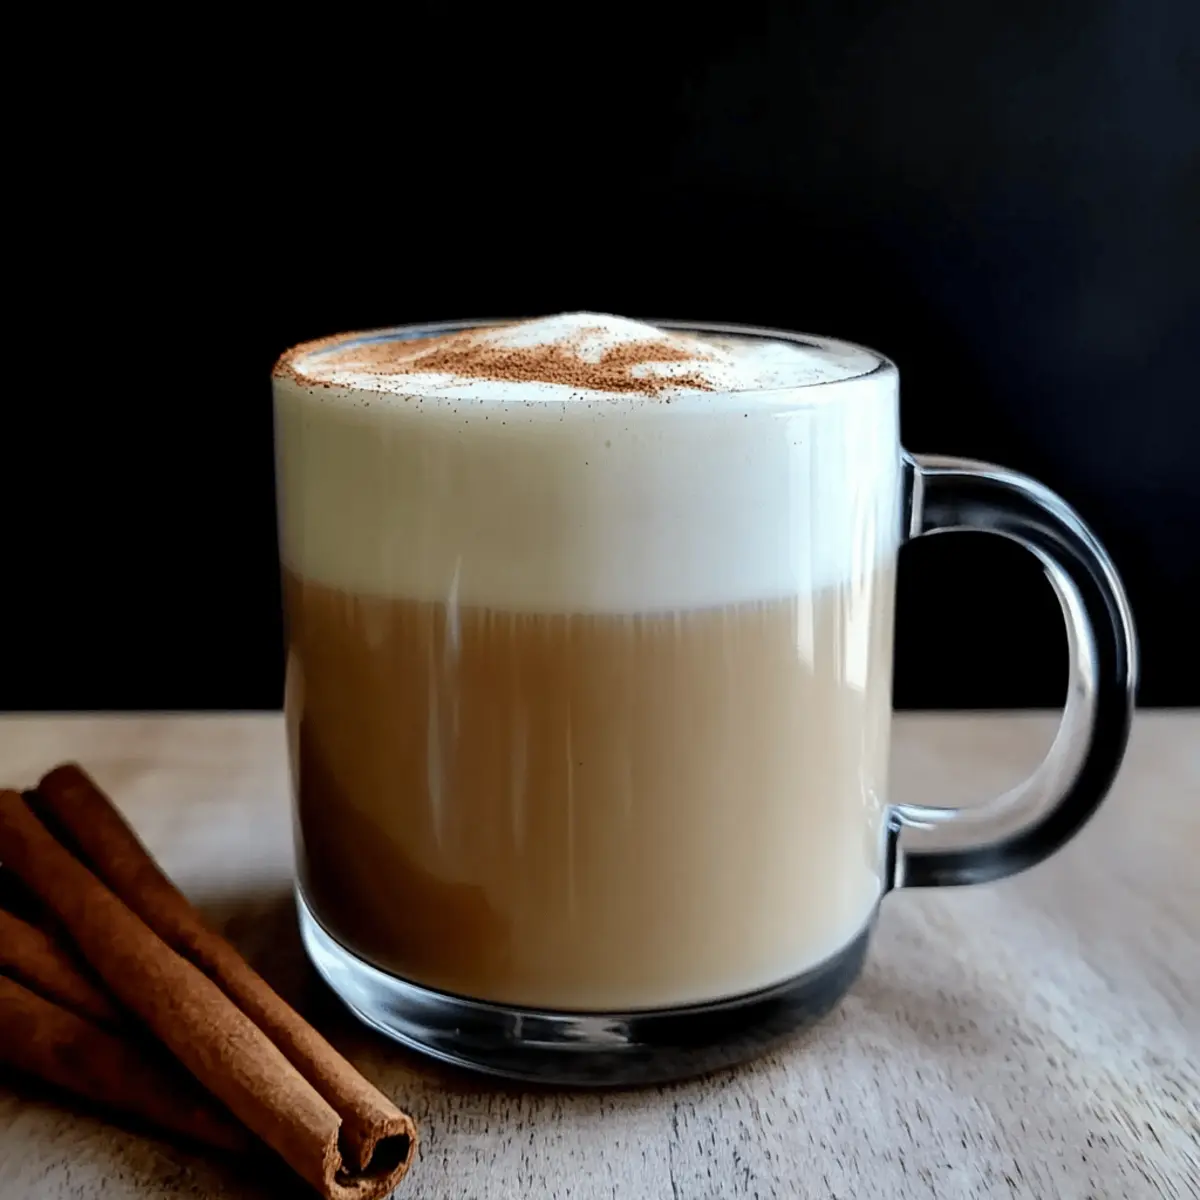
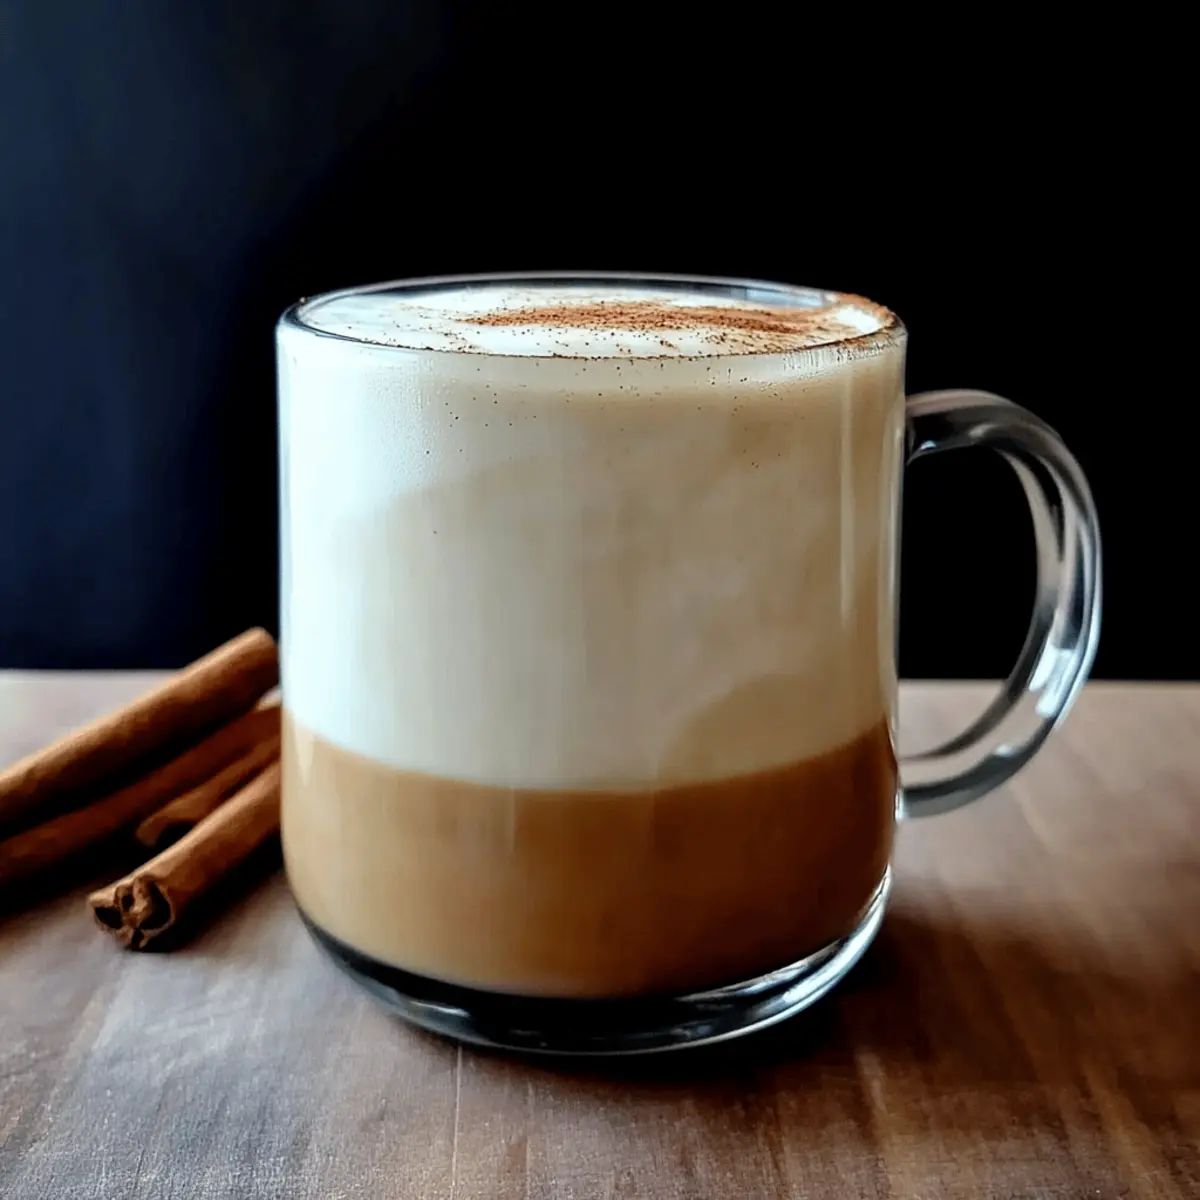
In a large mug, combine 3 tablespoons of the cinnamon syrup with your brewed coffee. Stir well to ensure the syrup disperses throughout the drink. Slowly pour the frothed milk over the coffee mixture, allowing the creamy texture to mix together elegantly. Top with a sprinkle of ground cinnamon for an extra touch of flavor.

Step 8: Enjoy Your Creation
Your Easy Cinnamon Dolce Latte is now ready to be savored! Take a moment to appreciate the comforting scents and the cozy atmosphere you’ve created. Whether you enjoy it with breakfast or as a midday treat, this homemade version of a café classic is sure to warm your heart.

What to Serve with Easy Cinnamon Dolce Latte?

The perfect pairing elevates your cozy café moment, turning a delightful drink into an unforgettable experience.

  • Fluffy Pancakes: Soft and warm, pancakes are the ideal match, soaking up the sweet flavors of your latte.

  • Chocolate Croissants: The flaky layers and rich chocolate contrast beautifully with the spiced notes of the latte, creating a decadent breakfast.

  • Overnight Oats: Creamy, wholesome oats are a nourishing companion, enhancing the latte's sweetness while keeping you satisfied.

  • Fruit Salad: Fresh, juicy fruits like apples and berries brighten the palate, balancing the warm espresso flavors with vibrant freshness.

  • Savory Quiche: A slice of quiche adds a comforting savory flair; the richness complements and enhances the coffee's depth.

  • Cinnamon Rolls: Nothing says cozy morning like cinnamon rolls! Their gooey sweetness mirrors the latte’s flavor, creating a cinnamon celebration.

  • Spiced Muffins: Soft muffins spiced with nutmeg or clove offer a wonderful texture, echoing the aromatic warmth of the drink.

  • Nutty Granola Bars: Chewy and crunchy, these bars provide a satisfying bite alongside your latte, perfect for an on-the-go breakfast.

  • Pumpkin Spice Cookie: A warm cookie with hints of pumpkin and spices intertwines perfectly with your latte, especially during the fall season.

  • Maple Syrup Drizzle: Consider drizzling a bit of maple syrup over your breakfast choice for a sweet, earthy boost that pairs impeccably with the cinnamon flavors.

Easy Cinnamon Dolce Latte Variations

Embrace your creativity and personalize your Easy Cinnamon Dolce Latte to make every cup a new adventure for your taste buds!

  • Dairy-Free: Swap regular milk for almond, coconut, or oat milk for a delightful, creamy alternative that everyone can enjoy.

  • Sugar-Free: For a lower-calorie twist, use a sugar substitute like erythritol or monk fruit sweetener while preparing your syrup.

  • Spiced Up: Add a pinch of nutmeg or a dash of vanilla extract to your syrup for an extra layer of warmth and flavor.

  • Iced Delight: Make your latte a refreshing iced version by chilling your coffee and serving it over ice with frothed milk on top.

  • Chocolate Lover's Twist: Stir in a spoonful of cocoa powder into your coffee for a rich chocolatey flavor that perfectly complements the cinnamon.

  • Nutty Variations: Incorporate a splash of hazelnut or almond syrup into your latte for a nutty upgrade that adds a gourmet touch.

  • Seasonal Spice: During the holidays, toss in a sprinkle of pumpkin spice alongside your cinnamon for a festive fall flavor.

  • Texture Boost: Experiment by adding whipped cream on top for an indulgent finish or sprinkle some crushed nuts for added crunch.

These variations ensure that your Easy Cinnamon Dolce Latte remains a beloved favorite, no matter how you choose to make it. And if you love the idea of combining coffee and spices, check out our delicious Pumpkin Cinnamon Roll for the perfect pairing!

Make Ahead Options

These Easy Cinnamon Dolce Lattes are perfect for busy mornings! You can prepare the cinnamon syrup up to 2 weeks in advance, ensuring a delightful and quick start to your day. Just follow the syrup instructions, allowing it to cool completely before storing in an airtight jar in the refrigerator. This way, you’ll have the sweet, spiced base ready to go whenever you crave a cozy latte. When you’re ready to serve, simply mix 3 tablespoons of the syrup with ½ cup of freshly brewed coffee, froth your milk, and pour it over. Enjoy café-quality results with minimal effort—your future self will thank you!

How to Store and Freeze Easy Cinnamon Dolce Latte

Fridge: Store your cinnamon syrup in a sealed jar in the refrigerator for up to 2 weeks. This will allow you to enjoy your Easy Cinnamon Dolce Latte whenever the craving strikes!

Freezer: If you want to keep the syrup longer, pour it into ice cube trays and freeze for easy portions. Use within 2–3 months for the best flavor.

Reheating: When ready to use the syrup, simply thaw the desired number of cubes and heat gently in the microwave or on the stovetop before adding to your latte.

Coffee Storage: Brewed coffee can be kept in the fridge for up to 3 days in an airtight container. Just remember to heat it up before mixing with the syrup and frothed milk.

Expert Tips for Easy Cinnamon Dolce Latte

  • Perfect Your Syrup: Letting the cinnamon sticks steep longer enhances the flavor, but avoid boiling to prevent bitterness.

  • Froth Your Milk: Frothing the milk properly is key! A frother or a mason jar can create that creamy texture you love without an espresso machine.

  • Customize Sweetness: Start with less sugar in the syrup, and add more to taste. This ensures your Easy Cinnamon Dolce Latte fits your sweetness preference perfectly.

  • Experiment with Milk: Don't hesitate to try different milk varieties—almond, oat, or coconut can give your latte a delicious twist!

  • Make it Iced: For a refreshing change, chill the coffee and pour it over ice, then top with frothed milk and syrup for an iced treat.

Easy Cinnamon Dolce Latte Recipe FAQs

How do I choose the right cinnamon for my latte?
Absolutely! For the best flavor, I recommend using fresh cinnamon sticks. They not only impart a richer aroma but also enhance the overall taste of your Easy Cinnamon Dolce Latte. Ground cinnamon can be used in a pinch, but do remember that it may alter the texture since it tends to clump more when mixed.

How long can I store the cinnamon syrup?
You can store your cinnamon syrup in a sealed jar in the refrigerator for up to 2 weeks. Make sure it's completely cooled before sealing it to maintain its freshness. I often make a batch ahead of time so it’s ready to go whenever I’m craving a cozy latte!

Can I freeze the cinnamon syrup?
Absolutely! To freeze, pour your cinnamon syrup into ice cube trays and freeze them. Once frozen, transfer the cubes to a resealable bag. They'll last for about 2 to 3 months. When you're ready to use, simply thaw a few cubes and heat them gently in the microwave or on the stovetop—perfect for a quick Easy Cinnamon Dolce Latte!

What should I do if my latte is too sweet?
No worries! If you find your Easy Cinnamon Dolce Latte too sweet for your taste, you can easily adjust it. Start by using less brown sugar in the syrup, then gradually add more sugar into your latte to personalize it. If you've already made it, you can balance sweetness by adding a bit more brewed coffee or a splash of milk to mellow the taste.

Can I make this recipe dairy-free?
Very much so! This Easy Cinnamon Dolce Latte is highly customizable. Simply use any non-dairy milk you love—almond, oat, or coconut milk work wonderfully! These alternatives can add a unique twist to your favorite latte, all while keeping it light and delicious!

Is this latte safe for pets?
It’s important to note that while the latte is a delightful treat for us, it’s not suitable for pets. Ingredients like caffeine from coffee and sugar can adversely affect their health. Always keep your coffee creations out of reach of your furry friends to ensure their safety.

Easy Cinnamon Dolce Latte

Easy Cinnamon Dolce Latte: Your Cozy Café Moment at Home

Enjoy the comforting flavors of an Easy Cinnamon Dolce Latte made at home with simple ingredients.
Print Recipe Pin Recipe
Prep Time 5 minutes mins
Cook Time 10 minutes mins
Cooling Time 5 minutes mins
Total Time 20 minutes mins
Servings: 2 cups
Course: Drinks
Cuisine: American
Calories: 180
Ingredients Equipment Method Nutrition Notes

Ingredients
  

For the Cinnamon Syrup
  • 1 cup Water Essential for creating the cinnamon syrup base.
  • 2 pieces Cinnamon Sticks Fresh sticks infuse a delightful flavor.
  • 1/2 cup Brown Sugar Adds sweetness and depth.
For the Latte
  • 1/2 cup Strong Coffee Use espresso or brewed coffee.
  • 1 cup Milk Frothy, use whole or non-dairy alternatives.

Equipment

  • small saucepan
  • mason jar
  • frother or whisk

Method
 

Step-by-Step Instructions for Easy Cinnamon Dolce Latte
  1. Combine 1 cup of water with 2 broken cinnamon sticks in a small saucepan. Bring to a gentle boil.
  2. Remove from heat and cover with a lid. Let steep for 10 minutes.
  3. Remove cinnamon sticks and stir in 1/2 cup of brown sugar until dissolved.
  4. Allow the cinnamon syrup to cool completely before transferring to a jar.
  5. Brew 1/2 cup of strong coffee or espresso.
  6. Heat 1 cup of milk over medium heat and froth until creamy.
  7. In a large mug, combine 3 tablespoons of cinnamon syrup with brewed coffee, then top with frothed milk.
  8. Enjoy your Easy Cinnamon Dolce Latte.

Nutrition

Serving: 1cupCalories: 180kcalCarbohydrates: 30gProtein: 5gFat: 4gSaturated Fat: 2gMonounsaturated Fat: 1gCholesterol: 10mgSodium: 70mgPotassium: 200mgFiber: 1gSugar: 24gVitamin A: 250IUCalcium: 150mgIron: 0.5mg

Notes

Customize the sweetness of the syrup and the type of milk used for a personal touch.

Tried this recipe?

Let us know how it was!

Goosebumps Halloween Punch: A Spooky Treat for All Ages

October 22, 2025 by Grace Snow Leave a Comment

As I rummaged through my pantry in search of festive treats, I stumbled upon a vibrant green bottle that sparked a delightful memory. It reminded me of my childhood love for Halloween and all the spooky fun that came with it. Enter the Goosebumps Halloween Punch, an easy-to-make 4-ingredient wonder that brings that magic right back. Perfectly fizzy and refreshingly sweet, this punch is a crowd-pleaser for both kids and adults, making it the ultimate addition to your Halloween festivities. Within just 10 minutes, you’ll whip up a drink that's not only eye-catching but also a conversation starter at any gathering. Want to know how simple it is to mix your way into a spooky adventure? Let’s dive into this hauntingly good recipe!

Why is Goosebumps Halloween Punch a Must-Try?

Simplicity: With just 4 ingredients, you can create a festive drink in minutes! Perfect for busy schedules or last-minute gatherings.

Fun Factor: The vibrant green color and gummy worms add a playful touch that delights both kids and adults alike.

Customizable: Whether you keep it non-alcoholic or mix in your favorite spirits, this recipe can cater to any crowd.

Kid-Friendly: Say goodbye to boring drinks; this punch embodies festive fun, making it a perfect addition to Halloween parties or family movie nights.

Conversation Starter: Its unique appearance is sure to spark conversations, creating a memorable experience for all your guests! For more fun variations, check out our suggestions on cocktail and punch ideas.

Goosebumps Halloween Punch Ingredients

For the Punch

  • Lemon Lime Soda – Provides the bubbly base and refreshing fizz that makes the Goosebumps Halloween Punch irresistible.
  • Green Food Coloring – Gives the drink its spooky appearance; adjust to achieve your preferred ghoulish hue.
  • Rainbow Sherbet – Adds a creamy sweetness and festive twist; for a different texture, consider using sorbet instead.
  • Gummy Worms – A fun garnish that enhances the Halloween theme; swap for other gummy candies if desired.

Optional Additions

  • Pineapple Juice – Mix in for a fruity twist that brightens up the flavor profile.
  • Vodka or White Rum – Add 1-2 cups for an adult-friendly version that keeps the Halloween spirit alive.

Step‑by‑Step Instructions for Goosebumps Halloween Punch

Step 1: Combine the Base
In a large punch bowl, pour in 3 liters of chilled Lemon Lime Soda, ensuring it's bubbly and refreshing. Add 12 drops of Green Food Coloring to create that spooky ghoulish hue, and use a ladle or a long spoon to stir gently until the color is evenly blended. This vibrant green base will set a festive mood for your Goosebumps Halloween Punch.

Step 2: Add the Sherbet
Scoop out the entire quart of Rainbow Sherbet and add it to the punch bowl, placing it in large dollops. Allow the sherbet to begin melting, which will create a delightful blend of creamy texture and fizz. As it swirls and softens, this adds a festive, frothy layer to your Goosebumps Halloween Punch, enhancing both flavor and visual appeal.

Step 3: Incorporate the Worms
Carefully mix in 18 of the 30 Gummy Worms directly into the punch, letting them float and add a fun, thematic element to the drink. This will give the punch a magical, whimsical touch that kids and adults will love. Reserve the remaining gummy worms for later garnish, ensuring they maintain their chewy texture.

Step 4: Serve and Garnish
Using a ladle, pour the spooky Goosebumps Halloween Punch into cups, making sure each serving gets a generous share of the fizzy liquid and creamy sherbet. To finish, decorate each cup with the reserved gummy worms draping over the edges, creating a playful presentation that's perfect for your Halloween celebration.

What to Serve with Goosebumps Halloween Punch

Creating a magical Halloween experience isn't complete without delicious pairings that complement this spooky drink.

  • Monster Cookies: These vibrant treats are colorful and chewy, adding a delightful sweetness that balances the fizzy punch. They make for a fun and spooky dessert.

  • Halloween Dirt Cups: Layered chocolate pudding, crushed cookies, and gummy candies echo the fun elements of the punch, creating a playful dessert that all ages will adore.

  • Spooky Cheese Platter: A mix of sharp cheeses, crackers, and eerie fruit shapes harmonizes cheesy and savory flavors with the sweetness of the punch, offering a twist to the menu.

  • Pumpkin Spice Muffins: Delight in the warm, fragrant spices from pumpkin muffins that pair beautifully with chilled drinks, bringing a cozy fall vibe to your gathering.

  • Witch’s Brew Popcorn: Seasoned with edible glitter and Halloween-themed sprinkles, this crunchy treat is a whimsical snack that adds texture and fun to your festive spread.

  • Apple Cider: A spiced apple cider, served warm or chilled, enhances the fall flavors and keeps the spooky spirit alive while providing a comforting contrast to the vibrant punch.

Each of these pairings brings its own texture and flavors, elevating your Goosebumps Halloween Punch into a full, enchanting feast that's sure to be memorable!

Storage Tips for Goosebumps Halloween Punch

  • Room Temperature: For best flavor and fizz, serve the Goosebumps Halloween Punch immediately after preparation. Avoid storing at room temperature to maintain freshness.

  • Fridge: If you need to store leftovers, refrigerate in an airtight container for up to 1 day. Be aware that the effervescence will diminish, impacting the punch's texture.

  • Freezer: Freezing is not recommended as it can alter the creamy texture of the sherbet and affect the punch's overall taste.

  • Reheating: Reheating is not necessary for a punch. Serve chilled or allow it to come to room temperature, but remember to stir gently to mix any settled ingredients.

Goosebumps Halloween Punch Variations

Feel free to let your creativity shine by customizing this punch with these fun and festive suggestions!

  • Fruity Twist: Add pineapple juice or lemonade concentrate for an invigorating citrus twist that brightens the overall flavor. It's a fruity surprise that takes the punch to a whole new level!

  • Soda Swap: Use other fruit-flavored sodas like orange or grape soda to change the base and create a unique taste. Imagine the delightful combinations you can explore!

  • Adult Additions: For an adult version, consider adding Midori or pineapple rum to elevate the tropical essence of the drink. Just mix slowly and taste to find your desired balance.

  • Colorful Gummy Worms: Get creative with different gummy candies. Eye-shaped gummies or gummy spiders can enhance the spooky effect and surprise all your guests!

  • Sugar Rim Variation: For a touch of elegance, create a sugar rim using colored sugar or sprinkles that match your party theme. Just dip the rims in your favorite spooky color for added fun!

  • Sherbet Substitution: Swap out the rainbow sherbet for green or orange sorbet for a unique texture. This simple change adds a subtle twist while keeping taste and creaminess intact.

  • Extra Fizz: Enhance the fizz by incorporating club soda or ginger ale instead of plain lemon-lime soda. This adds both sweetness and a delightful zing with every sip.

  • Flavor Enhancements: Consider adding a splash of freshly squeezed lime or lemon juice for a bright and zesty kick. It balances the sweetness and keeps it refreshing!

Need more ideas to ignite your Halloween spirit? Check out our fun suggestions on punch variations and spooky treats to accompany your Goosebumps Halloween Punch recipe!

Expert Tips for Goosebumps Halloween Punch

  • Fresh is Best: Serve the Goosebumps Halloween Punch immediately after making to maintain its fizzy goodness. The carbonation diminishes quickly after mixing.

  • Sugar Rim Option: For a spooky touch, create a sugar rim by mixing powdered sugar with a drop of green food coloring and a bit of water. Dip the rim of your cups for an extra festive flair!

  • Mix It Up: Want an adult version? Mix 1-2 cups of vodka or white rum into the punch bowl. Start small and taste, adjusting the flavor to suit your preference.

  • Gummy Worm Variations: Feel free to swap out gummy worms for other fun candy shapes, like eyeballs or spiders, to enhance the punch’s Halloween theme.

  • Smooth Serving: To ensure easy pouring, use a ladle with a long handle. It helps avoid spills while serving this fun, bubbly Goosebumps Halloween Punch to your guests.

Make Ahead Options

These Goosebumps Halloween Punch preparations are perfect for busy home cooks looking to streamline their festive gatherings! You can mix the Lemon Lime Soda and Green Food Coloring together up to 24 hours in advance, storing the mixture in the refrigerator to maintain its bubbly texture. Prepare the Rainbow Sherbet and keep it in the freezer until you're ready to serve. On the day of your event, simply add the sherbet to the soda mixture and stir gently to activate that whimsical froth. Finally, incorporate the gummy worms for that fun touch just before serving. This way, you’ll enjoy delicious, kid-friendly punch with minimal last-minute effort!

Goosebumps Halloween Punch Recipe FAQs

What kind of Lemon Lime Soda should I use for the punch?
Absolutely! For the Goosebumps Halloween Punch, I recommend using a chilled, classic Lemon Lime Soda like 7UP or Sprite. The carbonation is key for that fizzy effect, so make sure it’s fresh and well-chilled before mixing, as warmer soda won’t have the same bubbly pop!

How long can I store leftover Goosebumps Halloween Punch?
If you have any leftovers (which is rare with this crowd-pleaser!), store them in an airtight container in the fridge for up to 1 day. Just remember, the longer it sits, the less fizzy it becomes, impacting the delightful texture and fun experience of the punch.

Can I freeze Goosebumps Halloween Punch?
Freezing the punch is not recommended, as it can affect the creamy texture of the Rainbow Sherbet. If you want to prepare in advance, consider making the base (soda and food coloring) and adding Sherbet just before serving. The punch is best enjoyed fresh, ensuring that bubbly goodness lasts!

What can I do if my punch looks too dark?
If your Goosebumps Halloween Punch turns out darker than you'd like, add a splash more Lemon Lime Soda to lighten it up. Start by adding incremental amounts, stirring gently until the hue matches your spooky aesthetic. Remember, it’s all about having fun with it, so get creative!

Is this punch suitable for children and those with allergies?
Very! This punch is kid-friendly; however, always double-check the ingredients of the Lemon Lime Soda and any gummy candies you choose, as they might contain allergens like gelatin, gluten, or artificial colors. I often suggest using allergy-friendly candies to ensure everyone can enjoy the fun!

Goosebumps Halloween Punch

Goosebumps Halloween Punch: A Spooky Treat for All Ages

Goosebumps Halloween Punch is a fizzy, sweet, and spooky drink perfect for all ages, making it a must-have for Halloween parties.
Print Recipe Pin Recipe
Prep Time 10 minutes mins
Total Time 10 minutes mins
Servings: 10 cups
Course: Drinks
Calories: 150
Ingredients Equipment Method Nutrition Notes

Ingredients
  

For the Punch
  • 3 liters Lemon Lime Soda Chilled for a bubbly refreshment.
  • 12 drops Green Food Coloring Adjust to achieve preferred ghoulish hue.
  • 1 quart Rainbow Sherbet Or consider using sorbet for a different texture.
  • 30 pieces Gummy Worms Use as garnish or mix in.
Optional Additions
  • 1-2 cups Vodka or White Rum For an adult-friendly version.
  • 1 cup Pineapple Juice Mix for a fruity twist.

Equipment

  • Large punch bowl
  • Ladle

Method
 

Step-by-Step Instructions for Goosebumps Halloween Punch
  1. In a large punch bowl, pour in 3 liters of chilled Lemon Lime Soda and add 12 drops of Green Food Coloring, stirring gently to blend the color.
  2. Scoop out the entire quart of Rainbow Sherbet and add it to the punch bowl, allowing it to melt and swirl.
  3. Mix in 18 of the 30 Gummy Worms, letting them float in the drink for a whimsical touch.
  4. Ladle the punch into cups, garnishing with reserved gummy worms draped over the edges.

Nutrition

Serving: 1cupCalories: 150kcalCarbohydrates: 36gSodium: 50mgPotassium: 20mgSugar: 34gVitamin C: 10mg

Notes

Serve immediately to maintain fizz; can be garnished with a sugar rim for added flair.

Tried this recipe?

Let us know how it was!

Aztec Kahlúa Hot Cocoa: Your Cozy Indulgence This Winter

October 22, 2025 by Grace Snow Leave a Comment

As the chill of winter wraps around us, there’s nothing quite like a steaming cup of Aztec Kahlúa Hot Cocoa to warm the heart and soul. This delightful blend of semi-sweet chocolate and a hint of cayenne pepper transforms your ordinary hot cocoa into a cozy indulgence, making it the perfect companion for chilly evenings. What’s more, it’s not just a treat for adults; you can easily whip up a non-alcoholic version for the kids, ensuring everyone can join in on the fun. Whether you're curling up by the fire or gathering with friends during the holiday season, this luscious drink promises quick prep and a crowd-pleasing moment of joy. So, are you ready to discover how this rich, velvety cocoa can elevate your winter traditions? Let's dive in!

Why is Aztec Kahlúa Hot Cocoa a must-try?

Indulgent Delight: This rich cocoa is a perfect blend of semi-sweet chocolate and warming spices that elevate your winter nights.
Customizable Goodness: Easily enjoy a non-alcoholic version, making it a fun option for all ages!
Quick and Easy: Ready in just a few minutes, it's ideal for spontaneous gatherings or leisurely evenings.
Comfort in a Cup: The velvety texture wraps around you, providing warmth and comfort similar to a cozy blanket.
Perfect Pairing: Enjoy it alongside your favorite holiday baked goods or a classic Homemade Hot Chocolate for an unforgettable treat.
Crowd Favorite: Serve it at your next get-together, and watch it disappear in no time!

Aztec Kahlúa Hot Cocoa Ingredients

For the Cocoa Base
• Milk – A creamy base providing richness; substitute with almond milk for a dairy-free version.
• Heavy Cream – Adds luxurious creaminess; use half-and-half as a lighter substitute.
• Semi-Sweet Chocolate – The main cocoa source delivering chocolate flavor; dark chocolate can be used for a deeper taste.
• Instant Espresso Powder – Enhances chocolate flavor; omit if unavailable.
• Ground Cinnamon – Adds warmth and spice; nutmeg can be a substitute for a different flavor profile.
• Cayenne Pepper – Provides subtle heat; adjust quantity to taste or omit for a milder drink.
• Kosher Salt – Enhances flavors; regular salt can be used, but kosher salt is preferred.

For the Boozy Touch
• Mocha Kahlúa (or regular Kahlúa) – Adds sweetness and a rich coffee flavor; replace with chocolate syrup for a non-alcoholic version of Aztec Kahlúa Hot Cocoa.

Step‑by‑Step Instructions for Aztec Kahlúa Hot Cocoa

Step 1: Combine Ingredients
In a large saucepan, combine 2 cups of milk, 1 cup of heavy cream, 4 ounces of semi-sweet chocolate (chopped), 1 tablespoon of instant espresso powder, 1 teaspoon of ground cinnamon, and a pinch of cayenne pepper along with 1/4 teaspoon of kosher salt. Stir the mixture gently to ensure everything is well distributed before heading to the heat.

Step 2: Heat the Mixture
Place the saucepan over medium-low heat, stirring continuously. Allow the mixture to warm for about 5-7 minutes, or until the chocolate is completely melted and the mixture is steaming but not boiling. Keep an eye on it to prevent scorching. You’ll know it’s ready when it achieves a silky texture.

Step 3: Incorporate Kahlúa
Once the cocoa is warm and smooth, stir in 2 ounces of Mocha Kahlúa (or regular Kahlúa), mixing thoroughly until fully incorporated. This adds a delightful depth of flavor to your Aztec Kahlúa Hot Cocoa. Continue heating briefly for another 1-2 minutes to meld the flavors without boiling.

Step 4: Serve the Drink
Remove the saucepan from heat and carefully ladle the rich cocoa into mugs. For an extra special touch, consider topping your Aztec Kahlúa Hot Cocoa with fluffy marshmallows or a dollop of whipped cream. This little garnish will elevate your cozy beverage while adding a delightful visual appeal.

Step 5: Enjoy and Customize
Take a moment to savor the warmth as you enjoy your Aztec Kahlúa Hot Cocoa. Feel free to adjust the spice level by adding more cayenne if desired or use chocolate syrup for a non-alcoholic version for younger guests. This drink is perfect for gatherings or a tranquil evening to yourself.

Storage Tips for Aztec Kahlúa Hot Cocoa

Fridge: Refrigerate any leftover Aztec Kahlúa Hot Cocoa in an airtight container for up to 2 days. Make sure it's cooled before sealing to prevent condensation.

Freezer: While not ideal for hot cocoa, you can freeze the mixture in ice cube trays for up to 1 month. Use the cubes in smoothies or as cold cocoa bites!

Reheating: Reheat gently on the stovetop over low heat or in the microwave, stirring occasionally until warmed through. Avoid boiling to maintain the creamy texture.

Serving After Storage: Allow the cocoa to cool slightly after reheating before serving to ensure it’s comfortable to sip. Your cozy treat is ready to enjoy again!

Expert Tips for Aztec Kahlúa Hot Cocoa

• Continuous Stirring: Prevent scorching by stirring constantly while heating. This helps create a smooth texture without burnt chocolate.

• Spice Adjustment: Start with a small amount of cayenne pepper, then gradually add more to suit your taste. This keeps the drink enjoyable for everyone!

• Cool Before Serving: Allow the cocoa to cool slightly after cooking to prevent burns. It should be warm but comfortable to sip.

• Creative Toppings: Elevate your Aztec Kahlúa Hot Cocoa with varied toppings, such as whipped cream, marshmallows, or even a sprinkle of cinnamon for extra flair.

• Storage Solutions: If you have leftover cocoa, refrigerate it for up to two days. Reheat gently on the stove or in the microwave before serving.

Make Ahead Options

These Aztec Kahlúa Hot Cocoa cups are perfect for meal prep enthusiasts seeking to save time on busy weeknights! You can prepare the cocoa base (milk, heavy cream, chocolate, espresso powder, cinnamon, cayenne, and salt) up to 24 hours in advance; simply refrigerate it once it has cooled. When you're ready to serve, reheat the mixture gently over low heat, stirring until warmed through, and then mix in the Kahlúa until fully incorporated. This way, you maintain that rich, chocolatey flavor without sacrificing quality. By prepping ahead, you’ll have a cozy winter treat ready to enjoy with minimal effort!

Aztec Kahlúa Hot Cocoa Variations

Embrace your creativity with these delightful twists on the classic Aztec Kahlúa Hot Cocoa that will make your heart sing.

  • Dairy-Free: Substitute milk with almond milk or oat milk for a smooth, creamy cocoa suitable for dairy-free diets.

  • Lower Calorie: Use low-fat milk and reduce the heavy cream to enjoy a lighter version without sacrificing flavor.

  • Dark Chocolate: Swap semi-sweet chocolate for dark chocolate to create a richer, more intense cocoa experience that chocolate lovers will adore.

  • Flavored Liqueurs: Try replacing Kahlúa with hazelnut or vanilla coffee liqueur for a unique twist on the original flavor profile.

  • Extra Spice: For an invigorating kick, add a pinch of chili powder along with cayenne pepper, intensifying the heat and adding depth.

  • Nutty Additions: Mix in a tablespoon of almond butter or hazelnut spread while heating for a wonderfully nutty flavor and enhanced creaminess.

  • Marshmallow Swirl: Top your cocoa with toasted marshmallows or a dollop of marshmallow fluff for an indulgent treat that everyone will love!

  • Cocoa Delight Combo: Serve your Aztec Kahlúa Hot Cocoa alongside a slice of decadent chocolate cake or even a batch of festive Homemade Hot Chocolate cookies to create a truly deluxe dessert experience.

What to Serve with Aztec Kahlúa Hot Cocoa

Warm up your evenings with delightful pairings that complement the rich, spicy flavors of this indulgent cocoa.

  • Spiced Apple Cider: The blend of sweet and spicy notes pairs perfectly with the cocoa, enhancing the cozy atmosphere of winter gatherings.
  • Gingerbread Cookies: These festive treats' molasses and spices harmonize beautifully with the heat from the cayenne, making each sip and bite a joy.
  • Chocolate Chip Muffins: Soft and tender muffins provide a delightful textural contrast, creating a balance with the smooth richness of the hot cocoa.
  • Roasted Marshmallows: Imagine toasting marshmallows by the fire, then dipping them in hot cocoa—pure comfort to warm up chilly nights.
  • Mince Pies: Their fruity sweetness cuts through the richness of the cocoa, allowing a reflective pause during indulgent sips. Truly a festive treat!
  • Pecan Pie: This classic dessert's nutty sweetness complements the mocha richness from the Kahlúa, making for a satisfying, decadent finish to your evening.
  • Classic Irish Cream: For a more spirited pairing, serve a little shot of Irish cream on the side—its creaminess will perfectly mingle with your cocoa.
  • Chili Con Carne: A warm bowl of this hearty dish just before sipping your cocoa can set a wonderful contrast, balancing the warmth with spice.

Aztec Kahlúa Hot Cocoa Recipe FAQs

What type of milk is best for Aztec Kahlúa Hot Cocoa?
Absolutely! A creamy milk like whole milk or 2% is best to achieve that rich, velvety texture. For a dairy-free option, almond milk works wonderfully, though it may slightly alter the flavor.

How should I store leftover Aztec Kahlúa Hot Cocoa?
After enjoying your delicious cocoa, store any leftovers in an airtight container in the fridge. They’ll stay fresh for up to 2 days. Be sure to let it cool before sealing to avoid condensation!

Can I freeze Aztec Kahlúa Hot Cocoa?
Yes, you can! While it's best fresh, you can freeze the cocoa in ice cube trays for fun cocoa bites. Just remember, it will keep for about a month. To use, simply pop the cubes into a blender for a smoothie or let them melt into your favorite drinks.

What should I do if my cocoa is too thick or too thin?
Very! If your cocoa is too thick, simply stir in a bit more milk until you reach your desired consistency. For a thinner cocoa, gradually add more milk over low heat, stirring until well combined. Remember, it’s all about personal preference!

Can children enjoy a version of Aztec Kahlúa Hot Cocoa?
Absolutely! Just omit the Kahlúa and replace it with your favorite chocolate syrup for a delightful, non-alcoholic treat that’s perfect for kids. They’ll love the rich chocolate flavor without the spirits, ensuring everyone can cozy up with a cup.

What spices can I add if I want more flavor?
Yes, indeed! Feel free to experiment with spices like nutmeg or even a touch of vanilla extract for added depth. For those who love a kick, consider a dash of chili powder along with the cayenne. Adjust according to your taste preferences—exploring flavors is half the fun!

Aztec Kahlúa Hot Cocoa

Aztec Kahlúa Hot Cocoa: Your Cozy Indulgence This Winter

Enjoy a warm cup of Aztec Kahlúa Hot Cocoa, a delightful blend of chocolate and spices, perfect for chilly winter nights.
Print Recipe Pin Recipe
Prep Time 5 minutes mins
Cook Time 7 minutes mins
Total Time 12 minutes mins
Servings: 4 cups
Course: Drinks
Cuisine: Mexican
Calories: 370
Ingredients Equipment Method Nutrition Notes

Ingredients
  

For the Cocoa Base
  • 2 cups Milk substitute with almond milk for a dairy-free version
  • 1 cup Heavy Cream use half-and-half for a lighter substitute
  • 4 ounces Semi-Sweet Chocolate chopped; dark chocolate can be used
  • 1 tablespoon Instant Espresso Powder omit if unavailable
  • 1 teaspoon Ground Cinnamon nutmeg can be a substitute
  • a pinch Cayenne Pepper adjust to taste or omit
  • 1/4 teaspoon Kosher Salt preferably kosher salt
For the Boozy Touch
  • 2 ounces Mocha Kahlúa or regular Kahlúa; replace with chocolate syrup for non-alcoholic version

Equipment

  • Large saucepan

Method
 

Combine Ingredients
  1. In a large saucepan, combine 2 cups of milk, 1 cup of heavy cream, 4 ounces of semi-sweet chocolate (chopped), 1 tablespoon of instant espresso powder, 1 teaspoon of ground cinnamon, and a pinch of cayenne pepper along with 1/4 teaspoon of kosher salt. Stir gently to ensure well distribution before heading to heat.
Heat the Mixture
  1. Place the saucepan over medium-low heat, stirring continuously. Warm for about 5-7 minutes, or until chocolate is melted and mixture is steaming but not boiling.
Incorporate Kahlúa
  1. Once the cocoa is warm and smooth, stir in 2 ounces of Mocha Kahlúa (or regular Kahlúa). Mix thoroughly until fully incorporated.
Serve the Drink
  1. Remove from heat and ladle the cocoa into mugs. Consider topping with marshmallows or whipped cream.
Enjoy and Customize
  1. Savor the warmth and adjust spice levels as desired. Perfect for gatherings or relaxing evenings.

Nutrition

Serving: 1cupCalories: 370kcalCarbohydrates: 30gProtein: 6gFat: 25gSaturated Fat: 15gMonounsaturated Fat: 10gCholesterol: 70mgSodium: 210mgPotassium: 350mgFiber: 2gSugar: 25gVitamin A: 600IUCalcium: 290mgIron: 2mg

Notes

Stir continuously to prevent scorching. Allow cocoa to cool slightly before serving. Can refrigerate leftovers for up to 2 days.

Tried this recipe?

Let us know how it was!

Savory Smoked Spatchcocked Turkey That Wows Every Guest

October 22, 2025 by Grace Snow Leave a Comment

As I stood by the smoker, the intoxicating aroma of a juicy smoked spatchcocked turkey enveloped me, transforming my kitchen into a haven of comfort and anticipation. This recipe is not only straightforward to prepare but creates a captivating centerpiece for your holiday feast. Infused with a delightful smoky flavor and boasting crispy golden skin, this bird guarantees to impress your guests while saving you time and hassle in the kitchen. Perfect for Thanksgiving, it allows you to savor every moment of the celebration without the stress often associated with cooking a whole turkey. Ready to dive into a world of flavor and elevate your holiday dining experience? Let’s get started on the journey to your best turkey yet!

Why is Smoked Spatchcocked Turkey a Must-Try?

Simplicity Made Delicious: This recipe takes the stress out of Thanksgiving, ensuring a stunning turkey with minimal effort.

Mouthwatering Smokiness: Infused with apple cider, your turkey will have a depth of flavor that rivals any traditional roast.

Crispy Skin Awaits: The spatchcock technique results in perfectly crispy skin while keeping the meat juicy and tender.

Crowd-Pleasing Centerpiece: Impress your guests with a show-stopping turkey that’s sure to become a holiday favorite.

Time-Saving Cooking: With just a few hours in the smoker, you can spend more time enjoying the company of loved ones.

For additional tips on creating the ideal Thanksgiving meal, check out our serving suggestions. This turkey is versatile enough to pair beautifully with classic sides, making it the perfect choice for your festive gathering!

Smoked Spatchcocked Turkey Ingredients

For the Turkey

  • 18 lb turkey – Ensure it's fully defrosted before cooking for best results.
  • Kosher salt (optional) – Enhances overall flavor; only use if your spice rub is low in sodium.
  • Black pepper (optional) – Adds a touch of spiciness; adjust according to your spice rub's profile.

For the Spice Rub

  • ⅓ cup poultry spice rub – This blend adds depth and flavor; feel free to substitute with your favorite or homemade mix for a personal touch.

For Moisture

  • 3 cups apple cider or apple juice – Provides moisture and a hint of sweetness; apple juice is a less tart alternative that works beautifully in this smoked spatchcocked turkey recipe.

Let the deliciousness begin as you prepare this incredible smoked spatchcocked turkey that’s sure to leave everyone at the table asking for seconds!

Step‑by‑Step Instructions for Juicy Smoked Spatchcocked Turkey

Step 1: Preheat the Smoker
Begin by preheating your smoker to 400°F for 15 minutes, allowing it to reach the ideal cooking temperature. This is crucial for achieving that perfect smoky flavor right from the start. Ensure the smoker's wood chips are loaded and ready to create an aromatic environment for your juicy smoked spatchcocked turkey.

Step 2: Prepare the Turkey
While the smoker heats, prepare your 18 lb turkey by spatchcocking it. Use sharp kitchen shears to remove the backbone, then flatten the turkey by pressing down firmly on the breast. Rub the poultry spice blend generously all over the turkey, ensuring to get into the crevices and underneath the skin for maximum flavor impact.

Step 3: Initial Smoking Phase
Carefully place the turkey, breast side up, directly onto the grill grates of the smoker. Smoke for the first 30 minutes at 400°F to give it a great initial sear and crispy skin. Keep an eye on the smoke—if it starts to dissipate, you may need to replenish the wood chips to maintain that luscious smokiness throughout the cooking process.

Step 4: Lower the Temperature
After the initial smoking, reduce the smoker temperature to 300°F. Continue to cook your smoked spatchcocked turkey for about 3 to 4 hours, monitoring the internal temperature. Every hour, mist with apple cider or apple juice to keep the meat moist and add subtle sweetness, ensuring that your turkey remains juicy throughout.

Step 5: Check for Doneness
As your turkey approaches cooking time, check the internal temperature at the thickest part of the breast using a meat thermometer. The turkey should reach 160°F for perfect doneness. A golden brown skin with visible juices running clear indicates that your juicy smoked spatchcocked turkey is close to being ready to rest.

Step 6: Rest Before Carving
Once your turkey hits the desired temperature, carefully remove it from the smoker. Cover it loosely with aluminum foil and allow it to rest for 20-30 minutes. Resting is essential for redistributing the juices, ensuring that every bite of your smoked spatchcocked turkey is tender and flavorful before carving and serving.

What to Serve with Juicy Smoked Spatchcocked Turkey

Creating the perfect Thanksgiving meal is all about balance and flavor, and your juicy smoked spatchcocked turkey sets the stage beautifully.

  • Creamy Truffle Parmesan Mashed Potatoes: The rich, velvety texture enhances the turkey's smoky flavor, making every bite indulgent and satisfying.

  • Classic Cranberry Sauce: The tangy sweetness of this sauce cuts through the richness of the turkey, providing a refreshing contrast that brightens the meal.

  • Green Bean Casserole: This beloved side adds creaminess and a crunchy topping, bringing a delightful texture that complements the tender turkey perfectly.

  • Savory Stuffing: Packed with herbs and spices, stuffing adds depth and a cozy element to your Thanksgiving feast.

  • Roasted Brussels Sprouts: The slight bitterness of Brussels sprouts, caramelized to perfection, offers a lovely contrast to the turkey's rich smokiness.

  • Homemade Gravy: A must-have that brings everything together, this rich and flavorful gravy can further enhance the moistness of your smoked turkey.

Serve these alongside the juicy smoked spatchcocked turkey, and you’ll have a spread that transforms your Thanksgiving into a feast of laughter, love, and unforgettable flavors!

Variations & Substitutions: Smoked Spatchcocked Turkey

Feel free to explore your culinary creativity with this smoked spatchcocked turkey recipe by making delightful tweaks to tailor it to your taste!

  • Dairy-Free: Substitute any butter-based basting with olive oil or melted coconut oil for a rich, flavorful skin without dairy.

  • Herb Infusion: Try adding fresh herbs like rosemary or thyme into the spice rub to elevate the flavor profile with aromatic freshness. The more herbs, the more aromatic the experience.

  • Spice Level: If you crave a bit of heat, incorporate cayenne pepper or a dash of hot sauce into your spice blend. Adjust the amount to reach your desired spice level, giving your turkey a tantalizing kick.

  • Citrus Twist: Squeeze fresh lemon or orange juice over the turkey before smoking for a zesty brightness that pairs wonderfully with apple cider. This adds a refreshing contrast to the smoky notes.

  • Juice Variations: Use cranberry juice or pear juice in place of apple cider for an entirely different flavor twist. Each alternative brings a unique sweetness that complements the turkey beautifully.

  • Smoky Choices: For a deeper smoky flavor, experiment with pecan or cherry wood chips instead of hickory. Each type of wood imparts its own distinct aroma and taste, perfect for those looking to customize their smoking experience.

  • Single Serve Options: Consider cutting the turkey into smaller pieces for faster cooking and easier portioning. This is especially helpful if you're preparing for a gathering with varied preferences.

For additional inspiration on side dishes, check out our serving suggestions that perfectly complement your flavorful turkey! Feel free to let your taste buds guide you on this delicious culinary journey.

Make Ahead Options

These Juicy Smoked Spatchcocked Turkey preparations are perfect for busy home cooks looking to save time! You can spatchcock the turkey and apply the poultry spice rub up to 24 hours in advance; just wrap it tightly in plastic wrap and refrigerate. To enhance flavor and moisture, mist the turkey with apple cider before you smoke it. The final cooking can be done on the same day as your gathering, ensuring it’s just as delicious as if it were freshly prepared. When ready to serve, simply smoke it as directed, and enjoy a flavorful turkey that’s sure to impress your guests while giving you more time to relax!

Expert Tips for Smoked Spatchcocked Turkey

  • Brining Benefits: Brining your turkey a few days prior enhances juiciness. Consider a simple salt-water brine to make every bite succulent.
  • Internal Temperature Check: Always ensure your turkey reaches an internal temperature of 165°F for safety. Don’t rely solely on cooking time; use a thermometer for accuracy!
  • Basting Boost: Misting your turkey with apple cider every hour not only adds flavor but also helps keep it moist. This technique is key for a juicy smoked spatchcocked turkey.
  • Resting Ritual: Allow your turkey to rest covered in foil for at least 20-30 minutes before carving. This redistributes juices, enhancing tenderness.
  • Flavor Exploration: Experiment with different spice rubs and wood chips while smoking to create unique flavor profiles that will wow your guests.

How to Store and Freeze Smoked Spatchcocked Turkey

Fridge: Store any leftover smoked spatchcocked turkey in an airtight container for up to 4 days. Ensure it's completely cooled before sealing to preserve its flavor and moisture.

Freezer: For longer storage, freeze portions of the turkey in airtight bags or containers. It can last up to 3 months; make sure to label with the date for easy tracking.

Reheating: Thaw frozen turkey in the refrigerator overnight before reheating. To keep it juicy, reheat in the oven at 325°F, covering with foil to retain moisture.

Room Temperature: Avoid leaving the turkey out for more than 2 hours. If serving at gatherings, keep it in a warming tray or covered to maintain its deliciousness.

Smoked Spatchcocked Turkey Recipe FAQs

How do I select the best turkey for smoking?
Absolutely! When selecting a turkey for smoking, look for one that is fresh or thoroughly frozen, preferably organic or free-range for more flavor. Make sure it’s fully defrosted before cooking for the best results. A weight of around 12 to 18 pounds works well for even cooking in a smoker.

What’s the best way to store leftover smoked spatchcocked turkey?
I recommend storing any leftover smoked spatchcocked turkey in an airtight container in the refrigerator. It will remain fresh for up to 4 days. Allow the turkey to cool completely before sealing to maintain its moisture and flavor. For longer storage, consider freezing; it can last up to 3 months.

Can I freeze smoked spatchcocked turkey?
Absolutely! To freeze, allow the turkey to cool completely, then carve it into portions. Place the pieces in airtight freezer bags or containers, making sure to remove as much air as possible. Label them with the date for easy reference. For the best quality, consume within 3 months, but it can be safe for longer.

What should I do if my smoked turkey isn’t cooking evenly?
If your smoked turkey isn’t cooking evenly, ensure it's properly spatchcocked to allow for even heat distribution. You might want to rotate the turkey halfway through the cooking process. Additionally, if you notice that one side is browning faster, you can cover it loosely with aluminum foil to prevent burning while the rest continues to cook.

Is this smoked spatchcocked turkey recipe pet-friendly?
While turkey itself is safe for dogs in moderation, avoid giving them any seasoned meat, especially when using spices or ingredients like onion or garlic as they can be harmful. Always remove the skin before offering turkey to your pets and consult your veterinarian if unsure.

What should I watch for while smoking turkey?
Very important! During the smoking process, keep an eye on your smoker’s temperature and the internal temperature of the turkey. The ideal temperature for doneness should reach 160°F in the thickest part of the breast. Mist the turkey with apple cider every hour to keep it moist and flavorful, making sure to monitor the smoke level and replenish wood chips if necessary.

Smoked Spatchcocked Turkey

Savory Smoked Spatchcocked Turkey That Wows Every Guest

This Smoked Spatchcocked Turkey impresses with its smoky flavor and crispy skin, making it a holiday must-try.
Print Recipe Pin Recipe
Prep Time 15 minutes mins
Cook Time 4 hours hrs
Resting Time 30 minutes mins
Total Time 4 hours hrs 45 minutes mins
Servings: 10 servings
Course: Dinner
Cuisine: American
Calories: 450
Ingredients Equipment Method Nutrition Notes

Ingredients
  

For the Turkey
  • 18 lb turkey Ensure it's fully defrosted before cooking for best results.
  • Kosher salt Enhances overall flavor; use if your spice rub is low in sodium.
  • Black pepper Adjust according to your spice rub's profile.
For the Spice Rub
  • ⅓ cup poultry spice rub Feel free to substitute with your favorite or homemade mix.
For Moisture
  • 3 cups apple cider or apple juice Provides moisture and a hint of sweetness.

Equipment

  • Smoker
  • Meat Thermometer
  • Kitchen Shears

Method
 

Step-by-Step Instructions
  1. Preheat your smoker to 400°F for 15 minutes, ensuring it's ready for optimal smoky flavor.
  2. Spatchcock the turkey by removing the backbone and flattening it by pressing down on the breast. Rub the spice blend generously.
  3. Place the turkey breast side up on the grill grates of the smoker. Smoke for the first 30 minutes at 400°F.
  4. Lower the temperature to 300°F and continue cooking for 3 to 4 hours, misting with apple cider every hour.
  5. Check the internal temperature, it should reach 160°F. Look for golden brown skin and juicy breasts.
  6. Once at the desired temperature, remove from the smoker, cover with foil, and let rest for 20-30 minutes.

Nutrition

Serving: 1lbCalories: 450kcalProtein: 60gFat: 20gSaturated Fat: 5gPolyunsaturated Fat: 1gMonounsaturated Fat: 10gCholesterol: 150mgSodium: 100mgPotassium: 700mgCalcium: 1mgIron: 4mg

Notes

Brining enhances juiciness; ensure to check the internal temperature and allow resting post-cooking for the best results.

Tried this recipe?

Let us know how it was!

Spooktacular Halloween Milkshake Bar for Kids' Fun

October 22, 2025 by Grace Snow Leave a Comment

As autumn leaves swirl outside and the scent of cinnamon fills the air, it’s time to conjure up some Halloween magic right in your kitchen. What could be more delightful than a Customizable Kid-Friendly Halloween Milkshake Bar? Creating this fun treat is not just easy—it transforms your family’s Halloween celebration into an interactive festivity, where kids can unleash their creativity with delicious mix-ins and toppings. The joy of crafting a personalized milkshake together makes it a fantastic bonding activity, plus, you'll find it’s a crowd-pleaser that guarantees smiles all around. Ready to mix up some spooky sweetness? Let’s dive into this enchanting recipe that’s sure to turn your Halloween into a creamy, dreamy delight!

Why is This Milkshake Bar So Fun?

Interactive Experience: The Halloween Milkshake Bar allows kids to unleash their creativity, customizing their own spooky drinks with endless options.
Easily Customizable: Choose from a variety of ice cream flavors and colorful toppings, making it a treat that caters to every child's taste.
Quick and Simple: With easy steps and common ingredients, you can whip up this festive delight in no time, perfect for busy families.
Makes Wonderful Memories: Working together to create personalized milkshakes turns a simple treat into a delightful bonding experience.
Perfect for Parties: Serve this at a Halloween gathering, and watch as kids get excited over crafting their unique concoctions while keeping the fun flowing!

Halloween Milkshake Bar Ingredients

For the Milkshake Base
• Ice Cream – This is the heart of your Halloween milkshake bar; choose any flavor your kids adore!
• Whole Milk – Adjusts the thickness; for a thicker shake, use less, or add more for a slushier vibe.
• Heavy Whipping Cream – Essential for that luscious homemade whipped cream topping!

For the Whipped Cream
• Vanilla Extract – A splash of this enhances the whipped cream's flavor beautifully.
• Powdered Sugar – Sweetens the whipped cream, making it an irresistible addition to every shake.

For the Toppings
• Colorful Sprinkles – These add a festive and fun touch to your milkshakes, perfect for Halloween!
• Halloween-themed Candy – Use leftover candy for mix-ins, giving every shake a spooky surprise.
• Food Coloring – A few drops can transform your milkshake into a colorful festive treat!

Enjoy concocting an unforgettable Halloween milkshake bar that’s not just delicious but also a creative activity for the little ones!

Step‑by‑Step Instructions for Customizable Kid-Friendly Halloween Milkshake Bar

Step 1: Make Whipped Cream
Begin by pouring 1 cup of heavy whipping cream into your stand mixer bowl. Add 1-2 tablespoons of powdered sugar and a splash of vanilla extract. Mix on high speed for about 1-2 minutes, watching for the whipped cream to reach stiff peaks. Once it forms, stop mixing to avoid over-whipping—this homemade whipped cream will top off your Halloween Milkshake Bar perfectly!

Step 2: Prepare Milkshake Base
In a blender, combine 3-4 generous scoops of your favorite ice cream with ¼ cup of whole milk. Blend on medium speed until smooth and creamy; this should take about 30 seconds. If your milkshake seems too thick to pour, gradually add more milk until you reach the desired consistency. Aim for a thick, luscious texture that’s ideal for sipping!

Step 3: Chill and Assemble
While blending, consider chilling your milkshake glasses ahead of time in the freezer for about 10 minutes. This keeps your Halloween Milkshake Bar treats deliciously cold. Once chilled, pour the prepared milkshake into each glass, filling them about three-quarters full, allowing room for whipped cream and toppings without spilling over.

Step 4: Decorate with Whipped Cream
Using a piping bag or a simple spoon, generously pipe or dollop the homemade whipped cream atop each milkshake. The whipped cream should peak beautifully, creating an inviting look that enhances the festive presentation of your Halloween Milkshake Bar. For added flair, don’t hesitate to experiment with the decoration technique!

Step 5: Add Festive Toppings
Now comes the fun part! Encourage kids to add a variety of colorful toppings to their milkshakes. Sprinkle vibrant Halloween-themed sprinkles, crush some leftover candies, or even drizzle chocolate syrup for an extra indulgence. Let their creativity shine as they transform their milkshake into a spooky delight, making each one truly unique!

Step 6: Serve and Enjoy
Gather around the table for the big reveal! Present the whimsical Halloween Milkshake Bar with the finished milkshakes adorned with toppings and whipped cream. Remind everyone to enjoy their delicious creations immediately for the best experience. The visual feast of colors and textures will surely bring smiles, making this a festive highlight of your Halloween celebrations!

Expert Tips for the Halloween Milkshake Bar

  • Keep It Cold: Store ice cream over ice before serving to maintain the perfect creamy texture in your Halloween milkshake bar.
  • Pre-Scoop Ice Cream: Simplify the process for kids by having ice cream pre-scooped in bowls, allowing for carefree customization.
  • Make Whipped Cream Ahead: Homemade whipped cream tastes best; make it in advance to enhance the richness of your milkshakes.
  • Chill Glasses: Before serving, chill your glasses in the freezer for 10 minutes to keep each milkshake cool and refreshing.
  • Get Creative with Add-Ins: Encourage kids to use leftover Halloween candy and food coloring for unique flavors and spooky visuals!

How to Store and Freeze Halloween Milkshake Bar

Fridge: Keep any leftover whipped cream in an airtight container in the refrigerator for up to 3 days; simply re-whip before serving.

Freezer: Ice cream can be stored in the freezer for up to 2 months. Ensure it’s tightly sealed to prevent freezer burn and maintain its creamy texture.

Prepped Components: You can prepare the milkshake base ingredients ahead of time but avoid blending until you are ready to serve.

Serving Tip: Remember, Halloween Milkshake Bar creations are best enjoyed fresh, so assemble and serve immediately for optimal taste and enjoyment!

What to Serve with Customizable Kid-Friendly Halloween Milkshake Bar

As you gather your family for this delightful Halloween treat, consider some tasty companions to elevate the celebration.

  • Crispy Bat Wings: Perfect for spooky-themed gatherings, these baked chicken wings are seasoned to perfection, creating a crunchy contrast to the creamy milkshake.

  • Silly Sandwiches: Fun, bite-sized sandwiches cut into Halloween shapes make a playful addition. Their savory flavors balance the sweet richness of the milkshake.

  • Wacky Veggie Platter: A rainbow of fresh vegetables served with a tangy dip adds a healthy crunch. This crisp freshness brightens the festive atmosphere, encourage kids to munch while creating milkshakes.

  • Ghoulish Gelatin Cups: Colorful gelatin cups grab kids' attention. Their wiggly texture complements the milkshake, making dessert feel even more playful and fun in each bite.

  • Spooky Popcorn Mix: A blend of popcorn, candy corn, and chocolate pieces creates a chewy, crunchy delight. The sweetness pairs beautifully with the milkshake's creaminess.

  • Hot Chocolate or Pumpkin Spice Lattes: For a warm drink option, consider serving hot chocolate or pumpkin spice lattes in festive mugs. These comforting beverages provide a heartwarming touch on a chilly Halloween evening.

With these fun pairings, your Halloween Milkshake Bar turns into a festive feast that delights both the young and the young at heart!

Halloween Milkshake Bar Variations

Invite your family to unleash their creativity and customize this delightful Halloween treat in so many fun ways!

  • Chocolate Delight:
    Replace whole milk with chocolate milk for a rich, chocolatey flavor that every kid will adore.

  • Fruity Fun:
    Swap the ice cream for fruity flavors like strawberry or mango. The vibrant color and fresh taste will enliven your milkshake bar!

  • Candy Crunch:
    Add chunks of leftover Halloween candy as mix-ins for unexpected sweetness and crunch in every sip. Kids will love the surprise tucked away beneath the whipped cream.

  • Nutty Addition:
    Incorporate crushed nuts or nut butter for a delightful texture twist. A hint of almond extract in the milkshake can also enhance the flavor even further.

  • Spooky Colors:
    Use food coloring to create vibrant, festive shades in your milkshakes. A dash of green or purple adds a Halloween twist that’s visually appealing.

  • Minty Fresh:
    Mix in some mint extract or garnishes like crushed mint candies for a refreshing twist. The coolness will complement the sweetness perfectly!

  • Spiced Pumpkin:
    Add some pumpkin puree and spices like cinnamon or nutmeg for a seasonal touch. This twist will give your milkshake a cozy, autumnal vibe.

Feel free to mix and match these ideas! If you want even more inspiration, consider checking out other fun dessert options like our spooky desserts or perfect side treats like Halloween-themed snacks that pair wonderfully with this milkshake bar! Enjoy making your Halloween celebration truly special!

Make Ahead Options

Preparing your Customizable Kid-Friendly Halloween Milkshake Bar in advance can save precious time on the big day! You can make the homemade whipped cream up to 3 days ahead—just store it in an airtight container in the refrigerator to keep it fresh and fluffy. The milkshake base can also be prepped up to 24 hours prior; simply blend your ice cream and whole milk, then refrigerate it in a sealed container. To serve, just give the shake a quick stir and pour it into chilled glasses before topping with the whipped cream and festive decorations, ensuring your Halloween party whips up in no time, with all the fun intact!

Halloween Milkshake Bar Recipe FAQs

What kind of ice cream should I use?
Absolutely, you can use any ice cream flavor your kids love! I recommend using classic flavors like vanilla, chocolate, or even fun fruity options to cater to every taste at your Halloween Milkshake Bar. For an extra twist, consider seasonal flavors like pumpkin or candy corn!

How should I store leftover whipped cream?
Leftover whipped cream can be stored in an airtight container in the refrigerator for up to 3 days. Before serving it again, simply give it a quick re-whip to restore its texture and fluffiness—trust me, it makes all the difference!

Can I freeze the milkshake base?
While it’s best to enjoy the milkshake fresh, you can freeze the milkshake base. To do this, blend your milkshake ingredients and pour them into an airtight container. Freeze for up to 1 month. When you're ready to enjoy, thaw it in the fridge overnight and blend it again for a creamy texture!

What if my milkshake is too thick?
No worries! If your milkshake turns out too thick, simply add a little more whole milk and give it a good blend until you reach your desired consistency. Aim for a nice, creamy pour that’s tasty for sipping!

Are there any allergy considerations for this recipe?
Yes, it’s essential to consider dietary restrictions when creating your Halloween Milkshake Bar. For dairy allergies, opt for non-dairy ice creams and plant-based whipped toppings. Always check ingredient labels on toppings, as many candies contain allergens like nuts or gluten.

Can I make this milkshake bar ahead of time?
Definitely! You can prep some components ahead of time. Scoop the ice cream and store it in the freezer, and make the whipped cream a day in advance, keeping it in the fridge. When you're ready to serve, just blend the milkshake and let the kids have fun with the toppings at your Halloween Milkshake Bar!

Halloween Milkshake Bar

Spooktacular Halloween Milkshake Bar for Kids' Fun

Create a customizable Halloween Milkshake Bar for kids to enjoy endless fun and creativity with delicious mix-ins and toppings.
Print Recipe Pin Recipe
Prep Time 10 minutes mins
Chilling Time 10 minutes mins
Total Time 20 minutes mins
Servings: 6 milkshakes
Course: Dessert
Calories: 450
Ingredients Equipment Method Nutrition Notes

Ingredients
  

For the Milkshake Base
  • 3-4 scoops Ice Cream Any flavor your kids adore
  • 1/4 cup Whole Milk Adjust for thickness
  • 1 cup Heavy Whipping Cream For whipped cream topping
For the Whipped Cream
  • 1-2 tablespoons Powdered Sugar To sweeten
  • 1 teaspoon Vanilla Extract Enhances flavor
For the Toppings
  • 1 cup Colorful Sprinkles Festive touch
  • 1 cup Halloween-themed Candy For mix-ins
  • drops Food Coloring To customize colors

Equipment

  • Stand Mixer
  • Blender
  • piping bag
  • Milkshake Glasses

Method
 

Step-by-Step Instructions
  1. Make Whipped Cream: Pour heavy whipping cream into stand mixer, add powdered sugar and vanilla extract. Mix on high until stiff peaks form.
  2. Prepare Milkshake Base: In a blender, combine ice cream and whole milk. Blend until smooth, adjusting milk for desired consistency.
  3. Chill and Assemble: Chill milkshake glasses in the freezer for 10 minutes. Pour milkshake into glasses, filling about three-quarters full.
  4. Decorate with Whipped Cream: Pipe or dollop homemade whipped cream on top of each milkshake.
  5. Add Festive Toppings: Encourage kids to add sprinkles, crushed candies, or chocolate syrup to their milkshakes.
  6. Serve and Enjoy: Present the Halloween Milkshake Bar and remind everyone to enjoy their creations immediately.

Nutrition

Serving: 1milkshakeCalories: 450kcalCarbohydrates: 60gProtein: 6gFat: 22gSaturated Fat: 14gCholesterol: 80mgSodium: 150mgPotassium: 350mgFiber: 1gSugar: 45gVitamin A: 15IUCalcium: 20mgIron: 2mg

Notes

For optimal taste, serve immediately after assembling the milkshakes.

Tried this recipe?

Let us know how it was!

Delicious Purple People Eater Halloween Punch for Everyone

October 22, 2025 by Grace Snow Leave a Comment

As I wandered through the bustling streets of October, the unmistakable hint of spooky excitement crackled in the air. This is the time of year when ghosts and goblins roam, but it's also a chance to create something magical in your kitchen. Enter the Non-Alcoholic Purple People Eater Halloween Punch—a drink that promises to enchant kids and adults alike at your Halloween gathering. With its vibrant hue and fizzy lift, this refreshing concoction is a breeze to whip up, making it a perfect choice for busy party planners. Not only does it capture the spirit of Halloween, but it also ensures everyone can indulge, regardless of age. Are you ready to add a splash of color and fun to your festivities? Let’s gather our ingredients and bring this whimsical drink to life!

Why is this punch a Halloween hit?

Vibrant hues and fizzy fun make this punch a standout at any gathering. Perfectly kid-friendly, it offers a non-alcoholic option that everyone's palate will enjoy. Easy to prepare, this recipe saves you time with minimal fuss—ideal for busy hosts! Plus, impress your guests with unique serving options like spooky floats or a dramatic "Witches Brew" presentation. Don't forget to check out our easy Halloween treats to complement your festive spread!

Purple People Eater Halloween Punch Ingredients

For the Punch Base

  • Grenadine – Adds sweetness and a bright red color, enhancing the visual appeal. Substitute: pure cranberry juice for a similar tartness.
  • Blue Gatorade – Provides a blue color base and fruity flavor. Substitute: blue Hawaiian punch for a similar taste.
  • Sprite – Adds carbonation for fizz and sweetness. Substitute: 7-Up or other lemon-lime sodas.
  • Lemon juice – Introduces tartness to balance sweetness. Freshly squeezed is preferred.
  • Violet food coloring – Enhances the purple color profile. Use gel food coloring for vibrant results.

For Optional Garnishes

  • Gummy worms – Adds a fun, playful touch to your Halloween punch.
  • Candy eyeballs – Creepy, crawly additions that delight kids and adults alike.

With these ingredients in hand, you’re all set to concoct the delightful Purple People Eater Halloween Punch that’ll be the star of your spooky festivities!

Step‑by‑Step Instructions for Purple People Eater Halloween Punch

Step 1: Combine Base Ingredients
Begin by taking a large pitcher and pour in 1 cup of grenadine, 2 cups of Blue Gatorade, and 1 cup of freshly squeezed lemon juice. Next, slowly add in 2 cups of Sprite to bring in that fizzy element. Stir the mixture gently with a wooden spoon until all ingredients are well combined and you achieve a vibrant purple base, perfect for your Purple People Eater Halloween Punch.

Step 2: Adjust the Color
Once your punch base is ready, it's time to enhance the color. Add a few drops of violet food coloring to the punch, stirring gently after each addition. Continue adding until you reach your desired shade of purple, making sure the hue is bright and eye-catching. This step not only beautifies the punch but also sets the stage for a visually stunning Halloween presentation.

Step 3: Chill the Punch
To best enjoy your Purple People Eater Halloween Punch, chill it in the refrigerator for at least 30 minutes. This cooling period allows the flavors to meld beautifully while ensuring a refreshing experience for your guests. If you’re short on time, you can skip this step, but make sure to serve it over ice to keep it cool.

Step 4: Serve the Punch
When ready to serve, pour the punch into clear cups or goblets to show off its vibrant purple color. If desired, you can add fun garnishes like gummy worms or candy eyeballs to each glass, creating an inviting and festive look. These decorative elements will surely delight the kids and make your Halloween gathering a memorable one.

Step 5: Maintain Fizz
To maintain the fizz of your punch, add the remaining Sprite just before serving. This ensures your Purple People Eater Halloween Punch stays bubbly and refreshing. Gently stir in the Sprite to avoid losing too much carbonation, allowing guests to enjoy the delightful fizz and fun flavors captured in this festive drink.

How to Store and Freeze Purple People Eater Halloween Punch

Refrigerate: Store any leftover punch in an airtight container in the fridge for up to 3 days. Wait to add the Sprite until you're ready to serve to maintain fizz.

Freezer: If you have a large batch, you can freeze the punch base (without soda) for up to 1 month. Thaw it in the fridge before serving, and then mix in the Sprite.

Garnishes: Keep gummy worms and candy eyeballs in a separate container at room temperature until ready to serve. This ensures they remain fresh and delightful for your guests.

Make-Ahead: Prepare the punch base up to 24 hours in advance. Just remember to refrigerate it and add carbonation just before serving to keep your Purple People Eater Halloween Punch sparkling and fun!

Purple People Eater Halloween Punch Variations

Feel free to get creative and make this punch your own with these delightful variations!

  • Spooky Floats: Add scoops of vanilla ice cream or lime sherbet for a creamy, dreamy twist that kids will adore.
  • Witches Brew: Serve the punch in a black cauldron, adding dry ice for a bubbling, mystical effect that will amaze your guests. Just be careful—never let dry ice come into contact with the punch.
  • Citrus Burst: Swap out some of the lemon juice for fresh lime juice to give your punch a zesty, refreshing kick that brightens up the flavors.
  • Berry Blast: Mix in fresh berries like blueberries or raspberries for added color and a delightful fruity twist that makes the punch even more visually appealing.
  • Mango Magic: Replace Blue Gatorade with mango juice for a tropical flair that adds a sweet surprise to your Halloween gathering.
  • Heat It Up: If you want to spice things up, consider adding a few dashes of cayenne pepper to the mix for a surprising little kick.
  • Minty Fresh: Toss in a handful of fresh mint leaves for a refreshing aroma and a wonderful flavor that complements the sweetness of the punch.
  • Frozen Versions: Create ice cubes with juices from the punch base and use them in place of regular ice to keep it cool without dilution. As they melt, they add more flavor!

Feel free to mix and match these ideas to create a custom experience. You can also incorporate these variations as part of your fun Halloween treats. Enjoy serving this festive punch and watch everyone be thrilled by your creativity!

Make Ahead Options

These Purple People Eater Halloween Punch preparations are perfect for busy home cooks looking to save time! You can make the punch base—comprised of grenadine, Blue Gatorade, lemon juice, and violet food coloring—up to 24 hours in advance and simply refrigerate it until it’s time to serve. To maintain its refreshing quality, add the Sprite just before serving to keep that delightful fizz intact. When your guests are ready, pour the punch into cups and add any fun garnishes like gummy worms for that spooky touch. This simple prep not only makes for a smoother serving experience but ensures everyone enjoys a vibrant and tasty drink at your Halloween gathering!

Expert Tips for Purple People Eater Halloween Punch

• Chill Wisely: Ensure your punch chills for at least 30 minutes; this melds flavors and makes each sip refreshing for your guests.

• Color Control: Adjust the violet food coloring gradually. A little goes a long way, so add drops until your punch is vibrantly purple for spellbinding appeal.

• Fizz Factor: Avoid adding Sprite too early; maintain carbonation by mixing in soda just before serving. This keeps your Purple People Eater Halloween Punch lively!

• Playful Garnishes: Enhance the Halloween spirit by using gummy worms and candy eyeballs as garnishes. They not only look spooky but also add fun surprises for kids.

• Ice Ring Tip: For a chilling effect without dilution, freeze a portion of the punch in a ring mold and place it in the bowl. It’s both decorative and practical!

What to Serve with Purple People Eater Halloween Punch

The Halloween festivities are all about fun, flavor, and a spooky flair that tickles the senses while bringing everyone together.

  • Spooky Snack Board: A mix of cheese, crackers, and themed Halloween treats adds a savory counterpoint to the refreshing punch, making it a balanced and festive display.

  • Witch's Broomsticks: Simple pretzel sticks with cheese and chives resemble witch's brooms, offering a crunchy, cheesy complement to sip alongside the tart and fizzy punch.

  • Pumpkin Spice Popcorn: Sweet and savory popcorn drizzled with pumpkin spice caramel provides delightful contrast and a cozy flavor that elevates the punch experience.

  • Bat-Shaped Sandwiches: Use cookie cutters to create bat-shaped sandwiches filled with your favorite spreads. They're fun to eat, visually appealing, and pair remarkably well with the punch.

  • Candy Corn Fruit Kabobs: Colorful fruit skewers with pineapple, orange melon, and banana resemble fun candy corn shapes and bring a refreshing bite that balances sweetness with zesty punch.

  • Creepy Crawly Gummies: Serve gummy worms in the punch bowl or alongside. They add a playful element that kids love, echoing the whimsical, fantastical essence of the drink.

  • Haunted Halloween Cookies: Decorate sugar cookies with spooky designs. Their sweetness pairs beautifully with the fizzy flavor of Purple People Eater Halloween Punch, creating a delightful treat.

  • Festive Fruit Juice Slushies: For a layered texture, serve fruit juice slushies made with berries and citrus. They provide a tangy contrast to the punch while being visually spectacular!

  • Monster Munch Trail Mix: Mix pretzels, candy eyes, and dried fruits for a crunchy, sweet snack that enhance the festivity and complements the fruity flavors in your punch.

Purple People Eater Halloween Punch Recipe FAQs

How do I choose ripe ingredients for my punch?
Absolutely! For the freshest flavors, use quality ingredients. Look for grenadine that is deep red and not overly sweet. When selecting Blue Gatorade, check for vibrant blue, as faded colors indicate it may be losing its flavor. Freshly squeezed lemon juice is best—pick lemons that feel heavy for their size and are slightly soft when gently pressed.

How long can I store leftovers of the punch?
You can store any leftover Purple People Eater Halloween Punch in an airtight container in the fridge for up to 3 days. Make sure to keep the Sprite separate until you're ready to serve, as adding it too early will cause the carbonation to fizzle out!

Can I freeze the punch? If so, how?
Yes, you can freeze the punch base for a fun storage option! Pour the mixture (without Sprite) into an airtight container and freeze it for up to 1 month. When you're ready to enjoy, thaw it in the fridge overnight, and then mix in the Sprite just before serving to maintain that fizzy freshness.

What should I do if the punch is too sweet?
Very! If you find your punch to be overly sweet, you can balance it out by adding more freshly squeezed lemon juice. Start with a tablespoon at a time until you reach your desired flavor. If you want to adjust it further, consider a dash of soda water for added tang and fizz without the sweetness.

Are there any allergy considerations for this punch?
Great question! The Purple People Eater Halloween Punch is generally kid-friendly and free from common allergens like nuts or gluten. However, always check the labels of your ingredients, especially for drinks like Gatorade where flavors can differ by brand. If serving to those with dietary concerns, opt for naturally derived food coloring and ensure the garnishes, like gummy worms, are allergen-free.

Purple People Eater Halloween Punch

Delicious Purple People Eater Halloween Punch for Everyone

This non-alcoholic Purple People Eater Halloween Punch is perfect for all ages, ensuring everyone can indulge in the festive fun.
Print Recipe Pin Recipe
Prep Time 10 minutes mins
Chilling Time 30 minutes mins
Total Time 40 minutes mins
Servings: 8 cups
Course: Drinks
Cuisine: Halloween
Calories: 120
Ingredients Equipment Method Nutrition Notes

Ingredients
  

Punch Base
  • 1 cup Grenadine Adds sweetness and a bright red color, enhancing the visual appeal.
  • 2 cups Blue Gatorade Provides a blue color base and fruity flavor.
  • 1 cup Lemon juice Introduces tartness to balance sweetness. Freshly squeezed is preferred.
  • 2 cups Sprite Adds carbonation for fizz and sweetness.
  • a few drops Violet food coloring Enhances the purple color profile.
Optional Garnishes
  • to taste Gummy worms Adds a fun, playful touch to your Halloween punch.
  • to taste Candy eyeballs Creepy, crawly additions that delight kids and adults alike.

Equipment

  • Large pitcher
  • Wooden spoon
  • clear cups or goblets

Method
 

Preparation Steps
  1. Combine base ingredients in a large pitcher: 1 cup of grenadine, 2 cups of Blue Gatorade, 1 cup of freshly squeezed lemon juice, and 2 cups of Sprite. Stir gently with a wooden spoon until well combined.
  2. Add a few drops of violet food coloring to the punch, stirring gently after each addition until the desired shade of purple is achieved.
  3. Chill the punch in the refrigerator for at least 30 minutes to meld flavors. For quick serving, use ice.
  4. Serve in clear cups or goblets, adding gummy worms or candy eyeballs as garnishes for a festive look.
  5. To maintain fizz, add the remaining Sprite just before serving and stir gently to avoid losing carbonation.

Nutrition

Serving: 1cupCalories: 120kcalCarbohydrates: 30gSodium: 10mgPotassium: 50mgSugar: 29gVitamin C: 15mgCalcium: 2mg

Notes

Store any leftover punch in an airtight container in the fridge for up to 3 days without Sprite. For longer storage, freeze the punch base without soda for up to 1 month, then mix in the Sprite before serving.

Tried this recipe?

Let us know how it was!

Hocus Pocus Punch: A Magical 3-Ingredient Delight

October 22, 2025 by Grace Snow Leave a Comment

As the leaves turn crisp and the scent of autumn fills the air, Halloween whispers its enchanting secrets, beckoning us to gather and celebrate. Enter the Hocus Pocus Punch, a 3-ingredient delight that captures the essence of the season. With the vibrant blend of mango peach juice and sparkling peach water, this drink transforms ordinary gatherings into festive occasions. In just two minutes, you can whip up a whimsical potion topped with a scoop of colorful rainbow sherbet—perfect for kids and adults alike. Whether you’re hosting a spooky movie night or a fun family gathering, this punch will surely be a hit! Curious how to make it? Let’s dive into this easy and delightful recipe!

Why Is Hocus Pocus Punch a Must-Try?

Simplicity makes this punch a win! With just three ingredients, you can effortlessly create a festive drink that dazzles without the fuss. Kid-Friendly and delightful for all ages, this non-alcoholic treat is perfect for family gatherings or Halloween parties. Versatile enough to customize, swap in your favorite juices or sparkling waters for a personal twist. Plus, time-saving—whip it up in just two minutes! Whether enjoyed during spooky movie nights or holiday celebrations, this punch is the ultimate crowd-pleaser that promises to bring smiles and joy. For more festive ideas, explore our tips on themed snacks!

Hocus Pocus Punch Ingredients

• Get ready to mix up some magic with these simple ingredients!

For the Punch

  • Mango Peach Juice – This sweet nectar is essential for that tropical flavor; V8 brand delivers just the right punch!
  • Peach Sparkling Water – Adds a delightful fizz that elevates the flavors while maintaining a fruity essence.
  • Rainbow Sherbet – This fun treat creates a creamy texture and beautiful colors; you can replace it with vanilla ice cream if you prefer!

With these three ingredients, your Hocus Pocus Punch will be a hit at any festive gathering!

Step‑by‑Step Instructions for Hocus Pocus Punch

Step 1: Prepare Your Glasses
Start by filling each glass with ice cubes to keep your Hocus Pocus Punch refreshingly chilled. Aim to fill the glasses about halfway to allow for the punch and additional ingredients. Clear, tall glasses work best for an eye-catching presentation! Set the prepared glasses aside on a stable surface to easily access them during the mixing process.

Step 2: Pour in the Juice
Carefully pour the mango peach juice over the ice-filled glasses, allowing the vibrant tropical color to sparkle. Use about 1 cup of juice per glass, and watch as it cascades beautifully over the ice, creating a delightful visual effect. The juice should fill the glasses about three-quarters full, setting a sweet stage for the next ingredient in your Hocus Pocus Punch.

Step 3: Add the Sparkling Water
Next, gently add the peach sparkling water to each glass, filling them the rest of the way while creating a delightful fizz. Aim for about 1/2 cup of sparkling water per glass, and watch as the bubbles dance to the surface. Stir the mixture gently with a long spoon to combine, ensuring the fruity flavors meld beautifully without losing all the fizz.

Step 4: Top with Sherbet
Now comes the fun part! Scoop a generous portion of rainbow sherbet and place it atop each glass of Hocus Pocus Punch. Aim for about 2-3 tablespoons of sherbet per serving, letting it sit proudly like a colorful crown. As the sherbet begins to melt, it will create a whimsical swirled effect in your punch, enhancing both its appearance and creamy texture.

Step 5: Serve and Enjoy
Finally, it’s time to serve your enchanting Hocus Pocus Punch right away! The vibrant colors and aromas will beckon your guests to dive in. For the best experience, make sure each glass retains its chilly thrill as you gather everyone for a festive toast. This quick and delightful drink will surely be a hit for Halloween gatherings and family celebrations!

How to Store and Freeze Hocus Pocus Punch

Fridge: Keep any leftover Hocus Pocus Punch covered in an airtight container in the fridge for up to 3 days.

Freezer: If you want to freeze, pour the punch into ice cube trays to create fun, punch-flavored ice cubes. These can last for up to 3 months!

Reheating: For best taste, enjoy it chilled; do not reheat as the fizz will flatten.

Sherbet Storage: Store leftover rainbow sherbet in the freezer, tightly sealed, and serve it fresh with your next batch for an irresistible punch!

Expert Tips for Hocus Pocus Punch

  • Juice Choice: Ensure you use quality mango peach juice like V8 for the best flavor; it’s sweeter and rich in fruity goodness.
  • Fizz Factor: Don’t skimp on the peach sparkling water, as it adds a refreshing fizz; pour slowly to preserve the bubbles and excitement!
  • Sherbet Scoop: Use a generous scoop of rainbow sherbet for that colorful pop; add it just before serving to keep its texture intact.
  • Make Ahead: Prepare your juice and sparkling water in advance but wait to add the sherbet until guests arrive, maintaining its delightful creaminess.
  • Spiked Option: For adult gatherings, consider adding a splash of vodka, rum, or tequila for a lively twist in your Hocus Pocus Punch!

Hocus Pocus Punch: Creative Variations

Feel free to let your imagination run wild and customize your Hocus Pocus Punch with these magical twists!

  • Dairy-Free: Swap rainbow sherbet with coconut or almond milk-based ice cream for a creamy, lactose-free alternative.
    This version keeps the vibrant flavor while accommodating those with dairy sensitivities. The light coconut flavor adds a tropical twist!

  • Spiked: Elevate your punch by adding a splash of vodka, rum, or tequila for adult gatherings.
    Just stir in 1-2 ounces per glass after pouring the juice and sparkling water for an enchanting cocktail experience!

  • Citrus Burst: Substitute mango peach juice with a bright blend of orange pineapple juice for a zesty kick.
    This swap brings a playful tang that perfectly complements the fizz of peach sparkling water.

  • Bubbles Galore: Experiment with various flavored sparkling waters, like lime or raspberry, for a new dimension of fizz.
    Each flavor infuses its essence while keeping the punch delightfully refreshing and fizzy.

  • Frozen Treats: Replace the ice with frozen fruit chunks, such as diced peaches or berries, to keep the punch chilly without watering it down.
    This not only looks stunning but adds flavor as the fruit slowly melts into the drink.

  • Herbal Infusion: Add fresh mint or basil leaves to the punch for an aromatic boost.
    Toss in a few leaves after mixing and before serving for a fragrant twist that surprises the palate.

  • Light & Crisp: Use a low-calorie or sparkling water soda version to reduce calories while maintaining the festive fizz.
    This keeps your punch lighter without sacrificing the bubbly joy, making it perfect for more health-conscious gatherings.

Feel inspired to explore the enchanting variations of your Hocus Pocus Punch? It’s all about making magic in your kitchen! For even more festive ideas, check out our serving suggestions and themed snacks to complete your Halloween experience!

What to Serve with Hocus Pocus Punch

As you conjure up this festive punch, consider some delightful pairings that’ll enchant both taste buds and spirits.

  • Witch Hat Cupcakes: These adorable treats complement the punch's sweetness with their chocolate richness, creating a playful yet indulgent pairing for your celebrations.

  • Spooky Cheese Platter: A mix of creamy brie, tangy cheddar, and seasonal fruits lends a savory contrast that balances the fruity punch beautifully.

  • Monster Eyes Cookies: Yummy sugar cookies topped with candy eyes add whimsy while their sweetness rounds out the punch's fruity essence.

  • Ghostly Popcorn Balls: Light and airy, these marshmallow-coated popcorn treats offer a crunchy contrast, making them perfect for a casual snack alongside the punch.

  • Crispy Veggie Dippers: Fresh vegetable sticks served with a tangy dip bring a refreshing crunch, enhancing the flavors of the fruity punch and keeping the balance.

  • Halloween-Themed Cheese Balls: Shaped like pumpkins or spiders, these savory bites provide a fun and savory addition to your punch, sure to delight guests of all ages.

  • Sparkling Ciders: A non-alcoholic sparkling cider pairs well with the drink, offering a different yet festive fizz to complement your Halloween festivities.

The vibrant Hocus Pocus Punch is sure to shine brighter when served alongside these fun and festive options!

Make Ahead Options

Planning ahead for your Hocus Pocus Punch can save you valuable time during your Halloween festivities! You can prepare the mango peach juice and peach sparkling water mixture up to 24 hours in advance—just mix them together in a large pitcher and refrigerate. Keep the rainbow sherbet separate until you're ready to serve; this ensures it retains its delightful texture and prevents it from melting into the punch too soon. When you're ready to wow your guests, pour the prepped juice and water mixture over ice, then add a generous scoop of sherbet for that magical finish. By prepping ahead, you'll enjoy the party without the rush!

Hocus Pocus Punch Recipe FAQs

What type of mango peach juice should I use?
Absolutely! I recommend using V8 brand mango peach juice for its rich sweetness and fruity flavor. Opting for a quality juice ensures the best taste, making your Hocus Pocus Punch truly magical!

How long can I store leftover Hocus Pocus Punch?
Very! You can keep any leftover punch in an airtight container in the fridge for up to 3 days. Just give it a gentle stir before serving as the ingredients may separate over time.

Can I freeze Hocus Pocus Punch?
Absolutely! To freeze, pour the punch into ice cube trays, creating fun, punch-flavored ice cubes that can last for up to 3 months. You can use these cubes in future punches for an added flavor boost!

What should I do if my sherbet melts too quickly?
No worries! If you find your sherbet melting faster than expected, consider adding it just before serving or using chilled glasses. This way, it maintains its texture longer, contributing to that delightful swirl in your punch!

Is Hocus Pocus Punch safe for kids?
Very! This recipe is non-alcoholic and perfect for kids and families. If there are allergy concerns, feel free to substitute juices or sherbet to ensure everyone can enjoy this festive treat!

How can I make a spiked version of Hocus Pocus Punch?
To create a spiked version, simply add a splash (about 1-2 ounces) of your favorite spirit, like vodka, rum, or tequila, to each glass. Stir gently and adjust according to your taste preference for a lively adult twist!

Hocus Pocus Punch

Hocus Pocus Punch: A Magical 3-Ingredient Delight

Hocus Pocus Punch is a delightful 3-ingredient drink perfect for Halloween gatherings, combining mango peach juice, peach sparkling water, and rainbow sherbet.
Print Recipe Pin Recipe
Prep Time 2 minutes mins
Total Time 2 minutes mins
Servings: 4 glasses
Course: Drinks
Cuisine: American
Calories: 140
Ingredients Equipment Method Nutrition Notes

Ingredients
  

For the Punch
  • 1 cup Mango Peach Juice V8 brand recommended
  • 1/2 cup Peach Sparkling Water Adds fizz
  • 2-3 tablespoons Rainbow Sherbet Can substitute with vanilla ice cream

Equipment

  • Glasses
  • Spoon

Method
 

Step-by-Step Instructions
  1. Fill each glass with ice cubes to keep the punch chilled, about halfway.
  2. Pour in the mango peach juice until the glasses are three-quarters full.
  3. Add the peach sparkling water to fill the glasses, stir gently to combine.
  4. Scoop rainbow sherbet on top of each glass for a colorful finish.
  5. Serve immediately and enjoy your enchanting punch!

Nutrition

Serving: 1glassCalories: 140kcalCarbohydrates: 35gSodium: 15mgPotassium: 150mgSugar: 30gVitamin C: 10mg

Notes

Use quality ingredients for the best flavor. Serve chilled and enjoy immediately for optimal fizz.

Tried this recipe?

Let us know how it was!

Butternut Squash and Spinach Salad with Sweet Crunchy Pecans

October 20, 2025 by Grace Snow Leave a Comment

While preparing a meal, I noticed how the autumn sun seemed to warm even the coldest of days. That's when the idea for my Butternut Squash and Spinach Salad sparked to life. This vibrant dish combines the sweetness of roasted butternut squash with the crunch of pecans, the tang of pomegranate seeds, and the freshness of baby spinach—all brought together by a zesty poppy seed honey-lime dressing. It’s not just a healthy and gluten-free option; it’s also a beautiful centerpiece for any gathering, especially as the holidays approach. Whether you serve it as a side or make it the star of your table, it offers a delicious escape from fast food fatigue. Are you ready to dive into this flavorful adventure?

Why is this salad a must-try?

Vibrant flavors: The combination of sweet roasted butternut squash and crunchy pecans brings a delightful contrast.
Nutritious and gluten-free: Packed with vitamins and fiber, it makes healthy eating enjoyable!
Quick preparation: With just a few simple steps, you can create a stunning dish in no time.
Versatile options: Enjoy it as a side or a light main course, and switch up ingredients based on your pantry! This salad would pair beautifully with a comforting Jello Salad Cottage or complement the flavors in a Tofu Caesar Salad.
Crowd-pleaser: Its eye-catching presentation and unique flavors will impress family and friends at your next gathering!

Butternut Squash and Spinach Salad Ingredients

For the Salad

  • Butternut Squash – Roasted for a sweet, caramelized flavor; acorn squash makes a great substitute.
  • Baby Spinach – Provides a fresh and vibrant base; kale or arugula can be swapped in.
  • Pecans – Add lovely crunch and nutty richness; walnuts or pumpkin seeds can be used as alternatives.
  • Dried Cranberries – Introduce a chewy sweetness; raisins or chopped dried cherries work well.
  • Pomegranate Seeds – Offer a pop of color and tartness; you can omit this if unavailable.

For the Dressing

  • Olive Oil – Used for both the roasting and dressing, adding a smooth richness; any neutral oil can substitute.
  • Lime Juice – Adds a zesty acidity that balances the sweet flavors; lemon juice serves as a suitable replacement.
  • Honey – Sweetens the dressing beautifully; opt for maple syrup or agave for a vegan alternative.
  • Dijon Mustard – Braids in depth and flavor; can be skipped for a milder taste.
  • Poppy Seeds – Supply a nice crunch and nutty essence; feel free to omit if not on hand.
  • Salt – Elevates all the flavors; adjust to taste.

Enjoy whipping up this Butternut Squash and Spinach Salad that perfectly elevates any meal!

Step‑by‑Step Instructions for Butternut Squash and Spinach Salad

Step 1: Preheat the Oven
Begin by preheating your oven to 400°F (200°C). This lovely warmth creates the perfect environment for roasting, ensuring your butternut squash becomes beautifully sweet and caramelized. As the oven heats, you can prep your ingredients, setting the stage for an enjoyable cooking experience.

Step 2: Prepare the Butternut Squash
While the oven warms, peel and cube one medium butternut squash into bite-sized pieces. In a mixing bowl, toss the squash cubes with a drizzle of olive oil and a pinch of salt, ensuring each piece is well-coated. Spread the seasoned squash evenly on a baking sheet, allowing space for even cooking, and roast for 20-25 minutes, turning halfway through, until they are fork-tender and golden.

Step 3: Make the Dressing
In a medium bowl, whisk together olive oil, fresh lime juice, honey, poppy seeds, Dijon mustard, salt, and pepper. This sweet and tangy poppy seed honey-lime dressing will perfectly complement the earthy flavors of the butternut squash and the fresh baby spinach. Take a moment to taste and adjust the seasoning if needed, ensuring this dressing is just right for your Butternut Squash and Spinach Salad.

Step 4: Combine the Salad Ingredients
Once your butternut squash is roasted to perfection, remove it from the oven and let it cool slightly. In a large salad bowl, combine the warm butternut squash with baby spinach, two-thirds of the chopped pecans, dried cranberries, and a handful of pomegranate seeds. This blend of textures and flavors will bring your salad to life, creating a colorful and appetizing dish.

Step 5: Toss with Dressing
Drizzle the prepared poppy seed honey-lime dressing over the salad mixture. Gently toss the salad to ensure all the vegetables and toppings are coated with the dressing, allowing every bite to burst with flavor. Be careful not to over-mix; you want to keep the butternut squash intact for that delightful experience in your Butternut Squash and Spinach Salad.

Step 6: Garnish and Serve
Before serving, sprinkle the remaining pecans and pomegranate seeds atop the salad for an eye-catching finish. This final touch adds an extra crunch and vibrant color, making your Butternut Squash and Spinach Salad a feast for both the eyes and taste buds. Serve immediately and enjoy the warm, comforting flavors of this nutritious dish!

Butternut Squash and Spinach Salad Variations

Feel free to get creative with this delightful salad and make it your own!

  • Sweet Potato Swap: Swap roasted sweet potatoes for butternut squash for a sweeter twist on texture and flavor.

  • Creamy Additions: Add crumbled feta or goat cheese for a creamy element that beautifully complements the sweetness of the salad.

  • Nuts & Seeds: Experiment with different nuts like walnuts or pumpkin seeds to enhance the salad's crunch and flavor profile.

  • Herb Infusion: Incorporate fresh herbs like basil or cilantro into the dressing for an aromatic depth that elevates the entire dish.

  • Spicy Kick: Sprinkle red pepper flakes or add diced jalapeños for an exciting heat that contrasts nicely with the sweet ingredients.

  • Grain Boost: Toss in cooked quinoa or farro for an additional layer of texture and a protein boost, making this salad even more filling.

  • Zesty Flavor: Replace lime juice with orange juice for a fruity tanginess that brightens the entire salad.

  • Nut-Free Option: Omit the pecans and replace them with roasted chickpeas for a delicious crunch and a satisfying protein punch.

Whether you opt for a hearty addition like grilled chicken or a nourishing side like a light soup, this Butternut Squash and Spinach Salad can easily be paired with dishes like my cherished Chicken Salad Apples for a fulfilling meal!

Make Ahead Options

These Butternut Squash and Spinach Salad preparations are perfect for busy home cooks looking to save time! You can roast the butternut squash and store it in the refrigerator up to 3 days before serving, which will keep it tender and flavorful. Additionally, the dressing can be prepped up to 24 hours in advance—just be sure to refrigerate it in an airtight container to maintain its zesty brightness. When you're ready to enjoy the salad, simply combine the spinach, roasted squash, pecans, cranberries, and pomegranate seeds in a bowl, drizzle with dressing, and toss gently. This way, you'll have a refreshing, nutritious meal ready with minimal effort!

Expert Tips for Butternut Squash and Spinach Salad

  • Uniform Cutting: Ensure the butternut squash is cut into uniform cubes for even roasting; inconsistently sized pieces may cook at different rates.

  • Avoid Soggy Spinach: Add the dressing just before serving to keep the spinach fresh and crisp. This prevents wilting and preserves some crunch.

  • Toast for Flavor: For a deeper, nuttier taste, toast the pecans in the oven for a few minutes beforehand. Just keep an eye on them to avoid burning!

  • Substitution Sensibility: Feel free to mix and match ingredients based on season or personal taste! Use different nuts or greens in your Butternut Squash and Spinach Salad as desired.

  • Make-Ahead Friendly: If prepping in advance, store the dressing separately to keep flavors fresh and the salad ingredients crisp until serving.

Storage Tips for Butternut Squash and Spinach Salad

  • Fridge: Store leftover salad in an airtight container for up to 3 days. Keep the dressing separate until ready to serve to maintain freshness.
  • Freezer: It's best to avoid freezing this salad, as the spinach and dressing do not freeze well and can become soggy after thawing.
  • Reheating: If you have roasted butternut squash leftovers, you can heat them in a microwave or oven. Toss them back lightly with fresh spinach once warmed for a refreshing salad experience.
  • Ingredient Storage: Store pecans and dried cranberries in a cool, dry place to maintain their crunchiness for longer.

What to Serve with Butternut Squash and Spinach Salad?

Enhance your dining experience by harmonizing flavors and textures alongside this delightful salad.

  • Crispy Roasted Chicken: This savory dish complements the salad’s sweetness perfectly, adding a satisfying protein to the meal. Pair it with a side of garlic mashed potatoes for a comforting touch.

  • Quinoa Pilaf: Light and fluffy, quinoa pilaf adds a nutty flavor and a chewy texture that elevates your salad. It’s a perfect balance, making each bite a delightful experience!

  • Garlic Bread: The crunchy, buttery goodness of garlic bread is an excellent foil to the fresh salad. Its indulgent texture provides a satisfying contrast to the nutritional lightness of the salad.

  • Fruit and Nut Cheese Board: A medley of cheeses with fruits and nuts mirrors the flavors in your salad, elevating your appetizer game. This could be the perfect starter that pairs beautifully with a glass of wine.

  • Honey-Lime Grilled Shrimp: Sweet and zesty shrimp bring a grill-kissed flavor that enhances the fresh elements of the salad. Serve over a bed of rice for a complete dish!

  • Pumpkin Spice Muffins: As a delightful dessert, these muffins offer a warm, comforting finish to your meal. The spicy sweetness harmonizes wonderfully with the autumn flavors of the salad.

Butternut Squash and Spinach Salad Recipe FAQs

How do I choose ripe butternut squash?
Absolutely! When selecting butternut squash, look for ones that are smooth and free from dark spots or blemishes. The skin should be a matte, tan color, and the squash should feel heavy for its size. A ripe squash is typically firm to the touch with no soft spots.

How should I store leftovers from the salad?
You can store leftover salad in an airtight container in the refrigerator for up to 3 days. It's essential to keep the dressing separate until you're ready to serve to maintain the freshness of the spinach and prevent it from becoming soggy.

Can I freeze butternut squash?
Yes, you can freeze roasted butternut squash! To do this, allow it to cool completely after roasting. Then, spread it out on a baking sheet and freeze for about 1-2 hours until solid. Once frozen, transfer the squash to a freezer-safe container or bag. It can be stored for up to 3 months. Just remember, this method is best for roasted squash; the salad itself should not be frozen.

What can I do if my salad turns out soggy?
Very good question! If your salad is soggy, first check if you dressed it too early—this can make the spinach wilt. To remedy it, gently toss the salad with a handful of fresh spinach right before serving to add a crisp texture. Additionally, you can also serve the dressing on the side for guests to add as desired, keeping everything fresher.

Are there any allergies I should consider with this salad?
Indeed! This Butternut Squash and Spinach Salad contains nuts (pecans), which could be a concern for those with nut allergies. For a nut-free option, you can substitute pumpkin seeds or simply omit nuts altogether. Always check for any other dietary restrictions among your guests to ensure everyone can enjoy this delicious dish without worry.

Butternut Squash and Spinach Salad

Butternut Squash and Spinach Salad with Sweet Crunchy Pecans

A vibrant Butternut Squash and Spinach Salad combines roasted squash, crunchy pecans, and tangy pomegranate in a zesty dressing.
Print Recipe Pin Recipe
Prep Time 15 minutes mins
Cook Time 25 minutes mins
Total Time 40 minutes mins
Servings: 4 servings
Course: Salads
Cuisine: American
Calories: 250
Ingredients Equipment Method Nutrition Notes

Ingredients
  

For the Salad
  • 1 medium butternut squash peeled and cubed
  • 5 cups baby spinach fresh
  • 1 cup pecans chopped
  • 1/2 cup dried cranberries
  • 1/2 cup pomegranate seeds optional
For the Dressing
  • 1/4 cup olive oil for dressing and roasting
  • 2 tablespoons lime juice fresh
  • 2 tablespoons honey or maple syrup for vegan
  • 1 tablespoon Dijon mustard
  • 1 tablespoon poppy seeds optional
  • to taste teaspoon salt

Equipment

  • Oven
  • Mixing Bowl
  • Baking Sheet
  • Salad Bowl

Method
 

Preparation Steps
  1. Preheat the oven to 400°F (200°C).
  2. Peel and cube the butternut squash, then toss with olive oil and salt before spreading on a baking sheet.
  3. Roast for 20-25 minutes until fork-tender and golden.
  4. In a bowl, whisk together olive oil, lime juice, honey, poppy seeds, Dijon mustard, and salt to make the dressing.
  5. Combine warm butternut squash, spinach, two-thirds of the pecans, cranberries, and pomegranate seeds in a salad bowl.
  6. Drizzle dressing over the salad and gently toss to coat.
  7. Garnish with remaining pecans and pomegranate seeds before serving.

Nutrition

Serving: 1servingCalories: 250kcalCarbohydrates: 30gProtein: 5gFat: 12gSaturated Fat: 1gPolyunsaturated Fat: 2gMonounsaturated Fat: 8gSodium: 200mgPotassium: 450mgFiber: 5gSugar: 8gVitamin A: 3000IUVitamin C: 15mgCalcium: 70mgIron: 1.5mg

Notes

Add dressing just before serving to keep spinach crisp. For a nuttier flavor, toast pecans before use.

Tried this recipe?

Let us know how it was!

Cheese Stuffed Mushrooms That Will Wow Your Guests

October 20, 2025 by Grace Snow Leave a Comment

The aroma wafting from my kitchen had my family gathering around in anticipation, and I couldn’t help but smile. Today, I’m sharing my crowd-pleasing Bacon and Cheese Stuffed Mushrooms, a delightful appetizer that’s perfect for every occasion. With just a handful of ingredients, this quick-to-prepare recipe brings together the creaminess of Parmesan and Mozzarella, all wrapped in savory bacon, and tucked inside tender mushroom caps. Not only are these cheese stuffed mushrooms gluten-free, but they also make for a great bite-sized snack that’s sure to impress both adults and kids alike. Whether it's a party or a simple family dinner, these delectable morsels will have everyone reaching for more. Curious about how to whip up this irresistible treat? Let’s dive into the recipe!

Why Are Cheese Stuffed Mushrooms So Irresistible?

Simplicity at Its Best: This quick recipe is perfect for beginners; you only need basic skills to achieve delicious results.
Flavor Explosion: The rich mix of creamy cheeses and savory bacon delivers a delightful taste with every bite.
Crowd-Pleaser: Great as an appetizer, these cheese stuffed mushrooms will have your guests raving and coming back for seconds!
Versatile Ingredients: Feel free to switch up the ingredients; try adding spinach or herbs for a customized touch!
Perfect for Any Occasion: Whether you're hosting a party or enjoying a cozy family dinner, they fit seamlessly into any setting.
Make Ahead Option: You can prep these ahead of time, freeing you up to enjoy your gathering. Pair them with other favorites like Grilled Mushrooms Savory or Herby Ricotta Stuffed for a fabulous spread!

Cheese Stuffed Mushrooms Ingredients

• The perfect blend of flavors awaits!

For the Filling

  • Mushrooms (10 oz, about 20 small whole mushrooms) – The star ingredient that provides a sturdy base filled with flavor.
  • Butter (2 oz, melted) – Richness and flavor enhancer; olive oil offers a lighter twist if preferred.
  • Cream Cheese (4 oz, slightly softened) – Creates a smooth, creamy texture that binds everything together; try Neufchâtel for a lower-fat option.
  • Parmesan Cheese (½ cup, shredded) – Brings a nutty flavor to the mix; swap for Romano cheese for an even sharper taste.
  • Mozzarella Cheese (¼ cup, shredded) – Melts beautifully for a gooey interior; you can use Gouda or Monterey Jack as creative alternatives.
  • Bacon (2 slices, cooked and finely chopped) – Delivers a savory crunch; turkey bacon or bacon bits can lighten things up.
  • Green Bell Pepper (¼, very finely chopped) – Adds a fresh touch and subtle sweetness; consider red or yellow for added sweetness.
  • Salt and Cayenne Pepper – Essential for seasoning; adjust cayenne to your heat preferences.
  • Paprika – Offers vibrant color and a hint of smokiness; smoked paprika deepens the flavor profile.
  • Fresh Lemon Juice (optional) – Brightens up the filling with acidity; lime juice provides a tangy alternative.

These cheese stuffed mushrooms are sure to be a hit at your dinner table! Enjoy the delightful combination of textures and flavors in each bite.

Step‑by‑Step Instructions for Cheese Stuffed Mushrooms

Step 1: Preheat and Prepare the Baking Dish
Begin by preheating your oven to 400°F (200°C). While the oven heats up, lightly grease a medium baking dish with melted butter. This will not only prevent sticking but also add flavor to your Cheese Stuffed Mushrooms as they bake.

Step 2: Clean and Prepare the Mushrooms
Gently wipe the mushrooms with a damp paper towel to remove any dirt, being careful not to soak them. Next, carefully break off the stems and set the caps aside. Dip the mushroom caps in the melted butter to coat them lightly, which enhances their flavor and helps them crisp up nicely in the oven.

Step 3: Bake Mushroom Caps
Place the mushroom caps upside down in the greased baking dish, ensuring they are close but not touching. Sprinkle a pinch of salt over the tops to season them. Bake the mushrooms in the preheated oven for 10-15 minutes, allowing them to reduce moisture as they soften. The caps should become slightly tender and begin to release their juices.

Step 4: Flip and Drain Excess Liquid
Once baked, carefully remove the dish from the oven and flip the mushroom caps right side up. Drain any excess liquid that may have pooled inside the caps, as this will prevent your Cheese Stuffed Mushrooms from becoming soggy. Set them aside for a moment while you prepare the filling.

Step 5: Make the Cheese Filling
In a mixing bowl, combine softened cream cheese, shredded Parmesan, and Mozzarella cheeses. Add the chopped bacon for a smoky crunch, along with the finely chopped green bell pepper for a fresh touch. Season the mixture with a dash of cayenne and salt, blending everything until smooth and creamy to create the flavorful filling for your Cheese Stuffed Mushrooms.

Step 6: Fill the Mushroom Caps
Generously spoon the cheese and bacon mixture into each mushroom cap, slightly mounding the filling for a delightful presentation. Be careful not to overfill, as this can cause the mixture to spill out during baking. Each cap should be full, showcasing the delicious filling that awaits inside.

Step 7: Add Finishing Touches
Sprinkle paprika over the filled mushroom caps for an appealing pop of color. Drizzle any remaining melted butter from your mixing bowl over the tops of the stuffed mushrooms. This extra step ensures they remain flavorful and golden brown while baking.

Step 8: Final Bake
Return the baking dish to the oven and bake for an additional 20 minutes. Watch as the Cheese Stuffed Mushrooms become hot and bubbly with golden-brown tops, indicating they are ready to serve. The aroma will be irresistible, summoning everyone to the table for a taste.

Make Ahead Options

These Bacon and Cheese Stuffed Mushrooms are perfect for meal prep enthusiasts! You can prepare the filling (cream cheese, cheeses, bacon, and bell pepper) up to 3 days in advance, storing it in an airtight container in the refrigerator. Additionally, you can pre-bake the mushroom caps for up to 24 hours, then assemble them with the filling just before baking. To maintain quality, ensure to keep the stuffed mushrooms covered until you're ready to bake, preventing them from drying out. When you’re ready to serve, simply fill the prepped mushroom caps with the delicious mixture and bake for 20 minutes, ensuring piping hot, restaurant-quality results with minimal effort!

What to Serve with Bacon and Cheese Stuffed Mushrooms

Elevate your gathering with delightful accompaniments that perfectly complement the rich flavors of these savory bites.

  • Creamy Mashed Potatoes: The smoothness of mashed potatoes offers a comforting contrast to the rich cheese and bacon filling.

  • Garlic Breadsticks: These herby, buttery breadsticks enhance the meal with a satisfying crunch, perfect for scooping up any leftover filling.

  • Fresh Garden Salad: A light, crisp salad adds a refreshing contrast, balancing the savory mushrooms with vibrant greens and dressing.

  • Wine Pairing: A chilled Sauvignon Blanc or a light-bodied Pinot Noir enhances the flavors, making each bite of bacon and cheese even more enjoyable.

  • Savory Roasted Vegetables: Roasting seasonal veggies brings out their natural sweetness, making for a delightful side that adds color to your plate.

  • Zesty Dipping Sauce: Try a tangy garlic aioli or zesty ranch dressing; the coolness serves as a great foil to the warm stuffed mushrooms.

Each of these pairings enhances the overall experience, turning your appetizers into a memorable feast.

Cheese Stuffed Mushrooms Variations

Get ready to explore some delightful twists on your Cheese Stuffed Mushrooms that will take your taste buds on a little adventure!

  • Herb-Infused:
    Add fresh herbs like basil or thyme to the cheese mixture for an aromatic boost. These flavors breathe life into your stuffing, making every bite even more delightful.

  • Spicy Kick:
    Incorporate diced jalapeños or crushed red pepper flakes into the filling for an extra layer of heat. This will give a mouthwatering contrast to the creamy cheese base!

  • Veggie Delight:
    Fold in sautéed spinach or roasted red peppers for a nutrition-packed version that’s just as indulgent. Not only do they add color, but they also infuse the mushrooms with hearty flavors that balance perfectly with the savory notes of bacon.

  • Mediterranean Twist:
    Replace bacon with crumbled feta cheese and add black olives for a Mediterranean flair. This approach brings a tangy richness to the dish that pairs beautifully with the mushrooms.

  • Gourmet Blend:
    Mix in some truffle oil or gourmet cheeses like Gruyère for a luxurious touch. A little drizzle of truffle oil elevates these stuffed mushrooms into an elegant dish that's sure to impress!

  • Sweet Heat:
    For a surprising zing, include a touch of honey or balsamic glaze incorporated into the filling. This will create a wonderful contrast with the savory bacon and cheese.

  • Alternative Cheeses:
    Swap mozzarella for crumbled goat cheese for a tangy twist. Goat cheese adds a creamy texture and a distinctive flavor profile that complements the mushrooms beautifully. If you're feeling adventurous, try out smoked cheeses from your local deli!

  • Plant-Based Option:
    Use plant-based bacon and cream cheese for a delicious vegan adaptation. This way, everyone can enjoy these cheesy bites without missing out on flavor!

Feel free to mix and match these ideas to create your very own perfect Cheese Stuffed Mushrooms! For more inspiration, consider pairing them with Potato Blue Cheese for a unique flavor journey or try out some fresh styles in Grilled Mushrooms Savory. Enjoy the deliciousness!

Expert Tips for Cheese Stuffed Mushrooms

  • Soften Cream Cheese: Ensure your cream cheese is softened but not melted for easier mixing and a smoother filling.

  • Avoid Overfilling: Be cautious not to overfill the mushrooms, as excess filling can spill out during baking and create a mess.

  • Mushroom Selection: Choose small to medium-sized mushrooms for perfect bite-sized portions. Larger mushrooms might need more cooking time.

  • Drain Liquid: After baking, remember to flip the mushrooms and drain any collected liquid to keep your cheese stuffed mushrooms from becoming soggy.

  • Add Flavor: Consider experimenting with different herbs or spices in your filling like garlic powder or Italian seasoning to elevate the taste!

  • Cool Before Serving: Allow the mushrooms to cool slightly after baking to let the flavors settle and avoid burns when enjoying these cheesy bites.

Storage Tips for Cheese Stuffed Mushrooms

Fridge: Store unbaked cheese stuffed mushrooms in an airtight container for up to 3 days. Make sure they are well-wrapped to prevent moisture loss.

Freezer: For longer storage, freeze baked cheese stuffed mushrooms on a baking sheet until firm, then transfer to a freezer bag for up to 2 months.

Reheating: To reheat, bake from frozen at 350°F (175°C) for about 25-30 minutes, or until heated through. This keeps them warm and delicious!

Make Ahead: Prepare the cheese stuffed mushrooms in advance and freeze them; this allows you to enjoy stress-free entertaining whenever you choose!

Cheese Stuffed Mushrooms Recipe FAQs

What type of mushrooms should I use for stuffing?
I recommend using small to medium whole mushrooms, such as cremini or button mushrooms, since they provide the perfect bite-sized base. If you prefer larger mushrooms, like portobello, just keep in mind that they may require a longer baking time to ensure the filling is heated through.

How should I store leftover cheese stuffed mushrooms?
Store unbaked cheese stuffed mushrooms in an airtight container in the refrigerator for up to 3 days. If they are baked, keep them in the fridge for about the same duration. Just be sure to wrap them well to avoid moisture loss.

Can I freeze cheese stuffed mushrooms?
Absolutely! To freeze, first bake the cheese stuffed mushrooms, let them cool, and then freeze them on a baking sheet until firm. Transfer them to a freezer bag and store for up to 2 months. When you're ready to enjoy them, bake from frozen at 350°F (175°C) for about 25-30 minutes, or until heated through.

What can I do if my stuffing spills out while baking?
To prevent spillage, be mindful not to overfill the mushroom caps. Also, make sure to flip the mushrooms and drain excess liquid before adding the filling. This will keep the stuffing intact and allow for a beautifully presented dish.

Are cheese stuffed mushrooms safe for people with dietary restrictions?
These cheese stuffed mushrooms can be gluten-free depending on the ingredients you choose. Always double-check labels for any allergens, especially for cheese types. You can use turkey bacon or omit bacon altogether for a vegetarian option. If you're serving them to pets, please avoid any cheese or seasonings that aren't safe for them!

How can I know when the cheese stuffed mushrooms are done?
Your cheese stuffed mushrooms are ready when they are golden brown on top and the cheese is bubbly. The aroma will be absolutely delightful, drawing everyone to the kitchen! Let them cool slightly before serving to avoid burns and enhance the flavors.

Cheese Stuffed Mushrooms

Cheese Stuffed Mushrooms That Will Wow Your Guests

Delightful Cheese Stuffed Mushrooms, filled with creamy cheeses and savory bacon, are perfect for any occasion.
Print Recipe Pin Recipe
Prep Time 15 minutes mins
Cook Time 30 minutes mins
Total Time 45 minutes mins
Servings: 20 mushrooms
Course: Appetizers
Calories: 80
Ingredients Equipment Method Nutrition Notes

Ingredients
  

For the Filling
  • 10 oz Mushrooms about 20 small whole mushrooms
  • 2 oz Butter melted
  • 4 oz Cream Cheese slightly softened
  • ½ cup Parmesan Cheese shredded
  • ¼ cup Mozzarella Cheese shredded
  • 2 slices Bacon cooked and finely chopped
  • ¼ Green Bell Pepper very finely chopped
  • Salt to taste
  • Cayenne Pepper to taste
  • Paprika
  • Fresh Lemon Juice optional

Equipment

  • Oven
  • Baking Dish
  • Mixing Bowl

Method
 

Step-by-Step Instructions
  1. Preheat your oven to 400°F (200°C) and grease a medium baking dish with melted butter.
  2. Gently wipe the mushrooms with a damp paper towel and break off the stems. Coat mushroom caps in melted butter.
  3. Place mushroom caps upside down in the baking dish, sprinkle with salt, and bake for 10-15 minutes until tender.
  4. Flip mushroom caps right side up and drain any excess liquid.
  5. Combine cream cheese, Parmesan, Mozzarella, bacon, and bell pepper in a mixing bowl. Season to taste.
  6. Fill each mushroom cap with the cheese and bacon mixture, mounding slightly.
  7. Sprinkle paprika over the caps and drizzle with remaining melted butter.
  8. Bake for an additional 20 minutes until bubbly and golden brown.

Nutrition

Serving: 1mushroomCalories: 80kcalCarbohydrates: 2gProtein: 4gFat: 7gSaturated Fat: 4gMonounsaturated Fat: 2gCholesterol: 20mgSodium: 200mgPotassium: 90mgVitamin A: 200IUVitamin C: 2mgCalcium: 100mgIron: 0.5mg

Notes

These cheese stuffed mushrooms are perfect for parties or family dinners. Try adding different herbs for variety!

Tried this recipe?

Let us know how it was!

Delicious Nutter Butter Turkey Cookies for a Fun Thanksgiving Treat

October 20, 2025 by Grace Snow Leave a Comment

As I stood in my kitchen, colorful candy melts scattered across my countertop, a burst of excitement hit me. It wasn’t just another dessert day; I was on a mission to create the cutest Nutter Butter Turkey Cookies for Thanksgiving! These adorable no-bake treats are not only easy to whip up but also bring a festive flair to any holiday gathering. Imagine the smiles on your loved ones' faces as they discover these whimsical cookies, featuring creamy peanut butter cookies as the base and vibrant candy decorations that make them irresistible to both kids and adults alike. The simple prep allows you to spend more time enjoying the festivities, making these treats a perfect addition to your Thanksgiving dessert table. So, are you ready to channel your inner holiday baker and impress your family with this fun and delightful creation? Let’s get started!

Why Nutter Butter Turkey Cookies Stand Out?

Irresistible Fun: Who can resist these charming little turkeys? They’re perfect for adding a playful spirit to your Thanksgiving celebration!

No-Bake Simplicity: No ovens necessary! Just melt, assemble, and decorate—making them a breeze for both novice and experienced bakers.

Creative Customization: Get creative! Swap candies and cookie types to make each turkey uniquely yours. Try adding a twist with colorful melts or different candies!

Crowd-Pleasing Treat: With their delightful combination of creamy and crunchy textures, these cookies are guaranteed to be a hit with everyone at your gathering—just like my Crockpot Butter Chicken for a main dish that’s equally loved!

Festive Flair: These cookies elevate your dessert table, making them not just a treat but a centerpiece that draws smiles and conversation.

Roll up your sleeves, embrace the holiday spirit, and create these delightful Nutter Butter Turkey Cookies that your family will cherish!

Nutter Butter Turkey Cookies Ingredients

• Get ready to craft these festive delights!

For the Turkey Bodies

  • Nutter Butter Cookies (regular peanut-shaped) – They serve as the main base, offering a delicious peanut flavor and sturdy structure. Substitutions: Try Golden Oreos for a fun twist!
  • Nutter Butter Cookies (large round) – Perfect for forming the turkey's head; essential for that iconic look. Notes: Ensure you use the large round ones for the best results.

For the Decorations

  • Candy Eyes – These charming little treats bring your turkey to life! Notes: A must-have for that adorable touch.
  • Candy Corn – Vibrant feathers that add color and crunch to your creations. Notes: Fresh candy corn sticks well and enhances the fun!

For Assembly

  • Candy Melts (white) – Helps hold everything together and adds a sweet coating. Notes: Melt until smooth for the best adhesion.
  • Reese’s Pieces (orange, cut in half) – Makes for delightful turkey beaks; they add a lovely oaky flavor. Substitutions: Orange M&Ms work nicely too!
  • Red Cookie Icing – Perfect for the turkey's wattle for that extra festive flair. Notes: Alternatively, melted red candy wafers can be used.

Embrace your creativity and let’s bring these adorable Nutter Butter Turkey Cookies to life this Thanksgiving! Your loved ones will be thrilled with this delicious no-bake treat!

Step‑by‑Step Instructions for Nutter Butter Turkey Cookies

Step 1: Prep the Work Area
Begin by lining a large baking sheet with parchment paper to ensure an easy cleanup later on. This will act as your workspace for assembling the Nutter Butter Turkey Cookies. It’s essential to have a clear and organized area, so gather all your ingredients and tools close by to ensure a smooth and efficient assembly process.

Step 2: Melt Candy
In a microwave-safe bowl, add the white candy melts and heat them in the microwave at 30-second intervals. Stir the melts after each interval until they are fully melted and reach a smooth consistency, which usually takes about 1-2 minutes total. Once smooth, let the melted candy cool slightly before using to ensure it can efficiently adhere the cookie components together.

Step 3: Assemble Turkeys
To create the turkey bodies, spread a small dollop of the melted candy onto the bottom half of a large round Nutter Butter cookie. Then, gently press a regular peanut-shaped Nutter Butter cookie onto the lower half of the coated cookie. Hold it in place briefly until it starts to set, ensuring your fabulous Nutter Butter Turkey Cookies have a sturdy construction.

Step 4: Add Feathers
While the melted candy is still warm and tacky, take five pieces of candy corn and swiftly press them into the top of the peanut-shaped cookie to form the turkey's colorful feathers. Position the candy corn in a fan shape, and ensure they are pushed in well enough to stick, adding a bright and festive touch to your adorable treats.

Step 5: Apply Eyes & Beak
Using a skewer, dip it into the remaining melted candy and carefully place two candy eyes on the round Nutter Butter cookie to give your turkey some personality. For the turkey's beak, position a half piece of Reese’s on the cookie, securing it in place with a dab of melted candy. The combination of eyes and beak will bring your Nutter Butter Turkey Cookies to life!

Step 6: Decorate with Icing
To finish off your whimsical turkeys, take the red cookie icing and carefully pipe a wattle or snood on the round cookie right above the beak. This decorative touch adds to the turkey's charm and makes your Nutter Butter Turkey Cookies incredibly festive, creating an appealing visual that will delight everyone at your Thanksgiving gathering.

Step 7: Set
Once all your decoration is complete, allow the assembled Nutter Butter Turkey Cookies to set for about 15-20 minutes at room temperature. For quicker results, you can refrigerate the cookies for 5-10 minutes to help the candy harden. This final step ensures that all components are firmly in place, making your cookies ready to impress your guests!

Expert Tips for Nutter Butter Turkey Cookies

  • Cool Down Candy: Allow melted candy to cool slightly before use to prevent runniness, ensuring better adherence among the layers of your Nutter Butter Turkey Cookies.

  • Preparation is Key: Gather all ingredients and tools before starting the assembly process, making it easier and faster to create your whimsical cookies.

  • Use Fresh Candy Corn: Opt for fresh candy corn to ensure they stick well in the melted candy, creating vibrant and secure feathers for your turkey cookies.

  • Quick Setting Trick: For quicker hardening of your cookies, refrigerate them for 5-10 minutes after assembly to speed up the setting process, allowing you to enjoy your creations sooner.

  • Experiment with Variations: Don’t be afraid to customize your turkey cookies by trying different candies or cookie types, making each batch truly unique and exciting for your Holiday table!

Nutter Butter Turkey Cookies Variations

Get ready to personalize your festive treat with these fun variations that add a delightful twist to your Nutter Butter Turkey Cookies!

  • Dairy-Free: Swap the candy melts for dairy-free chocolate melts to keep the flavor rich and suitable for dairy-sensitive friends.

  • Flavor Boost: Add a drizzle of chocolate icing over the turkey bodies for an extra layer of sweetness. This will create a delightful contrast to the candy decorations!

  • Nut-Free: Replace Nutter Butter cookies with crunchy digestive biscuits or graham crackers to accommodate nut allergies, keeping the fun factor intact.

  • Spicy Kick: Introduce a touch of heat by using spicy cinnamon candies in place of traditional candy corn. This will add a surprising twist to your cookies!

  • Festive Sprinkles: After decorating, generously sprinkle holiday-themed edible glitter or colorful sprinkles over the cookies. The added sparkle makes them even more festive!

Bring these variations to life and make your Nutter Butter Turkey Cookies an unforgettable part of your Thanksgiving tradition! And if you’re looking for more festive treats, don't miss out on my delightful Eggnog Cookies Soft or these charming Thumbprint Cookies Melt that are sure to impress all your holiday guests!

Make Ahead Options

These Nutter Butter Turkey Cookies are a fantastic option for meal prep, allowing you to streamline your Thanksgiving dessert preparations! You can assemble the cookie bodies (Nutter Butter cookies) and store them in an airtight container for up to 3 days at room temperature without any loss of quality. Additionally, you can melt the candy melts and keep them in the refrigerator for up to 24 hours. When you’re ready to serve, simply reheat the candy melts until smooth, assemble the turkeys with candy eyes and feathers, and let them set. This way, you can enjoy the delightful process of decorating without the last-minute rush, ensuring your adorable Nutter Butter Turkey Cookies are just as delicious and festive!

Storage Tips for Nutter Butter Turkey Cookies

  • Room Temperature: Keep your cookies in an airtight container at room temperature for up to 2 weeks. This will maintain their delightful crunch and freshness.

  • Fridge: For an extended shelf life, store your Nutter Butter Turkey Cookies in the refrigerator for up to 1 month. The cool environment helps preserve the decorations.

  • Freezer: Avoid freezing these cookies, as the thawing process can compromise the integrity of the candy decorations, making them less appealing and messier.

  • Reheating: These cookies are best enjoyed cold or at room temperature. If stored in the fridge, simply take them out a few minutes before serving for optimal texture and flavor!

What to Serve with Nutter Butter Turkey Cookies

Elevate your Thanksgiving spread by pairing these whimsical cookies with delightful accompaniments that create a memorable feast experience.

  • Pumpkin Spice Latte: Warm your guests with this seasonal favorite, enhancing the cozy flavors of Thanksgiving with every sip of rich and spicy bliss.

  • Cranberry Sauce: The tartness of this classic side offers a refreshing contrast to the sweet cookies, balancing the overall dessert experience beautifully.

  • Vanilla Ice Cream: Creamy and sweet, a scoop of vanilla ice cream provides a delightful temperature contrast to the cookies’ crunch, making every bite heavenly.

  • Apple Cider: Serve a chilled or warm glass of fresh apple cider. Its crispness complements the cookies while evoking those nostalgic autumn vibes.

  • Chocolate Dip: Melt some chocolate for a dipping option. The rich, velvety flavor of chocolate enriches the sweetness of the cookies, making them even more indulgent!

  • Pecan Pie: A slice of this Thanksgiving staple provides a textural contrast and pairs well with the cookies' festive aesthetics, creating harmony on your dessert table.

Entice your family with these complementary treats, turning your Thanksgiving dessert spread into an unforgettable celebration of flavors and joy!

Nutter Butter Turkey Cookies Recipe FAQs

What type of Nutter Butter cookies should I use?
For the body of the turkey, you'll want regular peanut-shaped Nutter Butter cookies as they provide the perfect flavor and structure. For the head, be sure to use large round Nutter Butter cookies to achieve that lovable turkey look. If you're feeling adventurous, Golden Oreos can also be a fun substitute for a different flavor profile!

How should I store leftover Nutter Butter Turkey Cookies?
To keep your cookies fresh, store them in an airtight container at room temperature for up to 2 weeks. If you want to extend their shelf life, you can refrigerate them for up to 1 month. Just be careful not to freeze these cookies, as the thawing process could ruin the delightful candy decorations.

Can I freeze Nutter Butter Turkey Cookies?
It's best to avoid freezing these adorable cookies. Freezing can cause the candy decorations to lose their shape and texture when thawed. Instead, store them in an airtight container at room temperature or in the refrigerator to maintain their festive look and flavor.

What should I do if my melted candy is too runny?
If you find your melted candy is too runny, it's usually because it hasn't cooled enough. Let it sit for a couple of minutes after melting to allow it to thicken slightly. If it’s still too runny after cooling, you could try adding a bit more candy melt and remelting it carefully. Remember, a thicker consistency will help with better adhesion when assembling your cookies!

Are Nutter Butter Turkey Cookies suitable for those with allergies?
Nutter Butter cookies contain peanut butter and can pose a risk for those with nut allergies. When preparing these fun treats, be sure to inform guests about the ingredients to ensure everyone can safely enjoy them. If you have guests with allergies, consider using nut-free alternatives or consult a list of ingredients to find suitable substitutes.

Nutter Butter Turkey Cookies

Delicious Nutter Butter Turkey Cookies for a Fun Thanksgiving Treat

Create charming Nutter Butter Turkey Cookies for Thanksgiving - a delightful no-bake treat that will impress guests!
Print Recipe Pin Recipe
Prep Time 20 minutes mins
Setting Time 20 minutes mins
Total Time 40 minutes mins
Servings: 12 cookies
Course: Dessert
Cuisine: American
Calories: 120
Ingredients Equipment Method Nutrition Notes

Ingredients
  

For the Turkey Bodies
  • 12 pieces Nutter Butter Cookies (regular peanut-shaped) Substitutions: Try Golden Oreos for a fun twist!
  • 6 pieces Nutter Butter Cookies (large round) Ensure you use the large round ones for the best results.
For the Decorations
  • 1 pack Candy Eyes A must-have for that adorable touch.
  • 1 cup Candy Corn Fresh candy corn sticks well and enhances the fun!
For Assembly
  • 1 cup Candy Melts (white) Melt until smooth for the best adhesion.
  • 12 pieces Reese’s Pieces (orange, cut in half) Substitutions: Orange M&Ms work nicely too!
  • 1 bottle Red Cookie Icing Alternatively, melted red candy wafers can be used.

Equipment

  • Microwave-safe bowl
  • Baking Sheet
  • Parchment Paper
  • skewer

Method
 

Step-by-Step Instructions
  1. Prep the Work Area: Begin by lining a large baking sheet with parchment paper to ensure an easy cleanup later on.
  2. Melt Candy: In a microwave-safe bowl, add the white candy melts and heat them in the microwave at 30-second intervals until fully melted, about 1-2 minutes.
  3. Assemble Turkeys: Spread a small dollop of the melted candy onto the bottom half of a large round Nutter Butter cookie and press a regular peanut-shaped cookie onto it.
  4. Add Feathers: While the melted candy is still warm, press five pieces of candy corn into the top of the peanut-shaped cookie to form the turkey's feathers.
  5. Apply Eyes & Beak: Use a skewer dipped in the melted candy to place two candy eyes on the round cookie, then add a half piece of Reese’s for the beak.
  6. Decorate with Icing: Pipe red icing to create a wattle on the round cookie right above the beak.
  7. Set: Allow the assembled cookies to set for about 15-20 minutes or refrigerate for 5-10 minutes for quicker results.

Nutrition

Serving: 1cookieCalories: 120kcalCarbohydrates: 15gProtein: 2gFat: 6gSaturated Fat: 2gSodium: 60mgPotassium: 30mgFiber: 1gSugar: 8gIron: 2mg

Notes

These cookies can be customized with different candies for a unique twist. Make sure to use fresh candy corn for the best results.

Tried this recipe?

Let us know how it was!
  • « Previous Page
  • 1
  • …
  • 183
  • 184
  • 185
  • 186
  • 187
  • …
  • 244
  • Next Page »

Welcome!

Hi, I’m Grace, a Sydney-based home cook with a passion for bold flavors and trending ingredients. Whether you’re a busy beginner or a seasoned foodie, you’ll find dishes here that are fresh, fun, and full of flavor.

More about me

Popular Recipes

  • Delicious Keto Philly Cheesesteak Bowls You’ll Crave Daily
  • twice baked potato casserole
    Indulge in This Creamy Twice Baked Potato Casserole Delight
  • Red Potato Casserole
    Irresistible Red Potato Casserole with Crunchy Topping
  • Cowboy Potato Casserole
    Comforting Cowboy Potato Casserole for Cozy Nights

Footer

↑ back to top

About

  • Privacy Policy
  • Disclaimer
  • Terms & Conditions

Newsletter

  • Sign Up! for emails and updates

Contact

  • About me
  • Contact me

Copyright © 2025 TastyTrendIngredients