tastytrendingredients

  • Home
  • Recipes
    • Appetizers
    • Breakfast
    • Dessert
    • Dinner
    • Drinks
    • Salads
    • Snacks
    • Soups
  • About me
  • Contact
menu icon
go to homepage
  • Home
  • Recipes
    • Appetizers
    • Breakfast
    • Dessert
    • Dinner
    • Drinks
    • Salads
    • Snacks
    • Soups
  • About me
  • Contact
search icon
Homepage link
  • Home
  • Recipes
    • Appetizers
    • Breakfast
    • Dessert
    • Dinner
    • Drinks
    • Salads
    • Snacks
    • Soups
  • About me
  • Contact
×

Delicious Turkey Wild Rice Casserole for Cozy Nights

October 20, 2025 by Grace Snow Leave a Comment

The aroma of a warm casserole wafting through the kitchen evokes the coziest memories, doesn’t it? My Instant Pot Leftover Turkey Wild Rice Casserole takes those holiday leftovers and transforms them into a comforting one-pot meal that your family will adore. It's a fantastic way to repurpose turkey, mixing it with hearty wild rice, vibrant veggies, and a touch of creamy goodness. One of the best parts about this recipe is how quickly it comes together—perfect for any busy home chef. Plus, it’s gluten-free friendly! So whether you’re looking to make the most of your holiday feast or simply craving a satisfying meal, this casserole will warm both your heart and your stomach. What’s your favorite way to use up leftovers?

Why Love This Turkey Wild Rice Casserole?

Versatile Delight: This recipe is perfect for transforming any leftover turkey into an exciting dish that'll please everyone's taste buds. One-Pot Wonder: Easy clean-up means more time with loved ones and less in the kitchen! Nutritious & Hearty: Packed with veggies and healthy grains, this casserole brings satisfaction without guilt. Quick Cooking: In just about 30 minutes, you have a warm, delicious meal ready to serve. You might even enjoy serving it alongside a refreshing salad or some crusty bread for an even more delightful experience. If you're looking for more ideas, check out our delicious Cornbread Breakfast Casserole for a breakfast twist, too!

Turkey Wild Rice Casserole Ingredients

For the Casserole

  • Unsalted Butter – Adds rich flavor and helps soften vegetables.
  • Garlic (2 cloves, minced) – Builds the savory base for the Turkey Wild Rice Casserole.
  • White Onion (1, diced) – Provides aromatic sweetness and depth.
  • Celery (½ cup, diced) – Classic aromatic for texture and flavor.
  • Carrots (½ cup, diced) – Adds sweetness and vibrant color.
  • Chicken Broth (3 cups) – Supplies necessary liquid for cooking and enhances flavor.
  • Wild Rice (1 cup) – Adds chewiness and earthy flavor; nutty taste.
  • Long Grain Rice (½ cup) – Complements the wild rice, enhancing the dish's texture.
  • Red Lentils (½ cup) – Cook quickly, adding protein and soft texture.
  • Corn (½ cup) – Introduces sweetness and more color.
  • Sage Stuffing (1 cup, dry) – Provides herby, season-based flavor; can use homemade or store-bought.
  • Leftover Turkey (2 cups, shredded) – The star ingredient, giving protein and heartiness to the dish.

For Seasoning

  • Salt (1 tsp) – Enhances overall flavor.
  • Black Pepper (1 tsp) – Adds warmth.
  • Dried Thyme (½ tsp) – Contributes earthy flavor.
  • Dried Rosemary (½ tsp) – Imparts a slightly piney flavor.
  • Dried Sage (1 tsp) – Complements stuffing and turkey flavor.
  • Bay Leaves (2) – Infuses subtle flavor during cooking.

For the Creamy Finish

  • Heavy Cream (½ cup) – Stirred in at the end for a creamy finish.
  • Fresh Thyme – Used as a garnish for color and freshness.

Step‑by‑Step Instructions for Turkey Wild Rice Casserole

Step 1: Sauté the Aromatics
Set your Instant Pot to sauté mode and melt 2 tablespoons of unsalted butter. Add 2 minced garlic cloves, 1 diced white onion, ½ cup diced celery, and ½ cup diced carrots. Sauté for about 2 minutes, stirring occasionally, until the vegetables are softened and fragrant, then turn off the Instant Pot to keep the base warm.

Step 2: Deglaze the Pot
Pour in 3 cups of chicken broth into the pot, using a wooden spoon to scrape up any browned bits from the bottom. This step is crucial for adding depth of flavor to your Turkey Wild Rice Casserole and avoiding the dreaded burn notice during cooking, so ensure all particles are deglazed well.

Step 3: Add the Grains and Veggies
Stir in 1 cup of wild rice, ½ cup of long grain rice, ½ cup of red lentils, and ½ cup of corn to the pot. Mix until everything is well combined, ensuring the grains are evenly distributed. This will create a hearty base for your casserole, adding both texture and nutrition to the dish.

Step 4: Layer the Turkey and Seasoning
Place 2 cups of shredded leftover turkey on top of the rice mixture without stirring. Sprinkle with 1 teaspoon of salt, 1 teaspoon of black pepper, ½ teaspoon of dried thyme, ½ teaspoon of dried rosemary, 1 teaspoon of dried sage, and add 2 bay leaves. This layering allows the flavors to meld beautifully during pressure cooking.

Step 5: Cook Under Pressure
Seal the Instant Pot lid and switch the setting to manual high pressure. Cook for 20 minutes, allowing the casserole to build pressure and cook thoroughly. The lovely aroma will entice your family while it’s cooking, making everyone eager for a cozy meal.

Step 6: Natural Pressure Release
Once the cooking time is done, let the Instant Pot naturally release pressure for 10 minutes. Afterward, carefully turn the valve to release any remaining pressure. This step helps the Turkey Wild Rice Casserole develop flavor and ensures a perfect texture for your dish.

Step 7: Final Touches
Open the lid and remove the bay leaves from the casserole. Stir in ½ cup of heavy cream to add a rich, creamy finish to your casserole. This last step enriches the flavors and gives the dish that cozy, comforting feel everyone loves.

Step 8: Garnish and Serve
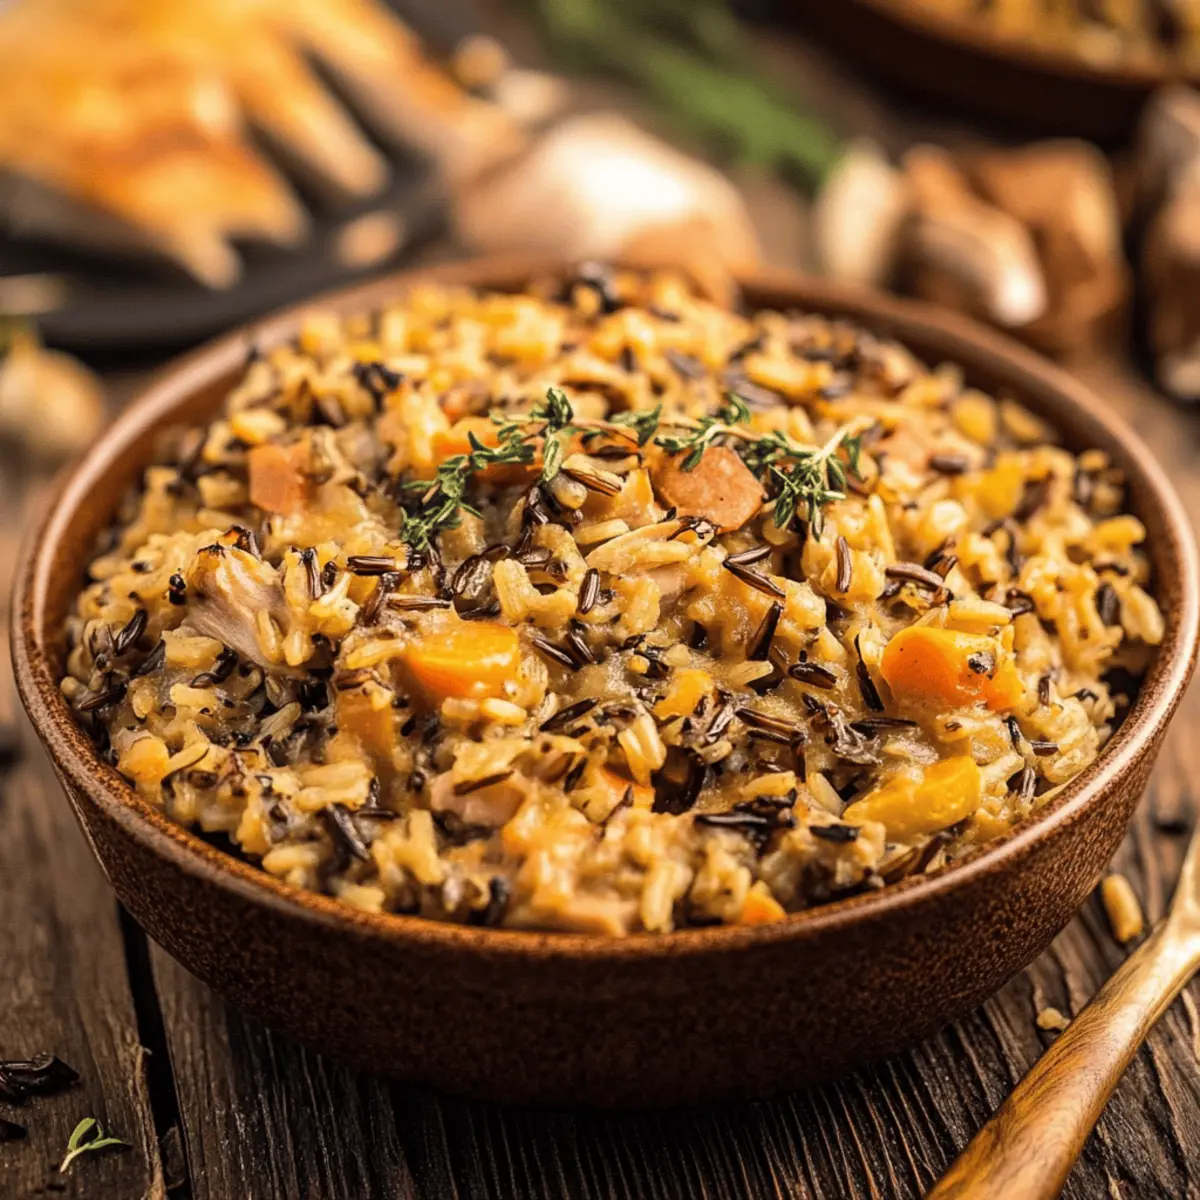
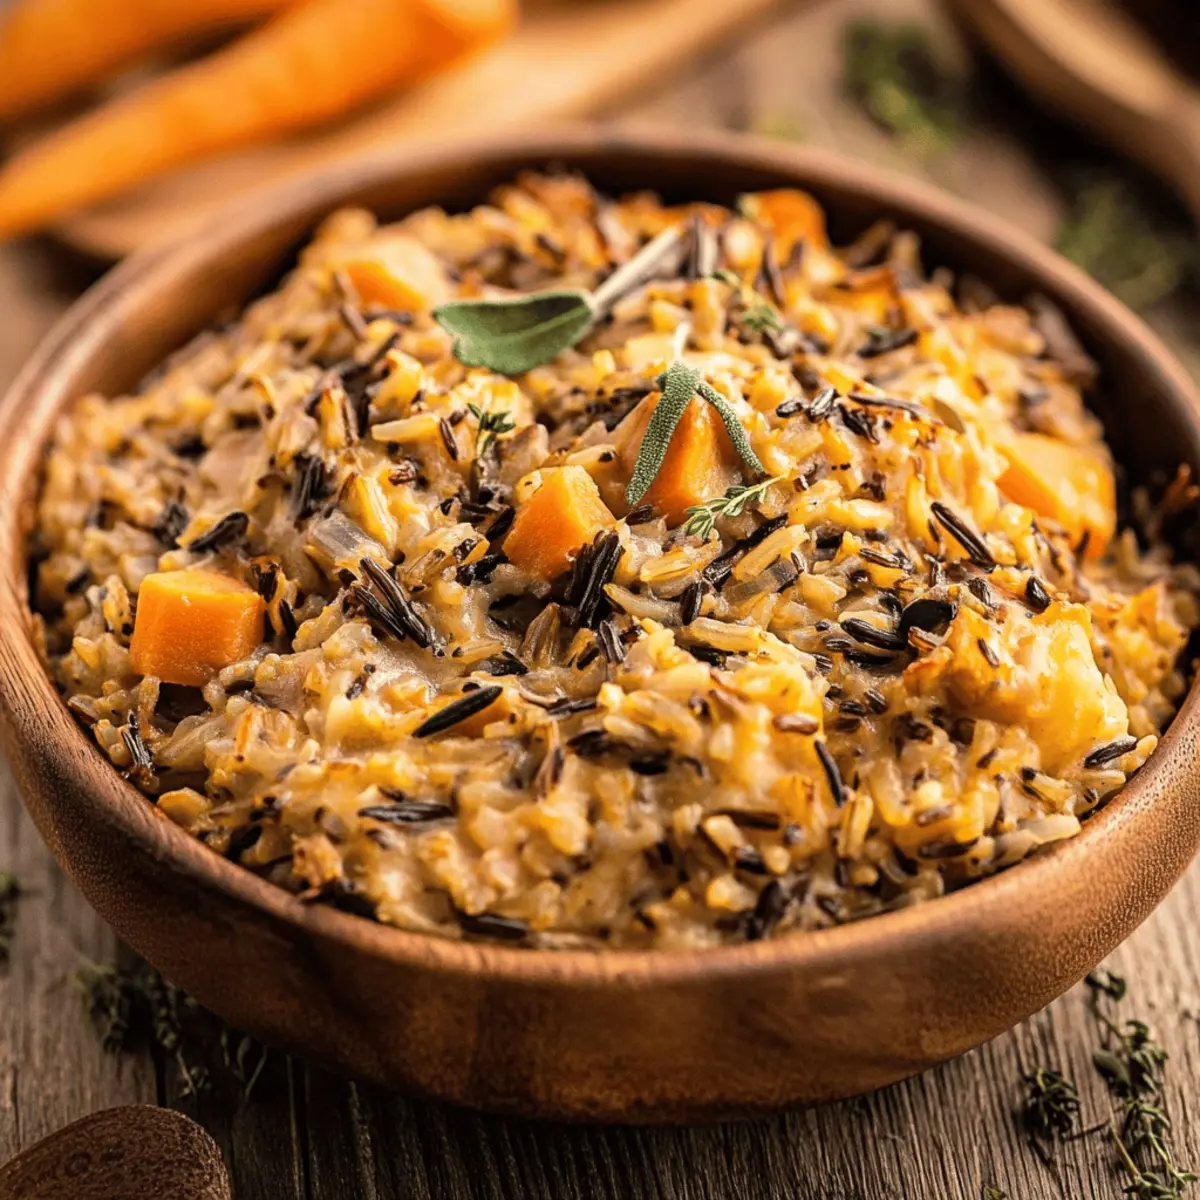
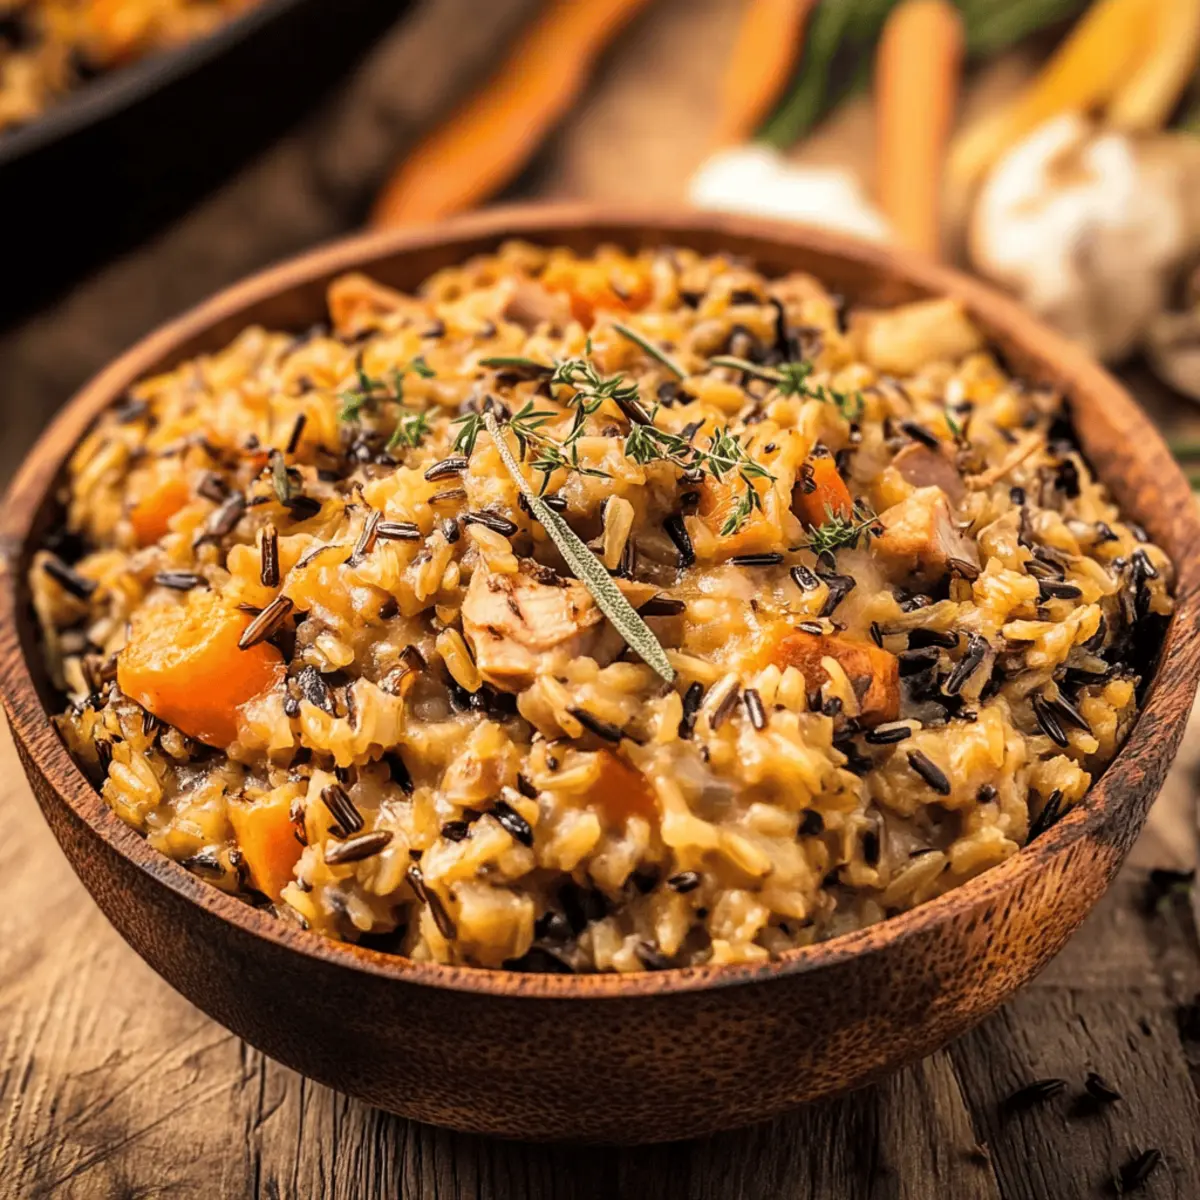
Spoon the Turkey Wild Rice Casserole into bowls and garnish with fresh thyme for a pop of color and freshness. Serve warm, and watch your family enjoy every hearty, creamy bite—it’s a delightful way to turn holiday leftovers into a comforting feast.

What to Serve with Instant Pot Leftover Turkey Wild Rice Casserole?

There’s nothing quite like a cozy meal paired with delightful sides to elevate your dining experience and fill your home with warmth.

  • Simple Side Salad: A light lemon parmesan chopped salad adds a refreshing crunch that balances the creamy casserole perfectly.
  • Crusty Bread: Serve with pumpkin seed or cranberry walnut bread for a nutty contrast that complements the rich flavors of the casserole.
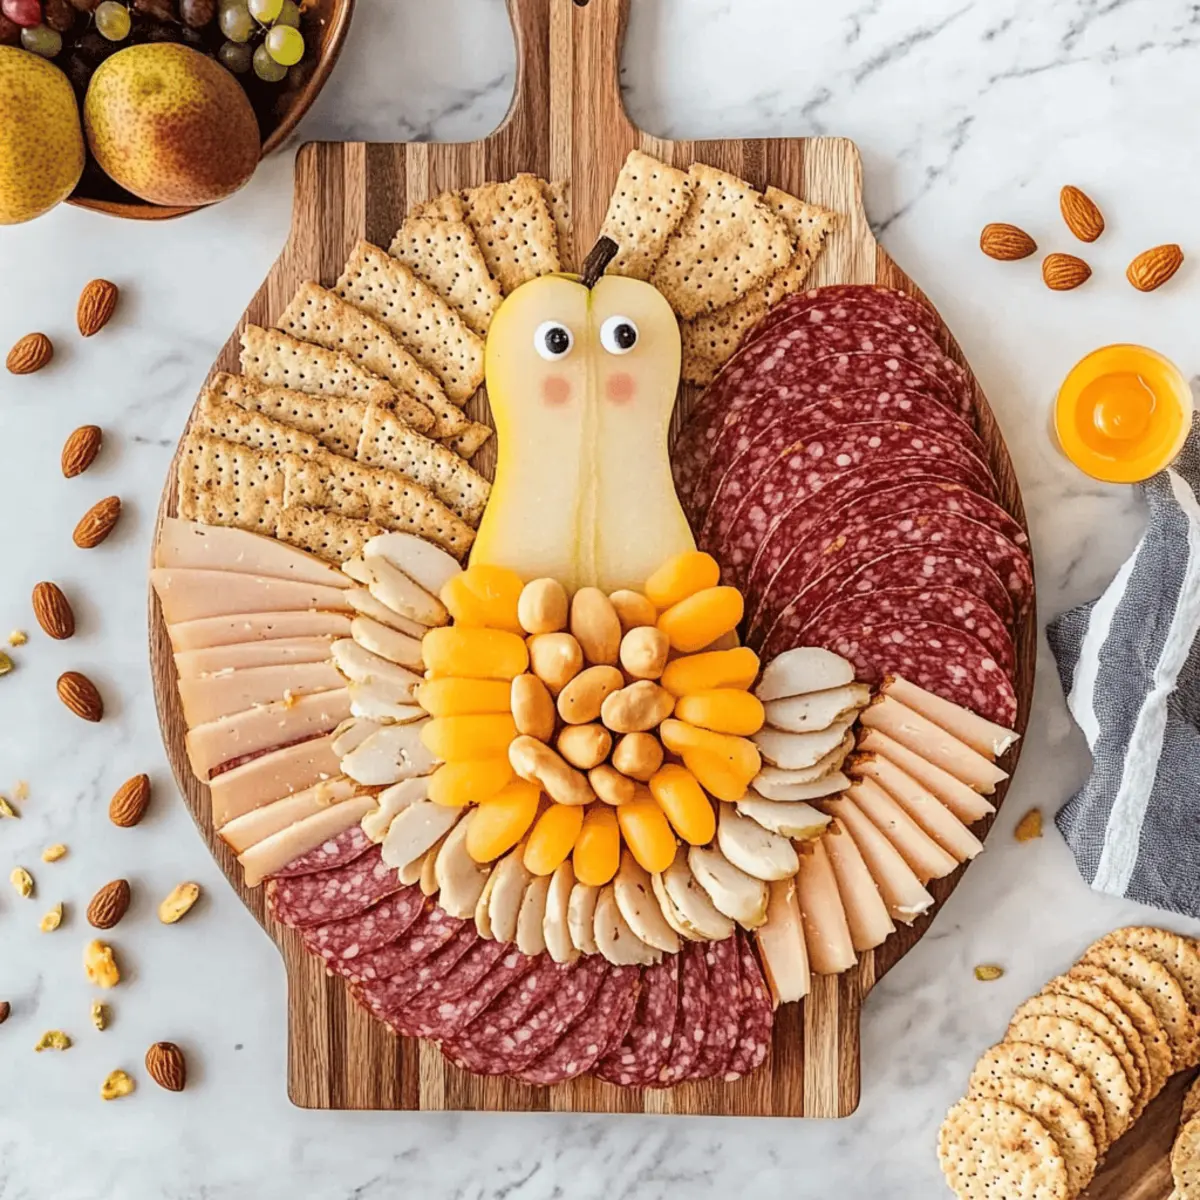
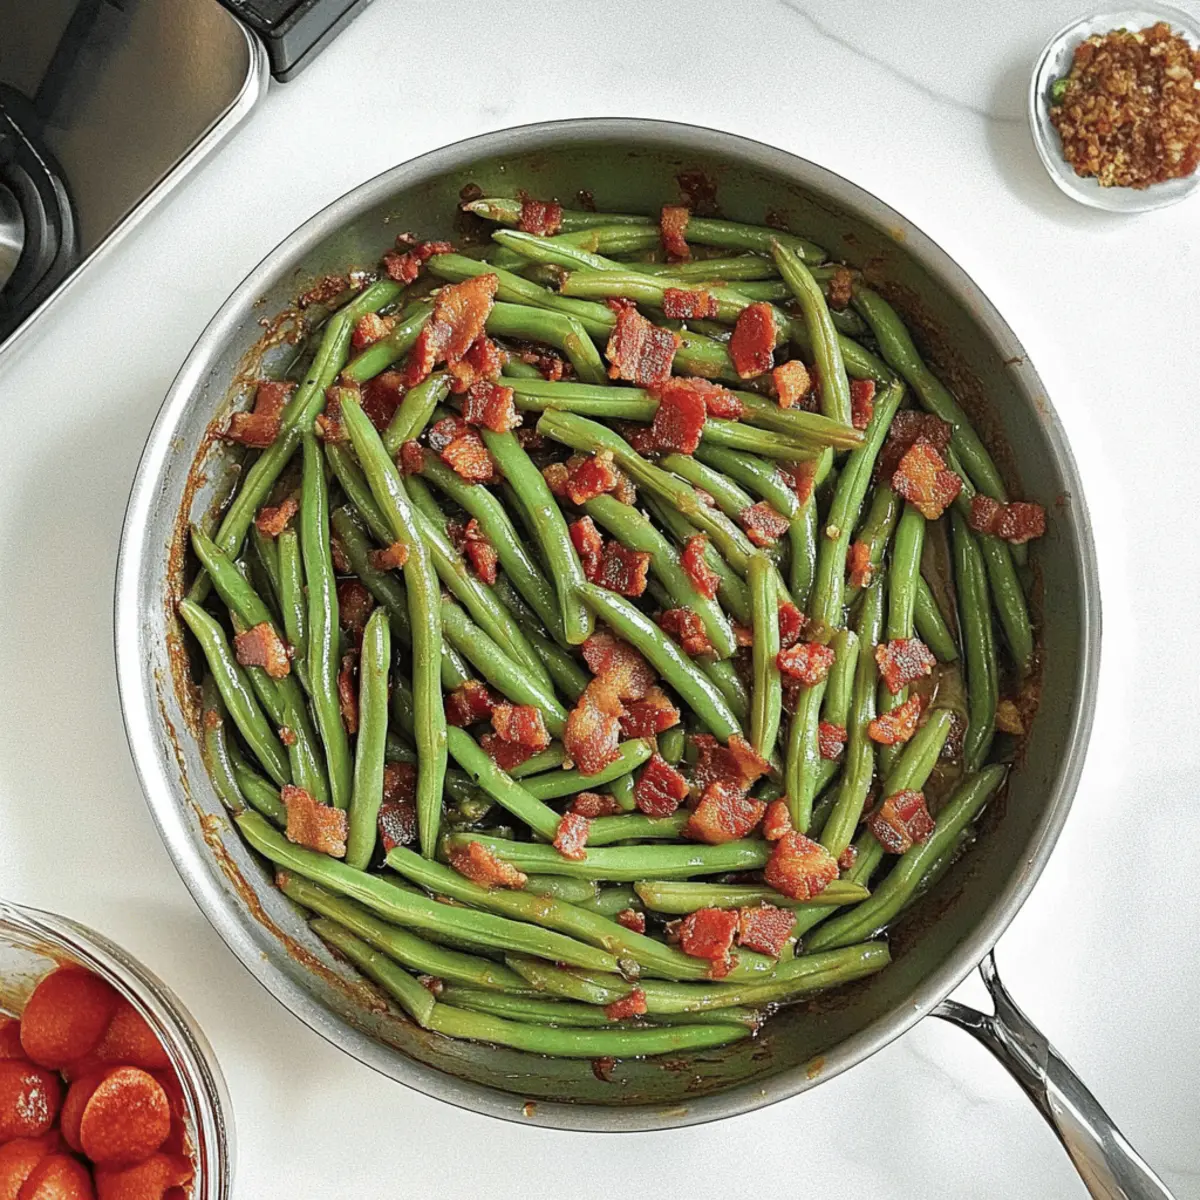
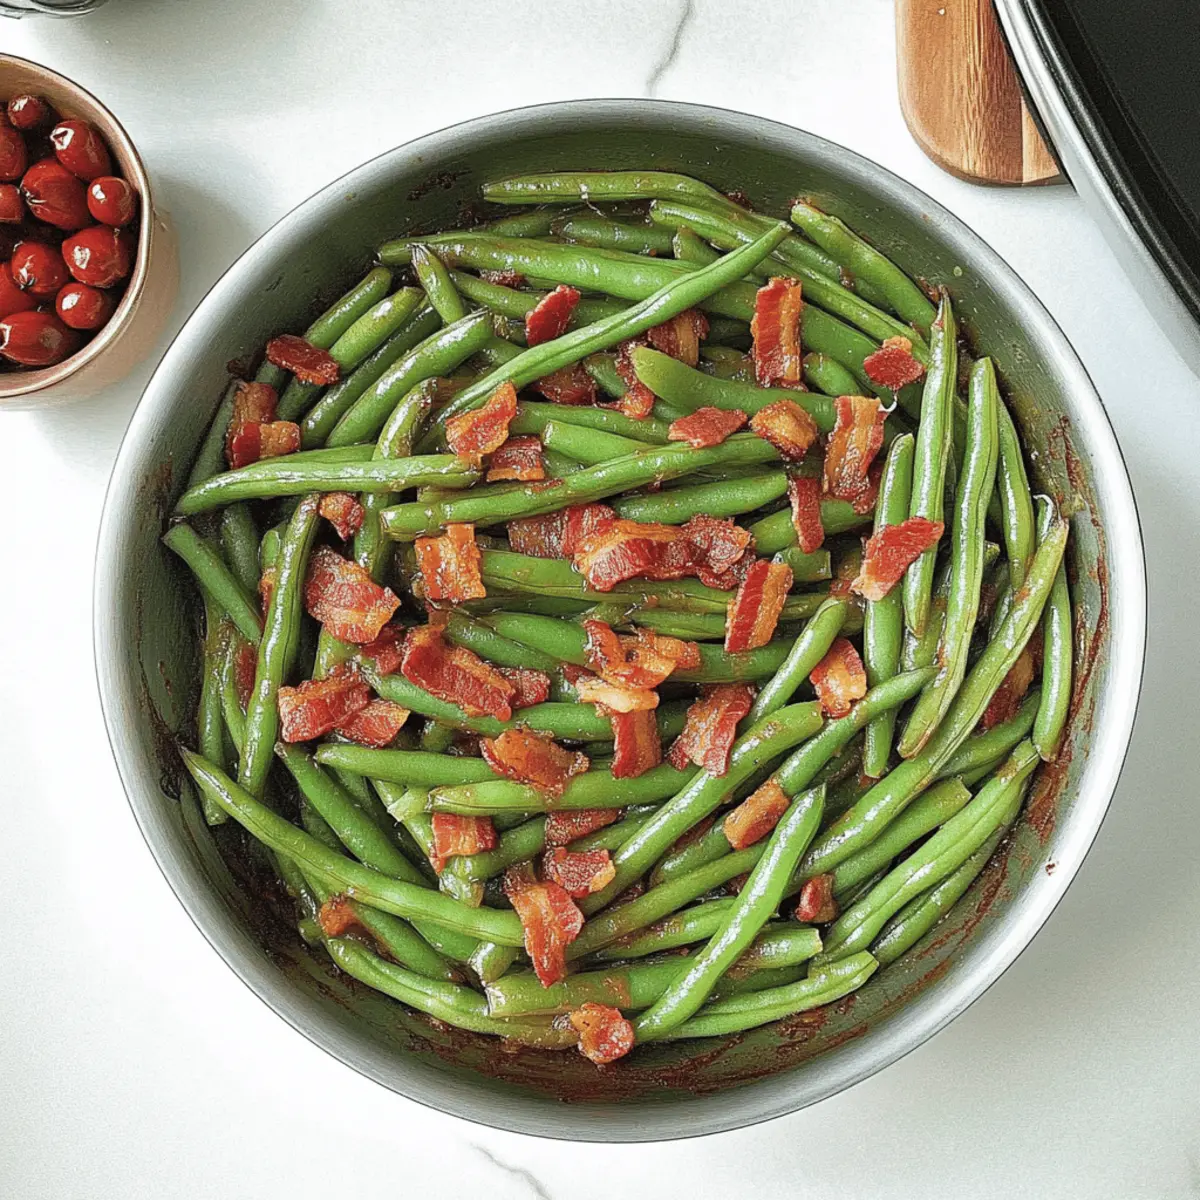
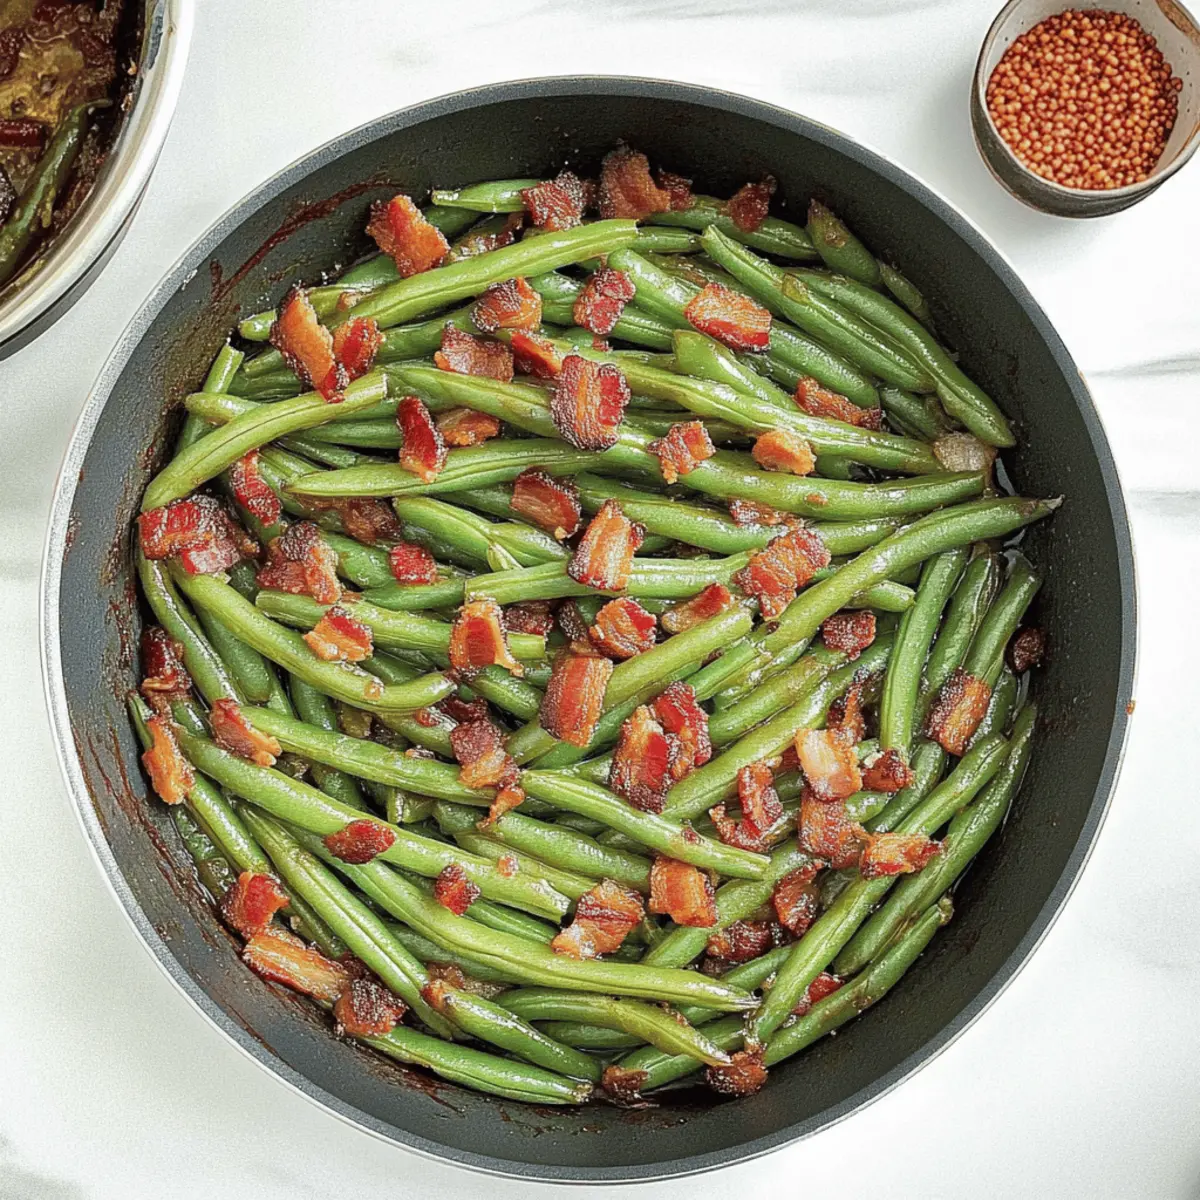
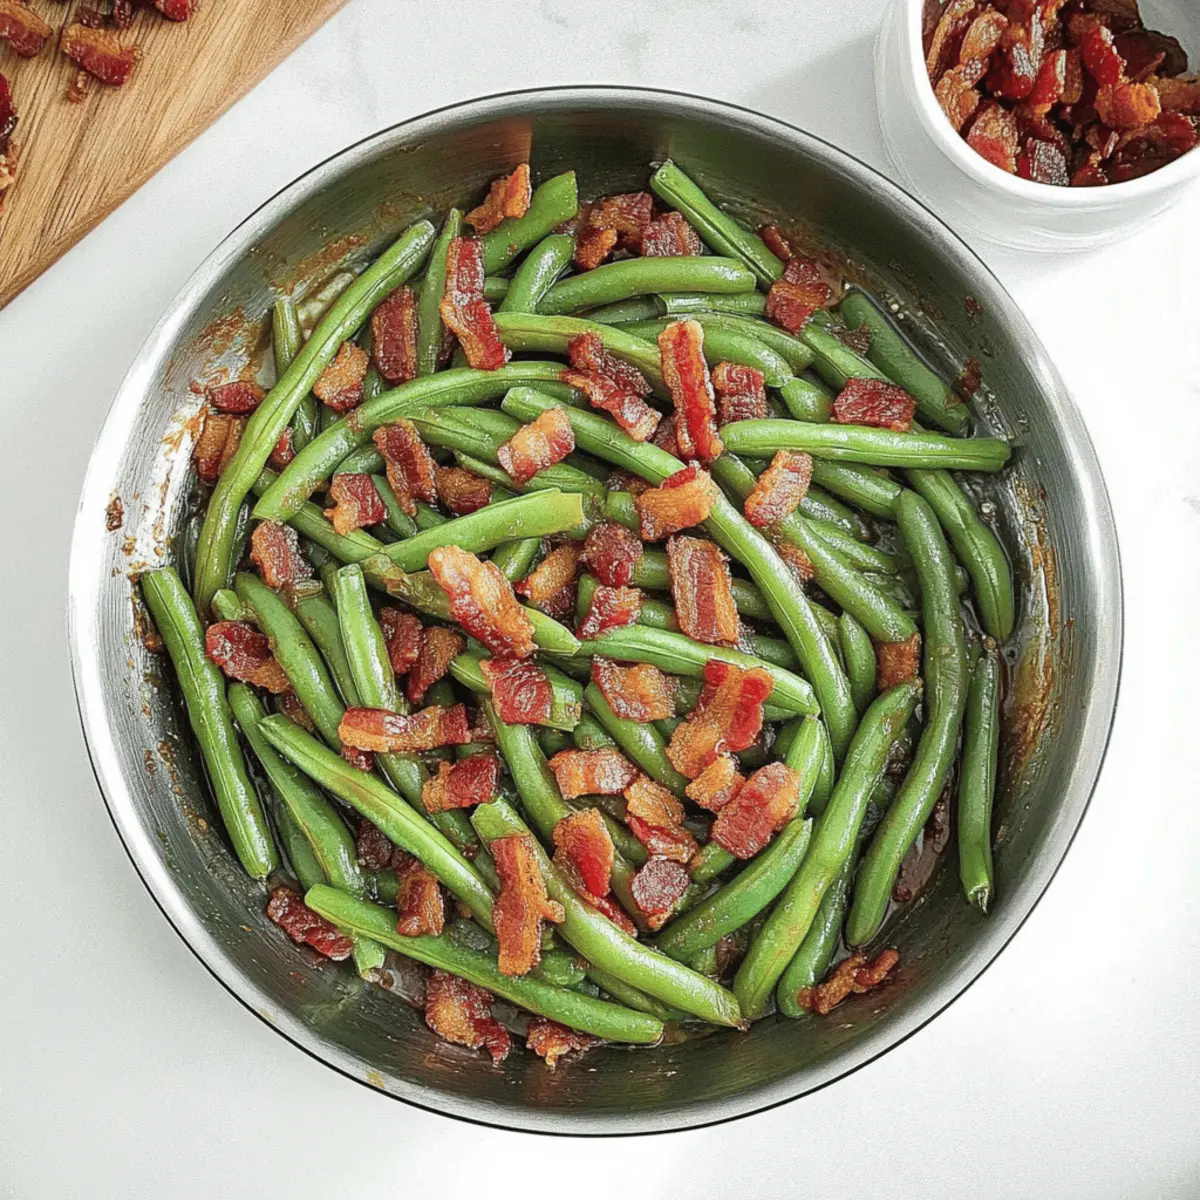
  • Steamed Green Beans: Their crisp-tender texture and mild flavor create a beautiful, fresh counterpart to the hearty turkey wild rice casserole.
  • Roasted Brussels Sprouts: Caramelized and slightly sweet, they add a delightful depth of flavor alongside the savory casserole.
  • Sweet Potato Mash: Creamy and slightly sweet, this side dish contrasts beautifully with the casserole’s savory notes and adds a pop of color to your plate.
  • Savory Cornbread: Perfect for soaking up the creamy sauce, cornbread adds a touch of sweetness and heartiness that rounds out the meal beautifully.
  • Cranberry Sauce: A spoonful of tart cranberry sauce brightens the flavors and celebrates the holiday spirit even after the feast is over.
  • Pumpkin Slab Pie: To finish your meal, a slice of this fall favorite adds a rich sweetness and serves as the perfect indulgence to sweeten the cozy vibe.

How to Store and Freeze Turkey Wild Rice Casserole

Fridge: Store leftover turkey wild rice casserole in an airtight container for up to 3 days. Make sure it’s cooled before sealing to prevent condensation.

Freezer: For longer storage, you can freeze the casserole for up to 3 months. Place it in a freezer-safe container and ensure it's properly sealed.

Reheating: Thaw in the fridge overnight. Reheat in the microwave or on the stovetop, adding a splash of broth or water if needed to regain creaminess.

Make-Ahead Tip: Prepare the casserole ahead of time and store it unbaked in the fridge. It can be baked fresh when you're ready to enjoy a cozy meal!

Expert Tips for Turkey Wild Rice Casserole

  • Deglaze Well: Thoroughly scrape the bottom of the pot after sautéing to prevent a burn notice. This helps your Turkey Wild Rice Casserole achieve deep, rich flavors.

  • Uniform Veggies: Cut your vegetables into similar sizes to ensure they cook evenly. This makes a big difference in texture throughout the dish.

  • Let it Rest: Allow the casserole to sit for a few minutes after cooking. This helps thicken the sauce and enhances flavor, making every bite even more delightful.

  • Creamy Finish: Stir in heavy cream just before serving for an extra layer of richness. If desired, substitute with full-fat coconut milk for a lighter touch.

  • Leftover Flexibility: Don't hesitate to use any meat or veggies you have on hand! Rotisserie chicken or even mushrooms can be excellent alternatives for a personalized twist on the classic Turkey Wild Rice Casserole.

Turkey Wild Rice Casserole Variations

Feel free to tailor this casserole to your family’s taste with these enticing variations!

  • Rotisserie Chicken: Swap out the turkey for rotisserie chicken for a quick and easy option. It’s perfect for those nights when time is of the essence but comfort food is still a must!

  • Mushroom Medley: Add diced mushrooms to the sautéed veggies for an earthy flavor boost. The mushrooms will add a delightful texture and depth, making each bite even more satisfying.

  • Lentil Alternatives: Replace red lentils with more rice, quinoa, or even chickpeas for variety. This allows you to adjust the protein and texture to suit your preferences!

  • Gluten-Free Friendly: Use gluten-free stuffing and ensure your chicken broth is gluten-free. This way, everyone at the table can enjoy this cozy casserole without worry.

  • Creamy Coconut Twist: Substitute heavy cream with full-fat coconut milk for a light, tropical flair. It adds a wonderful creaminess while being dairy-free!

  • Herb Explosion: Experiment with fresh herbs like parsley, dill, or cilantro for a freshness that elevates the flavors in your casserole. Fresh herbs can truly bring your dish to life!

  • Spice it Up: Want some heat? Stir in a teaspoon or two of red pepper flakes or your favorite hot sauce before cooking. It will add a delightful kick that'll spice things up!

  • Vegan Option: For a vegan twist, skip the turkey and use roasted vegetables along with plant-based cream. This way, you’ll make a hearty, plant-packed dish that everyone can enjoy.

If you find yourself yearning for more hearty comfort dishes, don’t miss out on our delicious recipe for Spicy Miso Casserole as your next kitchen adventure!

Make Ahead Options

These Turkey Wild Rice Casserole preparations are perfect for busy home cooks eager to save time during the week! You can prepare the base (steps 1-4) up to 24 hours in advance by storing it in an airtight container in the refrigerator. Be sure to let it cool completely before sealing to preserve quality. When ready to cook, simply add the particulate, seal the Instant Pot, and follow the pressure cooking steps. If you plan to freeze for up to three months, assemble everything but the heavy cream, and add that just before serving to maintain a rich and creamy texture. This way, you'll have a hearty, comforting meal in no time—just as delicious as if made fresh!

Turkey Wild Rice Casserole Recipe FAQs

How do I select ripe ingredients for this casserole?
Absolutely! When choosing your vegetables, look for fresh, firm carrots and celery without dark spots or blemishes. For the onion, opt for one that feels heavy for its size and has a dry skin. As for the wild rice, check for packaging that doesn’t have holes or tears to ensure you’re getting the best quality. The fresher the ingredients, the tastier your Turkey Wild Rice Casserole will be!

How should I store leftovers of the casserole?
Store leftover Turkey Wild Rice Casserole in an airtight container in the refrigerator for up to 3 days. It's crucial to let the dish cool down before sealing it to prevent condensation from making it soggy. I often separate it into portion-sized containers for easy reheating. Just pop them in the microwave when you're ready for a quick meal!

Can I freeze the Turkey Wild Rice Casserole?
Yes, you can freeze it! To do this, allow the casserole to cool completely, then transfer it to a freezer-safe container. It can be frozen for up to 3 months. To reheat, thaw it overnight in the refrigerator and reheat in the microwave or on the stovetop, adding a splash of broth or water to restore creaminess. This way, you have a hearty meal ready whenever you want it!

What should I do if my casserole is too thick after cooking?
If your Turkey Wild Rice Casserole turns out thicker than you’d like, simply add a little chicken broth or water while reheating. Stir it in gradually until you reach the desired consistency. If you find that it’s too thick right after cooking, you can add a splash of broth and stir before closing the lid to allow it to steam gently for a few more minutes.

Are there any dietary considerations for this recipe?
Very! This casserole can be made gluten-free by choosing a gluten-free stuffing and using gluten-free chicken broth. Additionally, ensure that your leftover turkey doesn’t include any elements that could trigger allergies. If you're serving this to pets, keep in mind that certain ingredients like onions and garlic can be harmful to them—so it’s best to keep this dish just for human enjoyment!

Turkey Wild Rice Casserole

Delicious Turkey Wild Rice Casserole for Cozy Nights

Transform leftover turkey into a comforting one-pot meal with this Turkey Wild Rice Casserole, perfect for busy nights.
Print Recipe Pin Recipe
Prep Time 10 minutes mins
Cook Time 30 minutes mins
Total Time 40 minutes mins
Servings: 6 servings
Course: Dinner
Cuisine: American
Calories: 350
Ingredients Equipment Method Nutrition Notes

Ingredients
  

For the Casserole
  • 2 tablespoons Unsalted Butter Adds rich flavor and helps soften vegetables.
  • 2 cloves Garlic, minced Builds the savory base for the casserole.
  • 1 count White Onion, diced Provides aromatic sweetness and depth.
  • 0.5 cup Celery, diced Classic aromatic for texture and flavor.
  • 0.5 cup Carrots, diced Adds sweetness and vibrant color.
  • 3 cups Chicken Broth Supplies necessary liquid for cooking.
  • 1 cup Wild Rice Adds chewiness and earthy flavor.
  • 0.5 cup Long Grain Rice Enhances the dish's texture.
  • 0.5 cup Red Lentils Cook quickly, adding protein.
  • 0.5 cup Corn Introduces sweetness.
  • 1 cup Sage Stuffing, dry Provides herby flavor.
  • 2 cups Leftover Turkey, shredded Gives protein and heartiness.
For Seasoning
  • 1 teaspoon Salt Enhances overall flavor.
  • 1 teaspoon Black Pepper Adds warmth.
  • 0.5 teaspoon Dried Thyme Contributes earthy flavor.
  • 0.5 teaspoon Dried Rosemary Imparts a slightly piney flavor.
  • 1 teaspoon Dried Sage Complements stuffing and turkey flavor.
  • 2 count Bay Leaves Infuses subtle flavor.
For the Creamy Finish
  • 0.5 cup Heavy Cream Stirred in at the end for a creamy finish.
  • Fresh Thyme Used as a garnish for freshness.

Equipment

  • Instant Pot

Method
 

Step‑by‑Step Instructions
  1. Set your Instant Pot to sauté mode and melt 2 tablespoons of unsalted butter. Add 2 minced garlic cloves, 1 diced white onion, ½ cup diced celery, and ½ cup diced carrots. Sauté for about 2 minutes, stirring occasionally, until softened.
  2. Pour in 3 cups of chicken broth, scraping up any browned bits from the bottom.
  3. Stir in 1 cup of wild rice, ½ cup of long grain rice, ½ cup of red lentils, and ½ cup of corn.
  4. Layer 2 cups of shredded leftover turkey on top without stirring. Sprinkle with seasonings.
  5. Seal the Instant Pot lid and cook on manual high pressure for 20 minutes.
  6. Let the Instant Pot naturally release pressure for 10 minutes.
  7. Open the lid and remove the bay leaves. Stir in ½ cup of heavy cream.
  8. Serve warm, garnished with fresh thyme.

Nutrition

Serving: 1cupCalories: 350kcalCarbohydrates: 45gProtein: 22gFat: 12gSaturated Fat: 7gPolyunsaturated Fat: 1gMonounsaturated Fat: 3gCholesterol: 85mgSodium: 720mgPotassium: 500mgFiber: 4gSugar: 2gVitamin A: 180IUVitamin C: 6mgCalcium: 50mgIron: 2mg

Notes

This casserole is flexible; use other meats or veggies if desired. Allow it to rest for better flavor and texture.

Tried this recipe?

Let us know how it was!

Craft Adorable Pine Cone Turkeys for Your Thanksgiving Decor

October 20, 2025 by Grace Snow Leave a Comment

As I rummaged through the autumn leaves, I stumbled upon an idea that combines nature's charm with our holiday spirit—adorable Pine Cone Turkeys! This delightful DIY craft not only provides a perfect way to engage kids and adults alike but also creates personalized decorations that will brighten any Thanksgiving gathering. With just a few simple materials like pinecones, acrylic paint, and pipe cleaners, you can whip up these whimsical turkeys without breaking the bank. Plus, they double as unique table centerpieces or festive gifts, adding a warm, homey touch to your holiday decor. Are you ready to unleash your creativity and embrace this fun crafting adventure? Let's dive in!

Why Make Pine Cone Turkeys?

Family Fun: This craft is perfect for both kids and adults, making it a fantastic way to bond over creativity during the Thanksgiving season.

Budget-Friendly: Using simple supplies like pinecones, acrylic paint, and pipe cleaners means you can create deliciously charming decor without overspending.

Unique Decor: Each turkey is a one-of-a-kind masterpiece, adding a personal touch to your holiday table or mantle.

Versatile Use: Not only do they serve as adorable centerpieces, but they also make perfect gifts or festive party favors to delight your guests!

Memorable Tradition: Crafting Pine Cone Turkeys can become a cherished family tradition, linking your loved ones to the joy of Thanksgiving decor.

Pine Cone Turkey Ingredients

• Gather your supplies to start crafting these delightful Pine Cone Turkeys!

For the Turkey Body

  • Pinecones – Look for medium-sized ones (about 3x3 inches) for a sturdy base; they provide rustic charm to your decorations.

For the Feathers

  • Matte Acrylic Craft Paint – Choose vibrant colors like orange, yellow, and red to brighten your turkeys' feathers; easily found at craft or dollar stores for budget-friendly fun.

For the Features

  • Craft Paper Scraps – Use colorful scraps to create beaks and wattles; orange, yellow, and red are festive color choices to match the Thanksgiving spirit.
  • Pipe Cleaners – Use these lively colors for legs and facial features; they’re flexible and can easily be shaped into charming turkey legs.
  • Googly Eyes – 15mm (0.6-inch) eyes add an adorable touch to each turkey's personality; they make your creations come alive!

Enjoy crafting these Pine Cone Turkeys and let your creativity shine as you personalize each turkey!

Step‑by‑Step Instructions for Pine Cone Turkeys

Step 1: Paint the Feathers
Begin by selecting your matte acrylic craft paint in vibrant colors like orange, yellow, and red. Using a paintbrush, apply the paint to the tips of each pinecone, making sure to cover them generously while leaving some sections natural for a charming contrast. Allow the painted feathers to dry for about 15-20 minutes before proceeding, ensuring the colors stay bold and lively.

Step 2: Make the Legs
While the feathers dry, take your pipe cleaners and cut them into lengths suited for turkey legs. Bend each piece into a U-shape to form the legs. Once shaped, secure them to the base of the pinecone by applying hot glue, making sure they are firmly attached. Ensure the legs are evenly spaced and provide a sturdy foundation for your Pine Cone Turkeys.

Step 3: Shape the Faces
Next, take a pipe cleaner and curl it into a spiral shape to create the turkey’s head. This will add whimsy and character to your Pine Cone Turkeys. Once shaped, carefully secure the spiral to the top of the pinecone using a small amount of hot glue. This step starts giving your turkey its charming personality, so have fun with the shape!

Step 4: Cut and Attach Features
Now it's time to bring your Pine Cone Turkeys to life! Cut small shapes from your craft paper scraps to form beaks and wattles, sticking with festive colors like orange and red. Use hot glue to attach these features along with googly eyes to the curled pipe cleaner. Position them to give your turkey an endearing expression, ensuring the features are securely glued.

Step 5: Assemble
Finally, attach the completed face to the front of the pinecone using a generous dab of hot glue. Hold it in place for a few moments to allow the glue to set. Once secure, step back and admire your Pine Cone Turkeys, ready to bring warmth and charm to your Thanksgiving decorations. Make sure to let your creations fully dry in a stable location before displaying them.

Pine Cone Turkeys Variations & Substitutions

Feel free to get creative and customize your Pine Cone Turkeys to make them uniquely yours!

  • Metallic Paints: Use metallic paints instead of matte for a glamorous holiday look. These shimmering turkeys will catch everyone's eye on your table.

  • Pastel Colors: Swap bright colors for soft pastels if you're aiming for a cheerful, springtime vibe rather than traditional autumn hues. This gives a fresh and fun twist!

  • Hand-Drawn Eyes: Instead of googly eyes, draw or paint faces for a personal touch. You can let kids create their own unique expressions, making every turkey truly special.

  • Patterned Paper: Integrate patterned scrapbook paper for more colorful beaks and wattles. Think polka dots or florals to add flair and personality to your turkeys.

  • Twisted Pipe Cleaners: Create spiral or braided legs using multiple colors of pipe cleaners for extra pizzazz, adding a whimsical twist to your turkey creations.

  • Felt Features: Try using felt instead of paper for the beaks and wattles. They offer a soft texture that can elevate the aesthetic of your turkey while being easy to cut and glue.

  • Natural Decor: Incorporate small pine needles or acorns as additional decorations around your turkeys, enhancing their connection to nature.

  • Spicy Touch: Add a little heat to your crafting vibe by sharing some spicy recipes or hot beverages to enjoy while creating these adorable decorations. Cozy blankets and a hot cup of pumpkin spice latte will warm up your crafting time!

Make Ahead Options

These adorable Pine Cone Turkeys are perfect for busy home cooks looking to simplify their Thanksgiving preparations! You can paint the pinecones and shape the legs up to 24 hours in advance; just store them in a cool, dry place to maintain their vibrant colors and quality. For the facial features, cut out the beaks and wattles, as well as prepare the googly eyes ahead of time—keeping them in a sealed bag will ensure they stay fresh until you’re ready to finish. When it’s time to gather your family and assemble, simply glue the features onto your painted pinecones, and you’ll have delightful decorations ready in no time, allowing you to enjoy the holiday spirit without stress!

What to Serve with Adorable Pine Cone Turkeys?

Bring your Thanksgiving table to life with delightful pairings that enhance both your meal and this charming decor.

  • Savory Stuffing: A classic walnut and sage stuffing complements the earthy flavor of your Thanksgiving feast while echoing the rustic charm of the pine cone turkeys.

  • Cranberry Sauce: This tangy, sweet sauce adds a refreshing contrast to the savory meats and side dishes, brightening your table and palate alongside your creative decor.

  • Maple Glazed Carrots: Roasted carrots tossed in maple syrup create a luscious sweetness that ties harmoniously with your holiday spread and echoes the autumn colors of your turkeys.

  • Pumpkin Pie: Nothing celebrates Thanksgiving quite like creamy pumpkin pie. Its warm spices create a comforting end to your meal, echoing the festive spirit brought by your crafted turkeys.

  • Herb Roasted Turkey: While you showcase your adorable pine cone versions, savor a succulent herb-roasted turkey, a centerpiece that ties together your crafting journey with a delicious tradition.

  • Spiced Apple Cider: Warm spiced apple cider is a perfect seasonal drink to serve guests, embracing the cozy holiday atmosphere while inviting them to sip and enjoy their surroundings.

  • Garlic Mashed Potatoes: Creamy garlic mashed potatoes provide the ultimate comfort food, enriching your meal while bringing a delightful balance to your Thanksgiving table.

  • Roasted Brussels Sprouts: Crispy Brussels sprouts with a hint of balsamic glaze engage your guests with their texture and flavor, making them an ideal side alongside your festive decor.

Each of these pairings not only blends perfectly with your homemade meal but also complements the whimsical charm of your pine cone turkeys!

Storage Tips for Pine Cone Turkeys

  • Room Temperature: Keep your Pine Cone Turkeys in a dry, stable area, away from direct sunlight to maintain their colorful appearance and structure.

  • Fridge: Not recommended; these decorations do not require refrigeration as they’re not perishable.

  • Display: Arrange turkeys on your mantel or dining table where they can be appreciated. Just ensure they are secure on the surface to prevent tipping.

  • Make-Ahead Tips: You can craft these turkeys in advance. They can be stored in a box or basket, keeping them safe until it's time for Thanksgiving display!

Expert Tips for Pine Cone Turkeys

  • Choose Dry Pinecones: Ensure your pinecones are completely dry to help glue adhere better and make painting easier.

  • Allow Drying Time: After painting, permit 15-20 minutes of drying time between applications to avoid mixing colors and maintain vibrancy.

  • Second Coat Advantage: For a deeper color, don’t hesitate to apply a second coat of paint—this enhances the brightness of your Pine Cone Turkeys.

  • Trim Legs if Necessary: If the pipe cleaner legs seem too long, gently trim them to create a better proportion for your turkey’s appearance.

  • Mix Feature Shapes: Get creative with various shapes and colors for beaks and wattles, adding a unique flair to each of your delightful turkeys.

Pine Cone Turkeys Recipe FAQs

How do I choose the right pinecones for my turkeys?
Choosing the right pinecones is essential for building sturdy Pine Cone Turkeys. Look for medium-sized pinecones, approximately 3x3 inches, that are dry and free from dark spots or mold. This ensures a solid base for decoration and makes painting easier.

How should I store my Pine Cone Turkeys after making them?
Store your Pine Cone Turkeys at room temperature in a dry, stable area, away from direct sunlight. Placing them on a mantel or a dining table where they can be admired is ideal. Just make sure they're secured on the surface to prevent them from tipping over.

Can I freeze my Pine Cone Turkeys for later use?
Freezing is not recommended for Pine Cone Turkeys, as they are decorative items and don’t require refrigeration. Keeping them in a stable environment is best to preserve their appearance and structural integrity.

What should I do if my paint is mixing on the pinecones?
If you notice your colors mixing while painting, it's likely the paint isn't dry yet. To prevent this, allow each layer of paint to dry for 15-20 minutes before applying additional coats. If you're already mixing colors, let it dry fully, then consider painting over with a second coat once it's hardened.

Are these turkeys safe for pets or children?
Yes, Pine Cone Turkeys can be safe around pets and children, but supervision is encouraged. Some materials, like googly eyes and pipe cleaners, could pose a choking hazard if removed. It's always best to keep an eye on little ones and furry friends while they’re around your festive decorations.

Pine Cone Turkeys

Craft Adorable Pine Cone Turkeys for Your Thanksgiving Decor

Create delightful Pine Cone Turkeys that add a charming touch to your Thanksgiving decor, perfect for family bonding.
Print Recipe Pin Recipe
Prep Time 20 minutes mins
Total Time 20 minutes mins
Servings: 1 turkey
Course: Uncategorized
Cuisine: Thanksgiving
Ingredients Equipment Method Nutrition Notes

Ingredients
  

For the Turkey Body
  • 1 medium-sized Pinecone About 3x3 inches for a sturdy base.
For the Feathers
  • 3 colors Matte Acrylic Craft Paint Choose vibrant colors like orange, yellow, and red.
For the Features
  • 1 pack Craft Paper Scraps Use orange, yellow, and red for beaks and wattles.
  • 2 pieces Pipe Cleaners Use for legs and facial features.
  • 2 pcs Googly Eyes 15mm (0.6-inch) for personality.

Equipment

  • Paintbrush
  • Hot glue gun
  • Scissors

Method
 

Step-by-Step Instructions
  1. Begin by selecting your matte acrylic craft paint in vibrant colors. Using a paintbrush, apply the paint to the tips of each pinecone, making sure to cover them generously while leaving some sections natural. Allow to dry for about 15-20 minutes.
  2. While the feathers dry, take your pipe cleaners and cut them to form turkey legs. Bend into a U-shape and secure to the base with hot glue.
  3. Curl a pipe cleaner into a spiral shape for the turkey’s head and secure it to the top of the pinecone with hot glue.
  4. Cut shapes from craft paper scraps for beaks and wattles. Use hot glue to attach these features along with googly eyes to the curled pipe cleaner.
  5. Attach the completed face to the front of the pinecone using hot glue. Hold in place to set. Let dry before displaying your Pine Cone Turkeys.

Nutrition

Serving: 1turkey

Notes

Pine Cone Turkeys are a fun and budget-friendly craft that can become a cherished family tradition during Thanksgiving.

Tried this recipe?

Let us know how it was!

Delicious Rice Krispie Turkey Legs for a Fun Holiday Treat

October 20, 2025 by Grace Snow Leave a Comment

As I wandered through the bustling aisles of my local market, I stumbled upon a delightful sight: a gaggle of joyful kids, eyes wide with wonder, crafting their own Thanksgiving treats. That's when it hit me—these adorable Rice Krispie Turkey Legs are just what we need to bring a sprinkle of magic to our holiday celebrations! These kid-friendly snacks not only look like mini drumsticks but are also incredibly easy to whip up using simple ingredients like marshmallows and pretzels. In no time, you’ll have a festive treat that’s perfect for both young chefs and big kids at heart. What's even better? They lend themselves to gluten-free options, making them a guilt-free indulgence for everyone at your table. Ready to impress your loved ones? Let's dive into this fun recipe that will surely become a cherished staple on your holiday dessert spread!

Why Are Rice Krispie Turkey Legs a Hit?

Kid-Friendly Fun: These delightful treats turn snack time into a creative adventure for both kids and adults. Quick to Make: With just a few easy steps, you can have a festive dessert ready in no time. Visual Appeal: Their cute, drumstick appearance will make them the star of your holiday table. Customizable: Feel free to use gluten-free pretzels or change the flavor of melting wafers to suit your taste preferences. Crowd-Pleaser: Kids and adults alike will love these sweet, crunchy creations, making them a hit at any gathering. Pair them with pumpkin s’mores cookies for an extra festive touch!

Rice Krispie Turkey Legs Ingredients

For the Turkey Legs
• Pretzel Rods – The main structure for turkey leg bones; substitute with gluten-free pretzels for dietary needs.
• Vanilla Melting Wafers – Provides a smooth coating and sweet flavor; any brand can be used.
• Vanilla Extract – Enhances the vanilla flavor; can be replaced with vanilla paste for a more intense taste.
• Salt – Balances sweetness; can reduce or omit if desired, especially if using salted butter.
• Mini Marshmallows – Used for shaping the bone ends and coating the legs; keep extra on hand for adjustments.
• Unsalted Butter – Offers richness; substitute with salted butter by halving the added salt.
• Cocoa Krispies Cereal – Gives the turkey legs an appealing brown color and crunchy texture; consider using gluten-free cereal for a gluten-free version.

Step‑by‑Step Instructions for Rice Krispie Turkey Legs

Step 1: Melt Candy Wafers
Begin by placing your vanilla melting wafers in a microwave-safe bowl. Heat in the microwave on low power for 30 seconds at a time, stirring after each interval until the mixture is smooth and glossy. This process should take about 1-2 minutes total. Set the melted wafers aside as you prepare to dip the pretzel rods.

Step 2: Dip and Shape Pretzel Rods
Take your pretzel rods and gently dip them halfway into the melted candy wafers, allowing any excess to drip off. While the coating is still soft, firmly press two mini marshmallows onto the ends of each rod to create the “bone” of your turkey leg. Place the dipped pretzel rods on a parchment-lined tray and chill in the refrigerator for about 5 minutes, or until the coating has set.

Step 3: Prepare Rice Krispie Mixture
In a large pot over low heat, melt the unsalted butter. Once melted, add the remaining mini marshmallows, stirring continuously until they are completely melted and the mixture is smooth. Remove from heat, then stir in a pinch of salt and vanilla extract for added flavor. This mixture will be the sweet base for your Rice Krispie turkey legs.

Step 4: Combine Cereal
Once the marshmallow mixture is smooth, gently fold in the Cocoa Krispies cereal with a spatula. Be careful to mix thoroughly but gently to avoid breaking the cereal pieces. Allow the mixture to cool for a few minutes, which will make it easier to shape as you prepare to form the turkey legs.

Step 5: Shape Turkey Legs
With your hands slightly greased to prevent sticking, take about ½ cup of the Rice Krispie mixture and mold it around each pretzel bone, forming the shape of a turkey leg. Ensure that the mixture adheres well to the pretzel rod. Repeat this process for all the pretzel rods and set each shaped leg on the same parchment-lined tray.

Step 6: Final Setting
Once all the turkey legs are shaped, set them aside to cool completely at room temperature for 10-20 minutes. This time allows the Rice Krispie mixture to firm up, creating a delightful crunchy texture that perfectly complements the creamy marshmallow coating. Now they're ready to serve and impress during your festive celebrations!

How to Store and Freeze Rice Krispie Turkey Legs

  • Room Temperature: Keep your Rice Krispie turkey legs in an airtight container at room temperature for up to 2-3 days to maintain their freshness and crunch.

  • Fridge: If you want to extend their shelf life, you can refrigerate them for up to 5 days. Just be aware that the texture may firm up slightly, so let them sit at room temperature for a few minutes before enjoying.

  • Freezer: For longer storage, wrap individual turkey legs tightly in plastic wrap and place them in a freezer-safe container. They can be frozen for up to 3 months. Thaw in the refrigerator overnight before serving.

  • Reheating: There's no need to reheat these treats; simply enjoy them at room temperature for the best taste and texture!

Expert Tips for Rice Krispie Turkey Legs

• Nonstick Spray: Use nonstick spray on your hands to prevent the Rice Krispie mixture from sticking while shaping the turkey legs.

• Cooling Time: Make sure the Rice Krispie mixture cools for a few minutes before molding; if it's too warm, it can become gooey and difficult to handle.

• Quick Work: After coating the pretzels in melted wafers, shape the Turkey Legs quickly to maintain the best presentation. Don't let the coating set up too much before molding.

• Texture Balance: If using salted butter, be sure to adjust the amount of added salt to maintain the sweet-salty balance in your Rice Krispie Turkey Legs.

• Customization Options: Feel free to experiment with different melting wafer flavors for unique looks and tastes; chocolate and colorful candy melts can add fun variations!

What to Serve with Thanksgiving Rice Krispie Turkey Legs

Add a delightful touch to your holiday feast by pairing these whimsical treats with complementary flavors and textures.

  • Pumpkin S’mores Cookies: The warm, spiced flavor of pumpkin cookies provides a cozy contrast to the sweet crunch of the Rice Krispie turkey legs.
  • Festive Fruit Salad: Bright, juicy fruits offer a refreshing palette cleanser, balancing the sweetness of the turkey legs while adding a burst of color to your table.
  • Whipped Cinnamon Butter: Spread this creamy, spiced butter on warm rolls for a mouthwatering side that enhances the sweet notes of your Rice Krispie legs.
  • Chocolate-Dipped Strawberries: The rich chocolate paired with tart strawberries makes for a joyful bite that pairs beautifully with the playful theme of the turkey legs.
  • Warm Apple Cider: This fragrant drink adds an aromatic warmth, echoing the delectable flavors of the season while providing a comforting sip alongside your treats.
  • Mini Pumpkin Spice Lattes: A small but flavorful coffee treat that ties in the festive spirit, offering a cozy drink option to accompany your playful dessert.
  • Marshmallow Fluff Dip: Serve this sweet and creamy dip on the side, allowing guests to dunk their turkey legs for an extra marshmallowy indulgence.

Make Ahead Options

These Rice Krispie Turkey Legs are perfect for meal prep enthusiasts looking to save time during the busy holiday season! You can prepare the pretzel rods dipped in melted wafers and shaped with marshmallows up to 24 hours in advance. Simply store them in an airtight container at room temperature to maintain their crunch. Additionally, the Rice Krispie mixture can be made ahead and stored in the refrigerator for up to 3 days; just make sure it's tightly covered. When you're ready to finish, mold the cooled mixture around the pretzel bones and allow them to set for about 10-20 minutes before serving. This way, you'll have delightful, homemade treats ready with minimal effort—just as delicious as when freshly made!

Rice Krispie Turkey Legs Variations

Feel free to get creative with these fun Rice Krispie turkey legs to match your family's preferences or dietary needs!

  • Gluten-Free: Substitute pretzel rods with gluten-free pretzels to keep this tasty treat accessible for everyone.
  • Flavorful Wafers: Use chocolate or colored melting wafers for a unique taste and festive flair that’ll wow your guests.
  • Nutty Twist: Add crushed nuts, like peanuts or almonds, to the Rice Krispie mixture for an extra crunch and delicious flavor.
  • Dipping Delight: Serve with a side of melted chocolate or caramel sauce for dipping, adding a luscious layer of flavor.
  • Marshmallow Fluff: Incorporate marshmallow fluff into the Rice Krispie mixture for an even chewier texture that kids will love.
  • Fruit Fusion: Mix in dried fruits such as cranberries or cherries to add a sweet, chewy burst that complements the treat.
  • Spicy Surprise: If you're feeling adventurous, sprinkle a little cayenne pepper on the melted wafers for a sweet-and-spicy combo that'll thrill your taste buds.
  • Crispy Coating: Roll the shaped turkey legs in crushed graham crackers or coconut for an extra layer of texture and flavor.

Feel inspired? Pair these fun Rice Krispie turkey legs with a delicious batch of pumpkin s’mores cookies or festive Lime Chicken Rice for the perfect holiday spread!

Rice Krispie Turkey Legs Recipe FAQs

How do I know when my pretzel rods are fresh?
Absolutely! Look for pretzel rods that are crisp and free from any dark spots or peculiar odors. Fresh pretzels should be firm to the touch and maintain their shape, which ensures your turkey legs will have a solid structure.

Can I store Rice Krispie turkey legs?
Yes, you can store your Rice Krispie turkey legs! Keep them in an airtight container at room temperature for up to 2-3 days. If you want to keep them longer, refrigerate them for up to 5 days, but be aware that they may become a bit firmer in texture.

How do I freeze Rice Krispie turkey legs?
Absolutely! To freeze your Rice Krispie turkey legs, first wrap each turkey leg tightly in plastic wrap to prevent freezer burn. Place them in a freezer-safe container, and they can last up to 3 months. When you're ready to enjoy them, simply thaw overnight in the refrigerator, and let them come to room temperature before serving.

What should I do if my Rice Krispie mixture is too sticky?
Very! If your Rice Krispie mixture feels sticky and hard to mold, try letting it cool for a few minutes longer. You can also lightly grease your hands with nonstick spray to prevent sticking while shaping the legs. If all else fails, add a handful of extra Cocoa Krispies to the mixture to tone down the stickiness.

Can I make Rice Krispie turkey legs gluten-free?
Absolutely! Substitute regular pretzel rods with gluten-free pretzels to make the entire treat gluten-free. Additionally, ensure you use gluten-free Cocoa Krispies, and you’re all set for a delightful, inclusive dessert that everyone can enjoy!

Are there any allergy considerations for this recipe?
Very! This recipe contains common allergens like dairy (from butter and marshmallows) and gluten (from traditional pretzels and Cocoa Krispies). If preparing for someone with allergies, opt for dairy-free butter and ensure all ingredients are certified gluten-free to keep your Rice Krispie turkey legs safe for all your loved ones!

Rice Krispie Turkey Legs

Delicious Rice Krispie Turkey Legs for a Fun Holiday Treat

Delightful Rice Krispie Turkey Legs are a fun holiday treat that kids will love making and eating.
Print Recipe Pin Recipe
Prep Time 20 minutes mins
Cook Time 10 minutes mins
Cooling Time 20 minutes mins
Total Time 50 minutes mins
Servings: 12 legs
Course: Snacks
Cuisine: American
Calories: 160
Ingredients Equipment Method Nutrition Notes

Ingredients
  

For the Turkey Legs
  • 12 pieces Pretzel Rods Substitute with gluten-free pretzels for dietary needs.
  • 12 ounces Vanilla Melting Wafers Any brand can be used.
  • 1 teaspoon Vanilla Extract Can be replaced with vanilla paste for a more intense taste.
  • 1 pinch Salt Can reduce or omit if desired.
  • 4 cups Mini Marshmallows Used for shaping the bone ends and coating the legs.
  • 4 tablespoons Unsalted Butter Substitute with salted butter by halving the added salt.
  • 6 cups Cocoa Krispies Cereal Consider using gluten-free cereal for a gluten-free version.

Equipment

  • Microwave-safe bowl
  • Large pot
  • Spatula
  • Parchment Paper

Method
 

Step-by-Step Instructions for Rice Krispie Turkey Legs
  1. Begin by placing your vanilla melting wafers in a microwave-safe bowl. Heat in the microwave on low power for 30 seconds at a time, stirring after each interval until the mixture is smooth and glossy. This process should take about 1-2 minutes total. Set the melted wafers aside as you prepare to dip the pretzel rods.
  2. Take your pretzel rods and gently dip them halfway into the melted candy wafers, allowing any excess to drip off. While the coating is still soft, firmly press two mini marshmallows onto the ends of each rod to create the 'bone' of your turkey leg. Place the dipped pretzel rods on a parchment-lined tray and chill in the refrigerator for about 5 minutes, or until the coating has set.
  3. In a large pot over low heat, melt the unsalted butter. Once melted, add the remaining mini marshmallows, stirring continuously until they are completely melted and the mixture is smooth. Remove from heat, then stir in a pinch of salt and vanilla extract for added flavor.
  4. Once the marshmallow mixture is smooth, gently fold in the Cocoa Krispies cereal with a spatula. Be careful to mix thoroughly but gently to avoid breaking the cereal pieces. Allow the mixture to cool for a few minutes.
  5. With your hands slightly greased, take about ½ cup of the Rice Krispie mixture and mold it around each pretzel bone, forming the shape of a turkey leg. Ensure that the mixture adheres well to the pretzel rod.
  6. Once all the turkey legs are shaped, set them aside to cool completely at room temperature for 10-20 minutes.

Nutrition

Serving: 1legCalories: 160kcalCarbohydrates: 24gProtein: 1gFat: 7gSaturated Fat: 4gMonounsaturated Fat: 2gCholesterol: 15mgSodium: 100mgPotassium: 30mgSugar: 10gVitamin A: 5IUCalcium: 10mgIron: 1mg

Notes

Use nonstick spray on your hands to prevent the Rice Krispie mixture from sticking while shaping the turkey legs. Store in an airtight container at room temperature for up to 2-3 days.

Tried this recipe?

Let us know how it was!

Thanksgiving Charcuterie Board: Effortless Holiday Delight

October 20, 2025 by Grace Snow Leave a Comment

As I meticulously arranged my first Thanksgiving charcuterie board, a burst of color caught my eye—vibrant oranges and rich browns that mirrored the autumn leaves outside. This no-cook Thanksgiving Charcuterie Board is not only a feast for the eyes but a delightful blend of flavors and textures that will impress guests with minimal effort. Crafted to resemble a turkey, this festive appetizer can be thrown together in just 30 minutes, making it an ideal option for busy holiday gatherings. Plus, its customizable ingredients mean you can personalize it to accommodate dietary preferences, including gluten-free options! Are you ready to create a showstopping centerpiece that will leave everyone talking? Let’s dive in!

Why is this Charcuterie Board Special?

Visual Appeal: This Thanksgiving Charcuterie Board isn't just food; it’s a stunning centerpiece that mimics a turkey, guaranteed to catch everyone’s eye.

No Cooking Required: With zero cooking involved, you can whip this up in just 30 minutes, freeing up your time for family and fun!

Customizable Options: From swapping cheese varieties to choosing gluten-free crackers, this recipe is designed to accommodate everyone’s taste preferences.

Crowd-Pleasing Charm: The combination of sweet and savory flavors ensures that there’s something for every palate, making it a hit at holiday gatherings.

Effortless Entertaining: Perfect for busy hosts, this charcuterie board simplifies the serving process while offering an array of delightful bites for guests to enjoy.

Elevate your Thanksgiving feast with this beautiful appetizer that reflects the joy and spirit of the season. For more ideas on easy holiday recipes, check out our guide on Festive Appetizers.

Thanksgiving Charcuterie Board Ingredients

For the Turkey Body

  • Pear – Acts as the turkey's body; for the best color, opt for a slightly brown pear, or swap it with fanned apple slices for a different look.
  • Candy Eyes – Create the turkey's eyes; these are optional but add a fun touch that everyone will love!

For the Feathers

  • Cheese – Use assorted types like cheddar, Colby, and gouda to provide varied textures; for the turkey's beak, a small triangle of orange cheese works perfectly.
  • Turkey Slices – Mimic turkey feathers with protein-packed slices; deli chicken is a great substitute if desired.
  • Sliced Ham – Adds another layer of flavor and texture; feel free to swap with any deli meat you prefer.
  • Crackers – Serve as both turkey feathers and a base for pairing with cheeses and meats; choose gluten-free options to cater to guests' needs.

For the Crunch

  • Almonds & Pistachios – For that perfect crunch and visual appeal; these can be replaced with pretzels or omitted entirely for a nut-free option.

This easy-to-assemble Thanksgiving Charcuterie Board is sure to impress and delight!

Step‑by‑Step Instructions for Thanksgiving Charcuterie Board

Step 1: Prepare Ingredients
Begin by selecting a ripe pear; cut it in half and reserve one half for the turkey’s body with the cut side facing down on the platter. Next, slice your orange cheese into a small triangle for the turkey's beak, and cut other cheese varieties into bite-sized pieces for layering later.

Step 2: Assemble the Board
Position the pear half centrally on your serving platter. Gently press the candy eyes onto the pear, adding the triangle of orange cheese as the beak and attaching cheese pieces for the legs, aiming for fun and whimsy while ensuring they stay secure for visual appeal.

Step 3: Create Feathers
Surround the pear with gluten-free crackers, arranging them in a fanned-out pattern to mimic the turkey's feathers. Lay assorted cheese slices and turkey slices along the edges of the crackers, ensuring a colorful and inviting presentation that highlights your Thanksgiving Charcuterie Board’s festive theme.

Step 4: Add Texture
Sprinkle roasted almonds and pistachios around the board to fill in any gaps and enhance the visual interest of your charcuterie spread. This not only adds crunch but also brings in a variety of colors and shapes, making your Thanksgiving Charcuterie Board even more appealing.

Step 5: Serve
Ensure your charcuterie board is at room temperature before serving, which enhances the flavors and textures of the ingredients. Place it at a central location on your dining table, ideally with small serving utensils to make it easy for guests to indulge in the delightful assortment you've created.

What to Serve with Thanksgiving Charcuterie Board

Create the perfect Thanksgiving meal by complementing your charcuterie board with delightful sides and drinks that enhance the festive spirit.

  • Harvest Salad: A crisp salad with mixed greens, roasted butternut squash, and a tangy vinaigrette offers a refreshing contrast to the hearty flavors of your board.

  • Cranberry Sauce: The tartness of homemade cranberry sauce adds a burst of flavor and beautifully complements the savory meats and cheeses.

  • Stuffing Bites: Mini stuffing balls bring a cozy, homey feel to your spread, echoing traditional Thanksgiving flavors everyone loves.

  • Pumpkin Soup: This warm, creamy soup provides a soothing touch and a seasonal taste that resonates with the Thanksgiving palette.

  • Maple-Glazed Vegetables: Roasted Brussels sprouts or carrots drizzled with maple syrup add a touch of sweetness that pairs wonderfully with the savory aspects of your charcuterie board.

  • Mulled Wine: Serve a warm glass of spiced mulled wine to envelop guests in a cozy embrace of holiday spirit, enhancing the gathering's charm.

  • Spiced Apple Cider: A hot spiced apple cider acts as a comforting drink that heightens the fall flavors of your Thanksgiving celebration.

  • Pecan Pie: End your meal with a slice of homemade pecan pie; its sweet, nutty flavor balances perfectly with the savory and sweet bites from your charcuterie board.

These accompaniments promise a memorable experience filled with warmth, flavor, and Thanksgiving cheer.

How to Store and Freeze Thanksgiving Charcuterie Board

Fridge: Store any leftover components of your Thanksgiving Charcuterie Board in airtight containers in the fridge for up to 3 days to maintain freshness and flavor.

Room Temperature: To keep the charcuterie board at its best, don’t leave it out at room temperature for more than 2 hours to ensure food safety.

Freezer: Freezing is not recommended for a charcuterie board due to the perishable nature of the ingredients. Instead, assemble it fresh when needed for optimal taste.

Reheating: If you’ve stored individual components, serve them chilled. Allow cheese or meats to come to room temperature for enhanced flavors before serving.

Make Ahead Options

Preparing your Thanksgiving Charcuterie Board in advance makes entertaining effortless! You can cut the pear and cheese up to 24 hours prior to assembling, storing them in airtight containers in the refrigerator to keep them fresh. Additionally, pre-slice your meats and store them separately to maintain their texture and prevent them from drying out. Remember to keep the crackers and nuts in their original packaging or in a dry container to retain crunchiness. When it's time to serve, simply assemble your prepped ingredients—attach the candy eyes, beak, and legs to your pear, arrange the crackers and meats around it, and voilà! You'll have a stunning charcuterie board ready to impress with minimal last-minute effort!

Thanksgiving Charcuterie Board Variations

Feel free to unleash your creativity and add your personal touch to the Thanksgiving charcuterie board!

  • Nut-Free Delight: Replace almonds and pistachios with pretzels or fresh fruit; both add crunch without the nuts.

  • Cheese Alternatives: Experiment with different cheeses like feta or brie, ensuring at least one orange-colored cheese for that turkey charm. This twist makes for a fun flavor exploration!

  • Meat Choices: Incorporate other deli meats such as salty prosciutto or spicy salami for unique flavor profiles that satisfy all taste preferences.

  • Herb-Infused: Add fresh herbs like basil or rosemary to the board for an aromatic boost; they enhance the overall dish and are a feast for the senses.

  • Spicy Kick: Include spicy pepperoni or jalapeño poppers for those who crave a little heat; it's sure to intrigue the spice lovers at your gathering.

  • Add Seasonal Veggies: Include slices of crunchy bell peppers, cucumbers, or radishes for extra color and crunch; they offer a refreshing contrast to the rich cheeses and meats.

  • Fruit Explosion: Mix in seasonal fruits like pomegranate seeds or figs for added sweetness and visual appeal; this contrast makes the board simply irresistible.

  • Gluten-Free Variety: Use rice crackers or veggie chips instead of traditional crackers, keeping it gluten-free without sacrificing flavor or texture.

Elevate your festive gathering with these fun variations! For more creative ways to explore appetizers, check out our guide on Festive Appetizers and discover delightful new ideas!

Expert Tips for Thanksgiving Charcuterie Board

  • Ingredient Swap: Customize your Thanksgiving Charcuterie Board by swapping out cheeses or meats based on your taste preferences or dietary needs.

  • Presentation Matters: Arrange ingredients thoughtfully; a visually appealing board entices guests to dig in and creates a festive atmosphere at your gathering.

  • Serving Instructions: Make sure to provide serving utensils and napkins; this keeps things tidy and ensures a smooth experience while your guests enjoy the board.

  • Timing is Key: Serve the board at room temperature; this enhances the flavors, so let it sit out for about 20 minutes before serving.

  • Avoid Room Temp: Keep food safety in mind; avoid leaving your Thanksgiving Charcuterie Board at room temperature for over 2 hours to ensure everyone stays healthy and happy!

Thanksgiving Charcuterie Board Recipe FAQs

What type of pear should I use for the turkey body?
I recommend selecting a slightly brown pear as it offers the best color and shape for the turkey body. If pears aren’t available, you can easily substitute with fanned apple slices for a similar visual effect.

How should I store leftovers from the Thanksgiving charcuterie board?
Store any leftover components in airtight containers in the refrigerator for up to 3 days. Make sure to keep them separated to maintain freshness, and always use clean utensils to avoid contamination.

Can I freeze components of the Thanksgiving charcuterie board?
Freezing is not advisable for this Thanksgiving Charcuterie Board due to the perishable nature of the ingredients, especially cheese and deli meats. It’s best to assemble the board fresh right before serving for the best taste and texture.

What if I have dietary restrictions among my guests?
No problem! You can easily customize this Thanksgiving Charcuterie Board to accommodate various dietary needs. For gluten-free options, use gluten-free crackers, and switch out nuts with pretzels or additional fruit for a nut-free version. Ensure you select cheeses and meats that cater to dietary preferences as well.

How can I ensure the charcuterie board stays fresh during the event?
To keep your Thanksgiving Charcuterie Board fresh, avoid leaving it out at room temperature for more than 2 hours. Place it in a cool location and consider serving it on a chilled platter if you’re entertaining for an extended period.

Thanksgiving Charcuterie Board

Thanksgiving Charcuterie Board: Effortless Holiday Delight

This Thanksgiving Charcuterie Board is a vibrant and customizable appetizer that is easy to assemble and a feast for the eyes, perfect for holiday gatherings.
Print Recipe Pin Recipe
Prep Time 30 minutes mins
Total Time 30 minutes mins
Servings: 8 people
Course: Appetizers
Cuisine: American
Calories: 250
Ingredients Equipment Method Nutrition Notes

Ingredients
  

Turkey Body
  • 1 medium Pear Or use fanned apple slices
  • 2 pieces Candy Eyes Optional decoration
Feathers
  • 3 ounces Assorted Cheese Cheddar, Colby, Gouda
  • 4 slices Turkey Slices Can substitute with deli chicken
  • 4 slices Sliced Ham Or any deli meat
  • 1 box Crackers Choose gluten-free if needed
Crunch
  • 1/2 cup Almonds Can substitute with pretzels
  • 1/2 cup Pistachios Omit for nut-free option

Equipment

  • Serving Platter

Method
 

Step‑by‑Step Instructions
  1. Begin by selecting a ripe pear; cut it in half and reserve one half for the turkey’s body with the cut side facing down on the platter.
  2. Position the pear half centrally on your serving platter and press the candy eyes onto the pear, adding the triangle of orange cheese as the beak.
  3. Surround the pear with gluten-free crackers, arranging them in a fanned-out pattern to mimic the turkey's feathers.
  4. Sprinkle roasted almonds and pistachios around the board to fill in any gaps.
  5. Ensure your charcuterie board is at room temperature before serving.

Nutrition

Serving: 1servingCalories: 250kcalCarbohydrates: 15gProtein: 10gFat: 17gSaturated Fat: 5gPolyunsaturated Fat: 3gMonounsaturated Fat: 9gCholesterol: 40mgSodium: 500mgPotassium: 200mgFiber: 2gSugar: 5gVitamin A: 500IUVitamin C: 7mgCalcium: 200mgIron: 1mg

Notes

Customize the board with various cheeses or meats to cater to dietary preferences and ensure to serve with utensils for convenience.

Tried this recipe?

Let us know how it was!

Thanksgiving Turkey Cookies: Delightful Festive Treats for All

October 20, 2025 by Grace Snow Leave a Comment

As I was bustling around the kitchen last Thanksgiving, I stumbled upon a delightful idea: why not combine the whimsical charm of macarons with the festive spirit of the holiday? Enter the Thanksgiving Turkey Macarons, a truly unique treat that’s sure to steal the show at your holiday gatherings. These gluten-free delights feature delicate almond flour shells bursting with rich pumpkin cream cheese buttercream, making them the perfect indulgence for pumpkin spice lovers. With vibrant decorations mimicking cute turkeys, they not only please the palate but also add a playful touch to your dessert table. Plus, they are a crowd-pleaser that even the kids will adore. Intrigued? Let’s dive into how to create these deliciously festive treats that will have everyone talking long after the meal is over!

Why Are These Turkey Macarons Special?

Whimsical Design: Their adorable turkey decorations add a playful touch, making them the star of your dessert table.
Festive Flavor: Rich pumpkin cream cheese buttercream inside almond flour shells captures the essence of the season.
Crowd-Pleasing Delight: Loved by guests of all ages, these treats bridge the gap between traditional desserts and modern whimsy.
Gluten-Free Goodness: Enjoy these delectable cookies worry-free, perfect for those with dietary restrictions.
Make Ahead: With the option to prepare in advance, these macarons will save you valuable time during hectic holiday preparations.
Pair them with classic desserts like Eggnog Cookies Soft or Mexican Wedding Cookies for an unforgettable feast!

Thanksgiving Turkey Cookies Ingredients

• Get ready to craft these festive delights!

  • For the Macaron Shells

  • Almond Flour – Provides a delightful nutty flavor; make sure to use finely sifted almond flour for the best texture.

  • Powdered Sugar – Sweetens the shells and ensures a smooth finish.

  • Ground Cinnamon – Adds a warm autumn flavor that enhances the macaron's seasonal appeal.

  • Egg Whites – Essential for achieving that perfect meringue structure; remember, room temperature whites yield the best results.

  • Cream of Tartar – Stabilizes your egg whites, aiding in reaching stiff peaks during whipping.

  • Granulated Sugar – Enhances sweetness and also helps to stabilize the meringue.

  • Gel Food Coloring – Use gel for vibrant colors in your macaron shells, as it won't alter the batter's consistency.

  • For the Pumpkin Buttercream Filling

  • Unsalted Butter – Creates a rich filling; ensure it is at room temperature for easier mixing.

  • Cream Cheese – Adds creaminess to the buttercream, beautifully complementing the pumpkin flavor.

  • Pumpkin Puree – Infuses a seasonal depth into the filling; be sure to drain excess moisture for the ideal consistency.

  • Brown Sugar – Contributes a deep caramel-like sweetness that pairs wonderfully with pumpkin.

  • Pumpkin Spice – Enhances the classic fall flavor profile of the filling.

  • More Powdered Sugar – Adjust to reach your desired buttercream consistency; this will ensure a perfect piping texture.

  • For Decorating

  • Butterscotch Chips – Melt these to create adorable turkey beaks; they add a fun twist to your presentation.

  • Candy Eyes & Candy Corn – Use these for a playful touch, transforming your macros into festive turkey faces!

These Thanksgiving Turkey Cookies are not only visually enchanting but also a delightful blend of flavors, sure to make your holiday gatherings extra special!

Step‑by‑Step Instructions for Thanksgiving Turkey Macarons

Step 1: Prepare Your Equipment
Start by thoroughly cleaning your mixing bowls, whisk, and utensils with vinegar to remove any grease. This will ensure perfect meringue while making your Thanksgiving Turkey Macarons. Lay out parchment paper or a silicone mat on your baking sheets, making it ready for piping those adorable macaron shells.

Step 2: Make the Macaron Batter
In a bowl, sift together the almond flour, powdered sugar, and ground cinnamon until well combined. Meanwhile, whip the egg whites and cream of tartar in a large mixing bowl until foamy. Gradually add granulated sugar while continuing to whip, until stiff peaks form. Carefully fold in the dry ingredients and add gel food coloring until the mixture is uniform and shiny.

Step 3: Pipe the Macaron Shells
Fill a piping bag with the macaron batter and pipe small circles onto the prepared silicone mat, about 1.5 inches in diameter and spacing them evenly. Once you've piped all the circles, gently tap the baking sheet on the counter to release any air bubbles. Allow the shells to sit at room temperature for 40-45 minutes until they develop a slight skin.

Step 4: Bake the Shells
Preheat your oven to 300°F (150°C). Once the macarons have rested, place the baking sheet in the oven and bake for 13-14 minutes, or until the shells have risen and their edges appear slightly crisp. After baking, let them cool completely on the mat before attempting to remove them, ensuring their delicate structure remains intact.

Step 5: Make the Pumpkin Buttercream
While the macaron shells cool, prepare the pumpkin buttercream filling. In a mixing bowl, combine drained pumpkin puree, unsalted butter, cream cheese, brown sugar, cinnamon, pumpkin spice, and more powdered sugar. Beat until smooth and creamy, ensuring it’s well mixed for a luscious filling that will complement your Thanksgiving Turkey Macarons perfectly.

Step 6: Assemble the Macarons
Once your macaron shells are cool, pair them up into matching sizes. Pipe a generous dollop of the pumpkin buttercream onto the flat side of one shell, then top it with another shell, pressing gently to create a sandwich. Repeat this process until all macarons are filled, giving you delightful treats ready for decoration.

Step 7: Decorate Your Turkeys
To create your turkey decorations, melt the butterscotch chips until smooth. Use a toothpick or piping bag to attach candy eyes onto the macaron tops and draw a small beak with the melted chips. Decorate with candy corn as tails, arranging them in a playful fashion for each Thanksgiving Turkey Macaron, turning each one into a festive masterpiece.

Expert Tips for Thanksgiving Turkey Cookies

  • Measure Accurately: Use a digital scale to ensure precise ingredient measurements, which is crucial for achieving perfect macaron texture.

  • Proper Egg Whites: Ensure your egg whites are at room temperature for optimal volume during whipping, giving your macaron shells that desired airy structure.

  • Avoid Overmixing: When folding the dry ingredients into the meringue, gently mix until just combined; overmixing can result in flat shells.

  • Oven Calibration: Test your oven temperature with an oven thermometer as variations can affect baking. Adjust as necessary if shells crack or spread during baking.

  • Cooling Time: Let the macarons cool completely on the baking mat before removing them; this helps maintain their delicate structure and prevents breakage.

  • Maturation Magic: For the best flavor and texture, allow the assembled Thanksgiving Turkey Cookies to mature in the refrigerator for at least 24 hours before serving.

Make Ahead Options

These Thanksgiving Turkey Macarons are perfect for busy home cooks looking to save time during the holiday rush! You can prepare the macaron shells and the pumpkin buttercream filling up to 24 hours in advance. Simply store the cooled macaron shells in an airtight container at room temperature, while refrigerating the buttercream. When you're ready to serve, assemble the macarons by piping the buttercream between two shells, and then decorate with melted butterscotch, candy eyes, and candy corn. This way, they will still taste just as delicious and maintain their delightful texture, making your holiday preparations a breeze!

Storage Tips for Thanksgiving Turkey Cookies

Fridge: Store assembled cookies in an airtight container for up to 5 days. This helps maintain their delightful texture and flavor, making sure you can enjoy them throughout the holiday week.

Freezer: For longer storage, freeze the macaron shells without filling for up to 1 month in an airtight container. When ready to serve, thaw them overnight in the refrigerator and then fill with the pumpkin buttercream.

Room Temperature: If you plan to serve them shortly after making, Thanksgiving Turkey Cookies can sit at room temperature for a few hours, but they are best enjoyed fresh.

Reheating: Avoid reheating macarons in the microwave as it can ruin their texture. If you must, a quick minute in a warm oven (200°F) can help refresh older macarons before serving.

What to Serve with Thanksgiving Turkey Macarons

These charming macarons are a delightful way to end your festive meal, inviting you to create a sensational dessert experience.

  • Pumpkin Pie: This classic dessert adds a comforting, spiced element that perfectly echoes the flavors in the macarons.
  • Caramel Apple Tarts: With their buttery crust and sweet apple filling, these tarts provide a lush contrast to the light texture of the macarons.
  • Whipped Cream: A dollop of freshly whipped cream brings a creamy balance that enhances the sweetness of the pumpkin buttercream.
  • Cinnamon Hot Chocolate: Cozy up with rich hot chocolate spiced with cinnamon for a warming drink that complements the autumnal essence of the macarons.
  • Spiced Pecan Cookies: These nutty cookies offer a satisfying crunch and a sweetness that pairs harmoniously with the soft macarons.
  • Apple Cider: A refreshing glass of warm apple cider can elevate your Thanksgiving gathering, enhancing the overall flavor experience.
  • Chocolate Ganache: Drizzle some velvety ganache over the macarons for an indulgent touch that will have guests reaching for more.
  • Hazelnut Coffee: The nutty notes of hazelnut coffee act as a perfect pairing, grounding the dessert experience while enhancing flavors.

Embrace the festive spirit by offering these delightful accompaniments alongside your Thanksgiving Turkey Macarons!

Thanksgiving Turkey Cookies Variations

Feel free to get creative and customize these whimsical Thanksgiving turkey cookies to match your taste and style!

  • Sweet Potato Filling: Swap pumpkin puree for sweet potato puree for a similarly delightful, sweeter twist.

  • Rainbow Colors: Use a variety of gel food colorings to create a rainbow of turkey macaron shells for a fun and festive touch.

  • Spice It Up: Incorporate nutmeg or ginger into your buttercream for an extra layer of autumnal flavor that will warm your heart.

  • Nut-Free Option: Substitute almond flour with finely ground sunflower seeds for a nut-free version, keeping the flavors intact while catering to those with allergies.

  • Meringue Magic: Add a hint of vanilla extract to the meringue for a lovely aromatic note that complements the overall flavor beautifully.

  • Chocolate Drizzle: For chocolate lovers, drizzle melted dark chocolate over the filled macarons for an indulgent treat that adds rich complexity.

  • Caramel Crunch: Sprinkle some toffee bits or crushed caramel candies on top of the buttercream filling before sandwiching the shells for a sweet crunch.

Looking for another fantastic treat? Consider pairing these adorable cookies with some delightful Thumbprint Cookies Melt or serve them alongside festive Peaches Cream Cookies for a spread that celebrates the spirit of the season!

Thanksgiving Turkey Macarons Recipe FAQs

What type of almond flour should I use for the shells?
I recommend using finely sifted almond flour for the best texture in your macaron shells. Coarse almond flour can lead to a grainy texture, which won’t give you that lovely smooth finish you’re looking for in these Thanksgiving Turkey Macarons.

How do I store leftover Thanksgiving Turkey Macarons?
Store your assembled macarons in an airtight container in the fridge for up to 5 days. This method helps maintain their delightful flavor and texture. If you're keeping them longer, try freezing the unfilled macaron shells for up to 1 month.

Can I freeze Thanksgiving Turkey Macarons?
Absolutely! To freeze, place the macaron shells in a single layer in an airtight container, separating layers with parchment paper. They can stay in the freezer for up to 1 month. When you're ready to serve, thaw them overnight in the refrigerator before filling with pumpkin buttercream.

What should I do if my macaron shells crack?
If your macaron shells crack, it could be due to several factors, like the oven temperature being too high or not allowing enough resting time before baking. Ensure your oven is calibrated correctly, and let the piped shells sit until a skin forms, which typically takes 40-45 minutes.

Are these macarons safe for gluten-sensitive individuals?
Yes, these Thanksgiving Turkey Macarons are gluten-free! They are made primarily with almond flour, which is a great substitute for traditional flour, making them a wonderful treat for those with dietary restrictions. Just be cautious about cross-contamination if you’re serving it to someone with celiac disease.

Can I decorate my Thanksgiving Turkey Macarons differently?
Very! If you're feeling creative, you can use different colors of gel food coloring for the shells or try different types of candy for decoration. For instance, chocolate chips can be used instead of butterscotch for turkey beaks, or you might make tiny sugar flowers instead for a different festive touch. Have fun with it!

Thanksgiving Turkey Cookies

Thanksgiving Turkey Cookies: Delightful Festive Treats for All

Thanksgiving Turkey Cookies are whimsical treats combining macarons with rich pumpkin buttercream, perfect for festive gatherings and gluten-free diets.
Print Recipe Pin Recipe
Prep Time 1 hour hr
Cook Time 14 minutes mins
Resting Time 45 minutes mins
Total Time 1 hour hr 59 minutes mins
Servings: 24 cookies
Course: Dessert
Cuisine: American
Calories: 150
Ingredients Equipment Method Nutrition Notes

Ingredients
  

For the Macaron Shells
  • 1 cup Almond Flour Finely sifted for best texture.
  • 1 cup Powdered Sugar Sweetens the shells.
  • 1 tsp Ground Cinnamon Enhances seasonal appeal.
  • 4 large Egg Whites Room temperature for best results.
  • 1 tsp Cream of Tartar Stabilizes egg whites.
  • 1/2 cup Granulated Sugar Enhances sweetness.
  • 1 tsp Gel Food Coloring For vibrant colors.
For the Pumpkin Buttercream Filling
  • 1/2 cup Unsalted Butter Room temperature for easier mixing.
  • 4 oz Cream Cheese Adds creaminess.
  • 1/2 cup Pumpkin Puree Drain excess moisture.
  • 1/4 cup Brown Sugar Deep caramel-like sweetness.
  • 1 tsp Pumpkin Spice Enhances classic fall flavor.
  • 1 cup Powdered Sugar Adjust for desired consistency.
For Decorating
  • 1 cup Butterscotch Chips Melted for turkey beaks.
  • 1 cup Candy Eyes For a playful touch.
  • 1 cup Candy Corn Used as tails.

Equipment

  • Mixing bowls
  • Whisk
  • piping bag
  • Baking Sheet
  • silicone mat

Method
 

Preparing the Cookies
  1. Start by thoroughly cleaning your mixing bowls, whisk, and utensils with vinegar to remove any grease.
  2. Lay out parchment paper or a silicone mat on your baking sheets, making it ready for piping the macaron shells.
  3. In a bowl, sift together the almond flour, powdered sugar, and ground cinnamon until well combined.
  4. In a large mixing bowl, whip the egg whites and cream of tartar until foamy.
  5. Gradually add granulated sugar while continuing to whip until stiff peaks form.
  6. Carefully fold in the dry ingredients and add gel food coloring until the mixture is uniform and shiny.
  7. Fill a piping bag with the macaron batter and pipe small circles onto the prepared silicone mat.
  8. Gently tap the baking sheet on the counter to release any air bubbles.
  9. Allow the shells to sit at room temperature for 40-45 minutes until they develop a slight skin.
  10. Preheat your oven to 300°F (150°C) and bake for 13-14 minutes.
  11. Let them cool completely before removing to ensure their structure remains intact.
  12. Prepare the pumpkin buttercream by combining pumpkin puree, unsalted butter, cream cheese, brown sugar, cinnamon, pumpkin spice, and more powdered sugar.
  13. Beat until smooth and creamy.
  14. Pair macaron shells and pipe a generous dollop of buttercream on one shell before topping with another.
  15. Melt the butterscotch chips until smooth and attach candy eyes onto the macaron tops.
  16. Draw a small beak with melted chips and decorate with candy corn.

Nutrition

Serving: 1cookieCalories: 150kcalCarbohydrates: 22gProtein: 2gFat: 7gSaturated Fat: 4gPolyunsaturated Fat: 0.5gMonounsaturated Fat: 2.5gCholesterol: 20mgSodium: 50mgPotassium: 50mgFiber: 1gSugar: 10gVitamin A: 300IUCalcium: 20mgIron: 0.5mg

Notes

Allow the assembled cookies to mature in the refrigerator for at least 24 hours for best flavor and texture.

Tried this recipe?

Let us know how it was!

Crack Green Beans: The Sweet-Savory Casserole You’ll Love

October 20, 2025 by Grace Snow Leave a Comment

As the oven warms and the unmistakable scent of bacon wafts through the air, I can’t help but feel that festive buzz in my kitchen. Today, I’m thrilled to share my recipe for Crack Green Beans, a savory-sweet green bean casserole that’s become a staple at our holiday gatherings. This dish isn’t just a side; it’s a comforting blend of tender green beans and crispy bacon, with flavors that dance together in perfect harmony. One of the best parts? It’s incredibly simple to prepare, making it a go-to even when time is tight. Plus, it’s adaptable—whether you have fresh, frozen, or canned beans on hand, you can whip it up without a hitch. Ready to elevate your meal with this crowd-pleasing dish? Let’s dig into the recipe!

Why Are Crack Green Beans So Irresistible?

Irresistible Flavor: This dish combines the savory richness of bacon with the sweet notes of brown sugar, creating a flavor profile that’s hard to resist.

Minimal Prep Time: With just a few simple steps, you can have this oven-ready dish prepped in no time, making it perfect for busy weeknights or holiday feasts.

Versatile Ingredients: Whether you opt for fresh, frozen, or canned green beans, this recipe adapts effortlessly to your pantry and schedule.

Crowd-Pleasing Appeal: It’s a guaranteed hit at gatherings, complementing hearty mains like turkey or prime rib, and pairs beautifully with other favorites, such as Smoky Sweet Corn.

Comforting Textures: The combination of tender green beans coated in a rich glaze with crispy bacon bits creates an appealing mix of textures that everyone will love.

Give it a try, and you’ll see why this dish always disappears at the dinner table!

Crack Green Beans Ingredients

For the Casserole

  • Fresh Green Beans – Bright and crunchy, these are the star of your dish; can substitute frozen (cook longer) or canned (add during assembly).
  • Bacon – Adds a savory crunch that elevates the entire casserole; feel free to swap with turkey bacon for a lighter touch or use pre-cooked bacon for convenience.
  • Brown Sugar – This sweet addition balances out the savoriness; remember to pack it tightly for the best results.
  • Unsalted Butter – Richness comes from this staple, but olive oil works as a great dairy-free alternative.
  • Low Sodium Soy Sauce – Enhances umami without overloading on salt; tamari is an excellent gluten-free substitute.
  • Worcestershire Sauce – Introduces complexity to the glaze; optionally skip it or try liquid smoke for a different twist.
  • Garlic Powder & Onion Powder – These seasonings bring aromatic depth; using fresh garlic and onion can elevate the flavor even further.
  • Black Pepper – For finishing touches; adjust to your preference for added warmth in taste.

The addictive nature of this Crack Green Beans casserole is sure to have you coming back for seconds!

Step‑by‑Step Instructions for Crack Green Beans

Step 1: Prepare Green Beans
Begin by steaming or blanching your fresh green beans to achieve that perfect crisp-tender texture. Boil the beans for 3-5 minutes or steam them for 5-7 minutes until they brighten and soften slightly. Drain and set aside, ensuring they retain their vibrant color as you prepare the rest of your Crack Green Beans casserole.

Step 2: Cook Bacon
In a skillet over medium heat, add diced bacon and cook until it becomes beautifully crisp, which should take about 10 minutes. Stir occasionally to ensure even cooking. Once ready, transfer the bacon to a paper towel-lined plate to drain, while reserving the flavorful grease left in the skillet for the next step.

Step 3: Make Glaze
Using the same skillet with the reserved bacon grease, lower the heat and add brown sugar and unsalted butter. Combine this with soy sauce, Worcestershire sauce, garlic powder, and onion powder. Cook for 4-5 minutes, stirring frequently, until the glaze thickens and becomes a rich, glossy caramel color that envelops your Crack Green Beans with flavor.

Step 4: Combine
Once your glaze is prepared, toss the steamed green beans into the skillet, along with half of the crumbled bacon. Stir well to coat the beans evenly with the savory-sweet glaze, heating everything together for 3-4 minutes until the green beans are nicely warmed and infused with that delicious flavor.

Step 5: Serve
Transfer your completed Crack Green Beans casserole to a serving dish, and as a final touch, top it with the remaining crispy bacon bits. Serve warm to highlight the delightful crunch of the bacon against the tender green beans, ensuring everyone at the table enjoys this crowd-pleaser!

How to Store and Freeze Crack Green Beans

Fridge: Store leftovers in an airtight container for up to 3 days. Reheat in the oven to retain crispness, stirring occasionally to prevent drying out.

Freezer: For longer storage, freeze the casserole in an airtight container for up to 2 months. To reheat, bake from frozen at 350°F (175°C) for about 30-40 minutes or until warmed through.

Make-Ahead: Prepare the casserole in advance and assemble it without baking. Cover and chill for up to 24 hours before baking, ensuring your Crack Green Beans are fresh upon serving.

Leftover Usage: Repurpose any leftovers into a delicious breakfast scramble or add to a savory pasta dish for a quick meal!

Make Ahead Options

These Crack Green Beans are perfect for busy home cooks looking to save time during the hectic holiday season! You can prepare the green beans and glaze up to 24 hours in advance by steaming the beans and mixing the glaze, then refrigerate both components separately. To maintain their vibrant color and crispness, make sure the beans are completely cooled before sealing in an airtight container. When you’re ready to serve, simply reheat the glaze on low heat, toss in the green beans to warm them through, and top with freshly cooked bacon for a deliciously crispy finish. Enjoy restaurant-quality results with minimal effort, ensuring your meal planning is seamless!

Expert Tips for Crack Green Beans

• Perfect Vegetable Texture: Don’t overcook your green beans; they should maintain a crisp-tender texture to provide that delightful crunch in every bite.

• Cooking Frozen Beans: If using frozen green beans, extend the cooking time and verify that they reach a safe temperature; this ensures a delicious outcome without compromising flavor.

• Quality Bacon Matters: Opt for high-quality bacon to amplify the savory flavor. A bacon that crisps up nicely will elevate your Crack Green Beans dish significantly.

• Sweetness Adjustment: Don’t hesitate to adjust the brown sugar quantity according to your preference; a little more can enhance the sweet-savory balance beautifully.

• Fresh vs. Powdered Aromatics: For a flavor boost, try using fresh garlic and onions instead of powdered. They can bring an aromatic freshness to your Crack Green Beans casserole.

What to Serve with Crack Green Beans?

Creating a memorable meal is all about finding the perfect balance of flavors and textures to complement each dish.

  • Roasted Turkey: Juicy turkey pairs wonderfully with the savory-sweet glaze, making your holiday table feel complete and festive.
  • Creamy Mashed Potatoes: Fluffy mashed potatoes provide a luscious contrast, soaking up the rich flavors from the casserole for a comforting bite.
  • Jiffy Corn Casserole: This sweet, moist corn dish complements the savory elements of the green beans while adding a delightful sweetness to your plate.
  • Honey-Glazed Carrots: These tender, caramelized carrots bring a touch of freshness and vibrant color, enhancing your meal with an earthy undertone.
  • Crispy Brussels Sprouts: The crunchy texture and slightly bitter flavor of Brussels sprouts balance the richness of the green beans, creating an exquisite harmony.
  • Apple Pie a la Mode: End your meal with a warm slice of apple pie topped with vanilla ice cream, offering a sweet finale that echoes the warmth of home.
  • Pinot Noir: A glass of this light red wine harmonizes beautifully with the savory bacon while enhancing the sweet undertones of your casserole.
  • Garlic Bread: The buttery, garlicky flavors from the bread provide a delightful accompaniment, perfect for scooping up any leftover glaze from your plate.
  • Side Salad: A refreshing mix of greens with a tangy vinaigrette brightens the meal, offering a crisp contrast to the hearty casserole.
  • Homemade Cranberry Sauce: This tart addition introduces a delightful zing that cuts through the richness, making every bite memorable.

Crack Green Beans Variations

Feel free to get creative with this recipe and make it your own with these fun twists!

  • Vegetable Switch: Substitute fresh green beans with asparagus or broccoli for a delightful twist. Each brings its own unique texture and flavor.
  • Turkey Bacon: For a lighter option, swap crispy bacon with turkey bacon, keeping the flavor while cutting down on fat. You still get that satisfying crunch in every bite!
  • Sweetness Variation: Adjust the brown sugar to suit your taste; try using a bit less for a more savory approach or add a hint more for an extra sweet pop.
  • Garlic and Onion Boost: Use fresh minced garlic and chopped onions instead of powders to enhance aromatics and freshness for an extra flavor kick.
  • Spicy Kick: Add crushed red pepper flakes to the glaze if you're looking for a little heat in your Crack Green Beans. They can spice things up in a delicious way!
  • Cheesy Delight: Incorporate a sprinkle of shredded cheddar cheese before serving for an additional layer of creamy flavor that melts into the warm beans.
  • Savory Smoke: For a smoky twist, swap Worcestershire sauce with liquid smoke or add a touch of smoked paprika to the glaze for that irresistible depth.
  • Coconutty Beans: For a tropical twist, try incorporating some Coconutty Beans Greens for a hint of coconut flavor that complements the sweetness beautifully.

Whether you're dressing them up or keeping it simple, each variation adds a personal touch to this classic dish. Enjoy experimenting!

Crack Green Beans Recipe FAQs

How do I select the best green beans?
Absolutely! Look for green beans that are bright green, firm, and free from dark spots or blemishes. The fresher, the better! If you can, try to get them from your local farmer's market or a store that stocks seasonal produce for the best flavor.

What’s the best way to store leftovers?
To store any leftover Crack Green Beans, simply place them in an airtight container and refrigerate. They’ll stay fresh for about 3 days. When reheating, I recommend using the oven to help retain that lovely, crispy texture. A quick reheat at 350°F (175°C) should do the trick!

Can I freeze Crack Green Beans?
Certainly! To freeze this delicious casserole, let it cool first, then transfer it to an airtight container, ensuring it's sealed well. You can freeze it for up to 2 months. When you're ready to enjoy it again, bake directly from frozen at 350°F (175°C) for about 30-40 minutes or until heated through.

Why did my green beans turn mushy?
Very! Overcooking green beans can lead to a mushy texture. If using fresh beans, aim for that perfect crisp-tender state—steaming for 5-7 minutes or boiling for 3-5 minutes is perfect. If using frozen beans, try extending the cooking time just a bit, but stay vigilant to avoid losing that delightful crunch.

Are there any dietary considerations to keep in mind?
Absolutely! If you need a gluten-free option, substitute low sodium soy sauce with tamari. If you're looking for a lighter dish, turkey bacon works beautifully instead of traditional bacon. Always check for allergies to any of the ingredients, especially additions like soy sauce or Worcestershire sauce!

Can I prepare this casserole ahead of time?
Definitely! You can assemble the Crack Green Beans casserole without baking it and store it in the fridge for up to 24 hours. Just be sure to cover it tightly. When you're ready to bake, pop it in the oven as directed, and you’ll have a delicious side ready to impress your guests!

Crack Green Beans

Crack Green Beans: The Sweet-Savory Casserole You’ll Love

Crack Green Beans is a savory-sweet casserole featuring green beans and bacon, perfect for holiday gatherings.
Print Recipe Pin Recipe
Prep Time 15 minutes mins
Cook Time 20 minutes mins
Total Time 35 minutes mins
Servings: 6 servings
Course: Dinner
Cuisine: American
Calories: 195
Ingredients Equipment Method Nutrition Notes

Ingredients
  

For the Casserole
  • 1 pound Fresh Green Beans Can substitute frozen or canned.
  • 8 ounces Bacon Can use turkey bacon or pre-cooked bacon.
  • 1/2 cup Brown Sugar Pack tightly for best results.
  • 4 tablespoons Unsalted Butter Olive oil works as a dairy-free alternative.
  • 1 tablespoon Low Sodium Soy Sauce Tamari is gluten-free substitute.
  • 1 teaspoon Worcestershire Sauce Optional or can use liquid smoke.
  • 1 teaspoon Garlic Powder Fresh garlic can elevate flavor.
  • 1 teaspoon Onion Powder Consider using fresh onion for flavor.
  • 1/2 teaspoon Black Pepper Adjust to preference.

Equipment

  • Skillet
  • Pot for boiling
  • Serving dish

Method
 

Preparation
  1. Begin by steaming or blanching your fresh green beans to achieve that perfect crisp-tender texture. Boil the beans for 3-5 minutes or steam them for 5-7 minutes until they brighten and soften slightly.
  2. In a skillet over medium heat, add diced bacon and cook until it becomes beautifully crisp, about 10 minutes.
  3. Using the same skillet with the reserved bacon grease, lower the heat and add brown sugar and unsalted butter. Combine this with soy sauce, Worcestershire sauce, garlic powder, and onion powder. Cook for 4-5 minutes until the glaze thickens.
  4. Once the glaze is prepared, toss the steamed green beans into the skillet, along with half of the crumbled bacon. Stir well to coat the beans evenly.
  5. Transfer your completed Crack Green Beans casserole to a serving dish, and top it with the remaining crispy bacon bits.

Nutrition

Serving: 1cupCalories: 195kcalCarbohydrates: 15gProtein: 6gFat: 12gSaturated Fat: 4gPolyunsaturated Fat: 2gMonounsaturated Fat: 5gCholesterol: 20mgSodium: 400mgPotassium: 250mgFiber: 4gSugar: 7gVitamin A: 700IUVitamin C: 20mgCalcium: 50mgIron: 1.5mg

Notes

Store leftovers in an airtight container for up to 3 days. Reheat in the oven to retain crispness.

Tried this recipe?

Let us know how it was!

Cheesy Carrot Casserole for Ultimate Comfort Food Nights

October 20, 2025 by Grace Snow Leave a Comment

As I prepared my kitchen for the cozy evening ahead, the aroma of sautéed onions mixed with the rich creaminess of cheese filled the air, instantly turning my heart towards comfort. That’s when I decided to whip up a Cheesy Carrot Casserole. This vibrant dish not only elevates any meal with its delightful combination of crunchy cornflakes and tender carrots, but it also promises to be a quick and satisfying side that even those leery of vegetables can’t resist. Perfect for festive gatherings or casual weeknights, this casserole is an adaptable canvas, allowing you to experiment with different veggies and toppings. What flavors will you add to make it your own?

Why is this Cheesy Carrot Casserole a Must-Try?

Comforting, Heartwarming Delight: This Cheesy Carrot Casserole envelops tender carrots in a creamy, cheesy sauce, perfect for keeping family dinners cozy and fulfilling.
Delicious Crunch: The crispy cornflake topping adds the perfect contrast in texture, ensuring each bite is as satisfying as the last.
Quick & Easy: With straightforward steps, even novice cooks will shine, making this recipe a go-to for weeknight meals or festive occasions.
Versatile Base: Feel free to swap in your favorite vegetables or cheeses, allowing creativity to take center stage! Check out variations like our Sweet Potato Casserole for more inspiration.
Crowd-Pleaser: This casserole is guaranteed to impress guests, transforming any meal into a celebration. Don't be surprised if it becomes the highlight of your holiday feasts!

Carrot Casserole Ingredients

• Explore the key components of this delicious dish.

For the Base

  • Salted Butter – Adds richness and flavor to the base; substitute with unsalted butter for a milder taste.
  • Onion – Provides a savory foundation and depth of flavor; use shallots for a milder option.
  • Flour – Acts as a thickening agent for the cheese sauce; gluten-free flour can work as a substitute.
  • Salt – Enhances overall flavor; adjust based on your dietary needs.
  • Pepper – Adds a touch of heat; try white pepper if you prefer milder seasoning.
  • Milk – Creates the creamy texture; half-and-half or non-dairy milk can lighten the dish.
  • Cream – Provides extra richness; replace with additional milk for a lighter version.
  • Cheddar Cheese – The star ingredient, delivering a sharp, creamy taste; blending cheeses can add variety.

For the Vegetables

  • Carrots – Main vegetable providing sweetness and vibrant color; both fresh or frozen carrots work well.
  • Parsley Flakes – Enhances flavor with fresh notes; fresh parsley can elevate the dish's color and taste.

For the Topping

  • Cornflakes – Offers a crunchy and sweet topping; crushed Ritz crackers or panko breadcrumbs can make a delightful alternative.

This Cheesy Carrot Casserole is not just a dish; it's a delightful expression of home-cooked love and comfort!

Step‑by‑Step Instructions for Cheesy Carrot Casserole

Step 1: Preheat and Prepare
Begin by preheating your oven to 350°F (175°C). While the oven heats, prepare a 9x11 baking dish by spraying it with cooking spray to prevent sticking. This simple step ensures that your Cheesy Carrot Casserole cooks evenly and lifts easily out of the dish for serving.

Step 2: Sauté the Aromatics
In a large pot over medium heat, melt 4 tablespoons of salted butter. Once melted, add 1 finely chopped onion and sauté for about 5 minutes, or until the onion becomes translucent and fragrant. This foundation will add depth to the casserole, creating a wonderful aroma that fills your kitchen.

Step 3: Create the Roux
Whisk in 4 tablespoons of flour, 1 teaspoon of salt, and 1/2 teaspoon of pepper to the sautéed onions. Cook the mixture for 3-4 minutes, stirring frequently, until it turns bubbly and slightly golden. This roux is essential for thickening the cheese sauce, contributing to the velvety texture of your Cheesy Carrot Casserole.

Step 4: Add Dairy and Thicken
Gradually pour in 2 cups of milk and 1/2 cup of cream while continuously stirring. Keep the heat on medium and mix until the mixture begins to bubble and thicken, about 5-7 minutes. You’ll know it’s ready when it coats the back of a spoon, creating a creamy sauce that envelops the carrots beautifully.

Step 5: Incorporate Cheese and Carrots
Remove the pot from heat and stir in 2 cups of shredded cheddar cheese until completely melted and integrated. Next, fold in 4 cups of cooked and chopped carrots and 1 tablespoon of parsley flakes, ensuring everything is well combined. This step transforms your mixture into a luscious filling for the casserole.

Step 6: Assemble in the Baking Dish
Carefully spread the cheesy carrot mixture into your prepared baking dish, smoothing it into an even layer with a spatula. This ensures that every bite of your Cheesy Carrot Casserole is equally flavorful and creamy. Press it down gently if needed to eliminate air pockets.

Step 7: Prepare the Topping
In a separate bowl, combine 1 1/2 cups of crushed cornflakes with 2 tablespoons of melted butter. Mix until the cornflakes are evenly coated. This mixture will create a delightful crispy topping that complements the creamy core of the casserole, adding a satisfying crunch.

Step 8: Bake Until Golden
Sprinkle the cornflake mixture generously over the carrot mixture in the baking dish. Bake in the preheated oven for 20-25 minutes, or until the top is golden brown and the edges are bubbling. This final step is essential for achieving that perfect crunchy topping that will tantalize your taste buds.

Step 9: Cool and Serve
Once baked, remove your Cheesy Carrot Casserole from the oven and let it cool for about 5 minutes before serving. This allows the casserole to set slightly, making it easier to cut into portions. Serve it warm as a delightful side dish that everyone will love!

Make Ahead Options

These Cheesy Carrot Casseroles are ideal for meal prep enthusiasts! You can assemble the casserole (excluding the cornflake topping) and refrigerate it for up to 3 days. Just prepare everything according to the recipe's instructions, then cover it tightly with plastic wrap or aluminum foil to maintain freshness and prevent drying out. When you're ready to serve, simply add the buttered cornflakes on top and bake as directed. If you're in a major time crunch, consider prepping the filling the night before and simply adding the topping before baking, offering you the comforting flavors of a homemade dish with minimal effort!

How to Store and Freeze Cheesy Carrot Casserole

Fridge: Store leftover Cheesy Carrot Casserole in an airtight container for up to 3 days. Make sure it has cooled to room temperature before refrigerating to maintain its texture.

Freezer: For longer storage, freeze the casserole for up to 3 months. Wrap it tightly in plastic wrap and aluminum foil to prevent freezer burn.

Reheating: To reheat, thaw in the fridge overnight, then bake at 350°F (175°C) for about 20 minutes until heated through and the topping is crispy.

Make-Ahead Option: Assemble the casserole without the cornflake topping and refrigerate for up to 3 days. Add the topping just before baking to keep it crunchy and fresh.

Expert Tips for Cheesy Carrot Casserole

  • Perfect Roux: Ensure your roux cooks long enough to avoid a raw flour taste, giving your Cheesy Carrot Casserole a smooth consistency.
  • Make Ahead: Assemble the casserole without the cornflake topping and refrigerate for up to 3 days; add the topping just before baking for freshness.
  • Frozen Carrots: If using frozen carrots, thaw and drain them well to prevent a watery casserole; this keeps every bite deliciously creamy.
  • Cheese Variations: Experiment with different cheese blends to customize the flavor; sharp cheddar pairs beautifully, but a mix can add complexity.
  • Taste As You Go: Always taste as you mix in components; adjusting seasonings like salt and pepper ensures a balanced dish that everyone will rave about.

What to Serve with Cheesy Carrot Casserole

Elevate your cozy meal experience with delightful sides and accompaniments that balance textures and flavors beautifully.

  • Savory Meatloaf: A classic pairing, meatloaf’s hearty flavor complements the creamy sweetness of the casserole, creating a comforting meal that feels like home.

  • Roasted Chicken: Juicy roasted chicken with its crispy skin enhances the casserole’s richness, making every bite a symphony of flavors that dance on your palate.

  • Crispy Green Beans: Bright and crunchy green beans add a fresh contrast to the creaminess of the casserole, ensuring your plate looks as vibrant as it tastes.

  • Garlic Bread: The warm, buttery goodness of garlic bread provides a delightful crunch, perfect for scooping up the cheesy carrot casserole's creamy goodness.

  • Sweet Potato Mash: Creamy mashed sweet potatoes introduce a hint of sweetness, harmonizing perfectly with the cheesy carrots while adding a lovely burst of color.

  • Herb-Infused Quinoa: Light and fluffy quinoa tossed with fresh herbs offers a nutritious touch, balancing the richness of the casserole while providing a satisfying bite.

  • Chilled Cucumber Salad: A refreshing cucumber salad brings a crisp, cool element to your meal, contrasting beautifully with the warmth of the cheesy carrot casserole.

  • Fruit Salad: A light fruit salad can cleanse the palate between bites, with the sweetness of fruit brightening the overall dining experience.

  • Chardonnay: A chilled glass of Chardonnay accentuates the cheese and buttery notes, offering a delightful pairing that rounds out the meal beautifully.

  • Chocolate Chip Cookies: End your meal on a sweet note with warm chocolate chip cookies; they’re the perfect dessert to satisfy your cravings after a comforting casserole!

Carrot Casserole Variations & Substitutions

Feel free to explore these fun twists and swaps for your Cheesy Carrot Casserole that’ll make it uniquely yours!

  • Texture Boost: Swap cornflakes with crushed potato chips or panko breadcrumbs for a delightful twist. This change will give you an entirely different crunch that can surprise your family.

  • Flavorful Cheddar: Use a blend of cheeses like Monterey Jack or Gouda alongside cheddar for enhanced flavor. Mixing cheeses can elevate the taste, making each bite even more enjoyable.

  • Veggie Joy: Replace carrots with green beans or broccoli to mix up the flavor and texture. Not only will this refresh your casserole, but it’ll also add seasonal variety!

  • Protein Power: Add cooked chicken or ham for a heartier version and transform this dish into a satisfying main course. It’s an effortless way to pack in some extra protein for growing families.

  • Dairy-Free Delight: Substitute milk and cream with non-dairy options like almond milk or coconut cream for a comforting yet lighter casserole. You’ll still enjoy that creamy texture without the dairy!

  • Herb Infusion: Infuse flavors by adding fresh herbs like thyme or rosemary to the mixture. Fresh herbs can bring brightness and depth, turning simple comfort food into something extraordinary.

  • Spicy Kick: Toss in some diced jalapeños or a sprinkle of cayenne for those who love a little heat. Adding spice can create a fantastic contrast to the creamy cheese sauce.

  • Nutty Flavor: Introduce a layer of chopped nuts like pecans or walnuts in the topping for an added crunch and nutty flavor. This unexpected twist will have everyone curious about your secret ingredient!

Don’t forget to check out our Spicy Miso Casserole for another vibrant option or the enticing Cornbread Breakfast Casserole when you’re looking for breakfast inspiration!

Cheesy Carrot Casserole Recipe FAQs

What type of carrots should I use for the casserole?
Absolutely! You can use both fresh or frozen carrots for this Cheesy Carrot Casserole. If using fresh carrots, make sure they are firm, with vibrant color and no dark spots. For frozen carrots, just thaw them out and drain any excess water to avoid a watery casserole.

How can I store leftovers of the Cheesy Carrot Casserole?
For best results, refrigerate leftover Cheesy Carrot Casserole in an airtight container for up to 3 days. Ensure it has cooled to room temperature before sealing it to preserve its creamy texture. When you’re ready to enjoy more, just reheat it until warmed through.

Can I freeze the Cheesy Carrot Casserole?
Very! You can freeze this casserole for up to 3 months. To do this, let it cool completely, then wrap it tightly in plastic wrap and aluminum foil to prevent freezer burn. When you’re ready to eat it, thaw it overnight in the refrigerator, then bake at 350°F (175°C) for about 20 minutes until heated through.

What toppings can I use instead of cornflakes?
The more the merrier! If you’d like to try a different crunch, feel free to swap cornflakes with crushed potato chips or panko breadcrumbs. Both options provide a delightful texture and can bring a unique twist to your casserole.

How do I prevent a watery casserole?
To ensure a creamy Cheesy Carrot Casserole without excess moisture, if using frozen carrots, be sure to thaw and thoroughly drain them. Additionally, cooking the roux long enough prevents a raw flour taste, while letting it bubble for a few minutes ensures a thicker cheese sauce consistency.

Are there any dietary considerations for this recipe?
Absolutely! This recipe includes dairy ingredients, so if you have lactose intolerance or a dairy allergy, you can substitute any dairy products with non-dairy alternatives, like almond milk and coconut cream. Always ensure to check labels for any allergens, especially when choosing pre-packaged items.

Carrot Casserole

Cheesy Carrot Casserole for Ultimate Comfort Food Nights

Cheesy Carrot Casserole is a delightful comfort food bursting with flavors and textures, perfect for gatherings.
Print Recipe Pin Recipe
Prep Time 20 minutes mins
Cook Time 30 minutes mins
Cooling Time 5 minutes mins
Total Time 55 minutes mins
Servings: 6 servings
Course: Dinner
Cuisine: American
Calories: 350
Ingredients Equipment Method Nutrition Notes

Ingredients
  

For the Base
  • 4 tablespoons Salted Butter Substitute with unsalted for milder taste
  • 1 medium Onion Finely chopped; shallots can be used
  • 4 tablespoons Flour Gluten-free flour can work
  • 1 teaspoon Salt Adjust based on dietary needs
  • 1/2 teaspoon Pepper White pepper can be used for milder flavor
  • 2 cups Milk Half-and-half or non-dairy milk can substitute
  • 1/2 cup Cream Use additional milk for lighter version
  • 2 cups Cheddar Cheese Shredded; blend of cheeses can be used
For the Vegetables
  • 4 cups Carrots Cooked and chopped, fresh or frozen
  • 1 tablespoon Parsley Flakes Fresh parsley can enhance flavor
For the Topping
  • 1 1/2 cups Cornflakes Crushed Ritz crackers or panko can be used
  • 2 tablespoons Melted Butter

Equipment

  • Large pot
  • 9x11 Baking Dish
  • Spatula
  • Bowls

Method
 

Step-by-Step Instructions
  1. Preheat your oven to 350°F (175°C) and prepare a 9x11 baking dish with cooking spray.
  2. Melt salted butter in a large pot over medium heat, then add finely chopped onion and sauté until translucent (about 5 minutes).
  3. Whisk in flour, salt, and pepper; cook for 3-4 minutes until bubbly and slightly golden.
  4. Gradually pour in milk and cream while stirring; cook until thickened (5-7 minutes).
  5. Remove from heat, stir in shredded cheddar cheese, then fold in cooked and chopped carrots and parsley flakes.
  6. Spread the mixture into the baking dish, smoothing it into an even layer.
  7. Combine crushed cornflakes with melted butter in a bowl; mix until evenly coated.
  8. Sprinkle cornflake mixture over the carrot mixture and bake for 20-25 minutes until golden brown.
  9. Let cool for 5 minutes before serving.

Nutrition

Serving: 1servingCalories: 350kcalCarbohydrates: 25gProtein: 9gFat: 25gSaturated Fat: 15gPolyunsaturated Fat: 1gMonounsaturated Fat: 8gCholesterol: 70mgSodium: 500mgPotassium: 300mgFiber: 2gSugar: 4gVitamin A: 800IUVitamin C: 10mgCalcium: 250mgIron: 1mg

Notes

This casserole is a delicious expression of home-cooked love and comfort; feel free to experiment with variations.

Tried this recipe?

Let us know how it was!

Delicious Skeleton Gingerbread Men for a Spooky Halloween

October 17, 2025 by Grace Snow Leave a Comment

As I sift through the fragrant spices of autumn, the unmistakable scent of ginger and cinnamon fills my kitchen, instantly transporting me to a cozy Halloween celebration. Enter the delightfully spooky Skeleton Gingerbread Men, a whimsical twist on the classic gingerbread cookie that’s sure to enchant both kids and adults alike. This festive recipe not only brings together the joy of baking but also serves as a perfect activity for creating cherished memories with loved ones. With quick prep and a fun decorating aspect, these biscuits are the ultimate alternative to fast food treats. So, are you ready to transform your kitchen into a haunted gingerbread workshop this season? Let's dive into this playful culinary adventure!

Why make Skeleton Gingerbread Men?

Fun Family Activity: Enjoy baking together! This recipe is the perfect way to engage kids in the kitchen, creating lasting memories while decorating these adorable cookies.

Irresistible Flavor: The blend of warm ginger and cinnamon transports you straight into autumn, leaving everyone craving more.

Quick & Easy: With minimal prep time, you can whip up a batch in no time. Perfect for those last-minute Halloween gatherings!

Versatile Design: Unleash your creativity by decorating with colorful royal icing, making each skeleton unique. Ideal for school treats and parties!

Crowd-Pleasing Appeal: These skeleton gingerbread men are not only fun to make, but they’re also a hit at any Halloween celebration. Enjoy them with a warm drink for an extra cozy experience!

Skeleton Gingerbread Men Ingredients

For the Dough

  • Plain Flour – Provides structure; consider whole wheat flour for a nuttier flavor.
  • Bicarbonate of Soda – Acts as a leavening agent; ensure it’s fresh for optimal rising.
  • Ground Ginger – Adds warmth and spice; use fresh grated ginger for an extra kick.
  • Ground Cinnamon – Enhances the aromatic profile; adjust to taste for your perfect balance.
  • Butter – Provides richness and tenderness; swap with margarine for a dairy-free version.
  • Soft Dark Brown or Dark Muscovado Sugar – Contributes depth and moisture; light brown sugar can substitute.
  • Golden Syrup – Adds sweetness and stickiness; in a pinch, corn syrup works well.
  • Black Treacle – Enriches flavor; molasses can be used if treacle is unavailable.

For Decoration

  • Royal Icing – Essential for decoration; opt for store-bought icing for convenience.
  • Black Edible Food Colour Pen or Writing Icing – Optional for detailing; enhances your cookie's spooky appeal, but not necessary.

Step‑by‑Step Instructions for Skeleton Gingerbread Men

Step 1: Preheat the Oven
Begin by preheating your oven to 200°C (fan 180°C/gas 6). This ensures it's hot enough for baking your Skeleton Gingerbread Men to perfection. While the oven warms, prepare your baking sheets by lining them with parchment paper to prevent the biscuits from sticking.

Step 2: Mix Dry Ingredients
In a large mixing bowl, combine the plain flour, bicarbonate of soda, ground ginger, and ground cinnamon. Use a whisk to ensure the ingredients are evenly distributed, creating a fragrant spice blend. This step lays the foundation for the warm, aromatic flavors that define your skeleton biscuits.

Step 3: Melt Wet Ingredients
In a saucepan over low heat, melt together the butter, soft dark brown sugar, golden syrup, and black treacle. Stir continuously until fully combined and smooth, taking about 5 minutes. Once melted, pour this rich mixture into your bowl of dry ingredients, allowing it to cool slightly before mixing.

Step 4: Form the Dough
As the melted mixture cools, add a little water if your dough feels too stiff, ensuring it comes together smoothly. Use your hands to mix until a dough forms. This should take 3-5 minutes. The dough for your Skeleton Gingerbread Men should be soft but cohesive, ready for shaping.

Step 5: Roll and Cut the Dough
On a lightly floured surface, roll out the dough to approximately ½ cm thick. Use a gingerbread man cutter to stamp out figures, re-rolling off-cuts as needed to maximize your cookie count. Aim for about 30 cookies to create a spooky skeleton army that's perfect for Halloween festivities.

Step 6: Bake the Biscuits
Carefully place the cut shapes onto the prepared baking sheets, allowing some space between each cookie. Bake in the preheated oven for 12-14 minutes, or until they turn golden brown. Keep an eye on them; they should be firm to the touch yet retain a slight softness in the center.

Step 7: Cool Completely
Once baked, remove the skeleton gingerbread men from the oven and let them cool on the baking sheets for a few minutes before transferring to a wire rack. Allowing them to cool completely ensures your cookies will hold their shape for decorating later on.

Step 8: Prepare the Royal Icing
While the cookies cool, prepare your royal icing by mixing powdered sugar with a small amount of water until it's paste-like. If you wish to use coloring, divide the icing into bowls and add food coloring, then mix thoroughly. This step is crucial for creating the designs on your Skeleton Gingerbread Men.

Step 9: Decorate the Cookies
Once the skeleton gingerbread men have cooled entirely, use a piping bag or a small spoon to outline and fill in your spooky decorations using the royal icing. Take your time, allowing your creativity to shine. Remember to let the icing set fully before adding any additional details or faces to your biscuits.

Skeleton Gingerbread Men Variations & Substitutions

Feel free to get creative and adjust this delightful recipe to suit your taste or dietary needs!

  • Whole Wheat Flour: Swap plain flour for whole wheat for a nuttier flavor and added nutrition. Your biscuits will still be deliciously chewy!

  • Dairy-Free: Use margarine or coconut oil instead of butter for a dairy-free version. This will keep your gingerbread soft and rich while accommodating those with dietary restrictions.

  • Spice It Up: Add a teaspoon of nutmeg or cloves for a different flavor profile that’s perfect for the autumn season. Embrace the warmth, and let your taste buds tingle!

  • Sugar Alternatives: Replace dark brown sugar with maple syrup or coconut sugar for a unique twist. Adjust the liquid in your dough accordingly for the perfect consistency!

  • Fun Shapes: Instead of skeletons, use cookie cutters for mummies or bats to add even more festive flair! The kids will love picking their favorite shapes.

  • Decorating Icing: Mix your royal icing with food coloring for vibrant designs. Kids can have fun creating their own spooky characters!

  • Spicy Kick: If you want some heat, add a pinch of cayenne pepper to the dough. It’ll surprise and delight anyone with a taste for adventure!

  • Flavored Icing: Infuse your royal icing with lemon or orange zest for a bright, zesty finish that unexpectedly complements the ginger. Enjoy those contrasting flavors!

For more exciting treats, explore our Ginger Snap Cookies or consider whipping up some Spooky Pumpkin Cupcakes for a complete Halloween spread. Happy baking!

Expert Tips for Skeleton Gingerbread Men

  • Dough Consistency: Ensure the dough isn't overworked to keep it tender. If it's too stiff, gradually add more water until it’s manageable.

  • Cooling Time: Allow your Skeleton Gingerbread Men to cool completely before decorating; otherwise, the icing may melt and run, ruining your spooky designs.

  • Cookie Thickness: Aim for about ½ cm when rolling out the dough. Too thin, and they may become crispy; too thick, and they won't bake evenly.

  • Storage Skills: Keep your decorated cookies in an airtight container with baking paper between layers to prevent icing from sticking together. They should last for several days!

  • Colorful Icing: Experiment with different colors for your royal icing to make vibrant skeletons. Kids will love personalizing each cookie with their artistic flair!

Storage Tips for Skeleton Gingerbread Men

Room Temperature: Keep your decorated skeleton gingerbread men in an airtight container at room temperature for up to 3-4 days to maintain their freshness.

Fridge: If you want to prolong their life, store them in the fridge for up to a week, ensuring they are wrapped well to prevent drying out.

Freezer: For longer preservation, freeze the cookies (uniced) for up to 3 months. To thaw, let them sit at room temperature for a few hours before decorating.

Reheating: If you prefer a warm treat, gently warm the cookies in the oven at 150°C (300°F) for 3-5 minutes, ensuring they don’t dry out. Enjoy your skeleton gingerbread men fresh and flavorful!

Make Ahead Options

These Skeleton Gingerbread Men are perfect for meal prep enthusiasts! You can prepare the dough up to 24 hours in advance and refrigerate it in an airtight container; this allows the flavors to deepen. Alternatively, you can roll and cut the shapes, then freeze them for up to 3 months. Just make sure to place parchment paper between layers to prevent sticking. When ready to bake, simply place the frozen shapes directly onto the baking sheet and add a couple of extra minutes to the baking time. This method ensures that your festive cookies are just as delicious and fresh when it's time to celebrate Halloween!

What to Serve with Skeleton Gingerbread Men?

As you gather around for Halloween festivities, these whimsical cookies can become stars of a delightful spread that tantalizes the senses.

  • Hot Apple Cider: The sweet and spicy notes of warm apple cider perfectly complement the ginger flavor, elevating your festive experience.

  • Pumpkin Spice Latte: Indulging in this seasonal favorite adds a touch of creamy warmth that pairs beautifully with the spiced cookies.

  • Creamy Vanilla Ice Cream: A scoop of vanilla provides a cool contrast and balances the ginger's warmth, creating a delightful harmony of flavors.

  • Chocolate Covered Pretzels: Crunchy with a hint of saltiness, these pretzels add textural variety and a surprising twist when enjoyed alongside the gingerbread men.

  • Caramel Dipping Sauce: Drizzle warm caramel over your skeletons for an extra layer of richness and sweetness that creates an irresistible treat.

  • Ghoulish Fruit Salad: Combine fresh fruits like strawberries, kiwi, and mandarin oranges for a bright, refreshing side that lightens up your dessert table.

  • Spooky Mocktail: Create a fun Halloween-themed drink using sparkling water, a splash of lime juice, and some blackberries for a refreshing, dark twist to sip alongside your cookies.

  • Candy Corn Snack Mix: A mix of candy corn, nuts, and pretzels can add a festive crunch and sweetness that is sure to delight guests of all ages.

Skeleton Gingerbread Men Recipe FAQs

What is the best way to select ginger for my Skeleton Gingerbread Men?
Absolutely! When selecting ginger, whether fresh or ground, look for firm roots without any dark spots or blemishes. Fresh grated ginger can elevate the flavor—opt for a root with a smooth skin for the best quality. For ground ginger, ensure the packaging is fresh and not expired; this guarantees the best aroma and spice in your cookies.

How should I store my Skeleton Gingerbread Men after baking?
To keep your decorated skeleton gingerbread men fresh, store them in an airtight container at room temperature for up to 3-4 days. If you want them to last longer, you can refrigerate them for up to a week, ensuring they are wrapped well to prevent drying out or absorbing odors.

Can I freeze my Skeleton Gingerbread Men?
Very! For longer preservation, freeze the undecorated cookies for up to 3 months. To freeze, place them in a single layer on a baking sheet until solid, then transfer to an airtight container or freezer bag, separating layers with parchment paper. Thaw them at room temperature for a couple of hours before icing, and they'll be just like freshly baked!

What should I do if my dough is too sticky or too dry?
If your dough is too sticky, try sprinkling in a little more flour, about a tablespoon at a time, until it reaches a soft but not sticky consistency. On the other hand, if it’s too dry, add water tablespoon by tablespoon until it holds together nicely. Remember, it’s better not to overwork it; just mix until combined.

Are there any dietary considerations I should be aware of for the Skeleton Gingerbread Men?
Certainly! This recipe is vegetarian but does contain dairy from the butter. If you have allergies, you can substitute the butter with margarine or coconut oil for a dairy-free option. Make sure to check labels for any processed ingredients, especially for the icing, which may contain allergens like gluten or nuts.

Skeleton gingerbread men

Delicious Skeleton Gingerbread Men for a Spooky Halloween

These skeleton gingerbread men are a delightful treat for Halloween, combining a spooky design with irresistible flavors.
Print Recipe Pin Recipe
Prep Time 20 minutes mins
Cook Time 14 minutes mins
Cooling Time 30 minutes mins
Total Time 1 hour hr 4 minutes mins
Servings: 30 cookies
Course: Dessert
Cuisine: Halloween
Calories: 150
Ingredients Equipment Method Nutrition Notes

Ingredients
  

Dough Ingredients
  • 500 g Plain Flour Consider whole wheat flour for a nuttier flavor.
  • 1 tsp Bicarbonate of Soda Ensure it’s fresh for optimal rising.
  • 2 tsp Ground Ginger Use fresh grated ginger for an extra kick.
  • 2 tsp Ground Cinnamon Adjust to taste for your perfect balance.
  • 125 g Butter Swap with margarine for a dairy-free version.
  • 175 g Soft Dark Brown or Dark Muscovado Sugar Light brown sugar can substitute.
  • 150 ml Golden Syrup Corn syrup works well in a pinch.
  • 50 g Black Treacle Molasses can be used if treacle is unavailable.
Decoration Ingredients
  • 200 g Royal Icing Opt for store-bought icing for convenience.
  • Black Edible Food Colour Pen or Writing Icing Optional for detailing; enhances your cookie's spooky appeal.

Equipment

  • Mixing Bowl
  • Whisk
  • Saucepan
  • gingerbread man cutter
  • Baking Sheets
  • Parchment Paper
  • piping bag

Method
 

Baking Instructions
  1. Preheat your oven to 200°C (fan 180°C/gas 6) and prepare baking sheets by lining them with parchment paper.
  2. In a large mixing bowl, combine the plain flour, bicarbonate of soda, ground ginger, and ground cinnamon.
  3. Melt together the butter, soft dark brown sugar, golden syrup, and black treacle in a saucepan over low heat.
  4. Pour the melted mixture into the dry ingredients and mix until a dough forms.
  5. Roll out the dough to approximately ½ cm thick and cut out cookie shapes using a gingerbread man cutter.
  6. Bake in the preheated oven for 12-14 minutes or until golden brown.
  7. Cool on a wire rack before decorating.
  8. Prepare royal icing by mixing powdered sugar with water until it's paste-like, and add food coloring if desired.
  9. Decorate the cooled cookies with royal icing and let the icing set fully before serving.

Nutrition

Serving: 1cookieCalories: 150kcalCarbohydrates: 22gProtein: 1gFat: 6gSaturated Fat: 4gPolyunsaturated Fat: 0.5gMonounsaturated Fat: 1.5gCholesterol: 20mgSodium: 120mgPotassium: 50mgFiber: 0.5gSugar: 10gVitamin A: 200IUCalcium: 30mgIron: 1mg

Notes

Keep the dough consistent and avoid overworking it to ensure tenderness. Allow cookies to cool completely before decorating to prevent icing from melting.

Tried this recipe?

Let us know how it was!

Irresistibly Creamy Chocolate Custard Tart Delight

October 17, 2025 by Grace Snow Leave a Comment

As I stood in my kitchen, the rich scent of melting chocolate transformed the air, igniting my excitement to make a classic Chocolate Custard Tart. This isn’t just any dessert; it’s a spectacular creation featuring a velvety chocolate filling nestled within a tender chocolate shortbread crust—a combination that's sure to delight any chocolate lover. Plus, this decadent triple chocolate custard tart comes together swiftly, making it a fantastic choice for special occasions or a cozy weeknight treat. With its shiny white chocolate drizzle, this dessert not only captivates the eyes but also offers a melt-in-your-mouth experience that will leave your guests asking for seconds. Ready to dive into the world of chocolate bliss? Let’s whip up this irresistible tart together!

Why is this tart a must-try?

Decadent Layers: The triple chocolate filling pairs beautifully with a buttery crust, creating an indulgent flavor experience.

Quick & Easy: With just a few simple steps, you’ll achieve a spectacular dessert that impresses without stress.

Perfect for All Occasions: Whether it’s a Halloween party or a cozy dinner, this tart is sure to be a crowd-pleaser.

Melt-in-Your-Mouth Texture: Each slice boasts a silky custard that contrasts with a crisp crust, ensuring a delightful bite every time.

Versatile Serving Options: Dress it up with a dollop of whipped cream or drizzle it with fruit sauce to elevate this classic treat.

Chocolate Custard Tart Ingredients

For the Crust
• Flour – Essential for structure; substitute gluten-free flour for a gluten-free option.
• Cocoa Powder – Adds a rich chocolate flavor; dark cocoa can enhance the depth.
• Butter – Creates richness in the crust; vegan butter can work for a dairy-free version.
• Powdered Sugar – Provides sweetness and helps achieve a tender texture; granulated sugar can be a substitute but may affect texture.
• Kosher Salt – Balances the sweetness and enhances the crust's flavors.

For the Custard Filling
• Heavy Cream – Contributes creaminess to the custard; you can use milk or non-dairy cream as alternatives, though it will alter texture.
• Whole Milk – Important for achieving a rich custard consistency; 2% can be used for a lighter option.
• Corn Syrup – Adds sweetness and helps with texture; honey or agave syrup can be alternatives.
• Semi-Sweet Chocolate Chips – The star of the custard; using dark chocolate can result in a richer flavor.
• Eggs – Provide structure and richness to the custard; consider egg substitutes for a vegan version.
• Vanilla Extract – Enhances the overall flavor; use pure vanilla for the best results.

For Decoration
• White Chocolate – Drizzle over the tart for a sweet contrast; can be omitted for a simpler appearance.

Enjoy creating this delightful Chocolate Custard Tart!

Step‑by‑Step Instructions for Chocolate Custard Tart

Step 1: Prepare the Crust
Begin by melting 1 cup of butter in a microwave-safe bowl. In a large mixing bowl, combine 1 ½ cups of sifted flour, ½ cup of cocoa powder, ½ cup of powdered sugar, and a pinch of kosher salt. Mix thoroughly, then pour in the melted butter. Stir until the mixture forms a cohesive dough. Press the dough evenly into the bottom and up the sides of a tart pan, then chill in the refrigerator for about 15 minutes.

Step 2: Pre-bake Crust
Preheat your oven to 375°F (190°C). Once the crust has chilled, remove it from the refrigerator and bake for 12 minutes. After the initial baking, beat one egg white and brush it over the hot crust to create a barrier. Return the tart shell to the oven for an additional minute to set the egg wash. This will ensure a crisp and delightful Chocolate Custard Tart base.

Step 3: Make the Custard Filling
In a saucepan, heat 1 cup of heavy cream, ½ cup of corn syrup, and 1 teaspoon of vanilla extract over medium heat until it just begins to simmer—watch for small bubbles around the edges. Add 1 cup of semi-sweet chocolate chips to the warm cream mixture and let it sit for a few minutes. This will allow the chocolate to melt smoothly; gently stir until fully combined and glossy.

Step 4: Incorporate the Eggs
In a separate bowl, whisk together 3 large eggs until well combined. Gradually pour the warm chocolate mixture into the eggs, whisking continuously to prevent scrambling. Once the custard is smooth and homogenous, carefully pour it into the pre-baked crust. The rich filling should look luscious and glossy, ready for baking.

Step 5: Bake the Tart
Reduce the oven temperature to 325°F (160°C) and place the tart in the oven. Bake for approximately 35-40 minutes, or until the custard is set but still slightly jiggles in the center—similar to a quivering jelly. This ensures perfect texture for your Chocolate Custard Tart. Carefully monitor towards the end of baking to prevent overcooking.

Step 6: Cool and Decorate
Once baked, remove the tart from the oven and let it cool to room temperature on a wire rack. Once cooled, melt some white chocolate in a microwave-safe bowl. Drizzle the melted white chocolate over the top of the tart for a beautiful decorative finish. This sweet touch will complement the rich chocolate custard beautifully, making it an eye-catching dessert for any occasion.

What to Serve with Chocolate Custard Tart

The rich velvety charm of this dessert deserves delightful companions that will elevate your entire dining experience.

  • Whipped Cream: A light, fluffy topping perfectly balances the rich chocolate custard, adding a creamy texture and airy contrast.

  • Fresh Berries: Strawberries or raspberries add a refreshing tartness, vibrant color, and a lovely burst of flavor that complements the chocolate.

  • Vanilla Ice Cream: The classic ice cream pairing melts into the warm tart, lending a soothing creaminess that enhances every forkful of chocolate richness.

  • Chocolate Sauce: Drizzle a luxurious chocolate sauce over the slice for an extra indulgent touch that chocolate lovers will adore.

  • Mint Sprigs: Garnish with fresh mint to add a pop of color and a refreshing aroma that brightens up the dessert's richness.

  • Coffee: Serve with a cup of freshly brewed coffee. The bitterness of the coffee pairs beautifully with the sweet chocolate, creating a sophisticated after-dinner treat.

  • Fruit Sauce: A drizzle of raspberry or strawberry sauce brings a fruity elegance that cuts through the tart's richness for a balanced finish.

  • Chai Tea: Serve alongside chai tea for a warm, spiced contrast that will add a cozy element to your dessert experience.

  • Dark Chocolate Shavings: For a visually stunning presentation and added texture, sprinkle dark chocolate shavings on top, enhancing the chocolate flavor further.

Expert Tips for Chocolate Custard Tart

  • Gentle Mixing: Avoid Bubbles: When combining the chocolate with the eggs, mix gently to keep the custard smooth and free of bubbles for a silky finish.

  • Jiggle Check: Perfect Bake Timing: Start checking the tart at 20 minutes; it should slightly jiggle in the center when done, similar to jello, indicating it's perfectly set.

  • Room Temperature Slice: Cleaner Cuts: Allow the tart to come to room temperature before slicing for a cleaner cut and more enjoyable presentation.

  • Chill the Crust: Better Texture: Chilling the crust before baking helps it maintain shape and ensures that delightful crispiness aligns beautifully with the creamy filling of the chocolate custard tart.

  • Decoration Alternatives: Personal Touch: While drizzling white chocolate is lovely, feel free to get creative with toppings like fresh berries or a dusting of cocoa powder for an exciting twist!

How to Store and Freeze Chocolate Custard Tart

Refrigerator: Keep the chocolate custard tart covered in an airtight container for up to 3 days. Allow it to reach room temperature before serving for enhanced flavor.

Freezer: If you need to store it longer, wrap slices tightly in plastic wrap and then in foil, storing in the freezer for up to 2 months. Thaw overnight in the fridge before enjoying.

Serving After Storage: For the best texture, reheat individual slices in the microwave for 15–20 seconds. This brings back the creaminess of the chocolate custard tart.

Making Ahead: This tart can be made a day in advance, as the flavors meld beautifully with time. Just store it properly in the refrigerator, and it's ready to impress your guests!

Make Ahead Options

These Chocolate Custard Tarts are a dream for busy home cooks looking to save time while preparing a show-stopping dessert! You can make the chocolate shortbread crust up to 24 hours in advance; simply cool it completely, then wrap it tightly and refrigerate. The custard filling can also be made up to 3 days ahead—just keep it covered in the fridge. When you're ready to serve, pour the filling into the pre-baked crust and bake as instructed—this ensures your tart tastes just as delightful as if made the same day. Remember to let the tart cool completely before drizzling it with white chocolate; this will enhance presentation while keeping flavors intact. Enjoy a fresh, homemade dessert without the last-minute rush!

Chocolate Custard Tart Variations

Feel free to explore delightful twists on this decadent chocolate custard tart to suit your tastes!

  • Dark Chocolate: Swap semi-sweet chocolate for dark chocolate for an intensified rich flavor; it will elevate the overall experience.

  • Vegan Delight: Replace butter with vegan butter and the eggs with an egg substitute to create a fabulous vegan tart that everyone can enjoy. It’s surprisingly satisfying!

  • Gluten-Free: Use gluten-free flour instead of traditional flour to cater to gluten sensitivities; the tart remains deliciously indulgent without any missing flavors.

  • Fruit Garnish: Top the tart with fresh berries or a fruit sauce, like raspberry, which adds a lovely contrast of flavor and a vibrant pop of color.

  • Nutty Crust: For an extra crunch, incorporate finely chopped nuts like hazelnuts or almonds into the crust; they introduce a delightful texture that complements the creamy filling perfectly.

  • Chili Chocolate: Add a pinch of cayenne or chili powder to the chocolate filling for a surprising heat that balances the sweetness wonderfully. A perfect conversation starter!

  • Fruity Custard: Blend in some pureed avocado or banana to the custard for a unique twist. It adds creaminess and a subtle fruity flavor without overpowering the chocolate.

  • Holiday Spice: Add a hint of cinnamon or nutmeg to the custard filling for a warm, seasonal twist that brings a cozy vibe, perfect for holiday gatherings.

If you're ever in the mood for something different, consider pairing this tart with homemade hot chocolate for a truly indulgent dessert experience—perfect for special occasions or quiet nights at home!

Chocolate Custard Tart Recipe FAQs

How do I choose the right chocolate for my tart?
Absolutely! When selecting chocolate for your chocolate custard tart, aim for high-quality semi-sweet or dark chocolate chips with at least 60% cocoa content. This choice ensures a rich, balanced flavor that elevates your dessert. Avoid inferior chocolates, as they may impart a less desirable taste.

What’s the best way to store leftovers?
Very! Cover the chocolate custard tart in an airtight container and store it in the refrigerator for up to 3 days. Allow it to come to room temperature before serving; this enhances flavor and allows the custard to regain its creamy texture.

Can I freeze the chocolate custard tart?
Absolutely! To freeze, wrap individual slices tightly in plastic wrap and then in aluminum foil. This protects them from freezer burn. The tart can be stored in the freezer for up to 2 months. Thaw overnight in the fridge before serving, and gently reheat slices in the microwave for 15–20 seconds to revive the creamy texture.

What if my custard filling doesn’t set?
If your custard filling is still jiggly after 40 minutes, it might need more time in the oven. Check in 5-minute intervals until gently jiggly—like set jello—as this signals the custard is perfectly done. If it overcooks, the texture can become grainy, so keep an eye on it!

Are there any dietary considerations for this tart?
Yes! For those with egg allergies, consider using an egg substitute like flaxseed meal mixed with water (1 tablespoon flaxseed meal + 2.5 tablespoons water = 1 egg). Furthermore, if you're catering to a gluten-free audience, swap regular flour with a gluten-free flour blend; just ensure your cocoa powder and chocolate chips are also gluten-free.

Can pets eat chocolate custard tart?
No, pets, especially dogs and cats, should not consume chocolate as it can be toxic to them. Make sure to keep this delicious dessert out of their reach to ensure their safety!

Chocolate Custard Tart

Irresistibly Creamy Chocolate Custard Tart Delight

This Chocolate Custard Tart features a velvety filling in a chocolate shortbread crust, perfect for any occasion.
Print Recipe Pin Recipe
Prep Time 20 minutes mins
Cook Time 40 minutes mins
Chilling Time 15 minutes mins
Total Time 1 hour hr 15 minutes mins
Servings: 8 slices
Course: Dessert
Cuisine: American
Calories: 300
Ingredients Equipment Method Nutrition Notes

Ingredients
  

For the Crust
  • 1.5 cups Flour sifted
  • 0.5 cups Cocoa Powder dark cocoa enhances flavor
  • 1 cups Butter melted; can substitute with vegan butter
  • 0.5 cups Powdered Sugar can substitute with granulated sugar
  • 1 pinch Kosher Salt balances sweetness
For the Custard Filling
  • 1 cups Heavy Cream can use milk or non-dairy cream
  • 0.5 cups Corn Syrup honey or agave syrup can be alternatives
  • 1 teaspoon Vanilla Extract use pure vanilla for best results
  • 1 cups Semi-Sweet Chocolate Chips can use dark chocolate for richer flavor
  • 3 large Eggs consider egg substitutes for a vegan version
For Decoration
  • 0.5 cups White Chocolate optional, for drizzling

Equipment

  • tart pan
  • Mixing bowls
  • Saucepan
  • Whisk

Method
 

Step-by-Step Instructions
  1. Begin by melting 1 cup of butter in a microwave-safe bowl.
  2. In a large mixing bowl, combine 1 ½ cups of sifted flour, ½ cup of cocoa powder, ½ cup of powdered sugar, and a pinch of kosher salt. Mix thoroughly, then pour in the melted butter. Stir until the mixture forms a cohesive dough.
  3. Press the dough evenly into the bottom and up the sides of a tart pan, then chill in the refrigerator for about 15 minutes.
  4. Preheat your oven to 375°F (190°C). Once the crust has chilled, remove it from the refrigerator and bake for 12 minutes.
  5. After the initial baking, beat one egg white and brush it over the hot crust to create a barrier. Return the tart shell to the oven for an additional minute to set the egg wash.
  6. In a saucepan, heat 1 cup of heavy cream, ½ cup of corn syrup, and 1 teaspoon of vanilla extract over medium heat until it just begins to simmer.
  7. Add 1 cup of semi-sweet chocolate chips to the warm cream mixture and let it sit for a few minutes.
  8. Gently stir until fully combined and glossy.
  9. In a separate bowl, whisk together 3 large eggs until well combined.
  10. Gradually pour the warm chocolate mixture into the eggs, whisking continuously to prevent scrambling.
  11. Carefully pour the custard into the pre-baked crust.
  12. Reduce the oven temperature to 325°F (160°C) and bake for approximately 35-40 minutes, or until set but slightly jiggles in the center.
  13. Once baked, remove the tart from the oven and let it cool to room temperature.
  14. Melt some white chocolate and drizzle over the top of the tart.

Nutrition

Serving: 1sliceCalories: 300kcalCarbohydrates: 35gProtein: 4gFat: 18gSaturated Fat: 10gPolyunsaturated Fat: 2gMonounsaturated Fat: 5gCholesterol: 80mgSodium: 150mgPotassium: 200mgFiber: 2gSugar: 20gVitamin A: 400IUCalcium: 30mgIron: 2mg

Notes

Allow tart to reach room temperature before slicing for cleaner cuts. Store in an airtight container in the refrigerator for up to 3 days.

Tried this recipe?

Let us know how it was!

Irresistibly Creamy Chocolate Custard Tart Delight

October 17, 2025 by Grace Snow Leave a Comment

As I stood in my kitchen, the rich scent of melting chocolate transformed the air, igniting my excitement to make a classic Chocolate Custard Tart. This isn’t just any dessert; it’s a spectacular creation featuring a velvety chocolate filling nestled within a tender chocolate shortbread crust—a combination that's sure to delight any chocolate lover. Plus, this decadent triple chocolate custard tart comes together swiftly, making it a fantastic choice for special occasions or a cozy weeknight treat. With its shiny white chocolate drizzle, this dessert not only captivates the eyes but also offers a melt-in-your-mouth experience that will leave your guests asking for seconds. Ready to dive into the world of chocolate bliss? Let’s whip up this irresistible tart together!

Why is this tart a must-try?

Decadent Layers: The triple chocolate filling pairs beautifully with a buttery crust, creating an indulgent flavor experience.

Quick & Easy: With just a few simple steps, you’ll achieve a spectacular dessert that impresses without stress.

Perfect for All Occasions: Whether it’s a Halloween party or a cozy dinner, this tart is sure to be a crowd-pleaser.

Melt-in-Your-Mouth Texture: Each slice boasts a silky custard that contrasts with a crisp crust, ensuring a delightful bite every time.

Versatile Serving Options: Dress it up with a dollop of whipped cream or drizzle it with fruit sauce to elevate this classic treat.

Chocolate Custard Tart Ingredients

For the Crust
• Flour – Essential for structure; substitute gluten-free flour for a gluten-free option.
• Cocoa Powder – Adds a rich chocolate flavor; dark cocoa can enhance the depth.
• Butter – Creates richness in the crust; vegan butter can work for a dairy-free version.
• Powdered Sugar – Provides sweetness and helps achieve a tender texture; granulated sugar can be a substitute but may affect texture.
• Kosher Salt – Balances the sweetness and enhances the crust's flavors.

For the Custard Filling
• Heavy Cream – Contributes creaminess to the custard; you can use milk or non-dairy cream as alternatives, though it will alter texture.
• Whole Milk – Important for achieving a rich custard consistency; 2% can be used for a lighter option.
• Corn Syrup – Adds sweetness and helps with texture; honey or agave syrup can be alternatives.
• Semi-Sweet Chocolate Chips – The star of the custard; using dark chocolate can result in a richer flavor.
• Eggs – Provide structure and richness to the custard; consider egg substitutes for a vegan version.
• Vanilla Extract – Enhances the overall flavor; use pure vanilla for the best results.

For Decoration
• White Chocolate – Drizzle over the tart for a sweet contrast; can be omitted for a simpler appearance.

Enjoy creating this delightful Chocolate Custard Tart!

Step‑by‑Step Instructions for Chocolate Custard Tart

Step 1: Prepare the Crust
Begin by melting 1 cup of butter in a microwave-safe bowl. In a large mixing bowl, combine 1 ½ cups of sifted flour, ½ cup of cocoa powder, ½ cup of powdered sugar, and a pinch of kosher salt. Mix thoroughly, then pour in the melted butter. Stir until the mixture forms a cohesive dough. Press the dough evenly into the bottom and up the sides of a tart pan, then chill in the refrigerator for about 15 minutes.

Step 2: Pre-bake Crust
Preheat your oven to 375°F (190°C). Once the crust has chilled, remove it from the refrigerator and bake for 12 minutes. After the initial baking, beat one egg white and brush it over the hot crust to create a barrier. Return the tart shell to the oven for an additional minute to set the egg wash. This will ensure a crisp and delightful Chocolate Custard Tart base.

Step 3: Make the Custard Filling
In a saucepan, heat 1 cup of heavy cream, ½ cup of corn syrup, and 1 teaspoon of vanilla extract over medium heat until it just begins to simmer—watch for small bubbles around the edges. Add 1 cup of semi-sweet chocolate chips to the warm cream mixture and let it sit for a few minutes. This will allow the chocolate to melt smoothly; gently stir until fully combined and glossy.

Step 4: Incorporate the Eggs
In a separate bowl, whisk together 3 large eggs until well combined. Gradually pour the warm chocolate mixture into the eggs, whisking continuously to prevent scrambling. Once the custard is smooth and homogenous, carefully pour it into the pre-baked crust. The rich filling should look luscious and glossy, ready for baking.

Step 5: Bake the Tart
Reduce the oven temperature to 325°F (160°C) and place the tart in the oven. Bake for approximately 35-40 minutes, or until the custard is set but still slightly jiggles in the center—similar to a quivering jelly. This ensures perfect texture for your Chocolate Custard Tart. Carefully monitor towards the end of baking to prevent overcooking.

Step 6: Cool and Decorate
Once baked, remove the tart from the oven and let it cool to room temperature on a wire rack. Once cooled, melt some white chocolate in a microwave-safe bowl. Drizzle the melted white chocolate over the top of the tart for a beautiful decorative finish. This sweet touch will complement the rich chocolate custard beautifully, making it an eye-catching dessert for any occasion.

What to Serve with Decadent Triple Chocolate Custard Tart

Indulging in a slice of this rich tart is a delightful experience, and pairing it with the right side dishes can elevate your dessert game even further.

  • Whipped Cream: A dollop of freshly whipped cream adds a light, airy contrast that beautifully balances the tart's richness.

  • Fresh Berries: Sweet, tart berries like raspberries or strawberries provide a refreshing burst of flavor that complements the chocolate beautifully.

  • Chocolate Sauce: Drizzle some extra chocolate sauce on top for an indulgent experience; the extra layer of chocolate makes it a true decadence.

  • Vanilla Ice Cream: Warm slices of the tart paired with vanilla ice cream offer a delightful temperature contrast and creamy texture that everyone loves.

  • Mint Leaves: Garnishing with fresh mint not only adds a pop of color but also imparts a refreshing note that brightens up each bite.

  • Dark Roast Coffee: A cup of rich, dark coffee enhances the chocolate flavors and provides a cozy drink option alongside your dessert.

Each of these pairings adds its own unique twist, transforming each serving into an unforgettable treat that delights the senses. Enjoy!

Chocolate Custard Tart Variations

Customize your Chocolate Custard Tart to make it even more delightful and uniquely yours!

  • Gluten-Free: Use a gluten-free flour blend to create a delicious tart that everyone can enjoy.
  • Dairy-Free: Swap regular butter and cream for plant-based alternatives for a vegan-friendly version that doesn’t skimp on flavor.
  • Rich Dark Chocolate: Substitute semi-sweet chocolate chips for dark chocolate for an intense chocolate experience that adds depth to every bite.
  • Fruit Fusion: Add a spoonful of raspberry or cherry sauce between the custard and crust for a fruity layer that brightens up the tart.
  • Nutty Delight: Incorporate crushed nuts like pecans or walnuts into the crust for added texture and a pleasing crunch.
  • Spiced Warmth: Sprinkle a touch of cinnamon or nutmeg into the custard mixture for a subtle warmth that perfectly complements the chocolate richness.
  • Caramel Drizzle: Top your finished tart with a homemade caramel sauce for an indulgent twist that balances beautifully with the chocolate.
  • Seasonal Twist: Decorate with edible flowers or themed sprinkles for festive occasions like birthdays or holidays—imagine the joy of a Halloween-inspired dessert!

These variations let you play with flavors and textures, keeping things exciting while celebrating every occasion with dessert. If you're in the mood for another chocolate delight, don’t forget to check out our German Chocolate Poke for more inspiration that will win hearts!

How to Store and Freeze Chocolate Custard Tart

Refrigerator: Keep the chocolate custard tart covered in an airtight container for up to 3 days. Allow it to reach room temperature before serving for enhanced flavor.

Freezer: If you need to store it longer, wrap slices tightly in plastic wrap and then in foil, storing in the freezer for up to 2 months. Thaw overnight in the fridge before enjoying.

Serving After Storage: For the best texture, reheat individual slices in the microwave for 15–20 seconds. This brings back the creaminess of the chocolate custard tart.

Making Ahead: This tart can be made a day in advance, as the flavors meld beautifully with time. Just store it properly in the refrigerator, and it's ready to impress your guests!

Expert Tips for Chocolate Custard Tart

  • Gentle Mixing: Avoid Bubbles: When combining the chocolate with the eggs, mix gently to keep the custard smooth and free of bubbles for a silky finish.

  • Jiggle Check: Perfect Bake Timing: Start checking the tart at 20 minutes; it should slightly jiggle in the center when done, similar to jello, indicating it's perfectly set.

  • Room Temperature Slice: Cleaner Cuts: Allow the tart to come to room temperature before slicing for a cleaner cut and more enjoyable presentation.

  • Chill the Crust: Better Texture: Chilling the crust before baking helps it maintain shape and ensures that delightful crispiness aligns beautifully with the creamy filling of the chocolate custard tart.

  • Decoration Alternatives: Personal Touch: While drizzling white chocolate is lovely, feel free to get creative with toppings like fresh berries or a dusting of cocoa powder for an exciting twist!

Make Ahead Options

These Chocolate Custard Tart preparations are perfect for busy home cooks looking to save time! You can prepare the chocolate shortbread crust up to 24 hours in advance; just wrap it tightly in plastic wrap and refrigerate to maintain freshness. The custard filling can be made up to 3 days ahead and stored in an airtight container in the fridge. To finish, simply pour the custard into the pre-baked crust and bake as directed. This not only keeps flavors vibrant but ensures your tart tastes just as delicious when served. With these make-ahead tips, you can impress your guests with minimal day-of effort!

Chocolate Custard Tart Recipe FAQs

What type of chocolate should I use for the custard?
Absolutely! For the best flavor, I recommend using high-quality semi-sweet chocolate chips for a rich and balanced taste. If you're feeling adventurous, you can substitute them with dark chocolate for a more intense cocoa flavor, just be careful with the sweetness balance!

How should I store leftover chocolate custard tart?
Very easy! Store your chocolate custard tart covered in plastic wrap or in an airtight container in the refrigerator for up to 3 days. This helps maintain its creamy texture and prevents it from absorbing odors from other foods.

Can I freeze chocolate custard tart for later?
Definitely! To freeze your chocolate custard tart, wrap it tightly in plastic wrap and then in aluminum foil. It can be kept in the freezer for up to 2 months. When you're ready to enjoy it, thaw it in the refrigerator overnight for the best results.

What should I do if my custard doesn't set properly?
Don't worry, it can happen to the best of us! If your custard is too runny after baking, this may mean it needs a little more time in the oven. Return it to the oven and check for doneness about every 5 minutes after the initial baking time. If it jiggles just slightly in the center, it’s done!

Are there any dietary considerations I should be aware of?
Great question! If you're preparing this tart for guests with dietary restrictions, consider using gluten-free flour and vegan butter to make it gluten-free and dairy-free, respectively. Also, ensure to use egg substitutes to create a vegan version without compromising on flavor!

How long does the tart keep its best flavor?
To enjoy the delightful flavors of your chocolate custard tart at their prime, it's best consumed within the first 3 days after preparation. After that, while the taste remains good, the texture may slightly alter. It's recommended to let it sit at room temperature for a few minutes before serving to enhance its lusciousness!

Chocolate Custard Tart

Irresistibly Creamy Chocolate Custard Tart Delight

This Chocolate Custard Tart features a velvety chocolate filling and buttery crust, perfect for any chocolate lover.
Print Recipe Pin Recipe
Prep Time 15 minutes mins
Cook Time 55 minutes mins
Chilling Time 15 minutes mins
Total Time 1 hour hr 25 minutes mins
Servings: 8 slices
Course: Dessert
Cuisine: American
Calories: 320
Ingredients Equipment Method Nutrition Notes

Ingredients
  

For the Crust
  • 1.5 cups flour substitute with gluten-free flour for a gluten-free option
  • 0.5 cups cocoa powder dark cocoa can enhance richness
  • 0.5 cups butter vegan butter can be used for a dairy-free version
  • 0.25 cups powdered sugar granulated sugar can substitute but may affect texture
  • 1 teaspoon vanilla extract use pure vanilla for best results
  • 1 pinch kosher salt balances sweetness and enhances flavors
For the Custard Filling
  • 1 cup heavy cream milk or non-dairy cream can substitute
  • 1 cup whole milk can use 2% for a lighter option
  • 0.25 cups corn syrup honey or agave syrup can be alternatives
  • 1.5 cups semi-sweet chocolate chips higher cocoa content leads to a richer tart
  • 3 large eggs use egg blocks as a replacement for a vegan version
For Decoration
  • 0.5 cups white chocolate omit if desired for a simple finish

Equipment

  • tart pan
  • Mixing bowls
  • Whisk
  • Saucepan
  • Microwave

Method
 

Step-by-Step Instructions for Chocolate Custard Tart
  1. Begin by melting 1/2 cup of butter in a microwave-safe bowl. In a large mixing bowl, sift together 1 ½ cups of flour, ½ cup of cocoa powder, ¼ cup of powdered sugar, and a pinch of kosher salt. Combine the melted butter with the dry mixture, forming a dough. Press this dough firmly into the base and up the sides of a tart pan. Chill the crust in the refrigerator for 15 minutes to firm up.
  2. Preheat your oven to 375°F (190°C). Once the crust has chilled, remove it from the refrigerator and bake it for 12 minutes until set. To ensure a crisp crust, gently brush the inside with a beaten egg white and return it to the oven for an additional minute.
  3. While the crust bakes, heat 1 cup of heavy cream and ¼ cup of corn syrup in a saucepan over medium heat. Stir until it reaches a gentle simmer, then remove the pan from heat. Pour this hot mixture over 1 ½ cups of semi-sweet chocolate chips in a mixing bowl, and let it sit for 2-3 minutes. Now, add 3 beaten eggs to the chocolate mixture and whisk until smooth and silky.
  4. Reduce your oven temperature to 325°F (160°C). Carefully pour the chocolate custard filling into the pre-baked tart crust, smoothing it out for an even surface. Bake the Chocolate Custard Tart for 35-40 minutes or until the edges are set, but the center still has a slight jiggle.
  5. Once done, remove the tart from the oven and let it cool to room temperature in the tart pan. After cooling, melt ½ cup of white chocolate to create a beautiful drizzle. Use a fork to swirl the melted white chocolate on top of your tart.

Nutrition

Serving: 1sliceCalories: 320kcalCarbohydrates: 35gProtein: 4gFat: 20gSaturated Fat: 12gPolyunsaturated Fat: 1gMonounsaturated Fat: 6gCholesterol: 105mgSodium: 180mgPotassium: 200mgFiber: 2gSugar: 15gVitamin A: 8IUCalcium: 4mgIron: 10mg

Notes

Ensure the chocolate mixture is gently combined to avoid introducing bubbles that can affect the custard's smooth texture.

Tried this recipe?

Let us know how it was!
  • « Previous Page
  • 1
  • …
  • 184
  • 185
  • 186
  • 187
  • 188
  • …
  • 244
  • Next Page »

Welcome!

Hi, I’m Grace, a Sydney-based home cook with a passion for bold flavors and trending ingredients. Whether you’re a busy beginner or a seasoned foodie, you’ll find dishes here that are fresh, fun, and full of flavor.

More about me

Popular Recipes

  • Delicious Keto Philly Cheesesteak Bowls You’ll Crave Daily
  • twice baked potato casserole
    Indulge in This Creamy Twice Baked Potato Casserole Delight
  • Red Potato Casserole
    Irresistible Red Potato Casserole with Crunchy Topping
  • Cowboy Potato Casserole
    Comforting Cowboy Potato Casserole for Cozy Nights

Footer

↑ back to top

About

  • Privacy Policy
  • Disclaimer
  • Terms & Conditions

Newsletter

  • Sign Up! for emails and updates

Contact

  • About me
  • Contact me

Copyright © 2025 TastyTrendIngredients