tastytrendingredients

  • Home
  • Recipes
    • Appetizers
    • Breakfast
    • Dessert
    • Dinner
    • Drinks
    • Salads
    • Snacks
    • Soups
  • About me
  • Contact me
menu icon
go to homepage
  • Home
  • Recipes
    • Appetizers
    • Breakfast
    • Dessert
    • Dinner
    • Drinks
    • Salads
    • Snacks
    • Soups
  • About me
  • Contact me
search icon
Homepage link
  • Home
  • Recipes
    • Appetizers
    • Breakfast
    • Dessert
    • Dinner
    • Drinks
    • Salads
    • Snacks
    • Soups
  • About me
  • Contact me
×

Easy Chicken Ranch Wraps: Quick, Creamy & Totally Satisfying

March 19, 2026 by Grace Snow Leave a Comment

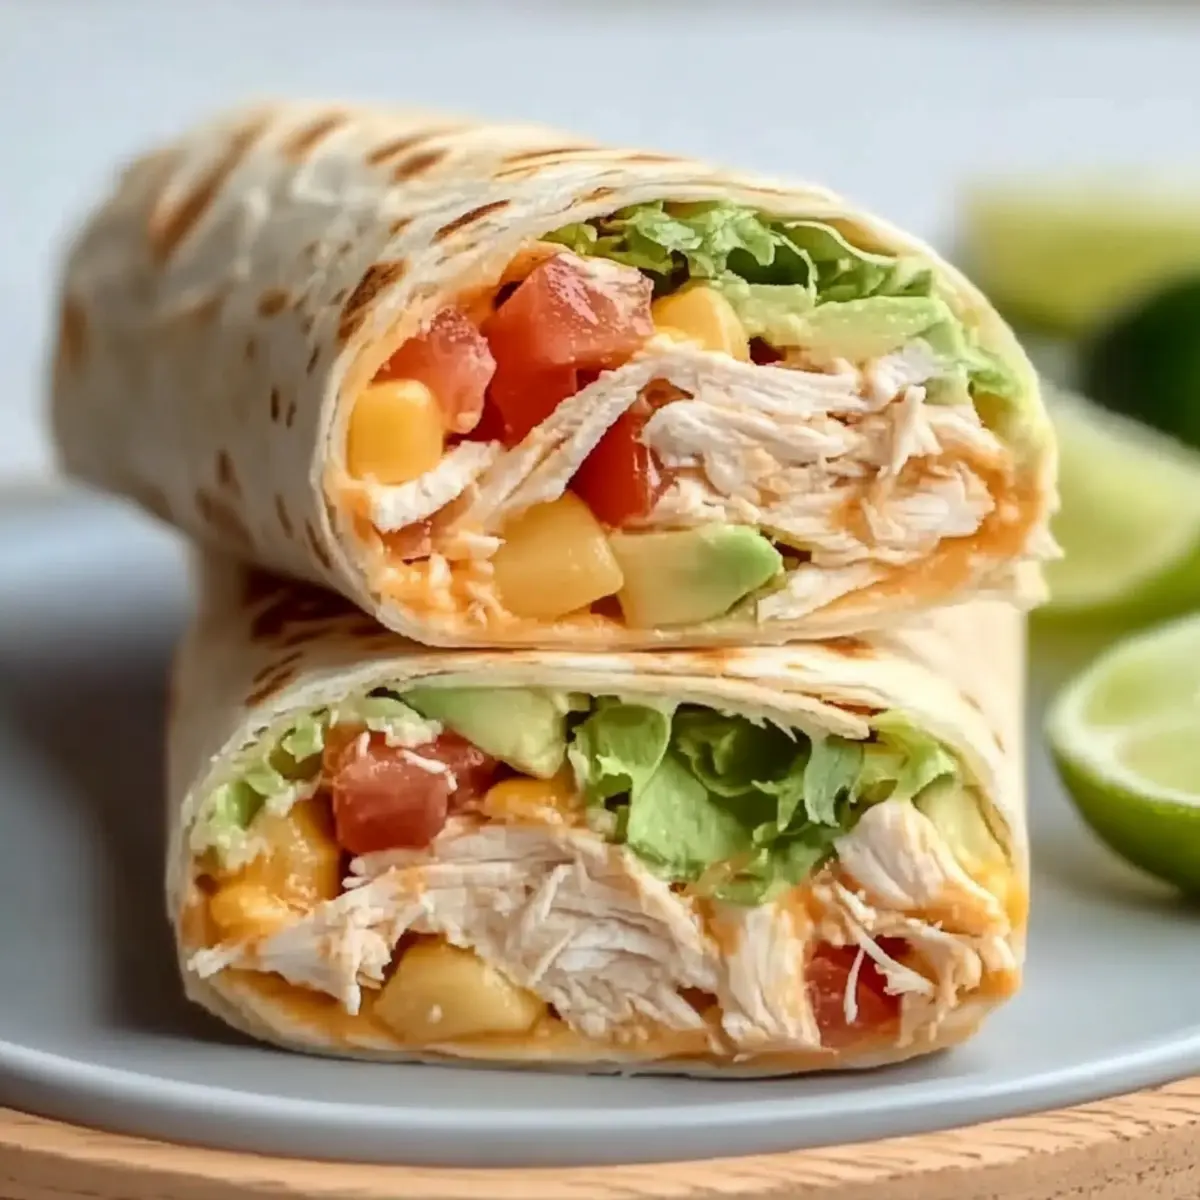
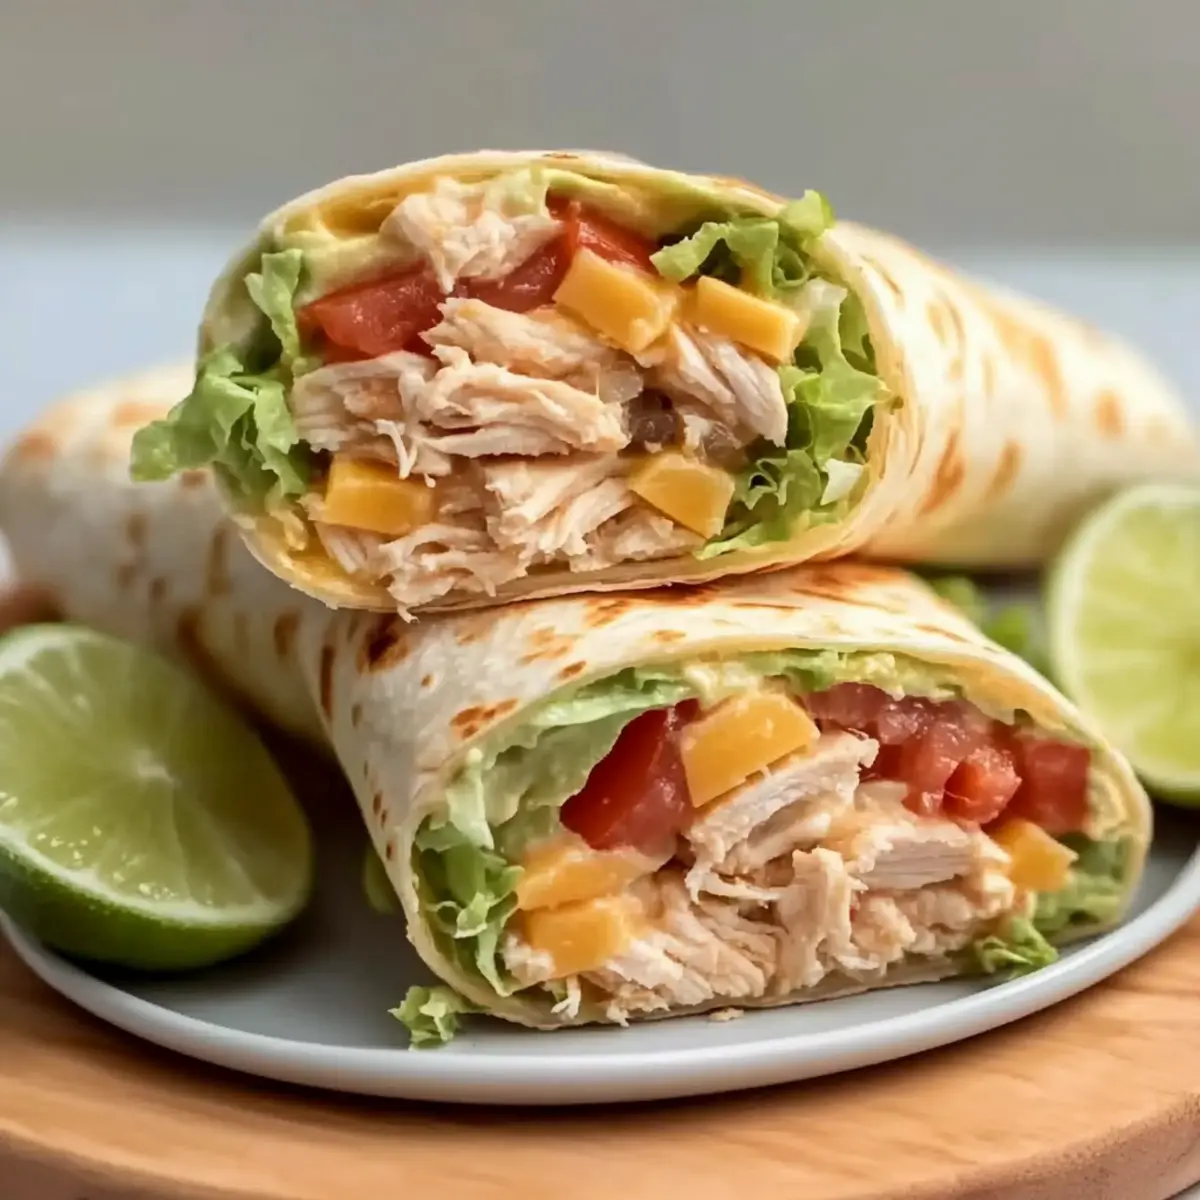
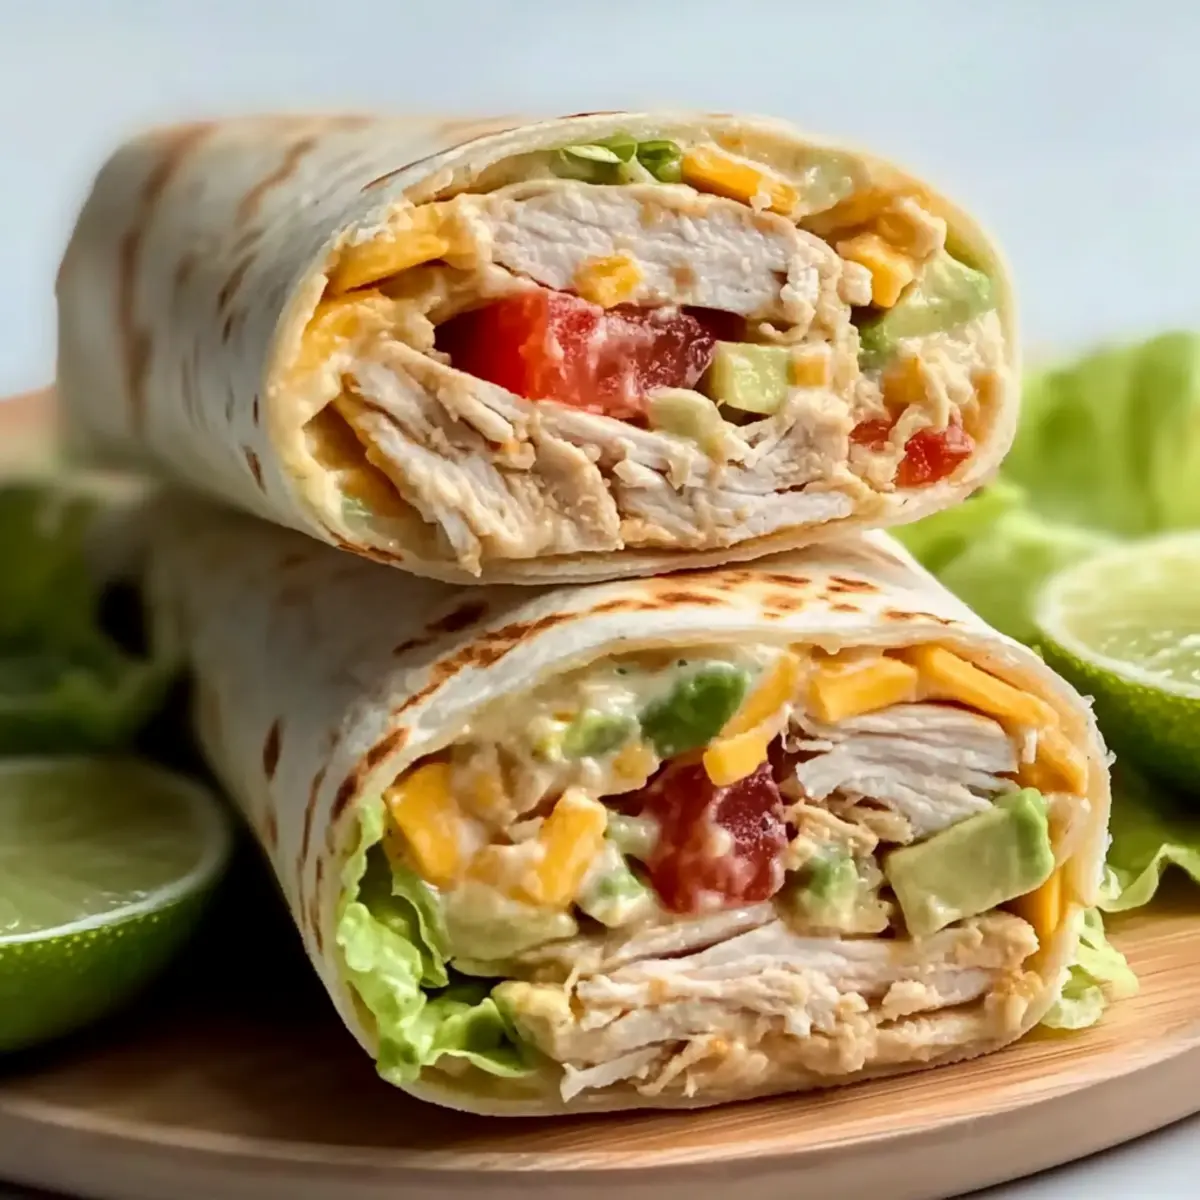
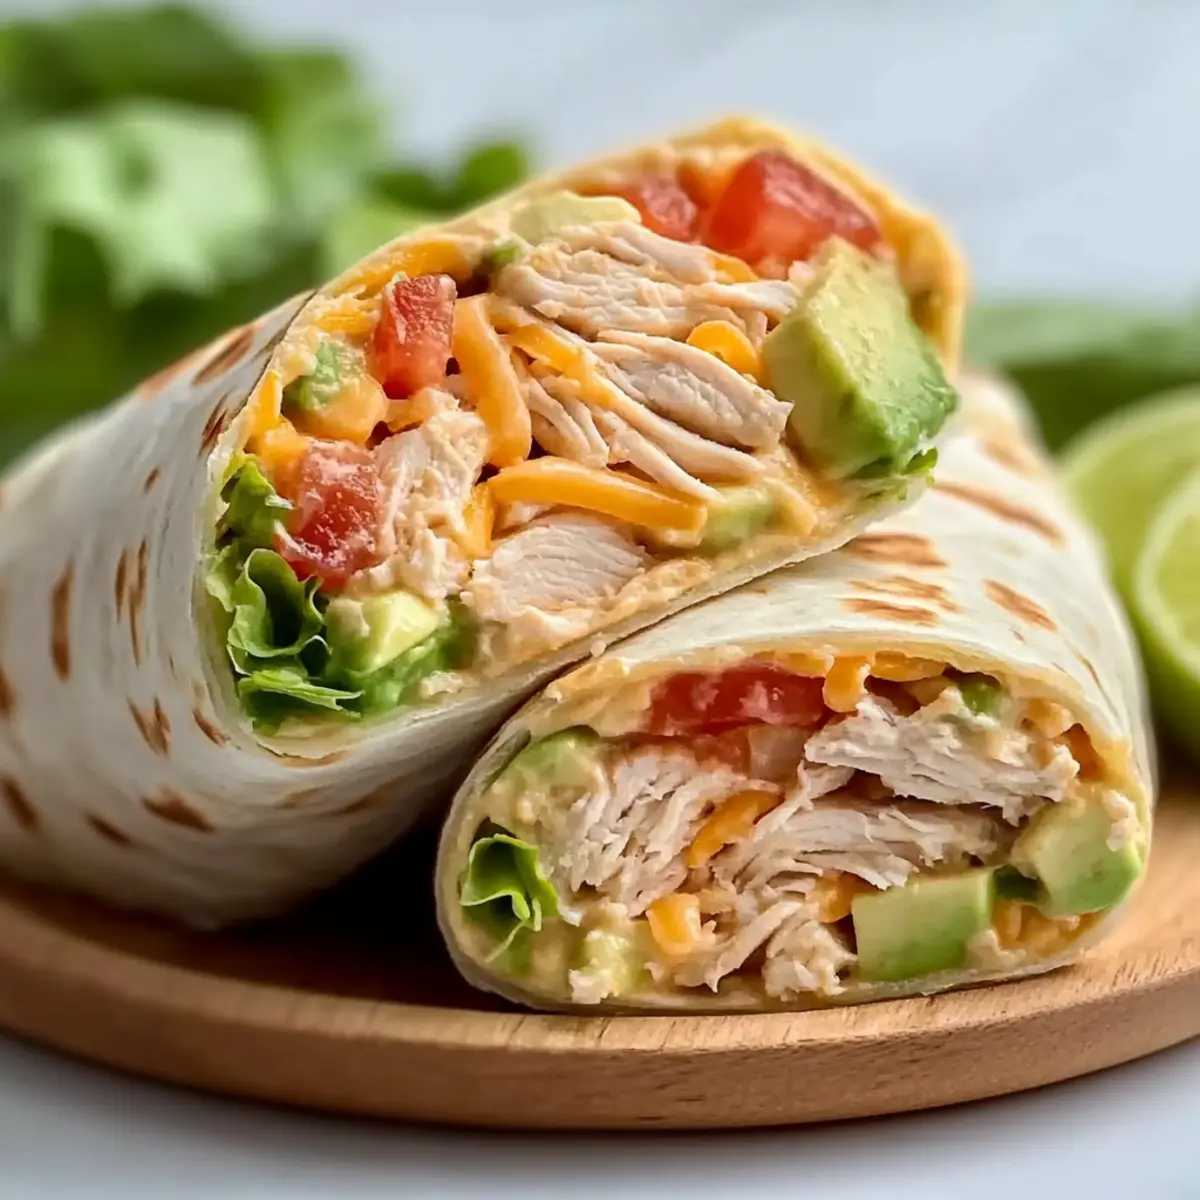
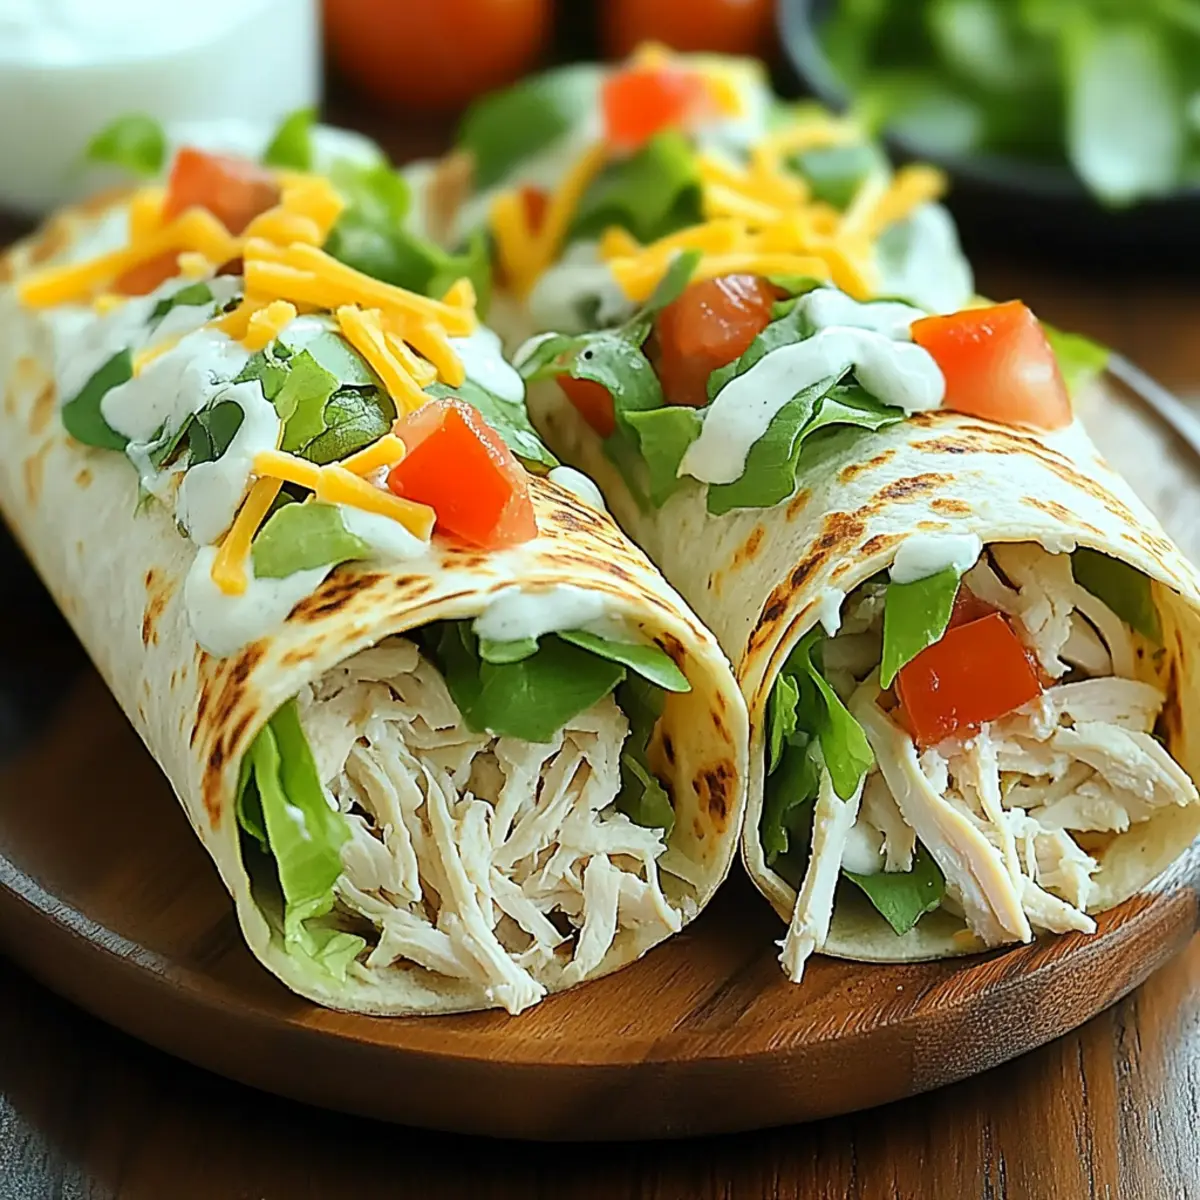
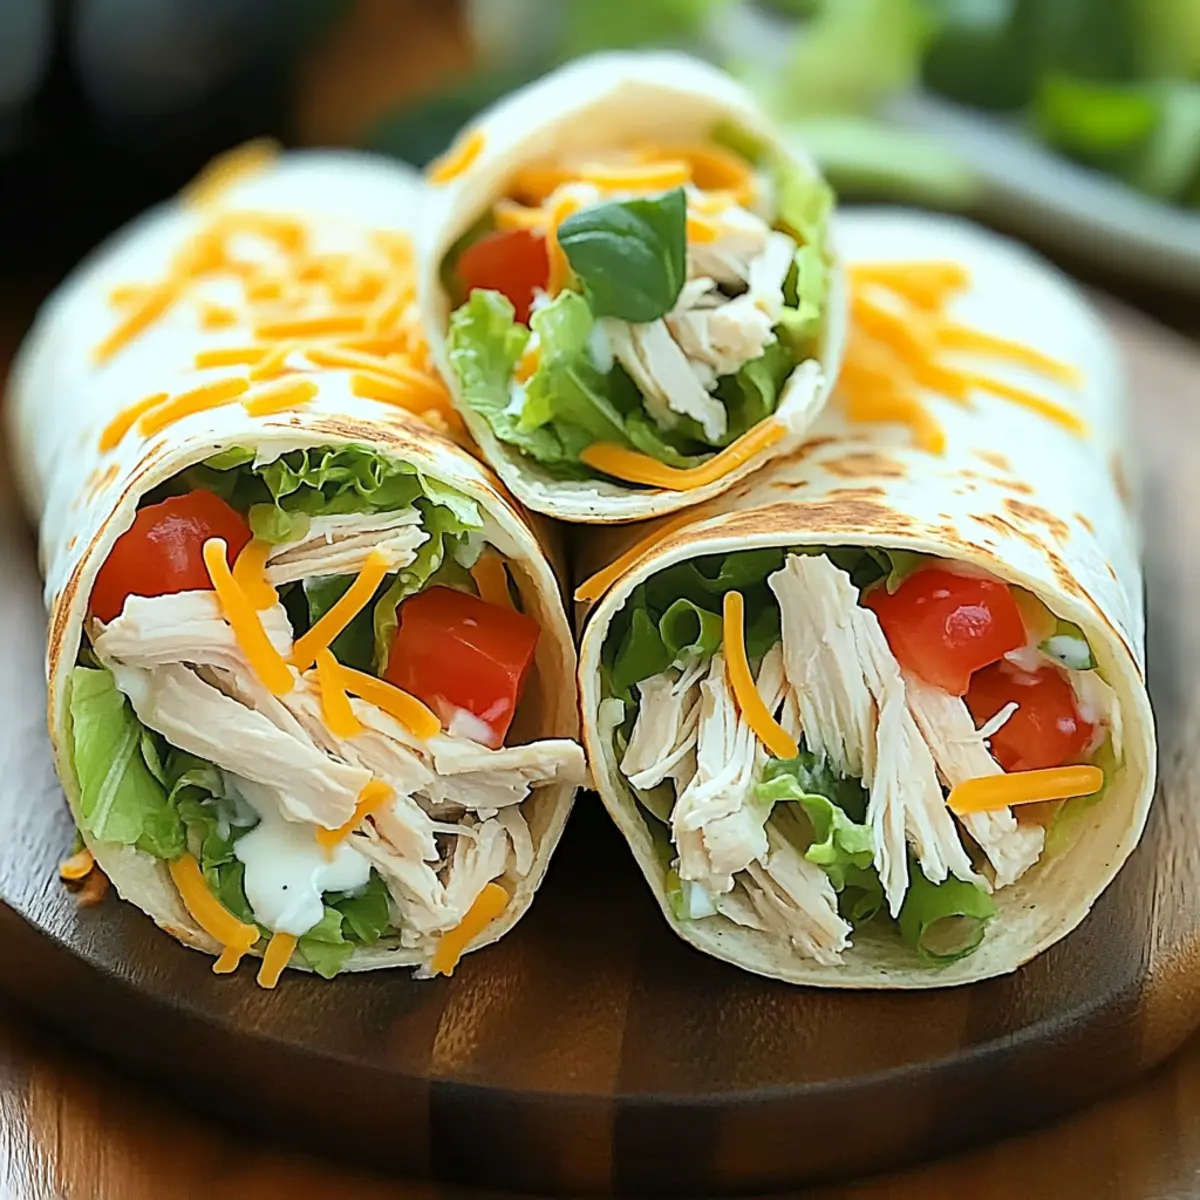
There's something so satisfying about a meal that's both quick to put together and packed with flavor. These Easy Chicken Ranch Wraps are a game-changer for busy weeknights or when cravings hit. With tender, shredded chicken slathered in creamy ranch dressing, crispy lettuce, and ripe tomatoes all snugly enveloped in your choice of flour or whole grain tortillas, you'll discover a family-friendly dish that pleases everyone at the table. Plus, they're customizable—swap in your favorite proteins or add extra veggies for a nutritious boost! Ready in just 15 minutes, these wraps promise to be your new go-to for fast lunches or delightful snacks. Curious how to whip them up and take your wrap game to the next level? Let's dive in!

Why are These Chicken Wraps a Must-Try?

Quick and super easy to prepare, these Easy Chicken Ranch Wraps come together in just 15 minutes! Customizable, you can switch up proteins or add extra veggies to suit your family’s taste. Healthy swaps like whole grain tortillas and Greek yogurt make it simple to lighten up this delight. Crowd-pleaser appeal means everyone will love them, whether for lunch or dinner. Plus, grill them for an added crunch, or serve them alongside a fresh garden salad for a satisfying meal. Don’t forget to check out variations like Honey Garlic Chicken Thighs for more delicious options!

Easy Chicken Ranch Wraps Ingredients

For the Wraps

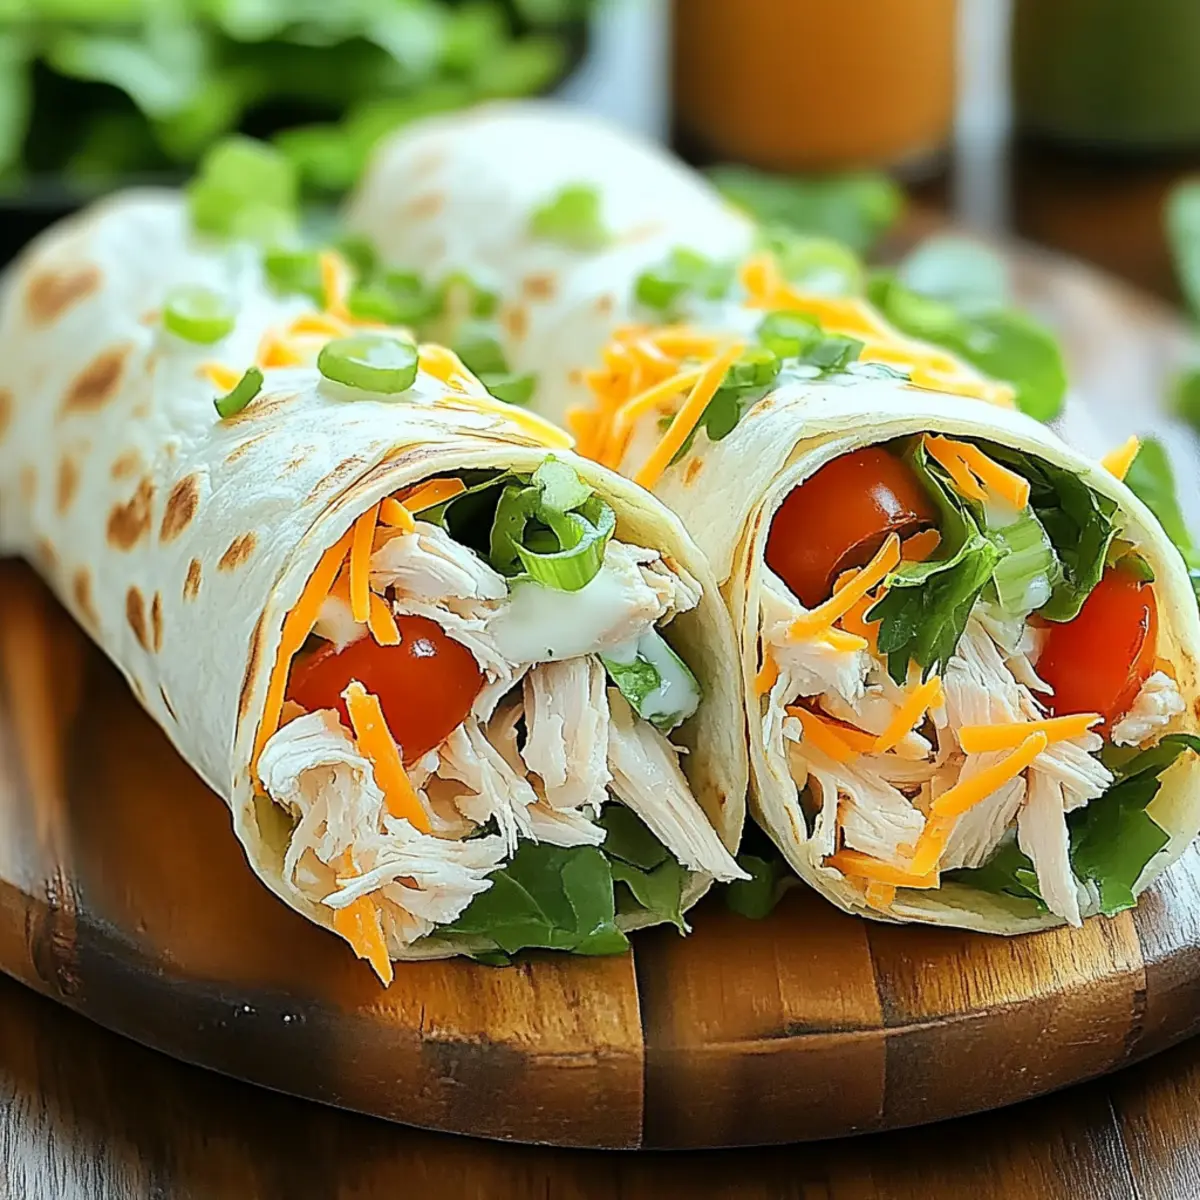
  • Cooked Chicken Breast – Provides protein and bulk; you can use leftover or rotisserie chicken for convenience.
  • Large Tortillas (Flour or Whole Grain) – The perfect base for your wraps; opt for whole grain for a healthier twist.

For the Dressing

  • Ranch Dressing – Adds creaminess and flavor; substitute with Greek yogurt for a tangy, lower-calorie option.

For the Fillings

  • Shredded Lettuce – Provides that crispy crunch; feel free to toss in spinach for extra nutrition.
  • Diced Tomatoes – These juicy bites brighten up your wraps; consider cucumbers or bell peppers for different tastes.
  • Chopped Green Onions – Contributes a fresh onion flavor; can be replaced with chives or omitted if preferred.
  • Shredded Cheese (Cheddar or your choice) – Enhances richness and adds a delightful creaminess; alternatives include mozzarella or pepper jack for a spicy kick.

Seasoning

  • Salt and Pepper – Essential for balancing flavors; don’t be shy—adjust to your personal taste!

These Easy Chicken Ranch Wraps are not just a meal, but an experience waiting to be had. Let your creativity shine through with these interchangeable ingredients!

Step‑by‑Step Instructions for Easy Chicken Ranch Wraps

Step 1: Prepare Chicken Mixture
Begin by shredding the cooked chicken breast into bite-sized pieces, ensuring it’s evenly shredded for a delightful texture. In a mixing bowl, combine the shredded chicken with ranch dressing, using a spoon to coat the chicken thoroughly. This should take about 2-3 minutes. The mixture will become creamy and aromatic, ready to enhance your Easy Chicken Ranch Wraps.

Step 2: Assemble the Wraps
Lay out the tortillas on a clean surface or plate, ensuring they are flat. Spoon an even layer of the chicken mixture down the center of each tortilla, leaving about an inch of space at the edges to allow for wrapping. This step should take around 2-4 minutes. Make sure to use a generous amount without overfilling, as that can lead to messy wraps.

Step 3: Add Toppings
Layer the shredded lettuce over the chicken mixture, followed by the diced tomatoes. Sprinkle your choice of shredded cheese on top, then add chopped green onions for freshness. Season lightly with salt and pepper to enhance the flavors. This assembly phase should take about 3-4 minutes, resulting in vibrant and colorful Easy Chicken Ranch Wraps.

Step 4: Roll the Wraps
Starting from one edge of the tortilla, carefully roll it tightly around the filling, making sure to tuck in the sides as you go to prevent any fillings from spilling out. This process should take 2-3 minutes. Once rolled, place the seam side down on a plate to keep the wraps intact and ready for the next step.

Step 5: Optional Grilling
To elevate your wraps, heat a skillet over medium heat, ensuring it’s hot but not smoking. Place the wraps seam side down in the skillet, grilling for 2-3 minutes on each side until they are golden brown and crispy. This will not only add a satisfying crunch but also help seal the wraps, making your Easy Chicken Ranch Wraps even more enjoyable.

Easy Chicken Ranch Wraps: Customization Delights

Feel free to get creative with these wraps and make them your own; the possibilities are endless!

  • Alternative Protein: Swap shredded chicken for turkey or even shredded beef to change up the taste. Each option brings its own delicious twist!

  • Vegetarian Option: Use hummus instead of ranch dressing for a creamy, vegetarian-friendly alternative. This adds a different flavor profile while keeping it satisfying.

  • Spice It Up: Incorporate spices like garlic powder or paprika to the chicken mixture for an extra kick. A little heat can transform your wraps into a bold flavor experience.

  • Sneak in More Veggies: Add extra vegetables such as bell peppers, diced cucumbers, or shredded carrots for vibrant color and added nutrition. It’s a fantastic way to increase your veggie intake.

  • Cheese Choices: Instead of cheddar, try mozzarella for a lighter flavor or pepper jack for those who enjoy some heat. Each cheese brings its unique melting quality and taste!

  • Low-Carb Variation: Replace tortillas with large lettuce leaves for a low-carb wrap option. Imagine fully loaded wraps with crisp lettuce instead of bread—delicious and refreshing!

  • Creamy Alternatives: If you’re looking for a lighter dressing, Greek yogurt makes a perfect substitute for ranch. It will keep that creaminess while reducing calories!

  • Taco Twist: Season the chicken mixture with taco seasoning for a twist on traditional ranch flavors. This variation could be a great introduction to flavors from Chicken Adobo Again!

With these exciting twists, you can experiment and discover your favorite version of Easy Chicken Ranch Wraps, making this dish a family favorite night after night!

Make Ahead Options

These Easy Chicken Ranch Wraps are fantastic for meal prep! You can prepare the chicken mixture (shredded chicken combined with ranch dressing) up to 24 hours in advance; simply store it in an airtight container in the fridge to maintain freshness. Additionally, you can chop the vegetables (lettuce, tomatoes, and green onions) and refrigerate them separately so they stay crisp. When you're ready to serve, just assemble the wraps by spreading the chicken mixture on the tortillas and adding the prepped toppings. For the best quality, avoid wrapping them until shortly before eating to prevent the tortillas from getting soggy. Enjoy the convenience and flavor of these wraps with minimal effort!

What to Serve with Easy Chicken Ranch Wraps?

These wraps are not just a meal on their own; they perfectly complement a few simple sides to elevate your dining experience.

  • Crispy Sweet Potato Fries: These offer a delightful sweetness that balances the savory flavors of your wraps, adding a cozy, comforting touch to the meal.

  • Fresh Garden Salad: A crisp salad with mixed greens, cucumbers, and a light vinaigrette provides a refreshing contrast and a burst of color to your plate.

  • Creamy Coleslaw: The crunch and tang from creamy coleslaw pair beautifully with the wraps, providing a delightful texture and palate-cleansing refreshment.

  • Homemade Potato Chips: A crunchy snack that adds an engaging texture, making each bite more exciting while maintaining that satisfying classic feel.

  • Zesty Pickles: Their tartness cuts through the richness of the ranch dressing, offering a bright burst of flavor that complements each wrap perfectly.

  • Chilled Sparkling Water with Lime: A refreshing drink that cleanses your palate, leaving you ready for the next delicious bite of your Easy Chicken Ranch Wraps.

  • Fruit Salad: A mix of seasonal fruits adds a sweet note and a juicy freshness, making it a perfect light dessert to end your meal on a satisfying note.

  • Whipped Greek Yogurt Dip: Serve as a tangy and creamy option for dipping that pairs wonderfully with the wraps, offering an alternative to ranch dressing.

  • Roasted Veggies: A medley of roasted vegetables brings warmth and deeper flavors, creating a fulfilling contrast to the lightness of your chicken wraps.

These thoughtful pairings will create a well-rounded meal, enhancing your dining experience with flavors and textures that harmonize beautifully!

How to Store and Freeze Easy Chicken Ranch Wraps

  • Room Temperature: Enjoy your Easy Chicken Ranch Wraps for up to 2 hours at room temperature; they taste best fresh!

  • Fridge: Store leftovers in an airtight container in the fridge for up to 3-4 days. To avoid sogginess, keep the dressing separate until ready to eat.

  • Freezer: For longer storage, wrap individual Easy Chicken Ranch Wraps tightly in plastic wrap and freeze for up to 3 months. Thaw in the fridge overnight before reheating.

  • Reheating: Reheat thawed wraps in a skillet over medium heat for 2-3 minutes per side or in the microwave for about 30 seconds, ensuring they remain crispy.

Tips for the Best Chicken Ranch Wraps

• Even Filling Distribution: Ensure all ingredients are spread evenly in each wrap to enjoy perfectly balanced flavors.

• Prevent Soggy Wraps: Avoid overfilling your tortillas; too much moisture can cause them to become soggy. Thicker tortillas are usually the best support.

• Grill for Crunch: Don’t skip the optional grilling step! It adds a delightful texture and helps hold the fillings in place.

• Dressing Alternatives: Consider using Greek yogurt instead of ranch dressing for a tangy, healthier twist while keeping your Easy Chicken Ranch Wraps creamy.

• Fresh Crunch: Add fresh ingredients like bell peppers or cucumbers for a vibrant crunch and boost in nutrition.

• Serve with Extras: Enhance your wraps with a side of extra ranch dressing for dipping—perfect for that creamy burst with every bite!

Easy Chicken Ranch Wraps Recipe FAQs

How do I select the perfect chicken for my wraps?
Absolutely! For these Easy Chicken Ranch Wraps, I recommend using cooked chicken breast—leftover or rotisserie chicken works wonderfully for convenience. Ensure the chicken is fresh and cooked thoroughly; if you opt for raw, make sure it reaches an internal temperature of 165°F (74°C).

What’s the best way to store leftover wraps?
Very! To store your Easy Chicken Ranch Wraps, place them in an airtight container in the fridge. They'll stay fresh for up to 3-4 days. To prevent sogginess, keep any dressings like ranch separate until you're ready to enjoy them.

Can I freeze the chicken wraps for later?
Absolutely! To freeze, wrap each prepared Easy Chicken Ranch Wrap tightly in plastic wrap, then place them in a zip-top freezer bag to prevent freezer burn. They can stay in the freezer for up to 3 months. When you’re ready to enjoy, thaw them in the fridge overnight, and reheat either in a skillet over medium heat for 2-3 minutes on each side or in the microwave for about 30 seconds.

What should I do if my wraps come out soggy?
Oh, I know that can be frustrating! To avoid soggy wraps, make sure not to overfill them and store them properly. If they do turn out soggy, try toasting them in a skillet for a few minutes to crisp up the tortillas again and warm the filling.

Are these wraps safe for people with allergies?
Very much! For those with dietary restrictions, be mindful of the ranch dressing and cheese, as they may contain dairy. Substituting with dairy-free dressing or leaving out cheese altogether creates a delicious allergy-friendly version of the Easy Chicken Ranch Wraps. Always double-check labels if you’re accommodating specific allergies.

What is the best way to ensure my ingredients are fresh?
Great question! When selecting ingredients for your Easy Chicken Ranch Wraps, look for fresh avocados, vibrant lettuce without brown edges, and firm tomatoes with no dark spots. For chicken, ensure it's refrigerated properly and cooked within the last few days to maintain quality!

Easy Chicken Ranch Wraps

Easy Chicken Ranch Wraps: Quick, Creamy & Totally Satisfying

Easy Chicken Ranch Wraps are quick, flavorful, and customizable snacks perfect for busy weeks.
Print Recipe Pin Recipe
Prep Time 15 minutes mins
Total Time 15 minutes mins
Servings: 4 wraps
Course: Snacks
Cuisine: American
Calories: 320
Ingredients Equipment Method Nutrition Notes

Ingredients
  

For the Wraps
  • 2 cups Cooked Chicken Breast Shredded
  • 4 large Tortillas (Flour or Whole Grain)
For the Dressing
  • 1/2 cup Ranch Dressing Or Greek yogurt as a substitute
For the Fillings
  • 2 cups Shredded Lettuce Or spinach
  • 1 cup Diced Tomatoes
  • 1/4 cup Chopped Green Onions Or chives
  • 1 cup Shredded Cheese Cheddar or your choice
Seasoning
  • to taste Salt
  • to taste Pepper

Equipment

  • Mixing Bowl
  • Skillet

Method
 

Step-by-Step Instructions
  1. Shred cooked chicken into bite-sized pieces and mix with ranch dressing in a bowl.
  2. Lay out tortillas and spoon chicken mixture down the center, leaving space at the edges.
  3. Top with lettuce, tomatoes, cheese, and green onions. Season with salt and pepper.
  4. Roll the tortillas tightly around the filling, tucking in the sides as you go.
  5. Optional: Grill wraps in a skillet over medium heat for 2-3 minutes per side until golden.

Nutrition

Serving: 1wrapCalories: 320kcalCarbohydrates: 36gProtein: 25gFat: 12gSaturated Fat: 4gPolyunsaturated Fat: 0.5gMonounsaturated Fat: 4gCholesterol: 70mgSodium: 850mgPotassium: 450mgFiber: 3gSugar: 3gVitamin A: 1000IUVitamin C: 12mgCalcium: 200mgIron: 2mg

Notes

Customize with extra veggies or proteins as desired. Serve with extra ranch dressing for dipping.

Tried this recipe?

Let us know how it was!

Crunchy Southwestern Chicken Wrap: Quick, Flavorful & Fun

March 19, 2026 by Grace Snow Leave a Comment

As I assembled my Crunchy Southwestern Chicken Wrap the other day, I couldn't help but smile at how easy it was to create a delightful meal in just 15 minutes. Imagine the satisfying crunch of Fritos mingling with juicy, seasoned chicken and a medley of fresh veggies, all drizzled with a creamy taco sauce. What I love most about this no-cook recipe is its versatility—whether you're looking for a weekend treat or a quick weeknight dinner, you can customize it effortlessly to suit your taste. Plus, if you're feeling adventurous, there are delicious vegetarian options that don’t compromise on flavor. Ready to discover how to elevate your lunch game?

Why is this wrap a must-try?

Simplicity: This recipe is perfect for busy weeknights, taking only 15 minutes to prepare with minimal cooking required.

Customizable: Whether you're a meat lover or prefer a meatless option, this wrap accommodates all diets, allowing for easy substitutions like black beans or grilled veggies.

Flavor Explosion: Each bite bursts with a delightful mix of juicy chicken, fresh veggies, and a creamy taco sauce, highlighted by the addictive crunch of Fritos.

Crowd-Pleaser: Ideal for family gatherings or casual get-togethers, this wrap can be adjusted to suit any palette, ensuring everyone leaves satisfied.

Complete Meal: Pair it with a refreshing black bean salad or tortilla chips for a nutritious and filling meal that’s as beautiful as it is delicious!

Crunchy Southwestern Chicken Wrap Ingredients

For the Sauce

  • Sour Cream – Adds creaminess to your sauce; Greek yogurt can be a lower-fat substitute.
  • Salsa – Provides flavor and moisture; choose a medium or chunky salsa for texture.
  • Taco Seasoning – Infuses the sauce with bold, savory flavors; consider using homemade blends.

For the Wrap

  • Cooked Chicken – Primary protein source; can substitute with black beans or tofu for a vegetarian option.
  • Large Tortilla – Serves as the wrap base; opt for whole wheat or gluten-free versions if preferred.

For the Fillings

  • Shredded Lettuce – Adds freshness and crunch; can replace with spinach or mixed greens.
  • Diced Tomatoes – Contributes juiciness and color; substitute with bell peppers for a twist.
  • Avocado – Adds creaminess; can replace with hummus if desired.
  • Cheddar Cheese – A flavorful component; pepper jack can kick up the spice if you like heat.

For the Crunch

  • Fritos Corn Chips – Provides an addictive crunch; any corn chip can serve as an alternative for the same texture.
  • Cilantro (for garnish) – Adds freshness; feel free to omit if cilantro isn't your thing.

For Serving

  • Lime Wedges – Enhances flavor when squeezed over the wrap; don't skip this for a zesty touch!

Step‑by‑Step Instructions for Crunchy Southwestern Chicken Wrap

Step 1: Prepare the Sauce
In a mixing bowl, combine ½ cup of sour cream, ½ cup of salsa, and 1 tablespoon of taco seasoning. Stir with a whisk until the mixture is smooth and well-blended. This creamy taco sauce will add tons of flavor to your Crunchy Southwestern Chicken Wrap, so taste it and adjust the seasoning if needed. Set the sauce aside while you prepare the rest.

Step 2: Assemble the Wrap Base
Lay a large tortilla flat on a clean surface or a large plate. Using a spatula or the back of a spoon, spread about 2 tablespoons of the prepared sauce evenly on the lower half of the tortilla, leaving about an inch border around the edges. This will help to hold everything neatly together when you wrap it up.

Step 3: Add the Fresh Fillings
Start layering your fillings on top of the sauce in the lower third of the tortilla. Begin with a generous handful of shredded lettuce followed by ½ cup of diced tomatoes and ¼ of an avocado, sliced. Then, add ½ cup of cooked, shredded chicken, so you get delightful bites in your Crunchy Southwestern Chicken Wrap.

Step 4: Enhance with Cheese and Crunch
Sprinkle ¼ cup of shredded cheddar cheese over the chicken, adding an extra layer of flavor. Just before wrapping, toss a handful of Fritos corn chips on top for that irresistible crunch. This is where the magic happens - the combination of textures will make your wrap so satisfying.

Step 5: Wrap It Up
Begin to fold in the sides of the tortilla to enclose the fillings gently. Starting from the bottom, roll the tortilla tightly upwards until you have a fully wrapped Crunchy Southwestern Chicken Wrap. Visualize a snug burrito; the tighter the roll, the less chance of spillage. Secure it with a toothpick if needed.

Step 6: Slice and Serve
Using a sharp knife, slice the wrap diagonally in half, showcasing the beautiful layers. Arrange the halves on a plate and serve with lime wedges for that zesty kick. As you take a bite, enjoy the burst of flavors and crunch that makes the Crunchy Southwestern Chicken Wrap an absolute treat!

Crunchy Southwestern Chicken Wrap Variations

Feeling adventurous? It's easy to customize your wrap with these delightful twists that cater to every palate!

  • Meatless Delight: Swap shredded chicken for black beans, grilled veggies, or roasted chickpeas for a delicious vegetarian option. You'll still capture that satisfying flavor and texture.

  • Spicy Kick: Add jalapeños or switch to pepper jack cheese for an extra spicy rendition that will awaken your taste buds. Spice lovers will appreciate every bite!

  • Creamy Alternatives: Trade sour cream for Greek yogurt or a dairy-free option like coconut yogurt. This keeps the creamy goodness with a healthier twist.

  • Bold Sauce: Experiment with chipotle mayo or a zesty ranch dressing instead of the taco sauce. These bold flavors elevate your wrap with a new zing.

  • Crunch Variation: Don’t have Fritos? Use crispy tortilla chips or even puffed quinoa. The crunch is key, and you can still get that satisfying texture!

  • Colorful Veggies: Add diced bell peppers, shredded carrots, or radishes for a pop of color and added crunch. These veggies enhance both the flavor and nutrition of your meal.

  • Citrusy Twist: Drizzle some fresh lime or lemon juice over your fillings for a zesty brightness. It refreshes the flavors and makes every bite sing!

For even more inspiration, check out my recipes for Honey Garlic Chicken or explore unique flavors with Spatchcock Chicken that could serve as delightful alternatives too!

Expert Tips for Crunchy Southwestern Chicken Wrap

  • Temperature Check: Ensure your tortilla is at room temperature for easier rolling, preventing tears that can lead to messy wraps.
  • Crunch Control: Add Fritos just before serving to maintain their crunch. This simple step keeps your wrap enjoyable to the last bite.
  • Sauce Balance: Taste your creamy taco sauce and adjust the seasoning. A little extra salsa or taco seasoning can elevate the flavor profile of your Crunchy Southwestern Chicken Wrap.
  • Layer Smartly: When adding fillings, layer from the heaviest (like chicken and cheese) to the lightest (lettuce and avocado) to prevent sogginess and ensure even bites.
  • Veggie Variations: For a vegetarian option, substitute chicken with black beans or grilled veggies. This not only adds variety but also complements the flavors beautifully.

What to Serve with Crunchy Southwestern Chicken Wrap

Pair your meal with flavorful sides that elevate your wrap experience and delight your taste buds.

  • Black Bean Salad: A zesty, protein-packed option that adds a refreshing crunch, perfectly complementing the wrap’s bold flavors.
  • Tortilla Chips and Guacamole: The creamy guac enhances the crunch factor while balancing the wrap’s spice with its smooth richness. Imagine scooping up chunks of chip with creamy avocado bliss!
  • Fresh Fruit Salad: A sweet, juicy medley of seasonal fruits revitalizes the palate, providing a delightful contrast to the savory wrap. Think of vibrant colors and refreshing juiciness in every bite!
  • Mexican Street Corn: Creamy and slightly tangy, this dish adds a touch of smokiness that pairs perfectly with the wrap’s Southwest flavors. Its texture and sweet corn appeal ensure extra satisfaction.
  • Cilantro Lime Rice: Fluffy rice infused with lime juice and fresh cilantro complements the wrap beautifully while adding a subtle brightness to the meal. It’s both aromatic and incredibly satisfying!
  • Sparkling Water with Lime: A light, refreshing drink that cleanses the palate, enhancing each bite of the wrap. The bubbles and zesty lime offer a fun twist that’s simply perfect for warm afternoons!
  • Chocolate Chip Cookies: End your meal on a sweet note with these classic treats, providing a touch of nostalgia and a comforting dessert option that everyone loves.

Make Ahead Options

These Crunchy Southwestern Chicken Wraps are perfect for meal prep enthusiasts! You can prepare the creamy taco sauce, shredded chicken, and chopped veggies up to 24 hours in advance. Simply store the sauce in an airtight container in the fridge to maintain its freshness. For the fillings, chop your lettuce and tomatoes and keep them refrigerated in separate containers. When you're ready to serve, take everything out, assemble the wraps, and finish with Fritos just before eating to ensure they remain crunchy. This way, you'll enjoy delicious, satisfying wraps in no time—making weeknight dinners effortless and hassle-free!

How to Store and Freeze Crunchy Southwestern Chicken Wrap

Fridge: Store leftovers wrapped tightly in plastic wrap or foil for up to 2 days. Keep them chilled to maintain freshness and prevent spoilage.

Freezer: For longer storage, wrap the Crunchy Southwestern Chicken Wrap in aluminum foil and freeze for up to 1 month. Thaw in the fridge before serving.

Reheating: To reheat, remove the foil and warm in the microwave for 30-60 seconds, or until heated through. Add fresh Fritos just before enjoying to restore crunch.

Flavor Maintenance: Always store the sauce separately if possible to preserve the vibrant flavors of your Crunchy Southwestern Chicken Wrap. This will keep all elements tasting fresh and enjoyable.

Crunchy Southwestern Chicken Wrap Recipe FAQs

What is the best way to select ripe ingredients for the wrap?
Absolutely! For the best flavor and texture, look for ripe avocados that yield slightly when pressed, but aren’t mushy. Choose tomatoes that are vibrant in color and feel firm but slightly tender. If using whole lettuce heads, opt for crisp, fresh leaves without any dark spots. As for the salsa, try a brand with whole ingredients and vibrant color for a punchy flavor.

How should I store leftovers of the Crunchy Southwestern Chicken Wrap?
To store your Crunchy Southwestern Chicken Wrap, wrap it tightly in plastic wrap or aluminum foil. I usually place it in the fridge, where it will stay fresh for up to 2 days. Just be sure to keep those Fritos separate until you're ready to eat, so they stay crunchy and don't get soggy!

Can I freeze Crunchy Southwestern Chicken Wrap?
Yes, you can! To freeze, wrap the entire Crunchy Southwestern Chicken Wrap in aluminum foil and place it in an airtight bag. It will be good for up to 1 month in the freezer. When you’re ready to enjoy it, thaw the wrap in the fridge overnight and reheat it in the microwave for about 30-60 seconds, or until heated through.

What are some common troubleshooting tips for making this wrap?
If your wrap is overflowing, try adding fewer fillings or using a larger tortilla next time. If the tortilla tears while wrapping, make sure it’s at room temperature and not cold from the fridge. This helps to keep it flexible. For keep the Fritos crispy, add them right before serving, instead of layering them in the wrap.

Are there any dietary considerations for the Crunchy Southwestern Chicken Wrap?
Very! This recipe is easily customizable to accommodate various dietary needs. If you have dairy allergies, swap the sour cream and cheese with dairy-free alternatives like vegan yogurt and cashew cheese. For a gluten-free option, choose a gluten-free tortilla. And for those who prefer meatless meals, black beans or grilled veggies make delicious substitutes for the chicken.

Can I make the sauce in advance?
Absolutely! You can prepare the sauce ahead of time and store it in the fridge for about 3-4 days. This is a great way to save time on busy days. Just give it a good stir before using, and feel free to adjust the seasoning to your liking for that fresh, burst of flavor when assembling your wraps!

Crunchy Southwestern Chicken Wrap

Crunchy Southwestern Chicken Wrap

Quick and flavorful, the Crunchy Southwestern Chicken Wrap is a customizable meal bursting with texture and taste.
Print Recipe Pin Recipe
Prep Time 15 minutes mins
Total Time 15 minutes mins
Servings: 2 wraps
Course: Snacks
Cuisine: Southwestern
Calories: 350
Ingredients Equipment Method Nutrition Notes

Ingredients
  

For the Sauce
  • 1/2 cup sour cream Greek yogurt can be a lower-fat substitute.
  • 1/2 cup salsa Choose a medium or chunky salsa for texture.
  • 1 tablespoon taco seasoning Consider using homemade blends.
For the Wrap
  • 1 large tortilla Opt for whole wheat or gluten-free versions if preferred.
  • 1 cup cooked chicken Can substitute with black beans or tofu for a vegetarian option.
For the Fillings
  • 2 cups shredded lettuce Can replace with spinach or mixed greens.
  • 1/2 cup diced tomatoes Substitute with bell peppers for a twist.
  • 1/4 whole avocado Can replace with hummus if desired.
  • 1/4 cup shredded cheddar cheese Pepper jack can kick up the spice if you like heat.
For the Crunch
  • 1 handful Fritos corn chips Any corn chip can serve as an alternative for the same texture.
  • to taste cilantro Feel free to omit if cilantro isn't your thing.
For Serving
  • 2 wedge lime Enhances flavor when squeezed over the wrap.

Equipment

  • Mixing Bowl
  • Spatula
  • Knife

Method
 

Prepare the Sauce
  1. In a mixing bowl, combine ½ cup of sour cream, ½ cup of salsa, and 1 tablespoon of taco seasoning. Stir until smooth.
Assemble the Wrap Base
  1. Lay a large tortilla flat and spread 2 tablespoons of the prepared sauce on the lower half, leaving a border around the edges.
Add the Fresh Fillings
  1. Layer shredded lettuce, ½ cup diced tomatoes, ¼ sliced avocado, and ½ cup cooked chicken on top of the sauce.
Enhance with Cheese and Crunch
  1. Sprinkle ¼ cup shredded cheddar cheese over the chicken and add a handful of Fritos on top.
Wrap It Up
  1. Fold in the sides of the tortilla and roll it tightly to enclose the fillings, securing with a toothpick if needed.
Slice and Serve
  1. Slice the wrap diagonally in half and serve with lime wedges.

Nutrition

Serving: 1wrapCalories: 350kcalCarbohydrates: 30gProtein: 20gFat: 10gSaturated Fat: 4gPolyunsaturated Fat: 1gMonounsaturated Fat: 5gCholesterol: 50mgSodium: 800mgPotassium: 700mgFiber: 5gSugar: 3gVitamin A: 500IUVitamin C: 10mgCalcium: 200mgIron: 2mg

Notes

Store leftovers wrapped tightly in plastic wrap in the fridge for up to 2 days. For longer storage, wrap in foil and freeze for up to 1 month.

Tried this recipe?

Let us know how it was!

Coronation Chicken Sandwiches: A Royal Twist on Comfort Food

March 19, 2026 by Grace Snow Leave a Comment

As I smoothed creamy sauce onto freshly baked bread, I recalled how the classic Coronation Chicken Sandwiches came to life in my kitchen. This British favorite isn’t just about taste; it brings people together, whether it’s for picnics or cozy gatherings. With their effortless prep time, these sandwiches are perfect for those busy weekdays when you crave something homemade yet quick. The mix of tender chicken in a vibrant mango and curry sauce not only delights the taste buds but also elevates simple ingredients into a dish that feels special. Have you ever been caught in a sandwich rut, longing for something exciting? Let’s dive into creating these flavorful Coronation Chicken Sandwiches that are sure to impress!

Why Try Coronation Chicken Sandwiches?

Taste Adventure: Experience a delightful mix of tender chicken and vibrant curry sauce, creating a flavor that excites your palate!

Effortless Preparation: With just minimal ingredients, you can whip up these sandwiches in no time, making them the perfect choice for busy weekdays.

Versatile Serving: Whether it’s a picnic or a cozy dinner, they shine at any gathering, pairing wonderfully with freshly baked bread for that touch of homemade goodness.

Boost Your Meal Prep: This recipe not only elevates lunch but also serves as a fantastic leftover option for those who love efficiency in the kitchen!

Get ready to elevate your sandwich game and impress your family with a dish that feels truly special.

Coronation Chicken Sandwich Ingredients

For the Chicken Filling
• Cooked Chicken – Shredded or diced, use leftover rotisserie chicken for a quick and easy option.
• Mango Chutney – Adds a sweet and tangy flavor; feel free to adjust the amount to suit your taste.
• Curry Powder – Gives the filling its vibrant flavor; experiment with different blends to find your favorite.
• Greek Yogurt – Provides a creamy texture with a tangy kick; substitute with mayonnaise for a richer taste.
• Lemon Juice – Brightens the flavors; freshly squeezed lemon juice is always best.
• Salt & Pepper – Essential for enhancing the overall flavor; adjust to your liking.

For Assembly
• Bread – Choose your favorite type, such as crusty ciabatta or soft whole grain for the perfect base.
• Fresh Greens – Add a layer of crisp lettuce or arugula for extra freshness and crunch.

These Coronation Chicken Sandwiches are not only a vibrant twist on comfort food but also a delightful option for any occasion!

Step‑by‑Step Instructions for Coronation Chicken Sandwiches

Step 1: Prepare the Chicken Mixture
In a medium bowl, combine shredded or diced cooked chicken with mango chutney, curry powder, Greek yogurt, and freshly squeezed lemon juice. Stir thoroughly until all ingredients are evenly coated, creating a creamy, flavorful filling. Taste and adjust seasoning with salt and pepper as needed. Set aside for 10 minutes to allow the flavors to meld beautifully.

Step 2: Choose Your Bread
Select your favorite type of bread, whether it’s crusty ciabatta or soft whole grain, depending on your texture preference. Slice the bread horizontally to create a top and bottom piece for your sandwiches. Lay the slices on a clean surface, ready to be filled with the delicious Coronation Chicken mixture.

Step 3: Assemble the Sandwiches
Spread a generous layer of the prepared chicken filling onto the bottom slice of each piece of bread, ensuring even coverage. It's essential to use enough filling to create a satisfying bite. Next, add a layer of fresh greens, such as crisp lettuce or arugula, on top of the chicken to introduce a refreshing crunch.

Step 4: Finalize the Sandwiches
Carefully place the top slice of bread on each assembled sandwich, pressing down gently to hold everything together. If you're feeling playful, you can cut each sandwich in half diagonally for an elegant touch. This simple step enhances the presentation, making your Coronation Chicken Sandwiches even more inviting!

Step 5: Serve and Enjoy
Arrange the Coronation Chicken Sandwiches on a platter, and consider garnishing them with extra greens or small herb sprigs for a pop of color. They are best enjoyed fresh, with your favorite side like chips or a light salad.

Step 6: Store Any Leftovers
If you have any delicious sandwiches left, wrap them tightly in plastic wrap or place them in an airtight container. Store them in the refrigerator for up to two days. When ready to serve, enjoy your Coronation Chicken Sandwiches cold or gently warmed in a pan for a delightful treat!

Storage Tips for Coronation Chicken Sandwiches

Fridge: Store any leftover Coronation Chicken Sandwiches in an airtight container or wrap them tightly in plastic wrap. They will keep fresh for up to 2 days.

Room Temperature: Avoid leaving unrefrigerated sandwiches out for more than 2 hours, as they can spoil quickly due to the ingredients.

Reheating: For a delightful taste experience, warm sandwiches in a pan over low heat for a few minutes, or enjoy them cold for a refreshing bite.

Freezer: Although best served fresh, you can freeze the chicken filling separately for up to 3 months. Just assemble sandwiches after thawing for a quick meal!

What to Serve with Coronation Chicken Sandwiches

Pair these delightful sandwiches with something that enhances their vibrant flavors and elevates your meal experience.

  • Crispy Potato Chips: The crunchy texture and salty flavor of chips perfectly balance the creamy chicken filling, adding an enjoyable crunch.

  • Garden Salad: A light, fresh salad with mixed greens and a zesty vinaigrette complements the richness of the sandwiches beautifully, making for a well-rounded meal.

  • Sweet Potato Fries: Baked or fried, these add a sweet and savory contrast to the Coronation Chicken, creating a delightful combination of flavors and textures.

  • Fruit Salad: A refreshing mix of seasonal fruits offers a sweet contrast, lightening up the meal with its juiciness and natural sweetness.

  • Herbal Iced Tea: A refreshing drink infused with mint or lemon complements the spices in the sandwiches and quenching thirst, enhancing the overall dining experience.

  • Mini Quiches: These bite-sized treats offer a savory option that pairs well, giving your meal a more sophisticated touch and balancing the flavors of the sandwiches.

Remember, the key to a memorable meal is variety, so mix and match to find your perfect pairing!

Coronation Chicken Sandwiches Variations

Feel free to let your creativity shine and customize these delightful sandwiches to suit your taste!

  • Spicy Kick: Add a pinch of cayenne pepper or diced jalapeños to the chicken mixture for a flavorful heat. This twist adds an exciting zing that pairs beautifully with the creamy sauce.

  • Fruity Addition: Toss in some diced apples or raisins for a sweet crunch that complements the mango chutney. The balance of flavors creates a refreshing surprise with each bite!

  • Herb Infusion: Fresh cilantro or mint can elevate your chicken filling with an aromatic touch. Just a handful will infuse the sandwich with freshness and vibrancy, making it even more inviting.

  • Creamy Alternative: Swap Greek yogurt for cream cheese for an indulgent twist. This makes your filling extra rich, providing a wonderfully smooth texture that delights with every mouthful.

  • Bread Swap: Try using naan or pita bread instead of traditional sandwich bread for a fun twist. These options add a delightful authenticity that transforms your lunch into a global experience.

  • Crunchy Texture: Add crushed nuts, like pistachios or almonds, to your filling for a delicious crunch. The nutty flavor pairs perfectly with the sweetness of the mango chutney for a satisfying contrast.

  • Veggie Boost: Mix in finely chopped celery or bell peppers for an added crunch and nutritional boost. These veggies enhance both the texture and appearance of your Coronation Chicken Sandwiches.

For more delightful chicken recipes, consider exploring Honey Garlic Chicken Thighs or get inspired by Crock Pot Chicken variations!

Expert Tips for Coronation Chicken Sandwiches

  • Use Quality Chicken: Choose tender, juicy chicken for your filling. Leftover rotisserie chicken works wonders, but make sure it's freshly cooked for the best flavor.

  • Adjust Your Spice: Not all curry powders are created equal. Start with a small amount, taste, and gradually add more until you reach your desired flavor profile.

  • Creamy Balance: Be mindful of your yogurt quantity; too much can make the filling overly runny. Aim for a luscious yet firm mixture that holds together well within the bread.

  • Fresh Greens: Don’t skip the fresh greens! They add essential crunch and freshness to contrast the creamy Coronation chicken filling.

  • Let It Rest: Allow the assembled sandwiches to sit for at least 10 minutes before serving. This helps meld the flavors together and makes for a more cohesive bite.

  • Storage Tips: Coronation Chicken Sandwiches are best enjoyed fresh, but if you have leftovers, store them in an airtight container. They can last up to two days in the refrigerator and still taste delightful!

Make Ahead Options

These Coronation Chicken Sandwiches are a fantastic choice for meal prep, allowing busy cooks to enjoy homemade taste without the last-minute rush! You can prepare the chicken filling up to 24 hours in advance; just store it in an airtight container in the refrigerator, ensuring the flavors meld beautifully. The filling's creamy texture and vibrant flavor will remain just as delicious. To assemble, simply spread the filling onto your chosen bread and add fresh greens right before serving to maintain crunch. If storing any leftovers, wrap them tightly and refrigerate for up to two days—perfect for quick lunches or light dinners!

Coronation Chicken Sandwiches Recipe FAQs

What type of chicken should I use for Coronation Chicken Sandwiches?
Absolutely! For the best flavor and texture, I recommend using tender, juicy chicken. Leftover rotisserie chicken is a fantastic option because it’s already cooked and packed with flavor. If you prefer, you can also poach or grill fresh chicken breast for a healthier version.

How should I store leftover Coronation Chicken Sandwiches?
To keep any extra sandwiches fresh, simply wrap them tightly in plastic wrap or place them in an airtight container. They can be stored in the refrigerator for up to 2 days. Be mindful not to leave them at room temperature for more than 2 hours to prevent spoilage.

Can I freeze the chicken filling for Coronation Chicken Sandwiches?
Very! You can absolutely freeze the chicken filling for your sandwiches. Just place the mixture in an airtight container and store it in the freezer for up to 3 months. When you're ready to enjoy, thaw it overnight in the refrigerator, then assemble the sandwiches fresh!

What if my Coronation Chicken mixture is too runny?
No worries! If you find your mixture too runny, start by gradually adding more Greek yogurt or a touch of additional curry powder to thicken it up. Alternatively, you could mix in some finely shredded lettuce or chopped nuts to absorb some moisture and add texture.

Are Coronation Chicken Sandwiches suitable for people with allergies?
Absolutely! If you're concerned about allergies, you can easily customize the recipe. Substitute Greek yogurt with an allergy-friendly mayonnaise if dairy is an issue. Just ensure that the mango chutney you choose does not contain any allergens, and always check the labels for any ingredients that might cause reactions.

Coronation Chicken Sandwiches

Coronation Chicken Sandwiches: A Royal Twist on Comfort Food

Enjoy Coronation Chicken Sandwiches, a delightful blend of tender chicken and vibrant curry sauce, perfect for gatherings or quick meals.
Print Recipe Pin Recipe
Prep Time 15 minutes mins
Cook Time 10 minutes mins
Resting Time 10 minutes mins
Total Time 35 minutes mins
Servings: 4 sandwiches
Course: Snacks
Cuisine: British
Calories: 350
Ingredients Equipment Method Nutrition Notes

Ingredients
  

For the Chicken Filling
  • 2 cups Cooked Chicken Shredded or diced, use leftover rotisserie chicken for a quick and easy option.
  • 1/3 cup Mango Chutney Adjust the amount to suit your taste.
  • 1 tablespoon Curry Powder Experiment with different blends to find your favorite.
  • 1/2 cup Greek Yogurt Substitute with mayonnaise for a richer taste.
  • 1 tablespoon Lemon Juice Freshly squeezed lemon juice is always best.
  • to taste Salt & Pepper Adjust to your liking.
For Assembly
  • 4 slices Bread Choose your favorite type, such as crusty ciabatta or soft whole grain.
  • 1 cup Fresh Greens Add a layer of crisp lettuce or arugula for extra freshness.

Equipment

  • medium bowl
  • Knife
  • Cutting Board

Method
 

Preparation Steps
  1. In a medium bowl, combine cooked chicken, mango chutney, curry powder, Greek yogurt, and lemon juice. Stir until evenly coated and set aside for 10 minutes.
  2. Select your preferred bread type and slice it horizontally.
  3. Spread a layer of the chicken filling on the bottom slice, then add fresh greens.
  4. Place the top slice on each sandwich and press down gently.
  5. Serve the sandwiches on a platter with additional greens for garnish.
  6. Wrap any leftovers tightly and refrigerate for up to 2 days.

Nutrition

Serving: 1sandwichCalories: 350kcalCarbohydrates: 42gProtein: 25gFat: 10gSaturated Fat: 3gPolyunsaturated Fat: 2gMonounsaturated Fat: 5gCholesterol: 70mgSodium: 600mgPotassium: 300mgFiber: 3gSugar: 6gVitamin A: 800IUVitamin C: 5mgCalcium: 100mgIron: 2mg

Notes

Allow assembled sandwiches to rest for at least 10 minutes before serving to enhance flavor melding.

Tried this recipe?

Let us know how it was!

Keto Spinach Artichoke Deviled Eggs That Steal the Show

March 18, 2026 by Grace Snow Leave a Comment

As I pulled out the vibrant green spinach and hearty artichokes from my pantry, I was suddenly reminded of the joy that comes from reinventing classic flavors. My Keto Spinach Artichoke Deviled Eggs are the perfect marriage of nostalgic comfort food and healthy eating—all while being gluten-free and low in carbs! These delightful bites offer two irresistible perks: they’re not only quick to prepare, but they also leave a lasting impression at any gathering, delighting the most discerning palates. With a creamy filling reminiscent of a classic dip, each egg is a little explosion of flavor and texture. Curious about how to whip up this crowd-pleaser that’s sure to up your appetizer game? Let’s dive in!

Why Will You Love These Deviled Eggs?

Irresistible Flavor: The fusion of creamy mayonnaise with vibrant spinach and artichoke creates an explosive taste sensation that’s hard to resist.

Healthy Twist: These keto-friendly deviled eggs are not only low in carbs but also gluten-free, making them an ideal choice for health-conscious eaters looking for delicious flavors.

Versatile Variations: Feeling adventurous? Try swapping out spinach for kale or giving a spicy kick with hot sauce—no two batches need to be the same!

Quick Prep Time: Ready in just a few simple steps, these eggs come together quickly, making them a go-to appetizer for your next gathering or weeknight snack.

Crowd-Pleasing Appeal: Their aesthetic appeal and addictive taste make them a guaranteed hit at parties, often leaving guests asking for the recipe. Pair them with other stunning bites like Crispy Parmesan Artichoke Hearts for an unforgettable spread!

Keto Spinach Artichoke Deviled Eggs Ingredients

For the Filling

  • Eggs – Choose large eggs for consistent sizes and optimal filling texture.
  • Mayonnaise – Adds essential creaminess; feel free to substitute with avocado or Greek yogurt if you prefer.
  • Spinach (cooked) – Fresh spinach can be softly sautéed for enhanced flavor and color.
  • Artichokes (chopped) – Ensure they are well-drained; canned or frozen artichokes work perfectly here.
  • Dijon Mustard – Infuses a tangy flavor; don't hesitate to mix in your favorite mustard for a personal touch.
  • Parmesan Cheese (grated) – Rich and flavorful, but you can swap it for nutritional yeast for a dairy-free version.
  • Garlic Powder – A dash adds depth; using fresh garlic will intensify the flavor even more!
  • Salt & Black Pepper – Essential for seasoning; adjust according to your taste.

Optional Garnishes

  • Paprika – A sprinkle of paprika adds color and a hint of smokiness.
  • Sumac – A unique twist; it brings a tangy flavor and vibrant color.
  • Fresh Herbs – Fresh chives or parsley can elevate the visual appeal and flavor profile.

These Keto Spinach Artichoke Deviled Eggs are a delightful addition to any gathering, making them a definite crowd-pleaser!

Step‑by‑Step Instructions for Keto Spinach Artichoke Deviled Eggs

Step 1: Prepare Eggs
Start by boiling 6 large eggs in a pot of salted water for about 10 minutes. Once they're boiling, reduce the heat to a gentle simmer. After the timer goes off, transfer the eggs to an ice bath for 5 minutes to stop the cooking process and help with peeling. The shells should come off easily once the eggs are cool.

Step 2: Mix Filling
Carefully slice the boiled eggs in half lengthwise and gently remove the yolks. Place the yolks in a mixing bowl and mash them well with a fork. To the mashed yolks, add ¼ cup of mayonnaise, 1 cup of cooked spinach, and ½ cup of chopped artichokes. Then, stir in 1 tablespoon of Dijon mustard, ¼ cup of grated Parmesan cheese, ½ teaspoon of garlic powder, and season with salt and pepper to taste.

Step 3: Fill Eggs
Spoon or pipe the delicious filling back into the hollowed egg whites. If the mixture is on the chunkier side, using a spoon can be easier for a clean fill. Aim for a mound that gracefully rises above the edge of each egg white, showcasing the vibrant green filling. This is where those Keto Spinach Artichoke Deviled Eggs really show their charm!

Step 4: Garnish and Serve
For an extra touch, sprinkle a dash of paprika, sumac, or some extra grated Parmesan on top of each filled egg before serving. You can also add freshly chopped herbs like chives or parsley for a burst of color and flavor. These garnished Keto Spinach Artichoke Deviled Eggs can be served immediately, or refrigerated for a bit if you like them chilled.

Expert Tips for Keto Spinach Artichoke Deviled Eggs

• Egg Peeling Hack: Shake your boiled eggs gently in the empty pot after cooking to make peeling easier without damaging the egg whites.

• Filling Consistency: For a smoother filling, mash yolks thoroughly. If you prefer a chunkier texture, just fold in the other ingredients without overmixing.

• Freshness Trick: Assemble the Keto Spinach Artichoke Deviled Eggs right before serving to preserve the fluffy texture of egg whites.

• Batch Prep: You can prepare the filling and egg whites separately up to 2 days in advance, ensuring both stay fresh until you’re ready to assemble.

• Taste Adjustment: Don't hesitate to add more Dijon mustard or adjust the seasoning with salt and pepper according to your taste preferences.

What to Serve with Keto Spinach Artichoke Deviled Eggs

These delightful bites are perfect for building a vibrant and satisfying meal, transforming any gathering into a memorable feast.

  • Crunchy Veggie Platter: Fresh carrots, celery, and bell peppers add a refreshing crunch that balances the creamy filling beautifully.
  • Savory Cheese Board: Pair with aged cheeses like sharp cheddar or creamy brie for a luxurious flavor contrast that tantalizes the taste buds.
  • Zesty Olives: The briny essence of assorted olives brings a salty component, enhancing the richness of the deviled eggs.
  • Classic Caesar Salad: Crisp romaine, tangy dressing, and crunchy croutons offer a fresh and indulgent layer to your meal presentation.
  • Garlic Breadsticks: Their warm, inviting aroma enriches your dining experience, creating a satisfying contrast to the vibrant flavors of the eggs.
  • Prosecco or Sparkling Water: Elevate your gathering with refreshing bubbles; a fruity prosecco can enhance the creaminess while sparkling water cleanses the palate.
  • Chocolate Mousse Cups: End on a sweet note with rich, decadent dessert cups that balance the savory elements from earlier in the meal.
  • Stuffed Mushrooms: The earthy flavor of mushrooms filled with cheese and herbs creates a warm, hearty experience to enjoy alongside these delightful deviled eggs.
  • Herb-Infused Quinoa: A light, fluffy side filled with herbs adds a pleasant earthiness, making it a great complement to the kaleidoscope of flavors in the deviled eggs.
  • Spicy Radish Salad: The bite of fresh radishes in a zesty vinaigrette offers a surprising kick, perfect for those who love a bit of heat!

How to Store and Freeze Keto Spinach Artichoke Deviled Eggs

Fridge: Store leftover deviled eggs in an airtight container for up to 2 days to maintain freshness and flavor.

Filling Storage: Keep the deviled egg filling in a separate container in the fridge for up to 3 days, making it perfect for sandwiches or quick snacks.

Freezer: While not recommended for the assembled deviled eggs, you can freeze the filling for up to a month. Thaw in the refrigerator before using.

Reheating: Simply enjoy these keto delights cold, or you can briefly microwave them (about 10 seconds) to bring out the flavors without overheating.

Make Ahead Options

These Keto Spinach Artichoke Deviled Eggs are perfect for meal prep enthusiasts looking to save time during busy weeknights! You can prepare the filling up to 3 days in advance by mixing the yolks with mayonnaise, spinach, artichokes, mustard, Parmesan, garlic powder, salt, and pepper. Simply refrigerate the mixture in an airtight container to keep it fresh and flavorful. Store the egg whites separately to maintain their texture until you're ready to serve. When it's time to impress your guests, just fill the egg whites with the prepared filling, garnish, and serve for delightful, restaurant-quality results with minimal effort!

Keto Spinach Artichoke Deviled Eggs Variations

Feel free to tailor these delicious deviled eggs to suit your taste and dietary needs!

  • Greens Galore: Replace spinach with kale or Swiss chard for a fresh twist. Both greens offer unique flavors and textures to your filling.

  • Heat It Up: Stir in a dash of hot sauce for a spicy kick. This subtle heat elevates the flavor profile, pleasing those who enjoy a little heat.

  • Cheesy Alternatives: Swap Parmesan cheese for tangy feta or creamy goat cheese. This adds a delightful twist, bringing new dimensions of flavor to the mix.

  • Herb Infusion: Mix in fresh herbs like dill, parsley, or chives for a burst of freshness. Herbs not only enhance flavor but also brighten up your egg filling visually.

  • Zesty Lemon: Add lemon juice and zest to the filling for a refreshing and vibrant lift. Citrus brightens up the creaminess and makes these eggs pop with flavor!

  • Creamy Avocado: Replace mayonnaise with ripe avocado for a creamy, healthy alternative. This swap is especially delightful for avocado lovers!

  • Nutty Flavor: Incorporate toasted pine nuts or walnuts for added crunch and richness. This simple addition provides a pleasing textural contrast to the creamy filling.

  • Perfect Pairing: Serve alongside Chickpea Spinach Curry for a colorful and harmonious appetizer spread. These deviled eggs make for a stunning display and equally delicious pairing!

With these variations, your Keto Spinach Artichoke Deviled Eggs are sure to impress at any gathering!

Keto Spinach Artichoke Deviled Eggs Recipe FAQs

How do I choose the best eggs for this recipe?
I recommend using large eggs for consistent sizes, which help when halving them and filling each half evenly. Look for eggs that are clean and free from cracks. If you see dark spots all over, it's a sign to skip those.

What is the best way to store leftover Keto Spinach Artichoke Deviled Eggs?
Store any leftover deviled eggs in an airtight container in the refrigerator for up to 2 days. Cover them with a damp paper towel to keep the egg whites from drying out. If the filling is left over, keep it in a separate container in the fridge for an additional 3 days.

Can I freeze the filling for later use?
Absolutely! You can freeze the deviled egg filling for up to 1 month. To do this, place it in an airtight container or freezer bag, pressing out all the air. When you're ready to enjoy, simply thaw it in the refrigerator overnight before refilling your egg whites.

What should I do if I can’t get the shells off easily?
If you’re having trouble peeling the boiled eggs, try rolling them gently on the countertop to crack the shells thoroughly before peeling. Another tip is to peel them under cool running water, which can help separate the shell from the egg white without breaking them.

Are these deviled eggs suitable for people with dietary restrictions?
Yes! These Keto Spinach Artichoke Deviled Eggs are gluten-free and can be made dairy-free by using nutritional yeast instead of Parmesan cheese. Always check for allergies related to eggs and feel free to swap any ingredients based on your dietary needs.

Can I make these deviled eggs ahead of time?
You can prepare the filling and cooked egg whites separately up to 2 days in advance. Just keep them in airtight containers and assemble them right before serving to maintain the freshness and texture of the egg whites.

Keto Spinach Artichoke Deviled Eggs

Keto Spinach Artichoke Deviled Eggs That Steal the Show

Enjoy delicious Keto Spinach Artichoke Deviled Eggs, low in carbs and gluten-free, perfect for any gathering.
Print Recipe Pin Recipe
Prep Time 10 minutes mins
Cook Time 10 minutes mins
Chilling Time 5 minutes mins
Total Time 25 minutes mins
Servings: 6 deviled eggs
Course: Snacks
Cuisine: American
Calories: 120
Ingredients Equipment Method Nutrition Notes

Ingredients
  

For the Filling
  • 6 large Eggs Boiled
  • 1/4 cup Mayonnaise Can substitute with avocado or Greek yogurt
  • 1 cup Spinach (cooked) Fresh spinach, sautéed
  • 1/2 cup Artichokes (chopped) Well-drained, canned or frozen
  • 1 tablespoon Dijon Mustard Or use your favorite mustard
  • 1/4 cup Parmesan Cheese (grated) Can substitute with nutritional yeast
  • 1/2 teaspoon Garlic Powder Or use fresh garlic
  • to taste Salt & Black Pepper Essential for seasoning
Optional Garnishes
  • Paprika For garnish
  • Sumac For garnish
  • Fresh Herbs Chives or parsley for garnish

Equipment

  • pot
  • Mixing Bowl
  • Fork
  • Spoon
  • Ice bath container

Method
 

Step-by-Step Instructions
  1. Start by boiling 6 large eggs in a pot of salted water for about 10 minutes. Once they're boiling, reduce the heat to a gentle simmer. After the timer goes off, transfer the eggs to an ice bath for 5 minutes to stop the cooking process and help with peeling.
  2. Carefully slice the boiled eggs in half lengthwise and gently remove the yolks. Mash them well in a mixing bowl.
  3. Add mayonnaise, cooked spinach, chopped artichokes, Dijon mustard, grated Parmesan cheese, garlic powder, salt, and pepper to the mashed yolks. Mix well.
  4. Spoon or pipe the filling back into the hollowed egg whites, aiming for a mound that rises above the edge.
  5. Sprinkle paprika, sumac, or extra grated Parmesan on top before serving. Add freshly chopped herbs like chives or parsley if desired.

Nutrition

Serving: 1deviled eggCalories: 120kcalCarbohydrates: 2gProtein: 6gFat: 10gSaturated Fat: 2gPolyunsaturated Fat: 1gMonounsaturated Fat: 7gCholesterol: 250mgSodium: 150mgPotassium: 50mgFiber: 1gVitamin A: 1000IUVitamin C: 3mgCalcium: 50mgIron: 1mg

Notes

Best served immediately, but can be chilled in the fridge. Can prepare filling separately for up to 3 days.

Tried this recipe?

Let us know how it was!

Crispy Garlic Butter Potato Rounds That Steal the Show

March 16, 2026 by Grace Snow Leave a Comment

The smell of garlic wafting through my kitchen is an instant mood lifter, especially when it heralds the arrival of my Crispy Garlic Butter Potato Rounds. This recipe is an absolute game changer, delivering heavenly, golden edges with a soft, buttery center. Perfectly quick to prepare, these rounds make for a fantastic comfort food side dish or a delightful snack for those cozy movie nights. With just a handful of ingredients, you can create a snack that your friends and family will devour. Whether you’re diving into them solo or sharing them at a gathering, their addictive crunch is something you’ll want to savor. Ready to whip these up and impress your loved ones? Let’s get cooking!

Why Are These Potato Rounds a Must-Try?

Irresistibly Addictive: These Crispy Garlic Butter Potato Rounds will leave you craving more with their delightful crunch and buttery satisfaction.

Quick to Prepare: This recipe takes minimal time and effort, perfect for those evenings when you desire a satisfying snack without the fuss.

Versatile Pairings: Serve them as a glorious side with grilled meats, or enjoy them alongside refreshing dips like sour cream or guacamole for an unforgettable appetizer.

Customizable Flavor: Feel free to play with seasonings like chili powder or fresh herbs to suit your taste; your creativity is the limit!

Crowd-Pleasing Appeal: Whether for a casual family dinner or a fun movie night, these potato rounds are sure to steal the show and delight everyone at the table.

Crispy Garlic Butter Potato Rounds Ingredients

For the Potato Rounds
• Yukon Gold or Russet Potatoes – The foundation of this dish; scrub well to remove any dirt.
• Olive Oil – Enhances flavor and gives a crispy texture; avocado oil is a great substitute.
• Unsalted Butter – Adds a rich, buttery flavor; use salted butter for an extra taste boost.
• Garlic – Minced finely for maximum flavor distribution; adjust the amount to suit your garlic preference.
• Salt – Essential for enhancing the overall flavor profile.
• Black Pepper – Introduces a subtle heat; feel free to adjust according to taste.
• Paprika (Optional) – Adds a hint of smokiness; swap for cayenne if you prefer a kick.

For Garnishing
• Fresh Parsley – Provides a burst of freshness and color; chives or green onions make great alternatives.
• Grated Parmesan Cheese (Optional) – Offers a delightful umami richness; skip for a dairy-free option.

Get ready for these Crispy Garlic Butter Potato Rounds to become your new favorite side dish!

Step‑by‑Step Instructions for Crispy Garlic Butter Potato Rounds

Step 1: Preheat the Oven
Begin by preheating your oven to 425°F (220°C). This high temperature is key to achieving that perfect crispiness in your Crispy Garlic Butter Potato Rounds. While waiting, line a baking sheet with parchment paper for easy cleanup and to prevent sticking. Once the oven is hot, you’ll be ready to transform your potatoes into a delectable snack.

Step 2: Slice the Potatoes
Next, take your well-scrubbed Yukon Gold or Russet potatoes and slice them into 1/4-inch thick rounds. The uniformity in thickness ensures they bake evenly and reach that golden crispiness. After slicing, lay the rounds out on a clean surface, taking a moment to admire their vibrant color; this is where the magic begins!

Step 3: Prepare the Flavor Mixture
In a large mixing bowl, combine olive oil, melted unsalted butter, finely minced garlic, salt, and black pepper. If you wish to add a touch of smokiness, sprinkle in some paprika. Use a whisk or a spoon to blend everything together until well-combined, creating a rich, aromatic mix that will coat your potato slices beautifully.

Step 4: Coat the Potato Rounds
Add the sliced potatoes to the bowl with the buttery garlic mixture, and toss them gently until each round is evenly coated. Ensure that the slices glisten with the flavorful blend; this step is essential for that irresistible taste. Feel free to adjust the amount of garlic and seasoning according to your preferences for maximum flavor.

Step 5: Arrange for Baking
Now, transfer the coated potato rounds to your prepared baking sheet, arranging them in a single layer without overlapping. This step is crucial as it allows each round to crisp up nicely. Take a moment to appreciate how deliciously glossy they look before placing them in the oven, ensuring a beautiful presentation.

Step 6: Bake the Potato Rounds
Place the baking sheet in the preheated oven and bake for 10-12 minutes. Once the first side is golden and crispy, flip each round over using tongs or a spatula, and return them to the oven for an additional 10-12 minutes. Keep an eye on them towards the end, looking for a delightful golden brown color on both sides.

Step 7: Garnish and Serve
Once your Crispy Garlic Butter Potato Rounds are perfectly cooked, remove them from the oven and let them cool slightly. Garnish with fresh parsley and a sprinkle of grated Parmesan cheese if desired; this adds a fresh touch and extra flavor. Serve them warm as a delightful snack or a side dish, and watch as they swiftly disappear!

Crispy Garlic Butter Potato Rounds Variations

Feel free to get creative with your crispy garlic butter potato rounds; let your taste buds guide the way!

  • Herb Swap: Replace fresh parsley with rosemary or thyme for a fragrant twist. Each herb brings its unique aroma, enhancing the earthy flavor of the potatoes.

  • Spicy Kick: Add chili powder or crushed red pepper flakes for some heat. This spicy variation is perfect for those who love a bit of fiery excitement in their snacks.

  • Italian Flair: Sprinkle Italian seasoning over the rounds before baking for a taste of the Mediterranean. The combination of herbs like oregano and basil elevates this dish to new levels.

  • Cheesy Delight: For an extra cheesy treat, add grated Parmesan on top right before they finish baking. The melty, savory goodness will make these rounds irresistible.

  • Smoky Paprika: Use smoked paprika instead of regular for a deeper, more robust flavor. This twist adds a subtle smokiness reminiscent of summer barbecues.

  • Sweet Potato Alternative: Substitute Yukon Gold potatoes with sweet potatoes for a sweeter, nutrient-dense spin. Their natural sweetness and vibrant color make them a delightful addition to any plate.

  • Tangy Boost: Drizzle balsamic glaze over your finished potato rounds for a tangy suspension of flavors. The sweetness and acidity complement the buttery texture beautifully.

These variations are just the beginning! Dive into the world of flavors and pair these crispy potato rounds with your favorite dips, like sour cream or guacamole, to enhance your culinary experience further. For more inspiration, check out my Honey Garlic Chicken or make a hearty pairing with Cheesy Garlic Bread. Happy cooking!

What to Serve with Crispy Garlic Butter Potato Rounds

Looking to complete your meal with more irresistible flavors that beautifully complement these golden, crunchy delights?

  • Grilled Chicken Skewers: Juicy and smoky, these skewers pair perfectly with the buttery potatoes, adding a satisfying protein element to your meal.

  • Zesty Salad: A fresh green salad with lemon vinaigrette introduces a bright, tangy contrast that balances out the richness of the potato rounds.

  • Homemade Guacamole: The creamy texture and vibrant flavor of guacamole elevate the potato rounds to a new level of indulgence, perfect for dipping and sharing.

  • Sour Cream Dip: A dollop of cool, tangy sour cream enhances the savory notes of the potatoes, creating a delicious combination that’s downright addictive.

  • Grilled Vegetables: A medley of charred veggies adds a wonderful burst of color and earthy flavors to your table, making each bite a delight for the senses.

  • Sparkling Lemonade: Quench your thirst with this refreshing drink, as its citrus notes provide a wonderful contrast to the richness of the crispy rounds.

Each of these pairings not only harmonizes beautifully with the Crispy Garlic Butter Potato Rounds but also creates a satisfying dining experience for everyone at the table.

Expert Tips for Crispy Garlic Butter Potato Rounds

  • Even Slicing: Ensure that your potato rounds are sliced uniformly to guarantee even cooking. Thick slices may result in a mushy center while thin ones can burn.

  • Non-Overlapping: Avoid overcrowding the baking sheet; give each round space to breathe. This helps achieve that coveted crispiness and prevents steaming.

  • Choose the Right Oil: For optimal flavor and crisp, extra virgin olive oil is ideal, but feel free to substitute with avocado oil for a different spin.

  • Adjust Seasonings: Don’t hesitate to modify the seasonings according to your taste. A bit more garlic or a dash of chili powder can elevate your Crispy Garlic Butter Potato Rounds!

  • Serve Fresh: For maximum deliciousness, serve your potato rounds immediately after baking. If there are leftovers, store them in an airtight container and reheat in the oven for best results.

How to Store and Freeze Crispy Garlic Butter Potato Rounds

Fridge: Store leftover Crispy Garlic Butter Potato Rounds in an airtight container for up to 3 days to keep them fresh and flavorful.

Freezer: For longer storage, freeze the cooked potato rounds on a baking sheet in a single layer for about 2 hours, then transfer them into a zip-top bag. They’ll last up to 3 months.

Reheating: When you’re ready to enjoy them again, reheat the frozen rounds straight from the freezer in the oven at 400°F (200°C) for about 15-20 minutes or until crispy.

Tip: Avoid microwaving as it can make the rounds soggy; enjoy the crispy texture by reheating in the oven or air fryer instead.

Make Ahead Options

These Crispy Garlic Butter Potato Rounds are perfect for meal prep enthusiasts! You can slice and coat the potatoes up to 24 hours in advance. Simply prepare the rounds as directed in the recipe, but stop before baking. Arrange them in a single layer on a baking sheet and cover tightly with plastic wrap or transfer them to an airtight container to prevent any browning. When you're ready to serve, preheat the oven and bake as instructed for all the crispy perfection without the hassle. Not only will your prep save you time, but you’ll get those golden, crunchy rounds that are just as delicious as fresh!

Crispy Garlic Butter Potato Rounds Recipe FAQs

How do I choose the best potatoes for this recipe?
Absolutely! For the perfect Crispy Garlic Butter Potato Rounds, I recommend using Yukon Gold or Russet potatoes. Yukon Golds offer a buttery flavor and creamy texture, while Russets are starchy and give a lovely crisp. Always choose firm, blemish-free potatoes without dark spots or sprouting—this ensures maximum flavor and quality.

What is the best way to store leftover potato rounds?
Very! To store leftover Crispy Garlic Butter Potato Rounds, place them in an airtight container and refrigerate them. They will stay fresh for about 3 days. Just make sure they’re completely cool before sealing the container to prevent moisture buildup.

Can I freeze these potato rounds?
Absolutely! To freeze, arrange your cooked potato rounds in a single layer on a baking sheet and freeze for about 2 hours until firm. Once frozen, transfer them to a zip-top bag, where they can last for up to 3 months. When you're ready to enjoy them, reheat the frozen rounds directly in the oven at 400°F (200°C) for about 15-20 minutes until they’re crispy again.

How do I prevent the potato rounds from getting soggy?
Great question! To avoid sogginess, it’s crucial to ensure your potato rounds are spread out in a single layer on the baking sheet without any overlapping. This allows hot air to circulate around them, leading to crispy edges. Also, I suggest using high-quality oil, such as extra-virgin olive oil or avocado oil, as they aid in achieving that desirable crispiness.

Are these potato rounds suitable for special dietary needs?
Very! The Crispy Garlic Butter Potato Rounds are vegetarian and can easily be adapted for various dietary preferences. Just omit the Parmesan cheese for a dairy-free version. Always check for allergies related to specific ingredients, such as garlic or any substitutes, to ensure they're safe for everyone at your table.

Crispy Garlic Butter Potato Rounds

Crispy Garlic Butter Potato Rounds That Steal the Show

Crispy Garlic Butter Potato Rounds are an addictive snack with heavenly golden edges and a soft center.
Print Recipe Pin Recipe
Prep Time 10 minutes mins
Cook Time 25 minutes mins
Total Time 35 minutes mins
Servings: 4 rounds
Course: Snacks
Cuisine: Comfort Food
Calories: 150
Ingredients Equipment Method Nutrition Notes

Ingredients
  

For the Potato Rounds
  • 4 medium Yukon Gold or Russet Potatoes Scrub well to remove dirt.
  • 3 tablespoons Olive Oil Avocado oil is a great substitute.
  • 4 tablespoons Unsalted Butter Use salted butter for a taste boost.
  • 3 cloves Garlic Minced finely.
  • 1 teaspoon Salt Essential for flavor enhancement.
  • 1/2 teaspoon Black Pepper Adjust according to taste.
  • 1 teaspoon Paprika Optional, adds a hint of smokiness.
For Garnishing
  • 2 tablespoons Fresh Parsley Chives or green onions make great alternatives.
  • 1/4 cup Grated Parmesan Cheese Optional, skip for a dairy-free option.

Equipment

  • Oven
  • Baking Sheet
  • Parchment Paper
  • Mixing Bowl
  • Whisk
  • Tongs

Method
 

Step‑by‑Step Instructions
  1. Preheat your oven to 425°F (220°C) and line a baking sheet with parchment paper.
  2. Slice Yukon Gold or Russet potatoes into 1/4-inch thick rounds.
  3. In a mixing bowl, combine olive oil, melted unsalted butter, minced garlic, salt, and black pepper, and blend well.
  4. Add the sliced potatoes to the bowl with the mixture and toss until evenly coated.
  5. Transfer the potato rounds to the prepared baking sheet in a single layer.
  6. Bake for 10-12 minutes, then flip the rounds and bake for another 10-12 minutes until golden.
  7. Remove from the oven, garnish with parsley and Parmesan cheese if desired, and serve warm.

Nutrition

Serving: 1roundCalories: 150kcalCarbohydrates: 22gProtein: 2gFat: 7gSaturated Fat: 4gPolyunsaturated Fat: 0.5gMonounsaturated Fat: 3gCholesterol: 15mgSodium: 250mgPotassium: 500mgFiber: 2gSugar: 1gVitamin A: 200IUVitamin C: 15mgCalcium: 20mgIron: 1mg

Notes

Ensure even slicing for uniform cooking. Avoid overcrowding the baking sheet for crispiness. Serve fresh for the best experience.

Tried this recipe?

Let us know how it was!

Crispy Baked Parmesan Zucchini Sticks That Wow Your Tastebuds

March 15, 2026 by Grace Snow Leave a Comment

As the sun dipped low in the sky, the scent of roasted vegetables wafted through my kitchen, creating a warm embrace that felt like home. Today, I’m excited to share my recipe for Baked Parmesan Zucchini, a delightful twist on your standard veggie snack. With just a handful of ingredients, these oven-roasted zucchini sticks offer an addictive crunch without the guilt of deep frying. They’re not only quick to prepare but also pack a nutritional punch, making them the perfect companion for any meal or as a stand-alone snack. With each bite, you’ll find them transforming even the most stubborn veggie skeptic into a fan. Curious how to achieve that golden, crispy perfection? Let’s dive into this easy and fulfilling recipe!

Why Choose Baked Parmesan Zucchini?

Flavorful Crunch: Every bite of these zucchini sticks delivers a delicious, addictively crunchy texture that rivals any fried snack.

Quick Preparation: With minimal prep time, you can have these zucchini sticks ready in under 30 minutes.

Healthy Alternative: Ditch the deep frying! These baked sticks are a guilt-free option that’s not only fun to eat but also packed with vitamins.

Versatile Snack: Whether served as a side or paired with marinara or yogurt sauce for dipping, they make a delightful addition to any meal or gathering.

Crowd-Pleasing Appeal: Perfect for anyone from health-conscious eaters to veggie skeptics, this recipe is sure to wow your family and friends.

If you're looking to make the most of those summer veggies, check out my recipes for Cheesy Zucchini Bake or for a sweet treat, like Matcha Baked Doughnuts!

Baked Parmesan Zucchini Ingredients

For the Zucchini Sticks
• Zucchini – Use firm, fresh zucchini for the best texture in your baked parmesan zucchini.
• Olive Oil – A drizzle of this essential ingredient aids in crisping and keeps the zucchini moist.

For the Parmesan Coating
• Parmesan Cheese – Freshly grated is the key to adding savory richness and an addictive crunch.
• Dried Thyme – Adds a wonderful herbal flavor; feel free to use Italian seasoning as a substitute.
• Dried Oregano – This brings a nice aromatic balance to the dish.
• Dried Basil – Enhances the overall flavor profile; fresh basil can add a vibrant twist.
• Garlic Powder – It contributes that savory depth—fresh minced garlic works well if you prefer.
• Kosher Salt – Essential for seasoning to taste; adjust based on your preference.
• Black Pepper – A dash of this spice adds a light kick to the coating.

For Garnish
• Fresh Parsley (optional) – Chopped for that touch of color and added freshness when serving.

Get ready to indulge in your new favorite healthy snack with these baked parmesan zucchini sticks!

Step‑by‑Step Instructions for Baked Parmesan Zucchini

Step 1: Preheat the Oven
Begin by preheating your oven to 350°F (175°C). This warm-up is essential for achieving that desired crispiness in your baked parmesan zucchini sticks. While the oven is heating, prepare a baking sheet by placing a cooling rack on top and generously coating it with nonstick spray to ensure your zucchini sticks won’t stick during baking.

Step 2: Prepare the Parmesan Coating
In a medium bowl, combine freshly grated parmesan cheese, dried thyme, oregano, basil, garlic powder, kosher salt, and black pepper. Mix these ingredients thoroughly until well-blended. This flavorful coating will add a delicious depth of flavor to your zucchini sticks and will become beautifully golden once baked.

Step 3: Cut the Zucchini
Take your firm zucchini and slice them into quarters lengthwise, creating long, thin sticks. This cutting technique maximizes the surface area for crispiness. Once cut, arrange the zucchini sticks in a single layer on your prepared cooling rack, ensuring they have space for air circulation to achieve that perfect baked texture.

Step 4: Add Olive Oil
Drizzle a light amount of olive oil over the zucchini sticks, ensuring every piece is coated. Use your hands to gently rub the oil over each stick for even distribution. This crucial step helps the zucchini cook evenly and enhances the crispiness of your baked parmesan zucchini—a key to enjoying every flavorful bite.

Step 5: Coat with Parmesan Mixture
Evenly sprinkle the parmesan mixture over the oiled zucchini sticks, ensuring each piece is generously covered. This step is vital for that addictively crunchy texture and savory flavor that will wow your taste buds. Use your hands to press the coating gently onto the zucchini for optimal adherence.

Step 6: Bake the Zucchini Sticks
Place the baking sheet in the preheated oven and bake the zucchini sticks for about 15 minutes. Keep an eye on them; you'll know they're ready when they become tender and the coating appears slightly golden. This baking process will create a delightful contrast between the crispy outside and tender inside of your baked parmesan zucchini.

Step 7: Broil for Extra Crispiness
After baking, switch your oven to the broil setting and broil the zucchini sticks for an additional 2-3 minutes. This final touch adds a beautiful golden brown hue and an irresistible crunch. Watch closely during this time to avoid burning, ensuring the tops turn crisp and perfectly browned.

Step 8: Garnish and Serve
Once done, take the baking sheet out of the oven and let the zucchini sticks cool for a moment. If desired, garnish with freshly chopped parsley to add a pop of color and freshness. Serve your baked parmesan zucchini sticks immediately as a healthy snack or side dish, and enjoy the delightful crunch!

Tips for the Best Baked Parmesan Zucchini

Slice Uniformly: Cut the zucchini into even sticks to ensure consistent baking and to achieve that perfect crispy texture.

Use Fresh Parmesan: Opt for freshly grated parmesan cheese rather than pre-packaged to enhance the flavor and crispiness of your baked parmesan zucchini.

Don't Overcrowd: Arrange zucchini sticks in a single layer with space between them on the baking sheet. This promotes even cooking and prevents sogginess.

Monitor Closely: Keep an eye on the zucchini during the broiling step. A minute or two can make the difference between golden perfection and burnt bits!

Cool Slightly Before Serving: Allow the baked zucchini to sit for a minute post-baking to help maintain that fantastic crunch as they cool slightly.

What to Serve with Oven-Roasted Parmesan Zucchini Sticks?

Elevate your oven-roasted zucchini sticks into a delightful meal with these complementary dishes that add flavor and variety.

  • Creamy Garlic Mashed Potatoes: The buttery texture of mashed potatoes pairs beautifully, creating a comforting contrast to the crunch of the zucchini.

  • Fresh Garden Salad: A vibrant mix of greens and colorful veggies brings a refreshing balance, enhancing the overall meal with crispness and nutrition.

  • Roasted Sweet Potatoes: Their natural sweetness and contrasting textures make a perfect companion, blending harmoniously with the savory taste of the zucchini.

  • Spicy Marinara Sauce: Ideal for dipping, the zesty kick from marinara makes every bite of the zucchini even more enticing. Delightfully tangy, it adds a fun element when served on the side.

  • Grilled Lemon-Herb Chicken: Juicy and packed with flavor, this protein-rich addition rounds out your plate, making it even more satisfying while keeping the dish light.

  • Crispy Quinoa Cakes: For a unique twist, serve with these hearty cakes that mimic the crunch of the zucchini while adding wholesome grains and flavor.

  • Chilled Yogurt Dip: A creamy yogurt dip, perhaps flavored with garlic and herbs, creates a light, cooling contrast that complements the warm, crispy zucchini wonderfully.

  • Sauvignon Blanc: A glass of this crisp white wine enhances the dish, with its acidity balancing the richness of parmesan and inviting the fresh flavors to shine.

Make Ahead Options

These Baked Parmesan Zucchini sticks are ideal for meal prep! You can slice the zucchini and coat them with the parmesan mixture up to 24 hours in advance. Simply store the prepared zucchini sticks in an airtight container in the refrigerator to keep them fresh. When you're ready to enjoy them, just drizzle with olive oil and bake; there's no need to waste time on the initial prep! While they will taste just as delicious, make sure to allow them to come to room temperature for a few minutes before baking for the best texture. Enjoy the crunch and flavor without the rush, making weeknight meals a breeze!

Storage Tips for Baked Parmesan Zucchini

Fridge: Store leftover baked parmesan zucchini in an airtight container in the refrigerator for up to 3 days to maintain freshness and flavor.

Freezer: For longer storage, freeze the cooked zucchini sticks in a single layer on a baking sheet for 1-2 hours, then transfer to a freezer-safe bag for up to 2 months.

Reheating: Reheat these delightful zucchini sticks in the oven at 350°F (175°C) for about 10-15 minutes to restore their crispy texture. Avoid microwaving, as it can make them soggy.

Room Temperature: If served at a gathering, keep the baked parmesan zucchini out for no more than 2 hours for food safety and optimal taste.

Baked Parmesan Zucchini Variations

Feel free to tailor these delightful baked zucchini sticks to suit your cravings and dietary needs!

  • Yellow Squash: Swap zucchini for yellow squash for a slightly sweeter flavor and a different texture.

  • Eggplant Option: Try using eggplant instead of zucchini for a unique twist; adjust baking time as needed for tenderness.

  • Spicy Kick: Add a dash of cayenne or paprika to the parmesan mixture to spice things up—perfect for heat lovers!

  • Vegan Delight: Substitute vegan cheese for parmesan to create a delicious dairy-free version that’s just as satisfying.

  • Herb Infusion: Mix in fresh herbs, like dill or chives, to the coating for an extra burst of flavor that will elevate each bite.

  • Nutty Crunch: For added texture, finely chop nuts like almonds or walnuts and mix them into the parmesan coating for irresistible crunchiness.

  • Bread Crumb Boost: Incorporate whole wheat or seasoned breadcrumbs into the parmesan mixture for an even crunchier exterior.

When you're ready to explore more veggie goodness, try these delightful options: Cheesy Zucchini Bake or perhaps indulge your sweet tooth with Matcha Baked Doughnuts!

Baked Parmesan Zucchini Recipe FAQs

How do I choose the best zucchini for this recipe?
Absolutely! When selecting zucchini, look for firm, shiny ones with smooth skin. Avoid those with dark spots or signs of softness. Fresh zucchini will yield the best texture and flavor in your baked parmesan zucchini sticks.

How should I store leftover baked zucchini sticks?
You can store your leftover baked parmesan zucchini in an airtight container in the refrigerator for up to 3 days. Just make sure they are completely cooled before sealing to retain their crunch. Alternatively, for longer storage, freeze them in a single layer on a baking sheet for 1-2 hours, then transfer to a freezer-safe bag for up to 2 months.

Can I reheat baked zucchini sticks?
Yes! Reheat your baked zucchini sticks in the oven at 350°F (175°C) for about 10-15 minutes to restore their crispy texture. Avoid using the microwave as it tends to make them soggy, which we definitely want to avoid!

What if my zucchini sticks aren't crispy enough?
If your baked parmesan zucchini sticks aren't as crispy as you'd like, try a couple of things: ensure that you’ve coated them evenly with olive oil, and avoid overcrowding them on the baking sheet. If they still seem soft after baking, pop them under the broiler for an additional 2-3 minutes, watching closely to prevent burning.

Are there any dietary considerations for this recipe?
You can easily adapt this recipe to suit different dietary needs! For a dairy-free version, opt for a vegan cheese alternative. Additionally, if you have allergies, check that your parmesan cheese doesn’t contain any undesired ingredients. As for pets, while zucchini is safe for dogs in moderation, be sure to avoid adding cheese or excessive salt if sharing with them!

Baked Parmesan Zucchini

Crispy Baked Parmesan Zucchini Sticks That Wow Your Tastebuds

Delightful Baked Parmesan Zucchini sticks offer a crispy, guilt-free snack that transforms veggie skeptics into fans.
Print Recipe Pin Recipe
Prep Time 10 minutes mins
Cook Time 18 minutes mins
Total Time 28 minutes mins
Servings: 4 servings
Course: Snacks
Cuisine: American
Calories: 150
Ingredients Equipment Method Nutrition Notes

Ingredients
  

For the Zucchini Sticks
  • 2 medium Zucchini Use firm, fresh zucchini for best texture.
  • 1 tablespoon Olive Oil Drizzle to aid in crisping.
For the Parmesan Coating
  • 1 cup Parmesan Cheese Freshly grated for best flavor.
  • 1 teaspoon Dried Thyme Herbal flavor, optional Italian seasoning substitute.
  • 1 teaspoon Dried Oregano Adds aromatic balance.
  • 1 teaspoon Dried Basil Enhances flavor profile.
  • 1 teaspoon Garlic Powder Savory depth, fresh minced garlic is an alternative.
  • 0.5 teaspoon Kosher Salt Season to taste.
  • 0.5 teaspoon Black Pepper Adds a light kick.
For Garnish
  • 2 tablespoons Fresh Parsley Chopped for garnish, optional.

Equipment

  • Oven
  • Baking Sheet
  • cooling rack
  • medium bowl

Method
 

Step-by-Step Instructions
  1. Preheat the oven to 350°F (175°C) and prepare a baking sheet with a cooling rack coated in nonstick spray.
  2. Combine parmesan cheese, thyme, oregano, basil, garlic powder, salt, and pepper in a bowl and mix well.
  3. Slice zucchini into quarters lengthwise, arrange on the cooling rack for air circulation.
  4. Drizzle olive oil over zucchini sticks and rub evenly to coat.
  5. Sprinkle the parmesan mixture over the oiled zucchini, pressing gently for adherence.
  6. Bake for about 15 minutes until tender and coating is golden.
  7. Switch to broil for an additional 2-3 minutes for extra crispiness, watching closely.
  8. Let cool briefly, garnish with parsley, and serve immediately.

Nutrition

Serving: 1servingCalories: 150kcalCarbohydrates: 6gProtein: 8gFat: 10gSaturated Fat: 4gPolyunsaturated Fat: 0.5gMonounsaturated Fat: 5gCholesterol: 20mgSodium: 400mgPotassium: 300mgFiber: 2gSugar: 2gVitamin A: 2000IUVitamin C: 20mgCalcium: 200mgIron: 1mg

Notes

Slice zucchini uniformly for even baking. Use freshly grated parmesan for best results. Don’t overcrowd on the baking sheet.

Tried this recipe?

Let us know how it was!

Creamy Cinnamon Orange Tea Sandwiches for Elegant Gatherings

March 14, 2026 by Grace Snow Leave a Comment

As I stood in my kitchen, the aroma of freshly toasted cinnamon swirl bread mingling with the sweet scent of mandarin oranges transported me to a sunlit tea party. These Creamy Cinnamon Orange Tea Sandwiches embody elegance and casual comfort, perfect for delighting guests or indulging during a quiet afternoon. With just a handful of ingredients, you can whip up these quick, vibrant sandwiches that marry the creamy richness of cream cheese with the refreshing zest of oranges and the delightful crunch of pecans. They not only present beautifully but are also an impressive crowd-pleaser for brunches or special gatherings. Why settle for ordinary bites when you can elevate your snacking experience with these charming little sandwiches? Ready to bring a touch of sophistication to your next tea time?

Why are you going to love these sandwiches?

Ease of Preparation: These Creamy Cinnamon Orange Tea Sandwiches come together in just a few simple steps. Perfect for even the busiest cook!

Bursting with Flavor: The mix of sweet mandarin oranges and spiced cream cheese creates a delightful flavor explosion that will leave your guests raving.

Visually Stunning: With their vibrant colors, these sandwiches are not just delicious, but they also make for an eye-catching addition to any table setting.

Versatile Option: Serve them at tea parties, brunches, or even casual gatherings—these sandwiches fit the bill for any occasion.

Make-Ahead Convenience: Prepping your sandwiches a few hours in advance allows you to enjoy your event stress-free, simply chill and serve!

Elevate your next brunch or afternoon tea with these stunning sandwiches, and don’t forget to check out our other delightful recipes like the Pumpkin Cinnamon Roll for more tasty inspirations!

Creamy Cinnamon Orange Tea Sandwiches Ingredients

For the Filling

  • Cream Cheese – Provides richness and structure; ensure it is softened for smooth mixing.
  • Mandarin Oranges – Adds bright, juicy notes; use fresh or canned—just drain and pat them dry.
  • Brown Sugar – Sweetens the filling, add to taste for the perfect balance.
  • Chopped Pecans – Offers a pleasant crunch; can be swapped with walnuts or left out for nut-free options.

For the Bread

  • Cinnamon Swirl Bread – Infuses flavor and texture into the sandwiches; plain white or whole wheat are great alternatives if needed.

These Creamy Cinnamon Orange Tea Sandwiches are sure to impress your guests while being quick and easy to prepare!

Step‑by‑Step Instructions for Creamy Cinnamon Orange Tea Sandwiches

Step 1: Prepare the Filling
In a medium mixing bowl, combine 8 ounces of softened cream cheese with drained mandarin orange segments, 2 tablespoons of brown sugar, and 1/4 cup of chopped pecans. Using a hand mixer or spatula, blend the mixture until it’s smooth and creamy, ensuring the oranges are roughly crushed so they create a delightful texture. This should take about 2–3 minutes.

Step 2: Assemble the Sandwiches
Lay out 8 slices of cinnamon swirl bread on a clean cutting board. Spread a generous layer of the creamy orange mixture on half of the bread slices, making sure to reach the edges for maximum flavor in each bite. The creamy mixture should be evenly distributed and visible, adding a luscious touch to your sandwiches.

Step 3: Complete the Sandwiches
Place the remaining bread slices on top of the cream cheese mixture, gently pressing down to adhere. If desired, trim the crusts for a more polished appearance. Use a sharp knife to cut the sandwiches into triangles or other fun shapes, which will make them more appealing for your tea party presentation.

Step 4: Serve and Garnish
Arrange the completed Creamy Cinnamon Orange Tea Sandwiches on a decorative platter, showcasing their vibrant colors. For an extra touch of elegance, garnish with a few extra mandarin segments or a light dusting of powdered sugar. Serve immediately for the best flavor, or refrigerate for up to 4 hours if prepping in advance.

Expert Tips for Creamy Cinnamon Orange Tea Sandwiches

• Room Temperature Cream Cheese: Ensure your cream cheese is at room temperature for easy mixing and a smooth filling.

• Drain Oranges Well: Dampen the mandarin oranges before adding them to avoid a watery filling, which can make your sandwiches soggy.

• Avoid Early Cutting: Delay cutting your sandwiches until just before serving to maintain freshness and prevent them from drying out.

• Presentation Matters: Arrange your Creamy Cinnamon Orange Tea Sandwiches on a tiered cake stand to create an elegant display that draws guests' attention.

• Garnish Options: Consider adding fresh mint leaves or edible flowers for an extra pop of color and sophistication.

How to Store and Freeze Creamy Cinnamon Orange Tea Sandwiches

Fridge: Keep assembled sandwiches in an airtight container for up to 4 hours. This maintains freshness while making them ideal for a pre-prepared snack.

Freezer: For longer storage, freeze unassembled sandwiches in layers separated by parchment paper for up to 1 month. Thaw in the fridge overnight before serving.

Reheating: These sandwiches are best served cold or at room temperature. If desired, let them sit out for a few minutes before serving for optimal flavor.

Leftover Storage: If you have any extras, they can be stored in the fridge for up to 1 day but may lose some texture. Enjoy while they’re fresh!

What to Serve with Creamy Cinnamon Orange Tea Sandwiches

These delightful sandwiches are a perfect centerpiece for an elegant gathering, but what else can you pair with them to create a full, fabulous meal?

  • Cucumber Salad: The crisp, refreshing slices of cucumber add a wonderful contrast to the creamy filling, making each bite delightful. A light, zesty dressing enhances the overall flavors, inviting your guests for more.

  • Herbal Iced Tea: Bright and refreshing iced tea, flavored with mint or lemon, complements the sweet and spicy notes of the sandwiches, making it an ideal sipper for your afternoon spread.

  • Fruit Platter: A vibrant assortment of seasonal fruits, such as strawberries, blueberries, and kiwi, adds natural sweetness and a pop of color to your table, working beautifully to cleanse the palate.

  • Scones with Jam and Cream: Soft, buttery scones serve as a lovely counterpart. Paired with raspberry jam and clotted cream, they bring a touch of classic tea culture while contrasting the flavors of your sandwiches.

  • Cheese Cubes: A sharp cheddar or creamy brie provides a savory option that balances the sweetness of the sandwich filling. Choose a few varieties to keep your platter interesting and delightful for guests.

  • Lemon Sorbet: This light, refreshing dessert provides a palate-cleansing finish, with its citrus notes beautifully mimicking that bright touch from the mandarin oranges in the sandwiches.

  • Sparkling Water with Citrus: A hint of lemon or lime in sparkling water refreshes the palate and provides a delightful effervescence to your brunch spread, enhancing the flavors of your elegant tea party fare.

Creating a cohesive meal with these pairings will elevate your tea gathering, turning ordinary into extraordinary! Enjoy crafting the perfect combination for your next hosting occasion.

Make Ahead Options

These Creamy Cinnamon Orange Tea Sandwiches are perfect for busy home cooks who want to prep ahead! You can prepare the creamy filling (combining cream cheese, mandarin oranges, brown sugar, and pecans) up to 24 hours in advance; just refrigerate it in an airtight container to keep it fresh and flavorful. The sandwiches can also be assembled up to 4 hours ahead of time; however, I recommend wrapping them tightly in plastic wrap after cutting to maintain their texture. When you're ready to serve, simply garnish with extra mandarin segments or powdered sugar to elevate the presentation. With these make-ahead tips, you'll have delicious sandwiches ready to impress your guests with minimal last-minute effort!

Creamy Cinnamon Orange Tea Sandwiches Variations

Let your creativity shine as you customize these delicious creamy sandwiches for your unique tastes and dietary needs!

  • Nut-Free: Swap out the pecans for seeds like sunflower or pumpkin for a delightful crunch without the nuts.
  • Vegan Delight: Use plant-based cream cheese and maple syrup instead of brown sugar to create a vegan-friendly option that everyone will love.
  • Zesty Kick: Add a pinch of cayenne or red pepper flakes to the cream cheese mixture for a surprising, savory twist.
  • Fruit Fusion: Mix in finely chopped apples or cranberries for an extra burst of flavor and a lovely texture.
  • Bread Swap: Try using multi-grain bread or ciabatta for a heartier sandwich that still holds the creamy filling beautifully.
  • Creamy Spinach: Fold in some finely chopped fresh spinach into the filling—this will not only add nutrients but also a pop of color!
  • Sweetened Variations: Drizzle honey or agave syrup over the filling before spreading for an extra layer of sweetness to delight your taste buds.
  • Herb Infusion: Incorporate fresh herbs like basil or mint into the filling for a refreshing culinary experience that tantalizes the senses.

Each of these variations ensures you’ll keep your gatherings dynamic and exciting! And while you’re here, take a moment to explore our tempting Pumpkin Cinnamon Roll recipe for a warm, seasonal treat!

Creamy Cinnamon Orange Tea Sandwiches Recipe FAQs

What type of cream cheese should I use?
Absolutely! For the best results, I recommend using full-fat cream cheese and ensuring it’s at room temperature before mixing. This allows for a smooth and well-combined filling, enhancing the overall texture of your Creamy Cinnamon Orange Tea Sandwiches.

How do I choose ripe mandarin oranges?
Choosing ripe mandarin oranges is key! Look for oranges that are firm, feel heavy for their size, and have a bright, vibrant color. Avoid any with dark spots or blemishes, as these can indicate overripeness. Fresh oranges will add a juicy freshness that beautifully complements the creamy filling.

Can I store these sandwiches in the fridge?
Very! Assemble your Creamy Cinnamon Orange Tea Sandwiches and keep them in an airtight container in the fridge for up to 4 hours before serving. If you have leftovers, they can last for an additional day, though the bread may lose some of its delightful texture and freshness.

How do I freeze these sandwiches?
For freezing, lay out unassembled sandwiches on a baking sheet, separating layers with parchment paper, and freeze for up to 1 month. Once frozen, transfer them to an airtight container or freezer bag. When you’re ready to enjoy, thaw them in the fridge overnight before serving to maintain their quality.

What if someone has a nut allergy?
No worries! You can easily make these sandwiches nut-free by omitting the chopped pecans—your Creamy Cinnamon Orange Tea Sandwiches will still be delicious. Alternatively, feel free to substitute with seeds like sunflower or pumpkin seeds for a bit of crunch without the nuts.

Any tips for serving these at a tea party?
Absolutely! Aim for elegance by arranging your sandwiches on a tiered cake stand. This visual height adds sophistication. You can also complement the sandwiches with fresh fruit, such as extra mandarin segments, and consider adding some fresh herbs or edible flowers to elevate the presentation even further.

Creamy Cinnamon Orange Tea Sandwiches

Creamy Cinnamon Orange Tea Sandwiches for Elegant Gatherings

Delight your guests with Creamy Cinnamon Orange Tea Sandwiches, a perfect blend of creamy filling and vibrant flavors.
Print Recipe Pin Recipe
Prep Time 15 minutes mins
Total Time 15 minutes mins
Servings: 8 sandwiches
Course: Snacks
Cuisine: American
Calories: 150
Ingredients Equipment Method Nutrition Notes

Ingredients
  

For the Filling
  • 8 oz Cream Cheese softened
  • 1 cup Mandarin Oranges drained and patted dry
  • 2 tbsp Brown Sugar add to taste
  • 1/4 cup Chopped Pecans can substitute with walnuts or omit
For the Bread
  • 8 slices Cinnamon Swirl Bread plain white or whole wheat are alternatives

Equipment

  • Mixing Bowl
  • hand mixer
  • Cutting Board
  • Knife

Method
 

Step-by-Step Instructions
  1. In a medium mixing bowl, combine cream cheese, mandarin oranges, brown sugar, and chopped pecans. Blend until smooth and creamy.
  2. Lay out slices of cinnamon swirl bread and spread the creamy orange mixture on half of the slices.
  3. Top with the remaining bread slices, pressing gently. Trim crusts if desired, and cut into triangles.
  4. Arrange sandwiches on a platter. Garnish with mandarin segments or powdered sugar and serve.

Nutrition

Serving: 1sandwichCalories: 150kcalCarbohydrates: 20gProtein: 3gFat: 7gSaturated Fat: 4gPolyunsaturated Fat: 1gMonounsaturated Fat: 2gCholesterol: 15mgSodium: 150mgPotassium: 50mgFiber: 1gSugar: 5gVitamin A: 250IUVitamin C: 15mgCalcium: 50mgIron: 0.5mg

Notes

Ensure cream cheese is at room temperature for smooth mixing. Drain oranges well to maintain filling consistency. Serve the sandwiches immediately or refrigerate for up to 4 hours if prepared in advance.

Tried this recipe?

Let us know how it was!

Monster Cookie Energy Balls for Deliciously Healthy Snacking

March 13, 2026 by Grace Snow Leave a Comment

“Hey, do you think chocolatey snacks can be healthy?” I overheard this question at a park playdate, and it struck me—how many of us struggle to bridge that gap? Enter the Monster Cookie Energy Balls! Perfectly positioned as a delightful afternoon energy boost or a fun after-school treat, these little bites are packed with hearty oats, creamy peanut butter, and just the right amount of chocolatey richness. With only six simple ingredients required and no baking in sight, they make healthy snacking a breeze for busy families. Imagine satisfying those cravings without compromising on nutrition—it’s a win-win! And yes, these energy balls are not only gluten-free but also customizable, so you can easily tailor them to your taste and dietary needs. Curious about how to whip them up? Let's dive into this deliciously easy recipe together!

Why Are Monster Cookie Energy Balls Amazing?

Convenient, No-Bake: You’ll love how easy this recipe is, with no oven required! Perfect for busy days when you want a healthy snack without the fuss.

Nutritious Ingredients: Packed with quick oats and creamy peanut butter, these energy balls offer a boost without the guilt.

Fun Customizations: Want to switch it up? Try different nut butters or toss in dried fruits instead of chocolate. Thumbprint Cookies Melt also make delightful treats with varied flavors!

Kid-Approved: These energy balls are not just for adults; kids love them too! They’re a fun way to engage the little ones in snack time.

Storable Goodness: Make a big batch and keep them fresh in the fridge for quick snacking all week. Give them a try, and you'll have a go-to snack for any occasion!

Monster Cookie Energy Balls Ingredients

• For the Base

  • Quick Oats – Acts as a binder, providing structure and texture; substitute with old-fashioned oats if needed, though it may affect binding.
  • Creamy Peanut Butter – Adds richness and helps bind the mixture; avoid using all-natural peanut butter as it can result in crumbly balls.
  • Honey – Provides sweetness and moisture; maple syrup can be an effective substitute for a different flavor.
  • Vanilla Extract – Adds a cookie-like flavor; optional but recommended for enhanced taste.

• For the Sweetness

  • Miniature Chocolate Chips – Adds a sweet, chocolatey richness; miniature size is preferred for better dispersion in the energy balls.
  • Miniature M&M's – Provides a fun and colorful touch; optional; can substitute with dried fruit for a healthier option.

These Monster Cookie Energy Balls ingredients are both nourishing and customizable, making them perfect for healthy snacking!

Step‑by‑Step Instructions for Monster Cookie Energy Balls

Step 1: Combine the Ingredients
In a large mixing bowl, add the quick oats, creamy peanut butter, honey, and vanilla extract. Using a wooden spoon or a hand mixer, mix the ingredients thoroughly until they are well combined and sticky. This should take about 2-3 minutes. The mixture should be slightly tacky and hold together when pressed.

Step 2: Add the Sweet Treats
Once the base is combined, fold in the miniature chocolate chips and M&M's, ensuring an even distribution throughout the mixture. Continue to mix using your spoon for another minute until the candies are well blended into the energy ball mixture. The sweetness of the chocolate and M&M's will enhance the overall flavor of the Monster Cookie Energy Balls.

Step 3: Shape the Energy Balls
Using your hands, scoop out small portions of the mixture and roll them into 1-inch balls. For ease, you can lightly spray your hands with cooking spray to prevent sticking. Place each formed ball on a plate or in a Tupperware container as you go along, ensuring they don’t touch to prevent sticking together.

Step 4: Chill for Firmness
Once all the balls are shaped, cover them with plastic wrap or a lid if using a container. Refrigerate for 30 minutes to 1 hour to allow them to firm up. This chilling time helps the Monster Cookie Energy Balls hold their shape, making them easier to enjoy as a grab-and-go snack.

Step 5: Enjoy or Store
After chilling, you can either enjoy your delicious Monster Cookie Energy Balls right away or store them in an airtight container. They can be kept in the fridge for up to a week or frozen for longer storage. These delectable bites are perfect for mid-afternoon cravings or quick snacks on the go!

Monster Cookie Energy Balls Variations

Feel free to get creative and make this recipe your own with exciting adaptations that will tickle your taste buds!

  • Nut-Free Option: Replace peanut butter with sun butter for a delicious nut-free alternative that everyone can enjoy.
  • Fruit-Filled: Swap miniature chocolate chips and M&M's for dried fruits like cranberries or apricots for a chewy, fruity twist. Dried fruits not only add sweetness but also a burst of flavor.
  • Different Nut Butters: Experiment with almond or cashew butter for an entirely new taste! Each nut butter brings a unique richness, allowing you to customize these treats per your cravings.
  • Choco-Lover's Delight: Use dark chocolate chips or chunks instead of regular ones for a richer, more decadent flavor. Your energy balls will be an indulgent yet healthy treat!
  • Coconut Crunch: Toss in some unsweetened shredded coconut to the mix. This adds an enjoyable chewy texture and a tropical flair to each bite.
  • Protein Boost: Mix in a scoop of your favorite protein powder for an extra boost. This will make the energy balls even more satisfying, while adding some nutritional value!
  • Spicy Kick: Add a pinch of cinnamon or a dash of cayenne pepper for a slight spice that enhances the overall flavor profile; it’s a twist that adds intrigue to your snack.
  • Grain-Free: For a gluten-free variation, use gluten-free oats or substitute them with ground nuts. This will keep the energy balls both grain-free and delightful!

If you’re curious about other delightful, refined treats, try my Peaches Cream Cookies for a fruity surprise or indulge in Mexican Wedding Cookies for a melt-in-your-mouth experience!

Expert Tips for Monster Cookie Energy Balls

  • Choose the Right Peanut Butter: Use smooth, creamy peanut butter to ensure the energy balls maintain their shape; avoid natural varieties that can cause crumbling.

  • Don’t Skip the Chill: Refrigerating the energy balls for at least 30 minutes helps them firm up nicely, making them easier to handle and reducing stickiness.

  • Stay Sticky: If your mixture is too dry, add a touch more honey or peanut butter to achieve the right consistency before rolling into balls.

  • Customizable Sweetness: Experiment with various add-ins like dried fruits or nuts instead of chocolate; this keeps your Monster Cookie Energy Balls exciting and healthy.

  • Proper Storage: Keep energy balls in a sealed container in the fridge for up to a week, or freeze them for longer enjoyment; they make great emergency snacks.

Storage Tips for Monster Cookie Energy Balls

Fridge: Store your Monster Cookie Energy Balls in a sealed container for up to one week. This keeps them fresh and ready for snacking anytime.

Freezer: For longer storage, freeze the energy balls in an airtight container for up to 3 months. Simply thaw in the fridge overnight before enjoying.

Reheating: These energy balls are meant to be enjoyed cold or at room temperature, so there's no need to reheat—just grab one and go!

Look for Signs: If you notice any changes in texture or smell after a week in the fridge, it’s best to discard them for safety.

What to Serve with Monster Cookie Energy Balls?

Imagine a delightful spread that turns your healthy snacking into a homey feast, complementing those chocolatey bites with fresh and vibrant flavors.

  • Fresh Fruit Salad: Light and refreshing, a mix of seasonal fruits brightens the table and adds a hydrating element to balance the sweetness.

  • Greek Yogurt Parfait: Layered with crunchy granola and berries, this treat is protein-packed and creates a satisfying contrast to the chewy energy balls.

  • Veggie Sticks with Hummus: Crisp, colorful vegetables served with creamy hummus make for a crunchy, nutritious side that packs a savory punch alongside your snack.

  • Nut Butter Banana Toast: A slice of whole-grain bread topped with nut butter and banana slices offers a complementary creaminess and enhances the energy boost.

  • Chocolate Milkshake: Creamy and indulgent, a chocolate-flavored shake perfectly echoes the flavors of your Monster Cookie Energy Balls—an irresistible treat for kids!

  • Homemade Trail Mix: Combine nuts, seeds, and a sprinkle of chocolate for a crunchy sidekick. This mix elevates snack time, ensuring an extra protein punch.

  • Coconut Chia Pudding: This dairy-free, creamy dessert provides a unique texture. It's subtly sweet and can be flavored with vanilla or fruit to pair beautifully.

  • Sparkling Water with Citrus: Refreshing and fizzy, a splash of lemon or lime in sparkling water enhances the experience, cleansing the palate between the sweet bites.

Make Ahead Options

These Monster Cookie Energy Balls are perfect for meal prep enthusiasts looking to save time during busy weeks! You can mix the ingredients and shape the balls up to 24 hours in advance. Simply follow the initial steps, then refrigerate the shaped energy balls covered in an airtight container. For best quality, ensure they are not touching to prevent sticking together. When you're ready to enjoy, pop them out of the fridge, and they’ll be just as delicious and chewy as freshly made. You can also store them in the freezer for up to 3 months, allowing you to have healthy snacks ready whenever you need a quick energy boost!

Monster Cookie Energy Balls Recipe FAQs

How do I choose ripe ingredients for my energy balls?
Absolutely! For the best results, make sure to select creamy peanut butter with a smooth texture that is rich in oils. If you want alternatives like honey or maple syrup, look for those that are pure and free of additives—this ensures your energy balls are as healthy and delicious as possible.

How should I store my Monster Cookie Energy Balls and for how long?
Keep your energy balls in a sealed container in the fridge for up to one week for the best freshness. I usually opt for a glass container with a tight lid to lock in flavor. If you want to store them longer, they can also be frozen for up to 3 months. Just make sure to place pieces of parchment paper between each layer to prevent sticking!

Can I freeze Monster Cookie Energy Balls?
Yes, they freeze beautifully! To freeze, place the formed energy balls in a single layer on a baking sheet and freeze for about 1-2 hours until firm. Once set, transfer them to an airtight container or freezer bag, separating layers with parchment paper. When you're ready to enjoy, simply thaw them in the fridge overnight or let them sit at room temperature for a bit.

What can I do if my mixture is too sticky or crumbly?
If your mixture is a bit too sticky, try lightly spraying your hands with cooking spray to make rolling easier, or add a bit more oats or powdered peanut butter for a firmer texture. On the flip side, if it’s too crumbly, incorporate a touch of honey or peanut butter a little at a time until you reach the desired consistency; don’t give up, you’re on the right track!

Are there any dietary considerations I should keep in mind?
Very! If you're making these for kids or those with allergies, feel free to replace peanut butter with sun butter for a nut-free version. Additionally, check the chocolate chips for potential allergens, and always be mindful of any dietary restrictions of family members or friends when hosting snack time!

Are Monster Cookie Energy Balls suitable for pets?
No, it’s best to keep these away from pets, especially since they contain ingredients that can be problematic, like chocolate and honey. Always double-check ingredients if you're considering sharing any snacks with your furry friends, and stick to pet-safe treats instead!

Monster Cookie Energy Balls

Monster Cookie Energy Balls for Deliciously Healthy Snacking

Monster Cookie Energy Balls are a delightful and healthy snack packed with oats, peanut butter, and chocolate, perfect for any time of the day.
Print Recipe Pin Recipe
Prep Time 10 minutes mins
Chill Time 30 minutes mins
Total Time 40 minutes mins
Servings: 12 balls
Course: Snacks
Cuisine: Healthy
Calories: 100
Ingredients Equipment Method Nutrition Notes

Ingredients
  

For the Base
  • 2 cups Quick Oats Acts as a binder, providing structure and texture.
  • 1 cup Creamy Peanut Butter Adds richness and binds the mixture.
  • 1/2 cup Honey Provides sweetness and moisture.
  • 1 teaspoon Vanilla Extract Optional but recommended for enhanced flavor.
For the Sweetness
  • 1/2 cup Miniature Chocolate Chips Adds a sweet, chocolatey richness.
  • 1/2 cup Miniature M&M's Optional; can substitute with dried fruit.

Equipment

  • Mixing Bowl
  • Wooden spoon
  • Tupperware container

Method
 

Step-by-Step Instructions for Monster Cookie Energy Balls
  1. In a large mixing bowl, add the quick oats, creamy peanut butter, honey, and vanilla extract. Mix until combined and sticky, about 2-3 minutes.
  2. Fold in the miniature chocolate chips and M&M's, ensuring even distribution. Mix for another minute.
  3. Scoop out small portions and roll into 1-inch balls. Place on a plate or container without touching.
  4. Cover and refrigerate for 30 minutes to 1 hour to firm up.
  5. Enjoy immediately or store in an airtight container for up to a week.

Nutrition

Serving: 1ballCalories: 100kcalCarbohydrates: 15gProtein: 3gFat: 4gSaturated Fat: 1gPolyunsaturated Fat: 1gMonounsaturated Fat: 2gSodium: 50mgPotassium: 100mgFiber: 2gSugar: 8gCalcium: 2mgIron: 4mg

Notes

These energy balls can be customized with different nut butters or dried fruits for variety. Keep them stored properly for snacks anytime.

Tried this recipe?

Let us know how it was!

Crispy Broccoli Cheese Patties You'll Love in Every Bite

March 11, 2026 by Grace Snow Leave a Comment

As I watched my kids turn their noses up at yet another dinner of plain veggies, I realized it was time for a change. Enter these delightful Broccoli Cheese Patties that save the day with their vibrant flavors! Made in just 35 minutes, they make for an easy, nutritious snack or appetizer that both adults and little ones adore. The crispy outsides and creamy, cheesy centers strike the perfect balance, ensuring every bite is a satisfying delight. Plus, these versatile patties can easily be customized to fit gluten-free diets or packed with your favorite herbs and spices. Who wouldn’t want to turn veggies into a family-favorite dish? Ready to impress everyone at home with this quick meal? Let’s dive into the recipe!

Why are these patties a must-try?

Satisfying, Crunchy Texture: The golden crust offers an irresistible crunch that contrasts beautifully with the warm, cheesy centers.
Super Quick: Made in just 35 minutes, these patties fit perfectly into your busy schedule.
Nutrient-Packed: Rich in fiber and protein, they are a healthy choice for snacks or meals.
Customizable: Tailor the recipe with add-ins like herbs or spices, or make it gluten-free with simple swaps. Plus, serve them with your favorite sauces like ranch or yogurt-based dips for extra flavor! You can explore more ideas like Potato Blue Cheese to keep your meals exciting.

Broccoli Cheese Patties Ingredients

For the Patties
• Broccoli – a vibrant green base loaded with vitamins; can be swapped for other vegetables for added variety.
• Cheese (Cheddar or alternatives) – enhances creaminess and flavor; consider mozzarella, gouda, or feta for a twist.
• Eggs – act as a binder, ensuring that your patties hold together beautifully.
• Breadcrumbs – adds structure and gives a delightful crunch; use gluten-free breadcrumbs for a gluten-free option or try almond flour instead.
• Spices (optional) – elevate flavor profiles; customize with your favorites to make these broccoli cheese patties uniquely yours.

Step‑by‑Step Instructions for Broccoli Cheese Patties

Step 1: Prep Broccoli
Begin by chopping a head of fresh broccoli into small florets. Steam the broccoli for about 5-7 minutes or until tender, making sure it retains a vibrant green color. Once cooked, allow it to cool slightly before mashing it lightly with a fork. This will help release some moisture and make it easier to mix with the other ingredients for your Broccoli Cheese Patties.

Step 2: Mix Ingredients
In a large mixing bowl, combine the cooled, chopped broccoli with shredded cheese of your choice, two beaten eggs, and breadcrumbs. If desired, add spices and herbs to elevate the flavor profile. Mix all the ingredients thoroughly for about 2-3 minutes, ensuring everything is evenly distributed. This step is crucial to create a cohesive mixture that holds together when forming the patties.

Step 3: Form Patties
With clean hands, scoop out portions of the broccoli mixture and shape them into uniformly sized patties, roughly 1 inch thick. Ensure each patty is compact, which will help prevent them from falling apart while cooking. Arrange the shaped patties on a plate or baking sheet lined with parchment paper, ready for cooking.

Step 4: Cooking Options
For frying, heat a skillet over medium heat and add a few tablespoons of oil. Once hot, carefully place the formed patties into the skillet, cooking them for 4-5 minutes on each side until they are golden brown and crispy. Alternatively, for baking, preheat your oven to 375°F (190°C) and arrange the patties on a greased baking sheet. Bake for about 20 minutes, flipping halfway through, until they achieve a nice golden color.

Step 5: Serve
Once cooked, remove your delicious Broccoli Cheese Patties from the skillet or oven and allow them to cool for a minute. Serve them warm with your favorite dipping sauces, such as ranch or yogurt-based sauces, to enhance the flavor experience. These patties make a delightful snack or appetizer, perfect for impressing family and friends.

Make Ahead Options

These Broccoli Cheese Patties are perfect for meal prep enthusiasts! You can prepare the broccoli mixture up to 24 hours in advance. Simply steam and chop the broccoli, then combine it with cheese, eggs, and breadcrumbs in a bowl. Cover the mixture tightly and refrigerate it; this will help the flavors meld. You can also form the patties and refrigerate them for up to 3 days before cooking for easy weeknight meals. When ready to serve, simply cook them as directed—either frying or baking—and enjoy just as delicious as fresh. This means busy evenings can still feel relaxed and satisfying!

Expert Tips for Broccoli Cheese Patties

• Fresh Broccoli Matters: Using fresh broccoli leads to a better flavor and texture in your patties. Avoid overcooking it to keep vibrant color and nutrients.

• Don’t Skip the Binding: Adding sufficient eggs and cheese is crucial; this ensures your broccoli cheese patties hold together well while cooking.

• Compact Formation: Shape each patty firmly; lightly press them to avoid falling apart during frying or baking. Perfectly compact patties are the secret to great texture.

• Customize Wisely: Feel free to experiment with spices, but avoid overpowering flavors that may detract from the yummy broccoli cheese combination.

• Storage Tips: For meal prep, store uncooked patties in the fridge for up to a day or freeze them for months, allowing you to enjoy these delicious broccoli cheese patties whenever you please!

What to Serve with Broccoli Cheese Patties

These delightful fritters are the perfect base for building a colorful, satisfying meal that everyone will love!

  • Crispy Sweet Potato Fries: The sweetness contrasts beautifully, lending a delightful crunch that pairs well with cheesy flavors.

  • Garlic Aioli: A creamy, garlicky dipping sauce enhances the flavor experience, making each bite even more enjoyable.

  • Fresh Green Salad: A light, zesty salad with mixed greens and a citrus vinaigrette balances the warmth of the patties while adding freshness. A vibrant salad can also keep your meal light and energetic.

  • Roasted Veggies: Oven-roasted seasonal vegetables add an earthy flavor that complements the patties, creating a colorful and nutritious plate.

  • Quinoa Pilaf: This nutty, protein-packed side provides an excellent textural contrast and complements the patties beautifully, rounding out your meal.

  • Chilled Yogurt Dip: A cooling yogurt dip mixed with cucumber and mint can lighten the meal, offering a refreshing complement to the warm patties. Ideal for a laid-back snack!

  • Sparkling Lemonade: A bubbly, refreshing drink brings a nice tartness that brightens the overall flavor profile, making your meal a celebration!

Broccoli Cheese Patties Variations

Feel free to get creative and customize your patties to fit your family's taste buds!

  • Cheesy Boost: Add extra cheese for a melt-in-your-mouth experience. Mixing in a blend of cheeses like mozzarella and gouda can elevate the flavor.
  • Herbed Delight: Toss in fresh herbs like parsley, dill, or basil for a garden-fresh note. This vibrant addition brightens the flavor and adds a delightful aroma.
  • Gluten-Free Option: Swap out regular breadcrumbs for gluten-free alternatives or almond flour, ensuring everyone can enjoy this snack!
  • Spicy Kick: Add a pinch of red pepper flakes or chopped jalapeños to spice things up. Just be cautious—small amounts can go a long way!
  • Veggie Medley: Incorporate finely diced carrots or bell peppers for added color and nutrition. This twist not only enhances texture but also gives an extra crunch.
  • Savory Twist: Mix in cooked bacon bits or ham for a heartier patty. The savory meat pairs wonderfully with the cheesy broccoli.
  • Baked Variation: Experiment with baking these patties atop a layer of marinara sauce for a delicious fusion dish. The sauce adds moisture and extra flavor to every bite.
  • Mini Bites: Shape smaller patties for bite-sized appetizers or snacks. Perfect for parties, these bite-sized versions are just as delicious and easy to enjoy!

Don’t forget to serve these patties with tasty dips! A side of creamy aioli or a zesty yogurt-based sauce can elevate the flavor. You might also enjoy experimenting with recipes like Jello Salad Cottage for a nostalgic side dish or consider the delightful Potato Blue Cheese for a scrumptious pairing.

How to Store and Freeze Broccoli Cheese Patties

Fridge: Store cooked broccoli cheese patties in an airtight container in the fridge for up to 3 days. Reheat in a skillet or microwave for a quick and tasty snack.

Freezer: For longer storage, freeze uncooked patties on a baking sheet until firm, then transfer to a freezer bag. They’ll last for up to 2 months! No need to thaw—just cook from frozen, adding a few extra minutes to your cooking time.

Reheating: To reheat, bake previously cooked patties in a preheated oven at 375°F (190°C) for about 10-15 minutes until heated through and crispy. Enjoy your delicious broccoli cheese patties whenever you crave a tasty snack!

Broccoli Cheese Patties Recipe FAQs

How do I choose the best broccoli for this recipe?
Absolutely! When selecting broccoli, look for firm, vibrant green florets with no dark spots or yellowing, which indicate freshness. The stalks should be crisp and not limp. If you find broccoli with tight buds, that's an excellent choice!

How should I store leftover broccoli cheese patties?
Very! You can store cooked broccoli cheese patties in an airtight container in the fridge for up to 3 days. Make sure they are completely cooled before sealing to prevent moisture buildup. When ready to enjoy, reheat in a skillet over medium heat or in the microwave for a quick snack!

Can I freeze broccoli cheese patties?
Certainly! To freeze, lay uncooked patties in a single layer on a baking sheet and freeze until firm, usually about 1-2 hours. Once solid, transfer them to a freezer bag, labeling with a date. They can be stored for up to 3 months. For cooking, you can take them directly from the freezer; just add a few extra minutes to your cooking time!

What if my patties fall apart while cooking?
I recommend ensuring that your mixture is well-combined and the patties are firmly shaped. If they do fall apart, try adding a bit more breadcrumb or another egg to help bind everything together. Also, let the mixture rest for about 10-15 minutes before cooking, which can help with binding!

Are broccoli cheese patties suitable for those with gluten allergies?
Yes, absolutely! For a gluten-free version, you can easily swap regular breadcrumbs for gluten-free breadcrumbs or even use almond flour. Just check the labels to ensure they meet your dietary needs. Enjoy these delicious patties without worrying about gluten!

Do these patties make a good snack for kids and pets?
Definitely! While broccoli cheese patties are a great way to sneak in veggies for kids, it's important to note that cheese is not advisable for pets. So, enjoy sharing them with the family but keep them out of reach from furry friends!

Broccoli Cheese Patties

Crispy Broccoli Cheese Patties You'll Love in Every Bite

Enjoy these Broccoli Cheese Patties, a healthy and tasty snack that's perfect for both kids and adults.
Print Recipe Pin Recipe
Prep Time 10 minutes mins
Cook Time 25 minutes mins
Total Time 35 minutes mins
Servings: 4 patties
Course: Snacks
Cuisine: American
Calories: 150
Ingredients Equipment Method Nutrition Notes

Ingredients
  

For the Patties
  • 1 head Broccoli chopped into small florets
  • 1 cup Cheese (Cheddar or alternatives) shredded
  • 2 large Eggs beaten
  • 1 cup Breadcrumbs use gluten-free for a gluten-free option
  • to taste Spices (optional) customize with your favorites

Equipment

  • Skillet
  • Oven
  • Mixing Bowl

Method
 

Step‑by‑Step Instructions for Broccoli Cheese Patties
  1. Begin by chopping a head of fresh broccoli into small florets. Steam the broccoli for about 5-7 minutes or until tender.
  2. In a large mixing bowl, combine the cooled, chopped broccoli with shredded cheese, two beaten eggs, and breadcrumbs. Mix thoroughly for about 2-3 minutes.
  3. Shape the broccoli mixture into uniformly sized patties, roughly 1 inch thick.
  4. For frying, heat a skillet over medium heat and add oil. Cook the patties for 4-5 minutes on each side until golden brown. For baking, preheat oven to 375°F (190°C) and arrange on a greased baking sheet. Bake for 20 minutes, flipping halfway through.
  5. Remove the patties from the skillet or oven, allow to cool for a minute, and serve warm with your favorite dipping sauces.

Nutrition

Serving: 1pattyCalories: 150kcalCarbohydrates: 10gProtein: 6gFat: 8gSaturated Fat: 4gPolyunsaturated Fat: 1gMonounsaturated Fat: 2gCholesterol: 50mgSodium: 200mgPotassium: 300mgFiber: 2gSugar: 1gVitamin A: 500IUVitamin C: 60mgCalcium: 200mgIron: 1mg

Notes

Store uncooked patties in the fridge for up to a day, or freeze for longer storage. Reheat in the oven for crispy results.

Tried this recipe?

Let us know how it was!

Delicious Easy Flatbread Recipe in Just 25 Minutes

March 11, 2026 by Grace Snow Leave a Comment

As I stood in my kitchen the other day, I realized something magical about making bread: it doesn't have to be complicated! Enter the Easy No-Yeast Flatbread Recipe—a delightful revelation that turns the daunting task of bread-making into a 25-minute joyride. This flatbread boasts a soft texture with perfectly crisp edges, making it the perfect canvas for your favorite dips or a cozy accompaniment to soups. Not only is it incredibly quick to whip up, but there's even a gluten-free option to cater to varying dietary preferences. With this simple recipe in your arsenal, say goodbye to fast food and hello to wholesome homemade goodness! Curious to find out how you can elevate your meals with this versatile flatbread? Let's dive in!

Why Is This Flatbread Recipe Amazing?

Simplicity: This Easy Flatbread Recipe requires no yeast, meaning you can skip the long rising times usually associated with bread-making.

Quick & Easy: In just 25 minutes, you can enjoy freshly made flatbread from scratch—a perfect solution for busy weeknights or spontaneous gathering.

Perfectly Pliable: The combination of baking powder and the right technique creates a soft and pliable texture, ideal for wrapping your favorite fillings or serving with soups.

Gluten-Free Option: You can easily make this recipe gluten-free by swapping in gluten-free flour, ensuring everyone at the table can enjoy it.

Versatile Base: Use it as a canvas for countless toppings or dips. Pair it with hummus or soups like Chicken Adobo Again for a delightful meal!

Crowd-Pleaser: Whether it's a family dinner or a casual get-together, this flatbread is sure to impress and satisfy your guests, leaving fast food behind for good.

Easy Flatbread Recipe Ingredients

For the Flatbread
• All-Purpose Flour – Provides structure and texture for the flatbread; can substitute with gluten-free flour, adjusting moisture accordingly.
• Baking Powder – Acts as a leavening agent for softness; essential for the rising effect in this no-yeast recipe.
• Salt – Enhances flavor and is crucial for taste; do not omit.
• Olive Oil – Adds moisture and richness; can substitute with vegetable oil if preferred.
• Ice Water – Binds the ingredients and helps form dough; use chilled water for best results.
• Oil for Cooking – Prevents sticking while frying; olive or vegetable oil is recommended.

Optional Toppings
• Garlic Powder – Adds a delicious savory touch; brush on post-cooking for extra flavor.
• Olive Oil – A drizzle can enhance richness; great to combine with garlic powder for a tasty coating.
• Parsley – Provides freshness and a pop of color; sprinkle on before serving for visual appeal.

Step‑by‑Step Instructions for Easy Flatbread Recipe

Step 1: Combine the Dry Ingredients
In a mixing bowl, whisk together 2 cups of all-purpose flour, 1 tablespoon of baking powder, and 1 teaspoon of salt until well combined. This initial mixture is crucial for your Easy Flatbread Recipe, providing the structure and flavor. Properly blending these dry ingredients ensures an even rise when cooked.

Step 2: Mix in the Wet Ingredients
Gradually stir in 1 tablespoon of olive oil and 3/4 cup of ice water into the dry mixture using a wooden spoon. Continue mixing until a moist, shaggy dough forms; adjust with a bit more flour or water if necessary. The dough should be wet yet manageable to create that perfect pliable texture.

Step 3: Rest the Dough
Cover the dough with a clean kitchen towel and let it rest for 10 minutes at room temperature. This brief resting period helps relax the gluten, making the dough easier to roll out and perfect for your Easy Flatbread Recipe. It's a great time to prepare your cooking surface and skillet.

Step 4: Shape the Dough
Turn the rested dough onto a lightly floured surface and divide it into 10 to 12 equal pieces. Roll each piece into a ball and then flatten it with your hands. Use a rolling pin to roll each piece into a circle about ¼ inch thick. The uniform thickness ensures even cooking and a soft texture.

Step 5: Heat the Skillet
Preheat a non-stick skillet over medium heat and add a drizzle of oil to coat the bottom. You want to achieve a hot skillet that provides a nice sizzle when cooking your Easy Flatbread. Proper heat ensures the edges turn golden brown while the center remains soft and pliable.

Step 6: Cook the Flatbreads
Carefully place one rolled flatbread in the hot skillet and cook for about 2 to 3 minutes on one side, or until you see bubbles forming. Flip to the other side and cook for an additional 2 to 3 minutes until both sides are golden brown and puffed. Keep an eye on the temperature to avoid burning.

Step 7: Optional Toppings and Serving
Once cooked, transfer the flatbreads to a plate and, if desired, brush them with melted garlic butter or sprinkle with parsley for added flavor. This final touch enhances your Easy Flatbread Recipe, making it a delicious companion for dips, stews, or as a wrap for your favorite fillings.

Storage Tips for Easy Flatbread Recipe

Room Temperature: Store cooked flatbread at room temperature for up to 2 days in a sealed container to maintain freshness.

Fridge: If you need to keep it longer, refrigerate the flatbread in an airtight container for up to 3 days. This helps retain its softness.

Freezer: For longer storage, freeze flatbreads wrapped in foil or plastic wrap for up to 1 month. Thaw at room temperature or heat in a skillet before serving.

Reheating: To enjoy leftovers, reheat flatbreads in a skillet over low heat for about 1-2 minutes on each side, so they regain their flexible texture.

Expert Tips for Easy Flatbread

• Proper Dough Texture: Ensure the dough is moist but not sticky—add flour gradually if too wet. This balance is key for your Easy Flatbread Recipe.

• Control the Heat: Cook over medium heat; too high will lead to burnt edges while leaving the center undercooked.

• Resting Time Matters: Allowing the dough to rest for 10 minutes is crucial for achieving the right texture—don't skip this step!

• Uniform Thickness: Roll each piece to about ¼ inch thick for even cooking and flexibility when wrapping.

• Experiment with Flavors: Feel free to add herbs or spices to the dough for additional flavor—your Easy Flatbread can be as creative as you!

What to Serve with Easy No-Yeast Flatbread

Create a feast that delights the senses and warms the heart with these perfect pairings!

  • Hummus: A smooth, savory dip bursting with flavor, hummus complements the flatbread's texture beautifully, perfect for scooping.
  • Tomato Basil Soup: The rich, zesty taste of this classic soup creates a wonderful contrast with the soft flatbread, making it a comforting meal.
  • Greek Salad: Crisp vegetables and tangy feta cheese provide a refreshing crunch that enhances the flatbread, adding a vibrant element to your dining experience.
  • Spiced Chickpeas: Serve these crispy spiced chickpeas as a crunchy topping, providing an exciting texture that pairs perfectly with the soft flatbread.
  • Tzatziki Sauce: This cool, creamy yogurt sauce adds a refreshing zing and pairs wonderfully for delicious dipping or spreading.
  • Garlic Butter: Brushing your flatbread with garlic butter elevates its flavor and adds a fragrant touch, perfect for dipping or savoring on its own.
  • Grilled Vegetables: Smoky, charred veggies add depth and complement the warm, soft flatbread, creating a wholesome and filling combination.
  • Sweet Chili Sauce: Add a touch of sweetness and heat with this vibrant sauce, making for a delightful dipping experience that will tantalize your taste buds.
  • Crispy Fried Chicken: For a heartier meal, serve alongside golden fried chicken, where the flatbread becomes the perfect vessel for tender, flavorful bites.

Make Ahead Options

These Easy Flatbread Recipe preparations are a lifesaver for busy home cooks looking to save time during the week! You can prepare the flatbread dough up to 3 days in advance by storing it tightly wrapped in the refrigerator. This allows you to enjoy fresh, warm flatbreads on demand. When you're ready to cook, simply take the dough out, let it come to room temperature for about 30 minutes, and then shape and cook as directed. Alternatively, you can also cook the flatbreads ahead of time and freeze them for up to one month. To reheat, just warm them in a skillet over medium heat until heated through—ensuring you experience just as delicious results without any fuss!

Easy Flatbread Recipe Variations

Feel free to make this delicious Easy Flatbread Recipe your own with these fun and flavorful twists!

  • Herb-Infused: Add fresh or dried herbs like rosemary or thyme to the dough for an aromatic flavor lift. Your flatbread will not only taste fantastic but also smell divine while cooking.

  • Garlic Lovers: Mix garlic powder directly into the dough. This flavorful variation will satisfy all the garlic aficionados at your table.

  • Spiced Up: Incorporate a pinch of cayenne or chili powder for a subtle heat that makes each bite exciting. Just the right kick can transform your flatbread experience!

  • Sweet Twist: After cooking, brush your flatbread with melted butter mixed with cinnamon and sugar. Serve alongside fruit or yogurt for a delightful treat.

  • Cheesy Delight: Fold in shredded cheese into the dough, such as feta or mozzarella, for a cheesy-version. This adds a nice melty surprise when you tear it apart!

  • Vegetable Puree: Mix in some spinach or beet puree into the dough for a colorful, nutrient-packed twist. Not only does it look great, but it also adds a wonderful depth of flavor.

  • Mix and Match Toppings: Try topping your flatbread with a scoop of your favorite dips, like hummus or tzatziki, or use it in place of the traditional crust in a creative pizza, fitting it perfectly with your baked favorites like Spatchcock Chicken or Breakfast Egg Muffins.

With these variations, you can enjoy a fresh take on your Easy Flatbread Recipe every time you make it!

Easy Flatbread Recipe FAQs

How do I choose the right flour for this flatbread recipe?
Absolutely! For the best texture, I recommend using all-purpose flour. However, if you need a gluten-free option, you can substitute it with a gluten-free flour blend. Just be sure to adjust the moisture accordingly, as gluten-free flours can absorb water differently.

What is the best way to store leftover flatbread?
You can store cooked flatbreads at room temperature for up to 2 days in a sealed container. If you want to keep them longer, refrigerate them in an airtight container for up to 3 days. For longer storage, wrap them in foil or plastic wrap and freeze for up to 1 month. Just warm them in a skillet before serving, and they’ll be good as new!

Can I freeze the flatbread?
Yes, you can! After cooking and cooling the flatbread, wrap each piece individually in foil or plastic wrap. Place them in a freezer-safe bag or container for up to 1 month. To defrost, simply leave them at room temperature or heat them in a skillet for a couple of minutes to enjoy that freshly made texture again.

What should I do if the dough is too sticky?
If you find the dough is sticky after mixing, don’t worry! Start by gradually adding more flour, a tablespoon at a time, until the dough is moist but manageable. Alternatively, if it feels too dry, add a splash more of ice water, mixing well until you achieve a pliable consistency that's easy to work with.

Can I add herbs or spices to the flatbread for added flavor?
Very! Feel free to be creative and enhance your flatbread by mixing in chopped herbs or spices into the dough while combining the dry ingredients. Options like dried oregano or garlic powder can elevate the flavor, making your Easy Flatbread a standout addition to any meal!

Is this recipe suitable for pets or people with allergies?
It's important to note that this Easy Flatbread contains gluten (unless using gluten-free flour) and may not be suitable for those with gluten allergies. Always check the specific ingredients you use, especially if preparing them for others with dietary restrictions or allergies, including pets! For a healthier approach, try using whole grain flour or adjust toppings accordingly.

Easy Flatbread Recipe

Delicious Easy Flatbread Recipe in Just 25 Minutes

Enjoy this Easy Flatbread Recipe that transforms bread-making into a quick and delicious treat.
Print Recipe Pin Recipe
Prep Time 10 minutes mins
Cook Time 15 minutes mins
Resting Time 10 minutes mins
Total Time 25 minutes mins
Servings: 10 pieces
Course: Snacks
Cuisine: Global
Calories: 120
Ingredients Equipment Method Nutrition Notes

Ingredients
  

For the Flatbread
  • 2 cups All-Purpose Flour Can substitute with gluten-free flour.
  • 1 tablespoon Baking Powder Essential for the rising effect.
  • 1 teaspoon Salt Enhances flavor.
  • 1 tablespoon Olive Oil Can substitute with vegetable oil.
  • 3/4 cup Ice Water Use chilled for best results.
  • 1 tablespoon Oil for Cooking Use olive or vegetable oil.
Optional Toppings
  • 1 teaspoon Garlic Powder Brush on post-cooking for extra flavor.
  • Olive Oil A drizzle can enhance richness.
  • 1 tablespoon Parsley Sprinkle on before serving.

Equipment

  • Mixing Bowl
  • Wooden spoon
  • Rolling Pin
  • non-stick skillet

Method
 

Main Steps
  1. In a mixing bowl, whisk together 2 cups of all-purpose flour, 1 tablespoon of baking powder, and 1 teaspoon of salt until well combined.
  2. Gradually stir in 1 tablespoon of olive oil and 3/4 cup of ice water into the dry mixture using a wooden spoon.
  3. Cover the dough with a clean kitchen towel and let it rest for 10 minutes at room temperature.
  4. Turn the rested dough onto a lightly floured surface and divide it into 10 to 12 equal pieces.
  5. Preheat a non-stick skillet over medium heat and add a drizzle of oil to coat the bottom.
  6. Carefully place one rolled flatbread in the hot skillet and cook for about 2 to 3 minutes on one side.
  7. Once cooked, transfer the flatbreads to a plate and, if desired, brush them with melted garlic butter or sprinkle with parsley.

Nutrition

Serving: 1pieceCalories: 120kcalCarbohydrates: 20gProtein: 3gFat: 4gSaturated Fat: 0.5gPolyunsaturated Fat: 1gMonounsaturated Fat: 2gSodium: 200mgPotassium: 50mgFiber: 1gCalcium: 1mgIron: 5mg

Notes

Store cooked flatbread at room temperature for up to 2 days. Refrigerate for up to 3 days, or freeze for longer storage.

Tried this recipe?

Let us know how it was!
  • 1
  • 2
  • 3
  • …
  • 16
  • Next Page »

Welcome!

Hi, I’m Grace, a Sydney-based home cook with a passion for bold flavors and trending ingredients. Whether you’re a busy beginner or a seasoned foodie, you’ll find dishes here that are fresh, fun, and full of flavor.

More about me

Popular Recipes

  • Cheesy Chicken Garlic Bread Sandwich
    Cheesy Chicken Garlic Bread Sandwich for Cozy Family Moments
  • Easy Chicken Ranch Wraps
    Easy Chicken Ranch Wraps: Quick, Creamy & Totally Satisfying
  • Chicken Caesar Sandwiches
    Delicious Chicken Caesar Sandwiches for Quick Comfort Food
  • best Cuban sandwich
    The Best Cuban Sandwich You’ll Want Every Weeknight!

Footer

↑ back to top

About

  • Privacy Policy
  • Disclaimer
  • Terms & Conditions

Newsletter

  • Sign Up! for emails and updates

Contact

  • About me
  • Contact me

Copyright © 2025 TastyTrendIngredients