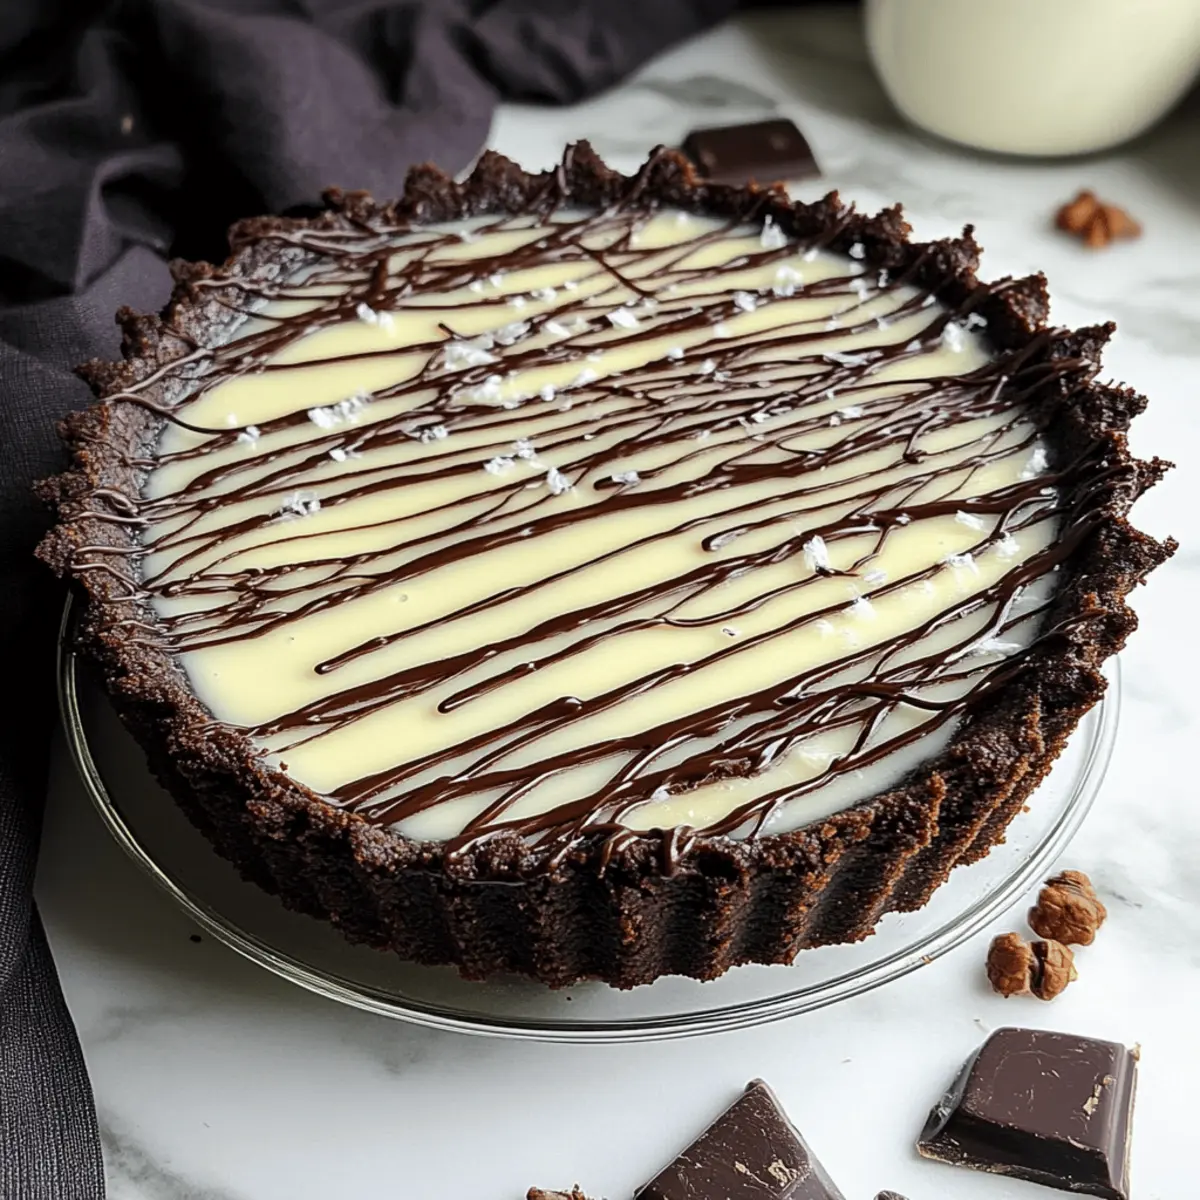
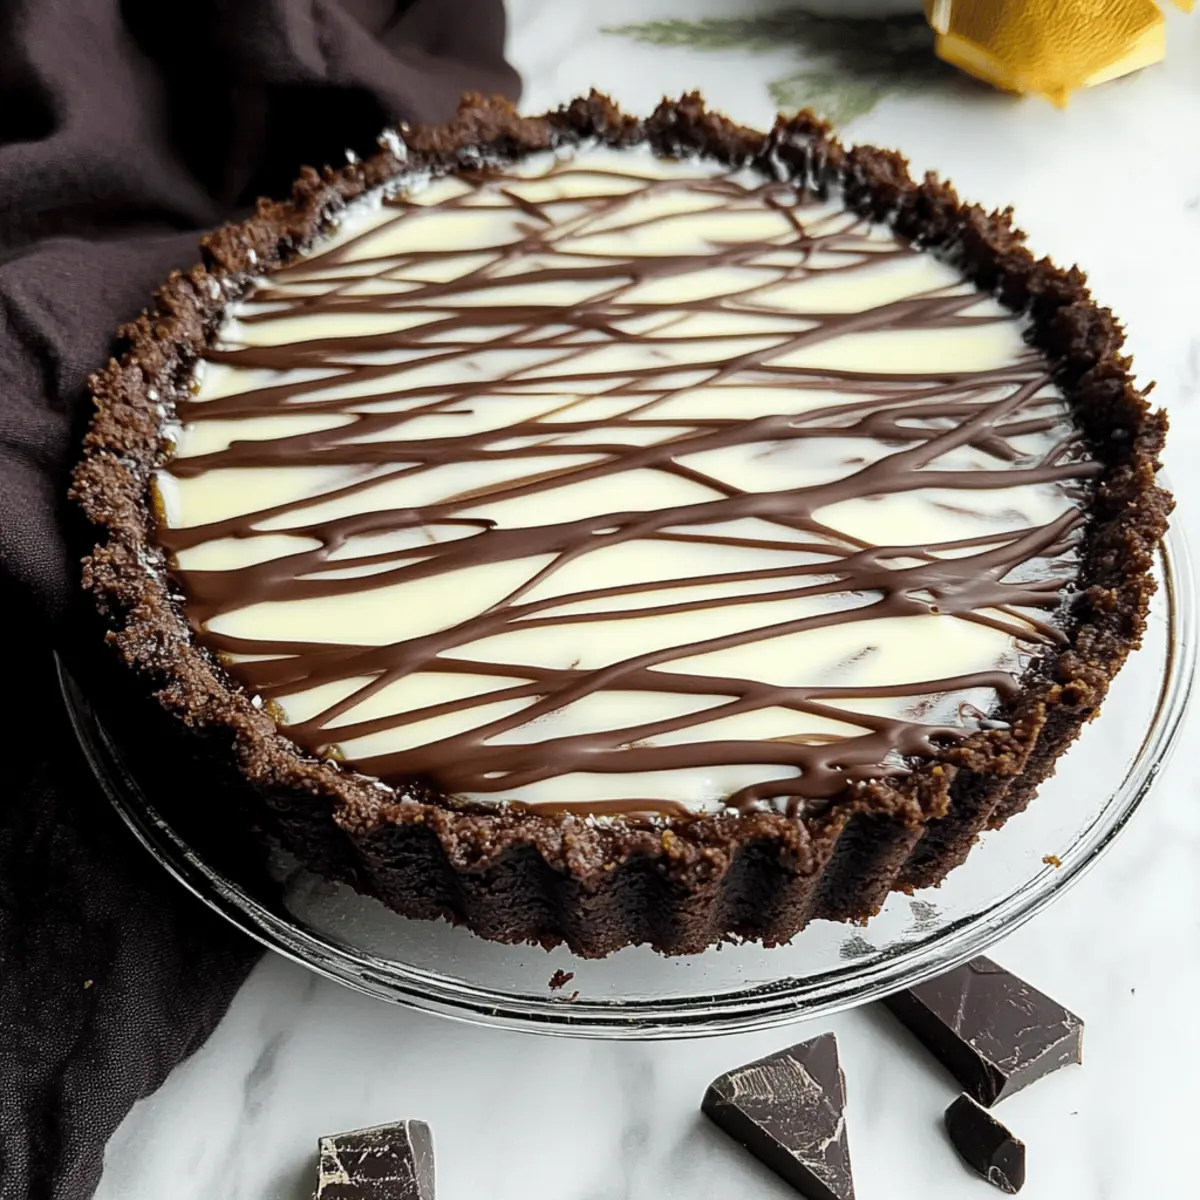
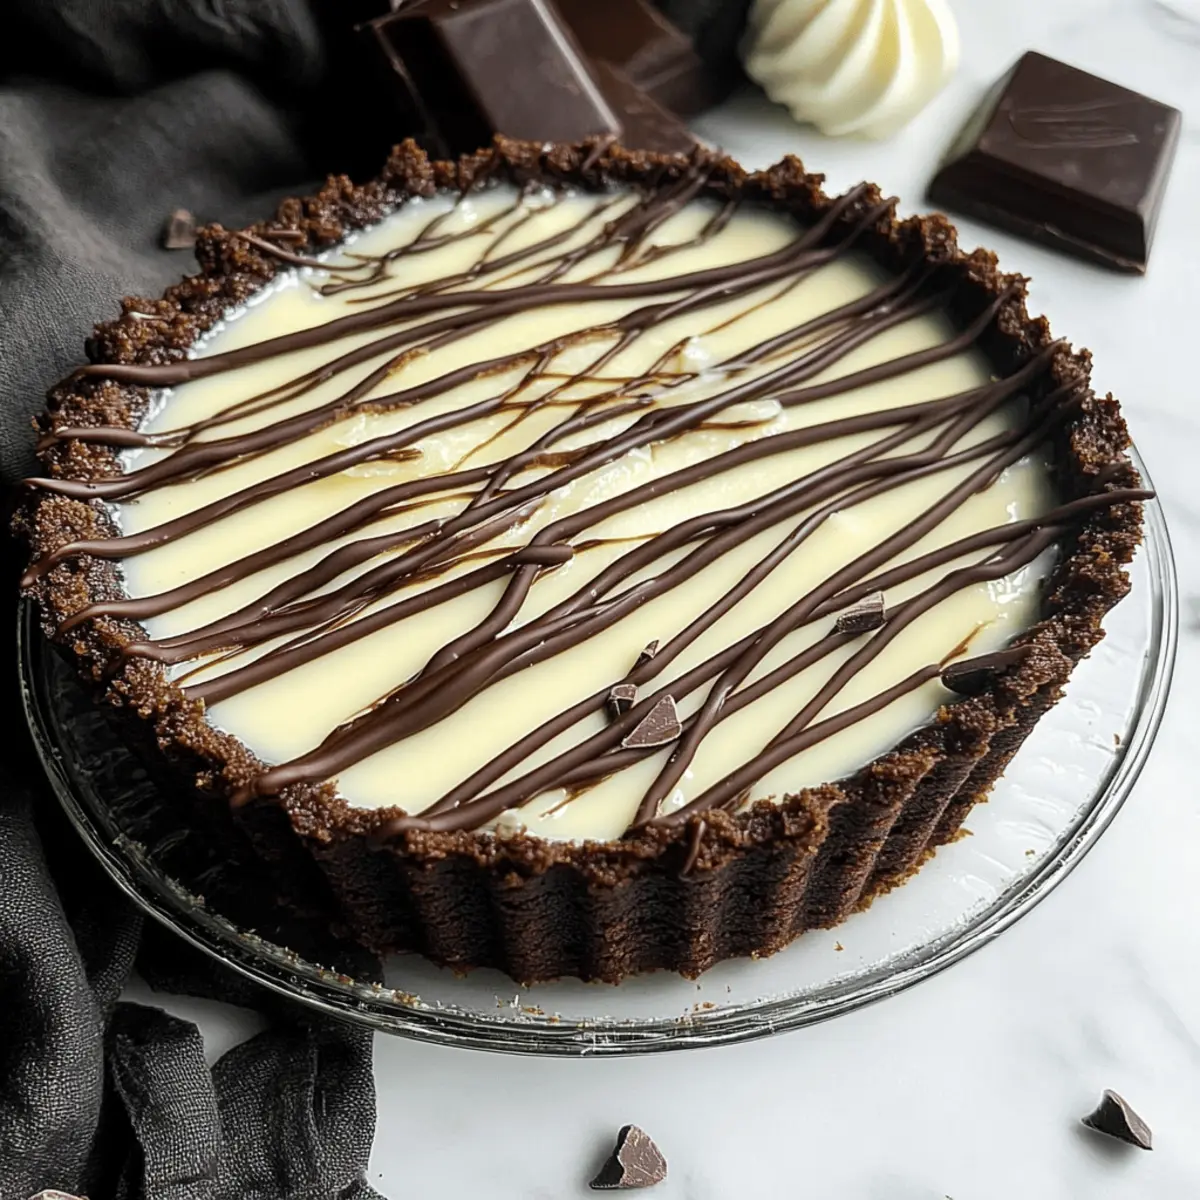
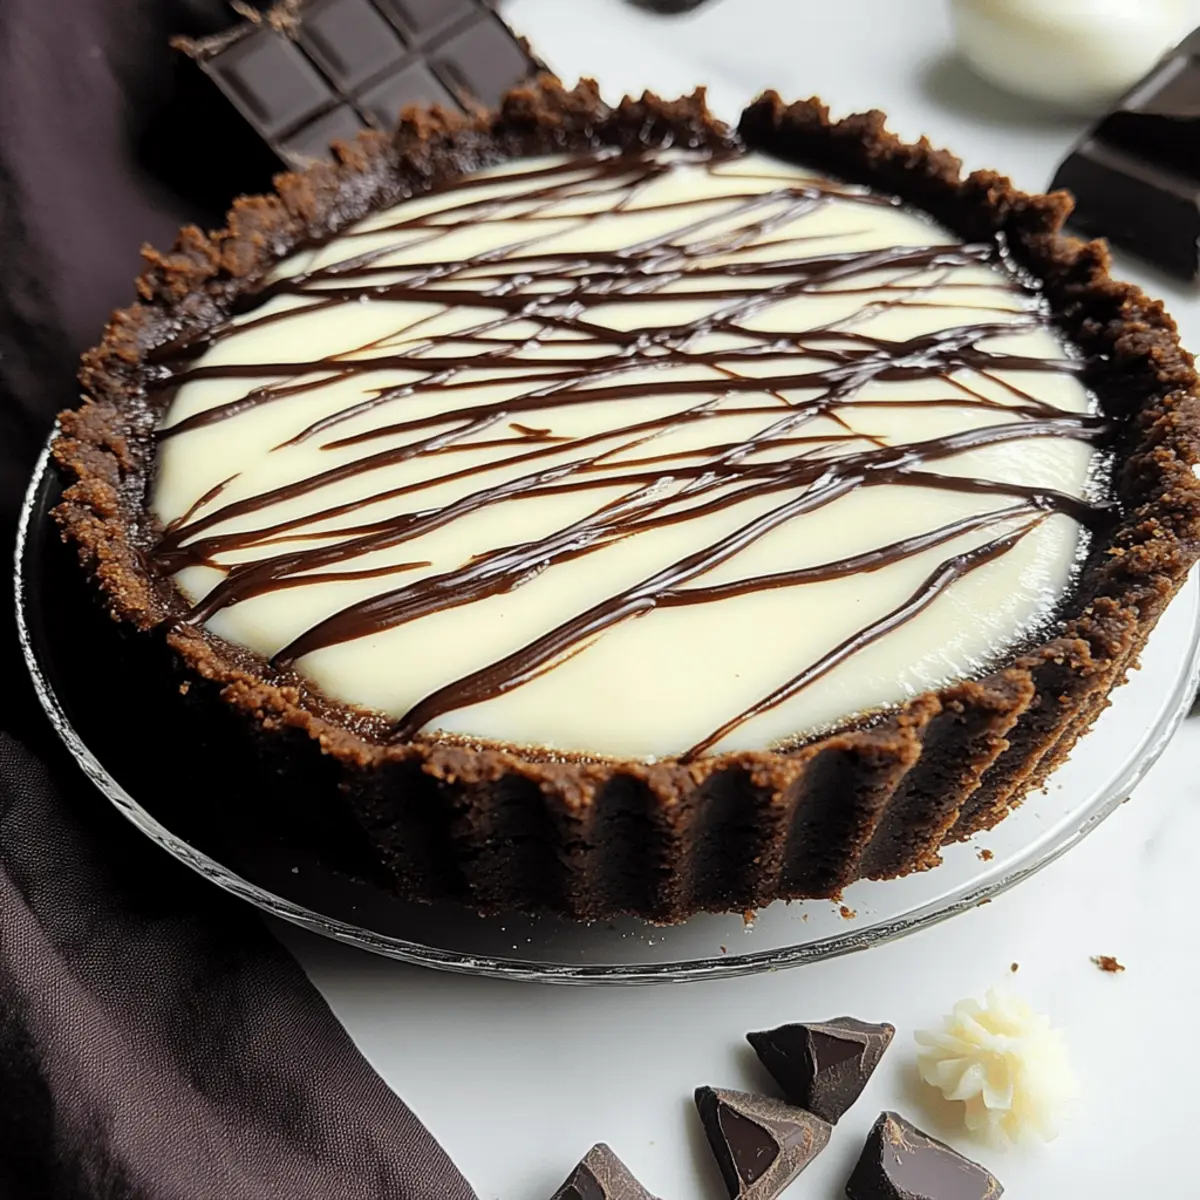
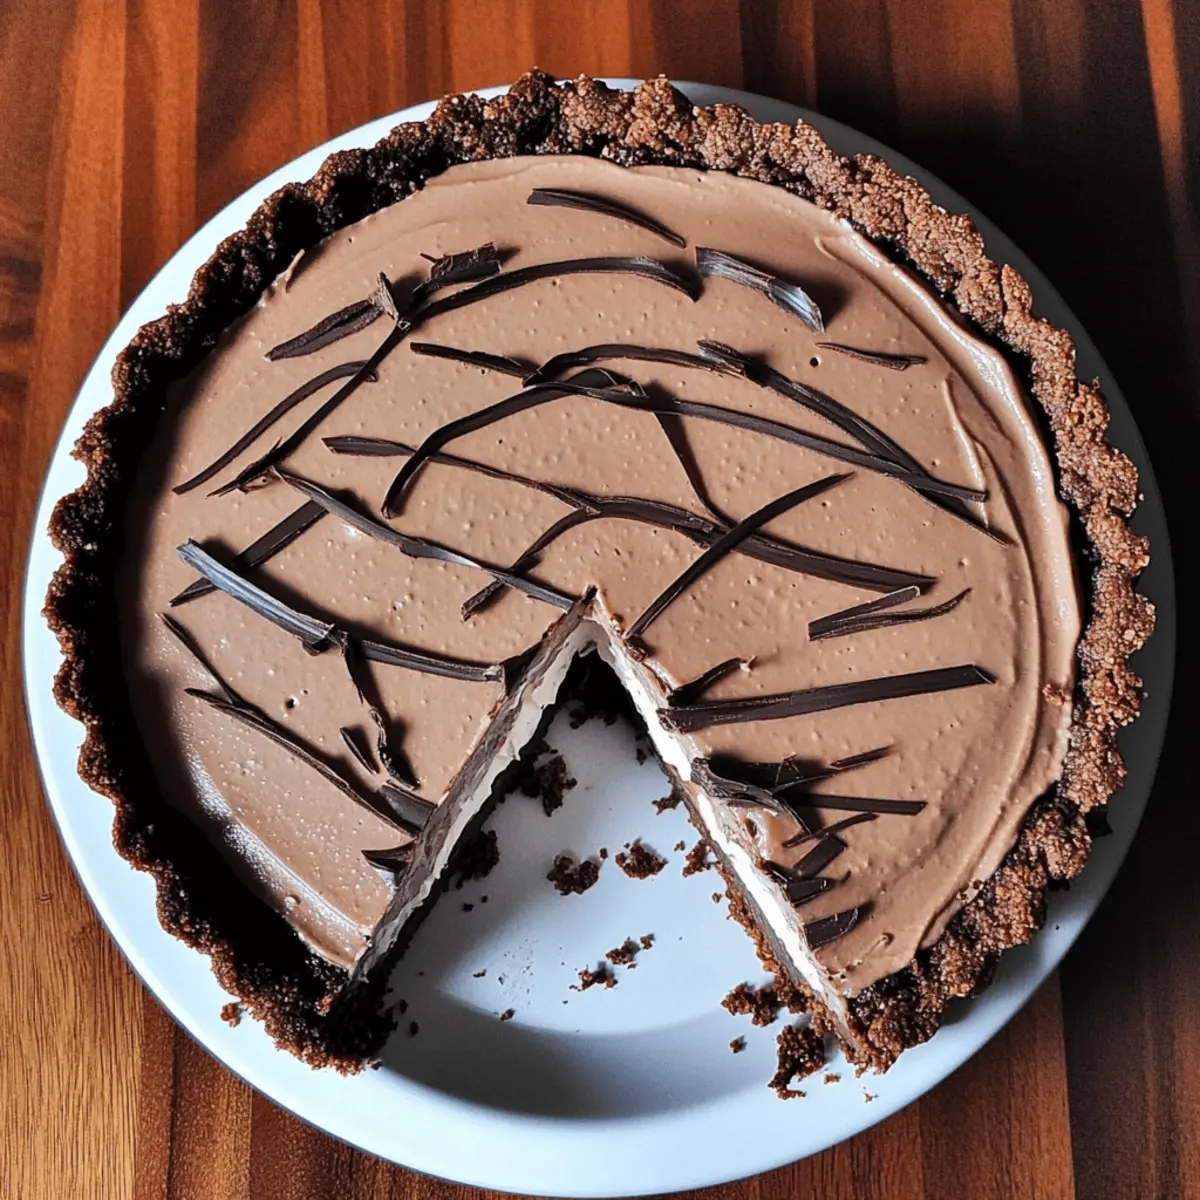
The moment you taste this Cacao Cream Tart, you'll understand why it's my go-to dessert for any gathering. The delightful blend of a crunchy chocolate cookie crust and a lush, creamy filling is simply irresistible. This no-bake chocolate dessert not only saves you time but also guarantees to impress your guests, making it perfect for busy weeknights or a last-minute potluck invite. Plus, it’s easily adaptable—swap in your favorite nut butter for a fun twist! As we dive into this easy recipe, can you already taste the rich layers of chocolate that await? Let’s bring this lush tart to life!
Why is this Cacao Cream Tart a must-try?
Decadent, no-bake indulgence: This Cacao Cream Tart is a showstopper that requires no baking, making it a breeze to whip up for any occasion.
Adaptable flavors: Swap out the nut butter for your favorite variety to customize your tart experience—peanut or almond butter, anyone?
Crowd-pleaser: With its perfect balance of crunchy crust and creamy filling, this dessert is guaranteed to satisfy both chocolate lovers and those looking for something unique.
Quick preparation: You won't spend hours in the kitchen; this delight comes together quickly and smoothly, leaving you plenty of time to enjoy with friends.
Impressive presentation: Drizzling with chocolate sauce or garnishing with fresh fruit elevates the tart for a stunning dessert that looks as good as it tastes!
Cacao Cream Tart Ingredients
For the Crust
• Ground Chocolate Wafers – Provides the base for the tart crust with a deep chocolate flavor; can substitute with vanilla wafers or graham crackers for a different taste.
• Unsalted Butter – Binds the cookie crumbs and adds richness; melted coconut oil works as a dairy-free option.
For the Filling
• Cream Cheese – Adds a rich, creamy texture; ensure it's at room temperature for easy mixing, or use vegan cream cheese for a dairy-free version.
• Cacao Bliss Spread (or other nut butter) – Delivers the main chocolate flavor; adaptable with peanut, cashew, or almond butter based on your taste preference.
• Whipping Cream – Lightens the filling, creating a fluffy texture; for a non-dairy option, try chilled whipped coconut cream.
• Powdered Sugar – Sweetens without graininess; alternatives like granulated sugar or maple syrup can be used, just adjust the quantities.
• Vanilla Extract – Enhances the overall flavor; fresh vanilla beans can further elevate the taste.
For Decoration
• White Chocolate – Used for a decorative touch and sweet contrast; dark chocolate is a delightful alternative for a richer presentation.
Step‑by‑Step Instructions for Cacao Cream Tart
Step 1: Prepare the Crust
Preheat your oven to 350°F (175°C). In a food processor, grind the chocolate wafers into fine crumbs, then combine them with melted butter until fully coated. Press this mixture firmly into a 9-inch tart pan, creating an even layer. Bake the crust for 10 minutes until set, and let it cool completely before adding the filling.
Step 2: Make the Filling
In a medium mixing bowl, beat the cream cheese and cacao bliss spread until the mixture is smooth and creamy. In a separate large bowl, whip the chilled whipping cream with powdered sugar and vanilla extract until soft peaks form—this will take a few minutes, so be patient. Once ready, gently fold half of the whipped cream into the cream cheese mixture until just combined, and then fold in the remaining whipped cream, preserving that light and airy texture.
Step 3: Assemble the Tart
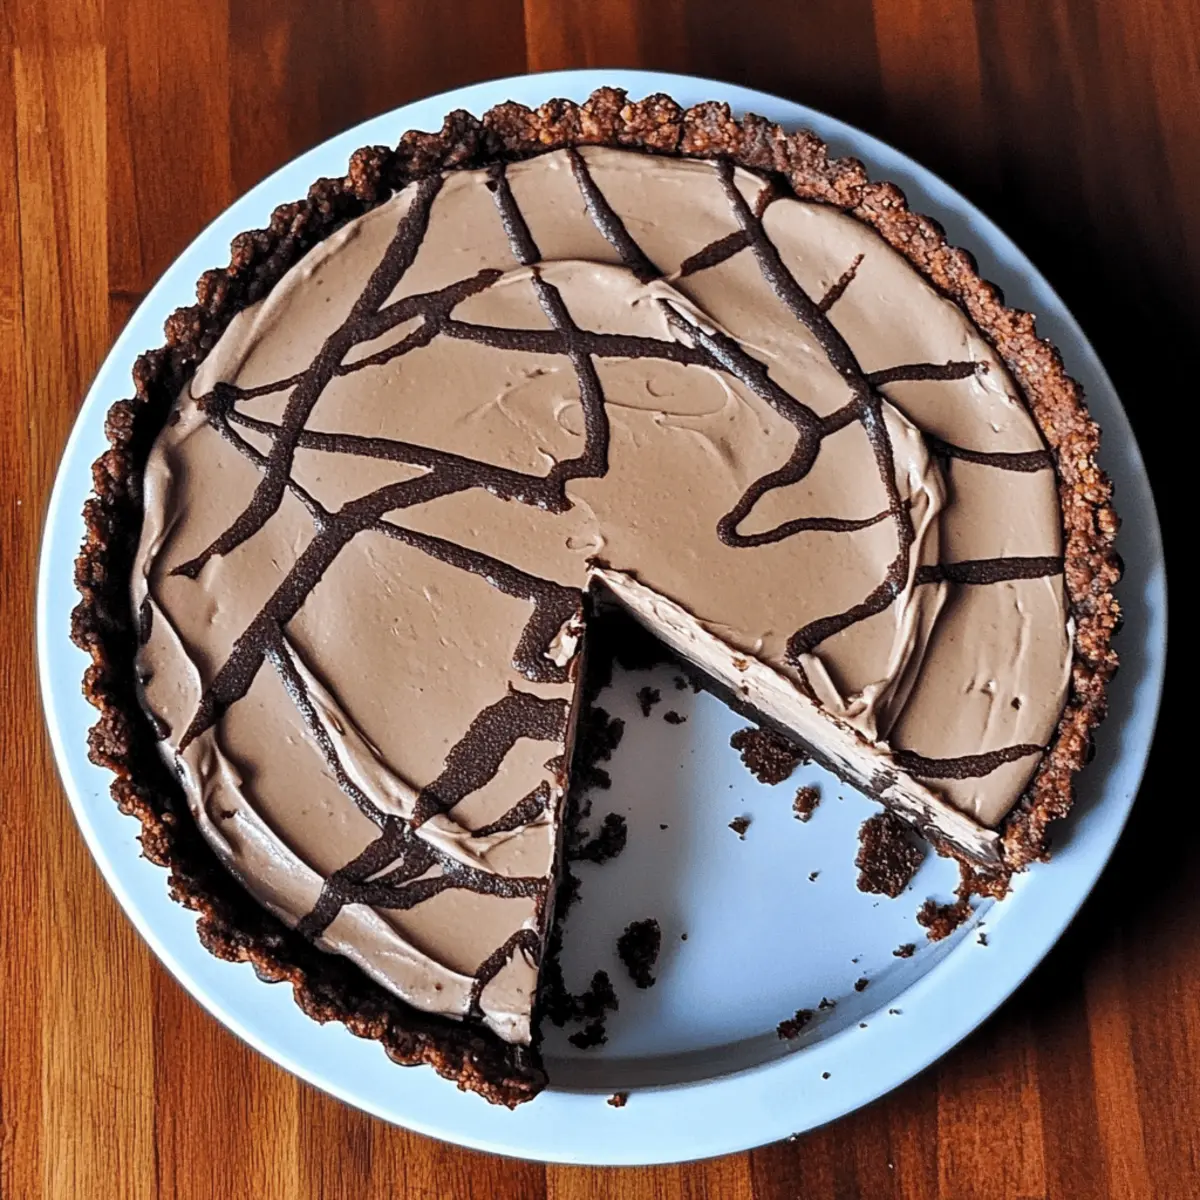
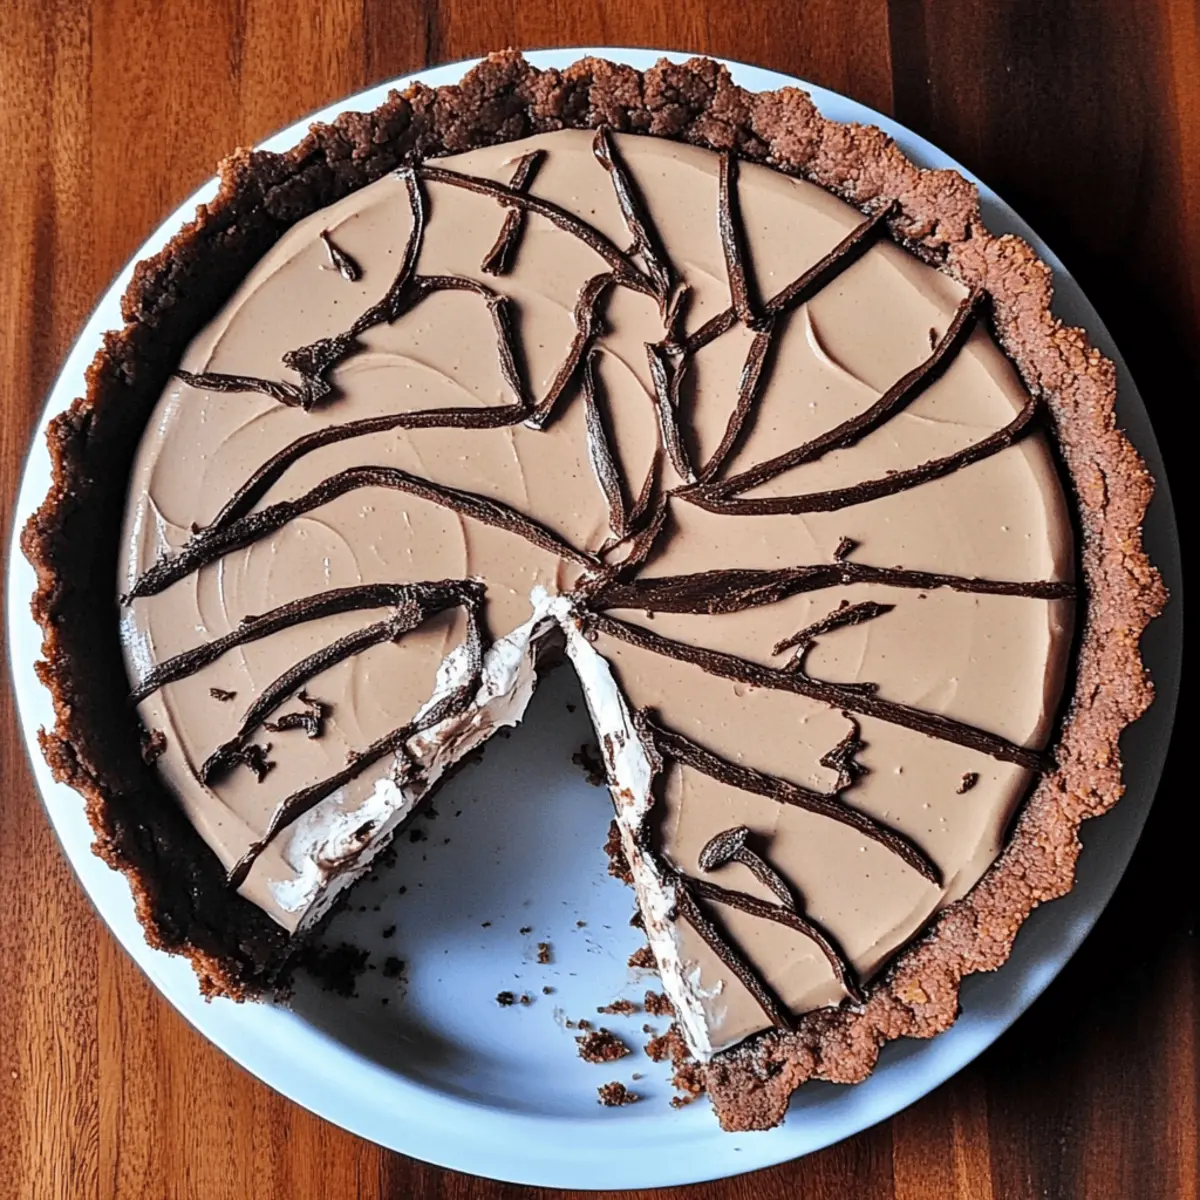
Carefully pour the luscious filling into the cooled chocolate crust. Using a spatula, smooth the top to achieve an even surface. For a decorative touch, melt white chocolate using a double boiler until smooth, then pipe it onto the tart in swirls to create an eye-catching design.
Step 4: Chill
Place the Cacao Cream Tart in the refrigerator and allow it to chill for at least 2 hours, or until fully set. This step is crucial for the filling to firm up, ensuring each slice holds its shape beautifully. Once chilled, you're ready to serve this stunning dessert!

What to Serve with Cacao Cream Tart
Indulging in a slice of this creamy delight pairs beautifully with a few thoughtful accompaniments that enhance its rich flavors.
-
Fresh Berries: Juicy strawberries or tangy raspberries add a refreshing burst, cutting through the creaminess and enriching each bite. Their natural sweetness also contrasts pleasantly with the dark chocolate.
-
Whipped Cream: A dollop of lightly sweetened whipped cream completes this dessert's sumptuous experience. The airy texture elevates each slice, adding an extra layer of indulgence.
-
Chocolate Drizzle: Drizzling more melted chocolate over the tart enhances its chocolatey goodness, creating visually stunning appeal while intensifying the dessert's flavor profile. Simply melt some chocolate and go to town!
-
Mint Sprigs: Fresh mint leaves lend a bright, herbaceous note that balances the tart's richness. They also make for a beautiful garnish, adding a pop of color.
-
Coffee or Espresso: The slightly bitter notes of coffee or espresso can perfectly complement the sweetness of the tart. A warm cup invites you to truly savor each bite amidst those rich chocolatey flavors.
-
Vanilla Ice Cream: A scoop of velvety vanilla ice cream beside the tart creates a delightful temperature contrast, enhancing the overall dessert experience. A classic pairing you'll never go wrong with!
-
Caramel Sauce: Swirls of caramel add a sweet sophistication and a slight saltiness that beautifully counterpoints the chocolate, providing another layer of flavor to explore.
These pairings not only enhance your dessert experience but create a well-rounded meal that delights your guests. Happy indulging!
How to Store and Freeze Cacao Cream Tart
Fridge: Keep the tart tightly covered in the refrigerator for up to 1 week. This keeps it fresh and delicious, ready to enjoy at a moment's notice.
Freezer: For longer storage, freeze the tart wrapped in plastic wrap and aluminum foil for up to 2 months. Thaw it overnight in the fridge before serving.
Reheating: There's no need to reheat this Cacao Cream Tart; it's best enjoyed chilled! Just slice and serve for a delightful treat.
Leftovers: If you have any leftover filling, store it in an airtight container in the fridge for up to 3 days. Use it as a dip for fresh fruit or spread on toast!
Expert Tips for the Cacao Cream Tart
-
Chill Your Tools: Use a chilled mixing bowl and beaters when whipping cream. This helps achieve maximum volume and a light texture in your filling.
-
Gentle Folding: When incorporating whipped cream into the cream cheese mixture, be gentle to avoid deflating the airy texture. This is key for your delightful Cacao Cream Tart!
-
Taste and Adjust: Always taste your filling before chilling. Adjust sweetness with powdered sugar or flavored extracts to suit your preference and make it even more delicious.
-
Decorative Drizzle: For an elegant touch, melt extra chocolate and drizzle it over the tart just before serving. It creates a beautiful presentation that’s sure to impress!
-
Storage Savvy: Keep any leftovers tightly covered in the fridge for up to a week. This tart is just as great the next day, making it perfect for snacks or spontaneous dessert cravings.
Make Ahead Options
This Cacao Cream Tart is ideal for busy home cooks looking to save time without sacrificing taste! You can prepare the crust up to 3 days in advance and store it tightly wrapped at room temperature, ensuring it stays crisp. The creamy filling can also be made up to 24 hours ahead; just keep it refrigerated to maintain that luscious texture. When you're ready to serve, simply pour the filling into the cooled crust, smooth the top, and add a decorative swirl of melted white chocolate. This advanced prep allows you to enjoy a delightful dessert, stress-free, while impressing your guests with minimal effort!
Cacao Cream Tart Variations & Substitutions
Feel free to explore these fun variations that will inspire you to make this Cacao Cream Tart uniquely yours!
-
Nut Butter Alternatives: Swap Cacao Bliss with any nut butter such as peanut, almond, or cookie butter for a different flavor profile. Each nut brings its own unique character to the tart, inviting unexpected delights in every bite.
-
Crust Substitutions: Use vanilla wafers, graham crackers, or gluten-free cookies to cater to dietary needs. A graham cracker crust adds a delightful sweetness, while a gluten-free option makes this dessert accessible to everyone.
-
Add-Ins: Incorporate crushed nuts or chocolate chips into the filling for added texture and crunch. These small additions can transform the tart into a delightful treasure trove of flavors in every slice.
-
Flavored Extracts: Elevate the flavor by experimenting with flavored extracts, such as almond or hazelnut. Just a splash can introduce a whole new depth and enrich the cocoa essence beautifully.
-
Fruit Variation: Top your tart with fresh fruit like berries or bananas to add a pop of color and freshness. This fruity twist not only looks stunning but enhances the tart's richness with a refreshing note.
-
Switch Up the Whipping Cream: For a lighter and dairy-free version, use chilled coconut cream instead of whipping cream. The coconut adds a tropical flair that beautifully complements the chocolate.
-
Chocolate Decoration: Instead of white chocolate, try dark chocolate or even a drizzle of caramel for a vibrant and rich presentation. These alternatives give the tart a unique visual appeal while enhancing its flavor profile.
Looking for more sweet inspirations? Consider trying out a Vegan Cacao Cream next for a delightful twist. Or how about making an elegant Ice Cream Cake to impress at your next gathering? Each variation brings its own charm, ensuring your dessert experience stays exciting!
Cacao Cream Tart Recipe FAQs
What type of chocolate wafers should I use for the crust?
Absolutely! I recommend using finely ground chocolate wafers for a deep, rich flavor in your tart crust. If you're looking for a different taste, feel free to substitute them with vanilla wafers or graham crackers. Just keep in mind that the flavor profile will change slightly based on your choice!
How should I store my Cacao Cream Tart?
For optimal freshness, store the tart tightly covered in the refrigerator for up to 1 week. This way, you can enjoy its luscious flavors as it keeps well. Just make sure it’s protected from any strong odors in your fridge!
Can I freeze the Cacao Cream Tart?
Yes, you can freeze it! Wrap the tart securely in plastic wrap and then in aluminum foil to prevent freezer burn. It will keep well for up to 2 months. To enjoy, simply thaw it in the refrigerator overnight before serving, and it will taste just as delightful.
How can I avoid a runny filling?
Great question! To avoid a runny filling, ensure that your cream cheese is at room temperature so it mixes smoothly and properly. Whipping the cream to soft peaks before folding it into the mixture also helps incorporate air while maintaining the structure. Gently fold to combine without deflating the whipped cream, which will keep your filling nice and light!
Are there any dietary considerations I should keep in mind?
Very! If you’re making this tart for guests with dietary restrictions, you can easily adapt it. Use a dairy-free cream cheese and whipped coconut cream for a vegan version! Additionally, check the nut butter used, as some guests may have nut allergies. Always communicate with your friends to make sure everyone can indulge safely!
What if I have leftover filling?
If you find yourself with leftover filling, store it in an airtight container in the fridge for up to 3 days. This extra deliciousness can be used as a dip for fresh fruits or even spread on toast—consider it a delightful bonus!
Decadent Cacao Cream Tart: The No-Bake Chocolate Bliss
Ingredients
Equipment
Method
- Preheat your oven to 350°F (175°C). Grind the chocolate wafers into fine crumbs, then mix with melted butter. Press into a 9-inch tart pan, bake for 10 minutes, and let cool.
- Beat the cream cheese and cacao bliss spread until smooth. Whip cream with powdered sugar and vanilla until soft peaks form. Fold whipped cream into cream cheese mixture.
- Pour filling into the cooled crust and smooth the top. Melt white chocolate and pipe it onto the tart.
- Place tart in the refrigerator for at least 2 hours to set.