tastytrendingredients

  • Home
  • Recipes
    • Appetizers
    • Breakfast
    • Dessert
    • Dinner
    • Drinks
    • Salads
    • Snacks
    • Soups
  • About me
  • Contact me
menu icon
go to homepage
  • Home
  • Recipes
    • Appetizers
    • Breakfast
    • Dessert
    • Dinner
    • Drinks
    • Salads
    • Snacks
    • Soups
  • About me
  • Contact me
search icon
Homepage link
  • Home
  • Recipes
    • Appetizers
    • Breakfast
    • Dessert
    • Dinner
    • Drinks
    • Salads
    • Snacks
    • Soups
  • About me
  • Contact me
×

Almond Flour Scones: Quick, Flaky Perfection in 10 Minutes

February 20, 2026 by Grace Snow Leave a Comment

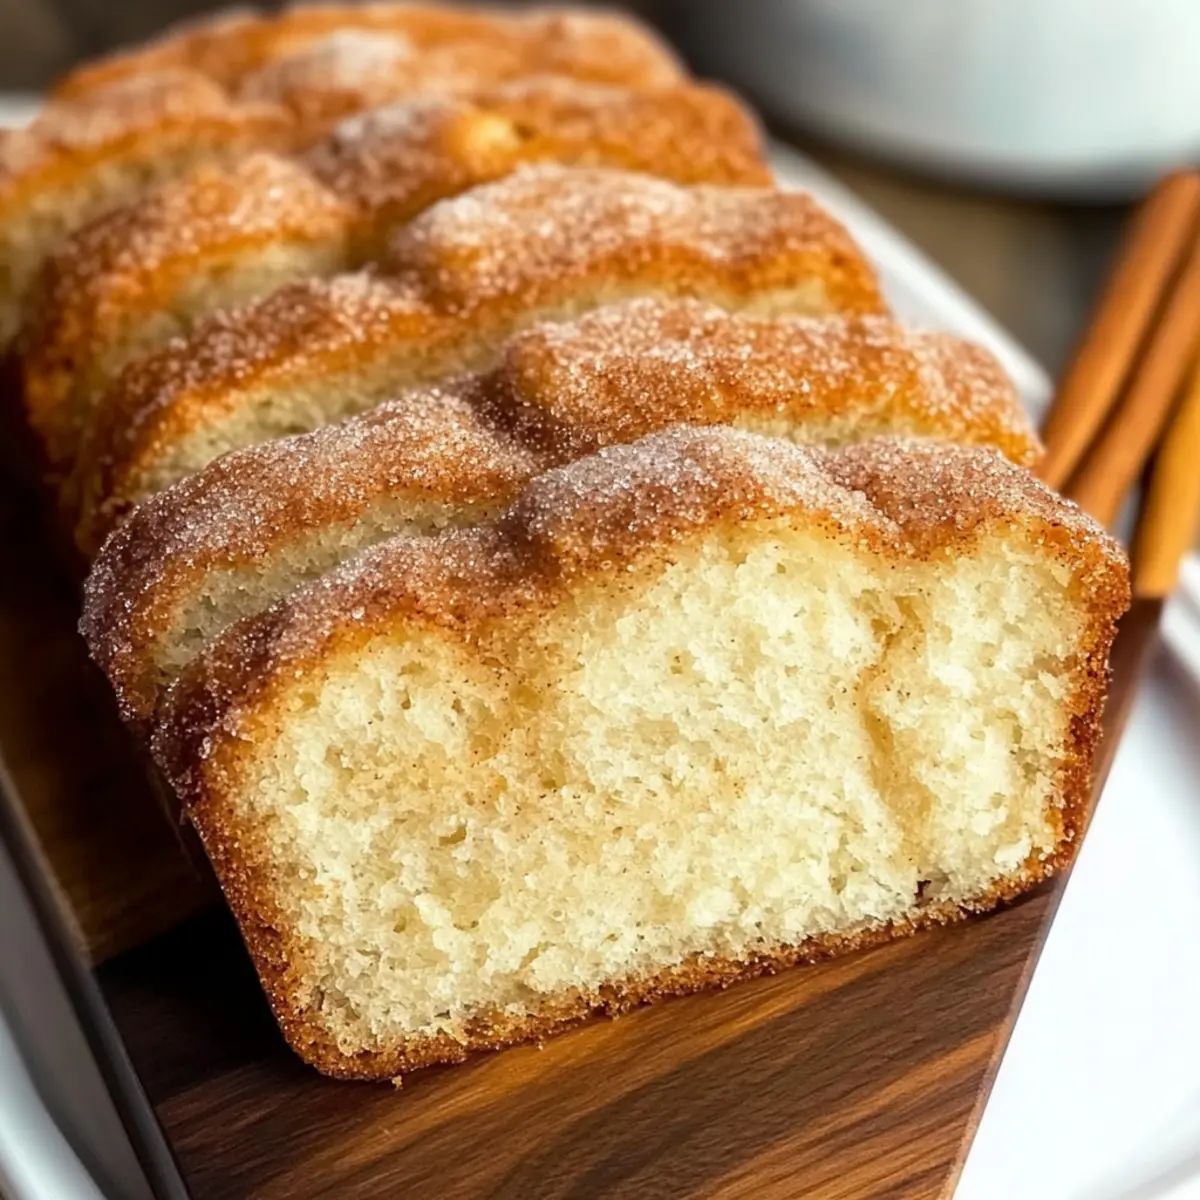
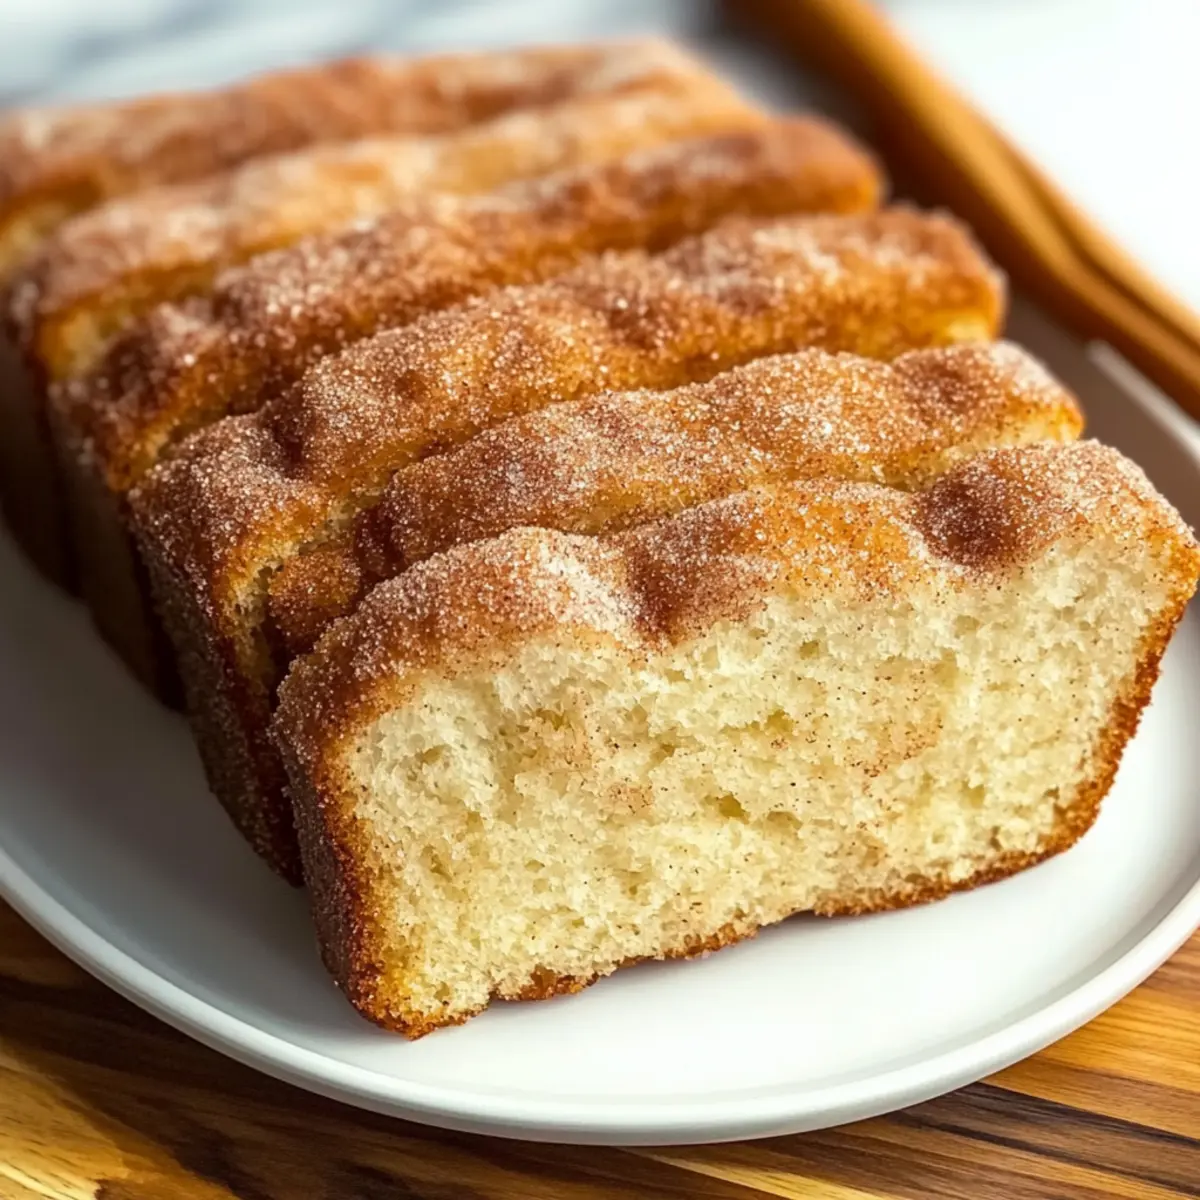
Did you ever find yourself needing a quick yet delightful treat that feels indulgent without the guilt? That’s where my 10-Minute Irresistible Almond Flour Scones come in! These gluten-free scones are so easy to whip up, making them perfect for a last-minute brunch gathering or an afternoon pick-me-up. With their moist, tender crumb and a subtly nutty flavor, they're not only delicious but also customizable—add chocolate chips or fresh berries for a touch of sweetness, or experiment with spices for a cozy twist. Whether you pair them with your favorite tea or enjoy them plain, these scones elevate any occasion effortlessly. Ready to impress your taste buds? Let’s dive in!

Why Are Almond Flour Scones So Irresistible?

Quick and Easy: In just 10 minutes, you can have fresh scones hot from the oven. Perfect for busy mornings or unexpected guests!

Gluten-Free Delight: Made with almond flour, these scones offer a nutty flavor that still satisfies your cravings without the gluten.

Customizable Options: Add-ins like chocolate chips or fresh berries let you tailor these scones to your liking. Feeling adventurous? Try adding spices for a unique twist!

Crowd-Pleaser: Whether it’s brunch or afternoon tea, you’ll impress family and friends with these delightful treats. Pair them with clotted cream or homemade jam for a luxurious touch.

Versatile Storage: Enjoy fresh scones for up to 5 days in the fridge, or freeze for longer storage—ideal for busy bakers!

Almond Flour Scones Ingredients

• You’ll love this delightful mix of wholesome ingredients!

For the Scones

  • Almond Flour – This gluten-free flour provides a tender texture and nutty flavor; finely ground is best for perfect scones.
  • Egg – Acts as a binder for moisture; for a vegan option, substitute with a flax egg (1 tbsp ground flaxseed + 2.5 tbsp water).
  • Maple Syrup – Adds a hint of sweetness; can be replaced with honey or agave nectar for variety.
  • Melted Butter or Coconut Oil – Delivers richness; choose coconut oil for a dairy-free alternative.
  • Baking Powder – Ensures the scones rise beautifully; you may add a pinch of baking soda for an extra fluffy texture.

Optional Add-ins

  • Chocolate Chips – Perfect for a touch of sweetness and indulgence; mix in dark or white chocolate for variety.
  • Fresh Berries – Adds a fruity burst; blueberries or raspberries work wonderfully.
  • Lemon Zest – Provides a citrusy brightness to enhance the flavor profile of your almond flour scones.

Each ingredient plays a crucial role in crafting almond flour scones that are not only quick and easy but also irresistibly tasty!

Step‑by‑Step Instructions for Almond Flour Scones

Step 1: Preheat the Oven
Begin by preheating your oven to 350°F (175°C). While the oven warms up, take a baking sheet and line it with parchment paper. This will ensure your almond flour scones bake evenly and don’t stick. Having a prepared workspace will make the process smoother as you move on to mixing the ingredients.

Step 2: Combine the Dry Ingredients
In a medium bowl, combine the almond flour and baking powder. Stir them together thoroughly, breaking up any lumps to ensure even distribution. The almond flour should be finely ground for the best texture. This mixture should be light and fluffy when properly combined—just what you need for tender almond flour scones!

Step 3: Mix the Wet Ingredients
In a separate bowl, crack an egg and whisk it together with maple syrup and melted butter or coconut oil. Mix until the ingredients are fully combined and smooth. This wet mixture will add moisture to your almond flour scones, contributing to their signature tender crumb.

Step 4: Merge the Mixtures
Gently pour the wet ingredients into the dry mixture, using a spatula to fold them together just until combined. Be careful not to overmix; this will keep your scones light and fluffy. The dough will be slightly sticky but should hold its shape nicely.

Step 5: Incorporate Optional Add-ins
If you’re feeling creative, now's the time to fold in any optional add-ins like chocolate chips, fresh berries, or lemon zest. Mix gently to evenly distribute these ingredients without overworking the dough. This step adds delightful bursts of flavor to your almond flour scones, making each bite special.

Step 6: Shape the Dough
Using a cookie scoop or your hands, form the dough into mounds about ¼ cup each and place them on your prepared baking sheet with a little space in between. Aim for a rustic look with slightly rounded tops. This spacing will allow the almond flour scones to rise and bake beautifully.

Step 7: Bake the Scones
Slide the baking sheet into your preheated oven and bake for 15-18 minutes. Keep an eye on the scones; they should turn golden brown and feel firm to the touch. These visual cues will tell you they’re perfectly baked and ready to be enjoyed straight from the oven.

Step 8: Cool and Serve
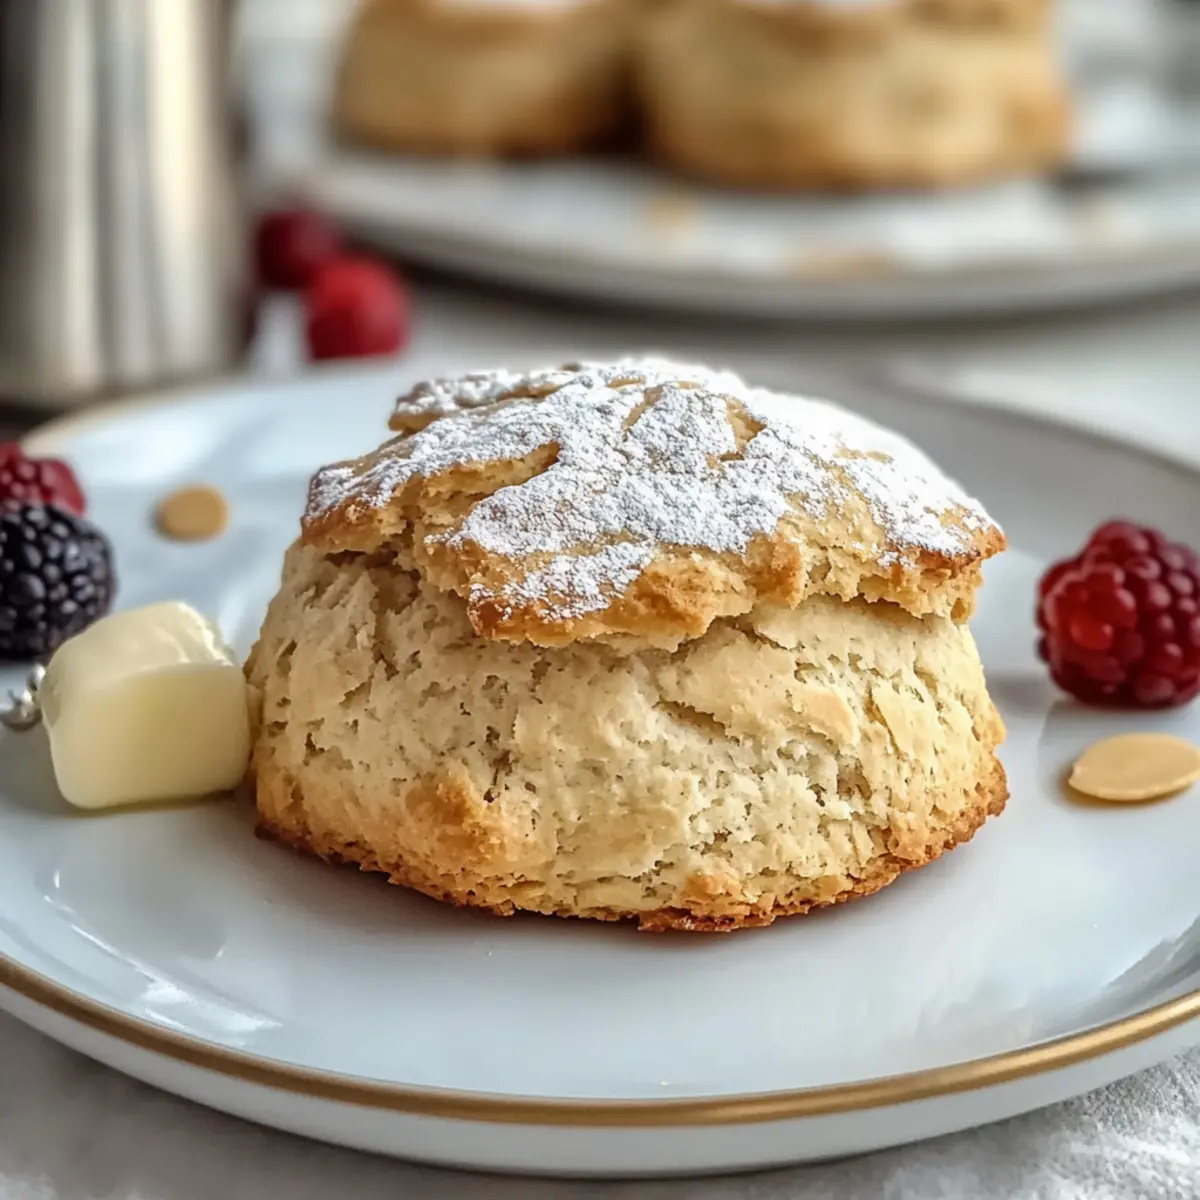
Once out of the oven, allow the almond flour scones to cool on the baking sheet for a few minutes before transferring them to a wire rack. This cooling step helps them set while still being warm and inviting. Serve your scones warm, perhaps with a side of clotted cream or your favorite jam for an extra special treat.

Expert Tips for Almond Flour Scones

  • Finely Ground Flour: Use finely ground almond flour to achieve a tender texture; coarse flour will result in a denser scone.

  • Avoid Overmixing: Gently combine wet and dry ingredients to keep the almond flour scones fluffy; overmixing toughens the dough.

  • Check Baking Time: Start checking your scones at 15 minutes to prevent over-baking; they should be golden brown and firm to the touch.

  • Experiment with Add-ins: Feel free to personalize your scones with chocolate chips, berries, or spices; just remember to adjust moisture if needed.

  • Proper Storage: Store leftover scones in an airtight container for up to 2 days or freeze for up to 3 months to maintain freshness.

What to Serve with 10-Minute Irresistible Almond Flour Scones

Pairing these delightful scones with the right accompaniments will elevate your experience and make any moment feel special.

  • Clotted Cream: This rich treat adds velvety luxury, perfectly enhancing the nutty flavor of almond flour scones.
  • Homemade Jam: A dollop of your favorite fruit jam provides a sweet burst and complements the scone's moist texture beautifully.

These pairings turn a simple scone into an indulgent affair! Imagine enjoying one warm, with clotted cream melting into its flaky layers, or savoring the juicy tang of a raspberry jam spread.

  • Herbal Tea: A calming cup of chamomile or mint tea harmonizes with the scones, making it a delightful afternoon pick-me-up.
  • Fresh Berries: Serve with a bowl of fresh mixed berries for a refreshing contrast that brightens each bite of the scones.

Fruits add a pop of color while their natural sweetness balances the nutty depth of the scones. Your taste buds will revel in this lovely combination!

  • Iced Coffee: For those who favor a caffeine boost, a chilled coffee can provide the perfect refreshment alongside warm scones, creating a cozy brunch vibe.
  • Lemon Curd: This zesty spread gives a tangy twist that brightens the scones, making it a fantastic treat with a splash of citrus flavor.

Serving these sumptuous options alongside your almond flour scones invites a delightful and memorable experience, making each bite a moment to cherish.

Make Ahead Options

These Almond Flour Scones are a fantastic option for meal prep! You can mix the dry ingredients (almond flour and baking powder) up to 3 days in advance and store them in an airtight container at room temperature to keep them fresh. Additionally, the wet mixture (egg, maple syrup, and melted butter or coconut oil) can be prepared the night before and refrigerated overnight. When you’re ready to bake, simply combine the mixtures, add any optional goodies, and shape the dough. Bake them fresh for 15-18 minutes, and you’ll enjoy delicious scones just like they were made from scratch, saving you precious time on busy mornings!

Almond Flour Scones: Customization Ideas

Feel free to get creative and customize your almond flour scones to fit your personal tastes!

  • Nut-Free Option: Substitute almond flour with sunflower seed flour for a delightful nut-free scone. Just know that the flavor will shift slightly.

  • Spiced Delight: Add cinnamon or nutmeg to the dry ingredients for a cozy, aromatic touch that welcomes your taste buds home.

  • Savory Twist: Mix in cheddar cheese and fresh herbs, like chives or thyme, for a savory scone that pairs beautifully with soups and salads.

  • Berry Medley: Swap in seasonal fresh berries, such as strawberries or blackberries, for a burst of fruity flavor in every bite. They’ll add sweetness and a pop of color!

  • Chocolate Lovers' Dream: Use dark or white chocolate chips instead of semi-sweet for a decadent twist. You might even try cacao nibs for a slightly more intense chocolate experience.

  • Zesty Kick: Incorporate more lemon zest or even a splash of orange juice for a citrusy brightness that balances the nutty flavor.

  • Extra Crunch: Add pumpkin seeds or chopped walnuts for texture and a delightful crunch in each bite, making each scone even more irresistible.

By embracing these delicious swaps and additions, you can create a perfect scone that suits any occasion. Whether it's a sweet indulgence for afternoon tea or a savory treat for brunch, your almond flour scones can be as unique as you are!

How to Store and Freeze Almond Flour Scones

Room Temperature: Keep the scones in an airtight container for up to 2 days to preserve their freshness and texture. Enjoy them warm or at room temperature for the best experience.

Fridge: If you want to extend their shelf life, store the almond flour scones in the fridge for up to 5 days. Just reheat briefly in the oven for a warm treat!

Freezer: For longer storage, place cooled scones in a zip-top bag and freeze for up to 3 months. Thaw overnight in the fridge or leave at room temperature for a few hours before enjoying.

Reheating: To revive your scones, reheat them in a preheated oven at 350°F (175°C) for about 5-8 minutes, ensuring they regain their delightful freshness.

Almond Flour Scones Recipe FAQs

What is the best way to choose almond flour?
Absolutely! For the best results, look for finely ground almond flour; it provides a tender texture and helps create fluffy scones. Make sure there are no visible coarse grains and that the flour is fresh, as older almond flour can develop a rancid taste.

How should I store leftover scones?
Very simply! Keep your almond flour scones in an airtight container at room temperature for up to 2 days. If you'd like to extend their freshness, they can be refrigerated for up to 5 days. Just remember to reheat them briefly in the oven for a warm treat!

Can I freeze almond flour scones?
Absolutely! To freeze, let the scones cool completely, then place them in a zip-top bag. They can be stored in the freezer for up to 3 months. When you're ready to enjoy one, simply thaw overnight in the fridge or leave it at room temperature for a few hours.

What should I do if my scones are too dry?
If you find that your almond flour scones are dry, it’s often due to overmixing or too little moisture. For next time, make sure to gently fold the wet and dry ingredients until just combined. If the dough feels too crumbly, try adding a splash of milk or extra maple syrup to hydrate it before shaping and baking.

Are there any dietary considerations for almond flour scones?
Definitely! These scones are gluten-free, making them suitable for those with gluten intolerances. If you have nut allergies, you can substitute almond flour with sunflower seed flour, although this might slightly alter the scone’s flavor. Always check the ingredients of any add-ins, like chocolate chips, for allergens.

Almond Flour Scones

Almond Flour Scones: Quick, Flaky Perfection in 10 Minutes

Delightful Almond Flour Scones are quick, gluten-free treats that can be made in just 10 minutes, perfect for any occasion.
Print Recipe Pin Recipe
Prep Time 10 minutes mins
Cook Time 18 minutes mins
Total Time 28 minutes mins
Servings: 8 scones
Course: Breakfast
Calories: 150
Ingredients Equipment Method Nutrition Notes

Ingredients
  

For the Scones
  • 2 cups Almond Flour finely ground for best texture
  • 1 large Egg acts as a binder; use flax egg for vegan
  • 2 tbsp Maple Syrup or substitute with honey or agave
  • 1/4 cup Melted Butter or Coconut Oil coconut oil for dairy-free
  • 1 tbsp Baking Powder a pinch of baking soda optional
Optional Add-ins
  • 1/2 cup Chocolate Chips dark or white for variety
  • 1/2 cup Fresh Berries blueberries or raspberries
  • 1 tbsp Lemon Zest adds citrusy brightness

Equipment

  • Oven
  • Baking Sheet
  • Mixing bowls
  • Spatula

Method
 

Step-by-Step Instructions for Almond Flour Scones
  1. Preheat the oven to 350°F (175°C) and line a baking sheet with parchment paper.
  2. Combine the almond flour and baking powder in a medium bowl, stirring to break up any lumps.
  3. Whisk together the egg, maple syrup, and melted butter or coconut oil in a separate bowl.
  4. Pour the wet ingredients into the dry mixture and fold gently until just combined.
  5. Incorporate any optional add-ins like chocolate chips or berries.
  6. Form the dough into mounds about ¼ cup each and place them on the baking sheet.
  7. Bake for 15-18 minutes until golden brown and firm to the touch.
  8. Allow to cool for a few minutes before transferring to a wire rack.

Nutrition

Serving: 1sconeCalories: 150kcalCarbohydrates: 12gProtein: 4gFat: 10gSaturated Fat: 3gPolyunsaturated Fat: 1gMonounsaturated Fat: 6gCholesterol: 30mgSodium: 180mgPotassium: 100mgFiber: 2gSugar: 3gVitamin A: 250IUCalcium: 50mgIron: 1mg

Notes

Enjoy fresh scones for up to 5 days in the fridge or freeze for longer storage.

Tried this recipe?

Let us know how it was!

Crispy Traditional Irish Boxty: Perfect Breakfast Bliss

February 19, 2026 by Grace Snow Leave a Comment

The kitchen filled with the warm, comforting aroma of frying potatoes, transporting me back to my grandmother's kitchen in Ireland. This Traditional Irish Boxty recipe is a cherished gem, bringing together grated and mashed potatoes to create a delightful pancake that's both crispy on the outside and fluffy on the inside. Not only is it quick to whip up, perfect for breakfast or as a cozy side dish, but it also celebrates the beauty of home-cooked meals using simple ingredients. Whether you’re hosting a brunch or craving a hearty snack, these little potato pancakes carry a slice of Irish history and hospitality. Curious about how to achieve that ideal balance of crunch and softness? Let’s dive in!

Why is Boxty so beloved?

Crispy Delight: The texture of these pancakes strikes an unbeatable balance—crispy on the outside and fluffy within, making them a true breakfast treat.

Quick and Easy: With simple ingredients and straightforward steps, you can whip up these Traditional Irish Boxty without spending hours in the kitchen.

Versatile Serving Options: Enjoy them with a dollop of sour cream, or serve alongside eggs for a filling meal. They perfectly complement savory dishes like fish or Irish stew as well.

Healthy and Hearty: Made primarily with potatoes, these pancakes offer a comforting, vegetarian option that satisfies.

Cultural Comfort: Enjoying boxty is not just eating; it’s a shared cultural experience steeped in Irish history, perfect for gathering around the table. Curious about storage? Check out my tips on meal prep and keeping them fresh for later!

Traditional Irish Boxty Ingredients

Unlock the secrets to creating these delightful potato pancakes with these essential ingredients!

For the Batter

  • Potatoes – The heart of the dish; choose starchy varieties like Russet or Yukon Gold for the best texture.
  • Gluten-Free Flour Blend – This acts as a binder; regular flour can be used but may change the texture slightly.
  • Milk – Helps achieve a smooth batter; be cautious with amounts to keep it from becoming too runny.
  • Egg (1) – Essential for binding the mixture, ensuring the pancakes hold together when cooking.
  • Salt – Enhances flavor; adjust to your personal taste preference.
  • Oil or Butter – The key to achieving that perfect, crispy exterior when frying the pancakes.

Enjoy making your Traditional Irish Boxty with these simple yet effective ingredients!

Step‑by‑Step Instructions for Traditional Irish Boxty

Step 1: Prepare Potatoes
Start by peeling and washing your starchy potatoes like Russet or Yukon Gold. Grate half of the potatoes using a box grater or food processor until fine; then, mash the other half until smooth in a large bowl. This combination creates the unique texture of Traditional Irish Boxty, balancing fluffiness with crispy elements.

Step 2: Mix Ingredients
In the bowl containing your mashed potatoes, add the grated potatoes, gluten-free flour blend, a splash of milk, the egg, and a sprinkle of salt. Stir everything together until you achieve a cohesive batter; adjust with more milk if necessary to ensure a thick, yet spreadable consistency.

Step 3: Heat Pan
Place a large frying pan over medium heat and add a couple of tablespoons of oil or butter. Allow the fat to heat up for about 2 minutes until shimmering; this will help you achieve a beautifully crispy exterior on the Boxty. You want the temperature just right to ensure even cooking.

Step 4: Cook Pancakes
Spoon about a quarter cup of the batter into the hot pan for each pancake. Gently flatten the batter with the back of a spatula to about half an inch thick. Cook them for 3-4 minutes until golden brown and crispy on one side, then carefully flip using a spatula and cook for another 3-4 minutes on the other side.

Step 5: Serve Warm
Once your Traditional Irish Boxty is cooked to a crispy golden perfection, transfer the pancakes to a plate lined with paper towels to absorb any excess oil. Serve warm immediately, or keep them on low heat in the oven while cooking the remaining batter. Enjoy each bite with your favorite toppings!

Make Ahead Options

Traditional Irish Boxty is a fantastic recipe for meal prep enthusiasts! You can prepare the batter up to 24 hours in advance by combining the grated and mashed potatoes, gluten-free flour blend, milk, egg, and salt, then refrigerating the mixture. To maintain the quality and prevent browning, cover the bowl tightly with plastic wrap. When you’re ready to serve, simply heat a frying pan, add oil or butter, and cook the pancakes for about 3-4 minutes on each side until golden and crispy. This way, you’ll enjoy freshly cooked boxty with minimal effort on busy mornings!

Traditional Irish Boxty Customizations

Feel free to add your personal touch to these delightful pancakes—let your creativity shine through each unique variation!

  • Dairy-Free: Substitute milk with almond or oat milk for a lactose-free version that still packs a fantastic flavor.

  • Gluten-Free: Use a gluten-free all-purpose flour blend instead of regular flour for a completely gluten-free boxty that everyone can enjoy.

  • Herbed Delight: Add fresh herbs like chives or parsley to the batter for a fresh flavor boost, perfect for brightening up your breakfast table.

  • Spicy Kick: Spice things up by mixing in a dash of cayenne pepper or paprika, elevating the traditional flavor profile to something exciting.

  • Cheesy Addition: Fold in shredded cheese like cheddar or feta into the batter for a savory twist that melts beautifully while cooking.

  • Veggie Boost: Incorporate finely chopped vegetables such as bell peppers, spinach, or zucchini for a colorful and nutritious addition to your boxty.

  • Onion Variation: Sauté some onions until golden brown and mix them into the batter for an added layer of sweetness and depth.

  • Sweet Twist: For a dessert version, swap some of the potato with finely grated apples or zucchini, add cinnamon, and serve with maple syrup or yogurt.

Feel free to explore these options, and don’t forget to check out my tips for meal prep and keeping them fresh. Every pancake can tell a different story on your plate!

How to Store and Freeze Traditional Irish Boxty

Fridge: Store leftovers in an airtight container for up to 2 days. Reheat in a skillet over medium heat for a few minutes until warm and crispy again.

Freezer: Wrap individual pancakes in plastic wrap and then place them in a freezer bag for up to 2 months. Thaw in the refrigerator overnight before reheating.

Reheating: For best results, reheat frozen or refrigerated pancakes in a skillet with a little oil or butter to regain crispiness. Alternatively, use an oven at 350°F (175°C) for about 10-15 minutes.

Helpful Tricks for Traditional Irish Boxty

  • Correct Potato Prep: Avoid excess moisture by not over-squeezing grated potatoes. This prevents soggy pancakes and ensures ideal crispiness.

  • Fresh Mashed Potatoes: For the best texture, always use freshly mashed potatoes. Instant potatoes can work, but they should be thick to maintain structure.

  • Pan Temperature: Ensure the frying pan is adequately heated before adding the batter. An under-heated pan can lead to uneven cooking and a less crispy surface.

  • Cooking Technique: Don't overcrowd the pan—give each pancake enough space to cook evenly. This helps achieve that desired golden-brown exterior for your Traditional Irish Boxty.

  • Baking Alternative: If you prefer less oil, try baking at 375°F (190°C) for 15-20 minutes, flipping halfway for uniform cooking and crispiness.

What to Serve with Traditional Irish Boxty

Enjoying your Irish Boxty makes a lovely foundation for a cozy, inviting meal that warms the heart and delights the senses.

  • Creamy Sour Cream: A dollop of sour cream adds creamy tanginess that beautifully balances the crispy texture of the boxty.

  • Savory Smoked Salmon: The rich, smoky flavors of salmon paired with the fluffy pancakes create a satisfying, elegant brunch option.

  • Perfectly Scrambled Eggs: Fluffy scrambled eggs offer a protein-packed complement, making for a hearty breakfast that feels indulgent yet wholesome.

  • Baked Beans: Sweet and savory baked beans enhance the traditional vibe, bringing in a warm, comforting flavor that pairs well with the pancakes.

  • Zesty Salsa: A fresh tomato salsa introduces bright acidity and chunky texture, elevating each bite with a refreshing zing and a vibrant twist.

  • Crispy Bacon Strips: The salty crunch of bacon adds a savory contrast, creating a classic Irish breakfast ensemble that’s utterly irresistible.

  • Herbed Garden Salad: A light garden salad with fresh herbs cuts through the richness of the pancakes, adding a crunchy, fresh element to your meal.

  • Rich Irish Stew: For a heartier combination, serve the boxty alongside a bowl of traditional Irish stew; the pancakes help soak up the delicious gravy.

  • Chilled Cider: A crisp, cold cider refreshes the palate while echoing the rustic charm of an Irish pub, completing a delightful dining experience.

  • Decadent Apple Crisp: For dessert, a warm apple crisp brings a sweet finish, with its cinnamon-spiced flavor harmonizing perfectly with the potato pancakes.

Traditional Irish Boxty Recipe FAQs

How do I choose the right potatoes for Boxty?
Absolutely! For the best results, it's essential to use starchy potatoes like Russet or Yukon Gold. These varieties are ideal because they provide a crispy exterior while keeping the inside fluffy. If you pick waxy potatoes, you may end up with a pancake that’s too dense or gummy.

How should I store leftover Boxty?
To keep your leftover Traditional Irish Boxty fresh, place them in an airtight container in the refrigerator for up to 2 days. When you’re ready to enjoy them again, simply reheat them in a skillet over medium heat for a few minutes until they're warm and crispy again. This method ensures you retain that delightful crispy texture!

Can I freeze Traditional Irish Boxty?
Yes, you can! To freeze, lay individual pancakes on a plate lined with parchment paper, then wrap each tightly in plastic wrap. Place the wrapped pancakes in a freezer bag for up to 2 months. When you're ready to eat, thaw them overnight in the refrigerator and reheat in a skillet for best results. You’ll be amazed at how well they hold up!

What can I do if my Boxty turns out soggy?
If your Traditional Irish Boxty ends up soggy, it might be due to excess moisture in the grated potatoes. To troubleshoot, make sure you gently squeeze out any liquid from the grated potatoes before mixing them into the batter. Additionally, ensure your frying pan is hot enough before adding the batter, as a cooler pan can lead to steam rather than crispiness.

Are there any dietary considerations with Boxty?
Definitely! Traditional Irish Boxty can easily be made vegetarian by using vegetable oil instead of butter for frying. Additionally, to make it gluten-free, simply use a gluten-free flour blend. Always check the labels to avoid cross-contamination if you or someone you're serving has food allergies. Happy cooking!

Traditional Irish Boxty

Crispy Traditional Irish Boxty: Perfect Breakfast Bliss

This Traditional Irish Boxty recipe is a cherished gem, combining grated and mashed potatoes for a delightful pancake that's crispy and fluffy.
Print Recipe Pin Recipe
Prep Time 15 minutes mins
Cook Time 15 minutes mins
Total Time 30 minutes mins
Servings: 4 pancakes
Course: Breakfast
Cuisine: Irish
Calories: 180
Ingredients Equipment Method Nutrition Notes

Ingredients
  

For the Batter
  • 2 cups starchy potatoes (like Russet or Yukon Gold) peeled and grated
  • 1 cup gluten-free flour blend acts as a binder
  • 1/2 cup milk adjust to maintain batter consistency
  • 1 large egg for binding
  • 1 teaspoon salt to taste
  • 2 tablespoons oil or butter for frying

Equipment

  • frying pan
  • Box grater
  • large bowl
  • Spatula

Method
 

Cooking Directions
  1. Peel and wash the starchy potatoes. Grate half of them and mash the other half until smooth.
  2. In a bowl, combine mashed potatoes, grated potatoes, gluten-free flour, milk, egg, and salt. Stir until cohesive.
  3. Heat a frying pan over medium heat with oil or butter for about 2 minutes.
  4. Spoon about a quarter cup of batter into the pan for each pancake. Flatten to half an inch thick and cook for 3-4 minutes until golden, then flip.
  5. Cook the other side for another 3-4 minutes. Transfer to a plate lined with paper towels, serve warm.

Nutrition

Serving: 1pancakeCalories: 180kcalCarbohydrates: 30gProtein: 4gFat: 6gSaturated Fat: 2gPolyunsaturated Fat: 1gMonounsaturated Fat: 2gCholesterol: 60mgSodium: 300mgPotassium: 450mgFiber: 3gSugar: 1gVitamin A: 200IUVitamin C: 10mgCalcium: 30mgIron: 1mg

Notes

Use freshly mashed potatoes and avoid excess moisture. Bake at 375°F for a healthier option if preferred.

Tried this recipe?

Let us know how it was!

Crispy Skillet Banana Fritters for a Tropical Breakfast Treat

February 16, 2026 by Grace Snow Leave a Comment

As the morning light filters through my kitchen window, the scent of warm bananas and spices brings a rush of cheerful nostalgia. I can’t help but smile thinking about the delightful moments spent preparing Skillet Banana Fritters. They’re a quick and easy treat, ready in just 15 minutes, perfect for transforming your breakfast or ending a meal on a sweet note. Crisp on the outside with a gooey, comforting banana center, these fritters offer a taste of the tropics that never fails to impress. Plus, you can easily customize them with shredded coconut or tangy pineapple for a fun twist! Are you ready to experience this tropical indulgence for yourself?

Why are Skillet Banana Fritters a must-try?

Quick and Easy: In just 15 minutes, these fritters can transform your breakfast or dessert game. Irresistibly Flavorful: The combination of warm bananas, cinnamon, and nutmeg creates a delightful tropical taste that's hard to resist. Versatile Options: Elevate your fritters further by adding shredded coconut or diced pineapple for an extra punch of flavor. Crispy Texture: Enjoy the perfect balance of a golden, crispy exterior with a gooey center that melts in your mouth. Crowd-Pleasing Treat: These fritters will impress family and friends alike, making any meal feel like a special occasion. For more delightful recipes, check out Cheesy Corn Fritters or try a refreshing Breakfast Banana Split!

Skillet Banana Fritters Ingredients

• The perfect blend of flavors awaits!

For the Batter

  • Overripe Bananas – Provide natural sweetness and moisture; for best flavor, use overripe bananas.
  • All-Purpose Flour – Gives structure to the fritters; gluten-free flour can be a suitable substitute for a gluten-free option.
  • Milk – Enhances the batter’s consistency; almond milk works well for a dairy-free version.
  • Sugar – Adds sweetness; consider reducing or omitting if using very sweet bananas.
  • Baking Powder – Helps create a light, crispy exterior; ensure it's fresh for optimal results.
  • Vanilla Extract – Adds depth to the flavor; optional but highly recommended for a delicious twist.
  • Salt – Balances the sweetness; just a pinch elevates the overall flavor.
  • Warm Spices (Cinnamon and Nutmeg) – Boosts the flavor profile; adjust to taste or omit for a simpler variant.

Optional Flavor Boosts

  • Shredded Coconut – Adds texture and tropical flair; fold it in for a delightful surprise.
  • Diced Pineapple – Introduces tangy sweetness; a fabulous way to amp up your fritters!
  • Rum or Coconut Milk – A splash brings out the tropical notes; perfect for adventurous palates.
  • Powdered Sugar or Whipped Cream – For a dessert option, these toppings make every bite sweeter!

Experience the warmth of Skillet Banana Fritters in every delicious bite!

Step‑by‑Step Instructions for Skillet Banana Fritters

Step 1: Prepare the Bananas
Begin by peeling 2-3 overripe bananas and placing them in a mixing bowl. Use a fork to mash the bananas until they’re smooth and creamy, with only a few small lumps remaining. This step should take about 2 minutes and is crucial for achieving the gooey interior of your Skillet Banana Fritters.

Step 2: Combine the Ingredients
Add 1 cup of all-purpose flour, ½ cup of milk, 2 tablespoons of sugar, 1 teaspoon of baking powder, 1 teaspoon of vanilla extract, a pinch of salt, and a sprinkle of cinnamon and nutmeg to the mashed bananas. Stir gently until the mixture is just combined, ensuring not to overmix. This process should take around 2-3 minutes, and you’ll want a thick batter that is well incorporated.

Step 3: Rest the Batter
Allow the banana batter to rest for about 5 minutes at room temperature. This brief pause improves the batter's texture while the baking powder activates, leading to fluffier Skillet Banana Fritters. Use this time to preheat your skillet, creating a perfect environment for cooking.

Step 4: Heat the Skillet
Place a skillet over medium heat and add enough oil or butter to coat the bottom, about 2 tablespoons. Wait for the oil to shimmer, indicating it’s hot enough for frying. This should take 2-3 minutes. Ensuring the skillet is at the right temperature will give your fritters that beautiful golden color.

Step 5: Fry the Fritters
Spoon heaping tablespoons of the banana batter into the skillet, making sure to leave space between each fritter to avoid overcrowding. Cook them for about 2-3 minutes until the bottoms are golden brown and the tops start to bubble. This initial frying step is essential for achieving the desired crispy texture.

Step 6: Flip and Cook the Other Side
Carefully flip each fritter using a spatula, and cook for an additional 2-3 minutes on the other side until they are golden brown and puffed. The fritters should feel lightly firm to the touch. This step ensures that both sides are equally crispy and delicious, contributing to the overall charm of the Skillet Banana Fritters.

Step 7: Drain and Serve
Once cooked, transfer the fritters to a plate lined with paper towels to drain any excess oil. Allow them to rest for a minute while you continue frying the remaining batter. Serve your warm Skillet Banana Fritters immediately for the best texture and flavor. Enjoy them plain, or top with powdered sugar or a scoop of ice cream for a delightful twist!

What to Serve with Skillet Banana Fritters?

As you indulge in these delightful fritters, consider building a full breakfast or dessert experience that tantalizes the taste buds and warms the heart.

  • Crispy Bacon: The savory notes of crispy bacon balance the sweet and warm banana fritters, creating a delightful sweet-and-savory breakfast. Perfectly enjoyed side by side, it adds a crunchy texture that complements the soft fritters beautifully.

  • Whipped Cream: A dollop of fluffy whipped cream enhances the sweetness and offers a smooth, creamy contrast, making each bite feel luxurious. It’s an ideal pairing that elevates these fritters into a light dessert.

  • Fresh Fruit Salad: Bright, colorful slices of seasonal fruits add a refreshing touch and a burst of juicy flavor that beautifully complements the fritters’ sweetness. Think tangy berries or tropical mango for an extra tropical flair.

  • Maple Syrup: Drizzling warm maple syrup over the fritters enhances their natural sweetness while adding a rich depth of flavor. The sticky texture contrasts wonderfully with the crispy exterior of the fritters.

  • Coconut Flakes: A sprinkle of toasted coconut flakes brings a delightful crunch and a hint of the tropics, perfect for those craving a bit of adventure. This subtle addition harmonizes beautifully with the banana’s flavor.

  • Vanilla Ice Cream: For a decadent dessert experience, serve these fritters warm alongside a scoop of creamy vanilla ice cream. The cold ice cream melts into the warm fritters, creating a blissful harmony of temperatures and textures.

  • Iced Coffee: A refreshing glass of iced coffee makes a perfect beverage to wash down the fritters. The robust flavor and coolness provide a nice balance to the sweet, warm comfort of the fritters.

  • Chocolate Sauce: Drizzling rich chocolate sauce adds a sweet, indulgent finish, transforming these fritters into a delightful dessert that will please any chocolate lover. The gooey chocolate pairs beautifully with the warm banana flavors.

Skillet Banana Fritters Variations & Substitutions

Feel free to add your own flair to these delightful fritters and make them truly yours!

  • Coconut Twist: Fold in shredded coconut for a chewy texture and a hint of tropical flavor.

  • Pineapple Delight: Add diced pineapple to the batter for a sweet and tangy punch, reminiscent of a piña colada.

  • Spiced Rum: A splash of rum can elevate the tropical taste; a delightful surprise for the adventurous eater!

  • Dairy-Free Option: Substitute milk with almond or oat milk to keep the fritters creamy and delicious without dairy.

  • Healthier Sweetener: Swap out sugar for honey or maple syrup to reduce refined sugars while adding an extra layer of flavor.

  • Nutty Addition: Toss in chopped nuts, such as pecans or walnuts, to introduce a crunchy element that compliments the softness of the banana.

  • Dessert Upgrade: Dust the fritters with powdered sugar or serve with whipped cream for a decadent dessert experience.

  • Spice It Up: Increase the cinnamon and nutmeg for a bolder flavor profile that will warm your kitchen and heart.

Don’t forget, if you’re looking for more breakfast inspiration, try these delicious Breakfast Banana Split or even a savory side with Cheesy Corn Fritters. Happy cooking!

Expert Tips for Skillet Banana Fritters

  • Use Overripe Bananas: They provide the best natural sweetness and moisture. Avoid underripe bananas, which can lead to a less flavorful fritter.
  • Don’t Overmix: When combining the batter, mix just until incorporated. Overmixing can lead to tough fritters instead of the delightful texture you want.
  • Maintain Medium Heat: Cooking at the right temperature is crucial. If it’s too hot, your fritters will burn; too low, and they won’t crisp up.
  • Fry in Batches: Avoid overcrowding the skillet to ensure even cooking and that crispy exterior we all crave in Skillet Banana Fritters.
  • Serve Immediately: For the best taste and texture, serve your fritters right after frying. They are irresistibly delicious while warm!

How to Store and Freeze Skillet Banana Fritters

  • Room Temperature: Skillet Banana Fritters are best enjoyed fresh. If you have to leave them out, keep them covered for no more than 2 hours to maintain their crispiness.
  • Fridge: Store leftover fritters in an airtight container in the refrigerator for up to 2 days. Reheating gently in a skillet helps restore their delightful texture.
  • Freezer: For longer storage, freeze fritters individually on a baking sheet before transferring them to a freezer bag or container. They can be frozen for up to 2 months.
  • Reheating: When ready to enjoy, reheat frozen fritters in a skillet over medium heat for about 4-5 minutes until heated through and crispy again.

Make Ahead Options

These Skillet Banana Fritters are a fantastic choice for busy home cooks looking to save time! You can prepare the batter up to 24 hours in advance by mixing all the ingredients and storing it in an airtight container in the refrigerator. To maintain quality, it's best not to add any optional mix-ins like shredded coconut or diced pineapple until you're ready to fry them. When you're ready to enjoy, simply stir the chilled batter gently, as it may thicken slightly in the fridge, then heat your skillet and fry according to the directions. This way, you'll have warm, delicious fritters with minimal morning effort, perfect for busy weekdays or last-minute brunch gatherings!

Skillet Banana Fritters Recipe FAQs

What kind of bananas should I use for Skillet Banana Fritters?
Use overripe bananas for the best sweetness and moisture; they should be spotted with brown for optimal flavor. You can substitute with ripe bananas, but overripe ones provide that gooey texture and rich taste that’s truly irresistible.

How should I store leftover Skillet Banana Fritters?
After enjoying your fritters, store any leftovers in an airtight container in the refrigerator for up to 2 days. To keep them as crispy as possible, reheat them gently in a skillet over medium heat for about 3-4 minutes, flipping to ensure even warming.

Can I freeze Skillet Banana Fritters?
Absolutely! To freeze, first let the fritters cool completely, then arrange them in a single layer on a baking sheet and freeze until solid. Once frozen, transfer them to a freezer-safe bag or container. They can last for up to 2 months. When you're ready to enjoy them, reheat in a skillet over medium heat for about 4-5 minutes until crispy and warmed through.

What if my fritters aren't cooking evenly?
If your fritters aren't cooking evenly, it’s likely that your skillet is overcrowded. Make sure to give each fritter enough space to allow for proper hot air circulation. Also, maintain a steady medium heat, adjusting as needed; if they're browning too fast, lower the temperature for more even cooking.

Are Skillet Banana Fritters pet-friendly?
No, the ingredients in Skillet Banana Fritters are not suitable for pets. Bananas are safe in small quantities, but the sugar and any added spices (like cinnamon) or flavorings can be harmful or upset your pet's stomach. Always keep human food away from your furry friends!

Can I make Skillet Banana Fritters gluten-free?
Yes! Simply substitute the all-purpose flour with a gluten-free flour blend. Make sure the blend contains xanthan gum or any binding agent for the best texture. Doing so will ensure that everyone can enjoy these delightful fritters without worry!

Skillet Banana Fritters

Crispy Skillet Banana Fritters for a Tropical Breakfast Treat

Delight in these quick and easy Skillet Banana Fritters, perfect for breakfast or dessert, with a crispy exterior and gooey banana center.
Print Recipe Pin Recipe
Prep Time 15 minutes mins
Cook Time 10 minutes mins
Resting Time 5 minutes mins
Total Time 30 minutes mins
Servings: 4 fritters
Course: Breakfast
Cuisine: Tropical
Calories: 150
Ingredients Equipment Method Nutrition Notes

Ingredients
  

For the Batter
  • 2-3 overripe Bananas peel and mash until smooth
  • 1 cup all-purpose Flour or gluten-free flour
  • 1/2 cup Milk or almond milk for dairy-free
  • 2 tablespoons Sugar reduce if using very sweet bananas
  • 1 teaspoon Baking Powder ensure freshness
  • 1 teaspoon Vanilla Extract optional but recommended
  • 1 pinch Salt to balance sweetness
  • 1 teaspoon Warm Spices (Cinnamon and Nutmeg) adjust to taste
Optional Flavor Boosts
  • 1/4 cup Shredded Coconut optional
  • 1/4 cup Diced Pineapple optional
  • 1 tablespoon Rum or Coconut Milk optional
  • to taste Powdered Sugar or Whipped Cream for serving

Equipment

  • Mixing Bowl
  • Skillet
  • Fork
  • Spatula

Method
 

Step-by-Step Instructions
  1. Begin by peeling 2-3 overripe bananas and placing them in a mixing bowl. Mash the bananas until smooth and creamy.
  2. Add 1 cup of all-purpose flour, ½ cup of milk, 2 tablespoons of sugar, 1 teaspoon of baking powder, 1 teaspoon of vanilla extract, a pinch of salt, and a sprinkle of cinnamon and nutmeg to the mashed bananas. Stir gently until combined.
  3. Allow the banana batter to rest for about 5 minutes at room temperature.
  4. Place a skillet over medium heat and add about 2 tablespoons of oil or butter. Wait for the oil to shimmer.
  5. Spoon heaping tablespoons of the banana batter into the skillet, ensuring not to overcrowd. Cook for about 2-3 minutes until golden brown.
  6. Carefully flip each fritter and cook for an additional 2-3 minutes until golden brown and puffed.
  7. Transfer the fritters to a plate lined with paper towels to drain. Serve immediately for the best texture and flavor.

Nutrition

Serving: 1fritterCalories: 150kcalCarbohydrates: 20gProtein: 2gFat: 7gSaturated Fat: 3gPolyunsaturated Fat: 1gMonounsaturated Fat: 2gCholesterol: 10mgSodium: 50mgPotassium: 150mgFiber: 1gSugar: 5gVitamin A: 100IUVitamin C: 1mgCalcium: 50mgIron: 0.5mg

Notes

Serve with optional toppings of powdered sugar or whipped cream for added sweetness.

Tried this recipe?

Let us know how it was!

Energizing Green Protein Smoothie Bowl for a Fresh Start

February 16, 2026 by Grace Snow Leave a Comment

As I stood in my kitchen, a whirlwind of uneaten bananas and a crisper packed with greens caught my eye. What if I transformed these seemingly mundane ingredients into a vibrant bowl that could kick-start my day? Enter the Green Protein Smoothie Bowl—my go-to solution for those mornings that need a little extra energy boost. Packed with creamy avocado and sweet mango, this recipe is both gluten-free and dairy-free, ensuring that everyone can indulge in its tropical goodness. It’s exceptionally quick to whip up, making it the ideal breakfast or a refreshing snack that leaves you feeling nourished and satisfied. Excited to dive into the details of crafting this nutrient-packed delight? Let’s blend up something special!

Why is this smoothie bowl a game changer?

Vibrant Colors: This Green Protein Smoothie Bowl is not just good for you; it’s a feast for the eyes, with a bright and cheerful appearance.

Quick & Easy: Whip it up in minutes! Just blend, pour, and top—perfect for busy mornings or post-workout snacks.

Nutrient-Packed: Loaded with healthy fats, protein, and fiber, this bowl will keep you fuller longer while fueling your day.

Customizable: Feel free to mix and match fruits with options like blueberries or peaches to suit your taste or seasonal availability.

Dairy-Free Delight: It fits seamlessly into vegan, gluten-free, or dairy-free diets without compromising an ounce of flavor. Pair it with a refreshing Chocolate Cherry Smoothie for a delightful treat!

Crowd-Pleasing: Serve it to family and friends, and watch everyone enjoy this delicious and nutritious dish without any complaints!

Green Protein Smoothie Bowl Ingredients

• A deliciously vibrant mix awaits!

For the Smoothie

  • Coconut Milk – Provides creaminess and a hint of sweetness; almond milk or oat milk can also work beautifully.
  • Baby Spinach – A nutritional powerhouse that adds greens without overwhelming the flavor; kale can be a great substitute.
  • Frozen Mango – Adds a luscious sweetness and a tropical taste; try frozen pineapple or banana for a delightful twist.
  • Frozen Zucchini Slices – Enhances the creamy texture and boosts fiber; feel free to omit if you don’t have it on hand.
  • Frozen Avocado – Delivers healthy fats and a dreamy creaminess; fresh avocado can also work; adjust as needed.
  • Vanilla Protein Powder – Increases protein content, making this smoothie bowl satisfying; use plant-based protein for a vegan alternative or skip it for a lighter option.

For the Toppings

  • Chia Seeds – Boost nutrition and add a satisfying crunch; sprinkle generously!
  • Raspberries – Provide a burst of flavor and visual appeal, harmonizing wonderfully with the green base.
  • Granola – Adds a lovely crunch for texture; opt for gluten-free granola if desired.
  • Nuts – Use your favorite nuts for extra protein and a hearty feel.
  • Bananas – Slice them up for added sweetness and creaminess; they never disappoint!
  • Yogurt – Drizzle a dairy-free yogurt on top for an extra creamy element and pleasing tang.

Embrace the magic of this Green Protein Smoothie Bowl, and feel free to let your creativity shine with toppings that you love!

Step‑by‑Step Instructions for Green Protein Smoothie Bowl

Step 1: Blend the Base Ingredients
Start by adding 1 cup of coconut milk to a high-speed blender, followed by 1 cup of baby spinach, 1 cup of frozen mango, 1/2 cup of frozen zucchini slices, 1/2 cup of frozen avocado, and 1 scoop of vanilla protein powder. Secure the lid tightly and blend on high for 30-45 seconds, until the mixture is smooth and creamy, with a vibrant green hue.

Step 2: Check the Consistency
After blending, pause to check the consistency of your Green Protein Smoothie Bowl. If it's too thick for your liking, add a little more coconut milk, about 2 tablespoons at a time, then blend again for around 10 seconds. The goal is a luscious, thick texture that will hold up beautifully when poured into a bowl.

Step 3: Pour into a Serving Bowl
Once your smoothie has reached the desired creamy consistency, carefully pour it into your favorite bowl. Use a rubber spatula if necessary to scrape down the sides of the blender and ensure you don’t waste any of this delicious green goodness. The vibrant color will be a feast for the eyes as you prepare to add your toppings.

Step 4: Add Toppings for Texture and Flavor
Now comes the fun part—adding toppings to your Green Protein Smoothie Bowl! Sprinkle a tablespoon of chia seeds for a nutritional boost, followed by a handful of fresh raspberries for a pop of color and flavor. Add a generous sprinkle of granola, a few banana slices, and if desired, a dollop of dairy-free yogurt to create a delightful mix of textures.

Step 5: Serve Immediately
Your Green Protein Smoothie Bowl is ready to be savored! Enjoy it immediately to maintain the perfect texture. Grab a spoon and dig into the creamy, nutrient-packed bowl, relishing every bite of this quick and healthy meal, perfect for breakfast or a refreshing snack.

Expert Tips for the Best Green Protein Smoothie Bowl

  • Choose Quality Ingredients: Fresh, ripe fruits and high-quality protein powder make all the difference in flavor and nutrition. Opt for organic when possible!

  • Perfect Texture: To achieve a creamy consistency, ensure your blender is powerful enough to handle frozen ingredients. Don't hesitate to adjust the coconut milk amount for desired thickness.

  • Avoid Overloading: Stick to recommended quantities for each ingredient to prevent a watery smoothie bowl. Too much liquid can dilute the vibrant flavors of your green protein smoothie bowl.

  • Prep Ahead: For busy mornings, pre-portion your smoothie ingredients in freezer bags. Just grab a bag, blend, and enjoy!

  • Topping Variety: Don't be afraid to experiment with different toppings each time you make your smoothie bowl! Seasonal fruits, nuts, and seeds can give you a new experience.

  • Immediate Enjoyment: Enjoy your smoothie bowl right after preparation to maintain optimal texture and freshness. If storing leftovers, re-blend with a bit of coconut milk before serving again.

Make Ahead Options

These Green Protein Smoothie Bowls are perfect for meal prep, saving you precious time on busy mornings! You can blend the smoothie base (coconut milk, spinach, mango, zucchini, avocado, and protein powder) up to 24 hours in advance and store it in an airtight container in the refrigerator. To maintain its delicious quality, give it a good shake before serving; if it's thickened, add a splash of coconut milk and re-blend for a creamy consistency. You can also prepare and portion out your toppings, like chia seeds and granola, in advance so everything is ready to go when you're ready to indulge in this nutritious treat. Enjoying a nutritious breakfast has never been easier!

Green Protein Smoothie Bowl Variations

Feel free to get creative with your smoothie bowl to make it uniquely yours!

  • Dairy-Free Delight: Substitute the coconut milk with almond or oat milk for a different creamy flavor.

  • Tasty Greens: Swap baby spinach for kale or swiss chard for a heartier taste while keeping it nutritious.

  • Frozen Fruit Fun: Replace frozen mango with frozen pineapple or mixed berries for a different tropical vibe.

  • Zucchini Option: If frozen zucchini isn’t on hand, simply omit it; your bowl will still be delicious without it.

  • Avocado Switch: Fresh avocado can replace frozen avocado; just use more if you prefer a creamier texture.

  • Flavor Boost: Add a tablespoon of nut butter for extra creaminess and a protein punch that will keep you full longer.

  • Bowl Toppings Twist: Try topping with shredded coconut or pomegranate seeds for an unexpected crunch and vibrant flavor.

  • Protein Variation: Use your favorite plant-based protein powder or try a chocolate flavor for a delicious chocolaty twist; it pairs perfectly with the greens!

The flexibility of this recipe allows you to enjoy a different experience each time! If you're feeling adventurous, you can also check out my refreshing Pitaya Smoothie Bowl or indulge in the delightful layers of flavor from my Lemon Ricotta Protein Pancakes. Get blending for a creatively satisfying breakfast!

How to Store and Freeze Green Protein Smoothie Bowl

  • Room Temperature: It's best to avoid keeping the smoothie bowl at room temperature, as it can quickly lose its freshness and texture.

  • Fridge: Leftovers can be stored in an airtight container in the refrigerator for up to 24 hours. For best results, re-blend with a splash of coconut milk before serving to restore creaminess.

  • Freezer: If you want to extend its life, pour the smoothie mixture into ice cube trays or freezer bags and freeze for up to a month. Thaw in the fridge overnight or blend straight from frozen for a chilly treat.

  • Reheating: Since this is a cold dish, there's no need to reheat it. Just give it a good blend if it's been frozen or stored to bring back that delightful texture of your Green Protein Smoothie Bowl.

What to Serve with Creamy Green Protein Smoothie Bowl

Elevate your meal experience with delightful pairings that enhance the nourishing essence of this creamy bowl.

  • Toasted Whole Grain Bread: Its nutty flavor and crunchy texture make a perfect companion to your smoothie bowl, providing a satisfying crunch.

  • Tropical Fruit Salad: A refreshing mix of pineapple, kiwi, and passion fruit complements the smoothie’s tropical notes, adding brightness and zing.

  • Vegan Overnight Oats: Creamy oats topped with nuts and berries can add a hearty element, creating a balanced and nourishing breakfast spread.

  • Crispy Roasted Chickpeas: For a protein-packed munch, these crunchy bites bring a savory contrast that’s both satisfying and nutritious.

  • Herbal Tea: A light peppermint or chamomile tea would harmonize well, offering a soothing beverage option to balance the vibrant flavors of your bowl.

  • Nut Butter Energy Balls: These bites of goodness provide an extra energy boost, and their rich, nutty flavor perfectly complements the smoothie’s creaminess.

  • Dairy-Free Yogurt Parfait: Layered with granola and fresh fruits, this parfait adds a delightful crunch and a touch of creaminess, marrying well with the smoothie bowl’s texture.

  • Lemon Water: Infused with fresh herbs like mint, this refreshing drink cleanses the palate and harmonizes beautifully with the vibrant flavors of your smoothie.

Green Protein Smoothie Bowl Recipe FAQs

How do I choose the ripeness of my ingredients?
Absolutely! When selecting your fruits and greens, aim for bright, unblemished produce. Choose ripe avocados that yield slightly to gentle pressure, and mangoes that have a sweet aroma and give a little when pressed. For greens like baby spinach, look for crisp leaves that are vibrant without any dark spots.

What’s the best way to store leftovers?
To store leftover Green Protein Smoothie Bowl, transfer the mixture into an airtight container and refrigerate. It’s best if consumed within 24 hours to maintain flavor and texture. Just before serving, give it a re-blend with a splash of coconut milk to refresh its creamy consistency.

Can I freeze the smoothie bowl?
Yes! To freeze your Green Protein Smoothie Bowl, pour the mixture into ice cube trays or freezer-safe bags. It can be frozen for up to 3 months. When you're ready, simply thaw overnight in the fridge or blend straight from frozen if you want an ultra-cold treat!

What if the smoothie bowl is too thick?
No worries! If your smoothie mixture turns out too thick, you can easily adjust it. Begin by adding 2 tablespoons of coconut milk, then blend for another 10 seconds. Repeat this process until you reach your desired creamy consistency. Remember, a little liquid goes a long way!

Are there any ingredient substitutions for allergies?
Very much so! If you or someone you're serving has allergies, consider using nut-free milk alternatives in place of coconut milk, like oat milk or hemp milk. If nut allergies are a concern, skip the nuts in the toppings and opt for seeds such as pumpkin seeds or sunflower seeds for crunch without worry.

Is this smoothie bowl pet-friendly?
While the Green Protein Smoothie Bowl is loaded with healthy ingredients for us, it’s best not to share it with pets. Ingredients like avocado can be toxic to dogs, so stick to pet-friendly treats for your furry friends!

Green Protein Smoothie Bowl

Energizing Green Protein Smoothie Bowl for a Fresh Start

Discover a delicious Green Protein Smoothie Bowl, perfect for breakfast or a refreshing snack, packed with nutrients and energy.
Print Recipe Pin Recipe
Prep Time 5 minutes mins
Total Time 5 minutes mins
Servings: 2 bowls
Course: Breakfast
Cuisine: Vegan
Calories: 350
Ingredients Equipment Method Nutrition Notes

Ingredients
  

For the Smoothie
  • 1 cup Coconut Milk Almond milk or oat milk can also work beautifully.
  • 1 cup Baby Spinach Kale can be a great substitute.
  • 1 cup Frozen Mango Try frozen pineapple or banana for a delightful twist.
  • 1/2 cup Frozen Zucchini Slices Feel free to omit if you don’t have it on hand.
  • 1/2 cup Frozen Avocado Fresh avocado can also work; adjust as needed.
  • 1 scoop Vanilla Protein Powder Use plant-based protein for a vegan alternative or skip for a lighter option.
For the Toppings
  • 1 tablespoon Chia Seeds Boosts nutrition and adds a satisfying crunch.
  • 1 cup Raspberries Provides a burst of flavor and visual appeal.
  • 1/2 cup Granola Opt for gluten-free granola if desired.
  • 1/4 cup Nuts Use your favorite nuts for extra protein.
  • 1 banana Bananas Slice them up for added sweetness.
  • 2 tablespoons Yogurt Drizzle a dairy-free yogurt on top for creaminess.

Equipment

  • High-speed blender

Method
 

Step-by-Step Instructions
  1. Start by adding 1 cup of coconut milk to a high-speed blender, followed by 1 cup of baby spinach, 1 cup of frozen mango, 1/2 cup of frozen zucchini slices, 1/2 cup of frozen avocado, and 1 scoop of vanilla protein powder. Secure the lid tightly and blend on high for 30-45 seconds, until the mixture is smooth and creamy.
  2. After blending, check the consistency. If it's too thick, add a little more coconut milk, about 2 tablespoons at a time, and blend again for around 10 seconds.
  3. Once your smoothie has reached the desired consistency, carefully pour it into your favorite bowl.
  4. Now add toppings: sprinkle a tablespoon of chia seeds, a handful of fresh raspberries, a generous sprinkle of granola, a few banana slices, and a dollop of dairy-free yogurt.
  5. Your Green Protein Smoothie Bowl is ready to be enjoyed immediately for the best texture.

Nutrition

Serving: 1bowlCalories: 350kcalCarbohydrates: 45gProtein: 12gFat: 15gSaturated Fat: 8gPolyunsaturated Fat: 2gMonounsaturated Fat: 5gSodium: 150mgPotassium: 600mgFiber: 10gSugar: 18gVitamin A: 5000IUVitamin C: 60mgCalcium: 100mgIron: 2mg

Notes

Feel free to let your creativity shine with toppings that you love. For busy mornings, pre-portion ingredients in freezer bags to make blending easier.

Tried this recipe?

Let us know how it was!

Cinnamon Rolls Recipe - Soft, Gooey, and Irresistibly Homemade

February 16, 2026 by Grace Snow Leave a Comment

The moment I cracked open the oven door, I was greeted by the divine smell of cinnamon swirling through my kitchen—a scent that instantly transports me to my childhood. This Cinnamon Rolls Recipe is my secret weapon for turning any ordinary day into a cozy celebration, perfect for breakfast, brunch, or a sweet snack. Not only are these rolls soft, fluffy, and irresistibly gooey, but they also require minimal effort, making them a delightful treat for both novice bakers and seasoned pros. Whether you're hosting a weekend gathering or simply indulging yourself, these homemade cinnamon rolls promise a melt-in-your-mouth experience that will leave everyone asking for seconds. Ready to fill your home with that heavenly aroma? Let’s roll!

Why Are These Cinnamon Rolls Irresistible?

Unmatched Gooeyness: These cinnamon rolls are oozing with sweetness in every bite, giving you that delightful melt-in-your-mouth experience.
Simple to Make: Even if you're a beginner, this recipe makes it easy to impress friends and family with minimal fuss.
A Versatile Treat: Enjoy these rolls for breakfast, brunch, or as a sweet snack with your favorite coffee or tea!
Make-Ahead Convenience: Plan your mornings effortlessly by prepping the rolls the night before—wake up to fresh-baked bliss!
Satisfying Aroma: Just one whiff of cinnamon wafting through your home will elevate your mood and create the perfect cozy atmosphere, inviting everyone to gather around.
Don't forget to check out my Pumpkin Cinnamon Roll recipe for a festive twist on a classic!

Cinnamon Rolls Recipe Ingredients

Here’s everything you need to create the most irresistible cinnamon rolls!

For the Dough

  • Whole Milk – Provides moisture and softness to the dough; warm to about 110°F to activate yeast.
  • Active Dry Yeast – A leavening agent that helps the dough rise; ensure it blooms by sprinkling over warm milk.
  • Granulated Sugar – Sweetens the dough and filling; essential for browning during baking.
  • Eggs – Provide structure and richness; use one whole egg and an additional yolk for added tenderness.
  • Unsalted Butter – Adds flavor and moisture to the dough (melted) and filling, contributing to that gooey center.
  • All-Purpose Flour – Main structural component of the dough; can substitute with bread flour for a chewier texture.
  • Salt – Enhances flavor and strengthens the dough.

For the Filling

  • Brown Sugar – Adds rich sweetness and deeper flavor to the filling, enhancing the overall experience.
  • Ground Cinnamon – The key flavor for the filling, imbuing warmth and a characteristic taste.

For the Frosting

  • Cream Cheese – The base for the frosting; provides tanginess and creaminess to balance the sweetness.
  • Powdered Sugar – Sweetens and thickens the frosting to perfection, making it irresistible on warm rolls.

With this Cinnamon Rolls Recipe, you can create bakery-quality rolls that promise a melt-in-your-mouth experience with every bite!

Step‑by‑Step Instructions for Cinnamon Rolls Recipe

Step 1: Prepare the Dough
Warm the whole milk to about 110°F to activate the yeast, then sprinkle the active dry yeast and a tablespoon of granulated sugar over it. Allow it to bloom for 5-10 minutes until frothy. In a mixing bowl, combine the melted unsalted butter, one whole egg, an additional egg yolk, flour, and salt. Mix until combined, then knead the dough for 7-8 minutes until smooth and elastic.

Step 2: First Rise
Grease a large bowl with a little melted butter or oil and place the kneaded dough inside, turning to coat. Cover the bowl with a clean kitchen towel and let it rise in a warm area for 60-90 minutes, or until the dough has doubled in size. You’ll know it’s ready when it springs back slightly when gently poked.

Step 3: Make Filling
While the dough is rising, prepare the cinnamon filling. In a small bowl, combine melted butter, brown sugar, and ground cinnamon to form a thick paste. Mix until smooth and cohesive, making sure it's well combined to ensure each roll has that sweet, gooey center. Set this delicious mixture aside as you wait for the dough to rise.

Step 4: Shape Rolls
Once the dough has risen, punch it down gently to release air and turn it onto a lightly floured surface. Roll it out into an 18x12-inch rectangle, ensuring even thickness. Spread the prepared cinnamon filling evenly across the dough, leaving a small border around the edges. Tightly roll the dough into a log, then slice into 12 equal pieces using a sharp knife or dental floss.

Step 5: Second Rise
Grease a baking pan and place the sliced cinnamon rolls next to each other, cut sides up. Cover the pan with a towel and let the rolls rise for another 30-45 minutes until puffy. As they rise, preheat your oven to 375°F, ensuring a hot environment for baking that perfect Cinnamon Rolls Recipe.

Step 6: Bake
Once the rolls have risen and look beautifully puffy, place them in the preheated oven. Bake for 20-25 minutes, or until they are golden brown on top and the centers are cooked through. Check for doneness at around 20 minutes, and keep an eye on them to avoid overbaking.

Step 7: Prepare Frosting
While the rolls cool for a few minutes, make the frosting. In a bowl, beat together cream cheese and softened unsalted butter until smooth and creamy. Gradually add powdered sugar and a splash of vanilla extract, mixing until well combined and fluffy. This creamy topping will balance the sweetness of your cinnamon rolls perfectly.

Step 8: Frost and Serve
Once the cinnamon rolls are slightly cooled, generously spread the cream cheese frosting over the top while they're still warm. This allows the frosting to melt slightly into the rolls, creating a deliciously gooey topping. Serve your warm, frosted cinnamon rolls and watch as everyone enjoys this delightful homemade Cinnamon Rolls Recipe!

What to Serve with Ultimate Homemade Cinnamon Rolls

Elevate your cinnamon roll experience by pairing them with delightful accompaniments that will make your meal truly special.

  • Fresh Fruit Salad: A medley of vibrant fruits adds a refreshing contrast to the rich sweetness of cinnamon rolls, making for a balanced breakfast.
  • Scrambled Eggs: Fluffy, soft scrambled eggs provide protein and creaminess, pleasantly offsetting the gooeyness of the rolls.
  • Savory Breakfast Potatoes: Crispy, seasoned potatoes bring a satisfying crunch and hearty texture that complements the soft rolls perfectly.
  • Maple Syrup Drizzle: A pour of warm maple syrup over your cinnamon rolls enhances their sweetness, creating a luxurious brunch treat.
  • Coffee or Tea: A steaming cup of coffee or your favorite tea enhances the cozy ambiance, providing a delightful contrast to the sweet rolls.
  • Creamy Yogurt Parfait: Layered with granola and berries, yogurt adds a tangy twist that balances the sweetness of your gooey cinnamon rolls.
  • Whipped Cream Topping: Light and airy whipped cream, lightly sweetened, can take your cinnamon rolls to the next level of indulgence.
  • Homemade Hot Chocolate: A rich cup of hot chocolate envelops you in warmth, creating a comforting pairing with the gooey cinnamon rolls.

Storage Tips for Cinnamon Rolls Recipe

Room Temperature: Store leftover cinnamon rolls in an airtight container at room temperature for up to 3 days to maintain their softness and gooeyness.

Fridge: If you want to keep them fresh for longer, refrigerate the rolls for up to a week. Just ensure they're in an airtight container to prevent drying out.

Freezer: For longer storage, freeze the cinnamon rolls in a single layer, then transfer to a freezer bag for up to 3 months. They can be thawed overnight in the fridge before reheating.

Reheating: To enjoy your cinnamon rolls warm, simply wrap them in foil and heat in a 350°F oven for about 10-15 minutes, or microwave for 15-20 seconds until warmed through.

Cinnamon Rolls Recipe Variations

Feel free to get creative with this cinnamon rolls recipe and make it your own with these delightful twists!

  • Flavorful Dough: Swap regular sugar for brown sugar in the dough for added depth and warmth. The subtle difference will enhance the overall flavor profile beautifully.

  • Nutty Delight: Add chopped nuts like walnuts or pecans into the filling for a delightful crunch. This adds an unexpected textural element that pairs perfectly with the gooey cinnamon swirl.

  • Chocolate Chip Surprise: Sprinkle chocolate chips in the filling for a sweet, indulgent upgrade. The melty chocolate melds beautifully with the cinnamon, creating an irresistibly gooey treat.

  • Fruit Fusion: Incorporate fresh or dried fruit, such as raisins or chopped apples, into the filling. The fruity notes provide a refreshing twist that balances the rich flavors of cinnamon and sugar.

  • Decadent Frosting: Mix in a splash of maple syrup or vanilla extract into the cream cheese frosting for an extra flavor boost. This small addition will elevate the frosting, making it even more tempting!

  • Pumpkin Spice Twist: For a seasonal variation, add pumpkin puree to the dough and a sprinkle of pumpkin pie spice to the filling. Fall flavors will embrace you with every delectable bite! Speaking of pumpkin, you might also enjoy my Pumpkin Cinnamon Roll recipe for a festive treat.

  • Spicy Kick: If you love a bit of heat, add a pinch of cayenne or chili powder to the filling. This surprising twist will electrify your taste buds and leave everyone guessing!

  • Glaze Variations: Instead of traditional cream cheese frosting, drizzle the rolls with a simple glaze made from powdered sugar and milk for a lighter option. This keeps the rolls sweet without overwhelming their natural flavors.

Whatever you choose, each variation promises to enhance your homemade cinnamon rolls while satisfying your unique cravings!

Expert Tips for Cinnamon Rolls Recipe

  • Yeast Activation: Always ensure your yeast blooms properly in warm milk; a bubbly, foamy texture means it's good to use, vital for a successful rise.

  • Flour Measurement: Avoid excess flour during kneading by measuring accurately. Use the spoon and level method for soft, fluffy rolls.

  • Rolling Technique: Roll the dough tightly to lock in the filling, preventing it from spilling out during baking and creating beautiful spirals.

  • Cover Tightly: When letting dough rise, cover it well to prevent it from drying out, which can cause uneven textures in your cinnamon rolls.

  • Taste Testing: Don’t shy away from tasting your filling! Adjust sugar or cinnamon based on your preference for sweetness and spice.

  • Storage Tips: For longer freshness, store leftover cinnamon rolls in an airtight container at room temperature for up to 3 days, or refrigerate for longer enjoyment.

Make Ahead Options

These Cinnamon Rolls Recipe are perfect for busy mornings and can be easily prepared ahead of time! You can shape the rolls and refrigerate them up to 24 hours before baking. Simply follow the recipe until you've cut the rolls, then place them in a greased pan, cover tightly with plastic wrap, and refrigerate. To ensure they rise properly, remove them from the fridge and let them sit at room temperature for about 30-60 minutes before baking. This method keeps them just as delicious and fluffy while saving you time on hectic mornings, allowing you to enjoy fresh, warm cinnamon rolls with minimal effort!

Cinnamon Rolls Recipe FAQs

What type of milk is best for the cinnamon rolls?
For the best results in this Cinnamon Rolls Recipe, I recommend using whole milk. It provides the necessary moisture and richness that contributes to a soft and fluffy dough. If you don't have whole milk on hand, 2% milk will also work, though it may yield slightly less rich rolls.

How long can I store leftover cinnamon rolls?
Store leftover cinnamon rolls in an airtight container at room temperature for up to 3 days. If you want them to last longer, refrigerate them for up to a week. Just ensure the container is sealed tightly to keep them from drying out!

Can I freeze cinnamon rolls?
Absolutely! To freeze your cinnamon rolls, let them cool completely after baking. Place them in a single layer on a baking sheet and freeze until solid. Once frozen, transfer them to a freezer bag and store for up to 3 months. When you’re ready to enjoy, thaw them overnight in the fridge, then heat them gently in the oven or microwave.

What if my dough doesn’t rise?
If your dough doesn’t rise, it could be due to inactive yeast. Ensure you're using fresh, active dry yeast that blooms properly in warm milk. After sprinkling yeast over the milk, look for a foamy texture within 5-10 minutes. If it’s not frothy, you may need to start over with fresher yeast.

Can I make these cinnamon rolls ahead of time?
Definitely! You can prepare the dough and roll it into shape the night before. After cutting them into rolls, place them in a greased baking dish, cover tightly, and store in the refrigerator overnight. In the morning, let them rise at room temperature for about 30-45 minutes before baking—perfect for holiday mornings!

Are these rolls suitable for those with allergies?
This Cinnamon Rolls Recipe contains common allergens including eggs, dairy, and gluten. If you or your guests have allergies, I recommend experimenting with dairy-free milk, egg substitutes like flaxseed meal, and gluten-free flour blends. However, keep in mind that the texture and flavor may vary slightly from the original recipe.

Cinnamon Rolls Recipe

Cinnamon Rolls Recipe - Soft, Gooey, and Irresistibly Homemade

This Cinnamon Rolls Recipe delivers soft, gooey, homemade rolls that transform any day into a cozy celebration.
Print Recipe Pin Recipe
Prep Time 30 minutes mins
Cook Time 25 minutes mins
Rising Time 1 hour hr 30 minutes mins
Total Time 2 hours hrs 25 minutes mins
Servings: 12 rolls
Course: Breakfast
Cuisine: American
Calories: 250
Ingredients Equipment Method Nutrition Notes

Ingredients
  

Dough Ingredients
  • 1 cup Whole Milk Warm to about 110°F to activate yeast.
  • 2.25 teaspoons Active Dry Yeast Ensure it blooms by sprinkling over warm milk.
  • 1/4 cup Granulated Sugar Essential for browning during baking.
  • 1 large Eggs One whole egg and an additional yolk for tenderness.
  • 1/4 cup Unsalted Butter Melted.
  • 4 cups All-Purpose Flour Can substitute with bread flour.
  • 1 teaspoon Salt Enhances flavor.
Filling Ingredients
  • 1/2 cup Brown Sugar Adds rich sweetness.
  • 2 tablespoons Ground Cinnamon Key flavor for the filling.
Frosting Ingredients
  • 4 ounces Cream Cheese Softened.
  • 1 cup Powdered Sugar Sweetens and thickens the frosting.

Equipment

  • Mixing Bowl
  • Baking pan
  • Rolling Pin
  • Whisk
  • measuring cups
  • Measuring Spoons
  • Oven

Method
 

Dough Preparation
  1. Warm the whole milk to about 110°F to activate the yeast, then sprinkle the active dry yeast and a tablespoon of granulated sugar over it. Allow it to bloom for 5-10 minutes until frothy.
  2. In a mixing bowl, combine the melted unsalted butter, one whole egg, an additional egg yolk, flour, and salt. Mix until combined, then knead the dough for 7-8 minutes until smooth and elastic.
First Rise
  1. Grease a large bowl with a little melted butter or oil and place the kneaded dough inside, turning to coat. Cover the bowl with a clean kitchen towel and let it rise in a warm area for 60-90 minutes, or until the dough has doubled in size.
Filling Preparation
  1. While the dough is rising, prepare the cinnamon filling. In a small bowl, combine melted butter, brown sugar, and ground cinnamon to form a thick paste.
Rolling and Shaping
  1. Once the dough has risen, punch it down gently to release air and turn it onto a lightly floured surface. Roll it out into an 18x12-inch rectangle.
  2. Spread the prepared cinnamon filling evenly across the dough, leaving a small border around the edges. Tightly roll the dough into a log, then slice into 12 equal pieces.
Second Rise
  1. Grease a baking pan and place the sliced cinnamon rolls next to each other. Cover the pan with a towel and let the rolls rise for another 30-45 minutes until puffy.
  2. As they rise, preheat your oven to 375°F.
Baking
  1. Once the rolls have risen, place them in the preheated oven. Bake for 20-25 minutes, or until golden brown.
Frosting Preparation
  1. While the rolls cool, make the frosting by beating together cream cheese and softened unsalted butter until smooth. Gradually add powdered sugar and mix until well combined.
Frost and Serve
  1. Once the cinnamon rolls are slightly cooled, generously spread the cream cheese frosting over the top.

Nutrition

Serving: 1rollCalories: 250kcalCarbohydrates: 36gProtein: 3gFat: 11gSaturated Fat: 6gPolyunsaturated Fat: 1gMonounsaturated Fat: 4gCholesterol: 30mgSodium: 300mgPotassium: 100mgFiber: 1gSugar: 10gVitamin A: 500IUVitamin C: 1mgCalcium: 50mgIron: 1mg

Notes

For longer freshness, store leftover cinnamon rolls in an airtight container at room temperature for up to 3 days.

Tried this recipe?

Let us know how it was!

Thick and Creamy Snickers Smoothie Bowl for Guilt-Free Indulgence

February 16, 2026 by Grace Snow Leave a Comment

As I stood in my kitchen, pondering a healthier way to satisfy my sweet tooth, the idea for this Thick and Creamy Snickers Smoothie Bowl struck me like a lightbulb moment. Imagine a luscious blend of frozen bananas and ripe avocados coming together to create a decadent treat that’s not only guilt-free but also incredibly filling. This smoothie bowl is a perfect choice for breakfast, a snack, or even a dessert—offering all the sweet and salty goodness of a Snickers bar without any of the heavy hits. Plus, it’s vegan, gluten-free, and packed with protein to power your day. Who knew you could indulge in such creamy deliciousness while nourishing your body? Can you envision all the delightful toppings you could add to this delightful creation?

Why Will You Love This Smoothie Bowl?

Guilt-Free Indulgence: This Thick and Creamy Snickers Smoothie Bowl satisfies your cravings without any guilt, combining delicious flavors with wholesome ingredients.
Super Easy Prep: With just a few steps, you can whip up this delightful treat in minutes, perfect for busy mornings or lazy afternoons.
Nutrient-Packed: Filled with healthy fats from avocados and natural sweetness from bananas, it's a great way to fuel your body.
Versatile Customization: Feel free to swap in your favorite nut butter or tweak toppings to match your taste—try it with our Chocolate Cherry Smoothie for a delicious twist!
Crowd-Pleasing: Whether it's breakfast or dessert, this recipe is sure to impress everyone, making it a fantastic option for family gatherings or brunch with friends.
Thick & Creamy Texture: The smoothie bowl has a luxurious texture, providing a delightful experience that feels like soft-serve ice cream—perfect for satisfying sweet cravings!

Thick and Creamy Snickers Smoothie Bowl Ingredients

• Get ready to indulge in a delightful blend!

For the Smoothie

  • Frozen Banana Slices – Adds natural sweetness and creaminess; fresh bananas can be used, but expect a less creamy texture.
  • Frozen Avocado Chunks – Provides a rich and creamy texture along with healthy fats; thaw for 10 minutes before blending for easier mixing.
  • Plant Milk – Essential for blending; unsweetened almond, coconut, or oat milk are great for a dairy-free option.
  • Cocoa Powder – Enhances the chocolate flavor; cacao powder can be used for a raw alternative.
  • Peanut Butter (Natural) – Adds creaminess and protein; choose peanut butter with just peanuts (and salt) for the best results.
  • Pure Maple Syrup – Serves as a natural sweetener; honey or another sweetener can be substituted if desired.

For Toppings (Optional)

  • Banana Slices – Fresh banana slices add a delicious touch and enhance the smoothie bowl's visual appeal.
  • Chocolate Chips – Dark or dairy-free chocolate chips bring an extra dose of sweetness and richness.
  • Chopped Peanuts – Adds a crunchy texture and a delightful nutty flavor to complement the smoothie.
  • Peanut Butter Drizzle – A swirl of extra peanut butter on top provides additional creaminess and visual allure.

Enjoy this Thick and Creamy Snickers Smoothie Bowl to satisfy your sweet cravings while nourishing your body!

Step‑by‑Step Instructions for Thick and Creamy Snickers Smoothie Bowl

Step 1: Thaw the Avocado
Begin by removing your frozen avocado chunks from the freezer and allowing them to thaw for about 10 minutes. This slight thawing will make blending much easier and help achieve that luscious, thick texture in your Thick and Creamy Snickers Smoothie Bowl. Set them aside while you prep the other ingredients.

Step 2: Combine the Main Ingredients
In a high-powered blender, add the frozen banana slices, cocoa powder, pure maple syrup, and the slightly thawed avocado. Scoop in the natural peanut butter, ensuring everything is in there for a creamy delight. The combination of these ingredients creates the base of your smoothie bowl that mimics the taste of a Snickers bar.

Step 3: Add Plant Milk and Blend
Now it’s time to pour in the plant milk. Start with ⅓ cup and securely place the lid on the blender. Blend on high speed for about 30 seconds, or until the mixture becomes smooth and creamy. Remember to scrape down the sides occasionally to incorporate all the ingredients well. The aim is a thick, luscious consistency.

Step 4: Adjust for Flavor
After achieving a creamy mixture, taste your smoothie bowl base. If you desire a deeper chocolate flavor, add a little more cocoa powder and blend briefly again. This is your opportunity to customize the Thick and Creamy Snickers Smoothie Bowl to your preferred taste, making it even more scrumptious.

Step 5: Transfer and Top
Once blended to perfection, gently pour the mixture into a bowl. You’ll see it maintains a delectable thickness that's perfect for a smoothie bowl. Now, it’s time to get creative! Top your bowl with banana slices, chocolate chips, chopped peanuts, or a drizzle of peanut butter to make it visually appealing and even more delicious.

Step 6: Serve Immediately
To truly relish the flavors and enjoy the creamy texture, serve your Thick and Creamy Snickers Smoothie Bowl immediately. Gather your loved ones around, or savor it solo; either way, this delightful treat promises to satisfy your sweet cravings while keeping it nutritious.

Expert Tips for Thick and Creamy Snickers Smoothie Bowl

  • Consistent Thickness: Avoid adding too much liquid at once; if needed, add one tablespoon of plant milk at a time to maintain that rich, thick consistency.
  • Perfectly Thawed Avocado: Make sure to thaw your frozen avocado chunks for about 10 minutes to ensure easy blending; fresh avocado can also be used without thawing.
  • Blend It Right: A high-powered blender is key to achieving the creamy perfection of the Thick and Creamy Snickers Smoothie Bowl. Regular blenders may struggle with texture.
  • Flavor Adjustments: Always taste before serving! Adjust cocoa powder or maple syrup after blending to meet your sweetness and flavor preferences.
  • Creative Toppings: Get adventurous with your toppings! Mixing and matching different fruits, nuts, and drizzles can elevate your smoothie bowl experience.

How to Store and Freeze Thick and Creamy Snickers Smoothie Bowl

Best Enjoyed Fresh: Consume your Thick and Creamy Snickers Smoothie Bowl immediately for a fresh taste and optimal texture.

Fridge: If leftovers remain, keep them in an airtight container in the fridge for up to 1 day. The consistency may change slightly, so stirring before consumption is recommended.

Freezer: You can freeze any remaining smoothie bowl in an airtight container for up to a week. Be aware that it may require blending again to regain its creamy texture after thawing.

Reheating: To enjoy, allow it to thaw in the fridge overnight before blending with a splash of plant milk to restore creaminess.

What to Serve with Thick and Creamy Snickers Smoothie Bowl

Elevate your smoothie bowl experience with delightful sides that encourage a wholesome yet indulgent meal.

  • Granola Clusters: A sprinkle of crunchy granola adds texture and pairs perfectly with the creamy base, bringing extra nutrition and energy.

  • Fresh Berries: Bright berries like strawberries or blueberries not only add a burst of color but their tartness beautifully contrasts the creamy sweetness of the bowl.

  • Chia Seed Pudding: Creamy, protein-packed, and filled with fiber, chia seed pudding complements the bowl's rich flavors while enhancing the overall health factor.

  • Almond Butter Toast: Pairing with a slice of whole-grain almond butter toast makes for a filling combination that keeps you satisfied throughout the morning.

  • Iced Herbal Tea: A refreshing herbal tea, such as hibiscus or mint, provides a delightful contrast to the decadent flavors of your smoothie bowl while keeping you hydrated.

  • Coconut Yogurt Parfait: For a vegan-friendly dessert option, layer coconut yogurt with fruits and nuts. This satisfying treat complements the smoothie and adds a variety of textures.

  • Peanut Butter Cookies: Indulge in a couple of homemade peanut butter cookies for a sweet treat that echoes the nutty flavors of the smoothie bowl.

  • Coconut Water: Sip on coconut water for a hydrating drink that reflects the tropical vibes of the smoothie bowl while adding a touch of natural sweetness.

Make Ahead Options

These Thick and Creamy Snickers Smoothie Bowls are perfect for meal prep enthusiasts! You can prepare the ingredient components, such as slicing frozen bananas and measuring out cocoa powder, up to 24 hours in advance, storing them in airtight containers in the refrigerator to maintain freshness. Additionally, you can thaw avocado chunks overnight for easier blending before serving. When you're ready to enjoy, simply blend the prepped ingredients with plant milk, adjusting the consistency to your liking. This makes it super easy for those busy mornings, ensuring you can enjoy a nutritious and indulgent treat with minimal effort! Just remember, for the best texture, blend right before serving.

Thick and Creamy Snickers Smoothie Bowl Variations

Feel free to let your creativity flow as you customize this delightful smoothie bowl to suit your taste buds!

  • Nut Butter Swap: Replace peanut butter with almond or cashew butter for a different nutty flavor.

  • Fruit Fusion: Add a handful of spinach or kale to sneak in more greens without altering the yummy taste.

  • Sweetness Boost: Experiment with different sweeteners like agave nectar or stevia if you want a unique twist on sweetness.

  • Texture Twist: For a crunchy contrast, sprinkle some granola or seeds on top to elevate your smoothie bowl experience.

  • Protein Power: Mix in your favorite protein powder to amp up the protein content—vanilla or chocolate flavors work beautifully!

  • Cocoa Kick: Feel free to increase the cocoa or cacao powder for a more intense chocolate experience; it's all about your preference!

  • Added Spice: Sprinkle cinnamon or a pinch of cayenne for a surprising kick that beautifully complements the sweetness.

  • Serve with a Side: Pair with a refreshing green smoothie or our delicious Acai Bowl Nutritious for a complete breakfast that has something for everyone!

Embrace the fun of customizing your Thick and Creamy Snickers Smoothie Bowl!

Thick and Creamy Snickers Smoothie Bowl Recipe FAQs

What type of bananas should I use for the best texture?
Using frozen banana slices is key to achieving the creamy texture in your Thick and Creamy Snickers Smoothie Bowl. If fresh bananas are all you have on hand, they can work—just know that the smoothie won't be as thick and may be a bit less sweet.

How long can I store leftovers of the smoothie bowl?
Your smoothie bowl is best enjoyed immediately to savor that fresh taste and thick texture. However, if you have leftovers, store them in an airtight container in the fridge for up to 1 day. When ready to eat, give it a good stir as the consistency may change.

Can I freeze my Thick and Creamy Snickers Smoothie Bowl for later?
Absolutely! You can freeze the remaining smoothie bowl in an airtight container for up to a week. When you're ready to enjoy it, thaw it overnight in the fridge, then throw it back into your blender with a splash of plant milk to regain that fabulous creaminess.

What should I do if my smoothie bowl is too runny?
If you find that your smoothie bowl is too thin, don't worry! You can thicken it up by adding a few more frozen banana slices or a bit more avocado. Blend it again until it reaches your desired consistency. Remember to add any liquid gradually to avoid making it too runny!

Are there any nut-free alternatives for the peanut butter?
Yes, if you or someone in your household has a nut allergy, feel free to substitute with sunflower seed butter or pumpkin seed butter for a nut-free alternative. These options will still provide that creamy texture and delicious flavor while keeping it safe for everyone.

Can I use dairy milk instead of plant milk in this recipe?
Certainly! While the Thick and Creamy Snickers Smoothie Bowl is designed to be vegan, you can absolutely use dairy milk if you prefer. Just keep in mind that the recipe will no longer be dairy-free.

Thick and Creamy Snickers Smoothie Bowl

Thick and Creamy Snickers Smoothie Bowl for Guilt-Free Indulgence

Enjoy a Thick and Creamy Snickers Smoothie Bowl that's both indulgent and guilt-free, packed with protein and nutrients.
Print Recipe Pin Recipe
Prep Time 10 minutes mins
Total Time 10 minutes mins
Servings: 2 bowls
Course: Breakfast
Cuisine: Vegan
Calories: 300
Ingredients Equipment Method Nutrition Notes

Ingredients
  

Smoothie Ingredients
  • 2 cups Frozen Banana Slices Adds natural sweetness and creaminess; fresh bananas can be used for a less creamy texture.
  • 1 cup Frozen Avocado Chunks Provides rich texture; thaw for 10 minutes before blending.
  • ⅓ cup Plant Milk Unsweetened almond, coconut, or oat milk work well.
  • 2 tablespoons Cocoa Powder Enhances chocolate flavor.
  • 2 tablespoons Peanut Butter (Natural) Choose peanut butter with just peanuts (and salt).
  • 1 tablespoon Pure Maple Syrup Acts as a natural sweetener.
Toppings (Optional)
  • 1 banana Banana Slices Adds visual appeal and taste.
  • 2 tablespoons Chocolate Chips Dark or dairy-free for added sweetness.
  • 2 tablespoons Chopped Peanuts Adds crunchy texture and nutty flavor.
  • 1 tablespoon Peanut Butter Drizzle Extra creaminess on top.

Equipment

  • High-powered blender

Method
 

Preparation Steps
  1. Thaw the frozen avocado chunks for about 10 minutes.
  2. In a blender, combine the frozen banana slices, cocoa powder, pure maple syrup, and thawed avocado.
  3. Add the natural peanut butter and blend until smooth.
  4. Pour in the plant milk and blend again until creamy; adjust consistency if needed.
  5. Pour into a bowl and top with banana slices, chocolate chips, chopped peanuts, or a drizzle of peanut butter.
  6. Serve immediately for the best texture and flavor.

Nutrition

Serving: 1bowlCalories: 300kcalCarbohydrates: 40gProtein: 8gFat: 15gSaturated Fat: 3gPolyunsaturated Fat: 1gMonounsaturated Fat: 10gSodium: 150mgPotassium: 600mgFiber: 6gSugar: 14gVitamin A: 10IUVitamin C: 20mgCalcium: 6mgIron: 8mg

Notes

Best enjoyed fresh, but can be stored in the fridge for up to 1 day or frozen for up to a week. Re-blend with a splash of plant milk if necessary after freezing.

Tried this recipe?

Let us know how it was!

Green Protein Smoothie Bowl for a Tropical Boost of Energy

February 16, 2026 by Grace Snow Leave a Comment

As I lifted the vibrant green smoothie bowl off the counter, I could practically hear my taste buds cheering in anticipation. This Green Protein Smoothie Bowl is more than just a breakfast choice; it's a creamy tropical treat packed with the goodness of mango, avocado, and nutrient-rich greens that come together in mere minutes. Whether you're running out the door or need a midday pick-me-up, this recipe triumphs in providing an energizing, gluten-free, and dairy-free meal that won't weigh you down. Plus, it’s a fun way to sneak some superfoods into your diet without sacrificing flavor. As you explore the endless topping options, you might find yourself crafting a masterpiece that’s not only eye-catching but also delightfully delicious. What unique twist will you give your smoothie bowl today?

Why is This Smoothie Bowl a Must-Try?

Vibrant Colors: The green protein smoothie bowl bursts with colors, making it as visually appealing as it is delicious. Each ingredient contributes not only to the flavor but to a stunning presentation!

Nutrient-Packed: Every spoonful is loaded with vitamins and minerals from nutrient-dense ingredients like spinach and avocado. It's an effortless way to support your health without compromising on taste.

Quick and Easy: Prep time is minimal, taking just a few minutes. Perfect for busy mornings, you can whip up this energizing treat without any fuss!

Versatile Toppings: Get creative with toppings! From chocolate delights like cacao nibs to fresh fruits and crunch from granola, you can mix and match to suit your mood.

Energy Boosting: Thanks to the rich protein content from the added protein powder, this bowl provides a satisfying and long-lasting energy boost. Whether you snack or have it for breakfast, you'll love feeling fueled and ready for the day!

If you're looking for more refreshing options, check out my Acai Bowl Nutritious recipe that’s perfect to mix into your breakfast rotation!

Green Protein Smoothie Bowl Ingredients

  • For the Base

  • Coconut Milk – Adds creaminess and a subtle sweetness; substitute with almond or oat milk for a different flavor profile.

  • Baby Spinach – Provides vibrant color and essential vitamins; can be swapped with kale or other leafy greens, but taste may vary.

  • Frozen Mango – Offers a tropical sweetness and creamy texture; fresh mango may be used if available, but it will alter the consistency.

  • Frozen Zucchini Slices – Adds fiber and thickness without altering flavor; cauliflower may be used as a low-calorie alternative.

  • Frozen Avocado – Enhances creaminess and provides healthy fats; fresh avocado can be substituted, but frozen gives a better consistency.

  • Vanilla Protein Powder – Boosts protein content and flavor; vegan protein powder is a great alternative for those with dietary restrictions.

  • For the Toppings (optional)

  • Chia Seeds – Adds a delightful crunch and omega-3 fatty acids; these seeds can enhance the nutritional profile of your smoothie bowl.

  • Raspberries – Provide a burst of flavor and a pop of color; fresh or frozen berries work beautifully here.

  • Granola – Offers crunch and a hint of sweetness that complements the smooth textures; consider using gluten-free options to stay on theme.

Feel free to mix and match your toppings for a unique spin on the green protein smoothie bowl each time!

Step‑by‑Step Instructions for Green Protein Smoothie Bowl

Step 1: Blend Ingredients
In a high-speed blender, combine 1 cup of coconut milk, 1 cup of baby spinach, 1 cup of frozen mango, 1 cup of frozen zucchini slices, 1/2 cup of frozen avocado, and 1 scoop of vanilla protein powder. Secure the lid and pulse the ingredients together at a low speed, gradually increasing until all components are thoroughly incorporated and you see a vibrant green color, about 30 seconds.

Step 2: Achieve Consistency
Increase the blender speed to high and blend for an additional 30–45 seconds until the mixture is smooth and creamy. If the smoothie bowl appears too thick for your liking, pour in a little more coconut milk, blending briefly to reach your desired consistency. The final texture should be thick enough to hold its shape when poured into a bowl.

Step 3: Serve
Carefully pour the blended green protein smoothie mixture into a bowl, allowing it to form a beautiful mound in the center. Use a spatula to scrape down the sides of the blender for any leftover deliciousness to ensure nothing goes to waste. The rich, vibrant green color will make it an inviting sight.

Step 4: Add Toppings
Here's where the magic happens! On top of your green protein smoothie bowl, sprinkle chia seeds for a delightful crunch, add fresh raspberries to introduce a tangy flavor, and finish with a handful of granola for texture. Feel free to get creative with your choice of toppings to make your bowl truly unique and personalized.

Step 5: Enjoy Immediately
For the best flavor and freshness, dive into your green protein smoothie bowl right after preparing it. Not only does it taste great, but the bright colors and textures will also energize your day! Take a moment to appreciate the delightful presentation before savoring each spoonful of this nutritious and satisfying treat.

Storage Tips for Green Protein Smoothie Bowl

Fridge: Store any leftover smoothie bowl in an airtight container in the fridge for up to 24 hours. This will help maintain its vibrant color and flavor while keeping the nutrients intact.

Toppings: If you have added toppings, it's best to keep them separate until you're ready to enjoy your smoothie bowl again. This helps to preserve their crunch and freshness.

Reheating: While it's best enjoyed chilled, you can adjust the temperature by blending in a splash of coconut milk or warming the bowl slightly in the microwave for just a few seconds, if preferred.

Best Practices: For optimal flavor and texture, consume your green protein smoothie bowl fresh. If storing, add toppings just before serving to keep them crisp and delicious.

Expert Tips for the Best Green Protein Smoothie Bowl

  • High-Speed Blender: Ensure you use a high-speed blender for a creamy texture; less powerful blenders may leave chunks, ruining your smoothie bowl's consistency.

  • Adjust Thickness: If your smoothie bowl is too thick, add more coconut milk or a little water to reach your desired consistency without compromising flavor.

  • Freshness Matters: Enjoy your green protein smoothie bowl immediately after preparing it for the best taste and vibrant color; letting it sit can cause separation and loss of texture.

  • Experiment with Greens: While baby spinach is mild and mixes well, don’t hesitate to try different leafy greens like kale. Just remember, they will alter the flavor profile.

  • Customize Toppings: Get creative with your toppings! Mix chia seeds, nuts, or different fruits to make each bowl unique and full of textures and flavors you love.

  • Store Wisely: If you have leftovers, store them in an airtight container in the fridge for up to 24 hours, but save crunchy toppings for when you’re ready to enjoy again!

What to Serve with Green Protein Smoothie Bowl

As you prepare to dive into this refreshing bowl of goodness, consider these delightful accompaniments to create a well-rounded meal experience.

  • Whole Grain Toast: The crunchy texture pairs beautifully with the creamy smoothie bowl, offering a satisfying foundation for spreads like avocado or nut butter.

  • Fresh Fruit Salad: A medley of vibrant fruits adds extra vitamins and an inviting sweetness, making each bite of your smoothie bowl feel like a tropical escape.

  • Nuts and Seeds: Sprinkling a mix of almonds or pumpkin seeds on top adds a nutty crunch, while also boosting your bowl's protein and healthy fat content.

  • Homemade Granola: Offering an irresistible crunch, it perfectly complements the smooth textures of your smoothie bowl and brings a touch of sweetness.

  • Coconut Yogurt: This dairy-free alternative enhances creaminess while adding probiotics to your meal, balancing flavors and textures effortlessly.

  • Green Tea or Herbal Infusion: A light beverage that supports digestion and hydration, it pairs well with the fresh and cooling flavors of the smoothie bowl, ensuring harmony in your meal.

Make Ahead Options

These Green Protein Smoothie Bowls are perfect for busy home cooks looking to streamline meal prep! You can prepare the smoothie base (coconut milk, baby spinach, frozen mango, zucchini, avocado, and protein powder) up to 24 hours in advance by blending everything together and storing it in an airtight container in the refrigerator. To maintain the smooth and creamy texture, it's best to refrigerate it right after blending. When you're ready to enjoy, simply stir the mixture and pour it into a bowl. Top with your favorite toppings just before serving, and you’ll have a delicious, nutrient-packed smoothie bowl ready to fuel your day!

Green Protein Smoothie Bowl Variations

Embrace your creativity and customize your Green Protein Smoothie Bowl to make it uniquely yours with these delightful twists!

  • Choco-Boost: Add a scoop of cocoa powder or cacao nibs to introduce a rich chocolate flavor. Chocolate lovers will rejoice in this creamy combination!

  • Fruity Fusion: Swap in fresh banana or juicy pineapple for a new fruity twist. Mixing fruits not only changes flavors but adds vibrant colors to your bowl.

  • Nutty Delight: Stir in a tablespoon of nut butter, like almond or peanut butter, for an extra layer of richness and creaminess. This will also enhance the protein content!

  • Spicy Kick: Sprinkle a pinch of cayenne pepper or add a slice of fresh ginger for an unexpected heat element that refreshes the flavor profile. It’s a delightful adventure for your taste buds!

  • Texture Twist: For an added crunch, mix in some rolled oats or chia seeds into the base. This will also help keep you fuller for longer, making it a satisfying meal.

  • Herbal Infusion: Toss in a sprig of fresh mint or basil for a refreshing herbal note that will brighten your smoothie bowl. It is both aromatic and invigorating!

  • Berry Medley: Incorporate a blend of frozen mixed berries for an antioxidant boost. This colorful mix gives a gorgeous aesthetic and adds delightful sweetness.

  • Coconutty Fun: Top with shredded coconut flakes for a tropical crunch and an extra dose of healthy fats. It reminds you of island vibes with each spoonful!

For more thrilling smoothie experiences, you might enjoy my recipe for a Chocolate Cherry Smoothie or explore the nourishing bites in Coconutty Beans Greens. Now, what will you create?

Green Protein Smoothie Bowl Recipe FAQs

What type of coconut milk should I use for the Green Protein Smoothie Bowl?
Absolutely! You can use full-fat coconut milk for a rich creaminess, or light coconut milk for a lighter option. If you're looking to mix it up, almond or oat milk can work beautifully, bringing their unique flavors to the smoothie bowl without sacrificing its dairy-free nature.

How should I store leftovers of my smoothie bowl?
Great question! If you have any leftover Green Protein Smoothie Bowl, simply transfer it to an airtight container and refrigerate it for up to 24 hours. However, to maintain the best texture and flavor, it's ideal to enjoy it fresh! Keep any toppings like granola or chia seeds separate until you’re ready to dive in for a crunch that adds a delightful contrast to your creamy base.

Can I freeze the Green Protein Smoothie Bowl for later?
Certainly! To freeze your smoothie bowl, pour the blended mixture into ice cube trays or silicone molds. Once frozen solid, transfer the cubes into a freezer-safe bag for up to 3 months. When you're ready to enjoy, blend the cubes with a splash of coconut milk until smooth, and you'll have a refreshing smoothie bowl ready in no time!

What should I do if my smoothie is too thick?
If you find your Green Protein Smoothie Bowl too thick, no worries! Simply add a little more coconut milk or even some water, and blend again until you achieve your desired consistency. Remember, it’s about finding the perfect texture that works for you, so don’t hesitate to adjust until it’s just right!

Are there any allergens in this recipe?
Very important question! This smoothie bowl is naturally gluten-free and dairy-free, but if you're allergic to nuts, ensure you choose toppings that fit your dietary needs (like seeds instead of nut butter). Also, check your protein powder—some brands contain allergens like soy or dairy. Always read labels carefully to keep your smoothie bowl safe and enjoyable!

Can pets have any leftovers from the Green Protein Smoothie Bowl?
While the ingredients are wholesome, it's best not to share your smoothie bowl with your furry friends. Ingredients like spinach and avocado can be harmful to dogs in large amounts. If you'd like to treat your pets, consider veggie scraps or a little of the fruits, ensuring you stick to safe options. Always consult your vet for pet-specific dietary guidance.

Green Protein Smoothie Bowl

Green Protein Smoothie Bowl for a Tropical Boost of Energy

This Green Protein Smoothie Bowl is a delicious, energy-boosting breakfast choice packed with tropical flavors.
Print Recipe Pin Recipe
Prep Time 10 minutes mins
Total Time 10 minutes mins
Servings: 2 bowls
Course: Breakfast
Cuisine: Tropical
Calories: 350
Ingredients Equipment Method Nutrition Notes

Ingredients
  

For the Base
  • 1 cup coconut milk Substitute with almond or oat milk for a different flavor profile.
  • 1 cup baby spinach Can be swapped with kale or other leafy greens.
  • 1 cup frozen mango Fresh mango may be used but will alter consistency.
  • 1 cup frozen zucchini slices Cauliflower can be used as a low-calorie alternative.
  • 1/2 cup frozen avocado Fresh avocado can be substituted.
  • 1 scoop vanilla protein powder Vegan protein powder is a great alternative.
For the Toppings (optional)
  • 2 tablespoons chia seeds Adds crunch and omega-3 fatty acids.
  • 1/2 cup raspberries Fresh or frozen work beautifully.
  • 1/2 cup granola Consider using gluten-free options.

Equipment

  • High-speed blender

Method
 

Step-by-Step Instructions for Green Protein Smoothie Bowl
  1. In a high-speed blender, combine coconut milk, baby spinach, frozen mango, frozen zucchini slices, frozen avocado, and vanilla protein powder. Blend at low speed, gradually increasing until green and smooth.
  2. Increase blender speed to high for 30–45 seconds until smooth. Add more coconut milk if too thick.
  3. Pour the blended mixture into a bowl, ensuring a beautiful presentation.
  4. Top with chia seeds, raspberries, and granola. Get creative with your toppings!
  5. Enjoy immediately for the best flavor and freshness!

Nutrition

Serving: 1bowlCalories: 350kcalCarbohydrates: 45gProtein: 15gFat: 15gSaturated Fat: 9gPolyunsaturated Fat: 1gMonounsaturated Fat: 5gSodium: 200mgPotassium: 800mgFiber: 10gSugar: 20gVitamin A: 1500IUVitamin C: 50mgCalcium: 150mgIron: 2mg

Notes

Use a high-speed blender for a creamy texture. Store leftovers in an airtight container for up to 24 hours.

Tried this recipe?

Let us know how it was!

Decadent Chocolate Peanut Butter Smoothie Bowl Bliss

February 16, 2026 by Grace Snow Leave a Comment

As I stood in my kitchen the other morning, the enticing aroma of peanut butter wafting through the air transported me back to my childhood. I couldn’t resist whipping up a quick breakfast, and that’s when I decided on a Chocolate Peanut Butter Smoothie Bowl. This high-protein treat combines Greek yogurt, frozen banana, and creamy peanut butter for a guilt-free indulgence that’s perfect for busy days. In just 2 minutes, you can create a nutritious breakfast that’s as satisfying as it is delicious. Plus, the thick, smooth texture makes it feel like a decadent dessert rather than a regular morning meal. Why settle for boring when you can elevate your breakfast game? Curious about how to make this scrumptious bowl? Let’s dive in!

Why is this smoothie bowl irresistible?

Indulgent Flavor: The rich fusion of chocolate and peanut butter creates a heavenly taste that feels like a treat!

Quick & Easy: Ready in just 2 minutes, this recipe fits perfectly into your busy morning routine, making it a time-saver.

Healthy Breakfast: Packed with 28g of protein, this smoothie bowl is a guilt-free way to start your day with lasting energy.

Versatile Toppings: Customize with your favorite toppings like sliced bananas, granola, or even nuts for added crunch and flavor!

Satisfying Texture: Enjoy the thick, creamy consistency that not only looks amazing but tastes indulgent, like dessert!

Ready to elevate your breakfast? Try this decadent Chocolate Peanut Butter Smoothie Bowl and indulge without the guilt!

Chocolate Peanut Butter Smoothie Bowl Ingredients

• Dive into deliciousness with this healthy breakfast recipe!

For the Smoothie Base

  • Vanilla Low-Fat Greek Yogurt – Provides a luscious, creamy foundation and is packed with protein.
  • Banana (Sliced and Frozen) – Adds natural sweetness and creaminess; fresh bananas can be used, but frozen yields a thicker texture.
  • Peanut Butter – Infuses rich flavor and healthy fats; try almond or sunflower seed butter for a nut-free twist.
  • Cocoa Powder – Delivers a chocolatey essence without added sugars; opt for unsweetened for the healthiest choice.
  • Ice (Optional) – Chills the smoothie while enhancing thickness; skip if using frozen bananas.

For the Toppings

  • Sliced Bananas – Brightens the bowl with freshness and aesthetic appeal.
  • Chopped Chocolate – Elevates the chocolate experience and makes it even more indulgent.
  • Granola – Adds delightful crunch and texture; use your favorite blend for personalization.
  • Drizzled Peanut Butter – Enhances both flavor and presentation, creating a visually stunning finish.

With these ingredients, you’re just moments away from enjoying a delightful Chocolate Peanut Butter Smoothie Bowl that checks all the boxes for a healthy breakfast!

Step‑by‑Step Instructions for Chocolate Peanut Butter Smoothie Bowl

Step 1: Blend the Smoothie Base
In a powerful blender, combine 1 cup of vanilla low-fat Greek yogurt, 1 sliced frozen banana, 2 tablespoons of peanut butter, 1 tablespoon of unsweetened cocoa powder, and a handful of ice if desired. Blend on high for about 30 seconds, or until the mixture is smooth and creamy, with no chunks remaining. The consistency should be thick enough to hold your toppings beautifully.

Step 2: Pour into a Bowl
Once the smoothie base reaches that velvety consistency, carefully pour it into a bowl. Use a spatula to scrape down any remaining delicious remnants from the blender. This luscious Chocolate Peanut Butter Smoothie Bowl deserves a beautiful presentation, so aim for a generous, even layer in your bowl.

Step 3: Add Toppings
Now comes the fun part! Artfully arrange your toppings—slice up a fresh banana, chop some chocolate, and sprinkle your favorite granola over the smoothie base. Each topping adds texture and flavor, transforming your smoothie bowl into a delightful breakfast experience that looks as good as it tastes.

Step 4: Drizzle with Peanut Butter
For an extra touch of indulgence, melt a tablespoon of peanut butter in the microwave for about 10-15 seconds until it becomes pourable. Drizzle it over the top of your decorated smoothie bowl. This not only enhances the flavor profile but also provides a gorgeous visual appeal.

Step 5: Serve Immediately
Your decadent Chocolate Peanut Butter Smoothie Bowl is now ready to enjoy! Serve it immediately while it's fresh and creamy, inviting every spoonful to be savored. Feel free to get creative with additional toppings or variations according to your preference for an even more personalized breakfast experience.

What to Serve with Chocolate Peanut Butter Smoothie Bowl

Elevate your breakfast experience with delightful pairings that enhance every luxurious spoonful of your smoothie bowl.

  • Crunchy Granola: Adds a satisfying texture and extra nutty flavor that contrasts beautifully with the smoothness of the bowl.
  • Fresh Berries: Bright, tart berries like strawberries or blueberries bring a refreshing pop of acidity that balances the richness of chocolate and peanut butter.
  • Coconut Flakes: These add a light, tropical twist with a chewy texture that complements the creamy base while providing a hint of sweetness.
  • Chia Seed Pudding: Creamy and nutritious, chia puddings offer a lovely contrast, making every bite feel indulgent yet healthy and protein-packed.
  • Nutty Banana Oat Muffins: Soft and wholesome, these muffins pair wonderfully as a side, enriching your meal with fibers and hearty flavors.
  • Coffee or Cold Brew: A sip of your favorite morning brew will enhance the rich flavors of the smoothie bowl, blending beautifully for a cozy morning treat.
  • Dark Chocolate Squares: A decadent addition, these little bites provide a rich chocolate experience that will delight your taste buds alongside the smoothie.
  • Herbal Tea: A light chamomile or mint tea can cleanse the palate and balance the richness, creating a soothing morning moment.
  • Savory Toast: Try avocado or hummus toast for a contrast in flavors, bringing a savory note to your sweet breakfast for balance.

How to Store and Freeze Chocolate Peanut Butter Smoothie Bowl

Consume Immediately: Enjoy your Chocolate Peanut Butter Smoothie Bowl fresh for the best flavor and texture; it’s best served immediately after preparing.

Fridge: If you need to store it, keep the smoothie base in an airtight container in the fridge for up to 24 hours. However, the texture may not be as creamy.

Smoothie Components: You can prep smoothie ingredients in advance, such as blending the yogurt, banana, and peanut butter. Keep them separate and store in the fridge for up to 2 days before blending for freshness.

Reheating: Avoid reheating a smoothie bowl, as it’s best enjoyed cold. If you have leftovers, consider turning them into a smoothie by adding a splash of milk and re-blending.

Chocolate Peanut Butter Smoothie Bowl Variations

Feel free to get creative with your Chocolate Peanut Butter Smoothie Bowl—each twist brings encouragement to your palate!

  • Nut-Free: Swap peanut butter for sunflower seed butter, making it perfect for those with nut allergies. This substitution maintains that creamy texture while offering a deliciously unique taste.
  • Dairy-Free: Use coconut yogurt instead of Greek yogurt for a dairy-free option. This gives the smoothie a tropical vibe and a rich mouthfeel that pairs wonderfully with chocolate.
  • Extra Greens: Add a handful of fresh spinach or kale for an extra nutrient boost without sacrificing flavor. Your smoothie will still remain decadent while sneaking in those greens!
  • Banana-Free: Swap the banana for a frozen avocado to keep the creaminess but cut down on sugar—avocados add healthy fats while remaining subtle in flavor.
  • Flavor Boost: Experiment with flavored Greek yogurt, such as honey or chocolate, to elevate the overall taste even further. This provides new layers of deliciousness with each spoonful.
  • Allergy-Friendly: Mix in chia seeds or ground flax seeds for an added texture and an Omega-3 boost. This not only enhances nutrition but adds a pleasant crunch.
  • Spicy Kick: Looking for a bit of heat? Add a pinch of cayenne pepper to your blend for an unexpected twist. It creates a delightful contrast with the sweetness of the chocolate.
  • Chocolate Lovers: For an extra chocolatey treat, include chocolate protein powder or add cacao nibs as a topping. Indulgence at its finest!

Feel inspired to make your own unique version of this delightful Chocolate Peanut Butter Smoothie Bowl—your creativity will surely shine through with each delicious bite!

Make Ahead Options

These Chocolate Peanut Butter Smoothie Bowls are perfect for meal prep enthusiasts! You can prepare the smoothie base—1 cup of vanilla low-fat Greek yogurt, 1 sliced frozen banana, 2 tablespoons of peanut butter, and 1 tablespoon of cocoa powder—up to 24 hours in advance. Simply blend your ingredients as directed, pour into a bowl, cover, and refrigerate. For optimal freshness, store toppings like sliced bananas and granola separately and add them just before serving to maintain their crunchiness. When you're ready to enjoy, simply drizzle with melted peanut butter and indulge in a nutritious breakfast that’s just as delicious as when freshly made!

Expert Tips for Chocolate Peanut Butter Smoothie Bowl

  • High-Powered Blender: Use a high-powered blender for a creamy texture; this ensures the frozen banana and yogurt blend seamlessly without chunks.
  • Prep Ahead: Save time by preparing the smoothie base the night before; blend and store in the fridge, adding fresh toppings just before serving.
  • Adjusting Texture: If using fresh bananas, add a couple more ice cubes to maintain a thick consistency typical of a Chocolate Peanut Butter Smoothie Bowl.
  • Flavor Variations: For different tastes, experiment with flavored Greek yogurt or add spinach for nutty greens without altering the taste.
  • Garnishing Tips: Get creative with toppings! A sprinkle of chia seeds or a few berries can enhance flavor and nutrition beautifully.

Chocolate Peanut Butter Smoothie Bowl Recipe FAQs

What should I look for when selecting bananas for my smoothie?
Absolutely! When choosing bananas, look for ones that are slightly speckled with brown spots; this indicates they are ripe and will provide the sweetest flavor. Avoid bananas with dark spots all over, as they may be overripe and mushy.

How should I store my Chocolate Peanut Butter Smoothie Bowl?
To keep your smoothie bowl fresh, consume it immediately for the best texture and flavor! If you have leftovers, store the smoothie in an airtight container in the fridge for up to 24 hours, though keep in mind that the texture may not be as creamy.

Can I freeze the smoothie bowl for later?
Certainly! To freeze your Chocolate Peanut Butter Smoothie Bowl, pour the blended smoothie into freezer-safe containers, leaving some space for expansion, and seal tightly. It can be stored in the freezer for up to 3 months. To enjoy later, let it thaw in the fridge overnight before consuming, and if needed, re-blend with a splash of milk for a smoother consistency.

What if my smoothie bowl is too thick or too thin?
Not to worry! If your smoothie bowl is too thick, simply add a splash of milk or water and blend again until you reach your desired consistency. On the other hand, if it’s too thin, you can add a little more frozen banana or even some ice cubes to thicken it up.

Is this recipe suitable for people with nut allergies?
Very much so! If you or someone you’re serving has nut allergies, feel free to substitute the peanut butter with sunflower seed butter or another nut-free alternative. Just look for varieties that align with the dietary needs of those enjoying the dish.

Can I prep smoothie components in advance?
Absolutely! For convenience, you can prep the smoothie base components by mixing the yogurt, banana, and peanut butter in advance and storing them separately in the fridge for up to 2 days. This makes mornings less hectic, just blend before serving!

Chocolate Peanut Butter Smoothie Bowl

Decadent Chocolate Peanut Butter Smoothie Bowl Bliss

Enjoy a guilt-free Chocolate Peanut Butter Smoothie Bowl, packed with protein and deliciousness, perfect for busy mornings.
Print Recipe Pin Recipe
Prep Time 2 minutes mins
Total Time 2 minutes mins
Servings: 1 bowl
Course: Breakfast
Cuisine: American
Calories: 400
Ingredients Equipment Method Nutrition Notes

Ingredients
  

For the Smoothie Base
  • 1 cup Vanilla Low-Fat Greek Yogurt Provides a luscious, creamy foundation and is packed with protein.
  • 1 Banana (Sliced and Frozen) Adds natural sweetness and creaminess; frozen yields a thicker texture.
  • 2 tablespoons Peanut Butter Infuses rich flavor and healthy fats.
  • 1 tablespoon Cocoa Powder Delivers a chocolatey essence without added sugars.
  • 1 handful Ice Optional, enhances thickness.
For the Toppings
  • 1 Sliced Bananas Brightens the bowl with freshness.
  • 1 Chopped Chocolate Elevates the chocolate experience.
  • Granola Adds delightful crunch.
  • 1 tablespoon Drizzled Peanut Butter Enhances flavor and presentation.

Equipment

  • Blender

Method
 

Step‑by‑Step Instructions
  1. In a powerful blender, combine vanilla low-fat Greek yogurt, sliced frozen banana, peanut butter, unsweetened cocoa powder, and a handful of ice if desired. Blend on high for about 30 seconds, until smooth and creamy.
  2. Carefully pour the smoothie base into a bowl, using a spatula to scrape down any remaining mixture from the blender.
  3. Artfully arrange your toppings—slice up a fresh banana, chop some chocolate, and sprinkle your favorite granola over the smoothie base.
  4. For an extra touch, melt a tablespoon of peanut butter in the microwave until pourable, then drizzle it over the top of your smoothie bowl.
  5. Serve your Chocolate Peanut Butter Smoothie Bowl immediately while fresh and creamy.

Nutrition

Serving: 1bowlCalories: 400kcalCarbohydrates: 38gProtein: 28gFat: 18gSaturated Fat: 3gPolyunsaturated Fat: 1gMonounsaturated Fat: 8gCholesterol: 10mgSodium: 180mgPotassium: 800mgFiber: 6gSugar: 10gVitamin A: 200IUVitamin C: 10mgCalcium: 200mgIron: 2mg

Notes

Experiment with different toppings to personalize your smoothie bowl. Enjoy fresh for the best flavor and texture.

Tried this recipe?

Let us know how it was!

Revitalize Mornings with a Green Protein Smoothie Bowl

February 16, 2026 by Grace Snow Leave a Comment

As I stood in my kitchen, the vibrant greens of fresh spinach and kale called out to me like an old friend. That’s how my Green Protein Smoothie Bowl came to life, bursting with nutritious goodness and energy—exactly what I needed to kick-start my morning! One of the best things about this bowl is how quick it is to prepare; in less than 10 minutes, you can whip up a breakfast that not only satisfies your taste buds but also fuels your day. Plus, it’s endlessly customizable—throw in your favorite toppings for a fun twist! If you’re ready to elevate your breakfast game and say goodbye to bland cereals, you’ll love this easy recipe. So, what will you add to your Green Protein Smoothie Bowl? Let’s dive in!

Why is This Smoothie Bowl a Must-Try?

Energy-Boosting: Packed with vibrant greens like spinach and kale, this bowl fuels your morning with essential nutrients, keeping you energized throughout the day.

Quick Prep: With just a few minutes needed, you can effortlessly create a delicious breakfast—a perfect choice for busy weekdays or lazy weekends.

Customizable Delight: Make it your own! Add your favorite toppings, whether it’s fresh fruit or nuts, to create endless variations that'll satisfy your cravings.

Nutrient-Rich: Infused with protein, this smoothie bowl not only fills you up but supports your health goals, making it a smart choice for anyone exhausted by fast food options.

Crowd Pleaser: Everyone will love this refreshing treat! It’s a fantastic way to introduce your family to more greens, just like in my other favorites like the Pitaya Smoothie Bowl or the Acai Bowl Nutritious.

Dive into a bowl of energy and flavor, and elevate your breakfast routine today!

Green Protein Smoothie Bowl Ingredients

For the Base

  • Coconut Milk – Adds creaminess and a subtle sweetness; substitute with almond or oat milk for a different flavor profile.
  • Baby Spinach – Provides vibrant color and essential vitamins; can be swapped with kale or other leafy greens, but taste may vary.
  • Frozen Mango – Offers a tropical sweetness and creamy texture; fresh mango may be used if available, but it will alter the consistency.
  • Frozen Zucchini Slices – Adds fiber and thickness without altering flavor; cauliflower may be used as a low-calorie alternative.
  • Frozen Avocado – Enhances creaminess and provides healthy fats; fresh avocado can be substituted, but frozen gives a better consistency.
  • Vanilla Protein Powder – Boosts protein content and flavor; vegan protein powder is a great alternative for those with dietary restrictions.

For Toppings

  • Chia Seeds – Add a nourishing crunch and omega-3s; they also look beautiful sprinkled on top.
  • Raspberries – Provide a burst of tartness and color; swap for strawberries or blackberries for a different taste.
  • Granola – Enhances texture and adds crunch; opt for a gluten-free variety if needed.
  • Other Options – Experiment with nuts, seeds, nut butter, coconut flakes, bananas, berries, yogurt, cereal, or cacao nibs for even more deliciousness.

This Green Protein Smoothie Bowl is as delightful to make as it is to eat! Enjoy the burst of flavors while feeding both your body and soul.

Step‑by‑Step Instructions for Green Protein Smoothie Bowl

Step 1: Blend the Base Ingredients
In a high-speed blender, combine 1 cup of coconut milk, 2 cups of fresh baby spinach, 1 cup of frozen mango chunks, 1 cup of frozen zucchini slices, and 1/2 cup of frozen avocado. Add 1 scoop of vanilla protein powder for an extra protein boost. Secure the lid and blend on high for about 30–60 seconds until everything is smoothly combined, and you can no longer see any green leafy bits.

Step 2: Adjust Consistency
After blending, take a moment to check the texture of your Green Protein Smoothie Bowl mixture. If it appears too thick, add a splash more coconut milk and blend again for an additional 10–15 seconds. You want it to be creamy yet thick enough to hold your toppings. Aim for a luscious green consistency that resembles soft serve ice cream.

Step 3: Serve the Smoothie Bowl
Once blended to perfection, pour the creamy green smoothie into a wide, shallow bowl. It should create a nice wave pattern as it settles. To turn this into an inviting Green Protein Smoothie Bowl, smooth the top with a spoon, creating a canvas for your toppings.

Step 4: Add Toppings
Now for the fun part—adorn your smoothie bowl! Sprinkle a tablespoon of chia seeds in the center, add a handful of fresh raspberries for a pop of color, and generously scatter some granola around the edges for crunch. You can also add sliced bananas, coconut flakes, or nuts to customize your bowl to your liking.

Step 5: Savor the Freshness
Your Green Protein Smoothie Bowl is best enjoyed immediately while it’s fresh and flavorful. Grab a spoon, dig in, and relish every bite of this nutritious delight! The combination of creamy base and crunchy toppings will leave you energized and ready to tackle the day.

Green Protein Smoothie Bowl Variations

Feel free to play around with flavors and textures in your Green Protein Smoothie Bowl for a delightful twist every time!

  • Nut-Free: Substitute nut milk or protein powder with seed-based alternatives like sunflower seed butter or pumpkin seed protein for a nut-free treat.

  • Extra Creamy: Toss in a scoop of nut butter, like almond or cashew, to make your smoothie even richer and creamier—perfect for those nut lovers at heart!

  • Fruity Swaps: Replace frozen mango with fresh bananas or pineapple for a refreshing twist. The natural sweetness adds a delightful flavor that brightens your morning.

  • Protein Power Boost: Add a tablespoon of chia or hemp seeds to boost your smoothie bowl with extra protein and omega-3s. These tiny powerhouses take your energy to a whole new level!

  • Chocolate Indulgence: Mix in cocoa powder or cacao nibs for a chocolate-flavored twist. This variation turns your smoothie bowl into a luscious treat that feels like dessert.

  • Spicy Kick: Add a pinch of cayenne pepper or fresh ginger for a spicy zing! It not only heightens the flavor but also gives a delightful warmth that wakes up your palate.

  • Green Superfood: Enhance the nutrient boost by incorporating a teaspoon of spirulina or chlorella. This addition turns your bowl into a superfood powerhouse, brimming with vitamins and minerals.

  • Topping Play: Switch up your toppings from granola to homemade hemp seed clusters or even a sprinkle of coconut flakes for a tropical vibe. These little changes keep things exciting and delicious!

Experiment with these variations, and you might just discover your new favorite way to enjoy your Green Protein Smoothie Bowl. For other delicious ideas, consider trying the Lemon Ricotta Protein Pancakes or the hearty Coconutty Beans Greens for a full breakfast spread!

What to Serve with Green Protein Smoothie Bowl

Elevate your morning ritual with delightful pairings that enhance the fresh and vibrant flavors of a smooth, nourishing bowl.

  • Whole Grain Toast: This crunchy addition complements the creamy texture, providing a hearty base for avocado or nut butter spreads. Perfect for a well-rounded breakfast!

  • Yogurt Parfait: Layer creamy dairy-free yogurt with granola and fresh berries for a delightful mix of flavors and textures. It's a refreshing sidekick to your smoothie bowl.

  • Fruit Salad: A colorful medley of fresh fruits adds sweetness and bright flavors that harmonize with the smoothie. This refreshing side keeps everything light and uplifting.

  • Oatmeal: A warm bowl of oatmeal can balance the refreshing smoothie, adding a comforting, hearty element. Dress it up with cinnamon or nut butter for extra flair.

  • Nuts and Seeds Mix: A crunchy trail mix of almonds, walnuts, and pumpkin seeds perfectly complements the creamy bowl. It’s a fun way to add extra nutrients and a satisfying crunch.

  • Herbal Tea: Pair your smoothie bowl with a warm infusion, like peppermint or chamomile, for a soothing and aromatic touch that enhances the overall experience.

  • Coconut Water: Hydrate and refresh with this naturally sweet drink that echoes the tropical themes of the smoothie, adding an exotic flair to your meal.

  • Chia Seed Pudding: This can be prepared the night before for a delightful and nutritious side. Its jelly-like texture contrasts beautifully with your smooth bowl.

  • Dark Chocolate Chunks: For a sweet twist, add a few rich dark chocolate chunks on the side. The slight bitterness complements the smoothie’s tropical sweetness perfectly!

Make Ahead Options

These Green Protein Smoothie Bowls are perfect for meal prep enthusiasts! You can prep the smoothie base up to 24 hours in advance by blending together the coconut milk, baby spinach, frozen mango, frozen zucchini slices, frozen avocado, and protein powder. Store the mixture in an airtight container in the refrigerator to keep it fresh and flavorful. When you're ready to serve, simply stir the smoothie to restore its creamy consistency—if it thickens, add a splash of coconut milk and blend for a few seconds. Add your favorite toppings just before serving to ensure they remain crunchy and vibrant, providing you with a delicious, nutritious breakfast ready in minutes!

Expert Tips for Your Green Protein Smoothie Bowl

  • High-Speed Blender: Use a high-speed blender for the creamiest texture. This ensures all ingredients blend smoothly without any leafy bits remaining.

  • Thick or Thin: Adjust the thickness by adding more coconut milk if it's too thick, or frozen fruits for a thicker consistency. Find the right balance that suits your taste!

  • Freshness Is Key: Enjoy your Green Protein Smoothie Bowl immediately for optimal flavor and freshness. The longer it sits, the more the texture can change.

  • Colorful Toppings: Get creative with toppings! Use a variety of fruits, seeds, and nuts to make your bowl visually appealing and packed with nutrients.

  • Batch Prep: If you’re in a rush, prep your base ingredients in advance and freeze them in portions, making morning prep a breeze!

How to Store and Freeze Green Protein Smoothie Bowl

Fridge: Store any leftovers in an airtight container for up to 24 hours. Keep toppings separate and add them just before serving for the best flavor.

Freezer: For longer storage, freeze the smoothie base in portion-sized containers for up to 1 month. When ready to enjoy, simply thaw overnight in the fridge or re-blend with a bit of coconut milk.

Reheating: If it thickens after freezing, add a splash of coconut milk and blend until smooth again. It’s best to enjoy freshly made, but these options allow you to savor your Green Protein Smoothie Bowl later!

Green Protein Smoothie Bowl Recipe FAQs

How do I select the ripest ingredients for my Green Protein Smoothie Bowl?
Absolutely! When choosing fruits like mango and avocado, look for slight give when gently pressed—this indicates ripeness. Mango should have a sweet aroma, while avocados are perfect when they feel slightly soft but not mushy. For the spinach, fresh leaves should be vibrant green with no dark spots or wilting.

How should I store my Green Protein Smoothie Bowl leftovers?
You can store any leftover smoothie in an airtight container in the fridge for up to 24 hours. However, to maintain its fresh flavor and texture, I recommend consuming it immediately. If needed, keep your toppings separate and add them just before eating for the best experience.

Can I freeze my Green Protein Smoothie Bowl?
Yes! Freezing is a great option. Pour the smoothie base into portion-sized containers and freeze for up to 1 month. When you're ready to enjoy it, just thaw it overnight in the fridge. To re-blend, add a splash of coconut milk for a smooth consistency if it thickens after freezing.

What if my smoothie is too thick?
Very! If you find your smoothie mixture is too thick, you can easily adjust the consistency. Simply add a bit more coconut milk, about 1-2 tablespoons at a time, then blend again until you reach your desired creaminess. You want it to hold toppings but still be easy to eat, like soft serve ice cream!

Are there any dietary considerations for my Green Protein Smoothie Bowl?
Definitely! This recipe is vegan, gluten-free, and dairy-free, making it suitable for various dietary restrictions. However, always check for allergies when adding toppings—nuts and seeds are common allergens. If you're preparing this for pets, keep in mind that ingredients like avocado can be harmful; stick to pet-safe fruits when sharing.

How can I customize my Green Protein Smoothie Bowl?
The more the merrier! You can easily customize by adding a scoop of cocoa powder for a chocolate twist or swap fruits based on preference, like bananas or pineapples. You can even make it more filling by incorporating oats or nut butter. It’s a fun way to tailor each bowl to your taste!

Revitalize Mornings with a Green Protein Smoothie Bowl

Kick-start your day with a nutritious Green Protein Smoothie Bowl, packed with energizing greens and customizable toppings.
Print Recipe
Prep Time 10 minutes mins
Total Time 10 minutes mins
Servings: 2 bowls
Course: Breakfast
Cuisine: Healthy
Calories: 300
Ingredients Equipment Method Nutrition Notes

Ingredients
  

For the Base
  • 1 cup Coconut Milk Adds creaminess and a subtle sweetness; substitute with almond or oat milk for a different flavor profile.
  • 2 cups Baby Spinach Provides vibrant color and essential vitamins; can be swapped with kale or other leafy greens, but taste may vary.
  • 1 cup Frozen Mango Offers a tropical sweetness and creamy texture; fresh mango may be used if available, but it will alter the consistency.
  • 1 cup Frozen Zucchini Slices Adds fiber and thickness without altering flavor; cauliflower may be used as a low-calorie alternative.
  • 1/2 cup Frozen Avocado Enhances creaminess and provides healthy fats; fresh avocado can be substituted, but frozen gives a better consistency.
  • 1 scoop Vanilla Protein Powder Boosts protein content and flavor; vegan protein powder is a great alternative for those with dietary restrictions.
For Toppings
  • 1 tablespoon Chia Seeds Add a nourishing crunch and omega-3s; they also look beautiful sprinkled on top.
  • 1 handful Raspberries Provide a burst of tartness and color; swap for strawberries or blackberries for a different taste.
  • 1 cup Granola Enhances texture and adds crunch; opt for a gluten-free variety if needed.
  • Other Options Experiment with nuts, seeds, nut butter, coconut flakes, bananas, berries, yogurt, cereal, or cacao nibs for even more deliciousness.

Equipment

  • High-speed blender

Method
 

Step-by-Step Instructions
  1. Blend the Base Ingredients: In a high-speed blender, combine coconut milk, fresh baby spinach, frozen mango chunks, frozen zucchini slices, frozen avocado, and vanilla protein powder. Blend on high for about 30–60 seconds until smooth.
  2. Adjust Consistency: Check the texture of your mixture. If too thick, add a splash more coconut milk and blend for 10–15 seconds to achieve a creamy yet thick consistency.
  3. Serve the Smoothie Bowl: Pour the blended smoothie into a wide, shallow bowl and smooth the top with a spoon.
  4. Add Toppings: Sprinkle chia seeds, add raspberries, and scatter granola around the edges. Customize with sliced bananas or coconut flakes as desired.
  5. Savor the Freshness: Enjoy the smoothie bowl immediately while fresh for optimal flavor and texture.

Nutrition

Serving: 1bowlCalories: 300kcalCarbohydrates: 35gProtein: 10gFat: 15gSaturated Fat: 8gPolyunsaturated Fat: 1gMonounsaturated Fat: 6gSodium: 150mgPotassium: 600mgFiber: 8gSugar: 10gVitamin A: 2500IUVitamin C: 25mgCalcium: 150mgIron: 2mg

Notes

Use a high-speed blender for the best texture and adjust thickness as needed. Enjoy immediately for freshness.

Tried this recipe?

Let us know how it was!

Cinnamon Sugar Donut Bread That'll Brighten Your Mornings

February 12, 2026 by Grace Snow Leave a Comment

As the aroma of baked goods wafts through the kitchen, nothing ignites nostalgia quite like the scent of warm cinnamon sugar. Today, I’m thrilled to share my beloved Cinnamon Sugar Donut Bread, a delightful creation that masterfully blends the comfort of traditional donuts with the heartiness of homemade bread. This easy-to-prepare recipe not only makes for a family-friendly breakfast but also doubles as a sweet snack or dessert. Each slice is a tender, fluffy treasure, enveloped in a sugary cinnamon crust that will have everyone asking for seconds. Plus, the best part? You can easily customize it by adding nuts or chocolate chips for that extra personal twist. Are you ready to fill your home with this irresistible scent and treat your loved ones to a slice (or two)? Let’s get baking!

Why is Cinnamon Sugar Donut Bread a Must-Try?

Irresistible Aroma: The moment this bread begins to bake, your kitchen will be filled with the warm, inviting scent of cinnamon and sugar, making it hard to resist.

Easy-to-Make: Perfect for all skill levels, this recipe doesn’t require advanced baking techniques—just simple mixing and pouring.

Customization Options: Feel free to get creative! Add your favorite nuts or chocolate chips for a delicious twist, ensuring everyone finds their perfect slice.

Family-Friendly: Whether for breakfast or dessert, it's a hit with kids and adults alike, making it an ideal choice for family gatherings.

Versatile Serving Ideas: Serve it warm, toasted with a bit of butter, or transform it into French toast—versatility at its best!

Indulging in each slice of this Cinnamon Sugar Donut Bread will not only brighten your mornings but leave lasting memories with every bite.

Cinnamon Sugar Donut Bread Ingredients

• Get ready to bake with these essentials!

For the Bread
• All-Purpose Flour – Provides structure and body to the bread; use gluten-free flour for a gluten-free version.
• Baking Powder – Acts as a leavening agent; crucial for achieving that fluffy texture.
• Salt – Enhances flavor while balancing sweetness; don’t skip it!
• Ground Cinnamon – Delivers that signature cinnamon flavor reminiscent of delicious donuts; increase for more intensity.
• Granulated Sugar – Sweetens the bread; can be reduced or substituted with a sugar alternative if needed.
• Unsalted Butter – Brings richness and moisture; swap with coconut oil for a dairy-free version.
• Eggs – Add moisture and structure; use flax eggs or applesauce for a vegan alternative.
• Milk – Contributes to softness; any milk type (dairy or non-dairy) works great!
• Vanilla Extract – Adds depth of flavor; for a twist, substitute with almond extract.

For the Topping
• Additional Sugar and Cinnamon – Creates that delightful, sweet crust; adjust based on your taste preference.

This irresistible Cinnamon Sugar Donut Bread is bound to become a favorite in your household!

Step‑by‑Step Instructions for Cinnamon Sugar Donut Bread

Step 1: Preheat and Prepare
Begin by preheating your oven to 350°F (175°C). While it's warming, grease a 9x5-inch loaf pan with butter or non-stick spray to ensure your Cinnamon Sugar Donut Bread slides out easily after baking. This step is crucial for achieving that perfect, golden crust.

Step 2: Combine Dry Ingredients
In a large mixing bowl, whisk together 2 cups of all-purpose flour, 2 teaspoons of baking powder, 1/2 teaspoon of salt, and 1 tablespoon of ground cinnamon until well combined. This mixture will create a robust base for your bread, providing both structure and flavor. Set it aside as you move on to the wet ingredients.

Step 3: Cream Butter and Sugar
In a separate mixing bowl, use a hand mixer or stand mixer to cream together 1/2 cup of softened unsalted butter and 1 cup of granulated sugar. Beat the mixture on medium speed until it becomes light and fluffy, approximately 3-4 minutes. This aeration step is critical in creating a tender crumb for your Cinnamon Sugar Donut Bread.

Step 4: Incorporate Eggs and Wet Ingredients
Add 2 large eggs to the butter-sugar mixture, one at a time, mixing well after each addition. Then stir in 1/2 cup of milk and 1 teaspoon of vanilla extract until the mixture is smooth. This combination of wet ingredients adds moisture and richness to your bread, enhancing its flavor and texture.

Step 5: Combine Wet and Dry Ingredients
Gently combine the dry ingredients with the wet mixture using a spatula or wooden spoon. Mix until just combined, taking care not to overmix; a few lumps are okay. This step ensures your Cinnamon Sugar Donut Bread will rise beautifully, creating that soft, fluffy texture that everyone loves.

Step 6: Layer the Batter
Pour half of the batter into your prepared loaf pan, spreading it evenly. In a small bowl, mix together 1/4 cup of granulated sugar with 1 tablespoon of cinnamon for the topping, and sprinkle half of this mixture over the batter. This creates a luscious sweet layer within your bread.

Step 7: Finish Adding Batter
Pour the remaining batter on top of the cinnamon sugar layer, smoothing it out carefully. Then sprinkle the rest of the cinnamon sugar mixture on top, ensuring an even coating. Use a knife to swirl gently through the batter for a beautiful marbled effect that enhances both appearance and flavor.

Step 8: Bake to Perfection
Place the loaf pan in your preheated oven and bake for 50-60 minutes. Keep a close eye on it, and check for doneness by inserting a toothpick into the center; it should come out clean or with a few crumbs. This will ensure your Cinnamon Sugar Donut Bread is perfectly baked and ready for cooling.

Step 9: Cool and Serve
Once done, remove the bread from the oven and allow it to cool in the pan for about 10 minutes. Then, gently transfer the loaf to a wire rack to cool completely. This cooling step is essential for a stable loaf, adorning your kitchen with a delicious aroma as it rests and waits to be sliced.

Make Ahead Options

These Cinnamon Sugar Donut Bread preparations are perfect for meal prep enthusiasts! You can make the batter up to 24 hours in advance by mixing all the dry ingredients and wet ingredients separately, then combining them just before baking. To maintain quality, simply refrigerate the prepared batter tightly covered until you’re ready to bake. You can also prepare the cinnamon sugar topping ahead of time and store it in an airtight container for up to 3 days. When you're ready to enjoy this delightful treat, just pour the batter into your loaf pan, sprinkle with the topping, and bake until golden—resulting in the same scrumptious flavor with minimal effort on busy mornings!

Cinnamon Sugar Donut Bread Variations

Feel free to get creative with your Cinnamon Sugar Donut Bread—your taste buds will thank you!

  • Nutty Delight: Add ½ cup of your favorite nuts, like walnuts or pecans, for a crunchy texture. The warmth of the cinnamon pairs beautifully with the nuttiness for a delightful contrast.

  • Chocoholic Indulgence: Incorporate ½ cup of chocolate chips into the batter for a decadent twist. The melty chocolate mingles with the cinnamon sugar, creating a rich, heavenly flavor.

  • Glazed Goodness: Drizzle a simple glaze made from powdered sugar and milk over the cooled bread for a sweet finish. This extra layer of sweetness adds a beautiful shine and flavor boost.

  • Banana Boost: Mash in one ripe banana into the wet ingredients for extra moisture and a subtle fruitiness. This adds a lovely twist that balances well with the cinnamon.

  • Pumpkin Spice: Substitute a portion of the milk with pumpkin puree and enhance the spices with a dash of nutmeg for a fall-inspired treat. This version brings the seasonal flavors of pumpkin pie right into your breakfast table!

  • Orange Zest: Stir in a teaspoon of orange zest for a bright, citrusy note that complements the cinnamon perfectly. This refreshing addition brings a lively flavor to each slice.

  • Maple Sweetener: Replace granulated sugar with maple syrup or brown sugar for a richer, caramel-like flavor. This swap creates an extra layer of warmth in every bite, reminiscent of cozy mornings.

  • Spicy Kick: For those who crave a little heat, add a pinch of cayenne pepper or a sprinkle of ginger to the batter. This unexpected twist will excite your palate and keep everyone guessing the secret ingredient!

Explore these delightful variations to make your Cinnamon Sugar Donut Bread uniquely yours! And if you're looking for more unique flavor combinations, check out my Pumpkin Cinnamon Roll recipes for inspiration.

What to Serve with Cinnamon Sugar Donut Bread

Imagine gatherings filled with laughter and the delightful fragrance of freshly baked bread wafting through the air.

  • Coffee or Warm Milk: A soothing cup enhances the comforting flavors, making it the perfect start to your morning.
  • Greek Yogurt Parfait: Layer with fresh fruits and granola for a refreshing contrast, adding both creaminess and crunch.
  • Strawberry Jam: Spread a bit of this sweet topping on warm slices to create a deliciously fruity twist. Spread the warmth of love alongside the warmth of the bread!
  • Fresh Fruit Salad: Bright, juicy fruits add a burst of freshness that beautifully complements the sweetness of the bread.
  • Maple Syrup Glaze: Drizzling a simple maple syrup over warm slices provides a decadent, sweet touch that elevates every bite.
  • Honey Butter: Whipped honey butter adds a creamy, sweet richness that perfectly harmonizes with the cinnamon sugar flavors.
  • Ice Cream: Serve warm slices alongside a scoop of vanilla or cinnamon ice cream for a delightful dessert experience.
  • Caramel Sauce: A drizzle of rich caramel takes this classic bread to new heights, enticing your sweet tooth!
  • Chai Latte: A warming drink with similar spice notes to the bread enhances the overall flavor experience—a perfect pairing!
  • Chocolate Milkshake: For a fun treat, a creamy chocolate shake adds a nostalgic twist that kids will love.

These serving suggestions will elevate your Cinnamon Sugar Donut Bread experience, transforming each meal into a cherished memory!

How to Store and Freeze Cinnamon Sugar Donut Bread

Room Temperature: Store your Cinnamon Sugar Donut Bread wrapped in plastic wrap or in an airtight container at room temperature for up to 3 days to keep it fresh and delicious.

Fridge: If you need to extend storage, place the wrapped bread in the fridge for up to 1 week. Be sure to let it come to room temperature before serving for the best texture.

Freezer: For longer preservation, freeze slices of Cinnamon Sugar Donut Bread in a freezer-safe bag or container for up to 3 months. To enjoy, simply thaw at room temperature or pop in the toaster.

Reheating: Reheat slices in the oven or toaster for a few minutes to revive the soft texture and warm aroma, bringing back that delicious freshly-baked taste.

Expert Tips for Cinnamon Sugar Donut Bread

  • Room Temperature Eggs: Make sure your eggs are at room temperature before mixing, as this helps achieve better incorporation and a fluffier texture in your Cinnamon Sugar Donut Bread.

  • Avoid Overmixing: Gently combine the wet and dry ingredients. Overmixing can lead to a dense bread, so mix just until identified lumps are gone for a light, fluffy loaf.

  • Check for Doneness: Use a toothpick to ensure your bread is baked through. It should come out clean or with a few moist crumbs to avoid any gummy centers.

  • Customize Wisely: When adding nuts or chocolate chips, slightly reduce the sugar in the base to balance the sweetness. Making these small adjustments can cater to different taste preferences!

  • Cool Properly: Allow the bread to cool in the pan for 10 minutes before transferring it to a wire rack. This helps maintain structure and prevents sticking, ensuring a beautiful loaf!

Cinnamon Sugar Donut Bread Recipe FAQs

How do I choose ripe ingredients for my Cinnamon Sugar Donut Bread?
Absolutely! For the best results, use fresh ingredients. Choose all-purpose flour that is free from clumps or moisture. Ensure your baking powder is still active (check the expiration date). Use room temperature eggs for easy mixing, and look for unsalted butter that is soft but not melted. Fresh, aromatic cinnamon will give your bread that delicious flavor, enhancing the overall taste.

What’s the best way to store Cinnamon Sugar Donut Bread?
Very! Store your Cinnamon Sugar Donut Bread wrapped tightly in plastic wrap or in an airtight container at room temperature for up to 3 days. If you'd like to keep it longer, place the wrapped loaf in the fridge for up to 1 week. Just remember to let it come back to room temperature before serving to maintain that wonderful texture!

Can I freeze Cinnamon Sugar Donut Bread? If so, how?
Of course! To freeze your Cinnamon Sugar Donut Bread, slice it first, as this makes it easy to thaw only what you need. Place the slices in a freezer-safe container or bag, removing as much air as possible. It can be stored in the freezer for up to 3 months. When you’re ready to enjoy a slice, simply thaw it at room temperature or pop it in the toaster for a few minutes. It’s like enjoying it fresh!

What should I do if my bread doesn't rise properly?
Oh, that can be troublesome! If your Cinnamon Sugar Donut Bread doesn’t rise as expected, the most common cause is old or expired baking powder. Make sure to check the expiration date regularly. Another reason could be overmixing the batter; this can lead to a denser bread. To resolve this, adhere to the mixing instructions, only combining until everything is just incorporated. For best results, keep that gentle touch!

Is this recipe suitable for people with dietary restrictions?
Yes, indeed! This Cinnamon Sugar Donut Bread can be customized to fit various dietary needs. For a gluten-free version, substitute all-purpose flour with a gluten-free flour blend. For dairy-free options, use coconut oil instead of butter and almond or oat milk in place of dairy milk. If someone is vegan, replace the eggs with flax eggs (1 tablespoon ground flaxseed mixed with 2.5 tablespoons of water for one egg) or unsweetened applesauce. Always make sure to verify ingredients when catering to specific allergies or sensitivities.

Cinnamon Sugar Donut Bread

Cinnamon Sugar Donut Bread That'll Brighten Your Mornings

Cinnamon Sugar Donut Bread is a delightful blend of traditional donuts and hearty bread, perfect for breakfast or dessert.
Print Recipe Pin Recipe
Prep Time 15 minutes mins
Cook Time 1 hour hr
Cooling Time 10 minutes mins
Total Time 1 hour hr 25 minutes mins
Servings: 8 slices
Course: Dessert
Calories: 200
Ingredients Equipment Method Nutrition Notes

Ingredients
  

For the Bread
  • 2 cups all-purpose flour use gluten-free flour for a gluten-free version
  • 2 teaspoons baking powder acts as a leavening agent
  • 1/2 teaspoon salt enhances flavor
  • 1 tablespoon ground cinnamon increase for more intensity
  • 1 cup granulated sugar can be reduced or substituted
  • 1/2 cup unsalted butter swap with coconut oil for dairy-free
  • 2 large eggs use flax eggs for vegan
  • 1/2 cup milk any milk type works
  • 1 teaspoon vanilla extract substitute with almond extract for a twist
For the Topping
  • 1/4 cup granulated sugar additionally needed for topping
  • 1 tablespoon ground cinnamon to create a sweet crust

Equipment

  • 9x5-inch loaf pan
  • Mixing bowls
  • Hand mixer or stand mixer
  • Whisk
  • Spatula

Method
 

Step-by-Step Instructions
  1. Preheat your oven to 350°F (175°C) and grease a 9x5-inch loaf pan.
  2. Whisk together flour, baking powder, salt, and ground cinnamon in a bowl.
  3. Cream butter and sugar until light and fluffy, about 3-4 minutes.
  4. Incorporate eggs one at a time, then mix in milk and vanilla until smooth.
  5. Gently combine dry and wet ingredients until just mixed; avoid overmixing.
  6. Pour half of the batter into the loaf pan, sprinkle half of the cinnamon sugar on top.
  7. Add remaining batter, sprinkle rest of topping, and swirl gently with a knife.
  8. Bake for 50-60 minutes, checking with a toothpick for doneness.
  9. Allow to cool in the pan for 10 minutes, then transfer to a wire rack.

Nutrition

Serving: 1sliceCalories: 200kcalCarbohydrates: 30gProtein: 3gFat: 9gSaturated Fat: 5gCholesterol: 40mgSodium: 150mgPotassium: 100mgFiber: 1gSugar: 10gVitamin A: 300IUCalcium: 50mgIron: 0.5mg

Notes

Ensure eggs are at room temperature for better incorporation. Avoid overmixing to keep the bread fluffy. Check for doneness with a toothpick, and allow proper cooling to maintain structure.

Tried this recipe?

Let us know how it was!
  • « Previous Page
  • 1
  • 2
  • 3
  • 4
  • 5
  • 6
  • …
  • 17
  • Next Page »

Welcome!

Hi, I’m Grace, a Sydney-based home cook with a passion for bold flavors and trending ingredients. Whether you’re a busy beginner or a seasoned foodie, you’ll find dishes here that are fresh, fun, and full of flavor.

More about me

Popular Recipes

  • Cheesy Chicken Garlic Bread Sandwich
    Cheesy Chicken Garlic Bread Sandwich for Cozy Family Moments
  • Easy Chicken Ranch Wraps
    Easy Chicken Ranch Wraps: Quick, Creamy & Totally Satisfying
  • Chicken Caesar Sandwiches
    Delicious Chicken Caesar Sandwiches for Quick Comfort Food
  • best Cuban sandwich
    The Best Cuban Sandwich You’ll Want Every Weeknight!

Footer

↑ back to top

About

  • Privacy Policy
  • Disclaimer
  • Terms & Conditions

Newsletter

  • Sign Up! for emails and updates

Contact

  • About me
  • Contact me

Copyright © 2025 TastyTrendIngredients