tastytrendingredients

  • Home
  • Recipes
    • Appetizers
    • Breakfast
    • Dessert
    • Dinner
    • Drinks
    • Salads
    • Snacks
    • Soups
  • About me
  • Contact
menu icon
go to homepage
  • Home
  • Recipes
    • Appetizers
    • Breakfast
    • Dessert
    • Dinner
    • Drinks
    • Salads
    • Snacks
    • Soups
  • About me
  • Contact
search icon
Homepage link
  • Home
  • Recipes
    • Appetizers
    • Breakfast
    • Dessert
    • Dinner
    • Drinks
    • Salads
    • Snacks
    • Soups
  • About me
  • Contact
×

Marinated Cheese Appetizer with Salami & Pickles Bliss

April 7, 2026 by Grace Snow Leave a Comment

The spicy aroma of garlic and Italian herbs filled my kitchen as I prepped for an evening gathering. In less than half an hour, I knew I could whip up a crowd-pleasing Easy Marinated Cheese Appetizer with Salami & Pickles that would leave my guests raving. This recipe is not only quick to prepare but also versatile, making it perfect for everything from a cozy family dinner to entertaining friends. The tangy pickles and savory salami dance beautifully with the creamy cheeses, ensuring a delightful flavor experience. And don't worry about special diets; I've got tips for making this dish gluten-free too! Are you ready to impress your guests with a stunningly simple appetizer?

Why You'll Love This Appetizer

Quick and Easy: This marinated cheese appetizer comes together in under 30 minutes, making it the perfect choice for last-minute gatherings or spontaneous get-togethers.

Flavor Explosion: The marriage of sharp cheddar, pepper jack, salami, and pickles creates a symphony of flavors that will tantalize your taste buds, ensuring every bite is a joy.

Versatile Adaptations: Feel free to customize with different cheeses or meet dietary preferences by swapping salami for options like prosciutto or veggies.

Crowd-Pleaser: Whether hosting a dinner party or just having friends over, this dish is guaranteed to impress and satisfy your guests, leaving them asking for more.

Perfect with Sides: Pair it with crispy breadsticks or olives for a complete charcuterie experience, reminiscent of delightful gatherings around a table. Don't miss out—add a refreshing twist to your appetizer game, just like my Smoky Sweet Corn or Tagliatelle Asparagus Peas.

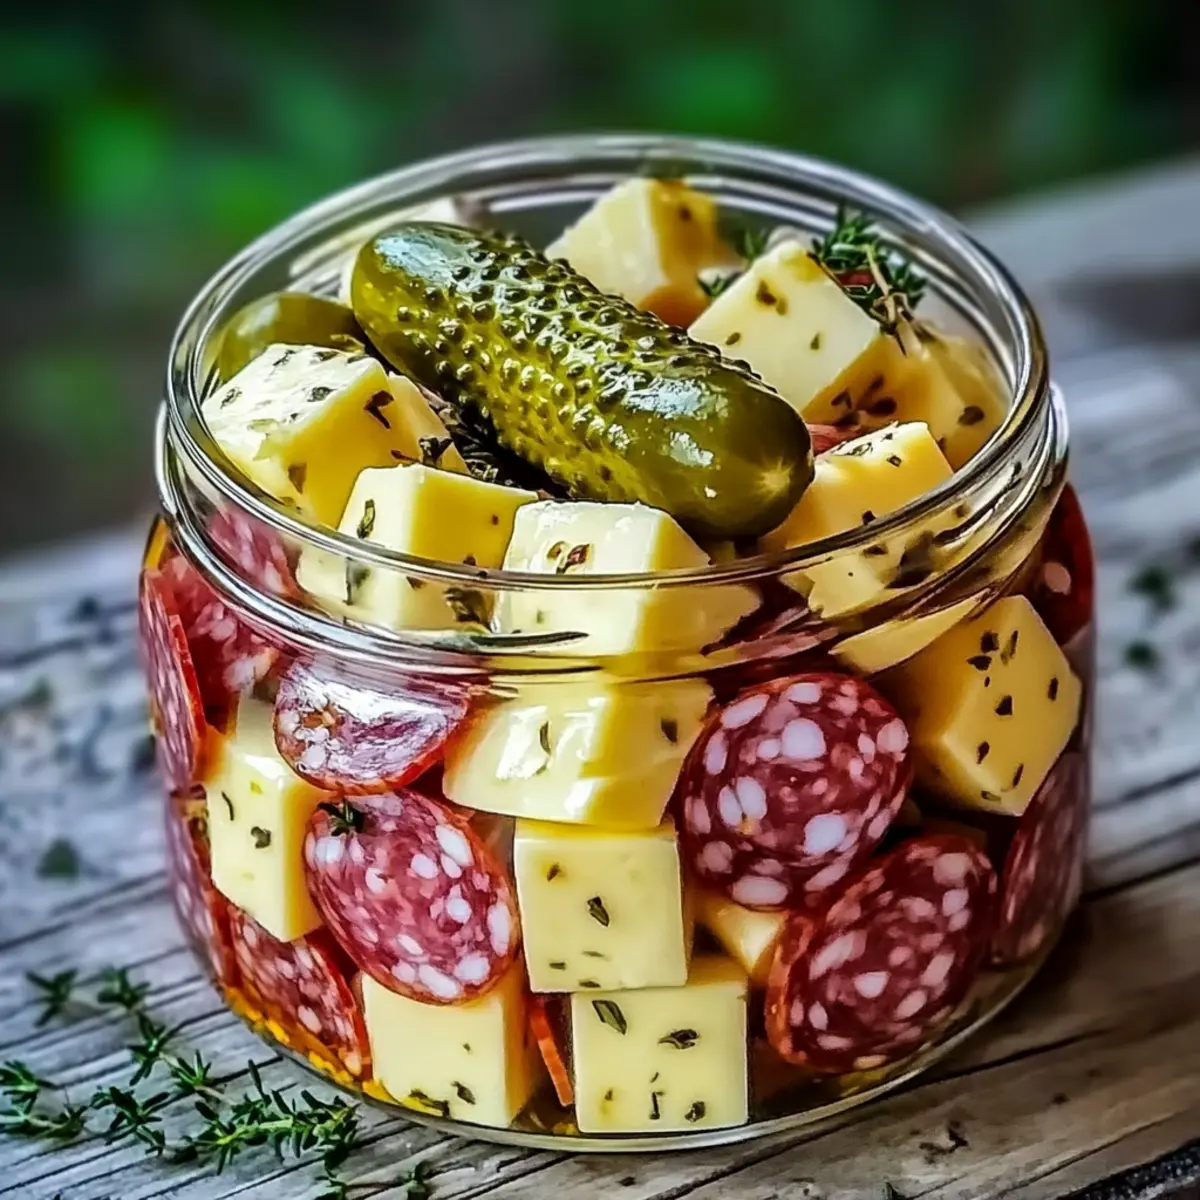
Marinated Cheese Appetizer Ingredients

• Discover the delightful components to create this Easy Marinated Cheese Appetizer with Salami & Pickles.

For the Marinade

  • Olive Oil – A rich base for the marinade; avocado oil can provide a unique twist.
  • Vinegar (white wine or apple cider) – The acidity that brings brightness; consider swapping with apple cider vinegar for a fruitier touch.
  • Italian Seasoning – Offers aromatic herbs; fresh herbs can elevate the flavor with vibrancy.
  • Garlic Powder – Enhances savory depth; use fresh minced garlic for a more robust flavor.
  • Salt & Pepper – Essential for flavor enhancement; adjust according to your dietary preferences.

For the Cheese

  • Sharp Cheddar Cheese – The main cheese providing a rich flavor; experiment with blue cheese for a bold taste.
  • Pepper Jack Cheese – Adds a subtle creamy heat; any melty cheese can work as an alternative.

For the Additions

  • Salami – Imparts a savory bite; consider prosciutto for a different cured meat experience.
  • Pickles – Adds delightful crunch and tang; feel free to substitute with pickled vegetables or olives for variety.

Dive into this delicious world of flavors and bring joy to your next gathering!

Step‑by‑Step Instructions for Easy Marinated Cheese Appetizer with Salami & Pickles

Step 1: Prepare the Marinade
In a large mixing bowl, whisk together 1/2 cup of olive oil, 1/4 cup of vinegar (white wine or apple cider), 2 teaspoons of Italian seasoning, and 1 teaspoon of garlic powder. Season generously with salt and pepper to taste. Look for a well-combined and smooth mixture that will infuse the marinated cheese with robust flavors. Set this aside to allow the ingredients to meld together while you prep the cheese.

Step 2: Cube the Cheese
Take 8 ounces of sharp cheddar cheese and 8 ounces of pepper jack cheese, cutting them into uniform bite-sized cubes. Place them into the marinade bowl, ensuring each piece is adequately coated. The variety of cheese adds depth to the Easy Marinated Cheese Appetizer with Salami & Pickles, contributing creamy textures. Allow the cheese to sit in the marinade for at least 30 minutes, but for optimal flavor enhancement, aim for 2 hours in the refrigerator.

Step 3: Prepare the Salami and Pickles
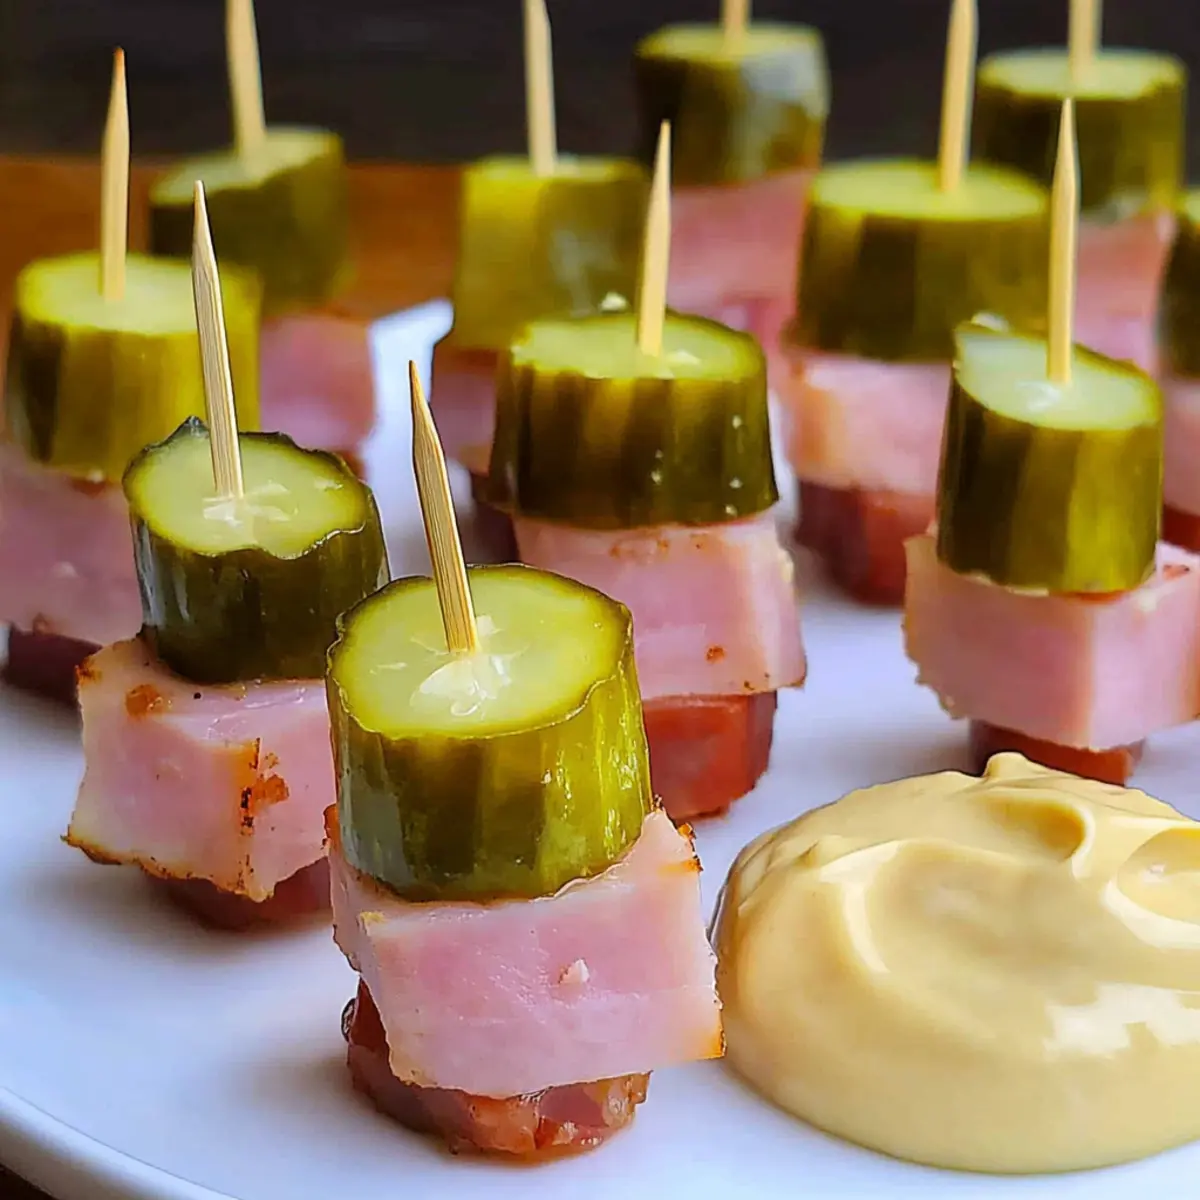
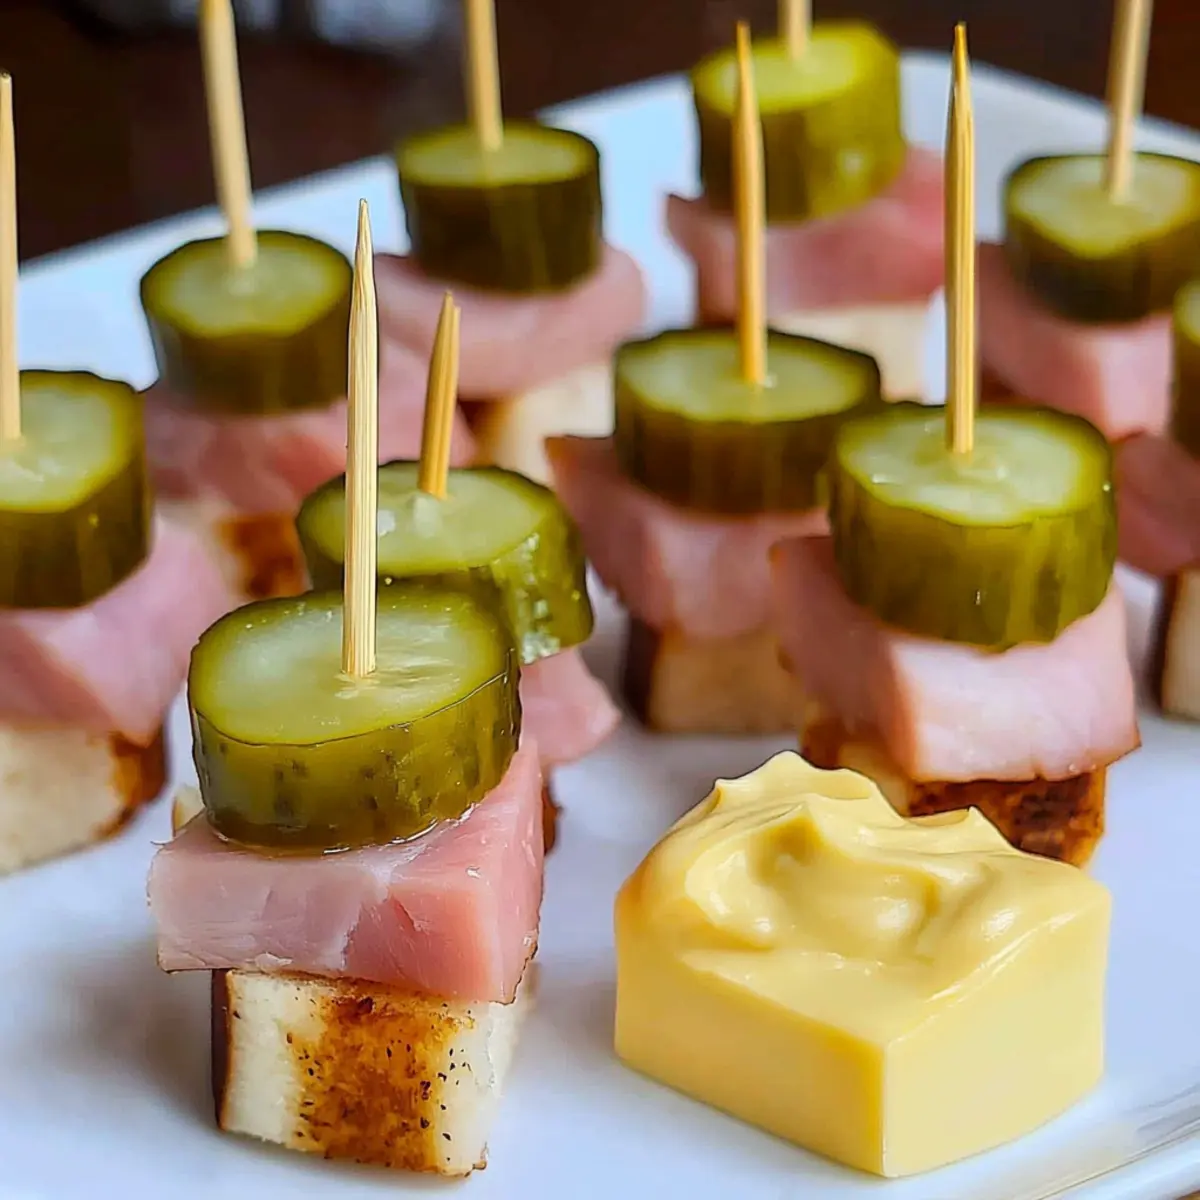
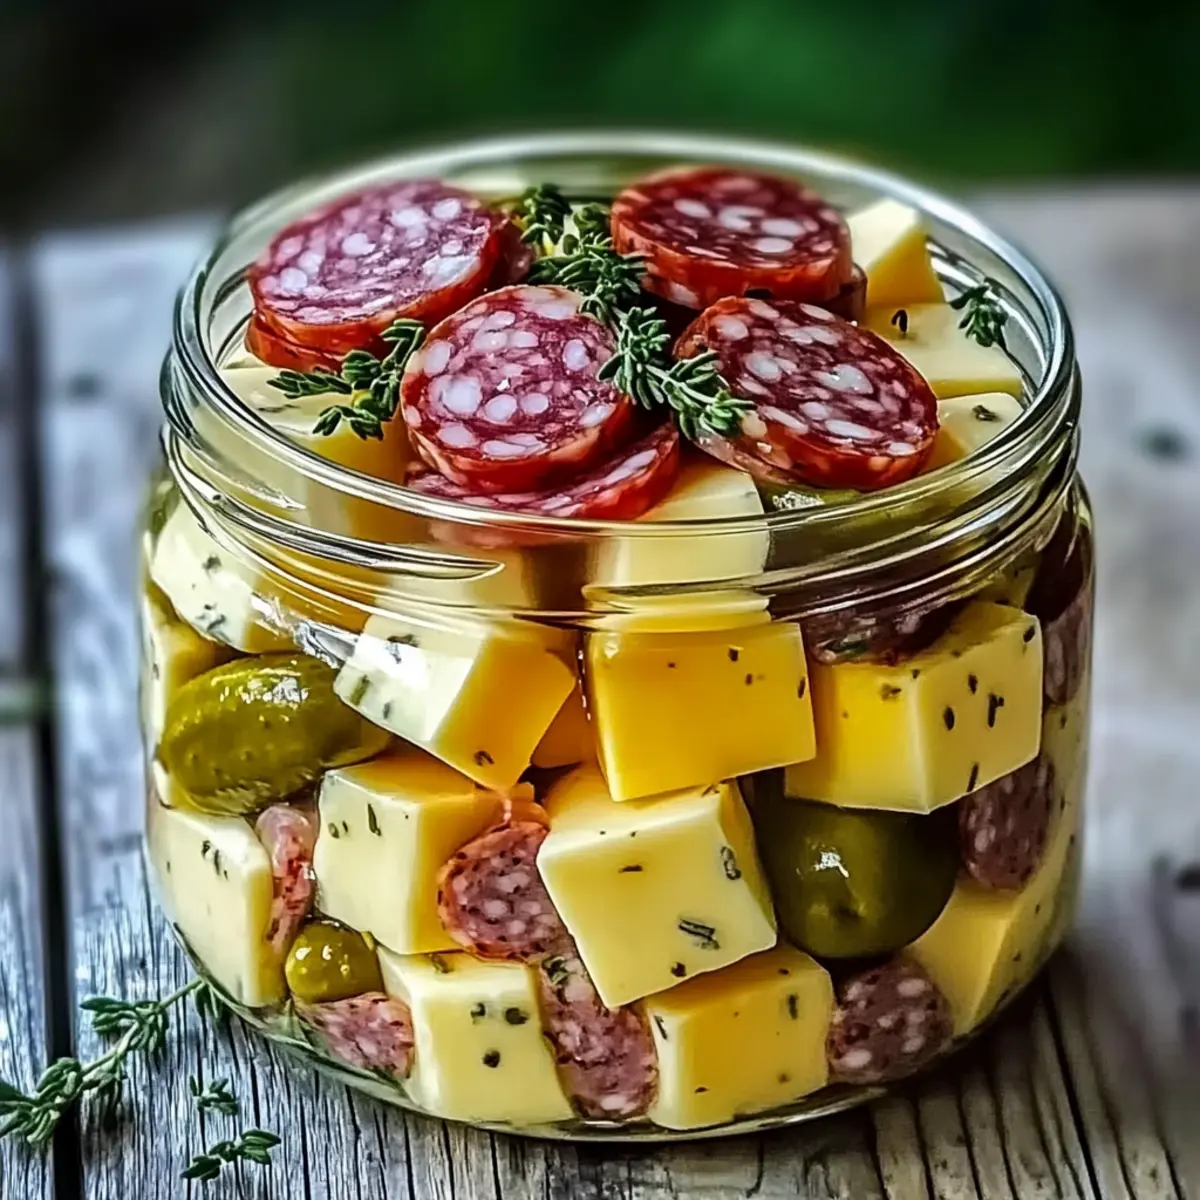
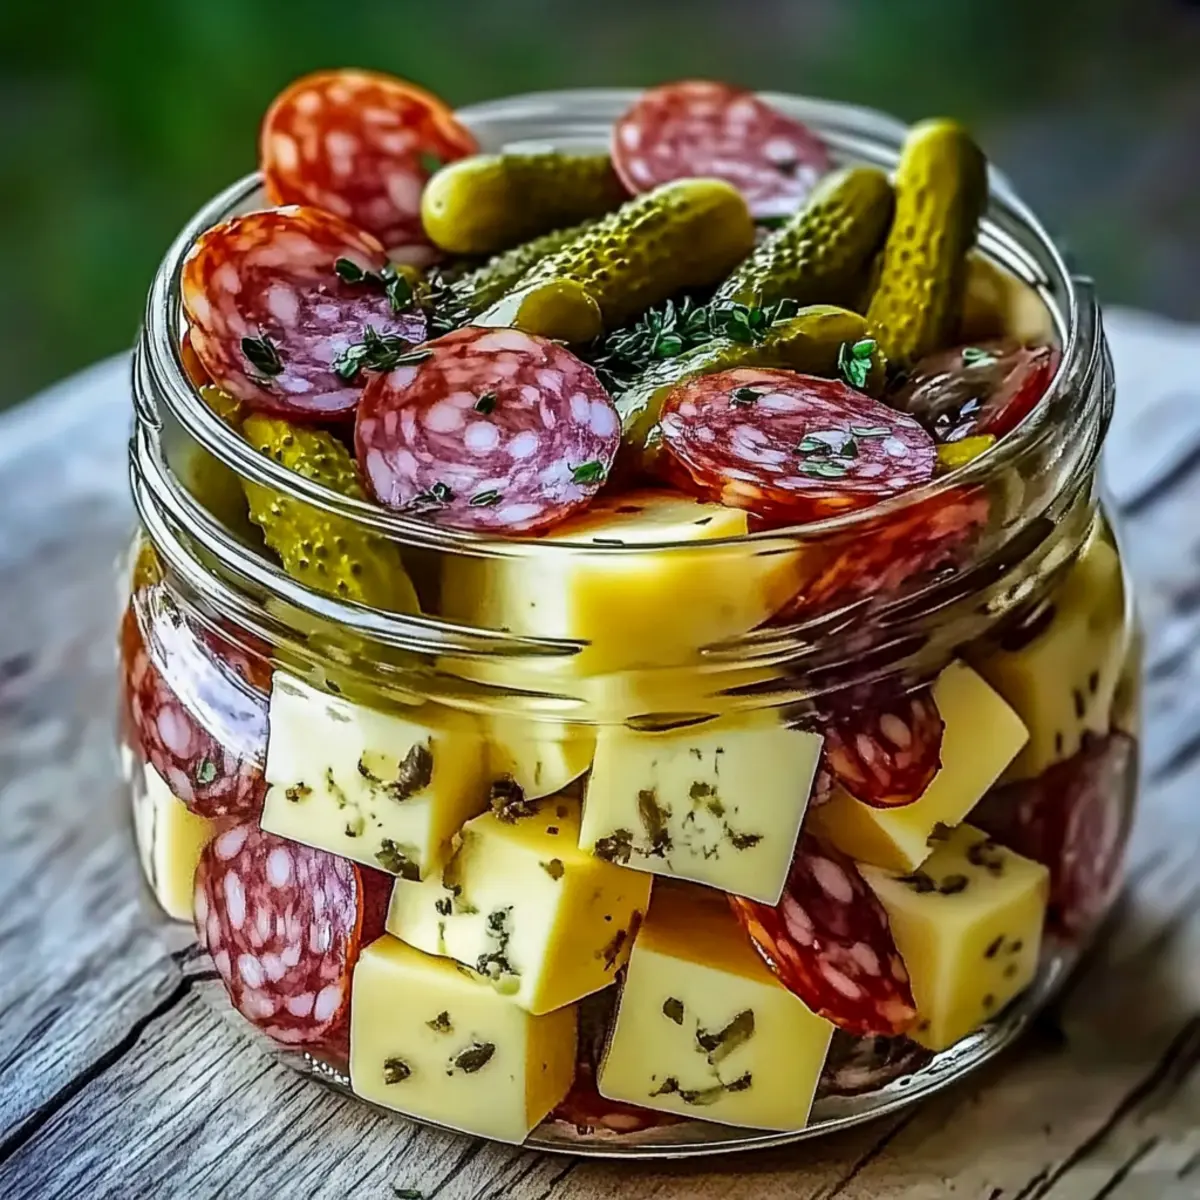
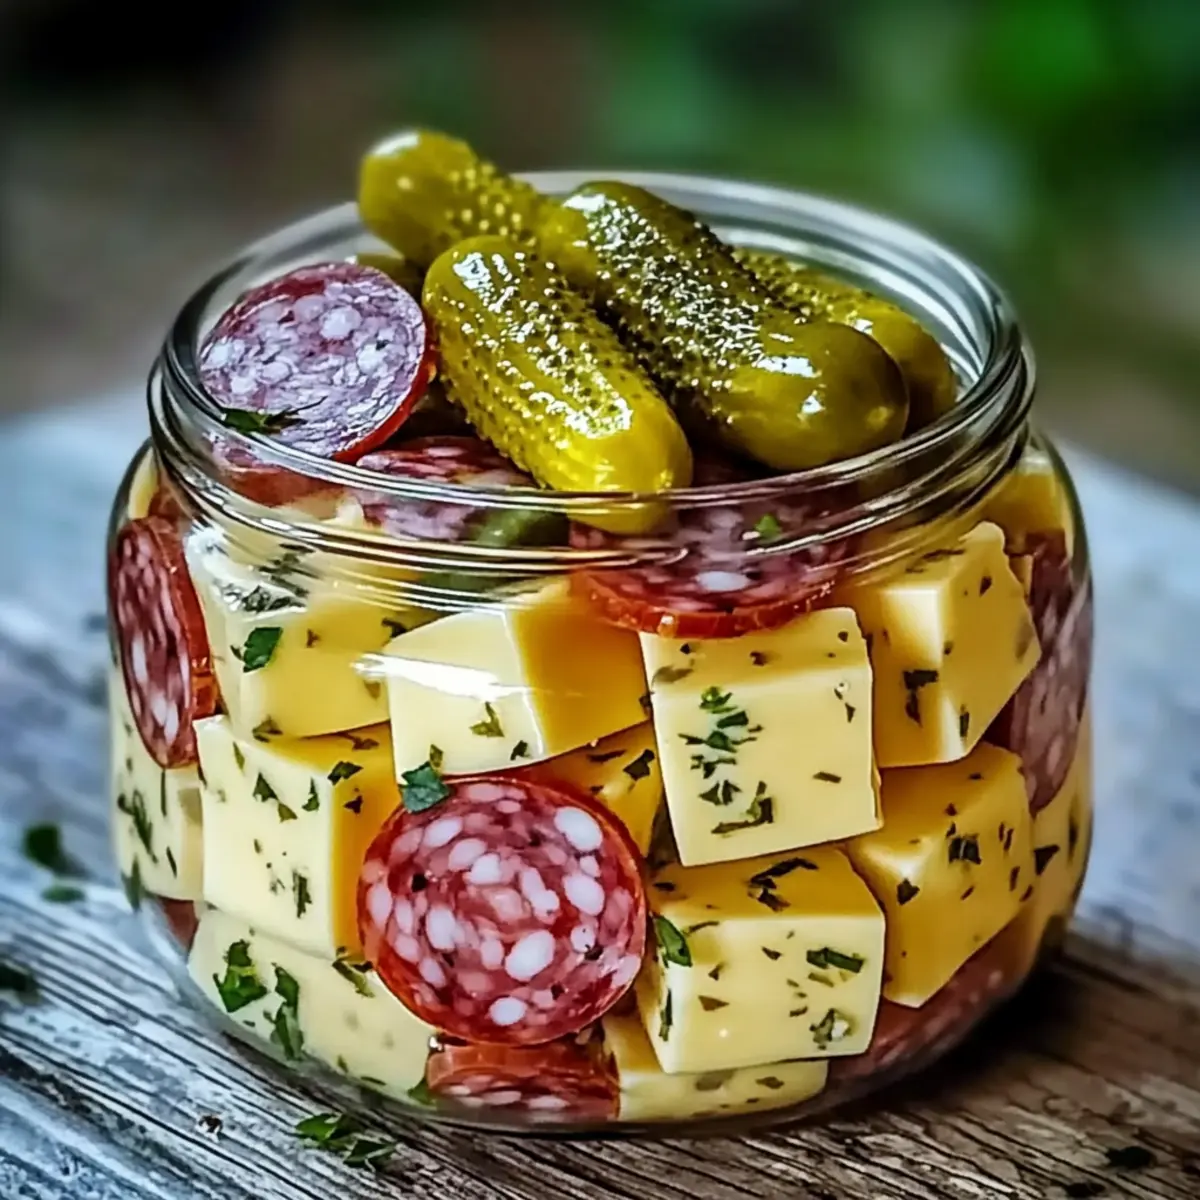
While the cheese is marinating, slice 4 ounces of salami into quarters and prepare 1 cup of dill pickles by cutting them into spears or rounds. These savory and tangy additions will beautifully complement the marinated cheese. Arrange the salami and pickles on a serving platter, creating an inviting base that will beautifully showcase the marinated cheese once it’s ready to serve.

Step 4: Assemble the Platter
After the cheese has marinated effectively, remove it from the refrigerator. Using a slotted spoon, transfer the marinated cheese cubes onto the prepared platter, placing them among the salami and pickles. Ensure the presentation is appealing, with colors and textures intertwined. This step draws attention, making the Easy Marinated Cheese Appetizer with Salami & Pickles not just a treat for the taste buds but also a feast for the eyes.

Step 5: Garnish and Serve
Finally, for an extra burst of freshness, sprinkle chopped fresh herbs like parsley or basil over the assembled platter. This simple garnish enhances the visual appeal and flavor of the appetizer. Serve the dish chilled or at room temperature, and watch as your guests enjoy the delightful combination of creamy cheese, savory salami, and crunchy pickles.

Make Ahead Options

These Easy Marinated Cheese Appetizer with Salami & Pickles are perfect for busy home cooks looking to save time while impressing their guests! You can prepare the marinade and cube the cheeses up to 24 hours in advance, allowing the flavors to meld beautifully in the refrigerator. For optimal taste, let the marinated cheese sit for at least 2 hours before serving, but longer is even better! Simply slice the salami and pickles, arranging them on a platter just before serving to maintain their crunch. When you're ready to enjoy, garnish with fresh herbs and serve cold or at room temperature for a delightful appetizer that’s just as delicious as when freshly made!

How to Store and Freeze Easy Marinated Cheese Appetizer

  • Fridge: Store leftovers in an airtight container for up to 3 days. The cheese will continue to absorb the marinade, enhancing the flavors with each passing day.

  • Freezer: While freezing is an option, it may alter the texture of the cheese. If you choose to freeze, wrap the cheese tightly in plastic wrap and use within a month. Thaw in the refrigerator before serving.

  • Room Temperature: For serving, the marinated cheese appetizer can sit out at room temperature for about 10 minutes before serving to enhance its creamy texture and flavor.

  • Reheating: There’s no need to heat this appetizer. Instead, serve it cold or at room temperature for the best flavor experience.

What to Serve with Easy Marinated Cheese Appetizer with Salami & Pickles

Creating a memorable meal goes beyond the appetizer; it’s about crafting an impressive spread that delights the senses.

  • Crispy Breadsticks: The crunch of fresh breadsticks adds a satisfying texture, perfect for scooping up the marinated cheese.
  • Mediterranean Olives: A bowl of seasoned olives brings a briny kick that complements the creaminess of the cheese.
  • Fresh Veggie Platter: Colorful carrots, cucumbers, and bell peppers provide a refreshing crunch that balances the richness of the cheese and salami.
  • Artisan Crackers: Pair with assorted crackers for additional crunch and an opportunity to mix flavors, enhancing that charcuterie vibe.
  • Sparkling Water or Wine: Light, bubbly drinks can cleanse the palate between bites, making your cheese experience even more enjoyable.
  • Fruit Salad: A bright mix of seasonal fruits brings a sweet contrast to the savory flavors, adding a splash of color to your spread.
  • Pickled Vegetables: A tangy selection of pickled beets or carrots maintains the theme and further elevates those zesty flavors.
  • Mini Quiches: Serving a couple of bite-sized quiches alongside your cheese adds a savory element that guests will love.

Elevate your gathering with these sides and watch as everyone gathers around, savoring every bite!

Marinated Cheese Appetizer Variations

Feel free to explore exciting twists to make this appetizer your own—a little creativity can go a long way!

  • Dairy-Free: Substitute cheeses with non-dairy alternatives like cashew cheese or almond-based cheese for a delicious vegan option.

  • Gluten-Free: Ensure your salami and pickles are gluten-free-certified; this appetizer can easily cater to gluten-sensitive guests.

  • Heat Lover's Delight: Add sliced jalapeños or drizzle with hot sauce to the marinated cheese for that extra spicy kick that heat seekers adore.

  • Balsamic Twist: Instead of vinegar, incorporate balsamic vinegar in your marinade for a touch of sweetness that complements the savory flavors beautifully.

  • Sweet & Savory: Toss in some dried fruits like apricots or figs alongside the salami—this adds a delightful contrast that brightens the dish.

  • Herb-Infused: Swap Italian seasoning for fresh dill or rosemary, which will give the marinade an aromatic flair and heighten the delightful flavors.

  • Mediterranean Style: Use olives instead of pickles for a Mediterranean vibe, or try marinated artichokes for an elevated taste experience.

  • Gourmet Cheese: Experiment with specialty cheeses like goat cheese or herbed cream cheese to introduce unique textures and flavors, reminiscent of a high-end charcuterie board.

When you're ready to elevate your appetizer spread even further, try pairing this delightful cheese creation with my Fried Shrimp Cabbage or peruse some creative ideas with Cocoa Crusted Steak that are sure to impress!

Expert Tips for Marinated Cheese Appetizer

  • Optimal Marinating Time: Allow the cheese to marinate for at least 2 hours for maximum flavor infusion, but if short on time, 30 minutes will still work.

  • Cheese Variety: Don't hesitate to experiment with different cheeses like smoked gouda or feta, but ensure they’re firm enough for cubing in this marinated cheese appetizer with salami & pickles.

  • Fresh Herbs Matter: For an elevated taste, use fresh herbs instead of dried. They add brightness and aromatic freshness that's hard to resist.

  • Salami Substitution: If you or your guests prefer a leaner option, feel free to replace salami with turkey or chicken slices for a lighter twist.

  • Environment for Serving: After removing from the fridge, let the appetizer sit at room temperature for about 10 minutes before serving for the best texture and flavor.

  • Emergency Storage: Keep any leftovers in an airtight container; they store well for up to 3 days and will absorb even more delicious flavor as they sit!

Easy Marinated Cheese Appetizer with Salami & Pickles Recipe FAQs

How do I choose the right cheese for marinating?
Absolutely! For the best flavor profile, I recommend using a combination of sharp cheddar and pepper jack cheese. Make sure the cheese is fresh, without dark spots or a dull appearance, which can indicate age. If you prefer a bolder taste, blue cheese can add a wonderful twist!

What’s the best way to store leftovers from this appetizer?
Very importantly, store any leftover marinated cheese in an airtight container in the refrigerator. It will keep fresh for up to 3 days, and the flavors will deepen as it sits! Just remember to recheck the cheese for any signs of spoilage before serving.

Can I freeze the marinated cheese appetizer?
Yes, you can freeze it! However, keep in mind that freezing may change the texture. Wrap the marinated cheese tightly in plastic wrap or foil and place it in a freezer-safe container. You can store it for up to 3 months. When you're ready to enjoy, thaw it in the refrigerator overnight and serve it cold.

What are some common issues when marinating cheese?
If your cheese becomes too soft or mushy, it might mean it was marinated for too long, or the cheese wasn't firm enough to start with. To avoid this, always use firmer varieties, and stick to marinating for about 2 hours for optimal flavor without compromising texture.

Is this appetizer suitable for those with gluten sensitivities?
Absolutely! As long as you choose gluten-free salami or omit it entirely, the rest of the ingredients in this Easy Marinated Cheese Appetizer with Salami & Pickles are gluten-free. Always double-check labels on pre-packaged items to ensure they're safe for your dietary needs.

Marinated Cheese Appetizer with Salami & Pickles

Marinated Cheese Appetizer with Salami & Pickles Bliss

This Marinated Cheese Appetizer with Salami & Pickles is a quick and flavorful dish perfect for gatherings.
Print Recipe Pin Recipe
Prep Time 30 minutes mins
Total Time 30 minutes mins
Servings: 8 servings
Course: Appetizers
Cuisine: Italian
Calories: 350
Ingredients Equipment Method Nutrition Notes

Ingredients
  

Marinade
  • 1/2 cup Olive Oil or avocado oil
  • 1/4 cup Vinegar (white wine or apple cider)
  • 2 teaspoons Italian Seasoning or fresh herbs
  • 1 teaspoon Garlic Powder or fresh minced garlic
  • Salt to taste
  • Pepper to taste
Cheese
  • 8 ounces Sharp Cheddar Cheese cubed
  • 8 ounces Pepper Jack Cheese cubed
Additions
  • 4 ounces Salami sliced
  • 1 cup Pickles cut into spears or rounds

Equipment

  • Mixing Bowl
  • Knife
  • Cutting Board
  • Serving Platter

Method
 

Preparation
  1. Prepare the marinade by whisking together olive oil, vinegar, Italian seasoning, garlic powder, salt, and pepper.
  2. Cube the cheddar and pepper jack cheese, adding them to the marinade.
  3. Slice the salami and prepare the pickles, arranging them on a platter.
  4. Transfer the marinated cheese onto the platter with salami and pickles.
  5. Garnish with fresh herbs and serve chilled or at room temperature.

Nutrition

Serving: 1servingCalories: 350kcalCarbohydrates: 4gProtein: 20gFat: 30gSaturated Fat: 10gPolyunsaturated Fat: 1gMonounsaturated Fat: 15gCholesterol: 60mgSodium: 600mgPotassium: 120mgSugar: 1gVitamin A: 400IUVitamin C: 2mgCalcium: 400mgIron: 1mg

Notes

For optimal flavor, allow cheese to marinate for at least 2 hours. Substitute salami with prosciutto for a different flavor profile.

Tried this recipe?

Let us know how it was!

Low Carb Cuban Sandwich Skewers for a Savory Delight

April 7, 2026 by Grace Snow Leave a Comment

I recently found myself longing for the bright, zesty flavors of a Cuban sandwich, but without the carbs weighing me down. That's when I stumbled upon the idea for Low Carb Cuban Sandwich Skewers. This delectable twist on a classic is not only quick to put together but also perfectly aligns with those seeking diabetic-friendly options. Featuring savory ham, creamy Swiss cheese, and tangy dill pickles, these skewers have become my go-to for family gatherings or meal prep. They pack a punch of flavor while remaining gluten-free and keto-approved. Whether enjoyed as a snack or a complete meal, they are sure to impress! What’s your go-to appetizer for feeding a crowd?

Why You'll Crave These Cubano Skewers

Simplicity at Its Best: Just a few quick steps turn classic ingredients into stunning skewers that wow your guests.
Flavor Fusion: Imagine the savory taste of ham, the creaminess of Swiss cheese, and the tang of pickles, all harmonizing in every bite.
Versatile Options: Customize with turkey, different cheeses, or even add cherry tomatoes to suit your taste.
Perfect for Any Occasion: Whether it’s a family gathering or a quick snack, these low carb Cuban Sandwich Skewers fit right in. And for more easy recipes, explore our Cauliflower Pasta Ready!
Time-Saving Delight: Assemble ahead of time for a fuss-free appetizer that everyone will love, and enjoy them at cold or room temperature.

Low Carb Cuban Sandwich Skewers

Here’s what you need to make a delicious, low-carb appetizer!

For the Skewers
• Ham – Provides savory flavor and protein; try substituting with turkey slices for a leaner option.
• Swiss Cheese – Adds creaminess and richness; feel free to use provolone or cheddar for variety.
• Dill Pickles – Contribute tanginess and crunch; cocktail pickles can offer a different flavor and fun presentation.

For the Mustard Dipping Sauce
• Mustard – Enhances flavor with a spicy kick; Dijon mustard works great for a sharper taste preference.
• Chili Flakes – Optional for garnish; sprinkle for an added touch of spice, but these can be omitted if you prefer milder flavors.
• Dried Parsley – Another optional garnish to jazz up your skewers and make them visually appealing.

These Low Carb Cuban Sandwich Skewers are sure to be a hit at your next gathering!

Step‑by‑Step Instructions for Low Carb Cuban Sandwich Skewers

Step 1: Prepare the Ingredients
Begin by cutting Swiss cheese into 1-inch cubes for a perfect bite-sized piece. If you prefer smaller bites, opt for ½-inch cubes. At the same time, slice dill pickles into ½-inch thick pieces, or use cocktail pickles for unique presentation. Organized ingredients make assembly easier, so arrange ham, cheese, and pickles at your workstation.

Step 2: Set Up for Assembly
Arrange your skewering tools—either toothpicks or small wooden skewers—within reach. Take a moment to lay out your prepared meat, cheese, and pickles neatly. This setup reduces mess and allows for a streamlined assembly process. The visual contrast of the colorful ingredients will inspire you as you prepare your Low Carb Cuban Sandwich Skewers.

Step 3: Assemble the Skewers
Skewer the assembly by threading a slice of pickle onto the toothpick first, followed by a folded slice of ham. Then, add a cube of Swiss cheese, ensuring the components alternate and remain upright. Continue this process until all ingredients are used or your skewers reach the desired length. Visual appeal is key, so be sure to vary the order for a lovely display.

Step 4: Prepare the Dipping Sauce
While assembling the Low Carb Cuban Sandwich Skewers, mix together your mustard and optional chili flakes in a small serving bowl. If you like a bolder flavor, consider using Dijon mustard for an extra zing. Stir until combined; the sauce will complement the savory flavors of the skewers and enhance your overall dining experience.

Step 5: Serve and Enjoy
Once all skewers are assembled and the dipping sauce is ready, place the skewers upright on a platter for a captivating presentation. Serve immediately for the best taste, as the flavors and textures are most vibrant fresh. Alternatively, chill briefly in the refrigerator if preparing in advance, providing a refreshing bite perfect for any occasion.

Make Ahead Options

These Low Carb Cuban Sandwich Skewers are perfect for meal prep enthusiasts looking to save time during busy weeknights! You can assemble the skewers up to 24 hours in advance, placing them in an airtight container in the refrigerator to maintain freshness. To keep the ingredients from becoming soggy, layer a paper towel between the skewers and the container lid. When you're ready to serve, simply take them out and pair with your mustard dipping sauce, or let them sit at room temperature for about 15 minutes for a delicious, ready-to-enjoy appetizer. Enjoy these flavorful skewers with minimal effort!

How to Store and Freeze Low Carb Cuban Sandwich Skewers

Fridge: Store assembled skewers in an airtight container in the refrigerator for up to 3 days. This keeps them fresh and easy to grab for quick snacks.

Freezer: If you want to freeze, wrap each skewer individually in plastic wrap and place them in a freezer-safe bag. They can be frozen for up to 2 months.

Reheating: For best results, thaw in the fridge overnight before serving. Enjoy cold or bring to room temperature before serving for optimal flavor in these Low Carb Cuban Sandwich Skewers.

Expert Tips for Low Carb Cuban Sandwich Skewers

  • Uniform Size: Make sure cheese and pickles are sliced evenly to enhance visual appeal and ensure consistent cooking and presentation.

  • Skewer Stability: Choose sturdy toothpicks or wooden skewers to prevent any tipping over when assembling your Low Carb Cuban Sandwich Skewers.

  • Dipping Sauce Variations: Experiment with different mustard types or add a touch of honey for sweetness, balancing the savory flavors excellently.

  • Prep Ahead: Assemble skewers in advance and keep them refrigerated. This way, you can easily serve them cold for a refreshing snack.

  • Garnish Wisely: A sprinkle of chili flakes or parsley can elevate both the flavor and the visual presentation, ensuring your skewers look as good as they taste.

What to Serve with Low Carb Cuban Sandwich Skewers

Each bite of these delightful skewers calls for complementary sides that enhance their flavors and textures.

  • Fresh Vegetable Sticks: Crisp, colorful veggies like carrots and cucumbers offer a refreshing crunch that balances the savory skewers.

  • Low-Carb Crackers: These provide a satisfying crunch that echoes the skewers' texture while being mindful of your carb count.

  • Creamy Avocado Dip: Rich and buttery, this dip adds a smoothness that pairs beautifully, contrasting with the savory elements of the skewers.

  • Side Salad: A light salad with mixed greens, avocado, and a tangy vinaigrette cuts through the richness of the cheese and ham, adding a vibrant touch.

  • Sparkling Water: The fizz of sparkling water or flavored seltzer complements the savory skewers while keeping things refreshing and light.

  • Dark Chocolate Bites: For a touch of sweetness, serve dark chocolate as a dessert. The bitterness richens the experience after the savory bites, creating a beautiful end to the meal.

Get creative with these suggestions to elevate your next gathering; your guests will love the combination!

Low Carb Cuban Sandwich Skewers Variations

Feel free to customize these skewers to suit your palate and dietary needs!

  • Turkey Swap: Replace ham with turkey slices for a lighter, leaner option. The turkey brings a mild flavor that pairs beautifully with the cheese.

  • Cheese Alternatives: Try pepper jack for a spicy twist or mozzarella for a milder taste. Each cheese brings a unique texture and flavor, making your skewers versatile!

  • Veggie-Loaded: Add ripe cherry tomatoes or sliced bell peppers between cheese and meat. These fresh additions contribute a burst of color and flavor to your skewers.

  • Olive Twist: Incorporate black or green olives to the mix for briny goodness. Their distinctive flavor elevates the savory notes and adds a pleasing texture.

  • Hot Kick: Spice things up by inserting a jalapeño slice in between the ingredients. This two-bite heat will delight those who crave a little extra zest!

  • Herbed Dip: Swap mustard with a homemade herb dip by mixing Greek yogurt with garlic, dill, and lemon. This creamy dip adds an exciting alternative for dipping while keeping it low-carb.

  • Make it Sweet: For an enjoyable variation, drizzle a bit of balsamic glaze over the skewers before serving. This sweet touch complements the salty and savory flavors beautifully.

  • Crunchy Addition: Add thinly sliced cucumbers for a refreshing crunch. This change not only enriches the texture but also introduces a garden-fresh note to your skewers.

Your taste buds will thank you for these fun twists on the classic Low Carb Cuban Sandwich Skewers! For more exciting ideas, check out our Cauliflower Pasta Ready for a fantastic alternative dish.

Low Carb Cuban Sandwich Skewers Recipe FAQs

How do I select the best ham for my skewers?
When choosing ham for your Low Carb Cuban Sandwich Skewers, opt for fresh deli-style slices that are not overly processed. Look for varieties that are labeled as "natural" or "no nitrates." If you want a leaner alternative, turkey slices make for a fantastic substitution that still packs in the flavor.

What’s the best way to store leftover skewers?
Absolutely! Store any leftover assembled skewers in an airtight container in the refrigerator for up to 3 days. This method keeps them crisp and delicious, making them perfect for quick snacking or lunch. To enjoy them later, simply grab and go!

Can I freeze the Low Carb Cuban Sandwich Skewers?
Yes, you can freeze these skewers! Individually wrap each skewer in plastic wrap to prevent freezer burn, then place them in a freezer-safe plastic bag. They can be stored for up to 2 months. To enjoy, just thaw in the refrigerator overnight and serve cold or let them come to room temperature before serving.

What should I do if my cheese starts to sweat or separate?
If you notice your Swiss cheese beginning to sweat or separate, it may be a sign it’s too warm. I recommend serving the skewers chilled to maintain a nice, firm texture. If they’ve been left out too long, simply pop them in the fridge for about 30 minutes before serving to get them back in shape.

Are these skewers safe for those with dietary restrictions?
Very! These Low Carb Cuban Sandwich Skewers are naturally gluten-free and low in carbohydrates, making them a great fit for those on keto diets or managing diabetes. However, double-check that the ham and mustard you’re using are gluten-free, especially if allergies are a concern. Enjoying these treats without concern is one of my favorite parts of making this recipe!

Low Carb Cuban Sandwich Skewers

Low Carb Cuban Sandwich Skewers for a Savory Delight

These Low Carb Cuban Sandwich Skewers offer a flavorful twist on the classic sandwich, perfect for low-carb diets.
Print Recipe Pin Recipe
Prep Time 15 minutes mins
Total Time 15 minutes mins
Servings: 4 skewers
Course: Appetizers
Cuisine: Cuban
Calories: 250
Ingredients Equipment Method Nutrition Notes

Ingredients
  

For the Skewers
  • 8 ounces Ham Savory flavor; can substitute with turkey slices
  • 8 ounces Swiss Cheese Can use provolone or cheddar for variety
  • 8 ounces Dill Pickles Use cocktail pickles for different presentation
For the Mustard Dipping Sauce
  • 4 tablespoons Mustard Dijon mustard works great
  • 1 teaspoon Chili Flakes Optional for garnish
  • 1 teaspoon Dried Parsley Optional, for decoration

Equipment

  • toothpicks or wooden skewers

Method
 

Step-by-Step Instructions for Low Carb Cuban Sandwich Skewers
  1. Prepare the ingredients by cutting Swiss cheese into 1-inch cubes and slice dill pickles into ½-inch thick pieces.
  2. Set up your skewering tools within reach and arrange the prepared ham, cheese, and pickles neatly for assembly.
  3. Assemble the skewers by threading a slice of pickle first, followed by a folded slice of ham, and then a cube of Swiss cheese.
  4. Prepare the dipping sauce by mixing mustard and optional chili flakes in a small serving bowl.
  5. Serve the skewers upright on a platter and enjoy immediately for the best taste.

Nutrition

Serving: 2skewersCalories: 250kcalCarbohydrates: 5gProtein: 20gFat: 18gSaturated Fat: 7gPolyunsaturated Fat: 1gMonounsaturated Fat: 9gCholesterol: 40mgSodium: 900mgPotassium: 150mgFiber: 1gSugar: 1gVitamin A: 200IUVitamin C: 3mgCalcium: 250mgIron: 1.5mg

Notes

These skewers are gluten-free, keto-approved, and perfect for meal prep or family gatherings.

Tried this recipe?

Let us know how it was!

Crispy Chinese Coconut Shrimp That Will Wow Your Taste Buds

April 4, 2026 by Grace Snow Leave a Comment

As I stood in my kitchen, the tantalizing aroma of sizzling shrimp filled the air, instantly transporting me to a sun-soaked beach. That's the magic behind my Crispy Chinese Coconut Shrimp. This delightful seafood treat combines succulent shrimp with a crunchy coconut coating, making it a fast favorite for both family dinners and casual gatherings. Not only is this recipe quick and easy to whip up, but it's also kid-approved – perfect for those evenings when you need a meal that pleases everyone around the table. Plus, you can serve it as a show-stopping appetizer at your next get-together! Are you ready to dive into this crispy, tropical delight?

Why is this shrimp recipe a must-try?

Quick Preparation: You can whip up these delicious Crispy Chinese Coconut Shrimp in no time, making it a perfect weeknight meal!

Crowd-Pleasing Flavor: The blend of sweet coconut and savory shrimp is sure to impress family and friends at any gathering.

Versatility: Pair them with a variety of dipping sauces, like sweet chili or a tangy yogurt dip, for a unique taste with each bite. For more fusion ideas, check out Pan Fried Shrimp!

Healthful Option: This recipe brings the benefits of protein-rich shrimp and healthy fats from coconut, making it a nutritious choice compared to fast food.

Textural Delight: Enjoy the satisfying crunch of the coconut coating against the tender, juicy shrimp, offering a delightful eating experience.

Chinese Coconut Shrimp Ingredients

Get ready to create a delightful seafood experience!

For the Breading
• Shrimp – Fresh or thawed shrimp delivers the best flavor and texture in this Chinese Coconut Shrimp dish.
• Coconut Flakes – Unsweetened flakes are ideal for adding that crunchy, tropical twist without overwhelming sweetness.
• Egg – This helps the coconut adhere; for a vegan option, try a flax egg instead.
• Flour – All-purpose flour is standard for dusting; opt for gluten-free flour if dietary needs require.
• Salt and Pepper – Essential seasonings to enhance the overall flavor; adjust according to your preference.

Step‑by‑Step Instructions for Chinese Coconut Shrimp

Step 1: Prepare the Shrimp
Begin by rinsing the shrimp under cold water to cleanse them. Then, carefully devein and shell the shrimp, ensuring they are fully cleaned. Pat them dry with paper towels to remove excess moisture, as this will help the coating stick better later. Set the prepared shrimp aside while you set up your breading station.

Step 2: Set Up the Breading Station
Next, create a simple breading station by arranging three shallow bowls. In the first bowl, add flour, seasoning it with salt and pepper to taste. In the second bowl, crack an egg and beat it until well combined. In the third bowl, place the unsweetened coconut flakes. Dredge each shrimp in flour, dip it into the egg, and then coat it generously with coconut flakes.

Step 3: Heat the Oil
In a large frying pan, pour enough oil to reach about 1/2 inch in depth. Place the pan over medium-high heat and let the oil heat up until it shimmers, which typically takes about 4-5 minutes. To test if it’s ready, drop in a small piece of bread or coconut; it should sizzle immediately. This preparation ensures your Chinese Coconut Shrimp will fry to perfection.

Step 4: Fry the Shrimp
Carefully place the breaded shrimp into the hot oil in batches, avoiding overcrowding the pan to ensure even cooking. Fry each batch for about 2-3 minutes per side, or until they reach a golden brown color, indicating they are crispy and cooked through. Use tongs to flip them gently, taking care not to disturb the coating.

Step 5: Drain and Serve
Once the shrimp are golden and crispy, transfer them to a plate lined with paper towels to drain any excess oil. This step is crucial for maintaining the delightful crunch of the Chinese Coconut Shrimp. Allow them to rest for a minute or two, then serve hot with your favorite dipping sauce, such as sweet chili or tangy yogurt. Enjoy the burst of flavors!

What to Serve with Crispy Chinese Coconut Shrimp?

Elevate your meal with delightful side dishes that will perfectly complement the tropical flavors of this delicious seafood treat.

  • Sweet Chili Sauce: A perfect match, this dipping sauce enhances the shrimp's flavors with its sweet and spicy profile.

  • Coconut Rice: Fluffy and fragrant, coconut rice pairs beautifully, allowing the shrimp's crunch to shine alongside its creamy background.

  • Asian Slaw: Crisp and refreshing, this tangy slaw balances the richness of the shrimp and adds a crunchy texture to your meal.

  • Grilled Pineapple: For a burst of sweetness, serve pineapple slices grilled to caramelized perfection; they harmonize beautifully with the shrimp.

  • Mango Salsa: Vibrant and fresh, this salsa adds a fruity zing that brightens each bite of the coconut shrimp.

  • Garlic Edamame: Simple yet satisfying, sautéed edamame with a touch of garlic offer a nutritious, protein-packed side.

  • Sesame Noodles: Tossed in a light soy and sesame dressing, these noodles provide a delightful chewiness that contrasts with the crisp shrimp.

  • Crispy Vegetable Spring Rolls: Fried or fresh, these rolls are a great appetizer that pairs well with the coconut shrimp for added crunch.

  • Chilled Beer: A light, crisp lager complements the meal seamlessly, cutting through the flavors while adding a refreshing touch.

How to Store and Freeze Chinese Coconut Shrimp

Fridge: Store leftover Chinese Coconut Shrimp in an airtight container for up to 2 days. To maintain the best flavor and texture, try to consume them sooner rather than later.

Freezer: For longer storage, freeze the breaded, uncooked shrimp in a single layer on a baking sheet before transferring to a zip-top bag. They can stay fresh for up to 3 months.

Reheating: When you're ready to enjoy leftovers, reheat the shrimp in the oven at 375°F (190°C) for about 10-15 minutes, or until heated through and crispy again. Avoid microwaving to keep them crunchy!

Room Temperature: Avoid leaving cooked shrimp at room temperature for more than 2 hours to minimize the risk of spoilage.

Chinese Coconut Shrimp Variations

Feel free to get creative with your crispy shrimp by playing with these fun twists and substitutions!

  • Spicy Kick: Mix cayenne pepper or chili flakes into the flour for a spicy version that adds warmth and zest.

  • Tropical Twist: Incorporate grated lime or pineapple into the coconut coating for a burst of fruity flavor that transports you to the tropics.

  • Protein Swap: Try using chicken tenders or crispy tofu for a different protein that works beautifully with the coconut coating.

  • Herb Infusion: Add fresh herbs like cilantro or mint to the flour blend for a refreshing herbal note that brightens the dish.

  • Baking Alternative: For a healthier twist, bake instead of frying. Coat the shrimp as usual, then bake on a lined sheet at 400°F for 12-15 minutes.

  • Zesty Dipping Sauce: Pair your shrimp with a zesty lime yogurt sauce or a tamarind dipping sauce for a unique flavor experience.

  • Nutty Crunch: Mix chopped nuts, like almonds or cashews, with the coconut for an extra crunchy texture and nutty flavor.

  • Asian Fusion: Serve alongside a zesty ginger soy sauce for something that complements the crispy shrimp wonderfully. Check out our recipe for Shrimp Tacos Zesty for more flavor-packed ideas!

Make Ahead Options

These Crispy Chinese Coconut Shrimp are perfect for meal prep, saving you valuable time on busy weeknights! You can bread the shrimp and refrigerate them for up to 24 hours before frying, ensuring that the flavors meld beautifully. To maintain their quality, keep the breaded shrimp in a single layer on a parchment-lined baking sheet covered tightly with plastic wrap, which prevents sogginess. When you're ready to serve, simply heat oil in a frying pan and fry the shrimp in batches until golden brown, about 2-3 minutes per side. This way, you still get that delightful crunch and fresh, delicious taste that makes these shrimp a family favorite!

Expert Tips for Crispy Chinese Coconut Shrimp

  • Oil Temperature: Ensure the oil is hot enough before frying. If it’s too cool, the shrimp will absorb excess oil and become soggy.

  • Batch Frying: Fry the shrimp in small batches. This prevents overcrowding, ensuring even cooking and that perfect golden-brown color for your Chinese Coconut Shrimp.

  • Pat Dry: Don't skip drying the shrimp after rinsing. Removing excess moisture helps the coating adhere better, leading to a crispier texture.

  • Season Well: Feel free to experiment with seasonings in the flour. A pinch of cayenne pepper can add a nice kick to your coconut shrimp.

  • Serve Fresh: This dish is best served hot and fresh from the pan. If you have leftovers, reheat them in the oven to keep them crispy!

Chinese Coconut Shrimp Recipe FAQs

How do I select the best shrimp for this recipe?
Absolutely! When choosing shrimp, look for fresh, firm shrimp that are translucent and smell like the sea. If using frozen shrimp, ensure they are either completely thawed or the raw, uncooked type. Avoid shrimp with a fishy odor or dark spots.

What is the best way to store leftover Chinese Coconut Shrimp?
You can store leftover Chinese Coconut Shrimp in an airtight container in the fridge for up to 2 days. To maintain their crunch, reheat them in the oven rather than the microwave, which can make them soggy.

Can I freeze the breaded shrimp before cooking?
Certainly! To freeze, arrange the breaded, uncooked shrimp in a single layer on a baking sheet and place them in the freezer until solid. After about 1-2 hours, transfer them to a zip-top bag. They can stay fresh for up to 3 months. When ready to cook, no need to thaw – just fry them straight from the freezer, adding a couple of extra minutes to the cooking time.

What should I do if my coconut coating isn’t sticking?
Very! If you find the coconut isn't adhering well, ensure that the shrimp are completely dry before dredging them in flour. The flour creates a better “glue” for the egg wash. Make sure to press the coconut flakes onto the shrimp gently after dipping in egg for better adhesion!

Is this recipe suitable for anyone with allergies?
Yes! This recipe primarily contains shrimp, egg, and coconut. For a nut-free or gluten-free option, use gluten-free flour for dusting. Always check for allergies, as some individuals may have sensitivities to seafood or eggs.

Can I make this dish vegan?
Absolutely! To make a vegan version of these Chinese Coconut Shrimp, substitute shrimp with chickpea “shrimp” or tofu. Use a flax egg (1 tablespoon ground flaxseed mixed with 2.5 tablespoons water) as a binding agent in place of the egg, and follow the same breading instructions for a delicious plant-based treat.

Chinese Coconut Shrimp

Crispy Chinese Coconut Shrimp That Will Wow Your Taste Buds

This Crispy Chinese Coconut Shrimp recipe combines succulent shrimp with a crunchy coconut coating, perfect for appetizers or family dinners.
Print Recipe Pin Recipe
Prep Time 15 minutes mins
Cook Time 10 minutes mins
Total Time 25 minutes mins
Servings: 4 servings
Course: Appetizers
Cuisine: Chinese
Calories: 300
Ingredients Equipment Method Nutrition Notes

Ingredients
  

For the Breading
  • 1 pound Fresh or thawed shrimp peeled and deveined
  • 1 cup Unsweetened coconut flakes
  • 1 large Egg beaten; for vegan option, use flax egg
  • 1/2 cup All-purpose flour or gluten-free flour
  • to taste Salt and pepper for seasoning

Equipment

  • frying pan
  • shallow bowls
  • Tongs
  • Paper towels

Method
 

Step-by-Step Instructions
  1. Begin by rinsing the shrimp under cold water to cleanse them. Then, carefully devein and shell the shrimp, ensuring they are fully cleaned. Pat them dry with paper towels to remove excess moisture, as this will help the coating stick better later. Set the prepared shrimp aside while you set up your breading station.
  2. Next, create a simple breading station by arranging three shallow bowls. In the first bowl, add flour, seasoning it with salt and pepper to taste. In the second bowl, crack an egg and beat it until well combined. In the third bowl, place the unsweetened coconut flakes. Dredge each shrimp in flour, dip it into the egg, and then coat it generously with coconut flakes.
  3. In a large frying pan, pour enough oil to reach about 1/2 inch in depth. Place the pan over medium-high heat and let the oil heat up until it shimmers, which typically takes about 4-5 minutes.
  4. Carefully place the breaded shrimp into the hot oil in batches, avoiding overcrowding the pan. Fry each batch for about 2-3 minutes per side, or until they reach a golden brown color.
  5. Once the shrimp are golden and crispy, transfer them to a plate lined with paper towels to drain any excess oil. Allow them to rest for a minute or two, then serve hot with your favorite dipping sauce.

Nutrition

Serving: 1servingCalories: 300kcalCarbohydrates: 25gProtein: 20gFat: 15gSaturated Fat: 10gPolyunsaturated Fat: 2gMonounsaturated Fat: 3gCholesterol: 170mgSodium: 400mgPotassium: 250mgFiber: 2gSugar: 1gVitamin A: 100IUVitamin C: 3mgCalcium: 20mgIron: 1mg

Notes

Best served hot and fresh. Reheat leftovers in the oven to maintain crispiness.

Tried this recipe?

Let us know how it was!

Homemade Applebee’s Chicken Wonton Tacos for Flavorful Fun

April 3, 2026 by Grace Snow Leave a Comment

The crispy sound of wontons emerging from the oven is music to my ears—a true signal that something spectacular is on its way! If you're also a fan of that irresistible crunch combined with savory goodness, then you’re in for a treat with these Homemade Applebee's Chicken Wonton Tacos. This delightful dish marries quick prep and budget-friendly ingredients, making it the perfect choice for those nights when you crave a restaurant-style experience at home. Picture it: a crispy wonton shell filled with tender chicken, bright slaw, and a drizzle of sweet chili sauce that is sure to impress. Plus, with options for a gluten-free twist, everyone can join in on the deliciousness! Are you ready to bite into something extraordinary? Let’s dive into this recipe together!

Why Are These Tacos So Irresistible?

Crispy Perfection: You'll love the crunchy wonton shells that create a delightful contrast with the tender chicken and slaw inside.

Flavor Explosion: The combination of sweet hoisin, zesty rice vinegar, and fresh ginger brings an unmatched depth of flavor that's hard to resist.

Quick and Easy: With just a few steps and minimal prep time, this recipe fits perfectly into your busy weeknight cooking routine.

Crowd-Pleasing Dish: Everyone, from kids to adults, will adore these tacos, making them a hit for family dinners and casual get-togethers.

Budget-Friendly: Enjoy an impressive meal without breaking the bank, especially when you use simple, affordable ingredients.

For a twist on traditional flavors, consider pairing these tacos with some Crock Pot Chicken or enjoying them with a refreshing garden salad for a complete meal!

Applebee’s Chicken Wonton Tacos Ingredients

For the Chicken Filling
• Chicken Breasts – Main protein, finely diced for quick cooking.
• Hoisin Sauce – Adds sweetness and depth of flavor; substitute with teriyaki sauce for a milder taste.
• Sesame Oil – Provides nuttiness; essential for both chicken and slaw preparation.
• Soy Sauce – Enhances umami flavor; can be swapped with tamari for a gluten-free option.
• Garlic – Offers aromatic flavor; minced for better integration.
• Fresh Ginger – Adds a spicy warmth; finely minced is best.

For the Slaw
• Coleslaw Mix – Provides crunch and freshness; mix with additional slaw ingredients to enhance flavor.
• Green Onions – Offers a mild onion flavor; sliced thinly for even distribution.
• Rice Vinegar – Adds acidity to balance flavors; key for slaw dressing.
• Honey – Gives a touch of sweetness to the slaw; can be adjusted to taste.

For the Taco Shells and Garnish
• Wonton Wrappers – Forms the taco shells; use square wrappers draped over muffin tins for proper shape.
• Sweet Chili Sauce – For serving; adds additional sweetness and tang to your Applebee’s Chicken Wonton Tacos.
• Chopped Cilantro – Garnish; provides freshness and color.
• Sesame Seeds – For garnish and crunch; optional but recommended.

These ingredients come together to create a mouthwatering dish that's sure to delight your taste buds and impress your family and friends!

Step‑by‑Step Instructions for Applebee’s Chicken Wonton Tacos

Step 1: Preheat and Prepare Muffin Tin
Begin by preheating your oven to 375°F (190°C). While the oven warms up, lightly spray the back of a muffin tin with cooking spray to prevent sticking. This is crucial for keeping your wonton shells crispy and intact. The warmth of the oven will ensure a lovely golden color on the wonton shells once baked.

Step 2: Shape the Wonton Shells
Take your wonton wrappers and gently drape them over the inverted muffin cups of the prepared tin. Ensure that they are positioned well to form little taco shells. Place them in the oven and bake for 5-7 minutes, or until the edges turn crispy and golden, filling your kitchen with a delightful aroma.

Step 3: Cook the Chicken Filling
While the wonton shells are baking, heat 1 tablespoon of sesame oil in a skillet over medium-high heat. Once hot, add the finely diced chicken breasts and cook for 3-4 minutes, stirring regularly until they are no longer pink. You want the chicken to be perfectly cooked and tender, so don't rush this step.

Step 4: Add Flavor to the Chicken
Next, stir in the hoisin sauce, soy sauce, minced garlic, and freshly grated ginger into the pan with the chicken. Cook this mixture for an additional 2-3 minutes, allowing it to bubble and coat the chicken with a glossy and flavorful glaze. The enticing scent will draw everyone into the kitchen!

Step 5: Make the Slaw
In a large mixing bowl, combine your coleslaw mix and sliced green onions. Drizzle in sesame oil, rice vinegar, and honey, then toss everything together until the slaw is well-coat. This mixture adds a refreshing crunch to your Applebee’s Chicken Wonton Tacos, balancing the savory chicken beautifully.

Step 6: Assemble the Tacos
Once the wonton shells are baked and crispy, remove them from the oven with caution. Begin filling each wonton shell with the flavorful chicken mixture, packing it in generously. Top them off with the prepared slaw, adding a nice layer of texture and freshness to your tacos.

Step 7: Garnish and Serve
To finish off your delicious Applebee’s Chicken Wonton Tacos, drizzle each one with sweet chili sauce, which adds an extra punch of sweetness. Sprinkle chopped cilantro and sesame seeds over the top for a burst of color and flavor. Serve these delightful tacos immediately to preserve their crunch and savor the vibrant flavors!

What to Serve with Homemade Applebee’s Chicken Wonton Tacos?

Savor the enticing flavors of these crispy tacos by complementing them with delightful sides and beverages that elevate your dining experience.

  • Creamy Avocado Salad: This dish adds a creamy richness that balances the crunch of the tacos, enhancing each bite with refreshing flavors. Imagine a zesty dressing drizzled over ripe avocado and vibrant cherry tomatoes.

  • Sweet Chili Dipping Sauce: While already included, serving extra sweet chili sauce will elevate the experience, inviting a dip that enhances the sweetness and adds extra depth to each taco.

  • Crisp Garden Salad: A fresh garden salad provides a bright contrast, with crunchy vegetables offering a satisfying textural balance. Toss fresh greens with a light vinaigrette to keep the flavors bright.

  • Spicy Sriracha Mayo: Mixing sriracha with creamy mayo maintains a balance of heat and coolness, perfect for those who love a kick. Serve it as an additional drizzle to complement the savory fillings.

  • Mango Salsa: The sweetness and tang of fresh mango salsa will contrast beautifully with the savory chicken and crunchy wontons, adding a tropical flair to your plate.

  • Cold Cucumber Soup: This rejuvenating dish offers a cooling effect against the warm tacos, making it a refreshing palate cleanser. Try blending cucumbers, yogurt, and dill for a silky texture.

  • Craft Beer: Pairing your meal with a light lager or a crisp pilsner brings out the flavors of the chicken while cutting through richness, providing a refreshing sip between bites.

  • Lime-Infused Sparkling Water: For a non-alcoholic option, lime-infused sparkling water is refreshingly crisp and complements the tacos' flavors beautifully. It's a delightful way to cleanse the palate with every sip.

Applebee’s Chicken Wonton Tacos Variations

Looking to spice up your homemade tacos? Dive into these delightful twists that will elevate your dish!

  • Gluten-Free: Use gluten-free wonton wrappers or crispy lettuce leaves instead of wontons for a fresh, low-carb option. Perfect for accommodating dietary needs!

  • Vegetarian: Swap chicken for sautéed mushrooms or tempeh, seasoned with soy sauce and hoisin for a rich, savory flavor that’s just as satisfying.

  • Spicy Kick: Add diced jalapeños or a dash of hot sauce to the chicken mixture to turn up the heat. Every bite will be a flavorful adventure!

  • Veggie-Packed: Mix in diced bell peppers or shredded carrots into the slaw for extra crunch and nutrients. The freshness complements the savory chicken wonderfully.

  • Sweet and Savory: Try drizzling honey or maple syrup over the assembled tacos for a delightful contrast to the savory fillings. Sweetness takes the flavor experience to new heights!

  • Crispy on the Outside: For an extra crunch, lightly fry the baked wonton shells in a shallow pan before filling them. The added texture will have everyone reaching for seconds.

  • Fusion Twist: Incorporate elements from a different cuisine, like adding kimchi to the slaw for a Korean-inspired taco experience. It’s all about creativity!

Enhancing your Applebee’s Chicken Wonton Tacos is easy with these variations, and if you’re looking for more flavor inspiration, check out the delicious Chipotle Lime Chicken to serve alongside or consider making Honey Garlic Chicken for a tasty combo!

Storage Tips for Applebee’s Chicken Wonton Tacos

Fridge: Keep cooked chicken and slaw in separate airtight containers for up to 3 days to maintain freshness and prevent sogginess in your Applebee’s Chicken Wonton Tacos.

Freezer: You can freeze cooked chicken for up to 2 months. Ensure it's in a well-sealed container or freezer bag to prevent freezer burn; just thaw overnight in the fridge before using.

Wonton Shells: For best results, store baked wonton shells in an airtight container at room temperature for up to 2 days. If you notice they are losing crunch, consider crisping them in the oven for a few minutes before serving.

Reheating: When ready to enjoy leftovers, reheat the chicken in a skillet over medium heat until warmed through, and bake the wonton shells for a few minutes to regain their crunch.

Make Ahead Options

These Homemade Applebee's Chicken Wonton Tacos are ideal for meal prep and can save you precious time on busy weeknights! You can prepare the chicken filling and coleslaw up to 3 days in advance. Simply cook the chicken as per the recipe, then let it cool completely before storing it in an airtight container in the refrigerator. The slaw can be mixed separately and also refrigerated. To maintain the crunch of the wonton shells, it's best to bake them the day you intend to serve the tacos. Just fill the shells with the chicken and slaw right before serving, drizzle with sweet chili sauce, and enjoy the same delicious taste without the last-minute stress!

Expert Tips for Applebee’s Chicken Wonton Tacos

  • Perfect Shells: Ensure your wonton wrappers are evenly draped over the muffin cups to create uniform taco shapes for even baking and crispiness.

  • Fresh Ingredients: Use fresh garlic and ginger for the best flavor; pre-minced versions can lack the aromatic punch you want in your filling.

  • Adjust to Taste: Feel free to tweak the amount of honey and vinegar in the slaw; balancing sweetness and acidity is key to enhancing your Applebee’s Chicken Wonton Tacos.

  • Serve Fresh: Assemble your tacos just before serving to keep the wonton shells crispy; they will soften if left assembled for too long.

  • Avoid Overcrowding: When filling the wonton shells, don’t overpack them. This can lead to sogginess and prevent the crispy texture you desire.

  • Storage Tips: Store chicken and slaw separately in airtight containers if you plan to enjoy leftovers; this keeps everything fresh and delicious!

Applebee's Chicken Wonton Tacos Recipe FAQs

How do I choose ripe ingredients for the slaw and chicken?
Absolutely! When selecting your ingredients, look for fresh, crisp coleslaw mix without any dark spots or wilting. For the chicken, make sure it’s pink with no gray coloring—this indicates freshness. If you can, buy your ginger fresh rather than pre-minced for the best flavor.

How long can I store the leftovers in the fridge?
You can keep the cooked chicken and slaw in separate airtight containers for up to 3 days in the fridge. This helps maintain the freshness of each component and prevents the wonton shells from getting soggy.

Can I freeze the chicken for later use?
Yes, you can freeze the cooked chicken filling for up to 2 months. To do this, let it cool completely and place it in a well-sealed container or freezer bag. When you’re ready to use it, simply thaw it overnight in the fridge. This is a great way to have a tasty filling ready for quick meals!

What should I do if my wonton shells turn out soggy?
If your wonton shells become soggy, here’s a quick fix: Preheat your oven to 375°F (190°C) and place the shells on a baking tray. Bake for about 3-5 minutes until they crisp up again. To prevent this from happening, fill the wonton shells just before serving!

Are there any dietary considerations I should keep in mind?
Absolutely! If you're catering to gluten-free diets, substitute soy sauce with tamari and ensure you use gluten-free wonton wrappers. Additionally, always double-check the hoisin sauce for gluten content, or you can try homemade versions to ensure it meets dietary needs.

How do I ensure my tacos stay crispy until served?
To maintain that precious crunch, keep your assembled Applebee's Chicken Wonton Tacos separate until you’re ready to serve. Store the chicken filling and slaw separately in the fridge, and assemble them just before enjoying—this way, the wonton shells will stay perfectly crispy!

Applebee’s Chicken Wonton Tacos

Homemade Applebee’s Chicken Wonton Tacos for Flavorful Fun

Enjoy delicious Applebee’s Chicken Wonton Tacos with crispy wonton shells and savory chicken filling for a fun meal!
Print Recipe Pin Recipe
Prep Time 15 minutes mins
Cook Time 20 minutes mins
Total Time 35 minutes mins
Servings: 4 tacos
Course: Appetizers
Cuisine: Asian
Calories: 200
Ingredients Equipment Method Nutrition Notes

Ingredients
  

Chicken Filling
  • 1 pound Chicken Breasts finely diced
  • 2 tablespoons Hoisin Sauce or teriyaki sauce
  • 1 tablespoon Sesame Oil for cooking
  • 2 tablespoons Soy Sauce or tamari for gluten-free
  • 2 cloves Garlic minced
  • 1 tablespoon Fresh Ginger finely minced
Slaw
  • 4 cups Coleslaw Mix add additional ingredients to taste
  • 2 scallions Green Onions sliced thinly
  • 2 tablespoons Rice Vinegar
  • 1 tablespoon Honey to taste
Taco Shells and Garnish
  • 20 pieces Wonton Wrappers square wrappers
  • 1 bottle Sweet Chili Sauce for drizzling
  • 1 cup Chopped Cilantro for garnish
  • 2 tablespoons Sesame Seeds optional

Equipment

  • Muffin tin
  • Skillet
  • Mixing Bowl

Method
 

Preparation
  1. Preheat your oven to 375°F (190°C) and lightly spray the back of a muffin tin with cooking spray.
  2. Drape wonton wrappers over the inverted muffin cups and bake for 5-7 minutes until golden.
  3. Heat sesame oil in a skillet and cook the diced chicken until no longer pink, about 3-4 minutes.
  4. Add hoisin sauce, soy sauce, garlic, and ginger to the chicken, cooking for an additional 2-3 minutes.
  5. In a large bowl, combine coleslaw mix, green onions, sesame oil, rice vinegar, and honey. Toss to combine.
  6. Fill the baked wonton shells with the chicken mixture and top with the slaw.
  7. Drizzle with sweet chili sauce and garnish with cilantro and sesame seeds before serving.

Nutrition

Serving: 1tacoCalories: 200kcalCarbohydrates: 15gProtein: 15gFat: 10gSaturated Fat: 1.5gPolyunsaturated Fat: 1gMonounsaturated Fat: 1gCholesterol: 60mgSodium: 600mgPotassium: 300mgFiber: 2gSugar: 4gVitamin A: 100IUVitamin C: 5mgCalcium: 40mgIron: 1mg

Notes

Assemble tacos just before serving to preserve crunch; store chicken and slaw separately for leftovers.

Tried this recipe?

Let us know how it was!

Easter Ham and Cheddar Pinwheels: Irresistibly Easy Appetizer

March 28, 2026 by Grace Snow Leave a Comment

As I stood in the kitchen, the scent of warm ham and melting cheddar wafting through the air, I couldn’t help but feel a wave of nostalgia. My Easter gatherings have always been filled with laughter, family, and the universal joy of delicious food—especially when it comes to my beloved Easter Ham and Cheddar Pinwheels. These delightful appetizers not only capture the essence of celebration but also come together effortlessly, making it a crowd-pleaser that even the pickiest of eaters can’t resist. With the option to prepare them ahead of time, you’ll find yourself with more moments to share with loved ones instead of being tied to the oven. Who can say no to that? Ready to indulge in these scrumptious bites? Let's roll up those sleeves!

Why Are These Pinwheels So Popular?

Easy Preparation: These Easter Ham and Cheddar Pinwheels come together in just a few steps, making them perfect for busy bakers!

Crowd-Pleasing Flavor: With a savory combination of ham, cheddar, and tangy Dijon, these bites are sure to wow your guests.

Versatile Options: Want to cater to different tastes? Switch up the cheese or try a vegetarian version with roasted veggies!

Make-Ahead Friendly: Prepare them a day in advance or freeze them for up to three months—ideal for stress-free entertaining!

Perfect for gatherings or holidays, these pinwheels are a fun addition to any table that everyone will enjoy.

Easter Ham and Cheddar Pinwheels Ingredients

For the Pinwheels

  • Puff Pastry – provides a flaky, buttery base; store-bought is a convenient option for quick prep.
  • Ham – adds savory flavor and protein; substitute with turkey or chicken for a healthier twist.
  • Cheddar Cheese – brings a rich, sharp flavor to each bite; consider using mild cheddar or Gruyère for a different taste.
  • Dijon Mustard – gives a tangy kick that enhances the savory elements; reduce or omit for a milder flavor, perfect for kids.

For the Variations

  • Pepper Jack Cheese – adds a spicy twist; perfect for those who enjoy a little heat in their snacks.
  • Provolone Cheese – brings an Italian flair; use with Italian herbs for a deliciously different flavor profile.
  • Roasted Vegetables – a great vegetarian option; try a mix of bell peppers, zucchini, and sun-dried tomatoes for a flavorful filling.

These delicious Easter Ham and Cheddar Pinwheels are sure to be a hit!

Step‑by‑Step Instructions for Easter Ham and Cheddar Pinwheels

Step 1: Prepare the Puff Pastry
Begin by preheating your oven to 400°F (200°C). Roll out the store-bought puff pastry on a lightly floured surface until it is smooth and uniform, about 1/8 inch thick. Ensure not to leave it too thick, as the Easter Ham and Cheddar Pinwheels need to bake evenly and become golden brown.

Step 2: Assemble the Filling
Spread a thin layer of Dijon mustard over the prepared puff pastry, covering the surface for extra flavor. Next, layer the sliced ham evenly across the pastry, followed by a generous sprinkle of shredded cheddar cheese. Make sure the ingredients are distributed uniformly for balanced bites, enticing everyone with their savory goodness.

Step 3: Roll and Chill the Pastry
Starting from one edge, carefully roll the pastry tightly into a log shape. Aim for a snug fit to keep the filling contained during baking. Once rolled, wrap the log in plastic wrap and chill in the refrigerator for at least 30 minutes. This chilling step is crucial for ensuring your Easter Ham and Cheddar Pinwheels hold their shape when sliced.

Step 4: Slice the Pinwheels
Remove the chilled log from the refrigerator and, using a sharp knife, slice it into ½-inch thick rounds. This ensures that each pinwheel is filled with a delightful mix of ham and cheddar. As you slice, you will see the beautiful layers forming; this visual cue means you’re on the right track!

Step 5: Bake the Pinwheels
Arrange the pinwheels on a parchment-lined baking sheet, making sure to leave space between each one for even cooking. Bake in the preheated oven for 20-25 minutes, or until they achieve a lovely golden brown color and the puff pastry is flaky. Keep an eye on them towards the end of baking to prevent burning!

Step 6: Serve Warm
Once baked, pull the Easter Ham and Cheddar Pinwheels from the oven and let them cool slightly on the baking sheet. Serve these delightful bites warm, showcasing their mouth-watering golden exterior and melty cheese interior. Present them beautifully on a platter, ready to bring joy to your gathering!

Make Ahead Options

These Easter Ham and Cheddar Pinwheels are perfect for busy cooks looking to save time on meal prep! You can assemble the pinwheels up to 24 hours in advance. Simply follow the instructions up to the rolling stage, then wrap the log in plastic wrap and refrigerate until ready to slice and bake. To ensure they stay fresh and just as delicious, avoid cutting them until you're ready to bake. When it's time to impress your guests, simply slice, arrange them on a baking sheet, and bake for 20-25 minutes. With this make-ahead option, you'll have more time to celebrate, and your pinwheels will turn out fabulous!

Storage Tips for Easter Ham and Cheddar Pinwheels

Room Temperature: Enjoy any leftover pinwheels within 2 hours of baking when served at room temperature to ensure safety and taste.

Fridge: Store baked pinwheels in an airtight container in the refrigerator for up to 3 days. Reheat them in the oven to restore crispness.

Freezer: For longer storage, freeze unbaked pinwheels tightly wrapped in plastic wrap or placed in a freezer-safe bag for up to 3 months. Bake directly from frozen, adding a few extra minutes to the bake time.

Reheating: To reheat already baked pinwheels, place them in a preheated oven at 350°F (175°C) for about 10-12 minutes until warmed through and crispy. Enjoy your Easter Ham and Cheddar Pinwheels again!

Expert Tips for Easter Ham and Cheddar Pinwheels

  • Chill Before Slicing: Ensure your rolled pastry is well-chilled before slicing. This helps maintain its shape and prevents filling leakage during baking.

  • Even Filling Spread: Spread the Dijon mustard and other fillings evenly and in thin layers. Too much filling can lead to oozing and uneven baking.

  • Watch the Bake Time: Keep an eye on the pinwheels in the oven. They should be golden brown and flaky—overbaking can lead to a dry texture.

  • Experiment with Cheese: Don’t hesitate to swap the cheddar for other cheeses like Gruyère or pepper jack. This can elevate your Easter Ham and Cheddar Pinwheels with exciting new flavors!

  • Prep Ahead: Make your pinwheels a day in advance or freeze unbaked ones. This makes entertaining easy and stress-free, allowing you to enjoy the celebration!

What to Serve with Easter Ham and Cheddar Pinwheels?

Pair your festive pinwheels with delightful side dishes for a truly memorable meal!

  • Crispy Garden Salad:
    A refreshing mix of greens, cherry tomatoes, and cucumbers adds a crunchy contrast, perfect for balancing the savory pinwheels.

  • Cheesy Garlic Breadsticks:
    Warm and gooey, these breadsticks not only enhance the cheese flavor but also provide a comforting addition to your appetizer spread.

  • Zesty Coleslaw:
    A tangy, colorful slaw adds a burst of freshness with every bite, making it a vibrant side that complements the richness of the pinwheels.

  • Honey Mustard Dipping Sauce:
    This sweet and tangy sauce brings an exciting twist and is perfect for dipping, enhancing the flavors of the savory filling.

  • Roasted Vegetable Platter:
    A medley of seasonal roasted veggies introduces earthy flavors and a satisfying texture, creating a well-rounded feast.

  • Sparkling Lemonade:
    Bright and refreshing, this bubbly drink pairs beautifully with the richness of the pinwheels, keeping everyone feeling light and festive.

  • Mini Cheesecakes:
    These sweet bite-sized desserts provide a delightful end to your meal, contrasting perfectly with the savory notes of the Easter Ham and Cheddar Pinwheels.

Easter Ham and Cheddar Pinwheels Variations

Feeling inspired? Let your creativity shine by customizing these delightful pinwheels to suit your taste buds!

  • Spicy Ham and Pepper Jack: Swap cheddar for pepper jack and add red pepper flakes for a zesty kick. Perfect for those who crave heat!

  • Italian Ham and Provolone: Use provolone cheese and incorporate Italian herbs like basil or oregano into the filling. It’s a delicious Italian twist!

  • Vegetarian Option: Replace ham with roasted vegetables or sun-dried tomatoes and mozzarella for a colorful plant-based delight. Your guests won’t miss the meat!

  • Herbed Cream Cheese Spread: Try spreading a layer of herbed cream cheese instead of mustard for a creamy and rich filling. It adds a lovely depth of flavor!

  • Smoky Bacon Addition: Add crispy bacon bits for that smoky essence to complement the ham. It enhances the savory profile beautifully.

  • Garlic Butter Glaze: Brush the pinwheels with melted garlic butter before baking for an aromatic boost. This extra touch will leave everyone craving more!

  • Savory Spinach and Cheese: Mix in some sautéed spinach for a pop of color and extra nutrients. It’s a simple way to boost the nutritional value without sacrificing taste.

  • Sweet Honey Mustard: Replace Dijon with honey mustard for a hint of sweetness. It perfectly balances the savory fillings, catering to those who enjoy a touch of sweetness in their bites.

Feel free to explore these variations or even combine a few! For more flavorful ideas, consider trying these options, like Pan Fried Shrimp or a delightful twist with Corn Fried Egg. Happy cooking!

Easter Ham and Cheddar Pinwheels Recipe FAQs

How do I choose the right puff pastry?
Absolutely, using high-quality puff pastry makes all the difference! I recommend going for store-bought options that are labeled "all-butter" for enhanced flavor. When you’re at the store, check for any signs of damage or tears in the packaging, as this might affect the flakiness once baked. If you feel adventurous, a homemade puff pastry can elevate your pinwheels to a whole new level!

How should I store leftover pinwheels?
Very good question! After enjoying your Easter Ham and Cheddar Pinwheels, store any leftovers in an airtight container in the refrigerator. They will stay fresh for up to 3 days. For added crispness when reheating, pop them into the oven at 350°F (175°C) for about 10-12 minutes. This helps maintain that delightful flaky texture that we all love!

Can I freeze unbaked pinwheels?
Absolutely, it’s a great idea to freeze unbaked pinwheels! After rolling the log, wrap it tightly in plastic wrap and then place it in a freezer-safe bag. They can be stored for up to 3 months. When you're ready to bake, just slice your pinwheels straight from the freezer, and add 5-10 extra minutes to your bake time to achieve that golden brown perfection.

What if my filling oozes out during baking?
Oh no, we certainly don’t want that! The key is to keep your filling thin and evenly spread out. If you find that your pinwheels are leaking, try a couple of tricks: chill the rolled pastry thoroughly before slicing to help the filling stay contained, and ensure not to overload the filling—less is often more with these delicious bites!

Are these pinwheels pet-friendly?
Unfortunately, these Easter Ham and Cheddar Pinwheels are not suitable for pets. Ingredients like cheese can be hard for some pets to digest, and the spices in Dijon mustard may upset their stomachs. If you’re looking for something special for your furry friends, consider making them a simple treat with plain cooked meat, without any seasoning.

Can I customize the pinwheels for dietary restrictions?
Very much so! If you want to make the pinwheels vegetarian, swap the ham for roasted vegetables like zucchini, bell peppers, or sun-dried tomatoes along with a flavorful cheese like mozzarella. You can also experiment with different cheeses or adjust the mustard to fit your preferred taste profile. Enjoy playing around with flavors!

Easter Ham and Cheddar Pinwheels

Easter Ham and Cheddar Pinwheels: Irresistibly Easy Appetizer

Easter Ham and Cheddar Pinwheels are easy to prepare, savory, and perfect for gatherings.
Print Recipe Pin Recipe
Prep Time 30 minutes mins
Cook Time 25 minutes mins
Chilling Time 30 minutes mins
Total Time 1 hour hr 25 minutes mins
Servings: 12 pinwheels
Course: Appetizers
Cuisine: American
Calories: 150
Ingredients Equipment Method Nutrition Notes

Ingredients
  

For the Pinwheels
  • 1 sheet puff pastry store-bought
  • 8 oz ham sliced
  • 8 oz cheddar cheese shredded
  • 2 tbsp Dijon mustard
For the Variations
  • 8 oz pepper jack cheese optional
  • 8 oz provolone cheese optional
  • 1 cup roasted vegetables optional, mix of bell peppers, zucchini, and sun-dried tomatoes

Equipment

  • Oven
  • Rolling Pin
  • Baking Sheet
  • plastic wrap
  • Sharp Knife

Method
 

Step-by-Step Instructions
  1. Preheat the oven to 400°F (200°C) and roll out the puff pastry on a floured surface until smooth.
  2. Spread a thin layer of Dijon mustard on the puff pastry, then layer the sliced ham and shredded cheddar cheese.
  3. Roll the pastry tightly into a log shape, wrap in plastic wrap, and chill for at least 30 minutes.
  4. Slice the chilled log into ½-inch thick rounds.
  5. Arrange the pinwheels on a baking sheet and bake for 20-25 minutes until golden brown.
  6. Let cool slightly and serve warm on a platter.

Nutrition

Serving: 1pinwheelCalories: 150kcalCarbohydrates: 10gProtein: 6gFat: 10gSaturated Fat: 4gCholesterol: 30mgSodium: 350mgPotassium: 150mgFiber: 1gSugar: 1gVitamin A: 200IUCalcium: 150mgIron: 1mg

Notes

These pinwheels can be made a day in advance or frozen for stress-free entertaining.

Tried this recipe?

Let us know how it was!

Spicy Banana Pepper Deviled Eggs That Steal the Show

March 18, 2026 by Grace Snow Leave a Comment

As I stood in my kitchen, the sun filtering through the window, I couldn’t help but marvel at the versatility of deviled eggs. Today, I was giving this classic appetizer a zesty twist with my Spicy Banana Pepper Deviled Eggs. With their creamy, vibrant yolk filling infused with the delightful kick of banana peppers, these crowd-pleasers are as much a feast for the eyes as they are for the taste buds. Not only are they effortlessly simple to whip up, but they also cater to those seeking a keto-friendly, low-carb option that’s bursting with nutrition. Whether it's a casual family get-together or a lively celebration, these deviled eggs will steal the show. Are you ready to spice up your next gathering? Let's dive into the recipe!

Why Are These Deviled Eggs Special?

Bursting with flavor, these Spicy Banana Pepper Deviled Eggs elevate a classic dish with a delightful kick. Easy to make, the recipe requires minimal ingredients and time, making it perfect for both beginner and seasoned cooks. Keto-friendly and low-carb, they satisfy cravings without the guilt. Visually stunning, the vibrant colors and garnishes enhance any appetizer spread. Versatile in spice level, you can easily adjust the heat to cater to your guests' preferences. Try serving these alongside Turkish Eggs for a complete brunch experience!

Spicy Banana Pepper Deviled Eggs Ingredients

• For the Filling

  • Eggs – Use large, fresh eggs for the creamiest texture in your deviled eggs.
  • Mayonnaise – This ingredient adds necessary creaminess; opt for a vegan or low-fat version if preferred.
  • Banana Peppers – Choose pickled for extra tang, or fresh for a crunchy bite; adjust the quantity based on your preferred spice level.
  • Smoked Paprika – Adds a delicious smokiness; regular paprika is a good alternative if you want to skip the smoke flavor.
  • Salt & Pepper – Essential for enhancing flavor; tweak to your taste for perfect seasoning.

• Optional Garnishes

  • Chives – Finely chopped chives add a fresh touch and vibrant color.
  • Herbs – Fresh herbs like parsley or dill elevate the dish with flavor and visual appeal.
  • Pepper Slices – Use slices of banana pepper for an extra zing and beautiful decoration.

These Spicy Banana Pepper Deviled Eggs will not just be a hit at any gathering; they'll leave your guests raving about them long after the last bite!

Step‑by‑Step Instructions for Spicy Banana Pepper Deviled Eggs

Step 1: Hard-Boil the Eggs
Begin by placing 6 large fresh eggs in a saucepan filled with cold water, ensuring they're submerged by at least an inch. Bring the water to a vigorous boil over medium-high heat. Once boiling, cover the pot, reduce to a low simmer, and cook for 10-12 minutes. When done, transfer the eggs to an ice water bath for about 5 minutes to halt cooking and make peeling easier.

Step 2: Peel and Halve the Eggs
Once the eggs are cool, gently tap them on a hard surface to crack the shell. Carefully peel the eggs under running water to remove all shell fragments. Slice each egg in half lengthwise using a sharp knife, and gently remove the yolks with a spoon, placing them in a mixing bowl. Set the egg whites aside on a serving platter.

Step 3: Prepare the Filling
In the mixing bowl, mash the yolks with a fork until finely crumbled. Add about 3 tablespoons of mayonnaise, 2-3 finely chopped banana peppers, 1 teaspoon of smoked paprika, and a pinch of salt and pepper. Mix everything until you achieve a smooth and creamy consistency. Feel free to adjust the amount of mayonnaise for a creamier filling in your Spicy Banana Pepper Deviled Eggs!

Step 4: Fill the Egg Whites
Using a piping bag or a simple spoon, carefully fill each egg white half with the yolk mixture. If using a piping bag, opt for a star-tip for a decorative finish. Ensure each egg white is generously filled, creating a lovely mound of the vibrant filling. This presentation not only looks appealing but adds to the flavor experience of your Spicy Banana Pepper Deviled Eggs.

Step 5: Garnish as Desired
To elevate your Spicy Banana Pepper Deviled Eggs, sprinkle a dash of paprika on top for a pop of color. For an added touch of freshness, garnish with finely chopped chives or fresh herbs. Place a slice of banana pepper on each egg to highlight the spicy flavor. Your appetizers are now ready to delight your guests!

Spicy Banana Pepper Deviled Eggs Variations

Feel free to explore these creative variations to make your deviled eggs uniquely yours!

  • Extra Spicy: Add chopped jalapeños or a dash of hot sauce for a fiery kick that spice lovers will adore.
    Incorporating hot elements brings not just heat, but a delightful burst of flavor that elevates your dish.

  • Vegan-Friendly: Replace eggs with a chickpea salad filled with mashed chickpeas, vegan mayo, and banana peppers.
    This variation offers a satisfying, creamy texture while remaining completely plant-based and packed with protein.

  • Cheesy Twist: Mix in crumbled feta or shredded cheddar cheese into the yolk filling for a rich, savory taste.
    The addition of cheese introduces a creamy, tangy element that pairs wonderfully with the smoked paprika.

  • Sweet & Spicy: Add some finely chopped sweet pickled banana peppers to balance the spicy kick with a hint of sweetness.
    This contrast can create a delightful synergy of flavors that will surprise your guests and keep them coming back for more.

  • Crunchy Texture: Fold in some finely chopped celery or crispy bacon bits for an added layer of crunch and flavor.
    This twist not only enhances the texture but adds a depth of savory richness to the eggs.

  • Herb Infusion: Incorporate fresh herbs like dill or cilantro into the filling for a refreshing burst of flavor.
    Herbs can transform the taste profile, making your deviled eggs lighter and fragrant, perfect for a summer gathering.

  • Gourmet Touch: Top with a drizzle of truffle oil right before serving for an upscale flavor experience.
    The luxurious aroma and taste of truffle oil can truly elevate your Spicy Banana Pepper Deviled Eggs into a gourmet delight.

For an amazing accompaniment to your deviled eggs, consider serving them with some delightful Breakfast Banana Split for a fun brunch menu!

Make Ahead Options

These Spicy Banana Pepper Deviled Eggs are a fantastic choice for meal prep, making your life easier during busy weeknights or gatherings. You can hard-boil the eggs and refrigerate them for up to 24 hours before assembly, ensuring they're ready when you are. Additionally, the yolk mixture can be made ahead of time and stored in an airtight container in the fridge for up to 3 days; this keeps the flavors melded while maintaining the creamy texture. Just remember to fill the egg whites shortly before serving to keep them fresh and visually appealing. By planning ahead in this way, you’ll have delicious, ready-to-serve appetizers with minimal effort!

What to Serve with Spicy Banana Pepper Deviled Eggs

A delightful spread complements the vibrant flavors of these zesty bites, enhancing your gathering with a culinary flourish.

  • Fresh Salad: A crisp, mixed greens salad with citrus vinaigrette offers a refreshing contrast to the creamy deviled eggs.
  • Crunchy Veggie Platter: Serve an assortment of colorful, crunchy vegetables like carrots and bell peppers, perfect for dipping in ranch or hummus.
  • Savory Cheese Platter: Include a variety of cheeses, like sharp cheddar or creamy goat cheese, to balance the spicy notes and add richness.
  • Light Soup: A chilled cucumber or gazpacho soup can be a refreshing starter, cleansing the palate between bites of the deviled eggs.
  • Tangy Pickles: The acidity of dill pickles complements the eggs' creaminess while enhancing the overall flavor profile.
  • Chardonnay or Sauvignon Blanc: Serve a chilled glass of either for a crisp, refreshing drink that pairs beautifully with the spice of the deviled eggs.
  • Dessert Bars: Consider offering lemon or key lime bars as a sweet finish, providing a zesty note that echoes the tangy flavors of the eggs.

These delightful pairings will not only enhance your Spicy Banana Pepper Deviled Eggs but also create a memorable dining experience!

Expert Tips for Spicy Banana Pepper Deviled Eggs

  • Perfectly Hard-Boiled: Always start with eggs in cold water, bringing it to a boil. Cooling in ice water immediately prevents that unappealing green-gray ring around the yolk.

  • Adjustable Spice: Feel free to tweak the amount of banana peppers based on your spice tolerance. Adding fewer will make these Spicy Banana Pepper Deviled Eggs milder for sensitive palates.

  • Smooth Filling: For a creamy texture, ensure your mayonnaise is well-blended with the yolks. Use a fork to mash thoroughly, adding a little more mayo if necessary to reach your desired consistency.

  • Presentation Matters: Using a piping bag with a decorative tip can elevate your presentation, making each deviled egg not just delicious but also visually stunning for your guests.

  • Make Ahead: Both the hard-boiled eggs and yolk filling can be prepared ahead of time. Store them separately in the fridge until you’re ready to assemble for maximum freshness.

Storage Tips for Spicy Banana Pepper Deviled Eggs

Fridge: Store your assembled Spicy Banana Pepper Deviled Eggs in an airtight container for up to 2 days for optimal freshness.

Make-Ahead: You can hard-boil the eggs and prepare the yolk filling up to 24 hours in advance. Keep the yolk mixture covered in the fridge until you're ready to fill the egg whites.

Serving Temperature: Serve the deviled eggs chilled for the best flavor experience, especially when garnished just before serving to maintain visual appeal.

Freezer: It's not recommended to freeze deviled eggs, as they may change texture upon thawing. Enjoy them fresh for the best taste!

Spicy Banana Pepper Deviled Eggs Recipe FAQs

How do I select the best eggs for this recipe?
Absolutely! When choosing eggs for your Spicy Banana Pepper Deviled Eggs, aim for large, fresh eggs. Look for eggs with no cracks and a clean shell. Fresh eggs will provide the best flavor and texture, resulting in a creamier filling that your guests will love!

What’s the best way to store leftover deviled eggs?
Very good question! Store your assembled Spicy Banana Pepper Deviled Eggs in an airtight container in the fridge for up to 2 days. Make sure they are well-covered to prevent drying out. However, for the freshest taste, it’s best to consume them as soon as possible!

Can I freeze deviled eggs?
I wouldn’t recommend freezing deviled eggs, as they may change in texture once thawed. The creaminess of the yolk filling can become grainy, losing that delightful smoothness we all love. Instead, enjoy them fresh for the best flavor experience!

What should I do if my egg yolk mixture is too thick?
No worries! If your yolk mixture for the Spicy Banana Pepper Deviled Eggs is too thick, simply add a little more mayonnaise, one tablespoon at a time, until you reach your desired consistency. Mix thoroughly after each addition. You want a smooth, creamy filling that's easy to pipe into the egg whites.

Are these deviled eggs suitable for those with dietary restrictions?
Definitely! These Spicy Banana Pepper Deviled Eggs are keto-friendly and low-carb, making them a wonderful option for anyone watching their carbohydrate intake. If you have a mayo allergy, you can try substituting with an avocado or a vegan mayo alternative to keep them delicious and safe for everyone.

How can I customize the spice level?
The more the merrier! Feel free to adjust the amount of banana peppers based on your heat preference. For added heat, consider using hotter varieties or even a drizzle of hot sauce mixed into the yolk filling. Simply taste as you go and make adjustments that suit your guests’ preferences!

Spicy Banana Pepper Deviled Eggs

Spicy Banana Pepper Deviled Eggs That Steal the Show

Delight your guests with Spicy Banana Pepper Deviled Eggs, a zesty, keto-friendly twist on a classic appetizer.
Print Recipe Pin Recipe
Prep Time 15 minutes mins
Cook Time 12 minutes mins
Cooling Time 5 minutes mins
Total Time 32 minutes mins
Servings: 6 eggs
Course: Appetizers
Cuisine: American
Calories: 100
Ingredients Equipment Method Nutrition Notes

Ingredients
  

For the Filling
  • 6 large Eggs Use fresh eggs for the best texture.
  • 3 tablespoons Mayonnaise Opt for vegan or low-fat if preferred.
  • 2-3 Banana Peppers Pickled for extra tang or fresh for crunch.
  • 1 teaspoon Smoked Paprika Regular paprika can substitute.
  • to taste Salt & Pepper Essential for enhancing flavor.
Optional Garnishes
  • to taste Chives Finely chopped for garnish.
  • to taste Herbs Fresh parsley or dill can elevate the dish.
  • to taste Pepper Slices For decoration and added flavor.

Equipment

  • Saucepan
  • Mixing Bowl
  • piping bag

Method
 

Step-by-Step Instructions
  1. Begin by placing 6 large fresh eggs in a saucepan filled with cold water, ensuring they're submerged by at least an inch. Bring the water to a vigorous boil over medium-high heat. Once boiling, cover the pot, reduce to a low simmer, and cook for 10-12 minutes. When done, transfer the eggs to an ice water bath for about 5 minutes to halt cooking and make peeling easier.
  2. Once the eggs are cool, gently tap them on a hard surface to crack the shell. Carefully peel the eggs under running water to remove all shell fragments. Slice each egg in half lengthwise using a sharp knife, and gently remove the yolks with a spoon, placing them in a mixing bowl. Set the egg whites aside on a serving platter.
  3. In the mixing bowl, mash the yolks with a fork until finely crumbled. Add about 3 tablespoons of mayonnaise, 2-3 finely chopped banana peppers, 1 teaspoon of smoked paprika, and a pinch of salt and pepper. Mix everything until you achieve a smooth and creamy consistency.
  4. Using a piping bag or a simple spoon, carefully fill each egg white half with the yolk mixture. If using a piping bag, opt for a star-tip for a decorative finish.
  5. To elevate your Spicy Banana Pepper Deviled Eggs, sprinkle a dash of paprika on top for a pop of color. For an added touch of freshness, garnish with finely chopped chives or fresh herbs. Place a slice of banana pepper on each egg to highlight the spicy flavor.

Nutrition

Serving: 1eggCalories: 100kcalCarbohydrates: 2gProtein: 6gFat: 8gSaturated Fat: 1gCholesterol: 186mgSodium: 130mgPotassium: 63mgVitamin A: 270IUVitamin C: 1.2mgCalcium: 20mgIron: 0.4mg

Notes

Store assembled deviled eggs in an airtight container for up to 2 days. Serve chilled for best flavor experience.

Tried this recipe?

Let us know how it was!

Elevate Your Party with Dirty Martini Deviled Eggs

March 18, 2026 by Grace Snow Leave a Comment

As I sipped a perfectly mixed martini, the idea hit me—a playful twist on a classic! Enter Dirty Martini Deviled Eggs, where the crisp, creamy richness of deviled eggs collides with the bold flavors of my favorite cocktail. Combining smooth yolks with tangy olives and a splash of gin or vodka feels both luxurious and fun, making this appetizer a standout at any gathering. Not only are they quick to whip up—taking under 30 minutes—but they also bring a sophisticated touch to your table that will leave your guests talking. Ready to elevate your next cocktail hour or brunch? These Dirty Martini Deviled Eggs are an irresistible bite that promises to impress!

Why Are These Deviled Eggs So Unique?

Cocktail-Inspired Delight: These Dirty Martini Deviled Eggs bring together the best of both worlds—classic deviled eggs and a favorite cocktail, making them irresistibly unique and fun.
Quick & Easy: With just 30 minutes of prep time, you can create an impressive appetizer without fussing for hours in the kitchen.
Flavor Explosion: The rich yolk mixture combined with briny olives and a hint of gin or vodka creates a robust flavor that will have your guests coming back for seconds.
Versatile Serve: Perfect for cocktail hours, festive brunches, or casual get-togethers, these eggs fit right in at any occasion!
Make Ahead Option: Prepare the yolk mixture in advance for a stress-free assembly when you’re ready to serve, letting you focus on enjoying your party. For more delicious ideas, check out Turkish Eggs Discover for another unique twist on deviled eggs!

Dirty Martini Deviled Eggs Ingredients

For the Egg Base
• 6 large eggs – Essential for creating that classic deviled egg structure.

For the Yolk Mixture
• 1/4 cup mayonnaise – Adds a velvety creaminess; Greek yogurt is a lighter substitution option.
• 1 tablespoon gin (or vodka) – Infuses the cocktail flavor; choose your favorite spirit for a personal touch.
• 1 teaspoon dry vermouth – Contributes aromatic complexity; consider omitting for a simpler taste.
• 1 1/2 teaspoons olive brine – Delivers saltiness and captures the 'dirty' martini essence; adjust to your salt preference.
• 1/4 teaspoon garlic powder – Enhances the depth of flavor; swap for fresh minced garlic for an extra kick.
• Kosher salt, to taste – Personalize based on your sodium preference after adding the brine.
• Freshly ground black pepper, to taste – Adds a dash of warmth and spice; optional but recommended.

For the Garnish
• 2 tablespoons finely chopped green olives – Introduces a briny texture; black olives can work too if desired.
• 1 tablespoon finely chopped parsley – Brings fresh flavor and a pop of color; feel free to omit for allergies.
• Paprika or chili flakes, for garnish (optional) – Offers a beautiful visual appeal and an extra spicy zing.

Elevate your gatherings with these scrumptious Dirty Martini Deviled Eggs that are sure to impress!

Step‑by‑Step Instructions for Dirty Martini Deviled Eggs

Step 1: Boil the Eggs
Start by placing the 6 large eggs in a medium-sized saucepan. Cover them with cold water, ensuring there's about an inch of water above the eggs. Bring the water to a rolling boil over medium-high heat, and as soon as it reaches a boil, immediately remove the saucepan from heat.

Step 2: Let the Eggs Sit
Cover the saucepan with a lid and let the eggs sit undisturbed for 10 minutes. This step is crucial for achieving the perfect hard-boiled consistency. After the waiting period, prepare an ice water bath in a large bowl to cool the eggs quickly.

Step 3: Cool the Eggs
Carefully transfer the eggs from the hot saucepan into the ice water bath. Allow them to cool completely for about 5-10 minutes. This immediate cooling helps with peeling later and ensures that your Dirty Martini Deviled Eggs maintain a smooth appearance without overcooking.

Step 4: Peel and Halve the Eggs
Once the eggs are fully cooled, gently tap each egg on a hard surface to crack the shell, then peel them under running water if necessary for easier removal. After peeling, slice each egg in half lengthwise and gently scoop the yolks into a mixing bowl, setting the egg whites aside.

Step 5: Prepare the Yolk Mixture
In the bowl with the yolks, add 1/4 cup of mayonnaise, 1 tablespoon of gin (or vodka), 1 teaspoon of dry vermouth, 1 1/2 teaspoons of olive brine, and 1/4 teaspoon of garlic powder. Mix everything thoroughly with a fork until the mixture is smooth and creamy, adjusting the seasoning with kosher salt and freshly ground black pepper to taste.

Step 6: Fold in Olives and Parsley
Gently fold in the 2 tablespoons of finely chopped green olives and 1 tablespoon of finely chopped parsley into the yolk mixture. This will add a delightful briny texture and freshness to your Dirty Martini Deviled Eggs. Taste the mixture once more and adjust any seasonings as needed.

Step 7: Stuff the Egg Whites
Using a spoon or a piping bag, carefully fill each of the halved egg whites with the yolk mixture, creating a beautiful mound. Aim for an elegant presentation, as this is part of what makes these Dirty Martini Deviled Eggs so sophisticated.

Step 8: Garnish and Serve
Finally, garnish your filled deviled eggs with extra chopped olives or a sprinkle of paprika or chili flakes for an eye-catching finish. Arrange them on a stylish platter and serve chilled, allowing your guests to enjoy these cocktail-inspired treats at your next gathering.

Dirty Martini Deviled Eggs Variations

Feel free to experiment and make these delicious Dirty Martini Deviled Eggs your own, enhancing flavors and textures!

  • Gluten-Free: Use gluten-free mayonnaise or yogurt to keep them friendly for all diets without sacrificing taste.
  • Spicy Kick: Add a splash of hot sauce to the yolk mixture for a fiery twist that’ll wake up your taste buds!
  • Smoky Depth: Swap regular paprika for smoked paprika to infuse your deviled eggs with a rich, smoky flavor.
  • Herbaceous Boost: Fold in fresh dill or chives with the olives for a refreshing herbal note that complements the briny flavors beautifully.
  • Crunchy Topping: Top with crispy shallots or crumbled bacon for a delightful crunch that adds texture to each creamy bite.
  • Tangy Twist: Incorporate a teaspoon of Dijon mustard into the filling for an unexpected zing that enhances the overall flavor harmony.
  • Vegan-Friendly: Substitute eggs with avocado for a creamy and vegan alternative to this crowd-pleaser. Check out Turkish Eggs Discover for more exciting egg-free recipes!
  • Chilled Variation: Serve these bountiful bites on a bed of ice with an extra olive garnish to keep them perfectly chilled.

Make Ahead Options

These Dirty Martini Deviled Eggs are perfect for meal prep, allowing you to save time and energy on busy days! You can hard-boil and peel your eggs up to 3 days before serving, storing them in an airtight container in the refrigerator to keep them fresh. Additionally, the yolk mixture can be prepared up to 24 hours in advance; simply mix all the ingredients and store in a sealed container. This way, when you’re ready to serve, all you need to do is fill the egg whites with the prepared yolk mixture and garnish them. With this approach, you can enjoy deliciously sophisticated appetizers without any last-minute stress!

Expert Tips for Dirty Martini Deviled Eggs

• Cool Completely: Ensure eggs are fully cooled before peeling; this prevents tearing the whites and makes for a cleaner presentation.

• Flavor Meld: For the best taste, prepare the yolk mixture a day ahead and let it sit in the fridge. Assemble just before serving to maintain freshness.

• Adjust the Brine: Feel free to modify the amount of olive brine based on your salt preference; too much can make the deviled eggs overly salty.

• Garnish Smartly: Don’t skip the garnish! A sprinkle of paprika or chili flakes not only adds taste but enhances the visual appeal of your Dirty Martini Deviled Eggs.

• Experiment with Spirits: Substitute gin for vodka or even try flavored variations like herbal gin to give your eggs a unique twist based on your favorite cocktail!

How to Store and Freeze Dirty Martini Deviled Eggs

Fridge: Store leftover Dirty Martini Deviled Eggs in an airtight container for up to 3 days. Keep them chilled until ready to serve for maximum freshness.

Make-Ahead: You can boil and peel the eggs up to 2 days before serving. Keep them submerged in water in a tightly sealed container to maintain moisture.

Yolk Mixture: Prepare the yolk filling a day in advance and store it in the fridge. Simply fill the egg whites when you're ready for serving to keep the texture perfect.

Freezer: It’s not recommended to freeze stuffed deviled eggs due to potential changes in texture, but you can freeze the yolk mixture in an airtight container for up to a month. Thaw in the fridge before using!

What to Serve with Dirty Martini Deviled Eggs

Elevate your gathering with complementary flavors and textures that enhance these delightful cocktail-inspired bites.

  • Crispy Crostini: Serve warm, toasted bread slices alongside for a crunchy element that balances the creaminess of the deviled eggs.

  • Savory Spiced Nuts: A mix of roasted nuts with spices provides a crunchy, salty contrast that's perfect for snacking between cocktails.

  • Fresh Garden Salad: A light, crisp salad featuring mixed greens and a tangy vinaigrette complements the rich flavors, adding freshness to the table.

  • Classic Shrimp Cocktail: This elegant seafood dish pairs beautifully, echoing the sophisticated vibe of the dirty martini flavor.

  • Olive Tapenade: A rich tapenade adds an extra burst of briny flavor while echoing the olive garnish in the deviled eggs, enhancing the overall experience.

  • Cucumber Mint Refresher: Light and refreshing, this cool beverage complements the rich notes of the deviled eggs, providing a lovely palate cleanser.

With these delicious pairings, your Dirty Martini Deviled Eggs will shine even brighter as the star of your gathering!

Dirty Martini Deviled Eggs Recipe FAQs

How do I select the best eggs for deviled eggs?
Absolutely! Always choose large eggs that are fresh, as they will yield creamier yolks and more stable whites. Look for eggs with clean, uncracked shells and a consistent color. If you're worried about the eggs being too fresh, a slightly older egg can be easier to peel after boiling.

How should I store leftover Dirty Martini Deviled Eggs?
Very simply! Place your leftover Dirty Martini Deviled Eggs in an airtight container in the refrigerator. They can typically last for up to 3 days while staying nice and fresh. Just remember to keep them chilled until you're ready to enjoy them again!

Can I freeze the yolk mixture for these deviled eggs?
Certainly! You can freeze the yolk mixture in an airtight container for up to one month. To do this, allow the yolk mixture to cool completely, then scoop it into a container, ensuring there's minimal air inside. When you're ready to use it, simply thaw it out overnight in the refrigerator and give it a good stir before filling the egg whites.

What if my egg whites tear when I peel them?
Don't worry; it happens to the best of us! If you find that your egg whites are tearing, try running them under cold water as you peel. This can help loosen any stubborn bits of shell. Make sure you allow the eggs to cool completely in an ice bath after boiling, as this helps prevent tearing and retains their perfect shape.

Are these deviled eggs suitable for gluten-free diets?
Absolutely! As long as your mayonnaise is gluten-free, these Dirty Martini Deviled Eggs are a fantastic gluten-free appetizer. Always double-check any packaged ingredients to ensure they're safe for gluten-free diets. This appetizer is not just delicious but also accommodating to various dietary needs!

Dirty Martini Deviled Eggs

Dirty Martini Deviled Eggs

Elevate your party with these Dirty Martini Deviled Eggs, a playful twist on a classic appetizer!
Print Recipe Pin Recipe
Prep Time 30 minutes mins
Total Time 30 minutes mins
Servings: 6 eggs
Course: Appetizers
Cuisine: American
Calories: 80
Ingredients Equipment Method Nutrition Notes

Ingredients
  

For the Egg Base
  • 6 large eggs Essential for creating that classic deviled egg structure.
For the Yolk Mixture
  • 1/4 cup mayonnaise Adds a velvety creaminess; Greek yogurt is a lighter substitution option.
  • 1 tablespoon gin (or vodka) Infuses the cocktail flavor; choose your favorite spirit.
  • 1 teaspoon dry vermouth Contributes aromatic complexity; consider omitting for a simpler taste.
  • 1 1/2 teaspoons olive brine Delivers saltiness and captures the 'dirty' martini essence.
  • 1/4 teaspoon garlic powder Enhances the depth of flavor; swap for fresh minced garlic.
  • Kosher salt to taste
  • Freshly ground black pepper to taste
For the Garnish
  • 2 tablespoons finely chopped green olives Introduces a briny texture; black olives can work too.
  • 1 tablespoon finely chopped parsley Brings fresh flavor and a pop of color; feel free to omit.
  • Paprika or chili flakes for garnish (optional)

Equipment

  • medium-sized saucepan
  • Mixing Bowl
  • spoon or piping bag

Method
 

Step-by-Step Instructions
  1. Step 1: Boil the Eggs - Place the 6 large eggs in a medium-sized saucepan, cover with cold water, and bring to a rolling boil. Remove from heat.
  2. Step 2: Let the Eggs Sit - Cover with a lid and let the eggs sit undisturbed for 10 minutes.
  3. Step 3: Cool the Eggs - Transfer the eggs to an ice water bath and cool completely for about 5-10 minutes.
  4. Step 4: Peel and Halve the Eggs - Tap each egg to crack the shell, peel, and slice in half lengthwise. Scoop yolks into a bowl.
  5. Step 5: Prepare the Yolk Mixture - Add mayonnaise, gin, vermouth, olive brine, and garlic powder to the yolks. Mix until smooth and season to taste.
  6. Step 6: Fold in Olives and Parsley - Gently fold in olives and parsley, adjusting seasoning if needed.
  7. Step 7: Stuff the Egg Whites - Fill each egg white with the yolk mixture, aiming for an elegant presentation.
  8. Step 8: Garnish and Serve - Garnish with additional olives or paprika. Serve chilled for an impressive appetizer.

Nutrition

Serving: 1eggCalories: 80kcalCarbohydrates: 1gProtein: 6gFat: 6gSaturated Fat: 1.5gPolyunsaturated Fat: 0.5gMonounsaturated Fat: 4gCholesterol: 186mgSodium: 120mgPotassium: 63mgVitamin A: 270IUCalcium: 20mgIron: 0.5mg

Notes

Store leftovers in an airtight container for up to 3 days. The yolk mixture can be prepared a day in advance for convenience.

Tried this recipe?

Let us know how it was!

Savory Baked Smashed Potatoes With Garlic & Parmesan Delight

March 16, 2026 by Grace Snow Leave a Comment

Have you ever faced a fridge full of ingredients and found yourself in a culinary rut? This was me not long ago, until I discovered the magic of Baked Smashed Potatoes with Garlic & Parmesan. These little beauties are a brilliant way to transform humble baby potatoes into something extraordinary. With their crispy edges and soft, buttery centers, they make for an irresistible side dish that can elevate any meal. Plus, they're deceptively easy to prepare—perfect for both seasoned chefs and busy home cooks looking to impress with minimal effort. Pair them with your favorite dipping sauce, and you have a comfort food classic that everyone will love. Are you ready to dive into this potato paradise?

Why are baked smashed potatoes irresistible?

Crispy Edges, Creamy Centers: Experience mouthwatering textures with an ideal balance that makes every bite delightful.
Flavor Explosion: The garlicky aroma and savory Parmesan elevate these potatoes, creating a comforting dish anyone would adore.
Effortless Preparation: This recipe only requires basic kitchen skills and ingredients, so you can whip up a gourmet side dish in no time!
Versatile Pairing: Whether enjoyed as a standalone snack or paired with grilled meats or homemade Cheesy Garlic Bread, they fit seamlessly into any meal.
Customizable Options: Feel free to swap herbs or our suggested spices to suit your taste, or even try a vegan twist! The possibilities are endless, ensuring that everyone in your home leaves satisfied.

Baked Smashed Potatoes With Garlic & Parmesan Ingredients

For the Potatoes
• Baby Potatoes – These small, waxy potatoes provide a wonderful texture; new potatoes can work as a substitute.
• Salt – Essential for enhancing flavor during the boiling process; adjust according to your taste preferences.

For the Garlic Mixture
• Olive Oil – Adds richness and helps achieve that perfect crispiness; you might also use avocado oil for a different twist.
• Melted Butter – Infuses flavor and lends a rich quality; consider vegan butter to keep it completely plant-based.
• Minced Garlic – This is the star ingredient, adding an aromatic punch that complements the potatoes beautifully.
• Black Pepper – For a hint of warmth; feel free to adjust based on your spice preference.
• Smoked Paprika – Adds a subtle smoky flavor, which is optional but highly recommended!
• Oregano – Contributes an aromatic touch and can be swapped out or omitted depending on your taste.

For the Topping
• Grated Parmesan – A cheesy addition that brings creaminess and flavor to the dish; nutritional yeast serves as a great vegan alternative.
• Fresh Parsley – This serves as a lovely garnish, adding color and a fresh finish to your dish.
• Red Pepper Flakes – Optional for those who enjoy a little kick in their comfort food.

Now, let’s dive into creating a dish that’s sure to become a family favorite—these Baked Smashed Potatoes with Garlic & Parmesan are about to steal the show!

Step‑by‑Step Instructions for Baked Smashed Potatoes With Garlic & Parmesan

Step 1: Prepare the Potatoes
Start by filling a large pot with water and adding a generous pinch of salt. Bring the water to a rolling boil over high heat. Once boiling, carefully add the baby potatoes and let them simmer for 15–20 minutes, or until they are fork-tender yet still hold their shape. Drain the potatoes in a colander and allow them to cool slightly for safe handling.

Step 2: Preheat the Oven
While the potatoes are cooling, preheat your oven to 425°F (220°C). Line a large baking sheet with parchment paper or a silicone mat to ensure easy cleanup and prevent sticking. With the oven heating up, you’ll create a perfect crispy base for your Baked Smashed Potatoes with Garlic & Parmesan.

Step 3: Smash the Potatoes
Once the potatoes are cool enough to handle, place them on the prepared baking sheet, leaving space between each one. Using the bottom of a glass or a potato masher, gently smash each potato to about ½-inch thickness. This will expose more surface area for crisping while retaining a fluffy interior, setting the stage for maximum flavor.

Step 4: Make the Garlic Mixture
In a medium bowl, combine olive oil, melted butter, minced garlic, salt, black pepper, smoked paprika, and oregano. Whisk the mixture until everything is well-blended and fragrant. This flavorful blend will infuse the Baked Smashed Potatoes with Garlic & Parmesan with a delightful garlicky aroma and rich taste.

Step 5: Brush and Top the Potatoes
Using a brush or spoon, generously coat the smashed potatoes with the garlic mixture, ensuring each one is well-covered. Then, sprinkle the grated Parmesan over the top of each potato for that cheesy, crispy topping. You want every bite to be packed with flavor, so don't hold back!

Step 6: Bake for Crispiness
Place the baking sheet in the preheated oven and bake for 25–30 minutes. Keep an eye on the potatoes toward the end; they should turn golden-brown and crispy around the edges. This irresistible texture is what makes these Baked Smashed Potatoes with Garlic & Parmesan a delightful comfort food treat.

Step 7: Optional Broil for Extra Crisp
For an added crunch, switch your oven to broil for 2–3 minutes at the end of baking. Watch closely—this step will quickly enhance the crispiness of the Parmesan topping without burning it. Once done, remove the baking sheet and allow them to cool for a minute before serving.

Step 8: Garnish and Serve
To finish, sprinkle chopped fresh parsley over the top of your baked smashed potatoes for a beautiful pop of color and freshness. Serve these delectable Baked Smashed Potatoes with Garlic & Parmesan immediately with your favorite dipping sauces, and get ready to indulge in a comforting dish that’s sure to impress!

Expert Tips for Baked Smashed Potatoes

Watch Cooking Time: Ensure the potatoes are boiled until fork-tender but not falling apart—this keeps them intact for smashing.

High Smoke-Point Oil: Use oils like olive or avocado oil to prevent burning and achieve that golden crisp when baking your smashed potatoes.

Broil Wisely: If broiling, stay nearby! Broiling enhances crispiness quickly, but it can also burn the cheese if left unattended too long.

Customize Seasonings: Feel free to experiment with different herbs or spices in your garlic mixture—this will allow you to create unique flavor profiles for your baked smashed potatoes with garlic & Parmesan.

Serve Hot: For the best experience, serve your potatoes hot to enjoy their contrast of crispy and fluffy textures.

Make Ahead Options

These Baked Smashed Potatoes with Garlic & Parmesan are perfect for meal prep, saving you time on busy weeknights! You can boil the baby potatoes and smash them up to 24 hours in advance. Simply let them cool after boiling, then store them in an airtight container in the refrigerator. When you're ready to serve, brush the garlic mixture and sprinkle Parmesan on top before baking. Bake straight from the fridge, adding an extra few minutes if needed for that perfect crispness. This easy prep method ensures you can have these delicious potatoes ready with minimal effort, and they will still taste just as delightful!

How to Store and Freeze Baked Smashed Potatoes

Fridge: Store any leftover baked smashed potatoes with garlic & Parmesan in an airtight container for up to 3 days to maintain their texture and flavor.

Freezer: For longer storage, freeze the cooled smashed potatoes in a single layer on a baking sheet, then transfer to a freezer bag. They can be frozen for up to 2 months.

Reheating: To enjoy them again, reheat in a 375°F oven for about 10 minutes, or use an air fryer at 350°F for 5 minutes to restore their crispiness.

Avoid Moisture: Make sure the potatoes are completely cooled before storing to prevent excess moisture and maintain crispiness.

Baked Smashed Potatoes With Garlic & Parmesan Variations

Feel free to explore these delightful twists to make your baked smashed potatoes even more enjoyable!

  • Herb-Infused: Add fresh rosemary or thyme to the garlic mixture for an aromatic boost. The earthy flavors will elevate your dish beautifully.
  • Spicy Kick: Toss in some cayenne pepper or jalapeños for a fiery version. This adds a thrilling heat that pairs beautifully with creamy dips.
  • Cheesy Gourmet: Consider swapping Parmesan for sharp cheddar or feta to create a unique flavor profile. A melty cheese can add richness that resonates in every bite.
  • Nutty Flavor: Try topping with crushed walnuts or pecans before baking for a delightful crunch. This twist adds texture and a nutty aroma wafting through your kitchen.
  • Vegan Delight: Replace butter and cheese with plant-based options like nutritional yeast and vegan margarine to keep it entirely plant-based without sacrificing taste. Your guests won't even notice the difference!
  • Smoky BBQ: Incorporate BBQ sauce into your garlic mix and use smoked paprika for that grilled flavor. These flavors echo a backyard cookout, making it a festive side dish.
  • Mediterranean Twist: Mix in sun-dried tomatoes and olives with the garlic blend for an inspired Mediterranean flavor. The umami richness will create an unforgettable side that isn’t just potatoes.
  • Creamy Sauce Pairing: Serve with a homemade garlic aioli or spicy sriracha mayo, boosting the flavor experience and elevating them from a side dish to a star!

These variations will keep your kitchen adventures exciting. You might even find a new family favorite that brings everyone together at the dinner table!

What to Serve with Baked Smashed Potatoes with Garlic & Parmesan

Elevate your dining experience by pairing these crispy delights with equally tempting sides and beverages!

  • Creamy Garlic Aioli: This luscious dip adds a rich, garlicky punch that perfectly complements the savory notes of the potatoes.
  • Tangy Sour Cream: A classic choice, sour cream balances the crispy potatoes with a cool, creamy contrast. Perfect for chilled family gatherings!
  • Grilled Chicken: Juicy, herb-marinated chicken is a wholesome main that pairs delightfully with the buttery, flaky texture of smashed potatoes.
  • Roasted Vegetables: Colorful, caramelized veggies add a healthy crunch and vibrant flavors that harmonize beautifully with the potatoes.
  • Herbed Quinoa Salad: Light and refreshing, this salad introduces a nutty contrast and a sprinkle of fresh herbs, enhancing the comfort of your meal.
  • Zesty Coleslaw: A crunchy coleslaw with a tangy dressing adds an airy freshness, balancing the richness of the baked potatoes.
  • Red Wine: The depth of a versatile red wine complements the rustic flavors of the potatoes, making every bite feel gourmet.
  • Chocolate Mousse: End your meal on a sweet note with a light, airy chocolate mousse, bringing a delightful richness to the table.

With these pairings, you’ll create a well-rounded meal that makes every gathering memorable!

Baked Smashed Potatoes With Garlic & Parmesan Recipe FAQs

How do I choose the best baby potatoes?
Absolutely! Look for small, waxy potatoes that feel firm when squeezed. Avoid any that have dark spots, sprouts, or soft patches. The freshest potatoes will have smooth skin, which enhances the texture of your baked smashed potatoes with garlic & parmesan.

How should I store leftovers?
To keep your delicious baked smashed potatoes fresh, place them in an airtight container in the fridge for up to 3 days. Don't forget to let them cool completely before storing—this prevents moisture from making them soggy.

Can I freeze baked smashed potatoes?
Yes, you can! After baking and cooling, arrange your smashed potatoes in a single layer on a baking sheet and freeze them until solid. Then, transfer them to a freezer bag, removing as much air as possible. They can stay in the freezer for up to 2 months. When you're ready to enjoy them, reheat in a 375°F oven for about 10 minutes for the best results.

What if my potatoes are mushy after boiling?
No worries! If you accidentally overcook the potatoes and they become mushy, try adding a little more olive oil and gently mixing before smashing them. This can help bind them together and maintain some texture. However, it's best to keep an eye on them while boiling to achieve that perfect fork-tender consistency!

Are there any dietary considerations?
Definitely! If you’re catering to a vegan diet, simply substitute melted butter with vegan butter and use nutritional yeast instead of Parmesan. Your baked smashed potatoes will still be full of flavor! Additionally, make sure to double-check for any allergies related to garlic, dairy, or specific spices you might use.

What are some good dipping sauces to pair with these potatoes?
The more the merrier! Sour cream, garlic aioli, or a spicy sriracha mayo work wonderfully with baked smashed potatoes. Feel free to get creative; a herb-infused yogurt or a tangy chimichurri could elevate your dish even more!

Baked Smashed Potatoes With Garlic & Parmesan

Savory Baked Smashed Potatoes With Garlic & Parmesan Delight

Baked Smashed Potatoes with Garlic & Parmesan are crispy, buttery, and easy to prepare, making them an irresistible side dish.
Print Recipe Pin Recipe
Prep Time 10 minutes mins
Cook Time 30 minutes mins
Cooling Time 5 minutes mins
Total Time 45 minutes mins
Servings: 4 portions
Course: Dinner
Cuisine: American
Calories: 220
Ingredients Equipment Method Nutrition Notes

Ingredients
  

For the Potatoes
  • 2 pounds baby potatoes Waxy potatoes that provide a wonderful texture.
  • 1 teaspoon salt Adjust according to taste.
For the Garlic Mixture
  • 1/4 cup olive oil Can substitute with avocado oil.
  • 2 tablespoons melted butter Vegan butter can be used.
  • 4 cloves minced garlic Star ingredient.
  • 1/2 teaspoon black pepper Adjust based on preference.
  • 1 teaspoon smoked paprika Optional but recommended.
  • 1 teaspoon oregano Can be swapped out or omitted.
For the Topping
  • 1 cup grated Parmesan Nutritional yeast serves as a vegan alternative.
  • 2 tablespoons fresh parsley For garnish.
  • 1/4 teaspoon red pepper flakes Optional for heat.

Equipment

  • Large pot
  • Baking Sheet
  • Parchment Paper
  • medium bowl
  • Whisk
  • potato masher
  • Brush

Method
 

Preparation Steps
  1. Fill a large pot with water and add a pinch of salt. Bring to a boil over high heat. Add baby potatoes and simmer for 15-20 minutes until fork-tender. Drain and cool slightly.
  2. Preheat your oven to 425°F (220°C). Line a baking sheet with parchment paper.
  3. Smash the cooled potatoes to about ½-inch thickness on the prepared baking sheet.
  4. In a bowl, combine olive oil, melted butter, minced garlic, salt, black pepper, smoked paprika, and oregano. Whisk until well-blended.
  5. Brush the garlic mixture over the smashed potatoes, then sprinkle grated Parmesan on top.
  6. Bake in the oven for 25-30 minutes until golden-brown and crispy.
  7. Optional: Switch to broil for 2-3 minutes for extra crispiness.
  8. Garnish with fresh parsley and serve immediately with dipping sauces.

Nutrition

Serving: 1portionCalories: 220kcalCarbohydrates: 30gProtein: 4gFat: 10gSaturated Fat: 3gPolyunsaturated Fat: 0.5gMonounsaturated Fat: 6gCholesterol: 15mgSodium: 480mgPotassium: 500mgFiber: 2gSugar: 1gVitamin A: 10IUVitamin C: 30mgCalcium: 150mgIron: 2mg

Notes

Serve hot to enjoy the contrast of crispy and fluffy textures. Customize seasonings to your taste.

Tried this recipe?

Let us know how it was!

Crispy Baked Parmesan Zucchini: Your New Favorite Healthy Snack

March 15, 2026 by Grace Snow Leave a Comment

As I prepared to pull dinner together one evening, my craving for a satisfying, healthy crunch clashed with the dull options in my pantry. That's when I decided to whip up these Crispy Baked Parmesan Zucchini Rounds. This delightful recipe not only transforms ordinary zucchini into an irresistible treat, but it also fits snugly into any clean-eating plan. Ready in under 30 minutes and using just a handful of wholesome ingredients, these rounds deliver both taste and nutrition without any guilt. They’re perfectly crispy on the outside, tender on the inside, and are bound to become your new favorite healthy snack or side dish! Curious about how to make this easy and delicious dish? Let’s dive into the recipe!

Why is this zucchini recipe a must-try?

Simplicity: With just a few ingredients, these Crispy Baked Parmesan Zucchini Rounds come together effortlessly. Perfect for busy evenings!

Irresistible Crunch: The zucchini transforms into a deliciously crispy snack, resembling chips without the guilt.

Flavor Packed: Rich Parmesan and savory garlic elevate this dish, making it a hit with kids and adults alike.

Versatile Serving: These rounds can be enjoyed as a healthy snack, a side dish, or paired with your favorite dip, like marinara sauce, for added fun!

Quick Preparation: Whip them up in less than 30 minutes; a great option for those craving a fast yet nourishing meal.

Diet-Friendly: Gluten-free, vegetarian, and low-calorie—these bites effortlessly fit into any clean-eating plan, making them everyone's new favorite!

Crispy Baked Parmesan Zucchini Ingredients

• Make your cooking experience delightful and simple with these essential ingredients!

For the Zucchini Rounds

  • Zucchini – Provides the base, low in calories and high in antioxidants; use medium-sized zucchinis for the best results.
  • Olive Oil – Aids in browning and enhances flavor; substitute with avocado oil for a different taste.

For the Coating

  • Freshly Grated Parmesan Cheese – Adds a rich, cheesy coating that crisps up nicely; avoid pre-shredded cheese for better melting quality.
  • Garlic Powder – Infuses flavor into the zucchini; can replace with fresh minced garlic—just adjust quantity to taste.
  • Italian Seasoning – Blends herbs to elevate the taste; alternatively, use a mix of dried oregano and basil.
  • Sea Salt – Enhances all flavors; adjust to taste depending on dietary needs.
  • Black Pepper – Adds a hint of spice; use cayenne for more heat.

For Garnish

  • Chopped Parsley or Lemon Zest – Brightens and adds freshness; feel free to use fresh herbs for variety.

Prepare to savor every crispy bite of these Crispy Baked Parmesan Zucchini Rounds! They're a wholesome treat that whisks away the boredom of fast food and embraces the joys of home cooking.

Step‑by‑Step Instructions for Crispy Baked Parmesan Zucchini

Step 1: Preheat and Prepare
Begin by preheating your oven to 425°F (220°C) and lining a baking sheet with parchment paper for easy cleanup. This step is crucial for ensuring your Crispy Baked Parmesan Zucchini rounds achieve that perfect golden crisp. While the oven heats, gather your ingredients to streamline your cooking process.

Step 2: Slice the Zucchini
Carefully slice the zucchinis into even 1/4-inch thick rounds, ensuring uniformity for even cooking. This thickness helps them become perfectly crispy without drying out. Once sliced, pat the rounds dry with a paper towel to remove any excess moisture that may hinder crispiness during baking.

Step 3: Combine Ingredients
In a large mixing bowl, toss the zucchini rounds with olive oil, garlic powder, Italian seasoning, sea salt, and black pepper until each piece is evenly coated. This combination not only enhances the flavor of your zucchini but also helps the coating adhere during baking. Allow the zucchini to marinate for a few minutes to absorb those delicious seasonings.

Step 4: Add Parmesan
Now, it's time to add the freshly grated Parmesan cheese to the bowl. Gently toss the zoodles again to ensure the cheesy goodness is evenly distributed. Keeping a small amount of Parmesan aside will help achieve that extra crispy topping later on, making your Crispy Baked Parmesan Zucchini even more irresistible.

Step 5: Arrange on Baking Sheet
Carefully arrange the zucchini slices in a single layer on the prepared baking sheet, making sure they don't overlap, as this is key to achieving crispiness. If your baking sheet is too crowded, feel free to use a second sheet. This spacing allows the hot air to circulate freely around each piece while baking.

Step 6: Top with Extra Parmesan
Sprinkle the reserved Parmesan cheese over the tops of the arranged zucchini rounds. This adds a delightful cheesy crust that will become wonderfully crisp during baking, enhancing the overall flavor and texture of the Crispy Baked Parmesan Zucchini. Make sure every piece gets its fair share for that cheesy finish!

Step 7: Bake to Perfection
Place the baking sheet in the preheated oven and bake for 18-22 minutes. Halfway through, carefully flip the zucchini slices to ensure even browning and that crisp, golden finish. Keep a close eye on them towards the end; you want them beautifully golden brown without burning.

Step 8: Cool and Garnish
Once finished baking, remove the zucchini from the oven and allow them to cool for a few moments. To elevate the dish, garnish with chopped parsley or a sprinkle of lemon zest for a burst of freshness. Serve your Crispy Baked Parmesan Zucchini warm, and watch them quickly disappear!

What to Serve with Crispy Baked Parmesan Zucchini

Picture a delightful meal where each bite is a celebration, perfectly complementing the crispy goodness of these zucchini rounds!

  • Creamy Garlic Dip: This luscious dip adds a rich layer of flavor, making each bite more irresistible. The creaminess balances the crispiness beautifully.

  • Quinoa Salad: A refreshing side packed with veggies and protein. The nuttiness of quinoa contrasts well with the cheesy zucchini, creating a wholesome dish.

  • Grilled Chicken: Juicy, tender chicken adds heartiness to your meal, while the savory flavor echoes the seasoning in the zucchini rounds, achieving a harmonious balance.

  • Steamed Asparagus: Bright green asparagus not only brings freshness but also a satisfying crunch that complements the texture of the baked zucchini, enhancing your dining experience.

  • Marinara Sauce: This classic pairing creates a perfect dipping experience. The rich tomato sauce wonderfully contrasts the cheesy, savory flavor of the zucchini, making each bite delightfully saucy!

  • Chilled White Wine: A crisp Sauvignon Blanc enhances the meal with its refreshing acidity, elevating the entire dining experience and rounding out the flavors delightfully.

Let your imagination run wild with these pairings; your dinner table will soon become the talk of the family!

Expert Tips for Crispy Baked Parmesan Zucchini

  • Choose Fresh Zucchini: Opt for fresh, whole zucchinis to ensure the best flavor and texture in your Crispy Baked Parmesan Zucchini. Avoid pre-sliced options!

  • Pat Dry Thoroughly: After slicing, pat the zucchini rounds dry to remove moisture. This step is crucial for achieving that ideal crispiness.

  • Single Layer Only: Arrange the zucchini in a single layer on the baking sheet; overcrowding leads to steaming rather than crisping. If needed, use two trays.

  • Extra Crunch: For an added crunchy texture, try broiling the zucchini for the last 1-2 minutes, but keep a close watch to prevent burning.

  • Store Properly: Store leftovers in an airtight container for up to 3 days, and reheat in the oven for a few minutes to regain their crispy texture.

Make Ahead Options

These Crispy Baked Parmesan Zucchini Rounds are ideal for meal prep enthusiasts! You can slice and season the zucchini rounds up to 24 hours in advance; simply store them in an airtight container in the refrigerator to keep them fresh and prevent moisture buildup. Additionally, you can pre-grate the Parmesan cheese and keep it in a separate container. When you're ready to bake, just preheat your oven, toss the seasoned zucchini with the cheese, arrange them on the baking sheet, and bake for 18-22 minutes. This approach saves precious time during busy weeknights while ensuring your dish is just as delicious as if made fresh!

Crispy Baked Parmesan Zucchini Variations

Feel free to customize these crispy treats in ways that excite your taste buds!

  • Gluten-Free Crunch: Mix in gluten-free breadcrumbs with the parmesan for an extra crispy bite. The added texture makes each round uniquely delightful.

  • Spicy Kick: Add red pepper flakes or smoked paprika to bring a zesty heat to your zucchini. The combination of spice and cheese will tantalize your palate!

  • Cheese Twist: Swap out the parmesan for aged cheddar or mozzarella for a different cheesy experience. Each cheese brings a distinct flavor that can shift this dish from comforting to gourmet.

  • Herb Explosion: Use fresh herbs like basil or thyme instead of dried Italian seasoning to enhance freshness. The aroma will fill your kitchen and make this dish even more delightful.

  • Lemon Zing: Drizzle lemon juice over the zucchini rounds before baking for a bright, citrusy flavor. Pair it with a sprinkle of lemon zest after baking for an extra pop!

  • Nutty Flavor: Sprinkle chopped nuts like pine nuts or walnuts on top for added crunch and depth. They’ll introduce a satisfying element of surprise in each bite.

  • Dairy-Free Option: For a vegan twist, substitute cheese with nutritional yeast. It provides a cheesy flavour that won’t disappoint while keeping it plant-based.

  • Dip Delight: Serve with a tasty dip, such as a yogurt-based ranch or spicy marinara. This simple addition can elevate snack time and keep things interesting. Enjoy them alongside your favorite side dishes, like Cheesy Zucchini Bake or Fish Taco Bowls, for a flavorful and satisfying meal!

There you go! With these variations, your Crispy Baked Parmesan Zucchini will become a versatile favorite that can easily adapt to different tastes and occasions. Happy cooking!

How to Store and Freeze Crispy Baked Parmesan Zucchini

Airtight Container: Store leftovers in an airtight container for up to 3 days in the fridge. This helps maintain their flavor and prevent moisture loss.

Freezer: For longer storage, freeze the zucchini rounds in a single layer on a baking sheet, then transfer to a freezer bag. They can be frozen for up to 2 months.

Reheating: Reheat leftovers in the oven at 375°F (190°C) for about 5-7 minutes, or until crispy. Avoid a microwave to ensure they don't become soggy.

Flavor Preservation: When freezing, consider layering parchment paper between zucchini rounds to prevent sticking and ensure they keep the perfect bite when reheated.

Crispy Baked Parmesan Zucchini Recipe FAQs

How do I choose ripe zucchinis for this recipe?
Absolutely! When selecting zucchinis, look for medium-sized ones that are firm and free of dark spots or blemishes on the skin. A fresh zucchini should feel heavy for its size and have a vibrant color, indicating it's packed with flavor and nutrition!

What is the best way to store leftovers of Crispy Baked Parmesan Zucchini?
Very good question! To store leftovers, place them in an airtight container in the fridge for up to 3 days. This keeps them fresh and maintains their flavor. When you're ready to enjoy them again, simply reheat them in the oven at 375°F (190°C) for about 5-7 minutes to restore that crispy texture!

Can I freeze Crispy Baked Parmesan Zucchini?
Yes, you can! To freeze them, first arrange the zucchini rounds in a single layer on a baking sheet and freeze until solid. Once frozen, transfer them to a freezer bag, removing as much air as possible, and store for up to 2 months. When you’re ready to eat, you can bake them from frozen—just increase the cooking time by a few minutes.

What should I do if my zucchini slices aren’t crisping up?
If your Crispy Baked Parmesan Zucchini isn’t as crispy as you'd like, there are a couple of fixes! First, be sure they’re not overlapping on the baking sheet; this can trap moisture and lead to steaming instead. Also, consider broiling them for the last 1-2 minutes of cooking, but keep a close eye to prevent burning. Patting the slices dry before seasoning can also help!

Are there any dietary considerations with this recipe?
Great point! This dish is gluten-free and vegetarian, making it suitable for many dietary preferences. However, if you or your guests have dairy allergies, you can experiment with using a dairy-free cheese alternative. Just ensure that the products you choose align with the dietary requirements of those you’re serving!

Can I adjust the seasonings in this recipe?
Absolutely! The beauty of this recipe is its versatility. You can easily adjust the garlic powder, add red pepper flakes for heat, or swap out the Italian seasoning for your favorite herb mix. Feel free to get creative—make it your own!

Crispy Baked Parmesan Zucchini

Crispy Baked Parmesan Zucchini: Your New Favorite Healthy Snack

Crispy Baked Parmesan Zucchini is a satisfying and nutritious snack that transforms ordinary zucchini into a delicious treat.
Print Recipe Pin Recipe
Prep Time 10 minutes mins
Cook Time 22 minutes mins
Cooling Time 5 minutes mins
Total Time 37 minutes mins
Servings: 4 rounds
Course: Snacks
Cuisine: American
Calories: 98
Ingredients Equipment Method Nutrition Notes

Ingredients
  

For the Zucchini Rounds
  • 2 medium Zucchini Provides the base, low in calories and high in antioxidants.
  • 2 tablespoons Olive Oil Aids in browning and enhances flavor; substitute with avocado oil if desired.
For the Coating
  • 1 cup Freshly Grated Parmesan Cheese Adds a rich, cheesy coating; avoid pre-shredded cheese.
  • 1 teaspoon Garlic Powder Infuses flavor; can replace with fresh minced garlic—adjust quantity to taste.
  • 1 teaspoon Italian Seasoning Blends herbs to elevate the taste; alternatively, use dried oregano and basil.
  • ½ teaspoon Sea Salt Enhances flavors; adjust to taste.
  • ¼ teaspoon Black Pepper Adds a hint of spice; use cayenne for more heat.
For Garnish
  • 2 tablespoons Chopped Parsley or Lemon Zest Brightens and adds freshness.

Equipment

  • Oven
  • Baking Sheet
  • Parchment Paper
  • Mixing Bowl
  • Knife
  • Cutting Board

Method
 

Step‑by‑Step Instructions for Crispy Baked Parmesan Zucchini
  1. Preheat your oven to 425°F (220°C) and line a baking sheet with parchment paper.
    Crispy Baked Parmesan Zucchini
  2. Slice the zucchinis into even 1/4-inch thick rounds and pat them dry with a paper towel.
    Crispy Baked Parmesan Zucchini
  3. In a large bowl, toss the zucchini rounds with olive oil, garlic powder, Italian seasoning, sea salt, and black pepper until evenly coated.
    Crispy Baked Parmesan Zucchini
  4. Add the freshly grated Parmesan cheese and gently toss again to evenly distribute.
    Crispy Baked Parmesan Zucchini
  5. Arrange the zucchini slices in a single layer on the prepared baking sheet.
    Crispy Baked Parmesan Zucchini
  6. Sprinkle reserved Parmesan cheese over the tops of the zucchini rounds.
    Crispy Baked Parmesan Zucchini
  7. Bake in the preheated oven for 18-22 minutes, flipping halfway through.
    Crispy Baked Parmesan Zucchini
  8. Allow to cool slightly before garnishing with chopped parsley or lemon zest and serve warm.
    Crispy Baked Parmesan Zucchini

Nutrition

Serving: 1roundCalories: 98kcalCarbohydrates: 7gProtein: 5gFat: 6gSaturated Fat: 2gPolyunsaturated Fat: 0.5gMonounsaturated Fat: 4.5gCholesterol: 10mgSodium: 300mgPotassium: 230mgFiber: 2gSugar: 2gVitamin A: 700IUVitamin C: 15mgCalcium: 150mgIron: 0.5mg

Notes

For best results, choose fresh zucchinis and pat them dry thoroughly before baking. Overcrowding the baking sheet can lead to steaming rather than crisping.

Tried this recipe?

Let us know how it was!

Mouthwatering Red Lobster Cheddar Bay Biscuits Made Easy

March 14, 2026 by Grace Snow Leave a Comment

The aroma of warm, buttery biscuits wafting through the air brings me back to sunny family brunches, where the star of the table was always the famous Red Lobster Cheddar Bay Biscuits. This copycat version captures that comforting essence in just 30 minutes, making it the perfect quick treat for every homemade meal. With their flaky texture and cheesy goodness, these irresistible biscuits not only elevate your dinner table but also mean one less trip to the drive-thru. Plus, they’re a fantastic crowd-pleaser, ensuring smiles all around. Are you ready to make your kitchen the next hotspot for buttery indulgence?

Why are these biscuits a must-try?

Unmatched Flakiness: Each biscuit boasts a wonderfully light texture that's easy to achieve, making them a baking triumph even for beginners.
Deliciously Buttery: With rich, melted butter mixed into both the dough and the finishing touch, every bite promises indulgent flavor.
Cheesy Goodness: Infused with sharp cheddar, you’ll enjoy ultimate cheesy satisfaction, reminiscent of your favorite restaurant dish.
Quick and Easy: Whipping these up takes just 30 minutes, so you can have fresh biscuits ready in no time—perfect for those busy weeknights!
Versatile Appeal: Serve them alongside hearty meals like pot roast or soup, and watch how they elevate any dining experience!
Freezer-Friendly: Want a last-minute snack? Just freeze unbaked biscuits for easy, delicious treats whenever the craving strikes!

Red Lobster Cheddar Bay Biscuits Ingredients

For the Biscuits

  • All-purpose flour – Provides structure to the biscuits; using White Lily flour can give you the best results.
  • Sugar – Adds a hint of sweetness that perfectly balances the savory flavors.
  • Baking powder – Acts as a leavening agent for that light and fluffy texture we all crave.
  • Garlic powder – Infuses the biscuits with that delicious savory flavor; fresh garlic can be a great alternative.
  • Kosher salt – Enhances overall flavor; feel free to adjust the amount to meet dietary needs.
  • Cayenne pepper (optional) – Adds a subtle warmth; omit it if you prefer a milder taste.
  • Buttermilk – Provides moisture and a slight tang, crucial for the beloved flavor and texture; substitute with milk and a tablespoon of lemon juice if needed.
  • Unsalted butter – Delivers richness and tenderness; it should be melted to blend seamlessly into the dough.
  • Shredded sharp cheddar cheese – The key flavor ingredient; swap it for gouda or pepper jack if you're looking for something different.

For the Topping

  • Unsalted butter – Adds a final layer of indulgent flavor when brushed on the hot biscuits.
  • Fresh parsley – Provides a pop of color and freshness to the topping.
  • Garlic powder – Enhances the aromatic finish that makes each biscuit unforgettable!

These Red Lobster Cheddar Bay Biscuits are sure to impress your family and friends with their tender, flaky goodness!

Step‑by‑Step Instructions for Red Lobster Cheddar Bay Biscuits

Step 1: Preheat the Oven
Begin by preheating your oven to 450°F (232°C). While it heats, prepare a baking sheet by lining it with parchment paper or a silicone mat; this will prevent your delicious biscuits from sticking. The oven needs to be hot to ensure your Red Lobster Cheddar Bay Biscuits achieve that beautiful golden-brown color.

Step 2: Mix the Dry Ingredients
In a large mixing bowl, whisk together the all-purpose flour, sugar, baking powder, garlic powder, kosher salt, and optional cayenne pepper. Ensure the ingredients are well combined to create a dry mixture that's light and fluffy; this is crucial for the biscuits' texture. This blend sets the flavor foundation for your homemade treats!

Step 3: Combine Wet Ingredients
In a separate bowl, whisk together the buttermilk and melted unsalted butter until fully combined. This flavorful mixture will bring moisture and richness to the dough. Once combined, pour this mixture over the dry ingredients and gently stir with a spatula until just incorporated; avoid overmixing to keep your Red Lobster Cheddar Bay Biscuits tender.

Step 4: Add the Cheese and Knead the Dough
Carefully fold in the shredded sharp cheddar cheese, ensuring it’s evenly dispersed throughout the dough. Lightly knead the mixture on a floured surface, just 3 to 4 times, until it comes together. Rolling out the dough to about 1¼ inches thick is the next step, which ensures your biscuits rise nicely while baking.

Step 5: Cut Out the Biscuits
Using a floured biscuit cutter, press down through the dough to cut out the biscuits, taking care not to twist the cutter to allow for proper rising. Assemble the cut biscuits on your prepared baking sheet, making sure to space them evenly; this will help them bake uniformly and give that delightful shape.

Step 6: Bake the Biscuits
Now, pop your baking sheet into the preheated oven and bake your biscuits for 10-12 minutes. Keep an eye on them, and look for a golden-brown top as a sign they are ready. The aroma of your homemade Red Lobster Cheddar Bay Biscuits will fill your kitchen and surely entice everyone nearby!

Step 7: Prepare the Topping
While the biscuits bake, melt some unsalted butter in a small bowl and mix in freshly chopped parsley and garlic powder. When your biscuits come out of the oven, brush this buttery blend generously over them while they're still hot; this final touch adds an unforgettable flavor that perfectly complements your homemade treats.

Make Ahead Options

These Red Lobster Cheddar Bay Biscuits are a fantastic choice for meal prep, allowing you to enjoy homemade deliciousness without the last-minute rush! You can prepare the dough up to 24 hours in advance—simply mix the dry ingredients and the wet ingredients separately, then refrigerate them. When you’re ready to bake, combine the mixtures and fold in the cheese. Alternatively, you can cut out the biscuits and freeze them for up to 3 weeks; just place them in a single layer on a baking sheet, freeze until firm, then transfer to an airtight bag. When you’re ready to enjoy, bake them straight from the freezer, adding a couple of extra minutes to the baking time for perfectly fluffy, cheesy biscuits just as delightful as if they'd been made fresh!

What to Serve with Irresistibly Buttery Homemade Cheddar Bay Biscuits

Indulging in warm, cheesy biscuits is just the beginning; let's explore delightful pairings to complete your meal.

  • Creamy Potato Soup: This rich soup's smooth texture perfectly complements the flaky biscuits, making each bite a cozy hug. The warmth of the soup and the buttery biscuits create a comforting duo, perfect for chilly nights.

  • Garlic Butter Shrimp: Infused with garlic and buttery flavors, the shrimp adds a savory kick alongside biscuits. The seafood brings a fresh contrast, enticing your tastebuds to dance with joy.

  • Beef Stew: Load your plate with hearty beef stew, and let the biscuits soak up the delicious gravy. This classic pairing turns every meal into a satisfying feast, ensuring no drop is left behind!

  • Simple Green Salad: With crisp greens, tomatoes, and a light vinaigrette, this salad provides a refreshing balance to the richness of the biscuits. The freshness complements the savory goodness flawlessly!

  • Baked Salmon: The flaky, tender salmon offers a nutritious contrast to the cheesy biscuits, adding heart and flavor to your dining experience. Drizzle with lemon for a zesty touch that brightens the plate.

  • Homemade Chili: The bold and spicy flavors in chili pair beautifully with the buttery softness of the biscuits. Each biscuit takes on the chili's richness, crafting a delightful match worthy of any gathering.

  • Sweet Tea: This classic Southern beverage balances the savory flavors of the meal, providing a refreshing sip between bites. A chilled glass enhances the comfort feel of your feast.

  • Chocolate Lava Cake: For dessert, indulge in a warm, gooey chocolate lava cake. It contrasts the savory biscuits with its sweetness, allowing for a delightful end to your meal.

  • Wine Pairing: A crisp Chardonnay or a light Pinot Grigio can enhance the meal, complementing the cheddar flavor found in the biscuits. Sipping wine alongside adds a touch of elegance to your gathering.

Storage Tips for Red Lobster Cheddar Bay Biscuits

Room Temperature: Store leftover Red Lobster Cheddar Bay Biscuits in an airtight container at room temperature for up to 2-3 days to maintain their softness.

Freezer: For long-term storage, freeze unbaked biscuits on a baking sheet for 1 hour, then transfer to an airtight bag for up to 3 weeks.

Reheating: To enjoy your biscuits again, reheat directly from the freezer by baking at 350°F (175°C) for about 15-20 minutes until warmed through.

Freshness Reminder: For best taste, consume any thawed biscuits within 1-2 days; they taste best fresh out of the oven!

Expert Tips for Red Lobster Cheddar Bay Biscuits

  • Dough Handling: Avoid overworking the dough to keep your biscuits light and flaky. Gentle mixing and minimal kneading are key!

  • Proper Cutting: Use a floured biscuit cutter and avoid twisting it when cutting the dough. This ensures even rising for perfect Red Lobster Cheddar Bay Biscuits.

  • Temperature Matters: Make sure your oven is fully preheated to 450°F (232°C). A hot oven helps achieve that beautiful golden-brown crust.

  • Customize Your Cheese: Feel free to swap sharp cheddar with other cheeses like gouda or pepper jack to match your taste preferences.

  • Freezing Tips: If you want to prepare ahead, freeze unbaked biscuits after cutting. They stay fresh for up to 3 weeks—convenient for quick future meals!

  • Serving Suggestion: For the best experience, serve warm right out of the oven with a sprinkle of extra cheese or fresh herbs on top!

Red Lobster Cheddar Bay Biscuits Variations

Feel free to customize these delectable biscuits to suit your tastebuds and dietary preferences!

  • Cheese Swap: Replace sharp cheddar with gouda, pepper jack, or even a creamy blue cheese for bold variations. This twist can really elevate the flavor profile, turning your biscuits into a gourmet delight!

  • Herb Infusion: Add finely chopped fresh herbs like rosemary or chives to the dough for a fragrant touch. These herbs complement the buttery richness beautifully, enhancing the overall flavor.

  • Vegan Option: Use plant-based butter and a non-dairy milk like almond or oat milk with a splash of vinegar for a delightful vegan version. Everyone will love these biscuits, regardless of dietary choices!

  • Spicy Kick: Mix in finely chopped jalapeños or add a dash of hot sauce to the butter topping for a spicy twist. This simple variation brings a delightful heat that pairs nicely with cheesy goodness.

  • Garlic Lovers: For intense garlic flavor, replace garlic powder in the recipe with roasted garlic. The rich sweetness of roasted garlic can transform your biscuits, making them irresistibly rich.

  • Savory Additions: Incorporate sundried tomatoes or olives into the dough for Mediterranean-inspired bites. This savory twist adds a unique flavor and texture that’s sure to astonish your guests!

  • Sweet and Savory: Add a teaspoon of honey to the dough for a subtle sweetness that beautifully contrasts the savory cheese. This unexpected mix will keep everyone coming back for more.

  • Mini Biscuit Bites: Instead of traditional biscuits, cut the dough into smaller pieces for bite-sized appetizers. Perfect for parties or gatherings, these tiny treats are sure to be a hit!

Feel free to experiment and make these Red Lobster Cheddar Bay Biscuits uniquely yours—after all, cooking is all about joy and creativity! If you're curious about more cheese-loving recipes, check out my Ultimate Cheesy Garlic Knots, or for a touch of spice, try my mouthwatering Jalapeño Cornbread! Enjoy your culinary adventure!

Red Lobster Cheddar Bay Biscuits Recipe FAQs

What type of flour should I use for the best biscuits?
I recommend using all-purpose flour, and if you can find it, White Lily flour often produces the best texture for biscuits. It provides a lighter result, making your Cheddar Bay Biscuits perfectly fluffy!

How should I store leftover biscuits?
After enjoying your delicious biscuits, store any leftovers in an airtight container at room temperature. They’ll stay fresh for 2-3 days, but trust me, they rarely last that long!

Can I freeze unbaked biscuits?
Absolutely! To freeze unbaked Red Lobster Cheddar Bay Biscuits, cut them out and place them on a baking sheet in a single layer. Freeze for about an hour, then transfer them to an airtight bag. They can be stored in the freezer for up to 3 weeks!

What if my biscuits don't rise?
If your biscuits don’t rise properly, it might be due to overworking the dough. Be sure to mix gently and knead only a few times. Another common issue is not using fresh baking powder, so double-check the expiration date before you start baking!

Can these biscuits be made dairy-free?
Yes! You can substitute the buttermilk with a dairy-free option by mixing non-dairy milk with 1 tablespoon of lemon juice or vinegar to mimic that tanginess. Additionally, use dairy-free butter instead of unsalted butter for the dough and topping. It’s an easy swap that keeps all the flavor intact!

Can I use fresh garlic instead of garlic powder?
Very much! If you prefer the flavor of fresh garlic, you can substitute garlic powder with 1-2 minced garlic cloves. Just remember to adjust the quantity based on your taste preference. Fresh garlic will add an even richer aroma to your biscuits!

Red Lobster Cheddar Bay Biscuits

Mouthwatering Red Lobster Cheddar Bay Biscuits Made Easy

This copycat recipe for Red Lobster Cheddar Bay Biscuits combines flakiness, cheesiness, and buttery flavor in under 30 minutes.
Print Recipe Pin Recipe
Prep Time 10 minutes mins
Cook Time 12 minutes mins
Total Time 22 minutes mins
Servings: 8 biscuits
Course: Appetizers
Cuisine: American
Calories: 200
Ingredients Equipment Method Nutrition Notes

Ingredients
  

For the Biscuits
  • 2 cups all-purpose flour Using White Lily flour can give you the best results.
  • 1 tablespoon sugar Adds a hint of sweetness.
  • 1 tablespoon baking powder Acts as a leavening agent.
  • 1 teaspoon garlic powder Infuses flavor; fresh garlic can be a great alternative.
  • 0.5 teaspoon kosher salt Enhances overall flavor.
  • 0.25 teaspoon cayenne pepper Optional for subtle warmth.
  • 1 cup buttermilk Provides moisture; substitute with milk and lemon juice if needed.
  • 0.5 cup unsalted butter Must be melted for the dough.
  • 1 cup shredded sharp cheddar cheese Key flavor ingredient; may substitute with gouda or pepper jack.
For the Topping
  • 2 tablespoons unsalted butter Adds flavor when brushed on biscuits.
  • 2 tablespoons fresh parsley Provides freshness.
  • 0.5 teaspoon garlic powder Enhances the aromatic finish.

Equipment

  • Oven
  • Mixing Bowl
  • Baking Sheet
  • Biscuit cutter

Method
 

Step-by-Step Instructions
  1. Preheat your oven to 450°F (232°C) and prepare a baking sheet with parchment paper.
  2. In a large mixing bowl, whisk together the all-purpose flour, sugar, baking powder, garlic powder, kosher salt, and optional cayenne pepper until combined.
  3. In a separate bowl, whisk buttermilk and melted unsalted butter together, then pour over dry ingredients and stir gently to combine.
  4. Fold in shredded sharp cheddar cheese and lightly knead on a floured surface. Roll the dough to about 1¼ inches thick.
  5. Cut out biscuits using a floured biscuit cutter and place them on the prepared baking sheet, spaced evenly.
  6. Bake in the preheated oven for 10-12 minutes until golden brown.
  7. Melt unsalted butter in a bowl, mix in parsley and garlic powder, and brush it over the hot biscuits after baking.

Nutrition

Serving: 1biscuitCalories: 200kcalCarbohydrates: 24gProtein: 4gFat: 10gSaturated Fat: 6gPolyunsaturated Fat: 1gMonounsaturated Fat: 3gCholesterol: 20mgSodium: 400mgPotassium: 110mgFiber: 1gSugar: 1gVitamin A: 200IUCalcium: 150mgIron: 1mg

Notes

Store leftovers in an airtight container for 2-3 days. Freezing unbaked biscuits for up to 3 weeks is recommended.

Tried this recipe?

Let us know how it was!
  • « Previous Page
  • 1
  • 2
  • 3
  • 4
  • 5
  • …
  • 16
  • Next Page »

Welcome!

Hi, I’m Grace, a Sydney-based home cook with a passion for bold flavors and trending ingredients. Whether you’re a busy beginner or a seasoned foodie, you’ll find dishes here that are fresh, fun, and full of flavor.

More about me

Popular Recipes

  • One Pot Keto Tuna Casserole
    One Pot Keto Tuna Casserole: Creamy Comfort in Minutes
  • Ultimate Jalapeno Popper Chicken Salad
    Ultimate Jalapeno Popper Chicken Salad That'll Wow Your Tastebuds
  • Green Chile Cheese Dip
    Mouthwatering Green Chile Cheese Dip for Cozy Gatherings
  • Easy Chimichurri Sauce
    Fresh and Zesty Easy Chimichurri Sauce in Just Minutes

Footer

↑ back to top

About

  • Privacy Policy
  • Disclaimer
  • Terms & Conditions

Newsletter

  • Sign Up! for emails and updates

Contact

  • About me
  • Contact me

Copyright © 2025 TastyTrendIngredients