tastytrendingredients

  • Home
  • Recipes
    • Appetizers
    • Breakfast
    • Dessert
    • Dinner
    • Drinks
    • Salads
    • Snacks
    • Soups
  • About me
  • Contact me
menu icon
go to homepage
  • Home
  • Recipes
    • Appetizers
    • Breakfast
    • Dessert
    • Dinner
    • Drinks
    • Salads
    • Snacks
    • Soups
  • About me
  • Contact me
search icon
Homepage link
  • Home
  • Recipes
    • Appetizers
    • Breakfast
    • Dessert
    • Dinner
    • Drinks
    • Salads
    • Snacks
    • Soups
  • About me
  • Contact me
×

Delicious Raspberry Sugar Cookies for Sweet Moments at Home

February 3, 2026 by Grace Snow Leave a Comment

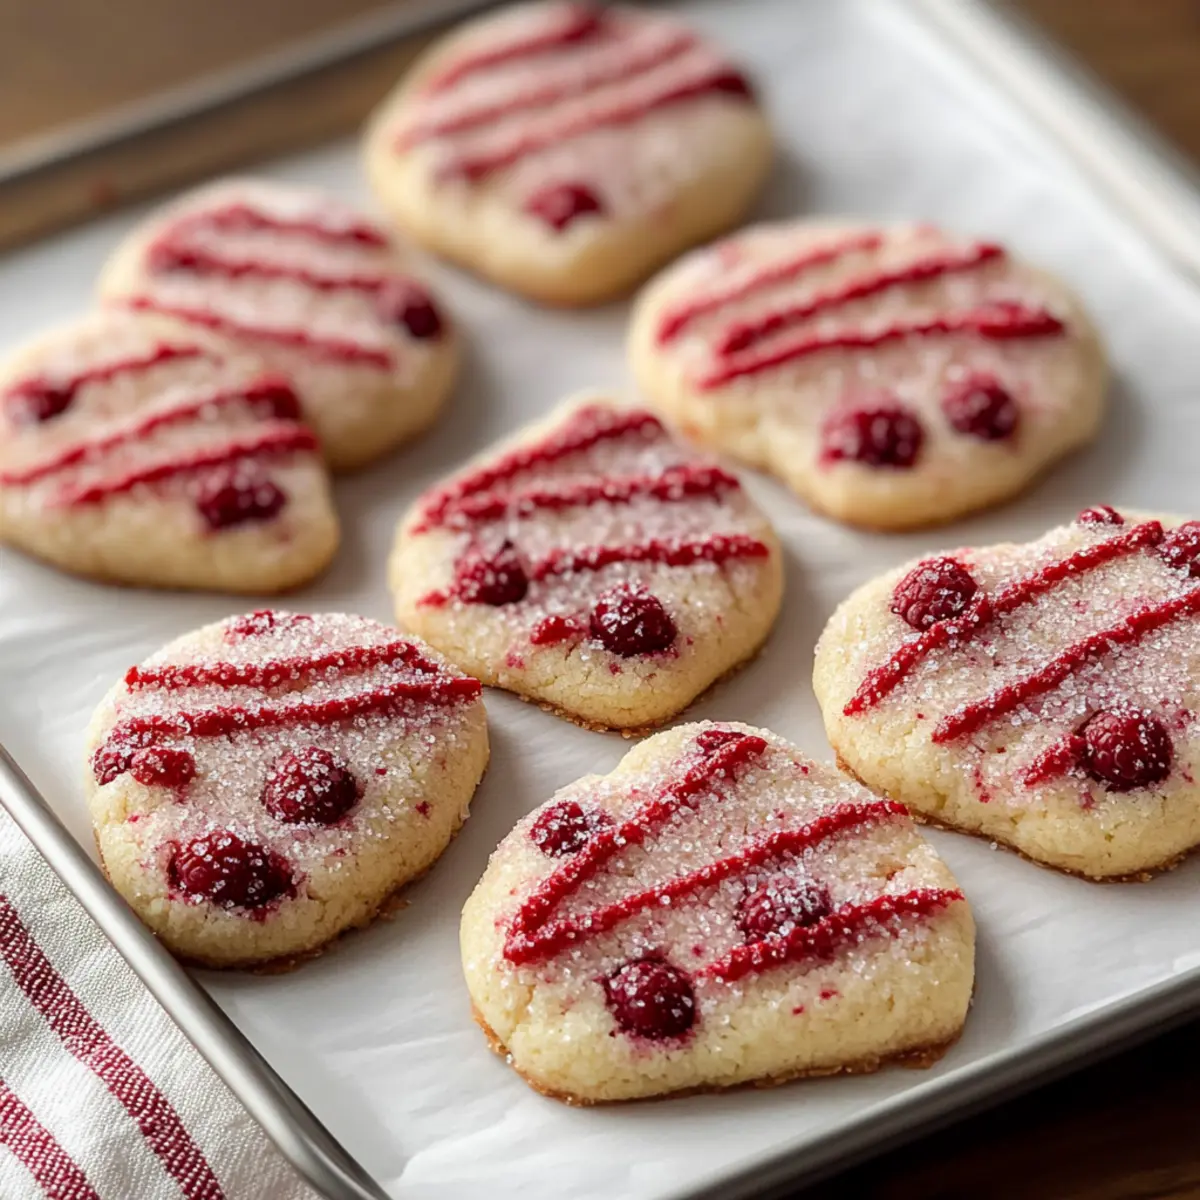
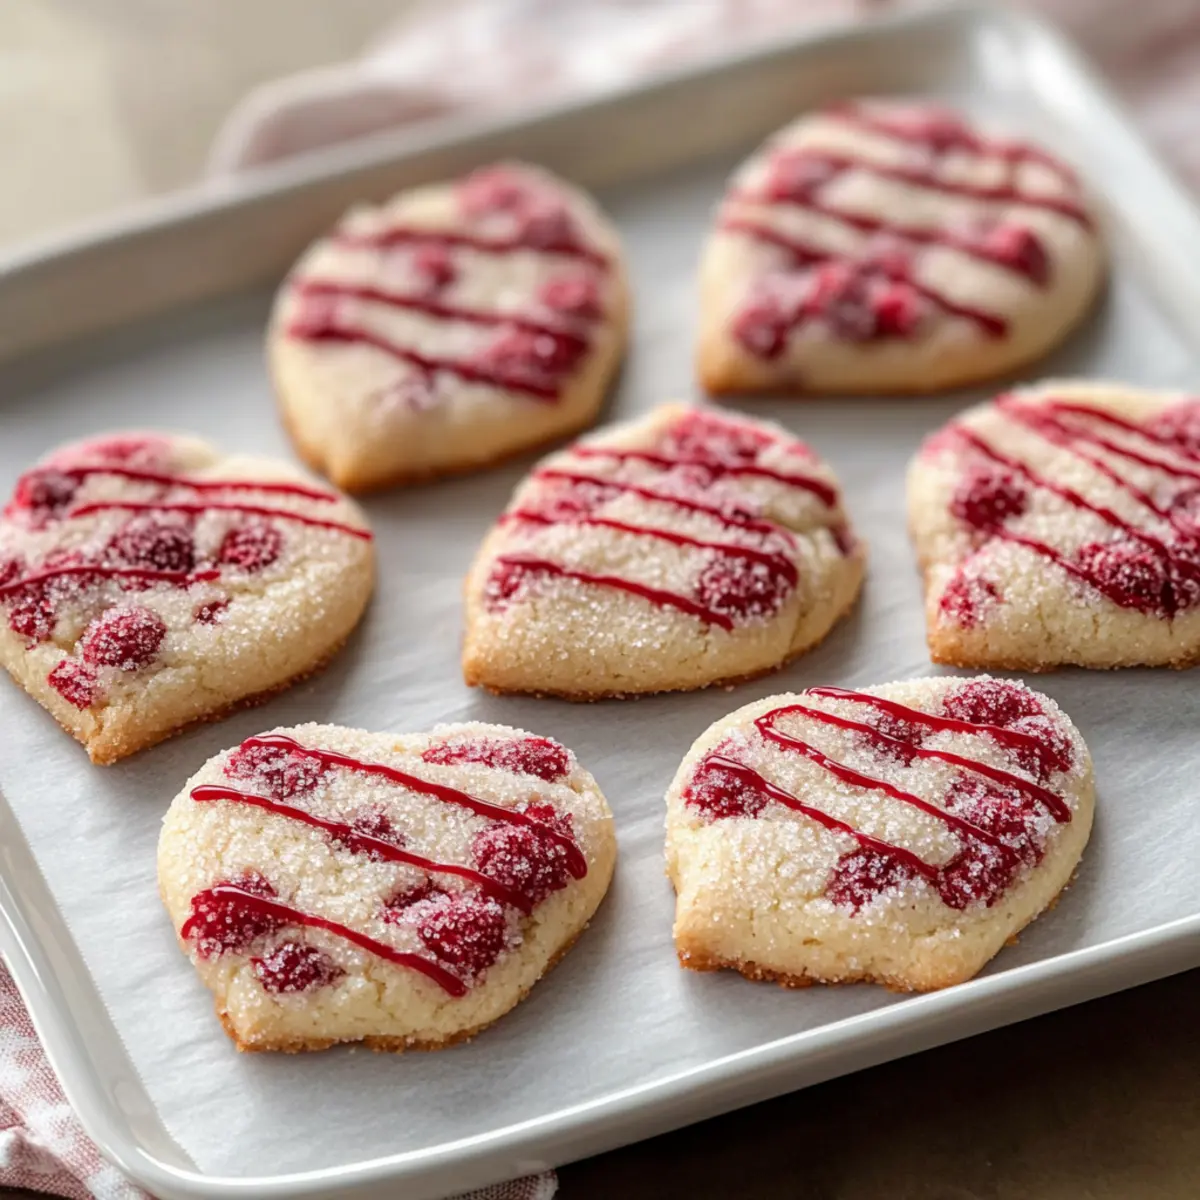
As I scrolled through my favorite baking sites, one thing became clear: there’s nothing quite like the comfort of homemade cookies. Enter my Raspberry Sugar Cookies, a delightful creation that takes the classic sugar cookie to a whole new level. With their tender texture and vibrant flavor, these cookies are a must-try for any baking enthusiast. The secret lies in the freeze-dried raspberries, which infuse each bite with an intense fruity burst without adding extra moisture. Better yet, they cater to all, featuring a gluten-free option and a vegan alternative that doesn’t compromise flavor. Whether you’re whipping them up for a gathering or simply treating yourself, these cookies promise to lift your spirits and impress your loved ones. Ready to dive into a world of tangy sweetness? Let’s bake!

Why Are These Cookies So Amazing?

Versatile for All: These Raspberry Sugar Cookies are incredibly adaptable, offering gluten-free and vegan options so everyone can indulge without worry.
Flavor Explosion: The freeze-dried raspberries deliver a rich, tangy sweetness that brightens each cookie, making them a delightful treat for any occasion.
Time-Saving Delight: With quick preparation and baking times, you can enjoy fresh cookies in no time, making them perfect for spur-of-the-moment cravings or last-minute gatherings.
Texture Perfection: Each bite reveals a tender cookie with a satisfying crunch from the raspberries, making them irresistible to cookie lovers. Looking to experiment further? Try adding mini white chocolate chips for extra sweetness or give them a refreshing lemon twist!

Raspberry Sugar Cookies Ingredients

• Perfectly crafted to ensure delicious flavor!

For the Cookie Dough

  • Flour – Provides structure for the cookies. Substitute with gluten-free baking flour for a gluten-free option.
  • Baking Powder – Acts as a leavening agent for a light, fluffy texture.
  • Salt – Enhances flavor and balances the sweetness of the cookies.
  • Butter (room temperature) – Adds richness and contributes to the tenderness of the cookies; use vegan butter for a dairy-free version.
  • Cream Cheese (softened) – Keeps cookies tender and rich; substitute with vegan cream cheese for a plant-based option.
  • Granulated Sugar – Sweetens the cookies beautifully.
  • Egg – Binds all the ingredients together; no substitute suggested for egg-free version.
  • Vanilla Extract – Adds a warm, aromatic element that enhances flavor.
  • Almond Extract (optional) – Enhances berry notes for added complexity.
  • Freeze-Dried Raspberries – Provides that intense raspberry flavor and crisp texture; you may also use a mix of freeze-dried berries for a delightful berry medley.

For Topping

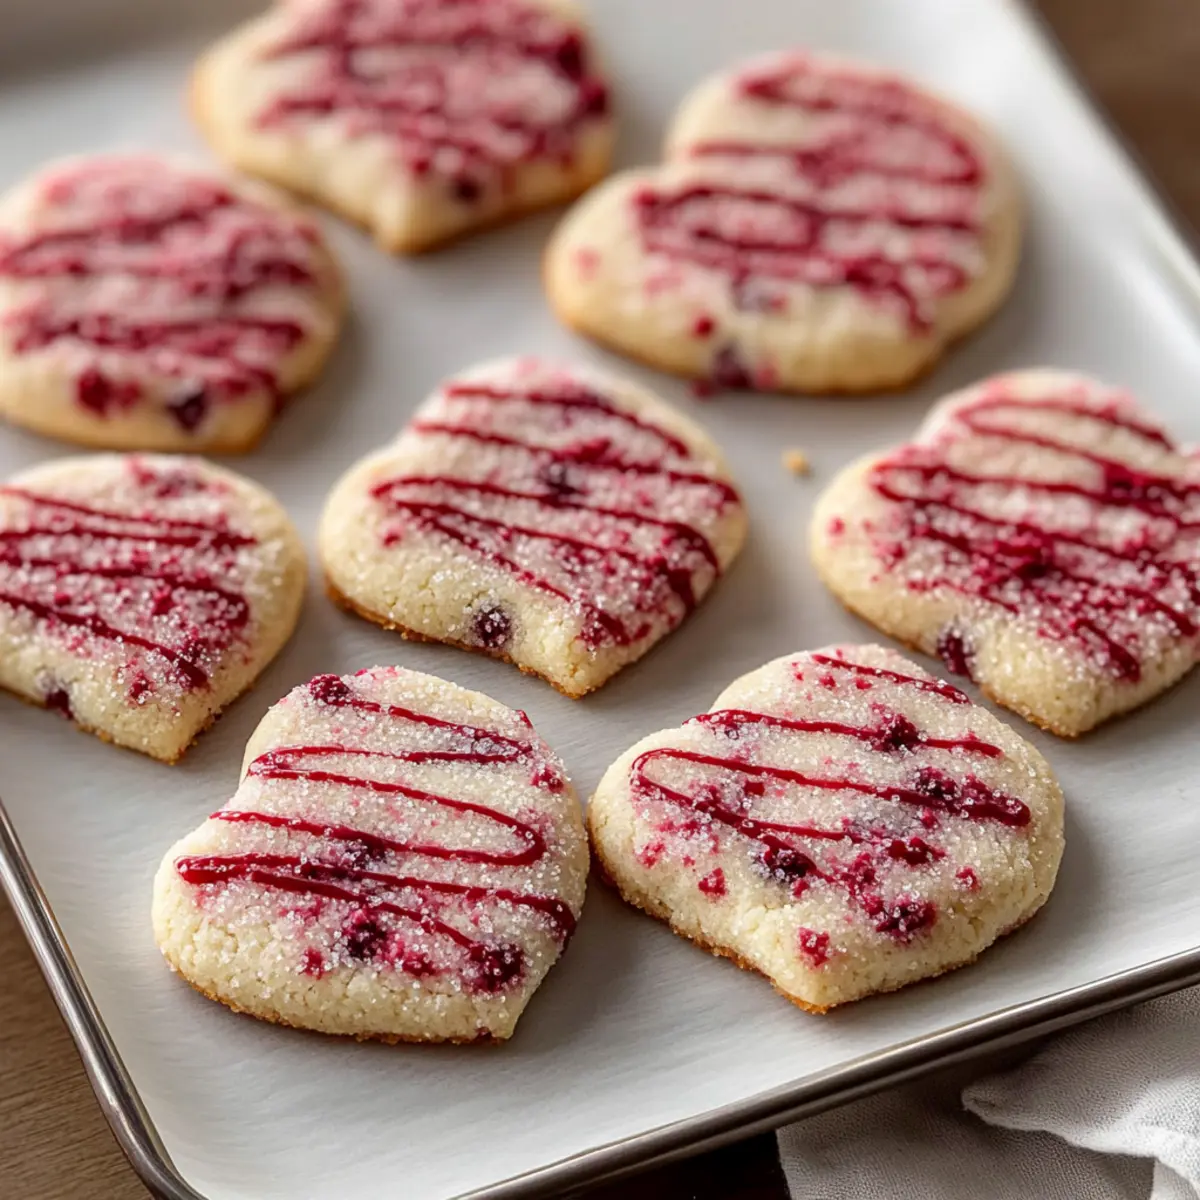
  • Extra Freeze-Dried Raspberry Powder – Enhances presentation and flavor for those picture-perfect cookies!
  • Chocolate for Drizzling (optional) – Adds a touch of sweetness and a luxurious finishing touch to your Raspberry Sugar Cookies.

With these simple yet flavorful ingredients, you're just moments away from enjoying the delightful experience of homemade Raspberry Sugar Cookies!

Step‑by‑Step Instructions for Raspberry Sugar Cookies

Step 1: Prep Raspberries
Begin by crushing 1½ cups of freeze-dried raspberries into a fine powder using a food processor or blender. Once powdered, coarsely chop ½ cup of freeze-dried raspberries to incorporate texture into your Raspberry Sugar Cookies. This combination will ensure you have both a burst of flavor and delightful crunch in each cookie.

Step 2: Preheat Oven
Preheat your oven to 350°F (175°C) while you prepare the cookie dough. Line two baking sheets with parchment paper to prevent the cookies from sticking. This setup allows for seamless baking, ensuring your Raspberry Sugar Cookies have the perfect golden edges while staying tender in the center.

Step 3: Mix Dry Ingredients
In a mixing bowl, whisk together 2 cups of all-purpose flour, 1 teaspoon of baking powder, and ½ teaspoon of salt. This mixture will provide the essential structure for your cookies, so ensure there are no lumps. Mixing these dry components evenly is crucial for achieving that light, fluffy texture in your Raspberry Sugar Cookies.

Step 4: Cream Butter and Cream Cheese
In a large mixing bowl, beat together ½ cup of softened butter and ½ cup of softened cream cheese using an electric mixer on medium speed for about 2 minutes until the mixture is light and fluffy. This process incorporates air, leading to tender, rich cookies that melt in your mouth, a key feature of your Raspberry Sugar Cookies.

Step 5: Combine Ingredients
To the creamed mixture, add 1 cup of granulated sugar and beat for another 2 minutes until fully combined. Next, mix in 1 large egg, 1 teaspoon of vanilla extract, and if using, ¼ teaspoon of almond extract. Be careful not to overmix, as this can lead to tougher cookies. This step brings together the fundamental flavors for your Raspberry Sugar Cookies.

Step 6: Incorporate Dry Ingredients
Gradually add the flour mixture to the wet ingredients, mixing gently until a soft dough forms. Take care not to overmix, as the goal is to just unite the ingredients. This ensures your Raspberry Sugar Cookies maintain their tender texture, perfect for a delicious homemade treat.

Step 7: Fold in Raspberries
Carefully fold both the raspberry powder and the chopped freeze-dried raspberries into the cookie dough using a spatula. This gentle folding technique ensures the raspberries are evenly distributed without breaking them down too much, adding delightful bursts of fruitiness to each Raspberry Sugar Cookie.

Step 8: Scoop Cookies
Using a cookie scoop or tablespoon, scoop the dough onto the prepared baking sheets, spacing them about 2 inches apart. This spacing allows for adequate spreading while baking. You should have enough dough for 24 cookies, giving you plenty to share—or savor all to yourself!

Step 9: Bake
Place the baking sheets in the preheated oven and bake for 11-13 minutes until the cookie edges are set and the centers look slightly underbaked. This creates a soft texture, which is ideal for your Raspberry Sugar Cookies. Keep an eye on them to avoid overbaking; they’ll firm up as they cool.

Step 10: Cool
After baking, remove the sheets from the oven and let the cookies cool on the sheets for 5 minutes. This resting time allows them to firm up slightly before transferring to a wire rack. Proper cooling lets your Raspberry Sugar Cookies maintain their texture and ensures a perfect bite every time.

Step 11: Optional Topping
For an extra touch, consider melting some chocolate and drizzling it over the cooled cookies. Sprinkle additional raspberry powder on top for decoration and added flavor. This finishing touch elevates your Raspberry Sugar Cookies, making them not only delicious but visually stunning as well.

Tips for the Best Raspberry Sugar Cookies

  • Use Freeze-Dried Raspberries: They provide intense flavor without adding moisture. Make sure they are dry before crushing into powder to achieve the right texture.
  • Room Temperature Ingredients: Ensure your butter and cream cheese are at room temperature for easy mixing and a fluffy cookie texture.
  • Gentle Mixing: When combining the wet and dry ingredients, mix just until combined to prevent tough cookies. Overmixing can lead to a denser texture.
  • Watch the Bake Time: Pull the cookies when they look slightly underbaked to maintain their soft texture. They will continue to firm up as they cool.
  • Storage Matters: Keep your Raspberry Sugar Cookies in an airtight container for freshness, or freeze them with parchment paper between layers to preserve texture.

What to Serve with Raspberry Sugar Cookies

Savoring a batch of these delightful cookies is just the beginning—let's explore more to complete your treat experience!

  • Fresh Fruit Salad: Bright, juicy fruits enhance the tangy notes of the cookies, providing a refreshing contrast to their sweetness.

  • Vanilla Ice Cream: The creamy richness of vanilla ice cream pairs perfectly with the fruity burst of raspberry, making each bite delightful.

  • Lemonade: A glass of zesty lemonade balances the sweetness of the cookies with its refreshing tartness, creating a harmonious flavor experience.

  • Whipped Cream: Light and airy, a dollop of whipped cream elevates the cookies with a touch of luscious creaminess.

  • Herbal Tea: A cup of mint or chamomile tea offers a soothing sip that complements the fruity notes of the cookies beautifully.

  • Chocolate Ganache: Drizzling rich chocolate ganache over the cookies adds a decadent layer that deepens the overall flavor profile.

  • Almond Milk: This nutty beverage complements the raspberry flavors while providing a creamy element that softens the sweetness.

  • Cheese Platter: Pairing with soft cheese or goat cheese introduces a savory element, balanced perfectly by the sweet and tangy cookies.

  • Sparkling Water with Lemon: Light and bubbly, it refreshes the palate, enhancing the vibrant flavors of your Raspberry Sugar Cookies.

Make Ahead Options

These Raspberry Sugar Cookies are ideal for busy home cooks looking to save time in the kitchen! You can prepare the cookie dough up to 3 days in advance; simply wrap it tightly in plastic wrap and refrigerate. For even longer storage, freeze the dough for up to 3 months. When ready to bake, thaw the dough overnight in the refrigerator, then scoop and bake as directed. To maintain that delightful texture, avoid pressing the dough flat before chilling. These cookies will be just as delicious, providing a sweet treat with minimal effort on the day of serving. Enjoy fresh-baked goodness anytime!

Storage Tips for Raspberry Sugar Cookies

Room Temperature: Keep the cookies in an airtight container for up to 1 week. Place parchment paper between layers to prevent sticking and maintain softness.

Fridge: If you live in a particularly warm area, store them in the fridge for added freshness, keeping them in an airtight container for up to 2 weeks.

Freezer: For longer storage, freeze your Raspberry Sugar Cookies for up to 3 months. Use parchment paper between layers in a freezer-safe container to keep cookies from clumping together.

Reheating: To enjoy them warm, reheat in the microwave for about 10-15 seconds or in a preheated oven at 300°F (150°C) for 5 minutes. This will restore their just-baked texture!

Raspberry Sugar Cookies Variations

Customize your Raspberry Sugar Cookies to suit your taste and dietary needs with these fun and flavorful twists!

  • Gluten-Free: Use a 1:1 gluten-free baking flour blend to enjoy these cookies without the gluten. Perfect for those with dietary restrictions!
  • Vegan: Replace butter with a plant-based vegan butter and swap cream cheese for vegan cream cheese for a delectable dairy-free treat. It’s just as satisfying!
  • Chocolate Chip Addition: Fold in mini white chocolate chips to add a rich, sweet surprise in each bite. Chocolate and raspberry were made for each other!
  • Lemon Twist: Add the zest of one lemon for a refreshing citrus contrast that brightens the raspberry flavor. It’s an uplifting change that offers a zesty kick!
  • Berry Medley: Mix in other freeze-dried berries like blueberries or strawberries for an exotic berry medley that adds delightful variety and flavor. Your taste buds will thank you!
  • Almond Joy: Incorporate slivered almonds for a crunchy texture boost that mimics those classic candy bar flavors. It's a nutty twist you won’t want to miss!
  • Spicy Surprise: Add a pinch of cayenne pepper or cinnamon for an unexpected hint of warmth that elevates the cookies to a whole new level. A gentle heat makes every bite intriguing!
  • Serving Suggestions: Serve these cookies warm with a scoop of vanilla ice cream or pair with freshly whipped cream for a delightful finish to your dessert. These perfect pairings enhance the overall indulgence!

For more delightful cookie recipes, be sure to check out my Matcha Cookies Soft or Thumbprint Cookies Melt!

Raspberry Sugar Cookies Recipe FAQs

What type of freeze-dried raspberries should I use?
Absolutely! For the best flavor and texture in your Raspberry Sugar Cookies, use high-quality freeze-dried raspberries. Ensure they are completely dry before crushing; they should not show any moisture or dark spots. You can typically find them in the baking aisle or health food stores.

How should I store my cookies after baking?
Very important! To keep your Raspberry Sugar Cookies fresh, store them in an airtight container at room temperature for up to 1 week. To maintain their softness, place parchment paper between layers of cookies. If you’re in a humid area, placing the container in the fridge can help prolong freshness.

Can I freeze the cookie dough before baking?
Of course! You can refrigerate your cookie dough for up to 5 days or freeze it for up to 3 months. To freeze, scoop the dough into balls and arrange them on a parchment-lined baking sheet. Freeze until solid, then transfer to a freezer-safe container. To bake, simply take out the desired amount and bake as usual, adding 1-2 extra minutes to the bake time!

What should I do if my cookies spread too much while baking?
If your Raspberry Sugar Cookies spread excessively, it might be due to the butter being too soft or melted. Make sure to use room temperature butter—not too warm. Also, the dough should be chilled briefly before scooping if your kitchen is particularly warm. This will help the cookies maintain their shape while they bake.

Are these cookies safe for pets or those with allergies?
Great question! These Raspberry Sugar Cookies contain butter, cream cheese, and eggs, which are not suitable for pets. If anyone has dairy or gluten allergies, be sure to use dairy-free cream cheese and gluten-free flour to ensure safe consumption. Also, check for any additional allergens in your ingredients, particularly with freeze-dried products.

Raspberry Sugar Cookies

Delicious Raspberry Sugar Cookies for Sweet Moments at Home

These Raspberry Sugar Cookies are a delightful treat that combines flavorful freeze-dried raspberries with a tender, sweet cookie base.
Print Recipe Pin Recipe
Prep Time 25 minutes mins
Cook Time 13 minutes mins
Cooling Time 5 minutes mins
Total Time 43 minutes mins
Servings: 24 cookies
Course: Dessert
Cuisine: American
Calories: 120
Ingredients Equipment Method Nutrition Notes

Ingredients
  

For the Cookie Dough
  • 2 cups all-purpose flour Substitute with gluten-free baking flour for gluten-free option.
  • 1 teaspoon baking powder Acts as a leavening agent.
  • ½ teaspoon salt Enhances flavor.
  • ½ cup butter Room temperature; use vegan butter for dairy-free.
  • ½ cup cream cheese Softened; substitute with vegan cream cheese for plant-based option.
  • 1 cup granulated sugar Sweetens the cookies.
  • 1 large egg Binds ingredients together.
  • 1 teaspoon vanilla extract Enhances flavor.
  • ¼ teaspoon almond extract Optional; enhances berry notes.
  • 1½ cups freeze-dried raspberries Provides intense flavor.
For Topping
  • to taste extra freeze-dried raspberry powder For presentation and flavor.
  • to taste chocolate for drizzling Optional; adds sweetness.

Equipment

  • Food Processor
  • Mixing Bowl
  • Electric mixer
  • Baking Sheets
  • Parchment Paper
  • Cookie Scoop
  • Spatula

Method
 

Step-by-Step Instructions
  1. Begin by crushing 1½ cups of freeze-dried raspberries into a fine powder using a food processor or blender. Coarsely chop ½ cup of freeze-dried raspberries for texture.
  2. Preheat your oven to 350°F (175°C) and line two baking sheets with parchment paper.
  3. In a mixing bowl, whisk together 2 cups of all-purpose flour, 1 teaspoon of baking powder, and ½ teaspoon of salt.
  4. In a large mixing bowl, beat together ½ cup of softened butter and ½ cup of softened cream cheese for about 2 minutes until light and fluffy.
  5. Add 1 cup of granulated sugar and beat for another 2 minutes. Mix in 1 large egg, 1 teaspoon of vanilla extract, and ¼ teaspoon of almond extract.
  6. Gradually add the flour mixture to the wet ingredients, mixing gently until a soft dough forms.
  7. Fold in both the raspberry powder and chopped freeze-dried raspberries into the cookie dough using a spatula.
  8. Scoop the dough onto the prepared baking sheets, spacing them about 2 inches apart.
  9. Bake in the preheated oven for 11-13 minutes until the cookie edges are set and centers look slightly underbaked.
  10. Let the cookies cool on the sheets for 5 minutes before transferring to a wire rack.
  11. For optional topping, drizzle melted chocolate over cooled cookies and sprinkle additional raspberry powder for decoration.

Nutrition

Serving: 1cookieCalories: 120kcalCarbohydrates: 16gProtein: 1gFat: 6gSaturated Fat: 3gPolyunsaturated Fat: 1gMonounsaturated Fat: 2gCholesterol: 25mgSodium: 50mgPotassium: 30mgSugar: 8gVitamin A: 200IUCalcium: 10mgIron: 0.2mg

Notes

This recipe provides gluten-free and vegan options to cater to dietary preferences.

Tried this recipe?

Let us know how it was!

TikTok Egg Boil: Spicy, Savory Goodness in Every Bite

February 2, 2026 by Grace Snow Leave a Comment

As I scrolled through my feed, a vibrant video caught my eye: the TikTok Egg Boil, a simple yet captivating dish that promised a spicy twist on a beloved snack. This recipe combines tender, jammy or hard-boiled eggs enveloped in a bold, garlic-infused sauce, and it’s perfect for anyone craving a budget-friendly, vegetarian treat. Not only is it quick and easy to prepare, but it also delivers an exciting burst of flavor that will leave your taste buds dancing. Whether you're serving it as a delightful snack or a light lunch, this dish is sure to impress both family and friends. Curious about how to create this deliciousness in your kitchen? Let’s get started!

Why is TikTok Egg Boil a Must-Try?

Flavor Explosion: The combination of rich, creamy eggs and a zesty, spicy sauce creates an unforgettable taste experience.

Quick and Easy: Prepare a delicious snack in under 30 minutes, making it perfect for busy evenings or spontaneous cravings.

Budget-Friendly: Utilizing simple ingredients, this recipe is easy on the wallet while delivering gourmet-level flavor.

Versatile Pairings: Enjoy it alone, or elevate your meal by serving it alongside jasmine rice or crusty ciabatta bread for added texture!

Perfect for Sharing: Impress your friends and family with this delightful dish that everyone will love, whether as a casual snack or a light lunch fix. Enjoy the joy of homemade cooking and say goodbye to boring fast food!

TikTok Egg Boil Ingredients

For the Eggs
• Eggs – Provides the base protein for the dish; use fresh eggs for best results.

For the Sauce
• Unsalted Butter – Adds richness and assists in making the sauce; substitute with olive oil for a dairy-free option.
• Garlic (¼ cup, minced) – Enhances flavor with a pungent, aromatic kick; fresh garlic is preferred for the best taste.
• Old Bay Seasoning (2¼ teaspoons) – Seasoning blend that adds depth with a mix of spices; can be replaced with Cajun seasoning for a different flavor profile.
• Light Brown Sugar (3 teaspoons) – Adds a hint of sweetness that balances the spice; substitute with honey or coconut sugar if needed.
• Onion Powder (½ heaping teaspoon) – Contributes subtle onion flavor; can be skipped if desired.
• Lemon Pepper Seasoning (1½ teaspoons) – Adds zesty notes; use fresh lemon juice and black pepper as an alternative.
• Paprika (1 teaspoon) – For mild heat and color; smoked paprika can add a different flavor twist.
• Red Chili Flakes (½ – 1 teaspoon, or to taste) – Provides heat to the sauce; adjust based on spice tolerance.
• Low Sodium Chicken Bone or Vegetable Broth (¾ cup) – Forms the base of the sauce; vegetable broth keeps it vegetarian.
• Lemon Juice (¼ lemon, juiced) – Brightens the sauce; use fresh lemon for best flavor.
• Kosher Salt – Enhances all flavors present in the dish; salt to taste as Old Bay already contains salt.

For Garnish
• Flat Leaf Parsley – Adds freshness and color; optional but recommended for presentation.

Now that you have all the ingredients for this delicious TikTok Egg Boil, it's time to dive into the cooking process and bring these flavors to life!

Step‑by‑Step Instructions for TikTok Egg Boil

Step 1: Prepare the Ice Bath
Begin by filling a large bowl with cold water and ice cubes. This ice bath will stop the cooking process of your eggs immediately after boiling, ensuring a perfectly tender texture. Set it aside while you bring water to a boil in the next step for the TikTok Egg Boil.

Step 2: Boil the Eggs
Fill a medium saucepan with enough water to fully submerge your fresh eggs, then bring it to a rolling boil over medium-high heat. Once boiling, carefully lower the eggs into the water using a slotted spoon. Let them cook for 7 minutes for jammy yolks, or up to 7½ minutes if you prefer them slightly firmer.

Step 3: Cool the Eggs
As soon as the eggs are done cooking, use a slotted spoon to transfer them to the ice bath prepared earlier. Allow the eggs to cool in the ice bath for at least 2 minutes. This step helps to halt cooking and makes peeling the eggs easier while giving you a perfect base for your TikTok Egg Boil.

Step 4: Peel the Eggs
Once your eggs have cooled, gently tap each one on a hard surface to crack the shell. Begin peeling from the wider end, where there is usually a little air pocket. Remove the shells carefully to reveal beautiful, intact eggs, ready to be combined with the flavorful sauce.

Step 5: Prepare the Sauce
In a large skillet, melt unsalted butter over low heat. Allow it to melt completely without browning, which takes about 2 minutes. Add the minced garlic and cook for approximately 1 minute, stirring frequently until it becomes fragrant and golden, laying a delicious foundation for your spicy sauce.

Step 6: Mix in Seasonings
Stir in the Old Bay seasoning, light brown sugar, onion powder, lemon pepper seasoning, paprika, and red chili flakes into the garlic-infused butter. Cook the mixture for another minute over low heat, allowing the spices to bloom and the flavors to meld beautifully, creating the heart of your TikTok Egg Boil.

Step 7: Add the Broth
Pour in the low sodium chicken or vegetable broth, then increase the heat to medium-high. Bring the sauce to a gentle boil and cook for about 6 minutes, stirring occasionally until it reduces slightly and thickens. You’ll notice a richer, more concentrated flavor developing – this is the essence of your TikTok Egg Boil!

Step 8: Final Touches
Once the sauce has thickened, stir in the freshly squeezed lemon juice for a bright finish. Taste and adjust with kosher salt as necessary, keeping in mind that the Old Bay seasoning already contains salt. You want the flavors to be well-balanced but lively in this vibrant dish.

Step 9: Combine Eggs and Sauce
In a large mixing bowl, gently toss the peeled eggs with the flavorful sauce until they are thoroughly coated. The sauce should cling beautifully to each egg, promising a burst of flavor with every bite. Keeping the eggs whole helps to preserve their delicate texture in the TikTok Egg Boil.

Step 10: Garnish and Serve
Garnish your TikTok Egg Boil with fresh flat-leaf parsley for a pop of color and freshness. Serve the dish warm, alongside crusty ciabatta bread or fluffy jasmine rice for a complete meal. Enjoy this delightful fusion of flavors that transforms simple ingredients into a truly extraordinary snack!

How to Store and Freeze TikTok Egg Boil

Fridge: Store any leftovers in an airtight container in the refrigerator for up to 3 days. Reheat gently in a skillet over low heat to maintain the eggs' texture.

Freezer: While the eggs can freeze, it's best to store the sauce separately. The sauce can be frozen for up to 1 month; reheat on the stove when you're ready to enjoy again.

Reheating: When reheating, add a splash of broth or water if the sauce thickens too much. Ensure eggs are heated through without overcooking to preserve that delightful jammy texture.

Best Enjoyed Fresh: For the ultimate flavor experience, enjoy your TikTok Egg Boil fresh, but these storage tips will help keep leftovers tasty for a few days!

TikTok Egg Boil Variations & Substitutions

Feel free to get creative and make this TikTok Egg Boil your own!

  • Vegetarian: Substitute chicken broth for vegetable broth to keep it entirely plant-based.
  • Spicy Upgrade: Add diced jalapeños or a splash of sriracha for heat that kicks it up a notch!
  • Onion Lovers: Incorporate sautéed onions or shallots for a sweeter, deeper flavor that complements the garlic beautifully.
  • Herbaceous Twist: Use fresh herbs like cilantro or chives instead of parsley to brighten the dish with a new flavor dimension.
  • Smoky Flavor: Swap regular paprika for smoked paprika to add a warm, smoky essence that elevates your egg experience.
  • Texture Variety: Garnish with toasted breadcrumbs for a delightful crunch that contrasts with the creamy eggs.
  • Sweet and Spicy: Mix in some chopped candied jalapeños to combine sweet heat that tantalizes the senses.
  • A Classic Side: Serve with roasted corn and fried egg tacos for an unforgettable meal that combines these dishes into a delightful feast!

Let your creativity shine with these ideas and explore new delicious possibilities!

What to Serve with Spicy TikTok Egg Boil?

Looking to create a full, comforting meal that will impress? Pair these flavor-packed eggs with delightful sides that elevate your dining experience.

  • Jasmine Rice: This fragrant rice absorbs the luscious sauce beautifully, providing a satisfying base that balances the heat.
  • Crusty Ciabatta Bread: Perfect for dipping, this crunchy bread adds a wonderful texture and complements the spicy sauce perfectly.
  • Roasted Vegetables: Toss seasonal veggies like zucchini and bell peppers in olive oil and spices, roasting until tender for a colorful, healthy addition.
  • Green Salad: A light salad with mixed greens, cucumber, and a zesty vinaigrette adds freshness—a lovely contrast to the rich egg dish.
  • Cold Beer: A crisp, cold pilsner or lager pairs well, cutting through the richness of the sauce while enhancing the meal's overall flavors.
  • Sparkling Lemonade: A bubbly lemonade provides a refreshing balance to the spicy notes of the eggs, brightening each bite with its citrusy zing.

Expert Tips for TikTok Egg Boil

• Fresh Eggs Matter: Use fresh eggs for the best texture and flavor. Older eggs may be harder to peel, making them less appealing in this beautiful dish.

• Adjusting Spice Levels: Start with a smaller amount of red chili flakes if you're unsure about spice tolerance. You can always add more to suit your personal heat preference in the TikTok Egg Boil.

• Perfect Ice Bath: Ensure you prepare an adequate ice bath right before boiling the eggs. This lets you cool them quickly, preventing overcooking and guaranteeing that jammy center you love.

• Careful Garlic Cooking: When sautéing garlic, keep the heat low to prevent it from burning, which would impart a bitter taste to your sauce and diminish the delicious flavor of the TikTok Egg Boil.

• Reuse Leftover Sauce: If you have leftover sauce, store it separately and adjust it by adding more broth or lemon juice for future meals. It pairs well with veggies or grains!

Make Ahead Options

These TikTok Egg Boils are a fantastic meal prep option for busy cooks! You can prepare the eggs and the flavorful sauce up to 24 hours in advance separately. Simply boil and cool the eggs, then peel and store them in the refrigerator in an airtight container to maintain their freshness. For the sauce, allow it to cool and store in another container. When you're ready to enjoy your TikTok Egg Boils, reheat the sauce in a skillet, then gently toss in the refrigerated eggs to warm through without overcooking. This preparation method saves you time during the week, delivering delicious, spice-infused snacks with minimal effort!

TikTok Egg Boil Recipe FAQs

How do I choose the right eggs for the TikTok Egg Boil?
Absolutely! For the best results, always choose fresh eggs as they provide the ideal texture and flavor. Fresh eggs will also be easier to peel, ensuring a beautiful presentation for your dish. Check for any cracks or dark spots on the shells, which could indicate quality issues.

What is the best way to store leftovers of the TikTok Egg Boil?
Leftovers can be stored in an airtight container in the refrigerator for up to 3 days. When ready to enjoy, simply reheat gently in a skillet over low heat to ensure the eggs remain tender and avoid overcooking.

Can I freeze the sauce from the TikTok Egg Boil? How should I do it?
Yes, you can freeze the sauce for future use! To do this, let the sauce cool completely and transfer it into a freezer-safe container. It can be stored for up to 1 month. When you're ready to use it again, thaw it in the fridge overnight, then reheat on the stove, adding a splash of broth or water if it thickens too much.

What should I do if my eggs are overcooked and too hard?
If you've overcooked your eggs, don't worry! For a creamier texture, you can try cutting them in half and soaking them in the sauce for a bit longer. This allows the flavors to infuse better and can help mask the hardness.

Are there any dietary considerations for the TikTok Egg Boil?
Very! This recipe is naturally vegetarian-friendly and can easily be adjusted for various dietary preferences. For those with allergies, be cautious with the seasonings like Old Bay or any specific ingredients that may contain allergens. If you're vegan, simply swap out the butter for olive oil, and omit the eggs for a plant-based version by using tofu or chickpeas in a spicy sauce.

How long can I keep the sauce for the TikTok Egg Boil?
The sauce can be refrigerated for up to 3 days if stored properly in an airtight container. If you notice it thickening too much, add a splash of broth or water during reheating to bring it back to the desired consistency. Don't be afraid to experiment a little!

TikTok Egg Boil

TikTok Egg Boil: Spicy, Savory Goodness in Every Bite

Experience the delightful flavors of the TikTok Egg Boil, a spicy and budget-friendly vegetarian snack.
Print Recipe Pin Recipe
Prep Time 10 minutes mins
Cook Time 20 minutes mins
Cooling Time 2 minutes mins
Total Time 32 minutes mins
Servings: 4 eggs
Course: Snacks
Cuisine: American
Calories: 150
Ingredients Equipment Method Nutrition Notes

Ingredients
  

For the Eggs
  • 4 whole Eggs Use fresh eggs for best results.
For the Sauce
  • 2 tablespoons Unsalted Butter Substitute with olive oil for a dairy-free option.
  • 1/4 cup Garlic Minced, fresh garlic is preferred for the best taste.
  • 2.25 teaspoons Old Bay Seasoning Can be replaced with Cajun seasoning for a different flavor profile.
  • 3 teaspoons Light Brown Sugar Can substitute with honey or coconut sugar.
  • 1/2 teaspoon Onion Powder Can be skipped if desired.
  • 1.5 teaspoons Lemon Pepper Seasoning Use fresh lemon juice and black pepper as an alternative.
  • 1 teaspoon Paprika Smoked paprika can add a different flavor twist.
  • 0.5-1 teaspoons Red Chili Flakes Adjust based on spice tolerance.
  • 3/4 cup Low Sodium Chicken Bone or Vegetable Broth Vegetable broth keeps it vegetarian.
  • 1/4 lemon Lemon Juice Use fresh lemon for best flavor.
  • to taste Kosher Salt Salt to taste as Old Bay already contains salt.
For Garnish
  • to taste Flat Leaf Parsley Optional but recommended for presentation.

Equipment

  • Medium saucepan
  • large bowl
  • slotted spoon
  • Large skillet

Method
 

Step-by-Step Instructions for TikTok Egg Boil
  1. Prepare the Ice Bath: Fill a large bowl with cold water and ice cubes and set aside.
  2. Boil the Eggs: Bring water to a boil, then carefully lower the eggs. Cook for 7-7.5 minutes.
  3. Cool the Eggs: Transfer cooked eggs to the ice bath for at least 2 minutes.
  4. Peel the Eggs: Tap and gently peel eggs starting from the wider end to reveal intact eggs.
  5. Prepare the Sauce: Melt unsalted butter in a skillet over low heat, then add minced garlic.
  6. Mix in Seasonings: Stir in Old Bay seasoning, light brown sugar, and other spices.
  7. Add the Broth: Pour in the broth, boil the sauce for about 6 minutes until it thickens.
  8. Final Touches: Stir in lemon juice and adjust with kosher salt if needed.
  9. Combine Eggs and Sauce: Toss the peeled eggs with the sauce in a large mixing bowl.
  10. Garnish and Serve: Top with parsley and serve warm with bread or rice.

Nutrition

Serving: 1eggCalories: 150kcalCarbohydrates: 5gProtein: 10gFat: 11gSaturated Fat: 4gPolyunsaturated Fat: 1gMonounsaturated Fat: 6gCholesterol: 200mgSodium: 300mgPotassium: 150mgSugar: 2gVitamin A: 300IUVitamin C: 2mgCalcium: 50mgIron: 1mg

Notes

Use fresh eggs for the best texture and flavor. Adjust spice levels according to preference. Stored leftovers in the fridge for up to 3 days.

Tried this recipe?

Let us know how it was!

Decadent Shirred Eggs for Your Perfect Brunch Escape

February 2, 2026 by Grace Snow Leave a Comment

The aroma of freshly baked eggs wafts through the kitchen, inviting everyone to gather for a cozy brunch. That's how I felt the first time I made these Simple & Elegant Shirred Eggs. This delightful dish features perfectly runny yolks nestled within tender, silky whites, all baked to divine perfection. Not only is this recipe incredibly easy to prepare, but it also makes a stunning centerpiece for any gathering. With just a handful of ingredients and a few minutes of your time, you can serve a gourmet breakfast that dazzles without the fuss. Plus, for those who prefer dairy-free options, I've included simple substitutions to ensure everyone can enjoy this classic French favorite. Are you ready to elevate your brunch game and impress your friends with these delectable shirred eggs? Let’s get started!

Why are Shirred Eggs a Must-Try?

Simplicity at its Finest: With only a few ingredients and minimal prep work, this recipe is perfect for those who want gourmet brunch at home without the hassle.

Decadent Flavor: The combination of rich cream and fresh eggs creates a dish that's both luxurious and satisfying, making it a crowd-pleaser every time.

Versatile Additions: Feel free to customize your shirred eggs with toppings like spinach or smoked salmon for an extra flavor boost—check out these tips for adorning your eggs.

Dairy-Free Adaptations: This recipe is adaptable for those with dietary preferences. Substituting coconut cream makes it completely dairy-free without sacrificing taste!

Impressive Presentation: Serve in beautiful ramekins for that elegant touch, making your brunch feel special and sophisticated. Enjoy your shirred eggs alongside a crisp salad or some toasted bread for the perfect pairing.

Shirred Eggs Ingredients

• To create these delightful shirred eggs, gather a few simple ingredients to enhance the flavor and texture of this classic dish.

For the Base

  • Unsalted Butter – Adds richness and helps grease the ramekin for easy release; swap with cooking spray for a lighter option.
  • Heavy Cream – Enhances creaminess and texture, creating a luxurious mouthfeel; use high-fat oat milk for a dairy-free version.
  • Large Eggs – The star of the dish providing protein and flavor; fresh, local eggs yield the best results.

For Seasoning

  • Salt – Enhances flavor; adjust based on your preference.
  • Freshly Ground Black Pepper – Adds a slight kick and depth of flavor.

For the Toppings

  • Minced Fresh Chives – Introduces a mild onion flavor and color; substitute with fresh parsley or green onions.
  • Grated Parmesan Cheese – Adds a savory umami note and creaminess; use nutritional yeast for a dairy-free option.

With these ingredients, your shirred eggs will not only satisfy but also bring a touch of gourmet flair to your home-cooked brunch!

Step‑by‑Step Instructions for Shirred Eggs

Step 1: Preheat the Oven
Begin by preheating your oven to 375°F (190°C). This temperature is ideal for baking shirred eggs, ensuring they cook evenly and become perfectly tender. While the oven heats up, gather your equipment: a 6-ounce ramekin and a baking sheet, which will catch any spills as your eggs bake.

Step 2: Prepare the Ramekin
Take your ramekin and generously grease it with unsalted butter. Make sure to coat the bottom and sides thoroughly to prevent the eggs from sticking. This step not only aids in releasing the shirred eggs but also adds an extra touch of richness to the dish.

Step 3: Add the Cream
Pour a tablespoon or two of heavy cream into the greased ramekin, allowing it to settle at the bottom. This creamy layer is key to achieving a luxurious texture in your shirred eggs. Feel free to use a dairy-free cream alternative if you prefer.

Step 4: Crack the Eggs
Gently crack two large eggs over the cream in the ramekin, being careful not to break the yolks. The whites should rest on the cream, creating a beautiful presentation as the eggs bake. This step assures you get that delightful runny yolk that makes shirred eggs so special.

Step 5: Season Thoughtfully
Sprinkle a pinch of salt and freshly ground black pepper onto the eggs, enhancing their flavor. Next, add a generous sprinkle of minced fresh chives for brightness, and top with some grated Parmesan cheese for a savory depth. The combination of these toppings creates an aromatic and flavorful dish.

Step 6: Bake Your Shirred Eggs
Place the ramekin on the prepared baking sheet, making it easier to transfer in and out of the oven. Bake for about 12-15 minutes, keeping a close eye. The whites should be set, while the yolks remain delightfully runny. Use this time to savor the enticing aroma that fills your kitchen.

Step 7: Cool and Serve
Once the baking time is up, carefully remove the ramekin from the oven, allowing it to cool for a couple of minutes. This cooling period helps the eggs firm up slightly, making them easier to serve. Enjoy your beautifully baked shirred eggs warm, preferably alongside some toasted bread or a refreshing salad for a complete brunch experience.

Storage Tips for Shirred Eggs

Room Temperature: Enjoy shirred eggs immediately after baking for the best texture; they are not suitable for room temperature storage.

Fridge: If you have leftovers, place the shirred eggs in an airtight container and refrigerate for up to 1 day. Reheating is not recommended, as they will lose their creamy texture.

Freezer: Freezing is not recommended as the delicate balance of the egg whites and yolks will change, resulting in an undesirable texture upon thawing.

Reheating: If you must reheat, do so gently in the oven at a low temperature (around 300°F) to avoid overcooking, but note that the quality will not match freshly baked shirred eggs.

Shirred Eggs Variations & Substitutions

Feel free to unleash your creativity and make this shirred eggs recipe your own with these delightful twists and swaps!

  • Dairy-Free: Swap unsalted butter for a vegan alternative and use coconut cream or oat milk instead of heavy cream for a luscious, dairy-free option.
  • Flavor Boost: Add a pinch of smoked paprika or a dash of hot sauce on top before baking for a flavorful kick.
  • Veggie Lover's Delight: Incorporate sautéed spinach or roasted bell peppers to amp up the nutrition and freshness in your dish.
  • Texture Twist: Sprinkle panko breadcrumbs over the top before baking for a delightful crunch that contrasts beautifully with the creamy eggs.
  • Protein-Packed: Top with crumbled feta or goat cheese before baking for an extra layer of flavor and creaminess.
  • Hearty Addition: Mix in some diced cooked bacon or sausage for a heartier version that's sure to satisfy those big appetites.
  • Herb Infusion: Experiment with different herbs like fresh dill or basil instead of chives for a unique flavor profile—each brings its own magic to the dish.
  • Sunny Side Up: For a sunny twist, simply bake the eggs without the heavy cream, letting the yolks shine and setting slightly less than with the cream for a runny finish.

As you embark on these delicious variations, why not explore these <a href="https://tastytrendingredients.com/turkish-eggs/">Turkish Eggs Discover</a> recipes for even more inspiration? You’ll find that the culinary world is full of possibilities! Don't be afraid to experiment. Happy cooking!

Expert Tips for Shirred Eggs

  • Use Fresh Eggs: Fresh eggs yield the best results, ensuring the yolks are vibrant and the whites cook evenly.

  • Monitor Baking Time: Keep an eye on your eggs while they bake. Overcooking will lead to firm yolks—aim for that perfectly runny center!

  • Adapt for Portions: If you're using a different ramekin size, adjust the baking time accordingly to prevent under or overcooking.

  • Experiment with Toppings: Feel free to mix in vegetables or proteins, such as spinach or smoked salmon, to customize your shirred eggs flavor.

  • Serve Warm: Serve your shirred eggs immediately after baking for the best texture—reheating alters their creamy consistency.

What to Serve with Simple & Elegant Shirred Eggs

There's nothing quite like a cozy brunch spread, and these shirred eggs can be the centerpiece of your morning feast.

  • Toasted Bread: Perfect for dipping into those runny yolks, this crispy addition complements the creamy texture of the eggs. Consider sourdough for a slightly tangy flavor.
  • Air-Fryer Breakfast Potatoes: These crispy little bites add a delightful crunch and heartiness, making your brunch feel complete and satisfying. Toss with herbs for an extra layer of flavor!
  • Fresh Salad: A light, zesty salad with mixed greens and a citrus vinaigrette balances the richness of the shirred eggs, refreshing your palate.
  • Fruit Platter: Bright, juicy fruits like berries and melons offer a sweet contrast, providing a pop of color and a burst of natural sweetness to your meal.
  • Mimosa: This bubbly classic pairs beautifully with the elegance of shirred eggs, adding a splash of festive cheer to your brunch table.
  • Coffee: A warm cup of freshly brewed coffee brings richness to the meal, complementing the flavors of the creamy eggs while providing a cozy warmth.
  • Crispy Bacon: The savory crunch of bacon or pancetta pairs beautifully with the delicate flavors of shirred eggs, making it a beloved brunch staple for many.
  • Herbed Quinoa: For a nutritious twist, serve fluffy quinoa tossed with fresh herbs; its nutty flavor is a delightful contrast to the creamy eggs.

Make Ahead Options

These shirred eggs are a fantastic choice for meal prep, saving you time on busy mornings! You can prepare the ramekins by greasing them with butter and adding the heavy cream, up to 24 hours in advance. Just cover them tightly with plastic wrap and refrigerate to maintain freshness. When you're ready to enjoy, crack the eggs on top right before baking, season, and pop them in the oven. Baking takes just 12-15 minutes, and you'll have a deliciously elegant brunch ready to impress. Following this make-ahead method ensures your shirred eggs are just as delightful as if made fresh!

Shirred Eggs Recipe FAQs

What kind of eggs should I use for shirred eggs?
Absolutely! Fresh, large eggs are essential for making the best shirred eggs. When you use farm-fresh eggs, you'll get vibrant yolks and tender whites that will cook evenly. If you have access to local eggs, go for them; their flavor and quality are often superior.

How should I store leftover shirred eggs?
While it’s best to enjoy shirred eggs immediately, you can store any leftovers in the refrigerator for up to 1 day. Place them in an airtight container to keep them fresh. However, reheating is not recommended, as it can lead to a less-than-desirable texture.

Can I freeze shirred eggs?
Unfortunately, freezing is not advisable for shirred eggs. The delicate composition of the eggs can result in a grainy texture once thawed. If you want to save time, consider prepping the ingredients and assembling them right before baking instead.

How do I prevent the yolks from overcooking?
Great question! To achieve that perfect runny yolk, keep a close eye on your eggs while they bake. Aim for a baking time of 12-15 minutes at 375°F (190°C) and use a timer to remove them from the oven as soon as the whites are set.

Can I make shirred eggs dairy-free?
Very! You can easily make this recipe dairy-free by swapping the heavy cream with high-fat oat milk or coconut cream. For the butter, use a vegan alternative or cooking spray. Substitute nutritional yeast for the Parmesan cheese, and enjoy this delicious dish without sacrificing flavor!

What are some tasty toppings for shirred eggs?
The more the merrier! You can elevate your shirred eggs by adding toppings like sautéed spinach, smoked salmon, or roasted vegetables. A sprinkle of breadcrumbs on top adds an enticing crunch. Let your creativity shine and adjust the toppings to suit your taste!

Shirred Eggs

Decadent Shirred Eggs for Your Perfect Brunch Escape

Delight in these Simple & Elegant Shirred Eggs, featuring perfectly runny yolks and silky whites, perfect for any brunch occasion.
Print Recipe Pin Recipe
Prep Time 10 minutes mins
Cook Time 15 minutes mins
Cooling Time 2 minutes mins
Total Time 27 minutes mins
Servings: 2 servings
Course: Breakfast
Cuisine: French
Calories: 320
Ingredients Equipment Method Nutrition Notes

Ingredients
  

For the Base
  • 1 tablespoon Unsalted Butter Or cooking spray for a lighter option.
  • 2 tablespoons Heavy Cream Use high-fat oat milk for a dairy-free version.
  • 2 large Large Eggs Fresh, local eggs yield the best results.
For Seasoning
  • 1 pinch Salt Adjust based on your preference.
  • 1 pinch Freshly Ground Black Pepper Adds a slight kick and depth of flavor.
For the Toppings
  • 1 tablespoon Minced Fresh Chives Substitute with fresh parsley or green onions.
  • 2 tablespoons Grated Parmesan Cheese Use nutritional yeast for a dairy-free option.

Equipment

  • 6-ounce ramekin
  • Baking Sheet

Method
 

Step-by-Step Instructions for Shirred Eggs
  1. Begin by preheating your oven to 375°F (190°C).
  2. Take your ramekin and generously grease it with unsalted butter.
  3. Pour a tablespoon or two of heavy cream into the greased ramekin.
  4. Gently crack two large eggs over the cream in the ramekin.
  5. Sprinkle a pinch of salt and freshly ground black pepper onto the eggs, then add minced fresh chives and grated Parmesan cheese.
  6. Place the ramekin on the prepared baking sheet and bake for about 12-15 minutes.
  7. Once baking is complete, allow the ramekin to cool for a couple of minutes before serving.

Nutrition

Serving: 1servingCalories: 320kcalCarbohydrates: 4gProtein: 18gFat: 28gSaturated Fat: 16gPolyunsaturated Fat: 1gMonounsaturated Fat: 10gCholesterol: 420mgSodium: 300mgPotassium: 200mgSugar: 1gVitamin A: 600IUCalcium: 150mgIron: 1mg

Notes

Serve alongside toasted bread or a refreshing salad for a complete brunch experience.

Tried this recipe?

Let us know how it was!

Miso Scrambled Eggs: A Creamy Umami Breakfast Delight

February 2, 2026 by Grace Snow Leave a Comment

Stepping into my kitchen, I found myself craving something cozy yet quick, and that’s when the idea of miso scrambled eggs struck me. Inspired by the creamy delights of traditional Japanese breakfasts, this dish transforms everyday eggs into a soft and custardy treasure, brimming with umami. With just five minutes of your time, you can whip up a bowl of these miso scrambled eggs that perfectly balance sweetness and savory goodness. Not only are they a speedy option for busy mornings, but they’re also a delightful twist on the usual breakfast fare that brings a touch of Japan to your table. Whether you enjoy them on their own or piled high on toast, you'll soon discover there’s nothing quite like this deliciously nourishing meal. Curious how to elevate your breakfast game? Let’s dive into the recipe!

Why are Miso Scrambled Eggs Irresistible?

Quick & Easy: In just five minutes, you can create a breakfast that feels gourmet yet requires minimal effort.

Umami Explosion: The rich, savory flavor of miso transforms simple scrambled eggs into a scrumptious delight.

Versatile Additions: Enjoy them plain, or get creative by adding sautéed veggies for a nutritious boost, or serve over rice for a hearty meal.

Perfect Comfort Food: Experience the creamy, custardy texture that wraps around your taste buds, making every bite a joy.

Looking for more inspiration? Check out my delicious Spicy Miso Tuna for a unique twist on comfort food!

Miso Scrambled Eggs Ingredients

For the Egg Mixture
• Large Eggs – Provide structure and protein; use fresh eggs for the best flavor and texture.
• White Sugar – Adds a subtle sweetness that balances the savory flavors of miso; brown sugar can be used for a different flavor profile.
• White Miso Paste – Offers umami depth and a slightly sweet flavor; you can substitute with yellow miso for a milder taste.
• Water – Helps incorporate the miso into the egg mixture easily.

For Cooking
• Toasted Sesame Oil – Adds nuttiness and enhances flavor; olive oil can substitute if needed.

For Garnishing (Optional)
• Shichimi Togarashi – A spicy Japanese seasoning blend for an extra kick; omit for a milder dish or replace with black pepper.

This delightful preparation of miso scrambled eggs is a velvety way to indulge in a quick, umami-rich breakfast. Enjoy crafting this creamy dish that’s sure to make your mornings a little brighter!

Step‑by‑Step Instructions for Miso Scrambled Eggs

Step 1: Prepare the Eggs
Crack the eggs into a medium bowl and whisk them together with white sugar until the mixture is smooth and well combined. The eggs should have a slightly frothy appearance, indicating they’re ready for the next step. This whisking will help incorporate air, ensuring light and fluffy miso scrambled eggs.

Step 2: Mix Miso with Water
In a separate small bowl, mix the white miso paste with a bit of water until it reaches a smooth consistency. This step ensures the miso blends seamlessly into the eggs, providing that delicious umami flavor without clumps. The mixture should be creamy and resemble a loose paste, ready to be added to the egg mixture.

Step 3: Combine Egg and Miso Mixtures
Pour the smooth miso mixture into the bowl with the whisked eggs, stirring gently to combine. Ensure that both components are thoroughly mixed, resulting in a vibrant yellow color with a creamy texture. This base will form the rich flavor profile of your miso scrambled eggs as you cook them.

Step 4: Heat the Pan
Place a nonstick frying pan over low heat and add a drizzle of toasted sesame oil, allowing it to heat for about a minute. The oil should shimmer slightly but not smoke, which helps infuse the oil’s nutty flavor into the cooking eggs. Using low heat is crucial for perfect, creamy scrambled eggs.

Step 5: Cook the Egg Mixture
Once the oil is heated, pour the egg and miso mixture into the pan. Begin to gently stir with a silicone spatula, encouraging the eggs to start cooking evenly. Allow them to sit undisturbed for about 1-2 minutes, until the edges begin to firm up while the center remains slightly runny.

Step 6: Fold the Eggs
After the edges start to set, use the spatula to fold the nearly cooked eggs toward the center of the pan. Continue this gentle folding motion until the scrambled eggs are softly set, which should take another 2-3 minutes. The goal is creamy curds without overcooking, resulting in delicious miso scrambled eggs.

Step 7: Serve and Garnish
Remove the pan from heat when the eggs are just set, keeping them slightly glossy for that perfect texture. Serve the miso scrambled eggs immediately on warm plates, garnished with optional shichimi togarashi for a touch of spice. This delectable dish is best enjoyed fresh for breakfast or as a delightful snack.

Miso Scrambled Eggs: Flavorful Twists

Feel free to get creative and tailor this dish to your liking with these simple tweaks!

  • Dairy-Free: Substitute water with non-dairy milk like almond or oat milk for an extra creamy texture without dairy.
  • Veggie-Packed: Add sautéed spinach, bell peppers, or shiitake mushrooms to enrich your breakfast with vibrant colors and nutrients.
  • Shiitake Mushroom Miso: Swap the white miso paste for shiitake miso to infuse a distinct mushroom flavor into your eggs.
  • Cheesy Delight: Mix in a sprinkle of shredded cheese, like cheddar or parmesan, for added creaminess and flavor.
  • Spicy Kick: Incorporate some chopped jalapeños or a dash of sriracha to your egg mixture for an exciting kick of heat.
  • Soy Sauce Drizzle: A light drizzle of soy sauce just before serving can elevate the umami depth, making the dish even more savory.
  • Tamago Sando: Why not use these miso scrambled eggs in a homemade tamago sando? Spread some kewpie mayo on Japanese milk bread for a delightful sandwich.
  • Asian-Inspired Toast: Serve atop slices of crispy toast spread with avocado and a sprinkle of sesame seeds for a fusion twist.

Now you’re all set to elevate your breakfast experience! If you’re in search of more unique dishes, don't miss my delicious Turkish Eggs Discover for an exciting brunch option or consider whipping up some Spicy Miso Tuna for a flavorful lunch.

Make Ahead Options

Miso scrambled eggs are perfect for meal prep enthusiasts looking to save time during busy mornings! You can whisk together the eggs and white sugar, as well as mix the white miso paste with water, up to 24 hours in advance. Store both mixtures separately in airtight containers in the refrigerator to maintain their quality. When you’re ready to enjoy your creamy miso scrambled eggs, simply combine the mixtures and cook them in a nonstick frying pan over low heat, stirring gently for about 4 minutes until fluffy and soft. This way, you can savor a delicious, umami-rich breakfast with minimal effort, making your mornings more enjoyable!

Expert Tips for Miso Scrambled Eggs

  • Low Heat Matters: Cooking on low heat helps prevent the eggs from becoming dry and ensures a creamy texture, which is key for perfect miso scrambled eggs.

  • Gentle Stirring: Stir gently and slowly as you cook to create large, fluffy curds. Avoid vigorous mixing to maintain that custardy consistency.

  • Timing is Everything: Remove the eggs from the heat just before they are fully set, as residual heat will continue to cook them and maintain that perfect softness.

  • Fresh Ingredients: Always use fresh eggs for the best flavor and texture; they make a significant difference in your miso scrambled eggs.

  • Customize Your Garnish: Feel free to adjust the garnishes. If shichimi togarashi is too spicy for your taste, try a sprinkle of black pepper or omit it entirely for a milder dish.

What to Serve with Miso Scrambled Eggs

Elevate your breakfast experience with delightful pairings that complement the creamy umami goodness of your dish.

  • Steamed Rice: A staple in Japanese cuisine, rice absorbs the miso flavors, creating a comforting and filling meal. Perfect for a cozy brunch.

  • Toasted Sourdough: The crispiness of the bread contrasts beautifully with the soft, custardy eggs. Add a pat of butter for a rich finish.

  • Stir-Fried Vegetables: Sautéed greens like bok choy or spinach enhance the dish's nutritious profile while adding vibrant color and texture. Their slight bitterness balances the sweet miso.

  • Salad with Sesame Dressing: A refreshing mix of greens drizzled with sesame dressing brings brightness and crunch, helping to offset the creamy richness of the eggs.

  • Soy Sauce Drizzle: A dash of soy sauce enhances the umami flavor, adding savory notes that beautifully mesh with the miso scrambled eggs.

  • Green Tea: This classic beverage cleanses the palate and complements the eggs' delicate flavors, making it a perfect pairing.

Enhancing your brunch spread with these complementary sides will ensure a delightful and satisfying meal, turning your simple miso scrambled eggs into a feast of flavors and textures.

Storage Tips for Miso Scrambled Eggs

  • Fridge: Store leftovers in an airtight container for up to 3 days. This keeps the miso scrambled eggs fresh and safe for future enjoyment.
  • Reheating: Warm gently on low heat in a nonstick pan, stirring occasionally to maintain creaminess. Avoid overheating to prevent dryness.
  • Freezer: Miso scrambled eggs can be frozen for up to 2 months. Just be aware that texture may change slightly upon reheating.
  • Thawing: When ready to enjoy, thaw in the refrigerator overnight before reheating for the best results.

Miso Scrambled Eggs Recipe FAQs

What kind of miso should I use for the best flavor?
I recommend using white miso paste for these scrambled eggs, as it offers a sweeter, milder flavor that's perfect for breakfast. If you prefer a slightly stronger taste, yellow miso can be used as a substitute. Avoid using red miso, as its robust and salty flavor can overpower the dish.

How should I store leftover miso scrambled eggs?
Store any leftover miso scrambled eggs in an airtight container in the refrigerator for up to 3 days. When you're ready to enjoy them again, reheat over low heat in a nonstick pan while stirring gently to maintain their creamy texture. Avoid high heat, as it may dry them out.

Can I freeze miso scrambled eggs? How do I do that?
Yes, you can freeze miso scrambled eggs for up to 2 months. To freeze, let the eggs cool completely after cooking, then transfer them to an airtight, freezer-safe container or bag. Make sure to label it with the date. When you're ready to eat, thaw in the refrigerator overnight and reheat gently in a pan on low heat to retain some creaminess.

What should I do if my scrambled eggs turn out dry or rubbery?
If your miso scrambled eggs become dry, it’s likely due to cooking at too high a temperature or for too long. To fix this, cook them on low heat next time and remove them just before they fully set. If they've already turned out dry, try adding a splash of cream or milk while reheating to bring back some moisture and creaminess.

Can I make this recipe suitable for a gluten-free diet?
Absolutely! Just make sure to omit the shichimi togarashi unless you confirm it's gluten-free. You can also check that your miso paste is gluten-free, as some brands may contain barley. The rest of the ingredients in this recipe, including eggs and sesame oil, are naturally gluten-free.

Are there any alternatives for the garnish?
If you don't have shichimi togarashi on hand or prefer a milder flavor, you can garnish your miso scrambled eggs with a sprinkle of black pepper or some fresh chives or scallions for a fresh finish. Enjoy experimenting with flavors that suit your taste!

Miso scrambled eggs

Miso Scrambled Eggs: A Creamy Umami Breakfast Delight

Miso scrambled eggs bring a creamy and umami-rich breakfast to your table in just five minutes.
Print Recipe Pin Recipe
Prep Time 5 minutes mins
Cook Time 5 minutes mins
Total Time 10 minutes mins
Servings: 2 servings
Course: Breakfast
Cuisine: Japanese
Calories: 250
Ingredients Equipment Method Nutrition Notes

Ingredients
  

For the Egg Mixture
  • 4 large Eggs Use fresh eggs for the best flavor and texture.
  • 1 tablespoon White Sugar Adds a subtle sweetness.
  • 2 tablespoons White Miso Paste Can substitute with yellow miso for a milder taste.
  • 2 tablespoons Water Helps incorporate the miso into the egg mixture.
For Cooking
  • 1 tablespoon Toasted Sesame Oil Enhances flavor; can substitute with olive oil.
For Garnishing (Optional)
  • 1 teaspoon Shichimi Togarashi Omit for a milder dish or replace with black pepper.

Equipment

  • nonstick frying pan
  • medium bowl
  • small bowl
  • Silicone Spatula

Method
 

Step‑by‑Step Instructions for Miso Scrambled Eggs
  1. Prepare the Eggs: Crack the eggs into a medium bowl and whisk them together with white sugar until smooth.
  2. Mix Miso with Water: In a separate small bowl, mix the white miso paste with a bit of water until smooth.
  3. Combine Egg and Miso Mixtures: Pour the miso mixture into the bowl with the eggs, stirring gently to combine.
  4. Heat the Pan: Place a nonstick frying pan over low heat and add toasted sesame oil, heating for about a minute.
  5. Cook the Egg Mixture: Pour the egg and miso mixture into the pan and gently stir with a spatula.
  6. Fold the Eggs: Once edges start to set, fold the eggs toward the center until softly set.
  7. Serve and Garnish: Remove from heat when just set, serve on warm plates, garnished with optional shichimi togarashi.

Nutrition

Serving: 1servingCalories: 250kcalCarbohydrates: 5gProtein: 12gFat: 20gSaturated Fat: 3gPolyunsaturated Fat: 2gMonounsaturated Fat: 15gCholesterol: 350mgSodium: 800mgPotassium: 200mgSugar: 1gVitamin A: 500IUCalcium: 50mgIron: 1mg

Notes

Cooking on low heat helps maintain creaminess and avoid dryness. Use fresh ingredients for the best texture and flavor.

Tried this recipe?

Let us know how it was!

Savor the Flavor: Easy Egg Roll in a Bowl Recipe

February 2, 2026 by Grace Snow Leave a Comment

As I stood in my kitchen with a rumbling stomach, I craved something comforting yet quick to prepare. Enter my 15-Minute Egg Roll in a Bowl! This dish is a delightful twist on traditional egg rolls, offering all the savory flavors you love without the hassle of wrappers or frying. In under 20 minutes, you can whip up a hearty, one-pan meal that’s not only satisfying but also packed with colorful veggies and your choice of protein—pork, chicken, or beef. Perfect for busy weeknights, it’s a keto-friendly option that doesn’t skimp on taste.

What savory twist will you add to make this dish your own?

What savory twist will you add?

Customization at Your Fingertips: This Egg Roll in a Bowl is incredibly versatile, allowing you to easily swap in ground chicken or beef based on your taste.
Quick and Easy: In just 15 minutes, you’ll have a delicious meal ready to enjoy. Perfect for those hectic weeknights!
One-Pan Wonder: Minimal cleanup required—just one pan means less time in the kitchen and more time for you.
Keto-Friendly: Low in carbs but high in flavor; this recipe fits seamlessly into a keto diet without sacrificing satisfaction.
Taste of Comfort: Each bite is a comforting blend of familiar flavors, reminiscent of your favorite restaurant dishes but made right at home. Try pairing it with some Pumpkin Cinnamon Roll for a sweet finish!

Egg Roll in a Bowl Ingredients

For the Base

  • Vegetable Oil – Provides a base for cooking; can substitute with canola or sunflower oil for a neutral flavor.
  • Ground Pork – The main protein source; offers a rich, flavorful taste. Substitute with ground chicken or beef for variety.

For the Aromatics

  • Onion – Adds aromatic depth; yellow or white onions are recommended for their mild sweetness.
  • Garlic – Enhances flavor with its strong aroma; always opt for fresh minced garlic for the best results.

For the Veggies

  • Coleslaw Mix – A time-saving blend of cabbage and carrots; you can use shredded cabbage if you prefer.

For the Seasoning

  • Soy Sauce – Provides a depth of umami flavor; tamari is a great gluten-free alternative.
  • Toasted Sesame Oil – Adds a signature nutty flavor; can be omitted for a lighter dish.
  • Sugar – Balances the saltiness of the soy sauce; consider honey or omitting it for a lower-sugar option.

For Garnish

  • Green Onions – Used for a fresh garnish; it adds a nice crunch and color to the dish. Optional but highly recommended!

Step‑by‑Step Instructions for Egg Roll in a Bowl

Step 1: Cook the Pork
Start by heating a large skillet over medium-high heat and adding vegetable oil. Once the oil shimmers, add the ground pork, breaking it apart with a spatula. Cook for about 6-7 minutes, ensuring the meat is no longer pink and begins to brown nicely. This step builds a rich flavor base for your Egg Roll in a Bowl.

Step 2: Add Aromatics
Now, stir in the finely chopped onion and minced garlic into the skillet, cooking for 2-3 minutes. Keep stirring until the onions turn translucent and fragrant, allowing their sweetness to enhance the dish. The aromatics are crucial for achieving that authentic egg roll flavor and help to infuse the pork with deliciousness.

Step 3: Incorporate Vegetables
Next, mix in the coleslaw blend, stirring frequently for about 5-7 minutes. Cook until the cabbage is tender and the colors are vibrant, adjusting the heat to high if moisture builds up—this will help keep the veggies from steaming. The combination of textures and flavors transforms your mixture into a delightful filling for the Egg Roll in a Bowl.

Step 4: Season the Mixture
Once the vegetables are cooked, pour in the soy sauce, toasted sesame oil, and sugar, then mix thoroughly for an additional 1-2 minutes. The sauce should coat the ingredients beautifully, creating that classic savory and slightly sweet flavor profile reminiscent of traditional egg rolls. Taste and adjust the seasoning if needed.

Step 5: Garnish & Serve
Remove the pan from the heat and transfer your Egg Roll in a Bowl to serving dishes. Garnish generously with chopped green onions for a fresh crunch and vibrant color. Serve it hot, perhaps over a bed of rice or alongside your favorite sauce, and relish in the comforting, homemade experience this dish provides.

Storage Tips for Egg Roll in a Bowl

Fridge: Store leftover Egg Roll in a Bowl in an airtight container for up to 3 days. This ensures freshness and maintains the delightful crunch of the veggies.

Freezer: For longer storage, freeze the dish in a freezer-safe container for up to 2 months. Be sure to let it cool completely before freezing to prevent ice crystals.

Reheating: When ready to enjoy again, reheat in a skillet over medium heat, stirring occasionally until heated through. You can also use the microwave; just cover the dish to prevent drying out.

Tip: To maintain that fresh flavor, consider adding a splash of soy sauce or sesame oil during reheating to revive the dish's original taste.

Egg Roll in a Bowl Variations

Add your personal touch to this delightful dish with these creative variations!

  • Dairy-Free: Use coconut aminos instead of soy sauce for a gluten-free, soy-free option.
  • Protein Swap: Replace ground pork with ground turkey or chicken for a lighter take.
  • Veggie Additions: Toss in bell peppers, mushrooms, or snap peas for a pop of color and crunch.
  • Spicy Kick: Add a dash of sriracha or red pepper flakes during cooking for heat that excites the palate.
  • Crunch Factor: Top it off with sliced almonds or fried onions for an extra layer of texture.
  • Sweetness Balance: Use honey or maple syrup instead of sugar for a natural sweet flavor profile.
  • Garnish Delight: Enhance your dish with fresh herbs like cilantro or basil to elevate the taste.
  • Cauliflower Rice: Serve it over riced cauliflower for a lighter, low-carb alternative.

Feel free to explore these variations to create your own signature version of the Egg Roll in a Bowl! And if you're looking for more wholesome ideas, check out this delicious Acai Bowl Nutritious recipe to keep those healthy vibes flowing!

Expert Tips for Egg Roll in a Bowl

  • Heat Control: Always ensure your pan is hot enough before adding ingredients to prevent the pork from steaming instead of browning.

  • ** Veggie Freshness:** Use fresh coleslaw mix or shredded cabbage for the best texture. Avoid soggy veggies by cooking them until just tender.

  • Seasoning to Taste: Adjust soy sauce according to personal preference. For a lighter taste, start with less and add more as desired.

  • Protein Flexibility: Feel free to substitute ground pork with ground chicken, beef, or even tofu—just make sure to adjust cooking times accordingly.

  • Quick Serving Tip: To save on cleanup, consider serving directly from the skillet! It keeps the dish warm and adds a rustic feel to your meal.

  • Storage Tips: Store leftovers in an airtight container in the fridge for up to 3 days. Reheat on the stove for optimal texture.

Make Ahead Options

Busy home cooks will love how easy it is to prepare this Egg Roll in a Bowl ahead of time! You can chop the vegetables and cook the ground pork up to 24 hours in advance. Simply cook the pork until no longer pink and allow it to cool before refrigerating it in an airtight container. You can also prepare the chopped onions and garlic, storing them together to save time. When you're ready to serve, just reheat the pork and aromatics in a skillet, mix in the coleslaw mix, and finish with the soy sauce and sesame oil for a quick weeknight meal that's just as delicious! This method keeps everything fresh and flavorful, so you can enjoy a homemade meal with minimal effort at the end of a busy day.

What to Serve with Egg Roll in a Bowl

Imagine sitting down to a cozy meal that offers a perfect blend of flavors and textures, each bite promising satisfaction.

  • Steamed Jasmine Rice: The fluffy rice soaks up the savory sauce, providing a lovely contrast to the crunchy veggies of your Egg Roll in a Bowl.

  • Cauliflower Rice: For a low-carb option, this light and healthy substitute packs in nutrients while adding a subtle crunch that complements your dish beautifully.

  • Egg Drop Soup: This warm, comforting soup enhances your meal, with its silky texture balancing the hearty goodness of the Egg Roll in a Bowl.

  • Crispy Spring Rolls: Pairing these with your main dish brings a delightful crunch, offering a taste of familiar flavors that echo the essence of traditional egg rolls.

  • Sesame Cucumber Salad: Crisp cucumbers tossed in a tangy sesame dressing provide a fresh burst of flavor, cleansing your palate between bites.

  • Sweet & Sour Sauce: A delightful dipping sauce that introduces a playful sweetness, creating a lovely contrast with the savory notes of the Egg Roll in a Bowl.

  • Chinese Tea: A soothing cup of green or jasmine tea serves as a wonderful drink pairing, enhancing the meal experience with its fragrant notes.

  • Fruit Sorbet: End your dinner on a refreshing note with a scoop of sorbet, which balances out the savory richness of the Egg Roll in a Bowl and leaves you feeling light.

Egg Roll in a Bowl Recipe FAQs

What is the best type of ground meat to use for Egg Roll in a Bowl?
Absolutely! The best type of meat for Egg Roll in a Bowl is typically ground pork, which provides a rich and flavorful base. However, you can easily substitute it with ground chicken or beef if you prefer. Each protein offers a unique taste that can elevate the dish based on your cravings.

How should I store leftover Egg Roll in a Bowl?
After enjoying your meal, store any leftovers in an airtight container in the refrigerator for up to 3 days. This helps maintain the freshness and crunchiness of the vegetables. If you're not planning to eat it right away, you can also freeze it in a freezer-safe container for up to 2 months. Be sure to let it cool completely before freezing to prevent ice crystals.

Can I freeze Egg Roll in a Bowl? If so, how?
Yes, you can freeze Egg Roll in a Bowl! To do this, allow the dish to cool fully after cooking. Then, portion it into airtight, freezer-safe containers. The key step is to ensure there's enough room for expansion, so leave a little space at the top. When ready to enjoy, thaw it in the fridge overnight and reheat it in a skillet over medium heat, stirring occasionally until heated through.

What should I do if my vegetables turn soggy while cooking?
Very commonly, soggy veggies can happen if the heat is too low or if there’s too much moisture in the pan. To prevent this, always ensure your pan is hot enough before adding the coleslaw mix. If moisture builds during cooking, increase the heat to high to promote evaporation. This way, you’ll get that perfect combination of tender and crunchy textures.

Are there any dietary considerations I should keep in mind?
Certainly! This recipe is naturally gluten-free if you use tamari instead of regular soy sauce. It's also keto-friendly due to the low-carb content when made with vegetables instead of rice. Always check for common allergens in your ingredients, such as soy or sesame oil, and if you're cooking for pets, ensure none of the ingredients are harmful to them, particularly garlic.

How long does Egg Roll in a Bowl stay fresh in the fridge?
Leftover Egg Roll in a Bowl stays fresh in the fridge for about 3 days. Storing it in an airtight container will help maintain the crunch of the vegetables and the flavor of the dish. I often recommend marking the date on the container to keep track of freshness and to enjoy it while it’s at its best!

Egg Roll in a Bowl

Savor the Flavor: Easy Egg Roll in a Bowl Recipe

Enjoy a quick and tasty Egg Roll in a Bowl, offering the flavors you love without the hassle.
Print Recipe Pin Recipe
Prep Time 5 minutes mins
Cook Time 15 minutes mins
Total Time 20 minutes mins
Servings: 4 bowl
Course: Dinner
Cuisine: Asian
Calories: 360
Ingredients Equipment Method Nutrition Notes

Ingredients
  

For the Base
  • 2 tablespoons Vegetable Oil Can substitute with canola or sunflower oil for a neutral flavor.
  • 1 pound Ground Pork Can substitute with ground chicken or beef.
For the Aromatics
  • 1 medium Onion Yellow or white onions are recommended.
  • 3 cloves Garlic Always opt for fresh minced garlic.
For the Veggies
  • 1 package Coleslaw Mix Can use shredded cabbage if preferred.
For the Seasoning
  • 3 tablespoons Soy Sauce Tamari is a gluten-free alternative.
  • 1 tablespoon Toasted Sesame Oil Can be omitted for a lighter dish.
  • 1 teaspoon Sugar Consider honey or omitting for a lower-sugar option.
For Garnish
  • 2 stalks Green Onions Optional but highly recommended!

Equipment

  • Large skillet

Method
 

Step-by-Step Instructions
  1. Start by heating a large skillet over medium-high heat and adding vegetable oil. Once the oil shimmers, add the ground pork, breaking it apart with a spatula. Cook for about 6-7 minutes, ensuring the meat is no longer pink and begins to brown nicely.
  2. Stir in the finely chopped onion and minced garlic into the skillet, cooking for 2-3 minutes until the onions turn translucent and fragrant.
  3. Mix in the coleslaw blend, stirring frequently for about 5-7 minutes until the cabbage is tender.
  4. Pour in the soy sauce, toasted sesame oil, and sugar, then mix thoroughly for an additional 1-2 minutes.
  5. Remove the pan from the heat and transfer your Egg Roll in a Bowl to serving dishes. Garnish with chopped green onions.

Nutrition

Serving: 1bowlCalories: 360kcalCarbohydrates: 15gProtein: 25gFat: 22gSaturated Fat: 6gCholesterol: 85mgSodium: 800mgPotassium: 550mgFiber: 3gSugar: 4gVitamin A: 40IUVitamin C: 50mgCalcium: 60mgIron: 2mg

Notes

Store leftovers in an airtight container in the fridge for up to 3 days. Reheat in a skillet for optimal texture.

Tried this recipe?

Let us know how it was!

Delicious Best Homemade Egg Rolls for Your Next Snack Attack

February 2, 2026 by Grace Snow Leave a Comment

On a cozy afternoon, the aroma of freshly baked cookies wafts through my kitchen, instantly transforming my space into a warm haven. That's the magic of these 4-Ingredient Chocolate Oat Cookies! With just a handful of simple ingredients, you can create soft, chewy morsels that are perfect for any occasion—whether as a quick snack for the kids or a delightful after-dinner treat. What makes these cookies truly special is their incredible versatility; you can easily adapt them to suit various dietary preferences. Plus, the prep time is so quick, you’ll find yourself baking these delectable bites on repeat. Are you ready to discover how easy it is to whip up your new favorite cookie?

Why are these cookies a must-try?

Simplicity at its finest: With only four ingredients, these cookies come together in no time, making them perfect for busy days.

Rich chocolatey goodness: Every bite bursts with intense cocoa flavor that chocolate lovers will adore.

Versatile and adaptable: You can easily modify these cookies to fit various dietary needs, whether gluten-free or vegan.

Crowd-pleasing treat: Perfect for gatherings, these cookies are bound to be a hit with friends and family. Pair them with a glass of Homemade Hot Chocolate for the ultimate comfort combo.

Balanced snacking: Packed with oats and nut butter, each cookie offers a satisfying snack that provides healthy fats and fiber.

Chocolate Oat Cookie Ingredients

• Prepare for a sweet adventure with these essential components!

For the Cookie Base

  • Oats – Provide essential texture and structure; rolled oats are best for that chewy bite.
  • Cocoa Powder – Imparts a rich chocolate flavor; go for unsweetened cocoa for optimal taste.
  • Sweetener (e.g., brown sugar or maple syrup) – Adds moisture and sweetness; choose maple syrup for a vegan-friendly treat.
  • Nut Butter (e.g., peanut butter or almond butter) – Binds the mixture together while contributing a creamy consistency; opt for no-added-sugar varieties for best results.

Optional Add-Ins

  • Chocolate Chips – For extra chocolatey goodness; a great way to elevate your cookie experience!
  • Dried Fruit – Adds natural sweetness and chewiness; a fun twist for flavor.
  • Nuts – Introduces a satisfying crunch; consider walnuts or pecans for added texture.

These Chocolate Oat Cookies are not just easy to make, but they're also incredibly satisfying, making them the best homemade egg rolls alternative for your sweet tooth!

Step‑by‑Step Instructions for 4-Ingredient Chocolate Oat Cookies

Step 1: Preheat and Prepare
Start by preheating your oven to 350°F (175°C) to create the perfect baking environment for your 4-Ingredient Chocolate Oat Cookies. While the oven heats, line a baking sheet with parchment paper to prevent the cookies from sticking and ensure easy cleanup.

Step 2: Mix Ingredients
In a medium mixing bowl, combine rolled oats, unsweetened cocoa powder, your chosen sweetener, and nut butter. Stir them together with a wooden spoon or spatula until a thick dough forms, ensuring all ingredients are well incorporated with no dry patches. This step takes about 3-5 minutes but will result in a delightful cookie base.

Step 3: Form Cookies
Use a tablespoon to scoop portions of dough and place them evenly on your prepared baking sheet. Flatten each scoop slightly to encourage even baking; they should look like small discs. Leave enough space between them to allow for spreading during baking—about 2 inches apart should do the trick.

Step 4: Bake the Cookies
Slide the baking sheet into your preheated oven and bake the cookies for 12-15 minutes. You'll know they're ready when the edges are firm but the centers still look a bit soft—this will give them that perfect chewy texture.

Step 5: Cooling Time
Remove the cookies from the oven and let them cool on the baking sheet for 5 minutes. This will help them set up without losing their delightful softness. After that, gently transfer the cookies to a wire rack to cool completely, allowing the warm chocolate aroma to fill your kitchen.

Step 6: Enjoy Your Treats
Once cooled, your 4-Ingredient Chocolate Oat Cookies are ready to be devoured! Serve them with a glass of milk or as a quick snack anytime. These cookies can also be stored in an airtight container at room temperature for up to a week—if they last that long!

What to Serve with 4-Ingredient Chocolate Oat Cookies

Indulge in these delightful cookies and explore the perfect pairings that elevate your treat experience!

  • Glass of Milk: A classic choice, the creamy richness perfectly complements the chocolatey goodness, creating a satisfying balance.

  • Fresh Berries: Tangy fruits like raspberries or strawberries add a refreshing contrast to the sweet, chewy cookies, enhancing each bite.

  • Ice Cream Scoop: Vanilla or chocolate ice cream brings a cool creaminess that melts into the warm cookie, creating a heavenly dessert.

  • Coffee or Tea: The warmth of a brewed beverage echoes the comforting nature of the cookies, making for a cozy afternoon snack.

  • Yogurt Parfait: Layer yogurt with granola and fruit for a nutritious snack that elevates your cookie moment to something truly special.

  • Chocolate Dipping Sauce: Drizzle some melted chocolate over the cookies for an extra decadent touch that chocolate lovers will adore.

  • Nut Butter Spread: A light layer of your favorite nut butter can add an extra creaminess, making every nibble even more delicious.

These options will enhance your enjoyment of the best homemade egg rolls alternative, ensuring a complete and joyful treat experience!

4-Ingredient Chocolate Oat Cookies Variations

Feel free to get creative with these cookies, turning them into delights that suit your taste and dietary needs!

  • Nut-Free: Swap almond butter for sunflower seed butter to create a nut-free treat that everyone can enjoy.

  • Gluten-Free: Use certified gluten-free oats to ensure these cookies are safe for those avoiding gluten. The taste will remain just as delicious!

  • Vegan Option: Replace honey with maple syrup and choose a nut butter without added sugars for a vegan twist. These cookies will still feel indulgent!

  • Extra Chocolatey: Mix in a handful of chocolate chips for an intensified chocolate experience. Picture every bite bursting with melty chocolate goodness!

  • Fruit Surprise: Add dried cranberries or raisins for a hint of natural sweetness and a chewy texture. They add a delightful fruitiness to each cookie.

  • Spicy Kick: A dash of cinnamon or a sprinkle of cayenne pepper can elevate the flavor, creating a warm, cozy twist that perfectly complements the chocolate.

  • Crunchy Texture: Fold in chopped walnuts or pecans for a satisfying crunch. This adds not only texture but also nutty flavor that harmonizes beautifully with the chocolate.

  • Vanilla Dream: A teaspoon of pure vanilla extract enhances the flavor profile, giving these cookies an aromatic finish. It’s a simple addition that transforms the flavor!

Try mixing and matching these ideas to discover your perfect chocolate oat cookie combination. Each variation will bring something unique to the table, just like serving these amazing cookies alongside a warm cup of Homemade Hot Chocolate or a delightful Breakfast Egg Muffins. Enjoy experimenting!

Expert Tips for 4-Ingredient Chocolate Oat Cookies

  • Room Temperature Nut Butter: Ensure the nut butter is at room temperature for easier mixing and a smoother dough that blends well.

  • Don’t Overbake: To keep that soft, chewy texture, watch the cookies closely. Remove them when the edges are firm, but the centers look slightly underbaked.

  • Consistent Dough Size: For even baking, use a tablespoon to scoop the dough. Flatten each cookie slightly to promote uniformity while baking.

  • Mix Add-Ins: If adding chocolate chips, nuts, or dried fruit, incorporate them evenly into the dough to ensure each bite is bursting with flavor.

  • Storage Solutions: Store any leftovers in an airtight container at room temperature for up to a week. For longer freshness, consider freezing the cookies!

Each of these tips will help you create the best homemade egg rolls alternative to satisfy your sweet cravings!

Make Ahead Options

These 4-Ingredient Chocolate Oat Cookies are perfect for meal prep enthusiasts looking to save time during busy weeks! You can prepare the cookie dough up to 24 hours in advance. Simply mix all the ingredients and store the dough in an airtight container in the refrigerator. This not only locks in freshness but also enhances the flavors as they meld together. When you're ready to bake, just scoop and flatten the dough onto your baking sheet, then bake as directed. For longer storage, these cookies can be frozen after baking; simply thaw at room temperature for a quick and delicious treat whenever you need it. With these make-ahead tips, you'll always have a sweet snack ready at your fingertips!

How to Store and Freeze Chocolate Oat Cookies

Room Temperature: Keep your cookies in an airtight container at room temperature for up to 7 days to maintain their soft, chewy texture.

Fridge: If you prefer, store them in the fridge to prolong freshness; they'll last for up to 10 days. Just remember to let them come to room temperature before enjoying their full flavor.

Freezer: To freeze your Chocolate Oat Cookies, place them in a single layer on a baking sheet to harden before transferring to a freezer-safe bag. They can be stored for up to 3 months.

Reheating: When ready to enjoy, simply thaw at room temperature or microwave for 10-15 seconds for that fresh-baked taste!

4-Ingredient Chocolate Oat Cookies Recipe FAQs

How do I choose the right oats?
For the best texture in your Chocolate Oat Cookies, use rolled oats. They provide great structure and chewiness. If necessary, you can substitute quick oats, but keep an eye on the cookie's consistency, as they may turn out a bit softer. Avoid steel-cut oats, as they won't yield the same chewy result.

How long do these cookies stay fresh?
These delectable cookies can be stored in an airtight container at room temperature for up to 7 days. If you want to extend their shelf life, consider placing them in the refrigerator where they can last for about 10 days. Just remember to let them warm back up to room temperature for that delightful flavor!

Can I freeze the cookies?
Absolutely! To freeze your Chocolate Oat Cookies, first arrange them in a single layer on a baking sheet to harden. After about an hour, transfer them to a freezer-safe bag, which can be stored for up to 3 months. When you're ready to indulge, simply thaw them at room temperature or pop them in the microwave for 10-15 seconds to regain that soft, fresh-baked feel.

What if the dough is too dry or too wet?
If your cookie dough feels too dry, try adding a splash of water or a little extra nut butter until you reach the desired consistency. Conversely, if it’s too wet, sprinkle in some additional oats—about a tablespoon at a time—until it holds together a little better. Remember, the dough should be thick, so avoid over-mixing!

Are these cookies suitable for allergies?
Yes, with a few adjustments! If you or someone you enjoy baking for has nut allergies, you can replace the nut butter with sunflower seed butter for a nut-free alternative. Always make sure to double-check your ingredients, especially with sweeteners, to ensure they're suitable for your dietary needs.

How do I store leftover cookies?
To keep your cookies fresh, you can store them at room temperature in an airtight container for up to 7 days, as mentioned earlier. For long-term storage, the freezer is a wonderful option—simply follow the freezing instructions described above. This way, you can always have your favorite treats ready to enjoy!

Best Homemade Egg Rolls

Delicious Best Homemade Egg Rolls for Your Next Snack Attack

These Best Homemade Egg Rolls are a delightful snack made with simple ingredients, perfect for any occasion.
Print Recipe Pin Recipe
Prep Time 10 minutes mins
Cook Time 15 minutes mins
Cooling Time 5 minutes mins
Total Time 30 minutes mins
Servings: 12 cookies
Course: Appetizers
Cuisine: American
Calories: 120
Ingredients Equipment Method Nutrition Notes

Ingredients
  

Cookie Base
  • 2 cups Rolled Oats Provides essential texture and structure
  • 1/2 cup Unsweetened Cocoa Powder Imparts rich chocolate flavor
  • 1/2 cup Sweetener (e.g., brown sugar or maple syrup) Adds moisture and sweetness
  • 1/2 cup Nut Butter (e.g., peanut butter or almond butter) Binds mixture together
Optional Add-Ins
  • 1/2 cup Chocolate Chips For extra chocolatey goodness
  • 1/2 cup Dried Fruit Adds natural sweetness
  • 1/2 cup Nuts (e.g., walnuts or pecans) Introduces a satisfying crunch

Equipment

  • Oven
  • Mixing Bowl
  • Baking Sheet
  • Parchment Paper
  • Wooden spoon
  • Spatula

Method
 

Baking Instructions
  1. Preheat your oven to 350°F (175°C) and line a baking sheet with parchment paper.
  2. In a medium mixing bowl, combine rolled oats, cocoa powder, sweetener, and nut butter. Mix until a thick dough forms.
  3. Scoop portions of the dough onto the baking sheet and flatten each scoop slightly.
  4. Bake for 12-15 minutes until edges are firm but centers look soft.
  5. Let cookies cool on the baking sheet for 5 minutes, then transfer to a wire rack to cool completely.
  6. Enjoy your cookies with a glass of milk or as a snack.

Nutrition

Serving: 1cookieCalories: 120kcalCarbohydrates: 15gProtein: 3gFat: 5gSaturated Fat: 1gPolyunsaturated Fat: 0.5gMonounsaturated Fat: 2gSodium: 50mgPotassium: 100mgFiber: 2gSugar: 4gCalcium: 20mgIron: 1mg

Notes

Store cookies in an airtight container at room temperature for up to a week.

Tried this recipe?

Let us know how it was!

Cozy One-Pot Egg Roll Soup: A Heartwarming Weeknight Delight

February 2, 2026 by Grace Snow Leave a Comment

The aroma of savory spices and fresh vegetables wafts from the kitchen, and I can’t help but feel an instant sense of comfort. That’s exactly what my Cozy One-Pot Egg Roll Soup delivers—rich flavors reminiscent of your favorite takeout dish, but with the added benefits of being low-carb and keto-friendly. On chilly evenings when you want something hearty yet quick, this dish shines by getting dinner on the table in just 30 minutes. Not only is it packed with nutritious ingredients like ground pork, crisp cabbage, and fragrant ginger, but it’s also meal prep-friendly, making it a fantastic option for those busy days ahead. So, why not bring a little cozy warmth into your home? What twist will you add to your One-Pot Egg Roll Soup?

Why Is This Soup a Must-Try?

Comforting Flavors: This Cozy One-Pot Egg Roll Soup is a delightful twist on a classic dish, bringing the comforting taste of egg rolls right to your bowl.

Quick to Make: In just 30 minutes, you can have a nourishing meal ready, perfect for those busy weeknights.

Versatile Ingredients: Feel free to swap out proteins for chicken or turkey, or add extra veggies like spinach or bok choy for a nutritious boost!

Meal Prep Friendly: Prep ahead of time and store in the fridge, making your meal planning effortless.

Low-Carb Goodness: With approximately 250 calories per serving, this hearty soup aligns perfectly with your low-carb or keto lifestyle—ideal for keeping you satisfied without the extra carbs.

Crowd-Pleaser: Packed with flavor, it’s sure to impress family and friends! For more comforting recipes, try my Egg Drop Soup or Zuppa Toscana Soup.

Cozy One-Pot Egg Roll Soup Ingredients

For the Soup Base
• Ground Pork – Main protein source; substitute with ground chicken or turkey for a lighter option.
• Low-Sodium Chicken Broth – Forms the savory base; can swap with vegetable broth for a vegetarian version.
• Soy Sauce – Enhances umami flavor; opt for gluten-free tamari for gluten-free options.
• Sesame Oil – Adds nuttiness and depth to the soup.
• Rice Vinegar – Provides acidity to balance flavors; apple cider vinegar also works well.

For the Aromatics
• Garlic – Adds aromatic flavor; fresh is preferred, but minced works in a pinch.
• Fresh Ginger – Provides zesty notes; if unavailable, ground ginger can substitute but fresh is more aromatic.
• Yellow Onion – Base flavor for the soup; shallots can be used for a milder option.

For the Vegetables
• Green Cabbage – Core vegetable providing crunch; Napa cabbage is a suitable alternative.
• Shredded Carrots – Adds sweetness and color; can swap with red bell pepper for variety.
• Green Onions – For garnish and added flavor; hold back some for finishing touches.

For Seasoning
• Salt and Pepper – Essential for seasoning; adjust to taste.
• Red Pepper Flakes or Sriracha (optional) – For heat; add according to your preference.

For Added Creaminess
• Beaten Eggs (optional) – Introduces creaminess and texture; omit for a lighter soup.

This Cozy One-Pot Egg Roll Soup is not just a meal; it's a warm hug in a bowl, perfect for those chilly nights!

Step‑by‑Step Instructions for Cozy One-Pot Egg Roll Soup

Step 1: Brown the Pork
In a large pot over medium-high heat, add the ground pork, breaking it apart with a spatula. Cook for 5–7 minutes, stirring occasionally, until the pork is beautifully browned and fully cooked, then drain any excess fat to ensure the soup remains light and flavorful.

Step 2: Sauté Aromatics
Reduce the heat to medium and toss in the diced yellow onion, minced garlic, and fresh ginger. Sauté for 3-4 minutes until the onions turn translucent and the kitchen fills with aromatic scents, creating a fragrant base for your Cozy One-Pot Egg Roll Soup.

Step 3: Build Soup Base
Next, spoon in the soy sauce, sesame oil, and rice vinegar before pouring in the low-sodium chicken broth. Stir everything together and bring the mixture to a gentle boil, watching the vibrant colors come together in the pot as the broth heats.

Step 4: Add Vegetables
Once boiling, mix in the shredded carrots and chopped green cabbage. Lower the heat to a simmer and let the soup gently cook for about 15 minutes, stirring occasionally until the cabbage wilts and softens, creating a comforting texture to the soup.

Step 5: Optional Egg Swirl
If you desire added creaminess, slowly drizzle in the beaten eggs while stirring the soup in a circular motion. Watch as the eggs form delicate ribbons throughout the Cozy One-Pot Egg Roll Soup, enhancing the dish’s heartwarming quality.

Step 6: Final Seasoning and Serve
Taste the soup and adjust the seasoning with salt and pepper as needed, then ladle it into warm bowls. Garnish with reserved green onions, and for those who enjoy a kick, sprinkle red pepper flakes or drizzle Sriracha on top, elevating the flavors even further.

What to Serve with Cozy One-Pot Egg Roll Soup

The rich flavors and vibrant textures of this soup create the perfect canvas for a variety of delicious side dishes and beverages.

  • Steamed Jasmine Rice: The fragrant, fluffy rice soaks up the soup's savory broth beautifully, offering a comforting balance to every spoonful.

  • Crispy Egg Rolls: Adding traditional egg rolls brings a wonderful crunch and familiar flavor that complements the cozy essence of the soup perfectly.

  • Asian Slaw: A crunchy, tangy slaw made with cabbage, carrots, and sesame dressing enhances the fresh notes in the soup while providing a delightful textural contrast.

  • Garlic Bok Choy: Lightly sautéed bok choy with garlic adds a tender, vibrant element, making for a nutritious and delicious pairing.

  • Chili Lime Shrimp: Grilled shrimp tossed in a spicy lime marinade adds a zesty pop that elevates the comforting flavors of the soup.

  • Miso Soup: The umami-rich flavors of miso soup flow beautifully alongside the egg roll soup, creating a delightful multi-course Asian-inspired meal.

  • Chilled Green Tea: The refreshing notes of chilled green tea cleanse the palate and counterbalance the warm, hearty soup perfectly.

  • Chocolate Mochi: For a sweet ending, serve these chewy treats that melt in your mouth, offering a delightful contrast to the savory soup.

Indulge in a cozy, satisfying dinner by mixing and matching these delicious sides!

Make Ahead Options

These Cozy One-Pot Egg Roll Soup preparations are perfect for time-strapped home cooks! You can chop the vegetables, mince the garlic, and grate the ginger up to 24 hours in advance, storing them in airtight containers in the refrigerator to keep them fresh. It's best to cook the ground pork a day ahead and refrigerate it as well; this not only saves time but also enhances the flavors. When you're ready to enjoy the soup, simply sauté the pork with the aromatics, add your prepped ingredients, and follow the remaining steps until the soup is warm and flavorful. This ensures you have a comforting bowl of soup on the table in no time, just as delicious as if you made it fresh!

Cozy One-Pot Egg Roll Soup Variations

Feel free to let your creative side shine while making this Cozy One-Pot Egg Roll Soup—there are so many delicious ways to customize it!

  • Ground Meat Swap: Change ground pork to ground chicken or turkey for a lighter take that still packs flavor. Both options will keep the essence of comfort without sacrificing taste!

  • Extra Greens: Add in spinach or bok choy for a vibrant nutritional boost. These leafy additions not only enhance color but also make the soup even more wholesome and satisfying.

  • Spicy Kick: Incorporate diced jalapeños if you crave some heat. This spicy variation can lift your cozy meal to a new level!

  • Cauliflower Rice: Use cauliflower rice instead of traditional rice or noodles for a lower-carb delight. This swap adds texture without compromising flavor, making it lighter and keto-friendly.

  • Colorful Sweetness: Replace shredded carrots with colorful bell peppers or snap peas for a sweet crunchy surprise, making each spoonful a burst of freshness.

  • Creamy Twist: Blend in a tablespoon of coconut milk at the end for an exotic touch of creaminess. This will give your soup a delightful richness, perfect for each cozy bowl.

  • Herb Infusion: Toss in fresh herbs like cilantro or basil for an extra layer of flavor. Herbs provide a freshness that makes every bite feel vibrant and alive!

  • Umami Boost: Add a tablespoon of miso paste to enhance the umami flavor profile of your soup. It’s an excellent way to deepen the savory notes and create a truly satisfying experience.

There's plenty of room for innovation; feel free to mix and match these suggestions. And while you're at it, why not explore my comforting Pumpkin Cinnamon Roll Muffins for dessert? They would pair beautifully with your cozy soup!

Expert Tips for Cozy One-Pot Egg Roll Soup

  • Prep Ahead: Prepare ingredients a day in advance to save time and ensure the dish comes together effortlessly.

  • Mind the Salt: Use low-sodium chicken broth and adjust salt to taste, as the soy sauce can add extra saltiness.

  • Texture Matters: Avoid adding eggs before storage; this keeps the soup's texture intact when reheating later.

  • Veggie Variations: Feel free to swap in your favorite vegetables; bok choy or snap peas offer added crunch and color in this cozy one-pot egg roll soup.

  • Heat Control: Customize the spice level with red pepper flakes or Sriracha, adjusting to your household's heat tolerance for maximum enjoyment.

  • Freeze for Later: Store leftover soup (without eggs) in airtight containers for up to three months, ensuring you have a quick meal option on hand!

How to Store and Freeze Cozy One-Pot Egg Roll Soup

  • Fridge: Store leftovers in an airtight container for up to 3-4 days, ensuring the soup remains fresh and flavors intact without the optional egg swirl added.

  • Freezer: For longer storage, freeze the soup (without eggs) in freezer-safe containers for up to 3 months. Thaw overnight in the refrigerator before reheating.

  • Reheating: When ready to enjoy, gently reheat on the stove over low heat, stirring occasionally, until warmed through. If needed, add a splash of broth to restore consistency.

Cozy One-Pot Egg Roll Soup Recipe FAQs

How do I select the best ground pork for my soup?
Absolutely! When choosing ground pork, look for lean cuts with minimal visible fat for a healthier option. Fresh ground pork should have a pinkish hue with no dark spots or strong odors. If you prefer a lighter meal, opting for ground chicken or turkey can be a delicious substitute.

What is the best way to store leftovers of the Cozy One-Pot Egg Roll Soup?
Store any leftovers in an airtight container in the fridge for up to 3-4 days. Make sure to keep the optional egg swirl separate if meal prepping for later, as it can affect the soup's texture when reheated. Reheat gently on the stovetop for best results!

Can I freeze my Cozy One-Pot Egg Roll Soup?
Yes, you can freeze the soup! Simply ladle the soup (without the eggs) into freezer-safe containers, leaving some room for expansion. It can be frozen for up to 3 months. When you're ready to enjoy, thaw overnight in the refrigerator and reheat on the stovetop.

What do I do if my soup tastes too salty?
If your soup ends up tasting too salty, no need to fret! You can balance the flavor by adding more unsalted chicken broth or even shredded potatoes. The key is to simmer with these additions until the flavors meld together, which should help mellow out the saltiness.

Are there any dietary considerations for this recipe?
Absolutely! This Cozy One-Pot Egg Roll Soup can easily be made gluten-free by using gluten-free tamari instead of soy sauce. Also, if anyone in the household has egg allergies, just omit the beaten eggs altogether for a lighter, still-delicious broth. Always check for personal dietary needs!

How can I customize the add-ins in my soup?
The more the merrier! Feel free to add additional vegetables like bok choy, snap peas, or even diced jalapeños for a spicy kick. Simply stir them in after you add the carrots and cabbage, adjusting the simmer time if needed until everything is tender.

Cozy One-Pot Egg Roll Soup

Cozy One-Pot Egg Roll Soup: A Heartwarming Weeknight Delight

Cozy One-Pot Egg Roll Soup is a heartwarming, low-carb, and keto-friendly dish that brings the comfort of egg rolls to your table.
Print Recipe Pin Recipe
Prep Time 10 minutes mins
Cook Time 20 minutes mins
Total Time 30 minutes mins
Servings: 4 bowls
Course: Soups
Cuisine: Asian
Calories: 250
Ingredients Equipment Method Nutrition Notes

Ingredients
  

For the Soup Base
  • 1 pound Ground Pork or substitute with ground chicken or turkey
  • 4 cups Low-Sodium Chicken Broth or vegetable broth
  • 4 tablespoons Soy Sauce or gluten-free tamari
  • 2 tablespoons Sesame Oil
  • 2 tablespoons Rice Vinegar or apple cider vinegar
For the Aromatics
  • 3 cloves Garlic minced
  • 1 tablespoon Fresh Ginger or ground ginger
  • 1 medium Yellow Onion diced
For the Vegetables
  • 4 cups Green Cabbage chopped
  • 1 cup Shredded Carrots
  • 2 scallions Green Onions for garnish
For Seasoning
  • 1 teaspoon Salt to taste
  • 1 teaspoon Black Pepper to taste
  • 1 teaspoon Red Pepper Flakes optional
For Added Creaminess
  • 2 large Beaten Eggs optional

Equipment

  • Large pot

Method
 

Step-by-Step Instructions
  1. In a large pot over medium-high heat, add the ground pork, breaking it apart with a spatula. Cook for 5–7 minutes, stirring occasionally, until the pork is beautifully browned and fully cooked, then drain any excess fat.
  2. Reduce the heat to medium and toss in the diced yellow onion, minced garlic, and fresh ginger. Sauté for 3-4 minutes until the onions turn translucent.
  3. Add the soy sauce, sesame oil, and rice vinegar before pouring in the low-sodium chicken broth. Stir and bring to a gentle boil.
  4. Once boiling, mix in the shredded carrots and chopped green cabbage. Lower the heat to a simmer and let cook for about 15 minutes.
  5. If desired, slowly drizzle in the beaten eggs while stirring the soup, forming delicate ribbons throughout.
  6. Taste and adjust seasoning with salt and pepper, then ladle into warm bowls and garnish with reserved green onions and optional red pepper flakes or Sriracha.

Nutrition

Serving: 1bowlCalories: 250kcalCarbohydrates: 10gProtein: 20gFat: 15gSaturated Fat: 4gPolyunsaturated Fat: 2gMonounsaturated Fat: 8gCholesterol: 150mgSodium: 800mgPotassium: 600mgFiber: 3gSugar: 2gVitamin A: 200IUVitamin C: 40mgCalcium: 70mgIron: 2mg

Notes

Feel free to swap proteins and vegetables for a personalized touch.

Tried this recipe?

Let us know how it was!

Creamy Ground Beef Orzo with Tomato Cream Sauce in One Pot

February 2, 2026 by Grace Snow Leave a Comment

The other night, as I stood over my stove stirring a bubbling pot, the aroma of rich tomato and savory beef filled my kitchen, wrapping me in warmth. This moment inspired my One-Pot Creamy Ground Beef Orzo with Tomato Sauce, a dish that evolved from a busy weeknight necessity into a comforting favorite. Perfect for those evenings when time is tight, this quick recipe comes together in just 30 minutes, allowing you to serve up a hearty meal with minimal effort. Not only is it a delightful one-pot meal that minimizes cleanup, but the creamy texture combined with tender orzo and fresh spinach makes it an irresistibly satisfying choice for the whole family. Ready to dive into a dish that’s warm, hearty, and simply delicious? Let’s get started!

Why is this recipe a weeknight winner?

Quick and Easy: With just 30 minutes from prep to plate, you'll have a delicious meal ready in no time, perfect for busy families.

One-Pot Convenience: Say goodbye to endless dishes—this creamy ground beef orzo cooks all in one pot, making cleanup a breeze.

Comfort in Every Bite: The rich tomato cream sauce pairs beautifully with tender orzo and savory beef, creating a dish that’s sure to satisfy.

Versatile Variations: Swap out ground beef for turkey or chicken, or add in veggies like bell peppers for extra color and nutrition.

Crowd-Pleasing Delight: Whether it's a family dinner or a small gathering, this recipe is a guaranteed hit that everyone will love! Don't forget to serve it with a side of garlic bread or a fresh salad for a complete meal.

Ground Beef Orzo Ingredients

• Here’s everything you need for a delicious Ground Beef Orzo with Tomato Cream Sauce!

For the Base
• Lean Ground Beef – Main source of protein; substitute with ground turkey or chicken for a leaner option.
• Medium Onion (1/2, chopped) – Adds sweetness and depth; can use shallots for a milder flavor.
• Garlic (3-4 cloves, minced) – Provides aromatic flavor; garlic powder may substitute in a pinch.
• Crushed Red Pepper Flakes (1/2 teaspoon, optional) – Adds heat; omit for a milder dish.
• Italian Seasoning (1/2 teaspoon) – Enhances flavor profile; fresh herbs can substitute for a fresher taste.

For the Pasta and Sauce
• Uncooked Orzo Pasta (1 cup) – Base of the dish; can replace with other small pasta shapes if desired.
• Tomato Sauce (1 can, 14 ounces) – Provides sauce base; use homemade or crushed tomatoes for a fresh twist.
• Beef Broth (3/4 cup) – Adds richness and moisture; vegetable broth is a good vegetarian alternative.
• Heavy/Whipping Cream (1 cup) – Adds creaminess; can substitute with half-and-half for a lighter option.
• Worcestershire Sauce (1 teaspoon) – Adds savory depth; soy sauce works as a substitute.

For the Finishing Touches
• Freshly Grated Parmesan Cheese (1/2 cup) – Adds saltiness and creamy texture; nutritional yeast is a vegan alternative.
• Fresh Baby Spinach (2 cups, packed) – Adds color and nutrients; kale can be used instead.

Step‑by‑Step Instructions for Ground Beef Orzo with Tomato Cream Sauce

Step 1: Brown the Beef
In a large soup pot or Dutch oven, heat over medium-high heat and add the lean ground beef. Cook for 5-6 minutes, allowing it to brown undisturbed, until fully cooked and no longer pink. As it sizzles, break it into smaller pieces with a wooden spoon for even cooking, enjoying the savory aroma that fills your kitchen.

Step 2: Sauté the Aromatics
Next, add the chopped onion to the pot and continue cooking for an additional 5 minutes. Stir occasionally until the onion becomes tender and translucent, absorbing the flavors of the beef. Then, mix in the minced garlic, crushed red pepper flakes, and Italian seasoning, sautéing for 1 minute until fragrant, setting the stage for your delicious Ground Beef Orzo with Tomato Cream Sauce.

Step 3: Incorporate the Orzo
Introduce the uncooked orzo pasta to the pot, stirring it gently with the beef and aromatics. Allow the pasta to toast slightly for about 1 minute, which helps enhance its flavor. Ensure everything is well combined before moving on to the next step, soaking up the vibrant aromas released by the ingredients.

Step 4: Add the Liquid Ingredients
Pour in the tomato sauce, beef broth, heavy cream, and Worcestershire sauce, stirring to combine all the ingredients. Bring the mixture to a gentle bubble over medium heat, allowing it to cook for about 10 minutes. Stir often, watching as the orzo absorbs the liquid, transforming into a creamy and savory foundation for your dish.

Step 5: Final Touches
Once the orzo has absorbed most of the liquid and is tender, remove the pot from heat. Stir in the freshly grated Parmesan cheese and packed baby spinach, mixing until the spinach wilts and the cheese melts into the sauce. This final touch adds both a pop of color and an extra layer of comforting flavor to your Ground Beef Orzo with Tomato Cream Sauce.

Step 6: Let it Thicken
Cover the pot and let it sit for about 3-5 minutes to thicken slightly, allowing flavors to meld. This rest period will also help achieve the perfect creamy consistency. Finally, taste and season with salt and pepper as desired before serving your one-pot meal hot, garnished with extra cheese if you wish.

What to Serve with One-Pot Creamy Ground Beef Orzo?

There's something about a steaming bowl of creamy goodness that calls for perfect pairings to elevate your meal experience.

  • Garlic Bread: Nothing beats the mouthwatering aroma of warm, crusty garlic bread, perfect for soaking up the delicious tomato cream sauce.

  • Caesar Salad: A fresh, crisp Caesar salad adds a delightful crunch and contrasting texture to the creamy orzo, making every bite balanced.

  • Roasted Vegetables: Serve a side of roasted seasonal vegetables to introduce a touch of earthy flavor and vibrant colors to your plate.

  • Parmesan Crisps: These savory, crunchy snacks provide a satisfying contrast to the softness of the dish, enhancing its cheesy notes.

  • Steamed Green Beans: Bright green beans offer a fresh pop of color and a light, crisp bite, providing a wonderful textural contrast alongside the rich orzo.

  • Chardonnay: A chilled glass of Chardonnay complements the creamy elements beautifully, adding a touch of sophistication to your cozy meal.

  • Tiramisu: Finish your dinner with a luscious dessert like tiramisu, whose coffee notes and creamy texture will linger in your taste buds, leaving a sweet impression.

  • Olive Tapenade: This zesty spread serves as a vibrant appetizer, enticing your palate and perfectly setting the stage for the comforting orzo to follow.

  • Sparkling Water with Lemon: Refresh your palate with sparkling water infused with a splash of lemon, offering a light and bubbly contrast to the rich meat and sauce.

Let these delightful pairings transform your One-Pot Creamy Ground Beef Orzo into a harmonious meal, perfect for family gatherings or any cozy night in!

How to Store and Freeze Ground Beef Orzo

Fridge: Refrigerate any leftovers in an airtight container for up to 3 days to maintain freshness. Ensure that the dish has cooled down before sealing it to avoid condensation.

Freezer: Freeze the cream sauce with orzo in a freezer-safe container for up to 3 months. Just be sure to to leave some space at the top for expansion when freezing.

Reheating: When ready to enjoy again, thaw overnight in the fridge. Reheat gently in the microwave or on the stovetop, adding a splash of broth to restore creaminess and prevent drying out.

Portioning: If you’re freezing individual servings, consider portioning them into small containers for quick and easy meals on busy nights.

Ground Beef Orzo with Tomato Cream Sauce Variations

Feel free to get creative with this recipe and make it your own!

  • Ground Turkey: Substitute ground beef with ground turkey for a lighter option while still preserving robust flavors.

  • Sautéed Vegetables: Add bell peppers or zucchini to the pot for color and added nutrition. It not only enhances the dish's appeal but also transforms it into a veggie-packed delight.

  • Herb Infusion: Use fresh basil or oregano instead of Italian seasoning for a fresher, garden-inspired flavor. The vibrant herbs can brighten the entire dish in surprising ways.

  • Plant-Based Twist: Swap out beef broth and heavy cream for vegetable broth and coconut milk, creating a creamy vegan version that doesn't sacrifice richness.

  • Cheesy Goodness: Top with extra cheese like mozzarella or gouda before covering to let it melt into a delicious gooey layer. This elevates the comfort factor and makes each bite extra indulgent.

  • Spicy Kick: Incorporate jalapeños or switch to spicy Italian sausage instead of ground beef for those who enjoy a little heat. The warmth can invigorate the dish and awaken your palate.

  • Golden Touch: Mix in a splash of white wine before adding the broth for a deeper taste. The wine creates a beautiful depth of flavor that is truly irresistible.

  • Nutty Flavor: Toss in some toasted pine nuts or walnuts at the end for a crunchy texture that contrasts beautifully with the creamy sauce. It's a delightful surprise in every bite!

No matter which variation you choose, each option brings its own unique flavor to the table, just like my family's cherished recipes do. You might also love how easy it is to whip up a side of Skillet Pasta with Sun-Dried Tomatoes, Walnuts, and Feta alongside this or how delightful it is to add a creamy treat like Vegan Cacao Nib Ice Cream for dessert. Enjoy!

Make Ahead Options

These Ground Beef Orzo with Tomato Cream Sauce are perfect for meal prep enthusiasts! You can prepare the beef and onion mixture up to 24 hours in advance by browning the ground beef and sautéing the onion and garlic. Simply refrigerate it in an airtight container. On the day of serving, reheat the mixture, stir in the uncooked orzo, tomato sauce, broth, cream, and Worcestershire sauce, then cook according to the instructions. This way, you'll save precious time on busy weeknights, and the dish will be just as delicious! For optimal quality, make sure to keep the ingredients separate until you're ready to combine them for cooking. Enjoy comforting, home-cooked goodness with minimal effort!

Expert Tips for Ground Beef Orzo

Watch the Liquid: Ensure you monitor liquid levels while cooking. If it evaporates too quickly, reduce heat and add a splash more broth to keep it creamy.

Rest for Perfection: Allow the dish to sit covered after removing from heat. This helps absorb excess liquid, achieving the ideal creamy consistency.

Taste and Adjust: Always taste your Ground Beef Orzo with Tomato Cream Sauce before serving. A simple adjustment of salt and pepper can elevate the flavors immensely.

Flexible Ingredients: Don't hesitate to experiment with substitutes like ground turkey or extra veggies, which can enhance both nutrition and taste while keeping the essence of the dish.

Stir Occasionally: Gently stir during the cooking process to prevent sticking and to ensure even cooking for the orzo and beef. Enjoy the aromatic rewards as you do!

Ground Beef Orzo with Tomato Cream Sauce Recipe FAQs

What should I look for when selecting fresh ingredients?
Absolutely! For the best flavor, choose lean ground beef with a bright red color and a fine texture. When it comes to onions, look for firm ones free of soft spots. For tomatoes, opt for a bright can of tomato sauce and avoid any with dented tops.

How should I store leftovers?
Very! Place any leftovers in an airtight container and refrigerate for up to 3 days. Make sure it cools down first to avoid condensation, which can affect the texture. When you reheat, use a splash of broth to regain creaminess!

Can I freeze Ground Beef Orzo?
Yes, you can! To freeze this creamy dish, use a freezer-safe container, leaving some space at the top to allow for expansion. It will keep well for up to 3 months. When ready to eat, thaw overnight in the fridge and reheat gently on the stovetop or microwave, adding a little broth as needed.

What if my dish turns out too thick?
Don't worry! If your orzo becomes too thick after cooling, simply add a splash of broth or cream while reheating, stirring well until you achieve your desired consistency. It’s a common adjustment I often make—easy peasy!

Are there any allergens in this recipe?
Very important! This dish contains dairy and gluten due to the cream and orzo pasta. If you're accommodating for allergies, consider using lactose-free cream alternatives and gluten-free pasta. Always check labels to ensure they meet dietary needs.

What if my cooked beef has a lot of grease?
No problem! If your ground beef releases a lot of fat while cooking, you can drain some of it after browning for a lighter dish. Just be sure to keep enough fat to flavor your sauce. This way, you keep the best balance of flavor and health!

Ground Beef Orzo with Tomato Cream Sauce

Creamy Ground Beef Orzo with Tomato Cream Sauce in One Pot

A quick and easy one-pot meal featuring ground beef and orzo in a rich tomato cream sauce.
Print Recipe Pin Recipe
Prep Time 10 minutes mins
Cook Time 20 minutes mins
Resting Time 5 minutes mins
Total Time 30 minutes mins
Servings: 4 servings
Course: Dinner
Cuisine: American
Calories: 500
Ingredients Equipment Method Nutrition Notes

Ingredients
  

For the Base
  • 1 pound Lean Ground Beef Substitute with ground turkey or chicken for a leaner option.
  • 1/2 medium Onion, chopped Can use shallots for a milder flavor.
  • 3-4 cloves Garlic, minced Garlic powder may substitute in a pinch.
  • 1/2 teaspoon Crushed Red Pepper Flakes Optional; omit for a milder dish.
  • 1/2 teaspoon Italian Seasoning Fresh herbs can substitute for a fresher taste.
For the Pasta and Sauce
  • 1 cup Uncooked Orzo Pasta Can replace with other small pasta shapes if desired.
  • 1 can Tomato Sauce 14 ounces; use homemade or crushed tomatoes for a fresh twist.
  • 3/4 cup Beef Broth Vegetable broth is a good vegetarian alternative.
  • 1 cup Heavy/Whipping Cream Can substitute with half-and-half for a lighter option.
  • 1 teaspoon Worcestershire Sauce Soy sauce works as a substitute.
For the Finishing Touches
  • 1/2 cup Freshly Grated Parmesan Cheese Nutritional yeast is a vegan alternative.
  • 2 cups Fresh Baby Spinach, packed Kale can be used instead.

Equipment

  • Large soup pot or Dutch oven

Method
 

Step-by-Step Instructions
  1. In a large soup pot or Dutch oven, heat over medium-high heat and add the lean ground beef. Cook for 5-6 minutes, allowing it to brown undisturbed, until fully cooked and no longer pink. Break it into smaller pieces with a wooden spoon for even cooking.
  2. Add the chopped onion to the pot and continue cooking for an additional 5 minutes. Stir occasionally until the onion becomes tender and translucent. Mix in the minced garlic, crushed red pepper flakes, and Italian seasoning, sautéing for 1 minute until fragrant.
  3. Introduce the uncooked orzo pasta to the pot, stirring gently with the beef and aromatics. Allow the pasta to toast slightly for about 1 minute. Ensure everything is well combined before moving on to the next step.
  4. Pour in the tomato sauce, beef broth, heavy cream, and Worcestershire sauce, stirring to combine all the ingredients. Bring the mixture to a gentle bubble over medium heat, allowing it to cook for about 10 minutes, stirring often.
  5. Once the orzo has absorbed most of the liquid and is tender, remove the pot from heat. Stir in the freshly grated Parmesan cheese and packed baby spinach, mixing until the spinach wilts and the cheese melts into the sauce.
  6. Cover the pot and let it sit for about 3-5 minutes to thicken slightly. Taste and season with salt and pepper as desired before serving hot.

Nutrition

Serving: 1bowlCalories: 500kcalCarbohydrates: 40gProtein: 25gFat: 25gSaturated Fat: 12gPolyunsaturated Fat: 2gMonounsaturated Fat: 8gCholesterol: 80mgSodium: 700mgPotassium: 600mgFiber: 3gSugar: 5gVitamin A: 600IUVitamin C: 15mgCalcium: 200mgIron: 3mg

Notes

For added flavor, serve with a side of garlic bread or a fresh salad. Adjust seasoning to taste before serving.

Tried this recipe?

Let us know how it was!

Creamy Rotel Pasta with Ground Beef for a Cozy Family Dinner

February 2, 2026 by Grace Snow Leave a Comment

As I stirred the pot, the rich aroma of sizzling ground beef mingled with zesty tomatoes, instantly transporting me to the comforting embrace of home-cooked favorites. This Creamy Rotel Pasta with Ground Beef is my go-to recipe for those busy weeknights when I need a meal that's both delicious and quick to whip up. In just 30 minutes, you’ll create a warm, family-friendly dinner that not only satisfies hungry bellies but also offers delightful versatility—swap in ground turkey or a plant-based option, and choose any pasta shape that tickles your fancy. Plus, this dish is a fantastic freezer-friendly option, perfect for meal prep enthusiasts. Curious how to bring this hearty, creamy delight to your dinner table? Let’s get cooking!

What makes this pasta dish a winner?

Quick and Easy: With just 30 minutes from start to finish, this Creamy Rotel Pasta with Ground Beef is perfect for busy weeknights.
Flavor Explosion: The zesty combination of ground beef, creamy cheese, and tangy Rotel tomatoes creates an unforgettable flavor that will have everyone asking for seconds.
Versatile Base: Swap out ground beef for turkey or plant-based options, and don’t hesitate to try different pasta shapes like penne or fusilli to suit your family’s tastes.
Crowd-Pleaser: This dish is a guaranteed hit with both kids and adults alike, making it your new go-to for family dinners.
Make-Ahead Magic: Preparation can be done in advance, and it freezes beautifully—perfect for those who love to meal prep! If you're looking for other crowd-pleasing options, consider Ground Beef Enchiladas or Seafood Pasta Savory.

Creamy Rotel Pasta Ingredients

For the Pasta

  • Elbow Macaroni – A classic choice that holds the creamy sauce well; feel free to swap in your favorite pasta shape.

For the Meat

  • Ground Beef – Offers hearty protein; ground turkey or plant-based alternatives work as lighter options.

For the Sauce

  • Olive Oil – Essential for browning the meat and adding richness; can be substituted with canola oil.
  • Garlic Powder – Elevates the dish's flavor; fresh minced garlic can impart a stronger taste.
  • Onion Powder – Adds depth and savory notes; consider using finely diced fresh onion for texture.
  • Salt & Pepper – Key for balancing flavors; adjust according to your taste preferences.
  • Diced Tomatoes with Green Chilies (Rotel) – Delivers zest and moisture; if unavailable, plain diced tomatoes with spices can work.
  • Cream Cheese – Creates a wonderfully creamy sauce; feel free to use sour cream for a tangy twist.
  • Beef Broth – Enriches flavor; for vegetarian needs, switch to vegetable broth.
  • Shredded Cheddar Cheese – Adds extra creaminess; Monterey Jack or dairy-free versions can be good substitutes.

Optional Add-Ins

  • Sliced Jalapeños – For an extra kick in your creamy sauce; adjust to your spice tolerance.

Step‑by‑Step Instructions for Creamy Rotel Pasta with Ground Beef

Step 1: Cook Pasta
Begin by bringing a large pot of salted water to a boil. Add in the elbow macaroni and cook for 7-8 minutes until al dente, stirring occasionally to prevent sticking. Once done, drain the pasta in a colander and set it aside while you prepare the rest of the dish.

Step 2: Brown Beef
In the same pot, heat 1 tablespoon of olive oil over medium heat. Add the ground beef and cook, breaking it apart with a spatula, for about 5-7 minutes until it’s nicely browned and no longer pink. Drain any excess fat from the pot to keep your Creamy Rotel Pasta light and flavorful.

Step 3: Add Seasonings
Next, stir in 1 teaspoon of garlic powder, 1 teaspoon of onion powder, and a pinch of salt and pepper to the cooked beef. Allow the seasonings to bloom by cooking for an additional minute. This step enhances the dish's flavor profile, creating a savory base for your creamy sauce.

Step 4: Make Sauce
To the seasoned beef, add a can of Rotel tomatoes, 8 ounces of cream cheese, and 1 cup of beef broth. Stir the mixture over medium heat until the cream cheese melts completely and the sauce is creamy and smooth. Watch for a gentle simmer, ensuring your Creamy Rotel Pasta gets all the delicious flavors together.

Step 5: Combine and Melt Cheese
Return the cooked macaroni back to the pot, stirring to coat it evenly in the creamy sauce. Then, add 1 cup of shredded cheddar cheese, stirring continuously until the cheese is fully melted and everything is well combined. This creates a rich and cheesy texture that your family will love.

Step 6: Serve
Once everything is well mixed and heated through, scoop the creamy pasta into bowls. If desired, garnish with fresh herbs like parsley or cilantro for an added touch. Serve hot for a comforting meal that everyone will enjoy, showcasing your delightful Creamy Rotel Pasta with Ground Beef.

Make Ahead Options

These Creamy Rotel Pasta with Ground Beef options are perfect for meal prep enthusiasts! You can cook the pasta and prepare the sauce up to 24 hours in advance, allowing you to save valuable time on busy weeknights. Simply follow the steps to cook the elbow macaroni and make the creamy sauce, then refrigerate both components in airtight containers. To maintain quality, be sure to store the sauce separately to prevent the pasta from absorbing too much moisture. When you're ready to serve, just reheat the sauce in a pot while you warm the pasta, combine them together, and finish with a sprinkle of cheddar cheese for delicious, comforting results!

Expert Tips for Creamy Rotel Pasta

Taste Test as You Go: Ensure your Creamy Rotel Pasta has the right flavor by tasting along the way; adjust seasoning if needed for a perfectly balanced dish.

Don’t Overcook Pasta: Aim for al dente pasta to maintain a good texture; cooking it too long can lead to mushy results that don't hold the sauce well.

Mix It Up: Feel free to customize protein options—ground turkey or plant-based alternatives work beautifully as a lighter substitute for ground beef.

Store Wisely: To preserve flavor and texture, store leftovers in an airtight container; reheat gently with a splash of broth to restore creaminess if needed.

Freeze for Later: This dish freezes well; consider doubling the recipe and saving half for a busy night when you need a quick meal!

Creamy Rotel Pasta Variations

Feel free to get creative with this recipe and make it your own, bringing new flavors and textures to dinner!

  • Ground Turkey: Swap the ground beef for lean ground turkey for a lighter, healthier option that still delivers on taste.

  • Plant-Based Alternative: Use a plant-based ground meat for a vegetarian-friendly dish without losing that rich, hearty flavor.

  • Pasta Shape Swap: Try penne, fusilli, or even whole grain pasta instead of elbow macaroni to add a fun twist to your meal.

  • Sour Cream Twist: Replace cream cheese with sour cream for a tangy flavor that adds a delightful zing to the sauce.

  • Cauliflower Pasta: Opt for Cauliflower Pasta Ready to reduce carbs while keeping it delicious and creamy.

  • Spice It Up: For a fiery kick, add sliced jalapeños or even a dash of hot sauce to the creamy mixture for those who crave a bit of heat.

  • Custom Seasonings: Experiment with Italian herbs like oregano or basil to enhance the flavor profile even further.

  • Cheese Variety: Swap out cheddar for Monterey Jack or try a dairy-free cheese if you're catering to dietary needs while keeping it creamy and delicious. For more cheesy goodness, check out our Tagliatelle Asparagus Peas as inspiration!

What to Serve with Creamy Rotel Pasta with Ground Beef

Treat your family to a delightful meal where every bite complements the creamy comfort of your pasta dish.

  • Garlic Bread: This classic pairing is perfect for soaking up any extra sauce, adding a crunchy texture alongside the creaminess.

  • Garden Salad: A fresh, crisp salad with mixed greens and a tangy vinaigrette balances the hearty richness of the pasta, bringing brightness to the table.

  • Roasted Vegetables: Seasonal roasted veggies add a lovely crunch and a kaleidoscope of colors, enhancing the meal's visual appeal while providing a healthy contrast.

  • Cheesy Breadsticks: Soft, cheesy breadsticks create a playful dip-and-savor experience that the whole family will enjoy, enhancing the cheesy goodness of the pasta.

  • Fruit Salad: A refreshing fruit salad can offer a sweet contrast, cleansing the palate and adding a burst of freshness after the rich, creamy pasta.

  • Red Wine: A glass of smooth red wine, like a Merlot or Cabernet Sauvignon, pairs beautifully, complementing the savory flavors while rounding out the meal.

  • Chocolate Cake: End on a sweet note with a slice of rich chocolate cake; its decadence perfectly balances the savory, comforting nature of the Creamy Rotel Pasta.

  • Lemonade: For a non-alcoholic refreshment, a tall glass of homemade lemonade adds a tart, cooling touch that refreshes the palate after each creamy bite.

  • Coleslaw: This crunchy, tangy dish makes a lovely side, providing texture and a hint of sweetness that contrasts nicely with the rich pasta.

How to Store and Freeze Creamy Rotel Pasta

Fridge: Store leftovers in an airtight container for up to 3 days, ensuring the pasta retains its creamy texture.

Freezer: This dish freezes beautifully! Place in a freezer-safe container for up to 1 month. Thaw in the fridge overnight before reheating.

Reheating: To restore creaminess, add a splash of beef broth or milk when reheating on the stovetop, ensuring it stays rich and delicious.

Make-Ahead: You can pre-cook the pasta and sauce separately, refrigerating them for up to 24 hours. Combine and reheat before serving for a quick meal!

Creamy Rotel Pasta with Ground Beef Recipe FAQs

How do I choose the right ripeness for tomatoes in this recipe?
Absolutely! When selecting tomatoes, look for fresh diced tomatoes with no dark spots or bruising. If using canned Rotel, check the expiration date to ensure optimal flavor. Fresh tomatoes should feel firm and have a vibrant color to enhance the dish’s brightness.

What’s the best way to store leftovers, and how long do they last?
To keep your Creamy Rotel Pasta fresh, store leftovers in an airtight container in the fridge for up to 3 days. Just ensure the container is sealed tightly to prevent drying out. When you're ready to enjoy it again, simply reheat gently on the stovetop with a splash of broth or milk to restore the creaminess.

Can I freeze Creamy Rotel Pasta, and how do I do it?
Very! This dish freezes beautifully, making it perfect for meal prep. To freeze, allow the pasta to cool completely, then transfer it to a freezer-safe container. It will stay good for up to 1 month. When ready to eat, thaw it overnight in the fridge, then reheat on the stovetop. Adding a little broth or milk during reheating will keep it creamy and delicious.

What should I do if my sauce is too thick?
If your sauce turns out thicker than desired, don’t worry! Simply add a splash of beef broth or milk over low heat, stirring continuously until you reach your preferred consistency. If you find it’s still too dense, a little water can help, but be cautious not to dilute the flavor.

Are there any dietary considerations I should keep in mind?
Absolutely! If you’re cooking for someone with allergies, be mindful of possible sensitivities to dairy and gluten. You can easily make this dish vegetarian by swapping ground beef for a plant-based alternative and using gluten-free pasta. For a lighter version, ground turkey works wonderfully and still maintains great flavor.

Can I make this dish vegan-friendly?
Certainly! To make Creamy Rotel Pasta vegan, substitute the ground beef with a plant-based alternative, use a non-dairy cream cheese, and vegetable broth instead of beef broth. Pasta choices should also be checked to ensure they are egg-free. This way, you can enjoy a comforting meal that meets your dietary needs!

Creamy Rotel Pasta with Ground Beef

Creamy Rotel Pasta with Ground Beef for a Cozy Family Dinner

This Creamy Rotel Pasta with Ground Beef is a quick and family-friendly dish that offers a flavor explosion and versatility, perfect for busy weeknights.
Print Recipe Pin Recipe
Prep Time 10 minutes mins
Cook Time 20 minutes mins
Total Time 30 minutes mins
Servings: 4 servings
Course: Dinner
Cuisine: American
Calories: 550
Ingredients Equipment Method Nutrition Notes

Ingredients
  

For the Pasta
  • 8 ounces Elbow Macaroni A classic choice that holds the creamy sauce well.
For the Meat
  • 1 pound Ground Beef Offers hearty protein; ground turkey or plant-based alternatives work as lighter options.
For the Sauce
  • 1 tablespoon Olive Oil Essential for browning the meat and adding richness; can be substituted with canola oil.
  • 1 teaspoon Garlic Powder Elevates the dish's flavor; fresh minced garlic can impart a stronger taste.
  • 1 teaspoon Onion Powder Adds depth and savory notes; consider using finely diced fresh onion for texture.
  • to taste Salt & Pepper Key for balancing flavors; adjust according to your taste preferences.
  • 1 can Diced Tomatoes with Green Chilies (Rotel) Delivers zest and moisture; if unavailable, plain diced tomatoes with spices can work.
  • 8 ounces Cream Cheese Creates a wonderfully creamy sauce; feel free to use sour cream for a tangy twist.
  • 1 cup Beef Broth Enriches flavor; for vegetarian needs, switch to vegetable broth.
  • 1 cup Shredded Cheddar Cheese Adds extra creaminess; Monterey Jack or dairy-free versions can be good substitutes.
Optional Add-Ins
  • to taste Sliced Jalapeños For an extra kick in your creamy sauce; adjust to your spice tolerance.

Equipment

  • Large pot

Method
 

Step-by-Step Instructions
  1. Begin by bringing a large pot of salted water to a boil. Add in the elbow macaroni and cook for 7-8 minutes until al dente, stirring occasionally to prevent sticking. Once done, drain the pasta in a colander and set it aside while you prepare the rest of the dish.
  2. In the same pot, heat 1 tablespoon of olive oil over medium heat. Add the ground beef and cook, breaking it apart with a spatula, for about 5-7 minutes until it’s nicely browned and no longer pink. Drain any excess fat from the pot.
  3. Next, stir in 1 teaspoon of garlic powder, 1 teaspoon of onion powder, and a pinch of salt and pepper to the cooked beef. Cook for an additional minute.
  4. Add a can of Rotel tomatoes, 8 ounces of cream cheese, and 1 cup of beef broth to the seasoned beef. Stir over medium heat until the cream cheese melts completely and the sauce is creamy and smooth.
  5. Return the cooked macaroni back to the pot, stirring to coat it evenly in the creamy sauce. Then, add 1 cup of shredded cheddar cheese, stirring until the cheese is fully melted.
  6. Once everything is well mixed and heated through, scoop the creamy pasta into bowls. If desired, garnish with fresh herbs like parsley or cilantro.

Nutrition

Serving: 1servingCalories: 550kcalCarbohydrates: 45gProtein: 30gFat: 30gSaturated Fat: 15gPolyunsaturated Fat: 0.5gMonounsaturated Fat: 12gCholesterol: 90mgSodium: 800mgPotassium: 600mgFiber: 3gSugar: 5gVitamin A: 500IUVitamin C: 15mgCalcium: 200mgIron: 3mg

Notes

Store leftovers in an airtight container for up to 3 days in the fridge. This dish freezes well for up to 1 month.

Tried this recipe?

Let us know how it was!

Quick & Easy Chinese Ground Beef and Cabbage Stir-Fry Delight

February 2, 2026 by Grace Snow Leave a Comment

The sizzling sound of ground beef hitting a hot skillet is like music to my ears, and I can’t help but feel a wave of excitement wash over me. Today, I'm sharing a dish that perfectly encapsulates that joy: Savory Chinese Ground Beef and Cabbage Stir-Fry. In just 30 minutes, you can whip up this protein-packed and nourishing meal, making it a lifesaver on your busiest weeknights. Toss in a medley of crisp cabbage and your choice of colorful vegetables for a customizable twist that your family will adore. The rich, savory-sweet sauce ties everything together beautifully, transforming a simple meal into something extraordinary. Are you ready to fill your kitchen with tantalizing aromas and create a stir-fry that will impress everyone at your table? Let's dive in!

What Makes This Stir-Fry So Special?

Quick and Easy: This Savory Chinese Ground Beef and Cabbage Stir-Fry comes together in just 30 minutes, perfect for those hectic weeknights.

Customizable Goodness: With the ability to swap in your favorite vegetables or even proteins like chicken or tofu, this dish is as versatile as it is delicious.

Flavor Explosion: The combination of soy sauce, ginger, and oyster sauce creates a mouthwatering depth of flavor that will have everyone coming back for seconds.

Nourishing and Satisfying: Packed with protein and fresh ingredients, it's a health-conscious choice that doesn’t skimp on taste, making it an excellent alternative to fast food.

Crowd-Pleaser: Whether it's a family dinner or a gathering with friends, this stir-fry is sure to impress and delight with its vibrant colors and tantalizing flavors.

Chinese Ground Beef and Cabbage Stir-Fry Ingredients

• For the Stir-Fry

  • Ground Beef – A protein-rich ingredient that adds flavor; choose 80/20 for juiciness.
  • Green Cabbage – Offers a satisfying crunch and essential nutrients; pre-shredded saves time.
  • Onion – Adds aromatic sweetness; finely chop for even cooking.
  • Garlic – Fresh and minced enhances overall flavor; don’t skip for potency.
  • Fresh Ginger – Grated for easy incorporation, delivering warmth and fragrance.
  • Soy Sauce – Delivers umami goodness; consider low-sodium for a healthier touch.
  • Oyster Sauce – Provides a rich, sweet finish; hoisin sauce can be a great substitute.
  • Rice Vinegar – Balances the dish with acidity; can swap for apple cider vinegar if needed.
  • Sesame Oil – A finishing oil that adds a nutty essence; drizzle just before serving.
  • Vegetable Oil – Neutral oil for cooking; feel free to use an alternative oil of your choice.
  • Salt and Pepper – Key for seasoning; adjust to taste for optimal flavor.
  • Green Onions or Chives – Bright garnish that adds visual appeal and fresh flavor.
  • Sesame Seeds – Optional garnish that adds a delightful crunch and nuttiness.

Dive into this Chinese Ground Beef and Cabbage Stir-Fry adventure, and let the delicious flavors swirl in your kitchen!

Step‑by‑Step Instructions for Chinese Ground Beef and Cabbage Stir-Fry

Step 1: Heat Oil
In a large skillet or wok, heat 2 tablespoons of vegetable oil over medium-high heat until it shimmers. This should take about 1-2 minutes. This sizzling sound will signal that your pan is ready for the ground beef, setting the stage for a delicious stir-fry.

Step 2: Brown Beef
Add 1 pound of ground beef to the skillet, breaking it apart with a spatula. Cook for 5-7 minutes, stirring occasionally, until the beef is browned and no longer pink. Drain any excess fat to keep your Chinese Ground Beef and Cabbage Stir-Fry light and healthy.

Step 3: Sauté Aromatics
Introduce 1 finely chopped onion, 3 minced garlic cloves, and 1 tablespoon of grated fresh ginger to the beef. Sauté the mixture for 2-3 minutes until the vegetables are tender and fragrant. The aroma will fill your kitchen, inviting everyone to gather around the dining table.

Step 4: Add Cabbage
Stir in 4 cups of pre-shredded green cabbage, ensuring it mixes well with the beef and aromatics. Cook for another 4-5 minutes, stirring frequently, until the cabbage is slightly softened yet still maintains some crunch. This is where your Chinese Ground Beef and Cabbage Stir-Fry begins to take shape.

Step 5: Combine Sauce
In a bowl, whisk together 3 tablespoons of soy sauce, 2 tablespoons of oyster sauce, and 1 tablespoon of rice vinegar. Pour this flavorful sauce over the beef and cabbage mixture in the skillet, stirring well to ensure everything is evenly coated. The colors will come alive!

Step 6: Finish Cooking
Drizzle 1 tablespoon of sesame oil over the stir-fry and season with salt and pepper to taste. Let the mixture cook for an additional 2 minutes; this will meld the flavors beautifully. The sizzling sounds will signal that your meal is almost ready!

Step 7: Serve
Transfer your Chinese Ground Beef and Cabbage Stir-Fry to a serving dish and garnish with sliced green onions and a sprinkle of sesame seeds. Serve immediately over a bed of rice or noodles for a complete meal that’s as visually appealing as it is delicious.

Chinese Ground Beef and Cabbage Stir-Fry Variations

Feel free to let your creativity shine and customize this stir-fry to suit your taste buds!

  • Vegetable Boost: Add bell peppers, broccoli, or snap peas for extra crunch and nutrition that brighten every bite.

  • Lean Protein: Substitute ground beef with ground turkey or chicken for a lighter option that still packs a protein punch.

  • Tofu Option: For a vegetarian twist, use firm tofu; press, cube, and sauté until golden for a delightful texture.

  • Noodle Swap: Serve your stir-fry over whole grain noodles or udon for a filling twist that adds a delightful chew.

  • Sweet Addition: Toss in fresh pineapple chunks or mango slices for a sweet surprise that beautifully complements the savory elements.

  • Spicy Kick: Add red pepper flakes or sriracha to turn up the heat, creating an exciting layer of flavor that spice lovers will adore.

  • Herb Infusion: Enhance the flavor with fresh cilantro or basil, adding a fragrant and vibrant element to your dish.

  • Mushroom Medley: Mix in shiitake or button mushrooms for an earthy flavor and rich texture that will deepen the dish's complexity.

Consider exploring these variations while making your Chinese Ground Beef and Cabbage Stir-Fry or pairing it with a refreshing side salad. You can also discover new delights like Chickpea Spinach Curry when you're in the mood for something different!

Make Ahead Options

These Savory Chinese Ground Beef and Cabbage Stir-Fry ingredients are perfect for meal prep enthusiasts looking to save time. You can prepare the ground beef mixture, including the onions, garlic, and ginger, up to 24 hours in advance; simply cook, cool, and store in an airtight container in the refrigerator. Additionally, the shredded cabbage can be prepped up to 3 days ahead; just keep it in a sealed bag in the fridge to lock in its freshness. When you’re ready to serve, sauté the prepped mixture in a skillet for a few minutes, add the cabbage, and combine with the sauce for a deliciously quick meal that’s just as tasty as if made fresh!

Storage Tips for Chinese Ground Beef and Cabbage Stir-Fry

Fridge: Store leftovers in an airtight container and refrigerate for up to 3-4 days to maintain freshness. Reheat on the stovetop or in the microwave until heated through.

Freezer: For long-term storage, freeze the stir-fry in a sealed container for up to 3 months. Thaw overnight in the fridge before reheating.

Reheating: When ready to enjoy, reheat on medium heat in a skillet, adding a splash of water or broth to prevent drying out, stirring until heated evenly.

Wrapping: If you're meal-prepping, divide into individual portions before freezing, which makes enjoying your Chinese Ground Beef and Cabbage Stir-Fry even easier!

Expert Tips for Chinese Ground Beef and Cabbage Stir-Fry

  • Quality Meat Matters: Choose high-quality ground beef with an 80/20 fat ratio for the best flavor and moisture; avoid leaner options that can be dry.

  • Don’t Overcook Cabbage: Keep an eye on the cabbage while cooking—it should be tender yet firm. Overcooking will result in a mushy texture, which isn’t ideal for this stir-fry.

  • Prep Ahead: Use pre-shredded cabbage and chopped vegetables to save time, making weeknight cooking faster and stress-free.

  • Adapt to Your Taste: Feel free to add your favorite vegetables, such as bell peppers or snap peas, to this Chinese Ground Beef and Cabbage Stir-Fry for extra nutrition and color.

  • Enhance the Spice: For those who love a kick, add sriracha or red pepper flakes to the beef as it cooks, enhancing the depth of flavor without overwhelming the dish.

What to Serve with Savory Chinese Ground Beef and Cabbage Stir-Fry

Pairing this hearty stir-fry with complementary side dishes will elevate your meal to new heights of flavor and satisfaction.

  • Steamed Jasmine Rice: Fluffy and fragrant, jasmine rice soaks up the savory sauce, turning each bite into pure delight. It's the perfect canvas for your stir-fry.

  • Quick Pickled Cucumbers: Refreshing and tangy, these cucumbers add a crunchy contrast to the warm, savory beef. They're quick to make and provide a delightful zing that cuts through the richness.

  • Garlic Bok Choy: Wilting bok choy and garlic creates a tender yet crisp side that echoes the flavors of your main dish, adding both nutrition and a beautiful presentation.

  • Egg Drop Soup: A warm bowl of this comforting soup complements the stir-fry perfectly. Its gentle flavors balance the richness of the beef, giving a cozy feel to the meal.

  • Chilled Noodle Salad: A cold noodle salad with sesame dressing offers a wonderfully refreshing counterpoint to the warm stir-fry. Toss in some vegetables for added crunch and nutrition.

  • Hot Green Tea: Sipping on hot green tea during your meal not only enhances the flavors but offers a soothing end to the bustling aromas of your kitchen.

Combining these suggestions with your Chinese Ground Beef and Cabbage Stir-Fry will take your dining experience to a whole new level, creating a feast that tantalizes all the senses.

Chinese Ground Beef and Cabbage Stir-Fry Recipe FAQs

What type of ground beef should I use?
Absolutely! For the best flavor and juiciness, I recommend using ground beef with an 80/20 fat ratio. This balance of fat ensures your stir-fry stays moist and rich in flavor. Leaner options, like 90/10, can dry out during cooking and won’t provide the same delicious results.

How should I store leftovers of the stir-fry?
Store any leftovers in an airtight container and refrigerate them for up to 3-4 days. This keeps them fresh and ready to reheat. If you don't think you'll eat them within that time, freezing is a great option!

Can I freeze the stir-fry for later use?
Certainly! To freeze your Chinese Ground Beef and Cabbage Stir-Fry, let it cool completely, then transfer it to a sealed freezer-safe container. It can be frozen for up to 3 months. When ready to enjoy, simply thaw it overnight in the fridge and then reheat it in a skillet over medium heat. For a touch of moisture, add a splash of broth or water while reheating.

What can I do if my cabbage becomes too mushy while cooking?
Very good question! If you find that your cabbage is getting too mushy, it’s likely being overcooked. To avoid this, cook the cabbage just until it wilts and softens slightly—about 4-5 minutes is usually perfect. Keeping it crunchy adds to the texture contrast in the stir-fry. If you need a quick fix after it’s cooked, you can toss in some fresh, raw cabbage at the end to restore that crunch!

Are there any dietary considerations I should be aware of?
Absolutely! This recipe contains ingredients that may not be suitable for certain diets. If you're cooking for someone with soy allergies, consider using coconut aminos as a substitute for soy sauce. For gluten-free options, check that your oyster sauce is gluten-free or replace it with a homemade sauce using hoisin sauce. Additionally, if you’re preparing this for pets or individuals with allergies, always check labels carefully for potential allergens!

Chinese Ground Beef and Cabbage Stir-Fry

Quick & Easy Chinese Ground Beef and Cabbage Stir-Fry Delight

This Chinese Ground Beef and Cabbage Stir-Fry is a quick, flavorful meal ready in just 30 minutes, ideal for busy weeknights.
Print Recipe Pin Recipe
Prep Time 10 minutes mins
Cook Time 20 minutes mins
Total Time 30 minutes mins
Servings: 4 servings
Course: Dinner
Cuisine: Chinese
Calories: 350
Ingredients Equipment Method Nutrition Notes

Ingredients
  

For the Stir-Fry
  • 1 lb Ground Beef 80/20 for juiciness
  • 4 cups Green Cabbage pre-shredded
  • 1 medium Onion finely chopped
  • 3 cloves Garlic minced
  • 1 tbsp Fresh Ginger grated
  • 3 tbsp Soy Sauce low-sodium recommended
  • 2 tbsp Oyster Sauce or hoisin sauce as a substitute
  • 1 tbsp Rice Vinegar can swap for apple cider vinegar
  • 1 tbsp Sesame Oil drizzle before serving
  • 2 tbsp Vegetable Oil neutral oil for cooking
  • Salt and Pepper adjust to taste
  • 3 tbsp Green Onions or Chives for garnish
  • Sesame Seeds optional garnish

Equipment

  • Skillet
  • Spatula
  • Mixing Bowl

Method
 

Cooking Steps
  1. Heat 2 tablespoons of vegetable oil in a large skillet over medium-high heat until shimmering.
  2. Add 1 pound of ground beef, breaking apart with a spatula. Cook for 5-7 minutes until browned.
  3. Add 1 finely chopped onion, 3 minced garlic cloves, and 1 tablespoon of grated fresh ginger. Sauté for 2-3 minutes.
  4. Stir in 4 cups of pre-shredded green cabbage and cook for another 4-5 minutes.
  5. Whisk together 3 tablespoons of soy sauce, 2 tablespoons of oyster sauce, and 1 tablespoon of rice vinegar. Pour over the stir-fry.
  6. Drizzle 1 tablespoon of sesame oil, and season with salt and pepper. Cook for an additional 2 minutes.
  7. Serve the stir-fry with sliced green onions and a sprinkle of sesame seeds.

Nutrition

Serving: 1servingCalories: 350kcalCarbohydrates: 12gProtein: 25gFat: 20gSaturated Fat: 6gPolyunsaturated Fat: 2gMonounsaturated Fat: 10gCholesterol: 70mgSodium: 750mgPotassium: 600mgFiber: 3gSugar: 4gVitamin A: 30IUVitamin C: 60mgCalcium: 4mgIron: 15mg

Notes

Feel free to customize with your favorite vegetables or proteins. Excellent for meal prep and reheating.

Tried this recipe?

Let us know how it was!
  • « Previous Page
  • 1
  • …
  • 30
  • 31
  • 32
  • 33
  • 34
  • …
  • 179
  • Next Page »

Welcome!

Hi, I’m Grace, a Sydney-based home cook with a passion for bold flavors and trending ingredients. Whether you’re a busy beginner or a seasoned foodie, you’ll find dishes here that are fresh, fun, and full of flavor.

More about me

Popular Recipes

  • Cheesy Chicken Garlic Bread Sandwich
    Cheesy Chicken Garlic Bread Sandwich for Cozy Family Moments
  • Easy Chicken Ranch Wraps
    Easy Chicken Ranch Wraps: Quick, Creamy & Totally Satisfying
  • Chicken Caesar Sandwiches
    Delicious Chicken Caesar Sandwiches for Quick Comfort Food
  • best Cuban sandwich
    The Best Cuban Sandwich You’ll Want Every Weeknight!

Footer

↑ back to top

About

  • Privacy Policy
  • Disclaimer
  • Terms & Conditions

Newsletter

  • Sign Up! for emails and updates

Contact

  • About me
  • Contact me

Copyright © 2025 TastyTrendIngredients