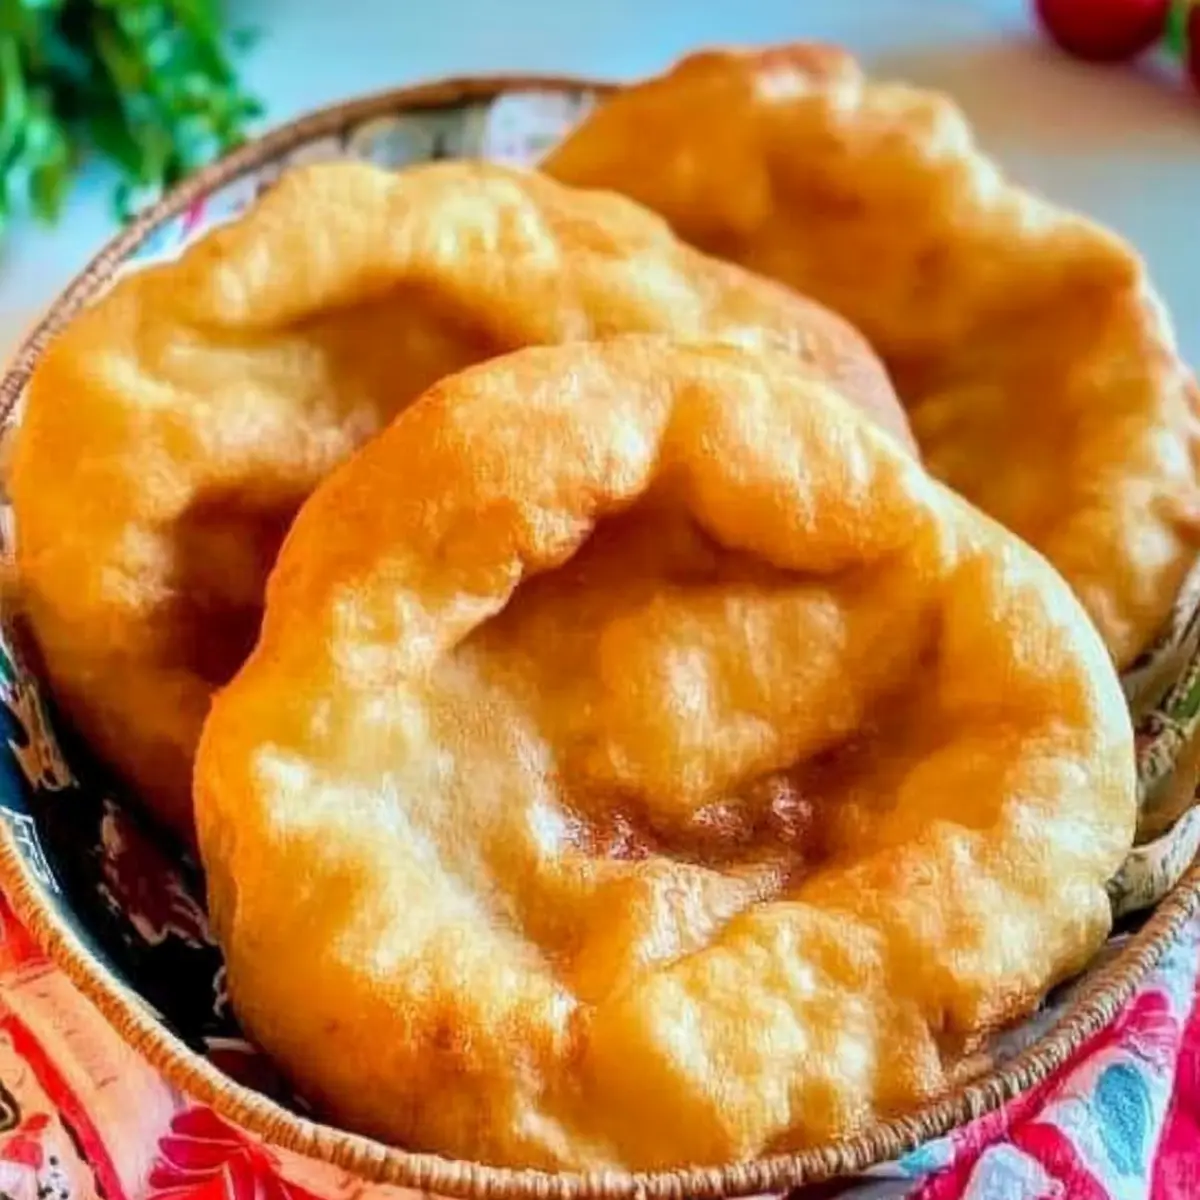
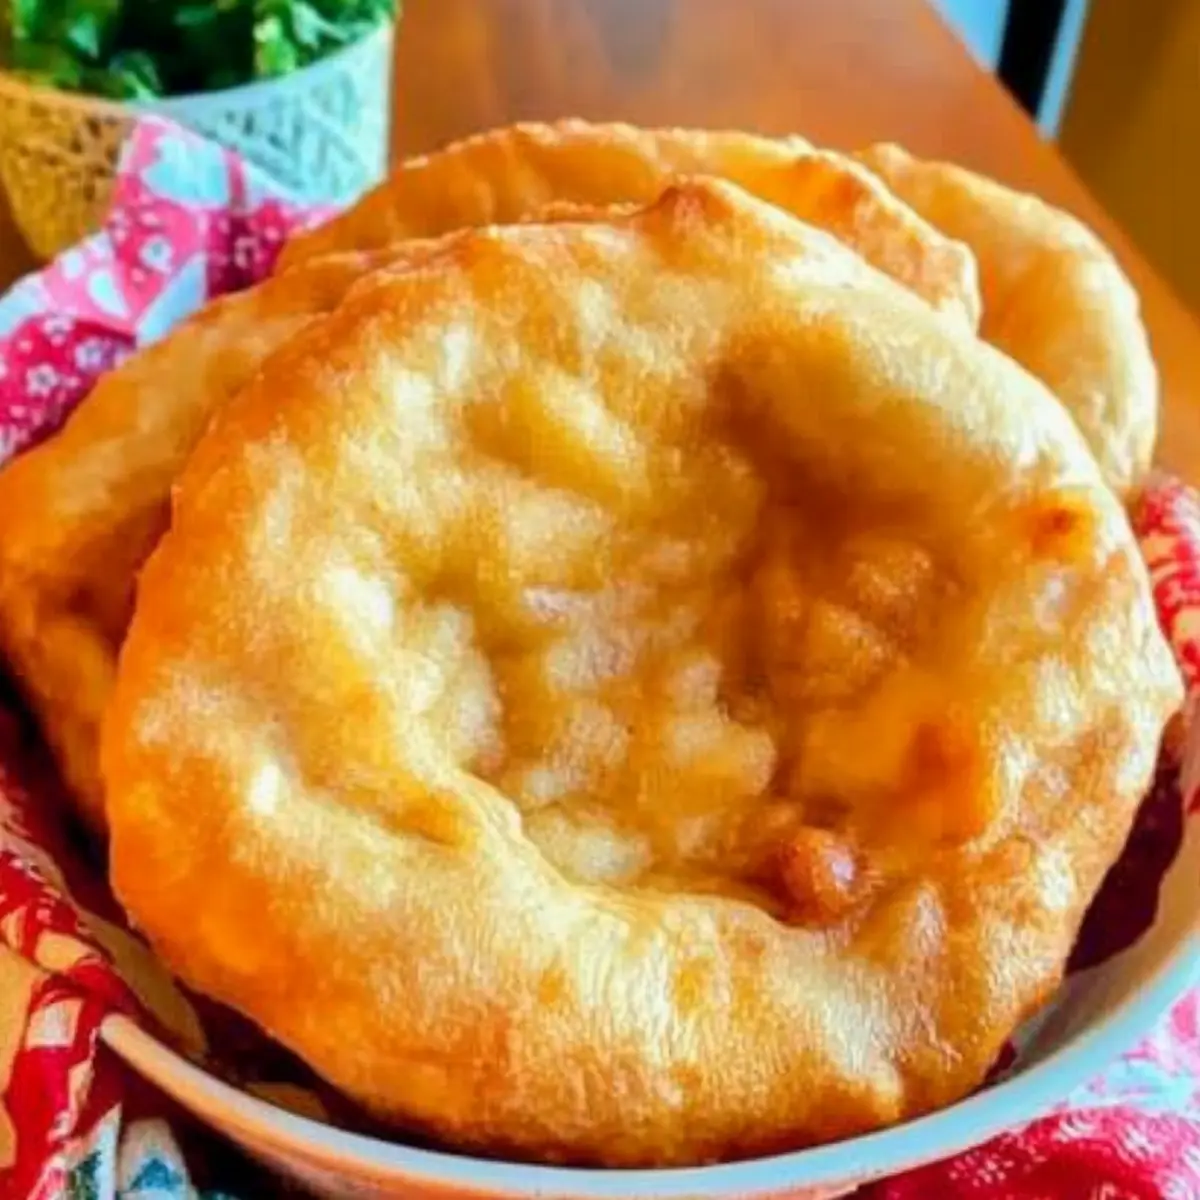
tastytrendingredients

  • Home
  • Recipes
    • Appetizers
    • Breakfast
    • Dessert
    • Dinner
    • Drinks
    • Salads
    • Snacks
    • Soups
  • About me
  • Contact me
menu icon
go to homepage
  • Home
  • Recipes
    • Appetizers
    • Breakfast
    • Dessert
    • Dinner
    • Drinks
    • Salads
    • Snacks
    • Soups
  • About me
  • Contact me
search icon
Homepage link
  • Home
  • Recipes
    • Appetizers
    • Breakfast
    • Dessert
    • Dinner
    • Drinks
    • Salads
    • Snacks
    • Soups
  • About me
  • Contact me
×

Easy Olive Tapenade Recipe for Ultimate Flavor Happiness

September 6, 2025 by Grace Snow Leave a Comment

As I whisked together the vibrant ingredients of my 5-Minute Mediterranean Olive Tapenade, the aromas transported me straight to a sun-soaked terrace overlooking the azure sea. This quick and satisfying vegan delight not only takes just five minutes to whip up, but it’s also the perfect accompaniment for those breezy summer evenings or cozy gatherings with loved ones. Imagine spreading this briny, savory concoction over fresh-baked bread or crostini—it's a game-changer for any appetizer spread! With a combination of rich olives and zesty capers, you’ll find that each bite packs a bold punch of flavor, making it an ideal choice for anyone looking to elevate their cooking game with minimal effort. Ready to dive into a taste of the Mediterranean? Let's get started on this savory adventure!

Why is this Olive Tapenade a Must-Try?

Simplicity and Speed: Whip up this flavorful tapenade in just 5 minutes—perfect for busy days or unexpected guests!

Vegan-Friendly Twist: It's 100% vegan and easily adaptable, ensuring everyone can enjoy its rich taste.

Bursting with Flavor: The earthy blend of olives and capers creates an unforgettable savory experience that'll have your taste buds dancing.

Endless Versatility: Use it as a dip, spread, or even a drizzle over grilled veggies; the possibilities are endless!

Great for Entertaining: Impress your friends and family with a dish that looks fancy but is incredibly easy to make. Take your appetizer spread to the next level with this delightful vegan Olive Tapenade that embodies the essence of Mediterranean cuisine!

Olive Tapenade Ingredients

For the Tapenade
• Olives – A mix of Kalamata and ripe black olives provides a well-rounded flavor; feel free to use Kalamatas alone for simplicity.
• Capers – These tiny, salty gems add a tangy kick that amplifies the overall taste.
• Anchovy Paste (optional) – This adds depth and umami; skip it for a vegan version and adjust salt accordingly.
• Olive Oil – Extra virgin is best for blending, helping achieve that perfect, creamy consistency.
• Garlic – Fresh garlic enriches the tapenade with a savory aroma and depth.

For Variations
• Green Olives – Substitute Kalamatas for green olives for a milder, yet still delicious, flavor.
• Sun-Dried Tomatoes – Toss in some chopped sun-dried tomatoes for an added sweet and tangy dimension.

Indulge in the robust world of Olive Tapenade and enjoy its vibrant burst of Mediterranean-inspired flavors!

Step‑by‑Step Instructions for Olive Tapenade

Step 1: Prep Ingredients
Begin by gathering all your ingredients: a mix of Kalamata and ripe black olives, capers, olive oil, garlic, and optionally, anchovy paste. Ensure your olives are pitted to achieve a smooth texture in your Olive Tapenade. Take a moment to measure out your ingredients, as having everything ready will streamline the blending process.

Step 2: Blend
In a food processor, add the prepared olives, capers, anchovy paste (if using), and peeled garlic cloves. Pour in a splash of olive oil to help with blending. Pulse the mixture until it reaches a chunky, spreadable consistency, around 15-20 seconds. You want your Olive Tapenade to retain some texture, so be careful not to over-process.

Step 3: Adjust Consistency
After blending, check the texture of your tapenade. If it seems too thick, gradually add more olive oil—about a teaspoon at a time—while pulsing, until you achieve your desired smoothness. This step will help your Olive Tapenade reach that perfect creamy consistency while enhancing its rich flavor.

Step 4: Taste and Season
Once you’re happy with the texture, taste your Olive Tapenade. If it's lacking in flavor, consider adding a pinch of salt or adjusting the anchovy paste for a deeper umami taste. Sample it on a small piece of bread to ensure the seasoning is spot on for your palette before serving.

Step 5: Serve and Enjoy
Transfer your vibrant Olive Tapenade to a serving dish, garnishing with a drizzle of extra virgin olive oil if you like. This delicious spread is perfect for dipping with crusty bread or as a flavorful topping on crostini, bringing a taste of the Mediterranean to your table. Serve immediately or let it chill for a bit to enhance flavors.

Make Ahead Options

These Olive Tapenade preparations are tailor-made for busy cooks looking to save time! You can easily prepare the tapenade up to 3 days in advance by blending all the ingredients together and storing it in an airtight container in the refrigerator. This allows the flavors to meld beautifully, making the tapenade even more delicious when you go to serve it. Just remember to give it a quick stir and a taste before serving, as the flavors may intensify over time. For optimal quality, ensure it’s well-contained to prevent drying out or absorbing other odors. When it’s time to enjoy, simply plate it and indulge in your bold, savory creation, ready to impress your guests!

Expert Tips for Olive Tapenade

  • Choose Quality Olives: Select high-quality olives for the best flavor; cheaper varieties can be overly salty and lack depth.

  • Mind the Saltiness: Always taste your olives and capers first to avoid an overly salty tapenade—adjust anchovy paste accordingly if needed.

  • Customize Texture: For a chunkier spread, pulse the mixture less; for a smoother texture, blend longer but avoid puréeing completely.

  • Enhance Flavor: Let the Olive Tapenade sit for 30 minutes before serving to allow the flavors to meld beautifully.

  • Storage Perfection: Keep leftovers in an airtight container in the refrigerator for up to a week. Allow reaching room temperature before serving again.

  • Experiment Freely: Don’t be afraid to mix in additional spices or herbs—like fresh basil or parsley—for a unique twist on your Olive Tapenade!

Olive Tapenade Variations & Substitutions

Feel free to get creative and make this Olive Tapenade your own with these exciting variations!

  • Green Olives: Swap Kalamata olives for green olives for a mild and bright twist. This minor change brings a fresh flavor profile that can be surprisingly delightful.

  • Sun-Dried Tomatoes: Add 2 tablespoons of chopped sun-dried tomatoes for an unexpected sweetness that beautifully balances the salty olives. Imagine the vibrant color and delightful taste they lend to your tapenade!

  • Dairy-Free Creaminess: Blend in a tablespoon of nutritional yeast for a cheesy flavor without the dairy, perfect for those who are vegan or lactose-intolerant. You'll love this nutritious boost!

  • Spicy Kick: Toss in a pinch of red pepper flakes or a diced jalapeño for an added layer of heat. This simple adjustment takes the tapenade to a whole new level, perfect for spice lovers!

  • Herb Infusion: Incorporate fresh herbs like basil or parsley for a fragrant touch that brightens the dish. Not only does it enhance the flavor, but it also adds an inviting pop of color to your spread!

  • Citrusy Zest: Add a splash of fresh lemon juice or a teaspoon of lemon zest to brighten the flavors, providing a zesty enhancement that keeps it fresh. This small tweak can make a huge difference in elevating your tapenade!

  • Nutty Texture: For a unique twist, fold in some finely chopped walnuts or pistachios for added texture and richness. The nuttiness creates a delightful contrast to the olives and enhances the overall experience.

  • Garlic Variations: Substitute roasted garlic for fresh garlic for a milder, sweeter flavor. This switch can completely transform the overall profile of your tapenade, offering a more nuanced taste that’s deeply satisfying.

With these variations, you can easily personalize your homemade Olive Tapenade to suit any occasion or preference!

What to Serve with 5-Minute Mediterranean Olive Tapenade?

Pair your savory tapenade with delightful accompaniments that enhance its Mediterranean flair and make every bite a celebration.

  • Crusty Baguette: The perfect vehicle for your tapenade, its chewy crust and soft interior provide a wonderful texture balance.

  • Grilled Vegetables: Charred zucchini, bell peppers, and eggplant add a smoky depth to your appetizer spread that plays beautifully against the tapenade's brininess.

  • Cheese Platter: A variety of creamy cheeses offer a rich contrast to the salty tapenade, making for a well-rounded and indulgent snacking experience.

  • Chickpea Salad: Fresh herbs, juicy tomatoes, and a lemony dressing bring a refreshing brightness that harmonizes with the savory notes of the tapenade.

  • Sparkling Wine: A crisp and bubbly sipper cleanses the palate beautifully, enhancing the rich flavors of your Olive Tapenade while elevating the evening's festivities.

  • Stuffed Peppers: Mini bell peppers filled with a herby cream cheese provide a creamy contrast, creating a delightful bite when enjoyed alongside your spread.

  • Olives Variety: Offering an assortment of marinated olives can enrich the platter, enriching the Mediterranean theme while adding layers of flavor.

  • Dark Chocolate: For those who enjoy a unique twist, dark chocolate adds a surprising sweetness that rounds out your savory experience perfectly.

Storage Tips for Olive Tapenade

Fridge: Store your Olive Tapenade in an airtight container in the refrigerator for up to 1 week. This helps to preserve its vibrant flavors while keeping it fresh.

Freezer: For longer storage, freeze the tapenade in small portions using ice cube trays. It will last up to 3 months. Thaw overnight in the fridge for later use.

Room Temperature: If serving, allow the Olive Tapenade to sit at room temperature for about 20 minutes before enjoying, as this enhances the flavors and aroma.

Reheating: There’s no need to reheat the tapenade, but if desired, gently warm it in a pan over low heat for a few minutes.

Olive Tapenade Recipe FAQs

What type of olives should I use for my Olive Tapenade?
Absolutely! I recommend a mix of Kalamata and ripe black olives for a well-rounded flavor. However, if you prefer simplicity, using only Kalamata olives will give you a delicious tapenade too!

How should I store leftover Olive Tapenade?
Store your Olive Tapenade in an airtight container in the refrigerator for up to 1 week. Make sure to let the tapenade reach room temperature for about 20 minutes before serving it again to enhance its flavors.

Can I freeze Olive Tapenade, and how do I do it?
Yes, you can freeze Olive Tapenade! Portion it into ice cube trays or small containers and freeze for up to 3 months. To use, simply thaw it overnight in the fridge. Enjoy the convenience of having a vibrant Mediterranean spread ready when you need it!

What if my Olive Tapenade turns out too salty?
If your tapenade ends up too salty, that could be from the saltiness of the olives or capers. To balance it, try adding a bit more olive oil or blending in a few extra olives to dilute the saltiness. Taste as you go—you want that perfect blend of salty and savory!

Are there any dietary considerations for pets or allergies with this recipe?
Definitely! Keep in mind that while Olive Tapenade is vegan and vegetarian-friendly, if you’re using anchovy paste, be cautious if serving to someone with seafood allergies. Additionally, since olives can be high in sodium, it’s better to avoid offering this to pets. Always double-check ingredients if you're cooking for someone with specific dietary needs!

Olive Tapenad

Easy Olive Tapenade Recipe for Ultimate Flavor Happiness

This easy Olive Tapenade recipe brings a burst of Mediterranean flavors to your table in just 5 minutes.
Print Recipe Pin Recipe
Prep Time 5 minutes mins
Total Time 5 minutes mins
Servings: 4 servings
Course: Appetizers
Cuisine: Mediterranean
Calories: 70
Ingredients Equipment Method Nutrition Notes

Ingredients
  

For the Tapenade
  • 1 cup Kalamata olives pitted
  • 1 cup ripe black olives pitted
  • 2 tablespoons capers
  • 1 teaspoon anchovy paste optional for umami
  • 1/4 cup extra virgin olive oil
  • 2 cloves garlic peeled
For Variations
  • 1 cup green olives optional, substitute for Kalamatas
  • 1/2 cup sun-dried tomatoes chopped, optional

Equipment

  • Food Processor

Method
 

Step-by-Step Instructions for Olive Tapenade
  1. Gather all your ingredients: a mix of Kalamata and ripe black olives, capers, olive oil, garlic, and optionally, anchovy paste. Ensure your olives are pitted.
  2. In a food processor, add the prepared olives, capers, anchovy paste (if using), and peeled garlic cloves. Pour in a splash of olive oil and pulse until chunky, about 15-20 seconds.
  3. Check the texture of your tapenade and add more olive oil if too thick, about a teaspoon at a time, while pulsing until desired smoothness is achieved.
  4. Taste your Olive Tapenade and adjust salt or anchovy paste if needed. Serve on a small piece of bread to check seasoning.
  5. Transfer the tapenade to a serving dish, garnishing with a drizzle of olive oil if desired. Serve with crusty bread or crostini.

Nutrition

Serving: 1tablespoonCalories: 70kcalCarbohydrates: 5gProtein: 1gFat: 6gSaturated Fat: 1gMonounsaturated Fat: 5gSodium: 150mgPotassium: 40mgFiber: 1gCalcium: 2mgIron: 1mg

Notes

Store leftovers in an airtight container in the fridge for up to 1 week. Allow it to sit at room temperature for about 20 minutes before serving to enhance flavors.

Tried this recipe?

Let us know how it was!

Ultimate Cheese Board: Impress with Flavorful Combinations

September 5, 2025 by Grace Snow Leave a Comment

As I strolled through the bustling market, vibrant cheese wheels caught my eye, each promising a delightful journey of flavors. With the right combinations, creating the Ultimate Cheese Board can transform any gathering into a culinary masterpiece. This recipe isn't just a feast for the eyes; it’s a hassle-free way to please your guests with a variety of textures and tastes, making it perfect for both casual get-togethers and sophisticated soirées. The beauty of this cheese board lies in its flexibility—whether you require gluten-free options or want a vegetarian delight, I’ve mapped out everything you need. So, why settle for ordinary snacks when you can impress and delight with something extraordinary? Ready to dive into the art of cheese board crafting? Let’s explore!

Why is the Ultimate Cheese Board a Must-Try?

Versatility: You can customize the Ultimate Cheese Board to cater to various dietary preferences, ensuring everyone at your gathering is included.

Elegant Presentation: With vibrant colors and textures, your cheese board will not only taste amazing but also look incredibly inviting, making it the centerpiece of any table.

Quick and Easy: No complicated cooking steps! Just choose your ingredients, arrange them beautifully, and you're ready to serve. It’s the perfect solution for those last-minute invitations.

Flavor Exploration: Each combination of cheese and accompaniments creates a unique tasting experience that invites guests to explore different pairings—pair with some light wines to elevate the flavor!

Crowd-Pleasing: Who doesn’t love cheese? This board is sure to be a hit, offering something for everyone; it's a guaranteed conversation starter! Explore more pairing ideas with a spicy miso casserole or an elegant potato blue cheese pizza.

Ultimate Cheese Board Ingredients

For the Cheeses

  • Soft Cheese – Adds creaminess; Brie or Camembert can be substituted for a more luscious texture.
  • Mild Slicing Cheese – Offers an easy-to-eat option; consider using mild cheddar or gouda for a balanced flavor.
  • Aged Crumbly Cheese – Introduces depth of flavor and texture; aged manchego or blue cheese are intriguing alternatives.
  • Wild Card Cheese – Choose according to what's available or your preference; goat cheese or a flavored cheese can bring variety.

For the Accompaniments

  • Crostini or Crackers – Provides the crunchy base for all your delicious toppings; gluten-free crackers are ideal for gluten-free options.
  • Spicy Mustard – Contributes a tangy kick; feel free to swap it for hummus if you're looking for a creamy dip alternative.
  • Jellies or Preserves – Adds a touch of sweetness; fig or apricot preserves pair perfectly with cheeses.
  • Fresh Fruits (grapes, apples) – Freshness that balances the rich and savory notes.
  • Dried or Fresh Figs – Introduces a chewy texture along with an additional sweetness.
  • Mixed Pickles and Olives – Offers a savory contrast; marinated vegetables work as a wonderful substitute.
  • Salted Nuts – Provides a satisfying crunch; Marcona almonds or walnuts add a lovely flavor.
  • Marinated Artichokes/Peppadews – Brings unique, tangy flavors that enhance the overall experience.

Note: With these ingredients for the Ultimate Cheese Board, you’ll ensure a delightful spread that mesmerizes your guests!

Step‑by‑Step Instructions for Ultimate Cheese Board

Step 1: Choose Your Cheeses
Start by selecting four cheeses that vary in texture and flavor for your Ultimate Cheese Board. Aim for a soft cheese like Brie, a mild slicing cheese such as gouda, an aged crumbly cheese like manchego, and a wild card cheese of your choice. Allow the cheeses to sit at room temperature for about 30 minutes prior to serving, which enhances their flavors and makes them easier to slice.

Step 2: Prepare Accompaniments
While your cheeses are warming up, prepare an assortment of accompaniments. Slice fresh fruits like apples and grapes, and arrange them on the board. Get the crostini or crackers ready, and if you choose to use spreads, place small bowls for mustard, jellies, or hummus. Aim for a colorful and diverse mix that complements the cheeses, ensuring your Ultimate Cheese Board pops visually.

Step 3: Arrange the Cheeses
Begin to assemble your Ultimate Cheese Board by positioning the cheeses on a large wooden board or platter. Space them out to avoid overcrowding, allowing guests easy access to each cheese while creating an inviting presentation. You might want to cut a few slices from each cheese to encourage sampling and showcase their enticing textures.

Step 4: Fill Gaps with Accompaniments
Next, fill the spaces around the cheeses with your choice of crackers, fruits, nuts, and spreads. This step is essential in crafting a beautiful layout as well as providing a balanced array of flavors and textures. Be playful in your arrangement—let colors and shapes guide you to create a visually stunning display that invites conversation.

Step 5: Add Finishing Touches
For the finishing touch on the Ultimate Cheese Board, sprinkle salted nuts for added crunch and include marinated artichokes or olives to introduce tangy elements. If you have fresh herbs or edible flowers, consider placing them in the center for an artistic touch. Once everything is arranged, cover the board with plastic wrap if you are preparing ahead of time, and refrigerate until ready to serve.

Step 6: Serve and Enjoy
When it's time to serve, take the board out of the refrigerator about 15 minutes beforehand. This allows the cheeses to return to room temperature for optimal flavor. Present your Ultimate Cheese Board as the centerpiece of your gathering, and don’t forget to provide cheese knives for each cheese to ensure guests can easily serve themselves without mixing flavors.

Make Ahead Options

Creating the Ultimate Cheese Board ahead of time is a fantastic way to save precious moments on the day of your gathering! You can prepare many components, such as slicing fresh fruits, arranging nuts, and portioning spreads, up to 24 hours in advance. For the best quality, keep the cheeses in their original packaging until you're ready to serve. When you’re ready to impress your guests, simply arrange the cheeses on your board and fill in with the prepped accompaniments, giving it a fresh touch as you lay everything out. Allow the board to sit at room temperature for about 15 minutes before serving to enhance the flavors. With these prep-ahead strategies, you’ll enjoy a beautiful cheese board with minimal last-minute fuss!

How to Store and Freeze Ultimate Cheese Board

Fridge: Store any leftover components of your Ultimate Cheese Board in an airtight container. Soft cheeses and cut fruits should be used within 3 days for the best taste and freshness.

Room Temperature: If serving again within an hour or so, you can leave the remaining cheeses and accompaniments out at room temperature. Just avoid direct sunlight to maintain quality.

Freezer: While it's best to avoid freezing most cheeses for texture reasons, you can freeze certain hard cheeses if necessary. Wrap them tightly in plastic wrap and foil, using within 3 months for flavor conservation.

Reheating: Refrain from reheating cheeses; it's best enjoyed at room temperature. Bring any refrigerated items out about 15 minutes prior to serving to enhance flavors.

Ultimate Cheese Board Variations

Customize your Ultimate Cheese Board with these delightful twists that elevate your appetizer game!

  • Gluten-Free Options: Use gluten-free crackers or crostini to ensure everyone can enjoy this impressive spread.

  • Spicy Kick: Add sliced jalapeños or spiced nuts to introduce some heat and an exciting flavor contrast.

  • Fruit Infusion: Mix in seasonal fruits like pears or berries for a burst of freshness. Their sweetness beautifully complements the rich cheeses.

  • Nuts Variety: Swap salted nuts for spiced or honey-roasted varieties for an extra crunch and depth of flavor.

  • Bolder Cheeses: Choose strong-flavored cheeses such as Roquefort or aged Cheddar for a richer tasting experience. The complexity will surely impress!

  • Flavorful Spreads: Incorporate unique spreads like truffle honey or herbed olive oil to enrich your board with exciting notes. These elegant touches can leave a lasting impression.

  • Vegetarian Delight: Focus on plant-based cheeses made from nuts for a delicious dairy-free alternative. It's a wonderful way to cater to vegetarian guests.

  • Charcuterie Touch: For meat lovers, add thinly sliced cured meats such as prosciutto or salami. This addition will transform your cheese board into a charcuterie masterpiece!

Enhance your cheeseboard experience with these personalized touches and explore additional ideas like pairing with a delightful chocolate poke cake or a hearty spicy miso casserole.

Expert Tips for the Ultimate Cheese Board

  • Cheese Variety: Aim for a good mix of textures and flavors; balance creamy, crumbly, and aged cheeses for an inviting experience.

  • Presentation Matters: Invest time in the arrangement; a well-spread cheese board captivates and attracts guests. Avoid overcrowding to allow easy access.

  • Freshness is Key: Prepare items like cut fruits or toasted crackers just before serving; this ensures vibrant flavors and a delightful crunch.

  • Avoid Flavor Mixing: Provide a separate cheese knife for each cheese to keep flavors distinct and enhance the tasting experience.

  • Seasonal Touches: Incorporate seasonal fruits or local specialties; this not only adds freshness but also sparks conversation around your Ultimate Cheese Board.

  • Wine Pairing: Suggest light wines or craft beers that complement the cheeses to elevate the overall flavors and dining experience.

What to Serve with Ultimate Cheese Board

Imagine the delightful crunch of flavorful accompaniments and refreshing bites that heighten your cheese board experience.

  • Fresh Baguette Slices: Perfect for piling on cheese, these crusty slices add warmth and texture, enhancing the overall experience.
  • Honey Drizzle: A touch of sweet honey brings out the flavors in aged cheeses, creating a delightful contrast that elevates every bite.
  • Roasted Vegetables: Add a savory element with caramelized roasted veggies; their earthiness beautifully complements the cheeses.
  • Sparkling Wine: A chilled glass of bubbly enhances the cheese’s creaminess, making your gathering feel even more festive and luxurious.
  • Seasonal Fruits: Incorporating fruits like figs or pears brightens the board, offering a refreshing contrast to the richness of cheese.
  • Chocolate Truffles: Add a decadent touch to your pairing; the rich sweetness balances savory notes and invites indulgence.
  • Olive Tapenade: Swirl this savory spread onto your crackers for a burst of Mediterranean flavors that pairs beautifully with the cheeses.
  • Craft Beer: Consider pairing with a light IPA; it complements the board’s richness and refreshes the palate for another bite.
  • Nuts & Dried Fruits: Crunchy nuts and chewy dried fruits present an additional textural layer, enticing guests with varied flavors.
  • Herb-Infused Olive Oil: A drizzle of this aromatic oil brings a burst of freshness and enhances the flavor profile of the cheeses.

Ultimate Cheese Board Recipe FAQs

What types of cheeses should I include for the Ultimate Cheese Board?
Absolutely! Aim for a delightful mix by selecting four types of cheese. For a well-rounded experience, include a soft cheese like Brie or Camembert, a mild slicing cheese such as gouda or mild cheddar, an aged crumbly cheese like manchego or blue cheese, and a wild card cheese that fits your taste, like goat cheese or a flavored option. This variety will create engaging textures and flavors!

How should I store leftovers from my Ultimate Cheese Board?
Very good question! To keep your Ultimate Cheese Board fresh, store any leftover components in an airtight container in the fridge. Ideally, soft cheeses and cut fruits should be consumed within 3 days. When storing, it’s best to cover cheeses with plastic wrap to avoid them drying out or absorbing other odors.

Can I freeze any components of my Ultimate Cheese Board?
The more the merrier! While most cheeses don't freeze well due to texture changes, hard cheeses can be frozen if necessary. Wrap them tightly in plastic wrap and then in foil. Use these within 3 months for the best flavor. Just remember to thaw them in the refrigerator instead of at room temperature to maintain their quality.

What if I need gluten-free options for my cheese board?
No worries at all! Simply substitute crostini or regular crackers with gluten-free crackers. There are plenty of options available today that maintain delicious crunch without gluten. Additionally, you can incorporate other crunchy elements like nuts or even veggie sticks to keep it tasty and varied!

How can I elevate the flavor of my cheese board?
Absolutely, here’s how! Pair your cheeses with complementary accompaniments like fruity jams or spicy mustards to enhance the flavors. Fresh herbs, edible flowers, or a drizzle of local honey adds a gorgeous touch. Suitable wine or craft beer pairings could also enhance the experience, guiding guests on flavorful adventures as they sample each element.

What should I do if my cheese starts to sweat or get too warm?
That's a great observation! If you notice your cheeses sweating or softening too much, it may be time to move them to a cooler area. Ideally, keep the board out of direct sunlight and serve in a climate-controlled environment. If you’re hosting outside, consider placing the board on a cooling tray or surrounded by ice to keep everything chill and fresh longer.

Ultimate Cheese Board

Ultimate Cheese Board: Impress with Flavorful Combinations

Create the Ultimate Cheese Board for a delightful gathering, featuring cheese varieties and perfect accompaniments.
Print Recipe Pin Recipe
Prep Time 15 minutes mins
Resting Time 30 minutes mins
Total Time 45 minutes mins
Servings: 8 servings
Course: Appetizers
Cuisine: International
Calories: 350
Ingredients Equipment Method Nutrition Notes

Ingredients
  

Cheeses
  • 1 round Brie or Camembert soft cheese, adds creaminess
  • 1 block Mild cheddar or gouda mild slicing cheese
  • 1 block Aged manchego or blue cheese aged crumbly cheese
  • 1 round Goat cheese or flavored cheese wild card cheese
Accompaniments
  • 1 box Crostini or crackers gluten-free options available
  • 1 jar Spicy mustard can swap for hummus
  • 1 jar Fig or apricot preserves
  • 1 cup Fresh fruits (grapes, apples)
  • 1 cup Dried or fresh figs
  • 1 cup Mixed pickles and olives marinated vegetables work well
  • 1 cup Salted nuts Marcona almonds or walnuts
  • 1 cup Marinated artichokes or Peppadews

Equipment

  • Cutting Board
  • Cheese knives

Method
 

Steps
  1. Choose four cheeses that vary in texture and flavor: soft cheese, mild slicing cheese, aged crumbly cheese, and wild card cheese. Allow them to sit at room temperature for 30 minutes before serving.
  2. Prepare an assortment of accompaniments, slicing fresh fruits and arranging them on the board. Get crostini or crackers ready, placing bowls for spreads.
  3. Arrange cheeses on a large wooden board or platter, spacing them to avoid overcrowding. Cut some slices to encourage sampling.
  4. Fill gaps with crackers, fruits, nuts, and spreads, creating a visually stunning display while ensuring a balanced array of flavors.
  5. Add finishing touches like salted nuts and marinated artichokes. Cover with plastic wrap if preparing ahead of time and refrigerate until serving.
  6. Serve after taking the board out of the refrigerator 15 minutes beforehand. Provide cheese knives for each cheese.

Nutrition

Serving: 1servingCalories: 350kcalCarbohydrates: 30gProtein: 15gFat: 25gSaturated Fat: 10gPolyunsaturated Fat: 5gMonounsaturated Fat: 5gCholesterol: 60mgSodium: 500mgPotassium: 300mgFiber: 3gSugar: 5gVitamin A: 200IUVitamin C: 5mgCalcium: 400mgIron: 2mg

Notes

This cheese board is great for any occasion, providing flexibility for dietary preferences and seasonal touches.

Tried this recipe?

Let us know how it was!

Healthy Apple Nachos That Will Make Snacking Fun Again

September 5, 2025 by Grace Snow Leave a Comment

There's something magical about transforming everyday ingredients into a fun, shareable treat. That's exactly what these Healthy Apple Nachos deliver! With crisp apple slices topped with a creamy yogurt drizzle and crunchy nuts, this easy-to-make snack is perfect for both kids and adults alike. Not only does this recipe offer a quick and satisfying solution for those hungry moments, but it's also a guilt-free way to indulge in a nutritious bite. You can easily personalize it with your favorite toppings, making it a crowd-pleaser for parties or a delightful dessert alternative for those trying to eat healthier. Ready to take your snacking game to the next level? Let's dive into the world of Apple Nachos!

Why Are Apple Nachos So Irresistible?

Flavorful and Fun: These Apple Nachos are a delightful twist on traditional snacking, transforming healthier options into a playful treat.
Versatile Toppings: Create your own masterpiece with options like granola or chocolate chips, ensuring everyone finds their favorite combination.
Quick and Easy: With minimal prep time, this recipe is perfect for busy individuals or families wanting a swift yet satisfying snack.
Nutritious Delight: Packed with vitamins from apples and protein from yogurt, Apple Nachos are a guilt-free indulgence.
Kid-Approved: This playful and colorful dish is sure to be a hit with kids, making healthy eating an enjoyable experience for the whole family.
For other healthy snacking ideas, check out Chicken Salad Apples.

Apple Nachos Ingredients

For the Base

  • Apples – Choose sweet varieties like Fuji or Honeycrisp for a refreshing and crunchy foundation.
  • Yogurt – Adds a creamy flavor and protein boost; opt for Greek yogurt for extra thickness or vegan yogurt for a plant-based option.

For the Crunch

  • Almonds – Provide a delightful crunch and nutty flavor; feel free to substitute with peanuts, walnuts, or leave them out for a nut-free version.

For the Extras

  • Optional Toppings – Get creative by adding granola, chocolate chips, or dried fruit to elevate your Apple Nachos with extra flavor and texture!

Step‑by‑Step Instructions for Apple Nachos

Step 1: Slice Apples
Begin by washing your chosen sweet apples, such as Fuji or Honeycrisp, thoroughly under cool water. Using a sharp knife, core and slice the apples into thin wedges, keeping the skin on for extra texture. Aim for uniform thickness of about 1/4 inch to ensure even distribution of toppings and ease of handling. Arrange the slices on a large plate for the next step.

Step 2: Prepare Drizzle
In a mixing bowl, combine your yogurt of choice—Greek or vegan—with any sweeteners like honey or a sprinkle of cinnamon, depending on your flavor preference. Stir until the mixture is smooth and well-blended. This creamy yogurt drizzle will complement the fresh apple slices beautifully, adding a delightful richness to your Apple Nachos.

Step 3: Assemble
Take your arranged apple slices and start drizzling the prepared yogurt mixture generously over them. Use a spoon or a squeeze bottle for precision, ensuring each slice gets a lovely coating of the creamy treat. This step makes your Apple Nachos look appealing and brings out their fresh flavors, setting the stage for the next exciting addition.

Step 4: Top with Nuts
Sprinkle your choice of chopped almonds or other nuts, such as peanuts or walnuts, over the drizzled apples for that perfect crunch. Aim for an even distribution to ensure every bite has some nutty goodness. The nuts not only add texture but also a boost of healthy fats, enhancing the overall appeal of your Apple Nachos.

Step 5: Add Optional Toppings
Now, get creative with optional toppings! Consider sprinkling granola, chocolate chips, or dried fruit over your Apple Nachos for extra flair and flavor. These additions can elevate the dish, giving it a unique twist that caters to everyone’s taste preferences. This step makes your snack not only nutritious but also visually stunning.

Step 6: Serve Immediately
Serve the Apple Nachos right away to enjoy their freshness and crispness. If you need to store them, cover the plate with plastic wrap and place it in the refrigerator, but try to consume within 2 hours for the best texture. Present these delightful Apple Nachos at your next gathering or enjoy them as a quick, healthy snack at home—either way, they’re sure to impress!

Expert Tips for Apple Nachos

  • Choose Crisp Apples: Select firm types like Fuji or Honeycrisp for the best texture; avoid soft apples to prevent sogginess in your Apple Nachos.
  • Prep Ahead: If making in advance, toss apple slices in lemon juice to prevent browning; this keeps them looking fresh longer.
  • Customize Toppings: Feel free to mix and match toppings; be cautious with sweet additions like chocolate chips to maintain a healthy balance.
  • Correct Portion Sizes: Aim for thin apple wedges (about 1/4 inch) to make them easy to handle and dip, ensuring every bite is delightful.
  • Serve Fresh: For best texture and flavor, serve Apple Nachos immediately after assembling; if necessary, store in an airtight container for no more than 2 hours.

What to Serve with Healthy Apple Nachos

Transform your Apple Nachos into a vibrant meal that delights the senses with complementary dishes and beverages.

  • Crispy Pita Chips: These crunchy, salty chips provide a delightful contrast to the sweetness of apple nachos, perfect for dipping into yogurt.
  • Mixed Green Salad: A refreshing side that balances sweetness with crisp greens and a tangy vinaigrette, elevating the overall meal experience.
  • Fruit Salad: A colorful blend of seasonal fruits will harmonize with the apple flavor, adding variety and additional nutrients to your snack.
  • Cheese Platter: Pairing with a selection of cheeses like sharp cheddar or creamy brie offers a delightful contrast in flavors and textures.
  • Nut Butter Dips: A bowl of peanut or almond butter creates a creamy dip that adds richness and pairs excellently with the apple’s crunch.
  • Sparkling Water: A refreshing drink option that cleanses the palate, making it an ideal choice to accompany the sweet and tangy flavors of the apple nachos.
  • Dark Chocolate Dipped Strawberries: These add a touch of indulgence and naturally complement the fruitiness of apple nachos for a sweet finish.
  • Homemade Trail Mix: Craft a mix with nuts, seeds, and dried fruits that mirrors the toppings on your nachos, providing an exciting crunch alongside.
  • Vitamin-Boosting Smoothie: A smoothie with spinach and banana pairs well, as it adds nutrients, making your snack feel complete without feeling heavy.

Apple Nachos: Exciting Variations Await!

Feel free to get creative and customize your Apple Nachos to match your tastes and dietary needs!

  • Nut-Free: Omit the almonds and replace them with sunflower seeds for added crunch without the nuts.

  • Vegan Twist: Use coconut yogurt instead of traditional yogurt for a delightful plant-based option that still packs flavor.

  • Dessert Delight: Drizzle a bit of melted dark chocolate over the toppings for a decadent twist, perfect for satisfying sweet cravings.

  • Berry Boost: Top your Apple Nachos with mixed berries like strawberries or blueberries for an additional layer of freshness and nutrition.

  • Spicy Kick: Add a sprinkle of cayenne pepper or chili powder to the yogurt mix for a surprising and delightful heat contrast.

  • Snack on Granola: Instead of nuts, use your favorite granola for a chewy texture that offers a delicious hidden crunch.

  • Chocolate Hazelnut: Swap out the yogurt drizzle entirely for a luscious layer of chocolate hazelnut spread to create an indulgent dessert version.

  • Cinnamon Sugar: Dust the finished dish with a light sprinkle of cinnamon sugar for an extra touch of sweetness that complements the apples beautifully.

For more inspiration, check out how to elevate your snack game with other fun ingredients like those in Chicken Salad Apples. Enjoy these delicious variations as you create your perfect Apple Nachos!

Storage Tips for Apple Nachos

Fridge: Store any leftovers in an airtight container for up to 2 hours to maintain freshness and crunch; the apples will brown if left longer.

Room Temperature: Best enjoyed immediately after preparation; if left out, consume within 30 minutes for optimal taste and texture.

Reheating: If the yogurt drizzle becomes too thick in the fridge, simply mix in a little extra yogurt before serving to restore its creamy consistency; avoid reheating the apple slices to keep them crisp.

Pro Tip: To prolong the life of leftover apple slices, spritz them with lemon juice before storing them; this can help maintain their vibrant color and crunch in your delicious Apple Nachos.

Make Ahead Options

Apple Nachos are perfect for meal prep, allowing you to enjoy a quick and healthy snack at any time! You can slice your apples and toss them with lemon juice to prevent browning up to 24 hours in advance. Store the apple slices in an airtight container in the refrigerator to maintain their freshness. Additionally, you can prepare the yogurt drizzle by mixing it with sweeteners and refrigerating it for up to 3 days. When it's time to serve, simply arrange your apples on a plate, drizzle with yogurt, and top with nuts and your choice of optional toppings for a delightful treat that’s just as delicious as when freshly made!

Apple Nachos Recipe FAQs

What kind of apples should I use for Apple Nachos?
Absolutely! You can use sweet varieties like Fuji or Honeycrisp, as they provide the perfect balance of sweetness and crunch. Avoid softer apples, as they may become mushy and unappealing in your Apple Nachos.

How should I store leftover Apple Nachos?
For the best crunch and flavor, store any leftovers in an airtight container in the refrigerator for up to 2 hours. If left out, try to consume them within 30 minutes to prevent the apples from browning and becoming soggy.

Can I freeze Apple Nachos?
While it’s best to consume Apple Nachos fresh, you can freeze the individual ingredients for later use. Slice apples and toss them in lemon juice to prevent browning, then freeze them in a single layer on a baking sheet for about 1-2 hours. Once frozen, transfer them to a freezer bag. They can be stored for up to 3 months; however, the texture may change upon thawing, so it’s ideal to prepare the yogurt and toppings fresh when you're ready to enjoy.

What if I want to make Apple Nachos nut-free?
Very! You can simply omit the almonds or substitute them with seeds like pumpkin or sunflower seeds for that delightful crunch without the nuts. Additionally, consider using a nut-free yogurt to keep the recipe allergy-friendly.

What can I use as a substitute for yogurt in Apple Nachos?
If you’re looking for alternatives, you can use a dairy-free yogurt, or even try a drizzle of honey or maple syrup if you prefer a sweeter bite. For a creamy texture without yogurt, consider blending a banana with a splash of almond milk and drizzling that over your apple slices!

How do I prevent the apples from browning after slicing?
I often recommend using lemon juice to prevent browning. After slicing your apples, toss them in a mixture of water and 1-2 tablespoons of lemon juice. This simple step keeps them looking fresh and crisp for your Apple Nachos!

Apple Nachos

Healthy Apple Nachos That Will Make Snacking Fun Again

Delightful Healthy Apple Nachos are a fun, nutritious treat perfect for snacking.
Print Recipe Pin Recipe
Prep Time 15 minutes mins
Total Time 15 minutes mins
Servings: 4 servings
Course: Snacks
Cuisine: American
Calories: 180
Ingredients Equipment Method Nutrition Notes

Ingredients
  

For the Base
  • 3 medium Apples (Fuji or Honeycrisp) Choose sweet varieties for best flavor.
  • 1 cup Yogurt Greek or vegan yogurt for a creamy drizzle.
For the Crunch
  • 1/2 cup Almonds Can substitute with peanuts or walnuts.
For the Extras
  • 1/4 cup Optional Toppings Granola, chocolate chips, or dried fruit.

Equipment

  • Knife
  • Mixing Bowl
  • Spoon
  • Plate
  • squeeze bottle

Method
 

Step-by-Step Instructions for Apple Nachos
  1. Slice the apples into thin wedges after washing them. Aim for uniform thickness of about 1/4 inch.
  2. In a mixing bowl, combine yogurt with sweeteners and stir until smooth.
  3. Drizzle the yogurt mixture generously over the sliced apples.
  4. Sprinkle chopped almonds or other nuts over the drizzled apples.
  5. Add optional toppings like granola or chocolate chips for extra flavor.
  6. Serve immediately to enjoy freshness; store covered in the fridge if needed.

Nutrition

Serving: 1servingCalories: 180kcalCarbohydrates: 30gProtein: 5gFat: 6gSaturated Fat: 1gPolyunsaturated Fat: 0.5gMonounsaturated Fat: 4gSodium: 50mgPotassium: 200mgFiber: 5gSugar: 15gVitamin A: 200IUVitamin C: 10mgCalcium: 100mgIron: 1mg

Notes

Best texture and flavor achieved when served immediately. Spritz apples with lemon juice if prepping ahead to prevent browning.

Tried this recipe?

Let us know how it was!

Delicious Iced Pumpkin Spice Latte for Cozy Fall Vibes

September 5, 2025 by Grace Snow Leave a Comment

Fall is in the air, and the aroma of pumpkin spice is calling my name! There’s something truly magical about cozying up with a homemade Iced Pumpkin Spice Latte. This recipe brings together rich espresso, creamy milk, and pure pumpkin puree, perfectly balanced with warm spices that evoke memories of crisp autumn afternoons. Not only is this drink an absolute delight for your taste buds, but it’s also a quick and easy way to elevate your coffee routine while ensuring you know exactly what’s in your cup. Whether you're entertaining friends or just treating yourself, this versatile latte can be made vegan or dairy-free, catering to everyone’s preferences. Who can resist a sip of this creamy goodness that’s as comforting as a warm hug? Ready to embrace the season? Let’s get brewing!

Why is this latte a must-try?

Rich, Creamy Texture: The combination of espresso and milk creates a velvety consistency that's simply irresistible.

Warm, Cozy Flavors: Infused with real pumpkin puree and a blend of aromatic spices, it captures the essence of fall in every sip.

Quick Preparation: Whip this up in minutes—perfect for busy mornings or an afternoon pick-me-up!

Customizable: Easily adapt it for vegan or dairy-free diets by choosing your preferred milk, ensuring everyone's happy.

Perfect Pairing: Enjoy alongside your favorite fall treats, like pumpkin muffins or cookies for a complete experience!

Iced Pumpkin Spice Latte Ingredients

For the Latte

  • Espresso – Rich and robust coffee flavor is key; substitute with very strong brewed coffee for a different taste.
  • Milk – Provides a creamy texture; use whole or 2% milk, oat milk for dairy-free, or almond milk for a nutty twist.
  • Pumpkin Puree – Gives the drink its signature taste and texture; opt for pure pumpkin puree without added sugars or spices.
  • Pumpkin Spice – Adds classic fall flavors; can be substituted with individual spices like cinnamon or nutmeg as needed.
  • Maple Syrup – A natural sweetener that enhances the latte; honey or agave syrup can be used if you prefer a different sweetness.
  • Whipped Cream (optional) – Adds decadence; for a vegan version, make whipped cream from coconut milk.

This delightful Iced Pumpkin Spice Latte, packed with cozy flavors, is waiting to be brewed in your kitchen!

Step‑by‑Step Instructions for Iced Pumpkin Spice Latte

Step 1: Brew Espresso
Start by brewing a double shot of rich espresso using your espresso machine or stovetop method, which should take about 5 minutes. The espresso should have a rich, robust flavor, creating the foundation of your Iced Pumpkin Spice Latte. If you prefer, you can also prepare a strong cup of coffee or cold brew concentrate as an alternative.

Step 2: Mix Pumpkin and Spices
In a large glass, combine the freshly brewed espresso with 2 tablespoons of pumpkin puree, 1 teaspoon of pumpkin spice, and 1-2 tablespoons of maple syrup. Stir the mixture vigorously for about 30 seconds, ensuring all ingredients are well incorporated. You should see a smooth blend of coffee and warm, cozy spices, creating a delightful base for your latte.

Step 3: Add Ice
Fill the same glass with ice cubes, leaving just enough space for milk. Use larger ice cubes to minimize dilution as you enjoy your Iced Pumpkin Spice Latte. Visualize the glass half-full of ice, ready to chill the warming flavors of fall we’ve just created.

Step 4: Pour in Milk
Gently pour your choice of milk over the ice until the glass is filled to your liking. Whole, oat, or almond milk will all work beautifully, depending on your preference. Stir the mixture again for about 15 seconds to combine the flavors evenly, resulting in a creamy, smooth texture.

Step 5: (Optional) Top with Whipped Cream
For an indulgent touch, add a generous dollop of whipped cream on top of your latte. This step is optional, but it elevates the experience! Sprinkle a pinch of additional pumpkin spice over the whipped cream for an extra burst of flavor, making your Iced Pumpkin Spice Latte look as good as it tastes.

What to Serve with Iced Pumpkin Spice Latte

Cozy up this fall with delightful pairings that elevate your Iced Pumpkin Spice Latte experience!

  • Pumpkin Muffins: These soft, spice-kissed treats mirror your latte’s flavors, making each sip and bite a harmonious celebration of autumn.
  • Spiced Cookies: Ginger or snickerdoodle cookies add an inviting crunch that perfectly balances the creamy smoothness of the latte.
  • Cinnamon Rolls: Warm, gooey cinnamon rolls with a hint of sweetness are a comforting companion that takes your coffee moment to a whole new level.
  • Apple Crisp: The tartness of baked apples with a crumbly topping creates a delightful contrast to the latte's creamy sweetness, inviting the senses.
  • Autumn Salad: A fresh salad with roasted butternut squash, cranberries, and walnuts introduces vibrant flavors and textures, refreshing your palate alongside the drink.
  • Herbal Tea: For an alternative sip, enjoy a warm herbal tea, such as chamomile or chai, to complement the cozy vibes of your pumpkin spice latte.
  • Hot Cocoa: Perfect for sharing, a cup of rich hot cocoa offers a chocolatey joy that pairs wonderfully with the fragrant spices of fall.
  • Cheesecake Bites: Tiny, delectable bites of cheesecake provide a creamy indulgence that enhances the richness of your latte while ensuring sweet satisfaction.
  • Sparkling Cider: A glass of sparkling apple cider adds a fizzy, refreshing touch and makes for a lovely match on crisp autumn afternoons.

Make Ahead Options

These Iced Pumpkin Spice Lattes are perfect for busy home cooks looking to save time during hectic mornings! You can prepare the espresso and pumpkin mixture up to 3 days ahead by combining 1 double shot of espresso with 2 tablespoons of pumpkin puree, 1 teaspoon of pumpkin spice, and 1-2 tablespoons of maple syrup. Store this concoction in an airtight container in the refrigerator. When you’re ready to enjoy, simply fill a glass with ice, pour in your milk of choice, and stir in the chilled espresso mixture. By prepping in advance, you’ll have all the delicious flavors of this cozy fall beverage with minimal effort, ensuring it’s just as delightful as when freshly made!

Iced Pumpkin Spice Latte Variations

Feel free to explore these delightful twists and substitutions that can transform your Iced Pumpkin Spice Latte into something uniquely yours!

  • Dairy-Free: Swap traditional milk for oat milk or almond milk for a creamy, nutty alternative that’s perfect for a plant-based experience.

  • Sweetener Options: Replace maple syrup with honey or agave syrup for a different level of sweetness—experiment to find your favorite!

  • Spicy Kick: Add a pinch of cayenne or extra pumpkin spice to pump up the flavor for those who enjoy a hint of heat in their drink.

  • Pumpkin Boost: Increase the pumpkin puree for a heartier flavor or even mix in some pumpkin pie filling for extra creaminess and spice.

  • Chai Twist: Substitute pumpkin spice with chai spices (like ginger, cloves, and cardamom) for a unique blend that combines the best of both worlds.

  • Chocolate Delight: Stir in a teaspoon of cocoa powder, creating a luscious mocha-pumpkin hybrid that’s irresistibly rich!

  • Frozen Variety: Blend everything with ice instead of pouring it over ice for a frosty version that’s perfect for warm days.

For more amazing fall-inspired treats, consider trying my luscious pumpkin brownies or fluffy pumpkin cinnamon rolls for a cozy celebration of autumn flavors!

Tips for the Best Iced Pumpkin Spice Latte

  • Quality Espresso: Use high-quality espresso for a richer flavor. Brands like Illy or Starbucks can take your latte to the next level!

  • Right Milk Choice: Whole or oat milk offers creaminess, while almond milk gives a nutty twist. Choose the one that suits your taste.

  • Don’t Over-sweeten: Keep an eye on the sweetness. A tablespoon of maple syrup is generally enough to let the pumpkin flavors shine through without overpowering them.

  • Chill Your Glass: Pre-chill your glass before adding ice; this helps maintain your Iced Pumpkin Spice Latte’s temperature and enhances the refreshing experience.

  • Make Ahead: Mix the espresso and pumpkin blend ahead of time and refrigerate. When you're ready, just add ice and milk for a quick treat!

How to Store and Freeze Iced Pumpkin Spice Latte

  • Fridge: Store any leftover Iced Pumpkin Spice Latte in an airtight container for up to 3 days. Give it a good stir before serving to refresh the flavors.

  • Freezer: You can freeze the espresso and pumpkin spice mixture in ice cube trays for up to 2 months. Use these cubes in your next latte for a quick, frosty treat!

  • Reheating: If you've refrigerated the latte, gently reheat it on the stove or in the microwave until warm, and then add ice for a refreshing cold drink again.

  • Make Ahead: Prepare the pumpkin spice mixture in advance and keep it refrigerated. Shake or stir well before blending with freshly brewed espresso and your choice of milk for a delicious Iced Pumpkin Spice Latte anytime!

Iced Pumpkin Spice Latte Recipe FAQs

What kind of pumpkin puree should I use?
Absolutely use pure pumpkin puree without any added sugars or spices for the best flavor. This ensures you get the authentic taste of pumpkin, which is pivotal for the cozy vibe of your Iced Pumpkin Spice Latte. Canned pumpkin puree works great, but you can also make your own by roasting and blending fresh pumpkin.

How long can I store my Iced Pumpkin Spice Latte in the fridge?
You can store any leftover Iced Pumpkin Spice Latte in an airtight container in the fridge for up to 3 days. Before serving, just give it a good stir to refresh the flavors. However, I recommend enjoying it fresh for the best taste and texture!

Can I freeze my Iced Pumpkin Spice Latte?
Yes! You can freeze the espresso and pumpkin spice mixture in ice cube trays for up to 2 months. This is a fantastic way to have a quick, frosty treat ready. Just pop the cubes into the blender with your choice of milk and blend until smooth! It’s an effortless way to enjoy this delicious latte anytime!

What should I do if my pumpkin spice latte turns out too sweet?
If you find your Iced Pumpkin Spice Latte is too sweet, the good news is you can balance it out! Adding more espresso or a bit more milk can help tone down the sweetness. Alternatively, you might add a pinch of salt, as it can help counteract sweetness and enhance the overall flavors.

Can I make the Iced Pumpkin Spice Latte vegan?
Very! To make your Iced Pumpkin Spice Latte vegan, simply use plant-based milk like oat or almond milk, and skip the whipped cream or use a non-dairy version made from coconut milk. This way, you can enjoy all the cozy flavors without any dairy products!

How can I make the drink spicier if I prefer?
If you’re looking to spice things up, you can definitely increase the amount of pumpkin spice. A pinch of cayenne pepper also adds a lovely warmth. Start with an extra half teaspoon of pumpkin spice, or for heat, one-eighth teaspoon of cayenne, and adjust according to your taste!

Iced Pumpkin Spice Latte

Delicious Iced Pumpkin Spice Latte for Cozy Fall Vibes

Enjoy a homemade Iced Pumpkin Spice Latte, combining rich espresso, creamy milk, and pumpkin puree with warm spices for cozy fall vibes.
Print Recipe Pin Recipe
Prep Time 5 minutes mins
Total Time 5 minutes mins
Servings: 1 cup
Course: Drinks
Cuisine: American
Calories: 240
Ingredients Equipment Method Nutrition Notes

Ingredients
  

For the Latte
  • 2 shots Espresso Rich and robust flavor
  • 1 cup Milk Use whole, 2%, oat, or almond milk
  • 2 tablespoons Pumpkin Puree Pure pumpkin without added sugars or spices
  • 1 teaspoon Pumpkin Spice Can substitute with individual spices like cinnamon or nutmeg
  • 1-2 tablespoons Maple Syrup Can substitute with honey or agave syrup
  • 1 dollop Whipped Cream (optional) Use coconut milk for vegan version

Equipment

  • Espresso machine
  • Large glass

Method
 

Step‑by‑Step Instructions for Iced Pumpkin Spice Latte
  1. Brew a double shot of espresso using your machine or stovetop, about 5 minutes.
  2. In a large glass, combine espresso, pumpkin puree, pumpkin spice, and maple syrup. Stir for 30 seconds until well mixed.
  3. Fill the glass with ice cubes, leaving space for milk.
  4. Pour your choice of milk over the ice until filled to your liking. Stir for 15 seconds.
  5. Top with whipped cream if desired and sprinkle with additional pumpkin spice.

Nutrition

Serving: 1cupCalories: 240kcalCarbohydrates: 30gProtein: 5gFat: 10gSaturated Fat: 5gCholesterol: 15mgSodium: 150mgPotassium: 350mgFiber: 2gSugar: 20gVitamin A: 50IUVitamin C: 1mgCalcium: 250mgIron: 1mg

Notes

This latte can be made vegan or dairy-free. Adjust sweetness to taste and enjoy with fall treats like cookies or muffins.

Tried this recipe?

Let us know how it was!

Delicious Pumpkin Smoothie for a Cozy Fall Morning

September 5, 2025 by Grace Snow Leave a Comment

As I sipped my latest creation, the earthy notes of pumpkin blended harmoniously with the warmth of spices, transporting me straight to a cozy autumn day. This Creamy Pumpkin Smoothie captures the essence of fall, offering a healthy twist on your favorite dessert with its rich flavors and smooth texture. Packed with protein from Greek yogurt and naturally sweetened with ripe bananas, this smoothie is not just a treat; it's a delightful addition to your brunch table or a quick breakfast option on those bustling mornings. Plus, with a simple swap for vegan yogurt, it embraces a variety of dietary preferences without sacrificing taste. Are you ready to indulge in a fall favorite that feels both comforting and nurturing?

Why is this Pumpkin Smoothie special?

Comforting and Creamy: This smoothie is like wrapping yourself in a warm blanket on a chilly day, with its thick, velvety texture reminiscent of pumpkin pie filling.
Healthy Indulgence: Packed with protein from Greek yogurt and natural sweetness from bananas, it’s a guilt-free treat that nourishes both body and soul.
Versatile Options: Easily transform it into a vegan-friendly delight by substituting the yogurt and milk, ensuring everyone can enjoy this fall favorite!
Quick and Easy: Ready in under 10 minutes, this recipe is perfect for busy mornings or spontaneous brunch gatherings.
Crowd-Pleasing Flavor: Rich in warm spices that evoke autumn, serve it at your next get-together and watch it disappear! Perfect with a sprinkle of cinnamon, this smoothie is your ticket to cozy vibes this season.

Pumpkin Smoothie Ingredients

• Perfect for cozy fall mornings!

For the Smoothie

  • Pumpkin Puree – Provides the main flavor and deliciously smooth texture; use canned or roasted fresh for added depth.
  • Greek Yogurt – Adds creaminess and protein; swap for vegan yogurt to create a dairy-free pumpkin smoothie.
  • Banana – Contributes natural sweetness and an indulgent creamy texture; choose ripe bananas for maximum flavor.
  • Maple Syrup – Enhances sweetness and complements the spices perfectly; adjust according to your taste preference.
  • Pumpkin Pie Spices – Infuses the smoothie with classic fall flavors; feel free to mix with cinnamon, nutmeg, or ginger for that cozy vibe.
  • Milk (Cow’s or Plant-Based) – Achieves your desired consistency; substitute almond or oat milk to keep it vegan-friendly.

Step‑by‑Step Instructions for Pumpkin Smoothie

Step 1: Blend Ingredients
In a blender, combine ½ cup pumpkin puree, 1 cup Greek yogurt, 1 ripe banana, 1 tablespoon maple syrup, and 1 teaspoon pumpkin pie spices. Blend on medium speed for about 30–45 seconds until the mixture is smooth and well combined. You'll want to see a creamy, uniform texture with no lumps.

Step 2: Add Milk
Gradually pour in ½ cup of your choice of milk—cow's or plant-based—while the blender is running. Blend for another 15–30 seconds until you achieve your desired consistency. The smoothie should be creamy but pourable, so adjust the milk as needed to reach the perfect thickness.

Step 3: Blend Until Smooth
Continue blending the pumpkin smoothie for an additional 15–20 seconds. Stop to scrape down the sides with a spatula, ensuring that all ingredients are fully incorporated. Look for a velvety texture that resembles a thick milkshake; this indicates it’s ready for tasting.

Step 4: Taste & Adjust
Once blended, taste the smoothie to ensure that it meets your flavor preferences. If you feel it needs a little more sweetness, add a touch more maple syrup or additional pumpkin pie spices. Blend for a few more seconds to integrate any adjustments effectively.

Step 5: Serve
Pour the creamy pumpkin smoothie into festive glasses, making sure to fill them to the brim for a vibrant presentation. If desired, garnish with a sprinkle of cinnamon on top for an extra touch of autumn flair. Serve chilled for a refreshing experience that captures the essence of fall.

How to Store and Freeze Pumpkin Smoothie

Fridge: Store your pumpkin smoothie in an airtight container for up to 24 hours. Give it a good stir before serving, as separation may occur.

Freezer: For longer storage, freeze the smoothie in individual portions using freezer-safe bags or containers. It can last up to 3 months; just blend again after thawing to restore its creamy texture!

Serving Tips: Always allow the frozen smoothie to thaw overnight in the fridge for optimal flavor and consistency. Enjoy it as a quick morning treat or a healthy snack!

Ingredient Freshness: To maintain the best taste, consume your pumpkin smoothie as soon as possible, especially if using fresh ingredients.

Pumpkin Smoothie Variations & Substitutions

Want to make this pumpkin smoothie your own? Let your creativity shine in the kitchen with these delightful twists!

  • Vegan Option: Replace Greek yogurt with your favorite plant-based yogurt for a creamy, dairy-free delight.
  • Sweetener Swap: Experiment with agave nectar, honey, or stevia to customize your sweetness level.
  • Green Boost: Add a handful of spinach or kale for a nutritious green twist—don't worry, the pumpkin flavor still shines through!
  • Nutty Flavor: Stir in a tablespoon of almond or peanut butter for a delicious, nutty depth that pairs beautifully with pumpkin.
  • Spice It Up: Play with different spice combinations, like cardamom or allspice, to give your smoothie a unique flair.
  • Chill Factor: For an extra cool treat, freeze your banana slices beforehand or toss in some ice cubes while blending.
  • Chocolate Twist: Blend in a spoonful of cocoa powder or chocolate protein powder for a rich, dessert-like experience.
  • Tropical Vibes: Substitute half the pumpkin puree with ripe mango for a sweet, tropical version that still captures fall flavors.

If you’re looking for more fall-inspired recipes, check out my decadent Pumpkin Brownies Decadent or whip up a bright and refreshing Pitaya Smoothie Bowl. The possibilities are endless!

Expert Tips for Pumpkin Smoothie

  • Use Fresh Pumpkin: Fresh roasted pumpkin adds a depth of flavor that canned puree can't match. Just ensure it's well-puréed for optimal texture.
  • Choose Ripe Bananas: Ripe bananas not only lend sweetness but also make your pumpkin smoothie creamier. Underripe bananas can lead to a less flavorful result.
  • Adjust Consistency: If your smoothie is too thick, gradually add extra milk until you reach your desired consistency. Avoid dumping in a lot at once to prevent it from becoming too runny.
  • Customize Spices: While pumpkin pie spices are key, don't hesitate to adjust them based on your taste. A dash of allspice or a hint of cloves can elevate your flavor profile!
  • Garnish for Flair: A sprinkle of cinnamon or a dollop of yogurt on top can enhance not just the look but also the flavor of your pumpkin smoothie, making it inviting and delicious.
  • Vegan Substitutions: For a fantastic vegan pumpkin smoothie, substitute Greek yogurt with your favorite plant-based yogurt and opt for almond or oat milk.

Make Ahead Options

These Pumpkin Smoothies are perfect for meal prep enthusiasts! You can prepare all the ingredients (pumpkin puree, Greek yogurt, banana, maple syrup, and spices) up to 24 hours in advance by measuring and storing them in an airtight container in the refrigerator. To keep the banana from browning, consider adding a few drops of lemon juice. When you're ready to enjoy your smoothie, simply blend the prepped ingredients with the milk until smooth. This approach saves you valuable time during busy mornings; you can have a delicious and nutritious Pumpkin Smoothie ready in just a few minutes! Just remember to stir well if it’s been sitting in the fridge.

What to Serve with Creamy Pumpkin Smoothie?

Indulge in the cozy flavors of fall by pairing this delightful smoothie with accompaniments that elevate your snacking experience.

  • Crunchy Granola: Adds a satisfying crunch and nuttiness, making each sip of the smoothie even more delicious.
  • Spiced Oatmeal Cookies: The warm spices in cookies mirror the flavors of the smoothie, creating a delightful combination of textures and tastes.
  • Cinnamon Toast: A crunchy, buttery slice of cinnamon toast beautifully complements the creamy nature of the smoothie and brings the warmth of fall.
  • Autumn Fruit Salad: Fresh apples, pears, and pomegranates add a refreshing burst of sweetness and a pop of color on your brunch table.
  • Chai Latte: The spiced, aromatic notes of a chai latte harmonize perfectly with the pumpkin flavors and create the ultimate cozy beverage pairing.
  • Warm Muffins: From blueberry to bran, warm muffins add a delicious contrast to the cold smoothie, making it an ideal breakfast companion.
  • Almond Milk Latte: Velvet-smooth almond milk coffee adds a nutty flavor that beautifully contrasts with the richness of the pumpkin smoothie.
  • Pumpkin Scones: These sweet treats echo the flavors of the smoothie while providing a flaky texture that’s simply irresistible with a cup of tea.
  • Maple Syrup Drizzle Dipped Pretzels: A unique twist! The salty pretzels with a sweet maple touch make for a perfect palate cleanser between sips.
  • Gingerbread Biscotti: These crunchy cookies offer a delightful crunch and seasonal spiciness that complements the smooth, creamy pumpkin goodness.

Pumpkin Smoothie Recipe FAQs

What types of pumpkin puree should I use?
Absolutely! You can use either canned pumpkin puree or homemade fresh pumpkin puree. If you opt for fresh, roast pumpkin until tender, then blend until smooth for a richer flavor. Just ensure there are no lumps for the best texture.

How should I store my pumpkin smoothie?
To keep your pumpkin smoothie fresh, store it in an airtight container in the fridge for up to 24 hours. If you notice separation, simply give it a good stir before serving to reincorporate the ingredients.

Can I freeze pumpkin smoothie for later use?
Very! Freeze your pumpkin smoothie in individual portions using freezer-safe bags or containers. It will stay fresh for up to 3 months. To enjoy, thaw it overnight in the fridge and give it a quick blend to restore its creamy goodness.

What if my smoothie is too thick?
If you find your smoothie is a bit thicker than desired, don't worry! Gradually add extra milk—either cow's or plant-based—while blending until you reach your desired consistency. Mixing in more liquid a little at a time helps prevent it from becoming too runny.

Are there any dietary restrictions to consider when making this smoothie?
Absolutely! This pumpkin smoothie is versatile. For those with dairy allergies, simply substitute Greek yogurt with a plant-based yogurt and choose almond or oat milk. It's also gluten-free and can be enjoyed as a vegan treat.

What if I want to enhance the flavor with more spices?
For an even warmer flavor profile, feel free to customize your spices! Adding a dash of allspice or a hint of cloves can bring an exciting twist to the pumpkin smoothie. Just start with a small amount and adjust to your taste preference—it's all about inviting those lovely fall flavors!

Pumpkin Smoothie

Delicious Pumpkin Smoothie for a Cozy Fall Morning

This Pumpkin Smoothie is a creamy, healthy treat perfect for autumn mornings.
Print Recipe Pin Recipe
Prep Time 10 minutes mins
Total Time 10 minutes mins
Servings: 2 glasses
Course: Breakfast
Cuisine: American
Calories: 250
Ingredients Equipment Method Nutrition Notes

Ingredients
  

For the Smoothie
  • 1/2 cup pumpkin puree canned or roasted fresh
  • 1 cup Greek yogurt or vegan yogurt for dairy-free
  • 1 ripe banana for maximum flavor
  • 1 tablespoon maple syrup adjust according to taste
  • 1 teaspoon pumpkin pie spices or mix with cinnamon, nutmeg, or ginger
  • 1/2 cup milk cow’s or plant-based

Equipment

  • Blender

Method
 

Step-by-Step Instructions
  1. In a blender, combine pumpkin puree, Greek yogurt, ripe banana, maple syrup, and pumpkin pie spices. Blend on medium speed for about 30–45 seconds until smooth.
  2. Gradually pour in your choice of milk while blending. Blend for another 15–30 seconds until you achieve your desired consistency.
  3. Continue blending for an additional 15–20 seconds, and scrape down the sides to ensure all ingredients are fully incorporated.
  4. Taste the smoothie and adjust sweetness with more maple syrup or spices if needed. Blend again for a few seconds.
  5. Pour the smoothie into glasses, garnish with cinnamon if desired, and serve chilled.

Nutrition

Serving: 1glassCalories: 250kcalCarbohydrates: 45gProtein: 10gFat: 4gSaturated Fat: 1gPolyunsaturated Fat: 0.5gMonounsaturated Fat: 2gCholesterol: 5mgSodium: 100mgPotassium: 450mgFiber: 5gSugar: 20gVitamin A: 3500IUVitamin C: 10mgCalcium: 150mgIron: 1mg

Notes

Store in an airtight container for up to 24 hours or freeze in portions for up to 3 months.

Tried this recipe?

Let us know how it was!

Cozy Fall Sangria Recipe Bursting with Autumn Flavors

September 5, 2025 by Grace Snow Leave a Comment

As I unbox the colorful bounty from my local farmer's market, the vivid hues of autumn inspire me. One sip of this Cozy Fall Apple Cider Sangria transports me straight to crisp days filled with falling leaves and cozy gatherings. This fall sangria recipe elegantly marries the sweetness of sparkling apple cider with a robust red wine base, brightened by vibrant slices of orange and the warm embrace of cinnamon. Not only is this drink a delightful crowd-pleaser, but it’s also incredibly easy to whip up—perfect for busy hosts or a quiet night in. Plus, it’s a generous nod to plant-based diets, making it an inclusive choice for everyone. Ready to elevate your fall celebrations? Let’s dive into the sweet and spicy magic of this seasonal sip!

Why is this Fall Sangria special?

Fall, Stunning Colors: The vibrant mix of apples, pears, and oranges not only adds visual appeal but also a delightful crunch to each sip.
Warming Spices: With the enticing aroma of cinnamon, this drink captures the essence of cozy autumn gatherings.
Versatile Recipe: Feel free to swap out the fruits or explore variations like pomegranate juice for an unexpected twist!
Crowd-Pleasing: Whether you’re hosting a big get-together or enjoying quiet moments, this sangria is a guaranteed hit that everyone will adore.
Plant-Based Joy: This Cozy Fall Apple Cider Sangria recipe is vegan-friendly, allowing everyone to join in the festive fun without compromise!

Fall Sangria Recipe Ingredients

For the Sangria
• Dry Red Wine – Provides the base and depth of flavor; a Spanish Tempranillo works perfectly here.
• Sparkling Apple Cider – Adds sweetness and effervescence; feel free to choose a non-alcoholic option for a family-friendly version.
• Orange – Offers freshness and citrus zing; use slices to enhance flavor and garnish your drink.
• Apples – Contributes sweetness and texture; opt for firm varieties like Honeycrisp or Granny Smith for the best results.
• Pears – Adds a lush sweetness; again, stick to firm textures to avoid mushiness in your sangria.
• Cinnamon – Infuses the drink with warmth and spice; it can also serve as a beautiful garnish.
• Rosemary (optional) – Introduces a hint of herbal complexity; garnish with sprigs for an aromatic touch.

Enjoy this delightful Fall Sangria Recipe that's sure to elevate your autumn gatherings!

Step‑by‑Step Instructions for Cozy Fall Apple Cider Sangria

Step 1: Prepare the Fruit
Begin by washing and slicing the apples, pears, and orange into thin wedges. Use a sharp knife and a cutting board to ensure uniform pieces, which will help them infuse flavor into your fall sangria more effectively. Aim for about 1 cup each of thinly sliced apples and pears, along with half a sliced orange for a bright pop of citrus.

Step 2: Combine Ingredients
In a large pitcher, combine the prepared fruit slices with your dry red wine and a generous sprinkle of cinnamon. Stir gently with a long spoon to ensure the ingredients mix well, allowing the fruity notes to marry with the spices. This mixture will serve as the flavorful base for your cozy fall apple cider sangria, so make sure everything is evenly distributed.

Step 3: Chill the Sangria
Cover the pitcher with plastic wrap or a lid and place it in the refrigerator for at least one hour. This chilling time allows the flavors to meld beautifully, enhancing the overall taste of your fall sangria. If time permits, letting it steep for up to four hours is even better for a richer flavor profile.

Step 4: Serve the Sangria
Once chilled, fill your glasses with ice, about halfway, to keep the sangria refreshingly cool. Pour the red wine and fruit mixture over the ice, filling each glass about three-quarters full, ensuring guests enjoy the vibrant fruit pieces in each serving of this cozy fall sangria.

Step 5: Add Sparkling Cider
Top off each glass with sparkling apple cider, gently pouring to preserve the bubbles. This adds a delightful effervescence and sweetness that balance the bold notes of the red wine wonderfully. Stir gently with a stirrer to mix the layers before serving, showcasing the beautiful colors.

Step 6: Garnish for Flair
Finally, elevate your presentation by garnishing each glass with a cinnamon stick, a slice of orange, and a sprig of rosemary if desired. These added touches not only beautify your cozy fall apple cider sangria but also enhance the aromatic experience for your guests.

Fall Sangria Recipe Variations

Feel free to take this cozy fall sangria to the next level with these delightful twists that will please any palate.

  • Dairy-Free: Substitute traditional cider with non-alcoholic sparkling cider for a family-friendly option. The fizzy sweetness carries the flavor beautifully!
  • Extra Flavor: Add a few slices of fresh ginger to infuse a spicy kick that perfectly complements the warming cinnamon. The heat will awaken your senses and add a new dimension.
  • Fruity Swap: Try using seasonal fruits like cranberries or diced peaches instead of apples and pears. The tartness from cranberries or the sweetness of peaches can elevate your sangria.
  • Herbal Touch: Incorporate fresh mint or thyme for a refreshing twist. This adds a burst of herbal notes that make the sangria feel truly unique and aromatic.
  • Spicy Version: Infuse a hint of heat by adding a splash of jalapeño or chili pepper. Just a few slices will bring a surprising yet delightful warmth to each sip!
  • Pomegranate Delight: Replace some of the red wine with pomegranate juice for a vibrant color and a tangy flavor. This twist creates a stunning visual and a refreshing taste!
  • Warm & Cozy: For a chilly evening, heat the sangria gently on the stove without boiling, and serve it warm. It’s like a hug in a glass, perfect for those crisp autumn nights!
  • Explore Varieties: Consider trying out different wine types like Pinot Noir or a fruity Merlot to find your perfect balance. Each brings its own flair, and experimenting is half the fun!

These variations can help you personalize your Fall Sangria experience, making it a wonderful addition to any gathering! If you ever seek other delightful ideas, check out our Spatchcock Chicken or the rich flavors of Chicken Adobo. Enjoy the journey of flavor!

What to Serve with Cozy Fall Apple Cider Sangria

Elevate your autumn gatherings by complementing this delightful drink with perfect sides and treats that enhance its seasonal charm.

  • Savory Cheese Platter: A mix of sharp and creamy cheeses paired with crusty bread balances the sangria's sweetness while offering lovely textures.
  • Spiced Nuts: Roasted with cinnamon and a hint of cayenne, these crunchy bites create an irresistible snack that echoes the warming spices in the sangria.
  • Honey-Glazed Roasted Vegetables: Their natural sweetness and caramelization beautifully complement the fruity notes of the sangria, making every bite enjoyable.
  • Autumn Fruit Salad: A refreshing medley of seasonal fruits like pomegranate, persimmons, and kiwi offers a crisp contrast to the drink’s rich flavors.
  • Pecan Pie Bars: Sweet and nutty, these bars introduce a comforting dessert option that pairs nicely with the soothing elements of fall sangria.
  • Cinnamon Sugar Donuts: Soft and fluffy, these treats make a delightful pairing, echoing the cozy warmth of the cinnamon in the cozy fall apple cider sangria.
  • Mulled Wine: For a harmonious beverage experience, consider serving warm mulled wine, which will echo the cozy, rich flavors of your sangria.

How to Store and Freeze Fall Sangria

Fridge: Store any leftover fall sangria in an airtight container in the refrigerator for up to 24 hours. The flavors will remain vibrant, but it's best enjoyed fresh.

Avoid Freezing: Freezing sangria is not recommended, as the texture and flavors will be compromised once thawed. The fruits may become mushy, affecting the drink's overall appeal.

Mixing Ahead: If you wish to prepare in advance, mix the wine, fruits, and spices up to four hours ahead, but only add the sparkling apple cider when you're ready to serve for optimal fizziness.

Reheating: If you prefer a warm version, gently heat the sangria in a pot on low heat without boiling. This creates a cozy, warm drink perfect for chilly evenings!

Make Ahead Options

Preparing this Cozy Fall Apple Cider Sangria ahead of time is an excellent way to save valuable moments during busy gatherings! You can slice the apples, pears, and oranges up to 24 hours in advance and store them in an airtight container in the refrigerator to keep them fresh and prevent browning. Mixing the dry red wine with the prepared fruit and cinnamon can also be done up to 3 days ahead; just cover the pitcher tightly and refrigerate. When you’re ready to serve, simply add ice to your glasses, pour the chilled sangria mixture, top with sparkling apple cider, and garnish. This effortless prep guarantees your fall sangria will be just as delicious and refreshing, making your hosting duties a breeze!

Expert Tips for Fall Sangria Recipe

  • Choose the Right Wine: Opt for a dry red wine to ensure your fall sangria has a balanced flavor profile and isn’t overly sweet.

  • Chill for Flavor: Letting your sangria steep in the fridge for at least an hour helps the flavors meld, making each sip burst with autumn goodness.

  • Prep Ahead: If you're hosting, mix everything except for the sparkling cider ahead of time. Add the cider just before serving to keep the fizz intact.

  • Fruit Selection: Use firm varieties of apples and pears to avoid mushiness, enhancing the texture and overall enjoyment of your fall sangria.

  • Garnish to Impress: Elevate presentation with rosemary, cinnamon sticks, and orange slices—they not only look beautiful but add aromatic notes to each glass.

Cozy Fall Apple Cider Sangria Recipe FAQs

What kind of dry red wine should I use for the sangria?
Absolutely! A Spanish Tempranillo is a fantastic choice for this fall sangria recipe as it provides depth and complexity. However, other dry reds like Merlot or Cabernet Sauvignon can also work well. Just remember to avoid overly sweet wines to maintain a balanced flavor profile throughout the drink.

How should I store leftover fall sangria?
To keep your sangria fresh, store any leftovers in an airtight container in the refrigerator. Ideally, it should be consumed within 24 hours for the best taste and to preserve its vibrant flavors. Be sure to keep any garnishes separate to maintain their freshness until serving!

Can I freeze fall sangria?
Unfortunately, freezing sangria isn’t recommended as it can alter both the texture and flavors of the drink. When thawed, the fruit may become mushy and unappealing. If you want a cozy treat for chilly evenings, consider gently warming your sangria on low heat instead!

What should I do if my sangria tastes too sweet?
Very! If your fall sangria ends up a bit on the sweet side, you can balance it by adding a splash more of dry red wine or a hint of lemon juice. Stir it all together and let it sit for a little while longer before serving, allowing the flavors to harmonize beautifully.

Are there any dietary considerations for this recipe?
Yes! This cozy fall apple cider sangria is vegan-friendly, making it inclusive for different dietary preferences. Just ensure that the sparkling apple cider you choose is also free of animal-derived ingredients. If you're concerned about allergies, review labels for any potential cross-contamination.

What types of fruits can I swap for the apples and pears?
The more the merrier! You can definitely switch things up with fruits like cranberries, pomegranate seeds, or even diced peaches based on what’s seasonal and available. Just stick to firm varieties to avoid a mushy finish, ensuring a delightful crunch in every sip of your fall sangria!

Fall Sangria Recipe

Cozy Fall Sangria Recipe Bursting with Autumn Flavors

This Fall Sangria Recipe combines sparkling apple cider and red wine for a delightful seasonal drink.
Print Recipe Pin Recipe
Prep Time 15 minutes mins
Chilling Time 1 hour hr
Total Time 1 hour hr 15 minutes mins
Servings: 6 glasses
Course: Drinks
Cuisine: American
Calories: 150
Ingredients Equipment Method Nutrition Notes

Ingredients
  

For the Sangria
  • 1 bottle Dry Red Wine Spanish Tempranillo recommended
  • 4 cups Sparkling Apple Cider Choose non-alcoholic option if desired
  • 1 medium Orange Sliced
  • 2 medium Apples Firm varieties like Honeycrisp or Granny Smith
  • 2 medium Pears Firm varieties recommended
  • 1 teaspoon Cinnamon For infusion and garnish
  • 1 sprig Rosemary Optional, for garnish

Equipment

  • Large pitcher
  • Sharp Knife
  • Cutting Board

Method
 

Step‑by‑Step Instructions
  1. Wash and slice the apples, pears, and orange into thin wedges.
  2. In a large pitcher, combine the prepared fruit slices with dry red wine and sprinkle with cinnamon.
  3. Cover the pitcher and chill in the refrigerator for at least one hour.
  4. Fill glasses halfway with ice, then pour in the red wine and fruit mixture.
  5. Top each glass with sparkling apple cider and stir gently.
  6. Garnish with a cinnamon stick, an orange slice, and a sprig of rosemary.

Nutrition

Serving: 1glassCalories: 150kcalCarbohydrates: 22gSodium: 5mgPotassium: 120mgFiber: 1gSugar: 12gVitamin A: 200IUVitamin C: 20mgCalcium: 20mgIron: 0.5mg

Notes

This sangria is best enjoyed fresh and is vegan-friendly, making it perfect for gatherings.

Tried this recipe?

Let us know how it was!

Delicious Shaved Brussels Sprout Salad for Vibrant Flavor!

September 5, 2025 by Grace Snow Leave a Comment

As I gathered ingredients for dinner, I couldn’t help but smile at the thought of a fresh, vibrant salad that celebrates the best of winter produce. Enter my Easy 7-Ingredient Shaved Brussels Sprout Salad—a creation that not only dazzles the eyes but also brings together a delightful mix of textures and flavors. In just a few minutes, you can whip up this crunchy, colorful dish that's both gluten-free and vegetarian-friendly. Plus, it’s an absolute time-saver for busy holiday meals or a refreshing packed lunch. Just imagine how this playful salad will brighten your table and delight your guests! Are you ready to dive into a bowl of deliciousness? Let’s get started!

Why Will You Love This Salad?

Simplicity, with just seven ingredients, this Shaved Brussels Sprout Salad is quick to throw together, perfect for busy weeknights or last-minute holiday gatherings. Bursting with Flavor, the combination of nutty pine nuts, sweet cranberries, and zesty lemon juice creates a vibrant taste that's sure to impress. Healthy and Wholesome, it's vegetarian and gluten-free (if you skip the cheese), making it a great choice for various dietary needs. Make-Ahead Friendly, you can prepare it in advance, ensuring you have more time to enjoy your meal with loved ones. So, whether paired with a roasted meat dish or enjoyed as a standalone dish for a light lunch, this salad is bound to become a favorite! For an extra twist, consider serving it alongside my flavorful Avocado Egg Salad or elevate your meal with a beautiful Balsamic Steak Salad.

Shaved Brussels Sprout Salad Ingredients

• Discover the perfect blend for a bright salad!

For the Salad

  • Brussels Sprouts – The main base, providing a delightful crunch and essential nutrients. Substitution: You can use kale or cabbage if needed.
  • Extra-Virgin Olive Oil – Adds richness and helps to tenderize the sprouts. Note: Can substitute with avocado oil for a different flavor.
  • Fresh Lemon Juice – Offers acidity and brightness, balancing the salad beautifully. Note: Lime juice can be used for a refreshing citrus twist.
  • Pine Nuts – Impart a rich, nutty flavor along with a satisfying crunch. Substitution: Walnuts or slivered almonds can serve as alternatives.
  • Dried Cranberries – Contribute a sweet, chewy element that complements the sprouts. Note: Raisins or chopped dates can also work well.
  • Pecorino Cheese (optional) – Introduces a creamy, salty layer to the salad. Substitution: Parmesan cheese or omit for a dairy-free option.
  • Chives – Provide a hint of onion flavor and a touch of freshness. Substitution: Green onions or shallots can be used instead.

Step‑by‑Step Instructions for Shaved Brussels Sprout Salad

Step 1: Shave the Brussels Sprouts
Begin by preparing your Brussels sprouts, trimming off the ends and removing any wilted outer leaves. Using a mandoline or food processor, shave the sprouts into thin slices, aiming for a consistent thickness to ensure even texture throughout your Shaved Brussels Sprout Salad. Set them aside in a large mixing bowl, and admire their vibrant green color.

Step 2: Combine Ingredients
In your bowl with the shaved Brussels sprouts, drizzle in extra-virgin olive oil and freshly squeezed lemon juice. Add the pine nuts and dried cranberries, along with the optional pecorino cheese, if using, and snip the chives directly into the bowl for fresh flavor. Gently toss everything together until the ingredients are fully incorporated and every sprout is well-coated in the dressing.

Step 3: Season the Salad
Lightly season your salad mixture with sea salt and freshly ground black pepper. Use your hands or tongs to mix gently and distribute the seasoning evenly. The Shaved Brussels Sprout Salad should have a well-balanced flavor, so ensure you taste it and adjust the seasoning as necessary to suit your preferences.

Step 4: Rest for Flavor Development
Allow the salad to rest for about 15 minutes at room temperature. This step is essential as it enables the flavors to meld and the sprouts to soften slightly, enhancing the overall taste and texture of your Shaved Brussels Sprout Salad. Knock on the kitchen counter during this time to remind yourself how delicious it’ll be!

Step 5: Final Adjustments and Serve
After resting, give the salad another gentle toss. You might want to drizzle a bit more olive oil for added richness or adjust the seasoning again with salt and pepper. Serve this colorful Shaved Brussels Sprout Salad immediately as a refreshing side dish or a light meal, and enjoy the compliments from your delighted guests!

Expert Tips for Shaved Brussels Sprout Salad

  • Thin Slicing: Use a mandoline or sharp knife to slice Brussels sprouts as thinly as possible for optimal texture and flavor absorption.

  • Resting Time: Allowing the salad to rest for 15 minutes blends the flavors beautifully. Don't skip this step for your shaved Brussels sprout salad!

  • Fresh Ingredients: Use fresh Brussels sprouts and high-quality olive oil to enhance the salad's overall taste. Avoid wilted or old sprouts.

  • Taste and Adjust: After seasoning, always taste your salad and adjust with more salt or lemon juice to balance flavors perfectly.

  • Storage Tips: If making ahead, store the salad in an airtight container; add nuts and chives right before serving for maximum freshness.

What to Serve with Easy 7-Ingredient Shaved Brussels Sprout Salad

This vibrant salad pairs beautifully with various dishes, enhancing your meal's overall flavor and experience.

  • Roasted Chicken: Juicy, flavorful roasted chicken complements the salad's refreshing crunch, creating a satisfying and balanced plate.
  • Grilled Salmon: The rich taste of grilled salmon provides a hearty touch, elevating the dish while the salad adds a crisp, light contrast.
  • Quinoa Pilaf: A nutty quinoa pilaf offers a wholesome grain option, with a lovely texture to pair alongside the salad’s vibrant greens.
  • Garlic Bread: The warmth and flavor of garlic bread create a comforting side, making every bite of salad even more delightful.
  • Herbed Couscous: Light and fluffy, herbed couscous brings a touch of Mediterranean flair, working harmoniously with the salad's tangy notes.
  • Cranberry Glazed Meatballs: Sweet and savory meatballs echo the salad’s cranberries, enhancing the meal’s flavor dimensions and bringing festive vibes to the table.
  • Steamed Asparagus: The fresh, earthy taste of steamed asparagus adds an elegant touch, making your dining experience feel both luxurious and healthy.
  • Sparkling Water: A glass of sparkling water with lemon or mint refreshes the palate, complementing the salad's zesty ingredients without overshadowing them.
  • Lemon Sorbet: For dessert, consider a light lemon sorbet to cleanse the palate, matching the salad’s bright citrus notes in a delightful way.

Shaved Brussels Sprout Salad Variations

Feel free to personalize this recipe and make it your own with these exciting twists!

  • Nut-Free: Omit pine nuts for a great nut-free option. Consider adding toasted seeds for a similar crunch.
  • Vegan: Leave out the cheese and use a vegan alternative or simply enjoy the salad without it for a delicious vegan dish.
  • Spice it Up: Add a pinch of red pepper flakes for a touch of heat that brings the flavors to life.
  • Mediterranean Twist: Include diced feta cheese and kalamata olives for a savory, Mediterranean-inspired flair. The tang of feta beautifully complements the sweetness of cranberries.
  • Extra Veggies: Toss in shredded carrots or bell pepper strips for extra color, crunch, and nutrition, making the salad even more visually appealing.
  • Citrus Burst: Swap the lemon juice with fresh orange juice for a sweet, vibrant twist that will brighten your palate.
  • Herby Delight: Try incorporating fresh herbs like parsley or dill to add layers of flavor and freshness that complement the Brussels sprouts perfectly.
  • Crunchy Alternatives: If you prefer a different texture, consider swapping out the dried cranberries for fresh pomegranate seeds or diced apples, both of which add freshness and a nice crunch.

No matter which variation you choose, this delightful salad will shine on any table. For other delightful ideas, check out my refreshing German Potato Salad or indulge in a cozy serving of Chicken Salad with Apples for added inspiration!

Storage Tips for Shaved Brussels Sprout Salad

Refrigerator: Store any leftover Shaved Brussels Sprout Salad in an airtight container for up to 2 days. To maintain freshness, add chives and pine nuts just before serving.

Room Temperature: Avoid leaving the salad out for more than 2 hours, especially at room temperature, to ensure food safety and keep ingredients crisp.

Make-Ahead: Prepare the salad components ahead of time, storing shaved Brussels sprouts and dressing separately to combine just before serving, maximizing flavors and texture.

Freezing: It's not recommended to freeze Shaved Brussels Sprout Salad as the texture of the sprouts may become mushy upon thawing, affecting the salad's delightful crunch.

Make Ahead Options

This Easy 7-Ingredient Shaved Brussels Sprout Salad is perfect for meal prep and can make your busy weeknights so much smoother! You can shave the Brussels sprouts and toss them with olive oil, lemon juice, and dried cranberries up to 24 hours in advance. Just keep the pine nuts, chives, and optional cheese separate until you're ready to serve to maintain their crunch and freshness. When it’s time to enjoy your meal, simply add the reserved ingredients and give the salad a gentle toss. You'll have a bright, flavorful dish ready in no time that tastes just as delicious as when freshly made!

Shaved Brussels Sprout Salad Recipe FAQs

Are Brussels sprouts ripe for use?
Absolutely! When selecting Brussels sprouts, look for firm, bright green sprouts that feel heavy for their size. Avoid any that have dark spots or yellowing leaves, as these can indicate age or spoilage. If you're purchasing them loose, choose sprouts that are about 1 to 2 inches in diameter for the best flavor and texture.

How should I store leftover shaved Brussels sprout salad?
To store your Shaved Brussels Sprout Salad, place it in an airtight container and keep it in the refrigerator for up to 2 days. To maintain its freshness, I recommend adding ingredients like chives and pine nuts just before you serve it. This ensures the salad retains its crunch and vibrant flavors.

Can I freeze this salad?
It's best not to freeze Shaved Brussels Sprout Salad. The delicate texture of the Brussels sprouts tends to become mushy once thawed, which would affect the refreshing crunch that makes this salad so delightful. Instead, consider preparing the salad components in advance and assembling them fresh just before serving.

What if my Brussels sprouts taste bitter?
If your Brussels sprouts taste bitter, it could be due to overcooking or slicing them too thickly, causing the less desirable flavors to emerge. For troubleshooting, ensure you slice them very thinly and try sautéing them briefly in olive oil before adding to your salad. This can help mellow out the bitterness and enhance their natural sweetness.

Is this salad safe for my gluten-free friend?
Yes, Shaved Brussels Sprout Salad can easily be made gluten-free! Simply omit the optional pecorino cheese, or ensure you use a certified gluten-free cheese alternative. This way, your gluten-sensitive or celiac friends can enjoy this vibrant dish worry-free!

Can I use other nuts instead of pine nuts?
Very! If you're out of pine nuts or prefer a different flavor, feel free to substitute with walnuts or slivered almonds. Just lightly toast them in a dry pan for a few minutes to enhance their nutty aroma and flavor before adding them to your salad. Enjoy experimenting!

Shaved Brussels Sprout Salad

Delicious Shaved Brussels Sprout Salad for Vibrant Flavor!

Easy 7-Ingredient Shaved Brussels Sprout Salad is a vibrant and healthy dish perfect for busy holiday meals.
Print Recipe Pin Recipe
Prep Time 15 minutes mins
Resting Time 15 minutes mins
Total Time 30 minutes mins
Servings: 4 servings
Course: Salads
Cuisine: American
Calories: 250
Ingredients Equipment Method Nutrition Notes

Ingredients
  

For the Salad
  • 4 cups Shaved Brussels Sprouts Substitution: You can use kale or cabbage if needed.
  • 2 tablespoons Extra-Virgin Olive Oil Can substitute with avocado oil for a different flavor.
  • 2 tablespoons Fresh Lemon Juice Lime juice can be used for a refreshing citrus twist.
  • 1/3 cup Pine Nuts Substitution: Walnuts or slivered almonds can serve as alternatives.
  • 1/2 cup Dried Cranberries Raisins or chopped dates can also work well.
  • 1/4 cup Pecorino Cheese Substitution: Parmesan cheese or omit for a dairy-free option.
  • 2 tablespoons Chives Substitution: Green onions or shallots can be used instead.

Equipment

  • mandoline
  • large mixing bowl

Method
 

Preparation Steps
  1. Begin by preparing your Brussels sprouts, trimming off the ends and removing any wilted outer leaves. Using a mandoline or food processor, shave the sprouts into thin slices, aiming for a consistent thickness to ensure even texture throughout your Shaved Brussels Sprout Salad. Set them aside in a large mixing bowl, and admire their vibrant green color.
  2. In your bowl with the shaved Brussels sprouts, drizzle in extra-virgin olive oil and freshly squeezed lemon juice. Add the pine nuts and dried cranberries, along with the optional pecorino cheese, if using, and snip the chives directly into the bowl for fresh flavor. Gently toss everything together until the ingredients are fully incorporated and every sprout is well-coated in the dressing.
  3. Lightly season your salad mixture with sea salt and freshly ground black pepper. Use your hands or tongs to mix gently and distribute the seasoning evenly. The Shaved Brussels Sprout Salad should have a well-balanced flavor, so ensure you taste it and adjust the seasoning as necessary to suit your preferences.
  4. Allow the salad to rest for about 15 minutes at room temperature. This step is essential as it enables the flavors to meld and the sprouts to soften slightly, enhancing the overall taste and texture of your Shaved Brussels Sprout Salad.
  5. After resting, give the salad another gentle toss. You might want to drizzle a bit more olive oil for added richness or adjust the seasoning again with salt and pepper. Serve this colorful Shaved Brussels Sprout Salad immediately as a refreshing side dish or a light meal, and enjoy the compliments from your delighted guests!

Nutrition

Serving: 1servingCalories: 250kcalCarbohydrates: 15gProtein: 5gFat: 20gSaturated Fat: 3gPolyunsaturated Fat: 2gMonounsaturated Fat: 15gCholesterol: 10mgSodium: 200mgPotassium: 300mgFiber: 4gSugar: 6gVitamin A: 50IUVitamin C: 60mgCalcium: 100mgIron: 2mg

Notes

For best results, use fresh Brussels sprouts and high-quality olive oil. Store any leftovers in an airtight container for up to 2 days.

Tried this recipe?

Let us know how it was!

Comforting Cabbage Soup: A Hearty, Healthy Delight

September 5, 2025 by Grace Snow Leave a Comment

As the crisp air begins to chill, I crave something that warms my soul and nourishes my body. This Hearty 1-Pot Cabbage Soup is just the comforting embrace I need on a quiet evening. Packed with vibrant vegetables and a touch of fire-roasted tomatoes, this healthy and easy-to-make soup showcases cabbage in a delicious way. Not only does it utilize an entire head of cabbage, promoting a fantastic green-centric meal, but it’s also a crowd-pleaser—perfect for sharing with family or savoring alone. With minimal prep time, you’ll find this soup is a lifesaver for those busy weeks when you desire something wholesome and satisfying. Curious about how to whip up this inviting, nourishing bowl of joy? Let’s dive in!

Why is Cabbage Soup a Delight?

Healthy Comfort: This soup embodies the essence of nutritious eating, packed with vitamins and minerals from its vibrant ingredients.

One-Pot Wonder: Embrace simplicity with minimal cleanup; all it takes is one pot to create this hearty meal!

Flavorful Fusion: The fire-roasted tomatoes combined with tender cabbage deliver an explosion of tastes that will warm you from the inside out.

Customizable Goodness: Feel free to adapt ingredients and add your favorite beans or grains for variety; this recipe is as versatile as it is delicious.

Satisfying & Filling: It’s not just soup; each bowl offers a nourishing experience that keeps hunger at bay, making mealtime truly satisfying.

If you're also in the mood for a soul-soothing experience, consider pairing it with a delightful Egg Drop Soup for a balanced meal!

Cabbage Soup Ingredients

For the Base

  • Extra-Virgin Olive Oil – Adds richness and subtle flavor; can substitute with vegetable oil if needed.
  • Carrots – Provide sweetness and color to the soup; try parsnips for a different twist.
  • Yellow Onion – Contributes depth of flavor; red onion can work in a pinch.
  • Celery – Offers a crisp texture and flavor base; can be omitted if not on hand.
  • Sea Salt – Enhances the overall flavor profile; kosher salt is a good alternative.
  • Freshly Ground Black Pepper – Adds spice and warmth; feel free to adjust to your taste.

For the Flavor Burst

  • White Wine Vinegar – Introduces tanginess; apple cider vinegar makes a great substitute.
  • Fire-Roasted Diced Tomatoes – Bring a smoky flavor to the mix; regular diced tomatoes can replace if necessary.
  • Vegetable Broth – Forms the soul of the soup; chicken broth can be used for non-vegetarians.
  • Garlic – Elevates the flavor—fresh garlic is best, but garlic powder can be a quick substitute.

For the Hearty Texture

  • Cooked White Beans – Provide protein and creaminess; any canned beans will do, just remember to drain and rinse well.
  • Yukon Gold Potatoes – Add heartiness and texture; any starchy potato makes a good stand-in.
  • Green Cabbage – The star of this dish, packed with health benefits; can be swapped with savoy or Napa cabbage.

For the Herbal Notes

  • Dried Thyme – Infuses earthy notes; fresh thyme works beautifully too—just use three times the amount.
  • Fresh Parsley – Adds a splash of brightness as a garnish; you can skip it if it's not available.

This comforting cabbage soup is sure to warm your heart, and with these ingredients, you'll be well on your way to creating a nourishing bowl of joy!

Step‑by‑Step Instructions for Hearty 1-Pot Cabbage Soup

Step 1: Heat the Oil
Begin by heating 2 tablespoons of extra-virgin olive oil in a large pot over medium heat. Allow the oil to shimmer, signaling that it’s hot enough for cooking. This step sets the foundation for the flavorful cabbage soup you're about to create.

Step 2: Sauté the Aromatics
Add 1 cup of chopped carrots, 1 diced yellow onion, and 1 diced celery stalk to the pot. Season with 1 teaspoon of sea salt and ½ teaspoon of freshly ground black pepper. Sauté these ingredients for about 8 minutes, stirring occasionally, until they soften and the onion becomes translucent, filling your kitchen with a delicious aroma.

Step 3: Deglaze with Vinegar
Pour in 2 tablespoons of white wine vinegar, stirring well to combine with the sautéed vegetables. Cook for an additional minute, allowing the vinegar to reduce slightly and mingle with the flavors. This step brightens the mixture and adds a lovely tang that enhances the overall taste of the cabbage soup.

Step 4: Add the Base Ingredients
Next, introduce a 14-ounce can of fire-roasted diced tomatoes, 4 cups of vegetable broth, 1 can of drained and rinsed white beans, 3 cloves of grated garlic, and 2 medium Yukon Gold potatoes, diced. Add 4 cups of chopped green cabbage and 1 teaspoon of dried thyme. Stir everything together, creating a vibrant medley of ingredients that will become the heart of your soup.

Step 5: Simmer to Perfection
Cover the pot and let the mixture simmer on medium-low heat for 20 to 30 minutes. As the soup cooks, the potatoes and cabbage will become tender. Check occasionally, giving it a gentle stir and enjoying the enticing smell of your cooking cabbage soup.

Step 6: Final Touches
After the simmering time, taste the soup and adjust the seasoning if needed. You can add more salt or pepper to suit your palate. Once satisfied, remove the pot from heat and let it stand for 5 minutes to let the flavors meld beautifully.

Step 7: Serve and Enjoy
Ladle the hearty cabbage soup into bowls, garnishing each with a sprinkle of fresh parsley for a pop of color and freshness. Serve hot, alongside crusty bread or a side salad, creating a nourishing and satisfying meal for you and your loved ones.

Cabbage Soup Variations & Substitutions

Feel free to get creative and make this nourishing dish your own with these delightful twists!

  • Spicy Kick: Add red pepper flakes during sautéing for a punch of heat that complements the savory flavors beautifully.
    Enhancing the warmth of the soup can elevate your culinary experience, making each bowl more exciting.

  • Earthy Lentils: Swap white beans with green or brown lentils for added texture and a protein boost.
    Lentils not only make the soup heartier but also lend a unique earthiness that pairs wonderfully with cabbage.

  • Savory Chicken: For a non-vegetarian option, toss in shredded cooked chicken or even some diced sausage.
    Adding leftover meat transforms this soup into a comforting feast, ensuring every bite is satisfying and filled with flavor.

  • Smooth & Creamy: Blend in some coconut milk or a splash of cream for a rich texture.
    This creamy twist makes your cabbage soup feel indulgent, providing a warm, velvety experience with every spoonful.

  • Veggie Boost: Incorporate zucchini or bell peppers for extra veggies.
    These additions can provide a pop of color and flavor, making your soup even more nutritious and visually appealing.

  • Herb Infusion: Use fresh herbs like basil or cilantro for a fragrant finish.
    Garnishing with fresh herbs can brighten up the dish, not only in flavor but also visually, creating a mouthwatering experience.

  • Grain Goodness: Add in some quinoa or barley for a filling grain option.
    These hearty grains can turn your soup into a satisfying meal, perfect for a chilly day.

  • Zesty Lemon: A squeeze of lemon juice at the end brightens up the flavors impeccably.
    The zesty addition can brighten the soup, balancing the richness while enhancing the overall taste.

If you're in the mood for more delicious soups, consider trying out a bowl of Asparagus Soup Healthy or the comforting Zuppa Toscana Soup for variety!

Make Ahead Options

These Cabbage Soup ingredients are perfect for meal prep enthusiasts! You can chop the vegetables (carrots, onion, celery, potatoes, and cabbage) and store them in airtight containers in the refrigerator for up to 3 days. This allows you to save time during busy weeknights. Additionally, you can sauté the aromatics (carrots, onion, and celery) ahead of time and refrigerate them, which keeps their flavors fresh and vibrant. When you’re ready to enjoy your soup, simply add the prepped ingredients to your pot along with the broth and other components, simmer, and you'll have a comforting meal ready in no time, just as delicious as if made fresh!

How to Store and Freeze Cabbage Soup

Fridge: Store leftover cabbage soup in an airtight container in the fridge for up to 4 days. Make sure it cools down to room temperature before sealing to lock in freshness.

Freezer: This nourishing cabbage soup can be frozen for up to 3 months. Cool completely before transferring to freezer-safe containers, leaving some space for expansion.

Thawing: To enjoy frozen soup, place it in the fridge overnight to thaw, ensuring it's ready to reheat the next day while maintaining its rich flavors.

Reheating: Reheat on the stovetop over low heat, stirring occasionally until heated through, or microwave in short intervals, making sure to stir to avoid hot spots.

What to Serve with Hearty 1-Pot Cabbage Soup

The wonderful aroma of this nourishing soup makes your kitchen feel like home, and pairing it right can elevate your meal further.

  • Crusty Bread: Perfect for dipping, crusty bread adds a delightful crunch, soaking up all the tasty broth while enhancing the cozy vibe.

  • Simple Green Salad: Fresh greens with a splash of lemon provide a refreshing contrast to the warm, hearty soup, balancing textures beautifully.

  • Grilled Cheese Sandwich: A classic pairing! The gooey, melty cheese complements the soup’s comforting flavors and adds satisfying richness.

  • Herb-Infused Couscous: Light and fluffy, couscous tossed with herbs not only adds a lovely texture but also makes each bite a flavorful adventure.

  • Roasted Vegetables: Seasoning seasonal veggies with herbs and roasting them brings out their natural sweetness, harmonizing perfectly with the soup's savory goodness.

  • Pickled Beets: Their tangy zip cuts through the richness of the soup, providing a delightful contrast and an extra pop of color on the plate.

  • Chilled White Wine: A glass of chilled Sauvignon Blanc enhances the soup’s bright flavors, making your meal feel extra special and inviting.

  • Apple Crisp: For dessert, a serving of warm apple crisp brings sweetness and texture, rounding off the meal with a comforting touch that lingers long after the last bite.

Expert Tips for Cabbage Soup

  • Cook the Cabbage Well: Ensure the cabbage is tender enough to blend into the soup, enhancing the overall flavor while remaining mellow and enjoyable.

  • Let It Rest: Allow the cabbage soup to sit for 30 minutes after cooking to let the flavors meld together, resulting in a more harmonious taste.

  • Freezing Properly: This soup freezes excellently; cool it completely before transferring to freezer-safe containers to maintain its delightful texture.

  • Flavor Variations: Don't hesitate to add a pinch of red pepper flakes for a kick, or substitute white beans with lentils for texture and protein diversity.

  • Season Thoughtfully: Always taste and adjust seasoning before serving; a little extra salt or pepper can elevate your cabbage soup beautifully.

Cabbage Soup Recipe FAQs

How do I select the best cabbage for my soup?
Absolutely! Look for a cabbage that feels heavy for its size with tightly packed leaves. Avoid any heads with dark spots all over or those that feel too soft. If possible, choose a crisp green cabbage with a vibrant color; this typically indicates freshness and flavor. A medium-sized head, around 2 to 3 pounds, will give you just the right amount for this recipe.

How long can I store leftover cabbage soup?
Very! Your delicious leftover cabbage soup can be stored in an airtight container in the fridge for up to 4 days. Make sure it has cooled to room temperature before sealing it. When you’re ready to enjoy it again, a gentle reheat will bring back its comforting warmth.

Can I freeze cabbage soup, and how should I do it?
Yes, indeed! Cabbage soup can be frozen for up to 3 months, making it perfect for meal prep. First, let the soup cool completely. Then, transfer it into freezer-safe containers, leaving some headspace as the soup can expand as it freezes. Label with the date and pop it in the freezer. When you're ready to enjoy it, just thaw in the fridge overnight before reheating.

What if my cabbage soup turns out too watery or bland?
No worries! If your soup is too watery, you can simmer it uncovered for a bit to allow some liquid to evaporate, thickening your soup. For blandness, consider adding more salt, herbs, or even a splash of white wine vinegar to brighten the flavor. Always taste as you go, and feel free to enhance it with additional cooked beans or a dash of hot sauce for a kick!

Are there any dietary considerations for cabbage soup?
Absolutely! This cabbage soup is vegetarian and can easily be made vegan by ensuring all ingredients (like broth) are plant-based. For those with allergies, check substitute ingredients like vegetable broth, as some brands may contain allergens. If you're preparing it for children or pets, ensure that none of the spices or added ingredients are unsuitable for their diets.

Why is it suggested to let the cabbage soup rest after cooking?
Great question! Allowing the soup to sit for about 30 minutes after cooking lets the flavors meld beautifully, enhancing the overall taste. The resting period allows the aromas to develop and intensify, making each bowl even more delicious when you finally serve it up!

Cabbage Soup

Comforting Cabbage Soup: A Hearty, Healthy Delight

This refreshing Cabbage Soup is a wholesome blend of vibrant vegetables, perfect for warming your soul while nourishing your body.
Print Recipe Pin Recipe
Prep Time 15 minutes mins
Cook Time 30 minutes mins
Resting Time 5 minutes mins
Total Time 50 minutes mins
Servings: 6 cups
Course: Soups
Cuisine: Healthy
Calories: 180
Ingredients Equipment Method Nutrition Notes

Ingredients
  

For the Base
  • 2 tablespoons extra-virgin olive oil can substitute with vegetable oil
  • 1 cup chopped carrots or parsnips for a twist
  • 1 large yellow onion can use red onion
  • 1 stalk celery can omit if not available
  • 1 teaspoon sea salt kosher salt is an alternative
  • 0.5 teaspoon freshly ground black pepper adjust to taste
For the Flavor Burst
  • 2 tablespoons white wine vinegar apple cider vinegar is a substitute
  • 14 ounces fire-roasted diced tomatoes can substitute with regular diced tomatoes
  • 4 cups vegetable broth can use chicken broth for non-vegetarians
  • 3 cloves garlic grated, fresh garlic is best
For the Hearty Texture
  • 1 can cooked white beans drained and rinsed
  • 2 medium Yukon Gold potatoes diced, can substitute with any starchy potato
  • 4 cups chopped green cabbage can swap with savoy or Napa cabbage
For the Herbal Notes
  • 1 teaspoon dried thyme can use fresh thyme (3x the amount)
  • fresh parsley for garnish, optional

Equipment

  • Large pot

Method
 

Step-by-Step Instructions for Hearty 1-Pot Cabbage Soup
  1. Heat the olive oil in a large pot over medium heat until shimmering.
  2. Add chopped carrots, diced onion, and celery stalk; season with salt and pepper. Sauté for about 8 minutes until translucent.
  3. Pour in white wine vinegar and stir well; cook for 1 additional minute.
  4. Add diced tomatoes, vegetable broth, drained beans, grated garlic, diced Yukon Gold potatoes, chopped cabbage, and thyme. Stir everything together.
  5. Cover and let simmer on medium-low heat for 20 to 30 minutes until vegetables are tender.
  6. Taste and adjust seasoning if necessary; let stand for 5 minutes.
  7. Ladle soup into bowls and garnish with fresh parsley.

Nutrition

Serving: 1cupCalories: 180kcalCarbohydrates: 35gProtein: 6gFat: 4gSaturated Fat: 0.5gPolyunsaturated Fat: 2gMonounsaturated Fat: 1gSodium: 600mgPotassium: 700mgFiber: 10gSugar: 5gVitamin A: 120IUVitamin C: 60mgCalcium: 50mgIron: 2mg

Notes

This cabbage soup freezes well; cool completely before storing in freezer-safe containers.

Tried this recipe?

Let us know how it was!

Butternut Squash Risotto: A Creamy Fall Comfort Dish

September 5, 2025 by Grace Snow Leave a Comment

Finding solace in the kitchen on a crisp fall evening can feel like unearthing a hidden treasure. As I diced up butternut squash, its vibrant orange flesh reflected the hues of autumn's palette, instantly sparking nostalgia for cozy family dinners. This Creamy Butternut Squash Risotto is my go-to recipe when I crave comfort food that’s not only easy to whip up with just ten simple ingredients, but also captures the essence of the season. The creamy texture and delightful flavors make it a crowd-pleaser, perfect for impressing loved ones or indulging in a quiet night at home. Best of all, it’s vegetarian-friendly, so everyone can savor a warm bowl without hesitation. Are you ready to bring a taste of fall to your dinner table?

Why Is This Risotto So Special?

Comforting, This creamy butternut squash risotto is like a warm hug on a plate, perfect for chilly nights. Simple, Using just ten ingredients, it's fast and easy to prepare without sacrificing flavor. Nutrient-Packed, The dish is full of fiber and vitamins, making it a wholesome option. Versatile, Feel free to mix in your favorite herbs or nuts to customize your experience. Whether you're hosting a dinner party or enjoying a cozy night in, this risotto will surely delight your taste buds!

Butternut Squash Risotto Ingredients

Get ready to create a deliciously creamy dish with these essential ingredients!

For the Base

  • Extra-Virgin Olive Oil – Adds richness and helps to sauté the vegetables.
  • Medium Yellow Onion – Provides a savory base layer of flavor through sautéing.
  • Sea Salt – Enhances overall taste; adjust according to preference.
  • Freshly Ground Black Pepper – Introduces a subtle hint of spice; feel free to customize.

For the Risotto

  • Cubed Butternut Squash – The star of the dish; brings sweetness and creaminess when cooked. Fresh or frozen variations work well too.
  • Garlic Cloves – Adds aromatic depth; finely chopped for better distribution.
  • Minced Rosemary or Sage – Delivers earthy herbal notes; fresh herbs are recommended for optimal flavor.
  • Uncooked Arborio Rice – Essential for achieving that creamy texture, soaking up all the delicious flavors.
  • Dry White Wine – Adds acidity and depth; can be omitted for a non-alcoholic option.
  • Warmed Vegetable Broth – The cooking liquid that enhances flavor and moisture; substitute with chicken broth if desired.

For Garnish

  • Chopped Parsley or Small Sage Leaves – Optional garnish that adds a refreshing touch to your risotto.
  • Grated Pecorino or Parmesan Cheese – Optional but highly recommended for a boost of richness and umami.

With these carefully selected ingredients, you’re all set to whip up a comforting and creamy butternut squash risotto that brings the essence of fall to your table!

Step‑by‑Step Instructions for Butternut Squash Risotto

Step 1: Sauté the Aromatics
In a large skillet over medium heat, warm 2 tablespoons of extra-virgin olive oil. Once the oil shimmers, add 1 chopped medium yellow onion with a pinch of sea salt and freshly ground black pepper. Stir and sauté for 2-3 minutes until the onion becomes translucent and fragrant, filling your kitchen with a warm aroma.

Step 2: Add the Squash
Next, stir in 4 cups of cubed butternut squash and continue to cook for an additional 6-8 minutes. Keep stirring occasionally, so the squash begins to soften and takes on a slight golden hue, which signals its readiness for the next step. This adds a delightful sweetness to your creamy butternut squash risotto.

Step 3: Incorporate Flavorful Ingredients
Mix in 3 minced garlic cloves along with 1 tablespoon of minced rosemary or sage. Cook for about 1 minute, letting the fragrances meld beautifully. Then, add 1 cup of uncooked Arborio rice, stirring continuously for another minute to coat the rice in the warm, flavorful mixture, allowing each grain to absorb the delicious aromas.

Step 4: Deglaze with Wine
Pour in 1/2 cup of dry white wine and stir continuously for 1-3 minutes. This deglazing step not only adds depth to your butternut squash risotto but also helps lift any flavorful bits stuck to the pan. Cook until most of the liquid is absorbed, and the mixture is slightly thickened.

Step 5: Gradually Add Broth
Now it's time to create that creamy texture! Gradually add 3 cups of warmed vegetable broth, starting with 3/4 cup at a time. Stir constantly until the liquid is almost fully absorbed before adding the next portion. Repeat this process, which will take about 20-25 minutes, until the rice is creamy and al dente.

Step 6: Finish the Risotto
Once the rice is tender and the mixture is creamy, remove it from heat and season with additional sea salt and freshly ground black pepper to taste. The butternut squash risotto should have a luxuriously smooth consistency, inviting you to dish it out and savor every bite.

Step 7: Serve and Garnish
Serve your butternut squash risotto hot, garnished with a sprinkle of chopped parsley or small sage leaves for a burst of color and freshness. If desired, add a generous sprinkle of grated Pecorino or Parmesan cheese on top for an extra touch of richness that perfectly complements the autumn flavors.

Make Ahead Options

These Butternut Squash Risotto preparations are perfect for busy home cooks seeking a time-saving solution! You can chop the butternut squash and onion up to 24 hours in advance, storing them in an airtight container in the refrigerator to maintain freshness and prevent browning. Additionally, you can measure out the Arborio rice and combine the garlic and herbs ahead of time, ensuring everything is prepped for a quick cook when you're ready. When it's time to serve, simply follow the final steps of the recipe, adding the prepped ingredients, deglazing with wine, and gradually incorporating warmed vegetable broth. You'll have a creamy, comforting dish ready with minimal effort and just as delicious as if you made it from scratch that day!

Expert Tips for Butternut Squash Risotto

  • Stir Constantly: Risotto demands attention. Stirring continuously helps achieve that creamy texture, so don’t treat it as a set-it-and-forget-it dish!

  • Use Warm Broth: Always add warmed vegetable broth gradually. Cold broth can shock the rice and delay the creamy outcome you’re aiming for with your butternut squash risotto.

  • Trust the Timing: It may appear underdone at first, but patience is key. Allow the risotto to absorb all the liquid, thickening beautifully over time.

  • Taste as You Go: Season carefully! Adjust salt and pepper to your preference, balancing the natural sweetness of the butternut squash with savory notes.

  • Save Some Broth: If you have leftover broth, keep a bit on hand for reheating. Adding a splash while warming will restore creaminess and flavor.

Storage Tips for Butternut Squash Risotto

  • Room Temperature: Allow leftover risotto to cool slightly before storing. It should be eaten within 2 hours if left at room temperature to prevent spoilage.

  • Fridge: Store your butternut squash risotto in an airtight container in the fridge for up to 3 days. Make sure to let it cool completely before sealing to maintain its creamy texture.

  • Freezer: For longer storage, freeze the risotto in a freezer-safe container for up to 2 months. Portioning into smaller servings can make defrosting easier when you're ready to enjoy it again.

  • Reheating: When ready to enjoy your leftover butternut squash risotto, reheat it gently on the stovetop. Add a splash of broth or water to restore its creamy consistency while warming.

Butternut Squash Risotto Variations

Let's explore the exciting ways to customize your butternut squash risotto and make it even more delightful!

  • Dairy-Free: Omit the cheese and use almond milk instead for a creamy texture, perfect for vegan diets. Try adding sautéed mushrooms for an earthy bite!
  • Nutty Twist: Stir in toasted walnuts or pine nuts just before serving for a delightful crunch that contrasts beautifully with the creamy risotto.
  • Spice it Up: Incorporate a pinch of red pepper flakes or a dash of cayenne pepper to introduce some heat, elevating your dish to a new flavor level.
  • Herb Infusion: Consider adding different herbs like thyme or tarragon for a fresh twist that brightens the dish. These herbs add a lovely herby aroma!
  • Squash Swap: Mix things up by substituting cubed butternut squash with sweet potatoes or acorn squash, creating a similar comfort dish with a unique flavor profile.
  • Cheesy Delight: For extra creaminess, stir in a dollop of mascarpone or cream cheese before serving. It’s pure indulgence!
  • Umami Boost: Add cooked mushrooms or sun-dried tomatoes to deepen the flavor and complexity, providing a savory punch in every bite. Consider pairing this with a light salad like a Pear Salad.
  • Sweet Surprise: Toss in some dried cranberries or apples toward the end of cooking for a sweet contrast that complements the squash's natural sweetness, reminiscent of fall flavors.

With these variations, you can switch up your butternut squash risotto based on your cravings or what you have on hand. Isn't it lovely to have so many ways to explore the comfort of this dish? Enjoy experimenting!

What to Serve with Butternut Squash Risotto

There's nothing quite like a cozy dinner filled with warm flavors and delightful textures to elevate your fall evenings.

  • Homemade Focaccia: This soft, pillowy bread is perfect for soaking up the creamy risotto and adds a delightful chewiness to each bite. Pair it with a drizzle of olive oil for an extra layer of flavor.

  • Pear Salad: Featuring fresh greens and juicy pears tossed in a light vinaigrette, this salad offers a crisp contrast that balances the richness of the risotto. The sweetness of the pears enhances the overall meal experience beautifully.

  • Shaved Brussels Sprouts Salad: Crispy Brussels sprouts, nuts, and a tangy lemon dressing add a crunchy element that complements the creaminess of the risotto while providing a burst of freshness.

  • Grilled Asparagus: Lightly charred asparagus adds a sophisticated touch. The slight bitterness and earthy flavor pair wonderfully with the sweetness of butternut squash risotto, achieving a well-rounded plate.

  • Crisp White Wine: A glass of dry Sauvignon Blanc will elevate the flavors of your meal, cutting through the creaminess with its refreshing acidity. It enhances the dining experience with a sophisticated touch.

  • Chocolate Mousse: For dessert, a rich and airy chocolate mousse provides a luxurious ending to your meal. The bittersweet chocolate will contrast nicely with the sweet notes of the risotto, leaving everyone satisfied.

Embrace the warmth of the season and impress your guests by incorporating these delightful pairings with your butternut squash risotto!

Butternut Squash Risotto Recipe FAQs

How do I choose the best butternut squash?
When selecting butternut squash, look for one that is firm, heavy for its size, and free from soft spots or blemishes. The skin should be a deep, uniform tan color, indicating ripeness. I often choose squash that feels dense, which usually means it's full of flavor and less watery when cooked.

How do I store leftover butternut squash risotto?
To store your leftover butternut squash risotto, allow it to cool down to room temperature for about 30 minutes. Then, transfer it to an airtight container and refrigerate for up to 3 days. If properly stored, it will retain its wonderful creaminess. Remember, you can also reheat it on the stovetop with a splash of broth or water to help restore its texture.

Can I freeze butternut squash risotto?
Absolutely! To freeze your butternut squash risotto, first let it cool completely. Then, portion it into freezer-safe containers or bags, removing excess air to prevent freezer burn. It can be stored for up to 2 months. When you're ready to enjoy it, thaw in the refrigerator overnight and reheat on the stovetop, adding a little broth or water to revive that creamy consistency.

What can I do if my risotto turns out too dry?
If your risotto feels too dry, don't worry! Simply add a bit more warm vegetable broth or water, gradually stirring it in until it reaches your desired consistency. You can also add a splash of white wine for extra flavor. Stirring continuously helps ensure everything combines well and gives you that luxurious, creamy texture.

Is this risotto suitable for vegetarians and vegans?
Yes, this butternut squash risotto is perfect for vegetarians since it uses vegetable broth. For a vegan version, simply omit the cheese or use a plant-based alternative. Whether you decide to indulge with cheese or keep it dairy-free, it will still be rich and comforting.

Butternut Squash Risotto

Butternut Squash Risotto: A Creamy Fall Comfort Dish

Butternut Squash Risotto is a creamy and comforting dish that embodies the flavors of fall, perfect for any dinner occasion.
Print Recipe Pin Recipe
Prep Time 10 minutes mins
Cook Time 30 minutes mins
Total Time 40 minutes mins
Servings: 4 servings
Course: Dinner
Cuisine: Italian
Calories: 350
Ingredients Equipment Method Nutrition Notes

Ingredients
  

For the Base
  • 2 tablespoons Extra-Virgin Olive Oil Adds richness and helps to sauté the vegetables.
  • 1 medium Yellow Onion Provides a savory base layer of flavor through sautéing.
  • 1 teaspoon Sea Salt Enhances overall taste; adjust according to preference.
  • 1/2 teaspoon Freshly Ground Black Pepper Introduces a subtle hint of spice; feel free to customize.
For the Risotto
  • 4 cups Cubed Butternut Squash The star of the dish; brings sweetness and creaminess when cooked.
  • 3 cloves Garlic Adds aromatic depth; finely chopped for better distribution.
  • 1 tablespoon Minced Rosemary or Sage Delivers earthy herbal notes; fresh herbs are recommended for optimal flavor.
  • 1 cup Uncooked Arborio Rice Essential for achieving that creamy texture.
  • 1/2 cup Dry White Wine Adds acidity and depth; can be omitted for a non-alcoholic option.
  • 3 cups Warmed Vegetable Broth The cooking liquid that enhances flavor; substitute with chicken broth if desired.
For Garnish
  • 1/4 cup Chopped Parsley or Small Sage Leaves Optional garnish that adds a refreshing touch.
  • 1/4 cup Grated Pecorino or Parmesan Cheese Optional but highly recommended for richness.

Equipment

  • Large skillet
  • Cutting Board
  • Knife
  • measuring cups
  • Measuring Spoons

Method
 

Step-by-Step Instructions
  1. In a large skillet over medium heat, warm 2 tablespoons of extra-virgin olive oil. Once the oil shimmers, add 1 chopped medium yellow onion with a pinch of sea salt and freshly ground black pepper. Stir and sauté for 2-3 minutes until the onion becomes translucent and fragrant.
  2. Stir in 4 cups of cubed butternut squash and continue to cook for an additional 6-8 minutes, stirring occasionally until the squash begins to soften.
  3. Mix in 3 minced garlic cloves along with 1 tablespoon of minced rosemary or sage. Cook for about 1 minute, then add 1 cup of uncooked Arborio rice, stirring continuously for another minute.
  4. Pour in 1/2 cup of dry white wine and stir continuously for 1-3 minutes, cooking until most of the liquid is absorbed.
  5. Gradually add 3 cups of warmed vegetable broth, starting with 3/4 cup at a time. Stir constantly until fully absorbed before adding the next portion, which will take about 20-25 minutes.
  6. Once the rice is tender and the mixture is creamy, remove from heat and season with sea salt and black pepper to taste.
  7. Serve hot, garnished with chopped parsley or sage leaves and grated Pecorino or Parmesan cheese.

Nutrition

Serving: 1bowlCalories: 350kcalCarbohydrates: 60gProtein: 10gFat: 10gSaturated Fat: 2gPolyunsaturated Fat: 1gMonounsaturated Fat: 3gSodium: 600mgPotassium: 800mgFiber: 7gSugar: 5gVitamin A: 8200IUVitamin C: 20mgCalcium: 100mgIron: 2mg

Notes

Stir constantly to achieve creamy texture. Use warm broth and taste as you go to season properly.

Tried this recipe?

Let us know how it was!

Savory Roasted Beets: Foil-Free and Irresistibly Sweet

September 5, 2025 by Grace Snow Leave a Comment

As I pulled a tray of shimmering red beets from the oven, the sweet, earthy aroma wrapped around me like a cozy blanket. This easy recipe for Perfect Roasted Beets is my go-to for those busy weeknights when I crave something simple yet delicious. With their wonderfully tender interiors and lightly caramelized exteriors, these roasted beets are not only vegan and gluten-free, but also incredibly inexpensive and pantry-friendly. Best of all, there’s no peeling involved—just scrub, slice, and roast. Whether you're a die-hard beet fan or hesitant about this root vegetable, I promise this dish will win you over. Curious about how you can elevate your meals with these vibrant gems? Let’s dive right in!

Why are Roasted Beets a Must-Try?

Simplicity at its finest: This foil-free method transforms the humble beet into a star dish with minimal effort. Just scrub, slice, and roast!

Irresistible Flavor: The natural sweetness intensifies during roasting, offering a rich, satisfying taste that even non-beet lovers will enjoy.

Versatile Pairing: Use them as a side dish, toss them in salads, or top with goat cheese and a drizzle of balsamic for a gourmet touch. Check out these delicious Maple Roasted Sweet potatoes for another easy recipe that bursts with flavor.

Seasonal Appeal: Perfect for any time of year, roasted beets shine in winter, spring, and fall menus, adding a stunning pop of color.

Crowd-Pleaser: Whether it’s a family dinner or a gathering with friends, they're sure to impress everyone at the table. Enjoy leftovers cold in salads or reheated as a cozy treat!

Roasted Beets Ingredients

  • For the Beets

  • Beets – The star of the dish, providing natural sweetness and earthy flavor; no peeling required!

  • For the Seasoning

  • Olive Oil – Enhances flavor and promotes caramelization; avocado oil makes a great neutral substitute.

  • Salt – Essential for bringing out the beets' natural sweetness; adjust based on your taste preferences.

  • Pepper – Adds a touch of heat; freshly cracked black pepper is best for maximum flavor.

Step‑by‑Step Instructions for Perfect Roasted Beets

Step 1: Preheat the Oven
Begin by preheating your oven to 375°F (190°C). This temperature is ideal for roasting beets, allowing them to caramelize beautifully without becoming too crispy. While the oven heats, gather a baking sheet, parchment paper if desired, and a scrub brush for cleaning the beets.

Step 2: Prepare the Beets
Thoroughly scrub each beet under running water to remove any dirt and debris, ensuring a clean surface for roasting. After scrubbing, cut the beets into uniformly-sized slices, about ½-inch thick. This uniformity is crucial for ensuring all pieces cook evenly, resulting in perfect roasted beets.

Step 3: Arrange on Baking Sheet
Spread the sliced beets onto the baking sheet in a single layer, ensuring there's space between each piece for optimal airflow during roasting. Avoid overcrowding the pan, as this can lead to steaming rather than roasting. If you have more beets than fit comfortably, consider using a second baking sheet.

Step 4: Season the Beets
Drizzle the beet slices with olive oil, using just enough to lightly coat them without excess pooling. Sprinkle salt and freshly cracked pepper over the beets, adjusting according to your preference. Toss the beets gently with your hands to ensure all slices are evenly seasoned and oiled for roasting.

Step 5: Roast the Beets
Place the baking sheet into the preheated oven and roast the beets for 30-40 minutes. Check for doneness by piercing with a fork; the beets should be tender and easily pierced. If necessary, rotate the baking sheet halfway through for even cooking and a beautifully caramelized exterior.

Step 6: Cool and Serve
Once the beets are tender, remove them from the oven and allow them to cool slightly. They can be enjoyed warm, at room temperature, or even chilled. Serve your perfect roasted beets as a delicious side dish or as an exciting addition to salads.

Storage Tips for Roasted Beets

  • Fridge: Store leftover roasted beets in an airtight container for up to 3 days. This will keep them fresh and flavorful for salads or side dishes.

  • Freezer: If you want to keep roasted beets longer, they can be frozen for up to 3 months. Ensure they're fully cooled, then place them in a freezer-safe bag, pressing out as much air as possible.

  • Reheating: Reheat roasted beets gently in the oven at 350°F (175°C) for about 10-15 minutes, or enjoy them cold in salads for a refreshing twist.

  • Serving Fresh: For the best taste, enjoy your roasted beets while they're fresh. Their sweet flavors and tender textures shine brightest when just roasted!

Roasted Beets Variations & Substitutions

Explore exciting ways to personalize your roasted beets with a few simple twists! The versatility of these vibrant gems allows you to enhance their natural sweetness and creativity in your cooking.

  • Herb-Infused: Toss the beets with fresh herbs like dill or chives before serving to add a burst of flavor and aroma.

  • Cheesy Delight: Top your roasted beets with crumbled goat cheese or feta and a drizzle of balsamic vinegar for a deliciously tangy contrast.

  • Different Colors: Try roasting golden beets instead of the classic red variety for a milder flavor and stunning presentation. They bring a lovely visual twist to your dish!

  • Spicy Kick: Add a sprinkle of cayenne pepper or crushed red pepper flakes to kick up the heat, balancing the sweetness of the beets with a spicy finish.

  • Nutty Texture: For extra crunch, sprinkle chopped nuts such as candied pecans or walnuts on top after roasting. The nutty richness elevates the dish to the next level!

  • Vinegar Brightness: A splash of apple cider vinegar or lemon juice right before serving can brighten the entire dish, enhancing the beets' natural sweetness.

  • Maple Glaze: For a sweet twist, brush the beets with a mix of maple syrup and olive oil before roasting. This caramelizes beautifully, creating an irresistible glaze.

  • Add Citrus: Toss some orange or grapefruit segments with the beets right before serving. The bright, citrusy notes complement the earthy flavor of the beets wonderfully. For more seasonal delights, check out these Roasted Corn Fried options to pair alongside!

No matter how you decide to enhance your roasted beets, remember that the best ingredient is your love for cooking and sharing delicious meals with those who matter most!

Expert Tips for Perfect Roasted Beets

  • Even Slices: Ensure uniform slicing of the beets for even cooking. This prevents some pieces from becoming mushy while others remain firm.

  • Single Layer: Spread the beet slices in a single layer on the baking sheet. Overcrowding can lead to steaming instead of roasting, resulting in less flavorful roasted beets.

  • Monitor Cooking Time: Check for doneness at the 30-minute mark. Depending on size, they may need a bit longer, but keeping an eye on them prevents overcooking.

  • Oven Positioning: When roasting multiple trays, swap their positions halfway through to achieve even caramelization on all beet pieces.

  • Flavor Boost: Experiment with fresh herbs like dill or chives in the last 5 minutes of roasting for an aromatic enhancement to your roasted beets.

What to Serve with Perfect Roasted Beets

Dive into an array of delightful pairings that elevate the sweetness of these beautifully roasted vegetables.

  • Creamy Goat Cheese: Adds a rich, tangy taste that perfectly balances the earthy sweetness of the beets. A sprinkle of fresh herbs can take this combination to the next level.

  • Mixed Green Salad: Fresh greens such as arugula or baby spinach provide a crisp, refreshing contrast to the tender beets, creating a vibrant, colorful dish.

  • Candied Pecans: These add a delightful crunch and sweetness that complements the caramelized edges of the roasted beets, creating a harmonious texture.

  • Quinoa Pilaf: Nutty quinoa offers a satisfying base, while its fluffy texture pairs beautifully with the sweetness of roasted beets. Toss with lemon juice for a zesty finish.

  • Balsamic Reduction: Drizzle a velvety balsamic glaze over the beets to enhance their natural sweetness with a touch of acidity. It’s a game-changer for flavor.

  • Herb-Infused Couscous: Light, fluffy couscous flavored with fresh herbs brings a delicate touch and a lovely synergy with roasted beets’ earthiness.

  • Red Wine: A fruity red wine harmonizes with the beets' flavors, adding depth to your meal. Opt for a light-bodied variety to keep it refreshing.

  • Chocolate Dessert: Finish with dark chocolate mousse or brownies for a luxurious dessert experience. The bittersweet chocolate contrasts nicely with the sweet, earthy flavors of the beets.

Let your imagination run wild as you pair these Perfect Roasted Beets with these crowd-pleasing side dishes and accompaniments!

Make Ahead Options

These Perfect Roasted Beets are ideal for meal prep enthusiasts looking to save time during busy weeknights! You can scrub and slice the beets up to 24 hours in advance; simply store them in an airtight container in the refrigerator to keep them fresh. Additionally, you can season the sliced beets with olive oil, salt, and pepper and refrigerate them for added convenience. When you're ready to serve, just roast the prepared beets in a preheated oven for 30-40 minutes, ensuring to check for tenderness. This way, you'll have delicious, tender roasted beets ready with minimal effort, just as satisfying as if you made them on the spot!

Perfect Roasted Beets Recipe FAQs

How can I select the best beets for roasting?
Absolutely! When choosing beets, look for firm bulbs with smooth skin and no dark spots or blemishes. Smaller to medium-sized beets are often sweeter and more tender compared to larger ones. Also, vibrant color and fresh greens can indicate freshness, but make sure to remove the greens before roasting, as they can sap moisture from the beet.

How should I store leftover roasted beets?
To keep your delicious roasted beets fresh, store them in an airtight container in the refrigerator. They will stay good for up to 3 days. If you're planning to enjoy them later, you can create a delightful salad by tossing them with some fresh greens and a light dressing for a refreshing meal.

Can I freeze roasted beets for later use?
Absolutely! Freezing roasted beets is a great way to preserve their lovely flavor and texture. First, allow them to cool completely, then place them in a freezer-safe bag, removing as much air as possible to prevent freezer burn. Properly stored, they can last for up to 3 months. When you're ready to enjoy them, simply thaw in the refrigerator overnight and reheat them gently in the oven.

What should I do if my roasted beets are overcooked?
If you find that your beets have become too soft or mushy while roasting, don’t worry! The flavor is still intact, and you can repurpose them. Consider mashing them into a puree or blending them into a soup for a creamy dish. You can also use them as a vibrant base for dips or spreads, adding ingredients like garlic and yogurt for an extra flavor kick.

Are roasted beets safe for pets to eat?
While beets are generally safe for dogs and cats in moderate amounts, it’s best to consult your veterinarian before introducing any new foods into your pet’s diet. If you decide to share, ensure they’re served plain, without seasoning or added oils that might upset your pet’s stomach. Always observe for any signs of allergic reactions.

Can I make roasted beets ahead of time?
Very much! You can roast the beets in advance and store them in the fridge for up to 3 days. This makes meal prep a breeze! Simply roast them, let them cool, and store in an airtight container. When it’s time to serve, just reheat them gently, or enjoy them cold in salads or grain bowls. The convenience will make your busy weeknights much more delicious!

Roasted Beets

Savory Roasted Beets: Foil-Free and Irresistibly Sweet

This simple recipe for Roasted Beets delivers a sweet and earthy flavor, perfect for any meal.
Print Recipe Pin Recipe
Prep Time 10 minutes mins
Cook Time 35 minutes mins
Total Time 45 minutes mins
Servings: 4 beets
Course: Salads
Cuisine: Vegan
Calories: 75
Ingredients Equipment Method Nutrition Notes

Ingredients
  

For the Beets
  • 4-5 medium Beets No peeling required!
For the Seasoning
  • 2 tablespoons Olive Oil Avocado oil is a neutral substitute.
  • 1 teaspoon Salt Adjust according to taste.
  • 1/2 teaspoon Pepper Freshly cracked black pepper is best.

Equipment

  • Baking Sheet
  • Parchment Paper
  • Scrub brush

Method
 

Step-by-Step Instructions
  1. Preheat your oven to 375°F (190°C).
  2. Thoroughly scrub each beet under running water, then slice into ½-inch thick pieces.
  3. Spread the sliced beets onto a baking sheet in a single layer.
  4. Drizzle with olive oil, sprinkle with salt and pepper, and toss gently.
  5. Roast for 30-40 minutes, checking for tender doneness.
  6. Allow to cool slightly before serving warm, at room temperature, or chilled.

Nutrition

Serving: 1beetCalories: 75kcalCarbohydrates: 17gProtein: 2gSodium: 170mgPotassium: 305mgFiber: 2gSugar: 9gVitamin A: 33IUVitamin C: 4mgCalcium: 37mgIron: 0.8mg

Notes

Experiment with fresh herbs like dill or chives for additional flavor in your roasted beets.

Tried this recipe?

Let us know how it was!
  • « Previous Page
  • 1
  • …
  • 4
  • 5
  • 6
  • 7
  • 8
  • …
  • 30
  • Next Page »

Welcome!

Hi, I’m Grace, a Sydney-based home cook with a passion for bold flavors and trending ingredients. Whether you’re a busy beginner or a seasoned foodie, you’ll find dishes here that are fresh, fun, and full of flavor.

More about me

Popular Recipes

  • Slow Cooker Chicken Alfredo
    Creamy Slow Cooker Chicken Alfredo for Effortless Family Dinners
  • Ranch Chicken
    Crispy Ranch Chicken with Creamy Herb Sauce to Savor Tonight
  • Slow Cooker Chicken Thighs
    Irresistibly Tender Slow Cooker Chicken Thighs for Family Bliss
  • Butternut Hummus with Feta & Pomegranates
    Creamy Butternut Hummus with Feta & Pomegranates Delight

Footer

↑ back to top

About

  • Privacy Policy
  • Disclaimer
  • Terms & Conditions

Newsletter

  • Sign Up! for emails and updates

Contact

  • About me
  • Contact me

Copyright © 2025 TastyTrendIngredients