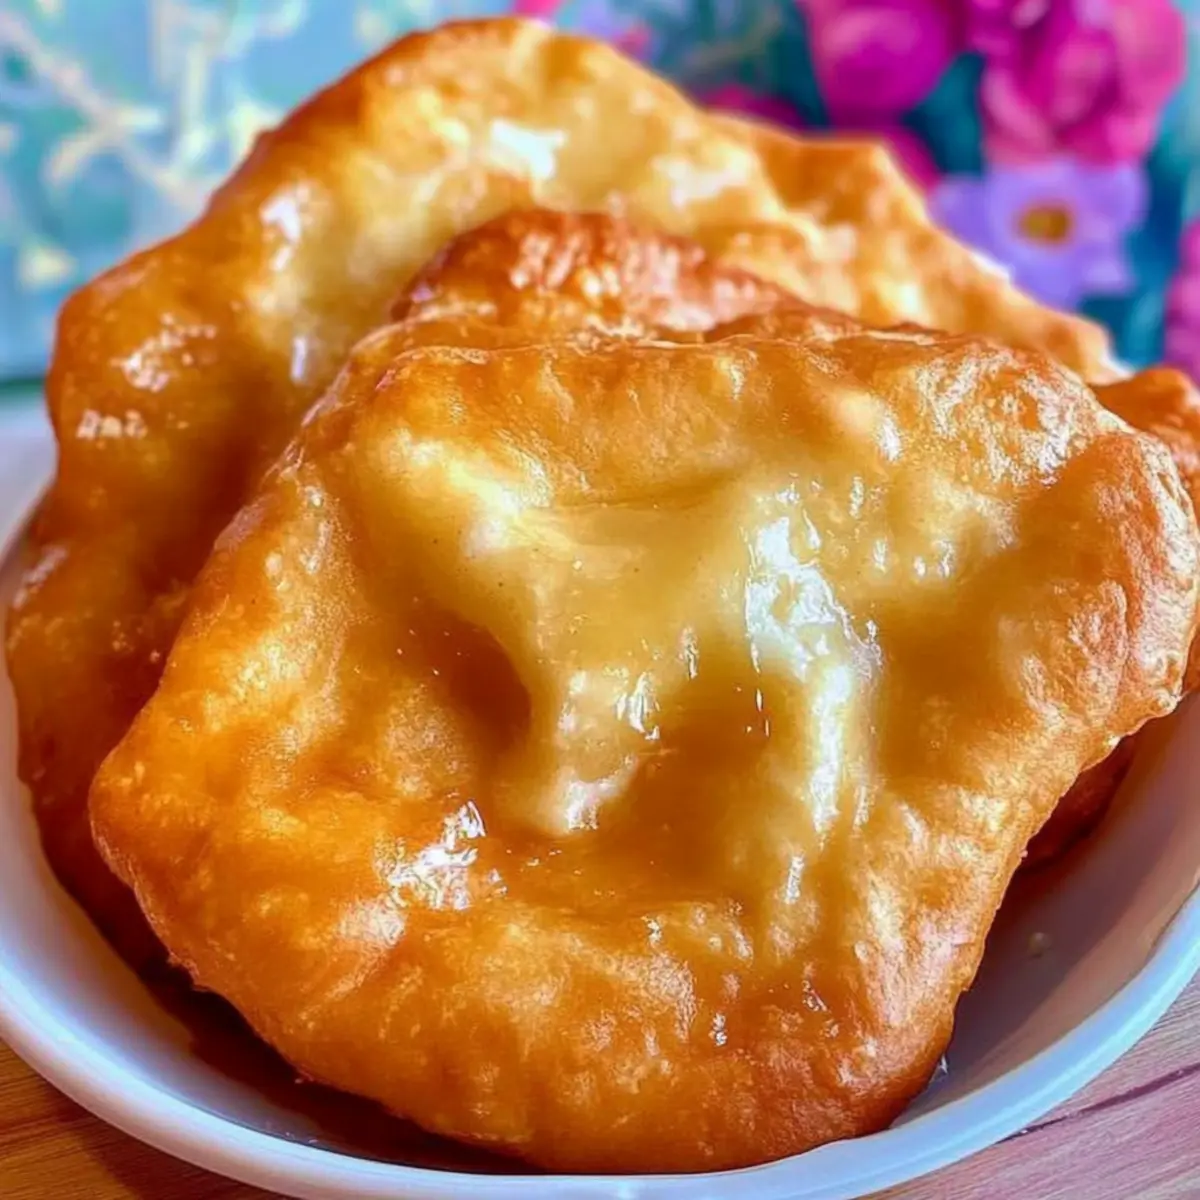
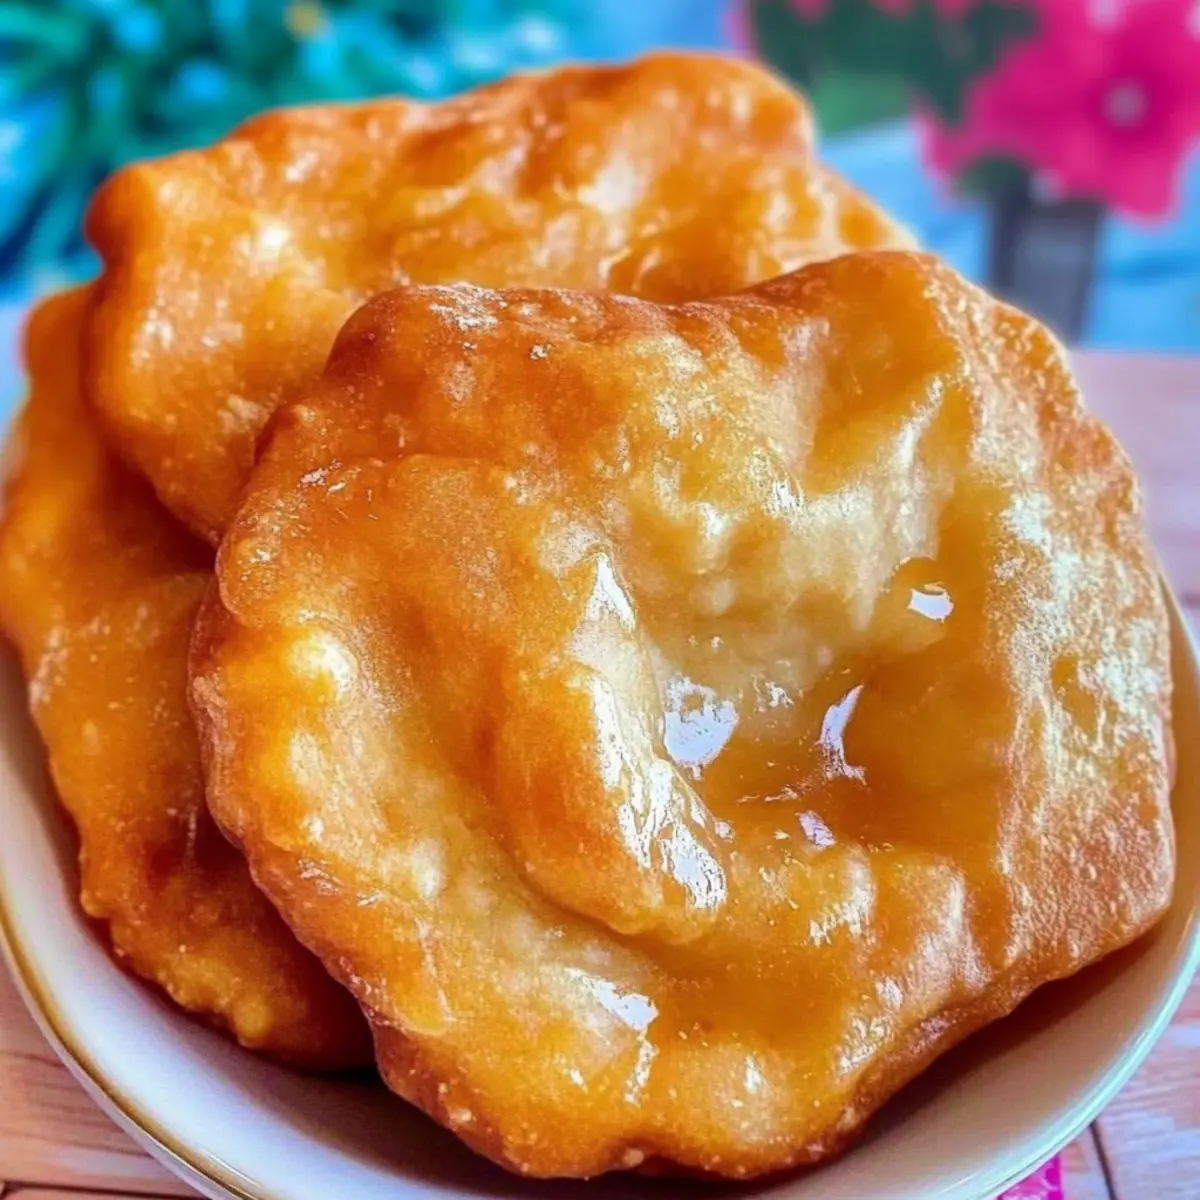
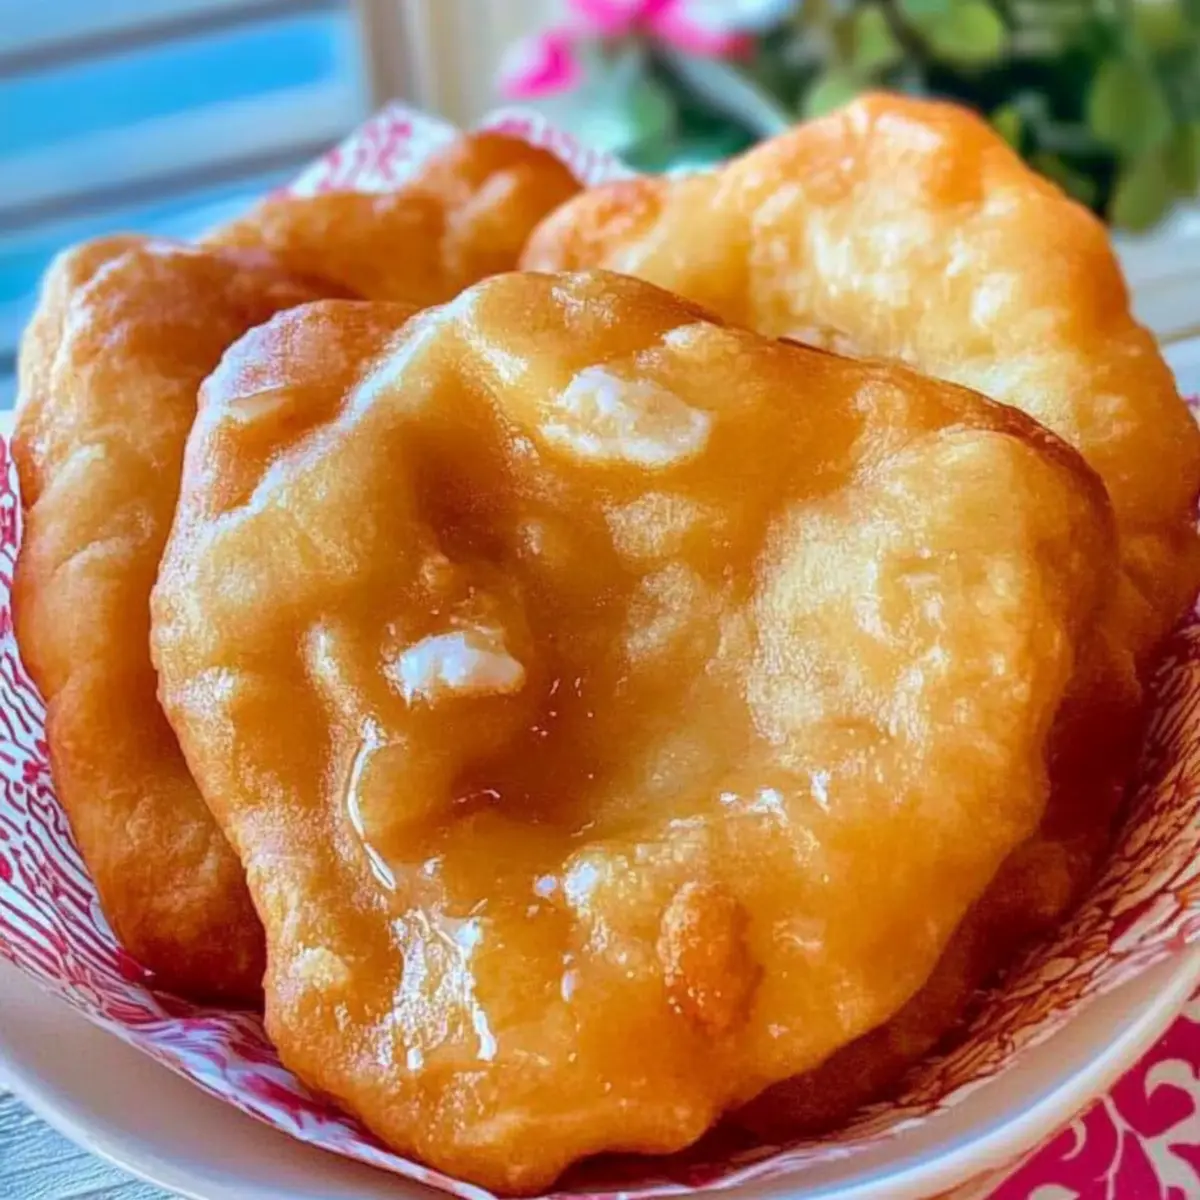
tastytrendingredients

  • Home
  • Recipes
    • Appetizers
    • Breakfast
    • Dessert
    • Dinner
    • Drinks
    • Salads
    • Snacks
    • Soups
  • About me
  • Contact me
menu icon
go to homepage
  • Home
  • Recipes
    • Appetizers
    • Breakfast
    • Dessert
    • Dinner
    • Drinks
    • Salads
    • Snacks
    • Soups
  • About me
  • Contact me
search icon
Homepage link
  • Home
  • Recipes
    • Appetizers
    • Breakfast
    • Dessert
    • Dinner
    • Drinks
    • Salads
    • Snacks
    • Soups
  • About me
  • Contact me
×

Deliciously Soft Breadstick Bones for a Spooky Halloween Treat

September 24, 2025 by Grace Snow Leave a Comment

As the first whispers of autumn swirl around us, it’s time to conjure up some culinary magic that brings a playful twist to your Halloween gatherings. Enter my Spooky Cheesy Breadstick Bones, a delightful homemade appetizer that’s soft, cheesy, and utterly irresistible. Perfect for dipping in marinara sauce to create a “bloody” effect, they quickly become the star of any festive spread. Not only are they a whimsical addition to your Halloween feast, but they are also quick to whip up, making them a no-stress option for busy home chefs. Whether you're hosting a Halloween party or simply looking to add some frightful fun to dinner, these breadstick bones are a crowd-pleaser that both kids and adults will adore. Ready to embrace the spooky spirit in your kitchen? Let’s dive into this fun recipe!

Why Are These Breadstick Bones a Must-Try?

Simplicity at its best: These breadstick bones require just basic skills, allowing anyone to create a spooky centerpiece for their Halloween feast.
Flavorful and cheesy: The combination of garlic salt and parmesan adds a savory twist that complements the soft texture beautifully.
Versatile for any occasion: While perfect for Halloween, these breadsticks can be shaped for any holiday or celebration, keeping your creativity flowing!
Quick to prepare: With minimal rising time and straightforward instructions, you’ll have a fun appetizer ready in no time, making it an excellent option for last-minute gatherings.
Crowd-pleasing appeal: They are sure to delight guests of all ages, making your party memorable and delicious. Serve them warm with your favorite marinara sauce for added excitement and watch them disappear!

Breadstick Bones Ingredients

For the Dough

  • Warm Water – Hydration is key; use lukewarm water (100°F max) to encourage yeast growth.
  • Active Dry Yeast – Fresh yeast is essential; it provides the perfect leavening for your breadstick bones.
  • Sugar – This little sweetener feeds the yeast; feel free to substitute with honey if desired.
  • Salt – Don’t skimp on this; it enhances flavor and controls yeast activity for perfectly risen breadsticks.
  • Canola Oil – Adds moisture; you can swap it with vegetable oil or melted butter for variation.
  • Flour (3-3¼ cups) – The backbone of your breadsticks; all-purpose flour is ideal, or use a gluten-free blend.
  • Butter – A brush of melted butter gives richness and flavor; olive oil is a great substitute.
  • Garlic Salt – Infuses flavor; fresh minced garlic works wonderfully if you're feeling adventurous.

For the Topping

  • Grated Parmesan Cheese – This delectable topping adds umami flavor; feel free to switch it with hard cheeses like pecorino.

For Serving

  • Marinara Sauce – Essential for that "bloody" dip; any tomato-based sauce will do just fine.

Step‑by‑Step Instructions for Cheesy Breadstick Bones

Step 1: Prepare Yeast Mixture
In a medium bowl, combine 1 packet of active dry yeast and 1 tablespoon of sugar with 1 cup of lukewarm water (around 100°F). Stir gently and let it sit for about 5-10 minutes until it becomes frothy, indicating that the yeast is active. This yeast mixture is critical for achieving the perfect rise in your breadstick bones.

Step 2: Mix Dough
Once the yeast is frothy, add 1 teaspoon of salt and 2 tablespoons of canola oil to the bowl. Gradually mix in 2 cups of all-purpose flour until the ingredients come together. Continue to add flour, a little at a time, until a soft, slightly tacky dough forms. This mixture will serve as the foundation for your delicious cheesy breadstick bones.

Step 3: Knead
Turn the dough out onto a lightly floured surface and knead for about 5-7 minutes, or until the dough is smooth and elastic. It should be soft but not overly sticky; if needed, sprinkle a little more flour as you knead. Once ready, place the dough in a greased bowl, cover it with a damp cloth, and let it rise in a warm spot for 1 hour or until it has doubled in size.

Step 4: Shape Bones
After the dough has risen, punch it down to release the air. Divide it into 16 equal pieces, rolling each piece into a rope about 12 inches long. To create the bone shape, cut slits into the ends of each rope, shaping them as you go. Lay the shaped breadstick bones on a parchment-lined baking sheet, ensuring they have space to expand during the second rise.

Step 5: Second Rise
Cover the shaped dough with a clean kitchen towel and let it rise for another 45 minutes in a warm location, allowing them to puff up slightly. During this time, preheat your oven to 425°F so it's ready when the dough finishes its rise. This second rise is key for achieving soft and fluffy breadstick bones.

Step 6: Bake
Once the breadstick bones have completed their second rise, place the baking sheet in the preheated oven. Bake for 12-14 minutes, or until they are golden brown and sound hollow when tapped. The heavenly aroma of the baking breadsticks will fill your kitchen—an indication that your spooky cheesy breadstick bones are almost ready!

Step 7: Finish
After baking, remove the breadsticks from the oven. Brush them with melted butter, then sprinkle with garlic salt and grated Parmesan cheese while they are still warm. This finishing touch enhances flavor and gives your breadstick bones an irresistible appeal. Serve immediately with marinara sauce for dipping and enjoy the festive playfulness!

Storage Tips for Breadstick Bones

  • Room Temperature: Store baked breadstick bones in an airtight container for up to 4-5 days to maintain their softness and flavor. Keep them in a cool, dry place for best results.
  • Freezer: For long-term storage, place cooled breadsticks in a freezer-safe bag or container; they can be frozen for up to 2 months. To enjoy, thaw and reheat directly from frozen.
  • Reheating: To revive the softness, reheat breadsticks in the oven at 350°F for about 5-7 minutes. This will ensure they are warm and slightly crispy again, ready to pair with marinara sauce!
  • Dough Preparation: If you want to make ahead, freeze pre-shaped, unbaked dough on a baking sheet first, then transfer to a Ziploc once solid. Bake directly from frozen for a quick treat!

What to Serve with Spooky Cheesy Breadstick Bones

As you prepare these delightful breadstick bones, think of complementary dishes that will enhance your Halloween feast's theme and flavor.

  • Pumpkin Chili: The rich flavors of this chunky chili offer a warm contrast to the cheesy breadstick bones, creating a hearty meal. A scoop of this hearty dish can balance the festive fun of the breadsticks perfectly.

  • Mummy Hot Dogs: These playful pastries bring a whimsical touch alongside the spooky breadsticks. Their savory taste and flaky texture are sure to excite little ghouls and goblins at the table!

  • Crispy Sweet Potato Fries: Crunchy, lightly spiced fries bring an excellent texture contrast to the soft breadsticks. They also add a vibrant color to your spread—a feast for the eyes!

  • Witch’s Brew Salad: A fresh mix of greens topped with Halloween-themed toppings, like jack-o’-lantern tomatoes and bat-shaped croutons, will brighten your meal. This salad offers a fresh and zesty balance, making every bite enjoyable.

  • Eyeball Caprese Skewers: Cherry tomatoes and mozzarella balls make fun and spooky eye-shaped snacks. Their creamy, tangy flavor contrasts beautifully with the cheesy breadstick bones, creating a delicious medley.

  • Apple Cider: A warm mug of apple cider spices up your gathering with cozy fall flavors. Perfectly complements the cheesy goodness of the breadsticks while enhancing that Halloween spirit within every sip.

  • Brownie Bites: End your meal on a sweet note with these fudgy bites. Their richness beautifully balances the savory flavors of the appetizer, making them an ideal festive treat.

Think of these pairings to create an enchanting and delightful Halloween spread that everyone will rave about!

Make Ahead Options

These Spooky Cheesy Breadstick Bones are perfect for meal prep, allowing you to enjoy stress-free entertaining! You can prepare the dough and shape it into bones up to 24 hours in advance. Simply follow the mixing and kneading instructions, then shape the bones and place them on a baking sheet. Cover and refrigerate overnight. When you're ready to bake, allow them to come to room temperature while you preheat your oven to 425°F. Bake for 12-14 minutes until golden brown, brushing with butter and topping with garlic salt and Parmesan as usual. This way, you'll have delicious homemade breadsticks with minimal last-minute fuss!

Expert Tips for Breadstick Bones

  • Perfect Yeast Activation: Always ensure your yeast is fresh and the water temperature is just right (around 100°F) for optimal dough rise.

  • Kneading Matters: Knead the dough until it’s smooth and slightly tacky, avoiding excess flour that can lead to dry breadsticks.

  • Shaping Tips: When cutting slits to create bone shapes, use kitchen scissors for precision, ensuring a fun appearance while maintaining structure.

  • Warm Rising Spot: Let your dough rise in a warm, draft-free environment. If your house is cool, place it near a warm oven or on top of a bowl of warm water.

  • Baking Insight: Keep an eye on the breadsticks in the oven; it’s easy to overbake them. They should be golden brown and sound hollow when tapped.

  • Storage Solutions: Baked breadstick bones can last 4-5 days at room temperature or be frozen for up to 2 months, perfect for quick snacking!

Breadstick Bones Variations & Substitutions

Feel free to get creative and customize your breadstick bones to match your family's taste and dietary needs!

  • Herb-Infused: Add dried Italian herbs to the dough for a savory twist, elevating the overall flavor profile.

  • Cheese-Loaded: Incorporate shredded mozzarella or cheddar directly into the dough for extra cheesiness and gooeyness. The melted cheese pulls will be a real crowd-pleaser!

  • Gluten-Free: For a gluten-free version, swap regular flour with a 1:1 gluten-free baking blend, allowing everyone to join in on the fun.

  • Spicy Kick: Mix in a pinch of red pepper flakes for a subtle heat, giving these breadsticks a delightful zing that pairs well with marinara.

  • Sweet Variation: For a fun dessert twist, add a pinch of cinnamon and a sprinkle of sugar before baking. Serve with warm chocolate sauce for dipping!

  • Toppings Mix: Instead of just garlic salt and parmesan, try topping with everything bagel seasoning or a dash of smoked paprika for a unique flavor.

  • Alternative Dips: Serve with pesto, ranch dressing, or even a caramel sauce for an unexpected taste adventure. Each option creates a unique experience!

  • Shape Flexibility: Play around with different shapes—for instance, twist them into spirals or make them into simple sticks for variation; they’ll still be delicious and fun!

For serving ideas, consider pairing your spooky breadstick bones with some of your favorite favorite Halloween dishes, like themed pizzas or pumpkin chili, for a festive feast!

Breadstick Bones Recipe FAQs

How do I choose the right ingredients for my breadstick bones?
Absolutely! For the best results, ensure your active dry yeast is fresh; check the expiration date before using. Use lukewarm water (about 100°F) to activate the yeast effectively. For flour, all-purpose is ideal, but if you’re gluten-free, a 1:1 flour blend works beautifully too. When selecting cheese, grated Parmesan adds a lovely umami flavor, but feel free to let your creativity shine with alternatives like pecorino.

What’s the best way to store leftover breadstick bones?
Very good question! Store any baked breadstick bones in an airtight container at room temperature for up to 4-5 days. If you want to keep them longer, freezing is the way to go! Simply place them in a freezer bag or container, and they can last for up to 2 months. When you’re ready to enjoy them, just thaw and reheat in a preheated oven at 350°F for 5-7 minutes for that warm, soft texture again!

Can I freeze the dough for breadstick bones before baking?
Yes, you can! To freeze the unbaked dough, first shape the bones and place them on a lined baking sheet. Freeze them until solid, then transfer to a Ziploc bag for easy storage. When you're ready to bake, pop them in the oven straight from the freezer—just add a few extra minutes to the baking time. This is a great way to make ahead for those busy days!

Why didn't my breadstick bones rise properly?
Sometimes this happens, but don’t worry, it’s fixable! Ensure your yeast is active; if it doesn't foam after mixing with warm water and sugar, it may be old or the water temperature was off. Also, make sure your dough is kneaded enough—it should be smooth and slightly tacky but not overly sticky. If your dough is too dry, adding a tiny bit of water during kneading can help; aim for a soft, elastic consistency.

Are these breadstick bones suitable for special dietary needs?
Definitely! This recipe is quite versatile. For gluten-free options, you can use a 1:1 gluten-free flour blend. If you're avoiding dairy, try using a non-dairy butter as a substitute and skip the cheese topping for your breadstick bones. Always check labels for any allergies, especially when serving to guests with dietary restrictions. Enjoy the festivities without worry!

Breadstick Bones

Deliciously Soft Breadstick Bones for a Spooky Halloween Treat

These Breadstick Bones are a fun, cheesy appetizer perfect for Halloween gatherings.
Print Recipe Pin Recipe
Prep Time 15 minutes mins
Cook Time 14 minutes mins
Rising Time 1 hour hr 45 minutes mins
Total Time 2 hours hrs 14 minutes mins
Servings: 16 pieces
Course: Appetizers
Cuisine: American
Calories: 120
Ingredients Equipment Method Nutrition Notes

Ingredients
  

For the Dough
  • 1 cup Warm Water Lukewarm (around 100°F)
  • 1 packet Active Dry Yeast Fresh yeast is essential
  • 1 tablespoon Sugar Feeds the yeast
  • 1 teaspoon Salt Enhances flavor
  • 2 tablespoons Canola Oil Can substitute with vegetable oil or melted butter
  • 3 cups All-Purpose Flour 3-3¼ cups depending on dough consistency
  • 2 tablespoons Butter Melted for brushing
  • 1 teaspoon Garlic Salt Infuses flavor
For the Topping
  • ½ cup Grated Parmesan Cheese Can substitute with hard cheeses
For Serving
  • 1 cup Marinara Sauce For dipping

Equipment

  • Mixing Bowl
  • Baking Sheet
  • Parchment Paper
  • Kitchen Towel

Method
 

Step-by-Step Instructions
  1. In a medium bowl, combine 1 packet of active dry yeast and 1 tablespoon of sugar with 1 cup of lukewarm water (around 100°F). Stir gently and let it sit for about 5-10 minutes until it becomes frothy.
  2. Once the yeast is frothy, add 1 teaspoon of salt and 2 tablespoons of canola oil. Gradually mix in 2 cups of all-purpose flour until the dough comes together.
  3. Turn the dough onto a floured surface and knead for 5-7 minutes until smooth. Place in a greased bowl, cover, and let rise for 1 hour.
  4. Punch down the dough, divide into 16 pieces, and roll each into a 12-inch rope. Cut slits into the ends to shape them like bones.
  5. Cover the shaped dough and let rise for another 45 minutes. Preheat the oven to 425°F while they rise.
  6. Bake the breadsticks for 12-14 minutes until golden brown. They should sound hollow when tapped.
  7. Brush the warm breadsticks with melted butter, sprinkle with garlic salt and Parmesan cheese. Serve with marinara sauce.

Nutrition

Serving: 1pieceCalories: 120kcalCarbohydrates: 18gProtein: 3gFat: 4gSaturated Fat: 2gPolyunsaturated Fat: 0.5gMonounsaturated Fat: 1gCholesterol: 10mgSodium: 220mgPotassium: 60mgFiber: 1gVitamin A: 200IUCalcium: 60mgIron: 0.5mg

Notes

For best results, ensure yeast is fresh and water is at the right temperature. Store baked breadsticks in an airtight container for up to 4-5 days.

Tried this recipe?

Let us know how it was!

Creepy Skewered Salami Eyeballs: Spooky Fun for Halloween

September 24, 2025 by Grace Snow Leave a Comment

“Have you ever wanted a snack that’s both playful and a little bit creepy?” That’s exactly what you’ll get with these Creepy Skewered Salami Eyeballs, a Halloween appetizer that’s sure to steal the spotlight at your next gathering. Not only are these eye-catching treats quick and easy to prepare, but they also bring a delightful twist to the classic Italian flavors we all love. Picture your guests’ reactions as they enjoy these amusing yet savory snacks - a fantastic way to bridge the gap between fun and flavor! Whether you’re hosting a Halloween party or just want to impress family with a charming surprise, these salami eyeballs will be a hit with both kids and adults. Are you ready to make your spooky spread unforgettable?

Why Are These Eyeballs So Fun?

Eye-catching: These Creepy Skewered Salami Eyeballs are not just a snack; they’re a conversation starter! Their unique presentation will leave your guests both laughing and impressed.

Quick & Easy: With simple ingredients and straightforward steps, whipping up these delightful treats takes hardly any time—perfect for busy hosts!

Savory Satisfaction: Enjoy the rich flavor of pepperoni combined with creamy mozzarella and briny olives—every bite is a tasty treat that appeals to all ages.

Festive Appeal: Ideal for Halloween parties, they can be easily served next to ghostly dips or spooky desserts, adding a playful touch to your spread.

Make-Ahead Magic: Prepare them a few hours in advance and let them chill—less stress for you before the festivities begin! Don’t forget to check out our tips for creating a spooky platter that will wow your guests.

Creepy Skewered Salami Eyeballs Ingredients

For the Eyeballs

  • Mozzarella Balls – Use fresh mozzarella for a creamy texture that forms the base of your eyeballs.
  • Kalamata Olives – Chop these to create the "eyes" that add a briny kick to each eyeball.
  • Pepperoni Stick – Adds savory flavor and structure—pre-sliced is great for convenience.

For the Decoration

  • Red Bell Pepper – This colorful addition enhances the visual appeal; you can substitute with dried chili peppers for added heat.

Assembly Essentials

  • Skewers – Use wooden or bamboo skewers to easily stack your ingredients for the creepy effect.

Get ready to delight your guests with these Creepy Skewered Salami Eyeballs, the perfect Halloween appetizer!

Step‑by‑Step Instructions for Creepy Skewered Salami Eyeballs

Step 1: Prepare Mozzarella
Begin by taking your fresh mozzarella balls and using a small knife to gently carve out indentations on one side of each ball. These will hold the kalamata olives, creating the perfect eye effect. Aim for about a thumbprint-sized indent, ensuring the cheese remains intact. Arrange the mozzarella on a platter and set aside while you prepare the rest of the ingredients.

Step 2: Make Eyes
Now it’s time to mix in the fun! Finely chop your kalamata olives and spoon them into the indentations made in the mozzarella balls. The dark color of the olives will create a striking contrast against the creamy mozzarella, giving each Creepy Skewered Salami Eyeball a lifelike appearance. Set the cheeseballs aside to allow the flavors to meld.

Step 3: Slice Pepperoni
Take your pepperoni stick and slice it into thick disks of about ¾-inch each, then make thin slices between ¼ to ½ inch thick. The variation in size will add extra intrigue to your skewers while providing bites of delightful flavor. Keep these slices handy as you prepare to assemble your skewers.

Step 4: Prepare Red Pepper
Next, grab your red bell pepper and chop it into small wedge-shaped pieces. These will serve as colorful accents between the mozzarella and pepperoni layers on your skewers. Make sure the pieces are uniform in size to ensure even assembly, and keep them close by for when you’re ready to build your Creepy Skewered Salami Eyeballs.

Step 5: Assemble Skewers
With all components ready, take your wooden or bamboo skewers and start assembling! Begin with a wedge of red bell pepper, followed by a chunk of pepperoni, then add a mozzarella ball with an olive eye. Stack a thicker slice of pepperoni next, and finish with another mozzarella ball for balance. Ensure each skewer looks appealing and is sturdy enough to hold together.

Step 6: Chill & Serve
To maximize the creepiness factor, refrigerate your assembled Creepy Skewered Salami Eyeballs for at least 1-2 hours. This chilling time allows the flavors to meld and makes the skewers refreshingly cool for your guests. When ready to serve, present them on a thematic platter that adds to the spooky ambiance of your Halloween gathering!

How to Store and Freeze Creepy Skewered Salami Eyeballs

  • Fridge: Keep leftover Creepy Skewered Salami Eyeballs wrapped in an airtight container in the refrigerator for up to 3 days. This helps maintain their freshness and visual appeal.

  • Freezer: While it's not ideal to freeze these skewers due to the cheese and other ingredients, if necessary, you can store them in a freezer-safe container for up to 1 month. Thaw in the fridge before serving.

  • Preparation Time: If making ahead, prepare the skewers a few hours in advance, allowing them to chill in the fridge to enhance flavor meld and presentation.

  • Reheating: These skewers are best served cold, but if you prefer them warm, lightly microwave them for 10-15 seconds, just enough to take the chill off without melting the cheese completely.

Make Ahead Options

These Creepy Skewered Salami Eyeballs are fantastic for meal prep, allowing you to spend less time in the kitchen on Halloween night! You can prepare the mozzarella and olives up to 24 hours in advance; simply carve the indents in the mozzarella and fill them with chopped olives, then store them in an airtight container in the refrigerator. The pepperoni and red bell pepper can also be prepped ahead, cutting them into pieces and keeping them refrigerated until assembly. When you’re ready to serve, just assemble the skewers with the prepped ingredients and chill them for at least 1-2 hours to ensure they’re refreshingly cool and visually striking. This means you can enjoy a stress-free soirée while still impressing your guests!

Creepy Skewered Salami Eyeballs Variations

Feel free to unleash your creativity and customize these spooky snacks to match your taste!

  • Cheese Twist: Swap mozzarella for feta or goat cheese for a tangy variation that adds an exciting flavor profile.
    The creaminess of goat cheese paired with the savory elements will create an intriguing balance.

  • Spicy Kick: Use spicy pepperoni or add jalapeños for an extra heat bomb in every bite.
    This twist will appeal to spice lovers and adds a daring twist to your Halloween appetizers.

  • Vegetable Medley: Replace red bell pepper with other colorful veggies like cherry tomatoes, cucumbers, or yellow bell peppers.
    Incorporating a variety of colors not only enhances your presentation but also keeps things fresh and vibrant.

  • Olive Options: Opt for green olives stuffed with pimentos for a fun, cartoonish effect instead of kalamata.
    These can give your eyeballs a lighter, whimsical feel that’s just as charming in appearance.

  • Herb Infusion: Sprinkle a touch of dried herbs like oregano or basil on your mozzarella for a flavor boost that nods to Italian cuisine.
    Enhancing the cheese will add an unexpected layer of deliciousness!

  • Meat Choices: Swap out pepperoni for alternative meats like salami, chorizo, or even prosciutto if you want a gourmet take.
    Each of these meats brings its own unique flavor that can elevate your appetizer game.

  • Sweet & Savory: Add a drizzle of balsamic glaze or honey over the finished skewers to contrast the savory elements with a hint of sweetness.
    It’s a delightful surprise that will leave your guests wanting more!

  • Garnishing Greatness: Top each skewer with fresh herbs like basil or parsley for a pop of color and freshness.
    This final touch will not only enhance the aesthetic but also provide a refreshing element to each bite.

Feel free to explore these variations and let your inner chef shine! Whether aiming for a festive look or a flavor twist, the possibilities are endless. As you create these delightful snacks, remember to pair them with other spooky treats like our spider cupcakes or themed dips for an unforgettable Halloween spread!

What to Serve with Creepy Skewered Salami Eyeballs

Delight your guests by complementing these amusing snacks with vibrant sides and enchanting flavors.

  • Spooky Spider Cupcakes: These eye-catching cupcakes add a sweet contrast, with their dark chocolate base and playful spider decorations echoing the Halloween spirit.

  • Witch's Brew Dip: A creamy spinach-artichoke dip brings a comforting yet festive element, perfect for scooping alongside your skewers.

  • Crispy Vegetable Platter: Fresh, colorful veggies like carrots and cucumbers provide a refreshing crunch, balancing the richness of the salami and mozzarella.

  • Pomegranate Salad: With its bright, jewel-like seeds, this salad adds a sweet-tart burst, beautifully contrasting the savory flavors of your Creepy Skewered Salami Eyeballs.

  • Hauntingly Good Cheese Board: Offering a mix of textures and flavors, a cheese board with assorted cheeses, crackers, and figs complements the amuse-bouche vibes of your eyeballs.

  • Chilling Fruit Punch: Serve a refreshing, spooky fruit punch infused with citrus and berries, invigorating guests while enhancing the playful mood of your gathering.

  • Ghoulish Garlic Bread: Add an irresistible savory touch with garlic bread, providing a warm and comforting pairing to the fun-filled atmosphere.

These items not only enhance the experience but also create a memorable Halloween spread that guests will rave about long after the festivities are over!

Expert Tips for Creepy Skewered Salami Eyeballs

  • Fresh is Best: Always opt for fresh mozzarella, as it ensures a creamier texture that complements the savory salami and olives beautifully.

  • Chill for Creepiness: Don’t skip the chilling step! Keeping the Creepy Skewered Salami Eyeballs refrigerated makes them visually striking and refreshing during your spooky gathering.

  • Color Contrast: Make sure to use kalamata olives for a rich color contrast with the mozzarella. If swapping for green olives, aim for vibrant, high-quality ones for visual impact.

  • Assembly Precision: To prevent skewers from falling apart, ensure each layer is stacked securely. Use thicker slices of pepperoni in the center for sturdiness and drama.

  • Time Savers: For quicker prep, buy pre-sliced pepperoni and mozzarella balls. It allows you more time to enjoy the Halloween fun rather than slaving in the kitchen!

Creepy Skewered Salami Eyeballs Recipe FAQs

What kind of mozzarella balls should I use?
I recommend using fresh mozzarella balls for the best results. They provide a creamy texture and hold up well during assembly. Look for those packed in water, which have a milder flavor and a delightful creaminess that pairs perfectly with the salami and olives.

How should I store leftover Creepy Skewered Salami Eyeballs?
Store any leftover skewers in an airtight container in the refrigerator for up to 3 days. This helps them stay fresh and maintains the visual appeal. Be sure to keep them tightly wrapped to prevent moisture loss!

Can I freeze Creepy Skewered Salami Eyeballs?
While it’s not recommended to freeze these skewers because the cheese might alter in texture, if you must, here’s how: place them in a single layer in a freezer-safe container, separated by parchment paper, and freeze for up to 1 month. To serve, thaw them in the refrigerator overnight before enjoying them!

What’s the best way to prevent the skewers from falling apart?
To ensure your Creepy Skewered Salami Eyeballs remain sturdy, start by using larger slices of pepperoni in the center and securing each ingredient well on the skewer. This way, the stronger components will hold the other ingredients in place, preventing wobbly skewers!

Can pets eat the ingredients used in these skewers?
While mozzarella and pepperoni can be enjoyed by pets in small quantities, moderation is key. Be cautious with kalamata olives, as they contain pits and can be harmful. If you have concerns about your pets and specific ingredients, please consult your veterinarian for advice.

What can I substitute for kalamata olives if I have an allergy?
If you or your guests have an olive allergy, you can substitute finely chopped pickles or capers for a similar briny kick. Green olives with pimentos can also serve as a fun alternative, giving your skewers a colorful cartoonish effect!

Creepy Skewered Salami Eyeballs

Creepy Skewered Salami Eyeballs: Spooky Fun for Halloween

Creepy Skewered Salami Eyeballs are a playful Halloween snack that combines savory flavors and eye-catching presentation.
Print Recipe Pin Recipe
Prep Time 30 minutes mins
Chilling Time 2 hours hrs
Total Time 2 hours hrs 30 minutes mins
Servings: 6 skewers
Course: Snacks
Cuisine: Italian
Calories: 90
Ingredients Equipment Method Nutrition Notes

Ingredients
  

For the Eyeballs
  • 12 oz Mozzarella Balls Use fresh mozzarella for best texture
  • 10 olives Kalamata Olives Chopped for the 'eyes'
  • 1 stick Pepperoni Stick Pre-sliced for convenience
For the Decoration
  • 1 medium Red Bell Pepper Chopped into wedges
Assembly Essentials
  • 6 pieces Skewers Wooden or bamboo

Equipment

  • Skewers

Method
 

Step-by-Step Instructions
  1. Prepare Mozzarella: Carve indentations in mozzarella balls to hold olives.
  2. Make Eyes: Fill the indentations with chopped kalamata olives.
  3. Slice Pepperoni: Cut pepperoni stick into thick and thin slices.
  4. Prepare Red Pepper: Chop red bell pepper into small wedges.
  5. Assemble Skewers: Layer red pepper, pepperoni, mozzarella with olive, and finish with more mozzarella.
  6. Chill & Serve: Refrigerate skewers for at least 1-2 hours before serving.

Nutrition

Serving: 1skewerCalories: 90kcalCarbohydrates: 3gProtein: 5gFat: 7gSaturated Fat: 3gMonounsaturated Fat: 2gCholesterol: 20mgSodium: 350mgPotassium: 140mgSugar: 1gVitamin A: 500IUVitamin C: 5mgCalcium: 150mgIron: 0.5mg

Notes

Always use fresh ingredients for the best taste and presentation. Chill the skewers to enhance flavor and appeal.

Tried this recipe?

Let us know how it was!

Pumpkin Patch Punch: Sip Fall’s Cozy Flavor All Season Long

September 24, 2025 by Grace Snow Leave a Comment

As the leaves turn crisp and the air takes on a hint of chill, there's nothing quite like cozying up with a festive drink in hand. Enter the Pumpkin Patch Punch, an easy party drink that captures the essence of autumn in every sip. Blending pumpkin spice liqueur with creamy apple cider and a splash of bourbon, this Halloween cocktail is sure to enchant your guests, whether young or young-at-heart. Not only is it a breeze to whip up for gatherings, but it also warms the soul with its comforting flavors, making every chilly evening feel just a bit more special. Ready to dive into the flavors of fall? Let's mix up a batch of this delightful punch together!

Why Is Pumpkin Patch Punch a Must-Try?

Deliciously Festive: This cocktail brings the essence of autumn right to your glass with its cozy pumpkin spice flavor.

Easy Preparation: In just a few simple steps, you can have a stunning punch ready for your guests—no advanced skills required!

Perfect for Gatherings: Whether it’s a Halloween party or a cozy fall night, this punch is a crowd pleaser that appeals to all ages.

Versatile Flavors: Customize your punch by swapping apple cider for pear cider or using spiced rum instead of bourbon. The possibilities are endless!

Inviting Aromas: The warmth of cinnamon and pumpkin wafting through your space will make everyone feel at home, just like a good autumn day.

Why not pair it with some delicious treats like Pumpkin Brownies Decadent or enjoy a sweet Pumpkin Cinnamon Roll for a delightful dessert spread? Splendid flavors await!

Pumpkin Patch Punch Ingredients

• Get ready to create the perfect festive drink with these cozy components!

For the Punch

  • Pumpkin spice liqueur – Provides a creamy, spiced flavor that embodies autumn; no direct substitution, but a different spiced liqueur can add a fun twist.
  • Apple cider – Adds a crisp, sweet base for the punch; fresh apple cider is recommended for the best flavor, or substitute with similar juice if unavailable.
  • Bourbon – Offers depth and warmth to the punch; feel free to replace it with rum or whiskey for a different taste profile.
  • Maple syrup (optional) – Enhances sweetness and complements the pumpkin flavors; omit if preferring less sweetness or substitute with agave syrup for a lighter option.

For Garnish

  • Cinnamon sticks – A beautiful garnish that adds aroma and festive flair; fresh herbs like mint can be used as a lively alternative.
  • Apple slices or pumpkin candies – Decorative elements that enhance visual appeal and add a fun Halloween theme; any seasonal fruit can work for variety.
  • Ice cubes – Essential for serving and chilling the punch; ensure you have plenty on hand for a refreshing drink.

Each of these ingredients contributes to the delightful warmth and festivity of this Pumpkin Patch Punch, making it a perfect addition to your autumn gatherings!

Step‑by‑Step Instructions for Pumpkin Patch Punch

Step 1: Mix Your Ingredients
In a large punch bowl, pour in the pumpkin spice liqueur, crisp apple cider, and robust bourbon. If you’re adding maple syrup for extra sweetness, drizzle it in now. Use a wooden spoon to stir the mixture gently for about 1–2 minutes, until everything is well combined and the flavors meld beautifully into a warm, inviting blend.

Step 2: Serve Over Ice
Take a few glasses and fill each with ice cubes, leaving enough space for the punch. Carefully ladle the Pumpkin Patch Punch over the ice, filling each glass about three-quarters full. Ensure that the punch cascades over the ice, creating a chilling effect as the vibrant liquids blend and swirl together beautifully.

Step 3: Garnish Creatively
Now it's time to make your punch visually delightful! Add a cinnamon stick to each glass for aromatic allure and a seasonal touch. For an extra festive flair, float a few apple slices or Halloween-themed candies on top. This will not only enhance the look of your Pumpkin Patch Punch but also add a delightful aroma with each sip.

Step 4: Keep It Cold
As your guests arrive, keep the fun flowing! Serve the punch immediately for the best experience. If you wish to maintain the chill throughout your gathering, place the punch bowl on a larger bowl filled with ice or add more ice to the glasses as needed. This ensures your Pumpkin Patch Punch stays refreshing and delicious for everyone to enjoy!

What to Serve with Pumpkin Patch Punch

As you sip on the warmth of fall, why not elevate your gathering with some delightful accompaniments that perfectly complement this cozy cocktail?

  • Savory Stuffed Mushrooms: These bite-sized delights are rich and flavorful, making them a perfect pairing with the spiced notes of the punch. Their earthiness balances out the sweeter elements in the cocktail.

  • Crispy Apple Chips: Light and crunchy, these chips bring a fresh touch that echoes the apple cider in your punch. They are a delightful snack that adds a healthy twist to your autumn festivities.

  • Cheese Board: A selection of soft and aged cheeses with fruits can enhance the experience. The creaminess of cheese complements the punch, creating a harmonious balance of flavors.

  • Pumpkin Bread Pudding: Embrace those autumn vibes with a warm and comforting dessert that pairs beautifully with your drink. Rich and indulgent, it will create a truly memorable ending to your meal.

  • Warm Pretzels with Mustard Dip: Their soft, chewy texture and slight saltiness contrast nicely with the sweet punch, offering a fun and interactive snack for guests to enjoy.

  • Spiced Pear Tart: A seasonal dessert that echoes the autumn flavors of your punch, this tart provides a perfect sweet and slightly tart finish to the evening, leaving everyone satisfied.

  • Mulled Wine: For an additional drink option, consider offering a warm mulled wine that resonates with the spiced notes of Pumpkin Patch Punch. This cozy drink invites conversations and merriment.

  • Pumpkin Spice Sugar Cookies: Delightfully sweet and softly spiced, these cookies can enhance everyone’s festive mood while mirroring the flavors of your punch. Perfect for holiday cheer!

Make Ahead Options

These Pumpkin Patch Punch preparations are perfect for busy home cooks wanting to save time! You can mix the punch base of pumpkin spice liqueur, apple cider, and bourbon up to 24 hours in advance and refrigerate it in an airtight container to keep it fresh. Just remember to stir it well before serving. When you're ready to enjoy your festive drink, fill glasses with ice and ladle the chilled punch over. Garnish each glass with a cinnamon stick and a slice of apple or some Halloween candies just before serving to ensure that they look inviting. This not only saves you time but also allows you to impress your guests with a ready-to-serve punch that’s just as delicious as if you made it fresh!

Pumpkin Patch Punch Variations

Feel free to make this festive cocktail your own with a few exciting twists!

  • Pear Cider: Substitute apple cider with pear cider for a unique, fruity flavor that brightens the punch. This adds a lovely twist while maintaining that cozy autumn essence.

  • Spiced Rum: Swap bourbon for spiced rum to create a sweeter, tropical note, perfect for an island-inspired autumn celebration. The warmth of spices adds depth to each sip.

  • Non-Alcoholic: For a festive mocktail, replace spirits with extra apple cider or sparkling cider for a bubbly, refreshing experience that everyone can enjoy.

  • Honey or Agave: Instead of maple syrup, use honey or agave syrup to sweeten the punch naturally. Both options provide lovely flavor variations that pair beautifully with the pumpkin.

  • Pineapple Juice: Mix in a splash of pineapple juice for a zingy twist that introduces an unexpected-but-delightful element to your punch.

  • Ginger Beer: For a spicy kick, combine with ginger beer instead of sparkling cider. This adds fizz and a bold, zingy note that beautifully complements the pumpkin spice.

  • Herb Garnishes: Instead of traditional cinnamon sticks, try fresh rosemary or thyme for an herbal twist. Their aromatic notes enhance the festive vibe and add a touch of elegance.

  • Seasonal Fruits: Experiment with garnishes like pomegranate seeds or seasonal citrus slices. They not only add vibrant color but also offer bursts of flavor with each sip.

No matter how you choose to customize your Pumpkin Patch Punch, each variation brings its unique charm. And speaking of flavor, don't forget to pair your punch with some delightful treats like Pumpkin Brownies Decadent for a truly enchanting autumn spread!

How to Store and Freeze Pumpkin Patch Punch

  • Room Temperature: Pumpkin Patch Punch is best served immediately. If left at room temperature, it should be consumed within 2 hours to ensure freshness and safety.

  • Fridge: Leftover punch can be stored in an airtight container in the refrigerator for up to 2 days. Always give it a good stir before serving again for the best flavor.

  • Freezer: While it's not recommended to freeze the entire punch due to the presence of ice and carbonation, you can freeze individual components (like apple cider) separately for up to 3 months. Just thaw and mix again when ready to serve!

  • Reheating: If the punch has been cooled, you can gently heat it on the stove over low heat, being careful not to boil, to serve warm again.

Expert Tips for Pumpkin Patch Punch

  • Mix Thoroughly: Ensure you stir the mixture well to evenly distribute the pumpkin spice flavor and sweetness throughout the punch.

  • Sweetness Control: Adjust the amount of maple syrup based on your taste preferences; a little can go a long way in enhancing the Pumpkin Patch Punch.

  • Chill Before Serving: For the best taste, prepare the punch ahead and store it in the refrigerator; add ice just before serving to avoid diluting the flavors.

  • Versatile Garnishes: Feel free to get creative with your garnishes. Use fresh herbs or different fruits to match your party's theme or personal preferences.

  • Test Before Guests Arrive: Always taste your punch before serving to ensure it's just right; small adjustments can make a big difference in the overall experience.

Pumpkin Patch Punch Recipe FAQs

What should I look for in pumpkin spice liqueur?
When selecting pumpkin spice liqueur, look for a rich and creamy texture with warm cinnamon and nutmeg aromas. I often prefer brands that include real pumpkin flavors, as they enhance the autumn vibe. Ensure the bottle is well-sealed and check the expiration date for optimal taste.

How long can I store leftover Pumpkin Patch Punch in the fridge?
Leftover Pumpkin Patch Punch can be stored in an airtight container in the refrigerator for up to 2 days. Make sure to give it a gentle stir before serving again, as some of the ingredients may settle while it rests. I recommend serving it over ice to keep it refreshing!

Can I freeze Pumpkin Patch Punch?
While freezing the entire punch isn't ideal due to potential dilution from melting ice, you can freeze individual components such as the apple cider. To freeze, pour the cider into ice cube trays or freezer-safe containers and store for up to 3 months. To enjoy, simply thaw and mix with the remaining ingredients before serving!

What if my Pumpkin Patch Punch is too sweet?
If you find your punch too sweet, there are a few simple adjustments you can make. Start by diluting it with a little more apple cider or even some soda water to balance out the sweetness. You can also add a splash of lemon juice for a tangy contrast, which can brighten the flavors beautifully!

Is Pumpkin Patch Punch suitable for dietary restrictions?
Absolutely! For a non-alcoholic version, simply replace the bourbon and pumpkin spice liqueur with extra apple cider or sparkling cider. This way, everyone can enjoy a festive drink. If you have any allergies, double-check all ingredient labels, especially for the liqueur and any garnishes you choose to use.

Pumpkin Patch Punch

Pumpkin Patch Punch: Sip Fall’s Cozy Flavor All Season Long

Pumpkin Patch Punch is a festive drink combining pumpkin spice liqueur, apple cider, and bourbon, perfect for fall gatherings.
Print Recipe Pin Recipe
Prep Time 10 minutes mins
Total Time 10 minutes mins
Servings: 8 cups
Course: Drinks
Cuisine: American
Calories: 180
Ingredients Equipment Method Nutrition Notes

Ingredients
  

For the Punch
  • 1 cup Pumpkin spice liqueur Provides a creamy, spiced flavor that embodies autumn.
  • 4 cups Apple cider Fresh apple cider is recommended for the best flavor.
  • 1 cup Bourbon Offers depth and warmth to the punch.
  • 1/4 cup Maple syrup (optional) Enhances sweetness and complements the pumpkin flavors.
For Garnish
  • 3 sticks Cinnamon sticks A beautiful garnish that adds aroma and festive flair.
  • 1 cup Apple slices or pumpkin candies Enhances visual appeal and adds a fun Halloween theme.
  • as needed Ice cubes Essential for serving and chilling the punch.

Equipment

  • Large punch bowl
  • Wooden spoon
  • Glasses

Method
 

Step-by-Step Instructions
  1. In a large punch bowl, pour in the pumpkin spice liqueur, crisp apple cider, and robust bourbon. If adding maple syrup for extra sweetness, drizzle it in now. Use a wooden spoon to stir gently for about 1–2 minutes, until well combined.
  2. Take a few glasses and fill each with ice cubes, leaving space for the punch. Ladle the Pumpkin Patch Punch over the ice, filling each glass about three-quarters full.
  3. Add a cinnamon stick to each glass for aromatic allure. Float apple slices or Halloween-themed candies on top for extra festive flair.
  4. Serve the punch immediately for the best experience. To keep it cold, place the punch bowl in a larger bowl filled with ice or add more ice to glasses as needed.

Nutrition

Serving: 1cupCalories: 180kcalCarbohydrates: 25gSodium: 5mgPotassium: 100mgSugar: 20gCalcium: 10mg

Notes

Adjust the sweetness by modifying the amount of maple syrup according to taste. Store any leftovers in the fridge for up to 2 days.

Tried this recipe?

Let us know how it was!

Chocolate Candle Cookies to Light Up Your Halloween Treats

September 24, 2025 by Grace Snow Leave a Comment

As I flipped through my favorite cookbook, a gleaming image of charming cookies shaped like candles caught my eye. Instantly, my mind was ablaze with ideas for a festive treat that could light up any Halloween gathering—enter my Spooky Candle Cookies. These delicious chocolate shortbread wonders are not just a feast for the eyes but also extremely simple to bake—no special tools required! With their rich taste and whimsical appearance, they are bound to be a hit at your table. Plus, they lend themselves beautifully to creative decorations, making them a fun project for anyone seeking to add a touch of homemade magic to their festivities. Curious about how to whip up these delightful treats? Let's dive into the recipe!

Why Are These Candle Cookies Unique?

Easy Preparation: No special tools needed—just basic kitchen essentials!

Festive Appeal: Designed for Halloween, their charming candle shape brings whimsy to your table.

Decadent Flavor: Rich chocolate shortbread delivers a satisfying treat that chocolate lovers will adore.

Creative Decorations: Unleash your imagination with colorful icing and unique toppings—try nuts or festive sprinkles!

Perfect for Sharing: These cookies are sure to impress at parties and gatherings—your guests will love them!

For a twist, pair them with Eggnog Cookies Soft or Thumbprint Cookies Melt for a delightful dessert spread!

Candle Cookies Ingredients

For the Cookies

  • All-Purpose Flour – Provides structure and body; substitute with gluten-free flour for a gluten-free option.
  • Cocoa Powder – Adds rich chocolate flavor; opt for unsweetened cocoa for the best results.
  • Salt – Enhances flavor; can be omitted or reduced for lower sodium.
  • Unsalted Butter – Creates a tender texture; use cold butter for firmer cookies if needed.
  • Confectioners Sugar – Sweetens the dough; powdered erythritol can be used for a sugar-free version.
  • Vanilla Extract – Adds depth of flavor; consider almond extract for a different twist.
  • Milk – Moistens the dough; use non-dairy milk for a vegan alternative.
  • Sliced Almonds – Used for decoration to simulate candle wicks; can be replaced with chocolate chips or nuts if preferred.

For the Icing

  • Confectioners Sugar – The base for icing; same substitutions apply as in the dough.
  • Water – Adjusts the icing consistency for the perfect drizzle.
  • Vanilla Extract – Flavors the icing; feel free to substitute with other extracts for a unique taste.
  • Red Gel Food Color – Provides a bleeding icing effect, adding a fun festive touch; use different gel colors for various holidays.

Step‑by‑Step Instructions for Candle Cookies

Step 1: Dough Preparation
In a medium bowl, whisk together 2 cups of all-purpose flour, ½ cup of unsweetened cocoa powder, and a pinch of salt until well combined. In a larger mixing bowl, beat together 1 cup of cold unsalted butter, 1 cup of confectioners sugar, and 1 teaspoon of vanilla extract until creamy and smooth. Gradually mix in the dry ingredients and 3 tablespoons of milk until the dough is crumbly and no dry flour remains.

Step 2: Shaping the Cookies
On a clean work surface, roll about 1 tablespoon of dough into a ball, then roll it into thick logs approximately 3 inches long. Place the logs on a wire rack lined with parchment paper to prevent sticking. At one end of each log, gently insert a few sliced almonds to mimic candle wicks, making sure they stay firmly attached for a festive touch.

Step 3: Chill the Dough
Cover the wire rack with plastic wrap and place it in the refrigerator to chill for at least 4 hours. This step is crucial for ensuring the Candle Cookies hold their shape during baking, resulting in beautifully formed, thick candle-like cookies that are ready for the oven.

Step 4: Baking the Cookies
Preheat your oven to 350°F (175°C) and line a baking sheet with parchment paper. Once the oven is ready, bake the chilled logs for about 25 minutes, or until they are firm to the touch and a darker shade of chocolate. Keep an eye on them to prevent over-baking, as you want that perfect shortbread texture.

Step 5: Preparing the Icing
While the cookies cool completely, prepare the icing by mixing 2 cups of confectioners sugar with 2 tablespoons of water and 1 teaspoon of vanilla extract in a small bowl. Stir until smooth, adjusting the water as necessary to achieve a thick drizzle consistency. Add red gel food coloring to create a festive bleeding effect, stirring until evenly colored.

Step 6: Icing the Cookies
Transfer the icing into a piping bag or a small plastic bag with the corner snipped off for easier drizzling. Once the Candle Cookies have completely cooled, drizzle the icing over them, allowing it to run down the sides to simulate dripping wax. Be creative and have fun with this step!

Step 7: Setting the Icing
After icing the cookies, place them on a wire rack to set for a few hours. This will allow the icing to harden properly, ensuring the stunning appearance of your Candle Cookies is preserved. Once set, they will be ready to serve and impress at your Halloween gatherings!

What to Serve with Spooky Candle Cookies

Imagine a celebration filled with laughter and joy, complemented by flavors that dance on your palate and warm your heart.

  • Warm Apple Cider: Its sweet, spiced flavors perfectly complement the rich chocolate of the Candle Cookies, making for a cozy pairing.
  • Pumpkin Pie: A classic fall dessert, its creamy texture and spiced notes enhance the festive spirit of Halloween.
  • Vanilla Ice Cream: The cool creaminess balances the cookies’ rich taste, providing a delightful contrast to every bite.
  • Chocolate Milkshake: Indulgent and nostalgic, this treat adds a delightful twist, creating a silky, sweet treat alongside the cookies.
  • Caramel Sauce: Drizzle over the Candle Cookies to enhance their festive appeal and add a luscious, gooey flavor that whispers autumn.
  • Spiced Pumpkin Bread: Its moist texture and spices evoke warm memories of fall, beautifully contrasting with the chocolatey goodness of the cookies.

Pair these delightful treats with your favorite drinks or enjoy as a decadent dessert display at your next gathering!

Make Ahead Options

These Candle Cookies are a fantastic option for busy home cooks looking to save time! You can prepare the cookie dough up to 24 hours in advance by following the first three steps: whisk together the dry ingredients, beat the butter and sugar, and mix in the dry components with milk until crumbly. Chill the formed logs in the refrigerator as directed, then simply bake them when you're ready for fresh cookies. To maintain quality, ensure that the dough is well-wrapped in plastic to prevent drying out. Once baked, let the cookies cool before icing; they can be decorated up to 3 days in advance to have a lovely festive treat ready for your Halloween festivities!

Storage Tips for Candle Cookies

  • Room Temperature: Store your Candle Cookies in an airtight container for up to 3 days. This helps maintain their delightful texture while ensuring they stay fresh.

  • Fridge: If you prefer, you can refrigerate the cookies to extend their freshness for up to 5 days, but this may alter the texture slightly—just let them come to room temperature before serving.

  • Freezer: For longer storage, freeze the baked cookies without icing in a zip lock bag for up to 2 months. When you're ready to enjoy, simply thaw at room temperature or warm them gently in the oven.

  • Reheating: If desired, reheat cookies at 300°F for about 5-10 minutes to restore their original texture before serving them again. Enjoy those delicious Candle Cookies whenever the craving strikes!

Candle Cookies Variations & Substitutions

Feel free to get creative and suit these Candle Cookies to your taste and occasion with these delightful twists!

  • Gluten-Free: Use a gluten-free flour blend in place of all-purpose flour for a deliciously accessible version.
  • Sugar-Free: Try powdered erythritol instead of confectioners sugar to make these cookies suitable for a sugar-free diet. They’ll still be sweet and delightful!
  • Dairy-Free: Substitute unsalted butter with vegan butter and replace milk with almond or oat milk for a completely dairy-free treat.
  • Flavor Infusion: Swap vanilla extract for almond extract to give your cookies a subtly unique flavor that pairs beautifully with the chocolate.
  • Nutty Variation: Use chopped walnuts or pecans instead of sliced almonds for decoration. This adds a lovely crunch and flavor twist to each bite.
  • Festive Colors: Change up the icing color by using green or orange gel food coloring for a Halloween theme, or even pastel shades for other holidays!
  • Textural Contrast: Add a handful of mini chocolate chips to the cookie dough for added richness and an extra gooey texture with each bite.
  • Hot and Spicy: For a kick, add a sprinkle of cayenne or chili powder to the dough. It’s an adventurous twist that provides a surprising heat to your cookies!

If these cookie variations inspire you, feel free to explore more festive delights like Eggnog Cookies Soft or Matcha Cookies Soft to fill your dessert platter!

Expert Tips for Candle Cookies

  • Dough Consistency Check: Roll a tablespoon of dough to ensure it holds together without cracks; if it crumbles, add a bit more milk for the perfect Candle Cookies.

  • Icing Thickness Matters: Aim for an icing consistency that's thick enough to drizzle slowly from the piping bag but not runny, ensuring a lovely dripping effect.

  • Prevent Cookie Sprawl: Chill the shaped dough for a minimum of 4 hours; this step is essential to maintain the cookies' charming candle shape during baking.

  • Choose Decor Wisely: While sliced almonds simulate wicks beautifully, feel free to experiment with chocolate chips or nuts as decoration for a fun twist on your Candle Cookies.

  • Storing Leftovers: Keep your cookies in an airtight container for up to 3 days, or freeze them without icing in a zip lock bag for a delightful treat later on!

Candle Cookies Recipe FAQs

How do I choose the right cocoa powder for my Candle Cookies?
Absolutely! For the best flavor in your Candle Cookies, opt for unsweetened cocoa powder. This variety offers a robust chocolate taste without added sweetness, enhancing the overall richness of your cookies.

What’s the best way to store my Candle Cookies?
To keep your Candle Cookies fresh, store them in an airtight container at room temperature for up to 3 days. If you want them to last longer, refrigerate them for up to 5 days, but remember to let them return to room temperature before serving for the best texture!

Can I freeze my Candle Cookies?
Very much! For longer storage, freeze the baked cookies without icing in a zip lock bag for up to 2 months. When you're ready to enjoy, simply thaw at room temperature. If you want to warm them slightly, preheat your oven to 300°F and bake for about 5-10 minutes until warm and comforting.

How can I troubleshoot crumbly dough when making Candle Cookies?
If your dough is crumbly, don’t worry! I recommend rolling about one tablespoon of the dough to check its consistency. If it cracks, try adding an extra tablespoon of milk at a time until the dough holds together smoothly without cracks. This will ensure that your Candle Cookies are perfectly shaped and delicious!

Are these Candle Cookies safe for dogs?
While the ingredients in Candle Cookies are generally safe for humans, they’re not suitable for dogs. The cocoa powder can be toxic to dogs in large amounts, so it's best to keep these delightful treats out of reach of your furry friends.

How can I decorate my Candle Cookies for different holidays?
Feel free to get creative! You can swap the red gel food coloring for green or white to celebrate other holidays. Additionally, using different nuts for decoration, such as walnuts or pecans, can give your cookies a unique twist while still maintaining the charming candle vibe!

Candle Cookies

Chocolate Candle Cookies to Light Up Your Halloween Treats

Delightful Chocolate Candle Cookies that are whimsical and easy to make, perfect for Halloween gatherings.
Print Recipe Pin Recipe
Prep Time 30 minutes mins
Cook Time 25 minutes mins
Chilling Time 4 hours hrs
Total Time 4 hours hrs 55 minutes mins
Servings: 24 cookies
Course: Dessert
Cuisine: American
Calories: 150
Ingredients Equipment Method Nutrition Notes

Ingredients
  

For the Cookies
  • 2 cups All-Purpose Flour Substitute with gluten-free flour for a gluten-free option.
  • 0.5 cups Cocoa Powder Opt for unsweetened cocoa for the best results.
  • 1 pinch Salt Can be omitted or reduced for lower sodium.
  • 1 cups Unsalted Butter Use cold butter for firmer cookies if needed.
  • 1 cups Confectioners Sugar Powdered erythritol can be used for a sugar-free version.
  • 1 teaspoon Vanilla Extract Consider almond extract for a different twist.
  • 3 tablespoons Milk Use non-dairy milk for a vegan alternative.
  • 0.5 cups Sliced Almonds Can be replaced with chocolate chips or nuts if preferred.
For the Icing
  • 2 cups Confectioners Sugar Same substitutions apply as in the dough.
  • 2 tablespoons Water Adjusts the icing consistency for the perfect drizzle.
  • 1 teaspoon Vanilla Extract Feel free to substitute with other extracts for a unique taste.
  • 1 drop Red Gel Food Color Use different gel colors for various holidays.

Equipment

  • Mixing bowls
  • Whisk
  • Rolling Pin
  • Baking Sheet
  • piping bag

Method
 

Step-by-Step Instructions
  1. In a medium bowl, whisk together 2 cups of all-purpose flour, ½ cup of unsweetened cocoa powder, and a pinch of salt until well combined.
  2. In a larger mixing bowl, beat together 1 cup of cold unsalted butter, 1 cup of confectioners sugar, and 1 teaspoon of vanilla extract until creamy and smooth.
  3. Gradually mix in the dry ingredients and 3 tablespoons of milk until the dough is crumbly and no dry flour remains.
  4. On a clean work surface, roll about 1 tablespoon of dough into a ball, then roll it into thick logs approximately 3 inches long.
  5. Place the logs on a wire rack lined with parchment paper to prevent sticking. At one end of each log, gently insert a few sliced almonds to mimic candle wicks.
  6. Cover the wire rack with plastic wrap and place it in the refrigerator to chill for at least 4 hours.
  7. Preheat your oven to 350°F (175°C) and line a baking sheet with parchment paper. Bake the chilled logs for about 25 minutes, or until they are firm to the touch.
  8. While the cookies cool completely, prepare the icing by mixing 2 cups of confectioners sugar with 2 tablespoons of water and 1 teaspoon of vanilla extract until smooth.
  9. Transfer the icing into a piping bag or a small plastic bag with the corner snipped off for easier drizzling.
  10. Once the Candle Cookies have completely cooled, drizzle the icing over them, allowing it to run down the sides.
  11. After icing the cookies, place them on a wire rack to set for a few hours.

Nutrition

Serving: 1cookieCalories: 150kcalCarbohydrates: 20gProtein: 1gFat: 7gSaturated Fat: 4gPolyunsaturated Fat: 2gMonounsaturated Fat: 1gCholesterol: 30mgSodium: 80mgPotassium: 100mgFiber: 1gSugar: 8gVitamin A: 200IUCalcium: 10mgIron: 1mg

Notes

Keep your cookies in an airtight container for up to 3 days, or freeze them without icing in a zip lock bag for a delightful treat later on!

Tried this recipe?

Let us know how it was!

Raspberry Zinger Poke Cake: A Refreshing Fruity Treat

September 24, 2025 by Grace Snow Leave a Comment

As I sifted through my collection of dessert recipes, a vibrant memory of summer picnics and family barbecues came rushing back, wrapped in the sweet aroma of a Raspberry Zinger Poke Cake. This delightful treat combines a soft white cake soaked in luscious raspberry gelatin, paired with smooth preserves and a fluffy topping, making it the ultimate easy dessert for any occasion. Not only does this poke cake deliver a delectable fruity flavor, but it also shines as a crowd-pleaser that requires minimal effort. Whether you're looking to impress guests at a festive gathering or indulge in a sweet bite after dinner, this recipe promises to delight both young and old alike. Ready to discover the simple steps to whip up this refreshing cake? Let’s dive in!

Why is Raspberry Zinger Poke Cake a Must-Try?

Irresistible Flavor: Bursting with sweet raspberry goodness, every bite offers a delightful symphony of fruitiness that your taste buds will adore.

Simple Preparation: With just a few ingredients, making this dessert is a breeze, even for novice bakers.

Perfect for Any Occasion: Whether it's a summer barbecue or a holiday gathering, this cake fits seamlessly into any menu and is sure to impress guests.

Versatile Variations: Feel free to experiment! Swap out the raspberry flavor with strawberry or peach for a new twist on this classic poke cake.

Make Ahead Convenience: You can easily prepare it the day before, allowing the flavors to meld beautifully and save you time on the day of your event.

Once you've tasted this amazing treat, you'll want to share it with friends! For more crowd-pleasing ideas, check out my delicious Ice Cream Cake for another fun dessert option!

Raspberry Zinger Poke Cake Ingredients

For the Cake
• White Cake Mix – A quality mix ensures a moist and fluffy base for the Raspberry Zinger Poke Cake.
• Hot Purified Water – Needed to dissolve the raspberry-flavored gelatin thoroughly for the perfect poke.

For the Raspberry Filling
• Raspberry-Flavored Gelatin – Adds that sweet, fruity essence essential for the poke cake effect; be sure it’s well-dissolved.
• Raspberry Preserves – Thick and luscious, these provide concentrated flavor; microwaving them for a few seconds helps with spreading.

For the Topping
• Whipped Topping – This light fluff creates a satisfying creaminess; feel free to substitute with fresh whipped cream.
• Unsweetened Shredded Coconut – Adds a delightful texture; if coconut's not your thing, try chopped nuts or white chocolate shavings.

Get ready to bring the refreshing taste of the Raspberry Zinger Poke Cake to life!

Step‑by‑Step Instructions for Raspberry Zinger Poke Cake

Step 1: Prepare the Cake
Start by preheating your oven to 350°F (175°C). In a large mixing bowl, follow the package instructions on your white cake mix to combine with water, oil, and eggs. Pour the batter into a greased 9x13-inch baking pan, spreading it evenly. Bake in the preheated oven for 25–30 minutes, or until a toothpick inserted in the center comes out clean. Allow the cake to cool for about 30 minutes at room temperature.

Step 2: Make the Holes
Once the cake has cooled, take the end of a wooden spoon and gently poke holes across the surface, about 1 inch apart and halfway deep. This step is crucial for the Raspberry Zinger Poke Cake, as it allows the gelatin to seep into the cake and infuse it with flavor. Make sure the holes are evenly distributed to ensure a delightful burst of raspberry goodness in every slice.

Step 3: Prepare and Pour the Gelatin
In a medium mixing bowl, dissolve the raspberry-flavored gelatin in 2 cups of hot purified water, stirring until fully dissolved. Carefully pour the vibrant gelatin mixture over the poked cake, ensuring that the holes fill completely. Let the cake sit for about 5 minutes to absorb the gelatin, which will give your Raspberry Zinger Poke Cake its signature moistness.

Step 4: Add Raspberry Preserves
For enhanced flavor, microwave the raspberry preserves for about 30 seconds to soften. Once warm, spread the preserves evenly over the gelatin-soaked cake using a spatula. This layer of rich raspberry preserves adds sweetness and depth to your cake. Take your time to ensure an even distribution, making the Raspberry Zinger Poke Cake both beautiful and delicious.

Step 5: Apply Whipped Topping
Next, take your whipped topping and dollop it over the layer of raspberry preserves. Using a spatula, gently spread the whipped topping to create a smooth and fluffy layer that covers the preserves completely. This light and airy topping is what makes the Raspberry Zinger Poke Cake so delightful. Make sure it’s spread evenly for a perfect finish.

Step 6: Sprinkle Coconut
To add texture and a tropical twist, evenly distribute the unsweetened shredded coconut over the whipped topping layer. This step not only enhances the flavor but also gives your Raspberry Zinger Poke Cake a visually appealing finish. You can use your hands or a spoon to sprinkle the coconut so that it covers the whipped cream generously.

Step 7: Chill the Cake
Finally, cover the cake with plastic wrap and refrigerate it for at least 4 hours, or overnight if time permits. Chilling allows the flavors to meld together beautifully, and it firms up the cake for easier slicing. When you're ready to serve, simply remove from the refrigerator, slice, and enjoy the refreshing taste of the Raspberry Zinger Poke Cake with family and friends!

How to Store and Freeze Raspberry Zinger Poke Cake

Fridge: Keep the Raspberry Zinger Poke Cake in an airtight container in the refrigerator for up to 5–7 days. This will maintain its freshness and flavor while preventing dryness.

Freezer: For longer storage, wrap portions tightly in plastic wrap and aluminum foil, then freeze for up to 3 months. Thaw in the fridge overnight before serving.

** serving:** When ready to enjoy, slice and serve chilled. Consider garnishing with fresh raspberries for a pop of color and added flavor.

Leftover Topping: If you have extra whipped topping, store it separately in the fridge, and use it within a few days to maintain its texture.

What to Serve with Raspberry Zinger Poke Cake

Creating a complete meal around this delightful dessert invites your family and friends to indulge in a lively experience filled with fresh, vibrant flavors.

  • Grilled Chicken Skewers: The smoky flavors from the grill enhance the sweetness of the cake, creating a beautiful flavor contrast.

  • Fresh Garden Salad: A crisp salad with mixed greens and balsamic vinaigrette provides a refreshing, tangy balance to the sweet poke cake.

  • Lemonade or Iced Tea: Both drinks offer a zest of citrus that complements the fruity notes of the Raspberry Zinger Poke Cake perfectly, making it a refreshing pairing.

  • Coconut Rice: The subtle sweetness and chewiness of coconut rice harmonize with the cake's coconut topping while providing a tropical theme to your meal.

  • Chocolate Chip Cookies: These classic treats serve as a delightful treat alongside the cake; their rich, buttery flavor pairs well with the delightfully fruity dessert.

  • Berries and Cream: Freshly whipped cream served with a medley of strawberries and blueberries brightens up the dessert table, echoing the raspberry flavor and adding a luxurious touch.

Invite loved ones to experience a complete feast that celebrates the joys of home-cooked flavors!

Raspberry Zinger Poke Cake Variations

Feel free to make this delicious dessert your own with fun and flavorful tweaks!

  • Nutty Flavor: Replace shredded coconut with chopped almonds for a crunchy twist that adds delightful texture.
  • Different Gelatins: Don’t hesitate to try strawberry or peach gelatin instead of raspberry for a fruity variation that’s equally refreshing.
  • Cream Cheese Layer: For a creamy surprise, mix in softened cream cheese with the whipped topping, creating a zesty flavor that balances the sweetness.
  • Chocolate Drizzle: Add a drizzle of chocolate syrup over the top for an indulgent finish that complements the fruity flavors beautifully.
  • Fruit Add-ins: Toss in fresh berries like blueberries or sliced strawberries atop the whipped topping for added taste and color.
  • No-Coconut Option: If coconut isn’t your favorite, simply substitute it with white chocolate shavings for a luscious finish.
  • Spicy Kick: For an adventurous flavor, add a pinch of cayenne pepper or jalapeño flakes to the raspberry preserves for a sweet-heat combo.
  • Layered Perfection: Create a layered dessert by serving individual portions in cups, alternating layers of cake, gelatin, and toppings for a stunning presentation.

Each of these variations introduces its own unique charm, just like this Ice Cream Cake can elevate any gathering! Explore and enjoy creating your perfect Raspberry Zinger Poke Cake!

Expert Tips for Raspberry Zinger Poke Cake

• Perfect Poking Technique: Ensure you poke holes deeply enough to let the gelatin seep into the cake, but not all the way through. This balance is key for a moist Raspberry Zinger Poke Cake.

• Gelatin Dissolving: Always use hot purified water for dissolving gelatin. This ensures it's completely mixed and will set properly, giving you that vibrant raspberry flavor.

• Preserve Warm-Up: Microwaving the raspberry preserves not only softens them for easier spreading but also enhances their flavor, allowing them to meld beautifully with the cake.

• Topping Options: Feel free to substitute whipped topping with homemade whipped cream for an extra touch. Just make sure to whip it to stiff peaks for the best texture in your Raspberry Zinger Poke Cake.

• Chill Time: For the best flavor and texture, chill the cake overnight. This allows the flavors to meld perfectly and makes for easier cutting and serving.

• Double the Recipe Cautiously: If you're making this for a crowd, consider using two pans instead of one to avoid overflow.

Make Ahead Options

These Raspberry Zinger Poke Cakes are perfect for meal prep enthusiasts! You can prepare the cake and poke the holes up to 24 hours in advance, refrigerating it to keep it fresh. Once cooled, simply cover the cake with plastic wrap and store it in the fridge. The raspberry gelatin can be made and poured over the cake just before serving to ensure it's perfectly hydrated. Additionally, you can microwave and spread the raspberry preserves ahead of time and store them separately in the fridge for up to 3 days. When you're ready to enjoy, just layer the preserves and whipped topping, sprinkle with coconut, and it's ready to impress your guests with minimal effort!

Raspberry Zinger Poke Cake Recipe FAQs

What type of white cake mix should I use?
I recommend using a high-quality white cake mix for the best results. Look for one that has a soft and fluffy texture, which will perfectly complement the fruity raspberry flavors in the Raspberry Zinger Poke Cake.

How should I store the Raspberry Zinger Poke Cake?
Store the Raspberry Zinger Poke Cake in an airtight container in the refrigerator for up to 5–7 days. This keeps it fresh and moist, ensuring that every slice is as delightful as the first. Just be sure to cover it well to prevent any dryness!

Can I freeze the leftover cake?
Absolutely! To freeze, slice the Raspberry Zinger Poke Cake into portions and wrap them tightly in plastic wrap and aluminum foil. This will prevent freezer burn and keep the cake fresh for up to 3 months. When you're ready to enjoy, thaw the slices in the refrigerator overnight.

Why is my cake not absorbing the gelatin well?
If the gelatin isn’t soaking in properly, you might not have poked the holes deep enough or evenly enough across the cake. Aim for holes that are halfway deep, about 1 inch apart, using the end of a wooden spoon. This allows the gelatin to seep in evenly, giving you that moist, flavorful texture you’re looking for in the Raspberry Zinger Poke Cake.

Are there any dietary considerations I should be aware of?
If you have guests with dietary restrictions, consider using gluten-free cake mix and whipped topping alternatives to cater to those needs. Additionally, always check the labels for potential allergens if serving to those with food sensitivities.

Can I make this cake in advance?
Yes, this cake is perfect for making ahead of time! In fact, I often prepare it a day in advance to allow the flavors to meld beautifully. Refrigerate it overnight for optimal taste and easy serving the next day.

Raspberry Zinger Poke Cake

Raspberry Zinger Poke Cake: A Refreshing Fruity Treat

This Raspberry Zinger Poke Cake is a delightful blend of fruity flavors and moist texture, perfect for summer gatherings and easy to prepare.
Print Recipe Pin Recipe
Prep Time 20 minutes mins
Cook Time 30 minutes mins
Chilling Time 4 hours hrs
Total Time 4 hours hrs 50 minutes mins
Servings: 12 slices
Course: Dessert
Cuisine: American
Calories: 300
Ingredients Equipment Method Nutrition Notes

Ingredients
  

For the Cake
  • 1 box White Cake Mix A quality mix ensures a moist and fluffy base.
  • 2 cups Hot Purified Water Needed to dissolve the raspberry-flavored gelatin.
For the Raspberry Filling
  • 1 box Raspberry-Flavored Gelatin Adds sweet, fruity essence.
  • 1 cup Raspberry Preserves Thick and luscious; microwave for easier spreading.
For the Topping
  • 1 container Whipped Topping Feel free to substitute with fresh whipped cream.
  • 1 cup Unsweetened Shredded Coconut Optional; can use chopped nuts or white chocolate shavings.

Equipment

  • 9x13-inch baking pan
  • Mixing Bowl
  • Spatula

Method
 

Preparation Steps
  1. Preheat your oven to 350°F (175°C). Combine white cake mix with water, oil, and eggs in a mixing bowl. Pour into a greased 9x13-inch baking pan and bake for 25–30 minutes, or until a toothpick comes out clean. Allow to cool for 30 minutes.
  2. Once cooled, poke holes across the surface of the cake about 1 inch apart and half deep using the end of a wooden spoon.
  3. Dissolve raspberry-flavored gelatin in 2 cups of hot purified water and pour it over the poked cake, letting it absorb for about 5 minutes.
  4. Microwave raspberry preserves for about 30 seconds to soften, then spread evenly over the gelatin-soaked cake.
  5. Dollop whipped topping over the raspberry preserves and spread evenly.
  6. Sprinkle unsweetened shredded coconut over the whipped topping layer.
  7. Cover with plastic wrap and refrigerate for at least 4 hours, or overnight, before serving.

Nutrition

Serving: 1sliceCalories: 300kcalCarbohydrates: 45gProtein: 3gFat: 12gSaturated Fat: 7gPolyunsaturated Fat: 1gMonounsaturated Fat: 3gCholesterol: 20mgSodium: 250mgPotassium: 150mgFiber: 1gSugar: 25gVitamin A: 2IUCalcium: 2mgIron: 4mg

Notes

For the best flavor and texture, chill the cake overnight. Consider garnishing with fresh raspberries for a pop of color and added flavor.

Tried this recipe?

Let us know how it was!

Easy Oreo Witch Hat Cookies: A Spooky, Fun Treat!

September 24, 2025 by Grace Snow Leave a Comment

As the leaves turn gold and the air gets crisp, there’s a certain magic in the kitchen that’s just waiting to be stirred up. I couldn’t resist diving into the festive spirit with these adorable Oreo Witch Hat Cookies—an easy, no-bake Halloween treat that’s sure to enchant kids and adults alike. With a crunchy Oreo base topped with creamy frosting and a whimsical chocolate kiss, they’re not only a visual delight but also super quick to whip up. Trust me, they’ll be a hit at any gathering or party! Plus, the best part? These cookies invite endless creativity; swap in your favorite cookies or customize frosting colors to match your Halloween theme. Are you ready to conjure up some fun? Let's get started!

Why are Oreo Witch Hat Cookies a must-make?

Quick and Easy: You only need a few simple ingredients and no baking required, making these a breeze to whip up.

Creative Customization: Whether you choose colorful frosting or festive sprinkles, the options are endless for making these treats uniquely yours.

Perfect for Parties: These cookies not only look adorable but are also a delightful treat to serve at Halloween gatherings, drawing in both kids and adults.

Delicious Textures: The combination of crunchy Oreo, smooth frosting, and rich chocolate kiss creates a delightful eating experience.

Versatile Variations: Try using other chocolate cookies like Keebler Fudge Stripes or Grasshopper Cookies for a twist!

Oreo Witch Hat Cookies Ingredients

• • Get ready to create some magic!

For the Cookies

  • Oreo cookies – The star of the show; their crunchy chocolate base is absolutely perfect for a Halloween treat.
  • Keebler Fudge Stripes – A delightful alternative that adds a unique flavor twist while still delivering deliciousness.

For the Frosting

  • Vanilla frosting – Provides the sweet creaminess that balances the chocolatey cookies; feel free to tint it with fun colors like orange or green!
  • Store-bought frosting – A quick option that saves time without sacrificing taste.

For the Decorations

  • Halloween sprinkles – These colorful toppings not only enhance presentation but also add a playful touch; highly recommended for that festive flair!
  • Chocolate kisses – These chocolatey “hats” complete the look, but you can use any chocolate-shaped candy if desired.

These Oreo Witch Hat Cookies are not only fun to make but also allow you to get creative in the kitchen this Halloween!

Step‑by‑Step Instructions for Oreo Witch Hat Cookies

Step 1: Prep the Frosting
Begin by placing your vanilla frosting in a mixing bowl. If you want to add some Halloween flair, tint it with food coloring, like orange or green, using a toothpick to achieve your desired shade. Stir until fully combined and smooth. This frosting serves as the magical glue that holds our Oreo Witch Hat Cookies together, so make sure it’s fluffy and vibrant before moving on.

Step 2: Assemble the Cookies
Grab your Oreo cookies and set them on a clean workspace. Fit a piping bag with a star or round frosting tip, then fill it with your prepared frosting. Pipe a generous dollop of frosting onto the center of each Oreo, creating a lovely, swirled mound that resembles a witch's hat. This step will give your Oreo Witch Hat Cookies their enchanting shape, so take your time for an even look.

Step 3: Add the Sprinkles
Before the frosting sets, it's time to decorate! Sprinkle Halloween-themed sprinkles over each dollop of frosting, ensuring they stick well. Use a variety of colors and shapes for added visual appeal, making your cookies festive and fun. This step not only enhances the presentation but also adds a delightful crunch to each bite of your Oreo Witch Hat Cookies.

Step 4: Finish with Kisses
Unwrap your chocolate kisses and gently press one into the center of each dollop of frosting. This chocolate “hat” will sit perfectly atop your cookies, creating that iconic witch hat shape we’re after. Be careful not to squish the frosting too much—you're aiming for a delightful balance of chocolate and creamy frosting in each delectable Oreo Witch Hat Cookie.

Step 5: Let Them Set
Once all your cookies are assembled, place them on a tray and let them set for about 15-20 minutes. This will allow the frosting to firm up slightly, ensuring that the chocolate kisses stay in place. Use this time to clean up your workspace and prepare for the fun of enjoying your finished creations. These Oreo Witch Hat Cookies are looking adorable and waiting to be devoured!

Make Ahead Options

These Oreo Witch Hat Cookies are perfect for making ahead, saving you precious time on busy party days! You can prepare both the cookies and the frosting up to 24 hours in advance. Simply assemble the cookies without the chocolate kisses and refrigerate them in an airtight container to maintain their freshness. When you’re ready to serve, simply add the kisses and sprinkles just before putting them out for your guests; this prevents any sogginess while keeping the cookies just as delicious. By prepping ahead, you’ll have a delightful treat ready to impress with minimal last-minute effort!

Expert Tips for Oreo Witch Hat Cookies

  • Frosting Technique: Use a star or round frosting tip to create different designs; this adds a fun touch to your Oreo Witch Hat Cookies.

  • Colorful Customization: Experiment with different food colors in your frosting to match your Halloween theme or your family’s favorite colors!

  • Avoid Overfilling: Don’t pipe too much frosting on the cookies as it can cause the chocolate kisses to topple over; a generous dollop is perfect.

  • Storage Solutions: Keep your cookies fresh by storing them in an airtight container, which will help maintain that delightful crunch for up to 3 days.

  • Try Other Cookies: Feel free to substitute with other chocolate cookies like Keebler Fudge Stripes or Grasshopper Cookies for a uniquely flavored twist.

How to Store and Freeze Oreo Witch Hat Cookies

Room Temperature: These cookies can be stored at room temperature in an airtight container for up to 3 days, helping maintain their crunchy texture.

Fridge: If you want to extend their freshness, store the cookies in the fridge. They will last for up to 1 week, but allow them to come to room temperature before serving for the best flavor.

Freezer: For longer storage, you can freeze the Oreo Witch Hat Cookies. Wrap them individually in plastic wrap and place them in a freezer-safe bag for up to 2 months.

Reheating: If desired, let the cookies thaw at room temperature. For a warm treat, microwave for a few seconds but be cautious to avoid melting the chocolate kiss too much.

What to Serve with Halloween Oreo Witch Hat Cookies

Delight in the festive spirit as you create the perfect spread to complement these enchanting treats.

  • Spooky Fruit Salad: A mix of seasonal fruits like oranges and blackberries, bringing a refreshing contrast to the sweet cookies.

  • Witch’s Brew Punch: This fun, spooky drink made with grape juice and soda adds a fizzy, festive touch to your Halloween gathering.

  • Mellow Marshmallow Treats: Soft marshmallow squares layered with rice cereal offer a chewy, gooey counterpart to the crunchy texture of the cookies.

  • Candy Corn Parfait: Layered candy corn with yogurt creates a colorful, tasty dessert that echoes Halloween’s iconic treats while balancing sweetness.

  • Pumpkin Spice Cupcakes: A nod to fall flavors, these cupcakes feature rich spices and a creamy frosting, perfectly pairing with the chocolaty cookies.

  • Chocolately Hot Cocoa: Warm, indulgent hot chocolate topped with whipped cream feels like a hug in a mug, complementing every bite of your Oreo Witch Hat Cookies perfectly.

  • Pumpkin Pie Milkshake: Creamy and decadent, this blend of pumpkin pie flavors with ice cream brings a delightful finish to your Halloween feast.

  • Gummy Worms Snack Cups: Create little fun cups filled with gummy worms, adding a whimsical touch to the dessert table while enhancing the spooky theme!

Oreo Witch Hat Cookies Variations

Dive into delightful tweaks for your Oreo Witch Hat Cookies that will excite your creativity and taste buds!

  • Chocolate Options: Swap Oreo cookies with Keebler Fudge Stripes or Grasshopper Cookies for a different chocolatey experience. Each bite will bring a unique twist to this classic treat.

  • Colorful Frosting: Create a festive vibe by using colored frosting to match your Halloween theme. Bright oranges, spooky greens, or ghostly purples make for eye-catching designs!

  • Crunchy Textures: For a fun twist, add crushed Halloween-themed candies or nuts atop the frosting for an extra crunch in every bite. This dimension elevates the cookie experience.

  • Non-Dairy Delight: Switch to vegan chocolate cookies and plant-based frosting for a dairy-free version that everyone can enjoy. You still get that enchanting look and taste!

  • Mini Variations: Make mini Oreo Witch Hats using mini Oreos for bite-sized fun. Perfect for sharing at gatherings or to delight little ones.

  • Spicy Kick: Add a dash of cinnamon or pumpkin spice into the frosting for a warm, autumn flavor profile that dances on your taste buds. You might just fall in love with this pumpkin-inspired twist!

  • Candy Toppers: Replace chocolate kisses with marshmallow ghosts or candy corn for a playful variation. The kids will be thrilled with these unexpected toppings!

  • Peanut Butter Lovers: Spread a thin layer of peanut butter between the Oreo and frosting for a nutty flavor boost that will delight any peanut butter fan!

If you’re in the mood for even more sweet options, why not pair your spooky cookies with some delightful Matcha Cookies Soft or try out the lovable Thumbprint Cookies Melt? Happy celebrating!

Oreo Witch Hat Cookies Recipe FAQs

How do I choose the best Oreo cookies?
Absolutely! For the best Oreo Witch Hat Cookies, look for cookies that are fresh and unbroken. If you prefer a different taste, chocolate sandwich cookies like Keebler Fudge Stripes or even homemade chocolate cookies can work beautifully. Just ensure they're not stale or overly crumbly for that perfect base!

How should I store these cookies?
Very! To keep your Oreo Witch Hat Cookies fresh, store them in an airtight container at room temperature for up to 3 days. If you want to extend their shelf life, place them in the fridge where they can last up to 1 week. Remember to let them come to room temperature before serving to enhance the flavors!

Can I freeze Oreo Witch Hat Cookies?
Of course! Freezing them is easy and a great way to keep some festive treats on hand. Wrap each cookie individually in plastic wrap and place them in a freezer-safe bag. They can be stored for up to 2 months. When you're ready to enjoy, let them thaw at room temperature. For an extra treat, microwave them for just a few seconds—just be cautious not to melt the chocolate kiss too much!

What if my frosting is too thick?
No worries! If you find your vanilla frosting too thick to pipe easily, simply add a teaspoon of milk at a time until you reach your desired consistency. Mix well after each addition to ensure it's evenly blended. This will make it much easier to pipe those perfect dollops on your cookies!

Are these cookies safe for people with allergies?
Great question! The Oreos themselves are typically safe for most, but always check the packaging for allergy information since they may contain traces of nuts or gluten. For a nut-free or gluten-free version, look for specialized cookies that meet dietary requirements. Always consider the icing and sprinkles, as some may also contain allergens.

What if I run out of frosting?
If you find yourself with less frosting than you need, no problem! You can easily whip up a small batch of homemade frosting using just butter, powdered sugar, a splash of milk, and a hint of vanilla extract. Mix until creamy and spreadable, and you’ll have just the right amount for your Oreo Witch Hat Cookies!

Oreo Witch Hat Cookies

Easy Oreo Witch Hat Cookies: A Spooky, Fun Treat!

Oreo Witch Hat Cookies are an easy, no-bake Halloween treat featuring crunchy Oreos, creamy frosting, and chocolate kisses.
Print Recipe Pin Recipe
Prep Time 20 minutes mins
Setting Time 20 minutes mins
Total Time 40 minutes mins
Servings: 12 cookies
Course: Dessert
Cuisine: American
Calories: 120
Ingredients Equipment Method Nutrition Notes

Ingredients
  

For the Cookies
  • 15 cookies Oreo cookies The star of the show
  • 15 cookies Keebler Fudge Stripes A delightful alternative
For the Frosting
  • 1 cup Vanilla frosting Can be tinted with food coloring
  • 1 cup Store-bought frosting
For the Decorations
  • 1 cup Halloween sprinkles Highly recommended for festive flair
  • 12 pieces Chocolate kisses Any chocolate-shaped candy can be used

Equipment

  • Mixing Bowl
  • piping bag
  • Star or round frosting tip

Method
 

Step-by-Step Instructions
  1. Prep the Frosting: Place vanilla frosting in a mixing bowl, tint if desired, stir until smooth.
  2. Assemble the Cookies: Pipe frosting onto the center of each Oreo, creating a swirled mound.
  3. Add the Sprinkles: Sprinkle Halloween-themed sprinkles over the frosting before it sets.
  4. Finish with Kisses: Press a chocolate kiss into the center of each dollop of frosting.
  5. Let Them Set: Place cookies on a tray and let them set for about 15-20 minutes.

Nutrition

Serving: 1cookieCalories: 120kcalCarbohydrates: 16gProtein: 1gFat: 6gSaturated Fat: 3gPolyunsaturated Fat: 1gMonounsaturated Fat: 1gCholesterol: 5mgSodium: 50mgPotassium: 50mgSugar: 10gCalcium: 2mgIron: 2mg

Notes

These cookies are customizable and can be made with various cookie types and frosting colors.

Tried this recipe?

Let us know how it was!

Nutter Butter Ghost Cookies for a Spooky Treat This Halloween

September 24, 2025 by Grace Snow Leave a Comment

As I rummaged through my pantry, I stumbled across a package of Nutter Butter cookies, sparking a delightful idea just in time for Halloween. These 4-ingredient Nutter Butter Ghost Cookies are the perfect treat to create some spooky joy without much fuss. With just a little melted candy coating and a few candy eyeballs, you can turn simple cookies into festive ghosts that are both fun to make and devour. Not only are they a fantastic quick fix for last-minute Halloween parties, but they also offer a no-bake option that’s perfect for anyone looking to whip up something homemade without the hassle. Curious to see how these ghoulish delights come together? Let’s dive into the sweet details!

Why Are Nutter Butter Ghost Cookies a Must-Try?

Unforgettable Fun: These ghost cookies are not just treats; they're a delightful way to engage in Halloween festivities, making them perfect for family bonding or classroom activities.

Quick and Easy: With only four ingredients, you can whip up these spooky snacks in no time, making them a fantastic last-minute party addition.

No-Bake Convenience: There's no need to turn on the oven! Simply melt and dip, saving you time and effort in the kitchen.

Customizable Creations: Whether you use Nutter Butter or opt for alternatives like Milano cookies, the variations allow everyone to enjoy a sweet bite, making them versatile for diverse diets.

Visually Appealing: Adorned with candy eyeballs, these cookies transform an ordinary cookie into an eye-catching delight, perfect for impressing your guests or kids.

For more quick cookie ideas, check out my Eggnog Cookies Soft or Mexican Wedding Cookies.

Nutter Butter Ghost Cookies Ingredients

• For the Cookies

  • Nutter Butter Cookies – These classic peanut butter cookies provide a delicious base; substitute with Milano cookies for a peanut-free option.
  • White Candy Melts – Used for coating, these add a smooth and creamy flavor; alternatively, use white chocolate chips if candy melts are unavailable.

• For the Decoration

  • Candy Eyeballs – Essential for creating the ghostly appearance, making your cookies fun and festive.
  • Mini Chocolate Chips – Perfect for adding the finishing touch as the mouth, giving your ghost a playful expression.

These Nutter Butter Ghost Cookies are sure to be a hit at any Halloween gathering!

Step‑by‑Step Instructions for Nutter Butter Ghost Cookies

Step 1: Prepare Your Workspace
Begin by lining a baking sheet with wax paper to hold your dipped Nutter Butter Ghost Cookies. This will prevent them from sticking, allowing for easy cleanup. Ensure your workspace is clear and gather all your ingredients, including Nutter Butter cookies, white candy melts, candy eyeballs, and mini chocolate chips.

Step 2: Melt the Candy Coating
Next, place the white candy melts in a microwave-safe bowl and microwave on 50% power. Stir every 30 seconds until fully melted, which should take about 4-5 minutes total. You'll know it's ready when the candy is smooth and glossy, without any lumps, making it perfect for dipping.

Step 3: Dip the Cookies
Once the candy melts are ready, carefully dip each Nutter Butter cookie into the melted coating. Cover 70-75% of the cookie, ensuring a nice ghostly effect. Allow any excess candy coating to drip off back into the bowl before moving to the next step for an even finish.

Step 4: Add the Ghostly Features
While the coating is still wet, immediately press two candy eyeballs and one mini chocolate chip onto each cookie to create the ghost's face. Position them playfully to give your Nutter Butter Ghost Cookies their spooky charm. Work quickly to ensure the decorations adhere well.

Step 5: Let the Cookies Set
Place the decorated cookies on the lined baking sheet and let them sit at room temperature for 5-10 minutes. Your Nutter Butter Ghost Cookies will set as the candy coating hardens. You'll know they're ready when the coating is firm to the touch, making them perfect for serving or storing.

How to Store and Freeze Nutter Butter Ghost Cookies

Room Temperature: Keep your cookies in an airtight container at room temperature for up to 5 days. This will prevent them from becoming stale while maintaining their delightful crunch.

Freezer: For longer storage, freeze the Nutter Butter Ghost Cookies for up to 2 weeks. Wrap each cookie individually in plastic wrap and place them in a freezer-safe container to keep them fresh.

Thawing: When you’re ready to enjoy, thaw the cookies in a dry place for about 30 minutes. Avoid using the microwave, as it can affect the texture of the candy coating.

Moisture Prevention: Always store cookies in a cool, dry place, away from moisture, as condensation can cause the candy coating to melt and lose its charm.

Make Ahead Options

These Nutter Butter Ghost Cookies are a fantastic option for meal prep! You can dip the cookies and decorate them up to 24 hours in advance, allowing the candy coating to set properly in the refrigerator. To maintain their delightful texture, store the finished cookies in an airtight container at room temperature until you’re ready to serve. If you wish to prepare components ahead, you can melt the candy coating and store it in an airtight container in the fridge for up to 3 days; simply reheat it gently in the microwave before dipping. When the time comes to enjoy your spooky treats, just serve them as is—no extra effort needed for ghostly deliciousness!

Nutter Butter Ghost Cookies Variations

Feel free to customize these delightful ghostly treats to suit your tastes and dietary needs. The options are spooky fun!

  • Dairy-Free: Use dairy-free white chocolate or coconut oil for coating instead of candy melts for a lactose-free version.
  • Gluten-Free: Swap Nutter Butter cookies with gluten-free alternatives like gluten-free vanilla sandwich cookies to accommodate dietary restrictions.
  • Color Variations: Go wild with colored candy melts for different holiday themes, like orange for Halloween or pastel colors for Easter!
  • Sugar-Free Options: Opt for sugar-free candy melts to create a lighter version that everyone can enjoy without the extra sweetness.
  • Add Sprinkles: Before the candy coating sets, sprinkle colorful edible decorations on top for an enchanting touch.
  • Flavor Twist: Mix in a hint of vanilla or almond extract into the melted candy for an unexpected flavor boost that pairs beautifully with the peanut butter.
  • Texture Fun: For extra crunch, consider adding finely crushed nuts or granola as a topping on the candy coating before it hardens.
  • Mini Ghost Cookies: Create bite-sized versions using mini Nutter Butter cookies for a fun party treat that will leave everyone wanting more!

For more delightful cookie ideas, check out my Matcha Cookies Soft or Peaches Cream Cookies.

Expert Tips for Nutter Butter Ghost Cookies

  • Melting Mastery: Use a microwave-safe bowl and melt the candy at 50% power. Stir every 30 seconds to prevent burning the chocolate.

  • Dip with Care: Avoid over-coating! Dip each cookie about 70-75% into the melted candy to ensure a balanced ghostly look without excess dripping.

  • Add Decor Quickly: Work fast when placing candy eyeballs and chocolate chips while the coating is still wet, ensuring they stick properly for that spooky character.

  • Storage Savvy: Keep cookies in an airtight container at room temperature for up to 5 days. If freezing, wrap them individually to maintain freshness for longer.

  • Peanut Allergy Alert: If serving to a group, confirm there are no peanut allergies. Substitute Nutter Butter cookies with Milano cookies for a safe, delightful alternative.

These helpful tips ensure your Nutter Butter Ghost Cookies turn out perfectly spooky and delicious every time!

What to Serve with Nutter Butter Ghost Cookies

As Halloween beckons with its playful spirit, these delightful ghost cookies become the centerpiece of any festive spread, ready to enchant guests young and old.

  • Crispy Apple Slices: The sweet and tangy flavor of fresh apple slices adds a refreshing crunch that balances the sweetness of the cookies. Pair them with caramel dip for an autumn twist.

  • Pumpkin Spice Hot Chocolate: Indulge in the warming flavors of autumn with a rich hot chocolate infused with pumpkin spice. The creamy texture complements the ghost cookies beautifully, creating a cozy treat.

  • Spooky Fruit Salad: A mix of seasonal fruits like oranges, pomegranate, and bananas can provide bright colors and fresh flavors. It adds a lively contrast to the rich, creamy cookies.

  • Cheese Platter: Offer a selection of soft cheeses, like brie or goat cheese, paired with honey and nuts. This savory contrast balances the sweet ghost cookies, making for an exciting culinary experience.

  • Witch’s Brew Smoothie: Blend spinach, banana, and almond milk for a green smoothie that's both nutritious and fun. It adds a vibrant touch, enticing kids and adults alike with its potion-like charm.

  • Ghostly Marshmallow Treats: Create even more spooky fun by serving rice cereal marshmallow treats shaped like ghosts. They’ll be a hit and echo the theme of your Nutter Butter Ghost Cookies.

  • Cinnamon Sugar Popcorn: Light and crunchy popcorn drizzled in butter and tossed with cinnamon sugar makes for a great crunchy snack that enhances the festive mood.

  • Mummy Dogs: Wrap crescent roll dough around hot dogs to create adorable “mummies.” They add a savory element that’s perfect alongside your sweet ghost cookies.

  • Apple Cider: Serve warm or chilled apple cider as a refreshing drink, enhancing the fall atmosphere and harmonizing with the flavors of the cookies.

  • Chocolate Creepy Crawlers: Decorate cookies with chocolate bugs or gummy worms for a playful presentation. These sweet surprises will thrill kids and amp up the Halloween spirit!

Nutter Butter Ghost Cookies Recipe FAQs

How do I choose the best Nutter Butter cookies?
When selecting Nutter Butter cookies for your spooky treat, look for packages without any signs of damage or moisture. Ideally, choose cookies with a smooth and even surface, as this will help create a great coating. If you need a peanut-free option, Milano cookies are a delicious alternative that safely keeps the spirit of the recipe.

What is the best way to store Nutter Butter Ghost Cookies?
To keep your cookies fresh, store them in an airtight container at room temperature for up to 5 days. Ensure the cookies are completely cool before sealing them, as any heat can create moisture, leading to soggy cookies. For longer preservation, wrap each cookie individually in plastic wrap and place them in a freezer-safe container to freeze for up to 2 weeks.

Can I freeze Nutter Butter Ghost Cookies? How?
Absolutely! To freeze, wrap each cookie in plastic wrap and place them in an airtight freezer-safe container. This method prevents freezer burn and helps maintain their delightful crunch. When you’re ready to enjoy them, simply thaw the cookies at room temperature for about 30 minutes. Avoid using the microwave for defrosting; this can melt the candy coating and affect the texture.

What should I do if the candy coating is too thick?
If you find that the candy coating is too thick for dipping, try adding a small amount of vegetable oil or shortening to the melted candy melts. Stir well and return to the microwave for a few seconds if needed. This will help create a smoother consistency, making it easier to dip your Nutter Butter cookies without leaving large clumps.

Can these cookies be made sugar-free?
Yes, you can easily make sugar-free Nutter Butter Ghost Cookies! Substitute the white candy melts with a sugar-free candy coating or sugar-free white chocolate chips. Additionally, when selecting your cookies, ensure they are also sugar-free or low-carb. These adaptations retain the festive spirit while catering to various dietary preferences.

Are there any allergy considerations for these cookies?
Definitely! If you're serving these Nutter Butter Ghost Cookies to a group, always check for peanut allergies, as the Nutter Butter cookies themselves contain peanuts. For a safe alternative, use Milano cookies or another nut-free cookie. Additionally, be mindful of any allergies to artificial colors or ingredients found in the candy eyeballs you choose to decorate with.

Nutter Butter Ghost Cookies

Nutter Butter Ghost Cookies for a Spooky Treat This Halloween

Delight in Nutter Butter Ghost Cookies, an easy Halloween treat made with just four ingredients for festive fun.
Print Recipe Pin Recipe
Prep Time 10 minutes mins
Setting Time 10 minutes mins
Total Time 20 minutes mins
Servings: 12 cookies
Course: Dessert
Calories: 150
Ingredients Equipment Method Nutrition Notes

Ingredients
  

For the Cookies
  • 1 package Nutter Butter Cookies Substitute with Milano cookies for a peanut-free option.
  • 1 cup White Candy Melts Alternatively, use white chocolate chips.
For the Decoration
  • 1 cup Candy Eyeballs
  • 1/4 cup Mini Chocolate Chips For adding facial features.

Equipment

  • Microwave-safe bowl
  • Baking Sheet
  • wax paper

Method
 

Step-by-Step Instructions for Nutter Butter Ghost Cookies
  1. Prepare your workspace by lining a baking sheet with wax paper.
  2. Melt the white candy melts in a microwave-safe bowl at 50% power, stirring every 30 seconds for about 4-5 minutes.
  3. Dip each Nutter Butter cookie into the melted coating, covering 70-75% of the cookie.
  4. Press two candy eyeballs and one mini chocolate chip onto each dipped cookie while the coating is still wet.
  5. Let the cookies sit at room temperature for 5-10 minutes to set.

Nutrition

Serving: 1cookieCalories: 150kcalCarbohydrates: 20gProtein: 2gFat: 7gSaturated Fat: 3gPolyunsaturated Fat: 1gMonounsaturated Fat: 2gSodium: 90mgPotassium: 30mgFiber: 1gSugar: 10gCalcium: 2mgIron: 4mg

Notes

Keep cookies in an airtight container at room temperature for up to 5 days. For longer storage, freeze them individually wrapped for up to 2 weeks.

Tried this recipe?

Let us know how it was!

Hauntingly Delicious Poison Apple Martini for Halloween Fun

September 24, 2025 by Grace Snow Leave a Comment

As I stirred the vibrant mix in my shaker, a potent cocktail was beginning to take shape—Halloween was just around the corner, and it was time to conjure up something truly enchanting. Enter the Poison Apple Martini, a cocktail that's not only visually striking but also packed with the cozy flavors of apple cider and tart pomegranate juice. This spooky drink is a crowd-pleaser, perfect for adding a dash of suspense to your Halloween celebrations. With a touch of activated charcoal for that haunting dark hue and a sweet rim of black sugar, every sip feels like a special treat. Plus, it’s incredibly easy to whip up, ensuring you can spend more time enjoying the festivities and less time behind the bar. Are you ready to embrace the magic of the season and impress your guests?

Why is the Poison Apple Martini Unforgettable?

Spectacular presentation: With its deep, dark hue and rim of black sugar, this cocktail is sure to be a focal point at any Halloween gathering. Delightful flavor balance: The combination of sweet apple cider and tart pomegranate juice creates a deliciously unique blend. Quick to prepare: You'll have time for trick-or-treating too, as this drink can be made in minutes! Crowd-pleasing treat: Its enchanting look and smooth taste appeal to both kids and adults (just skip the dry ice for the little ones!). As part of your Halloween menu, consider pairing it with fun bites like spider-shaped cheese balls for a complete spooky experience!

Poison Apple Martini Ingredients

Here’s everything you need to conjure up your very own Poison Apple Martini for a spooktacular celebration!

For Rimming the Glass

  • Black Lava Salt or Coarse Black Sugar – Use this for an eerie, sweet-salty contrast that enhances the visual appeal of your cocktail.

For the Cocktail

  • Apple Cider – This sweet ingredient gives the drink a fall-inspired base, making each sip feel cozy.
  • Pomegranate Juice – Adds a vibrant color and tartness that perfectly balances the sweetness of the apple cider.
  • Lemon Juice – A dash of freshness, bringing brightness to the drink's flavor profile.
  • Vodka (or Apple Vodka) – The main alcohol, providing a smooth backdrop for the other flavors.
  • Activated Charcoal (or Black Food Dye) – Optional but recommended for that hauntingly dark hue; it’s truly what makes this Poison Apple Martini stand out.
  • Dry Ice – Optional for an added spooky effect of smoky fog—just be careful when handling!

Now you're all set to whip up this delightful Halloween cocktail that'll have your guests bewitched!

Step‑by‑Step Instructions for Poison Apple Martini

Step 1: Prepare the Glass
Begin by rimming your martini glass with black lava salt or coarse black sugar. To do this, take a lemon wedge and run it along the rim of the glass to moisten it. Then, dip the rim into the black salt or sugar mixture, ensuring an even coating that adds a spooky touch to your Poison Apple Martini.

Step 2: Mix Ingredients
Grab a cocktail shaker and fill it halfway with ice to ensure a chilled drink. Pour in the apple cider, pomegranate juice, and fresh lemon juice, followed by the vodka. If you’re feeling adventurous, add a pinch of activated charcoal to create that signature dark hue. Seal the shaker and get ready to shake.

Step 3: Shake It Up
Vigorously shake the cocktail shaker for about 15-20 seconds until well chilled. You'll know it’s ready when the shaker feels frosty to the touch, and you can hear the ice clinking inside. This step is crucial to blending the flavors perfectly and achieving the smooth texture desired in your Poison Apple Martini.

Step 4: Strain the Mixture
Carefully open the shaker and position a strainer over the prepared martini glass. Pour the mixed ingredients into the glass, ensuring the rim stays clean. The deep, dark color of the drink will create an enticing visual as you serve this delightful Poison Apple Martini.

Step 5: Serve with a Spooky Twist
For an added eerie effect, drop a small piece of dry ice into the martini just before serving. Watch as the cocktail emits a spooky fog, captivating your guests. Be sure to remind everyone to wait until the dry ice has completely dissolved before sipping your potion for a safe and haunting experience!

Make Ahead Options

The Poison Apple Martini is a fantastic choice for those who want to save time during Halloween festivities! You can prepare the mixture of apple cider, pomegranate juice, lemon juice, and vodka up to 24 hours in advance and refrigerate it in an airtight container. To maintain the drink's quality, mix in the activated charcoal just before serving to retain its striking color. Additionally, you can rim your glasses with black lava salt or coarse black sugar a few hours ahead of time—just cover them until you're ready to use them. When it's time to impress your guests, simply shake the prepped mixture with ice, strain it into the prepared glasses, and finish with a spooky drop of dry ice. This strategy ensures you can enjoy the festivities without being stuck behind the bar!

Poison Apple Martini Variations

Get ready to unleash your creativity with these delightful twists on the classic Poison Apple Martini that’ll enchant your guests.

  • Pear Cider: Substitute apple cider with pear cider for a fruitier flavor profile that still captures the essence of fall.

  • Flavorful Vodkas: Experiment with flavored vodkas like caramel or cinnamon to introduce new dimensions and surprises.

  • Herbal Touch: Add a sprig of rosemary or thyme for an aromatic twist; simply shake it with the other ingredients for a unique herbal note.

  • Sparkling Version: Top the finished martini with a splash of sparkling water or prosecco for a bubbly, refreshing feel.

  • Lower Sugar: Use unsweetened pomegranate juice and reduce the sugar on the rim for a lighter, less sweet cocktail.

  • Garnish Options: Float sliced apples or blood oranges on top for a visually stunning and tasty garnish.

  • Chilled Variation: For an even cooler sip, freeze your martini glass prior to serving it for an icy surprise your guests will love.

  • Mocktail Version: Omit the vodka and double the apple cider and pomegranate juice for a family-friendly version that everyone can enjoy. Pair it with spooky treats like spider-shaped cheese balls for a festive experience.

With these variations, your Poison Apple Martini can be tailored to suit any taste and occasion while maintaining its eerie allure!

What to Serve with Poison Apple Martini

As you sip on the enchanting flavors of your Poison Apple Martini, elevate your gathering with delicious pairings that will enchant your guests even further.

  • Spider-Shaped Cheese Balls: These savory bites are as fun as they are delicious, perfect for adding a playful spirit to your spooky soirée. They pair wonderfully with the sweet-tart notes of the martini.

  • Ghost-Shaped Meringues: Light and airy, these whimsical treats offer a delightful contrast to the robust cocktail, adding a charm that's visually captivating.

  • Pumpkin Deviled Eggs: With a hint of spice and a creamy texture, these beauties complement the fall flavors in your martini, making every bite a burst of autumn magic.

  • Caramel Apple Slices: Drizzled with chocolate and paired with your drink, these sweet and crunchy apple treats echo the cocktail's apple flavors, creating a harmonious snacking experience.

  • Savory Meat and Cheese Platter: A mix of textures and flavors, this offering allows guests to nibble while enjoying the Poison Apple Martini’s richness, ensuring a well-rounded feast.

  • Apple Crisp Bars: These dessert bars need no introduction—warm, gooey apple flavors combined with cinnamon enhance the essence of your cocktail, making for an unforgettable ending to your spooky celebration.

  • Mulled Wine: A hot cup of spiced red wine warms the soul; its fragrant spices pair beautifully with the flavors of the martini, ideal for chilly Halloween nights.

  • Chilled Cucumber Soup: Refreshing and smooth, this contrasts nicely with the robust martini, offering a cooling effect and a touch of sophistication to your spread.

Storage Tips for Poison Apple Martini

  • Room Temperature: Best enjoyed fresh, but if necessary, you can leave the Poison Apple Martini at room temperature for up to 1 hour; make sure to drink it before it warms too much.
  • Fridge: If preparing in advance, refrigerate the mixed juices (apple cider, pomegranate juice, lemon juice) separately for up to 3 days, but avoid mixing with vodka until ready to serve.
  • Freezer: It’s not recommended to freeze the Poison Apple Martini as freezing could alter the texture and flavors; instead, prepare your ingredients fresh for the best experience.
  • Reheating: There's no need to reheat this cocktail; simply shake and serve, ensuring a delightful and chilling presentation that captures the essence of Halloween!

Expert Tips for the Best Poison Apple Martini

  • Perfectly Rimmed Glass: Ensure you moisten the glass rim evenly with lemon juice for a better stick of black sugar, enhancing both flavor and looks.
  • Chill the Shaker: Use a well-insulated shaker to keep the cocktail cool while mixing. This helps the ingredients combine beautifully for your Poison Apple Martini.
  • Controlled Dry Ice Use: When adding dry ice, handle it with gloves and keep it away from children. Always wait until it's fully dissolved before drinking.
  • Substitution Smart: If you want a sweeter cocktail, opt for apple vodka instead of regular vodka, as it’ll complement the apple cider nicely.
  • Visual Appeal: For an added touch, consider using a clear cocktail shaker to showcase the vibrant colors of your mixture before pouring.

Poison Apple Martini Recipe FAQs

How do I choose the right apples for my Apple Cider?
Absolutely! When selecting apples for your cider, opt for ones that are slightly firm and free from dark spots or bruises. Varieties like Honeycrisp or Gala bring a beautiful sweetness, while Granny Smith adds a tart note. You’ll want to balance sweet and tart to create the perfect flavor profile in your Poison Apple Martini.

How should I store leftover ingredients for my cocktail?
Very! If you have leftover apple cider or pomegranate juice, store them in an airtight container in the refrigerator for up to 3 days. Keep the vodka separate until you're ready to mix again. Just make sure to shake well before serving, as some separation may occur.

Can I freeze the ingredients for my Poison Apple Martini?
Of course! While it’s best to serve this cocktail fresh, you can freeze apple cider or pomegranate juice in ice cube trays for up to 3 months. Just remember to let the cubes thaw in the refrigerator before mixing, to ensure the freshest taste. Avoid freezing the entire cocktail as it could alter its texture.

Why did my Poison Apple Martini taste too tart?
That can happen sometimes! If your cocktail turns out too tart, it may be due to the acidity of the lemon juice or pomegranate juice you used. To balance the flavors, add a splash more apple cider or a teaspoon of simple syrup (1 part sugar, 1 part water boiled until dissolved) to sweeten it up to your liking.

Is this cocktail safe for those with dietary restrictions?
Definitely! The Poison Apple Martini is gluten-free as long as you use gluten-free vodka. For vegan options, all ingredients are plant-based. However, ensure your rimming sugar is free from any animal byproducts if that's a concern. Just double-check for any allergies, especially with the activated charcoal, which some may prefer to avoid.

Can I make this cocktail non-alcoholic?
Absolutely! To create a non-alcoholic version of the Poison Apple Martini, simply replace the vodka with additional apple cider or sparkling water for a bubbly twist. Mix as directed, and you’ll have a delightful, kid-friendly drink that still packs a festive punch for your Halloween festivities!

Poison Apple Martini

Hauntingly Delicious Poison Apple Martini for Halloween Fun

This Poison Apple Martini is a visually striking and delicious cocktail perfect for Halloween celebrations.
Print Recipe Pin Recipe
Prep Time 5 minutes mins
Total Time 5 minutes mins
Servings: 1 cocktail
Course: Drinks
Cuisine: American
Calories: 200
Ingredients Equipment Method Nutrition Notes

Ingredients
  

For Rimming the Glass
  • Black Lava Salt or Coarse Black Sugar For rimming the glass
For the Cocktail
  • 2 oz Apple Cider Sweet ingredient for a cozy flavor
  • 1 oz Pomegranate Juice Adds color and tartness
  • 0.5 oz Lemon Juice Adds freshness
  • 2 oz Vodka Main alcohol; can substitute with apple vodka
  • 0.5 tsp Activated Charcoal Optional for dark hue
  • 1 piece Dry Ice Optional for spooky effect

Equipment

  • cocktail shaker
  • strainer
  • Martini Glass

Method
 

Step-by-Step Instructions
  1. Prepare the glass by rimming it with black lava salt or coarse black sugar.
  2. Fill a cocktail shaker halfway with ice and add the apple cider, pomegranate juice, and lemon juice.
  3. Add vodka and activated charcoal if desired, then shake vigorously for about 15-20 seconds.
  4. Strain the mixture into the prepared martini glass.
  5. If using, drop a small piece of dry ice into the martini before serving.

Nutrition

Serving: 1cocktailCalories: 200kcalCarbohydrates: 20gSodium: 5mgPotassium: 100mgFiber: 1gSugar: 15gVitamin C: 10mgCalcium: 2mgIron: 1mg

Notes

Use caution with dry ice, ensuring it's fully dissolved before drinking. This cocktail is best served fresh.

Tried this recipe?

Let us know how it was!

Frankenstein Kiwi Pops: A Fun and Healthy Halloween Treat

September 24, 2025 by Grace Snow Leave a Comment

“Wanna hear something amusing? I had a minor kitchen mishap when trying to whip up a spooky Halloween treat, and instead of the usual sugary snacks, I ended up creating these fun Frankenstein Kiwi Pops! With their vibrant green color and adorable chocolate chip eyes, these healthy Halloween treats are not only a hit with kids but also a delightful way for us adults to reclaim a bit of festive joy without the guilt. Made with tangy kiwi and creamy Greek yogurt, this quick and easy recipe transforms nutritious ingredients into a frozen delight that feels like a special treat. Whether you’re gearing up for a Halloween gathering or just want to impress the little ones with something fun, these pops are sure to pique your curiosity—who knew healthy could look this cute?”

Why Are These Kiwi Pops So Special?

Delightful Fun: Kids will love the playful appearance of these pops, complete with chocolate chip eyes that make healthy eating exciting.
Nutrient-Packed: With kiwi's natural sweetness and Greek yogurt's creaminess, you're serving up a treat that's as nutritious as it is tasty.
Quick & Easy: The simple steps make it easy to whip up a batch in no time, perfect for busy parents.
Versatile Variations: Feel free to create your own version by using different fruits or yogurts, or even adding greens like spinach for a color boost—check out Watermelon Popsicles Blissful for another refreshing treat!
Guilt-Free Indulgence: No need to sacrifice flavor for health; these pops are a delicious way to enjoy Halloween without the extra sugar.
Crowd-Pleaser: Serve them at parties, and watch them disappear—everyone, adults included, will reach for these fun, fruity delights!

Frankenstein Kiwi Pops Ingredients

• Get ready for a spooky treat!

For the Base

  • Kiwi – Use ripe, soft kiwis for optimal sweetness and color.
  • Greek Yogurt – Adds creaminess and a protein boost; substitute with your favorite flavored yogurt for a twist.
  • Honey – A natural sweetener to enhance flavor; maple syrup is great for a vegan option.

For the Eyes

  • Mini Chocolate Chips – Perfect for creating Frankenstein's iconic eyes; try dark chocolate chips for a richer taste.

These Frankenstein Kiwi Pops are not only visually appealing but also a nutritious choice that kids will love!

Step‑by‑Step Instructions for Frankenstein Kiwi Pops

Step 1: Prep Kiwis
Begin by peeling and slicing the ripe kiwis into rounds about 1/4 inch thick, aiming for approximately 2 cups of kiwi slices. Lay them flat on a cutting board for a tidy workspace. Make sure the kiwis are bright green and soft to ensure maximum sweetness, as these will form the colorful base of your Frankenstein Kiwi Pops.

Step 2: Blend Ingredients
In a blender, combine the sliced kiwis, creamy Greek yogurt, and a drizzle of honey. Blend the ingredients on high until you achieve a smooth, vibrant mixture devoid of lumps, which should take about 30–45 seconds. The blended concoction’s bright green color will get your taste buds tingling, setting the stage for delightful pops that are both tasty and nutritious.

Step 3: Pour Mixture
Carefully pour the smooth kiwi-yogurt mixture into pop molds, filling them to about three-quarters full. Leave a quarter-inch of space at the top to allow for expansion during freezing. You might want to tap the molds gently on the counter to eliminate any air bubbles, ensuring your Frankenstein Kiwi Pops are perfectly formed and ready for the next step.

Step 4: Add Eyes
Take mini chocolate chips and gently press them into the mixture in each mold to create frighteningly cute "eyes." Position them to resemble Frankenstein’s iconic look—let your creativity flow! This step not only enhances the visual appeal of your pops but also adds a fun snackable element that kids will surely love during Halloween festivities.

Step 5: Insert Sticks & Freeze
Place sticks into each mold carefully, ensuring they stand straight and centered. After securing the sticks, cover the molds with a lid or plastic wrap to keep them clean and prevent ice formation. Now, pop them into the freezer for at least 4 hours, or ideally overnight, allowing the mixture to transform into icy treats.

Step 6: Remove from Molds
When ready to serve your Frankenstein Kiwi Pops, remove them from the freezer and let them sit for a minute for easier removal. Briefly run the molds under warm water for about 15-20 seconds to loosen the pops without melting them. With this gentle heat, the fun pops should slip out easily, revealing their vibrant green delight!

Step 7: Serve and Enjoy
Your Frankenstein Kiwi Pops are now ready to be shared! Serve them immediately to enjoy their refreshing and creamy texture. These spooky yet healthy treats can be enjoyed right away, or kept in an airtight container in the freezer for up to two weeks for a perfect grab-and-go snack that everyone can enjoy!

How to Store and Freeze Frankenstein Kiwi Pops

  • Fridge: Keep any remaining pops in the fridge for up to 2 days before they start losing their texture. However, these frozen treats are best enjoyed fresh from the freezer!
  • Freezer: Store the Frankenstein Kiwi Pops in an airtight container or wrap each pop in plastic wrap to prevent freezer burn, allowing them to stay fresh for up to 2 weeks.
  • Reheating: There’s no need to heat these pops! Just run the molds under warm water for a few seconds to release the pops when you're ready to enjoy them again.
  • Visual Appeal: For a fun presentation, consider placing the pops upright in a cup or bowl while serving to showcase their spooky charm.

What to Serve with Frankenstein Kiwi Pops?

These delightful pops are not just treats; they can inspire a whimsical and nutritious Halloween feast that excites both kids and adults alike.

  • Crunchy Veggie Platter: Pair with an assortment of colorful vegetables like carrots, bell peppers, and cucumbers. The crunch offers a satisfying contrast to the creamy texture of the pops, making snacking healthy and fun!

  • Coconut Whipped Cream: A dollop of coconut whipped cream adds a rich, tropical flavor that's irresistible. This creamy topping will make your Kiwi Pops feel even more indulgent while keeping the treat light and refreshing.

  • Cheesy Mini Quesadillas: Serving warm, gooey quesadillas next to these icy treats strikes a perfect balance of savory and sweet. The cheesy goodness warms you up, while the pops cool you down—ideal for excitement on Halloween night!

  • Sparkling Fruit Punch: A refreshing, fizzy fruit punch serves as a delightful drink option. Combining juice, sparkling water, and floating fruit slices creates a festive drink that enhances the overall celebration.

  • Frozen Yogurt Bark: Whip up a quick frozen yogurt bark covered in nuts and bits of dried fruit. This light dessert complements the fruity pops perfectly and offers a fun alternative to candy or sweets.

  • Nutty Energy Bites: Healthy, no-bake energy bites made from oats and nut butter work well as a protein-packed snack alongside the Kiwi Pops. Their chewy texture provides a delightful contrast, keeping everyone satisfied and energized!

Frankenstein Kiwi Pops Variations & Substitutions

Feel free to let your creativity flow as you customize these delightful pops—there’s a world of flavor waiting to be explored!

  • Fruity Twists: Substitute kiwis with other fruits like strawberries or peaches for a sweet, fruity explosion. Each fruit brings its unique taste and vibe—you can create a fruity rainbow of flavors!
  • Yogurt Choices: Try different yogurt flavors like vanilla, berry, or even coconut. This simple swap can transform the overall taste profile, making each batch uniquely delicious!
  • Healthy Additions: Add a handful of spinach or kale for an extra boost of nutrients while keeping the flavor intact. It’s a sneaky way to sneak in more greens, and kids won’t even notice!
  • Nutty Crunch: Toss in a sprinkle of chopped nuts like almonds or walnuts for added texture and healthy fats. This added crunch can elevate the pops, bringing a satisfying contrast to the creamy yogurt.
  • Sweetener Swaps: Use maple syrup instead of honey for a vegan-friendly option that delivers a lovely depth of flavor. Just a slight change can make all the difference in taste!
  • Spooky Swirls: Incorporate some pureed beetroot for a fun pink swirl effect, making your pops even more festive. The bright color will excite kids and make the Halloween theme pop!
  • Dessert Sauces: Drizzle melted dark or white chocolate over the finished pops for an indulgent treat. This twist adds a decadent touch and makes them even more visually enticing, perfect for Halloween parties!
  • Frozen Yogurt Pops: For a creamier texture, consider using frozen Greek yogurt instead of fresh for richness. This twist turns your pops into a mini ice cream treat!

If you're looking for more fruity inspirations, don't forget to explore Watermelon Popsicles Blissful for a juicy alternative that kids will adore!

Expert Tips for Frankenstein Kiwi Pops

  • Choose Ripe Kiwis: Make sure the kiwis are ripe and soft for optimal sweetness; bruised fruits will lead to disappointing flavor.
  • Smooth Blending: Blend the kiwi mixture until completely smooth—lumpy mixtures can result in a less appealing texture in your pops.
  • Tap Molds: After pouring the mixture into molds, gently tap them on the counter to release any trapped air bubbles; this ensures smooth edges.
  • Creative Eyes: Experiment with mini chocolate chip placements to add character—try different configurations for fun variations!
  • Freeze Time: Aim to freeze overnight for the best results; longer chilling ensures that your Frankenstein Kiwi Pops are perfectly solid.
  • Storage Tips: Wrap pops individually in plastic wrap before placing them back in the freezer for optimal freshness and flavor retention.

Make Ahead Options

These Frankenstein Kiwi Pops are ideal for those busy weeknights when you need to whip up a quick, healthy treat! You can prepare the kiwi-yogurt mixture up to 24 hours in advance and store it in an airtight container in the refrigerator, ensuring the vibrant color stays intact. To make the pops even easier, you can fill the molds with the mixture and insert the sticks, then cover them and freeze for up to 3 days. Just remember to run the molds under warm water for a few seconds when it's time to serve; this keeps the pops from sticking and ensures they come out perfectly every time. With these make-ahead tips, you'll have deliciously spooky snacks ready to go!

Frankenstein Kiwi Pops Recipe FAQs

How do I know when my kiwis are ripe?
Absolutely! Ripe kiwis should be slightly soft to the touch but not mushy. When you gently squeeze them, they should yield a bit but still feel firm. Look for vibrant green skin without any dark spots or bruises, which may indicate overripeness.

How long can I store my Frankenstein Kiwi Pops in the freezer?
I often recommend enjoying your Kiwi Pops fresh, but you can store them in the freezer for up to 2 weeks. Just wrap them individually in plastic wrap to prevent freezer burn, and keep them in an airtight container for the best flavor!

Can I freeze the Kiwi Pops for longer than two weeks?
While it’s best to consume them within 2 weeks for optimal freshness, you can freeze the pops for up to 3 months. Just make sure to package them carefully in airtight containers to avoid freezer burn. To serve, simply let them sit a few minutes at room temperature before enjoying!

What if the mixture turns out lumpy when I blend?
No worries! If your mixture is lumpy, just blend it on high for an additional 30 seconds, making sure to scrape down the sides of the blender to incorporate all the ingredients. A smooth texture is key for a delightful pop experience, so take your time with this step.

Are these pops safe for my child with allergies?
Yes! The Frankenstein Kiwi Pops are generally safe for children, but if your child has allergies, check each ingredient carefully. You can easily substitute Greek yogurt with a dairy-free alternative, and ensure the chocolate chips are allergy-friendly. Always consult your pediatrician if you're unsure about new foods!

What variations can I make with different fruits?
The more the merrier! You can swap kiwis for other fruits like strawberries, peaches, or even mangos for delightful variations. Just follow the original steps and blend your chosen fruits with Greek yogurt and honey, creating a fun twist for these healthy treats. Enjoy exploring new flavors together!

frankenstein kiwi pops

Frankenstein Kiwi Pops: A Fun and Healthy Halloween Treat

Enjoy these fun Frankenstein Kiwi Pops, a healthy Halloween treat packed with kiwi and Greek yogurt.
Print Recipe Pin Recipe
Prep Time 15 minutes mins
Freezing Time 4 hours hrs
Total Time 4 hours hrs 15 minutes mins
Servings: 6 pops
Course: Snacks
Calories: 70
Ingredients Equipment Method Nutrition Notes

Ingredients
  

For the Base
  • 2 cups Ripe kiwis Peeled and sliced
  • 1 cup Greek yogurt Can substitute with flavored yogurt
  • 2 tablespoons Honey Can substitute with maple syrup for vegan option
For the Eyes
  • 1/4 cup Mini chocolate chips For creating eyes

Equipment

  • Blender
  • Pop molds
  • Cutting Board
  • Knife

Method
 

Step-by-Step Instructions
  1. Prep Kiwis: Peel and slice kiwis into rounds about 1/4 inch thick, aiming for 2 cups.
  2. Blend Ingredients: Combine kiwis, Greek yogurt, and honey in a blender and blend until smooth.
  3. Pour Mixture: Pour the mixture into pop molds, filling them to three-quarters full.
  4. Add Eyes: Press mini chocolate chips into the mixture in each mold for eyes.
  5. Insert Sticks & Freeze: Insert sticks and freeze for at least 4 hours or overnight.
  6. Remove from Molds: Remove pops from molds by running them under warm water.
  7. Serve and Enjoy: Serve immediately or store in an airtight container for up to two weeks.

Nutrition

Serving: 1popCalories: 70kcalCarbohydrates: 15gProtein: 2gSodium: 5mgPotassium: 180mgFiber: 2gSugar: 10gVitamin C: 50mgCalcium: 4mgIron: 2mg

Notes

These pops can be customized with different fruits or yogurt flavors. Great for parties and gatherings!

Tried this recipe?

Let us know how it was!

Cottage Cheese Wraps: Soft, Protein-Packed and So Versatile

September 23, 2025 by Grace Snow Leave a Comment

As I stood in my kitchen, the rich aroma of garlic and Italian herbs mingled with the anticipation of a new recipe that would soon become a staple in my home—Cottage Cheese Wraps. These delightful wraps are not only soft and flexible, but they pack a punch with over 12g of protein per serving. Perfectly suited for low-carb diets, they offer a delicious alternative to traditional bread and tortillas. The beauty of these wraps lies in their versatility; you can fill them with anything from creamy avocado to savory grilled chicken, making them an ideal choice for quick lunches or meal prep. With minimal ingredients and simple instructions, you'll find yourself reaching for this recipe again and again. Ready to elevate your wrap game? Let’s dive into how to create these high-protein delights!

Why Are Cottage Cheese Wraps So Special?

Versatile Cooking: These wraps are a blank canvas, ready for your favorite fillings, whether it’s a savory Jello Salad Cottage or a Mediterranean-inspired delight.

Protein-Packed: With over 12g of protein per serving, they’re perfect for a satisfying meal that fuels your day!

Low-Carb Delight: As a low-carb alternative to bread, they fit seamlessly into a health-conscious lifestyle.

Quick & Easy: Just blend, bake, and roll! These wraps are a breeze to prepare, making them a go-to for busy weeknights.

Storage Friendly: Meal prep is a cinch—store them in the fridge or freeze for later use!

Cottage Cheese Wraps Ingredients

For the Wraps

  • Full-fat cottage cheese – Provides moisture and protein for the wraps; note that substituting low-fat may alter texture.
  • Large eggs – Act as a binder, helping the wrap hold together; substitute with flaxseed meal mixed with water for a vegan version.
  • Grated Parmesan cheese – Adds flavor and structure; you can use mozzarella or a dairy-free alternative for substitution.
  • Garlic powder – Infuses a savory depth; can be replaced with fresh minced garlic for an intense flavor.
  • Italian seasoning – Enhances flavor profile; Herbs de Provence or oregano could also work well.

Serving Suggestions

  • Fillings – Choose combinations like cream cheese with crispy bacon and cherry tomatoes for breakfast, or grilled chicken with avocado for lunch.
  • Stand-alone snack – Enjoy the wraps warm as a satisfying, low-carb treat!

Step‑by‑Step Instructions for Cottage Cheese Wraps

Step 1: Preheat the Oven
Begin by preheating your oven to 350°F (175°C). While the oven is warming up, line a baking sheet with parchment paper to prevent sticking. This step is crucial for ensuring that your Cottage Cheese Wraps come out perfectly and can be easily removed after baking without any hassle.

Step 2: Blend the Ingredients
In a blender, combine the full-fat cottage cheese, large eggs, grated Parmesan cheese, garlic powder, and Italian seasoning. Blend the mixture on medium speed until it reaches a smooth and creamy consistency, which should take about 30 seconds. This will create a batter that forms the base of your delightful wraps.

Step 3: Prepare the Baking Sheet
Once the mixture is blended, pour it onto the prepared baking sheet. Using a spatula, gently spread the batter into a thin rectangle, aiming for an even thickness across the surface. This ensures that your Cottage Cheese Wraps cook uniformly and achieve the perfect texture—soft yet sturdy.

Step 4: Bake the Wraps
Place the baking sheet in the preheated oven and bake for 30-35 minutes. You’ll know your wraps are ready when they feel dry to the touch and are lightly golden on top. This is a vital step to achieving that soft yet pliable texture that makes these wraps so enjoyable.

Step 5: Cool the Wraps
After baking, remove the tray from the oven and let the wraps cool completely on the tray for about 10-15 minutes. This cooling process helps firm up the wraps, making them easier to handle and less likely to tear as you prepare to serve them.

Step 6: Remove and Slice
Once cooled, carefully peel the Cottage Cheese Wraps off the parchment paper. Use a sharp knife to slice them into pieces or keep them whole for filling. At this point, you can load them with your favorite ingredients, such as savory grilled chicken or fresh veggies, to create a delicious meal.

What to Serve with Cottage Cheese Wraps

These wraps are a delightful starting point for a delicious meal that packs in flavor and nutrition.

  • Creamy Avocado Dip: A rich, buttery complement that enhances the wraps' soft texture while adding healthy fats.
  • Savory Grilled Chicken: Perfectly seasoned, juicy chicken adds a protein boost, turning your wrap into a filling meal.
  • Fresh Cucumber Salad: Crisp cucumbers tossed with vinaigrette provide a refreshing crunch that lightens every bite of the wrap.
  • Roasted Red Pepper Hummus: Creamy and flavorful, this dip adds a zesty twist that pairs beautifully with the wraps' mild taste.
  • Crispy Bacon Bits: Adding a smoky crunch, bacon elevates the flavor profile of the wraps while introducing delightful texture.
  • Zesty Italian Dressing: Drizzle over the fillings for a tangy kick that brightens the overall flavor of your wraps.
  • Mixed Berry Smoothie: A sweet, fruity drink that balances the savory flavors of your meal, rounding off your dining experience perfectly.
  • Chocolate Chia Pudding: For dessert, this indulgent yet healthy treat satisfies your sweet tooth while keeping the meal light.

Expert Tips for Cottage Cheese Wraps

  • Grease the Parchment: Ensure to grease the parchment well; this will prevent the wraps from sticking and make removal easy.

  • Cool Completely: Allow the baked wrap to cool completely on the tray to prevent tearing when you move or slice them.

  • Blend Texture: For a softer wrap, blend the mixture a little less. A smoother texture firms up better during baking, ensuring perfect Cottage Cheese Wraps.

  • Contrasting Fillings: When choosing fillings, combine contrasting textures for an enjoyable bite. Pair creamy ingredients with something crispy for the best experience.

  • Customization: Feel free to experiment with herbs and spices in your batter; this can elevate the flavor profile and make your Cottage Cheese Wraps uniquely yours!

Make Ahead Options

These Cottage Cheese Wraps are a fantastic choice for meal prep, allowing you to save time during busy weeknights! You can bake the wraps up to 3 days in advance and store them in an airtight container in the refrigerator. To maintain their soft texture, place a layer of parchment paper between each wrap to prevent sticking. When you're ready to serve, simply reheat them in the oven for about 5-10 minutes at 350°F (175°C). Whether you're filling them with grilled chicken or fresh veggies, you'll enjoy delicious, hassle-free Cottage Cheese Wraps that taste just as wonderful as when freshly made!

Storage Tips for Cottage Cheese Wraps

Fridge: Store your Cottage Cheese Wraps in an airtight container for up to 5 days. To prevent sticking, place parchment paper between each wrap.

Freezer: For longer storage, freeze the wraps with parchment paper between them, keeping them fresh for up to 2 months.

Defrosting: When ready to enjoy, thaw the wraps overnight in the fridge or at room temperature for a few hours before use.

Reheating: Reheat in a skillet over low heat or microwave for a quick warm-up, ensuring they remain soft and pliable.

Cottage Cheese Wraps: Customize to Your Taste!

Feel free to unleash your creativity and tailor these wraps to suit your palate perfectly!

  • Dairy-Free: Substitute full-fat cottage cheese with a dairy-free Greek yogurt for a plant-based option that still feels rich and creamy.

  • Herb-Infused: Add fresh or dried herbs like basil or chives directly into the batter for an aromatic twist. They'll uplift the flavor and add a vibrant touch.

  • Spicy Kick: Mix in a pinch of cayenne pepper or chopped jalapeños for a delightful heat that complements your fillings. It’s a fun way to spice things up!

  • Veggie Boost: Incorporate finely chopped spinach or kale into the batter for added nutrition and a pop of color. You'll hardly notice they're there, but your body will thank you!

  • Sweet Delight: Turn the wraps into a sweet treat by adding a dash of vanilla extract and cinnamon. Fill them with yogurt and fresh berries for a delightful breakfast or dessert option.

  • Cheesy Variety: Experiment with different cheeses like feta, gouda, or even a smoked cheese for an exciting flavor profile. Each cheese brings a unique taste that can redefine your wraps.

  • Texture Twist: For a crunchier bite, add crushed nuts or seeds to the batter. They’ll provide satisfying texture alongside the softness of the wrap.

And if you’re looking for great filling ideas, why not try a savory Potato Blue Cheese mix, or perhaps wrap them around a refreshing salad like a classic Jello Salad Cottage? The possibilities are endless!

Cottage Cheese Wraps Recipe FAQs

What type of cottage cheese is best for these wraps?
I recommend using full-fat cottage cheese for the best texture and moisture content. Low-fat options may result in a drier wrap, affecting the overall taste. If you want to go dairy-free, look for plant-based alternatives that mirror the texture.

How should I store leftover Cottage Cheese Wraps?
Store your wraps in an airtight container in the fridge for up to 5 days. To prevent them from sticking, place parchment paper between each wrap. This will keep them fresh and easy to access for that midday snack or next meal!

Can I freeze Cottage Cheese Wraps?
Absolutely! For longer storage, freeze the wraps by placing parchment paper between each one. This way, they won’t stick together. They will stay good for up to 2 months. When you’re ready to enjoy them, thaw overnight in the fridge or at room temperature for a few hours, then reheat as desired.

What if my wraps are too soft or tear easily?
If your wraps turn out too soft, it’s likely a blending issue or they may not have baked long enough. Be sure to let them cool completely on the tray as cooling firms them up. For a firmer wrap, blend the mixture less to keep some structure, ensuring they firm up well in the oven.

Are there any dietary restrictions I should consider?
If you're concerned about allergens, make sure to check for dairy allergies, as the wraps contain both cottage cheese and Parmesan. For vegan options, substitute the eggs with a mixture of flaxseed meal and water (1 tablespoon of flaxseed meal mixed with 2.5 tablespoons of water for each egg) to help bind the ingredients together effectively.

Cottage Cheese Wraps

Cottage Cheese Wraps: Soft, Protein-Packed and So Versatile

Cottage Cheese Wraps are soft, protein-packed snacks perfect for low-carb diets and versatile fillings.
Print Recipe Pin Recipe
Prep Time 10 minutes mins
Cook Time 35 minutes mins
Cooling Time 15 minutes mins
Total Time 1 hour hr
Servings: 4 wraps
Course: Snacks
Cuisine: American
Calories: 150
Ingredients Equipment Method Nutrition Notes

Ingredients
  

For the Wraps
  • 1 cup full-fat cottage cheese Substituting low-fat may alter texture.
  • 2 large eggs Can substitute with flaxseed meal mixed with water for a vegan version.
  • 1/2 cup grated Parmesan cheese Mozzarella or a dairy-free alternative can be used.
  • 1 teaspoon garlic powder Can be replaced with fresh minced garlic for more flavor.
  • 1 teaspoon Italian seasoning Herbs de Provence or oregano can be used.
Fillings
  • cream cheese Can be paired with crispy bacon and cherry tomatoes for breakfast.
  • grilled chicken Pair with avocado for a fulfilling lunch.

Equipment

  • Blender
  • Baking Sheet
  • Parchment Paper
  • Spatula
  • Sharp Knife

Method
 

Step-by-Step Instructions for Cottage Cheese Wraps
  1. Preheat the oven to 350°F (175°C) and line a baking sheet with parchment paper.
  2. Blend the cottage cheese, eggs, Parmesan, garlic powder, and Italian seasoning until smooth.
  3. Pour the mixture onto the baking sheet and spread into a thin rectangle.
  4. Bake for 30-35 minutes until lightly golden and dry to the touch.
  5. Cool on the tray for 10-15 minutes before removing.
  6. Slice or keep whole for filling as desired.

Nutrition

Serving: 1wrapCalories: 150kcalCarbohydrates: 6gProtein: 12gFat: 8gSaturated Fat: 4gPolyunsaturated Fat: 1gMonounsaturated Fat: 2gCholesterol: 130mgSodium: 250mgPotassium: 100mgFiber: 2gSugar: 2gVitamin A: 300IUCalcium: 150mgIron: 1mg

Notes

Grease the parchment and allow baking wrap to cool completely for easier handling. Feel free to customize the herbs and spices in your batter.

Tried this recipe?

Let us know how it was!
  • « Previous Page
  • 1
  • …
  • 159
  • 160
  • 161
  • 162
  • 163
  • …
  • 200
  • Next Page »

Welcome!

Hi, I’m Grace, a Sydney-based home cook with a passion for bold flavors and trending ingredients. Whether you’re a busy beginner or a seasoned foodie, you’ll find dishes here that are fresh, fun, and full of flavor.

More about me

Popular Recipes

  • Deli-Style Italian Grinder Salad
    Deli-Style Italian Grinder Salad: A Fresh Twist on Flavor
  • Quick and Easy Taco Bowl
    Savor the Flavor: Quick and Easy Taco Bowl That's Customizable
  • Taco Salad Bowls With Shredded Chicken
    Delicious Taco Salad Bowls With Shredded Chicken in 15 Minutes
  • Seven-Layer Taco Salad
    Savory Seven-Layer Taco Salad for Flavorful Gatherings

Footer

↑ back to top

About

  • Privacy Policy
  • Disclaimer
  • Terms & Conditions

Newsletter

  • Sign Up! for emails and updates

Contact

  • About me
  • Contact me

Copyright © 2025 TastyTrendIngredients