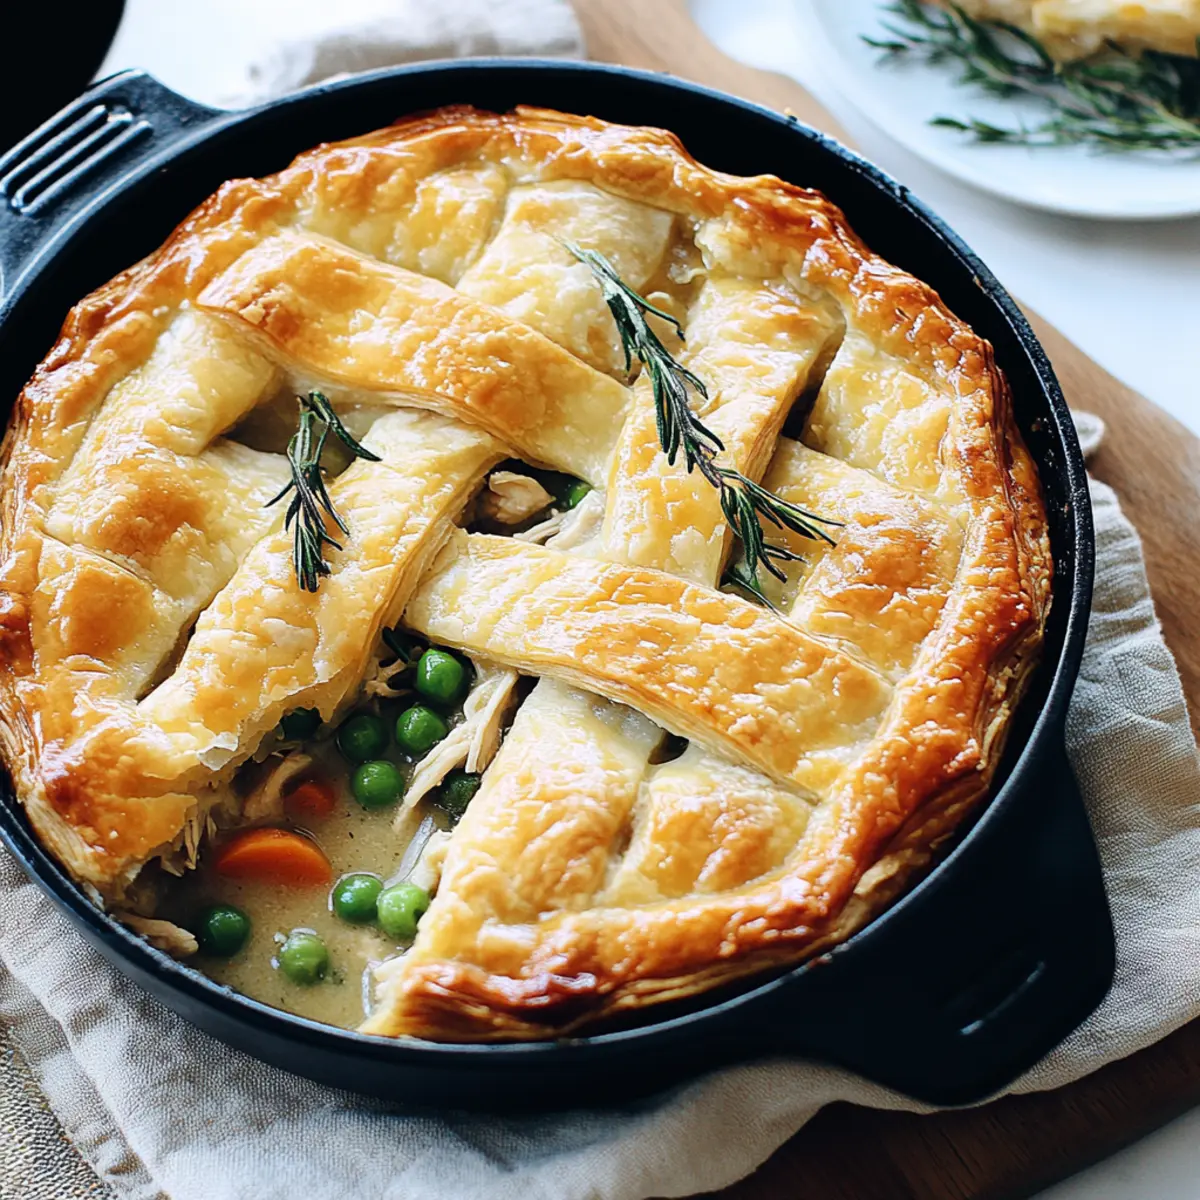
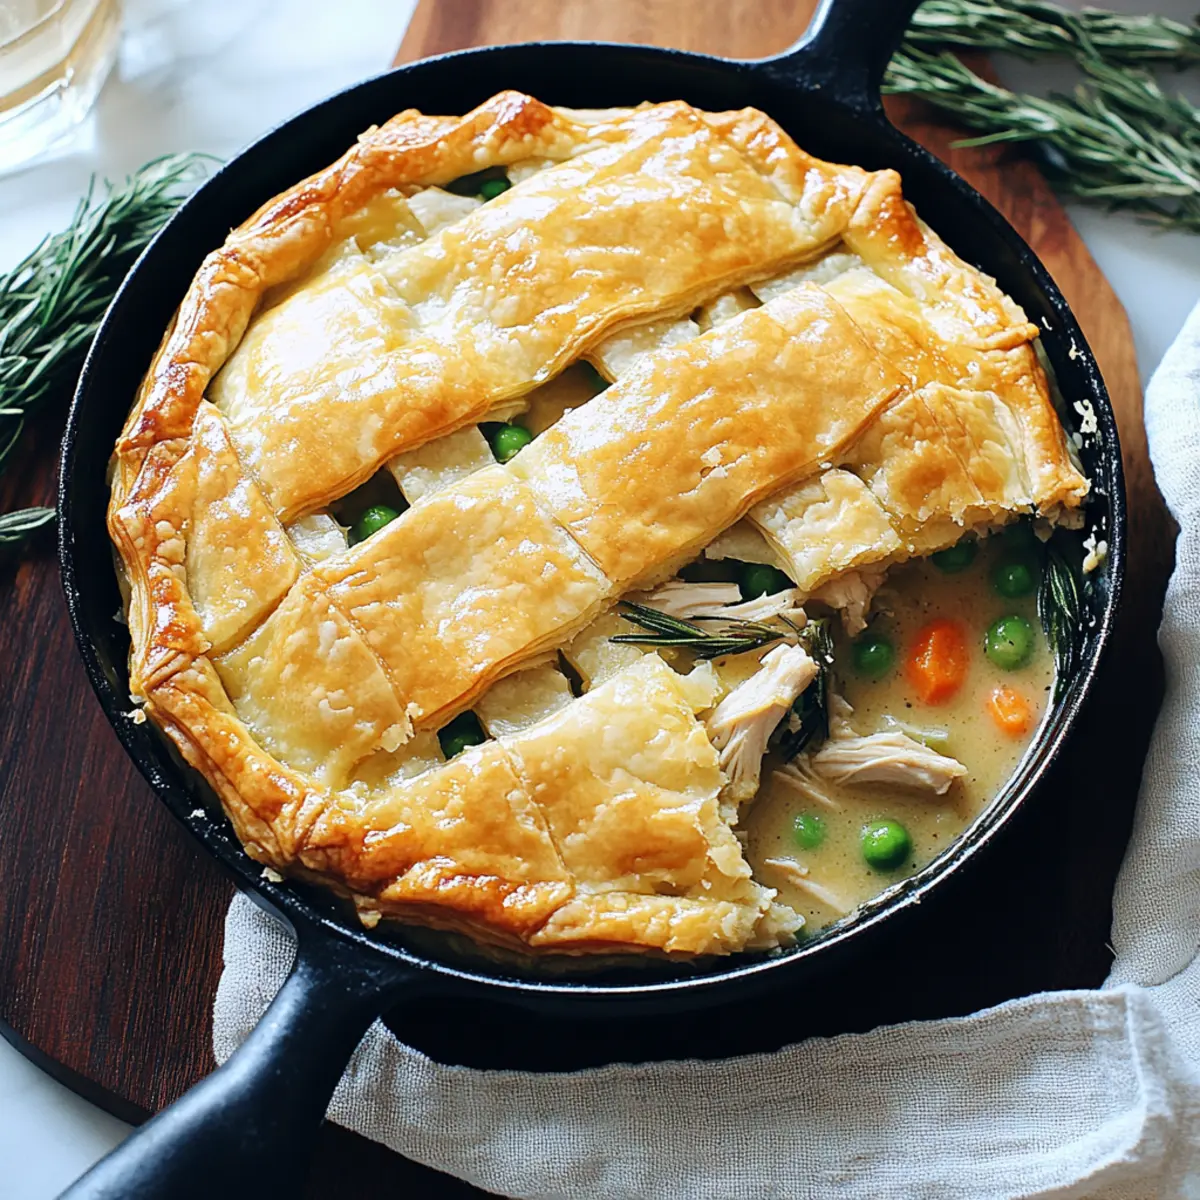
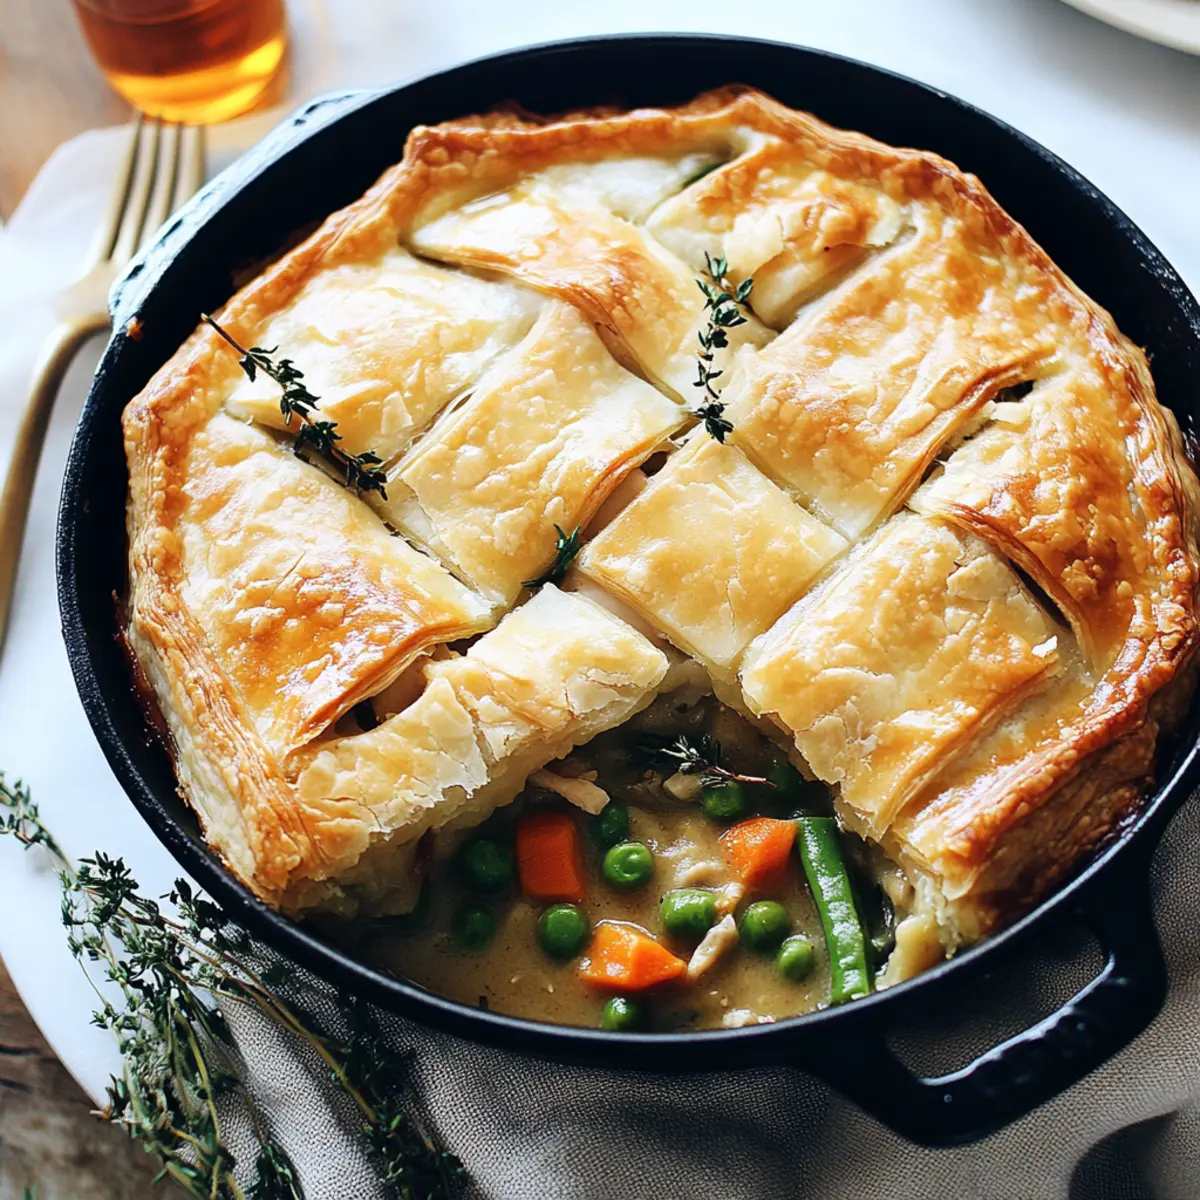
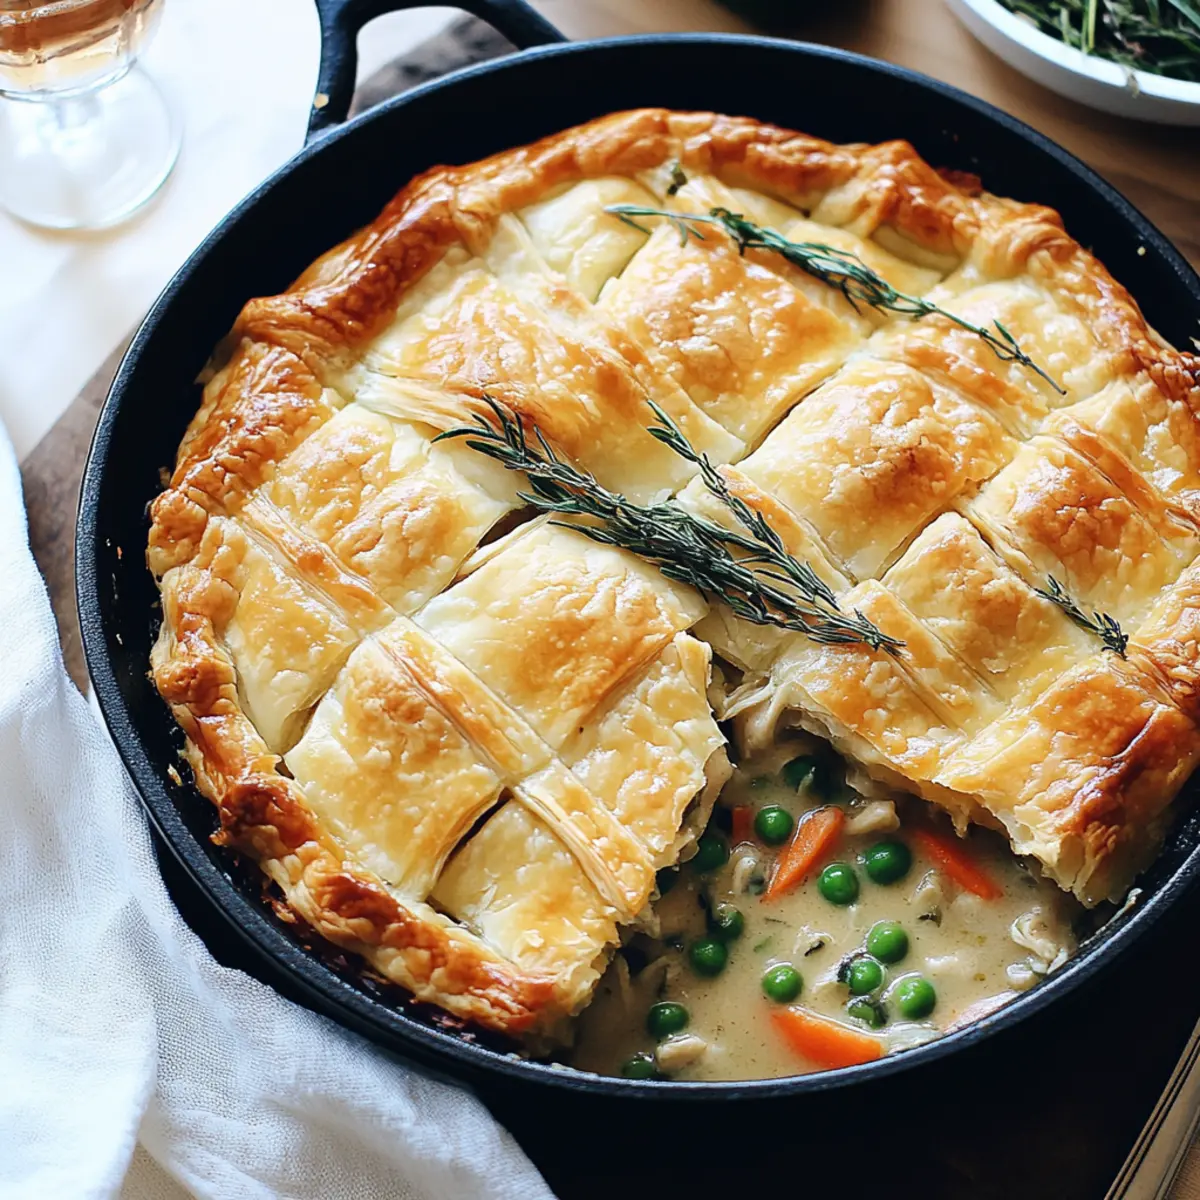
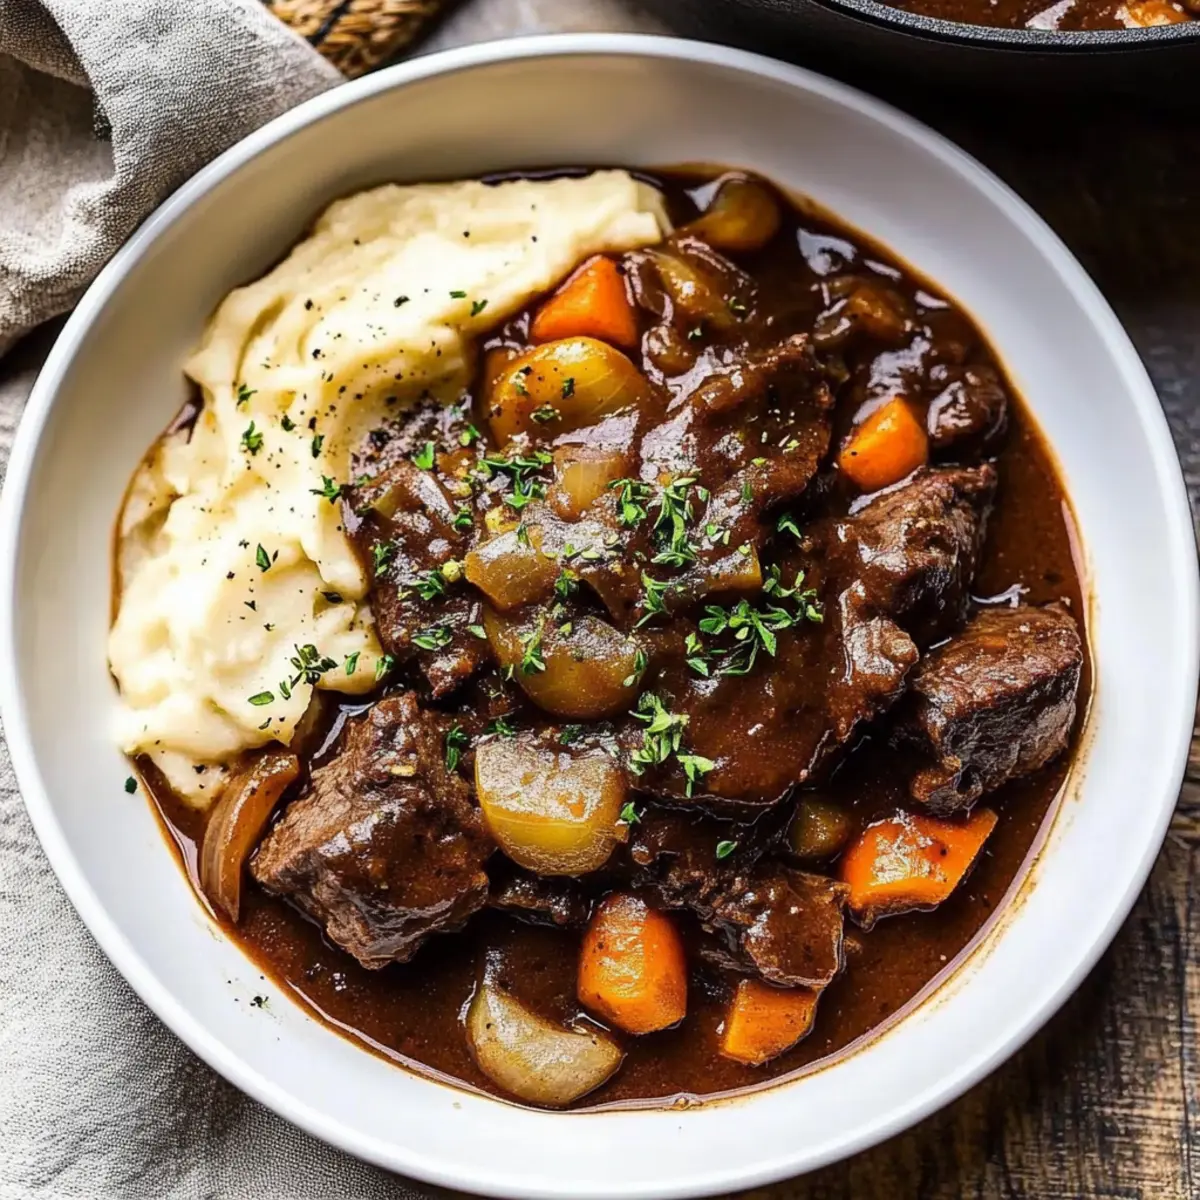
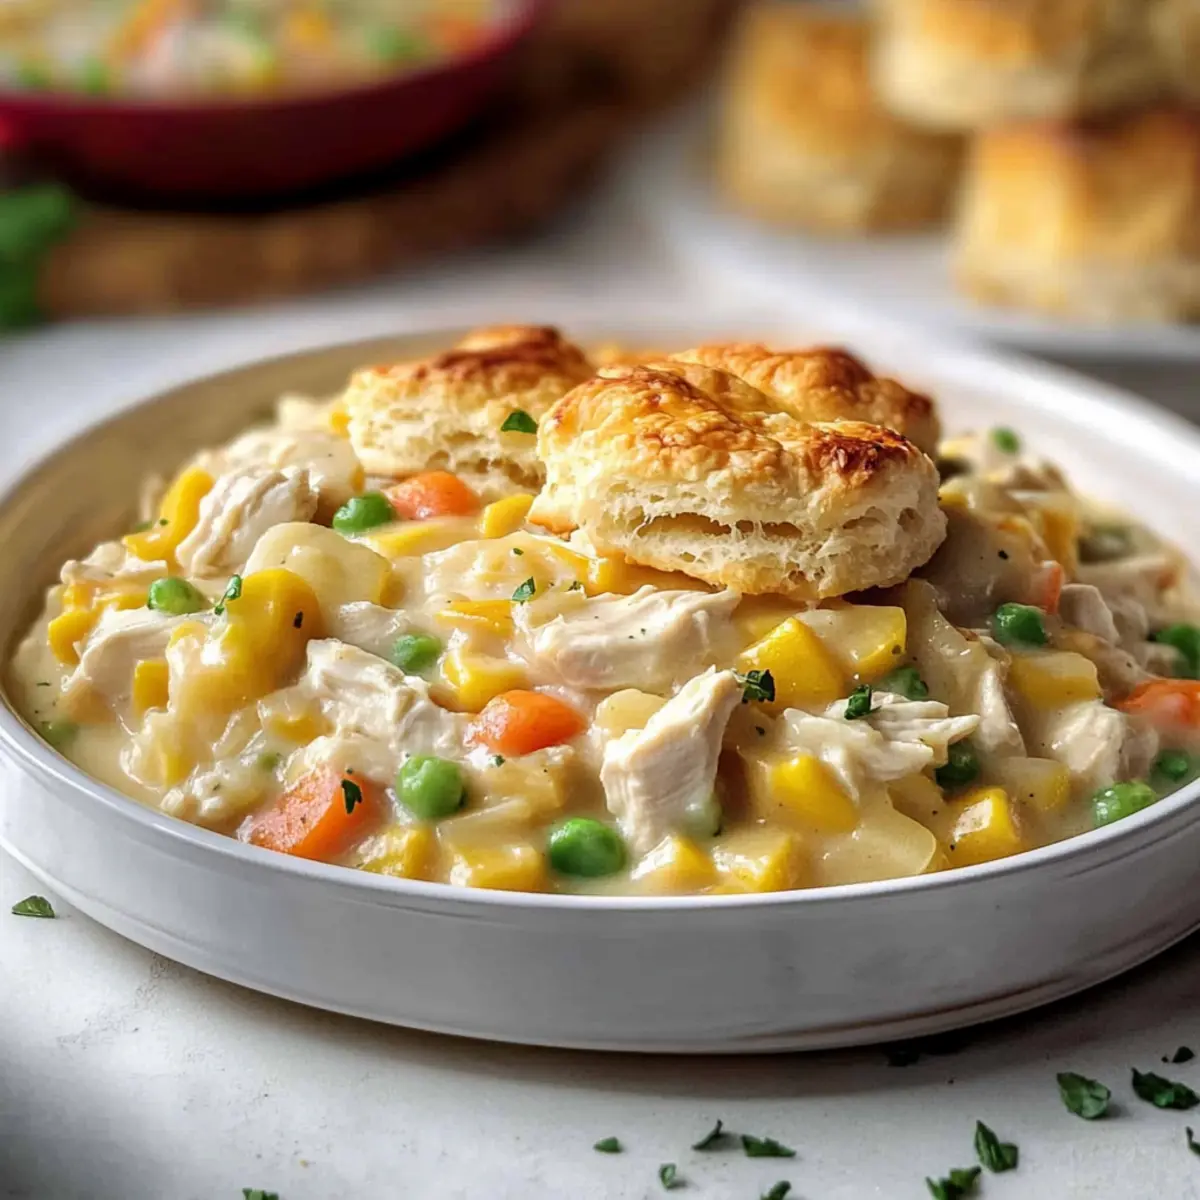
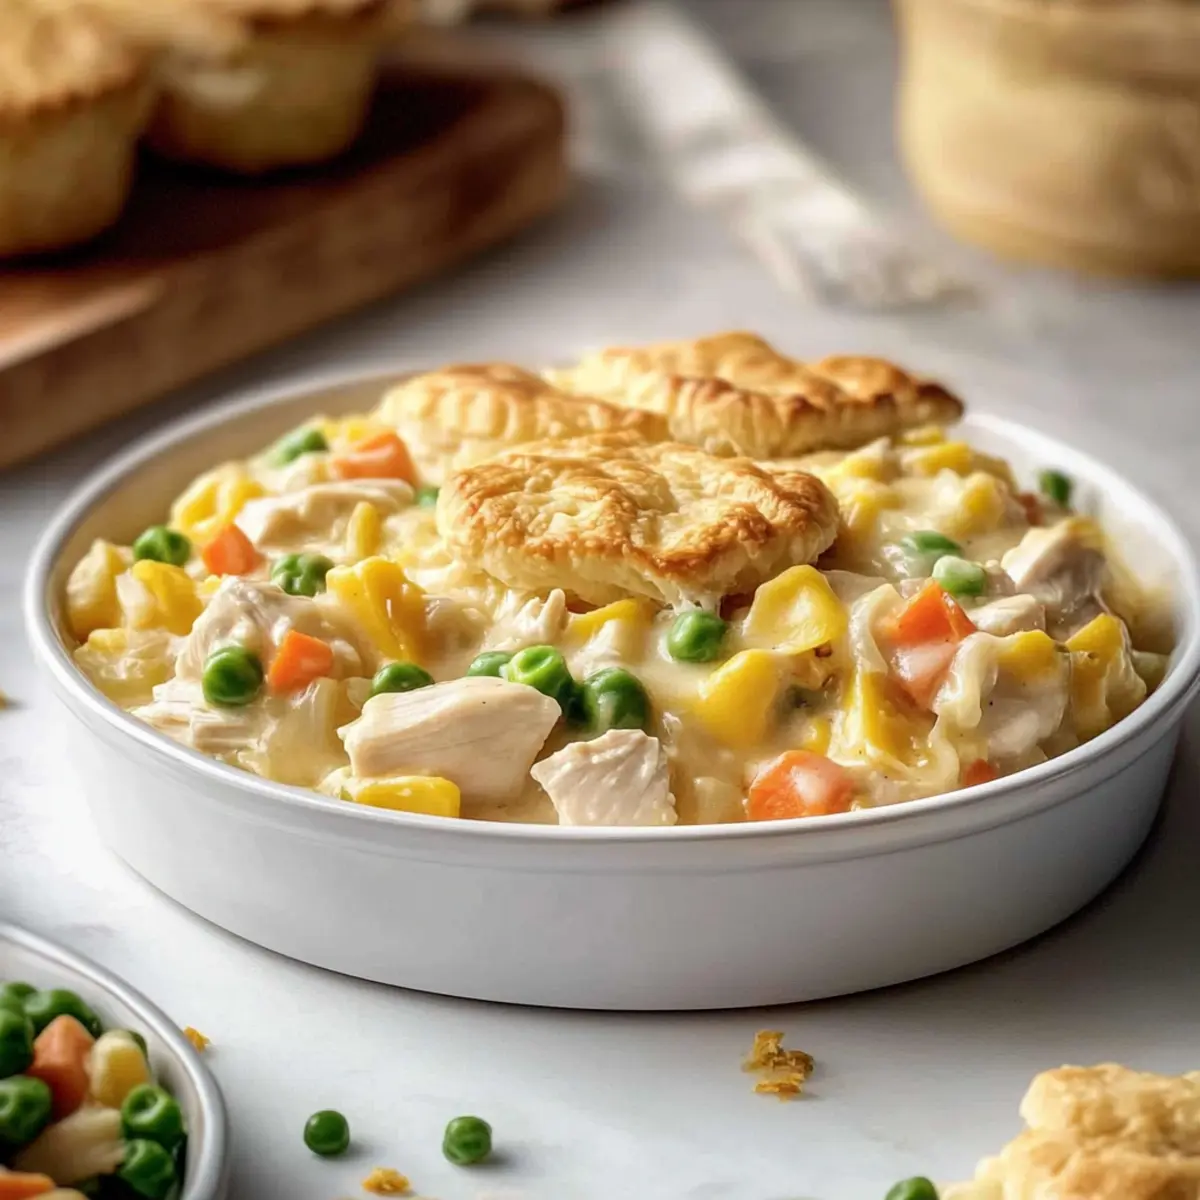
tastytrendingredients

  • Home
  • Recipes
    • Appetizers
    • Breakfast
    • Dessert
    • Dinner
    • Drinks
    • Salads
    • Snacks
    • Soups
  • About me
  • Contact me
menu icon
go to homepage
  • Home
  • Recipes
    • Appetizers
    • Breakfast
    • Dessert
    • Dinner
    • Drinks
    • Salads
    • Snacks
    • Soups
  • About me
  • Contact me
search icon
Homepage link
  • Home
  • Recipes
    • Appetizers
    • Breakfast
    • Dessert
    • Dinner
    • Drinks
    • Salads
    • Snacks
    • Soups
  • About me
  • Contact me
×

30-Minute Santa Fe Chicken Skillet for Bold Flavor Lovers

November 23, 2025 by Grace Snow Leave a Comment

Last week, I found myself in a culinary crunch. After a long day, the last thing I wanted was to settle for takeout. That’s when the idea of a Santa Fe Chicken Skillet danced into my mind—quick, comforting, and bursting with southwest flavors. With tender chicken, hearty black beans, sweet corn, and zesty Ro-tel tomatoes, this dish is ready in just 30 minutes, making it perfect for those busy nights when you crave something homemade. Plus, with melted cheese blanketing it all, you can’t help but feel a warm embrace from every bite. Whether you’re a seasoned home chef or just looking to spice up your weeknight routine, this skillet meal is a crowd-pleaser and a breeze to whip up. Are you ready to dive into a plate of colorful goodness? Let’s get cooking!

Why Choose Santa Fe Chicken Skillet?

Quick and Easy: Ready in just 30 minutes, this dish is perfect for busy nights when time is tight but you still want something delicious.

Bold Southwest Flavors: Combining zesty Ro-tel tomatoes, hearty black beans, and sweet corn, each bite bursts with exciting tastes that’ll transport your palate to the sunny Southwest.

Family-Friendly Appeal: With melted cheese bringing everything together, it’s sure to satisfy even the pickiest eaters. Pair it with a refreshing side salad to balance the flavors—check out some ideas for that here.

Customizable: Whether you want to go vegetarian or spice it up with jalapeños, this skillet adapts to your tastes, making it versatile for everyone at the table.

One-Pan Cleanup: Enjoy all the flavors without the fuss of multiple pots and pans! After a satisfying meal, just pop the skillet in the dishwasher.

Santa Fe Chicken Skillet Ingredients

Get ready to whip up a delightful dish that embodies southwest flavors!

For the Chicken

  • Chicken Breasts – Choose boneless, skinless for quicker cooking and lean protein.
  • Garlic Powder – Use this for a milder garlicky flavor; fresh garlic can boost potency.
  • Chili Powder – Adjust to your spice preference for customizing the heat.
  • Salt & Pepper – Essential seasonings that enhance the overall flavors; taste as you go!
  • Olive Oil – Ideal for sautéing; avocado oil is a great substitute if you prefer.

For the Skillet

  • Onion – Opt for yellow or white for the best sweetness.
  • Ro-tel Diced Tomatoes & Green Chilies – These provide acidity and a mild kick; any canned diced tomatoes can replace them but may lack the same zest.
  • Black Beans – A fantastic source of protein and fiber; pinto beans or refried beans can switch things up!
  • Corn – Adds subtle sweetness; frozen corn works just as well if canned isn’t on hand.
  • Smoked Paprika – Essential for that signature smoky flavor; regular paprika is fine in a pinch.

For Topping

  • Mexican Cheese Blend – Melts beautifully and enhances flavor; cheddar or Monterey Jack can be used instead.
  • Fresh Cilantro – A vibrant herb that brightens up the dish; feel free to omit for a simpler taste.

This Santa Fe Chicken Skillet is not just a meal; it's your ticket to vibrant southwest flavors in a flash!

Step‑by‑Step Instructions for Santa Fe Chicken Skillet

Step 1: Preheat the Oven
Begin by preheating your oven to 400°F (200°C) and position the oven rack in the middle. This will ensure an even bake for the Santa Fe Chicken Skillet later on. While the oven heats, gather your ingredients and prepare your skillet so you can move swiftly through the steps ahead.

Step 2: Prepare the Chicken
Slice the boneless, skinless chicken breasts into four cutlets. Season generously with garlic powder, chili powder, salt, and pepper, ensuring each piece is well coated. This flavorful seasoning will infuse the chicken with the bold southwest flavors characteristic of the Santa Fe Chicken Skillet, setting a tasty foundation for your dish.

Step 3: Sear the Chicken
In an oven-safe skillet, heat 2 tablespoons of olive oil over medium-high heat until shimmering. Carefully add the seasoned chicken cutlets and pan-fry for about 3-4 minutes on each side until they reach a golden-brown color. This browning not only enhances flavor but also creates a beautiful appearance that will make your Santa Fe Chicken Skillet vibrant.

Step 4: Sauté the Onions
Once the chicken is browned, remove the cutlets from the skillet and set them aside. In the same skillet, add chopped onions and sauté for about 5 minutes, stirring frequently. They should become soft and translucent, absorbing all the delightful flavors left behind by the chicken, which will add depth to your Santa Fe Chicken Skillet.

Step 5: Add the Remaining Ingredients
To the sautéed onions, add the Ro-tel diced tomatoes and green chilies, black beans, corn, and smoked paprika. Stir well, allowing the mixture to heat through for about 3-4 minutes. This step combines all the rich flavors, creating a hearty base for your dish while the aromatic spices fill your kitchen with enticing scents.

Step 6: Combine Chicken and Mixture
Return the seared chicken cutlets to the skillet, nestling them in the flavorful mixture. Spoon some of the bean and corn concoction over the chicken, ensuring it's covered well. Sprinkle a generous amount of the Mexican cheese blend on top, creating a cheesy layer that will melt beautifully as it bakes.

Step 7: Bake to Perfection
Transfer your Santa Fe Chicken Skillet to the preheated oven and bake for 5-7 minutes, or until the chicken reaches an internal temperature of 165°F (74°C) and the cheese is bubbling and melted. For an extra touch, you can broil the dish for an additional minute or two, giving the cheese a lovely brown crust.

Step 8: Garnish and Serve
Once out of the oven, let the skillet rest for a moment to cool slightly. Garnish with freshly chopped cilantro for a pop of color and flavor before serving. This final touch not only enhances the presentation but also provides a fresh, vibrant taste that complements the hearty elements of your Santa Fe Chicken Skillet.

Make Ahead Options

These Santa Fe Chicken Skillet preparations are a lifesaver for busy weeknights! You can season and sear the chicken cutlets, then store them in the refrigerator for up to 24 hours. Additionally, the bean and corn mixture can be prepared a day in advance and refrigerated too, making it quick to combine when ready to cook. When you're prepped, simply layer the sautéed mixture and chicken in the skillet, sprinkle cheese on top, and bake for 5-7 minutes until bubbly. To ensure quality, keep the components stored in airtight containers, which will help maintain freshness. This way, you'll enjoy a delicious homemade meal with minimal effort!

Santa Fe Chicken Skillet Variations

Feel free to explore your creativity in the kitchen and add a personal touch to this mouthwatering dish!

  • Vegetarian Swap: Replace the chicken with sautéed zucchini or mushrooms for a hearty vegetarian option that’s just as satisfying.

  • Spicy Kick: Add diced jalapeños or a splash of hot sauce to the mixture for an extra layer of heat that will delight spice lovers.

  • Chickpeas Upgrade: Use chickpeas instead of black beans for a different texture and nutty flavor, packed with protein too!

  • Flavor Boost: Stir in a tablespoon of lime juice right before serving to brighten up the dish and enhance those southwest flavors.

  • Smoky Variants: Incorporate a chipotle pepper in adobo sauce for a smoky depth that pairs beautifully with the other ingredients—don’t forget to check out my Chipotle Lime Chicken for more ideas!

  • Creamy Addition: Mix in a dollop of sour cream or Greek yogurt before serving, adding a creamy contrast that complements the flavors.

  • Crispy Topping: Top it with crushed tortilla chips or panko breadcrumbs and broil for a couple of minutes until golden for an added crunch that everyone will love.

  • Nutty Optional: Toss in toasted pumpkin seeds for a delightful crunch and a nutrition boost—this is a great way to add a twist without changing much of your original recipe!

Cooking is all about experimentation, and these variations will keep your Santa Fe Chicken Skillet exciting each time you prepare it!

What to Serve with Santa Fe Chicken Skillet?

Looking to enhance your meal experience with some delightful sides that perfectly complement your Santa Fe Chicken Skillet?

  • Creamy Avocado Salad:
    This refreshing salad adds creaminess and a hint of coolness, balancing the skillet's bold flavors. Toss diced avocados with lime juice, tomatoes, and red onion for a vibrant touch.

  • Cilantro Lime Rice:
    Fluffy rice infused with lime and fresh cilantro pairs beautifully with the southwest spices, providing a light and zesty contrast to your dish.

  • Roasted Vegetables:
    A medley of colorful seasonal veggies like bell peppers, zucchini, and carrots roasted to perfection adds texture and nutrition, rounding out the meal beautifully.

  • Cornbread Muffins:
    Soft and slightly sweet, cornbread complements the savory skillet, making each bite a taste of comfort. Serve warm for that extra touch of home.

  • Street Corn Salad:
    Grilled corn mixed with mayo, cotija cheese, and spices brings a sweet and creamy element that echoes the flavors in your skillet.

  • Margaritas:
    Sip on a refreshing margarita to elevate your dining experience. The citrusy drink pairs perfectly with the southwest flair, making it a fun addition.

  • Chocolate Flan:
    For dessert, indulge in a silky chocolate flan. Its rich, creamy texture and subtle sweetness are a delightful way to conclude your meal.

  • Tortilla Chips:
    Serve with some crispy tortilla chips for a fun, crunchy side. They provide a delightful contrast to the rich ingredients of the skillet.

  • Pico de Gallo:
    Fresh pico de gallo adds brightness and a punch of flavor. The mix of tomatoes, onion, cilantro, and lime enhances the overall taste of the meal.

  • Chilled White Wine:
    A nice glass of chilled white wine enhances the experience, bringing a refreshing note that pairs wonderfully with the vibrant flavors of the skillet.

How to Store and Freeze Santa Fe Chicken Skillet

Fridge: Store any leftovers in an airtight container for up to 3 days. This keeps the flavors fresh and ready for reheating!

Freezer: You can freeze the Santa Fe Chicken Skillet for up to 3 months. Just ensure it’s cooled completely, then transfer to a freezer-safe container, sealing it tightly to prevent freezer burn.

Reheating: To enjoy your leftovers, reheat in the microwave in short increments or place in an oven-safe dish and warm in the oven at 350°F (175°C) until heated through. The cheese will become melty and delightful again!

Avoid Overstoring: While this dish is delicious, consuming it within the recommended timeframes ensures the best taste and texture, preserving the unique southwest flavors.

Expert Tips for Santa Fe Chicken Skillet

  • Preheat Properly: Ensure your skillet is hot before adding chicken to prevent sticking and achieve that beautiful sear.

  • Season Everything: Don’t skip seasoning your beans and corn mixture with the same spices used on the chicken; it enhances the overall flavor.

  • Oven-Safe Skillet: If your skillet isn’t oven-safe, be sure to transfer the mixture to a baking dish before baking to avoid any kitchen mishaps.

  • Customize Spice Levels: Adjust the chili powder according to your taste; if you're sensitive to heat, start with less and add more as needed.

  • Leftover Magic: If you have leftovers, mix them into a salad or wrap for a quick lunch the next day to avoid waste and enjoy the flavors again!

Santa Fe Chicken Skillet Recipe FAQs

How do I select ripe ingredients for my Santa Fe Chicken Skillet?
Absolutely! For the best flavors, choose fresh ingredients. Look for chicken breasts that are pink and plump without any dark spots. When selecting Ro-tel tomatoes, aim for cans that are sealed and undamaged. Fresh corn should have bright yellow kernels and a green husk. If you’re using onions, ensure they’re firm without any soft spots or sprouting.

How should I store leftovers from the Santa Fe Chicken Skillet?
Very! You can store leftovers in an airtight container in the fridge for up to 3 days. Be sure to let the dish cool down before sealing it. To reheat, simply use the microwave or place it in an oven-safe dish at 350°F (175°C) until warmed through. This way, you maintain that delicious flavor and texture!

Can I freeze Santa Fe Chicken Skillet?
Yes, you can! For freezing, allow the dish to cool completely. Transfer it to a freezer-safe container or freezer bag, ensuring no air is trapped inside to prevent freezer burn. The Santa Fe Chicken Skillet can be frozen for up to 3 months. When ready to enjoy, thaw it overnight in the fridge before reheating it in the oven or microwave.

What should I do if my chicken is dry after cooking?
Don't worry! If you find your chicken is overcooked and dry, consider making a quick sauce to drizzle over it for moisture. Mix a little sour cream or Greek yogurt with lime juice and cilantro, then pour it over the chicken just before serving. It adds creaminess and brings the dish back to life!

Are there any dietary considerations for the Santa Fe Chicken Skillet?
Certainly! If you have dietary preferences or restrictions, this dish is versatile. For a gluten-free option, ensure all your ingredients (like spices and beans) are certified gluten-free. If serving to kids or individuals sensitive to spice, reduce the chili powder. Also, for vegetarians, substitute the chicken with sautéed mushrooms or zucchini. Just make sure to adjust cooking times accordingly!

How can I avoid soggy beans and corn in my Santa Fe Chicken Skillet?
Great question! To prevent sogginess, use canned beans and corn that have been drained and rinsed properly before adding them to the skillet. If you prefer using frozen corn, give it a quick sauté until heated through but not overcooked. This will help maintain the texture and ensure every bite is delightful!

Santa Fe Chicken Skillet

30-Minute Santa Fe Chicken Skillet for Bold Flavor Lovers

This Santa Fe Chicken Skillet is quick, comforting, and bursting with bold southwest flavors, perfect for busy weeknights.
Print Recipe Pin Recipe
Prep Time 10 minutes mins
Cook Time 20 minutes mins
Total Time 30 minutes mins
Servings: 4 servings
Course: Dinner
Cuisine: Southwest
Calories: 450
Ingredients Equipment Method Nutrition Notes

Ingredients
  

For the Chicken
  • 1 pound boneless, skinless chicken breasts
  • 1 teaspoon garlic powder
  • 1 teaspoon chili powder adjust to taste
  • to taste salt & pepper
  • 2 tablespoons olive oil can substitute with avocado oil
For the Skillet
  • 1 medium onion yellow or white
  • 1 can Ro-tel Diced Tomatoes & Green Chilies can substitute with any canned diced tomatoes
  • 1 can black beans can substitute with pinto or refried beans
  • 1 cup corn frozen corn works as well
  • 1 teaspoon smoked paprika regular paprika can be used in a pinch
For Topping
  • 1 cup Mexican cheese blend can substitute with cheddar or Monterey Jack
  • to taste fresh cilantro omit if desired

Equipment

  • Skillet
  • Oven

Method
 

Cooking Instructions
  1. Preheat your oven to 400°F (200°C) and position the oven rack in the middle.
  2. Slice the chicken breasts into four cutlets. Season with garlic powder, chili powder, salt, and pepper.
  3. Heat olive oil in an oven-safe skillet over medium-high heat. Add the chicken and pan-fry for 3-4 minutes on each side until golden brown.
  4. Remove the chicken and set aside. In the same skillet, sauté chopped onions for about 5 minutes until soft.
  5. Add Ro-tel tomatoes, black beans, corn, and smoked paprika to the onions. Heat through for 3-4 minutes.
  6. Return the chicken to the skillet and spoon the bean and corn mixture over it. Sprinkle cheese on top.
  7. Bake in the oven for 5-7 minutes until the chicken reaches 165°F and the cheese is melted.
  8. Garnish with chopped cilantro before serving.

Nutrition

Serving: 1servingCalories: 450kcalCarbohydrates: 35gProtein: 30gFat: 20gSaturated Fat: 8gPolyunsaturated Fat: 2gMonounsaturated Fat: 8gCholesterol: 75mgSodium: 550mgPotassium: 600mgFiber: 10gSugar: 5gVitamin A: 500IUVitamin C: 15mgCalcium: 200mgIron: 3mg

Notes

Enjoy all the flavors without the fuss of multiple pots and pans! Leftovers can be used in salads or wraps.

Tried this recipe?

Let us know how it was!

Creamy Rotel Pasta with Ground Beef for Cozy Nights

November 21, 2025 by Grace Snow Leave a Comment

As I was stirring a pot of creamy goodness the other day, I felt a wave of nostalgia wash over me—reminding me of family dinners filled with laughter and comfort. Today, I’m excited to share my go-to recipe for Creamy Rotel Pasta with Ground Beef, a hearty one-pot wonder that’s not only beginner-friendly but also perfect for those with busy evenings. With just 15 minutes of prep and a total cooking time of 30 minutes, this dish brings a delightful blend of rich ground beef, zesty Rotel tomatoes, and luscious cheddar cheese to your table. It’s a crowd-pleaser that makes weeknight meals utterly enjoyable. Curious about how to bring warmth and joy to your family dinner with this delicious pasta? Let’s dive in!

Why is Creamy Rotel Pasta a Must-Try?

Comforting Combination: This dish brings together ground beef, creamy cheese, and zesty tomatoes for a flavor explosion that’ll make everyone at the table smile.

One-Pot Ease: With just one skillet required, you’ll have minimal cleanup on busy nights, making it perfect for those who want an effortless cooking experience.

Quick Cooking: In just 30 minutes, you can serve a fully plated meal, meaning less time in the kitchen and more time to relax and enjoy with loved ones.

Versatile Substitutions: Not a fan of beef? No problem! You can easily swap in ground turkey or even lentils for a hearty vegetarian version, ensuring this recipe suits everyone's taste.

Family Favorite: This Creamy Rotel Pasta is bound to become a staple in your household for its crowd-pleasing flavors, similar to my Skillet Pasta Sun or Seafood Pasta Savory.

Creamy Rotel Pasta Ingredients

For the Pasta Dish
• Ground Beef – Adds protein and richness; feel free to substitute with ground turkey or plant-based beef for a lighter option.
• Onion (1 medium, diced) – Provides sweetness and depth; shallots can be used for a more delicate flavor.
• Garlic (2 cloves, minced) – Enhances overall flavor with its aromatic qualities; fresh garlic is best for maximum impact.
• Rotel Tomatoes (1 can, 10 oz with green chilies) – Introduces acidity and a touch of heat; swap for diced tomatoes with jalapeños if you like it spicier.
• Cream of Mushroom Soup (1 can, 10.5 oz) – Serves as a creamy base; consider making a homemade mushroom cream sauce for freshness.
• Heavy Cream (1 cup) – Provides richness and creaminess; use half-and-half for a lighter take.
• Cheddar Cheese (2 cups, shredded) – Creates that gooey, cheesy texture; Pepper Jack cheese adds a spicy twist if desired.
• Pasta (12 oz, penne or rotini) – The heart of the dish; other shapes like fusilli or farfalle can be used based on preference.
• Olive Oil (1 tbsp) – Essential for sautéing onion and garlic; any cooking oil will work in a pinch.
• Salt and Pepper – For seasoning to enhance the dish’s flavors.
• Green Onions (2, chopped, optional) – Adds a fresh garnish and touches of color to your plate.

Embark on a culinary adventure with this Creamy Rotel Pasta with Ground Beef that will not only satisfy your hearty cravings but also fill your home with comforting aromas!

Step‑by‑Step Instructions for Creamy Rotel Pasta with Ground Beef

Step 1: Cook the Pasta
Begin by boiling a large pot of salted water over high heat. Once the water reaches a rolling boil, add 12 ounces of your choice of pasta, such as penne or rotini. Cook for 8 to 10 minutes, or until al dente, stirring occasionally. Once cooked, drain the pasta in a colander and set it aside while you prepare the sauce.

Step 2: Sauté Onion and Garlic
In a large skillet, pour 1 tablespoon of olive oil and heat over medium heat. Add 1 medium diced onion and 2 minced garlic cloves, sautéing for about 3 minutes until the onion becomes translucent and fragrant. Stir frequently to ensure the garlic doesn’t burn, as you want a sweet flavor base for your Creamy Rotel Pasta.

Step 3: Brown the Ground Beef
Next, add your ground beef to the skillet, breaking it apart with a wooden spoon. Cook for 5 to 7 minutes until browned and no longer pink. Make sure to stir occasionally while the meat cooks, and once done, drain any excess fat from the skillet to keep your dish from becoming greasy.

Step 4: Add Rotel Tomatoes and Soup
Stir in one 10-ounce can of Rotel tomatoes and one 10.5-ounce can of cream of mushroom soup into the skillet with the beef. Mix thoroughly, allowing the warm flavors to meld together for about 2 minutes. This combination will be the base of the creamy sauce for your Creamy Rotel Pasta.

Step 5: Incorporate Heavy Cream
Pour in 1 cup of heavy cream to the skillet, stirring well to combine all ingredients. Let the mixture simmer on low heat for around 5 minutes, allowing it to thicken. The sauce should become velvety and rich, setting the stage for a luscious pasta experience.

Step 6: Add Cheddar Cheese
While your sauce is simmering, gradually add 2 cups of shredded cheddar cheese, stirring continuously until melted and creamy. This step is crucial for achieving that deliciously gooey texture that brings the Creamy Rotel Pasta together. Ensure everything is well-mixed and smooth.

Step 7: Season the Dish
Taste your sauce and season with salt and pepper to your liking. This simple seasoning helps enhance the flavors of the dish. Once seasoned, turn off the heat and prepare to combine the pasta with the sauce for a rich and satisfying meal.

Step 8: Combine Pasta and Sauce
Gently fold the cooked pasta into the creamy sauce in the skillet, ensuring every piece is well-coated. Use tongs or a spatula to combine thoroughly for about 1-2 minutes. The goal is to have a beautiful blend of flavors throughout the pasta, making this Creamy Rotel Pasta with Ground Beef truly irresistible.

Step 9: Serve and Garnish
Finally, serve your Creamy Rotel Pasta hot, garnished with chopped green onions if desired. This vibrant touch not only adds color but also a fresh crunch to your hearty meal. Enjoy a comforting bowl that brings smiles at the dinner table!

Storage Tips for Creamy Rotel Pasta

Fridge: Store any leftover Creamy Rotel Pasta in an airtight container for up to 3 days. This ensures freshness and prevents moisture loss.

Freezer: If you want to keep it longer, freeze the pasta in a covered container for up to 3 months. To reheat, allow it to thaw overnight in the fridge.

Reheating: Gently reheat the pasta on the stovetop over low heat or in the microwave. Adding a splash of milk will help revive the creaminess of the sauce.

Avoid Storing: Do not store in metal containers, as the acidity in the Rotel tomatoes may react with the metal and alter the taste.

What to Serve with Creamy Rotel Pasta with Ground Beef

Looking to elevate your comforting bowl of creamy pasta and create a full meal experience?

  • Garlic Bread: Its crispy, buttery goodness makes it the perfect vessel for scooping up extra sauce, bringing joy to every bite.
  • Fresh Green Salad: A vibrant mix of greens, tomatoes, and cucumbers offers a refreshing contrast to the richness of the pasta, making each forkful satisfying.
  • Roasted Vegetables: Sweet, caramelized veggies like zucchini or bell peppers add depth and color to your meal, balancing the flavors beautifully.
  • Coleslaw: Crisp, tangy coleslaw serves as a refreshing side that cuts through the creaminess with a delightful crunch.
  • Cheesy Garlic Breadsticks: Soft and gooey with a hint of garlic, these breadsticks soak up the creamy sauce, making them a family favorite.
  • Homemade Apple Crisp: End your cozy meal on a sweet note; the warm, cinnamon-spiced apples provide a comforting dessert that pairs well with your creamy pasta.
  • Sweet Iced Tea: A pitcher of refreshing iced tea complements the meal, offering a sweet, thirst-quenching balance to the savory dish.
  • Beer or Wine: A crisp white wine or a light beer can enhance the flavors of the dish and create a delightful dining experience for adults.
  • Fruit Salad: A light, fruity option adds a burst of color and a refreshing sweetness that rounds out your hearty meal splendidly.

Creamy Rotel Pasta with Ground Beef Variations

Feel free to mix and match to create your ideal version of this creamy delight!

  • Dairy-Free: Replace heavy cream and cheese with coconut cream and nutritional yeast for a rich, dairy-free alternative.
  • Spicy Twist: Add sliced jalapeños or a dash of hot sauce to the sauce for an extra kick that complements the Rotel tomatoes.
  • Flavor Boost: Stir in Italian seasoning or taco seasoning for a zesty, herby flavor profile that elevates the dish.
  • Veggie-Loaded: Toss in vegetables like spinach, bell peppers, or zucchini for added nutrients and a colorful presentation.
  • Pasta Variations: Experiment with different pasta shapes like farfalle or even zoodles to switch up the texture and presentation. Each shape captures the creamy sauce differently.
  • Savory Mushrooms: Incorporate sliced mushrooms along with the onions for extra umami flavor that beautifully complements the beef and creamy base.
  • Protein Packed: For extra protein, mix in beans like black or pinto beans to make the dish even heartier and add a delightful texture.
  • One-Pot Wonder: Want even less cleanup? Use a pressure cooker or Instant Pot for this recipe to cook everything in one pot seamlessly. You can check out my Ground Beef Enchiladas as another great one-pot option.

Feel free to let your culinary creativity flow, and enjoy crafting the perfect bowl of Creamy Rotel Pasta with Ground Beef!

Make Ahead Options

These Creamy Rotel Pasta with Ground Beef meals are perfect for busy home cooks looking to save time! You can prep the sauce (steps 2 through 6) up to 24 hours in advance. Just allow it to cool, then store it in an airtight container in the refrigerator to maintain its creamy texture. The pasta can also be cooked ahead of time and stored separately; keep it in an airtight container for up to 3 days. When you’re ready to serve, simply reheat both the sauce and pasta on the stovetop, gently mixing them together for perfectly creamy results that are just as delicious!

Expert Tips for Creamy Rotel Pasta

  • Perfect Pasta: Cook pasta until al dente to prevent it from becoming mushy when mixed with the creamy sauce.

  • Choose Wisely: Don’t skip draining excess fat from the ground beef; it helps keep your Creamy Rotel Pasta from becoming greasy.

  • Cheese Magic: Constantly stir the cheddar cheese into the sauce until fully melted to avoid clumping and achieve that smooth, creamy texture.

  • Seasoning Balance: Taste and adjust the salt and pepper at the end to enhance flavors. This ensures your dish has the right pop without overpowering it.

  • Customize with Spice: If you prefer a little heat, consider adding cayenne pepper or red pepper flakes while cooking for a tasty kick!

Creamy Rotel Pasta with Ground Beef Recipe FAQs

How do I choose ripe ingredients for this recipe?
Absolutely! For the best flavor in your Creamy Rotel Pasta, opt for fresh vegetables. Look for onions that are firm without any dark spots, and garlic that is dry to the touch. For Rotel tomatoes, a quality can with no dents or leaks is ideal—this ensures the ingredients are fresh and flavorful.

What are the best methods for storing leftovers?
Very easily! Store any leftover Creamy Rotel Pasta in an airtight container in the fridge for up to 3 days. Make sure it’s cooled down before sealing to maintain freshness. If you want to savor it longer, consider freezing it in a freezer-safe container for up to 3 months. Just remember to label it with the date!

Can I freeze Creamy Rotel Pasta? How?
Definitely! To freeze your Creamy Rotel Pasta, allow it to cool completely first. Then, scoop portions into airtight, freezer-safe containers, leaving space at the top for expansion. You can also use freezer bags, ensuring to press out as much air as possible. For reheating, let it thaw overnight in the fridge and when ready, warm it gently on the stovetop while adding a splash of milk to bring back the creaminess.

What should I do if the sauce is too greasy?
If you find your sauce oily, no worries! Drain the excess fat from the ground beef before adding the tomatoes and cream. This step is crucial for a richer, comforting dish. If your sauce still seems oily, you can also add a bit of cornstarch mixed with water—just simmer it a few minutes longer until it thickens.

Are there any dietary considerations for this recipe?
Absolutely! If you or someone you’re serving has allergies, make sure to check labels on the cream of mushroom soup and Rotel tomatoes, as they can sometimes contain allergens. For a vegetarian option, substitute the ground beef with lentils or plant-based meat substitutes and ensure that the cream and soup are vegetarian-friendly. Always best to be cautious!

Creamy Rotel Pasta with Ground Beef

Creamy Rotel Pasta with Ground Beef for Cozy Nights

A comforting and easy creamy Rotel pasta with ground beef, perfect for busy evenings.
Print Recipe Pin Recipe
Prep Time 15 minutes mins
Cook Time 30 minutes mins
Total Time 30 minutes mins
Servings: 4 servings
Course: Dinner
Cuisine: American
Calories: 600
Ingredients Equipment Method Nutrition Notes

Ingredients
  

For the Pasta Dish
  • 1 lb Ground Beef Can substitute with ground turkey or plant-based beef.
  • 1 medium Onion Diced; can use shallots for a more delicate flavor.
  • 2 cloves Garlic Minced; fresh garlic is best.
  • 1 can (10 oz) Rotel Tomatoes With green chilies; can swap for diced tomatoes with jalapeños.
  • 1 can (10.5 oz) Cream of Mushroom Soup Consider making a homemade mushroom cream sauce.
  • 1 cup Heavy Cream Use half-and-half for a lighter option.
  • 2 cups Cheddar Cheese Shredded; Pepper Jack cheese can be added for spice.
  • 12 oz Pasta Penne or rotini; other shapes like fusilli or farfalle work as well.
  • 1 tbsp Olive Oil Essential for sautéing.
  • to taste Salt
  • to taste Pepper
  • 2 Green Onions Chopped, optional for garnish.

Equipment

  • Large pot
  • Large skillet
  • Colander

Method
 

Cooking Steps
  1. Boil a large pot of salted water over high heat. Add pasta and cook for 8-10 minutes until al dente. Drain and set aside.
  2. In a large skillet, heat olive oil over medium heat. Sauté onion and garlic for about 3 minutes until onion becomes translucent.
  3. Add ground beef to the skillet, breaking it apart. Cook for 5-7 minutes until browned. Drain excess fat.
  4. Stir in Rotel tomatoes and cream of mushroom soup. Mix thoroughly and allow to warm for about 2 minutes.
  5. Pour in heavy cream and stir well. Simmer on low heat for around 5 minutes until thickened.
  6. Gradually add cheddar cheese, stirring continuously until melted and creamy.
  7. Season the dish with salt and pepper to your liking.
  8. Fold the cooked pasta into the creamy sauce, ensuring each piece is well-coated.
  9. Serve hot, garnished with chopped green onions if desired.

Nutrition

Serving: 1bowlCalories: 600kcalCarbohydrates: 45gProtein: 30gFat: 35gSaturated Fat: 18gPolyunsaturated Fat: 2gMonounsaturated Fat: 12gTrans Fat: 1gCholesterol: 100mgSodium: 800mgPotassium: 600mgFiber: 3gSugar: 4gVitamin A: 600IUVitamin C: 5mgCalcium: 300mgIron: 3mg

Notes

Store leftovers in an airtight container for up to 3 days, or freeze for up to 3 months. Reheat gently, adding a splash of milk if needed.

Tried this recipe?

Let us know how it was!

Parmesan Bow Tie Italian Pasta: A Fresh Summer Delight

November 21, 2025 by Grace Snow Leave a Comment

As I took the first bite of this Easy Parmesan Bow Tie Pasta Salad, a burst of summer flavors danced across my palate. This dish has quickly become my go-to for those hot days when gatherings are in full swing. With a medley of colorful fresh veggies and a zesty homemade Italian dressing, it’s the perfect vegetarian side that brings the whole meal together. What's even better? It's quick to whip up, making it an effortless yet impressive addition to any potluck or picnic. Plus, being mayonnaise-free means it’s safe to sit out on a warm day without worry. Curious how this bowl of sunshine can elevate your next gathering? Keep reading to discover the recipe that will certainly steal the show!

Why is this pasta salad a must-try?

Vibrant, this Easy Parmesan Bow Tie Pasta Salad bursts with flavor and color, making it a visual and delicious delight for any gathering. Quick to prepare, it’s an effortless dish that transforms any lunch or potluck into a festive meal. Versatile, you can customize it with different pasta and veggies, ensuring it suits everyone’s taste. Light and refreshing, it’s the perfect summer side that won’t weigh you down. Discover more about elevating your gatherings with Parmesan Artichoke Hearts or serving alongside Seafood Pasta Savory. You’ll love how effortlessly this dish blends with your favorite foods!

Parmesan Bow Tie Italian Pasta Ingredients

This vibrant dish will brighten your summer gatherings!

For the Pasta
• Bowtie Pasta (Farfalle) – The main ingredient providing structure; versatile enough to swap with medium-sized pasta shapes.

For the Vegetables
• Cherry Tomatoes – Adds sweetness and juiciness; can substitute with grape or diced tomatoes if needed.
• English Cucumber – Contributes crunch and freshness; Persian cucumber can work as a great substitute or omit if unavailable.
• Red Bell Pepper – Offers sweetness and color; yellow or orange bell peppers can be used for similar taste.
• Red Onion – Provides sharpness and crunch; try using green onions for a milder flavor.

For the Dressing
• Extra Virgin Olive Oil – Acts as the dressing base for richness; regular olive oil is a fine alternative.
• Red Wine Vinegar – Provides acidity for balance; white wine vinegar or apple cider vinegar are suitable substitutes.
• Italian Seasoning – Adds depth to the flavor profile; combine dried oregano and basil if needed.
• Garlic Powder – Offers savory undertones; fresh minced garlic can be used but reduce the amount.
• Salt & Black Pepper – Essential for enhancing overall flavor; adjust according to your preference.
• Honey – Balances acidity and bitterness, but can be left out for a sugar-free option.

For the Extras
• Grated Parmesan Cheese – Provides savory flavor and creaminess; swap for crumbled feta if you prefer.
• Fresh Parsley – Enhances overall flavor with herbal freshness; use fresh basil instead or omit if desired.
• Black Olives – Adds briny flavor and texture; substitute with green olives for a different twist.
• Spanish Olives – Brings a mellow sweetness and tang; you can use all black olives if preferred.

This Easy Parmesan Bow Tie Italian Pasta Salad is not just a meal; it’s a recipe that invites creativity and warmth to your table. Enjoy the flavors of summer!

Step‑by‑Step Instructions for Easy Parmesan Bow Tie Italian Pasta Salad

Step 1: Cook Pasta
Bring a large pot of salted water to a rolling boil over high heat. Carefully add 8 oz of bowtie pasta and cook for about 10 minutes, stirring occasionally, until al dente. Once cooked, drain the pasta in a colander, then rinse under cold water to halt the cooking process and cool it down, ensuring the perfect texture for your Easy Parmesan Bow Tie Italian Pasta Salad.

Step 2: Make Dressing
In a spacious mixing bowl, combine 1/3 cup of extra virgin olive oil, 2 tablespoons of red wine vinegar, and your Italian seasoning mix. Whisk in 1 teaspoon each of garlic powder, salt, and black pepper, along with a teaspoon of honey if desired. This zesty dressing will coat your pasta beautifully, bringing vibrant flavor to the dish, so ensure all ingredients are well blended before moving on.

Step 3: Prep Vegetables
While your pasta cools, take this time to prepare your veggies! Dice 1 cup of cherry tomatoes, half a cucumber, and 1 red bell pepper into bite-sized pieces. Also, finely chop 1/4 of a red onion and slice a mix of black and Spanish olives. Having these colorful additions ready will enhance the look and taste of your Easy Parmesan Bow Tie Italian Pasta Salad, ensuring each bite is packed with freshness.

Step 4: Combine Ingredients
Add the cooled bowtie pasta to the bowl with the dressing, followed by your chopped veggies and 1/4 cup of fresh parsley. Gently toss everything together until the vegetables are evenly distributed and coated in the dressing. This step is crucial as it allows the flavors to mingle, setting the stage for a delightful pasta salad that’s perfect for summer gatherings.

Step 5: Chill
Once everything is well mixed, cover the bowl with plastic wrap or transfer the mixture to an airtight container. Refrigerate the Easy Parmesan Bow Tie Italian Pasta Salad for at least 30 minutes. This chilling time allows the flavors to meld together, creating a refreshing dish that is best served cold, just in time for your next potluck or picnic!

How to Store and Freeze Parmesan Bow Tie Italian Pasta Salad

Fridge: Store the Easy Parmesan Bow Tie Italian Pasta Salad in an airtight container for up to 3 days. Keep it well-sealed to maintain its freshness and flavor.

Freezer: This pasta salad is best enjoyed fresh, but if you have leftovers, you can freeze it for up to a month. Thaw overnight in the fridge before serving.

Reheating: If you prefer to serve it warm, gently reheat the pasta in a skillet over low heat. Add a splash of olive oil for moisture and toss in some fresh veggies to refresh its crunch.

Make-Ahead Tip: For gatherings, prepare the salad a day in advance. Just make sure to add the fresh veggies right before serving for that vibrant crunch!

Make Ahead Options

These Easy Parmesan Bow Tie Italian Pasta Salad is a fantastic choice for busy weeknights and meal prep! You can prepare the pasta, chop the veggies, and whisk the dressing up to 24 hours in advance. Just cook your bowtie pasta, rinse it under cold water, and store it in an airtight container. Chop your cherry tomatoes, cucumber, red bell pepper, and onion, and keep them refrigerated until you're ready to assemble. When you're ready to serve, simply combine the prepped ingredients with the dressing, toss, and enjoy! This method ensures your pasta salad is just as delicious while saving you precious time when preparing for gatherings.

Parmesan Bow Tie Italian Pasta Options

You can easily customize this dish to suit your taste and dietary needs, inviting fresh adventures into your kitchen!

  • Gluten-Free: Swap bowtie pasta with gluten-free penne or rotini for a delightful alternative that everyone can enjoy.
  • Protein Boost: Add grilled chicken, chickpeas, or white beans to increase the protein content, making it a satisfying meal on its own.
  • Veggie Variety: Incorporate diced artichoke hearts or sautéed zucchini for added nutrition and varied texture, enhancing that summer garden feel.
  • Herb Infusion: Instead of parsley, try fresh basil or dill for an aromatic twist that pairs beautifully with the Italian dressing.
  • Cheesy Delight: Crumbled feta or goat cheese can replace Parmesan for a tangy twist, creating a richer flavor profile.
  • Nutty Crunch: Toss in some toasted pine nuts or walnuts to introduce a delightful crunch and an earthy contrast to the freshness.
  • Spice it Up: If you love a kick, sprinkle in some red pepper flakes or sliced jalapeños to bring an exciting heat level to your pasta salad.
  • Smooth Dressing: For a creamier texture, whisk in a couple of tablespoons of plain yogurt or sour cream into the dressing for a delightful twist.

Don't forget to explore other delicious pasta ideas, such as Seafood Pasta Savory or enjoy the flavors of White Bean Pasta for even more possibilities! Let your culinary imagination soar!

What to Serve With Easy Parmesan Bow Tie Italian Pasta Salad

This delightful pasta salad is the perfect centerpiece for a refreshing meal, and pairing it with complementary sides can elevate your dining experience.

  • Grilled Chicken Skewers: The smoky char from grilled chicken adds depth, perfectly balancing the fresh flavors of the pasta salad. Serve them drizzled with lemon for a zesty touch that brightens both dishes.

  • Garlic Bread: Crispy on the outside and soft inside, garlic bread is a classic side that complements the lightness of the salad, making each bite a comforting experience.

  • Caprese Salad: A simple caprese salad with fresh mozzarella, tomatoes, and basil brings out the Italian roots of your pasta dish, creating a beautiful contrast of textures and flavors.

  • Crispy Vegetable Chips: These add a satisfying crunch alongside the salad’s fresh ingredients. Their savory flavors harmonize beautifully, inviting everyone to munch happily as they savor their meal.

  • Lemonade or Iced Tea: Refreshing beverages like homemade lemonade or sweet iced tea create a delightful pairing with the pasta salad, enhancing those sunny summer vibes.

  • Fruit Salad: A light, colorful fruit salad acts as a sweet counterpoint to your savory meal, providing a cooling, hydrating element that completes the warm weather dining.

Let’s celebrate summer gatherings by bringing together these delicious pairings!

Expert Tips for Easy Parmesan Bow Tie Pasta Salad

  • Al Dente Pasta: Make sure to cook the bowtie pasta just until al dente. Overcooking will result in mushy pasta that won't hold up in the salad.

  • Chill Time: Allow the salad to chill for at least 30 minutes before serving. This lets the flavors combine beautifully in the Easy Parmesan Bow Tie Pasta Salad.

  • Dress It Up: Adjust the dressing's acidity by tasting it after mixing. Feel free to add a splash of vinegar or a pinch of salt to enhance the taste.

  • Fresh Herbs: Use fresh parsley or basil to elevate the flavor and add a pop of color. If using dried herbs, remember that they are more concentrated, so adjust accordingly.

  • Keep It Vibrant: Add the vegetables right before serving if you’re making the pasta salad in advance. This preserves their crunch and fresh flavor, ensuring every bite is delightful.

Easy Parmesan Bow Tie Italian Pasta Salad Recipe FAQs

What type of pasta is best for this salad?
Absolutely! Bowtie pasta (farfalle) is perfect due to its structure and ability to hold dressing well. You can easily substitute it with medium-sized pasta like penne or rotini. Just avoid small or large shapes, as they may not have the same delightful bite.

How should I store leftovers?
I recommend storing the Easy Parmesan Bow Tie Italian Pasta Salad in an airtight container. It will stay fresh in the fridge for up to 3 days. Just remember to give it a quick toss with a splash of olive oil before serving to refresh the flavors!

Can I freeze this pasta salad?
Yes, you can! While it's best enjoyed fresh, the salad can be frozen for up to 1 month. To freeze, place the pasta salad in an airtight container or freezer bag, ensuring all air is removed. Thaw it overnight in the fridge before serving. For best results, you may want to reheat it gently in a skillet with a splash of olive oil to revive its texture.

What if I have allergies to some ingredients?
Totally understandable! This pasta salad is quite versatile; if you have allergies, feel free to omit or substitute ingredients. For instance, you can replace the grated Parmesan cheese with crumbled feta or nutritional yeast for a dairy-free option. Ensure you check for any cross-contamination with olives or dressings if you're sensitive to specific allergens.

How ripe should my vegetables be for this recipe?
It's all about that fresh taste! Look for cherry tomatoes that are bright and firm, avoiding any that have dark spots or are overly soft. Opt for an English cucumber that is smooth and crisp, and choose bell peppers that are glossy and vibrant. Good-quality, ripe ingredients make a world of difference in your Easy Parmesan Bow Tie Italian Pasta Salad!

Parmesan Bow Tie Italian Pasta

Parmesan Bow Tie Italian Pasta

Delight your summer gatherings with this Easy Parmesan Bow Tie Italian Pasta salad, featuring vibrant veggies and a zesty dressing.
Print Recipe Pin Recipe
Prep Time 15 minutes mins
Cook Time 10 minutes mins
Chilling Time 30 minutes mins
Total Time 55 minutes mins
Servings: 6 servings
Course: Dinner
Cuisine: Italian
Calories: 210
Ingredients Equipment Method Nutrition Notes

Ingredients
  

For the Pasta
  • 8 oz Bowtie Pasta (Farfalle) Can swap with medium-sized pasta shapes.
For the Vegetables
  • 1 cup Cherry Tomatoes Can substitute with grape or diced tomatoes.
  • 1/2 unit English Cucumber Persian cucumber can be a substitute or omit.
  • 1 unit Red Bell Pepper Yellow or orange can be used.
  • 1/4 unit Red Onion Use green onions for a milder flavor.
For the Dressing
  • 1/3 cup Extra Virgin Olive Oil Regular olive oil is a fine alternative.
  • 2 tbsp Red Wine Vinegar White wine vinegar or apple cider can substitute.
  • 1 tsp Italian Seasoning Combine dried oregano and basil if needed.
  • 1 tsp Garlic Powder Fresh minced garlic can be used; reduce the amount.
  • 1 tsp Salt Adjust according to your preference.
  • 1 tsp Black Pepper Adjust according to your preference.
  • 1 tsp Honey Can be omitted for a sugar-free option.
For the Extras
  • 1/4 cup Grated Parmesan Cheese Swap for crumbled feta if preferred.
  • 1/4 cup Fresh Parsley Or use fresh basil instead or omit if desired.
  • 1/3 cup Black Olives Substitute with green olives for a different twist.
  • 1/3 cup Spanish Olives Can use all black olives if preferred.

Equipment

  • Large pot
  • Mixing Bowl
  • Colander

Method
 

Instructions
  1. Bring a large pot of salted water to a boil. Add 8 oz of bowtie pasta and cook for about 10 minutes, stirring occasionally, until al dente. Drain and rinse under cold water.
  2. In a mixing bowl, combine 1/3 cup olive oil, 2 tbsp red wine vinegar, 1 tsp Italian seasoning, 1 tsp garlic powder, salt, and black pepper. Whisk until blended.
  3. Dice 1 cup cherry tomatoes, 1/2 cucumber, and 1 red bell pepper. Finely chop 1/4 red onion and slice black and Spanish olives.
  4. Add the cooled pasta and veggies to the bowl with dressing. Toss gently to combine and distribute evenly.
  5. Cover and refrigerate the salad for at least 30 minutes to let flavors meld before serving.

Nutrition

Serving: 1servingCalories: 210kcalCarbohydrates: 27gProtein: 5gFat: 10gSaturated Fat: 1.5gPolyunsaturated Fat: 0.5gMonounsaturated Fat: 7gCholesterol: 5mgSodium: 300mgPotassium: 200mgFiber: 2gSugar: 3gVitamin A: 500IUVitamin C: 25mgCalcium: 100mgIron: 1mg

Notes

Use fresh herbs for enhanced flavor. Add vegetables right before serving to maintain freshness.

Tried this recipe?

Let us know how it was!

One Pot Kielbasa Pasta: Cozy Comfort in 30 Minutes

November 21, 2025 by Grace Snow Leave a Comment

As steam wafted from my stovetop, I couldn’t help but smile at the comforting aromas enveloping my kitchen. This Quick One Pot Kielbasa Pasta has become a staple in our home, effortlessly blending the savory, smoky flavors of kielbasa with creamy pasta in just 30 minutes. Perfect for those hectic weeknights, it’s both a budget-friendly option and a family favorite that pleases even the pickiest eaters! With minimal cleanup and the ability to customize with your favorite veggies or cheese, this dish checks all the boxes for convenience without compromising on taste. So, what do you say—are you ready to whip up a delicious dinner that feels like a warm hug in a bowl?

What makes this pasta dish a must-try?

Simplicity: With just one pot needed, cleanup is a breeze—perfect for busy weeknights.
Quick Cooking: In only 30 minutes, you can serve up a satisfying meal that delights the whole family.
Flavor Fusion: The blend of smoky kielbasa and creamy sauce creates a rich taste that keeps everyone coming back for more.
Budget-Friendly: This recipe is not only easy to make but also gentle on your wallet!
Versatility: Feel free to swap in your favorite vegetables or proteins, like chicken sausage or shrimp, for a personal twist.
Crowd-Pleasing: It's a comforting dish that caters to diverse palates, making it a guaranteed hit at any table. For more quick meal ideas, check out my Crock Pot Chicken or Seafood Pasta recipes!

One Pot Kielbasa Pasta Ingredients

• Get ready to create a hearty meal!

For the Pasta Base

  • Olive Oil – Adds richness and helps sauté ingredients; substitute with butter for a different flavor.
  • Smoked Kielbasa (or Turkey/Chicken Sausage) – Main protein providing smoky flavor; any cooked sausage of choice can be used for variations.
  • Diced Onion – Provides sweetness and flavor depth; can substitute with shallots or omit for a simpler profile.
  • Garlic – Enhances overall flavor; fresh garlic is preferred, but garlic powder works in a pinch.
  • Low-Sodium Chicken Broth – Forms the base of the sauce; vegetable broth can be used for a vegetarian option.
  • Diced Tomatoes (canned) – Adds acidity and moisture; fresh tomatoes can replace canned for a lighter option.
  • Dry Pasta (small pasta) – The heart of the dish; use small pasta like penne or rotini for the best texture.
  • Milk or Heavy Cream – Adds creaminess; substitute with half-and-half or plant-based milk for lighter options.
  • Salt and Pepper – Essential seasonings that enhance all the flavors; adjust according to taste.

For the Topping

  • Shredded Cheddar Cheese – Provides a creamy, cheesy topping; Parmesan or Monterey Jack can be used for varied taste.
  • Sliced Scallions – Adds freshness as a garnish; can be replaced with chives if not available.

Step‑by‑Step Instructions for One Pot Kielbasa Pasta

Step 1: Heat the Oil
In a large 4-5 quart sauté pan, heat 2 tablespoons of olive oil over medium-high heat. Allow the oil to shimmer but not smoke, indicating it's hot enough. This will create a rich base for your One Pot Kielbasa Pasta, providing the right environment to sauté your ingredients.

Step 2: Sauté the Kielbasa and Onions
Add the sliced kielbasa and diced onion to the pan. Cook for about 5–7 minutes, stirring occasionally, until the onions become translucent and the kielbasa is lightly browned. This step infuses the dish with smoky flavor and deepens the overall taste as the onions soften.

Step 3: Add the Garlic
Stir in minced garlic and cook for an additional 30 seconds, just until fragrant. Watch closely, as garlic can burn quickly! This aromatic addition elevates the flavor profile of your One Pot Kielbasa Pasta, making it even more appealing.

Step 4: Combine the Base Ingredients
Pour in 4 cups of low-sodium chicken broth, one can of diced tomatoes, and 1 cup of milk or heavy cream. Then, add 12 ounces of dry small pasta like penne or rotini, along with salt and pepper to taste. Give the mixture a good stir to combine and bring it to a simmer; this should take about 3–4 minutes.

Step 5: Cook the Pasta
Reduce the heat to medium and let the mixture simmer uncovered for about 15 minutes. Stir occasionally to prevent the pasta from sticking to the bottom. You'll know it's ready when the pasta is tender and has absorbed most of the liquid, creating a creamy sauce.

Step 6: Melt the Cheese
Once the pasta is cooked, remove the pan from heat and stir in half of the shredded cheddar cheese until melted and creamy. Then, sprinkle the remaining cheese on top, cover the pan, and let it sit for about 2–3 minutes. This allows the cheese to melt into a gooey, comforting topping for your One Pot Kielbasa Pasta.

Step 7: Garnish and Serve
Before serving, garnish your dish with sliced scallions for a fresh burst of flavor. These bright green slices will add a delightful contrast to the creamy pasta. Serve immediately, enjoying every comforting mouthful of this family-friendly meal!

Expert Tips for One Pot Kielbasa Pasta

  • Don’t Rush the Sauté: Saute the kielbasa and onions until the onions are translucent. This step develops essential flavors for your One Pot Kielbasa Pasta.
  • Watch the Liquid: If the dish looks too soupy at the end, simmer it a bit longer without the lid to reduce excess liquid.
  • Pasta Choices Matter: Use small pasta shapes like penne or rotini for the best texture. They help soak up the creamy sauce beautifully.
  • Customize Wisely: Feel free to add vegetables like spinach or bell peppers, but ensure they are cut to similar size for even cooking.
  • Adjust Creaminess: For a lighter dish, switch to half-and-half or a plant-based milk instead of heavy cream, keeping it delicious and budget-friendly.

Make Ahead Options

These One Pot Kielbasa Pasta is perfect for meal prep enthusiasts! You can prep the kielbasa, onions, and garlic up to 24 hours in advance by chopping them and storing in an airtight container in the refrigerator. The dry pasta can also be measured out ahead of time. When you're ready to enjoy this dish, simply heat the olive oil, sauté the prepped ingredients, and follow with the broth, tomatoes, and milk. This allows for a quick assembly during busy weeknights, significantly reducing cooking time. To maintain quality, don’t combine all ingredients until you're ready to cook; this ensures your pasta stays perfectly al dente!

What to Serve with Quick One Pot Kielbasa Pasta

A delightful dining experience is just around the corner, waiting to be enhanced with the right sides!

  • Crusty Garlic Bread: A perfect companion, this bread is perfect for soaking up every bit of delicious sauce while adding a flavorful crunch.

  • Fresh Garden Salad: Crisp greens with a tangy vinaigrette bring a refreshing contrast to the creamy pasta, balancing the meal beautifully.

  • Roasted Vegetables: Seasoned bell peppers, zucchini, and carrots not only add color but also provide a sweet, earthy flavor that complements the kielbasa.

  • Steamed Broccoli: Lightly steamed, this green veggie offers healthy nutrients and a vibrant pop of color, making your plate even more appetizing.

  • Creamy Coleslaw: The tangy crunch of coleslaw adds a pleasant texture contrast while cutting through the richness of the pasta.

  • Herbed Rice: Soft, fluffy rice cooked with fresh herbs provides a lovely base that absorbs the sauce's flavors, creating a hearty meal.

  • Sparkling Lemonade: This refreshing drink quenches your thirst while its citrusy zing brightens the meal, making every bite feel vibrant.

  • Chocolate Chip Cookies: For a sweet finish, these classic cookies provide a warm, comforting end to your family dinner that everyone loves.

One Pot Kielbasa Pasta Variations

Feel free to tweak this beloved recipe and let your personal touch shine through with these delightful variations!

  • Protein Swap: Substitute kielbasa with chicken sausage or shrimp for a tasty twist. Try combining different proteins for a fun, hearty mix!

  • Veggie Boost: Add nutrient-rich vegetables like spinach, bell peppers, or broccoli. They not only add color but also enhance the meal's nutritional profile without losing any flavor.

  • Cheesy Upgrade: Experiment with cheeses such as Parmesan or pepper jack for extra depth and a delightful kick. The more cheese, the better in my book!

  • Creamy Alternatives: For a lighter take, swap heavy cream with half-and-half or your favorite plant-based milk. You’ll still achieve that creamy consistency with a lighter touch!

  • Heat It Up: Add a pinch of red pepper flakes or diced jalapeños for a spicy kick that will keep your taste buds dancing. Just a small amount can make a big difference!

  • Herb Infusion: Toss in fresh herbs like parsley or basil just before serving to brighten up the dish. A sprinkle of freshness elevates the comfort factor immensely.

  • Pasta Variations: Use whole wheat or gluten-free pasta instead of regular dry pasta for dietary accommodations. There are great options available that don’t compromise on taste!

  • Sausage Blend: If you're feeling adventurous, mix different types of sausage like chorizo or andouille for a flavor explosion. Each type adds its unique zest to the dish!

These variations have the power to turn a simple dish into something completely unique! Once you're ready to take that plunge into culinary exploration, be sure to check out my comforting Crock Pot Chicken or delightful Seafood Pasta for more inspiring ideas. Enjoy experimenting!

Storage Tips for One Pot Kielbasa Pasta

Fridge: Store leftovers in an airtight container for up to 3 days. This helps maintain freshness and flavor in your One Pot Kielbasa Pasta.

Freezer: If you want to keep it longer, freeze the pasta for up to 2 months. Make sure to let it cool completely before placing it in a freezer-safe container.

Reheating: When you're ready to enjoy it again, reheat on the stovetop with a splash of broth or water to restore its creaminess. Stir gently until warmed through.

Room Temperature: Avoid leaving the pasta at room temperature for more than 2 hours to ensure food safety.

One Pot Kielbasa Pasta Recipe FAQs

What should I look for when selecting kielbasa?
Absolutely! When selecting kielbasa, look for a firm texture and a nice sheen on the surface; avoid any packages that have dark spots or feel slimy. Freshly made sausages often provide the best flavor, so check the packaging dates to ensure freshness.

How long can I store leftovers of One Pot Kielbasa Pasta?
Store your One Pot Kielbasa Pasta in an airtight container in the fridge for up to 3 days. I recommend reheating it gently on the stovetop with a splash of chicken broth or water to keep it creamy and delicious.

Can I freeze One Pot Kielbasa Pasta?
Yes! You can freeze this dish for up to 2 months. First, let it cool completely, then transfer it to a freezer-safe container. When ready to eat, thaw overnight in the refrigerator and reheat on the stovetop, adding a little broth to revive its creamy texture.

What if my pasta isn’t cooking evenly?
If you find that your pasta isn't cooking evenly, be sure to stir it occasionally while it simmers. This helps prevent it from sticking together and ensures even cooking. If it seems too dry, sprinkle in a little extra broth or water, and let it simmer a bit longer.

Is this recipe suitable for people with dietary restrictions?
Very! You can easily adapt the One Pot Kielbasa Pasta recipe for dietary needs. Substitute smoked kielbasa with turkey or chicken sausage for a leaner option, and use low-sodium broth to control sodium intake. For a vegetarian version, try using plant-based sausage and vegetable broth, and incorporate plenty of veggies for added flavor.

What if I want to add vegetables to my One Pot Kielbasa Pasta?
Absolutely! Adding veggies like spinach, bell peppers, or broccoli is a wonderful way to enhance both flavor and nutrition. Just chop them into bite-sized pieces and stir them in after you've added the broth and pasta. They will cook to tender perfection in the same time it takes for the pasta to finish cooking; perfect for a one-pot meal!

One Pot Kielbasa Pasta

One Pot Kielbasa Pasta: Cozy Comfort in 30 Minutes

One Pot Kielbasa Pasta is a quick and delicious recipe that combines smoky flavors and creamy pasta in just 30 minutes.
Print Recipe Pin Recipe
Prep Time 10 minutes mins
Cook Time 30 minutes mins
Total Time 40 minutes mins
Servings: 4 servings
Course: Dinner
Cuisine: American
Calories: 450
Ingredients Equipment Method Nutrition Notes

Ingredients
  

For the Pasta Base
  • 2 tablespoons Olive Oil Substitute with butter for a different flavor.
  • 14 ounces Smoked Kielbasa (or Turkey/Chicken Sausage) Any cooked sausage can be used.
  • 1 cup Diced Onion Can substitute with shallots or omit.
  • 3 cloves Garlic Fresh garlic is preferred.
  • 4 cups Low-Sodium Chicken Broth Vegetable broth can be used for vegetarian option.
  • 1 can Diced Tomatoes Fresh tomatoes can be used.
  • 12 ounces Dry Pasta (small pasta) Use small pasta like penne or rotini.
  • 1 cup Milk or Heavy Cream Substitute with half-and-half or plant-based milk.
  • to taste Salt
  • to taste Pepper
For the Topping
  • 1 cup Shredded Cheddar Cheese Parmesan or Monterey Jack can be used.
  • 1 bunch Sliced Scallions Can replace with chives.

Equipment

  • 4-5 quart sauté pan

Method
 

Preparation Steps
  1. In a large 4-5 quart sauté pan, heat 2 tablespoons of olive oil over medium-high heat until shimmering.
  2. Add the sliced kielbasa and diced onion to the pan. Cook for about 5–7 minutes, stirring occasionally, until the onions are translucent and the kielbasa is lightly browned.
  3. Stir in minced garlic and cook for an additional 30 seconds until fragrant.
  4. Pour in 4 cups of low-sodium chicken broth, one can of diced tomatoes, and 1 cup of milk or heavy cream. Add 12 ounces of dry small pasta along with salt and pepper to taste. Stir to combine and bring to a simmer for about 3–4 minutes.
  5. Reduce the heat to medium and let the mixture simmer uncovered for about 15 minutes, stirring occasionally.
  6. Once cooked, remove from heat and stir in half of the shredded cheddar cheese until melted. Sprinkle the remaining cheese on top, cover, and let sit for 2–3 minutes.
  7. Garnish with sliced scallions before serving and enjoy your comforting pasta dish!

Nutrition

Serving: 1servingCalories: 450kcalCarbohydrates: 60gProtein: 20gFat: 15gSaturated Fat: 7gPolyunsaturated Fat: 1gMonounsaturated Fat: 7gCholesterol: 30mgSodium: 800mgPotassium: 600mgFiber: 3gSugar: 4gVitamin A: 500IUVitamin C: 5mgCalcium: 200mgIron: 2mg

Notes

Feel free to customize with your favorite vegetables or proteins like chicken sausage or shrimp.

Tried this recipe?

Let us know how it was!

Deliciously Cheesy Baked Ziti for Cozy Family Nights

November 21, 2025 by Grace Snow Leave a Comment

There's something magical about the aroma of pasta baking in the oven, pulling everyone into the kitchen with its comforting embrace. My Life-Changing Baked Ziti, featuring a delightful combination of four cheeses, is a dish that transforms any ordinary evening into a memorable gathering. It’s wonderfully customizable, allowing you to experiment with different cheeses or add your favorite proteins, making it the perfect comfort food. What I love most is how quickly this dish comes together—less than an hour from prep to plate—making it ideal for busy weeknights and special occasions. As that golden-brown crust forms, you can almost hear the cheers from your family as they anticipate a hearty meal. So, are you ready to dive into this cheesy delight and discover why it’s a favorite around my dinner table?

Why is Baked Ziti a Family Favorite?

Quick and Easy: You'll love that this baked ziti can be on the table in under an hour, making it perfect for hectic weeknights.

Customizable Goodness: From adding your favorite proteins to experimenting with different cheese blends, the possibilities are endless!

Crowd-Pleaser: The creamy, cheesy layers appeal to everyone, ensuring even the pickiest eaters will come back for seconds.

Memorable Comfort: Picture everyone gathered around the table, savoring each bite of warm, gooey deliciousness; it’s a dish that creates lasting memories.

Ready to elevate your dinner game? Consider pairing this baked ziti with a fresh green salad or some delightfully crispy garlic bread for a meal that will impress! If you’re looking for more inspiration, check out my delicious Matcha Baked Doughnuts for a sweet finish!

Baked Ziti Ingredients

• Gather these delicious elements for the ultimate baked ziti experience.

For the Pasta

  • Ziti or Penne – Choose your favorite pasta shape, but cook until al dente to maintain that perfect texture.

For the Sauce

  • Marinara Sauce – A great quality sauce enhances flavor; consider making it from scratch for a personal touch.

For the Cheesy Mixture

  • Mozzarella Cheese – Fresh mozzarella is ideal for that gooey, stretchy goodness everyone loves.
  • Provolone Cheese – This addition brings a delightful depth of flavor to your baked ziti.
  • Ricotta Cheese – For a rich and creamy layer; if you prefer something lighter, cottage cheese works well too.
  • Parmesan Cheese – Grated for an even melt and a nutty, flavorful topping on your dish.

Optional Binder

  • Egg – Helps bind the cheese mixture together; it's optional but recommended for a firmer texture.

The key to a truly memorable baked ziti is the harmonious blend of these ingredients! Get ready for a family favorite that will have everyone looking for seconds.

Step‑by‑Step Instructions for Baked Ziti

Step 1: Preheat the Oven
Begin by preheating your oven to 350°F (175°C). This allows the heat to circulate evenly, ensuring your baked ziti cooks perfectly. As the oven warms up, prepare your baking dish by lightly greasing it with cooking spray or a drizzle of olive oil, helping to prevent sticking and promote an evenly cooked crust.

Step 2: Cook the Pasta
Boil a large pot of salted water and add your ziti or penne, cooking until al dente, about 6 minutes. Be careful not to overcook the pasta, as it will continue to soften while baking. Once done, drain the pasta and set it aside to cool slightly. This is the foundation of your comforting baked ziti!

Step 3: Prepare the Cheese Mixture
In a large mixing bowl, combine ricotta cheese, half of the mozzarella, provolone, and grated parmesan. Optionally, add the egg to the mixture for a firmer texture. Stir everything until well-blended, creating a rich and creamy layer that will elevate your baked ziti to delicious new heights.

Step 4: Assemble the First Layer
Take half of the cooked pasta and mix it with a generous portion of marinara sauce, ensuring every piece is coated. Spread this mixture evenly in your greased baking dish. This layer of pasta and sauce will create a flavorful base for your cheese mixture, enhancing the overall taste of the baked ziti.

Step 5: Add the Cheese Layer
Spread half of the creamy cheese mixture over your pasta layer in the baking dish. This will form the heart of your baked ziti, combining all the delicious flavors. Repeat the process by layering the remaining pasta and the leftover marinara sauce on top, creating a satisfying depth of flavor throughout the dish.

Step 6: Top with Cheese
Finish your assembly by spreading the remaining cheese mixture over the top, ensuring a luscious, cheesy finish. Sprinkle the remaining mozzarella and parmesan evenly across the surface, providing that gooey, melt-in-your-mouth texture and a golden-brown crust that will make everyone eager for a serving of your baked ziti.

Step 7: Bake the Ziti
Cover the baking dish with foil and place it in the preheated oven. Bake for 30 minutes to allow the flavors to meld and the cheeses to melt together. Removing the foil afterward is essential for achieving a deliciously bubbly and golden top, so set a timer for an additional 10-15 minutes.

Step 8: Broil for Extra Crispiness
If desired, set your oven to broil and place your baked ziti under the broiler for 1-2 minutes. This step is optional but highly recommended for that irresistible crispy finish on top. Keep a close eye on it to prevent burning, ensuring the cheese is golden and inviting.

Step 9: Let It Rest
Once baked to perfection, remove your baked ziti from the oven and let it rest for about 10-15 minutes. This resting period is crucial as it allows the layers to set, making it easier to cut and serve. The aroma will fill your kitchen, signalling that a delicious meal is nearly ready to be enjoyed!

Expert Tips for Baked Ziti

Perfect Pasta Texture: Ensure the pasta is al dente: Cooking the ziti for just about 6 minutes prevents mushiness after baking, maintaining that delightful bite.

Quality Ingredients: Choose fresh cheeses: Using high-quality mozzarella and ricotta significantly enhances the flavor and creaminess of your baked ziti.

Layer Wisely: Distribute evenly: When layering the pasta and cheese mixture, ensure even distribution to enjoy a harmonious flavor in every bite.

Add More Flavor: Don't skip the sauce: Consider mixing in browned meat like Italian sausage or ground beef into your marinara for a hearty twist on your baked ziti.

Let It Set: Rest before serving: Allowing the baked ziti to rest for 10-15 minutes after baking helps it hold its shape when sliced, making it easier to serve.

How to Store and Freeze Baked Ziti

Fridge: Store baked ziti in an airtight container for up to 3 days. Make sure to let it cool completely before covering to avoid condensation.

Freezer: To freeze, wrap unbaked assembled ziti tightly in plastic wrap and aluminum foil. It will last up to 3 months. When ready to bake, extend the cooking time.

Reheating: For leftovers, reheat in the oven at 350°F (175°C) for 20-30 minutes until heated through. Add a splash of marinara sauce if it seems dry to keep it deliciously gooey.

Make-Ahead: Consider prepping your baked ziti a day in advance and store it in the fridge. This allows flavors to meld beautifully before baking.

Baked Ziti Variations & Substitutions

Feel free to get creative and personalize your baked ziti experience with these delightful twists!

  • Dairy-Free: Substitute all cheeses with plant-based alternatives for a creamy, dairy-free version that's still delicious.

  • Meat-Lover's Delight: Add browned Italian sausage or ground beef to your marinara sauce for an extra layer of flavor and heartiness. The combination of savory meat with the cheesy goodness will surely satisfy.

  • Cheese Swap: Experiment with different cheese blends, such as gouda or cheddar, for a unique twist on the traditional flavor. Each type brings its own richness, elevating the dish to new heights.

  • Veggie-Packed: Toss in sautéed zucchini, spinach, or bell peppers to amp up the nutrition and add some color to your baked ziti. It’s a sneaky way to incorporate more veggies into your meal, without sacrificing flavor.

  • Spicy Kick: Add red pepper flakes or sliced jalapeños to the marinara sauce for those who love a bit of heat. This spicy addition will make your baked ziti a true flavor adventure.

  • Gluten-Free: Swap traditional pasta with gluten-free ziti or penne to make this comfort dish accessible for those with gluten sensitivities. Enjoy the same creamy goodness without the worry!

  • Herb Infusion: Sprinkle fresh basil or oregano over the top before baking to enhance the aromatic experience. Fresh herbs add a delightful burst of flavor that beautifully complements the cheese.

  • Sauce Exploration: Try using Alfredo sauce or a homemade roasted garlic sauce in place of marinara for a rich and creamy alternative. The change in sauce will take your baked ziti to a whole new flavor profile.

If you're feeling inspired, pair this delicious baked ziti with a fresh green salad and some crispy garlic bread for a comforting family dinner! And if you're in the mood for something sweet afterward, my delightful Matcha Baked Doughnuts would be the perfect ending to your meal.

Make Ahead Options

Baked Ziti is a perfect make-ahead dish for busy cooks looking to streamline their meal planning! You can assemble the entire baked ziti up to 24 hours in advance; simply cover and refrigerate it until you're ready to bake. For even longer storage, consider preparing the dish without baking and wrapping it tightly to freeze for up to 3 months—when ready to serve, just bake from frozen, adding about 15-20 minutes to the cooking time. To maintain its quality, ensure the pasta is cooked al dente and keep the cheese mixture evenly distributed. When it's time to enjoy this comforting meal, simply pop it in the oven, and you’ll have ooey-gooey, restaurant-quality baked ziti with minimal effort!

What to Serve with Life-Changing Baked Ziti

A warm, cheesy dish deserves the perfect companions to create a delightful meal experience.

  • Garlic Bread: Soft, buttery garlic bread offers a crunchy counterpart to the creamy baked ziti, soaking up every delicious bite.
  • Caesar Salad: Crisp romaine lettuce tossed with Caesar dressing adds a refreshing crunch, balancing the richness of the ziti.
  • Roasted Vegetables: Seasonal roasted veggies bring a touch of earthiness and vibrant colors to your plate, enhancing both flavor and nutrition.
  • Steamed Broccoli: Bright green broccoli adds freshness, and it pairs beautifully with the savory, cheesy pasta, making it a wholesome addition.
  • Italian Sausage: For those who crave extra protein, grilled or roasted Italian sausage elevates the dish while complementing its flavors deliciously.
  • Wine Pairing: A glass of Chianti or a light-bodied red wine enhances the rich flavors, creating a lovely dining experience with each sip.
  • Tiramisu: For dessert, creamy tiramisu adds a sweet, coffee-infused end to your meal, leaving everyone satisfied and happy.

Combine these delightful sides with your baked ziti for a family meal that feels warming and special.

Baked Ziti Recipe FAQs

How do I choose the right pasta for baked ziti?
Absolutely! For baked ziti, you want to stick with ziti or penne pasta. Both shapes hold up well during baking, and their tubular structure allows the sauce to cling beautifully, ensuring every bite is flavorful. Make sure to cook the pasta until al dente—about 6 minutes is ideal—so it doesn’t turn mushy while baking.

What’s the best way to store leftover baked ziti?
Very simply, store your baked ziti in an airtight container in the fridge for up to 3 days. Let it cool completely before sealing to prevent condensation from making it soggy. If you find yourself with more leftovers than you can handle, you can freeze it for up to 3 months—just ensure it's tightly wrapped to avoid freezer burn.

Can I freeze baked ziti before baking it?
Definitely! To freeze unbaked ziti, assemble the dish but don’t bake it. Cover it tightly with plastic wrap and then aluminum foil. When you’re ready to cook it, remove the plastic wrap and put it directly in the preheated oven. Just be prepared to increase the baking time by 10 to 15 minutes since it’ll be starting from frozen.

What if my baked ziti is too dry after reheating?
No worries at all! If your baked ziti seems a bit dry after reheating, simply add a splash of marinara sauce before popping it back in the oven. This will help restore that gooey, cheesy texture we all love. Reheat it at 350°F (175°C) for about 20-30 minutes until it's heated through and bubbling.

Are there any dietary considerations I should keep in mind?
Indeed! If you have guests with dietary restrictions, consider alternatives like gluten-free pasta for a gluten-sensitive option. When it comes to dairy, you can substitute ricotta with cottage cheese, making it lighter. Always double-check ingredient labels for allergens, especially with different types of cheese and sauces. Your loved ones will appreciate the consideration!

Baked Ziti

Deliciously Cheesy Baked Ziti for Cozy Family Nights

Baked Ziti is a comforting, cheesy dish perfect for family gatherings.
Print Recipe Pin Recipe
Prep Time 15 minutes mins
Cook Time 40 minutes mins
Resting Time 15 minutes mins
Total Time 1 hour hr 10 minutes mins
Servings: 6 servings
Course: Dinner
Cuisine: Italian
Calories: 400
Ingredients Equipment Method Nutrition Notes

Ingredients
  

For the Pasta
  • 12 oz Ziti or Penne Cooked until al dente.
For the Sauce
  • 24 oz Marinara Sauce Consider making it from scratch.
For the Cheesy Mixture
  • 15 oz Ricotta Cheese For a rich and creamy layer.
  • 16 oz Mozzarella Cheese Fresh, for gooeyness.
  • 8 oz Provolone Cheese Brings depth of flavor.
  • 8 oz Parmesan Cheese Grated for the topping.
Optional Binder
  • 1 large Egg Helps bind the cheese.

Equipment

  • Oven
  • Large pot
  • Mixing Bowl
  • Baking Dish

Method
 

Preparation Steps
  1. Preheat the oven to 350°F (175°C) and grease the baking dish.
  2. Cook ziti or penne in salted water until al dente for about 6 minutes.
  3. In a mixing bowl, combine ricotta, half mozzarella, provolone, and parmesan. Optionally add an egg.
  4. Mix half of the cooked pasta with marinara sauce and layer in the baking dish.
  5. Spread half of the cheese mixture over the pasta layer.
  6. Layer remaining pasta and marinara, then top with the remaining cheese mixture.
  7. Cover with foil and bake for 30 minutes; remove foil and bake for an additional 10-15 minutes.
  8. Optionally broil for 1-2 minutes for extra crispiness.
  9. Let rest for 10-15 minutes before serving.

Nutrition

Serving: 1plateCalories: 400kcalCarbohydrates: 45gProtein: 20gFat: 18gSaturated Fat: 10gPolyunsaturated Fat: 1gMonounsaturated Fat: 5gCholesterol: 80mgSodium: 800mgPotassium: 450mgFiber: 3gSugar: 6gVitamin A: 400IUVitamin C: 3mgCalcium: 300mgIron: 2mg

Notes

This dish is customizable; feel free to add proteins like Italian sausage for extra flavor.

Tried this recipe?

Let us know how it was!

TikTok Spaghetti: The Cheesy Comfort Meal You'll Love

November 21, 2025 by Grace Snow Leave a Comment

As I was scrolling through TikTok, I stumbled upon a delightful dish that stopped me in my tracks—TikTok Spaghetti! This heartwarming casserole combines layers of meaty richness with gooey cheese, creating an easy-to-make comfort food that’s perfect for family dinners or potlucks. You won't believe how simple and satisfying it is to whip up this meaty and cheesy TikTok Spaghetti Casserole, especially when you’re craving something delicious without spending hours in the kitchen. Plus, it's an instant crowd-pleaser that everyone will rave about. Who knew a viral recipe could taste this good? Curious how to make this creamy, cheesy wonder? Let's dive into the recipe!

Why is TikTok Spaghetti a Must-Try?

Comforting Layers: The harmonious combination of meaty goodness and gooey cheese layers will make your heart sigh with happiness.
Time-Saving Delight: Quick to prepare and bake, this dish is perfect for busy weeknights or impromptu gatherings.
Family-Friendly Appeal: With familiar flavors and fun textures, even picky eaters will ask for seconds!
Versatile Variations: Feel free to swap in turkey, veggies, or different cheeses to suit your taste, making it adaptable for everyone.
Crowd-Pleasing Winner: This recipe has gone viral for a reason—it's that good! Check out my Taco Spaghetti Cheesy for another twist on classic comfort food.

TikTok Spaghetti Ingredients

For the Base

  • Olive Oil – Provides healthy fats and aids in sautéing; can be substituted with canola or vegetable oil.
  • Onion, Chopped – Adds sweetness and depth to the sauce; use shallots for a milder flavor if desired.
  • Green Bell Pepper – Contributes crunch and sweetness; replace with red bell pepper for a sweeter twist.
  • Garlic, Minced – Enhances flavor with aromatic notes; garlic powder (1 teaspoon) works if fresh garlic isn't on hand.
  • Ground Beef (80/20) – Main protein source, adds richness; swap for ground turkey or plant-based ground for a lighter option.
  • Salt – Enhances all flavors; kosher or sea salt is recommended for the best taste.
  • Black Pepper – Provides mild heat; freshly cracked pepper ensures the best flavor.
  • Italian Seasoning – Infuses traditional Italian flavors; a mix of oregano, basil, and thyme can be used as a substitute.
  • Spaghetti Sauce (1 ½ jars/36 ounces) – Forms the base of the red sauce; homemade sauce brings a fresher flavor.
  • Salt (for pasta) – Essential for seasoning the water when boiling pasta.
  • Spaghetti (16 ounces) – The main carbohydrate; substitute with any pasta type, including gluten-free.

For the Alfredo Sauce

  • Butter (1/2 cup) – The base of the Alfredo sauce that adds richness; margarine can be used for a dairy-free option.
  • Garlic, Minced (4 cloves) – Adds flavor to the Alfredo sauce; garlic powder is an alternative if needed.
  • All-Purpose Flour – Thickens the Alfredo; use cornstarch (1 tablespoon) for a gluten-free version.
  • Heavy Cream (2 cups) – Creates a rich, creamy sauce; half-and-half can reduce calories if preferred.
  • Parmesan Cheese (1 ½ cups) – Imparts a nutty flavor; nutritional yeast can be a vegan substitute.

For the Topping

  • Mozzarella Cheese (2 cups) – Gives a gooey topping; cheddar cheese is a great alternative for a different flavor profile.

You’re all set to create this tasty TikTok spaghetti casserole! Let’s get cooking!

Step-by-Step Instructions for TikTok Spaghetti

Step 1: Preheat and Prepare
Start by preheating your oven to 350°F (177°C). While it heats up, grab a 9x13-inch baking dish and coat it with nonstick spray to ensure easy serving later. Setting up your dish in advance will save time when it's ready for assembly, so you can enjoy the delicious TikTok Spaghetti without any delays.

Step 2: Sauté Aromatics
In a large skillet, heat 2 tablespoons of olive oil over medium heat. Once the oil shimmers, add 1 chopped onion and 1 diced green bell pepper. Sauté these for about 5–7 minutes until softened and translucent. The aroma of sautéed veggies will fill your kitchen, setting the stage for the flavorful layers of your TikTok Spaghetti.

Step 3: Cook the Garlic
After the veggies have softened, add 4 minced garlic cloves to the skillet. Sauté for another 1-2 minutes, stirring frequently, until the garlic becomes fragrant but not browned. This step intensifies the flavor of your sauce, creating a lovely base for the meaty filling in your TikTok Spaghetti casserole.

Step 4: Brown the Beef
Add 1 pound of ground beef to the skillet, breaking it apart with a spoon. Cook for about 7–10 minutes until the meat is browned and no longer pink. Remember to drain any excess grease to keep your dish from being too oily, allowing the rich flavors of the meat to shine in your TikTok Spaghetti.

Step 5: Add Seasoning and Sauce
Stir in 1 teaspoon of salt, ½ teaspoon of black pepper, and 1 tablespoon of Italian seasoning. Pour in 1 ½ jars (36 ounces) of spaghetti sauce and mix well. Let the sauce simmer for about 5 minutes to meld the flavors, making your house smell incredible as the meaty mixture becomes ready for the next stage of your TikTok Spaghetti.

Step 6: Cook the Spaghetti
While the sauce simmers, bring a large pot of salted water to a boil. Add 16 ounces of spaghetti and cook according to package directions, usually around 8–10 minutes, until al dente. Once done, drain the pasta and set it aside. This step is crucial to ensure that the spaghetti holds its shape in the delicious layers of your TikTok Spaghetti casserole.

Step 7: Make the Alfredo Sauce
In a separate pan, melt ½ cup of butter over medium heat, then add another 4 minced garlic cloves and sauté for about 1 minute. Next, whisk in ½ cup of all-purpose flour and cook for 1 minute until bubbly, forming a roux. This will create a rich base for your creamy Alfredo sauce, complementing the savory layers of the TikTok Spaghetti.

Step 8: Stir in Cream and Cheese
Slowly add 2 cups of heavy cream to the roux, stirring continuously until the mixture is smooth. Then, gradually add 1 ½ cups of grated Parmesan cheese, whisking until melted and creamy. The result will be a luscious Alfredo sauce that envelops your spaghetti, making your TikTok Spaghetti a comforting delight.

Step 9: Combine Pasta and Sauce
Toss the drained spaghetti into the Alfredo sauce, ensuring each strand is evenly coated. This combination is what truly makes your TikTok Spaghetti extra creamy and flavorful. Spread the coated spaghetti evenly into the greased baking dish, ready for the layered goodness to come.

Step 10: Layer the Red Sauce
Carefully spoon the meat and red sauce mixture over the spaghetti, creating an even layer. Do not mix the layers together; you want to maintain that creamy goodness on the bottom of your TikTok Spaghetti. This will ensure each bite is a delightful combination of flavors and textures.

Step 11: Top with Cheese
Sprinkle 2 cups of shredded mozzarella cheese generously over the top of the casserole. This melty layer will provide a beautiful finish, creating that irresistible golden crust when baked. Make sure the cheese covers the red sauce completely for a beautifully gooey layer in the final updated TikTok Spaghetti.

Step 12: Bake to Perfection
Place the baking dish in the preheated oven and bake, uncovered, for about 30 minutes. The casserole should be bubbling and the cheese melted, giving it that inviting look. The aroma wafting through your home will surely make everyone eager for the first bite of your comforting TikTok Spaghetti.

Step 13: Cool and Serve
After baking, remove the casserole from the oven and let it cool for about 10 minutes before serving. This resting time helps the layers set, making it easier to serve. You can garnish with chopped parsley and a sprinkle of extra Italian seasoning for a fresh touch. Enjoy the cozy goodness of your TikTok Spaghetti with family and friends!

Make Ahead Options

These Meaty and Cheesy TikTok Spaghetti Casseroles are perfect for busy home cooks who love meal prepping! You can assemble the entire casserole up to 24 hours in advance, keeping it covered in the refrigerator to maintain freshness and prevent drying out. If you're planning to enjoy leftovers, they can be stored in an airtight container for up to 3 days. When you're ready to bake, simply preheat the oven to 350°F (177°C) and add an extra 10-15 minutes to the baking time, ensuring the casserole is hot and bubbly. This effortless prep ahead strategy saves you time during busy weeknights while still delivering delicious, comforting flavors.

What to Serve with TikTok Spaghetti

Looking to elevate your dining experience with dishes that harmonize perfectly with this creamy casserole?

  • Garlic Bread: The warm, buttery goodness of garlic bread is perfect for soaking up every last drop of sauce, making each bite more satisfying.
  • Simple Garden Salad: Vibrant veggies tossed in a light vinaigrette offer a refreshing crunch, balancing the hearty richness of the spaghetti.
  • Creamy Coleslaw: The sweet and tangy elements of a creamy coleslaw add a delightful contrast, cleansing your palate between bites.
  • Roasted Vegetables: Tender roasted seasonal veggies provide a lovely earthy flavor that complements the savory components of TikTok Spaghetti.
  • Cheesy Cauliflower Bake: This low-carb side mirrors the cheese in your casserole while adding another layer of creamy goodness to your meal.
  • Red Wine: A glass of Merlot or Chianti brings out the bold flavors of the meat sauce, making for a perfect pairing with your hearty meal.
  • Chocolate Chip Cookies: End your meal on a sweet note with warm cookies that evoke nostalgia—a familiar comfort alongside this comforting dish.
  • Crispy Fried Zucchini: For a fun twist, these crunchy bites add a unique texture, enhancing the flavor profile of your already delightful dinner.

Storage Tips for TikTok Spaghetti

Fridge: Store leftovers in an airtight container in the refrigerator for up to 3 days. When you're ready to eat, simply reheat in the oven or microwave until warmed through.

Freezer: You can freeze this TikTok Spaghetti casserole for up to 3 months. Wrap it tightly in plastic wrap and aluminum foil to prevent freezer burn. Thaw in the fridge before baking.

Reheating: For the best texture, reheat from frozen in a 350°F (177°C) oven for about 45 minutes, or reheat in the microwave in 1-2 minute intervals until hot.

Assembling Ahead: This dish can be assembled a day ahead and stored in the fridge before baking, making it perfect for busy weeknights!

TikTok Spaghetti Variations & Substitutions

Feel free to make this TikTok spaghetti your own by trying out these delightful variations that add flavor and adjust to different dietary needs!

  • Spicy Kick: Substitute ground beef with Italian sausage for a zesty flavor boost that adds a little heat. You’ll enjoy a savory depth that makes every bite exciting.

  • Low-Carb Delight: Swap spaghetti for zucchini noodles to create a refreshing, low-carb version of this hearty dish. Not only is it healthier, it still delivers that comforting essence everyone loves.

  • Veggie-Packed: Incorporate chopped mushrooms or spinach into the red sauce for a nutritious twist. This not only elevates the flavor but also adds vibrant colors to your casserole!

  • Creamy Vegan Option: Replace heavy cream with coconut cream and use nutritional yeast instead of Parmesan for a rich, plant-based take on the classic. You'd be surprised at how satisfying a vegan version can taste!

  • Cheese Lovers’ Twist: Try adding a mix of mozzarella and cheddar cheeses for a gooey, melted topping that gets extra cheesy goodness. Each slice will ooze with delightful flavors!

  • Garlic Lovers: North out the garlic in the Alfredo sauce with roasted garlic to deepen the flavor profile. It adds a sweet and savory touch that will impress garlic fans.

  • Herb-Infused Flavor: Sprinkle in fresh basil or oregano between layers for a bright herby flavor that will elevate your TikTok spaghetti to a new culinary level. You might also enjoy pairing it with my delicious Taco Spaghetti Cheesy for another herb-rich comfort food experience!

  • Extra Creamy: Increase the heavy cream in your Alfredo sauce to 2½ cups for an even richer, creamier texture. Your family will be begging for seconds with this luxurious twist!

These variations are not just practical—they're an invitation to explore new tastes while enjoying the comforting warmth of TikTok spaghetti! Enjoy customizing your casserole to suit your cravings and dietary needs.

Expert Tips for TikTok Spaghetti

  • Grease Drainage: Always drain excess grease from the ground beef to ensure a non-greasy, rich final dish that truly shines.
  • Cheesy Topping: Bake uncovered for the last 10 minutes to achieve a golden, bubbly cheese layer that completes your TikTok Spaghetti.
  • Layering Technique: Avoid mixing the layers of sauce and Alfredo; this keeps the creamy goodness intact and enhances the flavor in every bite.
  • Herbs for Flavor: Enhance the dish with fresh or dried herbs, such as basil or oregano, for additional flavor depth in your TikTok Spaghetti.
  • Vegetable Add-In: Boost nutrition by adding veggies like spinach or mushrooms to the meat sauce for delicious flavor and added texture.

TikTok Spaghetti Recipe FAQs

What kind of ground beef should I use for TikTok Spaghetti?
I recommend using ground beef with an 80/20 ratio for optimal flavor and moisture. If you're looking for a lighter option, ground turkey or a plant-based ground meat can also work beautifully!

How do I store leftover TikTok Spaghetti?
Leftovers can be stored in an airtight container in the refrigerator for up to 3 days. Just make sure to let it cool to room temperature before sealing it up. When you're ready to enjoy, you can easily reheat it in the oven or microwave.

Can I freeze TikTok Spaghetti?
Absolutely! You can freeze the casserole for up to 3 months. To do this, wrap it tightly in plastic wrap and then in aluminum foil to protect it from freezer burn. To serve, thaw it in the fridge overnight and bake it straight from there.

What's the best way to reheat TikTok Spaghetti?
For the best texture, I suggest reheating from frozen in a preheated oven at 350°F (177°C). Cover it with foil to prevent drying out, and bake for about 45 minutes. If it's just leftover, you can reheat in the microwave in 1-2 minute intervals until thoroughly warmed.

Are there any dietary considerations for TikTok Spaghetti?
Yes! You can easily adapt this recipe to accommodate various dietary needs. For a gluten-free version, swap regular spaghetti with gluten-free pasta. If dairy is a concern, use dairy-free cheese and margarine instead of butter. Always double-check any pre-packaged ingredients for allergens!

What should I do if my TikTok Spaghetti turns out watery?
If your casserole has excess liquid, it might be due to the meat sauce not thickening enough or overcooked spaghetti. For next time, ensure you cook the sauce until it's reduced or add a bit of cornstarch to thicken it up. If you encounter a watery casserole, let it rest for a bit after baking—this will help absorb excess moisture.

TikTok Spaghetti

TikTok Spaghetti: The Cheesy Comfort Meal You'll Love

Try TikTok Spaghetti for a quick and delicious dinner with cheesy layers of meat and sauce.
Print Recipe Pin Recipe
Prep Time 20 minutes mins
Cook Time 40 minutes mins
Cooling Time 10 minutes mins
Total Time 1 hour hr 10 minutes mins
Servings: 6 servings
Course: Dinner
Cuisine: American
Calories: 600
Ingredients Equipment Method Nutrition Notes

Ingredients
  

For the Base
  • 2 tablespoons Olive Oil can be substituted with canola or vegetable oil
  • 1 Onion, Chopped use shallots for milder flavor
  • 1 Green Bell Pepper replace with red bell pepper for a sweeter twist
  • 4 cloves Garlic, Minced garlic powder (1 teaspoon) works if fresh garlic isn't on hand
  • 1 pound Ground Beef (80/20) swap for ground turkey or plant-based ground
  • 1 teaspoon Salt kosher or sea salt recommended
  • ½ teaspoon Black Pepper freshly cracked pepper ensures the best flavor
  • 1 tablespoon Italian Seasoning mix of oregano, basil, and thyme as a substitute
  • 1 ½ jars Spaghetti Sauce (36 ounces) homemade sauce brings a fresher flavor
  • 1 tablespoon Salt (for pasta) essential for boiling pasta
  • 16 ounces Spaghetti substitute with any pasta type, including gluten-free
For the Alfredo Sauce
  • ½ cup Butter margarine can be used for dairy-free option
  • 4 cloves Garlic, Minced garlic powder is an alternative if needed
  • ½ cup All-Purpose Flour use cornstarch (1 tablespoon) for gluten-free version
  • 2 cups Heavy Cream half-and-half can reduce calories if preferred
  • 1 ½ cups Parmesan Cheese nutritional yeast can be a vegan substitute
For the Topping
  • 2 cups Mozzarella Cheese cheddar cheese is a great alternative

Equipment

  • 9x13-inch baking dish
  • Large skillet
  • pot
  • separate pan for Alfredo sauce

Method
 

Step-by-Step Instructions for TikTok Spaghetti
  1. Preheat your oven to 350°F (177°C) and coat a 9x13-inch baking dish with nonstick spray.
  2. Heat 2 tablespoons of olive oil in a large skillet over medium heat. Add 1 chopped onion and 1 diced green bell pepper. Sauté for 5-7 minutes until softened.
  3. Add 4 minced garlic cloves to the skillet and sauté for another 1-2 minutes until fragrant.
  4. Add 1 pound of ground beef, breaking it apart, and cook for 7-10 minutes until browned. Drain excess grease.
  5. Stir in 1 teaspoon of salt, ½ teaspoon of black pepper, and 1 tablespoon of Italian seasoning. Add 1 ½ jars (36 ounces) of spaghetti sauce and let simmer for 5 minutes.
  6. Bring a large pot of salted water to a boil. Cook 16 ounces of spaghetti according to package directions (8-10 minutes). Drain and set aside.
  7. In a separate pan, melt ½ cup of butter. Add 4 minced garlic cloves and sauté for about 1 minute. Whisk in ½ cup of all-purpose flour, cooking until bubbly.
  8. Slowly add 2 cups of heavy cream, stirring until smooth. Gradually whisk in 1 ½ cups of Parmesan cheese until melted and creamy.
  9. Toss the drained spaghetti into the Alfredo sauce, ensuring each strand is coated. Spread into the greased baking dish.
  10. Spoon the meat and red sauce mixture over the spaghetti without mixing the layers.
  11. Sprinkle 2 cups of shredded mozzarella cheese over the top of the casserole.
  12. Bake uncovered for about 30 minutes until bubbling and cheese is melted.
  13. Let cool for about 10 minutes before serving. Optionally garnish with parsley and extra Italian seasoning.

Nutrition

Serving: 1servingCalories: 600kcalCarbohydrates: 40gProtein: 30gFat: 35gSaturated Fat: 20gPolyunsaturated Fat: 2gMonounsaturated Fat: 10gTrans Fat: 1gCholesterol: 90mgSodium: 800mgPotassium: 600mgFiber: 3gSugar: 4gVitamin A: 800IUVitamin C: 10mgCalcium: 300mgIron: 3.5mg

Notes

This casserole can be assembled a day in advance and refrigerated before baking, making it perfect for busy weeknights.

Tried this recipe?

Let us know how it was!

Gordon Ramsay Ground Turkey Pasta: Creamy Comfort in Minutes

November 21, 2025 by Grace Snow Leave a Comment

The sizzle of ground turkey hitting a hot pan instantly fills the kitchen with warmth and promise. In just a few easy steps, you can elevate a simple weeknight dinner into a cozy yet sophisticated plate of Gordon Ramsay's Creamy Ground Turkey Pasta. This recipe not only combines the deliciousness of creamy sauces with lean protein, but it also offers endless versatility—perfect for adapting to whatever you have on hand. Whether you're looking to whip up a quick and nutritious dinner or add extra veggies for a healthier twist, you’ll find this dish to be a satisfying solution for both family and friends. Ready to spark your culinary creativity? Let’s dive into this delightful recipe!

Why is this recipe a must-try?

Simplicity at Its Best: With just a handful of ingredients and straightforward steps, preparing this creamy pasta dish is a breeze, making it perfect for busy weeknights.

Nutritious Comfort: Packed with lean ground turkey and ooey-gooey cheese, it strikes a balance between indulgence and health—ideal for anyone looking to enjoy a meal without the guilt.

Customizable Delight: Feel free to swap the penne for your favorite pasta shape or toss in fresh vegetables for a nutritious boost—endless variations mean there's something for everyone!

Crowd-Pleasing Flavor: The rich, savory sauce combined with tender pasta creates a dining experience your family will request time and again—which is why it's an excellent addition to your weeknight dinner rotation.

Quick & Easy Cleanup: One-skillet cooking means less mess and more time enjoying your meal, making it an excellent choice for both home cooks and busy professionals alike.

Gordon Ramsay Ground Turkey Pasta Ingredients

For the Pasta
• Penne Pasta – Provides a sturdy base; feel free to swap for shapes like fusilli or farfalle.
• Olive Oil – Essential for sautéing the aromatics; can be replaced with avocado or sunflower oil if preferred.

For the Sauce
• Yellow Onion – Adds sweet depth; red onion can offer a sharper contrast in flavor.
• Ground Turkey – A lean protein that keeps this dish healthy; ground chicken is a suitable alternative.
• Salt – Enhances overall flavor; adjust based on your salt sensitivity.
• Black Pepper – Freshly cracked delivers maximum aroma; consider white pepper for a milder taste.
• Italian Seasoning – Provides fragrant herbal notes; dried oregano or basil can also work well.
• Garlic – Brings boldness; fresh minced garlic is ideal, but garlic powder is fine in a pinch.
• All-Purpose Flour – Thickens the sauce; substitute with gluten-free flour for a gluten-free option.
• Chicken Broth – Imparts richness to the sauce; easily swap with vegetable broth for a vegetarian version.
• Tomato Sauce – Adds acidity and depth; crushed tomatoes can give a chunkier texture.
• Half-and-Half – Creates a rich creaminess; use heavy cream for a decadent touch or non-dairy milk for a lighter option.
• Mozzarella Cheese – Melts beautifully, tying everything together; feel free to use Gruyère or dairy-free options if desired.
• Cheddar Cheese – Offers a delightful sharpness; any melty cheese works, like Monterey Jack.

For Garnishing
• Fresh Parsley – Adds color and freshness; basil or arugula can be lovely alternatives.
• Red Chili Flakes – Provides a hint of spice; adjust to your heat preference or omit for milder flavor.

Elevate your culinary journey with Gordon Ramsay Ground Turkey Pasta—a creamy masterpiece awaiting your table!

Step‑by‑Step Instructions for Gordon Ramsay Ground Turkey Pasta

Step 1: Cook Pasta
Begin by bringing a large pot of salted water to a rolling boil over high heat. Add the penne pasta and cook it until just shy of al dente, about 8 to 10 minutes. Reserve 1 cup of the starchy pasta water before draining the pasta in a colander. Set the cooked pasta aside for later, allowing it to cool slightly as you prepare the sauce.

Step 2: Sauté Aromatics
In a large skillet, heat 2 tablespoons of olive oil over medium heat until shimmering. Add the diced yellow onion and sauté it for about 5 minutes, stirring frequently until the onion becomes soft and translucent. The fragrant aroma will fill your kitchen, indicating it’s time to move on to the next step in preparing your Gordon Ramsay Ground Turkey Pasta.

Step 3: Brown Turkey
Add the ground turkey to the skillet, breaking it apart with a wooden spoon as it cooks. Allow it to brown for 6 to 8 minutes, stirring occasionally. Season generously with salt, black pepper, and Italian seasoning for flavor. After the turkey is no longer pink, mix in minced garlic and continue to cook for another minute until fragrant.

Step 4: Build Sauce
Sprinkle the all-purpose flour over the browned turkey and stir well to combine, cooking for about 1 minute to remove the raw flour taste. Gradually pour in the chicken broth and tomato sauce, stirring constantly until the mixture thickens, which should take about 3 to 5 minutes. This rich sauce forms the heart of your creamy ground turkey pasta.

Step 5: Combine Pasta and Sauce
Gently fold the drained penne pasta into the skillet with the sauce, ensuring each piece is well-coated. Pour in the half-and-half along with a splash of the reserved pasta water, stirring to achieve your desired creaminess. Let everything simmer together for a couple of minutes, allowing flavors to meld.

Step 6: Add Cheese
Reduce the heat to low and fold in half of the mozzarella and cheddar cheese. Stir until the cheese melts smoothly into the sauce, about 2 to 3 minutes. For an extra cheesy finish, sprinkle the remaining cheese over the top, covering the skillet and letting it melt into a bubbly, delicious layer.

Step 7: Serve
Once the cheese is melted and bubbly, remove the skillet from the heat. Garnish your Gordon Ramsay Ground Turkey Pasta with freshly chopped parsley and a sprinkle of red chili flakes if you like some heat. Serve warm and enjoy the comforts of this creamy, satisfying dish that’s sure to please family and friends alike.

What to Serve with Gordon Ramsay Ground Turkey Pasta

Elevate your weeknight dinner experience by pairing this creamy delight with sides that are equally comforting and delicious.

  • Garlic Bread: A crunchy, buttery complement to soak up the creamy sauce, offering that perfect garlicky aroma that draws everyone to the table.

  • Fresh Green Salad: Crisp lettuce, juicy tomatoes, and a light vinaigrette provide a refreshing balance to the rich, creamy pasta, enhancing your meal's color and texture experience.

  • Roasted Vegetables: Seasonal vegetables caramelized to perfection add a roasted depth of flavor, rounding out the meal with earthy and sweet notes.

  • Steamed Broccoli: The vibrant green adds not only color but also a nutritious crunch, making it a delightful and healthful addition to your plate.

  • Homemade Coleslaw: A crunchy, tangy slaw offers a fresh contrast to the creamy pasta, brightening each bite and adding a fun texture.

  • Pinot Grigio: This light, refreshing white wine pairs beautifully, cutting through the richness while enhancing the overall dining experience.

  • Chocolate Mousse for Dessert: End your meal on a sweet note with a velvety chocolate mousse that will delight everyone with its rich flavor and light texture, perfect after a hearty pasta dish.

Expert Tips for Gordon Ramsay Ground Turkey Pasta

  • Flavor Boosting: Season the ground turkey well with salt and pepper for a depth of flavor. Don't skip this step; it makes a significant difference.

  • Perfect Onion Texture: Cook onions until they're softened and translucent to enhance their sweetness, preventing them from being crunchy in the final dish.

  • Flour Mixing: Gradually add flour to the ground turkey before introducing liquids. This method avoids clumps in your sauce, ensuring a smooth consistency for your pasta.

  • Cheese Melting: Keep the heat low when adding cheese to maintain a creamy texture. Higher temperatures can cause the cheese to separate and become greasy.

  • Pasta Precision: Remember to cook the pasta just shy of al dente, as it will continue cooking in the sauce, ensuring a perfect bite without mushiness.

  • Vegetable Incorporation: Feel free to add in vegetables like spinach or bell peppers for extra nutrition and color; this simple enhancement can elevate your Gordon Ramsay Ground Turkey Pasta to another level!

Variations & Substitutions for Gordon Ramsay Ground Turkey Pasta

Customize your dish and unleash your culinary creativity with these exciting variations that will tantalize your taste buds!

  • Gluten-Free: Swap out the penne pasta for gluten-free pasta alternatives like brown rice or quinoa pasta to enjoy this comforting dish without the gluten.

  • Vegetable Boost: Toss in fresh vegetables such as spinach, bell peppers, or zucchini for added nutrition and a splash of color. This not only enhances flavor but also makes it a nutritionally complete meal!

  • Extra Creamy: For those nights when you want an ultra-rich sauce, use heavy cream instead of half-and-half. This will create an indulgent treat that’s utterly irresistible.

  • Cheese Lovers: If you can never get enough cheese, mix in creamy ricotta or tangy cream cheese for a delightful twist that adds a new layer of flavor.

  • Spicy Kick: Craving some heat? Stir in red chili flakes or fresh jalapeños to give your creamy pasta an exciting fiery flair.

  • Baked Pasta: Transform your dish into a comforting baked pasta by layering it with breadcrumbs and cheese before broiling until crispy and golden on top. It’s a comforting surprise!

  • Swap Meats: Explore flavor variations by replacing ground turkey with ground chicken, beef, or even sausage for a unique take on this classic dish.

  • Seafood Twist: Feeling adventurous? Incorporate shrimp or scallops instead of ground turkey for a seafood-inspired variation that’s just as satisfying, making it reminiscent of a creamy seafood pasta.

For more inspiration, check out my recipes for Skillet Pasta Sun or dive into a delightful Seafood Pasta Savory. The possibilities are endless, and every bite can be a new adventure!

Make Ahead Options

Gordon Ramsay's Creamy Ground Turkey Pasta is an ideal dish for meal prep, alleviating weeknight stress! You can cook the pasta and prepare the sauce up to 24 hours in advance, storing each component separately in airtight containers in the refrigerator. The cooked pasta should be tossed with a bit of olive oil to prevent sticking, while the sauce can be refrigerated securely. When it’s time to serve, simply reheat the sauce in a skillet over low heat while adding the reserved starchy pasta water to achieve the right consistency. Combine the heated pasta with the sauce and fold in freshly grated cheese until melted for a meal that tastes just as delicious as if made fresh!

How to Store and Freeze Gordon Ramsay Ground Turkey Pasta

Fridge: Store your creamy ground turkey pasta in an airtight container for up to 3 days, allowing the flavors to meld even more beautifully.

Freezer: For longer storage, freeze portions in airtight containers or freezer bags for up to 3 months. It’s a great make-ahead option for busy days!

Reheating: Reheat in a skillet over low heat, adding a splash of chicken broth or reserved pasta water to restore creaminess, stirring until heated through.

Leftovers Tip: Always check for quality before reheating; if the pasta looks dried out or unappetizing, it’s time to let it go to avoid any waste.

Gordon Ramsay Ground Turkey Pasta Recipe FAQs

How do I choose the right pasta for this recipe?
Absolutely! I recommend using penne for its wonderful ability to hold sauce, but you can swap it for other pasta shapes like fusilli or fettuccine. Just keep in mind that cooking times may vary, so follow the package instructions accordingly.

How should I store leftover Gordon Ramsay Ground Turkey Pasta?
To keep your pasta fresh, store it in an airtight container in the fridge for up to 3 days. Allow it to cool before sealing to prevent condensation, which can affect the texture.

Can I freeze Gordon Ramsay Ground Turkey Pasta?
Very! You can freeze this dish in airtight containers or freezer bags for up to 3 months. To do this, let it cool completely, portion it out, remove excess air from bags, and label them with the date. When you're ready to enjoy it, thaw in the fridge overnight and reheat on low heat, adding a splash of chicken broth to bring back the creaminess.

What should I do if the sauce turns out too thick?
No worries! If your sauce seems too thick, simply add a little more chicken broth or the reserved pasta water—start with a tablespoon at a time—until you reach your desired consistency. Stir gently over low heat until well combined.

Are there any dietary considerations for garlic or cheese in this recipe?
Absolutely! For garlic, use inert substitutes like garlic powder if you're allergic or sensitive. As for cheese, consider dairy-free options or nutritional yeast to achieve that cheesy flavor without dairy. Additionally, always double-check packaging for allergens if serving kids or others with dietary restrictions.

Gordon Ramsay Ground Turkey Pasta

Gordon Ramsay Ground Turkey Pasta: Creamy Comfort in Minutes

Elevate a simple weeknight dinner with Gordon Ramsay's creamy ground turkey pasta, combining deliciousness and lean protein.
Print Recipe Pin Recipe
Prep Time 10 minutes mins
Cook Time 30 minutes mins
Total Time 40 minutes mins
Servings: 4 servings
Course: Dinner
Cuisine: Italian
Calories: 650
Ingredients Equipment Method Nutrition Notes

Ingredients
  

For the Pasta
  • 8 ounces Penne Pasta Feel free to swap for shapes like fusilli or farfalle.
  • 2 tablespoons Olive Oil Can be replaced with avocado or sunflower oil if preferred.
For the Sauce
  • 1 medium Yellow Onion Adds sweet depth; red onion can offer a sharper contrast in flavor.
  • 1 pound Ground Turkey A lean protein that keeps this dish healthy; ground chicken is a suitable alternative.
  • 1 teaspoon Salt Enhances overall flavor; adjust based on your salt sensitivity.
  • 1/2 teaspoon Black Pepper Freshly cracked delivers maximum aroma; consider white pepper for a milder taste.
  • 1 tablespoon Italian Seasoning Provides fragrant herbal notes; dried oregano or basil can also work well.
  • 3 cloves Garlic Brings boldness; fresh minced garlic is ideal.
  • 2 tablespoons All-Purpose Flour Thickens the sauce; substitute with gluten-free flour for a gluten-free option.
  • 2 cups Chicken Broth Imparts richness to the sauce; easily swap with vegetable broth for a vegetarian version.
  • 1 cup Tomato Sauce Adds acidity and depth; crushed tomatoes can give a chunkier texture.
  • 1 cup Half-and-Half Creates a rich creaminess; use heavy cream for a decadent touch or non-dairy milk for a lighter option.
  • 1 cup Mozzarella Cheese Melts beautifully; feel free to use Gruyère or dairy-free options.
  • 1 cup Cheddar Cheese Offers a delightful sharpness; any melty cheese works, like Monterey Jack.
For Garnishing
  • 1/4 cup Fresh Parsley Adds color and freshness; basil or arugula can be alternatives.
  • 1 teaspoon Red Chili Flakes Provides a hint of spice; adjust to your heat preference.

Equipment

  • Large pot
  • Skillet
  • Colander

Method
 

Step-by-Step Instructions
  1. Begin by bringing a large pot of salted water to a rolling boil over high heat. Add the penne pasta and cook it until just shy of al dente, about 8 to 10 minutes. Reserve 1 cup of the starchy pasta water before draining the pasta in a colander. Set the cooked pasta aside for later, allowing it to cool slightly as you prepare the sauce.
  2. In a large skillet, heat the olive oil over medium heat until shimmering. Add the diced yellow onion and sauté for about 5 minutes, stirring frequently until the onion becomes soft and translucent.
  3. Add the ground turkey to the skillet, breaking it apart with a wooden spoon as it cooks. Allow it to brown for 6 to 8 minutes, stirring occasionally. Season generously with salt, black pepper, and Italian seasoning for flavor. After the turkey is no longer pink, mix in minced garlic and continue to cook for another minute until fragrant.
  4. Sprinkle the all-purpose flour over the browned turkey and stir well to combine, cooking for about 1 minute to remove the raw flour taste. Gradually pour in the chicken broth and tomato sauce, stirring constantly until the mixture thickens, which should take about 3 to 5 minutes.
  5. Gently fold the drained penne pasta into the skillet with the sauce, ensuring each piece is well-coated. Pour in the half-and-half along with a splash of the reserved pasta water, stirring to achieve your desired creaminess. Let everything simmer together for a couple of minutes.
  6. Reduce the heat to low and fold in half of the mozzarella and cheddar cheese. Stir until the cheese melts smoothly into the sauce, about 2 to 3 minutes. Sprinkle the remaining cheese over the top, covering the skillet and letting it melt into a bubbly, delicious layer.
  7. Once the cheese is melted and bubbly, remove the skillet from the heat. Garnish with freshly chopped parsley and a sprinkle of red chili flakes if you like some heat. Serve warm and enjoy.

Nutrition

Serving: 1servingCalories: 650kcalCarbohydrates: 60gProtein: 35gFat: 30gSaturated Fat: 15gPolyunsaturated Fat: 1gMonounsaturated Fat: 12gCholesterol: 120mgSodium: 800mgPotassium: 700mgFiber: 4gSugar: 5gVitamin A: 15IUVitamin C: 10mgCalcium: 20mgIron: 15mg

Notes

Feel free to customize with extra vegetables for a healthier twist. Store leftovers in an airtight container for up to 3 days or freeze for up to 3 months.

Tried this recipe?

Let us know how it was!

Hearty Simple Bolognese: Your Family's New Favorite Dinner

November 21, 2025 by Grace Snow Leave a Comment

As I was stirring the sauce on the stove, the aroma of sautéing garlic and onions filled my kitchen—drawing family members in like moths to a flame. This Classic Simple Bolognese Sauce is truly a staple for a reason, embodying the heart of Italian comfort food while being incredibly easy to whip up. With just a handful of pantry staples and some fresh herbs, you can create a meal that’s not only budget-friendly but also perfect for busy weeknights. Whether you’re a seasoned chef or just starting, this recipe promises to delight your loved ones and banish fast food cravings for good. Ready to fill your home with warmth and deliciousness? Let’s dive into elevating your dinner game today!

Why is Bolognese sauce so beloved?

Comforting flavors of Simple Bolognese bring everyone to the table, creating moments to cherish with loved ones. Beginner-friendly, this recipe is straightforward, perfect for those new to cooking. Quick prep means you can whip up a satisfying meal in no time, ideal for busy evenings. Versatile ingredients allow customization, whether you want to add mushrooms for a vegetarian option or extra veggies for nutrition. Serve it with garlic bread and a salad for a complete feast that will keep your family asking for seconds!

Simple Bolognese Ingredients

For the Base

  • Olive Oil – Essential for sautéing; adds flavor and richness while providing a healthy fat source.
  • Onion (1 medium, coarsely chopped) – Provides a savory base; substitute with shallots for a sweeter flavor.
  • Garlic (2 cloves, coarsely chopped) – Enhances the aroma and taste; always go for fresh garlic for the best flavor.
  • Celery (1 stalk, coarsely chopped) – Adds depth and texture to the dish; can be omitted if you prefer a simpler sauce.
  • Carrot (1, coarsely chopped) – Contributes natural sweetness and balance; swap for bell pepper for a different twist.

For the Sauce

  • Ground Chuck Beef (1 lb) – The main protein that enriches the sauce; ground turkey works wonderfully for a leaner meal.
  • Crushed Cherry Tomatoes (2, 14-ounce cans) – Forms the sauce base, boosting acidity and sweetness; fresh tomatoes are a great option when in season.
  • Flat-leaf Italian Parsley (1/4 cup, chopped) – Adds a burst of freshness; replace with cilantro if that’s your preference.
  • Fresh Basil Leaves (8, chopped) – Imparts aromatic notes; dried basil can substitute in smaller amounts if needed.
  • Salt and Pepper – Essential for overall seasoning; always adjust to your taste—sea salt is a lovely choice for enhanced flavor.

For the Finishing Touch

  • Pecorino Romano Cheese (1/4 cup, freshly grated) – Adds creaminess and a salty kick to the dish; you can also use Parmesan if that’s what you have on hand.
  • Pasta (1 lb, such as mezzi rigatoni or pappardelle) – The perfect vehicle for the sauce; feel free to opt for gluten-free pasta to meet dietary needs.

Step‑by‑Step Instructions for Simple Bolognese

Step 1: Heat the Oil
In a large skillet, pour in 1/4 cup of olive oil and warm it over medium heat until it shimmers—this usually takes about 2 minutes. You want the oil hot enough to sauté but not smoking. This step lays the flavorful foundation for your Simple Bolognese sauce.

Step 2: Sauté the Aromatics
Add the coarsely chopped onion and garlic to the skillet, sautéing them for about 8 minutes. Stir occasionally until the onion becomes soft and translucent. This fragrant mixture will fill your kitchen with warmth and start building the layers of flavor for your Bolognese.

Step 3: Add the Vegetables
Next, stir in the chopped celery and carrot, cooking for an additional 5 minutes. Continue to sauté until the vegetables begin to soften, allowing their natural sweetness to blend with the aromatic base. The colors will brighten, signaling it's time to add the next ingredient.

Step 4: Cook the Beef
Increase the heat to high and add 1 pound of ground chuck beef to the skillet, breaking it up with a wooden spoon. Cook for about 10 minutes until the meat is browned and no longer pink. You’ll hear a satisfying sizzle, and the beef should start sticking slightly to the pan, adding depth to your Simple Bolognese sauce.

Step 5: Add Tomatoes and Herbs
Lower the heat back to medium-low and mix in the crushed cherry tomatoes, chopped parsley, and basil. Let the mixture simmer for approximately 30 minutes, stirring occasionally as the sauce thickens. Season with salt and pepper to taste, ensuring a well-rounded flavor emerges as it cooks down.

Step 6: Boil the Pasta
While your Simple Bolognese sauce simmers, bring a large pot of salted water to a rolling boil. Add 1 pound of pasta and cook until just 2 minutes shy of the package instructions—this usually takes about 8-9 minutes. You want the pasta to be al dente, remaining firm for the final toss with the sauce.

Step 7: Combine Pasta and Sauce
Using tongs, carefully transfer the cooked pasta directly to the Bolognese sauce, allowing a little bit of pasta water to join the mixture. Toss everything together for a minute until the pasta is well-coated with the thick, hearty sauce. The final dish should look inviting, glistening with flavor and ready to serve!

What to Serve with Simple Bolognese?

A well-crafted Bolognese sauce deserves the perfect companions to create a delightful meal experience that tantalizes the senses.

  • Garlic Bread: The buttery, garlicky flavors pair beautifully with the rich sauce, adding a delightful crunch that enhances every bite. It's the perfect way to scoop up extra sauce, bringing warmth to your dinner table.

  • Caesar Salad: Crisp romaine lettuce combined with a zesty Caesar dressing complements the hearty Bolognese by adding freshness and a satisfying crunch. Toss some homemade croutons in for an extra layer of flavor and texture.

  • Roasted Vegetables: A colorful medley of roasted zucchini, bell peppers, and asparagus offers a burst of vibrant flavors that balance the sauce's richness. This dish also packs in nutrients, keeping your meal hearty yet healthy.

  • Parmesan Risotto: Creamy and cheesy, risotto brings a luxurious, silky texture that melds wonderfully with the bold Bolognese sauce, enhancing the overall dining experience. You’ll relish every spoonful, savoring each bite.

  • Red Wine: A glass of Chianti or Merlot enhances the dining experience, its tannins cutting through the meatiness of the sauce. The deep notes of the wine perfectly echo the flavors of the Bolognese.

  • Lemon Sorbet: As a refreshing palate cleanser, lemon sorbet clears the richness of the Bolognese, leaving a zesty note that invigorates the taste buds. It's a delightful way to end your meal on a light note.

  • Cheesy Polenta: Creamy, cheesy polenta serves as a wonderful alternative to pasta, providing a comforting base to soak up the savory Bolognese sauce. The smooth texture makes each bite a comforting delight.

Make Ahead Options

These Simple Bolognese preparations are a dream come true for busy weeknights! You can cook the sauce up to 3 days in advance; simply let it cool completely before transferring it to an airtight container. For optimal flavor, refrigerate the sauce and reheat it on the stove before serving. Additionally, you can prepare the chopped vegetables (onion, celery, and carrot) up to 24 hours ahead. Store them in an airtight container in the fridge to lock in freshness. When it’s time to eat, just reheat your Bolognese and cook the pasta freshly in boiling water, ensuring a warm, comforting meal that feels just as delightful any night!

Storage Tips for Simple Bolognese

Fridge: Store your Simple Bolognese sauce in an airtight container; it will keep well for up to 5 days, ready for quick weekday meals.

Freezer: For longer storage, freeze the sauce in a freezer-safe container or freezer bags. It can last up to 3 months; just remember to label and date.

Thawing: To enjoy frozen Bolognese, thaw it overnight in the fridge or use the defrost setting on your microwave for a faster option.

Reheating: Reheat on the stovetop over medium heat, adding a splash of water if the sauce seems too thick. Stir often until heated through for a perfectly warm meal.

Expert Tips for Simple Bolognese

  • Simmer Longer: Let your sauce simmer for at least 30 minutes to deepen the flavors; add a splash of red wine for an extra kick.
  • Break It Up: Ensure to break the meat into small pieces while cooking for a uniform texture in your Simple Bolognese.
  • Adjust Acidity: If the sauce is too acidic, add a pinch of sugar to balance the flavors and enhance the overall taste.
  • Use Fresh Herbs: Fresh parsley and basil can elevate your sauce. Add half toward the beginning and the other half just before serving.
  • Pair Wisely: Serve with garlic bread and a green salad for a complete meal; the contrast of textures will delight your family.

Simple Bolognese Variations & Substitutions

Feel free to get creative with this Simple Bolognese sauce and add your personal touch to make it truly yours!

  • Vegetarian: Replace ground beef with 1 cup of cooked lentils or finely chopped mushrooms for a hearty veggie alternative.

  • Spicy Kick: Stir in a teaspoon of crushed red pepper flakes while sautéing for a pleasantly spicy note that warms the soul.

  • Herbaceous Twist: Experiment with different fresh herbs like thyme or oregano for a unique flavor profile that suits your taste.

  • Creamy Addition: For a luxurious twist, mix in a splash of heavy cream right before serving to create a luscious sauce that coats the pasta beautifully.

  • Zucchini Boost: Add diced zucchini or bell peppers along with your other veggies for extra nutrition and a pop of color.

  • Wine Infusion: A splash of red wine added during the cooking process can deepen the flavors—just let it simmer off for a maximum flavor experience!

  • Cheese Variation: Swap Pecorino Romano cheese for a rich Gruyère for a nutty flavor that elevates this classic dish.

  • Gluten-Free: Use gluten-free pasta varieties or zoodles (zucchini noodles) for a lighter, healthier option perfect for those with dietary restrictions.

No matter which variation you choose, your family will love the warm, inviting flavors of your lovingly crafted Simple Bolognese. And if you’re interested in discovering more delightful recipes to enhance your family meals, check out my guide on quick and easy weeknight dinners or dive into some satisfying vegetarian options that will inspire your kitchen creativity!

Simple Bolognese Recipe FAQs

What ingredients should I use for the best flavor?
For the best flavor in your Simple Bolognese, always opt for fresh ingredients. Use high-quality olive oil for sautéing, and go for fresh garlic rather than powdered. When choosing your ground meat, ground chuck beef gives a rich and hearty flavor but feel free to substitute with ground turkey for a leaner option. Fresh herbs like basil and parsley should be used toward the end for maximum freshness.

How can I store homemade Bolognese sauce?
Store your Simple Bolognese sauce in an airtight container in the fridge for up to 5 days. It’s a great way to have a quick meal ready when you need it! If you’re looking to keep it longer, freeze it in a freezer-safe container or zip-top bags. Ensure to label the bags with the date to keep track, as the sauce will be good for up to 3 months in the freezer.

Can I freeze Simple Bolognese sauce?
Absolutely! Freezing your homemade Simple Bolognese sauce is a fantastic way to save time for future meals. To do this, cool the sauce completely and then transfer it to freezer-safe containers or heavy-duty freezer bags. Remove as much air as possible before sealing. When you're ready to enjoy it, thaw it overnight in the refrigerator or use the defrost setting on your microwave. Heat it on the stovetop until warmed through, stirring occasionally.

What if my Bolognese sauce is too thick or too thin?
If your Simple Bolognese turns out too thick, simply add a splash of pasta water or broth to reach your desired consistency while reheating. Stir often to incorporate it evenly. Conversely, if it’s too thin, allow it to simmer uncovered on the stovetop for a little longer to reduce the liquid. Keep an eye on it to prevent burning, stirring occasionally for an even texture.

Are there any dietary concerns with this recipe?
Yes, consider dietary preferences when preparing your Simple Bolognese! This recipe can be easily adapted: for vegetarian options, replace ground beef with lentils or mushrooms. Additionally, be mindful of dairy allergies—Pecorino Romano can be omitted or substituted with a dairy-free cheese alternative. Always double-check ingredient labels for allergens, especially with sauces like crushed tomatoes or pasta.

Simple Bolognese

Hearty Simple Bolognese: Your Family's New Favorite Dinner

This Simple Bolognese recipe is a perfect blend of comforting flavors and easy preparation, making it a go-to for families.
Print Recipe Pin Recipe
Prep Time 15 minutes mins
Cook Time 1 hour hr
Total Time 1 hour hr 15 minutes mins
Servings: 6 servings
Course: Dinner
Cuisine: Italian
Calories: 500
Ingredients Equipment Method Nutrition Notes

Ingredients
  

Base
  • 1/4 cup Olive Oil Essential for sautéing; adds flavor and richness.
  • 1 medium Onion Coarsely chopped; substitute with shallots for a sweeter flavor.
  • 2 cloves Garlic Coarsely chopped; always use fresh for the best flavor.
  • 1 stalk Celery Coarsely chopped; can be omitted.
  • 1 Carrot Coarsely chopped; contributes natural sweetness.
Sauce
  • 1 lb Ground Chuck Beef Main protein; ground turkey is a leaner option.
  • 2 14-ounce cans Crushed Cherry Tomatoes Forms the sauce base.
  • 1/4 cup Flat-leaf Italian Parsley Chopped; adds freshness.
  • 8 Fresh Basil Leaves Chopped; imparts aromatic notes.
  • Salt Adjust to taste.
  • Pepper Adjust to taste.
Finishing Touch
  • 1/4 cup Pecorino Romano Cheese Freshly grated; adds creaminess.
  • 1 lb Pasta Such as mezzi rigatoni or pappardelle.

Equipment

  • Large skillet
  • pot

Method
 

Step-by-Step Instructions
  1. Heat the Olive Oil: In a large skillet, pour in 1/4 cup of olive oil and warm it over medium heat until it shimmers, about 2 minutes.
  2. Sauté the Aromatics: Add the chopped onion and garlic to the skillet, sautéing for about 8 minutes until softened.
  3. Add the Vegetables: Stir in the chopped celery and carrot, cooking for an additional 5 minutes.
  4. Cook the Beef: Increase the heat to high and add 1 pound of ground chuck beef, breaking it up. Cook for about 10 minutes until browned.
  5. Add Tomatoes and Herbs: Lower the heat to medium-low, mix in the crushed cherry tomatoes, parsley, and basil. Simmer for 30 minutes.
  6. Boil the Pasta: Bring a large pot of salted water to a boil, add 1 pound of pasta, and cook until al dente, about 8-9 minutes.
  7. Combine Pasta and Sauce: Transfer the cooked pasta to the Bolognese sauce, tossing together for a minute.

Nutrition

Serving: 1servingCalories: 500kcalCarbohydrates: 60gProtein: 30gFat: 20gSaturated Fat: 7gPolyunsaturated Fat: 1gMonounsaturated Fat: 10gCholesterol: 80mgSodium: 600mgPotassium: 800mgFiber: 4gSugar: 6gVitamin A: 500IUVitamin C: 10mgCalcium: 100mgIron: 3mg

Notes

For longer simmering, consider adding a splash of red wine for extra flavor.

Tried this recipe?

Let us know how it was!

Creamy Cowboy Butter Chicken Pasta for Cozy Nights

November 21, 2025 by Grace Snow Leave a Comment

Amid the hustle and bustle of daily life, finding time to whip up a satisfying dinner can feel like a mini crisis. That’s where my 30-Minute Cowboy Butter Chicken Pasta comes to the rescue! This creamy, comforting dish brings together tender chicken, aromatic garlic, and a hint of Italian herbs, all wrapped in a luscious sauce — a true delight for pasta lovers. Whether you're looking for a quick weeknight meal or something hearty to impress your loved ones, this recipe checks all the boxes. Plus, it’s versatile enough to cater to various dietary needs, allowing for easy vegan or gluten-free swaps. Can you think of a better way to elevate your family dinner? Let’s dive into the delightful world of Cowboy Butter Chicken Pasta!

Why is Cowboy Butter Chicken Pasta a Must-Try?

Quick Preparation: This dish can be ready in just 30 minutes, making it perfect for those busy weeknights when you crave something homemade without the lengthy cooking time.

Creamy Goodness: The rich, buttery sauce envelops every bite of tender pasta and chicken, creating a comforting meal reminiscent of your favorite Italian dishes.

Versatile Options: Easily adapt this recipe for vegan or gluten-free diets by swapping in plant-based ingredients like veggie pasta or dairy-free butter. It's a crowd-pleaser that everyone can enjoy!

Packed with Flavor: With aromatic garlic and a hint of Italian herbs, this dish delivers a savory punch that tantalizes the taste buds. It's not just a meal; it's a flavor experience.

Perfect Pairings: Serve alongside homemade garlic bread or a fresh salad for a complete, satisfying dinner that truly impresses!

Cowboy Butter Chicken Pasta Ingredients

• Get ready to create a delightful meal!

For the Pasta

  • Pasta – Forms the base of this delicious dish; gluten-free pasta can be substituted to cater to dietary needs.

For the Chicken

  • Chicken breast – Provides hearty protein; consider using plant-based chicken for a vegan-friendly option.

For the Sauce

  • Butter – Infuses richness and flavor; opt for non-dairy butter if you're making it vegan.
  • Garlic – Adds aromatic depth; make sure to mince it for even distribution of flavor.
  • Onion – Introduces sweetness; yellow or white onions work wonderfully.
  • Heavy cream – Creates a creamy sauce; coconut milk works as a great dairy-free alternative.
  • Chicken broth – Enhances the savory elements of the sauce; switch to vegetable broth for a vegetarian offering.
  • Parmesan cheese – Offers a cheesy finishing touch; nutritional yeast can be used for a vegan option.
  • Italian seasoning – Blends various Italian herbs; feel free to use individual herbs if you prefer.
  • Red pepper flakes – Provides a kick of heat; adjust the amount to suit your taste.
  • Salt and pepper – Essential for perfecting the dish’s flavor profile.
  • Fresh parsley – Adds a fresh garnish; it brightens up the presentation and taste!

Step‑by‑Step Instructions for Cowboy Butter Chicken Pasta

Step 1: Cook the Pasta
Bring a large pot of salted water to a rolling boil over high heat. Add your choice of pasta and cook for about 8-10 minutes, stirring occasionally until al dente. Once done, reserve 1 cup of the pasta water for later, then drain the pasta and set it aside in a colander while you prepare the sauce.

Step 2: Sauté the Chicken
In a large skillet, melt 2 tablespoons of butter over medium heat. Add the diced chicken breast, seasoning it generously with salt and pepper. Cook the chicken for about 6-8 minutes, stirring occasionally until it's golden brown and cooked through. Once finished, remove the chicken from the skillet and set it aside on a plate.

Step 3: Sauté Aromatics
In the same skillet, add the remaining 2 tablespoons of butter, allowing it to melt completely. Introduce the minced garlic and diced onion, sautéing the mixture for about 3-4 minutes until the onions become translucent and fragrant. This creates a flavorful base for your Cowboy Butter Chicken Pasta.

Step 4: Prepare the Creamy Sauce
Pour in the heavy cream and chicken broth into the skillet, stirring to combine the ingredients smoothly. Sprinkle in the Italian seasoning and red pepper flakes, bringing the mixture to a gentle simmer. Let the sauce cook for about 5 minutes, stirring occasionally until it slightly thickens and becomes luscious.

Step 5: Combine Chicken and Pasta
Return the cooked chicken and drained pasta to the skillet with the creamy sauce. Gently toss everything together for about 2 minutes, ensuring that the pasta and chicken are well coated in the sauce. If necessary, adjust the seasoning with extra salt and pepper according to your taste.

Step 6: Serve and Garnish
Once everything is well combined and heated through, serve the Cowboy Butter Chicken Pasta warm. Top each serving with a generous sprinkle of grated Parmesan cheese and a garnish of fresh parsley. This makes for a delightful and comforting presentation ready to impress your family or guests!

What to Serve with Cowboy Butter Chicken Pasta

A delightful meal awaits when you pair your comforting pasta dish with the perfect sides and beverages.

  • Garlic Bread: The warm, buttery crunch of garlic bread is the perfect vehicle for savoring every drop of the creamy sauce.
  • Fresh Garden Salad: A crisp salad with vibrant greens and a tangy vinaigrette balances the richness of the pasta and adds refreshing crunch.
  • Steamed Broccoli: Tender, bright green broccoli provides a nutritious contrast, enhancing your dish with a burst of color and flavor without overpowering it.
  • Roasted Vegetables: A medley of seasonal roasted vegetables brings warmth and earthiness, creating a harmonious background for your Cowboy Butter Chicken Pasta.
  • White Wine: A chilled glass of crisp Sauvignon Blanc perfectly highlights the buttery sauce without overwhelming the dish, making it a delightful pairing.
  • Lemon Sorbet: For dessert, a light and refreshing lemon sorbet cleanses the palate after a satisfying meal, leaving your taste buds tingling with delight.

Cowboy Butter Chicken Pasta Variations

Feel free to bring your personal touch to this lovely dish! Explore these delightful twists to enhance flavor and cater to different dietary needs.

  • Dairy-Free: Use coconut milk or cashew cream instead of heavy cream to make it vegan-friendly yet still rich and creamy.
  • Gluten-Free: Substitute regular pasta with gluten-free pasta for those with gluten sensitivities; it will still taste amazing!
  • Vegetable Boost: Toss in spinach, broccoli, or bell peppers for added nutrition and color, making each bite even more delightful.
  • Spicy Version: Increase red pepper flakes or add diced jalapeños for an extra kick; ideal if you love a bit of heat in your meals.
  • Lightened Up: Replace heavy cream with low-fat yogurt for a lighter option without losing creaminess—perfect for those watching their calories.
  • Cheesy Alternative: Instead of Parmesan, try goat cheese or feta crumbles for a tangy twist that complements the pasta beautifully.
  • Herb Variations: Sprinkle fresh basil or oregano on top instead of parsley for a fragrant herb boost—each herb brings its own personality.
  • Protein Swap: Use shredded rotisserie chicken for a quick shortcut or opt for tofu for a delicious plant-based alternative, maintaining the hearty nature of the dish.

For those who enjoy experimenting, check out this Crockpot Butter Chicken and Skillet Pasta with Sun-Dried Tomatoes, Walnuts, and Feta for more ways to tantalize your taste buds!

Expert Tips for Cowboy Butter Chicken Pasta

  • Perfectly Cooked Chicken: Ensure the chicken reaches an internal temperature of 165°F. Use a meat thermometer to avoid undercooking.

  • Creamy Sauce Consistency: If your sauce is too thick, gradually add reserved pasta water until you achieve the desired creaminess for your Cowboy Butter Chicken Pasta.

  • Fresh Ingredients Matter: Use fresh garlic and quality butter for richer flavor. Dried ingredients may dull the taste of your sauce.

  • Customize with Veggies: For added nutrition, consider tossing in vegetables like spinach or bell peppers during the sautéing step.

  • Adjust Heat Levels: Feel free to modify the amount of red pepper flakes based on your spice preference. More flakes equal more heat!

  • Plan for Leftovers: Store any leftovers in an airtight container, and reheat gently on the stove with a splash of chicken broth to revive your creamy sauce.

Storage Tips for Cowboy Butter Chicken Pasta

  • Fridge: Store leftovers in an airtight container for up to 3 days. This helps maintain the creamy texture and flavor of your Cowboy Butter Chicken Pasta.

  • Freezer: For longer storage, freeze portions in airtight containers for up to 2 months. Allow the pasta to cool completely before freezing to preserve quality.

  • Reheating: When you're ready to enjoy, reheat on the stove over low heat, adding a splash of chicken broth to restore creaminess. Stir gently to evenly heat.

  • Room Temperature: Avoid leaving the Cowboy Butter Chicken Pasta at room temperature for more than 2 hours to ensure food safety. Always refrigerate promptly after serving.

Make Ahead Options

These Cowboy Butter Chicken Pasta is a fantastic choice for meal prep enthusiasts! You can cook the pasta and chicken separately up to 3 days in advance, storing each in airtight containers in the refrigerator. The creamy sauce can also be prepared in advance; simply refrigerate it in a sealed jar for up to 2 days. To maintain quality, add a splash of reserved pasta water when reheating the sauce, ensuring it remains creamy. When you're ready to enjoy this comforting dish, simply heat the sauce in a skillet, add the cooked chicken and pasta, and toss everything together until warmed through. You'll have a delicious and satisfying meal with minimal effort!

Cowboy Butter Chicken Pasta Recipe FAQs

How do I choose ripe chicken for my Cowboy Butter Chicken Pasta?
When selecting chicken breast for a recipe like this, look for pieces that are pink in color with no dark spots. Fresh chicken should feel firm to the touch and have a fresh, mild smell. If you notice any unusual odor or if the meat appears slimy, it’s best to avoid it.

What’s the best way to store leftover Cowboy Butter Chicken Pasta?
After enjoying your Cowboy Butter Chicken Pasta, transfer any leftovers to an airtight container. It will remain fresh in the refrigerator for up to 3 days. Be sure to let it cool to room temperature before sealing it to prevent condensation, which can make the pasta soggy.

Can I freeze Cowboy Butter Chicken Pasta?
Absolutely! To freeze, allow the pasta to cool completely. Then, portion it into airtight freezer-safe containers. You can keep it in the freezer for up to 2 months. When you’re ready to enjoy it, simply thaw in the fridge overnight, then gently reheat on the stove with a splash of broth for a creamy texture.

What do I do if the sauce for my Cowboy Butter Chicken Pasta is too thick?
If your sauce becomes too thick while cooking, don't worry! Just add the reserved pasta water gradually until you reach your desired consistency. Start with a few tablespoons and mix well; the starch in the pasta water will help maintain that creamy texture while loosening up the sauce.

Are there any dietary considerations for Cowboy Butter Chicken Pasta?
Definitely! If you need to accommodate dietary restrictions, this recipe can be easily made vegan by using plant-based chicken, non-dairy butter, coconut milk, and nutritional yeast instead of Parmesan. Always check for allergies, particularly with the chicken broth and cheese options.

How long can I leave Cowboy Butter Chicken Pasta at room temperature?
It's important not to leave Cowboy Butter Chicken Pasta out at room temperature for more than 2 hours. To ensure food safety, refrigerate any leftovers promptly after serving. This helps prevent bacterial growth and keeps your meal safe for later enjoyment.

Cowboy Butter Chicken Pasta

Creamy Cowboy Butter Chicken Pasta for Cozy Nights

Enjoy the delightful Cowboy Butter Chicken Pasta, a creamy and comforting dish perfect for busy weeknights or impressing loved ones.
Print Recipe Pin Recipe
Prep Time 10 minutes mins
Cook Time 20 minutes mins
Total Time 30 minutes mins
Servings: 4 servings
Course: Dinner
Cuisine: Italian
Calories: 450
Ingredients Equipment Method Nutrition Notes

Ingredients
  

For the Pasta
  • 8 ounces pasta gluten-free pasta can be substituted
For the Chicken
  • 1 pound chicken breast plant-based chicken can be used for a vegan option
For the Sauce
  • 4 tablespoons butter use non-dairy butter for a vegan option
  • 3 cloves garlic minced
  • 1 medium onion yellow or white
  • 1 cup heavy cream coconut milk works as a great dairy-free alternative
  • 1 cup chicken broth vegetable broth for vegetarian offering
  • 1/2 cup Parmesan cheese nutritional yeast can be used for a vegan option
  • 2 teaspoons Italian seasoning
  • 1/4 teaspoon red pepper flakes adjust to taste
  • 1 teaspoon salt
  • 1/2 teaspoon pepper
  • 2 tablespoons fresh parsley for garnish

Equipment

  • Large pot
  • Large skillet
  • Colander

Method
 

Step-by-Step Instructions
  1. Bring a large pot of salted water to a rolling boil over high heat. Add your choice of pasta and cook for about 8-10 minutes, stirring occasionally until al dente. Once done, reserve 1 cup of the pasta water for later, then drain the pasta and set it aside in a colander while you prepare the sauce.
  2. In a large skillet, melt 2 tablespoons of butter over medium heat. Add the diced chicken breast, seasoning it generously with salt and pepper. Cook the chicken for about 6-8 minutes, stirring occasionally until it's golden brown and cooked through. Once finished, remove the chicken from the skillet and set it aside on a plate.
  3. In the same skillet, add the remaining 2 tablespoons of butter, allowing it to melt completely. Introduce the minced garlic and diced onion, sautéing the mixture for about 3-4 minutes until the onions become translucent and fragrant.
  4. Pour in the heavy cream and chicken broth into the skillet, stirring to combine the ingredients smoothly. Sprinkle in the Italian seasoning and red pepper flakes, bringing the mixture to a gentle simmer. Let the sauce cook for about 5 minutes, stirring occasionally until it slightly thickens.
  5. Return the cooked chicken and drained pasta to the skillet with the creamy sauce. Gently toss everything together for about 2 minutes, ensuring that the pasta and chicken are well coated in the sauce.
  6. Once everything is well combined and heated through, serve the Cowboy Butter Chicken Pasta warm, topped with a generous sprinkle of grated Parmesan cheese and a garnish of fresh parsley.

Nutrition

Serving: 1servingCalories: 450kcalCarbohydrates: 55gProtein: 30gFat: 15gSaturated Fat: 8gPolyunsaturated Fat: 2gMonounsaturated Fat: 3gCholesterol: 70mgSodium: 800mgPotassium: 600mgFiber: 3gSugar: 2gVitamin A: 500IUVitamin C: 2mgCalcium: 200mgIron: 2mg

Notes

Store leftovers in an airtight container for up to 3 days. Reheat gently on the stove, adding a splash of chicken broth to revive the creamy sauce.

Tried this recipe?

Let us know how it was!

One-Pot Taco Spaghetti: Easy Comfort Food for Busy Nights

November 21, 2025 by Grace Snow Leave a Comment

As I stirred the bubbling pot on the stove, the tantalizing aroma of spices enveloped my kitchen—it felt like a warm hug on a busy weeknight. This One-Pot Taco Spaghetti seamlessly blends the robust flavors of tacos with the comforting embrace of spaghetti, creating a dish that is not only quick to prepare but also a dream when it comes to cleanup. With just one pot needed, you’ll save time doing dishes, making it a go-to meal for those nights when you crave something delicious yet easy. Join me in whipping up this savory, satisfying dinner that’s bound to be a hit with family and friends alike. Are you ready to dive into this flavor-packed fusion?

Why is One-Pot Taco Spaghetti a Must-Try?

Simplicity at its Core: This dish is incredibly easy to whip up! With just one pot needed, cleanup becomes a breeze, allowing you to focus more on enjoying your meal.

Versatile Flavor Fusion: The combination of savory taco spices and cheesy spaghetti creates a flavor explosion that will impress even the pickiest of eaters. You can easily swap out proteins with options like turkey or make it vegetarian with black beans for added texture.

Quick and Satisfying: Ready in under 30 minutes, this recipe is a fantastic solution for busy weeknights. No need to order takeout; a hearty and delicious dinner awaits you at home!

Crowd-Pleasing Delight: Everyone loves tacos and pasta, so this dish brings together two favorites that family and friends will rave about. Try serving it with a side of tortilla chips for an extra crunch, and you’ll have a complete meal that’s sure to please!

Explore more exciting options like Taco Bell Crunchwrap or Fish Taco Bowls to keep your weeknight dinners varied and fun!

One-Pot Taco Spaghetti Ingredients

For the Main Dish

  • Ground Beef – The main protein source; feel free to substitute turkey or plant-based alternatives for a lighter dinner.
  • Garlic – Adds aromatic flavor; fresh garlic is recommended, but garlic powder works in a pinch.
  • Onion – Boosts the overall flavor; yellow or white onions are perfect, while green onions offer a milder alternative.
  • Taco Seasoning – Provides the dish's signature flavor; consider using homemade seasoning for a healthier option.
  • Diced Tomatoes – Adds moisture and fresh tomato flavor; fire-roasted varieties will bring a smoky twist to the dish.
  • Water – Essential for cooking the spaghetti; substitute with chicken or vegetable broth for an enhanced flavor.
  • Spaghetti – The heart of the meal; gluten-free pasta can be used for a gluten-free version.
  • Cheddar Cheese – Provides creaminess and richness; Monterey Jack or dairy-free cheese are great substitutes.
  • Fresh Parsley – For garnish and a touch of freshness; cilantro can be used for a different flavor profile.

Step‑by‑Step Instructions for One-Pot Taco Spaghetti

Step 1: Sauté Aromatics
In a large skillet, heat a drizzle of olive oil over medium heat. Once shimmering, add minced garlic and chopped onion, cooking for 2-3 minutes until the onions are translucent and fragrant. This aromatic base not only flavors your One-Pot Taco Spaghetti but sets the stage for the delicious spices to come.

Step 2: Brown the Beef
Add the ground beef to the skillet, breaking it apart with a spatula. Cook for about 5-7 minutes, stirring occasionally, until fully browned and no longer pink. Make sure to drain any excess fat, as this will keep the dish lighter and let the taco flavors shine through in your final One-Pot Taco Spaghetti.

Step 3: Combine Ingredients
Stir in the taco seasoning, diced tomatoes, and about a cup of water, mixing everything well. Allow the flavors to marry and bubble together for about a minute. This step enriches the dish with the signature taco spices and creates a savory sauce that coats the spaghetti perfectly.

Step 4: Add the Spaghetti
Break the spaghetti in half and gently add it to the skillet, ensuring it's submerged in the liquid. Turn the heat up to high and bring the mixture to a rolling boil. The bubbling sound is a cue that your One-Pot Taco Spaghetti is on its way to becoming a mouthwatering meal!

Step 5: Simmer
Once boiling, reduce the heat to low, cover the skillet with a lid, and let it simmer for 12-15 minutes. Stir occasionally, keeping an eye on the pasta to ensure it cooks evenly and absorbs all those delicious flavors, forming a rich, thick sauce.

Step 6: Liquid Reduction
After simmering, remove the lid and continue cooking for an additional 2-3 minutes. This step allows excess liquid to evaporate, achieving that creamy consistency in your One-Pot Taco Spaghetti that everyone loves. Stir gently to prevent sticking if needed.

Step 7: Add Cheese
Turn off the heat and sprinkle a generous layer of shredded cheddar cheese over the top. Cover the skillet again for about 2 minutes, letting the residual heat melt the cheese perfectly into the dish. This cheesy finish makes every bite of your One-Pot Taco Spaghetti indulgent and comforting.

Step 8: Garnish and Serve
Finally, uncover the skillet and garnish the dish with freshly chopped parsley for a burst of color and flavor. Serve immediately, sharing this delightful One-Pot Taco Spaghetti with family and friends for a meal that’s bound to impress!

Make Ahead Options

These One-Pot Taco Spaghetti are perfect for meal prep enthusiasts looking to save time on busy weeknights! You can brown the ground beef and sauté the garlic and onion up to 24 hours in advance, storing them in an airtight container in the refrigerator to maintain freshness. The diced tomatoes and taco seasoning can also be mixed together and kept aside. When ready to complete the dish, simply reheat the meat mixture in a skillet, add the remaining ingredients (water and spaghetti), and follow the same simmering steps for a family-friendly meal that tastes just as delicious as if made fresh! With these prep-ahead components, you’ll whip up dinner in no time!

Expert Tips for One-Pot Taco Spaghetti

Stir Consistently: Stirring occasionally while cooking helps to prevent the spaghetti from sticking together, ensuring a pleasant texture in your One-Pot Taco Spaghetti.

Submerge Fully: Make sure the spaghetti is fully submerged in the liquid to guarantee even cooking and prevent any hard pasta parts.

Customize Spice: Feel free to adjust the amount of taco seasoning depending on how spicy you want your dish. Don’t be shy to experiment!

Use Broth for Flavor: Instead of water, using chicken or vegetable broth enhances the flavor of the pasta, giving your One-Pot Taco Spaghetti an extra depth.

Watch Liquid Levels: Keep an eye on the sauce during the simmering process; if it gets too thick, add a splash of water to maintain the desired consistency.

Serve Hot: Enjoy your One-Pot Taco Spaghetti fresh off the stove for the best taste and texture; it’s the kind of meal that tastes even better when shared warm!

What to Serve with One-Pot Taco Spaghetti?

A delightful meal deserves delightful companions to create a memorable dining experience. Let’s explore some tasty pairings that enhance the flavors of your One-Pot Taco Spaghetti.

  • Crunchy Tortilla Chips:
    These chips add a satisfying crunch that contrasts perfectly with the creamy texture of the spaghetti, turning each bite into a fiesta.

  • Fresh Garden Salad:
    A simple salad with romaine lettuce, cherry tomatoes, and a light vinaigrette brings freshness and a vibrant color to your meal. The crispness complements the hearty pasta beautifully.

  • Spicy Guacamole:
    Creamy guacamole provides a rich, tangy flavor that enhances the taco notes in the spaghetti. Its smooth texture makes for an irresistible dip and a perfect match.

  • Mexican Street Corn (Elote):
    Grilled corn with lime, cheese, and spices adds a sweet and savory twist to the meal, echoing the taco flavors while introducing a different texture.

  • Creamy Cilantro Lime Rice:
    A side of cilantro lime rice brings a refreshing zest to your plate, giving a wonderful contrast to the bold tastes of the spaghetti without overpowering them.

  • Margaritas or Sparkling Water with Lime:
    Refreshing drinks like a zesty margarita or bubbly sparkling water with lime balance the meal's richness and add a festive touch.

Elevate your dining experience with these complementary sides, making your One-Pot Taco Spaghetti dinner an occasion to remember!

One-Pot Taco Spaghetti Variations

Feel free to make this One-Pot Taco Spaghetti your own and let your creativity shine in the kitchen!

  • Turkey Swap: Substitute ground beef with ground turkey for a leaner meal that still delivers on flavor. This twist keeps it hearty without sacrificing taste.

  • Veggie Power: Add black beans or corn to amp up the nutrition and texture. You'll enjoy a delightful pop of flavor and added fiber in every bite!

  • Cheese Variations: Use pepper jack cheese for a zesty kick, or opt for dairy-free cheese to cater to dietary preferences. Each cheese brings its own unique character to the dish.

  • Broth Boost: Replace water with chicken or vegetable broth to enhance the overall flavor profile. This swap adds richness, making every spoonful even more comforting.

  • Pasta Alternatives: Try using gluten-free pasta for a gluten-free option, or even zoodles for a low-carb twist! The dish stays delicious while accommodating various diets.

  • Spicy Kick: Add jalapeños or crushed red pepper for a heat upgrade. For those who love a fiery taste, this variation will awaken the senses!

  • Saucy Additions: Stir in some salsa or green enchilada sauce for a flavor-packed surprise. This change will create lovely depth in your One-Pot Taco Spaghetti.

  • Serving Suggestions: Elevate your meal by serving it with a side of tortilla chips or a fresh garden salad. This enhances both the crunch and nutritional aspects of your dinner.

For more delightful taco twists, don’t miss trying out these options: Taco Spaghetti Cheesy and Shrimp Tacos Zesty. Enjoy the journey of flavors!

How to Store and Freeze One-Pot Taco Spaghetti

Fridge: Store leftovers in an airtight container for up to 3 days. Ensure it's completely cool before sealing to prevent condensation.

Freezer: For longer storage, freeze your One-Pot Taco Spaghetti in a freezer-safe container for up to 3 months. Portion it into individual servings for easy reheating later.

Reheating: When ready to enjoy, reheat on the stovetop over low heat with a splash of water to avoid drying out. Stir occasionally until heated through, then serve!

Reserving Toppings: If possible, store fresh garnishes like parsley separately to keep their freshness intact until serving.

One-Pot Taco Spaghetti Recipe FAQs

What type of meat is best for One-Pot Taco Spaghetti?
I typically use ground beef for this dish, as it offers great flavor and texture. However, you can absolutely substitute it with ground turkey or even plant-based alternatives for a lighter or vegetarian version. Both options work wonderfully!

How can I store leftover One-Pot Taco Spaghetti?
Leftovers should be placed in an airtight container and stored in the refrigerator for up to 3 days. Make sure the spaghetti has cooled completely before sealing to maintain its texture. Reheat it gently on the stovetop with a splash of water to keep it from drying out.

Can I freeze One-Pot Taco Spaghetti?
Definitely! To freeze, portion the spaghetti into freezer-safe containers and store it for up to 3 months. When you're ready to enjoy it, thaw it in the fridge overnight and reheat on low heat on the stovetop, adding a bit of water to keep it moist.

What if my spaghetti is sticking together during cooking?
If you find that the spaghetti is sticking, stir it more frequently while it's simmering. This will help separate the strands and prevent clumping. Also, ensure the spaghetti is fully submerged in the liquid for even cooking; if necessary, add a little more water or broth.

Are there any dietary considerations I should keep in mind?
Absolutely! This dish can be tailored for various dietary needs. For gluten-free diets, feel free to substitute regular spaghetti with gluten-free pasta. Additionally, if you have dairy allergies, consider using a dairy-free cheese alternative for a similar creamy finish.

How do I know if my taco seasoning is still good?
Check your taco seasoning by smelling and tasting a small amount. If it has lost its aromatic scent or tastes bland, it's time to replace it. For the best flavor, I recommend making your own seasoning using spices like chili powder, cumin, and garlic powder; it's fresher and healthier!

One-Pot Taco Spaghetti

One-Pot Taco Spaghetti: Easy Comfort Food for Busy Nights

One-Pot Taco Spaghetti is a quick and delicious dish that combines savory taco flavors with comforting spaghetti, perfect for busy nights.
Print Recipe Pin Recipe
Prep Time 10 minutes mins
Cook Time 20 minutes mins
Total Time 30 minutes mins
Servings: 4 servings
Course: Dinner
Cuisine: Italian, Mexican
Calories: 450
Ingredients Equipment Method Nutrition Notes

Ingredients
  

For the Main Dish
  • 1 lb Ground Beef or turkey for a lighter option
  • 3 cloves Garlic minced
  • 1 medium Onion chopped
  • 2 tbsp Taco Seasoning or to taste
  • 14.5 oz Diced Tomatoes fire-roasted recommended
  • 2 cups Water or broth for flavor
  • 8 oz Spaghetti broken in half
  • 1 cup Cheddar Cheese shredded
  • 2 tbsp Fresh Parsley chopped, for garnish

Equipment

  • Large skillet

Method
 

Step-by-Step Instructions
  1. Sauté garlic and onion in olive oil for 2-3 minutes until onions are translucent.
  2. Add ground beef to the skillet; cook for about 5-7 minutes until browned, draining excess fat.
  3. Stir in taco seasoning, diced tomatoes, and water; simmer for a minute.
  4. Add spaghetti to the skillet, bring to a boil.
  5. Reduce heat, cover, and simmer for 12-15 minutes.
  6. Remove lid and cook for another 2-3 minutes to reduce liquid.
  7. Sprinkle cheddar cheese on top, cover for 2 minutes to melt.
  8. Garnish with parsley and serve.

Nutrition

Serving: 1servingCalories: 450kcalCarbohydrates: 50gProtein: 25gFat: 15gSaturated Fat: 7gPolyunsaturated Fat: 1gMonounsaturated Fat: 5gCholesterol: 70mgSodium: 800mgPotassium: 600mgFiber: 5gSugar: 4gVitamin A: 500IUVitamin C: 10mgCalcium: 250mgIron: 3mg

Notes

For a vegetarian option, substitute ground beef with black beans. Serve with tortilla chips for a crunch.

Tried this recipe?

Let us know how it was!
  • « Previous Page
  • 1
  • …
  • 19
  • 20
  • 21
  • 22
  • 23
  • …
  • 43
  • Next Page »

Welcome!

Hi, I’m Grace, a Sydney-based home cook with a passion for bold flavors and trending ingredients. Whether you’re a busy beginner or a seasoned foodie, you’ll find dishes here that are fresh, fun, and full of flavor.

More about me

Popular Recipes

  • Brookies Cookies
    Brookies Cookies: The Ultimate Fudgy-Sweet Delight
  • Peanut Butter Pretzel Cookies
    Peanut Butter Pretzel Cookies: Sweet & Salty Magic!
  • Traditional Greek Honey Cookies
    Delicious Traditional Greek Honey Cookies to Sweeten Your Holidays
  • Lemon Curd Cookies
    Lemon Curd Cookies That Burst with Citrus Love

Footer

↑ back to top

About

  • Privacy Policy
  • Disclaimer
  • Terms & Conditions

Newsletter

  • Sign Up! for emails and updates

Contact

  • About me
  • Contact me

Copyright © 2025 TastyTrendIngredients