tastytrendingredients

  • Home
  • Recipes
    • Appetizers
    • Breakfast
    • Dessert
    • Dinner
    • Drinks
    • Salads
    • Snacks
    • Soups
  • About me
  • Contact
menu icon
go to homepage
  • Home
  • Recipes
    • Appetizers
    • Breakfast
    • Dessert
    • Dinner
    • Drinks
    • Salads
    • Snacks
    • Soups
  • About me
  • Contact
search icon
Homepage link
  • Home
  • Recipes
    • Appetizers
    • Breakfast
    • Dessert
    • Dinner
    • Drinks
    • Salads
    • Snacks
    • Soups
  • About me
  • Contact
×

Creamy Keto Pollo Con Queso for Effortless Dinner Bliss

May 27, 2026 by Grace Snow Leave a Comment

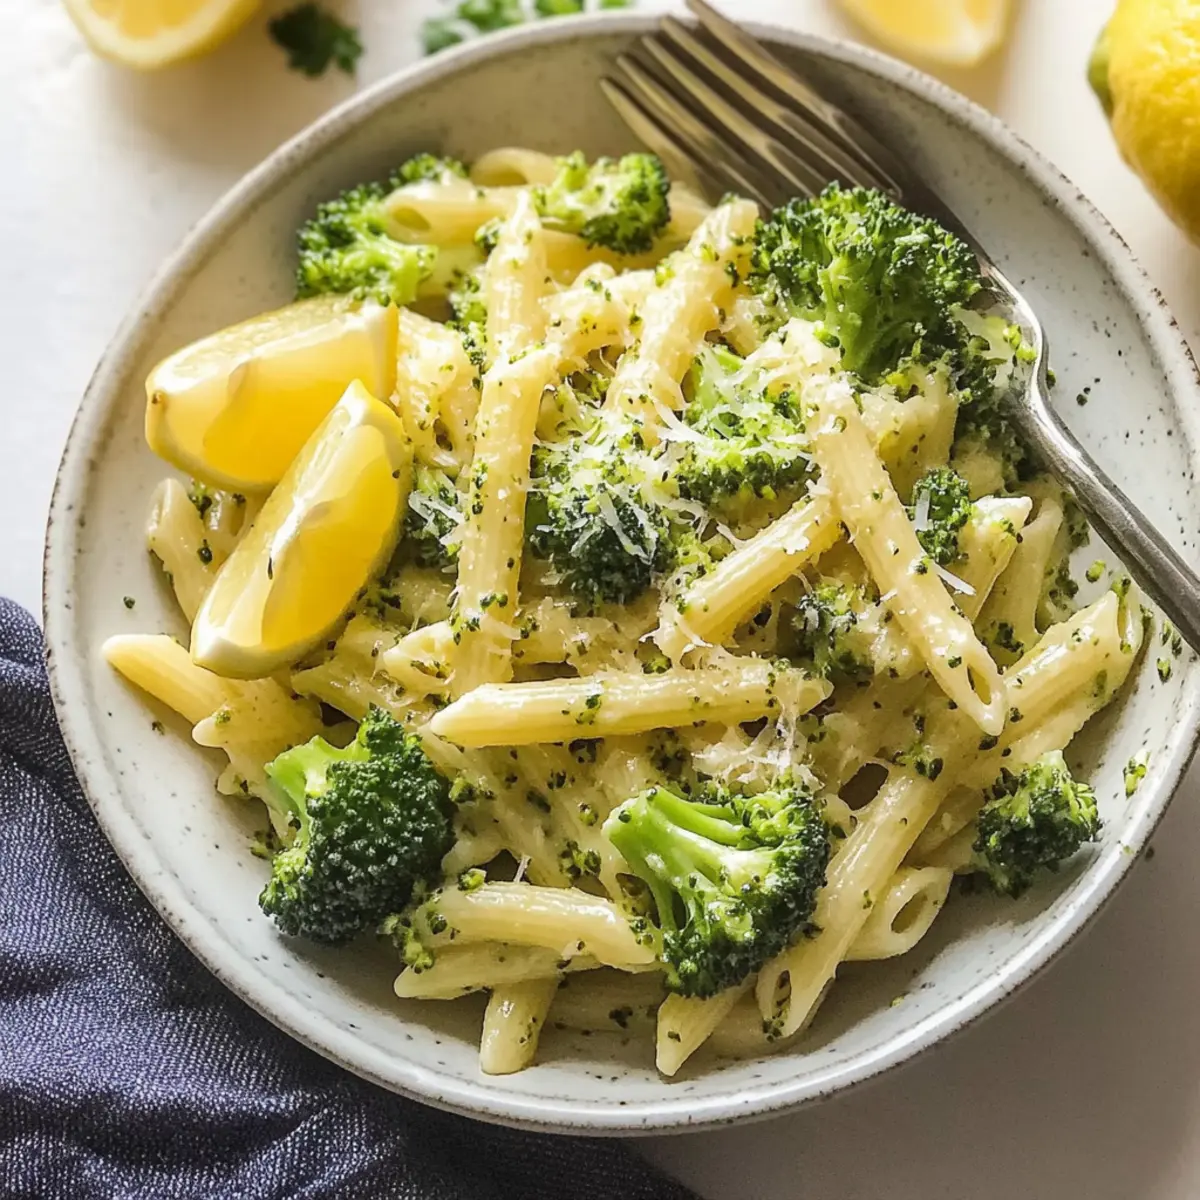
In every bustling kitchen, there comes a moment of culinary triumph, and for me, it was the day I discovered Keto Pollo Con Queso. This delightful dish transforms simple chicken into a velvety masterpiece bathed in a creamy, cheesy sauce that warms the heart and satisfies the cravings. Ready in just 30 minutes, this one-pan meal is a lifesaver for hectic weeknights, blending bold Tex-Mex flavors into a nourishing, low-carb option that the whole family will adore—even the picky eaters! Not only does it deliver on taste, but it also promises minimal cleanup, making dinner feel like a victory lap. Are you ready to elevate your weeknight meals with this easy dinner that brings flavors straight from the heart of a restaurant? Let’s dive in!

Why is Keto Pollo Con Queso Perfect?

Simplicity, this dish comes together in just 30 minutes, making it an ideal solution for busy evenings. Creamy, cheesy goodness envelops the chicken, turning a humble ingredient into a flavor-packed meal that's sure to impress. Versatile and adaptable, you can substitute proteins like shrimp for a fresh twist, or serve with veggies for added nutrition. Crowd-pleasing flavors ensure that even the pickiest eaters will come back for seconds! Whether you're looking for an easy weeknight dinner or a dish that feels indulgent, this Keto Pollo Con Queso is your go-to recipe. Pair it with Coconutty Beans Greens for a wholesome feast or enjoy it on its own for a comforting treat!

Keto Pollo Con Queso Ingredients

For the Chicken

  • 1.5 lbs boneless, skinless chicken breasts – This is the main protein that creates a tender base; feel free to swap with thighs for extra moisture.
  • 2 tablespoons olive oil – Ideal for searing the chicken, adding healthy fats; any cooking oil can suffice in a pinch.

For the Spice Blend

  • 1 teaspoon chili powder – Offers warmth and depth; adjust according to your heat preference.
  • 1 teaspoon ground cumin – Adds earthy notes to the dish; you can omit if you don’t have it.
  • 1 teaspoon garlic powder – Enhances savoriness; fresh garlic (1 clove) works as a delightful substitute.
  • 1 teaspoon onion powder – Gives a subtle sweetness; consider using 1/4 cup chopped onions instead.
  • 1 teaspoon smoked paprika – Infuses a hint of smokiness; regular paprika can be a great alternative, too.
  • 0.5 teaspoon sea salt – Balances all flavors; adjust to suit your taste.
  • 0.5 teaspoon black pepper – Adds a bit of bite; feel free to modify based on personal preference.

For the Sauce

  • 4 ounces full-fat cream cheese – Creates that irresistible creamy sauce; low-fat options can be used for a lighter take.
  • 0.5 cup heavy whipping cream – Enhances richness; substitute with half-and-half if necessary.
  • 2 cups shredded Pepper Jack cheese – Delivers a creamy texture with a spicy kick; Monterey Jack is a gentler choice if desired.
  • 4 ounces canned diced green chiles – Adds a mild heat and vibrant flavor; omit if you prefer a milder dish.

For Garnish

  • 2 tablespoons fresh cilantro – Offers a pop of freshness; feel free to replace with parsley if you prefer.

Step‑by‑Step Instructions for Keto Pollo Con Queso

Step 1: Prepare the Spice Rub
In a small bowl, whisk together chili powder, ground cumin, garlic powder, onion powder, smoked paprika, sea salt, and black pepper. This aromatic blend will infuse your Keto Pollo Con Queso with delightful flavors. Make sure everything is combined evenly, and set this spice rub aside for the next step.

Step 2: Season the Chicken
Cut the boneless, skinless chicken breasts into cubes and toss them in the prepared spice rub until they are completely coated. This marination step is essential for flavor absorption. Allow the chicken to sit for a few minutes to let the spices work their magic while you heat the skillet.

Step 3: Sear the Chicken
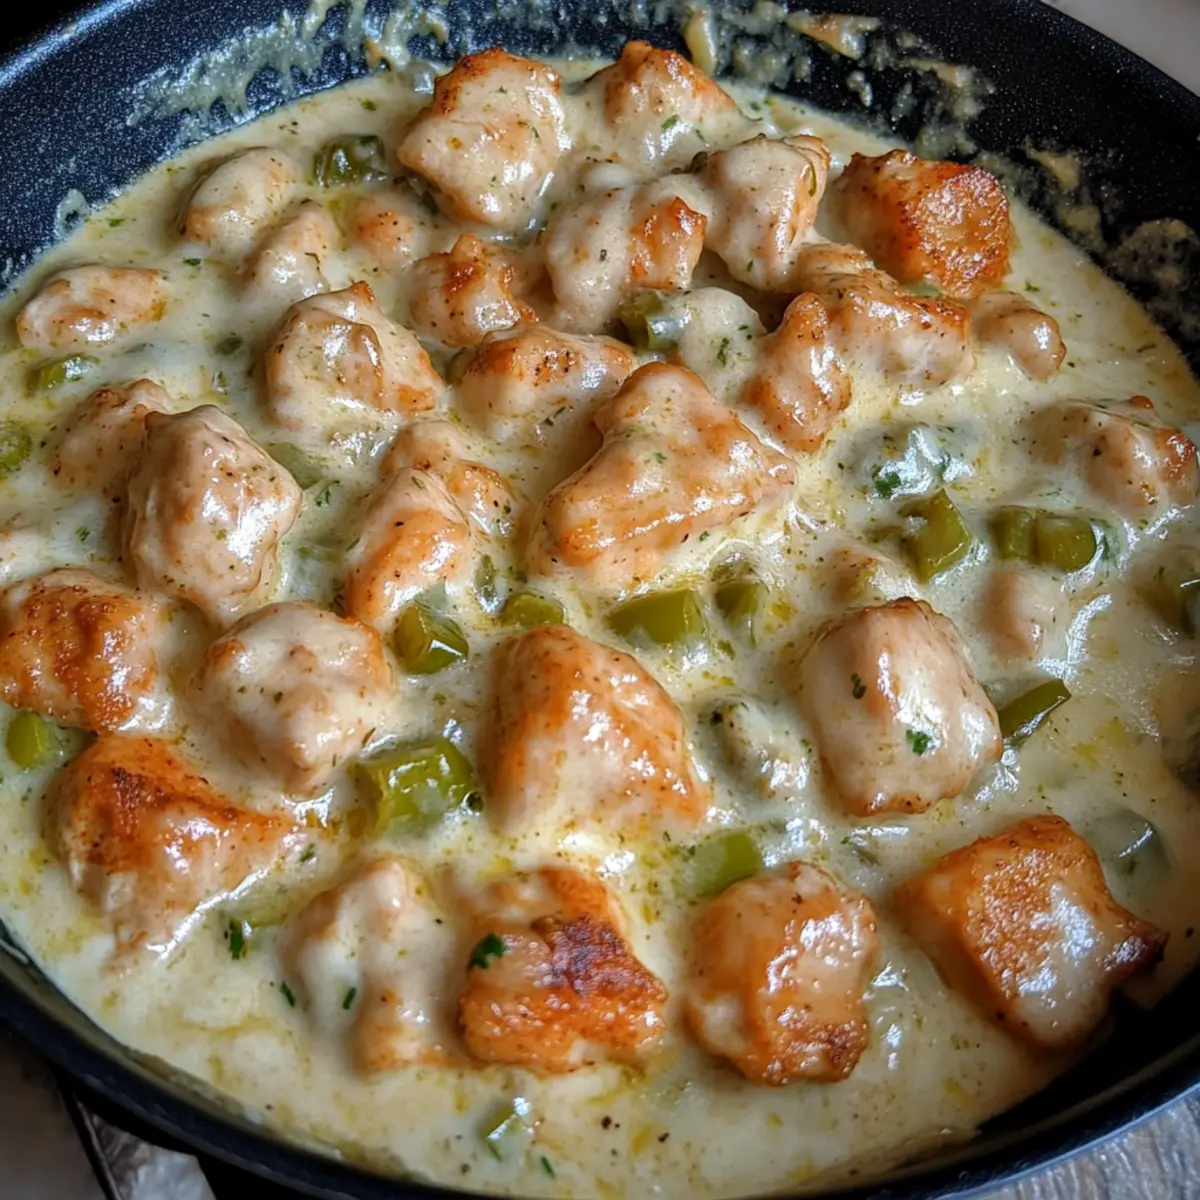
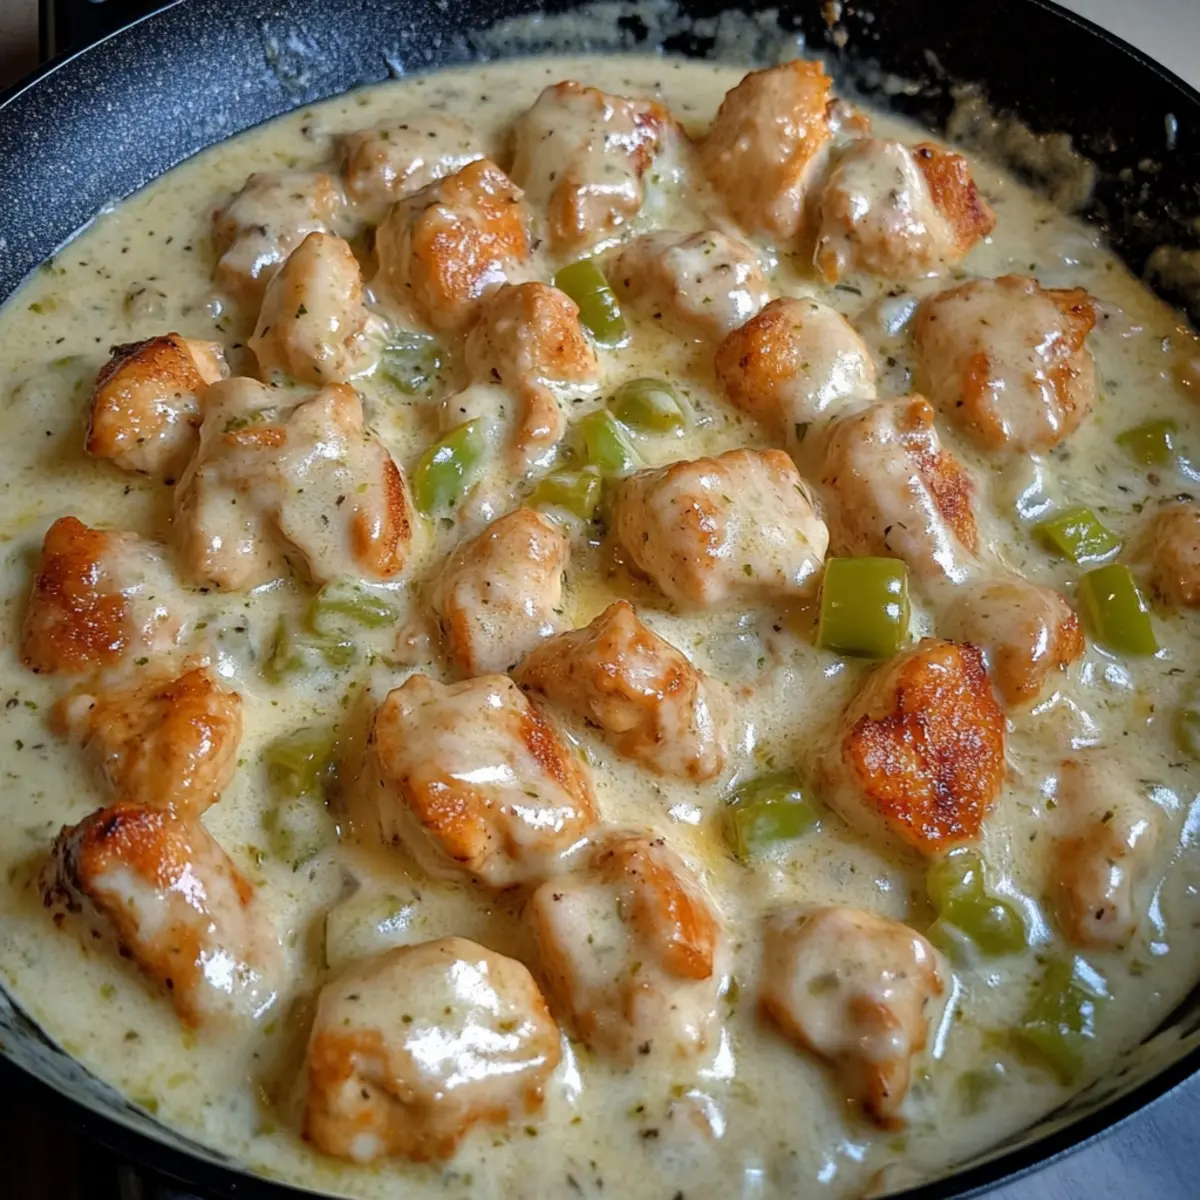
Heat 2 tablespoons of olive oil in a large skillet over medium-high heat. Once the oil shimmers, add the seasoned chicken cubes. Sear them for about 6-8 minutes, stirring occasionally, until they are golden brown and reach an internal temperature of 165°F (74°C). Remove the chicken from the skillet and set it aside on a warm plate.

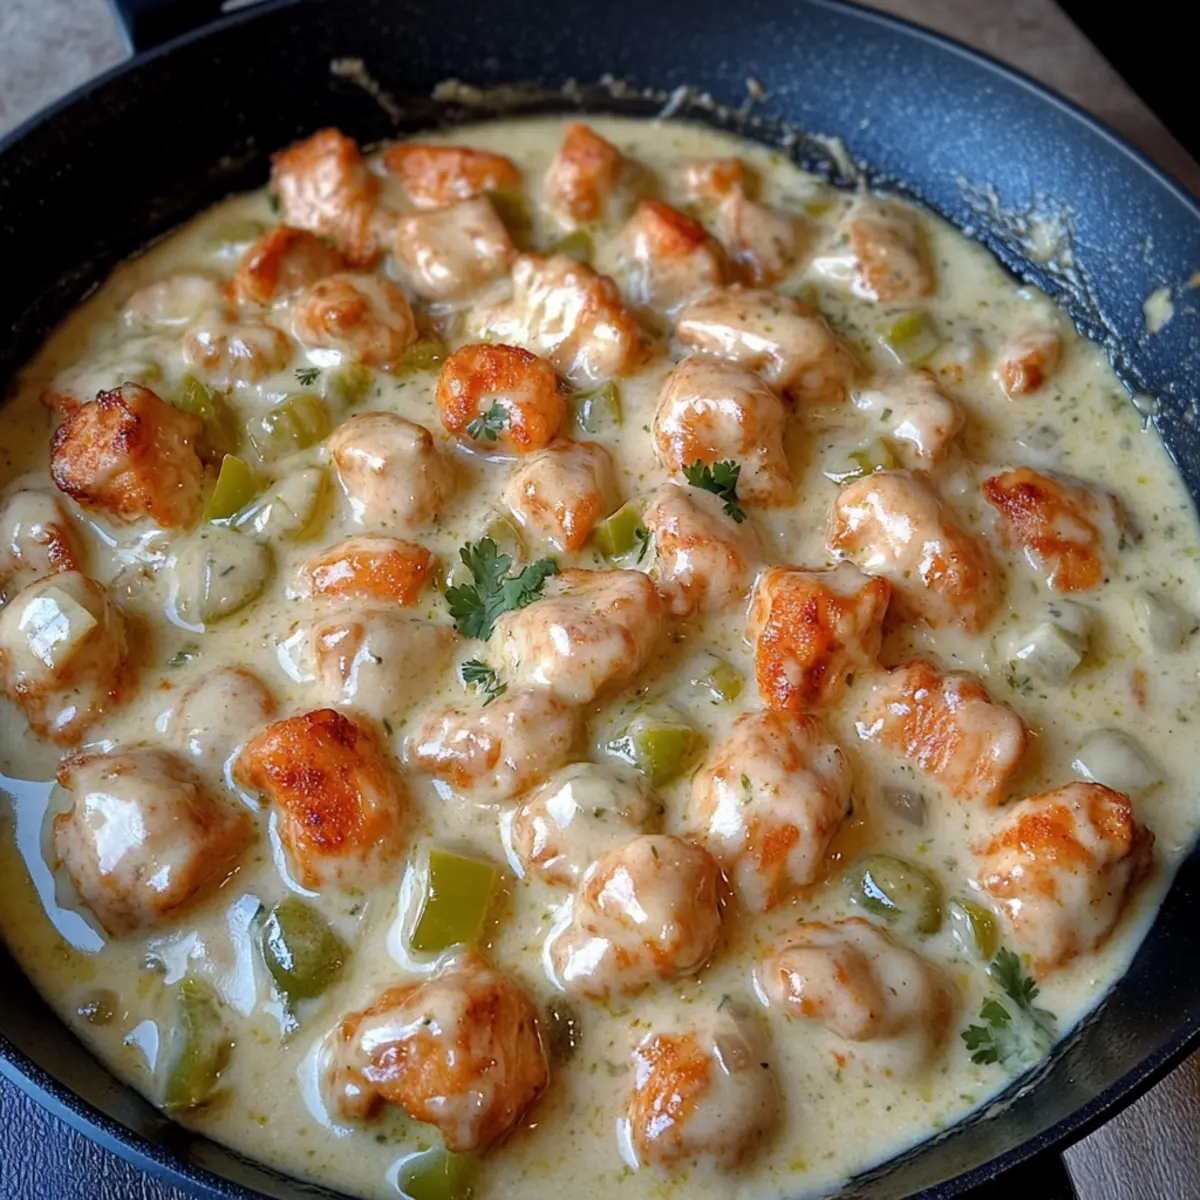
Step 4: Create the Creamy Sauce
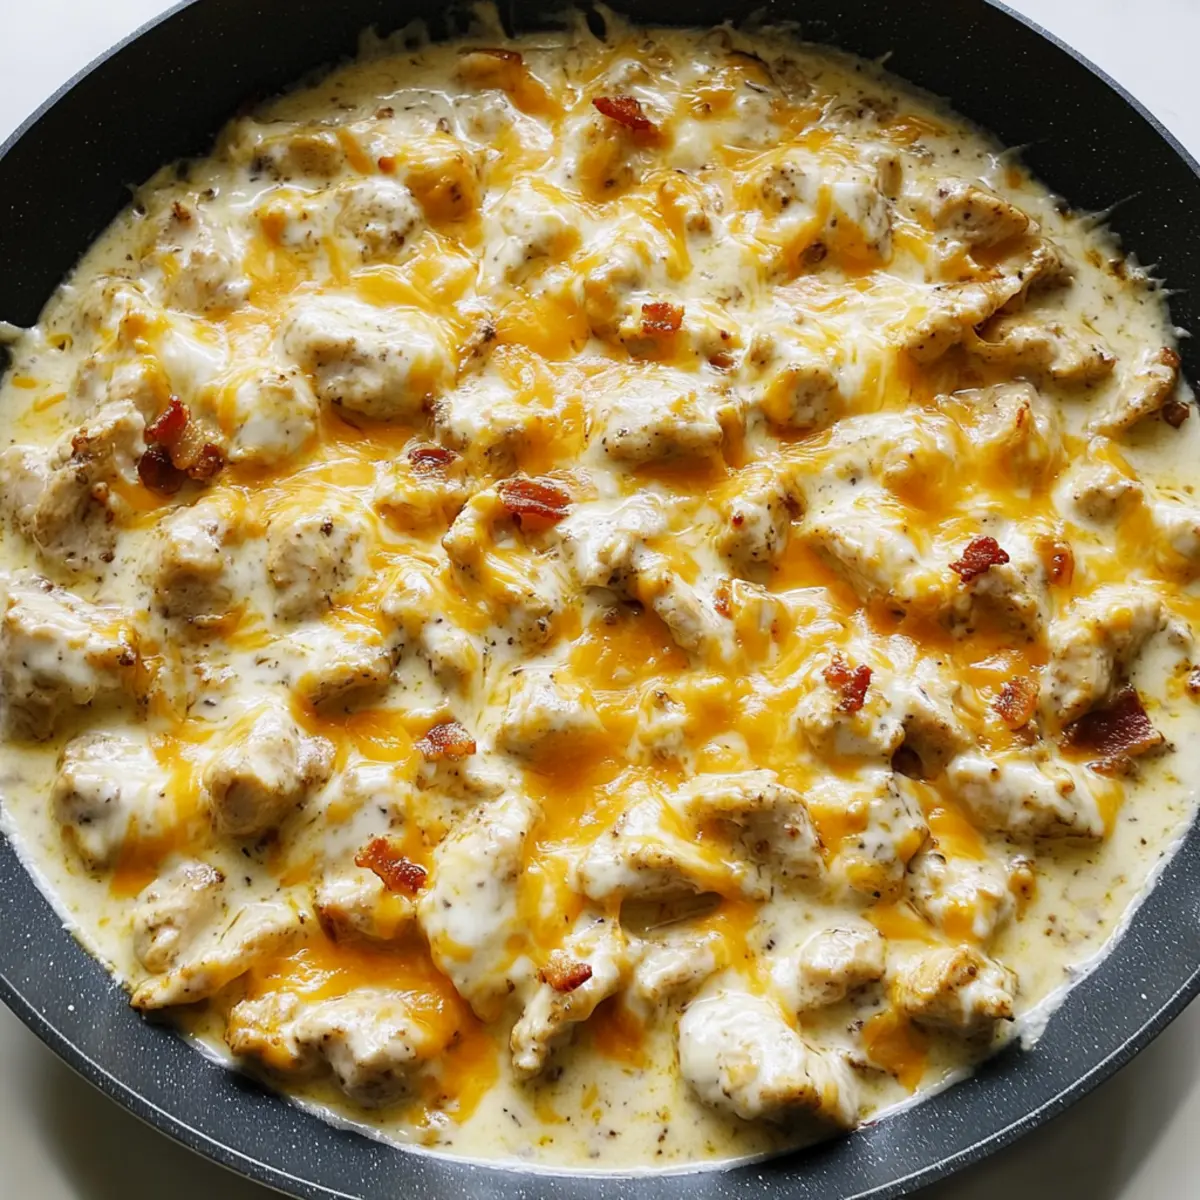
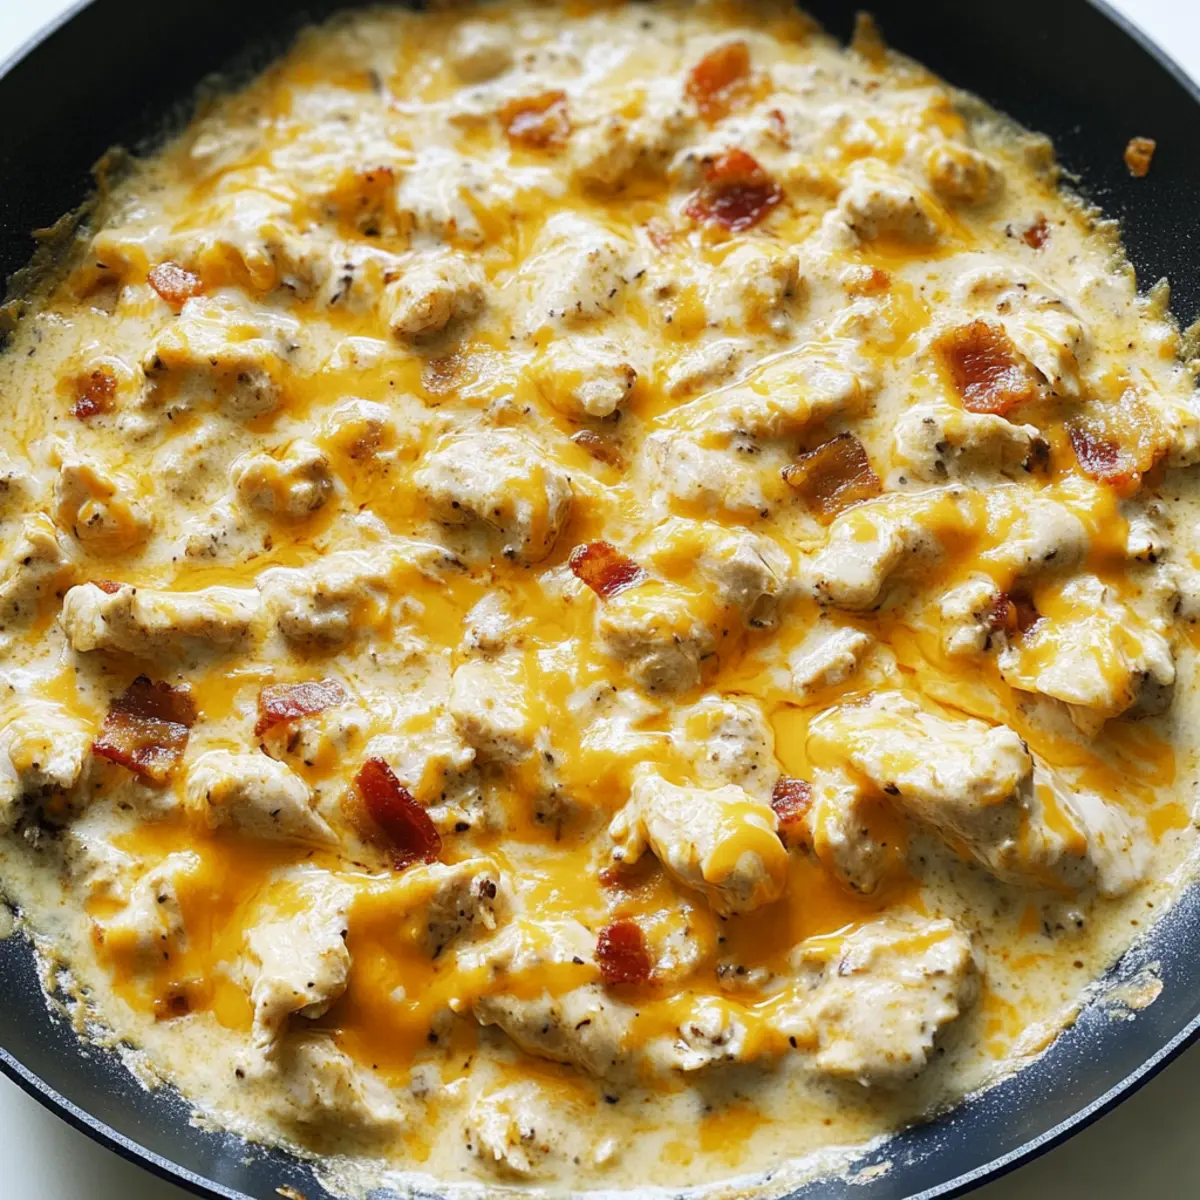
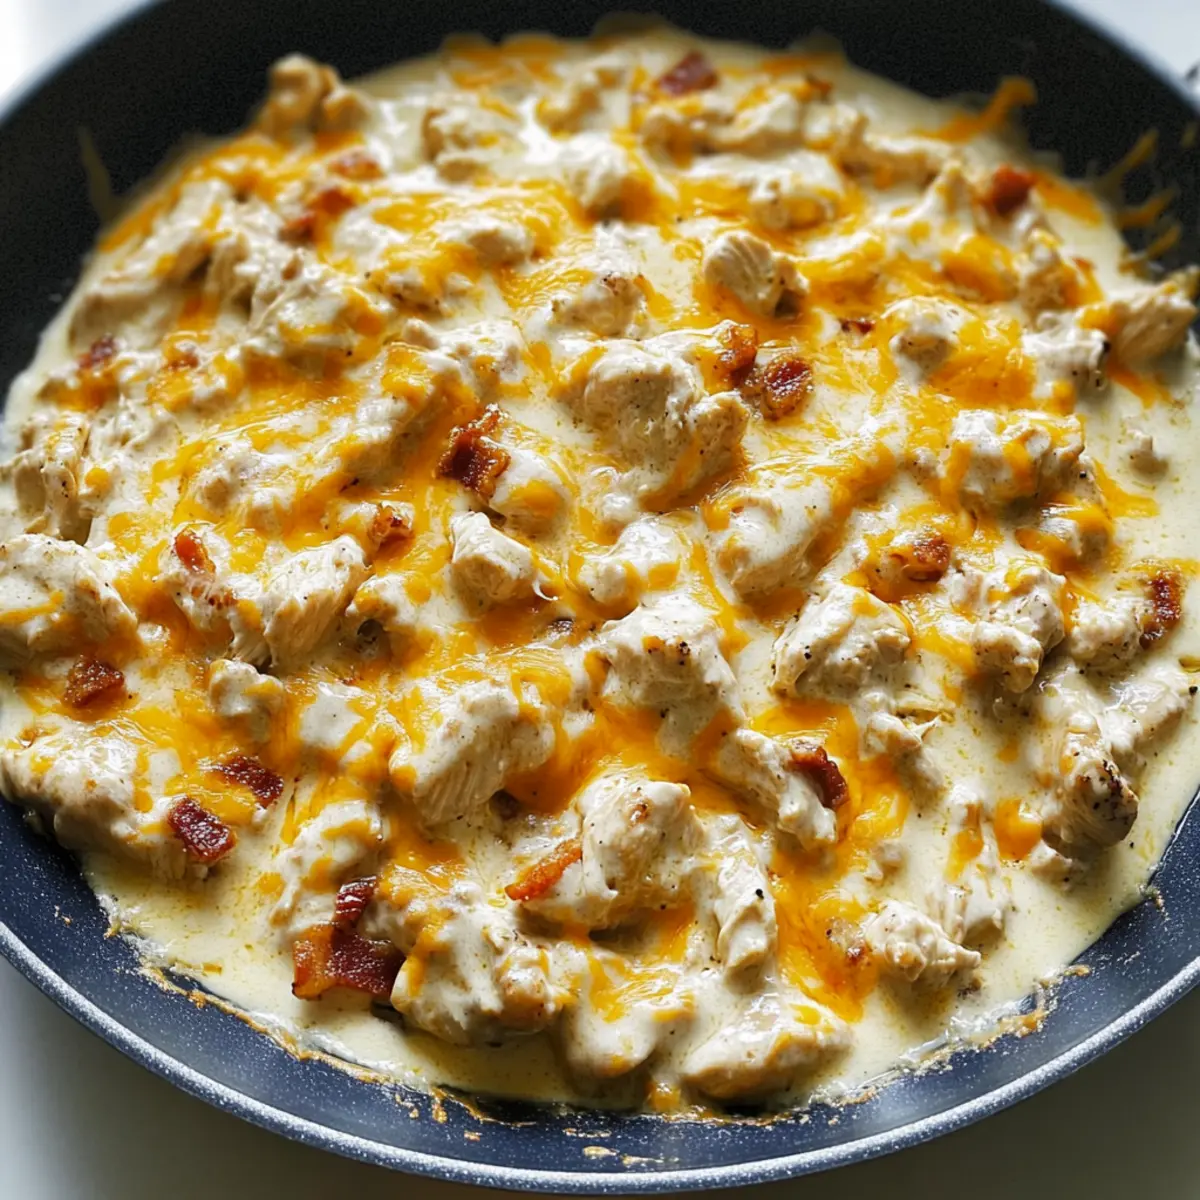
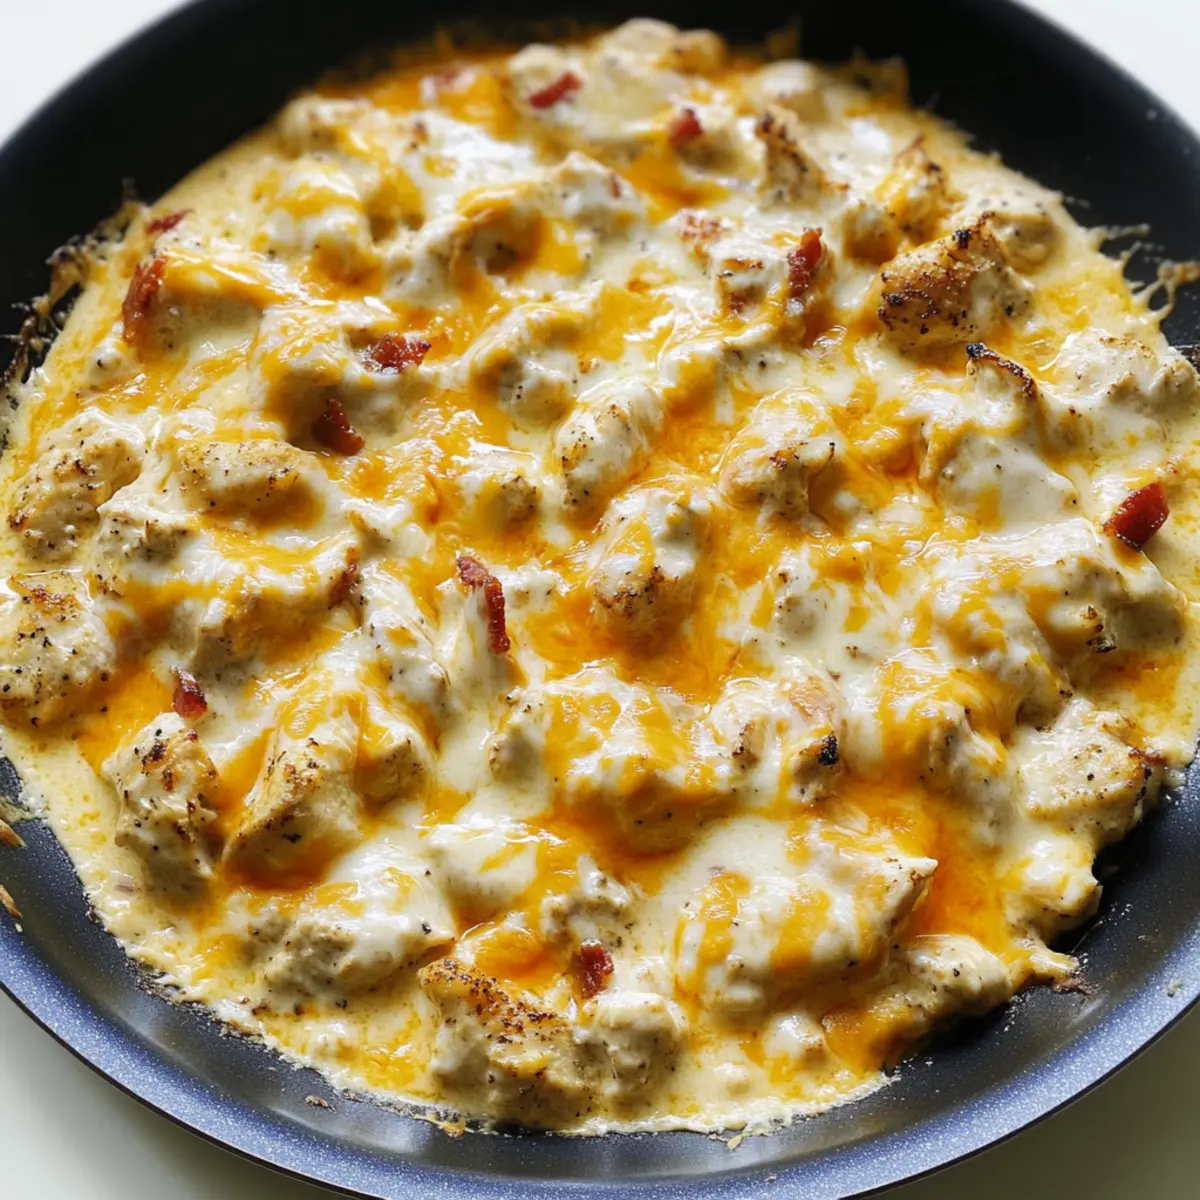
Reduce the skillet heat to low and add 4 ounces of cream cheese, 0.5 cup of heavy whipping cream, and 4 ounces of canned diced green chiles. Use a whisk to combine these ingredients smoothly. As the cream cheese melts, you'll create a rich, velvety sauce that is perfect for your Keto Pollo Con Queso.

Step 5: Add the Cheddar Cheese
Once the cream cheese mixture is smooth, gradually stir in 2 cups of shredded Pepper Jack cheese. Continue stirring over low heat until the cheese fully melts into the sauce, creating that signature creamy texture. The cheese should become thick and gooey, coating the back of a spoon.

Step 6: Combine Chicken and Sauce
Return the seared chicken back into the skillet. Gently mix the chicken with the cheese sauce until every piece is thoroughly coated. Let it simmer for an additional 1-2 minutes to ensure the chicken is heated through and flavored with the creamy sauce.

Step 7: Garnish and Serve
Remove the skillet from the heat and garnish your Keto Pollo Con Queso with 2 tablespoons of fresh cilantro. This adds a lovely burst of color and freshness to your dish. Serve hot with your favorite sides, and enjoy the comforting, cheesy goodness!

Expert Tips for Keto Pollo Con Queso

  • Cook Temperature: Ensure chicken reaches an internal temperature of 165°F for food safety. Use a meat thermometer for accuracy.

  • Whisk Smoothly: When melting the cheese, whisk continuously to prevent lumps. A smooth sauce is key for delicious Keto Pollo Con Queso.

  • Reheat Wisely: To keep the sauce creamy when reheating, add a splash of cream. This prevents separation and maintains texture.

  • Spice Adjustments: If you prefer less heat, swap Pepper Jack cheese with Monterey Jack. Adjust chili powder based on your taste preference.

  • Protein Alternatives: Experiment with shrimp or ground turkey instead of chicken for a refreshing twist on the classic Keto Pollo Con Queso.

Make Ahead Options

These Keto Pollo Con Queso preparations are perfect for busy home cooks looking to save time! You can season and cube the chicken up to 24 hours in advance, storing it in an airtight container in the refrigerator. The creamy sauce can also be made ahead and refrigerated for up to 3 days; simply combine the cream cheese, heavy cream, and spices without the cheese, then when you're ready to finish the dish, reheat the sauce and stir in the shredded Pepper Jack until melted. To ensure the flavors remain vibrant, keep the chicken and sauce separate until you're ready to serve, allowing you to enjoy restaurant-quality results with minimal last-minute effort!

How to Store and Freeze Keto Pollo Con Queso

Fridge: Store leftovers in an airtight container for up to 3 days. Reheat gently on the stovetop, adding a splash of cream for creaminess.

Freezer: Freeze after cooking by transferring the cooled dish to a freezer-safe container, where it can last up to 2 months. Thaw overnight in the fridge before reheating.

Reheating: When ready to eat, reheat gently on the stove. Stir in a little extra cream if needed to retain the luscious texture of the Keto Pollo Con Queso.

Make-Ahead: For an easy meal prep, prepare the chicken and sauce in advance and store them separately for quick assembly later.

Keto Pollo Con Queso Variations

Feel free to let your creativity shine with these fun variations, perfect for tweaking the flavor and texture!

  • Protein Switch: Swap chicken for shrimp or ground turkey to reinvent this dish. Each option brings a unique taste and texture, keeping meals exciting!

  • Dairy-Free Twist: Use a non-dairy milk instead of heavy cream for a lighter, vegan-friendly version. Simply adjust the seasoning to keep those flavors bright and bold!

  • Mild Option: Replace Pepper Jack cheese with Monterey Jack for a milder taste, making this dish more palatable for little ones. Creamy and comforting, this adaptation is a hit!

  • Veggie Lover: Add spinach or kale to the creamy sauce for an extra dose of nutrients. Stir them in right before combining the chicken so they wilt slightly without losing their vibrant color.

  • Heat It Up: Include jalapeños or increase the chili powder to amp up the spice! For spicy food lovers, this variation transforms your Keto Pollo Con Queso into a fiery fiesta!

  • Serve Differently: Present your dish over cauliflower rice, avocado slices, or low-carb tortilla chips for various delicious ways to enjoy it. Each option adds both charm and satisfaction!

  • Zesty Addition: For a tangy twist, mix in a splash of lime juice or top with fresh salsa before serving. This brightening element will elevate your dish and tickle your taste buds.

  • Herb Infusion: Consider swapping cilantro for scallions or parsley for a different herbal note. Both herbs offer their unique flair, making this dish even more personal!

For more ideas, why not try pairing this with a side of German Potato Salad or serve it alongside Coconutty Beans Greens? These sides complement the flavors beautifully while enhancing your meal!

What to Serve with Keto Pollo Con Queso

Imagine a trio of delightful sides that harmonize perfectly with your creamy, cheesy creation, elevating your dining experience.

  • Cauliflower Rice: A low-carb alternative that complements the creamy sauce beautifully while adding a delicate, fluffy texture.

  • Avocado Slices: Fresh and creamy, the rich flavor of avocado balances the spiciness of the dish while keeping your meal light and nutritious.

  • Zucchini Noodles: These spiralized veggies make for a fun, healthy twist, soaking up the flavorful sauce without the carbs of pasta. They add both crunch and color.

  • Salad with Cilantro Dressing: A crisp green salad drizzled with a zesty cilantro dressing cuts through the richness of the Keto Pollo Con Queso, refreshing the palate with each bite.

  • Low-Carb Tortilla Chips: For those who love a satisfying crunch, these chips are perfect for scooping up the cheesy goodness, making every mouthful an adventure.

  • Sparkling Water with Lime: This refreshing drink cleanses the palate after each cheesy bite, providing a fizzy contrast that complements the creamy texture.

Keto Pollo Con Queso Recipe FAQs

How do I select the perfect chicken for this recipe?
Absolutely! When choosing chicken for your Keto Pollo Con Queso, look for boneless, skinless breasts or thighs. Fresh chicken should be pink and moist, without any dark spots or a strong odor. If you can, opt for organic or free-range options for the best flavor and quality.

What is the best way to store leftovers?
Very! Store any leftovers in an airtight container for up to 3 days in the fridge. To ensure the creamy texture of the sauce remains intact when reheating, you can add a splash of cream while warming it on the stove on low heat.

Can I freeze Keto Pollo Con Queso?
Yes, you can! After cooking, let the dish cool completely before transferring it to a freezer-safe container. It can be stored in the freezer for up to 2 months. To enjoy later, simply thaw it in the fridge overnight, and reheat gently on the stove, stirring in a little more cream if needed to maintain creaminess.

What if the cheese sauce becomes lumpy?
Ah, this can happen! If your cheese sauce turns out lumpy, don't worry. Simply lower the heat, and whisk continuously until it smooths out. If it’s still not coming together, you can add a splash of warm cream or milk to help emulsify the sauce, making it wonderfully creamy again.

Is this recipe safe for people with dairy allergies?
No, unfortunately. If you're looking for a dairy-free alternative, you can use non-dairy cream cheese and coconut milk instead of heavy cream. Be mindful of ingredients in your chosen substitutes to ensure they meet your dietary needs.

Can I make this dish ahead of time?
Certainly! For effortless meal prep, you can prepare the chicken and sauce in advance. Simply store them separately in the fridge and combine them when you're ready to serve. This way, you can enjoy a quick, home-cooked meal by just reheating!

Keto Pollo Con Queso

Creamy Keto Pollo Con Queso for Effortless Dinner Bliss

Discover the culinary triumph of Keto Pollo Con Queso, a creamy, cheesy chicken dish ready in just 30 minutes.
Print Recipe Pin Recipe
Prep Time 10 minutes mins
Cook Time 20 minutes mins
Total Time 30 minutes mins
Servings: 4 servings
Course: Dinner
Cuisine: Tex-Mex
Calories: 450
Ingredients Equipment Method Nutrition Notes

Ingredients
  

For the Chicken
  • 1.5 lbs boneless, skinless chicken breasts or chicken thighs for extra moisture.
  • 2 tablespoons olive oil any cooking oil can suffice.
For the Spice Blend
  • 1 teaspoon chili powder adjust according to your heat preference.
  • 1 teaspoon ground cumin can be omitted.
  • 1 teaspoon garlic powder or 1 clove fresh garlic.
  • 1 teaspoon onion powder or 1/4 cup chopped onions.
  • 1 teaspoon smoked paprika regular paprika is a good alternative.
  • 0.5 teaspoon sea salt adjust to taste.
  • 0.5 teaspoon black pepper modify based on preference.
For the Sauce
  • 4 ounces full-fat cream cheese low-fat options can be used.
  • 0.5 cup heavy whipping cream or half-and-half if necessary.
  • 2 cups shredded Pepper Jack cheese Monterey Jack is a gentler choice.
  • 4 ounces canned diced green chiles omit for a milder dish.
For Garnish
  • 2 tablespoons fresh cilantro or parsley if preferred.

Equipment

  • Large skillet
  • Whisk
  • Meat Thermometer
  • small bowl

Method
 

Step-by-Step Instructions
  1. In a small bowl, whisk together chili powder, ground cumin, garlic powder, onion powder, smoked paprika, sea salt, and black pepper.
  2. Cut the chicken into cubes and toss them in the spice rub until fully coated. Allow to sit.
  3. Heat olive oil in a skillet over medium-high heat and sear the chicken cubes for 6-8 minutes until golden brown.
  4. In the same skillet, reduce heat to low and add cream cheese, heavy whipping cream, and green chiles. Whisk until smooth.
  5. Gradually stir in shredded Pepper Jack cheese until melted into the sauce.
  6. Return the chicken to the skillet and mix gently until coated with the sauce.
  7. Garnish with fresh cilantro and serve hot.

Nutrition

Serving: 1servingCalories: 450kcalCarbohydrates: 5gProtein: 35gFat: 35gSaturated Fat: 20gPolyunsaturated Fat: 1gMonounsaturated Fat: 15gCholesterol: 150mgSodium: 800mgPotassium: 600mgFiber: 1gSugar: 1gVitamin A: 800IUCalcium: 500mgIron: 2mg

Notes

Store leftovers in an airtight container for up to 3 days in the fridge, or freeze for up to 2 months.

Tried this recipe?

Let us know how it was!

Savor Orecchiette with Sausage and Broccoli in 30 Minutes

May 27, 2026 by Grace Snow Leave a Comment

The aroma hits you like a warm hug as you sauté the sausage, and suddenly, your busy weeknight seems a little brighter. This 30-Minute Orecchiette with Sausage and Broccoli is not just quick and easy; it’s a family-friendly dinner that hits all the right notes for a balanced meal. With tender pasta cradling juicy sausage and vibrant broccoli, every bite is a delightful mix of flavors and textures. Best of all, it can be easily customized to suit everyone’s tastes—whether you want to swap in some chicken or sneak in more veggies. After just half an hour, you’ll have a comforting dinner that’s sure to impress. Ready to find out how simple it can be to turn your weeknights around? Let’s dive into this delicious recipe!

Why is this dish a weeknight winner?

Quick to Make: In just 30 minutes, you can enjoy a satisfying dinner that feels like a gourmet meal.

Flavor Explosion: The delightful combination of savory sausage, fresh broccoli, and tender orecchiette creates a dish that’s bursting with flavor.

Customizable Options: Easily adjust ingredients by swapping sausage for chicken or adding extra veggies like spinach or bell peppers for your heart's desire.

Family-Friendly Delight: This recipe is designed to please even the pickiest eaters, ensuring everyone around the dinner table enjoys a delicious meal together.

Balanced Nutrition: Packed with protein, fiber, and vitamins, this meal keeps everyone nourished with every bite.

Serve it alongside an Italian chopped salad or warm garlic bread for an even more fulfilling feast!

Orecchiette with Sausage and Broccoli Ingredients

For the Pasta and Broccoli
• Broccoli florets – Adds nutrition and color, provides texture. Fresh or frozen can be used; cut into small pieces for even cooking.
• Orecchiette – The main pasta that holds sauce and ingredients well. Can substitute with medium shells or penne if needed.

For the Sauce
• Olive oil – Provides fat for sautéing and enhances flavor. Use extra virgin for a more robust taste.
• Italian sausage – Delivers protein and robust flavor. Can use pork, chicken, or turkey sausage; opt for a lower-fat option if desired.
• Garlic – Adds aromatic flavor. Fresh minced garlic is best, but garlic powder can be a quick substitute.
• Red pepper flakes – Introduces a hint of heat. Adjust to taste; omit for a milder dish.
• Cracked pepper & flaky salt – For seasoning and taste enhancement. Use to taste for balancing flavors.

For the Finish
• Parmesan cheese – Enhances depth of flavor and adds creaminess. Grated or shredded is fine; nutritional yeast can be used for a dairy-free option.

Step‑by‑Step Instructions for Orecchiette with Sausage and Broccoli

Step 1: Prep Broccoli
Begin by washing and chopping the broccoli into small florets to ensure quick and even cooking. Aim for bite-sized pieces, as this will enhance the dish's overall texture and presentation. Once prepped, set the broccoli aside, ready to join the flavorful mix of your Orecchiette with Sausage and Broccoli.

Step 2: Cook Pasta
In a large pot, bring salted water to a boil over high heat. Once boiling, add the orecchiette pasta and cook it for about 10-12 minutes, stirring occasionally. You want it al dente, with a slight firmness when bitten. Before draining, reserve about 2 cups of the pasta water to help bind the dish later; then drain the orecchiette and set it aside.

Step 3: Sauté Sausage
In a large skillet, heat 2 tablespoons of olive oil over medium heat. Once shimmering, add the crumbled Italian sausage to the pan. Cook for approximately 6-8 minutes, stirring occasionally, until the sausage is browned and fully cooked. This step infuses the oil with delicious flavors—drain any excess fat if necessary, and keep the sausage in the skillet.

Step 4: Add Garlic
Next, stir in the minced garlic into the skillet with your browned sausage. Cook for an additional 1-2 minutes, stirring frequently until the garlic is fragrant and just barely golden—be cautious not to burn it, as that can turn it bitter. This aromatic combination will elevate the flavor profile of your Orecchiette with Sausage and Broccoli beautifully.

Step 5: Combine Ingredients
With the garlic cooked, it’s time to combine everything. Add the drained orecchiette to the skillet along with the reserved pasta water. Toss in the prepped broccoli as well. Stir well to combine all ingredients, allowing 2-3 minutes of cooking. This helps the flavors meld together, heating the broccoli while creating a cohesive dish.

Step 6: Serve
Finally, divide the Orecchiette with Sausage and Broccoli onto plates. Finish with a generous sprinkle of grated Parmesan cheese and a dash of red pepper flakes for a hint of heat. Season with cracked pepper and flaky salt to taste, and your warm, hearty meal is ready to share with loved ones!

Storage Tips for Orecchiette with Sausage and Broccoli

Fridge: Store leftovers in an airtight container and keep them in the refrigerator for up to 3-4 days to maintain freshness and flavor.

Freezer: For longer storage, freeze the dish in an airtight container for up to 2 months. Make sure to cool it completely before sealing to prevent ice crystals.

Reheating: When ready to enjoy your Orecchiette with Sausage and Broccoli again, reheat in a skillet over medium heat, adding a splash of olive oil or reserved pasta water to restore creaminess.

Make-Ahead: You can prep the broccoli in advance and keep it in the fridge. Combine and cook with the other ingredients when you're ready to serve!

Make Ahead Options

These Orecchiette with Sausage and Broccoli are perfect for busy weeknights! You can chop the broccoli and store it in an airtight container in the refrigerator up to 3 days ahead of time to save precious minutes when you're ready to cook. Additionally, you can cook the orecchiette pasta and mix it with a drizzle of olive oil to prevent sticking, refrigerating it for up to 24 hours before combining it with other ingredients. When you're ready to serve, simply sauté the sausage and garlic, and then toss in the prepped pasta and broccoli. This way, you'll have a delicious, time-saving meal that's just as flavorful as if you'd made it all in one go!

What to Serve with Orecchiette with Sausage and Broccoli

The perfect accompaniment can elevate your lively pasta dish into a delightful family feast while bringing fresh flavors and textures to the table.

  • Italian Chopped Salad: A refreshing medley of greens, tomatoes, and olives adds a vibrant counterpoint to the hearty pasta. The zesty dressing will awaken your taste buds after a bite of the rich sausage.

  • Garlic Bread: Warm, crusty slices of garlic bread make this dinner truly comforting. Their buttery, garlicky goodness is perfect for soaking up any leftover sauce, ensuring not a drop goes to waste.

  • Roasted Vegetables: Oven-roasted seasonal vegetables, like bell peppers and zucchini, bring an earthy touch to the meal, creating a colorful plate that delights the senses. Their caramelization enhances both flavor and texture.

  • Lemon Zest Parmesan Pasta: For a zingy twist, serve a side of lemon zest pasta. Its brightness balances the rich sausage and hearty broccoli, adding a fresh finish to your dinner.

  • Herbed Quinoa: A nutty quinoa side dish tossed with fresh herbs provides a protein-packed addition that complements the main dish while incorporating more fiber and nutrients.

  • Sparkling Lemonade: A sparkling lemon drink acts as a refreshing palate cleanser, perfect for cutting through the richness of the sausage while adding a festive touch to your family dinner.

Let these delightful pairings harmonize beautifully, turning your Orecchiette with Sausage and Broccoli into an unforgettable dining experience!

Orecchiette with Sausage and Broccoli Variations

Feel free to mix things up and make this dish your own with these delightful variations!

  • Protein Swap: Try shredded rotisserie chicken or sautéed mushrooms for a hearty vegetarian alternative. This gives a new twist and keeps that comforting flavor profile intact.

  • Vegetable Mix: Add in your favorite veggies! Spinach, peas, or bell peppers will brighten up the dish and sneak in extra nutrients. Who doesn’t love a vibrant plate?

  • Pasta Alternatives: Swap traditional orecchiette with whole grain or gluten-free pasta for dietary needs, keeping the dish just as delicious. Experimenting with shapes can often provide a fun texture.

  • Herbal Boost: Toss in fresh herbs like basil or parsley at the end to elevate the dish’s freshness. A sprinkle can make all the difference, adding layers of flavor that dance on your palate.

  • Creamy Variation: Stir in a splash of cream or a dollop of mascarpone cheese to create a richer sauce. This indulgent twist will wrap each bite in luxurious creaminess.

  • Spicy Kick: Intensify the heat with additional red pepper flakes or diced jalapeños. If you thrive on spice, this is a fantastic way to turn it up a notch.

  • Cheesy Delight: Experiment with different cheeses! Swap Parmesan for Pecorino Romano or add a melting cheese like mozzarella for an ooey-gooey experience. Each cheese will impart its unique character to the dish.

  • Mediterranean Flair: Introduce olives or sun-dried tomatoes for a Mediterranean twist. This idea pairs beautifully and adds a briny depth that captivates your taste buds.

Also, consider serving it alongside a fresh Italian chopped salad or warm breadsticks to complete your family meal. Whichever variations you choose, enjoy the journey of flavors!

Expert Tips for Orecchiette with Sausage and Broccoli

  • Cooking Timing: Make sure to watch the pasta closely to avoid overcooking. It should be al dente for the best texture in your Orecchiette with Sausage and Broccoli.

  • Sautéing Garlic: Keep an eye on the garlic as it cooks; it can burn quickly and turn bitter, ruining the dish's flavor. Stir frequently to ensure even cooking.

  • Use of Reserved Water: Don’t skip reserving pasta water! This technique helps bind the sauce with the pasta, giving your dish a creamier finish.

  • Adjusting Consistency: If the dish feels dry once combined, gradually add more reserved pasta water until you reach the desired creaminess without over-saucing it.

  • Flavor Adjustment: Always taste before serving! Adjust the seasoning with cracked pepper and salt to ensure each bite of your Orecchiette with Sausage and Broccoli is perfectly balanced.

Orecchiette with Sausage and Broccoli Recipe FAQs

How do I choose the right broccoli for this recipe?
Absolutely! Look for firm, vibrant broccoli florets without dark spots or yellowing. Fresh broccoli is best for this dish, but if you're short on time, frozen broccoli works well too—just ensure it's thawed before cooking for even results.

How should I store leftovers of Orecchiette with Sausage and Broccoli?
Store your leftovers in an airtight container in the fridge for up to 3-4 days. This will keep the flavors fresh, and you can enjoy this tasty meal multiple times throughout the week!

Can I freeze the Orecchiette with Sausage and Broccoli?
Very! To freeze, allow the dish to cool completely before transferring it to an airtight container. It will stay good for up to 2 months. When you're ready to enjoy it again, thaw in the fridge overnight and reheat gently in a skillet, adding a splash of olive oil or reserved pasta water to restore the creaminess.

What if I don’t have all the ingredients on hand?
No worries! This recipe is quite customizable. You can swap the Italian sausage for shredded rotisserie chicken or mushrooms for a vegetarian option. Additionally, feel free to incorporate any other fresh vegetables you have—spinach, peas, or bell peppers can be wonderful additions.

Is this dish suitable for dietary restrictions?
Definitely! You can make this dish gluten-free by using gluten-free pasta options. For dairy-free choices, replace Parmesan with nutritional yeast or omit it entirely. As always, check labels for any allergies, especially with the sausage you choose, as some varieties might contain allergens.

What should I do if the dish appears dry when reheating?
If your Orecchiette with Sausage and Broccoli looks a bit dry after reheating, simply add a bit of the reserved pasta water or a splash of olive oil. Stir it gently to incorporate, which will help bring back the creamy texture and flavors!

Orecchiette with Sausage and Broccoli

Savor Orecchiette with Sausage and Broccoli in 30 Minutes

This 30-Minute Orecchiette with Sausage and Broccoli is a quick, family-friendly dinner that is both satisfying and nutritious.
Print Recipe Pin Recipe
Prep Time 10 minutes mins
Cook Time 20 minutes mins
Total Time 30 minutes mins
Servings: 4 servings
Course: Dinner
Cuisine: Italian
Calories: 450
Ingredients Equipment Method Nutrition Notes

Ingredients
  

For the Pasta and Broccoli
  • 2 cups Broccoli florets Fresh or frozen; cut into small pieces.
  • 12 oz Orecchiette Can substitute with medium shells or penne.
For the Sauce
  • 2 tablespoons Olive oil Use extra virgin for a more robust taste.
  • 1 lb Italian sausage Pork, chicken, or turkey; opt for a lower-fat option.
  • 3 cloves Garlic Fresh minced is best.
  • 1/2 teaspoon Red pepper flakes Adjust to taste.
  • Cracked pepper & flaky salt Use to taste.
For the Finish
  • 1/2 cup Parmesan cheese Grated or shredded; can use nutritional yeast for dairy-free.

Equipment

  • Large pot
  • Large skillet

Method
 

Step‑by‑Step Instructions
  1. Begin by washing and chopping the broccoli into small florets to ensure quick and even cooking. Set aside.
  2. In a large pot, bring salted water to a boil. Add orecchiette and cook for 10-12 minutes until al dente, reserving 2 cups of pasta water before draining.
  3. In a large skillet, heat olive oil over medium heat. Add crumbled Italian sausage and cook for 6-8 minutes until browned.
  4. Add minced garlic to the skillet and cook for 1-2 minutes until fragrant, being careful not to burn it.
  5. Combine the drained orecchiette, reserved pasta water, and broccoli in the skillet. Cook for 2-3 minutes, stirring well.
  6. Serve topped with grated Parmesan cheese and a sprinkle of red pepper flakes, seasoning with cracked pepper and salt to taste.

Nutrition

Serving: 1servingCalories: 450kcalCarbohydrates: 45gProtein: 22gFat: 20gSaturated Fat: 6gPolyunsaturated Fat: 2gMonounsaturated Fat: 10gCholesterol: 70mgSodium: 600mgPotassium: 600mgFiber: 5gSugar: 3gVitamin A: 500IUVitamin C: 70mgCalcium: 200mgIron: 3mg

Notes

Store leftovers in an airtight container in the fridge for up to 3-4 days. Freeze for up to 2 months. Reheat with a splash of olive oil or reserved pasta water.

Tried this recipe?

Let us know how it was!

Lemon Broccoli Pasta: A Bright and Easy One-Pot Wonder

May 27, 2026 by Grace Snow Leave a Comment

As I whisked the vibrant lemon zest into the pot, I could practically hear my taste buds cheering. This Quick and Easy Lemon Broccoli Pasta is my unassuming weeknight hero—a one-pot meal that packs a flavorful punch while keeping things simple. With just a handful of ingredients like tender broccoli, fresh lemon, and a hint of garlic, it’s perfect for anyone craving homemade goodness without the multi-pot madness. Not only does it come together in a flash, but it’s also a fantastic vegetarian option that can easily become gluten-free with a quick pasta swap. Whether you’re looking to impress dinner guests or simply whip up something satisfying after a long day, this dish has got your back. Ready to discover how to turn your pantry staples into a zesty delight?

Why is Lemon Broccoli Pasta a Must-Try?

Simplicity at its finest: This one-pot wonder means fewer dishes and more deliciousness, making it perfect for busy weeknights.

Bright, Zesty Flavor: The fresh lemon combined with savory garlic creates an uplifting taste that will have everyone coming back for seconds.

Quick and Convenient: With minimal prep and cooking time, you can sit down to a homemade meal in under 20 minutes!

Versatile Base: Feel free to customize with your favorite proteins like grilled chicken or shrimp, or even make it vegan with a simple cheese swap.

Crowd-pleaser: Perfect for family dinners or impressing guests, this dish appeals to both vegetarians and pasta lovers alike.

Pair with a salad or crusty bread for a complete meal that’s sure to delight! For more quick and hearty recipes, check out Lemon Chicken Soup or Cauliflower Pasta Ready.

Lemon Broccoli Pasta Ingredients

For the Pasta
• Dried Pasta – Provides the base of the meal; substitute with gluten-free pasta for a gluten-free version.
• Broccoli Florets – Adds nutrition and color; fresh or frozen works, but cooking time may vary for frozen.

For the Sauce
• Olive Oil – Used for sautéing garlic and creating a light sauce; essential for enhancing flavor.
• Garlic – Imparts aromatic flavor; freshly minced is preferred for the best taste.
• Lemon Juice – Offers acidity and brightness; freshly squeezed juice gives an extra pop of flavor.
• Lemon Zest – Adds a concentrated lemon flavor; grate only the yellow part of the peel for freshness.
• Dried Oregano – Enhances herbal notes; feel free to substitute with fresh herbs if available.
• Red Pepper Flakes – Provides a slight kick; adjust quantity based on your heat preference.
• Kosher Salt and Black Pepper – Enhances all flavors; use to taste for the most balanced dish.

For Serving
• Shredded Parmesan – Adds richness and umami; can be substituted with nutritional yeast for a vegan option.
• Lemon Wedges and Fresh Parsley – Optional garnishes that brighten up the presentation and flavor.

Dive into this delightful Lemon Broccoli Pasta and enjoy its bright flavors!

Step‑by‑Step Instructions for Lemon Broccoli Pasta

Step 1: Cook the Pasta
Begin by bringing a large pot of salted water to a rolling boil over high heat. Add dried pasta and cook according to package directions until al dente, which usually takes about 8-10 minutes. Stir occasionally to prevent sticking. The pasta should be firm yet tender, providing the perfect base for your Lemon Broccoli Pasta.

Step 2: Add the Broccoli
In the last 2-3 minutes of the pasta's cooking time, carefully add the chopped broccoli florets to the boiling pot. This step allows the broccoli to become tender without overcooking, preserving its bright green color and nutritional value. Both ingredients will be ready to strain together, and the vibrant broccoli will complement the dish beautifully.

Step 3: Reserve Pasta Water
Before draining the pasta and broccoli, carefully reserve about 3/4 cup of the starchy cooking water in a bowl. This water is key to creating a luscious sauce later. Once reserved, drain the pasta and broccoli together in a colander, letting the steam escape as you prepare to transform these ingredients into your zesty Lemon Broccoli Pasta.

Step 4: Sauté Garlic
In the same pot used for cooking, heat 2 tablespoons of olive oil over medium heat. Once it shimmers, add in the freshly minced garlic. Sauté for 30-60 seconds until fragrant, being careful not to let the garlic brown. The aroma will fill your kitchen, setting the stage for the delicious flavors that are about to come together.

Step 5: Create the Sauce
Stir in the freshly squeezed lemon juice, lemon zest, dried oregano, red pepper flakes, kosher salt, and black pepper into the sautéed garlic. Mix these ingredients well, allowing the flavors to meld together for about 1 minute. The combination of zesty lemon and savory garlic will create a bright and aromatic sauce that infuses the Lemon Broccoli Pasta with deliciousness.

Step 6: Whisk in Pasta Water
Gradually whisk in the reserved pasta cooking water to the garlic and lemon mixture in the pot. This will help emulsify the sauce, giving it a light, creamy texture. Whisk for 1-2 minutes until the sauce thickens slightly and coats the back of a spoon—this step is how you’ll achieve that deliciously cohesive sauce to bring your Lemon Broccoli Pasta to life.

Step 7: Combine Pasta and Broccoli
Return the drained pasta and broccoli to the pot, stirring gently to combine with the lemony sauce. Use tongs or a large spoon to ensure every piece of pasta and broccoli gets coated evenly. This melding process is what brings all the flavors together, making sure that the Lemon Broccoli Pasta is both visually appealing and inviting.

Step 8: Add Parmesan Cheese
Sprinkle the shredded Parmesan cheese over the pasta and broccoli mixture. Toss gently to combine, allowing the cheese to melt slightly into the warm dish. This step adds a rich, savory note to your Lemon Broccoli Pasta, ensuring each bite is bursting with creamy goodness.

Step 9: Serve Your Dish
Once well combined, serve the Lemon Broccoli Pasta immediately in bowls or plates. Garnish with optional lemon wedges and fresh parsley to elevate the presentation even further. The bright colors and delightful aroma will make this simple one-pot meal an irresistible choice for any dinner table.

Lemon Broccoli Pasta: Creative Variations

Feel free to make this dish your own by exploring these delightful twists and substitutions!

  • Gluten-Free: Swap out regular pasta for your favorite gluten-free pasta; it’s just as delicious and keeps the dish accessible for everyone.

  • Protein-Packed: Enhance the meal by adding grilled chicken, shrimp, or chickpeas for extra nutrition and heartiness. Each addition brings a new flavor dimension that makes this dish even more satisfying.

  • Veggie Medley: Toss in other vibrant vegetables like zucchini, asparagus, or spinach for added nutrients and varied textures. Fresh veggies can add a delightful crunch!

  • Creamy Twist: For an extra creamy sauce, mix in a few tablespoons of cream cheese or ricotta cheese after whisking in the pasta water. This approach elevates your Lemon Broccoli Pasta to a whole new level of comfort.

  • Spice It Up: If you crave more heat, add a few dashes of hot sauce or sliced jalapeños along with the red pepper flakes. It’s an exciting way to bring some zing to your meal.

  • Herbaceous Delight: Replace dried oregano with fresh herbs like basil or parsley for a bright, fragrant flavor boost. Fresh herbs impart vibrancy that perfectly complements the lemon.

  • Nutty Crunch: Sprinkle toasted pine nuts or walnuts over the finished dish for a crunchy texture that contrasts beautifully with the tender pasta and veggies. They add a lovely nutty flavor too!

As always, if you're intrigued by other delicious variations, try exploring recipes like the Tuscan White Bean Pasta or mix it up with Skillet Pasta Sun for even more inspiration!

Expert Tips for Lemon Broccoli Pasta

• Reserve Pasta Water: This starchy water is essential for emulsifying the sauce, ensuring it clings beautifully to your pasta.

• Careful with Garlic: Keep a close eye on the garlic while sautéing; cooking it just until fragrant prevents bitterness that can spoil the dish.

• Adjust Consistency: If your sauce seems too thick, simply whisk in more reserved pasta water until you achieve your desired creamy texture.

• Flavor Boost: For a more robust flavor, consider adding a splash of white wine after sautéing the garlic, letting it reduce slightly before adding lemon.

• Storage Tip: If you have leftovers, store them in an airtight container in the fridge; reheat gently to avoid overcooking the broccoli in your Lemon Broccoli Pasta.

Storage Tips for Lemon Broccoli Pasta

Fridge: Store leftovers in an airtight container for up to 3 days. This keeps the flavors fresh while ensuring easy access for any late-night cravings.

Freezer: If you want to keep Lemon Broccoli Pasta longer, freeze individual portions in airtight containers or freezer bags for up to 2 months. Allow to cool completely before freezing.

Reheating: For the best texture, gently reheat in a skillet over low heat, adding a splash of reserved pasta cooking water to maintain creaminess. You can also use a microwave, covering tightly for even warming.

Quality Check: Always check for freshness before serving leftovers; if the dish has an off smell or appearance, it’s best to toss it for safety.

What to Serve with Lemon Broccoli Pasta

To elevate your Lemon Broccoli Pasta into a full meal, consider these delightful pairings that enhance the dish's fresh and zesty profile.

  • Garlic Bread: The buttery, crispy texture complements the creamy pasta and absorbs any leftover sauce perfectly. A slice of warm, garlic-infused bread alongside makes for an irresistible bite.

  • Simple Arugula Salad: A fresh arugula salad with lemon vinaigrette adds a peppery crunch that balances the richness of the pasta. The refreshing greens are a wonderful contrast to the creamy sauce.

  • Roasted Veggies: Sweet, caramelized roast vegetables like zucchini and bell peppers provide a heartiness that rounds out the meal. Their natural sweetness aligns beautifully with the bright notes of lemon.

  • Crusty Focaccia Bread: A soft, herb-infused focaccia brings a Mediterranean flair and is perfect for scooping up any leftover pasta. The flaky texture enhances the dining experience with delightful flavors.

  • Sparkling Lemonade: Refreshing sparkling lemonade with hints of lemon and mint provides a tangy and effervescent pairing that keeps the overall meal light and uplifting.

  • Parmesan Crisps: For a crunchy side dish, serve homemade parmesan crisps that add a savory crunch. They mimic the cheese in the pasta and offer a lovely textural contrast.

Elevate your dining experience by pairing these delectable sides with your Lemon Broccoli Pasta!

Make Ahead Options

These Lemon Broccoli Pasta dish is perfect for meal prep enthusiasts! You can cook the pasta and broccoli up to 24 hours in advance. Just follow the initial steps, drain, and toss them lightly with olive oil to prevent sticking before refrigerating. For the sauce, you can prepare the garlic, lemon juice, zest, and spices mixture a day ahead, storing it in an airtight container in the fridge. When you're ready to serve, simply reheat the pasta and broccoli in a pot, whisk in the reserved pasta water, and finish by combining with the prepped sauce and Parmesan cheese. This way, you’ll have a delicious homemade meal ready in just minutes!

Lemon Broccoli Pasta Recipe FAQs

How do I choose the right broccoli for my Lemon Broccoli Pasta?
Look for bright green broccoli florets without dark spots or wilting. Fresh broccoli has a firm texture, while frozen is a convenient alternative that can save time. If using frozen, add it to the pot for the last 3 minutes of cooking to ensure it’s tender without overcooking.

What’s the best way to store leftover Lemon Broccoli Pasta?
Store your leftovers in an airtight container in the fridge for up to 3 days. To keep them fresh, ensure the container is sealed tightly. When you're ready to enjoy your pasta again, just reheat it on the stove over low heat, adding a splash of reserved pasta water to keep the sauce creamy.

Can I freeze Lemon Broccoli Pasta?
Absolutely! To freeze, allow the pasta to cool completely. Then, portion it into airtight containers or freezer bags, ensuring you remove as much air as possible. It will keep well in the freezer for up to 2 months. When you're ready to eat, thaw it in the fridge overnight and reheat gently on the stove or in the microwave, adding a bit of water if needed to revive the sauce.

What should I do if the pasta sauce is too thick?
If your Lemon Broccoli Pasta sauce is thicker than you’d like, don’t worry! Simply stir in a little more reserved pasta cooking water, whisking it in gradually until you reach your desired texture. This starchy water will help the sauce cling better and create that creamy consistency you’re aiming for.

Is Lemon Broccoli Pasta safe for pets or those with allergies?
While Lemon Broccoli Pasta is mostly vegetable-based, avoid feeding it to pets like dogs and cats. Garlic can be harmful to them in larger amounts. For those with dietary restrictions, you can easily make this dish gluten-free by using gluten-free pasta or opt for nutritional yeast instead of Parmesan to cater to vegans.

Can I customize the recipe for dietary preferences?
Definitely! This Lemon Broccoli Pasta is incredibly versatile. You can add cooked protein like grilled chicken or shrimp for an extra boost, or keep it vegan by omitting cheese or using a dairy-free alternative. Feel free to swap in other veggies as well, such as spinach, asparagus, or zucchini!

Lemon Broccoli Pasta

Lemon Broccoli Pasta: A Bright and Easy One-Pot Wonder

This Lemon Broccoli Pasta is a quick and easy one-pot meal bursting with zesty flavor and wholesome ingredients.
Print Recipe Pin Recipe
Prep Time 10 minutes mins
Cook Time 10 minutes mins
Total Time 20 minutes mins
Servings: 4 servings
Course: Dinner
Cuisine: Italian
Calories: 350
Ingredients Equipment Method Nutrition Notes

Ingredients
  

For the Pasta
  • 8 oz Dried Pasta Substitute with gluten-free pasta for a gluten-free version.
  • 2 cups Broccoli Florets Fresh or frozen works.
For the Sauce
  • 2 tbsp Olive Oil Used for sautéing garlic.
  • 2 cloves Garlic Freshly minced preferred.
  • 2 tbsp Lemon Juice Freshly squeezed for best flavor.
  • 1 tbsp Lemon Zest Grate only the yellow part.
  • 1 tsp Dried Oregano Substitute with fresh herbs if available.
  • 1/4 tsp Red Pepper Flakes Adjust based on heat preference.
  • to taste Kosher Salt Enhances flavor.
  • to taste Black Pepper Enhances flavor.
For Serving
  • 1/2 cup Shredded Parmesan Substitute with nutritional yeast for a vegan option.
  • to taste Lemon Wedges Optional garnish.
  • to taste Fresh Parsley Optional garnish.

Equipment

  • Large pot
  • Colander
  • Bowl
  • Tongs

Method
 

Step-by-Step Instructions
  1. Bring a large pot of salted water to a rolling boil. Add dried pasta and cook according to package directions until al dente, about 8-10 minutes.
  2. In the last 2-3 minutes, add chopped broccoli florets to the boiling pot.
  3. Reserve about 3/4 cup of the starchy cooking water, then drain the pasta and broccoli.
  4. In the same pot, heat olive oil over medium heat and sauté minced garlic until fragrant.
  5. Stir in lemon juice, lemon zest, oregano, red pepper flakes, kosher salt, and black pepper. Mix well.
  6. Gradually whisk in reserved pasta water to the mixture until it thickens slightly.
  7. Return the drained pasta and broccoli to the pot and stir gently to combine.
  8. Sprinkle shredded Parmesan cheese over the mixture and toss gently.
  9. Serve immediately, garnished with lemon wedges and fresh parsley.

Nutrition

Serving: 1bowlCalories: 350kcalCarbohydrates: 50gProtein: 12gFat: 12gSaturated Fat: 2gPolyunsaturated Fat: 1gMonounsaturated Fat: 3gCholesterol: 5mgSodium: 400mgPotassium: 600mgFiber: 5gSugar: 2gVitamin A: 1000IUVitamin C: 75mgCalcium: 150mgIron: 2mg

Notes

Store leftovers in an airtight container for up to 3 days. Reheat gently to avoid overcooking the broccoli.

Tried this recipe?

Let us know how it was!

Keto Buffalo Chicken Skillet: Creamy Comfort in 20 Minutes

May 27, 2026 by Grace Snow Leave a Comment

As I stood in my kitchen, the sizzle of bacon and the mouthwatering aroma of buffalo sauce wafted through the air, reminding me that dinner doesn’t have to be a complicated process. This Keto Buffalo Chicken Skillet is an absolute game-changer for busy weeknights, combining creamy textures and rich flavors in just 20 minutes. With tender chicken, crispy bacon, and a zesty kick, this one-pan delight is not only low-carb and gluten-free but also a crowd-pleaser that satisfies my cravings without the guilt. Whether you’re meal prepping or whipping up a speedy family dinner, this recipe delivers comfort food vibes with an effortless twist. Are you ready to turn up the heat and give your weeknight meals a delicious makeover?

Why is this dish a must-try?

Quick and Easy: This Keto Buffalo Chicken Skillet comes together in just 20 minutes, making it perfect for those busy evenings when time is of the essence.

Irresistible Flavor: With the perfect balance of spicy buffalo sauce combined with creamy cheese and crispy bacon, every bite bursts with rich flavor that will impress your taste buds.

Versatile Options: Feel free to get creative! You can substitute chicken breast with thighs for extra juiciness or even add in veggies like spinach or broccoli for some added nutrition.

Low-Carb Delight: As a comforting, low-carb option, this dish fits seamlessly into your keto lifestyle, satisfying cravings without derailing your diet.

Crowd-Pleasing Comfort: It's not just a meal; it’s a showstopper! This one-pan wonder is sure to please both family and friends. Serve it over leafy greens or alongside cauliflower rice for a complete meal. Don't forget to check out other crowd favorites like Crock Pot Chicken for more easy, delicious ideas!

Ingredients for Keto Buffalo Chicken Skillet

• Discover the perfect components for your Keto Buffalo Chicken Skillet!

For the Skillet

  • Chicken Breast – Diced for quick cooking, perfect for a lean protein source; chicken thighs can be used for more fat.
  • Bacon – Adds that delicious crunch and richness; swap with turkey bacon if you prefer a lighter dish.
  • Ranch Seasoning – A delicious way to boost flavor; consider making your own with garlic powder, onion powder, and dried herbs.
  • Butter – Essential for richness and a smooth sauce; olive oil or ghee can replace it for a dairy-free option.

For the Sauce

  • Cream Cheese – Creates a delightful creamy texture for the sauce; Neufchâtel cheese works as a lower-fat alternative.
  • Almond Milk – Adjust the consistency of the sauce; use regular milk or heavy cream, but reduce the amount when using heavy cream.
  • Cheddar Cheese – Melts beautifully into a scrumptious topping; feel free to use Monterey Jack or Pepper Jack for varied flavors.
  • Buffalo Sauce – Offers that spicy kick; opt for low-sugar or sugar-free versions to keep it keto-friendly.

This ingredient lineup not only transforms into a decadent dish but also makes dinner a quick and rewarding experience!

Step‑by‑Step Instructions for Keto Buffalo Chicken Skillet

Step 1: Preheat the Skillet
Begin by heating a large skillet over medium heat for about 1 minute. Once hot, gently add diced chicken breast and chopped bacon to the pan. Sauté them together, stirring occasionally for approximately 5–7 minutes, until the chicken is golden and cooked through (internal temperature should reach 165°F) and the bacon is crispy.

Step 2: Drain and Set Aside
After cooking, carefully drain the excess grease using a colander. This step ensures that your Keto Buffalo Chicken Skillet avoids any unwanted greasiness. Once drained, set the chicken and bacon aside on a plate, keeping the flavorful drippings in the skillet, which will add depth to your sauce.

Step 3: Prepare the Sauce Base
Now, reduce the heat to low and return the skillet to the burner. Add 2 tablespoons of butter, followed by 4 oz of cream cheese and ½ cup almond milk. Whisk these ingredients together until they melt and form a smooth and creamy sauce, which should take about 3–4 minutes. The rich aroma will fill your kitchen; this is the base of your Keto Buffalo Chicken Skillet!

Step 4: Add Cheddar and Simmer
Next, stir in 1 cup of shredded cheddar cheese gradually until it melts entirely into the sauce. Increase the heat slightly to bring the sauce to a gentle bubble, then reduce it back to simmer. This step should take another 2–3 minutes, and the sauce should become thick and creamy, ready to envelop the chicken and bacon.

Step 5: Mix in Chicken and Bacon
Once the sauce is bubbling, return the cooked chicken and bacon to the skillet, stirring well to coat everything evenly. Let the mixture blend together on low heat for 2 more minutes. This allows the flavors to meld beautifully, as the tender chicken and crispy bacon soak up the creamy buffalo sauce.

Step 6: Add Buffalo Sauce and Cheese Topping
Drizzle ½ cup of buffalo sauce over the chicken and bacon mixture, stirring gently to combine thoroughly. Top with the remaining melted cheddar for a deliciously cheesy finish. Cover the skillet with a lid and let everything simmer for an additional 5 minutes, allowing the flavors to intensify.

Step 7: Optional Broiling for Crisp
If you prefer a crispy cheese top, preheat your oven's broiler. After simmering, uncover the skillet and transfer it to the broiler for 1–2 minutes until the cheese is bubbly and golden. Keep an eye on it to prevent burning, and once it's beautifully browned, your Keto Buffalo Chicken Skillet is ready to serve!

Step 8: Serve and Enjoy
Finally, remove the skillet from heat and let it cool slightly. Serve your Keto Buffalo Chicken Skillet over a bed of leafy greens or alongside cauliflower rice for a comforting, low-carb dinner. This dish is not just a meal; it's a delightful experience bursting with flavor!

What to Serve with Keto Buffalo Chicken Skillet

Elevate your dining experience by complementing this zesty, creamy dish with delicious side options that add variety and flavor.

  • Cauliflower Rice: A fantastic low-carb alternative to regular rice, it absorbs flavors beautifully and adds a light texture to your meal.

  • Steamed Broccoli: This nutrient-rich green veggie provides a crunchy contrast to the creamy skillet. It’s an easy, healthy addition that boosts minerals.

  • Mixed Green Salad: A fresh salad drizzled with a zesty vinaigrette adds a refreshing crunch, making it the perfect counterpart to the rich Keto Buffalo Chicken Skillet.

  • Garlic Breadsticks: These soft, cheesy treats pair wonderfully for those who want a comforting addition without worrying too much about carbs.

  • Zucchini Noodles: For a lighter yet satisfying option, spiralized zucchini will soak up the sauce and give an appealing twist.

  • Crispy Brussels Sprouts: Roasted to perfection, these add a delightful caramelized flavor and crispy texture that enhances the overall experience.

  • Iced Tea or Sparkling Water: Refreshing drinks with a hint of lemon or mint will cleanse your palate and balance the meal's spices.

  • Chocolate Avocado Mousse: For dessert, indulge in this creamy and decadent treat, providing a low-carb sweet ending that complements your savory main course.

Expert Tips for Keto Buffalo Chicken Skillet

  • Perfectly Cooked Chicken: Use a meat thermometer to check for an internal temperature of 165°F to ensure your chicken is cooked through and tender.

  • Customize Heat Level: Adjust the amount of buffalo sauce according to your taste for spiciness; start with a little and add more for a bold kick.

  • Prepare Ahead: To save time, consider cooking the bacon in advance and storing it in the fridge; this shortens prep time significantly.

  • Creamy Sauce Care: Avoid overcooking the creamy sauce, as this can cause the cheese to become grainy. Stir gently while heating to maintain that luscious texture.

  • Vegetable Boost: For added nutrition, incorporate veggies like spinach or broccoli; they’ll add color and enhance the dish without sacrificing the keto profile.

  • Cheese Variations: Feel free to experiment with different cheeses such as mozzarella or Pepper Jack in your Keto Buffalo Chicken Skillet for personalized flavor!

Make Ahead Options

These Keto Buffalo Chicken Skillet ingredients are perfect for meal prep enthusiasts! You can cook the chicken and bacon up to 3 days in advance and store them in an airtight container in the refrigerator to save time on busy weeknights. Additionally, the creamy sauce can be made ahead and refrigerated for up to 24 hours; be sure to cover it tightly to maintain its rich texture. When you're ready to serve, simply reheat the skillet on low heat, stir in the buffalo sauce and top with cheese, then simmer until warmed through. You’ll enjoy the same delicious flavors with minimal effort, making dinner a breeze!

How to Store and Freeze Keto Buffalo Chicken Skillet

Fridge: Store leftover Keto Buffalo Chicken Skillet in an airtight container for up to 3 days to preserve freshness and flavor.

Freezer: For longer storage, freeze the dish in a freezer-safe container for up to 2 months. Thaw in the fridge overnight before reheating.

Reheating: When ready to enjoy, gently reheat in a skillet over medium heat, adding a splash of almond milk to restore creaminess.

Wrap-Up: Always ensure that your Keto Buffalo Chicken Skillet is fully cooled before storing it to keep the texture and taste intact.

Keto Buffalo Chicken Skillet Variations & Substitutions

Feel free to customize this dish to match your tastes and dietary needs; every change adds a unique twist!

  • Chicken Thighs: Swap chicken breast for thighs to enjoy a juicier, richer flavor that pairs beautifully with the sauce.

  • Turkey Bacon: For a lighter option, use turkey bacon instead of traditional bacon, cutting down on fat while still delivering smoky goodness.

  • Homemade Ranch: Create a personalized ranch seasoning using garlic powder, onion powder, and dried herbs for an extra burst of flavor.

  • Dairy-Free: Replace cream cheese and butter with cashew cream and olive oil for a delightful dairy-free version that's just as creamy!

  • Heavy Cream: Instead of almond milk, opt for heavy cream for an ultra-rich sauce; just reduce the quantity slightly for a thicker texture.

  • Cheese Variety: Explore different cheese options like Monterey Jack for a subtle sweetness or Pepper Jack for a spicy kick that'll elevate the dish even further.

  • Vegetable Boost: Add cooked veggies like spinach or broccoli for added nutrition and lovely texture, making this meal even more satisfying.

  • Adjust Spiciness: Vary the amount of buffalo sauce to suit your heat preferences; even a hint of extra sauce can bring sensational heat to each mouthful.

With these variations, you're not just enjoying a meal; you're embarking on a culinary adventure! For additional inspiration, check out my Honey Garlic Chicken or Skillet Pasta Sun for more delightful dishes to bring new flavors to your table!

Keto Buffalo Chicken Skillet Recipe FAQs

What type of chicken should I use for the Keto Buffalo Chicken Skillet?
For the best results, I recommend using diced chicken breast as it cooks quickly and remains lean. However, if you prefer a juicier, richer flavor, substituting with chicken thighs is a fantastic option!

How long can I store leftover Keto Buffalo Chicken Skillet in the fridge?
Absolutely! You can store leftovers in an airtight container in the refrigerator for up to 3 days. This way, you can enjoy the comforting flavors again without any hassle!

Can I freeze the Keto Buffalo Chicken Skillet?
Yes, you can! To freeze, place the skillet in a freezer-safe container after allowing it to cool completely. It can be stored for up to 2 months. When you're ready to enjoy it again, just thaw it in the fridge overnight and reheat gently on the stovetop.

What should I do if the sauce becomes grainy when reheating?
To prevent graininess, avoid overheating the sauce while reheating. If graininess occurs, add a splash of almond milk and stir gently over low heat until creamy again. This little trick restores the luscious texture!

Are there any dietary considerations for Paleo or gluten-free diets?
This Keto Buffalo Chicken Skillet is naturally gluten-free! For a Paleo-friendly twist, swap the cream cheese with a full-fat coconut cream or cashew cream. Always check labels for condiments like buffalo sauce to ensure they meet your dietary needs.

What if I can't find ranch seasoning?
No worries! You can easily make your own by combining 1 teaspoon of garlic powder, 1 teaspoon of onion powder, and 1 teaspoon of your favorite dried herbs (like dill or parsley). This will boost the flavor just like the store-bought ranch seasoning and fit perfectly in your Keto Buffalo Chicken Skillet!

Keto Buffalo Chicken Skillet

Keto Buffalo Chicken Skillet: Creamy Comfort in 20 Minutes

This Keto Buffalo Chicken Skillet brings creamy comfort and bold flavors in just 20 minutes, perfect for a quick dinner.
Print Recipe Pin Recipe
Prep Time 10 minutes mins
Cook Time 10 minutes mins
Total Time 20 minutes mins
Servings: 4 servings
Course: Dinner
Cuisine: American
Calories: 400
Ingredients Equipment Method Nutrition Notes

Ingredients
  

For the Skillet
  • 1 lb Chicken Breast Diced for quick cooking
  • 4 slices Bacon Can substitute with turkey bacon
  • 1 packet Ranch Seasoning Or homemade with garlic powder, onion powder, and dried herbs
  • 2 tbsp Butter Can replace with olive oil or ghee
For the Sauce
  • 4 oz Cream Cheese Or Neufchâtel cheese for a lower-fat option
  • ½ cup Almond Milk Adjust for desired consistency
  • 1 cup Cheddar Cheese Shredded, can also use Monterey Jack or Pepper Jack
  • ½ cup Buffalo Sauce Choose low-sugar or sugar-free versions

Equipment

  • Large skillet

Method
 

Step-by-Step Instructions
  1. Preheat the skillet over medium heat for 1 minute. Sauté diced chicken and chopped bacon for 5-7 minutes until golden and cooked through.
  2. Drain the excess grease and set chicken and bacon aside, keeping the drippings in the skillet.
  3. Reduce heat to low, add butter, cream cheese, and almond milk. Whisk until smooth over 3-4 minutes.
  4. Stir in cheddar cheese gradually until melted, increase heat to bubble then reduce to simmer for another 2-3 minutes.
  5. Return chicken and bacon to skillet, stir to coat, and heat on low for 2 minutes.
  6. Drizzle buffalo sauce over mixture, stir, and top with remaining cheddar. Cover and simmer for 5 minutes.
  7. For crispy cheese, broil for 1-2 minutes after simmering, keeping an eye on it.
  8. Let cool slightly before serving over leafy greens or cauliflower rice.

Nutrition

Serving: 1servingCalories: 400kcalCarbohydrates: 5gProtein: 30gFat: 30gSaturated Fat: 12gPolyunsaturated Fat: 2gMonounsaturated Fat: 5gCholesterol: 100mgSodium: 900mgPotassium: 600mgFiber: 1gSugar: 1gVitamin A: 500IUVitamin C: 1mgCalcium: 200mgIron: 2mg

Notes

Use a meat thermometer to ensure chicken is cooked to 165°F. Customize heat by adjusting buffalo sauce. Cook bacon ahead to save time, and consider adding veggies for nutrition.

Tried this recipe?

Let us know how it was!

Creamy Broccoli Cheese Pasta for a Cozy Weeknight Delight

May 27, 2026 by Grace Snow Leave a Comment

As I stood in my kitchen, the comforting aroma of melting cheese began to fill the air, instantly reminding me of my childhood family dinners. This Creamy Broccoli Cheese Pasta is the embodiment of simple comfort food, effortlessly marrying tender broccoli and sharp cheddar cheese in a rich, creamy sauce—what's not to love? In just 30 minutes, you can whip up this easy weeknight meal that’s not only delicious but also a healthier alternative to takeout. With options for gluten-free and vegan adaptations, it’s perfect for every table, making it a delightful choice for busy evenings when you crave something nourishing. Are you ready to dive into this creamy goodness that transforms dinner into a cozy gathering?

Why is Creamy Broccoli Cheese Pasta a must-try?

Creamy Bliss: This recipe offers a luxurious texture that balances entrees perfectly, enveloping pasta and broccoli in cheesy goodness.
Quick & Easy: Short on time? This meal comes together in just 30 minutes, making weeknight dinners a breeze!
Comfort Food Elevated: With its rich flavors and familiarity, this dish serves up nostalgia while keeping things fresh and vibrant.
Versatile Options: Go gluten-free or vegan with simple swaps, allowing everyone at your table to enjoy a delicious meal.
Crowd-Pleaser: Ideal for family dinners or casual gatherings, you’ll be the kitchen hero with this delightful comfort food that's sure to impress! For a twist, consider trying it alongside a refreshing Seafood Pasta Savory or a hearty Cauliflower Pasta Ready.

Creamy Broccoli Cheese Pasta Ingredients

• Ready to create this delight? Here’s everything you need!

For the Pasta

  • Short Pasta – Ideal shapes like penne or rotini hold the sauce beautifully; choose whole grain for added nutrition.

For the Cheese Sauce

  • Sharp Cheddar Cheese – The star of this creamy broccoli cheese pasta; ensure it’s gluten-free if needed.
  • Butter – Essential for creating a smooth roux that thickens the sauce to perfection.
  • All-Purpose Flour – Key ingredient for a creamy consistency; gluten-free flour works well as a substitute.
  • Milk (whole or low-fat) – Adds richness to the sauce; opt for plant-based alternatives for a vegan option.
  • Cream Cheese (optional) – Introduces an extra layer of creaminess; vegan cream cheese can be used if desired.
  • Garlic – Elevates the flavor profile; try toasted garlic for a deeper aroma.

For Enhancing Flavor

  • Broccoli – Fresh or frozen, it brings a crunchy texture and nutritional benefits to the dish.
  • Seasonings (salt, pepper, optional red pepper flakes) – Essential for taste; adjust to suit your palate.

This Creamy Broccoli Cheese Pasta is destined to be a hit on your dinner table, with its comforting flavors and generous servings. Prepare to enjoy a warm hug in a bowl!

Step‑by‑Step Instructions for Creamy Broccoli Cheese Pasta

Step 1: Cook the Pasta
Begin by bringing a large pot of salted water to a rolling boil over high heat. Add your choice of short pasta, like penne or rotini, and cook according to package directions, usually about 8–10 minutes, until al dente. Stir occasionally, ensuring that the pasta doesn’t stick together. Once done, drain the pasta and set aside, reserving some of the pasta water for later.

Step 2: Blanch the Broccoli
While the pasta cooks, fill a medium saucepan with water and bring it to a boil. Once boiling, add the fresh or thawed frozen broccoli florets for 2-3 minutes until they are vibrant green and tender-crisp. This quick blanching helps maintain their color and crunch. Drain the broccoli and set it aside, ready to mix into the creamy broccoli cheese pasta.

Step 3: Prepare the Roux
In a separate medium saucepan, melt 2 tablespoons of butter over medium heat. Once melted, whisk in 2 tablespoons of all-purpose flour, forming a roux. Continue whisking for about 1–2 minutes, allowing the roux to turn a light golden color, which helps to develop a rich flavor for the Creamy Broccoli Cheese Pasta sauce.

Step 4: Make the Cheese Sauce
Gradually pour in 2 cups of milk, whisking continuously to prevent lumps. Keep stirring until the mixture starts to thicken—this should take about 3–5 minutes. After the sauce reaches a creamy consistency, remove it from the heat and stir in 2 cups of shredded sharp cheddar cheese until it melts smoothly into the sauce.

Step 5: Combine Ingredients
Gently fold the drained pasta and blanched broccoli into the cheese sauce. Use a spatula to mix everything together, ensuring that the pasta and broccoli are well coated in that luscious sauce. If the mixture is too thick, add a splash of reserved pasta water to achieve your desired consistency for the Creamy Broccoli Cheese Pasta.

Step 6: Serve and Enjoy
Scoop the Creamy Broccoli Cheese Pasta into bowls while it’s hot, garnishing with additional shredded cheese or a sprinkle of black pepper, if desired. This comforting dish is best enjoyed warm, and it pairs beautifully with garlic bread or a crisp green salad for a complete meal that the whole family will love.

How to Store and Freeze Creamy Broccoli Cheese Pasta

Fridge: Store leftover creamy broccoli cheese pasta in an airtight container for up to 3 days. To reheat, warm it slowly on the stovetop, adding a splash of milk for creaminess.

Freezer: For longer storage, you can freeze the pasta for up to 2 months. Portion it into freezer-safe containers, allowing some space for expansion. Defrost in the fridge overnight before reheating.

Reheating: When ready to eat, reheat gently on low heat on the stovetop or microwave. Adding a little milk can help restore the creamy texture.

Separation Tip: If the sauce separates upon reheating, simply whisk in a bit of milk to bring it back to life, ensuring your creamy broccoli cheese pasta remains delicious.

Expert Tips for Creamy Broccoli Cheese Pasta

Fresh Cheese Matters: Always opt for freshly shredded cheddar cheese as it melts beautifully. Pre-packaged cheese often contains anti-caking agents, preventing that smooth texture.

Perfect Sauce Consistency: If your sauce becomes too thick, don't fret! Gradually incorporate reserved pasta water or additional milk until you reach that creamy balance perfect for your creamy broccoli cheese pasta.

Blanch Wisely: When blanching broccoli, time it right! Just 2-3 minutes should maintain that vibrant green color and tender-crisp texture; overcooking will result in a mushy mess.

Whisk Steadily: To avoid lumps in your cheese sauce, whisk your roux continuously while adding milk. A steady hand ensures a velvety smooth finish for your creamy broccoli cheese pasta.

Spice it Up: For added flavor depth, consider adding garlic powder or a dash of red pepper flakes to the sauce for an inviting kick that elevates the cheesy goodness.

What to Serve with Creamy Broccoli Cheese Pasta

Elevate your dinner experience with these delightful pairings that complement the comforting flavors of this creamy dish.

  • Garlic Bread: The irresistible crunch of toasted garlic bread adds a savory touch, perfect for scooping up every last bite of sauce.

  • Mixed Green Salad: A light, refreshing salad tossed with a tangy vinaigrette balances the rich creaminess, bringing a vibrant crunch to your meal experience. The freshness of greens ensures a delightful contrast.

  • Roasted Vegetables: Sweet, caramelized roasted veggies like carrots and bell peppers harmonize with the pasta, adding earthy flavors and additional nutrients.

  • Steamed Asparagus: Tender asparagus spears provide a delightful snap with every bite, making for a lovely, healthful pairing that complements the creamy texture beautifully.

  • Wine Pairing: A chilled glass of Pinot Grigio complements the cheesy richness while bringing light, crisp flavors that enhance the entire meal.

  • Chocolate Mousse: For dessert, indulge in a smooth chocolate mousse. Its rich, velvety texture follows the creamy pasta perfectly, culminating your meal on a sweet note.

With these delicious accompaniments, your creamy broccoli cheese pasta transforms into a memorable dining experience the whole family will love!

Creamy Broccoli Cheese Pasta Variations

Feel free to let your culinary imagination run wild with these delightful twists that can elevate your creamy broccoli cheese pasta experience!

  • Vegan Option: Swap out dairy cheese for plant-based cheese and milk alternatives to maintain that creamy richness while keeping it vegan-friendly.

  • Protein Boost: Add shredded rotisserie chicken or cooked sausage for a heartier meal that transforms the dish into a protein-packed feast.

  • Cheese Variety: Experiment by substituting sharp cheddar with Gouda, Monterey Jack, or even a sharp blue cheese for a new flavor profile that excites the palate.

  • Spice It Up: Amp up the flavor with a pinch of cayenne or crushed red pepper flakes. A touch of heat will beautifully balance out the creaminess.

  • Lemon Zest: Introduce a sparkle of freshness by adding a splash of lemon juice or a sprinkle of lemon zest right before serving. It brings out the natural flavors of the broccoli.

  • Herbs Galore: Fresh herbs like thyme, basil, or parsley can give your dish an aromatic boost. Add them towards the end for a wonderful fragrance that tantalizes.

  • Nutty Crunch: Stir in roasted nuts or seeds like pine nuts or sunflower seeds for added texture and nutritious benefits. They provide a pleasant crunch that contrasts beautifully with the creamy pasta.

  • Mix in Greens: Incorporate other veggies such as spinach or kale to increase the nutritional aspect while adding vibrant colors. They fold beautifully into the dish for a healthy spin.

Exploring these variations can not only tailor the dish to your preferences but also keep dinner exciting! For more inspirations, you might also enjoy pairing with a Skillet Pasta Sun or experimenting with a comforting Potato Blue Cheese that captures the essence of comfort food!

Make Ahead Options

These Creamy Broccoli Cheese Pasta preparations are a lifesaver for busy weeknights! You can prep the cheese sauce and blanched broccoli up to 24 hours in advance. Simply store the cheese sauce in an airtight container in the refrigerator, ensuring it’s cooled before sealing to maintain flavor and freshness. The blanched broccoli can be stored separately to preserve its crispness. When you’re ready to enjoy this comforting dish, reheat the cheese sauce gently on the stove over low heat, adding a splash of milk if it thickens too much. Combine it with freshly cooked pasta and broccoli, and you'll have a deliciously creamy dinner that feels just as special, with all the prep completed ahead of time!

Creamy Broccoli Cheese Pasta Recipe FAQs

How do I choose the right broccoli?
Absolutely! When selecting broccoli, look for firm, vibrant green florets without any dark spots or yellowing, as this indicates freshness. Fresh broccoli should feel dense and heavy for its size. If using frozen broccoli, ensure it's free from ice crystals.

What’s the best way to store leftover pasta?
After enjoying your Creamy Broccoli Cheese Pasta, store leftovers in an airtight container in the refrigerator for up to 3 days. To keep it creamy when reheating, warm it slowly on the stovetop, adding a splash of milk to rehydrate the sauce.

Can I freeze Creamy Broccoli Cheese Pasta?
Very! To freeze, portion the pasta into freezer-safe containers, leaving a little room for expansion, and seal tightly. It can be stored for up to 2 months. When ready to enjoy, defrost in the refrigerator overnight and reheat gently, using a bit of milk if needed to restore creaminess.

What should I do if my cheese sauce is too lumpy?
I’ve been there! If your cheese sauce turns lumpy, use an immersion blender or transfer it to a standard blender to smooth it out. Alternatively, whisk it vigorously while adding a splash of more milk to loosen the mixture until you achieve a silky texture.

Are there any dietary considerations for this dish?
Definitely! For a gluten-free option, ensure you use a gluten-free pasta and flour. For a vegan adaptation, swap out dairy ingredients with plant-based alternatives, such as cashew cream or vegan cheese. It's a comforting dish that can be enjoyed by everyone!

How can I make the sauce less thick?
If you find your sauce is too thick for your liking, simply add reserved pasta water or a little extra milk gradually while stirring. This will help you achieve the creamy consistency that pairs beautifully with the pasta and broccoli without sacrificing flavor.

Creamy Broccoli Cheese Pasta

Creamy Broccoli Cheese Pasta for a Cozy Weeknight Delight

This Creamy Broccoli Cheese Pasta is a comforting dish that combines tender broccoli and sharp cheddar cheese in a rich, creamy sauce—perfect for weeknight dinners.
Print Recipe Pin Recipe
Prep Time 15 minutes mins
Cook Time 15 minutes mins
Total Time 30 minutes mins
Servings: 4 servings
Course: Dinner
Cuisine: American
Calories: 450
Ingredients Equipment Method Nutrition Notes

Ingredients
  

For the Pasta
  • 8 ounces Short Pasta (penne or rotini) Choose whole grain for added nutrition.
For the Cheese Sauce
  • 2 cups Sharp Cheddar Cheese Ensure it's gluten-free if needed.
  • 2 tablespoons Butter Essential for creating a smooth roux.
  • 2 tablespoons All-Purpose Flour Gluten-free flour can be used as a substitute.
  • 2 cups Milk Use whole or low-fat; opt for plant-based alternatives for vegan.
  • 4 ounces Cream Cheese Optional for added creaminess; vegan cream cheese can be used.
  • 2 cloves Garlic Try toasted garlic for a deeper aroma.
For Enhancing Flavor
  • 2 cups Broccoli Fresh or frozen.
  • 1 teaspoon Salt Adjust to taste.
  • 1 teaspoon Pepper Adjust to taste.
  • Red Pepper Flakes Optional, adjust to taste.

Equipment

  • Large pot
  • Medium saucepan
  • Whisk
  • Spatula

Method
 

Step-by-Step Instructions
  1. Cook the Pasta by bringing a large pot of salted water to a boil. Add the short pasta and cook according to package directions until al dente, about 8-10 minutes. Drain and set aside.
  2. Blanch the Broccoli in boiling water for 2-3 minutes. Drain and set aside.
  3. Prepare the Roux by melting butter in a saucepan and whisking in flour until it turns golden.
  4. Make the Cheese Sauce by gradually adding milk to the roux, whisking until thickened. Stir in cheddar cheese until melted.
  5. Combine Ingredients by folding in the drained pasta and blanched broccoli into the cheese sauce.
  6. Serve and Enjoy hot, optionally garnishing with additional cheese or black pepper.

Nutrition

Serving: 1bowlCalories: 450kcalCarbohydrates: 50gProtein: 20gFat: 20gSaturated Fat: 10gPolyunsaturated Fat: 1gMonounsaturated Fat: 5gCholesterol: 50mgSodium: 800mgPotassium: 600mgFiber: 4gSugar: 3gVitamin A: 500IUVitamin C: 40mgCalcium: 300mgIron: 2mg

Notes

For best results, use freshly shredded cheddar cheese and adjust sauce consistency with reserved pasta water if too thick.

Tried this recipe?

Let us know how it was!

Savor Juicy Beef and Broccoli Ramen Noodles in 30 Minutes

May 27, 2026 by Grace Snow Leave a Comment

Rushing through the week can leave us craving something more satisfying than takeout, and that’s exactly when my Quick Juicy Beef and Broccoli Ramen Noodles come to the rescue. In just under 30 minutes, you'll transform simple ingredients into a vibrant one-pan meal that's not only hearty but also incredibly easy to whip up. With tender, juicy beef paired with crisp broccoli and silky ramen noodles, this dish is a perfect fit for busy nights when a comforting, homemade dinner is calling. Plus, the versatility of this recipe means you can easily adapt it with various cuts of meat or even swap in your favorite veggies. Ready to elevate your weeknight dinners? Let’s dive into the flavors of this scrumptious meal!

Why Make Juicy Beef and Broccoli?

Quick Preparation: In just 30 minutes, you can enjoy a wholesome dinner without compromising on flavor.

Flavor Explosion: The savory sauce harmonizes perfectly with tender beef, making every bite a taste sensation.

Versatile Ingredients: Feel free to use any cut of beef or add your favorite veggies, like bell peppers or snap peas, for a custom twist.

One-Pan Wonder: Clean-up is a breeze! Cook everything in one skillet, reducing your workload and hassle at meal time.

Crowd-Pleasing Meal: Perfect for family dinners or gatherings, this dish is sure to impress even the pickiest eaters.

If you’re looking for more quick and delicious recipes, check out my Gochujang Sesame Noodles or Chicken Teriyaki Noodles for an easy weeknight treat!

Juicy Beef and Broccoli Ingredients

• Whip up your delicious dish with these must-have ingredients!

For the Sauce

  • Soy Sauce – Adds saltiness and umami to the dish. Substitution: Tamari for a gluten-free option.
  • Honey – Provides sweetness to balance the salty flavors. Substitution: Maple syrup for a vegan option.
  • Hoisin Sauce – Adds depth and a touch of sweetness. Substitution: Replace with a mix of soy sauce and brown sugar for a similar flavor.
  • Beef Broth – Enhances the savory flavor of the sauce. Substitution: Vegetable broth offers a lighter version.
  • Sesame Oil – Contributes a rich, nutty flavor. Substitution: Olive oil can be used in a pinch, though flavor will differ.
  • Cornstarch – Thickens the sauce for a silky finish. Note: Must be mixed well to avoid lumps.
  • Red Pepper Flakes – Adds a hint of heat. Adjust based on your spice preference.

For the Noodles and Vegetables

  • Ramen Noodles – Serves as the main carbohydrate for this dish. Note: Discard the seasoning packets before use.
  • Broccoli – Provides color, crunch, and loads of nutrients. Tip: Cut into small florets for even cooking.

For the Beef

  • Sirloin Steak – Offers a tender protein source for this recipe. Substitution: Flank steak, skirt steak, or ribeye also work well.

Aromatics

  • Garlic – Infuses the sauce with aromatic flavor. Use fresh for the best results.
  • Ginger – Provides warmth and a touch of brightness. Fresh ginger is preferred, but ground ginger can be a substitute.

Cooking Essentials

  • Oil for Cooking – Essential for sautéing the beef. Olive oil is recommended for enhanced flavor.

Take these ingredients and let the magic of Juicy Beef and Broccoli Ramen Noodles unfold in your kitchen!

Step‑by‑Step Instructions for Juicy Beef and Broccoli Ramen Noodles

Step 1: Prepare the Sauce
In a medium bowl, whisk together soy sauce, honey, hoisin sauce, beef broth, sesame oil, minced garlic, ginger, cornstarch, and red pepper flakes until the mixture is smooth and slightly thickened. This savory sauce will be the star of your Juicy Beef and Broccoli Ramen Noodles, so ensure all ingredients are well combined to create a rich flavor base.

Step 2: Prep Ingredients
Thinly slice the sirloin against the grain and season it lightly with salt and pepper. Next, cut the broccoli into small florets for even cooking. To prepare the ramen noodles, boil a pot of water and cook the noodles for 2-3 minutes, then drain and rinse them under cold water to prevent sticking. Set everything aside as you get ready to cook.

Step 3: Cook Beef
Heat a large skillet or wok over medium-high heat and add olive oil. Once the oil shimmers, add the sliced sirloin in a single layer and sear for about 3 minutes without stirring, allowing a crust to form. After that, stir the beef and cook for an additional 2-3 minutes until medium-rare, then remove the beef from the skillet and set it aside.

Step 4: Steam Broccoli
In the same skillet, add the broccoli florets and ½ cup of water. Cover with a lid and steam the broccoli for about 2 minutes until vibrant green and tender-crisp. After steaming, remove the lid to let any excess water evaporate, enhancing the final flavor in your dish before moving on to the next step.

Step 5: Combine Ingredients
Return the cooked beef to the skillet with the steamed broccoli and the ramen noodles. Pour the prepared sauce over the mixture, ensuring everything is coated evenly. Stir constantly for 2-3 minutes, allowing the sauce to thicken and cling beautifully to the ingredients. The Juicy Beef and Broccoli Ramen Noodles will be turning into a glossy, mouthwatering delight.

Step 6: Serve and Garnish
Once thickened, divide the Juicy Beef and Broccoli Ramen Noodles into bowls. For an added touch of flavor and crunch, sprinkle sesame seeds on top and serve with a side of sriracha for those who enjoy a little heat. This comforting meal is ready to be enjoyed!

Variations & Substitutions for Juicy Beef and Broccoli Ramen Noodles

Feel free to play around with this recipe and make it your own, transforming it into something truly special for your family!

  • Gluten-Free: Use rice noodles instead of ramen to cater to gluten sensitivities while keeping it just as delicious.
  • Vegetarian: Swap the beef for tofu or tempeh and add extra veggies like bell peppers or snap peas for great protein and color.
  • Spicy Kick: Add sriracha directly into the sauce while mixing or top with fresh chili slices just before serving for that fiery punch.
  • Flavor Boost: Experiment with additional sauces—try adding a splash of oyster sauce for extra umami or a hint of lime juice for brightness.
  • Crunchy Toppings: Sprinkle some toasted peanuts or sliced almonds over the finished dish for a satisfying crunch that brings added texture.
  • Extra Veggies: Toss in baby bok choy, shredded carrots, or mushrooms for a flavor-packed nutrient boost. The more colorful, the better!
  • Coconut Swirl: Substitute some of the beef broth with coconut milk for a creamy, tropical twist, balancing perfectly with the savory elements.
  • Nutty Flavor: Drizzle a little extra sesame oil before serving to enhance the nutty notes in the dish, making every bite sing.

If you're on the hunt for even more inspiring recipes, try my Coconutty Beans and Greens Stew for a cozy, hearty meal or enjoy some delightful Roasted Corn Tacos for a fresh twist!

What to Serve with Juicy Beef and Broccoli Ramen Noodles

Transform your weeknight dinner into a vibrant feast by pairing your noodles with delightful sides and drinks that elevate the meal.

  • Crispy Vegetable Spring Rolls: These crunchy delights provide a satisfying contrast, adding a pop of freshness to the dish.

  • Classic Pot Stickers: Their savory filling complements the rich flavors of your ramen, making for a truly comforting meal experience.

  • Simple Cucumber Salad: A refreshing side that balances the hearty nature of the ramen and provides a crisp element.

  • Garlic Soy Edamame: This protein-packed snack mirrors the umami flavors and makes for a delightful appetizer or side.

  • Green Tea: A warm cup can cleanse the palate and enhance the dining experience, binding together the meal with its subtle earthiness.

  • Mango Sorbet: Finish on a sweet note with this light dessert, cleansing the palate while embracing tropical fruity freshness.

Let your culinary creativity shine as you explore these pairings, ensuring a satisfying and complete dinner experience every time!

Tips for the Best Juicy Beef and Broccoli

  • Choose Quality Beef: Use tender cuts like sirloin for optimal flavor; avoid overcooking to ensure juicy results.

  • Rinse Ramen: After boiling, rinse the ramen noodles under cold water to prevent them from sticking together; this maintains the perfect texture.

  • Steam Broccoli Efficiently: Cut broccoli into bite-sized florets for even cooking; larger pieces may require extra time, resulting in less than optimal texture.

  • Mix Sauce Properly: Whisk the sauce ingredients thoroughly to avoid lumps from the cornstarch, ensuring a smooth coating for your Juicy Beef and Broccoli Ramen Noodles.

  • Customize Spice Level: Adjust the amount of red pepper flakes to suit your taste; start with less if you're unsure, and add more gradually for heat!

Make Ahead Options

These Juicy Beef and Broccoli Ramen Noodles are perfect for meal prep, allowing you to enjoy a delicious dinner without the stress on a busy weeknight! You can slice the sirloin and cut the broccoli (up to 24 hours in advance), storing them separately in airtight containers in the refrigerator to maintain freshness. The savory sauce can also be prepared ahead and kept in the fridge for up to 3 days; just mix it well before use. When you’re ready to serve, simply cook the ramen noodles according to package instructions, combine everything in a skillet, and heat through for a quick, satisfying dish that tastes just as good as when made fresh!

How to Store and Freeze Juicy Beef and Broccoli Ramen Noodles

Fridge: Store leftovers in an airtight container for up to 3 days to maintain freshness.

Freezer: Freeze the beef and broccoli mix (without noodles) for up to 2 months. Divide into portions for easy reheating.

Reheating: Sauté in a skillet with a splash of broth or water, or microwave with added liquid for even warming. Ensure the noodles are included when reheating for best taste!

Juicy Beef and Broccoli Ramen Noodles Recipe FAQs

How do I choose the best beef for this dish?
Absolutely! For the best flavor and texture, opt for tender cuts like sirloin or flank steak. Look for beef that is bright red with minimal dark spots, as this indicates freshness. Avoid any cuts that appear discolored or have visible fat, which can negatively impact the dish's overall flavor. Cutting the beef against the grain will ensure each bite is tender and juicy.

How should I store leftovers of Juicy Beef and Broccoli Ramen Noodles?
Very good question! Store any leftovers in an airtight container in the fridge for up to 3 days. It's essential to let the dish cool down before sealing it to prevent condensation, which can make the noodles soggy. When you're ready to enjoy it again, simply reheat it on the stove with a splash of broth or water to keep everything moist and delicious!

Can I freeze the Juicy Beef and Broccoli Ramen Noodles?
Certainly! For optimal freezing, I recommend separating the beef and broccoli mix from the noodles. You can freeze the beef and broccoli for up to 2 months. To do this, let it cool completely, then portion it into freezer bags or airtight containers, removing as much air as possible to prevent freezer burn. When you're ready to eat, thaw it in the fridge overnight and reheat on the stove.

What if my sauce turns out lumpy?
No worries, this can happen to the best of us! If your sauce forms lumps due to cornstarch, whisk it vigorously in a bowl until smooth before adding it back to the skillet. To avoid lumps in the first place, make sure to dissolve the cornstarch in a bit of cold water before incorporating it into the sauce. This technique creates a smoother texture right from the start!

Is this dish suitable for a gluten-free diet?
Absolutely! You can easily make this dish gluten-free by selecting tamari in place of soy sauce and ensuring the beef broth is also gluten-free. Just be sure to check the labels for any hidden gluten ingredients. This way, everyone can indulge in the tasty flavors of Juicy Beef and Broccoli Ramen Noodles without worry!

How can I customize the vegetables in this dish?
Very easy! Feel free to add or substitute your favorite vegetables such as bell peppers, snap peas, or even carrots. Just remember to cut them into small, uniform pieces to ensure even cooking. You can add these veggies when you steam the broccoli, allowing them to soften slightly while keeping their vibrant colors and nutrients intact. The more, the merrier!

Juicy Beef and Broccoli Ramen Noodles

Savor Juicy Beef and Broccoli Ramen Noodles in 30 Minutes

Enjoy quick and easy Juicy Beef and Broccoli Ramen Noodles, perfect for busy weeknights.
Print Recipe Pin Recipe
Prep Time 15 minutes mins
Cook Time 15 minutes mins
Total Time 30 minutes mins
Servings: 4 servings
Course: Dinner
Cuisine: Asian
Calories: 450
Ingredients Equipment Method Nutrition Notes

Ingredients
  

For the Sauce
  • 1/4 cup Soy Sauce Substitution: Tamari for a gluten-free option.
  • 2 tablespoons Honey Substitution: Maple syrup for a vegan option.
  • 2 tablespoons Hoisin Sauce Substitution: Replace with a mix of soy sauce and brown sugar for a similar flavor.
  • 1/2 cup Beef Broth Substitution: Vegetable broth offers a lighter version.
  • 1 tablespoon Sesame Oil Substitution: Olive oil can be used in a pinch, though flavor will differ.
  • 1 tablespoon Cornstarch Must be mixed well to avoid lumps.
  • 1/2 teaspoon Red Pepper Flakes Adjust based on your spice preference.
For the Noodles and Vegetables
  • 8 ounces Ramen Noodles Discard the seasoning packets before use.
  • 2 cups Broccoli Cut into small florets for even cooking.
For the Beef
  • 1 pound Sirloin Steak Substitution: Flank steak, skirt steak, or ribeye also work well.
Aromatics
  • 2 cloves Garlic Use fresh for the best results.
  • 1 tablespoon Ginger Fresh ginger is preferred, but ground ginger can be a substitute.
Cooking Essentials
  • 2 tablespoons Oil for Cooking Olive oil is recommended for enhanced flavor.

Equipment

  • Skillet
  • medium bowl
  • pot

Method
 

Step-by-Step Instructions
  1. In a medium bowl, whisk together soy sauce, honey, hoisin sauce, beef broth, sesame oil, minced garlic, ginger, cornstarch, and red pepper flakes until the mixture is smooth and slightly thickened.
  2. Thinly slice the sirloin against the grain and season it lightly with salt and pepper. Cut the broccoli into small florets. Boil a pot of water and cook the ramen noodles for 2-3 minutes, then drain and rinse under cold water.
  3. Heat a large skillet over medium-high heat and add olive oil. Add the sliced sirloin in a single layer and sear for about 3 minutes. Stir and cook for an additional 2-3 minutes until medium-rare, then remove from skillet.
  4. In the same skillet, add broccoli florets and ½ cup of water. Cover with a lid and steam for about 2 minutes until vibrant green.
  5. Return the cooked beef to the skillet with steamed broccoli and ramen noodles. Pour the prepared sauce over everything, stirring constantly for 2-3 minutes.
  6. Divide the Juicy Beef and Broccoli Ramen Noodles into bowls and sprinkle sesame seeds on top. Serve with a side of sriracha.

Nutrition

Serving: 1bowlCalories: 450kcalCarbohydrates: 55gProtein: 30gFat: 15gSaturated Fat: 3gPolyunsaturated Fat: 1gMonounsaturated Fat: 10gCholesterol: 80mgSodium: 900mgPotassium: 600mgFiber: 3gSugar: 6gVitamin A: 50IUVitamin C: 30mgCalcium: 50mgIron: 3mg

Notes

Choose quality beef for optimal flavor; rinse ramen to maintain texture and steam broccoli efficiently.

Tried this recipe?

Let us know how it was!

One-Pan Cowboy Garlic Chicken & Potatoes Dinner for Easy Comfort

May 25, 2026 by Grace Snow Leave a Comment

As the aroma of garlic and herbs wafts through the kitchen, I can’t help but feel a sense of comfort and warmth—just what I need after a long day. This One-Pan Cowboy Garlic Chicken & Potatoes Dinner is my go-to recipe for busy weeknights when I crave something hearty without the fuss. With tender chicken thighs nestled among fluffy baby potatoes and a rich, buttery sauce, this dish not only delivers delightful flavors but also guarantees minimal cleanup—a true blessing in today’s fast-paced world. Whether you're cooking for a family gathering or just treating yourself to a soothing meal, this one-pan wonder is sure to impress. Ready to dive into this delightful journey of food? Let's get cooking!

Why is This One-Pan Meal Perfect?

Simplicity at its Finest: This One-Pan Cowboy Garlic Chicken & Potatoes recipe requires minimal ingredients and can be prepared with just one skillet, making cleanup a breeze—ideal for busy nights!

Flavor Explosion: The delightful combination of garlic, herbs, and smoked paprika envelops the chicken and potatoes, creating a dish that's bursting with savory goodness, tantalizing your taste buds with each bite.

Versatile Delight: Feel free to swap chicken thighs for breasts or incorporate seasonal veggies like bell peppers for a personal touch. Explore variations, such as pairing it with Honey Garlic Chicken for an extra flavor twist!

Crowd-Pleasing Appeal: This comforting dish is guaranteed to satisfy everyone at the table, from family meals to dinner parties, leaving them asking for seconds!

Quick Cook Time: With just 30 minutes in the oven, you get a hearty meal without the hassle, allowing you to enjoy more time with loved ones.

Overall, if you’re looking for a cozy dish that’s easy to make, delicious, and perfect for any occasion, this recipe is your ticket to a quick and satisfying dinner experience!

One-Pan Cowboy Garlic Chicken & Potatoes Ingredients

For the Chicken

  • Chicken Thighs – Boneless, skinless thighs are ideal for this one-pan recipe, keeping the meat moist and flavorful.
  • Olive Oil – A good cooking fat for searing; can be substituted with canola oil if needed.
  • Salt and Black Pepper – Essential for seasoning; adjust to your taste.

For the Potatoes

  • Baby Potatoes – Yukon Gold or red potatoes work well, ensuring you cut them into equal-sized chunks for even cooking.
  • Unsalted Butter – Adds a rich depth to the sauce; swap with extra olive oil for a dairy-free version.

For Aromatics and Seasoning

  • Garlic (minced) – Fresh garlic brings a robust aromatic flavor; it's preferable for the best taste.
  • Smoked Paprika – Infuses the dish with a smoky undertone; regular paprika can work as a substitute.
  • Garlic Powder – Boosts the overall garlic flavor; consider adding more fresh garlic if desired.
  • Onion Powder – Adds savory depth to the mix.
  • Dried Rosemary & Dried Thyme – These herbs bring earthy flavors; fresh varieties can be used but may need adjustment in amounts.
  • Chili Flakes (optional) – A pinch introduces a mild heat; feel free to omit if you prefer a milder flavor.

For the Sauce

  • Low-Sodium Chicken Broth – Provides moisture and a base flavor; vegetable broth works well for a vegetarian option.
  • Lemon Juice – Brightens the dish with a fresh zing; adjust according to your zest preference.

For Serving

  • Fresh Parsley (chopped) – A lovely garnish that adds freshness; you can also use other herbs like basil or cilantro for variation.

This One-Pan Cowboy Garlic Chicken & Potatoes dinner is a delightfully simple yet flavorful meal everyone will love!

Step‑by‑Step Instructions for One-Pan Cowboy Garlic Chicken & Potatoes Dinner

Step 1: Preheat the Oven
Begin by preheating your oven to 400°F (200°C). This step ensures that your One-Pan Cowboy Garlic Chicken & Potatoes Dinner cooks evenly and effectively, setting the stage for perfectly golden chicken thighs and tender potatoes. While the oven heats up, you can prep the chicken to maximize your cooking time.

Step 2: Prepare the Chicken
Pat the boneless, skinless chicken thighs dry with paper towels, removing any excess moisture. Then, sprinkle a mix of smoked paprika, garlic powder, onion powder, salt, and black pepper generously over both sides. This flavorful seasoning will infuse the chicken with a robust taste during cooking and help achieve that beautiful golden exterior.

Step 3: Sear the Chicken
In a large, oven-safe skillet, heat 2 tablespoons of olive oil over medium-high heat. Once the oil is shimmering, carefully add the seasoned chicken thighs and sear them for 3–4 minutes on each side until they turn a lovely golden-brown. This step locks in the moisture of the chicken, enhancing the overall flavor. After searing, remove the chicken from the skillet and set it aside.

Step 4: Make the Sauce Base
Lower the heat to medium and add the remaining olive oil, followed by 1 tablespoon of unsalted butter to the same skillet. Once the butter has melted, toss in the minced garlic and sauté for about 1 minute, stirring constantly until the garlic is fragrant and just beginning to brown. This aromatic base sets the tone for your One-Pan Cowboy Garlic Chicken & Potatoes Dinner.

Step 5: Combine Potatoes and Herbs
Add the halved baby potatoes to the skillet, along with the sautéed garlic, dried rosemary, dried thyme, chili flakes (if using), and additional seasoning to taste. Toss everything together until the potatoes are well coated with the buttery garlic and herb mixture, ensuring even flavor distribution. This colorful combination will contribute to a hearty base for your dish.

Step 6: Deglaze and Arrange
Pour in the low-sodium chicken broth, using a spatula to scrape up any brown bits stuck to the bottom of the skillet—this adds depth to your sauce. Next, place the seared chicken thighs gently on top of the seasoned potatoes. The broth will keep everything moist as it bakes, enhancing the flavors of your One-Pan Cowboy Garlic Chicken & Potatoes Dinner.

Step 7: Bake to Perfection
Transfer the skillet to your preheated oven and bake for 25–30 minutes. You're looking for an internal temperature of 165°F (74°C) in the chicken, and the potatoes should be tender. Keep an eye on the chicken as it bakes, ensuring it doesn't overcook, so it remains juicy and flavorful.

Step 8: Finish and Serve
Once the chicken and potatoes are beautifully cooked, remove the skillet from the oven. Drizzle fresh lemon juice over the dish for a bright finish, and garnish with chopped fresh parsley. Serve directly from the skillet for a rustic presentation that encourages family-style dining, making your One-Pan Cowboy Garlic Chicken & Potatoes Dinner a delight for both the eyes and taste buds!

What to Serve with One-Pan Cowboy Garlic Chicken & Potatoes

To elevate your dining experience, consider these fantastic pairings that will harmonize beautifully with your cozy one-pan dinner.

  • Garlic Bread: The crunch and buttery flavor of garlic bread makes it the perfect side to mop up the delicious sauce from your chicken and potatoes.
  • Green Salad: A fresh, crisp salad with mixed greens and a light vinaigrette provides a refreshing contrast to the savory richness of the dish.
  • Steamed Broccoli: With its tender yet crunchy texture, steamed broccoli adds a lovely pop of color and nutritious balance to your meal.
  • Creamy Coleslaw: The tangy crunch of coleslaw offers a delightful texture contrast and lightens the overall meal with its crisp cabbage and zesty dressing.
  • Roasted Asparagus: This seasonal delight brings a nutty flavor and sophisticated touch, making it a perfect companion to your hearty dinner.
  • Herb-Infused Rice: Fluffy rice cooked with herbs enhances the meal while absorbing any leftover sauce, creating an even more satisfying bite.
  • Homemade Cornbread: Slightly sweet, buttery cornbread pairs wonderfully, adding a comforting, warm element to your dinner.
  • Red Wine: A glass of smooth red wine, like a Merlot or Pinot Noir, beautifully complements the smoked paprika and garlic flavors in the dish.
  • Chocolate Mousse: For a sweet finish, a rich chocolate mousse offers creamy indulgence that balances the savory meal with a touch of elegance.

Make Ahead Options

This One-Pan Cowboy Garlic Chicken & Potatoes Dinner is perfect for meal prep enthusiasts! You can season the chicken and toss the potatoes with the garlic and herbs up to 24 hours in advance; simply store them separately in airtight containers in the refrigerator to maintain their freshness. When you're ready to cook, preheat your oven, place the seared chicken on the potato mixture, and bake as directed. To ensure everything is just as delicious, make sure to keep the chicken seasoned until you are ready to cook, helping to lock in the flavors. This way, you can enjoy a comforting homemade meal with minimal effort, making busy weeknights a breeze.

Storage Tips for One-Pan Cowboy Garlic Chicken & Potatoes

Fridge: Store leftovers in an airtight container for up to 3–4 days. This preserves the flavors of your One-Pan Cowboy Garlic Chicken & Potatoes while keeping them fresh for later meals.

Freezer: If you need to freeze this dish, transfer it to a freezer-safe container and it will last up to 3 months. To reheat, thaw in the fridge overnight before warming up.

Reheating: Reheat your chicken and potatoes at 350°F (175°C) in the oven until warmed through, about 20-25 minutes. This helps maintain the dish's wonderful texture and flavor.

Meal Prep Tip: Consider preparing this dish in advance for busy nights—just heat and serve when you're ready for a comforting meal!

One-Pan Cowboy Garlic Chicken & Potatoes Variations

Feel free to explore delicious tweaks to make this comforting dish your own!

  • Chicken Breasts: Swap chicken thighs for boneless breasts for a lighter meal—just monitor the cooking time to keep them juicy.
  • Different Potatoes: Try fingerling potatoes or purple potatoes for added color and texture; they also roast beautifully.
  • Seasonal Veggies: Mix in green beans or sliced bell peppers for a fresh twist—these add vibrant color and nutrition to the dish.
  • Herb Boost: Replace dried herbs with a handful of fresh rosemary and thyme for a more aromatic, robust flavor profile that'll elevate every bite.
  • Spicy Kick: Add diced jalapeños or a dash of hot sauce for a fiery flair that ignites your taste buds—perfect for heat lovers!
  • Pesto Infusion: Swirl in some basil pesto before baking for a unique and herby flavor that complements the garlic beautifully.
  • Creamy Upgrade: For a luscious twist, stir in a splash of cream or a spoonful of cream cheese in the last few minutes of baking.
  • Sweet Surprise: Add a handful of sweet corn or peas for a pop of sweetness that complements the savory elements in this dish.

Don’t hesistate to check out my recipes for Honey BBQ Chicken and Chipotle Lime Chicken for more inspiration!

Expert Tips for One-Pan Cowboy Garlic Chicken & Potatoes

  • Chicken Choice: Use skinless, boneless thighs for moistness. If using breasts, monitor closely to prevent drying out since they cook faster.
  • Optimal Potatoes: Cut potatoes into even-sized chunks for consistent cooking and tenderness throughout. This ensures all pieces are perfectly roasted.
  • Seasoning Balance: Don't skimp on the garlic and herbs! Fresh garlic yields the best flavor, while dried herbs can be adjusted based on preference—just remember, fresh can be stronger.
  • Add Veggies: Feel free to mix in seasonal vegetables like carrots or green beans for added nutrients and color, making your One-Pan Cowboy Garlic Chicken & Potatoes even more versatile!
  • Storage Know-How: Store any leftovers in an airtight container; they'll keep for up to 3–4 days in the fridge, but be sure to reheat at 350°F (175°C) for best results.
  • Creamy Sauce Tip: For a creamier sauce, stir in a splash of heavy cream or a tablespoon of cream cheese during the last 5 minutes of baking—perfect for indulging!

One-Pan Cowboy Garlic Chicken & Potatoes Recipe FAQs

What type of potatoes should I use for this recipe?
I recommend using baby Yukon Gold or red potatoes as they hold their shape well and cook evenly. If those are unavailable, feel free to use fingerling or another type of waxy potato, just ensure they're cut into similar sizes for consistent cooking.

How should I store leftovers from the One-Pan Cowboy Garlic Chicken & Potatoes?
Leftovers can be stored in an airtight container in the fridge for up to 3–4 days. To keep the flavors intact, ensure the container is sealed tightly. You can reheat them in the oven at 350°F (175°C) until warmed through, which typically takes about 20-25 minutes.

Can I freeze the One-Pan Cowboy Garlic Chicken & Potatoes?
Absolutely! To freeze, transfer any cooled leftovers into a freezer-safe container. This dish can last up to 3 months in the freezer. When you're ready to enjoy it again, let it thaw overnight in the fridge and reheat using the oven for best texture and flavor.

What should I do if the chicken is overcooked?
If the chicken turns out dry, try adding a splash of chicken broth or a bit of lemon juice while reheating to moisten it. Next time, be sure to check the internal temperature with a meat thermometer; the chicken should reach 165°F (74°C) for optimal juiciness.

Are there any dietary concerns I should be aware of with this recipe?
If you have dietary restrictions, this recipe is quite flexible! You can substitute the chicken with tofu or chickpeas for a vegetarian version and use vegetable broth instead of chicken broth. For those with dairy allergies, simply replace unsalted butter with additional olive oil for a delicious dairy-free alternative.

How can I adjust the seasoning if I prefer a different flavor profile?
Feel free to play around with the spices and herbs according to your taste preferences! If you're not a fan of smoked paprika, regular paprika will do, and you can also add other spices like cumin or oregano. The more the merrier, so don’t hesitate to make it your own!

One-Pan Cowboy Garlic Chicken & Potatoes Dinner

One-Pan Cowboy Garlic Chicken & Potatoes Dinner for Easy Comfort

This One-Pan Cowboy Garlic Chicken & Potatoes Dinner offers hearty comfort in minimal time, perfect for busy weeknights.
Print Recipe Pin Recipe
Prep Time 10 minutes mins
Cook Time 30 minutes mins
Total Time 40 minutes mins
Servings: 4 servings
Course: Dinner
Cuisine: American
Calories: 450
Ingredients Equipment Method Nutrition Notes

Ingredients
  

For the Chicken
  • 1 pound boneless, skinless chicken thighs ideal for moisture and flavor
  • 2 tablespoons olive oil can substitute with canola oil
  • to taste salt
  • to taste black pepper
For the Potatoes
  • 1 pound baby potatoes cut into equal-sized chunks
  • 1 tablespoon unsalted butter can swap with extra olive oil for dairy-free
For Aromatics and Seasoning
  • 4 cloves garlic (minced) preferably fresh
  • 1 teaspoon smoked paprika regular paprika can be substituted
  • 1 teaspoon garlic powder
  • 1 teaspoon onion powder
  • 1 teaspoon dried rosemary
  • 1 teaspoon dried thyme
  • 1/4 teaspoon chili flakes (optional) omit for milder flavor
For the Sauce
  • 1 cup low-sodium chicken broth vegetable broth for vegetarian option
  • 2 tablespoons lemon juice adjust to taste
For Serving
  • 2 tablespoons fresh parsley (chopped) can use other fresh herbs for variation

Equipment

  • oven-safe skillet

Method
 

Step-by-Step Instructions
  1. Preheat your oven to 400°F (200°C).
  2. Pat dry the chicken thighs and season with smoked paprika, garlic powder, onion powder, salt, and black pepper.
  3. Heat olive oil in a large oven-safe skillet and sear chicken thighs for 3–4 minutes on each side until golden-brown. Remove and set aside.
  4. Add remaining olive oil and butter to the skillet. Sauté minced garlic for about 1 minute.
  5. Combine halved baby potatoes, sautéed garlic, herbs, and seasonings in the skillet until well coated.
  6. Pour in the chicken broth, scraping up any browned bits, then arrange seared chicken on top of potatoes.
  7. Bake in the preheated oven for 25–30 minutes until chicken is cooked through and potatoes are tender.
  8. Remove from oven, drizzle with lemon juice, and garnish with parsley before serving.

Nutrition

Serving: 1servingCalories: 450kcalCarbohydrates: 30gProtein: 30gFat: 20gSaturated Fat: 5gCholesterol: 80mgSodium: 600mgPotassium: 800mgFiber: 5gSugar: 2gVitamin A: 2IUVitamin C: 20mgCalcium: 2mgIron: 8mg

Notes

Store leftovers in an airtight container for up to 3–4 days. For best results, reheat at 350°F (175°C).

Tried this recipe?

Let us know how it was!

Crispy Baked Ranch Chicken for a Flavorful Family Feast

May 25, 2026 by Grace Snow Leave a Comment

As I pulled the crispy Baked Ranch Chicken from the oven, the irresistible aroma wafted through the kitchen, promising a satisfying meal ahead. It’s amazing how a simple dish can evoke such excitement, especially when it’s coated in a golden Panko-Parmesan crust that crackles with each bite. This family-friendly recipe not only brings joy to the dinner table but also transforms weeknight cooking into a delightful experience. With its tender, juicy chicken and a flavor profile that dances from rich ranch to savory cheese, you'll find that it's a sure way to please everyone. Plus, it boasts quick prep time—making it perfect for those busy evenings. Ready to elevate your dinner game with this easy-to-make winner?

Why is this chicken recipe a must-try?

Simplicity at Its Best: This recipe doesn’t demand culinary expertise; just a few basic steps yield fantastic results.

Family-Friendly Flavor: The savory ranch seasoning pairs perfectly with a crispy coating, appealing to both kids and adults.

Textures to Love: Expect a delightful crunch from the Panko-Parmesan crust, complemented by the juicy, tender chicken inside.

Quick Prep Time: Perfect for busy weeknights, you can have this delicious meal ready in no time!

Versatile Options: Feel free to swap in your favorite seasonings or herbs, just like in our Honey Garlic Chicken Thighs or try it with a side of Crock Pot Chicken for a hearty feast.

Crowd-Pleaser: Whether it’s family dinner or a casual gathering, this dish is designed to impress everyone at the table!

Baked Ranch Chicken Ingredients

• Discover the essentials for a flavorful dish!

For the Coating

  • Ranch Seasoning Mix – Adds robust flavor; consider using a homemade version for fewer preservatives.
  • Panko Bread Crumbs – Delivers a light, crispy texture; regular breadcrumbs can be used, though they result in a denser coating.
  • Grated Parmesan Cheese – Adds flavor and helps in browning; use a vegan cheese for a dairy-free option.
  • Unsalted Butter – Helps in achieving a crisp crust; olive oil may be used as a healthier substitute.

For the Chicken

  • Boneless, Skinless Chicken Breasts – Main protein source; thighs can be used for additional moisture.

For the Flavor Mix

  • Dill Weed – Enhances the herbal note; fresh dill can be a substitute.
  • Onion Powder – Provides depth of flavor in absence of fresh onion.
  • Garlic Cloves – Offers aromatic flavor; grate finely for better distribution.
  • Ground Black Pepper – Adds mild heat; adjust to taste.
  • Salt – Essential for seasoning; reduce for low-sodium diets.
  • Mayonnaise – Acts as a binding agent and adds moisture; Greek yogurt is a lighter alternative.

This Baked Ranch Chicken recipe is sure to transform your family meals into delightful feasts!

Step‑by‑Step Instructions for Baked Ranch Chicken

Step 1: Preheat the Oven
Begin by preheating your oven to 425°F (220°C). This temperature will ensure your Baked Ranch Chicken cooks evenly and achieves that perfect golden crust. While the oven heats, prepare your baking sheet by lining it with parchment paper for easy cleanup and to prevent sticking.

Step 2: Prepare the Ranch Mixture
In a medium bowl, whisk together the ranch seasoning mix, dill weed, onion powder, ground black pepper, salt, grated garlic, and mayonnaise. Mix until all ingredients are fully combined into a smooth paste. This flavorful mixture will not only coat the chicken but also provide a delicious ranch flavor that penetrates each bite.

Step 3: Make the Panko Coating
In another bowl, combine Panko breadcrumbs, grated Parmesan cheese, and melted butter. Stir the ingredients with a fork until the Panko is evenly coated with butter and the cheese is well distributed. This mixture will create a delightful crispy crust for your Baked Ranch Chicken, adding texture and depth of flavor.

Step 4: Coat the Chicken
Take each boneless, skinless chicken breast and first dip it into the ranch mixture, ensuring it's evenly coated. Then, transfer the coated chicken to the bowl with the Panko mixture, firmly pressing down to ensure a substantial layer of breadcrumbs adheres to the surface. This double coating is key to achieving that satisfying crunch!

Step 5: Arrange the Chicken on the Baking Sheet
Place the coated chicken breasts on the prepared parchment-lined baking sheet. Space them evenly to allow for proper heat circulation, which will help the chicken cook evenly and develop a crispy texture. Now, it's almost time to bake—just a few finishing touches away!

Step 6: Bake to Perfection
Slide the baking sheet into the preheated oven and bake for 12-15 minutes. Keep an eye on the chicken; it’s ready when the coating is golden brown and an instant-read thermometer inserted into the thickest part registers 165°F (74°C). This ensures your Baked Ranch Chicken is cooked through while remaining juicy and tender.

Step 7: Serve and Enjoy
Once out of the oven, allow the Baked Ranch Chicken to rest for a few minutes before serving. This resting period helps the juices redistribute, maximizing flavor and moisture. You can serve it with your favorite sides for a wholesome family meal that will surely impress everyone at the table.

Expert Tips for Perfect Baked Ranch Chicken

  • Even Coating Matters: Ensure each chicken fillet is evenly coated in the ranch mixture; this helps achieve that delightful crunch from the Panko crust while infusing flavor.

  • Temperature Check: Use an instant-read thermometer to check for doneness, preventing overcooking and ensuring your Baked Ranch Chicken stays juicy and flavorful.

  • Prepare Ahead: For busy nights, you can coat the chicken ahead of time, then store it in the fridge until you're ready to bake—this enhances the flavor even more!

  • Cooking Surface: Place the baking sheet on the middle rack of your oven for even heat distribution, allowing your chicken to cook uniformly and attain that crispy perfection.

  • Storage Tips: Keep leftovers in an airtight container for up to 4 days; reheating them in the oven will maintain that irresistible crispy texture.

How to Store and Freeze Baked Ranch Chicken

Fridge: Store leftovers in an airtight container for up to 4 days. This will help maintain the chicken’s flavor while keeping it safe for later meals.

Freezer: For longer storage, freeze the coated and uncooked Baked Ranch Chicken in a freezer-safe bag for up to 3 months. Thaw in the fridge before baking.

Reheating: When reheating leftover baked chicken, place it in a preheated oven at 350°F (175°C) for about 10-15 minutes until warmed through, restoring its crispness.

Wrapping: If you have unbaked chicken coated with the ranch mixture, ensure it is well-wrapped to prevent freezer burn and retain the quality of the Baked Ranch Chicken.

What to Serve with Crispy Baked Ranch Chicken?

Set the table for a comforting family dinner experience, where every bite of crispy goodness is perfectly paired with delightful sides.

  • Steamed Broccoli: A vibrant green side that adds a pop of color and a nutritious crunch, balancing the richness of the chicken.
  • Creamy Boursin Mashed Potatoes: The silky texture of these flavorful potatoes complements the crispy exterior of the chicken, creating a dreamy mouthfeel.
  • Garlic Roasted Asparagus: Tender, roasted asparagus enhances your plate with a hint of sweetness and depth, making every bite memorable.
  • Fresh Garden Salad: Crisp romaine, cherry tomatoes, and cucumbers tossed in a light vinaigrette provide a refreshing contrast to the hearty chicken.
  • Savory Cornbread: Soft, slightly sweet cornbread introduces warmth and texture that pairs beautifully with the ranch flavors of the chicken.
  • Honey Glazed Carrots: Sweet and tender carrots offer a burst of natural sweetness that balances the savory ranch chicken perfectly.
  • Lemonade Iced Tea: The refreshing citrus notes of this drink cleanse the palate and enhance the overall dining experience.
  • Chocolate Chip Cookies: End the meal on a sweet note with warm cookies, bringing nostalgia and comfort everyone will cherish.

Make Ahead Options

These Crispy Baked Ranch Chicken fillets are perfect for meal prep enthusiasts! You can prepare the ranch mixture and coat the chicken fillets up to 24 hours in advance. Simply whisk together the ranch seasoning, dill, onion powder, pepper, salt, garlic, and mayonnaise, then coat the chicken as directed. Store the coated chicken in an airtight container in the refrigerator to keep it fresh. When you're ready to enjoy your meal, just pop the chicken in the oven and bake it according to the instructions for a scrumptious dinner that's just as delicious as when made fresh. This way, you can save valuable time on busy nights without sacrificing flavor!

Baked Ranch Chicken Serving Suggestions

Enjoy customizing your Baked Ranch Chicken by pairing it with delightful sides that enhance the overall experience!

  • Creamy Mashed Potatoes: Serve alongside rich and creamy Boursin mashed potatoes, providing a comforting balance to the crispy chicken with velvety texture.

  • Steamed Vegetables: Pair with fresh veggies like steamed broccoli or green beans, adding vibrant color and nutrients to your plate, creating a wholesome meal.

  • Caesar Salad: Complement the chicken with a refreshing Caesar salad. The crisp romaine, tangy dressing, and crunchy croutons contrast beautifully with the warm, crispy chicken.

  • Rice Pilaf: Try a fluffy rice pilaf seasoned with herbs. Its lightness is a lovely contrast to the hearty chicken, ensuring a satisfying and balanced dish.

  • Garlic Bread: For a delightful twist, serve with slices of garlic bread. This will add a fantastic aroma and additional flavors to your meal.

  • Macaroni and Cheese: Indulge in creamy macaroni and cheese for a family-favorite combo. The cheesiness is a surefire way to make everyone smile at the dinner table.

  • Roasted Potatoes: Roasted potatoes seasoned with herbs are a perfect partner for Baked Ranch Chicken. Their crispiness mimics the chicken's crust for a delightful textural match.

  • Corn on the Cob: Seasonal sweet corn on the cob makes for a lovely side, especially in summer. Its sweetness complements the savory chicken beautifully.

By selecting any of these pairings, you’ll create a dining experience that everyone at the table will cherish! And if you're in the mood for something different, consider trying Honey Bbq Chicken or even Spatchcock Chicken Flavor for variety in your family meals.

Baked Ranch Chicken Recipe FAQs

What should I consider when selecting chicken for this recipe?
For the best results, choose boneless, skinless chicken breasts that are plump and fresh. Look for chicken that’s pale pink and has no dark spots or unpleasant odor. If you prefer a juicier option, chicken thighs can be used instead, as they tend to remain moist during cooking.

How can I store and reheat leftovers?
Store any leftover Baked Ranch Chicken in an airtight container in the refrigerator for up to 4 days. When you’re ready to enjoy, reheat it in a preheated oven at 350°F (175°C) for about 10-15 minutes, until warm. This method helps maintain its crispy coating while ensuring the chicken stays juicy.

Can I freeze Baked Ranch Chicken?
Absolutely! For longer storage, you can freeze the coated, uncooked Baked Ranch Chicken. Place it in a freezer-safe bag and it will last up to 3 months. When you're ready to bake, simply thaw it in the refrigerator overnight before cooking, and proceed with the baking instructions as usual.

What if my Panko coating is soggy instead of crispy?
Soggy Panko usually indicates too much moisture. Ensure you coat the chicken evenly with the mayonnaise mixture, but avoid excess. If your Panko coating isn’t as crispy as you’d like, you can try spritzing it lightly with cooking oil before baking or increasing the baking time slightly, while keeping an eye on the chicken to prevent burning.

Are there any dietary concerns with this recipe?
This Baked Ranch Chicken recipe contains common allergens, such as dairy and mayonnaise. For a dairy-free option, substitute the grated Parmesan with vegan cheese. If you want to make it lighter, plain Greek yogurt can replace mayonnaise. Always consider any food allergies in your household when preparing meals.

Baked Ranch Chicken

Crispy Baked Ranch Chicken for a Flavorful Family Feast

This Baked Ranch Chicken dish features a golden Panko-Parmesan crust and savory flavors, perfect for a family dinner.
Print Recipe Pin Recipe
Prep Time 15 minutes mins
Cook Time 15 minutes mins
Resting Time 5 minutes mins
Total Time 35 minutes mins
Servings: 4 servings
Course: Dinner
Cuisine: American
Calories: 350
Ingredients Equipment Method Nutrition Notes

Ingredients
  

Coating
  • 1 packet Ranch Seasoning Mix Consider using a homemade version for fewer preservatives.
  • 1 cup Panko Bread Crumbs Regular breadcrumbs can be used, though they result in a denser coating.
  • 1/2 cup Grated Parmesan Cheese Use a vegan cheese for a dairy-free option.
  • 4 tablespoons Unsalted Butter Olive oil may be used as a healthier substitute.
Chicken
  • 4 pieces Boneless, Skinless Chicken Breasts Thighs can be used for additional moisture.
Flavor Mix
  • 1 tablespoon Dill Weed Fresh dill can be a substitute.
  • 1 teaspoon Onion Powder Provides depth of flavor.
  • 3 cloves Garlic Cloves Grate finely for better distribution.
  • 1 teaspoon Ground Black Pepper Adjust to taste.
  • 1 teaspoon Salt Reduce for low-sodium diets.
  • 1/2 cup Mayonnaise Greek yogurt is a lighter alternative.

Equipment

  • Oven
  • Baking Sheet
  • medium bowl
  • Fork
  • Whisk

Method
 

Preparation
  1. Preheat your oven to 425°F (220°C) and line a baking sheet with parchment paper.
  2. In a medium bowl, whisk together the ranch seasoning mix, dill weed, onion powder, ground black pepper, salt, grated garlic, and mayonnaise until combined.
  3. In another bowl, combine Panko breadcrumbs, grated Parmesan cheese, and melted butter, stirring until well mixed.
  4. Dip each chicken breast into the ranch mixture, then into the Panko mixture, pressing to adhere.
  5. Arrange the coated chicken on the baking sheet, spacing evenly.
  6. Bake for 12-15 minutes until golden brown and cooked through, reaching an internal temperature of 165°F (74°C).
  7. Let the chicken rest for a few minutes before serving.

Nutrition

Serving: 1pieceCalories: 350kcalCarbohydrates: 18gProtein: 35gFat: 15gSaturated Fat: 7gPolyunsaturated Fat: 2gMonounsaturated Fat: 6gCholesterol: 100mgSodium: 800mgPotassium: 500mgFiber: 1gSugar: 1gVitamin A: 500IUCalcium: 200mgIron: 1.5mg

Notes

Ensure each chicken fillet is evenly coated for the best texture and flavor. Store leftovers in an airtight container for up to 4 days.

Tried this recipe?

Let us know how it was!

Crispy Honey Mustard Chicken Thighs: A Flavorful Weeknight Delight

May 22, 2026 by Grace Snow Leave a Comment

Between the sizzling sounds of chicken in the oven and the tantalizing aroma wafting through the kitchen, I realized that a delicious dinner is just around the corner. My Easy Crispy Honey Mustard Chicken Thighs Sheet Pan Dinner captures the delightful dance of sweet and tangy flavors, making it the perfect addition to your weeknight repertoire. This recipe not only boasts a quick cooking time of just 40 minutes but also transforms ordinary ingredients into an extraordinary meal that feels special, minus the fuss. With crispy skin and tender meat that practically melts in your mouth, this dish is a guaranteed crowd-pleaser—plus, it's naturally gluten-free! Curious about how to whip up this impressive yet easy dinner?

Why is this recipe a weeknight winner?

Simplicity: This one-pan meal combines everything you need into a single dish, making cleanup a breeze!

Quick Cooking: In just 40 minutes, you’ll have a gourmet dinner on the table, leaving plenty of time for family fun.

Flavor Explosion: The balance of sweet honey and zesty mustard creates an addictive glaze that elevates tender chicken thighs and roasted veggies.

Versatile: Feel free to switch up the veggies or even substitute boneless chicken thighs for a lighter option—this recipe adapts beautifully!

Crowd-Pleasing: Perfect for busy families or date nights, this dish is sure to impress everyone at the table—don’t forget to serve it with a crisp side salad!

If you're looking for more delicious chicken options, check out my Honey Garlic Chicken or Crock Pot Chicken for easy alternatives!

Crispy Honey Mustard Chicken Thighs Ingredients

• Let's get cooking with the perfect components for our delightful dish!

For the Chicken

  • Chicken Thighs – Opt for bone-in, skin-on for juiciness and flavor.

For the Glaze

  • Honey – Sweetens and thickens the glaze; map out maple syrup if you're feeling adventurous with flavors.
  • Mustard – Provides that delightful tang; Dijon or yellow will both shine in this recipe!
  • Apple Cider Vinegar – Brightens the glaze with a zing of acidity.
  • Smoked Paprika – Adds depth and a hint of smokiness; feel free to swap, but expect some flavor changes.

For Cooking & Flavor

  • Olive Oil – Ideal for roasting your veggies; avocado oil makes a great alternative if desired.
  • Salt and Pepper – Vital for seasoning; adjust them to your own taste for that perfect bite!

For the Vegetables

  • Vegetables (e.g., carrots, potatoes) – Bring color and nutrition to the dish; choose seasonal favorites or whatever you have on hand.

Step‑by‑Step Instructions for Crispy Honey Mustard Chicken Thighs

Step 1: Preheat the Oven
Begin by preheating your oven to 425°F (220°C). This high temperature ensures crispy skin on the chicken thighs while allowing the vegetables to roast beautifully. Preparing your oven in advance will save you precious time and ensure even cooking once everything is assembled.

Step 2: Prepare the Chicken
Take your bone-in, skin-on chicken thighs and pat the skin dry using paper towels—this will enhance crispiness during baking. For an extra crunch, consider refrigerating the chicken uncovered for about 20 minutes while the oven heats. This simple step allows the skin to dry out, creating that irresistible crispy texture you'll love.

Step 3: Mix the Glaze
In a medium bowl, combine the honey, mustard (Dijon or yellow), apple cider vinegar, and smoked paprika. Stir these ingredients together until they form a smooth glaze; it should be slightly thick but pourable. This delicious mixture will give your Crispy Honey Mustard Chicken Thighs their signature sweet and tangy flavor, so make sure it’s well combined.

Step 4: Prepare the Vegetables
Chop your choice of vegetables, such as carrots and potatoes, into even pieces for uniform cooking. In a large bowl, toss the vegetables with olive oil and a sprinkle of salt and pepper. This step adds flavor and will help them roast nicely, transforming them into the perfect side for your chicken dish.

Step 5: Arrange on the Sheet Pan
Spread the seasoned vegetables evenly on a large sheet pan, creating a single layer for optimal roasting. Next, arrange the chicken thighs skin-side up on top of the vegetables. It's important to keep the chicken elevated to allow heat circulation, ensuring crispy skin and tender meat as it cooks.

Step 6: Glaze the Chicken
Using a brush or a spoon, generously apply the honey mustard mixture over each chicken thigh, making sure to coat them thoroughly. This will create a delightful glaze that caramelizes in the oven, coating the chicken with a layer of flavor that enhances the entire dish beautifully.

Step 7: Bake the Dish
Place the sheet pan in the preheated oven and bake for 25 to 30 minutes. Halfway through, open the oven and baste the chicken thighs with the pan juices for extra flavor. The chicken is ready when the skin is golden brown and crispy, and an internal temperature of 165°F (75°C) is reached.

Step 8: Monitor Cooking
Keep an eye on your chicken and vegetables as they bake. If the glaze starts to brown too quickly, gently tent the chicken with foil to prevent burning. Remember to check the tenderness of your vegetables; they may need to be removed from the pan sooner if they cook faster than the chicken.

Step 9: Serve and Enjoy
Once everything is cooked to perfection, remove the sheet pan from the oven. Let the Crispy Honey Mustard Chicken Thighs rest for a few minutes before serving. Plate the sautéed vegetables alongside the chicken, and savor the delightful array of flavors and textures that you've created!

How to Store and Freeze Crispy Honey Mustard Chicken Thighs

Fridge: Store any leftover crispy honey mustard chicken thighs in an airtight container for up to 3 days. This will help maintain their flavor and texture.

Freezer: If you want to freeze leftovers, tightly wrap the chicken thighs in plastic wrap and then place them in a zip-top freezer bag. Consume within 2 months for the best taste.

Reheating: When you're ready to enjoy leftovers, reheat the chicken thighs in the oven at 350°F (175°C) for about 15-20 minutes. This keeps the skin crispy and ensures even heating.

Separation Tip: For best results, store chicken separately from vegetables to avoid sogginess, then combine when reheating!

Make Ahead Options

These Easy Crispy Honey Mustard Chicken Thighs are fantastic for meal prep and can save you precious time on busy weeknights! You can marinate the chicken thighs in the honey mustard glaze up to 24 hours in advance, allowing the flavors to permeate beautifully. Additionally, wash and chop your vegetables—like carrots and potatoes—up to 3 days ahead. Simply store them in an airtight container in the fridge. When you're ready to cook, just preheat the oven, arrange the marinated chicken and prepped veggies on a sheet pan, and bake according to the instructions for a delicious, hassle-free dinner! With these make-ahead options, you can enjoy an impressive homemade meal with minimal effort.

Expert Tips for Crispy Honey Mustard Chicken Thighs

  • Dry the Skin: Patting the chicken thighs dry ensures the skin crisps up beautifully. This step is crucial for achieving that mouthwatering texture.
  • Use Fresh Ingredients: Fresh honey and mustard create the best flavor. Don’t substitute with outdated condiments that might alter the taste of your crispy honey mustard chicken thighs.
  • Keep Space on the Pan: Avoid overcrowding the sheet pan; this helps the chicken and veggies cook evenly. More space allows for better roasting and crispiness!
  • Baste Wisely: Basting halfway through cooking significantly enhances flavor. It’s a small step that can make your chicken thighs utterly irresistible!
  • Check Doneness Carefully: Use a meat thermometer to ensure your chicken has reached 165°F (75°C). This prevents undercooking and guarantees a safe and delicious meal.

Crispy Honey Mustard Chicken Thighs Variations

Feel free to get creative and make this dish your own with these delightful twists!

  • Boneless Thighs: Swap bone-in thighs for boneless to cut down on cooking time and enjoy leaner meat.
    Bite-sized boneless thighs cook faster and still remain juicy, making this a great option for a quick dinner!

  • Maple Glaze: Use maple syrup instead of honey for a unique, earthy sweetness.
    The maple syrup adds a lovely richness to the glaze, offering a delightful twist on the classic flavor profile.

  • Spicy Kick: Add red pepper flakes or cayenne to the glaze for a fiery twist.
    Just a pinch can elevate the dish, giving it a savory heat that complements the sweetness beautifully.

  • Vegetable Swap: Try different seasonal veggies such as bell peppers or zucchini in place of traditional potatoes and carrots.
    Mixing in these colorful choices can add a fresh twist and make your dish even more vibrant and nutritious.

  • Soy Sauce Boost: Mix in a splash of soy sauce for an umami flavor that enhances the chicken’s deliciousness.
    This addition offers a subtle savory depth that pairs perfectly with the sweet and tangy glaze, creating a flavorful harmony.

  • Citrus Zing: Incorporate fresh lemon or orange juice into the glaze for a bright citrus flavor.
    This twist adds an invigorating zing that can lighten the dish while also complementing the honey mustard's sweetness perfectly.

  • Herb Infusion: Add fresh herbs like rosemary or thyme to the veggies or glaze for an aromatic boost.
    Herbs not only enhance the flavor but also add an enticing fragrance, transforming your meal into an inviting feast.

  • Sweet Potato: Substitute regular potatoes with sweet potatoes for a nutritious and naturally sweet alternative.
    The sweetness of these tubers pairs wonderfully with the honey mustard glaze and adds a lovely color to your dish.

If you're on the hunt for more delicious chicken options, don't forget to check out my Honey Bbq Chicken for another family favorite or dive into the world of Chipotle Lime Chicken and Rice for a zesty experience!

What to Serve with Easy Crispy Honey Mustard Chicken Thighs

Elevate your weeknight meal with delightful sides that perfectly complement the sweet and tangy flavors of your chicken dish.

  • Creamy Mashed Potatoes: The silky texture of mashed potatoes contrasts beautifully with crispy chicken, creating a comforting dish. Lavish them with gravy or butter for a rich experience.

  • Roasted Brussels Sprouts: Their slight bitterness and crispy edges provide a wonderful balance to the sweetness of the honey mustard glaze. Tossed with a little olive oil, they roast perfectly alongside the chicken.

  • Garlic Green Beans: Fresh and vibrant, these green beans offer a crispy crunch that contrasts with the tender chicken thighs. A hint of garlic elevates their flavor, making them irresistible.

  • Simple Side Salad: A light salad with mixed greens and a zesty vinaigrette will brighten your plate. It serves as a refreshing counterpart to the hearty chicken and roasted veggies.

  • Quinoa Pilaf: This nutty grain adds a chewy texture and is fantastic for soaking up those delicious juices from the chicken. Add some herbs and lemon zest for an aromatic twist.

  • Crisp White Wine: Pair your meal with a chilled Sauvignon Blanc or Chardonnay, which both enhance the flavors of the honey mustard chicken. The acidity of the wine cuts through the richness beautifully.

  • Apple Crisp: For dessert, an apple crisp brings a delightful finish to your meal. The warm spices and sweet fruit harmonize wonderfully with the sweet notes in your main dish.

  • Sparkling Lemonade: This refreshing beverage, with a sweet-and-tart profile, complements the meal perfectly. It's an uplifting and fun way to end your dining experience.

  • Honey Glazed Carrots: Their natural sweetness echoes the glaze of the chicken while offering another layer of texture. Roast them until caramelized for a lovely sweetness.

Crispy Honey Mustard Chicken Thighs Recipe FAQs

What type of chicken thighs should I use?
For the best flavor and texture, I recommend using bone-in, skin-on chicken thighs. This cut provides juiciness and a crispy skin that enhances the overall dish. If you prefer a leaner option, boneless thighs can be substituted, but the cooking time may need slight adjustments.

How should I store leftovers?
Leftover crispy honey mustard chicken thighs can be stored in an airtight container in the refrigerator for up to 3 days. Ensure they are completely cool before sealing to maintain freshness. This allows the flavors to meld beautifully, making them even tastier the next day!

Can I freeze this dish?
Absolutely! To freeze, tightly wrap the chicken thighs in plastic wrap and place them in a zip-top freezer bag. They can be stored in the freezer for up to 2 months. When ready to enjoy, simply thaw overnight in the refrigerator and reheat in the oven at 350°F (175°C) for 15-20 minutes for optimal crispiness.

What can I do if the glaze browns too quickly?
If you notice the glaze browning too quickly while baking, simply tent the chicken thighs with aluminum foil to shield them from direct heat. This will prevent burning and allow the chicken to continue cooking until it reaches the perfect doneness without compromising on flavor.

Are there any dietary considerations I should be aware of?
This recipe is naturally gluten-free, making it suitable for those with gluten sensitivities. However, always check labels for any pre-packaged ingredients, like mustard or honey, to ensure they meet your specific dietary needs. Additionally, keep in mind that honey is not recommended for pets, so ensure leftovers are stored away from pet access!

Crispy Honey Mustard Chicken Thighs

Crispy Honey Mustard Chicken Thighs: A Flavorful Weeknight Delight

Crispy Honey Mustard Chicken Thighs is a delicious and easy weeknight dinner that combines sweet and tangy flavors with tender chicken. Perfect for busy families.
Print Recipe Pin Recipe
Prep Time 15 minutes mins
Cook Time 25 minutes mins
Total Time 40 minutes mins
Servings: 4 thighs
Course: Dinner
Cuisine: American
Calories: 320
Ingredients Equipment Method Nutrition Notes

Ingredients
  

For the Chicken
  • 4 thighs Chicken Thighs Bone-in, skin-on for juiciness and flavor
For the Glaze
  • 1/3 cup Honey Sweetens and thickens the glaze
  • 1/4 cup Mustard Dijon or yellow mustard
  • 2 tbsp Apple Cider Vinegar Brightens the glaze
  • 1 tsp Smoked Paprika Adds depth and smokiness
For Cooking & Flavor
  • 2 tbsp Olive Oil Ideal for roasting veggies
  • to taste Salt For seasoning
  • to taste Pepper For seasoning
For the Vegetables
  • 4 cups Vegetables Carrots, potatoes or seasonal veggies

Equipment

  • Oven
  • sheet pan
  • medium bowl
  • large bowl
  • Meat Thermometer

Method
 

Step-by-Step Instructions
  1. Preheat your oven to 425°F (220°C).
  2. Pat the chicken thighs dry with paper towels. Refrigerate uncovered for about 20 minutes while oven heats.
  3. In a medium bowl, combine honey, mustard, apple cider vinegar, and smoked paprika. Stir until smooth.
  4. Chop vegetables into even pieces. Toss them with olive oil, salt, and pepper.
  5. Spread vegetables evenly on a large sheet pan and place chicken thighs skin-side up on top.
  6. Generously brush chicken with the honey mustard glaze.
  7. Bake for 25 to 30 minutes, basting the chicken halfway through.
  8. Monitor cooking and tent with foil if necessary. Check that chicken reaches an internal temperature of 165°F (75°C).
  9. Remove from oven, let rest for a few minutes, then serve with vegetables.

Nutrition

Serving: 1thighCalories: 320kcalCarbohydrates: 12gProtein: 24gFat: 22gSaturated Fat: 5gPolyunsaturated Fat: 2gMonounsaturated Fat: 14gCholesterol: 80mgSodium: 500mgPotassium: 600mgFiber: 2gSugar: 8gVitamin A: 1000IUVitamin C: 15mgCalcium: 20mgIron: 1mg

Notes

For best results, store chicken separately from vegetables to avoid sogginess. Reheat chicken in the oven to maintain crispiness.

Tried this recipe?

Let us know how it was!

Southern Tomatoes and Rice: A Cozy One-Pot Delight

May 22, 2026 by Grace Snow Leave a Comment

Stepping into my kitchen one afternoon, the aroma of sautéed onions mingling with rich bacon grease whisked me back to my grandmother’s house, where Southern comfort was defined by simple yet heartwarming dishes. Today, I want to share my take on Southern Tomatoes and Rice—a delightful one-pot wonder that perfectly captures that nostalgic feeling. This budget-friendly recipe strips away unnecessary fuss, allowing the tangy tomatoes to shine alongside fluffy rice and the delectably sweet onions. It’s an effortless side dish, ideal for busy weeknights or those long-awaited family gatherings, bringing everyone together around the table. Are you ready to create a comforting masterpiece that nourishes both body and soul? Let's dive into this delicious recipe!

Why Will You Love Southern Tomatoes and Rice?

Simplicity at its finest: This dish uses just a handful of pantry staples, making it a breeze for anyone to whip up.

Flavor explosion: The combination of tangy tomatoes and savory bacon grease creates a dish bursting with vibrant taste, reminiscent of Southern kitchens.

One-Pot Wonder: Effortlessly cook everything in a single pot, saving you time and minimizing cleanup – perfect for busy weeknights!

Versatile sides: It pairs beautifully with grilled meats, fried chicken, or a fresh green salad, making it an adaptable addition to any meal.

For another delicious one-pot meal, try my One Pot Rice for an Asian twist!

Nostalgic comfort: Each bite of this dish is like a warm hug, evoking the comforting feelings of home and family gatherings.

Southern Tomatoes and Rice Ingredients

• A comforting dish awaits you!

For the Base

  • Bacon Grease – Adds richness and a unique flavor; if unavailable, unsalted butter or olive oil works well.
  • Finely Diced Onion – Provides sweetness and depth; about half a small onion should suffice.
  • Uncooked Long Grain White Rice – The base of the dish that absorbs flavors; note that brown rice will require longer cooking times.
  • Diced Tomatoes (canned, undrained) – Essential for moisture and tang; fresh tomatoes make a fine substitute but may need extra broth.
  • Low-Sodium Chicken Broth (or water) – Enhances the dish's depth; using water offers a lighter alternative.
  • Salt – Enhances flavor to taste; adjust as desired.
  • Black Pepper – Adds seasoning and a hint of warmth to balance the dish.

Optional Enhancements

  • Cheese (like cheddar or Parmesan) – Adds creaminess and depth; sprinkle on top before serving for extra goodness.
  • Seasonal Vegetables (like bell peppers or zucchini) – Incorporate for added nutrition and color; sauté with the onions for best results.

Create this delightful Southern comfort food that is sure to warm your heart!

Step‑by‑Step Instructions for Southern Tomatoes and Rice

Step 1: Sauté Onion
In a medium saucepan, heat 2 tablespoons of bacon grease over medium heat until shimmering. Add half a finely diced onion and sauté for about 3-4 minutes until the onion turns soft and translucent, releasing its sweet aroma. This is the foundation for your Southern Tomatoes and Rice, so make sure it’s cooked just right.

Step 2: Toast Rice
Next, stir in 1 cup of uncooked long grain white rice into the pan with the onions. Toast the rice for 1-2 minutes, stirring frequently, until it becomes slightly fragrant and begins to turn a light golden color. This process enhances the flavor of the rice, setting the stage for the delicious Southern Tomatoes and Rice.

Step 3: Combine Ingredients
Pour in one can of undrained diced tomatoes and 2 cups of low-sodium chicken broth or water into the pot. Season generously with salt and black pepper to your taste. Stir everything together, ensuring that the rice is evenly distributed and submerged in the liquid, which will help it absorb all the wonderful flavors during cooking.

Step 4: Boil and Simmer
Increase the heat to bring the mixture to a rolling boil, then immediately reduce the heat to low. Cover the saucepan with a lid and let it simmer for 18-20 minutes. Keep an eye on it; the rice should become tender, with all the liquid absorbed, creating a comforting texture that embodies the essence of Southern Tomatoes and Rice.

Step 5: Rest and Fluff
Once the rice is cooked, remove the saucepan from heat but keep it covered for an additional 5 minutes. This resting period helps the rice finish cooking and allows it to firm up. After 5 minutes, use a fork to fluff the rice gently, incorporating the flavors from the tomatoes and onions, and prepare to serve this hearty dish.

Expert Tips for Southern Tomatoes and Rice

  • Use Fresh Ingredients: Fresh tomatoes can enhance the flavor profile, but remember to adjust broth quantities to account for additional moisture.

  • Bacon Alternative: If you don’t have bacon grease, cooking a few slices of bacon first will not only provide flavorful drippings, but you can also crumble the crispy bacon on top for added texture.

  • Watch Cooking Times: When using brown rice, it requires a longer cooking time of 40-45 minutes. Increase the liquid slightly to ensure everything cooks perfectly.

  • Optimal Resting: Allow the dish to rest covered for 5 minutes after cooking. This final step ensures the rice firms up and absorbs the flavor of the Southern Tomatoes and Rice better.

  • Add Extra Veggies: Stir in seasonal vegetables like bell peppers or zucchini just before serving for a nutritious twist and to brighten up your meal.

Storage Tips for Southern Tomatoes and Rice

  • Fridge: Store leftovers in an airtight container in the refrigerator for up to 4 days. Ensure it's completely cooled before sealing to maintain freshness.

  • Freezer: Freeze in a freezer-safe container for up to 3 months. Portion out servings for easy reheating, and label with the date for reference.

  • Reheating: When ready to enjoy, reheat gently on the stovetop or in the microwave. Add a splash of chicken broth or water to restore moisture and fluffiness in the Southern Tomatoes and Rice.

  • Room Temperature: Avoid leaving the dish at room temperature for more than 2 hours to prevent foodborne illness.

Variations & Substitutions for Southern Tomatoes and Rice

Delight in these customizable options to make your Southern Tomatoes and Rice truly your own!

  • Fresh Tomatoes: Replace canned tomatoes with 1.5 to 2 cups of chopped fresh tomatoes, adjusting the broth for extra liquid.

  • Cheesy Twist: Stir in shredded cheddar or Parmesan cheese just before serving for a creamy finish that enhances the flavor beautifully.

  • Vegetable Boost: Add seasonal vegetables like bell peppers, zucchini, or spinach during the sautéing process for an extra nutrition and color burst.

  • Spicy Kick: Incorporate diced jalapeños or a dash of cayenne pepper to introduce a zesty heat that balances the flavors perfectly.

  • You-Could-Bacon: If bacon grease isn’t available, use olive oil or butter, and try crumbling crispy bacon on top for texture and extra flavor.

For another great variation, consider serving this dish alongside my Furikake Fried Rice for a burst of umami!

  • Different Rice: Swap white rice for brown rice, keeping in mind it will require a longer cooking time—about 40-45 minutes—along with a bit more liquid.

  • Protein Packed: Stir in diced ham or cooked sausage just before serving for a hearty, protein-rich meal that rounds out the dish beautifully.

Embrace these ideas and let your creativity shine in the kitchen as you prepare your comforting Southern Tomatoes and Rice!

What to Serve with Southern Tomatoes and Rice?

Enhance your comforting meal experience with delightful sides that complement the flavors of Southern Tomatoes and Rice.

  • Grilled Meats: The smoky char of grilled chicken or ribs perfectly balances the tangy sweetness of the tomatoes, creating a mouthwatering pairing.

  • Fried Chicken: Crispy fried chicken, with its crunchy exterior, offers a delightful textural contrast to the fluffy rice, bringing comfort to your plate.

  • Fresh Green Salad: A light and refreshing salad with crisp greens, cucumbers, and a zesty vinaigrette adds a bright note, balancing the hearty dish beautifully.

  • Cornbread Muffins: Fluffy cornbread muffins offer a delightful sweetness that contrasts perfectly with the savory notes of the rice, making each bite a treat.

  • Sautéed Greens: Incorporating some garlicky sautéed collard greens or spinach introduces a nutritious, vibrant element to your meal, enhancing its Southern charm.

  • Peach Cobbler: For dessert, a warm peach cobbler captures the essence of the South, providing a sweet, comforting finish that lingers in your memory.

These pairings will elevate your dining experience, ensuring every bite feels like a warm embrace from the South.

Make Ahead Options

These Southern Tomatoes and Rice are perfect for meal prep enthusiasts! You can sauté the onions and toast the rice up to 24 hours in advance. Simply refrigerate the sautéed mixture in an airtight container, and it will remain just as delicious. When you're ready to serve, combine the prepared components with the diced tomatoes and broth, then cook as usual, reducing the cooking time by a few minutes if everything is at room temperature. This simple prep allows you to enjoy a comforting dish that saves you time on busy weeknights, all while maintaining the rich flavors that embody Southern comfort food.

Southern Tomatoes and Rice Recipe FAQs

What type of tomatoes should I use for this recipe?
You can use canned diced tomatoes, undrained, which are convenient and full of flavor. If you prefer fresh tomatoes, you’ll need about 1.5 to 2 cups, chopped, but be sure to adjust the broth accordingly due to the lower moisture content in fresh tomatoes.

How should I store leftovers of Southern Tomatoes and Rice?
Store any leftovers in an airtight container in the refrigerator for up to 4 days. It’s important to let the dish cool completely before sealing to keep it fresh. When you’re ready to enjoy it again, simply reheat on the stovetop or in the microwave.

Can I freeze Southern Tomatoes and Rice?
Absolutely! You can freeze this dish in a freezer-safe container for up to 3 months. For best results, portion out individual servings to make reheating convenient. Just remember to label and date the containers so you know when they were frozen!

What should I do if my rice doesn’t seem to be cooking properly?
If the rice isn’t tender after the suggested cooking time, it could be due to the heat being too low, or there wasn’t enough liquid. You can add a bit more broth or water (about ¼ cup at a time) and allow it to simmer with the lid on until fully cooked. Always keep an eye on it to prevent burning.

Is this dish suitable for those with dietary restrictions?
Yes! This Southern Tomatoes and Rice recipe is naturally gluten-free and easily adaptable for dietary preferences. If you're vegetarian, simply replace chicken broth with vegetable broth or water. Additionally, if you have allergies, make sure to check the ingredients on any packaged items, like broth and tomatoes, for potential allergens.

How long can I keep Southern Tomatoes and Rice at room temperature?
To ensure food safety, avoid leaving Southern Tomatoes and Rice out at room temperature for more than 2 hours. Bacteria can grow quickly in cooked foods left out, so it’s best to refrigerate any leftovers promptly to enjoy later!

Southern Tomatoes and Rice

Southern Tomatoes and Rice: A Cozy One-Pot Delight

A comforting Southern Tomatoes and Rice recipe that highlights simple ingredients for a delicious, budget-friendly dish.
Print Recipe Pin Recipe
Prep Time 10 minutes mins
Cook Time 30 minutes mins
Resting Time 5 minutes mins
Total Time 45 minutes mins
Servings: 4 servings
Course: Dinner
Cuisine: Southern
Calories: 320
Ingredients Equipment Method Nutrition Notes

Ingredients
  

For the Base
  • 2 tablespoons Bacon Grease or unsalted butter/olive oil
  • 0.5 small Finely Diced Onion
  • 1 cup Uncooked Long Grain White Rice brown rice will require longer cooking
  • 1 can Diced Tomatoes (canned, undrained)
  • 2 cups Low-Sodium Chicken Broth or water
  • to taste Salt
  • to taste Black Pepper
Optional Enhancements
  • to taste Cheese (like cheddar or Parmesan) for extra creaminess
  • 1 cup Seasonal Vegetables (like bell peppers or zucchini) sauté with onions

Equipment

  • Medium saucepan

Method
 

Step-by-Step Instructions
  1. In a medium saucepan, heat 2 tablespoons of bacon grease over medium heat until shimmering. Add half a finely diced onion and sauté for about 3-4 minutes until the onion turns soft and translucent.
  2. Stir in 1 cup of uncooked long grain white rice into the pan with the onions. Toast the rice for 1-2 minutes, stirring frequently.
  3. Pour in one can of undrained diced tomatoes and 2 cups of low-sodium chicken broth or water. Season generously with salt and black pepper, stir to combine.
  4. Increase heat to bring the mixture to a boil, then reduce to low. Cover and let simmer for 18-20 minutes until the rice is tender and liquid is absorbed.
  5. Remove from heat but keep covered for 5 minutes, then fluff the rice gently with a fork to serve.

Nutrition

Serving: 1servingCalories: 320kcalCarbohydrates: 56gProtein: 6gFat: 8gSaturated Fat: 2gPolyunsaturated Fat: 1gMonounsaturated Fat: 4gSodium: 320mgPotassium: 400mgFiber: 3gSugar: 4gVitamin A: 2IUVitamin C: 10mgCalcium: 30mgIron: 2mg

Notes

For best results, use fresh ingredients and adjust cooking times based on the type of rice used.

Tried this recipe?

Let us know how it was!
  • « Previous Page
  • 1
  • …
  • 8
  • 9
  • 10
  • 11
  • 12
  • …
  • 87
  • Next Page »

Welcome!

Hi, I’m Grace, a Sydney-based home cook with a passion for bold flavors and trending ingredients. Whether you’re a busy beginner or a seasoned foodie, you’ll find dishes here that are fresh, fun, and full of flavor.

More about me

Popular Recipes

  • One Pot Keto Tuna Casserole
    One Pot Keto Tuna Casserole: Creamy Comfort in Minutes
  • Ultimate Jalapeno Popper Chicken Salad
    Ultimate Jalapeno Popper Chicken Salad That'll Wow Your Tastebuds
  • Green Chile Cheese Dip
    Mouthwatering Green Chile Cheese Dip for Cozy Gatherings
  • Easy Chimichurri Sauce
    Fresh and Zesty Easy Chimichurri Sauce in Just Minutes

Footer

↑ back to top

About

  • Privacy Policy
  • Disclaimer
  • Terms & Conditions

Newsletter

  • Sign Up! for emails and updates

Contact

  • About me
  • Contact me

Copyright © 2025 TastyTrendIngredients