tastytrendingredients

  • Home
  • Recipes
    • Appetizers
    • Breakfast
    • Dessert
    • Dinner
    • Drinks
    • Salads
    • Snacks
    • Soups
  • About me
  • Contact
menu icon
go to homepage
  • Home
  • Recipes
    • Appetizers
    • Breakfast
    • Dessert
    • Dinner
    • Drinks
    • Salads
    • Snacks
    • Soups
  • About me
  • Contact
search icon
Homepage link
  • Home
  • Recipes
    • Appetizers
    • Breakfast
    • Dessert
    • Dinner
    • Drinks
    • Salads
    • Snacks
    • Soups
  • About me
  • Contact
×

Savory Grilled Mushrooms: Juicy Summer Side in 15 Minutes

August 13, 2025 by Grace Snow Leave a Comment

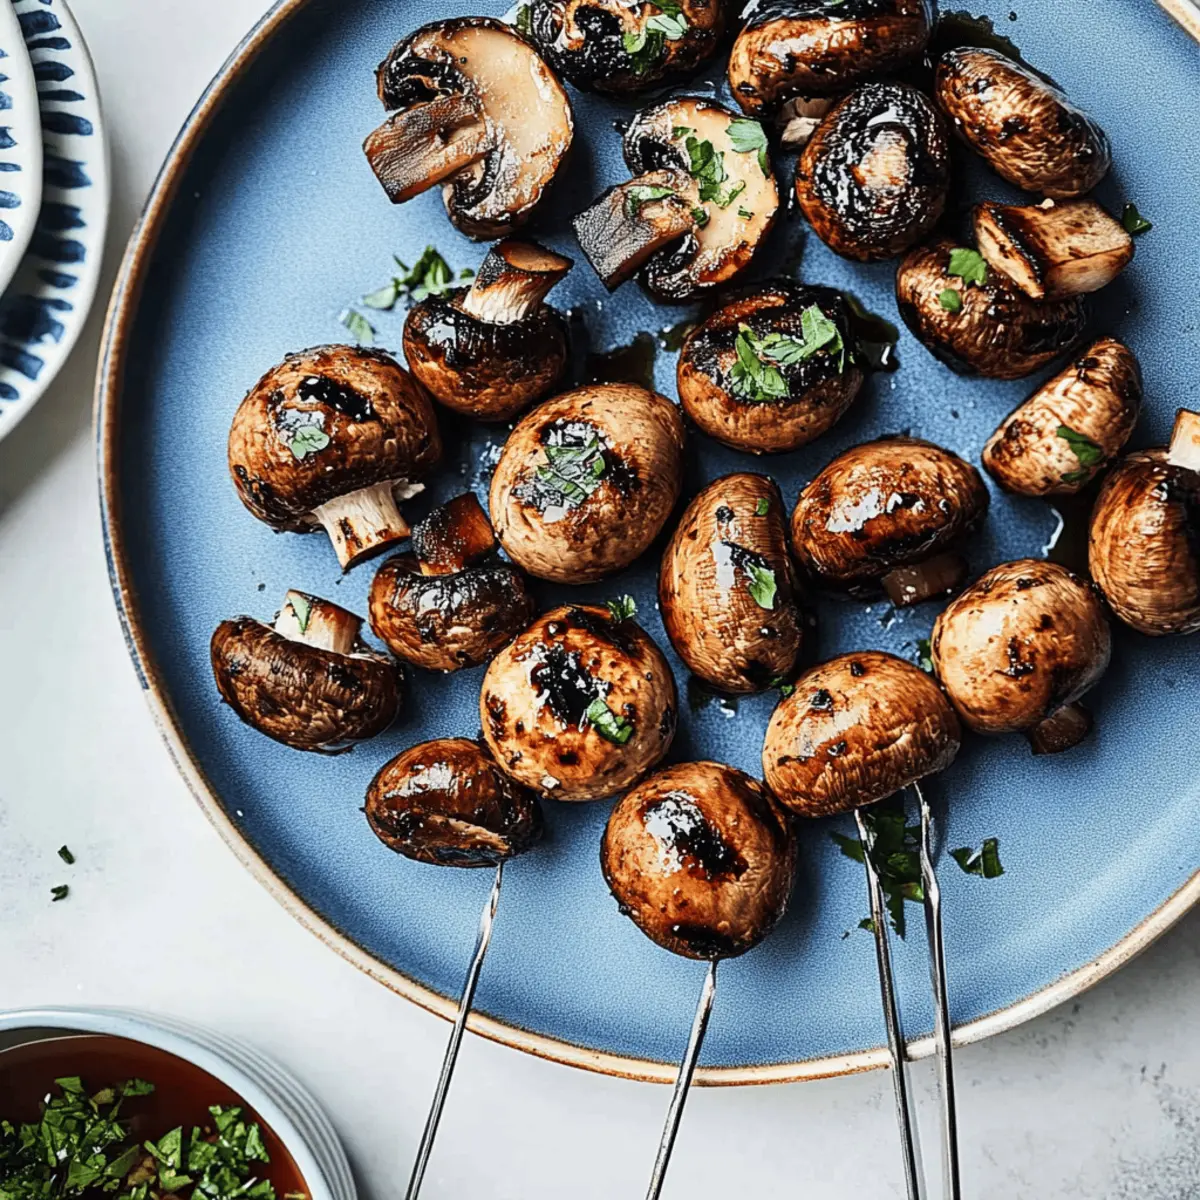
As I stood over the sizzling grill, the unmistakable scent of earthy mushrooms wafted through the summer air, instantly transporting me to backyard barbecues of my childhood. These 15-minute Grilled Mushrooms are a delightful twist to any meal, offering a juicy, meaty flavor without the guilt. Whether you choose rich Portobello or earthy Cremini, this recipe is quick to prepare, needing just six simple ingredients. Perfect as a summer side dish or as a scrumptious filling for your favorite tacos, it’s a versatile gem that’ll impress both vegetarians and meat-lovers alike. Plus, they're gluten-free, making them a fantastic addition to any dietary preference. Curious about how to achieve that perfect char and transform your meals into something extraordinary? Let’s dive in!

Why are Grilled Mushrooms a Must-Try?

Simplicity at its finest: These 15-minute grilled mushrooms require just six ingredients, making them a quick and hassle-free dish that even novice cooks can master.

Ultimate flavor fusion: The combination of balsamic vinegar and tamari results in a rich umami flavor that elevates the mushrooms to new heights. Perfect for summer barbecues!

Versatile delight: Serve them as a hearty side, or elevate your tacos and grain bowls by adding these juicy mushrooms in place of meat.

Health-conscious choice: Low in calories and gluten-free, these grilled mushrooms are guilt-free yet bursting with flavor, appealing to everyone at the table.

Crowd-pleaser potential: Impress both vegetarians and meat-lovers alike with this dish that satisfies all cravings. Don’t forget to check out my tips for how to achieve that perfect char!

Grilled Mushrooms Ingredients

• Perfect for summer grilling!

For the Mushrooms

  • Cremini or Portobello Mushrooms – The star of the dish; choose creminis for skewers and portobellos for a meaty option.

For the Marinade

  • Balsamic Vinegar – Adds a tangy kick and enhances the deep flavors of the mushrooms; drizzle generously.
  • Extra-Virgin Olive Oil – Provides richness and moisture; it's essential for achieving that beautiful grill flavor.
  • Tamari – Imparts a savory umami essence; substitute with low-sodium soy sauce if you're looking for a gluten-free option.
  • Sea Salt – Elevates all the flavors; opt for freshly ground for a more robust taste.
  • Freshly Ground Black Pepper – Adds a subtle spicy note and balances the richness before grilling.

Step‑by‑Step Instructions for Grilled Mushrooms

Step 1: Clean the Mushrooms
Begin by wiping the cremini or portobello mushrooms with a damp towel to remove any dirt. Avoid rinsing them under water, as this can make the mushrooms waterlogged and hinder their flavor. Take a moment to inspect each mushroom for blemishes or imperfections, ensuring you have the best quality for your grilled mushrooms.

Step 2: Prepare for Grilling
Trim the stems from the cremini mushrooms and gently remove the stems from the portobello mushrooms. This will help the mushrooms cook evenly on the grill. Ensure your mushrooms are set aside in a single layer, ready for seasoning, while you prepare the remaining ingredients.

Step 3: Season
On a large plate, arrange the cleaned mushrooms and drizzle them generously with balsamic vinegar, extra-virgin olive oil, and tamari. Sprinkle freshly ground sea salt and black pepper over the mushrooms. Using your hands, gently toss them to ensure they’re evenly coated, allowing the flavors to deeply penetrate the mushrooms before grilling.

Step 4: Skewer (if needed)
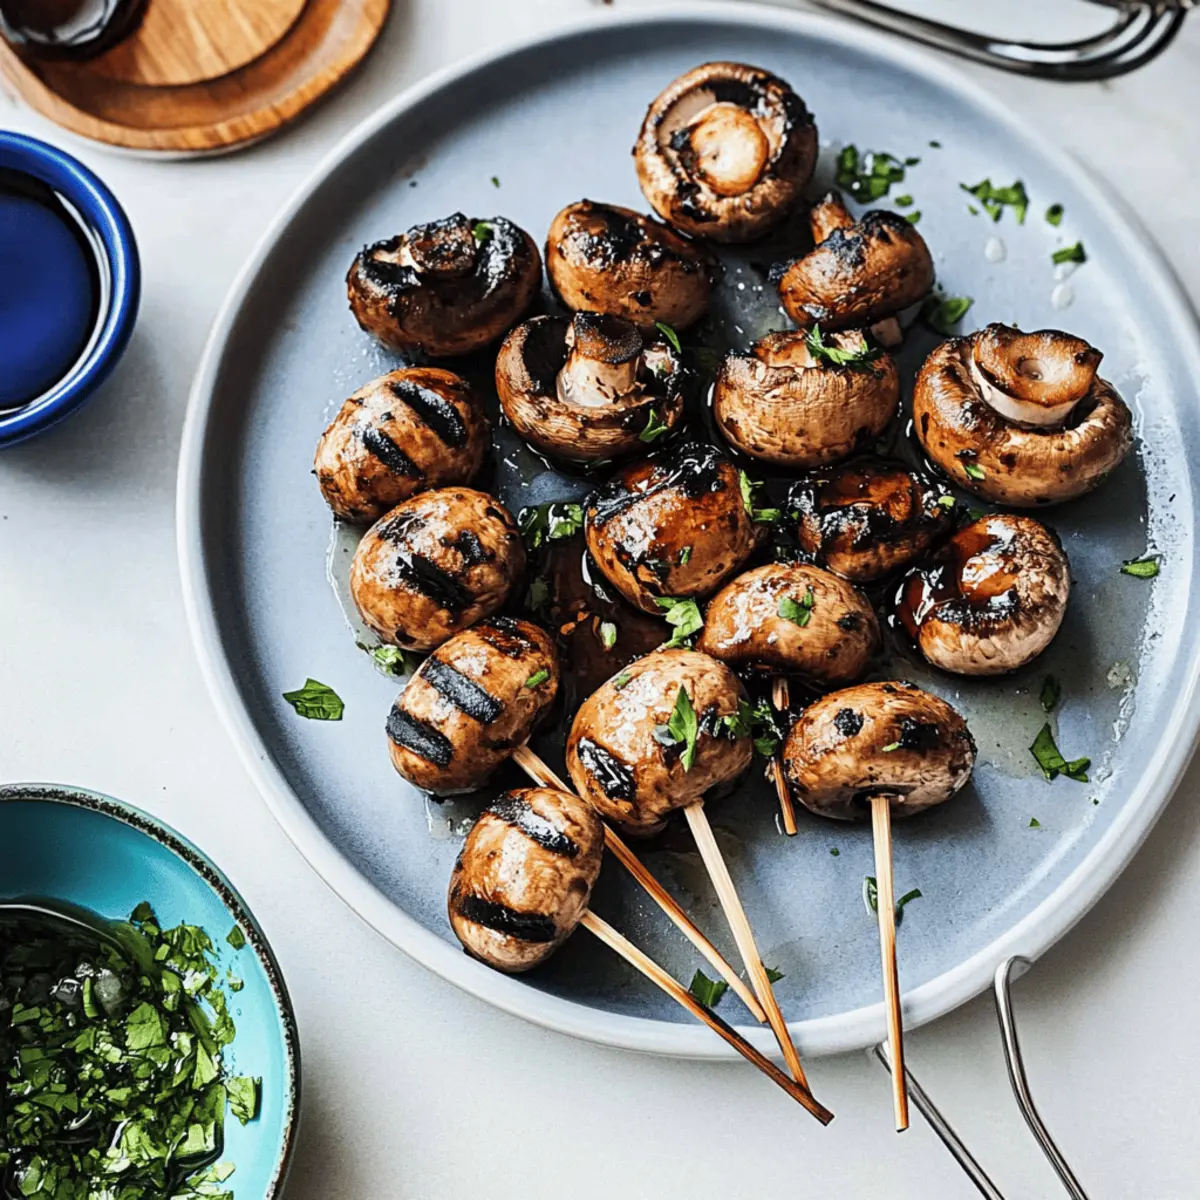
If you're grilling cremini mushrooms, thread them onto skewers for easy handling on the grill. Make sure to leave a little space between each mushroom to allow for even cooking. For portobellos, you can leave them whole, making them perfect for a hearty grilled presentation.

Step 5: Grill
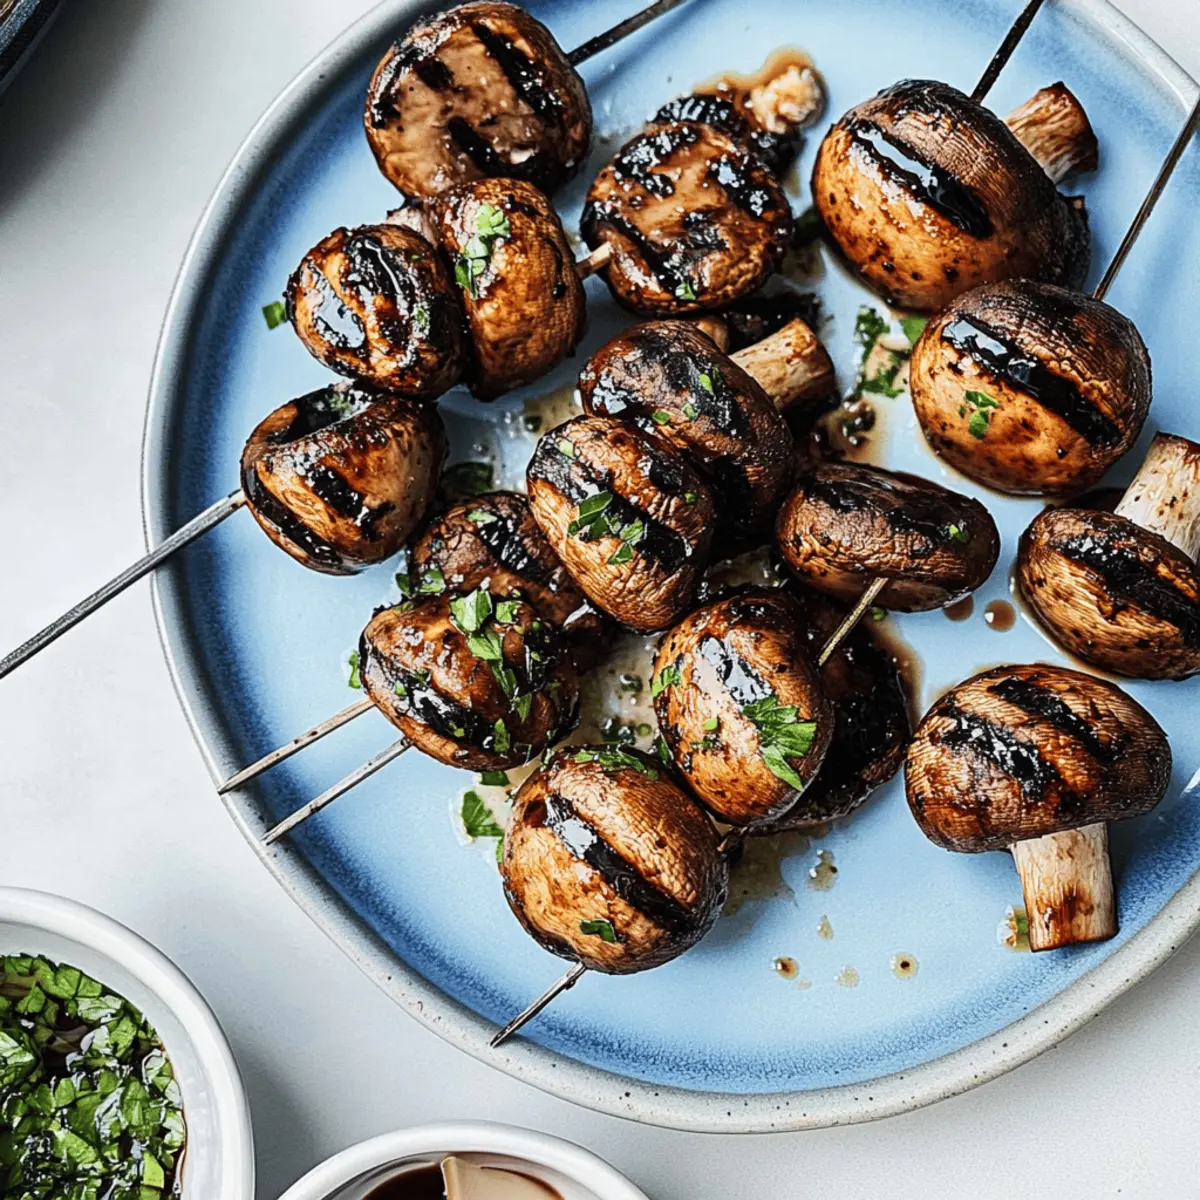
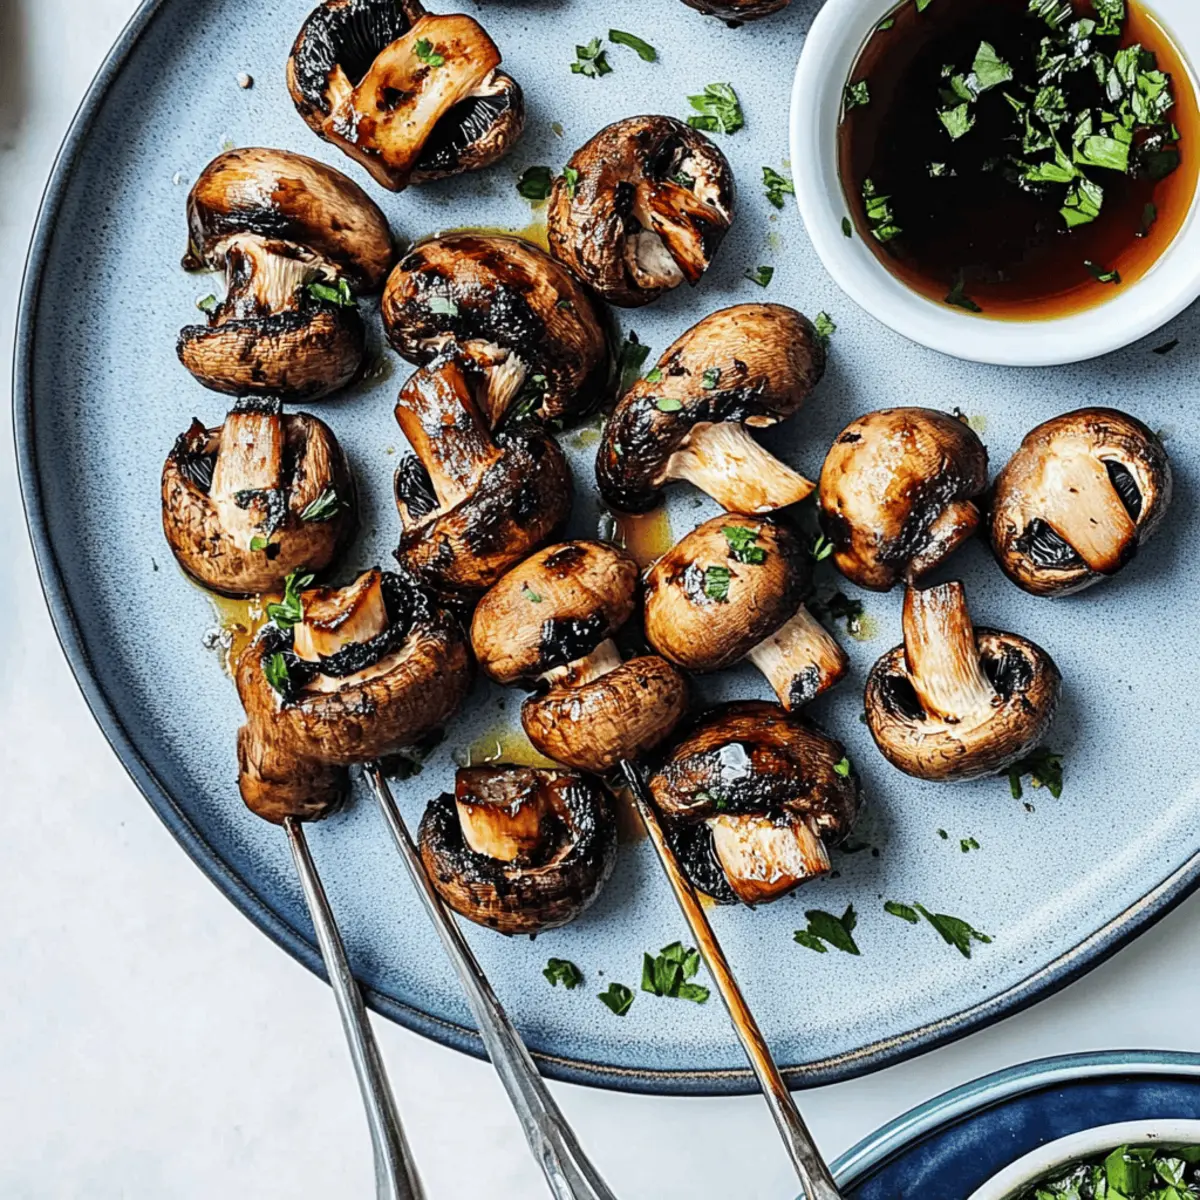
Preheat your grill to a medium temperature, ideally around 400°F (200°C). Place the mushrooms on the grill grates and cook them for approximately 5 to 7 minutes on each side. You'll know they're ready when they develop a beautiful char and become tender. Keep an eye on them to avoid overcooking, ensuring they stay juicy and flavorful.

Step 6: Serve
Once cooked, carefully remove the grilled mushrooms from the grill and let them rest for a minute. Serve them warm as a delightful summer side dish or use them as a savory filling in your tacos and grain bowls. Enjoy the meaty flavor and smoky aroma that will elevate your meal!

What to Serve with Grilled Mushrooms?

As the smoky aroma of grilled mushrooms fills the air, imagine how effortlessly they can transform your summer meal into a delightful feast.

  • Creamy Mashed Potatoes: The velvety texture pairs beautifully with the earthy umami flavors of grilled mushrooms, creating a comforting dish.

  • Fresh Garden Salad: Crisp greens tossed with a tangy vinaigrette provide a refreshing contrast, balancing the richness of the mushrooms.

  • Quinoa Salad: Nutty quinoa mixed with roasted vegetables brings a wholesome element, making it an ideal partner to these juicy mushrooms.

  • Garlic Bread: The crunchy, buttery goodness of garlic bread complements the tender mushrooms, perfect for soaking up any extra marinade.

  • Grilled Corn on the Cob: Sweet corn drizzled with lime and chili adds a fun pop of flavor, tying together the smoky theme of your meal.

  • Chimichurri Sauce: This zesty herb sauce amps up the grilled mushrooms with vibrant flavors, enhancing their already delicious profile.

  • Crisp White Wine: An ice-cold glass of Sauvignon Blanc elevates the entire dining experience, cutting through the richness and enhancing the food's flavors.

Imagine crafting a perfect plate with these combinations, inviting friends and family to share in a meal filled with flavor and togetherness.

Make Ahead Options

These Grilled Mushrooms are perfect for meal prep, allowing you to enjoy their deliciousness with minimal effort on busy nights! You can clean and season the mushrooms up to 24 hours in advance, refrigerating them in an airtight container to maintain optimal flavor. Just toss them with balsamic vinegar, olive oil, tamari, salt, and pepper, ensuring they're well-coated to absorb all that tasty goodness. When you're ready to serve, simply fire up the grill, skewer the creminis if applicable, and grill for about 5 to 7 minutes per side until charred and tender. This way, you’ll have juicy, flavorful grilled mushrooms ready to elevate your meal without the stress!

How to Store and Freeze Grilled Mushrooms

  • Fridge: Store leftover grilled mushrooms in an airtight container for up to 2 days. This helps retain their juicy texture and flavor.

  • Freezer: For longer storage, freeze grilled mushrooms in a single layer on a baking sheet before transferring them to an airtight container or freezer bag. They can last up to 3 months.

  • Reheating: When ready to enjoy, thaw in the fridge overnight, then reheat on the grill or in a pan over medium heat until warmed through. This will help restore their original texture.

  • Freshness Reminder: Grilled mushrooms taste best when freshly made, so plan to enjoy them soon after grilling for the fullest flavor experience!

Expert Tips for Grilled Mushrooms

  • Choose Wisely: Select fresh, firm mushrooms that are dry to the touch. Avoid any with dark spots, which could affect the taste of your grilled mushrooms.

  • Marinade Magic: Let the mushrooms marinate for at least 15 minutes before grilling. This enhances their flavor and ensures every bite is deliciously seasoned.

  • Mind the Grill: Always preheat your grill before adding the mushrooms. A hot grill prevents sticking and helps achieve that perfect char.

  • Keep Them Dry: Remember, don’t rinse the mushrooms! They absorb water and can become soggy, detracting from the grilled mushrooms’ texture.

  • Check for Doneness: Grilling times can vary; keep an eye on your mushrooms. They should be golden with visible grill marks and tender without being mushy.

Grilled Mushrooms: Flavorful Twists Await

Feel free to explore your creativity and customize these grilled mushrooms to fit your tastes and dietary needs.

  • Dairy-Free: Skip any cheese toppings and use a drizzle of your favorite dairy-free sauce for a fresh zing.
  • Herb-Infused: Toss with finely chopped fresh herbs such as thyme or rosemary before grilling for an aromatic boost.
  • Spicy Kick: Add a pinch of red pepper flakes to the marinade for a subtle heat that brings a delightful contrast to the umami flavors.
  • Different Mushroom Varieties: Try using shiitake or oyster mushrooms for unique flavors and textures that will surprise your palate.
  • Citrus Zing: Squeeze fresh lemon or lime juice over the grilled mushrooms just before serving to brighten the flavors and add an uplifting zest.
  • Balsamic Glaze: Drizzle a balsamic reduction over the grilled mushrooms for an exquisite finish that adds a touch of sweetness and richness.
  • Smoky Flavor: For an extra layer of flavor, add a dash of smoked paprika to the seasoning mix.
  • Marinade Swap: Replace tamari with teriyaki sauce for a sweet and savory twist that pairs well with grilled veggies and rice.

Your culinary imagination can take these tasty grilled mushrooms in countless fun directions! And if you’re looking for more ways to elevate your grilled meals, check out my ideas for making delicious tacos or creating vibrant grain bowls with them. Enjoy your grilling adventure!

Grilled Mushrooms Recipe FAQs

What type of mushrooms should I use for grilling?
You can choose between cremini and portobello mushrooms for this recipe. Cremini mushrooms are smaller and great for skewers, while portobellos are larger and provide a meaty texture that can stand alone as a main dish. Always look for fresh, firm mushrooms without dark spots for the best flavor.

How do I store leftover grilled mushrooms?
Store any leftover grilled mushrooms in an airtight container in the fridge for up to 2 days. To maintain their juicy flavor and texture, it’s best to reheat them on the grill or in a pan over medium heat, just until warmed through.

Can I freeze grilled mushrooms?
Absolutely! To freeze grilled mushrooms, first place them in a single layer on a baking sheet and freeze until solid. Then, transfer them to an airtight container or freezer bag. They can be stored in the freezer for up to 3 months. When you're ready to use them, thaw them overnight in the fridge before reheating.

What if my mushrooms are too soggy?
If your mushrooms become soggy, this usually means they were rinsed before cooking or not dried properly. To avoid this, always clean them with a damp cloth instead of rinsing and be sure to let them marinate without sitting in excess liquid. If you do end up with soggy mushrooms, try grilling them on a higher heat for a shorter time to help firm them up.

Are grilled mushrooms suitable for my gluten-free diet?
Yes! This recipe is perfect for a gluten-free diet. By using tamari instead of traditional soy sauce, you've got a delicious flavor without the gluten. Just make sure any additional ingredients or condiments you use are also gluten-free to keep your meal safe.

How can I enhance the flavor of my grilled mushrooms?
A fantastic way to enhance the flavor is by letting them marinate longer. Aim for at least 15 to 30 minutes, allowing the balsamic vinegar and tamari to deeply penetrate. You can also add fresh herbs like thyme or rosemary to the marinade for a fragrant twist that elevates the umami!

Grilled Mushrooms

Savory Grilled Mushrooms: Juicy Summer Side in 15 Minutes

Delight in these 15-minute Grilled Mushrooms, a savory summer side that offers a juicy, meaty flavor while being gluten-free.
Print Recipe Pin Recipe
Prep Time 5 minutes mins
Cook Time 10 minutes mins
Total Time 15 minutes mins
Servings: 4 servings
Course: Appetizers
Cuisine: American
Calories: 50
Ingredients Equipment Method Nutrition Notes

Ingredients
  

For the Mushrooms
  • 12 oz Cremini or Portobello Mushrooms Choose creminis for skewers and portobellos for a meaty option.
For the Marinade
  • 3 tbsp Balsamic Vinegar Adds a tangy kick.
  • 2 tbsp Extra-Virgin Olive Oil Essential for achieving grill flavor.
  • 2 tbsp Tamari Substitute with low-sodium soy sauce for a gluten-free option.
  • 1 tsp Sea Salt Opt for freshly ground for more flavor.
  • 1 tsp Freshly Ground Black Pepper Balances richness.

Equipment

  • Grill
  • Skewers
  • Measuring Spoons
  • Plate

Method
 

Step-by-Step Instructions for Grilled Mushrooms
  1. Begin by wiping the cremini or portobello mushrooms with a damp towel to remove any dirt.
  2. Trim the stems from the cremini mushrooms and gently remove the stems from the portobello mushrooms.
  3. Arrange the cleaned mushrooms on a plate and drizzle with balsamic vinegar, olive oil, and tamari, then sprinkle salt and pepper.
  4. If grilling cremini mushrooms, thread them onto skewers.
  5. Preheat your grill to a medium temperature. Grill the mushrooms for 5 to 7 minutes on each side.
  6. Once cooked, remove from the grill and let them rest before serving.

Nutrition

Serving: 1servingCalories: 50kcalCarbohydrates: 7gProtein: 2gFat: 3gSaturated Fat: 0.5gPolyunsaturated Fat: 0.5gMonounsaturated Fat: 2gSodium: 200mgPotassium: 300mgFiber: 2gSugar: 1gVitamin C: 4mgCalcium: 2mgIron: 4mg

Notes

Grilled mushrooms taste best when freshly made. Store leftovers in an airtight container for up to 2 days.

Tried this recipe?

Let us know how it was!

Zesty Shrimp Ceviche: Refreshing No-Cook Delight for Summer

August 8, 2025 by Grace Snow Leave a Comment

As the summer sun blazes down, the hunt for something cool and invigorating becomes all-consuming. My go-to solution? A delightful Shrimp Ceviche that brings a splash of the ocean right to my kitchen. This no-cook dish is not only refreshingly light but also a breeze to whip up, making it perfect for those sweltering days when you crave something satisfying yet effortless. Toss together tender shrimp marinated in vibrant citrus juices with crunchy veggies, and you’ve got an appetizer or light lunch that dazzles the palate. Plus, this gluten-free treat leaves you feeling energized rather than weighed down. Curious about how to make this zesty wonder come alive on your table? Let’s dive in!

Why is Shrimp Ceviche a Must-Try?

Freshness at its finest: This Shrimp Ceviche bursts with citrusy flavor, transporting you to sunny shores with every bite.

Quick & Easy: No cooking required! Just combine seafood and veggies for a delicious appetizer in no time.

Versatile delight: Feel free to swap shrimp for scallops or firm white fish. Customize with your favorite veggies for a personal touch.

Healthy & Light: Packed with nutrient-rich ingredients, it’s gluten-free and guilt-free, perfect for those beachy summer days.

Crowd-Pleasing: Serve it at gatherings, and watch it disappear! This dish is sure to impress friends and family, making it your new favorite go-to.

For more summer-inspired dishes, check out our light lunch ideas to keep your meals exciting!

Shrimp Ceviche Ingredients

For the Citrus Marinade

  • Fresh Lime Juice – The star of the show, it adds a zesty tang; use fresh juice for the best flavor.
  • Fresh Lemon Juice – Balances the flavors wonderfully; always opt for fresh over bottled.
  • Fresh Orange Juice – Brings a hint of sweetness; fresh juice makes a world of difference.

For the Ceviche Base

  • Shrimp (peeled and deveined) – Your primary protein source for this no-cook dish; fresh or thawed frozen shrimp works beautifully.
  • Roma Tomatoes – Adds a firm texture and sweetness; feel free to swap with other tomatoes if you like.
  • Red Onion – Vibrant in color with a hint of spice; soaking it in cold water can mellow its flavor.
  • Fresh Cilantro – Enhances the dish with its fresh, herbal notes; parsley can be a good substitute if desired.
  • Jalapeno – Perfect for introducing spice; adjust the amount based on your heat preference.
  • Salt – Essential for enhancing all the flavors; remember to adjust to your taste.
  • Avocado – Adds a creamy texture that complements the shrimp; make sure it's ripe for the best experience.

For Serving

  • Tortilla Chips – Recommended for that satisfying crunch; optional, but truly enhances the presentation and enjoyment.

Dive into the vibrant world of Shrimp Ceviche and elevate your summer meals with this refreshing delight!

Step‑by‑Step Instructions for Shrimp Ceviche

Step 1: Prepare the Citrus Marinade
In a medium glass bowl, combine fresh lime juice, lemon juice, and orange juice, mixing well to create a zesty marinade. Reserve about ½ cup of this vibrant blend for later use. The citrus aroma should invigorate your senses as you proceed, setting the stage for your refreshing Shrimp Ceviche.

Step 2: Marinate the Shrimp
Cut the peeled and deveined shrimp into ½-inch pieces, and gently fold them into the citrus marinade, ensuring they are fully submerged. Cover the bowl with plastic wrap and refrigerate for at least 30 minutes. This time allows the shrimp to turn from translucent to pink and opaque, indicating that they are ready to absorb the citrus flavors.

Step 3: Drain the Shrimp
After the marinating time, carefully strain the shrimp to remove excess liquid, discarding the marinade. Return the marinated shrimp back to the mixing bowl. You'll notice the shrimp's firm texture and bright color, signaling it's primed for the next flavorful additions in your Shrimp Ceviche.

Step 4: Add Vegetables and Seasoning
To the bowl of shrimp, add diced Roma tomatoes, finely chopped red onion, fresh cilantro, jalapeno, and a pinch of salt. Stir everything gently to combine, ensuring every ingredient mingles beautifully. Incorporating these veggies will add crunch and flavor, making your Shrimp Ceviche even more vibrant and exciting.

Step 5: Incorporate Reserved Marinade
Next, pour the reserved citrus marinade over the shrimp and vegetable mixture, folding it in delicately to enhance the flavors. Cover the bowl once more and refrigerate for an additional 30 minutes to 4 hours. This step allows the ingredients to marry together, resulting in a refreshing taste explosion is sure to impress.

Step 6: Add Avocado Before Serving
Just before sharing this delightful Shrimp Ceviche, gently fold in diced avocado for a creamy richness that balances the dish. Take care not to mash the avocado, keeping its lovely texture intact. Your final product should be a stunning mix of colors and textures, ready to be enjoyed.

Step 7: Serve with Tortilla Chips
Spoon the Shrimp Ceviche into serving bowls and present it alongside crunchy tortilla chips for a delightful contrast. This appetizer is perfect for hot summer days, inviting your guests to savor the zesty flavors and the joyous, fresh essence of the ocean.

Expert Tips for Shrimp Ceviche

  • Use Fresh Citrus: Always opt for fresh lime, lemon, and orange juices for the best flavor. Bottled juices can fall flat, affecting the shrimp ceviche's overall taste.
  • Know Your Shrimp: Ensure shrimp is fully thawed and deveined. Fresh shrimp provides the best texture, but frozen can work if thawed properly.
  • Watch Marination Time: Don't exceed 4 hours in the fridge. Over-marinating can lead to mushy shrimp ceviche, diminishing its delightful texture.
  • Mellowing Onions: Soak red onions in cold water for about 15 minutes before adding them. This reduces their sharpness and adds a gentler flavor to the dish.
  • Customize Ingredients: Feel free to get creative with your veggies! Adding mango or cucumber can enhance the sweetness and crunch of your shrimp ceviche.

Storage Tips for Shrimp Ceviche

Fridge: Enjoy your Shrimp Ceviche within 1 day for optimal freshness. Store it in an airtight container to maintain its vibrant flavors and textures.

Freezer: It's best not to freeze Shrimp Ceviche, as the shrimp can become tough and mushy upon thawing. Fresh is always better!

Reheating: This delightful dish is served cold, so there's no need for reheating. Serve chilled for the best taste and experience!

What to Serve with Shrimp Ceviche?

As you savor the bright, zesty flavors of shrimp ceviche, consider complementing it with these delightful pairings to create an unforgettable meal.

  • Creamy Guacamole: The richness of avocado balanced with lime adds an extra layer, enhancing the freshness of the ceviche. Perfect for spreading on tortilla chips!

  • Crisp Fennel Salad: A refreshing fennel salad with citrus vinaigrette adds crunch and brightness, marrying beautifully with the ceviche’s vibrant flavors. This crisp side will keep your palate tingling.

  • Mango Salsa: Combining sweet mango, red onion, and cilantro creates a delightful contrast. The sweetness complements the heat of the jalapeño in the ceviche, enhancing the overall experience.

  • Chilled White Wine: A glass of chilled Sauvignon Blanc or a dry Rosé elevates the meal, as their crispness pairs wonderfully with the seafood and citrus elements.

  • Coconut Rice: Serves as a luscious base that balances the tangy ceviche. Its subtle sweetness and creamy texture are the perfect match for the shrimp’s brightness.

  • Pineapple Sorbet: This refreshing dessert provides a sweet finish to your meal. Its fruitiness complements the ceviche’s flavors while cleansing your palate after a tangy appetizer.

  • Spicy Tortilla Chips: For extra texture and heat, serve with zesty, spicy tortilla chips. They add a delightful crunch and enhance the overall experience of your shrimp ceviche.

  • Cilantro Lime Rice: Light and fragrant, this rice dish enhances the ceviche's flavors while adding a satisfying base to your meal. Each bite intertwines fresh ingredients appealingly.

Shrimp Ceviche Variations & Substitutions

The beauty of Shrimp Ceviche lies in its flexibility, allowing you to create a fresh dish that’s uniquely yours!

  • Dairy-Free: Omit avocado for a lighter dish; simply focus on zesty citrus and crunchy veggies.
    This keeps the ceviche refreshingly light, making it perfect for those who prefer a dairy-free option.

  • Sweet Twist: Add diced mango or pineapple for a tropical flair.
    The sweetness combines harmoniously with the tart citrus, elevating the dish into a delightful summer treat.

  • Extra Crunch: Incorporate diced cucumber or red bell pepper for additional texture.
    These crunchy elements not only enhance the dish’s visual appeal but also add a refreshing, crisp bite.

  • Heat Adjustment: Swap jalapeno for serrano peppers for a spicier kick.
    Feel free to adjust the amount according to your spice tolerance; a little heat can beautifully balance the acidity of the ceviche.

  • Seafood Variety: Replace shrimp with scallops, firm white fish, or octopus for diverse flavors.
    This keeps the recipe exciting and introduces new textures while still showcasing the captivating citrus marinade.

  • Fresh Herbs: Substitute cilantro with parsley or even mint for a different herbal note.
    Herbs can dramatically change the flavor profile, giving your ceviche a unique twist that might surprise your palate.

  • Flavor Boosts: Add a splash of coconut milk for a creamy, tropical twist.
    This enhances the richness of the dish while keeping it refreshing and light, perfect for summer gatherings.

  • Tangy Addition: Stir in some finely chopped pickled onions for a tangy depth.
    These bright bites enhance the overall flavor experience and add an exciting zing to your ceviche.

Ready to explore more delicious options? Check out our fabulous light lunch ideas that will bring joy to your dining table!

Make Ahead Options

These Shrimp Ceviche preparations are perfect for busy home cooks looking to save time without sacrificing flavor! You can prep the shrimp (cut into ½-inch pieces) and marinate them in the citrus juices up to 24 hours in advance, ensuring they're covered completely. Additionally, you can chop the vegetables—Roma tomatoes, red onion, and jalapeno—up to 3 days ahead. Just keep them refrigerated in an airtight container to maintain their crispness. When you're ready to serve, simply combine the marinated shrimp with the prepped vegetables, fold in the diced avocado, and enjoy a fresh and delicious dish that feels just as vibrant as when it was first made!

Shrimp Ceviche Recipe FAQs

How do I know if my shrimp is fresh?
Absolutely! Look for shrimp that is firm to the touch, with a mild ocean scent. Avoid shrimp that has a strong fishy smell or is discolored. Fresh shrimp should be translucent with a slightly glossy sheen. If you’re buying frozen shrimp, ensure they are fully thawed and free from frost or ice crystals.

What is the best way to store leftover Shrimp Ceviche?
You’ll want to refrigerate your Shrimp Ceviche in an airtight container. It’s best enjoyed within 1 day to maintain its vibrant freshness and texture. Remember, storing it longer can make the shrimp mushy, so it’s best to savor it quickly! Keep it chilled until you are ready to serve.

Can I freeze Shrimp Ceviche?
Very! However, I recommend against freezing it. The shrimp can become tough and mushy upon thawing, losing their delightful texture. If you must, prepare the ceviche without the shrimp and freeze only the vegetables and marinades. When ready to serve, mix in fresh shrimp after thawing for the best results.

What if my ceviche tastes too acidic?
If you find your Shrimp Ceviche is too tart, you can balance it with a pinch of sugar or a dash of honey. Adding diced avocado can also help mellow the acidity while enhancing creaminess. Just take it slow and mix in a little at a time, tasting as you go to achieve the perfect balance.

Is there a way to reduce the sharpness of red onion?
Yes, indeed! Soaking chopped red onion in cold water for about 15 minutes before adding it to your ceviche works wonders. This simple step removes some of the sharpness, making the onion flavor milder and more pleasant in your dish. You’ll love the difference it makes!

Can my pets share in the Shrimp Ceviche fun?
No, it's best to keep this dish away from pets. Shrimp can be a safe treat for dogs in moderation, but the citrus, onions, and spices in ceviche may not be suitable for them. Always consult your veterinarian before introducing new foods to your pet's diet!

Shrimp Ceviche

Zesty Shrimp Ceviche: Refreshing No-Cook Delight for Summer

This refreshing Shrimp Ceviche is a no-cook delight, perfect for summer with zesty citrus flavors and vibrant veggies.
Print Recipe Pin Recipe
Prep Time 15 minutes mins
Marinating Time 30 minutes mins
Total Time 45 minutes mins
Servings: 4 servings
Course: Appetizers
Cuisine: Seafood
Calories: 200
Ingredients Equipment Method Nutrition Notes

Ingredients
  

For the Citrus Marinade
  • 1/2 cup Fresh Lime Juice Use fresh juice for the best flavor.
  • 1/4 cup Fresh Lemon Juice Always opt for fresh over bottled.
  • 1/4 cup Fresh Orange Juice Fresh juice makes a world of difference.
For the Ceviche Base
  • 1 pound Shrimp (peeled and deveined) Fresh or thawed frozen shrimp works beautifully.
  • 2 medium Roma Tomatoes Feel free to swap with other tomatoes if you like.
  • 1/4 cup Red Onion Soaking in cold water mellows its flavor.
  • 1/4 cup Fresh Cilantro Parsley can be a good substitute if desired.
  • 1 small Jalapeno Adjust based on your heat preference.
  • 1 teaspoon Salt Adjust to taste.
  • 1 medium Avocado Make sure it's ripe for the best experience.
For Serving
  • 1 bag Tortilla Chips Optional, but enhances presentation and enjoyment.

Equipment

  • medium glass bowl
  • plastic wrap
  • strainer

Method
 

Step-by-Step Instructions
  1. In a medium glass bowl, combine fresh lime juice, lemon juice, and orange juice, mixing well to create a zesty marinade. Reserve about ½ cup of this vibrant blend for later use.
  2. Cut the peeled and deveined shrimp into ½-inch pieces, and gently fold them into the citrus marinade, ensuring they are fully submerged. Cover the bowl with plastic wrap and refrigerate for at least 30 minutes.
  3. Carefully strain the shrimp to remove excess liquid, discarding the marinade. Return the marinated shrimp back to the mixing bowl.
  4. To the bowl of shrimp, add diced Roma tomatoes, finely chopped red onion, fresh cilantro, jalapeno, and a pinch of salt. Stir everything gently to combine.
  5. Pour the reserved citrus marinade over the shrimp and vegetable mixture, folding it in delicately. Cover the bowl and refrigerate for an additional 30 minutes to 4 hours.
  6. Just before serving, gently fold in diced avocado for a creamy richness. Take care not to mash the avocado.
  7. Spoon the Shrimp Ceviche into serving bowls and present it alongside crunchy tortilla chips.

Nutrition

Serving: 1bowlCalories: 200kcalCarbohydrates: 20gProtein: 15gFat: 8gSaturated Fat: 1gPolyunsaturated Fat: 2gMonounsaturated Fat: 5gCholesterol: 150mgSodium: 300mgPotassium: 400mgFiber: 5gSugar: 3gVitamin A: 500IUVitamin C: 30mgCalcium: 30mgIron: 1mg

Notes

For optimal freshness, enjoy your Shrimp Ceviche within 1 day and store it in an airtight container.

Tried this recipe?

Let us know how it was!

Hello world!

August 1, 2025 by admin 1 Comment

Welcome to WordPress. This is your first post. Edit or delete it, then start writing!

frzfzrrzberb

  • « Previous Page
  • 1
  • …
  • 14
  • 15
  • 16

Welcome!

Hi, I’m Grace, a Sydney-based home cook with a passion for bold flavors and trending ingredients. Whether you’re a busy beginner or a seasoned foodie, you’ll find dishes here that are fresh, fun, and full of flavor.

More about me

Popular Recipes

  • One Pot Keto Tuna Casserole
    One Pot Keto Tuna Casserole: Creamy Comfort in Minutes
  • Ultimate Jalapeno Popper Chicken Salad
    Ultimate Jalapeno Popper Chicken Salad That'll Wow Your Tastebuds
  • Green Chile Cheese Dip
    Mouthwatering Green Chile Cheese Dip for Cozy Gatherings
  • Easy Chimichurri Sauce
    Fresh and Zesty Easy Chimichurri Sauce in Just Minutes

Footer

↑ back to top

About

  • Privacy Policy
  • Disclaimer
  • Terms & Conditions

Newsletter

  • Sign Up! for emails and updates

Contact

  • About me
  • Contact me

Copyright © 2025 TastyTrendIngredients