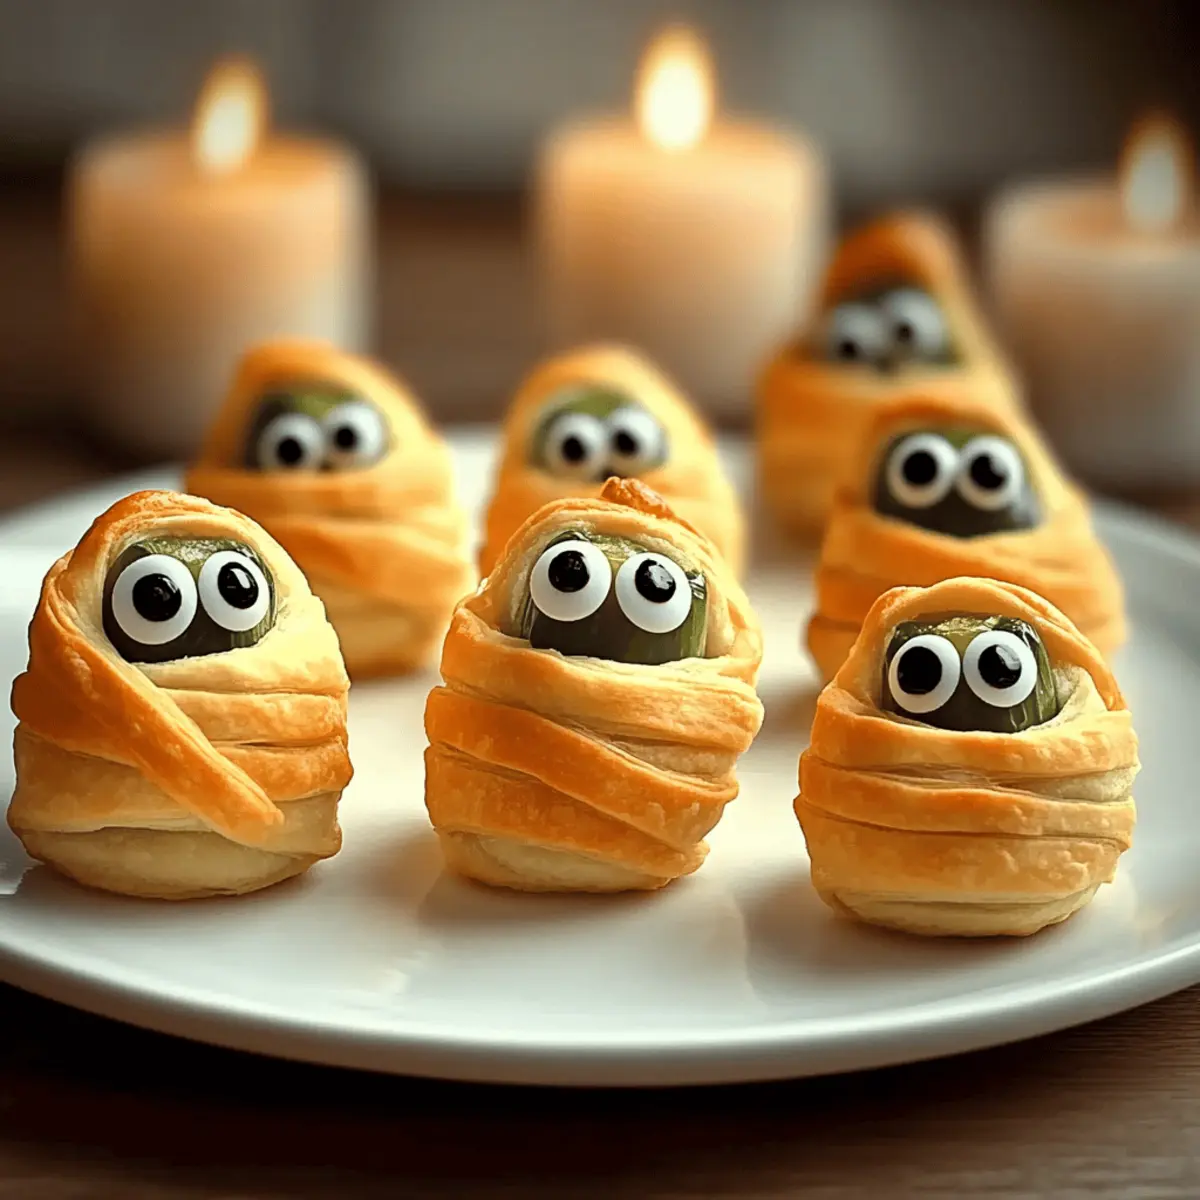
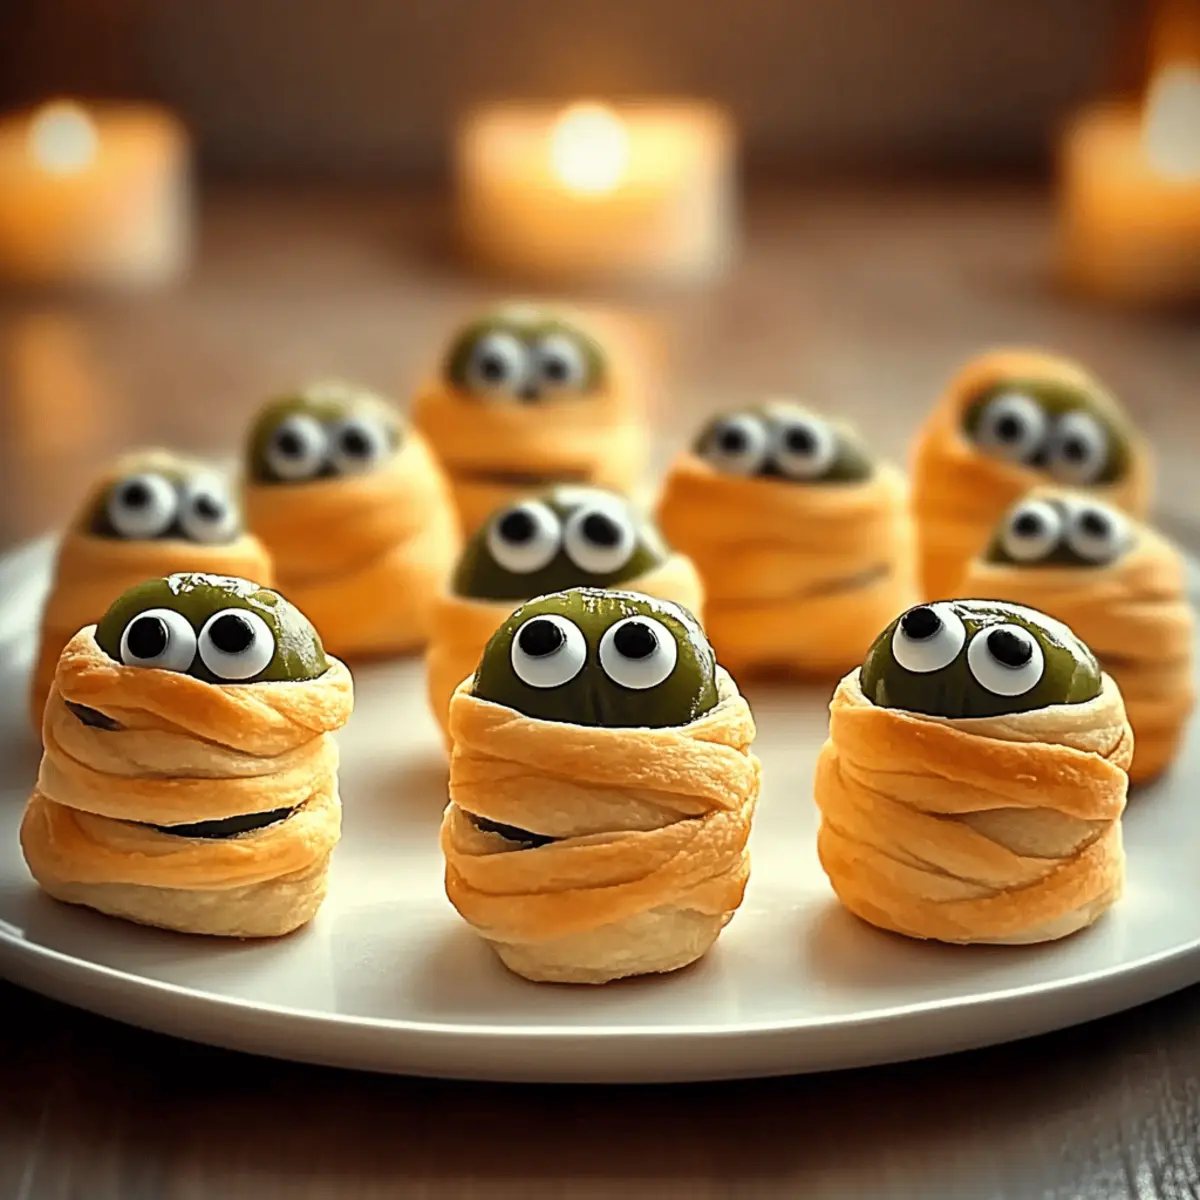
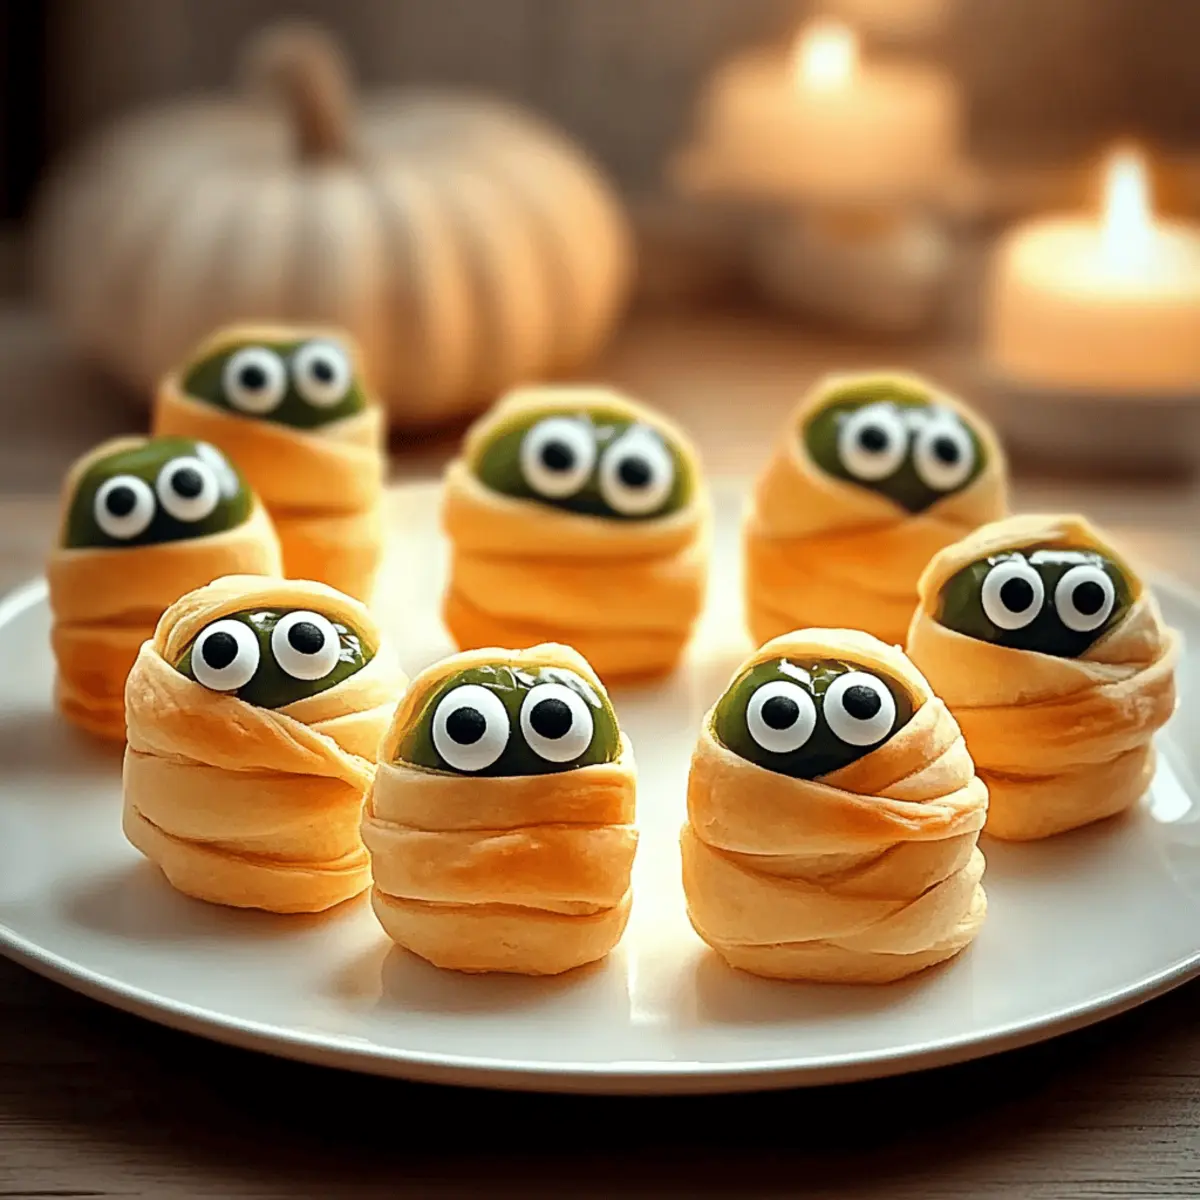
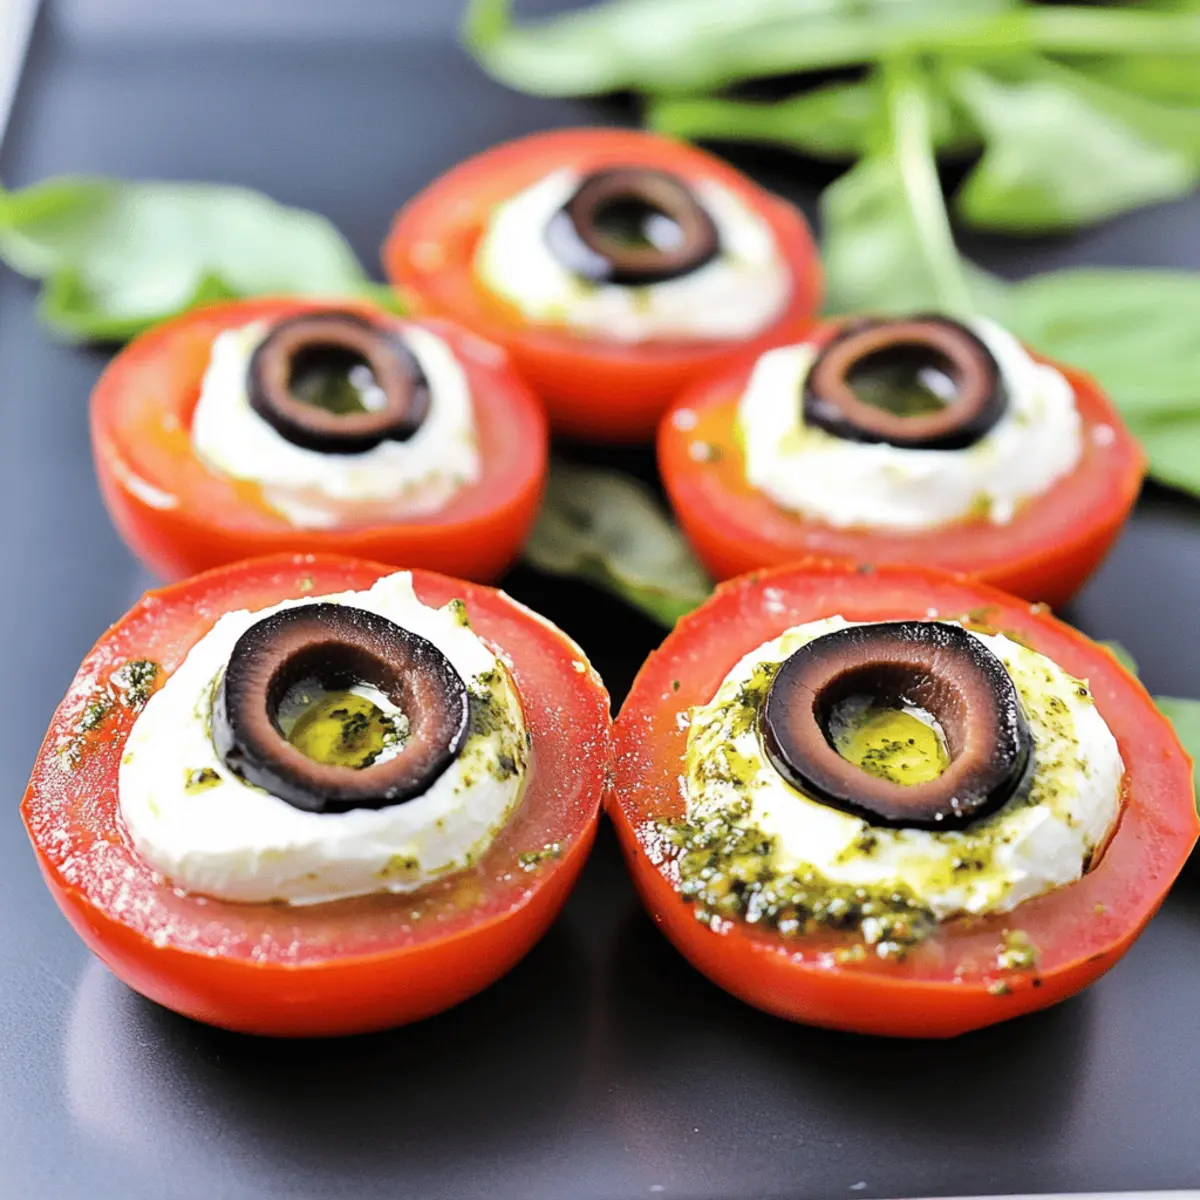
As I rifled through my pantry, a sudden inspiration struck—an eerie twist on a classic favorite! Enter Halloween Caprese Eyeballs: these delightful, spooky appetizers are perfect for any costume party or trick-or-treat gathering. What I love most about this recipe is not just how easy it is to whip up but also how you can present them in either a “clean” or “infected” style, bringing a fun edge to your Halloween spread. Plus, they’re a low-carb, diabetic-friendly treat that everyone can enjoy. Just imagine your guests marveling at these creepy creations while savoring the creamy, herby goodness of fresh ingredients! Are you ready to elevate your Halloween festivities with these unforgettable bites?
Why Are Halloween Caprese Eyeballs Irresistible?
Unique Presentation: These eyeballs stand out on any platter, perfect for spicing up your Halloween décor!
Kid-Friendly Fun: Kids will love the spooky aesthetic while enjoying fresh flavors, making them an ideal treat for family parties.
Quick and Easy: With just a handful of ingredients and straightforward steps, you can assemble these appetizers in no time—perfect for busy hosting.
Versatile Options: Serve them “clean” for a charming look or “infected” for a gruesome touch; the choice is yours!
Health-Conscious Delight: At only 70 calories each, they're low-carb and diabetic-friendly—everyone can indulge without guilt! Integrate them into your Halloween spread along with other delightful appetizers, and the compliments will roll in!
Halloween Caprese Eyeballs Ingredients
For the Eyeballs
- Small Tomatoes – Choose ripe, firm tomatoes to ensure they hold their shape for the spooky presentation.
- Whipped Cream Cheese – Provides a creamy texture; substitute with ricotta for a lighter option.
- Sliced Black Olives – Acts as the eyeball pupil, adding a salty kick; green olives can be used for a twist in color.
For the “Infection” Effect
- Pesto Sauce – Adds a flavorful layer and visual appeal; store-bought pesto saves time while still impressing your guests.
For Serving
- Fresh Basil – Use as a base for an attractive presentation and to impart a lovely aromatic flavor.
Feel free to get creative and elevate your Halloween Caprese Eyeballs with this ingredient breakdown! These delightful, low-carb bites are sure to enchant everyone at your gathering!
Step‑by‑Step Instructions for Halloween Caprese Eyeballs
Step 1: Prepare the Tomatoes
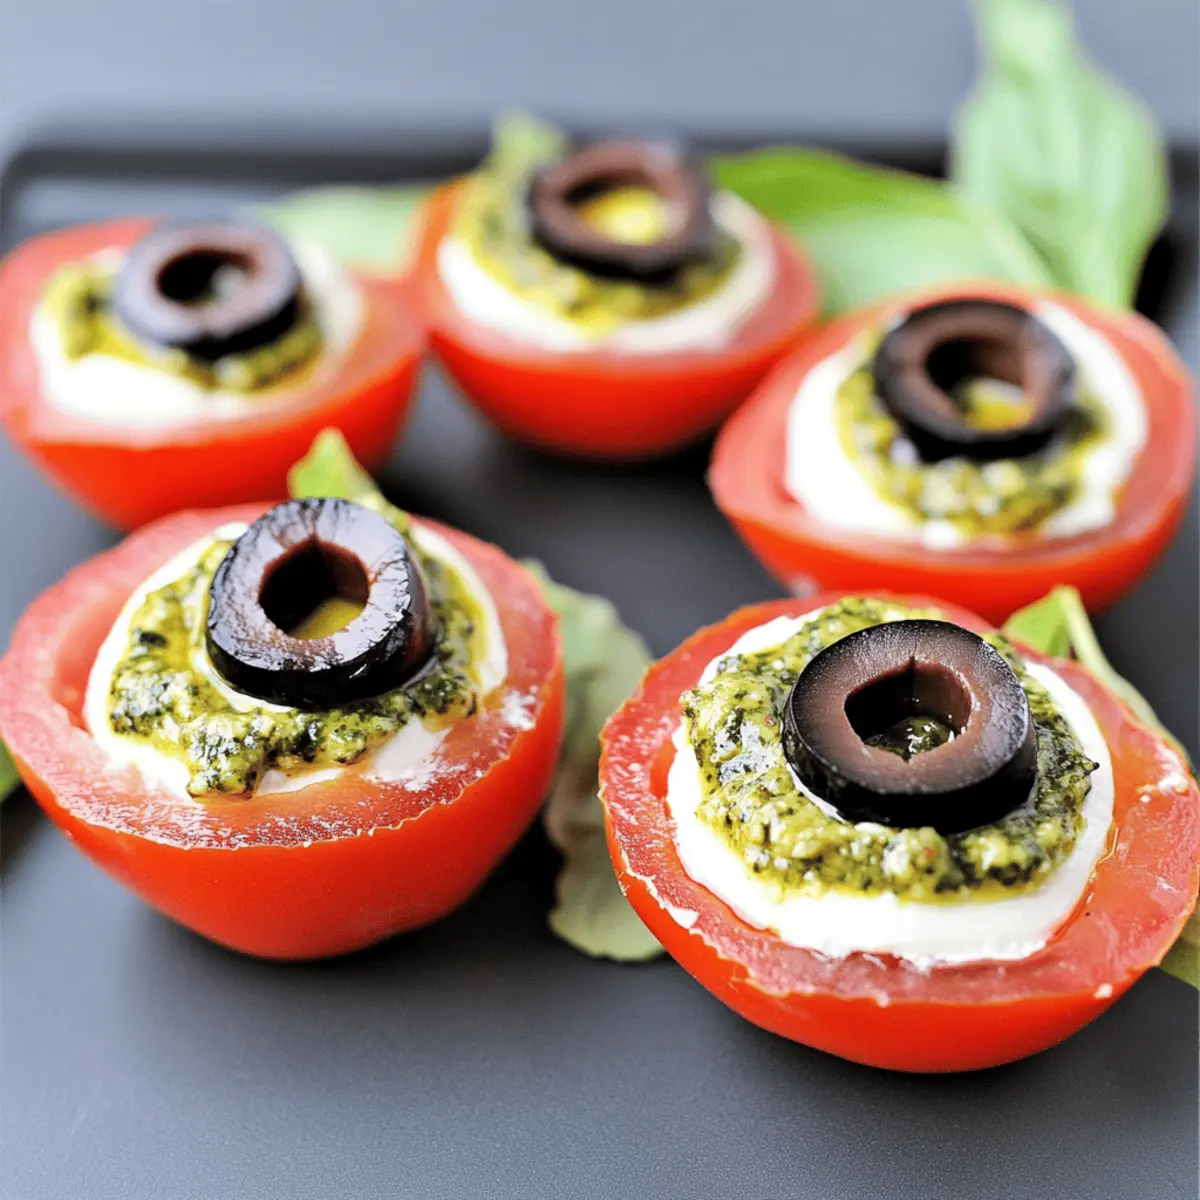
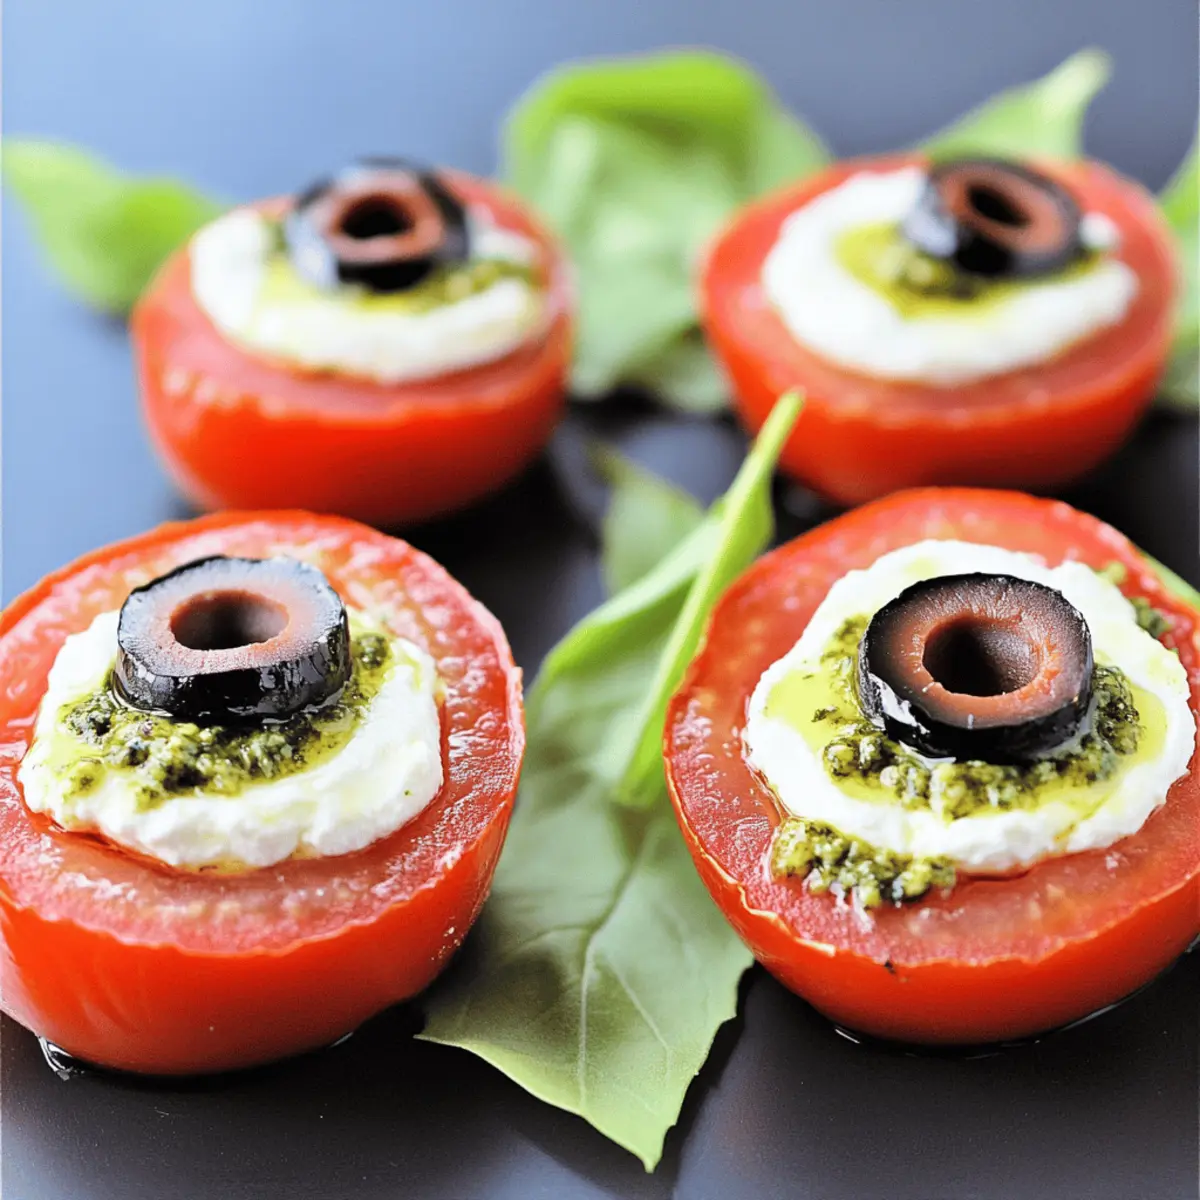
Begin by washing your small tomatoes thoroughly under cold running water. Then, using a sharp knife, carefully slice each tomato in half horizontally. Scoop out the insides with a small spoon, discarding the pulp and seeds while keeping the skins intact for that spooky shape. Set the emptied tomato halves on a clean plate, cut-side up, ready for their eerie filling.
Step 2: Apply the Pesto Sauce
Next, pour your pesto sauce into a squirt bottle for easy application. Squeeze the pesto around the inner rim of each tomato half, creating a “ghoulish” effect that will add flavor and visual appeal to your Halloween Caprese Eyeballs. This step takes just a couple of minutes, but remember to keep the filling side clean for the next ingredients!
Step 3: Fill with Cream Cheese
Now, take the whipped cream cheese and use a small spatula or spoon to fill each tomato half generously. As you fill them, allow a bit of the pesto to mix in for a fun marbled effect. Aim for a nice, rounded top, ensuring it’s visible above the rim. This should take about 5 minutes, and the creamy mixture will create a delightful contrast against the red tomato skin.
Step 4: Add the Black Olive Pupils
To create the perfect eyeball effect, gently press a sliced black olive into the center of each filled tomato. This will serve as the eyeball’s pupil, adding that savory push to your appetizer’s flavor profile. Ensure the olive sits snugly in the cream cheese so it doesn’t topple over. This step only requires a couple of minutes, and you’ll already see the ghoulish look taking shape!
Step 5: Enhance with More Pesto
For an extra touch of flair, squirt a small dot of pesto into the center of each olive pupil. This’ll create a striking contrast and enhance the eye's “infected” appearance, reinforcing the Halloween theme with vibrant color. Take your time with this step to ensure each eyeball looks its creepiest!
Step 6: Plate and Serve
Finally, to present your Halloween Caprese Eyeballs, arrange them on a large basil leaf or your favorite festive platter. Stick a toothpick through each eyeball to hold it in place if needed. Get creative with the arrangement, and serve them immediately for the best visual impact. These spooky appetizers are now ready to wow your guests!
Storage Tips for Halloween Caprese Eyeballs
Fridge: Assemble the Halloween Caprese Eyeballs a few hours before serving and store them in the refrigerator in an airtight container for up to 4 hours.
Freezer: These appetizers are best enjoyed fresh; however, if you have leftovers, avoid freezing as the tomatoes and creamy filling may change texture.
Reheating: If you need to adjust any chilled leftovers, let them sit at room temperature for about 20 minutes before serving, ensuring they return to their delicious, creamy state.
Presentation: When ready to serve, arrange the stored eyeballs on fresh basil leaves for an attractive presentation that still captivates the Halloween spirit!
Make Ahead Options
These Halloween Caprese Eyeballs are perfect for meal prep enthusiasts! You can hollow out and fill the tomato halves with cream cheese up to 24 hours in advance, ensuring they don't collapse. Just keep the assembled tomatoes refrigerated in an airtight container to maintain their freshness. The pesto can also be prepared ahead and stored separately to prevent it from browning, making your prep hassle-free. When you're ready to serve, simply add the black olive pupils and a final touch of pesto to each eyeball, and arrange them beautifully on a platter. You'll have spooky, delicious appetizers that are just as appetizing as if made fresh!
Expert Tips for Halloween Caprese Eyeballs
-
Choose Firm Tomatoes: Make sure to opt for ripe, firm tomatoes. This will prevent them from collapsing under the weight of the filling and help maintain their spooky shape.
-
Pesto Application: Using a squirt bottle for the pesto makes it easier to create that dramatic “infected” effect. Clarify any excess around the rim to keep the presentation clean.
-
Mixing It Up: Feel free to experiment with different fillings, like herbed cheese spreads or flavored labneh, to offer various flavor profiles while enjoying the Halloween Caprese Eyeballs.
-
Presentation Tips: Use fresh basil leaves creatively for an eye-catching display. Secure the eyeballs with toothpicks for easier serving and a professional touch.
-
Preparation Ahead: These appetizers can be made a few hours in advance. Just prepare and store in the refrigerator until you’re ready to serve, ensuring they stay fresh.
Halloween Caprese Eyeballs Variations
Feel free to unleash your creativity and customize these delightful Halloween Caprese Eyeballs into something uniquely yours!
-
Herbed Cheese Swap: Substitute whipped cream cheese with herbed cheese spread for a burst of flavor. Your taste buds will thank you!
-
Creamy Labneh Twist: Try using flavored labneh instead of cream cheese for a tangy twist. It adds a creamy richness that’s absolutely irresistible!
-
Goat Cheese Variation: Replace the cream cheese with herbed goat cheese for a more pronounced flavor. The combination with tomatoes is a match made in heaven.
-
Cherry Tomato Option: Use cherry tomatoes instead of small ones for bite-sized eyeballs. Their sweetness will add an extra layer of deliciousness!
-
Olive Alternatives: Swap black olives for green olives to experiment with color and taste. Who knew eyeballs could come in different hues?
-
Heat It Up: Add a jalapeño slice atop each eyeball for a fiery kick. It's a spooky surprise that’ll certainly thrill your adventurous guests!
-
Basil Infusion: Mix finely chopped fresh basil into the cream cheese for a herbal infusion that amplifies the freshness of the Caprese Eyeballs.
-
Vegan Delight: For a vegan option, replace cheese with a cashew cream spread. You can achieve both the same texture and a delightfully unique flavor.
Explore these variations to keep the Halloween spirit alive while ensuring your spooky appetizers are as joyful and delicious as any other family-favorite recipe! And if you’re curious about other Halloween themes, don’t miss checking out some mouthwatering appetizer ideas for Halloween parties. Whether it’s for a festive gathering or a cozy night in, these tips will ensure your table remains trick-or-treat ready!
What to Serve with Halloween Caprese Eyeballs
Elevate your spooky spread with these delightful pairings that complement the creamy, herby flavors of your Halloween Caprese Eyeballs.
-
Crispy Vegetable Chips: Add a crunch to the mix! Pairing these eyeballs with crunchy veggie chips creates a delightful texture contrast.
-
Zesty Garlic Bread: The warm, toasty aroma of garlic bread brings a comforting element that beautifully balances the coolness of the Caprese Eyeballs.
-
Chilled White Wine: A crisp Sauvignon Blanc refreshes the palate, enhancing the fresh flavors of tomato and basil while keeping the vibe festive.
-
Savory Cheese Platter: Featuring an array of cheeses, nuts, and dried fruits can round out your appetizer spread, providing a variety of tastes for all guests.
-
Roasted Pumpkin Soup: Serve in small cups for a seasonal touch; its warm, creamy texture pairs perfectly with the cold, savory eyeballs.
-
Herbaceous Salad: A simple arugula salad with lemon vinaigrette adds freshness, making it a great counterpoint to the rich cream cheese filling.
-
Spicy Deviled Eggs: Bring an extra kick to the table! The creamy yet spicy flavor will harmonize with the thrilling taste of your Halloween Caprese Eyeballs.
-
Chocolate Mousse Cups: For a sweet finish, decadent chocolate mousse provides a rich dessert that will satisfy any sweet tooth after the savory appetizers.
These pairings create a well-rounded Halloween gathering that’s sure to impress your guests!

Halloween Caprese Eyeballs Recipe FAQs
What kind of tomatoes should I use for the Halloween Caprese Eyeballs?
Absolutely go for small, firm tomatoes! Ripe varieties like cherry or grape tomatoes work perfectly. The firmness helps them hold their shape during preparation and adds a delightful bite when you eat them.
How should I store the Halloween Caprese Eyeballs?
These delicious little treats are best enjoyed fresh, but you can assemble them a few hours ahead of time. Store them in an airtight container in the refrigerator for up to 4 hours to keep everything nice and fresh. Just make sure to keep them chilled until serving!
Can I freeze Halloween Caprese Eyeballs?
I recommend avoiding the freezer for these appetizers. Freezing can alter both the texture of the tomatoes and the creamy filling, making them less enjoyable. Instead, prepare them fresh and keep leftovers in the fridge for up to 3 days, if any are left, of course!
What alternatives can I use for the filling besides whipped cream cheese?
The more the merrier! Instead of whipped cream cheese, you can use herbed cheese spreads or even ricotta for a lighter twist. If you want to go fancy, flavored labneh or goat cheese can add a wonderful depth of flavor and make your Halloween Caprese Eyeballs even more delightful.
Are there any dietary considerations I should keep in mind?
Absolutely! These Halloween Caprese Eyeballs are not only low-carb and diabetic-friendly, but they are also gluten-free. If you're serving guests with allergies, ensure that the pesto used does not contain any nuts, as some brands may include pine nuts. Always check labels for allergens to keep everyone safe!
What should I do if my tomatoes are too soft?
Great question! If you happen to pick up soft tomatoes, no worries! Simply let them sit at room temperature for a short while to see if they firm up a bit; however, if they're too far gone, it’s best to use them for a different recipe to avoid collapsing eyeballs. Always choose tomatoes that feel sturdy and firm to the touch.
Halloween Caprese Eyeballs: Spooky Low-Carb Appetizers
Ingredients
Equipment
Method
- Prepare the Tomatoes: Wash tomatoes and slice each in half horizontally. Scoop out the insides while keeping the skins intact.
- Apply the Pesto Sauce: Pour pesto into a squirt bottle and squeeze around the inner rim of each tomato half.
- Fill with Cream Cheese: Use a spatula to fill each tomato half with cream cheese, mixing in some pesto.
- Add the Black Olive Pupils: Press a sliced black olive into the center of each filled tomato.
- Enhance with More Pesto: Squirt a small dot of pesto into the center of each olive pupil.
- Plate and Serve: Arrange on a large basil leaf or festive platter and serve immediately.