tastytrendingredients

  • Home
  • Recipes
    • Appetizers
    • Breakfast
    • Dessert
    • Dinner
    • Drinks
    • Salads
    • Snacks
    • Soups
  • About me
  • Contact
menu icon
go to homepage
  • Home
  • Recipes
    • Appetizers
    • Breakfast
    • Dessert
    • Dinner
    • Drinks
    • Salads
    • Snacks
    • Soups
  • About me
  • Contact
search icon
Homepage link
  • Home
  • Recipes
    • Appetizers
    • Breakfast
    • Dessert
    • Dinner
    • Drinks
    • Salads
    • Snacks
    • Soups
  • About me
  • Contact
×

Creepy Halloween Brain Dip Appetizer: 3 Ingredients for Fun

October 17, 2025 by Grace Snow Leave a Comment

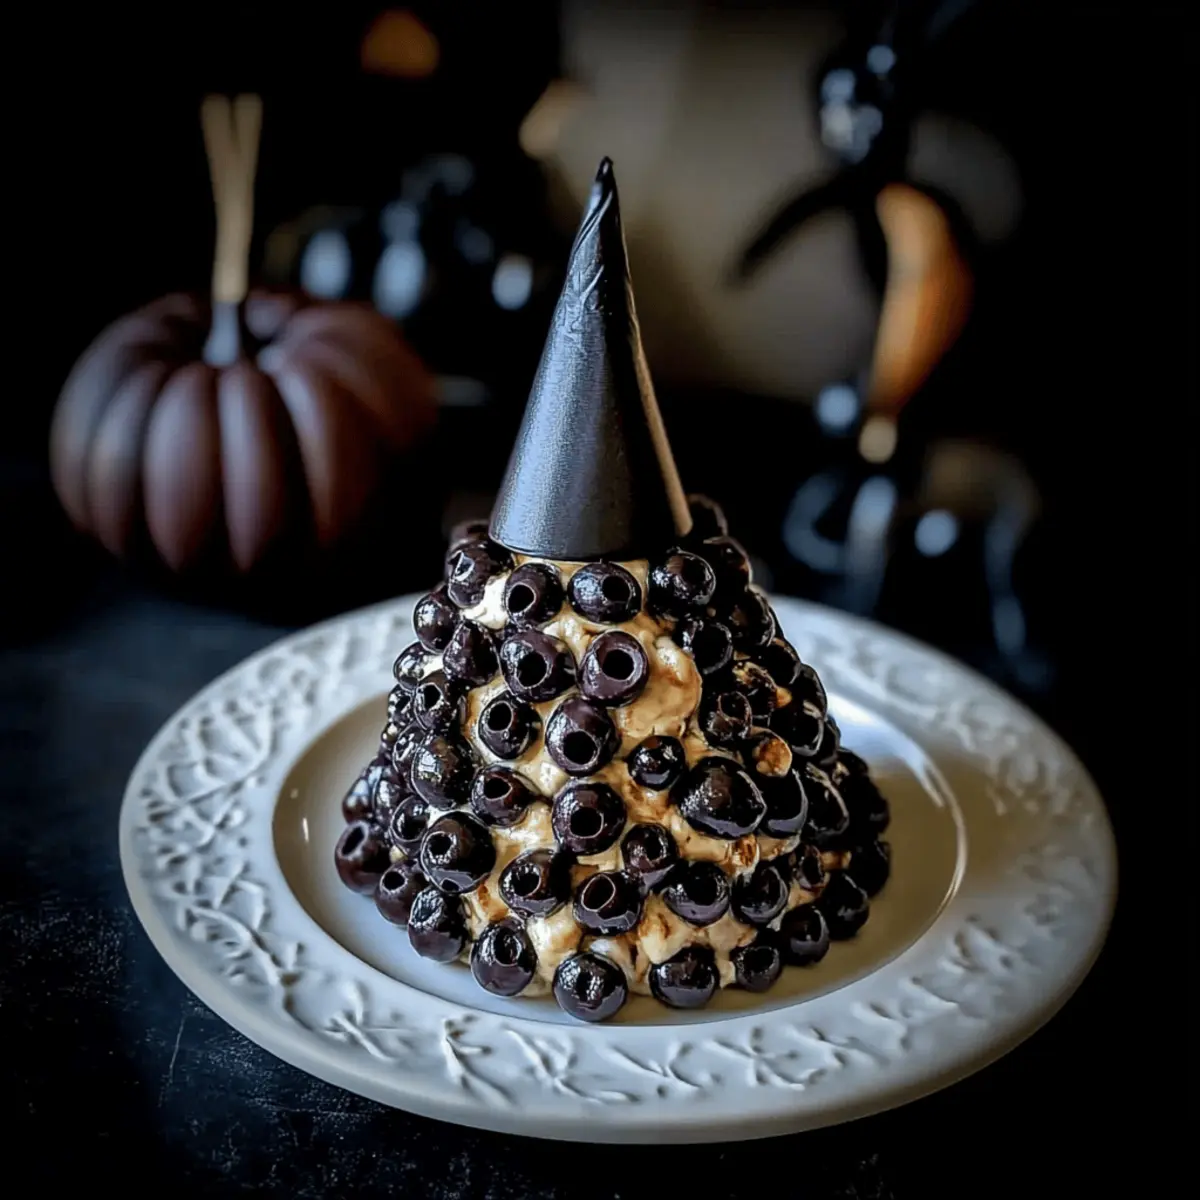
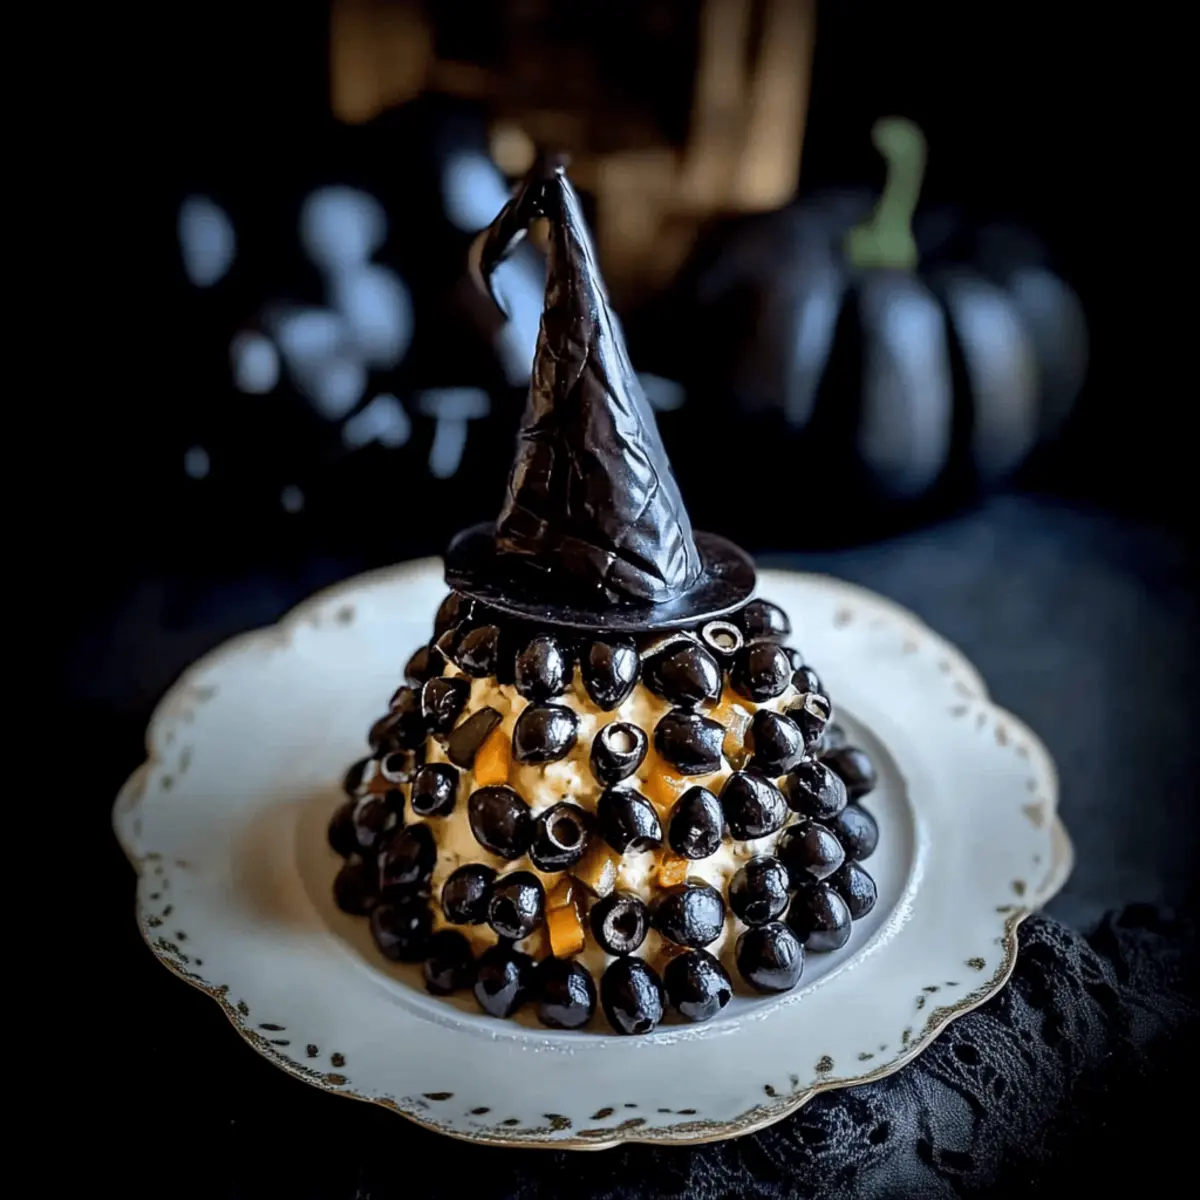
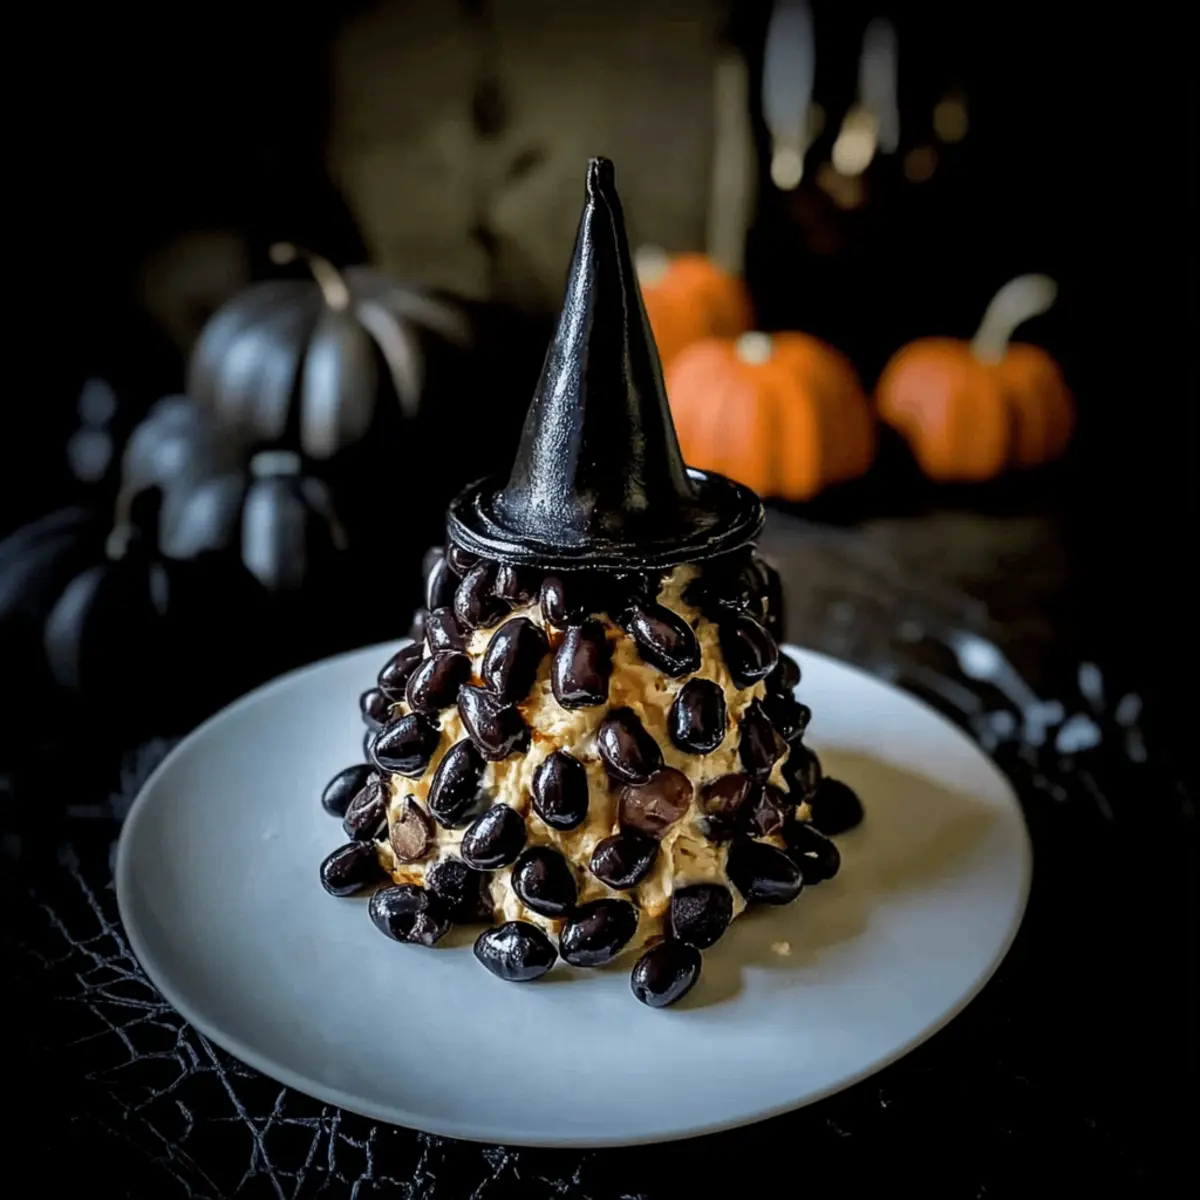
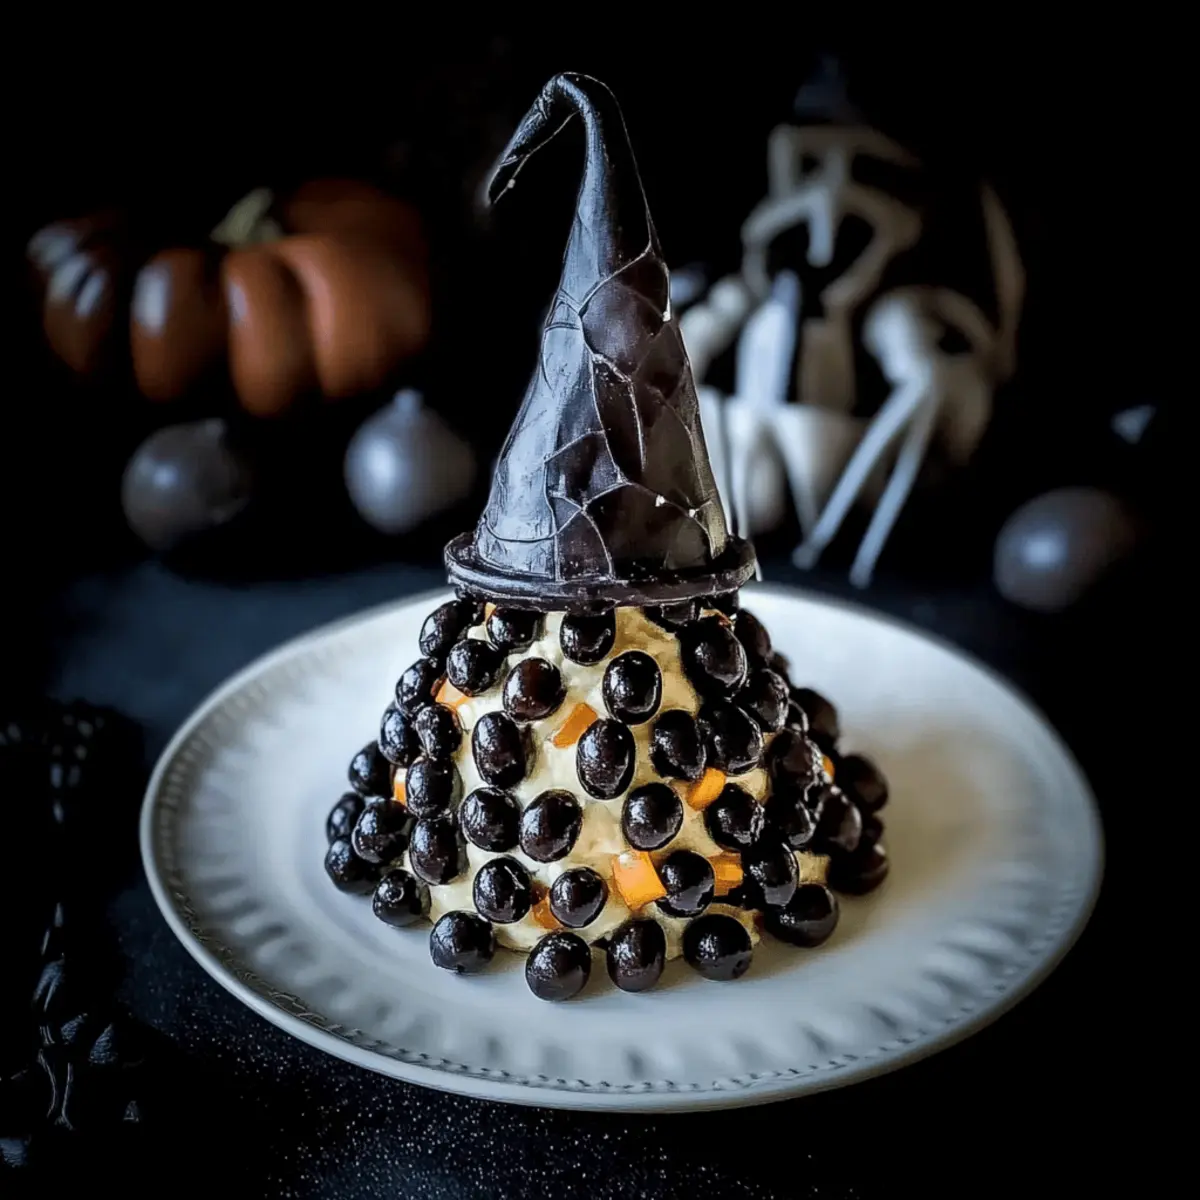
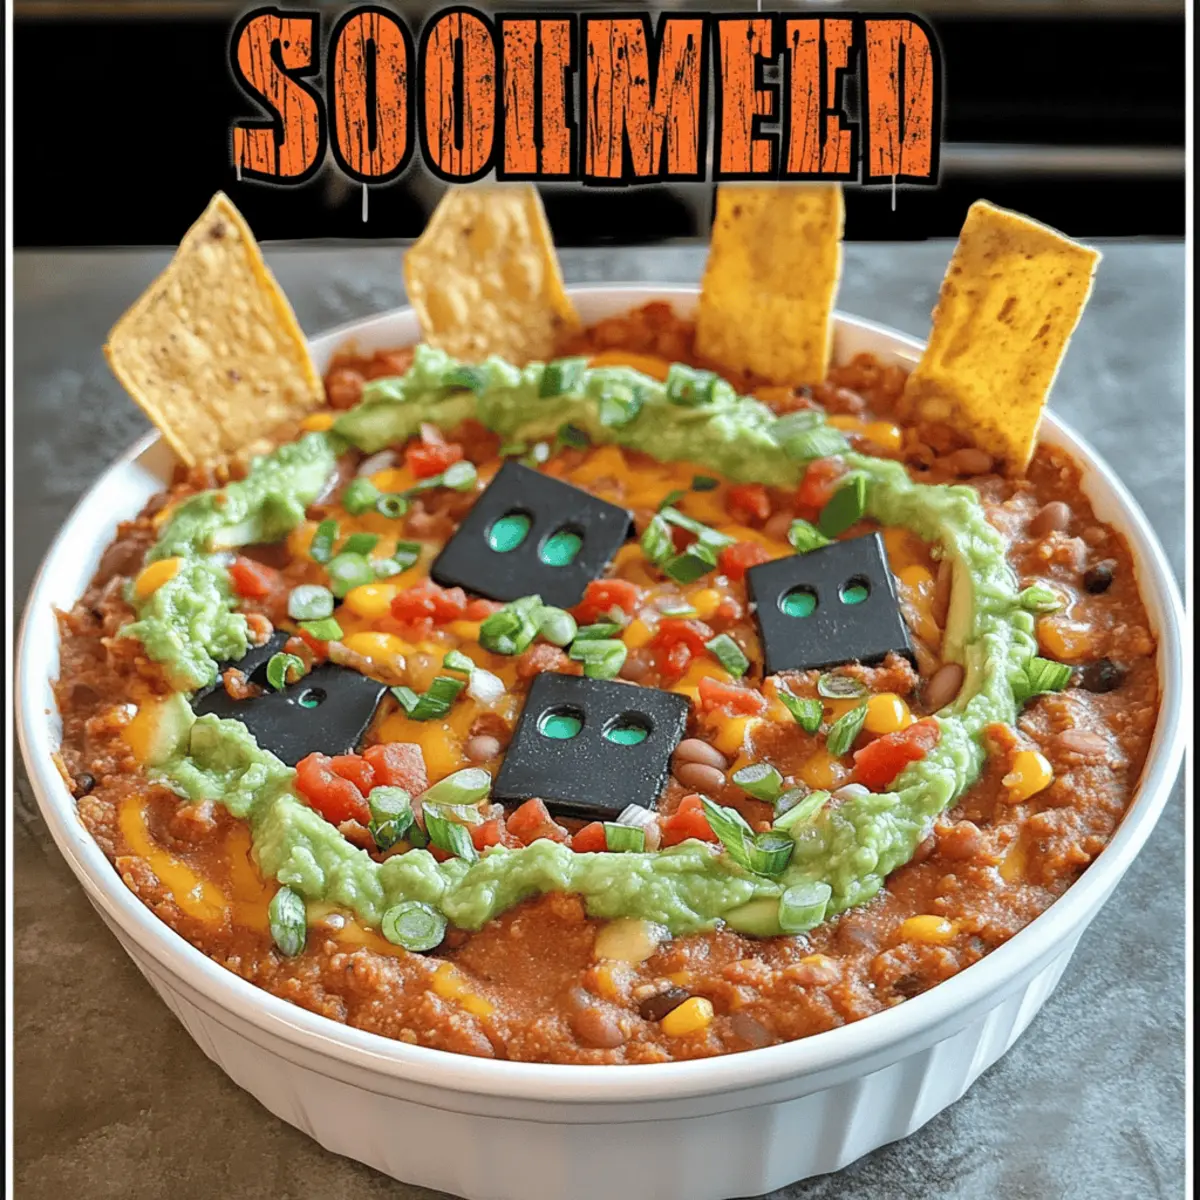
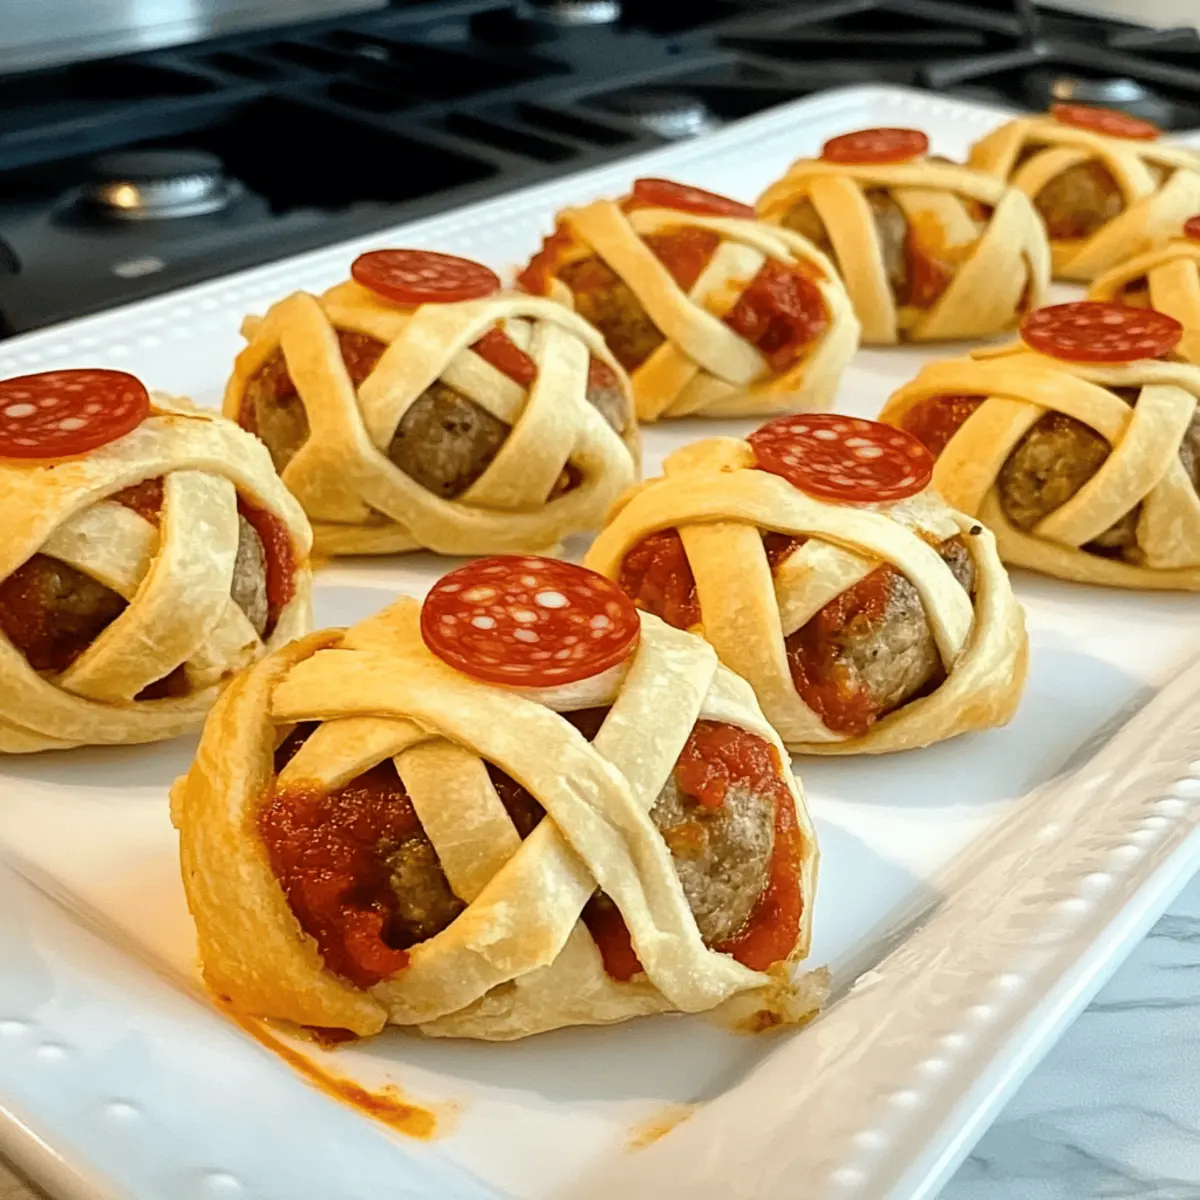
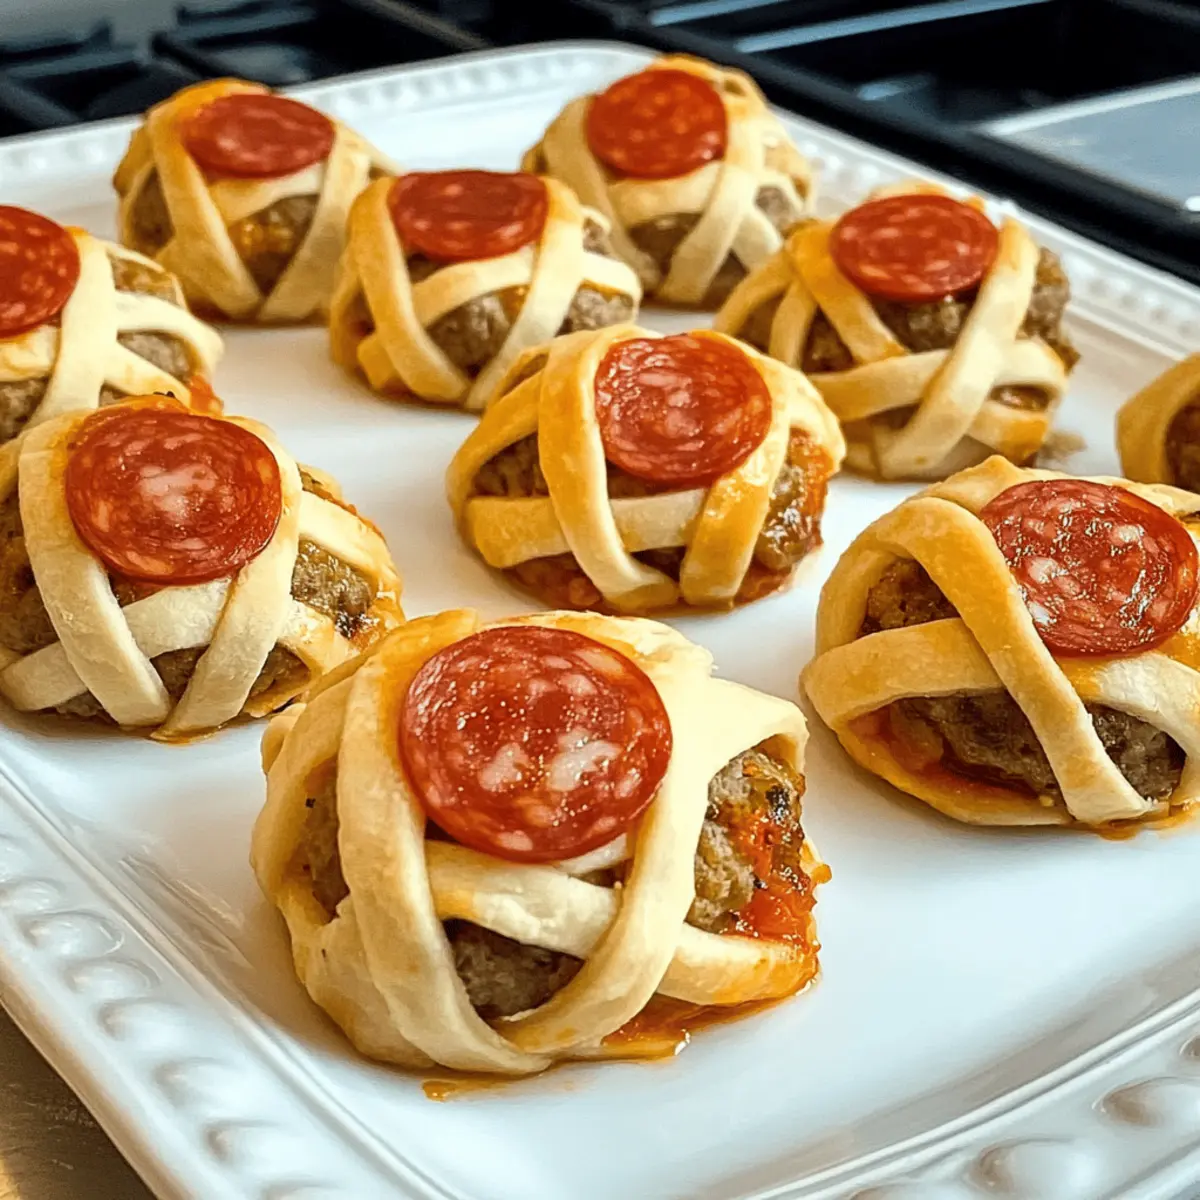
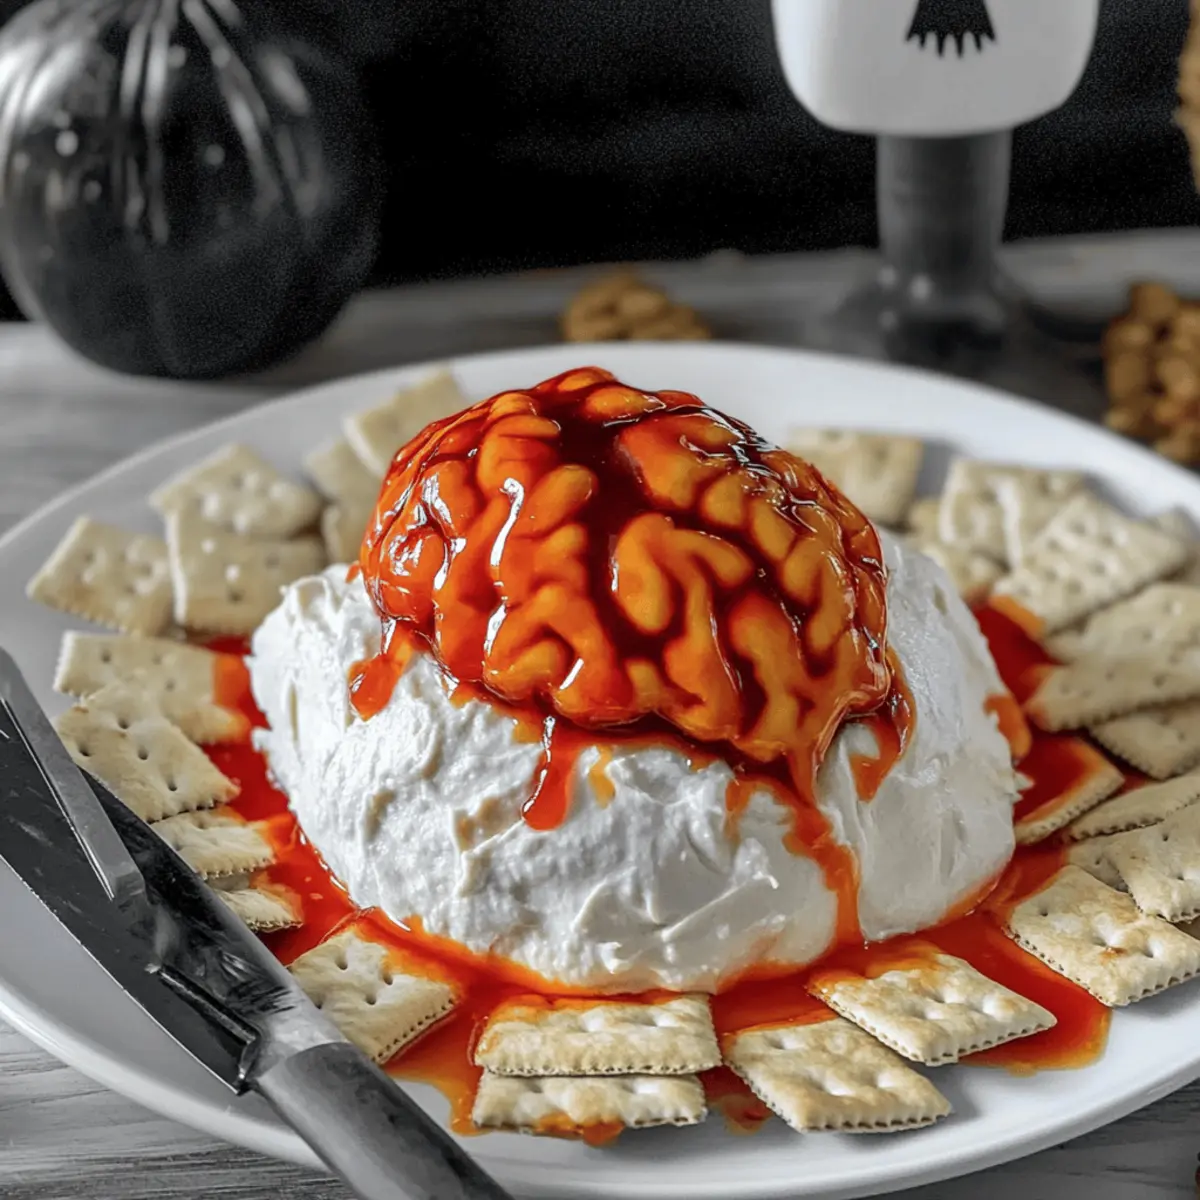
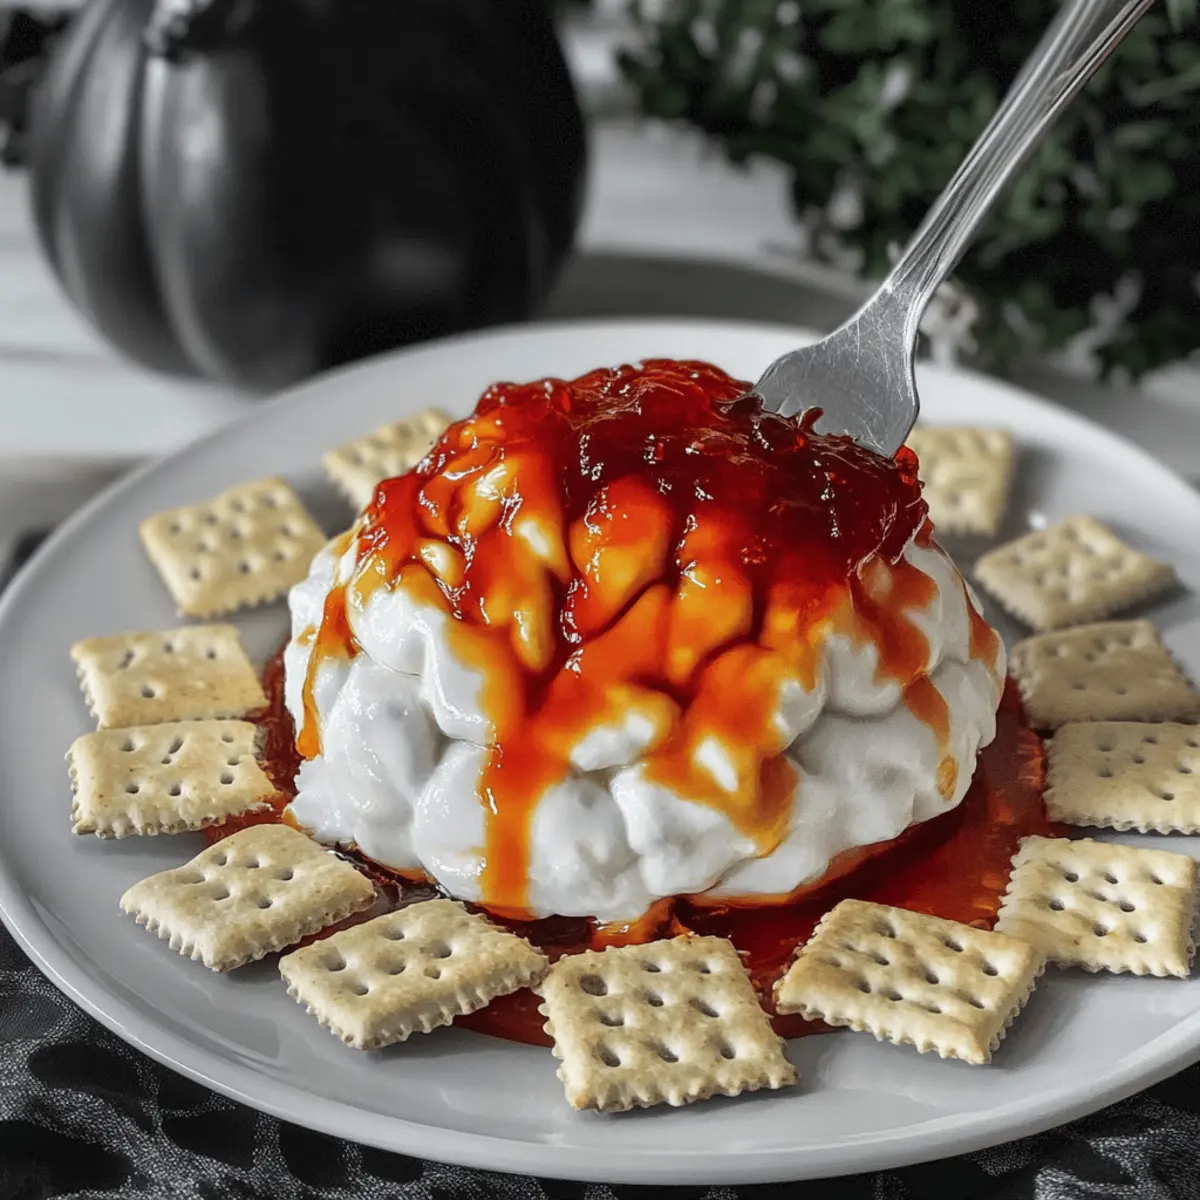
As the Halloween season creeps closer, I'm always on the hunt for the perfect appetizer that balances fun and flavor. Enter the Creepy Brain Dip: a wonderfully eerie treat that transforms your gathering into a spooky sensation. With just three simple ingredients, this Halloween Brain Dip Appetizer makes preparation a breeze, allowing you to whip up something spectacular with minimal fuss. Not only does it look downright fabulous, but it’s also a make-ahead dish that can save you from last-minute stress. Imagine your guests' delighted reactions as they dive into this creamy, delightfully unsettling creation, drizzled with red pepper jelly for that extra wow factor. Are you ready to add a touch of mischief to your Halloween spread?

Why Will You Love This Dip?

Simplicity: With only three ingredients, you can effortlessly create this spooky sensation. Make-Ahead: Prepare it days in advance to save time and ensure a stress-free Halloween party. Creamy Delight: The blend of Boursin and cream cheese results in a wonderfully smooth texture that your guests won't forget. Unique Presentation: Its brain-like shape, topped with red pepper jelly, adds an eye-catching element to any table. Plus, it pairs perfectly with crackers or veggies for a crowd-pleasing experience! For those who love themed treats, check out our ideas on Halloween-themed snacks that will complement this dip beautifully.

Halloween Brain Dip Ingredients

• Just three ingredients for spook-tacular fun!

For the Dip

  • Boursin cheese – Provides a creamy, flavorful base; can be replaced with any soft, herbed cheese for variety.
  • Cream cheese – Adds creaminess and structure; opt for low-fat cream cheese if you're looking for a lighter option.
  • Red pepper jelly – Introduces a sweet and spicy touch; substitute with any sweet jelly, and try adding hot sauce for a kick!

Enjoy making this Halloween Brain Dip Appetizer that's sure to impress your guests!

Step‑by‑Step Instructions for Creepy Brain Dip Appetizer

Step 1: Prepare the Cheese Mixture
In a mixing bowl, combine 8 ounces of Boursin cheese and 8 ounces of softened cream cheese using an electric mixer on medium speed. Beat until the mixture is smooth and creamy, taking about 2-3 minutes. This will create a rich base for your Halloween Brain Dip Appetizer, so ensure there are no lumps, and the texture is fluffy.

Step 2: Mold the Dip
Once your cheese mixture is fully combined, scoop it into a brain-shaped mold, using a spatula to press it down gently and remove any air pockets. Make sure to fill the mold completely, smoothing the top for an even surface. Cover the mold tightly with plastic wrap, and place it in the refrigerator to firm up for at least 4 hours or preferably overnight.

Step 3: Release from the Mold
After the chilling period, carefully remove the mold from the refrigerator. Take off the plastic wrap and gently invert the mold onto a serving platter. Tap the mold lightly on the counter to help the brain dip release easily. If you used a silicone mold, it should pop out effortlessly, ensuring your Halloween Brain Dip Appetizer retains its spooky shape.

Step 4: Add the Topping
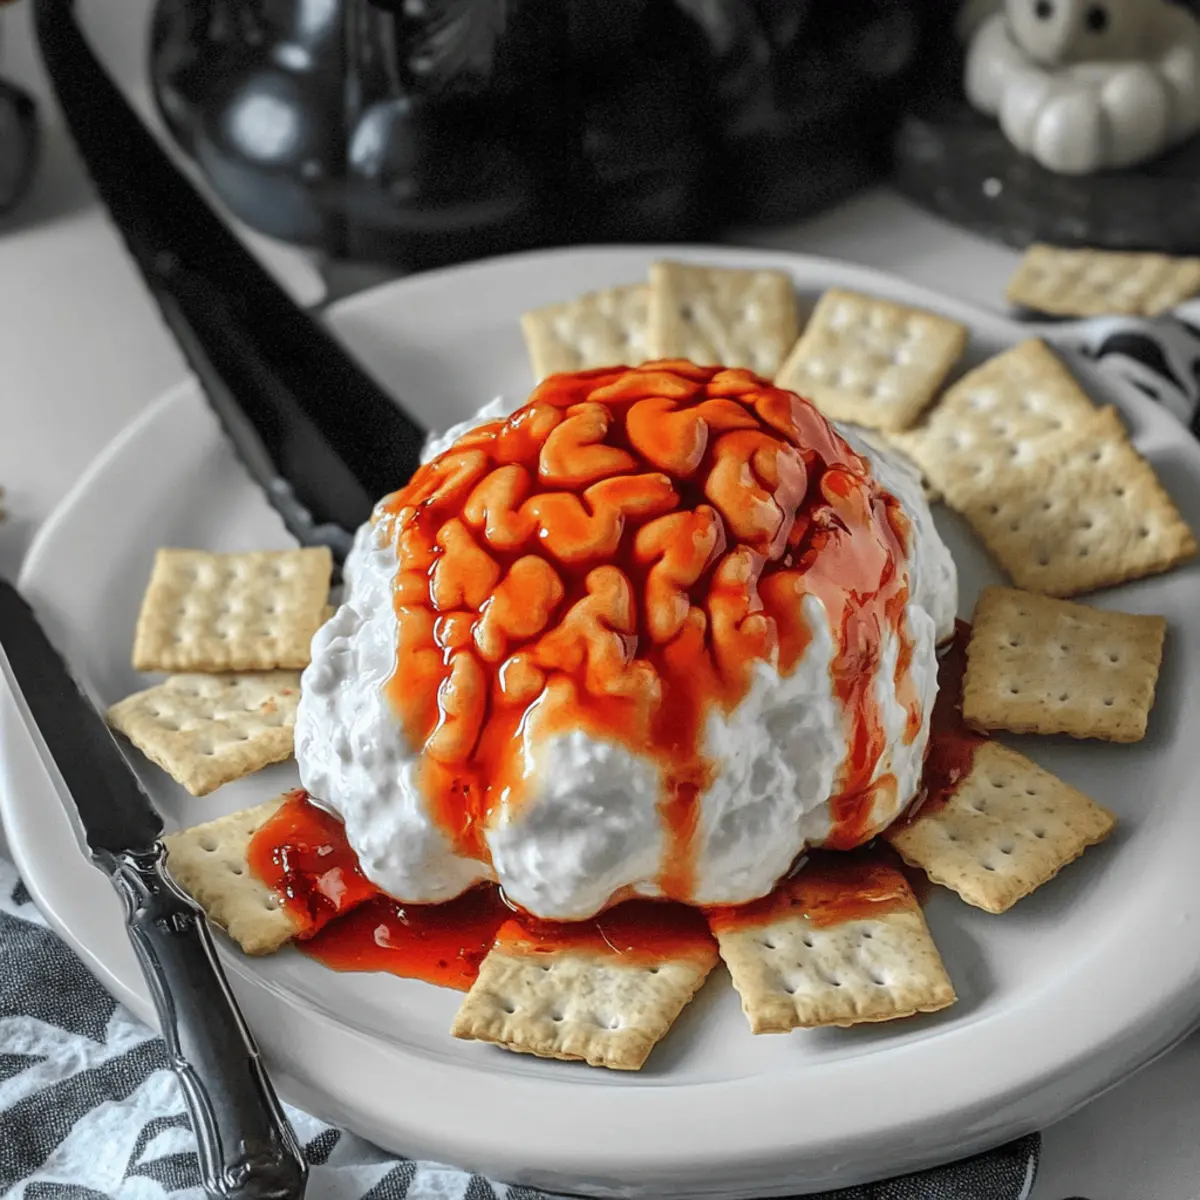
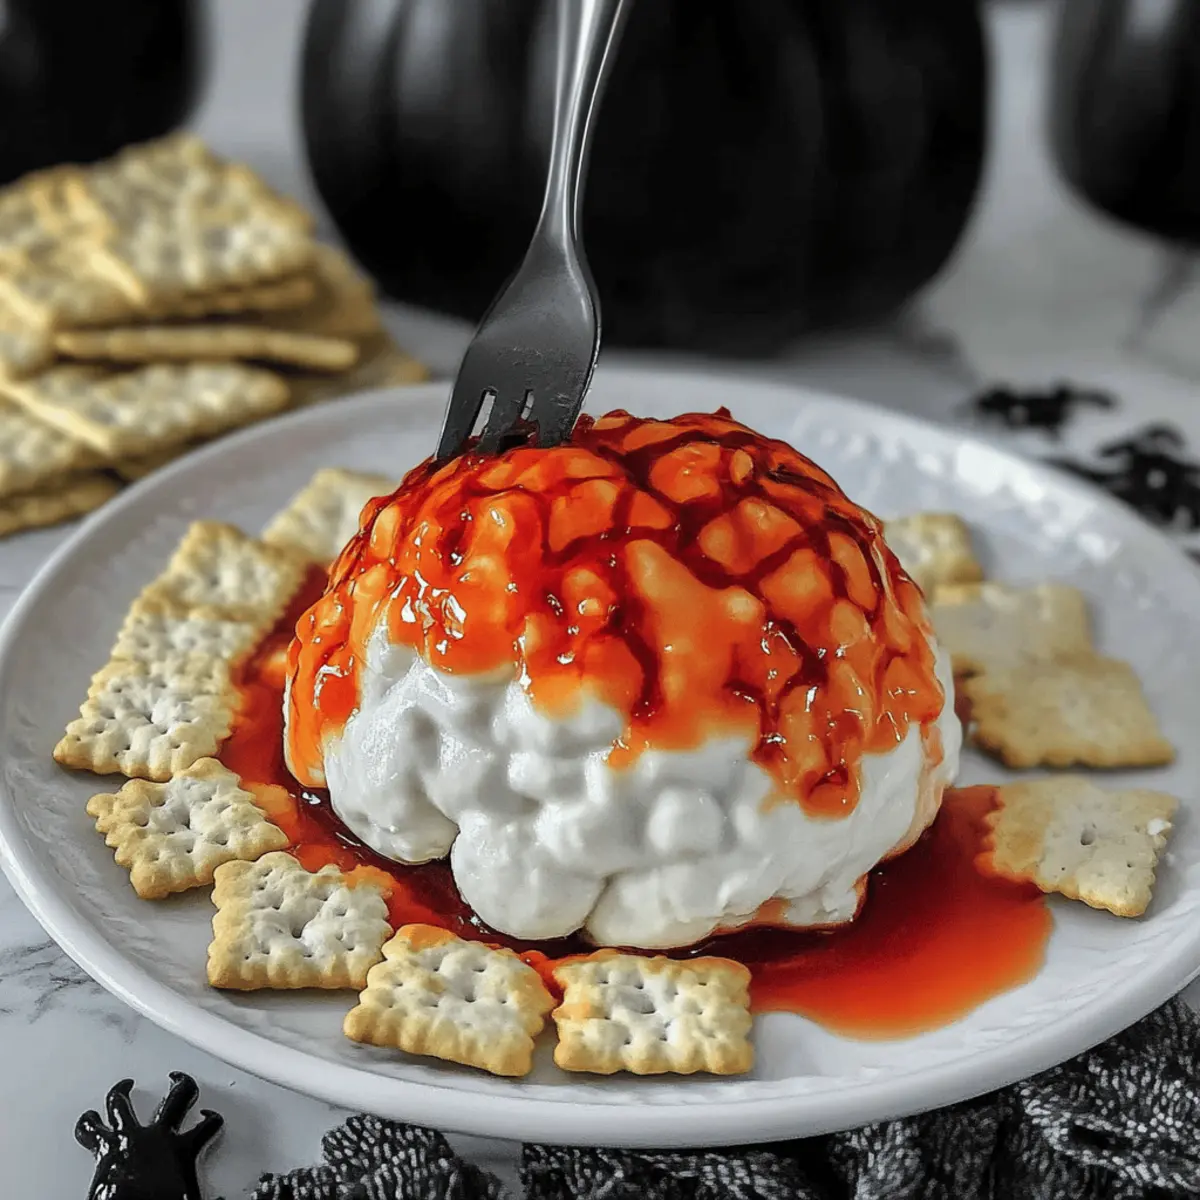
Thinning the red pepper jelly is crucial for the perfect presentation. In a small bowl, mix 1/4 cup of red pepper jelly with a tablespoon of warm water until it reaches a drizzling consistency. Once your dip is displayed, pour the thinned jelly over the top, allowing it to cascade down the curves, creating a visually delightful effect resembling the brain's crevices.

Step 5: Serve and Enjoy
Set the creepy brain dip out along with an assortment of crackers, veggie sticks, or even toasted bread for added crunch. Allow the dip to sit at room temperature for about 10 minutes before serving to enhance the flavors. This Halloween Brain Dip Appetizer is sure to be the centerpiece of your festive gathering, inviting everyone to dig in!

Halloween Brain Dip Appetizer Variations

Feel free to put your own twist on this spooky creation and surprise your guests with unique flavors and textures!

  • Dairy-Free: Substitute Boursin and cream cheese with cashew cream for a creamy, plant-based alternative that’s just as delightful.
  • Spicy Kick: Mix in some sriracha or finely chopped jalapeños for an extra punch of heat that will set taste buds tingling.
  • Herb Infusion: Add fresh herbs like chives or dill to the cheese mixture for a refreshing burst of flavor that brightens each bite.
  • Veggie Boost: Fold in finely diced bell peppers or olives for added crunch and flavor, transforming your dip into a hearty surprise!
  • Sweet & Savory: Swap out the red pepper jelly for a fig or olive tapenade, creating a sweet-savory duo that complements the cheese beautifully.
  • Crunchy Topping: Top the dip with crushed nuts or seeds like toasted pumpkin seeds for an interesting texture that brings the dish to life.
  • Berry Blast: Instead of jelly, drizzle the dip with a warm berry compote for a sweet twist that adds beautiful color and a burst of fruity goodness.
  • Smoky Flavor: Incorporate smoked paprika into the cheese mixture for a subtle yet rich flavor that takes your Halloween Brain Dip to the next level.

Remember, the magic of cooking lies in making it your own! Pair it with ideas from our Halloween-themed snacks for a truly haunting spread.

Expert Tips for Creepy Brain Dip

  • Room Temperature Release: Allow the dip to sit at room temperature for 10 minutes before serving. This makes it easier to remove from the mold without disturbing its shape.

  • Jelly Consistency: Thin the red pepper jelly carefully with warm water for a smooth drizzle. Too thick, and it won’t cascade beautifully down the dip.

  • Flavor Fun: Experiment with different flavored Boursin cheeses, like garlic or herb, to elevate your Halloween Brain Dip Appetizer with unexpected flavors.

  • Assembly Aid: Use a spatula to press the cheese mixture firmly into the mold, which prevents air pockets that might cause it to fall apart when inverted.

  • Prepare in Advance: Make your dip up to three days ahead and keep it refrigerated. This gives the flavors time to meld, making your appetizer even tastier!

Make Ahead Options

These Creepy Brain Dip Appetizers are the perfect solution for busy home cooks looking to save time during the Halloween festivities! You can prepare the creamy cheese mixture up to 3 days in advance. Simply combine the Boursin cheese and cream cheese, mold it, and refrigerate it covered until you're ready to serve. To ensure optimal texture and flavor, tightly wrap the mold in plastic wrap to prevent any drying out. When it’s time to impress your guests, simply remove the mold, let it sit for about 10 minutes, and drizzle the thinned red pepper jelly over the top for that mesmerizing effect. With this make-ahead plan, you'll have a fun and spooky centerpiece ready in no time!

How to Store and Freeze Halloween Brain Dip Appetizer

Fridge: Store the dip in an airtight container for up to 3 days. Cover it tightly to keep it fresh and delicious until your Halloween gathering.

Freezer: If you want to prepare well in advance, you can freeze the molded dip for up to 2 months. Wrap it tightly in plastic wrap and foil to prevent freezer burn.

Thawing: To serve, thaw the Halloween Brain Dip Appetizer overnight in the fridge. Allow it to come to room temperature for about 10 minutes before adding the jelly topping, ensuring it releases easily from the mold.

Reheating: This dip is best served cold, so there’s no need to reheat. Just top with red pepper jelly right before serving for the perfect spooky touch!

What to Serve with Creepy Brain Dip?

Imagine a table filled with delightful dishes, each one ready to complement the spooky charm of your Halloween gathering.

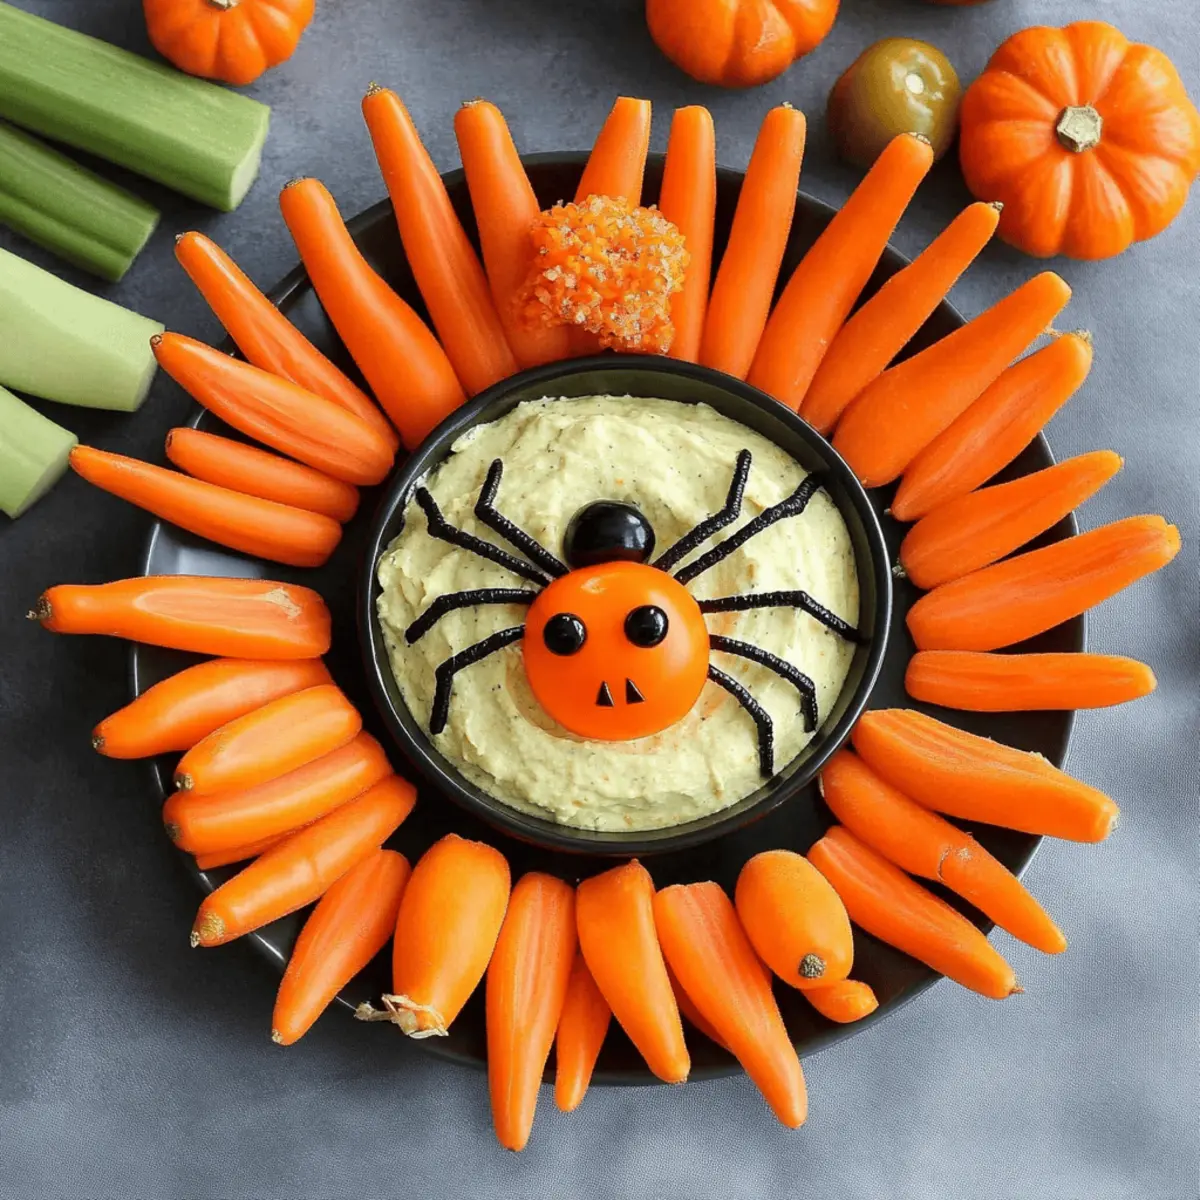
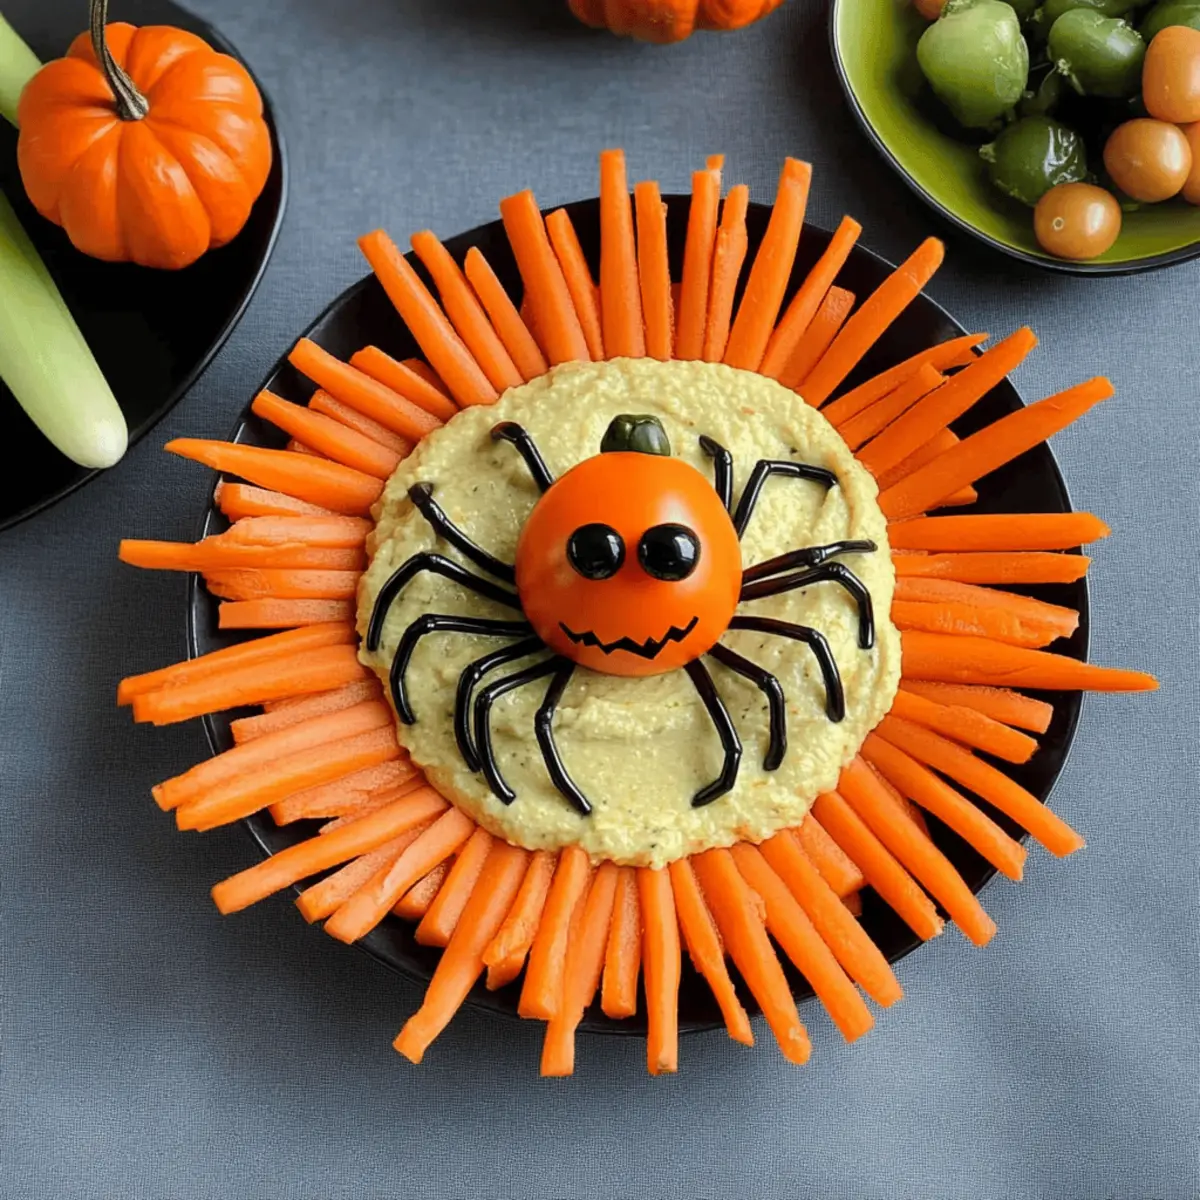
  • Crunchy Veggie Sticks: Fresh carrots, celery, and cucumbers add a vibrant crunch, balancing the creaminess of the dip while providing a healthy contrast.

  • Savory Crackers: A variety of crackers, from whole grain to herb-infused, make the perfect vehicle for scooping up the brain dip and enhance its flavors.

  • Toasted Baguette Slices: Crispy and warm, toasted baguette slices bring a comforting texture that pairs beautifully with the dip's creaminess, allowing for a delightful bite.

  • Spicy Salsa: A fruity or roasted salsa adds a tangy punch that complements the sweetness of the red pepper jelly, introducing a lively contrast to each mouthful.

  • Chilled White Wine: A glass of chilled Sauvignon Blanc or Pinot Grigio can elevate the entire dining experience, its crisp acidity cutting through the richness of the dip.

  • Halloween-Themed Fruit Platter: Bright, seasonal fruits like oranges and blackberries can add a festive touch, refreshing the palate after each dip.

  • Pumpkin Spice Cookies: For dessert, these whimsical cookies provide a deliciously sweet finish to your Halloween feast, balancing the savory starter perfectly.

With these delightful pairings, your Halloween Brain Dip Appetizer will shine at the center of your festive table!

Creepy Brain Dip: A Spooky 3-Ingredient Halloween Appetizer Recipe FAQs

What type of Boursin cheese should I use for the dip?
I recommend using garlic or herb-flavored Boursin cheese for added flavor, but any soft, herbed cheese will work beautifully. It really enhances the creamy texture and provides an extra layer of taste that pairs wonderfully with the red pepper jelly!

How should I store the Creepy Brain Dip after making it?
Store the dip in an airtight container in the refrigerator for up to 3 days. Make sure to cover it tightly to keep it fresh and maintain its delicious creamy texture until your Halloween festivities.

Can I freeze the Halloween Brain Dip Appetizer?
Absolutely! You can freeze the molded dip for up to 2 months. Wrap it tightly in plastic wrap followed by aluminum foil to prevent freezer burn and ensure it stays fresh. When you’re ready to serve, thaw it in the fridge overnight.

What should I do if my dip falls apart when I remove it from the mold?
If your dip struggles to release from the mold smoothly, try not to panic! Make sure you let it sit at room temperature for about 10 minutes before flipping it out. You can also run a thin knife along the edge to loosen it, or gently tap the mold on the counter to help it along.

Is this recipe allergy-friendly?
Since this dip contains dairy, it may not be suitable for those with lactose intolerance or dairy allergies. However, you can substitute with dairy-free cream cheese and a vegan soft cheese alternative to accommodate different dietary needs. Always check jelly labels for any potential allergens as well!

How can I make this dip spicier?
For an extra kick, mix some prepared horseradish into the red pepper jelly before drizzling it over the dip. You could also substitute the red pepper jelly with a spicy pepper jelly or add a few dashes of hot sauce to the cream cheese mixture for more heat!

Halloween Brain Dip Appetizer

Creepy Halloween Brain Dip Appetizer: 3 Ingredients for Fun

Enjoy a spooky yet delicious Halloween Brain Dip Appetizer with just three simple ingredients that will impress your guests.
Print Recipe Pin Recipe
Prep Time 15 minutes mins
Chilling Time 4 hours hrs
Total Time 4 hours hrs 15 minutes mins
Servings: 8 servings
Course: Appetizers
Cuisine: American
Calories: 150
Ingredients Equipment Method Nutrition Notes

Ingredients
  

For the Dip
  • 8 ounces Boursin cheese Can be replaced with any soft, herbed cheese
  • 8 ounces Cream cheese Opt for low-fat for a lighter option
  • 1/4 cup Red pepper jelly Thin with warm water for drizzling

Equipment

  • Mixing Bowl
  • Electric mixer
  • brain-shaped mold
  • Spatula
  • small bowl

Method
 

Step-by-Step Instructions
  1. Combine Boursin cheese and softened cream cheese in a mixing bowl using an electric mixer on medium speed until smooth and creamy.
  2. Scoop the cheese mixture into a brain-shaped mold, pressing it down gently to remove air pockets. Cover with plastic wrap and refrigerate for at least 4 hours or overnight.
  3. Remove the mold from the refrigerator, take off the plastic wrap, and gently invert the mold onto a serving platter.
  4. Mix red pepper jelly with a tablespoon of warm water until it reaches drizzling consistency, then pour it over the dip.
  5. Serve the creepy brain dip with crackers, veggie sticks, or toasted bread, allowing it to sit at room temperature for 10 minutes before serving.

Nutrition

Serving: 1servingCalories: 150kcalCarbohydrates: 5gProtein: 3gFat: 13gSaturated Fat: 8gPolyunsaturated Fat: 0.5gMonounsaturated Fat: 4.5gCholesterol: 30mgSodium: 200mgPotassium: 50mgSugar: 3gVitamin A: 10IUVitamin C: 2mgCalcium: 60mgIron: 0.5mg

Notes

Make ahead for best results, allowing flavors to meld. Ensure the jelly is thinned for the best presentation.

Tried this recipe?

Let us know how it was!

Halloween Bread Bowl: Spooky Spinach Dip Delight

October 15, 2025 by Grace Snow Leave a Comment

As autumn leaves begin to fall and the days shorten, it's the perfect time to host a spooky gathering filled with fun and delicious surprises. I’m excited to share a delightfully eerie Halloween appetizer that will steal the show: a Lipton Spinach Dip served in a creative coffin-shaped bread bowl! This playful presentation not only brings a festive touch to your celebrations but also offers the creamy, savory goodness of spinach dip in a crunch-friendly vessel. The best part? It’s incredibly easy to prepare in advance, allowing the flavors to meld overnight for a truly delicious treat. Whether you’re entertaining friends or family, this Halloween bread bowl will leave everyone raving. Ready to add a dash of fun to your next party?

Why is This Halloween Bread Bowl a Hit?

Uniquely Fun: This spooky presentation transforms your typical dip into a conversation starter that will wow your guests.

Make-Ahead Magic: Prepare the creamy spinach dip a day in advance, ensuring maximum flavor while saving you time on party day.

Versatile Serving Options: Pair it with pretzel crisps, tortilla chips, or fresh veggies for an appealing spread that suits all tastes.

Vegetarian Delight: Perfect for both vegetarians and those seeking lighter fare, this dip satisfies without compromising on flavor.

Crowd-Pleasing Appeal: Whether for Halloween parties, game-day gatherings, or casual get-togethers, this bread bowl will impress and entertain everyone! For more fun ideas, check out our Cornbread Breakfast Casserole or delightful Cheesy Garlic Bread.

Halloween Bread Bowl Ingredients

• Prepare to create your spooky masterpiece with these essential ingredients!

For the Coffin Bread Bowl

  • Whole loaf of bread, unsliced – Look for a firm, rectangular shape like Farmstyle bread for best results.
  • 1 crunchy bread stick – This adds a playful handle to create a lid for your coffin.

For the Spinach Dip

  • 1 10-oz package frozen chopped spinach – Provides the base flavor; ensure it's fully thawed and drained for the best texture.
  • 1 cup light mayonnaise – Adds creaminess; Greek yogurt makes a great substitute for a lighter option.
  • 1 cup light sour cream – Contributes to the dip's rich texture; can be swapped with a non-dairy alternative if desired.
  • 1/2 cup chopped onion or celery – Offers fresh crunch; shallots or green onions can provide a milder flavor.
  • 1 package (1.4 oz) Knorr or Lipton Veggie Soup Mix – Delivers essential seasoning; feel free to create your homemade blend for customization.
  • 1 8-ounce can water chestnuts, finely chopped – Brings a delightful crunch; omit if unavailable for a smoother dip.

Get ready to impress your guests with this easy yet engaging Halloween bread bowl filled with delectable spinach dip!

Step‑by‑Step Instructions for Halloween Spinach Dip in Coffin Bread Bowl

Step 1: Thaw the Spinach
Begin by removing the frozen chopped spinach from the packaging and placing it in a sieve or a clean kitchen towel. Allow the spinach to thaw completely, which typically takes about 1 hour at room temperature. Once thawed, squeeze it firmly to remove any excess water, ensuring your Halloween bread bowl dip doesn't become watery.

Step 2: Prepare the Dip
In a large mixing bowl, combine the drained spinach with 1 cup of light mayonnaise, 1 cup of light sour cream, and ½ cup of chopped onion or celery. Add the package of veggie soup mix and the finely chopped water chestnuts. Mix well until all ingredients are fully incorporated. Cover the mixture and refrigerate it for at least 2 hours to allow the flavors of your spooky spinach dip to meld beautifully.

Step 3: Craft the Coffin Bread Bowl
Take your whole loaf of bread and place it on a cutting board. Using a serrated knife, carefully cut the top off the loaf on three sides, leaving one side connected to create a lid. Aim for a coffin shape. Ensure the cut is smooth, allowing easy access to the dip once filled.

Step 4: Hollow Out the Bread
With the top removed, use your hands or a small knife to hollow out the center of the bread, creating a cavity large enough to hold the spinach dip. Leave about ½ inch of bread around the edges for structure. This will form a cute coffin for your delicious dip and keeps the bread from becoming soggy.

Step 5: Create the Coffin Handle
To add a whimsical touch, take your crunchy bread stick and attach it to the front of the bread coffin using toothpicks. This will serve as a playful handle for the lid. Make sure the bread stick is securely fastened, as it will enhance the Halloween vibe.

Step 6: Fill with Spinach Dip
Now, it’s time to fill your hollowed-out bread bowl with the chilled spinach dip. Use a spoon to evenly distribute the dip into the bread cavity, ensuring it’s packed well but not overflowing. Place a mini skeleton or other fun decoration inside the dip for an extra spooky touch!

Step 7: Prop the Lid Open & Serve
To keep the lid of your coffin bread bowl open, use wooden skewers as props. Position them so that the lid is held slightly ajar. Serve your Halloween bread bowl with an assortment of pretzel crisps, tortilla chips, or fresh vegetable sticks on the side for a delightful and festive appetizer at your gathering.

Make Ahead Options

These Halloween Bread Bowls are perfect for busy home cooks looking to save time! You can prepare the creamy spinach dip up to 24 hours in advance; just mix all the ingredients and refrigerate it in an airtight container. For the bread bowl, you can hollow it out and assemble it without the dip about 3 days prior, ensuring the bread stays firm and uncut to prevent sogginess. To maintain quality, store the bread bowl wrapped in plastic wrap in a cool, dry place. When you're ready to serve, simply fill the hollowed bread with the chilled spinach dip, prop the lid open, and enjoy your spooky creation, deliciously ready to impress your guests!

How to Store and Freeze Halloween Bread Bowl

Fridge: Keep any leftover filled Halloween bread bowl in the refrigerator without the lid for up to 3 days to maintain freshness and prevent sogginess.

Freezer: If you have extra spinach dip, store it in an airtight container for up to 2 months. Thaw in the fridge before using and refill a fresh bread bowl.

Reheating: To enjoy the dip, simply reheat it gently in a microwave or serve it chilled. The rich flavors remain delicious even after freezing!

Make-Ahead: The spinach dip can be made a day in advance and kept chilled before filling the bread bowl for optimal flavor melding.

Halloween Bread Bowl Variations & Substitutions

Feel free to get creative and customize this recipe to suit your taste and dietary preferences!

  • Greener Greens: Swap spinach for Swiss chard or kale for a delightful variation with different textures and nutrients.
    Make sure to sauté the greens slightly to soften them, enhancing the overall flavor of your dip.

  • Herb Infusion: Add fresh herbs like dill or parsley to the dip for extra flavor and freshness.
    These fragrant additions can elevate the taste and make for a lively twist that your guests will love!

  • Creamy Swap: Substitute light mayonnaise with Greek yogurt for a tangy, protein-packed option.
    This simple switch offers a lighter touch while still keeping that creamy consistency we all adore.

  • Bread Variety: Experiment with different types of bread, like sourdough or ciabatta, to create unique flavors and textures.
    Each bread type contributes a distinct character, so don't hesitate to mix things up!

  • Spicy Kick: For those who love heat, mix in some diced jalapeños or a splash of hot sauce to the dip.
    This fiery touch adds an exciting contrast to the creamy dip, making it unforgettable!

  • Nutty Crunch: Incorporate chopped nuts, like pecans or walnuts, into the dip for an unexpected crunch.
    This variation not only adds texture but also provides healthy fats that'll surprise your taste buds.

  • Omit Water Chestnuts: If you prefer a smoother texture, feel free to skip the water chestnuts; your dip will still be delicious!
    The absence of this ingredient will make for a creamier consistency that's equally satisfying.

  • Unique Dippers: Instead of traditional tortilla chips, try serving your Halloween bread bowl with veggie chips or puffed snacks.
    These alternatives bring a fun twist that aligns perfectly with your festive theme!

For even more creative ideas, check out our delicious Pitaya Smoothie Bowl options or try our hearty Fish Taco Bowls as a fresh accompaniment to your gathering!

What to Serve with Halloween Spinach Dip in Coffin Bread Bowl

Transform your Halloween gathering into a feast of flavors with these delightful pairings that will enhance the festive atmosphere!

  • Pretzel Crisps: These crunchy snacks provide a satisfying contrast to the creamy dip, making each bite a tasty experience.
  • Tortilla Chips: Their light and crispy texture complements the spinach dip beautifully, encouraging guests to keep dipping and munching.
  • Fresh Vegetable Sticks: Carrots, celery, and bell peppers add a refreshing crunch and vibrant colors, appealing to health-conscious guests.
  • Cheesy Garlic Bread: For an indulgent twist, serve this warm, buttery treat alongside your Halloween dip for an irresistible combination.

Pair with a Crisp White Wine: A chilled Sauvignon Blanc will balance the creaminess of the dip and elevate your Halloween party experience.

Bringing together these fun sides ensures a delicious spread and makes the spooky season even more special. Let the celebrations begin!

Expert Tips for Halloween Bread Bowl

• Bread Choice Matters: Use a sturdy loaf like Farmstyle bread to hold the spinach dip without getting soggy throughout your gathering.

• Avoid Watery Dip: Be sure to fully thaw and squeeze out excess moisture from the spinach. This step is vital for achieving the right dip consistency.

• Chill for Flavor: To enhance taste, prepare the spinach dip at least 2 hours in advance. This allows the flavors to meld and develop perfectly.

• Backup Plan: If your bread lid breaks during assembly, use toothpicks or wooden skewers to secure it back together—no one will notice!

• Decorate Creatively: Let the Halloween spirit shine! Include mini skeletons or spooky props in and around your Halloween bread bowl for a fun visual twist.

Halloween Spinach Dip in Coffin Bread Bowl Recipe FAQs

How do I choose the right bread for my Halloween bread bowl?
Absolutely! For your coffin bread bowl, look for a firm and sturdy loaf, such as Farmstyle bread. A rectangular shape provides a solid structure to hold the dip without becoming soggy, ensuring that your Halloween masterpiece looks great and holds up throughout the gathering.

How do I store leftovers or make this ahead of time?
Very good question! You can keep any leftover filled Halloween bread bowl in the refrigerator for up to 3 days without the lid to maintain freshness and prevent sogginess. The spinach dip can also be made a day in advance—just store it in an airtight container in the fridge until you’re ready to fill your bread bowl.

Can I freeze the spinach dip for later use?
Yes, you can! If you have extra spinach dip, simply store it in an airtight container and freeze it for up to 2 months. When you're ready to enjoy it again, thaw the dip in the refrigerator overnight before refilling a fresh bread bowl. The flavors will still be delicious, even after freezing!

What if my spinach dip is too watery?
Don't worry; it happens to the best of us! Ensure that you thoroughly thaw your frozen spinach and squeeze out any excess moisture before mixing it into your dip. If your dip ends up too watery after mixing, you can add a bit more sour cream or mayonnaise to balance it out and maintain that creamy texture.

Are there any dietary considerations for this recipe?
Certainly! This Halloween bread bowl is a vegetarian delight. If you or your guests have dietary restrictions, you can easily make substitutions such as using Greek yogurt instead of mayonnaise for a lighter option, and non-dairy sour cream for those avoiding dairy. Always check ingredients for allergens, especially the veggie soup mix, which may contain additives.

Halloween Bread Bowl

Halloween Bread Bowl: Spooky Spinach Dip Delight

Enjoy a spooky Halloween Bread Bowl filled with creamy spinach dip that's easy to prepare and sure to impress your guests.
Print Recipe Pin Recipe
Prep Time 30 minutes mins
Chilling Time 2 hours hrs
Total Time 2 hours hrs 30 minutes mins
Servings: 8 servings
Course: Appetizers
Cuisine: American
Calories: 250
Ingredients Equipment Method Nutrition Notes

Ingredients
  

For the Coffin Bread Bowl
  • 1 loaf whole bread, unsliced Firm, rectangular shape like Farmstyle bread
  • 1 stick crunchy bread stick For creating a lid
For the Spinach Dip
  • 1 package frozen chopped spinach (10 oz) Thawed and drained for best texture
  • 1 cup light mayonnaise Greek yogurt is a lighter option
  • 1 cup light sour cream Non-dairy alternative can be used
  • 1/2 cup chopped onion or celery Shallots or green onions are milder alternatives
  • 1 package Knorr or Lipton Veggie Soup Mix (1.4 oz) Can create a homemade blend for customization
  • 1 can water chestnuts, finely chopped (8 oz) Omit if unavailable for a smoother dip

Equipment

  • Mixing Bowl
  • sieve
  • Cutting Board
  • Serrated knife

Method
 

Preparation
  1. Remove the frozen chopped spinach from the packaging and place it in a sieve or a clean kitchen towel. Allow the spinach to thaw completely, which typically takes about 1 hour at room temperature. Once thawed, squeeze it firmly to remove any excess water.
  2. In a large mixing bowl, combine the drained spinach with light mayonnaise, light sour cream, and chopped onion or celery. Add the veggie soup mix and the finely chopped water chestnuts. Mix well and refrigerate for at least 2 hours.
  3. Take the whole loaf of bread and place it on a cutting board. Using a serrated knife, carefully cut the top off on three sides, leaving one side connected to create a lid in a coffin shape.
  4. Hollow out the center of the bread, leaving about 1/2 inch of bread around the edges for structure.
  5. Attach the crunchy bread stick to the front of the bread coffin using toothpicks to create a handle for the lid.
  6. Fill the hollowed-out bread bowl with the chilled spinach dip. Use a spoon to evenly distribute the dip into the cavity.
  7. Use wooden skewers as props to hold the lid open slightly. Serve with an assortment of pretzel crisps, tortilla chips, or fresh vegetable sticks.

Nutrition

Serving: 1servingCalories: 250kcalCarbohydrates: 30gProtein: 5gFat: 13gSaturated Fat: 2gPolyunsaturated Fat: 0.5gMonounsaturated Fat: 1gCholesterol: 10mgSodium: 500mgPotassium: 150mgFiber: 2gSugar: 2gVitamin A: 15IUVitamin C: 5mgCalcium: 6mgIron: 4mg

Notes

Prepare the spinach dip at least 2 hours in advance for optimal flavor. Use sturdy bread to hold the dip without getting soggy.

Tried this recipe?

Let us know how it was!

Halloween Mummy Stuffed Peppers: A Fun & Tasty Party Treat

October 15, 2025 by Grace Snow Leave a Comment

As I slid the baking tray into the oven, an air of excitement filled my kitchen. Who would have thought a simple stuffed pepper could turn into something so adorably festive? These Halloween Mummy Stuffed Peppers are not just fun to look at; they’re a delicious blend of savory black beans and melty mozzarella cheese, all wrapped up in sweet, crunchy peppers. In just 10 minutes, you can whip up a vegetarian-friendly fiesta that’s perfect for both kids' parties and adult gatherings alike. Not only are they a crowd-pleaser, but they also allow you to indulge guilt-free while celebrating the spooky spirit of Halloween. Curious about how to create this frightfully delightful snack? Let’s dive into the recipe!

Why Are These Mummy Stuffed Peppers a Hit?

Quick and Easy: These Halloween Mummy Stuffed Peppers take just 10 minutes to prepare, perfect for last-minute party planning.

Vegetarian Delight: Packed with black beans and cheese, they offer a satisfying option for veggie lovers.

Festive Presentation: With their adorable mummy appearance, they’re sure to be a hit with both kids and adults!

Versatile Filling: Feel free to mix in your favorite ingredients like diced tomatoes or spicy jalapeños for a twist. If you love stuffed peppers, check out my Ricotta Stuffed Peppers for another tasty variation.

Guilt-Free Indulgence: Each bite is a wholesome treat, making this recipe a fun addition to your Halloween spread.

Fun Garnish: The candy eyeballs add a playful touch that makes them irresistible at any gathering!

Halloween Mummy Stuffed Peppers Ingredients

Get ready to create a spooktacular dish that everyone will love!

For the Peppers

  • Sweet Peppers – 24, halved and stems removed; use colorful mini sweet peppers for an eye-catching presentation.

For the Filling

  • Black Beans – 1 cup, drained and rinsed; canned beans are a perfect time-saver for this vegetarian delight.

For the “Bandages”

  • Mozzarella Cheese – 1/2 cup, sliced thin or shredded; for a thicker layer, choose fresh mozzarella to enhance the mummy look.

For the Eyes

  • Candy Eyes – As needed for decoration; place on warm cheese to ensure they stick properly and create a cute effect.

Step‑by‑Step Instructions for Halloween Mummy Stuffed Peppers

Step 1: Preheat the Oven
Begin by preheating your oven to 350°F (175°C). This step is crucial, as it ensures that your Halloween Mummy Stuffed Peppers bake evenly and achieve the perfect gooey cheese texture. While the oven warms up, you can prepare the sweet peppers.

Step 2: Prepare the Peppers
Take 24 mini sweet peppers and carefully cut them in half lengthwise. Remove the stems and place them cut side up on a baking sheet lined with parchment paper. This not only makes for an adorable presentation but also allows the flavors to meld beautifully as they bake.

Step 3: Fill the Peppers
Now it’s time to fill those lovely pepper halves! Spoon in the drained and rinsed black beans until each pepper is generously packed. The rich black beans will provide a hearty base for your Halloween Mummy Stuffed Peppers, delivering both flavor and protein in every bite.

Step 4: Add the Cheese Bandages
Next, drape 2-4 strips of mozzarella cheese over the black beans in each pepper, mimicking the look of mummy bandages. Make sure the cheese is layered creatively, allowing it to melt and ooze slightly during baking, which adds to the delightful mummy appearance.

Step 5: Bake and Melt
Carefully place the baking sheet in the preheated oven and bake for about 5 minutes. Keep a close eye on your Halloween Mummy Stuffed Peppers as they bake; you’ll know they’re done when the cheese is melted and bubbly, creating a cozy and inviting look.

Step 6: Add the Eyes
Once your mummies are out of the oven, it’s time for the finishing touch! Press 2 candy eyeballs into the warm, melted cheese on each pepper. This step is essential to ensuring your mummies have a playful and spooky expression that will delight both kids and adults alike.

Step 7: Serve Warm
Finally, serve your Halloween Mummy Stuffed Peppers warm, either on their own or with a spicy dipping sauce for added flavor. This delicious, visually appealing dish is perfect for Halloween festivities, sure to be a hit at your next gathering. Enjoy the delightful reactions!

Expert Tips for Halloween Mummy Stuffed Peppers

  • Prep Ahead: You can make these Halloween Mummy Stuffed Peppers a few hours in advance, storing them without candy eyeballs until you're ready to serve.

  • Avoid Moisture: Don’t prep the stuffed peppers overnight, as excess moisture can cause the candy eyes to bleed, ruining their appearance.

  • Perfect Melt: Ensure the mozzarella cheese is fully melted before placing the candy eyes on top for the best adherence and presentation.

  • Cheese Choices: Try using different cheeses like pepper jack for extra flavor or fresh mozzarella for a more dramatic gooeyness.

  • Creative Fillings: Feel free to customize the filling with your favorite ingredients, like corn or diced tomatoes, for added texture and taste.

Make Ahead Options

These Halloween Mummy Stuffed Peppers are perfect for meal prep, allowing you to enjoy more time with your guests during the celebrations! You can prepare the peppers by cutting and filling them with black beans and mozzarella cheese up to 24 hours in advance. Simply place them in an airtight container in the refrigerator to maintain their freshness. However, it's best to wait until just before serving to add the candy eyeballs to prevent them from bleeding. When you’re ready to bake, pop them in the oven straight from the fridge for about 5 minutes, and you’ll have delightful, cheesy snacks that are just as delicious as when they were freshly made!

Storage Tips for Halloween Mummy Stuffed Peppers

  • Fridge: Store leftover Halloween Mummy Stuffed Peppers in an airtight container for up to 2 days. This keeps them fresh and ready for another round of snacking!

  • Freezer: For longer storage, wrap individual peppers tightly in plastic wrap, then place them in a freezer-safe bag. They can be frozen for up to 2 months.

  • Reheating: To enjoy leftover stuffed peppers, reheat them in the oven at 350°F (175°C) for about 10 minutes or in the microwave for 1-2 minutes until heated through.

  • Make-Ahead Tip: Prepare the stuffed peppers ahead of time without the candy eyeballs. Wait to add those until right before serving for the best presentation!

What to Serve with Halloween Mummy Stuffed Peppers

Perfectly warm and gooey, these delightful appetizers will inspire a laughter-filled gathering with every bite.

  • Crispy Tortilla Chips: Their crunchy texture makes a perfect contrast to the soft stuffed peppers, ideal for scooping up any leftover fillings.

  • Spicy Guacamole: Creamy and luscious, the avocado dip adds a refreshing kick that balances the savory flavors of the Mummy Peppers.

  • Mini Cornbread Muffins: These sweet, fluffy bites offer a comforting, homey touch, complementing the festive vibes of your Halloween spread.

Indulge in a flavor explosion! Pair these spooky mummies with a zesty salsa for an additional layer of zest and tang that tantalizes your taste buds.

  • Apple Cider: The warm spices in this autumn favorite bring a cozy feeling, making it the perfect drink to wash down every bite.

  • Chocolate Cupcakes: Finish off on a sweet note with rich, moist cupcakes. They provide a delicious contrast to the savory stuffed peppers and add a festive flair to your Halloween feast.

Halloween Mummy Stuffed Peppers Variations

Feel free to play with these Mummy Stuffed Peppers to make them uniquely your own and delight your family and guests!

  • Spicy Twist: Add diced jalapeños or chopped serrano peppers to the filling for a spicy surprise! A little heat will elevate the flavor and give your mummies an exciting kick.

  • Cheesy Blend: Swap out mozzarella for pepper jack or cheddar cheese for added flavor. Mixing different cheeses can create an interesting depth of taste that's sure to impress.

  • Vegetarian Boost: Incorporate corn or diced tomatoes for a pop of color and extra flavor. The sweetness of corn pairs beautifully with the savory filling, making every bite a treat!

  • Protein-Packed: Use refried beans instead of black beans for a creamier filling. This will create a different texture and add richness that’s equally satisfying.

  • Herb Infusion: Sprinkle fresh herbs like cilantro or parsley into the mix for a fresh twist. Herbs introduce bright flavors that contrast nicely with the richness of the cheese.

  • Mini Mummies: Make mini versions using smaller peppers like cherry or baby bell. These bite-sized delights are perfect for parties and are incredibly cute on a platter.

  • Smoky Flavor: Mix in some smoked paprika or chipotle powder to the filling for a smoky depth. The hint of smokiness will give your mummies a surprising yet delicious profile.

If you're a fan of stuffed pepper variations, you’ll love these options! You can also check out my delightful Ricotta Stuffed Peppers or whip up some delicious Roasted Bratwurst Peppers. Enjoy creating fun and flavorful twists on your Halloween Mummy Stuffed Peppers!

Halloween Mummy Stuffed Peppers Recipe FAQs

What kind of peppers should I use for the Halloween Mummy Stuffed Peppers?
Absolutely! I recommend using colorful mini sweet peppers for a vibrant presentation. They not only look adorable but also provide a nice crunch. If you can’t find mini ones, regular sweet bell peppers work too!

How should I store leftover Halloween Mummy Stuffed Peppers?
Leftovers can be stored in an airtight container in the refrigerator for 2 days. Just make sure to let them cool completely before sealing to keep them fresh. When ready to enjoy, you can reheat them in the oven or microwave.

Can I freeze Halloween Mummy Stuffed Peppers?
Yes, you can! Wrap each stuffed pepper individually in plastic wrap and place them in a freezer-safe bag. They can be frozen for up to 2 months. When you’re ready to eat them, simply thaw overnight in the fridge and reheat in the oven at 350°F (175°C) for about 10 minutes.

How can I prevent the candy eyes from bleeding or melting?
To keep those cute candy eyes from bleeding, avoid prepping the stuffed peppers overnight. If you're assembling them ahead of time, store them without the candy eyes and add them just before serving. This will ensure they maintain their delightful appearance!

Can I use other types of cheese for the mummy bandages?
Very! You can mix it up with different cheeses. For a spicy kick, try pepper jack. If you prefer a stringier, gooey texture, fresh mozzarella is the way to go. Just be sure to slice or shred it thinly for the best effect!

Halloween Mummy Stuffed Peppers

Halloween Mummy Stuffed Peppers: A Fun & Tasty Party Treat

These Halloween Mummy Stuffed Peppers are a delicious blend of black beans and mozzarella, perfect for Halloween gatherings.
Print Recipe Pin Recipe
Prep Time 10 minutes mins
Cook Time 5 minutes mins
Total Time 15 minutes mins
Servings: 12 peppers
Course: Appetizers
Cuisine: Vegetarian
Calories: 150
Ingredients Equipment Method Nutrition Notes

Ingredients
  

For the Peppers
  • 24 Sweet Peppers halved and stems removed; use colorful mini sweet peppers
For the Filling
  • 1 cup Black Beans drained and rinsed; canned beans are a perfect time-saver
For the 'Bandages'
  • 1/2 cup Mozzarella Cheese sliced thin or shredded; for a thicker layer, choose fresh mozzarella
For the Eyes
  • Candy Eyes As needed for decoration; place on warm cheese to ensure they stick properly

Equipment

  • Oven
  • Baking Sheet
  • Parchment Paper

Method
 

Step‑by‑Step Instructions
  1. Preheat your oven to 350°F (175°C).
  2. Cut 24 mini sweet peppers in half lengthwise and remove the stems. Place them cut side up on a baking sheet lined with parchment paper.
  3. Spoon in the drained and rinsed black beans until each pepper is generously packed.
  4. Drape 2-4 strips of mozzarella cheese over the black beans in each pepper.
  5. Bake the stuffed peppers for about 5 minutes until the cheese is melted and bubbly.
  6. Press 2 candy eyeballs into the warm, melted cheese on each pepper.
  7. Serve warm, either on their own or with a spicy dipping sauce.

Nutrition

Serving: 1pepperCalories: 150kcalCarbohydrates: 15gProtein: 6gFat: 7gSaturated Fat: 4gPolyunsaturated Fat: 1gMonounsaturated Fat: 2gCholesterol: 20mgSodium: 300mgPotassium: 300mgFiber: 4gSugar: 2gVitamin A: 500IUVitamin C: 60mgCalcium: 200mgIron: 2mg

Notes

You can prep these stuffed peppers a few hours in advance. Avoid prepping them overnight to prevent excess moisture affecting the candy eyes.

Tried this recipe?

Let us know how it was!

Witches Hat Cheese Ball: The Ultimate Halloween Snack Delight

October 15, 2025 by Grace Snow Leave a Comment

As the crisp autumn air rolls in and the leaves start to twirl to the ground, my imagination dances with visions of spooky soirées and festive feasts. One treat that never fails to enchant at these gatherings is the Witches Hat Cheese Ball. This whimsical Halloween snack combines creamy goodness with vibrant bell peppers and fresh green onions, making it not just a feast for the eyes but also a burst of delightful flavors. It’s an easy-to-prepare party appetizer that’s perfect for stress-free entertaining, and since it’s gluten-free and can be tailored to be keto-friendly, everyone at your table will be able to indulge without worry. So, are you ready to conjure up this bewitching delight and impress your guests? Let’s dive in!

Why is the Witches Hat Cheese Ball a Must-Try?

Unforgettable Presentation: This whimsical appetizer steals the show with its unique hat shape, making it a centerpiece on any Halloween table.

Easy to Prepare: With just a few simple steps, you can whip up this charming dish in no time, freeing you to focus on other festive treats like Avocado Egg Salad.

Flavor Explosion: Creamy cheese meets crunchy veggies, creating an irresistible blend that keeps guests coming back for more.

Versatile Options: Easily adapt this cheese ball for dietary preferences—it's gluten-free and can be keto-friendly!

Crowd-Pleasing Fun: Kids and adults alike will love this quirky snack that adds a playful touch to your Halloween gathering. Prepare to make lasting memories with this delightful treat!

Witches Hat Cheese Ball Ingredients

• Get ready to create a delightful masterpiece!

For the Cheese Ball

  • Cream Cheese – A rich and creamy base for that luscious texture; remember to use block cream cheese for perfect shaping!
  • Red Bell Pepper – Adds a lovely sweetness and vibrant color; feel free to swap with other sweet peppers for a twist!
  • Green Onions – Infuses freshness and a mild flavor; chives work beautifully as a substitute if you prefer.
  • Chopped Fresh Parsley – Offers a hint of earthiness and elevates visual appeal; dried parsley can work in a pinch.

For the Decor

  • Pitted Black Olives – These create the whimsical ‘hat’ exterior, providing a savory bite; other olives can be used or simply omitted for a different look.
  • Olive Oil (optional) – Brush on the olives for a beautiful shine; skip this step if you want to keep it simple.

This Witches Hat Cheese Ball is not just a snack; it’s a conversation starter!

Step‑by‑Step Instructions for Witches Hat Cheese Ball

Step 1: Soften the Cream Cheese
Begin by removing the block of cream cheese from the refrigerator and letting it sit at room temperature for about 30 minutes. This softening step is crucial, as it allows the cream cheese to mix more smoothly with the other ingredients, creating a creamy base for your Witches Hat Cheese Ball.

Step 2: Chop the Vegetables
While the cream cheese softens, finely chop the red bell pepper and green onions. Aim for small, uniform pieces to ensure they incorporate well into the cheese mixture. The vibrant colors of the peppers and the fresh greens will make your Witches Hat Cheese Ball visually appealing and add a pop of flavor to each bite.

Step 3: Mix the Ingredients
In a mixing bowl, combine the softened cream cheese, chopped red bell pepper, green onions, and chopped fresh parsley. Use a hand mixer or a sturdy spoon to blend everything together until evenly mixed and creamy. This step should take about 2-3 minutes, creating a harmonious mixture that will form the foundation of your spooky appetizer.

Step 4: Shape the Cheese Mixture
Lay a sheet of cling wrap on your countertop and spoon the cheese mixture onto the center. Gather the edges of the plastic wrap and carefully shape the mixture into a cone, resembling a witch's hat. Ensure it is tightly wrapped to maintain its shape, then twist the top closed. This sculpting technique gives your Witches Hat Cheese Ball its enchanting form.

Step 5: Chill the Cheese Ball
Transfer the wrapped cheese cone onto a serving plate and place it in the refrigerator. Allow it to chill for at least 4 hours, or even up to 48 hours. Chilling not only firms the cheese ball but also allows the flavors to meld beautifully, making every bite of the Witches Hat Cheese Ball bursting with flavor.

Step 6: Prepare the Hat Decoration
Once chilled, remove the cheese ball from the refrigerator and carefully unwrap it. To create the whimsical 'hat,' slice the pitted black olives in half and position them on top of the cone. You can decorate the cheese ball in a playful manner, ensuring it resembles a classic witch's hat and adds an extra touch of festivity to your Halloween celebration.

Step 7: Final Presentation
If desired, lightly brush the olives with olive oil to enhance their shine and appearance. Before serving your Witches Hat Cheese Ball, ensure it’s positioned on a platter with your choice of dippers, such as crackers or vegetable sticks. Your guests will surely be drawn in by the creative presentation and enticing aroma of this delightful Halloween appetizer!

Witches Hat Cheese Ball Variations

Feel free to unleash your creativity and make this festive appetizer uniquely yours!

  • Colorful Peppers: Swap the red bell pepper for yellow or orange for a twist in flavor and presentation. Your cheeseball will have a vibrant, eye-catching look that will excite your guests!

  • Herb Enhancements: Experiment with using fresh basil or dill instead of parsley for an unexpected flavor boost that brightens every bite. Each herbal variation can add its own delightful twist to the taste experience.

  • Savory Add-ins: Fold in some finely diced jalapeños for a delightful kick that elevates the cheese ball's flavor profile. This will cater to those who crave a bit of heat during the festivities!

  • Keto-Friendly Pairings: Instead of crackers, serve with salami or thick-cut ham to cater to your keto guests. These savory pairings not only look elegant but also complement the creamy cheese beautifully.

  • Edible Decorations: Use different herbs or edible flowers to decorate your cheese ball, adding a colorful touch that delights the eye and palate. The edible flowers can elevate the seasonal spirit of your party!

  • Mixed Olives: Swap black olives for green olives or a medley of olives for a fun flavor combination and unique appearance. With this twist, the flavor of your cheese ball will surprise and excite your guests.

  • Sweet & Savory Dippers: Substitute traditional crackers with crispy pumpkin chips or sweet potato chips. They add a compelling combination of flavors that can heighten the flavor notes of your Witches Hat Cheese Ball, offering a delightful change.

Remember, your Witches Hat Cheese Ball can spark joy and creativity, just like preparing other festive dishes such as Jello Salad or even a comforting Potato Blue Cheese treat!

What to Serve with Witches Hat Cheese Ball

As your guests gather around, the Witches Hat Cheese Ball will charm their taste buds while you add complementary delights that create a magical feast.

  • Crunchy Vegetable Sticks: A colorful assortment of carrots, celery, and bell peppers not only adds freshness but also balances the creamy richness of the cheese ball.

  • Savory Crackers: Choose a variety of crisp crackers to add texture and flavor contrasts. The crunchiness of the crackers will enhance the creamy goodness of the cheese.

  • Crispy Pumpkin Chips: These seasonal treats bring a delightful crunch and a hint of sweetness, perfectly matching the whimsical vibe of your Halloween soirée.

  • Tangy Apple Slices: Slices of crisp apples add a refreshing bite and slight acidity, cleansing the palate between bites of savory cheese.

  • Herbed Pita Chips: The herby notes in pita chips provide a wonderful contrast, complementing the cheese while keeping everything light and flavorful.

  • Bubbly White Wine: A chilled Sauvignon Blanc or sparkling wine pairs beautifully with the creamy cheese, enhancing your gathering's festive atmosphere.

  • Seasonal Fruit Platter: Including figs, grapes, and berries will add vibrant color and contrast, rounding out the table with natural sweetness.

  • Dark Chocolate Squares: For a sweet finale, dark chocolate squares make a decadent counterpoint to the savory cheese ball, offering a rich, delightful finish to your Halloween gathering.

Expert Tips for Witches Hat Cheese Ball

  • Room Temperature Cheese: Ensure your cream cheese is at room temperature before mixing. This makes it easy to blend with other ingredients and helps achieve a smooth consistency.

  • Watch Your Chopping: When chopping the veggies, aim for uniform pieces. This ensures an even texture throughout the Witches Hat Cheese Ball, enhancing both flavor and appearance.

  • Tight Wrapping: Use cling wrap to tightly shape the cheese ball. This prevents it from collapsing during refrigeration and helps maintain its charming witch hat shape.

  • Decor Variations: Don’t hesitate to get creative with toppings! Feel free to substitute the black olives with other dark olives or even edible flowers for a unique spin on your Witches Hat Cheese Ball.

  • Make Ahead: Prepare the cheese ball up to 48 hours in advance. This allows the flavors to meld beautifully and gives you a hassle-free experience when entertaining!

How to Store and Freeze Witches Hat Cheese Ball

Fridge: The Witches Hat Cheese Ball can be kept in the refrigerator for up to 48 hours. If you have leftovers, they may last for an additional 6 days, though freshness is best within the first two days.

Wrapping: To maintain flavor and shape, tightly wrap the cheese ball in cling wrap or foil before refrigerating. This reduces exposure to air and keeps it from drying out.

Freezer: If you wish to freeze it, shape and wrap the cheese ball securely in plastic wrap, then place it in an airtight container. It can be stored in the freezer for up to 2 months.

Reheating: When ready to serve, thaw the cheese ball in the refrigerator overnight. Avoid refreezing once defrosted, as this can affect the texture and flavor of the Witches Hat Cheese Ball.

Make Ahead Options

This Witches Hat Cheese Ball is perfect for busy home cooks looking to save time on party prep! You can make the cheese ball mixture up to 48 hours in advance; simply follow the initial steps of mixing the ingredients and shaping the cheese into a cone using cling wrap. Once shaped, refrigerate it to ensure it holds its form and flavor. On the day of serving, just take it out, decorate with sliced olives to create the ‘hat,’ and enjoy the delightful blend of creamy and crunchy textures. By prepping ahead, you’ll have more time to focus on enjoying your spooky soirée without the stress!

Witches Hat Cheese Ball Recipe FAQs

What kind of cream cheese should I use for the Witches Hat Cheese Ball?
Absolutely! For the best results, use block cream cheese instead of spreadable varieties. Block cream cheese holds its shape better and allows for easier mixing and molding, creating that perfect cone shape reminiscent of a witch's hat.

How should I store the Witches Hat Cheese Ball?
The Witches Hat Cheese Ball can be stored in the refrigerator for up to 48 hours before serving. If you have leftovers, they should maintain their quality for an additional 6 days. Just be sure to wrap it tightly in cling wrap or foil to prevent it from drying out and to keep the flavors fresh.

Can I freeze the Witches Hat Cheese Ball?
Yes! To freeze your Witches Hat Cheese Ball, wrap it tightly in cling wrap and then place it in an airtight container. It can be frozen for up to 2 months. When you're ready to enjoy it, simply thaw it in the refrigerator overnight before serving. Avoid refreezing once it has been thawed to preserve its texture and flavor.

What if my cheese ball is too soft to hold its shape?
Very! If you find that your cheese ball isn't holding its shape, it may be due to the cream cheese being too soft. Ensure you use fully block cream cheese and allow it to chill adequately for at least 4 hours in the fridge wrapped tightly. If it's still too soft, consider adding a small amount of shredded cheese or using a little more cream cheese to thicken it.

Can I make the Witches Hat Cheese Ball ahead of time?
Absolutely! The Witches Hat Cheese Ball can be made up to 48 hours in advance. This not only allows the flavors to meld deliciously but also gives you peace of mind when it comes to party prep. Just make sure to keep it wrapped tightly in the refrigerator until you're ready to serve.

Are there any dietary considerations for the Witches Hat Cheese Ball?
Yes! This cheese ball is naturally gluten-free and can be easily tailored to fit a keto-friendly diet. If you're serving guests with specific dietary preferences, consider offering a selection of dippers, such as celery sticks or salami, instead of crackers. And always check for allergies with ingredients like olives or green onions!

Witches Hat Cheese Ball

Witches Hat Cheese Ball: The Ultimate Halloween Snack Delight

Witches Hat Cheese Ball is a whimsical appetizer perfect for Halloween gatherings, combining creamy cheese with vibrant veggies.
Print Recipe Pin Recipe
Prep Time 30 minutes mins
Chilling Time 4 hours hrs
Total Time 4 hours hrs 30 minutes mins
Servings: 8 servings
Course: Appetizers
Cuisine: Halloween
Calories: 150
Ingredients Equipment Method Nutrition Notes

Ingredients
  

For the Cheese Ball
  • 8 ounces Cream Cheese Block cream cheese for perfect shaping
  • 1 medium Red Bell Pepper Sweet and vibrant; can swap with other sweet peppers
  • 2 stalks Green Onions Chives can be used as a substitute
  • 1/4 cup Chopped Fresh Parsley Dried parsley can work in a pinch
For the Decor
  • 1/2 cup Pitted Black Olives Creates the whimsical ‘hat’ exterior
  • Olive Oil Optional, for brushing on olives for shine

Equipment

  • Mixing Bowl
  • cling wrap
  • Spoon
  • Knife
  • serving plate

Method
 

Preparation Steps
  1. Begin by removing the block of cream cheese from the refrigerator and letting it sit at room temperature for about 30 minutes.
  2. While the cream cheese softens, finely chop the red bell pepper and green onions.
  3. In a mixing bowl, combine the softened cream cheese, chopped red bell pepper, green onions, and chopped fresh parsley.
  4. Lay a sheet of cling wrap on your countertop and spoon the cheese mixture onto the center. Shape the mixture into a cone.
  5. Transfer the wrapped cheese cone onto a serving plate and place it in the refrigerator for at least 4 hours.
  6. Once chilled, remove the cheese ball from the refrigerator and carefully unwrap it. Slice the pitted black olives in half and position them on top.
  7. Optionally, lightly brush the olives with olive oil to enhance their shine.

Nutrition

Serving: 1servingCalories: 150kcalCarbohydrates: 6gProtein: 4gFat: 12gSaturated Fat: 7gPolyunsaturated Fat: 1gMonounsaturated Fat: 4gCholesterol: 30mgSodium: 200mgPotassium: 150mgFiber: 1gSugar: 1gVitamin A: 500IUVitamin C: 20mgCalcium: 100mgIron: 1mg

Notes

This cheese ball can be made up to 48 hours in advance, ensuring flavors meld beautifully before serving.

Tried this recipe?

Let us know how it was!

Delicious Graveyard Taco Dip for Your Spooky Halloween Party

October 15, 2025 by Grace Snow Leave a Comment

As I laid my eyes on the festive spread at last year’s Halloween party, my heart raced when I spotted a delightful creation nestled amongst the treats: a Graveyard Taco Dip. Instantly, my imagination ignited, picturing layers of creamy goodness forming a spooky graveyard scene. This easy dip is a crowd-pleaser, perfect for livening up any gathering and sure to be a hit among friends and family. Not only is it a visual masterpiece, but it’s also incredibly simple to whip up—ideal for those busy autumn nights when we crave comfort without fuss. Ready to make your own spooky statement this Halloween? Let’s dive into how to bring this delicious dip to life!

Why Is Graveyard Taco Dip a Must-Make?

Crowd-Pleasing Delight: This spooky dip is guaranteed to impress your guests, becoming the life of the party!

Simple Prep: Just layer and chill—no complicated steps involved, leaving you with time to enjoy the festivities.

Flavorful Layers: Each bite combines creamy refried beans and zingy taco seasoning, balanced by cool avocado and zesty salsa—yum!

Versatile Dip: Pair with crispy tortilla chips, crunchy veggie sticks, or pita for delightful dipping options. Plus, you can customize it with extras like jalapeños for a kick!

Visual Appeal: The spooky tombstone decorations elevate the presentation, making it both a delicious treat and a conversation starter.

Get ready to elevate your Halloween party with this Delicious Graveyard Taco Dip for Your Spooky Halloween Party and ensure it’s a night to remember!

Graveyard Taco Dip Ingredients

For the Beans Layer

  • Refried Beans – Provides a rich base and savory depth; can substitute with black beans for a different flavor.

For the Creamy Layer

  • Sour Cream – Adds creaminess and tang; substitute Greek yogurt for a lighter version.
  • Taco Seasoning – Infuses robust flavors; use homemade seasoning for a fresher taste.
  • Mayonnaise – Adds richness and moisture; can replace with sour cream for a tangier kick.

For the Avocado Layer

  • Avocados – Contributes creaminess and healthy fats; for a twist, use guacamole instead.
  • Garlic – Enhances flavor with aromatic zest; substitute with garlic powder if fresh is unavailable.

For the Salsa Layer

  • Salsa – Provides moisture and flavor variety; opt for mild, medium, or spicy based on preference.

For the Topping

  • Scallions (Green Onions) – Adds freshness and a mild onion flavor; chives can be used as a substitute.

For Decorations

  • Tortillas – Create spooky tombstone decorations; use a firm tortilla for sturdiness and crispiness when baked.

Get ready to delight your guests with this eye-catching Graveyard Taco Dip that will be the star of your Halloween celebration!

Step‑by‑Step Instructions for Graveyard Taco Dip

Step 1: Prepare the Creamy Layer
In a small bowl, combine 1 cup of sour cream with 1 tablespoon of taco seasoning. Stir well until the mixture is fully blended and creamy. This base will add a zesty kick to your Graveyard Taco Dip. Set aside while you prepare the avocado layer, allowing the flavors to meld beautifully.

Step 2: Make the Avocado Layer
In another small bowl, mash 1 ripe avocado and mix it with 1 minced garlic clove and 2 tablespoons of mayonnaise. Stir until smooth and well-combined, creating a luscious and flavorful layer for your dip. The vibrant green of the avocado layer will add a pop of color to your presentation.

Step 3: Assemble the Layers
Take a small dish or pie plate and start with a base layer of 1 can of refried beans, spreading it evenly across the bottom. Next, layer the sour cream mixture on top, followed by the avocado mixture. Finally, scoop ½ cup of your favorite salsa over the avocado, creating a beautiful layered effect. Each layer should be distinct and visible to enhance the look of your Graveyard Taco Dip.

Step 4: Add the Final Touches
Sprinkle 2 tablespoons of chopped scallions on top of the salsa for added freshness and a mild onion flavor. This finishing touch not only enhances flavor but also contributes to the colorful appearance of your Graveyard Taco Dip. Now, it’s time to give this dip a moment to chill!

Step 5: Chill Before Serving
Cover the assembled dip tightly and refrigerate for at least 1 hour. This chilling time allows the flavors to blend together beautifully, making each bite even more delicious. If you want to prepare it the day before, feel free—just remember to keep it covered to retain freshness.

Step 6: Create Spooky Decorations
While the Graveyard Taco Dip chills, preheat your oven to 350°F. Cut out tombstone shapes from tortillas and place them on a baking sheet. Bake for about 10 minutes or until they are golden and crispy, making them perfect for decorating your dip. Let them cool before you add any writing.

Step 7: Final Presentation
Once the dip is chilled, arrange your tortilla tombstones artistically on top. Use a food-safe marker to write spooky names or phrases on them, enhancing the Halloween theme. Serve your delightful Graveyard Taco Dip with crispy tortilla chips or vegetable sticks for a tasty and festive treat that’s sure to delight your guests!

Graveyard Taco Dip Variations

Feel free to get creative with this delicious dip and make it your own with these enticing variations!

  • Black Olives: Sprinkle sliced black olives on top for a briny flavor boost and added texture.

  • Jalapeños: Add sliced fresh or pickled jalapeños to the layers for a spicy kick that will thrill heat lovers.

  • Vegetarian Delight: Swap the refried beans for mashed black beans for a more vibrant option that maintains delicious flavors.

  • Crunchy Alternative: Replace the tortilla decorations with baked pita chips for a different crunch and a fun twist on presentation.

  • Guacamole Twist: Use store-bought guacamole instead of fresh avocados for a quick and creamy shortcut that still packs a savory punch.

  • Flavor Boost: Experiment with flavored salsa—try a corn or mango salsa for a fruity contrast that complements the savory layers beautifully.

  • Cheesy Layer: Mix shredded cheese into the sour cream mixture to create a cheesy surprise that adds richness to every bite.

  • Fruity Salsa: Swap out traditional salsa with a fresh tomato and cucumber salad for a light, refreshing alternative that enhances the dip's flavor profile.

Feel free to explore these variations to make your spooky centerpiece even more spectacular! Pair your Graveyard Taco Dip with fun treats like Fish Taco Bowls or a classic Taco Bell Crunchwrap for an unforgettable Halloween feast.

What to Serve with Graveyard Taco Dip

Nothing sets the stage for a spectacular Halloween party quite like a fantastic spread to complement your spooky dip!

  • Crispy Tortilla Chips: The perfect crunchy vehicle for scooping up creamy layers, they provide a satisfying contrast to the dip’s smooth texture.

  • Veggie Sticks: Fresh carrots, celery, and bell peppers add a colorful crunch that balances the richness of the taco dip, brightening the overall flavor.

  • Cheesy Quesadillas: Stuffed with gooey cheese and your choice of fillings, these delightful bites pair well with the flavors in the dip, offering comfort and joy.

  • Savory Meatballs: Whether they're sweet, spicy, or tangy, meatballs can add heartiness to your spread, making it more filling for guests. Their unique flavors bring an interesting twist!

  • Spooky Mocktails: Refreshing drinks like a blood-orange soda or a ghostly limeade keep the vibe festive while washing down bites of your delicious dip.

  • Halloween Cupcakes: End the meal on a sweet note with cupcakes decorated as ghouls or pumpkins, bringing a playful element to your Halloween feast and leaving guests happy.

  • Spiced Pumpkin Seeds: Roasted seeds infused with cinnamon and paprika not only offer a crunchy snack but also add seasonal flair to your table!

Make Ahead Options

This Graveyard Taco Dip is perfect for meal prep enthusiasts! You can easily prepare the dip up to 24 hours in advance, which is a real time-saver for busy weeknights or your Halloween party. Simply layer the refried beans, sour cream mixture, avocado layer, and salsa in a dish; just cover it tightly with plastic wrap and refrigerate. To maintain the dip's deliciousness, wait to add the chopped scallions until just before serving. When you're ready to wow your guests, take the chilled dip out and garnish it with your spooky tortilla tombstones. This way, it stays just as delicious and fresh as when you first made it!

Expert Tips for Graveyard Taco Dip

• Chill Time Matters: Allow the dip to chill for at least an hour. This enhances the flavors and ensures a well-textured dip.

• Fresh Ingredients: Use ripe avocados and fresh garlic for the best taste. Avoid overripe avocados, which can affect the dip's creaminess.

• Crispy Tortilla Decorations: Bake the tortilla tombstones just before serving. If made too early, they may become soggy in the dip.

• Layering Technique: When assembling your Graveyard Taco Dip, ensure each layer is distinct to create a visually appealing effect.

• Customization Options: Don’t hesitate to add additional toppings like black olives or jalapeños for extra flavor, making it fun and unique!

How to Store and Freeze Graveyard Taco Dip

Fridge: Store the dip in an airtight container for up to 3 days. Make sure to cover tightly to keep it fresh and flavorful.

Freezer: While it's best enjoyed fresh, you can freeze the bean layer separately for up to a month. Thaw in the fridge before reassembling the dip.

Reheating: If you’ve frozen the refried beans, gently heat them on the stove before layering in your dip again. Avoid reheating the entire assembled dip to maintain its texture.

Make-Ahead: Feel free to prepare the Graveyard Taco Dip a day in advance; just keep it covered in the fridge to enhance flavors for your Halloween party!

Graveyard Taco Dip Recipe FAQs

What kind of beans should I use for the dip?
I recommend using refried beans for a creamy base, but feel free to substitute black beans for a different flavor profile. Just make sure whatever beans you choose are well-prepared and seasoned to keep up with the delicious layers of this Graveyard Taco Dip!

How long can I store the dip in the fridge?
You can store your prepared Graveyard Taco Dip in an airtight container for up to 3 days. Make sure it’s covered tightly to preserve freshness and flavors. If you’re planning to make it ahead of time, it’s a great idea to prepare it the day before your event!

Can I freeze the dip?
While it's best enjoyed fresh, you can freeze the bean layer of the dip separately for up to a month. Just follow these steps:

  1. Spread the refried beans in an airtight container.
  2. Seal it well and place it in the freezer.
  3. When ready to use, thaw it in the fridge overnight.
  4. Reheat gently on the stove before reassembling the dip.
    Avoid freezing the entire dip to maintain the texture of the other layers.

What are some signs my avocados are ripe?
Absolutely! Look for avocados that yield slightly to gentle pressure—this indicates they’re ripe and ready for use. Avoid ones with dark spots all over, as they may be overripe. Ideally, they should be a nice dark green and just a bit soft to the touch when you gently squeeze them.

Can I make this dip if I have dietary restrictions?
Very! This Graveyard Taco Dip can easily accommodate dietary preferences. For those with lactose intolerance, using dairy-free sour cream and mayonnaise works wonderfully. Also, feel free to replace the taco seasoning with a gluten-free version if needed. Just make sure to check all ingredient labels to ensure they align with your dietary needs!

What if I want to add extra toppings?
If you're feeling adventurous, consider adding black olives or sliced jalapeños for a bit more flavor and a fun twist! You can even mix in some diced tomatoes or chopped bell peppers for added crunch. The more the merrier—it’s all about creating the perfect dip for your Halloween festivities!

Graveyard Taco Dip

Delicious Graveyard Taco Dip for Your Spooky Halloween Party

This Graveyard Taco Dip is a crowd-pleasing appetizer perfect for your Halloween party.
Print Recipe Pin Recipe
Prep Time 20 minutes mins
Cook Time 10 minutes mins
Chilling Time 1 hour hr
Total Time 1 hour hr 30 minutes mins
Servings: 8 servings
Course: Appetizers
Cuisine: Mexican
Calories: 200
Ingredients Equipment Method Nutrition Notes

Ingredients
  

For the Beans Layer
  • 1 can Refried Beans Provides a rich base and savory depth; can substitute with black beans for a different flavor.
For the Creamy Layer
  • 1 cup Sour Cream Adds creaminess and tang; substitute Greek yogurt for a lighter version.
  • 1 tablespoon Taco Seasoning Infuses robust flavors; use homemade seasoning for a fresher taste.
  • 2 tablespoons Mayonnaise Adds richness and moisture; can replace with sour cream for a tangier kick.
For the Avocado Layer
  • 1 ripe Avocado Contributes creaminess and healthy fats; for a twist, use guacamole instead.
  • 1 clove Garlic Enhances flavor with aromatic zest; substitute with garlic powder if fresh is unavailable.
For the Salsa Layer
  • ½ cup Salsa Provides moisture and flavor variety; opt for mild, medium, or spicy based on preference.
For the Topping
  • 2 tablespoons Scallions (Green Onions) Adds freshness and a mild onion flavor; chives can be used as a substitute.
For Decorations
  • 1 firm tortilla Tortillas Create spooky tombstone decorations; use a firm tortilla for sturdiness and crispiness when baked.

Equipment

  • small bowl
  • Baking Sheet
  • Pie Plate

Method
 

Preparation Steps
  1. In a small bowl, combine 1 cup of sour cream with 1 tablespoon of taco seasoning. Stir well until the mixture is fully blended and creamy. Set aside.
  2. In another small bowl, mash 1 ripe avocado and mix it with 1 minced garlic clove and 2 tablespoons of mayonnaise.
  3. Take a small dish or pie plate and start with a base layer of refried beans, spreading it evenly across the bottom. Layer the sour cream mixture on top, followed by the avocado mixture. Lastly, scoop ½ cup of salsa over the avocado.
  4. Sprinkle 2 tablespoons of chopped scallions on top for added freshness. Cover the assembled dip tightly and refrigerate for at least 1 hour.
  5. Preheat your oven to 350°F. Cut out tombstone shapes from tortillas and place them on a baking sheet. Bake for about 10 minutes or until they are golden and crispy.
  6. Once the dip is chilled, arrange your tortilla tombstones on top and write spooky names or phrases on them. Serve with crispy tortilla chips or vegetable sticks.

Nutrition

Serving: 1cupCalories: 200kcalCarbohydrates: 20gProtein: 5gFat: 10gSaturated Fat: 2gPolyunsaturated Fat: 1gMonounsaturated Fat: 7gCholesterol: 5mgSodium: 400mgPotassium: 250mgFiber: 3gSugar: 2gVitamin A: 500IUVitamin C: 5mgCalcium: 50mgIron: 1mg

Notes

Allow the dip to chill for at least an hour to enhance flavors. Use ripe avocados and fresh garlic for the best taste.

Tried this recipe?

Let us know how it was!

Spooky Spider Halloween Appetizer That's Fun and Healthy

October 15, 2025 by Grace Snow Leave a Comment

As I scoured my kitchen for the perfect Halloween party idea, a sudden inspiration hit me: a playful Spooky Spider Halloween Appetizer Dip! This delightful dish not only elevates the festive spirit with a charming orange bell pepper spider, but it also makes meal prep a breeze—ready in under 30 minutes! What I love most about this recipe is its versatility; it's vegan, gluten-free, and a surefire way to impress guests while keeping them healthy. Plus, the colorful ingredients make it visually appealing, ensuring this dip becomes the talk of the table. Are you ready to bring a little fun and creativity to your Halloween gatherings? Let’s get started!

Why is this dip a Halloween must-try?

Playful Presentation: The charming pepper spider perched atop your dip adds a whimsical touch that’s sure to impress guests of all ages.

Quick and Easy: This recipe can be prepared in under 30 minutes, making it perfect for busy schedules or last-minute party planning.

Healthy Choice: It caters to various dietary preferences, being both vegan and gluten-free, without compromising on flavor or fun.

Versatile Variations: Feel free to switch up the flavors—use different dip bases or get creative with other colorful veggies to keep things exciting!

Crowd-Pleaser: With its vibrant colors and rich textures, this appetizer not only looks fantastic but tastes delicious, making it a hit at any Halloween gathering. Enjoy with fresh veggie sticks or whole-grain crackers for added crunch!

Spooky Spider Halloween Appetizer Ingredients

• Whip up this fun dish to delight your guests!

For the Spider

  • 1 orange bell pepper – Choose a naturally curved pepper for the spider's body; if needed, carve it from the side.
  • 1 sliced black olive – These add a savory touch and create the eyes, enhancing the overall appearance.

For the Dip

  • 1 cup hummus or guacamole – Both options are vegan and gluten-free; their thickness helps hold the spider's shape.
  • Fresh veggies or whole-grain crackers – Perfect for dipping and adding crunch to your Halloween spread.

Feel free to mix and match, but sticking with the Spooky Spider Halloween Appetizer theme keeps the festive spirit alive!

Step‑by‑Step Instructions for Spooky Spider Halloween Appetizer Dip

Step 1: Shape the Spider Body
Begin by cutting off the bottom of the orange bell pepper to create a rounded spider body. Aim for a stable shape, as this will be the focal point of your Spooky Spider Halloween Appetizer. Make sure it sits evenly on your serving dish, as the stability of the spider is essential for the presentation.

Step 2: Create the Legs
From the remaining pepper, slice out eight long, slender pieces for the spider's legs. Each leg should be about the same length to ensure your spider looks balanced and appealing. As you cut, try to create a natural curve in the legs for a more lifelike appearance when placed around the spider’s body.

Step 3: Make the Eyes
To give your spider a charming glow, take a black olive and cut out two tiny triangles. These will serve as your creepy spider eyes, adding a perfect touch to your Spooky Spider Halloween Appetizer. Make sure the triangles are proportional to the body so they stand out but don't overwhelm the design.

Step 4: Assemble the Spider
Carefully place the spider's body in the center of your chosen dip, which should be in a shallow bowl. Arrange the legs around the body, ensuring they're evenly spaced for a realistic look. Then, position the olive eye triangles on the body, using a dab of the dip to secure them if necessary; this will help them stay in place.

Step 5: Serve and Enjoy
Once your Spooky Spider Halloween Appetizer is fully assembled, present it with a platter filled with fresh veggie sticks or whole-grain crackers for dipping. The colorful combination of the dip and the playful spider will not only catch eyes but also tug at heartstrings. Gather your loved ones around and get ready for a spooky, delightful experience!

How to Store and Freeze Spooky Spider Halloween Appetizer

Fridge: Store any leftover Spooky Spider Halloween Appetizer Dip in an airtight container for up to 3 days. Keep the spider components separate to maintain freshness.

Pepper Pieces: If you prepare the orange bell pepper spider pieces in advance, wrap them tightly in plastic wrap and place in the fridge, where they can stay fresh for 1-2 days.

Freezer: While it's best to serve fresh, you can freeze thicker dips like hummus for up to 2 months. However, the bell pepper spider should not be frozen as it loses its shape and texture.

Reheating: If you've frozen the dip, thaw it in the fridge overnight and stir well before serving again. Avoid reheating the vegetables as they are best fresh!

Make Ahead Options

These Spooky Spider Halloween Appetizer Dips are perfect for meal prep enthusiasts looking to save time! You can prepare the spider components—such as cutting the orange bell pepper and slicing the black olives—up to 24 hours in advance. Just wrap the pepper pieces in plastic wrap to keep them fresh, and store them in the refrigerator. Additionally, you can make the dip of your choice (hummus or guacamole) and refrigerate it for up to three days prior to serving. When you’re ready to impress your guests, simply assemble the spider just before serving by placing it on the dip and arranging the legs and eyes for a fun presentation. This ensures your appetizer is just as delicious and playful, with minimal last-minute efforts on your part!

Spooky Spider Halloween Appetizer Variations

Feel free to add your personal touch to this charming appetizer dip and let your creativity shine!

  • Colorful Peppers: Use green or purple bell peppers for a unique spider twist that stays festive and fun.
    Mixing up colors not only brightens the dish but adds a playful flair to your Halloween spread.

  • Veggie Eyes: Replace black olives with sliced black radishes for a crunchy, eye-catching alternative.
    This swap gives your spider an earthy twist while maintaining the spooky vibe—impress your guests with this clever change!

  • Cheesy Delight: Incorporate a layer of shredded vegan cheese on top of your dip for a melty surprise.
    This not only adds richness but also enhances the overall flavor, making each bite that much more indulgent.

  • Herb Infusion: Add fresh herbs like cilantro or parsley to your dip to elevate its freshness.
    Herbs can invigorate the flavor profile, transforming your appetizer into a vibrant delight that guests will rave about.

  • Nutty Crunch: Sprinkle toasted pumpkin seeds on your dip before adding the spider for added crunch.
    The delightful texture and nutty flavor provide a pleasing contrast to the creamy dip below, making each bite an adventure.

  • Spicy Twist: Mix in some diced jalapeños if you crave a little heat in your dip.
    This fiery addition will surely excite spice lovers and give your spooky dip a fun kick that keeps things interesting!

  • Sweet & Savory: Incorporate a dash of maple syrup into your hummus or guacamole for a surprisingly delightful depth.
    Balancing the savory with sweet can create a unique flavor fusion that keeps palates guessing.

  • Make It a Centerpiece: Transform this into an octopus for an additional Halloween theme, changing the cut of the pepper accordingly.
    Adjusting the design adds even more flair to your presentation and keeps the creativity flowing for your holiday spread.

For more fun ideas or variations in flavors, check out these healthy dip recipes to give you additional inspiration that fits within your culinary schemes. Enjoy your spooky kitchen fun!

Expert Tips for Spooky Spider Halloween Appetizer

Choose the Right Pepper: Selecting a naturally curved orange bell pepper will create a more appealing spider shape. Look for one that has a rounded bottom.

Avoid Runny Dips: Ensure you pick a thicker dip like guacamole or hummus. Runny dips won't support the spider's shape effectively.

Prep in Advance: To save time on the day of your gathering, prepare the spider components a day ahead. Store them wrapped in the fridge for easy assembly.

Experiment with Colors: Don’t be afraid to mix it up! Use different colored bell peppers and vegetables to enhance your Spooky Spider Halloween Appetizer's appeal.

Secure Those Eyes: If the olive eyes don’t stick well, a small dab of dip will hold them in place, ensuring your spider looks perfect for your guests!

What to Serve with Spooky Spider Halloween Appetizer Dip

Elevate your Halloween feast with scrumptious sides that delight both the eyes and the palate.

  • Crispy Veggie Sticks: Fresh carrots, celery, and bell peppers add a satisfying crunch that pairs well with the creamy dip.
  • Whole-Grain Crackers: Their hearty texture complements the dip's richness while offering a wholesome alternative to chips.
  • Savory Roasted Chickpeas: These crunchy bites add protein and flavor, creating a satisfying balance with the smoothness of the dip.
  • Pumpkin Spice Hummus: For a festive twist, serve this sweet and savory dip alongside your spooky creation for a delightful contrast.
  • Crispy Tortilla Chips: Perfect for those who love a classic pairing, these chips add extra texture and are strong enough to scoop up every bite.
  • Apple Slices: The sweetness of fresh apple slices provides a refreshing contrast to the savory dip, perfect for those looking for lighter options.
  • Sparkling Apple Cider: This bubbly drink not only fits the season but also offers a fun, festive vibe to keep the spirits high during your gathering.
  • Chocolate-Covered Pretzels: For a sweet treat, these candies bring an unexpected sweetness, providing a delightful finish to the Halloween spread.

Mix and match these flavorful accompaniments to create a festive table that will enchant guests and keep the Halloween spirit alive!

Spooky Spider Halloween Appetizer Dip Recipe FAQs

What should I look for when selecting an orange bell pepper?
Absolutely! When choosing an orange bell pepper for your spider, look for one that has a natural curvature. A rounded bottom is essential for stability and to capture the playful spider shape. Avoid peppers with any dark spots or signs of decay, as these can affect both appearance and taste.

How can I store the leftovers of the Spooky Spider Halloween Appetizer Dip?
Very easy! Store any leftover dip in an airtight container in the refrigerator for up to 3 days. It's important to keep the spider components separate to maintain their freshness. Wrap the pepper spider pieces in plastic wrap and place them in the fridge, where they’ll stay fresh for 1-2 days until you're ready to serve again.

Can I freeze the Spooky Spider Halloween Appetizer Dip?
Yes, you can! If you have extra dip, especially thicker options like hummus, you can freeze it for up to 2 months. To do this, place the dip in a freezer-safe container, leaving some space at the top for expansion. Thaw in the fridge overnight before serving. However, avoid freezing the bell pepper spider, as it won't maintain its shape or texture.

What can I do if the olive eyes won’t stick to the spider?
No problem! If your olive eyes don’t adhere well to the pepper body, simply use a small dab of dip as glue. This little trick will help hold the eyes in place, ensuring your Spooky Spider Halloween Appetizer looks perfect and ready for your guests!

Are there any dietary considerations I should keep in mind with this recipe?
Great question! This recipe is vegan and gluten-free, making it suitable for a variety of dietary preferences. However, if guests have specific allergies, it’s wise to check if they're allergic to olives or any alternative dips you may choose. Always ensure to label your dish clearly, especially if you are creating variations with different ingredients.

How can I make this appetizer more visually appealing?
Absolutely! To elevate the visual appeal, you can experiment by using different colored bell peppers or veggies. For instance, a green bell pepper can create an eerie vibe, while dark-colored radishes can make for fun eyes! Additionally, serving the dip with a rainbow of fresh vegetable sticks not only enhances the look but adds delightful crunch!

Spooky Spider Halloween Appetizer

Spooky Spider Halloween Appetizer That's Fun and Healthy

Prepare a Spooky Spider Halloween Appetizer that's fun and healthy, perfect for festive gatherings.
Print Recipe Pin Recipe
Prep Time 15 minutes mins
Total Time 30 minutes mins
Servings: 8 servings
Course: Appetizers
Cuisine: Gluten-Free, Vegan
Calories: 150
Ingredients Equipment Method Nutrition Notes

Ingredients
  

For the Spider
  • 1 whole orange bell pepper Choose a naturally curved pepper for the body.
  • 1 sliced black olive These add a savory touch and create the eyes.
For the Dip
  • 1 cup hummus or guacamole Both options are vegan and gluten-free.
  • fresh veggies or whole-grain crackers Perfect for dipping.

Equipment

  • Cutting Board
  • Knife
  • Shallow Bowl

Method
 

Step-by-Step Instructions
  1. Begin by cutting off the bottom of the orange bell pepper to create a rounded spider body.
  2. From the remaining pepper, slice out eight long, slender pieces for the spider's legs.
  3. To give your spider a charming glow, cut two tiny triangles from a black olive for the eyes.
  4. Carefully place the spider's body in the center of your chosen dip and arrange the legs around it.
  5. Once assembled, present it with a platter of fresh veggie sticks or whole-grain crackers.

Nutrition

Serving: 1servingCalories: 150kcalCarbohydrates: 20gProtein: 3gFat: 7gSaturated Fat: 1gPolyunsaturated Fat: 2gMonounsaturated Fat: 4gSodium: 150mgPotassium: 300mgFiber: 5gSugar: 2gVitamin A: 500IUVitamin C: 40mgCalcium: 30mgIron: 1mg

Notes

Choose a naturally curved bell pepper for the best spider shape. Prepare in advance to save time on the day of serving.

Tried this recipe?

Let us know how it was!

Crispy Bat Cheese Balls That Will Steal the Show

October 13, 2025 by Grace Snow Leave a Comment

The moment the golden Bat Cheese Balls hit the table, you can almost hear the chorus of delighted gasps. These little bites of joy are not just crispy and golden; they boast a deliciously gooey center that will make your heart skip a beat. Perfect for gatherings or a cozy night in, these easy-to-make appetizers serve as a crowd-pleaser, effortlessly bringing everyone together. Plus, with creative ingredient substitutions and variations at your fingertips, you can tailor them to suit any palate. Are you ready to fry up some fun and elevate your snack game? Keep reading to dive into the irresistible world of Bat Cheese Balls!

Why are Bat Cheese Balls a Must-Try?

Irresistible Flavor: These Bat Cheese Balls pack a serious punch with their gooey cheese center and crispy exterior that leave you craving more.

Easy to Make: With just a handful of ingredients, this recipe is approachable for all cooking levels—perfect for a quick snack or impressive appetizer.

Adaptable Ingredients: Feel free to swap out cheeses or breadcrumbs to suit your taste; try Potato Blue Cheese for a twist!

Crowd-Pleaser: Whether it’s game night or a casual gathering, these bites will steal the show and have everyone back for seconds.

Make-Ahead Friendly: Prepare in advance and store in the fridge; just reheat for effortless entertaining!

Dive into the joy of Bat Cheese Balls—you won’t regret it!

Bat Cheese Balls Ingredients

• Get ready to gather deliciousness!

For the Cheese Mixture

  • Shredded Cheese – A blend of cheddar and mozzarella offers a rich, creamy flavor; try provolone or gouda for a unique twist.
  • Eggs – Essential for binding the mixture—you can use a flax egg for a vegan alternative.
  • Garlic Powder – Adds savory depth; substitute fresh minced garlic for a more robust taste.

For the Coating

  • Seasoned Breadcrumbs – Provides the crunch; panko breadcrumbs can elevate crispiness.
  • Salt – Enhances flavor; use kosher salt for a coarser texture or reduce for lower sodium.
  • Black Pepper – Adds warmth; replace with cayenne pepper if you prefer a spicy kick.

For Frying

  • Oil (Vegetable or Canola) – Required for frying to achieve that crispy exterior; feeling adventurous? Sunflower oil works great too!

Embrace your culinary creativity and enjoy these Bat Cheese Balls that are sure to impress!

Step‑by‑Step Instructions for Bat Cheese Balls

Step 1: Prepare Your Workspace
Start by gathering all your ingredients and tools for making Bat Cheese Balls. You'll need mixing bowls, a frying pan, and paper towels to drain excess oil later. Set everything within arm's reach to streamline the cooking process. A smooth workspace helps maintain focus and efficiency as you whip up these delicious cheese-filled delights!

Step 2: Mix the Cheese Mixture
In a large mixing bowl, combine the shredded cheese blend, eggs, garlic powder, salt, and black pepper. Use a sturdy spatula or your hands to mix everything until evenly combined—aim for a cohesive texture, but avoid overworking it. This step is essential to ensuring the Bat Cheese Balls achieve that delightful gooey center with every bite!

Step 3: Shape the Balls
Once your cheese mixture is ready, take small portions and roll them into compact balls, about one inch in diameter. Aim for uniform size, as this helps them cook evenly later. Set the shaped balls on a plate or parchment paper, leaving a little space between them. Consider chilling them in the refrigerator for about 15 minutes to help maintain their shape while frying.

Step 4: Heat the Oil
In a frying pan, pour enough oil to cover the bottom and heat it over medium heat until it shimmers—this usually takes about 5 minutes. A good test for doneness is to drop in a small piece of the cheese mixture; if it sizzles immediately, the oil is ready for frying your Bat Cheese Balls.

Step 5: Fry the Cheese Balls
Carefully lower a few cheese balls into the hot oil, making sure not to overcrowd the pan. Fry them for about 3-4 minutes on each side or until they turn a gorgeous golden brown. Use tongs to gently turn them over, ensuring an even crispness all around. The aroma will be irresistible as they cook!

Step 6: Drain and Serve
Once golden and crispy, remove the Bat Cheese Balls from the oil and place them on paper towels to drain any excess oil. Let them cool for a minute before serving—this way, the gooey cheese center can cool slightly without losing its delightful taste. Serve warm for the best flavor and texture, and enjoy the satisfied smiles at your gathering!

How to Store and Freeze Bat Cheese Balls

  • Room Temperature: Enjoy Bat Cheese Balls fresh out of the fryer for the best taste and texture; they should not be left out for more than 2 hours.

  • Fridge: Store leftovers in an airtight container in the fridge for up to 3 days; be sure to let them cool completely before sealing to prevent moisture buildup.

  • Freezer: For longer storage, freeze the uncooked cheese balls on a baking sheet until firm, then transfer to a zip-top bag for up to 3 months; ensure they are well-wrapped to avoid freezer burn.

  • Reheating: To restore crispiness, reheat leftovers in the oven at 350°F (175°C) for about 10-15 minutes, rather than using a microwave, which may make them soggy.

What to Serve with Irresistible Bat Cheese Balls

Elevate your snacking game with delightful accompaniments that complement the rich, cheesy goodness of these fabulous bites.

  • Tangy Marinara Sauce: A classic pairing, this zesty sauce enhances the flavors with its bright acidity, making each cheese ball even more irresistible.
  • Fresh Green Salad: Crisp greens topped with a light vinaigrette offer a refreshing contrast that balances the richness of the cheese balls beautifully.
  • Garlic Breadsticks: Soft and buttery breadsticks provide a comforting, hearty side that perfectly complements the crispy texture of the cheese balls. Serve warm for a cozy ultimate pairing!
  • Creamy Ranch Dip: This cool and creamy dip adds a luscious layer of flavor, making each bite a delightful experience. Perfect for the dipping enthusiast!
  • Spicy Jalapeño Poppers: For those craving a kick, these spicy bites can serve as a fiery contrast to the gooey cheese, creating a dynamic duo on your appetizer platter.
  • Chilled White Wine: A light and refreshing wine, like Sauvignon Blanc, offers a crisp acidity that echoes the flavors and enhances the overall experience of your gathering.
  • Fruity Dessert Platter: Finish with a beautiful array of fruits like strawberries and blueberries, providing a sweet and refreshing note that balances out the savory flavors perfectly.
  • Crispy Potato Wedges: Seasoned potato wedges provide an additional crunch and make for a satisfying side that pairs wonderfully with the cheesy balls and dips.

Make Ahead Options

These Irresistible Bat Cheese Balls are perfect for meal prep enthusiasts! You can prepare the cheese mixture and roll it into balls up to 24 hours in advance, storing them in an airtight container in the refrigerator to maintain their freshness. Additionally, if you prefer, you can fry the cheese balls and let them cool before refrigerating to enjoy them within 3 days. When you're ready to serve, simply reheat them in the oven at 350°F (175°C) for about 10-15 minutes, or until they are warm and crispy again. This way, you'll have delicious, homemade appetizers ready with minimal effort, ensuring your gatherings are stress-free yet delightful!

Bat Cheese Balls: Fun Variations Await!

Feel free to get creative and make this recipe truly your own with these exciting alternatives!

  • Spicy Twist: Add diced jalapeños to the cheese mixture for a zesty kick that brings extra flavor and excitement to every bite.
  • Dairy-Free Option: Use vegan cheese and a flax egg instead of traditional ingredients for a completely plant-based delight that everyone can enjoy.
  • Herb Infusion: Mix in fresh herbs like chives or rosemary for an aromatic lift that takes your Bat Cheese Balls to the next culinary level. The herbs will not only enhance the flavor but also add a beautiful touch to each bite, delighting your guests.
  • Baked Variation: For a healthier spin, shape the balls and bake them on a well-greased tray at 400°F (200°C) until golden brown. This method cuts down on oil while maintaining that satisfying crunch.
  • Seasoned Upgrade: Dip the cheese balls in seasoned flour before coating them with breadcrumbs for an extra layer of flavor. Experimenting with seasonings can make a noticeable difference.
  • Delicious Dipping Sauce: Serve with a homemade spicy marinara or creamy ranch dip, enhancing the overall tasting experience. If you're in the mood for something sweet, try a drizzle of honey for a unique twist.
  • Savory Stuffing: Place a cube of your favorite cheese, such as gouda or blue cheese, in the center of each ball before frying. The melty surprise will wow your friends at any gathering!
  • Heat Levels: Adjust the heat to your taste by swapping black pepper for cayenne or red pepper flakes. For milder flavors, simply omit or reduce the spicy components.

There are endless ways to enjoy Bat Cheese Balls depending on your mood or dietary needs! So, gather your ingredients and let the fun begin.

Expert Tips for Bat Cheese Balls

  • Cheese Balance: Choose a mix of cheeses for depth; too much mozzarella can make them too stretchy rather than gooey.
  • Chill Before Frying: Let the shaped balls chill for 15 minutes before frying to help them hold their shape, especially during frying.
  • Oil Temperature: Ensure the oil is hot enough before frying; dropping a small piece of the mixture should sizzle immediately.
  • Batch Frying: Fry in small batches to avoid crowding, which can lower the oil temperature and lead to soggy cheese balls.
  • Customize Your Flavors: Don’t hesitate to experiment with spices or herbs—adding a sprinkling of chopped chives can elevate these Bat Cheese Balls even further!

Bat Cheese Balls Recipe FAQs

How do I select the right cheese for Bat Cheese Balls?
Absolutely! For the best flavor, look for a blend of cheddar and mozzarella. This combination provides a rich, creamy texture. If you want to explore, you could use provolone or gouda for a different cheese experience. Avoid overly soft cheeses as they may not hold their shape during frying.

How should I store leftover Bat Cheese Balls?
Very! To keep them fresh, store leftovers in an airtight container in the fridge for up to 3 days. Make sure they are completely cooled before sealing to prevent moisture buildup. When you're ready to enjoy them again, reheat in the oven to restore their crispiness!

Can I freeze Bat Cheese Balls?
Absolutely! If you want to make a batch ahead of time, freeze the uncooked cheese balls on a baking sheet first until firm. Afterward, transfer them into a zip-top bag and store in the freezer for up to 3 months. When you're ready to fry them, there's no need to thaw—just drop them into hot oil straight from the freezer!

What should I do if my cheese balls fall apart while frying?
Very! If your Bat Cheese Balls are crumbling in the oil, it could be due to overworking the cheese mixture or not chilling them long enough. To fix this, ensure you mix just until combined and chill the shaped balls for about 15 minutes before frying. This will help maintain their shape and keep them intact!

Are there any dietary restrictions I should consider with this recipe?
Absolutely! If you're catering to vegan diets, simply substitute a flax egg for the regular egg in the recipe. For anyone with cheese allergies, you could explore alternative cheeses made from nuts or soy, but be sure to check labels for any allergens that may be present. Always ask your guests if they have any dietary restrictions to ensure everyone enjoys this delightful snack!

Bat Cheese Balls

Crispy Bat Cheese Balls That Will Steal the Show

These irresistible Bat Cheese Balls are crispy on the outside and gooey on the inside, making them the perfect crowd-pleasing appetizer.
Print Recipe Pin Recipe
Prep Time 30 minutes mins
Cook Time 10 minutes mins
Chilling Time 15 minutes mins
Total Time 55 minutes mins
Servings: 6 balls
Course: Appetizers
Cuisine: American
Calories: 250
Ingredients Equipment Method Nutrition Notes

Ingredients
  

Cheese Mixture
  • 1 cup shredded cheese blend cheddar and mozzarella
  • 2 large eggs flax egg for vegan alternative
  • 1 teaspoon garlic powder or fresh minced garlic
Coating
  • 1 cup seasoned breadcrumbs or panko breadcrumbs for extra crispiness
  • 1/2 teaspoon salt kosher salt optionally
  • 1/2 teaspoon black pepper or cayenne pepper for a spicy kick
For Frying
  • 2 cups oil vegetable or canola oil

Equipment

  • Mixing bowls
  • frying pan
  • Paper towels

Method
 

Steps
  1. Prepare Your Workspace: Gather all ingredients and tools, making sure everything is within reach.
  2. Mix the Cheese Mixture: Combine shredded cheese blend, eggs, garlic powder, salt, and black pepper until evenly mixed.
  3. Shape the Balls: Roll small portions into balls about one inch in diameter, and chill for 15 minutes.
  4. Heat the Oil: Heat oil in a frying pan until it shimmers, about 5 minutes.
  5. Fry the Cheese Balls: Fry balls in hot oil for 3-4 minutes per side until golden brown.
  6. Drain and Serve: Remove from oil, drain on paper towels, and serve warm.

Nutrition

Serving: 2ballsCalories: 250kcalCarbohydrates: 20gProtein: 10gFat: 15gSaturated Fat: 7gPolyunsaturated Fat: 2gMonounsaturated Fat: 5gCholesterol: 50mgSodium: 300mgPotassium: 150mgFiber: 1gSugar: 1gVitamin A: 500IUCalcium: 200mgIron: 1mg

Notes

Store leftovers in an airtight container in the fridge for up to 3 days. For longer storage, freeze uncooked cheese balls for up to 3 months.

Tried this recipe?

Let us know how it was!

Caramelized Onion and Goat Cheese Tarts for Festive Gatherings

October 11, 2025 by Grace Snow Leave a Comment

As the scents of the holiday season waft through my kitchen, I can't help but reminisce about the gatherings filled with laughter and warmth. This year, I'm turning to an old favorite: Caramelized Onion and Goat Cheese Tarts. These elegant appetizers are not just easy to whip up, but they also come together quickly without sacrificing sophistication—perfect for busy home chefs like us. Imagine golden-brown puff pastry cradling the sweet, rich onions paired with the creamy tang of goat cheese; they’re bound to impress even the pickiest guests! Whether you’re entertaining or simply seeking a special weekend treat, these tarts provide both comfort and flair. Have you ever tasted something that felt both festive and cozy at the same time? Let’s dive into this delightful recipe!

Why are Caramelized Onion Tarts a Must-Try?

Irresistible Flavor: The harmonious blend of sweet caramelized onions and creamy goat cheese creates a taste explosion that leaves everyone asking for seconds!

Easy to Make: With just a few simple steps, you can quickly whip up these elegant tarts, making them ideal for both novice and experienced cooks.

Crowd-Pleasing Appeal: Their stunning visual presentation and delectable taste make them the perfect addition to any festive gathering or holiday charcuterie board.

Versatile Ingredients: Feel free to switch up ingredients—try a hint of balsamic or some sautéed mushrooms for a unique twist! For a fresh side, pair them with a vibrant arugula salad dressed in lemon vinaigrette.

Make-Ahead Convenience: These tarts are perfect for prepping in advance. Assemble and freeze, then bake them right before serving—no last-minute stress!

Caramelized Onion and Goat Cheese Tarts Ingredients

These ingredients will help you create delicious tarts that are sure to impress!

For the Pastry

  • Puff Pastry – Provides a flaky, buttery crust; ensure it’s cold before handling for the best puff.
  • Egg (for wash) – Adds shine to the pastry; swap for a non-dairy alternative to make it vegan.

For the Filling

  • Onions (2 large, yellow or sweet) – The primary flavor base that sweetens beautifully when caramelized; shallots can be used for a milder taste.
  • Olive Oil (2 tablespoons) – Used for sautéing onions, imparting flavor and moisture; vegetable oil can be a good substitute.
  • Butter (1 tablespoon) – Adds richness to the filling; consider using vegan butter for a dairy-free version.
  • Sugar (1 teaspoon, optional) – Enhances the sweetness of the onions; feel free to omit if you prefer less sweetness.
  • Salt (½ teaspoon) – Balances flavors; adjust to your taste preferences.
  • Black Pepper (¼ teaspoon) – Adds warmth and depth; freshly cracked is ideal for maximum flavor.
  • Goat Cheese (4 oz, crumbled) – Brings creaminess and a tangy flavor that complements the sweet onions; feta or ricotta are great alternatives.
  • Heavy Cream (2 tablespoons, optional) – Offers a creamier consistency to the filling; omit for a lighter tart.
  • Fresh Thyme (1 teaspoon plus extra for garnish) – Adds aromatic freshness to the dish; rosemary or chives can be delightful substitutes.
  • Honey (optional, for drizzling) – Provides an additional layer of sweetness after baking that works beautifully with the tarts.

Embrace the joy of making Caramelized Onion and Goat Cheese Tarts and watch them become the stars of your gathering!

Step‑by‑Step Instructions for Caramelized Onion and Goat Cheese Tarts

Step 1: Prepare the Pastry
Begin by thawing the puff pastry in the refrigerator or at room temperature until pliable. Preheat your oven to 375°F (190°C). Lightly flour your work surface, roll out the pastry to 1/8-inch thickness, and cut it into your desired shapes, such as squares or circles, for mini tarts. Place the pastry pieces onto a parchment-lined baking sheet.

Step 2: Caramelize the Onions
In a large skillet over medium-low heat, add the olive oil and butter. Once the butter melts, add the sliced onions, sugar, salt, and pepper. Gently stir the ingredients together, cooking slowly for 25-30 minutes. As the onions caramelize, they should become soft and golden brown, releasing their natural sweetness and filling your kitchen with an irresistible aroma.

Step 3: Prepare Filling
In a mixing bowl, combine the warm caramelized onions with the crumbled goat cheese and fresh thyme. If you’re using heavy cream for a richer taste, mix it in gently until everything is well incorporated. The filling should be creamy, with bits of onion peeking through, making it perfect for stuffing into your pastry shells.

Step 4: Assemble Tarts
Carefully spoon the enticing onion and goat cheese mixture into each pastry shell. Be generous but make sure not to overfill, leaving a small border around the edges. This will allow the tarts to puff up nicely while baking. Arrange the filled pastries back on the baking sheet, ready for the oven.

Step 5: Bake
To give your tarts a beautiful golden finish, brush the edges with a beaten egg using a pastry brush. Bake the tarts in your preheated oven for 20-25 minutes or until they are puffed and golden brown. Watch closely as they bake; they should rise beautifully and develop a flaky crust that is truly irresistible.

Step 6: Serve
Once baked, remove the tarts from the oven and let them cool slightly on a wire rack. Serve them warm or at room temperature, garnished with a drizzle of honey and sprigs of fresh thyme if desired. These Caramelized Onion and Goat Cheese Tarts are sure to be a hit at any gathering, delivering both flavor and elegance!

What to Serve with Caramelized Onion and Goat Cheese Tarts

Are you ready to create a stunning spread that complements the elegance of these delightful tarts?

  • Fresh Arugula Salad: Bright and peppery arugula tossed with a lemon vinaigrette adds a refreshing contrast to the rich tarts.
  • Savory Roasted Vegetables: A mix of seasonal roasted vegetables brings earthiness, enhancing the tarts' sweet flavors with a delightful crunch.
  • Crispy Breadsticks: Serve alongside crispy breadsticks for a fun texture; they are perfect for mopping up any delicious tart filling.
  • Light Tomato Soup: A cup of broth-based tomato soup provides a warm, comforting pairing that balances the creamy filling.
  • Sparkling Wine: A glass of bubbly sparkling wine brings a festive touch and cuts through the creaminess of the goat cheese, providing a lively accompaniment.
  • Herbed Cream Cheese Dip: This creamy dip adds an extra layer of richness, making for an enticing appetizer spread.
  • Honey-Balsamic Glaze: Drizzle over the tarts or serving dishes to introduce a sweet and tangy element that pairs excellently with the garlic-infused goodness.
  • Mini Cheese Board: Assemble a mini cheese board with assorted cheeses, nuts, and dried fruit for a beautiful presentation that whets the appetite.
  • Apple or Pear Slices: Fresh slices of crisp apples or pears provide a refreshing bite, complementing the creamy and savory elements of the tarts.
  • Spiced Mulled Cider: This warm drink, full of seasonal spices, creates a cozy atmosphere and enhances the overall festive experience.

Expert Tips for Caramelized Onion and Goat Cheese Tarts

  • Perfect Caramelization: Cook onions slowly over medium-low heat to enhance their sweetness without burning. Patience is key for the best flavor!

  • Chill the Pastry: Always keep puff pastry cold while working to prevent sticking and ensure a perfect rise during baking.

  • Mix Cheeses: For a creamier texture, combine goat cheese with ricotta or cream cheese. This will create a delightful filling in your Caramelized Onion and Goat Cheese Tarts.

  • Egg Wash: Don’t skip brushing the pastry with a beaten egg for that beautiful golden sheen. It enhances presentation and makes the tarts more appealing!

  • Garnish Wisely: Fresh herbs like thyme or chives add a pop of color and flavor. Garnishing just before serving elevates the dish beautifully.

Caramelized Onion and Goat Cheese Tarts Variations

Ready to add your own personal touch to these delightful tarts? Let your creativity shine as you explore these tasty twists!

  • Mushroom Medley: Add sautéed mushrooms to the onion mixture for deep, earthy flavors that beautifully complement the sweet caramelized onions.
  • Nutty Crunch: Top the tarts with toasted walnuts or pecans for an extra layer of crunch and nutrition. The nuts will add a delightful texture contrast!
  • Cranberry Bliss: A spoonful of cranberry sauce on each tart before serving gives a sweet-tart kick that’s perfect for festive gatherings.
  • Vegan Delight: Swap traditional goat cheese for plant-based cheese and use vegan puff pastry for a completely vegan-friendly option that everyone can enjoy.
  • Herb-Infused: Experiment with different herbs—try rosemary or chives for a fragrant twist that elevates the overall flavor profile.
  • Spicy Kick: Add a pinch of red pepper flakes to the onion mixture to bring a touch of heat and a new dimension of flavor.
  • Cheesy Variations: Mix in ricotta or feta cheese with the goat cheese for a creamier filling that enhances the richness of the tarts.
  • Southwestern Flare: Incorporate diced roasted red peppers and a dash of cumin for a summery, Southwestern-inspired twist that delights the palate.

Get inspired and don’t hesitate to explore flavors that resonate with your taste! And if you’re looking for more delightful dishes, why not try these Pan Fried Mayo or these charming Roasted Corn Tacos? Your culinary adventure awaits!

Make Ahead Options

These Caramelized Onion and Goat Cheese Tarts are perfect for busy home cooks looking to save time during the hectic holiday season! You can prepare the onion filling up to 3 days in advance; just caramelize the onions and mix them with the goat cheese and seasonings, then refrigerate in an airtight container. Additionally, you can assemble the tarts entirely, cover them tightly, and freeze for up to 24 hours before baking. When you’re ready to serve, simply bake them directly from frozen, adding a few extra minutes to the baking time for perfectly puffed and golden results. This way, you can enjoy the flavors just as deliciously as if you made them fresh!

Storage Tips for Caramelized Onion and Goat Cheese Tarts

Fridge: Store leftover tarts in an airtight container for up to 3 days. To maintain their flaky texture, avoid stacking them.

Freezer: You can freeze unbaked tarts for up to 2 months. Assemble them, then wrap tightly in plastic wrap before freezing. Bake directly from frozen, adding a few minutes to the cooking time.

Reheating: If baked tarts are kept in the fridge, reheat them in the oven at 350°F (175°C) for about 5-7 minutes to restore their crispiness.

Make-Ahead: Preparing these Caramelized Onion and Goat Cheese Tarts ahead of time is a breeze. Assemble and store them in the freezer, making your holiday entertaining as stress-free as possible.

Caramelized Onion and Goat Cheese Tarts Recipe FAQs

What type of onions should I use for the tarts?
I recommend using yellow or sweet onions for their balance of sweetness and richness when caramelized. If you prefer a milder flavor, shallots are a fantastic alternative that can give your tarts a unique twist!

How should I store leftover tarts?
Leftover tarts can be stored in an airtight container in the refrigerator for up to 3 days. To keep their flaky texture, I suggest placing parchment paper between layers to avoid sogginess. When ready to enjoy, reheat them in the oven at 350°F for about 5-7 minutes to restore their crispness.

Can I freeze Caramelized Onion and Goat Cheese Tarts?
Absolutely! You can freeze unbaked tarts for up to 2 months. Assemble them fully, then wrap tightly in plastic wrap or aluminum foil. When you're ready to bake, simply take them out of the freezer and pop them directly into the preheated oven, adding a few extra minutes to the cooking time.

What can I do if my onions aren't caramelizing properly?
If your onions seem to be cooking too quickly, lower the heat and add a pinch of salt to draw out moisture. It's essential to stir occasionally to ensure even cooking; they should take around 25-30 minutes to develop that beautiful golden-brown color. Patience is key for optimal sweetness!

Are there any dietary considerations I should be aware of?
Yes, for those with dietary restrictions, you can easily make these tarts gluten-free by using gluten-free puff pastry. Additionally, substitute goat cheese with a plant-based cheese or ricotta for a dairy-free option. Always check for allergies with any of the ingredients, especially the cheese and egg.

How can I enhance the flavor of my tarts?
For added richness, consider incorporating balsamic vinegar when caramelizing the onions, or mixing in sautéed mushrooms for depth. You might also try topping the tarts with crushed walnuts or a drizzle of cranberry sauce for a festive flair!

Caramelized Onion and Goat Cheese Tarts

Caramelized Onion and Goat Cheese Tarts for Festive Gatherings

Indulge in these Caramelized Onion and Goat Cheese Tarts, perfect for festive gatherings and easy to make.
Print Recipe Pin Recipe
Prep Time 30 minutes mins
Cook Time 25 minutes mins
Chilling Time 10 minutes mins
Total Time 1 hour hr 5 minutes mins
Servings: 12 tarts
Course: Appetizers
Cuisine: French
Calories: 150
Ingredients Equipment Method Nutrition Notes

Ingredients
  

For the Pastry
  • 1 sheet Puff Pastry Ensure it’s cold before handling
  • 1 each Egg (for wash) Swap for a non-dairy alternative for vegan
For the Filling
  • 2 large Onions (yellow or sweet) Shallots can be used for milder taste
  • 2 tablespoons Olive Oil Vegetable oil can be a good substitute
  • 1 tablespoon Butter Consider using vegan butter for dairy-free
  • 1 teaspoon Sugar Enhances sweetness; optional
  • 0.5 teaspoon Salt Adjust to taste
  • 0.25 teaspoon Black Pepper Freshly cracked is ideal
  • 4 oz Goat Cheese (crumbled) Feta or ricotta are alternative options
  • 2 tablespoons Heavy Cream Omit for lighter tart; optional
  • 1 teaspoon Fresh Thyme Plus extra for garnish; rosemary or chives can be substitutes
  • 1 tablespoon Honey For drizzling after baking; optional

Equipment

  • Large skillet
  • Mixing Bowl
  • Pastry brush
  • Baking Sheet

Method
 

Step-by-Step Instructions
  1. Thaw the puff pastry until pliable and preheat your oven to 375°F (190°C). Roll out the pastry and cut into desired shapes.
  2. In a skillet, add olive oil and butter. Once melted, add onions, sugar, salt, and pepper. Cook for 25-30 minutes until caramelized.
  3. Combine warm caramelized onions with goat cheese and thyme in a mixing bowl. Add heavy cream if desired.
  4. Spoon the onion and cheese mixture into pastry shells, ensuring not to overfill. Arrange on a baking sheet.
  5. Brush edges with beaten egg and bake for 20-25 minutes until puffed and golden brown.
  6. Remove from oven, cool slightly, and serve garnished with honey and fresh thyme.

Nutrition

Serving: 1tartCalories: 150kcalCarbohydrates: 10gProtein: 3gFat: 10gSaturated Fat: 4gPolyunsaturated Fat: 1gMonounsaturated Fat: 5gCholesterol: 25mgSodium: 270mgPotassium: 80mgFiber: 1gSugar: 2gVitamin A: 200IUVitamin C: 2mgCalcium: 50mgIron: 1mg

Notes

These tarts can be made ahead of time and frozen for convenience. They are best served warm or at room temperature.

Tried this recipe?

Let us know how it was!

Crispy Caprese Crostini Ghosts for a Spooktacular Halloween

October 4, 2025 by Grace Snow Leave a Comment

If you've ever found yourself in the kitchen conjuring playful, festive treats, these Caprese Crostini Ghosts will delight both your taste buds and your Halloween spirit! Channeling the classic Italian flavors of fresh mozzarella, juicy tomatoes, and vibrant pesto, these spooky snacks are not only visually captivating but also quick and easy to whip up in under 20 minutes. Perfect as a vegetarian-friendly appetizer, they’ll make a memorable impression on both kids and adults alike. Plus, their delightful crispy texture and creamy mozzarella center promise to be the star of your Halloween gathering. Are you ready to add a deliciously haunted twist to your festivities? Let's get started!

Why are Caprese Crostini Ghosts a must-try?

Experience the magic of Halloween with these Caprese Crostini Ghosts that are as delightful to make as they are to eat!
Quick & Easy preparation ensures you’ll have a show-stopping appetizer ready in under 20 minutes.
Visual Treat: The ghostly shapes create an eye-catching display that will impress guests of all ages.
Flavorful Combo: Enjoy the perfect blend of creamy mozzarella, fresh tomatoes, and basil pesto that packs a flavor punch.
Versatile Options: Feel free to customize with your favorite toppings or switch up the cheese for a delightful surprise!
Crowd-Pleaser: These spooky bites cater to vegetarians and will leave everyone wanting more at your Halloween party.

Caprese Crostini Ghosts Ingredients

Create a spook-tacular treat with these essential components!

For the Crostini
• Fresh Baguette – Provides the crunchy base; slice into 1/2-inch pieces for the best texture.
• Extra-Virgin Olive Oil – Drizzle lightly for flavor and crispiness; essential for that golden finish!

For the Filling
• Fresh Whole-Milk Mozzarella – Perfectly creamy and ideal for ghost shapes; freeze for 10 minutes to slice cleanly.
• Campari Tomatoes – Juicy and flavorful; grape tomatoes work as a tasty substitute too!
• Pesto – Adds a fragrant, herbaceous layer; try using sun-dried tomato pesto for an exciting twist.

For the Decoration
• Balsamic Glaze – Essential for creating those ghost faces and adding a sweet-tangy flair to your Caprese Crostini Ghosts.

With these ingredients, you’re all set to create a hauntingly delightful appetizer that not only looks great but tastes divine!

Step‑by‑Step Instructions for Caprese Crostini Ghosts

Step 1: Preheat Oven
Begin by preheating your oven to 400°F (200°C). This temperature will ensure your crostini turn golden and crispy. While the oven heats up, gather your baking sheet, parchment paper, or a baking tray to prepare for the fresh baguette slices.

Step 2: Prepare Mozzarella
Take the fresh whole-milk mozzarella and place it in the freezer for about 10 minutes. Chilling helps it firm up, making it easier to slice into planks. After freezing, you’ll be able to achieve nice, clean cuts when shaping your ghostly figures.

Step 3: Slice Baguette
Now, take your fresh baguette and cut it diagonally into 1/2-inch slices. Each slice should be sturdy enough to hold the toppings yet thin enough to achieve that delightful crunch when baked. Arrange them on your baking sheet as you work through your slices.

Step 4: Bake Bread
Drizzle the baguette slices lightly with extra-virgin olive oil, ensuring they’re evenly coated for that perfect crispiness. Bake them in the preheated oven for about 8-9 minutes, or until they turn a beautiful golden brown. Keep an eye on them as they bake for that inviting color.

Step 5: Cut Mozzarella
Once the mozzarella is ready, remove it from the freezer and slice it into 1/4-inch planks. Utilize a ghost-shaped cookie cutter to create playful ghost forms from the cheese. These whimsical shapes will make your Caprese Crostini Ghosts enchanting and fun!

Step 6: Assemble Crostini
After removing the baked baguette from the oven, spread a generous layer of pesto on each toasted slice. Next, top them with the mozzarella ghost shapes and halved Campari tomatoes. This layering creates a delightful medley of flavor and presentation for your spooky appetizer.

Step 7: Decorate
To give your Caprese Crostini Ghosts their adorable faces, use a balsamic glaze to drizzle ghostly expressions onto the mozzarella. The dark glaze creates an eye-catching contrast, enhancing both the aesthetic and flavor of your festive treat.

Step 8: Serve Immediately
Finally, arrange your assembled Caprese Crostini Ghosts on a serving platter. It’s best to serve them right away to maintain their crispy texture and delectable flavors. Watch as guests eagerly reach for these fun and delicious Halloween-inspired snacks!

Caprese Crostini Ghosts Variations & Substitutions

Embrace your creativity and make these Caprese Crostini Ghosts truly your own with these fun and festive variations!

  • Vegan Version: Substitute mozzarella with a cashew-based cheese or a vegan cheese alternative for a plant-based twist.

  • Spicy Kick: Add sliced jalapeños on top of the tomatoes for a ghostly heat that will thrill adventurous palates. The fusion of spicy and creamy will enchant your taste buds.

  • Herbed Variation: Incorporate fresh basil or a sprinkle of oregano to enhance the traditional flavors, offering a fragrant touch that pairs beautifully with the cheese and tomatoes.

  • Cheese Swap: Try using burrata instead of mozzarella for an extra creaminess that melts in your mouth, offering an indulgent experience that elevates each bite.

  • Garlic Infusion: Brush the baguette slices with garlic-infused olive oil prior to baking for an aromatic layer that complements the toppings superbly.

  • Nutty Surprise: Sprinkle toasted pine nuts or walnuts over the pesto for an added crunch and depth of flavor. This delivers a lovely textural contrast alongside the creamy mozzarella.

  • Mini Ghosts: Use mini mozzarella balls instead of planks for bite-sized ghosts that keep all the charm while making for easy snacking! This fun twist will engage guests of all ages.

These variations and substitutions not only enhance the flavors, but also allow you to tailor the recipe to fit various dietary needs and preferences. Pair these delightful bites with a light salad or serve alongside a glass of sparkling apple cider to complete your festive spread!

Expert Tips for Caprese Crostini Ghosts

  • Crispness Reminder: Assemble your Caprese Crostini Ghosts just before serving. This keeps the baguette slices crispy and avoids sogginess later on.
  • Clean Cuts: If your mozzarella feels too soft, pop it back in the freezer for another 10 minutes for easier slicing and cleaner ghost shapes.
  • Balsamic Glaze: Use a thicker balsamic glaze for decorating. It sticks better to the mozzarella, resulting in more defined ghostly features.
  • Flavor Experiments: Don't hesitate to experiment with toppings like fresh basil or spicy red pepper flakes for an extra kick of flavor.
  • Storage Tips: Store leftover components separately in airtight containers. Crostini are best enjoyed fresh, but mozzarella and pesto can be kept for up to 3 days.

What to Serve with Caprese Crostini Ghosts

Elevate your Halloween gathering with delightful accompaniments that enhance the flavor and flair of your spooky creations.

  • Garlic Roasted Vegetables: A medley of seasonal vegetables seasoned with garlic offers a warm, hearty balance to these light crostini.
  • Chilled Cucumber Salad: Refreshing and crisp, a cucumber salad provides a cool contrast to the creamy mozzarella while adding crunch to your table.
  • Creamy Tomato Soup: Pairing these ghostly bites with a rich, creamy tomato soup creates a comforting and nostalgic experience, perfect for the season.
  • Herbed Quinoa Salad: This nutty, fluffy quinoa salad brings an earthy touch and elevates your appetizer spread with additional protein and fresh herbs.
  • Sparkling Apple Cider: An effervescent drink that complements the tangy balsamic glaze beautifully, adding a festive touch to your gathering.
  • Mini Pumpkin Cheesecakes: For dessert, serve mini pumpkin cheesecakes that tie into the Halloween theme while providing a sweet finish to the evening!
  • Pineapple Mojito: Light and refreshing, this cocktail blends minty freshness with a tropical twist, an intriguing pairing with the savory crostini.
  • Garlic Breadsticks: Perfect for dipping in remaining balsamic glaze, these warm sticks bring an extra level of comfort food to your spooky night.
  • Warm Spinach Dip: A creamy, cheesy dip loaded with spinach offers a delicious contrast to the crunchy crostini while keeping the appetite satisfied.

Make Ahead Options

These Caprese Crostini Ghosts are perfect for meal prep enthusiasts looking to save time during busy Halloween celebrations! You can slice the fresh baguette and store it in an airtight container at room temperature for up to 24 hours; this keeps them ready for quick assembly. Additionally, prepare the mozzarella ghosts and refrigerate them with a damp paper towel covering for up to 3 days to maintain their freshness. When you're ready to impress your guests, simply bake the baguette slices as directed, layer on the pesto, add the mozzarella and halved tomatoes, and decorate with balsamic glaze. This approach lets you enjoy a delightful snack with minimal last-minute effort while keeping the flavors just as delicious!

Storage Tips for Caprese Crostini Ghosts

Room Temperature: Serve crostini immediately for the best texture; they are best enjoyed fresh and crispy.

Fridge: Store leftover mozzarella and pesto in airtight containers for up to 3 days. Keep crostini separate to maintain crispness.

Freezer: Baguette slices can be frozen for up to 2 months; just toast them before assembling your Caprese Crostini Ghosts.

Reheating: If refrigerated, reheat assembled crostini in a 350°F (175°C) oven for 5-7 minutes to restore warmth and slight crispiness.

Caprese Crostini Ghosts Recipe FAQs

What type of tomatoes should I use for Caprese Crostini Ghosts?
Absolutely! You can use Campari tomatoes for their juiciness and flavor, or swap them with grape tomatoes if you prefer a sweeter option. Both types will create a delicious bite that pairs perfectly with the mozzarella and pesto.

How should I store Caprese Crostini Ghosts and for how long?
Very importantly, store leftover mozzarella and pesto in airtight containers for up to 3 days in the fridge. However, it's best to keep the crostini separate, as they are best enjoyed fresh and crispy. Plan to assemble your crostini just before serving to maintain that delightful crunch!

Can I freeze the ingredients for Caprese Crostini Ghosts?
Yes! You can freeze baguette slices for up to 2 months. To do so, slice the baguette, place the pieces in a single layer on a baking sheet to freeze individually, then transfer them to a zip-top bag. When you're ready to use them, simply toast the frozen slices before assembling your crostini.

What if my mozzarella is too soft to cut?
No worries! If your mozzarella is too soft for cutting, simply return it to the freezer for another 10 minutes. This slight chilling helps firm up the cheese, allowing you to achieve those clean, ghostly shapes with ease.

Are Caprese Crostini Ghosts suitable for those with dietary restrictions?
Absolutely! These crostini are vegetarian-friendly and can be adapted to suit various dietary needs. For example, if you have a lactose intolerance, consider substituting the mozzarella with a dairy-free cheese option. Always check ingredient labels for any allergies specific to individuals who will be enjoying your spooky treats.

Caprese Crostini Ghosts

Crispy Caprese Crostini Ghosts for a Spooktacular Halloween

Delightful Caprese Crostini Ghosts are quick and easy to prepare, perfect for Halloween celebrations!
Print Recipe Pin Recipe
Prep Time 10 minutes mins
Cook Time 9 minutes mins
Total Time 19 minutes mins
Servings: 4 appetizers
Course: Appetizers
Cuisine: Italian
Calories: 120
Ingredients Equipment Method Nutrition Notes

Ingredients
  

For the Crostini
  • 1 loaf Fresh Baguette Slice into 1/2-inch pieces
  • 2 tablespoons Extra-Virgin Olive Oil Drizzle lightly for flavor
For the Filling
  • 8 ounces Fresh Whole-Milk Mozzarella Freeze for 10 minutes to slice
  • 1 cup Campari Tomatoes Juicy and flavorful
  • 1/4 cup Pesto Try sun-dried tomato pesto for variation
For the Decoration
  • 2 tablespoons Balsamic Glaze For creating ghost faces

Equipment

  • Oven
  • Baking Sheet
  • Parchment Paper
  • Cookie cutter

Method
 

Step-by-Step Instructions
  1. Preheat your oven to 400°F (200°C). Gather your baking sheet and parchment paper.
  2. Place mozzarella in the freezer for 10 minutes to firm it up for easy slicing.
  3. Slice the fresh baguette into 1/2-inch diagonal slices and arrange on a baking sheet.
  4. Drizzle the baguette slices with olive oil and bake for 8-9 minutes until golden brown.
  5. Remove mozzarella from the freezer and cut into 1/4-inch planks using a ghost-shaped cookie cutter.
  6. Spread pesto on each toasted baguette slice, top with mozzarella ghosts and halved tomatoes.
  7. Drizzle balsamic glaze over mozzarella to create ghostly expressions.
  8. Serve immediately on a platter to maintain crispy texture.

Nutrition

Serving: 1crostiniCalories: 120kcalCarbohydrates: 15gProtein: 5gFat: 6gSaturated Fat: 2gMonounsaturated Fat: 3gCholesterol: 15mgSodium: 180mgPotassium: 200mgFiber: 1gSugar: 1gVitamin A: 300IUVitamin C: 4mgCalcium: 200mgIron: 1mg

Notes

Assemble crostini just before serving to keep them crispy. If mozzarella is too soft, freeze again for cleaner cuts.

Tried this recipe?

Let us know how it was!

Spooky Halloween Mummy Meatballs That Delight Every Bite

October 4, 2025 by Grace Snow Leave a Comment

As the leaves turn vibrant shades of orange and the air grows crisp, it’s the perfect time for festive gatherings filled with delicious treats. Let me introduce you to my Halloween Mummy Meatballs—an irresistible combination of juicy, savory meatballs wrapped in flaky crescent dough, creating a whimsical take on a classic appetizer. This spook-tacular dish is not only quick to prepare, ready in under 15 minutes, but also invites endless customization options, perfect for impressing guests or delighting your family at Halloween feasts. Whether you stick with familiar flavors or mix it up with your favorite meat types and dipping sauces, these meatballs are sure to become a crowd-pleaser. Are you ready to turn your kitchen into a haunted delight this Halloween?

Why Are Halloween Mummy Meatballs a Must-Try?

Simplicity: These Halloween Mummy Meatballs require minimal prep time, allowing you to whip up a festive treat in under 15 minutes.

Customization: Feel free to switch up the meatballs—choose beef, chicken, pork, or even a vegetarian option, ensuring everyone will love them!

Crowd-Pleasing: Their playful appearance and delicious flavors make them an instant hit at parties, leaving your guests raving about your holiday creativity.

Healthy Indulgence: At approximately 150 calories each, they balance protein and carbs, making them a satisfying snack without the guilt!

Endless Dipping Options: Pair them with your favorite sauces like marinara or BBQ, keeping the flavor fun and fresh for every palate.

Get ready to bake your way to Halloween fun and consider serving these delightful morsels alongside crispy garlic bread or a vibrant Witch's Salad!

Halloween Mummy Meatballs Ingredients

For the Mummy Wrap

  • Frozen, Pre-Cooked Meatballs – Choose beef, pork, chicken, or vegetarian for a quick and easy base.
  • Crescent Roll Dough (8 oz) – This creates the "bandages" that add a fun twist; fresh dough can elevate the flavor.

For the Eyes

  • Mini Pepperonis – Perfect for spooky eyes; you can also use small dabs of mustard for a creative alternative!

For Dipping

  • Dipping Sauce (1 cup) – Opt for marinara, BBQ, or cheese sauce to enhance the deliciousness of your Halloween Mummy Meatballs.

Step‑by‑Step Instructions for Halloween Mummy Meatballs

Step 1: Preheat Your Oven
Start by preheating your oven to 400°F (204°C) and preparing a baking sheet lined with parchment paper. This ensures your Halloween Mummy Meatballs have the perfect backdrop for baking while preventing them from sticking. Setting the stage early allows for a seamless cooking experience, creating a cozy atmosphere in your kitchen.

Step 2: Prepare the Dough Strips
Open the crescent roll dough and carefully unroll it onto a clean surface. Use a pizza cutter or knife to slice the dough into strips approximately 1/4 inch wide. These strips will serve as the “bandages” for your meatballs. Make sure the strips are uniform in size for even baking, adding to the delightful appearance of your spooky treats.

Step 3: Wrap the Meatballs
Take each frozen, pre-cooked meatball and wrap it with the crescent dough strips in a haphazard fashion, mimicking a mummy's look. Make sure to leave gaps between the dough strips to allow the meatballs to peek through, adding an authentic touch. Arrange the wrapped meatballs on the prepared baking sheet, leaving some space between each one for optimal baking.

Step 4: Bake to Perfection
Slide your baking sheet into the preheated oven and bake the wrapped meatballs for about 12-15 minutes. Keep an eye on them, and look for a golden-brown color on the dough, indicating they are perfectly crispy and ready to delight. The aroma of baking crescents mixed with savory meatballs will enhance your kitchen ambiance.

Step 5: Prepare the Eyes
While your Halloween Mummy Meatballs are baking, it’s time to prepare the mini pepperonis for the eyes. If you’re opting for mustard instead, place small dabs on a plate, ready for decorating later. This step adds a fun, spooky element to your creation, ensuring each one has its own character once they emerge from the oven.

Step 6: Attach the Eyes
Once your meatballs are done baking and have cooled slightly, carefully remove them from the baking sheet. Use a dab of your chosen dipping sauce to attach the mini pepperonis or mustard dots to serve as eyes. This playful touch brings your Halloween Mummy Meatballs to life, creating a whimsical treat that will impress everyone at your gathering.

Step 7: Serve Warm
Arrange your completed Halloween Mummy Meatballs on a festive platter and serve them warm alongside your choice of dipping sauces, such as marinara or BBQ. Allow your guests to enjoy the delicious flavors and charming presentation. These delightful bites will surely be the highlight of your Halloween festivities, inviting smiles and satisfied appetites!

Make Ahead Options

These Halloween Mummy Meatballs are perfect for meal prep enthusiasts! You can wrap the frozen, pre-cooked meatballs in crescent dough strips up to 24 hours in advance. To do this, simply prepare and assemble the meatballs as directed, but stop before baking. Place the wrapped meatballs in an airtight container and refrigerate until you're ready to bake. This step saves you time on busy Halloween nights! When you're ready to serve, just pop them in the oven and bake for about 12-15 minutes, ensuring they puff up nicely and reach that golden-brown perfection. Trust me, they’ll be just as delicious and fun, making your festivities easy and enjoyable!

Storage Tips for Halloween Mummy Meatballs

Fridge: Store leftover Halloween Mummy Meatballs in an airtight container for up to 2 days, ensuring they remain fresh and ready for quick snacking.

Freezer: If you want to keep them longer, wrap the meatballs tightly and freeze for up to 3 months. This is perfect for making ahead of your Halloween festivities!

Reheating: To reheat from frozen, bake at 350°F (175°C) for 15-20 minutes or until heated through, ensuring crispy dough. From the fridge, reheat for 10-15 minutes until warm.

What to Serve with Halloween Mummy Meatballs

These delightful bites are just the start of a spooky feast that will thrill your guests!

  • Crispy Garlic Bread: The crunchy texture and garlicky flavor provide a perfect contrast to the soft, pillowy meatballs.
  • Roasted Pumpkin Soup: This creamy, savory soup adds a seasonal touch that warms the soul and complements the meaty flavors beautifully.
  • Witch’s Salad: Packed with vibrant greens, cranberries, and pumpkin seeds, it brings a fresh and colorful balance to your Halloween spread.
  • Spooky Veggie Platter: Crunchy carrots, bell peppers, and celery served with an eerie green dip create a fun, healthy option for your guests.
  • Marshmallow Ghosts: For a sweet finish, these playful dessert treats will entertain both kids and adults while keeping the Halloween theme alive.
  • Cider or Homemade Sangria: These refreshing beverages infuse your gathering with fall spirit, offering a festive pairing that completes the seasonal experience.
  • Pumpkin Spice Brownies: Indulge your guests with these rich, chocolatey sweets that echo the flavors of the season after a delightful savory course.

Halloween Mummy Meatballs: Customization Galore!

Get ready to explore endless possibilities as you make this dish uniquely yours!

  • Different Meats: Swap out the traditional beef meatballs for juicy chicken, savory pork, or a hearty vegetarian option to cater to everyone’s preferences. Each type brings a distinct flavor that pairs wonderfully with the flaky dough.

  • Cheesy Delight: Add some shredded cheese inside the meatballs before wrapping them up. As they bake, the melted cheese creates a gooey center that enhances the flavors and keeps everyone coming back for more!

  • Ghoulish Eyes: Instead of mini pepperonis, try using green olives or even small bits of cherry tomatoes for a different look. Transform each meatball into a favorite spooky character, keeping your presentation fresh and exciting!

  • Spicy Twist: Mix in a pinch of crushed red pepper flakes or sriracha to your meatball mixture to give a subtle kick. This fiery addition can elevate the flavor profile for those seeking a little heat amidst the festivities.

  • Herb-Infused Varieties: Incorporate fresh herbs like basil, parsley, or even cilantro into the meatball mixture for added depth of flavor. Not only does this enhance the taste, but it also adds a vibrant dash of color!

  • Alternative Dough: Experiment with puff pastry or homemade pizza dough in place of crescent roll dough for varied textures. Each option offers a different experience, inviting your creativity to shine through.

  • Dipping Sauce Variations: Consider tie-dyeing your dipping experience by serving an array of unique sauces such as spicy ketchup, garlic aioli, or honey mustard alongside marinara or BBQ. This will tantalize your guests’ taste buds and keep them engaged!

  • Make-ahead Wonders: Assemble your Mummy Meatballs ahead of time and freeze them for a simpler, stress-free Halloween. When you pull them out of the freezer, you’ll have a delightful treat that’s ready to impress your guests in minutes!

Tap into your culinary instincts and mix things up with these fun adjustments—your Halloween Mummy Meatballs will never be boring! For a delightful crunch, consider serving them alongside a plate of crispy garlic bread or a colorful Witch's Salad.

Expert Tips for Halloween Mummy Meatballs

  • Use Pre-Cooked Meatballs: Ensure you use frozen, pre-cooked meatballs for a quick and safe option. If using raw meatballs, bake them beforehand to ensure thorough cooking.

  • Uniform Dough Strips: Cut crescent roll dough into uniform strips for even wrapping and baking. This will enhance their spooky mummy appearance and texture.

  • Customize Flavors: Feel free to add herbs, spices, or shredded cheese inside the meatballs before wrapping for a flavor boost. Remember, the more personalized your Halloween Mummy Meatballs, the more they’ll impress!

  • Creative Eye Options: Besides mini pepperonis, consider olives or mustard for the eyes. This allows you to mix and match, keeping each meatball unique and enticing.

  • Make Ahead Tips: Prepare the wrapped meatballs in advance and refrigerate or freeze them. Adjust baking time accordingly when ready to serve, making your Halloween prep hassle-free.

Halloween Mummy Meatballs Recipe FAQs

What type of meatballs should I use?
I recommend using frozen, pre-cooked meatballs for an easy and convenient base. You can choose from beef, pork, chicken, or even a vegetarian option to suit everyone's taste. If you prefer raw meatballs, it’s crucial to bake them first to ensure they are cooked through.

How long can I store Halloween Mummy Meatballs in the fridge?
You can store leftover Halloween Mummy Meatballs in an airtight container in the refrigerator for up to 2 days. Just make sure they’re sealed properly to keep them fresh and ready for a tasty snack anytime!

Can I freeze Halloween Mummy Meatballs?
Absolutely! Wrap the prepared, unbaked meatballs tightly in plastic wrap and store them in a freezer-safe container. They can be frozen for up to 3 months. When you're ready to enjoy them, simply bake directly from frozen, adjusting the baking time to about 15-20 minutes at 350°F (175°C) until heated through and the dough is perfectly crispy.

What can I do if the crescent dough burns before the meatballs are heated?
If you experience burning, make sure to cut the crescent dough strips uniformly and avoid wrapping them too tightly. Additionally, consider lowering the oven temperature to 375°F (190°C) and extending the baking time slightly to ensure the meatballs heat through properly while preventing the dough from burning.

Are there any dietary considerations for my guests?
If you're serving guests with dietary restrictions, consider offering a vegetarian option by using plant-based meatballs. Always double-check the ingredient labels for common allergens, such as gluten in the crescent dough or any added seasonings in the meatballs, to ensure your Halloween Mummy Meatballs are suitable for everyone at your gathering.

Halloween Mummy Meatballs

Spooky Halloween Mummy Meatballs That Delight Every Bite

Enjoy these Halloween Mummy Meatballs, a spook-tacular appetizer that combines meatballs and flaky dough for an unforgettable treat.
Print Recipe Pin Recipe
Prep Time 10 minutes mins
Cook Time 15 minutes mins
Total Time 25 minutes mins
Servings: 6 meatballs
Course: Appetizers
Cuisine: American
Calories: 150
Ingredients Equipment Method Nutrition Notes

Ingredients
  

For the Mummy Wrap
  • 24 meatballs Frozen, Pre-Cooked Meatballs Choose beef, chicken, pork, or vegetarian for a quick and easy base.
  • 8 oz Crescent Roll Dough This creates the 'bandages' that add a fun twist.
For the Eyes
  • 1 cup Mini Pepperonis Perfect for spooky eyes.
For Dipping
  • 1 cup Dipping Sauce Opt for marinara, BBQ, or cheese sauce.

Equipment

  • Oven
  • Baking Sheet
  • Parchment Paper
  • Pizza Cutter

Method
 

Step-by-Step Instructions
  1. Preheat your oven to 400°F (204°C) and prepare a baking sheet lined with parchment paper.
  2. Open the crescent roll dough and slice it into strips approximately 1/4 inch wide.
  3. Wrap each meatball with the dough strips in a haphazard fashion.
  4. Bake the meatballs for about 12-15 minutes until golden-brown.
  5. Prepare mini pepperonis for the eyes or small dabs of mustard as an alternative.
  6. Attach the mini pepperonis or mustard dots to the baked meatballs using dipping sauce.
  7. Serve warm on a festive platter with dipping sauces.

Nutrition

Serving: 1meatballCalories: 150kcalCarbohydrates: 15gProtein: 6gFat: 8gSaturated Fat: 1gCholesterol: 30mgSodium: 300mgPotassium: 120mgFiber: 1gIron: 1mg

Notes

Incorporate your favorite dipping sauces and consider serving alongside crispy garlic bread or a vibrant salad.

Tried this recipe?

Let us know how it was!
  • « Previous Page
  • 1
  • …
  • 10
  • 11
  • 12
  • 13
  • 14
  • …
  • 16
  • Next Page »

Welcome!

Hi, I’m Grace, a Sydney-based home cook with a passion for bold flavors and trending ingredients. Whether you’re a busy beginner or a seasoned foodie, you’ll find dishes here that are fresh, fun, and full of flavor.

More about me

Popular Recipes

  • One Pot Keto Tuna Casserole
    One Pot Keto Tuna Casserole: Creamy Comfort in Minutes
  • Ultimate Jalapeno Popper Chicken Salad
    Ultimate Jalapeno Popper Chicken Salad That'll Wow Your Tastebuds
  • Green Chile Cheese Dip
    Mouthwatering Green Chile Cheese Dip for Cozy Gatherings
  • Easy Chimichurri Sauce
    Fresh and Zesty Easy Chimichurri Sauce in Just Minutes

Footer

↑ back to top

About

  • Privacy Policy
  • Disclaimer
  • Terms & Conditions

Newsletter

  • Sign Up! for emails and updates

Contact

  • About me
  • Contact me

Copyright © 2025 TastyTrendIngredients