tastytrendingredients

  • Home
  • Recipes
    • Appetizers
    • Breakfast
    • Dessert
    • Dinner
    • Drinks
    • Salads
    • Snacks
    • Soups
  • About me
  • Contact
menu icon
go to homepage
  • Home
  • Recipes
    • Appetizers
    • Breakfast
    • Dessert
    • Dinner
    • Drinks
    • Salads
    • Snacks
    • Soups
  • About me
  • Contact
search icon
Homepage link
  • Home
  • Recipes
    • Appetizers
    • Breakfast
    • Dessert
    • Dinner
    • Drinks
    • Salads
    • Snacks
    • Soups
  • About me
  • Contact
×

Keto Beef Taquitos – Crispy, Cheesy, Guilt-Free Delights

June 18, 2026 by Grace Snow Leave a Comment

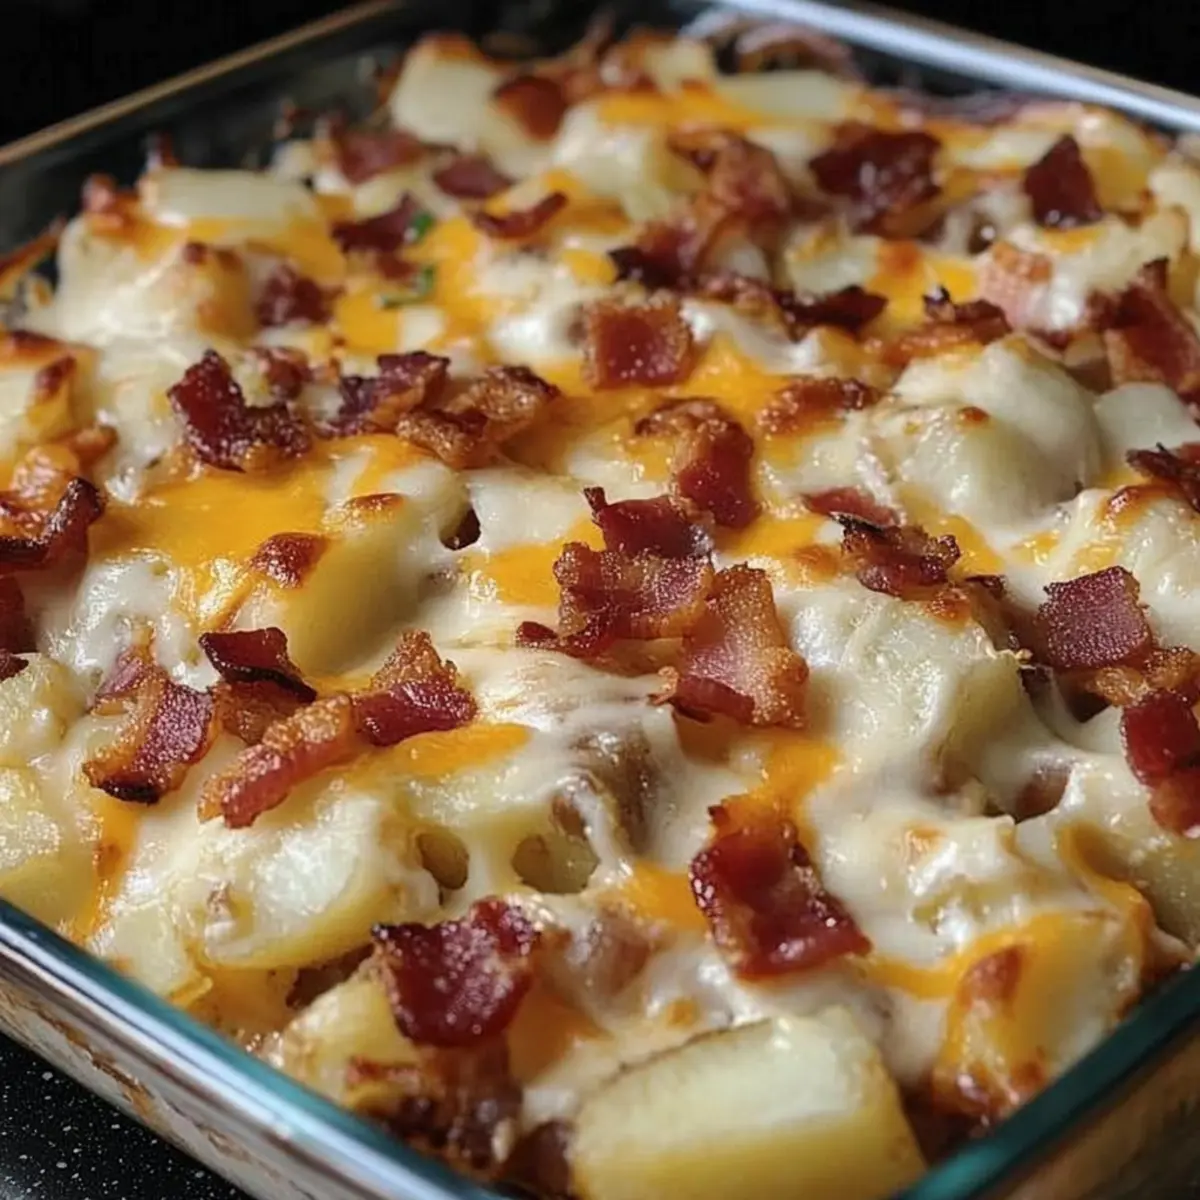
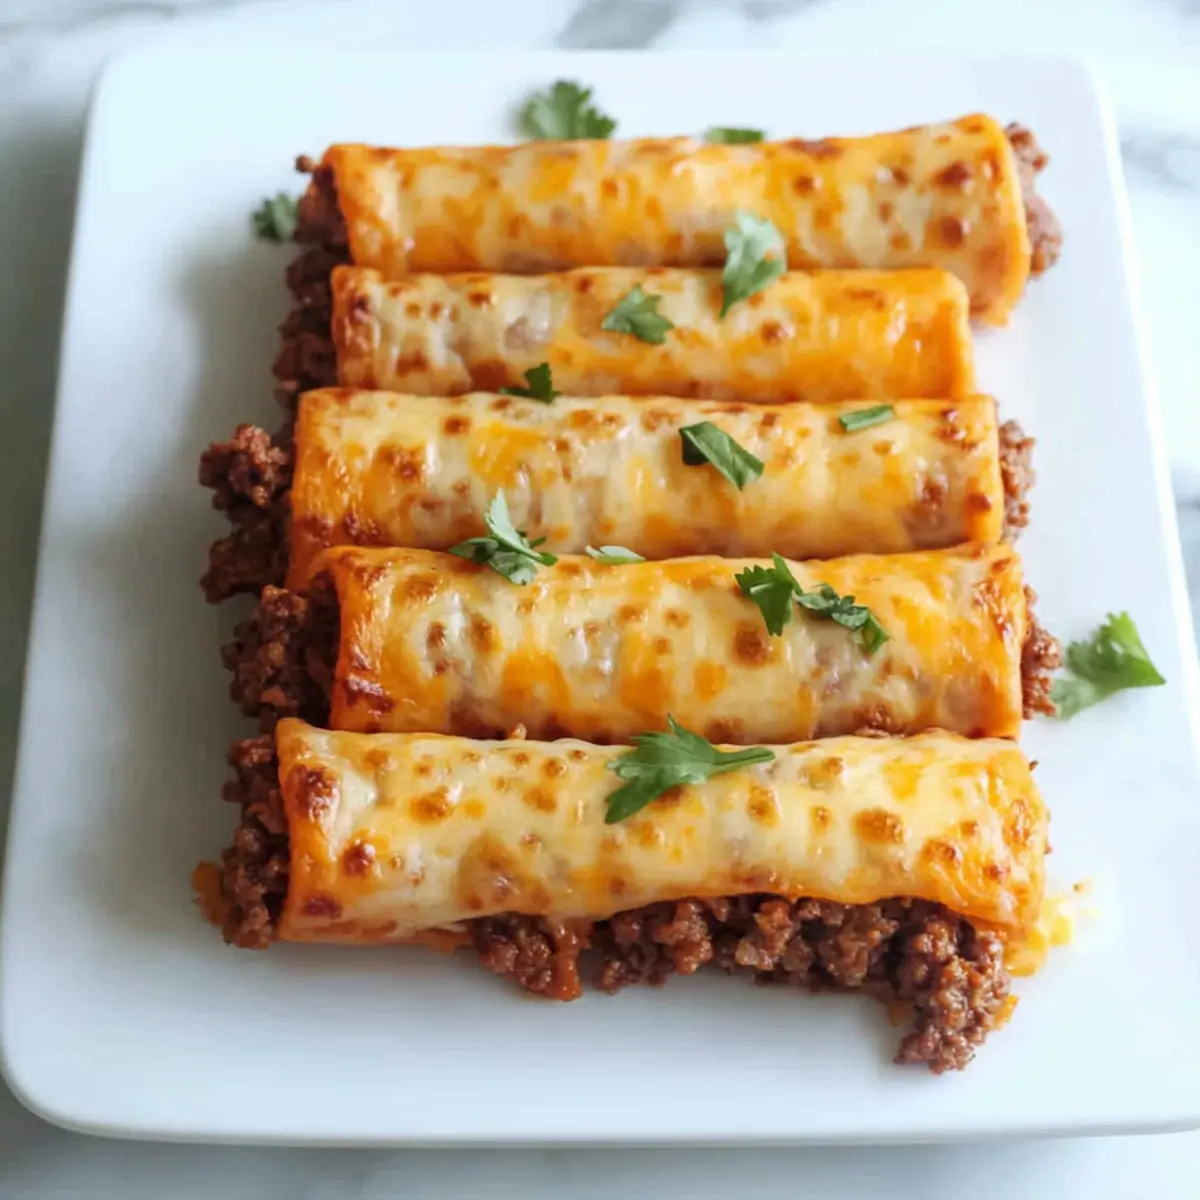
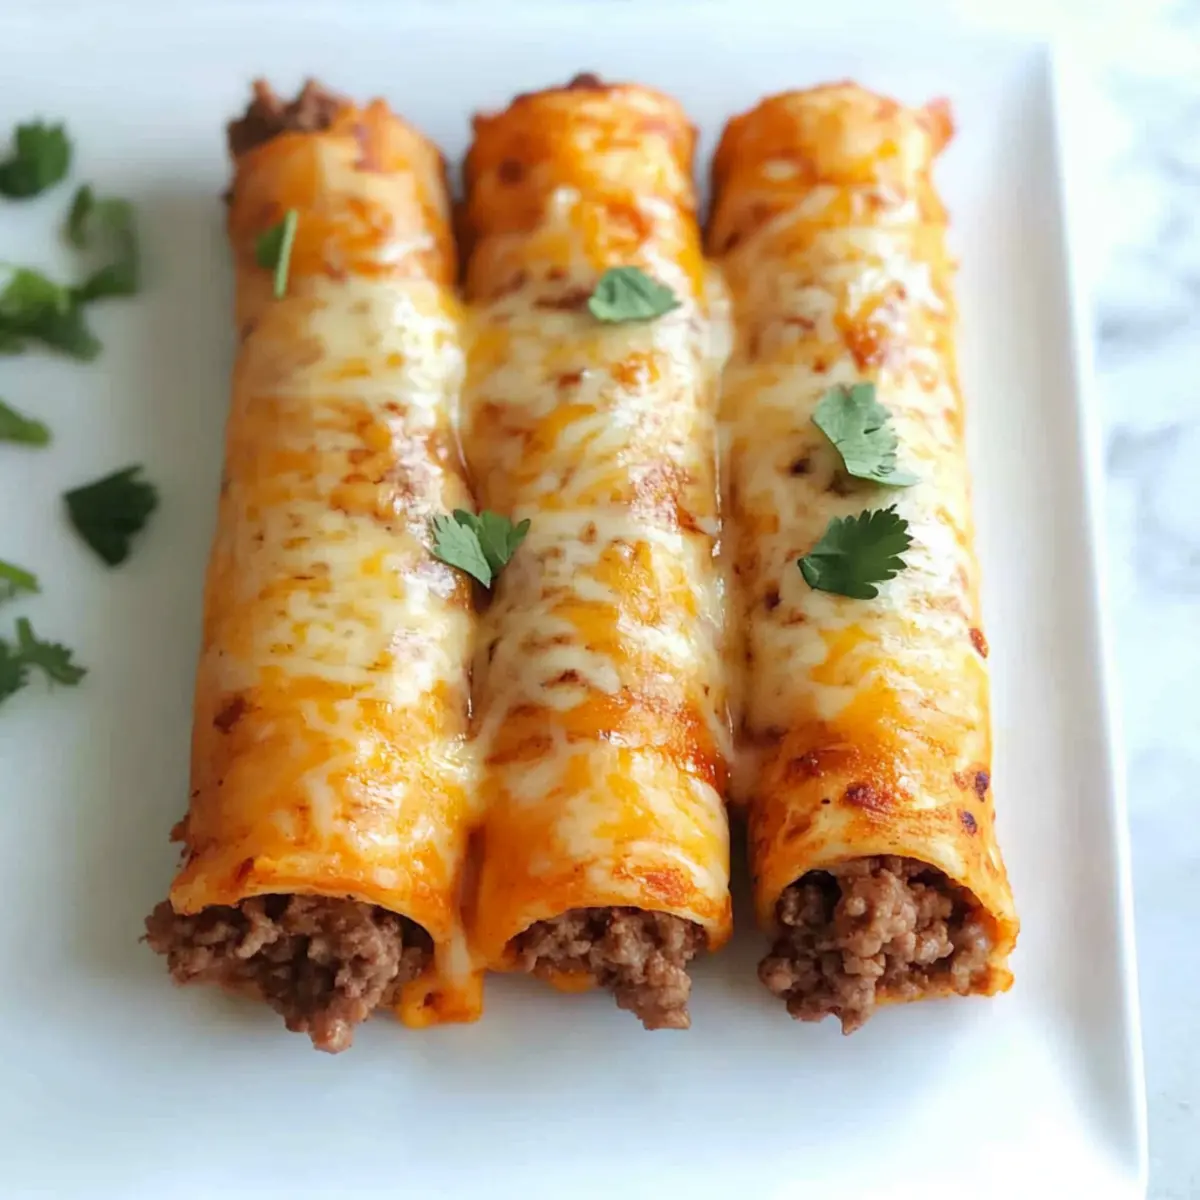
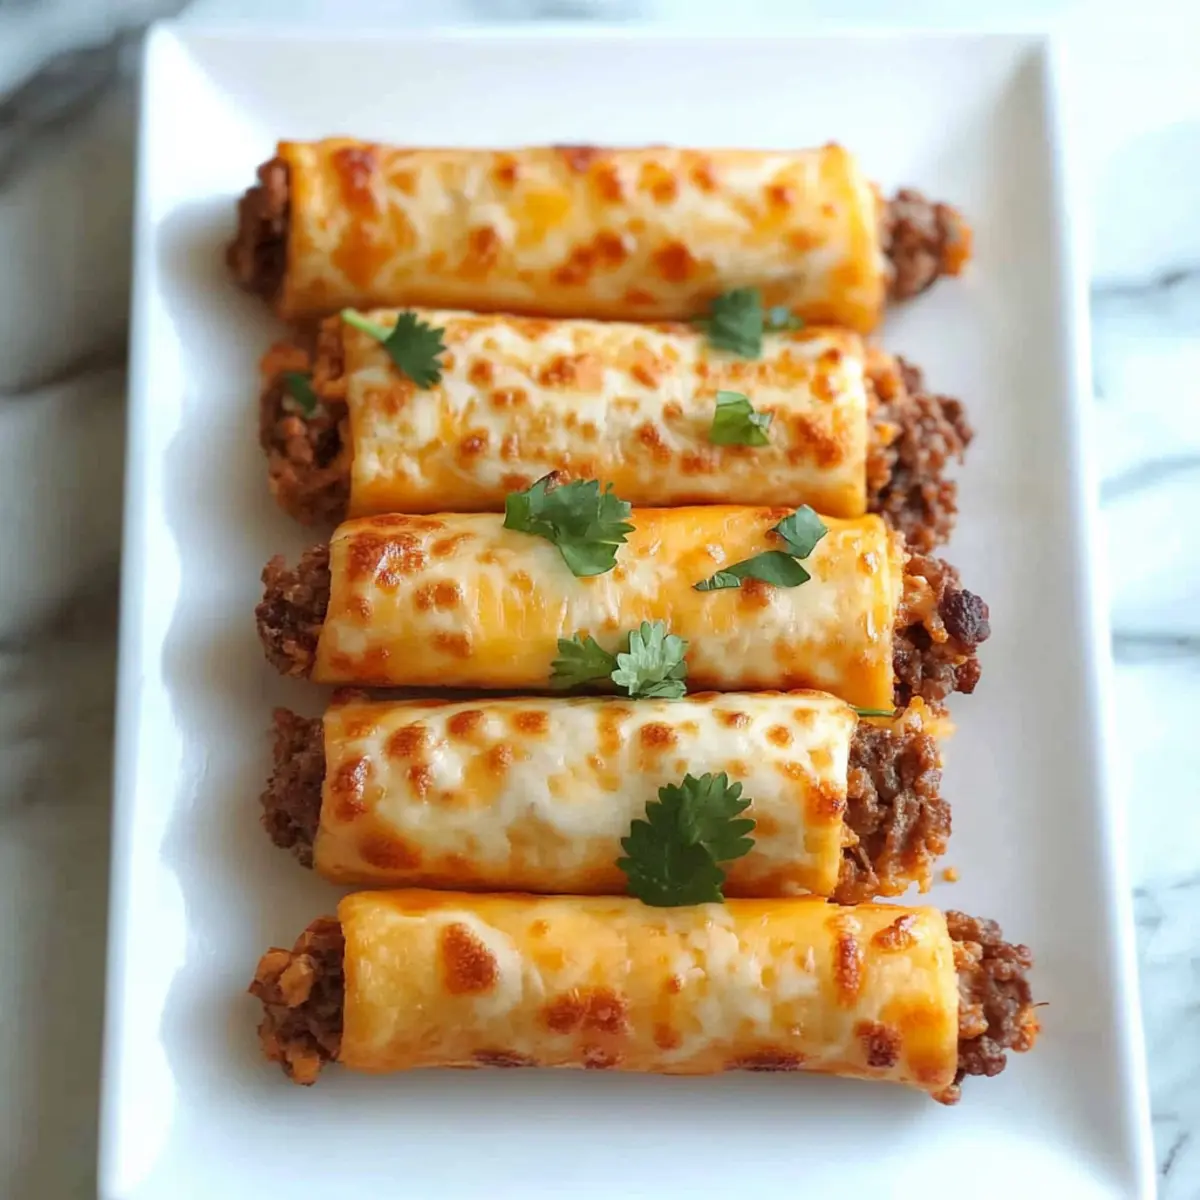
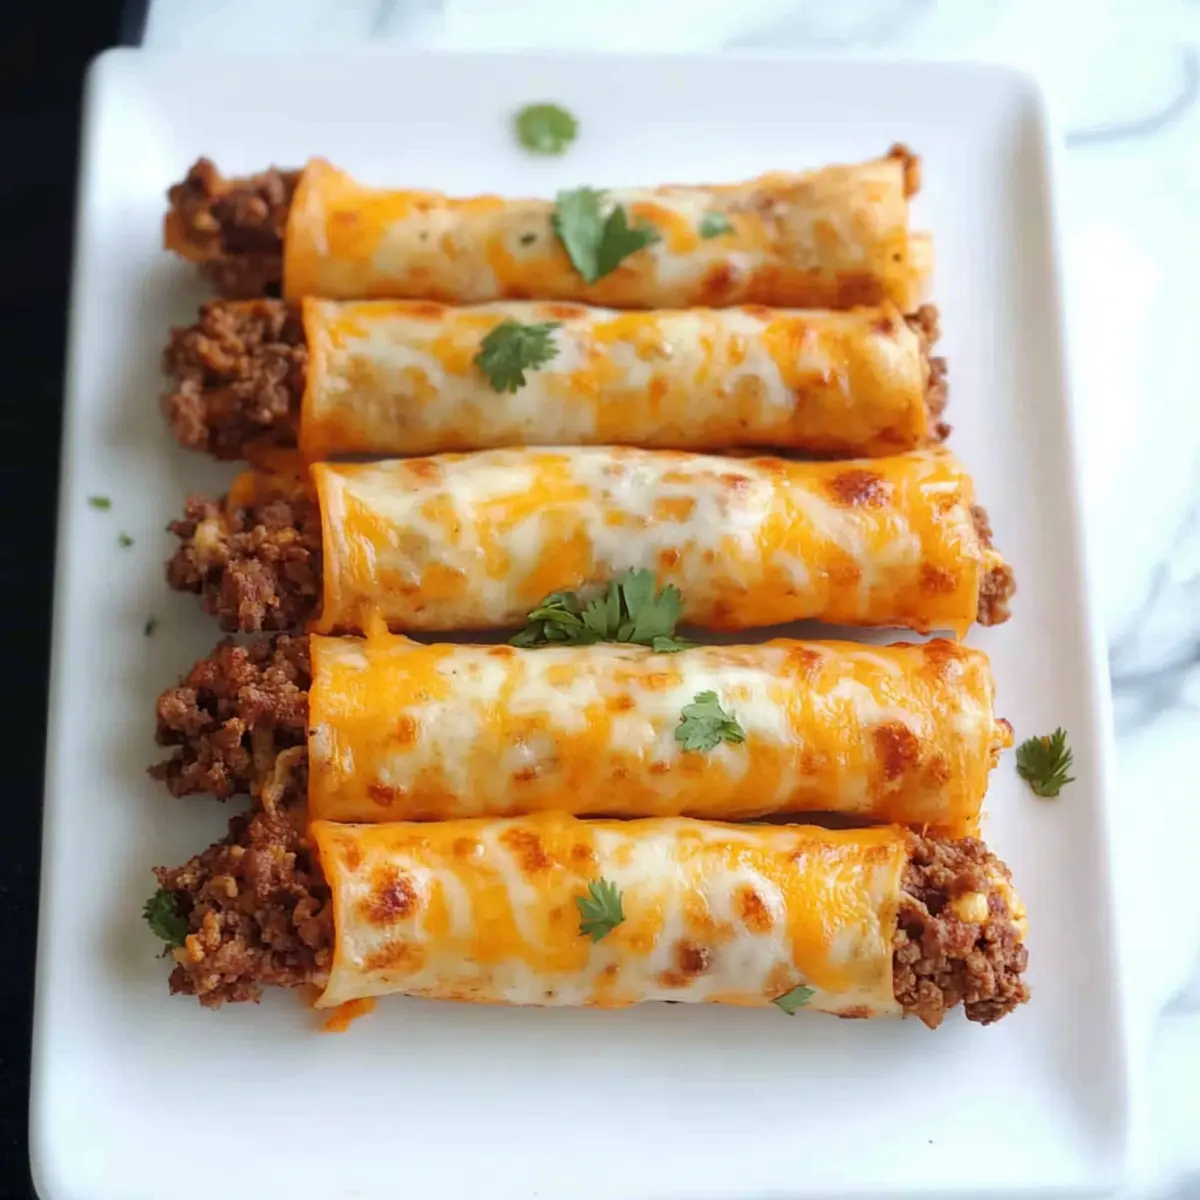
The sizzle of beef in a hot skillet, mixed with aromatic spices, fills my kitchen every time I make these tempting Keto Beef Taquitos. It’s amazing how a simple roll of cheese and flavorful filling can transform into a crowd-pleasing appetizer that's both gluten-free and low-carb. Perfect for a quick snack or a stylish addition to your dinner table, these taquitos are not just easy to whip up but also a fantastic way to indulge without straying from your dietary goals. With their crispy exterior and melty cheesy center, you'll find yourself savoring each bite. Want to play around? You can swap out the beef for chicken or even add a kick of jalapeños to customize this delightful dish. Are you ready to turn your kitchen into a taquito haven?

Why Will You Crave These Taquitos?

Crispy Texture: Each bite delivers a satisfying crunch, contrasting beautifully with the melty, cheesy interior.

Flavor Explosion: A mix of spices, cheese, and savory ground beef creates an unbeatable flavor profile that's bound to impress.

Quick Preparation: Made in under 30 minutes, these Keto Beef Taquitos fit perfectly into any busy schedule — no more fast food run!

Versatile Delight: Swap ground beef for chicken or mix in cream cheese and jalapeños for a personalized twist.

Crowd-Pleasing Appetizer: Ideal for gatherings, everyone from keto enthusiasts to snack lovers will enjoy these delicious bites!

You might enjoy pairing them with some fresh guacamole or trying out different variations, just like in our Ground Beef Enchiladas. Your friends and family will thank you!

Keto Beef Taquitos Ingredients

For the Cheese Shells
• Shredded Cheddar Cheese – Adds flavor and creaminess; substitute with any sharp cheese for a tangy twist.
• Shredded Mozzarella Cheese – Provides meltiness and structure; can be replaced with provolone for a unique taste.
• Grated Parmesan – Enhances flavor depth; optional but adds a delightful salty bite.

For the Filling
• Ground Beef – Main protein source; feel free to use ground turkey or chicken for a lighter alternative.
• Minced Onion – Adds sweetness and flavor; shallots can be used for a milder aroma.
• Chili Powder – Provides spice and warmth; adjust to taste and consider smoked paprika for an extra layer of flavor.
• Paprika – Adds color and subtle sweetness; optional but enhances the overall dish.
• Cumin – Brings an earthy note, essential for a taco taste; skip if you're not a fan.
• Onion Powder – Boosts onion flavor with no texture; can be omitted if using fresh onion.
• Garlic Powder – Delivers depth of flavor; fresh garlic can also be chopped for extra freshness.
• Salt – Enhances all flavors; adjust based on dietary needs for optimal taste.
• Water – Mixes spices with beef, ensuring even distribution of flavors throughout the filling.

Dive into these delicious Keto Beef Taquitos and satisfy your cravings in a healthier way!

Step‑by‑Step Instructions for Keto Beef Taquitos

Step 1: Brown the Beef
In a skillet over medium heat, brown 1 pound of ground beef with ½ cup of minced onion for about 5–7 minutes, stirring occasionally until the meat is no longer pink and is fully cooked. The beef should be nicely browned, and the onions will become soft and fragrant.

Step 2: Mix the Spices
In a small bowl, combine 1 teaspoon of cumin, 2 teaspoons of chili powder, 1 teaspoon of onion powder, 1 teaspoon of garlic powder, and ½ teaspoon of salt with ½ cup of water. Pour this spice mixture over the cooked beef mixture, stirring well to evenly coat. Allow it to simmer for 5–10 minutes, or until the liquid has evaporated, and the beef is flavorful and slightly thickened.

Step 3: Prepare the Cheese Shells
Preheat your oven to 400°F (200°C). In a mixing bowl, combine 1 cup of shredded cheddar cheese, 1 cup of shredded mozzarella cheese, and ½ cup of grated parmesan. Use parchment paper on a baking sheet to avoid sticking, then form the cheese mixture into six equal balls, spaced out on the sheet.

Step 4: Bake the Cheese Balls
Place the baking sheet in the preheated oven and bake for about 6–8 minutes, or until the cheese shells are bubbling and starting to turn golden brown. Watch closely for doneness to achieve the perfect crispy cheese shell. Once done, remove from the oven and let them cool for a few minutes until manageable.

Step 5: Shape the Taquitos
Once the cheese balls have cooled slightly, carefully flip each one over. Place a spoonful of the seasoned beef mixture on one edge and tightly roll the cheese around the filling. Work quickly to ensure the cheese doesn’t harden before rolling, creating a delicious Keto Beef Taquito with a crispy exterior.

Step 6: Bake Again
Return the assembled Keto Beef Taquitos back to the oven for an additional 5–7 minutes at 400°F (200°C), allowing them to crisp further. Keep an eye on the taquitos until they’re golden and crunchy on the outside, ensuring that the cheese remains melty inside while developing a delightful texture.

What to Serve with Keto Beef Taquitos?

Each bite of these sizzling, cheesy delights pairs perfectly with complementary flavors, enhancing your meal's overall experience.

  • Guacamole: Creamy and flavorful, guacamole adds a refreshing touch that balances the richness of the taquitos.
  • Sour Cream: A dollop of cool sour cream offers a tangy contrast and keeps the moisture in check with every bite.
  • Pico de Gallo: This fresh salsa brings zesty tomatoes and onions, enhancing the overall flavor with a burst of freshness.
  • Mexican Street Corn Salad: The sweet, buttery corn with lime and spices adds a delightful contrast and rounds out the meal beautifully.
  • Crispy Green Salad: A light salad with fresh greens, cucumbers, and a lime vinaigrette provides a crisp texture that complements the crunchy taquitos.
  • Spicy Jalapeño Poppers: For those seeking extra heat, pairing with stuffed jalapeños brings a bold flavor contrast, elevating your snacking experience.
  • Chilled Mexican Beer: A chilled, light beer helps refresh the palate, ensuring every bite of taquito is as enjoyable as the last.
  • Margaritas: These classic cocktails, with their sweet and tart flavor, pair wonderfully with the savory spices of the taquitos, creating a festive atmosphere.
  • Chocolate Avocado Mousse: For a decadent finish, try a rich and creamy chocolate avocado mousse—it's a delightful way to end a fabulous meal!

Make Ahead Options

These Keto Beef Taquitos are perfect for meal prep enthusiasts! To save time on busy weeknights, you can prepare the beef filling up to 3 days in advance. Just brown the ground beef with the minced onion, mix in the spices, and let it cool before placing it in an airtight container in the refrigerator. Additionally, you can shape the cheese shells and freeze them before baking. When you’re ready to enjoy, simply bake the cheese shells from frozen for about 10-12 minutes, and then fill with the beef mixture and bake for another 5-7 minutes. This ensures they remain just as delicious and crispy, making dinner a breeze!

Keto Beef Taquitos Variations

Feel free to get creative with these Keto Beef Taquitos and tailor them to your taste buds for a delightful twist!

  • Chicken Taquitos: Substitute ground beef with shredded cooked chicken for a lighter, yet equally delicious option. The tenderness of chicken offers a delightful contrast to the crispy shell.

  • Spicy Kick: Add diced jalapeños to the beef mixture for an extra layer of heat. Just enough to make your taste buds dance without overwhelming the overall flavor.

  • Creamy Delight: Mix in cream cheese with the beef for a richer, creamier filling. It adds a luscious texture that will leave you craving more.

  • Low-Carb Veggies: Incorporate finely chopped bell peppers and zucchini into the beef mixture to boost nutrition and add a dash of color. It’s a sneaky way to enjoy more vegetables without losing flavor!

  • Smoky Flavor: Swap chili powder with smoked paprika for a smoky twist that enhances the depth of flavors. Just a dash can elevate your Keto Beef Taquitos to gourmet status.

  • Cheese Variations: Experiment with different cheeses, like pepper jack for heat or gouda for a smoky finish. Each variation brings its own unique profile to the dish.

  • Taco Night Upgrade: Use this beef filling for taco night by simply placing it in lettuce wraps instead. It's a great way to bring the taco experience to a fresh and crispy level!

Don't forget, you can also explore other enticing options like our Ground Beef Enchiladas for even more flavor inspiration!

Expert Tips for Keto Beef Taquitos

• Parchment Paper Use: Always use parchment paper for baking the cheese shells to prevent sticking; wax paper will lead to disaster!

• Watch the Cooling: Allow the cheese balls to cool briefly before handling to prevent burns, but roll them quickly for easy shaping.

• Customize Your Spices: Feel free to adjust the chili powder or add smoked paprika for an extra flavor kick—just keep the balance right for your taste!

• Make-ahead Option: Prepare these Keto Beef Taquitos ahead of time; freeze before baking, then add a few extra minutes to your baking time from frozen.

• Cheese Choices: Experiment with different cheeses, like pepper jack for spice or gouda for a smokier flavor—variety keeps it exciting!

How to Store and Freeze Keto Beef Taquitos

Fridge: Store leftover Keto Beef Taquitos in an airtight container for up to 3 days. Ensure they are cool before sealing to avoid moisture buildup.

Freezer: Freeze uncooked, assembled taquitos in a single layer on a baking sheet. Once solid, transfer them to a freezer bag for up to 3 months. Bake from frozen, adding a few extra minutes to the cooking time.

Reheating: To reheat, place baked taquitos in the oven at 350°F (175°C) for about 10-15 minutes until warmed through and crispy again. Enjoy this tasty treat any time!

Keto Beef Taquitos Recipe FAQs

What type of cheese should I use for the taquitos?
Absolutely! I recommend using a mix of shredded cheddar and mozzarella for the best flavor and texture. If you’d like, you can substitute cheddar with a sharp cheese or try using provolone for a different taste. For an extra salty bite, consider adding grated parmesan to the mix.

How should I store leftover Keto Beef Taquitos?
Very! Store any leftover Keto Beef Taquitos in an airtight container in the fridge for up to 3 days. Make sure they are cool before sealing to prevent moisture from making them soggy. You can also reheat them in the oven at 350°F (175°C) for about 10-15 minutes to regain that crispy texture.

Can I freeze Keto Beef Taquitos?
Of course! First, assemble the taquitos without baking them and lay them out on a baking sheet. Freeze them in a single layer until solid, then transfer to a freezer bag. They’ll stay good for up to 3 months. When you’re ready to enjoy, bake them directly from frozen, adding a few extra minutes to the bake time.

What should I do if my cheese shells are sticking to the parchment paper?
Oh no! If your cheese shells are sticking, it's likely due to using wax paper instead of parchment paper, which is a must for this recipe. Be sure to use parchment as it withstands heat and allows for easy release. If they do stick, try carefully sliding a thin spatula underneath to lift them off without breaking.

Are these Keto Beef Taquitos safe for pets?
Great question! While the ingredients in Keto Beef Taquitos are safe for human consumption, keep in mind that some seasonings like garlic and onion can be harmful to dogs. It's best to share only the plain cheese parts with your furry friends, and avoid giving them any of the seasoned beef filling.

Can I customize the filling in the taquitos?
Absolutely! One of the beautiful aspects of this recipe is its versatility. You can use cooked shredded chicken, ground turkey instead of beef, or even add cream cheese for a richer filling. Don't forget to throw in some diced jalapeños for spicy aficionados, or experiment with your favorite spices to make this dish truly your own!

Keto Beef Taquitos

Keto Beef Taquitos – Crispy, Cheesy, Guilt-Free Delights

Enjoy these Keto Beef Taquitos, a delightful gluten-free and low-carb appetizer filled with flavorful beef and cheese.
Print Recipe Pin Recipe
Prep Time 10 minutes mins
Cook Time 20 minutes mins
Cooling Time 5 minutes mins
Total Time 35 minutes mins
Servings: 6 taquitos
Course: Appetizers
Cuisine: Mexican
Calories: 280
Ingredients Equipment Method Nutrition Notes

Ingredients
  

For the Cheese Shells
  • 1 cup Shredded Cheddar Cheese Substitute with any sharp cheese for a tangy twist.
  • 1 cup Shredded Mozzarella Cheese Can be replaced with provolone for a unique taste.
  • ½ cup Grated Parmesan Optional but adds a delightful salty bite.
For the Filling
  • 1 pound Ground Beef Feel free to use ground turkey or chicken for a lighter alternative.
  • ½ cup Minced Onion Shallots can be used for a milder aroma.
  • 1 teaspoon Cumin Essential for a taco taste; skip if you're not a fan.
  • 2 teaspoons Chili Powder Adjust to taste; consider smoked paprika for an extra layer of flavor.
  • 1 teaspoon Onion Powder Can be omitted if using fresh onion.
  • 1 teaspoon Garlic Powder Fresh garlic can also be chopped for extra freshness.
  • ½ teaspoon Salt Adjust based on dietary needs for optimal taste.
  • ½ cup Water Mixes spices with beef, ensuring even distribution of flavors throughout the filling.

Equipment

  • Skillet
  • Oven
  • Baking Sheet
  • Mixing Bowl

Method
 

Preparation
  1. In a skillet over medium heat, brown the ground beef with minced onion for about 5–7 minutes, until fully cooked.
  2. Combine cumin, chili powder, onion powder, garlic powder, and salt with water in a small bowl, then pour over cooked beef mixture.
  3. Preheat your oven to 400°F (200°C) and mix cheddar, mozzarella, and parmesan cheese.
  4. Bake cheese mixture in balls for about 6–8 minutes until golden brown.
  5. Once the cheese balls cool slightly, shape them with seasoned beef in rolls.
  6. Return taquitos to the oven for an additional 5–7 minutes at 400°F (200°C) until crispy.

Nutrition

Serving: 1taquitoCalories: 280kcalCarbohydrates: 3gProtein: 20gFat: 22gSaturated Fat: 10gMonounsaturated Fat: 12gTrans Fat: 1gCholesterol: 60mgSodium: 400mgPotassium: 300mgFiber: 1gSugar: 1gVitamin A: 500IUVitamin C: 2mgCalcium: 250mgIron: 2mg

Notes

Allow the cheese balls to cool briefly before handling. Experiment with different cheeses for variety.

Tried this recipe?

Let us know how it was!

Irresistible Stuffed Lemon Cookies Bursting with Flavor

June 18, 2026 by Grace Snow Leave a Comment

As I prepare for a sunny afternoon, the scent of zest mingles with the warm embrace of butter, transporting me to my favorite summer spot—my grandmother's kitchen. Today, I’m excited to share my recipe for Stuffed Lemon Cookies, where each bite unveils a luscious tangy lemon curd filling. These delightful cookies, with their buttery, lemon-infused dough, are not just a treat but a celebration of fresh ingredients and natural flavors. Whether you’re hosting a tea party or simply looking to elevate your dessert game, these cookies are a quick win that everyone will adore. They’re so irresistibly good that you'll find it hard to keep a stash! Ready to uncover the lemony goodness that awaits? Let’s dive in!

Why Are Stuffed Lemon Cookies So Irresistible?

Bright, Tangy Flavor: The zesty lemon curd filling bursts with freshness, elevating your taste buds and making every bite a vibrant experience.
Decadent Texture: Imagine crispy edges giving way to a soft, chewy center that contrasts beautifully with the luscious filling.
Simple to Make: Despite their gourmet appearance, these cookies are easy to whip up and perfect for both novice and seasoned bakers.
Versatile Delight: Great for tea parties, dinner gatherings, or as a sweet gift, these cookies will charm everyone in the room. Plus, try them alongside Matcha Cookies Soft for a delicious dessert duo!
Crowd-Pleaser: Once you serve these at any gathering, you can be sure they will disappear faster than you can imagine!

Stuffed Lemon Cookies Ingredients

For the Cookie Dough

  • Butter – Richness and moisture; use unsalted for better control over saltiness.
  • Caster Sugar – Sweetness with a fine texture; can substitute with granulated sugar if needed.
  • Fresh Lemon Zest – Adds an intense lemon aroma; always opt for fresh for the best flavor.
  • Vanilla Extract – A lovely flavor enhancer; can swap for almond extract for a unique twist.
  • Egg – Provides structure and moisture; substitute with a flax egg for a vegan option.
  • All-Purpose Flour – Gives the cookies their structure; for gluten-free, substitute with gluten-free flour.
  • Baking Soda – A leavening agent; ensure it's fresh for effective rising.
  • Salt – Balances sweetness; just a pinch is necessary to enhance flavor.

For the Lemon Curd Filling

  • Caster Sugar – Sweetness and smoothness for the lemon curd; can substitute with granulated sugar.
  • Cornstarch – Thickens the curd; no direct substitute but flour can work in a pinch.
  • Fresh Lemon Juice – Vital for that tangy flavor; use fresh for optimal taste, as bottled doesn’t compare.
  • Lemon Peel – Zesty flavor component; opt for organic lemons and avoid the bitter white pith.
  • Butter – Adds richness and creaminess; for a dairy-free alternative, try plant-based butter.
  • Egg – Provides richness and acts as a binding agent; if needed, can replace with a vegan option.

For Coating

  • Granulated White Sugar – For rolling the cookies before baking; this ensures a delightful crunchy exterior.

Now that you have the ingredients for these delightful Stuffed Lemon Cookies, let’s get ready to create a batch that will brighten any day!

Step‑by‑Step Instructions for Stuffed Lemon Cookies

Step 1: Prepare Lemon Curd Filling
In a heatproof bowl, combine caster sugar and cornstarch, whisking well to eliminate lumps. Then, incorporate the egg, fresh lemon juice, and lemon peel until smooth. Place the bowl over a simmering pot of water—bain-marie—cooking for about 10 minutes while stirring constantly until the mixture thickens. Remove from heat, mix in butter until melted, and let it cool. Chill for at least 30 minutes, then scoop portions to freeze for an hour for easier assembly.

Step 2: Make Cookie Dough
In a large mixing bowl, cream together the unsalted butter and caster sugar using a hand mixer until the mixture is fluffy and light in color. Add in the lemon zest and vanilla extract, mixing thoroughly before cracking in an egg, blending until well combined. In another bowl, sift together the all-purpose flour, salt, and baking soda, then gradually fold these dry ingredients into the wet mixture to create a non-sticky dough. Chill the dough in the fridge for at least 20 minutes for better shaping.

Step 3: Assemble Cookies
Preheat your oven to 350°F (180°C) and prepare a baking tray by lining it with parchment paper. Take a scoop of chilled cookie dough and flatten it slightly in your palm, then place a frozen portion of the lemon curd filling in the center. Gently fold the dough around the curd, shaping it into a ball. Roll the formed cookie in granulated sugar to coat, then place it on the baking tray, ensuring to leave enough space between each cookie for spreading during baking.

Step 4: Bake Cookies
Once your oven is preheated, bake the cookies for about 8-9 minutes or until the edges are golden while the centers remain soft and slightly puffed. Keep a close eye on them, as the perfect bake will leave deliciously chewy centers and crispy edges. After baking, remove the tray from the oven and allow the cookies to cool on the tray for a few minutes before transferring them to a wire rack to cool completely—this helps maintain their tender texture.

Stuffed Lemon Cookies Customization

Feel free to unleash your creativity and make these cookies your own with delightful twists and substitutions!

  • Citrus Swap: Replace lemon juice and zest with lime for a refreshing zesty twist that’s equally tantalizing.
  • Poppy Seed Surprise: Add poppy seeds to the cookie dough for a delightful crunch and a touch of charm.
  • Almond Flavor Boost: Swap vanilla extract with almond extract for a nutty, aromatic depth that complements the citrus beautifully.
  • Gluten-Free Option: Use a gluten-free flour blend in place of all-purpose flour to cater to dietary needs without compromising flavor.
  • Dairy-Free Delight: Substitute unsalted butter with plant-based butter to create a cookie that everyone can enjoy, regardless of dietary restrictions.
  • Spiced Variation: Add a sprinkle of cardamom or ginger for a warm, spicy note that elevates the classic lemon flavor.
  • Packed with Fruit: Mix in a handful of dried cranberries or cherries to the dough for a burst of fruity sweetness in every bite.
  • Frosted Treat: Drizzle with a simple icing made of powdered sugar and lemon juice for an extra sweet, tangy finish that looks stunning.

Explore these variations and check out other recipes like Eggnog Cookies Soft or Herby Ricotta Stuffed to bring even more joy to your baking adventures!

What to Serve with Stuffed Lemon Cookies

Indulge in a delightful meal pairing that elevates your homemade treats to another level of enjoyment.

  • Lemonade Spritzer: The refreshing fizz cuts through the sweetness, enhancing the zesty flavors of the cookies and creating a bright, revitalizing experience.
  • Earl Grey Tea: Its fragrant bergamot notes beautifully complement the lemony cookies, making for a sophisticated afternoon tea pairing that warms the soul.
  • Fresh Berry Salad: A medley of juicy berries adds a burst of color and freshness, balancing the richness of the cookies with vibrant, natural sweetness.
  • Whipped Cream: A dollop of lightly sweetened, airy cream provides a luscious contrast to the tangy lemon filling, offering a pleasant texture.
  • Yogurt Parfait: Layer creamy yogurt with granola and lemon curd for a delightful dessert while echoing the flavors in the stuffed cookies.
  • Chocolate Drizzle: A light pour of melted dark chocolate delivers a luxurious touch that harmonizes beautifully with the zesty lemon taste.
  • Mint Iced Tea: This chilled drink brings a refreshing coolness and an herbaceous note that enhances the overall flavor profile of your meal.
  • Pistachio Crumble: Sprinkle chopped pistachios on top for a crunchy texture contrast, introducing a nutty flavor that pairs wonderfully with the citrusy notes.
  • Lemon Sorbet: Serve a scoop alongside for an extra lemony punch and a refreshing contrast to the buttery richness of the cookies.

Make Ahead Options

These Stuffed Lemon Cookies are perfect for busy home cooks who appreciate the joy of meal prep! You can prepare the lemon curd filling up to 3 days in advance; just make sure to chill it thoroughly and store it in an airtight container to maintain its fresh flavor. Furthermore, you can also make the cookie dough 24 hours ahead. Simply shape it into balls and refrigerate, ensuring they are covered to prevent drying. When you're ready to bake, roll the chilled dough in sugar, place them on a baking tray, and pop them in the oven. This way, you’ll enjoy deliciously fresh cookies with minimal effort on the day of serving!

Expert Tips for Stuffed Lemon Cookies

  • Chill Dough Again: If your cookies spread too much while baking, try chilling the rolled dough for another 10-15 minutes before popping them in the oven.

  • Fresh Ingredients Matter: Always use fresh lemons for the best flavor and aroma in your Stuffed Lemon Cookies; avoid bottled juice for a duller taste.

  • Perfect Curd Consistency: Ensure the lemon curd is frozen solid before assembling; this prevents it from melting into the dough during baking.

  • Check Baking Powder Freshness: Baking soda needs to be fresh for your cookies to rise properly; a quick test is to add a bit to vinegar—if it bubbles, it's good to go!

  • Avoid Bitter Peel: When zesting the lemons, be careful not to include the white pith, as it can impart a bitter flavor to your cookies.

  • Seal Well: When shaping the cookie around the frozen lemon curd, ensure all edges are well-sealed to prevent leaks while baking.

How to Store and Freeze Stuffed Lemon Cookies

Room Temperature: Store leftover cookies in an airtight container for up to 3 days to maintain their freshness and softness.

Fridge: If you prefer a chilled treat, keep the cookies in the fridge for up to 1 week, ensuring they're in a sealed container to prevent drying out.

Freezer: For longer storage, freeze your Stuffed Lemon Cookies for up to 3 months. Place them in a single layer in a freezer-safe bag, separating layers with parchment paper.

Thawing: Thaw frozen cookies at room temperature for about 30 minutes before serving to regain their delightful texture and flavor.

Stuffed Lemon Cookies Recipe FAQs

What type of lemons should I use for the best flavor?
Absolutely! For the best flavor in your Stuffed Lemon Cookies, always opt for fresh, organic lemons. They pack a more intense and vibrant flavor compared to bottled lemon juice. Avoid lemons with dark spots or overly soft areas, as these can indicate overripeness. The zest is crucial for that zesty aroma, so don't skip this step!

How should I store leftover Stuffed Lemon Cookies?
I recommend storing your cookies in an airtight container at room temperature for up to 3 days to retain their soft texture. If you find you won't finish them that quickly, refrigerate them for up to a week. Just be sure to seal the container tightly to prevent them from drying out!

Can I freeze Stuffed Lemon Cookies, and how do I do it?
Yes, you can! To freeze your Stuffed Lemon Cookies, place them in a single layer on a baking sheet and freeze until solid. Then, transfer them to a freezer-safe bag, separating layers with parchment paper to prevent sticking. They can be frozen for up to 3 months. When you're ready to enjoy them, simply thaw at room temperature for about 30 minutes.

What can I do if my cookies spread too much while baking?
If your cookies spread too much during baking, don’t worry! This happens sometimes. To troubleshoot, try chilling the rolled dough for an extra 10-15 minutes before baking, which can help them hold their shape better. Also, ensure that your baking soda is fresh; expired leavening agents can lead to poor cookie structure.

Are there any dietary considerations for Stuffed Lemon Cookies?
Very! These cookies contain gluten, dairy, and eggs, so if you or your guests have allergies or dietary restrictions, there are alternatives. You can use gluten-free flour for a gluten-free version and substitute a flax egg for a vegan option. For a dairy-free alternative, plant-based butter works well. Always double-check ingredient labels based on individual dietary needs.

How long will the lemon curd filling last in the fridge?
Great question! If you have leftover lemon curd filling, store it in an airtight container in the fridge for up to a week. You can even use it as a topping for pancakes, yogurt, or toast—it's delicious and adds a burst of flavor! Just make sure it’s chilled before using it again, and give it a stir if it has thickened up.

Stuffed Lemon Cookies

Irresistible Stuffed Lemon Cookies Bursting with Flavor

Delight in these Stuffed Lemon Cookies, offering a vibrant burst of tangy lemon flavor with a luscious filling.
Print Recipe Pin Recipe
Prep Time 30 minutes mins
Cook Time 9 minutes mins
Chilling Time 30 minutes mins
Total Time 1 hour hr 9 minutes mins
Servings: 12 cookies
Course: Dessert
Cuisine: American
Calories: 150
Ingredients Equipment Method Nutrition Notes

Ingredients
  

For the Cookie Dough
  • 1 cup unsalted butter Richness and moisture
  • 1 cup caster sugar Sweetness with a fine texture
  • 2 tablespoons fresh lemon zest Adds intense lemon aroma
  • 1 teaspoon vanilla extract Lovely flavor enhancer
  • 1 large egg Provides structure and moisture
  • 2 cups all-purpose flour Gives cookies structure
  • 1 teaspoon baking soda Leavening agent
  • 1 teaspoon salt Balances sweetness
For the Lemon Curd Filling
  • 1 cup caster sugar Sweetness and smoothness for the curd
  • 2 tablespoons cornstarch Thickens the curd
  • 1/2 cup fresh lemon juice Vital for tangy flavor
  • 1 teaspoon lemon peel Zesty flavor component
  • 1 tablespoon butter Adds richness
  • 1 large egg Provides richness
For Coating
  • 1/4 cup granulated white sugar For rolling cookies before baking

Equipment

  • Mixing Bowl
  • hand mixer
  • Baking tray
  • Parchment Paper
  • Saucepan
  • Whisk

Method
 

Step-by-Step Instructions for Stuffed Lemon Cookies
  1. In a heatproof bowl, combine caster sugar and cornstarch, whisking well to eliminate lumps. Incorporate egg, lemon juice, and lemon peel until smooth. Place over a simmering pot of water, cooking for about 10 minutes while stirring until thick. Mix in butter and let cool. Chill for at least 30 minutes, freeze portions for 1 hour.
  2. In a large bowl, cream the butter and caster sugar until fluffy. Add lemon zest and vanilla, mix thoroughly, then blend in egg until combined. In another bowl, sift flour, salt, and baking soda, then fold dry ingredients into wet mixture to create a non-sticky dough. Chill dough for 20 minutes.
  3. Preheat oven to 350°F (180°C) and line a baking tray with parchment. Take a scoop of chilled dough, flatten it, place frozen lemon curd in the center, fold dough around the curd, and shape into a ball. Roll in granulated sugar, place on tray with space between cookies.
  4. Bake for 8-9 minutes until edges are golden and centers remain soft and slightly puffed. Cool on tray for a few minutes before transferring to a wire rack to cool completely.

Nutrition

Serving: 1cookieCalories: 150kcalCarbohydrates: 22gProtein: 2gFat: 7gSaturated Fat: 4gPolyunsaturated Fat: 0.5gMonounsaturated Fat: 2.5gCholesterol: 30mgSodium: 100mgPotassium: 50mgFiber: 0.5gSugar: 10gVitamin A: 200IUVitamin C: 3mgCalcium: 20mgIron: 0.5mg

Notes

Chill dough for better shaping and ensure all edges are sealed around the filling to prevent leaks during baking.

Tried this recipe?

Let us know how it was!

Delicious Keto Philly Cheesesteak Bowls You’ll Crave Daily

June 16, 2026 by Grace Snow Leave a Comment

As I stirred the bubbling skillet, the savory aroma of sautéing mushrooms and peppers filled the kitchen, transporting me straight to the lively streets of Philadelphia. This Keto Philly Cheesesteak Bowls recipe captures the essence of that iconic dish, but with a wholesome twist that keeps it low-carb and satisfying. With just a handful of ingredients, you can whip up a crowd-pleaser that’s not only quick to prepare but also a great option for meal prep. Imagine enjoying the richness of a traditional cheese steak without the bread weighing you down! Whether you’re new to the keto lifestyle or just hunting for a delicious homemade meal, this recipe is sure to become a favorite. Are you ready to create a comforting dish that’s sure to impress?

Why try Keto Philly Cheesesteak Bowls?

Irresistible Flavor: Each bowl is packed with savory goodness, featuring tender beef, sautéed peppers, and melty cheese that will make your taste buds sing.

Quick to Prepare: You can have dinner ready in 30 minutes or less, making it an ideal choice for busy weeknights or spontaneous gatherings with friends.

Low-Carb Delight: No bread means no guilt – this dish fits perfectly into your keto lifestyle, ensuring you can satisfy your cravings without compromising your goals.

Meal Prep Friendly: With its ability to store beautifully in the fridge, the Keto Philly Cheesesteak Bowl is perfect for those who love to plan ahead.

Family Approved: This versatile recipe is sure to please everyone at the table – from keto enthusiasts to picky eaters. Why not serve it alongside a fresh salad? For more delicious twists, check out our recipe for keto-friendly side dishes.

Keto Philly Cheesesteak Bowl Ingredients

For the Beef

  • Thinly sliced beef – use ribeye or flank steak for the best flavor and tenderness.

For the Veggies

  • Bell peppers – any color works; they add sweetness and crunch to your bowl.
  • Onion – yellow onion is perfect for caramelization, adding depth to your dish.
  • Mushrooms – opt for sliced cremini or button mushrooms to enhance the umami flavor.

For the Cheese Sauce

  • Cream cheese – provides the creamy base that makes this dish rich and indulgent.
  • Shredded provolone cheese – melts beautifully and gives that classic cheesesteak flavor.
  • Garlic powder – a pinch adds aromatic warmth that elevates the overall taste.

Seasoning & Extras

  • Salt and pepper – essential for bringing out the natural flavors of the ingredients.
  • Olive oil – use for sautéing and adds healthy fats that fit your keto meal plan.

This Keto Philly Cheesesteak Bowls recipe is sure to become a staple in your weekly rotation! Enjoy crafting your culinary masterpiece!

Step‑by‑Step Instructions for Keto Philly Cheesesteak Bowls

Step 1: Sauté the Vegetables
In a large skillet, heat 2 tablespoons of olive oil over medium heat. Add 1 diced onion and 1 sliced bell pepper of your choice into the pan, cooking for about 5 minutes. Stir occasionally until the veggies soften and develop a lovely caramelized exterior. Then, toss in 1 cup of sliced mushrooms, allowing them to cook for an additional 3-4 minutes until they are tender and aromatic.

Step 2: Cook the Beef
Push the sautéed vegetables to one side of the skillet and add 1 pound of thinly sliced beef to the empty space. Increase the heat to medium-high and season the beef with salt and pepper. Allow it to sear for 3-4 minutes until browned, stirring occasionally. This step is crucial for locking in the rich flavors that make these Keto Philly Cheesesteak Bowls irresistible.

Step 3: Mix in the Cheese Sauce
Reduce the heat to low and add 4 ounces of cream cheese to the skillet, stirring until melted and creamy. Sprinkle in 1 teaspoon of garlic powder and 1 cup of shredded provolone cheese, continuing to mix until everything is well combined and ooey-gooey. The cheese sauce should be smooth and luscious, enveloping the beef and veggies beautifully.

Step 4: Assemble the Bowls
Once everything is well-mixed and heated through, it’s time to assemble your Keto Philly Cheesesteak Bowls! Spoon generous portions of the cheesy beef mixture into serving bowls. You can layer it with additional sautéed veggies on top for added crunch and color; this will elevate not only the flavor but also the visual appeal of your dish.

Step 5: Serve and Enjoy
Garnish your Keto Philly Cheesesteak Bowls with any extra toppings you like, such as fresh parsley or a sprinkle of red pepper flakes for heat. Serve immediately while hot, allowing the rich aroma to invite your family to the table. With minimal prep and cooking time, these bowls promise a fulfilling meal without the carbs, perfect for weekday dining or a tasty weekend treat!

Expert Tips for Keto Philly Cheesesteak Bowls

  • Choose Quality Beef: Select ribeye or flank steak for maximum tenderness and flavor, avoiding tougher cuts that can result in a chewy texture.

  • Perfectly Cooked Veggies: Don’t rush the sautéing process. Allow your onions and peppers to caramelize, enhancing their natural sweetness and adding depth to the overall dish.

  • Cheese Sauce Consistency: Stir cream cheese over low heat to prevent clumping. Ensure it melts smoothly before adding provolone for a luxurious, gooey cheese sauce.

  • Avoid Overcooking: Keep an eye on the beef while cooking. Overcooking can lead to dryness, so sear until just browned for tender bites in your Keto Philly Cheesesteak Bowls.

  • Customize for Family: Feel free to toss in other low-carb veggies like zucchini or spinach, making this dish even more adaptable to preferences without compromising on flavor.

How to Store and Freeze Keto Philly Cheesesteak Bowls

Fridge: Store your Keto Philly Cheesesteak Bowls in an airtight container for up to 3 days. This keeps the flavors intact while ensuring freshness for your next meal.

Freezer: For longer storage, you can freeze the assembled bowls for up to 3 months. Make sure to freeze them in individual portions to make defrosting easier later on.

Reheating: To reheat, thaw overnight in the fridge and then warm in a skillet over low heat, stirring gently until heated through. This helps keep the beef tender and cheese melty!

Airtight Guidance: Always use airtight containers when storing, as this prevents freezer burn and preserves the delightful taste of your Keto Philly Cheesesteak Bowls.

What to Serve with Keto Philly Cheesesteak Bowls

Nothing pairs better with this hearty delight than a selection of colorful and vibrant sides!

  • Creamy Mashed Cauliflower: This low-carb alternative to mashed potatoes is smooth and buttery, perfectly complementing the richness of the bowls. A sprinkle of garlic elevates the flavor.

  • Garlicky Green Beans: Crisp-tender green beans sautéed in olive oil and garlic add a fresh crunch, balancing the savory cheese and beef mix.

  • Caesar Salad: A classic Caesar with crisp romaine, parmesan, and a tangy dressing adds a refreshing touch, creating a delightful contrast to the warm bowls.

  • Zucchini Noodles: Light and versatile, spiralized zucchini offers a satisfying, low-carb base that soaks up the cheesy goodness. Toss them in olive oil for extra flavor.

  • Roasted Brussels Sprouts: The crispy edges and nutty flavor of roasted Brussels sprouts provide depth, making each bite of your meal even more enjoyable.

  • Sparkling Water with Lime: A refreshing glass of sparkling water infused with lime slices cleanses the palate, enhancing the flavors of this rich dish without adding carbs.

  • Keto Cheesecake Bites: Satisfy your sweet cravings with these creamy, low-carb dessert bites that offer a delightful end to your meal. Perfectly rich yet guilt-free!

Make Ahead Options

These Keto Philly Cheesesteak Bowls are a dream for meal prep enthusiasts! You can prepare all the components up to 3 days in advance, ensuring a quick and satisfying dinner on busy nights. Start by sautéing the vegetables and cooking the beef as directed, then let them cool before storing them in airtight containers in the refrigerator. The creamy cheese sauce can also be made ahead and stored separately. When you're ready to enjoy, simply reheat the beef mixture and cheese sauce in a skillet over low heat until warmed through (this keeps the flavors fresh and delicious). With these prepping tips, you’ll have a hearty, low-carb meal ready at a moment’s notice!

Keto Philly Cheesesteak Bowls Variations

Feel free to get creative with this recipe and personalize it to your taste buds!

  • Dairy-Free: Swap the cream cheese and provolone for a dairy-free cream cheese and a vegan cheese alternative for the same creamy texture.
    Add a sprinkle of nutritional yeast for a cheesy flavor boost that everyone will love.

  • Vegetarian: Replace the beef with sautéed portobello mushrooms or eggplant, and add extra bell peppers for a hearty, satisfying dish.
    This variation keeps all the flavor while switching to a veggie-packed delight.

  • Spicy Twist: Mix in sliced jalapeños or a dash of hot sauce for a flavorful kick that enhances the savory goodness of the dish.
    The heat complements the rich flavors beautifully for those who love a little spice!

  • Low-Sodium Option: Use low-sodium beef broth instead of salt to season your beef for a heart-healthy version of this classic dish.
    This way, you can enjoy your favorite flavors without the added sodium.

  • Herb-Infused: Incorporate fresh herbs like basil or oregano as you sauté the vegetables to elevate the freshness of the dish.
    The aromatic herbs will take you on a delightful culinary journey with each bite.

  • Zucchini Noodles: Serve the cheesy beef mixture over zucchini noodles instead of using bowls for a fun, low-carb alternative.
    This adds a lovely texture while keeping everything fresh and light!

  • Garlic Lovers: For an intense flavor experience, increase the garlic powder to 2 teaspoons or add fresh minced garlic when cooking the beef.
    Every bite will be bursting with aromatic delight!

  • Meal Prep: Consider batch-cooking and storing individual portions in the freezer for a quick dinner option throughout the week.
    Perfect for those time-crunched days when you still want to enjoy flavorful homemade food!

Each variation unlocks new flavors and textures, allowing you to enjoy this delightful meal in so many ways! Be sure to check out our guide on low-carb cooking tips for more inspiration!

Keto Philly Cheesesteak Bowls Recipe FAQs

How do I select the best beef for my Keto Philly Cheesesteak Bowls?
Absolutely! For the best flavor and tenderness, go for ribeye or flank steak. These cuts have the right balance of fat and meat, which not only enhances the flavor but also keeps your dish juicy. Avoid tougher cuts like top round, as they can result in a chewy and less enjoyable texture.

What’s the best way to store leftover Keto Philly Cheesesteak Bowls?
Store your Keto Philly Cheesesteak Bowls in an airtight container in the fridge for up to 3 days. This ensures that the flavors remain fresh and tasty for your next meal. I often make mine in advance for a quick and satisfying lunch during the week!

Can I freeze my Keto Philly Cheesesteak Bowls? If so, how?
Absolutely! You can freeze the assembled bowls for up to 3 months. I recommend freezing them in individual portions for easy thawing. Just follow these steps:

  1. Allow the bowls to cool completely.
  2. Wrap them tightly in plastic wrap or transfer them to airtight freezer bags.
  3. Label the bags with the date.
    When you’re ready to enjoy, simply thaw overnight in the fridge and then reheat gently in a skillet over low heat.

What if my veggies turned out too mushy?
Very! It can happen if they were sautéed for too long. To achieve that perfect texture, keep an eye on them while cooking. Aim for that delightful caramelization without letting them lose their crunch. If this happens again, don’t hesitate to add fresh veggies to the reheated dish for extra crispness.

Are there any dietary considerations I should be aware of?
Definitely! If you're cooking for someone with allergies, be cautious with the cheese and seasonings. Cream cheese can be a dairy concern for some, so feel free to substitute with a dairy-free cream cheese alternative. Also, ensure your beef and seasonings are gluten-free if that’s a priority for your guests. The more thought you put into it, the better the experience will be for everyone!

Delicious Keto Philly Cheesesteak Bowls You’ll Crave Daily

These Keto Philly Cheesesteak Bowls are a low-carb twist on the classic dish, featuring savory beef, sautéed veggies, and gooey cheese.
Print Recipe
Prep Time 10 minutes mins
Cook Time 20 minutes mins
Total Time 30 minutes mins
Servings: 4 bowls
Course: Dinner
Cuisine: American
Calories: 450
Ingredients Equipment Method Nutrition Notes

Ingredients
  

For the Beef
  • 1 pound thinly sliced beef use ribeye or flank steak for best flavor
For the Veggies
  • 1 medium yellow onion diced
  • 1 medium bell pepper sliced, any color
  • 1 cup sliced mushrooms cremini or button mushrooms
For the Cheese Sauce
  • 4 ounces cream cheese
  • 1 cup shredded provolone cheese
  • 1 teaspoon garlic powder
Seasoning & Extras
  • 2 tablespoons olive oil for sautéing
  • to taste salt
  • to taste pepper

Equipment

  • Skillet

Method
 

Preparation Steps
  1. Heat olive oil in a large skillet over medium heat. Add diced onion and sliced bell pepper and cook for about 5 minutes until softened.
  2. Add sliced mushrooms to the skillet and cook for an additional 3-4 minutes until tender.
  3. Push vegetables to the side and add thinly sliced beef to the empty space. Increase heat to medium-high, season beef with salt and pepper, and sear for 3-4 minutes until browned.
  4. Reduce heat to low, add cream cheese, and stir until melted. Then add garlic powder and shredded provolone cheese, mixing until combined.
  5. Assemble the bowls by spooning the cheesy beef mixture into serving bowls, optionally layering with additional sautéed veggies.
  6. Garnish with extra toppings like parsley or red pepper flakes and serve immediately.

Nutrition

Serving: 1bowlCalories: 450kcalCarbohydrates: 6gProtein: 38gFat: 30gSaturated Fat: 15gPolyunsaturated Fat: 0.5gMonounsaturated Fat: 12gCholesterol: 110mgSodium: 700mgPotassium: 600mgFiber: 2gSugar: 2gVitamin A: 500IUVitamin C: 45mgCalcium: 300mgIron: 3mg

Notes

Store in an airtight container for up to 3 days in the fridge, or freeze for up to 3 months.

Tried this recipe?

Let us know how it was!

Indulge in This Creamy Twice Baked Potato Casserole Delight

June 15, 2026 by Grace Snow Leave a Comment

The aroma of crispy bacon sizzling in the pan is enough to make anyone weak in the knees. This Cheesy Bacon Loaded Potato Casserole is my go-to comfort dish, perfect for gatherings or cozy family dinners. The rich combination of tender potatoes, creamy cheeses, and that delightful crunch from the bacon makes this side dish a winner for any occasion. Not only is it quick to prepare, but it also packs a punch of flavor that will have your loved ones asking for seconds. Plus, it’s easily customizable—swap in your favorite cheese or add a dash of spice for an exciting twist. Ready to dive into this cheesy goodness? Let’s get cooking!

Why is This Casserole a Must-Try?

Ultimate Comfort Food: This Cheesy Bacon Loaded Potato Casserole is the embodiment of cozy food, making it a staple for family gatherings or just a comforting weeknight meal.

Flavor Explosion: Each bite is a delightful blend of creamy cheeses and crispy bacon, perfectly complemented by tender potatoes that are both satisfying and rich in flavor.

Quick & Easy: With just a few straightforward steps, you can whip up this dish in no time. Perfect for those busy evenings when you crave something homemade!

Customizable: Want to spice things up? Feel free to add jalapeños or swap in your favorite cheeses for a personal twist—just like with our Sweet Potato Casserole.

Crowd-Pleaser: It’s impossible not to love this dish! Serve it alongside grilled steaks or burgers for a well-rounded feast that everyone will remember.

Twice Baked Potato Casserole Ingredients

For the Casserole
• Red Potatoes – These provide a sturdy base for the casserole; Yukon Gold offers a buttery taste.
• Salt – Enhances flavor; adjust to your taste preference.
• Black Pepper – Adds a gentle spice; freshly cracked is ideal for full flavor.
• Bacon – Cooked and crumbled for that savory crunch; consider turkey bacon for a lighter option.
• Sour Cream – Adds creamy tang; Greek yogurt makes a fantastic healthy swap.
• Mozzarella Cheese – Gives a stretchy, gooey texture; feel free to substitute with any melting cheese.
• Cheddar Cheese – Adds a rich sharpness; choose mild or sharp based on your family’s preference.
• Green Onion – Offers a fresh, vibrant finish; chives are a great alternative if needed.

For the Topping
• Extra Cheese – Sprinkle some extra mozzarella or cheddar on top for a bubbly, golden finish; this will make your twice baked potato casserole even more irresistible!
• Herbs – Fresh parsley or cilantro can give a refreshing touch as a garnish before serving.

Let’s get this delicious twice baked potato casserole into your oven for a mouthwatering feast!

Step‑by‑Step Instructions for Cheesy Bacon Loaded Potato Casserole

Step 1: Prepare Potatoes
Preheat your oven to 400°F (200°C). Wash the red potatoes thoroughly, then arrange them on a baking sheet. Bake the potatoes for about 45–60 minutes, or until they are fork-tender and cooked through. Once done, remove them from the oven and allow them to cool slightly before chopping them into cubes.

Step 2: Cook Bacon
In a skillet over medium heat, cook the bacon until it becomes crispy, which should take about 8–10 minutes. Once perfectly crisp, transfer the bacon to a paper towel-lined plate to drain excess grease, then crumble it into small pieces. Set this savory crumbled bacon aside for the assembly of your cheesy bacon loaded potato casserole.

Step 3: Combine Ingredients
In a large mixing bowl, combine the cubed potatoes, sour cream, crumbled bacon, mozzarella cheese, cheddar cheese, salt, and freshly cracked black pepper. Use a spatula to gently fold the ingredients together until they are well mixed. You want to ensure the creamy goodness coats the potatoes, making this casserole rich and flavorful.

Step 4: Assemble Casserole
Transfer the potato mixture into a greased 9x13 inch baking dish. Spread the mixture evenly across the dish, smoothing the top with a spatula. This way, every bite of your twice baked potato casserole will have a great balance of flavors. Make sure to pack it lightly but not too tightly to maintain a fluffy texture.

Step 5: Top and Bake
Sprinkle finely chopped green onions over the top of the casserole for a splash of color and freshness. Preheat your oven to 350°F (175°C), then bake the assembled casserole for approximately 20 minutes. Keep an eye on it; you're looking for melted cheese that is bubbly and just starting to turn golden brown on top.

Step 6: Serve
Once baked, carefully remove the casserole from the oven and let it cool for about 5–10 minutes. This brief wait helps the casserole set. Serve warm as a crowd-pleasing side dish, and watch it disappear as everyone dives in for a taste of that cheesy bacon goodness!

How to Store and Freeze Cheesy Bacon Loaded Potato Casserole

• Fridge: Store leftovers in an airtight container for up to 3 days. This helps retain the creamy texture and delicious flavors of the cheesy bacon loaded potato casserole.

• Freezer: You can freeze the casserole if you have a big batch! Properly wrap it in plastic wrap and then in aluminum foil for up to 2 months.

• Reheating: When ready to enjoy, thaw in the fridge overnight and reheat in the oven at 350°F (175°C) for about 20-25 minutes until heated through.

• Avoid Microwave: For the best texture, avoid reheating the casserole in the microwave as it can make the potatoes mushy. Always aim for the oven for that bubbly top!

What to Serve with Cheesy Bacon Loaded Potato Casserole

Transform your meal into a delightful feast that makes every bite a celebration!

  • Grilled Steaks: The robust flavors of juicy steaks pair beautifully with the creamy richness, making it a match worth relishing.
  • Crunchy Salad: A fresh, crisp salad adds a refreshing contrast that balances the rich potato casserole, invigorating your palate.
  • Barbecued Chicken: Smoky, tender chicken complements the casserole’s cheesy goodness, creating a backyard barbecue atmosphere that's hard to resist.
  • Roasted Vegetables: A medley of roasted seasonal vegetables brings a hearty crunch and earthy tones, elevating your meal's overall appeal.
  • Garlic Bread: Slices of warm, buttery garlic bread are perfect for scooping up that cheesy goodness and give a delightful crunchy side.
  • Red Wine: A glass of medium-bodied red wine enhances the hearty flavors, inviting a cozy atmosphere for you and your loved ones.
  • Chocolate Dessert: A rich chocolate dessert brings a sweet ending, balancing the savory meal while ensuring an indulgent finish to your feast.
  • Apple Pie: Warm apple pie with its sweet-tart balance is the nostalgic end everyone loves, leaving lasting smiles around the table.

Make Ahead Options

These Cheesy Bacon Loaded Potato Casseroles are fantastic for meal prep, making busy weeknights a breeze! You can prepare the entire casserole up to 24 hours in advance by following these steps: First, bake and cube your potatoes a day ahead—this helps the flavors meld beautifully. Once assembled, cover the dish with foil and refrigerate. To maintain quality, ensure it's sealed well to prevent drying out. When you're ready to serve, simply remove it from the fridge and bake at 350°F (175°C) for about 30-35 minutes, adjusting for a cold start. You'll enjoy a delicious, hearty side dish that’s just as comforting and flavorful as when freshly made!

Variations & Substitutions for Cheesy Bacon Loaded Potato Casserole

Feel free to personalize this Cheesy Bacon Loaded Potato Casserole to create a dish that truly satisfies your taste buds!

  • Vegetarian: Omit the bacon and use sautéed mushrooms or a blend of roasted vegetables for that hearty texture.

  • Low-Carb: Swap out potatoes for cauliflower. It gives a light texture while still absorbing the creamy flavors.

  • Spicy Kick: Add chopped jalapeños or a dash of hot sauce to elevate the heat level and excite your palate.

  • Extra Veggies: Stir in cooked broccoli or spinach for added nutrition. These greens complement the creamy potatoes beautifully.

  • Cheese Swap: Experiment with different cheeses like Gouda or pepper jack for a unique twist. Each will bring its own flavor profile to the dish.

  • Herb Infusion: Mix in fresh herbs like rosemary or thyme for a fragrant touch that enhances the overall taste.

  • Creamy Twist: Substitute part of the sour cream with cream cheese for an ultra-creamy consistency that melts in your mouth.

  • Bacon Alternatives: For a slightly different flavor, try using crispy pancetta or prosciutto instead of traditional bacon.

These creative variations not only make the casserole your own but also keep it exciting! Serve alongside grilled steaks or burgers, as you would with a delicious Cornbread Breakfast Casserole or a refreshing German Potato Salad to round out your meal.

Expert Tips for Cheesy Bacon Loaded Potato Casserole

• Potato Perfection: Ensure potatoes are fully cooked before combining; underbaked potatoes can lead to a dense casserole.

• Bacon Delight: For optimal crunch, fry bacon until crispy, but avoid overcooking, which can make it tough.

• Cheese Choices: Experiment with different cheese blends for unique flavors; mixing cheddar and mozzarella yields the best taste and texture.

• Prep Ahead: Assemble the casserole a day in advance, cover it tightly, and refrigerate overnight; just remember to increase baking time if cooking from cold.

• Garnish Wisely: For added freshness, don't skip the green onions or herbs on top; they elevate the dish and enhance its visual appeal.

Cheesy Bacon Loaded Potato Casserole Recipe FAQs

What type of potatoes are best for this casserole?
Absolutely! Red potatoes are preferred for their sturdy texture, but Yukon Gold potatoes can also provide a wonderful buttery flavor. Choose what you love most!

How should I store leftovers of the casserole?
Store any leftovers in an airtight container in the refrigerator for up to 3 days. This keeps the casserole creamy and flavorful, perfect for a quick meal later in the week!

Can I freeze Cheesy Bacon Loaded Potato Casserole?
Certainly! If you want to freeze the casserole, wrap it tightly in plastic wrap, followed by aluminum foil, to prevent freezer burn. It can be frozen for up to 2 months. Just don’t forget to label it!

What’s the best way to reheat the casserole?
To reheat, thaw the casserole in the fridge overnight. Then, place it in a preheated oven at 350°F (175°C) for about 20-25 minutes, or until heated through and bubbly. This method helps retain the perfect texture!

Can this casserole be made ahead of time?
Absolutely! You can prepare the casserole a day in advance. Simply assemble it, cover with foil, and refrigerate. Increase the baking time by 5-10 minutes when you cook it from cold to ensure it’s piping hot all the way through.

Are there any dietary considerations for this casserole?
Very! If you're avoiding certain ingredients, you can easily swap sour cream for Greek yogurt for a healthier option or use turkey bacon if you’re looking for a lower-fat alternative. Always feel free to tailor the casserole to your dietary needs!

twice baked potato casserole

Indulge in This Creamy Twice Baked Potato Casserole Delight

This twice baked potato casserole is a creamy and cheesy dish loaded with bacon, perfect for family gatherings.
Print Recipe Pin Recipe
Prep Time 15 minutes mins
Cook Time 1 hour hr
Cooling Time 10 minutes mins
Total Time 1 hour hr 25 minutes mins
Servings: 6 servings
Course: Dinner
Cuisine: American
Calories: 400
Ingredients Equipment Method Nutrition Notes

Ingredients
  

For the Casserole
  • 2 pounds Red Potatoes Yukon Gold can be used for a buttery taste
  • 1 teaspoon Salt Adjust to your taste preference
  • 1 teaspoon Black Pepper Freshly cracked is ideal
  • 8 ounces Bacon Cooked and crumbled; consider turkey bacon for a lighter option
  • 1 cup Sour Cream Greek yogurt is a healthy swap
  • 1 cup Mozzarella Cheese Feel free to substitute with any melting cheese
  • 1 cup Cheddar Cheese Choose mild or sharp based on preference
  • 2 tablespoons Green Onion Chives can be used as an alternative
For the Topping
  • 1 cup Extra Cheese Sprinkle for a bubbly finish
  • 2 tablespoons Herbs Fresh parsley or cilantro for garnish

Equipment

  • Oven
  • Baking Sheet
  • Skillet
  • Mixing Bowl
  • Baking Dish
  • Spatula

Method
 

Step-by-Step Instructions
  1. Preheat your oven to 400°F (200°C). Wash the red potatoes thoroughly, then arrange them on a baking sheet. Bake for about 45–60 minutes, or until fork-tender. Cool slightly before chopping into cubes.
  2. In a skillet over medium heat, cook the bacon until crispy, about 8–10 minutes. Transfer to paper towels to drain and crumble it.
  3. In a large bowl, combine cubed potatoes, sour cream, crumbled bacon, mozzarella, cheddar, salt, and black pepper. Fold together gently.
  4. Transfer the mixture into a greased 9x13 inch baking dish and spread evenly.
  5. Sprinkle finely chopped green onions over the top. Preheat oven to 350°F (175°C) and bake for about 20 minutes until cheese is bubbly and golden.
  6. Let it cool for 5-10 minutes before serving warm as a side dish.

Nutrition

Serving: 1servingCalories: 400kcalCarbohydrates: 34gProtein: 15gFat: 25gSaturated Fat: 12gPolyunsaturated Fat: 2gMonounsaturated Fat: 9gCholesterol: 45mgSodium: 600mgPotassium: 700mgFiber: 3gSugar: 2gVitamin A: 500IUVitamin C: 30mgCalcium: 250mgIron: 2mg

Notes

For best results, ensure potatoes are cooked fully before combining and experiment with different cheese blends for unique flavors.

Tried this recipe?

Let us know how it was!

Irresistible Red Potato Casserole with Crunchy Topping

June 15, 2026 by Grace Snow Leave a Comment

As I stood in the kitchen, the aroma of buttery, crispy toppings filled the air, instantly reminding me of cherished family gatherings around the dining table. This Creamy Red Potato Casserole is not just a side dish; it’s a heartfelt creation packed with comfort and warmth. With its creamy texture from red potatoes and a delightful crunch from the corn flake topping, this dish strikes the perfect balance between indulgence and simplicity. Infused with smoky bacon and tangy ranch dressing, it’s easy to prepare, making it an ideal choice for both casual dinners and festive celebrations. Plus, leftovers are a bonus, as they reheat beautifully! Ready to elevate your next meal with this cozy casserole? Let's dive into the recipe!

Why is this casserole a must-try?

Comfort Food Bliss: This Red Potato Casserole wraps you in a warm hug with its creamy, rich interior and crunchy topping.

Versatile Dish: Whether paired with grilled meats or served as a hearty side at potlucks, it’s perfect for any occasion.

Simple Preparation: With straightforward steps, even beginner cooks can impress their guests.

Crowd-Pleasing Flavor: The combination of ranch dressing and smoky bacon creates a flavor explosion that will have everyone coming back for seconds!

Perfect Leftovers: Enjoy leftovers the next day - they reheat beautifully, making meal prep a breeze.

If you love similar comfort dishes, don't miss out on my delicious Sweet Potato Casserole for a twist on traditional flavors!

Red Potato Casserole Ingredients

Here’s everything you need to whip up this comforting dish that will warm your heart and satisfy your cravings!

For the Casserole

  • Red Potatoes – These are the star of the show, providing a creamy texture that makes the casserole irresistible.
  • Sour Cream – Adds a delicious tanginess and creaminess; you can use Greek yogurt for a lighter version.
  • Ranch Dressing – Enhances flavor depth; try homemade ranch for a fresh twist.
  • Bacon – Infuses a savory, smoky flavor; turkey bacon is a great lean alternative.
  • Sharp Cheddar Cheese – Brings in richness and flavor; mild cheddar can be swapped for a softer taste.

For the Topping

  • Corn Flakes – They create a crunchy topping that everyone loves; opt for gluten-free if necessary.
  • Butter – Helps crisp the corn flakes to perfection; melted olive oil works for a healthier option.

Now that you have your Red Potato Casserole ingredients ready, let’s bring these flavors together for a delightful meal!

Step‑by‑Step Instructions for Creamy Red Potato Casserole with Crunchy Corn Flake Topping

Step 1: Prepare the Potatoes
Begin by washing the red potatoes thoroughly under cold water. Cut them into large, bite-sized pieces to ensure even cooking. Place the potato chunks in a large pot and fill it with salted water until they are fully submerged. Bring the water to a boil over medium-high heat, then reduce to a simmer, cooking until the potatoes are fork-tender, about 20-25 minutes.

Step 2: Preheat the Oven
While the potatoes are boiling, preheat your oven to 350°F (175°C). This step is crucial as it allows the oven to reach the perfect temperature for baking your creamy red potato casserole. Once preheated, prepare a 9x13-inch baking dish by greasing it lightly with cooking spray or butter to prevent sticking during baking.

Step 3: Prepare the Crunchy Topping
In a medium-sized bowl, combine the corn flakes with melted butter, mixing well until all flakes are coated. This buttery mixture will create a deliciously crunchy topping on your casserole. Set the bowl aside as you gather the other ingredients for the creamy filling of the casserole.

Step 4: Mix the Casserole Filling
Once the potatoes are fork-tender, drain them thoroughly and return them to the pot. In a large mixing bowl, combine the drained potatoes with sour cream, ranch dressing, crumbled bacon, and one cup of shredded sharp cheddar cheese. Gently mash the mixture with a fork or potato masher until it’s well mixed but still has some chunks for texture.

Step 5: Assemble the Casserole
Transfer the creamy potato mixture into your greased baking dish, spreading it evenly. This creamy red potato casserole will form the delicious base layer. Level the mixture with a spatula, ensuring it fills the dish uniformly for even baking.

Step 6: Add Cheese and Topping
Sprinkle the remaining cup of shredded cheddar cheese evenly over the potato mixture, adding an extra layer of rich flavor. Next, evenly disperse the buttered corn flake mixture over the cheese, ensuring every corner is covered for the ultimate crunchy topping.

Step 7: Bake the Casserole
Place the baking dish in your preheated oven and bake uncovered for 20-30 minutes. The casserole is ready when the cheese is melted and bubbly and the corn flakes have turned a beautiful golden brown. Keep an eye on it to avoid over-browning.

Step 8: Serve the Dish
After baking, remove the casserole from the oven and let it cool for a few minutes to set. Serve this delightful creamy red potato casserole warm, offering a perfect combination of creamy texture and crispy topping that’s sure to be a hit at your table!

Make Ahead Options

These Creamy Red Potato Casserole preparations are perfect for busy weeknights! You can prepare the creamy potato mixture up to 24 hours in advance by mixing the drained potatoes with sour cream, ranch dressing, crumbled bacon, and shredded cheese. Store it in an airtight container in the refrigerator until you're ready to bake. To maintain the delicious quality, avoid adding the corn flake topping until just before baking. When you’re ready to serve, transfer the potato mixture to a greased baking dish, top with cheese and corn flakes, and bake it in your preheated oven for 20-30 minutes. This way, you enjoy that satisfying crunch and creaminess with minimal effort!

Red Potato Casserole Variations

Feel free to get creative with this cozy casserole, transforming flavors and textures to suit your tastes!

  • Cheesy Twist: Swap in mozzarella for a melty, stringy effect that adds a whole new layer of gooey goodness.

  • Veggie Boost: Fold in spinach or broccoli during the mixing stage for a pop of color and extra nutrition. The greens add a delightful freshness to every bite!

  • Spicy Kick: Introduce diced jalapeños or a sprinkle of paprika to amp up the heat, perfect for those who love bold flavors. A little kick can elevate the entire dish!

  • Dairy-Free Delight: Use a plant-based sour cream and cheese to make this casserole suitable for dairy-sensitive eaters. You'll still enjoy that creamy texture without any dairy!

  • Bacon-Free: Opt for crispy chickpeas or smoked tempeh in place of bacon for a delightful savory depth without meat. This option doesn't compromise on flavor—it’s truly delicious!

  • Corn Variation: Substitute the corn flakes with crushed tortilla chips for a southwestern twist that adds a unique crunchy flair. Each bite is filled with unexpected zest!

  • Herb Infusion: Enhance flavors by adding fresh herbs like chives or parsley to the potato mixture. Fresh herbs provide brightness and a little pop of freshness in every mouthful.

  • Loaded Option: Add in sour cream, green onions, and sprinkle more cheese on top before baking for an over-the-top Loading version that truly impresses.

For even more comforting ideas, check out my Cornbread Breakfast Casserole that’s perfect for brunch or my German Potato Salad that makes for a delightful side!

How to Store and Freeze Red Potato Casserole

Fridge: Store any leftovers in an airtight container in the fridge for up to 3 days. The flavors will continue to meld, making the casserole even better the next day!

Freezer: For longer storage, you can freeze the unbaked Red Potato Casserole. Wrap tightly with plastic wrap and aluminum foil, and it will last for up to 2 months.

Reheating: When ready to enjoy again, thaw overnight in the fridge and then bake at 350°F (175°C) for 30-40 minutes until heated through. Add corn flakes just before baking for extra crunch!

Make-Ahead Tip: You can prepare the creamy potato mixture and store it in the refrigerator for up to 24 hours before baking. Just add the corn flakes and bake when ready to serve.

What to Serve with Creamy Red Potato Casserole?

Elevate your dining experience with delightful pairings that enhance the warmth of this comforting dish.

  • Grilled Chicken: The smoky flavors of grilled chicken complement the rich creaminess of the casserole, creating a satisfying balance.

  • Garden Salad: A fresh and crisp salad offers a refreshing contrast to the indulgent casserole, adding vibrant colors and textures to your plate.

  • Roasted Vegetables: The caramelized sweetness of roasted veggies harmonizes beautifully with the cheesy potatoes, making for a wholesome side.

  • Steak: A juicy steak elevates your meal, offering a satisfying protein that pairs well with the creamy texture of the casserole.

  • Garlic Bread: Crispy garlic bread brings that irresistible crunch, perfect for scooping up the creamy casserole and savoring every bite.

  • Apple Pie: Finish off your meal with a slice of warm apple pie, balancing the savory casserole with a delightful hint of sweetness.

With these pairings, your table will be a celebration of comforting flavors that warm the heart!

Expert Tips for Red Potato Casserole

  • Fork-Tender Potatoes: Ensure your potatoes are cooked until fork-tender for the ideal creamy texture in your Red Potato Casserole.

  • Keep It Crunchy: To maintain the crunch of your topping, add corn flakes only to the portion you're serving immediately; apply before baking!

  • Customize Your Flavors: Feel free to add extras like green onions or different cheeses to enhance the flavor profile of your casserole.

  • Use Quality Ingredients: Opt for high-quality ranch dressing and bacon for deeper flavors that elevate your casserole to a family favorite.

  • Refrigerate for Convenience: You can prepare the creamy potato mixture ahead of time and refrigerate it overnight, just add the corn flakes before baking!

Red Potato Casserole Recipe FAQs

How do I choose the best red potatoes?
Absolutely! When selecting red potatoes, look for firm, smooth ones without any dark spots or blemishes. The skin should be a vibrant red color. Avoid potatoes that feel soft or have sprouted eyes, as these are signs of age.

How do I properly store leftovers?
You can store leftovers in an airtight container in the fridge for up to 3 days. This ensures they remain fresh and delicious! When reheating, I recommend using the oven to maintain that delightful crunch on top—simply cover with foil, heat at 350°F (175°C) for about 20 minutes, and uncover for the last few minutes.

Can I freeze the Red Potato Casserole?
Yes, you can! To freeze your unbaked Red Potato Casserole, wrap it tightly with plastic wrap and aluminum foil. It will keep well in the freezer for up to 2 months. When you're ready to bake it, place it in the fridge to thaw overnight, then add your corn flakes and bake at 350°F (175°C) for about 30-40 minutes, until heated through.

What if my casserole is too watery?
Very good question! If your casserole turns out watery, it could be due to excess moisture in the potatoes. You can prevent this by ensuring the potatoes are well-drained after boiling. If it happens, a quick fix is to bake the casserole uncovered for an additional 10-15 minutes to help evaporate the excess liquid.

Can I make this casserole gluten-free?
Yes, indeed! To cater to a gluten-free diet, simply use gluten-free corn flakes for the topping. Moreover, check your ranch dressing for any gluten-containing ingredients. Making these small adjustments allows everyone to enjoy this comforting dish!

Is this casserole pet-friendly?
It's great that you're thinking about your furry friends! However, this casserole contains ingredients like onion (in ranch dressing) and dairy, which can be harmful to pets. It's best to keep this delicious dish for human enjoyment only.

Red Potato Casserole

Irresistible Red Potato Casserole with Crunchy Topping

This Red Potato Casserole is a comforting dish with creamy red potatoes, smoky bacon, and a crunchy corn flake topping.
Print Recipe Pin Recipe
Prep Time 15 minutes mins
Cook Time 30 minutes mins
Cooling Time 5 minutes mins
Total Time 50 minutes mins
Servings: 8 servings
Course: Dinner
Cuisine: American
Calories: 350
Ingredients Equipment Method Nutrition Notes

Ingredients
  

For the Casserole
  • 4 cups Red Potatoes washed and cut into large chunks
  • 1 cup Sour Cream
  • 1 cup Ranch Dressing homemade or store-bought
  • 6 slices Bacon cooked and crumbled
  • 2 cups Sharp Cheddar Cheese shredded
For the Topping
  • 2 cups Corn Flakes gluten-free if necessary
  • 1/2 cup Butter melted

Equipment

  • Large pot
  • Mixing Bowl
  • Baking Dish
  • Spatula

Method
 

Preparation Steps
  1. Wash the red potatoes thoroughly under cold water, cut them into large, bite-sized pieces, and place them in a large pot with salted water. Bring to a boil, then simmer until fork-tender, about 20-25 minutes.
  2. Preheat the oven to 350°F (175°C) and grease a 9x13-inch baking dish.
  3. In a medium-sized bowl, mix corn flakes with melted butter until well coated.
  4. Drain the boiled potatoes, return them to the pot, and mix with sour cream, ranch dressing, crumbled bacon, and 1 cup of cheddar cheese. Mash gently until mixed but still chunky.
  5. Transfer the potato mixture into the greased baking dish, leveling it with a spatula.
  6. Sprinkle the remaining cheddar cheese over the potatoes, then add the buttered corn flakes on top.
  7. Bake uncovered for 20-30 minutes until cheese is melted and corn flakes are golden brown.
  8. Let cool for a few minutes before serving warm.

Nutrition

Serving: 1cupCalories: 350kcalCarbohydrates: 45gProtein: 10gFat: 15gSaturated Fat: 8gPolyunsaturated Fat: 1gMonounsaturated Fat: 5gCholesterol: 30mgSodium: 600mgPotassium: 800mgFiber: 4gSugar: 2gVitamin A: 500IUVitamin C: 20mgCalcium: 200mgIron: 2mg

Notes

Store leftovers in an airtight container in the fridge for up to 3 days. For longer storage, freeze unbaked casserole tightly wrapped for up to 2 months.

Tried this recipe?

Let us know how it was!

Comforting Cowboy Potato Casserole for Cozy Nights

June 15, 2026 by Grace Snow Leave a Comment

Amid the hustle and bustle of daily life, there's something magical about a dish that simmers away in your kitchen, filling the air with savory aromas. Enter my Slow Cooker Cowboy Potato Casserole, a hearty family favorite that's ready to rescue your weeknight dinners with ease and flavor. This comforting casserole combines seasoned ground beef, creamy potatoes, and sweet corn, all enveloped in zesty Rotel tomatoes that brighten each bite. It’s not just a meal; it’s a warm embrace after a long day. With minimal prep time, you can toss everything into the slow cooker and let it work its magic, making it an effortless addition to your busy schedule. Plus, it’s fully customizable for your family’s tastes, so everyone can dive into seconds (or thirds!). Who else is ready for some cowboy comfort on their dinner table tonight?

Why Is This Cowboy Casserole So Special?

Comforting meals like this Cowboy Potato Casserole are perfect for family dinners or cozy gatherings! Easy preparation: Just toss everything in the slow cooker, making it a stress-free cooking option. Rich, hearty flavors of beef, creamy potatoes, and sweet corn blend beautifully with zesty tomatoes for a dish everyone will love. Customizable: Adjust ingredients based on preferences or dietary needs—try adding extra veggies or using ground turkey for a lighter twist. Plus, it's a fantastic way to utilize your slow cooker, similar to my Cornbread Breakfast Casserole or Sweet Potato Casserole. Crowd-pleasing comfort food that brings warmth to your dining table? Yes, please!

Cowboy Potato Casserole Ingredients

A deliciously hearty dish, just for you!

For the Casserole

  • Ground Beef – Adds savory flavor and protein; substitute with ground turkey for a lighter meal.
  • Frozen Diced Potatoes – Base of the casserole; fresh potatoes can be used, but adjust cooking time.
  • Sweet Corn – Provides sweetness and texture; canned or fresh works beautifully.
  • Rotel Tomatoes with Green Chiles – Adds a zesty kick; use plain diced tomatoes for a milder taste.
  • Cream of Mushroom Soup – Creates creaminess; consider a homemade version or vegan alternative.
  • Broth or Milk – Ensures a rich, creamy consistency; swap with vegetable broth for a vegetarian option.
  • Paprika – Infuses depth and subtle smokiness to the dish.
  • Parsley Flakes – Offers a hint of freshness; fresh parsley can enhance the flavor even more.
  • Chili Powder – Boosts spice levels; adjust to taste for your heat preference.
  • Garlic Powder – Adds a savory touch; fresh minced garlic is a lovely substitute.
  • Black Pepper and Salt – Essential seasoning; always adjust to your liking.

For the Toppings

  • Shredded Cheddar Cheese – Melts deliciously into the casserole; feel free to substitute with your cheese of choice or leave it out for vegan options.
  • Crispy Fried Onions or Bacon Crumbles (optional) – Perfect for garnish, adding a delightful crunch.

This Cowboy Potato Casserole is just the comfort food you need for those cozy nights, offering warmth and heartiness in every spoonful!

Step‑by‑Step Instructions for Cowboy Potato Casserole

Step 1: Brown the Beef
In a large skillet over medium heat, add ground beef and cook for about 5–7 minutes, breaking it apart as it browns. Drain any excess fat before adding chopped onions and minced garlic. Sauté until the onions turn translucent, which should take an additional 3–4 minutes, releasing a wonderful aroma.

Step 2: Combine Ingredients
Transfer the browned beef mixture to your slow cooker. Next, add in the frozen diced potatoes, sweet corn, and Rotel tomatoes with green chiles. Pour in the cream of mushroom soup and the broth or milk, stirring thoroughly to ensure all the ingredients are evenly mixed, creating the base of your Cowboy Potato Casserole.

Step 3: Season the Mixture
Sprinkle in the paprika, parsley flakes, chili powder, garlic powder, black pepper, and salt to your mixture. Use a wooden spoon to incorporate the seasonings evenly throughout the casserole. This blend of spices will enhance the flavors beautifully, ensuring every bite is flavorful and comforting.

Step 4: Set the Slow Cooker
Cover the slow cooker with its lid and set it to low. Allow the casserole to cook for approximately 3 hours, checking occasionally. The potatoes should become tender, and the dish will begin to bubble subtly, filling your kitchen with delightful scents.

Step 5: Melt the Cheese
In the final 15 minutes of cooking, add 1 cup of shredded cheddar cheese to the slow cooker. Stir it in gently, allowing the cheese to melt and integrate into the casserole, creating a creamy, gooey texture that enhances the Cowboy Potato Casserole.

Step 6: Serve and Garnish
Once the cooking time is complete, give the casserole a final stir. Serve it hot, topped with any remaining shredded cheese and optional crispy fried onions or crumbled bacon for added crunch. Enjoy the warmth and comfort of your hearty Cowboy Potato Casserole!

Expert Tips for Cowboy Potato Casserole

  • Watch the Time: Be careful not to overcook the potatoes; check for tenderness after 3 hours to avoid a mushy texture.

  • Add Extra Flavor: Enhance the taste by sautéing mixed bell peppers or additional veggies with the beef; it adds nutrients and richness.

  • Check Your Slow Cooker: Different brands may vary in cooking times; ensure your slow cooker heats evenly for the best Cowboy Potato Casserole outcome.

  • Season to Taste: Don't hesitate to adjust seasonings! Taste along the way for the perfect balance of flavors to match your family's preferences.

  • Ingredient Swaps: Feeling adventurous? Substitute ground beef with turkey or chicken for a lighter dish or add more veggies for a wholesome boost.

What to Serve with Cowboy Potato Casserole

Cooking a cozy meal like this casserole is a joyful invitation to create a comforting family feast.

  • Simple Side Salad: A fresh salad adds a crisp contrast to the casserole's creaminess, bringing balance to your plate.
  • Garlic Bread: Crunchy, buttery garlic bread makes for the perfect vessel to soak up the rich, savory flavors of the casserole.
  • Steamed Broccoli: Lightly steamed broccoli is a nutritious, vibrant side that complements the hearty elements and adds a pop of color.
  • Coleslaw: The tangy crunch of coleslaw offers a delightful textural contrast and brightness to each delicious bite.
  • Roasted Vegetables: Seasonal roasted veggies provide a sweet, caramelized counterpart to the rich casserole, enhancing the comfort food experience.
  • Creamy Mashed Potatoes: For a truly indulgent meal, serve with velvety mashed potatoes that echo the creamy goodness of the casserole.
  • Sweet Tea or Lemonade: A refreshing drink choice; sweet tea or lemonade is perfect for cutting through the richness and uplifting your meal experience.

How to Store and Freeze Cowboy Potato Casserole

Fridge: Store any leftover Cowboy Potato Casserole in an airtight container for up to 3 days to maintain freshness.

Freezer: You can freeze the casserole for up to 3 months. Make sure it's cooled completely before transferring it to a freezer-safe container.

Reheating: Thaw overnight in the fridge and reheat in the oven or microwave until heated through, adding a splash of broth or milk to rehydrate if needed.

Make-Ahead: If you want to prepare this dish ahead, assemble all ingredients uncooked in the slow cooker and refrigerate. Just turn the slow cooker on when you're ready to cook!

Cowboy Potato Casserole Variations

Feel free to customize this casserole to suit your taste buds and dietary needs!

  • Ground Beef Swap: Use ground turkey or chicken for a lighter, leaner option. This alternative still brings hearty flavors to your dish.

  • Extra Veggies: Toss in diced bell peppers, zucchini, or carrots for added nutrition and a colorful twist. More veggies not only enhance flavor, but they also brighten up your casserole!

  • Cheese Options: Experiment with different cheese varieties, like pepper jack for a spicy kick or nutritional yeast for a vegan alternative. Choices allow everyone to enjoy a creamy texture with their personal flair.

  • Creamy Alternatives: Replace the cream of mushroom soup with homemade or coconut-based cream for a dairy-free option. You’ll still achieve that rich consistency, minus the dairy!

  • Broth Choices: Utilize vegetable broth for a vegetarian dish or chicken broth for extra depth. Both will enhance the flavor profile beautifully.

  • Heat Level: Add more chili powder or salsa for an extra zesty punch. For those who love the heat, toss in jalapeños to spice it up, making each bite an adventure!

  • Topping Ideas: Top with crushed tortilla chips instead of crispy fried onions for an extra crunch. This new layer adds a fun texture and a Southwestern flair. Consider serving with a side of refreshing salsa!

Looking for more inspiration? You can also explore my delicious Spicy Miso Casserole for a unique twist or delight in a comforting German Potato Salad to pair alongside your hearty Cowboy Potato Casserole!

Make Ahead Options

These Slow Cooker Cowboy Potato Casseroles are fantastic for meal prep, offering a hearty, comforting dish that can be assembled in advance! You can prepare the entire casserole and store it uncooked in the refrigerator up to 24 hours before cooking. Simply layer the browned beef, potatoes, corn, tomatoes, and soup in the slow cooker, season it, and cover it tightly with plastic wrap or a lid. This helps maintain freshness and flavor, so it’s just as delicious when cooked! When ready to serve, cook the casserole on low for about 3 hours, stirring in the cheese during the last 15 minutes. This way, you'll enjoy a warm, homemade meal with minimal effort after a busy day!

Cowboy Potato Casserole Recipe FAQs

What type of potatoes should I use for the casserole?
You can use frozen diced potatoes for convenience and ease, but if you prefer, fresh potatoes will work just as well. If using fresh, remember to adjust the cooking time accordingly, usually around 4-5 hours on low until tender.

How should I store leftover Cowboy Potato Casserole?
Absolutely! Store any leftovers in an airtight container in the refrigerator for up to 3 days. Just make sure it’s cooled before sealing to maintain freshness.

Can I freeze the casserole, and how do I do it?
Yes, freezing can be a great way to save this hearty dish! Make sure the casserole is completely cooled, then transfer it to a freezer-safe container. It can be frozen for up to 3 months. When you're ready to enjoy it again, thaw it overnight in the fridge and reheat it in the oven or microwave until warmed through. If it seems dry, a splash of broth or milk can help restore its creamy goodness.

What if my potatoes are mushy after cooking?
If your potatoes end up mushy, it’s likely they were overcooked. To prevent this, it’s essential to keep an eye on the cooking time, particularly if your slow cooker runs hotter than others. A good rule of thumb is to test the potatoes for tenderness around the 3-hour mark. If you find they’re too soft next time, try cooking on low for a shorter duration or switching to diced fresh potatoes.

Are there any dietary considerations for this casserole?
Very much so! For a leaner option, you can substitute ground beef with ground turkey or chicken. If you're looking for a vegetarian alternative, use vegetable broth, omit the meat, and add extra veggies. Always double-check for allergies, making sure ingredients like cheese or cream of mushroom soup align with dietary needs. Some people opt for dairy-free or gluten-free products as substitutes, so feel free to customize!

How can I personalize my Cowboy Potato Casserole?
The more the merrier! You can swap in your favorite veggies, like bell peppers or zucchini, or increase the spice with more chili powder. Additionally, different cheese varieties, like pepper jack, can give it a delightful twist. Don’t hesitate to mix and match ingredients to suit your family’s preferences or dietary needs!

Cowboy Potato Casserole

Comforting Cowboy Potato Casserole for Cozy Nights

A hearty Cowboy Potato Casserole that's easy to make and perfect for cozy family dinners.
Print Recipe Pin Recipe
Prep Time 15 minutes mins
Cook Time 3 hours hrs
Total Time 3 hours hrs 15 minutes mins
Servings: 6 servings
Course: Dinner
Cuisine: American
Calories: 400
Ingredients Equipment Method Nutrition Notes

Ingredients
  

For the Casserole
  • 1 lb Ground Beef Or substitute with ground turkey for a lighter meal.
  • 3 cups Frozen Diced Potatoes Fresh potatoes can be used; adjust cooking time.
  • 1 cup Sweet Corn Canned or fresh works beautifully.
  • 1 can Rotel Tomatoes with Green Chiles Use plain diced tomatoes for a milder taste.
  • 1 can Cream of Mushroom Soup Consider a homemade version or vegan alternative.
  • 1 cup Broth or Milk Swap with vegetable broth for a vegetarian option.
  • 1 tsp Paprika Infuses depth and subtle smokiness.
  • 1 tsp Parsley Flakes Fresh parsley can enhance the flavor.
  • 1 tsp Chili Powder Boosts spice levels; adjust to taste.
  • 1 tsp Garlic Powder Fresh minced garlic is a substitute.
  • to taste Black Pepper Essential seasoning; adjust to your liking.
  • to taste Salt Essential seasoning; adjust to your liking.
For the Toppings
  • 1 cup Shredded Cheddar Cheese Substitute with your cheese of choice or leave out for vegan options.
  • optional Crispy Fried Onions or Bacon Crumbles Perfect for garnish, adding crunch.

Equipment

  • Slow Cooker
  • Large skillet

Method
 

Step-by-Step Instructions
  1. In a large skillet over medium heat, add ground beef and cook for about 5–7 minutes, breaking it apart as it browns. Drain any excess fat before adding chopped onions and minced garlic. Sauté until the onions turn translucent, which should take an additional 3–4 minutes.
  2. Transfer the browned beef mixture to your slow cooker. Add in the frozen diced potatoes, sweet corn, and Rotel tomatoes with green chiles. Pour in the cream of mushroom soup and the broth or milk, stirring thoroughly.
  3. Sprinkle in the paprika, parsley flakes, chili powder, garlic powder, black pepper, and salt. Use a wooden spoon to incorporate the seasonings evenly throughout the casserole.
  4. Cover the slow cooker with its lid and set it to low. Allow the casserole to cook for approximately 3 hours, checking occasionally.
  5. In the final 15 minutes of cooking, add 1 cup of shredded cheddar cheese to the slow cooker. Stir it in gently to melt and integrate.
  6. Once the cooking time is complete, give the casserole a final stir. Serve it hot, topped with any remaining shredded cheese and optional crispy fried onions or crumbled bacon.

Nutrition

Serving: 1cupCalories: 400kcalCarbohydrates: 40gProtein: 25gFat: 20gSaturated Fat: 10gPolyunsaturated Fat: 1gMonounsaturated Fat: 3gTrans Fat: 1gCholesterol: 80mgSodium: 900mgPotassium: 600mgFiber: 4gSugar: 2gVitamin A: 10IUVitamin C: 20mgCalcium: 15mgIron: 15mg

Notes

Store leftovers in an airtight container for up to 3 days. You can freeze the casserole for up to 3 months. Thaw overnight in the fridge and reheat in the oven or microwave until heated through.

Tried this recipe?

Let us know how it was!

Creamy Rotel Pasta with Ground Beef for Ultimate Comfort

June 15, 2026 by Grace Snow Leave a Comment

There’s something magical about a cozy kitchen filled with the rich aroma of melted cheese and savory spices. When life gets busy, whipping up a comforting bowl of Creamy Rotel Pasta with Ground Beef becomes my go-to solution for an easy weeknight dinner. With tender rotini swirled in a luscious, creamy sauce, this hearty dish delights everyone at the table. Not only does it come together in under 30 minutes, but it’s also a guaranteed crowd-pleaser, perfect for those hectic evenings when you crave wholesome warmth. Plus, the leftovers? They’re just as satisfying, making meal prep a breeze. Are you ready to bring comfort and joy back to your dinner routine?

Why is Creamy Rotel Pasta a must-try?

Comforting Flavor: This dish combines rich cheese and zesty Rotel tomatoes, creating a symphony of taste that warms the soul.

Quick Preparation: Ready in under 30 minutes, it’s perfect for busy weeknights when time is of the essence.

Versatile Ingredients: Feel free to swap ground beef for turkey or veggies, tailoring it to your preferences or dietary needs.

Crowd-Pleaser: Whether it’s a family dinner or a potluck, everyone will love this creamy delight. For a delightful side, try pairing it with a simple salad or some garlic bread!

Leftover Gold: The flavors only get better with time, making leftovers a treat for lunch the next day. Each bowl offers a hearty dose of nostalgia that keeps you coming back for more.

Creamy Rotel Pasta Ingredients

• Get ready for comfort!

For the Pasta

  • Rotini Pasta – This spiral-shaped pasta holds onto the sauce beautifully; you can substitute with penne or fusilli if desired.

For the Meat

  • Ground Beef – Adds rich flavor and protein; feel free to swap for ground turkey, chicken, or a plant-based alternative for a lighter twist.

For the Sauce

  • Rotel Tomatoes – Brings a zesty, spicy kick to the dish; fresh diced tomatoes are a good non-spicy alternative.
  • Beef Broth – Enhances flavor depth; vegetable broth can work beautifully as a substitute.
  • Garlic Powder – Adds a hint of depth and aroma; fresh minced garlic can give an even bolder flavor.
  • Onion Powder – Contributes sweetness and savory goodness; sautéed fresh onions will brighten up the dish.
  • Salt and Pepper – Essential for balancing flavors; adjust to taste according to your preference.
  • Creamy Cheese (e.g., cream cheese or cheddar) – This is the heart of the creamy texture; gouda or mascarpone make delicious variations.

For Topping

  • Shredded Cheddar Cheese – Adds cheesiness on top; any melty cheese works as a lovely substitute.

Crafted with love, this Creamy Rotel Pasta with Ground Beef brings warmth and joy to every dinner table! 🧀❤️

Step‑by‑Step Instructions for Creamy Rotel Pasta with Ground Beef

Step 1: Cook Pasta
Begin by boiling a large pot of salted water over high heat. Once it reaches a rolling boil, carefully add the rotini pasta. Cook according to the package instructions until al dente, which usually takes around 8-10 minutes. When finished, drain the pasta in a colander and set it aside while you prepare the creamy sauce.

Step 2: Brown Beef
In a large skillet, heat a drizzle of olive oil over medium heat. Add the ground beef and use a wooden spoon to break it apart as it cooks. Brown the beef for about 6-8 minutes, until it’s fully cooked and no longer pink. Once done, drain any excess fat before moving on to the next step.

Step 3: Simmer Mixture
To the skillet with the browned beef, add the zesty Rotel tomatoes, beef broth, garlic powder, onion powder, salt, and pepper. Stir well to combine all the ingredients, then bring the mixture to a gentle simmer over medium-low heat. Allow it to cook for about 5 minutes, letting the flavors meld perfectly.

Step 4: Add Cheese
Reduce the heat to low and stir in the creamy cheese of your choice, whether it’s cream cheese or cheddar. Continuously stir until the cheese is completely melted and smoothly incorporated into the beef and tomato mixture, creating a rich, luscious sauce, which should take about 2-3 minutes.

Step 5: Combine with Pasta
Gently fold the drained rotini pasta into the cheese and beef mixture, using a spatula to ensure each piece is evenly coated with the creamy sauce. Continue to stir for another 1-2 minutes, until everything is heated through and well combined, making the Creamy Rotel Pasta with Ground Beef truly delightful.

Step 6: Melt Cheddar
Sprinkle a generous amount of shredded cheddar cheese evenly over the top of your pasta creation. Cover the skillet with a lid and let it sit on low heat for about 2-3 minutes, allowing the cheese to melt beautifully, creating a mouthwatering, cheesy topping.

Step 7: Serve
Once the cheese is gooey and melted to perfection, remove the skillet from the heat. Garnish your creamy rotini dish with freshly chopped parsley for a pop of color and a burst of flavor. Serve warm and enjoy this comforting bowl of Creamy Rotel Pasta with Ground Beef.

Make Ahead Options

These Creamy Rotel Pasta with Ground Beef is perfect for meal prep lovers! You can easily brown the ground beef and prepare the creamy cheese sauce up to 24 hours in advance, storing them separately in the refrigerator to maintain their quality. Additionally, you can cook the rotini pasta ahead of time; just be sure to toss it with a little olive oil to prevent sticking. When ready to serve, simply reheat the beef and sauce mixture in a skillet over low heat, add the pasta, and sprinkle with shredded cheddar for that cheesy topping—your dinner will be just as delicious with minimal effort!

What to Serve with Creamy Rotel Pasta with Ground Beef

Set the stage for a satisfying family meal with delightful pairings that enhance every comforting bite.

  • Garlic Bread: Crunchy and soft, this classic side perfectly complements the creamy pasta, providing a delightful contrast in texture.
  • Simple Side Salad: A light salad with fresh greens, tomatoes, and a drizzle of vinaigrette adds brightness and balances the richness of the dish.
  • Steamed Broccoli: Tender, vibrant broccoli boosts the nutrition while offering a fresh crunch that pairs wonderfully with cheesy flavors.
  • Roasted Vegetables: Seasoned carrots, zucchini, and bell peppers add a touch of sweetness and earthy taste, making your plate visually appealing.
  • Coleslaw: A tangy, crisp coleslaw serves as a refreshing contrast, cutting through the creamy texture of the pasta. Each bite offers a satisfying crunch!
  • Wine Pairing: Opt for a light white wine like Sauvignon Blanc or a medium-bodied red like Chianti for a fun pairing that elevates the entire meal.
  • Chocolate Chip Cookies: End on a sweet note with soft-baked cookies that echo the cozy warmth of your dinner, leaving everyone with a smile.

Expert Tips for Creamy Rotel Pasta

Avoid Overcooking Pasta: Ensure you cook the rotini until al dente to maintain that perfect texture for this creamy dish.

Consider Your Meat: While ground beef is fantastic, swapping it for turkey or a plant-based alternative still brings wonderful flavors in this Creamy Rotel Pasta.

Adjusting Spice Levels: If you're sensitive to spice, swap Rotel tomatoes for fresh diced tomatoes to control the heat while still keeping it delicious.

Add Veggies: For added nutrition and flavor, toss in some chopped bell peppers or spinach during the simmering stage for a delightful twist.

Storing Leftovers: This dish holds up well in the fridge for up to three days. Store in an airtight container to keep the creamy texture intact.

Reheating Tips: When reheating leftovers, do so gently on the stovetop. You can add a splash of milk or broth to revive the creamy consistency.

Creamy Rotel Pasta with Ground Beef Variations

Feel free to elevate your dish with these simple, creative twists that will keep your meals exciting and tailored to your taste.

  • Pasta Shape Swap: Substitute rotini with fusilli or penne for a fresh twist on texture. Each shape holds sauce differently, making every bite unique.
  • Veggie Boost: Add chopped bell peppers or spinach during the simmering step for a vibrant color and added nutrients. You'll not only enhance flavor but also nourish your body!
  • Meat Alternatives: Replace ground beef with Italian sausage for a spicier profile, or use ground turkey for a lighter option. Each meat offers its unique flavor, enriching your Creamy Rotel Pasta experience.
  • Creamy Cheese Variety: Swap cream cheese for gouda or mascarpone for a different creamy texture and rich flavor. These alternatives will elevate the dish to new, indulgent heights!
  • Heat it Up: For those who love spice, mix in a diced jalapeño or sprinkle cayenne pepper while simmering. Your taste buds will thank you for this tasty kick!
  • Dairy-Free Option: Use cashew cream and dairy-free cheese as substitutes to make this dish friendly for non-dairy diets. It’s just as comforting and delicious!
  • Zesty Twist: Add lime juice and chopped cilantro at the end for a fresh, zesty finish. This juicy combination will brighten your Comfort Food experience!
  • Seafood Delight: Incorporate shrimp or crab meat into the mix for a seafood take on this classic recipe. The seafood adds elegance, transforming your meal into something special.

Your kitchen is your canvas! Mix and match these variations along with ideas from my other savory recipes like Skillet Pasta Sun or Ground Beef Enchiladas. Embrace the joy of cooking and have fun creating your perfect bowl of Creamy Rotel Pasta with Ground Beef!

How to Store and Freeze Creamy Rotel Pasta

Fridge: Store leftover Creamy Rotel Pasta in an airtight container for up to 3 days. Ensure it's completely cooled before sealing to maintain freshness.

Freezer: For longer storage, freeze portions of the pasta in freezer-safe containers for up to 1 month. Thaw overnight in the fridge before reheating.

Reheating: To reheat, warm it gently on the stovetop over low heat. Add a splash of milk or broth to regain the creamy texture, stirring occasionally until heated through.

Repacking Tips: If storing in individual servings, divide into meal prep containers. This makes it easy to grab a comforting lunch or dinner on busy days!

Creamy Rotel Pasta with Ground Beef Recipe FAQs

What is the best way to choose ripe ingredients for this recipe?
Absolutely! When selecting fresh ingredients, for tomatoes, look for those without dark spots or blemishes. Choose a package of rotini that feels sturdy and not crushed. When picking ground beef, opt for meat that is bright red and firm, as this indicates freshness.

How should I store leftover Creamy Rotel Pasta?
For optimal freshness, store your leftovers in an airtight container in the fridge for up to 3 days. Make sure the pasta has completely cooled before placing it in the container to prevent moisture buildup, which can spoil your delicious creation.

Can I freeze Creamy Rotel Pasta, and how?
Absolutely! To freeze leftovers, let them cool completely and then portion your creamy pasta into freezer-safe containers. This dish can be frozen for up to 1 month. When you’re ready to enjoy, thaw it overnight in the refrigerator. Then, reheat gently on the stovetop, adding a splash of milk or broth to restore its creamy texture.

What should I do if my sauce is too thick?
If you find that your sauce has thickened too much, don't worry! Simply add a bit of beef broth or milk, stirring gently until you achieve the desired consistency. If it's too thin, let it simmer for a little longer to allow the sauce to thicken naturally.

Are there any dietary considerations for this recipe?
Very! If you’re cooking for someone with dietary restrictions, you can easily modify the recipe. Swap the ground beef with ground turkey, chicken, or a plant-based meat alternative to accommodate different diets. Also, be sure to check labels for potential allergens in the creamy cheese—if dairy is a concern, consider using a nut-based or vegan cheese option.

How long can I keep this dish in the fridge?
This comforting Creamy Rotel Pasta can be stored in the refrigerator for up to 3 days. Be sure to keep it in an airtight container to maintain its delightful flavor and creamy texture.

Creamy Rotel Pasta with Ground Beef

Creamy Rotel Pasta with Ground Beef for Ultimate Comfort

This Creamy Rotel Pasta with Ground Beef combines rich cheese and zesty tomatoes for a comforting, easy dinner that's ready in under 30 minutes.
Print Recipe Pin Recipe
Prep Time 10 minutes mins
Cook Time 15 minutes mins
Total Time 25 minutes mins
Servings: 4 servings
Course: Dinner
Cuisine: American
Calories: 600
Ingredients Equipment Method Nutrition Notes

Ingredients
  

For the Pasta
  • 8 ounces Rotini Pasta Substitute with penne or fusilli if desired.
For the Meat
  • 1 pound Ground Beef Can swap for ground turkey, chicken, or plant-based alternative.
For the Sauce
  • 1 can Rotel Tomatoes Fresh diced tomatoes are a good non-spicy alternative.
  • 1 cup Beef Broth Vegetable broth can also work.
  • 1 teaspoon Garlic Powder Fresh minced garlic can give bolder flavor.
  • 1 teaspoon Onion Powder Sautéed fresh onions will brighten the dish.
  • 1 teaspoon Salt Adjust to taste.
  • 1 teaspoon Pepper Adjust to taste.
  • 8 ounces Creamy Cheese e.g., cream cheese or cheddar; gouda or mascarpone are good variations.
For Topping
  • 1 cup Shredded Cheddar Cheese Any melty cheese can be used.

Equipment

  • Large pot
  • Colander
  • Large skillet
  • Wooden spoon
  • Spatula

Method
 

Step‑by‑Step Instructions
  1. Begin by boiling a large pot of salted water over high heat. Once it reaches a rolling boil, add the rotini pasta. Cook until al dente, about 8-10 minutes. Drain and set aside.
  2. In a large skillet, heat a drizzle of olive oil over medium heat. Add the ground beef and break it apart as it cooks. Brown for about 6-8 minutes until fully cooked. Drain any excess fat.
  3. Add the Rotel tomatoes, beef broth, garlic powder, onion powder, salt, and pepper to the skillet. Stir to combine and bring to a gentle simmer over medium-low heat. Cook for about 5 minutes.
  4. Reduce the heat to low and stir in the creamy cheese until melted and smoothly incorporated into the beef mixture, about 2-3 minutes.
  5. Gently fold the drained rotini pasta into the cheese and beef mixture until evenly coated, stirring for another 1-2 minutes until heated through.
  6. Sprinkle shredded cheddar cheese evenly over the pasta. Cover the skillet and let it sit on low heat for about 2-3 minutes to melt the cheese.
  7. Remove from heat and garnish with freshly chopped parsley. Serve warm.

Nutrition

Serving: 1bowlCalories: 600kcalCarbohydrates: 65gProtein: 30gFat: 25gSaturated Fat: 12gPolyunsaturated Fat: 3gMonounsaturated Fat: 6gTrans Fat: 1gCholesterol: 80mgSodium: 900mgPotassium: 600mgFiber: 4gSugar: 5gVitamin A: 500IUVitamin C: 5mgCalcium: 200mgIron: 3mg

Notes

This dish is perfect for weeknight meals and holds up well as leftovers.

Tried this recipe?

Let us know how it was!

Quick Savory Ground Beef and Broccoli in 20 Minutes

June 15, 2026 by Grace Snow Leave a Comment

As I stirred the vibrant green broccoli in the shimmering pan, the savory aroma of seasoned ground beef filled my kitchen, instantly transporting me to the warm comfort of family dinners. This 20-Minute One-Pan Ground Beef and Broccoli recipe combines ease with a splash of nutrition, making it an ideal choice for busy weeknights and satisfying appetites. With its quick prep time and minimal cleanup, this dish is perfect for those who desire homemade goodness without the fuss. Whether you’re cooking for a crowd or treating yourself to a delightful meal, this recipe is a versatile winner, featuring fresh ingredients and mouthwatering flavors. What’s your favorite twist to add in?!

Why is Ground Beef and Broccoli a Must-Try?

Quick, this recipe brings dinner to your table in just 20 minutes, leaving you more time to unwind after a busy day. Nutritious and vibrant, fresh broccoli mingles with seasoned beef for a meal that’s as healthy as it is satisfying. One-Pan wonder, this dish minimizes cleanup while maximizing flavor, perfect for those hectic weeknights. Versatile, customize it by adding veggies like bell peppers or swapping in ground turkey for a lighter option. After trying this dish, you’ll appreciate how it effortlessly blends convenience and taste, making it your go-to weeknight meal! If you're looking for another easy meal, check out Ground Beef Enchiladas for a delicious twist!

Ground Beef and Broccoli Ingredients

For the Beef and Broccoli

  • Olive Oil – Adds fat for cooking and enhances flavor; substitute with vegetable oil if needed.
  • Broccoli Florets (3-4 cups) – Primary vegetable providing nutrients and color; choose fresh for optimal texture.
  • Lean Ground Beef (1 pound) – Main protein source, contributing flavor and richness; can be replaced with ground turkey for a leaner option.
  • Garlic (2-3 cloves, minced) – Enhances overall flavor profile; fresh garlic is preferred, but garlic powder can be used in a pinch.
  • Low-Sodium Soy Sauce (1/4 cup) – Adds saltiness and umami; tamari can be used for gluten-free diets.
  • Brown Sugar (1/4 cup) – Provides sweetness to balance savory flavors; coconut sugar can serve as a substitute.
  • Toasted Sesame Oil (2 teaspoons) – Adds depth and nuttiness; regular sesame oil can be used if toasted is unavailable.
  • Ground Ginger (1/4 teaspoon) – Contributes warmth and spice; fresh ginger can also be grated as an alternative.
  • Red Pepper Flakes (1/4 teaspoon) – Provides heat; adjust to taste or use a milder spice for less heat.
  • Black Pepper (8-10 cranks) – Enhances seasoning; freshly ground is best for flavor.

For Serving

  • Sesame Seeds (optional garnish) – Aesthetic appeal and subtle nutty flavor when sprinkled on top before serving.

Enjoy crafting this delicious Ground Beef and Broccoli dish, where every bite encapsulates wholesome comfort and vibrant nutrition!

Step‑by‑Step Instructions for Ground Beef and Broccoli

Step 1: Heat Oil
In a large skillet, heat 2 tablespoons of olive oil over medium-high heat until shimmering. This will take about 1-2 minutes. Swirl the oil around to coat the bottom of the skillet, preparing to add the broccoli next and ensuring it cooks evenly for a delightful texture.

Step 2: Sauté Broccoli
Add 3-4 cups of fresh broccoli florets to the hot skillet. Stir-fry for about 3-4 minutes until the broccoli turns vibrant green and becomes slightly tender but still crisp. The bright color indicates perfect doneness, giving your Ground Beef and Broccoli a visually appealing base filled with nutrients.

Step 3: Cook Beef
Push the cooked broccoli to one side of the skillet, creating a space for the beef. Add 1 pound of lean ground beef to the pan and break it apart with a spatula. Cook for about 5-6 minutes, stirring occasionally, until the beef is browned and crumbly. This step melds the flavors together beautifully, enhancing your one-pan dish.

Step 4: Add Garlic
Once the beef is cooked, stir in 2-3 minced garlic cloves. Cook for an additional 30 seconds until the garlic becomes fragrant, turning golden and aromatic. This infusion of garlic heightens the savory aspect of your Ground Beef and Broccoli, ensuring every bite is packed with flavor.

Step 5: Mix Sauce
In a small bowl, whisk together 1/4 cup of low-sodium soy sauce, 1/4 cup of brown sugar, 2 teaspoons of toasted sesame oil, 1/4 teaspoon of ground ginger, 1/4 teaspoon of red pepper flakes, and several cranks of black pepper. Pour this flavorful mixture over the beef and broccoli in the skillet, allowing it to coat everything evenly.

Step 6: Combine
Gently stir everything together for an additional 2-3 minutes, ensuring that the sauce thoroughly envelops the beef and broccoli. Continue heating until everything is fully combined and heated through. This step creates a cohesive dish, uniting the savory and sweet elements beautifully.

Step 7: Serve
Remove the skillet from the heat and plate your scrumptious Ground Beef and Broccoli. For an optional touch, sprinkle sesame seeds on top for added texture and presentation. Serve this delightful dish over steamed rice, noodles, or quinoa, embracing the warmth and flavor of a homemade meal.

What to Serve with 20-Minute One-Pan Ground Beef and Broccoli

As the savory aroma of beef fills your kitchen, pairing this quick dish with delightful sides will elevate your meal to new heights.

  • Steamed Jasmine Rice: The fluffy, fragrant rice absorbs the savory sauce beautifully, creating a comforting foundation for your beef and broccoli.

  • Garlic Noodles: Soft, buttery noodles infused with garlic add a luscious texture that perfectly complements the dish’s robust flavors. They're like a warm hug on your plate!

  • Crisp Green Salad: A fresh salad of mixed greens, cucumber, and radishes brings a refreshing crunch, balancing the savory richness of the beef and broccoli, making your meal light yet satisfying.

  • Sesame Cucumber Salad: This light, tangy salad's crunch pairs wonderfully with the warm dish, offering a burst of fresh flavor to brighten each bite.

  • Sautéed Bok Choy: Tender bok choy lightly sautéed with garlic adds a delicate touch and extra greens, harmonizing perfectly with your vibrant beef and broccoli.

  • Chilled Sake or Green Tea: Take a moment to unwind with a glass of chilled sake or soothing green tea, enhancing the Asian-inspired theme through delightful culinary experiences.

Every combination will enhance your meal, creating a wholesome dining experience full of flavors and fresh elements!

Make Ahead Options

These Ground Beef and Broccoli bowls are perfect for meal prep enthusiasts looking to save time on busy evenings! You can chop the broccoli and mix the sauce (soy sauce, brown sugar, sesame oil, ginger, and spices) up to 3 days in advance. Store the broccoli in an airtight container in the refrigerator to keep it fresh and vibrant. For the ground beef, it can be browned ahead of time and stored as well—consider refrigerating it for up to 3 days. When you're ready to serve, simply reheat the beef and broccoli in a skillet over medium heat, add the sauce, and cook for a few minutes until heated through. This approach ensures your dinner remains just as delicious and full of flavor while giving you the flexibility you need during hectic nights!

How to Store and Freeze Ground Beef and Broccoli

  • Refrigerator: Store leftover Ground Beef and Broccoli in an airtight container for up to 3-4 days. This keeps it fresh and ready for quick lunches or dinners!

  • Freezer: For longer storage, freeze the dish in a freezer-safe container for up to 3 months. Be sure to label it with the date for your reference.

  • Reheating: When you're ready to enjoy your Ground Beef and Broccoli again, reheat in the microwave or on the stovetop until heated through. This preserves its flavor and texture beautifully.

  • Thawing: If frozen, transfer the container to the refrigerator a day before you plan to reheat for best results, allowing it to thaw gradually while maintaining taste and quality.

Expert Tips for Ground Beef and Broccoli

  • Fresh Ingredients: Use fresh garlic and vibrant broccoli for the best flavor and nutrition. Frozen vegetables can lose texture and taste.

  • Don’t Overcrowd: Ensure even cooking by not overcrowding the pan; cook in batches if necessary for that perfect sauté.

  • Taste Test: Adjust the sauce ingredients, particularly the sweetness from brown sugar and the heat from red pepper flakes, to suit your preferences.

  • Customize Veggies: Feel free to add bell peppers, snap peas, or carrots for a nutritional boost and added color to your Ground Beef and Broccoli.

  • Garnish for Flair: A sprinkle of sesame seeds not only enhances presentation but also adds a delightful nutty flavor right before serving.

Ground Beef and Broccoli Variations

Feel free to let your creativity shine by customizing this delicious dish with these fun variations!

  • Ground Turkey: Replace ground beef with ground turkey or chicken for a lighter meal option that’s just as satisfying.

  • Vegetable Add-Ons: Incorporate bell peppers, snap peas, or grated carrots for extra color and nutrients. The more veggies, the merrier!

  • Grain Swap: Serve over quinoa, whole grain noodles, or even cauliflower rice for a nutritious, low-carb alternative.

  • Heat Level Adjustment: Add Sriracha or chili garlic sauce to amp up the heat and flavor profile if you like a bit of spice!

  • Nut-Free Option: Omit sesame oil entirely if you're looking to cook a nut-free version. Use olive oil instead for a neutral taste.

  • Gluten-Free Alternative: Swap out regular soy sauce for tamari to keep this dish gluten-free without sacrificing flavor.

  • Sweet Substitute: Use maple syrup or agave nectar instead of brown sugar for a different kind of sweetness that still balances the dish beautifully.

  • Herbal Infusion: Stir in some fresh basil or cilantro right before serving for a fresh herb boost that elevates the flavor.

With these creative twists, your Ground Beef and Broccoli can be a fresh delight every time you prepare it! And if you’re interested in more quick meals, don’t miss out on my Pan Fried Shrimp with Cabbage Slaw and Gochujang Mayo for another fantastic flavor experience!

Ground Beef and Broccoli Recipe FAQs

How do I choose the best broccoli for this recipe?
Absolutely! Look for broccoli florets that are bright green and firm, avoiding any with yellowing or dark spots. Freshness will ensure the best texture and flavor in your dish!

How should I store leftovers of Ground Beef and Broccoli?
Refrigerate leftovers in an airtight container for up to 3-4 days. Make sure to let it cool before sealing to retain moisture and prevent condensation inside the container.

Can I freeze Ground Beef and Broccoli?
Yes, you can! To freeze, cool the dish completely and then transfer it to a freezer-safe container. It can be stored for up to 3 months. When ready to enjoy, thaw it in the refrigerator overnight before reheating to preserve its flavor and texture.

What if my Ground Beef and Broccoli sauce is too salty?
Very! If the sauce turns out too salty, you can balance it by adding a little extra brown sugar or a splash of water. Also, incorporating additional broccoli can help dilute the saltiness while adding more nutrition!

Is this recipe safe for my pets or those with allergies?
It's best to keep this dish away from pets, as the garlic and soy sauce can be harmful to them. For allergies, you can easily swap the soy sauce with gluten-free tamari, and choose ground turkey to avoid red meat if necessary. Always check labels for allergens in processed ingredients!

How can I spice this dish up?
If you prefer more heat, feel free to increase the amount of red pepper flakes or add fresh sliced chili peppers. Another wonderful alternative is to stir in a dash of sriracha right before serving. Play with the flavors to make it your perfect meal!

Ground Beef and Broccoli

Quick Savory Ground Beef and Broccoli in 20 Minutes

This Quick Savory Ground Beef and Broccoli recipe is a must-try for a wholesome, delicious meal in just 20 minutes.
Print Recipe Pin Recipe
Prep Time 10 minutes mins
Cook Time 10 minutes mins
Total Time 20 minutes mins
Servings: 4 servings
Course: Dinner
Cuisine: Asian
Calories: 400
Ingredients Equipment Method Nutrition Notes

Ingredients
  

For the Beef and Broccoli
  • 2 tablespoons Olive Oil Adds fat for cooking and enhances flavor; substitute with vegetable oil if needed.
  • 3-4 cups Broccoli Florets Primary vegetable providing nutrients and color; choose fresh for optimal texture.
  • 1 pound Lean Ground Beef Main protein source, contributing flavor and richness; can be replaced with ground turkey for a leaner option.
  • 2-3 cloves Garlic Enhances overall flavor profile; fresh garlic is preferred, but garlic powder can be used in a pinch.
  • 1/4 cup Low-Sodium Soy Sauce Adds saltiness and umami; tamari can be used for gluten-free diets.
  • 1/4 cup Brown Sugar Provides sweetness to balance savory flavors; coconut sugar can serve as a substitute.
  • 2 teaspoons Toasted Sesame Oil Adds depth and nuttiness; regular sesame oil can be used if toasted is unavailable.
  • 1/4 teaspoon Ground Ginger Contributes warmth and spice; fresh ginger can also be grated as an alternative.
  • 1/4 teaspoon Red Pepper Flakes Provides heat; adjust to taste or use a milder spice for less heat.
  • 8-10 cranks Black Pepper Enhances seasoning; freshly ground is best for flavor.
For Serving
  • Sesame Seeds Optional garnish.

Equipment

  • Large skillet

Method
 

Step-by-Step Instructions for Ground Beef and Broccoli
  1. In a large skillet, heat 2 tablespoons of olive oil over medium-high heat until shimmering. This will take about 1-2 minutes. Swirl the oil around to coat the bottom of the skillet, preparing to add the broccoli next and ensuring it cooks evenly for a delightful texture.
  2. Add 3-4 cups of fresh broccoli florets to the hot skillet. Stir-fry for about 3-4 minutes until the broccoli turns vibrant green and becomes slightly tender but still crisp.
  3. Push the cooked broccoli to one side of the skillet, creating a space for the beef. Add 1 pound of lean ground beef to the pan and break it apart with a spatula. Cook for about 5-6 minutes, stirring occasionally, until the beef is browned and crumbly.
  4. Once the beef is cooked, stir in 2-3 minced garlic cloves. Cook for an additional 30 seconds until the garlic becomes fragrant.
  5. In a small bowl, whisk together 1/4 cup of low-sodium soy sauce, 1/4 cup of brown sugar, 2 teaspoons of toasted sesame oil, 1/4 teaspoon of ground ginger, 1/4 teaspoon of red pepper flakes, and several cranks of black pepper. Pour this flavorful mixture over the beef and broccoli in the skillet.
  6. Gently stir everything together for an additional 2-3 minutes, ensuring that the sauce thoroughly envelops the beef and broccoli.
  7. Remove the skillet from the heat and plate your scrumptious Ground Beef and Broccoli. For an optional touch, sprinkle sesame seeds on top.

Nutrition

Serving: 1servingCalories: 400kcalCarbohydrates: 22gProtein: 30gFat: 20gSaturated Fat: 6gPolyunsaturated Fat: 2gMonounsaturated Fat: 10gCholesterol: 80mgSodium: 800mgPotassium: 800mgFiber: 4gSugar: 10gVitamin A: 500IUVitamin C: 90mgCalcium: 60mgIron: 3mg

Notes

Use fresh garlic and vibrant broccoli for the best flavor and nutrition. Feel free to customize with additional vegetables like bell peppers or carrots for an added nutritional boost.

Tried this recipe?

Let us know how it was!

Lazy Lasagna Tortellini: A 30-Minute Family Favorite

June 14, 2026 by Grace Snow Leave a Comment

“What if you could enjoy a hearty lasagna in half the time?” That’s the question I found myself pondering one busy weeknight as I rummaged through my pantry. Enter the Lazy Lasagna Tortellini—your new go-to recipe that captures the comforting essence of classic lasagna in just 30 minutes! With layers of rich savory ground beef and soft cheese tortellini bathed in marinara sauce, this dish serves up a tantalizing weeknight meal the entire family will rave about. Not only is it family-friendly and satisfying, but it’s also a breeze to prepare, allowing you to reclaim your evening without sacrificing flavor. So, are you ready to dig into this delicious twist on a beloved classic?

Why is Lazy Lasagna Tortellini a Game-Changer?

Quick and Easy: With just 30 minutes from start to finish, this recipe is perfect for those bustling weeknights.
Comforting Flavor: The merger of savory ground beef and creamy cheeses creates a satisfying dish that families adore.
Versatile Ingredients: Feel free to substitute tortellini or mix in your favorite veggies for a personalized twist!
Crowd-Pleasing Delight: This Lazy Lasagna Tortellini is sure to impress everyone at the dinner table, making it a hit for gatherings.
Time-Saving Solution: Ditch the lengthy prep of traditional lasagna; this recipe leverages simplicity without compromising on taste! For more quick dinner ideas, check out our Quick Weeknight Dinners.

Lazy Lasagna Tortellini Ingredients

• For the Main Dish

  • Ground Beef – Provides protein and savory flavor; can be substituted with Italian sausage for extra spice.
  • Tortellini – The core pasta element that adds rich texture; you can use any pasta but increase cheese to keep creaminess.
  • Marinara Sauce – Adds moisture and flavor; choose a thicker sauce if you prefer a less saucy result.
  • Ricotta Cheese – Delivers a creamy layer synonymous with classic lasagna; cottage cheese works as a lighter alternative.
  • Mozzarella Cheese – Creates a deliciously gooey top layer; more cheese enhances the richness, and you can swap it with provolone for a unique twist.
  • Yellow Onion – Enriches the dish with flavor when sautéed; skip or replace with shallots for quicker preparation.

• For Seasoning

  • Italian Seasoning – Intensifies the overall flavor; feel free to mix with your favorite dried herbs.
  • Onion Powder & Garlic Powder – Adds depth of flavor; fresh garlic can be used for a more potent taste.
  • Black Pepper & Salt – Essential for seasoning; adjust according to your taste.

This Lazy Lasagna Tortellini is not just about getting dinner on the table quickly; it’s all about bringing family together over a comforting meal that everyone will love!

Step‑by‑Step Instructions for Lazy Lasagna Tortellini

Step 1: Cook the Tortellini
Start by bringing a large pot of salted water to a boil. Add the tortellini and cook according to the package instructions until al dente, usually around 3–5 minutes. Once tender, drain the tortellini, and set aside in a large bowl while you prepare the rest of the ingredients.

Step 2: Sauté the Beef and Onions
In a large skillet over medium-high heat, add a drizzle of olive oil. Once heated, add finely diced yellow onion and sauté until translucent, about 2–3 minutes. Then, introduce the ground beef, breaking it up as it browns for about 5–7 minutes. Ensure the beef is fully cooked with no pink visible for a flavorful Lazy Lasagna Tortellini.

Step 3: Season the Beef Mixture
After browning the ground beef and onions, drain excess grease to enhance the dish's flavor. Stir in Italian seasoning, onion powder, garlic powder, salt, and black pepper. Mix well for about 1 minute, allowing the spices to coat the meat evenly and infuse their aromas into the Lazy Lasagna Tortellini.

Step 4: Combine Tortellini and Sauce
Pour in the marinara sauce and cooked tortellini into the skillet with the beef mixture. Gently toss everything together, ensuring the pasta is well-coated with the savory sauce. Let it simmer on low for 2–3 minutes, allowing the flavors to meld and creating a rich base for the dish.

Step 5: Add Ricotta and Cheese
Remove the skillet from heat and add dollops of ricotta cheese over the top, ensuring even distribution. Follow with a generous layer of shredded mozzarella cheese, which will melt beautifully in the oven. At this point, the Lazy Lasagna Tortellini is ready for baking!

Step 6: Bake the Dish
Preheat your oven to 350°F (175°C). Transfer the skillet to the oven and bake for about 10–15 minutes, or until the mozzarella cheese is melted and bubbling with golden edges. Keep an eye on it, and once you see a deliciously browned top, it’s time to remove your Lazy Lasagna Tortellini from the oven.

Step 7: Serve and Enjoy
After letting it cool for a few minutes, scoop generous portions of your Lazy Lasagna Tortellini onto plates. The creamy, cheesy goodness combined with the heartiness of the beef will surely impress your family. Pair it with garlic bread and a fresh salad for a complete meal that everyone will love!

Expert Tips for Lazy Lasagna Tortellini

  • Cook Tortellini Right: Ensure tortellini is al dente before adding it to the skillet for perfect texture in your Lazy Lasagna Tortellini.

  • Drain Grease: Always drain excess grease after browning ground beef; this keeps your dish from becoming overly greasy.

  • Layer Wisely: For a less messy version, instead of mixing everything together, consider layering ingredients in the skillet for a classic lasagna feel.

  • Sauce Thickness: Adjust marinara sauce viscosity based on your preference; a thicker sauce yields a less saucy dish that’s ideal for serving.

  • Mix It Up: Don't hesitate to substitute ingredients; experiment with meats or vegetables to create a Lazy Lasagna Tortellini that suits your family's tastes!

Make Ahead Options

These Lazy Lasagna Tortellini are perfect for busy home cooks looking to save time during the week! You can prep the entire dish up to 24 hours in advance by following these steps: cook the tortellini and ground beef with spices, then combine them with the marinara sauce and ricotta before adding the mozzarella cheese. Store it covered in the refrigerator. When you're ready to enjoy your Lazy Lasagna Tortellini, simply bake it at 350°F (175°C) for about 15-20 minutes until bubbly. This preparation not only saves you time but also ensures that the dish will be just as delicious when you're ready to serve it!

What to Serve with Lazy Lasagna Tortellini?

Transform your weeknight dinner into a feast with delightful pairings that complement the comforting flavors of this quick dish.

  • Garlic Bread: The warm, buttery taste of garlic bread perfectly balances the cheesy tortellini, making each bite even more satisfying.
  • Caesar Salad: Crisp romaine and creamy dressing add a fresh crunch, contrasting beautifully with the rich, savory lasagna flavors.
  • Steamed Broccoli: Bright green broccoli offers a nutrient-rich addition that lightens up your plate while adding color and texture.
  • Caprese Salad: Juicy tomatoes, creamy mozzarella, and fragrant basil create a refreshing side that enhances the meal's overall appeal.
  • Roasted Vegetables: A medley of roasted seasonal vegetables brings a sweet caramelization, complimenting the rich cheese and meat in the tortellini.
  • Red Wine: A bold red wine, such as Chianti, will elevate the dinner experience, harmonizing beautifully with the dish’s savory richness.
  • Tiramisu: End on a sweet note with this classic Italian dessert—its light, coffee-infused flavors provide a perfect finish to your meal.

Embrace the opportunity to create a warm, welcoming dinner experience with these tasty accompaniments!

Lazy Lasagna Tortellini Variations

Feel free to put your own spin on this delightful dish and enjoy a tantalizing burst of flavors!

  • Ravioli Swap: Replace tortellini with ravioli for a different stuffed pasta experience that still captures the essence of lasagna. Just imagine each bite filled with savoriness!

  • Spice It Up: Mix ground beef with Italian sausage for an extra zesty flavor profile. The delightful kick will leave your taste buds dancing!

  • Veggie Booster: Add vegetables like spinach or zucchini for a nutritional boost and added flavor. This variation not only makes it healthier but also adds a fresh crunch!

  • Cheesy Delight: Experiment with various cheese blends like cheddar or gouda to create a personalized flavor explosion. Each cheese adds its unique twist on this classic comfort dish.

  • Sauce Switch: Try adding pesto or Alfredo sauce instead of marinara for a deliciously creamy alternative. This will transform your Lazy Lasagna Tortellini into an entirely new culinary experience!

  • Herb Infusion: Incorporate fresh herbs like basil or parsley instead of dried to elevate the dish's freshness. The aromas will fill your kitchen with an irresistible scent.

  • Heat it Up: Add crushed red pepper flakes or diced jalapeños to amp up the heat level. This fiery addition caters to those who enjoy a little extra kick in their meals!

  • Sheet Pan Style: For a fun family-style dinner, spread everything on a sheet pan, layering with sauce and cheese before baking. It’s easier to serve and perfect for sharing!

These variations are just as comforting as the original Lazy Lasagna Tortellini. Let your creativity shine in the kitchen, and don’t forget, if you're looking for more delicious weeknight inspirations, our guide on Quick Weeknight Dinners is just a click away!

Storage Tips for Lazy Lasagna Tortellini

Fridge: Store leftovers in an airtight container for up to 3 days to keep them fresh and delicious.

Freezer: For longer storage, freeze Lazy Lasagna Tortellini in a freezer-safe container; it can last up to 2 months.

Reheating: Reheat in the oven at 350°F until heated through for the best texture; microwave for a quicker option, covering it to retain moisture.

Thawing: If frozen, thaw in the fridge overnight before reheating for even results and to maintain the flavors of the dish.

Lazy Lasagna Tortellini Recipe FAQs

How do I choose the right tortellini?
Absolutely! When selecting tortellini, look for fresh or frozen options that highlight your favorite flavors, such as cheese or meat-filled varieties. Fresh tortellini has a more delicate texture, while frozen offers convenience and shelf stability. Just ensure you adjust the cooking time according to package instructions—typically 3 to 5 minutes for fresh and 5 to 7 minutes for frozen.

How should I store leftovers of Lazy Lasagna Tortellini?
Very good question! Store leftovers in an airtight container in the refrigerator for up to 3 days. To keep them as delicious as the first serve, make sure to let them cool completely before sealing. When you’re ready to reheat, try doing so in the oven at 350°F until warmed through for the best texture.

Can I freeze Lazy Lasagna Tortellini?
Absolutely! This dish freezes beautifully. To freeze, let it cool completely, then transfer it to a freezer-safe container or zip-top bag. It can last for up to 2 months in the freezer. When ready to enjoy, thaw it overnight in the refrigerator, then reheat in the oven at 350°F for about 20-30 minutes, or until hot throughout.

What should I do if my Lazy Lasagna Tortellini is too saucy?
If you find your Lazy Lasagna Tortellini too saucy, don’t fret! This can happen sometimes. Next time, opt for a thicker marinara sauce, or simply reduce the amount of sauce used. You can also mix in a bit of grated cheese directly into the dish to help absorb some excess moisture. If you're already in the mix, consider adding a handful of shredded cheese, as it helps to balance the sauce while enhancing the flavor.

Is Lazy Lasagna Tortellini suitable for a family with allergies?
Absolutely, but it depends on the specific allergies! If someone has a gluten allergy, you can substitute the tortellini with gluten-free pasta. For dairy sensitivities, use plant-based cheese alternatives instead of ricotta and mozzarella. Always double-check labels for any processed ingredients, and don’t hesitate to experiment with different flavors!

Lazy Lasagna Tortellini

Lazy Lasagna Tortellini: A 30-Minute Family Favorite

Enjoy a quick and comforting Lazy Lasagna Tortellini, combining hearty ground beef and cheese in just 30 minutes.
Print Recipe Pin Recipe
Prep Time 10 minutes mins
Cook Time 20 minutes mins
Total Time 30 minutes mins
Servings: 4 servings
Course: Dinner
Cuisine: Italian
Calories: 550
Ingredients Equipment Method Nutrition Notes

Ingredients
  

Main Dish
  • 1 lb Ground Beef Can be substituted with Italian sausage.
  • 12 oz Tortellini Use any pasta but increase cheese for creaminess.
  • 24 oz Marinara Sauce Choose a thicker sauce for less moisture.
  • 15 oz Ricotta Cheese Cottage cheese is a lighter alternative.
  • 2 cups Mozzarella Cheese More cheese enhances richness.
  • 1 medium Yellow Onion Skip or replace with shallots for quicker prep.
Seasoning
  • 1 tbsp Italian Seasoning Feel free to mix with your favorite dried herbs.
  • 1 tsp Onion Powder Fresh garlic can be used for stronger taste.
  • 1 tsp Garlic Powder
  • 1 tsp Black Pepper Adjust according to taste.
  • 1 tsp Salt Adjust according to taste.

Equipment

  • Large pot
  • Large skillet
  • Oven

Method
 

Cooking Steps
  1. Boil salted water in a large pot and cook the tortellini according to package instructions, about 3–5 minutes. Drain and set aside.
  2. In a large skillet over medium-high heat, add olive oil. Sauté diced onions until translucent, then add ground beef and cook for 5–7 minutes until browned.
  3. Drain excess grease from the beef mixture and add Italian seasoning, onion powder, garlic powder, salt, and black pepper. Stir well for 1 minute.
  4. Combine the drained tortellini and marinara sauce with the beef mixture in the skillet. Toss and simmer on low for 2–3 minutes.
  5. Remove from heat and add dollops of ricotta cheese, followed by a layer of shredded mozzarella cheese.
  6. Preheat the oven to 350°F (175°C) and bake for 10–15 minutes until mozzarella is melted and golden.
  7. Cool for a few minutes, serve on plates, and enjoy with garlic bread and salad.

Nutrition

Serving: 1servingCalories: 550kcalCarbohydrates: 42gProtein: 30gFat: 28gSaturated Fat: 12gPolyunsaturated Fat: 0.5gMonounsaturated Fat: 10gTrans Fat: 1gCholesterol: 85mgSodium: 900mgPotassium: 600mgFiber: 3gSugar: 6gVitamin A: 20IUVitamin C: 4mgCalcium: 300mgIron: 3.5mg

Notes

Follow expert tips for cooking pasta al dente, draining grease, and adjusting sauce thickness for best results.

Tried this recipe?

Let us know how it was!

Satisfy Your Cravings with Cookies & Cream Dessert Pizza

June 14, 2026 by Grace Snow Leave a Comment

Nothing beats the happiness of watching loved ones gather around a dessert that sparks joy, and that's exactly what this Cookies and Cream Dessert Pizza delivers! This delightful treat combines a soft chocolate chip cookie base with smooth cream cheese icing, then gets a generous sprinkle of chopped Oreos and a sweet white chocolate drizzle. Best of all, it's incredibly easy to whip up, making it a perfect choice for family movie nights or casual get-togethers. Whether you choose to share or keep it all to yourself (who’s judging?), this dessert is sure to leave everyone craving more. Are you ready to dive into this fun dessert adventure?

Why is this dessert pizza a must-try?

Decadent delight: This Cookies and Cream Dessert Pizza tantalizes your taste buds with its rich chocolate chip cookie base and luscious cream cheese topping. Crowd favorite: Everyone loves Oreos, making this dessert a perfect hit at parties or family gatherings. Quick and easy: In just a few simple steps, you can whip up this treat, allowing more time for fun! Looking for more fun dessert ideas? Check out my Eggnog Cookies Soft or Matcha Cookies Soft for a delightful twist. Customization galore: Swap out Oreos for your favorite cookies or add fresh fruits for a fruity twist, turning this dessert into your own signature creation. Temperature flexibility: Best served chilled or at room temperature, this pizza fits perfectly into various entertaining scenarios!

Cookies & Cream Dessert Pizza Ingredients

For the Base

  • Chocolate chip cookie dough – Provides a soft and rich foundation; replace with sugar cookie dough for a tasty twist.

For the Creamy Topping

  • Cream cheese – Creates a smooth and luscious topping; ensure it's softened for easy mixing.
  • Butter – Adds richness; use softened butter for seamless blending.
  • Vanilla extract – Enhances the overall flavor profile; almond extract can be a delightful alternative.
  • Powdered sugar – Sweetens and thickens the cream cheese mixture; granulated sugar can work if well blended.

For the Topping

  • Oreos – The star of the show providing crunch and flavor; feel free to mix in any Oreo variation or other chocolate sandwich cookies.
  • White candy melts or white chocolate chips – For a sweet drizzle on top; dark or milk chocolate can be substituted for a different flavor experience.

This blissful Cookies and Cream Dessert Pizza is sure to bring smiles and satisfaction to your family table!

Step‑by‑Step Instructions for Cookies & Cream Dessert Pizza

Step 1: Preheat the Oven
Begin by preheating your oven to 350°F (175°C). This crucial step ensures your Cookies and Cream Dessert Pizza will bake evenly. While the oven heats, gather all your ingredients and prepare your 12-inch round pizza pan by lightly greasing it to prevent sticking, ensuring a flawless release after baking.

Step 2: Prepare the Cookie Base
Take your chocolate chip cookie dough and press it evenly into the prepared pizza pan. Aim for a uniform thickness across the base, filling all the way to the edges. Once the dough is spread out, it’s time to pop it into the preheated oven and bake for 10-15 minutes, keeping an eye out for a slight golden color around the edges.

Step 3: Cool the Cookie Crust
After baking, remove the pizza pan from the oven and place it on a wire rack to cool completely. It’s essential that the crust is fully cooled to allow the cream cheese mixture to spread smoothly without melting. While the cookie base cools, you can move on to preparing the creamy topping.

Step 4: Make the Cream Cheese Mixture
In a mixing bowl, combine the softened cream cheese, softened butter, vanilla extract, and powdered sugar. Using a hand mixer, beat the mixture until it becomes light and fluffy, roughly 2-3 minutes. The cream cheese mixture should be smooth and creamy, ready to blanket the cooled cookie crust.

Step 5: Spread the Cream Cheese Mixture
Once your cookie crust has cooled completely, it’s time to spread the cream cheese mixture evenly over the top. Use a spatula for an even application, ensuring every part of the crust is generously covered, creating a deliciously creamy layer that will harmonize with the Oreo topping.

Step 6: Add the Oreo Topping
Chop the Oreos into small chunks, and sprinkle them generously over the cream cheese layer. Press them down slightly to ensure they adhere well. The chocolatey crunch of the Oreos beautifully complements the creamy base, making this Cookies and Cream Dessert Pizza even more indulgent and irresistible.

Step 7: Drizzle with White Chocolate
Melt the white candy melts or white chocolate chips in a microwave-safe bowl. Microwave in short bursts of 15-20 seconds, stirring in between until smooth. Transfer the melted chocolate to a piping bag, and drizzle it creatively over the Oreo-topped dessert pizza, adding a sweet finishing touch that elevates the presentation.

Step 8: Slice and Serve
Let your Cookies and Cream Dessert Pizza sit for a few minutes to allow the chocolate drizzle to set slightly. Then, using a sharp knife, slice into wedges or squares. Serve immediately or refrigerate for a bit before serving for a chilled treat, perfect for gatherings or simply indulging at home!

Make Ahead Options

These Cookies and Cream Dessert Pizza are perfect for busy home cooks looking to save time! You can prepare the cookie base up to 24 hours in advance; just allow it to cool completely before storing it in an airtight container to maintain its softness. The cream cheese mixture can also be made ahead and refrigerated for up to 3 days. When ready to serve, simply spread the mixture over the cooled cookie crust, top with Oreos, and drizzle with melted white chocolate. This way, you'll still enjoy a delectable dessert that's just as delicious as when freshly made, all with minimal effort!

Expert Tips for Cookies & Cream Dessert Pizza

  • Bake Time Monitoring: Keep a close eye on your cookie base; overbaking can result in a tough texture. Aim for a light golden color for the perfect softness.

  • Room Temperature Ingredients: Let your cream cheese and butter come to room temperature before mixing. This ensures a smooth, creamy topping for your Cookies & Cream Dessert Pizza.

  • Cookie Substitutions: Want to mix things up? Try different cookie variations like peanut butter or chocolate chip cookies for the base, or experiment with other sandwich cookies as toppings.

  • Decadent Drizzle: For a beautiful presentation, melt your chocolate in short bursts and stir in between to avoid overheating. A piping bag helps create elegant drizzles!

  • Chill to Set: After decorating with the cream cheese mixture and Oreos, refrigerate the dessert pizza for 30 minutes. This allows the flavors to meld and makes cutting easier.

What to Serve with Cookies and Cream Dessert Pizza

Imagine a gathering filled with laughter and sweet aromas, all harmonizing beautifully at the table as you present this delightful treat!

  • Vanilla Ice Cream: The classic companion adds creamy coolness that perfectly contrasts the rich, sweet flavors of the dessert pizza.
  • Chocolate Dipped Strawberries: These provide a fresh, fruity pop that balances the richness of the cookie pizza, enticing every sweet tooth.
  • Cold Milk: A timeless favorite to wash down the indulgence, creating a nostalgic pairing reminiscent of childhood treats.
  • Fresh Berries: Strawberries, raspberries, or blueberries add a burst of color and a slight tartness to refresh your palate after each decadent bite.
  • Whipped Cream: This light, airy topping enhances the creaminess and makes every slice feel like a luxurious indulgence.
  • Coffee or Espresso: Stimulating flavors from a warm cup create a delightful contrast to the sweet dessert, perfect for the grown-ups in the family.
  • Sparkling Water with Lime: Its bubbly effervescence cleanses the palate, allowing everyone to enjoy the next slice of deliciousness!
  • Chocolate Mousse: For an extra layer of chocolate bliss, this rich and fluffy dessert echoes the flavors of the pizza while adding a touch of elegance.
  • Nut Butter Dip: A creamy peanut or almond butter dip creates a nutty contrast that children and adults will love dipping their slices into.
  • Fruit Punch: A fruity drink adds fun, color, and a refreshing splash to your gathering, making it a perfect match for the sweet pizza.

Cookies & Cream Dessert Pizza Variations

Feel free to personalize this delectable dessert pizza with these tasty twists!

  • Gluten-Free Base: Use gluten-free cookie dough as a substitute for the chocolate chip dough to accommodate gluten-sensitive diners.

  • Nutty Delight: Add chopped nuts like walnuts or pecans to the cookie base for an exciting crunch alongside the creaminess.

  • Fruity Layers: Layer fresh fruits like strawberries or bananas beneath the cream cheese topping. The burst of freshness beautifully contrasts with the rich flavors.

  • Minty Freshness: Incorporate a few drops of peppermint extract into the cream cheese mixture for a refreshing minted twist that pairs perfectly with Oreos.

  • Dairy-Free Option: Substitute cream cheese and butter with vegan cream cheese and coconut oil to create a dairy-free version everyone can enjoy.

  • Extra Decadence: Mix in mini chocolate chips or chopped-up chocolate bars directly into the cream cheese mixture for an added chocolatey flavor.

  • Warm Delight: Serve this dessert pizza warm by popping it back into the oven for a few minutes before serving; the gooey toppings will entice everyone!

  • Spicy Kick: Drizzle a touch of cayenne pepper or chili powder over the top just before serving for a surprising heat element that will intrigue your taste buds.

If you love delicious cakes and cookies, don’t forget to explore my Peaches Cream Cookies or the unique Thumbprint Cookies Melt for more creative ideas!

How to Store and Freeze Cookies & Cream Dessert Pizza

Fridge: Store leftover dessert pizza wrapped in plastic wrap or in an airtight container for up to 5 days to maintain freshness and flavor.

Freezer: For longer storage, freeze slices in an airtight container or wrapped in plastic wrap for up to 2 months. Thaw in the refrigerator before serving.

Reheating: If you prefer a warm treat, gently reheat individual slices in the microwave for 10-15 seconds, just enough to soften the cream cheese topping without melting it completely.

Serving Tips: Enjoy your Cookies & Cream Dessert Pizza chilled or at room temperature. Perfect for gatherings or a cozy movie night!

Cookies & Cream Dessert Pizza Recipe FAQs

How do I choose ripe Oreos?
When selecting Oreos, look for packages that have intact cookies without any visible damage. Fresh Oreos will appear crisp and sealed. Check the expiration date to ensure they’re within the freshness window, typically 6 to 12 months.

Can I store my dessert pizza?
Absolutely! To keep your Cookies & Cream Dessert Pizza fresh, wrap it in plastic wrap or place it in an airtight container. It will stay delightful for up to 5 days in the refrigerator. If you notice any moisture, ensure it’s well-sealed to prevent sogginess.

How do I freeze my dessert pizza?
For longer storage, slice the dessert pizza and place individual pieces in an airtight container. Be sure to layer parchment paper between the slices to prevent sticking. It can be frozen for up to 2 months! When ready to enjoy, simply transfer it to the refrigerator overnight to thaw.

What if my cream cheese mixture is lumpy?
No worries! If your cream cheese mixture turns out lumpy, it may be due to not being soft enough. Ensure your cream cheese and butter are at room temperature before mixing, as this allows for a smooth texture. If lumps persist, continue mixing with a hand mixer until fluffy, which should take about 2-3 minutes.

Are there any allergy considerations for this recipe?
Since this Cookies & Cream Dessert Pizza contains gluten (from the cookie dough) and dairy (from the cream cheese and butter), it’s not suitable for those with gluten intolerance or lactose allergies. For alternatives, consider gluten-free cookie dough and non-dairy cream cheese substitutes.

Can I make this dessert pizza a day ahead?
Very much so! Preparing your Cookies & Cream Dessert Pizza a day in advance can enhance the flavors as they meld together. Just cover it tightly with plastic wrap and store it in the refrigerator. Enjoy a delightful treat that's ready to serve when you are!

Cookies & Cream Dessert Pizza

Satisfy Your Cravings with Cookies & Cream Dessert Pizza

This Cookies & Cream Dessert Pizza combines a chocolate chip cookie base with cream cheese icing, Oreos, and a white chocolate drizzle, making it a delightful treat for gatherings.
Print Recipe Pin Recipe
Prep Time 20 minutes mins
Cook Time 15 minutes mins
Cooling Time 30 minutes mins
Total Time 1 hour hr 5 minutes mins
Servings: 8 slices
Course: Dessert
Cuisine: American
Calories: 300
Ingredients Equipment Method Nutrition Notes

Ingredients
  

For the Base
  • 1 batch Chocolate chip cookie dough Replace with sugar cookie dough for a twist.
For the Creamy Topping
  • 8 oz Cream cheese Ensure it's softened for easy mixing.
  • 4 tbsp Butter Use softened for seamless blending.
  • 1 tsp Vanilla extract Almond extract can be an alternative.
  • 2 cups Powdered sugar Granulated sugar can work if well blended.
For the Topping
  • 15 pcs Oreos Feel free to mix in any Oreo variation.
  • 1 cup White candy melts or white chocolate chips Dark or milk chocolate can be substituted.

Equipment

  • Oven
  • Mixing Bowl
  • hand mixer
  • Spatula
  • Pizza pan
  • piping bag

Method
 

Preparation
  1. Preheat your oven to 350°F (175°C). Prepare your 12-inch round pizza pan by lightly greasing it.
  2. Press the chocolate chip cookie dough into the prepared pizza pan. Bake for 10-15 minutes until golden.
  3. Let the pizza cool completely on a wire rack.
  4. In a mixing bowl, combine the softened cream cheese, softened butter, vanilla extract, and powdered sugar. Beat until light and fluffy.
  5. Spread the cream cheese mixture evenly over the cooled cookie crust.
  6. Chop Oreos into small chunks and sprinkle over the cream cheese layer. Press down slightly.
  7. Melt white candy melts in a microwave, stirring until smooth. Drizzle over the cookies.
  8. Let sit for a few minutes, slice, and serve immediately or chill before serving.

Nutrition

Serving: 1sliceCalories: 300kcalCarbohydrates: 40gProtein: 4gFat: 15gSaturated Fat: 8gPolyunsaturated Fat: 1gMonounsaturated Fat: 6gCholesterol: 30mgSodium: 250mgPotassium: 100mgFiber: 1gSugar: 20gVitamin A: 500IUCalcium: 50mgIron: 1mg

Notes

Store leftovers wrapped in plastic wrap for up to 5 days in the fridge or freeze slices for up to 2 months. Let ingredients reach room temperature for the best results when preparing the creamy topping.

Tried this recipe?

Let us know how it was!
  • « Previous Page
  • 1
  • 2
  • 3
  • 4
  • …
  • 245
  • Next Page »

Welcome!

Hi, I’m Grace, a Sydney-based home cook with a passion for bold flavors and trending ingredients. Whether you’re a busy beginner or a seasoned foodie, you’ll find dishes here that are fresh, fun, and full of flavor.

More about me

Popular Recipes

  • One Pot Keto Tuna Casserole
    One Pot Keto Tuna Casserole: Creamy Comfort in Minutes
  • Ultimate Jalapeno Popper Chicken Salad
    Ultimate Jalapeno Popper Chicken Salad That'll Wow Your Tastebuds
  • Green Chile Cheese Dip
    Mouthwatering Green Chile Cheese Dip for Cozy Gatherings
  • Easy Chimichurri Sauce
    Fresh and Zesty Easy Chimichurri Sauce in Just Minutes

Footer

↑ back to top

About

  • Privacy Policy
  • Disclaimer
  • Terms & Conditions

Newsletter

  • Sign Up! for emails and updates

Contact

  • About me
  • Contact me

Copyright © 2025 TastyTrendIngredients