tastytrendingredients

  • Home
  • Recipes
    • Appetizers
    • Breakfast
    • Dessert
    • Dinner
    • Drinks
    • Salads
    • Snacks
    • Soups
  • About me
  • Contact me
menu icon
go to homepage
  • Home
  • Recipes
    • Appetizers
    • Breakfast
    • Dessert
    • Dinner
    • Drinks
    • Salads
    • Snacks
    • Soups
  • About me
  • Contact me
search icon
Homepage link
  • Home
  • Recipes
    • Appetizers
    • Breakfast
    • Dessert
    • Dinner
    • Drinks
    • Salads
    • Snacks
    • Soups
  • About me
  • Contact me
×

Cheesy Taco Potatoes: Your New Family Favorite Comfort Dish

December 3, 2025 by Grace Snow Leave a Comment

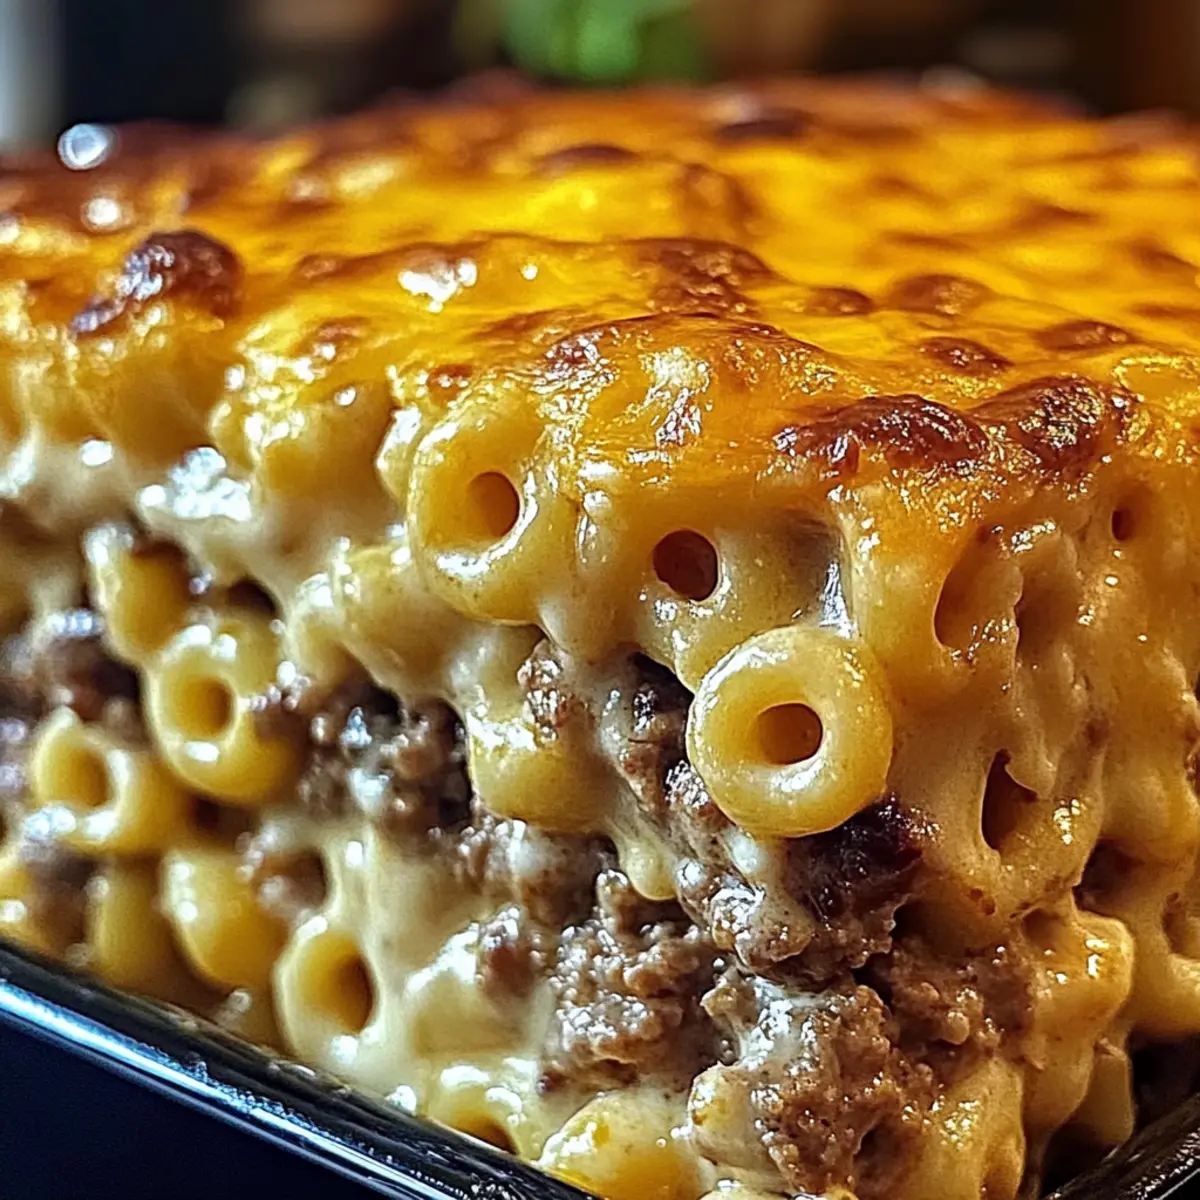
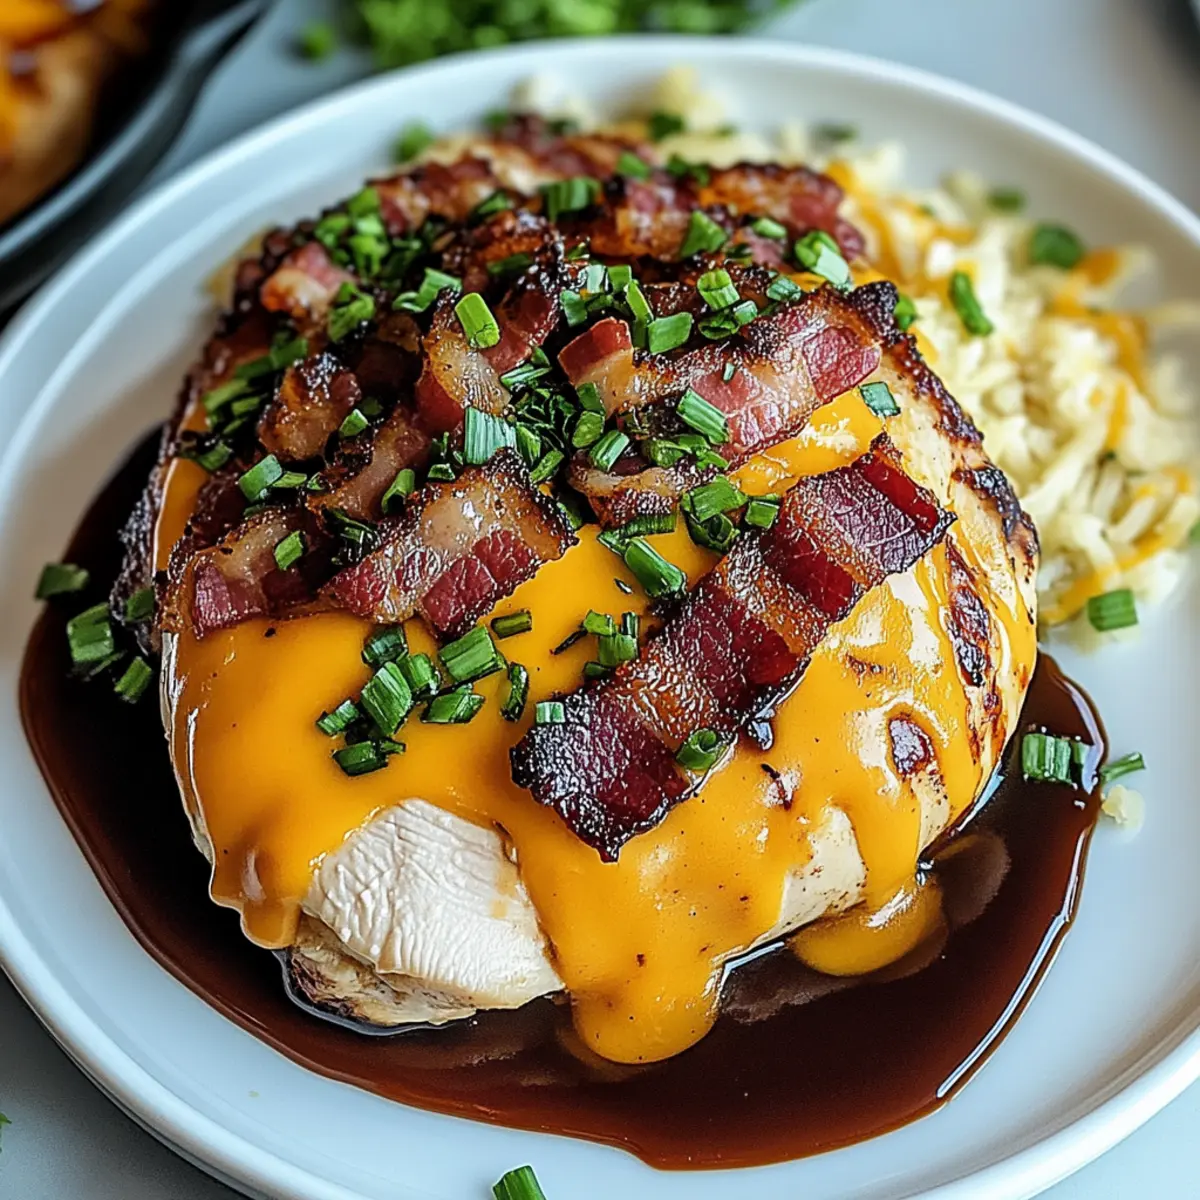
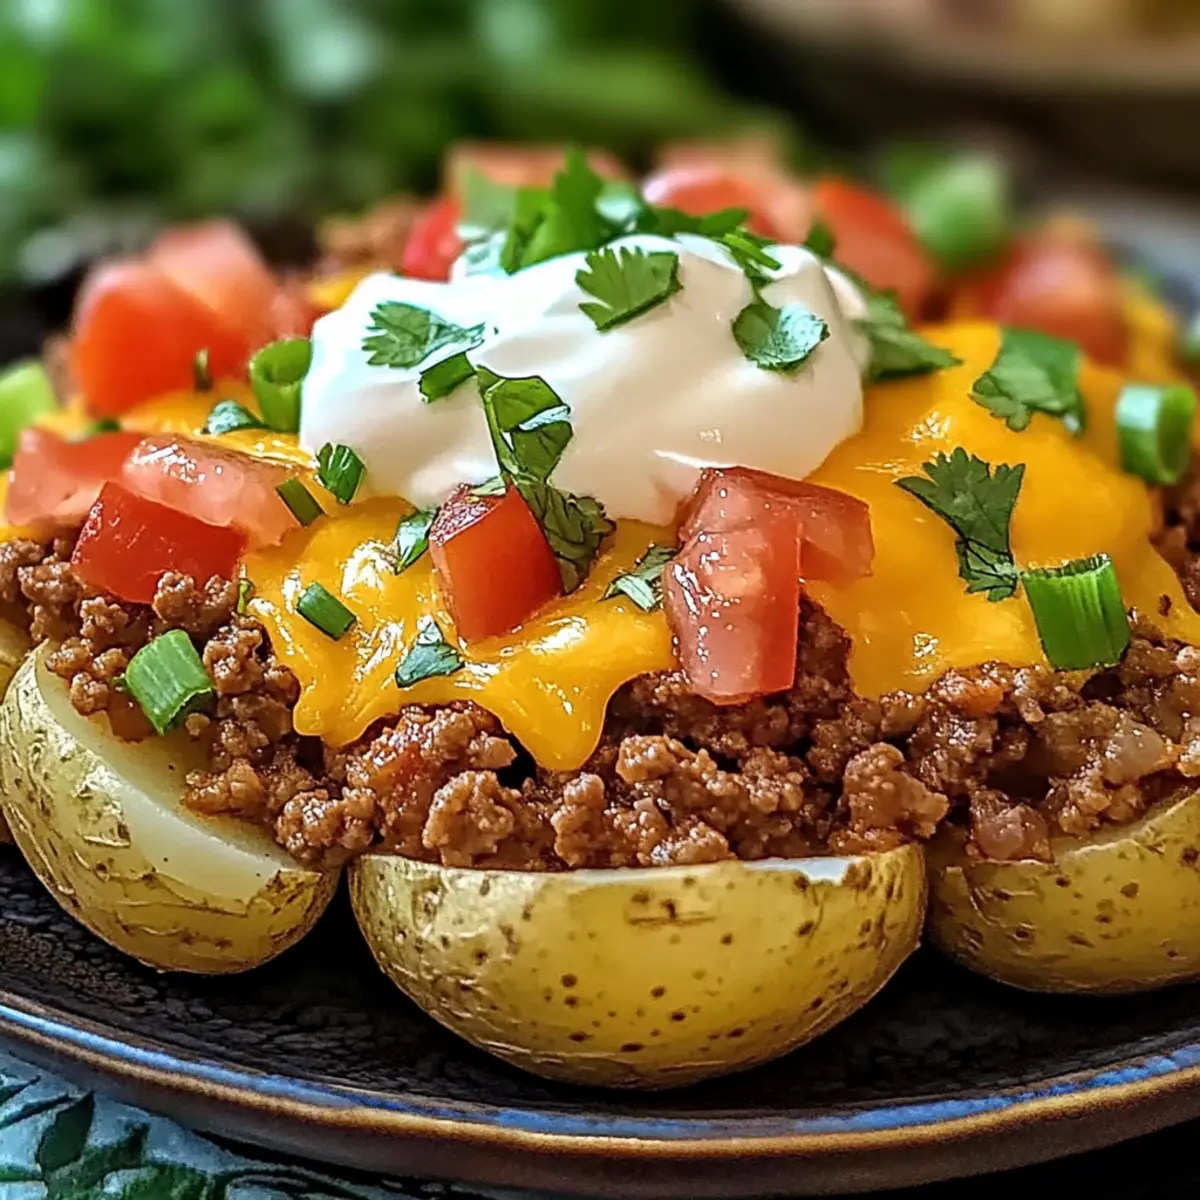
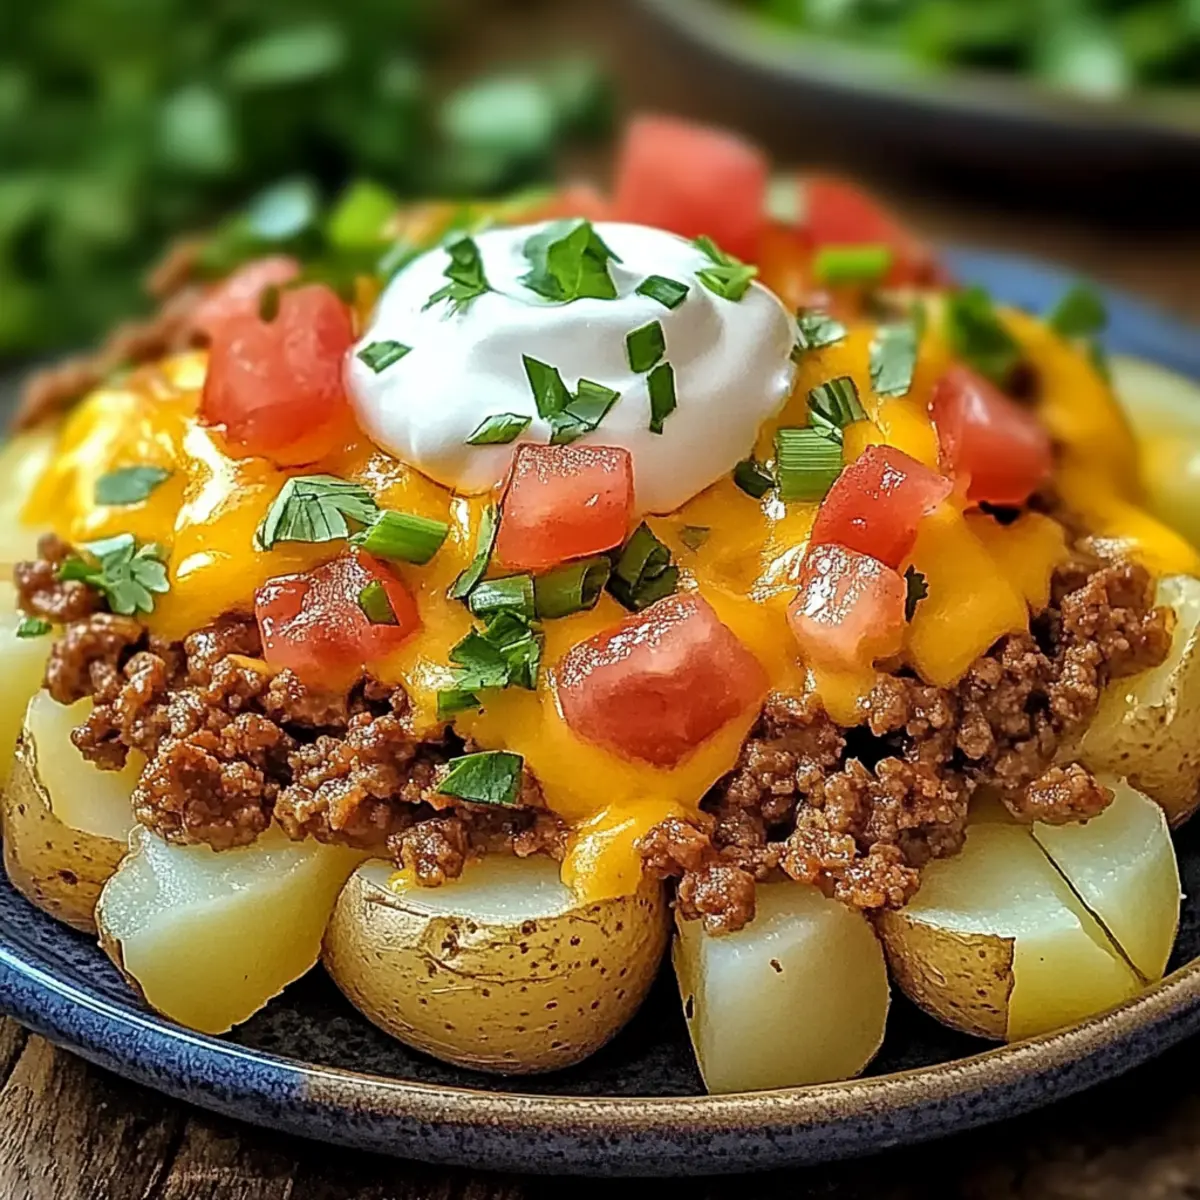
The scent of roasted potatoes fills the air, transporting me back to my mom's kitchen on chilly evenings. As we gathered around the table, the star of the meal was always her Cheesy Taco Potatoes—an easy, comforting dish that felt like a warm hug. These potatoes, loaded with seasoned ground beef or a hearty vegetarian option, tastefully blend the indulgence of melted cheese with the satisfying crunch of fresh toppings. With minimal prep and the ability to customize to your family's liking, this dish fits seamlessly into both busy weeknights and fun gatherings. Imagine cozying up with these fluffy wonders topped with salsa and a dollop of creamy goodness. Whether you stick to the classic recipe or add your own twist, you’ll find joy in every delicious bite. Ready to whip up a family meal that brings everyone together? Let’s dive in!

Why Are Cheesy Taco Potatoes Irresistible?

Comforting and satisfying, Cheesy Taco Potatoes are the epitome of home-cooked goodness! Easily customizable, you can adapt this dish to cater to both meat lovers and vegetarians alike. Quick to prepare, they save you precious time on busy weeknights yet remain impressive enough for a family feast. Savory and cheesy, they combine rich flavors and delightful textures, ensuring every bite feels like a warm hug. For a similar uplifting experience, check out our Cheesy Zucchini Bake or a vibrant side of Smoky Sweet Potatoes with Black Beans. Get ready to impress with these delicious bites!

Cheesy Taco Potatoes Ingredients

For the Potatoes
• Russet Potatoes – The perfect base for a fluffy texture; consider sweet potatoes for a sweeter twist.
• Olive Oil – Helps create a crispy skin while baking; feel free to use vegetable oil if preferred.
• Salt and Pepper – Essential for enhancing flavor; don’t skip on seasoning for the best results.

For the Filling
• Ground Beef – Provides hearty, savory goodness; swap for black beans or lentils for a vegetarian option.
• Taco Seasoning – Creates the iconic taco flavor; mix your own with chili powder, cumin, and garlic powder if needed.

For the Toppings
• Shredded Cheddar Cheese – Adds creaminess and richness; switch to Monterey Jack or dairy-free cheese for a lighter choice.
• Sour Cream – Balances out the spice with creaminess; Greek yogurt makes a great tangy substitute.
• Chopped Green Onions – Offers freshness and a hint of crunch; any fresh herbs can work beautifully here.
• Diced Tomatoes – Adds juiciness and color; fresh or canned both do the job well.
• Sliced Black Olives – Complements the richness of the dish; omit if you're not a fan.
• Chopped Cilantro – Enhances flavor and freshness; can be swapped with parsley or omitted based on preference.

For Serving
• Fresh Salsa – A vibrant topping that adds zesty flavor; make it fresh or grab your favorite store-bought version.

Get ready to create the incredible flavor of Cheesy Taco Potatoes that will have everyone coming back for seconds!

Step‑by‑Step Instructions for Cheesy Taco Potatoes

Step 1: Preheat the Oven
Begin by preheating your oven to 400°F (200°C). This important step ensures that your Cheesy Taco Potatoes will bake evenly and develop that lovely golden exterior. While the oven warms up, prepare your potatoes, as they will require sufficient baking time to become perfectly fluffy inside.

Step 2: Prepare the Potatoes
Take your Russet potatoes and give them a good scrub under running water to clean. Once dried, pierce each potato several times with a fork; this allows steam to escape during baking. Rub them generously with olive oil, then season with salt and pepper. This will enhance their flavor and help create a deliciously crispy skin.

Step 3: Bake the Potatoes
Place the seasoned potatoes on a baking sheet, ensuring they are evenly spaced out for optimal air circulation. Bake in the preheated oven for 45-60 minutes. You’ll know they’re done when a fork easily pierces through the skin, revealing a soft, fluffy interior. Once done, remove the potatoes from the oven and let them cool slightly for easier handling.

Step 4: Cook the Ground Beef
While your potatoes bake, heat a skillet over medium heat. Add the ground beef, cooking it until browned and completely cooked through, approximately 5-7 minutes. Once cooked, drain any excess fat to keep your Cheesy Taco Potatoes from being overly greasy. This step ensures a flavorful and hearty filling for your potatoes.

Step 5: Add Taco Seasoning
To the cooked ground beef, stir in your taco seasoning along with a splash of water. Allow this mixture to simmer for about 5 minutes, stirring occasionally until it thickens slightly and the spices meld beautifully. This infused flavor is what makes your Cheesy Taco Potatoes so irresistible!

Step 6: Fluff the Baked Potatoes
After letting the baked potatoes cool for a few minutes, carefully slice them lengthwise down the middle, being cautious not to cut all the way through. Use a fork to gently fluff the insides, creating a nice bed for your savory beef mixture. This is the perfect moment to channel your excitement for the Cheesy Taco Potatoes!

Step 7: Stuff the Potatoes
Now it’s time to fill the fluffed potatoes! Spoon a generous amount of the seasoned ground beef into each potato half, making sure to distribute it evenly. Once filled, top the beef with a hearty sprinkle of shredded cheddar cheese. This melty layer is what elevates your Cheesy Taco Potatoes to a whole new level of deliciousness.

Step 8: Melt the Cheese
Return the stuffed potatoes to the oven and bake for an additional 10-15 minutes. Keep an eye on them, and as the cheese melts and bubbles with a lovely golden hue, you’ll be met with a mouth-watering aroma. This is when the Cheesy Taco Potatoes truly start to come together!

Step 9: Add Final Toppings
Finally, take your cheesy, golden potatoes out of the oven and let them cool for just a moment. Top each potato with fresh salsa, a dollop of sour cream, and a sprinkle of chopped cilantro or green onions. These final touches not only enhance the flavor but also add a vibrant presentation to your comforting dish.

Cheesy Taco Potatoes: Fun Customizations

Feel free to explore these delightful variations to make your Cheesy Taco Potatoes even more scrumptious and tailored to your taste!

  • Vegetarian Delight: Replace ground beef with black beans or lentils for a hearty, veggie-packed option that even meat lovers will savor.

  • Spicy Kick: Add diced jalapeños or a drizzle of hot sauce to the beef mixture to turn up the heat and give your potatoes an exciting twist.

  • Sweet Potato Swap: Try using sweet potatoes instead of russets for a naturally sweeter flavor and a vibrant color that will brighten up your meal.

  • Taco Bar Extravaganza: Set up a taco bar with toppings like guacamole, diced avocados, and different cheese options. Let everyone customize their own potato for a fun family activity!

  • Flavor Boost: Mix some corn or diced bell peppers into the beef filling for additional texture and a delightful burst of flavor, making each bite even more satisfying.

  • Creamy Alternative: Swap sour cream for Greek yogurt or a dairy-free alternative such as cashew cream for a lighter yet equally creamy topping.

  • Herbaceous Upgrade: Use fresh herbs like chives or parsley instead of cilantro to add a unique flavor profile to the potatoes. Each herb brings its own special touch.

  • Cheddar Blend: Experiment with different cheeses! Try Monterey Jack or Pepper Jack to add a kick of flavor that complements the taco seasoning beautifully.

These adaptations will not only enhance your Cheesy Taco Potatoes but also create a lively and engaging dinner experience! If you're interested in more cheesy goodness, don’t miss our Cheesy Corn Fritters or Taco Spaghetti Cheesy. Enjoy the creativity!

How to Store and Freeze Cheesy Taco Potatoes

Fridge: Store any leftover Cheesy Taco Potatoes in an airtight container for up to 3 days. Make sure they cool completely before sealing to maintain their texture.

Freezer: If you want to freeze them, wrap the individual stuffed potatoes tightly in plastic wrap or foil and place them in a freezer-safe bag. They can last up to 2 months!

Reheating: For best results, reheat frozen potatoes in the oven at 350°F (175°C) for about 25-30 minutes, until heated through. This ensures the cheese remains gooey and delicious!

Make-Ahead: You can prepare and stuff the potatoes ahead of time, then cover and refrigerate for up to 2 days. Bake them fresh just before serving for ultimate warmth and flavor.

Make Ahead Options

Cheesy Taco Potatoes are perfect for meal prep, saving you time on busy evenings! You can bake the potatoes up to 24 hours in advance, allowing them to cool completely before storing them in an airtight container in the refrigerator. The filling can be prepared ahead as well; cook the ground beef and sauté it with taco seasoning, then store it in the fridge for up to 3 days. When you're ready to serve, simply reheat the potatoes in the oven until warmed through, stuff them with the beef mixture, and top with cheese. This ensures your Cheesy Taco Potatoes are just as delicious, with crispy skins and melty cheese, ready to enjoy with minimal hassle!

What to Serve with Cheesy Taco Potatoes

There's something special about creating a full meal that complements the comfort of these delicious potatoes.

  • Crispy Tortilla Chips: Perfect for dipping into salsa, these chips add a satisfying crunch to your meal that contrasts beautifully with the creamy potatoes.
  • Fresh Green Salad: A light and refreshing salad with mixed greens, tomatoes, and vinaigrette balances the richness of the Cheesy Taco Potatoes.
  • Grilled Corn on the Cob: Juicy, sweet corn brings warmth and a touch of summer to the table, making it a delightful sidekick to your potatoes.
  • Spicy Black Bean Soup: This hearty soup not only enhances the meal but also offers a comforting spicy kick that pairs well with the cheesy goodness.
  • Mexican Street Corn Salad: Bright and flavorful, this salad combines lime, cotija cheese, and chili for a vibrant topping that echoes the flavors of your stuffed potatoes.
  • Margaritas or Sparkling Water: Pair these hearty potatoes with a refreshing margarita or sparkling water with lime for a fun, festive drink option that ties the meal together.
  • Fruit Salsa: A sweet and spicy medley of fruits like mango and pineapple offers a tropical twist that cuts through the savory elements of the dish.
  • Chocolate Avocado Mousse: For dessert, this creamy chocolate mousse is a rich, decadent finish that satisfies your sweet tooth without being overly heavy.

Let each side dish enhance your experience, creating a well-rounded meal bursting with flavors and textures!

Expert Tips for Cheesy Taco Potatoes

  • Perfect Potato Prep: Always scrub and pierce your potatoes before baking to ensure even cooking and prevent them from bursting in the oven.

  • Flavor Boosters: For richer flavor, try adding a splash of lime juice to your taco seasoning mix. It elevates the taste of your Cheesy Taco Potatoes!

  • Customize Wisely: Don’t be afraid to mix in your family's favorite ingredients like corn or bell peppers into the beef filling. It’s all about personalization!

  • Avoid Overcooking: Keep an eye on your baked potatoes; overcooking can lead to a mushy texture, especially when filling them later.

  • Cheese Alternatives: Prefer a healthier twist? Substitute regular cheese with a dairy-free option or simply reduce the cheese amount; your Cheesy Taco Potatoes will still shine!

Cheesy Taco Potatoes Recipe FAQs

What type of potatoes should I use for Cheesy Taco Potatoes?
For Cheesy Taco Potatoes, I recommend using Russet potatoes as they become perfectly fluffy when baked. If you're in the mood for a twist, substitute them with sweet potatoes for a sweeter flavor!

How should I store leftovers of Cheesy Taco Potatoes?
Absolutely! Store any leftover Cheesy Taco Potatoes in an airtight container in the fridge for up to 3 days. Make sure they cool to room temperature before sealing to help maintain their texture.

Can I freeze Cheesy Taco Potatoes, and how?
Yes, you can freeze Cheesy Taco Potatoes! Wrap each stuffed potato tightly in plastic wrap or aluminum foil, then place them in a freezer-safe bag. They will remain good for up to 3 months. When you're ready to enjoy them, simply reheat in the oven at 350°F (175°C) for around 25-30 minutes until heated through.

What if my Cheesy Taco Potatoes come out dry?
If your potatoes end up dry, it might be because they were baked too long. To avoid this, keep an eye on them, ensuring they become tender without overbaking. You can always add a dollop more of sour cream or salsa on top when serving for extra moisture and flavor.

Are there any dietary considerations for Cheesy Taco Potatoes?
Certainly! For a vegetarian option, swap the ground beef for black beans or cooked lentils. Always check for allergies related to dairy or certain toppings, and feel free to customize with non-dairy cheese or Greek yogurt if needed. Your family can enjoy this dish without compromise!

Cheesy Taco Potatoes

Cheesy Taco Potatoes: Your New Family Favorite Comfort Dish

Cheesy Taco Potatoes are a comforting and customizable dish blending the indulgence of melted cheese with savory toppings.
Print Recipe Pin Recipe
Prep Time 15 minutes mins
Cook Time 1 hour hr
Cooling Time 5 minutes mins
Total Time 1 hour hr 20 minutes mins
Servings: 4 potatoes
Course: Dinner
Cuisine: American
Calories: 450
Ingredients Equipment Method Nutrition Notes

Ingredients
  

For the Potatoes
  • 4 count Russet Potatoes Consider sweet potatoes for a sweeter twist.
  • 2 tablespoons Olive Oil Feel free to use vegetable oil if preferred.
  • 1 teaspoon Salt
  • 1 teaspoon Black Pepper
For the Filling
  • 1 pound Ground Beef Swap for black beans or lentils for a vegetarian option.
  • 1 packet Taco Seasoning Mix your own with chili powder, cumin, and garlic powder if needed.
For the Toppings
  • 1 cup Shredded Cheddar Cheese Switch to Monterey Jack or dairy-free cheese for a lighter choice.
  • 1/2 cup Sour Cream Greek yogurt makes a great tangy substitute.
  • 1/4 cup Chopped Green Onions Any fresh herbs can work beautifully here.
  • 1 cup Diced Tomatoes Fresh or canned both do the job well.
  • 1/2 cup Sliced Black Olives Omit if you're not a fan.
  • 1/4 cup Chopped Cilantro Can be swapped with parsley or omitted based on preference.
For Serving
  • 1 cup Fresh Salsa Make it fresh or grab your favorite store-bought version.

Equipment

  • Oven
  • Baking Sheet
  • Skillet
  • Fork

Method
 

Step-by-Step Instructions for Cheesy Taco Potatoes
  1. Preheat the oven to 400°F (200°C).
  2. Scrub and dry the Russet potatoes, pierce them with a fork, rub with olive oil, and season with salt and pepper.
  3. Place the prepared potatoes on a baking sheet and bake for 45-60 minutes until fork-tender.
  4. While the potatoes bake, heat a skillet over medium heat and brown the ground beef for about 5-7 minutes, draining excess fat.
  5. Add the taco seasoning and a splash of water to the beef, allowing it to simmer for about 5 minutes.
  6. Slice the baked potatoes lengthwise, fluff the insides with a fork.
  7. Stuff each potato half with the seasoned ground beef and sprinkle shredded cheddar cheese on top.
  8. Return to the oven and bake for an additional 10-15 minutes until the cheese is melted.
  9. Add fresh salsa, a dollop of sour cream, and optional cilantro or green onions on top before serving.

Nutrition

Serving: 1potatoCalories: 450kcalCarbohydrates: 50gProtein: 25gFat: 20gSaturated Fat: 10gPolyunsaturated Fat: 1.5gMonounsaturated Fat: 5gCholesterol: 70mgSodium: 800mgPotassium: 800mgFiber: 7gSugar: 3gVitamin A: 500IUVitamin C: 20mgCalcium: 200mgIron: 3mg

Notes

For best results, scrub and pierce potatoes before baking. Customize fillings with family favorites.

Tried this recipe?

Let us know how it was!

Delicious Vegetable Soup That Heals and Comforts You

December 3, 2025 by Grace Snow Leave a Comment

As the cool breeze begins to dance through my kitchen window, there’s nothing quite like whipping up a pot of Easy Vegetable Soup. This vibrant bowl of goodness isn’t just a soothing embrace for chilly nights; it's a testament to using fresh, seasonal ingredients. With every spoonful, the warmth of sautéed garlic and Italian herbs mingles harmoniously with bright lemon juice, transforming simple vegetables into a comforting masterpiece. One of the best perks? This soup is a customizable canvas, perfect for using up leftover veggies, and it’s both gluten-free and low-carb! So, whether you're a seasoned home chef or just craving a nourishing, homemade dish, I promise this delightful Vegetable Soup will quickly become a beloved staple in your kitchen. What unique twist will you add to make it your own?

Why is This Vegetable Soup a Must-Try?

Comforting, vibrant flavors: Each spoonful bursts with the rich essence of garlic and Italian herbs, made lively with fresh lemon juice.

Customizable: Perfect for using up whatever vegetables you have on hand, making meal prep a breeze.

Healthy and wholesome: Packed with nutrients, this soup is gluten-free and low-carb, making it an ideal choice for health-conscious eaters.

Quick to prepare: With just a few basic steps, you can have a delicious soup ready in no time, perfect for busy weeknights.

Serve it alongside some crusty bread or a light salad for a complete meal! And if you enjoy soups with vibrant flavors, you might also love Asparagus Soup Healthy or Lemon Chicken Soup for more comforting options!

Vegetable Soup Ingredients

• Dive into the delightful world of Vegetable Soup with these fresh ingredients that ensure every bowl is bursting with flavor!

For the Base

  • Extra Virgin Olive Oil – Adds richness and helps sauté the vegetables; substitute with avocado oil for a change.
  • Medium Onion, diced – Provides foundational flavor; shallots can offer a milder taste.
  • Carrots, peeled and sliced – Adds sweetness and texture; feel free to swap with any other root vegetable.
  • Celery ribs, sliced – Contributes crunch and depth; leeks can be a lovely substitute.
  • Garlic cloves, minced – Enhances aroma and flavor; use garlic powder if you're in a pinch, but fresh is the best!
  • Italian Seasoning – Infuses the soup with classic Italian herbs; fresh herbs bring an even livelier taste.
  • Kosher Salt – Balances flavors; adjust to taste, or use sea salt as an alternative.
  • Freshly Ground Black Pepper – Adds a touch of warmth; increase the amount for a spicier kick.

For the Heartiness

  • Yukon Gold Potatoes, peeled and diced – Adds heartiness and thickness; replace with sweet potatoes for a sweeter flavor.
  • Fresh Green Beans, chopped – Contributes a vibrant color; frozen green beans also do the trick.
  • Diced Tomatoes (canned) – Introduces acidity and elevates the broth; opt for fresh tomatoes when in season.

For the Broth

  • Low-Sodium Vegetable Broth – The base liquid for the soup; chicken broth works for a non-vegetarian twist.
  • Bay Leaves – Adds depth to the broth; remember to remove them before serving.

For Extra Flavor and Texture

  • Frozen Corn – Brings sweetness and texture; canned corn is a good alternative.
  • Frozen Peas – Offers a pop of color and sweetness; fresh peas can be used in season.
  • Fresh Lemon Juice – Brightens the overall flavor; other citrus juices can add a fun twist.
  • Chopped Fresh Parsley – Lends freshness and color; consider using other herbs like cilantro or basil.

With these ingredients, your Vegetable Soup is sure to be a heartwarming delight that not only nourishes the body but also soothes the soul!

Step‑by‑Step Instructions for Easy Vegetable Soup

Step 1: Sauté the Aromatics
In a large pot, heat 2 tablespoons of extra virgin olive oil over medium-high heat. Once shimmering, add 1 diced onion, 2 sliced carrots, and 2 sliced celery ribs. Sauté for about 4-5 minutes until the vegetables soften and the onion turns translucent. Stir in 3 minced garlic cloves, 1 tablespoon of Italian seasoning, 1 teaspoon kosher salt, and ½ teaspoon freshly ground black pepper, cooking for an additional 30 seconds until fragrant.

Step 2: Add the Hearty Vegetables
Next, incorporate 2 peeled and diced Yukon Gold potatoes, 1 cup of chopped fresh green beans, and 1 can of diced tomatoes (plus their juice) into the pot. Add 2 bay leaves and 4 cups of low-sodium vegetable broth, stirring to combine. Bring the mixture to a boil, then reduce the heat to low, cover, and let it simmer for about 20 minutes, until the potatoes are just fork-tender.

Step 3: Stir in the Frozen Veggies
After the potatoes have softened, remove the lid and stir in 1 cup of frozen corn and 1 cup of frozen peas. Allow the soup to cook for an additional 5-7 minutes, just until the frozen vegetables are heated through and bright. This will not only add color to your Easy Vegetable Soup but also enhance its nutritional value.

Step 4: Finish with Freshness
Once all the vegetables are tender, remove the pot from heat. Stir in the juice of 1 fresh lemon and ¼ cup of chopped fresh parsley, which will brighten the entire dish. Taste and adjust the seasoning if necessary. Your vibrant Easy Vegetable Soup is now ready to be ladled into bowls, offering warmth and comfort in every spoonful!

What to Serve with Easy Vegetable Soup

As the comforting aroma of your Easy Vegetable Soup fills the kitchen, it's time to think about what might perfectly complete this nourishing meal.

  • Crusty Bread: The ideal companion, perfect for soaking up the flavorful broth and adds a satisfying crunch to each bite.
  • Simple Green Salad: A light, fresh salad with a tangy vinaigrette balances the warmth of the soup, making for a refreshing duo.
  • Parmesan Cheese: A sprinkle of grated Parmesan adds rich umami and creaminess, enhancing flavors without overpowering the soup.
  • Garlic Toast: Crispy garlic bread complements the soup beautifully, infusing every mouthful with comforting garlicky goodness.
  • Herb-Infused Rice: A fluffy side of rice, seasoned with fresh herbs, provides a hearty texture that contrasts delightfully with the soup.
  • Roasted Vegetables: Seasoned and roasted veggies bring out caramelized sweetness, creating a delightful medley of flavors alongside your soup.
  • Lemon-Infused Quinoa: Light and nutritious, the citrus notes in quinoa echo the lemon in the soup, creating a harmonious flavor experience.
  • Sparkling Water: A refreshing drink option that cleanses the palate, allowing the vibrant flavors of the soup to shine.
  • Fruit Salad: A bowl of fresh fruit adds a sweet contrast, rounding out your meal with a burst of color and natural sweetness.
  • Chocolate Mousse: End on a sweet note with a light, airy dessert that feels decadent yet complements your cozy soup perfectly.

Vegetable Soup Variations & Substitutions

Feel free to make this delicious Vegetable Soup uniquely yours by exploring these tantalizing variations. Your next bowl could be just a twist away!

  • Dairy-Free: Substitute olive oil with coconut milk for a creamy, rich texture without dairy. This adds an exquisite sweetness, complementing the vibrant veggies beautifully.

  • Low-Sodium: Opt for homemade broth using fresh vegetables and herbs to control sodium levels while enhancing flavor. It's a wholesome way to serve your family a healthier option!

  • Flavor Boost: Add a spoonful of pesto or some freshly grated Parmesan cheese just before serving for an extra layer of umami goodness. The aromatic herbs will elevate the dish to new heights.

  • Hearty Grains: Stir in some cooked quinoa or farro for a more filling soup. These grains provide a delightful chewy texture and make the soup even more satisfying.

  • Extra Veggies: Try adding seasonal vegetables like zucchini, bell peppers, or spinach for a colorful twist. These can add both vibrancy and nutrients, making your soup even healthier.

  • Spicy Kick: For those who crave heat, include red pepper flakes or a dash of your favorite hot sauce. Adjust the spice level to your liking – it's sure to warm the soul!

  • Vegan Protein: Toss in a cup of cooked lentils or chickpeas to make the soup heartier while providing plant-based protein. This addition will leave you feeling full and energized.

  • Herb Varieties: Switch up fresh herbs by using basil or cilantro instead of parsley to create an entirely new flavor profile. Each herb brings its unique flair, ensuring no two bowls are ever the same.

With these creative modifications, you're on your way to crafting a Vegetable Soup that's not just loving and nourishing, but a true expression of your culinary creativity. And if you're looking for more comforting soups, don’t miss out on Zuppa Toscana Soup or Egg Drop Soup for an exciting variety!

Make Ahead Options

These Easy Vegetable Soup preparations are a lifesaver for busy weeknights! You can chop vegetables and sauté the aromatics up to 24 hours in advance. Simply refrigerate the prepped ingredients separately in airtight containers to maintain freshness. When you're ready to enjoy this comforting soup, just combine the sautéed vegetables with the remaining ingredients and simmer as directed. Additionally, you can prepare the entire soup a day ahead; just refrigerate it and reheat on the stove when it’s time to serve. The flavors will meld beautifully, making it just as delicious as fresh! Enjoy the effortless time-saving this vegetable soup brings to your kitchen!

Expert Tips for Easy Vegetable Soup

  • Sauté First: Properly sautéing the mirepoix (carrots, celery, onion) enhances the depth of flavor. Don’t rush this step!

  • Customize to Taste: Use any leftover vegetables you have in your fridge. Just remember to add delicate greens like spinach towards the end to keep them vibrant.

  • Check Your Broth: Always taste your broth before adding salt. Low-sodium broth can be deceiving, so adjust seasoning to ensure your Vegetable Soup is perfectly balanced.

  • Texture Matters: For a heartier texture, don’t be afraid to mash some of the potatoes in the pot before serving. This thickens the soup without adding extra calories!

  • Brighten it Up: Fresh lemon juice makes a world of difference in flavor. Try varying citrus fruits for a unique twist each time you make this soup!

  • Proper Storage: This Vegetable Soup keeps well in the fridge and can be frozen, but avoid adding peas or corn if you plan to freeze it. They may become mushy upon reheating.

How to Store and Freeze Vegetable Soup

Fridge: Store your Vegetable Soup in an airtight container for up to 5 days. Allow the soup to cool before sealing to prevent condensation.

Freezer: Portion out the soup into individual airtight containers or freezer bags. It can be frozen for up to 3 months for quick meals later on.

Reheating: Thaw frozen soup in the fridge overnight or use the microwave. Reheat on the stovetop over low heat until warmed through, adding a splash of water or broth if needed.

Avoiding Mushiness: If you plan to freeze the Vegetable Soup, consider omitting peas and corn until reheating to maintain their texture.

Easy Vegetable Soup Recipe FAQs

What vegetables should I use for the best flavor in vegetable soup?
Absolutely! When choosing vegetables for your Easy Vegetable Soup, opt for fresh, seasonal produce to enhance flavor. Look for firm vegetables without dark spots; they indicate ripeness. Classic choices include onions, carrots, and celery for the base, while adding zucchini, green beans, or kale can elevate your soup. Feel free to make substitutions based on what you have on hand!

How long can I store this vegetable soup in the refrigerator?
Your Easy Vegetable Soup can be stored in an airtight container in the refrigerator for up to 5 days. Allow it to cool completely before sealing to keep moisture from forming. Just remember to reheat it gently on the stovetop to preserve the delightful flavors and textures!

Can I freeze vegetable soup and for how long?
Yes, you can freeze your Easy Vegetable Soup! Pour it into individual airtight containers or freezer bags, ensuring you leave a little space for expansion. It will keep well in the freezer for up to 3 months. For the best texture, consider omitting delicate vegetables like peas and corn before freezing; add them back in when you reheat to keep them vibrant and crisp!

What if my vegetable soup is too thick?
Very good question! If you find your soup has thickened more than you'd like, simply stir in a bit of extra vegetable broth or water until you reach your desired consistency. It's always a good idea to taste and adjust the seasoning accordingly, particularly if you've added extra liquid.

Can this soup be made gluten-free?
Absolutely! The Easy Vegetable Soup is naturally gluten-free as long as you use gluten-free vegetable broth. Just be sure that any additional ingredients you may add (like store-bought pasta or beans) are also labeled gluten-free to ensure everyone can enjoy this comforting dish!

Is this soup suitable for my dog?
While some ingredients are safe for dogs—like carrots and peas—remember to keep it simple and avoid adding salt, garlic, or onions, which can be harmful to pets. It's best to prepare a separate batch for your furry friend, using dog-safe veggies, to keep them happy and healthy!

Vegetable Soup

Delicious Vegetable Soup That Heals and Comforts You

This comforting vegetable soup is a delightful blend of fresh ingredients, perfect for chilly nights and customizable to your taste.
Print Recipe Pin Recipe
Prep Time 10 minutes mins
Cook Time 30 minutes mins
Total Time 40 minutes mins
Servings: 6 servings
Course: Soups
Cuisine: Italian
Calories: 150
Ingredients Equipment Method Nutrition Notes

Ingredients
  

For the Base
  • 2 tablespoons Extra Virgin Olive Oil substitute with avocado oil for a change
  • 1 medium Onion, diced shallots can offer a milder taste
  • 2 medium Carrots, peeled and sliced feel free to swap with any other root vegetable
  • 2 ribs Celery, sliced leeks can be a lovely substitute
  • 3 cloves Garlic, minced use garlic powder if you're in a pinch, but fresh is the best!
  • 1 tablespoon Italian Seasoning fresh herbs bring an even livelier taste
  • 1 teaspoon Kosher Salt adjust to taste, or use sea salt as an alternative
  • ½ teaspoon Freshly Ground Black Pepper increase for a spicier kick
For the Heartiness
  • 2 medium Yukon Gold Potatoes, peeled and diced replace with sweet potatoes for a sweeter flavor
  • 1 cup Fresh Green Beans, chopped frozen green beans also work
  • 1 can Diced Tomatoes opt for fresh tomatoes when in season
For the Broth
  • 4 cups Low-Sodium Vegetable Broth chicken broth works for a non-vegetarian twist
  • 2 leaves Bay Leaves remove before serving
For Extra Flavor and Texture
  • 1 cup Frozen Corn canned corn is a good alternative
  • 1 cup Frozen Peas fresh peas can be used in season
  • 1 tablespoon Fresh Lemon Juice other citrus juices can add a fun twist
  • ¼ cup Chopped Fresh Parsley consider using other herbs like cilantro or basil

Equipment

  • Large pot

Method
 

Step‑by‑Step Instructions
  1. In a large pot, heat 2 tablespoons of extra virgin olive oil over medium-high heat. Once shimmering, add 1 diced onion, 2 sliced carrots, and 2 sliced celery ribs. Sauté for about 4-5 minutes until the vegetables soften and the onion turns translucent. Stir in 3 minced garlic cloves, 1 tablespoon of Italian seasoning, 1 teaspoon kosher salt, and ½ teaspoon freshly ground black pepper, cooking for an additional 30 seconds until fragrant.
  2. Next, incorporate 2 peeled and diced Yukon Gold potatoes, 1 cup of chopped fresh green beans, and 1 can of diced tomatoes (plus their juice) into the pot. Add 2 bay leaves and 4 cups of low-sodium vegetable broth, stirring to combine. Bring the mixture to a boil, then reduce the heat to low, cover, and let it simmer for about 20 minutes, until the potatoes are just fork-tender.
  3. After the potatoes have softened, remove the lid and stir in 1 cup of frozen corn and 1 cup of frozen peas. Allow the soup to cook for an additional 5-7 minutes, just until the frozen vegetables are heated through and bright.
  4. Once all the vegetables are tender, remove the pot from heat. Stir in the juice of 1 fresh lemon and ¼ cup of chopped fresh parsley. Taste and adjust the seasoning if necessary.

Nutrition

Serving: 1cupCalories: 150kcalCarbohydrates: 25gProtein: 5gFat: 4gSaturated Fat: 1gPolyunsaturated Fat: 1gMonounsaturated Fat: 2gSodium: 400mgPotassium: 600mgFiber: 6gSugar: 4gVitamin A: 2500IUVitamin C: 15mgCalcium: 60mgIron: 2mg

Notes

This Vegetable Soup keeps well in the fridge for up to 5 days and can be frozen for up to 3 months. Avoid adding peas or corn if you plan to freeze it.

Tried this recipe?

Let us know how it was!

Tender Pot Roast Slow Cooker Recipe for Ultimate Comfort

December 3, 2025 by Grace Snow Leave a Comment

The aroma of a home-cooked meal can evoke cherished memories, transporting me back to family gatherings filled with laughter and warmth. Today, I’m excited to share my recipe for Slow Cooker Pot Roast, a quintessential comfort meal that wraps your kitchen in a savory embrace. With just a little prep time, this dish transforms tender chuck roast and hearty vegetables into a soul-soothing feast that practically cooks itself. It’s perfect for busy weeknights and is guaranteed to be a crowd-pleaser at cozy family dinners. Plus, this gluten-free recipe ensures that everyone can enjoy a plateful of nostalgia without worry. Are you ready to dive into the simplicity and deliciousness of this pot roast slow cooker masterpiece? Let’s get cooking!

Why is Pot Roast Slow Cooker a Must-Try?

Simplicity at Its Finest: This pot roast slow cooker recipe requires minimal prep and effort, making it the perfect solution for busy cooks.

Unforgettable Flavor: The slow cooking process melds the rich, savory flavors of beef, herbs, and vegetables, creating a delicious aroma that will have your family gathering around the table.

Comfort in Every Bite: Enjoy fork-tender beef paired with perfectly cooked root vegetables drowned in a luscious gravy—just like your grandma used to make!

Versatile Enjoyment: Serve it with crusty bread, or try it over mashed potatoes for an even heartier experience. And don't forget to check out my Roasted Sweet Potatoes as a delightful side!

Leftover Magic: This recipe makes great leftovers! Store it away for easy meals later in the week, or consider making a comforting stew with the extras, just like my Crock Pot Chicken.

With its mouthwatering appeal and ease of preparation, you’ll wonder how you ever lived without this pot roast slow cooker gem!

Pot Roast Slow Cooker Ingredients

For the Meat

  • Chuck Roast (3–4 lb) – The ideal cut for slow cooking, ensuring tenderness and rich flavor thanks to its marbling.

For the Vegetables

  • Yellow Onion (1, sliced) – Adds a sweet depth that dissolves into a flavorful broth as it cooks.
  • Carrots (4, cut into chunks) – Contributes natural sweetness and visual appeal; larger pieces prevent mushiness.
  • Gold Potatoes (4, quartered) – Maintains shape while absorbing the flavorful broth; avoid overcutting for best texture.
  • Garlic (3 cloves, minced) – Enhances the dish’s earthy richness; use crushed cloves for a milder flavor if desired.

For the Broth and Seasoning

  • Beef Broth (2 cups) – Forms the savory base; opt for low-sodium for better control over the flavors.
  • Worcestershire Sauce (1 tbsp) – Adds depth with a slight tang that perfectly balances the richness.
  • Salt (1 tsp) – Essential for enhancing the overall flavor profile.
  • Black Pepper (½ tsp) – Complements the other seasonings for a well-rounded taste.
  • Dried Thyme (1 tsp) – A classic herb for beef that brings woodsy undertones to the dish.
  • Bay Leaf (1) – Introduces aromatic depth as it cooks.

This pot roast slow cooker recipe is sure to bring warmth and comfort to your family dinners!

Step‑by‑Step Instructions for Pot Roast Slow Cooker

Step 1: Prepare the Chuck Roast
Pat the chuck roast dry with paper towels, ensuring it's free of moisture for better searing. Generously season the roast with salt and black pepper on all sides, creating a flavorful base for your pot roast slow cooker dish. This important step enhances the overall taste of the meat throughout the cooking process.

Step 2: Sear the Roast
In a large skillet, heat 1 tablespoon of olive oil over medium-high heat until it shimmers. Carefully place the seasoned roast in the skillet and sear for 2-3 minutes per side, or until a golden brown crust forms. This step helps to lock in the juices and flavors as the pot roast slow cooker works its magic.

Step 3: Layer the Vegetables
While the roast is searing, prepare your slow cooker by layering sliced yellow onions at the bottom. Next, arrange the carrot chunks and quartered gold potatoes on top of the onions, creating a colorful and hearty vegetable base. This arrangement will ensure that the vegetables absorb all the delicious flavors during cooking.

Step 4: Add Aromatics and Seasonings
Sprinkle the minced garlic evenly over the layered vegetables, followed by dried thyme and Worcestershire sauce. This combination will infuse the vegetables with rich aroma and depth of flavor as your pot roast slow cooker does its job. Make sure the seasonings are evenly distributed for maximum impact.

Step 5: Place the Roast on Top
Carefully transfer the seared chuck roast to the slow cooker, positioning it right on top of the vegetables. This setup allows the natural juices from the roast to flow down onto the veggies as they cook together, enhancing the flavors of your pot roast slow cooker masterpiece.

Step 6: Add the Broth
Pour in 2 cups of beef broth around the roast, ensuring that the vegetables are nearly covered but the roast remains above the liquid. The broth will create a rich, flavorful base while maintaining the dish's perfect balance. This step is crucial for achieving that comforting, juicy end result.

Step 7: Start Cooking
Cover the slow cooker with the lid and set it to cook on low for 8 hours or high for 4-5 hours. Avoid lifting the lid during cooking, as this can release steam and affect the cooking time. The slow, even heat will make the meat fork-tender and allow all flavors to meld beautifully.

Step 8: Final Touches and Serving
Once the cooking time is up, carefully remove the bay leaf from the pot roast slow cooker. Let the roast rest for about 10 minutes before slicing; this step retains the flavorful juices, ensuring each bite is moist and succulent. Serve your delicious pot roast with the cooked vegetables and enjoy the heartwarming flavors.

How to Store and Freeze Pot Roast Slow Cooker

Fridge: Store leftover pot roast in an airtight container for up to 4 days. This keeps the meat moist and retains the flavors of the gravy and vegetables.

Freezer: If you want to keep it longer, freeze pot roast for up to 3 months. Place it in a freezer-safe container or wrap it tightly in plastic wrap and aluminum foil to prevent freezer burn.

Thawing: When you're ready to enjoy your frozen pot roast again, thaw it in the refrigerator overnight. This gradual thawing helps maintain the meat's texture and juiciness.

Reheating: To reheat, warm the pot roast slow cooker on the stove over low heat until heated through. Add a splash of beef broth if needed to rejuvenate the gravy.

Pot Roast Slow Cooker Variations

Feel free to personalize this comforting recipe and make it your own with these delightful variations!

  • Different Cuts: Substitute brisket or bottom round for chuck roast to explore new flavors. Each cut brings its own unique texture, ensuring a delicious result.

  • Root Veggies Galore: Add parsnips or turnips into the mix for extra sweetness and depth. Their unique flavors can elevate the dish, bringing a fresh twist to classic comfort.

  • Herb Boost: Sprinkle in flavors like rosemary or parsley for a fragrant finish. These herbs not only add vibrancy but also enhance the overall earthy notes of your pot roast.

  • Spicy Kick: Add a few slices of jalapeño or a teaspoon of red pepper flakes to spice things up. This gentle heat can add excitement to your comforting dish.

  • Luscious Gravy: For a thicker gravy, mix a tablespoon of cornstarch with cold water and stir it into the broth in the last 30 minutes of cooking. This trick ensures you grab every bit of flavor on your plate!

  • Wine Wonders: Deglaze the skillet after searing your roast with a splash of red wine before pouring into the slow cooker. This adds a rich depth that transforms your dish into a gourmet delight.

  • Paleo-Friendly: Swap traditional beef broth for bone broth for an even richer, nourishing base that's perfect for a paleo diet. This adds health benefits without compromising taste.

  • Vegetarian Option: Season robust mushrooms like shiitake and a plant-based protein in place of beef for a hearty vegetarian alternative that doesn’t skimp on flavor.

With these variations, your pot roast slow cooker creation can be as unique and exciting as the memories it will create. For a perfect side, consider pairing it with some flavorful Roasted Sweet Potatoes or my comforting One Pot Salmon recipe to round out the meal. Enjoy crafting your delicious, heartwarming dish!

Expert Tips for Pot Roast Slow Cooker

  • Searing is Key: Sear the roast well to develop a flavorful crust, which enriches the overall taste of your pot roast slow cooker dish.

  • Vegetable Size Matters: Cut vegetables into larger chunks to prevent them from becoming mushy during the long cooking process.

  • Don’t Peek: Avoid lifting the lid while cooking; steam is essential for proper cooking and tenderness of the meat.

  • Rest for Juiciness: Allow the roast to rest for 10 minutes before slicing. This helps the juices redistribute, keeping the beef moist.

  • Season Wisely: Use low-sodium beef broth to control salt levels; this way, you're in charge of seasoning your pot roast slow cooker perfectly without overwhelming flavors.

What to Serve with Tender Pot Roast Slow Cooker?

Transform your comforting pot roast into an unforgettable meal with these delightful sides and pairings that complement its rich flavors beautifully.

  • Creamy Mashed Potatoes: The ultimate comfort food, these velvety potatoes soak up the flavorful gravy perfectly, enhancing every bite of the pot roast slow cooker.

  • Roasted Brussels Sprouts: With their caramelized edges and earthy flavor, these sprouts bring a satisfying crunch that beautifully contrasts the tender roast.

  • Honey Glazed Carrots: Adding a touch of sweetness, these tender-glazed carrots make for a colorful, palate-pleasing side that brightens the plate.

  • Fresh Garden Salad: Crisp greens and bright veggies drizzled with a zesty vinaigrette provide a refreshing contrast to the hearty pot roast slow cooker.

  • Crusty Bread: A loaf of warm, crusty bread is perfect for sopping up every delicious drop of gravy, rounding out this comforting meal.

  • Red Wine: A smooth, medium-bodied red wine enhances the savory flavors of the roast, making your dining experience feel extra special.

  • Chocolate Cake: For dessert, indulge in a rich chocolate cake that offers a decadent sweet finish to this sumptuous meal. It adds a delightful endnote to all that savory goodness!

Make Ahead Options

These Pot Roast Slow Cooker preparations are perfect for busy home cooks looking to save time without sacrificing flavor! You can season and sear the chuck roast up to 24 hours in advance; simply wrap it tightly in plastic wrap and store it in the refrigerator. Additionally, you can chop the vegetables (onions, carrots, and potatoes) and keep them in an airtight container for up to 3 days. When you’re ready to cook, layer the vegetables in the slow cooker, add the roast, and pour in the beef broth. This method ensures your pot roast slow cooker dish remains just as delicious, offering you the comforting taste of home-cooked goodness with minimal effort on busy nights!

Pot Roast Slow Cooker Recipe FAQs

What cut of beef is best for a pot roast slow cooker?
Absolutely! Chuck roast is the ideal cut for this recipe due to its ample marbling, which renders the meat tender and flavorful during the slow cooking process. The more marbling, the better the result!

How should I store leftovers from the pot roast slow cooker?
Leftovers can be stored in airtight containers for up to 4 days in the fridge. Make sure to seal them well to keep the flavors intact and prevent drying out. It’s always a joy to enjoy the comforting taste of pot roast for leftovers!

Can I freeze pot roast slow cooker leftovers?
Yes, you can! I recommend freezing your pot roast for up to 3 months. To do this, let it cool completely, then place it in a freezer-safe container or tightly wrap in plastic wrap and aluminum foil. This prevents freezer burn and keeps the flavors fresh!

What’s the best way to reheat frozen pot roast slow cooker?
When you're ready to enjoy your frozen pot roast, thaw it in the refrigerator overnight to maintain its juicy texture. Once thawed, reheat it gently on the stove over low heat, adding a splash of beef broth if necessary to bring back its rich gravy consistency.

How can I avoid mushy vegetables in my pot roast slow cooker?
Great question! To prevent mushy veggies, cut them into larger chunks and layer them properly in the slow cooker. By placing the denser vegetables like potatoes at the bottom and adding sturdier carrots in larger pieces, you'll achieve that perfect texture and retain their vibrant flavors.

Is pot roast slow cooker recipe gluten-free?
Very! This recipe is inherently gluten-free as long as you use gluten-free beef broth and Worcestershire sauce. Always check the labels of your ingredients to ensure they meet your dietary needs, so everyone can enjoy this comforting dish!

Pot Roast Slow Cooker

Tender Pot Roast Slow Cooker Recipe for Ultimate Comfort

This Pot Roast Slow Cooker recipe combines tenderness with rich flavors, perfect for family dinners.
Print Recipe Pin Recipe
Prep Time 20 minutes mins
Cook Time 8 hours hrs
Resting Time 10 minutes mins
Total Time 8 hours hrs 30 minutes mins
Servings: 6 servings
Course: Dinner
Cuisine: American
Calories: 350
Ingredients Equipment Method Nutrition Notes

Ingredients
  

For the Meat
  • 3–4 lb Chuck Roast Ideal cut for slow cooking.
For the Vegetables
  • 1 Yellow Onion, sliced Adds sweetness.
  • 4 Carrots, cut into chunks Natural sweetness.
  • 4 Gold Potatoes, quartered Maintains shape.
  • 3 cloves Garlic, minced Enhances earthy flavors.
For the Broth and Seasoning
  • 2 cups Beef Broth Opt for low-sodium.
  • 1 tbsp Worcestershire Sauce Adds depth.
  • 1 tsp Salt Enhances overall flavor.
  • ½ tsp Black Pepper For balanced taste.
  • 1 tsp Dried Thyme Brings woodsy undertones.
  • 1 Bay Leaf Introduces aromatic depth.

Equipment

  • Slow Cooker
  • Skillet

Method
 

Cooking Instructions
  1. Pat the chuck roast dry and season with salt and black pepper.
  2. Sear the roast in a skillet with olive oil over medium-high heat for 2-3 minutes per side.
  3. Layer sliced onions in the slow cooker, followed by carrots and potatoes.
  4. Sprinkle minced garlic, thyme, and Worcestershire sauce over vegetables.
  5. Place the seared roast on top of the vegetables.
  6. Pour in beef broth ensuring the vegetables are nearly covered.
  7. Cover and cook on low for 8 hours or high for 4-5 hours.
  8. Remove the bay leaf and let the roast rest for 10 minutes before slicing.

Nutrition

Serving: 1servingCalories: 350kcalCarbohydrates: 30gProtein: 40gFat: 15gSaturated Fat: 6gPolyunsaturated Fat: 1gMonounsaturated Fat: 8gCholesterol: 120mgSodium: 800mgPotassium: 800mgFiber: 5gSugar: 4gVitamin A: 800IUVitamin C: 10mgCalcium: 50mgIron: 3mg

Notes

This pot roast recipe makes great leftovers and can be turned into a stew.

Tried this recipe?

Let us know how it was!

Crispy Parmesan Crusted Baked Salmon That’ll Wow Your Taste Buds

December 3, 2025 by Grace Snow Leave a Comment

The aroma of lemon and garlic wafting through my kitchen brings back memories of family dinners filled with laughter and joy. Today, I’m excited to share my recipe for Crispy Parmesan Crusted Baked Salmon, a dish that effortlessly combines the comfort of home cooking with a healthy touch. Perfect for weeknight meals or special occasions, this easy recipe provides an impressive yet simple way to serve salmon that’s both low in fat and packed with flavor. With just a few fresh ingredients, you can create a gourmet experience right at home, ensuring everyone leaves the table satisfied. Are you ready to elevate your dinner game with this delightful dish? Keep scrolling to see how it’s done!

Why Is This Salmon Recipe a Must-Try?

Quick Preparation: With just a few simple steps, you’ll have a healthy meal on the table in 30 minutes or less.

Crispy Texture: The combination of finely grated Parmesan and fresh herbs creates a mouthwatering crust that contrasts beautifully with the tender salmon underneath.

Flavor Explosion: The zesty lemon juice and aromatic garlic powder elevate the flavor profile, making each bite a delight.

Versatile Options: Feel free to switch up the fish with options like trout or tilapia, or add fresh herbs such as dill to give it your personal touch. This recipe is fantastic alongside sides like Crispy Fish Taco Bowls or One Pot Salmon.

Crowd-Pleasing: Perfect for family dinners or impressing guests, this dish marries health and indulgence effortlessly!

Storage Friendly: Leftovers can be easily refrigerated and reheated without sacrificing that crispy topping, so it's a win-win for meal prep lovers.

Crispy Parmesan Crusted Baked Salmon Ingredients

• Here’s what you’ll need for this healthy delight!

For the Salmon

  • Salmon Fillet – Fresh salmon fillets yield the best flavor and texture for this dish.
  • Olive Oil – Drizzle this for moisture and to help the crust adhere beautifully.
  • Lemon Juice – Fresh lemon juice brightens the salmon's flavor; bottled works in a pinch.

For the Topping

  • Parmesan Cheese – Finely grated Parmesan creates that perfect crispy crust that everyone loves.
  • Dried Parsley – Adds color and flavor; fresh parsley can be used for an extra boost.
  • Garlic Powder – Gives an aromatic flavor, but feel free to substitute with minced garlic if needed.
  • Salt & Pepper – Essential for enhancing all the flavors; adjust to your preference!

Perfect for a healthy meal, these ingredients come together in the Crispy Parmesan Crusted Baked Salmon recipe for a dish that offers taste and nutrition without compromise!

Step‑by‑Step Instructions for Crispy Parmesan Crusted Baked Salmon

Step 1: Preheat the Oven
Begin by preheating your oven to 400°F (200°C). This crucial step ensures that your Crispy Parmesan Crusted Baked Salmon gets that perfect golden crust. While waiting for the oven to reach temperature, gather all your ingredients and feel free to line the baking sheet with parchment paper for easy cleanup.

Step 2: Prepare the Baking Sheet
Line a baking sheet with parchment paper to prevent sticking and make for easy cleanup. Place the fresh salmon fillet skin-side down on the lined sheet. The parchment paper will help the salmon's skin get crispy without sticking, while also making sure the fish stays intact when serving.

Step 3: Drizzle with Olive Oil and Lemon Juice
Generously drizzle olive oil and fresh lemon juice over the salmon fillet. The oil adds moisture while the lemon brightens the overall flavor of the dish. Be sure to coat the entire surface so the crust adheres well later on.

Step 4: Mix the Topping Ingredients
In a small bowl, combine finely grated Parmesan cheese, dried parsley, garlic powder, and a sprinkle of salt and pepper. Stir until the ingredients are evenly mixed. This delightful blend creates the crispy crust that makes the Crispy Parmesan Crusted Baked Salmon so irresistible.

Step 5: Apply the Parmesan Mixture
Sprinkle the Parmesan topping over the salmon fillet, pressing it down gently to ensure it sticks well. An even layer will guarantee each bite delivers that wonderful crispy texture. This step is pivotal for achieving that gourmet look and flavor.

Step 6: Bake the Salmon
Carefully place the baking sheet into the preheated oven and bake for approximately 12 to 15 minutes. Keep an eye on the salmon; it’s ready when the topping is golden brown, and the fish flakes easily with a fork.

Step 7: Serve and Enjoy
Once baked to perfection, remove your Crispy Parmesan Crusted Baked Salmon from the oven. Let it rest for a couple of minutes before serving. This brief cooling period allows the juices to settle, enhancing the flavor and texture for a delightful dining experience.

What to Serve with Crispy Parmesan Crusted Baked Salmon?

As you prepare the perfect meal, let your senses explore these delightful pairings that will elevate your dining experience.

  • Roasted Asparagus: The vibrant, slightly charred flavors of roasted asparagus add a fresh contrast to the rich salmon.
  • Quinoa Salad: Light and nutty, quinoa pairs well with the savory topping, creating a wholesome balance of textures in each bite.
  • Lemon-Herb Roasted Potatoes: Crispy on the outside, creamy on the inside, these potatoes enhance the dish with complementary flavors.
  • Creamy Garlic Mashed Potatoes: The rich, creamy texture of these mashed potatoes beautifully contrasts the crispy crust of the salmon, making every mouthful a delight.
  • Steamed Green Beans: Crisp-tender green beans provide a refreshing crunch, brightening the plate and palate alongside the baked salmon.
  • Light Vinaigrette Salad: A refreshing salad with a tangy vinaigrette cleanses the palate while harmonizing beautifully with the flavors of the dish.
  • Citrus-infused Sparkling Water: This effervescent drink offers a refreshing lift, enhancing the vibrant flavors of the salmon and brightening your dining experience.
  • Lemon Tart: To finish your meal on a sweet note, a zesty lemon tart offers a delightful balance of acidity and sweetness, perfect for and all seafood lovers.

Make Ahead Options

These Crispy Parmesan Crusted Baked Salmon fillets are perfect for meal prep lovers looking to save time during busy weeknights! You can season the salmon and apply the Parmesan topping up to 24 hours in advance—simply cover the prepared fillets with plastic wrap and refrigerate. This allows the flavors to meld beautifully while preventing the topping from losing its crispness. When you're ready to serve, simply preheat the oven, bake the salmon directly from the fridge for 12 to 15 minutes (no need to thaw), and enjoy restaurant-quality results with minimal effort. You'll be left with a delightful dish that’s just as delicious as when made fresh!

Variations for Crispy Parmesan Crusted Baked Salmon

Discover how to make this delightful dish your own by trying out these fun twists and swaps!

  • Fish Swap: Substitute salmon with tilapia or trout for a different flavor profile that’s just as delicious! Each type brings its unique characteristics to the table—experiment to find your favorite!

  • Herb Boost: Fresh herbs like dill or cilantro can elevate the dish’s freshness. Simply mix them into the topping or sprinkle over the salmon before serving for an aromatic flavor kick!

  • Zesty Upgrade: Adding lemon zest to the crust enhances that bright flavor. Just a teaspoon can take your dish from good to absolutely zesty!

  • Cheese Choices: Try using pecorino romano instead of Parmesan for a sharper, bolder crust. This twist will surprise your taste buds and offer a delightful change!

  • Veggie Crunch: Enhance the texture by incorporating crushed nuts like almonds or hazelnuts into the crust. It adds a delightful crunch that's hard to resist!

  • Spicy Kick: Add red pepper flakes to the topping for a little heat, perfect for those who enjoy a spicy edge to their meals. Balance the flavors by adjusting the amount to your taste.

  • Citrus Variations: Swap lemon juice with lime or orange juice for a refreshing twist. The citrus notes will bright up the flavors in a whole new way!

  • Gourmet Touch: Drizzle a balsamic reduction over the baked salmon before serving to introduce a sweet and tangy finish that pairs wonderfully with the crispy crust.

These options are just the beginning! Whether you're pairing this dish with sides like Crispy Fish Taco Bowls or Cocoa Crusted Steak, let your culinary creativity shine!

Storage Tips for Crispy Parmesan Crusted Baked Salmon

Fridge: Store leftovers in an airtight container within 2 hours of cooking. Enjoy them within 2-3 days for optimal freshness and flavor.

Freezer: If needed, you can freeze the salmon for up to 2 months. Place it in a freezer-safe container, ensuring it's tightly sealed to prevent freezer burn.

Reheating: For the best results, reheat in the oven at 350°F (175°C) for approximately 10-15 minutes, ensuring the crispiness of the topping on your Crispy Parmesan Crusted Baked Salmon is preserved.

Room Temperature: Avoid leaving the salmon out at room temperature for more than 2 hours to maintain safety and quality.

Expert Tips for Crispy Parmesan Crusted Baked Salmon

  • Perfect Preheat: Ensure your oven is fully preheated before baking to achieve that crispy topping that makes this salmon so irresistible.

  • Avoid Overcrowding: Give each salmon fillet room on the baking sheet. Overcrowding can lead to uneven cooking and a soggy crust.

  • Season Generously: Don’t skimp on the salt and pepper! A good seasoning enhances the flavors of this Crispy Parmesan Crusted Baked Salmon, making every bite pop.

  • Monitor Your Time: Keep an eye on the clock; baking for too long can dry out the salmon. Aim for 12-15 minutes for the best texture.

  • Reheat Wisely: If you have leftovers, reheat gently in the oven or air fryer to preserve that delightful crispiness.

  • Experiment with Herbs: Feel free to mix in fresh herbs like dill or cilantro for added flavor diversity in your Crispy Parmesan Crusted Baked Salmon.

Crispy Parmesan Crusted Baked Salmon Recipe FAQs

What kind of salmon is best to use for this recipe?
Absolutely! Fresh salmon fillets yield the best flavor and texture for your Crispy Parmesan Crusted Baked Salmon. Look for fillets that are brightly colored and free of dark spots or signs of browning. If fresh isn’t available, thawed frozen salmon is also a great option.

How should I store leftovers of Crispy Parmesan Crusted Baked Salmon?
I recommend storing any leftovers in an airtight container within 2 hours of cooking. They’ll stay fresh in the refrigerator for 2-3 days. If you're a meal prep lover, simply reheat gently in the oven or an air fryer at 350°F (175°C) for about 10-15 minutes to regain that delightful crispy texture.

Can I freeze the leftover salmon?
Yes, you can freeze your Crispy Parmesan Crusted Baked Salmon! Place it in a freezer-safe container, tightly sealed to prevent freezer burn, and it will be good for up to 2 months. When you’re ready to enjoy it again, let it thaw in the refrigerator overnight before reheating.

What if my salmon isn’t crispy enough after baking?
Very! If you find that your salmon isn’t crispy enough after the baking time, you can pop it under the broiler for an additional 1-2 minutes. Just keep an eye on it, as broilers can vary in strength and you don’t want to overcook the salmon!

Is this dish safe for people with allergies?
Always! This recipe contains fish and dairy (Parmesan cheese), which are common allergens. If you’re serving someone with allergies, consider using alternatives: a dairy-free cheese can replace Parmesan, and you might substitute the salmon with a safe fish option. Always check labels to ensure safety!

Crispy Parmesan Crusted Baked Salmon

Crispy Parmesan Crusted Baked Salmon That’ll Wow Your Taste Buds

A delightful Crispy Parmesan Crusted Baked Salmon that blends comfort and health, perfect for any dinner.
Print Recipe Pin Recipe
Prep Time 10 minutes mins
Cook Time 15 minutes mins
Total Time 25 minutes mins
Servings: 4 fillets
Course: Dinner
Cuisine: American
Calories: 350
Ingredients Equipment Method Nutrition Notes

Ingredients
  

For the Salmon
  • 4 fillets Salmon Fillet Fresh for best flavor
  • 2 tablespoons Olive Oil For moisture and crust adhesion
  • 2 tablespoons Lemon Juice Fresh or bottled
For the Topping
  • 1 cup Parmesan Cheese Finely grated
  • 2 tablespoons Dried Parsley Fresh can be used
  • 1 teaspoon Garlic Powder Can substitute with minced garlic
  • to taste Salt Essential for flavor
  • to taste Pepper Essential for flavor

Equipment

  • Oven
  • Baking Sheet
  • Parchment Paper
  • Mixing Bowl

Method
 

Step-by-Step Instructions
  1. Preheat your oven to 400°F (200°C).
  2. Line a baking sheet with parchment paper and place the salmon fillet skin-side down.
  3. Drizzle olive oil and lemon juice generously over the salmon fillet.
  4. In a small bowl, combine Parmesan cheese, dried parsley, garlic powder, salt, and pepper.
  5. Sprinkle the Parmesan topping over the salmon and press down gently.
  6. Place the baking sheet in the oven and bake for 12 to 15 minutes.
  7. Remove from the oven, let rest for a couple of minutes, then serve.

Nutrition

Serving: 1filletCalories: 350kcalCarbohydrates: 2gProtein: 30gFat: 25gSaturated Fat: 7gPolyunsaturated Fat: 3gMonounsaturated Fat: 15gCholesterol: 80mgSodium: 450mgPotassium: 700mgVitamin A: 500IUVitamin C: 2mgCalcium: 300mgIron: 1mg

Notes

Perfect for family dinners; leftovers can be refrigerated and reheated for meal prep lovers.

Tried this recipe?

Let us know how it was!

Mac and Cheese Meatloaf Casserole: Your Ultimate Family Comfort

December 3, 2025 by Grace Snow Leave a Comment

As I pulled a golden-brown casserole from the oven, the aroma of savory meat mingling with creamy cheese filled the kitchen, instantly transporting me back to simpler times. Enter the Mac and Cheese Meatloaf Casserole, a delightful mashup that brings two beloved comfort foods together into one irresistible dish. This recipe is not just about satisfying hunger; it’s an easy, family-friendly option that promises to please even the pickiest eaters. With quick prep time and endless customization possibilities—think vibrant veggies or alternative cheeses—it’s perfect for weeknight dinners or cozy gatherings. Ready to indulge in a deliciously nostalgic culinary adventure? Let’s dive in!

Why is this casserole so irresistible?

Comforting Layers: This Mac and Cheese Meatloaf Casserole combines two heartwarming classics that everyone loves. Creamy, Cheesy Goodness: The melted cheese envelops the macaroni, creating a velvety texture. Family-Friendly: It's a dish that pleases both kids and adults, making it ideal for family gatherings. Customizable: Add your favorite veggies or switch up the cheeses to suit your taste, just like in my Cornbread Breakfast Casserole. Quick Prep: Assembling this casserole takes minimal time, allowing you to enjoy more moments around the table. Crowd-Pleaser: Serve it at potlucks or cozy dinners, and watch it disappear in seconds!

Mac and Cheese Meatloaf Casserole Ingredients

For the Meatloaf Base
• Ground Beef – Provides protein and structure; can be substituted with ground turkey or lamb for lighter variations.
• Onion – Offers flavor and moisture; use shallots for a milder taste.
• Breadcrumbs – Acts as a binder for the meatloaf; panko can be used for a crunchier texture.
• Egg – Binds ingredients together; aquafaba (chickpea brine) can be used for a vegan version.
• Milk – Adds moisture to the meat mixture; almond or soy milk can substitute for a dairy-free option.
• Salt & Pepper – Essential seasonings that enhance flavors; adjust based on dietary preferences.

For the Cheese Sauce
• Butter – Used for the cheese sauce; can be replaced with olive oil for a healthier choice.
• Flour – Thickens the cheese sauce; cornstarch may be used as a gluten-free alternative.
• Cheese (Shredded) – Provides creaminess and flavor; experiment with mozzarella or gouda for different tastes.
• Paprika & Dry Mustard – Adds flavor depth to the cheese sauce; customize seasoning to personal preference.

For the Macaroni
• Macaroni – Main carbohydrate component that holds the cheese sauce; gluten-free pasta options are available for those with dietary restrictions.

Step‑by‑Step Instructions for Mac and Cheese Meatloaf Casserole

Step 1: Preheat the Oven
Begin by preheating your oven to 350°F (175°C). This temperature is ideal for ensuring that your Mac and Cheese Meatloaf Casserole cooks evenly throughout. While the oven heats, gather your ingredients and prepare a greased baking dish to make assembly smoother.

Step 2: Prepare the Meat Mixture
In a large mixing bowl, combine the ground beef, finely chopped onion, breadcrumbs, egg, and milk. Season generously with salt and pepper. Using your hands, mix everything until just combined, being careful not to overwork the meat, which could lead to a dense texture.

Step 3: Form the Meatloaf Base
Once combined, press the meat mixture firmly into the greased baking dish, forming an even layer. The surface should be smooth and level, which helps with even cooking. Bake in the preheated oven for about 20 minutes, or until the surface is lightly browned and cooked through.

Step 4: Cook the Macaroni
While the meatloaf base bakes, bring a pot of salted water to a boil. Add the macaroni and cook according to package directions until al dente. This typically takes about 6 to 8 minutes. Drain the pasta well, then set it aside to combine with the cheese sauce later.

Step 5: Make the Cheese Sauce
In a medium saucepan over medium heat, melt the butter until foamy, then whisk in the flour. Stir for about 1 minute until the mixture is bubbly, creating a roux. Gradually whisk in the milk, cooking until the sauce thickens and coats the back of a spoon, roughly 5 minutes. Add in salt, pepper, paprika, and dry mustard to enhance the flavor.

Step 6: Add Cheese to the Sauce
Once the cheese sauce has thickened, reduce the heat to low and stir in the shredded cheese until fully melted and creamy. The sauce should be rich and velvety, perfect for enveloping your macaroni. If it’s too thick, add a splash more milk to achieve your desired consistency.

Step 7: Combine Macaroni and Cheese Sauce
In a large mixing bowl, combine the drained macaroni with the creamy cheese sauce, stirring well until all the pasta is evenly coated. This step is crucial for achieving that delightful cheesy goodness throughout the casserole, making every bite deliciously satisfying.

Step 8: Assemble the Casserole
After the meatloaf base has baked for 20 minutes, carefully remove it from the oven. Pour the macaroni and cheese mixture evenly over the meatloaf, spreading it gently to cover the surface. The layers of flavors will meld beautifully during baking, creating a hearty meal.

Step 9: Add Topping and Bake Again
Sprinkle any remaining shredded cheese over the top of the assembled casserole for a gooey, golden finish. Return the dish to the oven and bake for an additional 25 minutes, or until the cheese is bubbly and slightly browned. The aroma will fill your kitchen with savory warmth.

Step 10: Cool and Serve
Once baked, remove the casserole from the oven and let it sit for about 10 minutes before serving. This will help set the layers and make serving easier. The combination of layers in your Mac and Cheese Meatloaf Casserole is now ready to delight your family and friends!

Mac and Cheese Meatloaf Casserole Variations

Feel free to explore the art of customization with these delightful twists on the classic casserole, ensuring it suits every palate!

  • Vegetable Boost: Add a cup of your favorite vegetables, like spinach or bell peppers, to the meat mixture for extra nutrition and color. This delightful addition brings in a fresh crunch that complements the richness of the dish beautifully.

  • Cheese Swap: Experiment with different cheese blends such as sharp cheddar, smoky gouda, or zesty pepper jack to infuse unique flavors. Each cheese will lend its own personality, making your casserole a versatile favorite.

  • Herb Infusion: Stir in fresh herbs like parsley, thyme, or basil into the cheese sauce or meat mixture for aromatic depth. A sprinkle of fresh ingredients can elevate your dish to a whole new level of comfort food joy.

  • Creamy Option: For an extra creamy texture, mix in a dollop of sour cream or cream cheese into the cheese sauce. This twist adds silkiness that will have everyone wanting seconds!

  • Spicy Kick: For those who enjoy a bit of heat, toss in some diced jalapeños or a dash of hot sauce in the cheese sauce. It’s a fun way to spice things up and cater to adventurous taste buds.

  • Gluten-Free Delight: Substitute traditional macaroni with gluten-free pasta to create a gluten-free version that everyone can enjoy. It’s just as delicious, ensuring that nobody misses out on this comforting treat.

  • Plant-Based Variation: For a vegetarian delight, swap out the meat for plant-based ground meat, and use vegetable broth instead of milk. You’ll keep all the flavors while catering to a meatless lifestyle that’s kind to the planet!

  • Loaded Toppings: Top your casserole with crispy fried onions or bacon bits before baking. This adds a delicious crunch and an extra burst of flavor, perfect for enticing the taste buds at the dinner table.

By giving your Mac and Cheese Meatloaf Casserole a personal twist, you can create a dish that’s uniquely yours, much like my beloved Spicy Miso Casserole and Sweet Potato Casserole. Enjoy the creativity of cooking!

Expert Tips for Mac and Cheese Meatloaf Casserole

  • Quality Ingredients: Use high-quality ground beef or substitutes to avoid a dry texture in the meatloaf. Avoid lean options, as they lack flavor and moisture.

  • Cook Pasta Al Dente: Ensure you cook the macaroni just until al dente as it will continue cooking in the oven. This helps maintain the right texture in your Mac and Cheese Meatloaf Casserole.

  • Layer Wisely: When pouring the macaroni and cheese over the meatloaf, spread it evenly to make sure every bite is deliciously cheesy and meaty, enhancing the overall flavor profile.

  • Rest Before Serving: Allow the casserole to cool for 10 minutes after baking. This resting period helps the layers set and makes for easier slicing and serving.

  • Customize Seasoning: Don't hesitate to adjust seasonings like salt and pepper in both the meatloaf and cheese sauce according to your taste. This small step can make a huge difference.

Make Ahead Options

These Mac and Cheese Meatloaf Casserole are perfect for busy weeknights and meal prep enthusiasts! You can prepare the meatloaf base and refrigerate it for up to 24 hours before baking, which allows the flavors to meld beautifully. Simply combine the ground beef, onion, breadcrumbs, egg, and milk, then press it into your baking dish. Meanwhile, you can cook the macaroni and make the cheese sauce, storing each component separately in the fridge for up to 3 days. When ready to bake, layer the macaroni and cheese mixture over the meatloaf, add the remaining cheese on top, and bake as instructed. This way, you’ll have that comforting satisfaction of homemade goodness with minimal last-minute effort!

Storage Tips for Mac and Cheese Meatloaf Casserole

Fridge: Store leftovers in an airtight container for up to 3 days. Ensure it's completely cooled before sealing to prevent moisture buildup.

Freezer: If you want to keep it longer, freeze the casserole for up to 3 months. Wrap it tightly in plastic wrap and foil to prevent freezer burn.

Reheating: Reheat individual portions in the microwave for 1-2 minutes or warm the entire casserole in a preheated oven at 350°F (175°C) for about 20 minutes, covered with foil to retain moisture.

Serving Suggestion: Enhance your meal by pairing it with a side salad or garlic bread to balance the richness of the Mac and Cheese Meatloaf Casserole.

What to Serve with Mac and Cheese Meatloaf Casserole?

Create the perfect dining experience to complement your deliciously hearty casserole.

  • Garlic Bread: A warm, buttery loaf adds a crunchy side that’s perfect for mopping up cheesy goodness.
  • Simple Green Salad: Crisp lettuce and refreshing veggies provide a light contrast, balancing the richness of the casserole.
  • Steamed Broccoli: Vibrant, tender florets not only add nutrition but also a pop of color, enhancing your plate visually.
  • Baked Beans: Their sweetness contrasts beautifully with savory flavors, creating a delightful mix of textures and tastes.
  • Roasted Brussels Sprouts: With their slight bitterness and crispy edges, they elevate the meal while providing a nutritional boost.
  • Apple Crisp: Finish your meal on a sweet note with this warm dessert that pairs perfectly with a scoop of vanilla ice cream.

With these delicious options, your Mac and Cheese Meatloaf Casserole dinner will feel complete and inviting!

Mac and Cheese Meatloaf Casserole Recipe FAQs

What type of ground beef is best for this casserole?
Absolutely! For the best flavor and moisture, I recommend using high-quality ground beef. Look for meat with at least 15% fat content; lower-fat varieties can result in a dry texture. If you prefer a lighter option, ground turkey or lamb are fantastic alternatives that still provide great flavor.

How long can I store leftovers of the casserole?
Leftovers can be stored in an airtight container in the fridge for up to 3 days. Allow the casserole to cool to room temperature before sealing, as this helps prevent excess moisture and keeps it fresh. Reheat in the microwave or oven until warmed through.

Can I freeze the Mac and Cheese Meatloaf Casserole?
Very! To freeze, let the casserole cool completely, then wrap it tightly in plastic wrap followed by aluminum foil to prevent freezer burn. It can be frozen for up to 3 months. When you're ready to enjoy it again, thaw in the refrigerator overnight and reheat in the oven, covered with foil, at 350°F (175°C) until heated through.

How do I ensure the macaroni doesn't get mushy after baking?
Good question! Cooking your macaroni al dente is key, as it allows for some texture to remain after baking. Typically, this means cooking it for about 1-2 minutes less than the package instructions suggest. This way, it doesn’t become overly soft when combined with the cheese sauce and baked in the casserole.

Can I customize the ingredients for dietary restrictions?
Absolutely! If you’re looking for a vegetarian version, substitute the ground meat with plant-based ground meat and use vegetable broth instead of milk. For a gluten-free option, swap regular macaroni with gluten-free pasta and use cornstarch instead of flour to thicken the sauce. Feel free to toss in your favorite vegetables, too, like spinach or bell peppers!

Mac and Cheese Meatloaf Casserole

Mac and Cheese Meatloaf Casserole: Your Ultimate Family Comfort

Enjoy the delightful Mac and Cheese Meatloaf Casserole, a mashup of comfort foods that pleases even the pickiest eaters.
Print Recipe Pin Recipe
Prep Time 15 minutes mins
Cook Time 45 minutes mins
Cooling Time 10 minutes mins
Total Time 1 hour hr 10 minutes mins
Servings: 6 slices
Course: Dinner
Cuisine: American
Calories: 400
Ingredients Equipment Method Nutrition Notes

Ingredients
  

For the Meatloaf Base
  • 1 lb Ground Beef Can substitute with ground turkey or lamb.
  • 1 medium Onion Finely chopped; shallots can be used for milder taste.
  • 1 cup Breadcrumbs Panko can be used for crunchier texture.
  • 1 large Egg Aquafaba can be used for a vegan version.
  • 1/2 cup Milk Almond or soy milk can be substituted for dairy-free option.
  • to taste Salt
  • to taste Pepper
For the Cheese Sauce
  • 1/4 cup Butter Can be replaced with olive oil.
  • 1/4 cup Flour Cornstarch may be used as gluten-free alternative.
  • 2 cups Cheese (Shredded) Experiment with mozzarella or gouda.
  • 1 teaspoon Paprika
  • 1 teaspoon Dry Mustard
For the Macaroni
  • 8 oz Macaroni Gluten-free pasta options available.

Equipment

  • Oven
  • Mixing Bowl
  • Baking Dish
  • Saucepan
  • pot
  • Whisk

Method
 

Step‑by‑Step Instructions
  1. Preheat your oven to 350°F (175°C).
  2. In a large mixing bowl, combine the ground beef, onion, breadcrumbs, egg, and milk. Season with salt and pepper.
  3. Press the meat mixture into a greased baking dish to form an even layer. Bake for about 20 minutes.
  4. Boil a pot of salted water, add macaroni, and cook until al dente (about 6-8 minutes). Drain and set aside.
  5. In a saucepan, melt butter and whisk in flour. Add milk gradually, cooking until thickened. Season with salt, pepper, paprika, and dry mustard.
  6. Stir in shredded cheese until melted and creamy.
  7. Combine drained macaroni with the cheese sauce until thoroughly coated.
  8. Pour the macaroni and cheese mixture over the meatloaf base, spreading evenly.
  9. Sprinkle remaining cheese over the top and bake for an additional 25 minutes.
  10. Let cool for 10 minutes before serving.

Nutrition

Serving: 1sliceCalories: 400kcalCarbohydrates: 30gProtein: 25gFat: 20gSaturated Fat: 10gPolyunsaturated Fat: 2gMonounsaturated Fat: 8gCholesterol: 80mgSodium: 600mgPotassium: 500mgFiber: 2gSugar: 3gVitamin A: 500IUVitamin C: 2mgCalcium: 300mgIron: 2mg

Notes

Quality ingredients enhance flavor. Customize seasoning to your taste preferences.

Tried this recipe?

Let us know how it was!

Cowboy BBQ Bacon Cheddar Chicken for a Flavor Explosion

December 2, 2025 by Grace Snow Leave a Comment

In the heart of the Wild West, meals were meant to be hearty and satisfying, and my Cowboy BBQ Bacon Cheddar Chicken pays homage to that spirit. Picture tender chicken breasts, sizzling away, then topped with a crispy bacon blanket, melty cheddar, and a drizzle of smoky BBQ sauce that ties it all together. This dish is not only a crowd-pleaser for family dinners but also simple enough to whip up after a busy day, making it the ultimate comfort food. Whether you’re looking for something to impress guests or just a tasty weeknight meal, this recipe fills your kitchen with warmth and deliciousness. Are you ready to transform your dinner routine with this cowboy-inspired delight?

Why is this chicken recipe a must-try?

Simplicity: This Cowboy BBQ Bacon Cheddar Chicken is a breeze to prepare, making it perfect for both novice and seasoned home cooks.

Flavor Explosion: The combination of smoky BBQ sauce, crispy bacon, and melty cheddar delivers a taste sensation that’s bold and unforgettable.

Crowd-Pleaser: Whether for family dinners or gatherings, this dish never fails to impress and satisfy everyone’s cravings.

Versatile Options: Feel free to customize with toppings like jalapeños or switch up the cheese for a new twist.

Quick Cooking: Ready in just over 30 minutes, it’s a fantastic option for busy weekdays and spontaneous dinner parties alike.

Once you’ve tried this dish, you’ll understand why it’s a gourmet favorite! Consider pairing it with simple green salads or serving it with Crock Pot Chicken for a delightful contrast of flavors and textures.

Cowboy BBQ Bacon Cheddar Chicken Ingredients

For the Chicken

  • Boneless, skinless chicken breasts – A juicy, protein-packed base that holds all the flavors.
  • Olive oil – Coats the chicken for a rich taste and ensures even cooking.
  • Garlic powder – Adds aromatic depth, enhancing the savory notes of the chicken.
  • Onion powder – Introduces a savory flavor without interrupting the chicken's texture.
  • Smoked paprika – Brings a mild smoky heat that enriches the dish's personality.
  • Salt – Essential for amplifying the natural flavors of every ingredient.
  • Black pepper – Contributes a subtle heat that perfectly balances the dish’s richness.

For the Topping

  • Bacon – Crispy, savory slices that give a delightful crunch and depth of flavor.
  • Shredded cheddar cheese – Melts beautifully over the chicken, making it ooey-gooey and rich.
  • Barbecue sauce – Infuses the dish with tangy sweetness, complementing the cheese and bacon.
  • Green onions, chopped – Adds a fresh crunch that brightens the flavors.
  • Red pepper flakes (optional) – For those who like a spicy kick, enhancing the Cowboy BBQ Bacon Cheddar Chicken experience.

Feel the excitement in your kitchen as you gather these ingredients, gearing up to create a meal that delights both the palate and the heart!

Step‑by‑Step Instructions for Cowboy BBQ Bacon Cheddar Chicken

Step 1: Preheat the Oven
Start by preheating your oven to 400°F (200°C). This temperature ensures that the Cowboy BBQ Bacon Cheddar Chicken cooks evenly and achieves that perfect golden-brown finish. While the oven heats up, gather your ingredients and get ready for the deliciousness that’s about to unfold.

Step 2: Cook the Bacon
In a skillet over medium heat, cook the bacon for about 5-7 minutes until it’s crispy and golden. Keep an eye on it to prevent burning, stirring occasionally. Once done, transfer the bacon to a plate lined with paper towels to drain excess grease and allow it to cool, enhancing its crunchiness.

Step 3: Crumble the Bacon
Let the bacon cool for a few minutes, then crumble it into small pieces. Set aside the crumbled bacon while you prepare the chicken. This crispy bacon will add a wonderful texture and flavor contrast to your Cowboy BBQ Bacon Cheddar Chicken once it’s baked.

Step 4: Prepare the Chicken
Take your boneless, skinless chicken breasts and coat them generously with olive oil on both sides. This not only adds richness but also helps the seasonings stick. Gently rub the oil into the chicken for an even layer, preparing it to soak up all those delicious flavors.

Step 5: Season the Chicken
Sprinkle the garlic powder, onion powder, smoked paprika, salt, and black pepper evenly over both sides of the chicken breasts. This seasoning blend will infuse the meat with savory depth and a hint of smokiness, elevating your Cowboy BBQ Bacon Cheddar Chicken to new flavor heights.

Step 6: Sear the Chicken
Using the same skillet that cooked the bacon, increase the heat to medium-high and sear the seasoned chicken for about 4-5 minutes on each side. Look for a beautiful golden-brown crust before flipping it. This step locks in juices and builds flavor, setting the stage for the toppings.

Step 7: Prepare Taco Toppings
While the chicken is searing, chop the green onions and prepare your barbecue sauce. The fresh green onions will provide a lovely crunch and brightness, while the barbecue sauce adds that essential tangy sweetness to your Cowboy BBQ Bacon Cheddar Chicken once it’s topped.

Step 8: Assemble the Chicken
After the chicken is seared, pour the barbecue sauce generously over each piece. Make sure to cover them completely for that flavorful kick. Next, sprinkle a generous amount of shredded cheddar cheese over the barbecue sauce, creating a cheesy barrier that holds all the deliciousness together.

Step 9: Add the Bacon
Scatter the crumbled bacon evenly over the melted cheese, ensuring every bite of the Cowboy BBQ Bacon Cheddar Chicken is packed with flavor. This crispy topping adds a delightful crunch that enhances the overall experience of the dish as it bakes to perfection.

Step 10: Bake
Place the skillet in the preheated oven and bake for 10-12 minutes. Keep an eye on it and look for the cheese to be beautifully melted and bubbly while the chicken is fully cooked and registers 165°F (74°C) internally, ensuring it’s safe and juicy.

Step 11: Garnish and Serve
Once baked, remove the skillet from the oven and top your Cowboy BBQ Bacon Cheddar Chicken with the chopped green onions and optional red pepper flakes for a kick. This adds freshness and vibrancy, transitioning the dish from oven to table.

Step 12: Let It Rest
Allow the chicken to rest for a few minutes after it comes out of the oven. This resting period ensures the juices redistribute, keeping your Cowboy BBQ Bacon Cheddar Chicken tender and juicy. Then, slice it and serve for a delicious family feast.

Make Ahead Options

Preparing Cowboy BBQ Bacon Cheddar Chicken ahead of time is a game-changer for busy weeknights! You can season and sear the chicken up to 24 hours in advance. Just store it in an airtight container in the refrigerator. Additionally, you can cook the bacon and crumble it a day ahead, then refrigerate it to maintain its crispiness. When you're ready to enjoy this delicious meal, simply take the chicken out, add the barbecue sauce, and layer with cheese and bacon. Bake in the oven for about 10-12 minutes until heated through and cheese is bubbly. This way, you'll savor restaurant-quality results with minimal effort!

What to Serve with Cowboy BBQ Bacon Cheddar Chicken

Bring your dinner table to life by complementing this mouthwatering dish with some fabulous sides!

  • Creamy Mashed Potatoes: The buttery, velvety texture creates a comforting contrast to the smoky, savory chicken, making each bite unforgettable.
  • Roasted Brussels Sprouts: The slight bitterness of roasted Brussels sprouts offers a delightful balance to the rich flavors of the chicken and bacon.
  • Garlic Breadsticks: Soft, warm breadsticks are perfect for soaking up that scrumptious BBQ sauce, adding a delightful crunch to your meal.
  • Coleslaw: A refreshing crunch and tangy dressing brighten the plate, providing a crisp counterpoint to the hearty chicken.
  • Corn on the Cob: Sweet, juicy corn brings a taste of summer right to your table, enhancing the overall flavor palette of your meal.
  • Simple Green Salad: Tossed greens dressed with a zesty vinaigrette add a light touch, ensuring every bite feels balanced and fresh.
  • Sweet Potato Fries: The sweetness contrasts beautifully with the savory chicken, creating a dish that delights the senses.
  • Iced Tea or Lemonade: Quench your thirst with these refreshing beverages, making your Cowboy BBQ Bacon Cheddar Chicken dinner even more enjoyable.
  • Chocolate Chip Cookies: For a sweet ending, serve warm cookies that bring comfort and nostalgia, perfect for rounding off a hearty meal.

How to Store and Freeze Cowboy BBQ Bacon Cheddar Chicken

Fridge: Store leftovers in an airtight container for up to 3 days. This keeps the chicken moist and flavorful, perfect for quick reheating.

Freezer: Wrap tightly in plastic wrap, then place in a freezer-safe bag. It stays fresh for up to 3 months; defrost in the fridge overnight before reheating.

Reheating: To retain the best texture, reheat in the oven at 350°F (175°C) for about 10-15 minutes or until warmed through. Enjoy your Cowboy BBQ Bacon Cheddar Chicken just as delicious as the first serving!

Wrap it Up: If you’re storing individual portions, separate them with parchment paper to prevent sticking, making it easier to grab a quick meal later on.

Cowboy BBQ Bacon Cheddar Chicken Variations

Now it’s time to get creative and make this dish your own with some delicious twists!

  • Cheese Swap: Try using mozzarella or Monterey Jack for a lighter, milder cheese experience. Each cheese brings its unique charm!
  • Add Some Heat: Toss in sliced jalapeños or serrano peppers for a fiery kick. Summer barbecues or cozy family dinners will never be the same.
  • BBQ Sauce Variants: Experiment with different BBQ sauces—try a honey mustard or spicy chipotle for a zesty twist. Each sauce can transform the flavor completely!
  • Herb Infusion: Add fresh herbs like chopped cilantro or parsley to elevate the flavors. It not only adds a color pop but also a touch of freshness that brightens every bite.
  • Creamy Avocado: Top with slices of creamy avocado for richness that perfectly balances the smoky flavors. This tantalizing addition makes it feel like a gourmet treat!
  • Ranch Seasoning: Sprinkle ranch dressing mix over the chicken before adding the BBQ sauce for a delightful flavor fusion. It adds an unexpected tang that works wonders.
  • Cauliflower Option: For a low-carb alternative, use cauliflower steaks instead of chicken. Roast them until golden for a satisfying, vegetarian twist.
  • Gluten-Free Version: Make this chicken gluten-free by using a certified gluten-free barbecue sauce and ensuring your bacon is free from gluten-containing additives.

Don't forget, variations are the spice of life! This Cowboy BBQ Bacon Cheddar Chicken serves as a great base to explore new tastes and textures, and if you're looking for more exciting chicken recipes, consider trying Honey Garlic Chicken or Spatchcock Chicken Flavor for different flavor profiles!

Expert Tips for Cowboy BBQ Bacon Cheddar Chicken

  • Sear with Care: Ensure the skillet is hot enough before adding the chicken; this locks in moisture and creates a beautiful crust.

  • Crispy is Key: Don't rush the bacon cooking process; patience ensures it becomes crispy and adds the perfect crunch to your Cowboy BBQ Bacon Cheddar Chicken.

  • Rest Time Matters: Allow the chicken to rest after baking; this helps keep it juicy and flavorful, ensuring every bite is tender.

  • Taste Test BBQ Sauce: Adjust the amount of barbecue sauce based on your personal preference; some love it tangy, while others prefer a sweeter taste.

  • Cheese Choices: Feel free to substitute cheddar with mozzarella or pepper jack for a unique twist on your Cowboy BBQ Bacon Cheddar Chicken.

  • Spice It Up: If you enjoy heat, sprinkle red pepper flakes generously over the dish before serving, but remember to start with a little and adjust to taste!

Cowboy BBQ Bacon Cheddar Chicken Recipe FAQs

What kind of chicken should I use for this recipe?
Absolutely, boneless, skinless chicken breasts are best for this Cowboy BBQ Bacon Cheddar Chicken. They maintain moisture and tenderness while allowing the flavors to infuse beautifully. If you prefer dark meat, boneless chicken thighs can also work wonderfully, giving a richer flavor.

How do I store leftovers?
To keep your Cowboy BBQ Bacon Cheddar Chicken fresh, store it in an airtight container in the fridge for up to 3 days. This helps retain moisture and flavor. When you're ready to enjoy it again, simply reheat in the oven or microwave, depending on your preference!

Can I freeze this dish?
Yes! You can freeze your Cowboy BBQ Bacon Cheddar Chicken for up to 3 months. Just wrap it tightly in plastic wrap and place it in a freezer-friendly bag. For the best texture when you’re ready to eat it, defrost in the fridge overnight and reheat in the oven at 350°F (175°C) for around 10-15 minutes until warmed through.

What if my chicken is dry after baking?
If you find your chicken comes out dry, it might be because it was overcooked. Always check the internal temperature with a meat thermometer; it should reach 165°F (74°C). To help, try using a meat mallet to slightly flatten the chicken before cooking—this encourages even cooking and juicy results.

Can I use a different cheese or add spicy ingredients?
Very! Feel free to swap out cheddar cheese for mozzarella, Monterey Jack, or even pepper jack if you like a spicy kick. You can also add jalapeños or other favorite toppings to customize your Cowboy BBQ Bacon Cheddar Chicken to your taste!

Is this recipe suitable for my dietary restrictions?
If you're watching out for allergens, this dish does contain poultry, dairy, and gluten from the barbecue sauce. Always check labels and consult your dietary guidelines. For a gluten-free barbecue sauce and cheese alternative, you can easily make adjustments, ensuring that everyone can enjoy this flavorful feast.

Cowboy BBQ Bacon Cheddar Chicken

Cowboy BBQ Bacon Cheddar Chicken for a Flavor Explosion

This Cowboy BBQ Bacon Cheddar Chicken is a hearty dish filled with bold flavors that’s perfect for any meal.
Print Recipe Pin Recipe
Prep Time 10 minutes mins
Cook Time 20 minutes mins
Resting Time 5 minutes mins
Total Time 35 minutes mins
Servings: 4 pieces
Course: Dinner
Cuisine: American
Calories: 450
Ingredients Equipment Method Nutrition Notes

Ingredients
  

For the Chicken
  • 4 pieces Boneless, skinless chicken breasts A juicy, protein-packed base that holds all the flavors.
  • 2 tablespoons Olive oil Coats the chicken for a rich taste and ensures even cooking.
  • 1 teaspoon Garlic powder Adds aromatic depth, enhancing the savory notes of the chicken.
  • 1 teaspoon Onion powder Introduces a savory flavor without interrupting the chicken's texture.
  • 1 teaspoon Smoked paprika Brings a mild smoky heat that enriches the dish's personality.
  • 1 teaspoon Salt Essential for amplifying the natural flavors of every ingredient.
  • 1/2 teaspoon Black pepper Contributes a subtle heat that perfectly balances the dish’s richness.
For the Topping
  • 6 slices Bacon Crispy, savory slices that give a delightful crunch.
  • 1 cup Shredded cheddar cheese Melts beautifully over the chicken, making it ooey-gooey.
  • 1/2 cup Barbecue sauce Infuses the dish with tangy sweetness.
  • 1/4 cup Green onions, chopped Adds a fresh crunch that brightens the flavors.
  • 1/4 teaspoon Red pepper flakes Optional for those who like a spicy kick.

Equipment

  • Skillet
  • Oven
  • Meat Thermometer

Method
 

Step-by-Step Instructions
  1. Preheat your oven to 400°F (200°C).
  2. In a skillet over medium heat, cook the bacon for about 5-7 minutes until crispy and golden.
  3. Once done, transfer the bacon to a plate lined with paper towels to drain excess grease.
  4. Let the bacon cool and then crumble it into small pieces.
  5. Coat the chicken breasts generously with olive oil on both sides.
  6. Sprinkle garlic powder, onion powder, smoked paprika, salt, and black pepper evenly over both sides of the chicken breasts.
  7. Increase the heat to medium-high and sear the seasoned chicken for about 4-5 minutes on each side.
  8. Chop the green onions and prepare your barbecue sauce.
  9. Pour the barbecue sauce generously over each piece of chicken.
  10. Sprinkle a generous amount of shredded cheddar cheese over the barbecue sauce.
  11. Scatter the crumbled bacon evenly over the melted cheese.
  12. Place the skillet in the preheated oven and bake for 10-12 minutes.
  13. Once baked, top your Cowboy BBQ Bacon Cheddar Chicken with the chopped green onions and optional red pepper flakes.
  14. Allow the chicken to rest for a few minutes before slicing and serving.

Nutrition

Serving: 1pieceCalories: 450kcalCarbohydrates: 4gProtein: 35gFat: 32gSaturated Fat: 12gPolyunsaturated Fat: 1gMonounsaturated Fat: 15gTrans Fat: 1gCholesterol: 90mgSodium: 900mgPotassium: 650mgFiber: 1gSugar: 3gVitamin A: 10IUVitamin C: 2mgCalcium: 20mgIron: 8mg

Notes

Feel free to customize with toppings like jalapeños or switch up the cheese for a new twist.

Tried this recipe?

Let us know how it was!

Pollo Loco: Irresistibly Creamy Mexican Chicken and Rice

December 2, 2025 by Grace Snow Leave a Comment

The kitchen was a whirlwind of aromas as I pulled the lid off the pot, revealing a vibrant medley of saffron-infused rice and tender chicken simmering in a savory embrace. This Pollo Loco - Mexican Chicken and Rice with Queso is my go-to for those busy weeknights when the family craves something hearty yet easy to whip up. With its comforting layers and creamy queso gracefully melting over each bite, it transforms simple pantry staples into an unforgettable feast. Not only is this recipe family-friendly, making it a crowd-pleaser for kids and adults alike, but it’s also a breeze to prep in advance—perfect for meal prepping! Ready to dig into a dish that combines warmth and flavor in every forkful? Let’s dive in!

Why Is Pollo Loco a Must-Try?

Comforting, rich flavors: Each bite of this Pollo Loco bursts with savory goodness, thanks to the creamy queso and tender, seasoned chicken.
Quick & Easy: With simple ingredients and less than 30 minutes of cook time, it's perfect for busy weeknights.
Meal Prep Friendly: Make it ahead and enjoy leftovers all week! Pair it with a fresh avocado and lime salad for a refreshing side.
Kid-Approved: Its familiar taste is sure to win over picky eaters, making family dinners stress-free.
Versatile: Adjust spice levels or swap ingredients for endless variations, like using rotisserie chicken or trying different types of cheese.

This recipe is ideal for those craving flavor without the fuss—just like our Fiesta Lime Chicken or Honey BBQ Chicken Rice. Dive into this delicious dish and share the love with your family!

Pollo Loco Ingredients

• Prepare for a flavor-packed journey with these essential ingredients!

For the Chicken

  • Chicken Breast – The main protein; opting for rotisserie chicken can save time!
  • Olive Oil – Used for sautéing, it ensures delicious flavor and moisture in the chicken.
  • Adobo Seasoning – Adds spice and depth; apply generously for the best flavor.

For the Rice

  • Saffron Yellow Rice – The colorful base of the dish; it infuses delightful flavor.
  • Tomato Bouillon Cube – Enhances umami, bringing out the rich taste in the rice.
  • Water – Essential for cooking the rice to perfection.

For the Creamy Topping

  • White Queso – Provides creaminess and richness; if needed, use cream cheese and Monterey Jack as a substitute.
  • Milk – Ensures a smooth and creamy consistency when mixed with the queso.

This Pollo Loco - Mexican Chicken and Rice with Queso is a delightful meal that transforms everyday cooking into a vibrant celebration!

Step‑by‑Step Instructions for Pollo Loco - Mexican Chicken and Rice with Queso

Step 1: Prepare the Chicken
Begin by patting the chicken breasts dry with paper towels. Generously season both sides with adobo seasoning, ensuring an even coating for full flavor. This step is crucial for making your Pollo Loco flavorful. Set the seasoned chicken aside while you heat the skillet.

Step 2: Sauté the Chicken
Heat a tablespoon of olive oil in a large skillet over medium heat. Once the oil shimmers, carefully place the seasoned chicken breasts into the skillet. Sauté each side for about 3 minutes, or until the chicken is nicely browned and no longer pink in the center. This caramelization adds great flavor to your Pollo Loco.

Step 3: Combine Ingredients
With the chicken cooked, add the saffron yellow rice to the skillet, followed by a cup of water and a crumbled tomato bouillon cube. Stir everything together, ensuring the rice is well-coated. Bring the mixture to a rolling boil, which will help infuse the rice with all the savory flavors from the chicken.

Step 4: Simmer the Rice
Once your mixture is boiling, reduce the heat to low and cover the skillet with a lid. Let it simmer for 20 to 25 minutes, checking occasionally. The rice should absorb the liquid and become fluffy, while the chicken continues cooking through. You’ll know it’s ready when the rice is tender and has a light, airy texture.

Step 5: Add Creamy Queso
After the rice has cooked, remove the skillet from heat. Stir in the white queso and a splash of milk, mixing until the queso melts and creates a creamy sauce that envelops the chicken and rice. This step is what makes your Pollo Loco irresistibly creamy and rich.

Step 6: Serve and Enjoy
Ladle generous portions of the Pollo Loco onto plates, ensuring each serving includes chicken and the flavorful rice. The creamy queso on top adds a lovely finish. For an added touch, consider garnishing with fresh cilantro, lime wedges, or a dollop of sour cream. Enjoy your comforting meal!

Make Ahead Options

Preparing Pollo Loco - Mexican Chicken and Rice with Queso in advance is a game changer for busy weeknights! You can season and cook the chicken up to 24 hours ahead, storing it in the refrigerator to allow the flavors to deepen. Additionally, you can prepare the saffron rice and combine it with the cooked chicken, refrigerating the mixture for up to 3 days. To maintain its quality, be sure to add a splash of water or broth when reheating to keep it moist. Just before serving, melt in the creamy queso and milk, mixing until smooth, and you’ll have a comforting feast ready in no time!

Pollo Loco Variations & Substitutions

Feel free to mix things up and create the Pollo Loco of your dreams with these delightful twists and swaps!

  • Dairy-Free: Use vegan cheese or coconut cream to replace the white queso, ensuring a creamy finish without dairy.
  • Spicy Kick: Add diced jalapeños during sautéing for an extra layer of heat that complements the chicken beautifully.
  • Brown Rice: Substitute white rice with brown rice for a nuttier flavor and added fiber. Just be mindful of the longer cooking time!
  • Vegetarian Delight: Swap the chicken for sautéed bell peppers and mushrooms, offering a colorful and hearty veggie alternative.
  • Flavorful Broth: Instead of water, use chicken or vegetable broth for cooking the rice to intensify flavors.
  • Citrus Zing: Add the juice of a lime or lemon during the final mixing stage for a refreshing burst of brightness that elevates the dish.
  • One-Pot Wonder: Combine all ingredients, including the chicken and rice, in a slow cooker for an effortless, hands-off cooking experience.
  • Smoky Notes: Incorporate smoked paprika into the adobo seasoning for a subtle smoky flavor that pairs perfectly with the other ingredients.

If you're in the mood for something different, you might also enjoy our One Pot Rice or a comforting bowl of Chicken Dumplings Cozy. So go ahead, unleash your creativity, and enjoy crafting your unique Pollo Loco experience!

Expert Tips for Pollo Loco

  • Flavor Development: Allow the Pollo Loco to sit for a bit after cooking. This helps the flavors meld together beautifully, making it taste even better next day.

  • Avoid Soggy Rice: Be careful not to overcook the rice; this can lead to a mushy texture. Keep an eye on the liquid level while it simmers.

  • Protein Variations: If you’re short on time, opt for shredded rotisserie chicken instead of raw to speed up preparation while still achieving delicious results.

  • Adjusting Spice Levels: Want a kick? Add diced jalapeños or a sprinkle of chipotle powder during cooking, but taste as you go to avoid overwhelming heat.

  • Creamy Consistency: If your queso isn’t melting smoothly, a little extra splash of milk can help achieve that luscious, creamy sauce you desire in this Pollo Loco dish.

How to Store and Freeze Pollo Loco

Fridge: Store leftovers in an airtight container and refrigerate for up to 3 days. Ensure the dish is completely cooled before sealing to maintain freshness.

Freezer: For longer storage, freeze Pollo Loco in a freezer-safe container for up to 3 months. Place parchment paper between layers if stacking to prevent sticking.

Reheating: Thaw in the fridge overnight, then reheat gently in a skillet over medium heat, adding a splash of broth or water to keep the creamy queso luscious and moist.

Make-Ahead: Prepare up to 2 days in advance. Combine all ingredients, refrigerate, and simply heat before serving for effortless meal prep.

What to Serve with Pollo Loco - Mexican Chicken and Rice with Queso

To create a delightful dining experience alongside this comforting Pollo Loco, consider these complementary dishes that elevate your meal.

  • Creamy Avocado Salad: The refreshing avocado salad adds a cool, creamy texture that balances the spicy and savory notes of the Pollo Loco, enhancing overall enjoyment.

  • Cilantro Lime Rice: Bright and zesty, this side dish echoes the flavors of saffron rice while adding a pop of freshness that pairs beautifully with the rich chicken and queso.

  • Roasted Corn on the Cob: Sweet and slightly charred, this classic Mexican side brings a satisfying crunch that contrasts nicely with the tenderness of the chicken.

  • Pico de Gallo: This fresh salsa loaded with tomatoes, onions, and cilantro provides a burst of flavor and acidity, cutting through the creaminess of the dish while adding a vibrant touch.

  • Chips and Guacamole: Crispy tortilla chips served with creamy guacamole make for a delightful snack or appetizer, inviting everyone to dig in and enjoy a bit of Mexican tradition before the main event.

  • Spicy Margaritas: A refreshing cocktail option to elevate your meal, the sweet and tangy notes of a spicy margarita perfectly complement the bold flavors in Pollo Loco, making it a fantastic pairing choice.

By combining these elements, you'll create a memorable meal that celebrates the rich flavors and textures of your Pollo Loco - Mexican Chicken and Rice with Queso, making any night feel like a special occasion.

Pollo Loco - Mexican Chicken and Rice with Queso Recipe FAQs

What is the best way to select chicken for Pollo Loco?
Absolutely! For the best flavor and texture, select chicken breasts that are firm and plump, with no dark spots or bruising. If you're short on time, using high-quality rotisserie chicken can save you the hassle and still deliver fantastic results.

How should I store leftover Pollo Loco?
Leftovers should be kept in an airtight container in the fridge where they can last for up to 3 days. Make sure the dish is completely cooled before sealing it to maintain freshness and flavor. Add a splash of water when reheating to keep it moist.

Can I freeze Pollo Loco for later?
Yes, you can! To freeze, let the Pollo Loco cool completely, then transfer it to a freezer-safe container, ensuring it's sealed tightly. It can be frozen for up to 3 months. For best results, I recommend labeling containers with the date for easy tracking.

What if my rice turns out mushy?
If your rice ends up mushy, it’s likely due to overcooking or too much liquid. Next time, keep an eye on the simmering process and check for doneness closer to the 20-minute mark. If it's not ready, give it a few extra minutes, but avoid letting it sit on the heat too long.

Can I make this dish egg-free or dairy-free?
Absolutely! To make Pollo Loco dairy-free, you can substitute the white queso with a vegan cheese alternative or a homemade cashew cream. Just blend soaked cashews with a bit of nutritional yeast and water until smooth for a creamy texture without any dairy.

What other ingredients can I add to enhance flavor?
Feel free to elevate your Pollo Loco with diced jalapeños for heat, fresh cilantro for herbiness, or a splash of lime juice for zesty brightness. The more the merrier! Don't hesitate to get creative with your additions based on what your family enjoys!

Pollo Loco - Mexican Chicken and Rice with Queso

Pollo Loco: Irresistibly Creamy Mexican Chicken and Rice

Pollo Loco - Mexican Chicken and Rice with Queso is a comforting and flavorful dish, perfect for busy weeknights.
Print Recipe Pin Recipe
Prep Time 10 minutes mins
Cook Time 25 minutes mins
Total Time 35 minutes mins
Servings: 4 servings
Course: Dinner
Cuisine: Mexican
Calories: 450
Ingredients Equipment Method Nutrition Notes

Ingredients
  

For the Chicken
  • 2 pieces Chicken Breast Can use rotisserie chicken for quicker prep.
  • 1 tablespoon Olive Oil Used for sautéing.
  • 2 tablespoons Adobo Seasoning Generously apply for best flavor.
For the Rice
  • 1 cup Saffron Yellow Rice Colorful base of the dish.
  • 1 cube Tomato Bouillon Enhances umami flavor.
  • 1 cup Water Essential for cooking the rice.
For the Creamy Topping
  • 1 cup White Queso Provides creaminess; can substitute if needed.
  • 1/2 cup Milk Ensures a smooth and creamy consistency.

Equipment

  • Skillet
  • measuring cups
  • Paper towels

Method
 

Step-by-Step Instructions
  1. Pat the chicken breasts dry with paper towels and season with adobo seasoning.
  2. Heat olive oil in a skillet over medium heat and sauté chicken for about 3 minutes each side until browned.
  3. Add saffron yellow rice, water, and crumbled tomato bouillon to the skillet, stirring well.
  4. Reduce heat to low, cover, and simmer for 20 to 25 minutes until rice is fluffy.
  5. Stir in white queso and milk off the heat until creamy.
  6. Serve with garnishes like cilantro and lime wedges, if desired.

Nutrition

Serving: 1servingCalories: 450kcalCarbohydrates: 40gProtein: 30gFat: 20gSaturated Fat: 7gPolyunsaturated Fat: 1gMonounsaturated Fat: 6gCholesterol: 70mgSodium: 900mgPotassium: 600mgFiber: 2gSugar: 2gVitamin A: 500IUVitamin C: 3mgCalcium: 250mgIron: 3mg

Notes

Allow flavors to meld by letting the dish sit after cooking. Store leftovers in the fridge for up to 3 days.

Tried this recipe?

Let us know how it was!

Pumpkin & Gouda Stuffed Shells: A Cozy Autumn Delight

December 2, 2025 by Grace Snow Leave a Comment

As the first whispers of autumn flutter in, I can't resist the allure of cozy comfort foods, especially when they come wrapped in cheesy goodness and seasonal delights. Enter my Pumpkin & Gouda Stuffed Shells – a dish that marries creamy gouda with the natural sweetness of pumpkin, all nestled within tender jumbo pasta shells. This recipe not only promises a quick prep time, but it’s also a great crowd-pleaser, perfect for family gatherings or a quiet night in. With a luxurious brown butter and sage Alfredo sauce drizzling over the top, each bite is like a warm embrace that will surely inspire nostalgia for chilly evenings spent around the dinner table. Are you ready to dive into this autumnal comfort food?

Why Are Pumpkin & Gouda Stuffed Shells Irresistible?

Comforting and Creamy: The combination of gouda and pumpkin creates a velvety filling that feels like a warm hug on a chilly evening.

Easy to Prepare: With simple steps and easy-to-find ingredients, you can create a spectacular dish in no time.

Versatile Options: Whether you want to add spinach for a nutrition boost or swap cheeses, this recipe allows for creative twists that cater to every taste.

Autumnal Flavors: Each bite celebrates the essence of fall, making it a perfect centerpiece for seasonal gatherings or cozy dinners at home.

Crowd Appeal: This dish not only pleases the palate but also impresses your guests, making it an excellent choice for entertaining.

As a delightful alternative to takeout, your Pumpkin & Gouda Stuffed Shells will become a family favorite, just like these Pumpkin Brownies Decadent or Herby Ricotta Stuffed dishes!

Pumpkin & Gouda Stuffed Shells Ingredients

For the Pasta
• Jumbo Pasta Shells – Provides a perfect vessel for the creamy filling; you can substitute with manicotti or medium shells if needed.

For the Filling
• Pumpkin Puree – Adds natural sweetness and creaminess; feel free to use canned or freshly roasted pumpkin for depth.
• Gouda Cheese – Contributes a rich, creamy flavor; it can be swapped for ricotta or mozzarella for a milder profile.
• Ricotta Cheese – Enhances the luxurious texture; if you're looking for a lighter alternative, cottage cheese works beautifully.
• Garlic Powder – Infuses a savory aroma; switch to fresh garlic if you prefer a bolder taste.
• Salt and Pepper – Essential seasoning to elevate the dish's flavors; adjust according to your taste preferences.

For the Alfredo Sauce
• Butter – Creates the base for the sauce; consider using clarified butter for extra richness and a nutty flavor.
• Heavy Cream – Delivers a rich and indulgent consistency to the sauce; whole milk can be a lighter substitute if desired.
• Fresh Sage Leaves – Adds a fragrant, earthy depth to the sauce; dried sage can work in a pinch, though the flavor will differ.
• Parmesan Cheese – Offers umami notes and rounds out the sauce; feel free to substitute pecorino for a sharper taste.

Enjoy crafting your delicious Pumpkin & Gouda Stuffed Shells, a dish that’s sure to delight all who are searching for comforting autumn flavors!

Step‑by‑Step Instructions for Pumpkin & Gouda Stuffed Shells

Step 1: Cook the Pasta
Begin by bringing a large pot of salted water to a rolling boil over high heat. Add the jumbo pasta shells and cook them for about 9-11 minutes until they are al dente, meaning they should have a slight bite to them. Once cooked, carefully drain the shells in a colander and set them aside, allowing them to cool slightly as you prepare the filling.

Step 2: Prepare the Filling
In a spacious mixing bowl, combine 1 cup of pumpkin puree, 1 cup of gouda cheese, 1 cup of ricotta cheese, 1 teaspoon of garlic powder, and salt and pepper to taste. Blend everything together until it forms a smooth and creamy mixture. The flavors should meld beautifully, creating a rich filling for your Pumpkin & Gouda Stuffed Shells.

Step 3: Stuff the Shells
With your filling ready, take each cooled jumbo shell and carefully scoop about 2 tablespoons of the pumpkin and gouda mixture into it, ensuring it's well packed but not overflowing. Place the filled shells seam-side up in a greased 9x13-inch baking dish. Arrange them closely packed to prevent them from drying out during baking.

Step 4: Make the Alfredo Sauce
In a medium saucepan, melt 4 tablespoons of butter over medium heat until it turns golden brown and starts to smell nutty, about 3-5 minutes. Carefully whisk in 1 cup of heavy cream and the finely chopped fresh sage leaves. Allow the sauce to simmer for about 5 minutes or until it thickens slightly and coats the back of a spoon beautifully.

Step 5: Assemble
Pour half of the brown butter and sage Alfredo sauce evenly over the stuffed shells in the baking dish. Sprinkle a generous layer of grated parmesan cheese over the top, allowing it to meld with the sauce, and then cover the dish with aluminum foil to trap in moisture for baking.

Step 6: Bake
Preheat your oven to 350°F (175°C) and bake the covered dish for 25 minutes. After 25 minutes, remove the foil and continue baking for an additional 10 minutes or until the shells are bubbly, golden, and the cheese is melted, creating a tantalizing topping for your Pumpkin & Gouda Stuffed Shells.

Step 7: Serve
Once your shells have baked to perfection, take them out of the oven and let them cool for a few minutes. Drizzle the remaining brown butter and sage Alfredo sauce generously over the top before serving. This final touch will elevate your dish and bring forth all those comforting autumn flavors!

Pumpkin & Gouda Stuffed Shells Variations

Feel free to let your creativity shine in the kitchen with these delightful variations that enhance your Pumpkin & Gouda Stuffed Shells!

  • Spinach & Kale: Add cooked spinach or kale to the filling for a pop of color and nutrition. This addition not only brightens the dish but also adds a lovely earthy note.

  • Sausage Boost: Incorporate cooked sausage or pancetta for a heartier dish. The savory protein brings an irresistible flavor that complements the sweetness of the pumpkin wonderfully.

  • Nutmeg Twist: Sprinkle a pinch of nutmeg into the filling for a warm, aromatic kick. This subtle spice elevates the dish with a cozy, festive touch perfect for autumn.

  • Cheese Swap: Try using a different cheese like ricotta or mozzarella for a milder flavor in the filling. Each cheese choice can provide a uniquely comforting taste experience.

  • Cayenne Heat: For a spicy twist, add a dash of cayenne pepper to the Alfredo sauce. This kick of heat will awaken your taste buds and create a perfect balance with the creamy sauce.

  • Pecorino Parmesan: Swap out Parmesan for pecorino cheese for a more robust flavor. This sharp cheese lends a delightful tang that complements the dish beautifully.

  • Roasted Pumpkin Puree: Use freshly roasted pumpkin puree instead of canned for a richer, more complex flavor. Roasting brings out the natural sweetness, enhancing the dish's overall warmth.

  • Herb Infusion: Mix in fresh herbs like thyme or rosemary into the sauce for an aromatic experience. These herbs infuse each bite with additional depth and a delightful fragrance.

For a homey culinary experience, serve your stuffed shells with a side of mixed greens or crusty bread, just like with these scrumptious Pumpkin Cinnamon Roll Muffins. Each variation invites you to explore, making every meal uniquely yours!

Make Ahead Options

These Pumpkin & Gouda Stuffed Shells are perfect for busy home cooks looking to save time! You can prepare the filling and stuff the shells up to 24 hours in advance—simply refrigerate them in a covered dish. Additionally, you can assemble the entire dish and store it in the fridge, but make sure to cover it tightly to maintain quality. When you're ready to eat, just pop it in a preheated oven at 350°F (175°C) for 35-40 minutes, allowing the shells to warm through and the cheese to melt beautifully. This makes for effortless meal planning, ensuring your delicious autumn feast is just a bake away!

Expert Tips for Pumpkin & Gouda Stuffed Shells

Watch the Cooking Time: Ensure the pasta shells are cooked al dente; overcooking leads to mushy shells that risk breaking while stuffing.

Use Fresh Ingredients: Fresh sage and roasted pumpkin can elevate the dish with richer flavors. Don’t hesitate to try these for a gourmet twist.

Pay Attention to Butter: While making the brown butter, keep a close eye to avoid burning. Dark brown butter has a nutty flavor, but too far can taste bitter.

Check Sauce Consistency: Aim for a thick yet pourable Alfredo. If too thin, let it simmer longer; if it's too thick, a splash of milk or cream can bring it back.

Layering Matters: Pour the Alfredo sauce evenly over the stuffed shells, ensuring each bite has that delicious flavor.

These tips will help you master the art of making perfect Pumpkin & Gouda Stuffed Shells!

How to Store and Freeze Pumpkin & Gouda Stuffed Shells

Fridge: Store leftovers in an airtight container for up to 3 days. Reheat in the oven at 350°F, adding a splash of cream to keep them moist.

Freezer: For longer storage, freeze the stuffed shells before baking. Wrap them tightly in plastic wrap and foil, lasting up to 3 months.

Reheating: Thaw overnight in the fridge before baking. Reheat at 350°F until warmed through, ensuring the sauce is bubbling and creamy.

Make-Ahead Tips: Assemble the Pumpkin & Gouda Stuffed Shells in advance and refrigerate for up to 24 hours before baking, making meal prep a breeze!

What to Serve with Pumpkin & Gouda Stuffed Shells

Creating the perfect meal doesn't just stop at the main dish; it's about complementing flavors that elevate the entire dining experience.

  • Garlic Bread: A warm, buttery loaf will soak up the rich Alfredo sauce perfectly, providing a delightful crunch that contrasts beautifully with the creamy filling.
  • Arugula Salad: Light and peppery, a fresh arugula salad dressed with lemon vinaigrette adds brightness and a touch of sophistication to your comforting dish.
  • Roasted Brussels Sprouts: Their crispy edges and earthy flavor enhance the sweet and savory notes of the stuffed shells, creating a balanced plate that celebrates autumn.
  • Butternut Squash Soup: A silky soup with a hint of spice curates a cozy atmosphere and sets the stage for the main event with its inherent fall flavors.
  • Sangiovese Wine: A medium-bodied red, like Sangiovese, complements the richness of the gouda and the sweet notes of pumpkin, making each sip a perfect match to every bite.
  • Pumpkin Spice Cheesecake: For a sweet ending, this creamy dessert echoes your main flavors while providing a festive touch that celebrates the season.

These delightful pairings will ensure your meal is not only memorable but also filled with the warmth and comfort we crave during the fall season!

Pumpkin & Gouda Stuffed Shells Recipe FAQs

What type of pumpkin should I use?
Absolutely! You can use either canned pumpkin puree or freshly roasted pumpkin. Canned pumpkin is super convenient, but roasting your pumpkin enhances the flavor. Simply cut a small pumpkin in half, remove the seeds, and roast it at 400°F (200°C) for about 45 minutes until tender. Scoop out the flesh, and you’re good to go!

How do I store leftovers?
Very simply! Leftover Pumpkin & Gouda Stuffed Shells can be stored in an airtight container in the refrigerator for up to 3 days. When you're ready to enjoy them again, just reheat in the oven at 350°F (175°C) for about 20 minutes, adding a splash of cream if they seem a bit dry.

Can I freeze the stuffed shells?
Yes! You can freeze the stuffed shells before baking. Wrap each shell tightly in plastic wrap and then in aluminum foil to prevent freezer burn. This way, they can be stored for up to 3 months. When you’re ready to cook, simply thaw them overnight in the fridge, and then bake as directed from the assembled state.

What if my Alfredo sauce is too thick?
No worries at all! If you find your Alfredo sauce is too thick, just whisk in a little bit of milk or cream over low heat until you reach your desired consistency. Aim for a sauce that’s thick enough to coat the back of a spoon, as it should be luxurious but still pourable.

Can I add other ingredients for dietary considerations?
Definitely! While the Pumpkin & Gouda Stuffed Shells are vegetarian, you can enhance them by adding cooked spinach or sautéed mushrooms for added nutrition. If you're looking for a protein boost, cooked sausage or pancetta works wonderfully. Just chop and incorporate them into the filling for a hearty twist!

Is it safe for pets?
It's best to keep these stuffed shells away from your pets. The ingredients, especially garlic and certain cheeses, can be harmful to dogs and cats. Instead, treat them with pet-friendly recipes for their meals, ensuring everyone in the family stays safe and healthy!

Enjoy every bite of your cozy creation!

Pumpkin & Gouda Stuffed Shells

Pumpkin & Gouda Stuffed Shells: A Cozy Autumn Delight

Enjoy the comforting flavors of Pumpkin & Gouda Stuffed Shells, a creamy and cheesy dish perfect for autumn gatherings.
Print Recipe Pin Recipe
Prep Time 30 minutes mins
Cook Time 35 minutes mins
Total Time 1 hour hr 5 minutes mins
Servings: 6 servings
Course: Dinner
Cuisine: Autumn, Italian
Calories: 450
Ingredients Equipment Method Nutrition Notes

Ingredients
  

For the Pasta
  • 12 pieces Jumbo Pasta Shells Can substitute with manicotti or medium shells.
For the Filling
  • 1 cup Pumpkin Puree Canned or freshly roasted pumpkin.
  • 1 cup Gouda Cheese Can be swapped for ricotta or mozzarella.
  • 1 cup Ricotta Cheese Cottage cheese can be a lighter alternative.
  • 1 teaspoon Garlic Powder Switch to fresh garlic for a bolder taste.
  • Salt and Pepper To taste.
For the Alfredo Sauce
  • 4 tablespoons Butter Consider using clarified butter for extra richness.
  • 1 cup Heavy Cream Whole milk can be a lighter substitute.
  • 8 pieces Fresh Sage Leaves Dried sage can work in a pinch.
  • 1/2 cup Parmesan Cheese Feel free to substitute pecorino for a sharper taste.

Equipment

  • Large pot
  • Mixing Bowl
  • Baking Dish
  • Medium saucepan

Method
 

Step-by-Step Instructions
  1. Cook the pasta in salted boiling water for 9-11 minutes until al dente. Drain and set aside.
  2. In a mixing bowl, combine pumpkin puree, gouda cheese, ricotta cheese, garlic powder, and salt and pepper. Blend until smooth.
  3. Stuff each pasta shell with about 2 tablespoons of the filling. Place in a greased baking dish, seam-side up.
  4. Melt butter in a saucepan over medium heat until golden brown. Whisk in heavy cream and sage, simmer for 5 minutes.
  5. Pour half of the Alfredo sauce over the stuffed shells. Top with parmesan cheese and cover with aluminum foil.
  6. Bake at 350°F for 25 minutes, remove foil, and bake for an additional 10 minutes until bubbly and golden.
  7. Let cool, then drizzle remaining Alfredo sauce over the top before serving.

Nutrition

Serving: 1servingCalories: 450kcalCarbohydrates: 35gProtein: 20gFat: 25gSaturated Fat: 15gCholesterol: 90mgSodium: 600mgPotassium: 450mgFiber: 3gSugar: 5gVitamin A: 7000IUVitamin C: 5mgCalcium: 300mgIron: 2mg

Notes

For optimal results, ensure to watch the cooking time and use fresh ingredients where possible.

Tried this recipe?

Let us know how it was!

Cranberry Brie Sourdough Pull Apart Bread to Wow Guests

December 2, 2025 by Grace Snow Leave a Comment

As I pulled the rich aroma of freshly baked bread from the oven, my heart danced with anticipation. This Cranberry Brie Sourdough Pull Apart Bread isn't just another appetizer; it’s a celebration of flavors that fills your kitchen with warmth and makes your gatherings unforgettable. With its easy preparation, you’ll impress your guests without slaving away in the kitchen. Each gooey pull reveals warm brie mingling with the tangy sweetness of cranberry, all encased in a crusty loaf that beckons to be shared. Perfect for holiday parties or cozy nights in, this vegetarian delight is bound to become your new go-to recipe. What’s your favorite twist on a classic, and are you ready to give this one a try?

Why is this recipe a showstopper?

Irresistible aroma: The moment this bread starts baking, your kitchen fills with a heavenly scent that draws everyone in.

Flavor explosion: Each bite combines creamy brie and tart cranberry, creating a sweet and savory harmony that delights the palate.

Easily customizable: Want to mix things up? You can easily swap brie for goat cheese or add caramelized onions to elevate the flavors.

Crowd-pleaser: Perfect for holiday gatherings or casual get-togethers, this appetizer will impress your guests without the fuss.

Quick and simple: With just a few easy steps, you're on your way to a dish that looks and tastes gourmet. If you enjoy homemade delights, consider pairing it with a side of Cheesy Garlic Bread for an extra treat.

Versatile option: This recipe is not just for gatherings; serve it as a cozy snack while enjoying a glass of wine.

Cranberry Brie Sourdough Pull Apart Bread Ingredients

For the Bread
• Sourdough Bread – Provides structure and a tangy flavor; substitute with any round crusty bread, like French or Italian, if sourdough is not available.

For the Cheese Filling
• Brie Cheese – Adds richness and melts beautifully; can be swapped for goat cheese, gouda, or sharp cheddar for different flavor profiles.
• Cranberry Sauce – Offers a sweet-tart contrast to the brie; alternatives include raspberry or fig jam for unique twists.

For the Flavor Base
• Butter – Essential for richness and flavor; use salted or unsalted based on preference.
• Garlic Powder – Enhances aroma and flavor; fresh garlic can be used as a substitute if preferred.
• Salt – Balances flavors; adjust according to taste.
• Pepper – Adds mild heat; can increase or decrease based on preference.

For the Garnish
• Fresh Parsley – For garnish and a pop of color; omit if unavailable.

This sumptuous Cranberry Brie Sourdough Pull Apart Bread reflects the love for homemade food and makes gatherings even more special!

Step‑by‑Step Instructions for Cranberry Brie Sourdough Pull Apart Bread

Step 1: Preheat the Oven
Begin by preheating your oven to 350°F (175°C). This temperature will ensure that your Cranberry Brie Sourdough Pull Apart Bread bakes evenly, resulting in a golden brown crust and a gooey interior. While the oven warms up, gather your ingredients and get your baking tray ready for the loaf.

Step 2: Prepare the Sourdough Loaf
Place the sourdough loaf on a cutting board and, using a serrated knife, carefully make deep cuts in a grid pattern without slicing all the way through the bottom. This allows the flavors to seep into the bread while maintaining its structure. You should make about 1-inch wide cuts, creating enough space to stuff with brie and cranberry sauce.

Step 3: Mix the Flavor Base
In a small bowl, melt some butter and stir in garlic powder, salt, and pepper to taste. This rich mixture will enhance the flavors of your Cranberry Brie Sourdough Pull Apart Bread. Make sure it’s well combined, as this butter will be drizzled into the cuts of the bread for added moisture and flavor.

Step 4: Drizzle the Butter Mixture
Gently drizzle the butter mixture into the cuts of the loaf, ensuring each crack is filled for maximum flavor infusion. Use a spoon if needed to help it reach the deeper sections. The buttery garlic aroma will start to fill your kitchen, giving you a hint of the deliciousness to come.

Step 5: Stuff the Bread
Now it’s time to stuff your bread! Take small pieces of brie cheese and cranberry sauce and carefully tuck them into each cut of the loaf. The brie should melt beautifully while the cranberry adds a tangy sweetness, creating a delightful contrast. Add a sprinkle of chopped parsley on top for a pop of color and freshness.

Step 6: Bake the Bread
Wrap the entire stuffed loaf in aluminum foil and place it on a baking tray before sliding it into the preheated oven. Bake for 15 minutes, allowing the bread to heat through and the brie to start melting. After 15 minutes, unwrap the foil and bake for an additional 10 minutes to achieve a crispy top and perfectly gooey center.

Step 7: Let Cool and Serve
Once the bread is golden brown and melty, remove it from the oven and let it cool for a few moments. This will allow the cheese to set slightly. Serve your Cranberry Brie Sourdough Pull Apart Bread warm, perfect for pulling apart and savoring each cheesy, sweet bite surrounded by a crunchy crust.

Make Ahead Options

These Cranberry Brie Sourdough Pull Apart Bread are perfect for busy home cooks looking to save time! You can prepare the entire loaf up to 24 hours in advance, just assemble the bread and wrap it tightly in aluminum foil. This keeps it fresh and prevents the bread from drying out. When you're ready to bake, simply remove it from the fridge, unwrap it, and pop it in the preheated oven at 350°F (175°C) for the same baking times. The bread will come out just as delicious, with gooey brie and sweet cranberry waiting to delight your guests. This make-ahead method ensures you'll have a show-stopping appetizer ready with minimal effort!

Cranberry Brie Sourdough Pull Apart Bread Variations

Feel free to take this delectable bread to new heights with a few fun twists and fillings!

  • Goat Cheese: Swap brie for goat cheese to introduce a tangy flavor that pairs wonderfully with cranberry.
  • Caramelized Onions: Add caramelized onions for a sweet and savory depth that elevates the overall taste experience.
  • Nutty Crunch: Incorporate chopped walnuts or pecans into the stuffing for a delightful crunch that contrasts with the melty cheese.
  • Spicy Kick: Mix in crushed red pepper flakes with the butter mixture to add a hint of spice that will tingle your taste buds.
  • Fruit Medley: Use fig jam or raspberry preserves instead of cranberry for a sweet twist that brings in different notes of flavor.
  • Herbed Delight: Experiment with fresh herbs like rosemary or thyme for an aromatic punch that complements the richness of the brie.
  • Smoky Flavor: Add a touch of smoked gouda to the cheese filling for a deep, smoky flavor that transforms each bite.
  • Vegetarian Twist: For a vegetarian-friendly option, combine different seasonal vegetables such as spinach or artichokes with your cheese to make this bread even heartier.

As you're creating these variations, you might enjoy pairing this bread with a comforting side like Cornbread Breakfast Casserole for those cozy nights in, or serve warm alongside some Cheesy Garlic Bread at your next gathering. The possibilities are endless, and it’s all about making it your own!

Expert Tips for Cranberry Brie Sourdough Pull Apart Bread

Prepare the Bread: Allow the sourdough loaf to sit out for about 15 minutes before cutting. This makes it easier to cut without squishing the bread.

Use Fresh Ingredients: Opt for fresh brie and homemade cranberry sauce when possible. They enhance the flavor of your Cranberry Brie Sourdough Pull Apart Bread.

Avoid Overstuffing: While you may be tempted to cram in as much filling as possible, overstuffing can cause the bread to break apart. Aim for balanced stuffing.

Watch Cooking Times: Every oven is different, so keep an eye on your bread towards the end of baking. You want a golden crust, but not overly browned.

Experiment Freely: Don’t hesitate to mix up the cheeses or add ingredients like caramelized onions or nuts based on personal taste. This make it your own signature dish!

Serve Warm: For maximum gooeyness, serve your bread warm. It’s at its best when straight out of the oven, enticing everyone to dig in!

What to Serve with Cranberry Brie Sourdough Pull Apart Bread

Nothing elevates a cozy gathering like the delightful aroma and taste of warm bread paired with exquisite sides.

  • Creamy Mashed Potatoes: Their smooth texture complements the chewy bread, creating a comforting balance of flavors. A dollop of gravy adds an extra layer of indulgence!

  • Garlic Herb Roasted Vegetables: The caramelization adds a savory depth, while the spices and herbs keep things fresh. These vibrant veggies provide a colorful contrast to your bread.

  • Honey-Glazed Carrots: Their natural sweetness pairs beautifully with the tart cranberry and rich brie. Plus, their crunch adds a lovely contrasting texture.

  • Spinach Salad: Light and refreshing, a simple spinach salad topped with a zesty vinaigrette cleanses the palate between bites of the cheesy bread. Consider adding some nuts for crunch.

  • Savory Cheese Plate: A variety of cheeses alongside nuts and fruits will enhance the experience. Think gouda or aged cheddar to create rich, flavorful layers.

  • Sparkling Wine: An effervescent bubbly complements the rich, creamy texture of the melted brie perfectly. It's the ideal accompaniment for any festive occasion.

  • Apple Crisp: For a sweet finish, this warm dessert with a crumbly topping echoes the sweet-tart elements of the pull-apart bread, delivering a satisfying ending to your meal.

Each of these delightful pairings bolsters the sweet and savory notes of the Cranberry Brie Sourdough Pull Apart Bread, transforming it into the star of your table.

How to Store and Freeze Cranberry Brie Sourdough Pull Apart Bread

Room Temperature: Store uneaten bread at room temperature in a paper bag or wrapped in a clean kitchen towel for up to 1 day. This helps maintain its crusty texture.

Fridge: If you have leftovers, place them in an airtight container in the fridge for up to 2 days. This will keep the flavors intact while preventing spoilage.

Freezer: Wrap the bread tightly in plastic wrap and then in aluminum foil to freeze for up to 2 months. When ready to enjoy, thaw overnight in the fridge and reheat.

Reheating: To restore the gooey texture of your Cranberry Brie Sourdough Pull Apart Bread, reheat in a 350°F (175°C) oven for about 10-15 minutes. Enjoy the melty delights once again!

Cranberry Brie Sourdough Pull Apart Bread Recipe FAQs

How do I select the best sourdough bread for this recipe?
Absolutely! Look for a round sourdough loaf that feels firm to the touch and has a crisp crust. The bread should have a pleasant, tangy aroma and a dense structure—this ensures it holds up when you make those deep cuts. If you notice dark spots all over, choose another loaf as it may be past its prime.

How should I store leftovers?
Very! If you have any leftover Cranberry Brie Sourdough Pull Apart Bread, place it in an airtight container and store it in the fridge for up to 2 days. This preserves its flavors while preventing spoilage. To enjoy its gooey goodness again, just reheat it in a 350°F (175°C) oven for about 10-15 minutes, and it'll taste fresh out of the oven!

Can I freeze the bread?
Absolutely! To freeze, wrap the fully baked bread tightly in plastic wrap, then wrap it again in aluminum foil. This protects it from freezer burn and keeps it fresh for up to 2 months. When you're ready to enjoy it, simply thaw it overnight in the fridge and reheat it in the oven for that delightful melty texture.

What should I do if my bread starts to break apart while stuffing?
Oh no! If your bread begins to crack while you’re stuffing it, just be gentle. Make smaller cuts or simply stuff fewer toppings into each slice to keep it intact. If you’re worried about it being too full, remember: it's about balance! You want enough filling to enjoy the flavors without compromising the bread's structure.

Is this recipe safe for pets or those with allergies?
Very! If you have pets, I recommend keeping this bread away from them, especially because of the dairy and potential garlic flavor, which can be harmful to some animals. For allergy considerations, it’s best to double-check with anyone who might have a sensitivity; you can always swap out ingredients to make it nut-free or dairy-free as necessary.

Can I prepare this dish ahead of time?
Absolutely! You can make the Cranberry Brie Sourdough Pull Apart Bread a few hours ahead of time. Just assemble it, wrap it tightly in foil, and refrigerate until you’re ready to bake. When it’s time to serve, pop it into the preheated oven for a delightful, freshly baked appetizer that will impress everyone.

Cranberry Brie Sourdough Pull Apart Bread

Cranberry Brie Sourdough Pull Apart Bread to Wow Guests

This Cranberry Brie Sourdough Pull Apart Bread is a delightful appetizer combining gooey brie and tangy cranberry, perfect for any gathering.
Print Recipe Pin Recipe
Prep Time 20 minutes mins
Cook Time 25 minutes mins
Total Time 45 minutes mins
Servings: 8 pieces
Course: Appetizers
Cuisine: American
Calories: 200
Ingredients Equipment Method Nutrition Notes

Ingredients
  

For the Bread
  • 1 loaf Sourdough Bread Substitute with any round crusty bread if sourdough is not available.
For the Cheese Filling
  • 8 ounces Brie Cheese Can be swapped for goat cheese or gouda.
  • 1 cup Cranberry Sauce Alternatives include raspberry or fig jam.
For the Flavor Base
  • 4 tablespoons Butter Use salted or unsalted based on preference.
  • 1 teaspoon Garlic Powder Fresh garlic can be used as a substitute.
  • 1 teaspoon Salt Adjust according to taste.
  • 1 teaspoon Pepper Increase or decrease based on preference.
For the Garnish
  • 2 tablespoons Fresh Parsley Omit if unavailable.

Equipment

  • Oven
  • Baking tray
  • Cutting Board
  • Serrated knife
  • small bowl
  • Aluminum Foil

Method
 

Step‑by‑Step Instructions
  1. Preheat your oven to 350°F (175°C).
  2. Place the sourdough loaf on a cutting board and make deep cuts in a grid pattern without slicing all the way through the bottom.
  3. In a small bowl, melt some butter and stir in garlic powder, salt, and pepper.
  4. Drizzle the butter mixture into the cuts of the loaf.
  5. Stuff the bread with small pieces of brie cheese and cranberry sauce.
  6. Wrap the stuffed loaf in aluminum foil and place it on a baking tray. Bake for 15 minutes, then unwrap and bake for an additional 10 minutes.
  7. Let it cool briefly, then serve warm.

Nutrition

Serving: 1pieceCalories: 200kcalCarbohydrates: 24gProtein: 6gFat: 10gSaturated Fat: 5gPolyunsaturated Fat: 0.5gMonounsaturated Fat: 3gCholesterol: 25mgSodium: 350mgPotassium: 150mgFiber: 1gSugar: 4gVitamin A: 500IUVitamin C: 2mgCalcium: 100mgIron: 0.5mg

Notes

This recipe is perfect for any gathering and can be customized with different cheeses or additional ingredients like caramelized onions.

Tried this recipe?

Let us know how it was!

Irresistible British Meat Pies: Cozy Comfort in Every Bite

December 2, 2025 by Grace Snow Leave a Comment

The aroma of freshly baked pastry fills the air, mingling with the savory scent of seasoned meat—it’s a symphony of comforting scents that draws you into the kitchen. Today, I'm excited to share my recipe for British Meat Pies, a classic dish that’s perfect for cozy nights or festive gatherings. These delightful pies offer not just mouthwatering flavors but also versatility, allowing you to play with fillings like ground beef, lamb, or chicken. And if you’re short on time, no worries! They come together easily to satisfy your homemade cravings. Whether you serve them with a side of tangy ketchup or rich gravy, they’re sure to please every palate. Curious to learn how to make these savory gems? Let’s dive into the recipe!

Why Are British Meat Pies So Irresistible?

Heartwarming Comfort: These British meat pies offer a delightful taste of nostalgia, transporting you back to cozy family dinners and festive gatherings.

Flaky Pastry: The golden crust is flaky and perfect, giving way to a savory filling that satisfies every time.

Endless Variations: You can easily switch up the fillings, using beef, lamb, or chicken. Don't hesitate to add veggies or alternate herbs for unique flavors!

Effortless Preparation: Even if you're short on time, these pies come together quickly, making them ideal for busy weeknights or spontaneous gatherings.

Crowd Pleaser: No one can resist a freshly baked pie, making them a surefire hit for parties or family meals. Serve with dipping sauces like ketchup or gravy for an added flair!

British Meat Pies Ingredients

For the Pastry
• Shortcrust Pastry – Creates a flaky outer crust; feel free to use store-bought for convenience.

For the Filling
• Lean Ground Beef – The primary protein choice, offering rich flavor; swap with ground chicken or lamb for a twist.
• Onion – Adds sweetness and depth; shallots can be substituted for a more delicate bite.
• Garlic – Enhances the savory filling; fresh minced garlic is best, but garlic powder works in a pinch.
• Beef Broth – Keeps the filling moist and flavorful; vegetable broth works well for a lighter version.
• Dried Thyme – Imparts an earthy aroma; fresh thyme can elevate the taste further.

For Egg Wash
• Egg – Provides a beautiful golden sheen on the crust; milk can substitute if you prefer a non-egg option.

With these ingredients, you'll create delicious British meat pies that offer comforting vibes and satisfy your homemade food cravings!

Step‑by‑Step Instructions for British Meat Pies

Step 1: Prepare the Pastry
Begin by rolling out the shortcrust pastry on a lightly floured surface until it’s about 1/4 inch thick. Use a round cutter to cut circles that will fit into your greased pie tins, ensuring you have enough pastry for the base and a lid. Aim for even thickness to promote even baking.

Step 2: Cook the Filling
In a skillet over medium heat, sauté chopped onions and minced garlic in a splash of oil until tender and fragrant, taking about 3-4 minutes. Next, add the lean ground beef, cooking until it browns completely, roughly 5-7 minutes. Pour in the beef broth and sprinkle the dried thyme, allowing the mixture to simmer until it thickens for about 10 minutes, stirring occasionally.

Step 3: Assemble the Pies
Take the circles of pastry and line each pie tin, gently pressing the dough into the edges. Spoon in the savory meat mixture, filling generously but leaving space at the top. Cover each pie with another pastry circle, then crimp the edges with a fork to seal them tightly, ensuring no filling escapes during baking.

Step 4: Egg Wash
Prepare an egg wash by beating an egg in a small bowl. Brush the tops of the assembled British meat pies with this wash, giving them a beautiful golden sheen when baked. This step is crucial for achieving that inviting color, so make sure to cover every edge.

Step 5: Bake
Preheat your oven to 400°F (200°C). Place the prepared meat pies on a parchment-lined baking sheet, ensuring they are spaced evenly apart. Bake the pies for 25-30 minutes, or until the crust is golden brown and crisp, keeping an eye on them in the last few minutes to prevent over-baking.

Step 6: Serve
Once baked, remove the pies from the oven and let them cool for a few minutes before serving. This rest allows the filling to set slightly, making them easier to handle. Pair your warm British meat pies with a side of ketchup or rich gravy for dipping, enhancing their comforting flavors.

Expert Tips for British Meat Pies

• Perfect Pastry Thickness: Ensure the pastry isn’t rolled too thin; a robust crust holds the filling better and prevents breakage.

• Cooling Filling: Let the meat mixture cool slightly before filling the pastry to avoid a soggy crust—nobody likes a floppy pie!

• Watch the Bake: Keep an eye on the baking time; ovens vary. Look for a deep golden color to ensure your British meat pies are perfectly done.

• Flavorful Herbs: Feel free to experiment with fresh herbs like rosemary or oregano for a twist on the traditional thyme—variety is key!

• Freezing for Later: These pies freeze wonderfully! Assemble them up to the baking point, then freeze for ready-to-bake meals anytime.

• Dipping Sauces Galore: Serve your pies with a variety of dips like tangy ketchup, rich gravy, or even a homemade mustard sauce—add an extra layer of flavor!

How to Store and Freeze British Meat Pies

Room Temperature: Enjoy your British meat pies fresh out of the oven for the best flavor, but they can be kept at room temperature for up to 2 hours.

Fridge: Store leftover pies in an airtight container in the refrigerator for up to 3 days. Reheat gently to maintain crispy pastry.

Freezer: For longer storage, freeze assembled but unbaked pies. Wrap them tightly in plastic wrap and foil; they can last in the freezer for up to 3 months.

Reheating: When ready to enjoy, bake from frozen at 400°F (200°C) for about 30-35 minutes, or until heated through and golden, ensuring they stay delightfully flaky!

Make Ahead Options

These British Meat Pies are a fantastic option for meal prep enthusiasts! You can make the flaky shortcrust pastry and assemble the pies up to 24 hours in advance; simply refrigerate them until you’re ready to bake. To maintain their quality, cover the assembled pies with plastic wrap to prevent drying out. The meat filling can also be prepared up to 3 days ahead—just let it cool completely before refrigerating. When you're ready to serve, preheat your oven, brush the tops with an egg wash, and bake straight from the fridge for a delightful homemade dinner in no time. Enjoy the convenience of make-ahead British Meat Pies that taste just as delicious as if they were freshly baked!

What to Serve with British Meat Pies

Nothing completes the heartwarming essence of homemade comfort food like delightful side dishes that enhance every savory bite.

  • Creamy Mashed Potatoes: These add a fluffy texture that contrasts beautifully with the flaky crust of the pies, soaking up any gravy for a flavorful experience.

  • Fresh Garden Salad: A light, zesty salad with crisp greens and a tangy vinaigrette brightens the meal, balancing the richness of the meat pies perfectly.

  • Roasted Vegetables: Seasoned root veggies deliver sweetness and earthy flavor, providing a hearty side that complements the savory filling nicely.

  • Hearty Gravy: Rich, homemade gravy elevates the experience, drenching your pie in savory goodness that mirrors traditional British comfort.

  • Apple Sauce: The sweetness of apple sauce offers a refreshing counterpoint to the savory richness of the meat pies, creating a delightful taste contrast.

  • Coleslaw: A crunchy, tangy coleslaw can provide a refreshing crunch, making it a delightful pairing that cuts through the richness of the pies.

  • Craft Beer or Cider: A cold pint of craft beer or a crisp apple cider pairs wonderfully, enhancing the flavors while providing a refreshing sip between bites.

  • Chocolate Biscuit Cake: For dessert, a slice of rich chocolate biscuit cake wraps up the meal perfectly, adding a sweet touch that echoes the warmth of your dinner table.

British Meat Pies: Delicious Variations Await

Get ready to elevate your British meat pies with scrumptious twists that cater to your taste and cravings!

  • Ground Chicken: Swap out beef for ground chicken, creating a lighter option that’s just as satisfying. The mild flavor pairs beautifully with the spices.

  • Lamb Substitute: For a richer flavor, use ground lamb instead of beef. Its distinct taste adds a delightful Mediterranean flair to your pies.

  • Vegetable Boost: Mix in finely chopped carrots and peas for added nutrition and a pop of color. They not only enhance the flavor, but also provide extra texture.

  • Herb Infusion: Try using fresh rosemary or oregano in place of dried thyme. Their aromatic profiles will bring a whole new dimension to your filling.

  • Spicy Kick: Add diced jalapeños or a pinch of red pepper flakes to introduce a gentle heat to the meat filling. This twist is perfect for those who enjoy a bit of spiciness!

  • Cheesy Surprise: Incorporate a handful of shredded cheese—like cheddar or mozzarella—into the filling for a gooey, melty indulgence. It creates a heavenly contrast with the flaky crust.

  • Gluten-Free Option: Use a gluten-free pastry mix to make these pies compatible with a gluten-free diet. You can still enjoy the same delightful flavors without any adjustments to the filling.

Feel free to mix and match these variations or create your own to suit your family’s preferences. And hey, if you're looking for ideas on sides, why not check out how to make a tangy dipping sauce or explore some other comforting homemade delights? Let your culinary imagination run wild!

British Meat Pies Recipe FAQs

How do I select the right ingredients for my British meat pies?
Absolutely! For the best flavor, choose lean ground beef that is fresh and well-marbled. Fresh vegetables should be bright and crisp—onions should be firm without dark spots, and garlic should be plump and not sprouting. Don't forget to check your herbs; fresh thyme can elevate the taste significantly compared to dried.

How long can I store leftover British meat pies?
Very! You can store your leftover British meat pies in an airtight container in the refrigerator for up to 3 days. Make sure to let them cool completely before storing to avoid excess moisture. This keeps the pastry crispy and the filling flavorful!

Can I freeze British meat pies, and how do I do it?
Absolutely! To freeze, assemble your pies but do not bake them. Wrap each pie tightly in plastic wrap and then in foil, ensuring no air is trapped inside. They can be frozen for up to 3 months. When you're ready to enjoy, bake from frozen at 400°F (200°C) for 30-35 minutes, or until heated through and golden. This way, you’ll have delicious homemade comfort food ready anytime!

What if my pastry breaks or doesn't hold the filling well?
No worries! If your pastry breaks, it might be too thin or not chilled enough. To fix it, simply patch it up with extra dough and make sure to seal it well. For better handling, chill your rolled-out pastry for about 15 minutes before cutting, and be mindful not to overwork the dough to keep it flaky.

Can my pets safely eat British meat pies?
Very! While the filling can be tempting for pets, it's best to avoid giving them any pie due to ingredients like garlic and onion that are harmful to dogs. If you want to share, prepare a special pet-friendly version by using plain, cooked meat without spices, which will be just as heartwarming for your furry friends without the risk!

How can I ensure my pies have that perfect golden finish?
To achieve that irresistible golden crust, apply a generous egg wash before baking. Whisk an egg and brush it evenly over the pastry tops. If you're avoiding eggs, using milk or a dairy-free alternative works well too. This step is crucial for giving your pies that appetizing, shiny surface that’s so inviting!

British Meat Pies

Irresistible British Meat Pies: Cozy Comfort in Every Bite

Discover how to make British Meat Pies, a delightful and comforting dish perfect for any occasion.
Print Recipe Pin Recipe
Prep Time 30 minutes mins
Cook Time 30 minutes mins
Cooling Time 5 minutes mins
Total Time 1 hour hr 5 minutes mins
Servings: 4 pies
Course: Dinner
Cuisine: British
Calories: 350
Ingredients Equipment Method Nutrition Notes

Ingredients
  

For the Pastry
  • 1 batch Shortcrust Pastry Feel free to use store-bought for convenience.
For the Filling
  • 1 lb Lean Ground Beef Swap with ground chicken or lamb for a twist.
  • 1 medium Onion Shallots can be substituted for a more delicate bite.
  • 2 cloves Garlic Fresh minced garlic is best.
  • 1 cup Beef Broth Vegetable broth works well for a lighter version.
  • 1 tsp Dried Thyme Fresh thyme can elevate the taste further.
For Egg Wash
  • 1 large Egg Milk can substitute if you prefer a non-egg option.

Equipment

  • Pie tins
  • Rolling Pin
  • Skillet
  • Baking Sheet
  • Mixing Bowl

Method
 

Step-by-Step Instructions for British Meat Pies
  1. Prepare the pastry by rolling out the shortcrust pastry on a lightly floured surface until it’s about 1/4 inch thick.
    British Meat Pies
  2. In a skillet over medium heat, sauté chopped onions and minced garlic in a splash of oil until tender and fragrant, taking about 3-4 minutes.
    British Meat Pies
  3. Add the lean ground beef, cooking until it browns completely, roughly 5-7 minutes. Pour in the beef broth and sprinkle the dried thyme, allowing the mixture to simmer until it thickens for about 10 minutes.
    British Meat Pies
  4. Take the circles of pastry and line each pie tin, gently pressing the dough into the edges. Spoon in the savory meat mixture, filling generously but leaving space at the top.
    British Meat Pies
  5. Cover each pie with another pastry circle, then crimp the edges with a fork to seal them tightly, ensuring no filling escapes during baking.
    British Meat Pies
  6. Prepare an egg wash by beating an egg in a small bowl. Brush the tops of the assembled British meat pies with this wash.
    British Meat Pies
  7. Preheat your oven to 400°F (200°C). Place the prepared meat pies on a parchment-lined baking sheet, ensuring they are spaced evenly apart. Bake for 25-30 minutes.
    British Meat Pies
  8. Once baked, remove the pies from the oven and let them cool for a few minutes before serving.
    British Meat Pies

Nutrition

Serving: 1pieCalories: 350kcalCarbohydrates: 40gProtein: 20gFat: 15gSaturated Fat: 5gPolyunsaturated Fat: 1gMonounsaturated Fat: 3gCholesterol: 65mgSodium: 600mgPotassium: 400mgFiber: 2gSugar: 2gVitamin A: 350IUVitamin C: 5mgCalcium: 30mgIron: 3mg

Notes

These pies freeze wonderfully! Assemble them up to the baking point, then freeze for ready-to-bake meals anytime.

Tried this recipe?

Let us know how it was!
  • « Previous Page
  • 1
  • …
  • 129
  • 130
  • 131
  • 132
  • 133
  • …
  • 221
  • Next Page »

Welcome!

Hi, I’m Grace, a Sydney-based home cook with a passion for bold flavors and trending ingredients. Whether you’re a busy beginner or a seasoned foodie, you’ll find dishes here that are fresh, fun, and full of flavor.

More about me

Popular Recipes

  • World’s Best Chocolate Cake
    World's Best Chocolate Cake That Melts in Your Mouth
  • Strawberry Chocolate Shell Cake
    Heavenly Strawberry Chocolate Shell Cake for Your Sweet Tooth
  • Air Fryer Tilapia
    Air Fryer Tilapia: Quick, Crispy, and Flavor-Packed Delight
  • Salmon Fettuccine Alfredo
    Creamy Salmon Fettuccine Alfredo with a Zesty Twist

Footer

↑ back to top

About

  • Privacy Policy
  • Disclaimer
  • Terms & Conditions

Newsletter

  • Sign Up! for emails and updates

Contact

  • About me
  • Contact me

Copyright © 2025 TastyTrendIngredients