tastytrendingredients

  • Home
  • Recipes
    • Appetizers
    • Breakfast
    • Dessert
    • Dinner
    • Drinks
    • Salads
    • Snacks
    • Soups
  • About me
  • Contact me
menu icon
go to homepage
  • Home
  • Recipes
    • Appetizers
    • Breakfast
    • Dessert
    • Dinner
    • Drinks
    • Salads
    • Snacks
    • Soups
  • About me
  • Contact me
search icon
Homepage link
  • Home
  • Recipes
    • Appetizers
    • Breakfast
    • Dessert
    • Dinner
    • Drinks
    • Salads
    • Snacks
    • Soups
  • About me
  • Contact me
×

Creamy Easy Peanut Butter Pie with a Crunchy Oreo Twist

November 20, 2025 by Grace Snow Leave a Comment

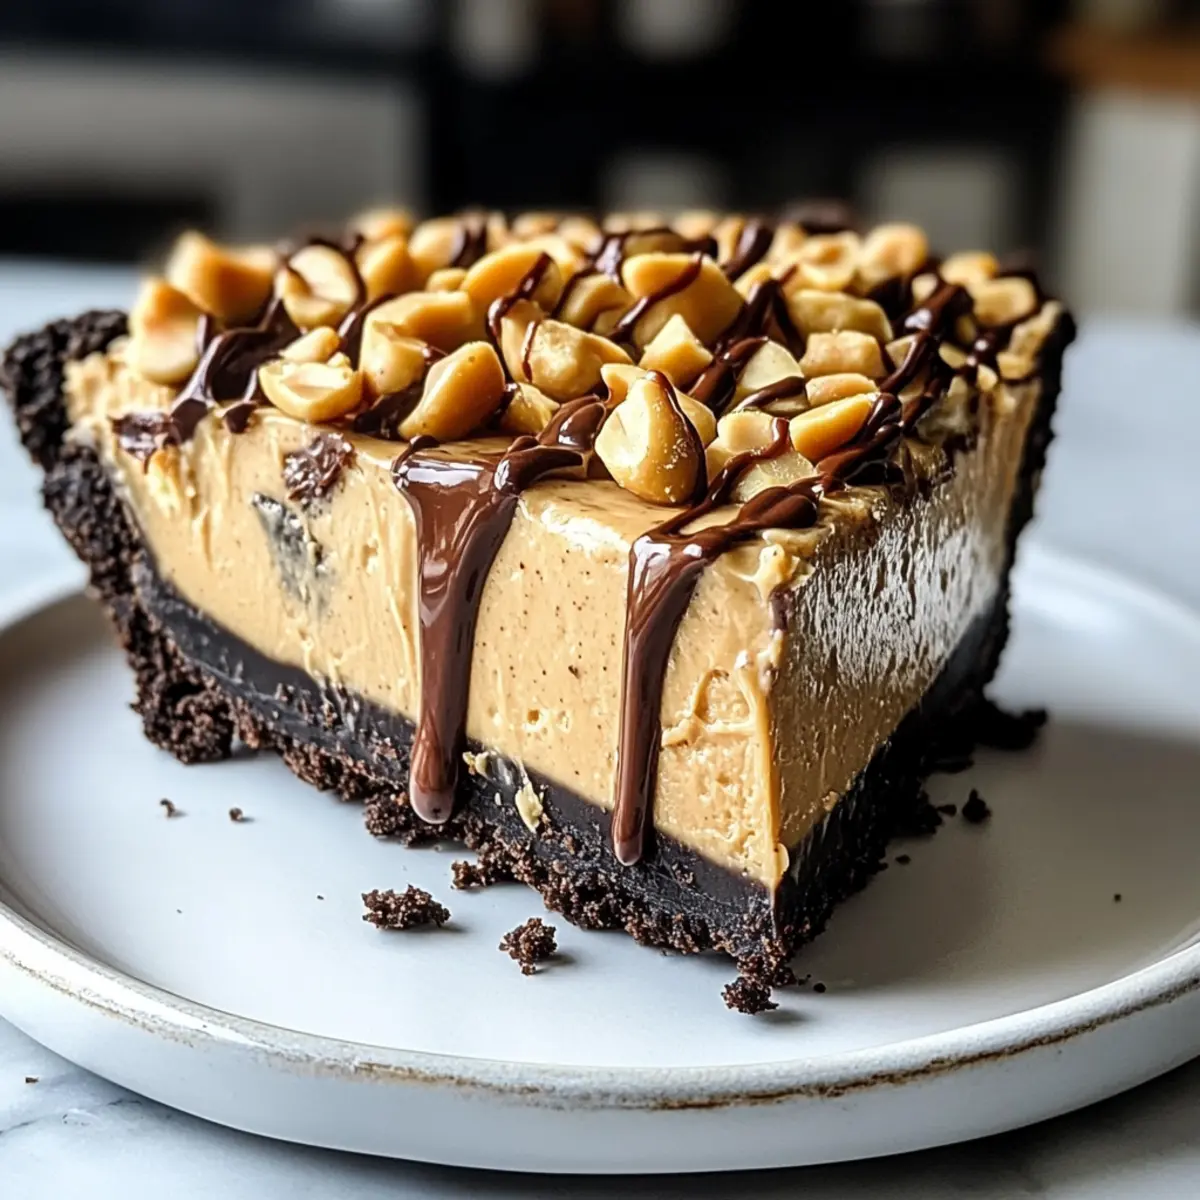
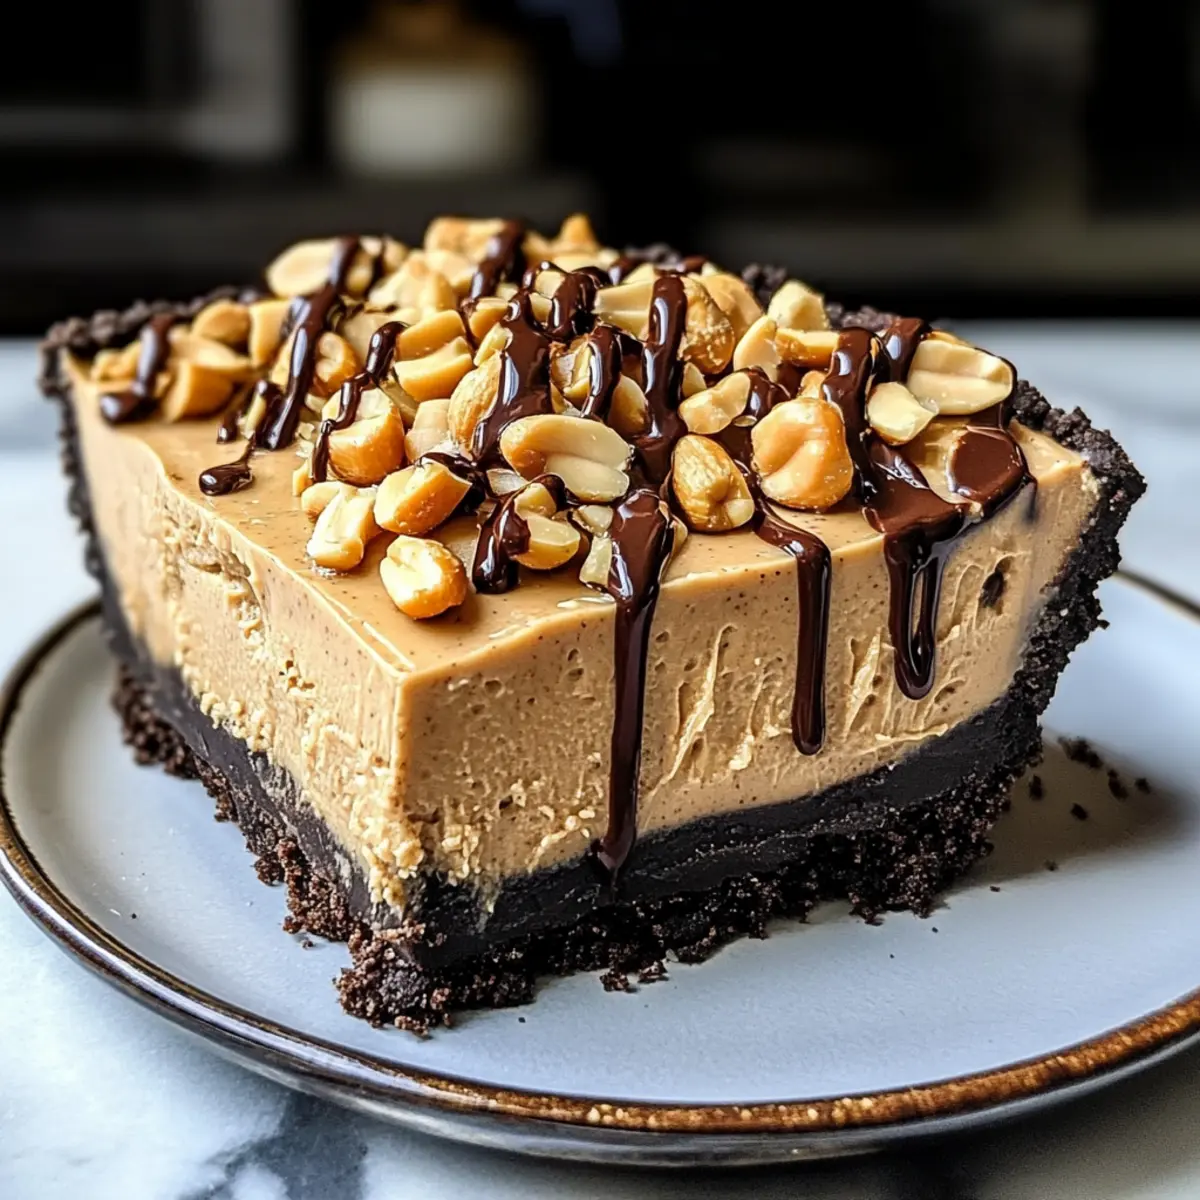
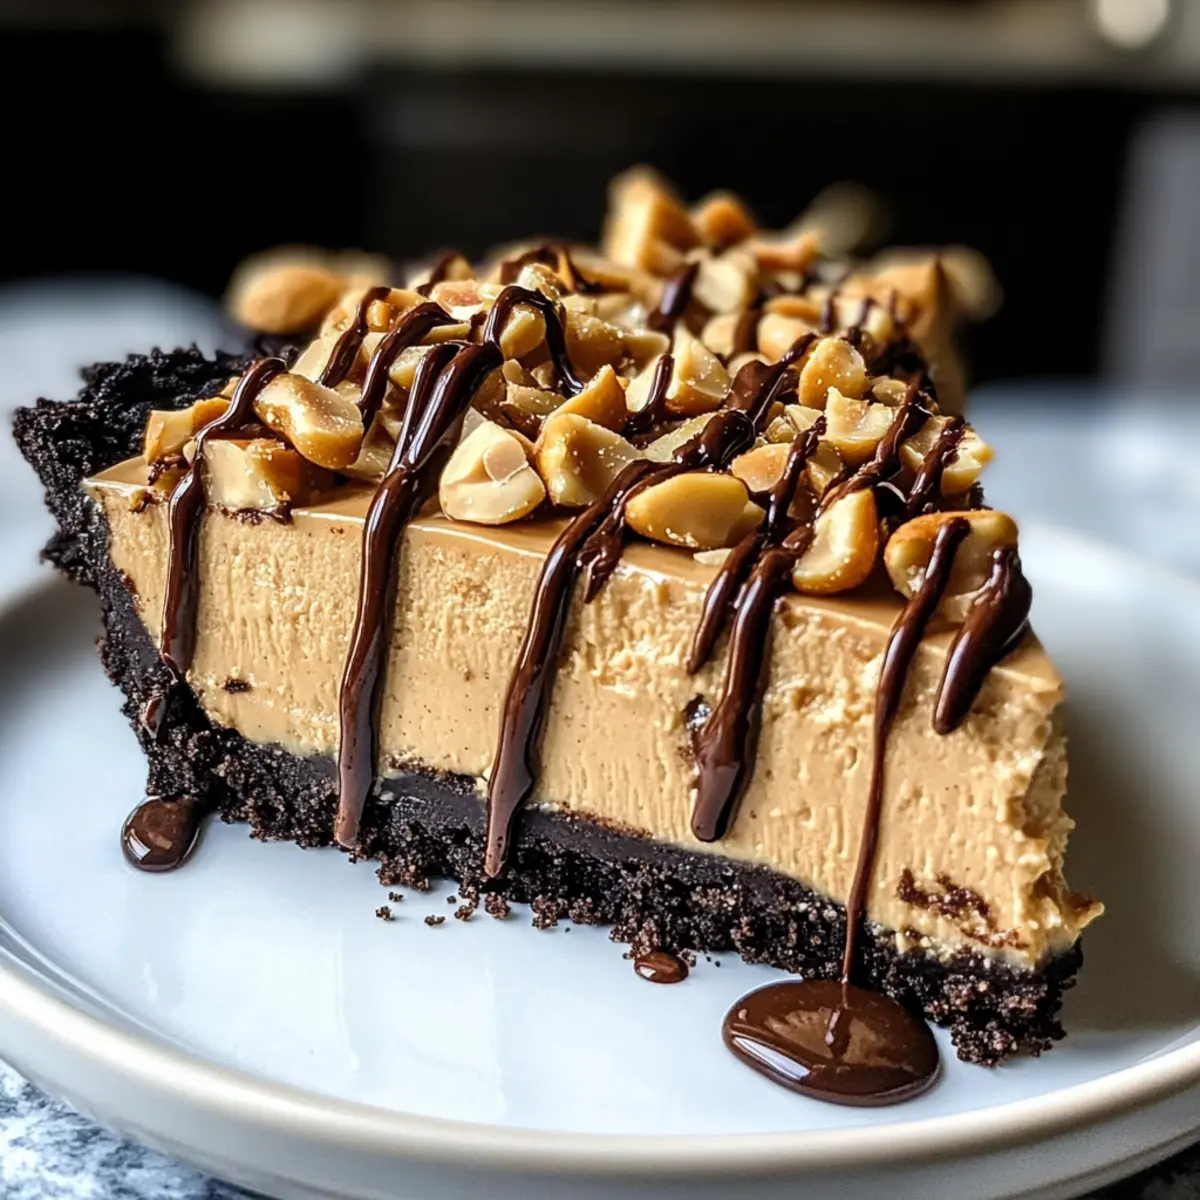
There’s something magical about the combination of creamy peanut butter and a crunchy chocolate crust. As I dig into this Easy Peanut Butter Pie, I’m flooded with memories of family gatherings and cozy nights in. This no-bake dessert is a game changer, designed for those of us who want a sweet indulgence without spending hours in the kitchen. With just 20 minutes of prep time, you can whip up a stunning pie that’s not only a crowd-pleaser but also gluten-free if you opt for gluten-free Oreos. So, why wait? Let’s dive into this delicious treat that promises to elevate any occasion. Are you ready to impress your loved ones with a dessert that’s as easy to make as it is delightful to eat?

Why is this Peanut Butter Pie special?

Indulgent Creaminess: This Easy Peanut Butter Pie features a luscious filling made with creamy peanut butter and tangy cream cheese that’s simply irresistible.
Quick Prep Time: With just 20 minutes of prep, you’ll have a delightful dessert ready to chill while you focus on other things.
Crowd-Pleasing: Perfect for family gatherings or parties, this pie is always a hit, leaving everyone craving seconds.
Gluten-Free Option: Use gluten-free Oreos to make this delicious treat accessible for everyone at the table.
Versatile Toppings: Dress it up with chopped peanuts and a drizzle of chocolate syrup for added flair and flavor. Dive into an unforgettable dessert experience that will have everyone asking for your secret recipe!

Easy Peanut Butter Pie Ingredients

For the Crust
• Oreo Cookies – Provides a delightful, crunchy base; substitute with gluten-free cookies if needed.
• Unsalted Butter – Binds the crushed Oreos together, creating a firm crust.

For the Filling
• Whipping Cream – Adds a light, airy texture; swap for non-dairy whipping cream for a dairy-free option.
• Powdered Sugar – Sweetens the filling perfectly, balancing flavors.
• Cream Cheese – Ensures a rich and creamy filling; use vegan cream cheese for a dairy-free alternative.
• Creamy Peanut Butter – The star ingredient that gives this Easy Peanut Butter Pie its signature flavor; you can opt for crunchy peanut butter for added texture.
• Vanilla Extract – Enhances the overall taste, bringing all flavors together.

For Topping
• Chopped Peanuts – Adds a delightful crunch on top; optional but highly recommended.
• Chocolate Syrup – Drizzle on top for an extra layer of flavor before serving.

Step‑by‑Step Instructions for Easy Peanut Butter Pie

Step 1: Prepare the Crust
Start by crushing about 24 Oreo cookies into fine crumbs using a food processor or a zip-top bag and rolling pin. Melt 5 tablespoons of unsalted butter and combine it with the crumbs until evenly coated. Press this mixture firmly into the bottom and up the sides of a greased 9-inch pie plate. Refrigerate for 30 minutes to set the crust.

Step 2: Whip the Cream
In a large mixing bowl, pour in 1 cup of whipping cream along with 2 tablespoons of powdered sugar. Using an electric mixer, whip the cream on medium-high speed until stiff peaks form, which should take about 3-5 minutes. Once done, gently set it aside; this whipped cream is the secret to the airy texture of your Easy Peanut Butter Pie.

Step 3: Make the Filling
In another mixing bowl, add 8 ounces of softened cream cheese and beat until smooth using an electric mixer. Gradually mix in 1 cup of creamy peanut butter, another 2 tablespoons of powdered sugar, and 1 teaspoon of vanilla extract until fully combined and creamy. The filling should be thick yet smooth, evoking that rich peanut butter flavor.

Step 4: Combine
Gently fold the whipped cream into the peanut butter mixture, taking care not to deflate it. Use a spatula to combine until you see no white streaks remaining, ensuring the filling stays light and fluffy. This step is crucial for achieving the creamy consistency of your Easy Peanut Butter Pie, enhancing its delightful texture.

Step 5: Assemble the Pie
Once your crust has set, spoon the filling into the cooled Oreo crust, spreading it evenly to create a smooth surface. For added flair, sprinkle chopped peanuts on top and drizzle with chocolate syrup, if desired. This decorative touch will make your Easy Peanut Butter Pie visually enticing and even more delicious.

Step 6: Chill Before Serving
Cover the assembled pie with plastic wrap and chill in the refrigerator for at least 2 hours, or ideally overnight. This chilling time allows the flavors to meld and sets the filling into a perfect sliceable form. Your patience will be rewarded as you await a creamy, indulgent dessert that’s ready to impress!

Step 7: Serve and Enjoy
After chilling, slice your Easy Peanut Butter Pie into wedges and serve cold. For an extra touch, pair it with some whipped cream or fresh fruit. With its rich filling and crunchy crust, this delightful dessert will surely be a hit among family and friends!

Make Ahead Options

These Easy Peanut Butter Pie preparations are a lifesaver for busy home cooks! You can prepare the crust up to 24 hours in advance by crushing the Oreo cookies and mixing them with melted butter. Press the mixture into the pie plate and refrigerate. The filling can also be whipped up and stored in the refrigerator for up to 3 days before assembly. Just make sure to cover it well to maintain its creamy texture. When you’re ready to serve, simply spoon the filling into the prepared crust, top with chopped peanuts and chocolate syrup, and chill for at least 2 hours. This way, you’ll have a delicious, no-bake dessert that’s ready in a snap, saving you time to enjoy with loved ones!

How to Store and Freeze Easy Peanut Butter Pie

Refrigerator: Store in an airtight container for up to 3-4 days to maintain optimal freshness and flavor; this no-bake pie is best enjoyed chilled.

Freezer: Wrap the pie tightly in plastic wrap and then in aluminum foil; it can be frozen for up to 1-2 months. Thaw in the fridge before serving for the best texture.

Slicing: For easy serving, slice the pie before freezing; this allows for convenient individual portions when you're ready to enjoy the Easy Peanut Butter Pie.

Reheating: No need to reheat! Serve chilled directly from the fridge or freezer for a delightful, refreshing dessert experience.

What to Serve with Easy Peanut Butter Pie

Create an unforgettable dessert spread that beautifully complements the rich and creamy flavors of your Easy Peanut Butter Pie.

  • Fresh Berries: The tartness of strawberries, raspberries, or blueberries provides a refreshing contrast to the creamy pie, enhancing every bite.
  • Vanilla Ice Cream: A classic pairing, this creamy scoop adds another layer of indulgence and contrast, melting delightfully into each slice.
  • Chocolate Drizzle: Elevate your pie with more chocolate! A generous drizzle on top deepens flavor while adding a touch of elegance.
  • Whipped Cream: This light and airy topping complements the dense pie, bringing balance and visually appealing height to your dessert.
  • Peanut Butter Cookies: For a nutty crunch, serve alongside soft peanut butter cookies to reinforce that beloved flavor while adding extra texture.
  • Coffee or Espresso: A warm cup can enhance the flavors of the pie, creating a cozy after-dinner experience that’s sure to please.
  • Caramel Sauce: A swirl of caramel brings a touch of sweetness, intensifying the already delightful mocha tones and making every mouthful more indulgent.
  • Honey or Maple Syrup: Drizzling a touch of honey can provide a lovely floral sweetness that brightens and elevates the overall dessert experience.

Expert Tips for Easy Peanut Butter Pie

• Soften the Cream Cheese: Ensure cream cheese is at room temperature for smooth mixing. Cold cream cheese can create lumps in your filling.

• Achieve the Right Consistency: Let the pie chill for at least 2 hours. This step is crucial for a firm, sliceable Easy Peanut Butter Pie that holds its shape.

• Folding Technique: Gently fold the whipped cream into the peanut butter mixture without overmixing. This preserves the light, airy texture essential for a delightful pie.

• Crust Alternatives: For a gluten-free option, use gluten-free Oreo cookies. Always check labels to ensure they fit your dietary needs.

• Creative Toppings: Experiment with toppings like chopped nuts, fresh fruit, or even a sprinkle of sea salt for added flavor depth and visual appeal.

Easy Peanut Butter Pie Variations

Feel free to bring your own twist to this delightful recipe and make it truly yours!

  • Nut Butter Swap: Replace creamy peanut butter with almond or cashew butter for a nutty twist.
    Experimenting with different nut butters can elevate your pie's flavor profile, adding unique layers of taste.

  • Gluten-Free: Use gluten-free Oreo cookies for the crust to cater to gluten-sensitive friends and family.
    This simple swap allows everyone to enjoy the same scrumptious dessert without worry!

  • Add Banana: Layer banana slices on top of the filling for a fresh, fruity contrast to the rich peanut butter.
    The banana's sweetness complements the pie's creaminess, creating a divine flavor duo that's hard to resist.

  • Choco-Peanut Burst: Incorporate mini chocolate chips into the filling for an extra chocolatey sensation.
    This variation will add delightful pops of taste throughout each slice!

  • Dairy-Free: Opt for coconut cream in place of whipping cream and use vegan cream cheese for a completely dairy-free dessert.
    It’s a thoughtful choice for anyone with dietary restrictions, proving that indulgence can still be accessible.

  • Flavor Infusion: Add a teaspoon of instant coffee granules to the filling for a subtle mocha flavor boost.
    This twist deepens the flavor, making each bite a unique experience that coffee lovers will adore.

  • Spice It Up: Sprinkle a bit of cinnamon into the filling to provide a warm, cozy note to the pie's flavor.
    Cinnamon beautifully enhances the overall taste, making it perfect for autumn gatherings or cozy nights in.

  • Whipped Cream Layer: Use flavored whipped cream—like chocolate or vanilla—while folding in for an added flavor layer.
    This artistic touch makes every slice a feast for the eyes and the taste buds.

No matter which variation you choose, your Easy Peanut Butter Pie will surely remain a crowd favorite. If you’re seeking more delicious recipes, don’t forget to check out this delightful Crockpot Butter Chicken or try a hearty Tamale Pie that’s equally easy and satisfying!

Easy Peanut Butter Pie Recipe FAQs

What type of Oreos should I use for the crust?
I recommend using classic Oreo cookies for their perfect balance of sweetness and crunch. If you need a gluten-free option, simply substitute with gluten-free cookies, which work just as well and maintain that delightful crust texture.

How long can I store my Easy Peanut Butter Pie in the refrigerator?
Your Easy Peanut Butter Pie can be stored in an airtight container in the refrigerator for up to 3-4 days. To keep it at its best, avoid leaving it out for extended periods as it can lose its fresh taste and texture.

Can I freeze the Easy Peanut Butter Pie?
Absolutely! To freeze your pie, wrap it tightly in plastic wrap, followed by aluminum foil, to prevent freezer burn. It can be frozen for up to 1-2 months. When you're ready to enjoy it, simply thaw it in the refrigerator overnight for the best texture before serving.

What should I do if the pie filling is too thick?
If your filling turns out too thick, you can add a little extra whipping cream to loosen it up. Just gently fold the cream into the mixture until you achieve a smoother consistency. Remember, avoid overmixing to maintain that wonderful lightness in your dessert.

Are there any allergy concerns with the ingredients?
Yes, this Easy Peanut Butter Pie contains common allergens like peanuts and dairy. For a nut-free option, consider using sunflower seed butter instead of peanut butter. Additionally, swap the cream cheese with a dairy-free or vegan cream cheese alternative to cater to those with dairy allergies. Always check ingredient labels to accommodate specific dietary needs.

What toppings can I use for the pie?
The possibilities are endless! I usually top mine with chopped peanuts for a delightful crunch and drizzle it with chocolate syrup for extra sweetness. You might also enjoy adding whipped cream, fresh fruit like strawberries or bananas, or even a sprinkle of sea salt to enhance the flavors. Enjoy experimenting!

Easy Peanut Butter Pie

Creamy Easy Peanut Butter Pie with a Crunchy Oreo Twist

This Easy Peanut Butter Pie combines creamy peanut butter with a crunchy Oreo crust for a delightful no-bake dessert.
Print Recipe Pin Recipe
Prep Time 20 minutes mins
Chilling Time 2 hours hrs
Total Time 2 hours hrs 20 minutes mins
Servings: 8 slices
Course: Dessert
Cuisine: American
Calories: 400
Ingredients Equipment Method Nutrition Notes

Ingredients
  

For the Crust
  • 24 cookies Oreo Cookies Substitute with gluten-free cookies if needed.
  • 5 tablespoons Unsalted Butter Melted.
For the Filling
  • 1 cup Whipping Cream Or non-dairy whipping cream for a dairy-free option.
  • 2 tablespoons Powdered Sugar To sweeten the filling.
  • 8 ounces Cream Cheese Softened.
  • 1 cup Creamy Peanut Butter Can use crunchy peanut butter for added texture.
  • 1 teaspoon Vanilla Extract
For Topping
  • 1/2 cup Chopped Peanuts Optional but recommended.
  • 1/4 cup Chocolate Syrup Drizzle on top before serving.

Equipment

  • Food Processor
  • Electric mixer
  • Mixing Bowl
  • Pie Plate

Method
 

Preparation Steps
  1. Crush 24 Oreo cookies into fine crumbs. Melt 5 tablespoons of unsalted butter and combine with crumbs. Press into a greased 9-inch pie plate. Refrigerate for 30 minutes.
  2. In a bowl, whip 1 cup of whipping cream with 2 tablespoons of powdered sugar until stiff peaks form. Set aside.
  3. In another bowl, beat 8 ounces of cream cheese until smooth. Gradually mix in 1 cup of creamy peanut butter, 2 tablespoons of powdered sugar, and 1 teaspoon of vanilla extract until creamy.
  4. Gently fold whipped cream into peanut butter mixture until no white streaks remain.
  5. Spoon filling into the cooled Oreo crust, spreading evenly. Sprinkle with chopped peanuts and drizzle with chocolate syrup if desired.
  6. Cover the pie and chill in the refrigerator for at least 2 hours or overnight before serving.
  7. Slice the pie into wedges and serve cold, optionally pairing with whipped cream or fresh fruit.

Nutrition

Serving: 1sliceCalories: 400kcalCarbohydrates: 30gProtein: 6gFat: 28gSaturated Fat: 10gPolyunsaturated Fat: 2gMonounsaturated Fat: 16gCholesterol: 30mgSodium: 200mgPotassium: 180mgFiber: 2gSugar: 20gVitamin A: 400IUCalcium: 50mgIron: 1mg

Notes

Ensure cream cheese is softened for smooth mixing. Chill the pie properly for the best texture and slicing ease. Experiment with various toppings to enhance flavor.

Tried this recipe?

Let us know how it was!

Bake the Best Fresh Apple Cake with Cream Cheese Frosting

November 20, 2025 by Grace Snow Leave a Comment

The sweet scent of freshly baked apple cake wafts through my kitchen, and I can’t help but feel a wave of nostalgia wash over me. This Irresistible Fresh Apple Cake with Cream Cheese Frosting is not just any dessert; it’s a cozy celebration of fall, packed with juicy apples and eased by a dreamy layer of tangy cream cheese frosting. What makes this recipe truly special is its ease of preparation—perfect for busy weekdays or casual get-togethers with friends and family. Plus, with its moist texture and warm spices, it’s sure to become a go-to comfort dessert that disappears faster than you can say “seconds, please!” Ready to bring a slice of warmth to your table? Let’s get baking!

Why Is This Apple Cake Irresistible?

Moist & Flavorful: Each slice of this Fresh Apple Cake is brimming with juicy apples and a hint of warm cinnamon, embodying the essence of comfort food.

Effortless Baking: With simple ingredients and straightforward instructions, this recipe is perfect for bakers of all skill levels.

Versatile & Customizable: Whether you prefer adding nuts or experimenting with spices, this cake adapts easily to suit your taste.

Crowd-Pleasing Delight: Ideal for gatherings or intimate family dinners, this dessert is bound to impress and make everyone ask for the recipe!

Perfect Pairing: Enjoy it warm or at room temperature, perhaps with a scoop of vanilla ice cream or a dollop of whipped cream, much like a delicious ice cream cake.

Dive into this warm, cozy treat—you won't regret it!

Fresh Apple Cake Ingredients

• Ready to bake this delightful Fresh Apple Cake? Here’s what you’ll need!

For the Cake

  • All-purpose flour – Provides structure to the cake; feel free to substitute with whole wheat flour for a healthier option.
  • Baking soda – Helps the cake rise; ensure it’s fresh for optimal fluffiness.
  • Salt – Enhances flavor; you can reduce it for low-sodium diets.
  • Ground cinnamon – Adds warmth and spice; substitute with nutmeg for a different twist.
  • Unsalted butter – Contributes richness and moisture; coconut oil makes a great dairy-free alternative.
  • Granulated sugar – Sweetens the cake; swap for brown sugar for a deeper, caramel-like flavor.
  • Eggs – Acts as a binder and adds moisture; use flax eggs for a vegan version.
  • Vanilla extract – Provides aromatic flavor; consider vanilla bean paste for an intense punch.
  • Fresh grated apples – Main flavor component; squeeze moisture out to prevent sogginess.
  • Chopped walnuts (optional) – Adds crunch and nuttiness; pecans work well too or omit for nut-free.

For the Frosting

  • Cream cheese – The star ingredient for frosting, offering tangy creaminess; vegan cream cheese is a fantastic substitute.
  • Powdered sugar – Sweetens and adds body to the frosting; adjust to your sweetness preference.
  • Milk – Thins the frosting if it’s too thick; almond milk can be used for a dairy-free option.

With these fresh ingredients, you'll be all set to create a memorable Fresh Apple Cake with Cream Cheese Frosting that your friends and family will adore!

Step‑by‑Step Instructions for Fresh Apple Cake with Cream Cheese Frosting

Step 1: Preheat the Oven
Begin by preheating your oven to 350°F (175°C). This ensures that your Fresh Apple Cake bakes evenly and achieves that perfect golden-brown exterior. While the oven heats, gather all your ingredients and have a 9x13-inch baking pan greased and ready for the batter.

Step 2: Mix Dry Ingredients
In a medium-sized bowl, whisk together 2 cups of all-purpose flour, 1 teaspoon of baking soda, ½ teaspoon of salt, and 2 teaspoons of ground cinnamon. This mixture will provide structure and flavor to the cake. Set this bowl aside as you prepare the wet ingredients, keeping everything organized and efficient.

Step 3: Cream Butter and Sugar
In a large mixing bowl, beat ½ cup of unsalted butter and 1 cup of granulated sugar together until the mixture is light and fluffy—about 2 minutes with an electric mixer. This step is crucial, as it creates air pockets in the batter, leading to a moist and tender Fresh Apple Cake.

Step 4: Incorporate Eggs and Vanilla
Add 2 large eggs to the butter-sugar mix one at a time, beating well after each addition until fully incorporated. Stir in 1 teaspoon of vanilla extract, mixing until everything is combined. Your batter will appear creamy and luscious; this is how you want it to look.

Step 5: Combine Wet and Dry Mixtures
Next, gently fold the dry ingredients into the wet mixture using a spatula or wooden spoon. Mix until just combined—this is crucial to avoid overworking the batter, which can lead to a dense cake. You should see a few streaks of flour remaining, which is perfectly fine.

Step 6: Add Apples and Nuts
Fold in 2 cups of freshly grated apples and ½ cup of chopped walnuts if you're using them. The apples bring moisture and sweetness, while the nuts add a delightful crunch. Make sure the apples are squeezed of excess moisture so your cake doesn’t turn out soggy.

Step 7: Pour Batter into Pan
Pour the batter into your prepared 9x13-inch pan and use a spatula to smooth out the top evenly. This will help the Fresh Apple Cake rise uniformly. Make sure the batter reaches the corners and touches the sides of the pan for the best bake.

Step 8: Bake the Cake
Place the pan in the preheated oven and bake for 30-35 minutes. You'll know the cake is done when a toothpick inserted into the center comes out clean or with just a few moist crumbs, indicating a beautifully baked cake filled with apple goodness.

Step 9: Cool the Cake
Once baked, remove the cake from the oven and let it cool in the pan for about 10 minutes. This cooling period helps set the cake before transferring it to prevent any breakage. Afterward, gently flip it onto a wire rack to cool completely.

Step 10: Prepare the Cream Cheese Frosting
While the cake cools, make the frosting by beating together 8 ounces of softened cream cheese and ½ cup of unsalted butter until mixture is smooth and creamy. Gradually add in 3 cups of sifted powdered sugar and 1 teaspoon of vanilla extract, adjusting the thickness with a splash of milk if needed.

Step 11: Frost the Cake
Once the cake is completely cooled, spread the cream cheese frosting generously over the top. Get creative with your frosting technique—smooth it for a clean look or swirl it for added flair. This frosting is rich and complements the moist apple cake beautifully.

Step 12: Serve and Enjoy
Slice the Fresh Apple Cake into squares and serve it at room temperature or slightly warmed. This delightful dessert is perfect for gatherings, paired beautifully with a scoop of vanilla ice cream or a dollop of whipped cream. Enjoy the smiles it brings!

How to Store and Freeze Fresh Apple Cake

Refrigerator: Store the Fresh Apple Cake with Cream Cheese Frosting in an airtight container in the fridge for up to 3-4 days to maintain its moisture and flavor.

Freezer: For longer storage, wrap the naked cake tightly in plastic wrap and aluminum foil, freezing it for up to 3 months. Frost when ready to serve for the best taste and texture.

Thawing: To enjoy, simply thaw the cake in the refrigerator overnight before frosting, or leave at room temperature for a few hours until soft.

Reheating: If you prefer it warm, microwave a slice for about 10-15 seconds; it pairs beautifully with vanilla ice cream for a comforting dessert.

Make Ahead Options

These Irresistible Fresh Apple Cake with Cream Cheese Frosting are perfect for meal prep enthusiasts! You can grate the apples and mix the dry ingredients up to 24 hours in advance, storing them separately in airtight containers to maintain freshness. For an even quicker option, you can bake the cake ahead of time and refrigerate it for up to 3 days without the frosting. Just remember to let the cake cool completely before wrapping it tightly to prevent any drying out. When you’re ready to serve, simply whip up the cream cheese frosting and spread it over the cake for that delightful finish. This way, you’ll have a delicious dessert that's just as fresh and flavorful with minimal effort!

What to Serve with Irresistible Fresh Apple Cake with Cream Cheese Frosting

Imagine a beautiful autumn gathering made even sweeter with delightful pairings that enhance the flavors of your Fresh Apple Cake.

  • Creamy Mashed Potatoes: This classic side balances the dessert’s sweetness with savory comfort, making your meal feel hearty and complete.

  • Cinnamon Sugar Donuts: These delightful bites are the perfect breakfast companion, echoing the warm spice notes of the cake, making them irresistible together.

  • Caramel Sauce Drizzle: Adding a rich, buttery element, a drizzle of caramel elevates the cake's natural flavors, creating an indulgent experience.

  • Vanilla Ice Cream: Nothing says comfort like a scoop of vanilla ice cream, its creamy texture marrying perfectly with the warm cake flavors, inviting smiles with every bite.

  • Spiced Hot Cider: A cozy cup of hot cider infused with cinnamon and cloves complements the apple and spice notes in the cake, warming you from the inside out.

  • Chopped Walnut Topping: Scatter a handful of toasted walnuts on top of the cake for added crunch and nuttiness, enhancing both flavor and texture.

These pairings will transform your dessert into a heartwarming celebration that everyone will love. Enjoy the magic of togetherness around the dinner table!

Fresh Apple Cake with Cream Cheese Frosting Variations

Invite friends and family to help you customize this delightful apple cake with these fun and delicious twists!

  • Nut-Free: Omit walnuts or replace them with sunflower seeds for a crunchy alternative without the allergens. You'll still get that delightful texture without worry!

  • Spice Infusion: Add a teaspoon of cardamom to the batter for an aromatic twist that complements the apples beautifully. This unique spice combination will surprise and delight your taste buds.

  • Tropical Vibe: Swap some grated apples for crushed pineapple for a fun, tropical flavor. This variation offers a juicy, sweet dimension that makes every bite extra special.

  • Lower Sugar: Replace half of the granulated sugar with unsweetened applesauce to cut down on sweetness while keeping the cake moist. It’s a guilt-free indulgence that doesn’t skimp on flavor!

  • Vegan Delight: Use flax eggs and vegan cream cheese to create a fully plant-based version of this creamy treat. You won’t miss the dairy one bit! A little creativity goes a long way.

  • Flavor Burst: Incorporate orange zest into the frosting for a refreshing pop of citrus that brightens the whole dessert. Pair it with a scoop of Vegan Cacao Cream for an indulgent experience!

  • Additional Toppings: Drizzle with caramel sauce or sprinkle with chocolate chips to elevate the flavor even more. The sweetness of caramelly goodness combined with the cream cheese frosting is simply irresistible!

  • Warm Spice Mix: Swap the cinnamon for a mix of pumpkin pie spice to add that festive fall twist. This combo will pair perfectly with a scoop of Cajeta Ice Cream for your next gathering!

Feel free to mix and match these variations to discover your favorite version of this comforting cake. Happy baking!

Expert Tips for Fresh Apple Cake

Butter & Cream Cheese: Ensure both the butter and cream cheese are at room temperature before mixing to avoid lumps in your frosting.

Don’t Overmix: Gently fold the batter to keep the Fresh Apple Cake light and airy; overmixing can lead to a dense texture.

Drain Apples: Remove excess moisture from the grated apples to prevent the cake from becoming soggy and ensure a perfect crumb.

Cool Completely: Allow the cake to cool fully before applying the frosting; this avoids melt-in your mouth frosting that can slide off the cake.

Flavor Variations: Feel free to personalize your cake; adding nuts or spices can elevate the flavor and create a unique twist on this classic recipe.

Fresh Apple Cake with Cream Cheese Frosting Recipe FAQs

How do I choose the best apples for this cake?
Absolutely! Use a mix of sweet and tart apples for a balanced flavor. Varieties like Granny Smith, Honeycrisp, or Fuji work wonderfully. Look for apples that are firm, without any bruising or dark spots—these usually signal freshness and optimal flavor.

How should I store the leftover cake?
To keep your Fresh Apple Cake with Cream Cheese Frosting delicious, store it in an airtight container in the refrigerator for up to 3-4 days. If you find that it’s still warm after frosting, set it in the refrigerator uncovered for about 15-20 minutes to firm up the frosting, then cover it tightly.

Can I freeze this cake, and how would I do it?
Certainly! To freeze, wrap the naked Fresh Apple Cake in plastic wrap, then aluminum foil, to prevent freezer burn. It can last in the freezer for up to 3 months. When you’re ready to serve, simply thaw it overnight in the refrigerator, frost it while it’s cold, and enjoy the festive flavors!

What if my cake is too dense?
Very! If you find your cake turns out dense, it could be due to overmixing. Always gently fold the dry ingredients into the wet until just combined, leaving a few streaks of flour. Additionally, ensure Your baking powder and baking soda are fresh, as they are vital for proper rising.

Are there any dietary considerations I should keep in mind?
Of course! If allergies are a concern, consider using flax eggs in place of regular eggs for a vegan version. You can also substitute the powdered sugar in the frosting for a sugar alternative if reducing sugar is a goal. Lastly, be mindful of nut allergies; omit or replace walnuts with seeds, like pumpkin or sunflower, for a similar crunch without the risk.

Fresh Apple Cake with Cream Cheese Frosting

Bake the Best Fresh Apple Cake with Cream Cheese Frosting

This Fresh Apple Cake with Cream Cheese Frosting is a cozy celebration of fall, packed with juicy apples and warm spices, perfect for any occasion.
Print Recipe Pin Recipe
Prep Time 20 minutes mins
Cook Time 35 minutes mins
Cooling Time 10 minutes mins
Total Time 1 hour hr 5 minutes mins
Servings: 12 slices
Course: Dessert
Cuisine: American
Calories: 320
Ingredients Equipment Method Nutrition Notes

Ingredients
  

For the Cake
  • 2 cups all-purpose flour Can substitute with whole wheat flour
  • 1 teaspoon baking soda Ensure it's fresh
  • ½ teaspoon salt Can reduce for low-sodium diets
  • 2 teaspoons ground cinnamon Substitute with nutmeg for a different twist
  • ½ cup unsalted butter Can use coconut oil as a dairy-free alternative
  • 1 cup granulated sugar Can substitute with brown sugar
  • 2 large eggs Can use flax eggs for vegan version
  • 1 teaspoon vanilla extract Consider vanilla bean paste for intense flavor
  • 2 cups fresh grated apples Squeeze moisture out
  • ½ cup chopped walnuts Optional; substitute with pecans or omit
For the Frosting
  • 8 ounces cream cheese Vegan cream cheese is a great substitute
  • ½ cup unsalted butter Ensure it's at room temperature
  • 3 cups powdered sugar Adjust to taste
  • 1 teaspoon vanilla extract
  • 1 splash milk Adjust thickness of frosting

Equipment

  • 9x13-inch baking pan
  • Medium-sized Bowl
  • large mixing bowl
  • Electric mixer
  • Spatula
  • wire rack

Method
 

Step-by-Step Instructions
  1. Preheat your oven to 350°F (175°C). Grease a 9x13-inch baking pan.
  2. In a medium bowl, whisk together flour, baking soda, salt, and cinnamon. Set aside.
  3. In a large mixing bowl, beat the butter and sugar together until light and fluffy, about 2 minutes.
  4. Add eggs one at a time, beating well after each addition. Stir in the vanilla extract.
  5. Gently fold the dry ingredients into the wet mixture until just combined.
  6. Fold in the grated apples and chopped walnuts until evenly mixed.
  7. Pour the batter into the prepared baking pan and smooth the top.
  8. Bake for 30-35 minutes until a toothpick comes out clean.
  9. Let the cake cool in the pan for 10 minutes before transferring to a wire rack.
  10. To make the frosting, beat cream cheese and butter until smooth; add powdered sugar and vanilla.
  11. Frost the cooled cake generously. Slice and serve!

Nutrition

Serving: 1sliceCalories: 320kcalCarbohydrates: 45gProtein: 3gFat: 15gSaturated Fat: 9gPolyunsaturated Fat: 1gMonounsaturated Fat: 4gCholesterol: 50mgSodium: 180mgPotassium: 150mgFiber: 1gSugar: 25gVitamin A: 500IUVitamin C: 2mgCalcium: 50mgIron: 1mg

Notes

Ensure ingredients are at room temperature for best results. Cool completely before frosting.

Tried this recipe?

Let us know how it was!

Delicious Baked Apple Fritters Recipe for Guilt-Free Indulgence

November 20, 2025 by Grace Snow Leave a Comment

The aroma of freshly baked treats wafting through my kitchen is one of my favorite parts of the day. As I whipped together this Healthy Baked Apple Fritters Recipe, memories of warm family meals flooded back, reminding me why homemade food holds such a special place in our hearts. These fritters are a game changer—not only do they capture the comforting essence of classic apple desserts, but they’re also baked, making them a much lighter choice for either breakfast or a sweet snack. With simple ingredients and quick preparation, these delightful bites are sure to win over even the pickiest eaters in your household. Curious about how to transform your kitchen into a haven of warm spices and tender apples? Let’s dive into the deliciousness together!

Why will you love these fritters?

Irresistible Flavors: The blend of warm spices and juicy apples will transport you to comfort food heaven.

Healthier Option: Baked instead of fried, these fritters are a guilt-free indulgence, making them perfect for breakfast or dessert.

Quick & Easy: With simple ingredients and straightforward steps, you’ll have these treats ready in no time.

Versatile Treat: Enjoy them as a light snack or pair with Greek yogurt and fresh berries for a complete meal.

Family Favorite: With their fluffy texture and delightful vanilla glaze, get ready for your loved ones to ask for these again and again!

Baked Apple Fritters Ingredients

• Discover the tasty components of this Baked Apple Fritters Recipe below!

For the Batter

  • All-Purpose Flour – Provides structure to the fritters; substitute with a gluten-free flour blend for a GF option.
  • Granulated Sugar – Adds the perfect amount of sweetness; brown sugar can create a richer flavor.
  • Baking Powder – Works as a leavening agent for fluffy fritters; be sure it’s fresh for best results.
  • Baking Soda – Helps with browning and provides lift in your fritters.
  • Salt – Enhances all flavors to create a harmonious balance.
  • Ground Cinnamon – Adds warmth and spice; feel free to increase for that cozy flavor.
  • Ground Nutmeg – Offers a subtle depth; omit if not available, but it’s worth it for flavor!
  • Eggs – Binds ingredients together and adds richness to the batter.
  • Milk – Provides moisture; any milk (dairy or non-dairy) will work beautifully.
  • Melted Butter – Enriches the batter for a tender texture; you can substitute vegetable oil if desired.
  • Vanilla Extract – Adds aromatic flavor; opt for fresh vanilla bean for a gourmet touch.
  • Diced Apples (Granny Smith or Honeycrisp) – The main flavor featured in these fritters; keep the peels on for added texture if you wish.

For the Glaze

  • Powdered Sugar – Provides sweetness and creaminess for the glaze; can substitute with a sweetener for a lower-calorie option.
  • Additional Milk – Helps achieve the desired pourable consistency for the glaze.

Get ready to embrace the magic of baked treats with this delightful Baked Apple Fritters Recipe!

Step‑by‑Step Instructions for Baked Apple Fritters Recipe

Step 1: Preheat the Oven
Begin by preheating your oven to 375°F (190°C). This temperature is key for achieving that perfectly golden-brown exterior on your Baked Apple Fritters. While the oven warms up, line a baking sheet with parchment paper to prevent sticking and ensure easy cleanup.

Step 2: Combine Dry Ingredients
In a large mixing bowl, whisk together the all-purpose flour, granulated sugar, baking powder, baking soda, salt, ground cinnamon, and ground nutmeg. This step creates a flavorful base for your fritters, ensuring the spices and leavening agents are evenly dispersed. Take a moment to appreciate the delightful aroma of the spices filling your kitchen.

Step 3: Mix Wet Ingredients
In another bowl, crack the eggs and add the milk, melted butter, and vanilla extract. Whisk these ingredients together until you achieve a smooth and creamy consistency. This mixture will add moisture and richness to your Baked Apple Fritters, setting the stage for deliciousness.

Step 4: Combine Wet and Dry Mixtures
Gently pour the wet mixture into the bowl with your dry ingredients. Using a spatula, fold everything together just until combined; be careful not to overmix. The batter should be slightly lumpy, and that's perfectly fine. Now, fold in the diced apples, ensuring they are well-coated in the batter.

Step 5: Spoon the Batter
Using a spoon or a cookie scoop, drop generous dollops of the batter onto the prepared baking sheet, leaving some space between each fritter to allow for expansion. This will help them bake evenly and rise beautifully. A bit of apple peeking through the batter adds a lovely visual touch!

Step 6: Bake the Fritters
Place the baking sheet in your preheated oven and bake the fritters for 15-18 minutes. They’re ready when they puff up and turn golden brown; your kitchen will be filled with an irresistible aroma inviting everyone to gather around.

Step 7: Prepare the Glaze
While the fritters are baking, prepare the creamy vanilla glaze. In a bowl, combine powdered sugar, a splash of milk, and a touch of vanilla extract. Whisk until it reaches a pourable consistency. Adjust the milk as needed for your desired thickness, ensuring it's silky and easy to drizzle.

Step 8: Glaze the Warm Fritters
Once the Baked Apple Fritters are golden and baked to perfection, remove them from the oven and let them cool for a few minutes. Drizzle the prepared glaze over the warm fritters, allowing it to set just right before serving. The glazed fritters will be an inviting sight that’s hard to resist!

Expert Tips for Baked Apple Fritters

  • Don’t Overmix: Keep the batter slightly lumpy to ensure your fritters stay light and fluffy; overmixing can lead to dense fritters.
  • Cooling Time: Allow fritters to cool for a few minutes before glazing; hot fritters can absorb the glaze too quickly, losing that delightful finish.
  • Apple Choices: Use Granny Smith or Honeycrisp apples for the best sweet-tart balance. Feel free to keep the peels on for added texture!
  • Experiment with Spices: Don't be afraid to get creative—mix in cardamom or ginger for unique flavor notes that elevate your Baked Apple Fritters!
  • Watch Baking Time: Keep an eye on the fritters in the oven; every oven is different, so pull them out when puffed and golden to prevent overbaking.
  • Fun Add-ins: Incorporate nuts or raisins for a delicious crunch in your fritters, enhancing both texture and flavor for the whole family to enjoy!

Storage Tips for Baked Apple Fritters

Room Temperature: Store baked apple fritters in an airtight container for up to 3 days. Keep them away from direct sunlight for optimal freshness.

Fridge: If you prefer, refrigerate fritters in an airtight container for up to 3 days. Just be sure to let them come to room temperature before enjoying for the best taste.

Freezer: For longer storage, freeze unglazed fritters in a single layer on a baking sheet, then transfer to a freezer-safe bag or container. They can be stored for up to 2 months.

Reheating: To reheat, simply pop frozen fritters in a preheated oven at 300°F (150°C) for about 10 minutes, making them just as delightful as when freshly baked!

Make Ahead Options

These Healthy Baked Apple Fritters are perfect for meal prep enthusiasts! You can prepare the batter up to 24 hours in advance by mixing the dry ingredients separately and storing them in an airtight container, while the wet ingredients can be whisked together and refrigerated until you're ready to bake. Additionally, you can dice and coat the apples in a little lemon juice (to prevent browning) and keep them in the fridge for up to 3 days. When you're ready to enjoy your fritters, simply combine the wet and dry ingredients, spoon onto the baking sheet, and bake as directed. This way, you’ll have delicious baked treats with minimal weekday effort!

Baked Apple Fritters Recipe Variations

Feel free to get creative with this recipe and make it your own, because who doesn’t love a little personal touch in their baking?

  • Dairy-Free: Substitute milk with almond or oat milk and replace butter with coconut oil for a delicious dairy-free option.
  • Gluten-Free: Use a gluten-free flour blend to make these fritters accessible for those avoiding gluten; the flavor remains delightful!
  • Sweetener Swap: Substitute granulated sugar with maple syrup or coconut sugar for a unique flavor twist that enhances the natural apple goodness.
  • Extra Spices: Experiment with adding a sprinkle of cardamom or ginger to the batter for an exciting new flavor profile that's sure to impress!
  • Fruit Variations: Swap out apples for diced pears or ripe peaches to explore new fruity delights that add a different sweetness.
  • Nutty Addition: Toss in chopped walnuts or pecans for a crunchy texture that complements the soft fritters beautifully!
  • Spicy Glaze: Add a pinch of cayenne pepper to the vanilla glaze for a surprising hint of heat that spices things up!
  • Syrup Drizzle: Instead of glaze, serve fritters drizzled with warm maple syrup for a sweet finish that’s irresistible.

For more inspirations, check out these Cheesy Corn Fritters or try the wonderfully flavorful Matcha Baked Doughnuts. Each variation is a new opportunity to delight your taste buds!

What to Serve with Healthy Baked Apple Fritters with Vanilla Glaze

Elevate your homemade Baked Apple Fritters into a delightful meal experience with these perfectly paired accompaniments.

  • Greek Yogurt: The creamy tanginess of Greek yogurt perfectly balances the sweetness of the fritters, creating a light and nutritious breakfast option.
  • Fresh Berries: A handful of juicy berries adds a burst of freshness and contrasting flavors that harmonize beautifully with the spiced fritters.
  • Coffee or Espresso: The rich, bold flavors of a strong coffee or espresso offer an energizing kick to your breakfast table, enhancing the overall indulgence.
  • Honey Drizzle: A light drizzle of honey over the fritters adds a natural sweetness that complements the vanilla glaze while enhancing the apple flavor.
  • Cinnamon Sugar Duster: A sprinkle of cinnamon sugar brings extra warmth and sweetness that echoes the cozy spices of the fritters for an extra comforting touch.
  • Nutty Granola: Crunchy granola brings a delightful texture contrast, providing a satisfying crunch that pairs wonderfully with the softness of the fritters.
  • Warm Compote: A warm apple or berry compote adds moisture and bursts of flavor, taking the dish to a whole new level of deliciousness.
  • Ice Cream: While a bit unconventional, a scoop of vanilla ice cream creates a sumptuous dessert experience, perfect for special occasions or a sweet afternoon treat.

Baked Apple Fritters Recipe FAQs

How do I select ripe apples for my fritters?
Absolutely! For the best flavor in your Baked Apple Fritters, I recommend using Granny Smith or Honeycrisp apples. Look for firm apples with no bruises or dark spots all over, as these can indicate they are overripe. A shiny skin and a fragrant aroma are good signs of freshness!

What’s the best way to store my fritters?
Very! Store your Baked Apple Fritters in an airtight container at room temperature for up to 3 days. If you’d like to keep them longer, refrigerate for another 3 days; just make sure to let them reach room temperature for the best flavor before enjoying them again.

Can I freeze Baked Apple Fritters?
Definitely! To freeze unglazed fritters, first place them in a single layer on a baking sheet. Once they're frozen, transfer them to a freezer-safe bag or container. They can be stored for up to 2 months. When you're ready to enjoy, reheat them in a preheated oven at 300°F (150°C) for about 10 minutes—it’ll feel like they were just baked!

What should I do if my fritters came out dense?
If your fritters turned out dense, it's likely due to overmixing the batter. Next time, be gentle when combining wet and dry ingredients; it's okay if there are a few lumps remaining! Also, check that your baking powder is fresh, as old leavening agents can affect fluffiness.

Are Baked Apple Fritters suitable for those with allergies?
Absolutely! While this Baked Apple Fritters Recipe contains eggs and dairy, you can easily substitute with non-dairy milk and an egg replacer for a vegan version. If anyone in your household has nut allergies, simply omit any added nuts in the batter. Always check your ingredient labels to ensure they're allergy-safe!

Baked Apple Fritters Recipe

Delicious Baked Apple Fritters Recipe for Guilt-Free Indulgence

This Baked Apple Fritters Recipe is a healthy indulgence with comforting flavors, perfect for dessert or breakfast.
Print Recipe Pin Recipe
Prep Time 15 minutes mins
Cook Time 18 minutes mins
Cooling Time 5 minutes mins
Total Time 38 minutes mins
Servings: 12 fritters
Course: Dessert
Cuisine: American
Calories: 150
Ingredients Equipment Method Nutrition Notes

Ingredients
  

For the Batter
  • 2 cups All-Purpose Flour Substitute with gluten-free flour blend for GF option.
  • 1 cup Granulated Sugar Brown sugar can create a richer flavor.
  • 1 tbsp Baking Powder Be sure it’s fresh for best results.
  • 1 tsp Baking Soda Helps with browning.
  • 1/2 tsp Salt Enhances all flavors.
  • 1 tsp Ground Cinnamon Feel free to increase for cozy flavor.
  • 1/4 tsp Ground Nutmeg Omit if not available.
  • 2 large Eggs Binds ingredients together.
  • 1 cup Milk Any milk (dairy or non-dairy) works.
  • 1/4 cup Melted Butter Substitute vegetable oil if desired.
  • 1 tbsp Vanilla Extract Opt for fresh vanilla bean for gourmet touch.
  • 2 cups Diced Apples (Granny Smith or Honeycrisp) Keep the peels on for added texture.
For the Glaze
  • 1 cup Powdered Sugar Can substitute with a sweetener for lower-calorie option.
  • 2 tbsp Additional Milk Adjust for desired consistency.

Equipment

  • Mixing bowls
  • Whisk
  • Baking Sheet
  • Parchment Paper
  • Spatula
  • Cookie Scoop

Method
 

Step‑by‑Step Instructions
  1. Preheat your oven to 375°F (190°C) and line a baking sheet with parchment paper.
  2. In a large mixing bowl, whisk together the dry ingredients: flour, sugar, baking powder, baking soda, salt, cinnamon, and nutmeg.
  3. In another bowl, mix the wet ingredients: eggs, milk, melted butter, and vanilla extract.
  4. Gently combine the wet mixture with the dry ingredients, and fold in the diced apples.
  5. Drop spoonfuls of the batter onto the prepared baking sheet with space in between.
  6. Bake for 15-18 minutes until puffed and golden brown.
  7. Prepare the glaze by combining powdered sugar, milk, and vanilla extract until pourable.
  8. Drizzle the glaze over warm fritters once cooled slightly before serving.

Nutrition

Serving: 1fritterCalories: 150kcalCarbohydrates: 25gProtein: 2gFat: 6gSaturated Fat: 3gMonounsaturated Fat: 2gCholesterol: 35mgSodium: 150mgPotassium: 100mgFiber: 1gSugar: 10gVitamin A: 100IUVitamin C: 3mgCalcium: 50mgIron: 1mg

Notes

These fritters are perfect as a light snack or dessert, enjoyed fresh or glazed after cooling.

Tried this recipe?

Let us know how it was!

Indulge in Pecan Pie Cheesecake – Your Ultimate Holiday Dessert

November 20, 2025 by Grace Snow Leave a Comment

While stirring up my favorite holiday memories, I stumbled upon a delightful treat that perfectly combines two classic favorites: Pecan Pie and cheesecake! Enter the Pecan Pie Cheesecake Bars—a dessert that captures the gooey, rich essence of traditional pecan pie, enveloped in the creamy, tangy goodness of cheesecake. These little bars are not only a feast for the senses, they’re also a fantastic option for holiday gatherings, thanks to their quick preparation and potluck-friendly nature. With a crunchy graham cracker crust providing the perfect base, each bite is a celebration of sweet, nutty flavors. Ready to create a show-stopping dessert that will have your friends and family begging for seconds? Let’s dive in and whip up this festive treat together!

Why is this Pecan Pie Cheesecake a Must?

Irresistible Flavor Fusion: The delightful combination of creamy cheesecake and rich pecan pie creates an unforgettable taste experience that will wow your guests.

Adaptable Variations: Whether you prefer cheesecake bars or a traditional round cheesecake, this recipe offers flexibility to suit your occasion.

Quick and Easy: Preparing this dessert is a breeze! With only a few simple steps, you can whip up a delicious treat that looks and tastes impressive.

Perfect for Gatherings: This dessert is a true crowd-pleaser, making it ideal for holiday parties or potlucks. Check out how well it pairs with Tamale Pie Hearty or Spinach Pie Deliciously as impressive options to complete your festive menu.

Make Ahead Magic: Prepare it in advance, freeing up your time on the big day, allowing you to enjoy more precious moments with family and friends.

Pecan Pie Cheesecake Ingredients

For the Crust
• Graham Crackers – provides the crunchy base; feel free to swap with gluten-free graham crackers if needed.
• Pecan Halves – adds nutty flavor; using chopped pecans will help distribute the taste evenly.
• Light Brown Sugar – sweetens the crust and topping; granulated sugar can be a suitable substitute.
• Melted Butter – binds the crust together for a rich flavor.

For the Cheesecake Layer
• Full-Fat Cream Cheese – the key ingredient for creamy texture; low-fat versions may change the consistency.
• Sour Cream – enhances the creaminess and adds a slight tang.
• Sugar – balances the flavors of the cheesecake filling.
• Eggs – provide structure for a stable cheesecake.
• All-Purpose Flour – helps set the cheesecake; cornstarch works as a gluten-free alternative.
• Vanilla Extract – infuses warmth and enhances the overall flavor.
• Salt – elevates sweetness and enhances cheesecake flavors.

For the Pecan Topping
• Heavy Cream – contributes to the luxurious texture; don’t skip this for the rich topping!
• Ground Cinnamon – adds a lovely warm, holiday flavor that complements the pecans.

Get ready to bring the irresistible flavors of Pecan Pie Cheesecake to your holiday gatherings!

Step‑by‑Step Instructions for Pecan Pie Cheesecake

Step 1: Prepare Oven and Baking Dish
Begin by preheating your oven to 350°F (175°C). While it warms up, grab a 9x13-inch baking dish and spray it evenly with nonstick cooking spray to prevent sticking. This preparation is crucial for easily lifting out your finished Pecan Pie Cheesecake Bars.

Step 2: Make the Crust
In a food processor, combine graham crackers, chopped pecans, and light brown sugar, pulsing until the mixture resembles fine crumbs. Slowly pour in the melted butter while mixing until the crumbs are well-coated. Press this mixture firmly into the bottom of the prepared baking dish, forming an even layer. Bake for 10 minutes, then let it cool slightly.

Step 3: Cheesecake Mix
In the same food processor, blend the full-fat cream cheese and sour cream until smooth and creamy. Add in sugar, eggs, all-purpose flour, vanilla extract, and salt, mixing until fully combined. It's important to have all ingredients at room temperature for the best texture. Pour this rich cheesecake filling over the cooled crust, spreading it evenly.

Step 4: Bake the Cheesecake Layer
Place the baking dish back in the oven and bake the cheesecake layer for 30-40 minutes. You’ll know it’s ready when the edges are set, but the center still has a slight jiggle. A toothpick inserted into the center should come out clean. Once done, remove it from the oven and allow it to cool.

Step 5: Prepare Pecan Topping
While the cheesecake cools, prepare the pecan topping. In a medium saucepan over medium heat, combine chopped pecans, brown sugar, heavy cream, butter, ground cinnamon, and a pinch of salt. Bring the mixture to a boil, then reduce the heat and let it simmer for 2-3 minutes until it thickens. Stir continuously until the sugar dissolves.

Step 6: Assemble the Dessert
Once the cheesecake layer has cooled slightly, pour the warm pecan topping evenly over the top, ensuring a delightful distribution of nuts and gooeyness. Spread it gently with a spatula if needed. For the best flavor, let the whole dessert cool at room temperature for about 15 minutes before placing it in the refrigerator.

Step 7: Chill and Serve
Cover the baking dish with plastic wrap and chill for at least 2 hours in the refrigerator, allowing the Pecan Pie Cheesecake Bars to set completely. Once set, cut them into squares using a sharp knife, wiping it clean with a warm cloth between cuts for neat slices. Serve chilled and relish in the deliciousness!

Make Ahead Options

These Pecan Pie Cheesecake Bars are a dream for busy home cooks looking to save time during the hectic holiday season! You can prepare the crust and cheesecake layer up to 24 hours in advance—simply bake the crust and chill the cheesecake mixture in the refrigerator until you’re ready to assemble. The pecan topping can also be made up to 3 days ahead; just refrigerate it in an airtight container, and rewarm briefly over low heat before pouring it over the cheesecake. When it's time to serve, allow the assembled bars to chill and set for at least 2 hours. This way, they maintain their delicious creamy texture and nutty flavor, resulting in a delightful dessert that feels fresh and festive!

Pecan Pie Cheesecake Variations & Substitutions

Feel free to mix it up and make this delectable dessert your own, creating mouthwatering twists that will surprise your taste buds!

  • Less Sweet: Reduce the amount of sugar in the topping for a lighter bite. This adjustment allows the natural sweetness of the pecans to shine through.
  • Nutty Swap: Walnuts: Substitute pecans with walnuts for a different flavor note. The slight bitterness of walnuts can add fascinating contrast.
  • Chocolate Delight: Ganache Drizzle: Drizzle chocolate ganache over the top for an indulgent twist that adds richness and a touch of decadence.
  • Gluten-Free Option: Cornstarch: Replace all-purpose flour with cornstarch for a gluten-free cheesecake that’s just as creamy and delicious.
  • Extra Spicy: Nutmeg: Add a pinch of nutmeg to the pecan topping for additional warmth and a delightful holiday spice.
  • Fruit Fusion: Cranberries: Toss dried cranberries into the pecan topping for a tangy burst and festive color. They balance the richness beautifully!
  • Dairy-Free Version: Cream Cheese Alternative: Use a dairy-free cream cheese substitute to make this dessert suitable for lactose intolerance without sacrificing taste.
  • Layered Style: Create a Layered Dessert by adding a layer of caramel sauce between the cheesecake and pecan topping for an extra layer of flavor.

No matter how you choose to customize, each bite of your Pecan Pie Cheesecake is bound to impress and delight!

How to Store and Freeze Pecan Pie Cheesecake

Fridge: Store leftover Pecan Pie Cheesecake Bars in an airtight container in the refrigerator for up to 1 week. This keeps them fresh and ready to enjoy at a moment’s notice.

Freezer: For longer storage, wrap individual bars in plastic wrap and place them in a freezer-safe container or bag. They can be frozen for up to 2-3 months.

Thawing: When ready to serve, simply transfer frozen bars to the refrigerator to thaw overnight. This helps retain their creamy texture.

Reheating: If you prefer them warm, gently heat bars in the microwave for about 10-15 seconds. Enjoy a slice of holiday magic whenever you crave it!

What to Serve with Pecan Pie Cheesecake Bars?

Indulging in these delightful bars is a sweet treat on its own, but pairing them with the perfect sides can elevate your dessert experience to a whole new level.

  • Whipped Cream: A dollop of fresh, fluffy whipped cream adds a light and airy contrast to the rich cheesecake, balancing each bite beautifully.

  • Spiced Apple Cider: This warm beverage, filled with cinnamon and cloves, complements the nutty flavors beautifully, creating a cozy atmosphere perfect for holiday gatherings.

  • Vanilla Ice Cream: The creamy, cold ice cream creates an irresistible combination with the warm, gooey pecan topping, making every bite a delightful contrast of temperatures.

  • Cranberry Sauce: The tartness of homemade cranberry sauce adds a refreshing zing that cuts through the richness of the bars, enhancing the overall flavor profile.

  • Coffee: A steaming cup of your favorite brew pairs perfectly with these bars, providing a subtle bitterness that complements the sweetness of the pecan pie cheesecake.

  • Chocolate Drizzle: Add a luxurious touch by drizzling melted chocolate on top of the bars before serving for an extra layer of indulgence that every chocoholic will adore.

  • Pecan Pie Ice Cream: For the ultimate indulgence, this flavor captures the essence of pecan pie, making it a match made in dessert heaven with your Pecan Pie Cheesecake Bars.

Expert Tips for Pecan Pie Cheesecake

  • Room Temperature Ingredients: Make sure all your ingredients, especially cream cheese and eggs, are at room temperature to achieve a smooth and creamy texture for your cheesecake layer.

  • Chill Time Matters: Don’t rush the chilling process; refrigerate the dessert for at least 2 hours to let it set perfectly, enhancing those delightful flavors.

  • Baking Properly: If you’re making a round cheesecake, adjust the baking time to 50-60 minutes for a fully set center. Use a springform pan for easy removal.

  • Neat Slicing: To get clean slices, wipe your knife with a damp cloth between cuts. This little trick allows each piece to look beautifully presented.

  • Experiment with Toppings: For an extra layer of sweetness, consider drizzling chocolate ganache or caramel over your Pecan Pie Cheesecake before serving.

Pecan Pie Cheesecake Recipe FAQs

What type of pecans should I use for this recipe?
I recommend using fresh pecan halves as they provide a lovely nutty flavor and texture. If you prefer a more even distribution of nuts, chopped pecans work perfectly too! Just make sure they’re not overly dark or stale, as fresh nuts will enhance the overall taste of your cheesecake.

How should I store leftover Pecan Pie Cheesecake Bars?
Store any leftovers in an airtight container in the refrigerator for up to 1 week. This will help preserve their freshness and flavor. Make sure to let them cool completely before covering them to prevent condensation.

Can I freeze Pecan Pie Cheesecake Bars?
Absolutely! These delicious bars can be frozen for up to 2-3 months. Just wrap each bar individually in plastic wrap and place them in a freezer-safe container. When you're ready to enjoy, simply transfer the bars to the refrigerator to thaw overnight for the best texture.

What should I do if the cheesecake is too soft after baking?
If your Pecan Pie Cheesecake turns out too soft, it might be due to underbaking or not allowing enough chilling time. Make sure to bake it until the edges are set with a slight jiggle in the center (30-40 minutes). After baking, let it cool at room temperature for about 15 minutes, then refrigerate for at least 2 hours to fully set.

Is this recipe suitable for those with nut allergies?
Since pecans are a key ingredient in the topping, this recipe isn't safe for individuals with nut allergies. However, if you're looking for a nut-free version, consider using cookie crumbs and a different type of topping, like a fruit compote or a chocolate ganache for rich flavors without the nuts.

How can I make my cheesecake bars more festive?
To add some holiday flair, try drizzling melted chocolate or caramel over the top of the pecan topping before serving. You can also sprinkle some festive sprinkles or serve with a dollop of whipped cream to elevate the presentation and flavor!

Pecan Pie Cheesecake

Pecan Pie Cheesecake

Indulge in Pecan Pie Cheesecake, a delightful fusion of creamy cheesecake and rich pecan pie, perfect for holiday gatherings.
Print Recipe Pin Recipe
Prep Time 20 minutes mins
Cook Time 50 minutes mins
Chill Time 2 hours hrs
Total Time 3 hours hrs 10 minutes mins
Servings: 12 slices
Course: Dessert
Cuisine: American
Calories: 350
Ingredients Equipment Method Nutrition Notes

Ingredients
  

For the Crust
  • 2 cups Graham Crackers Feel free to swap with gluten-free graham crackers if needed.
  • 1 cup Pecan Halves Chopped pecans can help distribute the taste evenly.
  • 1/2 cup Light Brown Sugar Granulated sugar can be a suitable substitute.
  • 1/2 cup Melted Butter
For the Cheesecake Layer
  • 24 oz Full-Fat Cream Cheese Low-fat versions may change the consistency.
  • 1 cup Sour Cream
  • 1 cup Sugar
  • 3 large Eggs Provide structure for a stable cheesecake.
  • 1/4 cup All-Purpose Flour Cornstarch works as a gluten-free alternative.
  • 1 teaspoon Vanilla Extract
  • 1/4 teaspoon Salt Elevates sweetness and enhances cheesecake flavors.
For the Pecan Topping
  • 1 cup Heavy Cream This adds a luxurious texture.
  • 1 teaspoon Ground Cinnamon Adds a warm, holiday flavor.

Equipment

  • 9x13-inch baking dish
  • Food Processor
  • Medium saucepan

Method
 

Step-by-Step Instructions
  1. Preheat your oven to 350°F (175°C) and spray a 9x13-inch baking dish with nonstick cooking spray.
  2. In a food processor, combine graham crackers, chopped pecans, and light brown sugar. Pulse until fine crumbs. Add melted butter and mix until coated. Press firmly into the baking dish.
  3. Blend full-fat cream cheese and sour cream until smooth. Add sugar, eggs, flour, vanilla, and salt, mixing until combined. Pour over the crust.
  4. Bake the cheesecake layer for 30-40 minutes or until the edges are set. Let it cool.
  5. In a saucepan, combine chopped pecans, brown sugar, heavy cream, butter, ground cinnamon, and salt. Boil, then simmer for 2-3 minutes until thickened.
  6. Pour the warm pecan topping over the cooled cheesecake layer.
  7. Chill in the refrigerator for at least 2 hours. Cut into squares and serve chilled.

Nutrition

Serving: 1sliceCalories: 350kcalCarbohydrates: 40gProtein: 6gFat: 20gSaturated Fat: 10gPolyunsaturated Fat: 2gMonounsaturated Fat: 8gCholesterol: 80mgSodium: 200mgPotassium: 150mgFiber: 1gSugar: 20gVitamin A: 600IUCalcium: 50mgIron: 1mg

Notes

Ensure all ingredients are at room temperature for the best texture. Wipe your knife with a damp cloth between cuts for neat slices.

Tried this recipe?

Let us know how it was!

Holiday Magic: Delicious Christmas Crack Recipe You’ll Crave

November 20, 2025 by Grace Snow Leave a Comment

Walking into my kitchen during the holiday season feels like entering a cozy candy wonderland. The aroma of melting butter mingles with the sweet and salty allure of my favorite indulgence: Christmas Crack. This easy Christmas Crack recipe is a delightful blend of crispy saltine crackers, buttery toffee, and rich chocolate—all whipped up in just 20 minutes without the fuss of a candy thermometer. The best part? It’s completely customizable! You can sprinkle on festive toppings or swap out the base to suit your taste, making it the perfect treat for holiday gatherings and gift-giving. Whether you’re a seasoned home chef or just looking to escape the fast food rut, this simple, crowd-pleasing recipe will satisfy your sweet cravings and make your celebrations a little brighter. Ready to create something magical? Grab your apron!

Why Is Christmas Crack So Irresistible?

Simplicity at its best: This easy recipe requires just 5 ingredients and minimal prep time—perfect for those busy holiday seasons.

Customizable options: With various bases and toppings, you can truly make this your own, enticing friends and family each time you serve it.

Delightful textures: Experience the amazing contrast of crispy saltines, creamy toffee, and smooth chocolate—a sweet and salty indulgence that promises to satisfy every craving.

No special equipment needed: Forget about those complicated candy thermometers; our simple method makes this treat achievable for anyone.

Perfect for sharing: Whether you're hosting holiday gatherings or looking for a last-minute homemade gift, this Christmas Crack is bound to impress everyone at your table! For more festive ideas, check out our delightful Chicken Adobo Again recipe for a cozy dinner after your sweet treat!

Christmas Crack Ingredients

• Get ready to make this Christmas Crack recipe magic!

For the Base

  • Saltine Crackers – They provide a crunchy base; use Ritz crackers for a buttery twist or pretzel crisps for extra saltiness.

For the Toffee

  • Unsalted Butter – Essential for achieving that rich toffee texture; always opt for real butter, as margarine affects the quality.
  • Light Brown Sugar – Adds sweetness and a hint of molasses flavor to deepen your toffee; feel free to swap in dark brown sugar for a more robust taste.

For the Topping

  • Semi-Sweet Chocolate Chips – Lends a smooth, sweet layer; high-quality chocolate melts beautifully and enhances flavor, while milk chocolate is sweeter if you prefer.

For Customization

  • Optional Toppings – Get creative! Add chopped pecans or walnuts for crunch, crushed candy canes for a festive flair, or flaky sea salt for a gourmet touch.

Step‑by‑Step Instructions for Christmas Crack Recipe

Step 1: Preheat Oven
Begin by preheating your oven to 400°F (200°C). While the oven heats up, grab a 10×15-inch rimmed baking sheet and line it with either foil or parchment paper. This step is crucial as it ensures that your Christmas Crack releases easily after baking, allowing for beautiful presentation.

Step 2: Arrange Crackers
Next, take your saltine crackers and lay them out in a single even layer across the lined baking sheet. Ensure that the crackers tightly cover the entire surface, as this serves as the crunchy base for your Christmas Crack. Take a moment to admire the neatly arranged crackers before moving on!

Step 3: Prepare Toffee
In a medium saucepan, melt 1 cup of unsalted butter over medium heat. Once melted, stir in 1 cup of light brown sugar, and bring the mixture to a rolling boil. Keep stirring constantly for exactly 3 minutes, watching for a smooth, bubbly texture to form. This toffee is essential for that deliciously sweet layer atop your crackers.

Step 4: Layer Toffee
With the toffee now ready, carefully pour it over the arranged saltine crackers. Using a spatula, quickly spread the hot toffee evenly across the crackers, making sure to cover them as completely as possible. The heat from the toffee will warm the crackers, enhancing their crunchiness and flavor.

Step 5: Bake
Once the toffee is layered, place the baking sheet into the preheated oven. Bake for about 5 minutes, keeping a close eye on the mixture until it bubbles and becomes golden brown. This baking time allows the toffee to set slightly, forming a delightful, cohesive topping for your Christmas Crack.

Step 6: Add Chocolate
After baking, carefully remove the sheet from the oven. Immediately sprinkle 2 cups of semi-sweet chocolate chips evenly over the bubbling toffee layer. Let sit for 2-3 minutes to allow the chocolate to soften. Once softened, gently spread the chocolate into an even layer over the toffee, creating a luscious top for your treat.

Step 7: Add Toppings
While the chocolate is still warm, it’s time to get creative! Sprinkle your choice of optional toppings over the melted chocolate layer. Try adding chopped pecans, crushed candy canes, or a touch of flaky sea salt for that gourmet finish. Gently press down on the toppings to help them stick, ensuring each bite is packed with flavor.

Step 8: Chill
To finish your Christmas Crack, place the baking sheet in the refrigerator for at least 2 hours. This chilling time is essential for allowing the layers to set properly. Once set, your treat will be ready to cut or break into delightful pieces.

Step 9: Serve
Finally, use the foil overhang to carefully lift your Christmas Crack from the baking sheet. Place it on a cutting board and break or cut it into squares as desired. Serve this festive candy at your holiday gatherings or package it up for delightful homemade gifts!

Storage Tips for Christmas Crack

Airtight Container: Store your Christmas Crack in an airtight container at room temperature for up to one week. This helps maintain its delightful crunchiness.

Refrigeration: If you've added perishable toppings like nuts or if your home is warm, refrigerate your Christmas Crack to keep it fresh and safe to eat.

Freezing: For longer storage, you can freeze Christmas Crack for up to three months. Wrap it tightly in plastic wrap, then place it in a freezer-safe container to prevent freezer burn.

Reheating: If you've refrigerated or frozen your Christmas Crack, allow it to come to room temperature before serving for the best texture and flavor.

Expert Tips for Christmas Crack

  • Watch the Toffee: Constant stirring while boiling is essential to avoid burning. Take care to achieve that smooth texture without any crunchy bits.

  • Fixing Graininess: If your toffee turns grainy from crystallization, whisk vigorously off heat or add a teaspoon of hot water while whisking till smooth.

  • Let the Chocolate Melt: Allow the chocolate chips to soften for at least 2-3 minutes before spreading, ensuring a glossy and even finish.

  • Pan Preparation: Always line your baking sheet thoroughly; this helps in easy removal and prevents your Christmas Crack from sticking.

  • Opt for Gluten-Free: For a festive twist suitable for everyone, use gluten-free saltine crackers instead of traditional ones in your Christmas Crack recipe.

Make Ahead Options

These Christmas Crack treats are perfect for busy home cooks looking to save time during the hustle and bustle of the holiday season! You can prepare the toffee and layer it over the crackers up to 24 hours in advance; simply cover the baking sheet tightly with plastic wrap once cooled. For even quicker preparation, feel free to bake the entire batch and refrigerate it for up to 3 days before serving. When you're ready to enjoy your Christmas Crack, simply melt the chocolate and spread it over the toffee layer, add your desired toppings, and allow it to chill until set. This way, you'll have a delicious treat waiting, just as delightful as when freshly made!

Christmas Crack Recipe Variations

Feel free to unleash your creativity and make this Christmas Crack truly your own with these delightful twists!

  • White Chocolate Peppermint: Swap semi-sweet chocolate for white chocolate and sprinkle with crushed candy canes. The combination of sweet and minty is a festive favorite!

  • Peanut Butter Style: Mix in some peanut butter chips along with chocolate chips, then top with chopped peanuts for a delightful nutty flavor. It gives a deliciously creamy richness!

  • S’mores Version: Use graham crackers as a base, then top with mini marshmallows and a drizzle of chocolate. This treat captures the essence of a campfire classic, perfect for cozy nights.

  • Salted Caramel Pretzel: Replace saltines with crunchy pretzel crisps for an elevated sweet-and-salty experience. The added crunch and flavor make it absolutely addictive!

  • Nutty Delight: Add a mix of our favorite nuts like almonds or walnuts into the toffee before layering, adding an extra crunch to this already delightful treat.

  • Spicy Kick: Drizzle some chili-infused chocolate or sprinkle cayenne pepper over the chocolate layer for those who enjoy a flavor challenge. It's a unique twist that will surprise your taste buds!

  • Coconut Bliss: Incorporate sweetened shredded coconut into the toppings for a tropical flair. Each bite brings a chewy texture that perfectly complements the crunch of the crackers.

These variations can elevate your Christmas Crack experience and keep your holiday gatherings exciting. For more flavor inspiration, try serving your sweet treats alongside a savory dish like our Chicken Adobo Again recipe for a rounded festive menu. Happy baking!

What to Serve with Christmas Crack

Nothing says holiday cheer like a delightful spread to pair with your sweet treats—let’s make your celebrations as memorable as the flavors!

  • Festive Hot Cocoa: Rich and creamy, a cup of hot cocoa with marshmallows complements the chocolatey notes perfectly, warming hearts and hands alike.

  • Cold Glass of Milk: The classic duo! A refreshing glass of cold milk balances the sweetness of Christmas Crack, making each bite even more enjoyable.

  • Nutty Cheese Platter: Bits of sharp cheddar or creamy brie with assorted nuts elevate your snack table, offering savory depth that contrasts beautifully with the crack’s sweetness.

  • Holiday Fruit Salad: Bright and refreshing, a fruit salad with pomegranate, apples, and citrus adds a burst of seasonal flavor and color, lightening up your festive spread.

  • Gingerbread Cookies: Pairing with spiced gingerbread brings an extra holiday flair, connecting the sweet and spicy elements of your dessert table.

  • Sugar Cookie Bars: Soft and sweet, these bar cookies are an easy, crowd-pleasing treat that echoes the festive spirit and keeps everyone coming back for more.

Indulge in these combinations to make your Christmas gathering unforgettable—perfect for sharing stories and laughter around the festive table!

Christmas Crack Recipe FAQs

What type of saltine crackers should I use?
The classic choice is regular saltine crackers, known for their perfect crunch. However, if you're looking to enhance flavor, Ritz crackers offer a buttery richness, while pretzel crisps provide a delightful salty kick. Feel free to experiment with what your taste buds crave!

How should I store my Christmas Crack?
To maintain its luscious crunch, store your Christmas Crack in an airtight container at room temperature for up to one week. If you've added toppings that might spoil or if the weather is particularly warm, it's best to refrigerate it. Just ensure it’s well-sealed to keep it fresh.

Can I freeze Christmas Crack?
Absolutely! You can freeze Christmas Crack for up to three months. To do this, wrap it tightly in plastic wrap and then place it in a freezer-safe container. This method prevents any freezer burn. When you’re ready to enjoy it, let it thaw at room temperature for the best taste and texture.

What if my toffee turns grainy?
If you find your toffee has developed a grainy texture, don’t worry! Simply remove it from heat and whisk vigorously off the heat—this will help combine the crystals back into a smooth mixture. Alternatively, you can add a teaspoon of hot water while whisking until smooth again. Just a little extra effort can save your batch!

Is there a gluten-free option for this recipe?
Yes, for those adhering to a gluten-free diet, simply substitute traditional saltine crackers with gluten-free saltines. They provide the same satisfying crunch while ensuring everyone can indulge in this festive delight without worries.

Can I customize the toppings for my Christmas Crack?
Very much! The beauty of this Christmas Crack recipe lies in its versatility. You can sprinkle on chopped nuts for added crunch, crushed candy canes for a holiday twist, or even a drizzle of caramel or melted peanut butter for a richer flavor profile. The more, the merrier! Enjoy tailoring it to your family’s favorites.

Christmas Crack Recipe

Holiday Magic: Delicious Christmas Crack Recipe You’ll Crave

This easy Christmas Crack recipe blends crispy saltines, buttery toffee, and rich chocolate, perfect for sweet cravings during the holidays.
Print Recipe Pin Recipe
Prep Time 10 minutes mins
Cook Time 10 minutes mins
Chilling Time 2 hours hrs
Total Time 2 hours hrs 20 minutes mins
Servings: 24 pieces
Course: Dessert
Cuisine: American
Calories: 150
Ingredients Equipment Method Nutrition Notes

Ingredients
  

For the Base
  • 1 box Saltine Crackers
For the Toffee
  • 1 cup Unsalted Butter Real butter recommended
  • 1 cup Light Brown Sugar Can substitute with dark brown sugar
For the Topping
  • 2 cups Semi-Sweet Chocolate Chips High-quality chocolate recommended
For Customization
  • Optional Toppings Chopped pecans, crushed candy canes, or flaky sea salt

Equipment

  • 10x15-inch rimmed baking sheet
  • Medium saucepan
  • Spatula

Method
 

Step-by-Step Instructions
  1. Preheat your oven to 400°F (200°C) and line a 10×15-inch baking sheet with foil or parchment paper.
  2. Arrange saltine crackers in an even layer on the lined baking sheet.
  3. Melt 1 cup of unsalted butter in a medium saucepan over medium heat. Stir in 1 cup of light brown sugar, bring to a rolling boil, and stir for 3 minutes.
  4. Pour the toffee over the saltine crackers and spread it evenly.
  5. Bake in the preheated oven for about 5 minutes until bubbly and golden brown.
  6. Sprinkle 2 cups of semi-sweet chocolate chips over the hot toffee, let sit for 2-3 minutes, then spread the melted chocolate.
  7. Add optional toppings over the warm chocolate layer and gently press them down.
  8. Chill in the refrigerator for at least 2 hours to set.
  9. Once set, lift from the baking sheet and break into squares.

Nutrition

Serving: 1pieceCalories: 150kcalCarbohydrates: 20gProtein: 1gFat: 8gSaturated Fat: 5gMonounsaturated Fat: 2gCholesterol: 30mgSodium: 100mgPotassium: 50mgSugar: 10gVitamin A: 250IUCalcium: 10mgIron: 0.5mg

Notes

Store in an airtight container for up to one week. Refrigerate if using perishable toppings, or freeze for up to three months.

Tried this recipe?

Let us know how it was!

Moist and Zesty Cranberry Orange Bread Recipe You'll Love

November 20, 2025 by Grace Snow Leave a Comment

As I stood in my kitchen, the sweet and tangy aroma of fresh oranges filled the air, instantly transporting me to holiday celebrations of my childhood. This Cranberry Orange Bread recipe is the perfect way to capture that festive spirit in just one hour! With its moist and flavorful crumb, it’s a holiday showstopper that’s equally delightful at breakfast or as a homemade gift. Easy to whip up and adaptable for gluten-free diets, this quick bread brings joy and comfort to every bite. Whether you’re baking for family brunch or preparing a thoughtful treat for friends, you’ll find it’s a crowd-pleaser that brightens up any occasion. Have you ever tasted a loaf that could evoke such happy memories? Let’s dive into the recipe!

Why Is This Recipe a Must-Try?

Moist and Flavorful: The delightful blend of fresh oranges and tart cranberries creates a flavor explosion that’s both savory and sweet—a perfect fit for any occasion.

Quick and Easy: In just one hour, you can create this beautiful loaf without fuss, making it a fantastic addition to your busy holiday baking schedule.

Versatile Serving Options: Enjoy it as a cozy breakfast, a delightful afternoon snack, or even dressed up as a gift. It pairs beautifully with cream cheese or butter, as well as coffee or tea.

Nutritious Adaptation: With a simple swap to gluten-free flour, everyone can enjoy this scrumptious bread—perfect for accommodating various dietary needs.

Crowd-Pleasing Appeal: Its vibrant flavor and stunning presentation make it an instant hit on any brunch table or holiday gathering. This recipe is sure to spark smiles and warm memories. Don't forget to try it alongside our delicious Cheesy Garlic Bread for an unforgettable spread!

Cranberry Orange Bread Ingredients

For the Bread

  • All-Purpose Flour – Structure your bread; for a gluten-free version, substitute with a gluten-free flour blend.
  • Baking Powder – Serves as a leavening agent; always check for freshness to ensure a proper rise.
  • Salt – Enhances the overall flavor; no substitute needed, regular salt works perfectly.
  • Granulated Sugar – Adds the perfect sweetness; reduce slightly if using dried cranberries for balance.
  • Orange Zest – Boosts flavor; fresh zest brings a vibrant taste compared to the dried variety.
  • Fresh Orange Juice – Adds moisture and acidity; opt for fresh juice for the best flavor experience.
  • Unsalted Butter – Contributes richness and moisture; can be replaced with oil for a dairy-free option.
  • Eggs – Binds ingredients and keeps the bread moist; no direct substitutes are recommended in traditional recipes.
  • Vanilla Extract – Deepens flavor; use pure vanilla for the finest taste.
  • Fresh or Dried Cranberries – Provides tartness and texture; chop dried cranberries and reduce sugar if using.
  • Powdered Sugar – Optional garnish; you can use a glaze made from powdered sugar and orange juice if desired.

This Cranberry Orange Bread Recipe is set to become a family favorite, bringing warmth and nostalgia to your kitchen. Get ready to bake!

Step‑by‑Step Instructions for Cranberry Orange Bread Recipe

Step 1: Preheat the Oven
Begin by preheating your oven to 350°F (175°C). While the oven heats, prepare your 9x5-inch loaf pan by greasing it lightly with butter or lining it with parchment paper. This ensures easy removal of the Cranberry Orange Bread once it’s baked to golden perfection.

Step 2: Mix Dry Ingredients
In a large mixing bowl, whisk together the all-purpose flour, baking powder, salt, granulated sugar, and fresh orange zest until well combined. This step builds the foundation for your quick bread and should take about 1-2 minutes. Make sure there are no lumps for even rising and flavor distribution in your Cranberry Orange Bread.

Step 3: Combine Wet Ingredients
In a separate bowl, pour in the fresh orange juice, melted unsalted butter, eggs, and vanilla extract. Whisk these ingredients vigorously until the mixture is smooth and well-blended, about 2-3 minutes. The combination of these ingredients will bring moisture and richness to your delicious bread.

Step 4: Combine Mixtures
Gently pour the wet ingredients into the bowl of dry ingredients. With a rubber spatula, fold everything together until just combined; be careful not to overmix, as this could lead to a denser crumb. You’ll want to see a few streaks of flour remaining, which usually takes around 1 minute.

Step 5: Fold in Cranberries
Add in the chopped fresh or dried cranberries into the batter. Using your spatula, fold them in gently until evenly distributed throughout the mixture. This step is crucial as the tart cranberries will enhance the flavor of your Cranberry Orange Bread, creating delicious pockets of sweetness in every slice.

Step 6: Bake the Bread
Pour the batter into the prepared loaf pan, smoothing the top with your spatula. Place it in the preheated oven and bake for 50-60 minutes. The bread is done when a toothpick inserted into the center comes out clean and the top is lightly golden brown, enticing you with its warm citrus aroma.

Step 7: Cool and Garnish
Once baked, remove the Cranberry Orange Bread from the oven and let it cool in the pan for about 10 minutes. Carefully transfer it to a wire rack to cool completely. If desired, dust the top with powdered sugar for a lovely finishing touch that enhances its festive appeal.

Make Ahead Options

These Cranberry Orange Bread recipes are perfect for meal prep! You can mix the dry ingredients—flour, sugar, baking powder, salt, and orange zest—up to 24 hours in advance, storing them in an airtight container to keep them fresh. If you're using dried cranberries, chop them ahead of time and coat in a bit of flour to prevent sinking. When you’re ready to bake, combine the wet ingredients and fold everything together, finishing your bread in no time. This way, you can enjoy delicious homemade bread without the fuss on busy mornings or during festive gatherings! Just remember, to maintain that fluffy texture, don't overmix the batter.

What to Serve with Moist and Flavorful Cranberry Orange Bread

Indulging in a slice of this vibrant bread opens up a universe of delightful accompaniments that complement its bright flavors.

  • Cream Cheese Spread: The rich creaminess balances the tartness of the bread, making each bite feel luxurious.

  • Butter: A simple pat of butter melts beautifully, enhancing the moist texture and adding a comforting warmth.

  • Coffee: A steaming cup of coffee elevates any breakfast or snack time, providing a delightful contrast to the sweet and zesty loaf.

  • Herbal Tea: A soothing herbal tea offers a light contrast, allowing the flavors of the Cranberry Orange Bread to shine through.

  • Fresh Fruit Salad: Bright, juicy fruits like berries or oranges amplify the citrus notes and add a refreshing crunch to your plate.

  • Vanilla Ice Cream: For a decadent dessert, serve warm slices with a scoop of creamy vanilla ice cream that melts into every crevice.

  • Whipped Cream: Light and airy, whipped cream adds a delightful texture while enhancing the sweet citrus notes of the bread.

  • Sparkling Water: A fizzy beverage like sparkling water can cleanse the palate, letting the flavors linger pleasantly without overwhelming the senses.

Whichever you choose, these pairings will create a delightful array that celebrates the comforting joy of this Cranberry Orange Bread recipe!

Cranberry Orange Bread Recipe Variations

Feel free to add your personal touch to this delightful fruit bread and make it your own!

  • Nutty Twist: Fold in ½ cup of walnuts or pecans along with the cranberries for delightful crunch and richness. The added texture elevates your loaf to another level of flavor and satisfaction.

  • Muffin Makeover: Transform this quick bread into muffins! Bake the batter in a muffin tin for 20-22 minutes, and enjoy individual servings that are perfect for on-the-go snacking or breakfast.

  • Dairy-Free Option: Substitute the unsalted butter with coconut oil or your favorite plant-based oil to make a delicious dairy-free version. This swap maintains the moistness while allowing everyone to indulge.

  • Zesty Addition: For an extra punch of citrus, add a teaspoon of grated lemon zest along with the orange zest. It offers a refreshing twist that brightens every bite!

  • Spiced Delight: Mix in 1 teaspoon of cinnamon or nutmeg with the dry ingredients. The warm spices harmonize beautifully with the cranberries and orange, making your bread feel even cozier.

  • Choco-Cranberry Surprise: Add a cup of semi-sweet chocolate chips into the batter for a rich, sweet contrast to the tart cranberries. This indulgent twist will make a fantastic treat!

  • Dried Fruit Medley: Combine cranberries with other dried fruits like chopped apricots or cherries for varied flavors and textures. This sweet blend enhances the bread's character and provides a new adventure in every slice.

If you find yourself with leftover slices, don’t hesitate to pair them with a simple cream cheese spread or even try it alongside our mouthwatering Cornbread Breakfast Casserole for a delightful brunch combination!

Expert Tips for Cranberry Orange Bread

  • Prevent Sinking: Toss cranberries in a little flour before folding them into your batter. This keeps them evenly distributed throughout your bread.

  • Enhance Orange Flavor: For a bolder taste, consider adding a teaspoon of orange extract or an extra tablespoon of orange zest, making your Cranberry Orange Bread even more vibrant.

  • Avoid Overmixing: Gently combine wet and dry ingredients until just moistened. Overmixing can result in a dense, tough loaf rather than the moist, tender bread you desire.

  • Check for Doneness: Monitoring your bread a few minutes early can prevent overbaking, keeping your Cranberry Orange Bread perfectly moist and avoiding any dryness.

  • Cool Properly: Allow your bread to cool in the pan for 10 minutes, then transfer it to a wire rack. This helps maintain its soft texture while preventing sogginess.

How to Store and Freeze Cranberry Orange Bread

Room Temperature: Store wrapped tightly in plastic wrap or foil for up to 3 days to maintain moisture and freshness.

Fridge: If you want to extend the shelf life, refrigerate your bread wrapped tightly; it will last up to a week, though it may slightly dry out.

Freezer: For long-term storage, freeze slices or the whole loaf in an airtight container for up to 2 months.

Reheating: Thaw overnight in the fridge before serving. For a warm treat, reheat in the oven at 350°F (175°C) for about 10-15 minutes to regain softness.

Cranberry Orange Bread Recipe FAQs

How do I choose the best cranberries for this recipe?
Absolutely! When selecting cranberries, look for firm, plump berries with a vibrant red color. Avoid any with dark spots or wrinkles, as they may be overripe. If you can't find fresh cranberries, dried cranberries can work, but remember to chop them and slightly reduce the sugar in the recipe to balance the sweetness.

How should I store leftover Cranberry Orange Bread?
Very good question! Wrap your leftover bread tightly in plastic wrap or aluminum foil, and it will stay fresh at room temperature for up to 3 days. If you want the bread to last longer, you can store it in the refrigerator, where it should keep well for about a week, though it might dry out a bit.

Can I freeze Cranberry Orange Bread, and if so, how?
Absolutely, you can freeze it! For the best results, slice the bread and wrap each slice in plastic wrap to prevent freezer burn. Place the wrapped slices in an airtight container or freezer bag and freeze for up to 2 months. When you’re ready to enjoy it, simply thaw overnight in the fridge, then reheat in the oven at 350°F (175°C) for about 10-15 minutes if you prefer it warm.

What should I do if my Cranberry Orange Bread is too dense?
No worries! If your bread turns out dense, it may have been overmixed or overbaked. Remember, kneading or stirring too much can develop the gluten, making the loaf heavy. To fix next time, gently combine wet and dry ingredients until just moistened and look for a toothpick test; it should come out clean when it's done baking but still appear moist.

Is this recipe suitable for people with gluten allergies?
Yes! To make this Cranberry Orange Bread gluten-free, simply substitute the all-purpose flour with a gluten-free flour blend that is one-to-one for baking. Make sure to check the ingredients for any allergens, and enjoy a delicious loaf with friends and family!

Can I add other ingredients to this recipe?
The more the merrier! Feel free to incorporate ingredients like walnuts or pecans for some crunch. You can add about ½ cup when folding in the cranberries. For a convenient option, transform the loaf into muffins by baking in a muffin tin at 350°F (175°C) for about 20-22 minutes.

Cranberry Orange Bread Recipe

Moist and Zesty Cranberry Orange Bread Recipe You'll Love

Enjoy the delightful flavors of this Cranberry Orange Bread Recipe, perfect for festive occasions.
Print Recipe Pin Recipe
Prep Time 15 minutes mins
Cook Time 1 hour hr
Total Time 1 hour hr 15 minutes mins
Servings: 10 slices
Course: Breakfast
Cuisine: American
Calories: 180
Ingredients Equipment Method Nutrition Notes

Ingredients
  

For the Bread
  • 2 cups All-Purpose Flour Substitute with gluten-free flour for gluten-free version.
  • 2 tsp Baking Powder Check for freshness.
  • 1 tsp Salt
  • 1 cup Granulated Sugar Reduce slightly if using dried cranberries.
  • 1 tbsp Orange Zest Use fresh for best flavor.
  • 1 cup Fresh Orange Juice Opt for fresh for best flavor.
  • 1/2 cup Unsalted Butter Can replace with oil for dairy-free.
  • 2 large Eggs No substitutes recommended.
  • 2 tsp Vanilla Extract Use pure vanilla for best results.
  • 1 cup Fresh or Dried Cranberries Chop dried cranberries and reduce sugar.
  • 1 cup Powdered Sugar Optional for garnish.

Equipment

  • 9x5-inch loaf pan
  • Mixing bowls
  • Whisk
  • rubber spatula

Method
 

Step-by-Step Instructions for Cranberry Orange Bread Recipe
  1. Preheat your oven to 350°F (175°C). Grease your loaf pan or line it with parchment paper.
  2. In a large bowl, whisk together flour, baking powder, salt, granulated sugar, and orange zest until well combined.
  3. In another bowl, whisk together fresh orange juice, melted butter, eggs, and vanilla extract until smooth.
  4. Gently fold the wet ingredients into the dry ingredients until just combined, without overmixing.
  5. Fold in chopped cranberries gently until evenly distributed.
  6. Pour the batter into the loaf pan and bake for 50-60 minutes until golden brown and a toothpick comes out clean.
  7. Let it cool for about 10 minutes in the pan, then transfer to a wire rack. Dust with powdered sugar if desired.

Nutrition

Serving: 1sliceCalories: 180kcalCarbohydrates: 28gProtein: 3gFat: 7gSaturated Fat: 4gPolyunsaturated Fat: 1gMonounsaturated Fat: 2gCholesterol: 50mgSodium: 150mgPotassium: 180mgFiber: 1gSugar: 8gVitamin A: 250IUVitamin C: 8mgCalcium: 30mgIron: 1mg

Notes

For best flavor, enhance the orange essence with additional zest or extract. Avoid overmixing to keep the bread tender. Cool properly to maintain texture.

Tried this recipe?

Let us know how it was!

Soft Baked Maple Donut Bars: Your New Favorite Breakfast Treat

November 20, 2025 by Grace Snow Leave a Comment

As the morning light filters through the kitchen, I can almost hear the joyful laughter of my kids waiting eagerly for something special. That’s when I reach for my trusty recipe for Soft Baked Maple Donut Bars, a delightful breakfast treat that's both fluffy and tender. These bars not only transport you back to those cozy childhood mornings with their warm maple aroma but are also incredibly simple to whip up, making them perfect for busy weekdays. They’re a hit with the little ones, making breakfast or snack time an absolute breeze. Plus, you can easily customize them to suit your family's tastes or dietary needs. Ready to find out how to create these mouthwatering delights? Let’s dive in!

What makes these donut bars irresistible?

Simplicity at Its Best: These Soft Baked Maple Donut Bars require minimal effort and basic ingredients, making them perfect for both novice bakers and seasoned chefs.

Nostalgic Flavor: The warm maple syrup creates a rich, comforting taste that brings back fond childhood memories for everyone at the table.

Kid-Friendly Treat: With their fluffy texture and sweet glaze, these bars are a guaranteed hit for kids, making breakfast or snack time a delightful experience.

Versatile Options: Try adding exciting mix-ins like chocolate chips or dried fruits, or swap maple syrup for honey to easily adapt to your family's preferences.

Make-Ahead Magic: Prepare the batter up to 24 hours in advance to save time during busy mornings, and you'll have a warm treat ready to enjoy!

Whether enjoyed warm or at room temperature, these delectable bars are sure to become a family favorite that brightens your breakfast table or snack lineup.

Soft Baked Maple Donut Bar Ingredients

For the Batter

  • All-Purpose Flour – Provides structure and texture; substitute with gluten-free flour for a different option.
  • Granulated Sugar – Adds sweetness; brown sugar can be used for a richer flavor.
  • Baking Powder – Acts as a leavening agent, so ensure it's fresh for optimal rise.
  • Salt – Enhances flavor; using kosher salt results in a cleaner taste.
  • Ground Cinnamon – Infuses warmth and spice; freshly ground is best for maximum flavor.
  • Large Eggs – Binds everything together and keeps them moist; using room temperature eggs creates a smoother batter.
  • Maple Syrup – The core flavor, adding both sweetness and richness; pure maple syrup is recommended for authenticity.
  • Milk – Adds moisture; you can choose whole, non-dairy, or almond milk as alternatives.
  • Butter – Contributes richness; for a dairy-free option, melted coconut oil is a great replacement.

For the Glaze

  • Powdered Sugar – Sweetens and decorates your bars; mix with a bit of milk to achieve the right consistency.

These Soft Baked Maple Donut Bars are not just easy to prepare; they can also satisfy your craving for something sweet and delightful!

Step‑by‑Step Instructions for Soft Baked Maple Donut Bars

Step 1: Preheat the Oven and Prepare the Pan
Begin by preheating your oven to 350°F (175°C). While it warms up, grab an 8x8 inch baking dish and line it with greased parchment paper, ensuring the sides are covered. This will help your Soft Baked Maple Donut Bars release easily after baking, keeping them beautifully intact for serving.

Step 2: Mix the Dry Ingredients
In a large mixing bowl, whisk together the dry ingredients: all-purpose flour, granulated sugar, baking powder, salt, and ground cinnamon. Whisking thoroughly ensures there are no lumps and that the baking powder is evenly distributed, which is essential for those light and fluffy bars. Set the dry mixture aside once combined, allowing the flavors to meld.

Step 3: Combine the Wet Ingredients
In a separate bowl, crack the room temperature large eggs and beat them well. Add the pure maple syrup, milk, and melted butter, mixing until the mixture is smooth and well-blended. This step is important to achieve that luscious and moist texture that makes the Soft Baked Maple Donut Bars such a delight.

Step 4: Blend the Mixtures Together
Gently fold the wet mixture into the dry ingredients using a spatula or wooden spoon. Be careful not to over-mix; the batter should just come together without any dry flour visible. This careful folding is crucial to maintaining the fluffy texture of your donut bars, which should be intriguing and airy when baked.

Step 5: Bake the Donut Bars
Pour the batter into your prepared baking dish, spreading it evenly into the corners. Place the dish in the preheated oven and bake for 20-25 minutes, or until the top is golden brown and a toothpick inserted in the center comes out clean. The delightful aroma of maple will fill your kitchen as they bake!

Step 6: Cool in the Pan
Once baked, remove the bars from the oven and let them cool in the pan for about 10 minutes. This cooling step allows the bars to set and makes transferring them to a wire rack easier, helping to maintain their soft and tender texture.

Step 7: Glaze the Bars
After the bars have cooled completely, prepare your glaze by mixing powdered sugar with a splash of milk until smooth and drizzling consistency. Drizzle this glaze over the top of your Soft Baked Maple Donut Bars, allowing a bit to drip down the sides for that visually appealing finish.

Step 8: Serve and Enjoy
Cut the glazed bars into squares or rectangles and serve warm, or at room temperature. These Soft Baked Maple Donut Bars are perfect for breakfast or as an afternoon treat, and they’re even better when paired with fresh berries or a dollop of yogurt. Enjoy every fluffy, sweet bite!

How to Store and Freeze Soft Baked Maple Donut Bars

  • Room Temperature: Store the bars in an airtight container at room temperature for up to 3 days to maintain their fluffy texture and taste.

  • Fridge: If you prefer a chilled treat, keep them in the refrigerator for up to a week. Just ensure they’re well-wrapped to prevent drying out.

  • Freezer: For longer storage, freeze the bars individually wrapped in plastic wrap and placed in a freezer-safe bag for up to 3 months.

  • Reheating: To enjoy frozen Soft Baked Maple Donut Bars, thaw them overnight in the fridge. Reheat in the microwave for about 15-20 seconds, or until warm.

Soft Baked Maple Donut Bars Variations

Feel free to personalize your Soft Baked Maple Donut Bars by trying out these delicious twists that will surely excite your taste buds!

  • Honey Swap: Use honey instead of maple syrup for a subtly different sweetness that’s equally delightful.

  • Nutty Crunch: Add ½ cup of chopped nuts like walnuts or pecans for a satisfying crunch that complements the soft texture beautifully. Think about the joy of a little added crunch with every bite!

  • Chocolate Delight: Incorporate ½ cup of mini chocolate chips into the batter for a decadent treat that chocolate lovers will adore. The gooey surprises hidden within will have everyone coming back for more!

  • Fruity Boost: Fold in diced fruits such as apples or blueberries for a burst of freshness and added moisture. Nature's candy can elevate the flavor and make for a colorful presentation!

  • Spicy Twist: Experiment with spices like nutmeg or ginger for an extra layer of warmth and flavor that will warm your heart. A touch of spice can transform these bars into cozy delights perfect for any occasion.

  • Gluten-Free Option: Substitute the all-purpose flour with a gluten-free flour blend to make these donut bars suitable for gluten-sensitive family members without sacrificing flavor or texture.

  • Dairy-Free Delight: Use almond milk and melted coconut oil in place of regular milk and butter to create a vegan-friendly version that everyone can enjoy. Taste the creaminess without the dairy!

  • Cake Batter Flavor: For a birthday twist, add a sprinkle of funfetti or vanilla extract into the batter to capture that celebratory cake batter flavor that will make any morning feel special.

If you are interested in further customizing your treats, you might enjoy these warm accompaniments, like a side of creamy yogurt, fresh berries, or perhaps a scoop of Maple Roasted Sweet ice cream for that dreamy finish! Dive into your creativity and make these bars uniquely yours!

What to Serve with Soft Baked Maple Donut Bars

A delightful breakfast or snack experience followed by just the right accompaniments turns a good recipe into an unforgettable family memory.

  • Creamy Yogurt: The tang of yogurt adds a refreshing contrast, enhancing the sweet maple flavor and creating a delightful texture combination.

  • Fresh Berries: Bright and juicy berries like strawberries or blueberries bring a pop of color and freshness, making the meal feel vibrant and wholesome.

  • Maple Pecan Ice Cream: A scoop of this ice cream can indulge your sweet tooth while enhancing the creamy sweetness with a crunchy twist of pecans.

  • Warm Milk or Almond Milk: A warm drink complements the comfort of the donut bars, providing a cozy touch – perfect for chilly mornings!

  • Coffee or Tea: The slight bitterness of a rich coffee or calming tea balances the sweetness beautifully, making them ideal breakfast partners.

  • Nut Butter Spread: Add a layer of peanut or almond butter for a protein boost and rich flavor contrast that kids adore.

  • Cinnamon Sugar Dusting: A sprinkling on top before serving adds an extra layer of sweetness and spice, making every bite a delightful treat.

  • Chocolate Drizzle: Enhance your donut bars with a light chocolate drizzle for a decadent touch that will surprise and delight.

A warm and blissful pairing can transform your experience of Soft Baked Maple Donut Bars into everyday family joy!

Make Ahead Options

These Soft Baked Maple Donut Bars are a fantastic choice for meal prep enthusiasts! You can prepare the batter up to 24 hours in advance by chilling it in the refrigerator (this keeps it fresh and ready for baking). Additionally, you can bake the bars ahead of time and store them at room temperature in an airtight container for up to 3 days. For long-term enjoyment, freeze cooled bars for up to 3 months. When you’re ready to serve, simply reheat the bars gently in the oven or microwave for the perfect warm treat. This way, you’ll have a delightful homemade breakfast or snack at your fingertips during busy mornings!

Expert Tips for Soft Baked Maple Donut Bars

  • Fresh Ingredients: Ensure all ingredients, especially baking powder, are fresh for the best rise and texture in your Soft Baked Maple Donut Bars.

  • Gentle Mixing: Fold the wet and dry ingredients together gently to maintain a light, airy texture; over-mixing can lead to dense bars.

  • Cooling Time: Allow the bars to cool in the pan for 10 minutes before transferring them; this helps maintain their structure and prevents crumbling.

  • Perfect Glaze: Let the bars cool completely before glazing. Drizzling warm glaze can cause it to melt and run off, losing that beautiful finish.

  • Flavor Variations: Don’t hesitate to experiment! Try adding nuts or fruits in the batter for unique taste and texture variations that will surprise everyone.

Soft Baked Maple Donut Bars Recipe FAQs

How do I choose the best maple syrup for these donut bars?
Absolutely! For the best flavor, opt for pure maple syrup, which provides a rich, authentic taste. Look for bottles labeled “100% Pure Maple Syrup” to avoid imitation or corn syrup blends. The grade (such as Grade A or B) indicates flavor intensity, with Grade B often having a deeper, more robust flavor, perfect for baking.

How should I store leftover Soft Baked Maple Donut Bars?
Store your donut bars in an airtight container at room temperature for up to 3 days. If you want to keep them longer, refrigeration works too! Just wrap them well to avoid drying out, and they’ll stay fresh for up to a week.

Can I freeze these donut bars?
Absolutely! To freeze, first, let the bars cool completely. Then, wrap each bar individually in plastic wrap and place them in a freezer-safe bag. They can be frozen for up to 3 months. When you're ready to enjoy them, simply thaw overnight in the fridge and reheat in the microwave for about 15-20 seconds to warm them up.

What should I do if my donut bars come out dense?
If your bars turn out dense, it may be due to over-mixing the batter or using stale baking powder. Remember, after folding the wet and dry ingredients together, just mix until combined—some lumps are okay! Additionally, check that your baking powder is fresh; old leavening agents won’t help your bars rise properly.

Are there any dietary considerations I should keep in mind?
Yes, for those with dietary restrictions, you can easily adapt this recipe! Substitute all-purpose flour with a gluten-free blend to make it gluten-free. Also, use almond milk or coconut milk instead of regular milk for a dairy-free version. For anyone with egg allergies, a flaxseed egg (1 tablespoon ground flaxseed mixed with 2.5 tablespoons water) can work as a great binder, creating delicious results!

Can I make the batter ahead of time?
Very! You can prepare the batter in advance and store it in the refrigerator for up to 24 hours before baking. This is a fantastic option for busy mornings! Just give it a quick stir before spreading it into the prepared baking dish, and bake as usual. Enjoy the delightful smell of fresh donut bars filling your home!

Soft Baked Maple Donut Bars

Soft Baked Maple Donut Bars: Your New Favorite Breakfast Treat

These Soft Baked Maple Donut Bars are fluffy and tender, perfect for busy mornings and sure to be a hit with kids.
Print Recipe Pin Recipe
Prep Time 15 minutes mins
Cook Time 25 minutes mins
Cooling Time 10 minutes mins
Total Time 50 minutes mins
Servings: 9 bars
Course: Dessert
Cuisine: American
Calories: 200
Ingredients Equipment Method Nutrition Notes

Ingredients
  

For the Batter
  • 2 cups all-purpose flour Substitute with gluten-free flour for a different option.
  • 1 cup granulated sugar Brown sugar can be used for a richer flavor.
  • 2 teaspoons baking powder Ensure it's fresh for optimal rise.
  • 1/2 teaspoon salt Using kosher salt results in a cleaner taste.
  • 1 teaspoon ground cinnamon Freshly ground is best for maximum flavor.
  • 2 large eggs Using room temperature eggs creates a smoother batter.
  • 1/2 cup maple syrup Pure maple syrup is recommended for authenticity.
  • 1/2 cup milk Whole, non-dairy, or almond milk can be used as alternatives.
  • 1/4 cup butter For a dairy-free option, use melted coconut oil.
For the Glaze
  • 1 cup powdered sugar Mix with a bit of milk to achieve the right consistency.

Equipment

  • 8x8-inch baking dish
  • Mixing bowls
  • Whisk
  • Spatula

Method
 

Step-by-Step Instructions
  1. Preheat your oven to 350°F (175°C) and line an 8x8 inch baking dish with greased parchment paper.
  2. In a large mixing bowl, whisk together flour, sugar, baking powder, salt, and cinnamon. Set aside.
  3. In a separate bowl, beat the eggs, then add maple syrup, milk, and melted butter. Mix until smooth.
  4. Fold the wet mixture into the dry ingredients gently, ensuring no dry flour remains.
  5. Pour the batter into the prepared baking dish and bake for 20-25 minutes, or until golden brown.
  6. Allow to cool in the pan for about 10 minutes, then transfer to a wire rack.
  7. Prepare the glaze by mixing powdered sugar with milk until smooth, then drizzle over the cooled bars.
  8. Cut into squares or rectangles and serve warm or at room temperature.

Nutrition

Serving: 1barCalories: 200kcalCarbohydrates: 30gProtein: 2gFat: 9gSaturated Fat: 5gPolyunsaturated Fat: 1gMonounsaturated Fat: 2gCholesterol: 30mgSodium: 150mgPotassium: 100mgFiber: 1gSugar: 10gVitamin A: 300IUCalcium: 100mgIron: 1mg

Notes

These bars are perfect for breakfast or as an afternoon treat and pair well with fresh berries or yogurt.

Tried this recipe?

Let us know how it was!

Christmas Fruitcake Cookies Your New Holiday Favorite

November 19, 2025 by Grace Snow Leave a Comment

The scent of holiday spices and sweet fruits wafting through the kitchen can turn anyone into a festive cheerleader, and that’s exactly what these Easy Christmas Fruitcake Cookies offer! Inspired by the traditional fruitcake, these delightful cookies blend dried fruits with rich, buttery goodness. Not only are they incredibly easy to whip up, but they also cater to a variety of taste buds—making them a stand-out treat at any holiday gathering. Plus, their shipping-friendly format means you can share them with loved ones who are far away, spreading joy with every bite. Curious to discover how to make these adaptable festive delights? Let’s dive in!

Why are These Cookies a Holiday Must?

Delightful flavors: With a perfect blend of dried fruits and warm spices, each bite delivers a burst of holiday cheer.
Easy to make: Even novice bakers will shine with this straightforward recipe that requires minimal effort.
Customizable: Tailor the ingredients to suit your taste—swap fruits, try different extracts, or even go nut-free!
Versatile treats: These cookies are not just a holiday favorite; they make excellent gifts in festive baskets or packaged to share with distant family.
Freshness guaranteed: You'll find them easy to store, ensuring they stay moist and delicious for weeks—perfect for holiday indulgence!

Christmas Fruitcake Cookies Ingredients

• Curious about what makes these cookies so festive? Here’s everything you need!

For the Dough

  • Unsalted Butter – Provides richness and moisture; ensure butter is at room temperature for easy creaming.
  • Granulated Sugar – Adds sweetness and helps achieve a light, fluffy texture when creamed with butter.
  • Egg – Binds ingredients together and adds moisture; can be substituted with a mashed banana for a vegan option.
  • Vanilla Extract – Offers warmth and depth of flavor; if unavailable, use equal parts of other extracts.
  • Almond Extract – Enhances the flavor profile; can substitute with hazelnut or omit if preferred.
  • Lemon Extract – Brightens the cookie and complements the fruits; fresh lemon zest could also work.
  • All-Purpose Flour – Provides structure; measure correctly to avoid a dense cookie. Consider gluten-free flour for a gluten-free version.
  • Salt – Balances sweetness and enhances flavors; do not omit.
  • Baking Soda – Helps cookies rise and achieve a light texture; necessary for proper bake.

For the Sweetness

  • Candied Fruits (chopped) – The main component providing sweetness and chew; chop into small (1/4 inch) pieces for even distribution.
  • Pecans – Adds nutty flavor and crunch; can be replaced with walnuts or omitted for a nut-free version.

Get ready to bake your new favorite Christmas Fruitcake Cookies—each ingredient carefully selected to bring warmth and joy to your holiday celebrations!

Step‑by‑Step Instructions for Christmas Fruitcake Cookies

Step 1: Preheat the Oven
Start by preheating your oven to 300°F (150°C). While the oven is heating up, take a baking sheet and line it with either silicone baking mats or parchment paper to ensure your cookies don’t stick, making it easier to remove them once baked.

Step 2: Cream the Butter and Sugar
In a large mixing bowl, add room-temperature unsalted butter and granulated sugar. Using an electric mixer, cream them together on medium speed for about 3-5 minutes until the mixture is light and fluffy. This important step provides the base for your Christmas Fruitcake Cookies, creating a lovely texture.

Step 3: Incorporate the Wet Ingredients
Once your butter and sugar mix is fluffy, crack in an egg, and add the vanilla, almond, and lemon extracts. Mix on low speed until everything is well combined. This adds moisture and delicious flavor to your cookie batter, making your Christmas Fruitcake Cookies even more irresistible.

Step 4: Combine the Dry Ingredients
In a separate bowl, whisk together all-purpose flour, salt, and baking soda. Gradually fold the dry ingredients into the wet mixture. Stir gently until just combined, being careful not to over-mix, as this could lead to dense cookies instead of the tender texture we’re aiming for.

Step 5: Add the Candied Fruits and Nuts
Now, gently fold in the chopped candied fruits and pecans into the cookie dough. Make sure the fruits are evenly distributed, giving each bite of your Christmas Fruitcake Cookies a delightful chew and delightful nutty crunch.

Step 6: Portion the Dough
Using a tablespoon, scoop out heaping portions of dough and drop them onto the prepared cookie sheet, ensuring they are spaced about 3-4 inches apart. This spacing is crucial, as the cookies will spread during baking, allowing for perfect round shapes and lovely edges.

Step 7: Bake the Cookies
Place your cookie sheet in the preheated oven and bake for approximately 20-25 minutes. Keep an eye on them; when the edges have turned a golden brown but the centers still look slightly soft, it’s time to take them out, ensuring a tender cookie texture.

Step 8: Cool on Wire Rack
Let the cookies cool on the baking sheet for about 5 minutes. After that, carefully transfer them to a wire rack to cool completely. This step helps the cookies firm up while keeping them moist, contributing to the melt-in-your-mouth quality of your Christmas Fruitcake Cookies.

Expert Tips for Christmas Fruitcake Cookies

  • Dust Your Fruits: Coat chopped candied fruits with a tablespoon of flour before mixing to prevent clumping in your Christmas Fruitcake Cookies.

  • Watch Your Bake Time: Avoid overbaking by checking for golden edges and slightly soft centers. This ensures the cookies remain tender and delightful.

  • Chill the Dough: If your butter is too soft, refrigerate the dough for 15 minutes before baking to prevent unwanted spreading.

  • Store with Care: Keep your cookies in an airtight container with a slice of bread to maintain moisture and freshness for weeks of holiday enjoyment.

  • Experiment Freely: Don’t hesitate to customize! Swap dried fruits, nuts, or extracts to create a Christmas Fruitcake Cookies version that’s uniquely yours.

How to Store and Freeze Christmas Fruitcake Cookies

Room Temperature: Store cookies in an airtight container at room temperature for up to 1 week to keep them fresh and delicious.

Fridge: For extended freshness, place cookies in the fridge in a sealed container for up to 3 weeks; the cooler temperatures will help maintain their moist texture.

Freezer: Freeze cookies in an airtight container or freezer bag for up to 3 months. To enjoy later, thaw them in the fridge overnight before enjoying.

Reheating: Simply microwave for 10-15 seconds to warm them up; they'll be just as delightful as when first baked!

Christmas Fruitcake Cookies Variations

Feel free to personalize your Christmas Fruitcake Cookies with these delightful variations that will make each batch uniquely yours!

  • Nut-Free: Omit pecans altogether or replace them with crispy rice cereal for a fun crunch without the nuts. This is perfect for those with nut allergies.

  • Chocolate Lover: Replace the candied fruits with chocolate chips or chunks for a rich, indulgent twist. This variation adds a luscious cocoa flavor that complements the cookie's buttery base beautifully.

  • Spice It Up: Add a pinch of ground cinnamon or nutmeg for extra warmth and spice. The aromatic notes will elevate the holiday feel, making each bite feel even cozier.

  • Dried Fruit Medley: Instead of using just candied fruits, mix dried cranberries, raisins, and apricots for a chewy, tangy surprise in every cookie. The variety adds an unexpected romance to the taste profile.

  • Vegan Delight: Substitute the egg with a mashed banana or a flaxseed meal mixed with water for a delightful vegan option. This adjustment keeps the cookie moist while adding a unique flavor twist.

  • Different Extracts: Experiment with different extracts like maple or coconut to tailor the taste to your family's preferences. Each extract can add its own unique character, creating a fun cookie adventure!

  • Zesty Additions: Add fresh lemon or orange zest for a bright, citrusy flavor that beautifully complements the sweetness of the candied fruits. It’s a refreshing takeover on traditional holiday flavors!

  • Crunchy Granola: Fold in rolled oats or granola for added texture and a healthy twist. The added chewiness brings a heartiness that contrasts with the buttery base, making every bite a wholesome treat.

These variations will not only surprise your tastebuds but will also make your holiday gatherings even more special. If you love the idea of versatile cookies, be sure to check out my Matcha Cookies Soft and Eggnog Cookies Soft for more festive inspiration! Enjoy the journey of creating your perfect Christmas Fruitcake Cookies!

Make Ahead Options

These Easy Christmas Fruitcake Cookies are perfect for meal prep, saving you time during the bustling holiday season! You can prepare the cookie dough up to 24 hours in advance; simply refrigerate the dough in an airtight container to maintain its freshness and prevent browning. For even more convenience, you can also scoop the dough onto a baking sheet and freeze the unbaked cookies for up to 3 months. When you're ready to enjoy them, bake straight from the freezer, adding an extra minute or two to the baking time. With these make-ahead strategies, you’ll have delicious Christmas Fruitcake Cookies ready to share, ensuring you can savor the season without the last-minute rush!

What to Serve with Easy Christmas Fruitcake Cookies?

These delightful cookies are perfect for creating a full holiday spread that will warm hearts and fill bellies.

  • Creamy Mashed Potatoes: The buttery richness pairs beautifully with the sweet spice of the cookies, offering a lovely contrast in textures.
  • Spiced Apple Cider: Serve this warm drink alongside for a cozy, festive experience that enhances the cookies' fruity flavors.
  • Cheese Platter: A selection of sharp cheddar or creamy brie balances the sweet, chewy cookies and adds an elegant touch to your gathering.
  • Homemade Eggnog: This classic holiday drink provides a rich, creamy texture that complements the cookies perfectly. It's festive and fun!
  • Roasted Seasonal Vegetables: Their savory, earthy flavors create a delightful contrast to the sweetness of the cookies, keeping everything balanced.
  • Chocolate-Dipped Strawberries: For a sweet pairing, these fresh berries offer a juicy burst that pairs delectably with the spiced cookies.
  • Walnut Brownies: The fudgy richness of these brownies makes for a decadent dessert option alongside the cookies. Indulgence at its best!
  • Festive Fruit Salad: A bright, refreshing mix of seasonal fruits brightens up the holiday table, enhancing the overall cheerfulness of your spread.
  • Coffee or Tea: A warm cup can elevate your cookie experience, allowing the warm spices and flavors to shine even brighter.
  • Mini Cheesecakes: Their creamy texture and slight tartness provide a lovely counterpoint to the festive sweetness of the cookies.

Christmas Fruitcake Cookies Recipe FAQs

What type of candied fruit is best for these cookies?
Absolutely! The best candied fruits for Christmas Fruitcake Cookies include a mix of chopped cherries, pineapple, and citrus peel for that classic fruity flavor. Aim for pieces that are about 1/4 inch to ensure even distribution throughout the dough. Alternatively, you can also use dried fruits like raisins or apricots for a more natural sweetness.

How should I store Christmas Fruitcake Cookies?
Very easy! Store your cookies in an airtight container at room temperature for up to one week. If you'd like them to last longer, refrigerate them in a sealed container for up to 3 weeks. For maximum freshness, you can freeze them for up to 3 months, wrapped tightly in plastic wrap and then placed in a freezer bag. Just thaw overnight in the fridge before enjoying!

Can I freeze the dough for Christmas Fruitcake Cookies?
The more the merrier! Yes, you can freeze the cookie dough before baking. Simply scoop the dough into individual portions on parchment paper, freeze until solid, then transfer to an airtight container or freezer bag. The dough will keep well for up to 3 months. When you're ready to bake, let the dough thaw in the fridge overnight, then bake as per the instructions—your cookies will turn out just as delicious!

What if my cookies spread too much during baking?
No worries! If your Christmas Fruitcake Cookies are spreading too much, it may be due to the butter being too soft. To prevent this, I recommend refrigerating the dough for about 15 minutes before baking. Additionally, ensure you have measured your flour accurately and are using the right amount of baking soda—both are crucial for maintaining structure while baking.

Are these cookies suitable for those with nut allergies?
Absolutely! If you're baking for someone with nut allergies, you can easily omit the pecans or substitute them with pumpkin or sunflower seeds for a delightful crunch without the risk. Moreover, just be sure to check the labels on any ingredients you use, like extracts or candied fruits, to ensure there are no hidden nuts in them.

Christmas Fruitcake Cookies

Christmas Fruitcake Cookies Your New Holiday Favorite

Discover the joy of Christmas Fruitcake Cookies, blending dried fruits with rich flavors for a festive treat!
Print Recipe Pin Recipe
Prep Time 30 minutes mins
Cook Time 25 minutes mins
Cooling Time 5 minutes mins
Total Time 1 hour hr
Servings: 24 cookies
Course: Dessert
Cuisine: American
Calories: 150
Ingredients Equipment Method Nutrition Notes

Ingredients
  

For the Dough
  • 1 cup unsalted butter at room temperature
  • 1 cup granulated sugar light and fluffy texture
  • 1 large egg can substitute with mashed banana for vegan option
  • 1 teaspoon vanilla extract or other extracts
  • 1 teaspoon almond extract can substitute with hazelnut or omit
  • 1 teaspoon lemon extract or fresh lemon zest
  • 2 cups all-purpose flour consider gluten-free flour
  • 1/2 teaspoon salt
  • 1 teaspoon baking soda
For the Sweetness
  • 1 cup candied fruits chopped into small pieces
  • 1/2 cup pecans can be replaced with walnuts or omitted

Equipment

  • Electric mixer
  • Mixing Bowl
  • Baking Sheet
  • silicone baking mats or parchment paper
  • wire rack

Method
 

Step-by-Step Instructions
  1. Preheat your oven to 300°F (150°C) and line a baking sheet with silicone baking mats or parchment paper.
  2. Cream together the room-temperature unsalted butter and granulated sugar for about 3-5 minutes until light and fluffy.
  3. Add in the egg, vanilla, almond, and lemon extracts to the butter and sugar mixture, mixing until well combined.
  4. In another bowl, whisk together the all-purpose flour, salt, and baking soda, then gently fold into the wet mixture.
  5. Fold in the chopped candied fruits and pecans, ensuring even distribution throughout the cookie dough.
  6. Using a tablespoon, scoop out dough portions and drop them onto the prepared cookie sheet, spaced 3-4 inches apart.
  7. Bake for approximately 20-25 minutes, until edges are golden brown and centers are slightly soft.
  8. Allow cookies to cool on the baking sheet for 5 minutes before transferring to a wire rack to cool completely.

Nutrition

Serving: 1cookieCalories: 150kcalCarbohydrates: 20gProtein: 2gFat: 7gSaturated Fat: 4gPolyunsaturated Fat: 1gMonounsaturated Fat: 2gCholesterol: 20mgSodium: 80mgPotassium: 50mgFiber: 1gSugar: 8gVitamin A: 200IUCalcium: 20mgIron: 0.5mg

Notes

Dust chopped candied fruits with flour to prevent clumping. Avoid overbaking for a tender texture. Store cookies in an airtight container with a slice of bread to maintain moisture.

Tried this recipe?

Let us know how it was!

Delicious Christmas Cookies for Diabetics You'll Love

November 19, 2025 by Grace Snow Leave a Comment

As I stood in my kitchen, the scent of peppermint danced through the air, whisking me back to cozy holiday memories. This season, I'm thrilled to share a delightful twist on a classic treat: Diabetic-Friendly Mint Chocolate Christmas Cookies. Perfect for those mindful of their sugar intake, these cookies invite everyone to indulge without compromise. With their soft, chewy texture and festive appeal, they not only meet dietary needs but also make a wonderful addition to any holiday gathering. Plus, they’re incredibly easy to whip up, ensuring more time for laughter and cheer around the table. Who's ready to bake some magic this Christmas?

Why Are These Cookies a Must-Try?

Health-Conscious Indulgence: These delightful cookies let you treat yourself without the sugar overload, ensuring festive enjoyment for everyone.
Rich Chocolate Flavor: Savor the deep cocoa and minty aroma that will have you reaching for more.
Easy to Make: With simple steps and minimal ingredients, these cookies are quick to prepare—perfect for busy holiday seasons!
Festive Appeal: Their charming appearance makes them a hit at holiday gatherings—everyone will want a taste, especially when served alongside Eggnog Cookies Soft.
Versatile Variations: Feel free to mix things up using different extracts or flours to personalize your baking experience!
Guilt-Free Treats: Enjoy every bite knowing you're nourishing your body while celebrating the season with the best of both worlds!

Christmas Cookies for Diabetics Ingredients

• Get ready to bake deliciousness!

For the Batter

  • Butter – Provides richness and moisture; make sure it’s softened for easy mixing.
  • Swerve Confectioner’s Sugar – A fantastic sugar substitute that adds sweetness without the calories, making it perfect for Christmas cookies for diabetics.
  • Egg – Acts as a binder and moisture source; ensure it’s at room temperature for the best results.
  • Mint Extract – Gives a festive minty flavor; can be swapped with vanilla for a different taste twist.
  • Almond Flour – Our main gluten-free flour substitute, adding nutty flavor and tender texture.
  • Cocoa Powder – Essential for that rich chocolate taste; it also gives the cookies a beautiful color.
  • Salt – Balances sweetness and enhances overall flavor.

Step‑by‑Step Instructions for Diabetic-Friendly Mint Chocolate Christmas Cookies

Step 1: Preheat the Oven
Begin by preheating your oven to 325°F (163°C) to ensure an even baking temperature for your Diabetic-Friendly Mint Chocolate Christmas Cookies. This is a crucial step as it helps the cookies rise properly and achieve a delightful texture. Make sure to gather your baking sheets lined with parchment paper while the oven warms up for increased efficiency later on.

Step 2: Cream the Butter and Sugar
In a KitchenAid Mixer, add the softened butter and Swerve Confectioner's Sugar. Beat them together on medium speed for about 3 minutes, until you achieve a light and fluffy mixture. This step is essential for creating a creamy base that will elevate the sweetness without the sugar overload. Once fluffy, stop the mixer so you can proceed with the next ingredients.

Step 3: Incorporate Egg and Extract
Next, add one room-temperature egg and the mint extract to your fluffy butter mixture. Mix everything on medium speed for an additional 1 to 2 minutes, until the mixture is smooth and well combined. The egg acts as a binder, ensuring your cookies hold together perfectly. The mint extract will infuse a delightful aroma that captures the essence of the holiday season.

Step 4: Prepare the Dry Ingredients
In a separate bowl, whisk together the almond flour, cocoa powder, and salt. This dry mixture should be well combined to ensure the cocoa is evenly distributed throughout your Diabetic-Friendly Mint Chocolate Christmas Cookies. The almond flour not only provides a gluten-free base but also adds a unique nutty flavor that complements the chocolate beautifully.

Step 5: Combine Wet and Dry Ingredients
Gradually incorporate the dry ingredients into the wet mixture using a spatula or your mixer on low speed. Mix until a cohesive dough forms; if the dough appears too dry, add cold water a tablespoon at a time until it reaches a pliable consistency. This step is key to achieving the right texture for your cookies, allowing them to be soft yet sturdy once baked.

Step 6: Shape the Cookies
Once your dough is ready, roll it into 1-inch balls using your hands. Place the cookie balls on your parchment-lined baking sheets, spacing them about 2 inches apart to allow for spreading. This preparation ensures that your Diabetic-Friendly Mint Chocolate Christmas Cookies have enough room to expand as they bake, resulting in perfectly shaped treats.

Step 7: Bake the Cookies
Now it’s time to bake! Place your baking sheets in the preheated oven and set a timer for 12 minutes. Your cookies should be firm to the touch but still soft in the center, which is their ideal doneness. Keep an eye on them, as oven temperatures can vary and may affect baking times.

Step 8: Cool and Dust with Sugar
After baking, remove the cookies from the oven and let them cool on the sheets for about 5 minutes. Then, roll them in additional Swerve Confectioner’s Sugar while still warm for a sweet finishing touch. Finally, transfer the cookies to a wire rack to cool completely, ensuring they retain their delightful texture and hang onto that festive presentation.

Storage Tips for Christmas Cookies for Diabetics

Room Temperature: Store the cookies in an airtight container at room temperature for up to 1 week. This will keep them fresh while maintaining their delightful texture.

Fridge: For longer freshness, you can refrigerate them in an airtight container for up to 2 weeks, ensuring they maintain their chewy qualities without drying out.

Freezer: Freeze cookies in a single layer on a baking sheet until solid, then transfer them to a freezer-safe bag or container. They can last up to 3 months in the freezer, making them perfect for holiday meal prep.

Reheating: When ready to enjoy, simply thaw at room temperature or reheat in a microwave for about 10-15 seconds for that freshly baked taste!

What to Serve with Diabetic-Friendly Mint Chocolate Christmas Cookies

The festive season is all about sharing delightful treats, and these cookies are best enjoyed with charming accompaniments.

  • Herbal Tea: A warm cup of chamomile or peppermint tea beautifully complements the minty flavor, creating a comforting pairing. The soothing sip enhances the cookie's festive spirit.
  • Fruit Salad: A vibrant mix of seasonal fruits adds brightness and freshness, balancing the rich chocolate and mint. Think juicy oranges, crisp apples, and pops of pomegranate for a lovely contrast!
  • Greek Yogurt Parfait: Serve these cookies alongside creamy Greek yogurt layered with berries and a drizzle of honey. The tart fruitiness perfectly offsets the sweet cookies, making this a delightful duo.
  • Dark Hot Chocolate: Indulge in a cozy mug of low-sugar dark hot chocolate to sip between bites. The rich chocolate and cool mint flavors melt together in perfect harmony.
  • Spiced Nuts: A bowl of lightly salted or spiced nuts offers a crunchy texture and savory flavor that balance the sweetness of the cookies. Everyone loves a bit of crunch in their holiday spread!
  • Date and Nut Bites: These naturally sweet bites echo the cookies' flavors while providing a wholesome energy boost. Their chewy consistency and nutty essence serve as a delicious, healthful alternative.
  • Coconut Macaroons: These light and chewy treats complement the mint chocolate cookies beautifully while keeping with the festive theme of holiday baking. The subtle coconut flavor plays well with chocolate.
  • Sparkling Water with Lime: A refreshing bubbly drink can cleanse the palate after enjoying the sweet cookies, making it a perfect light accompaniment for your holiday treat platter.

Make Ahead Options

These Diabetic-Friendly Mint Chocolate Christmas Cookies are perfectly suited for meal prep enthusiasts! You can prepare the cookie dough up to 3 days in advance—simply mix the ingredients as directed, roll the dough into balls, and refrigerate them in an airtight container to preserve their freshness. When you're ready to enjoy them, just bake them straight from the fridge, adding an extra minute or two to the baking time for the best results. Alternatively, you can also bake the cookies and store them in an airtight container at room temperature for up to one week. This makes them a delightful option for holiday gatherings or busy weeknights, ensuring they remain just as delicious as when freshly made!

Expert Tips for Christmas Cookies for Diabetics

  • Check Dough Consistency: If your dough seems too crumbly, add cold water gradually; this will help it come together without compromising the cookie's texture.

  • Cooling is Key: Ensure cookies are fully cooled before serving or storing to keep their softness intact, preventing them from becoming too hard.

  • Watch Baking Time: Use a kitchen timer for precise baking; since ovens vary in temperature, the cookies might need slight adjustments to ensure they're perfectly baked.

Christmas Cookies for Diabetics Variations

Looking to personalize your cookies? Let your creativity shine with these delightful twists and substitutions!

  • Coconut Flour: Replace almond flour with coconut flour for a gluten-free option; use less as it's more absorbent.

  • Different Extracts: Substitute mint extract with orange, lemon, or almond extract for a refreshing twist that brightens the flavors.

  • Add Nuts: Incorporate chopped walnuts or pecans into the dough for a delightful crunch in every bite. The nutty flavor balances beautifully with chocolate.

  • Lower Carb: Use a low-carb sugar substitute like erythritol in place of Swerve to cater to unique dietary preferences without sacrificing sweetness.

  • Dairy-Free Option: Swap butter with coconut oil for a creamy texture, making these cookies dairy-free and infused with tropical notes.

  • Spicy Kick: Add a pinch of cayenne or cinnamon for a surprising warmth that will spice up the festive mood—pair it with your favorite herbal tea for balance.

  • Frosted Fun: Once cooled, consider drizzling a sugar-free chocolate glaze on top to elevate the holiday spirit! It adds a touch of elegance and irresistible chocolate flavor.

  • Flourless Version: For a unique twist, try a flourless version by blending black beans into your dough for added protein and fiber, keeping the cookies soft and chewy.

With options like these, your Diabetic-Friendly Mint Chocolate Christmas Cookies can become a personalized masterpiece for this festive season. For more delicious recipes, consider making Matcha Cookies Soft or indulge in some savory Thumbprint Cookies Melt. Enjoy baking!

Christmas Cookies for Diabetics Recipe FAQs

How can I tell if my ingredients are fresh enough?
Absolutely! Fresh ingredients are key to delicious cookies. For butter, make sure it’s softened and without any discoloration or sour smell. When choosing Swerve Confectioner's Sugar, check for a fresh packaging date. Eggs should be at room temperature and free from cracks—if you're unsure, perform the float test by placing them in water; fresh eggs will sink.

What’s the best way to store these cookies to keep them fresh?
Very! Store your Christmas cookies for diabetics in an airtight container at room temperature for up to 1 week to retain their softness. For more longevity, refrigerate them for up to 2 weeks. You can also freeze them for up to 3 months; just ensure they’re sealed tightly to avoid freezer burn.

Can I freeze the cookie dough before baking?
Absolutely! To freeze the dough, shape it into 1-inch balls and arrange them in a single layer on a baking sheet. Freeze until solid, then transfer to a freezer-safe bag. The dough can be kept for up to 3 months. When you're ready to bake, simply place the frozen dough balls on a baking sheet and bake them straight from the freezer, adding an additional minute or two to the baking time.

What can I do if the dough is crumbly and won't hold together?
If your dough seems too crumbly, don't worry! Just add cold water—start with 1 tablespoon at a time—and mix until a cohesive dough forms. This should help bind the ingredients without compromising the cookie's delightful texture, so just be patient and add it slowly!

Are there any dietary considerations I should keep in mind?
Yes! While these cookies are specifically designed to be diabetic-friendly, always check ingredient labels for potential allergens, especially if you have food sensitivities. Since the recipe includes almond flour, it’s not suitable for those with nut allergies. If serving to guests, please let them know what’s in the cookies to ensure everyone can enjoy them safely!

Christmas Cookies for Diabetics

Delicious Christmas Cookies for Diabetics You'll Love

Delight in Christmas cookies for diabetics with these Diabetic-Friendly Mint Chocolate Christmas Cookies, perfect for festive indulgence without the sugar overload.
Print Recipe Pin Recipe
Prep Time 15 minutes mins
Cook Time 12 minutes mins
Cooling Time 5 minutes mins
Total Time 32 minutes mins
Servings: 24 cookies
Course: Dessert
Cuisine: American
Calories: 90
Ingredients Equipment Method Nutrition Notes

Ingredients
  

For the Batter
  • 1 cup Butter softened
  • 1 cup Swerve Confectioner’s Sugar sugar substitute
  • 1 large Egg room temperature
  • 1 teaspoon Mint Extract festive flavor
  • 2 cups Almond Flour gluten-free flour substitute
  • 1/2 cup Cocoa Powder for rich chocolate taste
  • 1/4 teaspoon Salt to balance sweetness

Equipment

  • Oven
  • KitchenAid Mixer
  • Baking Sheets
  • Parchment Paper
  • Mixing Bowl

Method
 

Step‑by‑Step Instructions
  1. Preheat your oven to 325°F (163°C) and gather your baking sheets lined with parchment paper.
  2. In a KitchenAid Mixer, beat together softened butter and Swerve Confectioner's Sugar for about 3 minutes until light and fluffy.
  3. Add one room-temperature egg and the mint extract, mixing for 1 to 2 minutes until smooth.
  4. Whisk together almond flour, cocoa powder, and salt in a separate bowl.
  5. Gradually mix the dry ingredients into the wet mixture until a cohesive dough forms, adding cold water if necessary.
  6. Roll dough into 1-inch balls and place them on parchment-lined baking sheets, spaced 2 inches apart.
  7. Bake for 12 minutes until firm to the touch but soft in the center.
  8. Cool cookies on sheets for 5 minutes, then roll in additional Swerve Sugar before transferring to a wire rack.

Nutrition

Serving: 1cookieCalories: 90kcalCarbohydrates: 6gProtein: 3gFat: 7gSaturated Fat: 4gPolyunsaturated Fat: 1gMonounsaturated Fat: 2gCholesterol: 30mgSodium: 60mgPotassium: 80mgFiber: 2gSugar: 1gVitamin A: 200IUCalcium: 50mgIron: 1mg

Notes

For best results, ensure ingredients are at the correct temperature and follow the provided tips for consistent baking.

Tried this recipe?

Let us know how it was!

Irresistible Chocolate Thumbprint Cookies with Ganache Delight

November 19, 2025 by Grace Snow Leave a Comment

The aroma of chocolate wafts through the kitchen, wrapping me in a warm embrace—this is the moment I know I’m ready to bake my favorite treat: Chocolate Thumbprint Cookies. These delightful little gems are not just any cookies; they pack a rich, chewy texture that’s simply irresistible. Filled with luscious ganache, they turn every bite into a celebration, making them perfect for festive gatherings or a cozy evening at home. Plus, they’re incredibly quick to whip up, needing only a handful of ingredients! As a passionate home chef, I love how these cookies can easily impress guests while also satisfying my chocolate cravings. So, are you ready to embark on this sweet adventure with me? Let’s dive into these deliciously decadent cookies!

Why are Chocolate Thumbprint Cookies amazing?

Delectable Texture: The combination of a soft, chewy cookie with a smooth ganache center creates a delightful experience for your taste buds.

Quick and Simple: With just a few ingredients, you’ll have a batch of these cookies ready in no time, making them perfect for last-minute festive treats or cozy nights in.

Endless Variations: Feel free to swap chocolate types or add exciting flavors like peppermint to customize your cookie experience.

Showstopper Appeal: These cookies not only taste incredible but also look stunning on any dessert platter, making them a great conversation starter at gatherings.

Perfect for Pairing: Enjoy them with a glass of milk or a cup of coffee—these treats match beautifully with a variety of beverages.

Before you start, check out my delicious Eggnog Cookies Soft for another delectable holiday option that warms the heart!

Chocolate Thumbprint Cookies Ingredients

Get ready to gather the essentials for your delicious Chocolate Thumbprint Cookies!

For the Cookie Base

  • All-Purpose Flour – Provides structure to the cookies; ensure to spoon and level for accuracy.
  • Dutch Process Cocoa Powder – Imparts that deep, rich chocolate flavor; you can use natural unsweetened cocoa if desired.
  • Salt – Enhances the overall flavor beautifully.
  • Baking Powder – Helps achieve that perfect tender texture in each cookie.
  • Unsalted Butter – Adds a wonderful richness; make sure it's softened for easy creaming.
  • Light Brown Sugar – Contributes both moisture and a lovely caramel note to your cookies.
  • Granulated White Sugar – Offers sweetness and aids in developing a crisp exterior.
  • Egg Yolks – Provide binding and richness; using them at room temperature helps emulsify better.
  • Vanilla Bean Paste or Extract – Elevates the flavor profile; pure vanilla extract can be a delightful substitute.

For the Ganache Filling

  • Semi-Sweet Chocolate Chips – The star ingredient for making that luscious ganache; dark chocolate can be used for an even deeper flavor.
  • Heavy Whipping Cream – Makes for a creamy ganache; always choose full-fat for the best consistency.

For the Finishing Touch

  • Nonpareils (optional) – Use them for a delightful decorative touch on top of the ganache.

Now that you have your ingredients ready, you're just a step away from creating these irresistible Chocolate Thumbprint Cookies that will surely steal the show at any event!

Step‑by‑Step Instructions for Chocolate Thumbprint Cookies

Step 1: Preheat the Oven
Start by preheating your oven to 350°F (175°C). Then, line two baking sheets with parchment paper, ensuring they're ready to receive your delectable Chocolate Thumbprint Cookies. While the oven heats, you’ll have just enough time to prepare your ingredients and get everything ready for mixing.

Step 2: Mix the Dry Ingredients
In a medium bowl, whisk together the all-purpose flour, Dutch process cocoa powder, salt, and baking powder until well combined. This step is key for building a beautiful chocolate flavor throughout your cookies. Set your bowl aside, as you’ll be returning to it shortly as you create that rich cookie base.

Step 3: Cream the Butters and Sugars
In a large mixing bowl, cream together the softened unsalted butter, light brown sugar, and granulated sugar with an electric mixer for about 2 minutes, or until the mixture is light and fluffy. You’re aiming for a pale and airy consistency, which will give your cookies that melt-in-your-mouth texture.

Step 4: Add Eggs and Vanilla
Once your butter and sugar are perfectly combined, add the egg yolks and vanilla bean paste (or extract) to the bowl. Mix at medium speed until the mixture is pale and thoroughly combined, which should take about a minute. This is where the magic begins as the flavors meld beautifully.

Step 5: Combine Wet and Dry Ingredients
Gradually add the dry ingredient mixture to your creamed mixture, mixing gently until just combined. Be careful not to overmix; you want to retain the delicate texture of your Chocolate Thumbprint Cookies. The dough should be soft and slightly sticky, perfect for rolling into balls.

Step 6: Shape the Cookie Dough
Scoop the dough into 34 equal portions and roll each portion into a ball between your palms. Place the dough balls on the prepared baking sheets, leaving enough space for spreading. Using the back of a 1/4 teaspoon, create a small indent in the center of each ball—this will form the perfect shape for the ganache filling.

Step 7: Chill the Indented Dough
Refrigerate the indented cookie dough for at least 1 hour before baking. This chilling step is crucial, as it helps prevent the cookies from spreading too much in the oven, ensuring they keep their lovely shape and that delightful thumbprint.

Step 8: Bake the Cookies
Once chilled, place the baking sheets in the preheated oven and bake for 9-11 minutes. Keep a close eye on them; the edges should look set while the centers remain soft. If necessary, gently re-press the indents immediately after baking to ensure they hold the ganache filling well.

Step 9: Prepare the Ganache
While the cookies cool, prepare the ganache. In a small saucepan, heat the heavy whipping cream until it bubbles gently, then pour it over the semi-sweet chocolate chips in a heatproof bowl. Let it sit for a few minutes before stirring until the mixture is smooth and glossy—this rich chocolate ganache will complement your cookies perfectly.

Step 10: Assemble the Cookies
Once the cookies have cooled completely, fill each indentation with the luscious ganache using a spoon or piping bag. If desired, sprinkle nonpareils on top of the ganache for a festive touch. Lastly, chill the filled cookies briefly to allow the ganache to set, ensuring each bite is a little piece of heaven!

Storage Tips for Chocolate Thumbprint Cookies

Room Temperature: Store the cookies in an airtight container at room temperature for up to 3 days to maintain their soft, chewy texture.

Fridge: For longer freshness, you can refrigerate the cookies in an airtight container for up to a week, but be aware that they may lose some of their initial texture.

Freezer: Freeze the unfilled cookies for up to 2 weeks. Once cooled, wrap them tightly in plastic wrap and place them in a freezer bag. Add the ganache filling after thawing for the best flavor.

Reheating: If you want to enjoy the cookies warm, gently reheat them in the oven at 300°F (150°C) for about 5 minutes to restore their deliciousness before serving.

Chocolate Thumbprint Cookies Variations

Feel free to let your creativity shine by customizing these cookies to suit your taste buds!

  • Dark Chocolate: Swap semi-sweet chocolate chips for dark chocolate chips to deepen the flavor profile. Perfect for serious chocolate enthusiasts!
  • White Chocolate: Try white chocolate chips instead of semi-sweet for a sweet, creamy contrast that adds a lovely twist to the tradition.
  • Peppermint Twist: Add a teaspoon of peppermint extract to the dough for a refreshing, holiday-inspired flavor that will dazzle your taste buds.
  • Nutty Crunch: Incorporate chopped walnuts or hazelnuts into the dough for a delightful crunch that beautifully complements the rich, chewy cookie.
  • Spicy Touch: Mix in a pinch of cayenne pepper or cinnamon to the dough for unexpected warmth in every bite. A little heat pairs wonderfully with chocolate!
  • Nut Butter Swirl: Fold in a few tablespoons of your favorite nut butter, such as almond or peanut butter, for a creamy, nutty flavor that enhances the texture.
  • Candy Cane Crush: Top your ganache with crushed candy canes instead of nonpareils for a festive, minty crunch that will make this treat truly stand out.
  • Fruit Flavors: Add a tablespoon of orange or lemon zest to the dough for a bright citrusy note that perfectly balances the rich chocolate.

For more delightful cookie options, don't miss these delicious Thumbprint Cookies Melt or try the seasonal charm of Eggnog Cookies Soft—each variation will bring its own magical taste to any gathering!

Expert Tips for Chocolate Thumbprint Cookies

  • Correct Measurements: Always spoon and level your flour when measuring to avoid dense cookies; precise measurements make all the difference in your Chocolate Thumbprint Cookies.

  • Chill the Dough: Don’t skip chilling the indented dough for at least one hour. This critical step prevents the cookies from spreading too much while baking.

  • Re-Press Indents: If the indents puff up during baking, gently re-press them with a teaspoon right after removing them from the oven to ensure enough space for the ganache.

  • Ganache Consistency: Heat the cream until it’s bubbling, then let it sit with the chocolate before stirring. This technique helps achieve the perfect silky texture for your ganache.

  • Fun Variations: Remember to swap flavors by using dark chocolate or even adding peppermint extract to the dough for a festive twist that elevates your Chocolate Thumbprint Cookies!

Make Ahead Options

These Chocolate Thumbprint Cookies are perfect for busy weeknights and meal prep enthusiasts! You can prepare the cookie dough up to 24 hours in advance; simply roll the dough into balls and chill them in the refrigerator. This not only helps the flavors meld together but also prevents spreading during baking. Additionally, the ganache can be made ahead and stored in an airtight container for up to 3 days in the refrigerator. When you're ready to enjoy your cookies, bake them straight from the fridge, and then fill with your ganache once they've cooled. By prepping ahead, you'll have deliciously fresh cookies ready with minimal last-minute effort!

What to Serve with Chocolate Thumbprint Cookies

Indulging in these delightful cookies is just the beginning; let’s explore what can make your dessert experience even sweeter.

  • Fresh Berries: Juicy strawberries or raspberries provide a tart contrast that balances the rich chocolate flavors, adding a refreshing touch.
  • Vanilla Ice Cream: A scoop of creamy vanilla ice cream melts beautifully against the warm ganache, creating a decadent dessert combo.
  • Coffee or Espresso: Serve with a steaming cup of coffee or a shot of espresso, enhancing the cookie’s chocolate richness while giving you a cozy caffeine boost.
  • Whipped Cream: Light, fluffy whipped cream adds an airy texture that complements the dense cookies perfectly, making each bite feel indulgent.
  • Mint Tea: The refreshing flavor of mint tea cleanses the palate after each bite, providing a delightful contrast to the sweetness of the cookies.
  • Chocolate Milk: A classic pairing, chocolate milk mirrors the cookie's flavor while adding a whimsical childhood nostalgia to your dessert experience.
  • Spiced Chai: The warm spices of chai lift the chocolate notes, creating a comforting and aromatic combination that feels perfect for chilly evenings.
  • Caramel Sauce: Drizzling caramel sauce on top or alongside adds a rich sweetness that elevates the cookie experience to a new level of indulgence.
  • Peanut Butter Spread: A dab of creamy peanut butter balances the sweetness with its nutty richness, creating a delightful flavor harmony.
  • Festive Spritzers: Try serving with a sparkling berry spritzer for a touch of elegance and lightness, making your dessert feel even more special during celebrations.

Chocolate Thumbprint Cookies Recipe FAQs

How do I choose ripe ingredients for my Chocolate Thumbprint Cookies?
Absolutely! For the best results, ensure that your unsalted butter is softened to room temperature, around 68°F to 70°F (20°C to 21°C). This allows for easy creaming with sugars and achieves a fluffy texture. If you're using eggs, try to select farm-fresh ones, preferably at room temperature, for better emulsification when mixing.

How should I store my Chocolate Thumbprint Cookies, and how long do they last?
Store your cookies in an airtight container at room temperature for up to 3 days. If you want to keep them for longer, refrigerate them in an airtight container for about a week, although this may change their texture slightly. For the best results, I recommend freezing the unfilled cookies for up to 2 weeks. Once cooled, wrap them tightly in plastic wrap and place in a freezer bag. Remember to add the ganache only after thawing for optimal taste!

Can I freeze Chocolate Thumbprint Cookies, and if so, how?
Yes, indeed! To freeze your cookies properly, first, bake and fully cool them. Then, wrap the unfilled cookies tightly in plastic wrap, followed by placing them into a freezer-safe bag. They can be frozen for up to 2 weeks. When you're ready to enjoy them, just thaw at room temperature and fill with freshly made ganache for a delightful treat!

What should I do if my cookies spread too much while baking?
Very! If your cookies spread excessively, it could result from warm dough or not chilling them long enough. Always ensure you chill the indented dough for at least 1 hour before baking. If you forget this step, once they come out of the oven, gently re-press the indents immediately to maintain the classic thumbprint shape, allowing enough space for the ganache filling.

Are there any dietary considerations for Chocolate Thumbprint Cookies?
While this recipe is not gluten-free, you can substitute all-purpose flour with a gluten-free blend for those with gluten sensitivities. Additionally, watch out for allergies; ensure that any chocolate used is dairy-free if you're making these cookies for someone with a dairy allergy. For pets, chocolate is toxic, so always keep these cookies out of their reach!

Can I customize my Chocolate Thumbprint Cookies?
Absolutely! The beauty of these cookies lies in their versatility. You can swap out the semi-sweet chocolate chips for dark chocolate for a richer taste or even go for white chocolate for a sweeter profile. You may also add a few drops of peppermint extract to the dough around the holiday season or sprinkle crushed candy canes on top for festive flair. The more the merrier!

Chocolate Thumbprint Cookies

Irresistible Chocolate Thumbprint Cookies with Ganache Delight

These Chocolate Thumbprint Cookies are rich, chewy, and filled with luscious ganache, perfect for festive gatherings.
Print Recipe Pin Recipe
Prep Time 30 minutes mins
Cook Time 11 minutes mins
Chilling Time 1 hour hr
Total Time 1 hour hr 41 minutes mins
Servings: 34 cookies
Course: Dessert
Cuisine: American
Calories: 120
Ingredients Equipment Method Nutrition Notes

Ingredients
  

For the Cookie Base
  • 1 cup All-Purpose Flour spoon and leveled
  • 1/2 cup Dutch Process Cocoa Powder or natural unsweetened cocoa
  • 1/4 teaspoon Salt to enhance flavor
  • 1 teaspoon Baking Powder for tender texture
  • 1/2 cup Unsalted Butter softened
  • 1/2 cup Light Brown Sugar
  • 1/2 cup Granulated White Sugar
  • 2 large Egg Yolks at room temperature
  • 1 teaspoon Vanilla Bean Paste or Extract pure extract can substitute
For the Ganache Filling
  • 1 cup Semi-Sweet Chocolate Chips or dark chocolate for deeper flavor
  • 1/2 cup Heavy Whipping Cream full-fat for best consistency
For the Finishing Touch
  • as needed Nonpareils optional for decoration

Equipment

  • Mixing bowls
  • Electric mixer
  • Baking Sheets
  • Parchment Paper
  • Heatproof bowl
  • Saucepan

Method
 

Step-by-Step Instructions
  1. Preheat your oven to 350°F (175°C) and line two baking sheets with parchment paper.
  2. In a medium bowl, whisk together the flour, cocoa powder, salt, and baking powder.
  3. In a large bowl, cream the softened butter, light brown sugar, and granulated sugar until light and fluffy.
  4. Add the egg yolks and vanilla to the creamed mixture and mix until combined.
  5. Gradually add the dry mixture to the wet mixture, mixing until just combined.
  6. Scoop the dough into 34 equal portions, roll into balls, and create an indent in each ball.
  7. Chill the indented cookie dough for at least 1 hour before baking.
  8. Bake the cookies for 9-11 minutes and re-press indents if necessary.
  9. Prepare the ganache by heating the cream and pouring over the chocolate chips, stirring until smooth.
  10. Fill the indents with ganache and chill briefly to set.

Nutrition

Serving: 1cookieCalories: 120kcalCarbohydrates: 15gProtein: 2gFat: 6gSaturated Fat: 4gPolyunsaturated Fat: 0.5gMonounsaturated Fat: 1.5gCholesterol: 20mgSodium: 60mgPotassium: 50mgFiber: 1gSugar: 8gVitamin A: 200IUCalcium: 10mgIron: 0.5mg

Notes

For best results, ensure accurate measurements and do not skip the chilling step to maintain cookie shape.

Tried this recipe?

Let us know how it was!
  • « Previous Page
  • 1
  • …
  • 101
  • 102
  • 103
  • 104
  • 105
  • …
  • 180
  • Next Page »

Welcome!

Hi, I’m Grace, a Sydney-based home cook with a passion for bold flavors and trending ingredients. Whether you’re a busy beginner or a seasoned foodie, you’ll find dishes here that are fresh, fun, and full of flavor.

More about me

Popular Recipes

  • Butter Pecan Cookies
    Irresistibly Soft Butter Pecan Cookies for Cozy Moments
  • Decadent Turtle Bars
    Decadent Turtle Bars: Indulge in Sweet Gooey Perfection
  • Salted Caramel Butter Bars
    Decadent Salted Caramel Butter Bars You Can't Resist
  • Easy Italian Pasta Salad
    Easy Italian Pasta Salad: A Summer Delight to Share

Footer

↑ back to top

About

  • Privacy Policy
  • Disclaimer
  • Terms & Conditions

Newsletter

  • Sign Up! for emails and updates

Contact

  • About me
  • Contact me

Copyright © 2025 TastyTrendIngredients