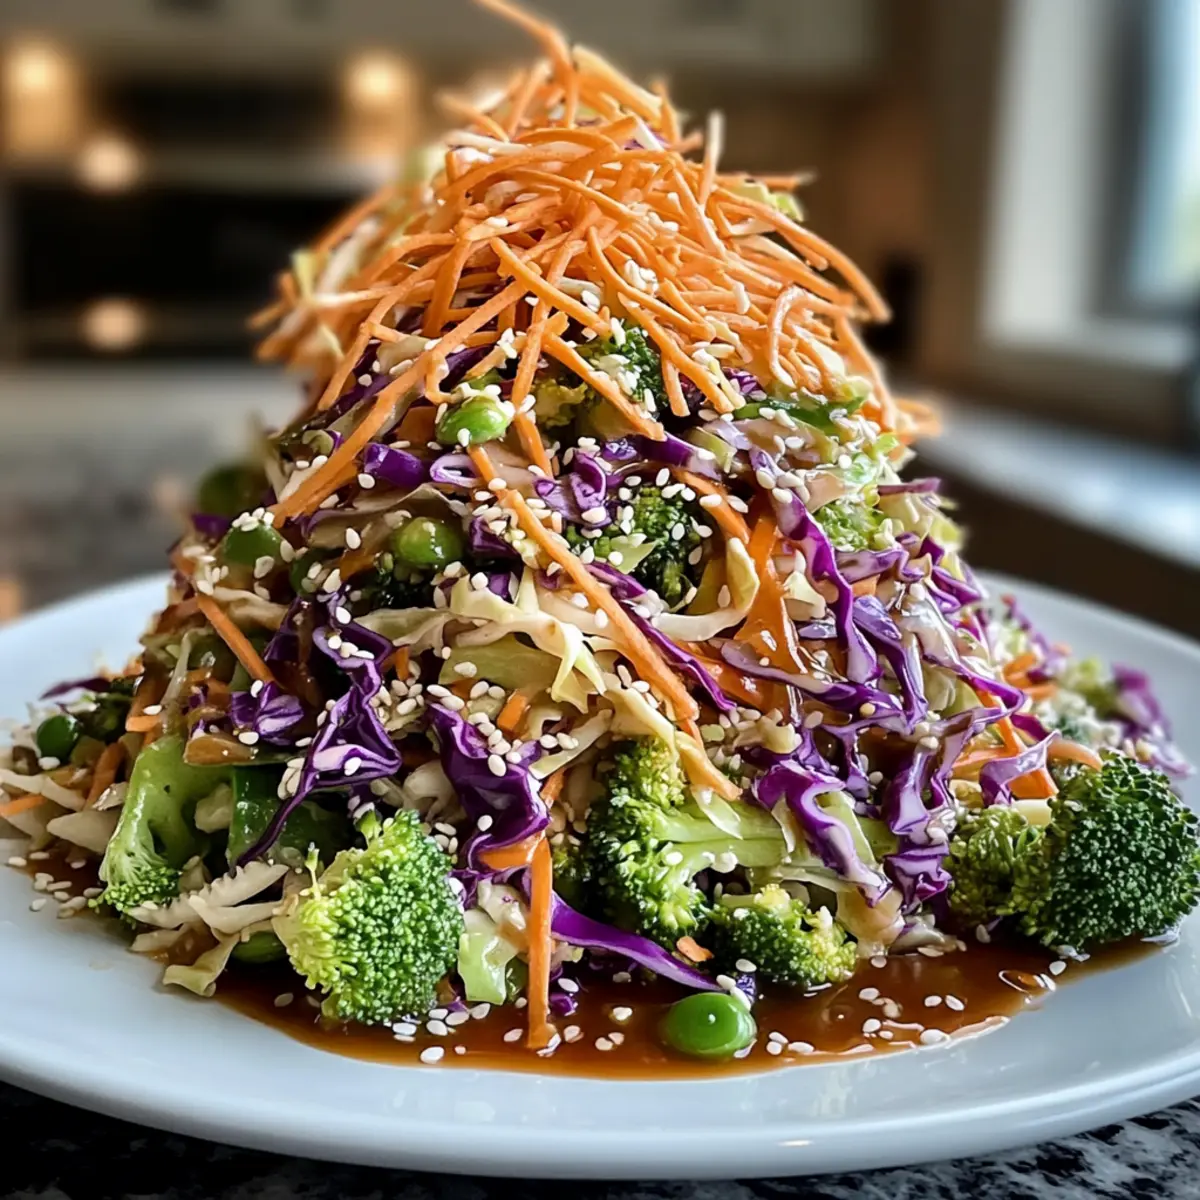
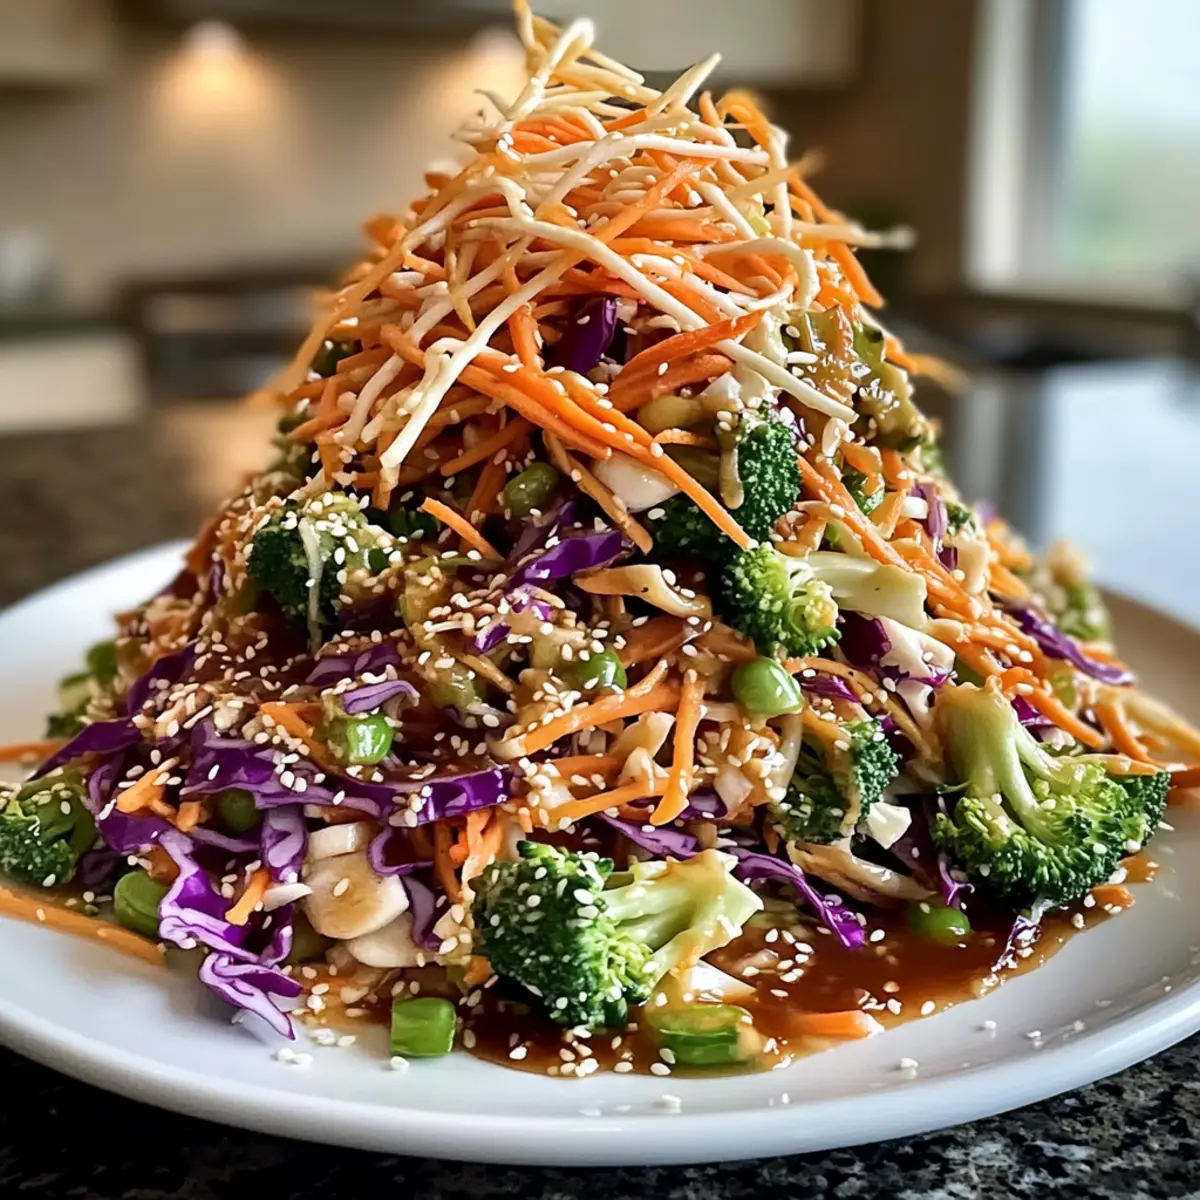
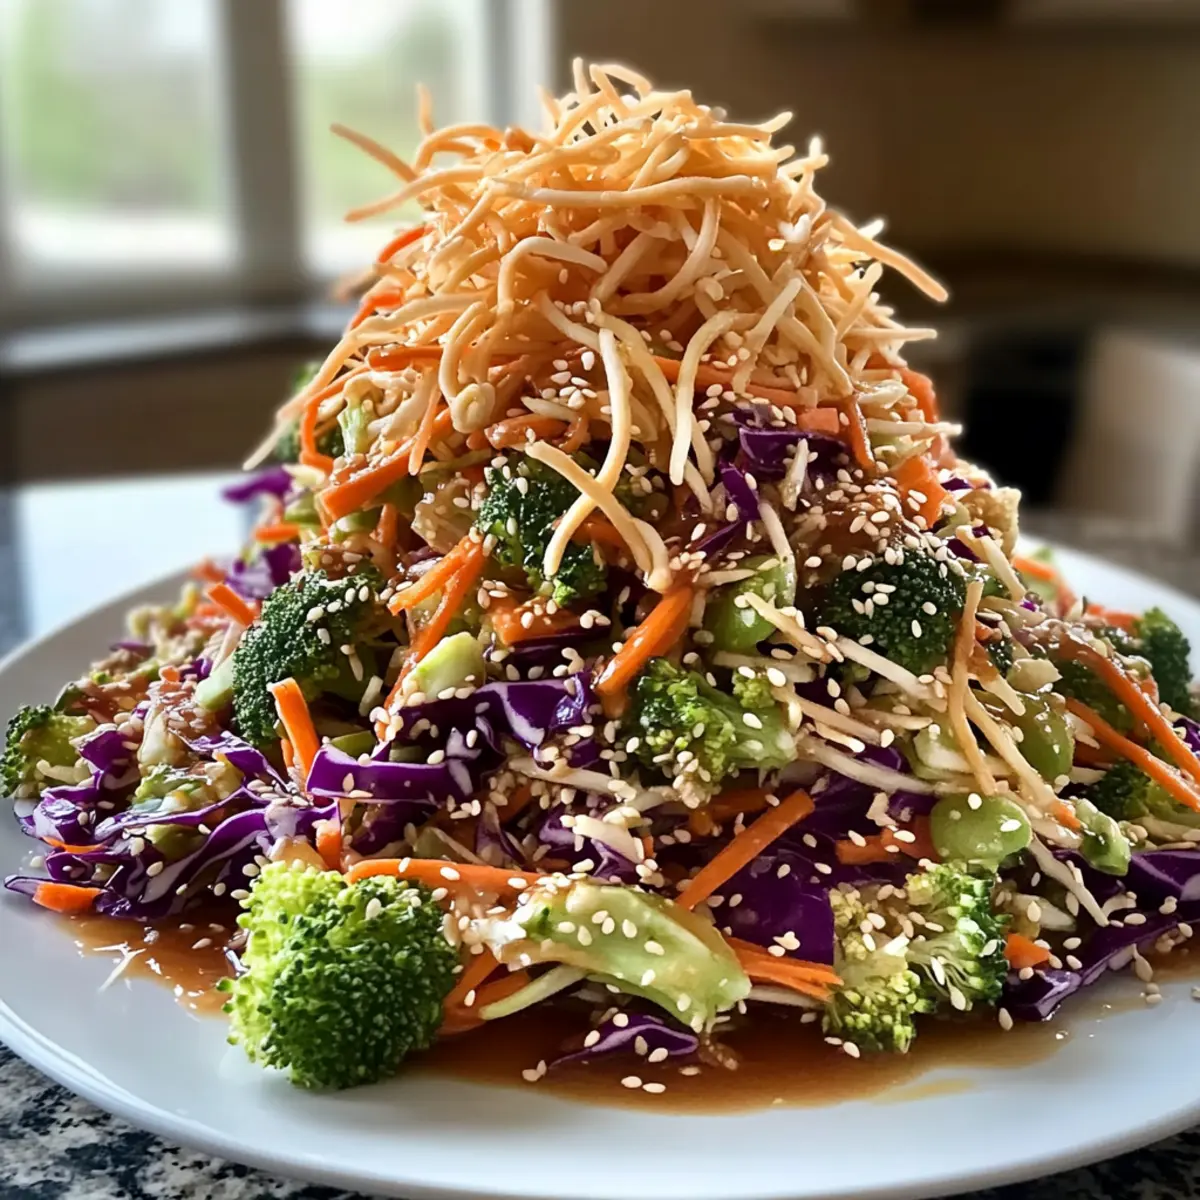
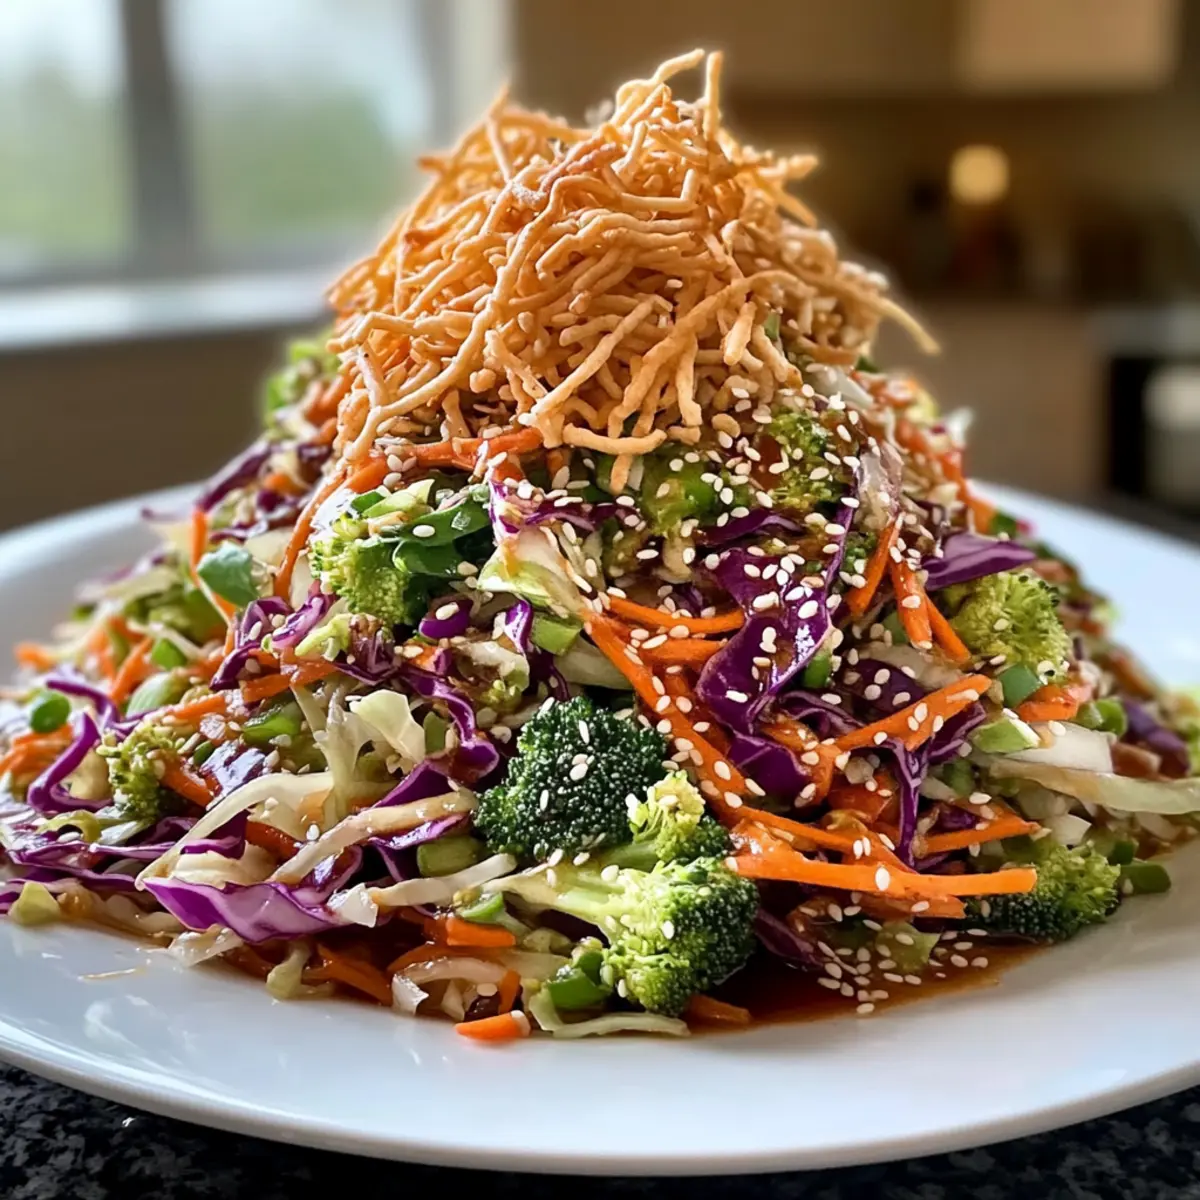
tastytrendingredients

  • Home
  • Recipes
    • Appetizers
    • Breakfast
    • Dessert
    • Dinner
    • Drinks
    • Salads
    • Snacks
    • Soups
  • About me
  • Contact me
menu icon
go to homepage
  • Home
  • Recipes
    • Appetizers
    • Breakfast
    • Dessert
    • Dinner
    • Drinks
    • Salads
    • Snacks
    • Soups
  • About me
  • Contact me
search icon
Homepage link
  • Home
  • Recipes
    • Appetizers
    • Breakfast
    • Dessert
    • Dinner
    • Drinks
    • Salads
    • Snacks
    • Soups
  • About me
  • Contact me
×

Tender Beef Braciole Recipe: A Cozy Italian Delight

December 26, 2025 by Grace Snow Leave a Comment

There’s an incredible satisfaction in preparing a meal that brings family and friends together, like a warm embrace on a plate. Today, I’m excited to share my Beef Braciole Recipe, a classic Italian-American dish that transforms simple ingredients into a heartwarming feast. With tender beef wrapped around a savory filling and simmered in a rich, wine-infused tomato sauce, this cozy dinner is not only a comforting reward after a long day but also a showstopper for your next gathering. Plus, the best part? It’s versatile enough to customize with your favorite fillings or cuts of meat. So, are you ready to roll up your sleeves and dive into this delicious culinary adventure?

Why is Beef Braciole a Must-Try?

Satisfying Comfort: This dish delivers a hearty meal that warms the soul, making it perfect for family gatherings.

Flavor Explosion: The rich, savory sauce made with wine and tomatoes elevates the simple ingredients to gourmet status.

Versatile Creations: Choose your favorite fillings! From classic cheese and herbs to more adventurous ingredients, the possibilities are endless.

Impressive Presentation: Rolled and braised to perfection, it’s a beautiful centerpiece that will impress your guests.

Time-Friendly Option: With options to cook in the oven, stovetop, or slow cooker, it adapts to your schedule effortlessly.

Give a comforting classic like Ground Beef Enchiladas a break and let Beef Braciole take the spotlight at your table!

Beef Braciole Recipe Ingredients

For the Beef Rolls
• Thinly Sliced Boneless Top Round (2 lbs) – This is your main protein; flank steak is a great alternative if you're looking for variety.
• Prosciutto (12 slices) – Adds a delightful moisture and flavor; you can opt for domestic prosciutto to keep costs down.
• Salt and Pepper – Essential for enhancing the flavors of your filling and sauce.

For the Filling
• Garlic (12 cloves) – Brings aromatic depth to your dish; if you're in a pinch, garlic powder works too!
• Italian Parsley (1/2 cup, chopped) – Adds a fresh note; basil can be a lovely substitute if desired.
• Parmesan or Romano Cheese (1 cup, shredded) – Provides a creamy texture and umami flavor; consider Pecorino for an even sharper taste.
• Seasoned Dry Breadcrumbs (2 tablespoons) – Helps bind the filling together; gluten-free breadcrumbs are a perfect alternative.

For the Sauce
• Olive Oil (2 tablespoons) – Required for browning the beef; feel free to substitute with a neutral oil, but flavors may slightly vary.
• Dry Red Wine (2 cups) – Infuses richness into your sauce; swap with beef broth and a splash of balsamic vinegar for a non-alcoholic version.
• Beef Broth (2 cups) – Adds depth to the sauce; homemade is always preferred for the best flavor.
• Crushed Tomatoes (28 oz can) – Forms the base of the sauce; choosing high-quality imports can significantly enhance the dish’s authenticity.
• Dried Italian Seasoning (2 teaspoons) – Blends herby flavors, featuring notes of oregano, basil, and thyme.
• All-Purpose Flour (2 tablespoons) – Used for thickening your sauce; cornstarch is a great substitute for a gluten-free option.
• Sugar (pinch, if needed) – Balances the acidity of the tomatoes, ensuring a well-rounded flavor.

Embrace the artistry of creating this Beef Braciole Recipe, and enjoy every bite of comfort it brings!

Step‑by‑Step Instructions for Beef Braciole Recipe

Step 1: Preheat the Oven
Begin by preheating your oven to 325°F (160°C). This sets the stage for slow-braising the Beef Braciole, ensuring it becomes tender and flavorful. As the oven warms up, gather your ingredients and prepare your workspace to create an efficient cooking flow.

Step 2: Prepare the Beef
Cut the thinly sliced boneless top round into 12 pieces, then place each slice between two pieces of plastic wrap. Use a meat mallet to pound each piece thin, aiming for about 1/4-1/8 inch in thickness. This step allows the beef to become tender and helps it roll more easily around the flavorful filling.

Step 3: Mix the Filling
In a medium bowl, combine the minced garlic, chopped Italian parsley, shredded cheese, breadcrumbs, salt, and pepper. Mix these ingredients thoroughly to form a flavorful filling. The right balance of ingredients is key, so make sure they are well-integrated before spreading them onto the beef slices.

Step 4: Assemble Rolls
Lay a slice of prosciutto on each beef slice, followed by a generous portion of the filling. Carefully roll each slice from one end to the other, encasing the filling inside. Secure the rolls tightly with toothpicks to prevent them from unrolling during cooking, creating perfect Beef Braciole.

Step 5: Brown the Beef
In a large Dutch oven, heat the olive oil over medium-high heat. Working in batches, add the beef rolls seam-side down and brown them on all sides, about 3-4 minutes per side. This step creates a beautiful crust that adds depth to the final dish. Once browned, set them aside on a plate.

Step 6: Deglaze the Pot
With the Dutch oven still on the heat, pour in the dry red wine, scraping up any browned bits stuck to the bottom. Allow the wine to boil for about 2-3 minutes to reduce slightly, enhancing the flavor of the sauce. Then, stir in the beef broth, crushed tomatoes, garlic slices, and dried Italian seasoning for a robust sauce.

Step 7: Braise the Rolls
Return the browned Beef Braciole to the pot and ensure they are submerged in the sauce. Cover the pot tightly with a lid or parchment paper and place it in the oven to braise for 1.5 to 2 hours, or until the beef is fork-tender. Alternatively, for stovetop cooking, simmer on low heat for about 1.5 hours.

Step 8: Finish the Sauce
After the cooking time, remove the beef from the pot and set aside. To thicken the sauce, mix the all-purpose flour with a couple of tablespoons of the cooking liquid to create a slurry. Stir this mixture into the sauce over medium heat until it thickens, reaching a desirable consistency to coat the Beef Braciole.

Step 9: Serve the Dish
Once thickened, remove the toothpicks from the Beef Braciole and arrange them on a serving platter. Garnish with additional chopped parsley for a fresh touch. Serve the Beef Braciole over pasta, potatoes, or polenta, allowing the rich sauce to tie every component of this hearty dish together.

Expert Tips for Beef Braciole

• Pound Evenly: Make sure to pound the beef slices to an even thickness. This helps them cook uniformly and prevents tough spots.

• Layer Seasoning: Don’t skimp on the salt and pepper in the filling. Properly seasoning the Beef Braciole enhances all the flavors when cooked.

• Seal Carefully: Be sure to secure the rolls tightly with toothpicks to prevent them from unraveling during braising; this ensures your beef remains juicy and flavorful.

• Monitor Sauce Consistency: Check the sauce while cooking. If it looks too thin, thicken it with a flour slurry as directed to achieve a luscious texture.

• Rest Before Serving: Allow the Beef Braciole to rest for a few minutes after cooking. This helps the meat retain its juices and enhances the overall flavor.

Enjoy this delightful Beef Braciole recipe and make it a favorite in your home!

Beef Braciole Recipe Variations

Discover exciting ways to tailor your Beef Braciole, adding your personal touch to this comforting classic!

  • Different Cuts: Use Pork or Chicken instead of beef for a lighter twist. Each meat brings its unique flavor profile, enhancing this homestyle dish.

  • Vegetarian Filling: Swap meat for Spinach and Ricotta for a creamy, flavorful option. This new filling not only offers a delicious alternative but also creates a beautiful color contrast.

  • Spicy Kick: Add Red Pepper Flakes to the filling for some heat. The warmth complements the rich sauce, making for a thoroughly comforting experience.

  • Herb Varieties: Experiment with Basil or Oregano instead of parsley for distinctive flavor notes. Fresh herbs can elevate the taste, giving it a unique touch.

  • Nuts and Fruits: Incorporate Pine Nuts or Raisins in the filling for a sweet crunch. This twist introduces a new layer of flavor, making each bite exciting.

  • Different Cheeses: Swap Parmesan for Fontina or Gouda for a creamy, melty texture. Each cheese offers a unique character to the dish.

After enjoying your customized Beef Braciole, you might find that a Spatchcock Chicken or Chicken Adobo could complement your culinary repertoire splendidly.

Make Ahead Options

These Beef Braciole are perfect for busy home cooks looking to streamline their meal prep! You can assemble the beef rolls and refrigerate them for up to 24 hours before cooking. Simply prepare the rolls, secure them with toothpicks, and place them in an airtight container to ensure freshness. To maintain quality, avoid adding the sauce until you're ready to cook; this prevents the beef from becoming too soggy. When you're ready to serve, just follow the recipe’s instructions to braise them in the sauce, and you'll have a cozy, delicious meal that's just as heartwarming as if you had made it fresh that day!

What to Serve with Hearty Italian Beef Braciole

Creating a memorable meal involves pairing the comforting flavors of this homestyle dish with delightful sides that complement every bite.

  • Creamy Polenta: The smooth, rich texture of polenta absorbs the savory sauce beautifully, making each mouthful indulgently satisfying.

  • Garlic Bread: Crispy, buttery garlic bread is perfect for soaking up the robust tomato-wine sauce, adding a crunchy element to your dinner.

  • Fresh Green Salad: A light salad with crisp greens, cherry tomatoes, and a zesty vinaigrette provides a refreshing contrast to the hearty beef.

  • Roasted Vegetables: Whether it's carrots, zucchini, or bell peppers, roasting vegetables brings out their natural sweetness, balancing the savory flavors of the Braciole.

  • Herbed Couscous: Fluffy couscous flavored with fresh herbs offers a light, grainy side that nicely complements the juicy beef rolls.

  • Red Wine: A glass of robust red wine centers the meal, enhancing the savory and aromatic notes in the beef while creating a cozy dining experience.

  • Tiramisu: End on a sweet note with this classic Italian dessert, balancing the meal with its creamy coffee and cocoa layers for a harmonious finish.

Each of these accompaniments will elevate your dining experience, ensuring every plate is as hearty and heartwarming as the Beef Braciole itself.

How to Store and Freeze Beef Braciole

Fridge: Store leftover Beef Braciole in an airtight container for up to 3 days. Make sure to refrigerate it after cooling completely to maintain quality.

Freezer: Freeze the cooked Beef Braciole in airtight containers for up to 2 months. This will preserve its rich flavors for those cozy dinner nights.

Reheating: When ready to enjoy, reheat the Beef Braciole in the oven at 350°F (175°C) for about 20-25 minutes, ensuring the sauce remains moist for that comforting experience.

Make-Ahead Tip: Assemble the rolls ahead of time and store them in the fridge. Cook them within 24 hours for the best flavor and texture in your Beef Braciole recipe!

Beef Braciole Recipe FAQs

What type of beef should I use for Beef Braciole?
Absolutely! Thinly sliced boneless top round is ideal for a tender, flavorful roll. For a different twist, flank steak is a great alternative that brings its own unique texture and flavor!

How do I know if my beef is ripe for cooking?
Look for fresh, bright red color without dark spots or an off odor. The meat should be firm to the touch; these visual cues indicate it's good to go!

Can I store leftovers, and how long do they last?
Yes, of course! Store leftover Beef Braciole in an airtight container in the refrigerator for up to 3 days. Make sure it’s completely cooled before refrigerating to maintain its quality.

How do I freeze Beef Braciole?
Definitely! First, let the cooked Beef Braciole cool completely. Then, place it in airtight containers or heavy-duty freezer bags, ensuring all air is removed. It can be frozen for up to 2 months. When you're ready to eat, just thaw it overnight in the fridge before reheating.

What if my sauce is too thin?
If you find that your sauce hasn't thickened as desired, don't worry! Just mix 1-2 tablespoons of all-purpose flour with a little cooking liquid to create a slurry. Stir it into the sauce over medium heat until it reaches your desired consistency, which usually takes just a few minutes!

Is Beef Braciole safe for my children and pets?
Very much so! However, ensure that your pets do not consume any cooked bones or excessive seasonings, especially those containing garlic or onions, as they can be harmful. As for children, the dish is nutritious, but keep the sauce mild if you have little ones who might prefer something less spicy in flavor!

Beef Braciole Recipe

Tender Beef Braciole Recipe: A Cozy Italian Delight

This Beef Braciole Recipe is a classic Italian-American dish that transforms simple ingredients into a heartwarming feast.
Print Recipe Pin Recipe
Prep Time 30 minutes mins
Cook Time 2 hours hrs
Resting Time 10 minutes mins
Total Time 2 hours hrs 40 minutes mins
Servings: 6 servings
Course: Dinner
Cuisine: Italian-American
Calories: 350
Ingredients Equipment Method Nutrition Notes

Ingredients
  

For the Beef Rolls
  • 2 lbs Thinly Sliced Boneless Top Round Flank steak is a great alternative.
  • 12 slices Prosciutto Opt for domestic prosciutto to keep costs down.
  • Salt and Pepper Essential for enhancing flavors.
For the Filling
  • 12 cloves Garlic Garlic powder can be used in a pinch.
  • 1/2 cup Italian Parsley, chopped Basil can be a lovely substitute.
  • 1 cup Parmesan or Romano Cheese, shredded Consider Pecorino for a sharper taste.
  • 2 tablespoons Seasoned Dry Breadcrumbs Gluten-free breadcrumbs are an option.
For the Sauce
  • 2 tablespoons Olive Oil Neutral oil can be substituted.
  • 2 cups Dry Red Wine Beef broth and balsamic vinegar can replace for non-alcoholic.
  • 2 cups Beef Broth Homemade is preferred.
  • 28 oz Crushed Tomatoes High-quality imports enhance authenticity.
  • 2 teaspoons Dried Italian Seasoning
  • 2 tablespoons All-Purpose Flour Cornstarch is a gluten-free option.
  • pinch Sugar Balances acidity of tomatoes.

Equipment

  • Dutch oven
  • Meat Mallet
  • plastic wrap

Method
 

Cooking Steps
  1. Step 1: Preheat the Oven to 325°F (160°C). Gather ingredients while the oven warms up.
  2. Step 2: Prepare the Beef by cutting into 12 pieces and pound thin between plastic wrap.
  3. Step 3: Mix the Filling in a bowl combining garlic, parsley, cheese, breadcrumbs, salt and pepper.
  4. Step 4: Assemble Rolls by laying prosciutto on beef slices and encasing the filling, securing with toothpicks.
  5. Step 5: Brown the Beef in olive oil in batches, creating a crust on all sides.
  6. Step 6: Deglaze the Pot with red wine, scraping up browned bits, then add broth, tomatoes, and seasoning.
  7. Step 7: Braise the Rolls in the oven for 1.5 to 2 hours until fork-tender.
  8. Step 8: Finish the Sauce by thickening with a flour slurry and stirring until desired consistency.
  9. Step 9: Serve the Dish by removing toothpicks and garnishing with parsley, serving over pasta or polenta.

Nutrition

Serving: 1servingCalories: 350kcalCarbohydrates: 30gProtein: 40gFat: 15gSaturated Fat: 5gPolyunsaturated Fat: 1gMonounsaturated Fat: 8gCholesterol: 120mgSodium: 800mgPotassium: 800mgFiber: 4gSugar: 5gVitamin A: 400IUVitamin C: 5mgCalcium: 250mgIron: 3mg

Notes

Pound beef slices evenly for uniform cooking. Monitor sauce consistency and allow beef to rest before serving.

Tried this recipe?

Let us know how it was!

Savory Beef with Oyster Sauce for a Quick Weeknight Delight

December 26, 2025 by Grace Snow Leave a Comment

As the unmistakable aroma of sizzling beef fills the air, I’m reminded of warm, bustling kitchens and gatherings with friends. This Quick & Easy Beef with Oyster Sauce brings those cherished moments to your table, transforming a busy weekday into a delightful culinary experience. With tender beef and vibrant asparagus bathed in a savory-sweet sauce, this dish is not only a feast for the senses but also a lifesaver for anyone craving a fast yet healthy dinner option. Plus, it’s gluten-free adaptable, making it a versatile choice for every palate. Ready to impress your loved ones with a simple, elegant meal that’s bursting with satisfaction? Let’s get cooking!

Why is this Beef Stir-Fry a Must-Try?

Simplicity at Its Best: With just a handful of ingredients and straightforward steps, this recipe is perfect for busy weeknights.

Flavor Explosion: The rich combination of oyster sauce and tender beef creates a savory journey that will tantalize your taste buds.

Gluten-Free Adaptable: Easily swap ingredients, making this a versatile dish for those with dietary restrictions, just like our Ground Beef Enchiladas.

Quick Preparation: In about 30 minutes, you’ll have a satisfying meal that rivals any takeout, perfect for impressing guests unexpectedly.

Crowd Pleaser: Serve it over jasmine rice, and watch everyone come back for seconds!

Beef with Oyster Sauce Ingredients

For the Beef

  • Beef Flank Steak or Skirt Steak – The primary protein that delivers tenderness; you can also use chicken or tofu for a variation.
  • Baking Soda – This ingredient tenderizes the beef for a juicy texture; mix it thoroughly with the marinade.

For the Sauce

  • Light Soy Sauce – Adds umami and a touch of saltiness; use gluten-free soy sauce for a gluten-free option.
  • Oyster Sauce – The star of this savory dish, providing that rich flavor we love in Beef with Oyster Sauce.
  • Dark Soy Sauce – Deepens the flavor and gives a beautiful color to your sauce.
  • Chicken Broth – The base for the sauce that adds wonderful depth.
  • Cornstarch – Essential for thickening your sauce, giving it a silky texture.
  • Sugar – Balances and enhances the savory notes in the sauce.
  • Sesame Oil – Adds a nutty aroma that elevates the dish.

For the Aromatics and Veggies

  • White Onion – Sweet and aromatic, it adds texture to the dish; substitute with shallots if desired.
  • Garlic – Provides aromatic depth and a bold flavor.
  • Ginger – Adds freshness and spice that enhances the overall dish.
  • Asparagus – Brings crispness and color; feel free to swap in seasonal veggies like broccoli or bell peppers.

Now that you have everything ready, you're set to whip up a delightful Beef with Oyster Sauce that will fill your home with irresistible aromas!

Step-by-Step Instructions for Quick & Easy Beef with Oyster Sauce

Step 1: Marinate the Beef
In a medium bowl, combine sliced beef flank (or skirt steak) with baking soda, light soy sauce, peanut oil, and cornstarch. Mix thoroughly to ensure each piece is well-coated. Let the beef marinate for at least 10-15 minutes while you prepare the other ingredients, allowing the flavors to meld and the meat to tenderize beautifully.

Step 2: Prepare the Sauce
In a separate bowl, whisk together chicken broth, oyster sauce, dark soy sauce, sugar, cornstarch, and sesame oil until well-combined. This savory sauce will be the heart of your Quick & Easy Beef with Oyster Sauce. Keep it aside, as you’ll add it to the stir-fry later to create a glossy, thick coating over the beef and vegetables.

Step 3: Stir-fry the Beef
Heat 2 tablespoons of peanut oil in a large skillet or wok over medium-high heat until shimmering. Gently add the marinated beef in a single layer. Cook for about 1 minute until golden brown, then flip the beef and cook for another minute until just browned. Quickly transfer the cooked beef to a plate to prevent overcooking, as it should remain tender and juicy.

Step 4: Stir-fry the Aromatics
In the same skillet, add the remaining oil and toss in the sliced white onion, minced garlic, and grated ginger. Stir-fry these aromatics for 2 minutes, or until the onion becomes translucent and aromatic, bringing a delightful fragrance to your kitchen. This step adds depth of flavor to your Quick & Easy Beef with Oyster Sauce.

Step 5: Add the Vegetables
Next, add the asparagus to the skillet, stirring continuously for about 1 minute. You want the asparagus to turn a vibrant green and start to soften while maintaining some crunch. This quick stir-fry method ensures that your vegetables are crisp and fresh, perfectly complementing the beef.

Step 6: Combine Sauce and Beef
Give your prepared sauce a good stir to dissolve any settled cornstarch, then pour it into the skillet with the onions and asparagus. Mix thoroughly until the sauce thickens—this should take about 1-2 minutes. Add the beef back into the skillet, stirring to coat the meat and vegetables in the savory sauce, ensuring every bite is packed with flavor.

Step 7: Serve
Once everything is well-coated and heated through, transfer your delightful Quick & Easy Beef with Oyster Sauce to a serving plate. Serve it hot, ideally paired with jasmine rice or over steamed white rice, allowing your loved ones to enjoy a home-cooked meal that feels both luxurious and comforting.

How to Store and Freeze Beef with Oyster Sauce

Fridge: Store leftover Beef with Oyster Sauce in an airtight container for up to 3 days. Reheat in a skillet over medium heat until warmed through, ensuring the beef stays tender.

Freezer: For longer storage, freeze prepared Beef with Oyster Sauce in an airtight container or freezer bag for up to 3 months. Allow to thaw overnight in the fridge before reheating.

Reheating: When reheating, add a splash of water or broth to keep it moist. Heat on the stovetop over medium-low heat, stirring occasionally, until heated through.

Assembly Tip: If you're prepping a double batch for meal prep, consider freezing in single portions to make it convenient for healthy weeknight dinners!

Make Ahead Options

These Beef with Oyster Sauce preparations are a game-changer for meal prep aficionados! You can marinate the beef up to 24 hours in advance, which allows it to absorb all the wonderful flavors. Additionally, you can prepare the sauce and store it in the refrigerator for up to 3 days to save valuable time during the week. When you're ready to cook, simply stir-fry the aromatics and vegetables, then add the marinated beef and pre-made sauce. This method not only preserves the dish's integrity—keeping the beef tender and the vegetables crisp—but also ensures you return to a delicious meal that’s ready in minutes, perfect for those busy weeknights!

Variations & Substitutions for Beef with Oyster Sauce

Feel free to explore new flavors and textures in this dish that will make it uniquely yours!

  • Dairy-Free: Swap any oyster sauce with a vegan alternative to keep it dairy-free and just as delicious.
  • Protein Swap: Use shrimp or chicken instead of beef for a lighter twist that still delivers on flavor.
  • Vegetable Variety: Replace asparagus with seasonal favorites like broccoli or bell peppers for a colorful mix.
  • Add Heat: Incorporate a teaspoon of Thai chili oil into the marinade for a spicy kick that’ll awaken your taste buds.
  • Gluten-Free: Substitute light soy sauce with a gluten-free version to ensure everyone can enjoy this delightful dish safely.
  • Flavor Boost: Enhance the savory goodness by adding a splash of fish sauce to the marinade and sauce for a deeper flavor profile.
  • Crunchy Texture: Toss in a handful of cashews or peanuts at the end for added crunch and nutty flair, balancing the soft beef and veggies.
  • Asian Twist: Marinate the beef with a little hoisin sauce for a hint of sweetness that dances beautifully with the oyster sauce.

These variations not only make the dish adaptable but also add an exciting twist that will impress your family, showing them that home-cooked meals can be both versatile and tantalizing. And if you're looking for some more inspiration, consider trying this delightful flavor combo with our Pan Fried Mayo or combine those crunch factors in our Buffalo Tofu with Caesar Salad for a different kind of satisfaction!

Expert Tips for Beef with Oyster Sauce

• Perfect Marinade Time: Allow the beef to marinate for at least 15 minutes to maximize tenderness and flavor infusion, avoiding a tough texture.

• Temperature Control: Ensure your skillet is hot enough before adding the beef; this creates a nice sear without overcooking, keeping it juicy.

• Don’t Overcook Veggies: Stir-fry asparagus (or other veggies) for just 1 minute; they should be vibrant and crisp, adding a delightful texture to your Beef with Oyster Sauce.

• Sauce Consistency: Stir the sauce well before adding it to the pan to ensure the cornstarch is dissolved, resulting in a smooth, thick coating.

• Repurpose Leftovers: Feel free to mix leftover Beef with Oyster Sauce with noodles for a quick lunch or a comforting second meal!

What to Serve with Quick & Easy Beef with Oyster Sauce

As you savor this succulent stir-fry, imagine a vibrant array of sides that will elevate your meal to new heights.

  • Steamed Jasmine Rice: The fluffy, fragrant rice perfectly soaks up the savory sauce, creating a delightful harmony on your plate.

  • Garlic Broccoli: Lightly sautéed garlic broccoli adds a fresh and crunchy contrast to the tender beef, enhancing the overall flavor experience.

  • Crispy Spring Rolls: These little bites of perfection bring a delightful crunch, making for a fun appetizer or side dish to complement the stir-fried beef.

  • Mango Salad: A refreshing salad of sweet mango, crisp cucumber, and zesty lime brings a burst of brightness that balances the richness of the beef.

  • Sesame Noodles: With their nutty flavor and silky texture, these noodles provide a pleasing contrast and allow you to enjoy every last drop of that delicious sauce.

  • Chilled Green Tea: Pair your meal with a glass of chilled green tea; its herbal notes cleanse the palate and add an element of relaxation to your dining experience.

Indulging in these sides will not only amplify your meal but also create a feast that your loved ones will remember fondly!

Beef with Oyster Sauce Recipe FAQs

How do I select the best beef for this recipe?
Absolutely! For the best results, choose beef flank steak or skirt steak, which are both known for their tenderness and flavor. Look for cuts with a nice marbling of fat, which helps keep the meat juicy during cooking. Avoid any cuts with dark spots or excess liquid in the packaging—these can indicate age or spoilage.

What is the best way to store leftover Beef with Oyster Sauce?
Very good question! Store your leftover Beef with Oyster Sauce in an airtight container in the refrigerator. It will keep well for up to 3 days. When you're ready to enjoy it again, simply reheat it in a skillet over medium heat until warmed through, which keeps the beef tender.

Can I freeze Beef with Oyster Sauce?
Absolutely! If you want to save some for later, you can freeze your Beef with Oyster Sauce in an airtight container or a freezer bag for up to 3 months. For best results, let it thaw overnight in the fridge before reheating. When you reheat it, adding a splash of broth or water can help maintain moisture and keep the beef tender.

What should I do if the sauce is too thick?
No worries! If your sauce turns out thicker than you'd like, just stir in a small amount of water or broth while heating it up—this will loosen it to your desired consistency. Start with a tablespoon and mix well; you can always add more if needed. Remember to heat over low to medium heat to avoid overcooking the beef.

Are there any dietary concerns I should be aware of?
Glad you asked! If anyone in your household has gluten sensitivities, be sure to use gluten-free soy sauce and oyster sauce for the recipe. Additionally, if you're cooking for pets, keep in mind that garlic can be harmful to them, so it's best to set aside a portion before adding garlic to your dish if you're sharing leftovers with your furry friends!

Beef with Oyster Sauce

Savory Beef with Oyster Sauce for a Quick Weeknight Delight

This Quick & Easy Beef with Oyster Sauce brings tender beef and vibrant asparagus for a savory meal that's gluten-free adaptable.
Print Recipe Pin Recipe
Prep Time 15 minutes mins
Cook Time 15 minutes mins
Total Time 30 minutes mins
Servings: 4 servings
Course: Dinner
Cuisine: Asian
Calories: 300
Ingredients Equipment Method Nutrition Notes

Ingredients
  

For the Beef
  • 1 pound Beef Flank Steak or Skirt Steak
  • 1/2 teaspoon Baking Soda
For the Sauce
  • 1/4 cup Light Soy Sauce use gluten-free for gluten-free option
  • 1/4 cup Oyster Sauce
  • 1 tablespoon Dark Soy Sauce
  • 1/2 cup Chicken Broth
  • 1 tablespoon Cornstarch
  • 1 tablespoon Sugar
  • 2 teaspoons Sesame Oil
For the Aromatics and Veggies
  • 1 medium White Onion substitute with shallots if desired
  • 2 cloves Garlic
  • 1 tablespoon Ginger grated
  • 1 bunch Asparagus or swap in seasonal veggies like broccoli or bell peppers

Equipment

  • large skillet or wok
  • medium bowl

Method
 

Step-by-Step Instructions for Quick & Easy Beef with Oyster Sauce
  1. In a medium bowl, combine sliced beef flank (or skirt steak) with baking soda, light soy sauce, peanut oil, and cornstarch. Mix thoroughly to ensure each piece is well-coated. Let the beef marinate for at least 10-15 minutes while you prepare the other ingredients.
  2. In a separate bowl, whisk together chicken broth, oyster sauce, dark soy sauce, sugar, cornstarch, and sesame oil until well-combined.
  3. Heat 2 tablespoons of peanut oil in a large skillet or wok over medium-high heat until shimmering. Gently add the marinated beef in a single layer and cook for about 1 minute until golden brown, then flip and cook for another minute.
  4. In the same skillet, add remaining oil and toss in sliced onion, minced garlic, and grated ginger. Stir-fry for 2 minutes until the onion becomes translucent.
  5. Add asparagus to the skillet, stirring continuously for about 1 minute until it turns a vibrant green.
  6. Give the sauce a good stir to dissolve any settled cornstarch, then pour it into the skillet with the onions and asparagus. Mix thoroughly until the sauce thickens, about 1-2 minutes.
  7. Add the beef back into the skillet, stirring to coat the meat and vegetables in the savory sauce. Serve hot with jasmine rice.

Nutrition

Serving: 1plateCalories: 300kcalCarbohydrates: 20gProtein: 25gFat: 15gSaturated Fat: 3gPolyunsaturated Fat: 0.5gMonounsaturated Fat: 10gCholesterol: 60mgSodium: 800mgPotassium: 500mgFiber: 3gSugar: 2gVitamin A: 5IUVitamin C: 10mgCalcium: 2mgIron: 15mg

Notes

This dish is great for meal prep and can be stored in the fridge for up to 3 days or frozen for up to 3 months.

Tried this recipe?

Let us know how it was!

Crispy Broccoli and Potato Bites Your Kids Will Crave

December 25, 2025 by Grace Snow Leave a Comment

“Crispy Broccoli and Potato Bites are the secret weapon every home chef needs up their sleeve!” When hunger strikes, and the kids are clamoring for something tasty, these delightful morsels save the day. With their golden, crunchy exterior and a cozy, cheesy interior, they transform vegetables into a guilt-free snack that's sure to please even the pickiest eaters. The best part? They are not just a hit with kids; adults will find themselves sneaking a few bites too. This recipe is incredibly versatile, allowing you to cater to different dietary needs, whether gluten-free, vegetarian, or even vegan. And don’t worry about time—these are quick to whip up, making them perfect for busy weeknights or as a convenient make-ahead option. Intrigued? Let’s dive into how to create this healthy snack that brings fun back to family meals!

Why Will You Love These Bites?

Crispiness: Each bite boasts a golden, crunchy exterior that contrasts beautifully with the soft, cheesy inside.

Healthy: Packed with nutrients, these bites transform broccoli into a snack everyone will crave.

Versatile: Feel free to customize them with your favorite add-ins or substitutions, like swapping in cauliflower or using dairy-free cheese for a vegan option.

Quick Prep: They can be whipped up in under 30 minutes—perfect for busy weeknights!

Crowd-Pleaser: Whether it’s an after-school treat or a party appetizer, these bites will impress both kids and adults alike. You might also enjoy making a batch of German Potato Salad or crispy Parmesan Artichoke Hearts for the ultimate snack spread!

Crispy Broccoli and Potato Bites Ingredients

• Get ready to create a delicious and nutritious snack!

For the Bites

  • Potatoes – Provides structure and a fluffy base; opt for starchy varieties like Russets for the best texture.
  • Broccoli – Adds nutrition and visual appeal; choose firm, dark green florets or substitute with cauliflower for a similar texture.
  • Cheddar Cheese – Offers delightful cheesy flavor; using block cheese ensures better melting, or try dairy-free cheese for a vegan option.
  • Salt and Pepper – Essential for flavor enhancement; always adjust to your palate.
  • Cornstarch/Breadcrumbs (optional) – A light dusting improves crunchiness; use this for a crispier exterior.

For Extra Flavor

  • Garlic Powder – A pinch adds depth to each bite; feel free to add more for a pronounced garlic flavor.
  • Herbs – Chopped fresh herbs like parsley or chives elevate the taste; they also make the bites visually appealing.

With these ingredients, you’re all set to whip up a batch of Crispy Broccoli and Potato Bites that your kids will crave!

Step‑by‑Step Instructions for Crispy Broccoli and Potato Bites

Step 1: Prep Potatoes
Start by boiling about 2 medium-sized potatoes in salted water for 15-20 minutes until fork-tender. Once cooked, drain and let them cool slightly. Make sure to thoroughly dry the potatoes by placing them back on low heat for a few minutes to evaporate any leftover moisture. This step is key for achieving those perfectly crispy broccoli and potato bites!

Step 2: Blanch Broccoli
While the potatoes are cooling, bring a pot of water to a rapid boil and add about 1 cup of chopped broccoli florets. Blanch for 2-3 minutes until vibrant green, then swiftly transfer them to a bowl filled with ice water. This quick method preserves the color and texture of the broccoli, ensuring it stays crunchy in your Crispy Broccoli and Potato Bites.

Step 3: Mix Ingredients
In a large mixing bowl, combine the mashed potatoes, thoroughly drained broccoli, and 1 cup of grated cheddar cheese. Season the mixture generously with salt and pepper, adding a pinch of garlic powder if desired for extra flavor. Blend until well combined but don’t overmix; a little texture adds character to your bites!

Step 4: Shape Bites
With clean, wet hands, scoop out portions of the mixture and form them into small mounds, roughly the size of a golf ball. Gently press a floret of broccoli into the top of each mound to highlight the vegetable. Arrange the shaped bites on a parchment-lined baking sheet, ensuring they have space in between for even cooking.

Step 5: Bake
Preheat your oven to 425°F (220°C) and let that energy build for about 10 minutes. Once heated, pop the baking sheet into the oven and bake your Crispy Broccoli and Potato Bites for approximately 20-25 minutes, or until they turn a beautiful golden brown. Keep an eye on them during the last few minutes for that delightful crunch!

Step 6: Cool and Serve
After baking, remove the bites from the oven and allow them to cool slightly on the baking sheet. This cooling period will help them set and maintain their shape. Serve warm as a tasty snack or appetizer, perfect for dipping in your favorite sauces while enjoying the delightful crunch and cheesy goodness.

How to Store and Freeze Crispy Broccoli and Potato Bites

Fridge: Keep your Crispy Broccoli and Potato Bites in an airtight container for up to 3 days to maintain freshness and crunch.

Freezer: For longer storage, freeze the bites on a baking sheet until solid, then transfer to a freezer-safe bag for up to 2 months.

Reheating: Bake frozen bites at 400°F (200°C) for about 15-20 minutes until heated through and crispy again for the best texture.

Make-Ahead: Prepare and shape bites, then refrigerate unbaked; bake straight from the fridge when ready to enjoy for a quick and delicious snack.

Variations & Substitutions: Crispy Broccoli and Potato Bites

Feel free to unleash your culinary creativity with these delightful twists and substitutions that will make these bites uniquely yours!

  • Vegan Option: Substitute cheddar cheese with your favorite dairy-free cheese or nutritional yeast for a cheesy flavor.

  • Spicy Kick: Add a dash of cayenne pepper or roasted jalapeños to the mix for a fiery flavor explosion.

  • Cauliflower Substitute: Swap broccoli for cauliflower for a milder taste and a slightly different texture that’s just as delightful.

  • Herb-Infused: Experiment with fresh herbs like thyme or dill mixed in for an aromatic touch that elevates your bites.

  • Cheesy Variations: Try mixing in different cheeses like pepper jack for a spicy twist or blue cheese for a bold flavor profile.

  • Nutty Crunch: Add crushed nuts, like almonds or walnuts, to the mixture for a delightful crunch and nutty flavor that surprises with each bite.

  • Middle Eastern Inspired: Incorporate spices like cumin and coriander, and serve with a tahini dipping sauce for an exotic twist.

These variations not only keep your meals interesting but also cater to a range of dietary preferences! You might also enjoy turning your next snack time into a feast with some delicious Fish Taco Bowls or whipping up a batch of Sweet Potato Casserole for added comfort!

What to Serve with Crispy Broccoli and Potato Bites

These delightful morsels shine when paired with complementary sides and dips to create a wholesome and satisfying meal.

  • Creamy Ranch Dip: A classic choice, ranch adds a creamy, herby flavor that enhances the bites’ crunchiness and cheesy goodness.

  • Spicy Sriracha Mayo: For those who love a kick, this sauce provides a creamy yet spicy contrast, perfectly balancing the mild flavors of the bites.

  • Fresh Garden Salad: A crisp salad with mixed greens, cherry tomatoes, and a light vinaigrette introduces freshness to the meal, making it more vibrant.

  • Garlic Butter Pasta: Tossed in garlic butter and herbs, this savory side complements the cheesy bites while adding a comforting, hearty element.

  • Zesty Quinoa Salad: A tangy quinoa salad with lemon, vegetables, and herbs brings a healthy whole grain option, making the meal even more nutritious.

  • Fruit Skewers: Add a touch of sweetness with fruit skewers featuring seasonal fruit; this bright addition contrasts the savory notes beautifully.

  • Apple Cider: A chilled glass of apple cider rounds out this meal, offering a refreshing contrast to the warm, crispy bites.

Whether you're hosting a gathering or simply feeding the family, these pairings will elevate your Crispy Broccoli and Potato Bites into a truly memorable feast!

Make Ahead Options

Crispy Broccoli and Potato Bites are a fantastic option for meal prep, allowing busy home cooks to save time during the week. You can fully assemble the bites, then refrigerate them unbaked for up to 24 hours, or freeze them for up to 3 months. If freezing, make sure to arrange the bites on a baking sheet first to freeze individually before transferring them to an airtight container. When you're ready to enjoy, simply bake the refrigerated bites straight from the fridge for about 20-25 minutes, or add an extra 5-10 minutes if baking from frozen. This method keeps the flavors fresh and ensures your bites are just as delicious and crispy as if made the same day!

Expert Tips for Crispy Broccoli and Potato Bites

• Dry Potatoes Well: Ensure potatoes are completely dried after boiling to avoid sogginess; moisture is the enemy of crispiness.

• Perfectly Blanch Broccoli: Avoid overcooking broccoli during blanching to retain its vibrant color and valuable nutrients, enhancing your Crispy Broccoli and Potato Bites.

• Adjust Consistency: If your mixture feels too wet, add breadcrumbs gradually until it holds together without being gooey, ensuring a perfect shape.

• Chill Before Baking: For better shape retention, chill the formed bites for 15-30 minutes before baking; this helps them hold together while they become crispy in the oven.

• Experiment with Flavors: Don’t be afraid to customize your bites further with spices or herbs like dill or paprika for an extra flavor boost!

Crispy Broccoli and Potato Bites Recipe FAQs

What type of potatoes should I use for the best texture?
I recommend using starchy potatoes like Russets for the fluffiest and lightest texture in your Crispy Broccoli and Potato Bites. These potatoes break down well when boiled and provide a perfect base for the mixture.

How should I store leftover Crispy Broccoli and Potato Bites?
Store your bites in an airtight container in the fridge for up to 3 days. To keep them crispy, let them cool completely before sealing. You can also reheat them in the oven to regain their crunchy exterior!

Can I freeze the Crispy Broccoli and Potato Bites?
Absolutely! To freeze, first freeze the shaped bites on a baking sheet for about an hour until solid. Then transfer them to a freezer-safe bag, ensuring you remove as much air as possible. They’ll last for up to 2 months! When you're ready to enjoy them, bake directly from frozen at 400°F (200°C) for about 15-20 minutes until heated through and crispy.

What if my mixture is too wet to form bites?
No worries! If your mixture feels too wet, gradually add breadcrumbs until it holds together without being gooey. This adjustment will help the mixture maintain its shape during baking, resulting in beautifully formed Crispy Broccoli and Potato Bites.

Are these bites suitable for people with allergies?
It's always best to adjust recipes based on dietary needs. For gluten-free options, use gluten-free breadcrumbs or cornstarch. If dairy is a concern, you can substitute with dairy-free cheese or nutritional yeast for that cheesy flavor. Always ensure to double-check ingredient labels to avoid any potential allergens!

Crispy Broccoli and Potato Bite

Crispy Broccoli and Potato Bites Your Kids Will Crave

Crispy Broccoli and Potato Bites are an addictive, nutritious snack the whole family will love!
Print Recipe Pin Recipe
Prep Time 30 minutes mins
Cook Time 25 minutes mins
Cooling Time 10 minutes mins
Total Time 1 hour hr 5 minutes mins
Servings: 4 bites
Course: Snacks
Cuisine: American
Calories: 150
Ingredients Equipment Method Nutrition Notes

Ingredients
  

For the Bites
  • 2 medium Potatoes starchy varieties like Russets
  • 1 cup Broccoli chopped
  • 1 cup Cheddar Cheese grated, or dairy-free for a vegan option
  • to taste Salt
  • to taste Pepper
  • optional Cornstarch/Breadcrumbs for added crunch
For Extra Flavor
  • pinch Garlic Powder
  • to taste Fresh Herbs like parsley or chives

Equipment

  • Mixing Bowl
  • pot
  • Baking Sheet
  • Parchment Paper
  • stove

Method
 

Step-by-Step Instructions
  1. Boil potatoes in salted water for 15-20 minutes until fork-tender, then drain and cool slightly.
    Crispy Broccoli and Potato Bite
  2. Blanch broccoli florets for 2-3 minutes in boiling water, then transfer to ice water.
    Crispy Broccoli and Potato Bite
  3. Combine mashed potatoes, drained broccoli, cheddar cheese, and seasonings in a bowl. Mix until well combined.
    Crispy Broccoli and Potato Bite
  4. Form mixture into small mounds and place on a parchment-lined baking sheet.
    Crispy Broccoli and Potato Bite
  5. Bake at 425°F for 20-25 minutes until golden brown.
    Crispy Broccoli and Potato Bite
  6. Cool slightly on baking sheet before serving.
    Crispy Broccoli and Potato Bite

Nutrition

Serving: 4bitesCalories: 150kcalCarbohydrates: 22gProtein: 5gFat: 6gSaturated Fat: 3gMonounsaturated Fat: 2gCholesterol: 15mgSodium: 300mgPotassium: 450mgFiber: 3gSugar: 1gVitamin A: 200IUVitamin C: 35mgCalcium: 150mgIron: 1mg

Notes

Ensure potatoes are dry after boiling and chill bites before baking for the best texture.

Tried this recipe?

Let us know how it was!

Irresistible Fresh Raspberry Tiramisu Perfect for Any Occasion

December 25, 2025 by Grace Snow Leave a Comment

As I stood in my kitchen, the sweet-tart aroma of fresh raspberries wafted through the air, instantly transporting me to warm summer days. If you're like me and have a soft spot for homemade desserts, get ready to indulge in the lusciousness of this Fresh Raspberry Tiramisu. This delightful twist on the classic Italian treat features layers of creamy mascarpone and raspberry-infused ladyfingers, making it a stunning centerpiece for your next gathering. One of the best perks of this no-bake dessert is that it’s effortlessly prepared ahead of time, allowing you to enjoy your event stress-free. Plus, it's a crowd-pleaser that will impress everyone from family to friends without requiring hours in the kitchen. Curious to learn how to recreate this vibrant and creamy delight? Let's dive into the recipe!

Why is Raspberry Tiramisu so special?

Irresistible Flavor: The pairing of sweet raspberries with creamy mascarpone creates a sensational taste experience that dances on the palate.

Effortless Preparation: This no-bake dessert allows you to impress guests without spending hours in the kitchen—perfect for busy hosts!

Make-Ahead Magic: Prepare it in advance, chill overnight, and let the flavors meld for an unforgettable treat that’s ready when you are.

Versatile Delight: While this recipe showcases raspberries, feel free to substitute with strawberries or peaches for a fruity twist or explore a chocolate version for a decadent alternative!

Eye-Catching Presentation: With its vibrant layers, this tiramisu is not just a treat for the taste buds but also a visually stunning centerpiece for any occasion.

Feeling inspired? Don’t forget to check out our Ricotta Stuffed Peppers or try a refreshing batch of Watermelon Popsicles to round out your dessert menu!

Fresh Raspberry Tiramisu Ingredients

For the Raspberry Jam
• Frozen Raspberries – Provides the main fruity flavor; you can also use fresh raspberries for a fresher taste.
• Granulated Sugar – Sweetens the jam and syrup, balancing the tartness of raspberries; no direct substitute recommended.
• Lemon Juice – Adds acidity to enhance sweetness; lime juice can be a zesty alternative.

For the Raspberry Syrup
• Water – Used for dissolving sugar in the syrup; no substitute necessary.
• Granulated Sugar – Essential for the sweetness and consistency of the syrup; no recommended substitutes here.
• Frozen Raspberries – The star fruit that flavors the syrup; fresh raspberries can add a delightful twist.

For the Tiramisu
• Ladyfinger Cookies – The structure of this dessert, soaking up the raspberry syrup; savoiardi or sponge cake can work as alternatives.
• Mascarpone Cheese – Provides that rich, creamy texture we love; cream cheese can offer a tangy twist, or opt for a dairy-free alternative if needed.
• Powdered Sugar – Sweetens the mascarpone filling and gives it a silky texture; no substitutions recommended.
• Vanilla Paste – Adds warmth and depth of flavor; pure vanilla extract makes a great substitute.
• Heavy Cream – Whipped to form light peaks in the filling; use coconut cream for a dairy-free option.
• Limoncello – Optional, but adds a lovely flavor to the syrup; feel free to substitute with a splash of lemonade or omit for a non-alcoholic variant.

Now that you have your Fresh Raspberry Tiramisu ingredients ready, you’re all set to create a dessert that not only delights the taste buds but also dazzles the senses!

Step‑by‑Step Instructions for Fresh Raspberry Tiramisu

Step 1: Make Raspberry Jam
In a medium saucepan, combine frozen raspberries, granulated sugar, and lemon juice over medium heat. Stir occasionally until the mixture comes to a gentle boil, about 5 minutes. Once bubbling, reduce the heat to low and let it simmer for 23-25 minutes until thickened, stirring to prevent sticking. You’ll know it’s ready when it coats the back of a spoon.

Step 2: Cool Jam
Pour the raspberry jam into a bowl and let it cool for a few minutes at room temperature. Then, cover the bowl with plastic wrap and refrigerate until completely cooled, about 30 minutes. This step is crucial as it enhances the rich raspberry flavor that beautifully complements the layers of your Fresh Raspberry Tiramisu.

Step 3: Prepare Raspberry Syrup
In another saucepan, combine water, granulated sugar, and frozen raspberries over medium heat. Stir until the sugar dissolves, then bring to a boil for approximately 2 minutes. Reduce heat to low and simmer for another 3 minutes. Strain the mixture through a fine-mesh sieve into a bowl, pressing lightly on the solids to extract liquid. Allow the syrup to cool completely.

Step 4: Make Mascarpone Filling
In a mixing bowl, combine mascarpone cheese, powdered sugar, lemon juice, and vanilla paste. Beat with an electric mixer on medium speed until smooth and well-aerated, about 2-3 minutes. In a separate bowl, whip heavy cream until it forms medium-stiff peaks. Gently fold the whipped cream into the mascarpone mixture, ensuring a light and airy filling for your Fresh Raspberry Tiramisu.

Step 5: Assemble Tiramisu
Begin the assembly by spooning a small dollop of the mascarpone mixture into the bottom of a 9x9-inch baking dish, smoothing it out evenly. Next, dip ladyfinger cookies into the raspberry syrup for a quick soak—aim for 2-3 seconds only to maintain their structure. Layer half of the dipped ladyfingers over the mascarpone, then add half of the remaining mascarpone mixture followed by half of the cooled raspberry jam. Repeat the layers.

Step 6: Chill Tiramisu
Cover the assembled Fresh Raspberry Tiramisu with plastic wrap, ensuring it’s tightly sealed. Refrigerate for at least 8 hours, preferably overnight. This chilling period allows the flavors to meld beautifully, yielding a dessert that’s not only delicious but also visually stunning when served.

Step 7: Serve
When ready to serve, remove the plastic wrap and top with the remaining raspberry jam, spreading it evenly over the surface. For an additional touch, garnish with fresh raspberries and lemon slices if desired. Cut into squares and enjoy the layered delight of your Fresh Raspberry Tiramisu, perfect for any occasion!

Make Ahead Options

These Fresh Raspberry Tiramisu are perfect for meal prep, allowing you to enjoy a spectacular dessert without the last-minute rush! You can make the raspberry jam and syrup up to 3 days ahead—just be sure to refrigerate them in airtight containers to preserve their vibrant flavors. Additionally, the mascarpone filling can be prepared a day ahead and stored separately, ensuring it remains light and fluffy. When you're ready to assemble, layer the soaked ladyfingers, mascarpone mixture, and raspberry jam, then cover and refrigerate for at least 8 hours, preferably overnight. This way, you'll have a beautifully melded dessert that is just as delicious and ready when you are!

Fresh Raspberry Tiramisu Variations

Feel free to let your creativity shine and customize this delightful dessert to suit your taste!

  • Fruit Swap: Substitute raspberries with strawberries or peaches for a seasonal twist; their sweet flavors create a fabulous contrast with the creamy filling.

  • Chocolate Delight: Add cocoa powder to the mascarpone mixture or drizzle melted chocolate between layers for a rich, indulgent experience that chocolate lovers will adore.

  • Yogurt Option: For a tangy and lighter dessert, try using Greek yogurt instead of mascarpone—just whip it until creamy and dreamy.

  • Nutty Crust: Layer crushed almonds or hazelnuts in between layers for an extra crunch—this earthy flavor complements the fruit beautifully!

  • Herb Infusion: Infuse some fresh mint leaves into the raspberry syrup for a refreshing zing that brightens every bite.

  • Heat It Up: For some spice, sprinkle in a touch of cayenne pepper or cinnamon into your mascarpone mixture; it gives an unexpected warmth that pairs delightfully with the raspberries.

  • Dairy-Free Dream: Use coconut cream instead of heavy cream and dairy-free mascarpone for a creamy yet dairy-free version that's just as delightful.

  • Elegant Topping: Top off the tiramisu with a dusting of edible flowers or lemon zest for a stunning presentation that will impress any guest.

This Fresh Raspberry Tiramisu is just the beginning of your dessert journey—after you indulge in this, why not try our refreshing Watermelon Popsicles for a cool treat or impressing with delectable Ricotta Stuffed Peppers? Happy cooking!

How to Store and Freeze Fresh Raspberry Tiramisu

Fridge: Store your assembled Fresh Raspberry Tiramisu covered tightly with plastic wrap in the refrigerator for up to 4 days. This helps maintain its creamy texture and vibrant flavor.

Freezer: If you want to freeze it, wrap individual slices tightly in plastic wrap, followed by aluminum foil. It should be good for up to 2 months; just thaw in the fridge overnight before serving.

Reheating: There's no need to reheat this dessert. Simply cut the chilled tiramisu into squares and enjoy the delightful layers cold.

Make-Ahead: You can prepare the tiramisu up to 4 days in advance. Just ensure it's well-covered to keep it fresh and ready for your special occasion!

What to Serve with Fresh Raspberry Tiramisu

As you prepare to indulge in this vibrant and creamy dessert, consider these delightful pairings to create a memorable meal experience.

  • Creamy Mashed Potatoes: The velvety texture and buttery flavor of mashed potatoes provide a comforting contrast to the tart raspberry layers, making them a cozy accompaniment.

  • Light Arugula Salad: A fresh salad tossed with lemon vinaigrette and topped with shaved parmesan adds brightness and a peppery crunch, balancing the sweetness of the tiramisu.

  • Sparkling Rosé: The bubbles and berry notes in sparkling rosé echo the raspberry in the tiramisu, enhancing the fruity flavors and elevating your dessert moment.

  • Grilled Peaches: Sweet, caramelized peaches drizzled with balsamic glaze create a fruity counterpart that complements the rich mascarpone while offering a seasonal twist.

  • Coconut Sorbet: The refreshing taste of coconut sorbet provides a cool, creamy contrast that cleanses the palate after each heavenly bite of the tiramisu.

  • Lemon Curd Tart: A tartlemon curd tart brings a bright citrus burst that cuts through the richness of the dessert, creating a delightful harmony of flavors.

  • Chocolate Covered Strawberries: These sweet bites add another layer of indulgence and a burst of flavor, harmonizing with the raspberry tiramisu beautifully.

  • Homemade Whipped Cream: A dollop of lightly sweetened whipped cream serves as a perfect dollop of creaminess, enhancing the luscious layers of your creation.

  • Hazelnut Coffee: Pairing with a warm cup of hazelnut coffee adds a nutty, aromatic touch that complements both the richness of the tiramisu and the fruity notes of the raspberries.

Expert Tips for Fresh Raspberry Tiramisu

  • Chill Overnight: For the best flavor, allow the Fresh Raspberry Tiramisu to chill overnight. This helps the flavors meld beautifully, enhancing every bite.

  • Ladyfinger Soak Time: Dip ladyfingers in raspberry syrup for just 2-3 seconds. Over-soaking can lead to a soggy dessert, while under-soaking may leave them too dry.

  • Texture Check: When whipping the heavy cream, aim for medium-stiff peaks. This lightness is crucial for creating a creamy, airy mascarpone filling.

  • Layering Technique: When layering, ensure each mascarpone mixture layer is even and smooth. This helps achieve a stunning presentation and allows for a perfect slice every time.

  • Garnish for Effect: Fresh raspberries and lemon slices on top not only add a pop of color but also enhance the visual appeal, making your Fresh Raspberry Tiramisu an irresistible centerpiece.

Fresh Raspberry Tiramisu Recipe FAQs

How do I choose the best raspberries for this tiramisu?
Absolutely! When selecting raspberries, look for plump, vibrant berries that are deep red in color, without any dark spots or mushiness. Fresh raspberries should feel firm to the touch. If you can only find frozen raspberries, that’s okay too! Just ensure there are no added sugars or preservatives in the frozen variety.

How should I store my Fresh Raspberry Tiramisu?
Very good question! To keep your Fresh Raspberry Tiramisu fresh, cover it tightly with plastic wrap and store it in the refrigerator. It will stay delicious for up to 4 days. Just make sure it's well-sealed to avoid drying out and maintain maximum creaminess!

Can I freeze Fresh Raspberry Tiramisu?
Certainly! If you want to freeze your tiramisu, I recommend slicing it into individual portions first. Wrap each slice tightly in plastic wrap followed by a layer of aluminum foil. This method will keep your dessert fresh for up to 2 months in the freezer. When ready to enjoy, thaw the slices overnight in the refrigerator, and they'll be just as delightful and creamy!

What should I do if my mascarpone mixture turns lumpy?
If your mascarpone mixture is looking lumpy, don't worry! This can happen if the mascarpone and heavy cream are at different temperatures. For a smoother texture, let the mascarpone sit at room temperature for about 30 minutes before mixing. When whipping the cream, ensure you gradually combine it with the mascarpone to achieve a beautifully smooth filling. If you still encounter lumps, you can use a hand mixer for a few extra seconds to blend it thoroughly.

Is this Fresh Raspberry Tiramisu suitable for people with allergies?
Actually, it depends on the specific allergies! This recipe contains dairy (mascarpone, heavy cream), gluten (ladyfingers), and eggs (in ladyfingers). For a dairy-free version, you could use a dairy-free cream alternative, and for gluten-free options, check for gluten-free ladyfingers or the use of sponge cake. Always read labels carefully and, when in doubt, consult with an allergist to ensure safety for those with food sensitivities.

Can I make a non-alcoholic version of the tiramisu?
Absolutely! If you would prefer a non-alcoholic version, simply omit the Limoncello from the raspberry syrup. You can enhance the flavor by adding a splash of lemonade instead. This will keep the essence of the dessert intact while keeping it family-friendly!

Fresh Raspberry Tiramisu

Irresistible Fresh Raspberry Tiramisu Perfect for Any Occasion

Indulge in the lusciousness of this Fresh Raspberry Tiramisu—a no-bake delight with layers of creamy mascarpone and raspberry-infused ladyfingers.
Print Recipe Pin Recipe
Prep Time 30 minutes mins
Cook Time 30 minutes mins
Chilling Time 8 hours hrs
Total Time 9 hours hrs
Servings: 8 slices
Course: Dessert
Cuisine: Italian
Calories: 380
Ingredients Equipment Method Nutrition Notes

Ingredients
  

For the Raspberry Jam
  • 2 cups Frozen Raspberries Fresh raspberries can be used for a fresher taste.
  • 1 cup Granulated Sugar No direct substitute recommended.
  • 2 tablespoons Lemon Juice Lime juice can be a zesty alternative.
For the Raspberry Syrup
  • 1 cup Water No substitute necessary.
  • 1 cup Granulated Sugar No recommended substitutes.
  • 1 cup Frozen Raspberries Fresh raspberries can add a delightful twist.
For the Tiramisu
  • 24 pieces Ladyfinger Cookies Savoiardi or sponge cake can work as alternatives.
  • 16 ounces Mascarpone Cheese Cream cheese can offer a tangy twist.
  • 1 cup Powdered Sugar No substitutions recommended.
  • 2 teaspoons Vanilla Paste Pure vanilla extract makes a great substitute.
  • 1 cup Heavy Cream Use coconut cream for a dairy-free option.
  • 2 tablespoons Limoncello Optional; can substitute with lemonade or omit for non-alcoholic.

Equipment

  • Medium saucepan
  • Mixing Bowl
  • Electric mixer
  • 9x9-inch baking dish

Method
 

Step-by-Step Instructions
  1. In a medium saucepan, combine frozen raspberries, granulated sugar, and lemon juice over medium heat. Stir occasionally until the mixture comes to a gentle boil, about 5 minutes. Reduce the heat to low and let it simmer for 23-25 minutes until thickened, stirring to prevent sticking.
  2. Pour the raspberry jam into a bowl and let it cool for a few minutes at room temperature. Cover with plastic wrap and refrigerate until completely cooled, about 30 minutes.
  3. In another saucepan, combine water, granulated sugar, and frozen raspberries over medium heat. Stir until the sugar dissolves, then bring to a boil for approximately 2 minutes. Reduce heat to low and simmer for another 3 minutes. Strain the mixture through a fine-mesh sieve.
  4. In a mixing bowl, combine mascarpone cheese, powdered sugar, lemon juice, and vanilla paste. Beat with an electric mixer until smooth and well-aerated, about 2-3 minutes. In a separate bowl, whip heavy cream until it forms medium-stiff peaks.
  5. Spoon a small dollop of the mascarpone mixture into the bottom of a 9x9-inch baking dish. Dip ladyfinger cookies into the raspberry syrup for 2-3 seconds. Layer half of the dipped ladyfingers over the mascarpone, then add half of the remaining mascarpone mixture and half of the cooled raspberry jam. Repeat the layers.
  6. Cover the assembled dessert with plastic wrap and refrigerate for at least 8 hours, preferably overnight.
  7. When ready to serve, remove the plastic wrap and top with the remaining raspberry jam. Garnish with fresh raspberries and lemon slices if desired.

Nutrition

Serving: 1sliceCalories: 380kcalCarbohydrates: 50gProtein: 5gFat: 18gSaturated Fat: 10gPolyunsaturated Fat: 1gMonounsaturated Fat: 5gCholesterol: 50mgSodium: 65mgPotassium: 150mgFiber: 1gSugar: 30gVitamin A: 500IUVitamin C: 10mgCalcium: 100mgIron: 0.5mg

Notes

Chill overnight for the best flavor. Ensure that the ladyfinger cookies are not over-soaked.

Tried this recipe?

Let us know how it was!

Hawaiian Butter Mochi: Delightfully Chewy Coconut Bliss

December 25, 2025 by Grace Snow Leave a Comment

The aroma of a warm, coconut-infused dessert wafts through the air, whisking me away to the sun-kissed shores of Hawaii. This is the essence of Hawaiian Butter Mochi, a delightfully chewy coconut dessert that has captured the hearts of many. Using just a handful of simple ingredients, this recipe brings together the rich creaminess of coconut milk and the unique bouncy texture of sweet rice flour to create a treat that is not only gluten-free but also a guaranteed crowd-pleaser. Perfect for those cozy afternoons with a cup of tea or as a standout dessert at your next gathering, this delightful confection offers an easy way to elevate your homemade dessert game. Are you ready to dive into this tropical delight and impress your friends and family?

Why is Hawaiian Butter Mochi a must-try?

Chewy Delight: The texture is unlike any other dessert, offering a unique combination of bounciness and chewiness that keeps you reaching for more.

Tropical Flavor: Rich coconut milk elevates each bite, delivering a taste of the islands right in your kitchen.

Versatile Options: Whether you stick with classic coconut or experiment with variations like ube extract or matcha powder, this recipe easily adapts to your preferences.

Quick & Simple: With just a few basic ingredients, you can whip this up in no time, making it an excellent choice for last-minute gatherings or cozy nights in.

Crowd-Pleasing Treat: Perfect for parties, this Hawaiian Butter Mochi is sure to impress guests, enchanting them with its flavorful and appealing presentation. For an easy family dinner, consider pairing it with some Crockpot Butter Chicken for a comfort food feast!

Hawaiian Butter Mochi Ingredients

• Elevate your dessert with this list of essential ingredients for Hawaiian Butter Mochi!

For the Batter

  • Sweet Rice Flour – Essential for that signature chewy texture of mochi; don't substitute it with regular rice flour!
  • Coconut Milk – Adds a rich, tropical flavor; you can replace it with whole milk if desired.
  • Salted Butter – Enhances creaminess; unsalted butter works too, but remember to add a pinch of salt.
  • Granulated Sugar – Sweetens the mochi perfectly, balancing the rich flavors.
  • Eggs – Binds everything together, providing the necessary structure for your dessert.
  • Vanilla Extract – Optional but recommended for a deeper flavor profile.
  • Baking Powder – Important for a slight rise in the texture.
  • Shredded Coconut (optional) – For extra coconut goodness, either mix it in or use as a topping.

Step‑by‑Step Instructions for Hawaiian Butter Mochi

Step 1: Preheat the Oven
Begin by preheating your oven to 350°F (175°C). While the oven warms up, prepare an 8x8-inch baking pan by lining it with parchment paper and greasing it with butter to prevent sticking. This step is crucial to ensure your Hawaiian Butter Mochi bakes evenly and releases easily once done.

Step 2: Mix Wet Ingredients
In a large mixing bowl, crack in the eggs and combine them with the granulated sugar. Whisk these together until frothy, then add in the creamy coconut milk, melted salted butter, and a splash of vanilla extract. Continue mixing until the mixture is smooth and well-blended, showcasing a luscious, shiny texture that hints at the tropical flavors to come.

Step 3: Combine Dry Ingredients
Next, gradually sift in the sweet rice flour and baking powder into the wet mixture. Using a spatula, gently fold the ingredients together until just combined—be careful not to overmix. The batter will be thick and slightly lumpy, which is perfect for achieving that signature chewy texture when you bake your Hawaiian Butter Mochi.

Step 4: Bake
Pour the batter into the prepared baking pan, spreading it evenly with a spatula. Bake in your preheated oven for 1 hour and 25 minutes, or until the top is golden brown and a toothpick inserted into the center comes out clean. Keep an eye on it towards the end to ensure it doesn’t overbake; the aroma will fill your kitchen as it cooks!

Step 5: Cool and Serve
Once baked, remove the pan from the oven and let it cool at room temperature. After about 20-30 minutes, cut the Hawaiian Butter Mochi into squares or rectangles. Serving it warm is delightful, but you can also enjoy it chilled. This chewy, coconut-infused treat is now ready to be shared and savored!

How to Store and Freeze Hawaiian Butter Mochi

Room Temperature: Keep your Hawaiian Butter Mochi in an airtight container at room temperature for up to 3 days for optimal freshness.

Fridge: For extended storage, refrigerate in an airtight container for up to 1 week. This option is great for maintaining its delightful chewy texture.

Freezer: Freeze cut squares in an airtight container or freezer bag for up to 3 months. When ready to enjoy, simply thaw at room temperature or reheat in the microwave for a few seconds.

Reheating: Gently reheat in the microwave for 10-15 seconds to restore that tender, chewy goodness, or enjoy it chilled for a refreshing treat.

Make Ahead Options

Hawaiian Butter Mochi is an excellent recipe for meal prep, making it a breeze to enjoy this delicious dessert later! You can prepare the batter and refrigerate it for up to 24 hours in advance, sealing it tightly to prevent drying. Alternatively, bake the mochi, allow it to cool fully, and store it in an airtight container at room temperature for up to 3 days or refrigerate for up to a week. When ready to serve, simply cut into squares and enjoy—it's just as chewy and delightful as when it was freshly made! This way, you can have a fabulous homemade dessert at your fingertips without the last-minute rush!

Hawaiian Butter Mochi Variations

Feel free to personalize your Hawaiian Butter Mochi experience with these exciting twists and substitutions! Your creativity will shine through in every chewy bite.

  • Dairy-Free: Substitute coconut milk with an equal amount of almond or soy milk for a creamy, dairy-free dessert.
  • Nutty Addition: Incorporate chopped macadamia nuts for an extra crunch that pairs beautifully with the soft mochi.
  • Ube Twist: Add a splash of ube extract to the batter for a vibrant lavender hue and a subtly sweet flavor twist.
  • Matcha Infusion: Mix in a teaspoon of matcha powder for a delightful green tea flavor that brings a refreshing dimension to your mochi.
  • Coconut Flake Topping: Sprinkle shredded coconut on top before baking for an extra crunchy texture and a burst of coconut goodness.
  • Seasonal Fruits: Fold in fresh diced mango or pineapple for a tropical fruit explosion that enhances the mochi experience.
  • Spicy Kick: For those who enjoy a little heat, add a pinch of cayenne pepper or chili powder for a surprising and delicious contrast to the sweetness.
  • Chocolate Drizzle: Once cooled, drizzle melted dark chocolate over the top for a decadent chocolatey twist that will satisfy your sweet tooth.

No matter how you choose to adapt this Hawaiian Butter Mochi, it’s bound to be a treat that will have everyone asking for seconds. For a delightful pairing, consider serving it alongside a comforting dish like Crockpot Butter Chicken. Enjoy the journey of flavors!

What to Serve with Hawaiian Butter Mochi?

Indulge in a delightful culinary experience by pairing your Hawaiian Butter Mochi with complementary sides and drinks that enhance its tropical charm.

  • Fresh Fruit Salad: A medley of tropical fruits like mango, pineapple, and kiwi adds brightness and freshness that perfectly balances the richness of the mochi.

  • Coconut Whipped Cream: The light and airy texture of whipped cream infused with coconut reflects the mochi's flavors, bringing an airy sweetness to every bite.

  • Matcha Green Tea: This earthy tea serves as a nice contrast to the dessert’s sweetness while its warm notes complement the coconut flavor beautifully.

  • Ice Cream Float: A scoop of vanilla ice cream topped with a splash of soda creates a refreshing dessert experience. The coldness contrasts beautifully with the chewy mochi.

  • Chocolate Drizzle: A warm drizzle of dark chocolate elevates the dish, creating a delightful mix of flavors that cater to chocolate lovers while enhancing the mochi’s sweetness.

  • Pineapple Sorbet: Serve alongside a cool pineapple sorbet for a refreshing and light palate cleanser that carries on the tropical theme, making it a perfect dessert duo.

  • Sweetened Tea: A nice glass of sweetened iced tea, either plain or with hints of hibiscus, is a great drink to sip alongside the decadent mochi, enhancing its tropical essence.

  • Coffee Brew: For a cozy pairing, a warm cup of coffee balances the sweetness of the mochi, creating a comforting experience perfect for afternoon enjoyment.

Expert Tips for Hawaiian Butter Mochi

  • Ingredient Integrity: Use sweet rice flour: This is essential for achieving the trademark chewy texture of Hawaiian Butter Mochi. Regular rice flour won’t work.

  • Texture Control: Adjust baking time: For a custard-like finish, reduce baking time. For a firmer bite, bake it a bit longer until golden brown.

  • Mixing Method: Avoid overmixing: Combine ingredients until just blended to maintain the perfect texture. Overmixing can make the mochi dense.

  • Visual Cues: Check for doneness: Look for a golden top and a firm center when the toothpick comes out clean, ensuring a delightful final product.

  • Cooling Time: Let it cool completely: Cooling the mochi before cutting is key. Cutting it warm may lead to a messy, uneven texture.

Hawaiian Butter Mochi Recipe FAQs

What type of rice flour should I use for Hawaiian Butter Mochi?
You must use sweet rice flour, also known as glutinous rice flour, to achieve the signature chewy texture of Hawaiian Butter Mochi. Regular rice flour will not give you that delightful bouncy quality, so be sure to find the right one to ensure a successful outcome!

How should I store leftover Hawaiian Butter Mochi?
Store your leftover Hawaiian Butter Mochi in an airtight container at room temperature for up to 3 days. If you'd like to keep it fresh longer, refrigerate it for up to one week. Just make sure it’s securely sealed to prevent drying out, and this will help maintain that sumptuous chewiness.

Can I freeze Hawaiian Butter Mochi?
Absolutely! To freeze Hawaiian Butter Mochi, cut it into squares and place them in an airtight container or a resealable freezer bag. You can freeze it for up to 3 months. When you’re ready to enjoy, let it thaw at room temperature or warm it up in the microwave for 10-15 seconds for that warm, chewy delight!

How can I adjust the texture of the Hawaiian Butter Mochi?
If you prefer a custard-like texture, reduce the baking time slightly—start checking for doneness a bit before 1 hour and 25 minutes. If you're looking for a firmer texture, extend the baking time until the top is a beautiful golden brown and firm to the touch. The visual cue of a golden top with clean toothpick results will guide you!

Is Hawaiian Butter Mochi safe for gluten-sensitive individuals?
Yes, Hawaiian Butter Mochi can be gluten-free if you use gluten-free sweet rice flour. Just make sure your ingredients, especially the baking powder, are gluten-free as well. It's always a good idea to double-check the labels to make sure it meets your dietary needs.

Can I use other types of milk instead of coconut milk?
Certainly! You can substitute coconut milk with whole milk or a combination of whole milk and coconut milk if you're looking for a different flavor profile. Other plant-based milk options may work, but the richness of coconut milk is what truly elevates this tropical treat!

Hawaiian Butter Mochi

Hawaiian Butter Mochi: Delightfully Chewy Coconut Bliss

Hawaiian Butter Mochi is a delightful chewy coconut dessert that's gluten-free and easy to make, perfect for any gathering.
Print Recipe Pin Recipe
Prep Time 15 minutes mins
Cook Time 1 hour hr 25 minutes mins
Cooling Time 30 minutes mins
Total Time 2 hours hrs 10 minutes mins
Servings: 9 pieces
Course: Dessert
Cuisine: Hawaiian
Calories: 250
Ingredients Equipment Method Nutrition Notes

Ingredients
  

For the Batter
  • 2 cups Sweet Rice Flour Essential for that signature chewy texture.
  • 1 cup Coconut Milk Adds a rich, tropical flavor.
  • 1/2 cup Salted Butter Enhances creaminess.
  • 1 cup Granulated Sugar Sweetens the mochi perfectly.
  • 3 large Eggs Binds everything together.
  • 1 teaspoon Vanilla Extract Optional but recommended.
  • 1 tablespoon Baking Powder Important for a slight rise.
  • 1 cup Shredded Coconut Optional, for extra coconut goodness.

Equipment

  • Oven
  • Mixing bowls
  • Whisk
  • Spatula
  • 8x8-inch baking pan

Method
 

Step-by-Step Instructions
  1. Preheat your oven to 350°F (175°C) and prepare an 8x8-inch baking pan by lining it with parchment paper and greasing it with butter.
  2. In a large mixing bowl, crack in the eggs and combine with granulated sugar. Whisk until frothy, then add coconut milk, melted salted butter, and vanilla extract. Mix until smooth.
  3. Gradually sift in sweet rice flour and baking powder into the wet mixture. Gently fold together until just combined to avoid overmixing.
  4. Pour the batter into the prepared baking pan and bake for 1 hour and 25 minutes, or until golden brown and a toothpick comes out clean.
  5. Let the mochi cool at room temperature for about 20-30 minutes before cutting into squares or rectangles.

Nutrition

Serving: 1pieceCalories: 250kcalCarbohydrates: 37gProtein: 3gFat: 10gSaturated Fat: 6gPolyunsaturated Fat: 1gMonounsaturated Fat: 3gCholesterol: 45mgSodium: 230mgPotassium: 150mgFiber: 1gSugar: 15gVitamin A: 200IUCalcium: 15mgIron: 1mg

Notes

Use sweet rice flour for the unique texture and adjust baking time for desired firmness. Cool completely before cutting to avoid a messy texture.

Tried this recipe?

Let us know how it was!

Delicious Grilled Apples with Prosciutto and Honey Bliss

December 25, 2025 by Grace Snow Leave a Comment

There's something undeniably satisfying about the blend of sweet, salty, and smoky flavors when you bite into a grilled apple wrapped in prosciutto with a drizzle of honey. This cozy combination has quickly become my go-to appetizer for gatherings, showcasing how simple ingredients can transform a dish into something truly special. With just three ingredients—juicy apples, savory prosciutto, and luscious honey—this recipe for Grilled Apples with Prosciutto and Honey is not only easy to whip up but also impressively elegant. It's perfect for those busy weeknights when you want something light yet indulgent, and it’s a delightful way to sneak in some fruit without feeling guilty. Have you ever considered how grilling apples can elevate their natural sweetness? Buckle up, because we're about to explore this deliciously unique creation!

Why Grill Apples with Prosciutto?

Unforgettable Flavor Fusion: The sweet, juicy apples combined with savory prosciutto creates a taste sensation that's both indulgent and satisfying.

Quick and Easy: With only three ingredients, you can whip this dish up in no time, making it a stress-free appetizer for any occasion.

Impressive Presentation: Grilled apples wrapped in prosciutto look stunning on any plate, making it a perfect choice for gatherings or dinner parties.

Healthier Indulgence: Not only does this recipe taste heavenly, but it also incorporates fruit in a delicious way, helping you feel good about your meal choice.

Versatile Pairing: Whether served as an appetizer or dessert, these grilled apples are sure to impress your taste buds, especially when paired with a refreshing drink or alongside something hearty like Bratwurst Peppers Onions.

Crowd Pleaser: Every bite is a delightful balance of flavors, making this dish a hit with friends and family alike!

Grilled Apples with Prosciutto Ingredients

• A tantalizing blend of flavors awaits you!

For the Grilled Apples

  • Apples – Use firm varieties like Granny Smith or Honeycrisp for that perfect crunch and flavor balance.
  • Prosciutto – Choose thinly sliced prosciutto for easy wrapping and maximum flavor infusion.
  • Honey – Opt for a quality honey to enhance the sweetness and elevate your dish to new heights.

Optional Add-Ons

  • Fresh Herbs – Consider adding a sprinkle of fresh thyme or rosemary for an aromatic touch.
  • Nuts – Chopped walnuts or pecans can be added for added texture and nutty flavor if desired.

Grilled Apples with Prosciutto and Honey provide an exciting twist on classic ingredients, bringing simplicity and elegance to your dining experience!

Step‑by‑Step Instructions for Grilled Apples with Prosciutto and Honey

Step 1: Preheat the Grill
Begin by preheating your grill to medium heat, around 350°F (175°C). This crucial step ensures that your grilled apples with prosciutto cook evenly and develop those beautiful grill marks. While the grill is heating, prepare your apples and prosciutto for assembly. You'll be ready to create a delicious dish in no time!

Step 2: Prepare the Apples
Next, wash and core your firm apples, such as Granny Smith or Honeycrisp, ensuring they maintain their shape during grilling. Slice each apple into thick wedges, about ¼ to ½ inch thick. The thickness will allow for a satisfying bite while remaining juicy. Arrange the apple slices on a clean cutting board, ready for wrapping with prosciutto.

Step 3: Wrap the Apples
Now it’s time to wrap your apple slices with thinly sliced prosciutto. Take a slice of prosciutto and gently wrap it around each apple wedge, ensuring the prosciutto overlaps slightly to hold the apples together. This savory layer will infuse flavor into the sweet apples as they grill. Carefully place the wrapped wedges on a plate, ready to hit the grill.

Step 4: Grill the Apples
Once the grill is preheated, place the prosciutto-wrapped apples directly onto the grates, ensuring they are evenly spaced for optimal heat circulation. Grill them for about 5-8 minutes, turning occasionally until the prosciutto turns crispy and the apples become tender. You'll know they’re ready when the prosciutto edges are golden brown and the apples are fragrant.

Step 5: Drizzle with Honey
After grilling, carefully remove the apple wedges from the grill using tongs. Arrange them on a serving platter while they’re still warm. Drizzle a generous amount of honey over the top of each grilled apple. This final touch enhances the flavors, adding a delightful sweetness that contrasts beautifully with the salty prosciutto.

Step 6: Add Optional Toppings
For an extra layer of flavor, consider sprinkling some fresh herbs like thyme or rosemary over the grilled apples with prosciutto and honey. If desired, you can also add chopped nuts for a delightful crunch. This step not only adds visual appeal but also elevates the overall taste profile, making your dish truly memorable.

Step 7: Serve and Enjoy
Your grilled apples with prosciutto and honey are now ready to be served! Present them warm as an elegant appetizer that’s sure to delight your guests. Enjoying these flavorful bites will surely make for a wonderful dining experience, showcasing how simple ingredients can create something extraordinary. Dive in and savor every bite!

Helpful Tricks for Grilled Apples

Choose the Right Apples: Ensure you pick firm apples like Granny Smith or Honeycrisp. They hold their shape well while grilling and enhance the overall taste.

Wrap Tightly: When wrapping the apples in prosciutto, make sure to overlap the slices slightly. This prevents the apple from falling apart and helps the flavors meld beautifully.

Monitor the Grill Time: Keep a close eye while grilling; overcooking can lead to mushy apples. Aim for 5-8 minutes until the prosciutto is crispy.

Use Quality Honey: Opt for a high-quality honey to enhance the natural sweetness of the grilled apples. It truly makes a difference in flavor!

Add Fresh Herbs: For a delicious twist, sprinkle fresh thyme or rosemary after grilling. It elevates the dish and adds aromatic notes that complement the apples and prosciutto.

Serve Warm: Enjoy your grilled apples with prosciutto and honey while they’re still warm for the best texture and fusion of flavors!

Storage Tips for Grilled Apples with Prosciutto

Room Temperature: Enjoy grilled apples at room temperature for optimal flavor; they can be kept out for up to 2 hours before needing to be refrigerated.

Fridge: Store any leftovers in an airtight container in the fridge for up to 3 days. Reheat gently in a microwave or on a grill for best results.

Freezer: If you want to keep them longer, freeze the grilled apples without prosciutto in a single layer on a baking sheet, then transfer to a freezer bag for up to 3 months.

Reheating: For the best taste, gently reheat frozen grilled apples in the oven or on the grill, and consider wrapping them with fresh prosciutto to refresh their flavor before serving.

Make Ahead Options

These Grilled Apples with Prosciutto and Honey are perfect for those busy weeknights when you want to impress without the stress! You can prep the apple wedges and wrap them in prosciutto up to 24 hours in advance. Simply store them in an airtight container in the refrigerator to maintain their freshness. When you’re ready to grill, just take them out and let them sit at room temperature for about 15 minutes before grilling for even cooking. After grilling, drizzle with honey immediately for that irresistible touch, and your elegant appetizer will taste just as delicious as if it were made fresh. Enjoy the time-saving benefits while still delivering an impressive dish!

Variations & Substitutions for Grilled Apples

Give your Grilled Apples with Prosciutto and Honey a personal twist and discover new flavor dimensions!

  • Vegan Alternative: Replace prosciutto with thinly sliced smoked tempeh for a similar savory flavor, keeping it plant-based and delightful.
  • Fruit Fusion: Experiment with different apple varieties like Fuji or Gala, or even mix in pears for a unique twist on sweetness.
  • Sweet Spice: Sprinkle cinnamon or nutmeg over the apples before grilling to add a warm, aromatic kick that tantalizes the senses.
  • Nutty Crunch: Toss in pre-roasted walnuts or crushed pecans before drizzling with honey, introducing delightful crunch and richness.
  • Herb Variations: Swap fresh thyme for mint or basil to bring a refreshing contrast, making for a summer party favorite.
  • Honey Substitutes: Use maple syrup or agave nectar if you're looking for a change in sweetness with a hint of depth.
  • Cheese Pairing: Crumble some feta or goat cheese on top just before serving for a creamy, tangy balance to the sweet apples.
  • Grilled Delight: For a smoky flavor, grill some slices of bacon alongside the apples, then wrap them for an even heartier option.

As you explore these variations, you might also want to consider pairing your apples with something hearty like Bratwurst Peppers Onions to create a complete culinary experience! Each twist adds a personal touch while elevating this delightful treat.

What to Serve with 4-Ingredient Crispy Chocolate Oat Cookies

Indulging in the sweetness of these cookies opens up a world of delightful pairings that can elevate your snacking experience.

  • Almond Milk: This creamy, nutty drink perfectly complements the richness of the chocolate, making every bite feel luxurious.

  • Fresh Berries: Juicy strawberries or raspberries add a refreshing contrast to the cookies’ sweetness, balancing flavors and textures.

  • Greek Yogurt: Creamy and tangy, Greek yogurt makes a wonderful dip, enhancing the wholesome flavors of the cookies and adding protein too.

  • Vanilla Ice Cream: Dreamy ice cream melts beautifully over warm cookies, turning them into a decadent dessert treat that everyone will adore.

  • Chia Seed Pudding: A simple chia pudding adds texture and can be flavored with vanilla or cocoa, making it a nutty partner to your cookies.

  • A Nutty Trail Mix: For a crunchy texture, serve with a trail mix of nuts and dried fruits. The contrasting textures will keep your palate entertained.

Pairing your cookies with these delightful accompaniments promises not only visual appeal but also a multi-layered flavor journey!

Grilled Apples with Prosciutto and Honey Recipe FAQs

How do I choose the best apples for grilling?
Absolutely! When selecting apples for grilling, aim for firm varieties like Granny Smith or Honeycrisp. These apples hold their shape better on the grill and offer a delightful balance of sweetness and tartness. Look for apples that are free from bruises and dark spots, as these can affect texture and flavor.

How should I store leftovers of grilled apples with prosciutto?
Enjoy your grilled apples at room temperature for optimal flavor—just don’t leave them out for more than 2 hours. If you have leftovers, store them in an airtight container in the fridge for up to 3 days. When you’re ready to enjoy them again, gently reheat them in the microwave or on the grill for the best results!

Can I freeze grilled apples with prosciutto?
Sure! If you want to save your grilled apples, I recommend freezing them without the prosciutto. Start by arranging them in a single layer on a baking sheet to freeze solid, then transfer them to a freezer bag. They can last up to 3 months in the freezer! When ready to enjoy, reheat the apples gently and consider wrapping them with fresh prosciutto before grilling again for a delicious touch.

What if I overcook my grilled apples?
Very! Overcooking can lead to mushy apples, but don’t worry. If you find your apples are soft, try using them in a smoothie or a fruit compote instead. You can also mix them into yogurt or oatmeal for added flavor! Moving forward, keep a close eye while grilling and aim for around 5-8 minutes total cooking time, turning them occasionally.

Are there any dietary considerations for this recipe?
Absolutely! This dish is quite versatile. For those with dietary restrictions, you can easily omit the prosciutto for a vegetarian option. If you're looking for a lighter touch, substitute with turkey bacon. Just be aware of honey if you're cooking for pets—avoid feeding them any honey, as it's not suitable for dogs.

Grilled Apples with Prosciutto and Honey

Delicious Grilled Apples with Prosciutto and Honey Bliss

This Grilled Apples with Prosciutto and Honey recipe blends sweet, salty, and smoky flavors into a delightful appetizer.
Print Recipe Pin Recipe
Prep Time 10 minutes mins
Cook Time 8 minutes mins
Total Time 18 minutes mins
Servings: 4 servings
Course: Appetizers
Cuisine: American
Calories: 150
Ingredients Equipment Method Nutrition Notes

Ingredients
  

Grilled Apples with Prosciutto Ingredients
  • 4 medium Apples (Granny Smith or Honeycrisp) Use firm varieties for best texture
  • 8 slices Prosciutto Thinly sliced for easy wrapping
  • 3 tablespoons Honey Opt for quality honey to enhance sweetness
Optional Add-Ons
  • 1 teaspoon Fresh Herbs (thyme or rosemary) For aromatic touch
  • 1/4 cup Chopped Nuts (walnuts or pecans) For added texture if desired

Equipment

  • Grill
  • Tongs
  • Cutting Board
  • Knife

Method
 

Step-by-Step Instructions for Grilled Apples with Prosciutto and Honey
  1. Preheat your grill to medium heat, around 350°F (175°C).
  2. Wash and core the apples, then slice them into thick wedges (¼ to ½ inch thick).
  3. Wrap each apple wedge with a slice of prosciutto, ensuring the slices overlap slightly.
  4. Grill the prosciutto-wrapped apples for about 5-8 minutes, turning occasionally until crispy.
  5. Remove the apples from the grill and drizzle honey over the top while warm.
  6. Sprinkle with fresh herbs or nuts if using, then serve warm and enjoy!

Nutrition

Serving: 1servingCalories: 150kcalCarbohydrates: 20gProtein: 6gFat: 5gSaturated Fat: 1gPolyunsaturated Fat: 1gMonounsaturated Fat: 2gCholesterol: 10mgSodium: 300mgPotassium: 180mgFiber: 2gSugar: 10gVitamin A: 200IUVitamin C: 5mgCalcium: 30mgIron: 0.5mg

Notes

Serve as a warm appetizer for gatherings with a delightful blend of flavors that impress guests.

Tried this recipe?

Let us know how it was!

Moist Chocolate Espresso Banana Bread for Ultimate Indulgence

December 25, 2025 by Grace Snow Leave a Comment

As I bit into a freshly baked slice of Chocolate Espresso Banana Bread, time seemed to freeze around me, transporting me to cozy afternoons of yesteryears spent in my grandmother's kitchen. This delightful creation is the perfect blend of rich chocolate, sweet bananas, and just the right hint of espresso to elevate the flavors. The result is a moist, tender loaf that’s not just incredibly delicious but also a quick and easy solution for using up ripe bananas smiling at you from the countertop. Whether you’re treating yourself to a slice for dessert or serving it up as a savory snack, this recipe is sure to become your new go-to comfort food. Curious about making your kitchen smell like a café while you whip up this scrumptious treat? Let’s dive in!

Why is this Banana Bread So Special?

Moist and Tender: Each slice of this Chocolate Espresso Banana Bread bursts with a rich, soft texture that melts in your mouth. Unique Flavor Combination: The pairing of espresso and chocolate enhances the natural sweetness of bananas, making it truly indulgent. Quick and Easy: Perfect for busy bakers, this recipe can be whipped up in no time—a fantastic use for those overripe bananas! Versatile Options: Customize it by adding nuts or a swirl of peanut butter for extra flavor. Crowd-Pleasing Delight: Serve it warm with butter or whipped cream for an irresistible treat that impresses anyone at your table. If you're looking for more banana inspiration, check out the Breakfast Banana Split to elevate your morning routine!

Chocolate Espresso Banana Bread Ingredients

For the Batter

  • All-Purpose Flour – Provides structure; use a bit less if substituting cocoa powder.
  • Cocoa Powder – Adds rich chocolate flavor; ensure to sift for better mixing results.
  • Baking Soda – Essential leavening agent for proper rise in your banana bread.
  • Kosher Salt – Enhances overall flavor; don’t skip, as it balances the sweetness nicely.
  • Espresso Powder – Intensifies the chocolate flavor; can substitute with instant coffee if desired.
  • Olive Oil – Keeps the bread moist; melted butter can be used but may affect texture.
  • Brown Sugar – Contributes sweetness with a hint of molasses; light brown is preferred.
  • Granulated Sugar – Additional sweetness; adjust to your taste preference.
  • Eggs – Acts as a binding agent; use room temperature eggs for an even mix.
  • Vanilla Extract – Adds depth of flavor; pure vanilla extract yields the best results.
  • Sour Cream – Increases moisture and richness; Greek yogurt can be used as a substitute.
  • Ripe Bananas – Provide natural sweetness and moisture; mash well for even distribution.
  • Dark Chocolate Chips – Adds richness; toss in a little flour to prevent sinking in the batter.
  • Semi-Sweet Chocolate Chips – Provides additional chocolate flavor; a mix gives more depth.

Optional Topping

  • Granulated Sugar (for topping) – Optional; sprinkles can caramelize on banana garnish for added sweetness.
  • Banana Slices (for garnish) – Optional; gives visual appeal to your finished loaf, but not necessary.

Dive into baking this Chocolate Espresso Banana Bread, and turn your kitchen into a delightful haven of rich, chocolatey aromas!

Step‑by‑Step Instructions for Chocolate Espresso Banana Bread

Step 1: Preheat and Prepare
Begin by preheating your oven to 350°F (175°C). While it warms, generously grease a 9x5-inch loaf pan with olive oil or non-stick spray to ensure your Chocolate Espresso Banana Bread releases seamlessly once baked. A well-prepared pan is vital for a beautiful loaf shape, so take your time with this step.

Step 2: Mix the Dry Ingredients
In a large mixing bowl, whisk together 2 cups of all-purpose flour, ⅓ cup of cocoa powder, 1 teaspoon of baking soda, ½ teaspoon of kosher salt, and 2 teaspoons of espresso powder. Sifting the cocoa powder before adding helps eliminate lumps and ensures even mixing. This dry mix sets the foundation for your bread, enhancing that delicious chocolate flavor.

Step 3: Combine the Wet Ingredients
Using a stand mixer, combine ½ cup of olive oil, ½ cup of brown sugar, and ½ cup of granulated sugar. Mix on medium speed for about 2-3 minutes until smooth and creamy. Make sure to scrape down the sides of the bowl occasionally for even mixing. The amalgamation of sugars and oil creates a luscious base that keeps your Chocolate Espresso Banana Bread moist.

Step 4: Add the Eggs
Add 2 room temperature eggs, one at a time, to the mixture, beating well after each addition. This process helps bind the ingredients together and enhances the bread's fluffiness. Continue mixing for 1-2 minutes until you see a homogeneous batter forming, glowing with the richness of your wet ingredients.

Step 5: Incorporate Flavorings
Pour in 1 teaspoon of pure vanilla extract and ½ cup of sour cream into the mixture. Follow this with 2-3 ripe bananas, mashed well to achieve a smooth consistency. Mix on low until combined, creating a rich, creamy base infused with the delightful essences of banana and vanilla—key components of your Chocolate Espresso Banana Bread.

Step 6: Combine Wet and Dry Ingredients
Gradually add the dry ingredient mixture to the wet ingredients, mixing gently until just combined. This step is crucial—overmixing can lead to a tough texture, so stop mixing as soon as you see no dry flour. The batter should be slightly lumpy and thick, indicating the perfect blend for your decadent bread.

Step 7: Add Chocolate Chips
Toss ½ cup of dark chocolate chips and ½ cup of semi-sweet chocolate chips with a tablespoon of flour before folding them into the batter. Coating the chocolate chips helps prevent them from sinking during baking. Gently fold the chips into your batter, distributing them evenly for delightful bursts of chocolate in each slice of your finished bread.

Step 8: Pour and Prepare for Baking
Pour the batter into your prepared loaf pan, smoothing the top with a spatula for an even bake. If desired, sprinkle reserved chocolate chips on top for a chocolatey crust, and add banana slices for a decorative touch. This will not only add sweetness but also an appealing presentation to your Chocolate Espresso Banana Bread.

Step 9: Bake to Perfection
Place the loaf pan in the preheated oven and bake for 55-65 minutes. Keep an eye on it—when ready, a toothpick inserted into the center should emerge clean or with a few moist crumbs. This visual cue ensures your Chocolate Espresso Banana Bread is baked to moist perfection, bursting with rich flavors.

Step 10: Cool and Enjoy
Once baked, remove the pan from the oven and allow the bread to cool in the pan for about 20 minutes. Carefully transfer it to a wire rack to cool completely before slicing. This cooling step helps the flavors to deepen and will make each slice a warm, tender indulgence, perfect for enjoying with your favorite drink or spread.

Chocolate Espresso Banana Bread Variations

Feel free to personalize this delicious recipe and let your creativity shine through!

  • Nutty Delight: Replace chocolate chips with walnuts or pecans for a delightful crunch that contrasts beautifully with the soft bread.
  • Peanut Butter Swirl: Add dollops of peanut butter into the batter before baking for a creamier texture and flavor explosion.
  • Gluten-Free Option: Swap all-purpose flour with a gluten-free flour blend, ensuring everyone can enjoy this indulgent treat.
  • Fruit Twist: Incorporate blueberries or raspberries for a fruity surprise in each bite, adding freshness alongside the rich chocolate.
  • Caramel Drizzle: Top with a homemade caramel sauce after baking for an extra layer of sweetness and sophistication.
  • Spicy Kick: Integrate a pinch of cayenne or cinnamon for a warm heat that elevates the chocolate and espresso flavors.
  • Dairy-Free Version: Substitute sour cream with almond milk yogurt to create a vegan-friendly, moist loaf without compromising taste.
  • Double Chocolate: Increase cocoa powder or add in extra dark chocolate chips for chocolate lovers who crave an even richer experience!

Dive into these variations and explore flavors that will make your homemade Chocolate Espresso Banana Bread even more delightful! If you’re looking for something refreshing, try pairing it with the delightful Breakfast Banana Split.

Expert Tips for Chocolate Espresso Banana Bread

  • Don’t Overmix: Stop mixing as soon as the dry ingredients are just combined. Overmixing can make your Chocolate Espresso Banana Bread dense and tough.

  • Choose Ripe Bananas: Ensure your bananas are fully ripe for maximum sweetness and moisture. Overripe bananas are the secret to a rich flavor.

  • Puddle Test for Moisture: If using frozen bananas, thaw and drain excess moisture before mashing. This prevents sogginess in your finished bread.

  • Use the Right Tools: An electric mixer helps achieve consistent blending and aeration. It can make mixing your batter smooth and effortless.

  • Check Ovens Often: Baking times may vary, so check for doneness starting around the 55-minute mark. A toothpick should come out clean or with a few moist crumbs.

  • Add Textures: For an extra crunch, consider adding chopped nuts or a swirl of peanut butter. This not only varies the flavor but also enhances the texture of your Chocolate Espresso Banana Bread.

How to Store and Freeze Chocolate Espresso Banana Bread

Counter: Wrap tightly in plastic wrap or aluminum foil; store at room temperature for up to 3 days. This is perfect for enjoying that fresh-baked flavor!

Fridge: For longer preservation, refrigerate wrapped banana bread for up to 5 days. Just allow it to come to room temperature before slicing for the best taste.

Freezer: To keep your Chocolate Espresso Banana Bread fresh for up to 3 months, wrap tightly in plastic wrap and then aluminum foil. Thaw in the fridge overnight before enjoying!

Reheating: To reheat, place slices in the microwave for about 10-15 seconds or warm in a toaster oven for a golden crust while keeping the inside moist. Enjoy your delicious treat!

What to Serve with Chocolate Espresso Banana Bread

Indulging in a slice of Chocolate Espresso Banana Bread is just the beginning of your delightful dessert experience; let’s explore perfect pairings to elevate your meal!

  • Whipped Cream: A dollop of fresh whipped cream adds a light, airy contrast to the rich bread, making each bite a heavenly treat.

  • Coffee or Espresso: A warm cup of coffee or espresso complements the coffee notes in the bread, enhancing the overall chocolate experience.

  • Vanilla Ice Cream: Creamy vanilla ice cream provides a luscious cool contrast to the warm, moist banana bread, creating an indulgent treat.

  • Fruit Salad: A refreshing fruit salad offers bright, fresh flavors that balance the sweetness of the bread, making for a vibrant dessert plate.

  • Nutty Granola: A sprinkle of crunchy granola brings texture and nuttiness, creating a delightful contrast with the soft, tender banana bread.

  • Chocolate Sauce Drizzle: For chocolate lovers, a drizzle of chocolate sauce elevates the dessert experience, making it a rich chocolate lover's dream.

  • Hazelnut Spread: Spread a layer of hazelnut chocolate spread on warm slices for a luxurious, nutty enhancement to the chocolate flavor.

  • Decadent Dark Chocolate: Pair with a piece of dark chocolate for a sophisticated finish, welcoming that intense chocolate profile to complement the bread.

  • Sparkling Water: A bubbly glass of sparkling water helps cleanse the palate, making your dessert an even more refreshing experience after the rich sweetness.

  • Chai Latte: The spiced warmth of a chai latte offers a wonderful aromatic companion to the chocolate espresso flavors, creating a cozy vibe.

Make Ahead Options

Preparing this Chocolate Espresso Banana Bread ahead of time is a savvy way to simplify your baking routine! You can mix the dry ingredients and store them in an airtight container for up to 3 days. Additionally, the wet ingredients, including the mashed bananas and wet mix, can be refrigerated up to 24 hours before baking—just make sure to bring them to room temperature before combining. To maintain the bread's moistness, avoid overmixing when combining dry and wet ingredients. When you’re ready to enjoy your delicious bread, simply follow the baking instructions, and you'll have a comforting treat with minimal effort!

Chocolate Espresso Banana Bread Recipe FAQs

How do I choose the best ripe bananas for this recipe?
Absolutely! Look for bananas with a yellow peel that are speckled with brown spots. This indicates they are ripe and at their sweetest, which is essential for achieving the moist texture and rich flavor in your Chocolate Espresso Banana Bread.

What’s the best way to store leftovers?
You can wrap your Chocolate Espresso Banana Bread tightly in plastic wrap or aluminum foil and store it at room temperature for up to 3 days for optimal freshness. If you’d like to keep it longer, refrigerate it for up to 5 days. Just make sure to allow it to come to room temperature before slicing to enjoy the best texture!

Can I freeze the Chocolate Espresso Banana Bread?
Yes! To freeze your chocolatey delight, wrap the loaf tightly in plastic wrap followed by aluminum foil to prevent freezer burn. It will stay fresh for up to 3 months. When you're ready to indulge, simply thaw it in the fridge overnight, or enjoy it warm by microwaving slices for about 10-15 seconds.

What should I do if my banana bread is too dense?
Very! If your Chocolate Espresso Banana Bread turns out too dense, it might be due to overmixing the batter or using too much flour. Ensure you mix until just combined; stop as soon as you see no dry ingredients. Measure flour accurately, and consider scooping it gently with a spoon for the best results. Achieving a light, moist texture is all about the delicate balance!

Are there any allergy considerations for this recipe?
Yes! If you are serving this Chocolate Espresso Banana Bread to family or friends with allergies, be aware of the ingredients like gluten (from the flour) and dairy (from the sour cream). You could substitute gluten-free flour to accommodate those with gluten sensitivities and use almond milk or coconut yogurt if dairy is a concern. Always check labels for allergens in chocolate chips as well!

Chocolate Espresso Banana Bread

Moist Chocolate Espresso Banana Bread for Ultimate Indulgence

This Chocolate Espresso Banana Bread combines rich chocolate, ripe bananas, and a hint of espresso for a moist and indulgent dessert.
Print Recipe Pin Recipe
Prep Time 15 minutes mins
Cook Time 1 hour hr
Cooling Time 20 minutes mins
Total Time 1 hour hr 35 minutes mins
Servings: 10 slices
Course: Dessert
Cuisine: American
Calories: 230
Ingredients Equipment Method Nutrition Notes

Ingredients
  

For the Batter
  • 2 cups All-Purpose Flour Provides structure; use a bit less if substituting cocoa powder.
  • ⅓ cup Cocoa Powder Adds rich chocolate flavor; sift for better mixing.
  • 1 teaspoon Baking Soda Essential leavening agent.
  • ½ teaspoon Kosher Salt Enhances overall flavor.
  • 2 teaspoons Espresso Powder Intensifies chocolate flavor.
  • ½ cup Olive Oil Keeps the bread moist.
  • ½ cup Brown Sugar Contributes sweetness with a hint of molasses.
  • ½ cup Granulated Sugar Additional sweetness.
  • 2 Eggs Use room temperature for an even mix.
  • 1 teaspoon Vanilla Extract Adds depth of flavor.
  • ½ cup Sour Cream Increases moisture and richness.
  • 2-3 Ripe Bananas Mash well for even distribution.
  • ½ cup Dark Chocolate Chips Adds richness.
  • ½ cup Semi-Sweet Chocolate Chips Provides additional chocolate flavor.
Optional Topping
  • 1 tablespoon Granulated Sugar (for topping) Optional; for added sweetness.
  • Banana Slices (for garnish) Optional; for visual appeal.

Equipment

  • Stand Mixer
  • Loaf pan
  • Mixing bowls
  • Whisk
  • Spatula

Method
 

Step-by-Step Instructions
  1. Preheat your oven to 350°F (175°C) and grease a 9x5-inch loaf pan with olive oil or non-stick spray.
  2. In a mixing bowl, whisk together all-purpose flour, cocoa powder, baking soda, kosher salt, and espresso powder.
  3. In a stand mixer, combine olive oil, brown sugar, and granulated sugar. Mix until smooth and creamy.
  4. Beat in the eggs, one at a time, ensuring each is well mixed before adding the next.
  5. Add vanilla extract and sour cream, followed by mashed bananas, and mix until combined.
  6. Gradually add the dry ingredients to the wet mixture, mixing gently until just combined.
  7. Fold in the dark chocolate chips and semi-sweet chocolate chips that have been dusted with flour.
  8. Pour the batter into the prepared loaf pan and smooth the top. Optionally, sprinkle chocolate chips and banana slices on top.
  9. Bake in the oven for 55-65 minutes, or until a toothpick inserted into the center comes out clean.
  10. Allow the bread to cool in the pan for about 20 minutes before transferring it to a wire rack to cool completely.

Nutrition

Serving: 1sliceCalories: 230kcalCarbohydrates: 35gProtein: 3gFat: 10gSaturated Fat: 2gPolyunsaturated Fat: 0.5gMonounsaturated Fat: 7gCholesterol: 30mgSodium: 200mgPotassium: 250mgFiber: 2gSugar: 15gVitamin A: 150IUVitamin C: 2mgCalcium: 30mgIron: 1mg

Notes

For an extra crunch, consider adding chopped nuts or a swirl of peanut butter. Store banana bread tightly wrapped at room temperature or in the fridge for longer preservation.

Tried this recipe?

Let us know how it was!

Crispy Vegan Corn Ribs with Aleppo Chili Butter & Lime Cream

December 25, 2025 by Grace Snow Leave a Comment

As I stood in my kitchen recently, the last rays of summer sunlight streaming through the window, I found myself craving something light, fun, and delightfully unique. That’s when I stumbled upon the idea of Vegan Corn Ribs with Aleppo Chili Butter & Lime Zest Cream Cheese, and let me tell you—this dish is a game changer! Not only are these crispy corn ribs incredibly easy to whip up, but they also provide a perfect balance of creamy, zesty, and slightly spicy flavors that will elevate your gatherings or weeknight meals. Whether you're looking to impress guests at your next barbecue or simply want a healthier alternative to fast food, these corn ribs check all the boxes. Ready to dive into this deliciously playful recipe? Let’s prepare to make your taste buds smile!

Why are Vegan Corn Ribs a Must-Try?

Crispy Delight: These Vegan Corn Ribs are not just delicious, but also offer a satisfying crunch that makes them irresistible.

Effortlessly Fun: The playful rib format makes eating fun and interactive, perfect for sharing with family or friends at any gathering.

Flavor Explosion: The combination of Aleppo chili butter and zesty lime cream cheese creates a captivating flavor profile that will keep your taste buds excited.

Quick and Easy: With minimal prep and cook time, this recipe is ideal for busy weeknights or last-minute gatherings.

Versatile Option: You can easily customize the spices to suit your taste. Whether you opt for smoky paprika or add crushed red pepper, the possibilities are endless!

Perfect Pairing: Serve alongside grilled veggies or as a standout appetizer with drinks. Your guests will be asking for more!

Vegan Corn Ribs Ingredients

These Vegan Corn Ribs with Aleppo Chili Butter & Lime Zest Cream Cheese are packed with vibrant flavors and fresh ingredients that will make your taste buds dance!

For the Corn Ribs

  • Corn – Fresh corn on the cob provides the sweetest base; look for plump, juicy ears for the best results.
  • Olive Oil – Adds richness and helps with seasoning; you can substitute with avocado oil for a unique flavor profile.
  • Paprika Powder – Choose sweet or smoked variety for warmth and color; adds a delightful complexity to the dish.
  • Garlic Powder – Enhances the savory taste; fresh garlic can be an excellent substitute if you prefer stronger flavor.
  • Salt & Pepper – Use to season to your preference; they are essential for enhancing all the flavors.

For the Aleppo Chili Butter

  • Vegan Butter – This forms the base of your chili butter; any dairy-free margarine can serve as a substitute.
  • Aleppo Chili Flakes – Adds mild heat and depth; try swapping with crushed red pepper for a spicier kick.

For the Lime Zest Cream Cheese

  • Vegan Cream Cheese – Essential for a creamy topping; stick to plain-flavored or mix with your favorite herbs for extra flavor.
  • Lime Zest and Juice – Offers a refreshing tanginess; you can easily substitute with lemon for a slight twist.

For Garnishing

  • Pine Nuts – For added crunch and nutty flavor; feel free to replace with walnuts or pumpkin seeds based on your preference.
  • Green Onion – Adds freshness and mild onion taste; scallions work well as a substitute.
  • Coriander or Parsley – Sprinkle as a garnish for enhanced flavor and visual appeal; choose based on your preferred herb.

With each ingredient selected for a reason, these Vegan Corn Ribs will not only satisfy your cravings but also leave you yearning for more!

Step‑by‑Step Instructions for Vegan Corn Ribs with Aleppo Chili Butter & Lime Zest Cream Cheese

Step 1: Prepare Corn
Start by trimming the husks off the fresh corn on the cob, ensuring each ear is clean. Carefully cut each ear in half vertically, then slice each half into quarters to create long, rib-like pieces. You'll end up with beautiful corn ribs that will be the star of your dish!

Step 2: Season
In a small bowl, whisk together olive oil, paprika powder, garlic powder, salt, and pepper to create a flavorful seasoning blend. Use a brush to evenly coat the cut surfaces of the corn ribs, making sure every inch is covered for maximum taste. The vibrant colors of the spices will make your corn ribs look even more tempting!

Step 3: Cook Corn
For crispy Vegan Corn Ribs, preheat your air fryer to 180°C (355°F). Place the seasoned corn ribs in the fryer basket in a single layer, ensuring not to overcrowd them. Air fry for 15 to 20 minutes, flipping halfway through, until they are golden brown and crisp. If using an oven, bake at the same temperature for 30 to 35 minutes.

Step 4: Make Chili Butter
While the corn is cooking, melt vegan butter in a small saucepan over low heat. Stir in olive oil and Aleppo chili flakes, allowing the mixture to come together. Keep the heat low to maintain the flavor and prevent burning. This aromatic chili butter will elevate your Vegan Corn Ribs immensely!

Step 5: Prepare Cream Cheese
In a mixing bowl, combine vegan cream cheese with the freshly grated lime zest and lime juice, stirring until smooth. This zesty cream cheese will provide a refreshing contrast to the spicy chili butter. Refrigerate the mixture until you're ready to serve, allowing the flavors to meld beautifully.

Step 6: Plate
Once the corn ribs are cooked and perfectly crispy, place them on a serving platter. Dollop the lime zest cream cheese generously over the corn ribs and drizzle the warm Aleppo chili butter on top. For added texture and flavor, sprinkle with pine nuts, sliced green onions, and fresh coriander. Enjoy this delightful Vegan Corn Ribs feast!

What to Serve with Vegan Corn Ribs with Aleppo Chili Butter & Lime Zest Cream Cheese

As you savor the crispy goodness of these vegan corn ribs, make your meal memorable by pairing them with delightful sides that enhance every bite.

  • Creamy Mashed Potatoes: The silky texture of mashed potatoes balances the crispy corn ribs, adding a comforting element to your plate.
  • Grilled Veggie Skewers: Colorful grilled veggies bring a smoky flavor and vibrant freshness, making your meal look as good as it tastes!
  • Chili-Lime Quinoa Salad: This protein-packed salad features zesty flavors and a crunch that complements the richness of the corn ribs beautifully.
  • Spicy Roasted Chickpeas: With a satisfying crunch and a bit of heat, these chickpeas make a delightful snack to enjoy alongside your corn ribs.
  • Zucchini Noodles: Light and refreshing, zucchini noodles tossed in olive oil and garlic offer a perfect contrast to the rich flavors of the dish.
  • Fresh Mango Salsa: A sweet and tangy mango salsa brightens your plate, providing a refreshing lift that pairs perfectly with the spicy chili butter.
  • Coconut Rice: The subtly sweet and creamy coconut rice adds a tropical twist, balancing the flavors while elevating your entire meal.
  • Chilled White Wine: A crisp and refreshing white wine like Sauvignon Blanc brings out the zing of the lime cream cheese, enhancing your dining experience.
  • Vegan Chocolate Mousse: End your meal on a sweet note with a light and airy mousse, offering a perfect contrast to the savory main dish.
  • Lemon Sorbet: This refreshing sorbet cleanses the palate and completes your meal with a bright, citrusy finish.

Storage Tips for Vegan Corn Ribs

Fridge: Store leftover Vegan Corn Ribs in an airtight container for up to 3 days to maintain their freshness and crispiness, allowing for a quick snack anytime.

Freezer: For longer storage, freeze corn ribs in a single layer on a baking sheet before transferring to freezer bags, where they can last up to 2 months.

Reheating: To reheat, place frozen corn ribs in an air fryer at 180°C (355°F) for about 8-10 minutes until heated through and crispy again for the best texture.

Avoid Moisture: Ensure the container is sealed tightly to prevent moisture, which can make your Vegan Corn Ribs soggy. Enjoy them freshly cooked for the ultimate experience!

Expert Tips for Vegan Corn Ribs

Cut with Care: Use a sharp knife and a stable surface when slicing the corn. If you're hesitant, leave the cob whole and cook it traditionally.

Avoid Overcrowding: Air fry the corn ribs in a single layer to ensure even cooking; this helps achieve the desired crispy texture.

Flavor Balance: Don’t shy away from adjusting spices. Experiment with smoked paprika or add in cayenne for a bolder kick to your Vegan Corn Ribs.

Garnish Wisely: Fresh herbs enhance both taste and presentation. Consider dill or basil as alternatives to coriander for a unique twist.

Serving Suggestions: Pair these corn ribs with a simple side salad or a dip for added freshness; they also shine as a standout appetizer at gatherings!

Vegan Corn Ribs Variations & Substitutions

Feel free to get creative with these delicious Vegan Corn Ribs and make them your own!

  • Oil Swap: Substitute olive oil with avocado oil for a richer taste and health benefits.
  • Spice Up: Experiment with ** cumin or smoked paprika** for your chili butter for a different flavor depth. This variation brings a robust smokiness that complements the corn beautifully.
  • Nut Alternatives: Switch out pine nuts for almonds or sunflower seeds to adjust crunch and flavor. This option not only changes the texture but also caters to different dietary preferences.
  • Heat Levels: Add a pinch of cayenne to the chili butter if you’re craving extra heat! A little spice can make the flavors pop even more.
  • Creamy Alternatives: Use cashew cream in place of vegan cream cheese for a luscious, dairy-free alternative that adds a touch of richness.
  • Citrus Twist: Try lemon instead of lime for your cream cheese, offering a refreshing twist while maintaining that zesty brightness.
  • Herb Variations: Opt for fresh dill or basil as substitutes for coriander for a different herbal touch that changes up the whole profile of the dish.
  • Vegan BBQ: Brush with your favorite vegan barbecue sauce instead of chili butter for a sweet and tangy twist that will add a new layer of flavor.

These options are not just fun to try but also allow you to cater to various dietary needs while elevating your culinary adventures! For more delightful twists on familiar recipes, check out my Fiesta Lime Chicken, or if you're in the mood for an indulgent treat, consider making a batch of Vegan Cacao Cream for dessert. Happy cooking!

Make Ahead Options

These Vegan Corn Ribs with Aleppo Chili Butter & Lime Zest Cream Cheese are a meal prep dream! You can prepare the corn ribs up to 24 hours in advance by cutting and seasoning them, then refrigerating the seasoned corn wrapped in plastic wrap to maintain freshness. Additionally, mix the lime zest cream cheese ahead of time and store it in an airtight container in the fridge for up to 3 days. When you’re ready to cook, simply air fry or bake the ribs until golden brown and drizzle with your pre-made Aleppo chili butter before serving for that warm, comforting touch. This way, you'll enjoy delicious, homemade flavors on even the busiest of nights!

Vegan Corn Ribs with Aleppo Chili Butter & Lime Zest Cream Cheese Recipe FAQs

How do I select the best corn for the recipe?
Absolutely! When choosing corn for your Vegan Corn Ribs, look for fresh, plump ears that feel heavy for their size. Check the husks for a bright green color, and make sure there are no dark spots or blemishes. The kernels inside should be milky and sweet when pierced. Fresh corn is key to achieving that delightful sweetness and crunch!

What is the best way to store leftover Vegan Corn Ribs?
Very! To keep your leftover corn ribs fresh, store them in an airtight container in the refrigerator for up to 3 days. Make sure they are completely cool before sealing to avoid condensation, which can make them soggy. Just reheat in an air fryer or oven to restore their crispiness when you're ready for a tasty snack!

Can I freeze Vegan Corn Ribs?
Yes, you can! To freeze your corn ribs, first lay them out in a single layer on a baking sheet and place them in the freezer for about 1-2 hours until they are frozen solid. Then transfer the ribs into airtight freezer bags, removing as much air as possible. They can last up to 2 months in the freezer. When you're ready to enjoy, simply air fry from frozen at 180°C (355°F) for about 8-10 minutes.

What if my Vegan Corn Ribs aren’t crispy after cooking?
No worries! If you find that your corn ribs aren't as crispy as you'd hoped, it could be due to overcrowding in the air fryer or oven. Make sure to spread them out in a single layer for even cooking. If they’re still soft, you can return them to the air fryer for a few more minutes at the same temperature to crisp them up. Additionally, ensure you're using enough oil in the seasoning to help achieve that desired crunch!

Are there any dietary considerations for this recipe?
Definitely! These Vegan Corn Ribs are entirely plant-based, making them vegan-friendly. However, always check to ensure that the brands of vegan butter and cream cheese you're using don’t contain any allergens such as nuts, soy, or gluten if you're preparing for someone with allergies. Furthermore, if you're cooking for pets, be mindful that some ingredients, like garlic or onion, can be harmful to them, so it's best not to share any leftovers with furry friends!

Vegan Corn Ribs with Aleppo Chili Butter & Lime Zest Cream Cheese

Crispy Vegan Corn Ribs with Aleppo Chili Butter & Lime Cream

Enjoy these Vegan Corn Ribs with Aleppo Chili Butter & Lime Zest Cream, offering a unique, flavorful appetizer.
Print Recipe Pin Recipe
Prep Time 10 minutes mins
Cook Time 20 minutes mins
Total Time 30 minutes mins
Servings: 4 ribs
Course: Appetizers
Cuisine: Vegan
Calories: 250
Ingredients Equipment Method Nutrition Notes

Ingredients
  

For the Corn Ribs
  • 4 ears Fresh corn on the cob Look for plump, juicy ears.
  • 2 tablespoons Olive oil Can substitute with avocado oil.
  • 1 teaspoon Paprika powder Sweet or smoked variety.
  • 1 teaspoon Garlic powder Fresh garlic can be used as a substitute.
  • to taste Salt Essential for enhancing flavors.
  • to taste Pepper Essential for enhancing flavors.
For the Aleppo Chili Butter
  • 1/2 cup Vegan butter Any dairy-free margarine can be a substitute.
  • 1 teaspoon Aleppo chili flakes Can swap with crushed red pepper.
For the Lime Zest Cream Cheese
  • 1 cup Vegan cream cheese Stick to plain or mix with herbs.
  • 1 tablespoon Lime zest Provides refreshing tanginess.
  • 2 tablespoons Lime juice Can substitute with lemon juice.
For Garnishing
  • 1/4 cup Pine nuts Can be replaced with walnuts or pumpkin seeds.
  • 2 tablespoons Green onion Scallions work well as a substitute.
  • 2 tablespoons Coriander or parsley Choose based on your preferred herb.

Equipment

  • Air fryer
  • Mixing Bowl
  • Saucepan
  • Sharp Knife

Method
 

Step-by-Step Instructions
  1. Trim the husks off the fresh corn on the cob and cut each ear in half vertically, then slice each half into quarters.
  2. Whisk together olive oil, paprika powder, garlic powder, salt, and pepper to create a seasoning blend. Coat the corn ribs with the mixture.
  3. Preheat the air fryer to 180°C (355°F) and air fry the corn ribs for 15-20 minutes until golden brown and crisp.
  4. Melt vegan butter in a saucepan over low heat, stir in olive oil and Aleppo chili flakes to create chili butter.
  5. Combine vegan cream cheese with lime zest and lime juice in a bowl until smooth and refrigerate.
  6. Plate the cooked corn ribs, dollop lime cream cheese, drizzle chili butter, and sprinkle with pine nuts, green onions, and coriander.

Nutrition

Serving: 2corn ribsCalories: 250kcalCarbohydrates: 30gProtein: 5gFat: 14gSaturated Fat: 3gPolyunsaturated Fat: 1gMonounsaturated Fat: 9gSodium: 300mgPotassium: 350mgFiber: 4gSugar: 3gVitamin A: 200IUVitamin C: 15mgCalcium: 20mgIron: 1mg

Notes

These Vegan Corn Ribs are perfect for sharing and can be customized with different spices and garnishes to suit your taste.

Tried this recipe?

Let us know how it was!

Sushi Wonton Cones: Fun and Fresh Handheld Delights

December 25, 2025 by Grace Snow Leave a Comment

As I settled into my kitchen one sunny afternoon, I found myself longing for something a little different. That’s when the idea of Sushi Wonton Cones struck me—this playful twist on traditional sushi brings all the delicious elements of sushi into a handheld delight. With a crispy wonton wrapper, flavorful seasoned rice, and fresh avocado, these Sushi Wonton Cones are not just visually stunning, but they’re also incredibly customizable, making them ideal for any gathering. Whether you're hosting a party or enjoying a cozy night at home, these crowd-pleasers are an effortless way to impress guests while keeping things fun and interactive. Who wouldn’t enjoy assembling their own perfect cone? Ready to dive into this delightful adventure? Let’s roll!

Why Choose Sushi Wonton Cones?

Customization at its finest: You can tailor each cone to suit every palate, from spicy tuna to vibrant veggies.

Interactive dining experience: Guests will love making their own cones, adding an element of fun to any gathering!

Crispy and creamy texture: The contrast between the crunchy wonton and the soft, creamy fillings offers a delightful bite.

Nutrient-rich ingredients: Packed with healthy fats from avocado and lean protein from tuna, these cones are as nourishing as they are delicious.

Quick to prepare: With simple components and straightforward steps, you'll have these ready in no time—perfect for last-minute parties.

So why not pair these delightful treats with some homemade Vegan Sushi Indulge for a complete sushi feast?

Sushi Wonton Cone Ingredients

Get ready to create delicious Sushi Wonton Cones with these fresh ingredients!

For the Cones

  • Wonton wrappers – Perfect structures that hold all your fillings together; spring roll wrappers can be used for a different texture.
  • Coconut oil – Essential for frying, giving a crispy finish; vegetable oil is a great alternative if you prefer.

For the Sushi Rice

  • Sushi rice – The heart of your dish, providing that signature flavor and texture; remember to use short-grain rice for best results.
  • Rice vinegar – Adds a tangy kick to your rice; if you're in a pinch, apple cider vinegar works, though the flavor will change.
  • Sugar – Balances the seasoning for your sushi rice perfectly.
  • Salt – Enhances the overall seasoning and flavor of your dish.

For the Filling

  • Avocado – Brings creaminess and healthy fats; for a lighter bite, consider substituting with cucumber.
  • Tuna steak (sushi-grade) – Main protein that gives flavor; feel free to swap in salmon or shrimp if you're looking for variety.
  • Kewpie mayonnaise – Adds a nice creamy texture and umami flavor; regular mayonnaise can work too, or simply omit for a lighter version.
  • Tomato ketchup or sauce – Provides sweetness and moisture in your tuna mixture.
  • Sriracha – Optional, but adds a delightful heat to the tuna mixture.
  • Lime zest – Infuses brightness and aromatic complexity to elevate flavors.
  • Furikake or black sesame seeds – Gorgeous garnishes that add both flavor and visual appeal.

Ready to roll up your sleeves and enjoy these playful, handheld Sushi Wonton Cones? Let’s get cooking!

Step‑by‑Step Instructions for Sushi Wonton Cones

Step 1: Prepare the Wonton Cones
Start by preheating your oven to 175 °C (350 °F). Lay out the wonton wrappers and gently press them around cream horn or cone molds to shape them. Ensure the edges overlap slightly and press to seal tightly. Arrange the cones on a baking sheet, ready for frying, and set aside while you heat the coconut oil.

Step 2: Fry the Wonton Cones
In a deep pan, heat coconut oil to 175 °C (350 °F). Carefully add the wrapped cones in batches, frying until they turn golden brown, about 2-3 minutes per side. Watch for a crisp, golden appearance—this indicates they’re perfectly fried. Remove them with tongs and let draining on paper towels to absorb excess oil.

Step 3: Prepare the Sushi Rice
While the cones cool, let's focus on the sushi rice. Rinse and cook sushi rice according to package instructions until tender, then transfer it to a large bowl. While still warm, gently fold in the rice vinegar, sugar, and salt, mixing until fully incorporated. Allow the seasoned rice to cool to room temperature, ensuring it's sticky enough for filling.

Step 4: Make the Tuna Filling
In a mixing bowl, flake or cube the sushi-grade tuna, making sure to keep it chilled. Combine the tuna with Kewpie mayonnaise, tomato sauce, optional sriracha, and lime zest. Mix until everything is well-coated and flavors meld together. This creamy, flavorful filling will elevate your Sushi Wonton Cones.

Step 5: Assemble the Sushi Wonton Cones
Once the cones and rice have cooled, it’s time to assemble your Sushi Wonton Cones. Start by filling each cone with a layer of sushi rice, packing it in gently. Follow with sliced avocado, adding a rich texture to the cone. Finally, spoon the tuna mixture generously on top, creating a colorful and appetizing display.

Step 6: Garnish and Serve
To finish your Sushi Wonton Cones, sprinkle furikake or black sesame seeds over the top for added flavor and visual appeal. Arrange the assembled cones upright in a mini muffin tin or on a serving platter for an eye-catching presentation. These delightful cones are ready to impress your guests at any gathering!

Make Ahead Options

These Sushi Wonton Cones are a fantastic choice for meal prep, saving you valuable time on busy days! You can prepare the sushi rice and the tuna filling up to 3 days in advance. Simply cook and season the sushi rice, then allow it to cool before refrigerating in an airtight container. For the tuna mix, combine the ingredients and store them chilled (to maintain freshness) until you’re ready to assemble. To ensure the wonton cones stay crispy, it's best to fry them fresh right before serving. Assemble the cones with the prepared rice and tuna mixture just before enjoyment, and you'll have a delightful, restaurant-quality appetizer that’s just as delicious as if you made it all in one go!

What to Serve with Sushi Wonton Cones

Imagine an inviting spread that complements the crunchy, flavorful experience of handheld sushi delights—perfect for a delightful gathering.

  • Eda Mame: Lightly salted edamame enhances the sushi experience while adding a satisfying crunch and protein boost.

  • Miso Soup: This warm, savory soup pairs beautifully with the fresh flavors of the cones, providing comforting contrast.

  • Cucumber Salad: Add a refreshing twist with thinly sliced cucumber dressed in rice vinegar for tangy zing—an excellent palate cleanser.

  • Sushi Rolls: Serve classic sushi rolls alongside your cones for a fun variety of flavors and textures; think spicy tuna or cucumber rolls.

  • Crispy Seaweed Snacks: These crunchy bites provide a delightful crispiness, echoing the texture of the wonton cones and making for easy snacking.

  • Iced Green Tea: Quench your guests' thirst with a cool, refreshing iced green tea; its lightness pairs superbly with the savory sushi flavors.

Sushi Wonton Cones become even more delightful when served alongside these bright, fresh offerings, creating a feast that will have everyone coming back for more!

Expert Tips for Sushi Wonton Cones

  • Fry Wisely: Keep an eye on your frying temperature; too hot can lead to burnt cones, while too low may leave them soggy.

  • Chill the Filling: Ensure your tuna is chilled until you’re ready to assemble. This keeps the texture perfect and flavor fresh!

  • Prep Ahead: Make your rice and filling ahead of time, but avoid filling the cones until just before serving to maintain crispness.

  • Don’t Overfill: While it’s tempting, avoid stuffing your cones too full. This can make them hard to eat and crush the delicate wrappers.

  • Try Alternatives: Experiment with different fillings like spicy tuna or even vegetarian options to customize your Sushi Wonton Cones to everyone’s taste!

How to Store and Freeze Sushi Wonton Cones

Room Temperature: Sushi Wonton Cones are best enjoyed fresh, but if left out, consume within 1-2 hours to maintain freshness and flavor.

Fridge: You can store assembled cones in the fridge for up to 3 hours. Wrap them tightly in plastic wrap to prevent the wontons from becoming soggy.

Freezer: While it's not ideal to freeze the filled cones, you can freeze unfilled, fried cones for up to 1 month. Thaw and fill just before serving for the best texture and taste.

Reheating: If needed, reheat fried cones in a preheated oven at 180 °C (350 °F) for about 5-7 minutes to regain their crispiness before filling with your sushi components.

Sushi Wonton Cones: Endless Customization

Embrace your creativity by personalizing these delightful cones to suit your taste and preferences!

  • Spicy Tuna: Swap the regular tuna for spicy tuna mixed with sriracha for an extra kick that amplifies the flavor and excitement.

  • Vegetarian Delight: Replace tuna with marinated tofu, diced bell peppers, and a splash of soy sauce to create a satisfying, meat-free option that’s just as filling.

  • Avocado Alternative: Instead of avocado, consider using thinly sliced cucumbers or radishes for a refreshing, crisp texture that lightens up the cone.

  • Energizing Greens: Add a layer of fresh arugula or spinach before the sushi rice for a peppery twist that adds freshness to each bite.

  • Gourmet Garnishes: Elevate your presentation with microgreens or edible flowers as a stunning garnish that will wow your guests and give a restaurant-style flair.

  • Heat Levels: For a bit of zing, kick up the heat with jalapeño slices or a touch of spicy mayo drizzled over the top.

  • Irresistible Dipping Sauces: Enhance the flavor experience by serving with sides of spicy mayo or a tangy soy-wasabi sauce. They're perfect for dunking and will leave everyone wanting more!

  • Crispy Texture Boost: For an added crunch, sprinkle crushed fried onions or tempura flakes on top just before serving, giving your cones a delightful twist.

Feel free to indulge in these variations, and why not consider pairing with some homemade Vegan Sushi Indulge to create a full sushi experience? Your guests will love the choices!

Sushi Wonton Cones Recipe FAQs

How do I choose the best ripe avocado for my Sushi Wonton Cones?
Absolutely! When selecting an avocado, look for one that yields slightly to gentle pressure; this indicates it’s ripe. Avoid those with dark spots or a mushy feel, as they may be overripe. A perfect avocado should have smooth, unblemished skin and feel firm yet slightly soft when held.

What is the best way to store leftover Sushi Wonton Cones?
Very! If you have any assembled Sushi Wonton Cones left, it's best to consume them within 3 hours for optimal freshness. To store them, wrap each cone in plastic wrap and refrigerate. This helps prevent the wonton from becoming soggy. However, if they must be stored, you can keep them in the fridge for up to 3 hours.

Can I freeze Sushi Wonton Cones?
Definitely! While it's not ideal to freeze filled cones, you can freeze the unfilled, fried wonton cones for up to 1 month. To do this, allow the cones to cool completely, then arrange them in a single layer on a baking sheet and place them in the freezer. Once frozen solid, transfer them to a freezer-safe bag or container. When ready to serve, thaw them in the fridge overnight and fill them just before enjoyment for the best texture.

What should I do if my wonton cones are too greasy after frying?
I’ve been there! If your cones come out greasy, it usually means the oil temperature was too low or they were in the oil for too long. For future batches, ensure the frying oil is preheated to 175 °C (350 °F). After frying, drain the cones on paper towels right away to remove excess oil effectively. If they’re already greasy, letting them sit on a paper towel can help absorb some of the oil.

Are there any dietary considerations for making these cones?
Absolutely! If hosting guests with dietary restrictions or allergies, you can customize your Sushi Wonton Cones easily. For gluten-free options, check that your wonton wrappers are gluten-free or use rice paper wrappers instead. If someone is allergic to seafood, consider using fresh vegetables or cooked proteins like chicken or tofu in your filling. Regardless of dietary needs, these cones can be made inclusive and enjoyable for everyone!

Sushi Wonton Cones

Sushi Wonton Cones: Fun and Fresh Handheld Delights

Sushi Wonton Cones are a playful and customizable twist on traditional sushi, featuring crispy wonton wrappers filled with seasoned rice, fresh avocado, and a flavorful tuna mixture.
Print Recipe Pin Recipe
Prep Time 20 minutes mins
Cook Time 20 minutes mins
Cooling Time 10 minutes mins
Total Time 50 minutes mins
Servings: 4 cones
Course: Appetizers
Cuisine: Japanese
Calories: 250
Ingredients Equipment Method Nutrition Notes

Ingredients
  

For the Cones
  • 10 wrappers Wonton Spring roll wrappers can be used for a different texture.
  • 2 tablespoons Coconut oil Vegetable oil is a great alternative.
For the Sushi Rice
  • 2 cups Sushi rice Use short-grain rice for best results.
  • 1/4 cup Rice vinegar Apple cider vinegar can work in a pinch.
  • 1 tablespoon Sugar
  • 1 teaspoon Salt
For the Filling
  • 1 medium Avocado For a lighter bite, consider substituting with cucumber.
  • 8 ounces Tuna steak (sushi-grade) Feel free to swap in salmon or shrimp.
  • 2 tablespoons Kewpie mayonnaise Regular mayonnaise can work too.
  • 1 tablespoon Tomato ketchup or sauce
  • 1 teaspoon Sriracha Optional, for heat.
  • 1 teaspoon Lime zest
  • 1 tablespoon Furikake or black sesame seeds For garnish.

Equipment

  • Oven
  • Deep pan
  • Cone molds
  • Mixing bowls
  • Baking Sheet
  • Tongs
  • mini muffin tin

Method
 

Step-by-Step Instructions for Sushi Wonton Cones
  1. Prepare the Wonton Cones: Preheat oven to 175 °C (350 °F). Press wonton wrappers around cone molds and seal edges, arrange on a baking sheet.
  2. Fry the Wonton Cones: Heat coconut oil to 175 °C (350 °F) and fry cones until golden brown, about 2-3 minutes; drain on paper towels.
  3. Prepare the Sushi Rice: Rinse and cook sushi rice as per package instructions. Mix in rice vinegar, sugar, and salt while warm, then cool to room temperature.
  4. Make the Tuna Filling: Flake sushi-grade tuna in a bowl and mix with Kewpie mayonnaise, tomato sauce, optional sriracha, and lime zest until well-coated.
  5. Assemble the Sushi Wonton Cones: Fill cones with sushi rice, then sliced avocado, and top with the tuna mixture for a colorful display.
  6. Garnish and Serve: Sprinkle with furikake or sesame seeds, and arrange cones upright on a platter for serving.

Nutrition

Serving: 1coneCalories: 250kcalCarbohydrates: 30gProtein: 10gFat: 12gSaturated Fat: 2gPolyunsaturated Fat: 1gMonounsaturated Fat: 8gCholesterol: 25mgSodium: 400mgPotassium: 300mgFiber: 3gSugar: 2gVitamin A: 300IUVitamin C: 5mgCalcium: 20mgIron: 1.5mg

Notes

Keep an eye on frying temperature to avoid burnt or soggy cones. Assemble just before serving to maintain crispness.

Tried this recipe?

Let us know how it was!

Fruity Pebbles Sushi: A Colorful Twist on Easy Snacks

December 25, 2025 by Grace Snow Leave a Comment

As I rummaged through my pantry the other day, a shocking realization hit me: the colorful box of Fruity Pebbles was calling my name! That delightful nostalgia swept over me, sparking the idea of creating a whimsical treat that would bring my sweet childhood memories right into the present. Enter Fruity Pebbles Sushi—a fun and easy dessert that’s perfect for both kids and adults alike. With its playful combination of crunchy cereal and soft bananas, this gluten-free delight is not only a fantastic way to engage young chefs but also a guilt-free way to satisfy those sweet cravings. Ready to roll up some smiles and bring a burst of color to your kitchen? Let’s dive in!

Why is Fruity Pebbles Sushi Irresistible?

Nostalgic Flavors: Every bite of this colorful delight brings you back to carefree childhood days. It’s the perfect way to indulge in sweet memories while treating your taste buds.
Kid-Friendly Fun: Get the little ones involved! This simple recipe is not only easy to prepare but also a creative kitchen project that will keep them engaged.
Customizable Options: Switch up the fillings and cereals for a unique twist every time. Whether you use strawberries instead of bananas or mix in different cereals, the possibilities are endless!
Eye-Catching Presentation: Wow your friends and family at gatherings with this Instagram-worthy dessert. Its vibrant colors are sure to impress at any party or movie night.
Quick and Easy: You’ll love how fast this recipe comes together—great for spontaneous cravings or last-minute events. For more fun treat ideas, check out our Vegan Sushi Indulge for a delicious variation!

Fruity Pebbles Sushi Ingredients

For the Sushi Mix

  • Fruity Pebbles Cereal – The star of this dessert, providing crunch and vibrant color; feel free to mix in other colorful cereals for fun!
  • Mini Marshmallows – These gooey bites act as a delicious binder; they help hold everything together in delightful sweetness.
  • Unsalted Butter – Essential for melting the marshmallows, creating a creamy texture; coconut oil is a great dairy-free substitute.

For the Sushi Wrap

  • Fruit Roll-Ups – These fruity sheets wrap up your sushi rolls; use any favorite fruit leather for a unique twist!

For the Filling

  • Medium Bananas – A classic filling that adds natural sweetness and creaminess; swap in strawberries or kiwi for a fresh change!

For Serving

  • Chocolate Syrup (Optional) – Drizzle on top for an extra layer of flavor and irresistible sweetness; a lovely touch to brighten up the Fruity Pebbles Sushi!

Feel free to get creative with this Fruity Pebbles Sushi recipe and enjoy every colorful bite!

Step‑by‑Step Instructions for Fruity Pebbles Sushi

Step 1: Melt the Butter
In a medium saucepan, melt 2 tablespoons of unsalted butter over medium heat, stirring frequently for about 2-3 minutes until fully melted. The butter should be a clear liquid without any browning. This creamy base will help transform your mini marshmallows into a gooey binding agent for your Fruity Pebbles Sushi.

Step 2: Incorporate the Marshmallows
Add 4 cups of mini marshmallows to the melted butter in the saucepan. Stir continuously for about 4-5 minutes until the marshmallows are entirely melted and the mixture is smooth and glossy. The heat helps blend the flavors perfectly, setting the stage for your colorful cereal treat.

Step 3: Mix in the Fruity Pebbles
Remove the saucepan from the heat and quickly mix in 5 cups of Fruity Pebbles cereal, stirring until everything is well combined and evenly coated with the marshmallow mixture. This should take about 1-2 minutes. The vibrant colors will pop, creating a delightful base for your Fruity Pebbles Sushi.

Step 4: Form the Cereal Mixture
Prepare a parchment-lined baking sheet by spreading the marshmallow-cereal mixture onto it. Use a spatula to flatten it into a rectangle about half an inch thick, ensuring an even layer. Allow it to cool for roughly 10-15 minutes until it’s firm enough to handle but still slightly warm to the touch.

Step 5: Prepare the Fruit Roll-Ups
While the mixture cools, lay out your fruit roll-ups flat on a clean surface. You’ll want enough room to work with each roll-up as you’ll be molding the Fruity Pebbles mixture to create the sushi. The fruity wraps will add a fun, chewy exterior to your delightful dessert.

Step 6: Assemble the Sushi Rolls
Once the cereal mixture has cooled slightly, take a portion and mold it into a rectangle shape at one end of the fruit roll-up. Place a medium banana lengthwise at the edge of the rectangle and carefully roll it up, enclosing the banana within the fruity mixture. Repeat this with the remaining rolls and bananas.

Step 7: Slice and Drizzle
Using a sharp knife, slice each sushi roll into bite-sized pieces—about 1-2 inches thick. Arrange the slices on a serving platter, and if desired, drizzle with chocolate syrup for extra sweetness. The contrasting colors and textures will make your Fruity Pebbles Sushi a feast for the eyes!

What to Serve with Fruity Pebbles Sushi

Bring a world of color and flavor to your dessert table with delightful pairings that complement every colorful bite!

  • Fresh Fruit Salad: A vibrant mix of seasonal fruits brings a refreshing contrast to the sweetness of sushi rolls, enhancing every mouthful.

  • Chocolate Dipping Sauce: Drizzling a rich chocolate sauce on top adds decadent sweetness and depth, making each bite even more indulgent.

  • Whipped Cream: Light and airy, whipped cream provides a creamy texture that balances the chewy delight of the Fruity Pebbles Sushi.

  • Coconut Ice Cream: Creamy and tropical, coconut ice cream offers a refreshing finish that complements the fruity flavors beautifully.

  • Sparkling Citrus Punch: This fizzy drink adds a bubbly brightness to your meal, cleansing the palate between bites of the sweet sushi.

  • Birthday Cake Pop: A fun, nostalgic treat that mirrors the celebratory vibe of Fruity Pebbles Sushi, making any occasion more festive.

Imagine savoring these pairings alongside your colorful sushi rolls, transforming dessert time into an unforgettable feast!

How to Store and Freeze Fruity Pebbles Sushi

  • Room Temperature: Keep leftovers in an airtight container for up to 2 days to maintain freshness. Enjoy them as a quick snack or treat during this time!

  • Fridge: Store the sushi in a sealed container for up to 5 days. The texture may firm up, but they’ll remain tasty; just warm slightly in your hands before serving!

  • Freezer: Wrap individual sushi rolls tightly in plastic wrap and then place them in a freezer-safe bag for up to 1 month. Thaw in the refrigerator before indulging in your colorful dessert.

  • Reheating: If you prefer a softer texture, briefly heat in the microwave (10-15 seconds) before enjoying your Fruity Pebbles Sushi again!

Make Ahead Options

Fruity Pebbles Sushi is an absolute game-changer for busy home cooks looking to simplify dessert prep! You can prepare the marshmallow and Fruity Pebbles mixture up to 24 hours in advance; simply store it in an airtight container at room temperature to keep it fresh. The fruit roll-ups should be kept separate until you're ready to assemble the sushi rolls to avoid any sogginess. You can also slice the bananas and wrap them in film or place them in a resealable bag to maintain their freshness for up to 3 days. When you’re ready to serve, just roll everything together, slice, and drizzle with chocolate syrup for that ultimate fun treat without the last-minute rush! Enjoy the whimsical flavors just as if they were made fresh!

Expert Tips for Fruity Pebbles Sushi

  • Grease Your Hands: Use greased hands to handle the sticky marshmallow mixture easily without it sticking to your fingers.

  • Adjust Consistency: If the cereal mixture feels too firm, gently warm it on the stove again to soften. This will make forming rolls much easier.

  • Choose Sturdy Fruits: Ensure the bananas or other fruits are firm enough to withstand rolling; avoid overly ripe fruits that might squish in the sushi.

  • Mix and Match Cereals: Feel free to substitute Fruity Pebbles with other colorful cereals for a fun, unique flavor in each batch.

  • Enjoy Right Away: For the best texture and taste, serve the Fruity Pebbles Sushi soon after making. Leftovers can firm up but still make a tasty snack!

Fruity Pebbles Sushi: Creative Twists Await

Get ready to have some fun in the kitchen! Tailoring your Fruity Pebbles Sushi allows you to explore delightful flavors and textures with every bite.

  • Dairy-Free: Substitute unsalted butter with coconut oil for a creamy, plant-based alternative that still binds your ingredients beautifully.
  • Berry Blast: Swap out bananas for fresh strawberries or sliced kiwi. This juicy twist adds a tart contrast to the sweetness of marshmallows!
  • Crunchy Variations: Try using Rainbow Cheerios or Trix cereal instead of Fruity Pebbles for different flavors and textures in your sushi rolls. Each cereal brings its own magic!
  • Sprinkle Surprise: Garnish with colorful sprinkles before serving. Not only do they look fabulous, but they also add a fun crunch that kids will adore.
  • Nutty Twist: Sprinkle some crushed nuts or sunflower seeds into the marshmallow mixture for added texture and a nutty flavor. It’s a great option if you want some extra crunch!
  • Zesty Citrus: Add a light zest of lime to the cereal mixture before rolling; the citrusy pop will elevate your sushi with a refreshing tang that pairs beautifully with sweet marshmallows.
  • Chocolate Heaven: Drizzle with melted chocolate instead of syrup for a rich, indulgent experience that’s sure to satisfy any chocolate lover in the house. You can never go wrong with chocolate!
  • Fun Shapes: Use cookie cutters to create fun shapes from the sushi rolls, making them even more exciting for a kids’ party or as a creative snack option. Shapes like stars or hearts will make them enchanting!

By exploring these variations, you’ll create Fruity Pebbles Sushi that’s uniquely yours. If you’re looking for more inspiration, you might love trying out some Vegan Sushi Indulge for even more creative cooking. Happy rolling!

Fruity Pebbles Sushi Recipe FAQs

What types of cereal work best for this recipe?
Absolutely! While Fruity Pebbles are the star of this dessert for their vibrant colors, other colorful cereals like Trix or Rainbow Cheerios can also be used for variations in flavor and texture, adding their own fun twist!

How should I store leftover Fruity Pebbles Sushi?
You can keep leftovers in an airtight container at room temperature for up to 2 days to maintain their crunchiness. For longer storage, refrigerate them for up to 5 days, but note that they may firm up in texture. Just warm them in your hands or briefly in the microwave before serving for a softer bite!

Can I freeze Fruity Pebbles Sushi?
Yes, you can! Wrap each sushi roll tightly in plastic wrap and then place them into a freezer-safe bag for up to 1 month. When you're ready to enjoy them, simply thaw in the refrigerator overnight before indulging in this fun treat!

Are there any dietary considerations with this recipe?
Very! This recipe is gluten-free, but always check the cereal and other product labels to ensure they're safe for your dietary needs if you have allergies. Additionally, if you're looking for a dairy-free option, simply swap the unsalted butter for coconut oil.

What should I do if the marshmallow mixture is too sticky to handle?
If you find it challenging to work with the sticky mixture, I recommend greasing your hands with a little butter or oil. This greatly helps in shaping the sushi logs without the mixture sticking everywhere! If it's too firm, you can gently warm it over low heat to soften it before forming.

Fruity Pebbles Sushi

Fruity Pebbles Sushi: A Colorful Twist on Easy Snacks

Fruity Pebbles Sushi is a fun and easy dessert that combines crunchy cereal and soft bananas, perfect for kids and adults.
Print Recipe Pin Recipe
Prep Time 15 minutes mins
Cook Time 10 minutes mins
Cooling Time 15 minutes mins
Total Time 40 minutes mins
Servings: 4 rolls
Course: Dessert
Cuisine: American
Calories: 200
Ingredients Equipment Method Nutrition Notes

Ingredients
  

For the Sushi Mix
  • 5 cups Fruity Pebbles Cereal The star of this dessert, providing crunch and vibrant color
  • 4 cups Mini Marshmallows These gooey bites act as a delicious binder
  • 2 tablespoons Unsalted Butter Essential for melting the marshmallows
For the Sushi Wrap
  • 1 package Fruit Roll-Ups Use any favorite fruit leather for a unique twist
For the Filling
  • 2 medium Bananas A classic filling that adds natural sweetness
For Serving
  • to taste Chocolate Syrup Drizzle on top for an extra layer of flavor

Equipment

  • Medium saucepan
  • Spatula
  • Parchment Paper
  • Sharp Knife

Method
 

Step-by-Step Instructions
  1. In a medium saucepan, melt the butter over medium heat for about 2-3 minutes.
  2. Add the mini marshmallows to the melted butter and stir continuously until smooth.
  3. Mix in the Fruity Pebbles cereal until well combined.
  4. Spread the mixture onto a parchment-lined baking sheet and flatten into a rectangle.
  5. Lay out the fruit roll-ups flat on a clean surface.
  6. Mold the cereal mixture into a rectangle on the fruit roll-up, add a banana, and roll it up.
  7. Slice each roll into bite-sized pieces and drizzle with chocolate syrup if desired.

Nutrition

Serving: 1rollCalories: 200kcalCarbohydrates: 34gProtein: 1gFat: 7gSaturated Fat: 4gCholesterol: 15mgSodium: 50mgPotassium: 100mgFiber: 1gSugar: 14gVitamin C: 2mgCalcium: 2mgIron: 2mg

Notes

Adjust consistency of the mixture with gentle heating if necessary. Enjoy right away for the best texture and taste.

Tried this recipe?

Let us know how it was!
  • « Previous Page
  • 1
  • …
  • 103
  • 104
  • 105
  • 106
  • 107
  • …
  • 217
  • Next Page »

Welcome!

Hi, I’m Grace, a Sydney-based home cook with a passion for bold flavors and trending ingredients. Whether you’re a busy beginner or a seasoned foodie, you’ll find dishes here that are fresh, fun, and full of flavor.

More about me

Popular Recipes

  • Chocolate Cake Pops
    Delicious Chocolate Cake Pops That Wow Every Dessert Lover
  • Caribbean-Style Beef Stew with Rice
    Caribbean-Style Beef Stew with Rice That Warms Your Soul
  • Healthy Crockpot Beef Stew
    Healthy Crockpot Beef Stew for Cozy Weeknight Dinners
  • Crispy Chicken Tacos
    Crispy Chicken Tacos for the Perfect Taco Tuesday Night

Footer

↑ back to top

About

  • Privacy Policy
  • Disclaimer
  • Terms & Conditions

Newsletter

  • Sign Up! for emails and updates

Contact

  • About me
  • Contact me

Copyright © 2025 TastyTrendIngredients