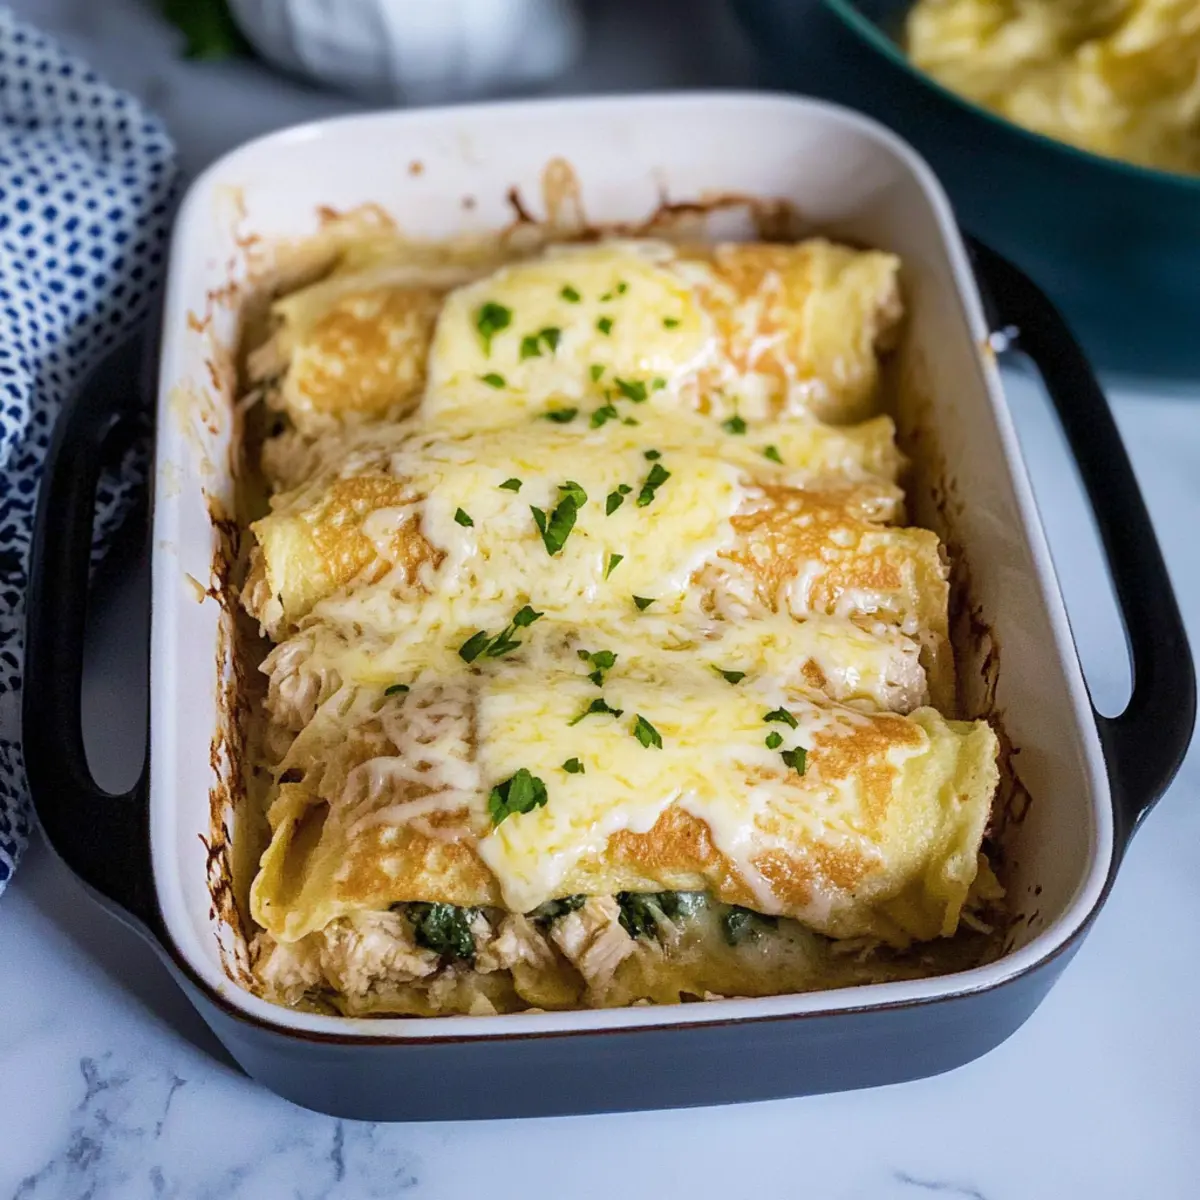
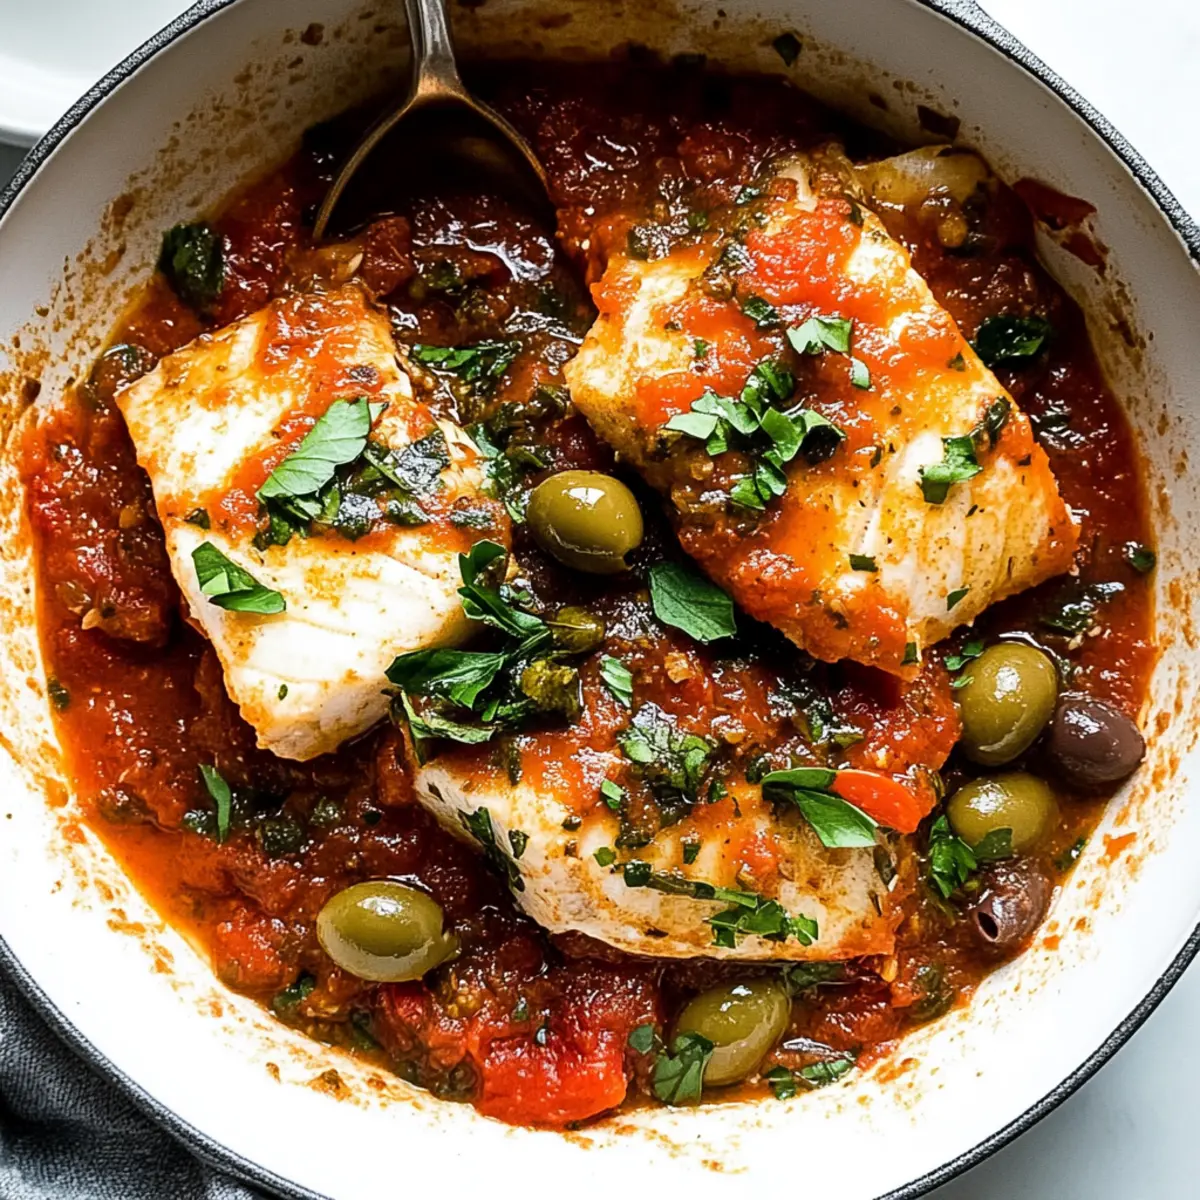
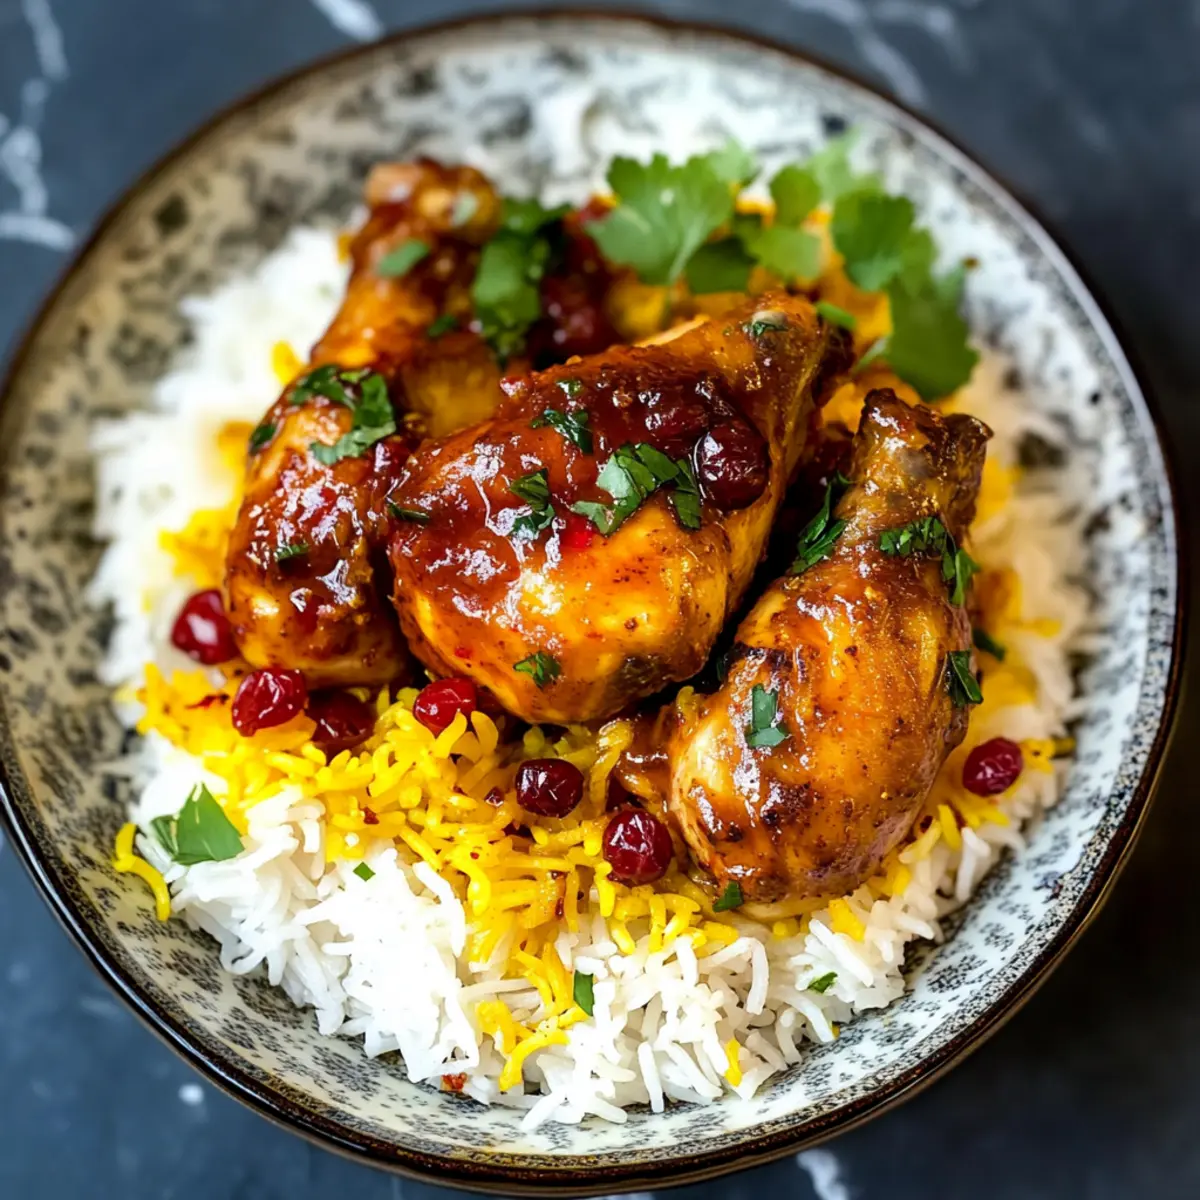
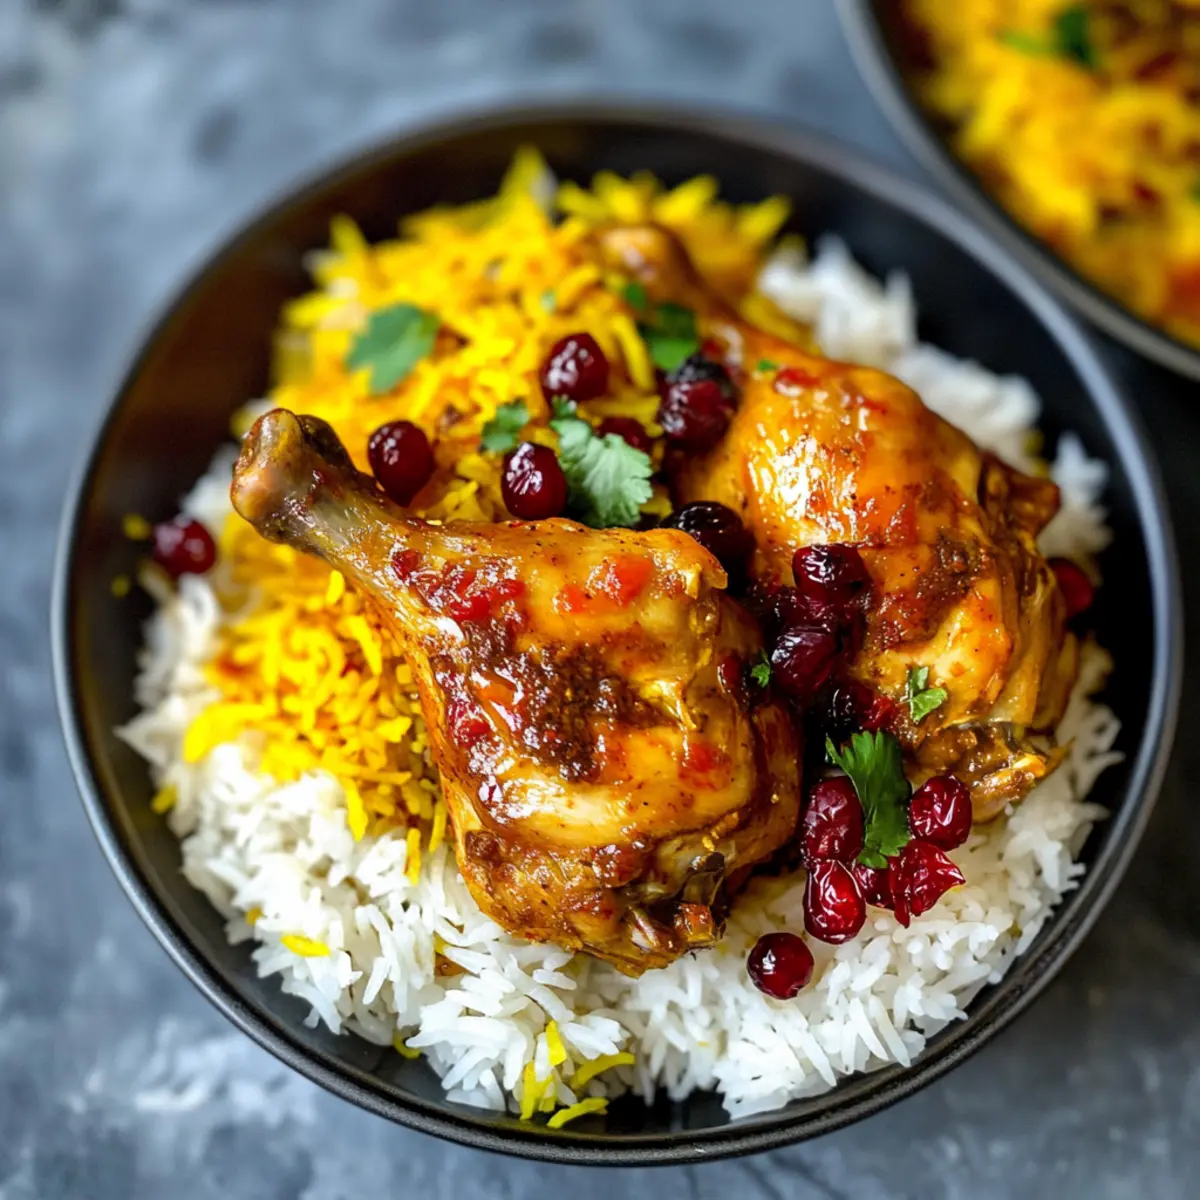
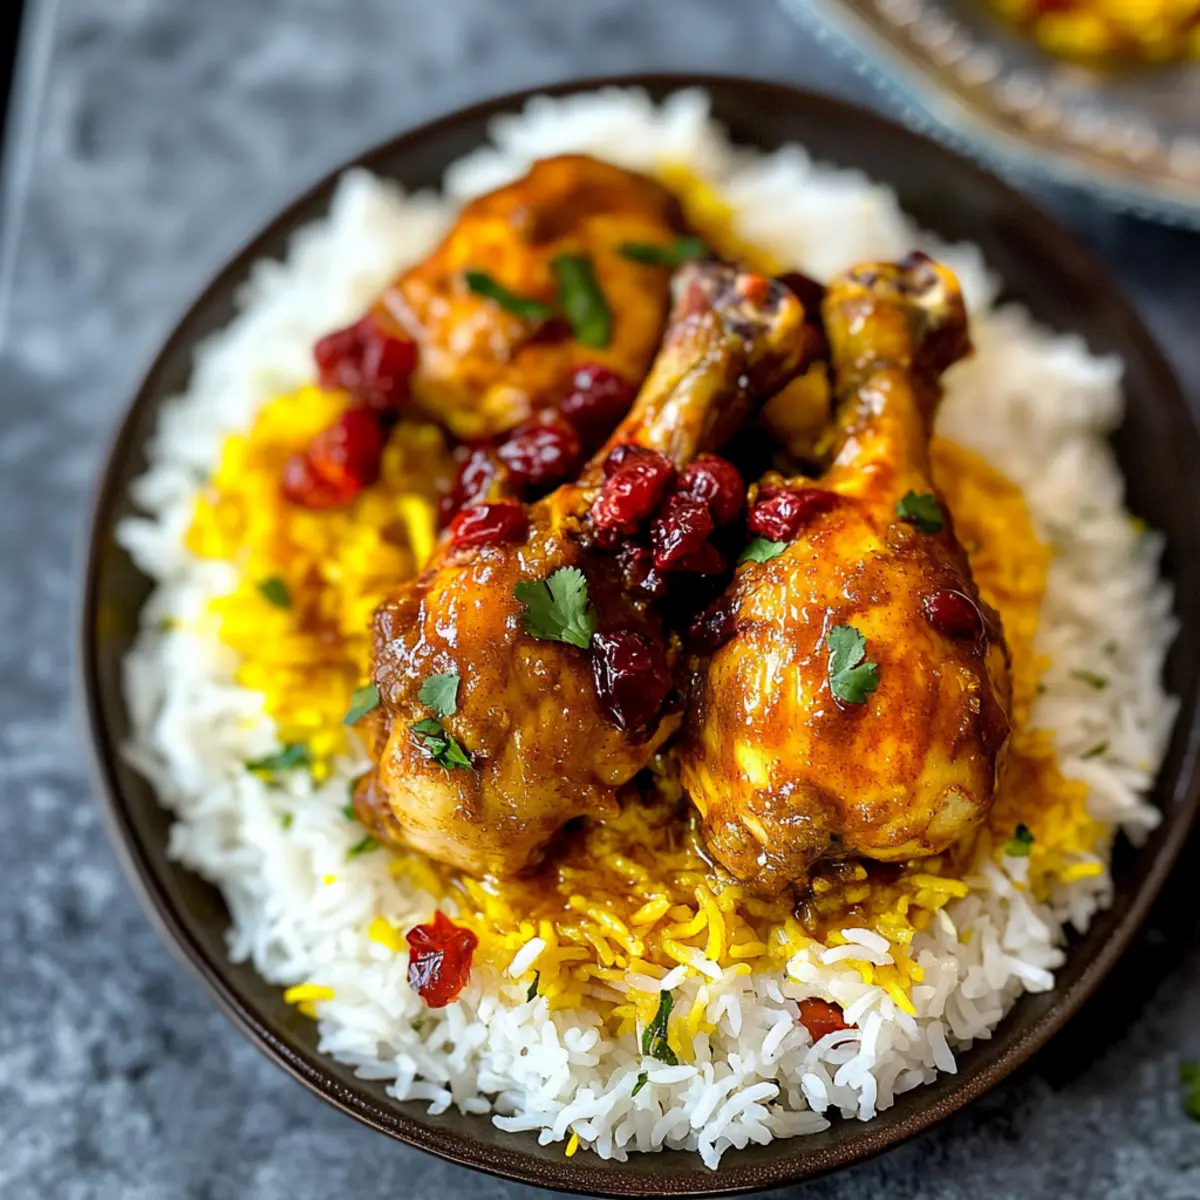
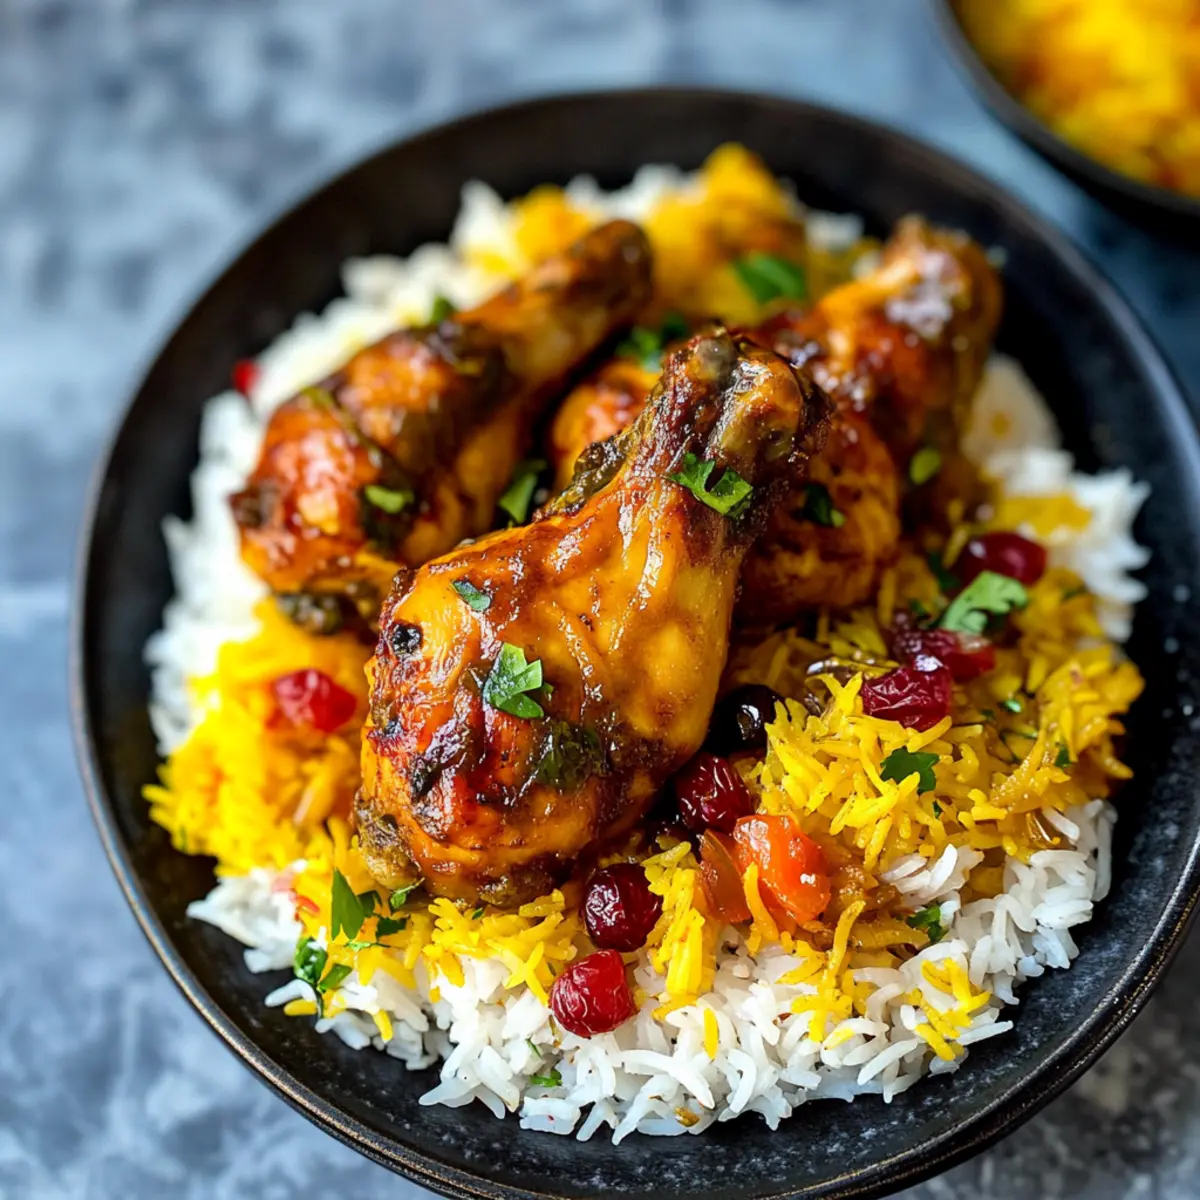
As the rich aroma of saffron wafts through my kitchen, I’m transported to the vibrant streets of Persia, where culinary traditions come alive. Today, I’m excited to share my version of Persian Saffron Chicken, an enchanting dish featuring tender chicken slow-simmered in a luxurious saffron sauce and served alongside aromatic barberry rice. This recipe is a true crowd-pleaser, perfect for special gatherings or those cozy nights when you crave comfort food. Not only is it packed with delicate flavors, but it's also gluten-free, making it an excellent option for everyone at your table. With effortless preparation that yields impressive results, you’ll find yourself making this stunning dish time and again. Curious about how to create this Persian delight right in your own home? Let’s dive into the recipe!
Why Is Persian Saffron Chicken Irresistible?
Uniquely Aromatic: The saffron-infused sauce envelops the chicken in a luxurious flavor bath that’s simply unforgettable.
Tender Perfection: With a slow-simmered technique, every bite of chicken is meltingly tender, practically falling off the bone.
Vibrant Flavors: The blend of spices along with barberries adds depth and a delightful tanginess, making each plate a feast for the senses.
Gluten-Free Goodness: This dish caters to a range of dietary preferences, being gluten-free, allowing everyone to enjoy its splendor.
Perfect for Gatherings: Whether it's a family dinner or a special celebration, this dish is a crowd-pleaser that’ll have your guests raving! If you love chicken dishes, you might also enjoy Honey Garlic Chicken Thighs or Chicken Adobo Again.
Persian Saffron Chicken Ingredients
• Get ready to create a culinary masterpiece!
- Vegetable Oil – Provides moisture and facilitates cooking; olive oil or ghee can be great substitutes.
- Bone-In Chicken (drumsticks or thighs) – The main protein, tender and flavorful when cooked with bones; boneless chicken can be substituted for quicker cooking.
- Yellow Onion (1 large, chopped) – Adds sweetness and depth; consider using a sweet onion for a milder flavor.
- Garlic (2 cloves, minced) – Enhances overall flavor profile; fresh garlic delivers the best results.
- Turmeric (1 3/4 teaspoons) – Provides earthy flavor and vibrant color for the saffron chicken.
- Cinnamon (1/4 teaspoon), Nutmeg (1/4 teaspoon), Cardamom (1/4 teaspoon), Cumin (1/4 teaspoon), Coriander (1/4 teaspoon), Chili Powder (1/8 teaspoon) – A unique blend of spices that contributes warmth and complexity.
- Tomato Paste (2 tablespoons) – Adds umami and body to the sauce; can also use crushed tomatoes for a different texture.
- Chicken Stock (2 1/2 cups) – Liquid base for the sauce; if using bone-in chicken, water can be a good substitute.
- Saffron Water (from 1/4 teaspoon saffron mixed with 1 ice cube) – Imparts luxurious flavor and aroma; reserve half for the rice to enhance its fragrance.
- Salt and Pepper – Essential for flavor enhancement; season to taste throughout cooking.
- Basmati Rice (1 1/2 cups, dry) – Forms the hearty base of the dish, fluffy and fragrant when cooked properly.
- Dried Barberries (1/3 cup) – Adds a tangy, tart flavor; these jewels of flavor can be sourced online.
- Butter (1 teaspoon) – For sautéing barberries and enhancing richness; consider using a bit more for a buttery finish.
- Sugar (1/4 teaspoon) – Balances the tartness of barberries; a dash more can be added for those with a sweeter palate.
- Cucumber (1, diced), Tomatoes (2, diced), Red Onion (1/2, diced) – Ingredients for the refreshing shirazi salad, perfect for adding crunch.
- Lemon Juice (from 1 lemon) – Provides acidity and brightness that lifts the dish; freshly squeezed lemon juice always brings the best flavor.
- Fresh Mint (1 tablespoon chopped or 1 teaspoon dried) – Adds freshness to the salad; substitute with parsley if mint isn't available.
- Salt and Pepper (for salad) – To taste; don’t shy away from seasoning for the best flavor profile.
Get ready to tantalize your taste buds with this authentic Persian Saffron Chicken recipe!
Step‑by‑Step Instructions for Persian Saffron Chicken
Step 1: Prepare Saffron Water
Start by preparing the saffron water, which adds a luxurious flavor to your Persian Saffron Chicken. Place 1/4 teaspoon of saffron in a small dish and melt an ice cube over it. Allow the saffron to steep and release its vibrant color and aroma while you proceed with the other steps. Set this flavorful mixture aside for later use.
Step 2: Brown the Chicken and Onions
In a large pot, heat a few tablespoons of vegetable oil over medium-high heat. Once hot, add the chopped yellow onion and cook for about 5 minutes until translucent. Next, introduce bone-in chicken pieces to the pot, letting them brown for 7-10 minutes on each side until they achieve a golden color. This step builds a beautiful depth of flavor.
Step 3: Add Aromatics and Spices
With the chicken perfectly browned, stir in the minced garlic, cooking for another minute until aromatic. Then, sprinkle in all the spices: turmeric, cinnamon, nutmeg, cardamom, cumin, coriander, and chili powder. Mix well before adding 2 tablespoons of tomato paste, half of the saffron water, and 2 1/2 cups of chicken stock. Combine until fully incorporated.
Step 4: Simmer the Chicken
Reduce the heat to low and leave the pot uncovered to simmer gently for about 4 hours. Check occasionally, stirring to prevent sticking. You’ll know your Persian Saffron Chicken is ready when the meat is fork-tender and the sauce has thickened to a rich consistency. If you’re in a hurry, increase the heat for a quicker cook but keep an eye on it.
Step 5: Cook the Basmati Rice
While the chicken simmers, rinse 1 1/2 cups of basmati rice under cold water until the water runs clear. Cook the rice according to package instructions. It should become fluffy and fragrant, providing a delightful base for the Persian Saffron Chicken once everything is plated. The rice usually takes about 15-20 minutes, so plan accordingly.
Step 6: Sauté Barberries
In a small pan, melt 1 teaspoon of butter over low heat. Once melted, add 1/3 cup of dried barberries along with a pinch of sugar. Sauté them briefly for about 1-2 minutes until they become plump and fragrant. This quick step enhances their flavor, allowing them to shine in your final dish.
Step 7: Combine Rice and Barberries
In a large bowl, take 1/2 cup of your cooked basmati rice and gently mix it with the sautéed barberries and the reserved saffron water. The mixture should be brightly colored and aromatic, ready to uplift the remaining rice. Once blended, mound the barberry-infused rice over the remaining fluffy basmati rice when you serve.
Step 8: Make the Shirazi Salad
To complete your meal, prepare a refreshing shirazi salad. In a mixing bowl, combine diced cucumber, diced tomatoes, and red onion. Drizzle with freshly squeezed lemon juice and add chopped fresh mint. Toss and season with salt and pepper to taste. Chill until you’re ready to serve, allowing the flavors to meld together beautifully.
Storage Tips for Persian Saffron Chicken
- Fridge: Store leftovers in an airtight container for up to 3 days. Make sure the chicken has cooled before refrigerating to maintain its texture and flavor.
- Freezer: You can freeze Persian Saffron Chicken for up to 3 months. Use freezer-safe containers, ensuring to label with the date for easy identification later.
- Reheating: Reheat the chicken in a saucepan over low heat, adding a splash of chicken stock to restore moisture. Ensure it's heated through before serving.
- Rice Storage: Basmati rice should be stored separately in the fridge for up to 3 days; reheat gently to avoid drying out, providing a warm base for the chicken.
What to Serve with Authentic Persian Saffron Chicken
Elevate your mealtime experience with delightful pairings that will perfectly complement the enchanting flavors of this dish.
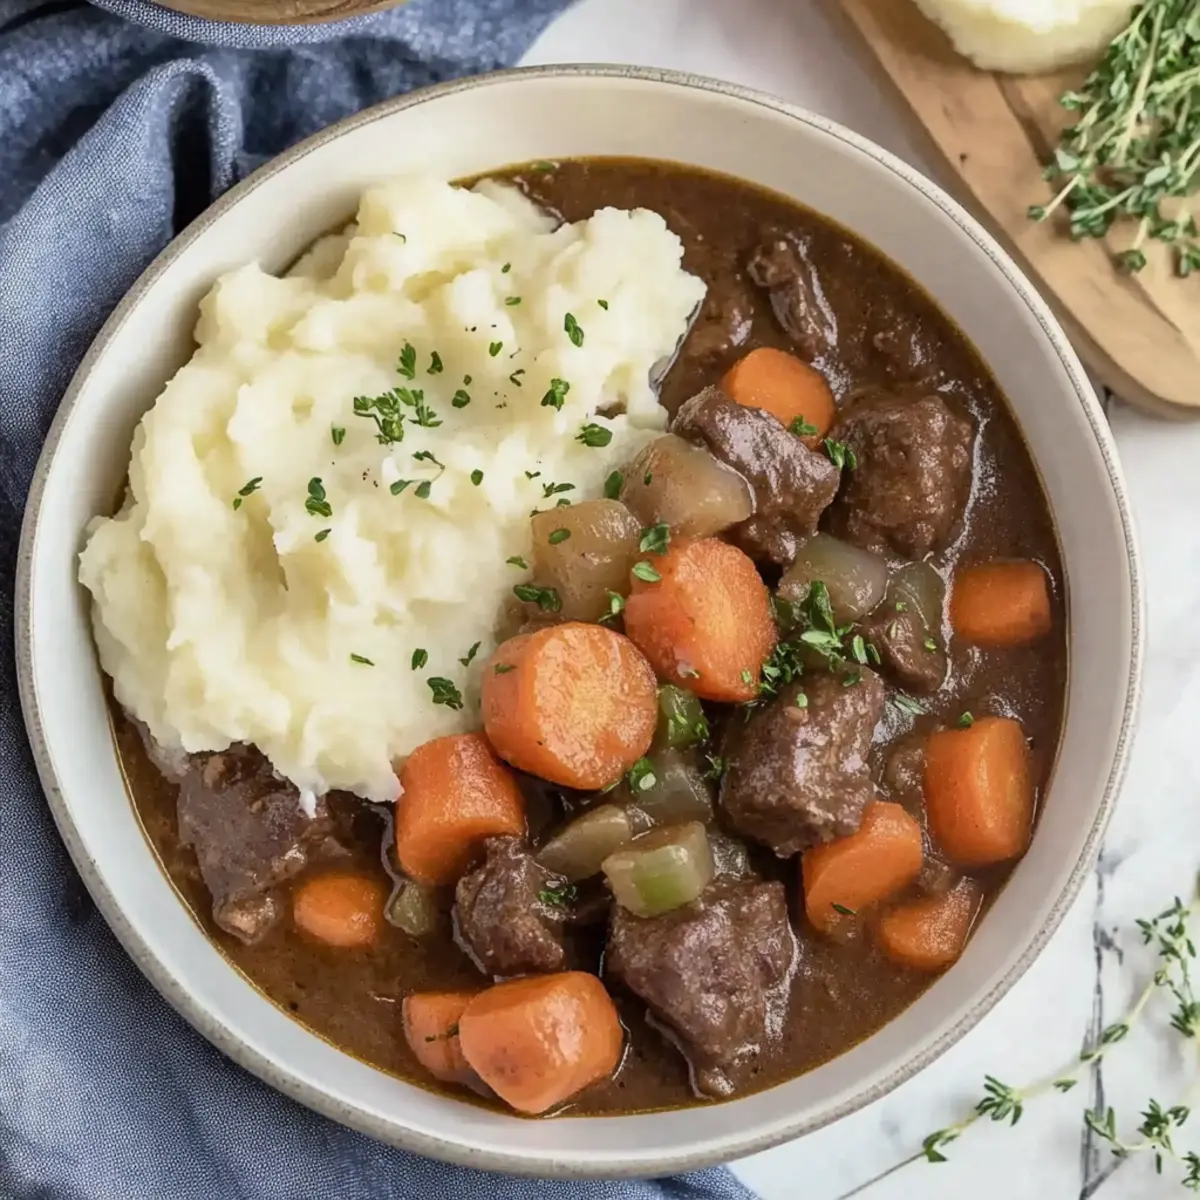
- Creamy Mashed Potatoes: Their silky texture contrasts beautifully with the tender chicken and rich saffron sauce, creating a comforting bite.
- Crispy Roasted Vegetables: A medley of seasonal veggies seasoned to perfection will add a colorful crunch beside your plate. Roasting brings out their natural sweetness, making every forkful a delight.
- Herbed Quinoa: This fluffy, protein-rich grain can balance the dish with a nutty flavor and lovely texture, enhancing your meal's overall profile. Drizzling with olive oil and lemon juice will add brightness that pairs well with the saffron chicken.
- Pickled Garlic and Beets: Their tangy bite and vibrant color will beautifully contrast with the flavors of the saffron chicken, adding a refreshing zing. Don't be surprised if they become your new favorite accompaniment!
- Persian Bread (Lavash): Serve warm with your meal to mop up the rich saffron sauce, adding a delightful chewiness and traditional touch that harmonizes with the dish.
- Mint Tea: Sipping on this fragrant herbal tea will cleanse your palate, letting you enjoy the complex spices of your main dish. It's a soothing way to wind down after a savory meal.
- Persian Saffron Ice Cream (Bastani): End on a sweet note with this aromatic dessert, featuring notes of saffron and rosewater that beautifully echo the flavors of your meal. A refreshing close to your culinary journey!
Make Ahead Options
These Persian Saffron Chicken delights are perfect for those busy weeknights when you crave comfort without the fuss! You can prepare the saffron water and marinate the chicken in the spice mixture up to 24 hours in advance, ensuring the flavors meld beautifully. Additionally, you can cook the chicken and sauce up to 3 days ahead; simply refrigerate in an airtight container. To maintain that tender quality, reheat gently on low heat, adding a splash of chicken stock if necessary for moisture. When you're ready to serve, reheat the chicken, prepare the basmati rice, and sauté the barberries just before plating for a fresh burst of flavor. Enjoy a restaurant-quality meal with minimal effort!
Persian Saffron Chicken Variations
Feel free to explore these delightful twists on the classic Persian saffron chicken recipe!
- Lamb or Beef: Substitute chicken with tender lamb or beef for a heartier flavor experience. The spices will complement the richness beautifully.
- Gluten-Free: While the recipe is naturally gluten-free, ensure any additional ingredients, such as stock or condiments, are labeled gluten-free to cater to dietary restrictions.
- Less Sauce: Use less chicken stock for a thicker sauce. This allows the spices and saffron to shine through even more, giving you a punchy flavor burst!
- Crockpot Option: Opt for a crockpot if you prefer set-it-and-forget-it cooking. This method allows for tender meat with minimal hands-on time.
- Aromatic Vegetable Additions: Toss in some sliced carrots or bell peppers along with the onions for added sweetness and a splash of color. These veggies will absorb the sauce's flavors beautifully.
- Herb Infusion: Try adding fresh herbs like rosemary or thyme to the cooking liquid for an aromatic twist that will elevate your dish's flavor profile.
- Spicy Kick: Add sliced jalapeños or red pepper flakes into the pot for those who crave a bit of heat. It balances the sweetness of the barberries perfectly.
- Fragrant Tomato Variation: Replace tomato paste with crushed tomatoes for a fresher taste. This option also gives your saffron chicken a beautiful red hue.
If you’re intrigued by rich flavors, don’t forget to check out Chipotle Lime Chicken and Rice for another exciting recipe to try in your kitchen.
Expert Tips for Persian Saffron Chicken
-
Simmer Slowly: Allow the chicken to simmer gently for a long time to achieve maximum tenderness and flavor; this is key for perfect Persian saffron chicken.
-
Season to Taste: Always adjust seasoning with salt and pepper during cooking; some may find they need to add a bit more for balance, especially with the rich flavors.
-
Extract Saffron's Flavor: For optimal saffron infusion, ensure it's ground finely; using a pestle and mortar works best to release all the aromatic oils fully.
-
Rice Rinsing: Rinse basmati rice thoroughly under cold water to remove excess starch, which helps achieve the perfect fluffy texture in your Persian saffron chicken dish.
-
Barberries Briefly: Sautéing barberries only for a minute or two will plump them while preventing them from becoming too tart—this enhances their sweet-tangy flavor profile beautifully.
Persian Saffron Chicken Recipe FAQs
How do I choose the right chicken for Persian Saffron Chicken?
For the best flavor and tenderness, I recommend using bone-in chicken, either drumsticks or thighs. The bones help infuse the sauce with richness during cooking. If you're short on time, boneless chicken can be used for quicker cooking, but you may miss out on that deep, savory flavor.
What’s the best way to store leftovers of Persian Saffron Chicken?
Store your Persian Saffron Chicken in an airtight container once it has cooled. It will keep well in the refrigerator for up to 3 days. Make sure to check the chicken and sauce, as the flavors can meld and improve with time—definitely a tasty perk!
Can I freeze Persian Saffron Chicken?
Absolutely! You can freeze your Persian Saffron Chicken for up to 3 months. To do this, place it in a freezer-safe container, and ensure you label it with the date. When you’re ready to enjoy it again, thaw it overnight in the fridge and reheat gently in a saucepan, adding a splash of chicken stock to keep it moist.
How can I troubleshoot if my saffron chicken sauce is not thickening?
If your sauce isn’t thickening as desired, first ensure you've simmered it long enough. You can also remove the chicken once it's cooked and increase the heat, allowing the sauce to reduce for 10-15 minutes. For a thicker texture, consider making a cornstarch slurry (mixing cornstarch with water) and stirring it into the sauce while it simmers to achieve a satisfying consistency.
Is Persian Saffron Chicken safe for those with gluten allergies?
Yes! This dish is gluten-free as long as you use gluten-free chicken stock. Always double-check ingredient labels for possible hidden gluten sources, especially in your stock and any spices you use. It’s perfect for gathering everyone around the table!
Can I use other types of rice for this recipe?
While basmati is traditional for Persian Saffron Chicken, you can substitute with other rice varieties like jasmine for a different flavor. However, cooking times and water ratios will vary. Just rinse them thoroughly and adjust cooking instructions as the recipe indicates. Enjoy the experimenting!
Meltingly Tender Persian Saffron Chicken You’ll Love
Ingredients
Equipment
Method
- Prepare saffron water by placing 1/4 teaspoon of saffron in a small dish and melting an ice cube over it. Set aside for later use.
- Heat vegetable oil in a large pot over medium-high heat. Add chopped onion and cook until translucent (about 5 minutes). Brown the chicken pieces for 7-10 minutes on each side.
- Stir in minced garlic and cook for an additional minute. Add spices and mix well before incorporating tomato paste, half the saffron water, and chicken stock.
- Reduce heat to low and simmer uncovered for about 4 hours, stirring occasionally until the meat is fork-tender.
- Rinse basmati rice under cold water and cook according to package instructions, about 15-20 minutes.
- Melt butter in a small pan over low heat, then add barberries with a pinch of sugar and sauté for 1-2 minutes.
- Combine 1/2 cup of cooked rice with sautéed barberries and reserved saffron water, mixing well.
- In a mixing bowl, combine diced cucumber, tomatoes, and red onion with lemon juice and mint. Season with salt and pepper, and chill.