tastytrendingredients

  • Home
  • Recipes
    • Appetizers
    • Breakfast
    • Dessert
    • Dinner
    • Drinks
    • Salads
    • Snacks
    • Soups
  • About me
  • Contact me
menu icon
go to homepage
  • Home
  • Recipes
    • Appetizers
    • Breakfast
    • Dessert
    • Dinner
    • Drinks
    • Salads
    • Snacks
    • Soups
  • About me
  • Contact me
search icon
Homepage link
  • Home
  • Recipes
    • Appetizers
    • Breakfast
    • Dessert
    • Dinner
    • Drinks
    • Salads
    • Snacks
    • Soups
  • About me
  • Contact me
×

Indian Overnight Oats with Kulfi Twist for Cozy Mornings

March 8, 2026 by Grace Snow Leave a Comment

As I stirred the warm, saffron-infused milk into my bowl of oats, the rich scents of cardamom and rose water whisked me away on a culinary adventure. This Creamy Indian Overnight Oats recipe, inspired by the beloved flavors of kulfi, transforms breakfast into a delightful experience that you'll look forward to every morning. With its easy prep and customizable options, you can whip up a nutritious and energizing meal that fits perfectly into your busy life. Whether you’re a fan of dairy or prefer plant-based alternatives, this delightful dish caters to all cravings. Ready to elevate your breakfast game? Let's dive into this comforting twist on a classic!

Why are Indian Overnight Oats special?

Creaminess: The saffron-infused milk gives these overnight oats a rich, luxurious texture that mimics traditional kulfi, making breakfast feel like a special treat.

Aromatic Spices: Ground cardamom and rose water add delightful, exotic flavors that wake up your senses and create a unique start to your day.

Customizable: These oats are easily tailored to your preferences—swap in your favorite nuts or sweeteners, and opt for dairy or plant-based milks to suit your dietary needs.

Nutritious: Packed with fiber and protein, this dish offers a healthy starting point to sustain energy levels and keep you fuller longer.

Quick Meal Prep: Perfect for busy mornings, these oats can be prepared in advance, making them a smart choice for meal prep enthusiasts. Dive deeper into easy meal prep with our meal prep tips for more inspiration!

Indian Overnight Oats Ingredients

Discover the delightful mix of flavors and textures!

For the Base

  • Rolled Oats – Provides structure and heartiness; choose whole rolled oats for the best results!
  • Milk – Acts as the soaking liquid, adding creaminess; substitute with almond, coconut, or soy milk for a vegan option.

For Flavoring

  • Ground Cardamom – Offers aromatic spice; use freshly ground for enhanced flavor.
  • Saffron Strands – Adds a luxurious essence and color; omit if preferred but consider turmeric for color instead.
  • Rose Water (optional) – Provides floral notes; can be reduced for a milder touch.
  • Vanilla Extract (optional) – Enhances flavor; opt for pure extract for the best result.

For Sweetness

  • Honey or Maple Syrup – Sweetens the mixture; adjust to taste, with maple syrup fitting for vegans.

For Texture

  • Chia Seeds (optional) – Thicken the mix and boost nutrition; omit if not desired.
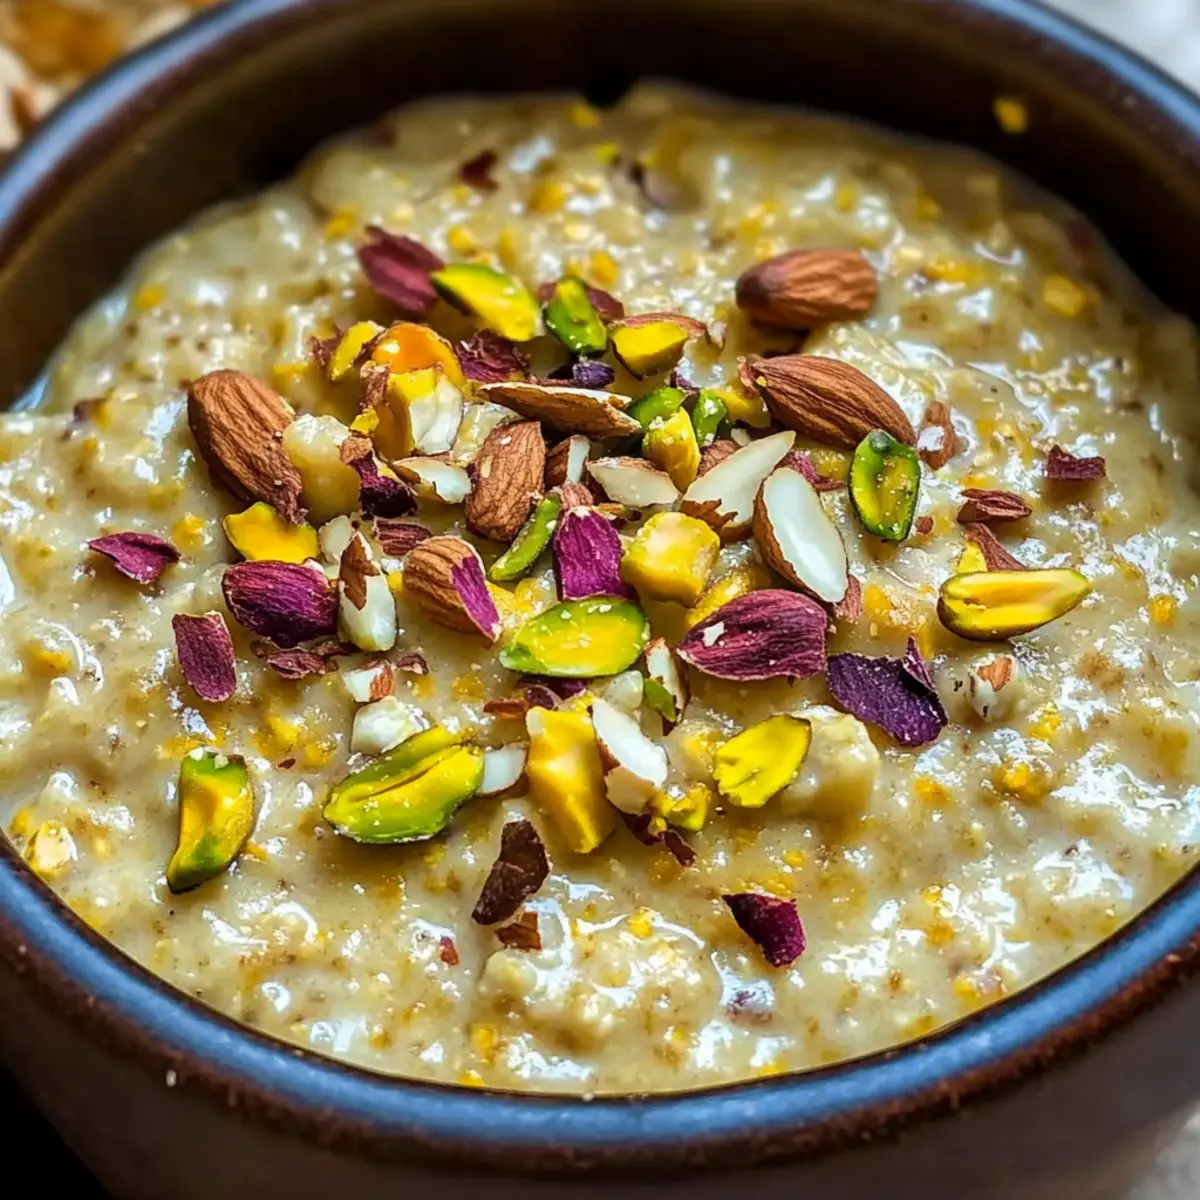
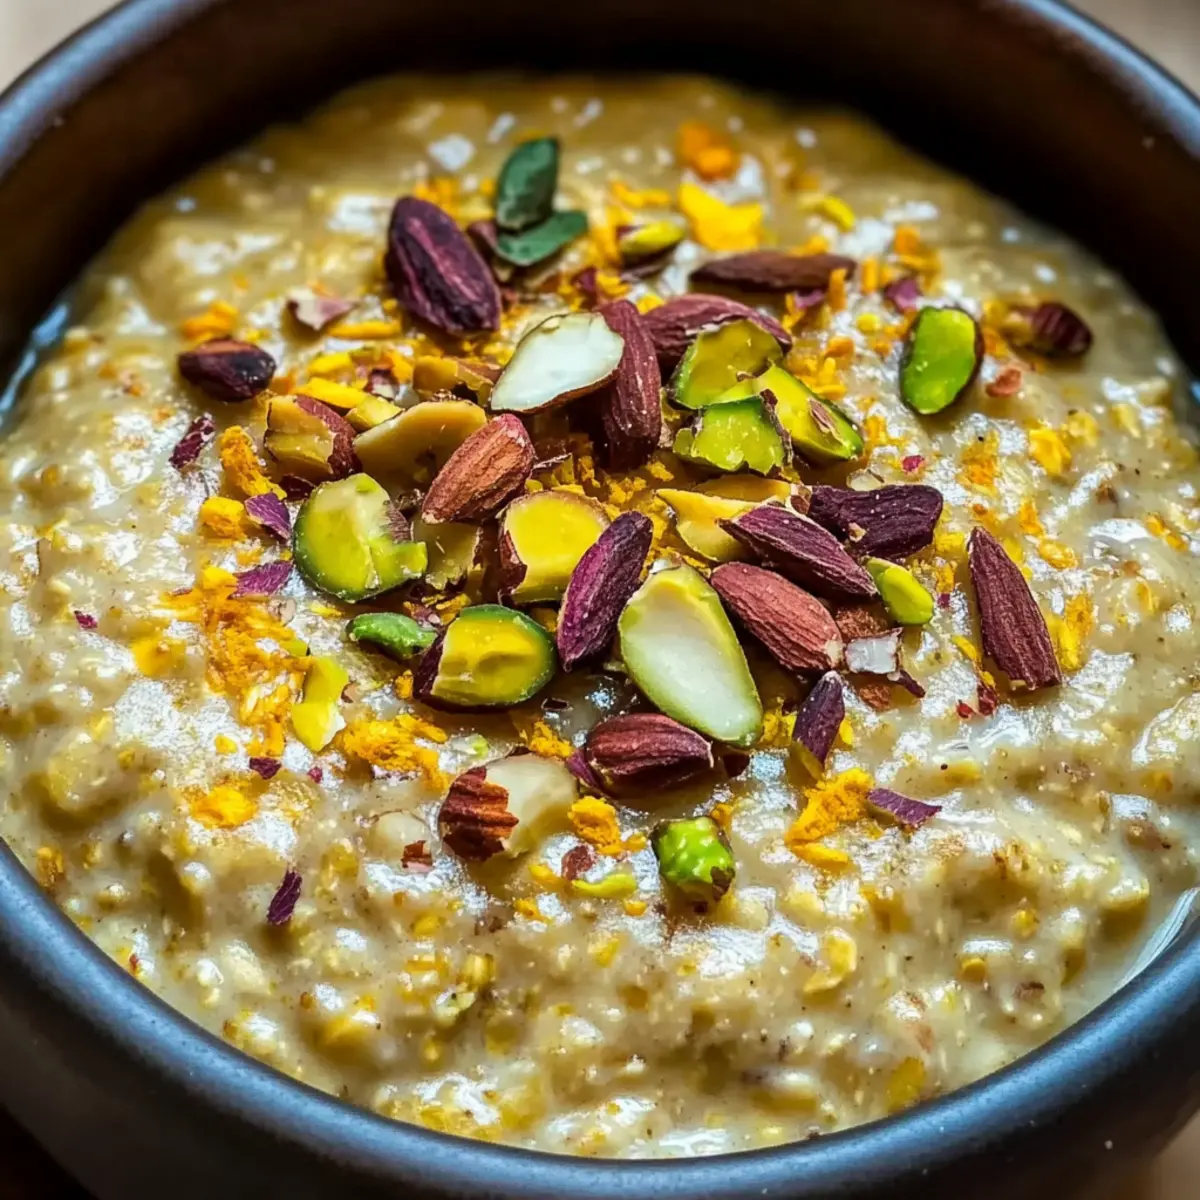
  • Chopped Pistachios – Adds crunch and rich flavor; enjoy them fresh or lightly toasted.
  • Chopped Almonds – Provides texture and healthy fats; feel free to substitute with your favorite nuts.

This creamy Indian Overnight Oats recipe offers a delicious, customizable breakfast option that will transform your mornings!

Step‑by‑Step Instructions for Indian Overnight Oats

Step 1: Warm the Milk
Begin by warming your milk in a small saucepan over low heat until it reaches approximately 110°F (43°C). Remove the pan from heat and stir in the saffron strands and ground cardamom. Let this aromatic mixture steep for about 5 minutes, allowing the spices to infuse their wonderful flavors into the milk, creating a beautifully fragrant base for your Indian Overnight Oats.

Step 2: Combine Oats and Chia Seeds
In a medium-sized jar or bowl, combine the rolled oats with chia seeds (if using). Mix them together gently to distribute the chia seeds evenly among the oats, which will help thicken your overnight oats. This step ensures that each bite of your Indian Overnight Oats is packed with nutrition and texture, ready to absorb the creamy milk mixture next.

Step 3: Pour in the Saffron-Infused Milk
Pour the warm saffron-infused milk over the oat and chia mixture in your jar or bowl. Add in the honey or maple syrup for sweetness, along with the rose water and vanilla extract if desired. Stir everything well until combined, ensuring the oats are fully coated in the flavorful liquid, setting the stage for a luxuriously creamy breakfast experience.

Step 4: Refrigerate Overnight
Cover the jar or bowl securely with a lid or plastic wrap and place it in the refrigerator. Allow the oats to soak overnight, or for at least 6 hours. This chilling time is crucial for the oats to absorb the flavors and moisture, transforming them into the creamy, indulgent Indian Overnight Oats you’re looking forward to enjoying the next morning.

Step 5: Stir and Check Consistency
When you’re ready to serve, gently stir the oats to ensure an even consistency. The overnight soaking should have thickened the mixture, creating a creamy texture reminiscent of kulfi. If the oats seem too thick for your preference, you can add a splash of additional milk to achieve your desired creaminess.

Step 6: Add Crunchy Toppings
Top your Indian Overnight Oats with a generous sprinkle of chopped pistachios and almonds for that delightful crunch. Feel free to get creative—add any other favorite nuts or dried fruits you enjoy. These toppings not only enhance the flavor and texture but also add a beautiful finish to your dish, making it visually appealing.

Step 7: Serve and Enjoy
Spoon your creamy Indian Overnight Oats into bowls or enjoy directly from the jar. For an extra touch, serve chilled and remember, you can drizzle a little more honey or pour in some milk if you wish for added sweetness. Dig into this refreshing breakfast treat that combines ease and exotic flavor, making your mornings feel special!

Expert Tips for Indian Overnight Oats

  • Choose the Right Oats: Always opt for whole rolled oats for best texture; instant oats will result in mushy consistency, ruining your Indian Overnight Oats experience.

  • Infuse Properly: Steep saffron and cardamom in warm milk to extract maximum flavor and aroma; this step is key to mimicking the essence of traditional kulfi.

  • Sweeten Gradually: Adjust sweetness to your preference; start with less honey or maple syrup and add more if needed—everyone’s taste is unique!

  • Texture Boost: Don’t skip chia seeds; they contribute to creaminess without overpowering the flavor, enhancing the overall nutritious profile of your oats.

  • Fresh Nuts are Best: Use fresh or lightly toasted nuts for optimal crunch and flavor. Avoid soft nuts, as they can detract from the delightful texture of your Indian Overnight Oats.

  • Correct Consistency: If your oats are too thick post-refrigeration, simply stir in a splash of milk to reach your desired creamy consistency before enjoying.

What to Serve with Indian Overnight Oats

Transform your breakfast experience by discovering delightful pairings that elevate your Indian overnight oats.

  • Fresh Mango Slices: Juicy and sweet, mango adds a tropical flair that brightens the dish with natural sweetness and vibrant color.

  • Yogurt Parfait: A dollop of creamy yogurt offers a luscious contrast, alongside fruity layers that enhance texture and nutritional value.

  • Spiced Chai: Warm, spiced chai complements the rich flavors of the oats, creating a comforting morning ritual that awakens the senses.

  • Mixed Berries: Fresh berries provide a burst of tartness and antioxidants, balancing the creaminess of the oats with juicy freshness in every bite.

  • Coconut Flakes: Toasted coconut adds a delightful crunch and a hint of tropical flavor, enhancing the overall complexity of your breakfast experience.

  • Nutty Granola: For a satisfying crunch, sprinkle some nutty granola on top; it blends beautifully with the creamy oats and adds an indulgent layer of texture.

These pairings beautifully enhance the flavor and texture of your creamy Indian overnight oats, making every bite a delightful experience!

Storage Tips for Indian Overnight Oats

Fridge: Store leftovers in an airtight container in the fridge for up to 2 days to maintain freshness. Make sure they are well sealed to avoid absorbing any unwanted odors.

Make-Ahead: These Indian Overnight Oats are perfect for meal prep; prepare them in advance and divide into individual jars for easy grab-and-go breakfasts throughout the week.

Reheating: Enjoy chilled, but if you prefer warm oats, gently warm in the microwave for about 30 seconds. Stir well and check consistency before indulging!

Customization: Feel free to add toppings like nuts or fruits just before serving to keep them crunchy. Adding these fresh ingredients at the last minute enhances the flavors and textures of your Indian Overnight Oats.

Make Ahead Options

These Indian Overnight Oats are perfect for meal prep, saving you precious time on busy mornings! You can prepare the oat mixture (without the toppings) up to 24 hours in advance, allowing the flavors to meld beautifully. Simply combine the rolled oats, chia seeds, saffron-infused milk, and sweetener in a jar, then seal and refrigerate overnight. To maintain quality, store your toppings separately, such as chopped nuts or dried fruits, and add them just before serving to keep the crunch. When you're ready to enjoy, stir the oats, adjust the consistency with a splash of milk if needed, and garnish with your favorite toppings for a delightful breakfast that feels indulgent yet is effortlessly simple!

Indian Overnight Oats Variations

Customize your Indian Overnight Oats to suit your tastes and dietary needs with these exciting ideas that will ignite your culinary creativity!

  • Vegan Delight: Swap dairy milk for almond, coconut, or oat milk to easily make these oats completely plant-based.
  • Sweetness Shift: Use agave syrup instead of honey, or mash ripe bananas for a natural sweetener that adds moisture and flavor.
  • Nutty Twist: Experiment with different nuts like walnuts or pecans for a unique crunch; toasted almonds can also enhance the nutty aroma.
  • Spice Swap: Substitute ground cardamom with cinnamon for a cozy warmth, allowing your taste buds to dance with familiar flavors.
  • Protein Boost: Mix in a scoop of your favorite protein powder before refrigerating; this twist makes breakfast more filling and nutritious.
  • Tropical Touch: Add shredded coconut or diced mango for a taste of the tropics that pairs beautifully with the spices, elevating the dish even further!
  • Dried Fruit Addition: Sprinkle in your choice of dried fruits like raisins or apricots for an extra burst of sweetness and texture.
  • Citrus Zing: Grate some fresh orange or lemon zest to brighten up the dish with a refreshing citrus note, ensuring every bite is lively and vibrant.

Let your imagination take flight as you create your perfect bowl of Indian Overnight Oats, and explore other delightful breakfast options with our top breakfast recipes to suit your unique palate!

Indian Overnight Oats Recipe FAQs

What kind of oats should I use for Indian Overnight Oats?
Absolutely! For the best texture, always use whole rolled oats. They provide structure and heartiness, while instant oats tend to become mushy, diminishing the creamy experience you're aiming for.

How long can I store leftovers of Indian Overnight Oats?
You can store any leftovers in an airtight container in the refrigerator for up to 2 days. Remember to seal the container tightly to maintain freshness and prevent any unwanted odors from invading your delicious oats.

Can I freeze Indian Overnight Oats? How do I do it?
Yes, you can freeze Indian Overnight Oats for up to 3 months! To do this, prepare your oats as usual but leave them unseasoned. Place them in a freezer-safe jar or container, leaving some space for expansion. When you're ready to enjoy, thaw in the refrigerator overnight and add your desired toppings just before serving. This makes breakfast preparation a breeze!

What if my Indian Overnight Oats are too thick?
Very common! If you find that your oats are too thick after refrigerating, simply stir in a splash of milk (dairy or plant-based) until you reach your desired creamy consistency. This not only helps adjust the texture but also enhances the flavor!

Are Indian Overnight Oats vegan?
Yes, you can easily make Indian Overnight Oats vegan! Simply substitute cow's milk with almond, coconut, or soy milk. Also, replace honey with maple syrup for a delightful vegan sweetness without compromising on taste.

Can I adjust the spices in Indian Overnight Oats?
The more the merrier! Feel free to experiment with spices to suit your palate. You can replace cardamom with cinnamon for a different flavor twist or even incorporate a mixture of spices according to your preference. Don't hesitate to make it your own!

Indian Overnight Oats

Indian Overnight Oats with Kulfi Twist for Cozy Mornings

This Indian Overnight Oats recipe transforms breakfast into a delightful experience with saffron, cardamom, and customizable options.
Print Recipe Pin Recipe
Prep Time 10 minutes mins
Refrigeration Time 6 hours hrs
Total Time 6 hours hrs 10 minutes mins
Servings: 2 bowls
Course: Breakfast
Cuisine: Indian
Calories: 350
Ingredients Equipment Method Nutrition Notes

Ingredients
  

For the Base
  • 1 cup Rolled Oats Choose whole rolled oats for the best results.
  • 1 cup Milk Substitute with almond, coconut, or soy milk for a vegan option.
For Flavoring
  • 1 teaspoon Ground Cardamom Use freshly ground for enhanced flavor.
  • a pinch Saffron Strands Adds a luxurious essence and color; can omit.
  • 1 teaspoon Rose Water Optional; can be reduced for a milder touch.
  • 1 teaspoon Vanilla Extract Optional; opt for pure extract for best result.
For Sweetness
  • 2 tablespoons Honey or Maple Syrup Adjust to taste, with maple syrup fitting for vegans.
For Texture
  • 1 tablespoon Chia Seeds Optional; omit if not desired.
  • 2 tablespoons Chopped Pistachios Adds crunch and rich flavor; enjoy fresh or toasted.
  • 2 tablespoons Chopped Almonds Feel free to substitute with your favorite nuts.

Equipment

  • small saucepan
  • medium-sized jar or bowl

Method
 

Step-by-Step Instructions
  1. Warm the milk in a small saucepan over low heat until it reaches about 110°F. Stir in saffron strands and ground cardamom. Steep for about 5 minutes.
  2. In a medium-sized jar or bowl, combine rolled oats with chia seeds, mixing gently to distribute the chia seeds evenly.
  3. Pour the warm saffron-infused milk over the oat and chia mixture. Add honey or maple syrup for sweetness, along with rose water and vanilla extract. Stir well until combined.
  4. Cover securely and refrigerate overnight or for at least 6 hours to let the oats soak and absorb flavors.
  5. When ready to serve, stir the oats gently. If too thick, add a splash of milk to achieve desired creaminess.
  6. Top with chopped pistachios and almonds. Add other favorite nuts or dried fruits if desired.
  7. Spoon into bowls or enjoy directly from the jar. Drizzle with more honey or milk if desired.

Nutrition

Serving: 1bowlCalories: 350kcalCarbohydrates: 50gProtein: 10gFat: 15gSaturated Fat: 4gPolyunsaturated Fat: 6gMonounsaturated Fat: 5gCholesterol: 10mgSodium: 100mgPotassium: 300mgFiber: 8gSugar: 10gVitamin A: 100IUCalcium: 150mgIron: 2mg

Notes

Perfect for meal prep. Store leftovers in an airtight container in the fridge for up to 2 days. Add nuts or fruits just before serving to maintain crunchiness.

Tried this recipe?

Let us know how it was!

Lemon Chia Breakfast Cookies for a Zesty Morning Boost

March 8, 2026 by Grace Snow Leave a Comment

As I opened my pantry this morning, the sunlight danced off the jars of bright yellow lemons and plump chia seeds, begging to be combined into something refreshing. That’s when I decided to whip up a batch of Lemon Chia Breakfast Cookies. These delightful treats are not only gluten-free and sugar-free, but they also transform busy mornings into something special with their chewy texture and zesty notes. Whether you're seeking a healthy breakfast option or a guilt-free snack, these cookies are a perfect balance of nutrition and flavor. Before you know it, they’ll become a staple in your kitchen, providing energy and satisfaction throughout your day. Curious about how to make this citrusy goodness yourself? Let’s dive into the recipe!

Why are Lemon Chia Breakfast Cookies irresistible?

Bright, Zesty Flavor: Each bite bursts with a refreshing lemon essence that invigorates your taste buds and adds a cheerful touch to your mornings.

Nutrient-Dense Ingredients: Packed with chia seeds and almond flour, these cookies provide essential nutrients, making them a health-conscious choice for anyone!

Flexible Recipe: Feel free to personalize the cookies with nuts or chocolate chips, or even try variations like swapping almond flour for sunflower seed flour.

Quick & Easy Preparation: With straightforward steps, you'll have delightful cookies ready to enjoy in just 12 minutes! Ideal for busy mornings or snacks, you won’t want to miss these!

Perfect Pairing: Serve these cookies with your favorite herbal tea or an iced citrus drink for a refreshing brunch that will impress any guest.

Lemon Chia Breakfast Cookies Ingredients

• Get ready to bake!

For the Cookies

  • Almond Flour – Provides structure and a nutty flavor; substitute with hazelnut flour for a different taste.
  • Coconut Flour – Absorbs moisture and adds sweetness; do not substitute in equal amounts due to its high absorbency.
  • Chia Seeds – Acts as a binder and offers health benefits (protein, omega-3s); can be replaced with ground flaxseeds if desired.
  • Baking Soda – Helps cookies rise; baking powder can be substituted, but adjust the quantity.
  • Salt – Enhances flavor; can use sea salt or Himalayan salt as alternatives.
  • Flax Egg (or Egg) – Binds ingredients together; use a flax egg (1 tbsp flaxseed meal + 2.5 tbsp water) for a vegan option.
  • Melted Coconut Oil – Adds moisture and richness; substitute with unsweetened applesauce for a lower-fat option.
  • Maple Syrup – Natural sweetener that enhances taste; monk fruit syrup can be used for a sugar-free version.
  • Lemon Juice – Provides tanginess; use additional zest or natural lemon extract for a stronger flavor.
  • Lemon Zest – Adds fresh citrus flavor; can increase the quantity for more zestiness.
  • Vanilla Extract – Enhances overall flavor; substitute with almond extract for a different profile.

These Lemon Chia Breakfast Cookies are all about bright, zesty flavors and a healthy twist—perfect for anyone looking to ditch fast food in favor of something homemade!

Step‑by‑Step Instructions for Lemon Chia Breakfast Cookies

Step 1: Preheat the Oven
Begin your Lemon Chia Breakfast Cookies by preheating your oven to 350°F (175°C). While the oven warms up, line a baking sheet with parchment paper to prevent the cookies from sticking. This step ensures that your cookies bake evenly and achieve that delightful golden color.

Step 2: Mix Dry Ingredients
In a mixing bowl, whisk together the almond flour, coconut flour, chia seeds, baking soda, and salt. Focus on breaking up any clumps so the ingredients blend smoothly. You should have a fine, even mixture that is light and fluffy, which will create a perfect base for your cookies.

Step 3: Combine Wet Ingredients
In another bowl, whisk together the egg (or flax egg), melted coconut oil, maple syrup, lemon juice, lemon zest, and vanilla extract. Mix until everything is well combined and smooth. The vibrant lemon juice and zest will create a fragrant base that is equally refreshing and inviting for your Lemon Chia Breakfast Cookies.

Step 4: Create the Cookie Batter
Pour the wet mixture into the bowl of dry ingredients, stirring gently until just combined. Be careful not to overmix, as this could make the cookies dense. Let the batter rest for about 5 minutes to allow the chia seeds to absorb moisture and thicken, enhancing the chewy texture of your cookies.

Step 5: Shape the Cookies
Using a spoon or cookie scoop, form 1.5-inch rounds of dough and place them on the prepared baking sheet. As you shape each cookie, flatten them slightly for even baking. They should be spaced evenly to allow for spreading. This step helps ensure that each Lemon Chia Breakfast Cookie bakes to perfection.

Step 6: Bake to Golden Perfection
Place the baking sheet in the preheated oven and bake for 10-12 minutes, or until the edges of the cookies turn a lovely golden brown. The center may look slightly soft, but it will firm up as they cool. Keep an eye on them to achieve that enticing crispiness on the edges.

Step 7: Cool and Serve
Once baked, take the cookies out and let them cool on the baking sheet for about 5 minutes. This allows them to set, making them easier to transfer. After cooling, move the Lemon Chia Breakfast Cookies to a wire rack to cool completely, perfect for enjoying fresh or storing for later.

Make Ahead Options

These Lemon Chia Breakfast Cookies are a fantastic choice for meal prep, allowing busy home cooks to enjoy a wholesome breakfast or snack with ease! You can prepare the dough up to 24 hours in advance; just cover it and refrigerate to keep the flavors fresh and prevent drying out. Alternatively, shape the cookies and store them in an airtight container for up to 3 days before baking, ensuring they retain their delicious chewiness. When you’re ready to serve, simply bake them according to the original instructions—no need to thaw! This way, you’ll have fresh, vibrant cookies ready at a moment’s notice, perfect for busy mornings.

What to Serve with Lemon Chia Breakfast Cookies

Serve these delightful cookies alongside your favorite beverages and sides to elevate your breakfast experience!

  • Herbal Tea: A warm cup of chamomile or lemon balm tea complements the cookies’ zesty flavor, creating a cozy morning ritual.

  • Iced Citrus Drink: A refreshing iced lemon or orange drink enhances the cookie’s bright notes, making for a revitalizing summer brunch.

  • Greek Yogurt Parfait: Layer creamy yogurt with fresh berries on the side. The tartness of the yogurt beautifully balances the sweetness of the cookies.

  • Fruit Salad: A vibrant mix of seasonal fruits adds freshness and color to your brunch table, offering a lovely contrast to the chewy cookies.

  • Avocado Toast: The rich creaminess of avocado on whole grain bread provides a satisfying savory balance, making for a well-rounded breakfast.

  • Smoothie Bowl: Pair them with a green smoothie bowl topped with granola and fruits for a nutritious, filling meal that energizes your morning.

  • Nut Butter Dip: Serve with almond or sunflower butter for an extra dose of protein and flavor. The creaminess complements the cookie's texture beautifully.

  • Chia Pudding: For a chia lover's dream combo, pair these cookies with a bowl of chia pudding topped with fresh fruits for double the texture and nutrition!

Lemon Chia Breakfast Cookies Variations

Feel free to explore and elevate your Lemon Chia Breakfast Cookies with these delightful twists and substitutions!

  • Nut-Free Option: Swap almond flour for ground sunflower seeds to cater to nut allergies without compromising flavor.

  • Sweetness Boost: Add an extra tablespoon of maple syrup for those who like a sweeter cookie. The added sweetness can complement the tartness of lemon beautifully.

  • Crispiness Factor: Mix in some chopped nuts or seeds for added crunch. The texture contrast will make each bite even more enjoyable!

  • Citrus Variety: Incorporate orange or lime zest along with lemon zest for a vibrant citrus medley that brightens up your cookies spectacularly.

  • Gluten-Free Flour Mix: If you don't have almond or coconut flour, try a gluten-free flour blend instead. This makes for a soft texture, keeping the cookies deliciously chewy.

  • Fruity Twist: Add dried fruits like cranberries or raisins for a chewy, fruity update. The sweetness from the fruit will pair well with the lemon's zesty notes.

  • Chocolaty Indulgence: Toss in dark chocolate chips for a delightful contrast that appeals to all ages. The balance of dark chocolate with lemon is a match made in heaven!

  • Savory Surprise: For a unique twist, consider adding a pinch of sea salt or even some herbs like rosemary for an unexpected savory note that complements the sweet and tart flavors wonderfully.

Feel inspired by these variations and make these cookies your own! Whether you're enjoying them fresh with a cup of herbal tea or stashing some for later, the possibilities are endless. If you're looking for more delicious ideas, check out my Cornbread Breakfast Casserole or try these Breakfast Egg Muffins for a fulfilling morning meal!

Expert Tips for Lemon Chia Breakfast Cookies

  • Rest the Batter: Let your batter rest for 5 minutes to allow the chia seeds to absorb moisture, creating a chewier texture in your cookies.

  • Avoid Overmixing: Mix until just combined to prevent dense cookies. Gentle stirring retains the desired chewy texture of your Lemon Chia Breakfast Cookies.

  • Personalize Your Cookies: Consider adding nuts, dark chocolate chips, or dried fruits to elevate flavor and add a bit of crunch.

  • Zesting Made Easy: Use a microplane for quick and uniform lemon zest, ensuring a fresh and vibrant flavor in every bite.

  • Check for Doneness: Keep an eye on your cookies as they bake; they should be golden around the edges while remaining soft in the center.

Storage Tips for Lemon Chia Breakfast Cookies

Room Temperature: Store cookies in an airtight container for up to 3 days to keep them fresh and chewy. Place parchment paper between layers for best preservation.

Fridge: For extended freshness, keep the Lemon Chia Breakfast Cookies in the fridge for up to 7 days. Ensure they are sealed tightly to maintain their delightful texture.

Freezer: Freeze cookies in a single layer on a baking sheet, then transfer to a freezer-safe container. They can be stored for up to 3 months, ensuring you have zesty treats on hand anytime!

Reheating: Thaw at room temperature or microwave for a few seconds to reheat. Enjoy them warm for an extra touch of comfort!

Lemon Chia Breakfast Cookies Recipe FAQs

What is the best way to select lemons for the cookies?
Absolutely! When choosing lemons, look for ones that are bright yellow, firm, and free from dark spots. A heavy lemon indicates juiciness, which is perfect for extracting both juice and zest.

How should I store Lemon Chia Breakfast Cookies?
You can store these cookies in an airtight container at room temperature for up to 3 days. For better longevity, refrigeration will keep them fresh for about 7 days. Just ensure they're sealed tightly to maintain their chewy texture.

Can I freeze Lemon Chia Breakfast Cookies?
Very much so! To freeze, lay the cookies in a single layer on a baking sheet and place them in the freezer until firm. Then, transfer them to a freezer-safe container where they can be stored for up to 3 months. To enjoy, simply thaw at room temperature or microwave for about 10-15 seconds for a warm treat.

What should I do if my cookies turn out too dry?
If your cookies are dry, it might be due to overbaking or not enough moisture in the ingredients. Ensure your oven is accurately calibrated and check the cookies around the 10-minute mark. If you want to add extra moisture next time, consider increasing the coconut oil or maple syrup slightly.

Is it safe for pets to eat Lemon Chia Breakfast Cookies?
While the ingredients in these cookies are healthy for humans, the lemon and sweeteners can be harmful to pets. It's best to avoid sharing these cookies with furry friends to ensure their health and safety.

Can I make Lemon Chia Breakfast Cookies nut-free?
Absolutely! You can swap out the almond flour for ground sunflower seeds to create a nut-free variant. Just be aware that it may slightly alter the taste and texture, but you’ll still enjoy a nutritious and delightful cookie!

Lemon Chia Breakfast Cookies

Lemon Chia Breakfast Cookies for a Zesty Morning Boost

Lemon Chia Breakfast Cookies are gluten-free and sugar-free treats with a refreshing taste, perfect for a healthy breakfast or snack.
Print Recipe Pin Recipe
Prep Time 5 minutes mins
Cook Time 12 minutes mins
Resting Time 5 minutes mins
Total Time 22 minutes mins
Servings: 12 cookies
Course: Breakfast
Cuisine: Gluten-Free, Vegan
Calories: 120
Ingredients Equipment Method Nutrition Notes

Ingredients
  

For the Cookies
  • 2 cups Almond Flour substitute with hazelnut flour for a different taste
  • 1/2 cup Coconut Flour do not substitute in equal amounts due to its high absorbency
  • 1/4 cup Chia Seeds can be replaced with ground flaxseeds if desired
  • 1 tsp Baking Soda baking powder can be substituted, but adjust the quantity
  • 1/2 tsp Salt can use sea salt or Himalayan salt as alternatives
  • 1 flax egg or egg Flax Egg (1 tbsp flaxseed meal + 2.5 tbsp water) for a vegan option
  • 1/4 cup Melted Coconut Oil substitute with unsweetened applesauce for a lower-fat option
  • 1/4 cup Maple Syrup monk fruit syrup can be used for a sugar-free version
  • 1/4 cup Lemon Juice use additional zest or natural lemon extract for a stronger flavor
  • 1 tbsp Lemon Zest can increase the quantity for more zestiness
  • 1 tsp Vanilla Extract substitute with almond extract for a different profile

Equipment

  • Oven
  • Mixing bowls
  • Whisk
  • Baking Sheet
  • Parchment Paper
  • Spoon or Cookie Scoop

Method
 

Step-by-Step Instructions
  1. Preheat the Oven: Begin your Lemon Chia Breakfast Cookies by preheating your oven to 350°F (175°C). While the oven warms up, line a baking sheet with parchment paper.
  2. Mix Dry Ingredients: In a mixing bowl, whisk together the almond flour, coconut flour, chia seeds, baking soda, and salt.
  3. Combine Wet Ingredients: In another bowl, whisk together the egg (or flax egg), melted coconut oil, maple syrup, lemon juice, lemon zest, and vanilla extract.
  4. Create the Cookie Batter: Pour the wet mixture into the bowl of dry ingredients, stirring gently until just combined. Let the batter rest for about 5 minutes.
  5. Shape the Cookies: Using a spoon or cookie scoop, form 1.5-inch rounds of dough and place them on the prepared baking sheet.
  6. Bake to Golden Perfection: Place the baking sheet in the preheated oven and bake for 10-12 minutes, or until the edges of the cookies turn a lovely golden brown.
  7. Cool and Serve: Once baked, take the cookies out and let them cool on the baking sheet for about 5 minutes before moving them to a wire rack.

Nutrition

Serving: 1cookieCalories: 120kcalCarbohydrates: 10gProtein: 3gFat: 8gSaturated Fat: 5gPolyunsaturated Fat: 2gMonounsaturated Fat: 1gSodium: 50mgPotassium: 75mgFiber: 2gSugar: 4gVitamin C: 2mgCalcium: 4mgIron: 4mg

Notes

These cookies are perfect for busy mornings or as a healthy snack option. Personalize with nuts or chocolate chips as desired.

Tried this recipe?

Let us know how it was!

Delicious Ube Pandesal with Cheese: A Fluffy Twist

February 26, 2026 by Grace Snow Leave a Comment

As I sifted through the vibrant purple ube jam, an unexpected warmth enveloped me—nostalgia mixed with anticipation. Today, I'm excited to share my Cheesy Ube Pandesal Rolls, a delightful fusion of sweet and savory that instantly takes me back to cozy mornings filled with the comforting aroma of freshly baked bread. These fluffy rolls are not only a wonderful twist on classic Filipino pandesal but also a guaranteed crowd-pleaser that will brighten up any brunch table or snack time. With a simple prep that easily fits into your busy schedule, you’ll find that these rolls are just as rewarding to make as they are to enjoy. Curious to see how these soft, cheesy treasures come together? Let's dive in!

Why is Ube Pandesal a Must-Try?

Uniquely delicious: These cheesy ube pandesal rolls bring a delightful twist to traditional flavors, marrying sweet ube and savory cheese for a taste sensation.
Easy to make: With simple steps, you’ll have warm rolls ready in no time—perfect for those busy mornings or unexpected guests.
Nostalgic comfort: Each bite transports you back to cherished family gatherings, celebrating the joy of homemade goodness.
Versatile treats: Serve them fresh for breakfast, as a snack, or even paired with coffee for an afternoon pick-me-up.
For more delightful twists, try Sweet Potatoes Black or enjoy them alongside your favorite dishes like Tagliatelle Asparagus Peas.

Ube Pandesal with Cheese Ingredients

For the Dough
• All-purpose flour – Provides structure and body to the bread; substitute with bread flour for a chewier texture.
• Active dry yeast – Leavens the dough, making it rise; can substitute with instant yeast, skipping proofing.
• Warm milk (110°F) – Activates the yeast and adds moisture; use dairy-free milk for a lactose-free option.
• White sugar – Adds sweetness and helps yeast activation; can replace half with honey or agave syrup.
• Salt – Enhances flavor and regulates yeast activity; essential for flavor balance—don’t omit.
• Large egg – Binds the ingredients and enriches the dough; use a flax egg for a vegan alternative.
• Vegetable oil – Adds moisture and softness to the rolls; substitute with melted coconut oil or unsalted butter.
• Ube halaya (purple yam jam) – Infuses the dough with color and flavor; use homemade or store-bought ube jam.
• Ube extract – Enhances ube flavor and color; omit for a less intense flavor.

For the Filling and Coating
• Cubed cheddar cheese – Provides a savory, creamy center; substitute with any melty cheese like mozzarella.
• Plain breadcrumbs – Coats the rolls, adding crunch; panko can be used for a flakier texture.

These delightful Ube Pandesal with Cheese rolls are sure to be a hit at your next gathering!

Step‑by‑Step Instructions for Ube Pandesal with Cheese

Step 1: Activate the Yeast
In a mixing bowl, combine 1 cup of warm milk (110°F), 1 tablespoon of active dry yeast, and 1 tablespoon of sugar. Stir gently and let it rest for about 10 minutes until the mixture becomes frothy and bubbly, indicating that the yeast is activated and ready to leaven your Ube Pandesal with Cheese.

Step 2: Prepare the Dough Mixture
In a large mixing bowl, whisk together 1 large egg, 3 tablespoons of vegetable oil, 1/2 cup of ube halaya, and a few drops of ube extract for enhanced flavor. Once well combined, gradually incorporate the frothy yeast mixture, mixing everything together until smooth. This base is essential for creating your soft and fluffy rolls.

Step 3: Combine Dry Ingredients
Next, gradually add 3 to 4 cups of all-purpose flour and 1 teaspoon of salt to the wet mixture. Stir until a dough starts to form, ensuring that all ingredients are thoroughly combined. The dough should be slightly tacky but smooth, setting the stage for your delicious ube pandesal rolls.

Step 4: Knead the Dough
On a floured surface, knead the dough for about 8 to 10 minutes, until it becomes elastic and smooth. If using a stand mixer, knead on medium speed with a dough hook attachment. Once kneaded, the texture should be soft yet slightly sticky, creating the perfect foundation for your rolls.

Step 5: First Rise
Transfer the kneaded dough to a greased bowl, covering it with a damp cloth or plastic wrap to retain moisture. Place it in a warm, draft-free area and let it rise for about 1 hour, or until it has doubled in size. This step helps develop flavor and texture in your Ube Pandesal with Cheese.

Step 6: Shape the Rolls
After the dough has risen, gently punch it down to release the air. Divide it into 16 equal portions and shape each piece into a ball. Flatten each ball slightly and place a cube of cheddar cheese in the center, then pinch the sides to seal the cheese inside. This ensures a gooey surprise in every bite!

Step 7: Coat the Rolls
Once filled, roll each dough ball in plain breadcrumbs, making sure they are thoroughly coated for added crunch. Arrange the coated rolls on a lined baking tray, allowing some space between each roll. Cover the tray and let them rise again for 30 to 40 minutes, until they've puffed up and are nearly doubled in size.

Step 8: Preheat the Oven
While the rolls are rising, preheat your oven to 350°F (175°C). Ensure it's fully heated by the time your rolls are ready to bake, so they rise beautifully and develop a golden crust, enhancing the overall experience of Ube Pandesal with Cheese.

Step 9: Bake the Rolls
Once the rolls have risen adequately, place the tray in the preheated oven and bake for 18 to 20 minutes. Keep an eye on them and look for a lovely golden-brown color. The rolls should be puffy and fragrant, filling your kitchen with the irresistible aroma of freshly baked bread.

Step 10: Cool and Serve
After baking, remove the rolls from the oven and allow them to cool on a wire rack for about 10 minutes. This step helps them set, while the cheese melts perfectly inside. Serve warm for a delightful snack or brunch option that everyone will love—your Ube Pandesal with Cheese is ready to be enjoyed!

Expert Tips for Ube Pandesal with Cheese

  • Perfect Yeast Activation: Ensure your warm milk is precisely 110°F. If it's too hot, it can kill the yeast, leading to dense rolls.

  • Knead Well: Take your time while kneading the dough for 8-10 minutes. This develops gluten, ensuring your Ube Pandesal with Cheese is fluffy and airy.

  • Check Dough Consistency: After mixing, the dough should be slightly tacky but not overly sticky. Adjust with more flour or water as needed to achieve the right texture.

  • First Rise Success: Make sure to let the dough rise in a warm, draft-free area. A longer rise might develop more flavor, so be patient!

  • Cheese Choice: Use high-quality cubed cheddar cheese for a gooey filling. For variations, mozzarella also works beautifully, giving you delicious twists!

What to Serve with Cheesy Ube Pandesal Rolls

Warm, fluffy, and bursting with sweet and savory flavors, these rolls can transform any meal into a festive gathering.

  • Rich Garlic Butter Pasta: The creamy essence of garlic butter perfectly contrasts the sweetness of ube, creating a balanced dining experience. Tossed with al dente noodles, it makes for a hearty dish that elevates your meal.

  • Tropical Fruit Salad: A refreshing medley of mango, pineapple, and bananas adds a zesty touch, complementing the sweet notes of ube. This vibrant side brings brightness to your table, making it a delightful snack alongside the warm rolls.

  • Savory Filipino Longganisa: The bold and sweet flavors of this sausage beautifully harmonize with ube's gentle sweetness. Pair these rolls with longganisa for a satisfying taste sensation, merging classic breakfast elements into one comforting plate.

  • Steamed Vegetable Medley: A colorful assortment of steamed broccoli, carrots, and bell peppers adds texture and crunch to your meal. This healthy side is a perfect counterbalance to the soft, cheesy rolls.

  • Creamy Coconut Curry: The rich sauce of a coconut curry brings an exotic twist while highlighting the subtle sweetness of ube. Serve your cheesy rolls on the side to soak up that delicious curry goodness.

  • Iced Coffee or Calamansi Juice: Brighten your meal with a refreshing drink. Cold brew coffee or a zesty calamansi juice nicely complements the flavors and keeps your palate refreshed.

  • Chocolate Dipped Strawberries: For a sweet ending to your meal, try pairing these rolls with luxurious chocolate-covered strawberries—a fun treat that perfectly balances the flavors of both desserts.

Make Ahead Options

These Ube Pandesal with Cheese rolls are perfect for busy cooks looking to save time without sacrificing flavor! You can prepare the dough up to 24 hours in advance; simply follow the instructions, let it rise after kneading, then cover the bowl and refrigerate. When you're ready to bake, take the dough out, let it sit at room temperature for about 30 minutes, then shape the rolls, fill them with cheese, and allow them to rise again for 30-40 minutes before baking. To maintain quality, keep the dough tightly covered to prevent drying out, and for the best results, enjoy them fresh the same day you bake!

Ube Pandesal with Cheese Variations

Feel free to play with this recipe and make it your own—you'll create delightful surprises in each bite!

  • Dairy-Free: Substitute cheddar cheese with vegan cheese options for a delicious dairy-free version.
    This keeps the creamy center intact while accommodating those with dairy restrictions—everyone can enjoy the joy of warm Ube Pandesal!

  • Spicy Kick: Add a teaspoon of chili flakes to the dough for a subtle heat that contrasts nicely with the sweet ube.
    This simple tweak will elevate your rolls, making them perfect for adventurous eaters.

  • Herb Infusion: Mix fresh herbs like rosemary or thyme into the dough for an aromatic touch.
    These fragrant herbs will beautifully complement the sweet ube, creating an enticing flavor profile.

  • Nutty Texture: Incorporate chopped nuts like walnuts or pecans into the filling for added crunch.
    Not only does this introduce a delightful texture contrast, but it also enriches the flavor of each roll.

  • Chocolate Delight: Replace the cheese with chocolate chips for a sweet, gooey surprise inside.
    Each roll becomes a mini dessert that can satisfy your sweet tooth while still embracing that fluffy ube goodness!

  • Cinnamon Sugar Coating: Before baking, roll the filled balls in a mixture of cinnamon and sugar for a sweet outer layer.
    This creates a blissful aroma and enhances the flavor, making these rolls perfect for brunch alongside coffee or tea.

  • Savory Garlic: Mix garlic powder into the breadcrumb coating for a burst of savory flavor.
    This adds an unexpected twist that pairs wonderfully with the sweet ube, delivering a flavorful experience in every bite!

For more delightful variations, consider checking out Cocoa Crusted Steak with Shishito Peppers or enjoy these rolls alongside your favorite dishes, like Buffalo Tofu with Caesar Salad.

How to Store and Freeze Ube Pandesal with Cheese

Room Temperature: Store leftover Ube Pandesal with Cheese in an airtight container at room temperature for up to 2 days to maintain freshness.

Fridge: If you want to keep them longer, you can refrigerate the rolls for up to 5 days. Just place them in a container to prevent them from drying out.

Freezer: For longer storage, freeze the unbaked rolls before the second rise. Place them in a single layer on a baking sheet, freeze until firm, then transfer to a freezer bag for up to 3 months.

Reheating: When ready to enjoy, bake frozen rolls directly from the freezer at 350°F (175°C) for an additional 5-10 minutes until warmed through and golden.

Ube Pandesal with Cheese Recipe FAQs

What kind of ube halaya should I use?
You can use either homemade or store-bought ube halaya for this recipe. Homemade provides a more personal touch with fresh flavors, while store-bought offers convenience. Just make sure it’s the purplest and most vibrant jam for that beautiful coloration in your rolls!

How do I store leftover Ube Pandesal with Cheese?
Store your leftover Ube Pandesal with Cheese in an airtight container at room temperature for up to 2 days. If you want to keep them fresh longer, you can refrigerate them for up to 5 days. Just ensure they are well-sealed to prevent them from drying out.

Can I freeze Ube Pandesal with Cheese?
Absolutely! For the best results, freeze the unbaked rolls after shaping them. Arrange them on a baking sheet in a single layer and freeze until solid. Then transfer them into a freezer bag for up to 3 months. When you’re ready to bake, simply preheat the oven to 350°F (175°C) and bake from frozen for about 5-10 extra minutes.

What should I do if my dough doesn’t rise?
If your dough isn’t rising, it could be due to several reasons. First, check if your yeast is still active; sprinkle a little in warm water—if it doesn’t froth after 10 minutes, it’s time to get fresh yeast. Ensure your milk is at the right temperature (110°F) to activate the yeast. You may also want to let the dough rise in a warmer spot, as drafts can hinder this process.

Are these rolls suitable for people with dairy allergies?
You can easily adapt Ube Pandesal with Cheese to be dairy-free! Replace the warm milk with dairy-free milk, use a dairy-free cheese alternative, and avoid traditional butter in the recipe. Following these steps, you can enjoy these lovely rolls without worry!

Can I make these rolls sweet instead of savory?
Very! You can incorporate chocolate chips instead of cheese for a sweet twist. Just substitute the cheese filling entirely and maybe even drizzle some melted chocolate on top after baking for an extra treat!

Ube Pandesal with Cheese

Delicious Ube Pandesal with Cheese: A Fluffy Twist

Try this Ube Pandesal with Cheese recipe for a delightful twist on classic Filipino bread, perfect for breakfast or snack time.
Print Recipe Pin Recipe
Prep Time 30 minutes mins
Cook Time 20 minutes mins
First Rise 1 hour hr
Total Time 1 hour hr 50 minutes mins
Servings: 16 rolls
Course: Breakfast
Cuisine: Filipino
Calories: 120
Ingredients Equipment Method Nutrition Notes

Ingredients
  

Dough Ingredients
  • 3-4 cups all-purpose flour Substitute with bread flour for chewier texture.
  • 1 tablespoon active dry yeast Can substitute with instant yeast.
  • 1 cup warm milk 110°F, can use dairy-free milk for lactose-free option.
  • 1/4 cup white sugar Can replace half with honey or agave syrup.
  • 1 teaspoon salt Essential for flavor balance.
  • 1 large egg Use flax egg for vegan alternative.
  • 3 tablespoons vegetable oil Substitute with melted coconut oil or unsalted butter.
  • 1/2 cup ube halaya Use homemade or store-bought.
  • few drops ube extract Omit for less intense flavor.
Filling and Coating Ingredients
  • 2 cups cubed cheddar cheese Substitute with any melty cheese like mozzarella.
  • 1 cup plain breadcrumbs Panko can be used for flakier texture.

Equipment

  • Mixing Bowl
  • Baking tray
  • Stand Mixer

Method
 

Step-by-Step Instructions
  1. In a mixing bowl, combine warm milk, active dry yeast, and sugar. Let it rest for about 10 minutes until frothy.
  2. In a large bowl, whisk together egg, vegetable oil, ube halaya, and ube extract. Gradually incorporate the yeast mixture until smooth.
  3. Add all-purpose flour and salt. Stir until a dough starts to form.
  4. Knead the dough for about 8 to 10 minutes until elastic and smooth.
  5. Place the dough in a greased bowl, cover, and let it rise for about 1 hour until doubled in size.
  6. Punch down the dough and divide it into 16 portions. Shape each into a ball and place cheese inside.
  7. Roll filled dough balls in breadcrumbs and arrange on a baking tray. Let them rise for 30 to 40 minutes.
  8. Preheat your oven to 350°F (175°C) while the rolls are rising.
  9. Bake the rolls for 18 to 20 minutes until golden brown.
  10. Allow cooling on a wire rack for 10 minutes before serving.

Nutrition

Serving: 1rollCalories: 120kcalCarbohydrates: 15gProtein: 3gFat: 5gSaturated Fat: 1.5gPolyunsaturated Fat: 0.5gMonounsaturated Fat: 2gCholesterol: 20mgSodium: 150mgPotassium: 80mgFiber: 1gSugar: 2gVitamin A: 150IUCalcium: 50mgIron: 1mg

Notes

These Ube Pandesal with Cheese rolls are perfect for breakfast or as a snack, offering a delightful blend of flavors and textures.

Tried this recipe?

Let us know how it was!

Deliciously Flaky Homemade French Croissant Recipe

February 25, 2026 by Grace Snow Leave a Comment

The warm, buttery aroma of fresh-baked pastries fills the air, transporting me to the charming streets of Paris. This Homemade French Croissant Recipe is my secret to recreating those moments at home, effortlessly elevating any breakfast or brunch. With just a bit of patience and effort, you'll master the art of crafting these flaky delights that are not only impressive but satisfying to make. They’re versatile too—perfect for indulging in sweet treats or savory surprises with your favorite fillings. So grab your rolling pin and let’s embark on this delightful baking adventure together. Ready to turn your kitchen into a French café?

Why Make Homemade French Croissants?

Homemade croissants are a culinary masterpiece that will impress your family and friends. Flaky texture and rich buttery flavor make these pastries irresistible, elevating any breakfast or brunch table. Versatility is key—fill them with chocolate or cheese for sweet and savory options! They're surprisingly approachable, and you'll feel accomplished each time you make them. Plus, the aroma wafting through your kitchen is pure magic. Why not try your hand at these gorgeous delights today? For more inspiration, consider pairing them with a delightful cup of Homemade Hot Chocolate for a cozy breakfast experience!

Homemade French Croissant Ingredients

• Discover the secrets to flaky delights!

For the Dough

  • All-purpose Flour – Provides structure and body; cake flour leads to a lighter croissant.
  • Granulated Sugar – Adds a hint of sweetness; feel free to omit for a traditional taste or substitute with coconut sugar for a richer flavor.
  • Salt – Enhances flavor and strengthens gluten; consider using sea salt for a delicate taste.
  • Active Dry Yeast – Leavens the dough for airy croissants; instant yeast can be directly mixed without dissolving.
  • Warm Milk – Hydrates dough and activates yeast; for a vegan twist, use non-dairy milk.
  • Unsalted Butter (melted) – Adds richness to the dough; margarine is a great dairy-free substitute.

For the Butter Block

  • Cold Unsalted Butter – Essential for creating layers that give croissants their signature flakiness; a high-fat butter works best, and keep it chilled!

For the Egg Wash

  • Egg – Provides a glossy finish; for a vegan option, try a mixture of almond milk and turmeric for color.

With this Homemade French Croissant Recipe, you're on your way to creating those exquisitely flaky pastries right in your own kitchen!

Step‑by‑Step Instructions for Homemade French Croissant Recipe

Step 1: Prepare the Dough
In a large mixing bowl, combine all-purpose flour, granulated sugar, and salt. In a separate bowl, dissolve active dry yeast in warm milk, allowing it to bubble for about 5 minutes. Pour the yeast mixture and melted unsalted butter into the dry ingredients. Mix until a rough dough forms, then knead on a lightly floured surface for about 10 minutes until smooth. Wrap in plastic and refrigerate for 1 hour to firm up.

Step 2: Prepare the Butter Block
While the dough chills, work on the butter block. Place cold unsalted butter between two sheets of parchment paper. Use a rolling pin to pound it into a square about 6 inches by 6 inches, ensuring it's evenly thick. This butter block will create the signature flaky layers in your Homemade French Croissant recipe. Once shaped, keep it in the fridge until ready to incorporate.

Step 3: Laminate the Dough
After the dough has chilled, roll it out on a lightly floured surface into a large rectangle, approximately 20 inches by 10 inches. Place the cold butter block in the center and fold the dough over to encase the butter completely. Roll this dough into a long rectangle, about 24 inches by 10 inches. Begin the first turn by folding the dough into thirds, like a letter. Wrap in plastic and refrigerate for 30 minutes to keep it chilled.

Step 4: Create Dough Layers
Remove the dough from the fridge and roll it out again into a rectangle. Repeat the folding process for the second turn and chill for another 30 minutes. For the third and final turn, roll the dough out one last time, folding it again. This step is crucial for building the flaky texture of your Homemade French Croissant. After the final turn, refrigerate for at least 1 hour to allow the dough to relax.

Step 5: Shape the Croissants
Once the dough is fully chilled, roll it out to about 1/4 inch thick and cut it into large triangles. Starting from the base, roll each triangle tightly towards the tip, tucking the tip underneath to secure the shape. Place each rolled croissant on a lined baking sheet with the point side down. This shaping is essential to achieve the classic crescent form of Homemade French Croissants.

Step 6: Proof the Croissants
Cover the shaped croissants with a clean kitchen towel and let them rise at room temperature until noticeably puffy, about 1.5 to 2 hours. During this proofing stage, the croissants will double in size and ensure a light and airy texture in your final product. Make sure the kitchen is warm and draft-free for optimal rising conditions.

Step 7: Bake the Croissants
Preheat your oven to 400°F (200°C). While waiting, prepare an egg wash by beating an egg and brushing it over the tops of the croissants for a shiny finish. Place the tray in the preheated oven and bake for 18–22 minutes until golden brown. Rotate halfway through for even baking. The aroma of your Homemade French Croissants will fill your kitchen as they bake.

Step 8: Cool and Serve
Once baked, remove the croissants from the oven and let them cool on a wire rack for a few minutes. This cooling allows the layers to set properly, resulting in that perfect flaky exterior. Serve warm with butter, jam, or your favorite filling for a delightful treat. Enjoy your homemade pastries that are sure to impress everyone at the breakfast table!

Homemade French Croissant Variations

Invite your creativity to soar as you explore these delightful twists on the classic croissant!

  • Almond Cream: Fill croissants with almond paste before rolling for a nutty, sweet surprise. The buttery flavor pairs beautifully with the smooth creaminess of almonds.

  • Cheese Delight: Add a slice of your favorite cheese, like Gruyère or mozzarella, inside each croissant pre-rolling. The melted cheese creates a savory, gooey center that will have everyone begging for more.

  • Chocolate Indulgence: Place chocolate strips or chips inside the dough for a rich, sweet treat. The melted chocolate oozes out, creating a heavenly experience that chocolate lovers won't resist.

  • Spinach and Feta: For a savory option, mix in sautéed spinach and crumbled feta cheese. This delightful combination adds a Mediterranean flair that transforms your croissant into a gourmet experience.

  • Dried Fruits: Incorporate dried apricots or cranberries into the filling for a fruity burst of flavor. Their sweetness contrasts wonderfully with the buttery layers. Picture a breakfast spread enhanced by these sweet bites!

  • Herb Infusion: Add fresh herbs like rosemary or thyme to the dough to create fragrant, savory croissants. A savory twist that's perfect alongside a hearty soup or salad.

  • Vegan Option: Substitute non-dairy milk and egg wash with almond milk or coconut milk and a plant-based egg wash. Even without dairy, you can still achieve that irresistible crunchy exterior.

  • Spicy Surprise: If you're feeling adventurous, add jalapeño slices or pepper jack cheese for a little heat. These spicy croissants can be a unique addition to your brunch spread!

Whichever variation you choose, these croissants will always be a hit. For an extra treat, why not serve them with a warm cup of Homemade Hot Chocolate? Your guests will be swooning!

How to Store and Freeze Homemade French Croissants

Room Temperature: Store croissants in an airtight container at room temperature for up to 2 days. This keeps them soft, but remember they are best enjoyed fresh!

Freezer: For longer storage, wrap unbaked shaped croissants tightly in plastic wrap and freeze for up to 3 months. Thaw overnight in the fridge before baking for best results.

Reheating: To restore crispiness, reheat baked croissants in a preheated oven at 350°F (175°C) for 5–7 minutes. Enjoy that fresh-out-of-the-oven taste!

Airtight Storage: When storing baked croissants, always use an airtight container to maintain their flaky texture and avoid dryness from the air.

Expert Tips for Homemade French Croissants

  • Chill Time Matters: Keep the dough and butter as cold as possible throughout the process to maintain the signature flaky layers in your homemade French croissant recipe.
  • Folding Technique: Take your time with the folding steps; patience is key to developing the layers. Don't skip any turns!
  • Proofing Perfection: Avoid rushing the proofing stage. Let your croissants rise until they're significantly puffy for the best texture.
  • Butter Choice: Use high-fat butter for the butter block to ensure optimal flakiness. Lower fat butters can lead to a greasy texture.
  • Oven Readiness: Preheat your oven thoroughly before baking to ensure even cooking and that irresistible golden-brown finish.
  • Fillings Fun: Don’t hesitate to get creative with fillings, but ensure they’re not too moist, which may affect the texture of your homemade French croissant.

Make Ahead Options

These Homemade French Croissants are perfect for meal prep enthusiasts! You can shape the croissants up to 24 hours in advance and refrigerate them; just cover them tightly with plastic wrap to prevent drying out. Additionally, unbaked croissants can be frozen for up to 3 months—simply place them on a parchment-lined baking sheet until solid, then transfer to an airtight container. When you’re ready to enjoy them, just pull the croissants from the fridge or freezer, let them proof at room temperature for about 1.5 to 2 hours, then bake as directed. This way, you’ll have fresh, flaky croissants with minimal effort, any day of the week!

What to Serve with Flaky Homemade French Croissants

Imagine a delightful brunch spread that harmonizes the heavenly layers of your croissant, inviting family and friends to indulge in every buttery bite.

  • Fresh Fruit Salad: A vibrant mix of berries and citrus adds a refreshing contrast, perfect for balancing the richness of the croissant.

  • Scrambled Eggs: Fluffy, tender eggs create a savory counterpart, making for an easy, satisfying meal that pairs beautifully with buttery pastries.

  • Coffee or Espresso: A steaming cup enhances the croissant experience while the robust flavor beautifully complements the bakery's buttery notes.

  • Honey or Jam: Drizzling honey or spreading homemade jam brings a touch of sweetness that accentuates the flaky layers, elevating breakfast to a special occasion.

  • Savory Cheese Platter: Offer a selection of aged cheeses—like brie or cheddar—providing contrasting textures and flavors that transform your croissant into a delightful savory bite.

  • Almond Milk Latte: For a creamy, nutty drink option, an almond milk latte pairs wonderfully with the croissants, creating a warm and inviting ambiance.

  • Chocolate Spread: For those with a sweet tooth, serve with a rich chocolate spread for a luxurious treat that echoes the culinary magic of classic French dessert culture.

Homemade French Croissant Recipe FAQs

What type of flour is best for making croissants?
All-purpose flour is the standard choice for crafting croissants, providing a good balance of gluten and structure. For an even lighter texture, you can substitute or mix in cake flour, which results in a more delicate pastry. Just remember, gluten is key for that lovely flakiness!

How should I store my homemade croissants?
Homemade croissants are best stored in an airtight container at room temperature for up to 2 days. This way, they stay soft and delicious. If you anticipate not finishing them, consider freezing them instead (more on that below) to maintain their flaky goodness!

Can I freeze unbaked croissants?
Absolutely! To freeze unbaked croissants, shape them as per the recipe instructions, then wrap each croissant tightly in plastic wrap or place them in a freezer-safe bag. They can be frozen for up to 3 months. When you're ready to bake, just thaw them overnight in the fridge, then allow them to proof again for the best results.

What if my dough isn't rising properly?
If your dough isn't rising as expected, there are a few troubleshooting tips: ensure your yeast is fresh by checking the expiration date; warm milk should be around 110°F (45°C) to effectively activate it. Also, make sure your kitchen is warm during the proofing stage—cold temperatures can slow yeast activity. If the dough has been sitting too long or hasn't risen significantly, it may need to be reseeded with fresh yeast.

Are homemade croissants safe for pets or those with allergies?
It's best to keep homemade croissants away from pets, as ingredients like butter and any fillings, such as chocolate or certain cheeses, can be harmful to them. For those with allergies, especially gluten or dairy, consider using gluten-free flour blends or non-dairy butter alternatives—just keep in mind that results may vary from the classic recipe.

Homemade French Croissant Recipe

Deliciously Flaky Homemade French Croissant Recipe

This Homemade French Croissant Recipe captures the essence of Parisian pastries. Enjoy flaky, buttery croissants at home with a little patience and practice.
Print Recipe Pin Recipe
Prep Time 2 hours hrs
Cook Time 22 minutes mins
Chilling Time 2 hours hrs
Total Time 4 hours hrs 24 minutes mins
Servings: 12 croissants
Course: Breakfast
Cuisine: French
Calories: 200
Ingredients Equipment Method Nutrition Notes

Ingredients
  

For the Dough
  • 4 cups All-purpose Flour
  • 1 tablespoon Granulated Sugar can be omitted or substituted with coconut sugar
  • 1 teaspoon Salt consider using sea salt
  • 2 teaspoons Active Dry Yeast instant yeast can be used
  • 1.5 cups Warm Milk or non-dairy milk for vegan option
  • 1 cup Unsalted Butter (melted) or margarine for dairy-free substitute
For the Butter Block
  • 1 cup Cold Unsalted Butter keep it chilled
For the Egg Wash
  • 1 large Egg or almond milk and turmeric for vegan option

Equipment

  • Mixing Bowl
  • Rolling Pin
  • Parchment Paper
  • Baking Sheet
  • wire rack

Method
 

Step‑by‑Step Instructions
  1. In a large mixing bowl, combine all-purpose flour, granulated sugar, and salt. In a separate bowl, dissolve active dry yeast in warm milk, allowing it to bubble for about 5 minutes. Pour the yeast mixture and melted unsalted butter into the dry ingredients. Mix until a rough dough forms, then knead on a lightly floured surface for about 10 minutes until smooth. Wrap in plastic and refrigerate for 1 hour to firm up.
  2. Place cold unsalted butter between two sheets of parchment paper. Use a rolling pin to pound it into a square about 6 inches by 6 inches, keeping it chilled.
  3. Roll out the dough into a large rectangle, approximately 20 inches by 10 inches. Place the cold butter block in the center and fold the dough over to encase the butter completely. Roll this dough into a long rectangle, about 24 inches by 10 inches. Begin the first turn by folding the dough into thirds, like a letter. Wrap in plastic and refrigerate for 30 minutes.
  4. Remove the dough from the fridge and roll it out again into a rectangle. Repeat the folding process for the second turn and chill for another 30 minutes. For the third and final turn, roll the dough out one last time and fold it again. Refrigerate for at least 1 hour.
  5. Roll out the dough to about 1/4 inch thick and cut it into large triangles. Starting from the base, roll each triangle tightly towards the tip, tucking the tip underneath. Place each rolled croissant on a lined baking sheet with the point side down.
  6. Cover the shaped croissants with a kitchen towel and let them rise at room temperature until noticeably puffy, about 1.5 to 2 hours.
  7. Preheat your oven to 400°F (200°C). Prepare an egg wash by beating an egg and brushing it over the tops. Bake for 18–22 minutes until golden brown.
  8. Remove the croissants from the oven and let them cool on a wire rack for a few minutes. Serve warm with butter, jam, or your favorite filling.

Nutrition

Serving: 1croissantCalories: 200kcalCarbohydrates: 24gProtein: 3gFat: 10gSaturated Fat: 6gPolyunsaturated Fat: 1gMonounsaturated Fat: 3gCholesterol: 30mgSodium: 200mgPotassium: 100mgFiber: 1gSugar: 1gVitamin A: 5IUCalcium: 2mgIron: 4mg

Notes

Keep the dough and butter cold throughout the process for best results. Consider using high-fat butter for optimal flakiness.

Tried this recipe?

Let us know how it was!

Delicious Flaky Cheese Danish Recipe for Effortless Mornings

February 25, 2026 by Grace Snow Leave a Comment

There's a magical moment when you pull a piping hot pastry from the oven and the delightful aroma fills your kitchen, instantly transporting you to a charming café. Today, I’m excited to share my Flaky Cheese Danish Recipe, bringing that bakery experience right to your home. Perfect for breakfast or brunch, this treat is not only a crowd-pleaser but also incredibly simple to whip up, especially when using ready-made puff pastry. You’ll savor the buttery, flaky layers wrapped around a luscious cream cheese filling that’s utterly divine. Plus, it’s a fun project that even beginners can tackle, making it perfect for a cozy weekend gathering or a delightful surprise for your loved ones. Are you ready to enjoy a warm slice of homemade happiness? Let’s get baking!

Why is This Cheese Danish Recipe Amazing?

Deliciously Flaky: Each bite showcases layers of buttery puff pastry that are perfectly crispy and delightfully flaky.

Creamy Center: The rich cream cheese filling adds a smooth texture that melts in your mouth, taking your tastebuds on a joyous ride.

Beginner-Friendly: With ready-made puff pastry, this recipe is designed for anyone, even the newest bakers in the kitchen!

Versatility: You can easily customize your cheese Danish by adding fruits or herbs—think berries or zesty citrus zest—to elevate your experience.

Perfect for Sharing: It’s an excellent addition to brunch gatherings or simply for a cozy morning at home. Pair it with fresh coffee or tea for a delicious start to your day.

Trust me, once you try these flaky cheese danishes, you won't want to go back to store-bought! For more delightful ideas, check out my Potato Blue Cheese and Spatchcock Chicken recipes to impress your guests.

Flaky Cheese Danish Ingredients

• Bring the magic of a bakery to your kitchen with these essential ingredients for a Flaky Cheese Danish Recipe.

For the Pastry

  • Ready-made puff pastry – This convenient base minimizes prep time, allowing for a quick assembly of your delicious Danish.

For the Cream Cheese Filling

  • Cream cheese – The heart of your filling, offering a rich and creamy texture. Swap it with ricotta for a lighter option!
  • Granulated sugar – Sweetens the cream cheese mixture; reduce the amount if you prefer a less sugary bite.
  • Vanilla extract – Enhances the flavor of your filling; try almond extract for a different depth of taste.
  • Lemon juice – Adds a zesty tang that brightens the creamy filling; lime juice is a great alternative if needed.

For the Finish

  • Egg yolk (for wash) – Provides a beautiful golden color on the baked pastry; milk is a great vegan substitute.
  • Powdered sugar – Used for glazing your danish for an extra touch of sweetness; feel free to omit if you want it less sweet.

With these simple ingredients, you’re just a few steps away from whipping up a stunning Flaky Cheese Danish that will impress everyone at your table! Happy baking!

Step‑by‑Step Instructions for Flaky Cheese Danish Recipe

Step 1: Preheat Your Oven
Begin by preheating your oven to 400°F (200°C). While it heats, line a large baking sheet with parchment paper to prevent sticking. This step sets the perfect stage for creating your Flaky Cheese Danish, ensuring that the pastries puff up beautifully and develop that tempting golden color.

Step 2: Make the Cream Cheese Filling
In a mixing bowl, combine 8 oz of cream cheese, 1/4 cup of granulated sugar, 1 tsp of vanilla extract, 1 tbsp of lemon juice, and a pinch of salt. Use a hand mixer or whisk to blend until the mixture is smooth and creamy, which should take about 2-3 minutes. This rich filling is what gives the Flaky Cheese Danish its delightful taste.

Step 3: Prepare the Puff Pastry
Lay your thawed puff pastry on a lightly floured surface. Roll it out gently to smooth out the creases, then cut it into 8 equal rectangles or squares. Aim for about 4x5 inches each. The pastry should feel soft and pliable—this will ensure those flaky layers rise perfectly in the oven.

Step 4: Arrange the Pastry on the Baking Sheet
Place the cut puff pastry rectangles on the prepared baking sheet, leaving space between each piece. For an added decorative touch, you can fold the edges over slightly or use a knife to score a border around the perimeter. This visual cue will help create a beautiful crust on your Flaky Cheese Danish.

Step 5: Fill the Pastries
Spoon approximately 1 tablespoon of the cream cheese filling into the center of each pastry rectangle. Be careful not to overfill, as this can cause the filling to leak during baking. This step allows you to enjoy the perfect balance of flaky pastry and creamy filling in each bite!

Step 6: Apply the Egg Wash
In a small bowl, whisk 1 egg yolk with a splash of water or milk to create an egg wash. Using a pastry brush, carefully brush the edges of each pastry rectangle with this mixture. This will give your Flaky Cheese Danish a gorgeous, shiny golden finish as they bake.

Step 7: Bake the Danishes
Pop the baking sheet into your preheated oven and bake for about 15-18 minutes, or until the pastries are puffed and golden brown. You’ll know they’re ready when the kitchen fills with a delightful aroma and the tops are beautifully caramelized—a clear indicator of your success!

Step 8: Cool and Glaze the Danishes
Once baked, remove the Flaky Cheese Danishes from the oven and allow them to cool on the baking sheet for about 5 minutes. Meanwhile, prepare a glaze by mixing powdered sugar with a little milk or lemon juice. Drizzle this over your warm pastries before serving, adding a delightful finishing touch to your homemade treat.

Flaky Cheese Danish Recipe Variations

Feel free to explore and play with these variations to make the recipe your own!

  • Fruit-Filled: Add a layer of fruit preserves or fresh berries atop the cream cheese filling for a burst of sweetness. Think raspberry, blueberry, or strawberry—each bite will be a delightful surprise!

  • Lemon Zest: Grate some lemon zest into your cream cheese mixture for a zesty kick that elevates the flavor profile. This twist adds brightness and is a refreshing contrast to the creamy filling.

  • Savory Style: For a savory option, blend in chopped herbs like chives or dill into your cream cheese filling. You can also incorporate finely diced spinach or roasted red peppers for an exciting flavor profile that’s still rich and creamy.

  • Almond Flour: If you're looking for a gluten-free twist, try using almond flour to dust your work surface. It adds a nutty flavor while still allowing you to enjoy that flaky texture you love.

  • Cinnamon Sugar Dusting: Before baking, sprinkle a mixture of cinnamon and sugar on the pastry. This sweet and spicy touch brings warmth and comfort to your pastry that’s perfect for cooler mornings.

  • Mascarpone Swap: Substitute mascarpone for the cream cheese to create a surprisingly creamy texture with a subtly sweet flavor. It’s great for those who love a bit of luxurious indulgence.

  • Berry Compote Drizzle: After baking, drizzle a warm berry compote over the top for extra visual appeal and luscious flavor. This will turn your Danish into an impressive dessert that beautifully pairs with coffee or tea.

Take these ideas as a stepping stone to craft your unique pastry masterpiece! Once you feel inspired, you might also want to check out my ideas for Chicken Adobo or how to make a delightful Spatchcock Chicken for your next meal. Happy baking!

Make Ahead Options

These Flaky Cheese Danishes are ideal for meal prep, allowing you to enjoy delicious homemade pastries with less effort during busy mornings! You can prepare the cream cheese filling up to 3 days ahead and store it in an airtight container in the refrigerator. Additionally, you can assemble the shaped danishes (filled and brushed) and refrigerate them for up to 24 hours before baking. To maintain their delightful flaky texture, cover the baking tray tightly with plastic wrap. When you're ready to impress your family or guests, simply preheat your oven and bake the refrigerated danishes directly, adding a few extra minutes to the bake time for perfect results! Enjoy the warm, buttery goodness with minimal fuss!

How to Store and Freeze Flaky Cheese Danish

Fridge: Store baked Flaky Cheese Danishes in an airtight container for up to 5 days. This ensures they maintain their delightful texture and flavor.

Freezer: If you have unbaked shaped pastries, they can be frozen for up to 1 month. Just bake them straight from the freezer, adding a few extra minutes to the baking time.

Reheating: To revive leftovers, preheat your oven to 325°F (160°C) and reheat the Danishes for 5-7 minutes until warm and flaky again.

Expert Tips for Flaky Cheese Danish Recipe

  • Proper Thawing: Ensure the puff pastry is fully thawed to achieve optimal flakiness; if it's still cold, it won’t puff as beautifully.

  • Mind the Filling: Avoid overfilling with cream cheese to prevent leakage during baking; a tablespoon in the center is just right for balance.

  • Golden Finish: Brush the edges with egg wash (or milk) for that shiny golden look; just remember to keep the wash away from the filling to avoid sogginess.

  • Cooling Time: Allow your Flaky Cheese Danishes to cool completely before storing them; this keeps them from becoming soggy due to trapped steam.

  • Experiment with Flavors: Don’t hesitate to add fruits like raspberries or zests of citrus to the filling, creating a personalized twist that's unique and delicious!

What to Serve with Flaky Cheese Danish Recipe

Pair your delightful cheese danish with some delicious sides to create a memorable breakfast or brunch experience.

  • Fresh Fruit Salad: A vibrant medley of seasonal fruits adds a refreshing contrast to the rich danish, lightening up every bite.
  • Greek Yogurt Parfait: Layered with granola and berries, this parfait offers a creamy texture and healthful elements that balance the sweetness.
  • Light Green Salad: Crisp greens with a citrus vinaigrette complement the pastry’s buttery nature, providing a fresh and zesty bite.
  • Savory Bacon or Sausage: These protein-packed sides add a savory contrast to the danish's sweetness, making for a well-rounded meal.
  • Classic Coffee: A fresh brew enhances the flavors of the cheese danish, perfect for enjoying alongside a warm slice.
  • Herbal Tea: Pair your danish with a fragrant herbal tea for a calming, aromatic addition that soothes the palate.
  • Lemon Curd for Dipping: This tangy companion adds a zesty pop of flavor that enhances the creaminess of the filling.

Elevate your Flaky Cheese Danish recipe with these delightful pairings and create a brunch that everyone will remember!

Flaky Cheese Danish Recipe FAQs

How do I choose the right puff pastry?
Absolutely! Look for ready-made puff pastry that is labeled as "all-butter" for the best flavor. Make sure it’s well-thawed before using, avoiding any cracking or tearing. You can tell it’s ready when it’s pliable and soft to the touch.

How should I store leftover cheese Danish?
To keep your Flaky Cheese Danishes fresh, store them in an airtight container in the fridge for up to 5 days. This method prevents them from drying out while maintaining their delightful texture and flavor. If they cool completely first, it helps maintain their crispiness!

Can I freeze cheese Danish before baking?
Yes, you can! If you’ve shaped the pastries but haven’t baked them yet, they can be frozen for up to 1 month. Simply place them on a baking sheet to freeze them individually for 1-2 hours, then transfer to an airtight bag. When you're ready to bake, just pop them in from frozen, adding a few extra minutes to the baking time.

What if my filling leaks during baking?
No worries! If this happens, it’s often due to overfilling the pastries. Make sure to keep the filling to about 1 tablespoon per Danish. If you experience leakage, you can also try placing the pastries on a parchment-lined baking sheet to catch any drips, making cleanup easier!

Are there any allergies I should be aware of?
Certainly! This recipe contains dairy and eggs, so it’s not suitable for those with lactose intolerance or egg allergies. For a dairy-free option, consider using a plant-based cream cheese. Also, if you're cooking for someone with gluten sensitivities, be sure to look for gluten-free puff pastry alternatives.

How can I add a personal touch to my cheese Danish?
The more the merrier! You can easily customize your cheese Danish by mixing in fruits like raspberries or blueberries into the cream cheese filling. Another fun twist is to sprinkle some lemon or orange zest to add a refreshing citrus flavor. Experiment and find what makes your heart sing!

Flaky Cheese Danish Recipe

Delicious Flaky Cheese Danish Recipe for Effortless Mornings

This Flaky Cheese Danish Recipe is a simple, crowd-pleasing breakfast treat that delivers a delightful bakery experience right at home.
Print Recipe Pin Recipe
Prep Time 20 minutes mins
Cook Time 18 minutes mins
Cooling Time 5 minutes mins
Total Time 43 minutes mins
Servings: 8 pieces
Course: Breakfast
Cuisine: French
Calories: 300
Ingredients Equipment Method Nutrition Notes

Ingredients
  

For the Pastry
  • 1 package Ready-made puff pastry for quick assembly
For the Cream Cheese Filling
  • 8 oz Cream cheese swap with ricotta for lighter option
  • 1/4 cup Granulated sugar reduce for less sweetness
  • 1 tsp Vanilla extract can substitute with almond extract
  • 1 tbsp Lemon juice lime juice is a great alternative
For the Finish
  • 1 large Egg yolk for wash; milk is a vegan substitute
  • 1 cup Powdered sugar omit for less sweetness

Equipment

  • Oven
  • Mixing Bowl
  • Hand mixer or whisk
  • Baking Sheet
  • Pastry brush
  • Parchment Paper

Method
 

Step-by-Step Instructions
  1. Preheat your oven to 400°F (200°C) and line a baking sheet with parchment paper.
  2. In a mixing bowl, combine cream cheese, sugar, vanilla extract, lemon juice, and a pinch of salt. Blend until smooth and creamy.
  3. Lay the thawed puff pastry on a floured surface. Roll it out and cut into 8 equal rectangles.
  4. Place the pastry rectangles on the baking sheet, leaving space in between. You can decorate the edges if desired.
  5. Spoon approximately 1 tablespoon of the cream cheese filling into the center of each pastry rectangle.
  6. Whisk the egg yolk with a splash of water or milk, then brush the edges of each pastry with the egg wash.
  7. Bake for 15-18 minutes until puffed and golden brown.
  8. Remove from oven and let cool for 5 minutes. Glaze with powdered sugar mixed with milk or lemon juice before serving.

Nutrition

Serving: 1pieceCalories: 300kcalCarbohydrates: 30gProtein: 4gFat: 18gSaturated Fat: 10gPolyunsaturated Fat: 1gMonounsaturated Fat: 5gCholesterol: 80mgSodium: 150mgPotassium: 150mgFiber: 1gSugar: 10gVitamin A: 500IUVitamin C: 1mgCalcium: 80mgIron: 1mg

Notes

Ensure puff pastry is fully thawed for best results. Experiment with flavor add-ins like fruits or zests.

Tried this recipe?

Let us know how it was!

Irresistible Ultimate Breakfast Sandwich You’ll Crave Daily

February 24, 2026 by Grace Snow Leave a Comment

As the aroma of caramelized onions fills the air, I can’t help but think about my favorite way to transform breakfast into an extraordinary feast: the Ultimate Breakfast Sandwich. With the perfect harmony of soft scrambled eggs, juicy breakfast sausage, and a zesty kick from spicy aioli, this sandwich offers a delightful twist that easily surpasses any restaurant option. Not only is it a hearty choice to fuel your day, but it's also a treat you can customize just the way you like it. Imagine savoring each bite of creamy avocado and melted cheddar, all bundled up in a toasted brioche bun. Plus, this recipe ensures you can whip it up quickly, making it an excellent option for busy mornings or leisurely brunches. Are you ready to elevate your breakfast game? Let's dive into the details that will bring this masterpiece to life!

Why not elevate your breakfast routine?

Irresistible Flavor: The combination of soft scrambled eggs, juicy sausage, and caramelized onions creates a mouthwatering experience that will make your mornings something to look forward to.

Unmatched Customization: You can switch ingredients like using turkey sausage or adding pepper jack cheese for a spicier delight.

Quick and Easy: With simple steps, you’ll have a restaurant-quality sandwich ready in no time—perfect for busy weekdays or leisurely brunches.

Perfectly Textured: Each bite offers a delightful mix of creaminess from the avocado and cheddar, making it a truly satisfying meal. Don’t forget to try this alongside our Cornbread Breakfast Casserole for a truly indulgent spread!

Ultimate Breakfast Sandwich Ingredients

For the Spicy Aioli

• Mayonnaise – Makes up the creamy base; you can substitute with Greek yogurt for a lighter option.
• Sriracha – Adds a zesty kick that elevates the flavor; feel free to adjust to your spice preference.

For the Caramelized Onions

• Oil – Essential for sautéing; divide between 2 tablespoons to ensure perfect cooking.
• Yellow Onion – Sweetens as it caramelizes; half a medium onion works best for depth of flavor.

For the Egg Mixture

• Eggs – The star ingredient; use three large eggs for fluffy soft scrambled eggs.
• Chives – Enhances the scrambled eggs' taste; fresh chives make a delightful difference!

For the Main Ingredients

• Breakfast Sausage Patties – Provides protein and heartiness; opt for high-quality sausage or substitute with ground turkey.
• Hard Cheddar – Adds a rich, creamy taste; two slices will melt beautifully on the sausage.
• Avocado – Offers a creamy texture and healthy fats; half an avocado adds richness.
• Brioche Buns – The perfect base for this sandwich; toast them for added flavor and crunch.

Get ready to assemble your Ultimate Breakfast Sandwich with these flavorful ingredients that promise to make your breakfast truly irresistible!

Step‑by‑Step Instructions for Ultimate Breakfast Sandwich

Step 1: Make Spicy Aioli
In a small bowl, combine 1 tablespoon of mayonnaise with 1 teaspoon of sriracha. Mix thoroughly until the mixture is smooth and evenly blended. This spicy aioli adds a delicious zing to your Ultimate Breakfast Sandwich, so give it a taste and adjust the sriracha if you like more heat. Set this aside while you prepare the other ingredients.

Step 2: Caramelize Onions
Heat 1 tablespoon of oil in a skillet over medium-high heat. Add half a previously sliced yellow onion and sauté for about 5 minutes until the onion becomes translucent. Lower the heat to medium-low and continue to cook for an additional 20 minutes, stirring occasionally, until the onions turn deep golden brown and sweet in aroma, adding depth to your breakfast sandwich.

Step 3: Cook Sausage Patties
In a separate skillet, heat another tablespoon of oil over medium heat. Place the breakfast sausage patties in the pan and cook for about 5-7 minutes on each side, or until they're nicely browned and cooked through. In the last minute of cooking, top each patty with a slice of cheddar cheese and cover the pan to allow the cheese to melt, creating a gooey layer of flavor.

Step 4: Prepare Scrambled Eggs
Whisk together three large eggs and 1 tablespoon of chopped chives in a bowl until well combined. In a nonstick skillet, heat 1 tablespoon of oil over medium-low heat. Pour the egg mixture into the skillet, letting it sit undisturbed for a few moments until edges set. Gently fold the eggs using a spatula, cooking until creamy and soft, about 3-4 minutes. Remove the eggs from heat before they fully set, as they'll continue cooking off the heat.

Step 5: Assemble the Sandwich
Toast your brioche buns until golden brown. Spread a generous layer of the spicy aioli on each half. On the bottom bun, layer the melted sausage patty, followed by the soft scrambled eggs, caramelized onions, and sliced avocado. Top it off with the other half of the bun, pressing down gently to hold everything together. Serve your Ultimate Breakfast Sandwich warm, and relish every bite of this decadent creation!

Expert Tips for the Ultimate Breakfast Sandwich

  • Perfect Eggs: Wait to season your eggs until after cooking to maintain their creamy texture. Gentle folding, not vigorous stirring, is key.

  • Onion Mastery: Patience is your friend! Allow onions to caramelize slowly; if the pan dries out, add a splash of water for extra moisture.

  • Bun Choice: Use a fresh, toasted brioche bun for the best texture. It holds up beautifully against the hearty toppings of your breakfast sandwich.

  • Spicy Aioli Prep: Make the sriracha aioli up to 5 days ahead for convenience, enhancing the flavors while saving time during breakfast rush.

  • Ingredient Swaps: Feel free to customize! Replace cheddar with pepper jack for a kick, or opt for turkey sausage for a lighter option.

Storage Tips for Ultimate Breakfast Sandwich

  • Room Temperature: It’s best to enjoy your Ultimate Breakfast Sandwich fresh; however, if left uneaten, it can sit at room temperature for up to 2 hours.

  • Fridge: Store any leftover components like caramelized onions and spicy aioli in airtight containers in the refrigerator for up to 5 days to maintain freshness.

  • Freezer: To save components for later, freeze caramelized onions in small portions for up to 3 months. Reheat them in a pan before assembling your sandwich.

  • Reheating: When reassembling your Ultimate Breakfast Sandwich, gently reheat the sausage patties and scrambled eggs in a skillet over low heat, ensuring they stay moist and flavorful.

What to Serve with The Ultimate Breakfast Sandwich

As you enjoy the delightful layers of your sandwich, consider these wonderful pairings that will elevate your breakfast experience.

  • Crispy Breakfast Potatoes:
    Golden and seasoned, they add a satisfying crunch that contrasts beautifully with the creamy texture of your sandwich.

  • Fresh Fruit Salad:
    A medley of seasonal fruits introduces bright flavors and refreshing sweetness, balancing the savory elements perfectly.

  • Smooth and Creamy Yogurt:
    With a dollop of honey or granola, it provides a wholesome contrast to the richness of the breakfast sandwich.

  • Zesty Green Salad:
    A mix of leafy greens with a tangy vinaigrette adds a light, refreshing bite that complements the hearty meal.

  • Mimosa or Sparkling Juice:
    These bubbly beverages bring a festive touch to your brunch, enhancing the overall elevated experience of your meal.

  • Avocado Toast:
    The creamy avocado spread on toasted bread echoes the flavors from the sandwich while adding a deliciously different texture.

  • Savory Sausage Links:
    For an extra protein boost, these tasty links harmonize with the flavors of the sandwich, making it an indulgent feast.

  • Chocolate Chip Pancakes:
    For a sweet ending, fluffy pancakes with melty chocolate chips create a delightful contrast to the savory breakfast.

  • Rich Coffee or Tea:
    A steaming cup of your favorite brew enhances the overall experience, grounding your meal with warmth and comfort.

Make Ahead Options

These Ultimate Breakfast Sandwiches are perfect for meal prep enthusiasts! You can prepare the spicy aioli up to 5 days in advance, storing it in an airtight container in the refrigerator to maintain its vibrant flavor. The caramelized onions can also be made ahead and kept in the fridge for up to 3 days; just reheat them gently before assembling. For the best results, cook the sausage patties and scramble the eggs fresh, but you can whisk the egg mixture and keep it in the refrigerator for up to 24 hours. When ready to enjoy, simply toast your brioche buns, assemble with the prepped ingredients, and savor a delicious breakfast in no time!

Ultimate Breakfast Sandwich Variations

Feel free to take your breakfast sandwich to the next level with these delightful twists that will awaken your taste buds!

  • Pepper Jack Cheese: Swap out cheddar for pepper jack to add a spicy kick, perfect for those who crave heat in the morning. The creaminess of the jack will also melt beautifully over your sausage.

  • Turkey Sausage: Use turkey sausage patties for a lighter option, keeping the sandwich hearty without the extra calories. It’s a fantastic choice for a wholesome, protein-packed breakfast.

  • Avocado Alternatives: Substitute avocado with a layer of fresh tomato for a vibrant pop of color and juicy flavor. This swap not only enhances freshness but also adds a delightful tang.

  • Vegetarian Delight: For a meat-free version, replace the sausage with sautéed mushrooms or spinach. The savory additions will provide richness without losing the sandwich’s comforting essence.

  • Brioche Bun Sub: Experiment with different bread! Try a whole-grain sandwich bun for added fiber, or even a bagel for a chewy texture that elevates your breakfast.

  • Add Extra Greens: Toss in fresh arugula or spinach to introduce a peppery flavor and a crunchy texture. It’s a simple addition that makes your sandwich feel garden-fresh!

  • Zesty Aioli Variations: Swap sriracha in your aioli for chipotle sauce to give your sandwich a smoky flavor. This helps create a more complex profile that’s sure to impress!

  • Egg Innovations: Customize the egg mixture by adding a splash of cheese or incorporating sautéed bell peppers for a colorful and flavorful breakfast extravaganza.

If you're looking to expand your breakfast repertoire, why not serve your Ultimate Breakfast Sandwich with a side of our delightful Breakfast Egg Muffins or a refreshing Breakfast Banana Split? Each option brings a fun twist to your morning meal!

Ultimate Breakfast Sandwich Recipe FAQs

What type of onions should I use for caramelizing?
I recommend using yellow onions, as they have a high sugar content that caramelizes beautifully, providing great sweetness and flavor. Avoid using red onions, as they can have a sharper taste and won't yield the same depth of sweetness.

How do I store leftover ingredients?
You can store leftover caramelized onions and spicy aioli in airtight containers in the refrigerator for up to 5 days. Be sure to label the containers with the date for easy tracking, ensuring everything stays fresh and tasty.

Can I freeze the components of the Ultimate Breakfast Sandwich?
Absolutely! You can freeze the caramelized onions in small portions for up to 3 months. Just let them cool completely, then transfer them into freezer-safe bags or containers. When you’re ready to use them, simply thaw in the refrigerator overnight and reheat in a skillet.

How do I prevent my scrambled eggs from becoming dry?
To achieve the perfect soft scrambled eggs, don’t add salt until after cooking. This will help retain moisture. Also, gently fold the eggs instead of vigorously stirring to ensure a creamy texture. Remember to take them off the heat just before they’re fully set, as they’ll continue to cook off the stove.

Is this sandwich suitable for those with dietary restrictions?
You can easily make this sandwich gluten-free by using gluten-free buns and ensuring your sausage is free from gluten. If you're vegetarian, consider swapping the sausage for a plant-based alternative. Always check labels for allergens like eggs, dairy, or specific spices if someone in your household has allergies.

How long can I leave the assembled sandwich at room temperature?
The Ultimate Breakfast Sandwich is best enjoyed fresh, but it can safely sit at room temperature for up to 2 hours. If you're not planning to eat it right away, I suggest refrigerating the individual components and assembling them just before serving for optimal freshness.

Ultimate Breakfast Sandwich

Irresistible Ultimate Breakfast Sandwich You’ll Crave Daily

Discover the flavors of the Ultimate Breakfast Sandwich, a delightful mix of soft scrambled eggs, juicy sausage, and spicy aioli.
Print Recipe Pin Recipe
Prep Time 15 minutes mins
Cook Time 35 minutes mins
Total Time 50 minutes mins
Servings: 2 sandwiches
Course: Breakfast
Cuisine: American
Calories: 700
Ingredients Equipment Method Nutrition Notes

Ingredients
  

For the Spicy Aioli
  • 1 tablespoon mayonnaise or Greek yogurt for a lighter option
  • 1 teaspoon sriracha adjust to spice preference
For the Caramelized Onions
  • 1 tablespoon oil for sautéing
  • 0.5 medium yellow onion sliced
For the Egg Mixture
  • 3 large eggs
  • 1 tablespoon chives fresh, chopped
For the Main Ingredients
  • 2 patties breakfast sausage or ground turkey
  • 2 slices hard cheddar or substitute with pepper jack for a spicier option
  • 0.5 avocado sliced
  • 2 buns brioche toasted

Equipment

  • Skillet
  • Bowl
  • Spatula

Method
 

Step‑by‑Step Instructions for Ultimate Breakfast Sandwich
  1. In a small bowl, combine mayonnaise and sriracha for spicy aioli. Mix until smooth and set aside.
  2. Heat oil in a skillet over medium-high. Sauté half a yellow onion for about 5 minutes, then lower heat to medium-low and cook for another 20 minutes until golden brown.
  3. In another skillet, heat oil and cook sausage patties for 5-7 minutes each side. In the last minute, add cheese on top to melt.
  4. Whisk eggs and chives in a bowl. In a nonstick skillet, heat oil and pour in the egg mixture. Cook gently for 3-4 minutes until soft and creamy.
  5. Toast brioche buns. Spread spicy aioli, then layer sausage, scrambled eggs, caramelized onions, and avocado. Top with the other half and serve warm.

Nutrition

Serving: 1sandwichCalories: 700kcalCarbohydrates: 45gProtein: 30gFat: 40gSaturated Fat: 15gPolyunsaturated Fat: 5gMonounsaturated Fat: 10gCholesterol: 300mgSodium: 1200mgPotassium: 600mgFiber: 4gSugar: 2gVitamin A: 300IUVitamin C: 2mgCalcium: 400mgIron: 3mg

Notes

Customize ingredients as desired, such as using turkey sausage or swapping cheeses. Prepare spicy aioli ahead for convenience.

Tried this recipe?

Let us know how it was!

Homemade Breakfast Hot Pockets to Kickstart Your Mornings

February 24, 2026 by Grace Snow Leave a Comment

Early mornings often feel like a race against time, but what if I told you breakfast could be both quick and delicious? Enter my Homemade Ham, Egg, & Cheese Hot Pockets! These delightful pockets are filled with fluffy scrambled eggs, savory diced ham, and melted cheese—all wrapped in a flaky, homemade crust that’s far healthier than the store-bought alternative. Perfect for hectic schedules, they’re easily portable and utterly customizable, allowing you to add any extras you have on hand. Whether you’re feeding a family or just treating yourself to a nourishing start, these hot pockets let you enjoy the comforting flavors of breakfast without the guilt. Curious about how you can whip these up in no time? Let’s dive in!

Why Homemade Breakfast Hot Pockets?

Deliciously Customizable: You can fill these pockets with whatever you have on hand, from fresh veggies to different meats.

Healthier Choice: Made from scratch, they cut out preservatives, giving you a breakfast that's both nourishing and satisfying.

Quick Assembly: So easy to prepare, you can whip them up in under an hour, perfect for busy mornings!

Crowd-Pleasing: Whether it’s a family gathering or breakfast with friends, everyone will love these comforting treats.

Portability: Ideal for on-the-go mornings, they make breakfast hassle-free and delicious wherever you are.

For more hearty breakfasts, check out these Breakfast Egg Muffins or a delightful Breakfast Banana Split!

Homemade Breakfast Hot Pockets Ingredients

• Note: Get ready to create a delightful and customizable breakfast treat!

For the Dough

  • All-Purpose Flour – This provides structure for the crust; you can use whole wheat flour for a healthier option.
  • Salt – Enhances flavor; opt for kosher salt for a cleaner taste.
  • Unsalted Butter – Adds richness and flakiness to the crust; cold butter is key for a perfect texture.
  • Ice Water – Binds the dough without melting the butter; adjust the amount based on the dough's texture.

For the Filling

  • Olive Oil – Used for scrambling eggs; can substitute with butter for a richer flavor.
  • Eggs – The main filling component; fresh eggs yield a fluffier scramble.
  • Diced Ham – Offers protein and savory flavor; switch out for cooked bacon or turkey for a different taste.
  • Shredded Cheddar Cheese – Adds creaminess and flavor; mozzarella or pepper jack can provide a varied taste.

Now that you have the ingredients ready, you're halfway to enjoying these delightful Homemade Breakfast Hot Pockets!

Step‑by‑Step Instructions for Homemade Breakfast Hot Pockets

Step 1: Prepare Dough
In a large mixing bowl, combine 2 cups of all-purpose flour and 1 teaspoon of salt. Cut in ½ cup of cold unsalted butter using a pastry cutter or fork until the mixture resembles coarse crumbs. Gradually add 4–6 tablespoons of ice water, mixing until just combined. Form the dough into a disk, wrap it in plastic wrap, and chill in the refrigerator for 1 hour to allow the flavors to meld.

Step 2: Cook Filling
While the dough chills, heat 1 tablespoon of olive oil in a non-stick skillet over medium heat. Add 4 beaten eggs and scramble until just set but still moist, about 3-4 minutes. Remove from heat and mix in 1 cup of diced ham and 1 cup of shredded cheddar cheese. Season with salt and pepper to taste, then let the filling cool slightly while you preheat the oven.

Step 3: Preheat Oven
Preheat your oven to 375°F (190°C) and prepare a baking sheet by lining it with parchment paper. This will ensure your Homemade Breakfast Hot Pockets bake evenly and do not stick to the pan, creating a perfectly golden finish that is pleasing to the eye and palate.

Step 4: Roll Dough
Once the dough is chilled, dust a clean surface with flour and roll it out to about ¼-inch thickness. Using a sharp knife or pizza cutter, cut the rolled dough into 12 equal rectangles. This will form the base for your homemade breakfast hot pockets, allowing for ample filling while maintaining a sturdy structure.

Step 5: Assemble Pockets
Take one rectangle of dough and place a generous spoonful of the ham, egg, and cheese filling on one half. Carefully fold the other half over the filling and pinch the edges to seal. Use a fork to crimp the edges and ensure they are well-sealed, preventing any delicious filling from escaping during baking.

Step 6: Bake
Place the assembled hot pockets on the prepared baking sheet, ensuring they have space in between for even cooking. Bake in the preheated oven for 20-25 minutes or until the pockets are golden brown and puffed up, signaling that they are perfectly cooked and ready to be enjoyed.

Step 7: Cool and Serve
Once baked, remove the hot pockets from the oven and let them cool on the baking sheet for about 5 minutes. This brief cooling time allows the filling to set slightly, making them easier to handle. Serve warm and enjoy the delectable flavors of your Homemade Breakfast Hot Pockets.

Homemade Breakfast Hot Pockets Variations

Feel free to unleash your creativity and tailor these hot pockets to your unique taste buds! Each variation brings a new twist, inviting delightful flavors to your breakfast table.

  • Vegetarian: Swap the diced ham for sautéed mushrooms, spinach, or bell peppers for a fresh, meat-free option. The earthy flavors of mushrooms pair beautifully with the cheesy filling.

  • Spicy: Add diced jalapeños or crushed red pepper flakes to your filling to give your hot pockets a tasty kick. Just imagine biting into a pocket that bursts with warmth and zest!

  • Dairy-Free: Use plant-based cheese and olive oil in your filling for a lactose-free treat! This not only makes it adaptable for those with dietary restrictions but also brings a different flavor profile.

  • Herbamazing: Incorporate fresh herbs like cilantro or basil into the egg mix for an aromatic touch. The bright notes of herbs elevate the overall flavor, making every bite a little more special.

  • Smoky: Add smoked paprika to the egg mixture or use smoked ham or bacon for an extra depth of flavor. This is perfect for those who appreciate a hint of smokiness in their dishes.

  • Breakfast Fiesta: Mix in some black beans, corn, and taco seasoning for a Mexican-inspired filling. Serve these with salsa for a fun twist that’s bursting with flavor.

  • Breakfast Sweet: For a sweet variation, fill with a mixture of diced apples, cinnamon, and a touch of brown sugar, then add cream cheese for a delightful dessert-inspired treat!

  • Savory Surprise: Add crumbled feta cheese and olives for a Mediterranean take on breakfast. This unique combination will tantalize your taste buds with its rich and savory flavor.

So, gather your ingredients and let your imagination run wild! And if you like exploring different brunch options, don’t forget to browse through these marvelous recipes for Cornbread Breakfast Casserole and Homemade Hot Chocolate. Happy cooking!

Storage Tips for Homemade Breakfast Hot Pockets

Fridge: Store any leftover Homemade Breakfast Hot Pockets in an airtight container for up to 3 days to maintain freshness and prevent sogginess.

Freezer: For longer storage, freeze the hot pockets before baking. Wrap each pocket tightly in plastic wrap, then place them in a freezer bag; they can be stored for up to 3 months.

Reheating: To reheat, bake frozen hot pockets straight from the freezer at 375°F (190°C) for 25-30 minutes or until golden brown. For fridge-stored pockets, 15-20 minutes in the oven will do the trick.

Thawing: If you're in a hurry, you can thaw the hot pockets in the refrigerator overnight before reheating for a quicker bake time.

What to Serve with Homemade Ham, Egg, & Cheese Hot Pockets

These delicious pockets are the perfect star of your breakfast table, but pairing them with complementary sides can elevate your morning meal!

  • Fresh Fruit Salad: A vibrant mix of seasonal fruits adds a sweet and refreshing balance, brightening the savory hot pockets.

  • Greek Yogurt Parfait: Layered with granola and berries, a parfait offers a creamy counterpoint while being a wholesome option to round out your meal.

  • Light Green Salad: Tossed greens with a zesty vinaigrette provide a crisp texture and lightness that match wonderfully with the hearty filling.

  • Roasted Veggies: Oven-roasted bell peppers and zucchini contribute smoky flavors and a pinch of health, enhancing the overall taste experience.

  • Homemade Salsa: A spicy or mild salsa served on the side not only adds a kick but also brings a colorful element to your breakfast plate.

  • Coffee or Smoothies: Pairing with a hot cup of coffee or a refreshing smoothie will elevate the meal. Each sip complements the warm, cheesy hot pockets perfectly.

Expert Tips for Homemade Breakfast Hot Pockets

  • Chill Your Dough: Keep the dough chilled before rolling it out to ensure a light, flaky crust. Warm dough can lead to tough pockets.

  • Customize the Filling: Feel free to swap out the ham for cooked bacon or turkey, and try different cheeses like pepper jack or mozzarella for varied flavors!

  • Seal Properly: Pinch the edges tightly and crimp with a fork to prevent any filling from leaking out while baking.

  • Brush for Shine: For a beautiful golden finish, consider brushing the tops of the hot pockets with a beaten egg before baking.

  • Bake in Batches: To maintain even cooking, avoid overcrowding on the baking sheet. Giving each pocket its space allows for better airflow and browning.

  • Storage Tips: If you have leftovers, store them in an airtight container in the fridge for up to 3 days—perfect for reheating as a quick snack or breakfast!

Make Ahead Options

These Homemade Ham, Egg, & Cheese Hot Pockets are perfect for meal prep, saving you precious time on busy mornings! You can prepare the dough and filling up to 24 hours in advance and refrigerate them separately. To maintain quality, wrap the dough tightly in plastic wrap and store the filling in an airtight container, preventing drying out. When you're ready to enjoy, simply assemble the pockets as directed and bake them directly from the refrigerator. You’ll have warm, flaky hot pockets that are just as delicious as when freshly made—ideal for those who want a quick breakfast without sacrificing flavor!

Homemade Ham, Egg, & Cheese Hot Pockets Recipe FAQs

What type of flour should I use for the dough?
I recommend using all-purpose flour for the best texture and structure in your homemade hot pockets. However, if you're looking for a healthier option, whole wheat flour makes a great substitute, providing a nuttier flavor and added nutrients.

How long can I store the hot pockets in the fridge?
You can store any leftover Homemade Ham, Egg, & Cheese Hot Pockets in an airtight container for up to 3 days. For the best texture, reheat them in the oven until warm. This keeps them delicious and not soggy, which can happen in the microwave.

Can I freeze these hot pockets?
Absolutely! To freeze, wrap each unbaked hot pocket tightly in plastic wrap and place them in a freezer bag. They can be stored for up to 3 months. When ready to enjoy, bake them straight from the freezer at 375°F (190°C) for about 25-30 minutes until golden brown.

What should I do if the dough is too crumbly?
If your dough seems crumbly and won't hold together, you may need to add a bit more ice water—start with 1 tablespoon at a time until the dough comes together. Just be careful not to add too much, as overly wet dough can lead to a tough crust!

Can I customize the filling for dietary restrictions?
Certainly! If you or someone you're serving has allergies or dietary preferences, you can easily customize the filling. Consider replacing diced ham with cooked turkey, bacon, or even sautéed vegetables like bell peppers or spinach for a meat-free option. Just ensure that any alternatives are cooked properly before adding them to the filling.

How do I get a nice golden finish on my hot pockets?
For a beautiful, glossy finish on your Homemade Ham, Egg, & Cheese Hot Pockets, brush the tops with a beaten egg before baking them. This gives them that lovely golden-brown color and enhances the visual appeal of your delicious breakfast treat!

Homemade Breakfast Hot Pockets

Homemade Breakfast Hot Pockets to Kickstart Your Mornings

Make quick and delicious Homemade Breakfast Hot Pockets filled with ham, egg, and cheese for a satisfying and nourishing breakfast.
Print Recipe Pin Recipe
Prep Time 1 hour hr
Cook Time 25 minutes mins
Chilling Time 1 hour hr
Total Time 2 hours hrs 25 minutes mins
Servings: 12 hot pockets
Course: Breakfast
Calories: 290
Ingredients Equipment Method Nutrition Notes

Ingredients
  

For the Dough
  • 2 cups all-purpose flour whole wheat flour can be used for a healthier option
  • 1 teaspoon salt opt for kosher salt for a cleaner taste
  • 0.5 cups unsalted butter cold butter is key for a perfect texture
  • 4-6 tablespoons ice water adjust based on the dough's texture
For the Filling
  • 1 tablespoon olive oil can substitute with butter
  • 4 large eggs fresh eggs yield a fluffier scramble
  • 1 cup diced ham can substitute with cooked bacon or turkey
  • 1 cup shredded cheddar cheese mozzarella or pepper jack can also be used

Equipment

  • Mixing Bowl
  • non-stick skillet
  • Pastry cutter
  • Baking Sheet
  • plastic wrap

Method
 

Preparation
  1. In a large mixing bowl, combine 2 cups of all-purpose flour and 1 teaspoon of salt. Cut in ½ cup of cold unsalted butter until the mixture resembles coarse crumbs.
  2. Gradually add 4–6 tablespoons of ice water until just combined. Form into a disk, wrap in plastic wrap, and chill in the refrigerator for 1 hour.
  3. Heat 1 tablespoon of olive oil in a non-stick skillet over medium heat. Add 4 beaten eggs and scramble until just set, about 3-4 minutes.
  4. Remove from heat and mix in 1 cup of diced ham and 1 cup of shredded cheddar cheese. Let the filling cool.
  5. Preheat your oven to 375°F (190°C) and prepare a baking sheet with parchment paper.
  6. Dust a clean surface with flour and roll the chilled dough to about ¼-inch thickness. Cut into 12 equal rectangles.
  7. On one half of a rectangle, place a spoonful of filling, fold over, pinch edges to seal, and crimp with a fork.
  8. Bake on the prepared sheet for 20-25 minutes or until golden brown and puffed.
  9. Let cool for 5 minutes before serving.

Nutrition

Serving: 1hot pocketCalories: 290kcalCarbohydrates: 32gProtein: 12gFat: 14gSaturated Fat: 8gPolyunsaturated Fat: 2gMonounsaturated Fat: 4gCholesterol: 140mgSodium: 420mgPotassium: 150mgFiber: 1gSugar: 1gVitamin A: 500IUCalcium: 200mgIron: 1.5mg

Notes

Customize the filling by using different meats and cheeses. Store in an airtight container in the fridge for up to 3 days.

Tried this recipe?

Let us know how it was!

Delicious Avocado & Smoked Salmon Omelet in 10 Minutes

February 24, 2026 by Grace Snow Leave a Comment

As I stood in my kitchen watching the sun rise, the thought of a nourishing breakfast danced in my mind. This is when I realized that my mornings deserved something a bit more exciting than the usual toast. That’s when I created the delightful Avocado & Smoked Salmon Omelet! In just 10 minutes, you can conjure up a fluffy, protein-packed masterpiece that marries the creamy textures of avocado with the savory notes of smoked salmon. It's not just a breakfast; this dish doubles as a stunning brunch centerpiece. Plus, it's perfect for those adhering to a low-carb or keto lifestyle, allowing you to indulge your cravings without any guilt. Curious how to craft this morning delight? Let's dive in!

Why is this omelet a must-try?

Speedy and Simple: In just 10 minutes, this recipe delivers a delicious, restaurant-quality breakfast without fuss!
Protein Powerhouse: Packed with high-quality protein from eggs and smoked salmon, it's the perfect energy boost to kickstart your day.
Flavor Fusion: The creamy avocado and savory smoked salmon unite for a mouthwatering experience that feels indulgent yet healthy!
Versatile & Adaptable: Want to switch things up? You can swap the smoked salmon for crispy bacon or even add fresh veggies, making it great for any palate.
Impressive Presentation: Perfectly fluffy with vibrant colors, this omelet is sure to impress guests at any brunch gathering. Enjoy with a side of arugula for an extra zing!

Avocado & Smoked Salmon Omelet Ingredients

For the Omelet

  • Eggs – A crucial protein source; use 4 large eggs for a fluffy texture.
  • Creamy Avocado – Adds richness and healthy fats; if unavailable, guacamole works as a great substitute.
  • Smoked Salmon – Delivers a savory kick and added protein; feel free to swap with cooked bacon for a twist.
  • Fresh Herbs (e.g., chives, dill) – Brings freshness and color; experiment with other herbs like parsley for variation.
  • Lemon Wedge – Brightens the dish; squeezing fresh lemon juice over the omelet enhances flavors beautifully.

Enjoy crafting your Avocado & Smoked Salmon Omelet with these delightful ingredients!

Step‑by‑Step Instructions for Avocado & Smoked Salmon Omelet

Step 1: Whisk Eggs
In a medium bowl, crack open four large eggs and vigorously whisk them until they turn pale and frothy, about 1-2 minutes. This step is crucial for creating a light, fluffy texture in your Avocado & Smoked Salmon Omelet. Make sure the yolks and whites are fully incorporated for even cooking.

Step 2: Prepare Skillet
Place a non-stick skillet on the stove and heat it over medium heat for about 1-2 minutes. If you desire extra flavor, add a small amount of butter or oil, allowing it to melt and coat the surface. This will prevent sticking and ensure a beautifully cooked omelet.

Step 3: Cook Eggs
Pour the whisked eggs into the heated skillet, swirling them gently to ensure an even layer covers the base. Cook for approximately 2-3 minutes or until the edges begin to set but the center is still slightly runny. Keep an eye on the eggs; they should appear soft and creamy, indicating they're nearly ready.

Step 4: Add Fillings
Once the edges are set, carefully fold the partially cooked eggs with a spatula, creating a pocket for the flavorful fillings. On one half of the omelet, layer in slices of creamy avocado and savory smoked salmon. The avocado will melt slightly into the eggs, enhancing the dish’s richness and taste.

Step 5: Finish Cooking
Allow the omelet to continue cooking for an additional 1-2 minutes. The eggs should be fully set but remain fluffy, with a slight jiggle in the center. If needed, gently cover the skillet with a lid to trap heat and ensure even cooking. Your Avocado & Smoked Salmon Omelet is almost ready to be plated!

Step 6: Serve
Carefully slide the omelet onto a warm plate, allowing it to fold naturally in half. Garnish with fresh herbs like chives or dill, and serve with a lemon wedge on the side to squeeze over the top. This final touch will brighten the flavors and elevate your meal, making it a perfect breakfast or brunch treat!

Expert Tips for the Best Avocado & Smoked Salmon Omelet

  • Heat Management: Maintain a medium heat on your skillet to achieve a gentle cook, ensuring your eggs don’t brown but remain fluffy for the perfect avocado omelet.
  • Filling Balance: Avoid overloading your omelet with too much avocado or salmon, as this may cause it to tear. Less is more for a fully cooked, beautiful presentation.
  • Garnish Love: Enhance the visual appeal and flavor by sprinkling fresh herbs on top just before serving. Their vibrant colors and freshness truly elevate your smoked salmon omelet.
  • Mix It Up: Experiment with cheese or other vegetables for variety; a sprinkle of feta or sautéed spinach can add a delightful twist to your brunch masterpiece.
  • Serving Perfection: Serve your omelet immediately for the best texture. A light arugula salad on the side dressed with lemon and olive oil complements the dish beautifully.

Make Ahead Options

These Avocado & Smoked Salmon Omelets are perfect for meal prep enthusiasts looking to save time on busy mornings! You can whisk the eggs and refrigerate them for up to 24 hours in advance, ensuring you’re ready to whip up this delicious breakfast at a moment's notice. Additionally, slice your avocado and smoked salmon ahead of time, storing them separately in airtight containers to maintain freshness. When you're ready to enjoy, pour the eggs into a heated skillet, add the prepped fillings, and finish cooking as directed. With this simple prep, you’ll have a delightful, protein-packed meal that tastes just as fresh and satisfying!

Avocado & Smoked Salmon Omelet Variations

Feel free to explore these delightful tweaks to make your omelet uniquely yours!

  • Dairy-Free: Swap out cream cheese for coconut yogurt or skip the cheese entirely for a lighter option.
  • Herb-Infused: Add a variety of chopped fresh herbs like basil or cilantro for a fragrant twist.
  • Cheesy Delight: Stir in crumbled feta or creamy goat cheese to elevate the richness and flavor.
  • Spice It Up: Sprinkle in some red pepper flakes or a dash of hot sauce for a spicy kick.
  • Veggie Boost: Toss in sautéed spinach, mushrooms, or roasted bell peppers to enhance the nutrition and flavor.

For an adventurous brunch, try incorporating ingredients from my One Pot Salmon recipe for a flavorful spin or pair it nicely with a light Avocado Egg Salad on the side. You can also create a zesty vibe with a side of Lime Chicken Avocado.

Storage Tips for Avocado & Smoked Salmon Omelet

  • Room Temperature: Ideally, serve your omelet fresh. If left out, consume within 2 hours to avoid any food safety issues.
  • Fridge: Store leftovers in an airtight container for up to 3 days, but note that the texture might change slightly after refrigeration.
  • Reheating: To enjoy the omelet again, gently reheat in the microwave for 30-60 seconds. This helps maintain the fluffy texture without overcooking.
  • Freezer: Freezing is not recommended for omelets, as the ingredients may lose their quality and texture upon thawing. Enjoy fresh whenever possible!

What to Serve with Avocado & Smoked Salmon Omelet

Start your day right by creating a beautifully balanced brunch experience that tantalizes the senses.

  • Fresh Arugula Salad: A light mix of arugula drizzled with lemon juice adds a peppery crunch that contrasts wonderfully with the creaminess of the omelet.

  • Crispy Hash Browns: Golden, crispy hash browns provide a hearty texture and heartiness, making each bite more satisfying and comfort-inducing.

  • Sliced Tomato and Cucumber: These bright, cool vegetables bring a refreshing element to your plate, enhancing the overall flavor profile of your meal.

  • Chilled Gazpacho: This cold soup serves as a delightful contrast, adding a zesty burst of flavor that cleanses the palate perfectly.

  • Sparkling Citrus Water: Refreshing and palate-cleansing, a drink infused with citrus is a light option to enhance the vibrant flavors of your omelet.

  • Sweet Melon Cubes: A side of juicy melon adds a hint of sweetness, ensuring a delightful balance to the savory notes of the omelet.

Avocado & Smoked Salmon Omelet Recipe FAQs

How do I choose ripe avocados for the omelet?
Absolutely! When selecting avocados, look for ones with a slightly soft texture when gently squeezed. If they have dark spots all over, they may be overripe. A perfect avocado for your omelet should yield slightly, but not feel mushy. If you're unsure, it’s better to choose an avocado that is firm and allow it to ripen at room temperature for a few days.

What's the best way to store leftovers of the avocado and smoked salmon omelet?
Very! To store your omelet, place it in an airtight container and refrigerate it for up to 3 days. Ensure it’s cooled to room temperature before sealing it to prevent condensation. When you’re ready to enjoy it again, gently reheat in the microwave for 30-60 seconds, checking frequently to avoid rubbery eggs.

Can I freeze the avocado and smoked salmon omelet?
I often make this omelet fresh because freezing isn’t advisable. The texture may change significantly after thawing, and the creaminess of the avocado and the flavors of the salmon don’t hold up well in the freezer. If you must prep ahead, consider storing ingredients separately until you're ready to cook.

What should I do if my omelet keeps breaking?
No worries! If your omelet breaks, it could be due to overfilling or cooking at too high a heat. For a perfect fold, make sure you've whisked the eggs thoroughly and cooked them on medium heat for a gentle setting. If it tears, just use the spatula to patch it up before serving; nobody will notice!

Are there any dietary considerations for this omelet?
Absolutely! This Avocado & Smoked Salmon Omelet is low-carb and keto-friendly, making it suitable for many dietary preferences. However, if you're allergic to eggs or fish, consider alternatives like tofu for egg-free options or a plant-based smoked “salmon.” Always check with your guests regarding any allergies or dietary restrictions beforehand!

Avocado & Smoked Salmon Omelet

Delicious Avocado & Smoked Salmon Omelet in 10 Minutes

A delightful breakfast of Avocado & Smoked Salmon Omelet packed with protein, healthy fats, and flavors.
Print Recipe Pin Recipe
Prep Time 5 minutes mins
Cook Time 5 minutes mins
Total Time 10 minutes mins
Servings: 1 omelet
Course: Breakfast
Cuisine: American
Calories: 380
Ingredients Equipment Method Nutrition Notes

Ingredients
  

For the Omelet
  • 4 large Eggs A crucial protein source.
  • 1 medium Creamy Avocado Adds richness and healthy fats.
  • 100 grams Smoked Salmon Delivers a savory kick.
  • 2 tablespoons Fresh Herbs (e.g., chives, dill) Brings freshness and color.
  • 1 slice Lemon Wedge To squeeze over the omelet.

Equipment

  • non-stick skillet

Method
 

Step-by-Step Instructions
  1. In a medium bowl, crack open four large eggs and whisk them until pale and frothy, about 1-2 minutes.
  2. Place a non-stick skillet on medium heat for about 1-2 minutes, adding butter or oil if desired.
  3. Pour the whisked eggs into the skillet, swirling gently, and cook for 2-3 minutes until edges set.
  4. Fold the partially cooked eggs with a spatula, layering in slices of creamy avocado and smoked salmon.
  5. Continue cooking for an additional 1-2 minutes until the eggs are fully set but fluffy.
  6. Carefully slide the omelet onto a warm plate, garnish with fresh herbs, and serve with a lemon wedge.

Nutrition

Serving: 1omeletCalories: 380kcalCarbohydrates: 7gProtein: 30gFat: 25gSaturated Fat: 8gPolyunsaturated Fat: 6gMonounsaturated Fat: 10gCholesterol: 370mgSodium: 800mgPotassium: 780mgFiber: 5gSugar: 1gVitamin A: 750IUVitamin C: 15mgCalcium: 80mgIron: 2mg

Notes

Serve immediately for the best texture. A light arugula salad dressed with lemon and olive oil complements the dish beautifully.

Tried this recipe?

Let us know how it was!

Irresistibly Cheesy Egg and Cheese Toasts for Quick Mornings

February 24, 2026 by Grace Snow Leave a Comment

The smell of toasted bread mingling with melted cheese can transform any ordinary morning into something extraordinary. I can still recall those busy weekdays when the clock was ticking, and I needed a quick meal that didn't compromise on taste. Enter my Egg and Cheese Toasts—a super customizable breakfast option that’s not just quick, but also a delightful way to use whatever cheese you have on hand. Whether it’s a bite of sharp cheddar or a hint of pepper jack, these toasts are perfect for any cheese lover. Plus, they’re an ideal choice for anyone looking to step away from fast food and enjoy a homemade breakfast in less than 15 minutes! So grab your favorite bread, and let's dive into the simple steps that will have you savoring every gooey bite. Ready to elevate your breakfast game?

Why Are These Egg and Cheese Toasts Irresistible?

Quick and Easy: With just 15 minutes from start to finish, you can enjoy a delicious homemade breakfast without the hassle. Customizable: Top with your favorite cheeses and herbs, allowing for endless variations; whether you crave Gruyère or a spicy pepper jack, each bite can be unique! Perfect Texture: The combination of a crispy exterior and gooey cheese creates a mouthwatering experience that’s simply irresistible. Crowd-Pleasing Delight: Serve these toasts alongside your favorite soup or salad, and watch them disappear at brunch gatherings. For more ideas, check out my Avocado Egg Salad for a healthy side or the comforting Egg Drop Soup that pairs beautifully!

Egg and Cheese Toasts Ingredients

• Get ready to create a delightful breakfast with these fantastic ingredients!

For the Base

  • Hearty Sandwich Bread – Choose a sturdy loaf that prevents sogginess; avoid airy sourdough.

For the Filling

  • Egg – The rich binder that adds moisture and a fluffy texture to every bite.
  • Grated Cheese (Cheddar, Pepper Jack, Gruyere) – Opt for your favorite melting cheese to enhance flavor and creaminess.

For the Flavor Boost

  • Fresh Herbs (Thyme, Rosemary) – Optional but recommended for a fresh, aromatic touch.
  • Salt and Pepper – Essential for seasoning; don’t overlook them for depth in flavor.
  • Cayenne (optional) – Add a pinch for a bit of heat; adjust to your preference.
  • Dijon Mustard (optional) – A thin smear underneath the cheese adds a delightful tang.

These Egg and Cheese Toasts are so easy to customize with your favorite toppings, making them a perfect farewell to fast food breakfast! Enjoy crafting your delicious morning masterpiece!

Step‑by‑Step Instructions for Egg and Cheese Toasts

Step 1: Preheat Your Oven or Air Fryer
Start by preheating your oven to 400°F for that perfect crispiness, or set your air fryer to 340°F. If you're using a toaster oven, ensure you switch to the bake setting while placing the rack on the bottom. This will create an ideal environment for your Egg and Cheese Toasts to bake evenly, ensuring that every bite is golden and delicious.

Step 2: Toast Your Bread Lightly
While the oven is heating, take your hearty sandwich bread and lightly toast it, or broil both sides for about 1-2 minutes until just golden. This initial crisping will help keep your toasts sturdy against the egg and cheese mixture, preventing sogginess, and enhancing the delightful texture of your Egg and Cheese Toasts.

Step 3: Prepare the Egg Mixture
In a medium bowl, crack your egg and beat it until smooth and slightly frothy. This step is crucial as it combines air into the egg, ensuring your toasts come out light and fluffy. It's the perfect blend to mix with your cheese and herbs, creating a rich filling that beautifully binds everything together in your Egg and Cheese Toasts.

Step 4: Combine Cheese and Seasonings
Next, add the grated cheese of your choice—be it cheddar, pepper jack, or Gruyère—into the beaten egg. Follow this with fresh herbs, salt, and pepper. Stir everything together until well combined. This mixture is what gives your Egg and Cheese Toasts that savory richness and depth, ensuring each bite is bursting with flavor.

Step 5: Assemble the Egg and Cheese Toasts
Now, take your toasted bread and spread the egg-cheese mixture evenly, reaching the edges to maximize flavor in every bite. If you like a little kick, sprinkle some cayenne pepper on top. This step is where your Egg and Cheese Toasts start to come to life with color and texture, enticing you with the aroma of melting cheese.

Step 6: Bake to Perfection
Place the assembled toasts into your preheated oven and bake for 10-12 minutes, or until the cheese is puffed and golden brown. If you’re using an air fryer, cook for 8-10 minutes without pre-toasting the bread. Keep an eye on them; the perfect Egg and Cheese Toasts should be bubbling and radiating that irresistible cheesy smell.

Step 7: Serve and Enjoy
Once baked, carefully remove your toasts from the oven and let them sit for a moment to cool slightly. Serve these Egg and Cheese Toasts warm, possibly alongside your favorite soup or a fresh salad for a delightful meal. The contrast of crispy edges and gooey cheese is sure to make this breakfast a hit!

How to Store and Freeze Egg and Cheese Toasts

Fridge: Store leftover Egg and Cheese Toasts in an airtight container for up to 2 days. Reheat in the oven or air fryer for 5-7 minutes to regain that crispy texture.

Freezer: For longer storage, freeze the toasts individually wrapped in foil or parchment paper, then place them in a freezer bag. They can last up to 1 month.

Reheating: From the fridge or freezer, reheat in a 350°F oven for about 10-15 minutes for best results, ensuring they heat through and stay crispy.

Room Temperature: It's best not to leave these toasts out at room temperature for more than 2 hours to ensure food safety.

Helpful Tricks for Egg and Cheese Toasts

  • Choose the Right Bread: Sturdy sandwich bread is essential; avoid those with large holes like sourdough to maintain structure and crunch.

  • Egg Texture: Beating the egg until frothy allows air to incorporate, resulting in a light and fluffy filling that enhances the Egg and Cheese Toasts.

  • Flavor Boosting: Don’t skip the salt and pepper! These staples are crucial for elevating the flavors in your cheesy mixture, ensuring a deliciously savory outcome.

  • Prevent Sogginess: Lightly toasting the bread before adding the egg-cheese mixture will keep your toasts crispy and prevent them from becoming soggy.

  • Customizable Variations: Feel free to add veggies, like spinach or tomatoes, for an extra boost; just remember that moisture may need to be balanced with the egg and cheese!

  • Watch the Bake Time: Keep a close eye while baking; overcooking can lead to toughness rather than that heavenly gooey texture you desire in your Egg and Cheese Toasts.

What to Serve with Egg and Cheese Toasts?

Indulging in these delicious toasts opens up a world of delightful pairings that can elevate your breakfast experience.

  • Tomato Soup: A warm bowl of creamy tomato soup contrasts brilliantly with crispy toasts, making for a comforting meal.

  • Simple Green Salad: Toss together fresh greens with a light vinaigrette; the freshness balances the richness of the Egg and Cheese Toasts beautifully.

  • Fresh Fruit Salad: A mix of juicy berries adds a refreshing sweetness that complements the savory toasts, making for a well-rounded meal.

  • Roasted Vegetables: Include seasonal veggies for a hearty side; their caramelized sweetness and nutty flavors enhance the overall dining experience.

  • Avocado Slices: Creamy avocado adds a luxurious texture and healthy fats, perfectly pairing with the cheesy goodness of your toasts.

  • Herbal Tea: Opt for a calming herbal tea to sip alongside; its gentle flavors refresh your palate while savoring each bite of toast.

  • Orange Juice: A glass of fresh orange juice brings a bright, zesty note to your breakfast table, complementing the rich flavors of the dish.

  • Chocolate Muffins: For a sweet touch, pair with homemade chocolate muffins; the sweetness contrasts with the savory notes wonderfully.

Embark on your breakfast adventure and discover what truly delightful combinations await you!

Egg and Cheese Toasts Variations & Substitutions

Feel free to get creative and personalize your Egg and Cheese Toasts with these tempting variations!

  • Cheese Swap: Experiment with different melting cheeses like Gruyère for a nutty flavor or mozzarella for a milder experience. Each cheese brings its unique twist, turning the classic into something fresh and new.

  • Veggie Delight: Add thinly sliced tomatoes, bell peppers, or fresh spinach before baking to boost nutrition and add a vibrant color. Not only does this enhance the toasts visually, but it also adds an element of freshness that complements the richness beautifully.

  • Sweet Surprise: Try topping with apple slices drizzled with honey and a sprinkle of cinnamon for a sweet version. This unexpected pairing will transform your breakfast into a delightful treat!

  • Herbal Infusion: Mix in fresh basil or chives with the cheese for an aromatic flavor boost. The added herbs create a fragrant experience that elevates every bite, making your morning feel special.

  • Spicy Kick: For those who crave heat, add diced jalapeños or a splash of hot sauce to the egg mixture. This little twist will awaken your taste buds and make breakfast an adventure!

  • Creamy Spread: Before adding the egg-cheese mixture, spread a thin layer of cream cheese or ricotta on the toasted bread. This adds extra creaminess and a delightful flavor depth that complements the egg and cheese.

  • Protein Boost: Incorporate cooked and crumbled bacon, sausage, or even sautéed mushrooms for added texture and heartiness. Elevate your breakfast experience by making it more filling with these savory additions.

  • Stuffed Toasts: Instead of spreading the egg mixture over the bread, try hollowing out the center and filling it with other goodies, like sautéed onions or peppers, for a stuffed toast option. This method adds a delightful surprise in every bite with layers of flavor.

With these variations, you can enjoy a new twist on your Egg and Cheese Toasts every time, ensuring they never become monotonous. And if you're ever in the mood for something different, why not check out my Breakfast Egg Muffins or the delightful Corn Fried Egg to shake things up? Happy cooking!

Make Ahead Options

These Egg and Cheese Toasts are perfect for meal prep, saving you precious time on busy mornings! You can prepare the egg-cheese mixture and store it in the refrigerator for up to 24 hours. Just whisk together the eggs, grated cheese, herbs, salt, and pepper, then cover tightly to maintain freshness. Simply wait to toast your bread until you're ready to bake for the best texture. When you're ready to enjoy, spread the mixture onto the pre-toasted bread and bake it for 10-12 minutes. This method ensures your Egg and Cheese Toasts remain just as delicious and gooey, allowing you to savor a warm breakfast with minimal effort!

Egg and Cheese Toasts Recipe FAQs

What type of bread is best for Egg and Cheese Toasts?
Absolutely! Choose a hearty sandwich bread that won't get soggy. Avoid overly airy loaves like sourdough, as they have large holes that can’t hold the toppings well. Look for a denser bread, such as whole grain or a thick-cut white bread, to get that perfect crispiness while holding all the delicious fillings.

How should I store leftover Egg and Cheese Toasts?
Very! To store, place your leftover toasts in an airtight container and keep them in the fridge for up to 2 days. When you're ready to enjoy them again, simply reheat in the oven or air fryer for about 5-7 minutes to bring back that delightful crispiness.

Can I freeze Egg and Cheese Toasts for later?
Yes, you can! For freezing, wrap each toast individually in foil or parchment paper, then transfer them to a freezer-safe bag. These toasts can be frozen for up to 1 month. To reheat, bake them straight from the freezer in a 350°F oven for about 10-15 minutes until heated through and crispy.

What should I do if my toasts turn out soggy?
If your Egg and Cheese Toasts end up soggy, it usually means the bread wasn’t sturdy enough or that they absorbed too much moisture from the egg mixture. Make sure to lightly toast the bread before adding the egg and cheese filler, and consider using less egg or incorporating more cheese to thicken the filling.

Are there any dietary considerations for Egg and Cheese Toasts?
Absolutely! While this recipe is vegetarian, be mindful if you have allergies to eggs or dairy. You can substitute eggs with a plant-based alternative like tofu or a chickpea flour mixture for a vegan option. Additionally, choose dairy-free cheese if you're lactose intolerant. Always check ingredient labels to ensure they meet your dietary needs.

Can I add vegetables to my Egg and Cheese Toasts?
For sure! Adding veggies like thinly sliced tomatoes, spinach, or bell peppers can enhance the flavor and nutritional content. If you're including moisture-rich vegetables, sauté them lightly first to reduce the moisture content before adding to your egg mixture. This ensures your toasts stay crispy and delicious!

Egg and Cheese Toasts

Irresistibly Cheesy Egg and Cheese Toasts for Quick Mornings

Enjoy Egg and Cheese Toasts, a quick and customizable breakfast option perfect for any cheese lover.
Print Recipe Pin Recipe
Prep Time 5 minutes mins
Cook Time 10 minutes mins
Cooling Time 2 minutes mins
Total Time 15 minutes mins
Servings: 2 toasts
Course: Breakfast
Cuisine: American
Calories: 280
Ingredients Equipment Method Nutrition Notes

Ingredients
  

For the Base
  • 2 slices Hearty Sandwich Bread Choose a sturdy loaf that prevents sogginess; avoid airy sourdough.
For the Filling
  • 1 large Egg The rich binder that adds moisture and a fluffy texture.
  • 1 cup Grated Cheese (Cheddar, Pepper Jack, Gruyere) Opt for your favorite melting cheese.
For the Flavor Boost
  • 1 tablespoon Fresh Herbs (Thyme, Rosemary) Optional but recommended for fresh flavor.
  • 1 teaspoon Salt Essential for seasoning.
  • 1 teaspoon Pepper Essential for seasoning.
  • 1 pinch Cayenne Optional; adjust to your preference.
  • 1 teaspoon Dijon Mustard Optional; adds a delightful tang.

Equipment

  • Oven
  • Air fryer
  • medium bowl

Method
 

Step-by-Step Instructions
  1. Preheat your oven to 400°F or set your air fryer to 340°F.
  2. Lightly toast the bread for about 1-2 minutes until just golden.
  3. Crack the egg into a bowl and beat it until smooth and slightly frothy.
  4. Add the grated cheese, fresh herbs, salt, and pepper to the beaten egg and stir until combined.
  5. Spread the egg-cheese mixture evenly over the toasted bread.
  6. Bake in the oven for 10-12 minutes or in an air fryer for 8-10 minutes.
  7. Serve warm, possibly alongside soup or salad.

Nutrition

Serving: 1toastCalories: 280kcalCarbohydrates: 30gProtein: 12gFat: 12gSaturated Fat: 6gPolyunsaturated Fat: 1gMonounsaturated Fat: 5gCholesterol: 185mgSodium: 450mgPotassium: 180mgFiber: 2gSugar: 2gVitamin A: 500IUCalcium: 250mgIron: 1.5mg

Notes

Lightly toasting the bread prevents sogginess and enhances the texture of the Egg and Cheese Toasts.

Tried this recipe?

Let us know how it was!

Delicious Breakfast Sandwich with Avocado You’ll Love

February 24, 2026 by Grace Snow Leave a Comment

As I took my first bite, the creamy avocado melded seamlessly with the crispy bacon and fluffy eggs, evoking pure breakfast bliss. Let me share my go-to for hearty mornings: the Creamy Avocado Breakfast Sandwich with Bacon. This delightful recipe is not only quick to whip up but also customizable, catering to everyone's tastes, whether you're a meat-lover or prefer a plant-based approach. The combination of toasted English muffins, melted cheddar, and fresh veggies ensures satisfaction in every layer. Plus, with the added perk of healthy fats from the avocado, you’ll start your day nourished and energized. Curious about how to make this mouthwatering breakfast creation? Let’s dive in!

Why is this sandwich a must-try?

Deliciously Customizable: Whether you prefer bacon or a meatless version, this sandwich adapts to your cravings. Quick to Prepare: With simple ingredients, it can be on your plate in minutes, making it ideal for busy mornings. Creamy Avocado Goodness: The avocado adds rich, healthy fats that boost your energy. Bursting with Flavor: A blend of melted cheddar, fresh veggies, and crispy bacon creates a satisfying taste explosion. Perfect for Any Meal: Although it's a breakfast treat, serve it at lunch or brunch, and watch it disappear, just like with a classic Cornbread Breakfast Casserole. Get ready to impress your friends and family with this culinary delight!

Breakfast Sandwich with Avocado Ingredients

Here's everything you'll need to create your delicious Breakfast Sandwich with Avocado:

For the Sandwich
• English Muffins – Perfect for holding all the tasty fillings; substitute with whole grain bread, bagels, or croissants for variety.
• Butter – Adds a rich flavor while toasting the muffins.
• Eggs – The heart of this dish; use two large eggs for a fluffy texture.
• Milk – Enhances creaminess in scrambled eggs; any type of milk can work well.
• Salt and Black Pepper – Essential for seasoning the eggs and elevating flavors.
• Avocado – Brings creaminess and healthy fats to the sandwich; always toss with lemon juice to keep it fresh.
• Lemon Juice – Prevents the avocado from browning while adding a delightful zing.
• Bacon – Adds a salty, crispy element; swap for turkey bacon or leave it out for a vegetarian twist.
• Cheddar Cheese – Melts beautifully, adding both flavor and creaminess; use dairy-free cheese for a vegan option.

For the Extras
• Tomatoes (optional) – Provides a fresh, juicy contrast to the richness of the eggs and avocado.
• Spinach (optional) – Introduces a burst of color and added nutrients to boost your meal.

Now that you've gathered your ingredients, you’re just a step away from assembling this scrumptious Breakfast Sandwich with Avocado that’s sure to be a morning hit!

Step‑by‑Step Instructions for Breakfast Sandwich with Avocado

Step 1: Crisp the Bacon
In a skillet over medium heat, cook the bacon until it becomes crispy and golden, about 5-7 minutes. Use tongs to flip the bacon halfway through for even cooking. Once done, remove the bacon from the skillet and drain it on paper towels to absorb excess grease, creating that perfect crunch for your Breakfast Sandwich with Avocado.

Step 2: Toast Muffins
While the bacon is cooking, split the English muffins and place them face down in a toaster or on a separate skillet over medium heat. Toast them until they're golden brown and crispy, approximately 3-4 minutes. If desired, spread a thin layer of butter on the cut sides while toasting for an additional rich flavor, preparing the base for your delicious sandwich.

Step 3: Scramble Eggs
In a mixing bowl, whisk together two large eggs, a splash of milk, and a pinch of salt and pepper until well combined. Pour this mixture into a non-stick skillet over medium heat. Cook the eggs while gently stirring with a spatula, just until they are softly set and creamy, which should take about 3-4 minutes. The fluffy scrambled eggs will perfectly complement the other ingredients in your Breakfast Sandwich with Avocado.

Step 4: Prepare Avocado
Slice the ripe avocado in half, remove the pit, and scoop the flesh into a small bowl. Add a splash of lemon juice to the avocado, tossing gently to coat and prevent browning. This creamy, luscious filling will add a healthful element to your Breakfast Sandwich with Avocado and ensure that every bite is bursting with flavor.

Step 5: Assemble Sandwiches
On the bottom half of each toasted English muffin, layer generous servings of the fluffy scrambled eggs, followed by melted cheddar cheese, crispy bacon, and the prepared avocado slices. If desired, add slices of fresh tomato and a handful of spinach for extra color and nutrients. This repeating layering will create a satisfying texture in your Breakfast Sandwich with Avocado.

Step 6: Serve
Finally, top each sandwich with the other half of the toasted muffin and serve immediately while everything is warm and melty. Enjoy the delightful combination of flavors and textures that make your Breakfast Sandwich with Avocado a satisfying start to your day.

Make Ahead Options

These Creamy Avocado Breakfast Sandwiches with Bacon are perfect for busy mornings and can be prepped in advance for ultimate convenience! You can prepare the bacon and scrambled eggs up to 3 days ahead; simply store them in airtight containers in the refrigerator. For the best quality, toast the English muffins just before serving to maintain their crisp texture. When you’re ready to enjoy your sandwiches, warm the bacon and eggs in a microwave or skillet, then assemble with freshly sliced avocado (tossed in lemon juice to prevent browning) and cheese. This way, you’ll have a delicious breakfast ready in minutes, making meal prep a breeze!

What to Serve with Creamy Avocado Breakfast Sandwich with Bacon

Dive into a delightful breakfast experience that can be easily complemented with refreshing and satisfying sides!

  • Crispy Hash Browns: Perfectly golden and crunchy, they add a comforting side that balances the creaminess of the sandwich. The crispy texture makes each bite a pleasure.

  • Fresh Fruit Salad: A medley of seasonal fruits brings a burst of freshness, lighting up your plate with color and natural sweetness. It's a palate cleanser between savory bites.

  • Smoothie Bowl: A thick, creamy smoothie bowl topped with granola and berries offers a nutritious boost. This refreshing option pairs well with the richness of the sandwich.

  • Yogurt Parfait: Layers of creamy yogurt, granola, and fresh fruits create a delightful contrast to the savory flavors. This combination keeps breakfast light and satisfying.

  • Avocado Toast: Elevate your theme with additional avocado on whole grain toast. It’s a flavorful way to embrace healthy fats while maintaining that avocado goodness.

  • Herbal Tea or Coffee: A warm beverage such as chamomile tea or rich coffee enhances the breakfast experience, providing comfort and a cozy feeling as you start your day.

  • Mini Muffins: Serve with a couple of freshly baked mini muffins for a touch of sweetness. Their fluffy texture is irresistible next to the savory layers of your breakfast sandwich.

Expert Tips for Breakfast Sandwich with Avocado

  • Crispy Perfection: Cook bacon until it’s very crispy to add a delightful crunch to your Breakfast Sandwich with Avocado. Soft bacon can make the sandwich soggy.
  • Egg Watch: Avoid overcooking your eggs; they should remain soft and creamy. This keeps the texture light and fluffy, enhancing the overall experience.
  • Layer Wisely: Assemble your sandwich right before serving to keep the avocado fresh and vibrant. This prevents browning and maintains the sandwich's appeal.
  • Make Ahead: Prepare components, like scrambled eggs and bacon, in advance. Store separately and assemble fresh when ready to enjoy your Breakfast Sandwich with Avocado.
  • Freezing Tips: If you’re making early batches, you can freeze the components except for the avocado. Reheat and add fresh avocado just before serving.

How to Store and Freeze Breakfast Sandwich with Avocado

  • Room Temperature: It's best to enjoy your Breakfast Sandwich with Avocado fresh, but if you must leave it out, consume it within 2 hours to ensure food safety.
  • Fridge: Wrap any leftover sandwiches tightly in foil or an airtight container. They can be stored for up to 3 days in the refrigerator.
  • Freezer: Separate sandwich components and freeze them individually. Store in freezer-safe containers for up to 2 months. Reheat thoroughly before adding fresh avocado.
  • Reheating: For the best texture, reheat thawed sandwiches in a skillet over medium-low heat or in the toaster oven until warmed through. Add avocado just before serving for freshness.

Breakfast Sandwich with Avocado Variations

Feel free to explore the delightful variety of twists you can add to this breakfast sandwich, making it uniquely yours!

  • Meatless Delight: Swap out the bacon for tempeh or crispy tofu to create a hearty vegetarian option that’s still full of flavor.

  • Gluten-Free Choice: Use gluten-free bread or lettuce wraps for a delicious gluten-free alternative that still satisfies your breakfast craving.

  • Add Spice: Incorporate sliced jalapeños or a dash of hot sauce for a spicy kick that enhances the overall flavor profile.

  • Creamy Alternatives: Instead of cheddar cheese, try cream cheese or a vegan cheese option for a completely different creamy experience.

  • Seasonal Goodness: In the warmer months, add fresh basil or arugula, and substitute ripe heirloom tomatoes to celebrate the season's bounty.

  • Sweet & Savory Fusion: Layer in slices of grilled peaches or apple for a sweet twist that pairs beautifully with the creamy avocado.

  • Ultimate Breakfast Boost: Add cooked quinoa or black beans inside the sandwich for extra protein and a satisfying texture that keeps you full longer.

  • Hearty Veggie Update: Toss in some sautéed mushrooms or roasted bell peppers for a flavor-packed veggie update that will leave you craving more.

If you're looking for more inspiration, check out this incredible Avocado Egg Salad for a fresh twist on a classic or explore Breakfast Banana Split for a sweet treat to pair with your savory sandwich. Let your culinary creativity run wild!

Breakfast Sandwich with Avocado Recipe FAQs

How do I select ripe avocados for my sandwich?
Absolutely! When choosing avocados, look for ones that yield slightly to gentle pressure, indicating they're ripe. Avoid any with dark spots all over, as this may signify overripeness. If you can, pick a few and let them ripen at home; they’ll be perfect when you're ready to make your Breakfast Sandwich with Avocado!

What’s the best way to store leftover sandwiches?
Very! To keep your leftover Breakfast Sandwich with Avocado fresh, wrap them tightly in foil or place them in an airtight container. They can be stored in the refrigerator for up to 3 days. When you're ready to enjoy, simply reheat them in a skillet or toaster oven, ensuring everything is warmed through.

Can I freeze the components of the sandwich?
Absolutely! To freeze, it's best to keep the components separate. You can scoop the avocado slices into an airtight container, but have fresh slices on hand for serving. The scrambled eggs and bacon can be frozen in individual portions in freezer-safe bags or containers. They’ll keep for about 2 months. Simply thaw in the refrigerator overnight before reheating!

What should I do if my eggs turn out too dry while scrambling?
The more the merrier! If your scrambled eggs end up dry, it's likely that they were overcooked. Try reducing the cooking time; you want them to be just set. If you do find yourself with dry eggs, mix in a splash of milk or a pat of butter while reheating to restore some moisture. Remember, gentle cooking over medium heat is the key!

Can my pets enjoy any part of this sandwich?
Very! Your furry friends can have eggs, as they're safe and nutritious for dogs and cats. However, avoid sharing bacon, cheese, and avocado due to their high-fat content. Always consult with your vet before introducing new foods to your pet’s diet to ensure it's safe for them!

Are there any allergens in this sandwich I should consider?
Absolutely! If you're serving the Breakfast Sandwich with Avocado to guests, be aware of common allergens like dairy (from the cheese and milk) and gluten (from the English muffins). Make it vegetarian or gluten-free by opting for plant-based cheese and gluten-free bread alternatives. Always check labels for specific ingredient information to keep everyone safe!

Breakfast Sandwich with Avocado

Delicious Breakfast Sandwich with Avocado You’ll Love

Savor a vibrant Breakfast Sandwich with Avocado, combining creamy avocado, crispy bacon, and fluffy eggs for a delicious morning treat.
Print Recipe Pin Recipe
Prep Time 10 minutes mins
Cook Time 15 minutes mins
Total Time 25 minutes mins
Servings: 2 sandwiches
Course: Breakfast
Cuisine: American
Calories: 450
Ingredients Equipment Method Nutrition Notes

Ingredients
  

For the Sandwich
  • 2 pieces English Muffins Substitute with whole grain bread, bagels, or croissants for variety.
  • 1 tablespoon Butter Adds rich flavor while toasting muffins.
  • 2 large Eggs For a fluffy texture.
  • 1 splash Milk Any type can work well.
  • 1 pinch Salt
  • 1 pinch Black Pepper
  • 1 whole Avocado Always toss with lemon juice to keep fresh.
  • 1 tablespoon Lemon Juice Prevents browning of avocado.
  • 2 slices Bacon Swap for turkey bacon or leave out for vegetarian option.
  • 1 slice Cheddar Cheese Use dairy-free cheese for a vegan option.
For the Extras
  • 1 medium Tomatoes Optional for fresh, juicy contrast.
  • 1 handful Spinach Optional for added nutrients.

Equipment

  • Skillet
  • Toaster
  • Mixing Bowl
  • Spatula
  • Tongs

Method
 

Step-by-Step Instructions for Breakfast Sandwich with Avocado
  1. In a skillet over medium heat, cook the bacon until crispy, about 5-7 minutes. Remove and drain on paper towels.
  2. While the bacon cooks, split the English muffins and toast them face down until golden brown, about 3-4 minutes.
  3. In a bowl, whisk eggs, milk, salt, and pepper. Pour into a skillet and cook gently until softly set, about 3-4 minutes.
  4. Slice the avocado, scoop into a bowl, and toss with lemon juice to prevent browning.
  5. Assemble by layering scrambled eggs, melted cheese, bacon, and avocado on the toasted muffins. Add tomatoes and spinach if desired.
  6. Top with the other half of the muffin and serve immediately.

Nutrition

Serving: 1sandwichCalories: 450kcalCarbohydrates: 30gProtein: 20gFat: 30gSaturated Fat: 10gPolyunsaturated Fat: 5gMonounsaturated Fat: 15gCholesterol: 200mgSodium: 800mgPotassium: 600mgFiber: 6gSugar: 3gVitamin A: 500IUVitamin C: 10mgCalcium: 250mgIron: 2mg

Notes

For the best texture, reheat thawed components in a skillet or toaster oven, adding avocado just before serving.

Tried this recipe?

Let us know how it was!
  • « Previous Page
  • 1
  • 2
  • 3
  • 4
  • 5
  • …
  • 17
  • Next Page »

Welcome!

Hi, I’m Grace, a Sydney-based home cook with a passion for bold flavors and trending ingredients. Whether you’re a busy beginner or a seasoned foodie, you’ll find dishes here that are fresh, fun, and full of flavor.

More about me

Popular Recipes

  • Cheesy Chicken Garlic Bread Sandwich
    Cheesy Chicken Garlic Bread Sandwich for Cozy Family Moments
  • Easy Chicken Ranch Wraps
    Easy Chicken Ranch Wraps: Quick, Creamy & Totally Satisfying
  • Chicken Caesar Sandwiches
    Delicious Chicken Caesar Sandwiches for Quick Comfort Food
  • best Cuban sandwich
    The Best Cuban Sandwich You’ll Want Every Weeknight!

Footer

↑ back to top

About

  • Privacy Policy
  • Disclaimer
  • Terms & Conditions

Newsletter

  • Sign Up! for emails and updates

Contact

  • About me
  • Contact me

Copyright © 2025 TastyTrendIngredients