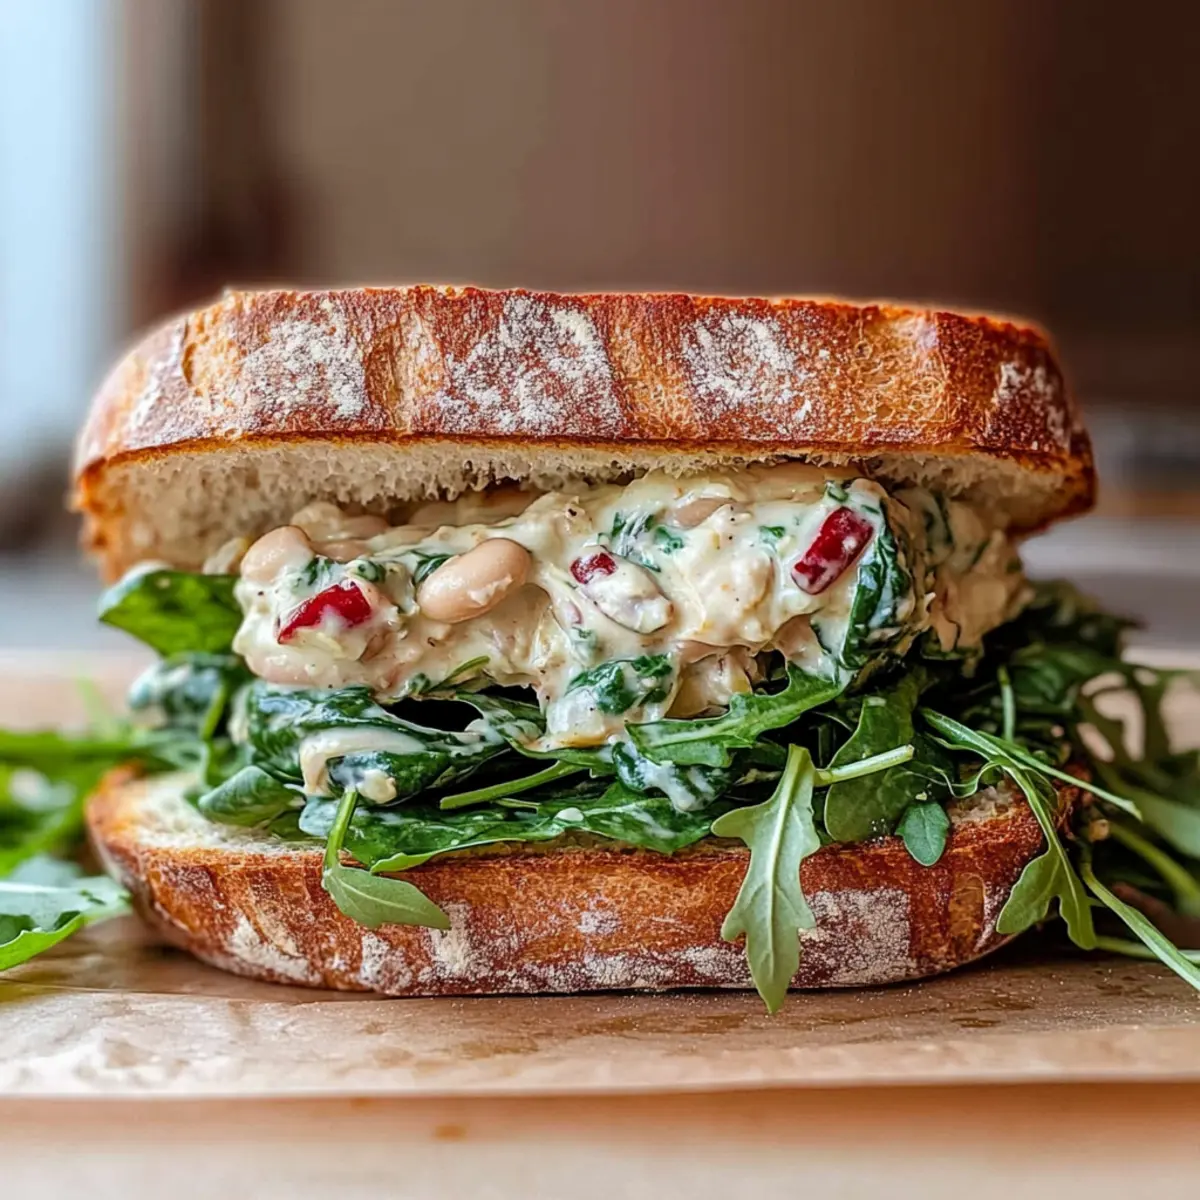
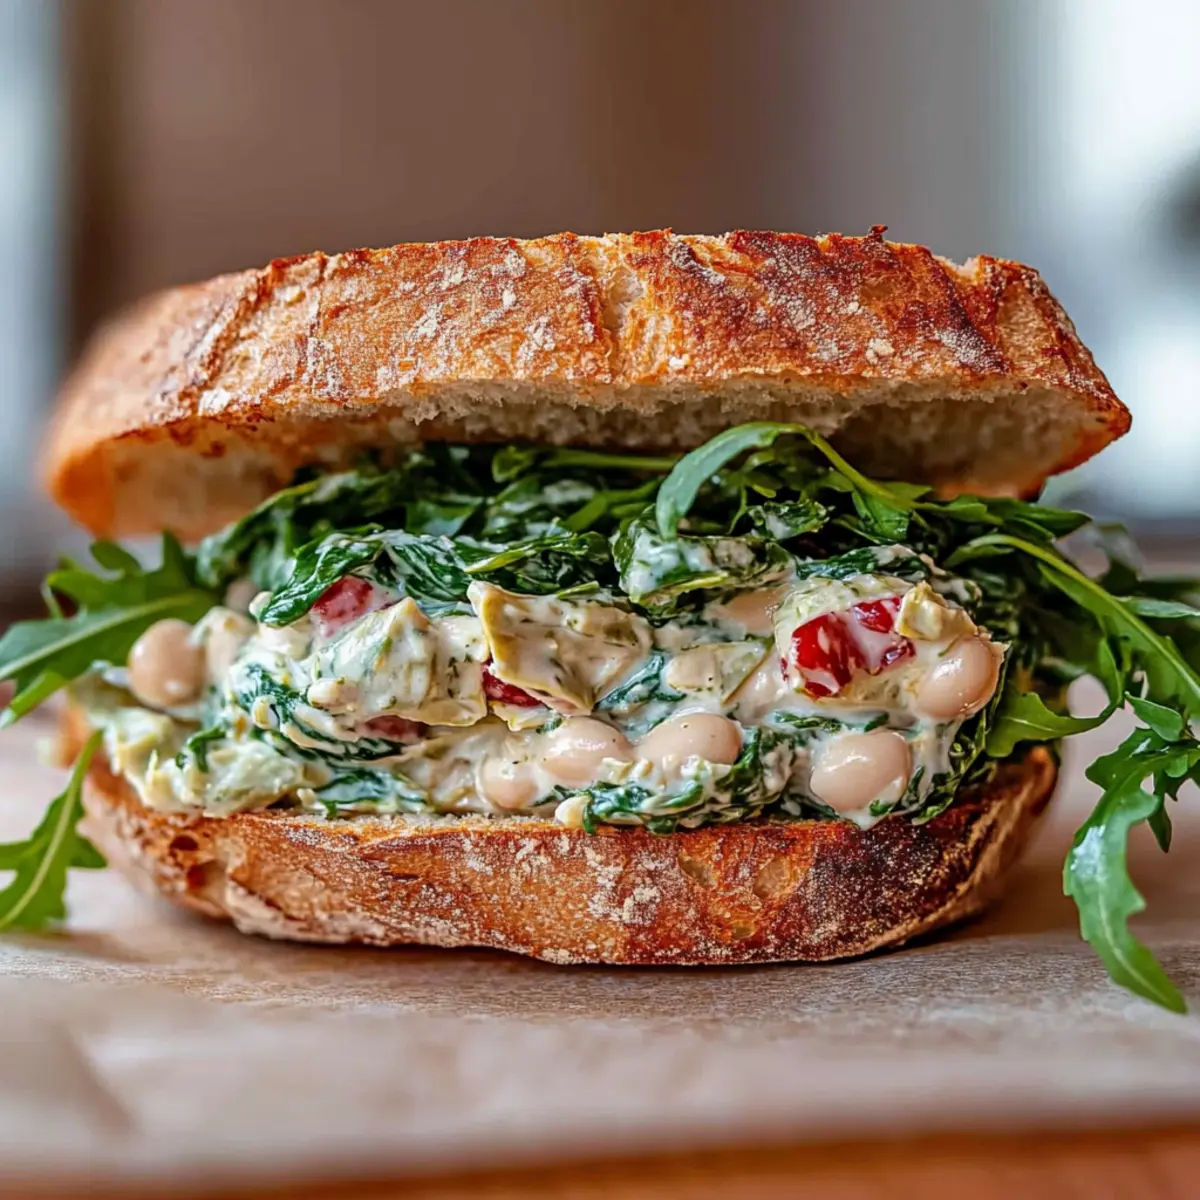
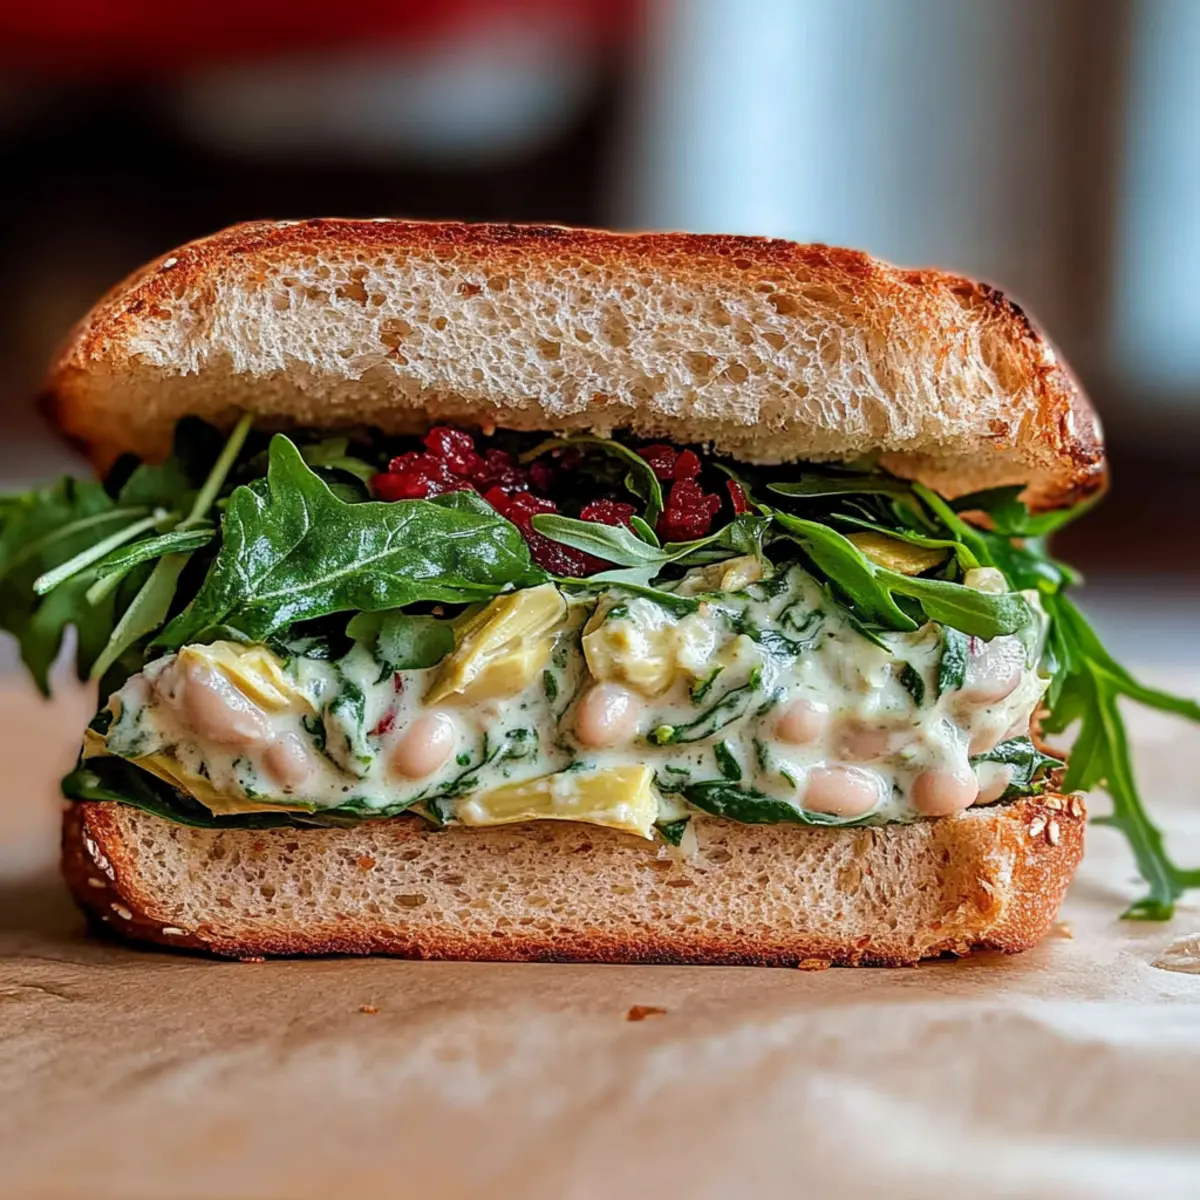
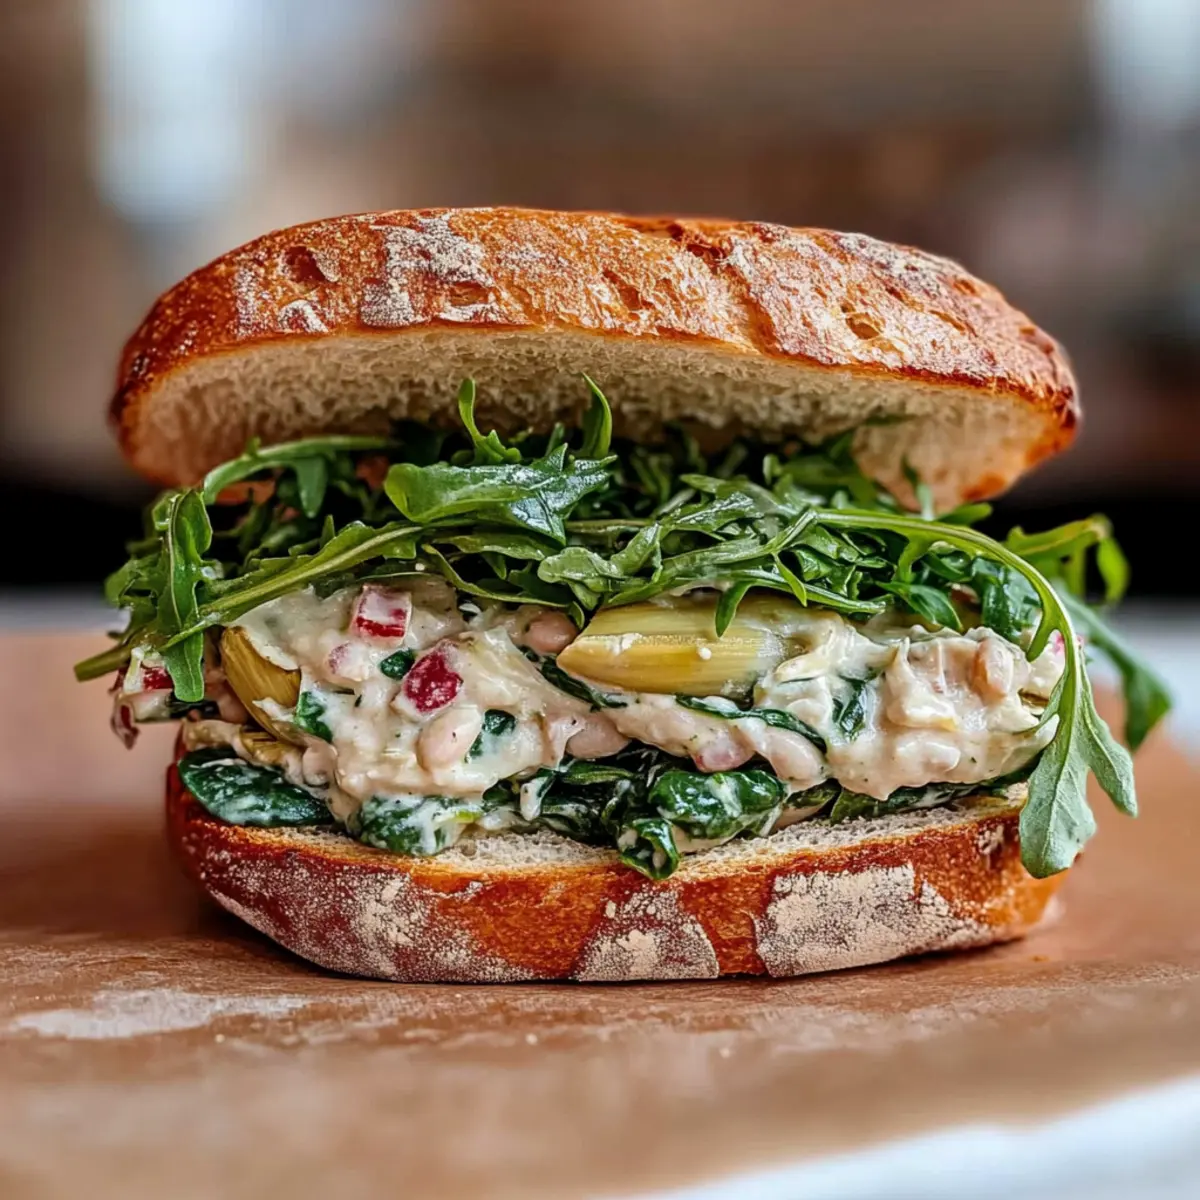
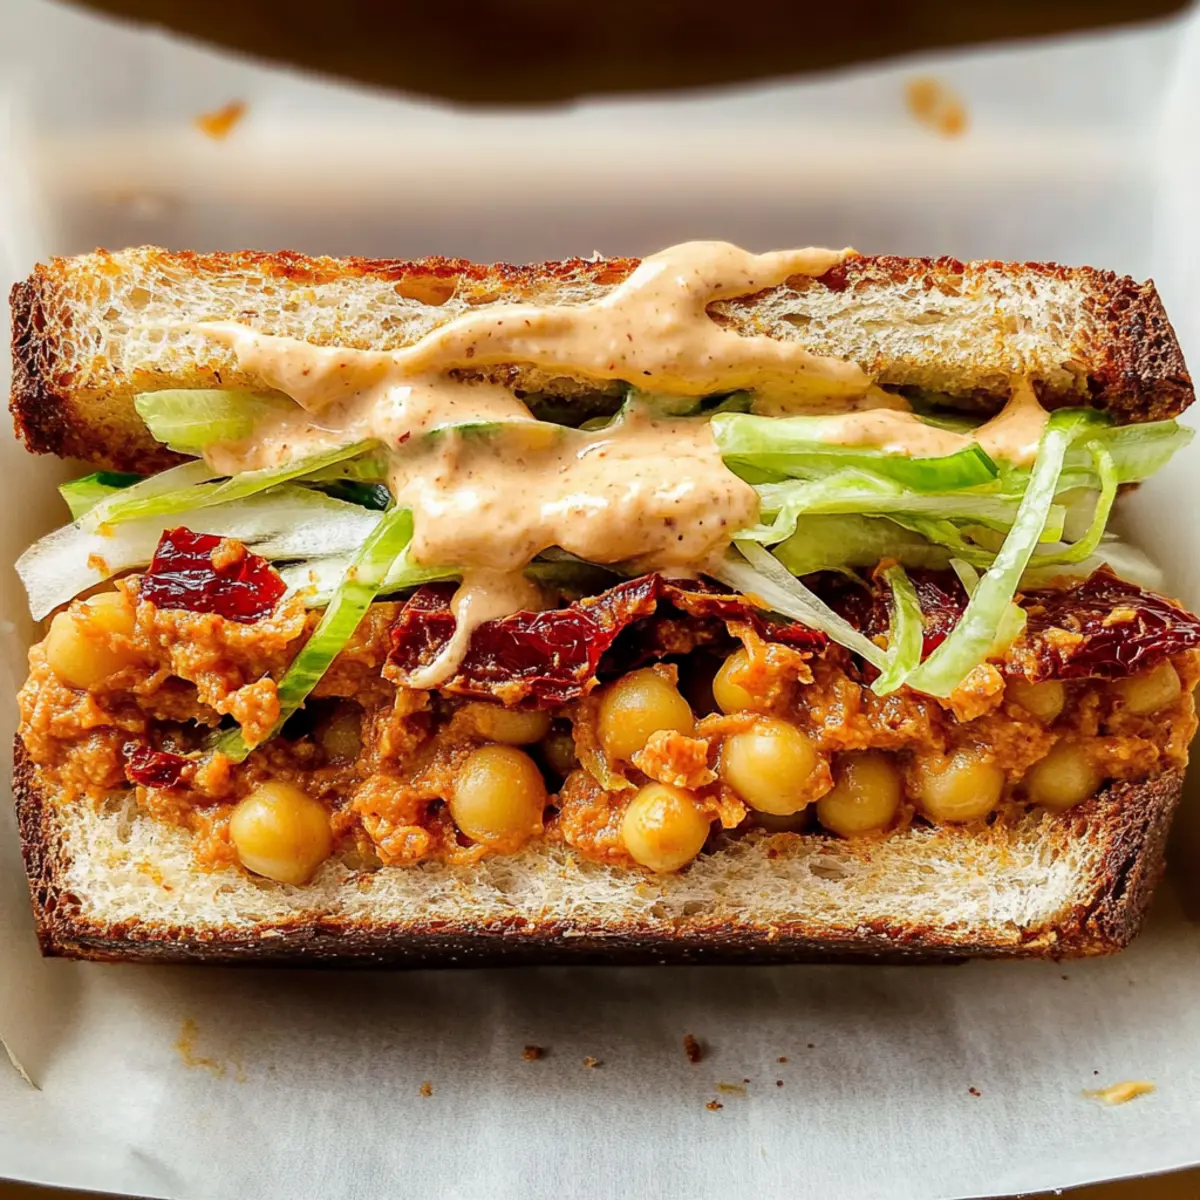
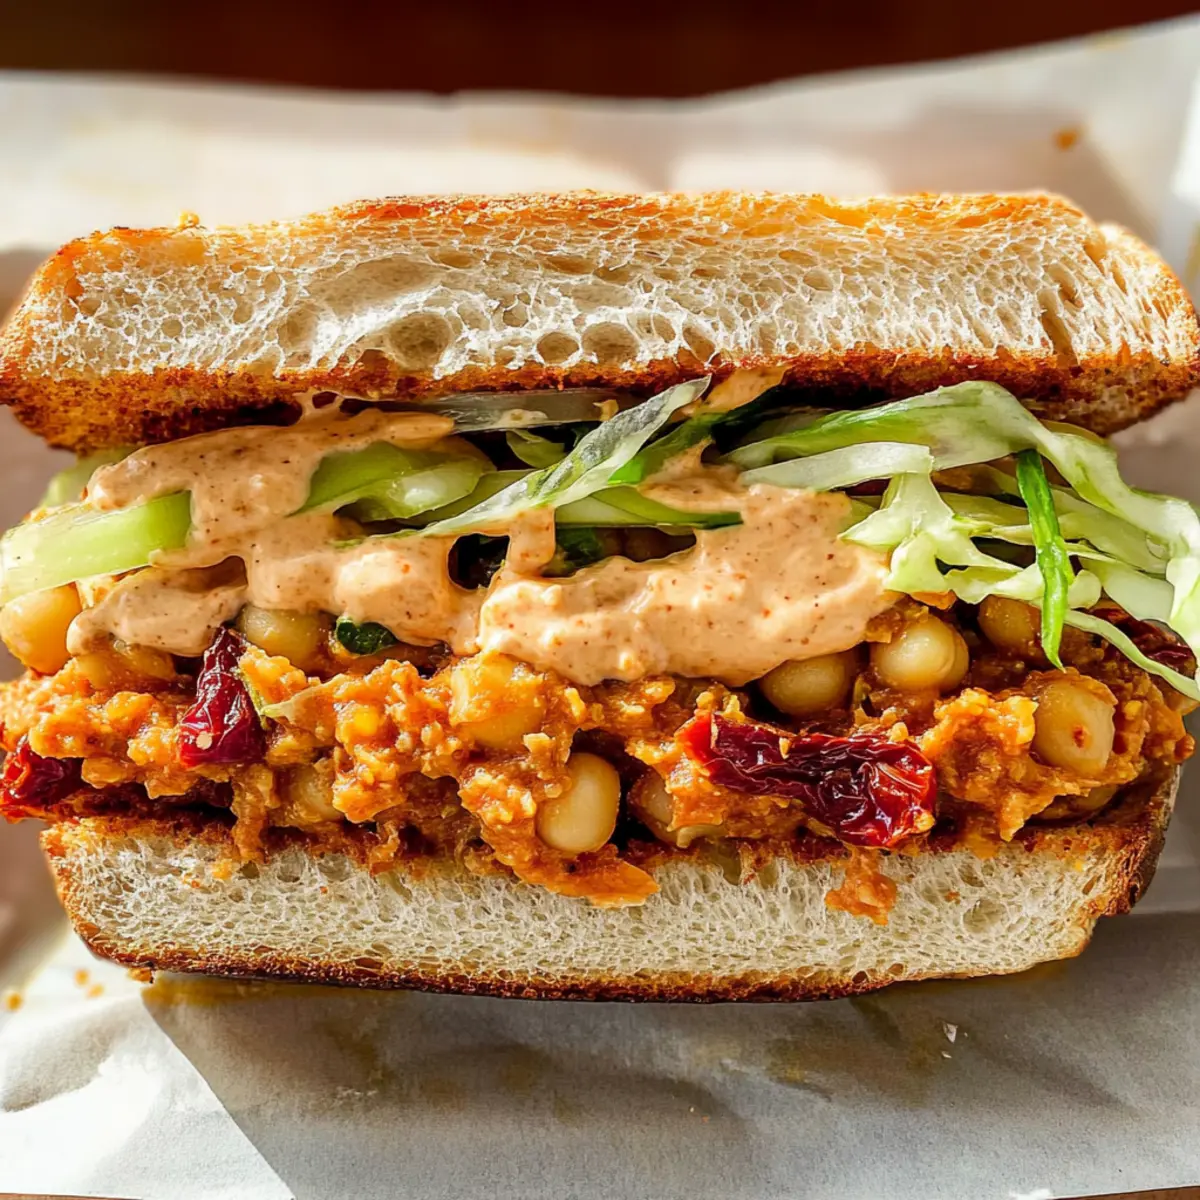
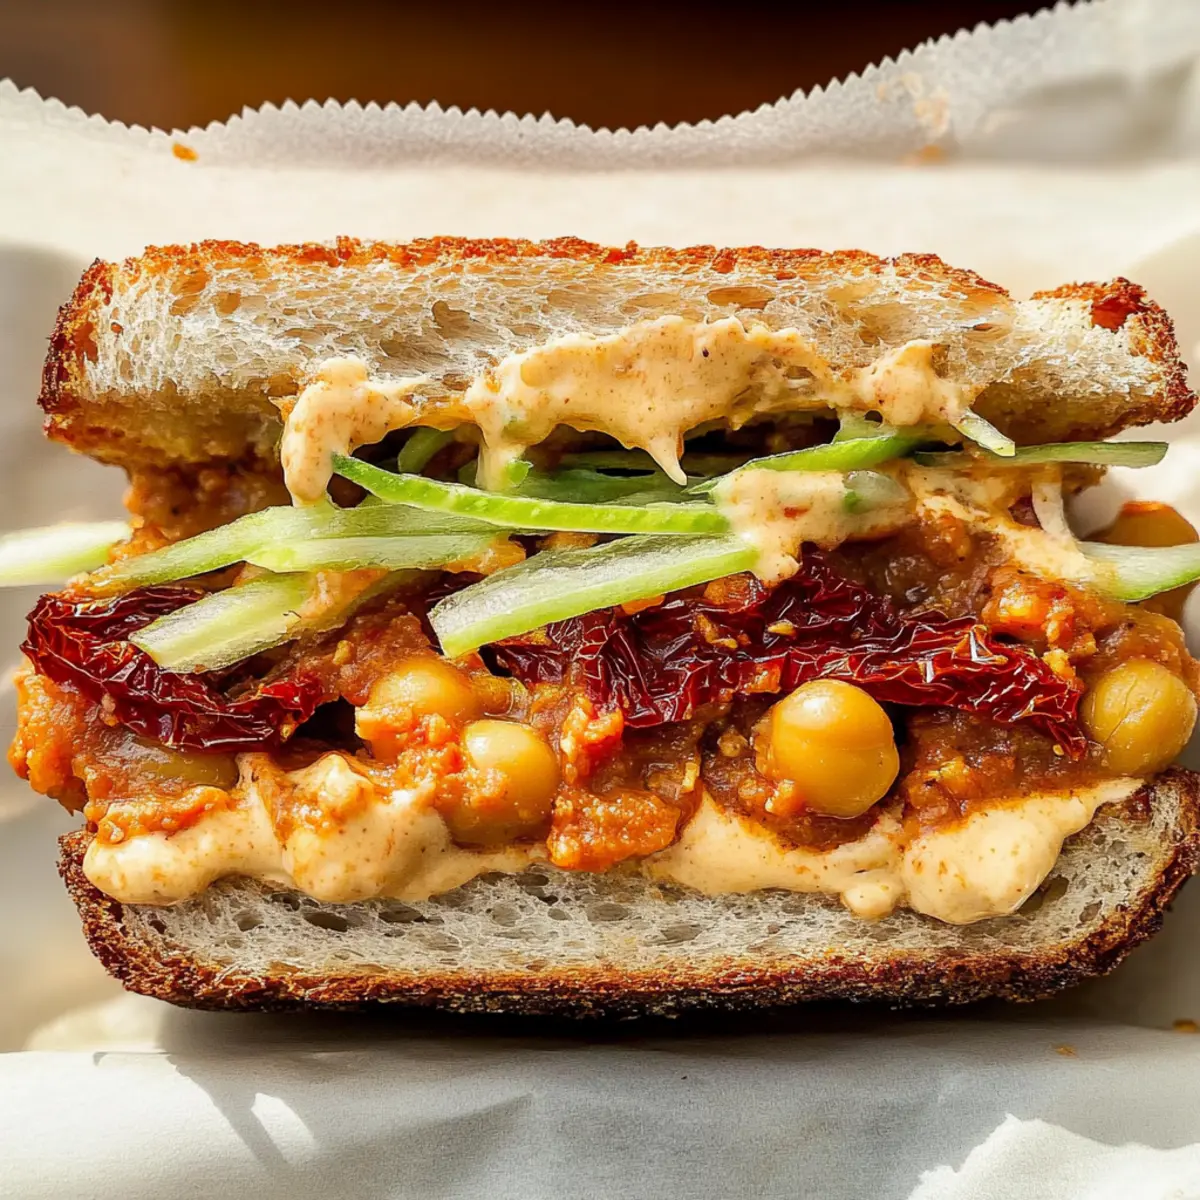
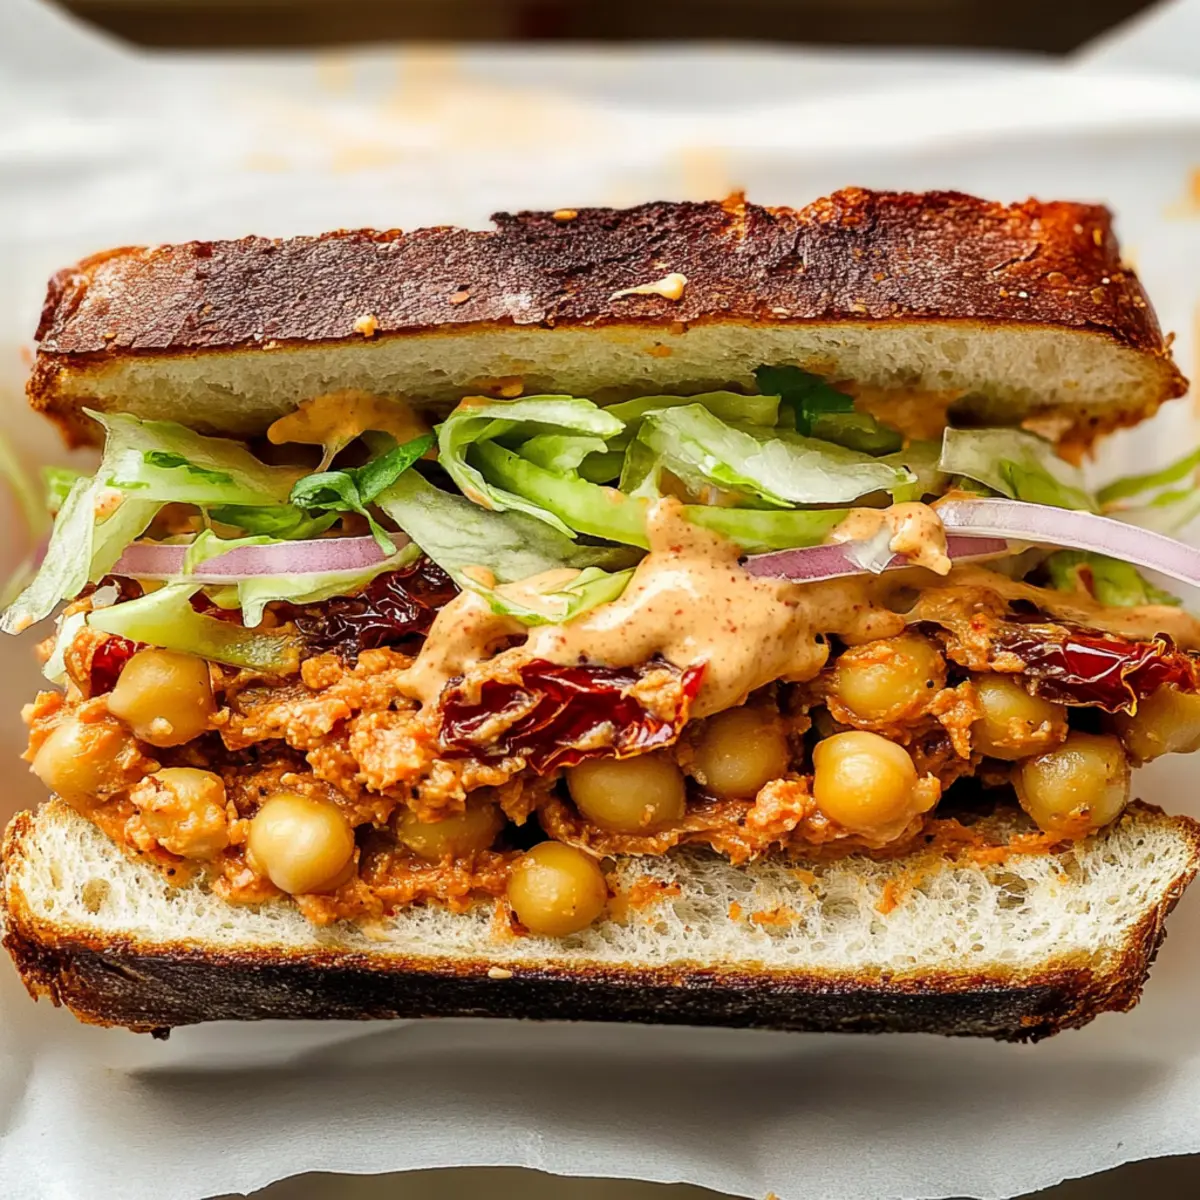
tastytrendingredients

  • Home
  • Recipes
    • Appetizers
    • Breakfast
    • Dessert
    • Dinner
    • Drinks
    • Salads
    • Snacks
    • Soups
  • About me
  • Contact me
menu icon
go to homepage
  • Home
  • Recipes
    • Appetizers
    • Breakfast
    • Dessert
    • Dinner
    • Drinks
    • Salads
    • Snacks
    • Soups
  • About me
  • Contact me
search icon
Homepage link
  • Home
  • Recipes
    • Appetizers
    • Breakfast
    • Dessert
    • Dinner
    • Drinks
    • Salads
    • Snacks
    • Soups
  • About me
  • Contact me
×

Ultimate Chocolate Croissants: A Decadent Homemade Delight

December 18, 2025 by Grace Snow Leave a Comment

Standing in my kitchen, the warm, inviting aroma of freshly baked pastries fills the air, and I feel transported to a charming Parisian café. If you’ve ever dreamed of indulging in the flaky delight of homemade Chocolate Croissants (Pain Au Chocolat), this is your moment! With just a little patience, you’ll create golden-brown pastries that boast layers of buttery goodness and a rich, melty chocolate center. This recipe isn’t just a step-by-step guide; it’s a beautiful journey into the art of baking that promises to impress your family and friends. Plus, this treat can be a surprisingly quick win for any level of baker, making it a perfect weekend project or an elegant breakfast surprise. Ready to kick fast food to the curb and elevate your mornings? Let's dive into the wonderfully delicious world of Chocolate Croissants!

Why Are Chocolate Croissants So Irresistible?

Indulge in pure bliss with these delectable Chocolate Croissants! Flaky Layers: Each bite melts in your mouth thanks to the perfectly layered, buttery pastry. Decadent Filling: A mix of rich chocolate creates an irresistible treat that’s hard to resist. Easy to Love: Whether for breakfast or as an afternoon snack, they appeal to everyone. Impress Your Friends: Your homemade creations will have your guests swooning and begging for the recipe! And for those cozy evenings, pair them with a mug of Homemade Hot Chocolate to elevate the experience.

Chocolate Croissants Ingredients

  • For the Dough

  • Warm Milk – 1 1/4 cup; activates yeast and hydrates dough—use whole milk for added richness.

  • Instant Yeast – 2 1/2 teaspoons; essential for rise—ensure it’s fresh for best results.

  • All-Purpose Flour – 3 1/2 cups (plus more for rolling); provides structure—substitute with bread flour for a chewier texture.

  • Sugar – 1/4 cup; adds sweetness and promotes browning—reduce for a less sweet taste.

  • Salt – 2 teaspoons; balances flavors and strengthens dough—don’t skip this!

  • Butter – 9 oz. (2 1/4 sticks, cold); creates flakiness—use high-quality unsalted butter for the best flavor.

  • For the Filling

  • Bittersweet Chocolate Bar – 1 (4 oz.); provides rich chocolate flavor—milk chocolate can be used for a sweeter profile.

  • For the Egg Wash

  • Egg – 1; gives a glossy finish—milk can be used as a dairy-free alternative.

  • Heavy Cream – 1 tablespoon; mixed with egg for a richer color and shine in your chocolate croissants.

Now that you have all the essential ingredients, you’ll be ready to transform your kitchen into a delightful bakery! Let's get baking!

Step‑by‑Step Instructions for Chocolate Croissants

Step 1: Dough Preparation
In a medium bowl, combine 1 cup of all-purpose flour, 2 1/2 teaspoons of instant yeast, and 1 1/4 cups of warm milk. Stir the mixture until well combined and let it sit for 20 minutes until bubbly and frothy. Gradually mix in the remaining flour (2 1/2 cups), 1/4 cup of sugar, and 2 teaspoons of salt. Knead the dough for about 2 minutes until smooth, then refrigerate for at least 2 hours or overnight.

Step 2: Butter Slab Preparation
Take 9 ounces of cold butter and place it between two sheets of parchment paper. Use a rolling pin to shape the butter into a 7x7 inch slab. Chill the butter slab in the refrigerator for 10 minutes to keep it firm. This butter strip will create those beautiful, flaky layers within your chocolate croissants when baked.

Step 3: Layering
On a floured surface, roll the rested dough into a 10x10 inch square. Place the cold butter slab diagonally in the center of the dough. Fold each corner of the dough over the butter, pinching to seal it inside completely. Roll the dough into a 10x24 inch rectangle, maintaining an even thickness. Once rolled, fold the dough in thirds like a letter, wrap it in plastic, and chill for 30 minutes to 1 hour before repeating this folding process two more times.

Step 4: Rolling Croissants
After the final fold, roll the dough out once more into a 10x24 inch rectangle. Cut the dough into long strips, about 4 inches wide. Take a piece of bittersweet chocolate (4 oz.) and place it at one end of each strip. Roll the dough tightly around the chocolate, ensuring the seam is on the bottom as you place the rolled croissants seam-side down on a lined baking sheet.

Step 5: Proofing
Cover the baking sheet with a clean kitchen towel, allowing the rolled chocolate croissants to proof overnight in the refrigerator or at room temperature. If at room temperature, let them puff up for about 1 hour until noticeably larger. This step is crucial to achieve light, airy croissants with a soft texture when baked.

Step 6: Baking
Preheat your oven to 400°F (200°C). Prepare an egg wash by whisking together 1 egg with 1 tablespoon of heavy cream, and gently brush it over the tops of the proofed croissants to give them a golden, glossy finish. Bake the croissants in the preheated oven for 25 to 30 minutes, rotating halfway through, until they are beautifully golden brown and flaky.

Step 7: Cooling
Once the chocolate croissants are out of the oven, transfer them to a wire rack and allow them to cool for a few minutes. This cooling period helps the chocolate set slightly, making them more enjoyable to eat. Serve warm alongside your favorite beverage, and indulge in the delicious layers of chocolatey goodness!

What to Serve with Decadent Chocolate Croissants

Warm buttery layers and rich chocolate make these homemade delights a perfect centerpiece for any meal or moment.

  • Fresh Fruit Salad: Bright, juicy fruits balance the sweetness of the croissants, providing a refreshing contrast that enhances your breakfast experience.

  • Rich Coffee: A robust cup of coffee draws out the chocolate’s depth while adding an energizing kick to your morning routine. The warmth melds beautifully with the flaky pastry.

  • Whipped Cream: Lightly sweetened, airy whipped cream offers a perfect topping, inviting you to indulge further in your chocolate croissant moment.

  • Coconut Macaroons: The chewy texture and flavor of toasted coconut harmonize with the flaky croissants, creating a delightful contrast for dessert.

  • Hazelnut Spread: Slathering this creamy spread on a warm croissant enhances its richness while lending a nutty crunch that pairs beautifully with chocolate.

  • Chamomile Tea: The delicate notes of chamomile tea provide a soothing complement to the decadent croissants, making for a lovely afternoon treat.

  • Orange Marmalade: A tangy orange marmalade brings a citrus zing that cuts through the richness, leaving your palate refreshed and ready for more.

  • Chocolate Milk: For a chocolaty twist, a glass of rich chocolate milk creates an indulgent memory reminiscent of childhood joy, perfect for any time of day.

Expert Tips for Chocolate Croissants

  • Patience Pays Off: Take your time during the dough preparation. Rushing can lead to tough croissants; patience ensures a tender, flaky texture.
  • Keep It Cold: "Baby the butter" to maintain its cold temperature during layering. Warm butter will spread instead of creating those essential flaky layers.
  • Quality Matters: Use high-quality bittersweet chocolate, as it's a key flavor in your chocolate croissants. Don't skimp here; your taste buds will thank you!
  • Resting Is Key: If the dough feels tight or resists rolling, let it rest in the refrigerator. This relaxes the gluten and makes it easier to handle.
  • Perfect Proofing: For the best rise, allow the croissants to proof until they’re noticeably puffy. Skipping this can result in dense pastries instead of light, airy treats.

How to Store and Freeze Chocolate Croissants

  • Room Temperature: Store cooled chocolate croissants in an airtight container at room temperature for up to 2 days to maintain their flaky texture.

  • Fridge: If you're not planning to eat them within two days, keep them in the refrigerator to prolong freshness for up to 5 days. Just make sure they're in a tightly sealed container.

  • Freezer: For longer storage, freeze chocolate croissants individually wrapped in plastic wrap and placed in a freezer-safe bag. They can last for up to 2 months.

  • Reheating: To reheat, place frozen or refrigerated croissants in a preheated oven at 350°F (175°C) for about 10–15 minutes, until warmed through and crispy. Enjoy the deliciousness of homemade chocolate croissants!

Chocolate Croissants Variations & Substitutions

Feel free to embark on a delightful adventure by customizing your chocolate croissants with these tempting variations!

  • Nutty Filling: Replace chocolate with almond paste or hazelnut spread for a different flavor profile. The nuttiness pairs beautifully with the buttery pastry.

  • Creamy Center: Swap the chocolate for cream cheese mixed with a bit of sugar and vanilla for a delightful twist. This adds a creamy texture that creates a wonderful surprise in every bite.

  • Fruit Infusion: Add fresh berries or dried fruits along with the chocolate. The tartness of raspberries or sweetness of cranberries can elevate the flavor dramatically.

  • Flavored Chocolate: Use flavored chocolates like orange-infused or mint chocolate for a unique touch. It’s a small change that can bring a whole new experience to your croissants.

  • Spiked Dough: Add a splash of vanilla or almond extract to your dough for an added aroma that will make your croissants even more irresistible.

  • Gluten-Free: Substitute all-purpose flour with a gluten-free blend to accommodate dietary needs. Just ensure you follow a recipe designed for gluten-free baking to maintain proper texture.

  • Sweet Cinnamon: Mix a teaspoon of cinnamon with the sugar before incorporating it into the dough for a deliciously warm undertone. Cinnamon and chocolate together? Absolutely heavenly!

  • Extra Crispy: For an even flakier texture, brush the layers with a bit of melted butter before folding. It can make those layers even more pronounced and scrumptious!

Dive into the world of pastry-making with these variations and don’t hesitate to experiment! For those cozy mornings, elevate your experience by pairing these croissants with a steaming cup of Homemade Hot Chocolate for a truly indulgent breakfast. Happy baking!

Make Ahead Options

These Chocolate Croissants are perfect for busy home cooks looking to save time without sacrificing flavor! You can prepare the dough and roll the croissants up to 24 hours in advance, which allows for a quick bake in the morning. Simply follow the steps to make the dough and shape the croissants, then place them on a baking sheet, cover with plastic wrap, and refrigerate overnight. To maintain their quality, avoid overcrowding them and ensure they are well-sealed to prevent drying out. When you're ready to enjoy, simply egg wash and bake them from the fridge, and you'll have warm, flaky croissants bursting with melted chocolate, ready to impress your family!

Chocolate Croissants Recipe FAQs

How should I select the right chocolate for my croissants?
For a delightful experience, use high-quality bittersweet chocolate, as it provides a rich flavor that elevates your pastries. Look for chocolate bars with at least 60% cocoa content for a balanced taste, but feel free to experiment with milk chocolate if you prefer a sweeter profile. Whatever you choose, avoid chocolate chips, as they can burn and won’t melt as beautifully inside your croissant!

How can I store my chocolate croissants to keep them fresh?
You can store cooled chocolate croissants in an airtight container at room temperature for up to 2 days to retain their flaky texture. If you want to keep them longer, transfer them to the refrigerator, which will extend their freshness to about 5 days—just ensure they’re tightly sealed to prevent them from drying out.

Can I freeze chocolate croissants, and if so, how?
Absolutely! For freezing, wrap each chocolate croissant tightly in plastic wrap and then place them in a freezer-safe bag. They can be stored in the freezer for up to 2 months. When you’re ready to enjoy one, simply reheat them in a preheated oven at 350°F (175°C) for about 10-15 minutes until warmed through and crisp. It’s like biting into a fresh bakery treat!

What should I do if my croissants don’t rise properly during proofing?
If your croissants are not rising as expected, it could be due to inactive yeast or too cool an environment. Ensure your yeast is fresh and active—test it by mixing it with warm milk and sugar; it should froth within minutes. For proofing, find a warm, draft-free spot, or place the covered tray in a slightly warmed (but turned off) oven. Allow the dough to rest until it's noticeably puffy, which is crucial for a light, airy texture.

Can I use gluten-free flour to make the croissants?
While the original recipe calls for all-purpose flour, you can try using a gluten-free flour blend designed for baking, though the result may differ slightly in texture. Look for blends that contain xanthan gum, as this will help mimic the elasticity of gluten. Keep in mind that the dough handling and layering process might require some adjustments, so be gentle and patient for the best results.

What's the best way to serve chocolate croissants?
Serve your freshly baked chocolate croissants warm from the oven, possibly dusted with a light sprinkle of powdered sugar. Pair them with a delicious cup of coffee or tea for a delightful breakfast or afternoon treat! You can also serve them with homemade jam or whipped cream for an extra touch if you’re feeling indulgent. Enjoy!

Chocolate Croissants

Ultimate Chocolate Croissants: A Decadent Homemade Delight

Delight in homemade Chocolate Croissants with flaky layers and a rich chocolate center.
Print Recipe Pin Recipe
Prep Time 1 hour hr
Cook Time 30 minutes mins
Resting Time 2 hours hrs
Total Time 3 hours hrs 30 minutes mins
Servings: 12 croissants
Course: Breakfast
Cuisine: French
Calories: 250
Ingredients Equipment Method Nutrition Notes

Ingredients
  

Dough
  • 1.25 cups Warm Milk Use whole milk for added richness.
  • 2.5 teaspoons Instant Yeast Ensure it’s fresh for best results.
  • 3.5 cups All-Purpose Flour Plus more for rolling.
  • 0.25 cups Sugar Reduce for a less sweet taste.
  • 2 teaspoons Salt Don’t skip this!
  • 9 oz Butter Use high-quality unsalted butter.
Filling
  • 1 bar Bittersweet Chocolate Provides rich chocolate flavor.
Egg Wash
  • 1 Egg Can use milk as a dairy-free alternative.
  • 1 tablespoon Heavy Cream Mixed with egg for richer color.

Equipment

  • Mixing Bowl
  • Rolling Pin
  • Baking Sheet
  • Parchment Paper
  • wire rack

Method
 

Dough Preparation
  1. In a medium bowl, combine 1 cup of all-purpose flour, 2 1/2 teaspoons of instant yeast, and 1 1/4 cups of warm milk. Stir the mixture until well combined and let it sit for 20 minutes until bubbly and frothy. Gradually mix in the remaining flour (2 1/2 cups), 1/4 cup of sugar, and 2 teaspoons of salt. Knead the dough for about 2 minutes until smooth, then refrigerate for at least 2 hours or overnight.
Butter Slab Preparation
  1. Take 9 ounces of cold butter and place it between two sheets of parchment paper. Use a rolling pin to shape the butter into a 7x7 inch slab. Chill the butter slab in the refrigerator for 10 minutes.
Layering
  1. On a floured surface, roll the rested dough into a 10x10 inch square. Place the cold butter slab diagonally in the center of the dough. Fold each corner of the dough over the butter, pinching to seal it inside completely. Roll the dough into a 10x24 inch rectangle, maintaining an even thickness.
Rolling Croissants
  1. After the final fold, roll the dough out once more into a 10x24 inch rectangle. Cut the dough into long strips, about 4 inches wide. Take a piece of bittersweet chocolate and place it at one end of each strip. Roll the dough tightly around the chocolate, placing the rolled croissants seam-side down on a lined baking sheet.
Proofing
  1. Cover the baking sheet with a clean kitchen towel, allowing the rolled chocolate croissants to proof overnight in the refrigerator or at room temperature.
Baking
  1. Preheat your oven to 400°F (200°C). Prepare an egg wash by whisking together 1 egg with 1 tablespoon of heavy cream, and gently brush it over the tops of the proofed croissants. Bake for 25 to 30 minutes, rotating halfway through.
Cooling
  1. Once the chocolate croissants are out of the oven, transfer them to a wire rack and allow them to cool for a few minutes.

Nutrition

Serving: 1croissantCalories: 250kcalCarbohydrates: 30gProtein: 4gFat: 15gSaturated Fat: 9gPolyunsaturated Fat: 1gMonounsaturated Fat: 4gCholesterol: 35mgSodium: 250mgPotassium: 150mgFiber: 1gSugar: 5gVitamin A: 500IUCalcium: 30mgIron: 1mg

Notes

Take your time during the dough preparation for tender, flaky texture. Use high-quality bittersweet chocolate for best flavor.

Tried this recipe?

Let us know how it was!

Bomboloni alla Crema: Indulge in Creamy Italian Bliss

December 18, 2025 by Grace Snow Leave a Comment

Every time I do a little deep dive into Italian cuisine, I stumble upon a treasure that captivates my taste buds all over again—Bomboloni alla Crema. These heavenly cream-filled doughnuts take the classic treat to an extraordinary level, transforming any occasion into a celebration. With their fluffy interiors and luxurious cream, they embody comfort and joy, making them perfect for sharing with friends or savoring solo as a sweet escape from the ordinary. Plus, the warm aroma wafting through your kitchen is simply irresistible. Not only are these doughnuts a delightful indulgence, but they also offer a fun adventure in the kitchen, complete with the satisfaction of homemade goodness. Are you ready to bring this Italian delight to life? Let’s dive into the recipe!

Why Are Bomboloni alla Crema Irresistible?

Creamy, Decadent Filling: The luscious pastry cream hugs your palate, turning each bite into a dreamy experience.
Fluffy Texture: The soft, airy dough melts in your mouth, creating a perfect contrast with the creamy center.
Homemade Joy: Crafting these doughnuts yourself brings a fulfilling sense of achievement and indulgence.
Crowd-Pleaser: Whether at a party or a cozy dinner, these treats are bound to impress your guests, making any meal feel festive.
Versatile Variations: Experiment with different flavors or fillings like chocolate ganache or berry jams for a delightful twist on this classic.
Pair your Bomboloni alla Crema with a rich coffee, just like the Italians do, for a delightful treat that brings warmth and joy to every moment!

Bomboloni alla Crema Ingredients

For the Dough

  • All-purpose flour – Provides structure to the dough; can substitute with bread flour for a chewier texture.
  • Sugar – Sweetens the dough and aids in browning; use granulated or coconut sugar for a richer flavor.
  • Yeast – Leavens the dough for a light and fluffy interior; instant yeast allows for a quicker rise.
  • Milk – Adds moisture and richness; almond milk can be used for a dairy-free option.
  • Eggs – Binds the dough and adds richness; consider flax eggs for an egg-free variation.
  • Butter – Enriches the dough for a tender crumb; substitute with vegan butter if desired.
  • Salt – Balances sweetness and enhances flavor; sea salt gives a nice crunch.
  • Vanilla extract – Adds depth and aroma to the cream filling; almond extract offers a delightful twist.

For the Cream Filling

  • Custard or pastry cream – The star filling, providing a silky and smooth texture; can replace with whipped cream for a lighter option.

For Dusting

  • Powdered sugar – For dusting, it adds sweetness and visual appeal; can be omitted or replaced with cocoa powder for a chocolatey twist.

Create these Bomboloni alla Crema and enjoy each delectable bite!

Step‑by‑Step Instructions for Bomboloni alla Crema

Step 1: Combine Dry Ingredients
In a large mixing bowl, whisk together 4 cups of all-purpose flour, ½ cup of sugar, 1 packet (2 ¼ teaspoons) of instant yeast, and ½ teaspoon of sea salt until well blended. Make sure to aerate the flour for a light texture. This dry mixture sets the foundation for your Bomboloni alla Crema, giving it the airy quality we all crave in these Italian doughnuts.

Step 2: Mix Wet Ingredients
In another bowl, gently warm 1 cup of milk until it’s just lukewarm, then whisk in 4 tablespoons of melted butter, 2 large eggs, and 1 teaspoon of vanilla extract. This delightful combination enhances the richness of the dough. Pour the wet mixture into the dry ingredients and stir until a sticky dough starts to form, signaling the next step in your Bomboloni adventure.

Step 3: Knead the Dough
Transfer the slightly sticky dough onto a floured surface and knead for about 8-10 minutes until it becomes smooth and elastic. You'll know it’s ready when it springs back gently when pressed. This step is crucial for developing the gluten, which gives your Bomboloni alla Crema their signature fluffiness.

Step 4: Let the Dough Rise
Place the kneaded dough into a lightly greased bowl, cover it with a damp cloth, and let it rise in a warm environment for about 1 hour, or until it has doubled in size. Look for the dough to become puffy and soft; this is where the magic happens, allowing for those airy, dreamy doughnuts we love.

Step 5: Shape and Rest the Dough
Once the dough has risen, punch it down gently to release air, then roll it out on a floured surface to about ½ inch thick. Use a doughnut cutter or a round cookie cutter to cut out circles. Place the circles on a baking sheet, cover them, and let them rest for about 20 minutes until slightly puffed. This resting is essential for achieving that perfect Bomboloni fluff.

Step 6: Heat the Oil
While the dough rests, heat about 2 inches of oil in a deep, heavy-bottomed pan over medium heat until it reaches 350°F (175°C). Use a thermometer for accuracy. This temperature is key to achieving golden-brown Bomboloni alla Crema without making them greasy; a proper fry will yield that crispy exterior we adore.

Step 7: Fry the Doughnuts
Carefully drop the rested dough rounds into the hot oil, a few at a time, ensuring not to overcrowd the pan. Fry for approximately 2-3 minutes on each side, flipping them halfway through, until they’re golden brown. Keep a close eye on them; they should puff up beautifully, signaling that they’re perfectly cooked.

Step 8: Drain and Cool
Once frying is complete, use a slotted spoon to remove the Bomboloni and place them on a paper towel-lined plate to drain excess oil. Let them cool slightly for about 5 minutes. This is the perfect time to admire your creation—you’ve just made authentic Bomboloni alla Crema!

Step 9: Fill with Cream
Using a piping bag fitted with a filling tip, carefully inject each doughnut with your preferred custard or pastry cream until they feel just right. The filling should be generous, adding that luxurious touch that defines Bomboloni alla Crema. Be gentle to ensure the doughnut retains its shape.

Step 10: Dust with Sugar
Lastly, dust the filled doughnuts with powdered sugar to enhance their sweetness and visual appeal. This final touch will give your delicious Italian treats that classic sugar-kissed look. Serve them warm or at room temperature, and savor the delightful flavor of your homemade Bomboloni alla Crema!

Make Ahead Options

These Bomboloni alla Crema are perfect for meal prep, making them a delightful treat even on the busiest days! You can prepare the dough up to 24 hours in advance; just allow it to rise, punch it down, and refrigerate it covered with plastic wrap. Additionally, the pastry cream can be made ahead and stored in an airtight container in the refrigerator for up to 3 days. When you're ready to enjoy, simply allow the dough to come to room temperature before shaping and frying, then fill with the cream, dust with powdered sugar, and savor the freshly made goodness that feels like a sweet hug from Italy!

Bomboloni alla Crema: Fun Variations to Try

Bring your own touch to these delightful doughnuts with creative twists and substitutions that will surprise and delight your palate!

  • Dairy-Free: Swap regular milk and butter for almond milk and vegan butter to create a deliciously rich dough without dairy.
    Experiment with your choices—coconut milk can also add a sweet aroma, enhancing the warmth of each doughnut.

  • Sugar Swap: Use coconut sugar instead of granulated sugar for a deeper, more caramelized flavor that complements the cream beautifully.
    Not only does it enhance the taste, but it also adds a touch of subtlety to your Bomboloni.

  • Flavor Infusion: Infuse your cream with citrus zest, such as orange or lemon, for a bright pop of flavor that dances on your tongue.
    A hint of liqueur, like limoncello, can elevate your dessert experience, adding sophistication to this classic treat!

  • Alternative Fillings: Get adventurous with different fillings! Replace the custard with chocolate ganache, flavored whipped cream, or fruity berry jam for a tasty twist.
    Each variation opens up a new dimension, making your Bomboloni an ever-changing delight!

  • Seasonal Spices: Sprinkle in seasonal spices like cinnamon or nutmeg into the dough for an extra layer of warmth and comfort.
    They pair beautifully with cream and offer a cozy experience, especially during the cooler months!

  • Chocolate Dip: After frying, dip the Bomboloni in melted chocolate instead of dusting with powdered sugar for a decadent chocolate-covered treat.
    Imagine biting into a warm doughnut, revealing a luscious cream filling and a delightful chocolate exterior—pure bliss!

  • Mini Bomboloni: For a fun party idea, shape the dough into bite-sized pieces and serve as mini Bomboloni for sharing.
    They're perfect for gatherings, allowing everyone to enjoy a little indulgence without the commitment of a full doughnut!

Feel free to explore these variations to personalize your Bomboloni alla Crema journey. Each twist keeps the joy of homemade cooking alive while adding a delightful surprise to your kitchen!

Expert Tips for Bomboloni alla Crema

  • Oil Temperature Matters: Ensure your oil is heated to 350°F (175°C). Too hot, and they'll burn; too cool, and they'll absorb more oil, becoming greasy.

  • Perfect Dough Rise: Let the dough rise until it doubles in size for the light, fluffy texture of Bomboloni alla Crema. Patience is key for perfect results!

  • Fry in Batches: Don't overcrowd the pan while frying. This ensures even cooking and helps maintain that lovely golden color.

  • Fill Generously: When filling your doughnuts, use a piping bag with a small tip to truly indulge in the creamy goodness—you want each bite bursting with flavor!

  • Stay Fresh: Enjoy your Bomboloni alla Crema fresh, but if making ahead, store them in an airtight container at room temperature for up to 2 days for best texture.

What to Serve with Bomboloni alla Crema

Indulging in Bomboloni alla Crema offers a delightful culinary experience, and pairing them with complementary dishes can elevate your meal to new heights.

  • Rich Espresso: A classic Italian companion, the bold flavors of espresso beautifully contrast the sweetness of the doughnuts, enhancing your overall dessert experience.
  • Vanilla Gelato: The creamy, cool texture of vanilla gelato pairs perfectly with the warm, fluffy doughnuts, creating an indulgent contrast that feels luxurious.
  • Fresh Berries: Tossed with a hint of sugar, the tartness of fresh berries adds a refreshing balance to the richness of Bomboloni, lightening each decadent bite.
  • Chocolate Sauce: Drizzling silky chocolate sauce over your doughnuts adds a layer of indulgent sweetness that will satisfy any sweet tooth and elevate the treat.
  • Sweet Wine: A glass of dessert wine, such as Vin Santo, complements the sweetness while offering a delightful touch to your dining experience, wrapping things up with Italian flair.
  • Homemade Whipped Cream: A dollop of lightly sweetened whipped cream can add texture and enhance the vanilla notes of the Bomboloni’s cream filling for a delightful treat.
  • Toasted Nuts: Chopped toasted hazelnuts or almonds sprinkled on top of the doughnuts introduce a nutty crunch, providing contrast to the soft pastry and creamy filling.
  • Citrus Salad: A refreshing citrus salad with oranges and grapefruits can cleanse the palate, allowing the luxurious flavors of the Bomboloni to shine through after each bite.
  • Herbal Tea: Opt for a calming herbal tea like chamomile or peppermint to sip alongside your doughnuts, creating a soothing end to your delightful meal.

How to Store and Freeze Bomboloni alla Crema

Room Temperature: Store the filled doughnuts in an airtight container at room temperature for up to 2 days to maintain freshness and softness.

Freezer: To freeze uncooked dough, wrap tightly in plastic wrap and place in a freezer bag. Use within 2 months for best results. Thaw in the fridge before frying.

Reheating: If you want to reheat leftover filled Bomboloni, place them in a warm oven (around 300°F) for a few minutes until warmed through. Enjoy them fresh for the best experience!

Bomboloni alla Crema Recipe FAQs

What type of flour should I use for Bomboloni alla Crema?
Absolutely, all-purpose flour is perfect for creating a light and fluffy dough. If you're after a chewier texture, I recommend using bread flour instead. It's great to experiment and find your perfect balance!

How should I store Bomboloni alla Crema after making them?
To keep your filled doughnuts fresh, store them in an airtight container at room temperature for up to 2 days. They’ll maintain their softness and deliciousness during this time. Just remember, these treats are best enjoyed fresh!

Can I freeze Bomboloni alla Crema?
Yes, you can! To freeze the uncooked dough, wrap it tightly in plastic wrap and place it in a freezer bag. They can be frozen for up to 2 months. When you’re ready to indulge, simply thaw in the fridge overnight before frying them for that perfect golden-brown finish.

What if my dough doesn’t rise?
Oh no! If your dough isn’t rising, it may be due to the yeast being inactive. Make sure your yeast is fresh and that your warm milk isn't too hot—aim for around 110°F (43°C). If it’s not rising well, try moving it to a warmer spot for a better environment (the oven with just the light on is ideal). Patience is key here, and a little tweaking may yield perfectly fluffy Bomboloni!

Are Bomboloni alla Crema suitable for those with allergies?
If you’re accommodating dietary restrictions, Bomboloni can definitely be modified! For a dairy-free option, swap in almond milk and use vegan butter. Moreover, for an egg-free doughnut, consider flax eggs. Just be conscious of filling choices as some creams might contain allergens. It’s all about customizing for your loved ones!

How long do Bomboloni alla Crema last in the fridge?
Though you’ll likely want to eat them fresh, the filled doughnuts can last in an airtight container in the fridge for about 3 to 4 days. Just pop them in a warm oven for a few minutes to revive their delightfully fluffy texture before enjoying!

Bomboloni alla Crema

Bomboloni alla Crema: Indulge in Creamy Italian Bliss

Experience Bomboloni alla Crema, luscious Italian cream-filled doughnuts that are irresistible and perfect for any celebration.
Print Recipe Pin Recipe
Prep Time 30 minutes mins
Cook Time 15 minutes mins
Resting Time 20 minutes mins
Total Time 1 hour hr 5 minutes mins
Servings: 12 doughnuts
Course: Dessert
Cuisine: Italian
Calories: 250
Ingredients Equipment Method Nutrition Notes

Ingredients
  

Dough Ingredients
  • 4 cups all-purpose flour can substitute with bread flour for a chewier texture
  • 0.5 cups sugar use granulated or coconut sugar for richer flavor
  • 1 packet (2 ¼ teaspoons) instant yeast leavens the dough
  • 1 cups milk a dairy-free option can be almond milk
  • 2 large eggs consider flax eggs for egg-free variation
  • 4 tablespoons butter substitute with vegan butter if desired
  • 0.5 teaspoon sea salt balances sweetness
  • 1 teaspoon vanilla extract almond extract can be used for variation
Cream Filling
  • 1 batch custard or pastry cream the main filling
Dusting
  • 1 cup powdered sugar can be replaced with cocoa powder

Equipment

  • Mixing Bowl
  • Doughnut cutter
  • Deep Frying Pan
  • piping bag
  • Thermometer

Method
 

Preparation Steps
  1. In a large mixing bowl, whisk together flour, sugar, yeast, and salt until blended.
  2. Warm milk and whisk in melted butter, eggs, and vanilla. Pour into dry ingredients and mix.
  3. Knead the dough on a floured surface for about 8-10 minutes until smooth and elastic.
  4. Place the kneaded dough in a greased bowl, cover, and let rise in a warm place for about 1 hour.
  5. After rising, punch down the dough and roll it out to ½ inch thick. Cut out circles.
  6. Heat oil in a deep pan until it reaches 350°F (175°C).
  7. Fry dough rounds in batches for 2-3 minutes on each side until golden brown.
  8. Remove and drain on paper towels. Let them cool slightly.
  9. Inject each doughnut with custard or pastry cream using a piping bag.
  10. Dust with powdered sugar before serving.

Nutrition

Serving: 1doughnutCalories: 250kcalCarbohydrates: 35gProtein: 3gFat: 12gSaturated Fat: 7gPolyunsaturated Fat: 1gMonounsaturated Fat: 2gCholesterol: 40mgSodium: 120mgPotassium: 150mgFiber: 1gSugar: 8gVitamin A: 200IUCalcium: 50mgIron: 1mg

Notes

Serve warm or at room temperature for the best experience. Enjoy fresh for maximum taste.

Tried this recipe?

Let us know how it was!

Blueberry Cream Cheese Babka to Elevate Your Brunch Game

December 18, 2025 by Grace Snow Leave a Comment

The aroma of freshly baked bread wafted through my kitchen, sweeping me back to sunlit mornings filled with laughter and stories over brunch. My latest creation, Blueberry Cream Cheese Babka, is not just a treat—it’s a delightful experience that can transform your breakfast or brunch into a luscious occasion. This yeast bread boasts a rich, buttery dough intertwined with zesty cream cheese and vibrant blueberry preserves, making each bite an irresistible delight. Plus, it’s surprisingly simple to whip up, requiring just a bit of patience for the dough to rise. As a bonus, this babka is versatile enough to allow you to experiment with different fillings, ensuring there’s always a new taste adventure waiting. Ready to add a touch of warmth and sweetness to your table? Let’s dive into this scrumptious recipe!

Why Choose This Blueberry Cream Cheese Babka?

Irresistible Flavor: The combination of fresh blueberries and cream cheese creates a sweet, decadent filling that elevates your taste buds.

Simple to Make: With basic baking skills, you can master this beautiful babka, making it the perfect introduction to homemade yeast bread.

Versatile Filling Options: While this recipe focuses on blueberries, feel free to mix things up with flavors like Nutella or different fruit preserves, just like in my Vegan Cacao Cream recipe.

Perfect for Any Occasion: Whether it’s brunch with friends or a cozy family gathering, this stunning loaf makes for an impressive centerpiece.

Make Ahead Capability: Prepare ahead of time, as this babka can be frozen for up to 2 months! Just thaw it before serving to enjoy its fresh, homemade goodness.

This Blueberry Cream Cheese Babka promises not only to satisfy your sweet cravings but also to create lasting memories around the table!

Blueberry Cream Cheese Babka Ingredients

• Here's everything you need to create this delectable treat!

For the Blueberry Preserves

  • Blueberries – Fresh blueberries provide the vibrant flavor; frozen can be a convenient alternative when fresh isn't an option.
  • Sugar (¾ cup) – Sweetens the preserves; adjust according to your taste preference.
  • Lemon Juice (1 tbsp) – Brightens the flavor of the blueberries, complementing the sweetness beautifully.

For the Cream Cheese Filling

  • Cream Cheese (8 oz) – Ensure it's softened for easier mixing; this adds a creamy, rich filling to the babka.
  • Sugar (⅓ cup) – Adds sweetness to the cream cheese filling; adjust depending on how sweet you like it.

For the Dough

  • All-Purpose Flour (4 cups) – Creates the structure of the dough; consider a 1:1 gluten-free blend if desired.
  • Kosher Salt (1 tsp) – Balances the sweetness and enhances overall flavor.
  • Active Dry Yeast (1 pkg, about 2 ¼ tsp) – Ensures a light and fluffy dough; can be replaced with instant yeast without proofing.
  • Milk (1 cup, warmed to 100-110°F) – Activates the yeast; dairy-free milk works well for a dairy-free version.
  • Eggs (2) – Provide richness and help with the dough's structure.
  • Vanilla Extract (1 tsp) – Enriches the flavor of the dough beautifully.
  • Unsalted Butter (10 tbsp, very soft) – Contributes to a tender, rich dough; make sure it's very soft for easy incorporation.

For the Finishing Touch

  • Sugar Syrup (⅓ cup sugar + ⅓ cup water) – A glaze that adds shine and sweetness; adjust the sugar based on your taste!

With these ingredients in hand, you’re all set to craft a beautiful Blueberry Cream Cheese Babka that’s bound to impress!

Step‑by‑Step Instructions for Blueberry Cream Cheese Babka

Step 1: Prepare Blueberry Preserves
In a saucepan over medium heat, combine fresh blueberries, ¾ cup of sugar, and 1 tablespoon of lemon juice. Bring the mix to a boil, then reduce heat to a simmer. Let it cook for 15 minutes, stirring occasionally until the mixture thickens and resembles a preserve. Once done, remove from the heat and refrigerate to cool.

Step 2: Make Cream Cheese Filling
In a mixing bowl, beat together 8 ounces of softened cream cheese and ⅓ cup of sugar until smooth and creamy, about 2-3 minutes. The mixture should be fluffy with no lumps. Set aside to allow the flavors to meld as you prepare the dough for the Blueberry Cream Cheese Babka.

Step 3: Prepare Dough
In a large bowl, whisk together 4 cups of all-purpose flour, ¼ cup of sugar, and 1 teaspoon of kosher salt. In a separate bowl, warm 1 cup of milk to 100-110°F and sprinkle 2¼ teaspoons of active dry yeast over it. Let it foam for about 5 minutes before combining it with 2 eggs, 1 teaspoon of vanilla extract, and the dry ingredients. Mix until a shaggy dough forms.

Step 4: Incorporate Butter and Knead
Soften 10 tablespoons of unsalted butter until very soft. Gradually add this to the dough, mixing with your hands or a stand mixer until fully integrated and the dough is smooth and elastic. This should take about 10 minutes of kneading. The dough should be sticky but manageable; if too sticky, consider adding a little more flour.

Step 5: First Rise
Transfer the kneaded dough into a greased bowl, turning it to coat. Cover with a kitchen towel or plastic wrap, and let it rise in a warm place for 1 to 1.5 hours. Wait until the dough has doubled in size and feels airy and light to the touch—this is crucial for a soft Blueberry Cream Cheese Babka.

Step 6: Shape Babka
Once risen, punch down the dough to release air. Divide it into two equal halves. Roll out each portion into a rectangle about ¼-inch thick. Spread each with the cream cheese filling, followed by a layer of blueberry preserves. Roll the dough tightly into a log, then twist the logs together to shape the babka, ensuring the filling is nice and snug.

Step 7: Second Rise
Place the twisted babka into greased loaf pans, ensuring they fit snugly. Cover loosely with a towel and let them rise for about an hour until they puff up and are nearly doubled in size. This second rise enhances the texture, leading to a beautifully fluffy Blueberry Cream Cheese Babka.

Step 8: Bake
Preheat your oven to 350°F. Once the babka have risen, bake them in the preheated oven for approximately 40 minutes, or until golden brown and a skewer inserted into the center comes out clean. Keep an eye on them towards the end of baking to avoid over-browning.

Step 9: Finish with Syrup
While the babka cools, prepare a simple sugar syrup by combining ⅓ cup of sugar and ⅓ cup of water in a saucepan; heat until sugar dissolves. Once baked, brush this syrup generously over the cooled babka for a sweet glaze. Allow to cool completely before slicing for the best presentation and flavor.

Blueberry Cream Cheese Babka Variations

Feel free to explore your creativity and customize this delightful babka to make it uniquely yours!

  • Raspberry Swirl: Replace blueberries with fresh or frozen raspberries for a tart twist.
  • Nutella Delight: Spread Nutella in place of cream cheese for a decadent chocolate version. Imagine the rich, nutty flavor mingling with the sweet dough!
  • Cinnamon Sugar: Add a sprinkle of cinnamon and sugar to the filling for a cozy, warm flavor profile that brings nostalgia to every bite.
  • Savory Option: Swap sweet fillings for a savory herbed cheese blend, creating a stunning appetizer that's perfect for parties or gatherings.
  • Apricot Surprise: Use apricot preserves instead of blueberries for a slightly sunny, fruity flavor that pairs well with the cream cheese.
  • Gluten-Free: Substitute regular flour with a 1:1 gluten-free baking blend to make this babka friendly for gluten-sensitive folks.
  • Mixed Berry Medley: Combine blueberries, raspberries, and strawberries for a colorful, flavor-packed filling that’s as beautiful as it is tasty!
  • Almond Cream: Use almond extract in the cream cheese filling for a unique flavor, reminiscent of marzipan, which adds a luxurious twist to the classic babka experience.

Embarking on these variations is just like creating a mouthwatering personal signature dish, much like the brilliance of my Ice Cream Cake. Each option can spark joy at your breakfast or brunch table—ready for your next culinary adventure?

Make Ahead Options

This Blueberry Cream Cheese Babka is perfect for meal prep enthusiasts looking to save time! You can prepare the blueberry preserves up to 3 days in advance and refrigerate them, ensuring they maintain their vibrant flavor. The dough can be made and left to rise overnight in the refrigerator for up to 24 hours; this not only saves time but also enhances the flavors. To keep the quality intact, cover the dough tightly with plastic wrap to prevent drying. When you're ready to bake, simply shape and let it rise for about an hour before baking, and you'll have a beautifully decadent babka to enjoy fresh from the oven!

How to Store and Freeze Blueberry Cream Cheese Babka

Room Temperature: Store the babka tightly wrapped in plastic wrap or in an airtight container for up to 3 days to maintain freshness and softness.

Fridge: For extended freshness, refrigerate the babka for up to 1 week; wrap it well to prevent it from drying out.

Freezer: Freeze the babka for up to 2 months by wrapping it tightly in plastic wrap and placing it in a freezer-safe bag. Thaw in the fridge overnight before serving.

Reheating: To reheat, warm slices in the toaster or oven for a few minutes until heated through, restoring that fresh-baked goodness!

Expert Tips for Blueberry Cream Cheese Babka

Proofing Yeast: Ensure your yeast is fresh and proof it in warm milk (100-110°F) to ensure the dough rises beautifully.

Dough Consistency: If the dough feels too sticky, refrigerate it briefly to stabilize before shaping. This will make handling much easier!

Filling Chill: Consider refrigerating the cream cheese filling before spreading it; this helps to manage any mess during assembly.

Flavor Variations: Don’t hesitate to experiment! Switch out blueberries for raspberries or cherries for an exciting twist on the classic Blueberry Cream Cheese Babka.

Baking Time: Keep a close watch while baking; ovens vary, and you want that perfect golden-brown crust without over-baking!

What to Serve with Blueberry Cream Cheese Babka

There's nothing quite like a warm, sweet slice of bread to accompany your cozy brunch or breakfast gathering.

  • Fresh Fruit Salad: A mix of seasonal fruits brightens the plate and adds a refreshing contrast to the babka’s sweetness.

  • Greek Yogurt with Honey: Creamy yogurt paired with a drizzle of honey provides a tart yet sweet balance, perfect for spooning over babka slices.

  • Fluffy Scrambled Eggs: The rich, savory flavor of eggs complements the sweet, buttery bread beautifully, creating a well-rounded meal.

  • Maple Syrup: Drizzling a hint of maple syrup enhances the sweetness and adds warmth, making each bite of babka even more indulgent.

  • Coffee or Tea: A steaming cup of coffee or herbal tea elevates the experience, grounding the sweetness of the babka with rich, bold flavors.

  • Whipped Cream: Light, airy whipped cream on the side allows for an extra dash of sweetness and makes each slice feel like a treat.

Imagine a lazy Sunday morning, surrounded by loved ones, sharing stories and laughter while enjoying your homemade Blueberry Cream Cheese Babka alongside these delightful pairings.

Blueberry Cream Cheese Babka Recipe FAQs

How do I choose ripe blueberries for the preserves?
Absolutely! Look for blueberries that are firm and plump without any dark spots or wrinkles. Those little beauties should be bright blue and slightly shiny; this indicates freshness. If you find some with a hint of white bloom, don’t worry; it’s a natural protective coating.

What’s the best way to store my Blueberry Cream Cheese Babka?
Very important! Store your babka tightly wrapped in plastic wrap or in an airtight container at room temperature for about 3 days. If you want to enjoy it longer, pop it in the refrigerator where it can stay fresh for up to a week, just make sure it's wrapped well to prevent it from drying out.

Can I freeze the Blueberry Cream Cheese Babka?
Of course! To freeze, wrap the babka tightly in plastic wrap and then place it inside a freezer-safe bag. It can be stored in the freezer for up to 2 months. When you're ready to enjoy, simply thaw it overnight in the refrigerator before serving.

What should I do if my dough doesn't rise?
Oh no! If your dough hasn't risen, it could be due to inactive yeast. Always check that your yeast is fresh and proof it in warm milk (100-110°F). If it doesn't foam after 5 minutes, it might be a good idea to start with a fresh batch. Also, make sure your dough was kept in a warm, draft-free place during rising!

Can I make this babka dairy-free?
Absolutely! To make a dairy-free Blueberry Cream Cheese Babka, you can substitute regular milk with dairy-free milk, and use plant-based cream cheese as well. Just ensure that your butter alternative is suitable for your dietary needs.

How do I know when my babka is done baking?
Look for that perfect combination of golden brown and texture! The babka should take around 40 minutes to bake; you can insert a toothpick into the center, and if it comes out clean, your delicious Blueberry Cream Cheese Babka is ready to be enjoyed. Keep an eye on it near the end of baking to avoid over-browning.

Blueberry Cream Cheese Babka

Blueberry Cream Cheese Babka to Elevate Your Brunch Game

This Blueberry Cream Cheese Babka promises a delicious experience, transforming breakfast or brunch into a delightful occasion.
Print Recipe Pin Recipe
Prep Time 30 minutes mins
Cook Time 40 minutes mins
Rising Time 1 hour hr 30 minutes mins
Total Time 2 hours hrs 40 minutes mins
Servings: 10 slices
Course: Dessert
Cuisine: American
Calories: 300
Ingredients Equipment Method Nutrition Notes

Ingredients
  

For the Blueberry Preserves
  • 2 cups Blueberries Fresh or frozen
  • ¾ cup Sugar Adjust to taste
  • 1 tbsp Lemon Juice
For the Cream Cheese Filling
  • 8 oz Cream Cheese Softened
  • ⅓ cup Sugar Adjust to taste
For the Dough
  • 4 cups All-Purpose Flour Consider gluten-free blend
  • 1 tsp Kosher Salt
  • 1 pkg Active Dry Yeast About 2 ¼ tsp
  • 1 cup Milk Warmed to 100-110°F
  • 2 large Eggs
  • 1 tsp Vanilla Extract
  • 10 tbsp Unsalted Butter Very soft
For the Finishing Touch
  • ⅓ cup Sugar Syrup ⅓ cup sugar + ⅓ cup water

Equipment

  • Saucepan
  • Mixing Bowl
  • Stand Mixer
  • Loaf Pans
  • Whisk

Method
 

Step-by-Step Instructions for Blueberry Cream Cheese Babka
  1. In a saucepan over medium heat, combine fresh blueberries, ¾ cup of sugar, and 1 tablespoon of lemon juice. Bring the mix to a boil, then reduce heat to a simmer. Let it cook for 15 minutes, stirring occasionally until the mixture thickens and resembles a preserve. Remove from heat and refrigerate to cool.
  2. In a mixing bowl, beat together 8 ounces of softened cream cheese and ⅓ cup of sugar until smooth and creamy, about 2-3 minutes. Set aside.
  3. In a large bowl, whisk together 4 cups of all-purpose flour, ¼ cup of sugar, and 1 teaspoon of kosher salt. In a separate bowl, warm 1 cup of milk and sprinkle 2¼ teaspoons of active dry yeast over it. Let it foam for about 5 minutes before combining with 2 eggs, 1 teaspoon of vanilla extract, and the dry ingredients. Mix until a shaggy dough forms.
  4. Gradually add 10 tablespoons of very soft unsalted butter to the dough, mixing until fully integrated and smooth. Knead for about 10 minutes until elastic.
  5. Transfer the kneaded dough into a greased bowl and cover. Let it rise in a warm place for 1 to 1.5 hours until doubled in size.
  6. Once risen, punch down the dough, divide into two halves, roll out each into a rectangle, spread with cream cheese filling, and blueberry preserves. Roll tightly into logs and twist together.
  7. Place twisted babka into greased loaf pans. Cover and let rise for about an hour.
  8. Preheat oven to 350°F. Bake risen babka for approximately 40 minutes, or until golden brown.
  9. Prepare sugar syrup by combining ⅓ cup sugar and ⅓ cup water in a saucepan; heat until sugar dissolves. Brush syrup over cooled babka.

Nutrition

Serving: 1sliceCalories: 300kcalCarbohydrates: 45gProtein: 5gFat: 12gSaturated Fat: 7gMonounsaturated Fat: 4gCholesterol: 50mgSodium: 230mgPotassium: 160mgFiber: 1gSugar: 15gVitamin A: 400IUVitamin C: 2mgCalcium: 30mgIron: 1mg

Notes

Store tightly wrapped for up to 3 days at room temperature, 1 week in the fridge, or freeze for up to 2 months.

Tried this recipe?

Let us know how it was!

Maple Bacon Cinnamon Rolls: Your New Brunch Obsession

December 18, 2025 by Grace Snow Leave a Comment

As the aroma of freshly baked Maple Bacon Cinnamon Rolls wafts through your kitchen, you might find yourself transported to a cozy café on a leisurely Sunday morning. This delightful recipe perfectly balances the sweetness of cinnamon and maple with the savory crunch of bacon, creating a breakfast treat that both comforts and indulges. Ideal for brunch gatherings or a special morning at home, these rolls are surprisingly simple to make, taking under two hours from start to finish, making them accessible for bakers of all levels. Plus, you can get creative by swapping in vegetarian options if you wish! Ready to bring some warmth to your kitchen and impress your loved ones? Let’s dive in and make those sweet and savory dreams come true!

Why are Maple Bacon Cinnamon Rolls irresistible?

Irresistible aromas engulf your kitchen as these rolls bake to perfection, making them the ultimate brunch showstopper. Sweet and savory blend harmoniously, with maple and bacon creating a taste sensation that’s hard to resist. Versatile enough to cater to dietary preferences, substitute vegetarian bacon for a guilt-free twist! Plus, this recipe is surprisingly simple, perfect for both novice and experienced bakers alike. Whether you’re serving them at a gathering or enjoying them on a cozy morning, these rolls are sure to impress—just like our delightful Pumpkin Cinnamon Roll recipe!

Maple Bacon Cinnamon Roll Ingredients

For the Dough
• Warm Milk – Provides moisture and activates yeast. Note: Use whole or 2% milk for the best flavor.
• Instant Yeast – Leavening agent that causes the dough to rise. No substitution necessary; use active dry yeast if preferred but will require adjustments.
• Granulated Sugar – Sweetens the dough and feeds the yeast. Can replace with brown sugar for a different flavor profile.
• Softened Butter – Adds richness and flavor to the dough. Substitute with margarine for a dairy-free option.
• Eggs – Contributes to structure and moisture in the dough. For a vegan version, use flax eggs (1 tablespoon ground flaxseed + 2.5 tablespoons water per egg).
• All-Purpose Flour – Main structure of the rolls. Can substitute half with whole wheat flour for a healthier option.
• Salt – Enhances flavor and regulates yeast activity. No substitutions necessary.

For the Filling
• Brown Sugar – Sweetens the filling and adds depth. Light or dark brown sugar can be used depending on preference.
• Ground Cinnamon – Key spice in the filling, providing warmth and sweetness. Increasing it enhances flavor complexity.

For the Glaze
• Powdered Sugar – For making the glaze, sweetens and creates a smooth texture. No substitutions required.
• Maple Syrup – Adds distinctive flavor to the glaze. Substitute with agave syrup for a similar texture and sweetness.

For the Topping
• Crispy Bacon – Provides savory crunch on top. Vegetarian alternatives include crispy tempeh or sautéed mushrooms.

Step‑by‑Step Instructions for Maple Bacon Cinnamon Rolls

Step 1: Activate the Yeast
In a large mixing bowl, combine 1 cup of warm milk, 2 ¼ teaspoons of instant yeast, and 2 tablespoons of granulated sugar. Stir gently and let the mixture sit for about 5 minutes, until it becomes frothy. This allows the yeast to activate, ensuring your Maple Bacon Cinnamon Rolls will rise beautifully.

Step 2: Mix the Dough
Add 4 tablespoons of softened butter, 2 large eggs, and 1 teaspoon of salt to the yeast mixture. Gradually incorporate 4 cups of all-purpose flour, mixing until a soft dough begins to form. Use a spatula or wooden spoon for this step, making sure all ingredients are thoroughly combined before moving on.

Step 3: Knead the Dough
Dust a clean surface with flour and transfer the dough onto it. Knead the dough for 8-10 minutes, until it becomes smooth and elastic. Use the heel of your hand to push the dough away from you, then fold it back over itself. When you’re done, the dough should spring back when lightly pressed.

Step 4: First Rise
Place the kneaded dough in a greased bowl, covering it with a clean kitchen towel. Let it rise in a warm spot, like a turned-off oven, for about 1 hour or until doubled in size. This is key for fluffy Maple Bacon Cinnamon Rolls, as the yeast works its magic during this time.

Step 5: Prepare the Filling
After the dough has risen, punch it down to deflate gently and roll it out on a floured surface into a large rectangle (about 15x20 inches). Spread the surface with 4 tablespoons of softened butter. Then, sprinkle a generous mixture of ½ cup brown sugar and 2 tablespoons of ground cinnamon evenly over the top.

Step 6: Roll and Cut the Dough
Starting from one long side, carefully roll the dough tightly into a log shape. Once rolled up, use a sharp knife or dental floss to cut the log into 12 equal pieces. Place the cut rolls in a greased baking dish, ensuring they have room to expand further.

Step 7: Second Rise
Cover the dish with a towel and let the rolls rise for another 30-40 minutes in a warm place. During this time, preheat your oven to 350°F (175°C). When the rolls have puffed up nicely and touch each other, they're ready to bake.

Step 8: Bake the Rolls
Once preheated, place the rolls in the oven and bake them for 25-30 minutes until they turn golden brown. Keep an eye on them; a nice light brown color is a sign that your Maple Bacon Cinnamon Rolls are done and will taste delightful!

Step 9: Glaze Preparation
While the rolls are baking, prepare the glaze by whisking together 1 cup of powdered sugar, ¼ cup of maple syrup, and 2-3 tablespoons of milk in a small bowl. Aim for a smooth consistency that will drizzle beautifully over the warm rolls once they come out of the oven.

Step 10: Finish with Toppings
After baking, allow the rolls to cool for about 10 minutes before drizzling the maple glaze over the top. Finish off with crispy bacon crumbles for an irresistible sweet and savory touch that defines your Maple Bacon Cinnamon Rolls!

What to Serve with Maple Bacon Cinnamon Rolls?

Indulge your senses as you create a delightful brunch experience that perfectly complements the warm, sweet, and savory flavors of these rolls.

  • Fresh Fruit Salad: A medley of seasonal fruits adds a refreshing contrast—think juicy berries and crisp apples that balance the richness of the cinnamon rolls.

  • Fluffy Scrambled Eggs: Light and airy scrambled eggs provide a protein-packed option that will fill your guests while enhancing the brunch vibe.

  • Crispy Hash Browns: Golden brown and crispy on the outside, soft inside, hash browns offer a satisfying crunch against the gooey maple glaze of your rolls.

  • Creamy Greek Yogurt Parfait: Layered with honey and granola, this parfait brings a creamy texture and lovely sweetness to your brunch table, making every bite memorable.

  • Steamed Asparagus with Lemon: For a touch of brightness, this lightly sautéed vegetable will provide a fresh, earthy flavor to round out the meal beautifully.

  • Freshly Brewed Coffee: A robust cup of coffee enhances the sweetness of the rolls while ensuring your guests feel energized and ready to enjoy their brunch feast.

Invite your friends and family to gather around your table, and let the delightful flavors of these accompaniments elevate your Maple Bacon Cinnamon Rolls to a brunch experience they won’t forget!

Expert Tips for Maple Bacon Cinnamon Rolls

  • Warm Environment: Ensure you let the dough rise in a warm place. A turned-off oven with the light on creates an ideal setting for the yeast in your Maple Bacon Cinnamon Rolls to work effectively.

  • Don’t Over-Knead: Kneading too long can lead to tough rolls. Aim for 8-10 minutes until the dough is smooth and elastic for the perfect texture.

  • Glaze Consistency: Adjust the milk in your glaze to achieve your desired thickness. A slightly thicker glaze sticks better to the rolls, adding a delightful finish.

  • Storage Savvy: Store any leftovers in an airtight container. If you plan to make ahead, refrigerate unbaked rolls overnight and then bake fresh in the morning for maximum freshness.

  • Vegetarian Substitutes: If you're looking for a meatless option, consider using tempeh or sautéed mushrooms instead of bacon, allowing everyone to enjoy these delicious Maple Bacon Cinnamon Rolls!

Make Ahead Options

These Maple Bacon Cinnamon Rolls are perfect for busy home cooks looking to save time without sacrificing flavor! You can prepare the dough and filling up to 24 hours in advance—just roll, cut, and place the rolls in a greased baking dish, then cover and refrigerate. When you're ready to bake, let them rise at room temperature for about 30-40 minutes before popping them in the oven. For the best results, ensure they’re stored tightly covered to prevent drying out. Trust me, whether you bake them fresh in the morning or the night before, you'll enjoy the same delightful blend of sweetness and savory goodness!

How to Store and Freeze Maple Bacon Cinnamon Rolls

Room Temperature: Store leftover rolls in an airtight container for up to 3 days to maintain freshness and prevent them from drying out.

Fridge: For longer storage, place the rolls in the fridge in an airtight container for up to 5 days. Reheat in the oven or microwave before serving for best taste.

Freezer: Freeze unglazed rolls in a single layer on a baking sheet, then transfer to a freezer bag for up to 3 months. You can bake them straight from frozen; simply add extra baking time.

Reheating: Reheat in a 350°F (175°C) oven for about 10-15 minutes or microwave for 20-30 seconds until warmed through, perfect for enjoying your Maple Bacon Cinnamon Rolls again!

Maple Bacon Cinnamon Roll Variations

Feel free to get creative and make these delights your own—there's a world of possibilities waiting for your kitchen!

  • Vegetarian Option: Swap crispy bacon for crispy tempeh or sautéed mushrooms to create a delicious meatless treat.
  • Nutty Flavor: Add chopped pecans or walnuts to the filling for an extra crunch and a burst of nutty flavor.
  • Dried Fruit Delight: Incorporate raisins or dried cranberries into the filling for a chewy, fruity surprise in every bite.
  • Spices Twist: Experiment with spices such as nutmeg or cardamom to elevate the aromatic profile of your rolls. Such subtle changes make each batch feel like a new recipe!
  • Chocolate Lovers: Toss in mini chocolate chips with the sugar and cinnamon for a decadent touch that blends beautifully with maple.
  • Whole Wheat Substitute: Replace half of the all-purpose flour with whole wheat flour for added nutrition and a heartier texture.
  • Glaze Variations: Try adding a splash of vanilla extract or a pinch of sea salt to the glaze for a unique flavor twist!
  • Maple Syrup Swap: Use agave syrup instead of maple syrup for a lighter, but still delicious glaze option.

These sweet rolls can also be paired seamlessly with countless sides, like our scrumptious Pumpkin Cinnamon Roll recipe for brunch gatherings! Happy baking!

Maple Bacon Cinnamon Rolls Recipe FAQs

What type of milk should I use for the dough?
I recommend using whole or 2% milk for the best flavor. Warm milk activates the yeast, helping your rolls rise and become soft. If you're looking for a dairy-free option, almond or oat milk can work, but keep in mind that it may slightly change the flavor and texture.

How long can I store Maple Bacon Cinnamon Rolls?
Leftover rolls can be stored in an airtight container at room temperature for up to 3 days. If you want to keep them longer, refrigerate them for up to 5 days, and reheat in the oven for optimal results. Just pop them back in at 350°F (175°C) for about 10-15 minutes to warm them up nicely.

Can I freeze unbaked rolls?
Absolutely! To freeze unglazed rolls, place them in a single layer on a baking sheet until frozen solid, then transfer them to a freezer bag. They can be kept for up to 3 months. When you’re ready to bake, take them out the night before and let them thaw in the fridge. They can go straight from the freezer to the oven; just remember to add extra baking time if needed.

What should I do if my dough doesn't rise?
If your dough hasn't risen after the first hour, it may be due to inactive yeast. Make sure your yeast is fresh and properly activated; it should foam up in warm milk with sugar. If the dough is over-kneaded, it might also struggle to rise. In the future, keep an eye on your kneading time and make sure you give the dough a warm place to rise, like a turned-off oven with a light on.

Are there any dietary considerations with this recipe?
Yes! You can make Maple Bacon Cinnamon Rolls vegetarian by using crispy tempeh or sautéed mushrooms instead of bacon. Additionally, for a vegan version, replace eggs with flax eggs (1 tablespoon ground flaxseed + 2.5 tablespoons water per egg) and use dairy-free butter and milk. It's always best to check for any allergies before serving to your guests!

Maple Bacon Cinnamon Roll

Maple Bacon Cinnamon Rolls: Your New Brunch Obsession

Enjoy the delightful sweetness of Maple Bacon Cinnamon Rolls, balancing cinnamon, maple, and savory bacon for a perfect brunch treat.
Print Recipe Pin Recipe
Prep Time 1 hour hr
Cook Time 30 minutes mins
Rising Time 40 minutes mins
Total Time 2 hours hrs 10 minutes mins
Servings: 12 rolls
Course: Breakfast
Cuisine: American
Calories: 250
Ingredients Equipment Method Nutrition Notes

Ingredients
  

Dough Ingredients
  • 1 cup Warm Milk Use whole or 2% for best flavor.
  • 2 ¼ teaspoons Instant Yeast Use active dry yeast if preferred but requires adjustments.
  • 2 tablespoons Granulated Sugar Can replace with brown sugar.
  • 4 tablespoons Softened Butter Can substitute with margarine for dairy-free option.
  • 2 large Eggs Use flax eggs for vegan option.
  • 4 cups All-Purpose Flour Can substitute half with whole wheat flour.
  • 1 teaspoon Salt No substitutions necessary.
Filling Ingredients
  • ½ cup Brown Sugar Light or dark brown sugar based on preference.
  • 2 tablespoons Ground Cinnamon Increase for enhanced flavor.
Glaze Ingredients
  • 1 cup Powdered Sugar No substitutions required.
  • ¼ cup Maple Syrup Substitute with agave syrup.
Topping Ingredients
  • to taste Crispy Bacon Vegetarian alternatives include crispy tempeh or sautéed mushrooms.

Equipment

  • Mixing Bowl
  • Spatula
  • Rolling Pin
  • Baking Dish

Method
 

Making the Rolls
  1. Activate the Yeast: In a large mixing bowl, combine warm milk, yeast, and sugar. Stir and let sit for 5 minutes until frothy.
  2. Mix the Dough: Add softened butter, eggs, and salt to the yeast mixture. Incorporate flour until a soft dough forms.
  3. Knead the Dough: Dust a surface with flour, transfer dough, and knead for 8-10 minutes until smooth and elastic.
  4. First Rise: Place dough in a greased bowl, cover with a towel, and let rise in a warm place for about 1 hour.
  5. Prepare the Filling: Roll out dough into a large rectangle, spread with butter, and sprinkle brown sugar and cinnamon.
  6. Roll and Cut the Dough: Roll tightly into a log and cut into 12 pieces, placing them in a greased baking dish.
  7. Second Rise: Cover and let the rolls rise for 30-40 minutes in a warm place while preheating the oven to 350°F (175°C).
  8. Bake the Rolls: Bake in the preheated oven for 25-30 minutes until golden brown.
  9. Glaze Preparation: Whisk together powdered sugar, maple syrup, and milk until smooth.
  10. Finish with Toppings: Cool the rolls for 10 minutes, drizzle with glaze, and top with crispy bacon.

Nutrition

Serving: 1rollCalories: 250kcalCarbohydrates: 30gProtein: 3gFat: 12gSaturated Fat: 7gCholesterol: 35mgSodium: 150mgPotassium: 50mgFiber: 1gSugar: 8gVitamin A: 300IUCalcium: 40mgIron: 1mg

Notes

Store leftovers in an airtight container for up to 3 days. To make ahead, refrigerate unbaked rolls overnight and bake fresh in the morning.

Tried this recipe?

Let us know how it was!

Cozy Up with Homemade Curry Dumpling Soup in 30 Minutes

December 16, 2025 by Grace Snow Leave a Comment

As the chill of evening creeps in, I often find myself craving something that feels like a warm hug—cue the simmering pot of Coconut Curry Dumpling Soup. This comforting Asian-inspired dish brilliantly blends tender dumplings with a rich and aromatic coconut curry broth. What’s more, it’s perfect for those busy weeknights when time is short, as this recipe comes together in just 30 minutes using store-bought dumplings. Not only is it quick and easy, but it’s also adaptable—you can switch up the curry pastes or add your favorite greens! Isn’t it time to trade in takeout for something homemade and heartwarming? Dive into this delightful recipe that’s sure to become a family favorite!

Why Is This Curry Dumpling Soup Amazing?

Quick and Easy: You can whip up this comforting soup in just 30 minutes, making it ideal for busy weeknights or last-minute gatherings.

Rich Flavor: The aromatic coconut broth infused with Thai red curry paste brings a delightful warmth and depth to every spoonful, inviting you back for more.

Adaptable Delight: Personalize it to your liking by swapping dumplings for fresh rice noodles or experimenting with different curry pastes, ensuring there's always something new to savor!

Nutrient-Packed: With vibrant spinach and a creamy broth, this soup is a delicious way to sneak in some extra vitamins without sacrificing flavor.

Crowd-Pleaser: Whether serving friends or family, the unique blend of textures and flavors guarantees that everyone will rave about your homemade version—no more bland takeout!

Ready to broaden your culinary horizons? Check out my Chickpea Spinach Curry for more quick, satisfying meals!

Curry Dumpling Soup Ingredients

• A delicious ensemble for a cozy meal.

For the Broth

  • Thai Red Curry Paste – Essential for adding warm flavors; start with 2-3 tablespoons and adjust to your preferred heat.
  • Onion – Sweetens and deepens the flavor profile of the soup.
  • Ginger – Provides a fragrant kick; use fresh or ground for convenience.
  • Garlic – Enhances aroma and flavor; fresh is best, but powdered works in a pinch.
  • Fish Sauce – Adds a savory umami essence; can substitute with soy sauce for a vegetarian option.
  • Chicken Broth – The heart of the soup; use vegetable broth for a plant-based variant.
  • Coconut Milk – Adds creaminess and richness, elevating the broth to a comforting level.

For the Dumplings

  • Dumplings – The stars of the show; select store-bought varieties for quick prep. Ensure they are mostly pre-cooked to maintain texture.

For the Greens

  • Spinach – Provides vibrant color and nutrients; add it just before serving to keep its lovely green hue.

For a Zesty Finish

  • Lime Juice – Brightens the overall flavor; adjust to your liking for a tangy twist.
  • Herbs (Green Onions, Cilantro) – Optional garnishes that add fresh notes and an appealing presentation.

With these ingredients at hand, you’re just moments away from creating a delightful Curry Dumpling Soup that warms the soul!

Step‑by‑Step Instructions for Curry Dumpling Soup

Step 1: Sauté the Aromatics
In a large soup pot, heat 1 tablespoon of oil over medium heat until shimmering. Add the chopped onion and sauté for about 5 minutes, or until the onion is softened and translucent. The aroma will fill your kitchen, setting the stage for your delightful Curry Dumpling Soup.

Step 2: Add Curry Paste and Spices
Stir in 2-3 tablespoons of Thai red curry paste, minced ginger, and garlic. Sauté the mixture for 2-3 minutes until fragrant, ensuring the spices bloom in the heat. Stir occasionally to prevent sticking, as the vibrant colors of the paste deepen, creating an irresistible base for your soup.

Step 3: Combine Broth Ingredients
Increase the heat slightly and pour in 4 cups of chicken broth and 1 can of coconut milk. Bring the mixture to a low boil, gently stirring to combine. As it simmers, the soup will begin to thicken and integrate the flavors, creating a creamy, aromatic broth that beckons you to continue.

Step 4: Season and Add Dumplings
Once simmering, stir in 1 tablespoon of fish sauce and a pinch of sugar for balance. Carefully add the store-bought dumplings—avoid stirring too vigorously to keep them intact. Allow them to simmer according to package instructions, usually for about 5-7 minutes, or until they float to the surface, signaling they're ready.

Step 5: Final Touches with Greens
Remove the pot from heat and stir in a couple of handfuls of fresh spinach along with sliced green onions and cilantro for an added burst of freshness. The spinach will wilt quickly, retaining its vibrant color—perfect for your hearty Curry Dumpling Soup.

Step 6: Add Brightness with Lime
Squeeze in the juice of 1 lime to brighten the flavors and elevate the broth. Taste and adjust the seasoning as needed, adding more lime juice or fish sauce to suit your palate. The vibrant aroma is sure to entice everyone waiting for their cozy bowl of soup.

Step 7: Serve and Enjoy!
Ladle your warm Curry Dumpling Soup into bowls and garnish with additional herbs or crispy shallots for a crunchy contrast. Pair it with jasmine rice or a fresh salad for a balanced meal. Each spoonful delivers a delightful blend of rich flavors and comforting textures that will surely become a family favorite!

Variations & Substitutions for Curry Dumpling Soup

Feel free to let your creativity shine and tailor this recipe to suit your taste and dietary preferences!

  • Noodle Swap: Replace dumplings with rice noodles for a gluten-free option that offers a delightful chewy texture.
  • Leafy Greens: Substitute spinach with bok choy or kale to add different textures and nutrients while keeping that vibrant green hue.
  • Heat Level: Experiment with spicier curry pastes like green curry for a bolder flavor explosion that definitely warms the soul.
  • Creaminess Boost: For an ultra-rich soup, blend in a touch of peanut butter to enhance the creaminess and add a nutty undertone.
  • Protein Variety: Toss in cubed tofu or shredded chicken for additional protein and substance—perfect for making this dish even heartier.
  • Coconut-Free: If coconut milk isn't your thing, opt for almond or cashew cream as a lighter alternative that still maintains a creamy texture.
  • Zesty Twist: Add a splash of coconut vinegar or rice vinegar to brighten the flavors even more; it enhances the overall freshness of each bowl.
  • Serving Style: Serve with a side of egg drop soup or a small portion of jasmine rice for a well-rounded meal that appeals to everyone.

For additional inspiration, don’t forget to check out my Lemon Chicken Soup or try whipping up a delicious Santa Soup Savory next!

How to Store and Freeze Curry Dumpling Soup

Fridge: Store any leftover Curry Dumpling Soup in an airtight container for up to 3 days. Reheat gently on the stovetop, stirring occasionally to ensure even warming.

Freezer: For longer storage, freeze the soup (without dumplings) in a freezer-safe container for up to 3 months. Thaw in the fridge overnight before reheating.

Dumpling Texture: If you plan to freeze, consider storing dumplings separately to preserve their texture. They may become soft when frozen with the soup.

Reheating: When ready to enjoy, reheat the soup over medium heat, adding fresh dumplings if desired, and a splash of chicken broth or coconut milk for creaminess.

Make Ahead Options

Curry Dumpling Soup is a fantastic option for busy home cooks looking to save time without sacrificing flavor! You can prepare the soup base—sautéing the onions, ginger, garlic, and curry paste, then adding the broth and coconut milk—up to 24 hours in advance. Simply store this base in an airtight container in the refrigerator until you're ready to serve. To maintain the quality of your dumplings, cook them fresh just before serving, as reheating can lead to a mushy texture. When ready to indulge, reheat the soup base, add the dumplings, and finish with the spinach and lime juice for a cozy bowl that's just as delicious as if made on the spot!

Expert Tips for Perfect Curry Dumpling Soup

  • Flavor Development: Allow the Thai red curry paste to sauté longer for deeper flavor; rushing can lead to a raw taste in your curry dumpling soup.

  • Gentle Simmer: Stir in the coconut milk gradually at a gentle simmer to prevent curdling; this helps maintain the creamy texture of your broth.

  • Handling Dumplings: To avoid breakage, reduce stirring after adding the dumplings; let them float gently in the broth as they cook.

  • Adjusting Heat: Start with 2 tablespoons of curry paste, then taste and adjust according to your heat preference; different brands may vary in potency.

  • Storage Tips: Keep leftovers in an airtight container for up to 3 days; be mindful that dumplings may soften over time.

What to Serve with Curry Dumpling Soup

As you savor the heartwarming soothing of this soup, consider pairing it with delightful sides to elevate your meal.

  • Steamed Jasmine Rice: The fluffy, fragrant rice absorbs the rich coconut broth beautifully, making every bite even more comforting.

  • Fresh Cucumber Salad: A crisp salad tossed with rice vinegar dressing offers a refreshing contrast to the warm, creamy soup.

  • Garlic Breadsticks: Soft, buttery breadsticks are perfect for dipping into the aromatic broth, adding a delightful texture to your dining experience.

  • Chili Lime Edamame: These zesty little pods bring a pop of flavor and a vibrant touch, enhancing the overall experience while packing a protein punch.

  • Crispy Spring Rolls: The crunchy exterior filled with fresh vegetables complements the softness of the dumplings, creating a lovely textural balance.

  • Mango Sticky Rice: For dessert, this sweet, coconut-infused treat rounds off the meal perfectly, bringing a touch of sweetness to balance the savory soup.

Enhance your culinary journey with these pairings that will make your dinner unforgettable!

Curry Dumpling Soup Recipe FAQs

What is the best way to choose fresh dumplings?
Absolutely! When selecting dumplings, look for packages that are well-sealed and have a clear expiration date. If purchasing frozen, ensure the dumplings are intact without any freezer burn. Fresh dumplings should be firm to the touch and free from any dark spots or cracks.

How long can I store leftover Curry Dumpling Soup?
Leftover soup can be stored in an airtight container for up to 3 days in the refrigerator. Be mindful that the dumplings may soften over time. When reheating, warm it gently on the stovetop to keep the flavors bright and fresh.

Can I freeze Curry Dumpling Soup?
Yes, you can freeze Curry Dumpling Soup, but I recommend doing so without the dumplings. Store your soup in a freezer-safe container for up to 3 months. To reheat, thaw it in the refrigerator overnight, then gently warm on the stovetop. Add fresh dumplings while reheating to keep their texture intact.

What if my soup tastes too salty?
Very! If your soup is too salty, consider adding diced potatoes or a pinch of sugar to balance the flavors. You can also incorporate more coconut milk or broth to dilute the saltiness. If time allows, simmer the soup for a bit longer to meld the flavors, which can help mellow the saltiness too.

Is the Curry Dumpling Soup suitable for vegetarians?
Absolutely! To make this dish vegetarian, simply substitute chicken broth with vegetable broth and use tofu or vegetable dumplings instead of meat-based ones. Also, be sure to check the fish sauce; it can be replaced with soy sauce for a similar umami flavor.

How can I keep my dumplings from breaking during cooking?
For sure! To maintain the integrity of your dumplings, avoid excessive stirring once they’re added to the broth. Let them float gently and cook according to the package instructions. If possible, add them near the end of cooking to minimize their time in the pot.

Curry Dumpling Soup

Cozy Up with Homemade Curry Dumpling Soup in 30 Minutes

Experience the warmth of Curry Dumpling Soup, a delightful dish that combines tender dumplings with a rich coconut broth.
Print Recipe Pin Recipe
Prep Time 10 minutes mins
Cook Time 20 minutes mins
Total Time 30 minutes mins
Servings: 4 bowls
Course: Soups
Cuisine: Asian
Calories: 320
Ingredients Equipment Method Nutrition Notes

Ingredients
  

For the Broth
  • 2-3 tablespoons Thai Red Curry Paste Adjust to preferred heat.
  • 1 medium Onion Chopped.
  • 1 tablespoon Ginger Minced fresh or ground.
  • 2-3 cloves Garlic Minced.
  • 1 tablespoon Fish Sauce Substitute with soy sauce for vegetarian option.
  • 4 cups Chicken Broth Use vegetable broth for plant-based.
  • 1 can Coconut Milk
For the Dumplings
  • 12 Dumplings Store-bought varieties.
For the Greens
  • 2 handfuls Spinach Add just before serving.
For a Zesty Finish
  • 1 tablespoon Lime Juice Adjust to taste.
  • 2 tablespoons Herbs (Green Onions, Cilantro) Optional garnishes.

Equipment

  • large soup pot

Method
 

Step-by-Step Instructions
  1. In a large soup pot, heat 1 tablespoon of oil over medium heat until shimmering. Add the chopped onion and sauté for about 5 minutes, or until the onion is softened and translucent.
  2. Stir in 2-3 tablespoons of Thai red curry paste, minced ginger, and garlic. Sauté the mixture for 2-3 minutes until fragrant.
  3. Increase the heat slightly and pour in 4 cups of chicken broth and 1 can of coconut milk. Bring to a low boil, gently stirring to combine.
  4. Once simmering, stir in 1 tablespoon of fish sauce and a pinch of sugar. Carefully add the dumplings and allow them to simmer according to package instructions.
  5. Remove the pot from heat and stir in a couple of handfuls of fresh spinach along with sliced green onions and cilantro.
  6. Squeeze in the juice of 1 lime to brighten the flavors and taste to adjust seasoning.
  7. Ladle your warm Curry Dumpling Soup into bowls and garnish with additional herbs or crispy shallots.

Nutrition

Serving: 1bowlCalories: 320kcalCarbohydrates: 35gProtein: 12gFat: 16gSaturated Fat: 8gCholesterol: 30mgSodium: 890mgPotassium: 500mgFiber: 2gSugar: 3gVitamin A: 2000IUVitamin C: 10mgCalcium: 100mgIron: 2mg

Notes

Flavor development can be enhanced by sautéing curry paste longer. Store leftovers in an airtight container for up to 3 days.

Tried this recipe?

Let us know how it was!

Creamy Winter Vegetable Casserole for Cozy Comfort Food Nights

December 16, 2025 by Grace Snow Leave a Comment

As I stood in my cozy kitchen, the aroma of sautéed vegetables filled the air, reminding me of winters spent gathered around the dinner table with family. Today, I’m excited to share my recipe for a Creamy Winter Vegetable Casserole that’s sure to warm your soul. This comforting dish showcases a delightful medley of seasonal veggies like carrots, parsnips, and Brussels sprouts, all wrapped in a luscious mushroom cream sauce. With a buttery, crispy topping, it’s not just a feast for the eyes but a wholesome and satisfying meal that’s perfect for both family dinners and holiday gatherings. Plus, with a quick prep time of just 45 minutes, it’s a hassle-free way to enjoy a healthy, vegetarian-friendly dinner. Are you ready to embrace winter flavors in a way that’s both delicious and nourishing? Let’s dive in!

Why Is This Casserole a Must-Try?

Comforting, this creamy winter vegetable casserole is the ultimate dish for chilly nights, bringing warmth and satisfaction to your table. Nutritious, packed with seasonal veggies, it not only delights the taste buds but also fills you up with healthy goodness. Versatile, easily modify this recipe to be gluten-free or dairy-free, ensuring everyone can enjoy it. Quick Prep, ready in just 45 minutes, it’s perfect for weeknight dinners or holiday feasts. You might also want to try serving it alongside a refreshing apple and walnut salad or pair it with a hearty Cornbread Breakfast Casserole for a delightful meal. Crowd-Pleasing, whether it’s family or guests, this casserole is bound to impress!

Creamy Winter Vegetable Casserole Ingredients

For the Casserole

  • Mixed Winter Vegetables – A blend of vegetables like carrots, parsnips, cauliflower, and Brussels sprouts creates a robust base for the dish.
  • Cream of Mushroom Soup – Provides a rich, creamy texture; opt for gluten-free varieties if needed.
  • Whole Milk or Plant-Based Milk – Enhances creaminess; you can substitute with unsweetened almond or oat milk for a dairy-free option.
  • Shredded Cheddar or Gruyère Cheese – Adds depth and flavor; feel free to swap in your favorite melting cheese.
  • Breadcrumbs – Forms a tasty crispy topping; available in regular or gluten-free versions.
  • Melted Butter – Helps bind breadcrumbs together for that perfect crunch.
  • Dried Thyme – Brings an aromatic touch; consider using rosemary for a different flavor profile.
  • Garlic Powder – Infuses the dish with flavor; fresh minced garlic can be a delicious alternative.
  • Salt and Black Pepper – Essential for seasoning; adjust to your taste.

For the Topping

  • Breadcrumbs – Crucial for a crunchy topping; be sure to choose gluten-free if necessary.
  • Melted Butter – Aids in achieving that golden, crispy layer; can be replaced with olive oil for a healthier twist.

This Creamy Winter Vegetable Casserole not only satisfies your cravings but also offers a comforting hug from the inside!

Step‑by‑Step Instructions for Creamy Winter Vegetable Casserole

Step 1: Prepare Oven and Baking Dish
Preheat your oven to 375°F (190°C) while you lightly grease a medium-sized baking dish with butter or cooking spray. Make sure you get the edges well, as this will help with easy serving later. The aroma of the melting butter will start to fill the kitchen, setting the stage for the delicious Creamy Winter Vegetable Casserole to come.

Step 2: Prep Vegetables
In a large pot, bring water to a boil and steam or blanch your mixed winter vegetables—carrots, parsnips, cauliflower, and Brussels sprouts—for about 3-4 minutes until they are tender but still vibrant in color. Drain them and pat dry if using frozen veggies. This step ensures that the vegetables retain their structure and vibrant flavors in your casserole.

Step 3: Combine Filling Ingredients
In a large mixing bowl, combine your prepared vegetables with cream of mushroom soup, whole or plant-based milk, and your choice of shredded cheddar or Gruyère cheese. Add in the dried thyme, garlic powder, salt, and pepper, mixing thoroughly until everything is well incorporated. The creamy mixture should have a lovely consistency, ready to envelop those delightful veggies.

Step 4: Fill Baking Dish
Transfer the combined vegetable mixture into your greased baking dish. Spread it evenly, making sure all the veggies are well-distributed and coated with the creamy sauce. At this stage, you should see a colorful array peeking through, promising a delicious bite in every spoonful of your Creamy Winter Vegetable Casserole.

Step 5: Add Topping
In a small bowl, mix the breadcrumbs with melted butter until they are evenly coated. Sprinkle this mixture generously over the top of the casserole, ensuring an even covering. The breadcrumbs will turn golden brown as they bake, adding a delightful crunch to the creamy filling below.

Step 6: Bake
Place the casserole in the preheated oven and bake uncovered for 25-30 minutes. Keep an eye on it; the topping should become golden and crispy while the filling bubbles lightly around the edges. The rich aroma wafting from the oven will make your kitchen feel extra cozy, capturing the spirit of winter comfort food.

Step 7: Rest and Serve
Once baked to perfection, remove the casserole from the oven and let it rest for about 5 minutes. This allows the flavors to meld beautifully and makes serving easier. Scoop out generous portions of your Creamy Winter Vegetable Casserole, and savor the blend of warm, creamy, and crunchy textures that will surely please everyone at the table.

Make Ahead Options

This Creamy Winter Vegetable Casserole is perfect for meal prep enthusiasts, allowing you to save valuable time on busy weeknights! You can prepare the entire casserole up to 24 hours in advance by assembling it completely and covering it tightly with plastic wrap. Just refrigerate until you’re ready to bake. If you prefer, you can also prep the mixed vegetables and combine them with the soup, milk, and cheese mixture so it’s ready to go! For maximum freshness, keep the breadcrumb topping separate until baking. When you're ready to serve, simply pop it in the oven, and enjoy restaurant-quality results with minimal effort, just as delicious as when freshly made!

Variations & Substitutions for Creamy Winter Vegetable Casserole

Feel free to play with this recipe and discover new flavors that excite your palate!

  • Gluten-Free: Use gluten-free breadcrumbs and check that your cream of mushroom soup is also gluten-free to keep it friendly for all diets.
  • Dairy-Free: Swap out dairy milk and cheese for plant-based alternatives like almond or cashew milk and nutritional yeast for cheesiness.
  • Extra Protein: Mix in a cup of cooked quinoa or even shredded chicken for a heartier meal that packs a nutritional punch.
  • Spicy Kick: Add a pinch of red pepper flakes or diced jalapeños to the vegetable mixture for a delightful heat that brightens every bite.
  • Creamy Twist: Instead of cream of mushroom soup, try using cream of celery soup for a refreshing new flavor that still maintains creaminess.
  • Herb Boost: Fresh herbs create vibrant flavors—consider using fresh parsley or rosemary instead of dried thyme for added aroma and freshness.
  • Nutty Texture: Toss in some toasted nuts like walnuts or slivered almonds for a crunchy texture that complements the softness of the vegetables.
  • Different Veggies: Don't hesitate to use other seasonal veggies such as sweet potatoes or butternut squash for a sweet, earthy flavor that changes the dish entirely.

With these variations, you can enjoy a different twist on your Creamy Winter Vegetable Casserole every time! If you're inspired, you might also want to explore a heartwarming Sweet Potato Casserole or the comforting layers of a Spicy Miso Casserole next!

How to Store and Freeze Creamy Winter Vegetable Casserole

Fridge: Store leftovers in an airtight container for up to 4 days. Reheat in the oven or microwave before enjoying your delicious Creamy Winter Vegetable Casserole again.

Freezer: For longer storage, freeze unbaked casserole tightly wrapped in plastic wrap and aluminum foil for up to 3 months. Thaw overnight in the refrigerator before baking.

Reheating: When ready to enjoy, bake from thawed at 375°F (190°C) for 30-35 minutes or until heated through and bubbly, ensuring you maintain that delightful texture.

Make-Ahead Tips: Consider prepping the casserole a day in advance. Store it in the fridge, then bake it the next day; the flavors will meld beautifully!

What to Serve with Creamy Winter Vegetable Casserole

This delicious casserole is perfect for building a complete and cozy meal that warms both the heart and belly.

  • Garlic Bread: Its crunchy, buttery goodness adds texture and flavor, perfect for scooping up that creamy sauce.
  • Mixed Greens Salad: A light and refreshing salad dressed in a citrus vinaigrette complements the richness of the casserole, adding brightness to your plate.
  • Honey-Glazed Carrots: Sweet and tender, these carrots provide a delightful contrast to the savory elements of the casserole.
  • Roasted Chicken: Juicy and tender, this protein pairing enhances the heartiness of the meal, while the roasty flavors integrate well with the earthy notes of winter vegetables.
  • Creamy Polenta: Luxuriously creamy and comforting, polenta acts as a soft base that complements the casserole's texture beautifully, soaking up the rich flavors.
  • Warm Apple Crisp: For dessert, indulge in a warm and comforting apple crisp. Its sweet, buttery topping and spiced apples create the perfect ending to your cozy meal.

Expert Tips for Creamy Winter Vegetable Casserole

• Quality Ingredients: Use fresh, seasonal vegetables for the best flavor. Frozen veggies work in a pinch; just ensure they’re thawed and dry to avoid excess moisture.

• Perfect Creaminess: For a velvety sauce, make sure to mix the soup and milk thoroughly before adding the vegetables. This prevents clumping and ensures a smooth texture in your Creamy Winter Vegetable Casserole.

• Crunchy Topping: Don’t skip the butter on the breadcrumbs! This crucial step creates that irresistible golden, crispy topping we all crave. For a lighter option, try olive oil instead.

• Herb Substitutions: If you don’t have dried thyme, switch it up with rosemary or Italian seasoning for a unique flavor twist. Just remember to adjust the amount based on the herb’s potency.

• Make-Ahead Magic: Prepare the casserole a day in advance, store it in the fridge, and simply bake it the next day for a hassle-free dinner. This enhances the flavors beautifully!

• Add Protein: If you want to make it heartier, include a cup of cooked quinoa or white beans. This not only boosts protein but also adds more texture to your Creamy Winter Vegetable Casserole.

Creamy Winter Vegetable Casserole Recipe FAQs

What vegetables work best for this casserole?
Absolutely! You can use a delightful mix of winter vegetables, such as carrots, parsnips, cauliflower, broccoli, and Brussels sprouts. Just ensure they're fresh for the best flavor; frozen vegetables work too, just make sure to thaw and dry them well to avoid excess moisture in your Creamy Winter Vegetable Casserole.

How should I store leftovers?
You can keep your leftover casserole in an airtight container for up to 4 days in the fridge. To reheat, simply place it in the oven at 350°F (175°C) for about 15-20 minutes, or until warmed through. It's a quick and easy way to enjoy the comforting flavors again!

Can I freeze this casserole?
Yes, you can freeze it! For best results, wrap the unbaked casserole tightly in plastic wrap and aluminum foil. It’ll keep in the freezer for up to 3 months. When you’re ready to enjoy it, simply thaw it overnight in the fridge and then bake at 375°F (190°C) for about 30-35 minutes until bubbly.

What should I do if my casserole is too watery?
If you find your casserole is too watery, it may be due to excess moisture from the vegetables. To remedy this, you can try draining the mixture before adding it to the baking dish. Another option is to mix in a tablespoon of cornstarch with your filling ingredients; this helps thicken up the sauce as it bakes.

Can I make this casserole dairy-free?
Very! To create a dairy-free version of the Creamy Winter Vegetable Casserole, simply substitute the whole milk with unsweetened almond or oat milk, and use a dairy-free cheese alternative for the cheddar or Gruyère. It’s just that simple, and everyone can enjoy a comforting meal!

Is this casserole suitable for pets or allergies?
While the casserole is wholesome and nutritious, it is important to avoid sharing with pets, as many ingredients could be harmful (like garlic powder). If you're considering allergies, always check the labels on your soup and cheese to ensure it meets your dietary needs, especially for dairy and gluten.

Creamy Winter Vegetable Casserole

Creamy Winter Vegetable Casserole for Cozy Comfort Food Nights

This Creamy Winter Vegetable Casserole is a comforting dish showcasing seasonal veggies and a rich mushroom cream sauce.
Print Recipe Pin Recipe
Prep Time 45 minutes mins
Cook Time 30 minutes mins
Resting Time 5 minutes mins
Total Time 1 hour hr 20 minutes mins
Servings: 6 servings
Course: Dinner
Cuisine: American
Calories: 350
Ingredients Equipment Method Nutrition Notes

Ingredients
  

For the Casserole
  • 1 pound Mixed Winter Vegetables A blend of carrots, parsnips, cauliflower, and Brussels sprouts
  • 1 can Cream of Mushroom Soup Gluten-free varieties if needed
  • 1 cup Whole Milk or Plant-Based Milk Use unsweetened almond or oat milk for dairy-free
  • 1 cup Shredded Cheddar or Gruyère Cheese Feel free to swap with your favorite melting cheese
  • 1 cup Breadcrumbs Regular or gluten-free versions
  • 2 tablespoons Melted Butter Helps bind breadcrumbs
  • 1 teaspoon Dried Thyme Consider rosemary as an alternative
  • 1 teaspoon Garlic Powder Fresh minced garlic can be used
  • to taste Salt
  • to taste Black Pepper
For the Topping
  • 1 cup Breadcrumbs Choose gluten-free if necessary
  • 2 tablespoons Melted Butter Can be replaced with olive oil

Equipment

  • Oven
  • Baking Dish
  • Mixing Bowl
  • pot

Method
 

Preparation Steps
  1. Preheat your oven to 375°F (190°C) and grease a baking dish with butter or cooking spray.
  2. In a pot, bring water to a boil and steam the mixed winter vegetables for 3-4 minutes until tender.
  3. In a mixing bowl, combine vegetables with cream of mushroom soup, milk, shredded cheese, thyme, garlic powder, salt, and pepper.
  4. Transfer the mixture to the greased baking dish, spreading it evenly.
  5. Mix breadcrumbs with melted butter and sprinkle over the casserole.
  6. Bake uncovered for 25-30 minutes until the topping is golden brown and filling is bubbly.
  7. Let it rest for 5 minutes before serving.

Nutrition

Serving: 1cupCalories: 350kcalCarbohydrates: 30gProtein: 10gFat: 20gSaturated Fat: 10gPolyunsaturated Fat: 2gMonounsaturated Fat: 6gCholesterol: 40mgSodium: 600mgPotassium: 500mgFiber: 4gSugar: 5gVitamin A: 3000IUVitamin C: 30mgCalcium: 200mgIron: 2mg

Notes

Using fresh, seasonal vegetables enhances flavor. Consider making it a day in advance for deeper flavors.

Tried this recipe?

Let us know how it was!

Creamy Bacon Cheddar Gnocchi Soup That Warms Your Soul

December 16, 2025 by Grace Snow Leave a Comment

As I stirred the pot, a surge of warmth enveloped me, filling the kitchen with the irresistible scent of crispy bacon mingling with creamy cheddar. This Bacon Cheddar Gnocchi Soup is not just a meal; it's a comforting embrace in a bowl, designed to chase away any chill and lift your spirits. In just 38 minutes, you can have this hearty dish on the table, perfect for gatherings or cozy nights in. Plus, it’s delightfully customizable, allowing you to swap in your favorite cheeses or even use turkey bacon for a lighter twist. Are you ready to discover how to transform simple ingredients into a soul-satisfying masterpiece? Let’s dive in!

Why is This Soup a Must-Try?

Comforting and creamy – This Bacon Cheddar Gnocchi Soup wraps you in warmth with every spoonful, perfect for chilly evenings. Quick to prepare – Ready in just 38 minutes, it’s ideal for busy weeknights. Customizable – Use your favorite cheeses or try turkey bacon for a lighter touch. Nutrient-packed – Toss in seasonal veggies for added color and health benefits. Whether for family gatherings or cozy nights, this soup will become a cherished favorite. Try pairing it with a side of German Potato Salad for a complete meal!

Bacon Cheddar Gnocchi Soup Ingredients

For the Soup Base
• Bacon – Adds a crispy texture and rich, smoky flavor; thick-cut is best for this recipe.
• Butter or Olive Oil – For sautéing vegetables, both offer a delicious depth of flavor.
• Onion – Diced for a sweet base that enhances the soup's taste.
• Carrots – Peeled and sliced; they contribute sweetness and texture to the dish.
• Chicken Broth – Forms the soup base; low-sodium allows better control over saltiness.
• Salt – Enhances overall flavor; adjust according to taste and broth saltiness.
• Pepper – Freshly ground pepper maximizes flavor in every bite.
• Garlic Powder or Fresh Garlic – Both options add savory depth to the soup.
• Dried Thyme – Infuses the soup with aromatic earthiness.
• Red Chili Flakes – Adds a kick; adjust for your desired heat level.

For the Gnocchi & Creaminess
• Gnocchi – Fresh or frozen, this creates the delightful texture that enhances the soup's heartiness.
• Heavy Cream or Half-n-Half – Adds a richness that makes this Bacon Cheddar Gnocchi Soup luxurious and creamy.
• Cheddar Cheese – Use sharp cheddar to elevate the dish with robust flavor.

Feel free to explore other variations by switching up the types of cheese or even using turkey bacon for a lighter option!

Step‑by‑Step Instructions for Bacon Cheddar Gnocchi Soup.

Step 1: Cook Bacon
In a large pot over medium heat, cook thick-cut bacon until crispy, about 6-8 minutes. Watch for a beautiful golden color, then remove the bacon, allowing it to cool on paper towels before chopping it into bite-sized pieces. Keep the pot on the heat for the next steps, as it will be filled with flavorful drippings.

Step 2: Sauté Vegetables
Using the same pot, add 2 tablespoons of butter or olive oil. Toss in diced onions and sliced carrots, cooking for 10-15 minutes until they soften and the onions become translucent. Stir frequently to prevent sticking and ensure they gain a bit of caramelization, enhancing the base of your Bacon Cheddar Gnocchi Soup.

Step 3: Add Broth
Pour in 4 cups of chicken broth and increase the heat to bring the mixture to a gentle simmer. This should take about 3-5 minutes. As the broth heats up, enjoy the comforting aroma wafting from the pot, which will set the stage for the delightful flavors to come.

Step 4: Incorporate Cream and Spices
Reduce the heat to low and stir in 1 cup of heavy cream or half-and-half. Next, add salt, pepper, garlic powder or fresh minced garlic, dried thyme, and red chili flakes to taste. Allow the soup to simmer gently for another 5 minutes, combining all the lovely spices and creaminess with the broth.

Step 5: Melt Cheese
Gradually mix in 2 cups of shredded sharp cheddar cheese into the soup, stirring constantly until the cheese melts and becomes smooth, which should take about 2-3 minutes. The rich, creamy consistency will make this Bacon Cheddar Gnocchi Soup utterly irresistible, transforming your pot into a cheesy embrace.

Step 6: Add Gnocchi and Bacon
Stir in 16 ounces of fresh or frozen gnocchi, cooking them in the bubbling soup for about 2 minutes until they float to the top. Next, add the chopped bacon back into the pot, stirring to incorporate everything well. Taste the soup and adjust the seasoning with salt and pepper if necessary, ensuring every spoonful is packed with flavor.

How to Store and Freeze Bacon Cheddar Gnocchi Soup

  • Room Temperature: This soup should not be left out at room temperature for more than 2 hours to prevent bacterial growth.

  • Fridge: Store the Bacon Cheddar Gnocchi Soup in an airtight container for up to 3 days. To reheat, warm gently on the stovetop, adding a splash of broth or cream to restore creaminess.

  • Freezer: Freeze the soup in airtight containers or freezer bags for up to 3 months. Thaw overnight in the fridge before reheating, and add a little broth to restore its velvety texture.

  • Reheating: Heat gently in a pot over low heat, stirring frequently. Avoid boiling to keep the cream from separating, ensuring every bite remains rich and delicious.

Make Ahead Options

Preparing your Bacon Cheddar Gnocchi Soup in advance is a fantastic way to save time during busy weeknights! You can chop the vegetables (onion and carrots) and cook the bacon up to 24 hours in advance, allowing them to be stored in an airtight container in the refrigerator. Additionally, you can prepare the soup base (broth, cream, and spices) and refrigerate it for up to 3 days. When you're ready to serve, simply reheat the base, add the gnocchi, and the cooked bacon, and simmer for a few minutes until warmed through. This way, your comforting soup remains just as delicious and ready to warm your soul with minimal effort!

Expert Tips for Bacon Cheddar Gnocchi Soup

  • Choose Quality Bacon: Use thick-cut bacon for a richer flavor and better texture. Avoid thin bacon that can become too crispy and chewy in the soup.
  • Mind the Heat: When adding cream and cheese, keep the heat on low to prevent curdling. High heat can make your Bacon Cheddar Gnocchi Soup grainy instead of creamy.
  • Fresh Gnocchi: If possible, opt for fresh gnocchi as they offer a delightful texture compared to frozen. Ensure they are cooked just until they float for the best consistency.
  • Customize Wisely: Feel free to swap in different cheeses or add turkey bacon, but remember to adjust the salt levels in the recipe; some cheeses are saltier than others.
  • Add Color & Nutrition: Toss in seasonal veggies like spinach or peas for added nutrition and a pop of color in your Bacon Cheddar Gnocchi Soup.
  • Storage Savvy: Store leftovers in an airtight container for up to 3 days, but reheat gently and add a splash of broth to maintain a creamy texture.

What to Serve with Bacon Cheddar Gnocchi Soup

A cozy bowl of creamy goodness deserves delightful companions to enhance your meal experience.

  • Crusty Bread: Perfect for dipping; the bread's crunchy crust contrasts beautifully with the creamy soup. A buttery garlic bread brings warmth and flavor, making every bite a moment to savor.

  • Simple Green Salad: A fresh salad with mixed greens and a tangy vinaigrette lightens up the meal, adding a refreshing crunch that balances the soup's richness. Feta or goat cheese crumbles elevate it further.

  • Garlic Parmesan Roasted Broccoli: Tender broccoli roasted with garlic adds a savory and slightly charred element that complements the cheesy flavors of the soup beautifully. The vivid green color brightens your plate, making it visually appealing.

  • Cheesy Biscuits: Flaky, golden biscuits bursting with cheese seamlessly blend with the soup, tempting you to reach for just one more. Their buttery softness complements the soup's creamy texture.

  • Steamed Asparagus: Lightly steamed asparagus drizzled with lemon juice provides a fresh, bright flavor that cuts through the heaviness, fostering a delightful contrast on your palate.

  • Chardonnay or Light Beer: A chilled glass of Chardonnay enhances the meal with its buttery tones, while a light beer refreshes the palate, making it a perfect pairing with the hearty soup.

  • Apple Crisp: For dessert, a warm apple crisp topped with vanilla ice cream offers a sweet finish that echoes the comforting vibe of your dinner. The fruity sweetness and crunchy topping create a satisfying end to your meal.

Bacon Cheddar Gnocchi Soup Variations

Feel free to experiment and tailor this recipe to your tastes; the possibilities are as delicious as they are varied!

  • Turkey Bacon: Swap out traditional bacon for turkey bacon for a lighter, healthier option without sacrificing flavor.
  • Cheese Medley: Mix different cheeses like gouda or mozzarella for a creamy, gooey texture that adds complexity to the soup.
  • Vegetable Boost: Incorporate seasonal vegetables like spinach or sweet corn for added nutrition and a pop of color that brightens up the dish.
  • Spice It Up: Add more red chili flakes or a dash of hot sauce for an extra kick if you love your soup with some heat!
  • Creamy Alternative: For a dairy-free approach, use coconut milk instead of heavy cream, providing a unique flavor twist with creaminess.
  • Meaty Variants: Introduce diced chicken or smoked sausage for a heartier, protein-packed version that transforms this soup into a full meal.
  • Gnocchi Alternatives: Try using small pasta shapes or even cauliflower gnocchi for a gluten-free option, bringing new textures to the table.
  • Fresh Herbs: Garnish with fresh herbs like parsley or chives to add brightness and a lovely finishing touch to your comforting bowl of soup.

Whether you’re thinking about some leftovers or want to try the comforting warmth of this German Potato Salad on the side, let your culinary imagination steer the way! Happy cooking!

Bacon Cheddar Gnocchi Soup Recipe FAQs

What type of bacon is best for this soup?
Absolutely! Thick-cut bacon is recommended for its rich flavor and satisfying texture. It holds up well during cooking and gives the soup that wonderful smoky essence. Thin bacon can become too crispy or chewy, which isn’t ideal for this creamy dish.

How do I store leftovers?
Very simple! Place any leftover Bacon Cheddar Gnocchi Soup in an airtight container and store it in the fridge for up to 3 days. When reheating, warm it gently on the stovetop, adding a splash of broth or cream to restore the soup's creamy texture.

Can I freeze the Bacon Cheddar Gnocchi Soup?
Absolutely! You can freeze this soup in airtight containers or freezer bags for up to 3 months. For best results, thaw it overnight in the fridge before reheating. When reheating, add a bit of broth to help bring back that velvety consistency.

What should I do if the soup is too thick after storing?
No worries! If your soup thickens after sitting in the fridge, simply add a little chicken broth or water while reheating. Stir gently over low heat until it reaches your desired consistency. This keeps the flavors intact while ensuring a smooth texture.

Can I make any dietary substitutions in this recipe?
Certainly! For a lighter option, you can use turkey bacon instead of regular bacon or substitute heavy cream with half-and-half or a non-dairy milk like almond milk. Just be mindful to adjust the salt levels, as some ingredients may have different sodium contents.

Can my pets eat any of the ingredients in this soup?
It's best to keep this soup away from your pets. Ingredients like garlic and onions can be harmful to dogs and cats, so ensure they don’t get a hold of any leftovers. Stick to pet-friendly treats for their snacking needs!

Bacon Cheddar Gnocchi Soup.

Creamy Bacon Cheddar Gnocchi Soup That Warms Your Soul

This Bacon Cheddar Gnocchi Soup is a comforting embrace in a bowl, perfect for chilly evenings.
Print Recipe Pin Recipe
Prep Time 10 minutes mins
Cook Time 28 minutes mins
Total Time 38 minutes mins
Servings: 4 servings
Course: Soups
Cuisine: American
Calories: 450
Ingredients Equipment Method Nutrition Notes

Ingredients
  

For the Soup Base
  • 8 ounces Bacon thick-cut
  • 2 tablespoons Butter or Olive Oil
  • 1 cup Onion diced
  • 2 medium Carrots peeled and sliced
  • 4 cups Chicken Broth low-sodium
  • 1 teaspoon Salt adjust according to taste
  • 1 teaspoon Pepper freshly ground
  • 1 teaspoon Garlic Powder or Fresh Garlic
  • 1 teaspoon Dried Thyme
  • 1/2 teaspoon Red Chili Flakes
For the Gnocchi & Creaminess
  • 16 ounces Gnocchi
  • 1 cup Heavy Cream or Half-n-Half
  • 2 cups Cheddar Cheese shredded sharp cheddar

Equipment

  • Large pot

Method
 

Step-by-Step Instructions
  1. In a large pot over medium heat, cook thick-cut bacon until crispy, about 6-8 minutes. Remove bacon and chop into bite-sized pieces.
  2. Add 2 tablespoons of butter or olive oil and sauté diced onion and sliced carrots for 10-15 minutes until softened and caramelized.
  3. Pour in 4 cups of chicken broth and bring to a gentle simmer, about 3-5 minutes.
  4. Stir in 1 cup of heavy cream or half-and-half, along with salt, pepper, garlic, thyme, and red chili flakes; let simmer for another 5 minutes.
  5. Gradually add 2 cups of shredded cheddar cheese, stirring until melted and smooth, about 2-3 minutes.
  6. Stir in 16 ounces of gnocchi and cook until they float, about 2 minutes. Add chopped bacon back to the pot and adjust seasoning as necessary.

Nutrition

Serving: 1bowlCalories: 450kcalCarbohydrates: 35gProtein: 20gFat: 25gSaturated Fat: 12gPolyunsaturated Fat: 1gMonounsaturated Fat: 10gCholesterol: 75mgSodium: 800mgPotassium: 600mgFiber: 2gSugar: 3gVitamin A: 1500IUVitamin C: 5mgCalcium: 400mgIron: 2mg

Notes

For best results, store leftovers properly and reheat gently to maintain creaminess.

Tried this recipe?

Let us know how it was!

One-Pot Philly Cheesesteak Soup That Warms the Soul

December 16, 2025 by Grace Snow Leave a Comment

As I wandered through the vibrant streets of Philadelphia, the aroma of sizzling meat and melting cheese wrapped around me like a warm hug. This isn’t just iconic street food; it’s the inspiration behind my One-Pot Philly Cheesesteak Soup. This cozy dish marries the beloved flavors of a classic cheesesteak with the simplicity and convenience of one-pot cooking—a dream come true for busy weeknights! Not only does this recipe come together quickly, but it also delivers that soul-soothing comfort we crave, especially on chilly evenings. Topped with crispy bacon and served alongside cheesy toast, it transforms the ordinary into something extraordinary. Are you ready to dive into this delightful twist on a Philadelphia classic? Let’s get stirring!

Why is this soup a must-try?

Comforting, delectable flavors: The One-Pot Philly Cheesesteak Soup brings the iconic taste of a classic cheesesteak right to your table, wrapped in creamy goodness.

Quick and easy: With minimal clean-up and straightforward steps, it’s perfect for busy nights or spontaneous gatherings.

Versatile options: Feel free to swap in ground turkey or a variety of cheeses, making this recipe adaptable to your cravings.

Crispy bacon bliss: The addition of crispy bacon elevates the flavor profile, adding a delightful crunch that complements the smooth soup.

Crowd-pleaser guaranteed: Whether it’s a weeknight meal or a weekend feast, this dish will impress your family and friends, leaving them wanting more! Don't forget to check out other comforting recipes like Zuppa Toscana Soup for more delicious options.

One-Pot Philly Cheesesteak Soup Ingredients

For the Soup

  • Beef – Choose tender cuts like sirloin for rich flavor and delightful texture.
  • Cheese – For the best melt, use provolone or cheddar to create a creamy base.
  • Bacon – Opt for thick-cut bacon for that satisfying crispy bite and smoky aroma.
  • Bell Peppers – Freshly diced, they add a sweet crunch and vibrant color to the soup.
  • Onions – Sautéed onions bring out sweetness, enhancing the overall flavor profile.
  • Vegetable Broth – Use low-sodium broth for a well-balanced base without overwhelming saltiness.
  • Cornstarch – Mix with water to thicken the soup and achieve a creamy consistency easily.
  • Almond or Oat Milk – Use these for a dairy-free option, perfect for keeping the soup creamy.

For Enhancing Flavor

  • Balsamic Vinegar – A splash brings depth and balance to the rich flavors of the soup.
  • Dijon Mustard – Just a teaspoon can add a tangy kick that brightens the dish.

For Serving

  • Bread – Choose a crusty loaf for toasting; it adds crunch and is perfect for soaking up the soup.
  • Extra Cheese – Always a welcome addition on the side for cheese lovers!

Now that you have all the key ingredients at hand, it’s time to turn your kitchen into a warm haven, where the comforting aroma of the One-Pot Philly Cheesesteak Soup will envelop you and your loved ones like a cozy blanket. Let's get cooking!

Step‑by‑Step Instructions for One-Pot Philly Cheesesteak Soup

Step 1: Cook the Bacon
In a large pot, heat over medium heat and add thick-cut bacon, cooking for about 6-8 minutes until crispy and golden brown. Once cooked, remove the bacon and place it on a paper towel-lined plate to drain, leaving the rendered fat in the pot to infuse flavor into your One-Pot Philly Cheesesteak Soup.

Step 2: Sauté the Vegetables
In the same pot with bacon fat, add in freshly diced bell peppers and onions. Sauté for about 4-5 minutes, stirring occasionally, until the vegetables are soft and fragrant, making sure they retain their vibrant colors. This step will create a beautiful base for your soup.

Step 3: Brown the Beef
Next, add your choice of ground or sliced beef to the pot, breaking it apart as it cooks. Stir for about 5-7 minutes until the beef is browned and no longer pink. Season with salt and pepper to taste, ensuring the rich flavors develop throughout the One-Pot Philly Cheesesteak Soup.

Step 4: Add the Broth
Pour in low-sodium vegetable broth, stirring well to combine all ingredients. Increase the heat until the mixture reaches a simmer, then reduce to medium-low, allowing it to cook for 10-15 minutes. This step melds the flavors while giving the soup a hearty essence.

Step 5: Thicken the Soup
To achieve a creamy consistency, mix cornstarch with a small amount of water to create a slurry. Gradually stir this mixture into the simmering broth, cooking for an additional 2-3 minutes until the soup thickens. Keep an eye on it to reach your desired texture for the One-Pot Philly Cheesesteak Soup.

Step 6: Stir in the Cheese
Once the soup has thickened, add your shredded provolone or cheddar cheese, stirring gently until it melts and blends beautifully into the soup. This will give your One-Pot Philly Cheesesteak Soup that signature creamy, cheesy goodness that everyone loves.

Step 7: Serve with Cheesy Toast
Ladle the hot soup into bowls and serve it alongside crispy, toasted bread topped with extra cheese. Toast the bread until golden and crunchy for the perfect contrast to the creamy soup. Enjoy this comforting and hearty dish with friends or family!

One-Pot Philly Cheesesteak Soup Variations

Dive into delightful ways to customize your One-Pot Philly Cheesesteak Soup, making it a perfect fit for your taste buds!

  • Turkey Swap: Replace ground beef with ground turkey for a lighter, leaner option that's just as flavorful.
  • Vegetarian Twist: Use plant-based beef alternatives and load up on veggies like mushrooms and spinach for a hearty vegetarian delight.
  • Cheese Variety: Explore different cheeses like Gouda or mozzarella for unique, creamy flavors that will elevate your soup experience.
  • Spicy Kick: Add diced jalapeños or a splash of hot sauce to bring a fiery twist to this comforting dish, perfect for heat lovers.
  • Garlic Boost: Sauté a couple of minced garlic cloves with the onions for an aromatic enhancement that will have everyone asking for seconds.
  • Herb Infusion: Stir in fresh herbs like parsley or thyme right before serving to bring a fragrant brightness to your One-Pot Philly Cheesesteak Soup.
  • Crunchy Toppings: Top with crispy fried onions or crushed tortilla chips for added texture and an exciting contrast to the creamy soup.
  • Flavor Fusion: Stir in a tablespoon of barbecue sauce for a smoky, tangy essence that takes the classic to new savory heights.

There's plenty of room to play with flavors here! And while you're at it, consider pairing this hearty soup with a refreshing side salad or perhaps indulge in the delightful taste of a Lemon Chicken Soup for an inviting meal spread that warms the soul. Enjoy experimenting!

Expert Tips for One-Pot Philly Cheesesteak Soup

• Bacon Bliss: For extra crunch, make sure to use thick-cut bacon and ensure it’s crispy before removing it from the pot.

• Cheesy Considerations: Always opt for freshly shredded cheese as it melts better and avoids the additives in pre-shredded varieties.

• Thickening Trick: To prevent lumps, mix cornstarch with water thoroughly before adding it to the soup. Adjust the thickness by varying how much you use.

• Flavor Boost: Don’t skip the optional balsamic vinegar or Dijon mustard; they add a delicious depth that elevates the One-Pot Philly Cheesesteak Soup.

• Vegetable Variations: Feel free to experiment with additional veggies like mushrooms or spinach, which enhance flavors while increasing nutrition!

How to Store and Freeze One-Pot Philly Cheesesteak Soup

Room Temperature: This soup is best enjoyed hot and fresh; it's not recommended to leave it out at room temperature for more than 2 hours.

Fridge: Store any leftovers of your One-Pot Philly Cheesesteak Soup in an airtight container for up to 3 days. Make sure it cools completely before refrigerating to preserve flavor.

Freezer: For longer storage, freeze the cooled soup in freezer-safe containers for up to 3 months. Avoid freezing with cheese; add freshly shredded cheese after reheating for the best texture.

Reheating: When you're ready to enjoy the soup again, reheat gently on the stove over low heat until warmed through, stirring occasionally for even heating.

Make Ahead Options

The One-Pot Philly Cheesesteak Soup is perfect for meal prep, making it a great choice for busy home cooks! You can chop the bell peppers and onions up to 24 hours in advance, storing them in an airtight container in the refrigerator to maintain their freshness. Additionally, the beef can be browned and refrigerated for up to 3 days, saving you valuable time during the week. When you're ready to serve, simply reheat the soup base, stir in the cheese until melted, and add your crispy bacon just before serving for that delightful crunch. This approach ensures that dinner is not only quick but also just as delicious as when freshly made!

What to Serve with One-Pot Philly Cheesesteak Soup

Experience the joy of a well-rounded meal with delightful sides that complement the rich, creamy flavors of this comforting dish.

  • Crispy Garlic Bread: Adds a crunchy texture and aromatic flavor that pairs perfectly with the soup's creaminess.
  • Garden Salad: A fresh mix of greens and veggies brings brightness and balances the richness of the soup.
  • Roasted Vegetables: Sweet and savory roasted carrots and zucchini offer a colorful, nutritious complement to your meal.
  • Homemade Pickles: The tangy crunch of pickles cuts through the soup's richness, adding a refreshing bite with every spoonful.
  • Beer or Cider: An ice-cold craft beer or a crisp apple cider brings out the flavors, making each bite even more enjoyable.
  • Cheesy Nachos: The gooey cheese and crispy chips provide a fun, sharable option that goes hand in hand with the main course.
  • Chocolate Chip Cookies: End your meal with a warm, gooey cookie for a sweet finale that will leave everyone smiling.
  • Apple Pie: A classic dessert that contrasts sweet and savory, it’s perfect after the hearty soup.

One-Pot Philly Cheesesteak Soup Recipe FAQs

How do I choose the right beef for this soup?
Absolutely! For the best flavor and texture, opt for tender cuts like sirloin or ribeye. These cuts provide a rich, juicy base for your One-Pot Philly Cheesesteak Soup. Look for beef that's bright red and well-marbled for optimal tenderness.

How should I store leftovers?
Very! Store any leftover One-Pot Philly Cheesesteak Soup in an airtight container in the refrigerator for up to 3 days. Allow the soup to cool completely before sealing it up to maintain its tasty freshness. When you're ready to enjoy it again, just reheat gently on the stove.

Can I freeze the soup?
Definitely! You can freeze the cooled One-Pot Philly Cheesesteak Soup in freezer-safe containers for up to 3 months. Just keep in mind to avoid freezing with cheese, as it changes the texture. Instead, add freshly shredded cheese after reheating for the best results when you're ready to enjoy a bowl.

What if my soup turns out too thick or thin?
No worries! If your One-Pot Philly Cheesesteak Soup ends up too thick, simply stir in a bit more vegetable broth or water until you reach your desired consistency. Conversely, if it’s too thin, make a small cornstarch slurry (1 tablespoon cornstarch mixed with 1 tablespoon of water) and stir it into the simmering soup until it thickens to your liking.

Is this soup gluten-free?
Absolutely! To make sure your One-Pot Philly Cheesesteak Soup is gluten-free, use gluten-free broth and check the labels on any cheese or bacon you choose. If you're using cornstarch as a thickening agent, it’s already a great gluten-free option!

Can I make this soup in advance?
Very! You can prepare the soup up to the point before adding cheese and then store it in the refrigerator for up to 3 days. When you’re ready to serve, simply reheat the soup on the stove and stir in fresh cheese. This not only enhances the flavor but also keeps the texture just right!

One-Pot Philly Cheesesteak Soup

One-Pot Philly Cheesesteak Soup That Warms the Soul

A cozy One-Pot Philly Cheesesteak Soup with comforting flavors, perfect for busy weeknights.
Print Recipe Pin Recipe
Prep Time 15 minutes mins
Cook Time 35 minutes mins
Total Time 50 minutes mins
Servings: 4 bowls
Course: Soups
Cuisine: American
Calories: 350
Ingredients Equipment Method Nutrition Notes

Ingredients
  

For the Soup
  • 1 lb Beef (sirloin) Choose tender cuts for rich flavor
  • 1 cup Cheese (provolone or cheddar) For best melt
  • 4 slices Bacon (thick-cut) For crispy bite
  • 1 medium Bell Pepper Freshly diced
  • 1 medium Onion Sautéed
  • 4 cups Vegetable Broth (low-sodium) For balanced flavor
  • 2 tbsp Cornstarch To thicken the soup
  • 1 cup Almond or Oat Milk Dairy-free option
For Enhancing Flavor
  • 1 tbsp Balsamic Vinegar For depth
  • 1 tsp Dijon Mustard Adds a tangy kick
For Serving
  • 1 loaf Bread Crusty loaf for toasting
  • 1 cup Extra Cheese For cheese lovers

Equipment

  • Large pot

Method
 

Step-by-Step Instructions
  1. Cook the Bacon: In a large pot, heat over medium heat and add thick-cut bacon, cooking for about 6-8 minutes until crispy and golden brown. Remove bacon and drain on paper towel, leaving fat in pot.
  2. Sauté the Vegetables: In the same pot, add diced bell peppers and onions, sauté for about 4-5 minutes until soft and fragrant.
  3. Brown the Beef: Add ground or sliced beef, breaking it apart as it cooks for about 5-7 minutes until browned. Season with salt and pepper.
  4. Add the Broth: Pour in low-sodium vegetable broth, stirring well. Increase heat to a simmer, reduce to medium-low, and cook for 10-15 minutes.
  5. Thicken the Soup: Mix cornstarch with water to create a slurry, stir into the broth, and cook for an additional 2-3 minutes until thickened.
  6. Stir in the Cheese: Add shredded cheese, stirring until melted and blended into the soup.
  7. Serve with Cheesy Toast: Ladle soup into bowls and serve with crispy, toasted bread topped with extra cheese.

Nutrition

Serving: 1bowlCalories: 350kcalCarbohydrates: 30gProtein: 25gFat: 18gSaturated Fat: 7gPolyunsaturated Fat: 2gMonounsaturated Fat: 4gCholesterol: 75mgSodium: 800mgPotassium: 700mgFiber: 2gSugar: 5gVitamin A: 10IUVitamin C: 15mgCalcium: 20mgIron: 15mg

Notes

Use thick-cut bacon for extra crunch and freshly shredded cheese for the best melt. Adjust the thickness by varying cornstarch amount. Optional balsamic vinegar or Dijon mustard enhances flavor.

Tried this recipe?

Let us know how it was!

Irresistible French Onion Soup That's Pure Comfort in a Bowl

December 16, 2025 by Grace Snow Leave a Comment

As I lifted the lid off my pot, the inviting aroma of caramelized onions greeted me like an old friend, instantly transporting me to a quaint French bistro. This Easy French Onion Soup is a comforting delight that marries rich, savory flavors with silky textures, creating the perfect dish for cozy nights or elegant gatherings. One of the best parts? This recipe is not only quick to whip up but can easily be transformed into a vegetarian option by swapping out beef broth for a quality vegetable broth. Whether you’re looking to impress dinner guests or simply warm your soul, this classic comfort food will surely bring a smile to your face. Are you ready to embrace the charm of homemade French onion soup? Let’s dive in!

What Makes This Soup So Special?

Comforting Warmth: The velvety broth filled with sweet, caramelized onions creates a soothing experience that feels like a warm hug on a chilly evening.

Easy to Make: With simple ingredients and straightforward steps, this recipe is perfect for both novice and seasoned chefs.

Versatile Options: Prefer a vegetarian twist? Just swap beef broth with quality vegetable broth for a deliciously rich flavor without compromise.

Crowd-Pleasing Appeal: Perfect as a starter or a main dish, French Onion Soup is a hit at dinner parties or cozy family meals alike. Pair it with a side of Asparagus Soup Healthy for a delightful duo!

Texture Heaven: The combination of crunchy baguette slices and gooey melted cheese atop fragrant soup creates an irresistible contrast that tantalizes your taste buds.

Get ready to indulge in a bowl of utterly satisfying goodness!

French Onion Soup Ingredients

For the Soup Base

  • Onions – Sweetness deepens when caramelized—mix yellow, white, and red onions for a unique flavor.
  • Butter – Adds richness and helps in sautéing the onions to perfection.
  • Olive Oil – Enhances taste when used alongside butter for sautéing.
  • Fresh Thyme – Imparts an aromatic, earthy note that elevates the soup.
  • Bay Leaf – Introduces complex herbal notes that enhance the flavor profile.
  • White Wine – Deglazes the pan and provides acidity; for an alternative, use beef broth with a splash of vinegar.
  • Beef Broth – The savory base of this soup; substitute with vegetable broth for a vegetarian option.

For the Topping

  • Baguette Slices – Provides a crunchy base that contrasts beautifully with the warmed soup.
  • Gruyère Cheese – Melts into a creamy topping—consider Emmental, Swiss, or a blend of cheeses as alternatives.

With these simple yet impactful ingredients, you'll create a French Onion Soup that warms both heart and soul!

Step‑by‑Step Instructions for Easy French Onion Soup

Step 1: Caramelize the Onions
In a large skillet, heat 2 tablespoons of butter and 1 tablespoon of olive oil over medium heat. Add 3 large sliced onions, along with 2 sprigs of fresh thyme and 1 bay leaf. Sauté gently on low heat for about 45 minutes, stirring every 10 minutes, until the onions are a deep golden brown and have caramelized beautifully. Sprinkle with salt for flavor enhancement during the process.

Step 2: Deglaze and Simmer
Once your onions are perfectly caramelized, pour in 1/2 cup of white wine and increase the heat to high to bring it to a gentle boil. Allow the alcohol to cook off for about 2-3 minutes, scraping the browned bits from the bottom of the skillet for added flavor. Then, add 6 cups of beef broth (or vegetable broth for a vegetarian option) and let the mixture simmer on low for 20-30 minutes, allowing the flavors to meld beautifully.

Step 3: Prepare for Broiling
While your soup is simmering, preheat your broiler to high. Grab 4 oven-safe bowls and ladle the hot soup into each one, ensuring an equal amount of the rich onion mixture fills them. Top each bowl with a slice of toasted baguette, then generously sprinkle with grated Gruyère cheese to create that luscious, melty topping we all love.

Step 4: Broil the Soup
Carefully place the bowls under the broiler for 3-5 minutes. Watch closely as the cheese melts, bubbles, and turns golden brown—this step is key for creating the perfect finish to your Easy French Onion Soup. Ensure to rotate the bowls if necessary for even browning.

Step 5: Garnish and Serve
After broiling, remove the bowls from the oven (handle with care as they will be hot!). If desired, add a few fresh thyme leaves on top for an aromatic touch. Serve immediately alongside a crisp green salad or some homemade bread for a dipping delight that complements the rich flavors of this classic French Onion Soup.

Tips for the Best French Onion Soup

  • Onion Selection: Choose a mix of yellow, white, and red onions for a more complex flavor profile and depth in your French Onion Soup.

  • Caramelization Matters: Stir onions frequently during caramelization to prevent burning. Low and slow cooking ensures that they become beautifully golden and sweet, enhancing the taste.

  • Don’t Skip Deglazing: This step is crucial! Scrape up the browned bits after adding wine to add incredible flavors to your soup, creating a richer broth.

  • Broiling Caution: Keep a close eye while broiling the soup to avoid burning the cheese. The goal is melted and bubbly, not charred!

  • Vegetarian Swap: Opt for a quality vegetable broth instead of beef broth for a savory vegetarian version without losing the classic taste.

  • Final Touches: Garnish with fresh thyme leaves just before serving for a pop of freshness that enhances both aroma and presentation.

What to Serve with Easy French Onion Soup

As you savor each spoonful of this aromatic delight, consider the perfect companions to create a truly unforgettable dining experience.

  • Crispy Green Salad: The bright and fresh flavors of a simple salad provide a delightful contrast to the rich soup, enhancing each bite. Toss together mixed greens, cherry tomatoes, and a light vinaigrette to elevate your meal.

  • Homemade Bread Rolls: Soft and warm rolls are perfect for dipping into your cheesy onion soup, soaking up every drop of delicious broth. They invite a cozy, comforting vibe, making mealtime extra special.

  • Garlic Butter Toast: Toasted baguette slices drizzled with garlic butter amplify the savory goodness found in the soup. Adding a sprinkle of fresh herbs creates an irresistible flavor combination that everyone will love.

  • Wine Pairing: A chilled Sauvignon Blanc or a light Pinot Noir cuts through the richness of the cheese, balancing flavors beautifully. This pairing adds a touch of sophistication to your meal, perfect for impressing dinner guests.

  • Roasted Vegetables: Seasoned and roasted carrots, zucchini, and bell peppers add a colorful and nutritious side that complements the warm, caramelized flavors of the soup. Their natural sweetness will harmonize wonderfully with the dish.

  • Chocolate Lava Cake: For dessert, indulge in a rich and velvety chocolate lava cake. The warm, gooey center provides a delightful contrast that playfully rounds out the comforting ambiance of your dinner.

With these delightful pairings, your Easy French Onion Soup transforms into a beloved dining experience that warms not only the palate but the heart as well.

French Onion Soup Variations

Feel free to get creative and personalize your French Onion Soup with these delightful tweaks that will bring a new twist to your comforting bowl!

  • Vegetarian Delight: Substitute beef broth with quality vegetable broth for a rich, yet vegetarian-friendly version.
  • Flavor Punch: Add a splash of balsamic vinegar while simmering for a layered depth of flavor that dances on your palate.
  • Onion Variety: Use a mix of red and caramelized onions for a sweeter, more complex profile. The change adds vibrant color and taste.
  • Nutritious Boost: Stir in some chopped kale or spinach towards the end for added nutrients and a pop of color.
  • Spicy Kick: Sprinkle in some red pepper flakes or add minced jalapeños to increase the heat level, making each sip exciting.
  • Wine Swap: Swap white wine for sherry or port for a richer, sweeter broth that enhances the caramelized notes of the onions.
  • Cheese Alternatives: Try mixing Gruyère with sharp cheddar or a smoky gouda for a unique cheese topping that melts beautifully over your soup.
  • Garnish Upgrade: Top with freshly chopped chives or parsley instead of thyme to change the flavor profile and brighten the dish.

As you venture into these variations, your culinary creativity is sure to impress dinner guests or simply satisfy your own cravings for comfort food. Passion for home cooking can lead to unforgettable flavors, so why not explore more delicious recipes? Try pairing this soup with a side of Zuppa Toscana Soup or a refreshing Santa Soup Savory to elevate your meal even further!

Make Ahead Options

These Easy French Onion Soup preparations are perfect for busy home cooks seeking to save time during the week! You can caramelize the onions (step 1) up to 24 hours in advance, allowing their rich sweetness to develop. Simply sauté, let cool, and refrigerate in an airtight container. Additionally, the soup base (broth, wine, and seasonings) can be prepared and simmered up to 3 days ahead; just store it in the fridge until you're ready to serve. When it's time to enjoy your soup, reheat the mixture on the stovetop, ladle into bowls, top with toasted baguette slices and cheese, then broil until bubbly for a restaurant-quality finish at home—just as delicious and satisfying!

How to Store and Freeze French Onion Soup

Fridge: Store leftover French Onion Soup in an airtight container for up to 3 days. Be sure to cool it down to room temperature before sealing.

Freezer: For longer storage, freeze the soup in serving-size portions using freezer-safe containers. It can last for up to 3 months.

Reheating: Thaw overnight in the refrigerator and reheat gently on the stovetop, adding a splash of broth or water if the soup thickens.

Cheese Note: If you freeze the soup, consider adding the Gruyère cheese fresh before serving, as it melts best when freshly broiled.

Easy French Onion Soup Recipe FAQs

How should I select ripe onions for my French Onion Soup?
Absolutely! Look for firm onions with papery, dry skins and no dark spots. A mix of yellow, white, and red onions will give you that depth of flavor when caramelized. The sweeter, the better!

What’s the best way to store leftover French Onion Soup?
You can store your soup in an airtight container in the refrigerator for up to 3 days. Just make sure it cools down to room temperature before sealing to prevent moisture buildup.

Can I freeze French Onion Soup? If so, how?
Very! To freeze, ladle the soup into freezer-safe containers, leaving some space at the top for expansion. It can be frozen for up to 3 months. Thaw overnight in the fridge before reheating on the stovetop, adding a splash of broth if it thickens.

What if my onions burn while caramelizing?
Don't fret! If your onions start to darken too quickly, lower the heat immediately. Stir consistently every 10 minutes to ensure even cooking. Adjust the temperature as necessary. If they do burn, it’s best to start over, as burnt onions can impart a bitter taste to the soup.

Can I make this soup vegetarian-friendly, and how?
Absolutely! To make a vegetarian version, simply substitute the beef broth with a high-quality vegetable broth. This still allows for a rich, satisfying flavor without the meat, while keeping all the comforting qualities of the original recipe!

What should I consider if I'm serving this to someone with cheese allergies?
If cheese is an allergen, simply skip the Gruyère cheese toppings or use a dairy-free alternative. You can also enhance the broth with more herbs or even a splash of balsamic vinegar for added depth, ensuring that your soup remains deliciously satisfying without cheese!

French Onion Soup

Irresistible French Onion Soup That's Pure Comfort in a Bowl

This French Onion Soup combines savory caramelized onions and rich broth, creating a comforting dish perfect for cozy nights.
Print Recipe Pin Recipe
Prep Time 10 minutes mins
Cook Time 1 hour hr 15 minutes mins
Total Time 1 hour hr 25 minutes mins
Servings: 4 bowls
Course: Soups
Cuisine: French
Calories: 320
Ingredients Equipment Method Nutrition Notes

Ingredients
  

For the Soup Base
  • 3 large onions mix of yellow, white, and red
  • 2 tablespoons butter
  • 1 tablespoon olive oil
  • 2 sprigs fresh thyme
  • 1 leaf bay leaf
  • 1/2 cup white wine
  • 6 cups beef broth or vegetable broth for vegetarian option
For the Topping
  • 4 slices baguette toasted
  • 1 cup Gruyère cheese grated

Equipment

  • Large skillet
  • broiler
  • oven-safe bowls

Method
 

Step-by-Step Instructions
  1. In a large skillet, heat 2 tablespoons of butter and 1 tablespoon of olive oil over medium heat. Add 3 large sliced onions, along with 2 sprigs of fresh thyme and 1 bay leaf. Sauté gently on low heat for about 45 minutes, stirring every 10 minutes, until the onions are a deep golden brown and have caramelized beautifully. Sprinkle with salt for flavor enhancement during the process.
  2. Once your onions are perfectly caramelized, pour in 1/2 cup of white wine and increase the heat to high to bring it to a gentle boil. Allow the alcohol to cook off for about 2-3 minutes, scraping the browned bits from the bottom of the skillet for added flavor. Then, add 6 cups of beef broth and let the mixture simmer on low for 20-30 minutes.
  3. Preheat your broiler to high. Grab 4 oven-safe bowls and ladle the hot soup into each one. Top each bowl with a slice of toasted baguette, then generously sprinkle with grated Gruyère cheese.
  4. Carefully place the bowls under the broiler for 3-5 minutes, watching closely as the cheese melts, bubbles, and turns golden brown.
  5. After broiling, remove the bowls from the oven and, if desired, add a few fresh thyme leaves on top for an aromatic touch. Serve immediately.

Nutrition

Serving: 1bowlCalories: 320kcalCarbohydrates: 30gProtein: 10gFat: 18gSaturated Fat: 10gPolyunsaturated Fat: 1gMonounsaturated Fat: 7gCholesterol: 50mgSodium: 900mgPotassium: 450mgFiber: 2gSugar: 5gVitamin A: 500IUVitamin C: 15mgCalcium: 300mgIron: 2mg

Notes

For best flavor, choose a mix of onion types and ensure to scrape the bottom of the pan while deglazing. Broil carefully to prevent burning and consider adding cheese fresh before serving if freezing the soup.

Tried this recipe?

Let us know how it was!

Sweet Maple Sausage Breakfast Casserole for Cozy Mornings

December 16, 2025 by Grace Snow Leave a Comment

The scent of maple syrup wafting through the air signals that something delightful is about to happen in the kitchen. This Sweet Maple Sausage Breakfast Casserole brings together the perfect fusion of sweet and savory, making it an exceptional choice for lazy weekend mornings or festive brunch gatherings. Not only is this one-pan dish a breeze to whip up, but it also has the added perk of being customizable to suit every palate—whether you prefer a hearty pork sausage or a lighter turkey option. Plus, with a make-ahead feature that allows you to prep it the night before, serving a delicious homemade breakfast has never been easier! What comforting twists will you add to yours?

Why is this casserole a must-try?

Simplicity reigns supreme with this Sweet Maple Sausage Breakfast Casserole; it’s a one-pan wonder that minimizes cleanup while maximizing flavor! Customizable options allow you to tailor ingredients to your friends' tastes, whether they’re vegetarian, gluten-free, or craving that classic savory sausage. Make-Ahead Magic: Prep it the night before and save precious time on busy mornings. Crowd-Pleasing Comfort: Its fluffy, custard-like center and bubbly cheesy top bring everyone to the table, making it perfect for brunch! Dive into the sweet and savory goodness and serve it with a side of arugula salad or toasted sourdough for a well-rounded meal.

Sweet Maple Sausage Breakfast Casserole Ingredients

For the Casserole

  • Pork Breakfast Sausage – This ingredient adds a rich, savory flavor; you can substitute with turkey or chicken sausage for a leaner option.
  • Yukon Gold Potatoes – Provides structure and heartiness; consider replacing with sweet potatoes or butternut squash for a touch of sweetness.
  • Red Bell Pepper – Adds a vibrant color and sweetness; any variety of bell pepper will work as a substitute.
  • Onion – Enhances the overall flavor profile; feel free to use sweet or yellow onion interchangeably.
  • Eggs – Essential for creating that delightful custard-like texture; using room temperature eggs helps with blending.
  • Whole Milk – Brings a creamy richness; swap with oat milk for a dairy-free version.
  • Sharp Cheddar Cheese – Offers melty goodness and depth of flavor; try pepper jack or smoked gouda for a different twist.
  • Maple Syrup – Introduces a sweet, natural flavor to the dish; adding a splash of bourbon can deepen the maple taste.
  • Dijon Mustard – Provides a tangy kick; ensure it’s gluten-free for those with sensitivities.
  • Apple Cider Vinegar – Brightens the dish and helps balance flavors.
  • Sea Salt & Black Pepper – Essential for enhancing all the flavors; adjust to your personal taste preferences.
  • Smoked Paprika – Adds a subtle warmth; it’s optional but recommended for an extra layer of flavor.
  • Unsalted Butter – Used for sautéing the vegetables and adds richness.
  • Fresh Thyme – Infuses aromatic freshness; dried thyme can be substituted in a pinch.

For Extra Yum

  • Optional Toppings – Spinkle on extra cheese or fresh herbs before serving for added flavor and appeal.

This Sweet Maple Sausage Breakfast Casserole not only satisfies your cravings but is also completely customizable, making it perfect for busy mornings or festive gatherings!

Step‑by‑Step Instructions for Sweet Maple Sausage Breakfast Casserole

Step 1: Preheat the Oven
Begin by preheating your oven to 375°F (190°C). A hot oven is crucial for achieving that perfect golden-brown top on your Sweet Maple Sausage Breakfast Casserole. While the oven heats up, gather your ingredients and get ready to chop fresh vegetables!

Step 2: Prep the Vegetables
Dice the Yukon Gold potatoes, red bell pepper, and onion into manageable ½-inch cubes. To ensure crispiness, soak the diced potatoes in cold water for 5 minutes, then drain and pat them dry thoroughly. This step will help achieve a delightful texture when they are sautéed later.

Step 3: Cook the Sausage
In a large skillet over medium-high heat, brown the crumbled pork breakfast sausage. This should take about 6-7 minutes, ensuring the sausage is fully cooked, with a nice golden color. Once browned, remove the sausage from the skillet and set it aside, saving the flavorful rendered fat for the next step.

Step 4: Sauté the Vegetables
In the same skillet with the reserved sausage fat, add the drained potatoes, diced bell pepper, and onion. Sauté everything together until the vegetables are lightly golden and fragrant, about 8 minutes. Stir occasionally to prevent sticking, allowing the flavors to meld beautifully.

Step 5: Whisk the Egg Mixture
In a large mixing bowl, whisk together the room-temperature eggs, whole milk, sea salt, black pepper, smoked paprika, and half of the shredded sharp cheddar cheese. As you mix, stir in the sweet maple syrup, Dijon mustard, and apple cider vinegar, creating a rich, custard-like mixture to pour over the casserole.

Step 6: Assemble the Casserole
Grease a 9x13-inch baking dish thoroughly to prevent sticking. Begin layering the crumbled sausage and sautéed vegetables evenly across the bottom of the dish. Pour the egg mixture over the top, and sprinkle the remaining cheese and fresh thyme evenly for extra flavor and aroma.

Step 7: Bake the Casserole
Transfer the assembled casserole into the preheated oven and bake for 30-35 minutes. Aim for the center to be set, with a golden-brown top that’s slightly puffed. The delightful smells of the Sweet Maple Sausage Breakfast Casserole will fill your kitchen, signaling it’s almost ready!

Step 8: Rest and Serve
Once done, remove the casserole from the oven and allow it to rest for 5-7 minutes. This brief cooling period helps to set the flavors and makes slicing easier. Cut into squares or rectangles and prepare to serve this comforting, hearty dish to your loved ones.

Sweet Maple Sausage Casserole Variations

Feel free to let your creativity shine as you adapt this delightful casserole to suit your personal taste and dietary needs!

  • Vegetarian Option: Swap pork sausage for seasoned tempeh or mushrooms for a savory alternative. The umami flavors will still shine!
  • Dairy-Free Delight: Replace whole milk with oat milk or almond milk, ensuring a creamy texture without any dairy.
  • Gluten-Free Choice: Ensure your Dijon mustard and any other condiments are gluten-free for a safe, delicious twist. You won’t lose any flavor!
  • Extra Veggies: Add in chopped spinach, zucchini, or kale for a nutritious boost. These colorful additions not only enhance flavor but also brighten the dish!
  • Sweet Potato Swap: Replace Yukon gold potatoes with sweet potatoes for a touch of natural sweetness that pairs beautifully with maple syrup.
  • Spice it Up: Incorporate a dash of cayenne pepper or chili flakes for a little heat. This will complement the sweet components and awaken your taste buds!
  • Cheese Variations: Experiment with different cheeses like pepper jack for a spicy kick or feta for a tangy surprise that elevates flavor.

For more inspiration, consider trying variations like our delightful Maple Roasted Sweet Potatoes with Pecans or the scrumptious Cornbread Breakfast Casserole. Customize your culinary adventure and enjoy every bite!

Make Ahead Options

Preparing the Sweet Maple Sausage Breakfast Casserole ahead of time is a fantastic way to save precious moments on busy mornings! You can assemble the casserole up to 24 hours in advance, covering it tightly with plastic wrap or aluminum foil to prevent it from drying out. Simply refrigerate it overnight. When you're ready to bake, remove it from the fridge and let it sit at room temperature for about 30 minutes before popping it into a preheated oven at 375°F (190°C). To ensure quality, you may need to extend the baking time by a few minutes if starting from cold. You'll enjoy a delicious, hassle-free breakfast with minimal morning fuss!

What to Serve with Sweet Maple Sausage Breakfast Casserole

Indulging in a delightful breakfast doesn’t have to end with the casserole; elevate the experience with complementary sides and sips!

  • Fresh Fruit Salad: A medley of juicy berries and citrus adds a refreshing contrast to the rich, savory casserole.

  • Arugula Salad: Tossed with lemon vinaigrette, this peppery salad provides a bright, crisp bite that balances the casserole's sweetness perfectly.

  • Toasted Sourdough Bread: The crusty texture of sourdough pairs beautifully, offering a satisfying crunch to every bite. Spread with butter or your favorite jam for added flavor.

  • Crispy Hash Browns: These golden, crunchy potatoes add an extra layer of comfort and make brunch feel like a true celebration!

  • Cinnamon Roll Bites: For those with a sweet tooth, these gooey treats complement the maple goodness while introducing a delightful aroma.

  • Mimosas: Sparkling and refreshing, a classic mimosa adds fizz and brightness, making every bite of the casserole feel extra festive.

Each addition helps to create a memorable experience around the breakfast table, ensuring everyone leaves satisfied!

Expert Tips for Sweet Maple Sausage Breakfast Casserole

  • Dry Potatoes: Ensure your potatoes are completely dry after soaking to achieve that perfectly crispy texture when sautéed.
  • Even Cutting: Dice vegetables uniformly; this ensures they cook evenly and avoid mushy bites in your Sweet Maple Sausage Breakfast Casserole.
  • Preheat Properly: Always preheat your oven well before baking—the right temperature is key for a nice golden top and evenly cooked casserole.
  • Temperature Check: Use a thermometer; the custard should reach 160°F (71°C) for safe eating and optimal texture.
  • Avoid Oven Peeking: Resist the urge to open the oven door during baking to maintain consistent heat—this helps the casserole rise perfectly.
  • Let It Rest: Allow the casserole to cool for a few minutes after baking—this helps firm up the layers for cleaner slices.

How to Store and Freeze Sweet Maple Sausage Breakfast Casserole

Fridge: Store leftovers in airtight containers for up to 4 days to maintain freshness and flavor. Allow the casserole to cool before sealing to avoid condensation.

Freezer: For longer storage, freeze individual portions in airtight containers or freezer bags for up to three months. Label with the date for easy identification.

Reheating: Thaw overnight in the fridge for best results, then reheat in the oven at 350°F (175°C) until warmed through. You can also microwave individual portions until hot.

Make-Ahead: Prepare the Sweet Maple Sausage Breakfast Casserole the night before and store it in the fridge before baking. This makes for a stress-free morning!

Sweet Maple Sausage Breakfast Casserole Recipe FAQs

How do I select ripe ingredients for the casserole?
Absolutely! Choose firm Yukon Gold potatoes without dark spots or blemishes, as these will provide the best texture. Look for vibrant, unwrinkled bell peppers, and pick eggs that are clean and have no cracks. This attention to detail ensures a delicious dish!

What is the best way to store leftover casserole?
For storing, place any leftovers in airtight containers and refrigerate for up to 4 days. Make sure to let the casserole cool before sealing to prevent moisture from building up inside, ensuring those flavors remain vibrant.

Can I freeze the Sweet Maple Sausage Breakfast Casserole?
Yes, you can! To freeze, let the casserole cool completely, then cut it into individual portions. Wrap each piece tightly in plastic wrap or foil, then place them in freezer-safe bags or containers. It can be frozen for up to three months. Just remember to label with the date for easy tracking!

What should I do if my casserole is too watery?
Very good question! If you find your casserole is watery, it might be due to ingredients containing excess moisture, like the potatoes or vegetables. Make sure to pat dry the potatoes after soaking, and sauté the vegetables well to reduce moisture. If it happens, just bake a bit longer to allow more liquid to evaporate.

Are there any dietary considerations for this recipe?
Absolutely! You can easily make this casserole gluten-free by using certified gluten-free mustard and bread crumbs. For dairy-free options, substitute with oat milk and utilize vegan cheese. If you're catering to vegetarian guests, swap the sausage for seasoned tempeh or plant-based sausage alternatives.

What can I do if my casserole doesn’t rise?
If your Sweet Maple Sausage Breakfast Casserole doesn’t rise as expected, it could be due to the eggs not being emulsified properly. Ensure you thoroughly whisk the eggs and milk, and make sure the oven is preheated to the right temperature (375°F). Lastly, avoid opening the oven door during the first 20 minutes of baking to maintain heat.

Sweet Maple Sausage Breakfast Casserole

Sweet Maple Sausage Breakfast Casserole for Cozy Mornings

This Sweet Maple Sausage Breakfast Casserole is a delightful dish combining sweet and savory flavors, perfect for lazy mornings.
Print Recipe Pin Recipe
Prep Time 20 minutes mins
Cook Time 35 minutes mins
Resting Time 7 minutes mins
Total Time 1 hour hr 2 minutes mins
Servings: 6 slices
Course: Breakfast
Cuisine: American
Calories: 300
Ingredients Equipment Method Nutrition Notes

Ingredients
  

For the Casserole
  • 1 pound Pork Breakfast Sausage Can substitute with turkey or chicken sausage
  • 4 cups Yukon Gold Potatoes Consider replacing with sweet potatoes or butternut squash
  • 1 cup Red Bell Pepper Any variety of bell pepper can substitute
  • 1 medium Onion Use sweet or yellow onion interchangeably
  • 6 large Eggs Use room temperature for better blending
  • 2 cups Whole Milk Swap with oat milk for dairy-free option
  • 2 cups Sharp Cheddar Cheese Try pepper jack or smoked gouda for variation
  • 1/2 cup Maple Syrup Add a splash of bourbon for a deeper flavor
  • 2 tablespoons Dijon Mustard Ensure it’s gluten-free if needed
  • 2 tablespoons Apple Cider Vinegar
  • 1 teaspoon Sea Salt Adjust to personal taste
  • 1 teaspoon Black Pepper Adjust to personal taste
  • 1 teaspoon Smoked Paprika Optional but recommended
  • 2 tablespoons Unsalted Butter For sautéing vegetables
  • 1 tablespoon Fresh Thyme Dried thyme can be used in a pinch
For Extra Yum
  • to taste Optional Toppings Extra cheese or fresh herbs before serving

Equipment

  • Oven
  • Skillet
  • Mixing Bowl
  • 9x13-inch baking dish

Method
 

Step-by-Step Instructions
  1. Preheat your oven to 375°F (190°C). Gather your ingredients and prepare to chop fresh vegetables.
  2. Dice the Yukon Gold potatoes, red bell pepper, and onion into ½-inch cubes. Soak diced potatoes in cold water for 5 minutes, then drain and pat dry.
  3. In a large skillet, brown the crumbled pork breakfast sausage for about 6-7 minutes. Remove the sausage from the skillet and set aside.
  4. In the same skillet, add the drained potatoes, bell pepper, and onion. Sauté until lightly golden, about 8 minutes.
  5. In a mixing bowl, whisk together eggs, milk, salt, pepper, smoked paprika, and half of the cheddar cheese. Stir in syrup, mustard, and vinegar.
  6. Grease a 9x13-inch baking dish. Layer sausage and vegetables, pour the egg mixture over, and sprinkle with remaining cheese and thyme.
  7. Bake for 30-35 minutes until the center is set and top is golden brown.
  8. Remove from oven and let rest for 5-7 minutes before serving.

Nutrition

Serving: 1sliceCalories: 300kcalCarbohydrates: 30gProtein: 20gFat: 15gSaturated Fat: 7gPolyunsaturated Fat: 2gMonounsaturated Fat: 5gCholesterol: 200mgSodium: 600mgPotassium: 500mgFiber: 2gSugar: 5gVitamin A: 15IUVitamin C: 25mgCalcium: 20mgIron: 10mg

Notes

This casserole can be prepped ahead of time for a stress-free morning, and leftovers can be stored in the fridge for up to 4 days or frozen for up to three months.

Tried this recipe?

Let us know how it was!
  • « Previous Page
  • 1
  • …
  • 111
  • 112
  • 113
  • 114
  • 115
  • …
  • 217
  • Next Page »

Welcome!

Hi, I’m Grace, a Sydney-based home cook with a passion for bold flavors and trending ingredients. Whether you’re a busy beginner or a seasoned foodie, you’ll find dishes here that are fresh, fun, and full of flavor.

More about me

Popular Recipes

  • Chocolate Cake Pops
    Delicious Chocolate Cake Pops That Wow Every Dessert Lover
  • Caribbean-Style Beef Stew with Rice
    Caribbean-Style Beef Stew with Rice That Warms Your Soul
  • Healthy Crockpot Beef Stew
    Healthy Crockpot Beef Stew for Cozy Weeknight Dinners
  • Crispy Chicken Tacos
    Crispy Chicken Tacos for the Perfect Taco Tuesday Night

Footer

↑ back to top

About

  • Privacy Policy
  • Disclaimer
  • Terms & Conditions

Newsletter

  • Sign Up! for emails and updates

Contact

  • About me
  • Contact me

Copyright © 2025 TastyTrendIngredients