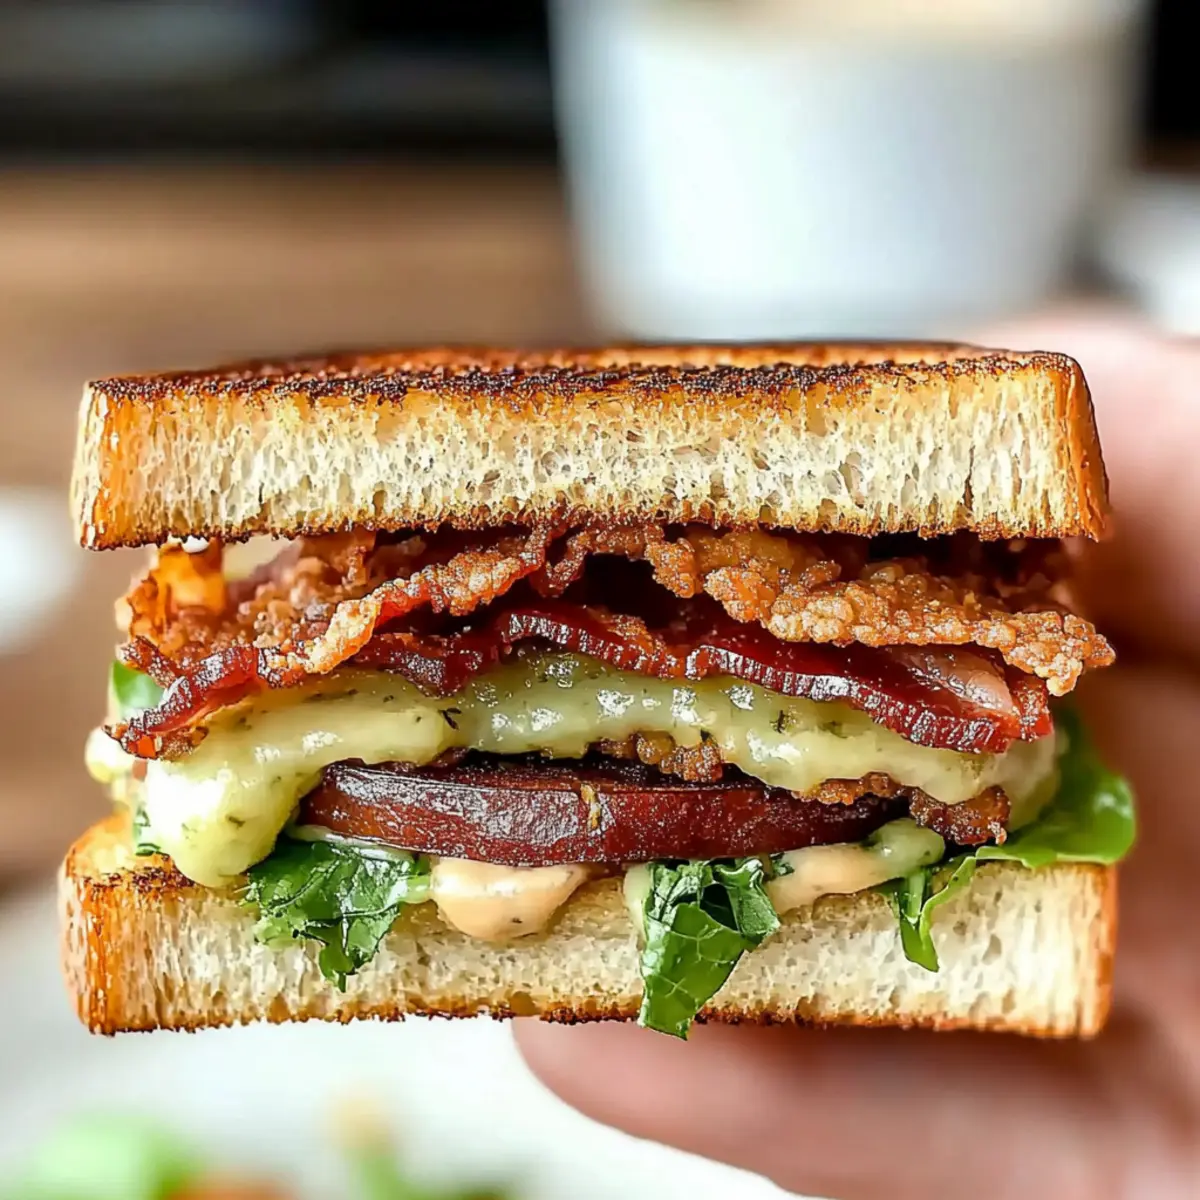
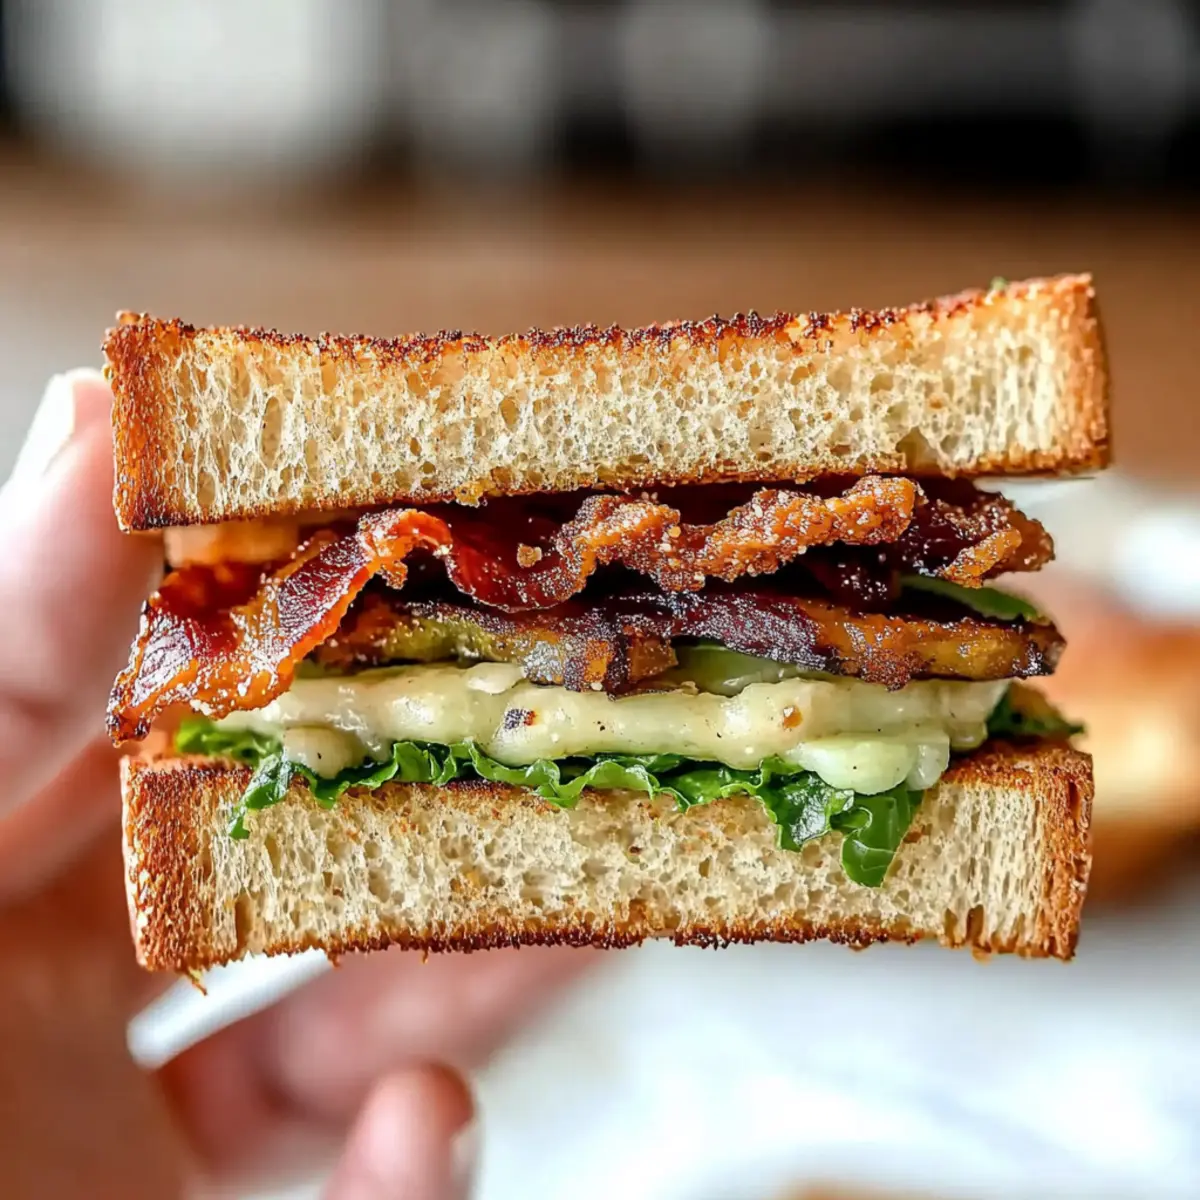
tastytrendingredients

  • Home
  • Recipes
    • Appetizers
    • Breakfast
    • Dessert
    • Dinner
    • Drinks
    • Salads
    • Snacks
    • Soups
  • About me
  • Contact me
menu icon
go to homepage
  • Home
  • Recipes
    • Appetizers
    • Breakfast
    • Dessert
    • Dinner
    • Drinks
    • Salads
    • Snacks
    • Soups
  • About me
  • Contact me
search icon
Homepage link
  • Home
  • Recipes
    • Appetizers
    • Breakfast
    • Dessert
    • Dinner
    • Drinks
    • Salads
    • Snacks
    • Soups
  • About me
  • Contact me
×

Sweet Maple Sausage Breakfast Casserole for Cozy Mornings

December 16, 2025 by Grace Snow Leave a Comment

The scent of maple syrup wafting through the air signals that something delightful is about to happen in the kitchen. This Sweet Maple Sausage Breakfast Casserole brings together the perfect fusion of sweet and savory, making it an exceptional choice for lazy weekend mornings or festive brunch gatherings. Not only is this one-pan dish a breeze to whip up, but it also has the added perk of being customizable to suit every palate—whether you prefer a hearty pork sausage or a lighter turkey option. Plus, with a make-ahead feature that allows you to prep it the night before, serving a delicious homemade breakfast has never been easier! What comforting twists will you add to yours?

Why is this casserole a must-try?

Simplicity reigns supreme with this Sweet Maple Sausage Breakfast Casserole; it’s a one-pan wonder that minimizes cleanup while maximizing flavor! Customizable options allow you to tailor ingredients to your friends' tastes, whether they’re vegetarian, gluten-free, or craving that classic savory sausage. Make-Ahead Magic: Prep it the night before and save precious time on busy mornings. Crowd-Pleasing Comfort: Its fluffy, custard-like center and bubbly cheesy top bring everyone to the table, making it perfect for brunch! Dive into the sweet and savory goodness and serve it with a side of arugula salad or toasted sourdough for a well-rounded meal.

Sweet Maple Sausage Breakfast Casserole Ingredients

For the Casserole

  • Pork Breakfast Sausage – This ingredient adds a rich, savory flavor; you can substitute with turkey or chicken sausage for a leaner option.
  • Yukon Gold Potatoes – Provides structure and heartiness; consider replacing with sweet potatoes or butternut squash for a touch of sweetness.
  • Red Bell Pepper – Adds a vibrant color and sweetness; any variety of bell pepper will work as a substitute.
  • Onion – Enhances the overall flavor profile; feel free to use sweet or yellow onion interchangeably.
  • Eggs – Essential for creating that delightful custard-like texture; using room temperature eggs helps with blending.
  • Whole Milk – Brings a creamy richness; swap with oat milk for a dairy-free version.
  • Sharp Cheddar Cheese – Offers melty goodness and depth of flavor; try pepper jack or smoked gouda for a different twist.
  • Maple Syrup – Introduces a sweet, natural flavor to the dish; adding a splash of bourbon can deepen the maple taste.
  • Dijon Mustard – Provides a tangy kick; ensure it’s gluten-free for those with sensitivities.
  • Apple Cider Vinegar – Brightens the dish and helps balance flavors.
  • Sea Salt & Black Pepper – Essential for enhancing all the flavors; adjust to your personal taste preferences.
  • Smoked Paprika – Adds a subtle warmth; it’s optional but recommended for an extra layer of flavor.
  • Unsalted Butter – Used for sautéing the vegetables and adds richness.
  • Fresh Thyme – Infuses aromatic freshness; dried thyme can be substituted in a pinch.

For Extra Yum

  • Optional Toppings – Spinkle on extra cheese or fresh herbs before serving for added flavor and appeal.

This Sweet Maple Sausage Breakfast Casserole not only satisfies your cravings but is also completely customizable, making it perfect for busy mornings or festive gatherings!

Step‑by‑Step Instructions for Sweet Maple Sausage Breakfast Casserole

Step 1: Preheat the Oven
Begin by preheating your oven to 375°F (190°C). A hot oven is crucial for achieving that perfect golden-brown top on your Sweet Maple Sausage Breakfast Casserole. While the oven heats up, gather your ingredients and get ready to chop fresh vegetables!

Step 2: Prep the Vegetables
Dice the Yukon Gold potatoes, red bell pepper, and onion into manageable ½-inch cubes. To ensure crispiness, soak the diced potatoes in cold water for 5 minutes, then drain and pat them dry thoroughly. This step will help achieve a delightful texture when they are sautéed later.

Step 3: Cook the Sausage
In a large skillet over medium-high heat, brown the crumbled pork breakfast sausage. This should take about 6-7 minutes, ensuring the sausage is fully cooked, with a nice golden color. Once browned, remove the sausage from the skillet and set it aside, saving the flavorful rendered fat for the next step.

Step 4: Sauté the Vegetables
In the same skillet with the reserved sausage fat, add the drained potatoes, diced bell pepper, and onion. Sauté everything together until the vegetables are lightly golden and fragrant, about 8 minutes. Stir occasionally to prevent sticking, allowing the flavors to meld beautifully.

Step 5: Whisk the Egg Mixture
In a large mixing bowl, whisk together the room-temperature eggs, whole milk, sea salt, black pepper, smoked paprika, and half of the shredded sharp cheddar cheese. As you mix, stir in the sweet maple syrup, Dijon mustard, and apple cider vinegar, creating a rich, custard-like mixture to pour over the casserole.

Step 6: Assemble the Casserole
Grease a 9x13-inch baking dish thoroughly to prevent sticking. Begin layering the crumbled sausage and sautéed vegetables evenly across the bottom of the dish. Pour the egg mixture over the top, and sprinkle the remaining cheese and fresh thyme evenly for extra flavor and aroma.

Step 7: Bake the Casserole
Transfer the assembled casserole into the preheated oven and bake for 30-35 minutes. Aim for the center to be set, with a golden-brown top that’s slightly puffed. The delightful smells of the Sweet Maple Sausage Breakfast Casserole will fill your kitchen, signaling it’s almost ready!

Step 8: Rest and Serve
Once done, remove the casserole from the oven and allow it to rest for 5-7 minutes. This brief cooling period helps to set the flavors and makes slicing easier. Cut into squares or rectangles and prepare to serve this comforting, hearty dish to your loved ones.

Sweet Maple Sausage Casserole Variations

Feel free to let your creativity shine as you adapt this delightful casserole to suit your personal taste and dietary needs!

  • Vegetarian Option: Swap pork sausage for seasoned tempeh or mushrooms for a savory alternative. The umami flavors will still shine!
  • Dairy-Free Delight: Replace whole milk with oat milk or almond milk, ensuring a creamy texture without any dairy.
  • Gluten-Free Choice: Ensure your Dijon mustard and any other condiments are gluten-free for a safe, delicious twist. You won’t lose any flavor!
  • Extra Veggies: Add in chopped spinach, zucchini, or kale for a nutritious boost. These colorful additions not only enhance flavor but also brighten the dish!
  • Sweet Potato Swap: Replace Yukon gold potatoes with sweet potatoes for a touch of natural sweetness that pairs beautifully with maple syrup.
  • Spice it Up: Incorporate a dash of cayenne pepper or chili flakes for a little heat. This will complement the sweet components and awaken your taste buds!
  • Cheese Variations: Experiment with different cheeses like pepper jack for a spicy kick or feta for a tangy surprise that elevates flavor.

For more inspiration, consider trying variations like our delightful Maple Roasted Sweet Potatoes with Pecans or the scrumptious Cornbread Breakfast Casserole. Customize your culinary adventure and enjoy every bite!

Make Ahead Options

Preparing the Sweet Maple Sausage Breakfast Casserole ahead of time is a fantastic way to save precious moments on busy mornings! You can assemble the casserole up to 24 hours in advance, covering it tightly with plastic wrap or aluminum foil to prevent it from drying out. Simply refrigerate it overnight. When you're ready to bake, remove it from the fridge and let it sit at room temperature for about 30 minutes before popping it into a preheated oven at 375°F (190°C). To ensure quality, you may need to extend the baking time by a few minutes if starting from cold. You'll enjoy a delicious, hassle-free breakfast with minimal morning fuss!

What to Serve with Sweet Maple Sausage Breakfast Casserole

Indulging in a delightful breakfast doesn’t have to end with the casserole; elevate the experience with complementary sides and sips!

  • Fresh Fruit Salad: A medley of juicy berries and citrus adds a refreshing contrast to the rich, savory casserole.

  • Arugula Salad: Tossed with lemon vinaigrette, this peppery salad provides a bright, crisp bite that balances the casserole's sweetness perfectly.

  • Toasted Sourdough Bread: The crusty texture of sourdough pairs beautifully, offering a satisfying crunch to every bite. Spread with butter or your favorite jam for added flavor.

  • Crispy Hash Browns: These golden, crunchy potatoes add an extra layer of comfort and make brunch feel like a true celebration!

  • Cinnamon Roll Bites: For those with a sweet tooth, these gooey treats complement the maple goodness while introducing a delightful aroma.

  • Mimosas: Sparkling and refreshing, a classic mimosa adds fizz and brightness, making every bite of the casserole feel extra festive.

Each addition helps to create a memorable experience around the breakfast table, ensuring everyone leaves satisfied!

Expert Tips for Sweet Maple Sausage Breakfast Casserole

  • Dry Potatoes: Ensure your potatoes are completely dry after soaking to achieve that perfectly crispy texture when sautéed.
  • Even Cutting: Dice vegetables uniformly; this ensures they cook evenly and avoid mushy bites in your Sweet Maple Sausage Breakfast Casserole.
  • Preheat Properly: Always preheat your oven well before baking—the right temperature is key for a nice golden top and evenly cooked casserole.
  • Temperature Check: Use a thermometer; the custard should reach 160°F (71°C) for safe eating and optimal texture.
  • Avoid Oven Peeking: Resist the urge to open the oven door during baking to maintain consistent heat—this helps the casserole rise perfectly.
  • Let It Rest: Allow the casserole to cool for a few minutes after baking—this helps firm up the layers for cleaner slices.

How to Store and Freeze Sweet Maple Sausage Breakfast Casserole

Fridge: Store leftovers in airtight containers for up to 4 days to maintain freshness and flavor. Allow the casserole to cool before sealing to avoid condensation.

Freezer: For longer storage, freeze individual portions in airtight containers or freezer bags for up to three months. Label with the date for easy identification.

Reheating: Thaw overnight in the fridge for best results, then reheat in the oven at 350°F (175°C) until warmed through. You can also microwave individual portions until hot.

Make-Ahead: Prepare the Sweet Maple Sausage Breakfast Casserole the night before and store it in the fridge before baking. This makes for a stress-free morning!

Sweet Maple Sausage Breakfast Casserole Recipe FAQs

How do I select ripe ingredients for the casserole?
Absolutely! Choose firm Yukon Gold potatoes without dark spots or blemishes, as these will provide the best texture. Look for vibrant, unwrinkled bell peppers, and pick eggs that are clean and have no cracks. This attention to detail ensures a delicious dish!

What is the best way to store leftover casserole?
For storing, place any leftovers in airtight containers and refrigerate for up to 4 days. Make sure to let the casserole cool before sealing to prevent moisture from building up inside, ensuring those flavors remain vibrant.

Can I freeze the Sweet Maple Sausage Breakfast Casserole?
Yes, you can! To freeze, let the casserole cool completely, then cut it into individual portions. Wrap each piece tightly in plastic wrap or foil, then place them in freezer-safe bags or containers. It can be frozen for up to three months. Just remember to label with the date for easy tracking!

What should I do if my casserole is too watery?
Very good question! If you find your casserole is watery, it might be due to ingredients containing excess moisture, like the potatoes or vegetables. Make sure to pat dry the potatoes after soaking, and sauté the vegetables well to reduce moisture. If it happens, just bake a bit longer to allow more liquid to evaporate.

Are there any dietary considerations for this recipe?
Absolutely! You can easily make this casserole gluten-free by using certified gluten-free mustard and bread crumbs. For dairy-free options, substitute with oat milk and utilize vegan cheese. If you're catering to vegetarian guests, swap the sausage for seasoned tempeh or plant-based sausage alternatives.

What can I do if my casserole doesn’t rise?
If your Sweet Maple Sausage Breakfast Casserole doesn’t rise as expected, it could be due to the eggs not being emulsified properly. Ensure you thoroughly whisk the eggs and milk, and make sure the oven is preheated to the right temperature (375°F). Lastly, avoid opening the oven door during the first 20 minutes of baking to maintain heat.

Sweet Maple Sausage Breakfast Casserole

Sweet Maple Sausage Breakfast Casserole for Cozy Mornings

This Sweet Maple Sausage Breakfast Casserole is a delightful dish combining sweet and savory flavors, perfect for lazy mornings.
Print Recipe Pin Recipe
Prep Time 20 minutes mins
Cook Time 35 minutes mins
Resting Time 7 minutes mins
Total Time 1 hour hr 2 minutes mins
Servings: 6 slices
Course: Breakfast
Cuisine: American
Calories: 300
Ingredients Equipment Method Nutrition Notes

Ingredients
  

For the Casserole
  • 1 pound Pork Breakfast Sausage Can substitute with turkey or chicken sausage
  • 4 cups Yukon Gold Potatoes Consider replacing with sweet potatoes or butternut squash
  • 1 cup Red Bell Pepper Any variety of bell pepper can substitute
  • 1 medium Onion Use sweet or yellow onion interchangeably
  • 6 large Eggs Use room temperature for better blending
  • 2 cups Whole Milk Swap with oat milk for dairy-free option
  • 2 cups Sharp Cheddar Cheese Try pepper jack or smoked gouda for variation
  • 1/2 cup Maple Syrup Add a splash of bourbon for a deeper flavor
  • 2 tablespoons Dijon Mustard Ensure it’s gluten-free if needed
  • 2 tablespoons Apple Cider Vinegar
  • 1 teaspoon Sea Salt Adjust to personal taste
  • 1 teaspoon Black Pepper Adjust to personal taste
  • 1 teaspoon Smoked Paprika Optional but recommended
  • 2 tablespoons Unsalted Butter For sautéing vegetables
  • 1 tablespoon Fresh Thyme Dried thyme can be used in a pinch
For Extra Yum
  • to taste Optional Toppings Extra cheese or fresh herbs before serving

Equipment

  • Oven
  • Skillet
  • Mixing Bowl
  • 9x13-inch baking dish

Method
 

Step-by-Step Instructions
  1. Preheat your oven to 375°F (190°C). Gather your ingredients and prepare to chop fresh vegetables.
  2. Dice the Yukon Gold potatoes, red bell pepper, and onion into ½-inch cubes. Soak diced potatoes in cold water for 5 minutes, then drain and pat dry.
  3. In a large skillet, brown the crumbled pork breakfast sausage for about 6-7 minutes. Remove the sausage from the skillet and set aside.
  4. In the same skillet, add the drained potatoes, bell pepper, and onion. Sauté until lightly golden, about 8 minutes.
  5. In a mixing bowl, whisk together eggs, milk, salt, pepper, smoked paprika, and half of the cheddar cheese. Stir in syrup, mustard, and vinegar.
  6. Grease a 9x13-inch baking dish. Layer sausage and vegetables, pour the egg mixture over, and sprinkle with remaining cheese and thyme.
  7. Bake for 30-35 minutes until the center is set and top is golden brown.
  8. Remove from oven and let rest for 5-7 minutes before serving.

Nutrition

Serving: 1sliceCalories: 300kcalCarbohydrates: 30gProtein: 20gFat: 15gSaturated Fat: 7gPolyunsaturated Fat: 2gMonounsaturated Fat: 5gCholesterol: 200mgSodium: 600mgPotassium: 500mgFiber: 2gSugar: 5gVitamin A: 15IUVitamin C: 25mgCalcium: 20mgIron: 10mg

Notes

This casserole can be prepped ahead of time for a stress-free morning, and leftovers can be stored in the fridge for up to 4 days or frozen for up to three months.

Tried this recipe?

Let us know how it was!

Crispy Shrimp Balls that Will Make You Ditch Fast Food

December 16, 2025 by Grace Snow Leave a Comment

As I stood in my kitchen, the sizzling sound of shrimp balls gently frying quickly transported me to a bustling street market teeming with flavor. These crispy shrimp balls are not just a delightful appetizer; they’re a celebration of seafood that you can easily whip up at home. With the perfect balance of a golden exterior and a juicy, flavorful shrimp filling, this dish is quick to prepare, making it an ideal choice for busy weeknights or gathering with friends. Plus, their versatility means you can customize them with different spices or fillings to suit any occasion. What will you choose to add to your batch?

Why are these shrimp balls irresistible?

Crispy Perfection: The golden, crunchy exterior gives way to a succulent shrimp filling that captivates every bite, enticing even the most discerning food lovers.
Endless Customization: Feel free to experiment! Whether you’re adding cream cheese or opting for spicy herbs, these shrimp balls are a canvas for your creativity.
Quick and Easy: Perfect for those busy evenings, this recipe allows you to whip up a delicious meal in no time.
Perfect Party Pleaser: Serve them as appetizers at your next gathering, and watch how they disappear faster than you can say “shrimp ball!” Pair with a side of fresh salad or a unique dipping sauce like sweet chili for an extra punch. For more delightful seafood options, consider trying Shrimp Tacos Zesty or Turmeric Dill Shrimp.

Shrimp Balls Ingredients

For the Shrimp Mixture
• Shrimp – Freshness is key for flavor and texture; you can substitute with crab or even plant-based alternatives for variations.
• Egg – Binds the ingredients together; an egg replacement can be utilized for vegan versions.
• Garlic – Adds depth and savory flavor; fresh minced garlic is ideal; garlic powder can work in a pinch.
• Green Onions – Offers freshness and a mild onion flavor; can be replaced with chives or omitted if desired.

For the Coating
• Breadcrumbs – Provides a crispy coating; use seasoned or panko breadcrumbs for extra crunch.

For Seasoning
• Spices (e.g., paprika, salt, pepper) – Enhances overall flavor; adjust according to personal taste or dietary restrictions.

For Dipping Sauce
• Dipping Sauce – Complements the dish; sweet chili or soy sauce are fantastic options for enjoying your shrimp balls.

Step‑by‑Step Instructions for Crispy Shrimp Balls

Step 1: Prepare Shrimp
Begin by cleaning and peeling your shrimp, ensuring they are fresh for optimal flavor. Chop the shrimp into small, bite-sized pieces, then pat them dry with paper towels to remove excess moisture. This step is crucial for achieving a perfect texture in your crispy shrimp balls later on.

Step 2: Mix Ingredients
In a large mixing bowl, combine the chopped shrimp with breadcrumbs, beaten egg, minced garlic, chopped green onions, and your chosen spices. Stir the mixture thoroughly until all ingredients are well incorporated and evenly coated. This forms the flavorful base of your shrimp balls, contributing to their irresistible taste.

Step 3: Shape Balls
With your hands, take small portions of the shrimp mixture and shape them into bite-sized balls, roughly the size of a golf ball. Make sure they are compact but not overly tight to allow for even cooking. Place the formed shrimp balls on a tray lined with parchment paper, preparing them for frying.

Step 4: Heat Oil
In a heavy-bottomed frying pan or skillet, pour enough oil to cover the bottom and heat it over medium heat. Allow the oil to heat until it shimmers, which indicates it’s ready for frying. This step is essential for achieving that crunchy exterior on your shrimp balls.

Step 5: Fry Balls
Carefully add the shrimp balls to the hot oil, making sure not to overcrowd the pan. Fry them for about 3 to 4 minutes on each side, or until they turn a beautiful golden brown and are crispy all over. Keep an eye on them, as the cooking time can vary slightly based on your stovetop.

Step 6: Drain
Once golden brown, use a slotted spoon to remove the shrimp balls from the oil and transfer them to a plate lined with paper towels. This helps absorb any excess oil and keeps your shrimp balls crispy. Serve them hot, paired with your favorite dipping sauce for a delightful seafood treat.

Make Ahead Options

These crispy shrimp balls are perfect for meal prep, saving you time on busy weeknights! You can shape the shrimp balls and refrigerate them for up to 24 hours before frying. To do this, simply follow the recipe until shaping, then cover the tray with plastic wrap to prevent drying out. For even longer storage, freeze the uncooked shrimp balls in a single layer on a baking sheet before transferring to a freezer bag, where they can last for up to 3 months. When ready to enjoy, fry them straight from frozen or thaw overnight in the refrigerator before cooking. They’ll still be just as delicious and maintain their crispy exterior!

Expert Tips for Crispy Shrimp Balls

  • Freshness Matters: Always choose the freshest shrimp possible; this enhances flavor and ensures the best texture in your shrimp balls.

  • Pat Dry: Don't skip patting the shrimp dry! Excess moisture can lead to a soggy coating instead of a crispy exterior.

  • Avoid Overcrowding: When frying, keep the shrimp balls spaced apart in the pan to maintain oil temperature, promoting an even, golden crispiness.

  • Baking Alternative: If you prefer a healthier option, bake your shrimp balls! Preheat the oven and spray them lightly with oil for that desired crispiness.

  • Experiment with Spices: Feel free to adjust seasonings according to your preference. Customizing the spices allows you to create unique flavor profiles for your shrimp balls.

What to Serve with Crispy Shrimp Balls

Elevate your meal experience with complementary sides and beverages that enhance the delicious flavors of these golden treats.

  • Zesty Coleslaw: Bright, crunchy coleslaw adds a fresh element, balancing the rich, savory shrimp balls with its tangy flavor.

  • Garlic Butter Rice: This buttery, fragrant rice makes for a comforting addition, allowing the shrimp balls to shine in every bite.

  • Crispy Vegetable Spring Rolls: Add a delightful crunch with these light and crispy rolls, perfect for dipping and enhancing the seafood theme.

  • Sweet Chili Dipping Sauce: Elevate each shrimp ball with this sweet and spicy sauce that perfectly complements the flavors and adds a delightful kick.

  • Cucumber Salad: A cool, refreshing cucumber salad cleanses the palate, offering a light crunch that contrasts beautifully with the crispy shrimp.

  • Mango Salsa: The sweetness of mango salsa brightens up the dish, adding tropical flair while its acidity cuts through the richness of the shrimp balls.

Indulging in these pairings will create a memorable meal that leaves your guests delighted and craving more!

How to Store and Freeze Shrimp Balls

  • Fridge: Store cooked shrimp balls in an airtight container for up to 2 days. Reheat in the oven for optimal crispiness before serving.

  • Freezer: Uncooked shrimp balls can be frozen on a baking sheet for about 1 hour to firm them up. Transfer to a freezer-safe bag and freeze for up to 3 months.

  • Thawing: To prepare frozen shrimp balls, thaw them in the refrigerator overnight before frying, ensuring they cook evenly without excess moisture.

  • Reheating: For leftover shrimp balls, reheat in an oven at 350°F (175°C) for about 10-15 minutes for a perfectly crispy texture.

Shrimp Balls Variations & Substitutions

Get ready to elevate your shrimp balls with these creative twists that will tickle your taste buds!

  • Creamy Surprise: Stuff the shrimp balls with cream cheese for an indulgent and richer flavor that melts delightfully in your mouth.

  • Fresh Herb Boost: Incorporate a handful of fresh herbs like parsley or cilantro for a vibrant flavor profile that brightens every bite.

  • Seafood Medley: Swap shrimp for other seafood like crab or scallops for a luxurious twist or combine shrimp with ground meats like pork for a hearty treat.

  • Spice it Up: Try a Cajun spice blend or Italian herbs to infuse your shrimp balls with unique and bold flavors, perfect for themed gatherings or your family's preference.

  • Gluten-Free Option: Use crushed rice crackers or almond flour instead of breadcrumbs to create a gluten-free crispy coating while retaining that delightful crunch.

  • Baked Goodness: If you prefer a lighter method, bake the shrimp balls instead! Just light spray them with oil and pop them in the oven for a healthier yet crispy version.

  • Heat Level: Add diced jalapeños or a dash of hot sauce to the mixture for a spicy kick that will appeal to heat lovers.

  • Zesty Dipping Enhancements: Pair with zesty dipping sauces like a lemon aioli or a sriracha mayo for an added layer of flavor that perfectly complements your shrimp balls.

Feel free to explore these variations! And if you love shrimp dishes, be sure to check out my Pan Fried Shrimp for another delicious seafood experience.

Shrimp Balls Recipe FAQs

What type of shrimp should I use for shrimp balls?
Absolutely! Fresh shrimp is essential for flavor and texture. Look for medium to large shrimp. If you want a twist, you can even substitute with crab or opt for plant-based alternatives if you’re aiming for a vegan dish.

How should I store leftover shrimp balls?
After cooking, store the shrimp balls in an airtight container in the refrigerator for up to 2 days. To reheat, place them in a preheated oven at 350°F (175°C) for about 10-15 minutes to regain their delightful crispiness.

Can I freeze uncooked shrimp balls?
Yes, you can! Place uncooked shrimp balls on a baking sheet and freeze them for about 1 hour, until firm. Once firm, transfer them to a freezer-safe bag. They can be stored for up to 3 months. For cooking, just thaw in the fridge overnight and fry as usual.

What can I do if my shrimp balls turn out soggy?
Very! Ensure your shrimp are thoroughly patted dry before mixing. Also, avoid overcrowding the frying pan, as this can lower oil temperature. If they are still soggy, try draining them on paper towels immediately after frying to absorb excess oil.

Can I make shrimp balls ahead of time?
Certainly! You can prepare the shrimp balls and refrigerate them for up to 2 hours before frying. This way, they remain fresh and flavorful when ready to cook. Just be sure to handle them gently when forming and frying!

Are shrimp balls safe for those with seafood allergies?
Always take precaution! If someone has a seafood allergy, avoid serving shrimp balls and consider using alternative proteins, like chicken or plant-based products. Always check ingredient labels if using store-bought components.

Shrimp Balls

Crispy Shrimp Balls that Will Make You Ditch Fast Food

Delicious crispy shrimp balls that combine the perfect balance of flavor and texture, ideal for any gathering or weeknight meal. Experience the joy of homemade shrimp balls.
Print Recipe Pin Recipe
Prep Time 15 minutes mins
Cook Time 15 minutes mins
Total Time 30 minutes mins
Servings: 4 balls
Course: Appetizers
Cuisine: Seafood
Calories: 200
Ingredients Equipment Method Nutrition Notes

Ingredients
  

For the Shrimp Mixture
  • 1 pound Fresh shrimp Can substitute with crab or plant-based alternatives.
  • 1 Egg Egg replacement for vegan versions can be used.
  • 2 cloves Garlic Minced garlic is ideal.
  • 2 stalks Green onions Chopped; can be replaced with chives.
For the Coating
  • 1 cup Breadcrumbs Use seasoned or panko for extra crunch.
For Seasoning
  • 1 teaspoon Paprika Adjust according to taste.
  • 1 teaspoon Salt To taste.
  • 1 teaspoon Pepper To taste.
For Dipping Sauce
  • 1 cup Dipping sauce Sweet chili or soy sauce recommended.

Equipment

  • frying pan
  • Mixing Bowl
  • slotted spoon
  • Parchment Paper

Method
 

Step‑by‑Step Instructions for Crispy Shrimp Balls
  1. Begin by cleaning and peeling your shrimp, then chop them into small pieces and pat them dry with paper towels.
  2. In a large bowl, combine the chopped shrimp with breadcrumbs, beaten egg, minced garlic, chopped green onions, and chosen spices. Stir until well incorporated.
  3. Shape the mixture into bite-sized balls, about the size of a golf ball, and place them on a tray lined with parchment paper.
  4. In a frying pan, heat enough oil over medium heat until it shimmers.
  5. Fry the shrimp balls for 3 to 4 minutes on each side until golden brown and crispy. Avoid overcrowding the pan.
  6. Use a slotted spoon to remove the shrimp balls from the oil and drain them on paper towels before serving with your favorite dipping sauce.

Nutrition

Serving: 4ballsCalories: 200kcalCarbohydrates: 15gProtein: 22gFat: 8gSaturated Fat: 2gPolyunsaturated Fat: 2gMonounsaturated Fat: 3gCholesterol: 180mgSodium: 600mgPotassium: 300mgFiber: 1gSugar: 1gVitamin A: 200IUVitamin C: 2mgCalcium: 50mgIron: 1mg

Notes

Always use the freshest shrimp for best results. Patting shrimp dry is crucial to achieving crispy balls. Avoid overcrowding while frying and consider baking for a healthier alternative.

Tried this recipe?

Let us know how it was!

Authentic Bun Bo Hue: Dive into Vietnam's Spicy Comfort Soup

December 16, 2025 by Grace Snow Leave a Comment

As the aroma of simmering spices danced through my kitchen, I couldn't help but feel transported to the bustling streets of Hue, Vietnam. This is where the heart of the culinary tradition truly lies, embodying the essence of Authentic Bun Bo Hue—a spicy beef noodle soup that warms both body and soul. The intricate layers of flavors that this dish offers are genuinely remarkable, and though it may take a little time to prepare, the reward is a hearty, satisfying meal that's perfect for sharing with loved ones. With its deep, rich broth and tender meat, this isn't just another recipe; it's a journey into authentic Vietnamese cooking that promises comfort and delight in every bowl. Are you ready to savor the magic of Bun Bo Hue?

What makes this soup so special?

Tradition at Its Core: This Authentic Bun Bo Hue is a celebration of Vietnamese culinary heritage, offering a deeply satisfying experience.

Hearty & Filling: Packed with tender brisket and chewy noodles, it’s a fulfilling dish perfect for family gatherings or cozy dinners.

Robust Flavor Profile: The careful blend of spices, from lemongrass to cinnamon, creates an aromatic broth that will tantalize your taste buds.

Customizable Spiciness: Adjust the heat level with red pepper flakes and fresh chilies, allowing each diner to tailor their experience.

Impressive Yet Manageable: While it may seem complex, following the straightforward steps makes this dish approachable, even for beginner cooks!

Unforgettable Aesthetics: The signature reddish hue and vibrant garnishes make for an eye-catching presentation that’s sure to wow your guests.

Dive deeper into the authentic tastes of Vietnam with this recipe, and don’t forget to explore serving suggestions for the perfect accompaniments!

Authentic Bun Bo Hue Ingredients

For the Broth
• Pork Bones – Crucial for depth of flavor; choose high-quality bones for the best results.
• Brisket – Adds tenderness; substitute with flank or shank if needed.
• Water – The main liquid; always use fresh water for a clear broth.
• White Onion – Enhances sweetness; do not omit for the authentic taste.
• Ginger – Offers warmth and aroma; fresh is essential for maximum flavor.
• Lemongrass – Aromatic garnish; bruise stalks to release more oils.
• Garlic – Adds depth; fresh minced garlic works best.
• Cinnamon Stick – Contributes warmth; avoid powdered for better clarity.
• Whole Cloves – Infuses the broth with spice; keep them whole for easy removal.

For the Flavor Boost
• Sesame Oil – Adds nuttiness; can use other oils, but flavors may vary.
• Annatto Seeds – Essential for that signature reddish hue; don’t substitute!
• Shallots – Adds a sweet flavor layer; can replace with more onion if needed.
• Red Pepper Flakes – Adjust for heat; include as desired for flavor.
• Shrimp Paste – Deepens flavor; essential for authenticity—do not skip.
• Fish Sauce – Adds salty depth; crucial for the authentic profile—choose quality brands.

For the Toppings
• Beef Tenderloin – High-quality meat for garnish; can also opt for other cuts.
• Hue Noodles – Traditional Vietnamese noodles; rice noodles can be a substitute.
• Vegetables (Water Spinach, Banana Flower, etc.) – Fresh garnishes for texture; highly recommend adding for authentic flair.
• Lime Wedges & Thai Chilies – Bright condiments served on the side for a fresh kick!

Take the time to gather these ingredients for an authentic Bun Bo Hue that will transport you straight to the heart of Vietnam!

Step‑by‑Step Instructions for Authentic Bun Bo Hue

Step 1: Prep Broth
Begin by blanching the pork bones and brisket. Place them in a large pot of boiling water and cook for 10 minutes. This process removes impurities, ensuring a clear broth. Once blanched, drain and rinse the meat under cold water, then set aside for later use in your Authentic Bun Bo Hue.

Step 2: Toasting Spices
In a dry skillet, toast the ginger, garlic, cinnamon stick, and bruised lemongrass over medium heat for about 3-5 minutes until fragrant. Keep a close eye to prevent burning. Once aromatic, remove from heat and create a spice sachet using cheesecloth, tying it securely to infuse your broth with rich flavors.

Step 3: Simmer Broth
In a large pot, combine the blanched pork bones and brisket with 4 quarts of fresh water. Bring to a rolling boil over high heat, then reduce heat to medium-low and simmer uncovered for 45 minutes. You'll notice the liquid starting to thicken and clarify, which is just the magic happening for your Authentic Bun Bo Hue.

Step 4: Add Onion
After simmering the broth, introduce the whole white onion into the pot. This will enhance the broth's sweetness and depth. Continue to simmer for an additional 45 minutes, skimming any foam that rises to the top. Your broth will develop a beautiful depth of flavor as these ingredients meld together.

Step 5: Oil Mixture
In a separate saucepan, heat the sesame oil over low heat, adding annatto seeds, minced garlic, and shallots. Cook gently for about 5 minutes until fragrant and formed into an oil mixture. Strain this infused oil into your broth, introducing a lovely reddish hue that is characteristic of Authentic Bun Bo Hue.

Step 6: Seasoning
With the brisket removed from the pot, add the remaining seasoning ingredients: shrimp paste, fish sauce, and red pepper flakes. Stir the mixture gently until everything is harmonized. Taste and adjust the seasoning as desired, ensuring the flavors are robust and fragrant in your simmering broth.

Step 7: Final Simmer
Let the broth continue to simmer on low heat for an additional 20 minutes, allowing all the flavors to meld beautifully together. The broth should be rich and aromatic, showcasing the work you've put into creating this Authentic Bun Bo Hue. Stir occasionally and keep the heat low to maintain clarity.

Step 8: Assemble Soup
To serve, place cooked Hue noodles in bowls and top with slices of brisket and tenderloin. Ladle the hot broth over the noodles and meat, ensuring everyone gets a hearty portion. Garnish with fresh vegetables, lime wedges, and Thai chilies on the side, perfect for each diner to customize their bowl of Authentic Bun Bo Hue.

How to Store and Freeze Authentic Bun Bo Hue

Fridge: Store leftover Authentic Bun Bo Hue in an airtight container for up to 3 days. Make sure to cool it completely before refrigeration to maintain flavor and quality.

Freezer: For longer storage, freeze the broth and cooked meat separately in airtight containers for up to 3 months. This helps retain the soup's rich texture and flavors.

Reheating: When ready to enjoy, thaw overnight in the fridge and reheat on the stovetop over low heat until warmed through. Add fresh noodles and garnishes for the best taste experience.

Broth Separation: It's recommended to store the broth and noodles separately if you plan to freeze—this keeps everything fresh and prevents sogginess in the noodles upon reheating.

Make Ahead Options

Authentic Bun Bo Hue is perfect for meal prep enthusiasts looking to save time during busy weeknights! You can prepare the broth and store it in the refrigerator for up to 3 days or freeze it for longer storage. To do this, simply complete steps 1 through 6 of the recipe, letting your broth cool before transferring it into airtight containers. To maintain the rich flavors, reheat the broth gently, skimming off any fat that surfaces, and then add any remaining seasoning to taste. When you're ready to serve, cook the Hue noodles separately and assemble your soup, ensuring a fresh and delicious meal that brings the comforting essence of Authentic Bun Bo Hue to your table in a jiffy!

Authentic Bun Bo Hue Variations & Substitutions

Feel free to explore these variations and substitutions to suit your taste buds and pantry!

  • Pork Shanks: Add for richer flavor and added depth; their tenderness enhances the broth beautifully.
  • Flank or Chuck: Swap brisket for these cuts to create different textures while maintaining heartiness. A simple change can introduce surprising flavor complexity.
  • Seafood Twist: Include shrimp or fish for a delightful seafood version, bringing coastal vibes to each spoonful. You’ll find an unexpected burst of sweetness that pairs well with the broth!
  • Spicy Kick: Up the heat by adding fresh Thai chilies or more red pepper flakes; customize as you taste! If you love a fiery experience, don’t hold back on this recommendation.
  • Vegetable Medley: Mix in more vegetables like bok choy or bean sprouts for added nutrients and texture. This not only makes the dish more colorful but also delightful with every bite.
  • Gluten-Free Noodles: Replace Hue noodles with rice noodles or zucchini noodles to cater to gluten-free diets. You won’t miss the traditional feel while enjoying your comforting soup.
  • Herbal Garnishes: Add fresh herbs like cilantro or mint for a vibrant and refreshing finish—this elevates your dish visually and flavor-wise!
  • Fish Sauce Substitute: For those avoiding fish products, consider using soy sauce, though it may slightly alter the flavor profile; a touch of liquid aminos can help maintain some savoriness.

Feel free to experiment with these swaps, and don't forget to check out serving suggestions for fresh ways to enhance your Bun Bo Hue experience!

Expert Tips for Authentic Bun Bo Hue

Blanching Matters: Always thoroughly blanch the pork bones and brisket to eliminate impurities, ensuring a clear and clean broth.

Avoid Over-Stirring: While simmering, try not to stir the broth too much; this will help maintain its clarity and rich appearance.

Fresh is Best: Use the freshest ingredients possible—especially the ginger and lemongrass. This significantly enhances the authentic flavor of your Bun Bo Hue.

Taste as You Go: Adjust the seasoning right before serving. Every palate is different, so tailor the broth's flavor to suit your family's preferences!

Quality Counts: Invest in high-quality fish sauce and shrimp paste; they are essential for achieving an authentic depth in your Bun Bo Hue.

Garnish Wisely: Don't skip the garnishes! Fresh herbs and lime can elevate the dish, adding brightness and aiding in a more complex flavor profile.

What to Serve with Authentic Bun Bo Hue

The perfect meal complements the heartwarming flavors of this spicy soup with vibrant colors and fresh ingredients.

  • Fresh Herbs: Pair with mint, basil, and cilantro for a fragrant touch that brightens each spoonful.
  • Crispy Spring Rolls: These crunchy, savory delights provide a satisfying texture contrast, enhancing your dining experience.
  • Vietnamese Fried Rice: This aromatic side dish adds depth and a touch of sweetness, offering a fulfilling addition to your meal.
  • Thai Chili Sauce: For those who crave a spicy kick, drizzle this on the soup or serve on the side—it elevates the culinary experience!
  • Lime Wedges: Presenting fresh lime on the side allows diners to add zesty brightness to their bowl, enhancing flavor harmony.
  • Banana Flower Salad: This crunchy, slightly bitter salad balances the hearty soup, introducing a refreshing element to your plate.
  • Coconut Juice: A cool, refreshing drink option, balancing the warmth of the soup while providing a sweet tropical twist.
  • Mango Sticky Rice: For dessert, this sweet, creamy dish concludes your meal perfectly, offering a delightful contrast to the spicy soup.
  • Iced Lemon Tea: This refreshing beverage adds a sweet-tart flair to your meal, cleansing the palate beautifully between bites.

Authentic Bun Bo Hue Recipe FAQs

How do I choose the right ingredients for my Bun Bo Hue?
Absolutely! Selecting high-quality ingredients is key to a delicious Authentic Bun Bo Hue. When choosing pork bones, look for ones with a good amount of meat and marbling—this will enhance your broth's flavor. For the brisket, choose one that's well-marbled for tenderness. Fresh lemongrass and ginger are crucial; they should be fragrant and vibrant. If you spot any dark spots on the lemongrass, it's best to opt for fresh stalks instead.

What’s the best way to store leftovers?
You can keep leftover Authentic Bun Bo Hue in an airtight container in the fridge for up to 3 days. Make sure the soup has cooled down completely before placing it in the fridge to maintain its flavor. If you notice any separation, don't worry! Just give it a gentle stir when you're ready to reheat.

Can I freeze Bun Bo Hue?
Very! For longer storage, consider freezing the broth and the meat separately in airtight containers. The broth can last for up to 3 months, while the cooked meat should also be consumed within that timeframe for optimal taste. When you're ready to enjoy, simply thaw the broth overnight in the fridge and reheat it gently on the stovetop.

What if my broth turns cloudy?
No worries! If you find your broth is cloudy, this usually happens when the meats aren’t blanched thoroughly or if the broth is stirred too much during simmering. To fix this in your next attempt, make sure to blanch your pork bones and brisket in boiling water for at least 10 minutes and allow any impurities to rise to the top during simmering—skim this off to maintain clarity.

Are there any dietary concerns I should be aware of?
Absolutely! If you or your guests have allergies, take note of the shrimp paste and fish sauce, as these ingredients contain shellfish and fish, which are common allergens. For a vegetarian or vegan adaptation, you can skip these items entirely and focus on broth made from vegetables and mushrooms, though it will diverge from the Authentic flavor profile.

How can I adjust the spiciness of my soup?
The more the merrier! If you like your Bun Bo Hue with a kick, you can increase the amount of red pepper flakes or add fresh Thai chilies topped on each serving for extra heat. Conversely, if you prefer a milder dish, you can reduce the red pepper flakes or simply serve the chilies on the side for those who want to add them to their bowl.

Authentic Bun Bo Hue

Authentic Bun Bo Hue: Dive into Vietnam's Spicy Comfort Soup

Authentic Bun Bo Hue is a hearty, spicy beef noodle soup that celebrates Vietnamese culinary traditions.
Print Recipe Pin Recipe
Prep Time 20 minutes mins
Cook Time 2 hours hrs 5 minutes mins
Total Time 2 hours hrs 25 minutes mins
Servings: 4 bowls
Course: Soups
Cuisine: Vietnamese
Calories: 450
Ingredients Equipment Method Nutrition Notes

Ingredients
  

For the Broth
  • 2 lbs Pork Bones Choose high-quality bones for the best results.
  • 1 lb Brisket Can substitute with flank or shank if needed.
  • 4 quarts Water Always use fresh water for a clear broth.
  • 1 large White Onion Do not omit for the authentic taste.
  • 1 piece Ginger Fresh is essential for maximum flavor.
  • 2 stalks Lemongrass Bruise stalks to release more oils.
  • 4 cloves Garlic Fresh minced garlic works best.
  • 1 stick Cinnamon Stick Avoid powdered for better clarity.
  • 5 whole Whole Cloves Keep them whole for easy removal.
For the Flavor Boost
  • 2 tbsp Sesame Oil Can use other oils, but flavors may vary.
  • 2 tbsp Annatto Seeds Essential for the signature reddish hue.
  • 3 medium Shallots Can replace with more onion if needed.
  • 1 tbsp Red Pepper Flakes Adjust for heat.
  • 2 tbsp Shrimp Paste Essential for authenticity.
  • 4 tbsp Fish Sauce Choose quality brands for authenticity.
For the Toppings
  • 0.5 lb Beef Tenderloin High-quality meat for garnish.
  • 8 oz Hue Noodles Traditional Vietnamese noodles.
  • 1 cup Vegetables (Water Spinach, Banana Flower, etc.) Highly recommend adding for authentic flair.
  • 2 pieces Lime Wedges Bright condiment served on the side.
  • 4 pieces Thai Chilies Fresh kick for each bowl.

Equipment

  • Large pot
  • Skillet
  • cheesecloth
  • Saucepan

Method
 

Step-by-Step Instructions for Authentic Bun Bo Hue
  1. Begin by blanching the pork bones and brisket in boiling water for 10 minutes. Drain and rinse under cold water, then set aside.
  2. In a dry skillet, toast the ginger, garlic, cinnamon stick, and bruised lemongrass over medium heat for about 3-5 minutes until fragrant.
  3. In a large pot, combine the blanched pork bones and brisket with 4 quarts of fresh water. Bring to a boil, then reduce heat to medium-low and simmer uncovered for 45 minutes.
  4. Introduce the whole white onion into the pot and continue to simmer for an additional 45 minutes, skimming any foam that rises to the top.
  5. In a separate saucepan, heat the sesame oil, adding annatto seeds, minced garlic, and shallots. Cook for about 5 minutes until fragrant and strain into your broth.
  6. With the brisket removed from the pot, add shrimp paste, fish sauce, and red pepper flakes. Stir gently until harmonized.
  7. Let the broth continue to simmer on low heat for an additional 20 minutes, allowing all flavors to meld beautifully.
  8. To serve, place cooked Hue noodles in bowls, top with slices of brisket and tenderloin, ladle hot broth, and garnish with fresh vegetables, lime wedges, and Thai chilies.

Nutrition

Serving: 1bowlCalories: 450kcalCarbohydrates: 50gProtein: 30gFat: 15gSaturated Fat: 5gPolyunsaturated Fat: 3gMonounsaturated Fat: 5gCholesterol: 85mgSodium: 1800mgPotassium: 800mgFiber: 2gSugar: 5gVitamin A: 400IUVitamin C: 20mgCalcium: 50mgIron: 3mg

Notes

Use the freshest ingredients possible for the best flavor. Adjust seasoning before serving to cater to personal tastes.

Tried this recipe?

Let us know how it was!

Delicious Pizza Hot Pockets: High Protein, Guilt-Free Treats

December 16, 2025 by Grace Snow Leave a Comment

As the aroma of freshly baked dough wafts through my kitchen, I can't help but feel a wave of nostalgia wash over me, reminiscent of weekend pizza parties from my childhood. These High Protein Pizza Hot Pockets are my modern twist on that classic experience. Not only are they incredibly easy to whip up in just 30 minutes, but they're also a guilt-free snack that fuels your day with protein. Whether you’re looking for a quick meal prep solution or a crowd-pleasing treat for kids and adults alike, these customizable pockets cater to every dietary whim. Are you ready to dive into a world of cheesy goodness that won’t derail your healthy eating goals? Let’s get cooking!

Why Try These Pizza Hot Pockets?

Deliciously Quick: These High Protein Pizza Hot Pockets come together in just 30 minutes, making them perfect for busy weeknights.

Customizable Delight: With easy swaps for various dietary needs, you can satisfy your cravings guilt-free—even if you're gluten-free or vegan!

Protein-Packed Flavor: Each pocket boasts approximately 25g of protein, so you can feel good about snacking without the guilt.

Family-Friendly Fun: These cheesy treats will delight both kids and adults, making them an ideal addition to lunchboxes or party platters.

Meal Prep Dream: Make a big batch and store them to enjoy later—just like Homemade Hot Chocolate for those cozy nights in!

Festive Appeal: Think of these pockets as mini pizzas that bring joy to any meal, with flavors that everyone will love!

Pizza Hot Pocket Ingredients

• Here’s everything you need for your tasty High Protein Pizza Hot Pockets!

For the Dough

  • Low-fat Greek Yogurt – Provides protein and moisture, creating a healthy dough base. Can substitute with blended low-fat cottage cheese for added protein.
  • All-Purpose Flour – Acts as the dough's foundation for a chewy texture. For a low-carb option, substitute with almond flour mixed with coconut flour.
  • Baking Powder – Serves as a leavening agent for a quick rise, ensuring fluffy pockets. Ensure freshness by checking expiration date.
  • Italian Seasoning – Enhances the flavor profile for an authentic pizza experience. Customize with your favorite herbs if preferred.
  • Garlic Powder – Adds depth of flavor. Fresh minced garlic can be used for a bolder taste.
  • Salt – Balances sweetness and enhances overall flavor.

For the Filling

  • Pizza Sauce – Provides moisture and tang, critical for that pizza flavor. Use homemade or store-bought sauce.
  • Low-fat Cheese – Melts beautifully for gooey goodness without excess fat. Fat-free mozzarella can be used for a lighter option.

Get ready to enjoy these delightful High Protein Pizza Hot Pockets, packed with flavor and goodness!

Step-by-Step Instructions for High Protein Pizza Hot Pockets

Step 1: Preheat the Oven
Begin by preheating your oven to 375°F (190°C). While the oven heats up, prepare a baking tray by lining it with parchment paper to prevent the Pizza Hot Pockets from sticking. This step is crucial for achieving that golden-brown, crispy exterior we all love.

Step 2: Prepare the Dough
In a mixing bowl, combine all-purpose flour, baking powder, Italian seasoning, garlic powder, and salt. Stir these dry ingredients until well mixed. Gradually fold in low-fat Greek yogurt, using a spatula to combine until a shaggy dough forms. Transfer the dough to a lightly floured surface and knead for 2-3 minutes until it becomes smooth and elastic.

Step 3: Shape the Dough
Once your dough is ready, divide it into 8 equal portions. Roll each portion into an oval shape, approximately 6 inches long. Ensure your hands and the surface are floured to prevent sticking. This shaping step sets up those delightful pockets for your flavorful filling.

Step 4: Fill the Pockets
Take one dough oval and spoon about 15g of pizza sauce onto one half, spreading it evenly. Add 20g of low-fat cheese on top of the sauce, leaving a ½-inch border around the edges to avoid overflow. This filling creates the perfect cheesy taste for your High Protein Pizza Hot Pockets.

Step 5: Seal the Pockets
Carefully fold the dough over the filling to create a pocket. Press the edges together firmly, then use a fork to crimp the edges and ensure a good seal. If the edges are not sticking, you can dampen them slightly with water to help them bond. This step is important to keep all the delicious fillings contained.

Step 6: Bake the Hot Pockets
Place your filled and sealed Pizza Hot Pockets on the prepared baking tray, giving them a bit of space to expand. Bake in the preheated oven for 18-20 minutes, or until they turn a beautiful golden brown and emit a tantalizing aroma. The perfect bake time is essential for that satisfying texture.

Step 7: Cool and Serve
Once baked, remove your Pizza Hot Pockets from the oven and allow them to cool on the tray for about 5 minutes. This brief cooling period helps the filling settle and makes them easier to handle. Serve warm, optionally with a side of marinara sauce for dipping, and enjoy the delightful flavors of these homemade treats!

Pizza Hot Pockets: Fun Variations Await

Feel free to unleash your creativity and make these High Protein Pizza Hot Pockets your own with these delightful twists!

  • Dairy-Free: Replace low-fat cheese with a plant-based alternative or nutritional yeast for a cheesy flavor without dairy.

  • Whole Wheat Option: Swap all-purpose flour for whole wheat flour for a heartier, nuttier flavor and added fiber.

  • Spicy Kick: Add sliced jalapeños or crushed red pepper flakes to the filling for a zesty, flavorful punch.

  • Veggie Boost: Mix in various vegetables like bell peppers, spinach, or olives to enhance nutrition without sacrificing taste.

  • Sweet Barbecue Twist: Instead of pizza sauce, use barbecue sauce for a mouthwatering and unexpected flavor profile that pairs wonderfully with cheese.

  • Protein Power-Up: Add cooked ground turkey or chicken to the filling for extra protein that boosts the savory goodness.

  • Italian Flavor Fusion: Incorporate Italian sausage or pepperoni for a meaty addition that transforms your hot pockets into a classic pizza experience.

  • Fun Dipping Sauces: Serve with homemade marinara or garlic aioli for a delicious dipping experience, just like at your favorite pizzeria. If you're looking for a cozy treat to pair with your hot pockets, try some Homemade Hot Chocolate on the side!

Make Ahead Options

These High Protein Pizza Hot Pockets are a fantastic option for meal prep, allowing you to enjoy delicious snacks with minimal effort! You can prepare the dough and fill the pockets up to 24 hours in advance. Simply complete steps 1 through 5, then place the filled pockets in an airtight container in the refrigerator. To maintain quality and prevent sogginess, store the pockets separately from any sauce. When you're ready to serve, bake them straight from the fridge, adjusting the baking time by a couple of minutes if needed. This way, you'll have tasty, homemade Pizza Hot Pockets ready in no time, perfect for those busy days!

Storage Tips for Pizza Hot Pockets

Fridge: Store cooked Pizza Hot Pockets in an airtight container for up to 3 days. Ensure they are completely cooled before sealing to prevent moisture buildup.

Freezer: For longer storage, freeze uncooked Pizza Hot Pockets on a baking sheet until solid, then transfer to a zip-top bag for up to 3 months. Bake from frozen, adjusting the cooking time as necessary.

Reheating: Reheat cooked pockets in the oven at 350°F (175°C) for about 10-15 minutes until warmed through, restoring their crispy texture.

Airtight: Whether refrigerating or freezing, always use airtight containers or bags to maintain freshness and flavor of your pizza hot pockets.

What to Serve with High Protein Pizza Hot Pockets

Elevate your homemade experience by pairing these irresistible pockets with delightful sides that make every bite unforgettable.

  • Garden Salad: A fresh mix of greens, tomatoes, and cucumbers adds a crisp contrast and balances the rich flavors of the hot pockets. Toss in some balsamic vinaigrette for a zesty kick.

  • Garlic Breadsticks: Warm, buttery breadsticks drizzled with garlic make for a comforting, savory side that complements the cheesy goodness. They’re perfect for dipping in marinara sauce, enhancing the pizza vibe!

  • Roasted Vegetables: Seasonal veggies like bell peppers, zucchini, and asparagus add not only vibrant color but also essential nutrients, making your meal wholesome and satisfying. The sweetness from roasting pairs beautifully with the savory hot pockets.

  • Homemade Marinara Sauce: Serve these pizza pockets with a side of rich and tangy marinara for dipping. It enhances the pizza experience while adding a burst of flavor to each bite.

  • Stuffed Peppers: For an adventurous twist, serve alongside stuffed bell peppers filled with quinoa, black beans, and cheese. This complementary dish is both filling and nutritious, perfect for a well-rounded meal.

  • Chilled Sparkling Water: Keep things light with a refreshing glass of sparkling water, infused with lemon or mint. It cleanses the palate and keeps the focus on the delightful flavors of your hot pockets.

  • Fruit Salad: A fruity mix of melon, berries, and citrus adds a sweet, refreshing contrast. The natural sugars will satisfy dessert cravings while keeping the meal light and refreshing.

  • Zucchini Fritters: Crispy, savory fritters offer a delightful texture and pair beautifully with hot pockets, adding a veggie-packed option to your plate. Serve with a yogurt dip for extra flavor!

These pairings not only enhance the experience but also create a memorable meal that'll have everyone coming back for seconds!

Expert Tips for Pizza Hot Pockets

Dough Consistency: Ensure your dough isn’t too sticky or dry. Gradually add flour if sticky or mix in more Greek yogurt or water if too dry.

Filling Freedom: For a flavor boost, experiment with various fillings like veggies, pepperoni, or different cheeses to personalize your Pizza Hot Pockets.

Proper Sealing: Make sure to crimp the edges securely to prevent the filling from leaking out during baking—nobody likes a messy pocket!

Even Baking: Space the pockets evenly on the tray to allow heat circulation, ensuring they bake evenly and achieve that lovely golden-brown crust.

Storage Solution: Store any leftovers in an airtight container for up to 3 days, or freeze uncooked pockets and bake straight from frozen for a quick meal option!

High Protein Pizza Hot Pockets Recipe FAQs

How do I choose the right ingredients for my Pizza Hot Pockets?
Absolutely! For your dough, it's best to use low-fat Greek yogurt as it provides a great balance of moisture and protein. If you prefer a different texture, you can substitute it with blended low-fat cottage cheese. For the flour, all-purpose works wonderfully, but if you're looking for a low-carb option, almond flour mixed with coconut flour is a fantastic alternative. Always check the freshness of your baking powder, as using expired ingredients can affect your dough's rise.

What’s the best way to store leftover Pizza Hot Pockets?
Very! If you have any leftover cooked Pizza Hot Pockets, store them in an airtight container in the fridge for up to 3 days. Ensure they are completely cooled before sealing to keep moisture at bay. If you're making a big batch, you can freeze uncooked pockets by placing them on a baking sheet until solid, then transfer to a zip-top bag for up to 3 months. Just bake them directly from frozen, adjusting the cooking time as necessary.

Can I freeze my uncooked Pizza Hot Pockets? How do I do that?
Certainly! To freeze uncooked Pizza Hot Pockets, start by preparing them according to your recipe. Arrange the filled pockets on a baking sheet lined with parchment paper, ensuring they aren’t touching. Freeze them for about 1-2 hours until solid. Once frozen, transfer them to a large zip-top bag, removing as much air as possible before sealing. They can be stored this way for up to 3 months. When you're ready to enjoy them, bake them straight from the freezer, adjusting the cooking time to about 25-30 minutes.

What should I do if my dough is too sticky or too dry?
No worries! If your dough is too sticky, gradually add a little more flour, about a tablespoon at a time, until you achieve a workable consistency. Make sure to knead it until it's smooth and elastic, which should take about 2-3 minutes. Conversely, if the dough is too dry, mix in a bit more Greek yogurt or a teaspoon of water to hydrate it properly. Achieving the right consistency is key to delightful Pizza Hot Pockets!

Can I make the Pizza Hot Pockets suitable for vegans?
Absolutely! To make these pockets vegan-friendly, simply substitute the low-fat cheese with nutritional yeast and opt for plant-based pizza sauce instead of traditional sauce. You can also enhance the flavor by adding sautéed vegetables or spices. The result will still be a delicious, comforting treat that everyone can enjoy!

Are there any common allergies I should consider?
Of course! If you or your guests have allergies, it's essential to consider common allergens like wheat (in the flour) and dairy (in the cheese and yogurt). For a gluten-free option, use a gluten-free flour blend in place of all-purpose flour. Always double-check the ingredient labels for any hidden allergens, and feel free to customize the fills and dough to suit individual dietary needs.

Pizza Hot Pockets

Delicious Pizza Hot Pockets: High Protein, Guilt-Free Treats

These High Protein Pizza Hot Pockets are customizable, easy to make, and perfect for a guilt-free snack that fuels your day with protein.
Print Recipe Pin Recipe
Prep Time 15 minutes mins
Cook Time 20 minutes mins
Cooling Time 5 minutes mins
Total Time 30 minutes mins
Servings: 8 pockets
Course: Snacks
Cuisine: Italian
Calories: 250
Ingredients Equipment Method Nutrition Notes

Ingredients
  

For the Dough
  • 1 cup Low-fat Greek Yogurt Can substitute with blended low-fat cottage cheese for added protein.
  • 1 cup All-Purpose Flour For a low-carb option, substitute with almond flour mixed with coconut flour.
  • 2 tsp Baking Powder Ensure freshness by checking expiration date.
  • 1 tsp Italian Seasoning Customize with your favorite herbs if preferred.
  • 1 tsp Garlic Powder Fresh minced garlic can be used for a bolder taste.
  • 1 tsp Salt
For the Filling
  • 1 cup Pizza Sauce Use homemade or store-bought sauce.
  • 1 cup Low-fat Cheese Fat-free mozzarella can be used for a lighter option.

Equipment

  • Oven
  • Mixing Bowl
  • Baking tray
  • Parchment Paper
  • Spatula
  • Fork

Method
 

Step-by-Step Instructions
  1. Preheat your oven to 375°F (190°C) and line a baking tray with parchment paper.
  2. In a mixing bowl, combine flour, baking powder, Italian seasoning, garlic powder, and salt until well mixed. Gradually fold in Greek yogurt to form a shaggy dough and knead until smooth.
  3. Divide dough into 8 equal portions and roll each into an oval shape, about 6 inches long.
  4. Take one dough oval, spoon about 15g of pizza sauce on one half, and add 20g of cheese, leaving a ½-inch border.
  5. Fold the dough over to seal the filling, crimp the edges with a fork, and dampen edges if needed to keep the filling contained.
  6. Place on the baking tray and bake for 18-20 minutes or until golden brown.
  7. Allow to cool for about 5 minutes before serving. Optionally serve with marinara sauce for dipping.

Nutrition

Serving: 1pocketCalories: 250kcalCarbohydrates: 30gProtein: 25gFat: 5gSaturated Fat: 2gMonounsaturated Fat: 2gCholesterol: 10mgSodium: 400mgPotassium: 200mgFiber: 3gSugar: 2gVitamin A: 2IUCalcium: 15mgIron: 10mg

Notes

Store leftovers in an airtight container for up to 3 days or freeze uncooked pockets for up to 3 months.

Tried this recipe?

Let us know how it was!

Savory Chicken Cordon Bleu Quesadillas for Cozy Nights

December 16, 2025 by Grace Snow Leave a Comment

As I flipped through my favorite cookbooks, a delightful idea struck me—melding the classic Chicken Cordon Bleu with the convenience of quesadillas. That's how I stumbled upon the creation of Chicken Cordon Bleu Quesadillas, a dish that brings indulgence into a quick meal. Imagine smoky ham, savory chicken, and melting cheese all tucked away in a crispy tortilla, paired with a creamy Parmesan Dijon sauce that takes every bite to the next level. Not only are these quesadillas a crowd-pleaser, but they also let you whip up comforting homemade food in no time—perfect for busy evenings! Whether you’re looking to impress guests or treat yourself, these easy quesadillas offer endless customization, making them a versatile staple in any kitchen. Curious about how to bring this mouthwatering twist to life? Let’s dive into the recipe!

Why are Chicken Cordon Bleu Quesadillas irresistible?

Quick and Easy: This recipe is perfect for busy nights, allowing you to whip up a delightful meal in under 30 minutes.
Indulgent Flavor: The combination of savory chicken, smoky ham, and gooey cheese creates a deliciously comforting bite.
Versatile Ingredients: Feel free to mix and match fillings, using your favorite cheeses or even adding veggies for extra nutrition.
Crowd-Pleasing Appeal: Great for family dinners or entertaining guests, everyone will love the unique twist on a classic dish.
Outstanding Dipping Sauce: The creamy Parmesan Dijon sauce enhances every bite, making these quesadillas even more delectable.
Customizable Delights: Whether you stick to the classic or experiment with variations, this recipe is sure to keep meal times exciting! If you enjoy hearty chicken dishes, you might also like Honey Garlic Chicken Thighs or Chicken Adobo Again.

Chicken Cordon Bleu Quesadillas Ingredients

• Get ready to whip up something delicious!

For the Quesadilla

  • Flour Tortillas – The perfect base to hold all the delicious fillings; alternatively, use corn tortillas for a gluten-free option.
  • Grilled Chicken Breast – Offers a protein-packed punch; pre-cooked or store-bought breaded chicken can save you time.
  • Deli Ham – Adds a touch of savory goodness; turkey or any sliced deli meat can work too.
  • Swiss or Provolone Cheese – Their meltiness brings a creamy texture; mozzarella can double as an excellent melting alternative.
  • Toasted Breadcrumbs – Increases the crunch factor; you can make your own with stale bread for freshness.
  • Melted Butter – Essential for frying, giving your quesadillas that golden, crispy finish.

For the Parmesan Dijon Sauce

  • Parmesan Cheese – Elevates sauce flavor to new heights; consider using reduced-fat options to lighten it up.
  • Dijon Mustard – Introduces a tangy zest; yellow mustard can be used for a milder kick.
  • Chicken Bouillon Cube – Infuses the sauce with rich chicken flavor; swap with vegetable bouillon for a vegetarian alternative.
  • Milk – Creates the creamy texture—dairy or non-dairy milk can both work.
  • Hot Sauce (optional) – Adds a spicy kick; leave it out for a milder version.
  • Salt and Pepper – Essential for seasoning to taste, bringing all the flavors together.

These Chicken Cordon Bleu Quesadillas are the ultimate comfort food, ready for your kitchen—let’s get cooking!

Step‑by‑Step Instructions for Chicken Cordon Bleu Quesadillas

Step 1: Prepare the Parmesan Dijon Sauce
In a medium saucepan over low heat, melt 2 tablespoons of butter, whisk in 2 tablespoons of flour until bubbly, and gradually add 1 cup of milk and 1 chicken bouillon cube. Stir constantly for about 5 minutes until the mixture thickens and bubbles. Remove from heat and mix in 2 tablespoons of Dijon mustard and ½ cup of grated Parmesan cheese until smooth and creamy.

Step 2: Assemble Quesadillas
On a clean surface, lay out a flour tortilla and spread a layer of the prepared creamy Parmesan Dijon sauce. On half of the tortilla, layer ½ cup of shredded Swiss cheese, a few slices of deli ham, some grilled chicken, and a sprinkle of toasted breadcrumbs. Top with another ½ cup of cheese before folding the tortilla in half to seal the quesadilla tantalizingly.

Step 3: Cook Quesadilla
In a skillet over medium heat, melt 1 tablespoon of butter until sizzling. Carefully place the assembled quesadilla into the skillet, cooking for about 3-4 minutes until the bottom is golden brown and crispy. Use a spatula to gently flip the quesadilla and cook the other side for an additional 3-4 minutes until both sides are golden and the cheese has melted deliciously.

Step 4: Serve with Sauce
Once the Chicken Cordon Bleu Quesadilla is perfectly cooked, transfer it to a cutting board and let it rest for a minute. Cut into triangles for easy sharing, and serve warm with the remaining creamy Parmesan Dijon sauce on the side, perfect for dipping. Enjoy this delightful twist on a classic dish!

How to Store and Freeze Chicken Cordon Bleu Quesadillas

  • Fridge: Store leftover quesadillas in an airtight container for up to 3 days. Reheat in a skillet over medium heat for best results.
  • Freezer: Wrap quesadillas individually in plastic wrap and then foil, freezing for up to 2 months. Reheat directly from the freezer in the oven or skillet until heated through.
  • Reheating: For the freshest taste, reheat quesadillas in a skillet or oven rather than microwaving, ensuring the crust stays crispy.
  • Make Ahead: You can assemble the Chicken Cordon Bleu Quesadillas ahead of time, keeping them in the fridge for a quick, delicious meal whenever you’re ready!

What to Serve with Chicken Cordon Bleu Quesadillas?

Imagine a cozy meal where each bite delivers comfort and warmth, perfectly complemented by inviting sides and beverages.

  • Mixed Green Salad: A light and refreshing salad offers a crisp contrast to the creamy quesadillas, brightening the plate with fresh flavors.

  • Garlic Breadsticks: Golden and buttery, these breadsticks invite a deliciously indulgent experience as you dip them into the savory sauce.

  • Roasted Brussels Sprouts: The earthy, caramelized crunch of Brussels sprouts brings depth and texture that perfectly balances the richness of the quesadillas.

  • Creamy Potato Soup: A warm bowl of potato soup provides a soothing accompaniment, enhancing the meal with its silky texture and homey flavors.

  • Savory Veggie Platter: A colorful array of sliced veggies like cucumber, carrot, and bell pepper adds a crisp bite, perfect for dipping in any leftover Parmesan Dijon sauce.

  • Sparkling Apple Cider: This bubbly pairing adds a touch of sophistication and sweetness, refreshing the palate between each cheesy, savory bite.

  • Chocolate Lava Cake: For dessert, a decadent chocolate lava cake with its molten center adds an elegant finish to your comforting quesadilla meal.

  • Herbed Tea: A warm cup of herbal tea can aid digestion and adds a calming touch to your cozy dining experience.

  • Fruit Salad: A side of seasonal fruit salad provides a refreshing burst of sweetness, balancing the richness with a delightful pop of flavor.

Expert Tips for Chicken Cordon Bleu Quesadillas

  • Don’t Rush the Sauce: Slow cooking the Parmesan Dijon sauce allows flavors to develop, creating a rich and creamy dip for your quesadillas.
  • Heat Control: Maintain medium heat while cooking to ensure the cheese melts perfectly without over-browning the tortilla.
  • Crispy Texture: For extra crunch, consider using panko breadcrumbs or frying in a bit more butter until deeply golden.
  • Filling Flexibility: Use leftover rotisserie chicken or even festive turkey as a substitute; both pair wonderfully in your Chicken Cordon Bleu Quesadillas.
  • Season Generously: Remember to season your fillings with a pinch of salt and pepper to bring all the flavors to life!
  • Cut Properly: Let the quesadillas rest before cutting to prevent cheese from oozing out—this creates the perfect bite!

Chicken Cordon Bleu Quesadillas Variations

Embrace your inner chef and explore delightful twists with these creative ideas that will make your taste buds sing!

  • Turkey Swap: Replace chicken with turkey for a festive twist during holiday seasons. It brings an inviting, savory flavor that’s simply delightful.

  • Cheese Galore: Experiment with different types of cheese! Try cheddar or gouda to customize the flavor profile for a unique and cheesy experience.

  • Vegetarian Option: Ditch the meat and load up on mushrooms and zucchini instead. This hearty vegetarian version is packed with rich flavors and textures.

  • Add Greens: Stir in a handful of spinach or arugula for a burst of color and nutrition. These greens add freshness that perfectly balances the richness of the other ingredients.

  • Spicy Kick: Feel free to sprinkle in some diced jalapeños or drizzle hot sauce for an extra layer of heat. The added spice brings everything to life and is sure to please heat lovers!

  • Crunch Factor: Swap out regular breadcrumbs for panko for an even crispier texture. The light and airy crunch elevates each bite into a satisfying experience.

  • Sauce Variations: Switch up the Parmesan Dijon sauce with a barbecue or ranch dressing for those who enjoy a tangy, smoky dip. Different sauces open a world of flavor and fun!

  • Extra Dippin’: Serve with a side of creamy ranch or classic salsa for additional dipping options. This way, you can cater to all taste preferences at your table!

For more delightful chicken inspiration, try out Honey BBQ Chicken or savor the flavors of Crock Pot Chicken. Enjoy experimenting!

Make Ahead Options

These Chicken Cordon Bleu Quesadillas are a fantastic choice for meal prep lovers! You can prepare the creamy Parmesan Dijon sauce up to 3 days in advance; simply refrigerate it in an airtight container. Additionally, you can assemble the quesadillas (without cooking them) and store them in the fridge for up to 24 hours wrapped tightly in plastic wrap. To maintain their crispy texture when ready to serve, cook the quesadillas straight from the fridge to a hot skillet—this also helps the cheese melt perfectly. Just fry them until golden brown, and enjoy a delightful meal that feels fresh and homemade, saving you time during busy weeknights!

Chicken Cordon Bleu Quesadillas Recipe FAQs

How do I choose the right chicken for my quesadillas?
Absolutely! For the best flavor and texture, opt for grilled or roasted chicken breast. Pre-cooked chicken is also a great time-saver. If you’re feeling adventurous, you could even use leftover rotisserie chicken for extra flavor!

What’s the best way to store leftover quesadillas?
For leftover quesadillas, simply place them in an airtight container and store them in the fridge for up to 3 days. When you're ready to enjoy them again, reheat them in a skillet over medium heat to regain that crispy exterior.

Can I freeze Chicken Cordon Bleu Quesadillas?
Yes, you can! To freeze, wrap each quesadilla individually in plastic wrap, then in foil to prevent freezer burn. They can be stored in the freezer for up to 2 months. When you’re ready to indulge, reheat them in the oven or skillet until heated throughout, ensuring that they stay crunchy.

What if I don’t have all the ingredients on hand?
No worries at all! This recipe is flexible. You can substitute deli ham with turkey or even go meatless by adding sautéed mushrooms or zucchini. Feel free to mix and match cheeses like mozzarella for a slightly different flavor. The more the merrier!

How can I ensure my quesadillas don’t get soggy?
Great question! To prevent sogginess, be sure to toast your breadcrumbs before using them; this adds a wonderful crunch. Also, avoid overfilling your quesadillas, which can trap moisture. A perfect balance will give you a delightful crispy quesadilla!

Are there any dietary considerations I should be aware of?
Very! If you're catering to dietary restrictions, you can easily adapt this recipe. Use gluten-free corn tortillas for a gluten-free option. For a vegetarian dish, substitute the chicken and ham with hearty vegetables like spinach or bell peppers, and use vegetable bouillon in the sauce. Enjoy the flexibility!

Chicken Cordon Bleu Quesadillas

Savory Chicken Cordon Bleu Quesadillas for Cozy Nights

These Chicken Cordon Bleu Quesadillas combine smoky ham, savory chicken, and melting cheese, perfect for busy nights.
Print Recipe Pin Recipe
Prep Time 10 minutes mins
Cook Time 20 minutes mins
Resting Time 1 minute min
Total Time 30 minutes mins
Servings: 4 quesadillas
Course: Dinner
Cuisine: American
Calories: 500
Ingredients Equipment Method Nutrition Notes

Ingredients
  

For the Quesadilla
  • 4 pieces Flour Tortillas or corn tortillas for gluten-free
  • 2 cups Grilled Chicken Breast pre-cooked or store-bought
  • 8 slices Deli Ham turkey or any sliced deli meat can work
  • 1 cup Swiss or Provolone Cheese or mozzarella
  • 1/2 cup Toasted Breadcrumbs optional for crunch
  • 2 tablespoons Melted Butter for frying
For the Parmesan Dijon Sauce
  • 1/2 cup Parmesan Cheese grated
  • 2 tablespoons Dijon Mustard or yellow mustard
  • 1 cube Chicken Bouillon or vegetable bouillon for vegetarian
  • 1 cup Milk dairy or non-dairy
  • 1 dash Hot Sauce optional
  • to taste Salt and Pepper for seasoning

Equipment

  • Skillet
  • Medium saucepan

Method
 

Step‑by‑Step Instructions
  1. Prepare the Parmesan Dijon Sauce: In a medium saucepan over low heat, melt 2 tablespoons of butter. Whisk in 2 tablespoons of flour until bubbly, then gradually add 1 cup of milk and 1 chicken bouillon cube. Stir constantly for about 5 minutes until thickened. Mix in 2 tablespoons of Dijon mustard and ½ cup of grated Parmesan cheese until smooth.
  2. Assemble Quesadillas: Lay out a flour tortilla, spread a layer of the sauce, then layer ½ cup of shredded Swiss cheese, deli ham slices, grilled chicken, and toasted breadcrumbs. Top with another ½ cup of cheese. Fold the tortilla in half.
  3. Cook Quesadilla: In a skillet over medium heat, melt 1 tablespoon of butter. Place the quesadilla in the skillet and cook for 3-4 minutes until golden. Flip and cook the other side for an additional 3-4 minutes until both sides are golden and cheese is melted.
  4. Serve with Sauce: Transfer cooked quesadilla to a board, let it rest for a minute, cut into triangles, and serve warm with remaining sauce.

Nutrition

Serving: 1quesadillaCalories: 500kcalCarbohydrates: 42gProtein: 30gFat: 24gSaturated Fat: 12gPolyunsaturated Fat: 2gMonounsaturated Fat: 8gCholesterol: 80mgSodium: 1200mgPotassium: 400mgFiber: 3gSugar: 2gVitamin A: 500IUVitamin C: 1mgCalcium: 400mgIron: 3mg

Notes

Great for family dinners or entertaining guests! Experiment with different fillings and cheeses.

Tried this recipe?

Let us know how it was!

Cajun Shrimp Deviled Eggs That Will Wow Your Guests

December 16, 2025 by Grace Snow Leave a Comment

As I was flipping through an old cookbook, I stumbled upon a page that took me straight to the vibrant streets of New Orleans, where the air is thick with spice and warmth. That's when I knew I had to share my bold and flavorful Cajun Shrimp Deviled Eggs with you! This fabulous appetizer marries creamy, zesty goodness with perfectly blackened shrimp, bringing together an enticing medley of flavors that your guests won’t soon forget. Not only are these deviled eggs a stunning centerpiece for any gathering, but they’re also incredibly make-ahead friendly, giving you more time to enjoy the party. Whether you’re hosting a casual get-together or simply craving a delightful seafood treat, these deviled eggs will surely be a crowd-pleaser. Curious about how to elevate your next appetizer game? Let’s dive into the recipe!

Why Are Cajun Shrimp Deviled Eggs Amazing?

Irresistible Flavor Fusion: The bold Cajun spices combined with creamy filling and smoky shrimp create an explosion of taste.

Make-Ahead Marvel: Prep the eggs and filling up to two days in advance, making party planning a breeze.

Visual Showstopper: These stunning appetizers will steal the spotlight on any plate, impressing both the eyes and the taste buds.

Versatile Indulgence: Feel free to swap the shrimp for crab or smoked salmon to mix things up!

Perfect Pairing Ideas: Serve with a refreshing veggie platter or a delightful charcuterie board for a well-rounded feast.

Quick to Prepare: With straightforward steps, you can whip up these deviled eggs in no time, leaving you free to enjoy your gathering.

Cajun Shrimp Deviled Eggs Ingredients

For the Filling
• Eggs – Fresh eggs provide structure and protein for the dish.
• Mayonnaise – Adds the creamy richness essential for a dreamy filling; substitute with Greek yogurt for a lighter option.
• Dijon Mustard – Elevates the flavor with a hint of tanginess.
• Hot Sauce – Infuses heat and enhances the overall flavor of the Cajun shrimp deviled eggs.
• Smoked Paprika – Offers a deep, smoky flavor and vibrant color; regular paprika can be used as a substitute.
• Cayenne Pepper – Adds a kick of heat; feel free to adjust according to your spice preference.
• Dried Oregano – Imparts pleasant herbal notes to the filling.
• Garlic Powder – Adds delicious savory depth to the filling.
• Onion Powder – Enhances the overall flavor profile beautifully.
• Granulated Sugar – A dash helps balance flavors, though optional.

For the Shrimp
• Shrimp – Choose peeled and deveined shrimp for convenience, adding rich, briny flavor.
• Olive Oil – Necessary for searing the shrimp and achieving that delicious smoky char.

For Toppings
• Jalapeño – Fresh slices for topping; they add crunch and a bit more heat.
• Chives – Freshly chopped for a burst of color and flavor.
• Lemon Wedges – Serve on the side for a bright squeeze of citrus over the eggs.

Step‑by‑Step Instructions for Cajun Shrimp Deviled Eggs

Step 1: Hard Boil the Eggs
In a medium saucepan, place the eggs in a single layer and cover with about an inch of water. Bring the water to a rolling boil over medium heat, then remove from heat and cover the saucepan. Let the eggs stand in the hot water for 12 minutes. Afterward, cool them under cold running water to stop the cooking process, ensuring perfectly hard-boiled eggs for your Cajun Shrimp Deviled Eggs.

Step 2: Prepare Filling
Once the eggs have cooled, carefully peel them and slice them in half lengthwise. Gently scoop the yolks into a mixing bowl and mash them until smooth. Add mayonnaise, Dijon mustard, hot sauce, and the Cajun spices, mixing well until creamy and unified. For the best flavor, chill this zesty filling in the refrigerator while you move on to the next step.

Step 3: Season and Sear Shrimp
In a small bowl, combine the remaining spices to season the shrimp. Heat olive oil in a skillet over medium-high heat until shimmering. Add the seasoned shrimp and cook for about 2 minutes on each side until they turn pink and are slightly charred. Watch for a golden-brown crust forming; this adds flavor! Remove from heat and let the shrimp cool completely before you assemble.

Step 4: Assemble Eggs
Return to the chill-filled yolk mixture and stir to loosen it if needed. Carefully spoon or pipe the creamy filling back into the egg whites, filling each half generously. Top each filled egg with a piece of the seared shrimp and garnish with jalapeño slices and fresh chives for that added pop of flavor and color.

Step 5: Serve and Enjoy
Arrange your beautiful Cajun Shrimp Deviled Eggs on a serving platter, and consider garnishing with lemon wedges on the side for a tangy burst when served. To meld the flavors, it's best to let them rest in the fridge for at least 30 minutes before serving, allowing the delicious taste to shine through at your gathering!

Make Ahead Options

These Cajun Shrimp Deviled Eggs are perfect for meal prep, allowing you to enjoy more time with your guests! You can prepare the eggs and the zesty filling up to 24 hours in advance; just store them separately in airtight containers in the refrigerator to maintain their freshness. The cooked shrimp can also be seasoned and seared ahead of time, keeping them in the fridge for up to 3 days—just be sure to cool them completely before storing. When you're ready to serve, simply assemble the deviled eggs by filling the whites with the chilled yolk mixture, topping with shrimp, and adding jalapeño slices and chives. This way, you'll have a stress-free gathering with your Cajun Shrimp Deviled Eggs tasting just as delicious as if they were freshly made!

What to Serve with Cajun Shrimp Deviled Eggs

Elevate your gathering with vibrant accompaniments that will enhance the flavors of these zesty morsels!

  • Crispy Veggie Platter:
    Fresh, crunchy vegetables like bell peppers and cucumbers add a refreshing contrast, balancing the richness of the deviled eggs.

  • Herbed Garlic Bread:
    Soft, garlicky bread with fresh herbs provides a comforting texture and flavor that complements the spicy notes of the eggs.

  • Savory Charcuterie Board:
    A mix of cured meats, cheeses, and pickles invites diverse flavors to the table, creating an inviting spread, perfect for mingling!

  • Chilled White Wine:
    A crisp sauvignon blanc or tart Pinot Grigio perfectly complements the richness of the shrimp, enhancing the overall dining experience.

  • Sweet Mini Desserts:
    Mini cheesecake bites or fruit tarts offer a delightful, sugary contrast to the savory deviled eggs, leaving guests with a sweet finish.

  • Classic Ceasar Salad:
    The tangy dressing and crunchy romaine pair beautifully with the creamy, spicy deviled eggs, making for a well-rounded meal.

How to Store and Freeze Cajun Shrimp Deviled Eggs

  • Fridge: Store assembled Cajun Shrimp Deviled Eggs in an airtight container in the fridge for up to 2 days to maintain freshness.

  • Freezer: It’s best not to freeze the assembled deviled eggs, as the texture of the shrimp and filling can be affected.

  • Make-Ahead Tips: Prepare the egg whites and filling up to 2 days in advance; simply cook the shrimp and assemble just before serving for the best flavor and texture.

  • Reheating: Enjoy these excellent appetizers chilled without reheating, as they shine best when served cold.

Cajun Shrimp Deviled Eggs Variations

Feel free to put your unique spin on these delightful appetizers and discover new flavor combinations that excite your taste buds!

  • Seafood Swap: Substitute shrimp with crab or smoked salmon for a luxurious twist that adds different textures and flavors.

  • Spice Blends: Use Old Bay or Creole seasoning instead of Cajun spices for a different taste sensation. Each blend brings its own unique history!

  • Veggie Delight: For a vegetarian option, replace shrimp with diced pickles or olives. This will give your deviled eggs a salty, briny flavor profile.

  • Creamy Base: Try using avocado instead of mayonnaise for a dreamy, creamy filling that adds healthy fats and a subtle richness.

  • Cheesy Indulgence: Incorporate crumbled feta or shredded cheddar into your filling for a cheesy variation that will impress cheese lovers.

  • Herbed Infusion: Fresh herbs like dill or cilantro can add bright, fresh notes. Just chop finely and mix them into the filling!

  • Heat Variation: If you want less heat, opt for sweet paprika instead of smoked paprika and reduce the amount of cayenne pepper; this creates a milder version without sacrificing flavor.

For more inspiration, don’t forget to check out our Shrimp Ceviche Zesty or toss together some delicious Shrimp Tacos Zesty with that leftover shrimp!

Expert Tips for Cajun Shrimp Deviled Eggs

  • Perfect Peel: For easy peeling, add 1 teaspoon of baking soda to the water when boiling eggs; it works wonders!
  • Chill Time: Allow the filled eggs to rest for at least 30 minutes in the fridge to meld flavors for the best Cajun shrimp deviled eggs.
  • Taste Test: Always cook extra shrimp for seasoning; this ensures the shrimp have the perfect flavor before topping.
  • Presentation Matters: For a beautiful look, lay shrimp on their sides instead of standing them upright atop the eggs.
  • Adjust the Heat: Tailor the spice level of your deviled eggs by adjusting the amount of cayenne pepper and hot sauce according to your taste preference.

Cajun Shrimp Deviled Eggs Recipe FAQs

What type of eggs should I use for the best results?
Absolutely! Fresh eggs are ideal for this recipe as they provide the best structure and protein. If you're struggling with peeling, I recommend adding 1 teaspoon of baking soda to the cooking water — it truly makes a difference for easy peeling!

How should I store leftover Cajun Shrimp Deviled Eggs?
Store any leftover assembled Cajun Shrimp Deviled Eggs in an airtight container in the fridge. They'll stay fresh for up to 2 days, but they’re best enjoyed within the first day for optimal flavor and texture.

Can I freeze Cajun Shrimp Deviled Eggs?
It’s best not to freeze these delicious deviled eggs, as freezing can affect both the texture of the shrimp and the filling mixture. However, you can prepare the egg whites and the filling in advance and simply cook the shrimp right before you're ready to assemble!

What if the filling is too thick or too thin?
If your filling is too thick, try adding a little more mayonnaise or a splash of lemon juice to loosen it up. Alternatively, if it’s too thin, simply mix in some extra mashed yolks or even a touch of powdered sugar to thicken it up. Taste as you go to ensure you're happy with the consistency!

Are there any dietary considerations with Cajun Shrimp Deviled Eggs?
If you're serving these delicious appetizers to guests with allergies or dietary restrictions, be mindful of the mayonnaise, which contains eggs. You can substitute it with Greek yogurt for a lighter option. Additionally, always ensure your shrimp are peeled and deveined to avoid any issues for those sensitive to shellfish.

Cajun Shrimp Deviled Eggs

Cajun Shrimp Deviled Eggs That Will Wow Your Guests

Experience bold and flavorful Cajun Shrimp Deviled Eggs that your guests won’t forget, perfect for any gathering.
Print Recipe Pin Recipe
Prep Time 30 minutes mins
Cook Time 12 minutes mins
Chill Time 30 minutes mins
Total Time 1 hour hr 12 minutes mins
Servings: 12 pieces
Course: Appetizers
Cuisine: Cajun
Calories: 150
Ingredients Equipment Method Nutrition Notes

Ingredients
  

For the Filling
  • 6 pieces Eggs
  • 1/2 cup Mayonnaise can substitute with Greek yogurt
  • 1 tablespoon Dijon Mustard
  • 1 teaspoon Hot Sauce
  • 1 teaspoon Smoked Paprika can substitute with regular paprika
  • 1/4 teaspoon Cayenne Pepper adjust to taste
  • 1/2 teaspoon Dried Oregano
  • 1/2 teaspoon Garlic Powder
  • 1/2 teaspoon Onion Powder
  • 1 teaspoon Granulated Sugar optional
For the Shrimp
  • 1 pound Shrimp peeled and deveined
  • 2 tablespoons Olive Oil
For Toppings
  • 1 Jalapeño sliced for topping
  • 2 tablespoons Chives freshly chopped
  • 1 Lemon wedges for serving

Equipment

  • Medium saucepan
  • Mixing Bowl
  • Skillet

Method
 

Step-by-Step Instructions
  1. Hard Boil the Eggs: Place eggs in a single layer in a saucepan, cover with water, bring to a boil, remove from heat, cover, and let stand for 12 minutes. Cool under cold running water.
  2. Prepare Filling: Peel and halve the eggs, scoop yolks into a bowl, mash smooth, add mayonnaise, mustard, hot sauce, and spices. Mix well and chill.
  3. Season and Sear Shrimp: Mix spices and season shrimp. Heat olive oil in a skillet and cook shrimp until pink and slightly charred, about 2 minutes each side. Let cool.
  4. Assemble Eggs: Stir yolk mixture, fill egg whites, top with shrimp, jalapeño slices, and chives.
  5. Serve and Enjoy: Arrange on platter, garnish with lemon wedges, and let chill for 30 minutes before serving.

Nutrition

Serving: 1pieceCalories: 150kcalCarbohydrates: 2gProtein: 10gFat: 12gSaturated Fat: 2gPolyunsaturated Fat: 1gMonounsaturated Fat: 9gCholesterol: 150mgSodium: 300mgPotassium: 100mgSugar: 1gVitamin A: 250IUVitamin C: 2mgCalcium: 25mgIron: 1mg

Notes

For easy peeling, add baking soda to the boiling water. Store in an airtight container for up to 2 days in the fridge.

Tried this recipe?

Let us know how it was!

Crack Burgers: Irresistibly Juicy with Ranch and Bacon Delight

December 16, 2025 by Grace Snow Leave a Comment

You know that feeling when you take a bite of a burger that’s so flavorful, it feels like a warm hug? That’s exactly what you’ll get with these Juicy Crack Burgers, where savory ground chuck meets the perfect creaminess of cheddar cheese, the zing of ranch dressing, and the irresistible crunch of crispy bacon. This quick burger recipe doesn’t just promise taste; it’s a breeze to whip up, making it perfect for those busy weeknights or lively backyard gatherings. Plus, the beauty of this easy burger recipe lies in its adaptability—you can tailor it to your taste in no time. Are you ready to elevate your burger game and create a masterpiece that will leave everyone craving more?

Why are Crack Burgers a must-try?

Irresistible Flavor: The combination of creamy cheddar, tangy ranch, and crispy bacon creates layers of flavor that satisfy every palate.

Quick & Easy: With just a few simple steps, these burgers can be on your table in under 30 minutes, making them perfect for busy nights.

Versatile Ingredients: You can easily swap the ranch or cheese for your favorites, allowing you to customize these burgers to your liking.

Crowd-Pleasing Delight: Whether it's a family dinner or a backyard barbecue, these burgers are sure to impress and leave everyone asking for seconds.

Perfect Texture: Expect juicy, flavorful patties with a delightful crunch—ideal for anyone who appreciates a gourmet burger experience!

Don’t forget to serve these alongside some coleslaw or potato wedges for a full meal, or consider trying our vegetarian alternatives for a delightful twist!

Crack Burgers Ingredients

For the Patty

  • Ground Chuck – Provides a delicious and juicy base; choose an 80/20 lean-to-fat ratio for the best flavor and texture.
  • Ranch Dressing Mix – Adds a tangy flavor boost; this can be substituted with homemade ranch seasoning for a personal touch.
  • Bacon – Introduces smokiness and a satisfying crunch; feel free to swap for turkey bacon as a lighter alternative.
  • Cheddar Cheese – Brings creaminess and richness; experiment with other melting cheeses like pepper jack for exciting variations.

For Serving

  • Burger Buns – Use soft, toasted buns for the perfect vessel; try brioche or whole grain for extra flavor.
  • Additional Toppings – Customize your burger with lettuce, tomatoes, or avocado; these enhance freshness and add color to your plate.

Embrace the joy of creating mouthwatering Crack Burgers at home with these simple yet delicious ingredients!

Step‑by‑Step Instructions for Crack Burgers

Step 1: Prep the Mixture
In a large mixing bowl, combine the ground chuck, ranch dressing mix, crumbled bacon, and shredded cheddar cheese. Gently mix until everything is just combined to avoid overworking the meat, which can make the burgers tough. This mixture should have a well-blended appearance, with the cheese and bacon evenly distributed, ready for shaping.

Step 2: Form the Patties
Lightly oil your hands and shape the mixture into patties that are about ¾ inch thick, ensuring they are slightly wider than your burger buns to account for shrinkage while cooking. Aim for an even thickness across each patty, as this helps them cook uniformly. Place the patties on a plate or tray, allowing them to rest while you prepare your cooking surface.

Step 3: Cook the Burgers
Preheat your grill or skillet over medium heat for about 5 minutes. Once hot, carefully place the patties on the cooking surface, making sure not to overcrowd them. Cook the Crack Burgers for approximately 4-6 minutes on one side until they develop a rich, brown crust. Flip them gently, and continue cooking for another 4-6 minutes until the internal temperature reaches 160°F (71°C).

Step 4: Serve
Once the burgers are cooked through, remove them from the heat and let them rest for a couple of minutes to lock in juices. Place each patty on a toasted bun and dress with your choice of toppings, from crisp lettuce to ripe tomatoes. Add extra ranch dressing for a flavor boost, and serve your delicious Crack Burgers warm, inviting everyone to dig in!

Crack Burgers: Endless Flavor Possibilities

Feel free to make these Crack Burgers your own with exciting tweaks that amplify flavor and cater to your preferences!

  • Spicy Kick: Add diced jalapeños or a splash of sriracha for a fiery twist. Heat lovers will enjoy the zing that lingers.
  • Vegetarian Alternative: Swap ground chuck for a plant-based meat substitute, achieving a delicious meatless burger experience without sacrificing flavor.
  • Different Cheeses: Experiment with Swiss, Monterey Jack, or a zingy blue cheese to add rich, creamy layers. Each option transforms the burger into something unique!
  • Savory Additions: Incorporate sautéed mushrooms or caramelized onions into the patty mixture for extra depth and interest, making each bite even more indulgent.
  • Herb Infusions: Add fresh herbs like chopped parsley or basil for a fresh and vibrant flavor that complements the richness of the burger.
  • BBQ Bliss: Top with barbecue sauce and pickles for a tangy, sweet twist that takes these burgers to the next level; pure crowd pleasers!
  • Bacon Lovers: Consider crumbling extra crispy bacon on top for a double dose of that savory, smoky crunch that pairs beautifully with cheddar.
  • Sweet Elements: A hint of maple syrup in the patty mix can add a surprising sweetness that balances the savory components delightfully.

Get creative with your toppings—consider pairing with our vegetable side dishes for an uplifting meal experience that everyone will love!

How to Store and Freeze Crack Burgers

Fridge: Store leftover Crack Burgers in an airtight container in the refrigerator for up to 3 days to maintain freshness and flavor.

Freezer: If you want to prolong their life, wrap each burger tightly in plastic wrap and then place in a freezer-safe bag. They can last for up to 3 months in the freezer.

Reheating: To reheat, thaw in the fridge overnight and warm in a skillet over medium heat for about 5 minutes on each side, or until heated through and juicy.

Making Ahead: You can prepare the patties ahead of time and store them uncooked in the fridge for up to 24 hours, making it even easier to whip up these flavorful Crack Burgers on busy nights!

Expert Tips for Crack Burgers

  • Quality Meat: Use 80/20 ground chuck for maximum flavor and juiciness. Leaner meat can lead to dry burgers that lack depth.

  • Mixing Technique: Combine ingredients gently; overmixing can create tough patties. Just blend until everything is incorporated for tender, flavorful Crack Burgers.

  • Cooking Temperature: Preheat your grill or skillet adequately to ensure proper searing. If the heat is too low, burgers might cook unevenly and lose their flavor.

  • Rest Time: Allow burgers to rest after cooking to retain their juices. Cutting into them too soon will cause the flavorful juices to escape, resulting in drier patties.

  • Customize with Toppings: Embrace versatility by adding unique toppings! Try avocado, jalapeños, or different cheeses to elevate your Crack Burgers to gourmet status.

Make Ahead Options

These Crack Burgers are perfect for meal prep enthusiasts looking to save time without sacrificing flavor! You can prepare the burger mixture (ground chuck, ranch dressing mix, bacon, and cheddar cheese) up to 24 hours in advance by combining everything in a bowl and refrigerating it, covered tightly to prevent moisture loss. The formed patties can also be shaped, wrapped individually, and stored in the fridge for up to 3 days. When it’s time to cook, simply grill or pan-fry the chilled patties straight from the refrigerator for just a few extra minutes (to ensure thorough cooking). This way, you'll enjoy juicy, flavorful Crack Burgers that taste just as delicious as if made fresh, making weeknight dinners a breeze!

What to Serve with Juicy Crack Burgers

Dive into the perfect sides that will complement the hearty and flavorful experience of your homemade burgers.

  • Crispy Coleslaw: A bright, tangy crunch that balances the richness of the burgers, providing a refreshing contrast to each bite.

  • Golden Potato Wedges: These crispy, seasoned wedges add a delightful crunch and heartiness, making your meal all the more satisfying.

  • Grilled Corn on the Cob: Smoky and slightly sweet, it’s the ultimate summer side that pairs wonderfully with the savory flavors of the burgers.

  • Homemade Sweet Potato Fries: Their natural sweetness offers a delightful flavor contrast, making for a satisfying and vibrant side choice.

  • Classic Burger Toppings: Fresh lettuce, juicy tomatoes, and sliced avocados transform each bite into a gourmet experience, adding freshness and texture.

  • Chilled Pickles: Their tangy crunch elevates the burger experience, cutting through the richness while adding a burst of flavor.

  • Sparkling Lemonade: This cool, zesty drink pairs beautifully with the savory Crack Burgers, refreshing your palate with every sip.

  • Chocolate Chip Cookies: End your meal on a sweet note with warm, gooey cookies, creating a homey and comforting finish to your burger feast.

Crack Burgers Recipe FAQs

What type of ground chuck should I choose for Crack Burgers?
For the juiciest and most flavorful Crack Burgers, you should look for ground chuck with an 80/20 lean-to-fat ratio. This combination ensures that the burgers remain moist and rich in flavor while cooking.

How can I store leftover Crack Burgers?
Absolutely! Store any leftover Crack Burgers in an airtight container in the refrigerator for up to 3 days. This will keep them fresh, and you can reheat them in a skillet or microwave when you're ready for a quick bite.

Can I freeze Crack Burgers?
Yes! To freeze your delicious Crack Burgers, wrap each patty tightly in plastic wrap and place them in a freezer-safe bag. They can last for up to 3 months in the freezer. When you're ready to enjoy them, simply thaw in the fridge overnight and reheat in a skillet over medium heat until they're warmed through and juicy.

What should I do if my burgers are falling apart while cooking?
If you find your burgers are falling apart, it might be due to overmixing the meat or not using enough binding ingredients. Make sure to mix the ingredients gently and consider adding a little bread crumb or an egg to help bind them together if you're using leaner meat.

Are there any dietary considerations for making Crack Burgers?
Certainly! If you're cooking for someone with dietary restrictions, you can easily adapt this recipe. Substitute ground chuck with a plant-based meat alternative for a vegetarian option. Additionally, be mindful of any allergies related to ranch dressing. You can make a homemade version using safe herbs and spices if necessary.

How can I tell if my Crack Burgers are done cooking?
To ensure your Crack Burgers are cooked perfectly, use a meat thermometer to check the internal temperature. They should reach 160°F (71°C), which guarantees that they are safe to eat. If you don't have a thermometer, the burgers should be nicely browned on the outside and firm to the touch.

Crack Burgers

Crack Burgers: Irresistibly Juicy with Ranch and Bacon Delight

Crack Burgers are irresistibly juicy, combining savory ground chuck, creamy cheddar, tangy ranch, and crispy bacon for a delightful meal.
Print Recipe Pin Recipe
Prep Time 10 minutes mins
Cook Time 12 minutes mins
Resting Time 5 minutes mins
Total Time 27 minutes mins
Servings: 4 burgers
Course: Dinner
Cuisine: American
Calories: 450
Ingredients Equipment Method Nutrition Notes

Ingredients
  

For the Patty
  • 1 pound Ground Chuck 80/20 lean-to-fat ratio for the best flavor and texture
  • 1 packet Ranch Dressing Mix Can be substituted with homemade ranch seasoning
  • 4 slices Bacon Can substitute with turkey bacon for a lighter option
  • 1 cup Cheddar Cheese Other melting cheeses like pepper jack can be used
For Serving
  • 4 buns Burger Buns Soft, toasted buns; brioche or whole grain recommended
  • 1 Additional Toppings Lettuce, tomatoes, or avocado can be added for freshness

Equipment

  • Grill or Skillet

Method
 

Step-by-Step Instructions for Crack Burgers
  1. In a large mixing bowl, combine the ground chuck, ranch dressing mix, crumbled bacon, and shredded cheddar cheese. Gently mix until everything is just combined to avoid overworking the meat.
  2. Lightly oil your hands and shape the mixture into patties that are about ¾ inch thick, slightly wider than your burger buns.
  3. Preheat your grill or skillet over medium heat for about 5 minutes. Carefully place the patties on the cooking surface and cook for approximately 4-6 minutes on one side until browned.
  4. Flip the patties and continue cooking for another 4-6 minutes until the internal temperature reaches 160°F (71°C).
  5. Remove burgers from heat and let them rest for a couple of minutes. Serve on toasted buns with toppings.

Nutrition

Serving: 1burgerCalories: 450kcalCarbohydrates: 30gProtein: 28gFat: 26gSaturated Fat: 10gPolyunsaturated Fat: 3gMonounsaturated Fat: 10gTrans Fat: 1gCholesterol: 80mgSodium: 800mgPotassium: 500mgFiber: 2gSugar: 2gVitamin A: 250IUVitamin C: 2mgCalcium: 200mgIron: 3mg

Notes

Serve with coleslaw or potato wedges for a full meal. Can prepare patties ahead of time and store in the fridge for up to 24 hours.

Tried this recipe?

Let us know how it was!

Brownie Bite Gnomes: Whimsical No-Bake Treats to Delight

December 16, 2025 by Grace Snow Leave a Comment

As I sifted through my pantry, I stumbled upon a treasure trove of ingredients just waiting to transform into something magical. That's when the idea for Brownie Bite Gnomes came to life. These charming, no-bake dessert treats blend fudgy brownie bites with fluffy cream cheese frosting and playful strawberries for the perfect gnome hats. Ideal for festive gatherings, they bring a smile to faces of all ages with their whimsical appearance and delightful crunch from Reese's Puffs cereal as noses. Plus, the best part? They’re incredibly easy to whip up, making them a hassle-free addition to your holiday celebrations. Are you ready to create a dessert that’s as fun to make as it is to devour? Let’s dive into the delicious world of gnome magic!

Why are Brownie Bite Gnomes so special?

Whimsy in Every Bite: These Brownie Bite Gnomes are not just desserts; they are little pieces of art that add a playful spirit to any gathering.
Easy Assembly: With no baking required, you’ll find this recipe perfect for busy days or spontaneous get-togethers.
Crowd-Pleaser: Their adorable design and rich flavors make them a sure hit with guests of all ages, whether it’s a holiday party or a family game night.
Versatile Treats: Feel free to personalize them! Swap out strawberries for other fruits or try chocolate frosting for a unique twist.
Time-Saving Option: Make the cream cheese frosting in advance and store it in the fridge, making the assembly a breeze and giving you more time to enjoy your company! If you love easy, delightful desserts, check out our Pumpkin Brownies Decadent or refreshing Watermelon Popsicles for more magical treats!

Brownie Bite Gnomes Ingredients

• Gather these delightful components to create your own whimsical treats!

For the Brownie Base

  • Brownie Bites – Store-bought or homemade brownie bites can be used for a rich fudgy foundation.

For the Frosting

  • Cream Cheese Frosting – This sweet addition adds a creamy texture and can be made ahead for convenience.

For the Gnome Hats

  • Fresh Strawberries – Choose firm strawberries for the perfect gnome hat shape, adding freshness and color to each treat.

For the Gnome Noses

  • Reese’s Puffs Cereal – This crunchy treat serves as the gnome's nose, but Cheerios or mini chocolate chips work as tasty substitutes.

Optional Decorative Touches

  • Mini Chocolate Chips – Sprinkle around the serving plate for an extra visual appeal that enhances your holiday spread.
  • Cocoa Powder – Dust lightly over the assembled gnomes for added flavor and an aesthetic finish.

Embrace your creativity and let the magic of these Brownie Bite Gnomes shine during your festive gatherings!

Step‑by‑Step Instructions for Brownie Bite Gnomes

Step 1: Prepare Strawberries
Begin by washing and drying your fresh strawberries thoroughly. Trim the tops to create a gnome hat shape, which means cutting less than a quarter off the top. Make sure the strawberries stand upright by cutting a small slice at the bottom if needed. This will allow your gnome hats to sit securely on the brownie bites later.

Step 2: Pipe Frosting
Using a piping bag fitted with a star tip, fill it with your prepared cream cheese frosting. Apply the frosting generously on each brownie bite, creating a cascading beard effect that mimics the whimsical charm of gnomes. Aim to cover the top two-thirds of the brownie bite completely, leaving room at the base for stability and visual appeal.

Step 3: Assemble Gnomes
Carefully place a trimmed strawberry on top of each frosted brownie bite to form the gnome's hat. Gently push a Reese’s Puffs cereal piece into the frosting below the strawberry, acting as the gnome’s nose. Ensure each piece is secure and visually cohesive to maintain the adorable appearance of your Brownie Bite Gnomes.

Step 4: Chill
After assembling all your gnomes, it's essential to refrigerate them for at least one hour. This chilling period allows the frosting to set and the flavors to meld, ensuring that your Brownie Bite Gnomes hold their shape and look fabulous when served at your gathering.

Step 5: Enhance Presentation
Before serving, consider sprucing up your presentation. Optionally sprinkle mini chocolate chips around the serving plate for a festive touch, or dust the assembled gnomes lightly with cocoa powder for added flavor and visual flair. This final step will elevate your Brownie Bite Gnomes from delightful to dazzling!

Storage Tips for Brownie Bite Gnomes

Fridge: Store any leftover Brownie Bite Gnomes in an airtight container in the refrigerator for up to 2 days to maintain freshness and prevent sogginess.

Make-Ahead: You can make the cream cheese frosting a day in advance and keep it in the fridge. This saves time on assembly day and keeps your treats fluffy.

Avoid Freezing: It’s best not to freeze the decorated gnomes, as the strawberries and frosting won’t retain their texture or appearance once thawed.

Wrap Brownie Bites: If preparing brownie bites in advance, wrap them tightly in plastic wrap or store in an airtight container to keep them moist until you’re ready to assemble.

Make Ahead Options

These Brownie Bite Gnomes are perfect for meal prep, allowing you to enjoy your festivities without the last-minute rush! You can prepare the cream cheese frosting up to 24 hours in advance; simply store it in an airtight container in the refrigerator to keep it fresh and creamy. Additionally, the brownie bites can be made ahead, and if using store-bought ones, they can be kept well for up to 3 days at room temperature. For optimal quality, assemble the gnomes just before serving to prevent the strawberries from losing their firmness. Once ready to serve, simply pipe the frosting, top with strawberries, and finish with Reese's Puffs for those charming noses. Enjoy stress-free celebrations with this easy make-ahead option!

What to Serve with Brownie Bite Gnomes?

Elevate your dessert experience with delightful pairings that complement these whimsical treats!

  • Creamy Vanilla Ice Cream: The smooth, cold ice cream perfectly contrasts the warm, fudgy brownie bite, creating a delightful harmony of flavors and temperatures.

  • Fresh Fruit Salad: A refreshing mix of seasonal fruits adds brightness and a burst of flavor that balances the richness of the gnomes.

  • Whipped Cream: Light and airy, whipped cream brings an extra layer of indulgence, making every bite creamy and exceptional.

  • Chocolate Milk: This sweet, nostalgic drink pairs beautifully with the chocolatey goodness of the Brownie Bite Gnomes, enveloping you in a comforting cocoa embrace.

  • Coffee or Espresso: A warm cup of coffee enhances the dessert's chocolate flavors, making it an ideal companion for a cozy afternoon gathering.

  • Nutty Granola: Adding a sprinkle of crunchy granola delivers a satisfying texture contrast that enhances the overall dessert experience.

  • Spiced Apple Cider: Embrace the festive spirit by serving hot spiced apple cider. Its warming spices and sweetness harmonize beautifully with the gnomes!

  • Chocolate Dipping Sauce: A decadent drizzle of warm chocolate takes these gnomes to new heights, inviting guests to indulge in the chocolate extravaganza.

Expert Tips for Brownie Bite Gnomes

  • Chill for Stability: Always refrigerate the assembled gnomes for at least one hour to maintain their shape and keep the frosting from melting.

  • Fresh Strawberries Matter: Choose firm, ripe strawberries and trim them properly for gnome hats. Overripe strawberries can collapse and ruin the presentation.

  • Frosting Consistency: Make sure your cream cheese frosting is at room temperature for easy piping. Cold frosting can be difficult to spread, affecting your Brownie Bite Gnomes' aesthetic.

  • Avoid Overstuffing: Be careful not to overfill the piping bag with frosting at once. This can lead to pressure buildup and messy results while decorating.

  • Play with Texture: If you want an added crunch, consider mixing some finely chopped nuts into the frosting or using crushed graham crackers on top for a delightful twist!

Brownie Bite Gnomes Variations

Get ready to sprinkle some personal magic into your Brownie Bite Gnomes with these delightful twists that will tickle your taste buds!

  • Fruity Hats: Swap out strawberries for raspberries or blueberries for a pop of color and a burst of tangy flavor. Each bite becomes a new adventure for the palate!

  • Chocolate Lovers: Use chocolate frosting instead of cream cheese to add a rich, velvety layer to your gnomes. The combination of brownie and chocolate frosting is simply irresistible.

  • Nutty Texture: Add a handful of chopped nuts to the frosting for an extra crunch that complements the soft brownie base. It enhances both texture and flavor while keeping things interesting!

  • Minty Freshness: Mix in some peppermint extract into the frosting for a refreshing aftertaste. This is a festive touch that’s delightful for holiday gatherings or cozy winter nights.

  • Spiced Wonder: Add a dash of cinnamon or pumpkin spice to the brownie mix for a warm, inviting flavor that evokes the essence of the season. You won't be able to resist these aromatic treats!

  • Crunchy Alternative: If you're out of Reese’s Puffs, try using mini chocolate chips or even crushed graham crackers for the gnome's nose. They'll create a lovely contrast of textures without losing the fun!

  • Fruit-filled Surprise: Tuck a small piece of banana or a dollop of jam under the strawberry hat for a fruity surprise, making each bite bursting with flavor! It’s a delightful twist that'll amaze your guests.

Feel free to play around, and don’t forget to pair your enchanting gnomes with a scoop of ice cream or a cup of warm coffee for a festive dessert spread that’ll leave everyone smiling. For more delightful ideas, explore our Crock Pot Chicken or check out the refreshing Watermelon Popsicles. Let your creativity shine in the kitchen!

Brownie Bite Gnomes Recipe FAQs

What kind of strawberries should I use for the gnome hats?
Absolutely! Select firm, ripe strawberries to create the perfect gnome hat shape. Look for berries that are vibrant in color and free of dark spots. Trim less than a quarter off the top to create the hat shape while ensuring they stand upright. If needed, you can slice a small bit off the bottom to stabilize them better.

How should I store leftover Brownie Bite Gnomes?
Very simply! Store any leftover Brownie Bite Gnomes in an airtight container in the refrigerator for up to 2 days. Keeping them chilled will help maintain their freshness and avoid sogginess, making sure they’re ready to delight whenever cravings hit!

Can I make the cream cheese frosting in advance?
Yes, you can! I often recommend making the cream cheese frosting a day ahead and storing it in the fridge. To ensure it's ready for piping, let it sit at room temperature for about 15-30 minutes before using. This way, assembly day will be a breeze without sacrificing flavor and texture!

Is it okay to freeze decorated Brownie Bite Gnomes?
It's best to avoid freezing the decorated gnomes. The strawberries and cream cheese frosting may not hold up well once thawed, which can lead to a mushy texture and a less appealing presentation. Instead, assemble and enjoy them fresh for that delightful crunch!

What can I do if my frosting is too stiff to pipe?
If your frosting isn't cooperating, don't fret! Start by letting it warm up slightly at room temperature for about 10-15 minutes. If it’s still too stiff, you can add a splash of milk, about a teaspoon at a time, and mix it in until you reach your desired consistency. This will make piping a lot easier and help achieve that beautiful gnome beard effect!

Are there any dietary considerations for Brownie Bite Gnomes?
Yes, absolutely! The Brownie Bite Gnomes are vegetarian-friendly, but you’ll want to check the specific ingredients in your brownie bites and cream cheese frosting for allergens. If you're accommodating different dietary restrictions, consider using gluten-free brownie bites, and for a nut-free option, ensure the frosting does not contain any nut-based ingredients. Happy gnome-making!

Brownie Bite Gnomes

Brownie Bite Gnomes: Whimsical No-Bake Treats to Delight

Brownie Bite Gnomes are whimsical no-bake treats that blend fudgy brownies, creamy frosting, and playful strawberries.
Print Recipe Pin Recipe
Prep Time 20 minutes mins
Chilling Time 1 hour hr
Total Time 1 hour hr 20 minutes mins
Servings: 12 gnomes
Course: Dessert
Cuisine: American
Calories: 150
Ingredients Equipment Method Nutrition Notes

Ingredients
  

For the Brownie Base
  • 12 pieces Brownie Bites Store-bought or homemade
For the Frosting
  • 1 cup Cream Cheese Frosting Can be made ahead
For the Gnome Hats
  • 12 pieces Fresh Strawberries Choose firm strawberries
For the Gnome Noses
  • 1 cup Reese’s Puffs Cereal Can substitute with Cheerios or mini chocolate chips
Optional Decorative Touches
  • 1/2 cup Mini Chocolate Chips For visual appeal
  • 2 tablespoons Cocoa Powder For dusting

Equipment

  • piping bag
  • Star tip

Method
 

Step-by-Step Instructions
  1. Begin by washing and drying your fresh strawberries thoroughly. Trim the tops to create a gnome hat shape.
  2. Using a piping bag fitted with a star tip, fill it with your prepared cream cheese frosting. Apply the frosting generously on each brownie bite.
  3. Carefully place a trimmed strawberry on top of each frosted brownie bite to form the gnome's hat. Gently push a Reese’s Puffs cereal piece into the frosting below the strawberry.
  4. After assembling all your gnomes, refrigerate them for at least one hour to allow the frosting to set and the flavors to meld.
  5. Before serving, consider sprinkling mini chocolate chips around the serving plate or dusting the assembled gnomes lightly with cocoa powder.

Nutrition

Serving: 1gnomeCalories: 150kcalCarbohydrates: 20gProtein: 2gFat: 8gSaturated Fat: 4gCholesterol: 20mgSodium: 50mgPotassium: 50mgFiber: 1gSugar: 10gVitamin A: 5IUVitamin C: 15mgCalcium: 2mgIron: 4mg

Notes

These treats are perfect for festive gatherings and are easy to customize with various fruits and toppings.

Tried this recipe?

Let us know how it was!

Citrus Orange Cranberry Muffins for Your Best Breakfast Ever

December 16, 2025 by Grace Snow Leave a Comment

The minute I catch a whiff of freshly baked muffins, my heart skips a beat. There’s something incredibly inviting about the aroma of citrus and warm spices filling the kitchen, especially when it comes to these delightful Citrus Orange Cranberry Muffins. They combine the bright, zesty flavor of oranges with the tartness of cranberries, creating a breakfast experience that’s both refreshing and comforting. Best of all, these muffins require just one bowl and can be whipped up in no time—making them perfect for those hectic mornings or leisurely weekend brunches. If you’re looking for a make-ahead option to brighten your breakfast table, you’re in for a treat. Are you ready to embark on a citrusy adventure? Let’s dive into this easy recipe!

Why Are These Muffins a Must-Try?

Simplicity is key: With just one bowl, these Citrus Orange Cranberry Muffins can be whipped up in a flash, making them perfect for busy mornings. Bursting with flavor, the combination of tart cranberries and zesty orange creates a delightful breakfast experience. Versatility shines here; feel free to mix in your favorite nuts or substitute fruits. Make-ahead friendly, these muffins stay fresh for days and freeze beautifully, ensuring you’re always ready for a delicious treat. Whether paired with cream cheese or enjoyed plain, they’re bound to impress your family and friends!

Citrus Orange Cranberry Muffin Ingredients

These delicious Citrus Orange Cranberry Muffins are as simple as they are scrumptious!

For the Muffins

  • All-Purpose Flour – Provides the structure; you can use whole wheat flour for a healthier twist.
  • White Sugar – Adds sweetness; swap with coconut sugar or honey, just reduce the liquid slightly.
  • Baking Powder – Acts as a leavening agent; ensure it's fresh to achieve the best rise.
  • Baking Soda – Enhances browning and texture; if you don't have any, baking powder can substitute.
  • Eggs – Acts as a binder while keeping the muffin moist; for vegan options, try flaxseed meal instead.
  • Vegetable Oil or Unsalted Butter – Contributes to moisture; applesauce can be used for a lighter substitute.
  • Milk – Adds flavor and moisture; non-dairy milk works wonderfully as an alternative.
  • Vanilla Extract – Enhances the overall flavor; almond extract can bring a unique quality instead.
  • Orange Extract (optional) – Intensifies the citrus flavor; feel free to leave it out if you don’t have any.
  • Grated Orange Zest – Brings brightness; avoid using juice as it changes the muffin's moisture content.
  • Cranberries (Fresh or Frozen) – Provides tartness and texture; blueberries can be an excellent substitute if needed.
  • Coarse Sparkling Sugar – Offers a lovely crunchy topping; regular sugar works as well or simply skip it.

Bite into these muffins, and experience the zesty delight that makes them a breakfast essential. Perfectly moist and bursting with flavor, they will surely become a family favorite!

Step‑by‑Step Instructions for Citrus Orange Cranberry Muffins

Step 1: Prepare the Dry Ingredients
In a large bowl, whisk together the all-purpose flour, white sugar, baking powder, and baking soda until the mixture is smooth and lump-free, taking about 1-2 minutes. This flour blend will create the delightful structure for your Citrus Orange Cranberry Muffins, so ensure it’s well incorporated before moving forward.

Step 2: Combine the Wet Ingredients
Add the eggs, vegetable oil or melted butter, milk, vanilla extract, orange extract, and grated orange zest to the dry ingredients. Mix gently until just combined, avoiding over-mixing to keep the muffins light and fluffy. This process should take about 1 minute, and you’ll want to see a few small streaks of flour remaining for perfect texture.

Step 3: Incorporate the Cranberries
Gently fold in the cranberries, whether fresh or frozen, using a spatula to ensure they are evenly distributed throughout the batter without causing too much bleeding. This step is key as it preserves the beautiful balance of sweet and tart in your Citrus Orange Cranberry Muffins, leaving them with bursts of flavor.

Step 4: Prepare the Muffin Tin
Preheat your oven to 350°F (175°C) and prepare a muffin tin by greasing each cup with non-stick spray or lining with paper liners. This will prevent your muffins from sticking, allowing them to release easily after baking. Make sure the oven is hot before moving on to the next step for optimal baking.

Step 5: Fill the Muffin Cups
Divide the batter evenly among the prepared muffin cups, filling each about three-quarters full. Use a cookie scoop or a spoon to ensure even portions and a lovely domed shape when they bake. The batter's vibrant orange and cranberry colors will make your Citrus Orange Cranberry Muffins look simply inviting.

Step 6: Add Topping
Sprinkle coarse sparkling sugar over the top of each muffin before baking, which will create a delightful, crunchy crust. This extra touch adds both texture and a bit of sparkle, making your muffins look extra special and ready to impress at breakfast or brunch.

Step 7: Bake to Perfection
Place the muffin tin in the preheated oven and bake for 22-25 minutes, or until the tops are golden brown and a toothpick inserted into the center of a muffin comes out clean. Avoid opening the oven door in the first 15 minutes to help the muffins rise beautifully.

Step 8: Cool and Serve
Once baked, remove the muffin tin from the oven and allow the muffins to cool in the tin for 5-10 minutes. After they have cooled slightly, transfer them to a wire rack to cool completely. This step will keep them moist and enhance the flavors, making your Citrus Orange Cranberry Muffins irresistible!

Citrus Orange Cranberry Muffins Variations

Feel free to experiment and make these Citrus Orange Cranberry Muffins your own with exciting twists!

  • Whole Wheat: Substitute all-purpose flour with whole wheat flour for a heartier muffin that's still oh-so-delicious. You’ll get extra fiber without sacrificing taste.

  • Vegan Delight: Replace eggs with flaxseed meal and use non-dairy milk for a delightful vegan version. This keeps the muffins moist and fluffy, just like the original.

  • Nutty Addition: Mix in chopped walnuts or pecans for added crunch and flavor. The nutty aroma blends beautifully with the citrus, creating a taste sensation.

  • Citrus Swirl: Swap orange zest for lemon or lime zest for a bright spin on the classic flavor. The zesty tang from different citrus fruits adds a refreshing twist!

  • Mixed Berries: Use fresh or frozen blueberries instead of cranberries for a sweet and juicy variation. Each bite will be a burst of berry goodness alongside that aromatic citrus.

  • Dried Fruit Fusion: Trade cranberries for dried apricots or cherries for a delightful new texture. Dried fruits bring a chewier element that's sure to please your taste buds.

  • Spice It Up: Add a sprinkle of cinnamon or nutmeg to the batter for cozy, warm flavors. A hint of spice elevates the muffins, making them perfect for chilly mornings.

  • Zesty Glaze: Drizzle a simple orange or lemon glaze on top after baking for a sweet, citrusy finish. This adds a lovely shine and extra sweetness that will have everyone reaching for seconds!

If you love these variations, you might also enjoy my Breakfast Egg Muffins as a perfect complement to start your day right!

Storage Tips for Citrus Orange Cranberry Muffins

Room Temperature: Store your muffins in an airtight container at room temperature for up to 3 days to maintain their moisture and flavor.

Fridge: If you want to keep them longer, store in the fridge for up to a week. Let them come to room temperature before serving for the best taste.

Freezer: For longer storage, freeze individually wrapped muffins for up to 3 months. Thaw at room temperature or warm in the microwave for a quick breakfast treat.

Reheating: To enjoy them warm, reheat in the microwave for 10-15 seconds. This will restore their fluffy texture and enhance the delicious orange cranberry flavor.

What to Serve with Citrus Orange Cranberry Muffins?

Transform your breakfast or brunch into a delightful occasion with these perfect pairings!

  • Creamy Butter: A classic choice, spreading some rich, creamy butter on these muffins provides a luscious contrast to their zesty flavor.
  • Fresh Fruit Salad: Bright, sweet fruits add a refreshing touch, complementing the tartness of the cranberries while giving you a burst of juicy goodness.

Imagine enjoying these muffins alongside a vibrant bowl of fresh berries, oranges, and grapes. It creates a colorful presentation that appeals to both the eyes and the taste buds.

  • Scrambled Eggs: Silky scrambled eggs introduce a savory element that balances the sweetness of the muffins beautifully, making it a perfect savory-sweet morning combo.
  • Crispy Bacon: The crispy, salty bite of bacon enhances every bite of the muffins, providing an irresistible contrast to the sweet and tart flavor profile.

Pairing your Citrus Orange Cranberry Muffins with these options will ensure a breakfast feast that leaves everyone inspired and satisfied. Enjoy!

  • Chai Tea: This spiced tea brings warmth and depth, highlighting the flavors of the muffins and creating a cozy experience any time of day.
  • Maple Syrup Drizzle: A light drizzle of pure maple syrup adds a sweet finishing touch that perfectly harmonizes with the orange and cranberry flavors.

Make Ahead Options

These Citrus Orange Cranberry Muffins are perfect for meal prep lovers! You can prepare the dry ingredients (flour, sugar, baking powder, and baking soda) and store them in an airtight container for up to 3 days to save time during busy mornings. Additionally, you can also mix the wet ingredients and refrigerate them up to 24 hours in advance—this will help enhance the flavors while maintaining quality. When you’re ready to bake, just combine the wet and dry ingredients, gently fold in the cranberries, and proceed with baking as usual. This approach allows you to enjoy freshly baked muffins with minimal effort, making your mornings that much brighter!

Expert Tips for Citrus Orange Cranberry Muffins

  • Mixing Matters: Avoid over-mixing the batter; just stir until combined to keep your muffins light and fluffy.

  • Cranberry Prep: Toss cranberries in a tablespoon of flour before adding to the batter. This helps prevent them from sinking during baking.

  • Don't Peek: Resist the urge to open the oven for at least the first 15 minutes to maintain the muffins' rise and texture.

  • Cool Down: Allow muffins to cool for a bit in the pan before transferring them to a wire rack, ensuring they stay moist and delicious.

  • Storage Savvy: If making ahead, store them in an airtight container at room temperature or freeze them individually for easy access to your Citrus Orange Cranberry Muffins later.

Citrus Orange Cranberry Muffins Recipe FAQs

How do I choose ripe ingredients for my muffins?
When selecting cranberries, look for firm, plump berries without dark spots or shriveling. For the oranges, choose ones that feel heavy for their size and have a bright, smooth skin. Fresh, quality ingredients will significantly enhance the flavor and texture of your Citrus Orange Cranberry Muffins.

How should I store my muffins after baking?
To keep your Citrus Orange Cranberry Muffins fresh, store them in an airtight container at room temperature for up to 3 days. If you want to keep them longer, place them in the fridge for up to a week. Remember to allow them to come to room temperature before serving for the best taste experience!

Can I freeze my Citrus Orange Cranberry Muffins? How?
Absolutely! Freeze your muffins individually by wrapping each one in plastic wrap and placing them in a freezer-safe bag or container for up to 3 months. When you're ready to enjoy, simply thaw them at room temperature or pop them in the microwave for about 10-15 seconds for a fresh-out-of-the-oven taste.

What if my muffins sink in the middle while baking?
If your Citrus Orange Cranberry Muffins sink, it’s often due to overmixing the batter or not having enough leavening agent. Make sure to mix until just combined and check that your baking powder and soda are fresh. If they don't rise properly during baking, try not to open the oven door until the first 15 minutes to allow them to set.

Are these muffins suitable for special diets?
Yes, definitely! You can make them vegan by replacing eggs with flaxseed meal (1 tablespoon of flaxseed mixed with 2.5 tablespoons water per egg) and using non-dairy milk. For those with gluten sensitivities, substituting with gluten-free all-purpose flour can still yield delicious Citrus Orange Cranberry Muffins, giving everyone a chance to indulge in this delightful treat.

Can I use different fruits instead of cranberries?
Very! If cranberries aren’t available, feel free to swap them for blueberries or even diced apples for a different twist. Just remember that using fresh fruits may affect the moisture of your muffins, so adjust baking times if necessary. Enjoy exploring different flavors!

Citrus Orange Cranberry Muffins

Citrus Orange Cranberry Muffins for Your Best Breakfast Ever

Delightful Citrus Orange Cranberry Muffins combine zesty orange with tart cranberries for a refreshing breakfast.
Print Recipe Pin Recipe
Prep Time 10 minutes mins
Cook Time 25 minutes mins
Cooling Time 10 minutes mins
Total Time 45 minutes mins
Servings: 12 muffins
Course: Breakfast
Cuisine: American
Calories: 180
Ingredients Equipment Method Nutrition Notes

Ingredients
  

For the Muffins
  • 2 cups All-Purpose Flour Can use whole wheat flour for a healthier twist.
  • 3/4 cup White Sugar Can swap with coconut sugar or honey, reduce liquid slightly.
  • 2 teaspoons Baking Powder Ensure it's fresh for the best rise.
  • 1 teaspoon Baking Soda Can substitute with baking powder if needed.
  • 2 large Eggs For vegan options, try flaxseed meal instead.
  • 1/2 cup Vegetable Oil or Unsalted Butter Applesauce can be used as a lighter substitute.
  • 1 cup Milk Non-dairy milk works well as an alternative.
  • 1 teaspoon Vanilla Extract Almond extract can enhance the flavor.
  • 1 teaspoon Orange Extract Optional, intensifies citrus flavor.
  • 1 tablespoon Grated Orange Zest Avoid using juice as it changes moisture content.
  • 1 cup Cranberries (Fresh or Frozen) Blueberries can be a substitute.
  • 1 tablespoon Coarse Sparkling Sugar For topping, can use regular sugar or skip.

Equipment

  • Muffin tin
  • Mixing Bowl
  • Whisk
  • Spatula

Method
 

Step-by-Step Instructions for Citrus Orange Cranberry Muffins
  1. In a large bowl, whisk together the all-purpose flour, white sugar, baking powder, and baking soda until the mixture is smooth and lump-free, taking about 1-2 minutes.
  2. Add the eggs, vegetable oil or melted butter, milk, vanilla extract, orange extract, and grated orange zest to the dry ingredients. Mix gently until just combined.
  3. Gently fold in the cranberries using a spatula to ensure they are evenly distributed throughout the batter.
  4. Preheat your oven to 350°F (175°C) and prepare a muffin tin by greasing each cup.
  5. Divide the batter evenly among the prepared muffin cups, filling each about three-quarters full.
  6. Sprinkle coarse sparkling sugar over the top of each muffin before baking.
  7. Place the muffin tin in the preheated oven and bake for 22-25 minutes or until golden brown.
  8. Once baked, remove the muffin tin from the oven and allow the muffins to cool in the tin for 5-10 minutes.

Nutrition

Serving: 1muffinCalories: 180kcalCarbohydrates: 30gProtein: 3gFat: 7gSaturated Fat: 1gCholesterol: 25mgSodium: 180mgPotassium: 100mgFiber: 1gSugar: 8gVitamin C: 4mgCalcium: 3mgIron: 5mg

Notes

Avoid over-mixing and ensure cranberries are tossed in flour before adding to prevent sinking.

Tried this recipe?

Let us know how it was!

Maple Donut Bars That Make Mornings Irresistibly Sweet

December 16, 2025 by Grace Snow Leave a Comment

The smell of warm maple syrup drifting through the kitchen instantly transports me to lazy weekend mornings, when sweet indulgence feels just right. If you’re craving a delicious yet simple treat, my Soft Baked Maple Donut Bars are just what you need. These delightful bars combine a soft, cake-like base with a sticky maple glaze that’s sure to satisfy your sweet tooth. Perfect for brunch or an afternoon snack, they’re incredibly beginner-friendly and require minimal equipment, making them a hit for both new bakers and kitchen pros alike. Plus, you can easily adapt the recipe to suit your dietary preferences, ensuring everyone can enjoy a taste of homey goodness. Ready to whip up some nostalgic magic in your kitchen? Let’s dive into this recipe for maple perfection!

Why Are Maple Donut Bars Special?

Irresistible sweetness: The fusion of maple syrup and powdered sugar creates a glaze that’s simply heavenly, making these bars a beloved treat.

Beginner-friendly: Whipping up these donuts is a breeze, perfect for those just stepping into baking. You’ll impress loved ones with minimal effort!

Perfect for any occasion: Whether for brunch, a sweet snack, or even dessert, these bars fit the bill elegantly.

Versatile flavors: Feel free to experiment; swap out maple for cinnamon or chocolate for exciting variations! Explore options like Maple Roasted Sweet for another sweet inspiration.

Make-ahead convenience: Bake ahead and store for those busy mornings—you can easily savor these delightful bars fresh, warm, and ready to enjoy!

Maple Donut Bars Ingredients

• Get ready to create sweet magic!

For the Bars

  • 2 cups all-purpose flour – Provides structure and a tender crumb; swap with whole wheat flour for a healthier twist.
  • 1/2 teaspoon baking soda – Essential for helping the bars rise.
  • 1/2 teaspoon baking powder – Works with baking soda for a light, airy texture.
  • 1/4 teaspoon salt – Enhances the overall flavor of your Maple Donut Bars.
  • 1/2 teaspoon ground nutmeg – Adds warm, inviting spices that complement the maple beautifully.
  • 1/2 cup granulated sugar – Sweetens the dough; substitute with coconut sugar for a lower glycemic option.
  • 1/4 cup unsalted butter, softened – Contributes to richness and moisture; can be replaced with vegan butter for dairy-free options.
  • 1 large egg – Acts as a binder; use a flax egg for a vegan alternative.
  • 1/2 cup buttermilk – Provides the necessary acidity for tenderness; substitute with milk mixed with vinegar for a buttermilk alternative.
  • 1 teaspoon vanilla extract – Enhances the overall flavor profile.

For the Maple Glaze

  • 1/2 cup powdered sugar – Crucial for that sweet glaze.
  • 2 tablespoons maple syrup – Gives the bars their signature maple flavor; adjust for a more intense sweetness.
  • 1/2 teaspoon maple extract – Intensifies the maple flavor; omitting it will tone it down significantly.
  • 1–2 tablespoons milk, as needed for glaze consistency – Adjust to reach your desired thickness for that luscious finish.

Step‑by‑Step Instructions for Maple Donut Bars

Step 1: Prepare Oven & Pan
Preheat your oven to 350°F (175°C) while you prepare your baking pan. Line a 9x9 inch baking pan with parchment paper or lightly grease it to ensure easy removal of your Maple Donut Bars once baked. This step is crucial for achieving a beautiful finish on your bars.

Step 2: Mix Dry Ingredients
In a large mixing bowl, whisk together 2 cups of all-purpose flour, 1/2 teaspoon of baking soda, 1/2 teaspoon of baking powder, 1/4 teaspoon of salt, and 1/2 teaspoon of ground nutmeg. Ensure there are no lumps in the flour to promote even rising. Set this bowl aside, ready for the next step in creating your delightful bars.

Step 3: Cream Butter & Sugar
In a separate bowl, use an electric mixer to beat 1/4 cup of softened unsalted butter and 1/2 cup of granulated sugar together until the mixture is light and fluffy—about 3-4 minutes. This whipping process incorporates air, which will make your Maple Donut Bars soft and tender, ensuring a delicious texture.

Step 4: Combine Wet Ingredients
To the creamed butter and sugar, add 1 large egg, 1 teaspoon of vanilla extract, and 1/2 cup of buttermilk. Mix until the wet ingredients are thoroughly combined and smooth. This mixture forms the rich base of your donut bars and infuses them with incredible flavor.

Step 5: Incorporate Dry Ingredients
Gradually add the dry mixture to the wet ingredients in your large bowl, stirring gently until just combined. Be careful not to overmix—the batter should be slightly lumpy for the best texture in your Maple Donut Bars. This is where the flavors meld together beautifully.

Step 6: Bake
Pour the batter into the prepared baking pan, making sure it's evenly spread. Bake in the preheated oven for 18-20 minutes, or until a toothpick inserted in the center comes out clean. The top should be lightly golden, indicating that your Maple Donut Bars are baking to perfection.

Step 7: Cool
After baking, remove the pan from the oven and allow the bars to cool in the pan for about 10 minutes. Once slightly cooled, transfer the bars to a wire rack to cool completely. This step helps maintain their moisture and texture, making the final product even more enjoyable.

Step 8: Prepare Glaze
In a medium bowl, whisk together 1/2 cup of powdered sugar, 2 tablespoons of maple syrup, 1/2 teaspoon of maple extract, and 1-2 tablespoons of milk until smooth and glossy. Adjust the amount of milk for your desired glaze consistency. This glossy topping is what makes your Maple Donut Bars irresistible.

Step 9: Glaze Bars
Once the bars are completely cooled, generously spread or drizzle the prepared glaze over the top. Let it set for a few minutes for a lovely finish. This final touch will add that sweet maple flavor that will make your Maple Donut Bars truly delightful.

Storage Tips for Maple Donut Bars

Room Temperature: Store the Maple Donut Bars in an airtight container at room temperature for up to 2 days to keep them soft and flavorful.

Fridge: If you want to extend their freshness, refrigerate the bars in an airtight container for up to 5 days. Just remember, they may lose that freshly baked warmth!

Freezer: For longer storage, freeze the unglazed Maple Donut Bars for up to 1 month. Make sure to wrap them tightly in plastic wrap, and glaze them after thawing for the best taste.

Reheating: To enjoy warm, simply reheat individual bars in the microwave for about 10-15 seconds. Enjoy them fresh out of the oven feel again!

Maple Donut Bars Variations & Substitutions

Customize your Maple Donut Bars with these fun and flavorful twists! Enjoy exploring different tastes and textures that will make this recipe uniquely yours.

  • Dairy-Free: Substitute unsalted butter with vegan butter and buttermilk with plant-based milk mixed with vinegar for a tasty dairy-free version.

  • Sugar-Free: Replace granulated sugar with erythritol or monk fruit sweetener for a guilt-free treat suitable for those watching their sugar intake.

  • Whole Wheat: Use whole wheat flour instead of all-purpose flour for added fiber and a hearty texture. The nutty flavor enhances these delicious bars wonderfully!

  • Nutty Crunch: Add 1/2 cup of chopped walnuts or pecans to the batter for an added crunch and rich, nutty flavor that perfectly complements the sweetness.

  • Flavor Boost: Swap maple extract for almond or coconut extract to create a delightful twist for a more exotic flavor profile. You might also enjoy trying a cinnamon variation!

  • Fruit Infusion: Mix in 1/2 cup of diced apples or fresh blueberries into the batter for a burst of fruity goodness that brightens up each bite.

  • Spicy Kick: For a heat twist, add a pinch of cayenne pepper or a dash of black pepper to the glaze. This unexpected zing unlocks an exciting depth to the sweetness.

  • Chocolate Lovers: Drizzle melted dark chocolate over the glaze for a decadent topping that’s totally irresistible. This can elevate the sweetness even further and is a must for chocolate enthusiasts!

Let your imagination run wild, and consider pairing these bars with other delightful recipes, such as Maple Roasted Sweet potatoes for an even sweeter meal experience. Enjoy every bite of your uniquely crafted Maple Donut Bars!

What to Serve with Maple Donut Bars?

The warm aroma of freshly baked Maple Donut Bars is just the beginning of a delightful meal experience.

  • Coffee: A bold cup of coffee balances the sweetness of the bars, making for a perfect morning treat. The rich flavors enhance the maple notes beautifully.

  • Fresh Fruit Salad: A refreshing mix of seasonal fruits adds brightness, making for a well-rounded brunch alongside the indulgent bars. Their lightness contrasts deliciously with the bars' texture.

  • Whipped Cream: Light, airy whipped cream offers a dollop of decadence that pairs fantastically with maple flavors. Serve chilled for a delightful, creamy accompaniment.

  • Maple Pecan Ice Cream: A scoop of this creamy delight brings a luscious touch, enhancing the maple flavor and providing a delightful texture contrast with the soft bars.

  • Herbal Tea: A delicate cup of herbal tea introduces gentle flavors that envelop your senses, cooling off your palate after indulging in the sweet bars.

  • Maple Bacon: The saltiness of crispy bacon adds a savory crunch - a fantastic juxtaposition to the sweetness of the bars. The added maple essence can deepen the overall experience.

  • Caramel Drizzle: For an extra touch of sweetness, add a caramel sauce drizzle over each bar. The gooey texture brings richness to the table.

  • Yogurt Parfait: Layered yogurt, granola, and fruits create a fulfilling plate that balances health and indulgence with your sweet donut bars.

  • Sweet Wine: A chilled dessert wine complements the sweet flavors while offering a refreshing sip to accompany the treats.

  • Chocolate Espresso Cookies: A couple of these cookies alongside will satisfy those chocolate cravings, making for a delightful assortment of flavors on your plate.

Expert Tips for Maple Donut Bars

  • Proper Measurements: Always measure your flour carefully to avoid dry bars. Spoon it into the measuring cup and level it off for best results.

  • Oven Accuracy: Check your oven temperature with an oven thermometer to ensure perfect baking. An incorrect temperature can lead to over- or undercooked bars.

  • Avoid Overmixing: When combining dry and wet ingredients, stir until just combined. Overmixing can result in dense, tough Maple Donut Bars.

  • Gulp the Glaze: For the perfect glaze consistency, start with less milk and gradually add until you reach your desired thickness.

  • Flavor Boost: Feel free to experiment with extracts or add-ins like chocolate chips or nuts to customize your Maple Donut Bars to your taste!

Make Ahead Options

These Maple Donut Bars are perfect for meal prep, allowing you to enjoy their deliciousness even on busy mornings! You can prepare the batter up to 24 hours in advance by covering it tightly and refrigerating it to keep it fresh. Alternatively, you can bake the bars and store them, unglazed, at room temperature for up to 2 days or refrigerate for up to 5 days. For maximum freshness, consider freezing the unglazed bars for up to 1 month. When ready to serve, simply glaze them after thawing; they'll taste just as delightful as freshly baked. This make-ahead strategy saves time without sacrificing flavor, ensuring warm, homemade goodness whenever you need it!

Maple Donut Bars Recipe FAQs

How do I know if my ingredients are ripe or fresh?
Absolutely! For the best results in your Maple Donut Bars, be sure to use fresh ingredients. Check your flour for free of lumps or a rancid smell, and use fresh baking powder and baking soda; they should be effective for about 6 months after opening. Also, make sure your buttermilk is still good—look for any off smells or clumps.

What’s the best way to store Maple Donut Bars?
You can store the Maple Donut Bars in an airtight container at room temperature for up to 2 days, ensuring they stay soft and delicious. For maximum freshness, pop them in the refrigerator, where they can last for up to 5 days. Just don’t forget to keep them in an airtight container to avoid drying out!

Can I freeze Maple Donut Bars?
Very much! I often freeze unglazed Maple Donut Bars for up to 1 month. Just wrap them tightly in plastic wrap to protect them from freezer burn. When you’re ready to enjoy, thaw them at room temperature, then glaze them for that freshly made taste.

What should I do if my bars come out too dry?
If your Maple Donut Bars are a bit dry, this could be due to too much flour or overmixing the batter. To adjust for next time, ensure you’re measuring flour properly—spooning it into the measuring cup and leveling it off. Be careful not to overmix after adding dry ingredients; you want just a few lumps for tenderness.

Are there any dietary considerations for Maple Donut Bars?
Of course! These bars are easily customizable. For a dairy-free option, substitute the butter with vegan butter and use almond milk or a non-dairy milk with vinegar instead of buttermilk. If you're considering allergies, make sure to check for gluten in your flour or opt for a gluten-free all-purpose blend.

How long can I keep glazed Maple Donut Bars?
I recommend consuming glazed Maple Donut Bars within 2 days if left at room temperature, as the glaze may become sticky or harden over time. If you find you have leftovers, store them in the fridge, and enjoy them within 5 days for the best flavor and texture. Just remember: the sooner, the sweeter!

Maple Donut Bars

Maple Donut Bars That Make Mornings Irresistibly Sweet

Enjoy these Maple Donut Bars, a sweet treat perfect for brunch or snacks.
Print Recipe Pin Recipe
Prep Time 20 minutes mins
Cook Time 20 minutes mins
Cooling Time 10 minutes mins
Total Time 50 minutes mins
Servings: 12 bars
Course: Dessert
Cuisine: American
Calories: 200
Ingredients Equipment Method Nutrition Notes

Ingredients
  

For the Bars
  • 2 cups all-purpose flour or whole wheat flour for healthier twist
  • 1/2 teaspoon baking soda
  • 1/2 teaspoon baking powder
  • 1/4 teaspoon salt
  • 1/2 teaspoon ground nutmeg
  • 1/2 cup granulated sugar or coconut sugar for lower glycemic
  • 1/4 cup unsalted butter, softened or vegan butter for dairy-free
  • 1 large egg or flax egg for vegan alternative
  • 1/2 cup buttermilk or milk mixed with vinegar
  • 1 teaspoon vanilla extract
For the Maple Glaze
  • 1/2 cup powdered sugar
  • 2 tablespoons maple syrup adjust for sweetness
  • 1/2 teaspoon maple extract omit for less intensity
  • 1–2 tablespoons milk as needed for glaze consistency

Equipment

  • 9x9-inch baking pan
  • large mixing bowl
  • Electric mixer
  • wire rack

Method
 

Step-by-Step Instructions
  1. Preheat your oven to 350°F (175°C). Line or grease a 9x9 inch baking pan.
  2. In a large mixing bowl, whisk together dry ingredients: flour, baking soda, baking powder, salt, and nutmeg.
  3. In a separate bowl, beat softened butter and sugar until light and fluffy, about 3-4 minutes.
  4. Add egg, vanilla extract, and buttermilk to the butter-sugar mixture and mix until smooth.
  5. Gradually incorporate the dry mixture into the wet ingredients, mixing gently until just combined.
  6. Pour the batter into the prepared pan and bake for 18-20 minutes, or until a toothpick comes out clean.
  7. Allow the bars to cool in the pan for 10 minutes, then transfer to a wire rack to cool completely.
  8. Prepare the glaze by whisking together powdered sugar, maple syrup, maple extract, and milk until smooth.
  9. Spread or drizzle the glaze over the cooled bars and let it set before serving.

Nutrition

Serving: 1barCalories: 200kcalCarbohydrates: 30gProtein: 2gFat: 8gSaturated Fat: 5gPolyunsaturated Fat: 0.5gMonounsaturated Fat: 2.5gCholesterol: 32mgSodium: 150mgPotassium: 120mgFiber: 1gSugar: 10gVitamin A: 250IUCalcium: 50mgIron: 1mg

Notes

Ensure proper measurements and oven accuracy for best results. Experiment with flavors to customize your donut bars.

Tried this recipe?

Let us know how it was!
  • « Previous Page
  • 1
  • …
  • 112
  • 113
  • 114
  • 115
  • 116
  • …
  • 217
  • Next Page »

Welcome!

Hi, I’m Grace, a Sydney-based home cook with a passion for bold flavors and trending ingredients. Whether you’re a busy beginner or a seasoned foodie, you’ll find dishes here that are fresh, fun, and full of flavor.

More about me

Popular Recipes

  • Flavor-Packed Chicken Torta Sandwich
    Mouthwatering Flavor-Packed Chicken Torta Sandwich to Savor
  • Chocolate Cake Pops
    Delicious Chocolate Cake Pops That Wow Every Dessert Lover
  • Caribbean-Style Beef Stew with Rice
    Caribbean-Style Beef Stew with Rice That Warms Your Soul
  • Healthy Crockpot Beef Stew
    Healthy Crockpot Beef Stew for Cozy Weeknight Dinners

Footer

↑ back to top

About

  • Privacy Policy
  • Disclaimer
  • Terms & Conditions

Newsletter

  • Sign Up! for emails and updates

Contact

  • About me
  • Contact me

Copyright © 2025 TastyTrendIngredients