tastytrendingredients

  • Home
  • Recipes
    • Appetizers
    • Breakfast
    • Dessert
    • Dinner
    • Drinks
    • Salads
    • Snacks
    • Soups
  • About me
  • Contact me
menu icon
go to homepage
  • Home
  • Recipes
    • Appetizers
    • Breakfast
    • Dessert
    • Dinner
    • Drinks
    • Salads
    • Snacks
    • Soups
  • About me
  • Contact me
search icon
Homepage link
  • Home
  • Recipes
    • Appetizers
    • Breakfast
    • Dessert
    • Dinner
    • Drinks
    • Salads
    • Snacks
    • Soups
  • About me
  • Contact me
×

Savory Chicken Pillows: Comforting Bites of Creamy Goodness

February 8, 2026 by Grace Snow Leave a Comment

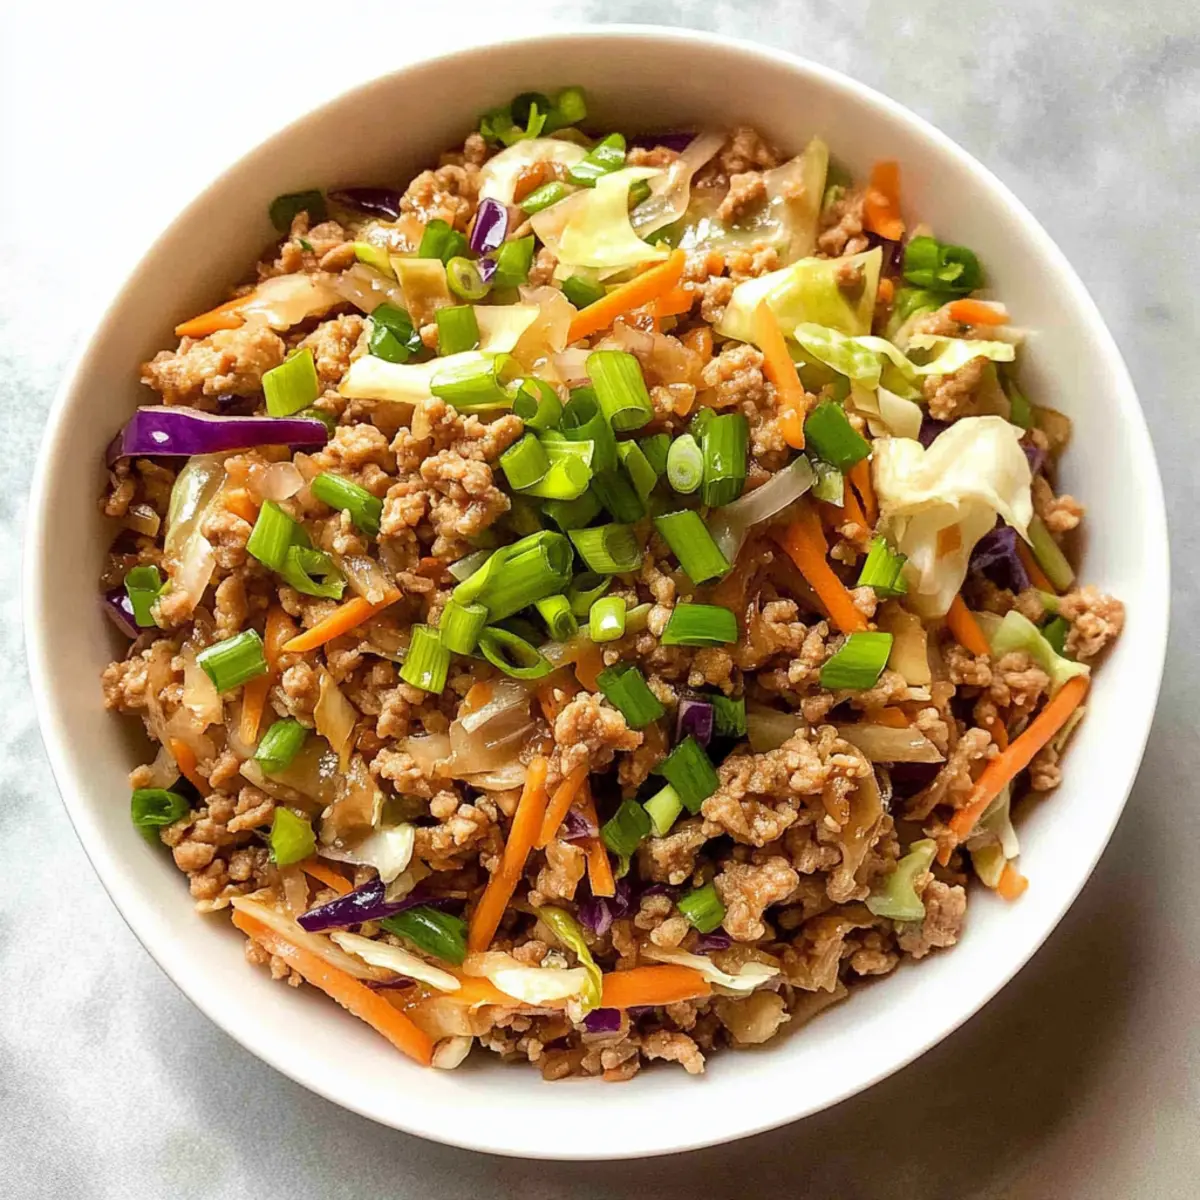
As I stood in my kitchen, a wave of nostalgia washed over me when I thought of the comforting Chicken Pillows my mom used to make. These delightful bites are not only a family favorite, they also bring together creamy chicken filling and flaky crescent dough for the ultimate comfort food experience. Whipping up Chicken Pillows is a breeze, perfect for anyone looking to swap out fast food for something homemade and satisfying. Plus, you can customize them with your favorite toppings or even opt for brown or mushroom gravy for a fun twist. Are you ready to dive into this mouthwatering journey of flavor? Let’s get cooking!

Why are Chicken Pillows a must-try?

Comfort Food Reinvented: These Chicken Pillows redefine classic comfort food with their creamy filling and flaky exterior.

Simplicity Rules: The straightforward preparation makes them perfect for busy weeknights, showing that homemade doesn't have to mean complicated.

Customization Potential: With options for different cheeses or gravy types, these pillows can cater to various tastes, ensuring everyone at the table is satisfied, much like the flavors in Honey Garlic Chicken Thighs.

Crowd-Pleasing Delight: They make a fantastic addition to potluck gatherings or family dinners, offering a familiar taste that's hard to resist.

Quick and Freezable: Prepare a batch ahead of time and freeze them, making future meals even easier and more accessible. You can bake them straight from the freezer, which is a lifesaver on hectic days!

Chicken Pillows Ingredients

For the Filling
• Cooked, shredded chicken breast – The heart of the dish, providing a satisfying protein boost. Substitute with rotisserie chicken for an effortless option.
• Cream cheese – Adds creaminess and richness to the filling; can be replaced with Greek yogurt for a lighter alternative.
• Salted butter – Enhances flavor and contributes to a luscious filling; unsalted butter works just as well.
• Dried chives – Imparts a mild onion flavor and a pop of color; fresh chives elevate the taste even further.
• Dried minced onion – Adds savory depth; fresh minced onions are a great option but may require slight adjustments in cooking time.
• Salt and pepper – Essential for flavor; adjust to taste based on your preference.

For the Dough
• Refrigerated Pillsbury crescent roll dough – The perfect flaky outer layer that holds it all together; puff pastry is a great substitute if desired.
• Italian breadcrumbs – Creates a crispy texture; use panko breadcrumbs for an extra crunch.

For the Gravy
• Cream of chicken soup – Acts as a flavorful base for the gravy; consider cream of mushroom soup for a twist.
• Chicken gravy mix – A quick and tasty way to prepare gravy; homemade gravy options can enhance the flavor more personally.
• Water – Necessary for combining with the gravy mix and soup to achieve the right consistency.

These Chicken Pillows promise to bring comfort to your table, making every bite a delightful treat!

Step‑by‑Step Instructions for Chicken Pillows

Step 1: Preheat the Oven
Start by preheating your oven to 350°F (175°C). While the oven warms up, prepare a baking sheet by spraying it lightly with non-stick spray. This will ensure that your Chicken Pillows bake evenly and don't stick to the sheet, giving them that coveted golden-brown finish.

Step 2: Prepare the Filling
In a mixing bowl, combine softened cream cheese and salted butter, mixing until smooth and creamy. Next, gently fold in the shredded chicken, dried chives, minced onion, salt, and pepper until all ingredients are well incorporated. This flavorful mixture will create a delicious filling for your Chicken Pillows.

Step 3: Form the Dough Rectangles
Unroll the refrigerated Pillsbury crescent roll dough on a clean surface. Take two dough triangles and press them together to form a rectangle, making sure to seal the seams gently. Repeat this process until you have a total of four rectangles, which will house your creamy chicken filling.

Step 4: Fill the Dough
Divide the creamy chicken filling evenly among the prepared rectangles, placing the mixture in the center of each one. Carefully fold the corners of the dough over the filling, pinching the seams to ensure they are well sealed. This step is crucial for preventing any delicious filling from escaping while they bake.

Step 5: Coat with Butter and Breadcrumbs
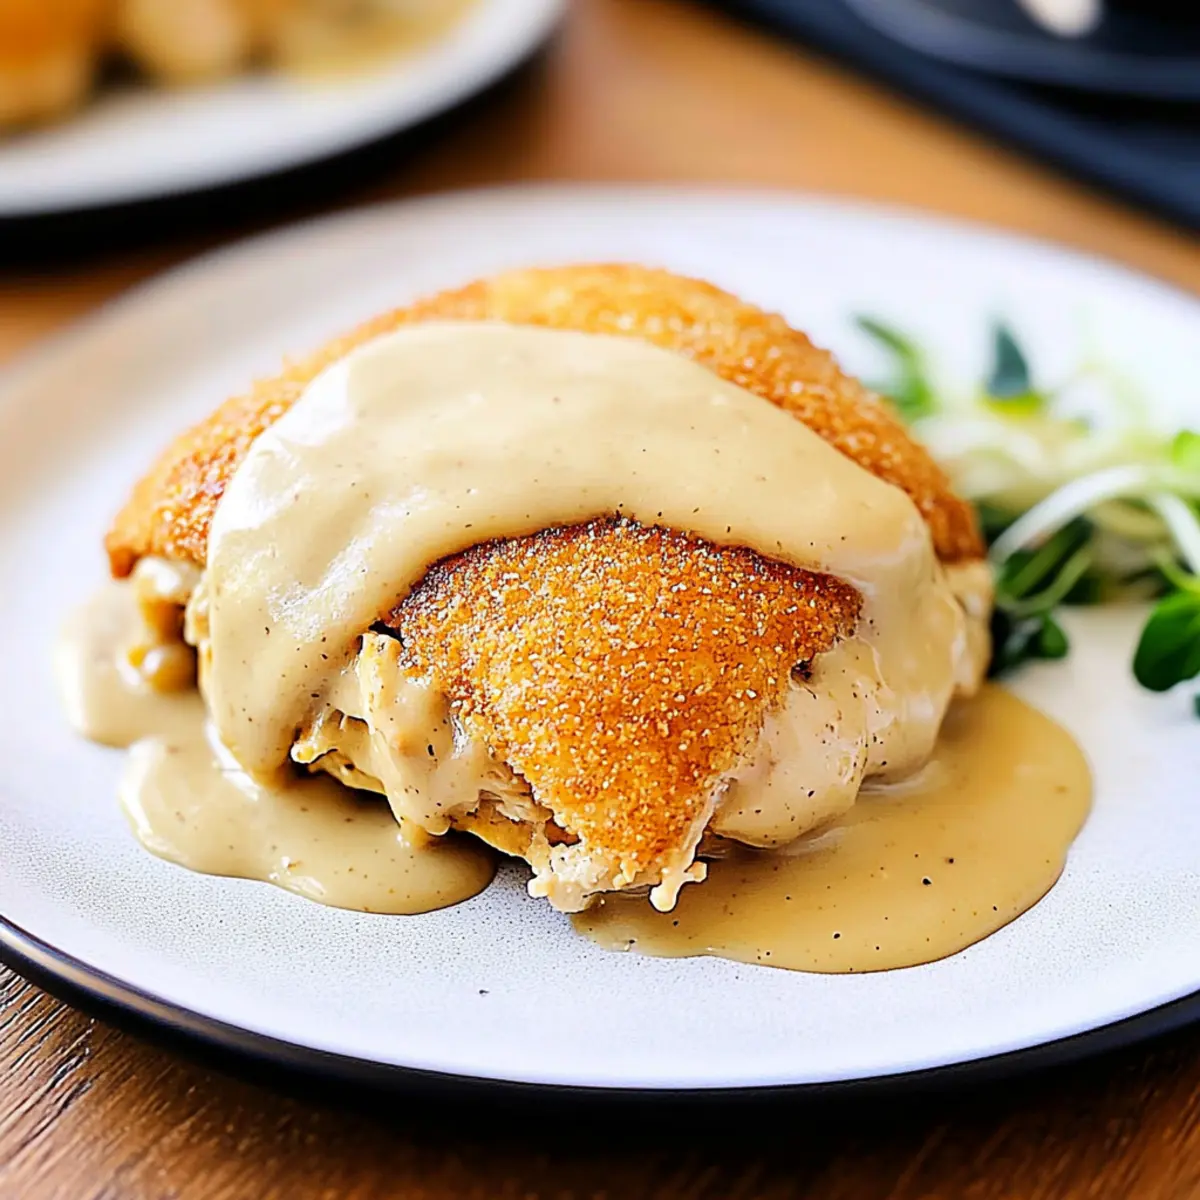
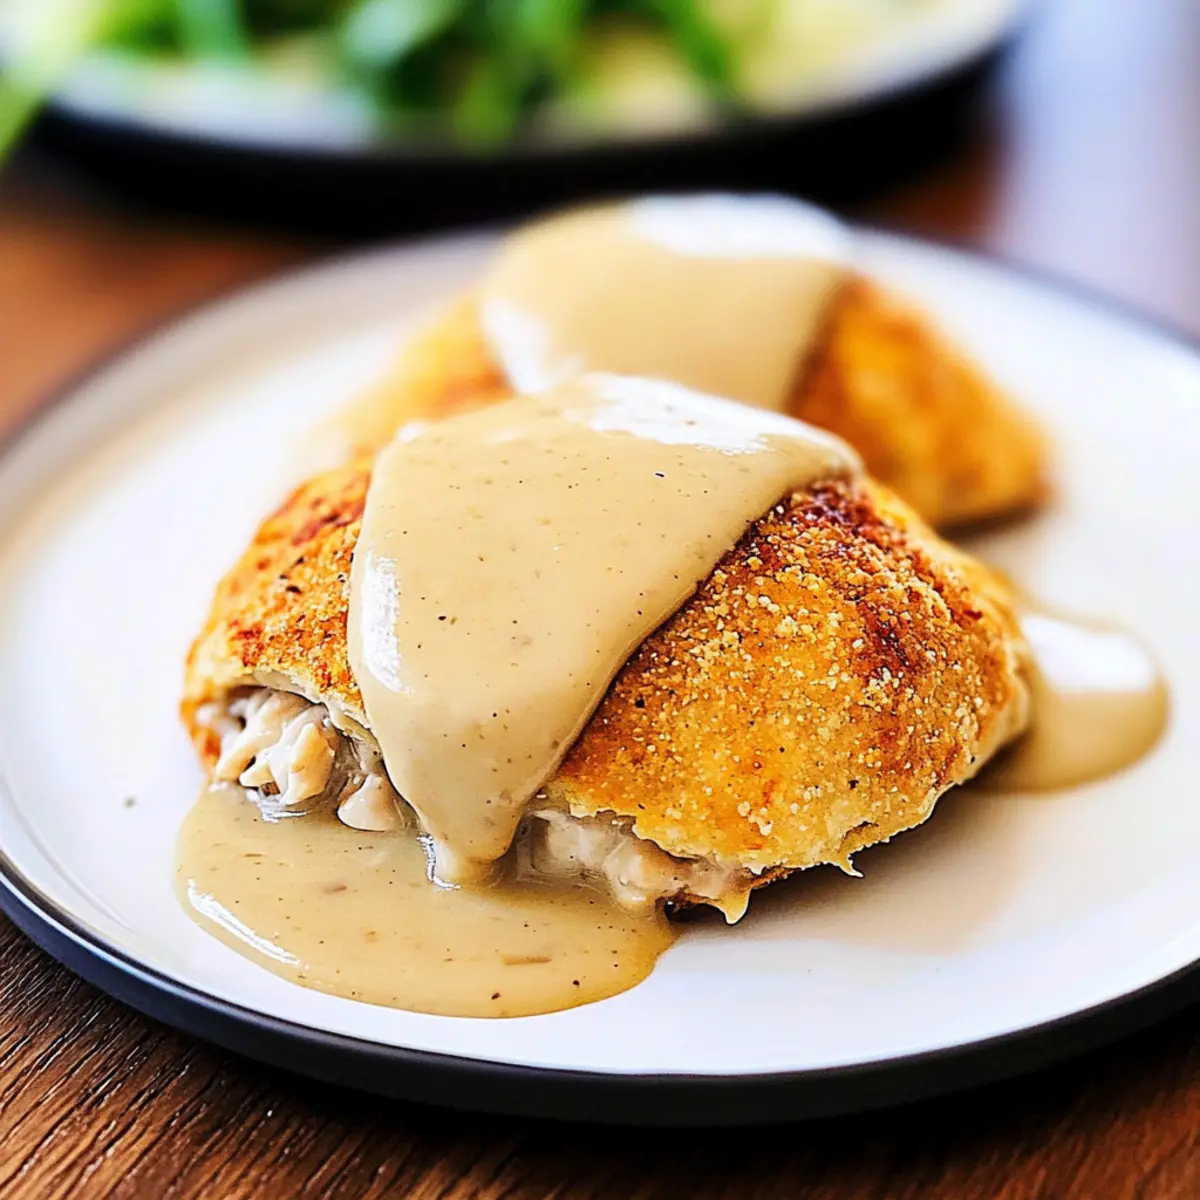
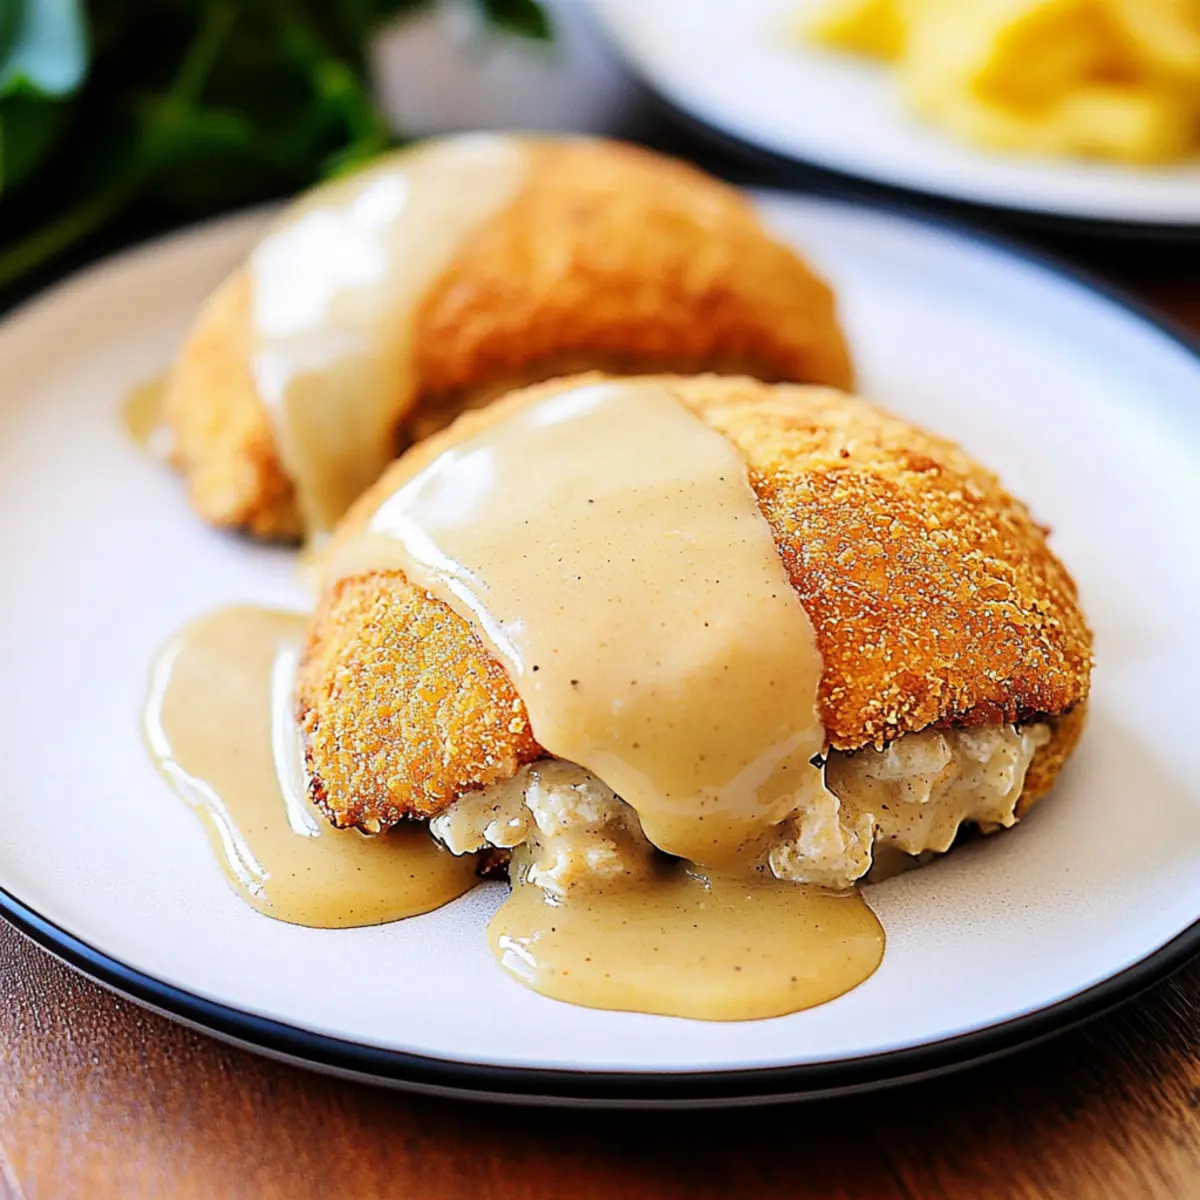
Melt a small amount of butter in a microwave-safe dish. Dip each sealed Chicken Pillow in the melted butter, allowing excess to drip off. Then, roll each one in Italian breadcrumbs to coat thoroughly. This will add a wonderfully crispy texture to the outside of your Chicken Pillows.

Step 6: Bake the Chicken Pillows
Place the coated Chicken Pillows on the greased baking sheet, ensuring they are spaced appropriately apart. Bake them in the preheated oven for 22-25 minutes, or until they are golden brown and perfectly crisp. The aroma will fill your kitchen, signaling that your comfort food is nearly ready.

Step 7: Make the Gravy
While the Chicken Pillows are baking, prepare the savory gravy. In a saucepan, combine cream of chicken soup, chicken gravy mix, and water. Heat over medium-high heat, stirring until the mixture comes to a gentle boil. Once boiling, reduce the heat to low and let it simmer until you’re ready to serve.

Step 8: Serve with Gravy
Once the Chicken Pillows are golden brown and crisp, remove them from the oven. Allow them to rest for a few minutes before serving, which will help the fillings set. Drizzle the warm gravy generously over the Chicken Pillows for a final touch of flavor before serving these delightful bites to your family.

Make Ahead Options

These Chicken Pillows are fantastic for meal prep, allowing you to whip up a cozy dinner with minimal fuss during busy weeknights! You can prepare the creamy chicken filling and assemble the pillows up to 24 hours in advance; simply refrigerate them until you’re ready to bake. For longer storage, they can also be frozen before baking for up to 3 months. To maintain quality, ensure they are well-sealed in an airtight container or wrapped tightly to prevent freezer burn. When it's time to serve, bake them from frozen, adding an extra 5-10 minutes to the baking time, and you’ll have effortlessly delicious Chicken Pillows ready to delight your family!

Chicken Pillows: Customization Ideas

Enjoy expressing your culinary creativity with these delightful Chicken Pillows! Each twist brings something special to the table, making every bite an exciting new experience.

  • Cheese Variations: Swap out cream cheese for ranch or garlic herb spreads for a kick of flavor. Each brings a different creaminess that'll turn heads at your dinner table!

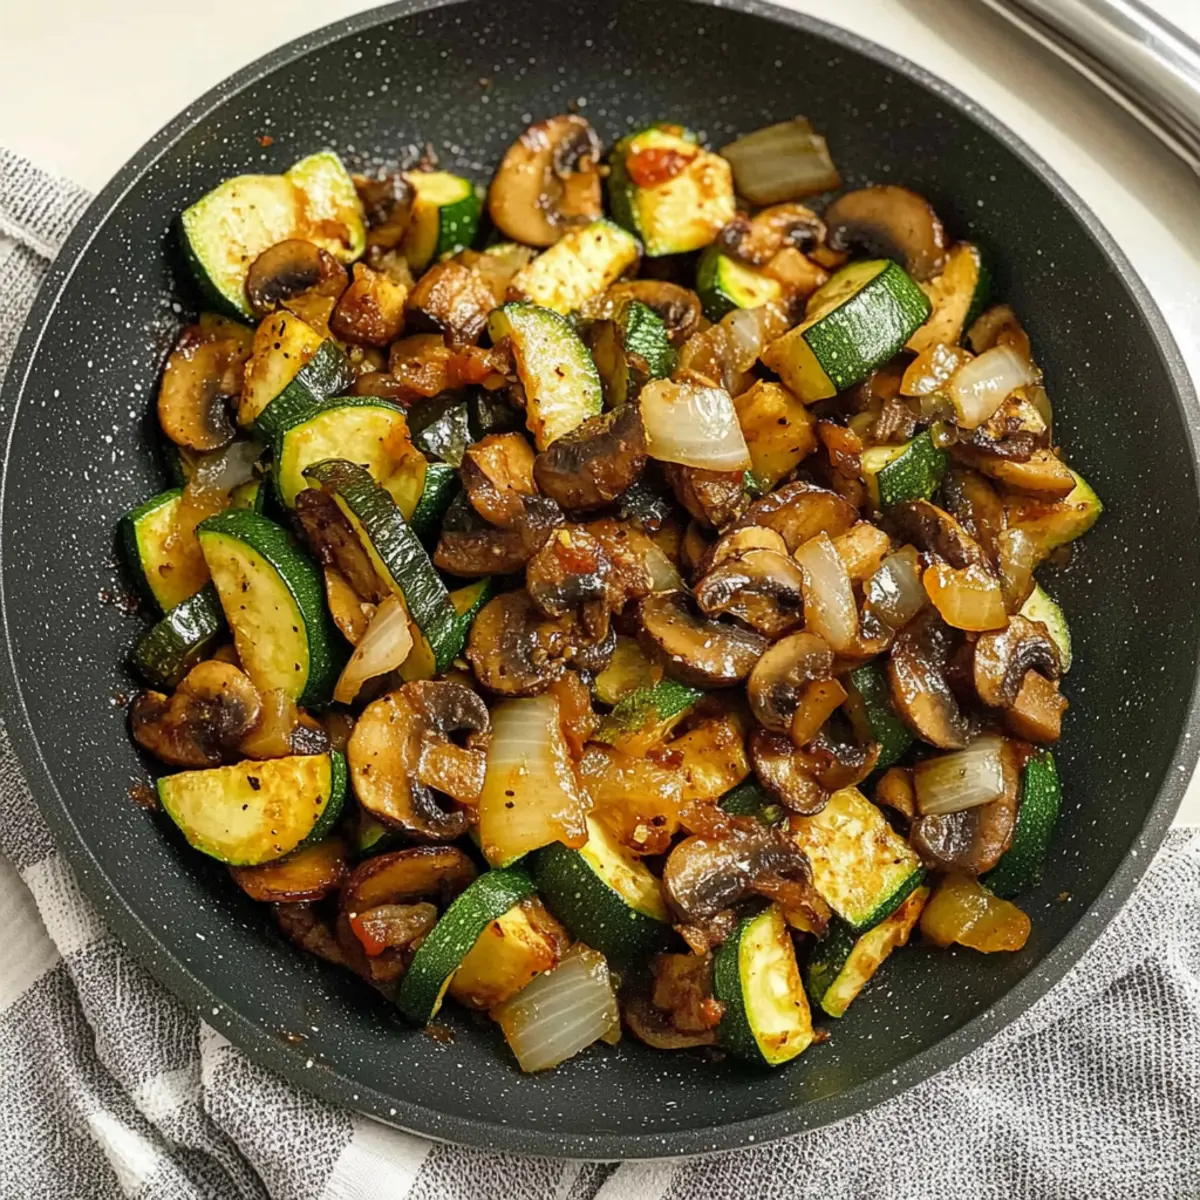
  • Veggie Boost: Incorporate spinach, diced bell peppers, or even some sautéed mushrooms into the filling. This not only enhances nutrition but offers a fresh crunch in each heavenly bite.

  • Gravy Lovers: Try using brown gravy or mushroom gravy instead of the traditional chicken gravy for a personalized touch. It’s a simple change that adds a delicious depth that you'll crave.

  • Protein Alternatives: If chicken isn’t your thing, consider using shredded turkey or even jackfruit for a vegetarian option. Both provide satisfying textures while keeping the spirit of these pillows intact.

  • Herb Infusion: Add fresh herbs like basil or thyme to your filling for an aromatic surprise. Fresh herbs elevate the classic flavors and make each pillow a fragrant delight.

  • Heat Factor: For those who enjoy a little spice, add diced jalapeños or a splash of your favorite hot sauce to the filling. This heat can bring your Chicken Pillows to a whole new level of excitement!

  • Crispy Coating: Want extra crunch? Try using crushed tortilla chips instead of breadcrumbs for a zesty twist. It adds an unexpected flavor that pairs beautifully with the creamy filling.

  • Homemade Gravy: Elevate your sauce game by whipping up a quick homemade gravy to pour over your pillows. A rich, savory gravy will enhance the flavors and make it feel like a special occasion.

These variations ensure that your Chicken Pillows never get boring! If you're craving more chicken inspiration, don't forget to check out Honey BBQ Chicken Rice or experience the tender flavors in Crock Pot Chicken for a comforting meal anytime.

Expert Tips for Chicken Pillows

  • Seal the Dough: Ensure all seams of the crescent dough are thoroughly sealed to prevent any delicious filling from leaking out during baking.

  • Rest Before Serving: Let the Chicken Pillows rest for a few minutes after baking. This allows the filling to settle, making them easier to serve and eat.

  • Breadcrumb Tip: For an even crunchier texture, feel free to swap the Italian breadcrumbs for panko breadcrumbs. This small change can elevate your Chicken Pillows.

  • Filling Customization: Don't hesitate to mix in some sautéed vegetables, like spinach or peppers, into the chicken filling for added flavor and nutrition.

  • Ideal Gravy Choices: While a classic cream of chicken soup is recommended for the gravy, consider trying a homemade version to enhance the taste profile of your Chicken Pillows.

How to Store and Freeze Chicken Pillows

Fridge: Store leftover Chicken Pillows in an airtight container for up to 3 days. This keeps them fresh while allowing you to enjoy them a second time.

Freezer: To freeze Chicken Pillows, place them uncooked in a single layer on a baking sheet, then transfer to a freezer-friendly container once frozen. They can last up to 3 months.

Reheating: To reheat, bake frozen Chicken Pillows straight from the freezer at 350°F (175°C) for 30-35 minutes, or until heated through and crispy. Perfect for a quick homemade meal!

Make-Ahead Tip: Prepare a batch of Chicken Pillows ahead of time and freeze them unbaked, so you can easily pull them out for a cozy, comforting dinner!

What to Serve with Chicken Pillows

Elevate your cozy dinner with delightful sides that bring out the flavors of these creamy, savory bites.

  • Steamed Vegetables: A vibrant medley of steamed broccoli, carrots, and snap peas adds color and nutrients, balancing the richness of the Chicken Pillows.
  • Garden Salad: A fresh garden salad with crisp greens and a light vinaigrette offers a refreshing contrast, making every bite that much more enjoyable.
  • Garlic Bread: Crunchy, buttery garlic bread provides additional texture and flavors that complement the creamy filling perfectly, perfect for sopping up any leftover gravy.
  • Mashed Potatoes: Creamy, buttery mashed potatoes are the classic comfort food pairing, adding extra warmth and heartiness to your meal.
  • Coleslaw: A tangy coleslaw brings a bit of crunch and zest, cutting through the richness of the Chicken Pillows to create a delightful contrast.
  • Brown Gravy or Mushroom Gravy: Enhance your dish with a generous drizzle of brown or mushroom gravy for an added layer of flavor that pairs beautifully with the chicken filling.
  • Apple Crisp: For dessert, an apple crisp with warm spices offers a sweet finish to your meal, rounding it off with cozy, comforting flavors.

With these delightful accompaniments, you’ll create a warm and inviting meal sure to please everyone at your table!

Chicken Pillows Recipe FAQs

How do I select the best chicken for the filling?
Absolutely! For the best results, use cooked, shredded chicken breast. You can opt for fresh, leftover roasted chicken or even grab a rotisserie chicken for convenience. Just make sure it's tender and juicy, as that will enhance the overall flavor of your Chicken Pillows.

How should I store leftover Chicken Pillows?
To maintain their taste and texture, store any leftover Chicken Pillows in an airtight container in the fridge for up to 3 days. When you're ready to indulge again, simply reheat them in your oven at 350°F (175°C) until warmed through.

Can I freeze Chicken Pillows?
Very! You can freeze Chicken Pillows before baking. Arrange them in a single layer on a baking sheet, freeze until solid, then transfer them to a freezer bag or container. They can last up to 3 months. When you're ready to eat, bake them from frozen at 350°F (175°C) for 30-35 minutes, until golden and crispy.

What if my Chicken Pillows leak during baking?
No worries! This can happen if the seams of the crescent dough aren't tightly sealed. Ensure you pinch the seams firmly and press the corners together well before baking. Should they still leak, don’t fret too much—just add a little extra gravy when serving!

Are Chicken Pillows suitable for people with dietary restrictions?
Definitely! For gluten-free options, you might consider using gluten-free crescent or puff pastry. If you're concerned about dairy, substitute cream cheese with a non-dairy cream cheese or Greek yogurt. Just keep an eye on allergies—you'll want to ensure no one at your table has an allergy to any of the ingredients like chicken or cream of chicken soup.

Can I add vegetables to the Chicken Pillows?
Absolutely! Incorporating sautéed vegetables, such as spinach or bell peppers, is an excellent way to enhance nutrition and add flavor to your Chicken Pillows. Just be cautious—you may need to adjust the filling consistency by reducing some of the cream cheese or butter to accommodate the additional moisture from the vegetables.

Chicken Pillows

Savory Chicken Pillows: Comforting Bites of Creamy Goodness

These Chicken Pillows redefine comfort food with creamy filling and flaky dough, perfect for homemade meals.
Print Recipe Pin Recipe
Prep Time 15 minutes mins
Cook Time 25 minutes mins
Resting Time 5 minutes mins
Total Time 45 minutes mins
Servings: 4 pillows
Course: Dinner
Cuisine: American
Calories: 320
Ingredients Equipment Method Nutrition Notes

Ingredients
  

For the Filling
  • 2 cups cooked, shredded chicken breast Substitute with rotisserie chicken for convenience.
  • 8 oz cream cheese Can be replaced with Greek yogurt for lighter version.
  • 2 tbsp salted butter Unsalted butter can be used.
  • 1 tbsp dried chives Fresh chives can enhance the flavor.
  • 1 tbsp dried minced onion Fresh minced onions can be used.
  • to taste salt and pepper Adjust according to preference.
For the Dough
  • 1 tube refrigerated Pillsbury crescent roll dough Puff pastry can be used as a substitute.
  • 1 cup Italian breadcrumbs Panko breadcrumbs can be used for extra crunch.
For the Gravy
  • 1 can cream of chicken soup Cream of mushroom soup can be used as an alternative.
  • 1 packet chicken gravy mix Homemade gravy option can enhance flavor.
  • 1 cup water

Equipment

  • Oven
  • Mixing Bowl
  • Baking Sheet
  • Saucepan
  • Microwave-safe dish

Method
 

Step-by-Step Instructions
  1. Preheat your oven to 350°F (175°C) and prepare a baking sheet by spraying lightly with non-stick spray.
  2. In a mixing bowl, combine softened cream cheese and salted butter until smooth. Fold in shredded chicken, dried chives, minced onion, salt, and pepper.
  3. Unroll the crescent roll dough and combine two dough triangles to form a rectangle, sealing seams. Repeat to create four rectangles.
  4. Divide the chicken filling evenly among the rectangles, fold corners of the dough over the filling, and pinch seams to seal.
  5. Melt a small amount of butter and dip each Chicken Pillow, then roll in Italian breadcrumbs until coated.
  6. Place Chicken Pillows on the baking sheet and bake for 22-25 minutes until golden brown and crisp.
  7. To prepare gravy, combine cream of chicken soup, gravy mix, and water in a saucepan. Heat until boiling and simmer until ready to serve.
  8. Let Chicken Pillows rest for a few minutes after baking. Serve drizzled with warm gravy.

Nutrition

Serving: 1pillowCalories: 320kcalCarbohydrates: 30gProtein: 15gFat: 18gSaturated Fat: 10gPolyunsaturated Fat: 1gMonounsaturated Fat: 6gTrans Fat: 0.5gCholesterol: 60mgSodium: 750mgPotassium: 300mgFiber: 1gSugar: 2gVitamin A: 500IUCalcium: 100mgIron: 1mg

Notes

For best results, seal all dough seams thoroughly before baking. Let rest for a few minutes after baking to set the filling.

Tried this recipe?

Let us know how it was!

Savor the Flavor: Easy Egg Roll in a Bowl Recipe

February 2, 2026 by Grace Snow Leave a Comment

As I stood in my kitchen with a rumbling stomach, I craved something comforting yet quick to prepare. Enter my 15-Minute Egg Roll in a Bowl! This dish is a delightful twist on traditional egg rolls, offering all the savory flavors you love without the hassle of wrappers or frying. In under 20 minutes, you can whip up a hearty, one-pan meal that’s not only satisfying but also packed with colorful veggies and your choice of protein—pork, chicken, or beef. Perfect for busy weeknights, it’s a keto-friendly option that doesn’t skimp on taste.

What savory twist will you add to make this dish your own?

What savory twist will you add?

Customization at Your Fingertips: This Egg Roll in a Bowl is incredibly versatile, allowing you to easily swap in ground chicken or beef based on your taste.
Quick and Easy: In just 15 minutes, you’ll have a delicious meal ready to enjoy. Perfect for those hectic weeknights!
One-Pan Wonder: Minimal cleanup required—just one pan means less time in the kitchen and more time for you.
Keto-Friendly: Low in carbs but high in flavor; this recipe fits seamlessly into a keto diet without sacrificing satisfaction.
Taste of Comfort: Each bite is a comforting blend of familiar flavors, reminiscent of your favorite restaurant dishes but made right at home. Try pairing it with some Pumpkin Cinnamon Roll for a sweet finish!

Egg Roll in a Bowl Ingredients

For the Base

  • Vegetable Oil – Provides a base for cooking; can substitute with canola or sunflower oil for a neutral flavor.
  • Ground Pork – The main protein source; offers a rich, flavorful taste. Substitute with ground chicken or beef for variety.

For the Aromatics

  • Onion – Adds aromatic depth; yellow or white onions are recommended for their mild sweetness.
  • Garlic – Enhances flavor with its strong aroma; always opt for fresh minced garlic for the best results.

For the Veggies

  • Coleslaw Mix – A time-saving blend of cabbage and carrots; you can use shredded cabbage if you prefer.

For the Seasoning

  • Soy Sauce – Provides a depth of umami flavor; tamari is a great gluten-free alternative.
  • Toasted Sesame Oil – Adds a signature nutty flavor; can be omitted for a lighter dish.
  • Sugar – Balances the saltiness of the soy sauce; consider honey or omitting it for a lower-sugar option.

For Garnish

  • Green Onions – Used for a fresh garnish; it adds a nice crunch and color to the dish. Optional but highly recommended!

Step‑by‑Step Instructions for Egg Roll in a Bowl

Step 1: Cook the Pork
Start by heating a large skillet over medium-high heat and adding vegetable oil. Once the oil shimmers, add the ground pork, breaking it apart with a spatula. Cook for about 6-7 minutes, ensuring the meat is no longer pink and begins to brown nicely. This step builds a rich flavor base for your Egg Roll in a Bowl.

Step 2: Add Aromatics
Now, stir in the finely chopped onion and minced garlic into the skillet, cooking for 2-3 minutes. Keep stirring until the onions turn translucent and fragrant, allowing their sweetness to enhance the dish. The aromatics are crucial for achieving that authentic egg roll flavor and help to infuse the pork with deliciousness.

Step 3: Incorporate Vegetables
Next, mix in the coleslaw blend, stirring frequently for about 5-7 minutes. Cook until the cabbage is tender and the colors are vibrant, adjusting the heat to high if moisture builds up—this will help keep the veggies from steaming. The combination of textures and flavors transforms your mixture into a delightful filling for the Egg Roll in a Bowl.

Step 4: Season the Mixture
Once the vegetables are cooked, pour in the soy sauce, toasted sesame oil, and sugar, then mix thoroughly for an additional 1-2 minutes. The sauce should coat the ingredients beautifully, creating that classic savory and slightly sweet flavor profile reminiscent of traditional egg rolls. Taste and adjust the seasoning if needed.

Step 5: Garnish & Serve
Remove the pan from the heat and transfer your Egg Roll in a Bowl to serving dishes. Garnish generously with chopped green onions for a fresh crunch and vibrant color. Serve it hot, perhaps over a bed of rice or alongside your favorite sauce, and relish in the comforting, homemade experience this dish provides.

Storage Tips for Egg Roll in a Bowl

Fridge: Store leftover Egg Roll in a Bowl in an airtight container for up to 3 days. This ensures freshness and maintains the delightful crunch of the veggies.

Freezer: For longer storage, freeze the dish in a freezer-safe container for up to 2 months. Be sure to let it cool completely before freezing to prevent ice crystals.

Reheating: When ready to enjoy again, reheat in a skillet over medium heat, stirring occasionally until heated through. You can also use the microwave; just cover the dish to prevent drying out.

Tip: To maintain that fresh flavor, consider adding a splash of soy sauce or sesame oil during reheating to revive the dish's original taste.

Egg Roll in a Bowl Variations

Add your personal touch to this delightful dish with these creative variations!

  • Dairy-Free: Use coconut aminos instead of soy sauce for a gluten-free, soy-free option.
  • Protein Swap: Replace ground pork with ground turkey or chicken for a lighter take.
  • Veggie Additions: Toss in bell peppers, mushrooms, or snap peas for a pop of color and crunch.
  • Spicy Kick: Add a dash of sriracha or red pepper flakes during cooking for heat that excites the palate.
  • Crunch Factor: Top it off with sliced almonds or fried onions for an extra layer of texture.
  • Sweetness Balance: Use honey or maple syrup instead of sugar for a natural sweet flavor profile.
  • Garnish Delight: Enhance your dish with fresh herbs like cilantro or basil to elevate the taste.
  • Cauliflower Rice: Serve it over riced cauliflower for a lighter, low-carb alternative.

Feel free to explore these variations to create your own signature version of the Egg Roll in a Bowl! And if you're looking for more wholesome ideas, check out this delicious Acai Bowl Nutritious recipe to keep those healthy vibes flowing!

Expert Tips for Egg Roll in a Bowl

  • Heat Control: Always ensure your pan is hot enough before adding ingredients to prevent the pork from steaming instead of browning.

  • ** Veggie Freshness:** Use fresh coleslaw mix or shredded cabbage for the best texture. Avoid soggy veggies by cooking them until just tender.

  • Seasoning to Taste: Adjust soy sauce according to personal preference. For a lighter taste, start with less and add more as desired.

  • Protein Flexibility: Feel free to substitute ground pork with ground chicken, beef, or even tofu—just make sure to adjust cooking times accordingly.

  • Quick Serving Tip: To save on cleanup, consider serving directly from the skillet! It keeps the dish warm and adds a rustic feel to your meal.

  • Storage Tips: Store leftovers in an airtight container in the fridge for up to 3 days. Reheat on the stove for optimal texture.

Make Ahead Options

Busy home cooks will love how easy it is to prepare this Egg Roll in a Bowl ahead of time! You can chop the vegetables and cook the ground pork up to 24 hours in advance. Simply cook the pork until no longer pink and allow it to cool before refrigerating it in an airtight container. You can also prepare the chopped onions and garlic, storing them together to save time. When you're ready to serve, just reheat the pork and aromatics in a skillet, mix in the coleslaw mix, and finish with the soy sauce and sesame oil for a quick weeknight meal that's just as delicious! This method keeps everything fresh and flavorful, so you can enjoy a homemade meal with minimal effort at the end of a busy day.

What to Serve with Egg Roll in a Bowl

Imagine sitting down to a cozy meal that offers a perfect blend of flavors and textures, each bite promising satisfaction.

  • Steamed Jasmine Rice: The fluffy rice soaks up the savory sauce, providing a lovely contrast to the crunchy veggies of your Egg Roll in a Bowl.

  • Cauliflower Rice: For a low-carb option, this light and healthy substitute packs in nutrients while adding a subtle crunch that complements your dish beautifully.

  • Egg Drop Soup: This warm, comforting soup enhances your meal, with its silky texture balancing the hearty goodness of the Egg Roll in a Bowl.

  • Crispy Spring Rolls: Pairing these with your main dish brings a delightful crunch, offering a taste of familiar flavors that echo the essence of traditional egg rolls.

  • Sesame Cucumber Salad: Crisp cucumbers tossed in a tangy sesame dressing provide a fresh burst of flavor, cleansing your palate between bites.

  • Sweet & Sour Sauce: A delightful dipping sauce that introduces a playful sweetness, creating a lovely contrast with the savory notes of the Egg Roll in a Bowl.

  • Chinese Tea: A soothing cup of green or jasmine tea serves as a wonderful drink pairing, enhancing the meal experience with its fragrant notes.

  • Fruit Sorbet: End your dinner on a refreshing note with a scoop of sorbet, which balances out the savory richness of the Egg Roll in a Bowl and leaves you feeling light.

Egg Roll in a Bowl Recipe FAQs

What is the best type of ground meat to use for Egg Roll in a Bowl?
Absolutely! The best type of meat for Egg Roll in a Bowl is typically ground pork, which provides a rich and flavorful base. However, you can easily substitute it with ground chicken or beef if you prefer. Each protein offers a unique taste that can elevate the dish based on your cravings.

How should I store leftover Egg Roll in a Bowl?
After enjoying your meal, store any leftovers in an airtight container in the refrigerator for up to 3 days. This helps maintain the freshness and crunchiness of the vegetables. If you're not planning to eat it right away, you can also freeze it in a freezer-safe container for up to 2 months. Be sure to let it cool completely before freezing to prevent ice crystals.

Can I freeze Egg Roll in a Bowl? If so, how?
Yes, you can freeze Egg Roll in a Bowl! To do this, allow the dish to cool fully after cooking. Then, portion it into airtight, freezer-safe containers. The key step is to ensure there's enough room for expansion, so leave a little space at the top. When ready to enjoy, thaw it in the fridge overnight and reheat it in a skillet over medium heat, stirring occasionally until heated through.

What should I do if my vegetables turn soggy while cooking?
Very commonly, soggy veggies can happen if the heat is too low or if there’s too much moisture in the pan. To prevent this, always ensure your pan is hot enough before adding the coleslaw mix. If moisture builds during cooking, increase the heat to high to promote evaporation. This way, you’ll get that perfect combination of tender and crunchy textures.

Are there any dietary considerations I should keep in mind?
Certainly! This recipe is naturally gluten-free if you use tamari instead of regular soy sauce. It's also keto-friendly due to the low-carb content when made with vegetables instead of rice. Always check for common allergens in your ingredients, such as soy or sesame oil, and if you're cooking for pets, ensure none of the ingredients are harmful to them, particularly garlic.

How long does Egg Roll in a Bowl stay fresh in the fridge?
Leftover Egg Roll in a Bowl stays fresh in the fridge for about 3 days. Storing it in an airtight container will help maintain the crunch of the vegetables and the flavor of the dish. I often recommend marking the date on the container to keep track of freshness and to enjoy it while it’s at its best!

Egg Roll in a Bowl

Savor the Flavor: Easy Egg Roll in a Bowl Recipe

Enjoy a quick and tasty Egg Roll in a Bowl, offering the flavors you love without the hassle.
Print Recipe Pin Recipe
Prep Time 5 minutes mins
Cook Time 15 minutes mins
Total Time 20 minutes mins
Servings: 4 bowl
Course: Dinner
Cuisine: Asian
Calories: 360
Ingredients Equipment Method Nutrition Notes

Ingredients
  

For the Base
  • 2 tablespoons Vegetable Oil Can substitute with canola or sunflower oil for a neutral flavor.
  • 1 pound Ground Pork Can substitute with ground chicken or beef.
For the Aromatics
  • 1 medium Onion Yellow or white onions are recommended.
  • 3 cloves Garlic Always opt for fresh minced garlic.
For the Veggies
  • 1 package Coleslaw Mix Can use shredded cabbage if preferred.
For the Seasoning
  • 3 tablespoons Soy Sauce Tamari is a gluten-free alternative.
  • 1 tablespoon Toasted Sesame Oil Can be omitted for a lighter dish.
  • 1 teaspoon Sugar Consider honey or omitting for a lower-sugar option.
For Garnish
  • 2 stalks Green Onions Optional but highly recommended!

Equipment

  • Large skillet

Method
 

Step-by-Step Instructions
  1. Start by heating a large skillet over medium-high heat and adding vegetable oil. Once the oil shimmers, add the ground pork, breaking it apart with a spatula. Cook for about 6-7 minutes, ensuring the meat is no longer pink and begins to brown nicely.
  2. Stir in the finely chopped onion and minced garlic into the skillet, cooking for 2-3 minutes until the onions turn translucent and fragrant.
  3. Mix in the coleslaw blend, stirring frequently for about 5-7 minutes until the cabbage is tender.
  4. Pour in the soy sauce, toasted sesame oil, and sugar, then mix thoroughly for an additional 1-2 minutes.
  5. Remove the pan from the heat and transfer your Egg Roll in a Bowl to serving dishes. Garnish with chopped green onions.

Nutrition

Serving: 1bowlCalories: 360kcalCarbohydrates: 15gProtein: 25gFat: 22gSaturated Fat: 6gCholesterol: 85mgSodium: 800mgPotassium: 550mgFiber: 3gSugar: 4gVitamin A: 40IUVitamin C: 50mgCalcium: 60mgIron: 2mg

Notes

Store leftovers in an airtight container in the fridge for up to 3 days. Reheat in a skillet for optimal texture.

Tried this recipe?

Let us know how it was!

Creamy Ground Beef Orzo with Tomato Cream Sauce in One Pot

February 2, 2026 by Grace Snow Leave a Comment

The other night, as I stood over my stove stirring a bubbling pot, the aroma of rich tomato and savory beef filled my kitchen, wrapping me in warmth. This moment inspired my One-Pot Creamy Ground Beef Orzo with Tomato Sauce, a dish that evolved from a busy weeknight necessity into a comforting favorite. Perfect for those evenings when time is tight, this quick recipe comes together in just 30 minutes, allowing you to serve up a hearty meal with minimal effort. Not only is it a delightful one-pot meal that minimizes cleanup, but the creamy texture combined with tender orzo and fresh spinach makes it an irresistibly satisfying choice for the whole family. Ready to dive into a dish that’s warm, hearty, and simply delicious? Let’s get started!

Why is this recipe a weeknight winner?

Quick and Easy: With just 30 minutes from prep to plate, you'll have a delicious meal ready in no time, perfect for busy families.

One-Pot Convenience: Say goodbye to endless dishes—this creamy ground beef orzo cooks all in one pot, making cleanup a breeze.

Comfort in Every Bite: The rich tomato cream sauce pairs beautifully with tender orzo and savory beef, creating a dish that’s sure to satisfy.

Versatile Variations: Swap out ground beef for turkey or chicken, or add in veggies like bell peppers for extra color and nutrition.

Crowd-Pleasing Delight: Whether it's a family dinner or a small gathering, this recipe is a guaranteed hit that everyone will love! Don't forget to serve it with a side of garlic bread or a fresh salad for a complete meal.

Ground Beef Orzo Ingredients

• Here’s everything you need for a delicious Ground Beef Orzo with Tomato Cream Sauce!

For the Base
• Lean Ground Beef – Main source of protein; substitute with ground turkey or chicken for a leaner option.
• Medium Onion (1/2, chopped) – Adds sweetness and depth; can use shallots for a milder flavor.
• Garlic (3-4 cloves, minced) – Provides aromatic flavor; garlic powder may substitute in a pinch.
• Crushed Red Pepper Flakes (1/2 teaspoon, optional) – Adds heat; omit for a milder dish.
• Italian Seasoning (1/2 teaspoon) – Enhances flavor profile; fresh herbs can substitute for a fresher taste.

For the Pasta and Sauce
• Uncooked Orzo Pasta (1 cup) – Base of the dish; can replace with other small pasta shapes if desired.
• Tomato Sauce (1 can, 14 ounces) – Provides sauce base; use homemade or crushed tomatoes for a fresh twist.
• Beef Broth (3/4 cup) – Adds richness and moisture; vegetable broth is a good vegetarian alternative.
• Heavy/Whipping Cream (1 cup) – Adds creaminess; can substitute with half-and-half for a lighter option.
• Worcestershire Sauce (1 teaspoon) – Adds savory depth; soy sauce works as a substitute.

For the Finishing Touches
• Freshly Grated Parmesan Cheese (1/2 cup) – Adds saltiness and creamy texture; nutritional yeast is a vegan alternative.
• Fresh Baby Spinach (2 cups, packed) – Adds color and nutrients; kale can be used instead.

Step‑by‑Step Instructions for Ground Beef Orzo with Tomato Cream Sauce

Step 1: Brown the Beef
In a large soup pot or Dutch oven, heat over medium-high heat and add the lean ground beef. Cook for 5-6 minutes, allowing it to brown undisturbed, until fully cooked and no longer pink. As it sizzles, break it into smaller pieces with a wooden spoon for even cooking, enjoying the savory aroma that fills your kitchen.

Step 2: Sauté the Aromatics
Next, add the chopped onion to the pot and continue cooking for an additional 5 minutes. Stir occasionally until the onion becomes tender and translucent, absorbing the flavors of the beef. Then, mix in the minced garlic, crushed red pepper flakes, and Italian seasoning, sautéing for 1 minute until fragrant, setting the stage for your delicious Ground Beef Orzo with Tomato Cream Sauce.

Step 3: Incorporate the Orzo
Introduce the uncooked orzo pasta to the pot, stirring it gently with the beef and aromatics. Allow the pasta to toast slightly for about 1 minute, which helps enhance its flavor. Ensure everything is well combined before moving on to the next step, soaking up the vibrant aromas released by the ingredients.

Step 4: Add the Liquid Ingredients
Pour in the tomato sauce, beef broth, heavy cream, and Worcestershire sauce, stirring to combine all the ingredients. Bring the mixture to a gentle bubble over medium heat, allowing it to cook for about 10 minutes. Stir often, watching as the orzo absorbs the liquid, transforming into a creamy and savory foundation for your dish.

Step 5: Final Touches
Once the orzo has absorbed most of the liquid and is tender, remove the pot from heat. Stir in the freshly grated Parmesan cheese and packed baby spinach, mixing until the spinach wilts and the cheese melts into the sauce. This final touch adds both a pop of color and an extra layer of comforting flavor to your Ground Beef Orzo with Tomato Cream Sauce.

Step 6: Let it Thicken
Cover the pot and let it sit for about 3-5 minutes to thicken slightly, allowing flavors to meld. This rest period will also help achieve the perfect creamy consistency. Finally, taste and season with salt and pepper as desired before serving your one-pot meal hot, garnished with extra cheese if you wish.

What to Serve with One-Pot Creamy Ground Beef Orzo?

There's something about a steaming bowl of creamy goodness that calls for perfect pairings to elevate your meal experience.

  • Garlic Bread: Nothing beats the mouthwatering aroma of warm, crusty garlic bread, perfect for soaking up the delicious tomato cream sauce.

  • Caesar Salad: A fresh, crisp Caesar salad adds a delightful crunch and contrasting texture to the creamy orzo, making every bite balanced.

  • Roasted Vegetables: Serve a side of roasted seasonal vegetables to introduce a touch of earthy flavor and vibrant colors to your plate.

  • Parmesan Crisps: These savory, crunchy snacks provide a satisfying contrast to the softness of the dish, enhancing its cheesy notes.

  • Steamed Green Beans: Bright green beans offer a fresh pop of color and a light, crisp bite, providing a wonderful textural contrast alongside the rich orzo.

  • Chardonnay: A chilled glass of Chardonnay complements the creamy elements beautifully, adding a touch of sophistication to your cozy meal.

  • Tiramisu: Finish your dinner with a luscious dessert like tiramisu, whose coffee notes and creamy texture will linger in your taste buds, leaving a sweet impression.

  • Olive Tapenade: This zesty spread serves as a vibrant appetizer, enticing your palate and perfectly setting the stage for the comforting orzo to follow.

  • Sparkling Water with Lemon: Refresh your palate with sparkling water infused with a splash of lemon, offering a light and bubbly contrast to the rich meat and sauce.

Let these delightful pairings transform your One-Pot Creamy Ground Beef Orzo into a harmonious meal, perfect for family gatherings or any cozy night in!

How to Store and Freeze Ground Beef Orzo

Fridge: Refrigerate any leftovers in an airtight container for up to 3 days to maintain freshness. Ensure that the dish has cooled down before sealing it to avoid condensation.

Freezer: Freeze the cream sauce with orzo in a freezer-safe container for up to 3 months. Just be sure to to leave some space at the top for expansion when freezing.

Reheating: When ready to enjoy again, thaw overnight in the fridge. Reheat gently in the microwave or on the stovetop, adding a splash of broth to restore creaminess and prevent drying out.

Portioning: If you’re freezing individual servings, consider portioning them into small containers for quick and easy meals on busy nights.

Ground Beef Orzo with Tomato Cream Sauce Variations

Feel free to get creative with this recipe and make it your own!

  • Ground Turkey: Substitute ground beef with ground turkey for a lighter option while still preserving robust flavors.

  • Sautéed Vegetables: Add bell peppers or zucchini to the pot for color and added nutrition. It not only enhances the dish's appeal but also transforms it into a veggie-packed delight.

  • Herb Infusion: Use fresh basil or oregano instead of Italian seasoning for a fresher, garden-inspired flavor. The vibrant herbs can brighten the entire dish in surprising ways.

  • Plant-Based Twist: Swap out beef broth and heavy cream for vegetable broth and coconut milk, creating a creamy vegan version that doesn't sacrifice richness.

  • Cheesy Goodness: Top with extra cheese like mozzarella or gouda before covering to let it melt into a delicious gooey layer. This elevates the comfort factor and makes each bite extra indulgent.

  • Spicy Kick: Incorporate jalapeños or switch to spicy Italian sausage instead of ground beef for those who enjoy a little heat. The warmth can invigorate the dish and awaken your palate.

  • Golden Touch: Mix in a splash of white wine before adding the broth for a deeper taste. The wine creates a beautiful depth of flavor that is truly irresistible.

  • Nutty Flavor: Toss in some toasted pine nuts or walnuts at the end for a crunchy texture that contrasts beautifully with the creamy sauce. It's a delightful surprise in every bite!

No matter which variation you choose, each option brings its own unique flavor to the table, just like my family's cherished recipes do. You might also love how easy it is to whip up a side of Skillet Pasta with Sun-Dried Tomatoes, Walnuts, and Feta alongside this or how delightful it is to add a creamy treat like Vegan Cacao Nib Ice Cream for dessert. Enjoy!

Make Ahead Options

These Ground Beef Orzo with Tomato Cream Sauce are perfect for meal prep enthusiasts! You can prepare the beef and onion mixture up to 24 hours in advance by browning the ground beef and sautéing the onion and garlic. Simply refrigerate it in an airtight container. On the day of serving, reheat the mixture, stir in the uncooked orzo, tomato sauce, broth, cream, and Worcestershire sauce, then cook according to the instructions. This way, you'll save precious time on busy weeknights, and the dish will be just as delicious! For optimal quality, make sure to keep the ingredients separate until you're ready to combine them for cooking. Enjoy comforting, home-cooked goodness with minimal effort!

Expert Tips for Ground Beef Orzo

Watch the Liquid: Ensure you monitor liquid levels while cooking. If it evaporates too quickly, reduce heat and add a splash more broth to keep it creamy.

Rest for Perfection: Allow the dish to sit covered after removing from heat. This helps absorb excess liquid, achieving the ideal creamy consistency.

Taste and Adjust: Always taste your Ground Beef Orzo with Tomato Cream Sauce before serving. A simple adjustment of salt and pepper can elevate the flavors immensely.

Flexible Ingredients: Don't hesitate to experiment with substitutes like ground turkey or extra veggies, which can enhance both nutrition and taste while keeping the essence of the dish.

Stir Occasionally: Gently stir during the cooking process to prevent sticking and to ensure even cooking for the orzo and beef. Enjoy the aromatic rewards as you do!

Ground Beef Orzo with Tomato Cream Sauce Recipe FAQs

What should I look for when selecting fresh ingredients?
Absolutely! For the best flavor, choose lean ground beef with a bright red color and a fine texture. When it comes to onions, look for firm ones free of soft spots. For tomatoes, opt for a bright can of tomato sauce and avoid any with dented tops.

How should I store leftovers?
Very! Place any leftovers in an airtight container and refrigerate for up to 3 days. Make sure it cools down first to avoid condensation, which can affect the texture. When you reheat, use a splash of broth to regain creaminess!

Can I freeze Ground Beef Orzo?
Yes, you can! To freeze this creamy dish, use a freezer-safe container, leaving some space at the top to allow for expansion. It will keep well for up to 3 months. When ready to eat, thaw overnight in the fridge and reheat gently on the stovetop or microwave, adding a little broth as needed.

What if my dish turns out too thick?
Don't worry! If your orzo becomes too thick after cooling, simply add a splash of broth or cream while reheating, stirring well until you achieve your desired consistency. It’s a common adjustment I often make—easy peasy!

Are there any allergens in this recipe?
Very important! This dish contains dairy and gluten due to the cream and orzo pasta. If you're accommodating for allergies, consider using lactose-free cream alternatives and gluten-free pasta. Always check labels to ensure they meet dietary needs.

What if my cooked beef has a lot of grease?
No problem! If your ground beef releases a lot of fat while cooking, you can drain some of it after browning for a lighter dish. Just be sure to keep enough fat to flavor your sauce. This way, you keep the best balance of flavor and health!

Ground Beef Orzo with Tomato Cream Sauce

Creamy Ground Beef Orzo with Tomato Cream Sauce in One Pot

A quick and easy one-pot meal featuring ground beef and orzo in a rich tomato cream sauce.
Print Recipe Pin Recipe
Prep Time 10 minutes mins
Cook Time 20 minutes mins
Resting Time 5 minutes mins
Total Time 30 minutes mins
Servings: 4 servings
Course: Dinner
Cuisine: American
Calories: 500
Ingredients Equipment Method Nutrition Notes

Ingredients
  

For the Base
  • 1 pound Lean Ground Beef Substitute with ground turkey or chicken for a leaner option.
  • 1/2 medium Onion, chopped Can use shallots for a milder flavor.
  • 3-4 cloves Garlic, minced Garlic powder may substitute in a pinch.
  • 1/2 teaspoon Crushed Red Pepper Flakes Optional; omit for a milder dish.
  • 1/2 teaspoon Italian Seasoning Fresh herbs can substitute for a fresher taste.
For the Pasta and Sauce
  • 1 cup Uncooked Orzo Pasta Can replace with other small pasta shapes if desired.
  • 1 can Tomato Sauce 14 ounces; use homemade or crushed tomatoes for a fresh twist.
  • 3/4 cup Beef Broth Vegetable broth is a good vegetarian alternative.
  • 1 cup Heavy/Whipping Cream Can substitute with half-and-half for a lighter option.
  • 1 teaspoon Worcestershire Sauce Soy sauce works as a substitute.
For the Finishing Touches
  • 1/2 cup Freshly Grated Parmesan Cheese Nutritional yeast is a vegan alternative.
  • 2 cups Fresh Baby Spinach, packed Kale can be used instead.

Equipment

  • Large soup pot or Dutch oven

Method
 

Step-by-Step Instructions
  1. In a large soup pot or Dutch oven, heat over medium-high heat and add the lean ground beef. Cook for 5-6 minutes, allowing it to brown undisturbed, until fully cooked and no longer pink. Break it into smaller pieces with a wooden spoon for even cooking.
  2. Add the chopped onion to the pot and continue cooking for an additional 5 minutes. Stir occasionally until the onion becomes tender and translucent. Mix in the minced garlic, crushed red pepper flakes, and Italian seasoning, sautéing for 1 minute until fragrant.
  3. Introduce the uncooked orzo pasta to the pot, stirring gently with the beef and aromatics. Allow the pasta to toast slightly for about 1 minute. Ensure everything is well combined before moving on to the next step.
  4. Pour in the tomato sauce, beef broth, heavy cream, and Worcestershire sauce, stirring to combine all the ingredients. Bring the mixture to a gentle bubble over medium heat, allowing it to cook for about 10 minutes, stirring often.
  5. Once the orzo has absorbed most of the liquid and is tender, remove the pot from heat. Stir in the freshly grated Parmesan cheese and packed baby spinach, mixing until the spinach wilts and the cheese melts into the sauce.
  6. Cover the pot and let it sit for about 3-5 minutes to thicken slightly. Taste and season with salt and pepper as desired before serving hot.

Nutrition

Serving: 1bowlCalories: 500kcalCarbohydrates: 40gProtein: 25gFat: 25gSaturated Fat: 12gPolyunsaturated Fat: 2gMonounsaturated Fat: 8gCholesterol: 80mgSodium: 700mgPotassium: 600mgFiber: 3gSugar: 5gVitamin A: 600IUVitamin C: 15mgCalcium: 200mgIron: 3mg

Notes

For added flavor, serve with a side of garlic bread or a fresh salad. Adjust seasoning to taste before serving.

Tried this recipe?

Let us know how it was!

Creamy Rotel Pasta with Ground Beef for a Cozy Family Dinner

February 2, 2026 by Grace Snow Leave a Comment

As I stirred the pot, the rich aroma of sizzling ground beef mingled with zesty tomatoes, instantly transporting me to the comforting embrace of home-cooked favorites. This Creamy Rotel Pasta with Ground Beef is my go-to recipe for those busy weeknights when I need a meal that's both delicious and quick to whip up. In just 30 minutes, you’ll create a warm, family-friendly dinner that not only satisfies hungry bellies but also offers delightful versatility—swap in ground turkey or a plant-based option, and choose any pasta shape that tickles your fancy. Plus, this dish is a fantastic freezer-friendly option, perfect for meal prep enthusiasts. Curious how to bring this hearty, creamy delight to your dinner table? Let’s get cooking!

What makes this pasta dish a winner?

Quick and Easy: With just 30 minutes from start to finish, this Creamy Rotel Pasta with Ground Beef is perfect for busy weeknights.
Flavor Explosion: The zesty combination of ground beef, creamy cheese, and tangy Rotel tomatoes creates an unforgettable flavor that will have everyone asking for seconds.
Versatile Base: Swap out ground beef for turkey or plant-based options, and don’t hesitate to try different pasta shapes like penne or fusilli to suit your family’s tastes.
Crowd-Pleaser: This dish is a guaranteed hit with both kids and adults alike, making it your new go-to for family dinners.
Make-Ahead Magic: Preparation can be done in advance, and it freezes beautifully—perfect for those who love to meal prep! If you're looking for other crowd-pleasing options, consider Ground Beef Enchiladas or Seafood Pasta Savory.

Creamy Rotel Pasta Ingredients

For the Pasta

  • Elbow Macaroni – A classic choice that holds the creamy sauce well; feel free to swap in your favorite pasta shape.

For the Meat

  • Ground Beef – Offers hearty protein; ground turkey or plant-based alternatives work as lighter options.

For the Sauce

  • Olive Oil – Essential for browning the meat and adding richness; can be substituted with canola oil.
  • Garlic Powder – Elevates the dish's flavor; fresh minced garlic can impart a stronger taste.
  • Onion Powder – Adds depth and savory notes; consider using finely diced fresh onion for texture.
  • Salt & Pepper – Key for balancing flavors; adjust according to your taste preferences.
  • Diced Tomatoes with Green Chilies (Rotel) – Delivers zest and moisture; if unavailable, plain diced tomatoes with spices can work.
  • Cream Cheese – Creates a wonderfully creamy sauce; feel free to use sour cream for a tangy twist.
  • Beef Broth – Enriches flavor; for vegetarian needs, switch to vegetable broth.
  • Shredded Cheddar Cheese – Adds extra creaminess; Monterey Jack or dairy-free versions can be good substitutes.

Optional Add-Ins

  • Sliced Jalapeños – For an extra kick in your creamy sauce; adjust to your spice tolerance.

Step‑by‑Step Instructions for Creamy Rotel Pasta with Ground Beef

Step 1: Cook Pasta
Begin by bringing a large pot of salted water to a boil. Add in the elbow macaroni and cook for 7-8 minutes until al dente, stirring occasionally to prevent sticking. Once done, drain the pasta in a colander and set it aside while you prepare the rest of the dish.

Step 2: Brown Beef
In the same pot, heat 1 tablespoon of olive oil over medium heat. Add the ground beef and cook, breaking it apart with a spatula, for about 5-7 minutes until it’s nicely browned and no longer pink. Drain any excess fat from the pot to keep your Creamy Rotel Pasta light and flavorful.

Step 3: Add Seasonings
Next, stir in 1 teaspoon of garlic powder, 1 teaspoon of onion powder, and a pinch of salt and pepper to the cooked beef. Allow the seasonings to bloom by cooking for an additional minute. This step enhances the dish's flavor profile, creating a savory base for your creamy sauce.

Step 4: Make Sauce
To the seasoned beef, add a can of Rotel tomatoes, 8 ounces of cream cheese, and 1 cup of beef broth. Stir the mixture over medium heat until the cream cheese melts completely and the sauce is creamy and smooth. Watch for a gentle simmer, ensuring your Creamy Rotel Pasta gets all the delicious flavors together.

Step 5: Combine and Melt Cheese
Return the cooked macaroni back to the pot, stirring to coat it evenly in the creamy sauce. Then, add 1 cup of shredded cheddar cheese, stirring continuously until the cheese is fully melted and everything is well combined. This creates a rich and cheesy texture that your family will love.

Step 6: Serve
Once everything is well mixed and heated through, scoop the creamy pasta into bowls. If desired, garnish with fresh herbs like parsley or cilantro for an added touch. Serve hot for a comforting meal that everyone will enjoy, showcasing your delightful Creamy Rotel Pasta with Ground Beef.

Make Ahead Options

These Creamy Rotel Pasta with Ground Beef options are perfect for meal prep enthusiasts! You can cook the pasta and prepare the sauce up to 24 hours in advance, allowing you to save valuable time on busy weeknights. Simply follow the steps to cook the elbow macaroni and make the creamy sauce, then refrigerate both components in airtight containers. To maintain quality, be sure to store the sauce separately to prevent the pasta from absorbing too much moisture. When you're ready to serve, just reheat the sauce in a pot while you warm the pasta, combine them together, and finish with a sprinkle of cheddar cheese for delicious, comforting results!

Expert Tips for Creamy Rotel Pasta

Taste Test as You Go: Ensure your Creamy Rotel Pasta has the right flavor by tasting along the way; adjust seasoning if needed for a perfectly balanced dish.

Don’t Overcook Pasta: Aim for al dente pasta to maintain a good texture; cooking it too long can lead to mushy results that don't hold the sauce well.

Mix It Up: Feel free to customize protein options—ground turkey or plant-based alternatives work beautifully as a lighter substitute for ground beef.

Store Wisely: To preserve flavor and texture, store leftovers in an airtight container; reheat gently with a splash of broth to restore creaminess if needed.

Freeze for Later: This dish freezes well; consider doubling the recipe and saving half for a busy night when you need a quick meal!

Creamy Rotel Pasta Variations

Feel free to get creative with this recipe and make it your own, bringing new flavors and textures to dinner!

  • Ground Turkey: Swap the ground beef for lean ground turkey for a lighter, healthier option that still delivers on taste.

  • Plant-Based Alternative: Use a plant-based ground meat for a vegetarian-friendly dish without losing that rich, hearty flavor.

  • Pasta Shape Swap: Try penne, fusilli, or even whole grain pasta instead of elbow macaroni to add a fun twist to your meal.

  • Sour Cream Twist: Replace cream cheese with sour cream for a tangy flavor that adds a delightful zing to the sauce.

  • Cauliflower Pasta: Opt for Cauliflower Pasta Ready to reduce carbs while keeping it delicious and creamy.

  • Spice It Up: For a fiery kick, add sliced jalapeños or even a dash of hot sauce to the creamy mixture for those who crave a bit of heat.

  • Custom Seasonings: Experiment with Italian herbs like oregano or basil to enhance the flavor profile even further.

  • Cheese Variety: Swap out cheddar for Monterey Jack or try a dairy-free cheese if you're catering to dietary needs while keeping it creamy and delicious. For more cheesy goodness, check out our Tagliatelle Asparagus Peas as inspiration!

What to Serve with Creamy Rotel Pasta with Ground Beef

Treat your family to a delightful meal where every bite complements the creamy comfort of your pasta dish.

  • Garlic Bread: This classic pairing is perfect for soaking up any extra sauce, adding a crunchy texture alongside the creaminess.

  • Garden Salad: A fresh, crisp salad with mixed greens and a tangy vinaigrette balances the hearty richness of the pasta, bringing brightness to the table.

  • Roasted Vegetables: Seasonal roasted veggies add a lovely crunch and a kaleidoscope of colors, enhancing the meal's visual appeal while providing a healthy contrast.

  • Cheesy Breadsticks: Soft, cheesy breadsticks create a playful dip-and-savor experience that the whole family will enjoy, enhancing the cheesy goodness of the pasta.

  • Fruit Salad: A refreshing fruit salad can offer a sweet contrast, cleansing the palate and adding a burst of freshness after the rich, creamy pasta.

  • Red Wine: A glass of smooth red wine, like a Merlot or Cabernet Sauvignon, pairs beautifully, complementing the savory flavors while rounding out the meal.

  • Chocolate Cake: End on a sweet note with a slice of rich chocolate cake; its decadence perfectly balances the savory, comforting nature of the Creamy Rotel Pasta.

  • Lemonade: For a non-alcoholic refreshment, a tall glass of homemade lemonade adds a tart, cooling touch that refreshes the palate after each creamy bite.

  • Coleslaw: This crunchy, tangy dish makes a lovely side, providing texture and a hint of sweetness that contrasts nicely with the rich pasta.

How to Store and Freeze Creamy Rotel Pasta

Fridge: Store leftovers in an airtight container for up to 3 days, ensuring the pasta retains its creamy texture.

Freezer: This dish freezes beautifully! Place in a freezer-safe container for up to 1 month. Thaw in the fridge overnight before reheating.

Reheating: To restore creaminess, add a splash of beef broth or milk when reheating on the stovetop, ensuring it stays rich and delicious.

Make-Ahead: You can pre-cook the pasta and sauce separately, refrigerating them for up to 24 hours. Combine and reheat before serving for a quick meal!

Creamy Rotel Pasta with Ground Beef Recipe FAQs

How do I choose the right ripeness for tomatoes in this recipe?
Absolutely! When selecting tomatoes, look for fresh diced tomatoes with no dark spots or bruising. If using canned Rotel, check the expiration date to ensure optimal flavor. Fresh tomatoes should feel firm and have a vibrant color to enhance the dish’s brightness.

What’s the best way to store leftovers, and how long do they last?
To keep your Creamy Rotel Pasta fresh, store leftovers in an airtight container in the fridge for up to 3 days. Just ensure the container is sealed tightly to prevent drying out. When you're ready to enjoy it again, simply reheat gently on the stovetop with a splash of broth or milk to restore the creaminess.

Can I freeze Creamy Rotel Pasta, and how do I do it?
Very! This dish freezes beautifully, making it perfect for meal prep. To freeze, allow the pasta to cool completely, then transfer it to a freezer-safe container. It will stay good for up to 1 month. When ready to eat, thaw it overnight in the fridge, then reheat on the stovetop. Adding a little broth or milk during reheating will keep it creamy and delicious.

What should I do if my sauce is too thick?
If your sauce turns out thicker than desired, don’t worry! Simply add a splash of beef broth or milk over low heat, stirring continuously until you reach your preferred consistency. If you find it’s still too dense, a little water can help, but be cautious not to dilute the flavor.

Are there any dietary considerations I should keep in mind?
Absolutely! If you’re cooking for someone with allergies, be mindful of possible sensitivities to dairy and gluten. You can easily make this dish vegetarian by swapping ground beef for a plant-based alternative and using gluten-free pasta. For a lighter version, ground turkey works wonderfully and still maintains great flavor.

Can I make this dish vegan-friendly?
Certainly! To make Creamy Rotel Pasta vegan, substitute the ground beef with a plant-based alternative, use a non-dairy cream cheese, and vegetable broth instead of beef broth. Pasta choices should also be checked to ensure they are egg-free. This way, you can enjoy a comforting meal that meets your dietary needs!

Creamy Rotel Pasta with Ground Beef

Creamy Rotel Pasta with Ground Beef for a Cozy Family Dinner

This Creamy Rotel Pasta with Ground Beef is a quick and family-friendly dish that offers a flavor explosion and versatility, perfect for busy weeknights.
Print Recipe Pin Recipe
Prep Time 10 minutes mins
Cook Time 20 minutes mins
Total Time 30 minutes mins
Servings: 4 servings
Course: Dinner
Cuisine: American
Calories: 550
Ingredients Equipment Method Nutrition Notes

Ingredients
  

For the Pasta
  • 8 ounces Elbow Macaroni A classic choice that holds the creamy sauce well.
For the Meat
  • 1 pound Ground Beef Offers hearty protein; ground turkey or plant-based alternatives work as lighter options.
For the Sauce
  • 1 tablespoon Olive Oil Essential for browning the meat and adding richness; can be substituted with canola oil.
  • 1 teaspoon Garlic Powder Elevates the dish's flavor; fresh minced garlic can impart a stronger taste.
  • 1 teaspoon Onion Powder Adds depth and savory notes; consider using finely diced fresh onion for texture.
  • to taste Salt & Pepper Key for balancing flavors; adjust according to your taste preferences.
  • 1 can Diced Tomatoes with Green Chilies (Rotel) Delivers zest and moisture; if unavailable, plain diced tomatoes with spices can work.
  • 8 ounces Cream Cheese Creates a wonderfully creamy sauce; feel free to use sour cream for a tangy twist.
  • 1 cup Beef Broth Enriches flavor; for vegetarian needs, switch to vegetable broth.
  • 1 cup Shredded Cheddar Cheese Adds extra creaminess; Monterey Jack or dairy-free versions can be good substitutes.
Optional Add-Ins
  • to taste Sliced Jalapeños For an extra kick in your creamy sauce; adjust to your spice tolerance.

Equipment

  • Large pot

Method
 

Step-by-Step Instructions
  1. Begin by bringing a large pot of salted water to a boil. Add in the elbow macaroni and cook for 7-8 minutes until al dente, stirring occasionally to prevent sticking. Once done, drain the pasta in a colander and set it aside while you prepare the rest of the dish.
  2. In the same pot, heat 1 tablespoon of olive oil over medium heat. Add the ground beef and cook, breaking it apart with a spatula, for about 5-7 minutes until it’s nicely browned and no longer pink. Drain any excess fat from the pot.
  3. Next, stir in 1 teaspoon of garlic powder, 1 teaspoon of onion powder, and a pinch of salt and pepper to the cooked beef. Cook for an additional minute.
  4. Add a can of Rotel tomatoes, 8 ounces of cream cheese, and 1 cup of beef broth to the seasoned beef. Stir over medium heat until the cream cheese melts completely and the sauce is creamy and smooth.
  5. Return the cooked macaroni back to the pot, stirring to coat it evenly in the creamy sauce. Then, add 1 cup of shredded cheddar cheese, stirring until the cheese is fully melted.
  6. Once everything is well mixed and heated through, scoop the creamy pasta into bowls. If desired, garnish with fresh herbs like parsley or cilantro.

Nutrition

Serving: 1servingCalories: 550kcalCarbohydrates: 45gProtein: 30gFat: 30gSaturated Fat: 15gPolyunsaturated Fat: 0.5gMonounsaturated Fat: 12gCholesterol: 90mgSodium: 800mgPotassium: 600mgFiber: 3gSugar: 5gVitamin A: 500IUVitamin C: 15mgCalcium: 200mgIron: 3mg

Notes

Store leftovers in an airtight container for up to 3 days in the fridge. This dish freezes well for up to 1 month.

Tried this recipe?

Let us know how it was!

Quick & Easy Chinese Ground Beef and Cabbage Stir-Fry Delight

February 2, 2026 by Grace Snow Leave a Comment

The sizzling sound of ground beef hitting a hot skillet is like music to my ears, and I can’t help but feel a wave of excitement wash over me. Today, I'm sharing a dish that perfectly encapsulates that joy: Savory Chinese Ground Beef and Cabbage Stir-Fry. In just 30 minutes, you can whip up this protein-packed and nourishing meal, making it a lifesaver on your busiest weeknights. Toss in a medley of crisp cabbage and your choice of colorful vegetables for a customizable twist that your family will adore. The rich, savory-sweet sauce ties everything together beautifully, transforming a simple meal into something extraordinary. Are you ready to fill your kitchen with tantalizing aromas and create a stir-fry that will impress everyone at your table? Let's dive in!

What Makes This Stir-Fry So Special?

Quick and Easy: This Savory Chinese Ground Beef and Cabbage Stir-Fry comes together in just 30 minutes, perfect for those hectic weeknights.

Customizable Goodness: With the ability to swap in your favorite vegetables or even proteins like chicken or tofu, this dish is as versatile as it is delicious.

Flavor Explosion: The combination of soy sauce, ginger, and oyster sauce creates a mouthwatering depth of flavor that will have everyone coming back for seconds.

Nourishing and Satisfying: Packed with protein and fresh ingredients, it's a health-conscious choice that doesn’t skimp on taste, making it an excellent alternative to fast food.

Crowd-Pleaser: Whether it's a family dinner or a gathering with friends, this stir-fry is sure to impress and delight with its vibrant colors and tantalizing flavors.

Chinese Ground Beef and Cabbage Stir-Fry Ingredients

• For the Stir-Fry

  • Ground Beef – A protein-rich ingredient that adds flavor; choose 80/20 for juiciness.
  • Green Cabbage – Offers a satisfying crunch and essential nutrients; pre-shredded saves time.
  • Onion – Adds aromatic sweetness; finely chop for even cooking.
  • Garlic – Fresh and minced enhances overall flavor; don’t skip for potency.
  • Fresh Ginger – Grated for easy incorporation, delivering warmth and fragrance.
  • Soy Sauce – Delivers umami goodness; consider low-sodium for a healthier touch.
  • Oyster Sauce – Provides a rich, sweet finish; hoisin sauce can be a great substitute.
  • Rice Vinegar – Balances the dish with acidity; can swap for apple cider vinegar if needed.
  • Sesame Oil – A finishing oil that adds a nutty essence; drizzle just before serving.
  • Vegetable Oil – Neutral oil for cooking; feel free to use an alternative oil of your choice.
  • Salt and Pepper – Key for seasoning; adjust to taste for optimal flavor.
  • Green Onions or Chives – Bright garnish that adds visual appeal and fresh flavor.
  • Sesame Seeds – Optional garnish that adds a delightful crunch and nuttiness.

Dive into this Chinese Ground Beef and Cabbage Stir-Fry adventure, and let the delicious flavors swirl in your kitchen!

Step‑by‑Step Instructions for Chinese Ground Beef and Cabbage Stir-Fry

Step 1: Heat Oil
In a large skillet or wok, heat 2 tablespoons of vegetable oil over medium-high heat until it shimmers. This should take about 1-2 minutes. This sizzling sound will signal that your pan is ready for the ground beef, setting the stage for a delicious stir-fry.

Step 2: Brown Beef
Add 1 pound of ground beef to the skillet, breaking it apart with a spatula. Cook for 5-7 minutes, stirring occasionally, until the beef is browned and no longer pink. Drain any excess fat to keep your Chinese Ground Beef and Cabbage Stir-Fry light and healthy.

Step 3: Sauté Aromatics
Introduce 1 finely chopped onion, 3 minced garlic cloves, and 1 tablespoon of grated fresh ginger to the beef. Sauté the mixture for 2-3 minutes until the vegetables are tender and fragrant. The aroma will fill your kitchen, inviting everyone to gather around the dining table.

Step 4: Add Cabbage
Stir in 4 cups of pre-shredded green cabbage, ensuring it mixes well with the beef and aromatics. Cook for another 4-5 minutes, stirring frequently, until the cabbage is slightly softened yet still maintains some crunch. This is where your Chinese Ground Beef and Cabbage Stir-Fry begins to take shape.

Step 5: Combine Sauce
In a bowl, whisk together 3 tablespoons of soy sauce, 2 tablespoons of oyster sauce, and 1 tablespoon of rice vinegar. Pour this flavorful sauce over the beef and cabbage mixture in the skillet, stirring well to ensure everything is evenly coated. The colors will come alive!

Step 6: Finish Cooking
Drizzle 1 tablespoon of sesame oil over the stir-fry and season with salt and pepper to taste. Let the mixture cook for an additional 2 minutes; this will meld the flavors beautifully. The sizzling sounds will signal that your meal is almost ready!

Step 7: Serve
Transfer your Chinese Ground Beef and Cabbage Stir-Fry to a serving dish and garnish with sliced green onions and a sprinkle of sesame seeds. Serve immediately over a bed of rice or noodles for a complete meal that’s as visually appealing as it is delicious.

Chinese Ground Beef and Cabbage Stir-Fry Variations

Feel free to let your creativity shine and customize this stir-fry to suit your taste buds!

  • Vegetable Boost: Add bell peppers, broccoli, or snap peas for extra crunch and nutrition that brighten every bite.

  • Lean Protein: Substitute ground beef with ground turkey or chicken for a lighter option that still packs a protein punch.

  • Tofu Option: For a vegetarian twist, use firm tofu; press, cube, and sauté until golden for a delightful texture.

  • Noodle Swap: Serve your stir-fry over whole grain noodles or udon for a filling twist that adds a delightful chew.

  • Sweet Addition: Toss in fresh pineapple chunks or mango slices for a sweet surprise that beautifully complements the savory elements.

  • Spicy Kick: Add red pepper flakes or sriracha to turn up the heat, creating an exciting layer of flavor that spice lovers will adore.

  • Herb Infusion: Enhance the flavor with fresh cilantro or basil, adding a fragrant and vibrant element to your dish.

  • Mushroom Medley: Mix in shiitake or button mushrooms for an earthy flavor and rich texture that will deepen the dish's complexity.

Consider exploring these variations while making your Chinese Ground Beef and Cabbage Stir-Fry or pairing it with a refreshing side salad. You can also discover new delights like Chickpea Spinach Curry when you're in the mood for something different!

Make Ahead Options

These Savory Chinese Ground Beef and Cabbage Stir-Fry ingredients are perfect for meal prep enthusiasts looking to save time. You can prepare the ground beef mixture, including the onions, garlic, and ginger, up to 24 hours in advance; simply cook, cool, and store in an airtight container in the refrigerator. Additionally, the shredded cabbage can be prepped up to 3 days ahead; just keep it in a sealed bag in the fridge to lock in its freshness. When you’re ready to serve, sauté the prepped mixture in a skillet for a few minutes, add the cabbage, and combine with the sauce for a deliciously quick meal that’s just as tasty as if made fresh!

Storage Tips for Chinese Ground Beef and Cabbage Stir-Fry

Fridge: Store leftovers in an airtight container and refrigerate for up to 3-4 days to maintain freshness. Reheat on the stovetop or in the microwave until heated through.

Freezer: For long-term storage, freeze the stir-fry in a sealed container for up to 3 months. Thaw overnight in the fridge before reheating.

Reheating: When ready to enjoy, reheat on medium heat in a skillet, adding a splash of water or broth to prevent drying out, stirring until heated evenly.

Wrapping: If you're meal-prepping, divide into individual portions before freezing, which makes enjoying your Chinese Ground Beef and Cabbage Stir-Fry even easier!

Expert Tips for Chinese Ground Beef and Cabbage Stir-Fry

  • Quality Meat Matters: Choose high-quality ground beef with an 80/20 fat ratio for the best flavor and moisture; avoid leaner options that can be dry.

  • Don’t Overcook Cabbage: Keep an eye on the cabbage while cooking—it should be tender yet firm. Overcooking will result in a mushy texture, which isn’t ideal for this stir-fry.

  • Prep Ahead: Use pre-shredded cabbage and chopped vegetables to save time, making weeknight cooking faster and stress-free.

  • Adapt to Your Taste: Feel free to add your favorite vegetables, such as bell peppers or snap peas, to this Chinese Ground Beef and Cabbage Stir-Fry for extra nutrition and color.

  • Enhance the Spice: For those who love a kick, add sriracha or red pepper flakes to the beef as it cooks, enhancing the depth of flavor without overwhelming the dish.

What to Serve with Savory Chinese Ground Beef and Cabbage Stir-Fry

Pairing this hearty stir-fry with complementary side dishes will elevate your meal to new heights of flavor and satisfaction.

  • Steamed Jasmine Rice: Fluffy and fragrant, jasmine rice soaks up the savory sauce, turning each bite into pure delight. It's the perfect canvas for your stir-fry.

  • Quick Pickled Cucumbers: Refreshing and tangy, these cucumbers add a crunchy contrast to the warm, savory beef. They're quick to make and provide a delightful zing that cuts through the richness.

  • Garlic Bok Choy: Wilting bok choy and garlic creates a tender yet crisp side that echoes the flavors of your main dish, adding both nutrition and a beautiful presentation.

  • Egg Drop Soup: A warm bowl of this comforting soup complements the stir-fry perfectly. Its gentle flavors balance the richness of the beef, giving a cozy feel to the meal.

  • Chilled Noodle Salad: A cold noodle salad with sesame dressing offers a wonderfully refreshing counterpoint to the warm stir-fry. Toss in some vegetables for added crunch and nutrition.

  • Hot Green Tea: Sipping on hot green tea during your meal not only enhances the flavors but offers a soothing end to the bustling aromas of your kitchen.

Combining these suggestions with your Chinese Ground Beef and Cabbage Stir-Fry will take your dining experience to a whole new level, creating a feast that tantalizes all the senses.

Chinese Ground Beef and Cabbage Stir-Fry Recipe FAQs

What type of ground beef should I use?
Absolutely! For the best flavor and juiciness, I recommend using ground beef with an 80/20 fat ratio. This balance of fat ensures your stir-fry stays moist and rich in flavor. Leaner options, like 90/10, can dry out during cooking and won’t provide the same delicious results.

How should I store leftovers of the stir-fry?
Store any leftovers in an airtight container and refrigerate them for up to 3-4 days. This keeps them fresh and ready to reheat. If you don't think you'll eat them within that time, freezing is a great option!

Can I freeze the stir-fry for later use?
Certainly! To freeze your Chinese Ground Beef and Cabbage Stir-Fry, let it cool completely, then transfer it to a sealed freezer-safe container. It can be frozen for up to 3 months. When ready to enjoy, simply thaw it overnight in the fridge and then reheat it in a skillet over medium heat. For a touch of moisture, add a splash of broth or water while reheating.

What can I do if my cabbage becomes too mushy while cooking?
Very good question! If you find that your cabbage is getting too mushy, it’s likely being overcooked. To avoid this, cook the cabbage just until it wilts and softens slightly—about 4-5 minutes is usually perfect. Keeping it crunchy adds to the texture contrast in the stir-fry. If you need a quick fix after it’s cooked, you can toss in some fresh, raw cabbage at the end to restore that crunch!

Are there any dietary considerations I should be aware of?
Absolutely! This recipe contains ingredients that may not be suitable for certain diets. If you're cooking for someone with soy allergies, consider using coconut aminos as a substitute for soy sauce. For gluten-free options, check that your oyster sauce is gluten-free or replace it with a homemade sauce using hoisin sauce. Additionally, if you’re preparing this for pets or individuals with allergies, always check labels carefully for potential allergens!

Chinese Ground Beef and Cabbage Stir-Fry

Quick & Easy Chinese Ground Beef and Cabbage Stir-Fry Delight

This Chinese Ground Beef and Cabbage Stir-Fry is a quick, flavorful meal ready in just 30 minutes, ideal for busy weeknights.
Print Recipe Pin Recipe
Prep Time 10 minutes mins
Cook Time 20 minutes mins
Total Time 30 minutes mins
Servings: 4 servings
Course: Dinner
Cuisine: Chinese
Calories: 350
Ingredients Equipment Method Nutrition Notes

Ingredients
  

For the Stir-Fry
  • 1 lb Ground Beef 80/20 for juiciness
  • 4 cups Green Cabbage pre-shredded
  • 1 medium Onion finely chopped
  • 3 cloves Garlic minced
  • 1 tbsp Fresh Ginger grated
  • 3 tbsp Soy Sauce low-sodium recommended
  • 2 tbsp Oyster Sauce or hoisin sauce as a substitute
  • 1 tbsp Rice Vinegar can swap for apple cider vinegar
  • 1 tbsp Sesame Oil drizzle before serving
  • 2 tbsp Vegetable Oil neutral oil for cooking
  • Salt and Pepper adjust to taste
  • 3 tbsp Green Onions or Chives for garnish
  • Sesame Seeds optional garnish

Equipment

  • Skillet
  • Spatula
  • Mixing Bowl

Method
 

Cooking Steps
  1. Heat 2 tablespoons of vegetable oil in a large skillet over medium-high heat until shimmering.
  2. Add 1 pound of ground beef, breaking apart with a spatula. Cook for 5-7 minutes until browned.
  3. Add 1 finely chopped onion, 3 minced garlic cloves, and 1 tablespoon of grated fresh ginger. Sauté for 2-3 minutes.
  4. Stir in 4 cups of pre-shredded green cabbage and cook for another 4-5 minutes.
  5. Whisk together 3 tablespoons of soy sauce, 2 tablespoons of oyster sauce, and 1 tablespoon of rice vinegar. Pour over the stir-fry.
  6. Drizzle 1 tablespoon of sesame oil, and season with salt and pepper. Cook for an additional 2 minutes.
  7. Serve the stir-fry with sliced green onions and a sprinkle of sesame seeds.

Nutrition

Serving: 1servingCalories: 350kcalCarbohydrates: 12gProtein: 25gFat: 20gSaturated Fat: 6gPolyunsaturated Fat: 2gMonounsaturated Fat: 10gCholesterol: 70mgSodium: 750mgPotassium: 600mgFiber: 3gSugar: 4gVitamin A: 30IUVitamin C: 60mgCalcium: 4mgIron: 15mg

Notes

Feel free to customize with your favorite vegetables or proteins. Excellent for meal prep and reheating.

Tried this recipe?

Let us know how it was!

Spicy Ground Beef Stir-Fry Bowl That'll Warm Your Soul

February 2, 2026 by Grace Snow Leave a Comment

The sizzling sound of garlic hitting the pan instantly transports me to a bustling street market, where the aroma of delicious stir-fry fills the air. Today, I’m excited to share my Spicy Ground Beef Stir-Fry Bowl with Garlic Veggies—a vibrant dish that brings the essence of homemade comfort to your dinner table in just under 30 minutes. Packed with umami flavors and a delightful kick, this recipe not only satisfies your craving for bold tastes but also allows for endless customization. Whether you prefer swapping in ground turkey or mixing in your favorite veggies, it's the perfect quick meal for busy weeknights. So, are you ready to elevate your dinner game and whip up a bowl that everyone will love?

Why Is This Stir-Fry Bowl a Must-Try?

Quick and Easy: This Spicy Ground Beef Stir-Fry Bowl can be prepared in under 30 minutes, making it ideal for those hectic weeknights when dinner needs to be both fast and satisfying.

Customizable Delight: Tailor this dish to your taste by swapping proteins like ground turkey or tofu, and feel free to mix in your favorite vegetables like spinach or snow peas for added nutrition.

Bold Flavors: The harmonious blend of garlic, soy sauce, and chili flakes creates a rich umami experience that’ll keep your taste buds dancing.

Nutritious and Filling: Each bowl is packed with protein, fiber, and wholesome ingredients, perfectly balancing your macros for a post-workout meal or a hearty dinner.

Family-Friendly Appeal: Kids and adults alike will appreciate the vibrant colors and textures; serve it with a sprinkle of toasted sesame seeds or fresh herbs for an extra touch.

Want more quick meal ideas? Check out these poor man’s burrito bowls or try the delicious flavors of my Spicy Miso Tuna Noodle Casserole.

Spicy Ground Beef Stir-Fry Bowl Ingredients

• Get ready to create a flavor-packed meal!

For the Beef

  • Ground Beef – A hearty base; choose lean or grass-fed for a healthier option.
  • Soy Sauce – Enhances umami and saltiness; opt for tamari if you need a gluten-free version.
  • Chili Flakes – Bring on the heat! Adjust according to your preferred spice level.
  • Brown Sugar – Balances the spice with a hint of sweetness; swap for coconut sugar if preferred.
  • Sesame Oil – Adds a nutty flavor; substitute with olive oil if necessary.

For the Veggies

  • Garlic (Minced) – Infuses the dish with aromatic goodness; feel free to add more for extra flavor.
  • Broccoli Florets – Crunchy and nutrient-rich; you can also use snap peas or green beans as a substitute.
  • Red Bell Pepper – A sweet and colorful addition; yellow or orange bell peppers work beautifully too.
  • Zucchini – Adds moisture and texture; can be replaced with squash if desired.
  • Mushrooms – Provide deep umami flavor; select your favorite variety, like shiitake or button mushrooms.

For Serving

  • Steamed White Rice – The perfect base for your stir-fry bowl; use brown rice or cauliflower rice for a health boost.
  • Olive Oil – Necessary for sautéing veggies; vegetable oil can also do the trick.

Dive into this delightful Spicy Ground Beef Stir-Fry Bowl where customization meets deliciousness!

Step‑by‑Step Instructions for Spicy Ground Beef Stir-Fry Bowl

Step 1: Prep Ingredients
Start by washing and chopping your vegetables—broccoli into florets, bell pepper into strips, zucchini into half-moons, and mushrooms into slices. Mince the garlic and measure out your sauces, ensuring everything is ready to go. This organization will make the cooking process smooth and quick, paving the way for a delightful Spicy Ground Beef Stir-Fry Bowl.

Step 2: Cook Beef
In a large skillet, heat 1 tablespoon of sesame oil over medium heat. Once the oil is shimmering, add the minced garlic, sautéing for about 30 seconds until fragrant. Add the ground beef, breaking it apart with a spatula. Cook until browned and no longer pink, about 4-5 minutes. Stir in soy sauce, chili flakes, and brown sugar, allowing it to simmer for 3-4 minutes until everything is well combined and slightly thickened.

Step 3: Sauté Veggies
In a separate pan, heat 1 tablespoon of olive oil over medium-high heat. When the oil is hot and shimmering, add a clove of minced garlic, cooking for about 30 seconds until it becomes aromatic. Next, toss in the sliced mushrooms and stir-fry for 2 minutes until softened, then add broccoli, zucchini, and red bell pepper. Cook for an additional 3-4 minutes until vibrant and tender-crisp, stirring occasionally.

Step 4: Assemble Bowl
To assemble your Spicy Ground Beef Stir-Fry Bowl, start with a generous scoop of steaming white rice in the bottom of each bowl. Top with the savory ground beef mixture, followed by a colorful array of sautéed vegetables. Feel free to drizzle some extra soy sauce over the top for added flavor and serve immediately for the best experience.

How to Store and Freeze Spicy Ground Beef Stir-Fry Bowl

Fridge: Store leftovers in airtight containers for up to 4 days. Keep beef and veggies separate for best texture.

Freezer: Freeze the beef and vegetables in airtight bags for up to 3 months. Rice can also be frozen but may lose texture after thawing.

Reheating: Reheat components separately in the microwave, adding a splash of water or soy sauce to regain moisture.

Meal Prep Tip: Portion out the Spicy Ground Beef Stir-Fry Bowl in individual containers for easy access to a quick meal throughout the week!

Spicy Ground Beef Stir-Fry Bowl Swaps

Feel free to mix and match with these exciting variations to make this stir-fry bowl truly your own!

  • Ground Turkey: Substitute ground beef for a lighter option that still packs a punch.
  • Chicken: Use ground chicken for a lean alternative, maintaining the dish's great flavor.
  • Tofu: Opt for crumbled firm tofu as a fantastic vegetarian alternative, soaking up all the delicious sauces.
  • Shrimp: For a seafood twist, swap in shrimp, cooking them just until pink and tender for a delightful crunch.
  • Garlic Boost: Craving more garlic? Toss in extra cloves to amplify that irresistible aroma and taste.
  • Veggie Medley: Explore other veggies like bok choy or carrots for additional texture and color; let your creativity shine!
  • Rice Variations: Swap your white rice for brown, cauliflower rice, or even quinoa to enhance nutritional value.
  • Add Heat: Increase your chili flakes or add sliced jalapeños if you’re looking to turn up the spice factor!

The beauty of this dish lies in its versatility! Each swap can lead to a new culinary adventure, just like when trying my delicious Acai Bowl Nutritious or refreshing Pitaya Smoothie Bowl. Your culinary journey awaits!

What to Serve with Spicy Ground Beef Stir-Fry Bowl

A delicious, vibrant stir-fry deserves the perfect companions to create a well-rounded meal that warms the soul.

  • Creamy Mashed Potatoes: The smooth, buttery texture provides a comforting contrast to the spicy and crunchy stir-fry, balancing flavors wonderfully.

  • Fresh Cucumber Salad: Crisp and refreshing, this salad cuts through the heat and adds a delightful crunch, making each bite feel lighter.

  • Garlic Breadsticks: Their crunchy exterior and soft center complement the bold flavors of the stir-fry beautifully while adding a fun dipping element to your meal.

  • Steamed Edamame: Packed with protein and a subtle sweetness, these vibrant green pods are a quick and nutritious side that pairs nicely with the savory bowl.

  • Miso Soup: This warm, umami-rich soup offers a gentle earthiness that complements the flavors in your Spicy Ground Beef Stir-Fry Bowl, creating a harmonious meal experience.

  • Fruity Smoothies: A cold, refreshing smoothie made with tropical fruits adds a sweet touch that balances the heat from the dish, ensuring a satisfying end to your meal.

  • Toasted Sesame Seeds: A simple sprinkle over your meal adds nutty flavor and texture, enhancing every bite while beautifully finishing off your Spicy Ground Beef Stir-Fry Bowl.

  • Lemon Sorbet: For a light dessert, this zesty treat cleanses the palate after a spicy meal, leaving you feeling refreshed and satisfied.

Make Ahead Options

These Spicy Ground Beef Stir-Fry Bowls are a fantastic choice for meal prep enthusiasts! You can chop your vegetables and mince garlic up to 24 hours in advance, storing them in airtight containers to keep them fresh. Additionally, you can cook the ground beef mixture and refrigerate it for up to 3 days. When you're ready to serve, simply reheat the beef in a skillet while quickly sautéing the prepped veggies until tender-crisp. For the best quality, add the soy sauce just before serving to maintain the vibrant flavors. This way, you'll have a delicious and satisfying meal ready in no time, perfect for those busy weeknights!

Expert Tips for Spicy Ground Beef Stir-Fry Bowl

  • Use Day-Old Rice: When making a stir-fry, day-old rice has a firmer texture that prevents clumping. It’s the secret to achieving that perfect fried rice quality.

  • Don’t Overcook Veggies: Keep those vibrant colors and crunch! Sauté your vegetables just until tender-crisp to maintain their delightful texture in your Spicy Ground Beef Stir-Fry Bowl.

  • Adjust Your Heat: Remember, spice levels can vary greatly! Start with a smaller amount of chili flakes, then taste and adjust according to your personal preference to ensure it’s just right.

  • Flavor Boosts: For an irresistible finish, consider adding a fried egg on top of your bowl, or garnish with fresh herbs like cilantro or green onions for extra flavor and freshness.

  • Prep Ahead: Making this meal for a busy week? Chop your veggies and marinate the beef the night before, so when it’s time to cook, you have everything ready to go in a flash!

Spicy Ground Beef Stir-Fry Bowl Recipe FAQs

What type of ground beef should I use for the best flavors?
Absolutely! For an optimal taste, I recommend using either grass-fed or lean ground beef. If you're looking for a lighter option, ground turkey works wonderfully as a swap!

How should I store leftovers from my Spicy Ground Beef Stir-Fry Bowl?
Store leftovers in airtight containers, separating the beef and veggies for up to 4 days in the refrigerator. Keeping them separate helps maintain their textures. The rice can be refrigerated as well and will last for about 5 days.

Can I freeze my Spicy Ground Beef Stir-Fry Bowl for later?
Very! You can freeze the beef and vegetables together in airtight freezer bags for up to 3 months. I recommend portioning them out into individual servings for easy meal prep. Although rice can also be frozen, be aware it may lose texture when thawed.

What’s the best way to reheat my stir-fry leftovers?
To reheat, I suggest microwaving the components separately. Adding a splash of water or soy sauce helps to regain moisture and keep your meal delicious. Heat for 1-2 minutes or until heated through, stirring halfway for even warming.

Are there any dietary considerations I should be aware of?
Absolutely! If you have gluten sensitivities, opt for tamari instead of soy sauce to make it gluten-free. For those watching their spice intake or have children sensitive to heat, start with fewer chili flakes and adjust as needed. Also, if you're making this dish for pets, be cautious of ingredients like garlic and onions, which can be harmful to them.

How can I adjust the spice level in this dish?
If you're looking to control the heat, begin with a smaller amount of chili flakes—about half a teaspoon is a great start. Taste as you go and gradually add more if you'd like more heat. Everyone's spice tolerance is different, so make it your own!

Spicy Ground Beef Stir-Fry Bowl

Spicy Ground Beef Stir-Fry Bowl That'll Warm Your Soul

This Spicy Ground Beef Stir-Fry Bowl is a quick and customizable dish that brings bold flavors to your dinner table.
Print Recipe Pin Recipe
Prep Time 10 minutes mins
Cook Time 20 minutes mins
Total Time 30 minutes mins
Servings: 4 bowls
Course: Dinner
Cuisine: Asian
Calories: 450
Ingredients Equipment Method Nutrition Notes

Ingredients
  

For the Beef
  • 1 lb Ground Beef Choose lean or grass-fed for a healthier option.
  • 3 tbsp Soy Sauce Opt for tamari if gluten-free.
  • 1 tsp Chili Flakes Adjust according to your preferred spice level.
  • 1 tbsp Brown Sugar Can be swapped for coconut sugar.
  • 1 tbsp Sesame Oil Substitute with olive oil if necessary.
For the Veggies
  • 4 cloves Garlic (Minced) Feel free to add more for extra flavor.
  • 2 cups Broccoli Florets Can be substituted with snap peas or green beans.
  • 1 each Red Bell Pepper Yellow or orange bell peppers work as well.
  • 1 each Zucchini Can be replaced with squash if desired.
  • 1 cup Mushrooms Select your favorite variety.
For Serving
  • 4 cups Steamed White Rice Use brown rice or cauliflower rice for a health boost.
  • 1 tbsp Olive Oil Vegetable oil can also be used.

Equipment

  • Skillet
  • pan
  • Cutting Board
  • Knife

Method
 

Step-by-Step Instructions
  1. Prep Ingredients: Wash and chop vegetables—broccoli into florets, bell pepper into strips, zucchini into half-moons, and mushrooms into slices. Mince the garlic.
  2. Cook Beef: In a large skillet, heat sesame oil over medium heat. Add minced garlic and sauté for about 30 seconds. Then, add ground beef, cooking until browned (4-5 minutes). Stir in soy sauce, chili flakes, and brown sugar; simmer for 3-4 minutes.
  3. Sauté Veggies: In a separate pan, heat olive oil over medium-high heat. Add minced garlic and cook for 30 seconds. Toss in mushrooms and stir-fry for 2 minutes. Add broccoli, zucchini, and red bell pepper; cook for an additional 3-4 minutes.
  4. Assemble Bowl: Start with a scoop of rice in each bowl, top with ground beef mixture and sautéed vegetables. Drizzle extra soy sauce if desired and serve immediately.

Nutrition

Serving: 1bowlCalories: 450kcalCarbohydrates: 50gProtein: 30gFat: 18gSaturated Fat: 5gPolyunsaturated Fat: 1gMonounsaturated Fat: 3gCholesterol: 80mgSodium: 900mgPotassium: 800mgFiber: 4gSugar: 5gVitamin A: 500IUVitamin C: 80mgCalcium: 60mgIron: 3mg

Notes

Use day-old rice for the best texture. Don’t overcook the veggies to keep them vibrant. Adjust spice levels to your preference.

Tried this recipe?

Let us know how it was!

Cantonese Beef Rice Bowls for Quick, Cozy Family Dinners

February 2, 2026 by Grace Snow Leave a Comment

The aroma hit me like a warm embrace as I stirred the savory medley bubbling in my wok, a reminder of cozy family dinners past. These Cantonese Beef Rice Bowls marry tender ground beef and a luscious sauce, making it the ultimate quick comfort food for busy weeknights. In under 30 minutes, you can serve a dish that not only pleases the palate but also brings everyone around the table, reconnecting hearts and appetites alike. This recipe is a delightful crossover reminiscent of a beloved spaghetti bolognese, yet with a special twist that welcomes everyone, from the little ones to grandma. So, are you ready to transform your weeknight meals into a celebration of flavor and warmth?

Why will you love these beef rice bowls?

Quick & Easy: In just 30 minutes, you can whip up these delicious Cantonese Beef Rice Bowls, making them perfect for busy weeknights.

Family-Friendly Flavor: The savory sauce and tender beef combination makes this dish appealing to all ages—kids won't even notice it’s not spaghetti!

Customizable Delight: Feel free to swap ground beef for turkey or add in veggies like bell peppers or carrots, tailoring it to your family’s preferences.

One-Pan Wonder: With minimal cleanup, this recipe is a great way to enjoy a homemade meal without a mountain of dishes, just like my favorite Mans Burrito Bowls.

Satisfying Comfort: With a glossy sauce that clings to soft rice, every bite is a harmony of flavors, perfect for bringing everyone together around the dinner table.

Try these pork-filled flavors inspired by Ground Beef Enchiladas and discover the joys of diversity in your family food repertoire!

Cantonese Beef Rice Bowls Ingredients

For the Beef Mixture
• Oil – Adds fat for sautéing; use vegetable or peanut oil for frying.
• Ground Beef (1 pound) – Main protein source with rich flavor; can substitute with ground turkey or pork.
• Onion (1 medium, finely diced) – Provides an aromatic base for flavor; yellow or white onions work well.
• Garlic (3 cloves, minced) – Enhances the flavor profile; fresh garlic is recommended for best results.
• Shaoxing Wine (1 tablespoon) – Adds depth; can substitute with dry sherry or omit for an alcohol-free version.
• Chicken Stock (2.5 cups) – Provides a liquid foundation for the sauce; substitute with vegetable stock for a lighter option.
• Oyster Sauce (3 tablespoons) – Adds umami and richness; for a vegetarian version, use mushroom oyster sauce.
• Light Soy Sauce (2 tablespoons) – Offers salty depth; can substitute with tamari for gluten-free.
• Dark Soy Sauce (1 teaspoon) – Adds color and sweetness; can skip if not available.
• Sesame Oil (1 teaspoon) – Provides a nutty aroma; use toasted sesame oil for more flavor.
• White Pepper (1/8 teaspoon) – Adds mild heat; black pepper can be used as a substitute.
• Frozen Peas (1 cup) – Adds color and sweetness; fresh peas can also be used as a substitute.
• Cornstarch (2 tablespoons mixed with 2 tablespoons water) – Thickens the sauce; arrowroot can be used as an alternative.

For Serving
• Steamed Rice – Base for serving; jasmine or basmati rice complement the dish well.

Feel the joy of preparing these Cantonese Beef Rice Bowls—a meal that not only nourishes the body but warms the soul!

Step‑by‑Step Instructions for Cantonese Beef Rice Bowls

Step 1: Heat the Wok
Begin by heating a large wok or skillet over high heat for about 2 minutes until it’s shimmering. Add 2 tablespoons of vegetable oil, swirling it to coat the surface. The oil should glisten but not smoke, indicating it’s ready for cooking the meat. This high heat will help brown the beef beautifully, setting the stage for rich flavors.

Step 2: Brown the Ground Beef
Carefully add 1 pound of ground beef to the hot oil, using a spatula to break it into small pieces. Cook for approximately 5-6 minutes, stirring occasionally until the beef is slightly browned and no longer pink. As the beef sizzles and browns, you’ll notice a fragrant aroma filling your kitchen, promising delicious Cantonese Beef Rice Bowls.

Step 3: Sauté Aromatics
Lower the heat to medium and add 1 finely diced medium onion and 3 minced garlic cloves to the beef. Stir these ingredients together for about 3-4 minutes or until the onion becomes translucent and fragrant. This step adds a lovely depth of flavor to the meat, enriching your sauce that will coat the rice in just a bit.

Step 4: Introduce Shaoxing Wine
Pour in 1 tablespoon of Shaoxing wine, allowing it to deglaze the pan. Stir continuously for about 1 minute to mix it well with the beef and aromatics. The wine will evaporate slightly, enhancing the overall flavor profile of the Cantonese Beef Rice Bowls, as it adds a wonderful complexity with each stir.

Step 5: Add Chicken Stock and Simmer
Now, pour in 2.5 cups of chicken stock, bringing the mixture to a boil over high heat. As soon as it reaches a rolling boil, reduce the heat to low and let it simmer. Cover the wok and allow it to cook gently for about 5 minutes, letting all those flavors meld together wonderfully.

Step 6: Stir in Sauces and Simmer
Add 3 tablespoons of oyster sauce, 2 tablespoons of light soy sauce, 1 teaspoon of dark soy sauce, 1 teaspoon of sesame oil, and 1/8 teaspoon of white pepper to the simmering liquid. Mix thoroughly and cover again, letting it simmer for another 10 minutes. The sauce should thicken slightly, becoming rich and glossy, perfect for your Cantonese Beef Rice Bowls.

Step 7: Incorporate Frozen Peas
With the flavors developed, uncover the wok and stir in 1 cup of frozen peas. Stir-fry this mixture for about 1 minute or until the peas are heated through and vibrant green. This step not only adds a pop of color but also a delightful sweetness to the savory beef sauce, rounding out the dish beautifully.

Step 8: Thicken the Sauce
Prepare a cornstarch slurry by mixing 2 tablespoons of cornstarch with 2 tablespoons of water. Drizzle this mixture evenly into the simmering sauce while stirring constantly. Continue stirring for about 1-2 minutes until the sauce thickens to your desired consistency. Adjust the thickness by adding more water if necessary for the perfect coating consistency for your Cantonese Beef Rice Bowls.

Step 9: Serve Over Steamed Rice
Finally, serve the beef mixture generously over bowls of steaming jasmine or basmati rice. Ensure each bowl is topped with plenty of that thick, luscious sauce. This step brings everything together, creating a satisfying and hearty meal that’s ready to be enjoyed by the whole family.

What to Serve with Cantonese Beef Rice Bowls

When it comes to creating a well-rounded meal, a delightful array of sides can elevate your Cantonese Beef Rice Bowls into a feast for all senses.

  • Stir-Fried Bok Choy: The crunchy texture and mild bitterness of bok choy perfectly balance the rich flavors of the beef, bringing freshness to the table.
  • Cucumber Salad: A refreshing cucumber salad with a tangy dressing adds a crisp contrast, cleansing the palate between bites of savory beef.
  • Lightly Seasoned Edamame: These tender, protein-packed soybeans offer a subtle nuttiness that pairs wonderfully with the Asian-inspired flavors of the rice bowls.
  • Garlic Green Beans: Stir-fried with a hint of garlic, these green beans provide a satisfying crunch and complement the umami notes of the beef sauce beautifully.
  • Sesame Seeds: Sprinkling sesame seeds on top of the bowls not only enhances presentation but also adds a nutty flavor, making each bite even more delightful.
  • Chilled Tea: A refreshing green or jasmine tea serves as a perfect drink that harmonizes with the dish's warm spices and savory components.
  • Mango Sticky Rice: For dessert, this sweet Thai treat can serve as a lovely contrast to the savory meal, satisfying your sweet tooth with its creamy coconut flavor.

Cantonese Beef Rice Bowls Variations

Feel free to explore these creative twists on your Cantonese Beef Rice Bowls, making your dish even more delightful.

  • Lean Protein: Swap ground beef for ground turkey or chicken. This change adds a lighter touch while maintaining flavor.

  • Vegetable Boost: Add veggies like bell peppers or carrots for extra color and nutrition. They’ll brighten the dish and provide added crunch.

  • Vegetarian Option: Use mushroom oyster sauce and switch to a plant-based meat substitute. This delightful twist opens up the dish for all diets.

  • Gluten-Free Version: Replace soy sauce with tamari. This keeps the savory flavor intact without gluten—perfect for those with dietary restrictions.

  • Flavor Upgrade: Try adding a tablespoon of sriracha or chili garlic sauce for a spicy kick. The extra heat may become a new favorite for spice lovers!

  • Different Stocks: Experiment by substituting chicken stock with vegetable stock for a lighter flavor while allowing the umami of the sauces to shine.

  • Fruity Touch: Toss in pineapple chunks during the last minute of cooking. The sweetness pairs fantastically with the savory elements.

  • Noodle Twist: Transform it into a noodle dish by serving over noodles instead of rice. This adds a delightful change in texture, reminiscent of a savory stir-fry.

Each of these variations can enhance your Cantonese Beef Rice Bowls, offering exciting new flavors to enjoy alongside accompanying dishes like Fish Taco Bowls or Furikake Fried Rice. Enjoy experimenting with your family's newest weeknight favorite!

How to Store and Freeze Cantonese Beef Rice Bowls

Fridge: Keep your Cantonese Beef Rice Bowls in an airtight container for up to 3 days. This allows the flavors to meld, making each bite even more savory.

Freezer: For longer storage, freeze the beef mixture in a freezer-friendly container or bag for up to 3 months. Thaw in the fridge overnight before reheating.

Reheating: When ready to enjoy, reheat gently in the microwave or on the stovetop. If the sauce thickens too much during storage, add a splash of water for the desired consistency.

Make Ahead Options

These Cantonese Beef Rice Bowls are perfect for meal prep enthusiasts! You can prepare the beef mixture up to 3 days in advance by cooking it fully and then letting it cool before refrigerating in an airtight container. For best quality, also pre-cook your rice, storing it separately; this allows both components to retain their flavors and textures when reheating. When you're ready to serve, simply reheat the beef mixture on the stovetop over medium heat, adding a splash of water if the sauce has thickened too much. This way, you can enjoy a comforting, homemade meal in a fraction of the time—just as delicious as when it was first made!

Expert Tips for Cantonese Beef Rice Bowls

  • Stir Constantly: To avoid lumps in your sauce, make sure to stir constantly while adding the cornstarch slurry. This ensures a smooth, velvety texture.

  • Adjust Sauce Thickness: If your sauce is too thick, simply add a splash of water. Conversely, add more cornstarch slurry if it’s too thin, achieving that perfect consistency for your Cantonese Beef Rice Bowls.

  • High Heat for Flavor: Start with high heat when browning the ground beef to lock in those delicious juices. This step is crucial for enhancing the flavor of your dish.

  • Ingredient Substitutions: Feel free to experiment! Swap ground beef with turkey or try different vegetables like carrots for an entirely new twist on these rice bowls.

  • Use Fresh Garlic: For the best flavor, always go for fresh garlic instead of pre-minced. It adds a vibrant aroma that elevates your Cantonese Beef Rice Bowls to the next level.

Cantonese Beef Rice Bowls Recipe FAQs

How do I choose the best ground beef for this recipe?
When selecting ground beef, look for meat with around 80-85% lean content. This balance provides enough fat for flavor without being greasy. If you prefer a leaner option, ground turkey or pork works wonderfully too - just keep in mind that the flavor will differ.

What’s the best way to store leftover Cantonese Beef Rice Bowls?
Store your leftovers in an airtight container in the refrigerator for up to 3 days. The flavors will continue to meld, making each subsequent bite even more delightful. If you plan to enjoy it later, portion it out for quick servings when you’re ready!

Can I freeze this dish, and if so, how?
Absolutely! To freeze the Cantonese Beef Rice Bowls, transfer the beef mixture to a freezer-safe container or bag. Label it with the date and use it within 3 months for the best flavor. When you’re set to enjoy it again, thaw it overnight in the fridge, then reheat gently with a splash of water if the sauce thickens.

What should I do if my sauce turns out too thick or too thin?
No sweat! If your sauce is too thick, add water in small amounts while stirring until you reach your desired consistency. If it’s too thin, mix a little more cornstarch with water (1 tablespoon each) and stir it in while cooking until it thickens up nicely. Remember to adjust gradually – it's all about finding your perfect balance!

Are there any dietary considerations I should keep in mind?
Yes! For gluten-free options, substitute light soy sauce with tamari and ensure the oyster sauce you choose is gluten-free too. If you're catering to a vegetarian crowd, swap the beef for a meat substitute and use mushroom oyster sauce instead for that umami richness. Always check labels for potential allergens as well.

How can I make this dish more nutritious?
To amp up the nutritional value, try adding a rainbow of veggies like bell peppers or carrot slices into the beef mixture. They not only enhance the flavor but also boost the vitamins in your dinner, making your Cantonese Beef Rice Bowls delightful and colorful!

Cantonese Beef Rice Bowls

Cantonese Beef Rice Bowls for Quick, Cozy Family Dinners

Enjoy these delicious Cantonese Beef Rice Bowls, a comforting dish perfect for busy weeknights.
Print Recipe Pin Recipe
Prep Time 10 minutes mins
Cook Time 20 minutes mins
Total Time 30 minutes mins
Servings: 4 bowls
Course: Dinner
Cuisine: Cantonese
Calories: 450
Ingredients Equipment Method Nutrition Notes

Ingredients
  

For the Beef Mixture
  • 2 tablespoons vegetable oil or peanut oil for frying
  • 1 pound ground beef can substitute with ground turkey or pork
  • 1 medium onion, finely diced yellow or white onions work well
  • 3 cloves garlic, minced fresh garlic is recommended
  • 1 tablespoon Shaoxing wine or dry sherry, optional
  • 2.5 cups chicken stock or vegetable stock for a lighter option
  • 3 tablespoons oyster sauce or mushroom oyster sauce for vegetarian
  • 2 tablespoons light soy sauce or tamari for gluten-free
  • 1 teaspoon dark soy sauce can skip if not available
  • 1 teaspoon sesame oil use toasted for more flavor
  • 1/8 teaspoon white pepper or black pepper as a substitute
  • 1 cup frozen peas or fresh peas as a substitute
  • 2 tablespoons cornstarch mixed with 2 tablespoons water for thickening
For Serving
  • steamed rice jasmine or basmati rice complement the dish well

Equipment

  • Wok
  • Spatula
  • measuring cups
  • Measuring Spoons

Method
 

Step-by-Step Instructions
  1. Heat a large wok or skillet over high heat for about 2 minutes. Add vegetable oil, swirling to coat the surface.
  2. Add ground beef to the hot oil, breaking it into small pieces. Cook for 5-6 minutes until browned and no longer pink.
  3. Lower heat to medium and add diced onion and minced garlic to the beef. Stir for 3-4 minutes until onion is translucent.
  4. Pour in Shaoxing wine, stirring for about 1 minute to mix with the beef and aromatics.
  5. Add chicken stock and bring to a boil over high heat. Then reduce to low and simmer for 5 minutes.
  6. Stir in oyster sauce, light soy sauce, dark soy sauce, sesame oil, and white pepper. Simmer for another 10 minutes.
  7. Uncover the wok and stir in frozen peas. Stir-fry for about 1 minute until heated through.
  8. Prepare a cornstarch slurry by mixing cornstarch with water. Drizzle into the sauce while stirring constantly. Cook for 1-2 minutes until thickened.
  9. Serve the beef mixture over steamed rice, ensuring each bowl is topped with plenty of sauce.

Nutrition

Serving: 1bowlCalories: 450kcalCarbohydrates: 50gProtein: 30gFat: 15gSaturated Fat: 4gPolyunsaturated Fat: 1gMonounsaturated Fat: 9gCholesterol: 75mgSodium: 800mgPotassium: 600mgFiber: 3gSugar: 5gVitamin A: 500IUVitamin C: 10mgCalcium: 30mgIron: 3mg

Notes

Store leftovers in an airtight container for up to 3 days in the fridge. Reheat gently and adjust sauce thickness as needed.

Tried this recipe?

Let us know how it was!

Hearty Beef and Pepper Rice Bowl for Quick Weeknight Dinners

February 2, 2026 by Grace Snow Leave a Comment

As I rummaged through my pantry one hectic evening, the familiar aroma of sautéed garlic filled the air, instantly lifting my spirits. That’s when I realized—a Beef and Pepper Rice Bowl was just what my weeknight called for! Tender, juicy beef strips dance with vibrant peppers and onions, all layered over fluffy rice, creating an incredible flavor profile that’s as comforting as it is satisfying. This quick dinner option is a busy home-chef's dream, allowing for endless customization with your favorite toppings or vegetables. Whether you're feeding a crowd or enjoying a cozy night in, this hearty meal is sure to hit the spot. Curious about how to make your own Beef and Pepper Rice Bowl? Let’s dive into the details together!

Why Try the Beef and Pepper Rice Bowl?

Quick and Easy: Perfect for those busy weeknights, this meal comes together in a flash, allowing you to whip up dinner in less than 30 minutes!

Hearty Satisfaction: Tender beef combined with crunchy peppers creates a heartwarming dish that feels like a hug in bowl form.

Endless Customization: Feel free to swap in your favorite proteins or vegetables for a tailored meal experience. Whether it’s a sprinkle of cashews for texture or a splash of sesame oil for flair, the options are limitless!

Crowd-Pleasing: Serve it at family dinners or casual get-togethers, and watch everyone come back for seconds! Pair it with other wonderful dishes like Corn Furikake Fried Rice for an even more robust meal.

Flavor Explosion: With the delightful interplay of soy sauce and garlic, each bite is packed with savory goodness, making it hard to resist.

Dive into this fantastic recipe and discover how comforting a Beef and Pepper Rice Bowl can be!

Beef and Pepper Rice Bowl Ingredients

For the Beef
• Beef strips – Tender strips create a hearty base filled with flavor; feel free to substitute with chicken, pork, or tofu.

For the Vegetables
• Bell Peppers – Adds a sweet crunch; you can use any color or mild chili peppers for a kick.
• Onions – Sautéed for savory sweetness that enhances the overall taste; shallots can provide a milder flavor.
• Garlic – Infuses the dish with aromatic depth; for convenience, use garlic powder (1/4 tsp for each clove).

For the Rice
• Rice – Acts as a comforting base that absorbs all the delicious flavors; for a healthier twist, opt for brown rice or quinoa.

For Seasoning
• Soy Sauce – Delivers umami and saltiness essential to the dish; try tamari for gluten-free or coconut aminos for a lighter flavor.
• Olive Oil – Essential for sautéing the beef and vegetables evenly; canola or avocado oil makes great substitutes.
• Seasonings (Salt, Pepper, Paprika/Chili Powder) – Enhances the flavor profile; adjust to your preference for spice in your Beef and Pepper Rice Bowl.

Embrace the simplicity and joy of cooking with these ingredients, and watch your culinary creation come alive!

Step‑by‑Step Instructions for Beef and Pepper Rice Bowl

Step 1: Heat the Pan
Begin by heating a large skillet or wok over medium-high heat for about 2-3 minutes until it's hot. You want that sizzle when the ingredients hit the pan! This step is crucial for achieving a great sear on the beef in your Beef and Pepper Rice Bowl, ensuring it locks in all those savory juices.

Step 2: Sear the Beef
Add a drizzle of olive oil to the hot pan, swirling it around to coat the surface. Then, add your beef strips in a single layer, making sure not to overcrowd the pan. Sear the beef for about 5-7 minutes, turning occasionally until it’s browned and cooked through. Look for that beautiful caramelization, which adds depth to your dish!

Step 3: Sauté the Vegetables
Once the beef is ready, transfer it to a plate and cover it to keep warm. In the same skillet, toss in chopped onions and colorful bell peppers. Sauté these for 5-7 minutes until they're softened and slightly caramelized, bringing out their natural sweetness. The vibrant colors will transform your Beef and Pepper Rice Bowl into a feast for the eyes!

Step 4: Add Aromatics and Seasoning
Stir in minced garlic along with your chosen seasonings of paprika or chili powder, salt, and pepper. Cook for an additional minute until the garlic is fragrant but not browned. This aromatic blend will elevate the flavors in your Beef and Pepper Rice Bowl, filling your kitchen with a mouthwatering aroma.

Step 5: Combine with Rice
Next, fold the cooked beef back into the skillet with the sautéed vegetables. Add your cooked rice, mixing everything gently to combine. Stir well for about 2-3 minutes until all the ingredients are heated through and the rice is coated with the savory mixture. Your Beef and Pepper Rice Bowl is coming together beautifully!

Step 6: Adjust and Serve
Taste the dish and adjust the seasoning if necessary, adding more salt, pepper, or soy sauce as desired. Once everything is harmoniously blended, serve your Beef and Pepper Rice Bowl immediately in vibrant bowls. Garnish with fresh herbs or a drizzle of additional soy sauce for an extra punch of flavor!

Make Ahead Options

These Beef and Pepper Rice Bowls are fantastic for meal prep! You can chop the bell peppers, onions, and slice the beef up to 24 hours in advance; simply store them in an airtight container in the refrigerator to maintain freshness. The rice can also be cooked ahead and refrigerated for up to 3 days. When you're ready to enjoy your Beef and Pepper Rice Bowl, just sauté the prepped vegetables and beef together until heated through, mix in the refrigerated rice, and finish with any seasonings or soy sauce as desired. This simple approach saves time while ensuring your meal is just as delicious on serve day!

Tips for the Best Beef and Pepper Rice Bowl

Hot Pan Essential: Ensure your pan is pre-heated for a perfect sear on the beef, locking in those delicious juices and flavors.

Customize Veggies: Don’t be afraid to toss in extra vegetables like broccoli or snap peas to your Beef and Pepper Rice Bowl for added nutrition and color!

Meal Prep Friendly: Prep ingredients ahead of time and store them separately; cook everything together for a quick and easy dinner when you need it.

Storage Tips: Store leftovers in an airtight container for up to 3 days; when reheating, add a splash of water to keep rice moist and flavorful.

Garnish Wisely: Fresh herbs like cilantro or green onions elevate the dish, adding brightness and flavor; don’t skip this final touch!

How to Store and Freeze Beef and Pepper Rice Bowl

Fridge: Store leftover Beef and Pepper Rice Bowl in an airtight container for up to 3 days. It’s best enjoyed fresh but can be reheated.

Freezer: For longer storage, portion the Beef and Pepper Rice Bowl in freezer-safe containers and freeze for up to 3 months. Label with the date for easy tracking.

Reheating: To reheat, transfer to a skillet over medium heat with a splash of water to keep the rice from drying out. Stir gently until warmed through, about 5-7 minutes.

Meal Prep: If you decide to meal prep, you can store ingredients separately and assemble as needed for quick weeknight dinners without compromising flavor.

What to Serve with Beef and Pepper Rice Bowl?

Cozy up your dinner table with the perfect companions for this hearty dish, creating a delightful meal experience.

  • Creamy Mashed Potatoes: Their rich texture complements the savory beef and adds a comforting element to your plate. A dollop of gravy can elevate it even further!

  • Fresh Cucumber Salad: The crispness of cucumbers drizzled in a light vinaigrette provides a refreshing contrast, balancing the warmth of the rice bowl.

  • Roasted Broccoli with Garlic: Perfectly charred and infused with garlic, this veggie side adds a delicious depth of flavor while boosting nutrition.

  • Sweet and Spicy Pickles: Add an intriguing twist that enhances the dish’s flavor profile with a tangy kick! They’re delightful for munching on the side.

  • Szechuan Green Beans: These tender green beans stir-fried with soy sauce and sesame elevate your meal with a pop of color and crunch.

  • Fruit-Infused Sparkling Water: A bubbly drink adds a refreshing touch. Lemon and mint are a classic combo that won't overshadow the meal's savory notes.

  • Chocolate Mousse: For dessert, treat yourself to a rich chocolate mousse, providing a sweet finish that contrasts beautifully with the beef's bold flavors.

Transform your Beef and Pepper Rice Bowl into a multi-course delight with these complementary dish ideas!

Beef and Pepper Rice Bowl Variations

Unlock a world of flavors by customizing your Beef and Pepper Rice Bowl to suit your taste buds!

  • Dairy-Free: Skip any dairy-based toppings like cheese or sour cream to keep it light and fresh.
  • Spicy Kick: Add sliced jalapeños or a drizzle of sriracha to bring some heat to the dish! The warmth balances the savoriness beautifully.
  • Veggie-Packed: Toss in extra vegetables such as broccoli, snap peas, or zucchini for added crunch and nutrition. It turns this hearty meal into a colorful medley!
  • Flavor Boost: Swap regular soy sauce for a teriyaki or hoisin sauce to elevate the sweetness and complexity. It adds layers of flavor that will surprise your palate.
  • Rice Alternatives: Use cauliflower rice for a low-carb option, or try quinoa for a protein boost while maintaining that comforting texture.
  • Nutty Delight: Sprinkle toasted sesame seeds or nuts like cashews over the dish for a delightful crunch. It’ll change the entire mouthfeel and be absolutely satisfying!
  • Herb Infusion: Garnish with fresh herbs like basil, cilantro, or green onions. A sprinkle of fresh herbs adds a vibrant touch along with aromatic freshness that’s so appealing.
  • One-Pan Marvel: Consider adding chickpeas or edamame for a protein twist that’s equally hearty and wholesome, creating a complete meal in one pan!

For even more delicious rice ideas, don’t miss out on trying Roasted Bratwurst Peppers or a refreshing Corn Furikake Fried Rice. Happy cooking!

Beef and Pepper Rice Bowl Recipe FAQs

How do I choose the best beef for my Beef and Pepper Rice Bowl?
Absolutely! Look for tender cuts like flank steak, sirloin, or ribeye, as they provide great flavor and tenderness. Ensure the beef has a nice marbling of fat, which enhances the juiciness. If you’re short on time, pre-sliced beef strips are a fantastic option, saving you the prep work!

What is the best way to store leftovers of my Beef and Pepper Rice Bowl?
Very good question! Store your leftover Beef and Pepper Rice Bowl in an airtight container in the fridge for up to 3 days. To keep the rice moist while reheating, add a splash of water before warming it on the stove over medium heat for about 5-7 minutes or until heated through.

Can I freeze my Beef and Pepper Rice Bowl?
Certainly! To freeze, portion your Beef and Pepper Rice Bowl into freezer-safe containers and seal tightly. It will maintain its quality for up to 3 months. When you're ready to enjoy, thaw it overnight in the fridge and reheat gently in a skillet with a sprinkle of water to avoid drying out.

What can I do if my beef turns out tough in my Beef and Pepper Rice Bowl?
No worries! If your beef is tough, it may need a little extra attention. Make sure to cook it just until browned, and avoid overcooking, as this can lead to toughness. For a more tender bite, consider marinating the beef beforehand in a mix of soy sauce, garlic, and a touch of vinegar for about 30 minutes. Marinating helps break down the fibers and adds flavor, making every bite succulent!

Are there any dietary considerations for my Beef and Pepper Rice Bowl?
Absolutely! If you're serving this to those with allergies, it's important to choose gluten-free soy sauce for gluten sensitivities. For a healthier option, you might opt for brown rice or quinoa instead of white rice. Additionally, feel free to use alternative proteins like chicken, pork, or tofu for varying dietary needs. Always double-check ingredient labels to ensure they fit your guests' dietary restrictions!

Can I use frozen vegetables in my Beef and Pepper Rice Bowl?
Yes, you can absolutely use frozen vegetables for convenience! Just add them directly to the skillet when sautéing the onions and peppers, allowing a few extra minutes for them to cook through. This will save you prepping time and still provide a delicious flavor to your Beef and Pepper Rice Bowl!

Beef and Pepper Rice Bowl

Hearty Beef and Pepper Rice Bowl for Quick Weeknight Dinners

A Beef and Pepper Rice Bowl that is quick, satisfying, and customizable, perfect for busy weeknights.
Print Recipe Pin Recipe
Prep Time 10 minutes mins
Cook Time 20 minutes mins
Total Time 30 minutes mins
Servings: 4 bowl
Course: Dinner
Cuisine: Asian
Calories: 450
Ingredients Equipment Method Nutrition Notes

Ingredients
  

For the Beef
  • 1 pound Beef strips Feel free to substitute with chicken, pork, or tofu.
For the Vegetables
  • 2 cups Bell Peppers Any color or mild chili peppers can be used.
  • 1 cup Onions Shallots can provide a milder flavor.
  • 3 cloves Garlic Minced; for convenience, use garlic powder (1/4 tsp for each clove).
For the Rice
  • 2 cups Rice Brown rice or quinoa can be used for a healthier twist.
For Seasoning
  • 1/4 cup Soy Sauce Try tamari for gluten-free or coconut aminos for lighter flavor.
  • 2 tablespoons Olive Oil Canola or avocado oil makes great substitutes.
  • to taste Seasonings (Salt, Pepper, Paprika/Chili Powder) Adjust to your preference for spice.

Equipment

  • Skillet
  • Cutting Board
  • Knife

Method
 

Step-by-Step Instructions
  1. Heat a large skillet or wok over medium-high heat for about 2-3 minutes until hot.
  2. Add olive oil to the hot pan, swirl it to coat, then add beef strips in a single layer. Sear for 5-7 minutes until browned and cooked through.
  3. Transfer beef to a plate and cover to keep warm. In the same skillet, add chopped onions and bell peppers. Sauté for 5-7 minutes until softened.
  4. Stir in minced garlic and seasonings. Cook for an additional minute until garlic is fragrant.
  5. Fold cooked beef back into skillet with sautéed vegetables. Add cooked rice, mixing gently to combine.
  6. Taste and adjust seasoning if necessary. Serve immediately in bowls, garnished with fresh herbs or additional soy sauce.

Nutrition

Serving: 1bowlCalories: 450kcalCarbohydrates: 45gProtein: 30gFat: 15gSaturated Fat: 3gPolyunsaturated Fat: 1gMonounsaturated Fat: 10gCholesterol: 70mgSodium: 800mgPotassium: 600mgFiber: 3gSugar: 6gVitamin A: 1200IUVitamin C: 80mgCalcium: 40mgIron: 3mg

Notes

Customize with your favorite toppings or vegetables. Perfect for meal prep and leftovers.

Tried this recipe?

Let us know how it was!

Delicious Spicy Garlic Chinese Zucchini Recipe You’ll Love

February 2, 2026 by Grace Snow Leave a Comment

As the sizzling aroma of garlic fills my kitchen, I can’t help but feel a rush of excitement for this Spicy Garlic Chinese Zucchini recipe. It’s a fantastic way to elevate a humble vegetable into a show-stopping dish that caters to all dietary preferences—from gluten-free to vegan. With just a few simple ingredients, I can craft a colorful plate that dances with a perfect balance of nutty and spicy flavors. This quick-to-make recipe is not only an easy side dish but also a fabulous light meal that's packed with freshness. Plus, if you’re looking for versatility, you can effortlessly add your choice of protein to make it even heartier. Isn’t it time to bring a little excitement to your dinner table? Let’s dive into these zesty zoodles!

Why Is This Recipe a Must-Try?

Deliciously Unique: This Spicy Garlic Chinese Zucchini recipe flips traditional cooking on its head, transforming simple zucchini into vibrant zoodles that wow the palate.
Quick & Easy: Perfect for busy weeknights, this dish comes together in a snap, allowing you to savor dinner without the lengthy prep time.
Diet-Friendly: Whether you’re gluten-free or vegan, this adaptable recipe can fit any lifestyle, making it a fantastic choice for gatherings.
Flavor Explosion: With aromatic garlic and a zesty kick, each bite is a burst of flavor that keeps you coming back for more—perfect in or alongside Cheesy Garlic Bread.
Crowd-Pleaser: Serve it as a main or a side, and watch it disappear from the table—everyone will be asking for seconds.
Nutrient-Packed: Enjoy a dish that’s low in calories yet high in flavor and nutrients, offering you a guilt-free indulgence that satisfies!

Spicy Garlic Chinese Zucchini Ingredients

• Here’s what you’ll need for an irresistible Spicy Garlic Chinese Zucchini recipe.

For the Zoodles

  • Zucchini – The main ingredient that creates light and refreshing noodles (zoodles); choose firm zucchinis for the best texture.
  • Salt – Essential for drawing out moisture from the zucchini and enhancing flavor; sea salt makes a delightful alternative.

For the Flavorful Sauce

  • Garlic – Freshly chopped for aromatic depth and strong flavor; avoid powdered garlic for maximum impact.
  • Coconut Aminos – A gluten-free soy sauce alternative that brings savory depth; you can easily substitute with soy sauce.
  • Tahini (or Peanut/Almond Butter) – Adds creaminess and nutty undertones; use sunflower seed butter for a nut-free alternative.
  • Sesame Oil – Gives the dish a rich, distinctive flavor; essential for authenticity—substitute with olive oil if necessary.
  • Chili Powder – Adds that wonderfully spicy kick; adjust the amount based on your personal spice preference.
  • Chili Oil – An optional drizzle for extra heat and flavor enhancement; sriracha can be used as a fantastic substitute.
  • Honey (or Maple Syrup) – Balances the spice with a hint of sweetness; omit for sugar-free diets if desired.

For the Garnish

  • Toasted Sesame Seeds – Optional but adds great texture and visual appeal; feel free to replace with chopped nuts or skip altogether.

Step‑by‑Step Instructions for Spicy Garlic Chinese Zucchini Recipe

Step 1: Prepare the Zucchini
Begin by spiralizing or slicing two firm zucchinis into thin noodles, also known as zoodles. If you don't have a spiralizer, a vegetable peeler or julienne slicer will work, too. Aim for long, noodle-like strands to capture the essence of traditional pasta. This step creates the base of your Spicy Garlic Chinese Zucchini recipe, making it light and refreshing.

Step 2: Salt the Zoodles
Place the zoodles in a colander and sprinkle them with salt. Allow them to sit for about 30 minutes to draw out excess moisture. This process prevents the zoodles from becoming mushy, ensuring a satisfying crunch in every bite. You will know they are ready when you see moisture collecting in the bottom of the colander.

Step 3: Make the Flavorful Sauce
While the zoodles are resting, prepare your sauce by combining freshly chopped garlic, coconut aminos, tahini, sesame oil, chili powder, chili oil, and honey in a mixing bowl. Stir well until the mixture is smooth and well-blended. This aromatic sauce will enhance the taste of your Spicy Garlic Chinese Zucchini, packing it with flavors that dance on your palate.

Step 4: Squeeze Out Excess Moisture
After the 30-minute salting period, gently squeeze the zoodles to remove any excess moisture. Be careful not to overdo it, as you want to keep some water for flavor. This step ensures that your zoodles retain a lovely texture when combined with the sauce, allowing the flavors to cling beautifully and create a satisfying bite.

Step 5: Combine Zoodles and Sauce
In a large serving bowl, mix the drained zoodles with the previously prepared sauce. Toss gently to ensure each noodle is evenly coated with the rich, spicy sauce. This step transforms your simple zoodles into a vibrant, flavor-packed Spicy Garlic Chinese Zucchini dish that can serve as a dazzling side or a light main course.

Step 6: Chill for Enhanced Flavor
For those who have the time, let the finished dish sit in the refrigerator for a few hours or even overnight. This allows the ingredients to meld together, enhancing the flavor profile. If preferred, you can serve the zoodles cold or at room temperature, offering a refreshing option for your meal.

Spicy Garlic Chinese Zucchini Variations

Feel free to get creative with this Spicy Garlic Chinese Zucchini recipe and make it your own!

  • Protein Packed: Add cooked chicken, tofu, shrimp, or beef for a satisfying and heartier meal. Dinner just got exciting and filling!
  • Veggie Delight: Toss in some raw or sautéed bell peppers, carrots, or snap peas for a burst of color and added nutrients. Enjoy the lively crunch!
  • Spice it Up: Don’t be shy! Adjust the chili powder to your preferred spice level, or use fresh chopped chilies for a fiery twist that excites the taste buds.
  • Creamy Vegan Twist: Swap tahini for avocado or cashew cream for a super creamy and decadent version without losing the vegan touch. Talk about indulgence!
  • Nut-Free Option: Replace tahini with sunflower seed butter for a nut-free alternative that still delivers rich creaminess. Everyone can enjoy this tasty dish!
  • Saucy Goodness: Mix in a splash of sweet chili sauce or teriyaki for an Asian fusion vibe that takes flavors to another dimension. Embrace the delicious fusion of tastes!
  • Chill & Serve: Serve chilled for a refreshing summer meal or side dish. It’s great alongside grilled proteins or as part of a picnic spread. Perfect for those warm evenings!
  • Whole30-Friendly: Omit honey and use coconut sugar or leave it out entirely for a Whole30-compliant dish. No one needs to miss out on deliciousness!

Don’t forget to pair it with other delightful dishes like Honey Garlic Chicken or a side of Cheesy Zucchini Bake for a full meal experience!

Expert Tips for the Best Spicy Garlic Chinese Zucchini

  • Choose Quality Zucchini: Opt for firm zucchinis without blemishes to create perfect zoodles that won't turn mushy during cooking.
  • Mind the Salt: Avoid over-salting! If the zoodles sit too long, they can become excessively watery. Aim for 30 minutes maximum.
  • Fresh Garlic Matters: Use freshly chopped garlic for the best flavor. Powdered garlic lacks the aromatic impact needed for this spicy dish.
  • Adjust Spice Levels: Feel free to modify the chili powder based on your heat tolerance. Start with a small amount and gradually increase as desired.
  • Refrigerate for Flavor: Allow your salad to chill for a few hours or overnight—increasing flavor depth for the Spicy Garlic Chinese Zucchini recipe is key!
  • Protein Boost: Add your favorite protein, like grilled chicken or tofu, to turn your zoodles into a hearty meal that satisfies everyone!

How to Store and Freeze Spicy Garlic Chinese Zucchini

Fridge: Store leftovers in an airtight container for up to 5 days to maintain freshness and flavor. Be sure the dish has cooled to room temperature before sealing.

Freezer: For longer storage, freeze the zoodles without sauce for up to 2 months. When ready to eat, thaw and quickly sauté just until warmed.

Reheating: To reheat, gently warm the dish in a skillet over low heat, stirring occasionally. This maintains the crisp texture, ensuring your Spicy Garlic Chinese Zucchini recipe remains delightful.

Serving After Storage: If serving after refrigeration, enjoy it cold or let it come to room temperature for a refreshing twist that enhances the flavors.

Make Ahead Options

These Spicy Garlic Chinese Zucchini noodles are a fantastic choice for meal prep, saving you time on busy weeknights! You can prepare the zoodles by spiralizing the zucchini and letting them rest with salt up to 24 hours ahead, allowing the moisture to draw out and maintain their delightful crunch. The flavorful sauce can also be mixed in advance and stored in the refrigerator for up to 3 days. When you're ready to enjoy, simply combine the zoodles with the sauce, toss gently, and serve cold or at room temperature for a tasty meal that's just as delicious as when freshly made. By prepping ahead, you'll have an irresistible dish ready to go in no time!

What to Serve with Spicy Garlic Chinese Zucchini

Complement your meal with these delightful pairings that amplify flavor and texture while ensuring a well-rounded dining experience.

  • Sesame Broccoli: This lightly steamed side adds a crunchy, nutty element that echoes the sesame oil in the zoodles, creating a harmonious balance.
  • Grilled Chicken: Juicy and charred, the protein melds beautifully with the spice-infused zoodles, making for a fulfilling meal that’s both satisfying and light.
  • Coconut Rice: Fluffy and slightly sweet, the creamy texture of coconut rice enhances the meal's spiciness while providing a comforting base.
  • Sautéed Kale: Add a vibrant green element with sautéed kale, which offers a mild earthiness that contrasts the zoodles’ bold flavors beautifully.
  • Miso Soup: This warm and umami-rich broth serves as a soothing counterpart that complements the spicy profile of the dish, creating a wonderfully cozy meal.
  • Chilled Sake: Serve with a glass of chilled sake for a refreshing drink that enhances the flavors of your dish while providing a delightful dining experience.
  • Spicy Tofu Skewers: For a heartier touch, serve skewers of marinated tofu, grilled to perfection, bringing another layer of texture and flavor that complements the zoodles.
  • Lemon Sorbet: End the meal on a light note with lemon sorbet; its sharp citrus flavor cleanses the palate and refreshes after the spicy zoodles.
  • Radish Salad: Crisp and crunchy, a radish salad with a drizzle of vinegar offers a refreshing bite that brightens up the dish and adds zesty contrast.

Spicy Garlic Chinese Zucchini Recipe FAQs

How do I choose ripe zucchini?
Absolutely! When selecting zucchini, look for firm specimens without any blemishes or dark spots. They should have a glossy appearance, indicating freshness. Avoid soft or overly large zucchinis, as they tend to be watery and less flavorful.

What’s the best way to store leftovers?
You can store your Spicy Garlic Chinese Zucchini in an airtight container in the fridge for up to 5 days. To maintain the dish's crispness, make sure it's cooled to room temperature before sealing. This helps preserve its delicious flavors!

Can I freeze zucchini noodles?
Yes, you can! For freezing, I recommend storing the zoodles without any sauce. Place them in a freezer-safe container or bag, ensuring all air is removed to prevent freezer burn. They will keep well for up to 2 months. When ready to eat, simply thaw and sauté them in a pan until warmed through.

What if my zoodles become mushy?
Very often, mushy zoodles are a result of over-salting or letting them sit too long. Aim for a salting time of about 30 minutes, and gently squeeze out any moisture afterward—just enough to maintain some water content for flavor. If they still come out mushy, consider using less salt next time or eating them fresh instead.

Can I adjust the recipe for dietary restrictions?
Absolutely! The Spicy Garlic Chinese Zucchini recipe is highly adaptable. For gluten-free needs, use coconut aminos or gluten-free soy sauce. Vegans can enjoy it as is, while those with nut allergies can swap tahini for sunflower seed butter. There’s plenty of room to customize this dish to suit your dietary preferences!

Spicy Garlic Chinese Zucchini Recipe

Delicious Spicy Garlic Chinese Zucchini Recipe You’ll Love

This Spicy Garlic Chinese Zucchini recipe is a quick, flavorful dish that caters to all dietary preferences.
Print Recipe Pin Recipe
Prep Time 30 minutes mins
Cook Time 10 minutes mins
Total Time 40 minutes mins
Servings: 4 servings
Course: Sides
Cuisine: Chinese
Calories: 160
Ingredients Equipment Method Nutrition Notes

Ingredients
  

For the Zoodles
  • 2 medium Zucchini firm zucchinis for the best texture
  • 1 teaspoon Salt sea salt is a delightful alternative
For the Flavorful Sauce
  • 4 cloves Garlic freshly chopped
  • 4 tablespoons Coconut Aminos gluten-free soy sauce alternative
  • 2 tablespoons Tahini or Peanut/Almond Butter
  • 2 tablespoons Sesame Oil substitute with olive oil if necessary
  • 1 teaspoon Chili Powder adjust based on spice preference
  • 1 tablespoon Chili Oil optional drizzle for extra heat
  • 1 tablespoon Honey or Maple Syrup, omit for sugar-free diets
For the Garnish
  • 1 tablespoon Toasted Sesame Seeds optional but adds great texture

Equipment

  • Spiralizer
  • Mixing Bowl
  • Colander
  • Skillet

Method
 

Step-by-Step Instructions
  1. Spiralize or slice the zucchinis into thin noodles, known as zoodles.
  2. Place the zoodles in a colander and salt them. Let them sit for 30 minutes.
  3. In a mixing bowl, combine garlic, coconut aminos, tahini, sesame oil, chili powder, chili oil, and honey.
  4. After 30 minutes, gently squeeze out any excess moisture from the zoodles.
  5. Mix the drained zoodles with the prepared sauce in a large serving bowl.
  6. Chill the dish in the refrigerator for a few hours to enhance flavor.

Nutrition

Serving: 1servingCalories: 160kcalCarbohydrates: 12gProtein: 6gFat: 10gSaturated Fat: 1gPolyunsaturated Fat: 2gMonounsaturated Fat: 6gSodium: 500mgPotassium: 600mgFiber: 3gSugar: 3gVitamin A: 5IUVitamin C: 40mgCalcium: 4mgIron: 6mg

Notes

For a heartier meal, consider adding grilled chicken or tofu. Store leftovers in an airtight container for up to 5 days.

Tried this recipe?

Let us know how it was!

Sautéed Zucchini: Quick, Flavorful, and Guilt-Free Delight

February 2, 2026 by Grace Snow Leave a Comment

As I stood in my kitchen, the sun streaming through the window, I felt the urge to whip up a satisfying yet healthy side dish. That’s when I decided to make Quick and Easy Low-Carb Sautéed Zucchini. This delightful recipe not only showcases the star ingredient—tender zucchini—but also brings together earthy mushrooms and aromatic garlic, making it a perfect accompaniment to your favorite proteins. In under 15 minutes, you can create a dish that’s not only low-carb and vegetarian but also gluten-free! It’s a versatile, quick option that will easily become a staple in your kitchen. Whether you’re winding down the day or hosting a gathering, this sautéed zucchini is bound to be a crowd-pleaser. Ready to transform your meals with this simple, nutritious side? Let’s dive in!

Why is Sautéed Zucchini a Must-Try?

Quick and Easy: This recipe promises to have your sautéed zucchini ready in under 15 minutes, making it ideal for busy weeknights or last-minute dinner parties.

Low-Carb Delight: Perfect for those following a low-carb diet, this dish lets you indulge in vegetables without the guilt.

Flavorful and Versatile: The combination of garlic, Italian seasoning, and red pepper flakes adds depth and personality, while also allowing for creativity—feel free to toss in other veggies or herbs!

Crowd-Pleaser: Whether served with grilled chicken or as part of a vibrant grain bowl, this dish is sure to impress guests and family alike.

Storage-Friendly: Leftovers can be easily reheated and incorporated into soups or sauces, ensuring you don’t waste a bite. For more delicious veggie inspiration, check out my Cheesy Zucchini Bake!

Sautéed Zucchini Ingredients

• Ready to prepare this easy and healthy side?

For the Sauté

  • Olive Oil – Adds healthy fat and helps sauté the vegetables; you can substitute with avocado oil for a different flavor.
  • Butter – Provides richness and flavor; feel free to use unsalted or margarine as an alternative.
  • Medium Yellow Onion – Offers sweetness and depth; shallots or red onions can be used instead if you prefer.
  • White Button Mushrooms – Contributes umami flavor and texture; for a stronger taste, you can substitute with cremini mushrooms.

For the Veggies

  • Medium Zucchini – The star ingredient, providing bulk and nutrients; yellow squash can also be a good alternative to include in your sautéed zucchini.
  • Garlic – Enhances flavor; you can reduce the quantity or use garlic powder if you want a milder taste.

For Seasoning

  • Italian Seasoning – Adds a delicious blend of herbs to elevate the flavor; feel free to substitute with mixed dried herbs like oregano or thyme.
  • Red Pepper Flakes – Provides a hint of heat; adjust to your taste or switch to cayenne pepper for a spicier kick.
  • Kosher Salt and Fresh Ground Black Pepper – Essential for seasoning; consider using sea salt or table salt and adjust to your preference.

Step‑by‑Step Instructions for Sautéed Zucchini

Step 1: Heat the Base
In a large skillet, heat 1 tablespoon of olive oil and 2 tablespoons of butter over medium-high heat. Watch for the butter to melt and foam, signaling it's ready. This combination will create a flavorful base for your sautéed zucchini, so ensure the mixture is hot but not smoking before moving on to the next step.

Step 2: Sauté the Aromatics
Add the chopped medium yellow onion and white button mushrooms to the skillet. Sauté for about 5 minutes, stirring occasionally, until the onions are translucent and the mushrooms are browned. This process enhances their flavor and sweetness, forming a delicious base for your sautéed zucchini.

Step 3: Remove the Aromatics
Once the onions and mushrooms are nicely caramelized, carefully plate them and set aside. If the skillet appears dry, feel free to add a splash of olive oil. This step ensures that the sautéed zucchini can achieve a beautiful golden color without overcrowding the pan.

Step 4: Cook the Zucchini
Add the chopped medium zucchini to the skillet, spreading it in a single layer. Let it cook undisturbed for about 3 minutes before tossing gently. Continue to sauté for another 5-7 minutes, until the zucchini is browned and tender yet still slightly crisp. This step is key to achieving perfectly sautéed zucchini without mushiness.

Step 5: Add Garlic and Seasonings
Reduce the heat to low, then stir in 2 minced garlic cloves, 1 teaspoon of Italian seasoning, and a pinch of red pepper flakes. Cook for an additional minute, allowing the garlic to become fragrant. This infusion of flavor will elevate your sautéed zucchini, making it even more appetizing.

Step 6: Final Seasoning
Taste the mixture and season with kosher salt and freshly ground black pepper according to your preference. This final touch ensures that your sautéed zucchini is well-rounded in flavor and ready to impress. Stir everything together for even seasoning and let the mixture sit for 30 seconds to meld the flavors.

Step 7: Serve Immediately
Transfer the sautéed zucchini to a serving dish and enjoy promptly for the best flavor and texture. Serve alongside your favorite proteins or as a vibrant addition to a grain bowl. The colorful medley of flavors and textures is sure to be a delightful hit at your table!

Sautéed Zucchini: Flexible Twist Options

Feel free to personalize your sautéed zucchini experience with these variations that can tickle your taste buds in delightful ways!

  • Dairy-Free: Swap butter for a vegan margarine or simply increase olive oil for a dairy-free option that still delivers on flavor.
  • Cheesy Delight: Add a sprinkle of grated Parmesan cheese right before serving for an extra layer of richness and flavor. This simple twist can elevate your dish in an instant.
  • Extra Veggie Power: Incorporate bell peppers or carrots along with zucchini for an added splash of color and nutrition. The more, the merrier in a veggie medley!
  • Spicy Kick: If you love heat, double the red pepper flakes or toss in freshly diced jalapeños.
  • Herb Garden: Replace Italian seasoning with fresh herbs like basil or dill. It gives a fresh twist to the overall flavor profile, celebrating the herbs beautifully.
  • Grain Bowl Base: Turn this sautéed zucchini into a filling for grain bowls—mix with quinoa or brown rice, and top with your favorite proteins and sauces. It’s a nourishing meal you’ll love.
  • Mediterranean Flair: Add olives and sun-dried tomatoes for a Mediterranean spin on your sautéed zucchini. This pairing invites bold flavors that will leave everyone raving!
  • Zesty Citrus: Squeeze some fresh lemon juice over the finished dish to brighten up the flavors for a refreshing touch. A little zest can make all the difference!

Don’t miss out on trying out these delightful options—you may find your new favorite combination! For other delicious veggie inspirations, consider checking out my Cheesy Zucchini Bake or perhaps indulge in some flavorful stir-fried veggies!

Make Ahead Options

These Sautéed Zucchini are perfect for meal prep enthusiasts! You can chop the zucchini, onions, and mushrooms up to 24 hours in advance, storing them separately in airtight containers in the refrigerator to maintain their freshness. For the best results, drizzle the cut zucchini with a little lemon juice to prevent browning. When you’re ready to serve, simply heat olive oil and butter in a skillet, sauté the onions and mushrooms first, and then toss in the zucchini, garlic, and seasonings as directed. This way, you’ll have a delicious side dish ready in no time, making your busy weeknights a whole lot easier!

What to Serve with Quick and Easy Low-Carb Sautéed Zucchini

Elevate your meal with these delightful pairings that bring out the vibrant flavors of sautéed zucchini.

  • Grilled Chicken: Juicy, marinated chicken complements the zucchini’s mild flavor while adding satisfying protein to your plate.
  • Quinoa Salad: A lemony quinoa salad adds zing and freshness, creating a wholesome, nutrient-packed meal.
  • Parmesan Crusted Salmon: The richness of this flavorful fish enhances the sautéed zucchini, making for an elegant pairing.
  • Brown Rice: Simple brown rice offers a hearty base to soak up the savory juices from the sauté, enriching each bite.
  • Garlic Bread: Crunchy garlic bread provides a delightful contrast in texture, perfect for dipping into the savory flavors of the veggies.
  • Caprese Salad: Fresh mozzarella and tomatoes provide a refreshing balance to the sautéed zucchini, making your meal feel bright and vibrant.
  • Chardonnay: A glass of chilled Chardonnay enhances the dish's earthy notes while complementing any meat you choose.
  • Lemon Sorbet: Light and refreshing, this dessert provides a perfect close to the meal, cleansing your palate after the savory dishes.
  • Herb-Infused Olive Oil: Drizzle over your zucchini for a boost in flavor that connects beautifully with grilled meats and bread.

Expert Tips for Sautéed Zucchini

  • Cut Size Matters: Evenly cut zucchini into chunks instead of slices for a better texture. This creates those satisfying tender bites for your sautéed zucchini.

  • Avoid Overcrowding: Sauté in batches to prevent steaming. Overcrowding the skillet leads to mushy veggies; ensure they brown nicely instead!

  • Herb Adventures: Feel free to mix and match herbs and spices! Fresh parsley, dill, or thyme can add unique flavors to your sautéed zucchini.

  • Watch Cook Times: Pay close attention to cooking times. Zucchini cooks quickly; take care not to overcook and lose that lovely crunch.

  • Smart Leftovers: If you have extra sautéed zucchini, consider adding it to soups or sauces instead of freezing, as zucchini’s high water content doesn't freeze well.

How to Store and Freeze Sautéed Zucchini

Fridge: Store leftovers in an airtight container in the refrigerator for up to 3 days. This keeps your sautéed zucchini fresh, ready to enjoy later!

Freezer: While it’s not ideal to freeze sautéed zucchini due to its high water content, if you must, place it in a freezer-safe bag for up to 2 months. Thaw in the fridge before reheating.

Reheating: When reheating, gently warm the zucchini in a skillet over low heat to maintain its texture. Avoid the microwave if possible to prevent sogginess.

Leftover Ideas: Use any leftover sautéed zucchini in omelets, soups, or pasta dishes for a quick flavor boost—no waste here!

Sautéed Zucchini Recipe FAQs

What’s the best way to select zucchini for this recipe?
Absolutely! Look for medium zucchini that feels firm to the touch and has smooth, unblemished skin. Avoid ones with dark spots or soft spots, as those indicate overripeness. For optimal flavor and nutrition, choose zucchini that’s bright in color and relatively small, around 6 to 8 inches long.

How long can I store leftovers in the fridge?
Very! You can store any leftover sautéed zucchini in an airtight container in the refrigerator for up to 3 days. To maintain the best taste and texture, I recommend consuming it within this timeframe, as the zucchini can become mushy over time.

Can I freeze sautéed zucchini?
While it’s possible to freeze sautéed zucchini, it's not the ideal option due to its high water content, which can lead to a mushy texture upon thawing. If you choose to freeze it, place the cooled zucchini in a freezer-safe bag and use it within 2 months. When you’re ready to use it, thaw in the refrigerator and reheat on the stove to help retain some of its original texture.

What should I do if my zucchini turns mushy while cooking?
No worries! If your zucchini becomes mushy during cooking, it might be a sign that it was overcooked or cut too thinly. For the next attempt, try cutting the zucchini into larger chunks to help maintain texture, and avoid overcrowding the skillet. Additionally, cook in batches to ensure even cooking and browning without creating steam.

Are there any dietary considerations, like allergies, for sautéed zucchini?
Yes, indeed! This sautéed zucchini recipe is gluten-free and vegetarian, making it suitable for many diets. However, if you or your guests have a garlic allergy, feel free to omit the garlic, or if you want a milder flavor, consider using garlic-infused oil instead. Always double-check ingredients, especially pre-made seasonings, if allergies are a concern.

How can I repurpose leftover sautéed zucchini?
Great question! If you have any leftover sautéed zucchini, consider adding it to omelets for a delicious breakfast, blending it into soups for added nutrients, or tossing it with pasta dishes or grain bowls for an easy and healthy meal. Think of it as a versatile ingredient that opens many culinary doors!

Sautéed Zucchini

Sautéed Zucchini: Quick, Flavorful, and Guilt-Free Delight

This sautéed zucchini recipe is a quick, low-carb, and flavorful side dish that is perfect for any meal.
Print Recipe Pin Recipe
Prep Time 5 minutes mins
Cook Time 10 minutes mins
Total Time 15 minutes mins
Servings: 4 servings
Course: Dinner
Cuisine: Vegetarian
Calories: 120
Ingredients Equipment Method Nutrition Notes

Ingredients
  

For the Sauté
  • 1 tablespoon Olive Oil Can substitute with avocado oil
  • 2 tablespoons Butter Unsalted or margarine can be used as alternatives
  • 1 medium Yellow Onion Shallots or red onions can be used instead
  • 8 ounces White Button Mushrooms Cremini mushrooms can be substituted for a stronger taste
For the Veggies
  • 2 medium Zucchini Yellow squash can also be a good alternative
  • 2 cloves Garlic Can use garlic powder for a milder taste
For Seasoning
  • 1 teaspoon Italian Seasoning Can substitute with oregano or thyme
  • 1 pinch Red Pepper Flakes Adjust to taste or switch to cayenne pepper
  • to taste Kosher Salt Sea salt or table salt can be used
  • to taste Fresh Ground Black Pepper Adjust according to preference

Equipment

  • Large skillet

Method
 

Step-by-Step Instructions for Sautéed Zucchini
  1. In a large skillet, heat 1 tablespoon of olive oil and 2 tablespoons of butter over medium-high heat until the butter melts and foams.
  2. Add the chopped medium yellow onion and white button mushrooms to the skillet. Sauté for about 5 minutes until the onions are translucent and the mushrooms are browned.
  3. Once the onions and mushrooms are nicely caramelized, carefully plate them and set aside. Add a splash of olive oil if the skillet appears dry.
  4. Add the chopped medium zucchini to the skillet, spreading it in a single layer. Cook undisturbed for about 3 minutes before tossing gently. Sauté for another 5-7 minutes until browned and tender.
  5. Reduce the heat to low, stir in 2 minced garlic cloves, 1 teaspoon of Italian seasoning, and a pinch of red pepper flakes. Cook for an additional minute until garlic becomes fragrant.
  6. Taste the mixture and season with kosher salt and freshly ground black pepper according to preference. Stir everything together and let it sit for 30 seconds to meld the flavors.
  7. Transfer the sautéed zucchini to a serving dish and enjoy promptly.

Nutrition

Serving: 1servingCalories: 120kcalCarbohydrates: 8gProtein: 3gFat: 9gSaturated Fat: 4gPolyunsaturated Fat: 1gMonounsaturated Fat: 4gCholesterol: 15mgSodium: 200mgPotassium: 450mgFiber: 2gSugar: 3gVitamin A: 50IUVitamin C: 15mgCalcium: 40mgIron: 1mg

Notes

Use any leftover sautéed zucchini in omelets, soups, or pasta dishes for a quick flavor boost. Store leftovers in an airtight container in the refrigerator for up to 3 days.

Tried this recipe?

Let us know how it was!
  • « Previous Page
  • 1
  • …
  • 9
  • 10
  • 11
  • 12
  • 13
  • …
  • 58
  • Next Page »

Welcome!

Hi, I’m Grace, a Sydney-based home cook with a passion for bold flavors and trending ingredients. Whether you’re a busy beginner or a seasoned foodie, you’ll find dishes here that are fresh, fun, and full of flavor.

More about me

Popular Recipes

  • Cheesy Chicken Garlic Bread Sandwich
    Cheesy Chicken Garlic Bread Sandwich for Cozy Family Moments
  • Easy Chicken Ranch Wraps
    Easy Chicken Ranch Wraps: Quick, Creamy & Totally Satisfying
  • Chicken Caesar Sandwiches
    Delicious Chicken Caesar Sandwiches for Quick Comfort Food
  • best Cuban sandwich
    The Best Cuban Sandwich You’ll Want Every Weeknight!

Footer

↑ back to top

About

  • Privacy Policy
  • Disclaimer
  • Terms & Conditions

Newsletter

  • Sign Up! for emails and updates

Contact

  • About me
  • Contact me

Copyright © 2025 TastyTrendIngredients