tastytrendingredients

  • Home
  • Recipes
    • Appetizers
    • Breakfast
    • Dessert
    • Dinner
    • Drinks
    • Salads
    • Snacks
    • Soups
  • About me
  • Contact
menu icon
go to homepage
  • Home
  • Recipes
    • Appetizers
    • Breakfast
    • Dessert
    • Dinner
    • Drinks
    • Salads
    • Snacks
    • Soups
  • About me
  • Contact
search icon
Homepage link
  • Home
  • Recipes
    • Appetizers
    • Breakfast
    • Dessert
    • Dinner
    • Drinks
    • Salads
    • Snacks
    • Soups
  • About me
  • Contact
×

Coconut Mango Bliss Balls: Sweet Tropical Energy Bites

February 25, 2026 by Grace Snow Leave a Comment

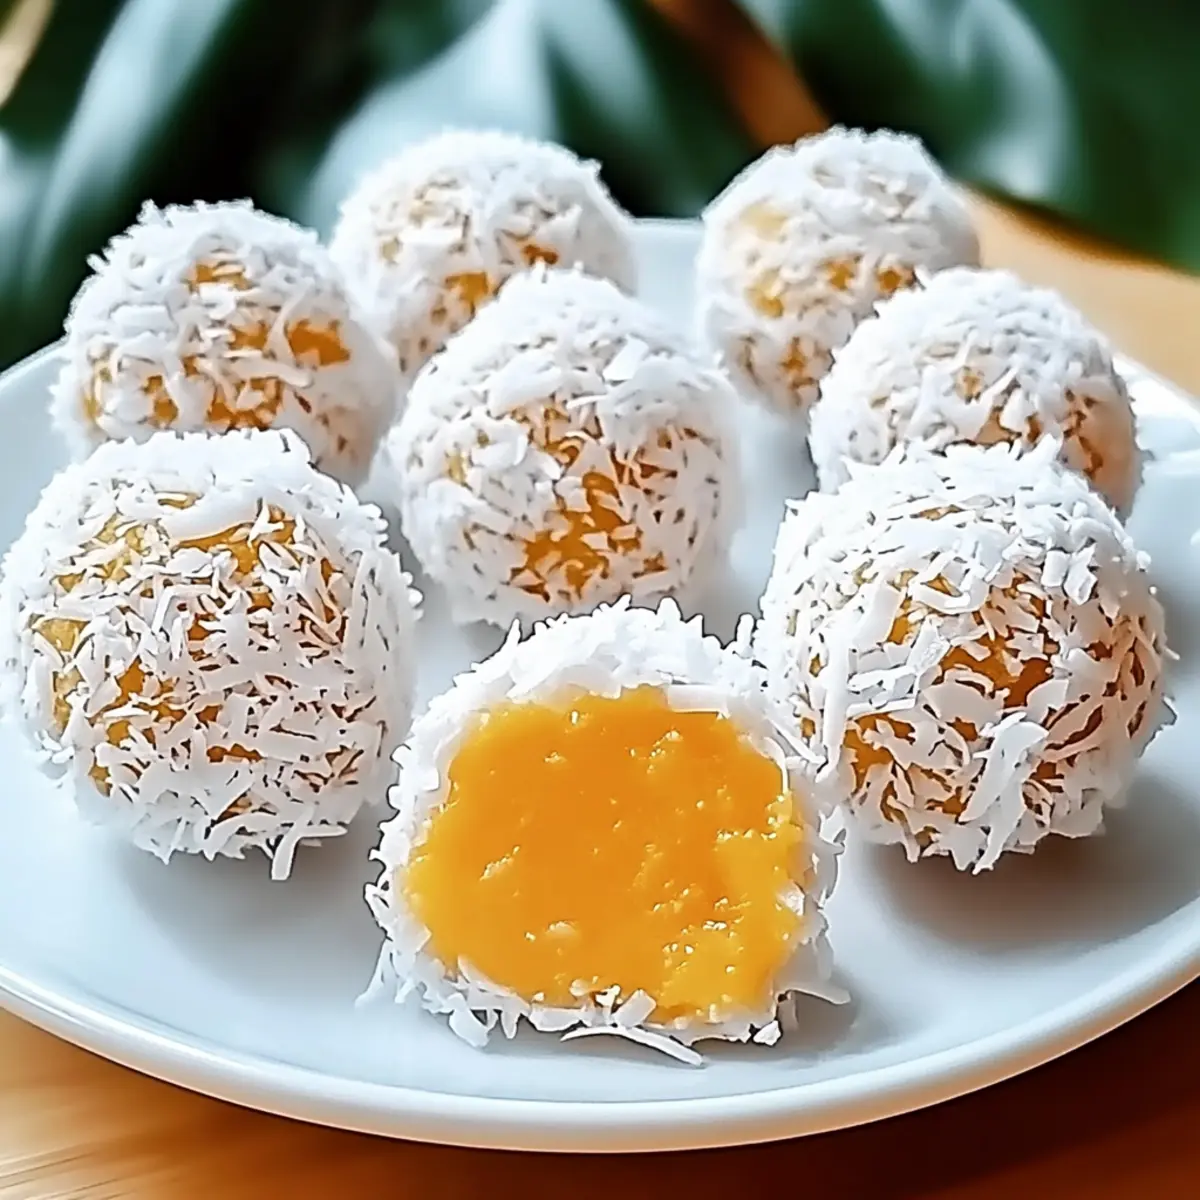
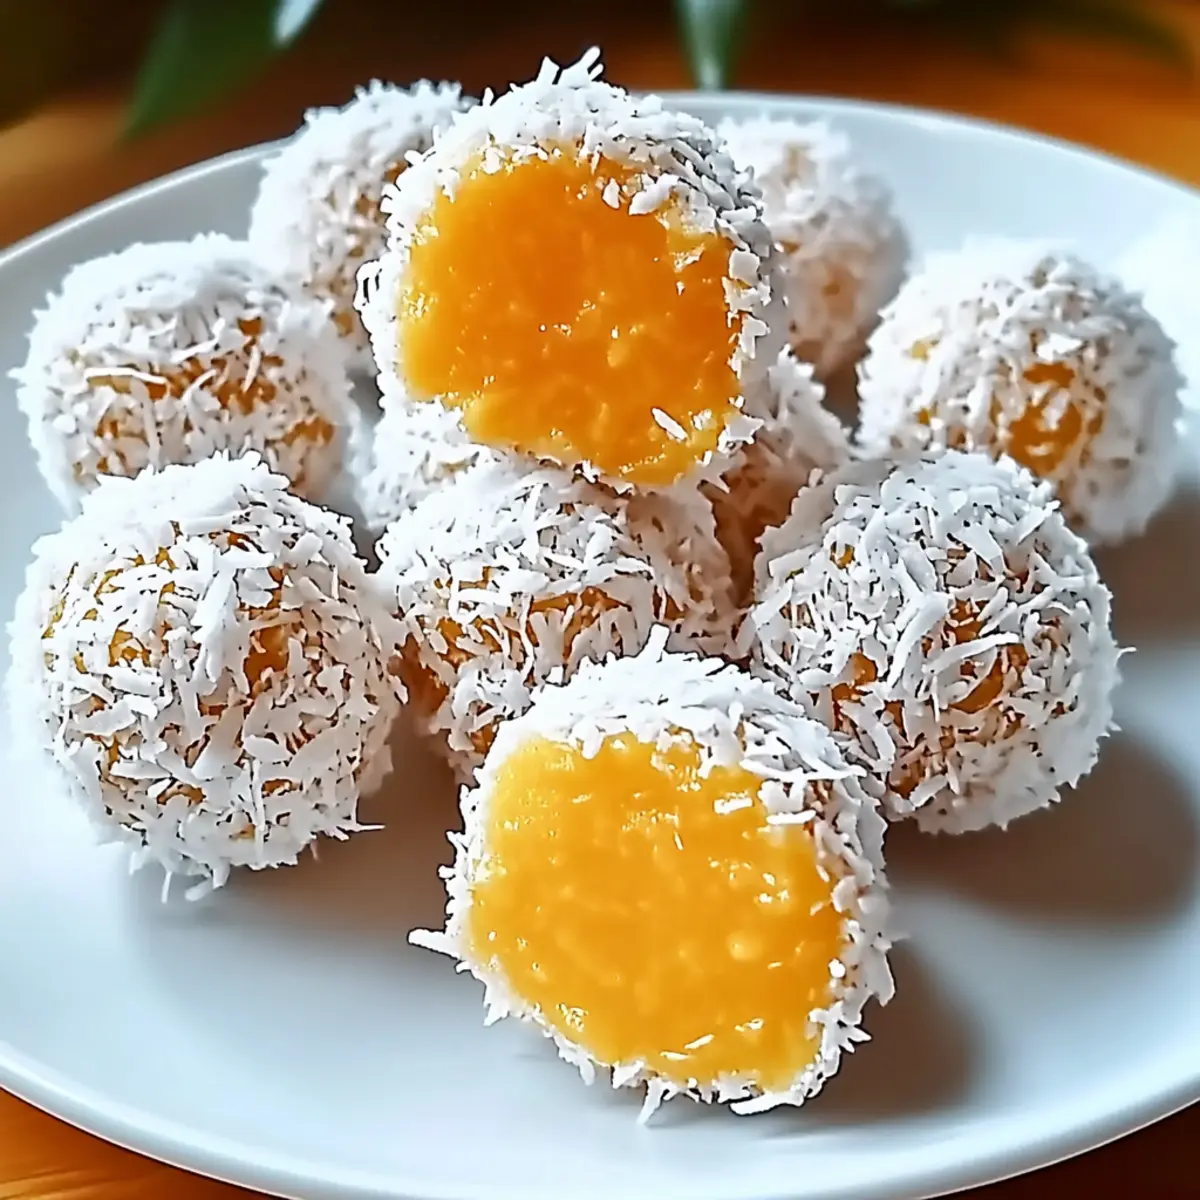
Stepping into my kitchen, I can almost hear the sound of ocean waves and feel a warm breeze as I whip up these Tropical Coconut Mango Bliss Balls. Inspired by the vibrant flavors of summer, this no-bake snack combines luscious mango puree and rich coconut, creating a delightful treat that’s quick to prepare and satisfyingly healthy. These bliss balls are not only gluten-free but also a perfect solution for those busy days when you crave something sweet without the guilt. Whether you’re hosting friends or simply treating yourself, each bite transports you to a tropical paradise. Ready to discover how to make this refreshing delicacy? Let’s dive in!

Why Are Coconut Mango Bliss Balls Special?

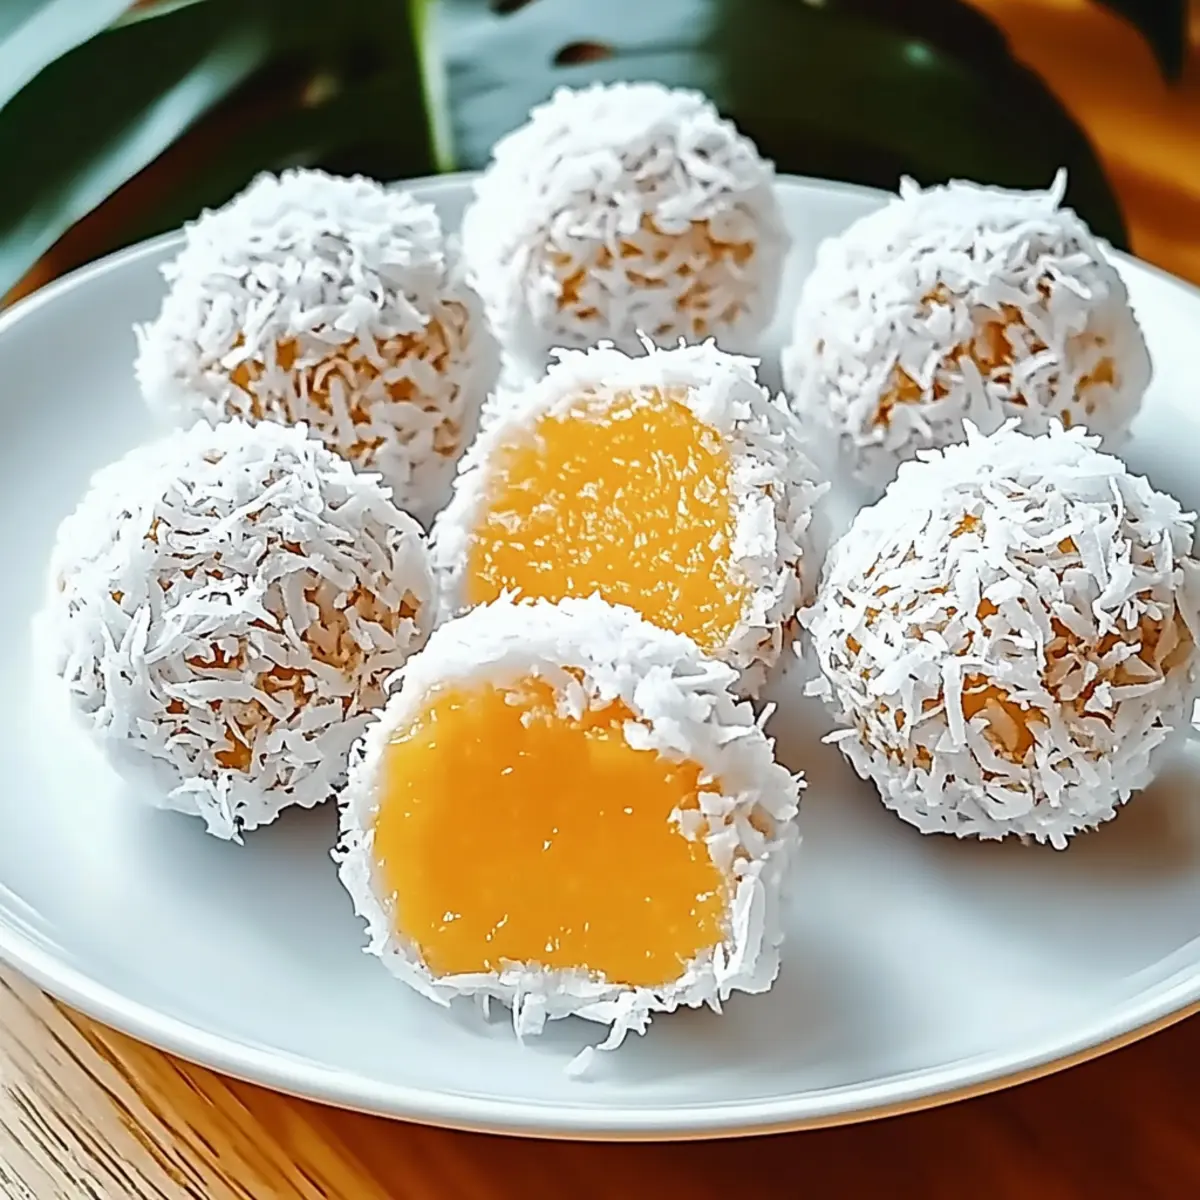
Tropical Escape: These bliss balls bring a slice of paradise right to your kitchen, encapsulating the essence of summer in each bite.

Effortless Preparation: No-bake and quick to make, you’ll have a delightful snack ready in no time!

Healthy Indulgence: Packed with wholesome ingredients, these treats are gluten-free and a perfect energy boost that won't weigh you down.

Versatile Twist: Feel free to explore flavors! Experiment with other fruit purees or add a drizzle of honey for extra sweetness.

Crowd-Pleasing Goodness: They're perfect for gatherings, and who wouldn’t love a refreshing snack that’s both fun and nutritious?

Embrace this tropical delight and consider pairing it with a light coconut yogurt parfait or, for a fuller meal, serve alongside a refreshing Coconutty Beans Greens for a complete experience!

Coconut Mango Bliss Balls Ingredients

For the Dough

  • Glutinous Rice Flour – Provides structure and a delightful chewy texture; regular rice flour may alter texture.
  • Coconut Milk – Adds richness and enhances the tropical flavor profile; substitute with almond or oat milk for a non-dairy option.
  • Granulated Sugar – Sweetens the dough; adjust to personal taste, but natural sweeteners like honey or maple syrup may alter texture.
  • Pinch of Salt – Elevates the overall flavor balance.
  • Water – Helps achieve the right consistency in the batter.

For the Filling

  • Mango Puree – The star ingredient that delivers a refreshing burst of tropical flavor; substitute with other purees like passionfruit or raspberry for variations.

For Coating

  • Shredded Desiccated Coconut – Offers a crunchy, sweet exterior; opt for unsweetened for a healthier option.

Step‑by‑Step Instructions for Coconut Mango Bliss Balls

Step 1: Combine Dry Ingredients
In a medium mixing bowl, whisk together 1 cup of glutinous rice flour, 1/4 cup of granulated sugar, and a pinch of salt until well mixed. This will create the base for your Coconut Mango Bliss Balls, giving them a delightful chewy texture. The sugar will ensure that the dough is perfectly sweetened to balance the tropical flavors.

Step 2: Add Wet Ingredients
Gradually pour in 3/4 cup of coconut milk and 1/4 cup of water, stirring continuously with a wooden spoon. Mix until the batter is smooth and free of lumps, creating a creamy consistency. This melding of ingredients is crucial for the final texture, as it allows the flavors of the Coconut Mango Bliss Balls to blend beautifully.

Step 3: Steam Dough
Transfer the batter to a heatproof dish and place it in a steamer. Steam for 20-25 minutes over medium heat, or until the mixture has transformed into a sticky dough that holds together nicely. You'll know it’s done when it becomes slightly translucent and no longer clings excessively to the dish. Remove from heat and allow the dough to cool for a few minutes.

Step 4: Prep Filling
While the dough cools, scoop small portions of fresh mango puree, about 2 tablespoons each, and place them on a parchment-lined tray. Freeze the portions for about 15 minutes, or until they are firm enough to handle without being overly soft. This step is key for creating the luscious filling inside your Coconut Mango Bliss Balls.

Step 5: Shape Bliss Balls
Once the dough has cooled, grease your hands lightly to prevent sticking. Take about a tablespoon of the dough and flatten it in your palm. Place a frozen mango puree scoop in the center, then carefully fold the dough around it to encase the filling and roll it into a ball shape. Repeat this process until all the dough is shaped into bliss balls.

Step 6: Coat
Roll each formed Coconut Mango Bliss Ball in a plate filled with shredded desiccated coconut, ensuring they are completely covered in the coconut for a sweet and crunchy exterior. Gently press the coconut onto the balls to help it stick. This coating not only adds flavor but also enhances the tropical essence of your delightful snack.

Step 7: Chill and Serve
Place the coated bliss balls in the refrigerator for about 15 minutes before serving. Chilling them helps firm up their shape and allows the flavors to meld beautifully. When you're ready to enjoy, savor each Coconut Mango Bliss Ball as a refreshing and wholesome treat, perfect for any occasion!

Make Ahead Options

These Coconut Mango Bliss Balls are a fantastic option for meal prep enthusiasts! You can prepare the dough and shape the bliss balls up to 24 hours in advance; just store them in an airtight container in the fridge to keep them fresh. For even greater convenience, you can freeze the uncoated bliss balls for up to 2 months; simply separate layers with parchment paper to prevent sticking. When you're ready to enjoy, just roll them in shredded desiccated coconut, refrigerate for about 15 minutes to firm up, and serve. This way, you'll have a tropical, guilt-free snack ready to delight at a moment’s notice!

What to Serve with Coconut Mango Bliss Balls

Experience a delightful pairing that elevates your tropical indulgence into a full meal, rich in flavor and freshness.

  • Tropical Fruit Salad: This vibrant mix of juicy fruits complements the mango bliss balls perfectly, enhancing the fruity essence while providing a refreshing crunch. Drizzle with a lime dressing for an extra zing!

  • Coconut Yogurt Parfait: Layer creamy coconut yogurt with granola and fresh fruits for a satisfying snack that mirrors the flavors of the bliss balls, creating a harmonious, satisfying breakfast or dessert.

  • Chilled Green Tea: A lightly sweetened chilled green tea offers a refreshing contrast to the rich, tropical flavors, cleansing the palate beautifully between bites.

  • Crispy Spring Rolls: These crunchy, fresh rolls filled with vibrant veggies boost texture and add a savory element to your snack time, creating a delightful balance with the sweet bliss balls.

  • Chocolate-Dipped Pineapple: For a sweet treat that pairs delightfully with the bliss balls, try chocolate-dipped pineapple. The rich chocolate contrasting with the sweet pineapple echoes the tropical sweetness of the mango, making every bite a celebration.

  • Coconut Water: This hydrating drink enhances the tropical theme and refreshes your palate. Its subtle sweetness and lightness make it the perfect companion to your flavorful bliss balls.

Elevate your snack experience by pairing these bliss balls with bright, refreshing options that create a vibrant, mood-lifting meal!

How to Store and Freeze Coconut Mango Bliss Balls

Room Temperature: Keep homemade Coconut Mango Bliss Balls in an airtight container at room temperature for up to 2 days to enjoy their fresh and chewy texture.

Fridge: Store in the refrigerator for up to 1 week in an airtight container, maintaining their delightful flavor and texture for a longer period.

Freezer: For longer storage, freeze the Coconut Mango Bliss Balls for up to 2 months. Ensure to separate layers with parchment paper to prevent sticking.

Reheating: When ready to enjoy, simply take out the desired amount and let them thaw at room temperature for about 15 minutes before indulging in their tropical goodness.

Expert Tips for Coconut Mango Bliss Balls

  • Consistent Texture: Ensure that the dough consistency is just right—not too dry or sticky. Adjust the moisture with coconut milk or water as needed for perfect Coconut Mango Bliss Balls.

  • Firm Filling: Freezing mango puree portions for 15 minutes will make it easier to handle when shaping the bliss balls and prevent any mess during preparation.

  • Hand Preparation: Lightly oil your hands before shaping to avoid stickiness, making it easier to form the perfect ball without the dough clinging to your fingers.

  • Coat Generously: Roll each ball thoroughly in shredded coconut to maximize that tropical flavor and ensure a delightful crunchy exterior.

  • Substitutions Matter: If you experiment with different fruit purees, keep in mind that some may alter the texture; stick with varieties that maintain a similar consistency to mango for best results.

Coconut Mango Bliss Balls Variations

Feel free to personalize your Coconut Mango Bliss Balls with these delightful twists, making each bite a new adventure!

  • Dairy-Free: Swap coconut milk for almond or oat milk to cater to lactose intolerant friends while keeping it lush.
  • Different Fruits: Substitute mango puree with other purees like passionfruit or raspberry for exciting flavor variations. Each fruit brings its own unique sweetness, providing a playful twist on this tropical delight!
  • Sweetener Switch: For a lower-glycemic option, try using natural sweeteners like agave syrup or stevia in place of granulated sugar while adjusting ratios for taste.
  • Crunchy Additions: Incorporate chopped nuts like almonds or walnuts for added crunch and nutrients in every bite. The combination of creamy dough and crunchy nuts creates a satisfying mouthfeel that’s sure to please!
  • Chocolate Drizzle: After chilling, drizzle melted dark chocolate over the bliss balls for an indulgent touch. This delightful addition elevates your treat, making it a showstopper at gatherings.
  • Protein Boost: Add protein powder to the dough for a nutrient-packed snack. It makes each bliss ball not only delicious but a filling treat to power through your day.
  • Spicy Kick: For those who adore heat, sprinkle in a pinch of cayenne pepper or chili powder to the dough for a sweet-and-spicy flavor explosion.
  • Flavored Coconut: Use flavored shredded coconut—like chocolate or vanilla—for the coating, enhancing the overall taste and offering a fun surprise.

As you embark on this culinary journey, you might also enjoy the refreshing taste of an Acai Bowl Nutritious alongside your bliss balls or indulge in a proper breakfast with Breakfast Egg Muffins. Each variation opens the door to new experiences and makes your Coconut Mango Bliss Balls even more delightful!

Coconut Mango Bliss Balls Recipe FAQs

What type of mango is best for the puree?
Absolutely! For the best flavor, opt for ripe, sweet mangoes like Honey or Ataulfo. These varieties are incredibly sweet and have a smooth texture that blends beautifully into the puree, making your Coconut Mango Bliss Balls taste even more delightful.

How should I store leftover Coconut Mango Bliss Balls?
To enjoy your Coconut Mango Bliss Balls at their best, store them in an airtight container. They can be kept at room temperature for up to 2 days. If you want to preserve them longer, refrigerate them for up to 1 week. Just make sure they’re tightly sealed to maintain their freshness!

Can I freeze Coconut Mango Bliss Balls for later?
Yes, you can! To freeze, place the bliss balls in a single layer on a parchment-lined tray and put them in the freezer until firm. Once they’re set, transfer them to an airtight container or a freezer bag, separating layers with parchment paper. They can be frozen for up to 2 months. When you’re ready to enjoy, thaw them at room temperature for about 15 minutes.

What if my dough is too sticky or too dry?
Getting the dough consistency just right is crucial. If it’s too sticky, gradually add a little more glutinous rice flour until it reaches a manageable texture. If it’s too dry, stir in a bit more coconut milk or water, one tablespoon at a time, until it softens. Aim for a consistency that is cohesive but not overly sticky, which will help shape the balls easily.

Are Coconut Mango Bliss Balls suitable for people with nut allergies?
Very much so! These bliss balls are made without nuts, making them a great option for those with nut allergies. However, always double-check the labels of any packaged ingredients, like shredded coconut, to ensure they are processed in a nut-free environment if allergies are a concern. Enjoy a worry-free tropical treat!

What can I substitute for glutinous rice flour in a pinch?
If glutinous rice flour isn't available, you can use regular rice flour, but keep in mind it may result in a slightly different texture. The best alternative for a similar chewy quality is sweet rice flour, which should yield very similar results to the bliss balls. Just ensure you’re using the right flour to achieve that delightful chewy texture!

Coconut Mango Bliss Balls

Coconut Mango Bliss Balls: Sweet Tropical Energy Bites

Coconut Mango Bliss Balls are a delightful and healthy no-bake snack filled with tropical flavors.
Print Recipe Pin Recipe
Prep Time 30 minutes mins
Cook Time 25 minutes mins
Chilling Time 15 minutes mins
Total Time 1 hour hr 10 minutes mins
Servings: 12 balls
Course: Snacks
Cuisine: Tropical
Calories: 120
Ingredients Equipment Method Nutrition Notes

Ingredients
  

For the Dough
  • 1 cup glutinous rice flour Provides structure and a delightful chewy texture
  • 1/4 cup granulated sugar Sweetens the dough; adjust to personal taste
  • 1 pinch salt Elevates overall flavor balance
  • 3/4 cup coconut milk Adds richness and enhances the tropical flavor
  • 1/4 cup water Helps achieve the right consistency in the batter
For the Filling
  • 2 tablespoons mango puree Delivers a refreshing burst of tropical flavor
For Coating
  • 1 cup shredded desiccated coconut Offers a crunchy, sweet exterior

Equipment

  • Mixing Bowl
  • Steamer
  • parchment paper tray

Method
 

Step-by-Step Instructions
  1. In a medium mixing bowl, whisk together glutinous rice flour, granulated sugar, and salt until well mixed.
  2. Gradually pour in coconut milk and water, stirring continuously until the batter is smooth and free of lumps.
  3. Transfer the batter to a heatproof dish and steam for 20-25 minutes, or until it becomes a sticky dough.
  4. Scoop small portions of fresh mango puree, freeze for about 15 minutes until firm.
  5. Once the dough has cooled, grease your hands and take about a tablespoon of the dough, flatten it.
  6. Place a frozen mango puree scoop in the center, fold the dough around it, and roll into a ball shape.
  7. Roll each ball in shredded desiccated coconut, ensuring they are completely covered.
  8. Chill the coated bliss balls in the refrigerator for about 15 minutes before serving.

Nutrition

Serving: 1ballCalories: 120kcalCarbohydrates: 15gProtein: 1gFat: 6gSaturated Fat: 4gMonounsaturated Fat: 2gSodium: 5mgPotassium: 60mgFiber: 1gSugar: 5gVitamin A: 5IUVitamin C: 10mgCalcium: 2mgIron: 2mg

Notes

These bliss balls are gluten-free and can be adapted with different fruit purees for variations.

Tried this recipe?

Let us know how it was!

Fresh and Vibrant Vietnamese Mango Salad to Brighten Your Day

February 25, 2026 by Grace Snow Leave a Comment

As I stood by my kitchen window, the bright sun streamed in, illuminating a bowl overflowing with ripe, juicy mangoes. I knew instantly that a vibrant Vietnamese Mango Salad was calling my name. This delightful dish combines sweet, succulent mango with a medley of fresh, crunchy vegetables, all perfectly dressed in a zesty dressing that dances on the palate. It’s quick to whip up, making it an ideal choice for those relaxed summer evenings or hurried lunches when you crave something fresh and exciting. What I love most is its versatility; you can easily toss in any leftover veggies lurking in your fridge, turning this salad into a customized masterpiece. Ready to transform your meals? Let’s dive into this refreshing dish!

Why is this salad a must-try?

Fresh and Flavorful: The vibrant ingredients create a burst of flavor that brightens any meal.

Quick Preparation: This salad comes together in just minutes, perfect for busy weeknights or spontaneous lunch plans.

Versatile Options: Utilize leftover veggies by swapping in your favorites—no need for strict recipes!

Crisp Contrast: The combination of sweet mango and crunchy vegetables offers a delightful textural experience.

Crowd-Pleaser: Whether you’re serving it at a picnic or a family dinner, this salad is sure to impress; it pairs wonderfully with dishes like Chicken Salad Apples or even complements a hearty main like Balsamic Steak Salad.

Add this Fresh Vietnamese Mango Salad to your recipe repertoire and enjoy its colorful charm at your next gathering!

Vietnamese Mango Salad Ingredients

For the Salad
• Mango – choose ripe, juicy mangoes for the sweetest, tropical flavor.
• Cucumbers – add crunch and hydration; English cucumbers work best for a crisp bite.
• Bell Peppers – bring in color and sweetness, feel free to use any variety you love.
• Carrots – shredded for extra crunch and a pop of color; they also add natural sweetness.
• Fresh Herbs (cilantro, mint) – these elevate the flavor; always opt for fresh rather than dried.

For the Dressing
• Lime Juice – imparts tangy brightness that perfectly complements the sweetness of the mango.
• Fish Sauce – adds depth and umami; can substitute with soy sauce for a vegan Vietnamese Mango Salad.
• Sugar – balances the flavors; adjust to your preference or use agave syrup for a lighter option.

Feel free to mix in any leftover veggies you have at home to make this a personalized culinary delight!

Step‑by‑Step Instructions for Vietnamese Mango Salad

Step 1: Prepare Ingredients
Begin your Vietnamese Mango Salad by peeling and slicing the ripe mango into thin strips or cubes, ensuring they are juicy and vibrant. Next, julienne or chop the cucumbers, bell peppers, and carrots into bite-sized pieces. Finally, rinse and roughly chop fresh herbs like cilantro and mint for that extra pop of flavor. Gather all your ingredients in a large mixing bowl, enjoying the colorful medley as you go.

Step 2: Make Dressing
In a small bowl, whisk together the tangy lime juice, fish sauce, and sugar until the sugar fully dissolves and the mixture is well-combined. Taste and adjust sweetness according to your preference, substituting agave syrup if desired for a vegan option. You'll know it’s ready when the dressing has a balanced flavor profile that complements the sweetness of the mango.

Step 3: Combine Salad
Now that your ingredients are prepped, pour the chopped vegetables and mango into the large mixing bowl with the herbs. Gently toss these fresh components together using salad tongs or your hands, allowing the colors and textures to blend beautifully without bruising the delicate mango. The vibrant combination should look inviting and lively.

Step 4: Dress Salad
Drizzle the freshly made dressing over the salad mixture, taking care to evenly coat each component. Use your hands or salad tongs to toss everything together gently, ensuring the dressing envelops all the vegetables and fruits without overmixing. Aim for a colorful display where each ingredient shines through, highlighting the essence of this Vietnamese Mango Salad.

Step 5: Serve Fresh
For the ultimate experience, serve your vibrant Vietnamese Mango Salad immediately. The fresh ingredients provide the best texture and flavor combination right away. If you prefer a more developed taste, let the salad chill for about 15-20 minutes in the refrigerator before serving, allowing the flavors to meld beautifully together.

Vietnamese Mango Salad Variations

Feel free to customize your Vietnamese Mango Salad with these exciting twists that enhance flavors and cater to your taste!

  • Crunchy Nuts: Add crushed peanuts or cashews on top for an irresistible crunch and a nutty flavor boost. The contrast between the creamy mango and the crunch of the nuts adds a delightful textural element that makes each bite even more satisfying.

  • Mango Substitute: Try swapping mango for ripe papaya or even peaches if they're in season. This will create a different yet equally sweet tropical vibe while still maintaining the essence of freshness in your salad.

  • Spicy Kick: For those who love a little heat, sprinkle in some thinly sliced jalapeños or serrano peppers. The spice will balance beautifully with the sweetness of the mango, creating a zesty contrast you won't want to miss.

  • Vegetarian Delight: Switch out fish sauce for soy sauce or coconut aminos to make a vegan-friendly version without sacrificing the umami flavor that brings the salad to life. It still brings that savory punch that complements the fresh ingredients so wonderfully.

  • Add Seasonal Veggies: Incorporate extra seasonal vegetables like snap peas, radishes, or even shredded cabbage for added color, crunch, and nutrients. Each addition can tell a new story with the salad, making it a unique creation every time.

  • Herb Explosion: Boost the herbal note by adding fresh basil or green onions alongside the cilantro and mint. This will enhance the aromatic quality of the salad, leaving your taste buds dancing with joy. Imagine the fragrant aroma wafting through your kitchen as you prepare this delightful dish!

  • Zesty Lime Variations: If you want something a bit different, consider infusing the dressing with a splash of orange juice or zest for a citrusy twist. This elevates the salad and gives it a refreshing burst of sweetness that mingles beautifully with the mango and vegetables.

Elevate your mealtime experience with this vibrant Vietnamese Mango Salad, and explore even more delicious ideas by checking out dishes like Jello Salad Cottage for a refreshing side or Tofu Caesar Salad for a hearty main. Happy cooking!

Expert Tips for Vietnamese Mango Salad

• Choose Ripe Mangoes: Look for mangoes that are slightly soft when pressed; they should yield gently for the sweetest flavor in your salad.

• Customize Veggies: Don't hesitate to swap in any leftover vegetables you have. Just remember, each variety brings its own unique texture to the Vietnamese Mango Salad.

• Dress Wisely: Add your dressing gradually and taste as you go. It’s easier to adjust the flavor without overwhelming the fresh ingredients.

• Toss Gently: Be careful not to overmix the salad. You want to keep that vibrant texture of the mango and vegetables intact for an appealing presentation.

• Serve Fresh: Enjoy this salad immediately for the best taste. Letting it sit too long may cause the ingredients to lose their crispness.

How to Store and Freeze Vietnamese Mango Salad

Fridge: Store leftover Vietnamese Mango Salad in an airtight container for up to 2 days. This keeps the ingredients fresh but may soften the texture.

Room Temperature: Ideally, keep the salad refrigerated and avoid leaving it out for more than 2 hours to prevent spoilage.

Freezer: Freezing is not recommended for this salad due to the high water content in the vegetables and mango, which can lead to a mushy texture upon thawing.

Reheating: If you chill the salad before serving, simply toss it lightly to re-distribute the ingredients for the best taste. Enjoy chilled for optimal flavor!

Make Ahead Options

These vibrant Vietnamese Mango Salad components can be prepped to save time during busy weeks! You can chop the vegetables (cucumbers, bell peppers, and carrots) up to 3 days in advance and store them in an airtight container in the refrigerator to maintain their crunch. Additionally, you can prepare the dressing and keep it refrigerated for up to 1 week; just give it a quick whisk before using. However, it's best to combine the fresh mango and herbs only right before serving to ensure the salad stays bright and flavorful. When you're ready to enjoy, mix everything together, toss with the dressing, and relish in a delightful, hassle-free meal!

What to Serve With Vibrant Vietnamese Mango Salad

Elevate your meal experience by pairing this refreshing salad with complementary dishes that enhance its vibrant flavors.

  • Grilled Chicken Skewers: The smoky flavor from the grill pairs beautifully with the sweet mango, creating a delightful contrast.
  • Spring Rolls: Fresh, rice-paper rolls filled with shrimp or vegetables mirror the salad's crispness and add a lovely textural element.
  • Jasmine Rice: Light and fragrant, it serves as a perfect base for soaking up the zesty dressing and adds substance to your meal.
  • Coconut Curry: The creamy, aromatic elements of curry provide a warming counterpoint to the bright, zesty salad, making a perfect duo.
  • Peanut Satay Sauce: Drizzle this nutty sauce over grilled meat or tempeh for a rich complement that elevates the overall flavor profile.
  • Lemonade or Iced Tea: A refreshing drink can cleanse your palate; the citrusiness of lemonade enhances the tang of the salad.
  • Chilled White Wine: Opt for a crisp Sauvignon Blanc or a fruity Riesling to balance the sweetness of mango with a refreshing sip.
  • Fruit Sorbet: As a light dessert, it echoes the salad’s tropical notes and rounds off the meal with a refreshing sweetness.

Dive into these pairings and create a full, flavorful feast that celebrates the vibrant essence of your Vietnamese Mango Salad!

Vietnamese Mango Salad Recipe FAQs

How can I tell if my mango is ripe?
Absolutely! To choose the perfect mango, gently squeeze it; it should give slightly to pressure. Look for a fragrant aroma at the stem end and a golden hue – dark spots are fine, but if the mango feels too mushy, it might be overripe.

What is the best way to store leftover salad?
Very good question! If you have any Vietnamese Mango Salad left, please store it in an airtight container in the refrigerator. It’s best consumed within 2 days, as the fresh ingredients may start to lose their crunch.

Can I freeze Vietnamese Mango Salad?
I wouldn't recommend freezing this salad. The high water content in both the mangoes and vegetables can result in a mushy texture once thawed. Instead, enjoy it fresh, where all the vibrant flavors shine!

How can I customize the ingredients?
The more the merrier! Feel free to mix in any leftover veggies you have, like shredded cabbage, snap peas, or even diced radishes. Just chop them up into similar sizes to keep that delightful crunch and balance in textures.

Is this salad suitable for specific dietary needs?
Absolutely! If someone has a fish allergy, you can substitute fish sauce with soy sauce or coconut aminos for a vegan option. Just be mindful of any fresh herbs used, as some may cause allergic reactions in certain individuals, but those can easily be omitted if necessary.

Vietnamese Mango Salad

Fresh and Vibrant Vietnamese Mango Salad to Brighten Your Day

Enjoy a refreshing Vietnamese Mango Salad filled with sweet mango, crunchy vegetables, and zesty dressing, perfect for any occasion.
Print Recipe Pin Recipe
Prep Time 15 minutes mins
Chilling Time 20 minutes mins
Total Time 35 minutes mins
Servings: 4 servings
Course: Salads
Cuisine: Vietnamese
Calories: 150
Ingredients Equipment Method Nutrition Notes

Ingredients
  

For the Salad
  • 2 pieces Mango ripe and juicy
  • 1 piece Cucumber preferably English cucumber
  • 1 piece Bell Pepper any variety
  • 1 cup Carrots shredded
  • 1 cup Fresh Herbs cilantro and mint
For the Dressing
  • 2 tablespoons Lime Juice
  • 1 tablespoon Fish Sauce or soy sauce for vegan option
  • 1 tablespoon Sugar or adjust to taste with agave syrup

Equipment

  • Mixing Bowl
  • Whisk
  • salad tongs

Method
 

Step-by-Step Instructions
  1. Peel and slice the ripe mango into thin strips or cubes.
  2. Julienne or chop the cucumbers, bell peppers, and carrots into bite-sized pieces.
  3. Rinse and roughly chop fresh herbs like cilantro and mint.
  4. Gather all the ingredients in a large mixing bowl.
  5. In a small bowl, whisk together lime juice, fish sauce, and sugar until well-combined.
  6. Taste and adjust sweetness, substituting agave syrup if desired.
  7. Pour the chopped vegetables and mango into the large mixing bowl.
  8. Gently toss these components together, avoiding bruising the mango.
  9. Drizzle the dressing over the salad mixture and toss everything gently.
  10. Serve your salad immediately for the best texture and flavor.
  11. Alternatively, chill for about 15-20 minutes before serving if desired.

Nutrition

Serving: 1servingCalories: 150kcalCarbohydrates: 35gProtein: 2gFat: 1gSodium: 200mgPotassium: 400mgFiber: 4gSugar: 14gVitamin A: 5000IUVitamin C: 60mgCalcium: 30mgIron: 0.5mg

Notes

Customize with any leftover vegetables you have at home for a personalized dish.

Tried this recipe?

Let us know how it was!

Raspberry Mango Bars: A Tropical Treat You Can't Resist

February 25, 2026 by Grace Snow Leave a Comment

As I opened the fridge, the scent of ripe mangoes and tart raspberries wafted toward me, igniting my creativity. That's when the thought struck: why not bring these vibrant flavors together in a delightful tropical dessert? Enter my Raspberry Mango Bars with Buttery Shortbread Crust! This easy-to-slice treat is not just a feast for the eyes; it boasts a perfectly firm texture thanks to gelatin and a harmonious blend of sweet and tart notes. With a buttery, crisp shortbread base that cradles silky mango curd and a striking swirl of raspberry jam, these bars are sure to be a hit at your next gathering. Plus, they’re fantastic for prepping ahead of time—just slice and serve whenever you’re ready. Who's it going to be for first, you or your loved ones?

Why You’ll Love Raspberry Mango Bars

Bright, Tropical Flavors: The combination of ripe mango and tart raspberry creates a refreshing and uplifting taste that’s perfect for any occasion.

Easy Preparation: With simple ingredients and straightforward steps, you’ll experience baking with ease, even if you’re not an expert in the kitchen.

Perfectly Portable: These bars are easy to slice and serve, making them ideal for picnics, potlucks, or family gatherings—crowd-pleasers everyone will adore!

Make Ahead Magic: They can be prepared in advance and stored for days, ensuring you have a delicious dessert ready whenever the craving strikes.

Versatile Variation Ideas: Customize your treats with options like Passion Fruit Mango Bars or Raspberry Mango Meringue Bars, helping you explore new flavor adventures.

Get ready to indulge in this deliciously whipping up a batch today! If you’re looking for more delightful tropical desserts, check out our other recipes for more inspiration.

Raspberry Mango Bars Ingredients

For the Crust

  • All-Purpose Flour – Provides structure and helps create a firm base for the bars.
  • Powdered Sugar – Adds sweetness to the crust without a gritty texture.
  • Salt – Enhances flavor and balances sweetness.
  • Butter (Cold, Cut into Pieces) – Essential for a crumbly, buttery shortbread texture; use margarine as a substitution for dairy-free options.
  • Egg Yolk – Acts as a binding agent for the crust, providing richness.
  • Heavy Cream – Adds moisture and contributes to the shortbread's tenderness.
  • Vanilla Extract – Infuses flavor into the crust, enhancing the overall taste.

For the Mango Curd

  • Unflavored Gelatin Powder – Ensures the mango curd sets nicely without being runny; crucial for achieving clean slices of Raspberry Mango Bars.
  • Cold Water – Used to bloom gelatin, activating its thickening properties.
  • Butter (Softened) – Adds creaminess and improves the texture of the mango curd.
  • Granulated Sugar – Sweetens the curd, ensuring a pleasant balance with the tart raspberry.
  • Egg Yolks – Provide richness and help in thickening the curd.
  • Mango Puree – Key flavor component; use ripe mangoes for the best results.
  • Fresh Lemon Juice – Adds acidity, brightening the flavor profile of the curd.

For the Topping

  • Raspberry Jam – Provides tartness and color contrast in the bars; can be swapped with passion fruit jam for a delightful variation.

With these ingredients, you're well on your way to creating a vibrant, delicious treat that’s sure to impress! Happy baking!

Step‑by‑Step Instructions for Raspberry Mango Bars

Step 1: Prepare the Crust
Begin by preheating your oven to 350°F (175°C). Line a 9x9-inch baking dish with parchment paper, leaving some overhang. In a food processor, combine all-purpose flour, powdered sugar, and salt until well mixed. Add cold butter in pieces, pulsing until the mixture resembles coarse sand. Mix egg yolk, cream, and vanilla together, then add it to the processor and pulse until the dough is crumbly. Press the dough firmly into the pan, prick with a fork, and freeze for 20-30 minutes.

Step 2: Bake the Crust
Once chilled, line the crust with foil, fill with weights, and bake for 15 minutes. Carefully remove the weights and foil, then return the crust to the oven, baking for an additional 20 minutes or until golden brown. Keep an eye on it to ensure it doesn’t over-bake. Once it’s nicely golden, remove from the oven and let it cool completely before adding the filling.

Step 3: Prepare the Mango Curd
While the crust cools, bloom the gelatin powder by sprinkling it over cold water in a shallow dish and setting it aside. Prepare a double boiler by simmering water in a saucepan and placing a heat-safe bowl on top. In that bowl, cream softened butter and granulated sugar until fluffy, then add egg yolks, mango puree, salt, and fresh lemon juice. Stir continuously over simmering water for about 15-25 minutes until the mixture thickens enough to coat the back of a spoon.

Step 4: Incorporate Gelatin into Curd
Carefully warm the bloomed gelatin in the microwave for about 5-10 seconds until just melted, ensuring it doesn’t get too hot. Stir the gelatin into the thickened mango curd until fully incorporated. This step is crucial for ensuring the curd of your Raspberry Mango Bars sets properly without being runny. Strain the mixture through a fine mesh sieve into a clean bowl for a smooth texture.

Step 5: Assemble the Bars
Spread the luscious mango curd evenly over the cooled shortbread crust. Make sure it fills the pan without spilling over the edges. This silky layer serves as the heart of the Raspberry Mango Bars, so smooth it out to ensure an even surface.

Step 6: Add Raspberry Swirl
Warm the raspberry jam slightly in the microwave for about 10-15 seconds to loosen it. Drop spoonfuls of the warm jam over the mango curd, then use a knife to gently swirl the jam into the curd for a marbled effect. This not only adds a vibrant color but enhances the flavor profile of your bars.

Step 7: Chill to Set
Place the assembled bars in the refrigerator and allow them to set for 4 to 6 hours or overnight, if possible. This chilling time is essential for the filling to firm up properly, ensuring perfect slices when served. The vibrant colors and flavors will meld beautifully during this time, making it well worth the wait.

Step 8: Serve the Bars
To serve, run a warm knife around the edges of the dish to loosen the bars. Carefully lift them out using the parchment overhang. Slice into squares, dipping the knife in hot water between cuts for clean edges. These Raspberry Mango Bars are now ready to bring tropical delight to your next gathering!

Expert Tips for Raspberry Mango Bars

• Keep Butter Cold: Ensure your butter is cold when making the crust for perfectly flaky and tender shortbread.

• Bloom Gelatin Properly: Always bloom gelatin in cold water for effective thickening; this prevents any lumps in the smooth mango curd.

• Use Ripe Mangoes: Choose ripe, juicy mangoes for the mango puree to achieve the best flavor in your Raspberry Mango Bars.

• Chill for Success: Allow adequate refrigeration time for the bars to set properly; this ensures clean slices and a lovely presentation.

• Avoid Over-Baking: Keep an eye on the crust while baking; over-baking can lead to a dry texture, affecting the overall experience.

Make Ahead Options

These Raspberry Mango Bars are perfect for busy home cooks looking to save time during the week! You can prepare the buttery shortbread crust and the silky mango curd up to 24 hours in advance. Simply bake the crust and allow it to cool completely before spreading the mango curd on top. Once assembled, refrigerate the bars for at least 4 to 6 hours or overnight to set properly. If you're planning to make them earlier, you can store the cooked crust and mango curd separately in airtight containers in the refrigerator for up to 3 days. Just remember to swirl the raspberry jam right before serving to keep the flavors fresh and vibrant. Enjoy these delicious treats with minimal effort on busy days!

Raspberry Mango Bars Variations

Feel free to get creative with your Raspberry Mango Bars and explore delightful new flavors and textures!

  • Passion Fruit Mango Bars: Substitute raspberry jam with passion fruit curd and add toasted coconut for a fun, tropical twist.

  • Raspberry Mango Meringue Bars: Top your bars with a light, fluffy meringue, gently toasted for added sweetness and a beautiful finish.

  • Vegan Version: Use a flax egg and coconut oil in place of butter and eggs, ensuring a delightful treat everyone can enjoy.

  • Gluten-Free Adaptation: Substitute all-purpose flour with a 1:1 gluten-free baking blend for a delicious gluten-free option.

  • Chocolate Drizzle: Melt dark chocolate and drape it on top of the set bars for a decadent chocolatey finish that pairs wonderfully with the tropical flavors.

  • Spicy Mango Twist: Add a pinch of cayenne pepper or chopped jalapeño to the mango curd for a surprising kick of heat that complements the sweetness.

  • Yogurt Swirl: Replace half of the raspberry jam top with a yogurt layer for a creamy, tangy contrast that enhances the bars' flavor.

  • Nutty Crust: Mix in crushed almonds or hazelnuts to the shortbread crust for a delightful crunch and a hint of nutty flavor.

Feel free to indulge in these variations and discover a new favorite with every batch! For more dessert ideas, check out our tropical-inspired treats and other wonderful easy dessert recipes that will satisfy your sweet tooth!

How to Store and Freeze Raspberry Mango Bars

Refrigerator: Keep the bars in an airtight container for up to 5 days. This will maintain their freshness and delightful texture.

Freezer: For longer storage, freeze individual Raspberry Mango Bars on a baking sheet. Once solid, transfer to a container lined with parchment and keep for up to 3 months.

Thawing: To enjoy from the freezer, let the bars thaw in the fridge overnight before serving, allowing the flavors to fully develop.

Serving Tips: For best results, slice while slightly chilled, as this helps ensure clean, beautiful edges for your tropical dessert!

What to Serve with Raspberry Mango Bars

Elevate your dessert experience with delightful pairings that complement the tropical flavors of these luscious bars.

  • Coconut Whipped Cream: A dollop of this light, fluffy cream adds a hint of paradise and enhances the tropical vibes.
  • Fresh Fruit Salad: A medley of strawberries, kiwi, and pineapple brings a refreshing contrast, enhancing the vibrant flavors of the bars.
  • Iced Green Tea: The herbal notes of this drink balance the sweetness, offering a soothing contrast that will refresh your palate.
  • Thick Greek Yogurt: A scoop brings creaminess and tang, perfectly pairing with the sweetness of the bars for a balanced bite.
  • Vanilla Ice Cream: Rich and creamy, this classic dessert complements the tangy notes of the mango bars while providing a cool contrast.
  • Chocolate Drizzle: A light drizzle of dark chocolate sauce adds a decadent twist, creating a beautifully rich taste with every combination.

Imagine serving these Raspberry Mango Bars alongside fresh fruit salad and a scoop of creamy vanilla ice cream for a truly unforgettable tropical feast!

Raspberry Mango Bars Recipe FAQs

What kind of mangoes should I use for the mango puree?
Absolutely! For the best flavor in your Raspberry Mango Bars, use ripe, juicy mangoes like Ataulfo or Haden. Look for mangoes that yield slightly to gentle pressure and have a sweet fragrance. Avoid overly soft or blemished mangoes, as they can affect the taste and texture of your dessert.

How should I store the Raspberry Mango Bars?
Very! Store your Raspberry Mango Bars in an airtight container in the refrigerator for up to 5 days. This keeps them moist and delicious! If you're not planning to finish them in that time, consider freezing for longer storage.

Can I freeze Raspberry Mango Bars?
Absolutely! To freeze, place each bar on a baking sheet and freeze until firm. Once solid, transfer them to an airtight container layered with parchment paper to prevent sticking. They can be stored in the freezer for up to 3 months. When ready to enjoy, simply thaw them in the fridge overnight.

What should I do if my mango curd doesn't set properly?
If your mango curd doesn't set, it may be because the gelatin wasn't bloomed properly or not mixed well enough. First, ensure you're using unflavored gelatin and that it's bloomed in cold water. If you suspect the curd isn't thick enough, return it to a double boiler and cook it gently while stirring until thickened, then add bloomed gelatin again for a firmer consistency.

Are there any allergies I should consider with this recipe?
For sure! This Raspberry Mango Bars recipe contains common allergens such as dairy (butter, cream), eggs, and gluten. If you or your guests have dietary restrictions, consider substitutions like dairy-free margarine for the butter, and use a gluten-free flour blend. Always check labels for any hidden allergens.

Can I make variations of the bars?
Of course! You can switch things up by using passion fruit jam instead of raspberry for Passion Fruit Mango Bars or topping them with a light meringue for Raspberry Mango Meringue Bars. Customize to delight your taste buds and impress your guests!

Raspberry Mango Bars

Raspberry Mango Bars: A Tropical Treat You Can't Resist

Indulge in delightful Raspberry Mango Bars featuring a buttery shortbread crust and silky mango curd, perfect for any occasion.
Print Recipe Pin Recipe
Prep Time 30 minutes mins
Cook Time 35 minutes mins
Chilling Time 6 hours hrs
Total Time 12 hours hrs 5 minutes mins
Servings: 9 bars
Course: Dessert
Cuisine: Tropical
Calories: 250
Ingredients Equipment Method Nutrition Notes

Ingredients
  

For the Crust
  • 1 cup All-Purpose Flour Provides structure and helps create a firm base for the bars.
  • 1/4 cup Powdered Sugar Adds sweetness to the crust without a gritty texture.
  • 1/4 teaspoon Salt Enhances flavor and balances sweetness.
  • 1/2 cup Butter (Cold, Cut into Pieces) Essential for a crumbly, buttery shortbread texture.
  • 1 large Egg Yolk Acts as a binding agent for the crust.
  • 2 tablespoons Heavy Cream Adds moisture and contributes to the shortbread's tenderness.
  • 1 teaspoon Vanilla Extract Infuses flavor into the crust.
For the Mango Curd
  • 1 tablespoon Unflavored Gelatin Powder Ensures the mango curd sets nicely.
  • 3 tablespoons Cold Water Used to bloom gelatin.
  • 1/2 cup Butter (Softened) Adds creaminess to the mango curd.
  • 1/2 cup Granulated Sugar Sweetens the curd.
  • 3 large Egg Yolks Provide richness for the curd.
  • 1 cup Mango Puree Key flavor component.
  • 2 tablespoons Fresh Lemon Juice Adds acidity to the curd.
For the Topping
  • 1/2 cup Raspberry Jam Provides tartness and color contrast.

Equipment

  • Oven
  • Food Processor
  • 9x9-inch baking dish
  • Double Boiler
  • Shallow dish

Method
 

Preparation Steps
  1. Preheat your oven to 350°F (175°C) and line a 9x9-inch baking dish with parchment paper.
  2. Combine all-purpose flour, powdered sugar, and salt in a food processor. Add cold butter, pulsing until mixed. Incorporate egg yolk, cream, and vanilla, then pulse until crumbly.
  3. Press the dough into the pan, prick with a fork, and freeze for 20-30 minutes.
  4. Bake the crust with foil and weights for 15 minutes, then remove and bake for another 20 minutes until golden. Cool completely.
  5. Bloom gelatin in cold water. In a double boiler, cream softened butter and granulated sugar, then add egg yolks, mango puree, salt, and lemon juice. Stir until thickened.
  6. Warm bloomed gelatin in the microwave until melted, then stir into the mango curd and strain into a bowl.
  7. Spread mango curd over the cooled crust evenly.
  8. Warm raspberry jam slightly and swirl it into the curd with a knife.
  9. Chill the bars in the refrigerator for 4 to 6 hours or overnight to set.
  10. Run a warm knife around the edges to loosen, lift out using parchment, and slice into squares.

Nutrition

Serving: 1barCalories: 250kcalCarbohydrates: 35gProtein: 2gFat: 12gSaturated Fat: 7gMonounsaturated Fat: 5gCholesterol: 40mgSodium: 50mgPotassium: 150mgFiber: 1gSugar: 15gVitamin A: 10IUVitamin C: 15mgCalcium: 2mgIron: 4mg

Notes

Keep butter cold for the crust, bloom gelatin properly, and use ripe mangoes for the best flavor.

Tried this recipe?

Let us know how it was!

Meltingly Tender Persian Saffron Chicken You’ll Love

February 25, 2026 by Grace Snow Leave a Comment

As the rich aroma of saffron wafts through my kitchen, I’m transported to the vibrant streets of Persia, where culinary traditions come alive. Today, I’m excited to share my version of Persian Saffron Chicken, an enchanting dish featuring tender chicken slow-simmered in a luxurious saffron sauce and served alongside aromatic barberry rice. This recipe is a true crowd-pleaser, perfect for special gatherings or those cozy nights when you crave comfort food. Not only is it packed with delicate flavors, but it's also gluten-free, making it an excellent option for everyone at your table. With effortless preparation that yields impressive results, you’ll find yourself making this stunning dish time and again. Curious about how to create this Persian delight right in your own home? Let’s dive into the recipe!

Why Is Persian Saffron Chicken Irresistible?

Uniquely Aromatic: The saffron-infused sauce envelops the chicken in a luxurious flavor bath that’s simply unforgettable.
Tender Perfection: With a slow-simmered technique, every bite of chicken is meltingly tender, practically falling off the bone.
Vibrant Flavors: The blend of spices along with barberries adds depth and a delightful tanginess, making each plate a feast for the senses.
Gluten-Free Goodness: This dish caters to a range of dietary preferences, being gluten-free, allowing everyone to enjoy its splendor.
Perfect for Gatherings: Whether it's a family dinner or a special celebration, this dish is a crowd-pleaser that’ll have your guests raving! If you love chicken dishes, you might also enjoy Honey Garlic Chicken Thighs or Chicken Adobo Again.

Persian Saffron Chicken Ingredients

• Get ready to create a culinary masterpiece!

  • Vegetable Oil – Provides moisture and facilitates cooking; olive oil or ghee can be great substitutes.
  • Bone-In Chicken (drumsticks or thighs) – The main protein, tender and flavorful when cooked with bones; boneless chicken can be substituted for quicker cooking.
  • Yellow Onion (1 large, chopped) – Adds sweetness and depth; consider using a sweet onion for a milder flavor.
  • Garlic (2 cloves, minced) – Enhances overall flavor profile; fresh garlic delivers the best results.
  • Turmeric (1 3/4 teaspoons) – Provides earthy flavor and vibrant color for the saffron chicken.
  • Cinnamon (1/4 teaspoon), Nutmeg (1/4 teaspoon), Cardamom (1/4 teaspoon), Cumin (1/4 teaspoon), Coriander (1/4 teaspoon), Chili Powder (1/8 teaspoon) – A unique blend of spices that contributes warmth and complexity.
  • Tomato Paste (2 tablespoons) – Adds umami and body to the sauce; can also use crushed tomatoes for a different texture.
  • Chicken Stock (2 1/2 cups) – Liquid base for the sauce; if using bone-in chicken, water can be a good substitute.
  • Saffron Water (from 1/4 teaspoon saffron mixed with 1 ice cube) – Imparts luxurious flavor and aroma; reserve half for the rice to enhance its fragrance.
  • Salt and Pepper – Essential for flavor enhancement; season to taste throughout cooking.
  • Basmati Rice (1 1/2 cups, dry) – Forms the hearty base of the dish, fluffy and fragrant when cooked properly.
  • Dried Barberries (1/3 cup) – Adds a tangy, tart flavor; these jewels of flavor can be sourced online.
  • Butter (1 teaspoon) – For sautéing barberries and enhancing richness; consider using a bit more for a buttery finish.
  • Sugar (1/4 teaspoon) – Balances the tartness of barberries; a dash more can be added for those with a sweeter palate.
  • Cucumber (1, diced), Tomatoes (2, diced), Red Onion (1/2, diced) – Ingredients for the refreshing shirazi salad, perfect for adding crunch.
  • Lemon Juice (from 1 lemon) – Provides acidity and brightness that lifts the dish; freshly squeezed lemon juice always brings the best flavor.
  • Fresh Mint (1 tablespoon chopped or 1 teaspoon dried) – Adds freshness to the salad; substitute with parsley if mint isn't available.
  • Salt and Pepper (for salad) – To taste; don’t shy away from seasoning for the best flavor profile.

Get ready to tantalize your taste buds with this authentic Persian Saffron Chicken recipe!

Step‑by‑Step Instructions for Persian Saffron Chicken

Step 1: Prepare Saffron Water
Start by preparing the saffron water, which adds a luxurious flavor to your Persian Saffron Chicken. Place 1/4 teaspoon of saffron in a small dish and melt an ice cube over it. Allow the saffron to steep and release its vibrant color and aroma while you proceed with the other steps. Set this flavorful mixture aside for later use.

Step 2: Brown the Chicken and Onions
In a large pot, heat a few tablespoons of vegetable oil over medium-high heat. Once hot, add the chopped yellow onion and cook for about 5 minutes until translucent. Next, introduce bone-in chicken pieces to the pot, letting them brown for 7-10 minutes on each side until they achieve a golden color. This step builds a beautiful depth of flavor.

Step 3: Add Aromatics and Spices
With the chicken perfectly browned, stir in the minced garlic, cooking for another minute until aromatic. Then, sprinkle in all the spices: turmeric, cinnamon, nutmeg, cardamom, cumin, coriander, and chili powder. Mix well before adding 2 tablespoons of tomato paste, half of the saffron water, and 2 1/2 cups of chicken stock. Combine until fully incorporated.

Step 4: Simmer the Chicken
Reduce the heat to low and leave the pot uncovered to simmer gently for about 4 hours. Check occasionally, stirring to prevent sticking. You’ll know your Persian Saffron Chicken is ready when the meat is fork-tender and the sauce has thickened to a rich consistency. If you’re in a hurry, increase the heat for a quicker cook but keep an eye on it.

Step 5: Cook the Basmati Rice
While the chicken simmers, rinse 1 1/2 cups of basmati rice under cold water until the water runs clear. Cook the rice according to package instructions. It should become fluffy and fragrant, providing a delightful base for the Persian Saffron Chicken once everything is plated. The rice usually takes about 15-20 minutes, so plan accordingly.

Step 6: Sauté Barberries
In a small pan, melt 1 teaspoon of butter over low heat. Once melted, add 1/3 cup of dried barberries along with a pinch of sugar. Sauté them briefly for about 1-2 minutes until they become plump and fragrant. This quick step enhances their flavor, allowing them to shine in your final dish.

Step 7: Combine Rice and Barberries
In a large bowl, take 1/2 cup of your cooked basmati rice and gently mix it with the sautéed barberries and the reserved saffron water. The mixture should be brightly colored and aromatic, ready to uplift the remaining rice. Once blended, mound the barberry-infused rice over the remaining fluffy basmati rice when you serve.

Step 8: Make the Shirazi Salad
To complete your meal, prepare a refreshing shirazi salad. In a mixing bowl, combine diced cucumber, diced tomatoes, and red onion. Drizzle with freshly squeezed lemon juice and add chopped fresh mint. Toss and season with salt and pepper to taste. Chill until you’re ready to serve, allowing the flavors to meld together beautifully.

Storage Tips for Persian Saffron Chicken

  • Fridge: Store leftovers in an airtight container for up to 3 days. Make sure the chicken has cooled before refrigerating to maintain its texture and flavor.
  • Freezer: You can freeze Persian Saffron Chicken for up to 3 months. Use freezer-safe containers, ensuring to label with the date for easy identification later.
  • Reheating: Reheat the chicken in a saucepan over low heat, adding a splash of chicken stock to restore moisture. Ensure it's heated through before serving.
  • Rice Storage: Basmati rice should be stored separately in the fridge for up to 3 days; reheat gently to avoid drying out, providing a warm base for the chicken.

What to Serve with Authentic Persian Saffron Chicken

Elevate your mealtime experience with delightful pairings that will perfectly complement the enchanting flavors of this dish.

  • Creamy Mashed Potatoes: Their silky texture contrasts beautifully with the tender chicken and rich saffron sauce, creating a comforting bite.
  • Crispy Roasted Vegetables: A medley of seasonal veggies seasoned to perfection will add a colorful crunch beside your plate. Roasting brings out their natural sweetness, making every forkful a delight.
  • Herbed Quinoa: This fluffy, protein-rich grain can balance the dish with a nutty flavor and lovely texture, enhancing your meal's overall profile. Drizzling with olive oil and lemon juice will add brightness that pairs well with the saffron chicken.
  • Pickled Garlic and Beets: Their tangy bite and vibrant color will beautifully contrast with the flavors of the saffron chicken, adding a refreshing zing. Don't be surprised if they become your new favorite accompaniment!
  • Persian Bread (Lavash): Serve warm with your meal to mop up the rich saffron sauce, adding a delightful chewiness and traditional touch that harmonizes with the dish.
  • Mint Tea: Sipping on this fragrant herbal tea will cleanse your palate, letting you enjoy the complex spices of your main dish. It's a soothing way to wind down after a savory meal.
  • Persian Saffron Ice Cream (Bastani): End on a sweet note with this aromatic dessert, featuring notes of saffron and rosewater that beautifully echo the flavors of your meal. A refreshing close to your culinary journey!

Make Ahead Options

These Persian Saffron Chicken delights are perfect for those busy weeknights when you crave comfort without the fuss! You can prepare the saffron water and marinate the chicken in the spice mixture up to 24 hours in advance, ensuring the flavors meld beautifully. Additionally, you can cook the chicken and sauce up to 3 days ahead; simply refrigerate in an airtight container. To maintain that tender quality, reheat gently on low heat, adding a splash of chicken stock if necessary for moisture. When you're ready to serve, reheat the chicken, prepare the basmati rice, and sauté the barberries just before plating for a fresh burst of flavor. Enjoy a restaurant-quality meal with minimal effort!

Persian Saffron Chicken Variations

Feel free to explore these delightful twists on the classic Persian saffron chicken recipe!

  • Lamb or Beef: Substitute chicken with tender lamb or beef for a heartier flavor experience. The spices will complement the richness beautifully.
  • Gluten-Free: While the recipe is naturally gluten-free, ensure any additional ingredients, such as stock or condiments, are labeled gluten-free to cater to dietary restrictions.
  • Less Sauce: Use less chicken stock for a thicker sauce. This allows the spices and saffron to shine through even more, giving you a punchy flavor burst!
  • Crockpot Option: Opt for a crockpot if you prefer set-it-and-forget-it cooking. This method allows for tender meat with minimal hands-on time.
  • Aromatic Vegetable Additions: Toss in some sliced carrots or bell peppers along with the onions for added sweetness and a splash of color. These veggies will absorb the sauce's flavors beautifully.
  • Herb Infusion: Try adding fresh herbs like rosemary or thyme to the cooking liquid for an aromatic twist that will elevate your dish's flavor profile.
  • Spicy Kick: Add sliced jalapeños or red pepper flakes into the pot for those who crave a bit of heat. It balances the sweetness of the barberries perfectly.
  • Fragrant Tomato Variation: Replace tomato paste with crushed tomatoes for a fresher taste. This option also gives your saffron chicken a beautiful red hue.

If you’re intrigued by rich flavors, don’t forget to check out Chipotle Lime Chicken and Rice for another exciting recipe to try in your kitchen.

Expert Tips for Persian Saffron Chicken

  • Simmer Slowly: Allow the chicken to simmer gently for a long time to achieve maximum tenderness and flavor; this is key for perfect Persian saffron chicken.

  • Season to Taste: Always adjust seasoning with salt and pepper during cooking; some may find they need to add a bit more for balance, especially with the rich flavors.

  • Extract Saffron's Flavor: For optimal saffron infusion, ensure it's ground finely; using a pestle and mortar works best to release all the aromatic oils fully.

  • Rice Rinsing: Rinse basmati rice thoroughly under cold water to remove excess starch, which helps achieve the perfect fluffy texture in your Persian saffron chicken dish.

  • Barberries Briefly: Sautéing barberries only for a minute or two will plump them while preventing them from becoming too tart—this enhances their sweet-tangy flavor profile beautifully.

Persian Saffron Chicken Recipe FAQs

How do I choose the right chicken for Persian Saffron Chicken?
For the best flavor and tenderness, I recommend using bone-in chicken, either drumsticks or thighs. The bones help infuse the sauce with richness during cooking. If you're short on time, boneless chicken can be used for quicker cooking, but you may miss out on that deep, savory flavor.

What’s the best way to store leftovers of Persian Saffron Chicken?
Store your Persian Saffron Chicken in an airtight container once it has cooled. It will keep well in the refrigerator for up to 3 days. Make sure to check the chicken and sauce, as the flavors can meld and improve with time—definitely a tasty perk!

Can I freeze Persian Saffron Chicken?
Absolutely! You can freeze your Persian Saffron Chicken for up to 3 months. To do this, place it in a freezer-safe container, and ensure you label it with the date. When you’re ready to enjoy it again, thaw it overnight in the fridge and reheat gently in a saucepan, adding a splash of chicken stock to keep it moist.

How can I troubleshoot if my saffron chicken sauce is not thickening?
If your sauce isn’t thickening as desired, first ensure you've simmered it long enough. You can also remove the chicken once it's cooked and increase the heat, allowing the sauce to reduce for 10-15 minutes. For a thicker texture, consider making a cornstarch slurry (mixing cornstarch with water) and stirring it into the sauce while it simmers to achieve a satisfying consistency.

Is Persian Saffron Chicken safe for those with gluten allergies?
Yes! This dish is gluten-free as long as you use gluten-free chicken stock. Always double-check ingredient labels for possible hidden gluten sources, especially in your stock and any spices you use. It’s perfect for gathering everyone around the table!

Can I use other types of rice for this recipe?
While basmati is traditional for Persian Saffron Chicken, you can substitute with other rice varieties like jasmine for a different flavor. However, cooking times and water ratios will vary. Just rinse them thoroughly and adjust cooking instructions as the recipe indicates. Enjoy the experimenting!

Persian Saffron Chicken

Meltingly Tender Persian Saffron Chicken You’ll Love

Experience the rich flavors of Persian Saffron Chicken, a gluten-free delight with tender chicken in a saffron sauce.
Print Recipe Pin Recipe
Prep Time 20 minutes mins
Cook Time 4 hours hrs
Total Time 4 hours hrs 20 minutes mins
Servings: 4 servings
Course: Dinner
Cuisine: Persian
Calories: 450
Ingredients Equipment Method Nutrition Notes

Ingredients
  

Oil and Chicken
  • 2 tablespoons Vegetable Oil olive oil or ghee can be great substitutes
  • 4 pieces Bone-In Chicken (drumsticks or thighs) boneless can be substituted for quicker cooking
Aromatics
  • 1 large Yellow Onion, chopped consider using a sweet onion for a milder flavor
  • 2 cloves Garlic, minced fresh garlic delivers the best results
Spices
  • 1.75 teaspoons Turmeric provides earthy flavor and vibrant color
  • 0.25 teaspoon Cinnamon
  • 0.25 teaspoon Nutmeg
  • 0.25 teaspoon Cardamom
  • 0.25 teaspoon Cumin
  • 0.25 teaspoon Coriander
  • 0.125 teaspoon Chili Powder
Sauce Components
  • 2 tablespoons Tomato Paste can also use crushed tomatoes for a different texture
  • 2.5 cups Chicken Stock water can be a substitute if using bone-in chicken
  • 1/4 teaspoon Saffron Water from 1/4 teaspoon saffron mixed with 1 ice cube
  • Salt and Pepper essential for flavor enhancement
Rice and Barberries
  • 1.5 cups Basmati Rice, dry fluffy and fragrant when cooked properly
  • 1/3 cup Dried Barberries these jewels of flavor can be sourced online
  • 1 teaspoon Butter consider using a bit more for a buttery finish
  • 1/4 teaspoon Sugar to balance the tartness of barberries
Shirazi Salad Components
  • 1 piece Cucumber, diced for freshness in the salad
  • 2 pieces Tomatoes, diced
  • 1/2 piece Red Onion, diced
  • 1 lemon Lemon Juice freshly squeezed for the best flavor
  • 1 tablespoon Fresh Mint, chopped substitute with parsley if mint isn't available
  • Salt and Pepper to taste

Equipment

  • Large pot
  • small pan
  • Mixing Bowl
  • measuring cups
  • Measuring Spoons

Method
 

Cooking Steps
  1. Prepare saffron water by placing 1/4 teaspoon of saffron in a small dish and melting an ice cube over it. Set aside for later use.
  2. Heat vegetable oil in a large pot over medium-high heat. Add chopped onion and cook until translucent (about 5 minutes). Brown the chicken pieces for 7-10 minutes on each side.
  3. Stir in minced garlic and cook for an additional minute. Add spices and mix well before incorporating tomato paste, half the saffron water, and chicken stock.
  4. Reduce heat to low and simmer uncovered for about 4 hours, stirring occasionally until the meat is fork-tender.
  5. Rinse basmati rice under cold water and cook according to package instructions, about 15-20 minutes.
  6. Melt butter in a small pan over low heat, then add barberries with a pinch of sugar and sauté for 1-2 minutes.
  7. Combine 1/2 cup of cooked rice with sautéed barberries and reserved saffron water, mixing well.
  8. In a mixing bowl, combine diced cucumber, tomatoes, and red onion with lemon juice and mint. Season with salt and pepper, and chill.

Nutrition

Serving: 1servingCalories: 450kcalCarbohydrates: 50gProtein: 35gFat: 15gSaturated Fat: 5gPolyunsaturated Fat: 2gMonounsaturated Fat: 8gCholesterol: 75mgSodium: 600mgPotassium: 800mgFiber: 2gSugar: 3gVitamin A: 800IUVitamin C: 15mgCalcium: 50mgIron: 3mg

Notes

For optimal saffron infusion, ensure it's ground finely. Rinse basmati rice thoroughly to achieve perfect texture. Store leftovers in an airtight container for up to 3 days. Freeze for up to 3 months.

Tried this recipe?

Let us know how it was!

Deliciously Creamy Chicken Supreme for Cozy Nights

February 25, 2026 by Grace Snow Leave a Comment

As I stirred the pot, the rich aroma of garlic and herbs wafted through my kitchen, transporting me to my grandmother’s bustling home. Today, I’m excited to share a recipe for Creamy Chicken Supreme that has become a cherished staple in my family. Not only is this dish a comforting hug on a plate, but it's also a quick weeknight hero that can impress friends and family alike. With just a handful of ingredients, you’ll be serving up succulent chicken in a luscious, creamy sauce that pairs beautifully with rice or pasta. Plus, the best part? It’s a fantastic option for meal prep, allowing you to savor its deliciousness throughout the week. Ready to unleash your inner chef? Let's dive into this delightful journey of flavor together!

Why is Creamy Chicken Supreme a Must-Try?

Comforting Warmth: This dish wraps you in a cozy embrace, perfect for chilly evenings.
Easy to Prepare: With just a few simple steps, even new cooks can shine.
Versatile Pairing: Serve it on rice, pasta, or alongside veggies for a well-rounded meal.
Meal Prep Friendly: Make a big batch, and enjoy delicious leftovers all week!
Impressive Flavor: With its garlic and herb-infused creamy sauce, this recipe rivals your favorite takeout. If you're in the mood for more chicken goodness, check out Honey Garlic Chicken Thighs for another delightful option!

Creamy Chicken Supreme Ingredients

For the Chicken
• Boneless Chicken Breasts – Perfectly tender and ideal for soaking up the creamy sauce.
• Salt and Pepper – Essential for seasoning; don't be shy to sprinkle generously!

For the Creamy Sauce
• Butter – Adds richness and flavor to the dish, making it oh-so-decadent.
• Garlic – Freshly minced garlic infuses your sauce with aromatic goodness.
• Heavy Cream – The heart of the Creamy Chicken Supreme; provides that luscious texture.
• Chicken Broth – Use low-sodium to control the saltiness without compromising flavor.
• Dried Thyme – Offers a fragrant herbal note that elevates the dish.
• Parmesan Cheese – Grated for extra creaminess and a savory depth of flavor.

For the Garnish
• Fresh Parsley – Chopped and sprinkled on top adds a pop of color and a touch of freshness.

Gather these ingredients to create a dish that will become a favorite in your home!

Step‑by‑Step Instructions for Creamy Chicken Supreme

Step 1: Prepare the Chicken
Start by patting the boneless chicken breasts dry with paper towels. Season both sides generously with salt and pepper to taste. In a large skillet, heat a tablespoon of butter over medium-high heat until it sizzles. Add the chicken breasts and cooking for about 6-7 minutes per side, until golden brown and cooked through. Remove the chicken from the skillet and set aside.

Step 2: Make the Aromatic Base
In the same skillet, reduce the heat to medium and add another tablespoon of butter. Once melted, toss in the minced garlic and sauté for 1-2 minutes, stirring frequently, until fragrant but not browned. This step enhances the depth of flavor for your Creamy Chicken Supreme.

Step 3: Create the Creamy Sauce
Pour in 1 cup of chicken broth and bring to a simmer, scraping up any flavorful brown bits from the bottom of the skillet. Allow it to reduce slightly for about 3-4 minutes. Then, gently stir in the heavy cream and dried thyme, cooking for another 2-3 minutes until the sauce starts to thicken to a luscious texture.

Step 4: Finish the Dish
Add the cooked chicken breasts back into the skillet, spooning the creamy sauce over the top. Let it simmer for an additional 2-3 minutes, allowing the chicken to soak in the flavors and heat through. When the sauce has thickened enough to coat the back of a spoon, it’s time to serve!

Step 5: Garnish and Serve
To plate your Creamy Chicken Supreme, transfer the chicken to serving plates and drizzle with extra sauce. Sprinkle freshly chopped parsley on top for a beautiful color contrast and fresh flavor. Pair it with rice, pasta, or steamed veggies for a complete meal that’s sure to impress!

Expert Tips for Creamy Chicken Supreme

• Choose Quality Chicken: Opt for fresh, organic boneless chicken breasts to enhance flavor and tenderness in your Creamy Chicken Supreme.

• Don’t Rush the Garlic: Sauté garlic until fragrant but never browned, as burnt garlic can turn bitter and ruin your sauce.

• Simmer Slowly: Allow the sauce to simmer gently after adding heavy cream. This ensures it thickens beautifully without curdling.

• Season with Care: Taste and adjust seasonings throughout the cooking process. A pinch of salt here and there will elevate your creamy dish perfectly.

• Serve with Style: Garnish with fresh parsley just before serving to brighten up the plate and add that extra touch of flavor to your Creamy Chicken Supreme.

Make Ahead Options

These Creamy Chicken Supreme preparations are ideal for busy weeknights! You can season the boneless chicken breasts and refrigerate them up to 24 hours in advance, which helps infuse flavor while saving you precious time on the day of cooking. The creamy sauce can also be prepared a day ahead and stored in an airtight container, allowing the flavors to meld beautifully—just be sure to reheat gently to maintain that luscious texture. When ready to serve, simply sauté the chicken until cooked through, then combine with the reheated sauce for a delightful dish that tastes freshly made, and enjoy the satisfaction of a homemade meal without the last-minute scramble!

What to Serve with Creamy Chicken Supreme?

Savoring the warmth of a home-cooked meal is made even better when you serve it alongside delicious sides that elevate the experience.

  • Fluffy Rice: The perfect canvas to soak up the rich sauce, offering a satisfying texture and mild flavor that balances the dish.

  • Garlic Bread: Crispy on the outside and soft inside, it complements the garlic infused sauce beautifully, inviting you to scoop every last bit.

  • Steamed Broccoli: Brightens up the plate with its vibrant color and brings a fresh, crunchy contrast to the creamy, savory chicken.

  • Herbed Couscous: Light and nutty, couscous absorbs the creamy sauce effortlessly, creating a delightful harmony of flavors that dances on your palate.

  • Mixed Green Salad: A refreshing side that adds a zingy touch; use a zesty vinaigrette to cut through the richness of the chicken.

  • Chardonnay: A glass of crisp Chardonnay enhances the meal with its fruity notes and acidity, making every bite even more enjoyable.

Creamy Chicken Supreme Variations

Feel free to get creative and customize your Creamy Chicken Supreme to suit your taste buds!

  • Gluten-Free: Substitute regular pasta or rice with gluten-free options like quinoa or spiralized vegetables for a lighter dish.
  • Spicy Kick: Add a pinch of crushed red pepper flakes or chopped jalapeños to the sauce for an exciting heat that elevates the flavor profile. Give it a stir and notice how the heat seeps pleasantly into the creamy goodness.
  • Herb Infusion: Besides thyme, try using fresh basil or oregano for a different herbal twist that brings a garden-fresh scent to your dish. Fresh herbs can significantly enhance the creaminess with their vibrant flavors.
  • Vegetarian Twist: Swap the chicken for hearty mushrooms or tofu to create a luscious meatless version packed with flavor. The creamy sauce hugs every bite wonderfully, making it a vegetarian delight.
  • Cheesy Variation: Experiment with different cheeses like Gouda, Fontina, or a spicy pepper jack melted into the sauce to create a cheesy profile that will wow your taste buds. Each cheese offers a unique character, making this dish new and exciting.
  • Lemon Zest: Add a tablespoon of fresh lemon juice or zest at the end for a bright, refreshing contrast to the rich creaminess. It lightens the dish and balances the flavors beautifully.
  • Rich Flavor: Use white wine instead of some of the chicken broth for a unique depth that pairs perfectly with the cream. Cooking with wine adds an elegant touch to the overall flavor, giving it a restaurant-quality flair.
  • Add Vegetables: Toss in some fresh spinach or sun-dried tomatoes during the cooking process for added color and nutrition. This simple addition brings a lovely burst of flavor and makes the dish more wholesome.

Feeling adventurous? Try swapping chicken with Crock Pot Chicken for a slow-cooked twist or bring a taste of Mexico to your table with Chipotle Lime Chicken and Rice! The possibilities are endless!

How to Store and Freeze Creamy Chicken Supreme

Fridge: Store any leftover Creamy Chicken Supreme in an airtight container in the fridge for up to 3 days. Reheat gently on the stove or microwave until heated through.

Freezer: For longer storage, freeze the creamy sauce separately from the chicken in freezer-safe containers for up to 3 months. Thaw in the fridge overnight before reheating.

Reheating: To maintain the dish's creamy texture, reheat slowly on low heat, adding a splash of chicken broth or water if needed to restore creaminess.

Serving: Pair the reheated Creamy Chicken Supreme with fresh sides like rice or veggies to enhance your meal!

Creamy Chicken Supreme Recipe FAQs

How do I choose the right chicken for Creamy Chicken Supreme?
Absolutely! Fresh, organic boneless chicken breasts are your best bet for this recipe. Look for breasts that are plump, with no dark spots or discoloration. This ensures a tender and flavorful outcome.

What is the best way to store leftovers of Creamy Chicken Supreme?
You should store any leftovers in an airtight container in the fridge for up to 3 days. It's a great way to enjoy the comforting flavors again! Just reheat gently on the stove or in the microwave until heated through.

Can I freeze Creamy Chicken Supreme?
Yes, you can! For optimal results, freeze the creamy sauce separately from the chicken in freezer-safe containers for up to 3 months. When you’re about to enjoy it again, thaw the sauce in the fridge overnight and reheat it slowly on low heat, adding a splash of chicken broth or water if needed.

My cream sauce separated while cooking. What did I do wrong?
That can happen if the heat is too high or if the cream isn’t stirred in thoroughly. Be sure to sauté the garlic gently and reduce the heat before adding the heavy cream. Simmer slowly to allow it to thicken beautifully—your dish will thank you for it!

Can I make Creamy Chicken Supreme dairy-free?
Very much so! Use coconut cream or almond milk with a thickener like cornstarch as a substitute for heavy cream. Additionally, you can swap butter for a dairy-free alternative. Just keep an eye on the seasoning, as these ingredients will alter the dish's flavor profile a bit.

Is Creamy Chicken Supreme safe for my pets?
While this dish is delicious for us, it’s best to avoid sharing with pets. Ingredients like garlic and certain seasonings can be harmful to dogs and cats. Stick to pet-friendly treats if you want to share with your furry friends!

Creamy Chicken Supreme Recipe FAQs

Deliciously Creamy Chicken Supreme for Cozy Nights

This Creamy Chicken Supreme is a comforting, quick dish perfect for weeknights, featuring succulent chicken in a garlic and herb-infused creamy sauce.
Print Recipe
Prep Time 10 minutes mins
Cook Time 30 minutes mins
Total Time 40 minutes mins
Servings: 4 servings
Course: Dinner
Cuisine: American
Calories: 450
Ingredients Equipment Method Nutrition Notes

Ingredients
  

For the Chicken
  • 4 pieces Boneless Chicken Breasts Perfectly tender and ideal for soaking up the creamy sauce.
  • to taste Salt Essential for seasoning; don't be shy to sprinkle generously!
  • to taste Pepper Essential for seasoning; don't be shy to sprinkle generously!
For the Creamy Sauce
  • 2 tablespoons Butter Adds richness and flavor to the dish.
  • 3 cloves Garlic Freshly minced for aromatic goodness.
  • 1 cup Heavy Cream The heart of the Creamy Chicken Supreme.
  • 1 cup Chicken Broth Use low-sodium to control saltiness.
  • 1 teaspoon Dried Thyme Offers a fragrant herbal note.
  • 1/2 cup Parmesan Cheese Grated for extra creaminess.
For the Garnish
  • 2 tablespoons Fresh Parsley Chopped for garnish.

Equipment

  • Skillet
  • measuring cups
  • Measuring Spoons
  • Cutting Board
  • Knife
  • Spatula

Method
 

Cooking Steps
  1. Pat the boneless chicken breasts dry and season with salt and pepper. Heat butter in a skillet over medium-high heat and cook chicken for 6-7 minutes per side until golden brown. Set aside.
  2. In the same skillet, reduce heat to medium, add another tablespoon of butter, and sauté minced garlic for 1-2 minutes until fragrant.
  3. Pour in chicken broth and simmer for 3-4 minutes. Stir in heavy cream and dried thyme, cooking for another 2-3 minutes until the sauce thickens.
  4. Return chicken to skillet, spoon sauce over it, and simmer for an additional 2-3 minutes until heated through.
  5. Serve the chicken on plates, drizzled with sauce and garnished with parsley. Pair with rice, pasta, or veggies.

Nutrition

Serving: 1servingCalories: 450kcalCarbohydrates: 7gProtein: 40gFat: 30gSaturated Fat: 15gCholesterol: 140mgSodium: 600mgPotassium: 600mgSugar: 1gVitamin A: 10IUVitamin C: 2mgCalcium: 15mgIron: 5mg

Notes

Store leftovers in an airtight container in the fridge for up to 3 days. For longer storage, freeze the sauce separately for up to 3 months.

Tried this recipe?

Let us know how it was!

Deliciously Flaky Homemade French Croissant Recipe

February 25, 2026 by Grace Snow Leave a Comment

The warm, buttery aroma of fresh-baked pastries fills the air, transporting me to the charming streets of Paris. This Homemade French Croissant Recipe is my secret to recreating those moments at home, effortlessly elevating any breakfast or brunch. With just a bit of patience and effort, you'll master the art of crafting these flaky delights that are not only impressive but satisfying to make. They’re versatile too—perfect for indulging in sweet treats or savory surprises with your favorite fillings. So grab your rolling pin and let’s embark on this delightful baking adventure together. Ready to turn your kitchen into a French café?

Why Make Homemade French Croissants?

Homemade croissants are a culinary masterpiece that will impress your family and friends. Flaky texture and rich buttery flavor make these pastries irresistible, elevating any breakfast or brunch table. Versatility is key—fill them with chocolate or cheese for sweet and savory options! They're surprisingly approachable, and you'll feel accomplished each time you make them. Plus, the aroma wafting through your kitchen is pure magic. Why not try your hand at these gorgeous delights today? For more inspiration, consider pairing them with a delightful cup of Homemade Hot Chocolate for a cozy breakfast experience!

Homemade French Croissant Ingredients

• Discover the secrets to flaky delights!

For the Dough

  • All-purpose Flour – Provides structure and body; cake flour leads to a lighter croissant.
  • Granulated Sugar – Adds a hint of sweetness; feel free to omit for a traditional taste or substitute with coconut sugar for a richer flavor.
  • Salt – Enhances flavor and strengthens gluten; consider using sea salt for a delicate taste.
  • Active Dry Yeast – Leavens the dough for airy croissants; instant yeast can be directly mixed without dissolving.
  • Warm Milk – Hydrates dough and activates yeast; for a vegan twist, use non-dairy milk.
  • Unsalted Butter (melted) – Adds richness to the dough; margarine is a great dairy-free substitute.

For the Butter Block

  • Cold Unsalted Butter – Essential for creating layers that give croissants their signature flakiness; a high-fat butter works best, and keep it chilled!

For the Egg Wash

  • Egg – Provides a glossy finish; for a vegan option, try a mixture of almond milk and turmeric for color.

With this Homemade French Croissant Recipe, you're on your way to creating those exquisitely flaky pastries right in your own kitchen!

Step‑by‑Step Instructions for Homemade French Croissant Recipe

Step 1: Prepare the Dough
In a large mixing bowl, combine all-purpose flour, granulated sugar, and salt. In a separate bowl, dissolve active dry yeast in warm milk, allowing it to bubble for about 5 minutes. Pour the yeast mixture and melted unsalted butter into the dry ingredients. Mix until a rough dough forms, then knead on a lightly floured surface for about 10 minutes until smooth. Wrap in plastic and refrigerate for 1 hour to firm up.

Step 2: Prepare the Butter Block
While the dough chills, work on the butter block. Place cold unsalted butter between two sheets of parchment paper. Use a rolling pin to pound it into a square about 6 inches by 6 inches, ensuring it's evenly thick. This butter block will create the signature flaky layers in your Homemade French Croissant recipe. Once shaped, keep it in the fridge until ready to incorporate.

Step 3: Laminate the Dough
After the dough has chilled, roll it out on a lightly floured surface into a large rectangle, approximately 20 inches by 10 inches. Place the cold butter block in the center and fold the dough over to encase the butter completely. Roll this dough into a long rectangle, about 24 inches by 10 inches. Begin the first turn by folding the dough into thirds, like a letter. Wrap in plastic and refrigerate for 30 minutes to keep it chilled.

Step 4: Create Dough Layers
Remove the dough from the fridge and roll it out again into a rectangle. Repeat the folding process for the second turn and chill for another 30 minutes. For the third and final turn, roll the dough out one last time, folding it again. This step is crucial for building the flaky texture of your Homemade French Croissant. After the final turn, refrigerate for at least 1 hour to allow the dough to relax.

Step 5: Shape the Croissants
Once the dough is fully chilled, roll it out to about 1/4 inch thick and cut it into large triangles. Starting from the base, roll each triangle tightly towards the tip, tucking the tip underneath to secure the shape. Place each rolled croissant on a lined baking sheet with the point side down. This shaping is essential to achieve the classic crescent form of Homemade French Croissants.

Step 6: Proof the Croissants
Cover the shaped croissants with a clean kitchen towel and let them rise at room temperature until noticeably puffy, about 1.5 to 2 hours. During this proofing stage, the croissants will double in size and ensure a light and airy texture in your final product. Make sure the kitchen is warm and draft-free for optimal rising conditions.

Step 7: Bake the Croissants
Preheat your oven to 400°F (200°C). While waiting, prepare an egg wash by beating an egg and brushing it over the tops of the croissants for a shiny finish. Place the tray in the preheated oven and bake for 18–22 minutes until golden brown. Rotate halfway through for even baking. The aroma of your Homemade French Croissants will fill your kitchen as they bake.

Step 8: Cool and Serve
Once baked, remove the croissants from the oven and let them cool on a wire rack for a few minutes. This cooling allows the layers to set properly, resulting in that perfect flaky exterior. Serve warm with butter, jam, or your favorite filling for a delightful treat. Enjoy your homemade pastries that are sure to impress everyone at the breakfast table!

Homemade French Croissant Variations

Invite your creativity to soar as you explore these delightful twists on the classic croissant!

  • Almond Cream: Fill croissants with almond paste before rolling for a nutty, sweet surprise. The buttery flavor pairs beautifully with the smooth creaminess of almonds.

  • Cheese Delight: Add a slice of your favorite cheese, like Gruyère or mozzarella, inside each croissant pre-rolling. The melted cheese creates a savory, gooey center that will have everyone begging for more.

  • Chocolate Indulgence: Place chocolate strips or chips inside the dough for a rich, sweet treat. The melted chocolate oozes out, creating a heavenly experience that chocolate lovers won't resist.

  • Spinach and Feta: For a savory option, mix in sautéed spinach and crumbled feta cheese. This delightful combination adds a Mediterranean flair that transforms your croissant into a gourmet experience.

  • Dried Fruits: Incorporate dried apricots or cranberries into the filling for a fruity burst of flavor. Their sweetness contrasts wonderfully with the buttery layers. Picture a breakfast spread enhanced by these sweet bites!

  • Herb Infusion: Add fresh herbs like rosemary or thyme to the dough to create fragrant, savory croissants. A savory twist that's perfect alongside a hearty soup or salad.

  • Vegan Option: Substitute non-dairy milk and egg wash with almond milk or coconut milk and a plant-based egg wash. Even without dairy, you can still achieve that irresistible crunchy exterior.

  • Spicy Surprise: If you're feeling adventurous, add jalapeño slices or pepper jack cheese for a little heat. These spicy croissants can be a unique addition to your brunch spread!

Whichever variation you choose, these croissants will always be a hit. For an extra treat, why not serve them with a warm cup of Homemade Hot Chocolate? Your guests will be swooning!

How to Store and Freeze Homemade French Croissants

Room Temperature: Store croissants in an airtight container at room temperature for up to 2 days. This keeps them soft, but remember they are best enjoyed fresh!

Freezer: For longer storage, wrap unbaked shaped croissants tightly in plastic wrap and freeze for up to 3 months. Thaw overnight in the fridge before baking for best results.

Reheating: To restore crispiness, reheat baked croissants in a preheated oven at 350°F (175°C) for 5–7 minutes. Enjoy that fresh-out-of-the-oven taste!

Airtight Storage: When storing baked croissants, always use an airtight container to maintain their flaky texture and avoid dryness from the air.

Expert Tips for Homemade French Croissants

  • Chill Time Matters: Keep the dough and butter as cold as possible throughout the process to maintain the signature flaky layers in your homemade French croissant recipe.
  • Folding Technique: Take your time with the folding steps; patience is key to developing the layers. Don't skip any turns!
  • Proofing Perfection: Avoid rushing the proofing stage. Let your croissants rise until they're significantly puffy for the best texture.
  • Butter Choice: Use high-fat butter for the butter block to ensure optimal flakiness. Lower fat butters can lead to a greasy texture.
  • Oven Readiness: Preheat your oven thoroughly before baking to ensure even cooking and that irresistible golden-brown finish.
  • Fillings Fun: Don’t hesitate to get creative with fillings, but ensure they’re not too moist, which may affect the texture of your homemade French croissant.

Make Ahead Options

These Homemade French Croissants are perfect for meal prep enthusiasts! You can shape the croissants up to 24 hours in advance and refrigerate them; just cover them tightly with plastic wrap to prevent drying out. Additionally, unbaked croissants can be frozen for up to 3 months—simply place them on a parchment-lined baking sheet until solid, then transfer to an airtight container. When you’re ready to enjoy them, just pull the croissants from the fridge or freezer, let them proof at room temperature for about 1.5 to 2 hours, then bake as directed. This way, you’ll have fresh, flaky croissants with minimal effort, any day of the week!

What to Serve with Flaky Homemade French Croissants

Imagine a delightful brunch spread that harmonizes the heavenly layers of your croissant, inviting family and friends to indulge in every buttery bite.

  • Fresh Fruit Salad: A vibrant mix of berries and citrus adds a refreshing contrast, perfect for balancing the richness of the croissant.

  • Scrambled Eggs: Fluffy, tender eggs create a savory counterpart, making for an easy, satisfying meal that pairs beautifully with buttery pastries.

  • Coffee or Espresso: A steaming cup enhances the croissant experience while the robust flavor beautifully complements the bakery's buttery notes.

  • Honey or Jam: Drizzling honey or spreading homemade jam brings a touch of sweetness that accentuates the flaky layers, elevating breakfast to a special occasion.

  • Savory Cheese Platter: Offer a selection of aged cheeses—like brie or cheddar—providing contrasting textures and flavors that transform your croissant into a delightful savory bite.

  • Almond Milk Latte: For a creamy, nutty drink option, an almond milk latte pairs wonderfully with the croissants, creating a warm and inviting ambiance.

  • Chocolate Spread: For those with a sweet tooth, serve with a rich chocolate spread for a luxurious treat that echoes the culinary magic of classic French dessert culture.

Homemade French Croissant Recipe FAQs

What type of flour is best for making croissants?
All-purpose flour is the standard choice for crafting croissants, providing a good balance of gluten and structure. For an even lighter texture, you can substitute or mix in cake flour, which results in a more delicate pastry. Just remember, gluten is key for that lovely flakiness!

How should I store my homemade croissants?
Homemade croissants are best stored in an airtight container at room temperature for up to 2 days. This way, they stay soft and delicious. If you anticipate not finishing them, consider freezing them instead (more on that below) to maintain their flaky goodness!

Can I freeze unbaked croissants?
Absolutely! To freeze unbaked croissants, shape them as per the recipe instructions, then wrap each croissant tightly in plastic wrap or place them in a freezer-safe bag. They can be frozen for up to 3 months. When you're ready to bake, just thaw them overnight in the fridge, then allow them to proof again for the best results.

What if my dough isn't rising properly?
If your dough isn't rising as expected, there are a few troubleshooting tips: ensure your yeast is fresh by checking the expiration date; warm milk should be around 110°F (45°C) to effectively activate it. Also, make sure your kitchen is warm during the proofing stage—cold temperatures can slow yeast activity. If the dough has been sitting too long or hasn't risen significantly, it may need to be reseeded with fresh yeast.

Are homemade croissants safe for pets or those with allergies?
It's best to keep homemade croissants away from pets, as ingredients like butter and any fillings, such as chocolate or certain cheeses, can be harmful to them. For those with allergies, especially gluten or dairy, consider using gluten-free flour blends or non-dairy butter alternatives—just keep in mind that results may vary from the classic recipe.

Homemade French Croissant Recipe

Deliciously Flaky Homemade French Croissant Recipe

This Homemade French Croissant Recipe captures the essence of Parisian pastries. Enjoy flaky, buttery croissants at home with a little patience and practice.
Print Recipe Pin Recipe
Prep Time 2 hours hrs
Cook Time 22 minutes mins
Chilling Time 2 hours hrs
Total Time 4 hours hrs 24 minutes mins
Servings: 12 croissants
Course: Breakfast
Cuisine: French
Calories: 200
Ingredients Equipment Method Nutrition Notes

Ingredients
  

For the Dough
  • 4 cups All-purpose Flour
  • 1 tablespoon Granulated Sugar can be omitted or substituted with coconut sugar
  • 1 teaspoon Salt consider using sea salt
  • 2 teaspoons Active Dry Yeast instant yeast can be used
  • 1.5 cups Warm Milk or non-dairy milk for vegan option
  • 1 cup Unsalted Butter (melted) or margarine for dairy-free substitute
For the Butter Block
  • 1 cup Cold Unsalted Butter keep it chilled
For the Egg Wash
  • 1 large Egg or almond milk and turmeric for vegan option

Equipment

  • Mixing Bowl
  • Rolling Pin
  • Parchment Paper
  • Baking Sheet
  • wire rack

Method
 

Step‑by‑Step Instructions
  1. In a large mixing bowl, combine all-purpose flour, granulated sugar, and salt. In a separate bowl, dissolve active dry yeast in warm milk, allowing it to bubble for about 5 minutes. Pour the yeast mixture and melted unsalted butter into the dry ingredients. Mix until a rough dough forms, then knead on a lightly floured surface for about 10 minutes until smooth. Wrap in plastic and refrigerate for 1 hour to firm up.
  2. Place cold unsalted butter between two sheets of parchment paper. Use a rolling pin to pound it into a square about 6 inches by 6 inches, keeping it chilled.
  3. Roll out the dough into a large rectangle, approximately 20 inches by 10 inches. Place the cold butter block in the center and fold the dough over to encase the butter completely. Roll this dough into a long rectangle, about 24 inches by 10 inches. Begin the first turn by folding the dough into thirds, like a letter. Wrap in plastic and refrigerate for 30 minutes.
  4. Remove the dough from the fridge and roll it out again into a rectangle. Repeat the folding process for the second turn and chill for another 30 minutes. For the third and final turn, roll the dough out one last time and fold it again. Refrigerate for at least 1 hour.
  5. Roll out the dough to about 1/4 inch thick and cut it into large triangles. Starting from the base, roll each triangle tightly towards the tip, tucking the tip underneath. Place each rolled croissant on a lined baking sheet with the point side down.
  6. Cover the shaped croissants with a kitchen towel and let them rise at room temperature until noticeably puffy, about 1.5 to 2 hours.
  7. Preheat your oven to 400°F (200°C). Prepare an egg wash by beating an egg and brushing it over the tops. Bake for 18–22 minutes until golden brown.
  8. Remove the croissants from the oven and let them cool on a wire rack for a few minutes. Serve warm with butter, jam, or your favorite filling.

Nutrition

Serving: 1croissantCalories: 200kcalCarbohydrates: 24gProtein: 3gFat: 10gSaturated Fat: 6gPolyunsaturated Fat: 1gMonounsaturated Fat: 3gCholesterol: 30mgSodium: 200mgPotassium: 100mgFiber: 1gSugar: 1gVitamin A: 5IUCalcium: 2mgIron: 4mg

Notes

Keep the dough and butter cold throughout the process for best results. Consider using high-fat butter for optimal flakiness.

Tried this recipe?

Let us know how it was!

Delicious Flaky Cheese Danish Recipe for Effortless Mornings

February 25, 2026 by Grace Snow Leave a Comment

There's a magical moment when you pull a piping hot pastry from the oven and the delightful aroma fills your kitchen, instantly transporting you to a charming café. Today, I’m excited to share my Flaky Cheese Danish Recipe, bringing that bakery experience right to your home. Perfect for breakfast or brunch, this treat is not only a crowd-pleaser but also incredibly simple to whip up, especially when using ready-made puff pastry. You’ll savor the buttery, flaky layers wrapped around a luscious cream cheese filling that’s utterly divine. Plus, it’s a fun project that even beginners can tackle, making it perfect for a cozy weekend gathering or a delightful surprise for your loved ones. Are you ready to enjoy a warm slice of homemade happiness? Let’s get baking!

Why is This Cheese Danish Recipe Amazing?

Deliciously Flaky: Each bite showcases layers of buttery puff pastry that are perfectly crispy and delightfully flaky.

Creamy Center: The rich cream cheese filling adds a smooth texture that melts in your mouth, taking your tastebuds on a joyous ride.

Beginner-Friendly: With ready-made puff pastry, this recipe is designed for anyone, even the newest bakers in the kitchen!

Versatility: You can easily customize your cheese Danish by adding fruits or herbs—think berries or zesty citrus zest—to elevate your experience.

Perfect for Sharing: It’s an excellent addition to brunch gatherings or simply for a cozy morning at home. Pair it with fresh coffee or tea for a delicious start to your day.

Trust me, once you try these flaky cheese danishes, you won't want to go back to store-bought! For more delightful ideas, check out my Potato Blue Cheese and Spatchcock Chicken recipes to impress your guests.

Flaky Cheese Danish Ingredients

• Bring the magic of a bakery to your kitchen with these essential ingredients for a Flaky Cheese Danish Recipe.

For the Pastry

  • Ready-made puff pastry – This convenient base minimizes prep time, allowing for a quick assembly of your delicious Danish.

For the Cream Cheese Filling

  • Cream cheese – The heart of your filling, offering a rich and creamy texture. Swap it with ricotta for a lighter option!
  • Granulated sugar – Sweetens the cream cheese mixture; reduce the amount if you prefer a less sugary bite.
  • Vanilla extract – Enhances the flavor of your filling; try almond extract for a different depth of taste.
  • Lemon juice – Adds a zesty tang that brightens the creamy filling; lime juice is a great alternative if needed.

For the Finish

  • Egg yolk (for wash) – Provides a beautiful golden color on the baked pastry; milk is a great vegan substitute.
  • Powdered sugar – Used for glazing your danish for an extra touch of sweetness; feel free to omit if you want it less sweet.

With these simple ingredients, you’re just a few steps away from whipping up a stunning Flaky Cheese Danish that will impress everyone at your table! Happy baking!

Step‑by‑Step Instructions for Flaky Cheese Danish Recipe

Step 1: Preheat Your Oven
Begin by preheating your oven to 400°F (200°C). While it heats, line a large baking sheet with parchment paper to prevent sticking. This step sets the perfect stage for creating your Flaky Cheese Danish, ensuring that the pastries puff up beautifully and develop that tempting golden color.

Step 2: Make the Cream Cheese Filling
In a mixing bowl, combine 8 oz of cream cheese, 1/4 cup of granulated sugar, 1 tsp of vanilla extract, 1 tbsp of lemon juice, and a pinch of salt. Use a hand mixer or whisk to blend until the mixture is smooth and creamy, which should take about 2-3 minutes. This rich filling is what gives the Flaky Cheese Danish its delightful taste.

Step 3: Prepare the Puff Pastry
Lay your thawed puff pastry on a lightly floured surface. Roll it out gently to smooth out the creases, then cut it into 8 equal rectangles or squares. Aim for about 4x5 inches each. The pastry should feel soft and pliable—this will ensure those flaky layers rise perfectly in the oven.

Step 4: Arrange the Pastry on the Baking Sheet
Place the cut puff pastry rectangles on the prepared baking sheet, leaving space between each piece. For an added decorative touch, you can fold the edges over slightly or use a knife to score a border around the perimeter. This visual cue will help create a beautiful crust on your Flaky Cheese Danish.

Step 5: Fill the Pastries
Spoon approximately 1 tablespoon of the cream cheese filling into the center of each pastry rectangle. Be careful not to overfill, as this can cause the filling to leak during baking. This step allows you to enjoy the perfect balance of flaky pastry and creamy filling in each bite!

Step 6: Apply the Egg Wash
In a small bowl, whisk 1 egg yolk with a splash of water or milk to create an egg wash. Using a pastry brush, carefully brush the edges of each pastry rectangle with this mixture. This will give your Flaky Cheese Danish a gorgeous, shiny golden finish as they bake.

Step 7: Bake the Danishes
Pop the baking sheet into your preheated oven and bake for about 15-18 minutes, or until the pastries are puffed and golden brown. You’ll know they’re ready when the kitchen fills with a delightful aroma and the tops are beautifully caramelized—a clear indicator of your success!

Step 8: Cool and Glaze the Danishes
Once baked, remove the Flaky Cheese Danishes from the oven and allow them to cool on the baking sheet for about 5 minutes. Meanwhile, prepare a glaze by mixing powdered sugar with a little milk or lemon juice. Drizzle this over your warm pastries before serving, adding a delightful finishing touch to your homemade treat.

Flaky Cheese Danish Recipe Variations

Feel free to explore and play with these variations to make the recipe your own!

  • Fruit-Filled: Add a layer of fruit preserves or fresh berries atop the cream cheese filling for a burst of sweetness. Think raspberry, blueberry, or strawberry—each bite will be a delightful surprise!

  • Lemon Zest: Grate some lemon zest into your cream cheese mixture for a zesty kick that elevates the flavor profile. This twist adds brightness and is a refreshing contrast to the creamy filling.

  • Savory Style: For a savory option, blend in chopped herbs like chives or dill into your cream cheese filling. You can also incorporate finely diced spinach or roasted red peppers for an exciting flavor profile that’s still rich and creamy.

  • Almond Flour: If you're looking for a gluten-free twist, try using almond flour to dust your work surface. It adds a nutty flavor while still allowing you to enjoy that flaky texture you love.

  • Cinnamon Sugar Dusting: Before baking, sprinkle a mixture of cinnamon and sugar on the pastry. This sweet and spicy touch brings warmth and comfort to your pastry that’s perfect for cooler mornings.

  • Mascarpone Swap: Substitute mascarpone for the cream cheese to create a surprisingly creamy texture with a subtly sweet flavor. It’s great for those who love a bit of luxurious indulgence.

  • Berry Compote Drizzle: After baking, drizzle a warm berry compote over the top for extra visual appeal and luscious flavor. This will turn your Danish into an impressive dessert that beautifully pairs with coffee or tea.

Take these ideas as a stepping stone to craft your unique pastry masterpiece! Once you feel inspired, you might also want to check out my ideas for Chicken Adobo or how to make a delightful Spatchcock Chicken for your next meal. Happy baking!

Make Ahead Options

These Flaky Cheese Danishes are ideal for meal prep, allowing you to enjoy delicious homemade pastries with less effort during busy mornings! You can prepare the cream cheese filling up to 3 days ahead and store it in an airtight container in the refrigerator. Additionally, you can assemble the shaped danishes (filled and brushed) and refrigerate them for up to 24 hours before baking. To maintain their delightful flaky texture, cover the baking tray tightly with plastic wrap. When you're ready to impress your family or guests, simply preheat your oven and bake the refrigerated danishes directly, adding a few extra minutes to the bake time for perfect results! Enjoy the warm, buttery goodness with minimal fuss!

How to Store and Freeze Flaky Cheese Danish

Fridge: Store baked Flaky Cheese Danishes in an airtight container for up to 5 days. This ensures they maintain their delightful texture and flavor.

Freezer: If you have unbaked shaped pastries, they can be frozen for up to 1 month. Just bake them straight from the freezer, adding a few extra minutes to the baking time.

Reheating: To revive leftovers, preheat your oven to 325°F (160°C) and reheat the Danishes for 5-7 minutes until warm and flaky again.

Expert Tips for Flaky Cheese Danish Recipe

  • Proper Thawing: Ensure the puff pastry is fully thawed to achieve optimal flakiness; if it's still cold, it won’t puff as beautifully.

  • Mind the Filling: Avoid overfilling with cream cheese to prevent leakage during baking; a tablespoon in the center is just right for balance.

  • Golden Finish: Brush the edges with egg wash (or milk) for that shiny golden look; just remember to keep the wash away from the filling to avoid sogginess.

  • Cooling Time: Allow your Flaky Cheese Danishes to cool completely before storing them; this keeps them from becoming soggy due to trapped steam.

  • Experiment with Flavors: Don’t hesitate to add fruits like raspberries or zests of citrus to the filling, creating a personalized twist that's unique and delicious!

What to Serve with Flaky Cheese Danish Recipe

Pair your delightful cheese danish with some delicious sides to create a memorable breakfast or brunch experience.

  • Fresh Fruit Salad: A vibrant medley of seasonal fruits adds a refreshing contrast to the rich danish, lightening up every bite.
  • Greek Yogurt Parfait: Layered with granola and berries, this parfait offers a creamy texture and healthful elements that balance the sweetness.
  • Light Green Salad: Crisp greens with a citrus vinaigrette complement the pastry’s buttery nature, providing a fresh and zesty bite.
  • Savory Bacon or Sausage: These protein-packed sides add a savory contrast to the danish's sweetness, making for a well-rounded meal.
  • Classic Coffee: A fresh brew enhances the flavors of the cheese danish, perfect for enjoying alongside a warm slice.
  • Herbal Tea: Pair your danish with a fragrant herbal tea for a calming, aromatic addition that soothes the palate.
  • Lemon Curd for Dipping: This tangy companion adds a zesty pop of flavor that enhances the creaminess of the filling.

Elevate your Flaky Cheese Danish recipe with these delightful pairings and create a brunch that everyone will remember!

Flaky Cheese Danish Recipe FAQs

How do I choose the right puff pastry?
Absolutely! Look for ready-made puff pastry that is labeled as "all-butter" for the best flavor. Make sure it’s well-thawed before using, avoiding any cracking or tearing. You can tell it’s ready when it’s pliable and soft to the touch.

How should I store leftover cheese Danish?
To keep your Flaky Cheese Danishes fresh, store them in an airtight container in the fridge for up to 5 days. This method prevents them from drying out while maintaining their delightful texture and flavor. If they cool completely first, it helps maintain their crispiness!

Can I freeze cheese Danish before baking?
Yes, you can! If you’ve shaped the pastries but haven’t baked them yet, they can be frozen for up to 1 month. Simply place them on a baking sheet to freeze them individually for 1-2 hours, then transfer to an airtight bag. When you're ready to bake, just pop them in from frozen, adding a few extra minutes to the baking time.

What if my filling leaks during baking?
No worries! If this happens, it’s often due to overfilling the pastries. Make sure to keep the filling to about 1 tablespoon per Danish. If you experience leakage, you can also try placing the pastries on a parchment-lined baking sheet to catch any drips, making cleanup easier!

Are there any allergies I should be aware of?
Certainly! This recipe contains dairy and eggs, so it’s not suitable for those with lactose intolerance or egg allergies. For a dairy-free option, consider using a plant-based cream cheese. Also, if you're cooking for someone with gluten sensitivities, be sure to look for gluten-free puff pastry alternatives.

How can I add a personal touch to my cheese Danish?
The more the merrier! You can easily customize your cheese Danish by mixing in fruits like raspberries or blueberries into the cream cheese filling. Another fun twist is to sprinkle some lemon or orange zest to add a refreshing citrus flavor. Experiment and find what makes your heart sing!

Flaky Cheese Danish Recipe

Delicious Flaky Cheese Danish Recipe for Effortless Mornings

This Flaky Cheese Danish Recipe is a simple, crowd-pleasing breakfast treat that delivers a delightful bakery experience right at home.
Print Recipe Pin Recipe
Prep Time 20 minutes mins
Cook Time 18 minutes mins
Cooling Time 5 minutes mins
Total Time 43 minutes mins
Servings: 8 pieces
Course: Breakfast
Cuisine: French
Calories: 300
Ingredients Equipment Method Nutrition Notes

Ingredients
  

For the Pastry
  • 1 package Ready-made puff pastry for quick assembly
For the Cream Cheese Filling
  • 8 oz Cream cheese swap with ricotta for lighter option
  • 1/4 cup Granulated sugar reduce for less sweetness
  • 1 tsp Vanilla extract can substitute with almond extract
  • 1 tbsp Lemon juice lime juice is a great alternative
For the Finish
  • 1 large Egg yolk for wash; milk is a vegan substitute
  • 1 cup Powdered sugar omit for less sweetness

Equipment

  • Oven
  • Mixing Bowl
  • Hand mixer or whisk
  • Baking Sheet
  • Pastry brush
  • Parchment Paper

Method
 

Step-by-Step Instructions
  1. Preheat your oven to 400°F (200°C) and line a baking sheet with parchment paper.
  2. In a mixing bowl, combine cream cheese, sugar, vanilla extract, lemon juice, and a pinch of salt. Blend until smooth and creamy.
  3. Lay the thawed puff pastry on a floured surface. Roll it out and cut into 8 equal rectangles.
  4. Place the pastry rectangles on the baking sheet, leaving space in between. You can decorate the edges if desired.
  5. Spoon approximately 1 tablespoon of the cream cheese filling into the center of each pastry rectangle.
  6. Whisk the egg yolk with a splash of water or milk, then brush the edges of each pastry with the egg wash.
  7. Bake for 15-18 minutes until puffed and golden brown.
  8. Remove from oven and let cool for 5 minutes. Glaze with powdered sugar mixed with milk or lemon juice before serving.

Nutrition

Serving: 1pieceCalories: 300kcalCarbohydrates: 30gProtein: 4gFat: 18gSaturated Fat: 10gPolyunsaturated Fat: 1gMonounsaturated Fat: 5gCholesterol: 80mgSodium: 150mgPotassium: 150mgFiber: 1gSugar: 10gVitamin A: 500IUVitamin C: 1mgCalcium: 80mgIron: 1mg

Notes

Ensure puff pastry is fully thawed for best results. Experiment with flavor add-ins like fruits or zests.

Tried this recipe?

Let us know how it was!

Irresistible Ultimate Breakfast Sandwich You’ll Crave Daily

February 24, 2026 by Grace Snow Leave a Comment

As the aroma of caramelized onions fills the air, I can’t help but think about my favorite way to transform breakfast into an extraordinary feast: the Ultimate Breakfast Sandwich. With the perfect harmony of soft scrambled eggs, juicy breakfast sausage, and a zesty kick from spicy aioli, this sandwich offers a delightful twist that easily surpasses any restaurant option. Not only is it a hearty choice to fuel your day, but it's also a treat you can customize just the way you like it. Imagine savoring each bite of creamy avocado and melted cheddar, all bundled up in a toasted brioche bun. Plus, this recipe ensures you can whip it up quickly, making it an excellent option for busy mornings or leisurely brunches. Are you ready to elevate your breakfast game? Let's dive into the details that will bring this masterpiece to life!

Why not elevate your breakfast routine?

Irresistible Flavor: The combination of soft scrambled eggs, juicy sausage, and caramelized onions creates a mouthwatering experience that will make your mornings something to look forward to.

Unmatched Customization: You can switch ingredients like using turkey sausage or adding pepper jack cheese for a spicier delight.

Quick and Easy: With simple steps, you’ll have a restaurant-quality sandwich ready in no time—perfect for busy weekdays or leisurely brunches.

Perfectly Textured: Each bite offers a delightful mix of creaminess from the avocado and cheddar, making it a truly satisfying meal. Don’t forget to try this alongside our Cornbread Breakfast Casserole for a truly indulgent spread!

Ultimate Breakfast Sandwich Ingredients

For the Spicy Aioli

• Mayonnaise – Makes up the creamy base; you can substitute with Greek yogurt for a lighter option.
• Sriracha – Adds a zesty kick that elevates the flavor; feel free to adjust to your spice preference.

For the Caramelized Onions

• Oil – Essential for sautéing; divide between 2 tablespoons to ensure perfect cooking.
• Yellow Onion – Sweetens as it caramelizes; half a medium onion works best for depth of flavor.

For the Egg Mixture

• Eggs – The star ingredient; use three large eggs for fluffy soft scrambled eggs.
• Chives – Enhances the scrambled eggs' taste; fresh chives make a delightful difference!

For the Main Ingredients

• Breakfast Sausage Patties – Provides protein and heartiness; opt for high-quality sausage or substitute with ground turkey.
• Hard Cheddar – Adds a rich, creamy taste; two slices will melt beautifully on the sausage.
• Avocado – Offers a creamy texture and healthy fats; half an avocado adds richness.
• Brioche Buns – The perfect base for this sandwich; toast them for added flavor and crunch.

Get ready to assemble your Ultimate Breakfast Sandwich with these flavorful ingredients that promise to make your breakfast truly irresistible!

Step‑by‑Step Instructions for Ultimate Breakfast Sandwich

Step 1: Make Spicy Aioli
In a small bowl, combine 1 tablespoon of mayonnaise with 1 teaspoon of sriracha. Mix thoroughly until the mixture is smooth and evenly blended. This spicy aioli adds a delicious zing to your Ultimate Breakfast Sandwich, so give it a taste and adjust the sriracha if you like more heat. Set this aside while you prepare the other ingredients.

Step 2: Caramelize Onions
Heat 1 tablespoon of oil in a skillet over medium-high heat. Add half a previously sliced yellow onion and sauté for about 5 minutes until the onion becomes translucent. Lower the heat to medium-low and continue to cook for an additional 20 minutes, stirring occasionally, until the onions turn deep golden brown and sweet in aroma, adding depth to your breakfast sandwich.

Step 3: Cook Sausage Patties
In a separate skillet, heat another tablespoon of oil over medium heat. Place the breakfast sausage patties in the pan and cook for about 5-7 minutes on each side, or until they're nicely browned and cooked through. In the last minute of cooking, top each patty with a slice of cheddar cheese and cover the pan to allow the cheese to melt, creating a gooey layer of flavor.

Step 4: Prepare Scrambled Eggs
Whisk together three large eggs and 1 tablespoon of chopped chives in a bowl until well combined. In a nonstick skillet, heat 1 tablespoon of oil over medium-low heat. Pour the egg mixture into the skillet, letting it sit undisturbed for a few moments until edges set. Gently fold the eggs using a spatula, cooking until creamy and soft, about 3-4 minutes. Remove the eggs from heat before they fully set, as they'll continue cooking off the heat.

Step 5: Assemble the Sandwich
Toast your brioche buns until golden brown. Spread a generous layer of the spicy aioli on each half. On the bottom bun, layer the melted sausage patty, followed by the soft scrambled eggs, caramelized onions, and sliced avocado. Top it off with the other half of the bun, pressing down gently to hold everything together. Serve your Ultimate Breakfast Sandwich warm, and relish every bite of this decadent creation!

Expert Tips for the Ultimate Breakfast Sandwich

  • Perfect Eggs: Wait to season your eggs until after cooking to maintain their creamy texture. Gentle folding, not vigorous stirring, is key.

  • Onion Mastery: Patience is your friend! Allow onions to caramelize slowly; if the pan dries out, add a splash of water for extra moisture.

  • Bun Choice: Use a fresh, toasted brioche bun for the best texture. It holds up beautifully against the hearty toppings of your breakfast sandwich.

  • Spicy Aioli Prep: Make the sriracha aioli up to 5 days ahead for convenience, enhancing the flavors while saving time during breakfast rush.

  • Ingredient Swaps: Feel free to customize! Replace cheddar with pepper jack for a kick, or opt for turkey sausage for a lighter option.

Storage Tips for Ultimate Breakfast Sandwich

  • Room Temperature: It’s best to enjoy your Ultimate Breakfast Sandwich fresh; however, if left uneaten, it can sit at room temperature for up to 2 hours.

  • Fridge: Store any leftover components like caramelized onions and spicy aioli in airtight containers in the refrigerator for up to 5 days to maintain freshness.

  • Freezer: To save components for later, freeze caramelized onions in small portions for up to 3 months. Reheat them in a pan before assembling your sandwich.

  • Reheating: When reassembling your Ultimate Breakfast Sandwich, gently reheat the sausage patties and scrambled eggs in a skillet over low heat, ensuring they stay moist and flavorful.

What to Serve with The Ultimate Breakfast Sandwich

As you enjoy the delightful layers of your sandwich, consider these wonderful pairings that will elevate your breakfast experience.

  • Crispy Breakfast Potatoes:
    Golden and seasoned, they add a satisfying crunch that contrasts beautifully with the creamy texture of your sandwich.

  • Fresh Fruit Salad:
    A medley of seasonal fruits introduces bright flavors and refreshing sweetness, balancing the savory elements perfectly.

  • Smooth and Creamy Yogurt:
    With a dollop of honey or granola, it provides a wholesome contrast to the richness of the breakfast sandwich.

  • Zesty Green Salad:
    A mix of leafy greens with a tangy vinaigrette adds a light, refreshing bite that complements the hearty meal.

  • Mimosa or Sparkling Juice:
    These bubbly beverages bring a festive touch to your brunch, enhancing the overall elevated experience of your meal.

  • Avocado Toast:
    The creamy avocado spread on toasted bread echoes the flavors from the sandwich while adding a deliciously different texture.

  • Savory Sausage Links:
    For an extra protein boost, these tasty links harmonize with the flavors of the sandwich, making it an indulgent feast.

  • Chocolate Chip Pancakes:
    For a sweet ending, fluffy pancakes with melty chocolate chips create a delightful contrast to the savory breakfast.

  • Rich Coffee or Tea:
    A steaming cup of your favorite brew enhances the overall experience, grounding your meal with warmth and comfort.

Make Ahead Options

These Ultimate Breakfast Sandwiches are perfect for meal prep enthusiasts! You can prepare the spicy aioli up to 5 days in advance, storing it in an airtight container in the refrigerator to maintain its vibrant flavor. The caramelized onions can also be made ahead and kept in the fridge for up to 3 days; just reheat them gently before assembling. For the best results, cook the sausage patties and scramble the eggs fresh, but you can whisk the egg mixture and keep it in the refrigerator for up to 24 hours. When ready to enjoy, simply toast your brioche buns, assemble with the prepped ingredients, and savor a delicious breakfast in no time!

Ultimate Breakfast Sandwich Variations

Feel free to take your breakfast sandwich to the next level with these delightful twists that will awaken your taste buds!

  • Pepper Jack Cheese: Swap out cheddar for pepper jack to add a spicy kick, perfect for those who crave heat in the morning. The creaminess of the jack will also melt beautifully over your sausage.

  • Turkey Sausage: Use turkey sausage patties for a lighter option, keeping the sandwich hearty without the extra calories. It’s a fantastic choice for a wholesome, protein-packed breakfast.

  • Avocado Alternatives: Substitute avocado with a layer of fresh tomato for a vibrant pop of color and juicy flavor. This swap not only enhances freshness but also adds a delightful tang.

  • Vegetarian Delight: For a meat-free version, replace the sausage with sautéed mushrooms or spinach. The savory additions will provide richness without losing the sandwich’s comforting essence.

  • Brioche Bun Sub: Experiment with different bread! Try a whole-grain sandwich bun for added fiber, or even a bagel for a chewy texture that elevates your breakfast.

  • Add Extra Greens: Toss in fresh arugula or spinach to introduce a peppery flavor and a crunchy texture. It’s a simple addition that makes your sandwich feel garden-fresh!

  • Zesty Aioli Variations: Swap sriracha in your aioli for chipotle sauce to give your sandwich a smoky flavor. This helps create a more complex profile that’s sure to impress!

  • Egg Innovations: Customize the egg mixture by adding a splash of cheese or incorporating sautéed bell peppers for a colorful and flavorful breakfast extravaganza.

If you're looking to expand your breakfast repertoire, why not serve your Ultimate Breakfast Sandwich with a side of our delightful Breakfast Egg Muffins or a refreshing Breakfast Banana Split? Each option brings a fun twist to your morning meal!

Ultimate Breakfast Sandwich Recipe FAQs

What type of onions should I use for caramelizing?
I recommend using yellow onions, as they have a high sugar content that caramelizes beautifully, providing great sweetness and flavor. Avoid using red onions, as they can have a sharper taste and won't yield the same depth of sweetness.

How do I store leftover ingredients?
You can store leftover caramelized onions and spicy aioli in airtight containers in the refrigerator for up to 5 days. Be sure to label the containers with the date for easy tracking, ensuring everything stays fresh and tasty.

Can I freeze the components of the Ultimate Breakfast Sandwich?
Absolutely! You can freeze the caramelized onions in small portions for up to 3 months. Just let them cool completely, then transfer them into freezer-safe bags or containers. When you’re ready to use them, simply thaw in the refrigerator overnight and reheat in a skillet.

How do I prevent my scrambled eggs from becoming dry?
To achieve the perfect soft scrambled eggs, don’t add salt until after cooking. This will help retain moisture. Also, gently fold the eggs instead of vigorously stirring to ensure a creamy texture. Remember to take them off the heat just before they’re fully set, as they’ll continue to cook off the stove.

Is this sandwich suitable for those with dietary restrictions?
You can easily make this sandwich gluten-free by using gluten-free buns and ensuring your sausage is free from gluten. If you're vegetarian, consider swapping the sausage for a plant-based alternative. Always check labels for allergens like eggs, dairy, or specific spices if someone in your household has allergies.

How long can I leave the assembled sandwich at room temperature?
The Ultimate Breakfast Sandwich is best enjoyed fresh, but it can safely sit at room temperature for up to 2 hours. If you're not planning to eat it right away, I suggest refrigerating the individual components and assembling them just before serving for optimal freshness.

Ultimate Breakfast Sandwich

Irresistible Ultimate Breakfast Sandwich You’ll Crave Daily

Discover the flavors of the Ultimate Breakfast Sandwich, a delightful mix of soft scrambled eggs, juicy sausage, and spicy aioli.
Print Recipe Pin Recipe
Prep Time 15 minutes mins
Cook Time 35 minutes mins
Total Time 50 minutes mins
Servings: 2 sandwiches
Course: Breakfast
Cuisine: American
Calories: 700
Ingredients Equipment Method Nutrition Notes

Ingredients
  

For the Spicy Aioli
  • 1 tablespoon mayonnaise or Greek yogurt for a lighter option
  • 1 teaspoon sriracha adjust to spice preference
For the Caramelized Onions
  • 1 tablespoon oil for sautéing
  • 0.5 medium yellow onion sliced
For the Egg Mixture
  • 3 large eggs
  • 1 tablespoon chives fresh, chopped
For the Main Ingredients
  • 2 patties breakfast sausage or ground turkey
  • 2 slices hard cheddar or substitute with pepper jack for a spicier option
  • 0.5 avocado sliced
  • 2 buns brioche toasted

Equipment

  • Skillet
  • Bowl
  • Spatula

Method
 

Step‑by‑Step Instructions for Ultimate Breakfast Sandwich
  1. In a small bowl, combine mayonnaise and sriracha for spicy aioli. Mix until smooth and set aside.
  2. Heat oil in a skillet over medium-high. Sauté half a yellow onion for about 5 minutes, then lower heat to medium-low and cook for another 20 minutes until golden brown.
  3. In another skillet, heat oil and cook sausage patties for 5-7 minutes each side. In the last minute, add cheese on top to melt.
  4. Whisk eggs and chives in a bowl. In a nonstick skillet, heat oil and pour in the egg mixture. Cook gently for 3-4 minutes until soft and creamy.
  5. Toast brioche buns. Spread spicy aioli, then layer sausage, scrambled eggs, caramelized onions, and avocado. Top with the other half and serve warm.

Nutrition

Serving: 1sandwichCalories: 700kcalCarbohydrates: 45gProtein: 30gFat: 40gSaturated Fat: 15gPolyunsaturated Fat: 5gMonounsaturated Fat: 10gCholesterol: 300mgSodium: 1200mgPotassium: 600mgFiber: 4gSugar: 2gVitamin A: 300IUVitamin C: 2mgCalcium: 400mgIron: 3mg

Notes

Customize ingredients as desired, such as using turkey sausage or swapping cheeses. Prepare spicy aioli ahead for convenience.

Tried this recipe?

Let us know how it was!

Delicious Spicy Prawn Rolls with Homemade Buns You’ll Love

February 24, 2026 by Grace Snow Leave a Comment

As I stood by the stove, the aroma of sizzling prawns mingled with spices wafted through the air, transporting me to sun-kissed beach picnics. These Spicy Prawn Rolls, featuring perfectly crispy homemade buns and a zesty cocktail sauce, have quickly become a staple in my kitchen. With tender King prawns nestled alongside crunchy lettuce, this dish is not just a feast for the taste buds; it's a breeze to prepare, taking only 20 minutes from start to finish. Whether you’re looking for a scrumptious lunch or a casual dinner that impresses, these rolls hit the spot. Curious to see how to whip them up and wow your guests? Let’s dive into this delicious recipe!

Why are Spicy Prawn Rolls a Must-Try?

Simplicity: This recipe comes together in just 20 minutes, making it perfect for busy weeknights or last-minute entertaining.

Flavor Explosion: The fusion of cayenne and smoked paprika in the cocktail sauce delivers a thrilling taste experience that will leave your taste buds dancing.

Versatile Variations: Feel free to swap King prawns for shrimp or even griddled veggies for a delightful vegetarian option, ensuring everyone can enjoy this dish!

Homemade Buns: Elevate your rolls with fresh, homemade buns that are crispy on the outside and soft on the inside, providing the perfect vessel for your flavorful filling.

Crowd-Pleaser: Whether it's a casual lunch or a beach gathering, these Spicy Prawn Rolls are sure to impress friends and family alike. For even more seafood inspiration, try our delightful Spicy Miso Tuna dish for a delicious twist!

Spicy Prawn Rolls Ingredients

• For the Cocktail Sauce

  • Mayonnaise – a creamy base that enhances flavor and texture.
  • Tomato Ketchup – adds sweetness and depth to the sauce.
  • Lemon Juice – brightens the flavors and balances richness.
  • Worcestershire Sauce – introduces umami and complexity to the sauce.
  • Gherkin Juice – a tangy kick that enhances the sauce's flavor.
  • Brandy (optional) – adds depth; skip if you prefer to keep it simple.
  • Cayenne Pepper – the star spice for heat; adjust according to your preference.
  • Smoked Paprika – offers smokiness and warmth that complements the prawns.
  • Celery Salt – enhances overall seasoning for a well-rounded taste.

• For the Prawn Filling

  • Cooked King Prawns – the main attraction; ensure they are peeled and prepared.
  • Gherkins – finely diced for added crunch in the filling.
  • Celery – finely diced, contributing freshness and texture.
  • Capers – a briny flavor that elevates the overall taste.
  • Chives – fresh herb garnish for a mild onion flavor.

• For the Buns

  • Hot Dog Buns – the base for the rolls; homemade is preferred for best results.
  • Butter – for toasting the buns and adding delicious richness.

• For the Salad

  • Little Gem Lettuce – washed and finely shredded, providing a fresh crunch!

These Spicy Prawn Rolls are not only easy to make but also packed with flavor, making them a fantastic choice for any occasion!

Step‑by‑Step Instructions for Spicy Prawn Rolls

Step 1: Prepare the Cocktail Sauce
In a mixing bowl, combine 100g mayonnaise, 50g tomato ketchup, 1 tablespoon lemon juice, 2 teaspoons Worcestershire sauce, and 2 teaspoons gherkin juice. Whisk these ingredients together until smooth and creamy. Add in 1 teaspoon of brandy (if desired), ¼ teaspoon cayenne pepper, ¼ teaspoon smoked paprika, and ¼ teaspoon celery salt. Mix thoroughly and season with salt and pepper to achieve the desired flavor.

Step 2: Mix in the Filling
Next, add 2 finely diced gherkins, 1 finely diced celery stalk, and 1 teaspoon capers into the cocktail sauce you just prepared. Gently fold in 200g of cleaned and peeled King prawns, ensuring each prawn is well-coated in the flavorful sauce. Take a moment to relish the vibrant colors and enticing aromas as everything comes together, creating a delicious filling for your Spicy Prawn Rolls.

Step 3: Prepare the Buns
For the homemade buns, take 5 hot dog buns and trim the edges for an even surface. Carefully split each bun down the middle, stopping just before you cut all the way through; this keeps them intact for filling. This preparation sets the stage for a perfect vessel to showcase your succulent prawn mixture, and using homemade buns will elevate the dish even more.

Step 4: Toast the Buns
Spread 20g of softened butter on the flat sides of each bun for a rich flavor. Heat a frying pan over medium heat and place the buns cut-side down. Toast for about 2–3 minutes, or until golden brown. The crispy exterior will contrast beautifully with the creamy prawn filling, creating an extraordinary bite that encapsulates the essence of your Spicy Prawn Rolls.

Step 5: Assemble the Rolls
Once the buns are toasted to perfection, it’s time to assemble your rolls! Place a generous handful of finely shredded Little Gem lettuce into each toasted bun. Top it with a heaping scoop of your zesty prawn mixture, ensuring the filling is visible and inviting. For an extra touch, dust each roll with a sprinkle of smoked paprika and scatter some chopped chives on top, enhancing both the visual appeal and flavor.

Step 6: Serve and Enjoy
Finally, serve your Spicy Prawn Rolls immediately while they are still warm, letting the fresh flavors and delightful textures shine. Pair these tasty rolls with a chilled beverage for a refreshing meal experience. With each bite, experience the perfect blend of spicy, creamy, and crunchy sensations that make these rolls an irresistible treat for any occasion!

How to Store and Freeze Spicy Prawn Rolls

Fridge: Store leftover Spicy Prawn Rolls in an airtight container for up to 1 day. Consume cold for a refreshing twist, enhancing the flavors of the cocktail sauce.

Freezer: While it's best to enjoy these rolls fresh, you can freeze the prawn filling for up to 1 month. Thaw in the fridge before assembling with freshly made buns.

Buns: If you have extra homemade buns, wrap them tightly in plastic wrap and store at room temperature for 2–3 days. For longer storage, freeze them for up to 3 months.

Reheating: Toast the frozen buns directly in a warm pan for a crispy exterior, then fill with thawed prawn mixture for a delightful meal!

What to Serve with Spicy Prawn Rolls

Your homemade Spicy Prawn Rolls deserve delightful companions to create a well-rounded meal experience.

  • Crispy Sweet Potato Fries: The natural sweetness and crispy texture of sweet potato fries complement the spicy prawns, adding a satisfying crunch that enhances each bite.

  • Coleslaw: A tangy, creamy coleslaw balances the heat of the rolls with its refreshing crunch, making every bite feel lighter and more uplifting.

  • Garlic Bread: Toasted garlic bread adds a rich, buttery taste that pairs wonderfully with the spicy notes of the rolls, perfect for sopping up any leftover sauce.

  • Chilled White Wine: A chilled Sauvignon Blanc or a light Pinot Grigio can brighten the palate, enhancing the freshness of the prawns while toning down the spice.

  • Green Salad: A crisp green salad drizzled with vinaigrette offers a refreshing contrast to the richness of the prawn filling—perfect for cleansing the palate.

  • Fruit Salad: A vibrant fruit salad, bursting with seasonal flavors, provides a sweet and refreshing counterpoint to the heat of the rolls, leaving you feeling satisfied yet light.

  • Pineapple Salsa: The sweetness of pineapple salsa with a hint of lime complements the spiciness of the prawns, creating a vibrant and zesty explosion of flavors.

  • Iced Tea: Serve up a refreshing iced tea infused with mint or lemon to provide a cooling effect alongside the spicy rolls, perfect for warm days.

Make Ahead Options

These Spicy Prawn Rolls are perfect for busy home cooks looking to save time during the week! You can prepare the spicy cocktail sauce and store it in the refrigerator for up to 3 days—this allows the flavors to develop beautifully. Additionally, the prawn mixture can be combined ahead of time (just ensure it's fully cooled) and kept in an airtight container for up to 24 hours. For the buns, prepare them in advance and toast them fresh right before serving to maintain that delightful crunch. When you're ready to enjoy, simply fill the toasted buns with shredded lettuce and your coated prawn mixture, and serve for a satisfying meal that’s just as delicious as if it were made fresh!

Expert Tips for Spicy Prawn Rolls

• Prawn Perfection: Ensure that the cooked King prawns are well-prepared, peeled, and cleaned to avoid any unpleasant shell bits in your rolls.

• Heat It Right: Adjust the cayenne pepper in the cocktail sauce to suit your taste; start with a little less if you're cautious about spice.

• Golden Toast: For the best texture, toast the buns until they’re golden brown—this helps achieve a delightful crunch that perfectly complements the creamy filling.

• Fresh Ingredients: Use fresh Little Gem lettuce to add that needed crunch and freshness, giving your Spicy Prawn Rolls an extra layer of flavor and texture.

• Customize Away: Feel free to add your favorite toppings or sauces to personalize the rolls, making them even more special for your guests.

Spicy Prawn Rolls Variations & Substitutions

Feel free to get creative and make these delicious rolls your own with these enticing ideas!

  • Shrimp Substitute: Use shrimp instead of King prawns for a flavorful twist that remains equally satisfying.

  • Lobster Delight: Swap prawns for tender lobster meat, giving a luxurious upgrade to your rolls that's perfect for special occasions.

  • Veggie Alternative: For a vegetarian option, replace the seafood with a grilled vegetable medley and a yogurt-based sauce to maintain creaminess.

  • Extra Crunch: Add crispy fried onions or fresh radish slices for a delightful crunch and a pop of flavor that takes your rolls to the next level.

  • Spicy Kick: Mix in some diced jalapeños or a dash of hot sauce to the cocktail sauce to amp up the heat for spice lovers.

  • Herb Variations: Try mixing different herbs such as dill or parsley into the filling for a fresh flavor boost that's vibrant and aromatic.

  • Different Breads: Switch from hot dog buns to fluffy pita bread or soft tortillas for a fun spin on presentation and texture.

  • Sauce Twist: Experiment with a sriracha mayonnaise for a creamy and spicy contrast, or try a sweet chili sauce for balance; it’s lovely and unexpected! For more flavor inspiration, don’t miss our delightful Spicy Miso Tuna that showcases another exciting seafood option!

Spicy Prawn Rolls Recipe FAQs

How do I choose the best prawns for this recipe?
Absolutely! Look for large, firm, and pink King prawns that are fresh and sold unpeeled. If you can, buy from a reputable source to ensure optimal flavor and quality. A great visual cue is to check for prawns that have a slight sheen and are free from any dark spots or unpleasant odors.

How should I store leftover Spicy Prawn Rolls?
Store any leftover Spicy Prawn Rolls in an airtight container in the refrigerator for up to 1 day. They can be enjoyed cold, which creates a refreshing flavor contrast. Just keep in mind that the texture may differ slightly from freshly made rolls, so they’re best consumed as soon as possible!

Can I freeze the prawn mixture?
Yes, you can freeze the prawn filling for up to 1 month! To freeze, place the prawn mixture in a freezer-safe container or bag, removing as much air as possible. When ready to use, thaw the mixture in the fridge overnight before assembling your rolls with freshly made buns.

What if the cocktail sauce is too spicy for my taste?
If you find the cocktail sauce too spicy, no worries! You can adjust the heat by reducing the cayenne pepper or adding more mayonnaise and ketchup to balance the flavors. Another option is to add a splash of honey or brown sugar for a touch of sweetness that will counteract the heat.

Are these rolls suitable for someone with shellfish allergies?
Unfortunately, no; these Spicy Prawn Rolls are not suitable for anyone with shellfish allergies. However, you can easily adapt the recipe by using grilled vegetables or a chickpea mixture in place of prawns, coupled with a yogurt-based dressing for a delicious vegetarian option. Everyone deserves a tasty meal!

How long will the homemade buns stay fresh?
Homemade buns can stay fresh at room temperature for about 2–3 days when properly wrapped in plastic wrap or stored in a bread bag. If you want to keep them longer, you can freeze them for up to 3 months. Just make sure they're tightly wrapped to avoid freezer burn.

Spicy Prawn Rolls

Delicious Spicy Prawn Rolls with Homemade Buns You’ll Love

These Spicy Prawn Rolls are a quick, flavorful treat that everyone will love.
Print Recipe Pin Recipe
Prep Time 20 minutes mins
Total Time 20 minutes mins
Servings: 4 rolls
Course: Appetizers
Cuisine: International
Calories: 320
Ingredients Equipment Method Nutrition Notes

Ingredients
  

For the Cocktail Sauce
  • 100 g mayonnaise a creamy base that enhances flavor and texture.
  • 50 g tomato ketchup adds sweetness and depth to the sauce.
  • 1 tablespoon lemon juice brightens the flavors and balances richness.
  • 2 teaspoons Worcestershire sauce introduces umami and complexity to the sauce.
  • 2 teaspoons gherkin juice a tangy kick that enhances the sauce's flavor.
  • 1 teaspoon brandy optional; adds depth; skip if you prefer to keep it simple.
  • 1/4 teaspoon cayenne pepper the star spice for heat; adjust according to your preference.
  • 1/4 teaspoon smoked paprika offers smokiness and warmth that complements the prawns.
  • 1/4 teaspoon celery salt enhances overall seasoning for a well-rounded taste.
For the Prawn Filling
  • 200 g cooked King prawns the main attraction; ensure they are peeled and prepared.
  • 2 gherkins finely diced for added crunch in the filling.
  • 1 celery stalk finely diced, contributing freshness and texture.
  • 1 teaspoon capers a briny flavor that elevates the overall taste.
  • 1 tablespoon chives fresh herb garnish for a mild onion flavor.
For the Buns
  • 5 hot dog buns the base for the rolls; homemade is preferred for best results.
  • 20 g butter for toasting the buns and adding delicious richness.
For the Salad
  • Little Gem Lettuce washed and finely shredded, providing a fresh crunch!

Equipment

  • Mixing Bowl
  • frying pan
  • Whisk
  • Knife
  • Cutting Board

Method
 

Preparation Steps
  1. In a mixing bowl, combine the mayonnaise, tomato ketchup, lemon juice, Worcestershire sauce, and gherkin juice. Whisk until smooth and creamy.
  2. Add the brandy (if desired), cayenne pepper, smoked paprika, and celery salt. Mix thoroughly and season with salt and pepper.
  3. Next, add the finely diced gherkins, celery, and capers into the cocktail sauce. Gently fold in the cleaned and peeled King prawns.
  4. Trim the edges of the hot dog buns and split each bun down the middle, stopping just before cutting all the way through.
  5. Spread softened butter on the flat sides of each bun. Heat a frying pan over medium heat and toast the buns cut-side down for about 2–3 minutes until golden brown.
  6. Assemble the rolls by placing shredded Little Gem lettuce into each toasted bun, then top with the prawn mixture. Optionally, sprinkle with smoked paprika and chopped chives.
  7. Serve immediately while warm for a delightful meal experience.

Nutrition

Serving: 1rollCalories: 320kcalCarbohydrates: 28gProtein: 17gFat: 16gSaturated Fat: 6gPolyunsaturated Fat: 2gMonounsaturated Fat: 8gCholesterol: 150mgSodium: 600mgPotassium: 300mgFiber: 1gSugar: 4gVitamin A: 500IUVitamin C: 10mgCalcium: 50mgIron: 1mg

Notes

Ensure that the cooked King prawns are well-prepared, peeled, and cleaned to avoid any unpleasant shell bits in your rolls. Adjust the cayenne pepper in the cocktail sauce to suit your taste.

Tried this recipe?

Let us know how it was!

Homemade Breakfast Hot Pockets to Kickstart Your Mornings

February 24, 2026 by Grace Snow Leave a Comment

Early mornings often feel like a race against time, but what if I told you breakfast could be both quick and delicious? Enter my Homemade Ham, Egg, & Cheese Hot Pockets! These delightful pockets are filled with fluffy scrambled eggs, savory diced ham, and melted cheese—all wrapped in a flaky, homemade crust that’s far healthier than the store-bought alternative. Perfect for hectic schedules, they’re easily portable and utterly customizable, allowing you to add any extras you have on hand. Whether you’re feeding a family or just treating yourself to a nourishing start, these hot pockets let you enjoy the comforting flavors of breakfast without the guilt. Curious about how you can whip these up in no time? Let’s dive in!

Why Homemade Breakfast Hot Pockets?

Deliciously Customizable: You can fill these pockets with whatever you have on hand, from fresh veggies to different meats.

Healthier Choice: Made from scratch, they cut out preservatives, giving you a breakfast that's both nourishing and satisfying.

Quick Assembly: So easy to prepare, you can whip them up in under an hour, perfect for busy mornings!

Crowd-Pleasing: Whether it’s a family gathering or breakfast with friends, everyone will love these comforting treats.

Portability: Ideal for on-the-go mornings, they make breakfast hassle-free and delicious wherever you are.

For more hearty breakfasts, check out these Breakfast Egg Muffins or a delightful Breakfast Banana Split!

Homemade Breakfast Hot Pockets Ingredients

• Note: Get ready to create a delightful and customizable breakfast treat!

For the Dough

  • All-Purpose Flour – This provides structure for the crust; you can use whole wheat flour for a healthier option.
  • Salt – Enhances flavor; opt for kosher salt for a cleaner taste.
  • Unsalted Butter – Adds richness and flakiness to the crust; cold butter is key for a perfect texture.
  • Ice Water – Binds the dough without melting the butter; adjust the amount based on the dough's texture.

For the Filling

  • Olive Oil – Used for scrambling eggs; can substitute with butter for a richer flavor.
  • Eggs – The main filling component; fresh eggs yield a fluffier scramble.
  • Diced Ham – Offers protein and savory flavor; switch out for cooked bacon or turkey for a different taste.
  • Shredded Cheddar Cheese – Adds creaminess and flavor; mozzarella or pepper jack can provide a varied taste.

Now that you have the ingredients ready, you're halfway to enjoying these delightful Homemade Breakfast Hot Pockets!

Step‑by‑Step Instructions for Homemade Breakfast Hot Pockets

Step 1: Prepare Dough
In a large mixing bowl, combine 2 cups of all-purpose flour and 1 teaspoon of salt. Cut in ½ cup of cold unsalted butter using a pastry cutter or fork until the mixture resembles coarse crumbs. Gradually add 4–6 tablespoons of ice water, mixing until just combined. Form the dough into a disk, wrap it in plastic wrap, and chill in the refrigerator for 1 hour to allow the flavors to meld.

Step 2: Cook Filling
While the dough chills, heat 1 tablespoon of olive oil in a non-stick skillet over medium heat. Add 4 beaten eggs and scramble until just set but still moist, about 3-4 minutes. Remove from heat and mix in 1 cup of diced ham and 1 cup of shredded cheddar cheese. Season with salt and pepper to taste, then let the filling cool slightly while you preheat the oven.

Step 3: Preheat Oven
Preheat your oven to 375°F (190°C) and prepare a baking sheet by lining it with parchment paper. This will ensure your Homemade Breakfast Hot Pockets bake evenly and do not stick to the pan, creating a perfectly golden finish that is pleasing to the eye and palate.

Step 4: Roll Dough
Once the dough is chilled, dust a clean surface with flour and roll it out to about ¼-inch thickness. Using a sharp knife or pizza cutter, cut the rolled dough into 12 equal rectangles. This will form the base for your homemade breakfast hot pockets, allowing for ample filling while maintaining a sturdy structure.

Step 5: Assemble Pockets
Take one rectangle of dough and place a generous spoonful of the ham, egg, and cheese filling on one half. Carefully fold the other half over the filling and pinch the edges to seal. Use a fork to crimp the edges and ensure they are well-sealed, preventing any delicious filling from escaping during baking.

Step 6: Bake
Place the assembled hot pockets on the prepared baking sheet, ensuring they have space in between for even cooking. Bake in the preheated oven for 20-25 minutes or until the pockets are golden brown and puffed up, signaling that they are perfectly cooked and ready to be enjoyed.

Step 7: Cool and Serve
Once baked, remove the hot pockets from the oven and let them cool on the baking sheet for about 5 minutes. This brief cooling time allows the filling to set slightly, making them easier to handle. Serve warm and enjoy the delectable flavors of your Homemade Breakfast Hot Pockets.

Homemade Breakfast Hot Pockets Variations

Feel free to unleash your creativity and tailor these hot pockets to your unique taste buds! Each variation brings a new twist, inviting delightful flavors to your breakfast table.

  • Vegetarian: Swap the diced ham for sautéed mushrooms, spinach, or bell peppers for a fresh, meat-free option. The earthy flavors of mushrooms pair beautifully with the cheesy filling.

  • Spicy: Add diced jalapeños or crushed red pepper flakes to your filling to give your hot pockets a tasty kick. Just imagine biting into a pocket that bursts with warmth and zest!

  • Dairy-Free: Use plant-based cheese and olive oil in your filling for a lactose-free treat! This not only makes it adaptable for those with dietary restrictions but also brings a different flavor profile.

  • Herbamazing: Incorporate fresh herbs like cilantro or basil into the egg mix for an aromatic touch. The bright notes of herbs elevate the overall flavor, making every bite a little more special.

  • Smoky: Add smoked paprika to the egg mixture or use smoked ham or bacon for an extra depth of flavor. This is perfect for those who appreciate a hint of smokiness in their dishes.

  • Breakfast Fiesta: Mix in some black beans, corn, and taco seasoning for a Mexican-inspired filling. Serve these with salsa for a fun twist that’s bursting with flavor.

  • Breakfast Sweet: For a sweet variation, fill with a mixture of diced apples, cinnamon, and a touch of brown sugar, then add cream cheese for a delightful dessert-inspired treat!

  • Savory Surprise: Add crumbled feta cheese and olives for a Mediterranean take on breakfast. This unique combination will tantalize your taste buds with its rich and savory flavor.

So, gather your ingredients and let your imagination run wild! And if you like exploring different brunch options, don’t forget to browse through these marvelous recipes for Cornbread Breakfast Casserole and Homemade Hot Chocolate. Happy cooking!

Storage Tips for Homemade Breakfast Hot Pockets

Fridge: Store any leftover Homemade Breakfast Hot Pockets in an airtight container for up to 3 days to maintain freshness and prevent sogginess.

Freezer: For longer storage, freeze the hot pockets before baking. Wrap each pocket tightly in plastic wrap, then place them in a freezer bag; they can be stored for up to 3 months.

Reheating: To reheat, bake frozen hot pockets straight from the freezer at 375°F (190°C) for 25-30 minutes or until golden brown. For fridge-stored pockets, 15-20 minutes in the oven will do the trick.

Thawing: If you're in a hurry, you can thaw the hot pockets in the refrigerator overnight before reheating for a quicker bake time.

What to Serve with Homemade Ham, Egg, & Cheese Hot Pockets

These delicious pockets are the perfect star of your breakfast table, but pairing them with complementary sides can elevate your morning meal!

  • Fresh Fruit Salad: A vibrant mix of seasonal fruits adds a sweet and refreshing balance, brightening the savory hot pockets.

  • Greek Yogurt Parfait: Layered with granola and berries, a parfait offers a creamy counterpoint while being a wholesome option to round out your meal.

  • Light Green Salad: Tossed greens with a zesty vinaigrette provide a crisp texture and lightness that match wonderfully with the hearty filling.

  • Roasted Veggies: Oven-roasted bell peppers and zucchini contribute smoky flavors and a pinch of health, enhancing the overall taste experience.

  • Homemade Salsa: A spicy or mild salsa served on the side not only adds a kick but also brings a colorful element to your breakfast plate.

  • Coffee or Smoothies: Pairing with a hot cup of coffee or a refreshing smoothie will elevate the meal. Each sip complements the warm, cheesy hot pockets perfectly.

Expert Tips for Homemade Breakfast Hot Pockets

  • Chill Your Dough: Keep the dough chilled before rolling it out to ensure a light, flaky crust. Warm dough can lead to tough pockets.

  • Customize the Filling: Feel free to swap out the ham for cooked bacon or turkey, and try different cheeses like pepper jack or mozzarella for varied flavors!

  • Seal Properly: Pinch the edges tightly and crimp with a fork to prevent any filling from leaking out while baking.

  • Brush for Shine: For a beautiful golden finish, consider brushing the tops of the hot pockets with a beaten egg before baking.

  • Bake in Batches: To maintain even cooking, avoid overcrowding on the baking sheet. Giving each pocket its space allows for better airflow and browning.

  • Storage Tips: If you have leftovers, store them in an airtight container in the fridge for up to 3 days—perfect for reheating as a quick snack or breakfast!

Make Ahead Options

These Homemade Ham, Egg, & Cheese Hot Pockets are perfect for meal prep, saving you precious time on busy mornings! You can prepare the dough and filling up to 24 hours in advance and refrigerate them separately. To maintain quality, wrap the dough tightly in plastic wrap and store the filling in an airtight container, preventing drying out. When you're ready to enjoy, simply assemble the pockets as directed and bake them directly from the refrigerator. You’ll have warm, flaky hot pockets that are just as delicious as when freshly made—ideal for those who want a quick breakfast without sacrificing flavor!

Homemade Ham, Egg, & Cheese Hot Pockets Recipe FAQs

What type of flour should I use for the dough?
I recommend using all-purpose flour for the best texture and structure in your homemade hot pockets. However, if you're looking for a healthier option, whole wheat flour makes a great substitute, providing a nuttier flavor and added nutrients.

How long can I store the hot pockets in the fridge?
You can store any leftover Homemade Ham, Egg, & Cheese Hot Pockets in an airtight container for up to 3 days. For the best texture, reheat them in the oven until warm. This keeps them delicious and not soggy, which can happen in the microwave.

Can I freeze these hot pockets?
Absolutely! To freeze, wrap each unbaked hot pocket tightly in plastic wrap and place them in a freezer bag. They can be stored for up to 3 months. When ready to enjoy, bake them straight from the freezer at 375°F (190°C) for about 25-30 minutes until golden brown.

What should I do if the dough is too crumbly?
If your dough seems crumbly and won't hold together, you may need to add a bit more ice water—start with 1 tablespoon at a time until the dough comes together. Just be careful not to add too much, as overly wet dough can lead to a tough crust!

Can I customize the filling for dietary restrictions?
Certainly! If you or someone you're serving has allergies or dietary preferences, you can easily customize the filling. Consider replacing diced ham with cooked turkey, bacon, or even sautéed vegetables like bell peppers or spinach for a meat-free option. Just ensure that any alternatives are cooked properly before adding them to the filling.

How do I get a nice golden finish on my hot pockets?
For a beautiful, glossy finish on your Homemade Ham, Egg, & Cheese Hot Pockets, brush the tops with a beaten egg before baking them. This gives them that lovely golden-brown color and enhances the visual appeal of your delicious breakfast treat!

Homemade Breakfast Hot Pockets

Homemade Breakfast Hot Pockets to Kickstart Your Mornings

Make quick and delicious Homemade Breakfast Hot Pockets filled with ham, egg, and cheese for a satisfying and nourishing breakfast.
Print Recipe Pin Recipe
Prep Time 1 hour hr
Cook Time 25 minutes mins
Chilling Time 1 hour hr
Total Time 2 hours hrs 25 minutes mins
Servings: 12 hot pockets
Course: Breakfast
Calories: 290
Ingredients Equipment Method Nutrition Notes

Ingredients
  

For the Dough
  • 2 cups all-purpose flour whole wheat flour can be used for a healthier option
  • 1 teaspoon salt opt for kosher salt for a cleaner taste
  • 0.5 cups unsalted butter cold butter is key for a perfect texture
  • 4-6 tablespoons ice water adjust based on the dough's texture
For the Filling
  • 1 tablespoon olive oil can substitute with butter
  • 4 large eggs fresh eggs yield a fluffier scramble
  • 1 cup diced ham can substitute with cooked bacon or turkey
  • 1 cup shredded cheddar cheese mozzarella or pepper jack can also be used

Equipment

  • Mixing Bowl
  • non-stick skillet
  • Pastry cutter
  • Baking Sheet
  • plastic wrap

Method
 

Preparation
  1. In a large mixing bowl, combine 2 cups of all-purpose flour and 1 teaspoon of salt. Cut in ½ cup of cold unsalted butter until the mixture resembles coarse crumbs.
  2. Gradually add 4–6 tablespoons of ice water until just combined. Form into a disk, wrap in plastic wrap, and chill in the refrigerator for 1 hour.
  3. Heat 1 tablespoon of olive oil in a non-stick skillet over medium heat. Add 4 beaten eggs and scramble until just set, about 3-4 minutes.
  4. Remove from heat and mix in 1 cup of diced ham and 1 cup of shredded cheddar cheese. Let the filling cool.
  5. Preheat your oven to 375°F (190°C) and prepare a baking sheet with parchment paper.
  6. Dust a clean surface with flour and roll the chilled dough to about ¼-inch thickness. Cut into 12 equal rectangles.
  7. On one half of a rectangle, place a spoonful of filling, fold over, pinch edges to seal, and crimp with a fork.
  8. Bake on the prepared sheet for 20-25 minutes or until golden brown and puffed.
  9. Let cool for 5 minutes before serving.

Nutrition

Serving: 1hot pocketCalories: 290kcalCarbohydrates: 32gProtein: 12gFat: 14gSaturated Fat: 8gPolyunsaturated Fat: 2gMonounsaturated Fat: 4gCholesterol: 140mgSodium: 420mgPotassium: 150mgFiber: 1gSugar: 1gVitamin A: 500IUCalcium: 200mgIron: 1.5mg

Notes

Customize the filling by using different meats and cheeses. Store in an airtight container in the fridge for up to 3 days.

Tried this recipe?

Let us know how it was!
  • « Previous Page
  • 1
  • …
  • 79
  • 80
  • 81
  • 82
  • 83
  • …
  • 247
  • Next Page »

Welcome!

Hi, I’m Grace, a Sydney-based home cook with a passion for bold flavors and trending ingredients. Whether you’re a busy beginner or a seasoned foodie, you’ll find dishes here that are fresh, fun, and full of flavor.

More about me

Popular Recipes

  • Orange Sugar Cookies
    Deliciously Soft Orange Sugar Cookies Bursting with Flavor
  • Hot Fudge Sundae Cookies
    Chewy Hot Fudge Sundae Cookies That'll Brighten Your Day
  • Tennessee Peach Pudding
    Heavenly Tennessee Peach Pudding for Cozy Gatherings
  • Peaches and Cream Cake
    Irresistible Peaches and Cream Cake for Sweet Gatherings

Footer

↑ back to top

About

  • Privacy Policy
  • Disclaimer
  • Terms & Conditions

Newsletter

  • Sign Up! for emails and updates

Contact

  • About me
  • Contact me

Copyright © 2025 TastyTrendIngredients