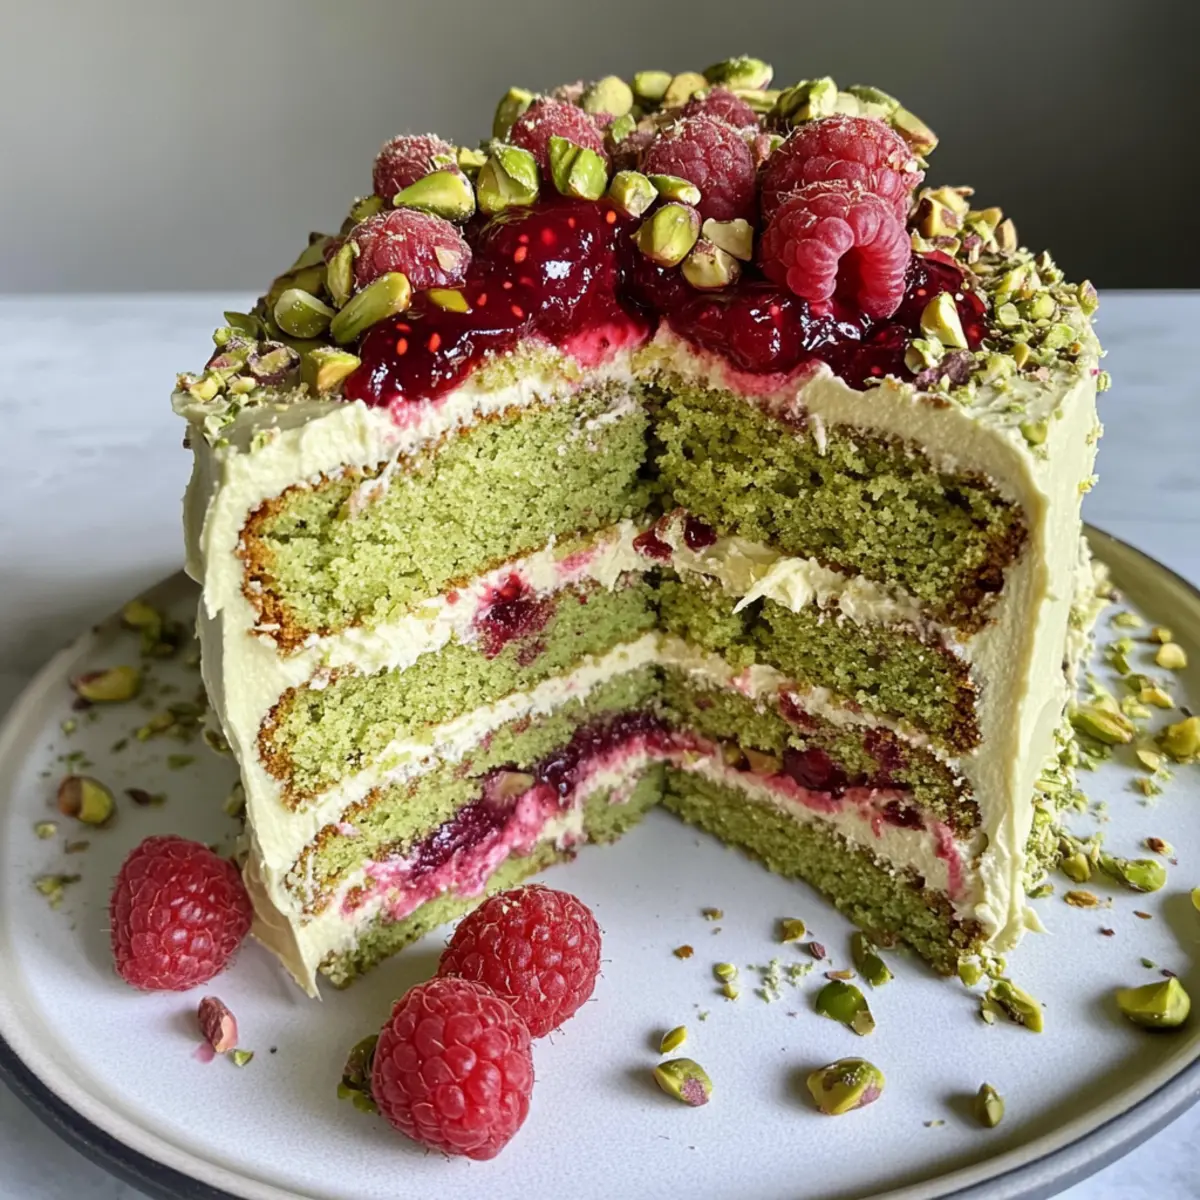
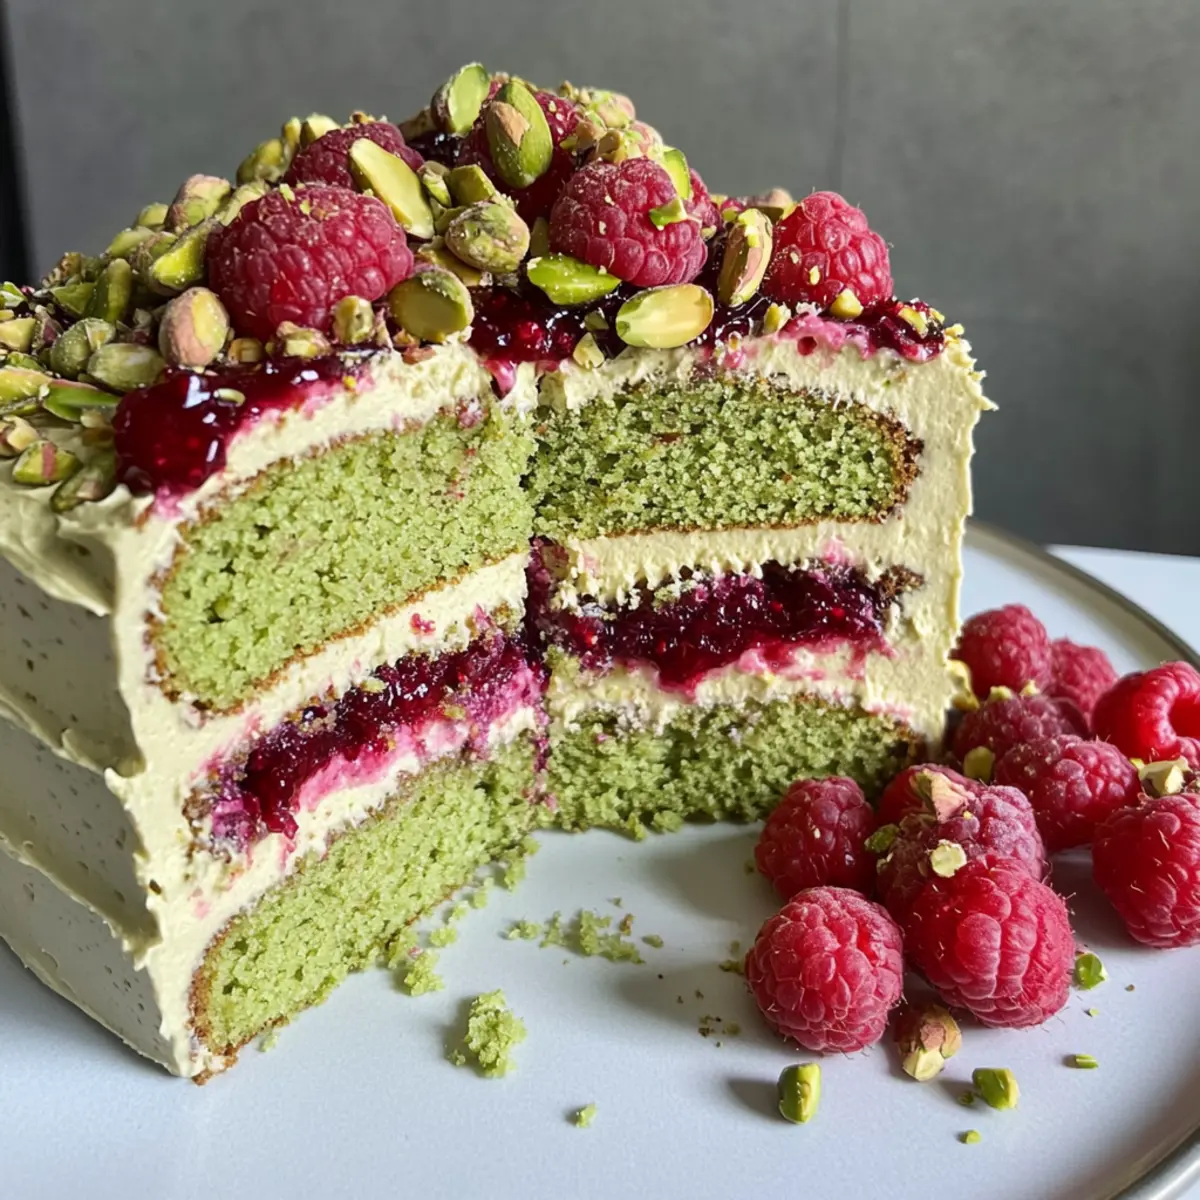
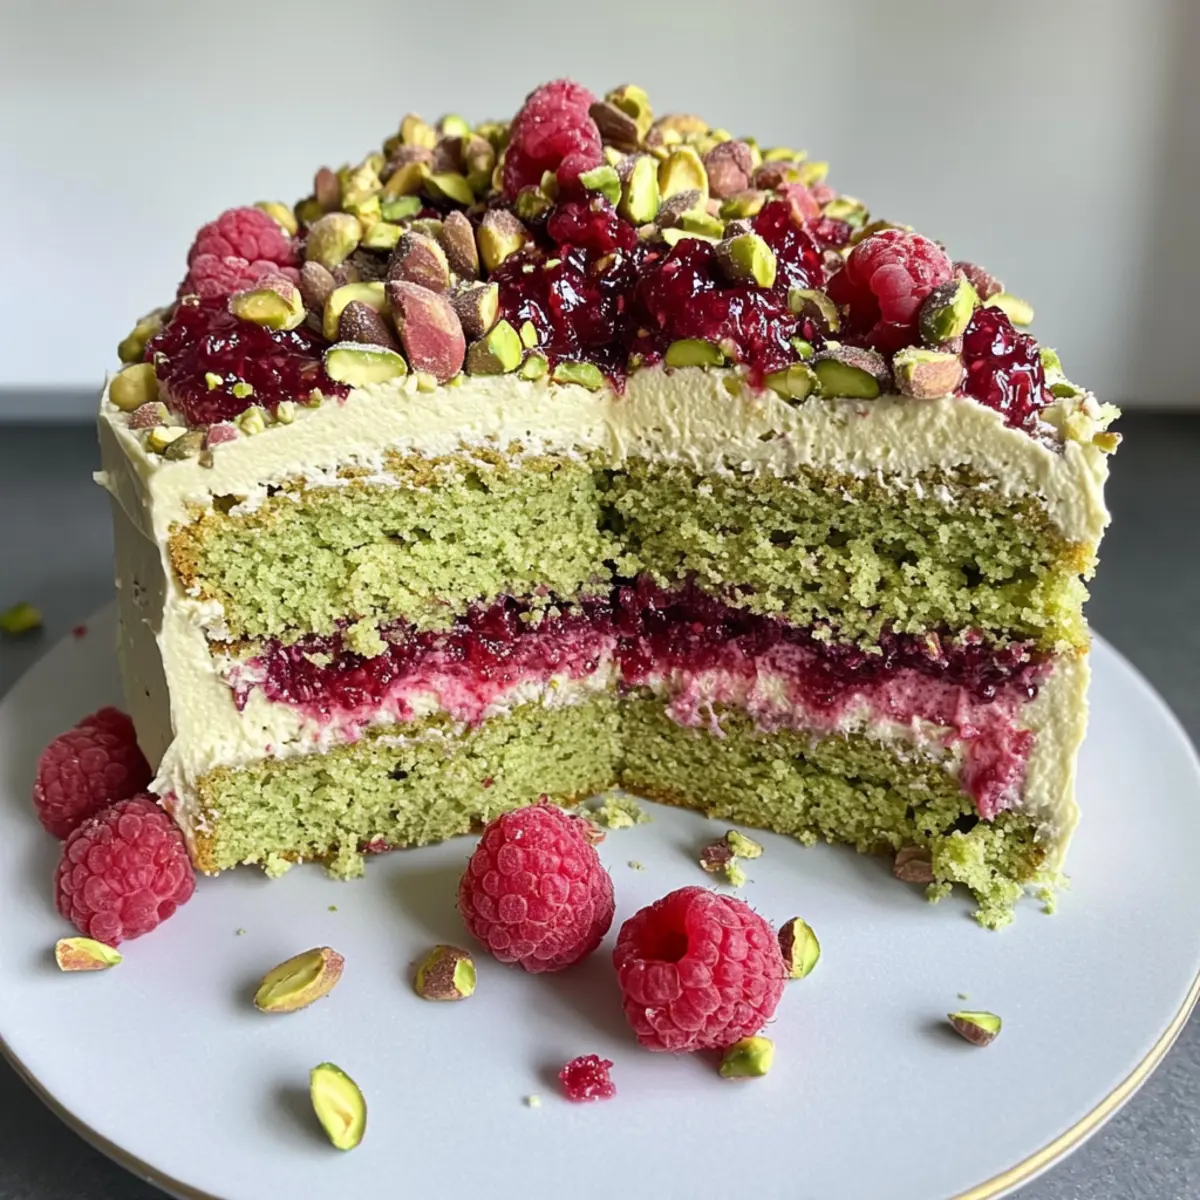
As I laid out the ingredients for this vibrant dessert, a memory of a sun-drenched garden party came rushing back—tables laden with colorful treats and laughter echoing beneath blooming trees. If you're ready to impress your guests (and yourself!) with an extraordinary Pistachio Raspberry Cake, you’re in for a treat. This cake is not only a feast for the eyes but also a delightful quick bake that's sure to steal the show. With its moist pistachio sponge layered between velvety buttercream and luscious raspberry jam, every slice offers a perfect balance of nutty and tart flavors. Plus, it’s a fantastic way to show off your baking prowess while enjoying the fresh, seasonal fruits that add a burst of vibrancy. Curious about how to whip up this stunning cake? Let’s dive in!
Why is Pistachio Raspberry Cake So Special?
Unique Flavor Combination: This cake blends the nutty richness of pistachios with the bright tartness of raspberries, creating a mouthwatering experience.
Easy to Make: You'll find this recipe straightforward, perfect for bakers of any level, meaning it's accessible yet impressive.
Versatile Twist: Feel free to swap fruits or adapt flavors; ground almonds or hazelnuts can easily replace pistachios for a new take.
Stunning Presentation: Your dessert table will shine with this lovely layered cake, drawing eyes and smiles from your guests.
Treat your family to this recipe that embodies springtime joy, similar to a delightful Ice Cream Cake or a comforting Chocolate Pudding Cake.
Pistachio Raspberry Cake Ingredients
For the Cake
• Unsalted Butter (250 g) – Provides richness and moisture; make sure it’s softened for optimal creaming with sugar.
• Golden Caster Sugar (240 g) – Adds sweetness and depth of color; substitute with regular superfine sugar if needed.
• Vanilla Extract (1 tsp) – Enhances overall flavor; feel free to swap it for vanilla bean paste for a more intense taste.
• Large Eggs (4) – Acts as a binding agent; ensure they are at room temperature for the best results.
• Plain Flour (150 g) – Main structure of the cake; use all-purpose flour in the US for best outcomes.
• Baking Powder (2 tsp) – Essential for lift; critical for achieving a light and fluffy cake texture.
• Fine Sea Salt (¼ tsp) – Enhances flavor balance in your Pistachio Raspberry Cake.
• Shelled Pistachios (100 g) – Adds unique flavor and color; grind finely for use in both the batter and decoration.
For the Buttercream
• Softened Unsalted Butter (175 g) – This creamy base is key for a luscious buttercream.
• Sifted Icing Sugar (280 g) – Sweetens and stabilizes the buttercream; sieving ensures a smooth texture.
• Smooth Pistachio Cream (2 tbsp) – Infuses a rich pistachio flavor; pistachio paste can be used as an alternative.
• Fine Sea Salt (½ tsp) – Balances sweetness, enhancing the overall flavor profile.
• Lemon Juice (1 tsp) – Brightens up the buttercream; adjust to taste for zing.
To Decorate
• Raspberry Jam (3 tbsp) – Provides a fruity layer; pair the jam with your chosen fruit for delightful variations.
• Fresh Raspberries (250 g) – Add freshness and visual appeal; can also be substituted with strawberries or cherries.
• Chopped Pistachios (2 tbsp) – Perfect for garnish and an added crunch.
• Sprigs of Fresh Mint – A lovely touch for garnish and freshness that brightens up the presentation.
Step‑by‑Step Instructions for Pistachio Raspberry Cake
Step 1: Preheat and Prepare Tins
Begin by preheating your oven to 160°C (fan) or 180°C (conventional). While the oven heats, grease and line two 20 cm round cake tins with parchment paper for easy removal later. This ensures that your luscious Pistachio Raspberry Cake maintains its beautiful shape and makes the baking process smooth and fuss-free.
Step 2: Cream Butter and Sugar
In a large mixing bowl, combine the softened unsalted butter and golden caster sugar. Use an electric mixer to cream them together on medium speed for about 3-5 minutes, or until the mixture turns light and fluffy. This step is crucial for achieving a tender cake, as incorporating air into the batter creates a delightful texture.
Step 3: Add Flavorings and Eggs
Next, mix in the vanilla extract to enhance the flavor, and then add the room-temperature eggs one at a time. After each addition, beat the mixture until it is smooth and fully combined. This will create a rich, flavorful base for your Pistachio Raspberry Cake that will elevate each bite.
Step 4: Incorporate Dry Ingredients
Grind the shelled pistachios in a food processor until finely ground. In a separate bowl, sift together the plain flour, baking powder, and fine sea salt. Gradually fold the dry ingredients into the creamed mixture along with the ground pistachios. Mix gently until just combined to avoid overworking the batter, which is vital for a light cake.
Step 5: Bake the Cakes
Divide the batter evenly between the prepared cake tins, smoothing the tops with a spatula. Place the tins in the preheated oven and bake for 30-35 minutes, or until a skewer inserted in the center comes out clean and the edges turn a light golden brown. The delightful aroma will fill your kitchen as the cakes bake to perfection.
Step 6: Cool the Cakes
Once baked, remove the tins from the oven and let them cool for about 15 minutes. After this, carefully transfer the cake layers to a wire rack to cool completely. Cooling the Pistachio Raspberry Cake thoroughly ensures that the buttercream frosting will adhere beautifully when you assemble the cake.
Step 7: Make the Buttercream
For the buttercream, beat the softened unsalted butter in a mixing bowl until creamy. Gradually sift in the icing sugar and continue mixing until well combined. Next, add the pistachio cream, fine sea salt, and lemon juice; mix on high speed until the buttercream is light and fluffy, creating a velvety frosting for your cake.
Step 8: Assemble the Cake
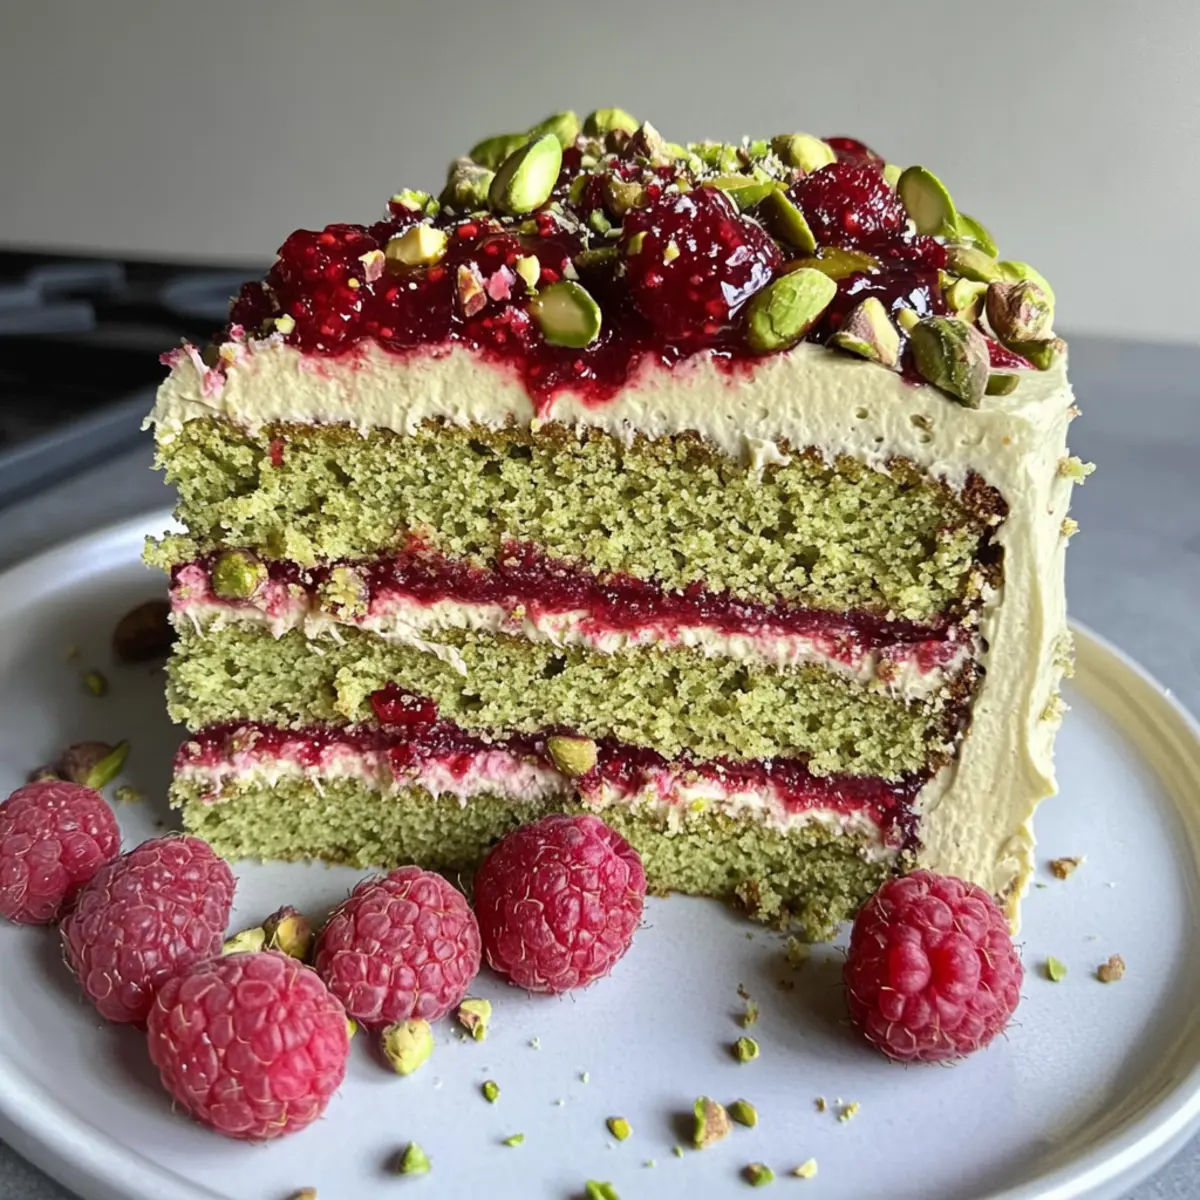
Once your cakes are completely cooled, place one layer on a serving plate. Generously spread a layer of buttercream on the top, followed by a layer of raspberry jam for a delightful tartness. Carefully place the second cake on top, and use the remaining buttercream to frost the top and sides, creating a beautiful finish.
Step 9: Decorate the Cake
Transform your Pistachio Raspberry Cake into a showstopper by decorating it with fresh raspberries, a sprinkle of chopped pistachios, and sprigs of fresh mint for a touch of elegance. This presentation not only enhances the visual appeal but also adds fresh flavors to each slice.
Step 10: Serve and Enjoy
Slice the cake into generous pieces, and serve at room temperature. Each slice of your stunning Pistachio Raspberry Cake will offer a delightful combination of flavors and textures, making it a perfect centerpiece for any celebration or afternoon tea gathering.
How to Store and Freeze Pistachio Raspberry Cake
Room Temperature: Store the cake in an airtight container at room temperature for up to 3 days. It’s best enjoyed fresh, with its delightful textures intact.
Fridge: Alternatively, you can keep the cake in the refrigerator, where it will stay fresh for up to 5 days. Cover it well to prevent it from drying out or absorbing other odors.
Freezer: To freeze, wrap the cake layers separately in plastic wrap and aluminum foil. Store them in the freezer for up to 3 months. When ready to enjoy, thaw them at room temperature for a few hours before frosting.
Reheating: If you prefer to enjoy a slice warm, simply microwave for 10-15 seconds to achieve a wonderful melt-in-your-mouth experience with your Pistachio Raspberry Cake.
Make Ahead Options
These Pistachio Raspberry Cake layers are perfect for meal prep enthusiasts! You can bake the cake layers up to three days in advance; just let them cool completely, then wrap each layer tightly in plastic wrap and refrigerate them. The buttercream can also be prepared ahead and stored in an airtight container in the fridge for up to 5 days. To maintain the quality, ensure both the cake and buttercream are well-covered to prevent drying out. When you're ready to serve, simply frost the chilled cake, decorate with fresh raspberries and chopped pistachios, and enjoy a stunning dessert with minimal last-minute effort—just as delicious as when freshly made!
What to Serve with Pistachio Raspberry Cake
Indulging in a beautifully layered dessert like this cake inspires the creation of a delightful meal that captivates the senses.
- Light Garden Salad: A crisp, refreshing salad with mixed greens and a citrus vinaigrette cleanses the palate, enhancing the cake's richness.
- Vanilla Ice Cream: The creamy, smooth texture of vanilla ice cream pairs perfectly, balancing the tart raspberry and nutty flavors of the cake.
- Fresh Berry Compote: A warm compote of seasonal berries enriches the tartness of the cake while adding a lovely visual element to the plate.
Pairing this cake with a fruity beverage can transform your gathering.
- Sparkling Water with Mint: Light and refreshing, this beverage complements the cake's flavors while keeping your palate refreshed. Add a few raspberries for a fancy touch!
- Elderflower Cordial: Sweet and floral, this drink harmonizes beautifully with the pistachio notes and adds a hint of sophistication.
Finish with something sweet for a truly enchanting end to your meal.
- Chocolate-Covered Strawberries: These luxurious bites offer a crisp texture, contrasting deliciously with the soft cake.
- Lemon Bars: The zesty citrus of lemon bars is a delightful counterpoint, keeping the dessert experience bright and invigorating.
- Pistachio Macarons: These nutty delights mirror the cake's flavor and add a touch of elegance to your dessert spread.
Expert Tips for Pistachio Raspberry Cake
-
Use Room Temperature Ingredients: Ensure your eggs and butter are at room temperature. This helps in creating a smooth batter that incorporates air effectively for a lighter cake.
-
Don’t Overmix: Gently fold the dry ingredients into the wet mixture to prevent overworking the batter, which can lead to a dense texture. Aim for just combined.
-
Precise Measurements: Weigh your ingredients for accuracy, especially when it comes to flour and sugar. This ensures that your Pistachio Raspberry Cake turns out as intended every time.
-
Check for Doneness: Use a skewer to test the cake's doneness. It should come out clean or with a few moist crumbs. Avoid opening the oven door too frequently, as this can disrupt the cake's rise.
-
Cool Completely: Allow the cakes to cool completely before frosting. This prevents the buttercream from melting and sliding off, ensuring a beautiful layer of frosting.
Pistachio Raspberry Cake Variations
Feel free to let your culinary creativity shine with these fun twists on the classic Pistachio Raspberry Cake!
-
Nut-Free: Substitute ground pistachios with sunflowers seeds, ground until fine. This swap maintains a lovely texture without the nuts.
-
Berry Blast: Mix in a variety of berries, like blueberries or blackberries, for a vibrant, fruity surprise in your cake layers. Each bite will be a delightful fusion of flavors!
-
Mocha Delight: Enhance the flavor with espresso powder mixed into the batter for added depth. This twist brings a delightful coffee flavor, perfect for those who enjoy a caffeine kick with their dessert.
-
Spicy Kick: Add a pinch of cardamom or cinnamon to the cake batter for a unique warmth that complements the pistachios perfectly. This fragrant touch can transport your cake to a new aromatic level!
-
Zesty Lemon: Incorporate lemon zest into your buttercream to brighten the flavors further and cut the sweetness just a bit. The bright acidity pairs perfectly with raspberries, creating a refreshing balance.
-
Plant-Based: Swap the eggs with "flax eggs" (1 tbsp ground flaxseed + 2.5 tbsp water per egg) and use vegan butter to create a delicious vegan version. This hearty alternative still keeps that delightful structure and flavor.
-
Chocolate Drizzle: For a decadent topping, melt some dark chocolate and drizzle it over the frosted cake. This rich contrast between chocolate and the tartness of the raspberries is simply divine.
-
Layered Parfait: If you're short on time, layer cake crumbs with pistachio buttercream, raspberry jam, and fresh berries in jars for an irresistible dessert parfait that looks just as delightful as the cake itself!
Now, if you're keen to explore baking more remarkable cakes, you might consider trying out this delicious Chocolate Poke Cake or an incredible Ice Cream Cake! And remember, experimenting with these variations will surely—like the classic cake—make you swoon with joy. Enjoy!
Pistachio Raspberry Cake Recipe FAQs
What kind of pistachios should I use for the cake?
Absolutely! I recommend using unsalted, shelled pistachios for the best flavor. You’ll want to grind them finely for incorporation into the batter and decoration. Avoid buying pre-ground pistachios, as they can lose freshness and flavor over time.
How do I store the Pistachio Raspberry Cake?
You can store the cake in an airtight container at room temperature for up to 3 days. If you prefer to keep it longer, refrigerate it for up to 5 days. Just ensure it's tightly wrapped to prevent it from drying out.
Can I freeze the Pistachio Raspberry Cake?
Very much! To freeze, wrap individual cake layers in plastic wrap and then in aluminum foil. You can keep the wrapped layers in the freezer for up to 3 months. To serve, thaw them at room temperature for about 3-4 hours before frosting.
What should I do if the cake turns out dense?
If this happens, it's usually because the batter was overmixed or too much flour was added. Always gently fold your dry ingredients into the wet ones just until combined. Also, ensure your measurements are accurate, especially when weighing your flour and sugar.
Are there any allergy considerations for this recipe?
Be mindful of allergies! This cake contains nuts (pistachios) and dairy (butter). If serving to guests with these allergies, consider making a nut-free version by substituting pistachios with ground almonds or using a dairy-free butter alternative for the frosting.
What is the best way to make the cake ahead of time?
If you’d like to prepare the Pistachio Raspberry Cake in advance, you can bake the layers a day ahead, then wrap them tightly in plastic wrap. Store them at room temperature until you’re ready to frost and serve. This not only saves time but allows flavors to deepen!
Delightful Pistachio Raspberry Cake That Will Wow Everyone
Ingredients
Equipment
Method
- Preheat your oven to 160°C (fan) or 180°C (conventional). Grease and line two 20 cm round cake tins with parchment paper.
- In a large bowl, cream the softened butter and sugar together on medium speed for 3-5 minutes until light and fluffy.
- Mix in the vanilla extract and add the room-temperature eggs one at a time, beating until smooth after each.
- Grind the shelled pistachios finely. Sift together the flour, baking powder, and salt, then fold dry ingredients with ground pistachios into the creamed mixture.
- Divide the batter between the prepared tins and bake for 30-35 minutes until a skewer comes out clean.
- Cool the cakes for 15 minutes in tins, then transfer to a wire rack to cool completely.
- Beat the softened butter for the buttercream until creamy, then gradually sift in icing sugar, mixing until combined. Add pistachio cream, salt, and lemon juice, mixing until fluffy.
- Place one cooled cake layer on a plate, spread buttercream on top, followed by raspberry jam. Layer the second cake on top and frost with remaining buttercream.
- Decorate with fresh raspberries, chopped pistachios, and mint sprigs for a beautiful finish.
- Slice the cake into pieces and serve at room temperature.