tastytrendingredients

  • Home
  • Recipes
    • Appetizers
    • Breakfast
    • Dessert
    • Dinner
    • Drinks
    • Salads
    • Snacks
    • Soups
  • About me
  • Contact me
menu icon
go to homepage
  • Home
  • Recipes
    • Appetizers
    • Breakfast
    • Dessert
    • Dinner
    • Drinks
    • Salads
    • Snacks
    • Soups
  • About me
  • Contact me
search icon
Homepage link
  • Home
  • Recipes
    • Appetizers
    • Breakfast
    • Dessert
    • Dinner
    • Drinks
    • Salads
    • Snacks
    • Soups
  • About me
  • Contact me
×

BBQ Chicken Coleslaw Wraps for a Flavor-Packed Meal

November 27, 2025 by Grace Snow Leave a Comment

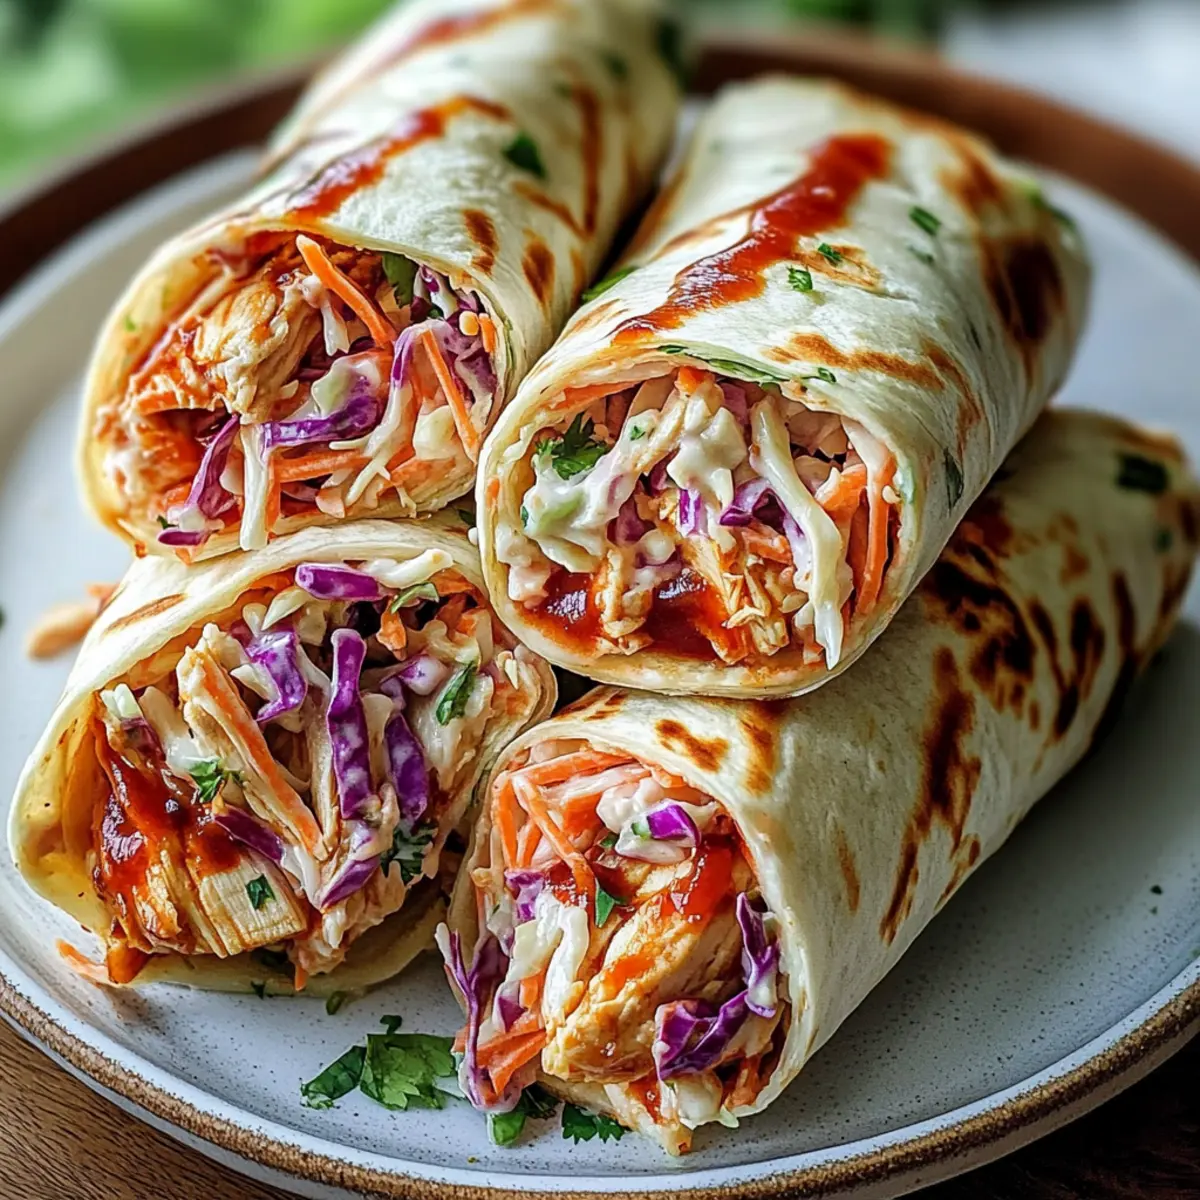
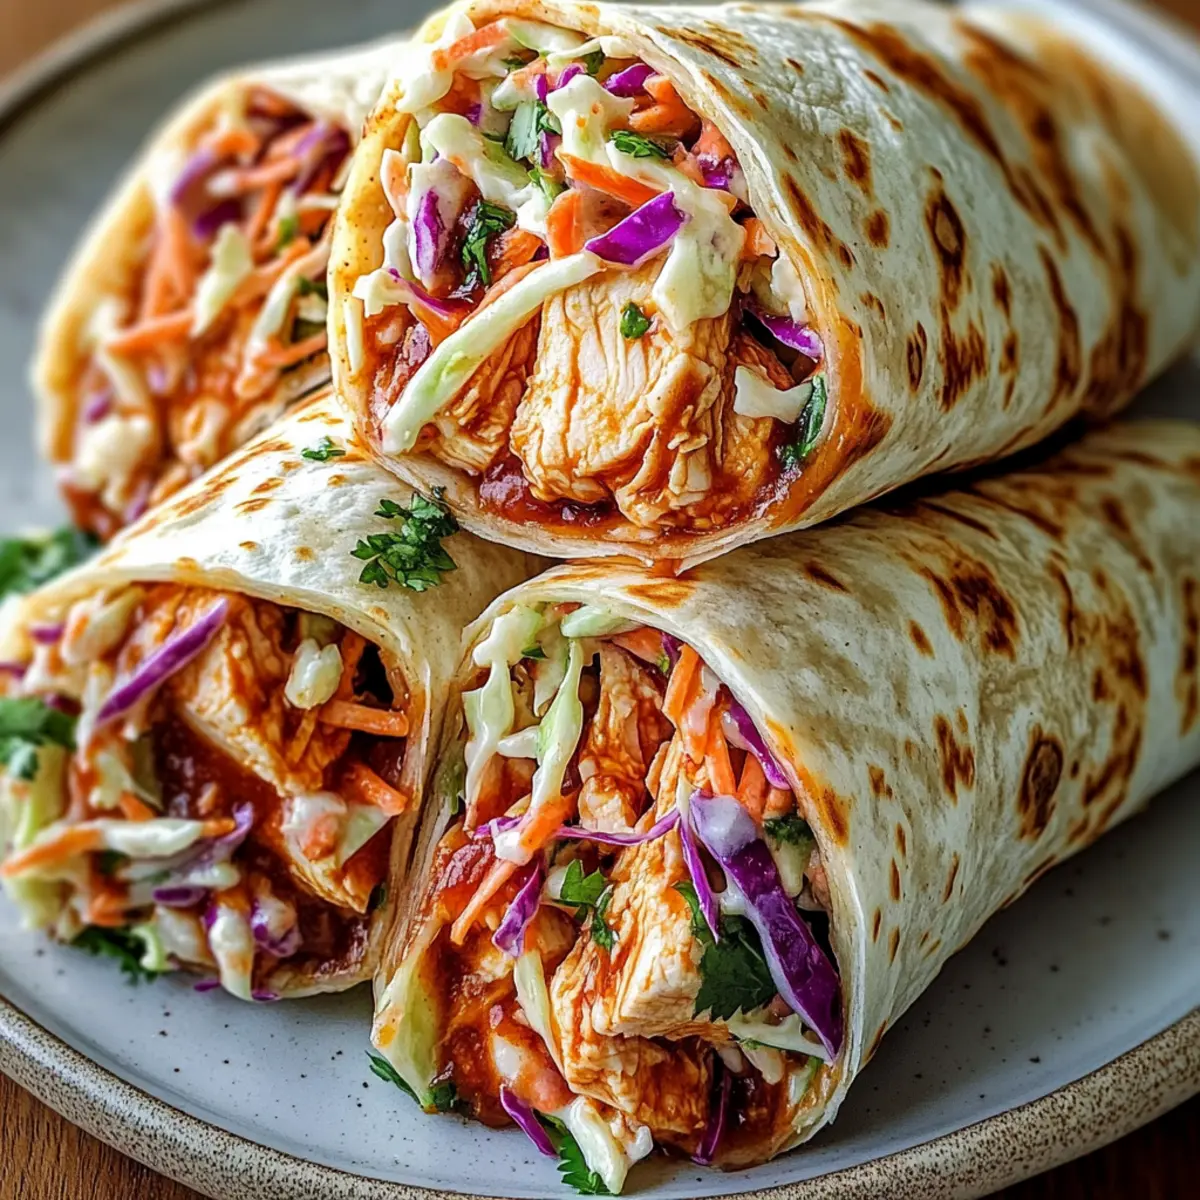
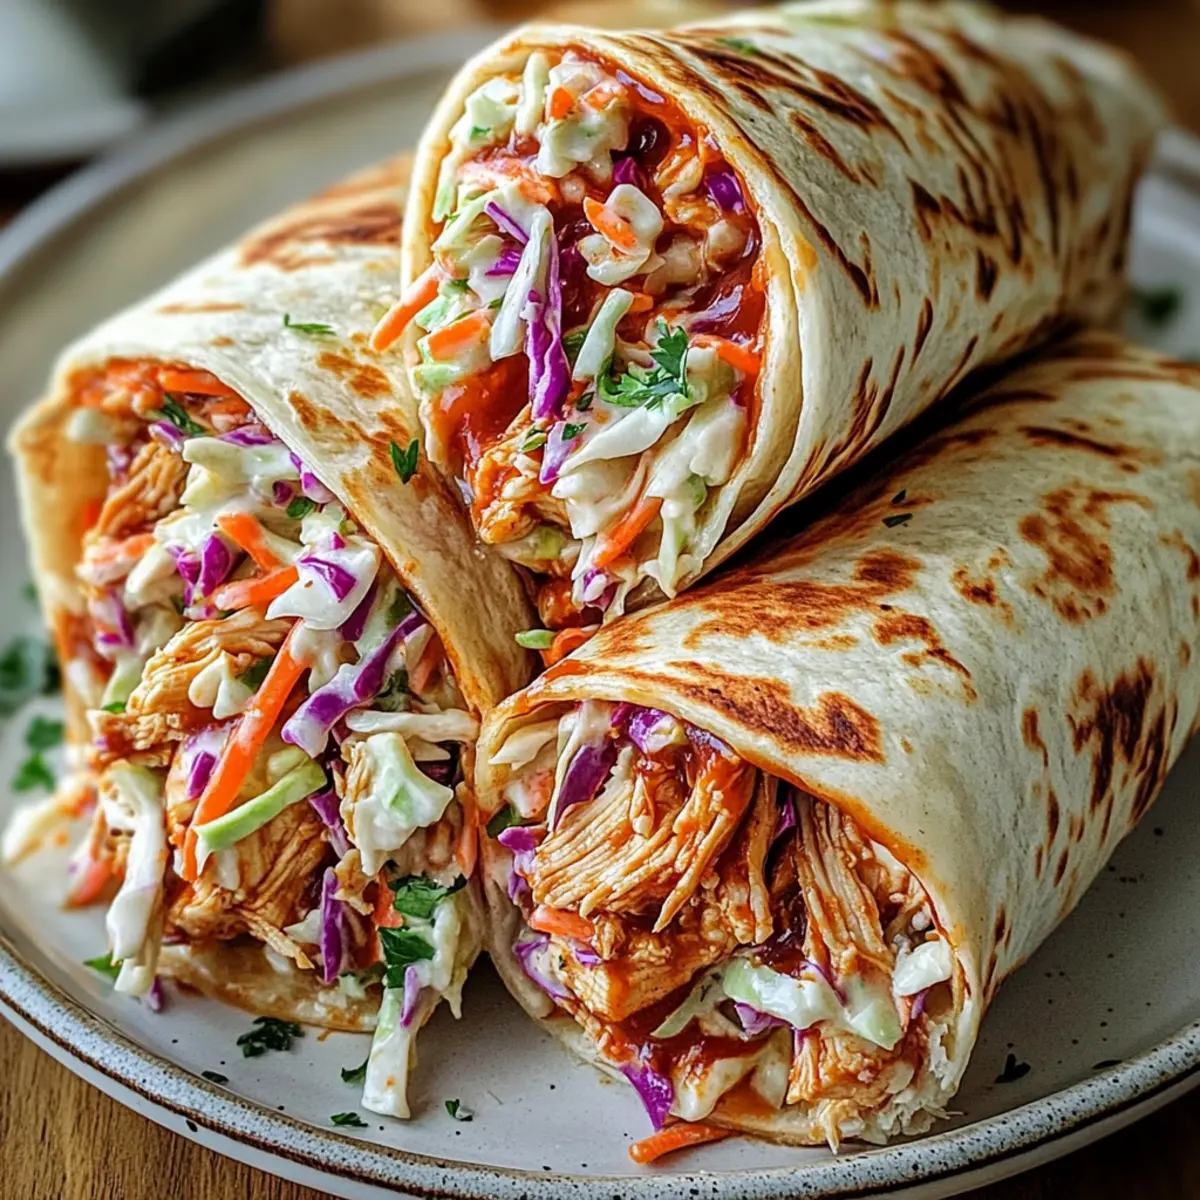
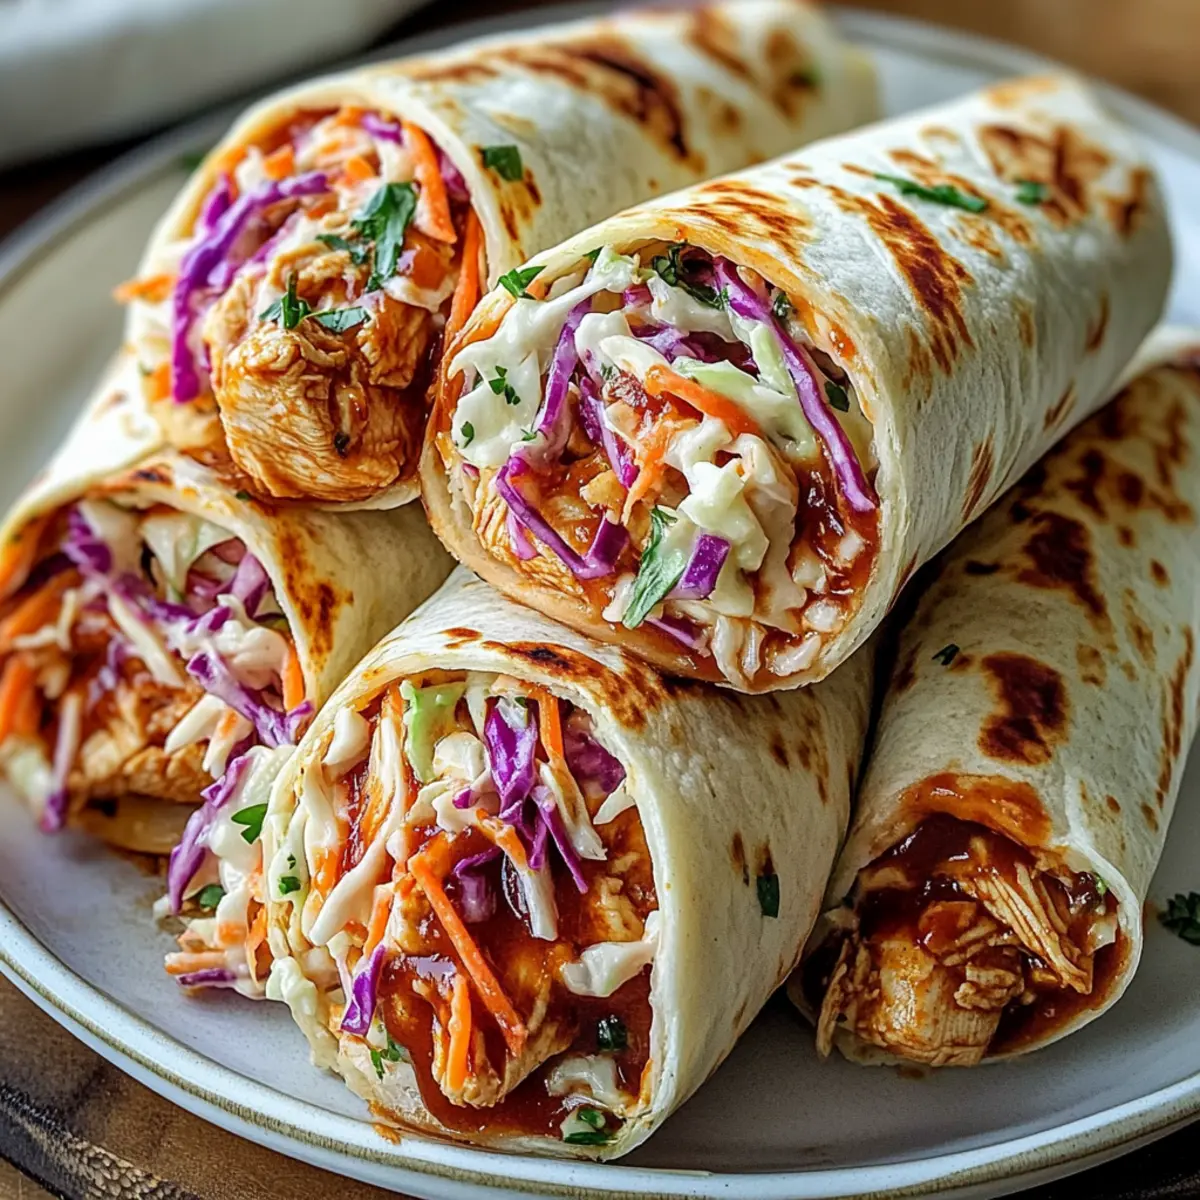
As I sifted through my fridge, I stumbled upon some leftover BBQ chicken and a vibrant bag of coleslaw mix. Suddenly, a lightbulb went off—BBQ Chicken Coleslaw Wraps! This quick, no-cook recipe is a game-changer, combining tender chicken and crunchy slaw all wrapped up in a soft tortilla. In just 15 minutes, you can whip up a delicious meal that’s perfect for lunch, dinner, or even casual picnics with friends. Not only are these wraps beginner-friendly, but they also offer a delightful, guilt-free alternative to fast food cravings. Whether you're a passionate home-chef or just tired of takeout, you're bound to love these easy, satisfying wraps. So, are you ready to dive into this fun and tasty adventure?

Why Are These Wraps So Irresistible?

Ultimate Convenience: With just 15 minutes of assembly time, these wraps are a lifesaver for busy weekdays.

Satisfying Flavor: The tangy BBQ chicken dances perfectly with the crunchy coleslaw, creating a mouthwatering experience in every bite.

Endless Versatility: Feel free to switch up the proteins—pulled pork or tofu work wonderfully, letting you cater to various dietary preferences.

Health-Conscious Deliciousness: Packed with fresh ingredients, they offer a lighter alternative to greasy fast food.

Crowd-Pleaser: Serve them at picnics or gatherings, and you’ll have everyone asking for the recipe!

Give them a try alongside Honey BBQ Chicken for a flavor adventure or explore the delightful Crock Pot Chicken options for meal prepping ideas.

BBQ Chicken Coleslaw Wraps Ingredients

Get ready to create a flavor-packed meal with these easy-to-find ingredients!

For the Chicken Mixture
• Cooked Chicken Breast – Lean protein that serves as the hearty base; swap for pulled pork, beef, turkey, or shredded tofu for vegetarian options.
• BBQ Sauce – Provides that signature tangy-sweet flavor; choose a gluten-free brand if necessary.

For the Wrap
• Flour Tortillas – Soft carriers for your delicious filling; gluten-free tortillas work well for dietary restrictions.
• Coleslaw Mix – Adds crunch and a burst of color; feel free to use homemade coleslaw for extra freshness.

For the Creamy Slaw Dressing
• Mayonnaise – Acts as a creamy binder for the slaw; Greek yogurt is a lighter alternative.
• Apple Cider Vinegar – Brings acidity to balance out flavors; white vinegar can be used as a substitute.
• Sugar – Helps round out the vinegar's tang; adjust to taste based on your sweetness preference.
• Salt and Pepper – Essential for seasoning; use to enhance flavors as desired.

Optional Flavor Boosters
• Fresh Cilantro – Adds a herbal freshness; can be replaced with parsley if preferred.
• Green Onions – Provide an oniony flavor and visual appeal; consider red onions for a sharper taste.

These BBQ Chicken Coleslaw Wraps ingredients are sure to create a delicious experience that beats any fast food alternative!

Step‑by‑Step Instructions for BBQ Chicken Coleslaw Wraps

Step 1: Prepare the BBQ Chicken Mixture
In a medium bowl, combine your shredded cooked chicken breast with BBQ sauce, using a spatula to stir until every piece is well coated and glistening. This should take about 2 minutes. Aim for a thick, saucy consistency that clings to the chicken, making it flavorful. Set aside to allow the flavors to meld while you prepare the coleslaw.

Step 2: Mix the Coleslaw Dressing
In another bowl, add the coleslaw mix, mayonnaise, apple cider vinegar, sugar, salt, and pepper. Stir the ingredients together until the mixture is creamy and well combined, which should take about 1-2 minutes. The dressing should evenly cover each piece of coleslaw, creating a vibrant and enticing mixture that will balance perfectly with the BBQ chicken.

Step 3: Enhance the Coleslaw Flavor
(Optional) For an extra burst of flavor, fold in chopped fresh cilantro and sliced green onions into the coleslaw mixture. Gently mix until the herbs are evenly distributed, enhancing the texture and presentation of the slaw. This step adds freshness and visual appeal, making your BBQ Chicken Coleslaw Wraps even more delightful.

Step 4: Assemble the Wraps
Lay a soft flour tortilla flat on a clean surface or plate. Spoon about 1/4 of the BBQ chicken mixture in the center, followed by 1/4 of the coleslaw mixture on top. Make sure not to overfill, as you want to wrap them easily. This initial arrangement should take about 1 minute per wrap, ensuring you have enough space to fold.

Step 5: Roll the Tortillas
To fold the tortillas, start by bringing the sides inwards towards the center, then roll from the bottom up, tightly enclosing the delicious filling inside. This should look like a neat burrito. Hold it gently to maintain its shape while you continue to roll the remaining wraps in this manner, taking about 30 seconds for each one.

Step 6: Slice and Serve
Once all your BBQ Chicken Coleslaw Wraps are assembled, cut each wrap diagonally in half using a sharp knife or kitchen scissors. This will create manageable portions, making them easier to handle and eat. Place them on a plate and get ready to serve, whether for a family meal or a social gathering.

Step 7: Store Leftovers Properly
If you have any leftovers or want to prepare your wraps in advance, be sure to wrap them tightly in parchment or plastic wrap. This will help maintain their freshness for up to 2-3 days in the refrigerator. Alternatively, uncut wraps can be frozen for longer storage, ready for quick meals whenever you need them!

Make Ahead Options

These BBQ Chicken Coleslaw Wraps are perfect for meal prep! You can prepare the BBQ chicken mixture and coleslaw up to 24 hours in advance, storing them separately in airtight containers in the refrigerator to maintain freshness. Simply mix the shredded chicken with BBQ sauce and let it chill, while the coleslaw should be combined with mayonnaise, vinegar, and sugar. When you’re ready to serve, just warm the chicken if desired, assemble the wraps in tortillas, and enjoy a delicious, hassle-free meal, just as flavorful as when made fresh! This approach not only saves you time during busy weeknights but ensures delightful quality every time.

Storage Tips for BBQ Chicken Coleslaw Wraps

Fridge: Wrap any leftover BBQ Chicken Coleslaw Wraps tightly in plastic wrap or store in an airtight container for optimal freshness. They will be good for up to 2-3 days.

Freezer: For longer storage, freeze the uncut wraps. Place them in a freezer-safe bag or container and enjoy for up to 2 months. Thaw in the fridge before serving.

Reheating: To maintain the wraps' texture, reheat in a microwave or a skillet for a few minutes until warmed through, ensuring the chicken mixture stays moist.

Prevent Moisture: Avoid soggy tortillas by wrapping each wrap separately in parchment paper before storing. This helps keep them crisp and ready for delicious meals!

What to Serve with BBQ Chicken Coleslaw Wraps

Transform your meal into a delightful spread that blends freshness, flavor, and fun!

  • Homemade Potato Chips: Crisp and salty, these chips add a satisfying crunch, perfect for balancing the wraps' flavors.
  • Fresh Veggie Platter: A colorful assortment of carrots, cucumbers, and bell peppers brings a refreshing contrast and is great for dipping.
  • Sweet Potato Fries: These naturally sweet fries add a delightful twist, complementing the BBQ’s smoky notes with their earthy sweetness.
  • Lime Wedges: A splash of lime juice can brighten the flavors of the wraps, adding a zesty kick that elevates the entire meal.
  • Fruit Salad: A mix of seasonal fruits provides a sweet, juicy balance and a burst of color that makes the table inviting.
  • Iced Tea or Lemonade: Refreshing drinks that cleanse the palate and enhance the overall dining experience with their light, crisp flavors.

These ideas will help you create a memorable meal around your BBQ Chicken Coleslaw Wraps, ensuring every bite is enjoyed to its fullest!

BBQ Chicken Coleslaw Wraps Variations

Feel free to get creative and customize your wraps to match your taste buds!

  • Protein Swap: Replace chicken with pulled pork, beef, turkey, or shredded tofu for a delightful twist. Each option offers its own unique flavor!

  • Gluten-Free: Choose gluten-free tortillas if you follow a gluten-free diet. This simple swap ensures everyone can enjoy these wraps without worry.

  • Spicy Kick: Add diced jalapeños or a drizzle of hot sauce for a zesty burst of heat. Imagine the warmth dancing across your palate with every bite!

  • BBQ Sauce Variety: Experiment with different BBQ sauces for unique flavor profiles like apple cider, honey mustard, or smoky chipotle. The possibilities are endless!

  • Herb Boost: Fresh herbs like basil or mint can lighten the flavors and add a refreshing twist to the coleslaw. Consider folding in these fragrant options for an aromatic experience.

  • Extra Crunch: Sprinkle in some sunflower seeds or crushed peanuts for added texture and crunch. They bring a delightful surprise in every mouthful, enhancing the overall experience!

  • Coleslaw Twist: Try using different slaw bases such as kale or broccoli slaw for a distinctive flavor and nutritional boost. It's a fun and healthy way to change things up.

Whether you mix and match or stick to a signature twist, these variations will keep your BBQ Chicken Coleslaw Wraps fresh and exciting every time. You might also enjoy pairing them with Honey Garlic Chicken for a delicious meal combo!

Expert Tips for BBQ Chicken Coleslaw Wraps

  • Texture Matters: To achieve the best wraps, ensure your BBQ chicken mixture isn’t too wet. Excess moisture can make tortillas soggy and hard to handle.
  • Season Wisely: Taste your coleslaw dressing before mixing it with the coleslaw mix. Adjust the sugar or vinegar as needed to avoid overwhelming flavors.
  • Wrap Properly: When rolling the tortillas, make sure to tuck in the sides firmly to prevent spills while eating. This keeps each wrap neat and enjoyable.
  • Customize Freely: Don’t hesitate to swap proteins! Whether you choose pulled pork, beef, turkey, or tofu, the BBQ Chicken Coleslaw Wraps will remain delicious.
  • Serve Fresh: For the best taste and texture, serve these wraps immediately after assembly. If you need to prepare them in advance, store them tightly wrapped to avoid drying out.

BBQ Chicken Coleslaw Wraps Recipe FAQs

What type of chicken should I use for BBQ Chicken Coleslaw Wraps?
Absolutely! You can use any cooked chicken breast that’s shredded. If you're looking for alternatives, pulled pork, beef, turkey, or even shredded tofu work beautifully as substitutes. This allows for customization based on your dietary preferences or what's available in your kitchen.

How should I store leftover BBQ Chicken Coleslaw Wraps?
For the best freshness, wrap any leftover BBQ Chicken Coleslaw Wraps tightly in plastic wrap or place them in an airtight container. They can be stored in the refrigerator for up to 2-3 days. This way, you can enjoy them for lunch or a quick dinner without losing any flavors or textures.

Can I freeze BBQ Chicken Coleslaw Wraps?
Yes, you can! To freeze, I recommend wrapping the uncut wraps in plastic wrap and then placing them in a freezer-safe bag or container. They can last up to 2 months in the freezer. When you're ready to eat, simply thaw them in the fridge overnight, then reheat in a microwave or skillet for a few minutes.

Why did my wraps become soggy after storing?
Good question! Sogginess can occur if there's excess moisture from the BBQ chicken mixture or coleslaw. To prevent this, ensure that you let any excess sauce drain before assembling the wraps. Additionally, wrap each one in parchment paper before storing to keep them crisp!

Are these wraps suitable for kids or adults with dietary restrictions?
Yes, these BBQ Chicken Coleslaw Wraps are quite adaptable! You can make them gluten-free by opting for gluten-free tortillas and BBQ sauce. They are beginner-friendly and fulfilling for both kids and adults, with the option to adjust the spice level or protein to suit any palate.

What’s the best way to add extra flavor to the coleslaw?
You can enhance your coleslaw by mixing in fresh herbs like cilantro or parsley. For a bolder taste, consider adding diced jalapeños or a touch of hot sauce. Mix these flavor boosters into your coleslaw mixture after combining all the original ingredients for a delightful twist!

BBQ Chicken Coleslaw Wraps

BBQ Chicken Coleslaw Wraps for a Flavor-Packed Meal

Quick and delicious BBQ Chicken Coleslaw Wraps for a satisfying meal, perfect for lunch or casual gatherings.
Print Recipe Pin Recipe
Prep Time 15 minutes mins
Total Time 15 minutes mins
Servings: 4 wraps
Course: Snacks
Cuisine: American
Calories: 350
Ingredients Equipment Method Nutrition Notes

Ingredients
  

For the Chicken Mixture
  • 2 cups Cooked Chicken Breast Shredded
  • 1/2 cup BBQ Sauce Gluten-free if necessary
For the Wrap
  • 4 large Flour Tortillas Gluten-free tortillas work as well
  • 4 cups Coleslaw Mix Store-bought or homemade
For the Creamy Slaw Dressing
  • 1/2 cup Mayonnaise Greek yogurt for a lighter option
  • 2 tablespoons Apple Cider Vinegar White vinegar can be substituted
  • 1 tablespoon Sugar Adjust based on sweetness preference
  • 1 teaspoon Salt
  • 1/2 teaspoon Pepper
Optional Flavor Boosters
  • 1/4 cup Fresh Cilantro Can be replaced with parsley
  • 2 tablespoons Green Onions Consider red onions for a stronger flavor

Equipment

  • medium bowl
  • Spatula
  • Sharp Knife
  • kitchen scissors

Method
 

Step‑by‑Step Instructions
  1. In a medium bowl, combine shredded cooked chicken breast with BBQ sauce and stir until well coated, about 2 minutes.
  2. In another bowl, add coleslaw mix, mayonnaise, apple cider vinegar, sugar, salt, and pepper. Stir until creamy and well combined, about 1-2 minutes.
  3. Optional: Fold in chopped fresh cilantro and sliced green onions into the coleslaw mixture and mix until evenly distributed.
  4. Lay a flour tortilla flat, spoon about 1/4 of the BBQ chicken mixture and then 1/4 of the coleslaw mixture on top, ensuring not to overfill.
  5. Roll the tortillas by bringing the sides inwards and rolling from the bottom up, tightly enclosing the filling.
  6. Cut each wrap diagonally in half using a sharp knife or kitchen scissors.
  7. Wrap any leftovers tightly in plastic wrap or store in an airtight container.

Nutrition

Serving: 1wrapCalories: 350kcalCarbohydrates: 40gProtein: 25gFat: 15gSaturated Fat: 3gPolyunsaturated Fat: 1gMonounsaturated Fat: 3gCholesterol: 70mgSodium: 900mgPotassium: 400mgFiber: 3gSugar: 5gVitamin A: 500IUVitamin C: 20mgCalcium: 100mgIron: 2mg

Notes

Serve fresh for best taste. Adjust seasonings in the dressing to preference.

Tried this recipe?

Let us know how it was!

Kielbasa Sausage Cheesy Potato Casserole: Comfort in Every Bite

November 27, 2025 by Grace Snow Leave a Comment

As I stood in my kitchen, the scent of smoky kielbasa danced through the air, instantly whisking me back to family gatherings filled with laughter and warmth. My Kielbasa Sausage Cheesy Potato Casserole is the ultimate comfort food, marrying the hearty richness of savory sausage with tender, creamy potatoes and layers of melted cheese. Not only does this dish come together in a flash, making it an easy weeknight dinner, but it also works like a charm for potlucks, pleasing even the pickiest of eaters. With its make-ahead convenience, you can savor time with loved ones while this delicious casserole bakes to golden perfection. So, ready to discover how this delightful dish can elevate your next meal? Let’s dive in!

Why is this casserole a must-try?

Comforting flavors abound in this Kielbasa Sausage Cheesy Potato Casserole, making it perfect for family dinners or potlucks. Super simple to whip up, it requires minimal prep, so you can enjoy more time with loved ones. Versatile by nature, you can easily customize it with your favorite cheeses or add in veggies like broccoli to boost nutrition. Make-ahead convenience is another bonus; prepare it the day before and simply bake when you're ready to feast! Plus, crowd-pleasing, this dish boasts a gooey, cheesy profile—a guaranteed hit, reminiscent of classic comfort food that everyone adores. If you’re still hungry for more delightful casseroles, be sure to check out my Cheesy Zucchini Bake or the flavor-packed Spicy Miso Casserole.

Kielbasa Sausage Cheesy Potato Casserole Ingredients

For the Casserole
• Smoked Kielbasa Sausage – Adds rich, smoky flavor; swap for turkey kielbasa for a lighter option.
• Frozen Diced Hash Brown Potatoes – Provide the structure of the casserole; no need to thaw before use.
• Cream of Chicken Soup – Acts as a creamy base; can be substituted with cream of mushroom for more umami.
• Sour Cream – Adds tanginess and creaminess; Greek yogurt can offer a lighter alternative.
• Shredded Cheddar Cheese – The key cheese for flavor; sharp cheddar is ideal, but mozzarella works for a creamier texture.
• Chopped Green Onions (or Onion) – Adds depth; sautéing mellows their flavor if you want something milder.
• Seasonings – Garlic powder, black pepper, and paprika enhance flavor.

For the Topping
• Optional Toppings – Crushed cornflakes or Ritz crackers for a delightful crunch; these add texture to your Kielbasa Sausage Cheesy Potato Casserole.

Step‑by‑Step Instructions for Kielbasa Sausage Cheesy Potato Casserole

Step 1: Preheat and Prepare Baking Dish
Start by preheating your oven to 375°F (190°C). While the oven heats up, grab a 9x13-inch baking dish and generously grease it with cooking spray or butter. This ensures easy removal later on. The casserole will be ready to receive its cheesy, hearty filling shortly!

Step 2: Prepare the Kielbasa
Slice the smoked kielbasa into half-moons, about ¼-inch thick. For extra flavor, heat a skillet over medium heat and brown the slices for 3-4 minutes until they are slightly crispy on the edges. This step enhances the smoky flavor and adds depth to your Kielbasa Sausage Cheesy Potato Casserole.

Step 3: Mix the Creamy Base
In a large mixing bowl, combine the cream of chicken soup and sour cream to create a creamy base. Add 1.5 cups of shredded cheddar cheese, chopped green onions, garlic powder, black pepper, and paprika. Stir everything together until the mixture is smooth and well combined, ensuring an inviting depth of flavor for your casserole.

Step 4: Incorporate the Potatoes and Kielbasa
Now, gently fold in the frozen diced hash browns into the creamy mixture. Once the potatoes are well coated, incorporate the browned kielbasa, ensuring every ingredient is mixed evenly. This will create a delicious blend of textures and flavors that will bake to perfection in your casserole.

Step 5: Assemble the Casserole
Carefully transfer the mixture into your prepared baking dish, spreading it out evenly. This is the foundation of your Kielbasa Sausage Cheesy Potato Casserole! Sprinkle the remaining cheese evenly over the top, and if you're using them, add any optional crunchy toppings like crushed cornflakes or Ritz crackers for a delightful finish.

Step 6: Bake to Golden Perfection
Place the baking dish in the preheated oven and bake uncovered for 45-50 minutes. You'll know it's done when the casserole is bubbling and the top is golden brown. This baking time allows all those comforting flavors to meld beautifully, resulting in an irresistible aroma wafting through your kitchen.

Step 7: Let it Rest Before Serving
Once baked, remove the casserole from the oven and allow it to cool for 5-10 minutes. This resting time helps the cheese set and makes serving much easier! Take a moment to appreciate the warm, cheesy goodness in your Kielbasa Sausage Cheesy Potato Casserole before diving in with family or friends.

Make Ahead Options

These Kielbasa Sausage Cheesy Potato Casserole is a fantastic recipe for those busy weeknights when time is limited! You can assemble the entire casserole up to 24 hours in advance and simply refrigerate it, making meal prep a breeze. Just follow the initial steps, and once you're ready to bake, allow for an extra 10-15 minutes of cooking time if the casserole is cold. If you'd like to prepare it even earlier, consider making it and freezing it uncovered for up to 3 months; wrap it tightly in foil, and thaw overnight in the refrigerator before baking. This way, you'll enjoy the same comforting flavors—just as delicious as when freshly made!

What to Serve with Kielbasa Sausage Cheesy Potato Casserole?

The perfect meal isn’t just about the main dish; let’s create a comforting spread to savor alongside this creamy casserole.

  • Fresh Green Salad: Crisp greens and vibrant vegetables complement the richness of the casserole, adding a refreshing crunch to each bite. Toss in a tangy vinaigrette for balance.

  • Roasted Brussels Sprouts: Their natural sweetness and slightly charred flavor enhance the smoky notes of the kielbasa, making for a delightful contrast that excites every palate.

  • Savory Garlic Bread: Warm, crusty bread slathered with garlic butter is ideal for soaking up every last bit of cheesy goodness. It adds a comforting touch everyone loves.

  • Steamed Broccoli: Vibrant green broccoli not only brings a pop of color to your plate but also a subtle flavor that pairs beautifully with the creamy casserole.

  • Homemade Coleslaw: The tangy crunch of a creamy coleslaw brings a welcome contrast to the softness of the dish, adding texture and brightness that enhances the flavor profile.

  • Apple Pie: For dessert, a slice of warm apple pie with vanilla ice cream warms the heart, creating the perfect sweet ending to a comforting meal that celebrates home-cooked joy.

Storage Tips for Kielbasa Sausage Cheesy Potato Casserole

  • Fridge: Store leftovers in an airtight container and enjoy them within 4 days. This keeps your Kielbasa Sausage Cheesy Potato Casserole fresh and flavorful for easy reheating.

  • Freezer: For longer storage, freeze the casserole unbaked for up to 3 months. Wrap it tightly in foil to prevent freezer burn; thaw in the fridge before baking.

  • Reheating: Reheat individual portions in the oven at 350°F (175°C) for about 20 minutes, or until heated through. For the best texture, avoid microwaving if possible.

  • Make-Ahead: Assemble your casserole a day in advance, refrigerate it, and simply pop it in the oven when you're ready to serve, adding extra time if baked straight from the fridge.

Kielbasa Sausage Cheesy Potato Casserole Variations

Feel free to let your creativity shine by putting your unique spin on this comforting casserole!

  • Breakfast Twist: Swap in breakfast sausage for a delightful morning version; consider topping it with scrambled eggs for extra heartiness.

  • Veggie Boost: Mix in diced bell peppers, broccoli, or spinach for a nutritious kick; these colorful additions will enhance both flavor and texture.

  • Zesty Ranch: Incorporate a packet of ranch seasoning into the creamy base for a zesty twist; the tangy flavor pairs wonderfully with kielbasa.

  • BBQ Infusion: Drizzle BBQ sauce over the assembled casserole before baking for a smoky, sweet flavor; it complements the sausage beautifully!

  • Cheese Variety: Experiment with different cheeses like gouda or pepper jack for a creamier, spicier finish; each will bring a lovely depth to the dish.

  • Sour Cream Swap: Replace sour cream with Greek yogurt for a lighter alternative while still maintaining that creamy texture; your waistline will thank you!

  • Potatoes Galore: For a rich texture, use a combination of fresh potatoes and frozen hash browns; this will offer a delightful variance in texture.

  • Crunchy Topping: Instead of cornflakes or Ritz crackers, try crushed pretzels for a salty crunch that adds a unique twist to your Kielbasa Sausage Cheesy Potato Casserole.

No matter how you decide to customize your casserole, you’re sure to create an inspiring dish that warms the hearts of your loved ones. For more exciting flavors, don't miss my recipe for German Potato Salad that pairs deliciously with any hearty main!

Expert Tips for Kielbasa Sausage Cheesy Potato Casserole

  • Make-Ahead Magic: Assemble the casserole a day before, cover tightly, and refrigerate. Just add extra baking time if it’s cold when you pop it in the oven.

  • Freezing Friendly: For easy future meals, prepare the casserole without baking, tightly wrap, and freeze for up to 3 months. Thaw thoroughly before baking.

  • Potato Perfection: If using fresh potatoes, remember to dice them finely and soak to remove excess starch for a smoother texture in your Kielbasa Sausage Cheesy Potato Casserole.

  • Flavor Boost: Consider adding a splash of Worcestershire sauce to the creamy base for an extra layer of umami that complements the smoky kielbasa beautifully.

  • Cheese Variations: Don’t hesitate to mix cheeses! Gouda or pepper jack can add a unique twist while enhancing creaminess and flavor.

  • Cooking Evenly: To ensure even cooking, imagine layering your mixture in the dish rather than just dumping it all in; this promotes even heat distribution and perfect texture.

Kielbasa Sausage Cheesy Potato Casserole Recipe FAQs

What are the best potatoes to use for this casserole?
Absolutely go for frozen diced hash brown potatoes for an easy, no-thaw option! They provide the ideal texture and structure. If using fresh potatoes, shred or dice them finely and soak them in water to remove excess starch, which prevents them from becoming too gummy during cooking.

How should I store leftover Kielbasa Sausage Cheesy Potato Casserole?
Store any leftovers in an airtight container in the fridge for up to 4 days. When you’re ready to enjoy it again, simply reheat in the oven at 350°F (175°C) for about 20 minutes, ensuring the cheese remains nice and gooey upon serving!

Can I freeze Kielbasa Sausage Cheesy Potato Casserole?
Very much so! Prepare the casserole without baking it, then wrap it tightly in aluminum foil and freeze for up to 3 months. When you’re ready to bake, thaw it in the fridge overnight, and add an extra 10-15 minutes to the baking time if it's still a bit cold when you put it in.

What should I do if my casserole is too watery?
If you find your casserole ends up watery, it could be due to excess moisture from the frozen hash browns or the soup. To troubleshoot, be sure to mix the ingredients thoroughly but don’t over-stir the potatoes. If you’re using fresh potatoes, make sure they are well-dried after soaking. You can also add a bit more cheese or crushed crackers as a topping to absorb moisture while baking.

Are there any dietary considerations for this recipe?
Definitely! If you have allergies, turkey kielbasa works as a lighter alternative to smoked kielbasa, and you can substitute Greek yogurt for sour cream. Always check ingredient labels for specific allergens, and be cautious when sharing with pets, as certain seasonings could be harmful to them.

Can I make this casserole ahead of time?
Yes! You can assemble your Kielbasa Sausage Cheesy Potato Casserole up to 24 hours in advance. Just cover it tightly and refrigerate until you’re ready to bake. If you put it directly in the oven from the fridge, be sure to add a few extra minutes to the cooking time for a perfectly baked result.

Kielbasa Sausage Cheesy Potato Casserole

Kielbasa Sausage Cheesy Potato Casserole: Comfort in Every Bite

A delicious Kielbasa Sausage Cheesy Potato Casserole that combines savory sausage, creamy potatoes, and melted cheese for the ultimate comfort food experience.
Print Recipe Pin Recipe
Prep Time 15 minutes mins
Cook Time 50 minutes mins
Resting Time 10 minutes mins
Total Time 1 hour hr 15 minutes mins
Servings: 6 servings
Course: Dinner
Cuisine: American
Calories: 420
Ingredients Equipment Method Nutrition Notes

Ingredients
  

For the Casserole
  • 1 lb Smoked Kielbasa Sausage Adds rich, smoky flavor; swap for turkey kielbasa for a lighter option.
  • 30 oz Frozen Diced Hash Brown Potatoes Provide the structure of the casserole; no need to thaw before use.
  • 10.5 oz Cream of Chicken Soup Acts as a creamy base; can be substituted with cream of mushroom for more umami.
  • 1 cup Sour Cream Adds tanginess and creaminess; Greek yogurt can offer a lighter alternative.
  • 2 cups Shredded Cheddar Cheese The key cheese for flavor; sharp cheddar is ideal, but mozzarella works for a creamier texture.
  • 4 oz Chopped Green Onions Adds depth; sautéing mellows their flavor if you want something milder.
  • 1 tsp Garlic Powder
  • 1 tsp Black Pepper
  • 1 tsp Paprika
For the Topping
  • 1 cup Crushed Cornflakes Optional toppings for a delightful crunch.
  • 1 cup Ritz Crackers Optional toppings for a delightful crunch.

Equipment

  • 9x13-inch baking dish
  • Skillet
  • Mixing Bowl

Method
 

Step-by-Step Instructions
  1. Preheat your oven to 375°F (190°C) and grease a 9x13-inch baking dish.
  2. Slice the smoked kielbasa into half-moons, about ¼-inch thick. Brown the slices in a skillet for 3-4 minutes.
  3. In a mixing bowl, combine cream of chicken soup and sour cream. Add 1.5 cups shredded cheddar cheese, chopped green onions, garlic powder, black pepper, and paprika. Stir until smooth.
  4. Gently fold in frozen diced hash browns and browned kielbasa until mixed evenly.
  5. Transfer the mixture to the baking dish, spreading it evenly. Sprinkle remaining cheese and optional toppings on top.
  6. Bake uncovered for 45-50 minutes, until bubbling and golden brown.
  7. Let the casserole cool for 5-10 minutes before serving.

Nutrition

Serving: 1servingCalories: 420kcalCarbohydrates: 30gProtein: 18gFat: 25gSaturated Fat: 11gPolyunsaturated Fat: 2gMonounsaturated Fat: 7gCholesterol: 70mgSodium: 800mgPotassium: 700mgFiber: 3gSugar: 2gVitamin A: 10IUVitamin C: 5mgCalcium: 25mgIron: 10mg

Notes

Can be prepared a day in advance or frozen for future meals. Add a splash of Worcestershire sauce to enhance flavor.

Tried this recipe?

Let us know how it was!

Crockpot Ham And Potato Casserole: Comfort in Every Bite

November 27, 2025 by Grace Snow Leave a Comment

As I stirred the ingredients in my trusty slow cooker, the warm, savory aroma of my Crockpot Ham and Potato Casserole filled the kitchen, instantly elevating my mood. This is the kind of dish that feels like a hug on a chilly evening—creamy, hearty, and incredibly satisfying. You’ll love how easily this comfort food comes together, allowing you to enjoy a delicious homemade meal without spending hours in the kitchen. Perfect for busy weeknights, it offers the flexibility to add your favorite veggies or cheese for a personal touch. Are you ready to dig into a bowl of nostalgia wrapped in gooey goodness? Let’s get cooking!

Why Is This Recipe a Must-Try?

Comforting, this Crockpot Ham and Potato Casserole delivers heartwarming flavors that wrap you in nostalgia with every bite. Customizable, easily tailor this dish by adding veggies like bell peppers or peas to suit your family’s tastes. Time-saving, the slow cooker allows you to set it and forget it, freeing up your evening. Flavor-packed, the union of creamy soup, tender potatoes, and savory ham creates an indulgent experience without the fuss. Ready to create some magic? Pair it with a Cornbread Breakfast Casserole for a perfect meal!

Crockpot Ham And Potato Casserole Ingredients

For the Casserole
• Potatoes (4 cups, diced) – Adds bulk and texture; use about 4 medium potatoes for the perfect base.
• Cooked Ham (2 cups, diced) – Provides protein and a savory element; any leftover ham works beautifully here.
• Shredded Cheddar Cheese (1 cup) – For creaminess and flavor; substitute with Monterey Jack for a milder taste.
• Cream of Mushroom Soup (1 can, 10.5 oz) – Acts as a base for the casserole and thickens the dish; you can replace it with cream of chicken for a lighter option.
• Milk (1 cup) – Thin the soup mixture for better dispersion; unsweetened almond milk works for a dairy-free version.
• Onion (1 medium, diced) – Adds aromatic flavor to the mix; substitute with shallots for a milder taste.
• Garlic Powder (1 teaspoon) – Enhances overall flavor; fresh minced garlic can also be used for an extra kick.
• Salt (1 teaspoon) – Essential for seasoning; adjust according to taste preference.
• Black Pepper (½ teaspoon) – Adds mild heat; can be omitted for a milder dish.
• Paprika (½ teaspoon, optional) – Introduces a subtle smokiness; smoked paprika can enhance the flavor further.

Expert Tip: Feel free to add extra vegetables or your favorite cheese for customizing your Crockpot Ham and Potato Casserole!

Step‑by‑Step Instructions for Crockpot Ham And Potato Casserole

Step 1: Preparation
Start by washing and dicing your potatoes, onions, and leftover cooked ham into bite-sized pieces. Aim for uniform sizes to ensure even cooking. Set aside your diced ingredients while you gather the rest of your supplies for the Crockpot Ham And Potato Casserole.

Step 2: Mix Wet Ingredients
In a mixing bowl, combine the cream of mushroom soup and milk, whisking until smooth. This mixture will serve as the creamy base of your casserole, so take your time to incorporate thoroughly. Once your sauce is ready, set it aside and prepare for layering.

Step 3: Layer the Casserole
In your slow cooker, start layering by placing half of the diced potatoes at the bottom. Follow with half of the diced ham and then sprinkle half of the diced onions and shredded cheddar cheese over the layers. Repeat this process with the remaining potatoes, ham, onions, and cheese to build a hearty foundation for your Crockpot Ham And Potato Casserole.

Step 4: Add Sauce and Season
Pour the milk-soup mixture evenly over the layered casserole. This addition will soak into the ingredients, creating that comforting texture. Season the top with garlic powder, salt, black pepper, and paprika, gently mixing with a spoon if necessary to distribute the flavors consistently.

Step 5: Cook
Cover your crockpot with its lid and set it to cook on low for approximately 6 hours. The casserole is done when the potatoes are fork-tender, and you see bubbling along the edges. Resist the urge to lift the lid too often to maintain the temperature and cooking time.

Step 6: Serve
Once cooked, check the seasoning before serving your Crockpot Ham And Potato Casserole. Adjust if needed and scoop generous portions into bowls. The dish should be bubbling and fragrant, inviting you to dig into this warm and satisfying meal!

How to Store and Freeze Crockpot Ham And Potato Casserole

Fridge: Store leftover casserole in an airtight container for up to 3 days. This helps retain its creamy texture and flavors.

Freezer: For longer storage, freeze the casserole in a freezer-safe container for up to 3 months. Thaw in the fridge before reheating for optimal taste.

Reheating: Reheat individual portions in the microwave or in the oven at 350°F (175°C) until heated through, approximately 20-25 minutes. Add a splash of milk to revive creaminess if needed.

What to Serve with Crockpot Ham and Potato Casserole

When you’ve poured your heart into that creamy comfort, it’s time to make the meal irresistible with delightful pairings.

  • Garlic Bread: This crispy, buttery treat offers a crunchy contrast that’s perfect for sopping up the casserole’s creamy goodness.

  • Steamed Broccoli: Fresh and lightly seasoned, this vibrant veggie adds a pop of color and brings a refreshing crunch alongside the rich casserole.

  • Side Salad: A mixed greens salad topped with cherry tomatoes and a light vinaigrette balances the hearty dish with crispness and tang.

  • Macaroni and Cheese: For the ultimate indulgence, pair with a creamy mac and cheese for double the comfort food joy. Can you say "melty heaven"?

  • Roasted Asparagus: Seasoned with olive oil and lemon, this elegant side adds a flavorful, tender bite, enhancing the overall dining experience.

  • Red Wine: A glass of fruity red wine complements the savory flavors of the ham and cheese, elevating the meal into a cozy evening affair.

  • Apple Pie: To end on a sweet note, serve warm apple pie with vanilla ice cream. The sweet and tart flavors make for a nostalgic dessert that rounds off the meal beautifully.

Let each bite transport you and your loved ones to a place of warmth and comfort while enjoying this delightful feast together!

Make Ahead Options

These Crockpot Ham and Potato Casserole preparations are perfect for meal prep enthusiasts looking to simplify busy weeknights! You can chop the potatoes, ham, and onion up to 24 hours in advance and store them in an airtight container in the refrigerator to maintain their freshness. Additionally, you can combine the cream of mushroom soup and milk, whisking it smooth to save time. When you’re ready to serve, simply layer the prepped ingredients in the crockpot, pour the sauce over, season, and cook on low for around 6 hours. This way, you’ll have a warm, comforting meal waiting for you at the end of a long day, just as delicious as if made fresh!

Crockpot Ham And Potato Casserole Variations

Feel free to customize your dish and elevate the flavors with these exciting ideas!

  • Vegetable Boost: Add diced bell peppers, corn, or peas for a colorful twist and extra nutrition. These veggies not only complement the dish but also introduce new textures, making every bite delightful.

  • Cheese Galore: Swap out cheddar for Gouda or Gruyère to create a gourmet experience. The different cheeses bring unique flavors that can make a familiar dish feel fresh and exciting.

  • Bacon Crunch: Crumble crispy bacon on top before serving for an irresistible crunch. This adds a smoky flavor that pairs perfectly with the creamy base.

  • Herb Infusion: Include fresh herbs like thyme or rosemary to enhance the aroma and taste. A sprinkle of chopped parsley or chives right before serving can add a hint of freshness.

  • Spicy Kick: Mix in diced jalapeños or a dash of cayenne pepper to spice things up. This variation introduces a delightful heat that contrasts beautifully with the creamy casserole.

  • Nutty Flavor: Incorporate a handful of crushed walnuts or pecans for a surprising twist. The added crunch and nutty flavor create a wonderful contrast with the soft potatoes.

  • Creamy Garlic: Use fresh minced garlic in place of garlic powder for a more robust flavor. This addition amplifies the savory notes and makes the casserole even more aromatic.

  • Swap the Soup: Replace cream of mushroom with cream of celery or a homemade version for a lighter feel. Making your own soup opens the door to customized flavors that can enhance the overall dish.

For more inspiration, why not check out some Spicy Miso Casserole ideas or try it alongside a classic German Potato Salad for a complete meal? Dive into creativity and make it your own!

Expert Tips for Crockpot Ham And Potato Casserole

  • Even Dicing: Ensure your potatoes are evenly diced for consistent cooking. Large chunks may remain firm while smaller pieces turn mushy.
  • Add Texture: For extra crunch, consider adding in some frozen peas or diced bell peppers during layering. It'll brighten up the dish!
  • Thicker Casserole: If you prefer a thicker consistency, increase the amount of cream of mushroom soup or reduce the milk in the mix.
  • Layer Smart: Start with a layer of potatoes on the bottom to prevent sticking, making it easier when serving your Crockpot Ham And Potato Casserole.
  • Seasoning Adjustments: Always taste and adjust seasoning based on your preference before serving. A little extra salt can enhance the flavors notably!
  • Keep It Warm: If serving later, keep the crockpot on warm to maintain the dish's creamy texture and inviting aroma while you gather everyone around the table.

Crockpot Ham And Potato Casserole Recipe FAQs

What type of potatoes work best for this casserole?
I recommend using russet or Yukon Gold potatoes for their creamy texture and ability to hold shape during cooking. Avoid waxy potatoes like red potatoes, as they may become mushy.

How should I store leftover Crockpot Ham and Potato Casserole?
Store leftovers in an airtight container in the fridge for up to 3 days. If you're like me and enjoy meals ready to go, this is a perfect, hassle-free option!

Can I freeze the casserole?
Absolutely! To freeze, allow the casserole to cool completely. Then, transfer it to a freezer-safe container and label it with the date. It can be frozen for up to 3 months. When you're ready to enjoy it, thaw in the fridge overnight and reheat!

What if my potatoes are undercooked after 6 hours?
If your potatoes still have some bite to them, don't worry! Just cover the crockpot and continue cooking for an additional 30 to 60 minutes on low, checking periodically until they reach fork-tender perfection. This will ensure a wonderfully creamy result.

Are there any dietary considerations I should keep in mind?
Always consider any allergies or dietary restrictions! For a dairy-free version, switch out the milk and cream of mushroom soup for almond milk and a dairy-free cream soup. If you have a pet, remember that ham should not be a regular part of their diet.

Can I customize the vegetables in this casserole?
The more the merrier! Feel free to add in your favorite veggies like bell peppers, broccoli, or corn. Just chop them into small pieces for even cooking and to blend beautifully with the creamy sauce. This personalization allows you to get creative while adding nutrients!

Crockpot Ham And Potato Casserole

Crockpot Ham And Potato Casserole: Comfort in Every Bite

Enjoy a warm bowl of Crockpot Ham and Potato Casserole, a comforting and customizable dish perfect for busy weeknights.
Print Recipe Pin Recipe
Prep Time 15 minutes mins
Cook Time 6 hours hrs
Total Time 6 hours hrs 15 minutes mins
Servings: 6 servings
Course: Dinner
Cuisine: American
Calories: 400
Ingredients Equipment Method Nutrition Notes

Ingredients
  

For the Casserole
  • 4 cups Potatoes, diced Use about 4 medium potatoes for the perfect base.
  • 2 cups Cooked Ham, diced Any leftover ham works beautifully here.
  • 1 cup Shredded Cheddar Cheese Substitute with Monterey Jack for a milder taste.
  • 1 can Cream of Mushroom Soup You can replace with cream of chicken for a lighter option.
  • 1 cup Milk Unsweetened almond milk works for a dairy-free version.
  • 1 medium Onion, diced Substitute with shallots for a milder taste.
  • 1 teaspoon Garlic Powder Fresh minced garlic can also be used for an extra kick.
  • 1 teaspoon Salt Adjust according to taste preference.
  • 0.5 teaspoon Black Pepper Can be omitted for a milder dish.
  • 0.5 teaspoon Paprika, optional Smoked paprika can enhance the flavor further.

Equipment

  • Slow Cooker

Method
 

Step-by-Step Instructions for Crockpot Ham And Potato Casserole
  1. Start by washing and dicing your potatoes, onions, and leftover cooked ham into bite-sized pieces. Aim for uniform sizes to ensure even cooking. Set aside your diced ingredients while you gather the rest of your supplies.
  2. In a mixing bowl, combine the cream of mushroom soup and milk, whisking until smooth. This mixture will serve as the creamy base of your casserole.
  3. In your slow cooker, start layering by placing half of the diced potatoes at the bottom. Follow with half of the diced ham, then sprinkle half of the diced onions and shredded cheddar cheese over the layers. Repeat this process with the remaining ingredients.
  4. Pour the milk-soup mixture evenly over the layered casserole. Season the top with garlic powder, salt, black pepper, and paprika, gently mixing with a spoon if necessary to distribute the flavors consistently.
  5. Cover your crockpot with its lid and set it to cook on low for approximately 6 hours, until the potatoes are fork-tender.
  6. Once cooked, check the seasoning before serving. Adjust if needed and scoop generous portions into bowls.

Nutrition

Serving: 1cupCalories: 400kcalCarbohydrates: 36gProtein: 20gFat: 20gSaturated Fat: 10gPolyunsaturated Fat: 2gMonounsaturated Fat: 6gCholesterol: 60mgSodium: 800mgPotassium: 800mgFiber: 3gSugar: 2gVitamin A: 600IUVitamin C: 15mgCalcium: 200mgIron: 2mg

Notes

Feel free to add extra vegetables or your favorite cheese for customizing your Crockpot Ham and Potato Casserole.

Tried this recipe?

Let us know how it was!

Savory Simple Salisbury Steak That’s Family-Approved

November 27, 2025 by Grace Snow Leave a Comment

As I stood in the kitchen, the unmistakable aroma of savory meat and rich gravy began to wrap around me like a warm hug after a long day. It’s moments like these that remind me why I adore cooking from scratch—especially when it comes to my Simple Salisbury Steak. This easy homemade recipe transforms basic ingredients into a family-friendly delight, perfect for busy weeknights. Not only is it budget-friendly, but it’s also a quick meal option that even the pickiest of eaters will love! Imagine serving it alongside creamy mashed potatoes or crisp steamed vegetables; the sheer comfort is unbeatable. Ready to learn how to recreate this classic dish with my special twist? Let’s dive in!

Why Is This Salisbury Steak a Must-Try?

Simplicity at its Finest: This Easy Homemade Salisbury Steak requires minimal preparation, allowing you to whip up a comforting meal in under 30 minutes.

Rich, Flavorful Gravy: The homemade gravy elevates each patty, making every bite an explosion of taste that warms the soul.

Family-Friendly Appeal: Perfect for even the pickiest eaters, this dish is guaranteed to please everyone at the dinner table.

Inexpensive Ingredients: Enjoy a restaurant-quality dish at home without breaking the bank—ideal for budget-conscious cooks.

Versatility: Feel free to add your twist—try adding mushrooms or use ground turkey for a lighter option, just like my Grilled Balsamic Steak Salad for more innovative ideas!

With its satisfying flavors and effortless preparation, this Salisbury Steak recipe is destined to become a staple in your home!

Simple Salisbury Steak Ingredients

• Gather these key components for a delicious meal.

For the Patties

  • Lean Ground Beef – The primary protein source that ensures juicy patties; ground turkey or pork can offer a lighter option.
  • Bread Crumbs – Provides that essential binding and texture; feel free to use gluten-free bread crumbs for a gluten-free version.
  • Ketchup – Adds a touch of sweetness and moisture; substitute with BBQ sauce if you’re craving a smoky flavor.
  • Mustard – Introduces that important tang; Dijon mustard can ramp up the flavor depth.
  • Worcestershire Sauce – Infuses a savory umami flavor into the patties; soy sauce works as a good alternative.
  • Garlic Powder – Enhances the overall flavor; replace with fresh minced garlic for a stronger punch.
  • Onion Powder – Adds subtle onion flavor; consider using sautéed fresh onions for a lovely texture.
  • Salt and Pepper – Essential seasonings that bring out the best in your ingredients.

For the Gravy

  • Brown Gravy Mix – Creates a rich and convenient gravy; you can make homemade gravy from broth and seasonings for that personal touch.
  • Hot Water – Needed to dissolve the gravy mix and whisk it into creamy goodness.

With these ingredients for your Simple Salisbury Steak, you’re ready to embark on a cooking adventure that your family will cherish!

Step‑by‑Step Instructions for Simple Salisbury Steak

Step 1: Prepare Patties
In a large mixing bowl, combine lean ground beef with bread crumbs, ketchup, mustard, Worcestershire sauce, garlic powder, onion powder, salt, and pepper. Use your hands to mix until all ingredients are well incorporated, ensuring even seasoning and texture. This step sets the foundation for your Simple Salisbury Steak, so aim for a cohesive mixture without overworking the meat.

Step 2: Cook Patties
Heat 1 tablespoon of olive oil in a large skillet over medium heat. Shape the meat mixture into patties, about 1-inch thick, and add them to the skillet. Cook the patties for approximately 4-5 minutes on each side, or until they are nicely browned and no longer pink in the center. Use a spatula to flip them gently, ensuring a well-seared crust.

Step 3: Prepare Gravy
After the patties are cooked, reduce the heat to low. In a separate bowl, whisk together the brown gravy mix and hot water until smooth. Add in a splash of ketchup and Worcestershire sauce, stirring to combine. This rich gravy will elevate your Simple Salisbury Steak, so whisk thoroughly to prevent lumps for a silky finish.

Step 4: Combine and Simmer
Pour the prepared gravy mixture evenly over the cooked patties in the skillet. Allow it to simmer on low heat for about 5 minutes, letting the gravy heat through and thicken slightly. Stir occasionally to coat the patties thoroughly, creating a deliciously flavorful sauce that envelops each one in comfort.

How to Store and Freeze Simple Salisbury Steak

Fridge: Store leftover Simple Salisbury Steak in an airtight container for up to 3 days to maintain freshness. Make sure to let it cool before sealing to prevent condensation.

Freezer: For longer storage, freeze the patties and gravy in a freezer-safe container for up to 3 months. To prevent freezer burn, wrap them tightly in plastic wrap before placing them in the container.

Reheating: When ready to enjoy, thaw in the refrigerator overnight. Reheat in the microwave or on the stovetop, adding a splash of water to the gravy for moisture, until heated through.

Serving Suggestions: Consider reheating your Simple Salisbury Steak over a bed of mashed potatoes or with a side of steamed vegetables for a comforting meal.

What to Serve with Easy Homemade Salisbury Steak

Imagine cozying up to a table filled with comforting, hearty sides that perfectly complement each bite of your savory steak.

  • Creamy Mashed Potatoes: The buttery smoothness of mashed potatoes pairs beautifully with the rich gravy, creating a delightful mouthfeel.

  • Steamed Green Beans: Their fresh, crisp texture brightens the plate and adds a splash of color, balancing out the richness of the steak.

  • Garlic Butter Mushrooms: Savory mushrooms sautéed in garlic enhance the umami flavors of the Salisbury steak, making for an irresistible duo.

  • Caesar Salad: Crisp romaine and tangy dressing offer a refreshing contrast, cutting through the luscious gravy and adding a crunchy texture.

  • Baked Mac and Cheese: For a comforting twist, this cheesy favorite brings a creamy, satisfying element that will have everyone coming back for seconds.

  • Homemade Biscuits: Fluffy biscuits are perfect for scooping up extra gravy, adding a delightful fluffy texture to your meal.

  • Red Wine: A glass of medium-bodied red wine complements the savory flavors of the beef, enhancing the overall dining experience.

Indulging in these pairings not only elevates your dinner but also adds a touch of warmth and comfort that everyone will cherish!

Make Ahead Options

These Simple Salisbury Steak patties are perfect for meal prep enthusiasts! You can prepare the beef mixture and form the patties up to 24 hours in advance, storing them in the refrigerator to keep them fresh. Simply combine the ground beef, breadcrumbs, ketchup, mustard, Worcestershire sauce, garlic powder, onion powder, salt, and pepper, then shape into patties and refrigerate in a single layer, covered with plastic wrap (to prevent drying out). You can also make the gravy up to 3 days ahead; just cook and cool it before transferring it to an airtight container. When you're ready to serve, cook the patties and heat the gravy over low heat, and you'll have a comforting, homemade meal with minimal effort!

Expert Tips for Simple Salisbury Steak

  • Perfectly Formed Patties: Make sure your patties are uniform in size to ensure even cooking. Uneven patties can lead to some being overcooked while others remain raw.

  • Moisture Matters: To prevent dry patties, don’t overmix the meat mixture. Just combine it until everything is distributed evenly for a juicy Simple Salisbury Steak.

  • Gravy Consistency: If the gravy is too thick, gradually add more hot water until it reaches your desired consistency; this will ensure a smooth and luscious sauce.

  • Temperature Check: Ensure the patties are cooked to an internal temperature of 160°F to guarantee they are safe to eat. A meat thermometer takes the guesswork out.

  • Customization: Feel free to add sautéed onions or mushrooms into the gravy for an added layer of flavor that enhances your Simple Salisbury Steak.

  • Resting Time: Allow the patties to rest for a couple of minutes after cooking; this helps retain their juices for even better flavor and texture.

Simple Salisbury Steak Variations

Feel free to personalize your Simple Salisbury Steak with these delightful twists and substitutions that will excite your taste buds!

  • Healthier Option: Swap in ground turkey or lean ground chicken for a lighter protein choice that still delivers on flavor.

  • Gluten-Free Friendly: Use certified gluten-free bread crumbs to make your patties soar while keeping it safe for those with gluten sensitivities.

  • Smoky Flavor: Replace ketchup with BBQ sauce, adding a rich, smoky depth to your gravy that brings a new twist to tradition.

  • Veggie Boost: Add sautéed onions and mushrooms to the gravy for a delicious layer of flavor and a hearty texture that complements the beef perfectly.

  • Dijon Twist: For an extra kick, substitute regular mustard with Dijon mustard, giving your patties a sophisticated flavor that's sure to impress.

  • Spicy Kick: Incorporate a dash of hot sauce or crushed red pepper flakes into the meat mixture. It’s a simple way to elevate the heat level for those who enjoy a little spice.

  • Homemade Gravy: Ditch the mix and create your homemade gravy using beef broth, flour, and seasonings for a truly artisanal touch that enhances the meal.

  • Mix It Up: Add some shredded cheese, like cheddar or mozzarella, to the beef mixture for a cheesy, gooey surprise in every bite that kids will adore.

With these suggestions, your Simple Salisbury Steak can transform into a new family favorite or come alive with twinkling new flavors. For more inspiration, check out my simple yet divine Cocoa Crusted Steak recipe to keep your dinner rotation exciting!

Simple Salisbury Steak Recipe FAQs

How do I choose the best ground beef for my Salisbury steak?
Absolutely! Look for lean ground beef (around 80/20). This ratio gives you the right amount of fat for flavor without making your patties overly greasy. Check for bright red color, and avoid any packages that have dark spots or excess liquid inside.

What’s the best way to store leftover Simple Salisbury Steak?
Leftovers can be stored in an airtight container in the refrigerator for up to 3 days. I recommend letting them cool completely before sealing to prevent moisture buildup. To reheat, just pop them in the microwave or over low heat on the stovetop until warmed through.

Can I freeze my Simple Salisbury Steak?
Certainly! Simply place the cooled patties and gravy in a freezer-safe container or tightly wrap them in plastic wrap for up to 3 months. For best results, I like to divide them into portion sizes. When you're ready to enjoy, thaw them overnight in the refrigerator and reheat with a splash of water to keep the gravy moist.

What should I do if my patties are falling apart while cooking?
No worries! If your patties are crumbling, this usually means they need a little more binding. You can mix in a beaten egg to the meat mixture next time to help hold them together. Additionally, ensuring you aren’t overmixing the beef can help maintain structure.

Are there any dietary considerations I should be aware of with this recipe?
Great question! This recipe can be easily adapted to be gluten-free by using gluten-free bread crumbs. For those who are mindful of dietary restrictions, you can substitute lean ground turkey for the beef. Always be sure to check labels on all condiments for potential allergens like soy or gluten.

Can I make this recipe without using gravy mix?
Yes, absolutely! For a homemade option, you can sauté some onions and mushrooms in the skillet after cooking your patties. Then, create a simple gravy by adding beef broth, flour, and seasonings until it reaches your desired consistency. This process takes a bit longer but results in a deliciously rich flavor!

Simple Salisbury Steak

Savory Simple Salisbury Steak That’s Family-Approved

This Simple Salisbury Steak recipe transforms basic ingredients into a family-friendly delight, perfect for busy weeknights.
Print Recipe Pin Recipe
Prep Time 10 minutes mins
Cook Time 20 minutes mins
Total Time 30 minutes mins
Servings: 4 servings
Course: Dinner
Cuisine: American
Calories: 350
Ingredients Equipment Method Nutrition Notes

Ingredients
  

For the Patties
  • 1 lb Lean Ground Beef or ground turkey/pork for a lighter option
  • 1/2 cup Bread Crumbs can use gluten-free bread crumbs
  • 1 tbsp Ketchup or BBQ sauce for a smoky flavor
  • 1 tbsp Mustard Dijon mustard can enhance flavor
  • 1 tbsp Worcestershire Sauce soy sauce can be a substitute
  • 1 tsp Garlic Powder or fresh minced garlic
  • 1 tsp Onion Powder can use sautéed fresh onions
  • 1 tsp Salt
  • 1 tsp Pepper
For the Gravy
  • 1 pack Brown Gravy Mix or homemade gravy
  • 2 cups Hot Water

Equipment

  • Skillet
  • Mixing Bowl

Method
 

Step-by-Step Instructions
  1. In a large mixing bowl, combine lean ground beef with bread crumbs, ketchup, mustard, Worcestershire sauce, garlic powder, onion powder, salt, and pepper. Mix until well incorporated.
  2. Heat 1 tablespoon of olive oil in a large skillet over medium heat. Shape the meat mixture into patties and add them to the skillet. Cook for 4-5 minutes on each side.
  3. In a separate bowl, whisk together the brown gravy mix and hot water until smooth. Add ketchup and Worcestershire sauce.
  4. Pour the gravy mixture over the cooked patties in the skillet. Simmer on low heat for about 5 minutes, stirring occasionally.

Nutrition

Serving: 1patty with gravyCalories: 350kcalCarbohydrates: 20gProtein: 25gFat: 18gSaturated Fat: 6gPolyunsaturated Fat: 2gMonounsaturated Fat: 5gCholesterol: 70mgSodium: 800mgPotassium: 450mgFiber: 1gSugar: 3gVitamin A: 10IUVitamin C: 2mgCalcium: 30mgIron: 3mg

Notes

Store leftovers in an airtight container for up to 3 days in the fridge, or freeze for up to 3 months.

Tried this recipe?

Let us know how it was!

Delicious Italian Sausage & Pepper Casserole for Cozy Nights

November 27, 2025 by Grace Snow Leave a Comment

As I stood in my kitchen, the intoxicating aroma of sizzling Italian sausage wafted through the air, instantly transporting me to the sunny streets of Italy. There's something magical about the combination of Italian Sausage & Pepper Casserole that warms both heart and soul. This dish is not just a meal; it’s an easy, comforting way to gather loved ones around the table after a busy day. With vibrant bell peppers and sweet onions joining the juicy sausage, each bite is a cozy hug that feels like home. Plus, this delightful casserole is a breeze to whip up, whether you're a seasoned chef or just starting your culinary journey. Ready to turn your kitchen into a haven of savory bliss? Let’s dive into this flavorful recipe that’s bound to become a family favorite!

Why is this casserole a must-try?

Simplicity shines: This recipe is incredibly easy to prepare, making it perfect for busy weeknights or impromptu gatherings.

Bold flavors: The rich combination of Italian sausage, sweet bell peppers, and aromatic garlic melds together, creating a dish that's bursting with taste.

Customizable goodness: You can easily swap in your favorite veggies or even opt for plant-based sausage for a vegetarian twist.

Hearty comfort: Each bite provides the warmth and satisfaction of true comfort food, making it a delightful choice for family dinners.

Crowd-pleaser: With its vibrant colors and delicious aroma, this casserole is sure to impress your guests and leave them asking for seconds! Pair it with a fresh green salad for a complete meal or explore another cozy option like the Cornbread Breakfast Casserole for variety.

Italian Sausage & Pepper Casserole Ingredients

For the Casserole

  • Italian Sausage – Adds a rich, savory flavor; choose spicy for heat or sweet for a milder touch.
  • Bell Peppers – A mix of red, yellow, and green provides sweetness and vibrant color; they really brighten up the dish!
  • Onion – Yellow onions add just the right amount of sweetness that complements the sausage beautifully.
  • Garlic – Fresh minced garlic enhances the flavor; it’s your secret ingredient for that Italian essence!
  • Canned Tomatoes – Diced tomatoes create moisture and acidity; they’re essential for the Italian Sausage & Pepper Casserole body.
  • Italian Seasoning – A blend of herbs like oregano and basil brings authentic Italian flavors; don’t skip it!
  • Cheese (Mozzarella or Parmesan) – Melting cheese on top creates a gooey, irresistible finish; both kinds work wonderfully in this dish.
  • Pasta (Optional) – For a heartier casserole, add your favorite cooked pasta shape; it makes for a delightful twist!

Feel free to experiment and make this dish your own!

Step‑by‑Step Instructions for Italian Sausage & Pepper Casserole

Step 1: Prep Ingredients
Begin by chopping your bell peppers and onion into bite-sized pieces, and mince the garlic to unleash its aroma. Preheat your oven to 375°F (190°C), ensuring it's ready for the final bake. Gather all your ingredients and equipment, including a large skillet and a baking dish, for a seamless cooking experience.

Step 2: Sauté Sausage
In a large skillet, place the sliced Italian sausage over medium heat. Cook for 5-7 minutes, stirring occasionally, until the sausage is beautifully browned and crispy, releasing its savory oils. This browning process is key to adding depth of flavor to your Italian Sausage & Pepper Casserole.

Step 3: Add Vegetables
Once the sausage is browned, mix in the chopped bell peppers and onions. Sauté the mixture for another 4-5 minutes, observing how the vegetables soften and become more vibrant in color. This step enhances the casserole's flavor, ensuring each bite is filled with deliciousness.

Step 4: Incorporate Flavors
Add the minced garlic and canned diced tomatoes to the skillet, stirring everything together. Allow the mixture to simmer for 3-4 minutes, letting the flavors meld beautifully. Keep an eye on the mixture as it cooks; you'll know it's ready when the tomatoes are heated through and fragrant.

Step 5: Season & Transfer
stir in the Italian seasoning, along with salt and pepper to taste, adjusting based on your preference. If you wish, mix in your favorite cheese for extra creaminess. Once well combined, pour the savory mixture into a baking dish, spreading it evenly to prepare for baking.

Step 6: Bake
Place the baking dish in the preheated oven and bake uncovered for 25-30 minutes. Keep an eye on it as it cooks, waiting for the top to become bubbly and golden brown. This final step is crucial for achieving that irresistible casserole finish, bringing the comforting Italian Sausage & Pepper Casserole to life.

Make Ahead Options

These Italian Sausage & Pepper Casserole is ideal for busy cooks looking to save time during the week! You can prepare the entire casserole (without baking) up to 24 hours in advance, covering it tightly with plastic wrap to keep it fresh. Simply sauté the sausage and vegetables, mix in the spices and cheese, and transfer everything to a baking dish. When you're ready to enjoy, just remove the wrap and bake it in the preheated oven for about 30-35 minutes or until bubbly and golden brown. This method ensures the flavors meld beautifully, making the casserole just as delicious when baked later!

Expert Tips for Italian Sausage & Pepper Casserole

  • Brown the Sausage: Ensure your Italian sausage is thoroughly browned; this step deepens the flavors and adds richness to the dish.

  • Don’t Overcook Vegetables: Sauté the bell peppers and onions just until they’re softened to maintain their vibrant color and natural sweetness in the casserole.

  • Layer the Cheese: For a gooey finish, sprinkle cheese in layers, mixing some into the filling before baking and then topping it off for that luscious crust.

  • Season Wisely: Taste the mixture before transferring to the baking dish; seasoning levels can vary based on the sausage, so adjust salt and pepper to suit your taste.

  • Bake Uncovered: Baking the casserole uncovered allows the top to become golden and bubbly, creating that comforting texture that everyone adores.

  • Recipe Variations: Feel free to explore different veggie combinations or even swap in plant-based sausage; customizing your Italian Sausage & Pepper Casserole makes it uniquely yours!

Storage Tips for Italian Sausage & Pepper Casserole

  • Fridge: Store any leftovers in an airtight container for up to 3 days to keep the flavors fresh and vibrant.

  • Freezer: For longer storage, freeze the casserole in a tightly sealed container for up to 3 months. Thaw overnight in the fridge before reheating.

  • Reheating: Reheat individual portions in the microwave or warm the entire casserole in the oven at 350°F (175°C) until heated through for the best texture.

  • Avoid After Cooking: To maintain the quality of your Italian Sausage & Pepper Casserole, avoid letting it sit out at room temperature for more than 2 hours.

Italian Sausage & Pepper Casserole Variations

Feel free to take your Italian Sausage & Pepper Casserole on a tasty adventure with these delightful twists!

  • Vegetable Boost: Swap out bell peppers for zucchini or mushrooms; they add unique flavors and extra nutrition. It's a wonderful way to sneak in more veggies for those picky eaters!

  • Plant-Based: Use plant-based sausage for a hearty vegetarian version; it keeps the dish rich and satisfying without sacrificing flavor. Everyone will love the familiar taste in a whole new way!

  • Add Pasta: Mix in cooked pasta shapes like penne or fusilli for a heartier casserole. It turns the dish into a complete meal that’s even more filling!

  • Cheesy Delight: Experiment with different cheeses like sharp cheddar or creamy goat cheese for a distinctive twist on the classic topping. Each cheese brings its own flavor profile to enhance your dish.

  • Spicy Kick: For extra zest, toss in some red pepper flakes or diced jalapeños along with the seasoning; it adds a fun, fiery dimension that spice lovers will appreciate.

  • Herb Infusion: Amplify the flavor by adding fresh herbs like basil or parsley just before serving. It brightens up the dish, adding freshness and aromatic appeal!

  • Comfort Gluten-Free: Swap traditional pasta for gluten-free varieties or quinoa for a gluten-free twist; it's perfect for those with dietary restrictions without losing the comforting vibe.

  • Savory Topping: Top the casserole with crispy breadcrumbs or panko before baking for a delightful crunch that contrasts beautifully with the soft interior. This added texture makes each bite even more enticing!

Don't forget to serve this comforting dish with a fresh green salad or try it alongside the Sweet Potato Casserole for a deliciously balanced meal.

What to Serve with Flavorful Italian Sausage & Pepper Casserole

Imagine gathering around a table filled with comforting dishes that beautifully complement your casserole.

  • Crusty Garlic Bread: The perfect companion, it enhances the rustic feel of your meal and soaks up every delicious drop of sauce.

  • Mixed Green Salad: A light, vibrant salad with a zesty vinaigrette balances the richness of the casserole, adding a refreshing contrast.

  • Roasted Vegetables: Seasonal roasted veggies add a lovely depth of flavor, encouraging everyone to indulge in their natural sweetness alongside the casserole.

  • Creamy Polenta: Smooth and buttery polenta provides a luxurious base that can absorb the savory juices, turning each bite into a comforting delight.

  • Herbed Quinoa: This protein-packed side offers a delightful nuttiness while incorporating fresh herbs that pair well with the Italian flavors of the casserole.

  • Cheesy Garlic Knots: Soft and cheesy, these are irresistible and make for a fun finger food that will have everyone reaching for seconds.

  • Wine Pairing: A glass of Chianti or a light Pinot Grigio enhances the entire meal experience, bringing out the rich flavors of the Italian sausage.

  • Tiramisu: End your evening on a sweet note with this classic Italian dessert; its coffee and cocoa notes create a delightful finish to your meal.

Italian Sausage & Pepper Casserole Recipe FAQs

How do I select the best bell peppers for this casserole?
Absolutely! When choosing bell peppers, look for ones that are firm and shiny without any dark spots or blemishes. The colors can vary—red, yellow, or green—but I recommend a mix for sweetness and visual appeal. Avoid peppers with wrinkles or soft spots, as these indicate overripeness and affect flavor.

What’s the best way to store leftovers of Italian Sausage & Pepper Casserole?
Very! Store any leftovers in an airtight container in the refrigerator for up to 3 days. Make sure to let it cool to room temperature before sealing it tight. To reheat, simply pop it in the oven at 350°F (175°C) until it’s heated through, which will help maintain that lovely texture.

Can I freeze Italian Sausage & Pepper Casserole? How?
Definitely! You can freeze your casserole for up to 3 months. Allow it to cool completely, then transfer it to a freezer-safe container or wrap it tightly in plastic wrap and aluminum foil. Label the container with the date for easy tracking. To reheat, thaw it overnight in the fridge and then bake it at 350°F (175°C) until hot and bubbly.

What should I do if my casserole is too watery?
If your casserole ends up watery, worry not! During the cooking process, make sure to let it simmer long enough for the tomatoes to reduce and thicken. You can also add an extra layer of cheese on top before baking, which will help absorb some moisture. For future attempts, try using less canned tomato juice or even some breadcrumbs to absorb extra liquid.

Is this casserole suitable for pets?
It’s important to note that this Italian Sausage & Pepper Casserole contains ingredients like garlic and onions, which can be harmful to pets. If you're wondering about sharing some flavors, consider setting aside a portion of cooked vegetables (without any seasoning) to treat your furry friends instead!

Are there any common allergens in this recipe?
Yes! The Italian sausage can contain allergens such as gluten and dairy, especially if you use pre-packaged varieties. For a safer option, check the labels or make your own sausage using ground meat and spices. If someone has allergies, opt for gluten-free pasta and a dairy-free cheese alternative to make it suitable for everyone.

Italian Sausage & Pepper Casserole

Delicious Italian Sausage & Pepper Casserole for Cozy Nights

A comforting Italian Sausage & Pepper Casserole that combines flavorful sausage, vibrant bell peppers, and aromatic garlic for a cozy family meal.
Print Recipe Pin Recipe
Prep Time 15 minutes mins
Cook Time 30 minutes mins
Total Time 45 minutes mins
Servings: 4 servings
Course: Dinner
Cuisine: Italian
Calories: 450
Ingredients Equipment Method Nutrition Notes

Ingredients
  

For the Casserole
  • 1 lb Italian Sausage Choose spicy for heat or sweet for a milder touch.
  • 3 cups Bell Peppers A mix of red, yellow, and green.
  • 1 medium Onion Yellow onion adds sweetness.
  • 2 cloves Garlic Fresh minced.
  • 1 can Canned Tomatoes Diced, essential for moisture.
  • 1 tbsp Italian Seasoning Blend of herbs.
  • 1 cup Cheese (Mozzarella or Parmesan) For topping.
  • 2 cups Pasta (Optional) Cooked, for a heartier casserole.

Equipment

  • Large skillet
  • Baking Dish

Method
 

Step-by-Step Instructions
  1. Begin by chopping your bell peppers and onion into bite-sized pieces, and mince the garlic. Preheat your oven to 375°F (190°C).
  2. In a large skillet, place the sliced Italian sausage over medium heat. Cook for 5-7 minutes until browned and crispy.
  3. Once the sausage is browned, add the chopped bell peppers and onions. Sauté for another 4-5 minutes.
  4. Add the minced garlic and canned diced tomatoes to the skillet, stirring everything together. Simmer for 3-4 minutes.
  5. Stir in the Italian seasoning, along with salt and pepper to taste. Mix in your favorite cheese for extra creaminess.
  6. Pour the mixture into a baking dish, spreading it evenly. Bake uncovered for 25-30 minutes until bubbly and golden brown.

Nutrition

Serving: 1servingCalories: 450kcalCarbohydrates: 30gProtein: 25gFat: 25gSaturated Fat: 10gPolyunsaturated Fat: 2gMonounsaturated Fat: 8gCholesterol: 80mgSodium: 800mgPotassium: 600mgFiber: 5gSugar: 6gVitamin A: 1500IUVitamin C: 100mgCalcium: 200mgIron: 3mg

Notes

Be sure to try different veggie combinations or use plant-based sausage for variations.

Tried this recipe?

Let us know how it was!

Easy Ground Beef Enchiladas for Cozy Family Nights

November 27, 2025 by Grace Snow Leave a Comment

As I stood in my kitchen, the comforting aroma of sizzling ground beef and fragrant spices whisked me away to a cozy Mexican cantina. There’s something magical about finally creating a plate of Easy Ground Beef Enchiladas that not only warms you from the inside but also brings people together for unforgettable meal times. These enchiladas are not only a breeze to whip up, but they also make for a crowd-pleasing favorite at any gathering. Whether you’re seeking a delightful weeknight dinner or planning for a weekend feast, these hearty enchiladas are the answer. With the flexibility to swap in chicken, turkey, or even lentils, they cater to every palate. Are you ready to dive into this cheesy delight that feels like a hug on a plate?

Why are Easy Ground Beef Enchiladas a Must-Try?

Comforting and Familiar: These enchiladas transport you straight to comfort food heaven, with rich ground beef harmonizing with gooey cheese.
Customizable Wonders: Whether you prefer beef, chicken, turkey, or lentils, this recipe adapts effortlessly to your preferences.
Quick and Simple: With minimal prep time, you can serve up these delicious enchiladas in under an hour, making weeknight meals a breeze.
Crowd-Pleasing Favorite: Perfect for gatherings, they're sure to impress, whether with family or friends, bringing everyone together around the table.
Freezer-Friendly: Easily make-ahead, assemble them, and store for later—they reheat beautifully, always ready for those busy nights! For a variety of flavors, don’t forget to check out our Breakfast Egg Muffins or Spatchcock Chicken for a complete meal experience.

Easy Ground Beef Enchiladas Ingredients

For the Filling
• Ground Beef – Main protein source, offering rich flavor; feel free to substitute with ground chicken, turkey, or lentils for a vegetarian option.
• Onions – Aromatics that build depth of flavor when sautéed; shallots or leeks can also provide a delightful twist.
• Garlic – Enhances the overall flavor; for convenience, garlic powder works just as well.
• Cumin and Chili Powder – A spice blend that warms up the dish; adjust according to your preferred heat level.

For the Tortillas
• Tortillas – Provides structure and wraps the delicious filling; consider lightly frying to prevent sogginess for your Easy Ground Beef Enchiladas.

For the Sauce
• Enchilada Sauce – Adds moisture and flavor; can be homemade or store-bought for ease—tomatillo sauce is a fun alternative!

For the Topping
• Shredded Cheese – Melts to perfection on top, delivering that cheesy goodness; mix it up with a blend of Monterey Jack or pepper jack for extra flavor.

Embrace the delightful experience of making these enchiladas with loved ones, and let them bring warmth and joy to your kitchen!

Step‑by‑Step Instructions for Easy Ground Beef Enchiladas

Step 1: Preheat the Oven
Begin by preheating your oven to 375°F (190°C). This is crucial as it ensures your Easy Ground Beef Enchiladas will bake perfectly, achieving that bubbly, golden-brown finish. While the oven heats up, gather all your ingredients and have your baking dish ready, greased lightly to prevent sticking.

Step 2: Brown the Beef and Onions
In a large skillet over medium heat, add your ground beef and diced onions. Cook for 5-7 minutes until the beef is browned and the onions are translucent. Stir occasionally to break up the beef evenly. You’ll know it’s ready when the beef is no longer pink, and the onions have softened, creating a mouth-watering aroma.

Step 3: Add Spices and Garlic
Next, stir in minced garlic along with cumin and chili powder, allowing everything to cook for an additional minute. This will infuse your filling for the enchiladas with robust flavors. Keep stirring until the garlic is fragrant, which signals that it’s time to move on to the next step for your Easy Ground Beef Enchiladas.

Step 4: Prepare the Tortillas
Take a tortilla and spoon a portion of the beef mixture along one edge. Roll it tightly, ensuring the filling is secure, and place it seam-side down in your greased baking dish. Continue to fill and roll the tortillas until all the meat mixture is used. Try to arrange them snugly in the dish for even baking.

Step 5: Add Sauce and Cheese
Pour your enchilada sauce evenly over the rolled tortillas, making sure to cover them completely. Then, generously sprinkle shredded cheese on top, creating a gooey, cheesy layer. This adds a delightful richness to your Easy Ground Beef Enchiladas that everyone will love.

Step 6: Bake the Enchiladas
Transfer your baking dish into the preheated oven and bake uncovered for 20-25 minutes. Watch for that irresistibly bubbly and golden brown cheese on top, which signals that your enchiladas are ready to be devoured. The colors will deepen, and the delicious aroma will fill your kitchen!

Step 7: Serve and Enjoy
Once baked, remove the enchiladas from the oven and let them cool for a couple of minutes. Serve hot, garnished with fresh cilantro or jalapeños if desired. These Easy Ground Beef Enchiladas are now ready to bring joy to your meal, inviting your family to come together around the table.

Tips for the Best Easy Ground Beef Enchiladas

  • Tortilla Prep: Ensure tortillas are lightly fried before filling; this creates a moisture barrier, keeping your Easy Ground Beef Enchiladas from becoming soggy.

  • Season to Taste: Adjust the cumin and chili powder based on your family’s heat preference—too much spice can overshadow the other flavors, so start small.

  • Cheese Choices: Experiment with different cheese blends for depth of flavor; using a mix of Monterey Jack and pepper jack adds a delightful kick to your enchiladas.

  • Assembly Tip: Roll the tortillas tightly and place seam-side down; this helps them stay intact while baking and maintains their delicious filling.

  • Storage Savvy: Store leftovers in an airtight container for up to three days, and remember to reheat in the oven to preserve that fresh, bubbly texture.

Storage Tips for Easy Ground Beef Enchiladas

Fridge: Store leftovers in an airtight container for up to 3 days to keep your Easy Ground Beef Enchiladas fresh and delicious.

Freezer: For longer storage, wrap the assembled enchiladas tightly in plastic wrap and aluminum foil; they can be frozen for up to 3 months.

Reheating: To reheat, place the enchiladas in a preheated oven at 350°F (175°C) for 15-20 minutes, covering them with foil to prevent drying out.

Make-Ahead: You can assemble enchiladas in advance and refrigerate them before baking. Just add a few extra minutes to the baking time if they go in chilled.

What to Serve with Easy Ground Beef Enchiladas

A delightful spread elevates the experience of these enchiladas from a simple dinner to a full fiesta celebration.

  • Mexican Rice: This fluffy side dish adds a comforting element, soaking up the enchilada sauce perfectly while providing a lovely texture contrast.

  • Refried Beans: Creamy and savory, these beans offer an excellent source of protein and complement the enchiladas without overpowering their flavors.

  • Fresh Guacamole: The creamy avocado dip brings a cool, refreshing touch that balances the warmth and spice of the enchiladas, making each bite a little slice of heaven.

  • Chopped Salad: A bright mixture of lettuce, tomatoes, and bell peppers adds a crisp texture. Toss in a citrus vinaigrette for a zing that enhances your meal.

  • Corn on the Cob: Sweet, buttery corn pairs delightfully, echoing the fiesta vibe while lending a delightful sweetness to the savory enchiladas.

  • Sangria: This fruity Spanish drink introduces a refreshing, seasonal taste that works beautifully with the spiced flavors of the enchiladas, making it a perfect pairing for gatherings.

  • Churros: Sweet, crispy churros dusted in cinnamon sugar provide a delightful finale to the meal, rounding out the cozy Mexican experience with a touch of sweetness.

Make Ahead Options

These Easy Ground Beef Enchiladas are a fantastic choice for meal prep! You can assemble the enchiladas and refrigerate them up to 24 hours in advance, ensuring a delightful homemade dinner with minimal effort when it’s time to eat. To maintain quality, lightly fry your tortillas before filling, which prevents them from becoming soggy. When you’re ready to serve, simply pour your enchilada sauce and cheese on top, then bake them in a preheated oven at 375°F (190°C) for 20-25 minutes until bubbling and golden brown. This make-ahead option is perfect for busy weeknights, giving you delicious, comforting enchiladas with just the right amount of love and care!

Easy Ground Beef Enchiladas Variations

Feel free to customize your enchiladas and make them uniquely yours with these delicious alternatives!

  • Chicken Swap: Substitute ground beef with shredded chicken for a lighter twist. It pairs wonderfully with the same spices and enchilada sauce!
  • Turkey Option: Ground turkey is leaner but still takes on all those cozy flavors beautifully. A perfect guilt-free option that everyone will enjoy.
  • Vegetarian Delight: Use lentils or black beans instead of meat for a fulfilling vegetarian version. Packed with protein, they create an equally tasty dish!
  • Cheese Blend: Mix in Monterey Jack with pepper jack cheese for an extra punch of flavor. The creamy melt brings out the heartiness of your enchiladas!
  • Hot and Spicy: Add diced jalapeños to your filling or sprinkle some crushed red pepper flakes in the sauce for an exciting heat level. Spice lovers, rejoice!
  • Corn Tortillas: Swap flour for corn tortillas for a gluten-free option. They provide a deliciously authentic flavor and extra crunch!
  • Savory Additions: Incorporate sautéed bell peppers and zucchini into your filling for added nutrition and layers of flavor. A great way to sneak in those veggies!
  • Sauce Twist: Experiment with a tomatillo sauce instead of classic enchilada sauce for a tangy-sweet twist that will surprise your taste buds!

For more delicious ideas, try our Ground Beef Enchiladas or delight in some savory Breakfast Egg Muffins for a complete culinary adventure!

Easy Ground Beef Enchiladas Recipe FAQs

How do I choose ripe ingredients for my Easy Ground Beef Enchiladas?
Absolutely! When selecting your ingredients, look for fresh, high-quality produce. Choose onions that are firm and without visible blemishes, and garlic bulbs should feel heavy for their size with tight skin. For the ground beef, opt for well-marbled cuts like 80/20 for moist enchiladas. If using tortillas, find ones that are soft and pliable—this helps in rolling them without breaking.

How should I store leftover Easy Ground Beef Enchiladas?
Very! After you’ve enjoyed a hearty meal, store leftovers in an airtight container in the refrigerator. They will remain fresh for up to three days. Allow them to cool completely before sealing to prevent condensation. This way, you can enjoy the cheesy goodness again without losing flavor!

Can I freeze Easy Ground Beef Enchiladas?
Yes, indeed! To freeze, wrap the assembled, unbaked enchiladas tightly in plastic wrap and then in aluminum foil. They can be stored in the freezer for up to 3 months. When you're ready to enjoy them, simply remove them from the freezer and bake them directly from frozen, adding an additional 10-15 minutes to the baking time for a perfectly cooked meal.

What should I do if my enchiladas are soggy after baking?
Make sure to lightly fry the tortillas before filling them; this creates a moisture barrier that keeps them from getting soggy. If they are still soggy after baking, consider reducing the amount of sauce you're using, or bake them for a few extra minutes uncovered to allow steam to escape and the cheese to crisp up nicely.

Are there any dietary considerations for making these enchiladas?
Certainly! If cooking for someone with allergies, you can make adjustments to accommodate. Substitute the cheese with dairy-free alternatives or leave it out for a lighter version. Also, remember to check that your enchilada sauce is free of gluten if you're serving gluten-sensitive friends or family members. You can also create a vegetarian option by using lentils or beans instead of meat!

How can I ensure my Easy Ground Beef Enchiladas come out perfectly every time?
Ensure everything is prepped properly: finely chop your onions and garlic, and season the beef mixture well. I recommend rolling the tortillas tightly and placing them seam-side down to keep the filling secure during baking. Lastly, always keep an eye on them while baking—once the cheese is bubbly and golden, they’re ready for the table!

Easy Ground Beef Enchiladas

Easy Ground Beef Enchiladas for Cozy Family Nights

Easy Ground Beef Enchiladas are a comforting dish perfect for family nights and gatherings.
Print Recipe Pin Recipe
Prep Time 15 minutes mins
Cook Time 25 minutes mins
Total Time 40 minutes mins
Servings: 6 enchiladas
Course: Dinner
Cuisine: Mexican
Calories: 350
Ingredients Equipment Method Nutrition Notes

Ingredients
  

For the Filling
  • 1 pound Ground Beef or substitute with ground chicken, turkey, or lentils
  • 1 medium Onion diced
  • 2 cloves Garlic minced
  • 1 teaspoon Cumin
  • 1 teaspoon Chili Powder adjust to taste
For the Tortillas
  • 8 pieces Tortillas consider lightly frying
For the Sauce
  • 2 cups Enchilada Sauce homemade or store-bought
For the Topping
  • 2 cups Shredded Cheese Monterey Jack or pepper jack

Equipment

  • Large skillet
  • Baking Dish
  • Oven

Method
 

Step‑by‑Step Instructions for Easy Ground Beef Enchiladas
  1. Preheat the oven to 375°F (190°C). Gather all ingredients and prepare your baking dish.
  2. In a skillet, cook ground beef and diced onions over medium heat for 5-7 minutes until browned.
  3. Stir in minced garlic, cumin, and chili powder; cook for an additional minute.
  4. Spoon beef mixture onto a tortilla, roll tightly, and place seam-side down in a greased baking dish.
  5. Pour enchilada sauce over tortillas and sprinkle shredded cheese on top.
  6. Bake uncovered for 20-25 minutes until cheese is bubbling and golden brown.
  7. Remove from oven, let cool for a few minutes, serve hot garnished with cilantro or jalapeños.

Nutrition

Serving: 1enchiladaCalories: 350kcalCarbohydrates: 30gProtein: 20gFat: 15gSaturated Fat: 7gPolyunsaturated Fat: 1gMonounsaturated Fat: 5gCholesterol: 60mgSodium: 800mgPotassium: 400mgFiber: 3gSugar: 2gVitamin A: 500IUVitamin C: 2mgCalcium: 200mgIron: 3mg

Notes

Store leftovers in an airtight container for up to 3 days. Enchiladas can be made ahead and refrigerated.

Tried this recipe?

Let us know how it was!

Garlic Parmesan Focaccia Bread That Will Wow Your Guests

November 27, 2025 by Grace Snow Leave a Comment

The rich, buttery scent of freshly baked bread wafts through my kitchen, wrapping around me like a warm hug. This Garlic Parmesan Focaccia Bread is more than just a recipe; it’s a little slice of heaven that I can’t wait to share with you. Whipped up in no time, this delightful bread boasts a golden crust and a soft, pillowy interior, perfect for dismantling your weeknight cooking hassle or impressing guests at your next gathering. With garlic and Parm blending seamlessly together, every bite offers a comforting embrace that dances on the palate. Ready to transform your homemade bread game? Join me in crafting this warm, Italian-inspired treat that’s sure to become your new favorite staple!

Why is Focaccia So Irresistible?

Unmatched Flavor: The combination of garlic and Parmesan creates an aromatic, savory masterpiece that tantalizes the taste buds. Each bite makes you feel like you’re dining at a cozy Italian trattoria.

Quick and Easy: No need for complicated techniques! With straightforward steps, you can whip up homemade goodness in a flash, perfect for busy days or unexpected guests.

Versatile Delight: From sandwiches to sides, this bread pairs beautifully with just about anything. Try it alongside Honey Garlic Chicken or served warm with an olive oil dipping sauce.

Stunning Presentation: Impress your family and friends with its golden crust and dimpled surface that showcase your culinary skills. Everyone will want to know your secret!

Crowd-Pleasing Comfort: Whether it’s a family dinner or a social gathering, your guests will rave about this delicious companion!

Garlic Parmesan Focaccia Bread Ingredients

For the Dough
• All-Purpose Flour – Provides structure and texture; substitute with gluten-free flour for a gluten-free version.
• Instant Yeast – Activates the dough, ensuring it rises; active dry yeast can be used if proofed first.
• Salt – Enhances flavor and strengthens gluten; do not skip for best results.
• Warm Water (about 110°F) – Hydrates the dough and activates yeast; use warm, not hot water.
• Sugar – Feeds the yeast for activation; can be replaced with honey or maple syrup.
• Extra Virgin Olive Oil – Adds richness and moisture; use for greasing the pan as well.

For the Flavor
• Garlic (minced) – Infuses flavor throughout the bread; fresh is recommended for the best taste.
• Parmesan Cheese (freshly grated) – Provides savory flavor and texture; substitute with Pecorino Romano or omit for a dairy-free option.
• Dried Italian Herbs or Chopped Rosemary – Optional for added flavor; use fresh herbs for a more vibrant taste.
• Flaky Sea Salt – For topping, adds a finishing touch of flavor.

This Garlic Parmesan Focaccia Bread is packed with delightful elements that will elevate your homemade bread game. Get ready to bake up deliciousness!

Step‑by‑Step Instructions for Garlic Parmesan Focaccia Bread

Step 1: Mix Dough
In a large mixing bowl, combine 1 cup of warm water (about 110°F), 1 tablespoon of sugar, and 2 teaspoons of instant yeast. Let this mixture sit for about 5 minutes until it's foamy and bubbly. Gradually add in 3 cups of all-purpose flour and 1 teaspoon of salt, mixing until a sticky dough forms. Knead the dough on a floured surface for about 8-10 minutes until it becomes smooth and elastic.

Step 2: First Rise
Grease a clean bowl with olive oil and place the dough inside, turning it to coat lightly. Cover the bowl with a damp cloth or plastic wrap, and find a warm spot in your kitchen for the dough to rise. Allow it to rise for 1 to 1.5 hours, until it has doubled in size and feels puffy to the touch.

Step 3: Prepare Garlic Oil
While the dough is rising, heat 1/4 cup of extra virgin olive oil in a small saucepan over medium heat. Add 3-4 cloves of minced garlic to the oil and sauté for 2-3 minutes, or until the garlic becomes fragrant and lightly golden. Remove from heat and let the garlic oil cool slightly. This garlic-infused oil will enhance the flavor of your Garlic Parmesan Focaccia Bread.

Step 4: Stretch and Second Rise
Once the dough has risen, gently punch it down to release the air, then transfer it onto a greased 9x13-inch baking pan. Press the dough into the pan, stretching it to fit into the corners. Cover it again with a cloth, and let it rise for an additional 30-45 minutes until slightly puffed up and airy.

Step 5: Top and Bake
Preheat your oven to 425°F (220°C). After the second rise, use your fingertips to make dimples all over the surface of the dough. Brush generously with the garlic oil you prepared, then sprinkle a layer of freshly grated Parmesan cheese, dried Italian herbs, and flaky sea salt on top. Bake the Garlic Parmesan Focaccia Bread for 20-25 minutes, or until it turns a beautiful golden brown.

Step 6: Cool and Serve
Once baked, remove the focaccia from the oven and allow it to cool in the pan for about 5-10 minutes. Carefully transfer it to a wire rack to cool completely before slicing. This bread is best enjoyed warm and can be served as a side, for sandwiches, or enjoyed on its own with a drizzle of olive oil.

Storage Tips for Garlic Parmesan Focaccia Bread

Room Temperature: Store leftover focaccia in an airtight container or wrapped in foil at room temperature for up to 2 days. This helps maintain its softness and flavor.

Freezer: If you want to enjoy your Garlic Parmesan Focaccia Bread later, wrap it tightly in plastic wrap and then in foil, storing it in the freezer for up to 2 months for best freshness.

Reheating: To reheat, thaw frozen focaccia overnight in the fridge, then warm it in a 350°F (175°C) oven for about 10 minutes. This restores its delightful texture and flavor.

Slicing Advice: For easier storage, slice the focaccia before storing. This allows for quick access and means you can indulge in just a piece or two at a time!

Make Ahead Options

These delicious Garlic Parmesan Focaccia Bread loaves are perfect for meal prep! You can prepare the dough and let it rise, then refrigerate it for up to 24 hours. To do this, after the first rise, gently punch down the dough and cover it tightly with plastic wrap before placing it in the fridge. This allows the flavors to develop beautifully without sacrificing quality. When you’re ready to bake, simply bring the dough to room temperature and continue with the second rise before topping and baking as directed. This strategy will not only save you time on busy weeknights but also result in an irresistibly flavorful bread that's just as delightful as when freshly made!

Expert Tips for Garlic Parmesan Focaccia Bread

  • Fresh Yeast Check: Always test your yeast for freshness by ensuring it's bubbly after mixing with water and sugar. Old yeast can lead to flat bread.

  • Knead It Right: Knead the dough until it's smooth and elastic, which ensures proper gluten formation. This is key for a successful Garlic Parmesan Focaccia Bread.

  • Don’t Rush the Rise: Allow the dough ample time to rise in each stage. Quick rises can lead to dense bread. A warm, draft-free spot works wonders!

  • Generous Oil Usage: Coat the pan and the dough with a sufficient amount of olive oil to achieve those irresistibly crispy edges and enhance flavor.

  • Use Fresh Garlic: Freshly minced garlic infuses the best flavor throughout the focaccia. Avoid pre-chopped garlic or garlic powder for optimal taste.

  • Cool Before Slicing: Let the focaccia cool slightly on a wire rack before slicing. This helps maintain the light, airy texture we're aiming for!

What to Serve with Garlic Parmesan Focaccia Bread

The warm, rustic aroma of focaccia wafting through your home sets the perfect stage for an unforgettable meal with family and friends.

  • Creamy Tomato Basil Soup: This classic comfort food pairs beautifully, with rich flavors that harmonize with the savory focaccia.

  • Herbed Olive Oil Dip: A simple blend of olive oil and fresh herbs enhances each bite, drawing out the focaccia’s flavor profile. Dunking pieces into this dip creates a delightful experience.

  • Chopped Greek Salad: Crisp cucumbers, tangy feta, and ripe tomatoes create a refreshing contrast to the warm, fluffy bread, making every bite a balanced mix of textures.

  • Garlic Butter Shrimp: Juicy shrimp sautéed in garlic butter echo the bread’s flavors, perfect for soaking up with focaccia pieces, adding a touch of elegance.

  • Classic Caesar Salad: Crunchy romaine, creamy dressing, and crispy croutons provide a refreshing counterpart, allowing the focaccia to shine as an accompaniment without overpowering it.

  • Wine Pairing: A chilled Pinot Grigio or a light-bodied red, like Chianti, complements the bread’s robust flavors and elevates your dining experience, bringing a touch of Italy to your table.

Garlic Parmesan Focaccia Bread Variations

Feel free to get creative and make this recipe your own with these delightful twists!

  • Cheese Swap: Substitute Parmesan with other cheeses like Asiago or Mozzarella for a new flavor dimension. Each cheese brings a unique taste that may surprise your palate!

  • Herb Medley: Sprinkle in fresh herbs like basil or thyme for a fragrant twist. The aroma will transport you to an Italian herb garden, adding something special to each bite.

  • Heat It Up: Add red pepper flakes to the garlic oil for a spicy kick. It’s an excellent way to turn up the heat on this classic favorite!

  • Savory Additions: Top with sun-dried tomatoes or olives before baking for extra flavor richness. These ingredients will add bursts of taste and color, making your focaccia even more inviting.

  • Vegan Option: Swap Parmesan for nutritional yeast and use a plant-based oil. Your focaccia can still be satisfying and delicious, ensuring everyone can enjoy a slice!

  • Sweet Touch: Incorporate caramelized onions for a hint of sweetness that pairs beautifully with savory garlic. This unexpected twist will leave guests guessing what your secret ingredient is!

  • Flavored Oil: Infuse your olive oil with herbs or spices like rosemary or smoked paprika for an aromatic flair. This tiny adjustment can elevate the entire dish to a gourmet level.

  • Dipping Duo: Serve with a mix of balsamic reduction and olive oil for dipping, enhancing your focaccia experience. The combination of flavors will surely be a crowd-pleaser, making it hard to stop at one piece!

Making these simple variations to your Garlic Parmesan Focaccia Bread will surely impress your family and friends. Try pairing it with something like Cheesy Garlic Bread to create a scrumptious meal or enjoy it on its own!

Garlic Parmesan Focaccia Bread Recipe FAQs

What is the best way to select garlic for this recipe?
Absolutely! Look for firm bulbs that are plump and should have tight, unbroken skin. Avoid garlic with green shoots or dark spots, as these can affect the flavor. Fresh garlic will give your Garlic Parmesan Focaccia Bread the aromatic punch it needs!

How should I store leftover focaccia bread?
To keep your Bread fresh, store it in an airtight container or wrap it tightly in foil at room temperature for up to 2 days. If you want it to last longer, you can freeze it; just wrap it in plastic wrap, then in foil, and pop it in the freezer for up to 2 months!

Can I freeze Garlic Parmesan Focaccia Bread?
Yes! Freezing is a great option. After baking and cooling the focaccia completely, wrap it tightly in plastic wrap, and then in aluminum foil. This will protect it from freezer burn. When you’re ready to enjoy it, thaw it overnight in the fridge and warm it back up in the oven for about 10 minutes at 350°F (175°C) for that fresh-baked flavor!

What should I do if my dough doesn’t rise?
Very! If your dough hasn’t risen, the culprit might be inactive yeast. Make sure your yeast is fresh and properly activated before mixing. If you’re unsure, a test can be done by combining warm water, sugar, and yeast and letting it sit for 5-10 minutes until foamy. Also, ensure that the environment is warm enough for the dough to rise—an oven with the light on works wonderfully!

Is this recipe suitable for people with dairy allergies?
For sure! You can substitute the Parmesan with a dairy-free cheese or omit it entirely for a delicious, dairy-free Garlic Focaccia. Additionally, ensure that your other ingredients, like the olive oil, are also free from dairy residues. Enjoy everyone at the table!

Garlic Parmesan Focaccia Bread

Garlic Parmesan Focaccia Bread That Will Wow Your Guests

This Garlic Parmesan Focaccia Bread boasts a golden crust and a soft interior, perfect for impressing guests.
Print Recipe Pin Recipe
Prep Time 15 minutes mins
Cook Time 25 minutes mins
Rising Time 1 hour hr 30 minutes mins
Total Time 2 hours hrs 10 minutes mins
Servings: 8 slices
Course: Uncategorized
Cuisine: Italian
Calories: 150
Ingredients Equipment Method Nutrition Notes

Ingredients
  

For the Dough
  • 3 cups All-Purpose Flour Substitute with gluten-free flour for gluten-free
  • 1 cup Warm Water About 110°F
  • 1 tablespoon Sugar Can be replaced with honey or maple syrup
  • 2 teaspoons Instant Yeast Active dry yeast can be used if proofed first
  • 1 teaspoon Salt Do not skip for best results
  • 1/4 cup Extra Virgin Olive Oil Use for greasing the pan
For the Flavor
  • 3-4 cloves Garlic Minced, fresh recommended
  • 1 cup Parmesan Cheese Freshly grated; substitute with Pecorino Romano
  • Dried Italian Herbs or Chopped Rosemary Optional for added flavor
  • Flaky Sea Salt For topping

Equipment

  • Mixing Bowl
  • Baking pan
  • Saucepan

Method
 

Step-by-Step Instructions
  1. In a large bowl, combine warm water, sugar, and instant yeast. Let sit for 5 minutes until foamy.
  2. Gradually add flour and salt, mixing until a sticky dough forms. Knead for 8-10 minutes until smooth.
  3. Grease a bowl with oil, place the dough inside, cover, and let it rise for 1 to 1.5 hours until doubled.
  4. Heat olive oil in a saucepan, add minced garlic, and sauté for 2-3 minutes until fragrant. Let cool.
  5. After rising, punch down the dough, transfer it to a greased pan, stretch to fit, cover, and let rise for 30-45 minutes.
  6. Preheat oven to 425°F. Make dimples in the dough, brush with garlic oil, sprinkle with cheese and salt, then bake for 20-25 minutes.
  7. Allow to cool in the pan for 5-10 minutes, then transfer to a wire rack before slicing.

Nutrition

Serving: 1sliceCalories: 150kcalCarbohydrates: 22gProtein: 4gFat: 6gSaturated Fat: 1gPolyunsaturated Fat: 0.5gMonounsaturated Fat: 4.5gCholesterol: 5mgSodium: 300mgPotassium: 100mgFiber: 1gSugar: 1gCalcium: 4mgIron: 6mg

Notes

Best enjoyed warm; can be served as a side or for sandwiches.

Tried this recipe?

Let us know how it was!

Delicious Italian Sausage & Pepper Casserole for Cozy Nights

November 27, 2025 by Grace Snow Leave a Comment

As I stood in my kitchen, the intoxicating aroma of sizzling Italian sausage wafted through the air, instantly transporting me to the sunny streets of Italy. There's something magical about the combination of Italian Sausage & Pepper Casserole that warms both heart and soul. This dish is not just a meal; it’s an easy, comforting way to gather loved ones around the table after a busy day. With vibrant bell peppers and sweet onions joining the juicy sausage, each bite is a cozy hug that feels like home. Plus, this delightful casserole is a breeze to whip up, whether you're a seasoned chef or just starting your culinary journey. Ready to turn your kitchen into a haven of savory bliss? Let’s dive into this flavorful recipe that’s bound to become a family favorite!

Why is this casserole a must-try?

Simplicity shines: This recipe is incredibly easy to prepare, making it perfect for busy weeknights or impromptu gatherings.

Bold flavors: The rich combination of Italian sausage, sweet bell peppers, and aromatic garlic melds together, creating a dish that's bursting with taste.

Customizable goodness: You can easily swap in your favorite veggies or even opt for plant-based sausage for a vegetarian twist.

Hearty comfort: Each bite provides the warmth and satisfaction of true comfort food, making it a delightful choice for family dinners.

Crowd-pleaser: With its vibrant colors and delicious aroma, this casserole is sure to impress your guests and leave them asking for seconds! Pair it with a fresh green salad for a complete meal or explore another cozy option like the Cornbread Breakfast Casserole for variety.

Italian Sausage & Pepper Casserole Ingredients

For the Casserole

  • Italian Sausage – Adds a rich, savory flavor; choose spicy for heat or sweet for a milder touch.
  • Bell Peppers – A mix of red, yellow, and green provides sweetness and vibrant color; they really brighten up the dish!
  • Onion – Yellow onions add just the right amount of sweetness that complements the sausage beautifully.
  • Garlic – Fresh minced garlic enhances the flavor; it’s your secret ingredient for that Italian essence!
  • Canned Tomatoes – Diced tomatoes create moisture and acidity; they’re essential for the Italian Sausage & Pepper Casserole body.
  • Italian Seasoning – A blend of herbs like oregano and basil brings authentic Italian flavors; don’t skip it!
  • Cheese (Mozzarella or Parmesan) – Melting cheese on top creates a gooey, irresistible finish; both kinds work wonderfully in this dish.
  • Pasta (Optional) – For a heartier casserole, add your favorite cooked pasta shape; it makes for a delightful twist!

Feel free to experiment and make this dish your own!

Step‑by‑Step Instructions for Italian Sausage & Pepper Casserole

Step 1: Prep Ingredients
Begin by chopping your bell peppers and onion into bite-sized pieces, and mince the garlic to unleash its aroma. Preheat your oven to 375°F (190°C), ensuring it's ready for the final bake. Gather all your ingredients and equipment, including a large skillet and a baking dish, for a seamless cooking experience.

Step 2: Sauté Sausage
In a large skillet, place the sliced Italian sausage over medium heat. Cook for 5-7 minutes, stirring occasionally, until the sausage is beautifully browned and crispy, releasing its savory oils. This browning process is key to adding depth of flavor to your Italian Sausage & Pepper Casserole.

Step 3: Add Vegetables
Once the sausage is browned, mix in the chopped bell peppers and onions. Sauté the mixture for another 4-5 minutes, observing how the vegetables soften and become more vibrant in color. This step enhances the casserole's flavor, ensuring each bite is filled with deliciousness.

Step 4: Incorporate Flavors
Add the minced garlic and canned diced tomatoes to the skillet, stirring everything together. Allow the mixture to simmer for 3-4 minutes, letting the flavors meld beautifully. Keep an eye on the mixture as it cooks; you'll know it's ready when the tomatoes are heated through and fragrant.

Step 5: Season & Transfer
stir in the Italian seasoning, along with salt and pepper to taste, adjusting based on your preference. If you wish, mix in your favorite cheese for extra creaminess. Once well combined, pour the savory mixture into a baking dish, spreading it evenly to prepare for baking.

Step 6: Bake
Place the baking dish in the preheated oven and bake uncovered for 25-30 minutes. Keep an eye on it as it cooks, waiting for the top to become bubbly and golden brown. This final step is crucial for achieving that irresistible casserole finish, bringing the comforting Italian Sausage & Pepper Casserole to life.

What to Serve with Flavorful Italian Sausage & Pepper Casserole

Savor the warmth of an Italian-inspired feast that will leave your family and friends wanting more!

  • Crusty Bread: Perfect for soaking up the savory juices, a slice of warm, crusty bread adds delightful texture to each bite.
  • Simple Green Salad: A fresh salad with mixed greens and a zesty vinaigrette balances the richness of the casserole beautifully.
  • Garlic Bread: Indulge in buttery garlic bread that complements the flavors, making it a comforting addition to your meal.
  • Roasted Vegetables: Add an array of roasted seasonal vegetables for extra nutrition and a colorful contrast to your hearty casserole.
  • Italian Wine: A glass of Chianti or Pinot Grigio elevates the dining experience and pairs harmoniously with the rich flavors.
  • Steamed Asparagus: Tender asparagus lightly seasoned adds a crisp, vibrant element that perfectly contrasts the casserole's warmth.
  • Tiramisu: Finish your meal with a classic Italian dessert like tiramisu, bringing a sweet note that completes the dining experience in style.
  • Antipasto Platter: Serve with a selection of cured meats and cheeses to satisfy those who love a variety of flavors and textures.
  • Lemon Sorbet: A refreshing lemon sorbet offers a light, citrusy note to cleanse the palate after a hearty meal.
  • Sparkling Water: Serve chilled sparkling water with lemon slices for a refreshing, fizzy alternative that complements every bite.

Make Ahead Options

These Italian Sausage & Pepper Casserole is perfect for meal prep enthusiasts! You can chop the vegetables (bell peppers and onions) and mince the garlic up to 24 hours in advance, storing them in an airtight container in the refrigerator to maintain their freshness. For even more convenience, you can assemble the casserole entirely, covering it with foil, and refrigerate it for up to 3 days before baking. When you’re ready to enjoy this comforting dish, just preheat your oven to 375°F (190°C), remove the cover, and bake it for 30-35 minutes until bubbly and golden. This way, you’ll have a hearty meal ready for busy weeknights, just as delicious as if made fresh!

Storage Tips for Italian Sausage & Pepper Casserole

  • Fridge: Store any leftovers in an airtight container for up to 3 days to keep the flavors fresh and vibrant.

  • Freezer: For longer storage, freeze the casserole in a tightly sealed container for up to 3 months. Thaw overnight in the fridge before reheating.

  • Reheating: Reheat individual portions in the microwave or warm the entire casserole in the oven at 350°F (175°C) until heated through for the best texture.

  • Avoid After Cooking: To maintain the quality of your Italian Sausage & Pepper Casserole, avoid letting it sit out at room temperature for more than 2 hours.

Italian Sausage & Pepper Casserole Variations

Feel free to add your personal touch and take this comforting casserole to the next level with these delicious twists!

  • Vegetable Swap: Use zucchini or mushrooms for added nutrition and to change up the flavor profile. The subtle earthiness of mushrooms blends beautifully with the dish's richness.

  • Spicy Kick: Add crushed red pepper flakes to elevate the heat. This versatile twist allows everyone to adjust their spice level, making each bite as fiery or mild as they desire.

  • Plant-Based Option: Go for vegan sausage to create a delightful vegetarian version without losing flavor. It’s an excellent choice for meatless Mondays or when you want something lighter.

  • Cheese Variation: Try Parmesan instead of Mozzarella for a nutty depth of flavor that complements the Italian seasonings. Sprinkling the top with breadcrumbs and cheese creates a delightful crunchy crust.

  • Grain Boost: Add cooked quinoa or farro for added texture and heartiness. This twist transforms the casserole into a wholesome dish, perfect for meal prep and leftovers.

  • Herb Infusion: Experiment with fresh herbs like basil or thyme for more vibrant flavors. These fresh herbs elevate the aromatic profile, making every bite a fragrant delight.

  • Creamy Texture: Mix in a dollop of ricotta cheese for a creamier base. This addition adds a luxurious touch, making the casserole rich and indulgent.

  • Pasta Addition: Toss in some cooked penne or fusilli for a complete one-pot meal. This turn adds carbs, making it a satisfying and filling dish that’s sure to please.

For more Italian-inspired ideas, you might enjoy Cornbread Breakfast Casserole or explore the comforting layers of Sweet Potato Casserole. Happy cooking!

Expert Tips for Italian Sausage & Pepper Casserole

  • Brown the Sausage: Ensure your Italian sausage is thoroughly browned; this step deepens the flavors and adds richness to the dish.

  • Don’t Overcook Vegetables: Sauté the bell peppers and onions just until they’re softened to maintain their vibrant color and natural sweetness in the casserole.

  • Layer the Cheese: For a gooey finish, sprinkle cheese in layers, mixing some into the filling before baking and then topping it off for that luscious crust.

  • Season Wisely: Taste the mixture before transferring to the baking dish; seasoning levels can vary based on the sausage, so adjust salt and pepper to suit your taste.

  • Bake Uncovered: Baking the casserole uncovered allows the top to become golden and bubbly, creating that comforting texture that everyone adores.

  • Recipe Variations: Feel free to explore different veggie combinations or even swap in plant-based sausage; customizing your Italian Sausage & Pepper Casserole makes it uniquely yours!

Italian Sausage & Pepper Casserole Recipe FAQs

What type of Italian sausage should I use?
You can choose between spicy or sweet Italian sausage depending on your heat preference. Spicy sausage will give your casserole a nice kick, while sweet sausage offers a milder, more savory flavor.

How do I store leftovers from the casserole?
Absolutely! Store any leftover Italian Sausage & Pepper Casserole in an airtight container in the refrigerator for up to 3 days. Make sure it's cool before sealing to maintain the best texture and flavor.

Can I freeze the casserole?
Yes, you can freeze the casserole! To do this, allow it to cool completely, then transfer it to a tightly wrapped dish or individual portions. It can be frozen for up to 3 months. When ready to eat, thaw it in the refrigerator overnight and reheat in the oven at 350°F (175°C) for about 20-25 minutes.

What if my casserole seems too watery?
If you find your Italian Sausage & Pepper Casserole is too watery, it could be due to excess liquid from the canned tomatoes or undercooked vegetables. To troubleshoot, you can cook it a little longer uncovered, allowing excess moisture to evaporate. Alternatively, adding a tablespoon of cornstarch can help thicken the dish.

Is this casserole pet-friendly?
Generally, this casserole isn’t suitable for pets due to ingredients like onions and garlic, which can be harmful to dogs and cats. If you have furry friends, it’s best to keep their diet separate from human meals. Always check for any potential allergies related to individual ingredients as well.

Can I use gluten-free pasta in the casserole?
Very! If you want to add pasta to your Italian Sausage & Pepper Casserole but require a gluten-free option, simply substitute it with your favorite gluten-free pasta. Cook it according to package instructions before mixing it into your casserole for a hearty twist!

Italian Sausage & Pepper Casserole

Delicious Italian Sausage & Pepper Casserole for Cozy Nights

This Italian Sausage & Pepper Casserole is an easy and comforting dish, perfect for cozy family dinners.
Print Recipe Pin Recipe
Prep Time 15 minutes mins
Cook Time 30 minutes mins
Resting Time 10 minutes mins
Total Time 55 minutes mins
Servings: 4 servings
Course: Dinner
Cuisine: Italian
Calories: 350
Ingredients Equipment Method Nutrition Notes

Ingredients
  

For the Casserole
  • 1 pound Italian Sausage spicy or sweet
  • 3 cups Bell Peppers mix of red, yellow, and green
  • 1 medium Onion yellow
  • 3 cloves Garlic minced
  • 14.5 ounces Canned Tomatoes diced
  • 1 tablespoon Italian Seasoning
  • 1 cup Cheese Mozzarella or Parmesan
  • 2 cups Pasta Optional, cooked

Equipment

  • Skillet
  • Baking Dish
  • Knife
  • Cutting Board

Method
 

Step-by-Step Instructions
  1. Begin by chopping the bell peppers and onion into bite-sized pieces, then mince the garlic cloves. Preheat your oven to 375°F (190°C).
  2. Heat a large skillet over medium heat and add sliced Italian sausage. Cook for 5-7 minutes until browned and crispy.
  3. Incorporate the chopped bell peppers and onions into the skillet with the sausage. Sauté for another 4-5 minutes until softened.
  4. Stir in the minced garlic and diced tomatoes, letting the mixture simmer for 3-4 minutes.
  5. Add Italian seasoning, along with salt and pepper to taste, stirring well. Transfer the mixture into a greased baking dish.
  6. Place the casserole in the preheated oven and bake uncovered for 25-30 minutes until bubbly and golden brown.

Nutrition

Serving: 1servingCalories: 350kcalCarbohydrates: 30gProtein: 20gFat: 15gSaturated Fat: 6gPolyunsaturated Fat: 1gMonounsaturated Fat: 6gCholesterol: 60mgSodium: 800mgPotassium: 600mgFiber: 3gSugar: 5gVitamin A: 800IUVitamin C: 80mgCalcium: 150mgIron: 3mg

Notes

Allow the casserole to rest for 5-10 minutes before serving to let flavors meld together.

Tried this recipe?

Let us know how it was!

Savory Apple Cider Turkey Meatballs for Cozy Dinner Bliss

November 27, 2025 by Grace Snow Leave a Comment

There I was, standing in my kitchen, eagerly waiting for the autumn breeze to drift through the open window, bringing with it the scents of apple orchards and cozy spices. That’s when I had the idea—what if I blended the sweet, tangy notes of apple cider with turkey meatballs? And thus, my Healthy Apple Cider Turkey Meatballs were born! These delightful bites are not only a quick recipe, ready in under 30 minutes, but they also bring joy to the whole family, making them a perfect weeknight dinner. Packed with protein and a cozy warmth from spices like cinnamon and nutmeg, these meatballs are a healthy, gluten-free, and dairy-free twist that everyone will adore. Curious about how to bring fall flavors into your kitchen? Let’s dive into this delicious journey together!

Why Are Apple Cider Turkey Meatballs So Special?

Unique Flavor Fusion: These meatballs harmoniously blend apple cider's sweet tang with aromatic spices, creating an irresistible taste that will remind you of fall.

Quick and Easy: In just 30 minutes, you can create a wholesome dish that fits perfectly into your busy weeknight schedule.

Healthy Yet Satisfying: Packed with lean turkey, these meatballs provide protein while being low in fat, making them a great choice for health-conscious eaters.

Versatile for Everyone: Whether you're gluten-free or dairy-free, this recipe accommodates various dietary preferences, ensuring everyone can enjoy it! Pair them with sides like roasted veggies or a fresh salad for a complete meal, much like my delightful Chicken Salad Apples.

Family Favorites: Kids and adults alike will adore these juicy bites of flavor, making them a guaranteed hit at your dinner table!

Apple Cider Turkey Meatball Ingredients

For the Meatballs

  • Ground Turkey – The main protein source; opt for 93% lean for delicious juiciness, but ground chicken is a suitable substitute.
  • Apple Cider – Infuses sweetness and moisture; avoid apple cider vinegar as a substitute, since it can change the flavor profile.
  • Whole Wheat Breadcrumbs – Provides necessary binding and fiber; gluten-free breadcrumbs or crushed rice crackers work well if needed.
  • Egg – Essential for binding all the ingredients together smoothly.
  • Onion – Adds depth of flavor as a savory aromatic base.
  • Garlic – A flavor enhancer that adds depth and warmth; minced garlic incorporates best into the mixture.

For the Spices and Herbs

  • Spices (Cinnamon, Nutmeg, Allspice) – Bring seasonal warmth to each bite, enhancing the overall flavor experience.
  • Fresh Herbs (Sage, Thyme) – Add a refreshing balance; dried herbs can be used at one-third the amount for convenience.

For the Glaze

  • Maple Syrup – An optional sweetener that elevates the glaze, perfect if you want a breakfast-style twist to your dish.
  • Dijon Mustard – Delivers a touch of tanginess to the glaze for added flavor depth, though it's optional.

These Apple Cider Turkey Meatballs are not only a delightful twist on a classic but also healthy and versatile for the entire family!

Step‑by‑Step Instructions for Apple Cider Turkey Meatballs

Step 1: Mix Meatball Ingredients
In a large mixing bowl, combine 1 pound of ground turkey, ½ cup of apple cider, ½ cup of whole wheat breadcrumbs, 1 beaten egg, ¼ cup finely chopped onion, 2 minced garlic cloves, ½ teaspoon each of cinnamon, nutmeg, and allspice, along with 1 tablespoon of chopped fresh sage and thyme. Use your hands to gently mix everything together, ensuring not to overmix, which helps keep the meatballs tender.

Step 2: Form Meatballs
With your hands or a scoop, portion out the meatball mixture into equal sizes, about 1–2 inches in diameter. Shape each portion into a ball, making sure they are firm but not tightly packed. To keep the meatballs from falling apart when cooking, place them on a parchment-lined baking tray and chill in the refrigerator for 15-20 minutes.

Step 3: Sear Meatballs
Heat 2 tablespoons of olive oil in a large skillet over medium-high heat until shimmering. Carefully place the chilled meatballs in the skillet, ensuring there’s space between each one to allow even browning. Sear the meatballs for about 4-5 minutes on each side, or until they are golden brown and reach an internal temperature of 165°F, ensuring they are fully cooked.

Step 4: Make Glaze
Once the meatballs are cooked, remove them from the skillet and set aside. In the same skillet, pour in ½ cup of apple cider, 2 tablespoons of maple syrup, and 1 tablespoon of Dijon mustard. Stir the mixture and bring it to a simmer over medium heat. Cook for about 4-5 minutes, allowing the glaze to reduce slightly until it thickens, coating the back of a spoon.

Step 5: Coat Meatballs
Return the seared meatballs to the skillet with the glaze, gently tossing to coat each meatball thoroughly. Let them simmer in the glaze on low heat for an additional 2-3 minutes, allowing the flavors to meld together while making sure each meatball is glistening and flavorful.

Step 6: Serve Immediately
Transfer the coated Apple Cider Turkey Meatballs to a serving platter. They are best enjoyed warm and can be served alongside your favorite sides, like roasted vegetables or over a bed of fresh salad. Enjoy the wonderful blend of flavors that come together in this delightful dish!

Apple Cider Turkey Meatballs Variations

Feel free to make these delicious meatballs your own with these fun and easy twists!

  • Gluten-Free: Replace whole wheat breadcrumbs with gluten-free breadcrumbs or crushed rice crackers for a perfect texture that everyone can enjoy.
  • Dairy-Free: Skip the maple syrup glaze if desired to maintain a dairy-free option, as it’s already naturally free.
  • Vegetarian: Substitute ground turkey with plant-based meat to craft a hearty veggie-friendly version that everyone will love.
  • Veggie Boost: Stir in grated carrots or zucchini to the meatball mixture for added nutrition and moisture, giving each bite a delightful crunch.
  • Herb Variation: Switch out fresh sage and thyme for Italian herbs such as oregano or basil to create an exciting flavor profile that pairs perfectly with the apple cider.
  • Spice It Up: Add a pinch of red pepper flakes or cayenne to the mix for a hint of heat. This will create a unique contrast to the sweetness of the cider.
  • Sauce Alternatives: Instead of a glaze, simmer the meatballs in your favorite marinara sauce or barbecue sauce for a different flavor experience.
  • Breakfast Twist: Mix in a little cinnamon and extra maple syrup for a breakfast-inspired take, and serve these meatballs on a toasted English muffin topped with fresh eggs.

No matter how you twist these Apple Cider Turkey Meatballs, they’re bound to be a hit! If you’re looking for more ways to incorporate apples into your meals, check out my delightful Chicken Salad Apples for another tasty twist!

How to Store and Freeze Apple Cider Turkey Meatballs

Fridge: Store cooked apple cider turkey meatballs in an airtight container for up to 3 days. Make sure they have cooled completely before sealing to preserve their moisture.

Freezer: For longer storage, freeze the meatballs in a single layer on a baking sheet. Once frozen, transfer them to a freezer bag or container, where they can last for up to 3 months.

Reheating: Reheat individual meatballs in the microwave for about 1-2 minutes or warm them in a skillet over low heat until heated through. Enjoy them with your favorite sides!

Make Ahead Options

These Healthy Apple Cider Turkey Meatballs are perfect for meal prep, making weeknight dinners a breeze! You can mix the meatball ingredients (1 pound of ground turkey, ½ cup of apple cider, etc.) and form the meatballs up to 24 hours in advance. Just cover them tightly and refrigerate to prevent browning. Additionally, cooked meatballs can be stored in the fridge for up to 3 days or frozen for up to 3 months; simply reheat gently before serving to keep them juicy and flavorful. When you’re ready to enjoy, all you need to do is make the glaze and coat the meatballs—restaurant-quality results with minimal effort!

What to Serve with Healthy Apple Cider Turkey Meatballs?

There's something truly magical about creating a cozy meal that appeals to the senses and warms the heart.

  • Creamy Mashed Potatoes: The fluffy texture and buttery flavor enhance the savory meatballs and glaze beautifully. A classic pairing for comfort food lovers!

  • Roasted Seasonal Vegetables: Tossing carrots, Brussels sprouts, and sweet potatoes in olive oil and herbs brings a sweet, earthy contrast to the meal. Their caramelized edges offer delightful crunch.

  • Fresh Garden Salad: A crisp salad with mixed greens, cherry tomatoes, and a tangy vinaigrette adds brightness and a refreshing lift to the rich meatballs. It’s a perfect way to balance flavors.

  • Quinoa Pilaf: This nutty, light bowl of quinoa with herbs and toasted almonds serves as a wholesome base beneath the meatballs. Combining textures makes every bite interesting!

  • Whole Wheat Pasta: Tossing the meatballs and glaze over whole wheat pasta transforms it into a delightful dish that your family will ask for again and again.

  • Garlic Bread: Serve with warm slices of garlic bread to soak up the sweet and savory glaze. It’s a delightful addition that’s nearly impossible to resist!

  • Apple Cider Mimosa: To celebrate the autumn vibes, a refreshing cocktail made with sparkling cider and a splash of apple juice pairs wonderfully with the simplistic flavors of the meatballs.

  • Pumpkin Spice Muffins: Round off the meal with these moist, spiced muffins for dessert. Their warmth and sweetness echo the flavors of your main dish and will leave everyone delighted!

Expert Tips for Apple Cider Turkey Meatballs

  • Don’t Overmix: Mixing too much can lead to tough meatballs. Gently combine the ingredients until just mixed for a tender texture.
  • Chill for Shape: Shape the meatballs and chill them for 15-20 minutes before cooking. This helps them hold their form while cooking.
  • Use a Meat Thermometer: Ensure the internal temperature of the meatballs reaches 165°F for safe and delicious results.
  • Adjust Consistency: If the mixture feels too wet, add more breadcrumbs gradually until the right consistency is achieved for sturdy meatballs.
  • Customize Flavors: Feel free to experiment with different spices and herbs. Personalizing your Apple Cider Turkey Meatballs makes them uniquely yours!

Healthy Apple Cider Turkey Meatballs Recipe FAQs

How do I select the best apple cider for this recipe?
Absolutely! When selecting apple cider, look for a brand that is labeled as "100% pure apple cider" with no added sugars or preservatives. This will ensure the natural sweetness and flavor shines through your turkey meatballs. Organic apple cider can also provide a deeper richness.

How should I store leftover meatballs?
Very easy! Place your cooked apple cider turkey meatballs in an airtight container and refrigerate. They will stay fresh for up to 3 days. Make sure they are completely cooled before sealing to keep them moist and delicious!

Can I freeze Apple Cider Turkey Meatballs? How?
Of course! To freeze, place your shaped but uncooked meatballs on a baking sheet in a single layer and freeze until solid. Transfer them into a freezer-safe bag or container, and they’ll keep well for up to 3 months. When it’s time to enjoy, simply cook from frozen, adding a few extra minutes to the cooking time.

What should I do if my meatball mixture is too wet?
Don't fret! If you find your mixture is too loose to hold together, gradually add more breadcrumbs, a tablespoon at a time, until it's firm enough. Aim for a texture that holds shape well but isn’t overly dry. If troubles persist, chilling the mixture for 15-20 minutes will help!

Can I make these meatballs dairy-free or gluten-free?
Yes, indeed! To keep your Apple Cider Turkey Meatballs dairy-free, simply use a dairy-free breadcrumb option and skip any cheese toppings. For gluten-free options, choose certified gluten-free breadcrumbs or crushed rice crackers. Both alternatives will maintain the delightful flavors while accommodating dietary needs.

Is it safe to give these turkey meatballs to pets?
It’s always best to consult with your veterinarian before sharing human food with your pets. Turkey meatballs can be safe for some pets, but avoid giving them any garlic or onion, as those ingredients can be harmful to animals. Always ensure any offerings are free from seasonings and sauces!

Apple Cider Turkey Meatballs

Savory Apple Cider Turkey Meatballs for Cozy Dinner Bliss

Enjoy these delightful Apple Cider Turkey Meatballs, a healthy and flavorful dish perfect for your weeknight dinners.
Print Recipe Pin Recipe
Prep Time 10 minutes mins
Cook Time 20 minutes mins
Chilling Time 20 minutes mins
Total Time 30 minutes mins
Servings: 4 meatballs
Course: Dinner
Cuisine: American
Calories: 250
Ingredients Equipment Method Nutrition Notes

Ingredients
  

For the Meatballs
  • 1 lb Ground Turkey Opt for 93% lean for juiciness
  • 0.5 cup Apple Cider Avoid apple cider vinegar as a substitute
  • 0.5 cup Whole Wheat Breadcrumbs Gluten-free breadcrumbs or crushed rice crackers can be used
  • 1 large Egg Beaten
  • 0.25 cup Onion Finely chopped
  • 2 cloves Garlic Minced
For the Spices and Herbs
  • 0.5 teaspoon Cinnamon
  • 0.5 teaspoon Nutmeg
  • 0.5 teaspoon Allspice
  • 1 tablespoon Fresh Sage Chopped
  • 1 tablespoon Fresh Thyme Chopped
For the Glaze
  • 0.5 cup Apple Cider
  • 2 tablespoons Maple Syrup Optional
  • 1 tablespoon Dijon Mustard Optional

Equipment

  • large mixing bowl
  • Skillet
  • Baking tray
  • Parchment Paper

Method
 

Steps
  1. In a large mixing bowl, combine ground turkey, apple cider, whole wheat breadcrumbs, beaten egg, finely chopped onion, minced garlic, cinnamon, nutmeg, allspice, sage, and thyme. Mix gently to combine without overmixing.
  2. Portion the mixture into 1–2 inch balls and place them on a parchment-lined baking tray. Chill in the refrigerator for 15-20 minutes.
  3. Heat olive oil in a large skillet over medium-high heat. Sear chilled meatballs for 4-5 minutes on each side until golden brown and fully cooked.
  4. Remove meatballs and in the same skillet, combine apple cider, maple syrup, and Dijon mustard. Simmer for 4-5 minutes until it thickens.
  5. Return meatballs to the skillet, tossing to coat in the glaze. Simmer on low for another 2-3 minutes.
  6. Transfer to a serving platter and enjoy warm with sides like roasted vegetables or fresh salad.

Nutrition

Serving: 4meatballsCalories: 250kcalCarbohydrates: 30gProtein: 21gFat: 8gSaturated Fat: 2gPolyunsaturated Fat: 1gMonounsaturated Fat: 5gCholesterol: 90mgSodium: 400mgPotassium: 500mgFiber: 4gSugar: 7gVitamin A: 120IUVitamin C: 3mgCalcium: 30mgIron: 2mg

Notes

Mix gently to avoid tough meatballs. Chill before cooking to maintain shape. Use a meat thermometer to ensure they reach 165°F.

Tried this recipe?

Let us know how it was!

Stovetop Maple Bacon Brussels Sprouts with a Sweet Twist

November 27, 2025 by Grace Snow Leave a Comment

As I stood in my kitchen, the toasty aroma of crispy bacon teased my senses, beckoning me to create something truly special. This is precisely the moment I decided to whip up my Stovetop Maple Bacon Brussels Sprouts. This dish marries tender Brussels sprouts with savory bacon and crunchy pecans, drizzled in a luscious maple syrup glaze that dances between sweet and savory. Not only do these sprouts come together in just 30 minutes, but they also offer an effortless prep that makes them an instant crowd-pleaser, perfect for your next family gathering or weeknight dinner. With stunning flavors and textures, this recipe is sure to become a go-to in your home. Curious about how to elevate this classic side dish with just a few simple ingredients? Let’s dive in!

How Can You Elevate Brussels Sprouts?

Simplicity, with just one pan required, this recipe allows you to enjoy hassle-free cooking. Rich, Sweet-Savory Flavor is achieved through the perfect caramelization of maple syrup and bacon, ensuring every bite is a delight. Quick Assembly means you can have this side dish ready in just 30 minutes, making it ideal for busy weeknights. Versatile Serving Options allow it to beautifully complement roasted turkey or grilled meats, making it a perfect side for any occasion. Looking for more veggie inspiration? Check out these delicious ideas like Maple Roasted Sweet and German Potato Salad. Crowd-Pleasing Appeal ensures that even skeptics of Brussels sprouts will be asking for seconds!

Stovetop Maple Bacon Brussels Sprouts Ingredients

If you're ready to create a side dish that will steal the show, look no further!

For the Brussels Sprouts

  • Brussels Sprouts – Use uniform-sized sprouts for even cooking and a tender crunch.
  • Kosher Salt – Adjust to taste for perfectly enhanced flavors.

For the Bacon

  • Bacon – Provides delightful savory richness; turkey bacon can be used for a lighter option.

For the Crunch

  • Pecans – Their nuttiness adds crunch; feel free to substitute walnuts if desired.

For the Flavor

  • Ground Mustard – Offers a tangy contrast to sweetness; Dijon mustard makes a great replacement.
  • Bourbon – Optional for an added depth of flavor, but apple cider vinegar works as a non-alcoholic substitute.
  • Maple Syrup – The star ingredient that brings sweet harmony; agave syrup or honey serves as a lovely alternative.

For the Finish

  • Ground Pepper – Adds seasoning; adjust according to your personal taste.

Embrace the magic of these ingredients, and prepare to savor the wonderful balance of flavors in your Stovetop Maple Bacon Brussels Sprouts!

Step‑by‑Step Instructions for Stovetop Maple Bacon Brussels Sprouts

Step 1: Blanch the Sprouts
Begin by bringing a large pot of salted water to a boil. Trim and halve your Brussels sprouts, then carefully add them to the boiling water. Blanch for 4-5 minutes until they turn bright green and are tender, yet still firm. Once done, quickly drain them and plunge into an ice bath to stop the cooking process, ensuring they maintain their vibrant color.

Step 2: Cook the Bacon
In a large skillet, place diced bacon over medium heat. Cook the bacon for about 7-8 minutes, stirring occasionally, until it becomes crispy and golden brown. Once cooked, use a slotted spoon to remove the bacon, allowing the grease to drain on a plate lined with paper towels. Keep the flavorful bacon fat in the skillet for added richness.

Step 3: Sauté Brussels Sprouts
Increase the heat to medium-high in the same skillet, now infused with bacon fat. Add the blanched Brussels sprouts and chopped pecans, sautéing for 4-5 minutes. Stir frequently until the sprouts are golden and crisp around the edges. The aroma will be enticing as the pecans toast and the sprouts gain color, creating a delightful base for your Stovetop Maple Bacon Brussels Sprouts.

Step 4: Season and Deglaze
Sprinkle ground mustard over the sautéed Brussels sprouts and pecans, mixing well to ensure each piece gets coated. Carefully add bourbon or apple cider vinegar to the skillet, scraping up any browned bits from the bottom with a wooden spoon. Let it cook for about 2-3 minutes until the liquid reduces slightly, deepening the flavors of the dish.

Step 5: Combine and Serve
Now, return the crispy bacon to the skillet and pour in the rich maple syrup, tossing everything together to coat thoroughly. Allow the mixture to cook for an additional minute, just until the syrup thickens slightly and clings to the sprouts. Taste and adjust seasoning with salt and pepper if needed, then serve immediately for a mouthwatering side dish that highlights your Stovetop Maple Bacon Brussels Sprouts beautifully.

Stovetop Maple Bacon Brussels Sprouts Variations

Let your creativity shine by customizing this recipe to suit your flavor palate!

  • Turkey Bacon: Swap traditional bacon for turkey bacon; it's a lighter alternative that maintains great flavor.

  • Nut-Free: Remove the pecans for a nut-free dish. The Brussels sprouts will still shine without that added crunch.

  • Balsamic Glaze: Instead of maple syrup, drizzle with balsamic reduction for a tangy flavor twist that pairs beautifully with the sprouts.

  • Dried Fruit: Add a handful of dried cranberries or pomegranate seeds towards the end for a sweet and fruity burst that brightens the dish.

  • Spicy Kick: Toss in a pinch of red pepper flakes or sliced fresh jalapeños while sautéing for a bit of heat that perfectly complements the sweetness.

  • Cauliflower Crumble: For a unique texture, mix in or substitute with cauliflower florets; this twist adds a heartiness while keeping it low-carb.

  • Herb Infusion: Sprinkle some chopped fresh herbs like thyme or rosemary before serving, inviting an aromatic freshness that elevates the entire dish.

For more exciting flavor combinations, don’t miss out on the lovely variations offered in our other recipes, like Maple Roasted Sweet or the delightful German Potato Salad. Each offers its own unique twist and inspiration for your next culinary adventure!

Expert Tips for Stovetop Maple Bacon Brussels Sprouts

  • Consistent Size: Ensure Brussels sprouts are cut into similar sizes for even cooking, avoiding any that are overly crunchy or mushy.

  • Crispy Bacon: Let the bacon cool on paper towels to achieve maximum crispiness. Soft bacon won't hold up in texture when mixed with the sprouts.

  • Prep Ahead: Blanch and store the Brussels sprouts in the fridge up to 24 hours ahead. This little trick speeds up dinner prep when making your Stovetop Maple Bacon Brussels Sprouts.

  • Adjust Sweetness: Taste the maple syrup before adding; if it's too sweet, you can balance it with a splash more vinegar or mustard for a delightful contrast.

  • Keep It Simple: Don’t overcrowd the skillet when sautéing. Work in batches if necessary to ensure everything gets that beautiful caramelization.

  • Experiment with Nuts: Try sunflower seeds or pine nuts instead of pecans for a different crunch, making your dish unique yet still irresistible!

How to Store and Freeze Stovetop Maple Bacon Brussels Sprouts

Fridge: Store leftovers in an airtight container for up to 3 days. Reheat gently in a skillet over low heat to preserve texture and flavor.

Freezer: For longer storage, freeze the sautéed Brussels sprouts on a baking sheet until solid, then transfer to a freezer bag. They can last up to 2 months.

Reheating: Thaw in the fridge overnight before reheating. Warm them in a skillet with a little olive oil or bacon fat to regain crispiness.

Make-Ahead: You can blanch and prepare the Brussels sprouts in advance, storing them in the fridge for up to 24 hours before finishing the cooking process for your Stovetop Maple Bacon Brussels Sprouts.

Make Ahead Options

These Stovetop Maple Bacon Brussels Sprouts are perfect for meal prep enthusiasts! You can blanch and cool the Brussels sprouts up to 24 hours in advance, storing them in an airtight container in the refrigerator to maintain their vibrant color. Additionally, you can cook the bacon and store it separately for up to 3 days for maximum freshness. To serve, simply heat the bacon fat in a skillet, add the blanched sprouts and pecans, and sauté as directed; then season, deglaze with bourbon or cider vinegar, and finish with maple syrup. This way, you’ll have a delicious and impressive side dish ready in just 15 minutes, saving precious time in your busy week!

What to Serve with Maple Bacon Brussels Sprouts

Pair your vibrant, sweet-and-savory Brussels sprouts with delightful sides and drinks that will elevate your meal experience.

  • Creamy Mashed Potatoes: Their velvety texture and buttery flavor complement the crispy bacon, making each bite a creamy delight.

  • Roast Chicken: Simple and elegant, a juicy roast chicken provides a comforting contrast to the sweet glaze of the sprouts.

  • Garlic Bread: Crispy, aromatic, and warm, garlic bread brings a crunchy texture that pairs beautifully with the tender Brussels sprouts.

  • Fresh Spinach Salad: A bright salad with zesty vinaigrette adds freshness and cuts through the richness, balancing the overall meal.

  • Honey-Glazed Carrots: These natural sugars and soft textures coexist perfectly with the maple flavor, creating a harmonious veggie medley.

  • Cranberry Sauce: A splash of tartness brightens the rich sweetness of the sprouts, making this classic condiment the perfect companion.

  • Sparkling Water with Lime: A refreshing drink option, the citrusy zest cleanses the palate and enhances the flavors of every dish on your table.

  • Apple Crisp: For dessert, warm apple crisp enhances the sweet notes of your Brussels sprouts, merging savory and sweet in a delightful way.

Feel free to mix and match these suggestions to create a full, flavor-packed meal that will impress your family and friends!

Stovetop Maple Bacon Brussels Sprouts Recipe FAQs

How do I know if my Brussels sprouts are ripe?
Absolutely! Look for Brussels sprouts that are firm and tightly closed, without any dark spots or yellowing leaves. Smaller sprouts tend to be sweeter and more tender, while larger ones can have a more bitter flavor. Choose uniform-sized sprouts for even cooking.

What’s the best way to store leftover Stovetop Maple Bacon Brussels Sprouts?
Very! Store any leftovers in an airtight container in the fridge for up to 3 days. When reheating, do so gently over low heat in a skillet to retain their wonderful texture and flavor. Adding a splash of olive oil can help bring them back to life!

Can I freeze Stovetop Maple Bacon Brussels Sprouts?
Absolutely! To freeze, spread the sautéed Brussels sprouts on a baking sheet in a single layer and freeze until solid. Then, transfer them to a freezer-safe bag, where they’ll last up to 2 months. When ready to enjoy, thaw them overnight in the fridge, and reheat in a skillet for the best results.

What if my bacon doesn’t get crispy?
No worries! For crispier bacon, make sure it’s cut into smaller pieces for more surface area exposure when cooking. Additionally, ensure that your skillet is preheated and that you're using medium heat; cooking too slowly can lead to chewy bacon. If it is still soft after cooking, allow it to drain on paper towels, which helps absorb excess grease.

Are Stovetop Maple Bacon Brussels Sprouts suitable for gluten-free diets?
Yes! This recipe is inherently gluten-free when prepared with the ingredients listed, including gluten-free bacon options. Always double-check your bacon brand for any hidden gluten ingredients, and you’re good to go!

Can I make Stovetop Maple Bacon Brussels Sprouts ahead of time?
Definitely! I often find it helpful to blanch the Brussels sprouts a day in advance and store them in the fridge. This way, when it's time for dinner, you can just finish the cooking process in about 15 minutes for a quick, delicious side dish!

Stovetop Maple Bacon Brussels Sprouts

Stovetop Maple Bacon Brussels Sprouts with a Sweet Twist

This Stovetop Maple Bacon Brussels Sprouts recipe combines savory bacon, tender Brussels sprouts, and a luscious maple glaze for a delightful side dish.
Print Recipe Pin Recipe
Prep Time 10 minutes mins
Cook Time 20 minutes mins
Total Time 30 minutes mins
Servings: 4 servings
Course: Dinner
Cuisine: American
Calories: 250
Ingredients Equipment Method Nutrition Notes

Ingredients
  

For the Brussels Sprouts
  • 1 pound Brussels Sprouts Use uniform-sized sprouts for even cooking.
  • 1 teaspoon Kosher Salt Adjust to taste.
For the Bacon
  • 6 slices Bacon Provides delightful savory richness.
For the Crunch
  • 1/2 cup Pecans Substitutable with walnuts.
For the Flavor
  • 1 teaspoon Ground Mustard Dijon mustard is a good replacement.
  • 2 tablespoons Bourbon Optional; apple cider vinegar works as a non-alcoholic substitute.
  • 1/4 cup Maple Syrup Agave syrup or honey can be alternatives.
For the Finish
  • 1 teaspoon Ground Pepper Adjust according to your taste.

Equipment

  • Large pot
  • Large skillet
  • slotted spoon
  • Paper towels

Method
 

Step-by-Step Instructions
  1. Blanch the Brussels sprouts in a large pot of boiling salted water for 4-5 minutes until bright green and tender, then drain and plunge into an ice bath.
  2. Cook diced bacon in a large skillet over medium heat for 7-8 minutes until crispy. Remove with a slotted spoon and let drain on paper towels, retaining the bacon fat in the skillet.
  3. Sauté the blanched Brussels sprouts and chopped pecans in the bacon fat over medium-high heat for 4-5 minutes until golden and crisp around the edges.
  4. Sprinkle ground mustard over the sprouts and pecans, deglaze with bourbon or apple cider vinegar, and cook for 2-3 minutes until the liquid reduces.
  5. Combine the crispy bacon with the sautéed mixture, add maple syrup, and cook for an additional minute until thickened. Adjust seasoning with salt and pepper to taste.

Nutrition

Serving: 1servingCalories: 250kcalCarbohydrates: 25gProtein: 5gFat: 15gSaturated Fat: 4gPolyunsaturated Fat: 2gMonounsaturated Fat: 7gCholesterol: 15mgSodium: 450mgPotassium: 300mgFiber: 4gSugar: 10gVitamin A: 500IUVitamin C: 60mgCalcium: 40mgIron: 1mg

Notes

Ensure Brussels sprouts are cut to a consistent size for even cooking. Let bacon cool on paper towels to maximize crispiness. Prep can be done ahead by blanching the Brussels sprouts a day in advance.

Tried this recipe?

Let us know how it was!
  • « Previous Page
  • 1
  • …
  • 134
  • 135
  • 136
  • 137
  • 138
  • …
  • 221
  • Next Page »

Welcome!

Hi, I’m Grace, a Sydney-based home cook with a passion for bold flavors and trending ingredients. Whether you’re a busy beginner or a seasoned foodie, you’ll find dishes here that are fresh, fun, and full of flavor.

More about me

Popular Recipes

  • World’s Best Chocolate Cake
    World's Best Chocolate Cake That Melts in Your Mouth
  • Strawberry Chocolate Shell Cake
    Heavenly Strawberry Chocolate Shell Cake for Your Sweet Tooth
  • Air Fryer Tilapia
    Air Fryer Tilapia: Quick, Crispy, and Flavor-Packed Delight
  • Salmon Fettuccine Alfredo
    Creamy Salmon Fettuccine Alfredo with a Zesty Twist

Footer

↑ back to top

About

  • Privacy Policy
  • Disclaimer
  • Terms & Conditions

Newsletter

  • Sign Up! for emails and updates

Contact

  • About me
  • Contact me

Copyright © 2025 TastyTrendIngredients