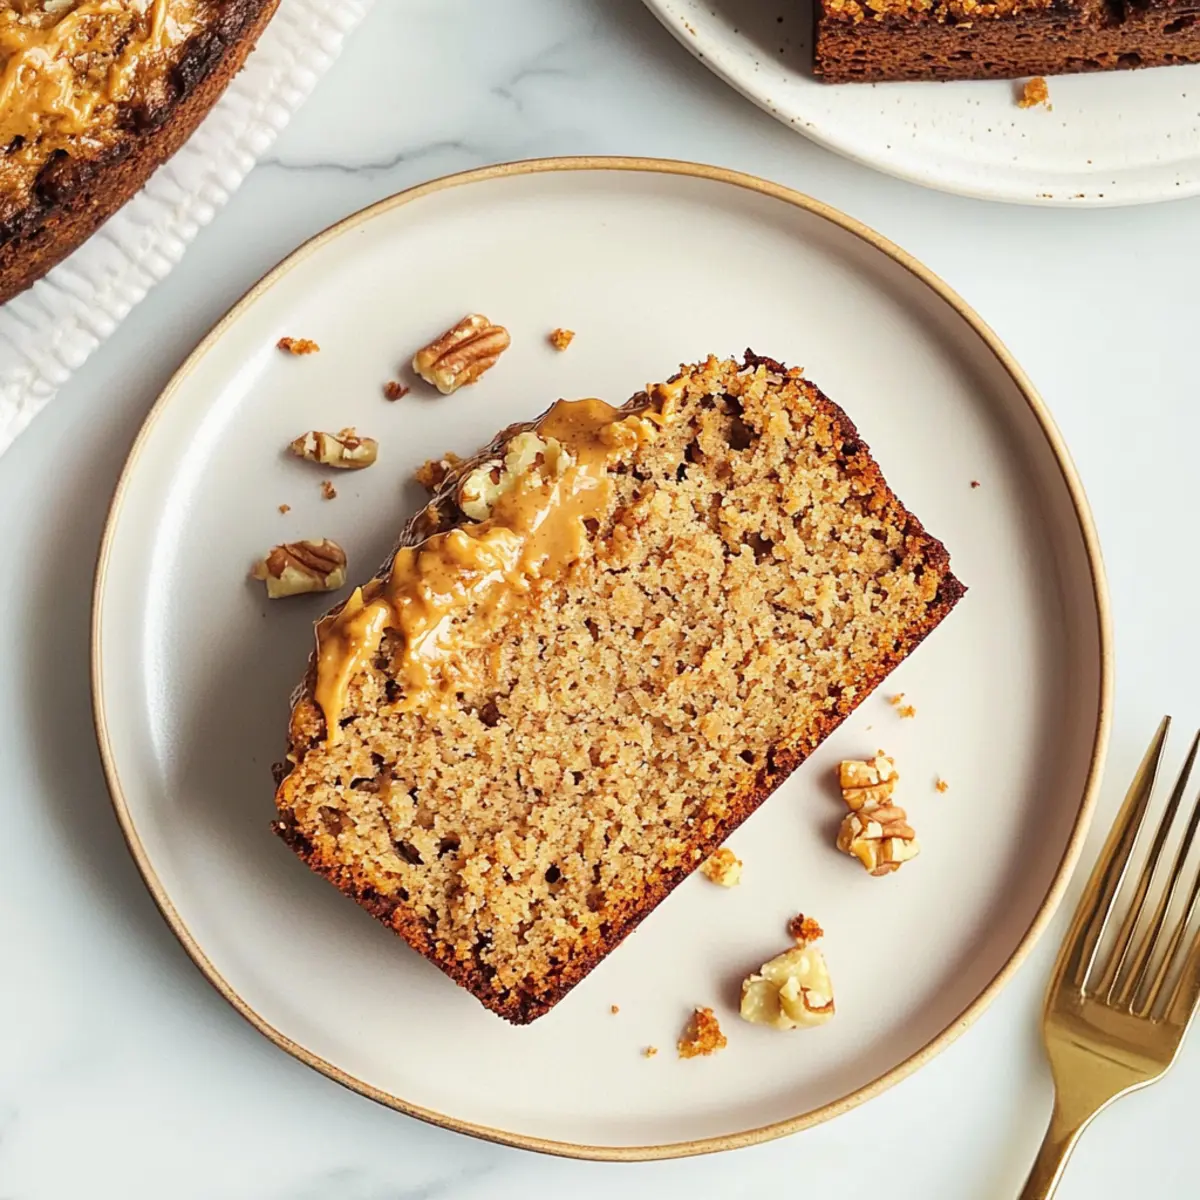
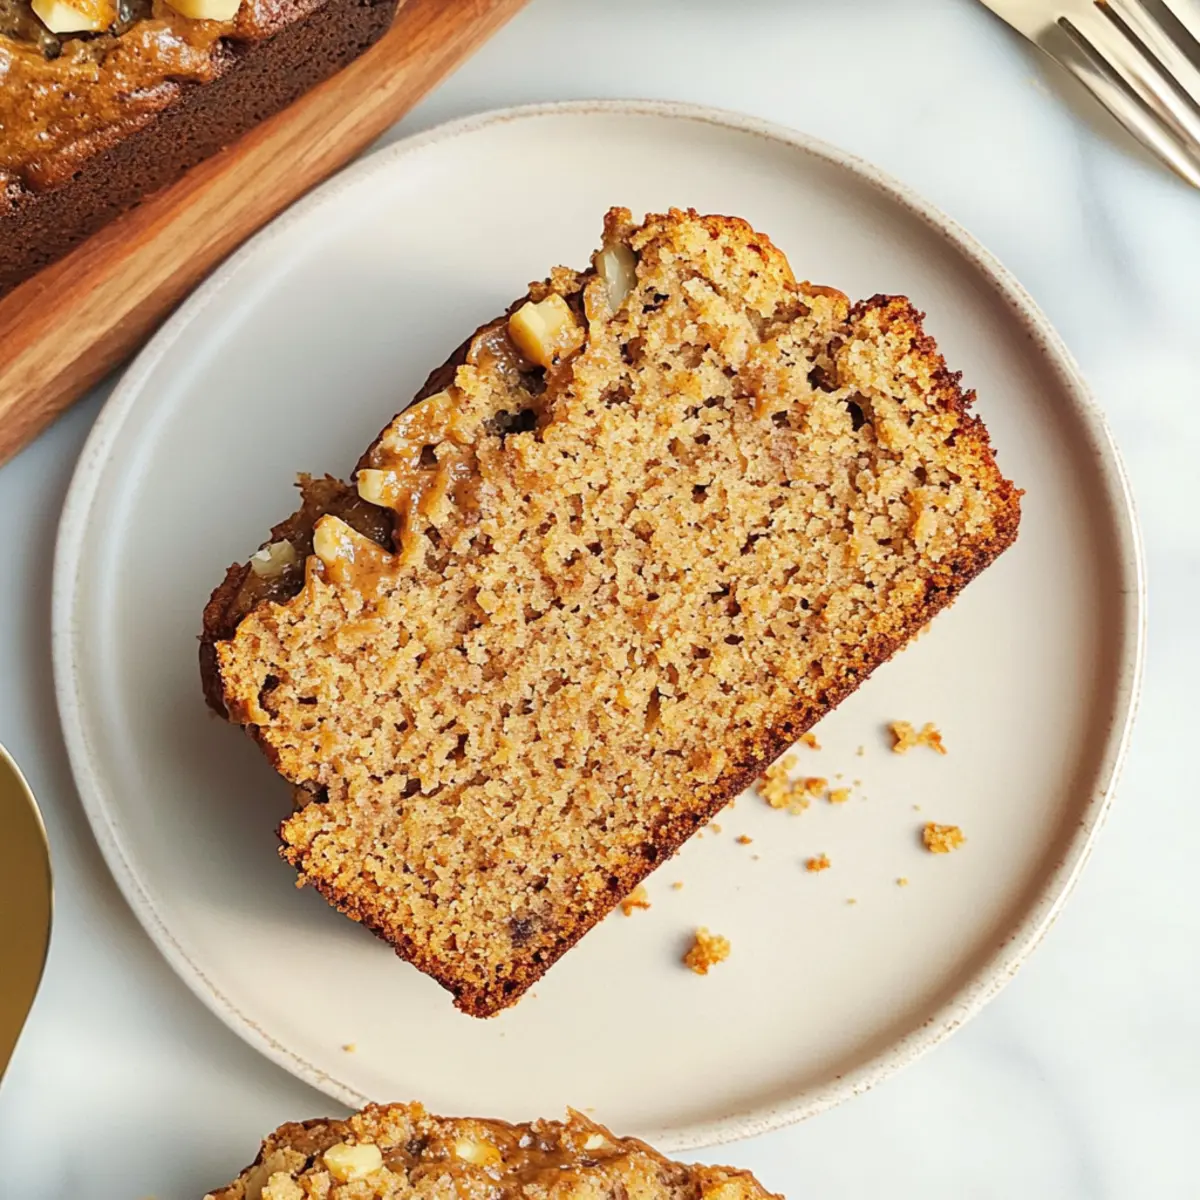
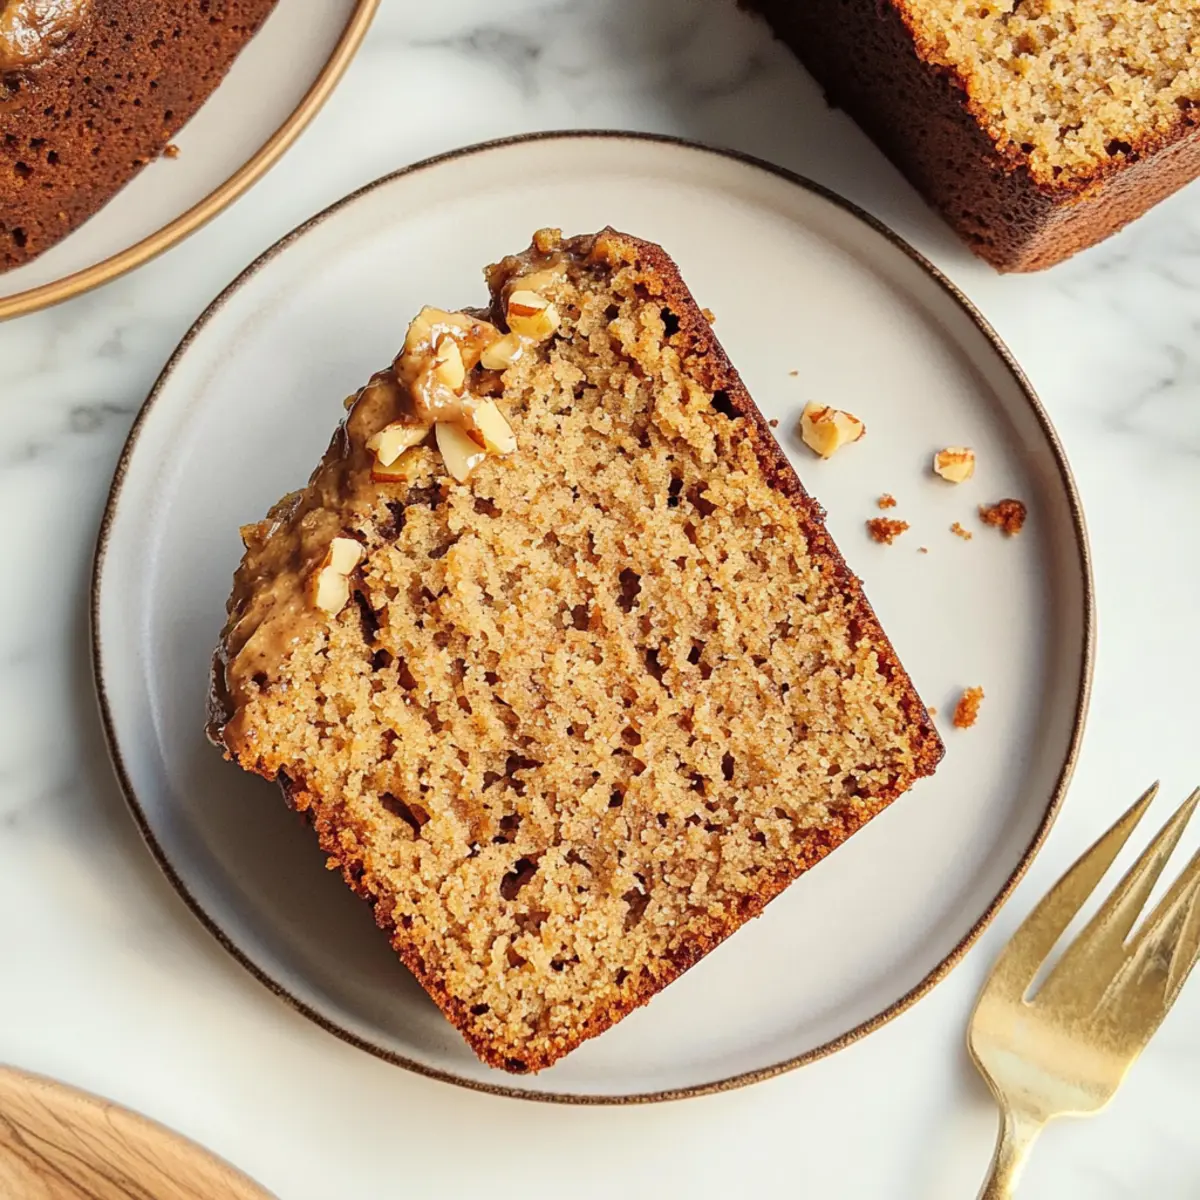
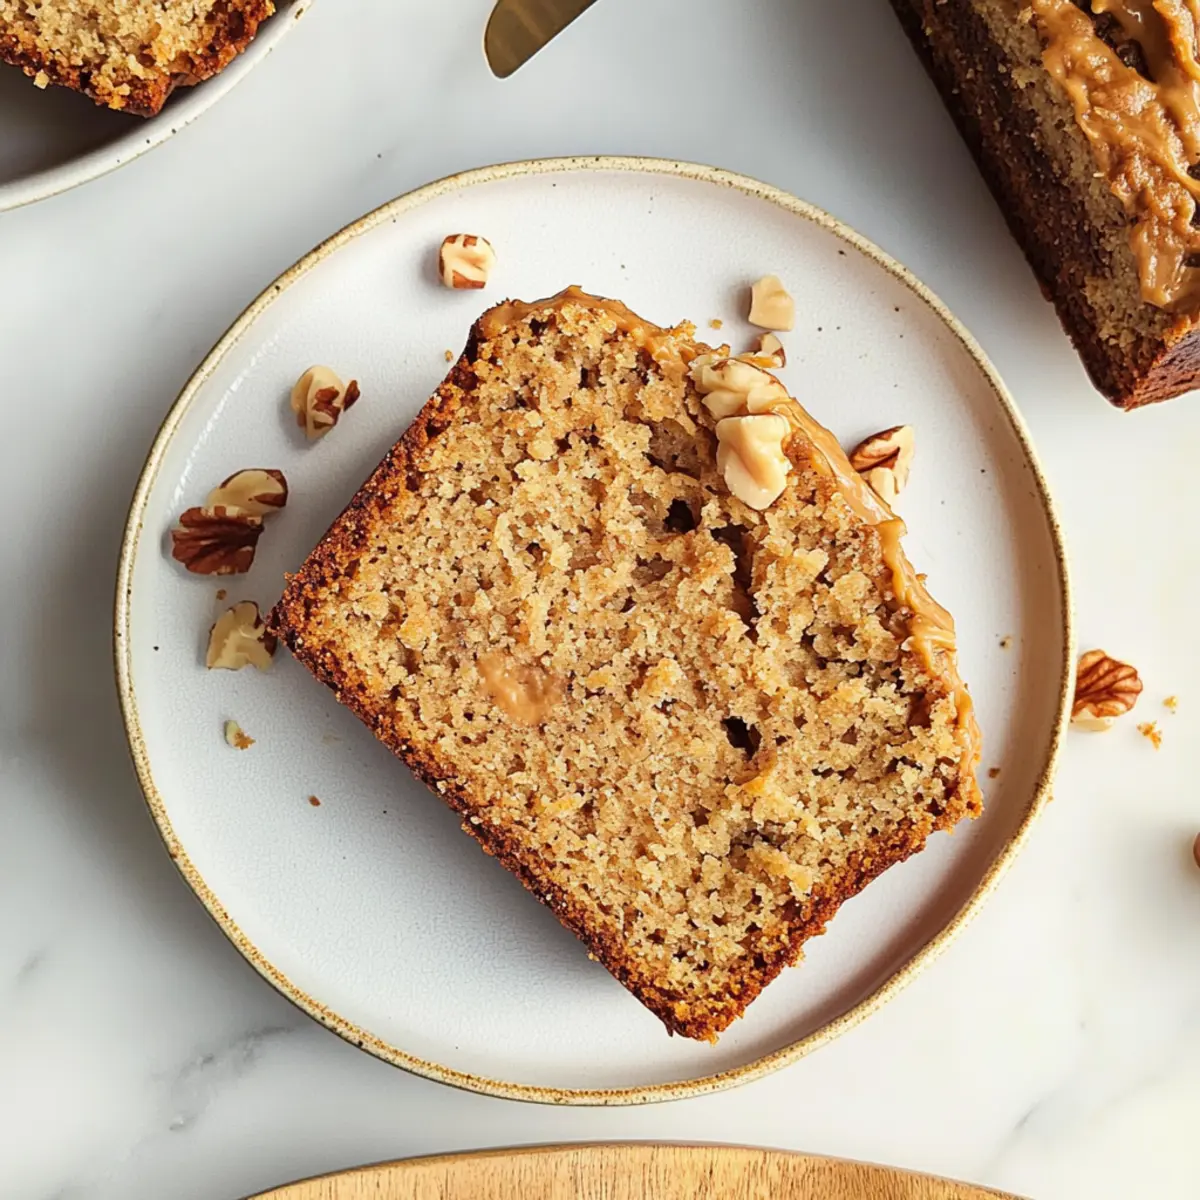
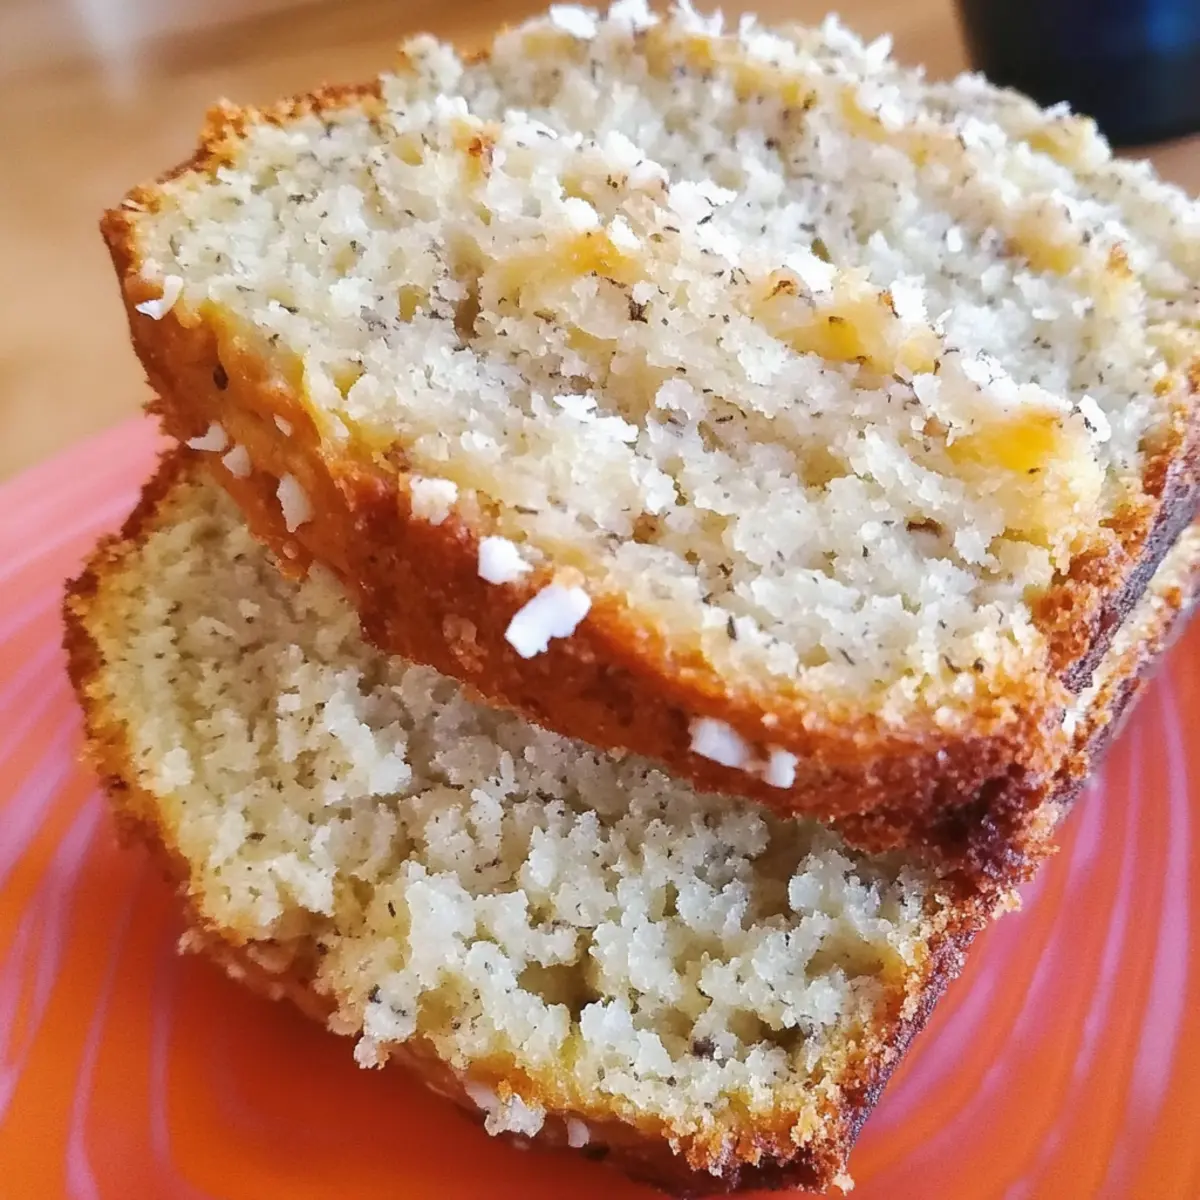
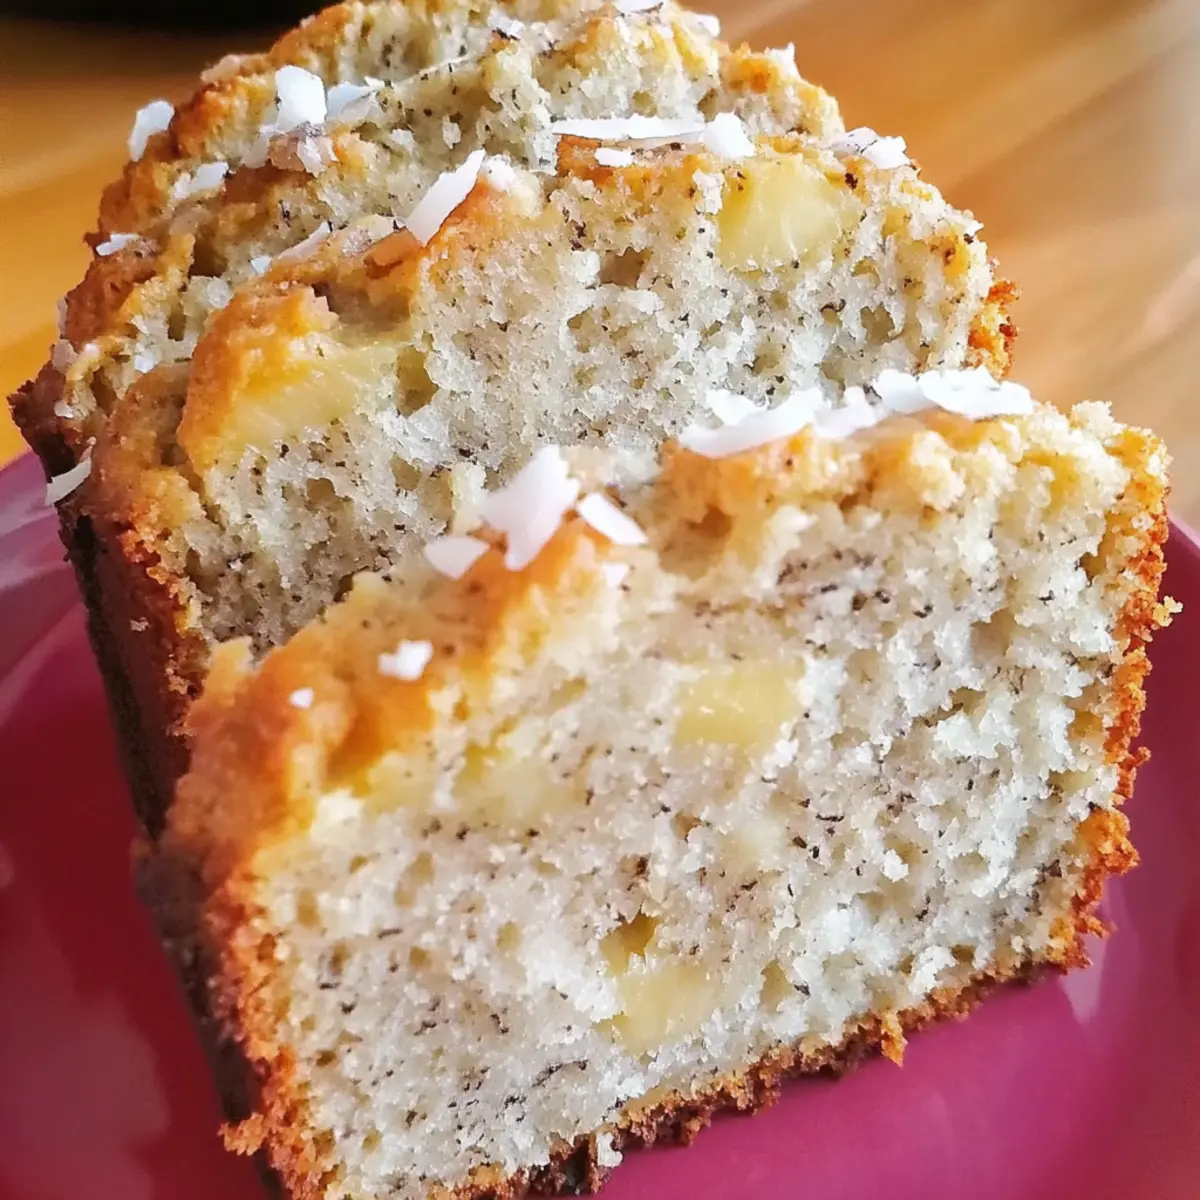
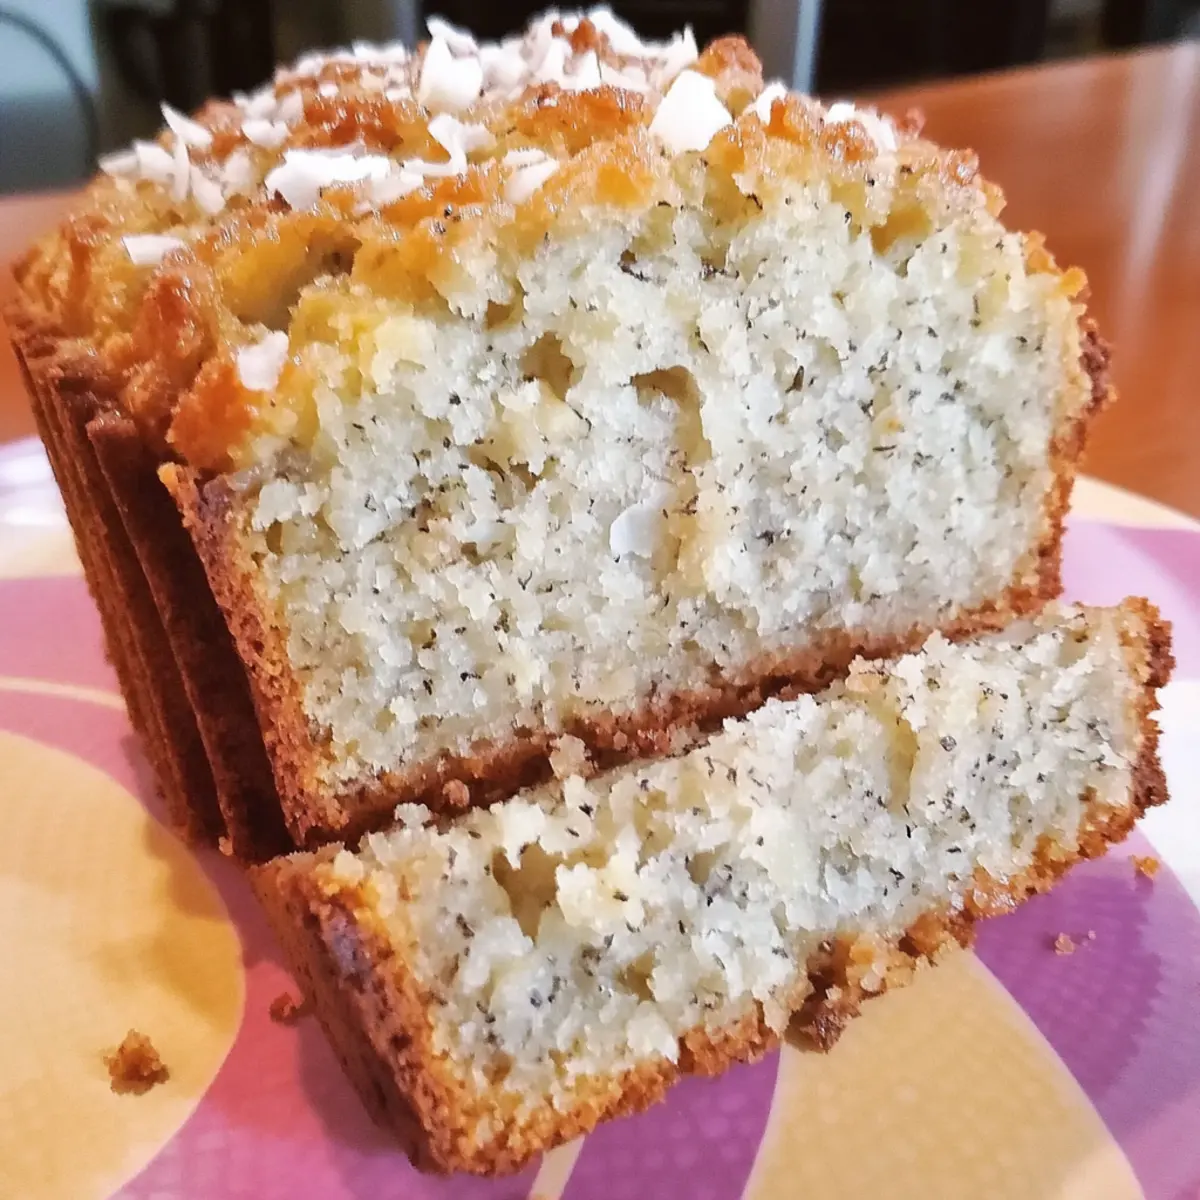
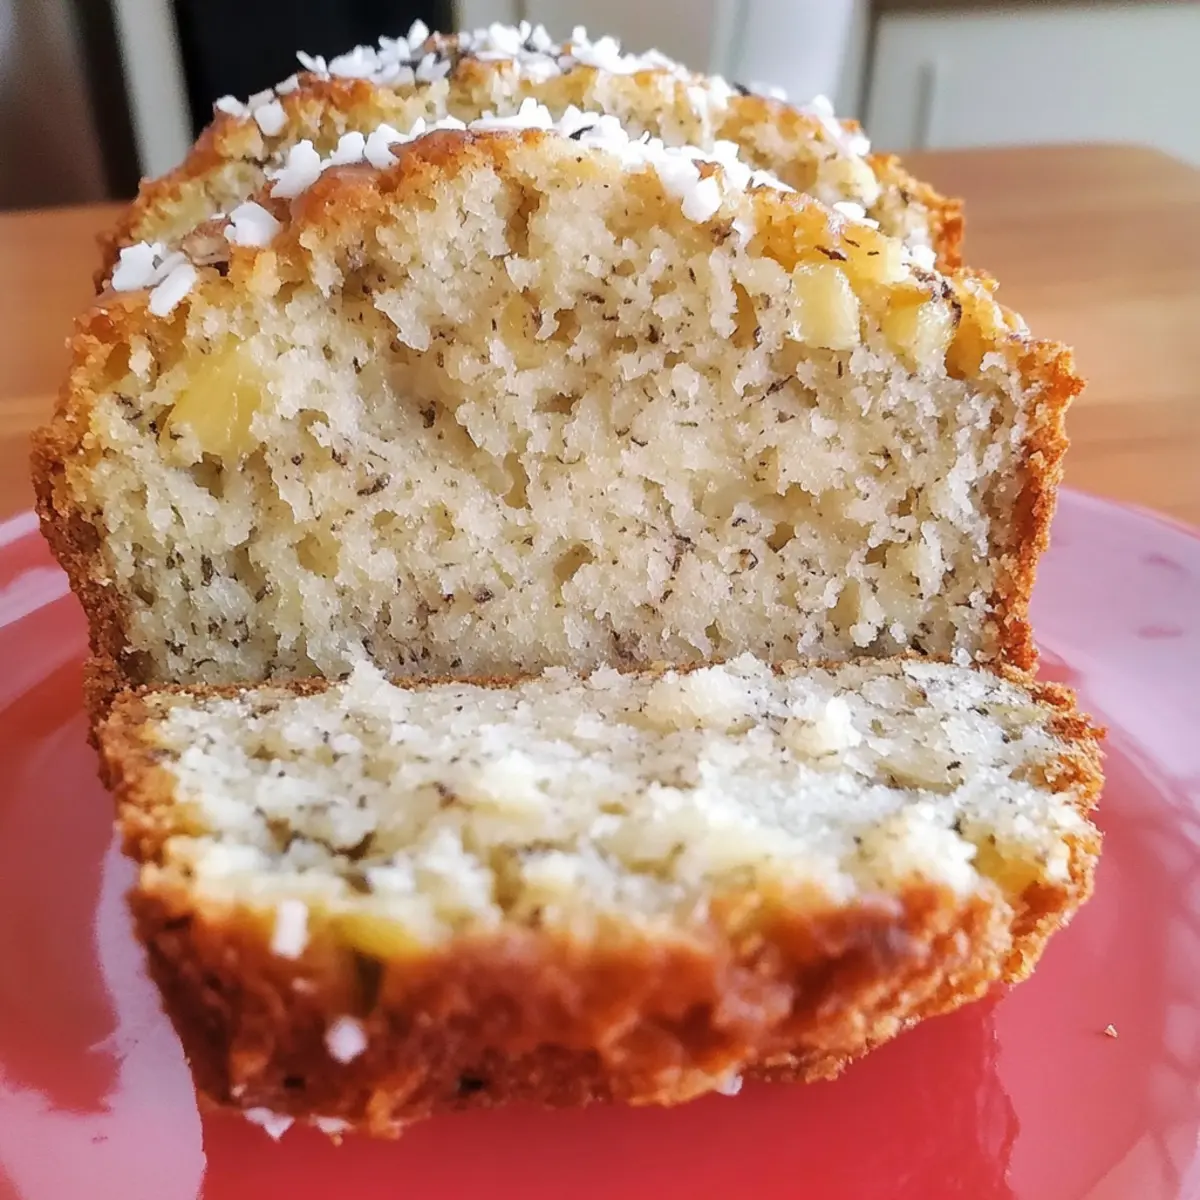
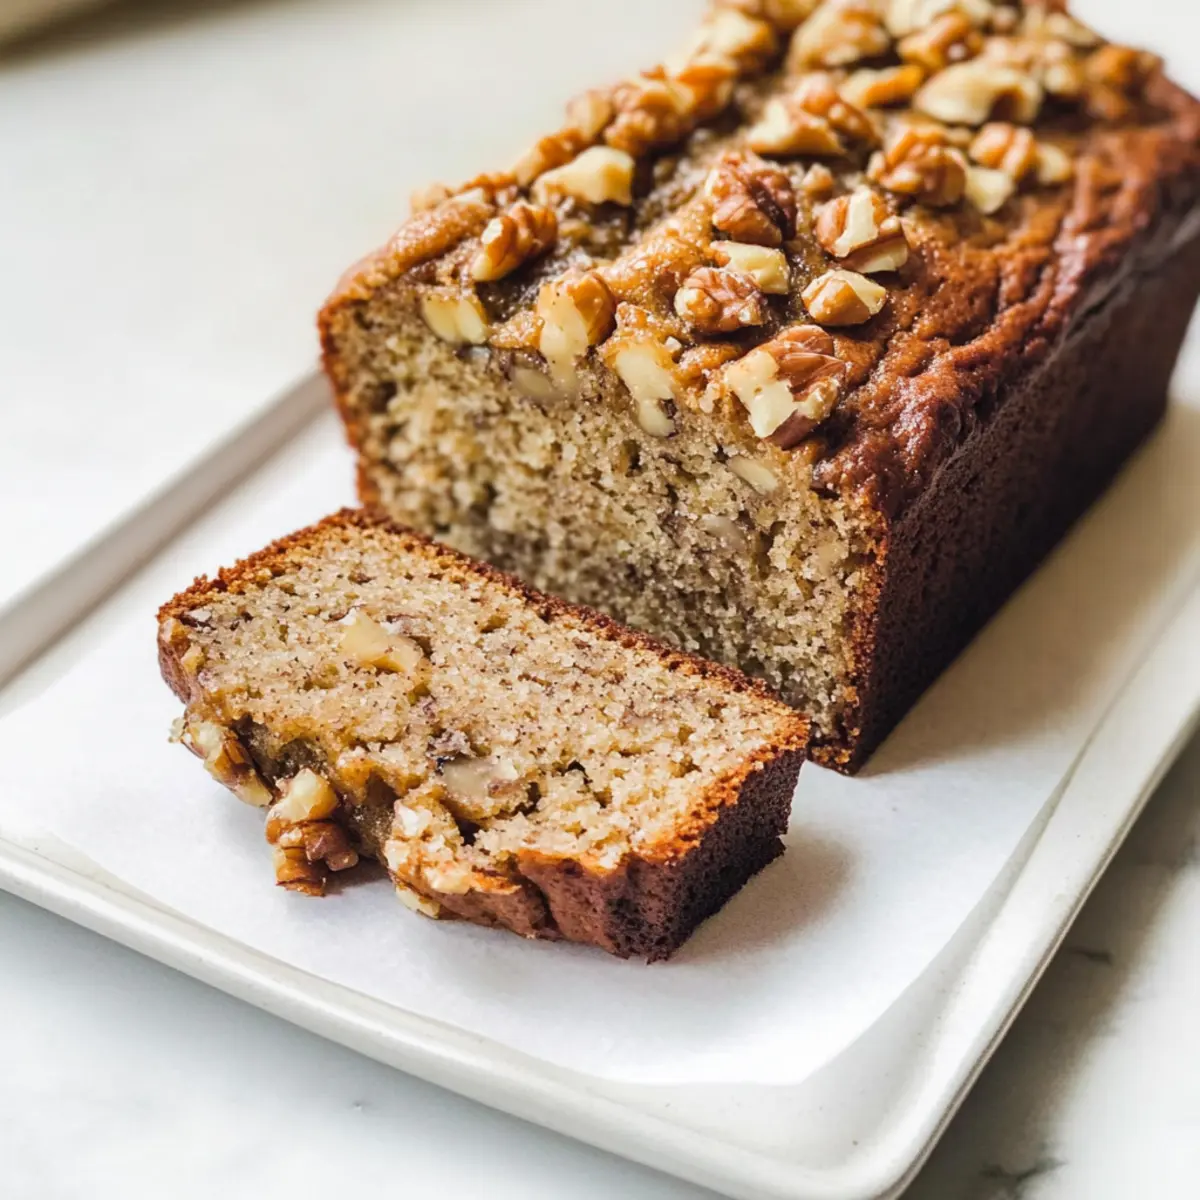
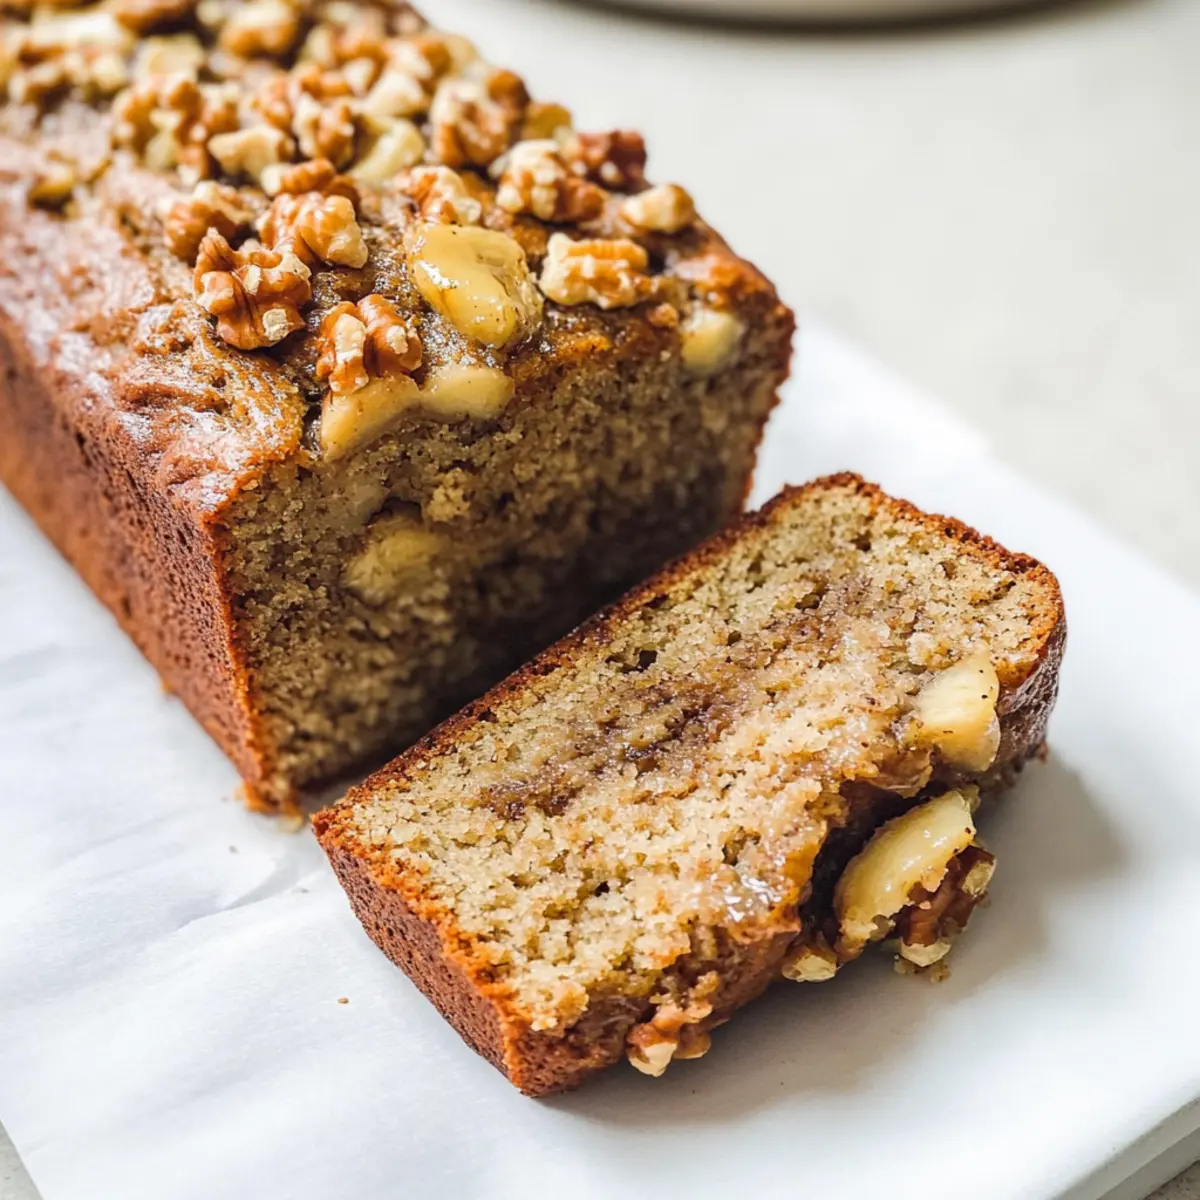
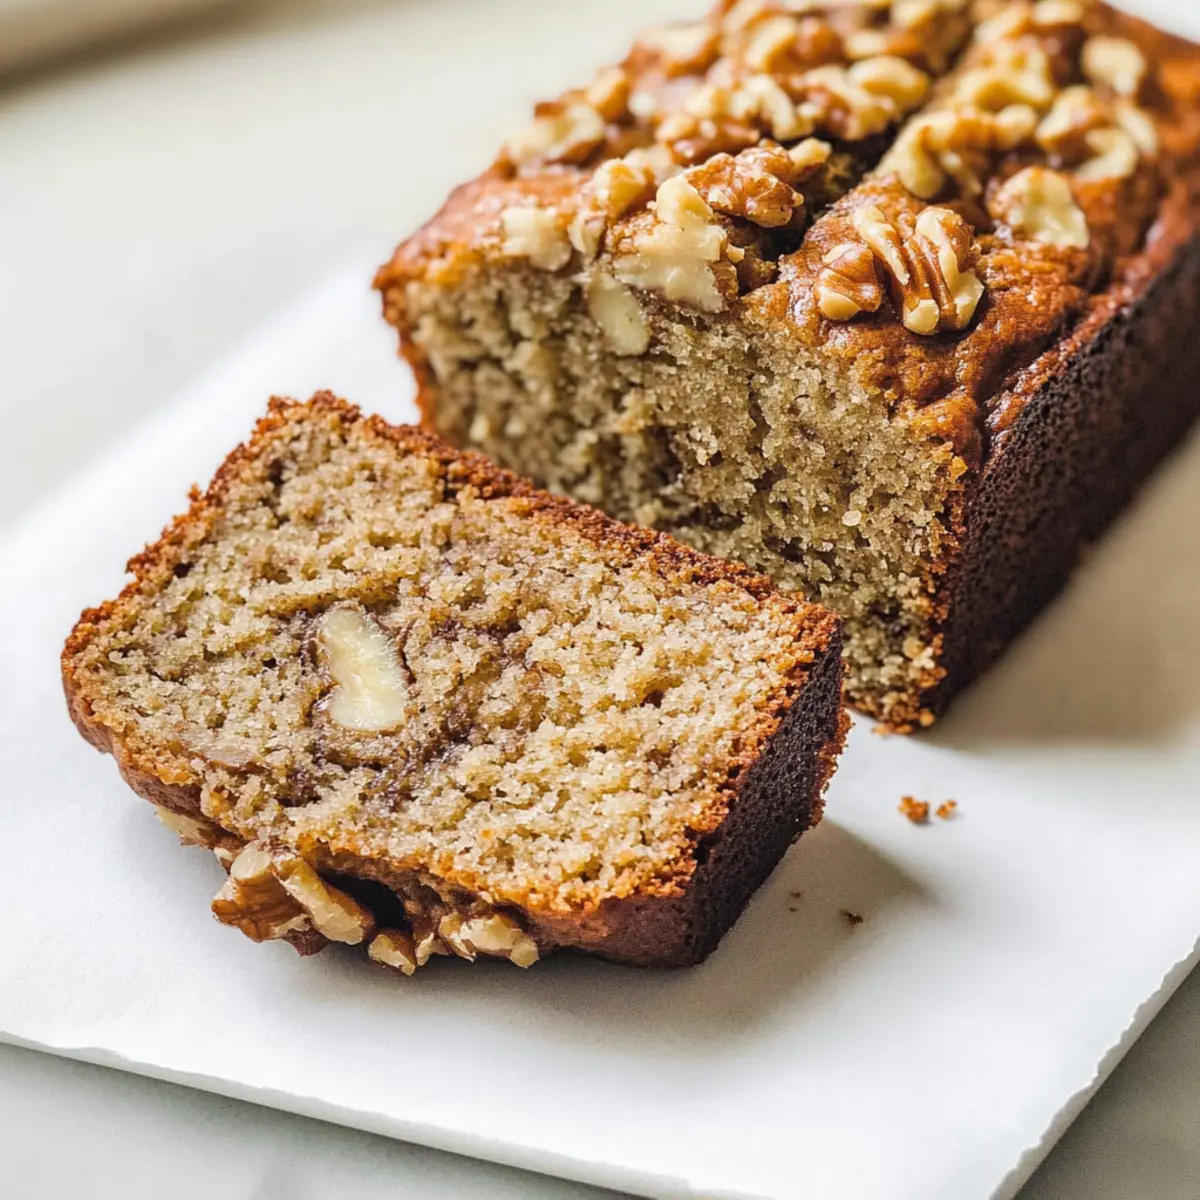
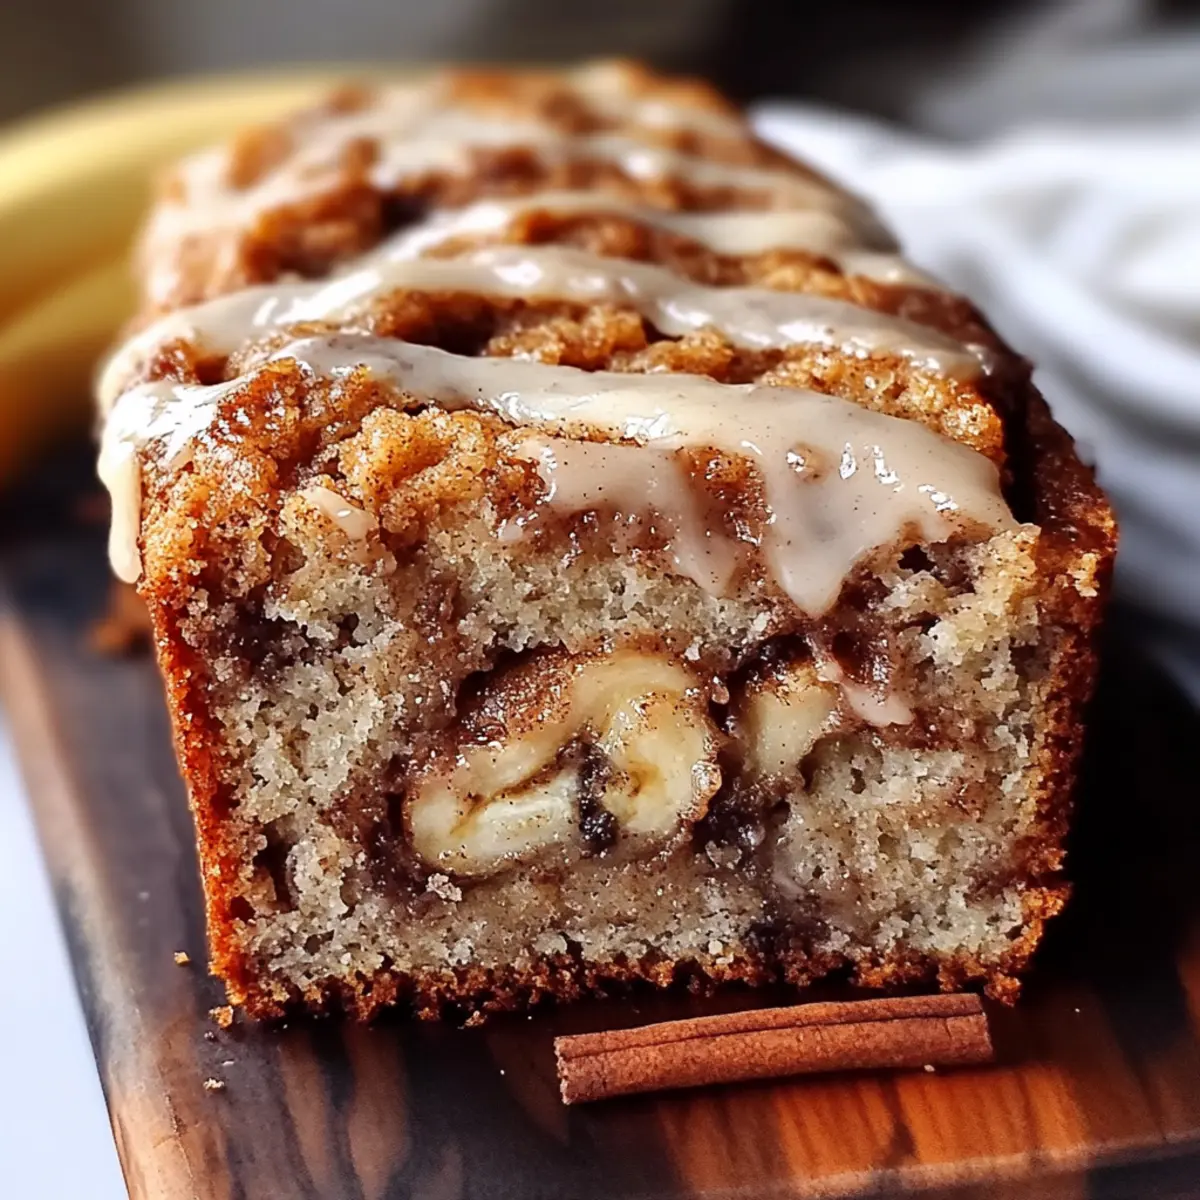
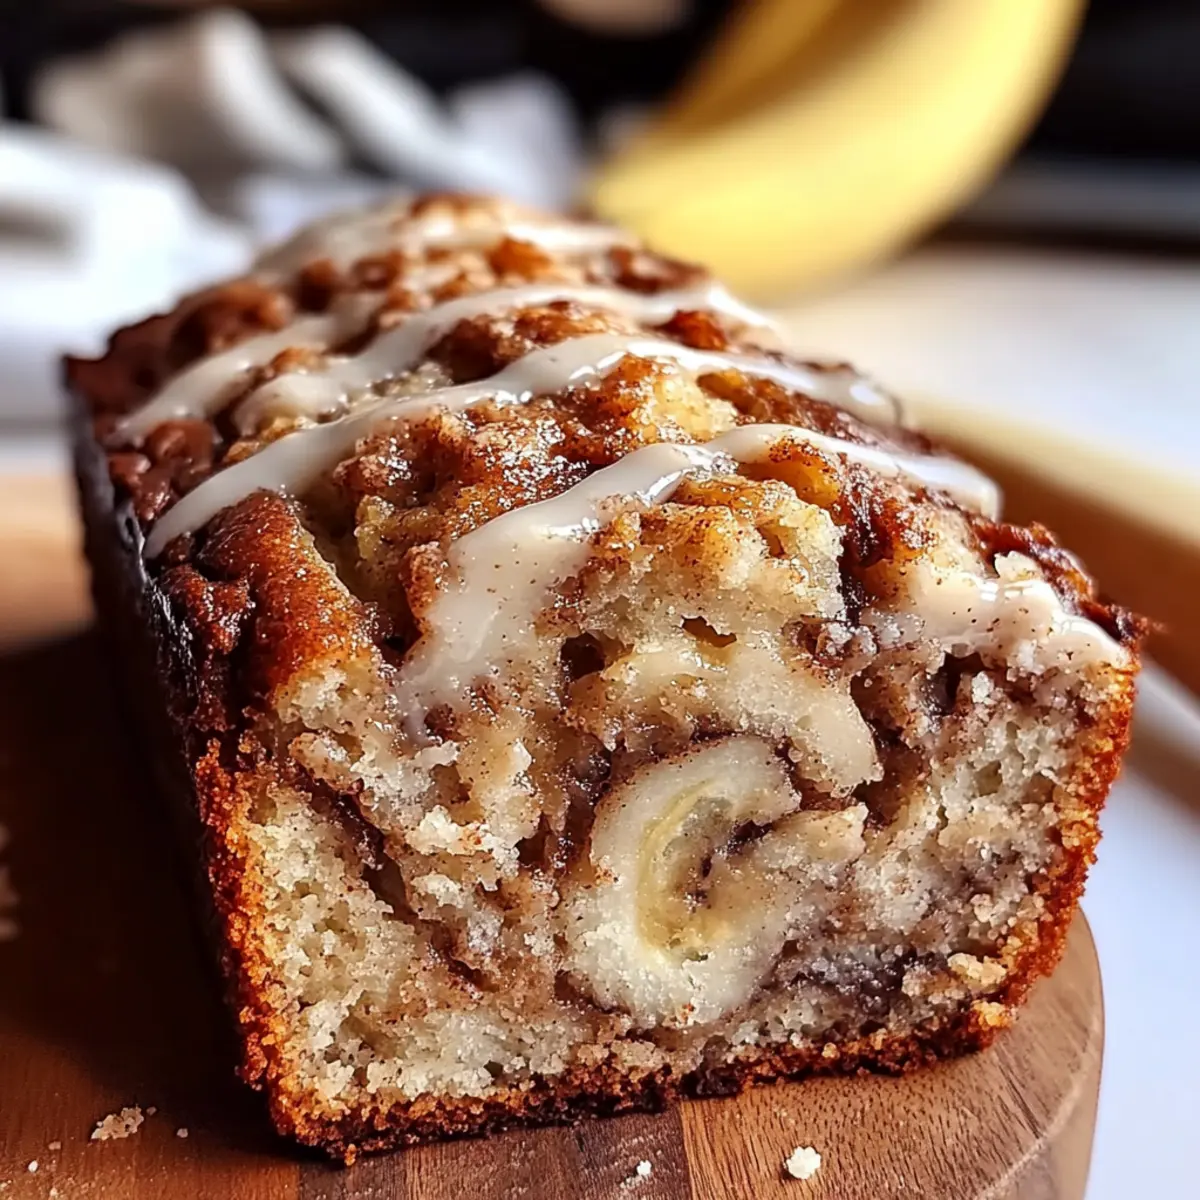
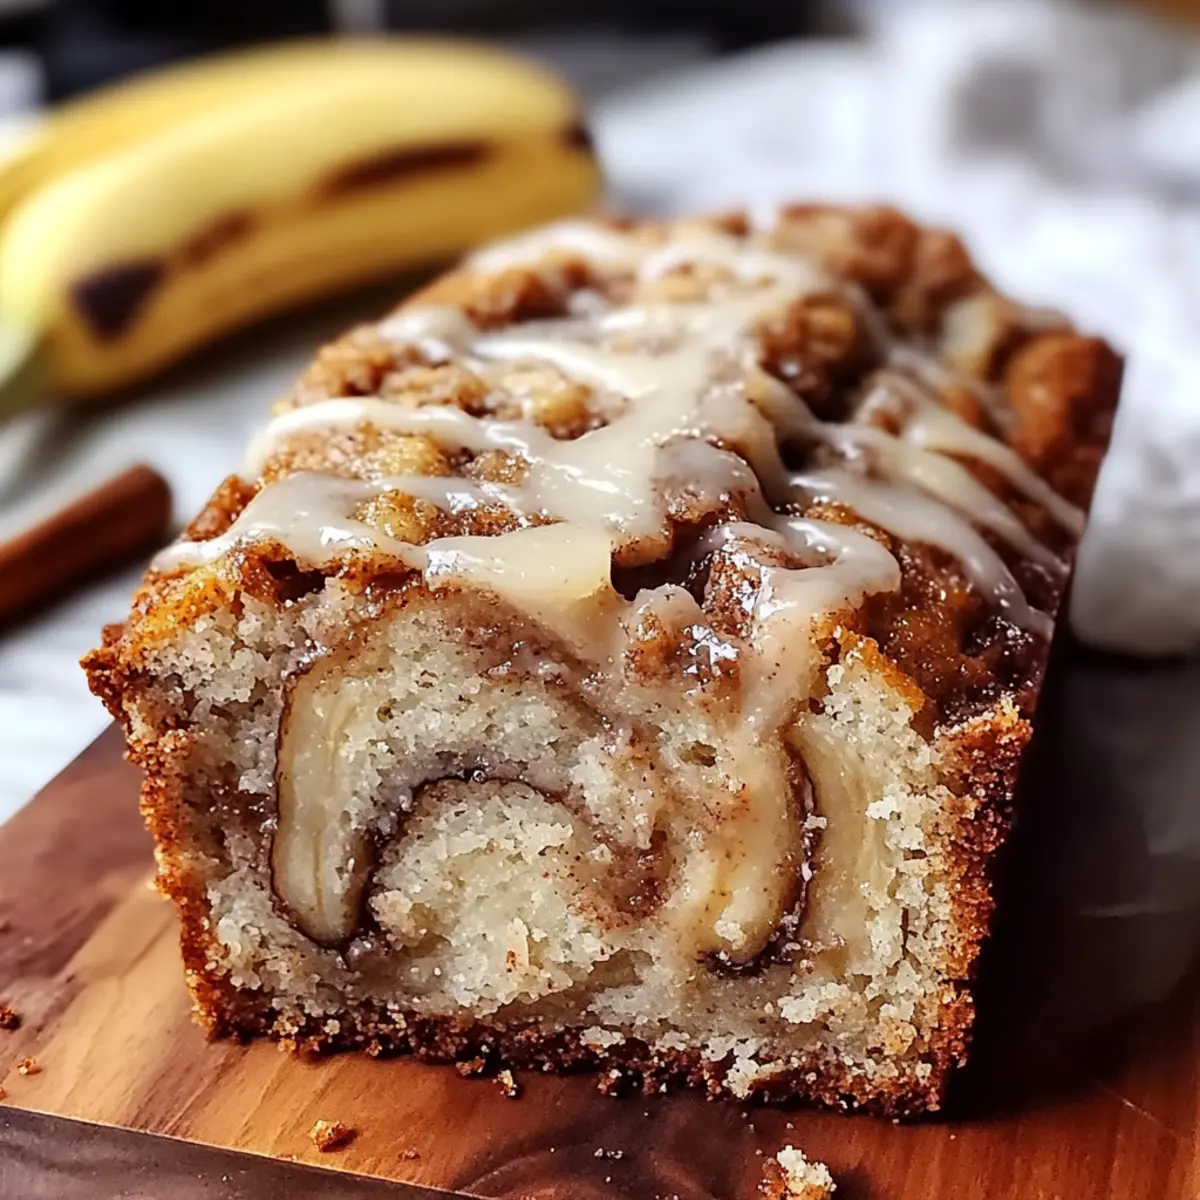
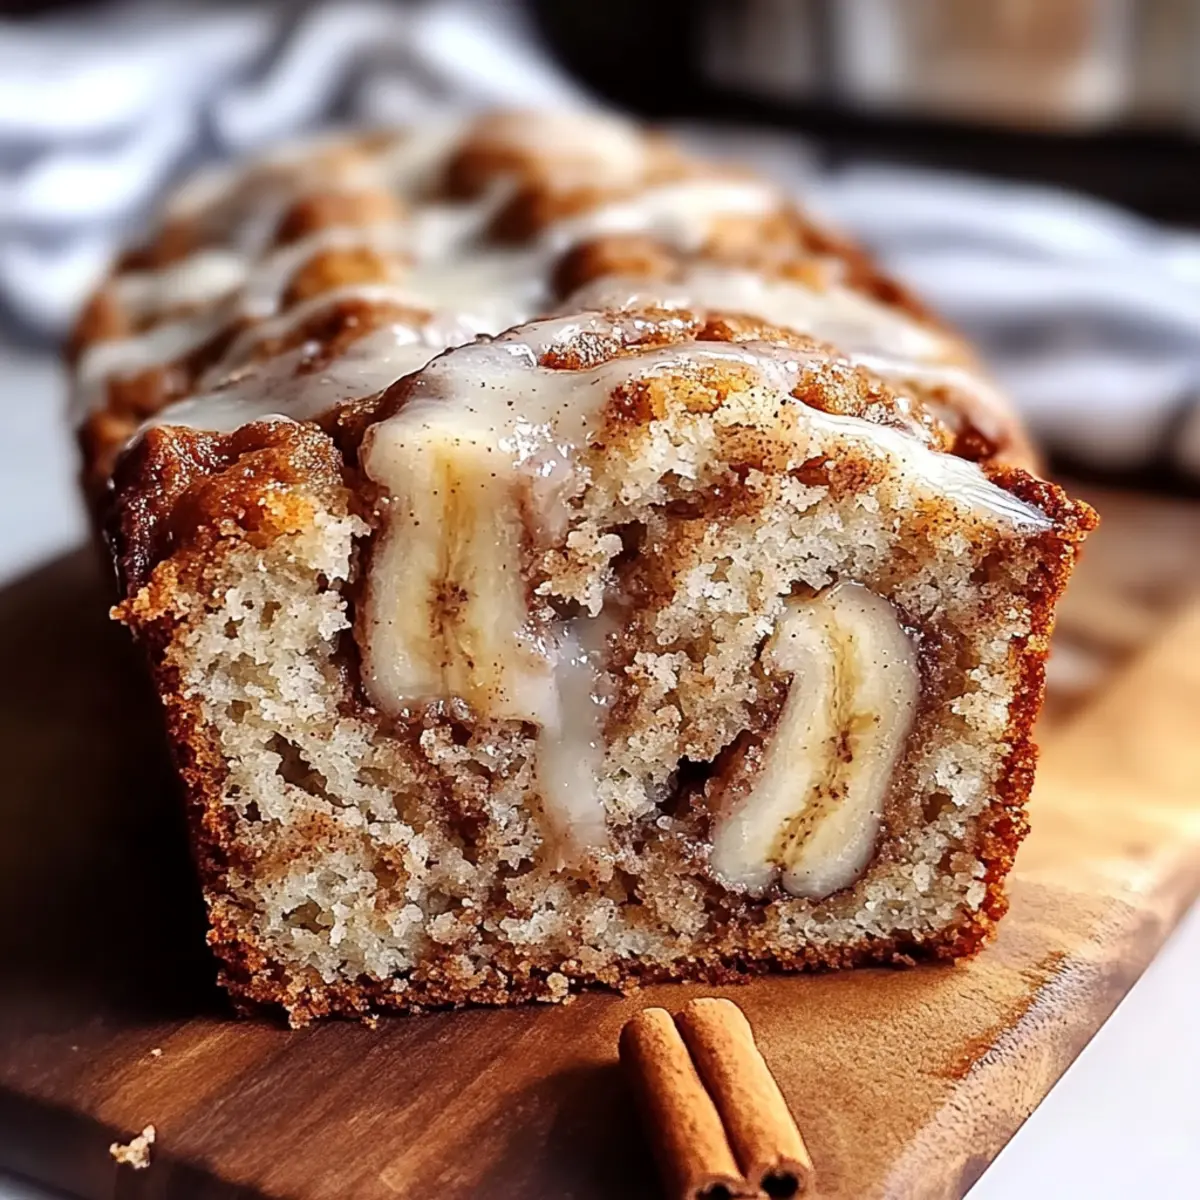
tastytrendingredients

  • Home
  • Recipes
    • Appetizers
    • Breakfast
    • Dessert
    • Dinner
    • Drinks
    • Salads
    • Snacks
    • Soups
  • About me
  • Contact me
menu icon
go to homepage
  • Home
  • Recipes
    • Appetizers
    • Breakfast
    • Dessert
    • Dinner
    • Drinks
    • Salads
    • Snacks
    • Soups
  • About me
  • Contact me
search icon
Homepage link
  • Home
  • Recipes
    • Appetizers
    • Breakfast
    • Dessert
    • Dinner
    • Drinks
    • Salads
    • Snacks
    • Soups
  • About me
  • Contact me
×

Creamy Pasta with Mushrooms and Peas in 30 Minutes Flat

August 22, 2025 by Grace Snow Leave a Comment

The aroma of sautéed garlic and onions swirls through the kitchen, instantly transporting me to a place of comfort and joy. This Creamy Pasta with Mushrooms and Peas is not just a meal; it is a cozy hug on a plate, perfect for those busy weeknights when cooking feels like a chore. Ready in 30 minutes or less, this dairy-free delight strikes the perfect balance between indulgence and simplicity, making it a family-favorite that everyone can enjoy. Whether you stick to the classic version or explore the many creative substitutions, you’ll find that this dish is as versatile as it is satisfying. So, are you ready to dive into this creamy, dreamy pasta adventure? Let’s get cooking!

Why is this pasta dish a must-try?

Quick and Easy: This Creamy Pasta with Mushrooms and Peas comes together in just 30 minutes, making it perfect for busy weeknights. No more takeout; enjoy a gourmet meal at home!

Dairy-Free Indulgence: Rich and creamy without the dairy, it ensures everyone can join in, whether they’re vegan or just looking to reduce dairy intake.

Customizable Flavors: Swap the fusilli for gluten-free options or elevate with your favorite veggies like spinach or kale to suit your taste.

Family-Friendly Appeal: Kids love the creamy texture and sweet peas, while adults appreciate the depth of flavor from mushrooms. Everyone's happy!

Perfectly Satisfying: This dish is a comforting hug on a plate, leaving you feeling full and delighted without the heaviness of traditional creamy pastas. Check out Pan Fried Mayo for a delicious side to complete your meal!

Creamy Pasta with Mushrooms and Peas Ingredients

For the Pasta
• Fusilli Pasta – The backbone of this dish; feel free to substitute with gluten-free pasta if needed.

For the Sauce
• Onion – Adds sweetness and depth; no direct substitution suggested for the best flavor.
• Garlic – Infuses aromatic goodness; fresh garlic is ideal, but garlic powder works in a pinch.
• Baby Bella Mushrooms – Provide umami and a hearty texture; white mushrooms can be a perfect alternative.
• Butter – Creates creaminess; switch to vegan butter or olive/coconut oil for a dairy-free version.
• Spelt Flour – Thickens the sauce; feel free to use all-purpose flour if that's what you have.
• Unsweetened Soy Milk – This is the base for your creamy sauce; almond or oat milk are great substitutes.
• Dried Oregano – Adds an herbaceous note; Italian seasoning works well as a substitute.
• Nutritional Yeast – Gives a cheezy richness; alternatively, use dairy-free mozzarella shreds.
• Salt, Pepper, and Cayenne Pepper – Essential for seasoning; adjust to taste for preferred spice level.

For Additional Flavor
• Frozen Peas – These add a burst of sweetness and color; swap for fresh peas or omit if desired.

Step‑by‑Step Instructions for Creamy Pasta with Mushrooms and Peas

Step 1: Prepare the Pasta
Begin by bringing a large pot of salted water to a boil over medium-high heat. Add 8 ounces of fusilli pasta and cook according to the package instructions, typically around 8 to 10 minutes, until al dente. Once cooked, drain the pasta and set it aside while you whip up the creamy sauce that will transform this dish into the delightful Creamy Pasta with Mushrooms and Peas.

Step 2: Sauté the Aromatics
In a large skillet, heat 1 tablespoon of vegan butter over medium heat. Add 1 diced onion and cook for about 4 minutes until it becomes soft and translucent. Stir in 2 minced garlic cloves and allow them to cook for an additional 2 minutes until fragrant, filling your kitchen with inviting aromas. These aromatics form the flavorful base of your creamy sauce.

Step 3: Cook the Mushrooms
Next, incorporate 8 ounces of sliced baby bella mushrooms into the skillet, stirring to combine. Cook for about 5 minutes, allowing the mushrooms to soften and release their juices while everything melds together beautifully. The mushrooms add a rich umami flavor that is essential for the Creamy Pasta with Mushrooms and Peas.

Step 4: Create the Creamy Base
Once the mushrooms are tender, add another tablespoon of vegan butter, allowing it to melt completely. Next, sprinkle in 2 tablespoons of spelt flour, stirring for 1-2 minutes until the mixture becomes sticky. Gradually pour in 1 cup of unsweetened soy milk, whisking continuously until the sauce becomes creamy and smooth, which should take about 3-5 minutes.

Step 5: Season the Sauce
Now, it's time to introduce flavor! Stir in 1 teaspoon of dried oregano, nutritional yeast, salt, and pepper to taste. For a little kick, consider adding a pinch of cayenne pepper. Mix well, allowing the seasonings to blend into the creamy sauce for about 1-2 minutes, ensuring it's as flavorful as the Creamy Pasta with Mushrooms and Peas should be.

Step 6: Add the Peas and Pasta
Fold in 1 cup of frozen peas and the drained pasta into the creamy sauce, stirring gently to combine. Allow the mixture to cook for an additional 4-5 minutes over medium heat until everything is warmed through and the peas are bright green. This step not only adds sweetness but also provides a lovely pop of color to the dish.

Step 7: Final Adjustments
Taste your Creamy Pasta with Mushrooms and Peas and adjust the seasoning as necessary. You might want to add extra salt, pepper, or even a sprinkle of cayenne depending on your preference. Give it a final stir, ensuring all flavors are perfectly balanced before serving.

Step 8: Serve and Garnish
Finally, spoon generous portions of your creamy pasta onto plates, and don’t forget to garnish with a sprinkle of dried oregano or crushed red pepper for added flavor and visual appeal. This creamy, dreamy dish is now ready to be enjoyed immediately, bringing warmth and comfort to your table!

What to Serve with Creamy Pasta with Mushrooms and Peas

A delightful dining experience is just around the corner with these perfect pairings to elevate your meal.

  • Garlic Bread: This warm, buttery classic adds a crunchy texture and complements the creamy sauce beautifully. Dip it into the leftover sauce for maximum enjoyment!

  • Simple Side Salad: A fresh mix of greens with a light vinaigrette brings balance to the rich pasta. The crunch of cucumbers and tomatoes adds a refreshing contrast.

  • Roasted Vegetables: Seasoned and caramelized, veggies like bell peppers or zucchini enrich your meal with vibrant flavors and colorful appeal. They bring an extra layer of nutrition to your plate.

  • Herbed Quinoa: This fluffy, protein-packed side adds a nutty flavor and a chewy texture that pairs wonderfully with the pasta. Plus, it's a fab gluten-free option to keep things light.

  • Chilled White Wine: Opt for a crisp Sauvignon Blanc or a refreshing Pinot Grigio, both of which complement the earthy flavors of mushrooms while keeping your meal lively.

  • Chocolate Mousse: End your meal on a sweet note with this creamy dessert. Its rich texture and bittersweet notes contrast perfectly with the savory pasta, leaving everyone satisfied.

Storage Tips for Creamy Pasta with Mushrooms and Peas

Fridge: Store leftovers in an airtight container in the refrigerator for up to 3 days. Allow the dish to cool completely before sealing to prevent condensation.

Freezer: For longer storage, place cooled creamy pasta in a freezer-safe container, where it can last up to 2 months. Make sure to label it clearly with the date!

Reheating: When ready to enjoy, reheat on the stovetop with a splash of water or soy milk to restore the creamy texture of your Creamy Pasta with Mushrooms and Peas and prevent it from drying out.

Serving Fresh: The pasta is best enjoyed fresh, so if possible, only prepare what you will eat in one sitting to savor its delicious creaminess.

Expert Tips for Creamy Pasta with Mushrooms and Peas

  • Onion & Garlic Mastery: Ensure you sauté the onion and garlic thoroughly to build a robust flavor foundation for your creamy pasta. Overcooking can lead to bitterness, so keep an eye on them!

  • Perfect Pasta Texture: Aim for al dente pasta; it should have a slight bite. If overcooked, it will become mushy and lose its delightful texture in the Creamy Pasta with Mushrooms and Peas.

  • Creaminess Check: Pour the soy milk gradually while whisking continuously to achieve that luxurious creamy consistency. Avoid adding it too quickly to prevent clumps.

  • Season to Taste: Always taste and adjust the seasoning towards the end. You can add more salt, pepper, or even cayenne to enhance the flavors according to your preference.

  • Leftover Love: Store any leftovers in an airtight container in the fridge. To reheat, add a splash of water or soy milk to restore the creamy texture before warming it on the stovetop.

Creamy Pasta with Mushrooms and Peas Variations

Feel empowered to make this dish your own by swapping in ingredients that excite your taste buds and fit your dietary needs!

  • Gluten-Free: Substitute fusilli with gluten-free pasta or chickpea pasta for a nutritious twist. You'll enjoy the same creamy goodness, but with a protein boost that you'll feel great about.

  • Extra Greens: Toss in fresh spinach or kale during the last few minutes of cooking for a vibrant color and added nutrients. This not only brightens the dish visually but also infuses it with fresh flavor that your family will love!

  • Mushroom Medley: Swap baby bella mushrooms for shiitake or portobello mushrooms for a different flavor profile. Each mushroom variety adds its own unique taste and texture, making every bite an adventure.

  • Protein Power: Incorporate cooked tofu or chickpeas for a heartier meal. This addition transforms your pasta into a satisfying protein-rich dish that keeps hunger at bay.

  • Creaminess Upgrade: For an even richer sauce, use coconut milk instead of soy milk. This twist imparts a subtle sweetness that beautifully complements the savory mushrooms and offers a hint of tropical flair.

  • Spice it Up: Add a hint of red pepper flakes or a dash of sriracha for an extra kick. This simple adjustment can elevate the flavor profile and awaken your taste buds to new levels of excitement.

  • Herbaceous Twist: Experiment with fresh herbs like basil or parsley instead of dried oregano. Fresh herbs provide a burst of freshness that complements the creaminess beautifully.

  • Nutty Crunch: Sprinkle toasted pine nuts or walnuts on top for a delightful crunch. This not only enhances the dish's texture but also adds a lovely nutty flavor that pairs perfectly with the creamy pasta.

With these delightful variations, you'll find plenty of ways to enjoy your Creamy Pasta with Mushrooms and Peas, whether you're looking to try something new or accommodate different dietary preferences. Check out our delicious Skillet Pasta Sun for more pasta inspiration!

Make Ahead Options

These Creamy Pasta with Mushrooms and Peas are perfect for busy home cooks looking to simplify mealtime! You can prepare the creamy sauce (without the peas and pasta) up to 24 hours in advance. To do this, cook the sauce and let it cool completely before transferring it to an airtight container for refrigeration. When you’re ready to serve, just reheat the sauce on the stovetop over low heat, adding a splash of soy milk if it thickens too much. Cook the pasta fresh so it remains al dente, then fold it into the warmed sauce along with the peas just before serving for that creamy, comforting taste everyone loves!

Creamy Pasta with Mushrooms and Peas Recipe FAQs

What type of pasta should I use for this recipe?
Absolutely! Fusilli works wonderfully as it captures the creamy sauce perfectly. However, feel free to use any type of pasta you enjoy, including gluten-free options like brown rice or chickpea pasta for a protein boost.

How do I store leftovers of this creamy pasta?
For sure! Store any leftovers in an airtight container in the refrigerator for up to 3 days. Be sure to let the pasta cool completely before sealing it to prevent condensation from making it soggy.

Can I freeze Creamy Pasta with Mushrooms and Peas?
Certainly! This dish can be frozen for up to 2 months. Allow it to cool fully, then transfer it to a freezer-safe container. Label it with the date, and when you're ready to enjoy it again, just thaw overnight in the refrigerator before reheating.

What should I do if the pasta sauce is too thick?
No worries! If you find the sauce too thick, simply add a splash of water or additional soy milk while stirring over low heat until you reach your desired consistency. This will help restore that creamy texture while warming the dish back up.

Are there any allergy concerns for this dish?
Definitely! This recipe is dairy-free, which is perfect for those with lactose intolerance or anyone following a vegan diet. However, it's essential to check the labels of your ingredients, especially your soy milk and nutritional yeast, as some brands may include allergens like nuts or gluten.

Can I add extra vegetables to this creamy pasta?
Very much! Feel free to incorporate any vegetables you love, such as spinach, kale, or even colored bell peppers. Just sauté them along with the onions or toss them in last for a fresh crunch. The more the merrier with veggies!

Creamy Pasta with Mushrooms and Peas

Creamy Pasta with Mushrooms and Peas in 30 Minutes Flat

Enjoy this Creamy Pasta with Mushrooms and Peas, a comforting and versatile dish perfect for busy weeknights.
Print Recipe Pin Recipe
Prep Time 10 minutes mins
Cook Time 20 minutes mins
Total Time 30 minutes mins
Servings: 4 servings
Course: Dinner
Cuisine: Italian
Calories: 350
Ingredients Equipment Method Nutrition Notes

Ingredients
  

For the Pasta
  • 8 ounces Fusilli Pasta Feel free to substitute with gluten-free pasta if needed.
For the Sauce
  • 1 medium Onion Adds sweetness and depth.
  • 2 cloves Garlic Fresh garlic is ideal but garlic powder works.
  • 8 ounces Baby Bella Mushrooms White mushrooms can be an alternative.
  • 1 tablespoon Vegan Butter Switch to olive/coconut oil for a dairy-free version.
  • 2 tablespoons Spelt Flour Feel free to use all-purpose flour.
  • 1 cup Unsweetened Soy Milk Almond or oat milk are great substitutes.
  • 1 teaspoon Dried Oregano Italian seasoning works well as a substitute.
  • 2 tablespoons Nutritional Yeast Alternatively use dairy-free mozzarella shreds.
  • to taste Salt Essential for seasoning.
  • to taste Pepper Essential for seasoning.
  • to taste Cayenne Pepper For preferred spice level.
For Additional Flavor
  • 1 cup Frozen Peas Swap for fresh peas or omit if desired.

Equipment

  • Large pot
  • Large skillet
  • Whisk

Method
 

Step-by-Step Instructions
  1. Bring a large pot of salted water to a boil over medium-high heat. Add fusilli pasta and cook according to package instructions (8-10 minutes). Drain and set aside.
  2. In a large skillet, heat vegan butter over medium heat. Add diced onion and cook for about 4 minutes until soft and translucent. Stir in minced garlic and cook for an additional 2 minutes until fragrant.
  3. Incorporate sliced baby bella mushrooms, stirring to combine. Cook for about 5 minutes until the mushrooms soften and release their juices.
  4. Add another tablespoon of vegan butter and allow it to melt completely. Sprinkle in spelt flour, stirring for 1-2 minutes until the mixture becomes sticky. Gradually pour in soy milk, whisking continuously until creamy and smooth (3-5 minutes).
  5. Stir in dried oregano, nutritional yeast, salt, and pepper to taste. For a kick, add a pinch of cayenne pepper. Mix well for about 1-2 minutes.
  6. Fold in frozen peas and drained pasta into the creamy sauce, stirring gently. Cook for an additional 4-5 minutes until warmed through and peas are bright green.
  7. Taste and adjust the seasoning as necessary. Add extra salt, pepper, or cayenne to enhance the flavors.
  8. Spoon generous portions onto plates and garnish with dried oregano or crushed red pepper before serving.

Nutrition

Serving: 1servingsCalories: 350kcalCarbohydrates: 60gProtein: 10gFat: 12gSaturated Fat: 3gPolyunsaturated Fat: 2gMonounsaturated Fat: 1gSodium: 500mgPotassium: 300mgFiber: 5gSugar: 4gVitamin A: 5IUVitamin C: 10mgCalcium: 20mgIron: 10mg

Notes

Store leftovers in an airtight container in the refrigerator for up to 3 days. Reheat on stovetop with a splash of water or soy milk to restore creaminess.

Tried this recipe?

Let us know how it was!

Delicious Veggie Pasta with Marinara Sauce in One Pot!

August 22, 2025 by Grace Snow Leave a Comment

As I stirred the pot, a wave of savory aromas filled my kitchen, instantly transforming it into a cozy haven. There's something magical about creating my One-Pot Veggie Pasta with Marinara Sauce that warms not just the stomach but the soul. This dish is a stellar choice for anyone seeking a quick, easy meal with minimal cleanup, ideal for busy nights or a relaxing family dinner. Packed with fresh vegetables and flavor, it's not only a delightful way to enjoy a hearty pasta experience but also offers the perk of being completely plant-based. Plus, you can easily customize it to fit gluten-free needs! Are you ready to dive into a delicious bowl of veggie goodness?

Why choose veggie pasta tonight?

Simplicity: This One-Pot Veggie Pasta is ready in just 30 minutes, making it a perfect choice for a hectic weeknight.

Flavor Explosion: The rich garlic marinara pairs perfectly with a medley of fresh vegetables, ensuring every bite is packed with taste.

Customizable: You can effortlessly switch out veggies or pasta types based on what you have on hand, making it a truly versatile meal.

Healthy Comfort Food: Enjoy a hearty dish that’s entirely plant-based yet satisfying enough to please even the pickiest eaters.

Minimal Cleanup: With everything cooked in one pot, you'll spend less time washing dishes and more time enjoying your delicious meal.

Why not pair it with a refreshing side salad or some homemade garlic bread for a complete feast? And if you’re curious about more delicious pasta options, check out Seafood Pasta Savory or Cauliflower Pasta Ready for inspiration!

Veggie Pasta with Marinara Sauce Ingredients

• Dive into the world of flavors with this delightful dish!

For the Pasta

  • Rigatoni Pasta – The star of the show! You can swap it for any pasta to match your preference, just adjust the cooking time accordingly.

For the Sauce

  • Fresh Garlic – Brings a beautiful aroma; if you don't have it, garlic powder works just as well.
  • Marinara Sauce – Choose a high-quality marinara; it’s key to achieving a rich and flavorful base that celebrates the veggie pasta with marinara sauce.

For the Vegetables

  • Onions – Adds sweetness and depth; feel free to caramelize them for extra flavor.
  • Squash – Bright in color and taste! You can substitute it with zucchini or bell peppers if desired.
  • Mushrooms – Earthy and savory, they provide amazing texture; try shiitake or button mushrooms.
  • Spinach – A nutrient-packed leafy green; swap this with kale for a different twist.

For the Garnish

  • Crushed Red Pepper – For those who like a little heat, sprinkle this on top!
  • Fresh/Dried Herbs – Enhance the flavor profile with basil or parsley according to your taste.
  • Nutritional Yeast – A cheesy, nutty addition that's perfect for vegan diets. You can skip this if you're not vegan, but it’s sure to enhance the dish!

This ingredient lineup will help create a scrumptious one-pot meal that everyone at the table will love!

Step‑by‑Step Instructions for One-Pot Veggie Pasta with Flavorful Garlic Marinara

Step 1: Combine the Ingredients
In a large pot, add the rigatoni pasta, minced garlic, oregano, and a colorful assortment of chopped vegetables such as onions, squash, mushrooms, and spinach. Pour in your chosen marinara sauce and stir well to coat everything evenly. This hearty mix sets the stage for a delicious one-pot veggie pasta with marinara sauce.

Step 2: Add the Cooking Liquid
Next, pour in enough water or vegetable broth to cover the pasta and vegetables, following the pasta's package instructions. Typically, you’ll want about 4 cups. Stir everything together while ensuring it’s well combined, and this will create a flavorful cooking base for the pasta.

Step 3: Bring to a Boil
Place the pot on medium-high heat and allow the mixture to come to a rolling boil. Keep an eye on it, as this should only take about 5–7 minutes. Once boiling, reduce the heat to low to stabilize the temperature, and prepare for the next step.

Step 4: Simmer for Perfect Cooking
Cover the pot with a lid and let it simmer gently for the time indicated on the pasta package, usually around 10–12 minutes. Stir occasionally to prevent sticking, making sure your one-pot veggie pasta with marinara sauce is cooking evenly and the vegetables are becoming tender.

Step 5: Check for Doneness
After the cooking time has elapsed, carefully uncover the pot and taste a piece of pasta. It should be tender yet slightly firm (al dente) with a lovely mixture of flavors from the marinara sauce and the veggies. Season with salt and pepper as desired, adjusting to your taste preferences.

Step 6: Serve and Garnish
Remove the pot from heat and let it sit for a minute. Serve your delicious one-pot veggie pasta with marinara sauce hot, garnished with a sprinkle of crushed red pepper, fresh herbs, or nutritional yeast for an extra flavor boost. Enjoy this comforting dish with your favorite side salad or garlic bread!

Make Ahead Options

These One-Pot Veggie Pasta with Marinara Sauce are ideal for busy home cooks looking to save time! You can chop your vegetables (onions, squash, mushrooms, and spinach) up to 3 days in advance and refrigerate them in an airtight container to keep them fresh. Additionally, you can measure out the rigatoni and store it alongside the marinara sauce in a separate container for up to 24 hours before cooking. When you're ready to whip up this delightful meal, simply combine the prepped ingredients in your pot, add the recommended cooking liquid, and follow the original cooking instructions. This way, you’ll achieve a comforting, veggie-packed dish with a fraction of the effort, making dinner a breeze!

What to Serve with One-Pot Veggie Pasta with Marinara Sauce

Looking to elevate your One-Pot Veggie Pasta experience? Here are delightful pairings to create an unforgettable meal.

  • Garlic Bread: Soft and buttery, this classic side adds a crunchy contrast and absorbs all that delicious marinara sauce.

  • Mixed Green Salad: A refreshing salad with a tangy vinaigrette brightens up the meal and gives a crisp texture alongside the warm pasta.

  • Roasted Vegetables: Tossed with olive oil and herbs, these add depth and variety while complementing the flavors of the veggie pasta perfectly.

  • Fresh Fruit Salad: Light and sweet, a seasonal fruit medley offers a contrasting palate-cleansing bite after the savory pasta dish.

  • Red Wine: A glass of Chianti or a bold Merlot enhances the experience, as the acidity pairs beautifully with the tomato-based sauce.

Consider mixing and matching these options on your table; each pairing will add a special touch, making your meal a heartwarming celebration of flavors.

Variations & Substitutions for Veggie Pasta with Marinara Sauce

Feel free to unleash your creativity in the kitchen with these delicious twists and tweaks to make this dish truly yours.

  • Gluten-Free: Use gluten-free pasta to accommodate dietary needs while enjoying the comforting flavors of this dish.
  • Creamy Texture: Stir in a dollop of cashew cream or coconut milk for a luxurious, creamy sauce.
  • Add Protein: Toss in cooked lentils or chickpeas for an extra boost of protein that’ll keep you fuller longer. They add not only nutrition but also some delightful textures!
  • Spicy Kick: Add minced jalapeños or a splash of hot sauce if you like a bit of spice in your pasta. This simple tweak turns up the heat and excitement in every bite!
  • Cheesy Flavor: Swap nutritional yeast with freshly grated Parmesan or a plant-based cheese for a different flavor profile that many cheese lovers will cherish. A sprinkle just before serving can elevate the taste!
  • Extra Veggies: Experiment with seasonal vegetables like asparagus or sun-dried tomatoes to keep things fresh and exciting. They can bring vibrant colors and unique flavors to your plate.
  • Lighten Up: Use spiralized vegetables, like zucchini or carrots, instead of pasta for a lighter, veggie-packed meal. It’s a delicious way to get even more nutrients in your bowl!
  • Herb Infusion: Change up the herbs and use thyme or rosemary for a unique flavor twist that adds depth and warmth to the dish.

With these variations, you can create something new and delightful every time you make this one-pot wonder! If you're looking for more pasta ideas, check out Tagliatelle Asparagus Peas or Tuscan White Bean Pasta. Happy cooking!

How to Store and Freeze Veggie Pasta with Marinara Sauce

Fridge: Store in an airtight container for up to 3-4 days to maintain freshness. Allow the pasta to cool before sealing to prevent condensation.

Freezer: Freeze leftovers in individual portions in freezer-safe containers for up to 2 months. Make sure to leave space for expansion.

Reheating: Thaw frozen pasta in the fridge overnight, then reheat on the stove or in the microwave, adding a splash of water or broth to restore moisture.

Leftover Tips: For best flavor, consume your veggie pasta with marinara sauce within the indicated storage time; it’s at its freshest when enjoyed right after cooking!

Expert Tips for Veggie Pasta with Marinara Sauce

  • Vegetable Timing: Adjust cooking times based on the veggies you choose. Denser vegetables, like carrots or squash, may need longer to cook for the best texture.

  • Flavor Boosting: Add a splash of lemon juice or a dash of balsamic vinegar before serving to elevate flavors in your one-pot veggie pasta.

  • Consistent Stirring: Stir occasionally during simmering to prevent sticking and ensure even cooking; this helps distribute the sauce evenly among the pasta and vegetables.

  • Liquid Level: Keep an eye on the cooking liquid—if it appears too dry, add splashes of broth or water to maintain moisture and avoid burning.

  • Serve Fresh: For maximum flavor, add herbs and garnishes right before serving. This keeps them vibrant and aromatic atop your veggie pasta with marinara sauce.

One-Pot Veggie Pasta with Flavorful Garlic Marinara Recipe FAQs

How do I choose the right vegetables for my veggie pasta?
Absolutely! Opt for fresh, vibrant vegetables, avoiding any with dark spots or wilting. For this One-Pot Veggie Pasta, try to choose a mix that includes denser veggies like squash and mushrooms, which hold their texture. You can always mix in some softer vegetables like spinach or cherry tomatoes—just add them towards the end of cooking for the best results.

How long can I store leftovers of the veggie pasta?
Very! Store your One-Pot Veggie Pasta with Marinara Sauce in an airtight container in the refrigerator for up to 3-4 days. Make sure to let it cool before sealing to keep it fresh and prevent condensation. This pasta is best enjoyed within this time frame for optimal taste!

Can I freeze my veggie pasta dish?
Of course! To freeze your One-Pot Veggie Pasta, let it cool completely, then portion it into freezer-safe containers, leaving space for expansion. It can be frozen for up to 2 months. When you're ready to enjoy it, thaw overnight in the fridge and reheat on the stove with a splash of broth or water to revive the moisture.

What should I do if my pasta is undercooked or overcooked?
No worries! If you find your pasta is undercooked, simply add a little more liquid and continue to simmer for a few more minutes, stirring occasionally. On the other hand, if your pasta is overcooked, toss in some additional fresh veggies when serving to create a textural contrast and balance the dish. Making adjustments is all part of the cooking adventure!

Is this recipe suitable for people with dietary restrictions?
Absolutely! This One-Pot Veggie Pasta with Marinara Sauce is vegan and can be easily modified for gluten-free diets by opting for gluten-free pasta. Be sure to check the marinara sauce for any allergens if you or your guests have specific dietary needs. Cooking at home allows you to control the ingredients and cater to every palate!

Veggie Pasta with Marinara Sauce

Delicious Veggie Pasta with Marinara Sauce in One Pot!

Enjoy a quick and hearty Veggie Pasta with Marinara Sauce, all made in one pot for minimal cleanup.
Print Recipe Pin Recipe
Prep Time 10 minutes mins
Cook Time 30 minutes mins
Total Time 40 minutes mins
Servings: 4 servings
Course: Dinner
Cuisine: Italian
Calories: 350
Ingredients Equipment Method Nutrition Notes

Ingredients
  

For the Pasta
  • 1 pound Rigatoni Pasta You can swap it for any pasta.
For the Sauce
  • 4 cloves Fresh Garlic Minced; garlic powder can be used.
  • 24 ounces Marinara Sauce Choose a high-quality marinara.
For the Vegetables
  • 1 medium Onion Chopped; can be caramelized.
  • 1 medium Squash Chopped; can substitute with zucchini or bell peppers.
  • 1 cup Mushrooms Chopped; shiitake or button mushrooms work well.
  • 4 cups Spinach Fresh or substitute with kale.
For the Garnish
  • 1 teaspoon Crushed Red Pepper Optional for heat.
  • 2 tablespoons Fresh/Dried Herbs Basil or parsley according to your taste.
  • 3 tablespoons Nutritional Yeast Skip if not vegan.

Equipment

  • Large pot

Method
 

Step-by-Step Instructions
  1. In a large pot, add the rigatoni pasta, minced garlic, oregano, and a colorful assortment of chopped vegetables such as onions, squash, mushrooms, and spinach. Pour in your chosen marinara sauce and stir well to coat everything evenly.
  2. Pour in enough water or vegetable broth to cover the pasta and vegetables, following the pasta's package instructions, typically about 4 cups.
  3. Place the pot on medium-high heat and bring to a rolling boil, which should take about 5–7 minutes.
  4. Cover the pot and let it simmer gently for the time indicated on the pasta package, usually around 10–12 minutes.
  5. After cooking, taste a piece of pasta for doneness. It should be tender yet slightly firm (al dente). Season with salt and pepper as desired.
  6. Remove from heat, let it sit for a minute, and serve hot, garnished with crushed red pepper, fresh herbs, or nutritional yeast.

Nutrition

Serving: 1plateCalories: 350kcalCarbohydrates: 55gProtein: 12gFat: 7gSaturated Fat: 1gPolyunsaturated Fat: 1gMonounsaturated Fat: 5gSodium: 600mgPotassium: 800mgFiber: 10gSugar: 5gVitamin A: 2500IUVitamin C: 25mgCalcium: 80mgIron: 3mg

Notes

Adjust cooking times based on the vegetables chosen. Maximize flavor by adding herbs and garnishes just before serving.

Tried this recipe?

Let us know how it was!

One-Pot Pumpkin Chili: Warmth and Comfort in Every Bite

August 22, 2025 by Grace Snow Leave a Comment

As the leaves turn and the air gets crisper, there's nothing quite like the scent of a simmering pot of chili wafting through the kitchen. Enter my One-Pot Pumpkin Chili, a hearty vegan delight that combines the creamy richness of pumpkin puree with a medley of fresh vegetables, beans, and lentils. This dish is not just easy to whip up; it’s a cozy hug in a bowl that makes perfect leftovers for busy weeknights or gathering with friends. Plus, it’s gluten-free and packed with plant-based protein, ensuring everyone can indulge without a worry. Are you ready to warm up your cooking routine with this comforting fall favorite? Let’s dive in!

Why is this chili a must-try?

Hearty Comfort: Each spoonful of this One-Pot Pumpkin Chili offers a warm embrace, making it perfect for chilly evenings.

Easy One-Pot Wonder: Save time on cleanup with this single-pot recipe that minimizes fuss and maximizes flavor.

Plant-Based Goodness: Loaded with protein-rich lentils and beans, it’s a delicious way to enjoy vegan comfort food.

Versatile Ingredients: Feel free to customize it with seasonal veggies or your favorite beans; the possibilities are endless!

Crowd-Pleasing Flavor: This chili is sure to impress at potlucks or family dinners, leaving everyone asking for seconds.

To explore more delightful pumpkin recipes, check out my Pumpkin Brownies Decadent for a sweet treat!

One-Pot Pumpkin Chili Ingredients

For the Chili Base
• Pumpkin Puree – Adds creaminess and depth of flavor; use canned or homemade pureed pumpkin.
• Onion – Provides a savory base; substitute with shallots for a sweeter note.
• Bell Peppers – Contribute sweetness and color; any color bell pepper works beautifully.
• Jalapeños – Adds heat; omit for a milder chili or use banana peppers for less spice.
• Garlic – Enhances flavor; garlic powder can substitute if fresh is unavailable.
• Diced Tomatoes – Adds acidity and texture; use fresh when in season for best results.

For Protein & Fiber
• Red Lentils – Thickens the chili and adds protein; green lentils can substitute, but adjust cooking time.
• Black Beans – Provide protein and fiber; replace with chickpeas for a different texture.

For Flavor & Spice
• Vegetable Broth – The base for the chili; use homemade or store-bought depending on your time.
• Chili Powder – Essential for flavor; adjust based on your spice preference.
• Cumin Powder – Adds earthiness; no direct substitutes are recommended.
• Cayenne Pepper – For extra heat; adjust according to your spice tolerance.
• Pumpkin Spice – Optional for a hint of warmth; nutmeg or cinnamon can also be used for fall vibes.

This One-Pot Pumpkin Chili brings warmth and comfort to your table—perfect for those chilly evenings! Enjoy crafting this delightful dish.

Step‑by‑Step Instructions for One-Pot Pumpkin Chili

Step 1: Sauté the Aromatics
Heat 2 tablespoons of olive oil in a large pot over medium heat. Add the chopped onions and sauté for about 3 minutes until they become translucent and soft. This step is essential as it builds a flavorful base for your One-Pot Pumpkin Chili. Stir occasionally to prevent sticking and ensure even cooking.

Step 2: Add Vegetables and Seasoning
Next, incorporate the chopped bell peppers, diced jalapeños, minced garlic, salt, and pepper into the pot. Continue cooking for another 4-5 minutes until the vegetables are tender and fragrant. Stir continuously to prevent burning and to evenly mix the spices, allowing their flavors to meld together.

Step 3: Incorporate Pumpkin and Broth
With the vegetables softened, it's time to stir in the pumpkin puree, diced tomatoes, red lentils, black beans, vegetable broth, chili powder, cumin, cayenne pepper, and optional pumpkin spice. Bring this colorful mixture to a boil over high heat, watching for bubbles to form. This step adds depth and creaminess, making the chili a delicious dish.

Step 4: Simmer to Perfection
Once boiling, reduce the heat to low and cover the pot. Let the One-Pot Pumpkin Chili simmer for 20-25 minutes, stirring occasionally. The lentils are cooked when they're tender but still hold their shape. Keep an eye on the texture, adding a splash of water if necessary to maintain the desired consistency.

Step 5: Taste and Serve
After simmering, taste the chili and adjust seasoning as needed with additional salt, pepper, or spices. Once you're satisfied with the flavor, serve the One-Pot Pumpkin Chili warm in bowls. Garnish with your favorite toppings such as avocado slices, fresh cilantro, or dairy-free sour cream for an added touch of taste and presentation.

Make Ahead Options

These One-Pot Pumpkin Chili options are a lifesaver for busy weeknights! You can sauté the vegetables and spices up to 24 hours in advance; just refrigerate them in an airtight container. Additionally, the chili itself can be fully cooked and stored in the fridge for up to 3 days—it actually develops deeper flavors over time! When ready to serve, simply reheat the chili in a pot over low heat, stirring occasionally until warmed through. For optimal quality, add a splash of vegetable broth if it thickens too much during storage. This means effortless meals with just a little bit of planning, making your time in the kitchen a breeze!

One-Pot Pumpkin Chili Variations

Feel free to get creative and make this cozy dish your own with these delightful twists!

  • Extra Veggies: Toss in chopped carrots, sweet potatoes, or corn for added sweetness and nutrition. These colorful additions will enhance the chili's texture and flavor.

  • Bean Swaps: Try using kidney beans or pinto beans instead of black beans. Each bean brings its unique flavor, making each pot a little different and exciting!

  • Herbal Boost: Add a handful of fresh spinach or kale during the last few minutes of cooking for a vibrant green touch and a boost of nutrients. Not only does it elevate the dish, but it also adds a lovely color contrast.

  • Spice It Up: Feeling adventurous? Add diced green chiles for a spicy kick, perfect for those who crave extra heat. Just remember, a little goes a long way!

  • Dairy-Free Creaminess: For a richer texture, swirl in some dairy-free sour cream or coconut cream just before serving. This adds a smoothness that pairs wonderfully with the chili's spices.

  • Savory Toppings: Serve with a sprinkle of crispy tortilla chips or crunchy fried onions on top. They add a delightful crunch to every spoonful, making each bite fun to enjoy.

For even more pumpkin-inspired treats, don't miss my delightful Pumpkin Cinnamon Roll Muffins that make for a perfect breakfast pairing!

  • Flavor Variations: Don’t shy away from experimenting with spices! Try adding smoked paprika or a dash of liquid smoke for a BBQ flavor profile. This twist could transform your One-Pot Pumpkin Chili into an entirely new experience.

Embrace these variations to find your favorite spin on this comforting recipe!

How to Store and Freeze One-Pot Pumpkin Chili

Fridge: Keep your One-Pot Pumpkin Chili in an airtight container for up to 3 days. This way, you can enjoy delicious leftovers without compromising flavor.

Freezer: For longer storage, freeze the chili in freezer-safe containers for up to 3 months. Portion it out for convenient meal prep on busy days!

Reheating: When ready to enjoy, simply thaw in the refrigerator overnight and reheat on the stovetop over medium heat, stirring occasionally until warmed through.

Serving Note: Don't be afraid to add a splash of vegetable broth while reheating if the chili seems too thick; this keeps it creamy and satisfying!

What to Serve with One-Pot Pumpkin Chili

As you prepare to fill your bowls with this creamy, comforting chili, consider a few delightful sides that will round out your meal.

  • Crunchy Tortilla Chips: Perfect for scooping, these chips add a delightful crunch that contrasts beautifully with the creamy chili.
  • Avocado Slices: Fresh and creamy avocado brings a cool contrast to the spice of the chili, amplifying the overall flavor experience.
  • Tangy Cornbread: Moist and slightly sweet, cornbread pairs wonderfully with chili by soaking up every delicious drop while adding a hint of sweetness.
  • Zesty Coleslaw: A crunchy, tangy slaw provides a refreshing contrast to the heartiness of the chili, balancing the meal perfectly.
  • Fresh Fruit Salad: A light and refreshing fruit salad can cleanse your palate between bites, enhancing the enjoyment of this warming dish.
  • Crisp Green Salad: A mixed greens salad with a light vinaigrette adds a fresh element that complements the richness of the chili.
  • Herbal Iced Tea: A refreshing herbal iced tea offers a soothing drink option that pairs well without overwhelming the flavors of the meal.
  • Chocolate Avocado Mousse: For dessert, this rich, creamy mousse gives a decadent finish and is a delightful health-conscious treat that everyone will love.
  • Pumpkin Spice Latte: Chase the meal with this warm coffee drink to heighten the autumnal flavors in the meal, blending beautifully with the chili's spices.

Expert Tips for One-Pot Pumpkin Chili

  • Check Lentil Tenderness: Always ensure lentils are fully cooked—test for tenderness before removing from heat to maintain the right texture.

  • Add Veggies Wisely: Incorporate delicate vegetables like mushrooms late in the cooking process to prevent them from becoming mushy and losing their shape.

  • Storage Savvy: Store any leftovers in an airtight container in the refrigerator for up to 3 days, or freeze for future quick meals.

  • Season to Taste: Taste the chili before serving and adjust seasoning as needed. Remember, the flavors deepen upon resting!

  • Customize Your Beans: Feel free to experiment! Substitute black beans with kidney beans or chickpeas for variety; just keep the flavor, comfort, and health benefits of your One-Pot Pumpkin Chili in mind.

One-Pot Pumpkin Chili Recipe FAQs

What is the best way to select ripe pumpkins for this recipe?
Absolutely! When choosing a pumpkin, look for one that is firm, with a smooth, unblemished skin. Avoid any with dark spots or soft areas, as these indicate overripeness. A good pumpkin should feel heavy for its size, which is a great sign of quality and moisture content.

How should I store leftovers of One-Pot Pumpkin Chili?
To keep your One-Pot Pumpkin Chili fresh, store it in an airtight container in the refrigerator for up to 3 days. If you'd like to savor it beyond that, simply freeze it in freezer-safe containers for up to 3 months. Just ensure it's cooled down before transferring to avoid condensation creating ice crystals!

Can I freeze One-Pot Pumpkin Chili?
Yes, you can! To freeze, portion the cooled chili into airtight, freezer-safe containers. Make sure to leave some space at the top for expansion. When you're ready to eat, simply thaw the chili overnight in the refrigerator, then reheat on the stovetop or microwave, adding a splash of broth if it seems too thick.

What should I do if the chili is too thick or too watery?
If your One-Pot Pumpkin Chili turns out too thick, you can add a bit of vegetable broth or water to achieve your desired consistency. Stir it in gradually until you reach the thickness you prefer. On the flip side, if it’s too watery, let it simmer uncovered for a few more minutes to allow some of the liquid to evaporate and thicken the chili.

Is this chili suitable for those with dietary restrictions?
Very! This One-Pot Pumpkin Chili is vegan and gluten-free, making it a fantastic option for those with dietary considerations. However, always check your canned goods (like broth and beans) to ensure they are certified gluten-free. If catering to allergies, make sure to avoid common allergens like certain beans or spices, and feel free to modify the recipe as needed to suit your needs.

One-Pot Pumpkin Chili

One-Pot Pumpkin Chili: Warmth and Comfort in Every Bite

Enjoy a hearty One-Pot Pumpkin Chili, a warm and comforting vegan dish perfect for autumn nights.
Print Recipe Pin Recipe
Prep Time 10 minutes mins
Cook Time 30 minutes mins
Total Time 40 minutes mins
Servings: 6 servings
Course: Soups
Cuisine: Vegan
Calories: 250
Ingredients Equipment Method Nutrition Notes

Ingredients
  

Chili Base
  • 1 cup Pumpkin Puree use canned or homemade
  • 1 Onion chopped; substitute with shallots for sweeter note
  • 1 Bell Peppers any color, chopped
  • 1 Jalapeños chopped; adjust based on spice preference
  • 3 cloves Garlic minced
  • 1 can Diced Tomatoes fresh preferred when in season
Protein & Fiber
  • 1 cup Red Lentils green lentils can substitute
  • 1 can Black Beans can replace with chickpeas
Flavor & Spice
  • 4 cups Vegetable Broth homemade or store-bought
  • 2 tablespoons Chili Powder adjust according to spice preference
  • 1 teaspoon Cumin Powder
  • 1/4 teaspoon Cayenne Pepper adjust for heat
  • 1 teaspoon Pumpkin Spice optional

Equipment

  • Large pot

Method
 

Cooking Instructions
  1. Heat 2 tablespoons of olive oil in a large pot over medium heat. Add the chopped onions and sauté for about 3 minutes until translucent.
  2. Incorporate the chopped bell peppers, diced jalapeños, minced garlic, salt, and pepper into the pot. Cook for another 4-5 minutes until tender.
  3. Stir in pumpkin puree, diced tomatoes, red lentils, black beans, vegetable broth, chili powder, cumin, cayenne pepper, and optional pumpkin spice. Bring to a boil.
  4. Reduce the heat to low, cover, and let simmer for 20-25 minutes, stirring occasionally.
  5. Taste and adjust seasoning as needed. Serve warm in bowls with desired toppings.

Nutrition

Serving: 1bowlCalories: 250kcalCarbohydrates: 40gProtein: 10gFat: 5gSaturated Fat: 1gPolyunsaturated Fat: 2gMonounsaturated Fat: 2gSodium: 500mgPotassium: 700mgFiber: 10gSugar: 5gVitamin A: 150IUVitamin C: 70mgCalcium: 6mgIron: 15mg

Notes

Store leftovers in an airtight container for up to 3 days or freeze for up to 3 months. Reheat on stovetop, adding a splash of vegetable broth if too thick.

Tried this recipe?

Let us know how it was!

Creamy Mashed Potatoes with Mushroom Gravy Bliss

August 22, 2025 by Grace Snow Leave a Comment

As I stood in my kitchen, the warm scent of sautéing mushrooms filled the air, instantly transporting me to childhood dinners spent around the table. There’s something undeniably comforting about a hearty serving of mashed potatoes with mushroom gravy—the velvety texture topped with rich, savory sauce is truly a game changer. This dish not only becomes the star of any meal but also proves to be a fantastic quick-prep option, perfect for busy weeknights or cozy gatherings with friends. Whether you're looking for a satisfying side or a main event by adding plant protein, this recipe adapts beautifully. Ready to embrace a delightful twist on classic comfort food? Let’s dive into the ingredients that make this dish a must-try.

Why are Mashed Potatoes with Mushroom Gravy irresistible?

Creamy texture: The rich, velvety mashed potatoes unite perfectly with a luscious mushroom gravy, offering every bite a sense of indulgence.
Quick prep: With straightforward ingredients and simple steps, you're just 30 minutes away from a satisfying meal.
Vegan-friendly: This recipe caters to a variety of diets by using plant-based alternatives, making it suitable for everyone at the table.
Hearty satisfaction: Add plant proteins like chickpeas or baked tofu for a filling main dish that won’t disappoint your hunger.
Crowd pleaser: A classic comfort dish that appeals to both family and friends, it fits seamlessly at any gathering or celebration. Pair it with some Smoky Sweet Potatoes for a wholesome feast!

Mashed Potatoes with Mushroom Gravy Ingredients

For the Mashed Potatoes

  • Russet Potatoes – The base for creaminess; Yukon Golds offer a richer flavor alternative.
  • Salt – Essential for enhancing the flavor during cooking; don’t skimp on it!
  • Butter – Adds a touch of richness; vegan butter is a wonderful substitute for a plant-based option.
  • Milk – Creates that creamy consistency; almond or soy milk work great for a vegan touch.
  • Garlic Powder – Adds depth of flavor; fresh garlic can elevate the dish even more.
  • Black Pepper – For that perfect seasoning touch; feel free to adjust to your taste!

For the Mushroom Gravy

  • Oil – Used for sautéing; olive oil is an excellent choice for flavor.
  • Onion – Adds sweetness and body to the gravy; shallots also work if you prefer.
  • Mushrooms – The star of the gravy, offering rich umami flavor; any type like button or cremini is delicious.
  • Mushroom Gravy – The main sauce delivering a rich flavor; you can use store-bought or homemade for more control. Ensure it’s vegan if needed.

Feel free to mix and match with toppings or additional protein to make your mashed potatoes with mushroom gravy even more delightful!

Step‑by‑Step Instructions for Creamy Mashed Potatoes with Mushroom Gravy

Step 1: Boil the Potatoes
Fill a large pot with water and add a generous pinch of salt. Bring it to a rolling boil over high heat. Carefully add the peeled or scrubbed Russet potatoes to the pot and reduce the heat slightly. Cook for 20-25 minutes, or until the potatoes are fork-tender and easily break apart.

Step 2: Drain and Mash
Once the potatoes are tender, carefully drain them in a colander and return them to the pot or a large mixing bowl. Using a potato masher or fork, mash the potatoes to your desired creamy consistency. For ultra-smooth mashed potatoes, an immersion blender works wonders for even texture.

Step 3: Add Creaminess
Mix in the butter and warm milk gradually, stirring until fully combined. Sprinkle in the garlic powder, salt, and black pepper to taste, allowing the ingredients to meld beautifully. Taste and adjust seasoning as needed, ensuring your mashed potatoes are velvety rich and flavorful.

Step 4: Sauté the Onions
In a separate skillet, heat a tablespoon of oil over medium heat. Once the oil is shimmering, add diced onions, sautéing them for 3-4 minutes until they turn translucent and fragrant. This step sets the stage for the luscious gravy.

Step 5: Cook the Mushrooms
Add the sliced mushrooms and minced garlic to the pan with the onions. Continue to sauté for about 4-5 minutes, or until the mushrooms are tender and golden brown. This process releases their savory, umami flavor, making your mushroom gravy truly scrumptious.

Step 6: Heat the Gravy
Pour in the mushroom gravy and stir to combine with the sautéed onions and mushrooms. Allow the mixture to heat through, stirring occasionally for about 3-5 minutes until the gravy is warm and bubbly. The rich aroma will fill your kitchen, promising a delightful dish ahead.

Step 7: Serve and Enjoy
To serve, spoon a generous amount of creamy mashed potatoes onto each plate. Top them with the savory mushroom gravy, ensuring to cover every inch for an irresistible finish. Garnish with a sprinkle of fresh thyme if desired, enhancing both flavor and visual appeal with this comforting dish.

How to Store and Freeze Mashed Potatoes with Mushroom Gravy

Fridge: Store leftover mashed potatoes with mushroom gravy in an airtight container for up to 3 days. Reheat gently on the stove or in the microwave, adding a splash of plant-based milk for creaminess.

Freezer: If you want to keep it longer, freeze the mashed potatoes without gravy in a freezer-safe container for up to 2 months. Thaw overnight in the fridge before reheating.

Reheating: For creamy mashed potatoes with mushroom gravy, reheat on low heat, stirring occasionally, until warmed through. You can add a bit of olive oil or vegan butter to enhance the texture.

Make-Ahead: Feel free to prepare the mashed potatoes ahead of time and store them. The gravy can be made in advance and stored separately for easy assembly at mealtime.

Mashed Potatoes with Mushroom Gravy Variations

Feel free to put your personal spin on these mashed potatoes—they're incredibly versatile and still oh-so-delicious!

  • Yukon Gold: Swap Russet potatoes for Yukon Gold for a buttery flavor that adds depth to the dish.
  • Chickpeas: Incorporate chickpeas or white beans into the gravy for a protein boost that also adds heartiness.
  • Baked Tofu: For a satisfying vegan protein option, top with baked tofu that adds a delightful texture and flavor.
  • Herb Infusion: Stir in fresh herbs like rosemary or thyme into the potatoes for an aromatic twist that elevates the comfort food experience.
  • Creamy Swaps: Use coconut milk instead of regular milk for a unique, tropical creaminess in your mashed potatoes.
  • Savory Garlic: For garlic lovers, add roasted garlic cloves to the mashed potatoes for a sweeter, mellower garlic flavor that enhances the dish.
  • Smoky Flavor: Mix in some smoked paprika for a hint of smokiness that pairs beautifully with the rich gravy.
  • Umami Boost: Drizzle a little soy sauce or tamari into the mushroom gravy, adding an extra kick of umami that complements the dish perfectly.

These adaptations can all bring something new to your delightful mashed potatoes with mushroom gravy, so embark on your culinary journey and savor the magic! You might also enjoy pairing them with some Roasted Sweet Potatoes for a wholesome feast.

Make Ahead Options

These creamy mashed potatoes with mushroom gravy are perfect for meal prep enthusiasts! You can prepare the mashed potatoes up to 3 days in advance by following these steps: After mashing the potatoes, let them cool to room temperature, then transfer them to an airtight container and refrigerate. For the mushroom gravy, cook and store it separately in the fridge, where it will hold up nicely for up to 3 days as well. When you’re ready to serve, simply reheat the mashed potatoes in a pot over low heat, adding a splash of plant-based milk for creaminess, and warm the gravy on the stove until hot. This ensures that your comfort dish remains just as delicious and satisfying as when it was freshly made!

What to Serve with Creamy Mashed Potatoes with Savory Mushroom Gravy

Elevate your dining experience by pairing these creamy mashed potatoes with a variety of delightful ingredients that complement their rich flavors.

  • Steamed Broccoli: This vibrant vegetable adds a fresh crunch and balances the creaminess, making your meal colorful and nutritious.
  • Garlic Roasted Asparagus: The subtle garlic flavor enhances your dish while the asparagus brings a tender, savory touch, creating a mouthwatering side.
  • Baked Tofu: Crispy and packed with protein, baked tofu not only adds texture but also keeps the dish vegan-friendly and satisfying.
  • Crispy Brussels Sprouts: The caramelized edges of Brussels sprouts bring a delightful bitterness that contrasts beautifully with the rich mashed potatoes and gravy.
  • Simple Green Salad: A refreshing salad tossed with a tangy vinaigrette will cleanse your palate and provide a light contrast to the velvety gravy.
  • Savory Mushroom Soup: Extend the mushroom theme by serving a warm bowl of rich mushroom soup as an appetizer, setting the tone for your comfort meal.
  • Red Wine: A glass of medium-bodied red wine brings out the earthy flavors of the mushroom gravy while enhancing the overall meal experience.
  • Lemon Tart: For dessert, a tangy lemon tart provides a refreshing end to your meal, cleansing your taste buds after the hearty comfort of potatoes.

Each pairing adds a unique flavor profile, ensuring that your creamy mashed potatoes with mushroom gravy are the star of a charming and wholesome meal.

Tips for the Best Mashed Potatoes with Mushroom Gravy

  • Potato Choice: Use Russet potatoes for the ultimate creaminess; Yukon Golds lend a buttery flavor, perfect for your mashed potatoes with mushroom gravy.

  • Don’t Overcook: Keep an eye on the boiling time to avoid mushy potatoes—fork-tender is the goal, as overcooking can lead to watery results.

  • Creamy Additions: For the creamiest texture, mix in warm milk and melted vegan butter gradually. This prevents clumping and ensures a velvety finish.

  • Garlic Boost: Fresh garlic can dramatically elevate flavor. If using garlic powder, don’t forget to taste and adjust based on your preference.

  • Thickening Tips: If your mushroom gravy is too thin, let it simmer for a few extra minutes to thicken up, achieving that luxurious consistency to drizzle over your potatoes.

  • Experiment with Toppings: Enhance your dish further by adding crispy plant-based bacon or a sprinkle of nutritional yeast for an added umami punch.

Mashed Potatoes with Mushroom Gravy Recipe FAQs

What type of potatoes should I use for mashed potatoes?
Absolutely! Using Russet potatoes gives your mashed potatoes the creaminess and fluffy texture that we're all after. If you prefer a richer flavor, Yukon Gold potatoes are also a fantastic option. They lend a buttery essence that pairs beautifully with the savory mushroom gravy.

How do I store leftover mashed potatoes with mushroom gravy?
Very simply! Store any leftovers in an airtight container in the fridge for up to 3 days. When reheating, do so gently on the stove or in the microwave. I often add a splash of plant-based milk to bring back the creamy consistency.

Can mashed potatoes be frozen?
Yes, they can! If you want to keep your mashed potatoes without mushroom gravy, they freeze beautifully. Place them in a freezer-safe container and store for up to 2 months. When you’re ready to enjoy them, thaw them overnight in the fridge before reheating.

What if my gravy turns out too thin?
Not a problem! If your mushroom gravy is too thin, let it simmer on low heat for a few extra minutes. This will allow it to reduce and thicken up into a luxurious consistency. Stir occasionally, and if you find it still isn’t thickening to your liking, consider adding a little cornstarch mixed with water to give it that perfect texture.

Are there any dietary considerations for pets or allergies?
Yes, it's essential to keep in mind that this recipe is vegan and gluten-free, which is great for many diets. However, mushrooms themselves can be a trigger for some allergies. Additionally, remember to keep the dish away from pets, especially if it contains anything like garlic, which can be harmful to them.

How can I make this dish more nutritious?
The more the merrier! You can boost the nutritional value of your mashed potatoes with mushroom gravy by adding plant proteins like cooked chickpeas or white beans directly into the mixture. They integrate well and provide a hearty base for a comforting vegan meal.

Mashed Potatoes with Mushroom Gravy

Creamy Mashed Potatoes with Mushroom Gravy Bliss

This comforting dish of mashed potatoes with mushroom gravy offers a velvety texture and rich flavor, perfect for any meal.
Print Recipe Pin Recipe
Prep Time 10 minutes mins
Cook Time 20 minutes mins
Total Time 30 minutes mins
Servings: 4 servings
Course: Dinner
Cuisine: American
Calories: 350
Ingredients Equipment Method Nutrition Notes

Ingredients
  

Mashed Potatoes
  • 4 pieces Russet Potatoes or Yukon Golds for richer flavor
  • 1 teaspoon Salt for boiling
  • 4 tablespoons Butter or vegan butter for plant-based option
  • 1 cup Milk almond or soy milk for vegan option
  • 1 teaspoon Garlic Powder or fresh garlic for more flavor
  • 1/2 teaspoon Black Pepper to taste
Mushroom Gravy
  • 1 tablespoon Oil olive oil preferred
  • 1 medium Onion diced
  • 8 ounces Mushrooms sliced, any type
  • 2 cups Mushroom Gravy store-bought or homemade

Equipment

  • Large pot
  • Colander
  • potato masher
  • Skillet
  • Mixing Bowl

Method
 

Preparation Steps
  1. Fill a large pot with water and add salt. Bring to a boil and cook the peeled Russet potatoes for 20-25 minutes.
  2. Drain the tender potatoes and mash them until smooth, mixing in butter and warm milk gradually.
  3. Sprinkle in garlic powder, salt, and black pepper; adjust seasoning to taste.
  4. In a skillet, heat oil and sauté onions for 3-4 minutes until translucent.
  5. Add sliced mushrooms and cook for an additional 4-5 minutes until browned.
  6. Pour in mushroom gravy, stirring to combine; heat through for 3-5 minutes.
  7. Serve mashed potatoes topped with mushroom gravy, garnished with fresh thyme if desired.

Nutrition

Serving: 1plateCalories: 350kcalCarbohydrates: 50gProtein: 6gFat: 15gSaturated Fat: 5gPolyunsaturated Fat: 2gMonounsaturated Fat: 8gCholesterol: 15mgSodium: 600mgPotassium: 800mgFiber: 5gSugar: 2gVitamin A: 5IUVitamin C: 20mgCalcium: 10mgIron: 15mg

Notes

For best results, use Russet potatoes for creaminess. You can add crispy plant-based bacon or nutritional yeast on top for extra flavor.

Tried this recipe?

Let us know how it was!

Louisiana Style Red Beans and Rice: Comfort in Every Bite

August 20, 2025 by Grace Snow Leave a Comment

As the aroma of simmering Andouille sausage mingled with the essence of sautéed onions, it felt like a warm embrace from my beloved Louisiana. This delectable Louisiana Style Red Beans and Rice embodies comfort food at its finest, marrying protein-rich sausage with creamy red beans and the celebrated “holy trinity” of Cajun cooking: onion, bell pepper, and celery. Not only is it a budget-friendly option perfect for meal prep, but it also promises scrumptious leftovers that taste even better the next day. With each bite, you’ll relish the perfectly balanced flavors and textures that make this dish a family favorite. Are you ready to dive into a hearty bowl of soul-warming goodness?

Why is This Recipe a Must-Try?

Comforting and hearty, this Louisiana Style Red Beans and Rice is truly food for the soul. Budget-friendly, it allows you to savor a rich meal without breaking the bank. Meal prep friendly, it stores well for delicious leftovers that intensify in flavor. High in protein and fiber, this dish fuels you with wholesome goodness. Versatile by nature, feel free to swap in your favorite sausage or add extra veggies. Try it with a side of Coconutty Beans Greens for a nutritious twist!

Louisiana Style Red Beans and Rice Ingredients

For the Beans

  • 1 lb. dry red beans – A protein and fiber-packed base; substitute with kidney beans if needed.
  • 2 Tbsp cooking oil – Essential for sautéing that adds flavor; olive oil is a great alternative.
  • 14 oz. Andouille sausage – This adds a smoky flavor; select medium or mild if desired.
  • 1 yellow onion – Sautéed for sweetness and depth of flavor.
  • 1 green bell pepper – Brings a crunchy sweetness; consider red bell pepper for a different taste.
  • 3 ribs celery – A crucial part of the "holy trinity" for that classic flavor.
  • 4 cloves garlic – Amplifies the aromatic essence of the dish.
  • 2 tsp smoked paprika – Infuses smoky depth to the recipe.
  • 1 tsp dried oregano – Adds a nice herbal note to balance the flavors.
  • 1 tsp dried thyme – Offers an earthy backdrop that complements the beans.
  • 1/2 tsp garlic powder – Enhances the garlic flavor even more.
  • 1/2 tsp onion powder – Boosts the overall savory essence of the dish.
  • 1/4 tsp cayenne pepper – Adjust for heat levels to suit your preferences.
  • 1/4 tsp freshly cracked black pepper – Adds subtle heat and complexity.
  • 2 bay leaves – Provides an aromatic quality during cooking.
  • 6 cups water – Vital for cooking and hydrating the beans.
  • 1 Tbsp salt, or to taste – Elevates the flavors throughout the dish.

For the Rice

  • 1.5 cups long grain white rice, uncooked – Serves as the perfect base; brown rice may require longer cooking.

For Garnishing

  • 1/4 cup chopped parsley – Fresh garnish adds a pop of color and light flavor.
  • 3 green onions – Fantastic for a fresh finishing touch and extra flavor.

Step‑by‑Step Instructions for Louisiana Style Red Beans and Rice

Step 1: Soak Beans
The night before making Louisiana Style Red Beans and Rice, soak 1 lb. of dry red beans in a large bowl filled with water, ensuring the beans are covered with at least double their volume. Refrigerate overnight to hydrate, which helps them cook evenly and enhances their creamy texture.

Step 2: Cook Sausage
In a large pot, heat 2 tablespoons of cooking oil over medium heat. Slice 14 oz. of Andouille sausage and add it to the pot, cooking until browned—about 5–7 minutes. The sausage should be sizzling and fragrant. Remove the sausage from the pot, leaving the drippings behind, and set it aside for later.

Step 3: Sauté Vegetables
In the same pot with the sausage drippings, add 1 chopped yellow onion, 1 diced green bell pepper, and 3 ribs of chopped celery. Sauté for about 5–6 minutes, stirring occasionally, until the vegetables are softened and fragrant. Stir in 4 minced cloves of garlic and cook for an additional minute until the garlic is aromatic.

Step 4: Add Spices
Sprinkle in 2 teaspoons of smoked paprika, 1 teaspoon of dried oregano, 1 teaspoon of dried thyme, 1/2 teaspoon of garlic powder, 1/2 teaspoon of onion powder, 1/4 teaspoon of cayenne pepper, and 2 bay leaves. Cook the spice mixture for about 1 minute, stirring constantly, allowing the spices to bloom and infuse their flavors into the sautéed vegetables.

Step 5: Cook Beans
Drain and rinse the soaked beans, then add them to the pot along with 6 cups of water. Bring the mixture to a rolling boil over high heat, then reduce the temperature to low and simmer uncovered for about 1 hour. The beans should be tender but not fully cooked at this stage.

Step 6: Mash Beans
After simmering for an hour, take a potato masher or fork and gently mash some of the beans against the sides of the pot to thicken the mixture. Allow the beans to simmer uncovered for an additional 30 minutes, stirring occasionally. You’ll notice the dish becoming creamier while still retaining some whole beans for texture.

Step 7: Cook Rice
While the beans finish cooking, prepare 1.5 cups of long grain white rice in a separate pot according to the package instructions. Bring water to a boil, add the rice, and let it simmer until fluffy, about 15–20 minutes. By the time the rice is done, the beans will also be perfectly cooked.

Step 8: Finish Dish
Return the browned Andouille sausage to the pot of beans and stir in 1/4 cup of chopped parsley. Taste and adjust with salt (about 1 tablespoon) if needed to elevate the flavors. Let the mixture simmer for another 5 minutes so the sausage can heat through and blend in seamlessly.

Step 9: Serve
To serve your Louisiana Style Red Beans and Rice, spoon the creamy bean mixture generously over a mound of fluffy rice. For a fresh kick, garnish each bowl with sliced green onions. Enjoy the warm, hearty dish that is bound to bring comfort to your table!

Expert Tips for Louisiana Style Red Beans and Rice

  • Soak Beans Properly: Always soak your red beans overnight for the best texture. If you’re short on time, remember that a quick soak method works too.
  • Adjust Spice Levels: The cayenne pepper can easily be adjusted. Start with less if you prefer mild flavors and add more gradually to suit your taste.
  • Texture Matters: For a creamier consistency, mash some beans against the pot while simmering. However, leave a few whole to keep the authentic texture of Louisiana Style Red Beans and Rice.
  • Choose Your Sausage: While Andouille is traditional, feel free to substitute with turkey sausage for a lighter option. Just ensure to pick a smoky variety for that authentic flavor.
  • Leftovers Love: Store leftovers in an airtight container in the fridge. They get even tastier as the flavors meld over time, making them the perfect comfort meal!

Make Ahead Options

These hearty Louisiana Style Red Beans and Rice are perfect for meal prep enthusiasts! You can soak the red beans up to 24 hours in advance, making them ready for cooking. Additionally, you can sauté the sausage and vegetables ahead of time and store them in the refrigerator for up to 3 days. When you're ready to enjoy this comforting dish, simply cook the soaked beans with the remaining spices and water, stir in your prepped sausage and vegetables, and simmer until fully heated. This prep work not only saves you valuable time on busy nights but also enhances the flavors, making your Louisiana Style Red Beans and Rice just as delicious as freshly made!

What to Serve with Louisiana Style Red Beans and Rice

Elevate your meal experience with delightful sides and drinks that beautifully complement this warming dish.

  • Cornbread Muffins: Soft and slightly sweet, cornbread is the perfect vehicle to soak up every savory bite.
  • Coleslaw: A crunchy, tangy slaw adds a refreshing contrast to the creamy beans, balancing the meal perfectly.
  • Garlic Bread: Warm, buttery garlic bread offers a satisfying crunch and flavor that enhances the whole dish.
  • Fried Green Tomatoes: These crispy bites provide a southern touch, adding a crispy texture that is utterly irresistible.

Imagine pairing your bowl of Louisiana Style Red Beans and Rice with a light, green salad tossed in a zesty vinaigrette. The freshness of the greens will not only cleanse your palate but also brighten the flavors of this comforting classic.

  • Sweet Tea: Nothing like a glass of this southern staple to quench your thirst and sweeten every savory bite.
  • Pineapple Upside-Down Cake: Finish your meal with this nostalgic dessert that combines sweetness and a hint of tartness to round out your dining experience.

How to Store and Freeze Louisiana Style Red Beans and Rice

Fridge: Store leftovers in an airtight container for up to 3 days. This rich Louisiana Style Red Beans and Rice will develop even more flavor over time.

Freezer: Portion into freezer-safe bags or containers for up to 3 months. Be sure to leave some space for expansion as it freezes.

Reheating: Thaw overnight in the fridge before reheating. Warm on the stovetop over low heat, adding a splash of water for moisture, or microwave in short intervals, stirring in between. Enjoy the comforting flavors all over again!

Louisiana Style Red Beans and Rice Variations

Feel free to play with this classic recipe, adding personal touches that delight your taste buds!

  • Turkey Sausage: Swap Andouille for smoked turkey sausage for a lighter vibe. It keeps the smoky flavor while reducing fat content.
  • Brown Rice: Use brown rice instead of white for added fiber and a nuttier taste. This change may slightly alter the cooking time, so watch it closely.
  • Add Veggies: Toss in diced carrots or zucchini for more nutrients and a colorful twist. This not only ramps up the health factor but also adds vibrant visuals.
  • Spicy Kick: Increase the cayenne pepper for those who love heat. You might even consider adding chopped jalapeños for an extra spicy punch, making every bite exhilarating.
  • Smoky Paprika Boost: Enhance the smokiness by adding an extra teaspoon of smoked paprika. A little more of this spice can beautifully intensify the flavor profile.
  • Creamy Texture: For a creamier result, blend a portion of the cooked beans before combining them back into the pot. This way, you get the perfect balance of texture and creaminess.
  • Cajun Style: Include a bay leaf or two infused with Cajun spices to elevate the dish with quintessential Louisiana flavors. It’s a delightful way to tap into traditional cuisine!
  • Fresh Herb Garnish: Experiment with fresh herbs like cilantro or thyme instead of parsley for a different herbaceous flair. This simple switch can yield entirely new flavor dynamics.

If you’re looking for an easy side to go along, consider pairing it with Honey BBQ Chicken Rice or Furikake Fried Rice. Enjoy exploring the delicious possibilities!

Louisiana Style Red Beans and Rice Recipe FAQs

What beans are best for Louisiana Style Red Beans and Rice?
Absolutely! The star of this dish is the dry red beans, which provide essential protein and fiber. If you can’t find red beans at your local store, you can use kidney beans as a substitute. They offer a similar texture and flavor, ensuring your dish still captures that classic essence.

How should I store leftovers of Louisiana Style Red Beans and Rice?
Very easy! Store any leftovers in an airtight container in the refrigerator for up to 3 days. This dish actually gets better the longer the flavors meld together, so you’ll enjoy delicious meals all week long!

Can I freeze Louisiana Style Red Beans and Rice?
Of course! For freezing, portion the red beans and rice into freezer-safe bags or containers, leaving some space for expansion as they freeze. You can keep them in the freezer for up to 3 months. When you're ready to enjoy again, simply thaw in the refrigerator overnight, then reheat on the stovetop, adding a splash of water to maintain moisture.

What should I do if my beans are too firm after cooking?
No worries, this is a common issue! If your beans remain firm, they may not have soaked long enough or didn’t cook long enough. Simply continue simmering them with a little more water over low heat until they become tender. Keep an eye on them and stir occasionally, as this will also help in thickening the dish!

Are there any dietary considerations for Louisiana Style Red Beans and Rice?
Yes! This dish is naturally gluten-free and can be made vegetarian or vegan by using a plant-based sausage and vegetable broth. Always check the labels to ensure your sausage is suitable for your dietary preferences, especially if dealing with allergies.

How do I tell if my beans are fresh before cooking?
Great question! When selecting dried beans, look for ones that are firm, smooth, and free from dark spots or cracks. If beans feel hard or make a rattling noise inside the bag, they may be too old and could result in a less favorable texture when cooked. Always go for the freshest beans you can find!

Louisiana Style Red Beans and Rice Recipe FAQs

Louisiana Style Red Beans and Rice

Louisiana Style Red Beans and Rice: Comfort in Every Bite

This Louisiana Style Red Beans and Rice recipe combines hearty Andouille sausage with creamy red beans for a comforting meal that satisfies.
Print Recipe Pin Recipe
Prep Time 15 minutes mins
Cook Time 2 hours hrs
Total Time 2 hours hrs 15 minutes mins
Servings: 6 servings
Course: Dinner
Cuisine: American, Cajun, Southern
Calories: 300
Ingredients Equipment Method Nutrition Notes

Ingredients
  

For the Beans
  • 1 lb. dry red beans Substitute with kidney beans if needed.
  • 2 Tbsp cooking oil Olive oil is a great alternative.
  • 14 oz. Andouille sausage Select medium or mild if desired.
  • 1 yellow onion Sautéed for sweetness and depth of flavor.
  • 1 green bell pepper Consider red bell pepper for a different taste.
  • 3 ribs celery A crucial part of the 'holy trinity'.
  • 4 cloves garlic Amplifies the aromatic essence of the dish.
  • 2 tsp smoked paprika
  • 1 tsp dried oregano
  • 1 tsp dried thyme
  • 1/2 tsp garlic powder
  • 1/2 tsp onion powder
  • 1/4 tsp cayenne pepper Adjust for heat levels to suit your preferences.
  • 1/4 tsp freshly cracked black pepper
  • 2 bay leaves
  • 6 cups water Vital for cooking and hydrating the beans.
  • 1 Tbsp salt Or to taste.
For the Rice
  • 1.5 cups long grain white rice Uncooked.
For Garnishing
  • 1/4 cup chopped parsley
  • 3 green onions Sliced for garnish.

Equipment

  • Large pot
  • Bowl
  • potato masher

Method
 

Step-by-Step Instructions
  1. Soak 1 lb. of dry red beans in a large bowl filled with water overnight.
  2. Heat 2 tablespoons of cooking oil in a large pot over medium heat. Slice 14 oz. of Andouille sausage and brown it for about 5–7 minutes. Remove sausage and set aside.
  3. In the same pot, add 1 chopped yellow onion, 1 diced green bell pepper, and 3 chopped ribs of celery. Sauté for about 5–6 minutes. Stir in 4 minced cloves of garlic and cook for an additional minute.
  4. Add 2 teaspoons of smoked paprika, 1 teaspoon of dried oregano, 1 teaspoon of dried thyme, 1/2 teaspoon of garlic powder, 1/2 teaspoon of onion powder, 1/4 teaspoon of cayenne pepper, and 2 bay leaves. Cook for about 1 minute.
  5. Drain and rinse the soaked beans. Add them along with 6 cups of water to the pot. Bring to a boil, then reduce to low and simmer uncovered for about 1 hour.
  6. After an hour, gently mash some of the beans against the pot to thicken the mixture. Simmer uncovered for an additional 30 minutes.
  7. Prepare 1.5 cups of long grain white rice in a separate pot according to package instructions. Simmer until fluffy.
  8. Return the browned sausage to the pot of beans and stir in 1/4 cup of chopped parsley. Adjust with salt if needed and simmer for another 5 minutes.
  9. Serve the bean mixture over rice, garnished with sliced green onions.

Nutrition

Serving: 1cupCalories: 300kcalCarbohydrates: 50gProtein: 15gFat: 10gSaturated Fat: 3gPolyunsaturated Fat: 2gMonounsaturated Fat: 5gCholesterol: 30mgSodium: 800mgPotassium: 600mgFiber: 10gSugar: 2gVitamin A: 10IUVitamin C: 25mgCalcium: 6mgIron: 15mg

Notes

Store leftovers in an airtight container in the fridge for up to 3 days. Freezes well for up to 3 months.

Tried this recipe?

Let us know how it was!

Baked Feta Potatoes: Creamy, Crispy Joy in Every Bite

August 20, 2025 by Grace Snow Leave a Comment

As I peeled back the layers of discovery in my kitchen, I found a delightful fusion of flavors waiting to be unleashed: Baked Feta Potatoes. This dish marries crispy, golden potatoes with creamy, tangy feta, brightened by zesty lemon and aromatic garlic. Inspired by the viral baked feta pasta trend, these potatoes stand out as the ultimate vegetarian side dish for any gathering or cozy dinner at home. Not only are they incredibly easy to prepare, but they also deliver an exciting twist that can transform your meals from mundane to memorable. Whether you're looking for a crowd-pleaser for a summer cookout or a comforting companion for a weeknight dinner, these Baked Feta Potatoes are sure to impress. Ready to elevate your cooking game with this irresistible recipe?

Why Baked Feta Potatoes Rock?

Simplicity: These Baked Feta Potatoes are incredibly easy to whip up, requiring just basic cooking skills.

Flavor Explosion: The creamy, tangy feta combined with roasted garlic and lemon creates a burst of flavor that elevates any meal.

Versatile Dish: Perfect as a side for Greek salads, dinner parties, or BBQ gatherings, you'll find yourself wanting to serve them on repeat.

Year-Round Enjoyment: Enjoy this dish in summer or winter; their comforting warmth makes them a seasonal favorite.

Crowd-Pleasing: Whether you're entertaining guests or enjoying a cozy dinner, these potatoes are sure to delight everyone at the table.

Unique Twist: Inspired by the trending baked feta pasta, this recipe takes familiar ingredients and transforms them into a standout side dish you won't soon forget. Want to explore more delightful pairings? Consider trying them with a refreshing Greek salad or some delicious Roasted Sweet Potatoes!

Baked Feta Potatoes Ingredients

• Create a flavor-packed experience with these Baked Feta Potatoes featuring comforting ingredients.

For the Potatoes

  • Large Baking Potatoes – Provide structure; you can swap them with sweet potatoes for a little extra sweetness.
  • Olive Oil – Essential for achieving that crispy texture; opt for extra virgin for a richer flavor.
  • Salt – Enhances all your dish’s flavors; adjust according to your feta's saltiness.
  • Black Pepper – Adds warmth and seasoning; freshly cracked is preferred for the best flavor.

For the Feta Mixture

  • Feta Cheese (200g block) – The star ingredient for creaminess and tang; feel free to substitute with goat cheese or a vegan cheese for a different spin.
  • Dried Thyme – Infuses the dish with earthy aromas; you can use dried rosemary in its place if needed.
  • Dried Oregano – Complements the Greek flavors beautifully, adding depth to your dish.
  • Red Chilli Flakes – Offers just the right amount of heat; adjust to your spice preference.

For the Zesty Finish

  • Garlic (1 head, top cut off) – Roasted to mellow its sharpness; it brings sweetness to the dish.
  • Lemon (1, quartered) – Adds brightness and acidity; squeeze over the potatoes for an uplifting flavor.
  • Honey (1 tbsp) – Optional sweetness that balances the dish; adjust to your taste.
  • Fresh Basil (¼ cup, chopped) – For a pop of freshness and vibrant color to complete your dish.

Step‑by‑Step Instructions for Baked Feta Potatoes

Step 1: Preheat Oven
Begin by preheating your oven to 200°C (390°F). This temperature ensures that your Baked Feta Potatoes will achieve that perfect crispy exterior. While your oven heats up, gather your baking dish and other ingredients, so everything is ready for a seamless cooking experience.

Step 2: Prepare Potatoes
Wash and cube your large baking potatoes into uniform pieces to ensure even cooking. Next, bring a pot of salted water to a boil and par-boil the potatoes for 6 to 10 minutes until slightly tender but not fully cooked. Drain them well and allow them to steam dry for a minute to enhance their crispiness.

Step 3: Season & Roast Potatoes
In a large baking dish, combine the drained potatoes with olive oil, dried thyme, dried oregano, salt, and black pepper. Toss everything together until the potatoes are evenly coated. Spread them out in a single layer and roast in your preheated oven for about 30-40 minutes, or until they are golden brown and crispy, turning them halfway through for even roasting.

Step 4: Add Feta and Lemon
Once your potatoes are beautifully roasted, take the baking dish out of the oven. Nestle the block of feta cheese in the center, and pour the juice of half a quartered lemon over it. The bright lemon juice will enhance the flavor of the feta and infuse it into the potatoes.

Step 5: Roast with Feta
Return the baking dish to the oven for an additional 15 minutes. During this time, the feta will soften and begin to brown slightly, adding a creamy, tangy element that pairs perfectly with the crispy potatoes. Keep an eye on it to ensure it achieves that delightful golden color without overcooking.

Step 6: Prepare Garlic
As the feta and potatoes roast, prepare your garlic. Once the garlic is cool enough to handle, squeeze the roasted garlic cloves from their skins into a bowl. Use a fork to mash the garlic into a smooth paste, releasing its sweet, mellow flavor that will blend beautifully with the final dish.

Step 7: Mix Potatoes
After the second roast, remove the baking dish from the oven. Combine the mashed roasted garlic with the Baked Feta Potatoes, along with the chopped basil and the juice of the remaining lemon. Stir gently to mix all the flavors together, ensuring every potato is coated with the creamy feta and aromatic garlic.

Step 8: Serve
To finish off your Baked Feta Potatoes, drizzle honey over the top for a touch of sweetness, if desired. Garnish with additional fresh basil to brighten the dish’s appearance. Now you’re ready to enjoy this delightful, flavor-packed side that will elevate any meal!

Expert Tips for Baked Feta Potatoes

  • Feta Attention: Keep a close eye on the feta while it bakes to prevent it from becoming rubbery. Avoid overcooking for the best creamy texture.

  • Uniform Sizes: Cut the potatoes into uniform pieces for even cooking and browning, ensuring every bite is perfectly crispy.

  • Par-Boil Properly: Don’t skip the par-boiling step! It helps to soften the potatoes, reducing the roasting time and preventing hard spots.

  • Adjust Seasoning: Remember to taste as you go! Adjust salt according to the saltiness of your feta, and feel free to modify spice levels for personal preferences.

  • Mix Gently: When combining the ingredients post-roasting, stir gently to keep the potato pieces intact while mixing the creamy feta and garlic.

Make Ahead Options

These Baked Feta Potatoes are a fantastic option for meal prep, saving you time on busy weeknights! You can prepare the potatoes by washing, cubing, and par-boiling them up to 24 hours in advance; just refrigerate them in an airtight container to maintain freshness. Also, you can mix the seasoning and pre-crumble the feta for quick access. When you're ready to enjoy, simply reheat the potatoes in a baking dish, toss them in olive oil, and roast them at 200°C (390°F) for about 30-40 minutes. Finally, add the feta and lemon, return to the oven for an additional 15 minutes, and you’ll have delightful Baked Feta Potatoes with minimal hassle!

Baked Feta Potatoes: Creative Twists

Feel free to explore these variations that will add a unique twist to your Baked Feta Potatoes, bringing your meals to new heights!

  • Sweet Potato Swap: Substitute regular potatoes with sweet potatoes for a deliciously sweet flavor; they roast beautifully and add vibrant color.
  • Dairy-Free Delight: Use a plant-based feta cheese for a vegan-friendly version that doesn’t skimp on creamy texture.
  • Herb Infusion: Experiment with fresh herbs like dill or parsley instead of basil for a fresh twist; they’ll brighten up each bite!
  • Extra Heat: For a spicy kick, add fresh jalapeños or more red chili flakes to give a lively temperature to the dish.
  • Roasted Veggie Medley: Mix in your favorite vegetables, like bell peppers or zucchini, alongside the potatoes for added nutrition and color.
  • Lemon Zest Boost: Enhance the zesty lemon flavor by adding some lemon zest; a little goes a long way in brightening the dish.
  • Creamy Garlic Sauce: Drizzle a homemade garlic yogurt sauce over the top before serving for an extra creamy finish; it harmonizes beautifully with the flavors.
  • Nutty Crust: Top with crushed walnuts or pine nuts after baking for a delightful crunch that complements the creamy potatoes.

Looking for more inspiration? Pair these Baked Feta Potatoes with a refreshing Greek salad or some irresistible Skillet Pasta Feta for a complete meal!

What to Serve with Baked Feta Potatoes?

Imagine a vibrant array of flavors and textures that perfectly complement your gooey, cheesy potatoes, creating the ultimate dining experience.

  • Greek Salad: A refreshing counterpart, this crisp salad balances the creamy feta with juicy tomatoes, cucumbers, and tangy olives for a Mediterranean delight.

  • Grilled Lemon Chicken: Tender, flavorful chicken marinated in lemon and herbs enhances the dish's overall zest while providing a hearty protein option.

  • Tzatziki Sauce: This creamy cucumber-yogurt sauce offers a cool contrast to the warmth of the potatoes and enriches your meal with a burst of flavor.

  • Roasted Vegetables: Colorful seasonal veggies roasted until tender add both nutrition and a lovely charred texture, making your plate even more inviting.

  • Quinoa Pilaf: Nutty quinoa seasoned with herbs provides a wholesome element that pairs deliciously with the crispy baked feta potatoes.

  • Chickpea Stew: A hearty, spiced stew introduces unique flavors and an excellent protein source, perfect for vegetarian diners.

  • Souvlaki Skewers: Serve skewered, marinated meats or vegetables for a flavorful grill option that adds an exciting twist to your meal.

  • White Wine Spritzer: A light and refreshing drink, this fizzy choice will cleanse your palate and enhance your feast without overwhelming it.

  • Baklava: End your meal on a sweet note with this honey-soaked pastry, which beautifully contrasts the savory flavors of your main dish.

Let each of these delightful pairings elevate your dining experience, transforming your baked feta potatoes into an extraordinary culinary celebration.

How to Store and Freeze Baked Feta Potatoes

Fridge: Store leftover Baked Feta Potatoes in an airtight container for up to 5 days. They can be enjoyed hot or cold, making them perfect for meal prep!

Freezer: For longer storage, freeze the potatoes in a single layer on a baking sheet until solid, then transfer to a freezer bag for up to 3 months. Reheat directly from frozen.

Reheating: To reheat, place in a preheated oven at 180°C (350°F) for about 20-25 minutes until heated through. You can add a drizzle of olive oil or fresh herbs to refresh their flavor.

Room Temperature: If serving at a gathering, keep the Baked Feta Potatoes out for no more than 2 hours to ensure food safety and freshness.

Baked Feta Potatoes Recipe FAQs

How do I select ripe potatoes for this recipe?
It's essential to choose large baking potatoes that feel firm and smooth to the touch. Avoid any with dark spots or blemishes, as these can indicate spoilage. If you're looking for a sweeter flavor, feel free to experiment with sweet potatoes, but remember to adjust cooking times accordingly.

How should I store leftover Baked Feta Potatoes?
Store leftovers in an airtight container in the fridge for up to 5 days. They can be enjoyed both hot and cold! If you're saving them for later, I often recommend reheating them in the oven to maintain their crispiness, as microwaving can make them soggy.

Can I freeze Baked Feta Potatoes?
Absolutely! To freeze your Baked Feta Potatoes, first let them cool completely. Arrange them in a single layer on a baking sheet and freeze until solid. Once frozen, transfer them to a freezer-safe bag or container. They can be stored this way for up to 3 months. To reheat, bake them directly from frozen at 180°C (350°F) for about 20-25 minutes until heated through.

What if my potatoes are not crispy after roasting?
If your potatoes aren't crispy, it might be due to moisture. Ensure they are well-drained after par-boiling and spread them out in a single layer on the baking sheet. Additionally, try increasing the roasting time or the oven temperature slightly, checking often to prevent burning.

Are these potatoes suitable for people with dietary restrictions?
Yes, these Baked Feta Potatoes are vegetarian! For those avoiding dairy, you can substitute feta with plant-based cheese like a vegan feta or even goat cheese. Just be mindful that some individuals may have allergies to nuts or specific grains, so always read the labels on any alternative ingredients to ensure they meet your dietary needs.

Can I use different herbs in this recipe?
Very! If you don’t have dried thyme or oregano, feel free to experiment with herbs like rosemary or Italian seasoning. Just remember that fresh herbs are usually stronger, so if you choose to use them, you may want to reduce the quantity. Enjoy the flavor exploration!

Baked Feta Potatoes

Baked Feta Potatoes: Creamy, Crispy Joy in Every Bite

Baked Feta Potatoes offer a fusion of crispy, golden potatoes and creamy feta, perfect for any gathering.
Print Recipe Pin Recipe
Prep Time 15 minutes mins
Cook Time 55 minutes mins
Total Time 1 hour hr 10 minutes mins
Servings: 4 potatoes
Course: Dinner
Cuisine: Mediterranean
Calories: 220
Ingredients Equipment Method Nutrition Notes

Ingredients
  

For the Potatoes
  • 4 large Baking Potatoes Can swap with sweet potatoes for extra sweetness
  • 2 tbsp Olive Oil Extra virgin preferred for richer flavor
  • 1 tsp Salt Adjust according to feta's saltiness
  • 1 tsp Black Pepper Freshly cracked is preferred
For the Feta Mixture
  • 200 g Feta Cheese Feel free to substitute with goat cheese or vegan cheese
  • 1 tsp Dried Thyme Dried rosemary can be used instead
  • 1 tsp Dried Oregano Adds depth to the dish
  • 1/2 tsp Red Chilli Flakes Adjust to your spice preference
For the Zesty Finish
  • 1 head Garlic Top cut off, roasted
  • 1 whole Lemon Quartered, squeeze over potatoes
  • 1 tbsp Honey Optional, adjust to taste
  • 1/4 cup Fresh Basil Chopped, for garnish

Equipment

  • Oven
  • Baking Dish
  • pot
  • Fork

Method
 

Step‑by‑Step Instructions
  1. Preheat your oven to 200°C (390°F). Gather your baking dish and ingredients.
  2. Wash and cube the potatoes. Bring salted water to a boil and par-boil for 6-10 minutes until slightly tender. Drain and steam dry.
  3. In a large baking dish, combine potatoes with olive oil, thyme, oregano, salt, and pepper. Toss to coat and roast for 30-40 minutes until golden and crispy.
  4. Add feta cheese in the center and pour the juice of half the lemon over it. Return to oven.
  5. Roast for another 15 minutes until feta softens and browns slightly.
  6. Squeeze roasted garlic into a bowl and mash into a paste.
  7. Mix together the potatoes, mashed garlic, chopped basil, and remaining lemon juice.
  8. Drizzle with honey if desired and garnish with fresh basil before serving.

Nutrition

Serving: 1potatoCalories: 220kcalCarbohydrates: 35gProtein: 5gFat: 8gSaturated Fat: 2gMonounsaturated Fat: 6gCholesterol: 5mgSodium: 400mgPotassium: 710mgFiber: 4gSugar: 2gVitamin A: 2IUVitamin C: 30mgCalcium: 5mgIron: 8mg

Notes

Store leftovers in an airtight container for up to 5 days. For longer storage, freeze for up to 3 months.

Tried this recipe?

Let us know how it was!

Coconut Crusted Fish with Mango Salsa that Dazzles Your Tastebuds

August 20, 2025 by Grace Snow Leave a Comment

As I sifted through the warm sands of a sun-kissed beach, the tantalizing aroma of grilled fish danced on the breeze, instantly whisking me back to vibrant summertime gatherings. Inspired by those tropical flavors, I couldn't wait to recreate that magic in my kitchen with this Coconut Crusted Fish with Mango Salsa. This delightful dish strikes the perfect balance between a crispy coconut coating and tender, flaky fish, making it not only a showstopper but also a quick dinner option for busy weeknights. It's gluten-free and packed with fresh ingredients, so you can feel great about serving it to loved ones. Ready to transport your taste buds to a beachside paradise with every bite? Let’s dive into this vibrant recipe that promises to be a hit at your next dinner!

Why Is Coconut Crusted Fish Irresistible?

Flavor Explosion: The combination of crispy coconut and juicy mango creates a vibrant taste experience that’s absolutely delightful.

Healthy Choice: This dish is gluten-free and utilizes fresh, whole ingredients, making it perfect for clean eating enthusiasts.

Quick and Easy: You can whip this up in under 30 minutes, making it a fantastic weeknight dinner option that doesn’t skimp on flavor.

Versatile Delight: Feel free to substitute salmon or mahi-mahi for a twist on the classic flavor profiles; the possibilities are endless!

Crowd-Pleasing Favorite: Whether it’s a summer gathering or a family dinner, this dish is sure to impress everyone at the table, just like my favorite Fiesta Lime Chicken with Avocado.

Coconut Crusted Fish with Mango Salsa Ingredients

For the Fish
• White Fish Fillets – A primary protein source; options include cod, halibut, or tilapia.
• Unsweetened Shredded Coconut – Adds natural sweetness and a delightful texture; ensure it’s unsweetened for healthier preparation.
• Panko Breadcrumbs – Provides the perfect crunch; opt for a gluten-free version if necessary.
• Eggs – Acts as a binding agent in the breading process, ensuring a crispy crust.
• Almond or Coconut Flour – Ideal for dredging the fish; can be substituted with regular flour if gluten isn’t a concern.
• Garlic Powder – Infuses depth and flavor, enhancing the overall dish.
• Smoked Paprika – Adds a subtle smoky taste that complements the fish perfectly.
• Sea Salt – Essential for enhancing the overall flavor of the dish.
• Olive Oil – Used for light frying and contributes an added richness.

For the Mango Salsa
• Ripe Mango – The star of the salsa, providing sweetness; can be replaced with pineapple, peach, or papaya if necessary.
• Red Bell Pepper – Adds crunch and vibrant color, along with sweetness to the salsa.
• Red Onion – Introduces sharpness and flavor contrast; finely diced for best texture.
• Fresh Cilantro – Essential herb for freshness and flavor in the salsa.
• Lime Juice – Offers brightness and acidity, balancing the salsa perfectly.
• Salt and Pepper – For seasoning the salsa to taste.
• Jalapeño (optional) – Adds a spice element; adjust based on your heat preference.

Feel free to gather these ingredients for the quick and delightful Coconut Crusted Fish with Mango Salsa that will surely dazzle your taste buds!

Step‑by‑Step Instructions for Coconut Crusted Fish with Mango Salsa

Step 1: Preheat the Oven
Start by preheating your oven to 425°F (220°C). While the oven heats up, prepare a baking sheet by lining it with parchment paper and giving it a light spray of olive oil. This initial step sets the stage for the Coconut Crusted Fish to bake to crisp perfection, so make sure you're ready to go when the time comes.

Step 2: Set Up Dredging Stations
Gather three shallow dishes for your dredging process. In the first, pour a light layer of almond or coconut flour; in the second, beat a couple of eggs until smooth. In the third dish, combine unsweetened shredded coconut, panko breadcrumbs, garlic powder, smoked paprika, and sea salt. This organized setup makes breading your fish seamless and efficient, ensuring even coverage of flavors.

Step 3: Bread the Fish
Now, pat your white fish fillets dry using a paper towel to remove excess moisture. First, dredge each fillet in the flour mixture, ensuring it's fully coated, then dip it into the beaten eggs to adhere. Finally, press the fish firmly into the coconut mixture, coating one side thoroughly. You want that beautiful crust to form as it bakes, so make sure to cover all edges.

Step 4: Bake the Fish
Place the breaded fish fillets on your prepared baking sheet, allowing a bit of space between them for even cooking. Lightly spray the tops with olive oil for a golden finish. Bake in the preheated oven for 16–18 minutes, flipping halfway through, until the fish is golden brown and flakes easily with a fork. This step brings your Coconut Crusted Fish to life with a delightful crunch.

Step 5: Make the Mango Salsa
While the fish is baking, it’s time to prepare the mango salsa. In a mixing bowl, combine diced ripe mango, finely chopped red bell pepper, red onion, chopped fresh cilantro, and a squeeze of lime juice. Season with salt and pepper to taste, then gently mix to combine all the vibrant flavors. Refrigerate the salsa until the fish is ready to serve, allowing the flavors to meld beautifully.

Step 6: Serve the Dish
Once the Coconut Crusted Fish is perfectly baked, remove it from the oven and top each fillet generously with your freshly made mango salsa. For an extra touch, garnish with additional cilantro. This final step elevates your dish, turning it into a tropical feast that’s as visually appealing as it is delicious. Enjoy this wonderful balance of flavors that your family will love!

Expert Tips for Coconut Crusted Fish

Dry Fish Thoroughly: Ensuring your fish fillets are completely dry before breading is essential for the coconut crust to adhere well during baking.

Use Olive Oil Spray: Lightly spray the coated fish with olive oil before baking. This helps achieve a golden, crispy exterior without the need for frying.

Flipping Fish: Be gentle when flipping the fish halfway through baking; using a spatula will help keep the crust intact while ensuring even cooking.

Fresh Ingredients: Opt for fresh, ripe mango for your salsa to maximize the fruity flavor and sweetness in your Coconut Crusted Fish with Mango Salsa.

Avoid Microwaving: If you have leftovers, reheat the fish in the oven rather than the microwave to maintain that delightful crunch instead of compromising it.

Experiment with Fish: Don’t hesitate to try different fish varieties, like salmon or mahi-mahi, to explore different flavors while keeping the dish gluten-free!

What to Serve with Tropical Coconut Crusted Fish with Mango Salsa

Transform your tropical dinner into a complete culinary experience with these delightful pairings that tantalize the senses.

  • Quinoa Salad: A light, nutrient-packed option, this dish offers a fluffy texture that complements the crispy fish beautifully. Toss it with herbs, cherry tomatoes, and a zesty dressing for a refreshing combo.

  • Steamed Asparagus: With its vibrant green color and delicate crunch, asparagus adds elegance to the meal. Simply season with lemon zest and a sprinkle of sea salt for a fresh taste.

  • Coconut Rice: This creamy, slightly sweet rice dish echoes the coconut flavors in the fish while adding a rich texture. The coconut notes enhance the tropical theme beautifully.

  • Coleslaw with Lime Dressing: A crunch-packed slaw with a tangy lime dressing balances the richness of the fish. Packed with vibrant vegetables, it adds color and freshness to your plate.

  • Mango Mojito: A refreshing beverage packed with mint and citrus complements the sweetness of the mango salsa. This drink elevates the dish’s tropical vibe, perfect for warm summer evenings.

  • Grilled Pineapple Slices: Juicy, caramelized pineapple slices serve as a sweet contrast to the savory dish. They not only taste fantastic but also make for a stunning presentation on the table.

  • Coconut Chia Pudding: For dessert, serve a light coconut chia pudding adorned with fresh fruit. This creamy treat ties back to the coconut theme and serves as a beautiful endnote to your tropical feast.

Storage Tips for Coconut Crusted Fish with Mango Salsa

Fridge: Store any leftover Coconut Crusted Fish in an airtight container in the fridge for up to 2 days. This helps maintain freshness while preventing odors from other foods.

Freezer: For longer storage, freeze the baked fish in an airtight freezer-safe container for up to 2 months. Just thaw overnight in the fridge before reheating.

Reheating: Reheat your fish in the oven at 350°F (175°C) for about 10–15 minutes, until warmed through and crispy again. This method preserves the delightful crunch of the coconut crust.

Mango Salsa Storage: Keep the mango salsa in a separate airtight container in the fridge for up to 3 days. Stir well before serving to reinvigorate flavors!

Coconut Crusted Fish with Mango Salsa Variations

Feel free to unleash your creativity in the kitchen with these delightful twists on a classic dish!

  • Salmon Substitute: Swap out white fish for salmon to enhance flavor richness and omega-3s. The combination of salmon’s buttery texture and coconut crust is simply irresistible.

  • Mango Salsa Variations: Experiment by adding diced strawberries or using pineapple in your salsa for a refreshing tropical twist. The sweetness of the fruit beautifully complements the coconut crusted fish in unexpected ways.

  • Spicy Kick: For heat lovers, incorporate diced jalapeños into your mango salsa for that extra zing. Adjust the amount based on your spice tolerance, creating a salsa that packs a punch!

  • Coconut Yogurt Topper: Trade mango salsa for a dollop of coconut yogurt mixed with lime juice and a sprinkle of cilantro. This swap creates a creamy, tangy contrast that’s just heavenly!

  • Nut-Free Options: If you’re looking for a nut-free version, replace almond or coconut flour with regular flour or ground oats. Both options still give a lovely texture to your dish, ensuring everyone can enjoy it.

  • Herb Infusion: Add fresh herbs like mint or basil to your mango salsa for an aromatic lift. These herbs can elevate the dish, offering a new level of freshness that complements the coconut perfectly.

  • Vegetable Boost: Mix in finely chopped cucumber or diced avocado to the salsa for added crunch and creaminess. This creates a chunky, satisfying topping that enhances the overall experience.

  • Quinoa or Rice Base: Serve the fish over a bed of fluffy quinoa or coconut rice instead of simply plating it alone. This not only adds a textural contrast but also makes the meal even more filling!

With these variations, your Coconut Crusted Fish with Mango Salsa will never get old. Why not try a few the next time you cook? You might discover a new family favorite! For more delicious seafood ideas, check out my Cocoa Crusted Steak or Air Fryer Fish for more culinary inspiration.

Make Ahead Options

These Coconut Crusted Fish with Mango Salsa are perfect for meal prep enthusiasts! You can bread the fish fillets up to 24 hours in advance and store them in an airtight container in the refrigerator to maintain freshness. Additionally, prepare the mango salsa up to 3 days ahead; just be sure to keep it well-covered in the fridge to prevent browning and keep it flavorful. When you’re ready to serve, simply bake the crusted fish at 425°F (220°C) for about 16–18 minutes until golden brown, and top with the chilled salsa. This way, you’ll enjoy a healthy, delicious meal with minimal effort on busy evenings!

Coconut Crusted Fish with Mango Salsa Recipe FAQs

How do I choose the best fish for this recipe?
Absolutely! For optimal flavor and texture, select fresh white fish fillets such as cod, halibut, or tilapia. When choosing fish, look for fillets that are firm and have a clean, ocean-like scent. Avoid any fish with dark spots or a fishy odor to ensure a delicious end result.

What is the best way to store leftover Coconut Crusted Fish?
Keep any leftover Coconut Crusted Fish in an airtight container in the fridge for up to 2 days. This will help preserve its flavor and texture. When reheating, I recommend using the oven at 350°F (175°C) for about 10–15 minutes to regain that delicious crunchy crust.

Can I freeze Coconut Crusted Fish?
Absolutely! To freeze the cooked Coconut Crusted Fish, let it cool completely, then place it in an airtight freezer-safe container. It can be stored for up to 2 months. When you're ready to enjoy it again, thaw overnight in the fridge and reheat in the oven for best results.

What can I do if the crust doesn’t stick to the fish?
If you find the crust isn’t adhering well, it might be due to excess moisture on the fish. To remedy this, ensure the fish fillets are thoroughly dried with a paper towel before breading. Additionally, make sure to press the coconut mixture firmly onto the fish to create a better bond.

Is this dish suitable for people with allergies?
Great question! This Coconut Crusted Fish recipe is naturally gluten-free if you use gluten-free panko breadcrumbs and flour. However, it does contain eggs and coconut, so if you have allergies to either of those, you may want to explore egg substitutes like a flaxseed mixture or aquafaba for binding, though the crust's texture may vary slightly.

How long does the mango salsa stay fresh?
The mango salsa can be stored in an airtight container in the fridge for up to 3 days. To keep flavors fresh, I recommend stirring it gently before serving, as the ingredients can settle over time. If you're preparing ahead, consider making the salsa just a few hours before serving for the best taste!

Coconut Crusted Fish with Mango Salsa

Coconut Crusted Fish with Mango Salsa that Dazzles Your Tastebuds

Coconut Crusted Fish with Mango Salsa is a gluten-free dish that perfectly balances crispy coconut and tender fish.
Print Recipe Pin Recipe
Prep Time 10 minutes mins
Cook Time 18 minutes mins
Total Time 28 minutes mins
Servings: 4 servings
Course: Dinner
Cuisine: Tropical
Calories: 300
Ingredients Equipment Method Nutrition Notes

Ingredients
  

For the Fish
  • 4 fillets White Fish (cod, halibut, or tilapia)
  • 1 cup Unsweetened Shredded Coconut Ensure it's unsweetened for health benefits
  • 1 cup Panko Breadcrumbs Gluten-free if necessary
  • 2 large Eggs Beaten
  • 1/2 cup Almond or Coconut Flour Regular flour can be substituted
  • 1 teaspoon Garlic Powder
  • 1 teaspoon Smoked Paprika
  • 1 teaspoon Sea Salt
  • 3 tablespoons Olive Oil For frying
For the Mango Salsa
  • 1 large Ripe Mango Can substitute with pineapple, peach, or papaya
  • 1 medium Red Bell Pepper
  • 1/2 medium Red Onion Finely diced
  • 1/4 cup Fresh Cilantro Chopped
  • 2 tablespoons Lime Juice
  • to taste Salt and Pepper
  • 1 tablespoon Jalapeño (optional) Adjust based on heat preference

Equipment

  • Oven
  • Baking Sheet
  • Mixing bowls
  • Shallow Dishes
  • Spatula

Method
 

Preparation Steps
  1. Preheat your oven to 425°F (220°C) and prepare a baking sheet lined with parchment paper and a light spray of olive oil.
  2. Set up three shallow dishes: one with almond or coconut flour, one with beaten eggs, and one with shredded coconut, panko, garlic powder, smoked paprika, and sea salt.
  3. Pat fish fillets dry, dredge in flour, dip in eggs, and then press into the coconut mixture, coating one side thoroughly.
  4. Place the coated fish fillets on the baking sheet, spray lightly with olive oil, and bake for 16–18 minutes, flipping halfway through.
  5. While the fish bakes, prepare the salsa by mixing diced mango, red bell pepper, red onion, cilantro, and lime juice. Season with salt and pepper to taste.
  6. Once the fish is baked, top with the mango salsa and garnish with additional cilantro before serving.

Nutrition

Serving: 1filletCalories: 300kcalCarbohydrates: 22gProtein: 25gFat: 12gSaturated Fat: 4gPolyunsaturated Fat: 2gMonounsaturated Fat: 6gCholesterol: 90mgSodium: 650mgPotassium: 500mgFiber: 3gSugar: 4gVitamin A: 200IUVitamin C: 30mgCalcium: 20mgIron: 1.5mg

Notes

Ensure fish fillets are dry before breading for best results. Lightly spray with olive oil for a crispy texture.

Tried this recipe?

Let us know how it was!

Creamy Rotel Pasta with Ground Beef for Cozy Nights

August 20, 2025 by Grace Snow Leave a Comment

As I poured the rich, creamy sauce over the twirling elbow macaroni, a wave of nostalgia washed over me—reminding me of cozy family dinners filled with laughter. This Creamy Rotel Pasta with Ground Beef is not only a delightful dish but also a swift solution for busy weeknights, combining bold flavors with the comforting essence of home-cooked food. Packed with hearty ingredients, this recipe redefines the classic pasta experience by infusing it with a zesty twist that will have your family asking for seconds. Plus, its versatility means you can easily make substitutions to cater to dietary preferences or simply use what you have on hand. What’s your favorite way to customize pasta dishes?

Why Is This Pasta Recipe So Great?

Comforting and hearty, this Creamy Rotel Pasta with Ground Beef delivers an unbeatable flavor combination that warms the soul. Quick and easy, you can whip up this dish in just 30 minutes, making it perfect for busy weeknights. Versatile options allow substitutions like ground turkey or veggies, tailoring it to your taste. Crowd-pleaser quality means it's sure to satisfy the whole family and keep everyone coming back for more. For a fresh accompaniment, consider pairing it with a fresh garden salad or enjoy it alongside warm garlic bread. This recipe is comfort food reimagined!

Rotel Pasta with Ground Beef Ingredients

• Discover the essential ingredients needed for your delicious Rotel Pasta with Ground Beef!

For the Pasta

  • Elbow Macaroni – Provides the perfect pasta base; feel free to substitute with any pasta shape or gluten-free pasta if needed.

For the Beef

  • Ground Beef – The heartiness revolves around this protein source; consider using ground turkey, chicken, or a plant-based meat alternative for a lighter option.
  • Olive Oil – Used for cooking the beef and imparting flavor; vegetable oil or butter makes a suitable substitute.

For Flavoring

  • Garlic Powder – Enhances the dish's flavor profile; fresh garlic can give you a more robust taste.
  • Onion Powder – Adds depth to the flavor; you can also sauté fresh onions with the meat for a fresher kick.
  • Salt and Pepper – Essential for seasoning; adjust these to suit your personal taste.

For the Sauce

  • Diced Tomatoes with Green Chilies (Rotel) – This adds the zesty kick and acidity crucial for the dish’s flavor; add more chilies for an extra heat level if you like!
  • Cream Cheese – Creates the rich and creamy sauce that elevates the dish; you can swap it for sour cream or Greek yogurt for a tangy twist.
  • Beef Broth – Helps create the desired sauce consistency; a vegetable or chicken broth can be used for different flavors.

For the Cheesy Finish

  • Shredded Cheddar Cheese – Infuses creaminess and more flavor; try using any melting cheese like Monterey Jack or Colby as an alternative.

Step‑by‑Step Instructions for Creamy Rotel Pasta with Ground Beef

Step 1: Cook the Pasta
Bring a large pot of salted water to a roaring boil over high heat. Add elbow macaroni and cook for 7–8 minutes until al dente, stirring occasionally to prevent sticking. Once done, drain the pasta in a colander and set it aside, allowing it to rest while you prepare the delicious sauce for your Rotel Pasta with Ground Beef.

Step 2: Brown the Beef
In the same pot, heat 1 tablespoon of olive oil over medium heat. Once shimmering, add the ground beef and break it apart with a spatula. Cook for about 5–7 minutes or until the beef is browned and no longer pink. Carefully drain any excess fat and return the pot with the browned beef to the stovetop.

Step 3: Season the Meat
Sprinkle in the garlic powder, onion powder, salt, and pepper, stirring to combine everything. Continue to cook for an additional minute, allowing the spices to toast and release their wonderful aromas. This step ensures your Rotel Pasta with Ground Beef is full of rich flavors from the very beginning.

Step 4: Prepare the Sauce
Next, add the canned Rotel, cream cheese, and beef broth to the pot with the seasoned beef. Stir well, allowing the cream cheese to melt and blend into the mix. Cook for about 3–4 minutes until the sauce is creamy and well incorporated, creating a flavorful base for your dish.

Step 5: Combine Pasta and Cheese
Add the drained elbow macaroni back into the pot, folding it gently into the creamy Rotel sauce. Then, mix in the shredded cheddar cheese and stir until everything is evenly coated and the cheese has fully melted. Continue cooking for another 2–3 minutes over low heat until everything is hot and bubbly.

Step 6: Serve and Enjoy
Once it's perfectly creamy and delicious, it's time to serve your Rotel Pasta with Ground Beef! Scoop the pasta into bowls and garnish with fresh cilantro or parsley for a pop of color. Enjoy this hearty dish hot, savoring each bite of bold flavors and comforting textures.

What to Serve with Creamy Rotel Pasta with Ground Beef

A delightful meal deserves delicious accompaniments that elevate the dining experience to new heights.

  • Garden Salad: Light and refreshing, a simple salad with crisp greens and a vinaigrette balances the creamy pasta beautifully.
  • Garlic Bread: Warm, buttery garlic bread complements the rich flavors, providing a satisfying crunch with each bite.
  • Sautéed Veggies: Brightly colored bell peppers and zucchini stir-fried in olive oil add vibrant colors and textures, while also boosting nutrition.
  • Corn on the Cob: Sweet, juicy corn pairs wonderfully with the spicy notes of the Rotel pasta, introducing a delightful sweetness to the meal.
  • Coleslaw: The crunch and tang of coleslaw create a refreshing contrast to the creamy, rich pasta, making each bite even more enjoyable.
  • Fruit Salad: A light and colorful fruit salad serves as a perfect ending to your meal, offering a sweet note to balance the savory flavors.
  • Sparkling Water or Sweet Tea: Refreshing drinks like sparkling water with a slice of lemon or sweet iced tea keep the meal light and enjoyable.

Rotel Pasta with Ground Beef Variations

Feel free to get creative with your dish—there are so many ways to customize this creamy delight!

  • Turkey Substitute: Swap ground beef for ground turkey for a healthier, lighter meal without sacrificing flavor. The dish still holds that comforting essence!
  • Veggie Boost: Toss in bell peppers, spinach, or zucchini to elevate the nutritional value and add a vibrant touch. It makes your plate look even more inviting!
  • Dairy-Free: Use plant-based cream cheese and nutritional yeast for a creamy, cheesy flavor without dairy. This is great for those with lactose intolerance!
  • Cheesy Kick: Replace cheddar with Pepper Jack cheese for a spicy twist that will tantalize your taste buds. It’s a fun way to bring more heat!
  • Gluten-Free: Substitute elbow macaroni with gluten-free pasta, ensuring everyone can enjoy this dish. The creamy sauce perfectly coats all kinds of pasta.
  • Extra Heat: If you crave spice, incorporate diced jalapeños or a dash of cayenne into the sauce to add that fiery kick. It’s the perfect way to amp up the flavor profile!
  • Creamy Alternatives: Swap cream cheese for Greek yogurt or sour cream to add a tangy richness while keeping it creamy. It’s a delightful twist that’s equally satisfying!
  • Seafood Variation: Try adding shrimp or cooked crab for a seafood twist that brings the ocean's flavor right to your plate. Pair it with Seafood Pasta Savory for more ideas!

Let's make this creamy pasta dish your own and create memories around the dinner table with your unique touches!

Make Ahead Options

These Creamy Rotel Pasta with Ground Beef are a fantastic choice for busy home cooks looking to save time during the week! You can prepare the meat sauce (brown the beef and mix in the Rotel and cream cheese) up to 3 days in advance; simply store it in an airtight container in the refrigerator. Additionally, you can cook the pasta and keep it in a separate container in the fridge for up to 24 hours. To finish the dish, reheat the sauce gently on the stovetop while you cook the pasta (if not prepped) until it's hot and creamy. Combining the sauce and pasta just before serving ensures your meal tastes just as delicious as when freshly made!

How to Store and Freeze Creamy Rotel Pasta with Ground Beef

Fridge: Store any leftovers in an airtight container for up to 3 days. The flavors will meld beautifully, but reheat gently to maintain creaminess.

Freezer: Freeze the pasta in a freezer-safe container for up to 2 months. Thaw overnight in the fridge before reheating for best results.

Reheating: To reheat, use a stovetop pan over medium heat, adding a splash of beef broth or water to restore creaminess, stirring until heated through.

Make-Ahead: Prepare the pasta and sauce separately, store in the fridge, and combine before serving to enjoy fresh Rotel Pasta with Ground Beef.

Expert Tips for Creamy Rotel Pasta with Ground Beef

  • Cook Thoroughly: Ensure the ground beef is well-cooked, browned completely to enhance flavor, preventing any raw taste in your Rotel Pasta with Ground Beef.

  • Adjust the Creaminess: For a creamier sauce, modify the amount of beef broth according to your preference, ensuring it's just as indulgent as you'd like.

  • Spice It Up: If you enjoy heat, consider adding jalapeños or cayenne pepper to elevate the spice level in your pasta dish, making it perfect for spice lovers.

  • Season Well: Taste as you go! Adjust salt and pepper according to your liking to ensure the dish is flavorful from the first bite to the last.

  • Experiment with Cheese: Mix up the type of cheese! Using varieties like Pepper Jack can add an exciting twist, enhancing texture and flavor in your pasta.

Creamy Rotel Pasta with Ground Beef Recipe FAQs

How do I select the best ripe tomatoes for this dish?
Absolutely! When choosing tomatoes, look for ones that are firm and free of dark spots or blemishes. They should be vibrant in color and have a fresh scent. Ideally, choose tomatoes that are slightly soft to the touch for the best flavor in your Creamy Rotel Pasta with Ground Beef.

What’s the best way to store leftovers?
To store your delicious Creamy Rotel Pasta with Ground Beef, transfer it to an airtight container and keep it in the fridge for up to 3 days. Just make sure to allow it to cool completely before sealing to avoid condensation. When reheating, a little splash of beef broth or water can help maintain the creamy consistency.

Can I freeze Creamy Rotel Pasta with Ground Beef?
Yes, you can absolutely freeze the leftovers! Allow the pasta to cool first, then transfer it to a freezer-safe container, ensuring it’s well sealed. You can freeze it for up to 2 months. When ready to enjoy, thaw it in the fridge overnight and reheat on the stovetop, adding a bit of water or broth to restore creaminess.

What do I do if my pasta turns out too dry?
If you notice that your pasta has become dry, don’t worry! Simply add a splash of beef broth or water while reheating, and stir well to reincorporate the sauce. This simple step can bring back the delightful creaminess and make your meal enjoyable again.

Are there any dietary considerations for this recipe?
Very! If you need to make adjustments for dietary restrictions, consider substituting ground beef with ground turkey or a plant-based meat alternative for a lighter option. Also, using gluten-free pasta ensures that everyone can enjoy this delightful Creamy Rotel Pasta with Ground Beef without worries.

Can this recipe be made vegetarian?
Absolutely! You can convert this recipe into a vegetarian option by substituting ground beef for a plant-based meat alternative and using vegetable broth instead of beef broth. Additionally, you can load it with your favorite veggies, such as bell peppers or spinach, to enhance nutrition and texture. Enjoy experimenting!

Rotel Pasta with Ground Beef

Creamy Rotel Pasta with Ground Beef for Cozy Nights

This Creamy Rotel Pasta with Ground Beef is a comforting dish perfect for busy weeknights, combining bold flavors and hearty ingredients.
Print Recipe Pin Recipe
Prep Time 10 minutes mins
Cook Time 30 minutes mins
Total Time 40 minutes mins
Servings: 4 servings
Course: Dinner
Cuisine: American
Calories: 450
Ingredients Equipment Method Nutrition Notes

Ingredients
  

For the Pasta
  • 8 oz Elbow Macaroni Feel free to substitute with any pasta shape or gluten-free pasta if needed.
For the Beef
  • 1 lb Ground Beef Consider using ground turkey, chicken, or a plant-based meat alternative for a lighter option.
  • 1 Tbsp Olive Oil Vegetable oil or butter makes a suitable substitute.
For Flavoring
  • 1 tsp Garlic Powder Fresh garlic can give you a more robust taste.
  • 1 tsp Onion Powder You can also sauté fresh onions with the meat for a fresher kick.
  • to taste Salt Adjust to suit your personal taste.
  • to taste Pepper Adjust to suit your personal taste.
For the Sauce
  • 1 can Diced Tomatoes with Green Chilies (Rotel) Add more chilies for an extra heat level if you like!
  • 8 oz Cream Cheese You can swap it for sour cream or Greek yogurt for a tangy twist.
  • 1 cup Beef Broth A vegetable or chicken broth can be used for different flavors.
For the Cheesy Finish
  • 1 cup Shredded Cheddar Cheese Try using any melting cheese like Monterey Jack or Colby as an alternative.

Equipment

  • Large pot
  • Colander
  • Spatula

Method
 

Step-by-Step Instructions
  1. Bring a large pot of salted water to a roaring boil over high heat. Add elbow macaroni and cook for 7–8 minutes until al dente. Drain and set aside.
  2. In the same pot, heat 1 tablespoon of olive oil over medium heat. Add the ground beef and break it apart. Cook for about 5–7 minutes until browned, then drain any excess fat.
  3. Sprinkle in garlic powder, onion powder, salt, and pepper. Stir to combine and cook for an additional minute.
  4. Add the canned Rotel, cream cheese, and beef broth. Stir well and cook for about 3–4 minutes until the sauce is creamy.
  5. Add the drained elbow macaroni back into the pot and mix in the shredded cheddar cheese until evenly coated.
  6. Serve the pasta in bowls and garnish with fresh cilantro or parsley.

Nutrition

Serving: 1servingCalories: 450kcalCarbohydrates: 38gProtein: 25gFat: 24gSaturated Fat: 10gPolyunsaturated Fat: 2gMonounsaturated Fat: 10gCholesterol: 80mgSodium: 600mgPotassium: 600mgFiber: 3gSugar: 5gVitamin A: 500IUVitamin C: 10mgCalcium: 250mgIron: 3mg

Notes

Consider pairing with a fresh garden salad or warm garlic bread for a complete meal.

Tried this recipe?

Let us know how it was!

Raspberry Swirl Brioche Loaf: A Sweet Festive Delight

August 20, 2025 by Grace Snow Leave a Comment

In the heart of my kitchen, the inviting aroma of freshly baked bread mingles with a hint of sweet raspberries, instantly lifting my spirits. If you're looking for a holiday baking project that combines visual appeal with delectable flavor, you have to try this Raspberry Swirl Brioche Loaf! With its tender, buttery layers and vibrant raspberry filling, this loaf is a stunning centerpiece for any festive gathering, offering both a nostalgic comfort and a delightful surprise. Not only is it naturally a crowd-pleaser, but it’s also surprisingly simple to make at home, allowing you to impress loved ones without the fuss of complex baking. Are you ready to roll up your sleeves and transform your kitchen into a bakery?

Why is this Brioche Loaf Special?

Irresistible Flavor: The perfect fusion of sweet and tangy raspberry preserves against buttery brioche makes every bite an explosion of joy.

Eye-Catching Presentation: With its vibrant swirls, it’s a show-stopper at any holiday gathering or brunch.

Versatile Pairings: Whether with coffee in the morning or as a sweet dessert, this loaf works for any occasion.

Reliable Recipe: Even novice bakers will find this easy. You can nail that perfect rise and texture every time!

Make-Ahead Friendly: Prepare it in advance and bake later, making it a time-saver on busy holiday days or gatherings.

Elevate your next celebration with this stunning Raspberry Swirl Brioche Loaf that’s sure to impress! If you love baking with fresh flavors, don’t forget to check out my tips for holiday baking to truly master your kitchen skills.

Raspberry Swirl Brioche Loaf Ingredients

For the Dough

  • All-purpose flour – Provides structure and elasticity; substitute with gluten-free flour for a gluten-free version.
  • Active dry yeast – Essential for fermentation; ensure it’s fresh for maximum rise.
  • Granulated sugar – Sweetens the dough and activates the yeast; can be replaced with a sugar alternative for fewer calories.
  • Salt – Enhances flavor and controls yeast fermentation.
  • Warm milk (about 110°F) – Activates the yeast and adds moisture; use dairy-free milk for a non-dairy option.
  • Unsalted butter – Enriches flavor and texture; substitute with margarine for dairy-free.
  • Large eggs – Provide moisture and binding; for egg-free versions, use flax eggs or applesauce.
  • Vanilla extract – Adds depth; almond extract can be used for a fun twist.
  • Lemon zest (optional) – Brightens the flavor profile; feel free to omit if desired.

For the Raspberry Filling

  • Raspberry preserves or jam – The star ingredient that provides sweet-tart excitement; try any berry jam as a substitute.
  • Cornstarch – Thickens the jam to prevent seepage; essential for maintaining loaf integrity.
  • Water – Adjusts the filling’s consistency for the perfect spreadability.

For Topping and Glaze

  • Melted butter (for brushing) – Creates a golden crust; olive oil can be used for a lighter option.
  • Powdered sugar – For the optional glaze, adding extra sweetness; substitute with powdered erythritol for a low-sugar option.
  • Lemon juice – Provides a tangy kick to the glaze, balancing the sweetness.

Dive into the joy of baking with this amazing Raspberry Swirl Brioche Loaf—the ultimate festive treat!

Step‑by‑Step Instructions for Raspberry Swirl Brioche Loaf

Step 1: Prepare the Dough
In a large mixing bowl, combine 2¼ teaspoons of active dry yeast, ½ cup of warm milk (about 110°F), and 2 tablespoons of granulated sugar. Allow this mixture to sit for about 5 to 10 minutes until it becomes frothy. Then, add 3½ cups of all-purpose flour, 1 teaspoon of salt, ½ cup of softened unsalted butter, 3 large eggs, 1 teaspoon of vanilla extract, and optional lemon zest. Mix until combined and knead the dough until smooth for about 10-12 minutes.

Step 2: First Rise
Place the dough in a lightly greased bowl, cover it with a clean kitchen towel or plastic wrap, and let it rise in a warm area for 1 to 1.5 hours. It should double in size and feel soft and pillowy. A warm oven, turned off with the light on, makes a perfect environment for this first rise.

Step 3: Make Raspberry Filling
While the dough is rising, prepare the raspberry filling. In a medium saucepan over low heat, combine 1 cup of raspberry preserves, 1 tablespoon of cornstarch, and 2 tablespoons of water. Stir continuously until the mixture thickens, which takes about 5 minutes. Once thickened, remove it from heat and let it cool to room temperature.

Step 4: Shape the Loaf
After the dough has risen, punch it down gently to release air bubbles. Roll the dough out on a lightly floured surface into a large rectangle, approximately 12x18 inches. Spread the cooled raspberry filling evenly over the surface, leaving a small border. Roll the dough tightly into a log, slice it lengthwise down the center, and twist the two halves together.

Step 5: Second Rise
Transfer the twisted loaf into a greased 9x5-inch loaf pan. Cover with a kitchen towel and let it rise again for 30-45 minutes until it has puffed up. The loaf should fill the pan and look fluffy, preparing it for the warmth of the oven.

Step 6: Bake
Preheat your oven to 350°F (175°C). Once the loaf has risen, brush the top with melted butter for a golden crust. Bake for 35-40 minutes, covering the loaf with foil for the last 10 minutes to prevent over-browning. The loaf is done when it is golden brown and sounds hollow when tapped.

Step 7: Cool and Glaze
Remove the Raspberry Swirl Brioche Loaf from the oven and allow it to cool in the pan for about 10 minutes. Then, transfer it to a wire rack. To make the glaze, mix 1 cup of powdered sugar with a splash of lemon juice and a tablespoon of milk. Drizzle this over the cooled loaf for a sweet finishing touch.

What to Serve with Raspberry Swirl Brioche Loaf

Indulge your senses by pairing this delightful loaf with complementary flavors and textures that enhance its charm.

  • Creamy Mashed Potatoes: The rich, buttery flavor of mashed potatoes creates a divine contrast to the fruity sweetness of the brioche.

  • Fresh Fruit Salad: A vibrant mix of seasonal fruits adds brightness and a refreshing sweetness, perfect for breakfast or brunch.

  • Classic Coffee: A warm, aromatic cup balances the sweet-tartness of the raspberry, making for a cozy pairing to enjoy any time of day.

  • Whipped Cream: Dollop some lightly sweetened whipped cream on the side, enhancing every bite while adding a luscious creaminess.

  • Dark Chocolate Drizzle: A simple drizzle of melted dark chocolate can elevate the brioche's flavor profile, mirroring the sweetness of the raspberries.

  • Vanilla Ice Cream: Serve each slice warm with a scoop of vanilla ice cream for a hot-and-cold dessert experience that feels indulgent and festive.

How to Store and Freeze Raspberry Swirl Brioche Loaf

Room Temperature: If you plan to enjoy your Raspberry Swirl Brioche Loaf within 2 days, store it wrapped in foil or in an airtight container at room temperature to keep it soft.

Fridge: To extend freshness, refrigerate the loaf for up to 5 days, wrapped tightly to prevent drying out. Allow it to reach room temperature before serving for the best flavor and texture.

Freezer: For longer storage, freeze the loaf after completely cooling. Wrap it tightly in plastic wrap followed by aluminum foil, and it will keep well for up to 3 months.

Reheating: Thaw overnight in the fridge and allow it to rise at room temperature before reheating. Warm gently in the oven at 350°F for about 10-15 minutes to restore its fresh-baked goodness.

Make Ahead Options

The Raspberry Swirl Brioche Loaf is a fantastic recipe for meal prep enthusiasts looking to save time on busy days! You can refrigerate the dough after the first rise for up to 24 hours, allowing the flavors to deepen. Simply punch down the dough and cover it well before refrigerating. In addition, the raspberry filling can be made in advance and kept in the fridge for up to 3 days—just ensure it’s cooled and stored in an airtight container. When ready to bake, let the dough come to room temperature before shaping and allowing it to rise again. You'll have a stunning loaf that’s just as delicious and impressive, saving you time without sacrificing quality!

Raspberry Swirl Brioche Loaf Variations

Feel free to sprinkle your own creative twist on this delightful loaf, making it truly yours!

  • Gluten-Free: Substitute all-purpose flour with a gluten-free flour blend to enjoy this treat without gluten.
  • Alternative Fillings: Swap raspberry preserves for strawberry or blackberry jam to experiment with new flavors.
  • Nutty Addition: Add chopped walnuts or pecans for a delightful crunch that complements the soft brioche.
  • Spiced Depth: Incorporate spices like cinnamon or nutmeg into the dough for a cozy, warm aroma and taste.
  • Dairy-Free: Use coconut oil instead of butter and dairy-free milk to whip up a vegan version of this wonderful loaf. Many people love the rich flavor that coconut oil adds!
  • Citrusy Brightness: Stir in orange zest along with the lemon for an extra zesty kick in both the dough and glaze.
  • Savory Twist: Include finely chopped herbs like rosemary or thyme for a unique savory brioche that pairs beautifully with cheese.
  • Decadent Topping: Top with a cream cheese glaze instead of a powdered sugar glaze for a rich, creamy finish that elevates every bite.

No matter how you choose to customize your Raspberry Swirl Brioche Loaf, each variation opens up a world of delicious possibilities. If you're eager for more fun tips and suggestions, don't miss my guide on holiday baking to elevate your culinary experience this season!

Expert Tips for Raspberry Swirl Brioche Loaf

  • Fresh Yeast: Always ensure your active dry yeast is fresh and hasn’t expired for the best rise and texture in your Raspberry Swirl Brioche Loaf.

  • Prevent Leakage: When spreading the raspberry filling, leave a small border of dough to avoid overflow during baking. This will keep the swirls intact.

  • Cooling the Filling: Chill the raspberry filling slightly after mixing; this makes it less runny and easier to handle while shaping the loaf.

  • Monitor Baking: Keep an eye on the loaf during the last 10 minutes of baking; loosely cover with foil to prevent over-browning while maintaining that perfect golden crust.

  • Flavor Twists: For variations, feel free to swap out raspberry preserves with strawberry or blueberry jam for a delightful twist on this classic loaf!

Raspberry Swirl Brioche Loaf Recipe FAQs

What kind of yeast should I use for this recipe?
I recommend using active dry yeast for the best results; just make sure it's fresh! If you’re not sure, you can activate it by combining it with warm milk and sugar to check for fizzing—this indicates it’s good to go!

How should I store my Raspberry Swirl Brioche Loaf?
For the freshest experience, store your loaf at room temperature wrapped in foil or in an airtight container for up to 2 days. If it's not going to be eaten right away, refrigeration works too—just wrap tightly and it will last up to 5 days.

Can I freeze Raspberry Swirl Brioche Loaf?
Absolutely! Once cooled, wrap your loaf tightly in plastic wrap followed by aluminum foil. It can be frozen for up to 3 months. When you're ready to enjoy it, thaw it overnight in the fridge, then let it rise at room temperature before gently reheating in the oven at 350°F for about 10-15 minutes.

What can I do if my dough isn't rising properly?
The most common reason for dough not rising is using expired yeast. Always check your yeast's expiration date and consider a warm environment for rising. If your dough hasn't doubled after 1.5 hours, try moving it to a warmer spot (like a turned-off oven with the light on) or give it a little more time.

Are there any dietary considerations for this recipe?
Yes! If you want it to be dairy-free, substitute the butter with margarine or coconut oil, and use dairy-free milk. For an egg-free version, you can swap the eggs for flax eggs (1 tablespoon ground flaxseed + 2.5 tablespoons water = 1 egg). Also, ensure your raspberry preserves are free from allergens if you have specific dietary needs.

Can I use a different fruit filling?
Very! If raspberry doesn’t suit your fancy, you can experiment with strawberry or blueberry jam instead of raspberry preserves for a delightful twist. Just make sure the consistency is similar; overly runny jam might make your loaf difficult to shape!

Raspberry Swirl Brioche Loaf

Raspberry Swirl Brioche Loaf: A Sweet Festive Delight

Experience the joy of baking with this Raspberry Swirl Brioche Loaf, a festive treat combining sweet raspberry filling and tender brioche layers.
Print Recipe Pin Recipe
Prep Time 1 hour hr
Cook Time 40 minutes mins
Rising Time 2 hours hrs
Total Time 3 hours hrs 40 minutes mins
Servings: 10 slices
Course: Dessert
Cuisine: American
Calories: 250
Ingredients Equipment Method Nutrition Notes

Ingredients
  

For the Dough
  • 3.5 cups All-purpose flour Can be substituted with gluten-free flour
  • 2.25 teaspoons Active dry yeast Ensure freshness for maximum rise
  • 0.5 cups Granulated sugar Optional sugar alternatives available
  • 1 teaspoon Salt
  • 0.5 cups Warm milk About 110°F, can use dairy-free milk
  • 0.5 cups Unsalted butter Substitutable with margarine for dairy-free
  • 3 large Eggs Alternatives include flax eggs or applesauce
  • 1 teaspoon Vanilla extract Almond extract can be used instead
  • Lemon zest Optional
For the Raspberry Filling
  • 1 cup Raspberry preserves or jam Any berry jam can be a substitute
  • 1 tablespoon Cornstarch Essential for maintaining loaf integrity
  • 2 tablespoons Water
For Topping and Glaze
  • 2 tablespoons Melted butter Olive oil is a lighter option
  • 1 cup Powdered sugar Low-sugar option can be used
  • 1 tablespoon Lemon juice

Equipment

  • Mixing Bowl
  • Loaf pan
  • Saucepan
  • wire rack

Method
 

Dough Preparation
  1. Combine active dry yeast, warm milk, and granulated sugar. Let sit for 5-10 minutes until frothy.
  2. Add flour, salt, butter, eggs, vanilla extract, and optional lemon zest. Mix and knead until smooth, about 10-12 minutes.
First Rise
  1. Place the dough in a greased bowl, cover, and let it rise in a warm area for 1-1.5 hours until doubled.
Raspberry Filling
  1. In a saucepan, combine raspberry preserves, cornstarch, and water. Stir over low heat until thickened, about 5 minutes.
  2. Remove from heat and cool to room temperature.
Shaping the Loaf
  1. Punch down the dough, roll into a rectangle, spread raspberry filling, roll tightly, slice, and twist.
Second Rise
  1. Place the twisted loaf in a greased pan, cover, and let rise for 30-45 minutes until puffy.
Bake
  1. Preheat the oven to 350°F. Brush with melted butter, bake for 35-40 minutes, covering with foil if needed.
Cool and Glaze
  1. Cool in the pan for 10 minutes, then transfer to a wire rack. Drizzle with glaze made from powdered sugar and lemon juice.

Nutrition

Serving: 1sliceCalories: 250kcalCarbohydrates: 34gProtein: 4gFat: 11gSaturated Fat: 7gCholesterol: 50mgSodium: 200mgPotassium: 160mgFiber: 1gSugar: 8gVitamin A: 500IUVitamin C: 1mgCalcium: 50mgIron: 1mg

Notes

For best results, ensure your yeast is fresh. Control filling amounts to prevent leakage during baking. Chill filling slightly for easier handling.

Tried this recipe?

Let us know how it was!

Cheese and Olive Quick Bread: Your New Favorite Comfort Food

August 20, 2025 by Grace Snow Leave a Comment

In a cozy kitchen filled with the alluring aroma of freshly baked bread, I found myself wrestling with the desire to create something unique yet familiar. Enter the Savory Cheese and Olive Quick Bread—a delightful fusion that marries the rich tang of cheese with the briny pops of olives. This recipe is not just straightforward and quick to whip up, it’s also completely customizable, allowing you to play with different cheese and olive combinations that suit your palate. Perfect for casual brunches or a comforting snack, this fluffy loaf with its golden crust is bound to elevate any occasion. Who’s ready to knead their way to comfort and flavor? Let’s dive into the details!

Why is this Cheese and Olive Quick Bread special?

Flavorful combinations bring the best of both worlds—tangy cheese meets savory olives for a burst of taste in every bite. Customizable to fit any mood, you can swap in your favorite cheeses and olives for a personalized twist. Quick and easy preparation means you can indulge in homemade goodness without hours in the kitchen. Perfectly paired with soups or as a part of a brunch spread, this bread is sure to impress guests or satisfy a craving. If you adore comforting, flexible recipes, this Savory Cheese and Olive Quick Bread will become a beloved staple in your kitchen.

Cheese and Olive Quick Bread Ingredients

For the Batter

  • All-Purpose Flour – Provides structure and texture; can substitute with whole wheat flour for added fiber.
  • Baking Powder – Acts as a leavening agent to help the bread rise.
  • Salt – Enhances the flavor of the quick bread.
  • Black Pepper – Adds mild heat and depth to the flavor profile.
  • Cayenne Pepper (optional) – Introduces a spicy kick; omit if you prefer a milder taste.
  • Shredded Cheese – Contributes moisture and flavor; cheddar or mozzarella work well, but feel free to explore other cheeses like gouda or feta.
  • Whole Milk – Moistens the dough and adds a richer flavor; almond milk can be a great dairy-free alternative.
  • Olive Oil – Adds moisture and a rich flavor; you can substitute with melted butter if desired.
  • Eggs – Provide structure and bind the ingredients together.
  • Pitted Olives – Adds a savory flavor; consider mixing green and black olives for variety or include sun-dried tomatoes for a fun twist.
  • Fresh Thyme/Dried Thyme (optional) – Provides lovely herbal notes; if fresh thyme is unavailable, use dried at one-third of the amount.

For Greasing

  • Butter/Non-Stick Cooking Spray – Used for greasing the pan to ensure easy release of your delicious bread.

Step‑by‑Step Instructions for Cheese and Olive Quick Bread

Step 1: Preheat and Prepare
Begin by preheating your oven to 375°F (190°C). Grease a 9x5 inch loaf pan with butter or non-stick cooking spray to ensure your savory Cheese and Olive Quick Bread releases smoothly once baked. Set the prepared pan aside as you move on to mixing the dry ingredients.

Step 2: Mix Dry Ingredients
In a large mixing bowl, whisk together 2 cups of all-purpose flour, 1 tablespoon of baking powder, 1 teaspoon of salt, ½ teaspoon of black pepper, and, if desired, a pinch of cayenne pepper for an extra kick. Make sure the mixture is well combined and no lumps remain, allowing the flavors to mingle and ensuring your bread rises beautifully in the oven.

Step 3: Combine Wet Ingredients
In a separate bowl, whisk together 1 cup of whole milk, ¼ cup of olive oil, and 2 large eggs until fully incorporated. The wet ingredients help create a tender dough, so give them a good mix to blend the flavors. Once combined, gradually incorporate this mixture into your dry ingredients, stirring gently to combine.

Step 4: Mix to Form Batter
Using a spatula or wooden spoon, gently fold the wet mixture into the dry ingredients until just combined; be careful not to overmix. You want to achieve a thick batter without any dry flour pockets, as overmixing can lead to denser bread. The key is a bit of lumpiness; it ensures your Cheese and Olive Quick Bread remains fluffy and light.

Step 5: Fold in Flavorful Add-ins
Now it’s time to add the star ingredients! Fold in 1 cup of shredded cheese and ¾ cup of pitted olives into the batter, along with optional fresh or dried thyme for a fragrant touch. Be sure to distribute the cheese and olives evenly throughout the batter so that each bite bursts with flavor in your delightful quick bread.

Step 6: Pour Batter into Pan
Carefully pour the batter into your greased loaf pan, spreading it evenly with the spatula. Smooth the top so the bread bakes uniformly, creating a lovely golden crust. As the batter settles, you’ll notice the delicious combinations already melding, making your kitchen smell inviting, even before the baking begins.

Step 7: Bake to Perfection
Place the loaf pan in your preheated oven and bake for 45-50 minutes, or until the top is golden brown and a wooden skewer inserted into the center comes out clean. This is an essential step in achieving a fluffy texture and that delightful crispy, golden crust we all love in a perfect Cheese and Olive Quick Bread.

Step 8: Cool and Serve
Once baked, remove the bread from the oven and let it cool in the pan for 10-15 minutes. This resting period allows the bread to firm up a bit for easier slicing. Afterward, carefully transfer it to a wire rack to cool completely. Slice and serve your warm, flavorful Cheese and Olive Quick Bread, and enjoy the tempting aroma wafting through your home!

Cheese and Olive Quick Bread Variations

Feel free to get creative with this recipe and make it your own, adding unique flavors that tickle your taste buds!

  • Vegetable-Loaded: Add sun-dried tomatoes or chopped spinach for an extra burst of color and flavor.
    These additions not only enhance the taste but also contribute beautiful visual appeal to your bread.

  • Spicy Kick: Toss in some jalapeños or crushed red pepper flakes for a fiery twist.
    This little addition can transform your quick bread into a flavor-packed experience that'll warm you up from the inside out.

  • Herb Infusion: Swap out thyme with fresh rosemary or oregano for an aromatic surprise.
    These fragrant herbs will bring a delightful freshness to your cheese and olive bread with each slice.

  • Nutty Addition: Incorporate chopped walnuts or pecans for added crunch and flavor.
    The nuttiness will complement the cheese and olives perfectly, making each bite interesting.

  • Cheese Variety: Mix different cheeses like feta, gouda, or even a sharp blue cheese for great complexity.
    The unique twists in flavor will keep your palate excited every time you bake a loaf.

  • Olive Mix: Experiment with kalamata, green olives, or even a blend of stuffed olives for a flavor adventure.
    Each mix offers a unique taste experience that can transport you to a Mediterranean getaway.

  • Garlic Lovers: Add minced garlic or garlic powder to the batter for those who crave extra flavor.
    This little twist can create a savory garlic bread experience that pairs splendidly with soups or salads.

  • Sweet Touch: For a contrasting flavor, think about adding a touch of honey or maple syrup to your batter.
    The subtle sweetness can create a delightful balance, especially if served with a cheese platter or charcuterie board.

Don’t forget, if you’re in need of some tasty side dishes, this bread pairs beautifully with a warm bowl of Cornbread Breakfast Casserole or is delicious alongside Fried Shrimp Cabbage for a delightful brunch! Let your imagination soar, and enjoy the baking journey!

Make Ahead Options

These Savory Cheese and Olive Quick Bread are perfect for meal prep enthusiasts! You can prepare the dry ingredients (flour, baking powder, salt, black pepper, and cayenne) up to 24 hours in advance. Simply store them in an airtight container to maintain freshness. The wet ingredients (milk, olive oil, and eggs) can also be combined and refrigerated for up to 3 days. When you’re ready to bake, mix the wet and dry ingredients, fold in your desired cheese and olives, and then pour the batter into the greased pan. This makes your cooking process seamless, ensuring just as delicious results with minimal effort!

Expert Tips for Cheese and Olive Quick Bread

  • Avoid Overmixing: Gently fold the wet and dry ingredients to keep the bread light and fluffy. Overmixing can create a dense texture that isn't ideal for a Cheese and Olive Quick Bread.
  • Cheese Choices: Experiment with different cheeses like feta or gouda for a unique flavor profile. Each cheese will alter the taste, giving you plenty of choices to explore!
  • Fresh is Best: Serve your quick bread fresh for maximum flavor. If you have leftovers, store them in an airtight container or freeze for later enjoyment.
  • Herb Infusion: Adding fresh thyme or other herbs can elevate the flavor. If using dried thyme, remember to use only one-third of the amount for a balanced taste.
  • Flavor Combinations: Don’t hesitate to mix up the olives! Combining green and black olives or adding sun-dried tomatoes can create fun variations you’ll love.

How to Store and Freeze Cheese and Olive Quick Bread

  • Room Temperature: Store the cooled Cheese and Olive Quick Bread in an airtight container for up to 3 days to maintain its freshness and prevent it from drying out.
  • Fridge: For longer storage, wrap the bread in plastic wrap and place it in the fridge. It can last up to a week, but the texture may change slightly.
  • Freezer: To freeze, wrap the bread tightly in plastic wrap followed by aluminum foil to prevent freezer burn. It can be frozen for up to 3 months.
  • Reheating: For the best results, slice the frozen bread and toast it in a skillet or toaster until warm and crispy. Enjoy the delightful flavors once again!

What to Serve with Cheese and Olive Quick Bread?

Savor the joy of pairing this delicious bread with dishes that complement its rich flavors and textures.

  • Creamy Tomato Soup: The acidity of the soup enhances the cheesy goodness while adding warmth to your meal. A classic pairing that warms both heart and stomach.

  • Garden Salad: Fresh greens topped with a tangy vinaigrette balance the richness of the bread. The crisp textures and vibrant flavors create a refreshing contrast.

  • Mediterranean Antipasto Platter: Serve with olives, cheeses, and cured meats for a full flavor experience. This combination makes for a delightful appetizer spread that friends will love.

  • Roasted Vegetables: Sweet roasted carrots, zucchini, or bell peppers bring a satisfying array of flavors and nutrients, grounding the dish with their earthy essence.

  • Herbed Butter: Spread a bit of herbed butter on warm slices. The richness of the butter, coupled with fragrant herbs, elevates every bite of bread.

  • Olive Oil Dipping Sauce: A simple mix of high-quality olive oil, balsamic vinegar, and Italian herbs creates a perfect dipping sauce that highlights the bread's flavor.

  • Sparkling Wine: Pairing this bread with a light sparkling wine adds a celebratory touch to any gathering. The effervescence cuts through the richness, making each sip refreshing.

  • Fruit Jam or Chutney: A sweet jam or spicy chutney on the side complements the savory notes delightfully. The contrast adds another layer of flavor excitement.

Cheese and Olive Quick Bread Recipe FAQs

What type of cheese works best for Cheese and Olive Quick Bread?
Absolutely! While cheddar and mozzarella are popular choices for a rich, creamy texture, you can customize your Cheese and Olive Quick Bread by using gouda for a smoky flavor or feta for a tangy twist. Experiment with your favorites to discover unique flavor combinations!

How should I store Cheese and Olive Quick Bread?
To keep your delicious Cheese and Olive Quick Bread fresh, store it in an airtight container at room temperature for up to 3 days. If you want to keep it longer, wrap it tightly in plastic wrap and place it in the fridge where it can last up to a week, though the texture may change. For the best preservation, use the freezer method!

Can I freeze Cheese and Olive Quick Bread?
Very much so! To freeze, wrap the cooled bread tightly in plastic wrap followed by aluminum foil to prevent freezer burn. It can be stored in the freezer for up to 3 months. When you’re ready to indulge again, simply slice and toast the frozen bread in a skillet or toaster for a warm, crispy treat!

What should I do if my bread is too dense?
If your Cheese and Olive Quick Bread turns out dense, it’s likely due to overmixing the batter. Next time, gently fold the wet and dry ingredients until just combined, keeping some lumps. Also, ensure your baking powder is fresh to achieve a good rise, giving your bread that fluffy texture we all love.

Can I make this recipe gluten-free?
Absolutely! You can substitute the all-purpose flour with a gluten-free flour blend. I recommend using a blend that includes xanthan gum to mimic the structure of wheat flour. Just make sure to measure accurately, as gluten-free flours can absorb moisture differently. Enjoy your delicious gluten-free Cheese and Olive Quick Bread!

Are there any allergy considerations for this recipe?
Yes, if you or your guests have dietary restrictions, be mindful of the dairy in this recipe. You can easily make it dairy-free by using almond milk and substituting cheese with dairy-free alternatives available on the market. Always check ingredient labels to ensure they fit your needs!

Cheese and Olive Quick Bread Recipe FAQs.

Cheese and Olive Quick Bread

Cheese and Olive Quick Bread: Your New Favorite Comfort Food

This Cheese and Olive Quick Bread is a quick, customizable recipe that combines tangy cheese and savory olives, perfect for any occasion.
Print Recipe Pin Recipe
Prep Time 15 minutes mins
Cook Time 50 minutes mins
Cooling Time 15 minutes mins
Total Time 1 hour hr 20 minutes mins
Servings: 10 slices
Course: Snacks
Cuisine: Baked Goods
Calories: 180
Ingredients Equipment Method Nutrition Notes

Ingredients
  

For the Batter
  • 2 cups all-purpose flour can substitute with whole wheat flour for added fiber
  • 1 tablespoon baking powder acts as a leavening agent
  • 1 teaspoon salt enhances flavor
  • 0.5 teaspoon black pepper adds depth to flavor
  • 0.25 teaspoon cayenne pepper optional for spice
  • 1 cup shredded cheese cheddar or mozzarella recommended
  • 1 cup whole milk almond milk for dairy-free option
  • 0.25 cup olive oil can substitute with melted butter
  • 2 large eggs binds ingredients
  • 0.75 cup pitted olives consider mixing green and black olives
  • 1 tablespoon fresh thyme or 1 teaspoon dried thyme as substitute
For Greasing
  • 1 tablespoon butter for greasing the pan

Equipment

  • Loaf pan
  • Mixing bowls
  • Whisk
  • Spatula

Method
 

Step-by-Step Instructions
  1. Preheat your oven to 375°F (190°C) and grease a 9x5 inch loaf pan.
  2. Whisk together the dry ingredients in a mixing bowl.
  3. In a separate bowl, whisk together the wet ingredients until fully incorporated.
  4. Gently fold the wet mixture into the dry ingredients until just combined.
  5. Fold in the shredded cheese and pitted olives.
  6. Pour the batter into the greased loaf pan and smooth the top.
  7. Bake for 45-50 minutes until golden brown and a skewer comes out clean.
  8. Cool in the pan for 10-15 minutes before transferring to a wire rack.

Nutrition

Serving: 1sliceCalories: 180kcalCarbohydrates: 22gProtein: 6gFat: 7gSaturated Fat: 3gPolyunsaturated Fat: 0.5gMonounsaturated Fat: 3gCholesterol: 50mgSodium: 350mgPotassium: 120mgFiber: 1gSugar: 1gVitamin A: 500IUCalcium: 100mgIron: 1mg

Notes

Avoid overmixing to keep the bread light and fluffy. Experiment with cheese and olive combinations for unique flavors.

Tried this recipe?

Let us know how it was!
  • « Previous Page
  • 1
  • …
  • 54
  • 55
  • 56
  • 57
  • 58
  • …
  • 67
  • Next Page »

Welcome!

Hi, I’m Grace, a Sydney-based home cook with a passion for bold flavors and trending ingredients. Whether you’re a busy beginner or a seasoned foodie, you’ll find dishes here that are fresh, fun, and full of flavor.

More about me

Popular Recipes

  • Autumn Harvest Grain Salad with Cranberries
    Autumn Harvest Grain Salad with Cranberries for Cozy Nights
  • Ground Beef Hot Honey Bowl
    Ground Beef Hot Honey Bowl for a Flavor-Packed Dinner Enjoyment
  • Autumn Harvest Grain Salad with Cranberries
    Autumn Harvest Grain Salad with Cranberries for Cozy Nights
  • Ground Beef Hot Honey Bowl
    Ground Beef Hot Honey Bowl for a Flavor-Packed Dinner Enjoyment

Footer

↑ back to top

About

  • Privacy Policy
  • Disclaimer
  • Terms & Conditions

Newsletter

  • Sign Up! for emails and updates

Contact

  • About me
  • Contact me

Copyright © 2025 TastyTrendIngredients