tastytrendingredients

  • Home
  • Recipes
    • Appetizers
    • Breakfast
    • Dessert
    • Dinner
    • Drinks
    • Salads
    • Snacks
    • Soups
  • About me
  • Contact me
menu icon
go to homepage
  • Home
  • Recipes
    • Appetizers
    • Breakfast
    • Dessert
    • Dinner
    • Drinks
    • Salads
    • Snacks
    • Soups
  • About me
  • Contact me
search icon
Homepage link
  • Home
  • Recipes
    • Appetizers
    • Breakfast
    • Dessert
    • Dinner
    • Drinks
    • Salads
    • Snacks
    • Soups
  • About me
  • Contact me
×

Delicious Traditional Greek Honey Cookies to Sweeten Your Holidays

January 16, 2026 by Grace Snow Leave a Comment

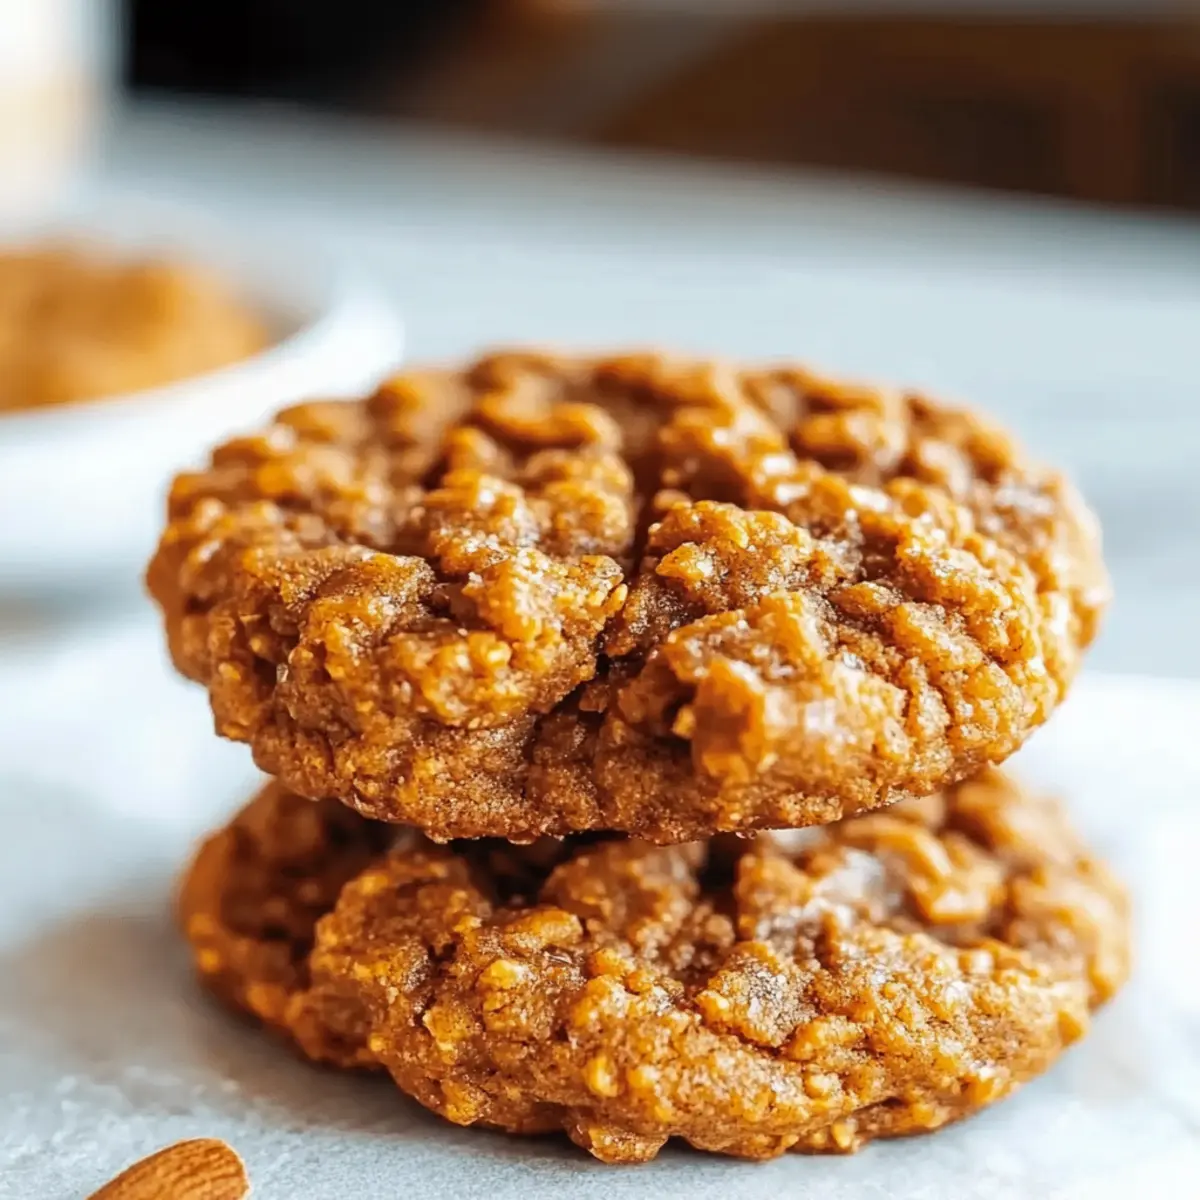
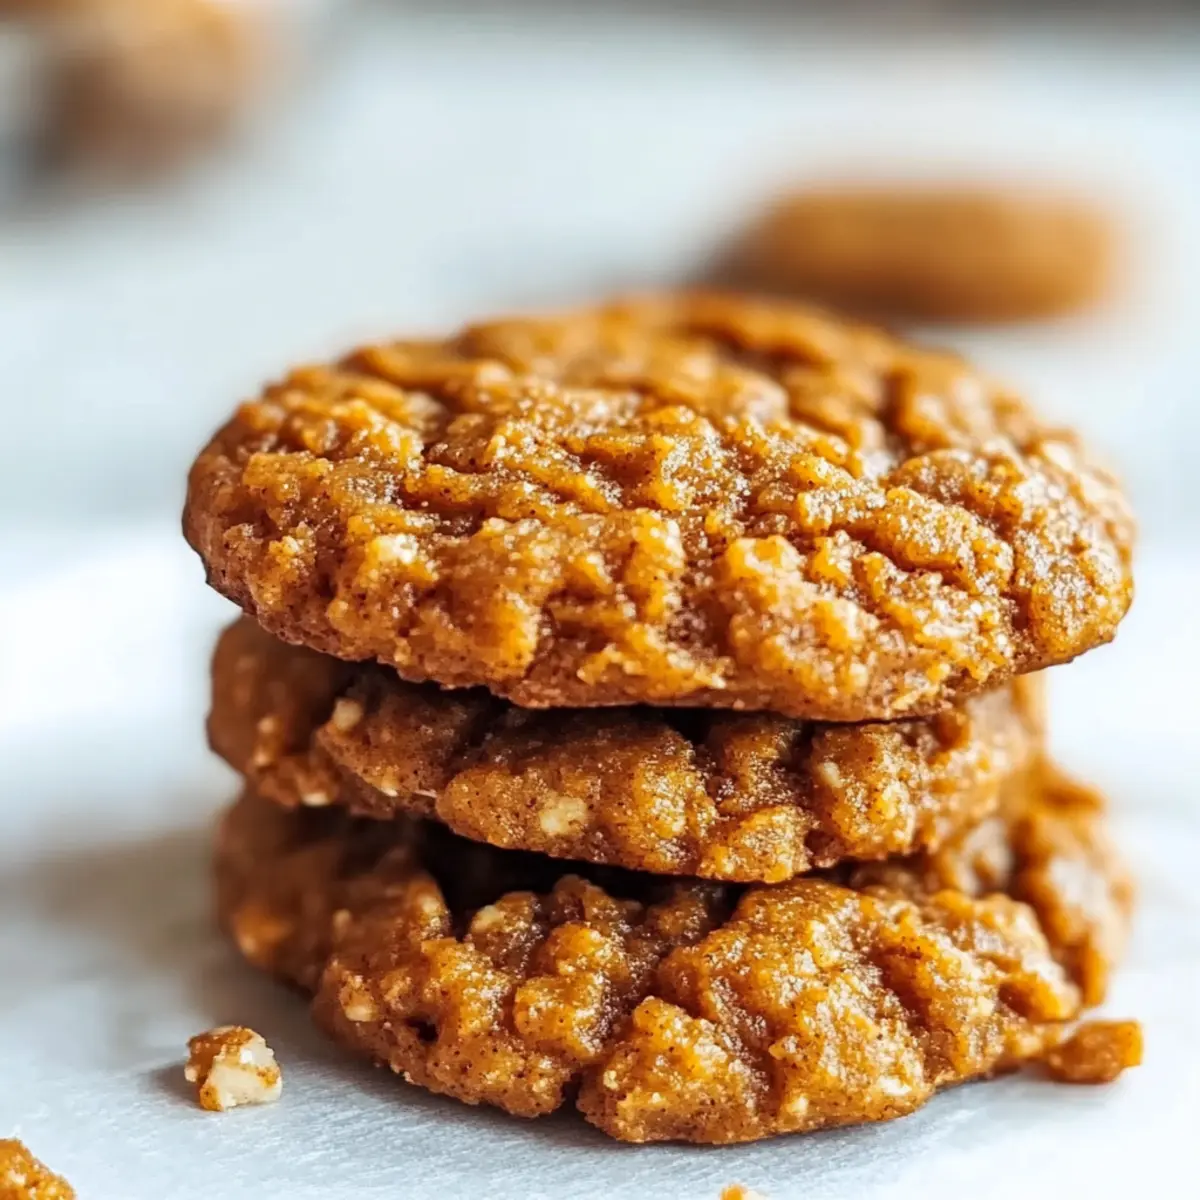
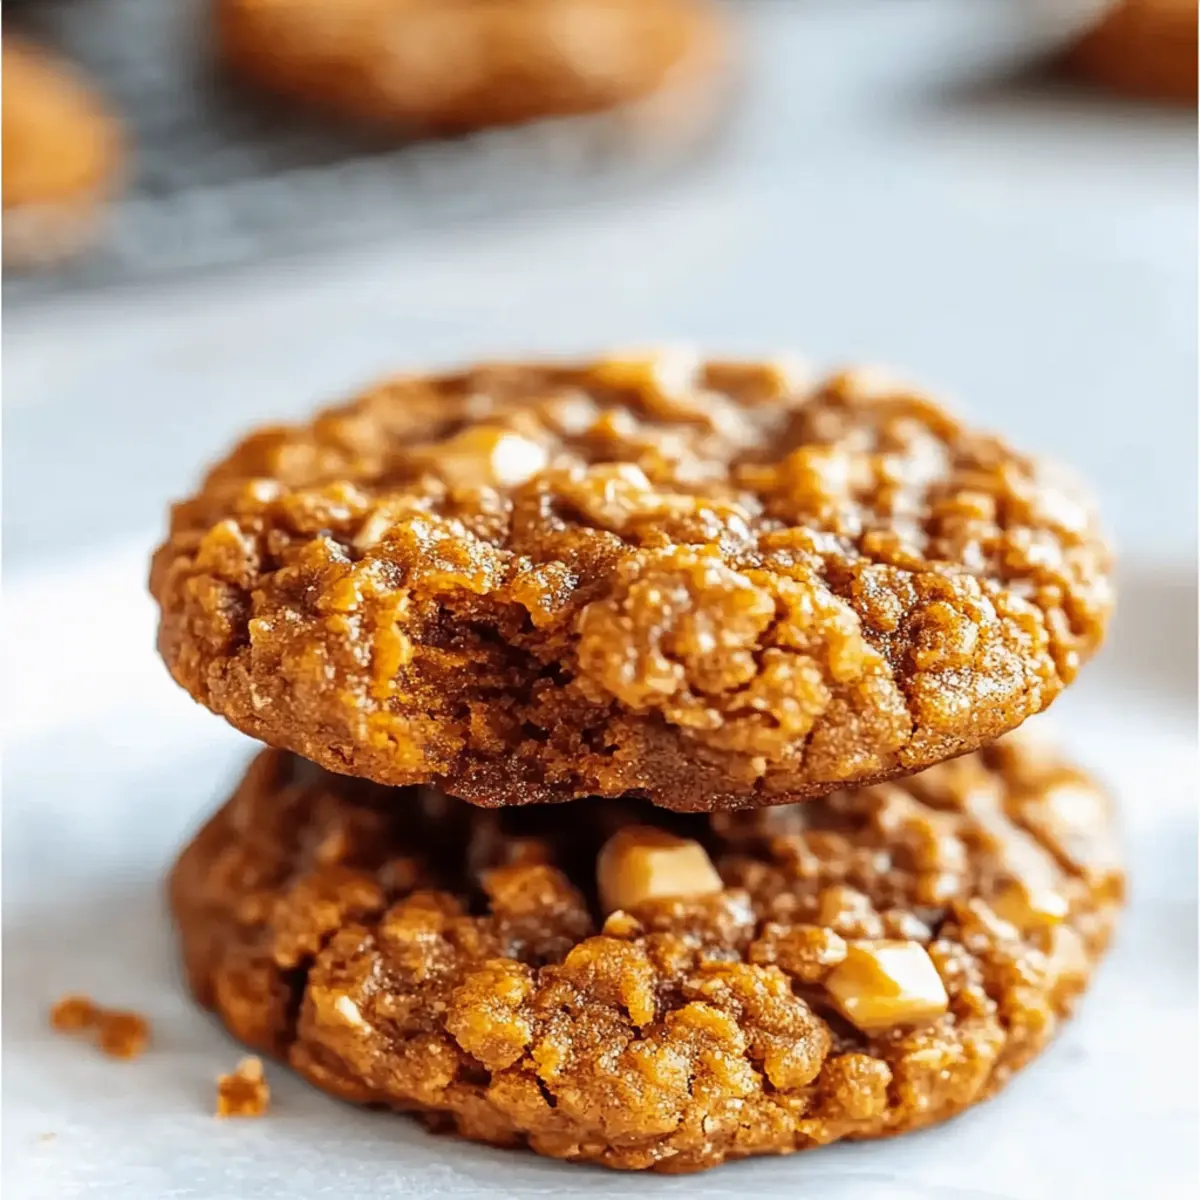
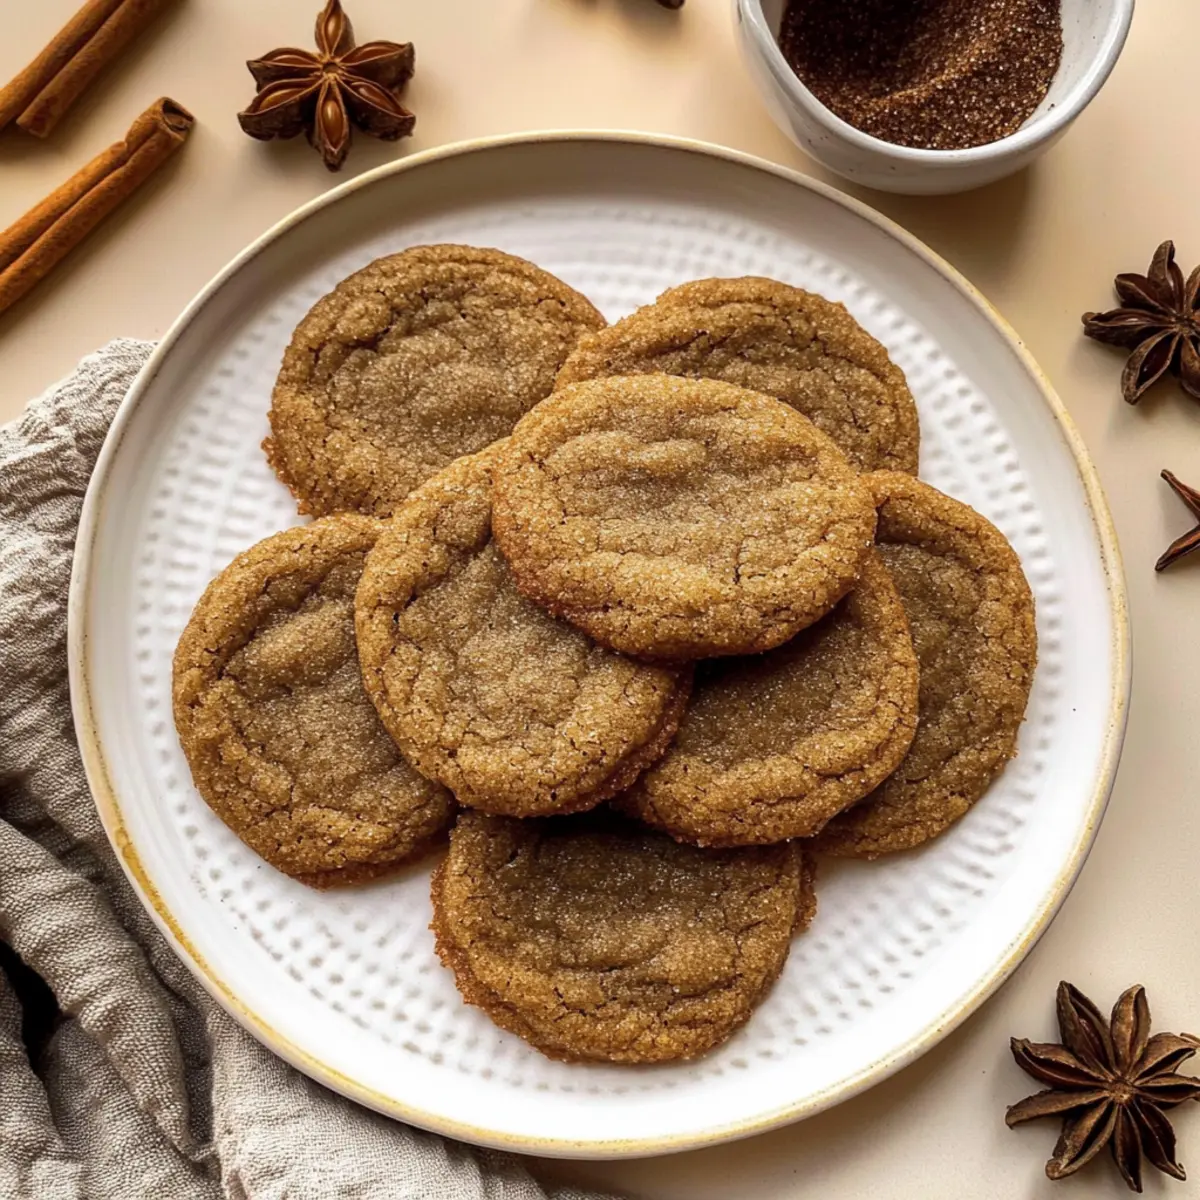
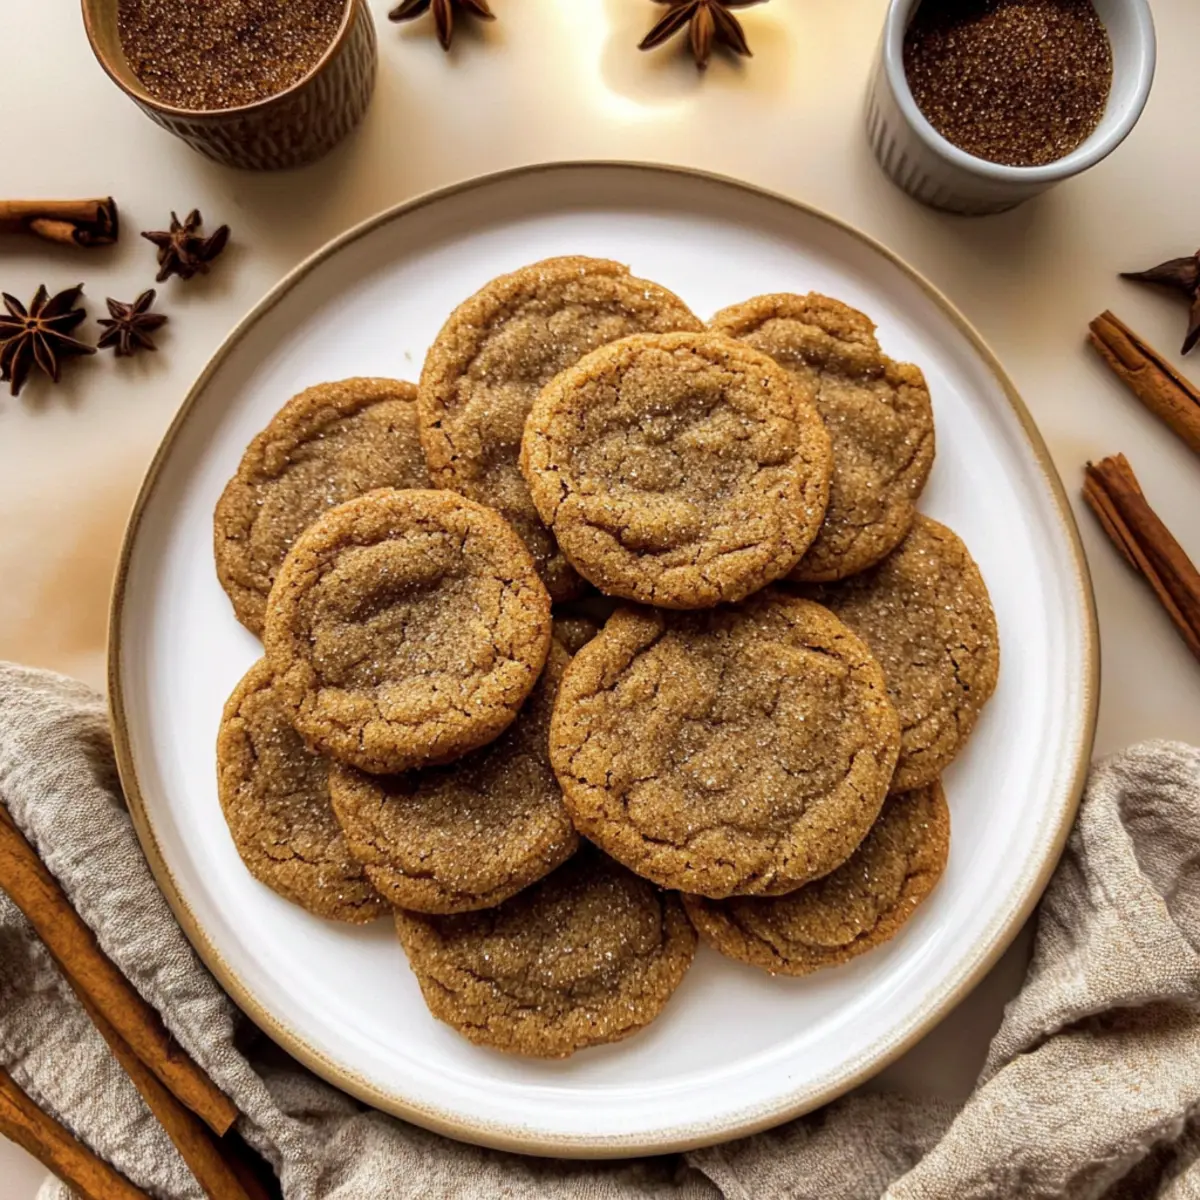
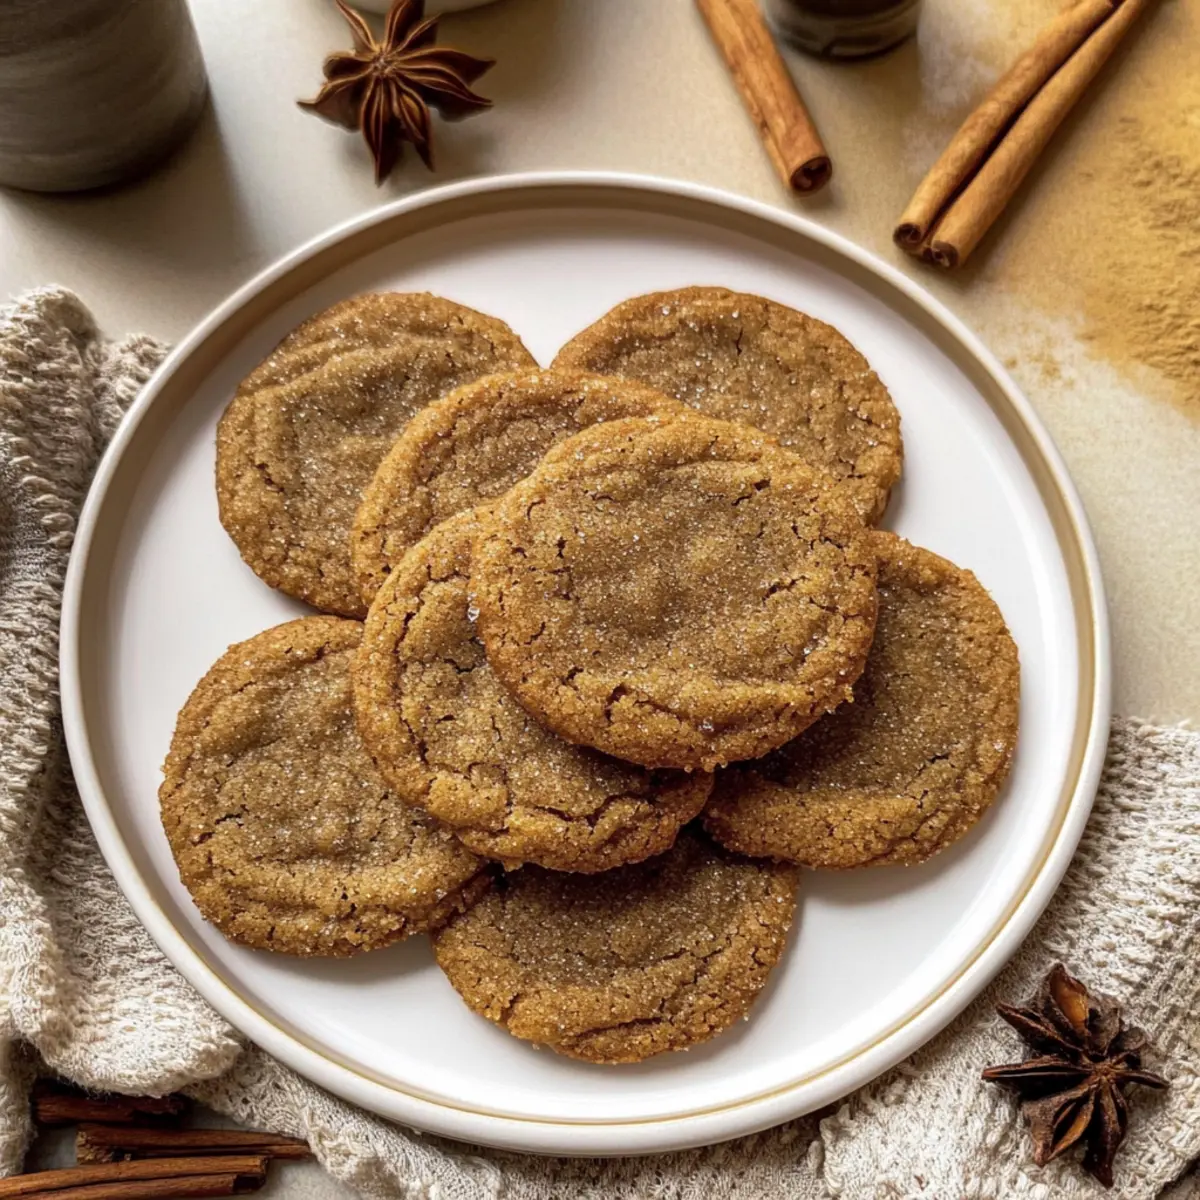
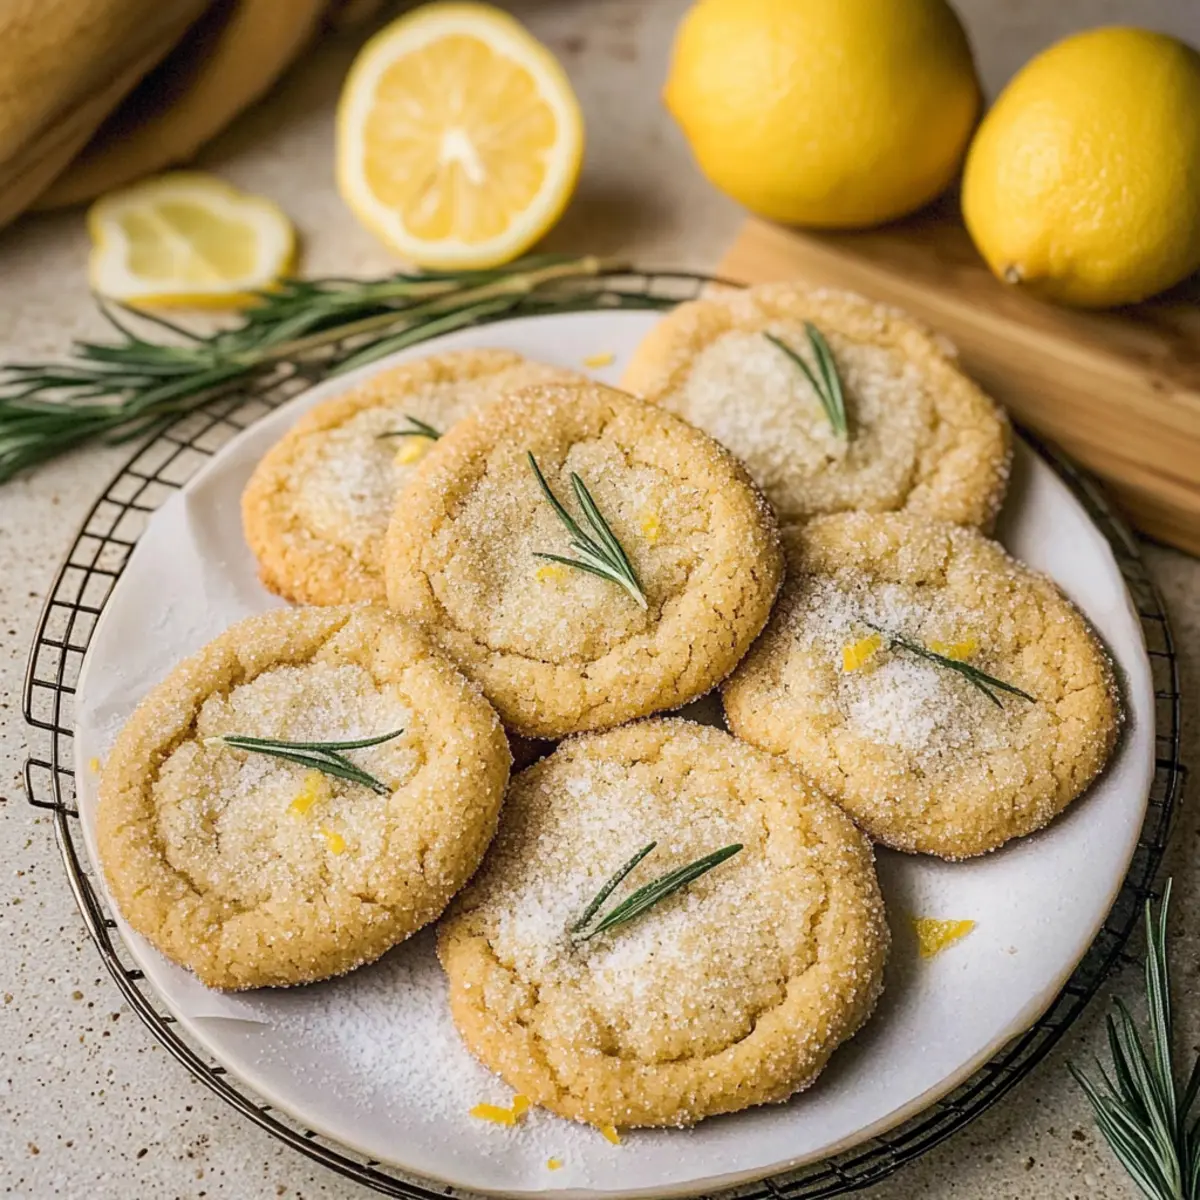
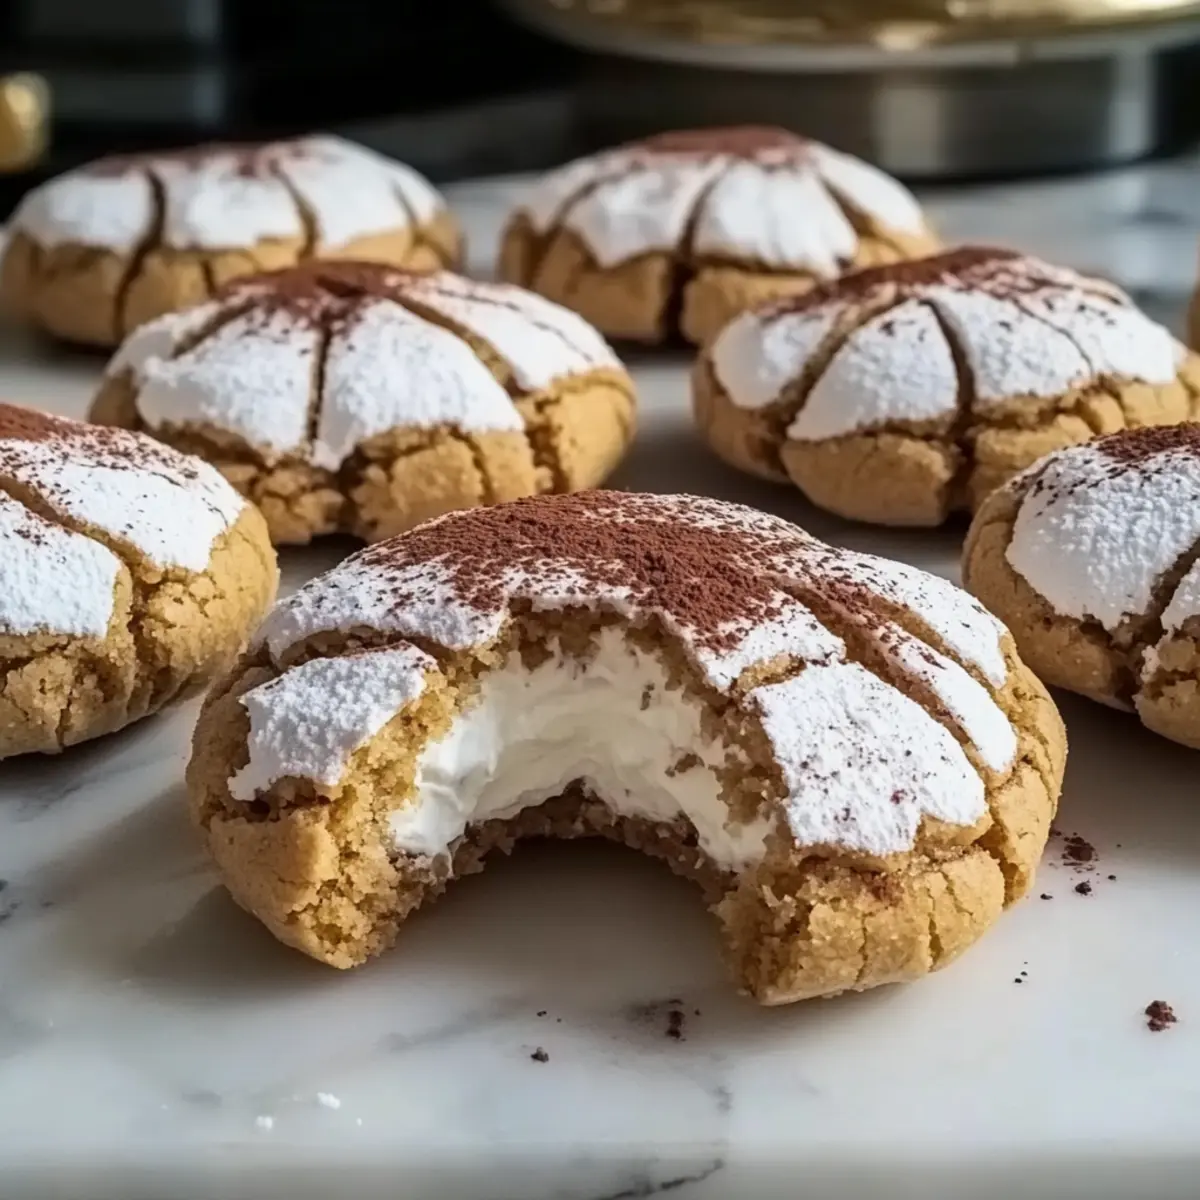
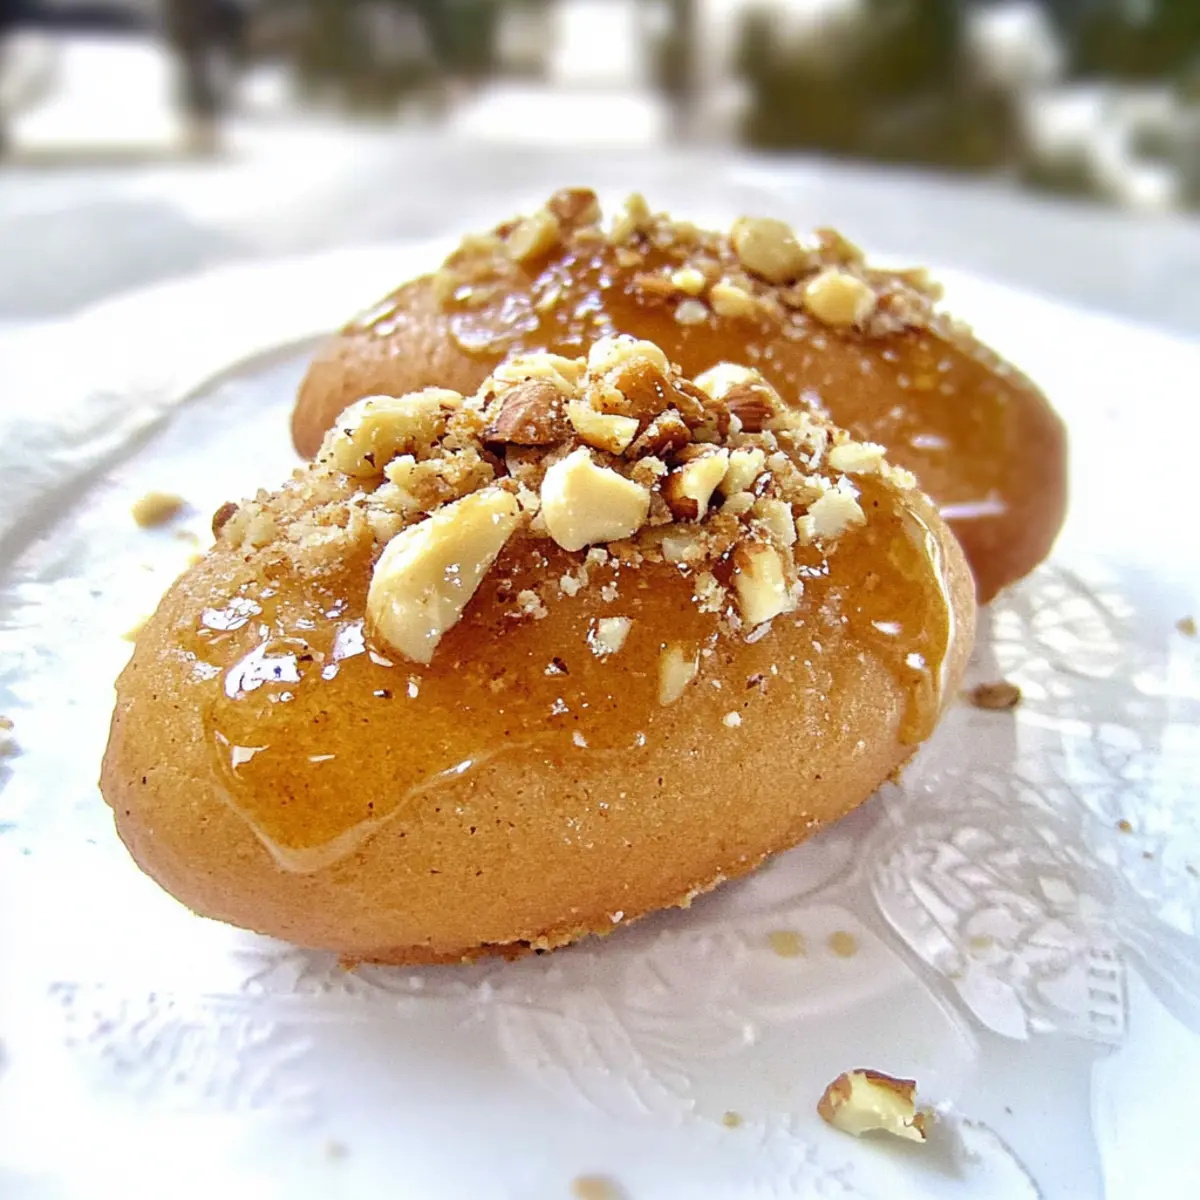
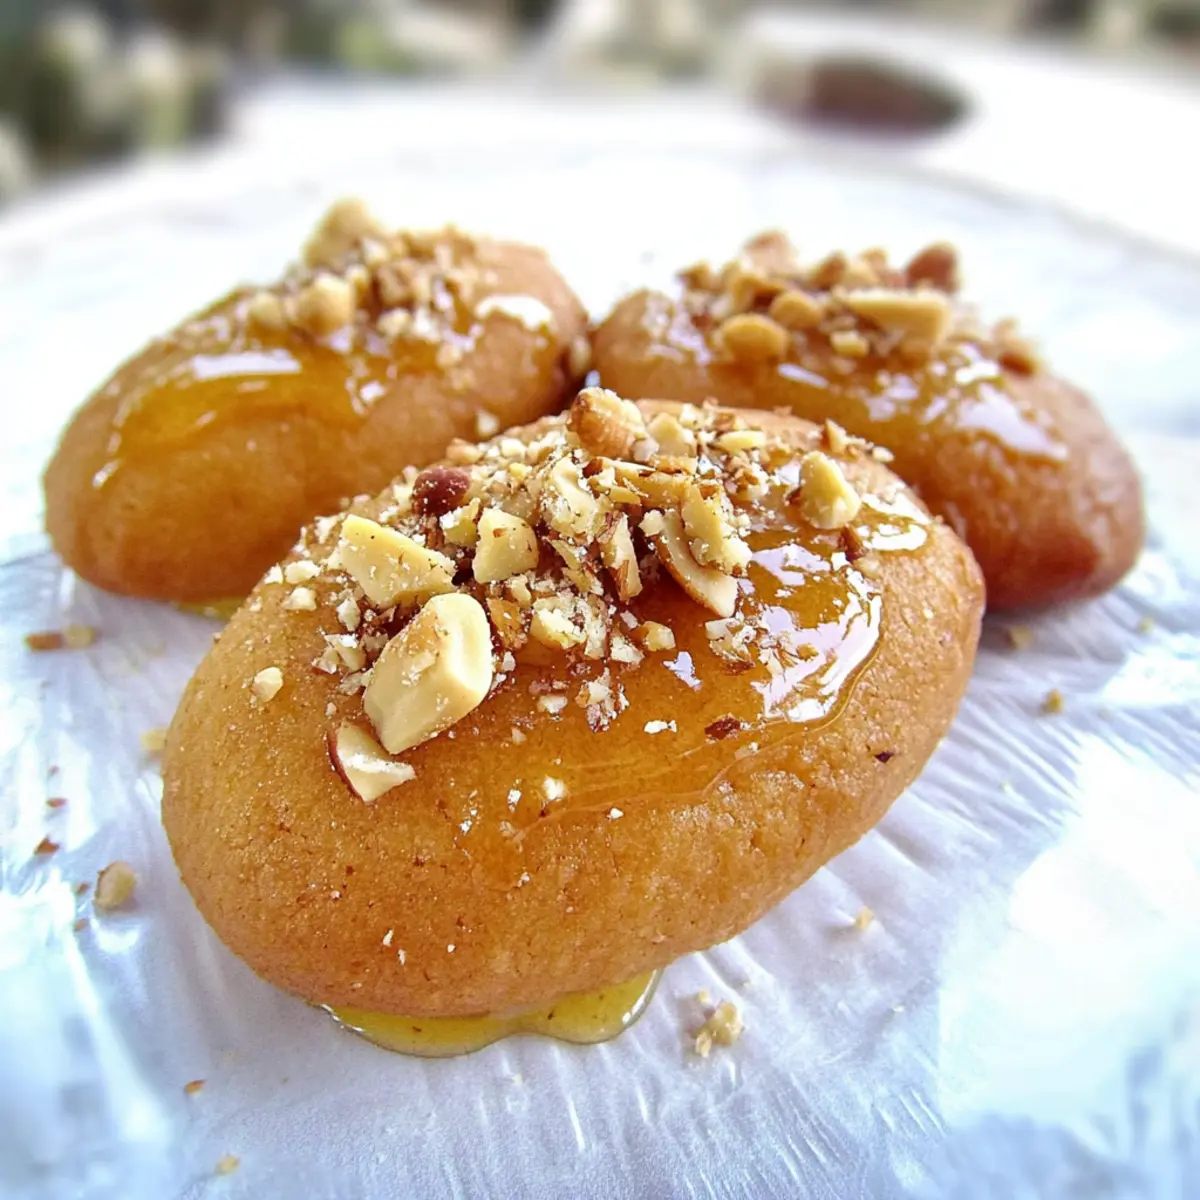
As the aroma of spiced sweetness fills my kitchen, I can’t help but feel the warmth of tradition wrap around me like a cozy blanket. These Traditional Greek Honey Cookies, known as Melomakarona, are a cherished holiday gem that transforms any gathering into a celebration. Infused with rich flavors from fragrant spices and soaked in luscious syrup, they embody both the joy and the history of Greek festive baking. They are deceptively quick to prepare, making them a perfect last-minute treat for Christmas gatherings, and they’re ideal for sharing with beloved friends and family. Every bite offers a soft, crumbly texture delightfully accented by crunchy walnuts, a harmonious blend that’s hard to resist. Which festive occasion are you looking forward to celebrating with these delightful cookies?

Why are these cookies a holiday must-try?

Irresistible Kick of Flavor: The blend of warm spices and honey creates a rich taste that will leave you wanting more.

Cultural Tradition: Enjoying these cookies means embracing Greek history and the traditions that come with it, making every bite feel special.

Quick Preparation: With simple steps, delicious home-baked goodness is just around the corner, perfect for the holiday rush.

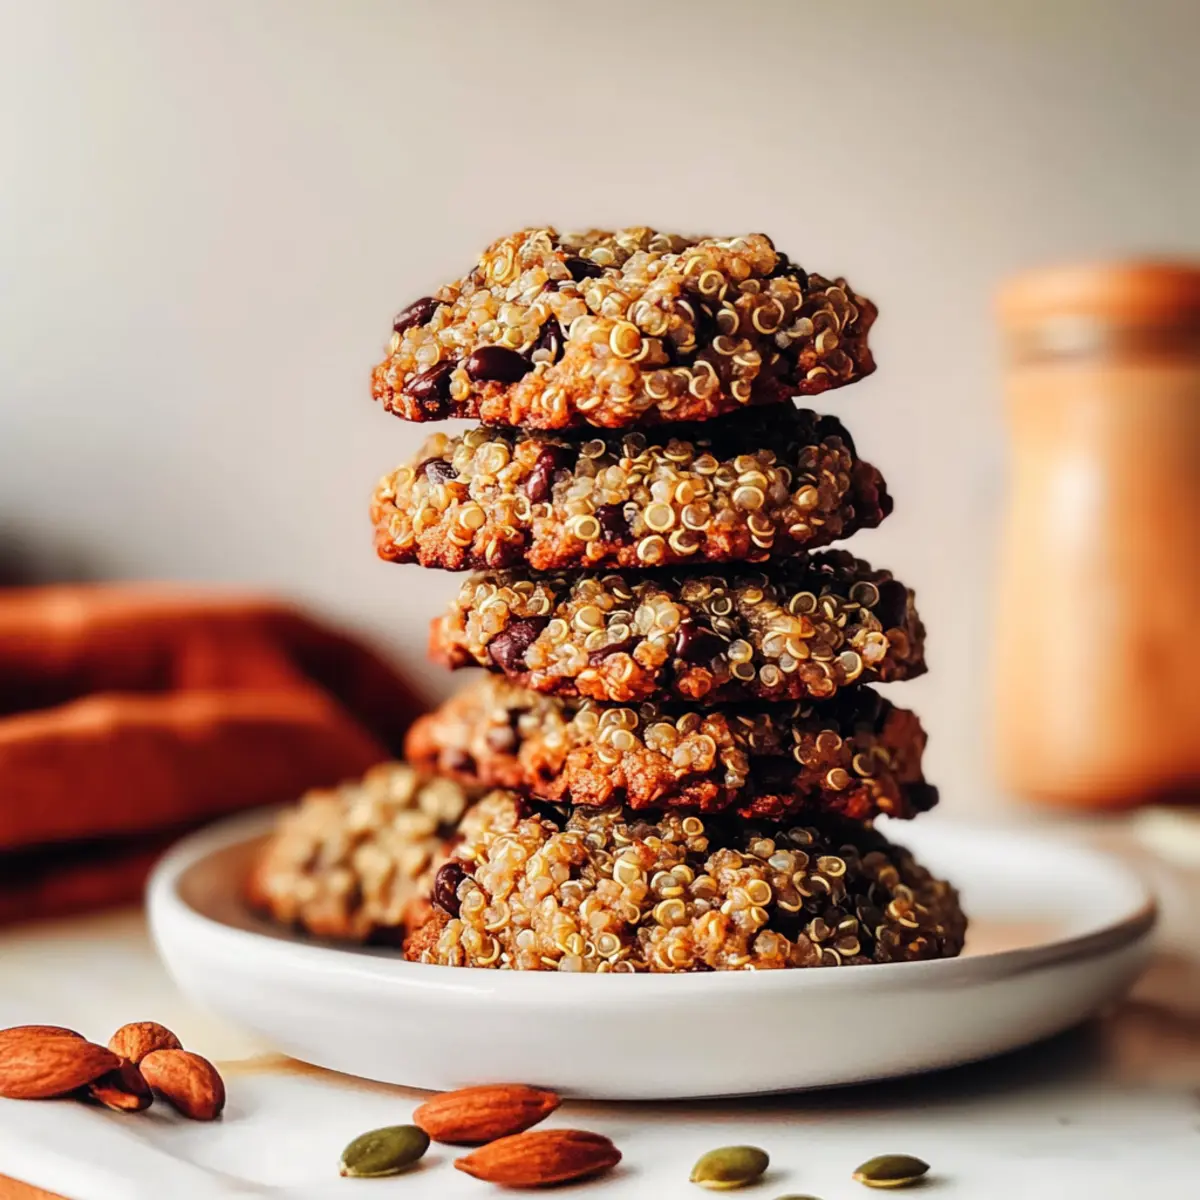
Soft Yet Crunchy: The unique texture—soft, crumbly cookies topped with crunchy walnuts—will tantalize your taste buds.

Perfect for Sharing: These cookies make a wonderful addition to any holiday gathering, sure to impress friends and family, much like my Honey Garlic Chicken or Honey BBQ Chicken Rice. 💖

Traditional Greek Honey Cookies Ingredients

• Dive into the world of flavors with these delightful cookies!

For the Dough

  • Orange Juice – Fresh juice provides a fruity zest that balances the sweetness beautifully.
  • Olive Oil – Adds richness; substitute half with sunflower oil for a lighter touch.
  • Honey – An essential ingredient that brings natural sweetness and a characteristic flavor.
  • Water – Helps dissolve sugar and achieve the perfect syrup consistency.
  • Sugar – Contributes to the overall sweetness and aids in the cookie's texture.
  • Ground Cinnamon – Infuses warmth and depth, a classic spice for traditional Greek desserts.
  • Ground Clove – Enhances the rich flavor profile typical of holiday confections.
  • Ground Nutmeg – Adds a subtle sweet-spicy hint that complements other spices.
  • Vanillin Powder/Vanilla Extract – Boosts sweetness and aroma for a chef’s touch.
  • Zested Orange – Provides a fresh, vibrant note that uplifts the cookie flavor.
  • Baking Soda – Essential for helping the cookies rise and achieve an airy texture.
  • Fine Semolina – Creates a delightful crumbly texture in every bite.
  • All-Purpose Flour – The building block that gives the cookies their form and structure.
  • Baking Powder – Assists in leavening, leading to lighter cookies.

For the Syrup

  • Sugar (Syrup) – The key to sweetness, making each cookie irresistibly moist.
  • Honey (Syrup) – Adds gloss and a delightful stickiness to the finished cookies.
  • Water (Syrup) – Used to achieve that syrupy perfection your Melomakarona needs.
  • Cinnamon Stick, Dried Cloves, Orange Peel – These ingredients enhance the syrup with a spiced aroma that elevates the overall experience.

For the Garnish

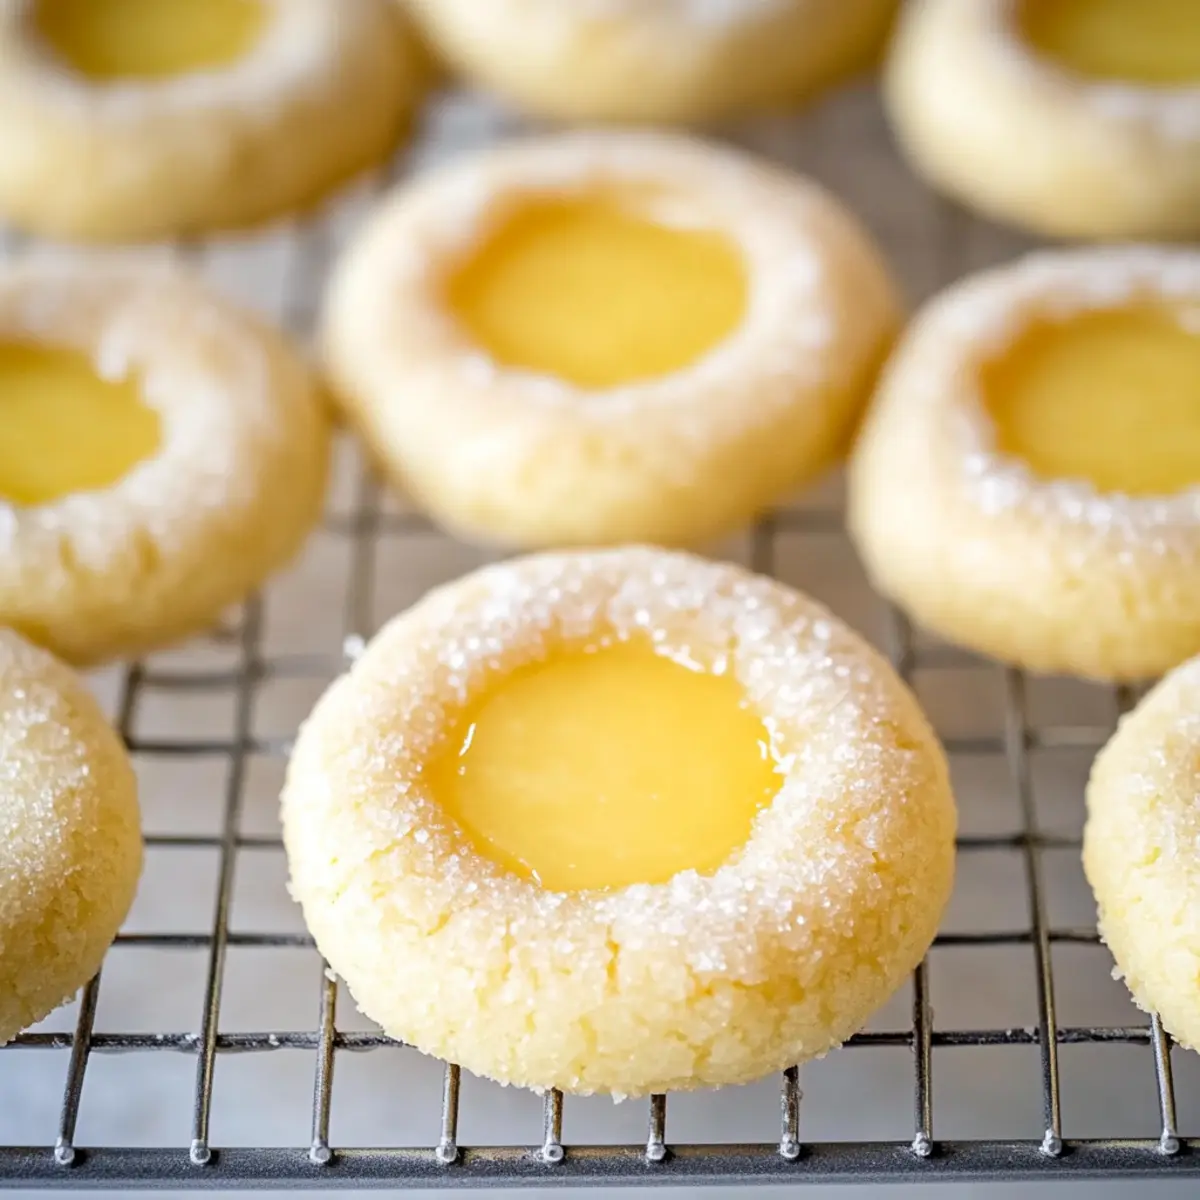
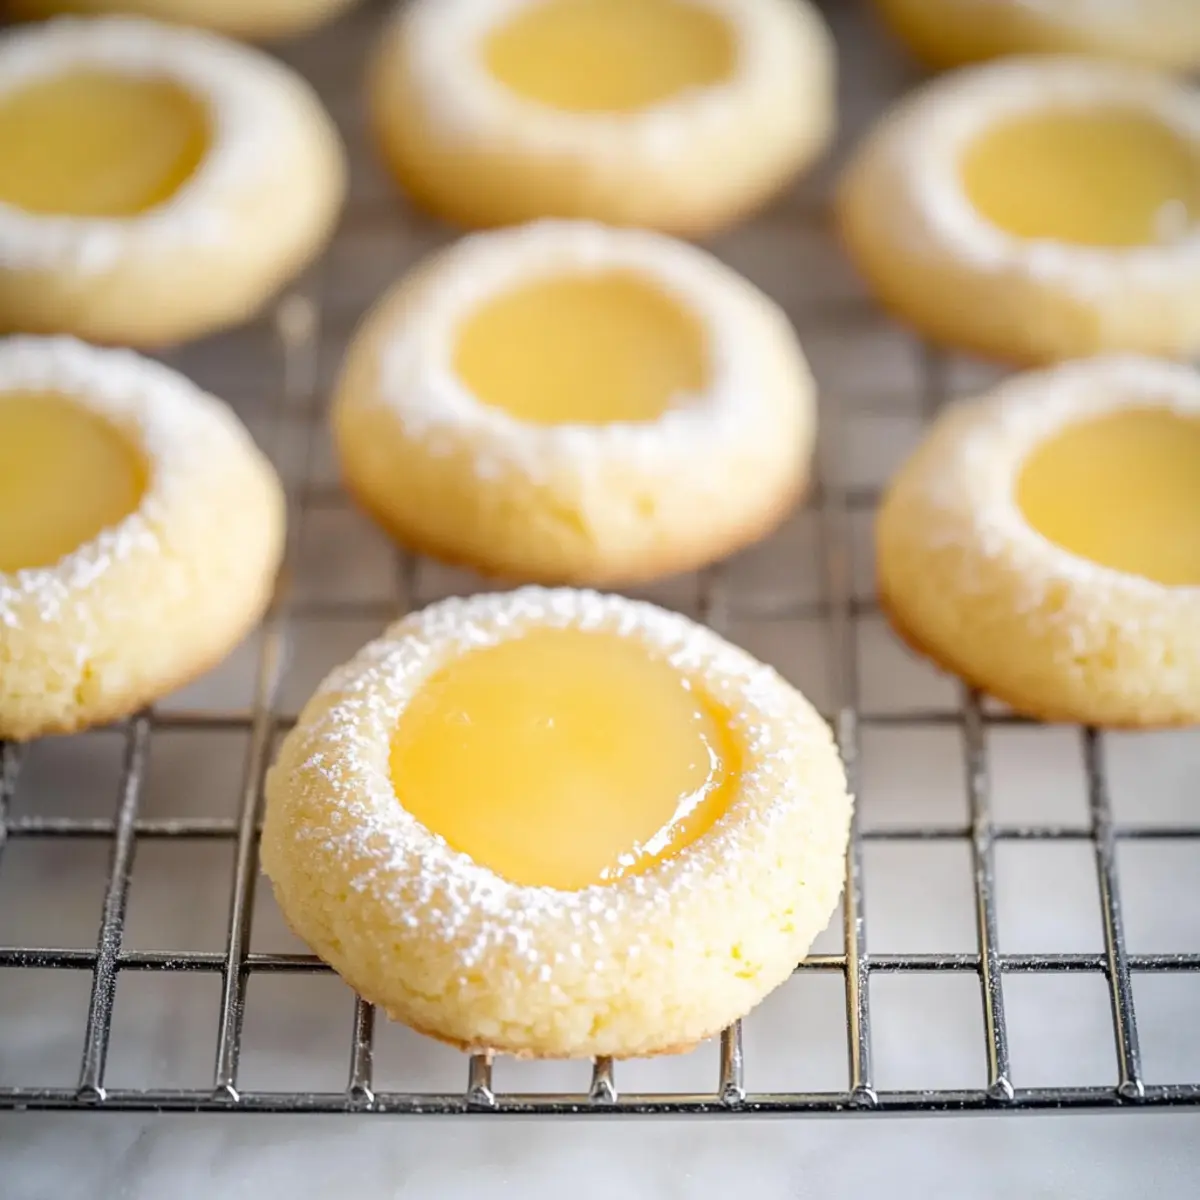
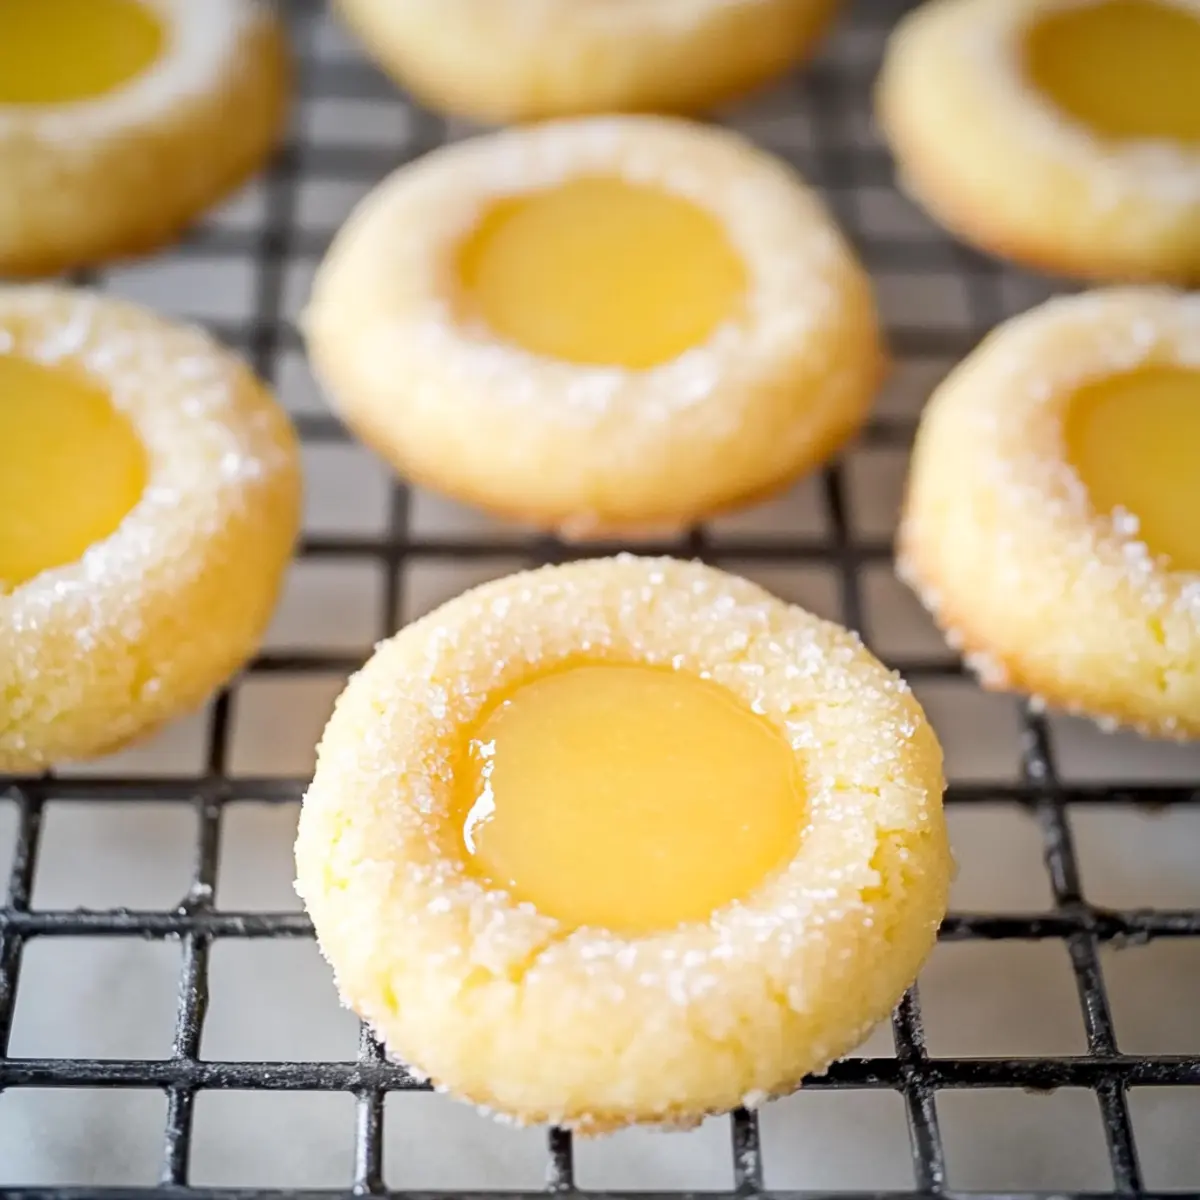
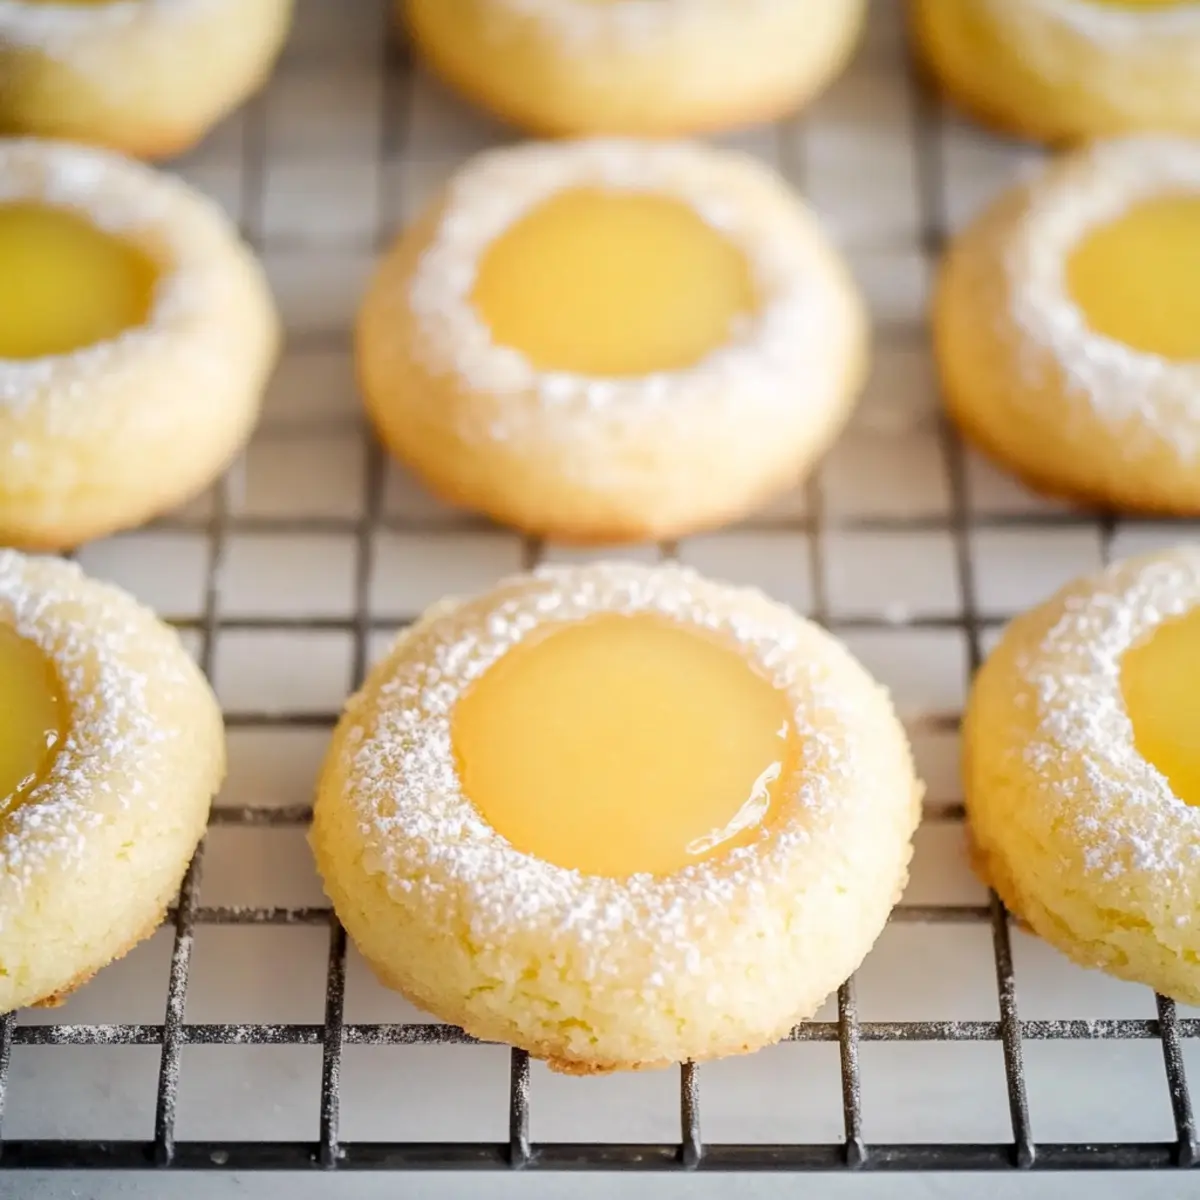
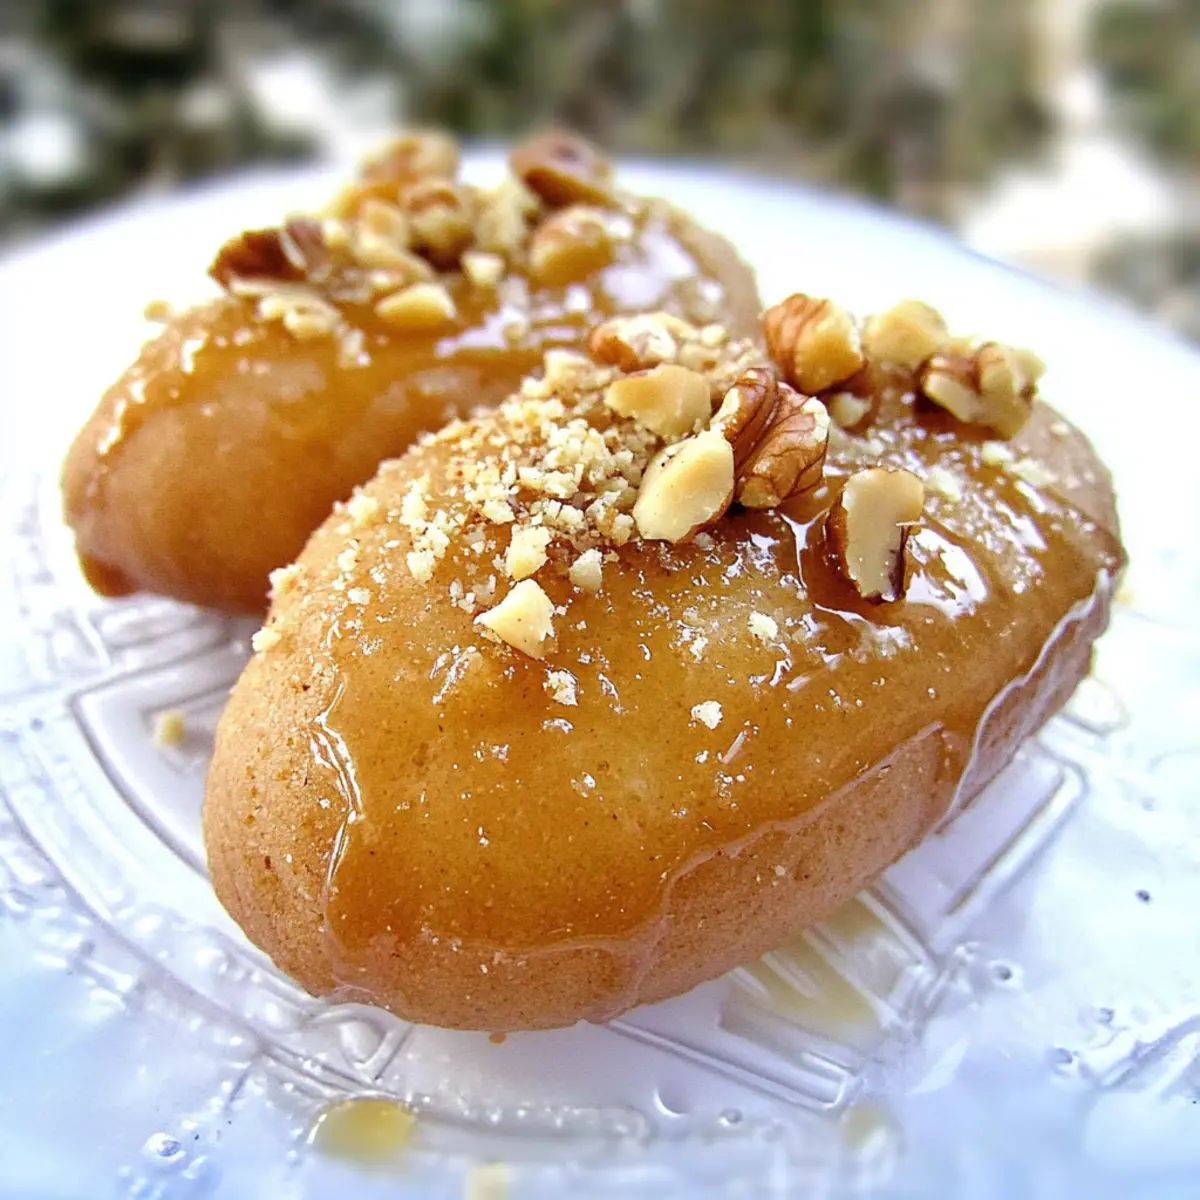
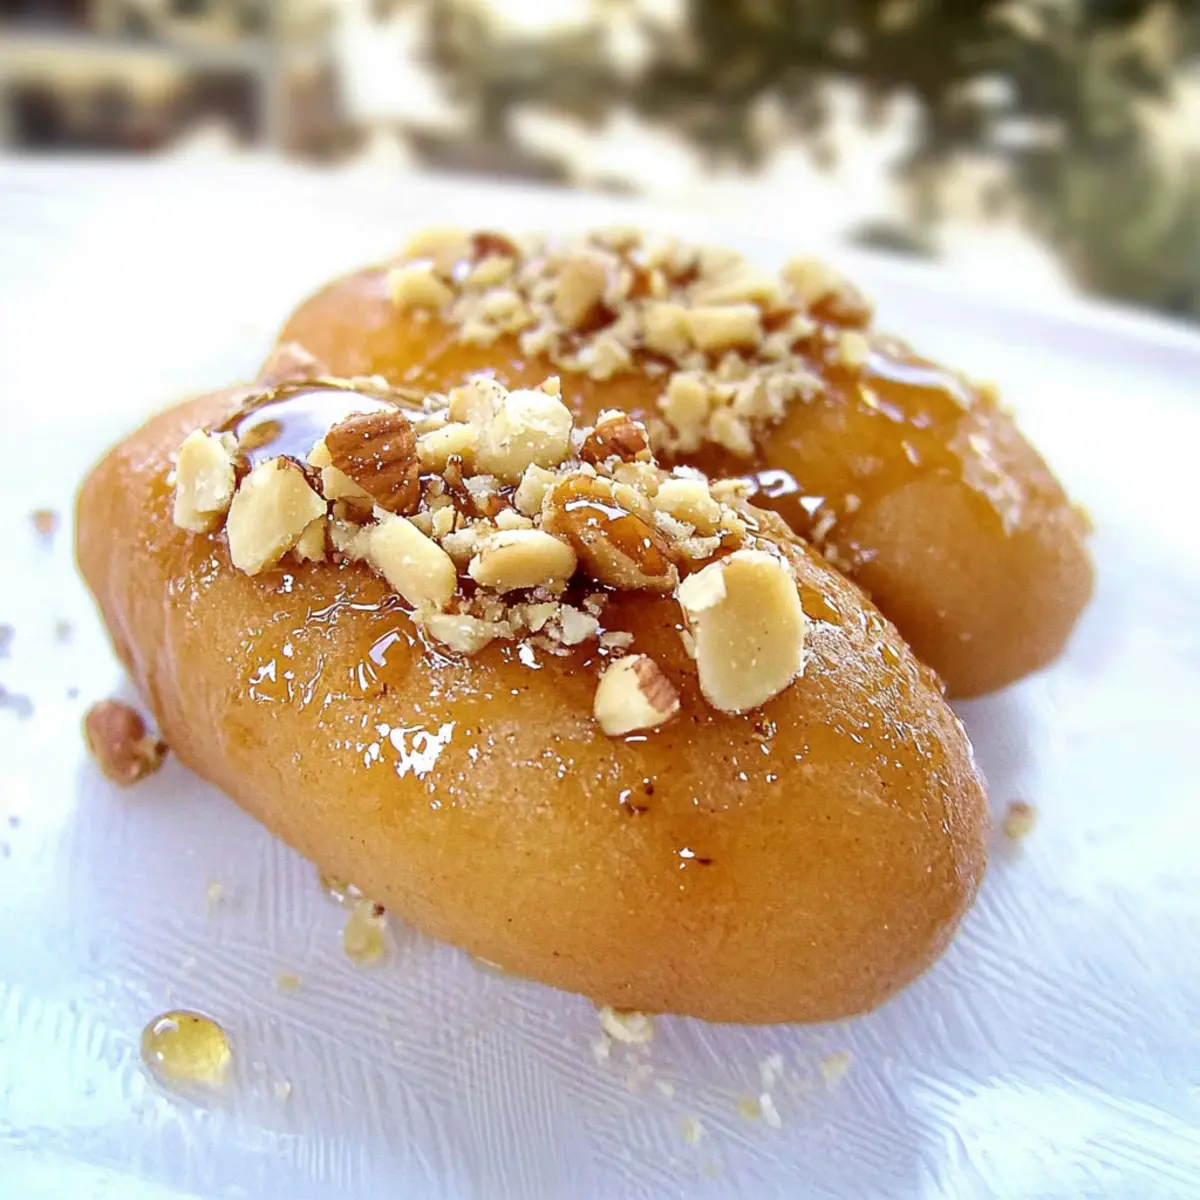
  • Ground Walnuts – Sprinkle on top for a delightful crunch that complements the soft cookie texture.

Step‑by‑Step Instructions for Traditional Greek Honey Cookies

Step 1: Prepare the Dough
In a large mixing bowl, combine fresh orange juice, olive oil, honey, water, and sugar. Whisk vigorously until the sugar is fully dissolved. This mixture should be smooth and slightly viscous. Allow it to sit for a moment to blend the flavors while you prepare to incorporate the dry ingredients.

Step 2: Mix Ingredients
Gradually add the fine semolina, all-purpose flour, baking powder, ground cinnamon, ground clove, nutmeg, and vanillin powder to the liquid mixture. Knead gently until a soft, oily dough forms, ensuring everything is well combined. The dough should be slightly sticky yet smooth, an indication that it's ready for shaping into cookies.

Step 3: Shape Cookies
Take small portions of the dough and roll them into oval shapes, about the size of a golf ball. Place each cookie on a parchment-lined baking tray, ensuring there’s ample space between them for air circulation. You should see a smooth surface on each cookie, which will help achieve an even bake.

Step 4: Decorate
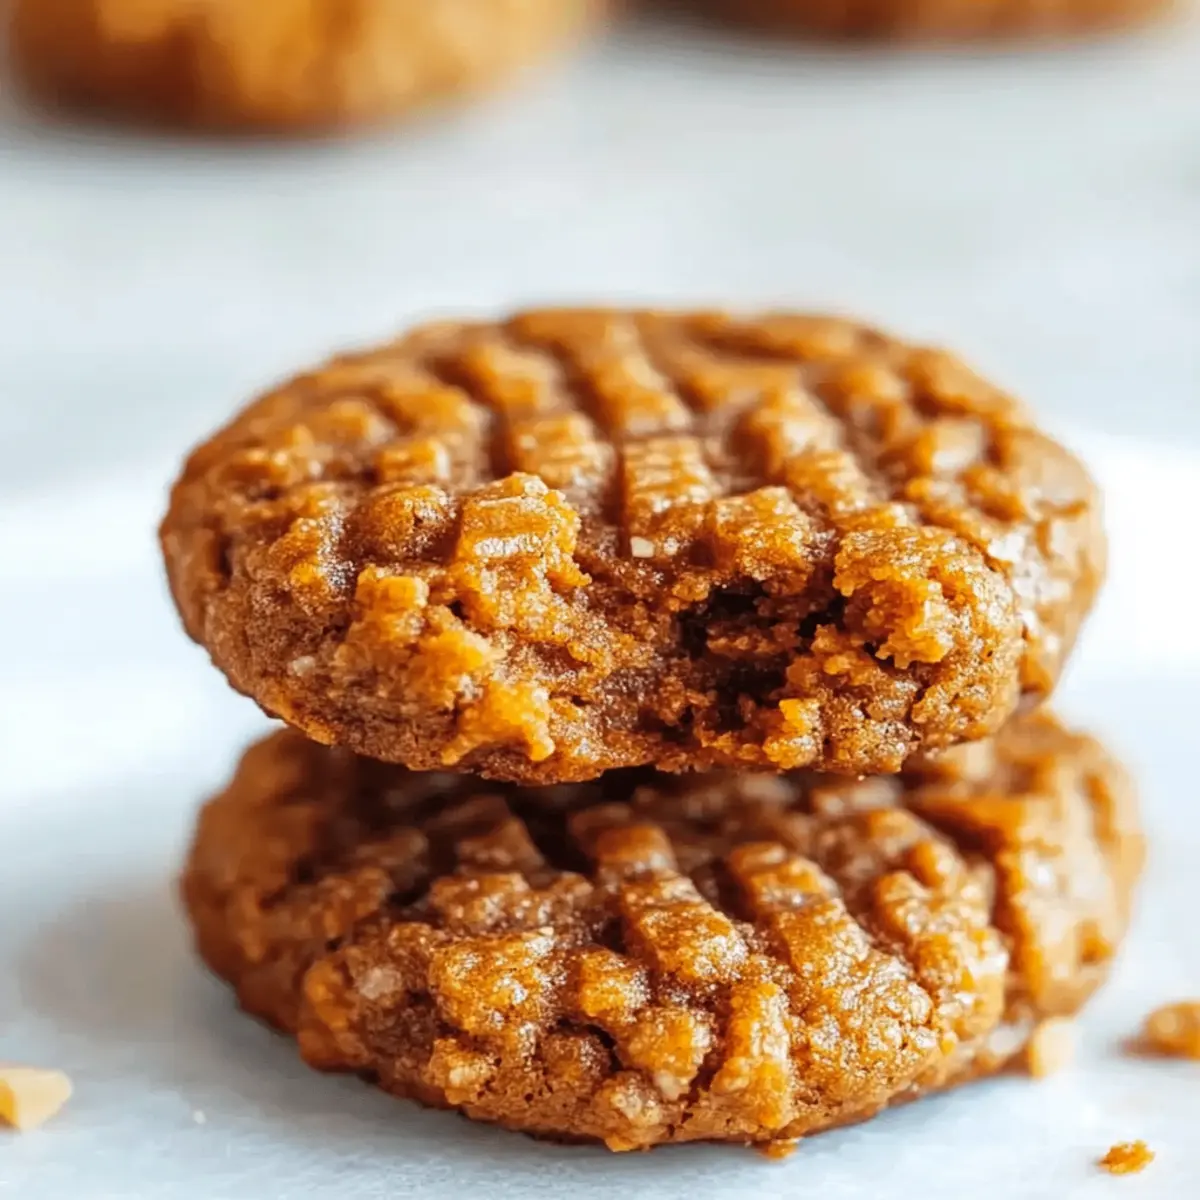
With a sharp knife or grater, gently press down to make criss-cross patterns on the top of each oval-shaped cookie. This not only adds a decorative touch but also allows them to absorb the syrup better later. The patterns should be noticeable yet delicate, enhancing both the appearance and flavor of the Traditional Greek Honey Cookies.

Step 5: Bake
Preheat your oven to 180°C (356°F). Once the oven reaches the right temperature, place the baking tray inside and bake for about 20 minutes. You’re looking for a light brown color, indicating they are baked through. The aroma wafting through your kitchen will be a delightful hint of what's to come!

Step 6: Make Syrup
While your cookies are baking, prepare the syrup by boiling a mixture of water, sugar, honey, a cinnamon stick, dried cloves, and orange peel in a saucepan. Bring it to a gentle boil for 4 minutes without stirring. You should see a syrupy consistency forming, which will soon coat your freshly baked cookies.

Step 7: Soak Cookies
Once the cookies are out of the oven and still warm, immediately dip them into the hot syrup for a few seconds. Make sure they’re fully immersed to allow the syrup to soak in but be careful not to leave them too long; they should feel tender but not falling apart. Let them drain on a cooling rack to remove excess syrup.
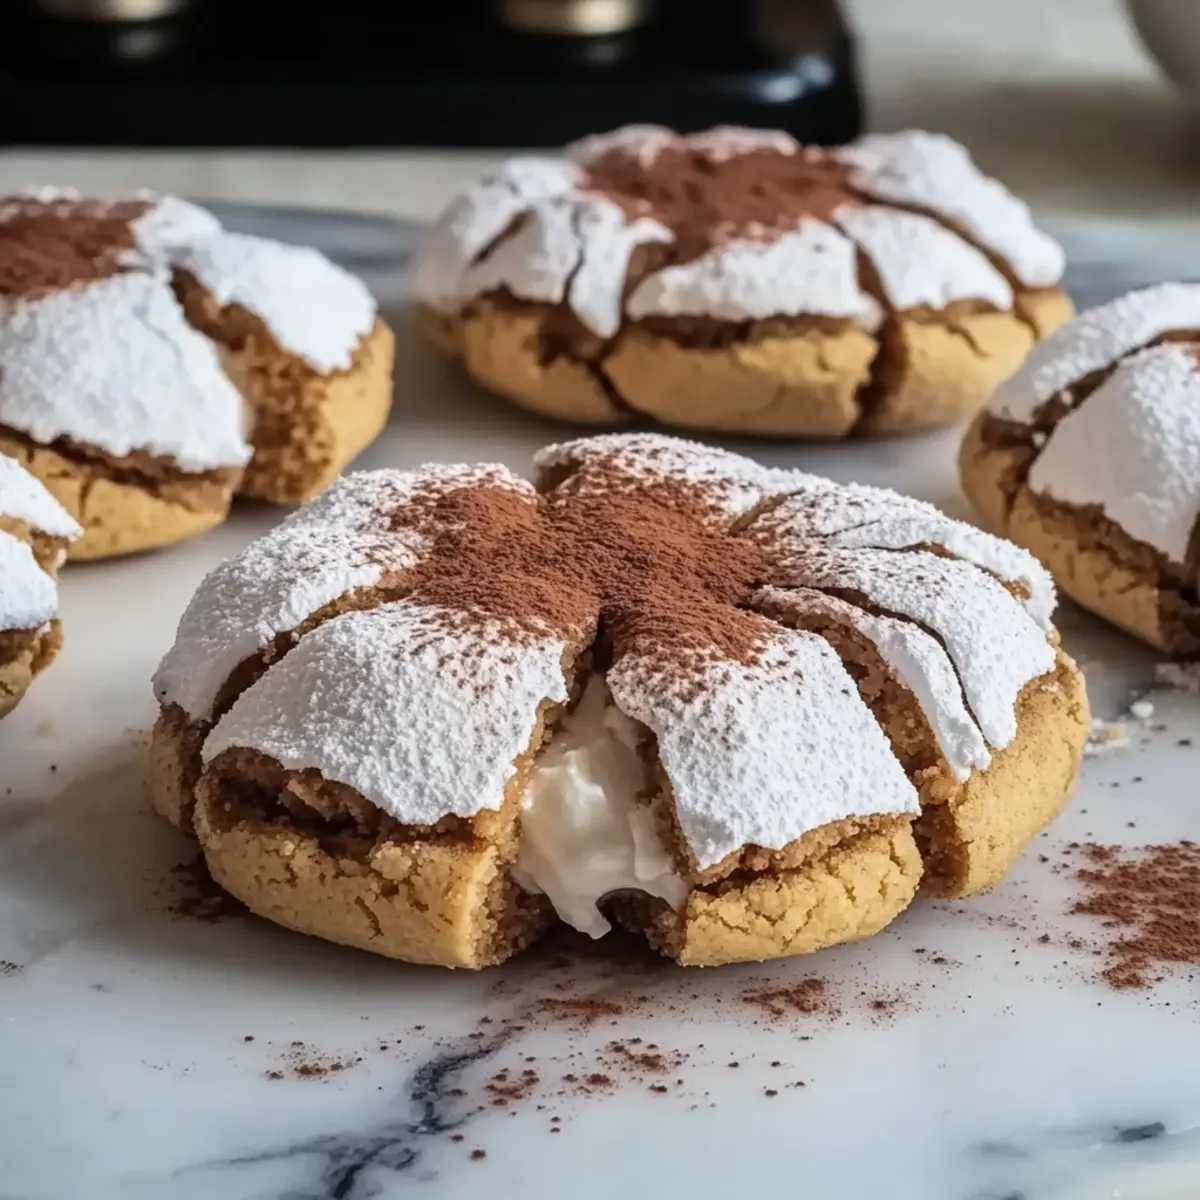
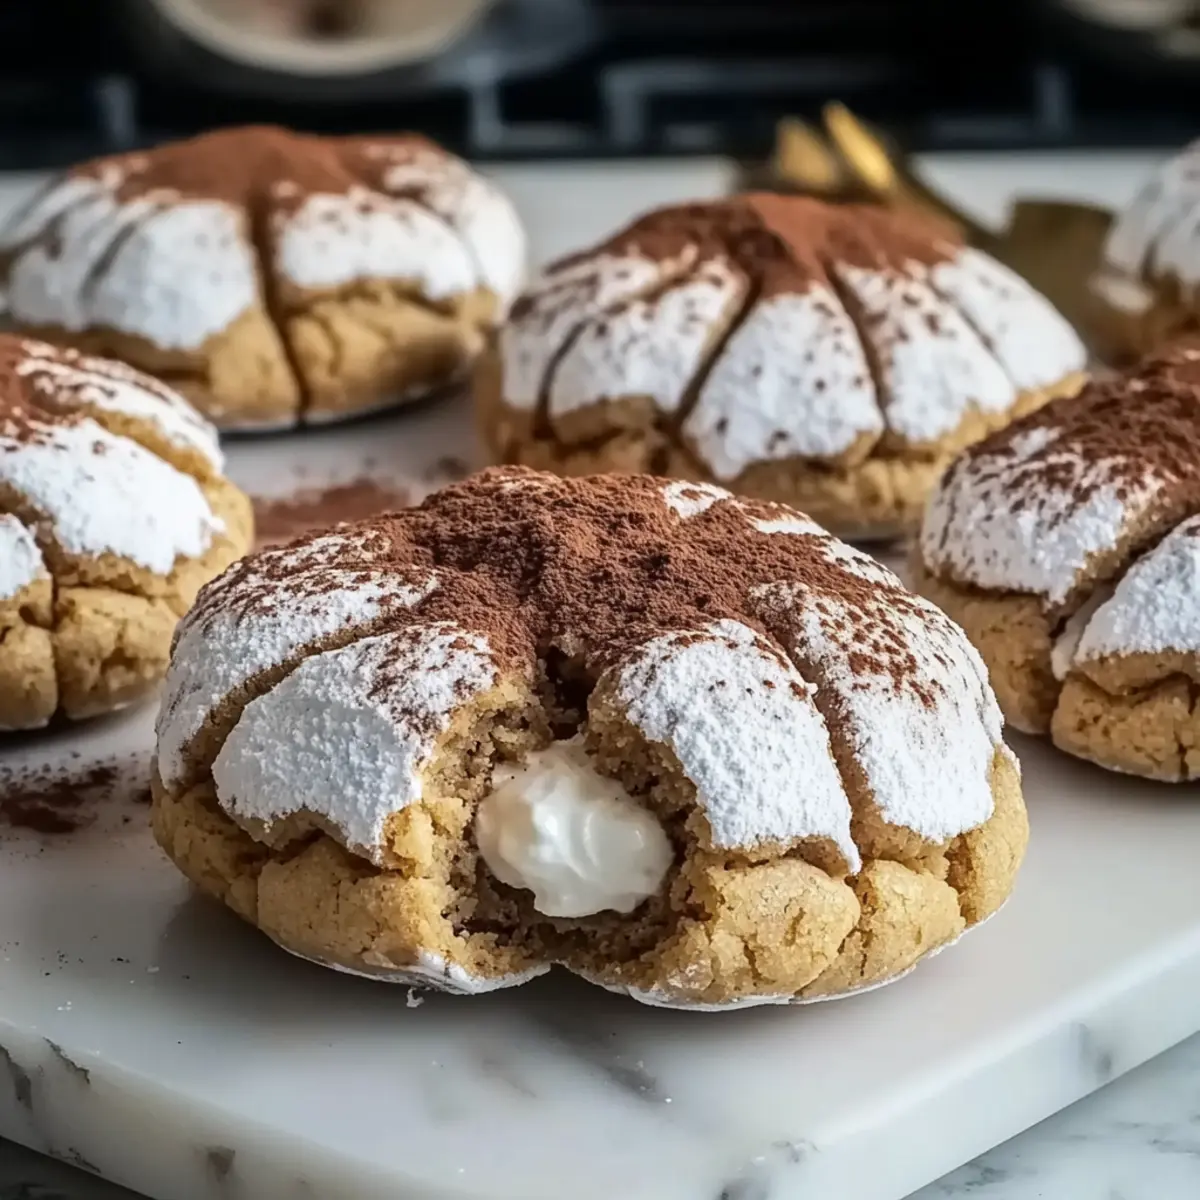
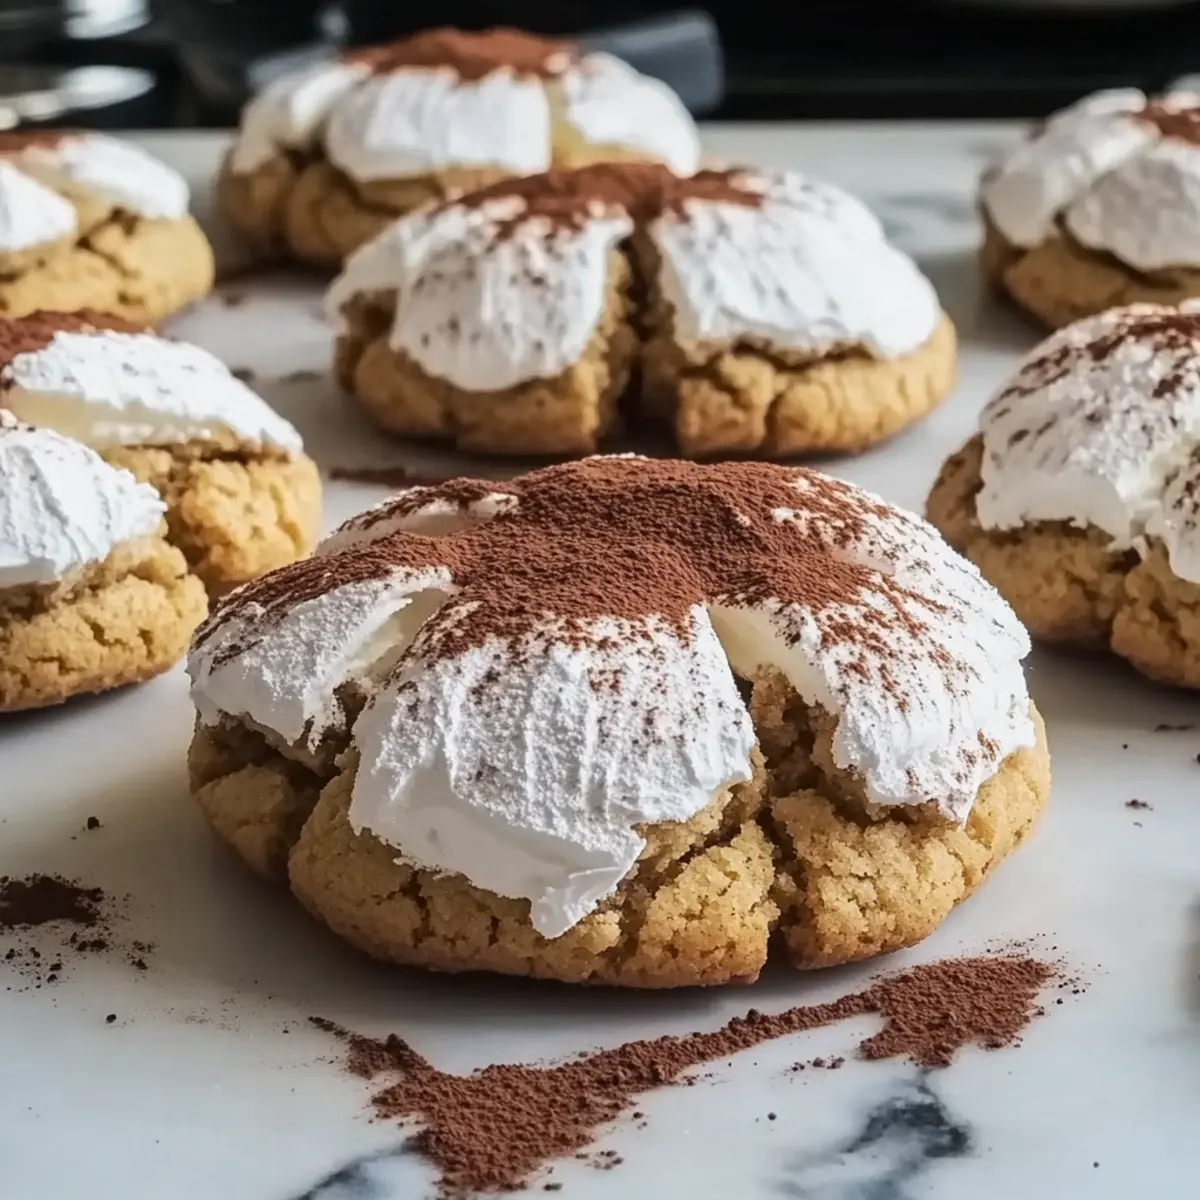
Step 8: Serve
After cooling, drizzle the Traditional Greek Honey Cookies with a little extra honey and sprinkle with ground walnuts for garnish. These final touches add an irresistible sweetness and texture, creating a beautiful presentation. Serve them to your friends and family, and watch them delight in every bite of this festive treat.

How to Store and Freeze Traditional Greek Honey Cookies

Room Temperature: Store in an airtight container at room temperature to maintain softness and flavor for up to 3 weeks.

Fridge: If you prefer a longer shelf life, you can refrigerate cookies for up to 1 month, but allow them to return to room temperature before serving for the best texture.

Freezer: For extended storage, freeze the Traditional Greek Honey Cookies in a single layer, then transfer to an airtight container, keeping them fresh for up to 3 months.

Reheating: When ready to enjoy, thaw cookies in the fridge overnight, then warm them briefly in the oven at 150°C (302°F) for about 5 minutes for that just-baked feel.

Expert Tips for Traditional Greek Honey Cookies

• Perfecting the Dough: Ensure your dough is well-kneaded but not overworked. A soft, oily texture is ideal for the best Traditional Greek Honey Cookies.

• Syrup Timing: Soak the cookies while they're warm to achieve the best flavor absorption. Don’t leave them too long in the syrup; just a few seconds will do!

• Garnish Wisely: Add ground walnuts only after the cookies cool down slightly to prevent them from becoming soggy. This will keep your cookies crunchy.

• Storing Secrets: Keep your cookies in an airtight container at room temperature. Proper storage helps maintain their softness and flavor for up to three weeks.

• Monitoring Bake Time: Keep an eye on the cookies as they bake to ensure they reach a light golden color. Underbaking may lead to a doughy texture in the Traditional Greek Honey Cookies.

Make Ahead Options

These Traditional Greek Honey Cookies (Melomakarona) are fantastic for meal prep enthusiasts! You can prepare the cookie dough up to 24 hours in advance by mixing all the wet and dry ingredients, then refrigerate it tightly wrapped. The unbaked cookies can also be shaped and placed on a baking tray for up to 3 days in the fridge—this keeps their freshness intact. When you're ready to bake, just pop them into the oven, bake until light brown, and soak them in syrup immediately after baking for that delightful syrupy finish. By prepping ahead, you'll save time on busy holiday mornings while enjoying homemade treats that taste just as delicious as if they were freshly baked!

Variations & Substitutions for Traditional Greek Honey Cookies

Feel free to explore these delightful twists on the classic recipe, bringing your own magical touch to each batch!

  • Nut-Free: Swap walnuts for sunflower seeds or pumpkin seeds for a delicious crunch without nuts. You won’t lose any of that satisfying texture!
  • Dairy-Free: Use coconut oil instead of olive oil to keep these cookies completely dairy-free while adding a hint of tropical flavor. Your taste buds will dance with joy!
  • Gluten-Free: Replace all-purpose flour with a gluten-free flour blend for a similar texture and flavor. Just ensure it contains xanthan gum for structure!
  • Low-Sugar Option: Use stevia or monk fruit sweetener in place of sugar to cut down on sweetness without compromising flavor. Your cookie enjoyment is still fully intact!
  • Spiced Syrup: Infuse the syrup with ginger or cardamom for an exciting spicy kick. This unique twist will add warmth with each delicious bite!
  • Chocolate Lovers: Fold in cocoa powder into the dough for a rich, chocolatey version of these cookies. Top with chocolate drizzle for the ultimate treat.
  • Citrus Zest: Enhance the cookie flavor by adding lemon or lime zest into the dough. This subtle change brings freshness that will brighten up your cookie platter!
  • Syrup Varieties: Experiment with flavored syrups, like almond or hazelnut syrup, instead of honey for a unique sweetness that's sure to be a conversation starter at your holiday gatherings.

Whichever variation you choose, you’ll be celebrating the love and warmth of traditional Greek desserts in every bite! And if you're looking for more inspiration, consider trying my delightful Matcha Cookies Soft or festive Eggnog Cookies Soft for some extra holiday cheer!

What to Serve with Traditional Greek Honey Cookies

As you delight in the sweet embrace of these honey-soaked treasures, consider rounding out your meal with some complementary dishes and treats.

  • Greek Coffee: The robust flavor of this traditional brew perfectly balances the sweetness of the cookies, making every nibble and sip an experience of harmony.

  • Sliced Fruit Platter: A medley of fresh, juicy citrus fruits and berries refreshes the palate between bites, enhancing their delightful taste.

  • Spiced Red Wine: Mulled wine infused with cloves and cinnamon echoes the warm spices of the cookies, creating a cozy, festive atmosphere.

  • Homemade Chocolate Bark: A touch of dark chocolate offers a rich contrast to the cookies’ sweetness while adding an enticing crunch.

  • Cheese Board: Serve with tangy feta or creamy goat cheese for a delightful flavor contrast; the savory notes elevate the dessert experience.

  • Baklava: Layered phyllo pastry with nuts and syrup creates a delightful double-dessert scenario; this classic complements the melomakarona beautifully.

  • Vanilla Ice Cream: Creamy, cool vanilla ice cream drizzled with honey complements the warm flavors of the cookies, turning dessert into a dreamy delight.

  • Nutty Trail Mix: A mix of toasted almonds and pistachios adds crunch and heartiness, providing a savory contrast to your sweet cookie indulgence.

  • Cinnamon Tea: A soothing cup of this spiced infusion enhances the flavors of your cookies, creating a comforting moment reminiscent of holiday gatherings.

Each of these pairings helps to enhance your cookie experience, making them the perfect centerpiece for your festive celebrations!

Traditional Greek Honey Cookies Recipe FAQs

How do I choose ripe ingredients for the cookies?
Absolutely! For the best flavor, always use fresh orange juice, as it adds a delightful fruity note. When picking your oranges, look for ones that are firm and heavy, indicating juiciness. Also, make sure to use high-quality honey for a richer syrup; pure honey should have a clear, sweet aroma.

What are the best storage methods for these cookies?
Store your Traditional Greek Honey Cookies in an airtight container at room temperature to maintain their softness and flavor for up to 3 weeks. If you choose to refrigerate them, they can last up to 1 month, but be sure to let them come to room temperature before serving for optimal taste and texture.

Can I freeze Traditional Greek Honey Cookies? If so, how?
Yes, you can freeze these delicious cookies! First, place them in a single layer on a baking sheet lined with parchment paper to prevent sticking. Once frozen solid, transfer the cookies to an airtight container or freezer bag. They will stay fresh for up to 3 months. When ready to enjoy, let them thaw overnight in the fridge, then heat them briefly in the oven at 150°C (302°F) for about 5 minutes to revive that wonderful texture.

What should I do if my cookies come out too hard or doughy?
If your cookies turn out hard, it may be due to overbaking. Aim for a light golden color when baking for the perfect texture. On the other hand, if they are doughy, ensure you’ve measured your ingredients correctly. A common mistake is adding too much liquid. To salvage slightly dry cookies, soak them a moment longer in the warm syrup to reintroduce moisture.

Are Traditional Greek Honey Cookies safe for pets or certain allergies?
These cookies contain ingredients like honey and nuts, which are not safe for pets. If you have nut allergies, consider substituting the walnuts with seeds like sunflower or pumpkin seeds. Additionally, ensure that your chosen honey is pure and allergen-free if necessary. Always check with guests regarding any dietary restrictions before serving.

Traditional Greek Honey Cookies

Delicious Traditional Greek Honey Cookies to Sweeten Your Holidays

These Traditional Greek Honey Cookies, known as Melomakarona, are a holiday gem filled with rich flavors and spiced sweetness.
Print Recipe Pin Recipe
Prep Time 30 minutes mins
Cook Time 20 minutes mins
Cooling Time 15 minutes mins
Total Time 1 hour hr 5 minutes mins
Servings: 24 cookies
Course: Dessert
Cuisine: Greek
Calories: 120
Ingredients Equipment Method Nutrition Notes

Ingredients
  

For the Dough
  • 1 cup Fresh Orange Juice
  • 1/2 cup Olive Oil or sunflower oil for a lighter touch
  • 1/2 cup Honey essential for sweetness
  • 1/2 cup Water
  • 1 cup Sugar for sweetness
  • 1 teaspoon Ground Cinnamon
  • 1/4 teaspoon Ground Clove
  • 1/4 teaspoon Ground Nutmeg
  • 1 teaspoon Vanillin Powder/Vanilla Extract
  • 1 tablespoon Zested Orange
  • 1 teaspoon Baking Soda
  • 1 cup Fine Semolina
  • 2 cups All-Purpose Flour
  • 1 teaspoon Baking Powder
For the Syrup
  • 1 cup Sugar (Syrup)
  • 1/2 cup Honey (Syrup)
  • 1 cup Water (Syrup)
  • 1 piece Cinnamon Stick
  • 4 pieces Dried Cloves
  • 1 piece Orange Peel
For the Garnish
  • 1/2 cup Ground Walnuts for decoration

Equipment

  • Mixing Bowl
  • Baking tray
  • Saucepan
  • Whisk
  • Oven

Method
 

Preparation Steps
  1. In a large mixing bowl, combine fresh orange juice, olive oil, honey, water, and sugar. Whisk vigorously until the sugar is fully dissolved.
  2. Gradually add the fine semolina, all-purpose flour, baking powder, ground cinnamon, ground clove, nutmeg, and vanillin powder to the liquid mixture. Knead gently until a soft, oily dough forms.
  3. Take small portions of the dough and roll them into oval shapes, placing each cookie on a parchment-lined baking tray.
  4. Gently press down to make criss-cross patterns on the top of each oval-shaped cookie.
  5. Preheat your oven to 180°C (356°F) and bake for about 20 minutes until they reach a light brown color.
  6. Prepare the syrup by boiling a mixture of water, sugar, honey, a cinnamon stick, dried cloves, and orange peel for about 4 minutes without stirring.
  7. Once baked, immediately dip cookies into the hot syrup for a few seconds, then let them drain on a cooling rack.
  8. Drizzle with extra honey and sprinkle with ground walnuts for garnish before serving.

Nutrition

Serving: 1cookieCalories: 120kcalCarbohydrates: 18gProtein: 1gFat: 5gSaturated Fat: 1gPolyunsaturated Fat: 1gMonounsaturated Fat: 3gSodium: 30mgPotassium: 50mgFiber: 0.5gSugar: 10gVitamin A: 25IUVitamin C: 1mgCalcium: 5mgIron: 0.3mg

Notes

Store in an airtight container to maintain softness and flavor for up to three weeks. Refrigerate for up to one month or freeze for up to three months.

Tried this recipe?

Let us know how it was!

Lemon Curd Cookies That Burst with Citrus Love

January 16, 2026 by Grace Snow Leave a Comment

As I took a bite of one of these Zesty Lemon Curd Thumbprint Cookies, a burst of sunshine filled my senses. The soft, tender cookie cradled a luscious, tangy lemon curd that danced on my taste buds, offering a delightful alternative to a heavy tart. If you're craving that vibrant lemon zing without the fuss, this recipe for Lemon Curd Cookies is your answer! It's not only easy to whip up but also a guaranteed crowd-pleaser. With surprisingly quick prep, these cookies are perfect for any gathering or simply to satisfy your sweet tooth. What flavor twist will you try—passion fruit, blood orange, or maybe a zesty lime?

Why Are Lemon Curd Cookies So Irresistible?

Delightful Balance: The combination of soft cookies and creamy lemon curd crafts a perfect harmony of textures and flavors that will impress anyone.

Easy to Make: Despite their elegance, these cookies are simple to assemble, making them ideal for a quick baking session in your kitchen.

Versatile Options: Feel free to switch up the flavor with alternatives like passion fruit or blood orange curd—the variations are endless!

Perfect for Any Occasion: Whether for afternoon tea, a casual get-together, or a sweet indulgence, these cookies will shine at any event.

Make-Ahead Friendly: You can prepare the cookies and curd in advance; they wait patiently in your fridge until you’re ready to assemble, saving you time when you need it most!

Each bite offers a refreshing getaway from mundane flavors—once you try these zesty lemon curd cookies, you’ll understand why they keep your cravings satisfied!

Lemon Curd Cookies Ingredients

For the Cookies

  • Unsalted Butter – Provides essential moisture and richness; bring to room temperature for best blending results.
  • Powdered Sugar – Crucial for a tender texture; its fine consistency creates soft cookies.
  • Lemon Zest – Elevates the lemon flavor beautifully; always use fresh zest for the brightest taste.
  • Vanilla Extract – Introduces a depth of flavor; opt for standard vanilla for classic results.
  • Large Whole Egg – Functions as a binding agent, ensuring your cookies maintain their shape.
  • Morton’s Kosher Salt – Ensures balanced flavor; stick with this specific salt for consistent results.
  • Baking Powder – Aerates the dough, giving cookies a light and fluffy texture.
  • All-Purpose Flour – Provides crucial structure; helps prevent cookies from spreading too thin.

For the Lemon Curd

  • Fresh Lemon Juice – Provides that fresh and vibrant lemon flavor; avoid bottled juices for authentic taste.
  • Egg Yolk – Adds a luxurious richness and aids in thickening the lemon curd.
  • Granulated Sugar – Sweetens the curd while balancing the sourness; castor sugar can be substituted if needed.
  • Strained Lemon Curd – Combines egg yolks, whole eggs, sugar, and lemon juice; straining smooths the texture before finishing with unsalted butter for added silkiness.

These Lemon Curd Cookies are not just a treat; they're a slice of sunshine that will bring joy to your baking adventures!

Step‑by‑Step Instructions for Lemon Curd Cookies

Step 1: Prepare Cookie Dough
Start by creaming together 1 cup of room-temperature unsalted butter and 1 cup of powdered sugar in a mixing bowl until the mixture is light and fluffy, around 3-5 minutes. Next, add in 1 large egg and 1 teaspoon of vanilla extract, mixing until fully incorporated and smooth. This forms the base of your delicious Lemon Curd Cookies.

Step 2: Add Dry Ingredients
Gradually add 2 ½ cups of all-purpose flour, 1 teaspoon of baking powder, ½ teaspoon of Morton’s kosher salt, and the zest of 1 lemon to the wet mixture. Mix gently until the dough just comes together, ensuring not to overmix, which will keep your cookies tender. The texture should be slightly sticky yet hold its shape well.

Step 3: Chill Dough
Divide the dough into equal portions and roll them into balls, about 1 inch in diameter. Place the balls on a parchment-lined baking sheet and make a deep indentation in the center of each using your thumb. Chill the cookies in the refrigerator for at least 1 hour to help them maintain their shape during baking.

Step 4: Bake Cookies
Preheat your oven to 350°F (180°C). Once the dough has chilled, bake the cookies on the center rack for 12-15 minutes, or until the edges are lightly golden. Keep an eye on them; they should be firm at the edges but still soft in the center. Let them cool on the baking sheet for a few minutes before transferring to a wire rack.

Step 5: Make Lemon Curd
While the cookies are baking, prepare the lemon curd. In a saucepan, whisk together 3 large egg yolks, 2 whole eggs, ½ cup of granulated sugar, and ¾ cup of freshly strained lemon juice. Cook the mixture over medium heat, stirring constantly until it thickens, which takes about 10 minutes, ensuring it does not boil.

Step 6: Finish Curd
Once thickened, remove the lemon curd from heat and whisk in ½ cup of unsalted butter, one tablespoon at a time, until smooth and creamy. If desired, strain the curd through a fine mesh sieve to ensure a silky texture. Let it cool slightly before assembling your delightful Lemon Curd Cookies.

Step 7: Assemble Cookies
Once both the cookies and the lemon curd have cooled sufficiently, fill the indents of each cookie with a generous spoonful of lemon curd. Allow the cookies to sit for about 30 minutes to set the curd slightly before enjoying your zesty Lemon Curd Cookies.

Expert Tips for Lemon Curd Cookies

  • Room Temperature Ingredients: Ensure your butter and eggs are at room temperature. Cold ingredients can lead to dense cookies that lack the desired tenderness.

  • Don’t Rush the Chilling: Chilling the dough is crucial for maintaining cookie shape. Skipping this step might lead to flat cookies that lose their beautiful indents.

  • Mind the Indentation: Make a deep indent for the curd, but be careful not to pierce through the bottom of the cookie! This prevents any delicious lemon curd from leaking out while baking.

  • Strain for Smoothness: Always strain your lemon juice and curd after cooking to ensure there are no lumps or pulp. This will create a silky texture that pairs perfectly with your cookies.

  • Experiment with Flavors: Don't hesitate to substitute different curd flavors like passion fruit or blood orange. These variations can elevate your Lemon Curd Cookies to a whole new level!

  • Avoid Overmixing: Mix the dough until just combined. Overmixing can lead to tough cookies, so let those delicate flavors shine through!

Make Ahead Options

These Lemon Curd Cookies are perfect for busy home cooks looking to save time! You can prepare the cookie dough up to 24 hours in advance; simply shape the balls, make indents, and refrigerate. The lemon curd can also be made up to 3 days ahead—just ensure it’s properly cooled and stored in an airtight container in the refrigerator to maintain its creamy texture. When you're ready to bake, simply remove the chilled dough from the fridge, bake as directed, fill with curd, and allow to set for about 30 minutes. This prep-ahead strategy saves you precious time while still delivering delicious, fresh Lemon Curd Cookies that are just as delightful!

Lemon Curd Cookies Variations

Embrace your culinary creativity and explore delightful twists to these scrumptious cookies!

  • Passion Fruit Curd: Swap lemon curd for tangy passion fruit curd for a tropical burst of flavor.
  • Blood Orange Curd: Use blood orange curd instead of lemon for a sweeter, vibrant alternative that’s equally delicious.
  • Lime Curd: Craving something different? Lime curd can bring a zesty kick that’s refreshingly unique.
  • Berry Topping: Top each cookie with a fresh raspberry or strawberry slice for an added fruity flair and visual appeal.
  • Nutty Crunch: Add finely chopped nuts, like pistachios or almonds, into the cookie dough for extra texture and flavor.
  • Chocolate Drizzle: Elevate the cookies by drizzling dark chocolate over the filled curd for a rich contrast that chocolate lovers will adore.
  • Coconut Add-In: Mix in shredded coconut into the dough for a chewy, flavorful tease of the tropics in every bite.
  • Herbal Infusion: Experiment with a hint of fresh mint or basil in the lemon curd to create an unexpected and refreshing herbal note.

For those who love a hint of diversity, why not pair your cookies with herbal tea or a light dessert wine? You might also enjoy trying your hand at Thumbprint Cookies Melt or Mexican Wedding Cookies for more delightful variations!

How to Store and Freeze Lemon Curd Cookies

Room Temperature: Store unfilled cookies in an airtight container at room temperature for up to 2 days to keep them soft and fresh.

Fridge: For filled Lemon Curd Cookies, keep them in an airtight container in the refrigerator. They will stay fresh for up to 5 days, but are best enjoyed within the first 1–3 days.

Freezer: You can freeze unfilled cookies for up to 3 months; layer them between parchment paper in a freezer-safe bag. Thaw in the fridge before filling with lemon curd.

Reheating: If you prefer warm cookies, pop them in a preheated oven at 350°F (175°C) for about 5-10 minutes to regain their fresh-baked texture.

What to Serve with Zesty Lemon Curd Thumbprint Cookies

There's nothing quite like complementing your sweet treats with delightful sides that enhance the experience.

  • Herbal Iced Tea: A refreshing drink that perfectly balances the sweetness of cookies with its herbal notes, keeping you cool and complemented.

  • Fresh Berries: A medley of raspberries and blueberries provides a juicy burst of freshness and brightens up your dessert presentation. Serve with a dollop of whipped cream for a creamy contrast.

  • Almond Biscotti: The crunchy texture of biscotti adds a nice contrast to the soft, gooey lemon curd center, making for an enjoyable dipping experience.

  • Vanilla Ice Cream: Serve on the side or atop your cookies for a creamy, indulgent treat. The coldness of the ice cream beautifully counteracts the tanginess of the lemon curd.

  • Citrus Sorbet: An elegant, light finish that echoes the lemon flavors and cleanses the palate for a refreshing end to your dessert.

  • Champagne Cocktail: Elevate your treat with a bubbly drink that brings a festive touch, enhancing the fruity notes of lemon while offering a celebratory flair.

  • Lemon Scented Shortbread: These buttery bites share the citrus theme and add a subtle crunch, creating a harmonious blend of flavors across your dessert spread.

  • Pistachio Financier: These nutty, moist little cakes offer a rich contrast to the lemony freshness, making each bite a delightful surprise.

  • Chocolate Fondue: The richness of dark chocolate beautifully complements the bright lemon flavors, creating a deliciously decadent experience. Dip fruits, cookies, or marshmallows for extra fun!

Lemon Curd Cookies Recipe FAQs

How do I select the best lemons for this recipe?
Absolutely! Look for lemons that are firm and heavy for their size, as this indicates juiciness. A vibrant, bright yellow skin is a good sign of freshness, while avoid any that have dark spots or blemishes. Fresh zest is key, so choosing top-quality lemons will really amplify the flavor of your cookies!

What’s the best way to store my Lemon Curd Cookies?
To keep your cookies fresh, store unfilled Lemon Curd Cookies in an airtight container at room temperature for up to 2 days. For filled cookies, I recommend placing them in the refrigerator. They stay fresh for up to 5 days but are best enjoyed within the first 1-3 days for maximum flavor and texture.

Can I make the cookies and lemon curd ahead of time?
Very! You can prepare the cookie dough and lemon curd in advance. The cookies can be rolled and chilled in the fridge for a few hours or even overnight. Likewise, the lemon curd can be made up to a week in advance and stored in the fridge. Just assemble them together closer to serving time for a fresher taste!

How can I freeze Lemon Curd Cookies?
For sure! You can freeze unfilled cookies for up to 3 months. Simply place them on a baking sheet in a single layer until frozen, then transfer them to a freezer-safe bag, layering parchment paper between cookies to avoid sticking. When ready to serve, thaw in the fridge and then fill them with lemon curd before enjoying!

What should I do if my cookies turn out flat?
Don't worry! Flat cookies often result from not chilling the dough long enough. If they flatten out too much, try chilling them for an additional 30 minutes next time. Always ensure that your baking powder is fresh, as old leavening agents can also lead to a lack of rise in cookies.

Is this recipe suitable for those with egg allergies?
While this recipe does contain eggs, you can make an egg-free version using a substitute, such as 1/4 cup unsweetened applesauce or 1 tablespoon of flaxseed meal mixed with 2.5 tablespoons of water for each egg. Keep in mind that this may slightly alter the texture, but will still result in delicious cookies!

Lemon Curd Cookies

Lemon Curd Cookies That Burst with Citrus Love

These Lemon Curd Cookies offer a vibrant zesty flavor with a tender texture, perfect for any occasion.
Print Recipe Pin Recipe
Prep Time 30 minutes mins
Cook Time 15 minutes mins
Chilling Time 1 hour hr
Total Time 1 hour hr 45 minutes mins
Servings: 24 cookies
Course: Dessert
Cuisine: Baking
Calories: 120
Ingredients Equipment Method Nutrition Notes

Ingredients
  

For the Cookies
  • 1 cup Unsalted Butter Room temperature
  • 1 cup Powdered Sugar For tender texture
  • 1 tablespoon Lemon Zest Fresh for best flavor
  • 1 teaspoon Vanilla Extract Standard for classic taste
  • 1 large Whole Egg Binding agent
  • 0.5 teaspoon Morton’s Kosher Salt For balanced flavor
  • 1 teaspoon Baking Powder Lightens texture
  • 2.5 cups All-Purpose Flour Provides structure
For the Lemon Curd
  • 0.75 cup Fresh Lemon Juice Avoid bottled juices
  • 3 large Egg Yolks For richness
  • 0.5 cup Granulated Sugar Sweetens the curd
  • 0.5 cup Unsalted Butter Added for silkiness

Equipment

  • Mixing Bowl
  • Whisk
  • Saucepan
  • Parchment Paper
  • Oven

Method
 

Cookie Preparation
  1. Cream together unsalted butter and powdered sugar in a mixing bowl until light and fluffy for about 3-5 minutes.
  2. Add egg and vanilla extract; mix until fully incorporated.
  3. Gradually add flour, baking powder, salt, and lemon zest, mixing until just combined.
  4. Roll dough into balls and make a deep indentation using your thumb; chill for at least 1 hour.
  5. Preheat oven to 350°F (180°C) and bake cookies for 12-15 minutes until edges are golden.
Lemon Curd Preparation
  1. Whisk together egg yolks, whole eggs, sugar, and lemon juice in a saucepan.
  2. Cook over medium heat, stirring constantly until thickened, about 10 minutes.
  3. Remove from heat and whisk in butter until smooth. Strain if desired.
Assembling Cookies
  1. Once cookies and curd are cooled, fill cookie indents with lemon curd.
  2. Allow cookies to sit for about 30 minutes before serving.

Nutrition

Serving: 1cookieCalories: 120kcalCarbohydrates: 15gProtein: 1.5gFat: 6.5gSaturated Fat: 4gPolyunsaturated Fat: 0.5gMonounsaturated Fat: 2gCholesterol: 30mgSodium: 90mgPotassium: 50mgSugar: 6gVitamin A: 250IUVitamin C: 5mgCalcium: 10mgIron: 0.5mg

Notes

Ensure butter and eggs are at room temperature for best results. Do not rush the chilling process to maintain cookie shape.

Tried this recipe?

Let us know how it was!

Chewy Pistachio Cream Cookies for a Sweet Escape

January 16, 2026 by Grace Snow Leave a Comment

Stepping into the cozy aroma of freshly baked sweets always brings a smile to my face, and it's even more delightful when the star of the show is a batch of Chewy Pistachio Cream Cookies with Chocolate Chunks. These lovely cookies effortlessly blend the vibrant crunch of roasted pistachios with the rich embrace of gooey chocolate, creating an irresistible taste experience. And here’s the best part—they’re incredibly easy to whip up in under 30 minutes! Whether you're entertaining guests or treating yourself after a long day, these nut-based delights are the perfect quick indulgence. Plus, I've even included options for creating nut-free versions, so everyone can join in on the fun. Are you ready to embark on this delightful baking adventure together? Let’s dive into the recipe!

Why are Pistachio Cream Cookies a must-try?

Irresistible Flavor: These cookies boast a unique nutty richness from pistachio cream, perfectly balanced with melty chocolate chunks for a heavenly bite.

Quick and Easy: Made in under 30 minutes, this recipe suits anyone craving a homemade treat without a time commitment.

Versatile Variations: Feel free to swap nuts or chocolate types based on your taste, giving you endless possibilities to play with flavors. Consider trying these Matcha Cookies Soft for a different twist!

Perfect for Any Occasion: Whether it's a casual afternoon snack or a dessert for guests, these cookies shine in every setting, promising to please.

Crowd-Pleaser: With their chewiness and delightful flavors, they garner compliments every time you share them! So, gather your ingredients and get ready to impress your family and friends.

Pistachio Cream Cookies Ingredients

For the Dough
• Pistachio Cream – Adds nutty richness and flavor; substitute with any unsweetened nut cream or butter if necessary.
• Unsalted Butter – Acts as a fat source for moisture and texture; make sure it’s at room temperature for optimal blending.
• Granulated Sugar – Provides sweetness and contributes to texture; feel free to adjust based on your sweetness preference.
• All-Purpose Flour – Gives structure to the cookies; sift for lighter, airier treats.
• Baking Soda – Essential for leavening; ensures your cookies are soft and chewy.
• Sea Salt – Enhances flavors; adjust based on the saltiness of your pistachios.

For the Mix-ins
• Roasted Pistachios – Adds a delightful crunch and nutty flavor; choose salted or unsalted based on your taste.
• Chocolate Chunks – Offers sweet pockets of chocolate; can substitute with chocolate chips if preferred.

These Pistachio Cream Cookies are not just a treat, but a wonderful way to bring a slice of homemade goodness into your day!

Step‑by‑Step Instructions for Pistachio Cream Cookies

Step 1: Prepare the Dough
In a large mixing bowl, combine the pistachio cream and softened unsalted butter. Using a hand mixer, blend them together on medium speed until smooth and creamy, which should take about 1-2 minutes. Gradually add the granulated sugar, mixing until the mixture becomes light and fluffy.

Step 2: Incorporate Dry Ingredients
In a separate bowl, sift together the all-purpose flour, baking soda, and sea salt. Slowly fold this dry ingredient mixture into the pistachio blend using a spatula. This ensures even distribution while preventing overmixing. Continue folding until just combined, with no dry flour remaining, to maintain the soft texture of your Pistachio Cream Cookies.

Step 3: Add Mix-ins
Gently fold in the roasted pistachios and chocolate chunks, distributing them evenly throughout the dough. The vibrant colors and textures will be visible as you stir. Ensure that every cookie will be infused with the delicious nutty and chocolate goodness, but stop mixing once the add-ins are well incorporated to keep the dough light and fluffy.

Step 4: Shape Cookies
Preheat your oven to 350°F (175°C) and line a baking sheet with parchment paper. Using a cookie scoop or tablespoon, dollop the dough onto the prepared baking sheet, spacing them about 2 inches apart. Gently flatten each cookie slightly with the back of a spoon, preparing them for even baking while retaining a nice dome shape.

Step 5: Bake
Once your oven is preheated, place the baking sheet in the center rack. Bake the cookies for 10-12 minutes, or until the edges are golden and the centers look soft and lightly puffed. Keep a close eye to avoid overbaking; the centers will firm up while cooling, ensuring that melt-in-your-mouth quality you expect from Pistachio Cream Cookies.

Step 6: Cool
After baking, allow the cookies to cool on the baking sheet for about 5 minutes. This step is crucial as it helps them set. Then, transfer them carefully to a wire rack to cool completely. During this time, they will continue to develop their perfect chewy texture and deepen in flavor.

Step 7: Serve and Store
Once cooled, decide how you want to enjoy your delicious Pistachio Cream Cookies! They pair wonderfully with coffee or milk. If you need to store them, place the cookies in an airtight container at room temperature, where they will remain fresh for up to a week.

Make Ahead Options

These Pistachio Cream Cookies are ideal for busy home cooks looking to save precious time! You can prepare the cookie dough up to 24 hours in advance by mixing it, then wrapping it tightly in plastic wrap and refrigerating it (this allows the flavors to meld beautifully). You can also scoop the dough balls onto a baking sheet, freeze them for about an hour until firm, then transfer them to a zip-top bag and freeze for up to 3 months. When you’re ready to enjoy these delicious treats, simply place the frozen dough on a lined baking sheet, let them thaw for about 15 minutes, and bake as instructed. This ensures your cookies are just as delightful as if they were made fresh!

Pistachio Cream Cookies Variations

Feel free to make these delightful cookies your own with some clever twists!

  • Nut-Free Option: Swap pistachio cream with sunflower seed butter for a nut-free delight that all can enjoy.

  • Gluten-Free: Use a gluten-free flour blend to cater to gluten sensitivities. The texture will still be delightful without the gluten!

  • Chocolate Lovers: Replace chocolate chunks with rich dark chocolate or white chocolate to cater to different taste preferences. Try mixing both for a fun medley of flavors!

  • Added Flavor: Incorporate a splash of vanilla extract for a warm, aromatic twist that elevates the cookie experience. Just a teaspoon can work wonders!

  • Spiced Up: Add a sprinkle of cinnamon or cardamom to the dry ingredients for an exotic flavor boost that perfectly complements the nutty notes.

  • Fruity Delight: Fold in dried cranberries or chopped dates for an added sweetness and chewy texture, creating a lovely contrast with the rich pistachios.

  • For a Crunch: Toast the pistachios before adding them to the dough to enhance their flavor and add an extra layer of crunchiness.

  • Twists on Serving: Enjoy these cookies warm with a scoop of vanilla ice cream, or why not try a drizzle of caramel sauce on top for a mouthwatering dessert?

For those looking to explore more cookie styles, you might enjoy these Eggnog Cookies Soft or the charming Peaches Cream Cookies!

Expert Tips for Pistachio Cream Cookies

• Check Butter Temperature: Ensure your unsalted butter is at room temperature for better blending, which helps achieve a soft and creamy dough.

• Avoid Overbaking: Monitor your cookies closely in the oven; they should be slightly soft in the center when removed, as they'll firm up while cooling.

• Chill the Dough: For thicker cookies, consider chilling the dough for about 30 minutes before baking. This prevents spreading and enhances the texture.

• Use Fresh Ingredients: Always check the freshness of your baking soda and flour to ensure optimal rising and texture in your Pistachio Cream Cookies.

• Customize Your Mix-ins: Don’t hesitate to swap out mix-ins! Experiment with different nuts or chocolate types to create your own unique flavor profile.

Storage Tips for Pistachio Cream Cookies

Room Temperature: Store your cookies in an airtight container at room temperature for up to 7 days, maintaining their chewy texture and delicious flavor.

Fridge: For an extra layer of freshness, consider refrigerating them in an airtight container, where they can last for up to 10 days. Just allow them to come to room temperature before serving.

Freezer: Freeze baked cookies for up to 3 months. Wrap individually in plastic wrap and place in a freezer-safe bag; thaw at room temperature before enjoying.

Reheating: To enjoy a warm cookie experience, reheat in the microwave for 10-15 seconds or in a preheated oven at 350°F (175°C) for about 5 minutes. This will bring back the gooey deliciousness of the chocolate chunks in your Pistachio Cream Cookies.

What to Serve with Chewy Pistachio Cream Cookies?

Indulge your senses with a delightful pairing that complements the rich flavors of these heavenly cookies.

  • Creamy Vanilla Ice Cream: A scoop of creamy vanilla ice cream creates a luscious contrast that will leave you craving more.

  • Fresh Berries: Juicy strawberries or tart raspberries add a burst of freshness and balance the sweetness of the cookies. Picture a vibrant berry medley on your plate!

  • Espresso or Coffee: A warm cup of robust espresso or coffee elevates the cookie experience, enhancing the nutty flavors with each sip.

  • Milk: Dip your cookies in a glass of cold milk for a classic pairing that brings back fond childhood memories.

  • Chocolate Ganache Dip: For the chocolate lovers, a rich chocolate ganache dip adds an indulgent twist, deepening the chocolate experience of each bite.

  • Pistachio Milkshake: Blend pistachio cream and vanilla ice cream for a creamy milkshake that echoes the flavors of the cookies.

  • Coconut Macaroons: These chewy coconut delights will bring in a delightful tropical vibe that pairs surprisingly well with the nutty richness of your cookies.

  • Cupcake Frosting: Top a vanilla cupcake with cookie crumbles and a light cream cheese frosting to create a sweet, crunchy dessert fit for any occasion.

  • Herbal Tea: A warm cup of calming herbal tea, like chamomile or mint, provides a gentle lift to the rich cookie experience without overshadowing it.

  • Dark Chocolate Bar: Enjoy a few squares of dark chocolate alongside your cookies to complement the sweetness with a touch of richness and sophistication.

Pistachio Cream Cookies Recipe FAQs

What type of pistachio cream should I use?
I recommend using a high-quality unsweetened pistachio cream for the best flavor. If you can’t find it, feel free to substitute with any unsweetened nut butter or cream, such as almond or cashew, keeping in mind that this may slightly alter the flavor profile.

How should I store Pistachio Cream Cookies?
To keep your cookies fresh, store them in an airtight container at room temperature for up to 7 days. If you'd like them to last longer, refrigerate them for up to 10 days. Just be sure to let them come back to room temperature before enjoying!

Can I freeze these cookies?
Absolutely! You can freeze baked Pistachio Cream Cookies for up to 3 months. To do this, wrap them individually in plastic wrap, then place them in a freezer-safe bag. When ready to enjoy, simply thaw at room temperature. For a warm treat, pop them in the microwave for 10-15 seconds or reheat in a preheated oven at 350°F (175°C) for about 5 minutes.

What if my cookies are too flat after baking?
If your cookies spread too much, ensure your butter is softened but not melted. Next time, you can chill the dough for about 30 minutes in the fridge before baking; this helps the cookies maintain their shape. Also, check that your baking soda is fresh, as expired leavening agents can affect the texture.

Are there any allergy considerations for this recipe?
Yes, this recipe contains nuts and dairy. If you’re making these for someone with nut allergies, substitute the pistachio cream with a nut-free alternative, like sunbutter. Additionally, use dairy-free butter if avoiding dairy. Always verify the brands you choose to ensure they're safe for those with allergies.

Can I make these cookies nut-free?
Certainly! To create nut-free Pistachio Cream Cookies, swap the pistachio cream for a nut-free alternative like sunflower seed butter or oat flour mixed with a bit of coconut milk for moisture. This will allow everyone to enjoy these treats without any nut concerns!

Pistachio Cream Cookies

Chewy Pistachio Cream Cookies for a Sweet Escape

Indulge in Chewy Pistachio Cream Cookies packed with flavors of pistachios and chocolate chunks. A quick and easy dessert perfect for any occasion!
Print Recipe Pin Recipe
Prep Time 15 minutes mins
Cook Time 12 minutes mins
Cooling Time 5 minutes mins
Total Time 30 minutes mins
Servings: 12 cookies
Course: Dessert
Calories: 150
Ingredients Equipment Method Nutrition Notes

Ingredients
  

For the Dough
  • 1 cup Pistachio Cream Substitute with unsweetened nut cream or butter if necessary.
  • 1/2 cup Unsalted Butter Should be at room temperature.
  • 3/4 cup Granulated Sugar Adjust based on sweetness preference.
  • 1 cup All-Purpose Flour Sift for lighter, airier treats.
  • 1/2 teaspoon Baking Soda Essential for leavening.
  • 1/4 teaspoon Sea Salt Adjust based on the saltiness of your pistachios.
For the Mix-ins
  • 1/2 cup Roasted Pistachios Choose salted or unsalted.
  • 1 cup Chocolate Chunks Can substitute with chocolate chips.

Equipment

  • Mixing Bowl
  • hand mixer
  • Spatula
  • Cookie Scoop
  • Baking Sheet
  • Parchment Paper

Method
 

Step-by-Step Instructions
  1. In a large mixing bowl, combine the pistachio cream and softened unsalted butter. Blend with a hand mixer until smooth and creamy.
  2. Gradually add the granulated sugar, mixing until light and fluffy.
  3. In a separate bowl, sift together the all-purpose flour, baking soda, and sea salt.
  4. Fold the dry ingredient mixture into the pistachio blend using a spatula until just combined.
  5. Gently fold in the roasted pistachios and chocolate chunks.
  6. Preheat your oven to 350°F (175°C) and line a baking sheet with parchment paper.
  7. Dollop the dough onto the baking sheet, spacing them 2 inches apart. Flatten slightly with the back of a spoon.
  8. Bake for 10-12 minutes, until edges are golden and centers are soft.
  9. Allow cookies to cool on the baking sheet for 5 minutes before transferring to a wire rack.
  10. Store in an airtight container at room temperature for up to 7 days.

Nutrition

Serving: 1cookieCalories: 150kcalCarbohydrates: 20gProtein: 2gFat: 8gSaturated Fat: 5gPolyunsaturated Fat: 1gMonounsaturated Fat: 1gCholesterol: 20mgSodium: 50mgPotassium: 80mgFiber: 1gSugar: 10gVitamin A: 150IUCalcium: 15mgIron: 0.5mg

Notes

These cookies are perfect for pairing with coffee or milk. Additionally, storing them properly ensures they maintain their chewy texture and flavor.

Tried this recipe?

Let us know how it was!

Cinnamon Sweet Potato Breakfast Cookies That'll Brighten Mornings

January 16, 2026 by Grace Snow Leave a Comment

The moment I inhaled the warm, spicy aroma wafting from the oven, I knew I had stumbled upon something special—Cinnamon Sweet Potato Breakfast Cookies. These delightful treats aren’t just a tasty morning pick-me-up; they are a heavenly blend of wholesome ingredients that cater to both your cravings and dietary needs. Made with creamy sweet potato and hearty oats, these cookies are naturally sweetened with maple syrup or honey, making them gluten-free and refined sugar-free. What's more, they’re incredibly quick to whip up and perfect for busy mornings, afternoon snacking, or even satisfying those late-night cravings. Trust me, you’ll want to keep this recipe close at hand! Ready to indulge in some chewy goodness? Let’s dive in!

Why Are These Cookies a Must-Try?

Unmatched Nutrition: Packed with wholesome ingredients, these cookies are not just delicious but also gluten-free and refined sugar-free, making them a guilt-free treat.

Quick and Easy: In just a few simple steps, you can enjoy these soft, chewy cookies in no time, perfect for those busy mornings or snack attacks.

Customizable Delights: Whether you prefer raisins, nuts, or even chocolate chips, this recipe easily accommodates your favorite mix-ins for a personalized touch.

A Family Favorite: These cookies are bound to please everyone—from picky eaters to health enthusiasts—ensuring smiles all around at breakfast or snack time!

So, if you're looking for a wholesome breakfast option that showcases the delightful flavors of sweet potato, you might also want to check out my recipe for Smoky Sweet Potatoes for more inspiration!

Cinnamon Sweet Potato Breakfast Cookies Ingredients

For the Cookies

  • Mashed Sweet Potato – About 1 medium sweet potato, cooked and mashed; this adds moisture and natural sweetness.
  • Rolled Oats – Stick to rolled oats for optimal texture; do not use steel-cut oats for the best chewiness.
  • Almond Flour – Gluten-free option that contributes to the cookie's texture; substitute regular flour if necessary.
  • Cinnamon – Adds a warm, spicy flavor; feel free to adjust the amount to suit your taste.
  • Nutmeg – Complements the cinnamon for that cozy flavor.
  • Baking Soda – Aids in the cookie's slight rise.
  • Salt – Enhances the overall flavor of the cookies.
  • Maple Syrup or Honey – Natural sweeteners; choose one based on your preference for sweetness.
  • Egg – Binds all the ingredients together; a flax egg works as a vegan substitute (1 tbsp flaxseed + 3 tbsp water).
  • Melted Coconut Oil or Butter – Adds moisture and enhances flavor; choose based on dietary needs.
  • Vanilla Extract – Gives a lovely aroma and extra sweetness to the cookies.

Optional Mix-Ins

  • Chopped Pecans or Walnuts – Adds a delightful crunch and nuttiness.
  • Raisins or Dried Cranberries – Bursts of sweetness in every bite.

These Cinnamon Sweet Potato Breakfast Cookies are not only delicious but also cater to your healthy lifestyle. Now, let's get baking!

Step‑by‑Step Instructions for Cinnamon Sweet Potato Breakfast Cookies

Step 1: Preheat the Oven
Begin by preheating your oven to 350°F (175°C). While the oven warms up, take a moment to line a large baking sheet with parchment paper. This will prevent the cookies from sticking and ensure they bake evenly.

Step 2: Mix Wet Ingredients
In a large mixing bowl, combine the mashed sweet potato, egg, maple syrup or honey, melted coconut oil, and vanilla extract. Use a whisk or fork to blend these ingredients until smooth and fully incorporated, creating a creamy base for your Cinnamon Sweet Potato Breakfast Cookies.

Step 3: Combine Dry Ingredients
Next, sprinkle in the rolled oats, almond flour, cinnamon, nutmeg, baking soda, and salt. Gently mix the dry ingredients into the wet ones until just combined, avoiding overmixing. The dough should be cohesive, with the oats and flour evenly distributed throughout.

Step 4: Add Optional Mix-Ins
If you’re feeling adventurous, now is the time to fold in any optional mix-ins like chopped pecans, walnuts, or dried fruits such as raisins or cranberries. These additions will bring extra texture and flavor to your Cinnamon Sweet Potato Breakfast Cookies, making them even more delightful.

Step 5: Scoop the Dough
Using a tablespoon or a cookie scoop, portion out about 2 tablespoons of dough for each cookie. Carefully place them onto the prepared baking sheet, leaving space between each one. Gently flatten the dough balls slightly to help them spread as they bake.

Step 6: Bake the Cookies
Place the baking sheet in the preheated oven and bake the cookies for 12–15 minutes. Keep an eye on them; they should be set and light golden underneath when done. The sweet, warm aroma will fill your kitchen as they bake—an inviting sign of deliciousness to come.

Step 7: Cool the Cookies
Once baked, remove the cookies from the oven and allow them to cool on the baking sheet for about 5 minutes. Then, transfer them to a wire rack to cool completely. This step is crucial as the cookies will firm up as they cool, ensuring the perfect chewy texture of your Cinnamon Sweet Potato Breakfast Cookies.

What to Serve with Cinnamon Sweet Potato Breakfast Cookies

Indulging in these warm, spiced cookies opens a world of delightful pairings that elevate your breakfast or snack experience.

  • Creamy Yogurt: A dollop of Greek yogurt adds a tangy creaminess that balances the sweetness of the cookies.
  • Fresh Fruit Salad: Juicy berries or sliced bananas provide freshness and brighten up the meal, complementing the spices beautifully.
  • Hot Coffee or Tea: The rich flavors of coffee or a warm herbal tea create a cozy atmosphere, perfect for savoring each bite.
  • Nut Butter Spread: A smear of almond or peanut butter enhances the cookie's chewiness with a delightful nutty flavor.
  • Oatmeal Bowl: Pairing cookies with a warm bowl of oatmeal makes for a comforting breakfast that's full of wholesome goodness.
  • Dark Chocolate Drizzle: For an indulgent twist, a light drizzle of dark chocolate provides a rich contrast to the sweet potato cookies.
  • Cottage Cheese: This protein-packed addition offers a creamy texture that enriches the experience while keeping it healthy.
  • Milk Alternatives: Try pairing with almond or oat milk for a satisfying balance that enhances the nutty notes in the cookies.
  • Honey or Maple Syrup Dip: A drizzle on the side creates a lovely extra touch, adding sweetness to each bite as you enjoy your treat.

Expert Tips for Cinnamon Sweet Potato Breakfast Cookies

• Choose Fresh Potatoes: Use fresh, cooked sweet potatoes for the best texture and sweetness. Canned options can be too watery.

• Measure Accurately: Measuring almond flour and oats precisely is key; too much can lead to dry cookies, while too little may alter the consistency.

• Cooling Time: Allow the cookies to cool completely on a wire rack. They will continue to firm up as they cool, achieving that desirable chewy texture.

• Custom Mix-Ins: Don’t hesitate to experiment with mix-ins! However, avoid adding too many extras or they may overwhelm the base flavor of the Cinnamon Sweet Potato Breakfast Cookies.

• Storage Tips: Keep cookies stored in an airtight container for up to one week. For longer storage, freeze them and thaw as needed without compromising on quality.

How to Store and Freeze Cinnamon Sweet Potato Breakfast Cookies

Room Temperature: Store cookies in an airtight container at room temperature for up to 3 days to maintain their soft, chewy texture.

Fridge: If you want them to last longer, refrigerate the cookies in an airtight container for up to a week, keeping them fresh and delicious.

Freezer: For extended storage, freeze the cookies in a single layer on a baking sheet, then transfer them to a freezer bag for up to 3 months; thaw at room temperature when ready to enjoy.

Reheating: To warm, microwave the cookies for about 10-15 seconds for a cozy, gooey treat. Enjoy your Cinnamon Sweet Potato Breakfast Cookies anytime!

Cinnamon Sweet Potato Breakfast Cookies Variations

Feel free to mix and match to create your perfect cookie experience!

  • Dairy-Free: Swap melted butter for coconut oil to keep the recipe vegan-friendly while adding a hint of tropical flavor.

  • Nut-Free: Use a seed butter, like sunflower seed butter, in place of almond flour or nuts if you're nut-sensitive; it gives a unique, creamy texture.

  • Chocolate Lovers: Fold in dark chocolate chips instead of dried fruits for a sweet, indulgent twist that’s sure to delight.

  • Extra Fiber: Add chia seeds or flax seeds to the dough; both options boost nutrition and add a pleasant crunch.

  • Flavor Adventure: Experiment with spices like cardamom or ginger for a taste boost; these spices complement sweet potato beautifully, offering an exciting new angle on the classic cookie flavor.

  • Fruitful Additions: Substitute the optional raisins with chunks of dried apricots or figs; they'll bring a burst of fruity sweetness that'll keep your taste buds dancing.

  • Pumpkin Twist: Can't find sweet potatoes? Use canned pumpkin puree instead; it provides a deliciously similar texture with a slightly different yet delightful flavor profile.

These variations not only keep the fun in baking alive but also help cater to dietary needs. If you’re also looking for more ways to use sweet potatoes, check out my recipe for Roasted Sweet Potatoes—delicious and versatile!

Make Ahead Options

These Cinnamon Sweet Potato Breakfast Cookies are perfect for meal prep enthusiasts looking to save time! You can prepare the cookie dough up to 24 hours in advance; simply mix all the ingredients except for the optional mix-ins, cover the bowl, and refrigerate. This helps maintain the cookies' freshness and flavors. When you're ready to bake, fold in any mix-ins, scoop the dough onto a baking sheet, and bake as directed. For longer storage, you can also freeze the formed cookies for up to 3 months; just pull them out and bake straight from the freezer, adding an extra minute or two to the baking time. Enjoy the convenience of having delicious, homemade cookies ready with minimal effort!

Cinnamon Sweet Potato Breakfast Cookies Recipe FAQs

What kind of sweet potatoes should I use for the cookies?
Absolutely! I recommend using fresh, cooked sweet potatoes for the best flavor and moisture. One medium sweet potato, baked or steamed until soft, should do the trick. Avoid using canned versions as they can be too watery.

How do I store Cinnamon Sweet Potato Breakfast Cookies?
You can store these delicious cookies in an airtight container at room temperature for up to 3 days to keep them soft and chewy. If you want to preserve them longer, refrigerate them for up to a week.

Can I freeze the cookies for later?
Yes! To freeze your Cinnamon Sweet Potato Breakfast Cookies, first place them in a single layer on a baking sheet until they're solid. Then, transfer them to a freezer-safe bag or container and store them for up to 3 months. To thaw, simply let them sit at room temperature or warm them briefly in the microwave for that fresh-baked goodness!

What if my cookies spread too much while baking?
Very! If your cookies spread excessively, it could be due to using too much liquid or not enough flour. Make sure to measure your ingredients accurately, and if you find your dough to be too runny, adding a couple of tablespoons of almond flour can help thicken it up. Always let the dough chill in the fridge for about 30 minutes before baking if you’re having trouble!

Are these cookies safe for people with nut allergies?
Definitely! If you need a nut-free option, you can substitute the almond flour with an equal amount of oat flour or another gluten-free flour blend. Just double-check that your other ingredients, like oats and any mix-ins, are also nut-free to ensure safety for those sensitive to nuts.

Can I substitute the egg in the recipe?
Yes! For a vegan option, you can make a flax egg by mixing 1 tablespoon of flaxseed meal with 3 tablespoons of water. Let it sit for about 5 minutes until it thickens before adding it to your cookie mixture. This works wonderfully to bind the ingredients together just like an egg would!

Cinnamon Sweet Potato Breakfast Cookies

Cinnamon Sweet Potato Breakfast Cookies That'll Brighten Mornings

Indulge in these Cinnamon Sweet Potato Breakfast Cookies, a wholesome and delicious pick-me-up for your mornings.
Print Recipe Pin Recipe
Prep Time 10 minutes mins
Cook Time 15 minutes mins
Cooling Time 5 minutes mins
Total Time 30 minutes mins
Servings: 12 cookies
Course: Breakfast
Cuisine: American
Calories: 120
Ingredients Equipment Method Nutrition Notes

Ingredients
  

For the Cookies
  • 1 medium sweet potato, cooked and mashed adds moisture and natural sweetness
  • 2 cups rolled oats do not use steel-cut oats
  • 1 cup almond flour gluten-free option
  • 1 teaspoon cinnamon adjust to taste
  • 1 teaspoon nutmeg complements cinnamon
  • 1 teaspoon baking soda aids in slight rise
  • 1/2 teaspoon salt enhances flavor
  • 1/3 cup maple syrup or honey natural sweeteners
  • 1 large egg binds ingredients together
  • 1/4 cup melted coconut oil or butter adds moisture and flavor
  • 1 teaspoon vanilla extract adds aroma
Optional Mix-Ins
  • 1/2 cup chopped pecans or walnuts adds crunch and nuttiness
  • 1/2 cup raisins or dried cranberries bursts of sweetness

Equipment

  • Oven
  • Baking Sheet
  • Mixing Bowl
  • Whisk
  • Spatula

Method
 

Step‑by‑Step Instructions
  1. Preheat your oven to 350°F (175°C) and line a baking sheet with parchment paper.
  2. In a mixing bowl, combine the mashed sweet potato, egg, maple syrup or honey, melted coconut oil, and vanilla extract until smooth.
  3. Add the rolled oats, almond flour, cinnamon, nutmeg, baking soda, and salt, mixing gently until just combined.
  4. Fold in any optional mix-ins like chopped pecans, walnuts, or dried fruits.
  5. Scoop about 2 tablespoons of dough for each cookie onto the prepared baking sheet, leaving space between them.
  6. Bake for 12–15 minutes until light golden underneath. Let cool for 5 minutes, then transfer to a wire rack to cool completely.

Nutrition

Serving: 1cookieCalories: 120kcalCarbohydrates: 18gProtein: 2gFat: 5gSaturated Fat: 3gPolyunsaturated Fat: 0.5gMonounsaturated Fat: 1.5gCholesterol: 20mgSodium: 90mgPotassium: 140mgFiber: 2gSugar: 5gVitamin A: 2000IUVitamin C: 5mgCalcium: 40mgIron: 1mg

Notes

These cookies can be customized with your favorite mix-ins and stored in an airtight container for freshness.

Tried this recipe?

Let us know how it was!

Vegan Brown Sugar Chai Cookies for Cozy Moments

January 16, 2026 by Grace Snow Leave a Comment

The kitchen filled with the comforting aroma of spices as I pulled my latest creation from the oven—Soft & Chewy Vegan Brown Sugar Chai Cookies. With an alluring blend of cinnamon, cardamom, and ginger, these cookies transform an ordinary day into something extraordinary. Not only are they incredibly quick to prepare in just one bowl, but their delightful chewy texture makes them a crowd favorite, perfect for sharing—or secretly indulging all by yourself! Whether you're a seasoned home-chef or someone craving a cozy treat, this recipe is your ticket to warm, homemade goodness without the fuss. Curious how these cookies can become your new go-to sweet fix? Let’s dive right in!

Why will you crave these cookies?

Irresistible aroma: The moment they bake, your kitchen will be enveloped in a warm, inviting scent that beckons everyone to gather around.

Quick & Easy: With just one bowl and minimal prep time, you’ll have these delightfully chewy Vegan Brown Sugar Chai Cookies ready in no time.

Crowd-Pleasing Flavor: The warming chai spices of cinnamon, cardamom, and ginger create a unique flavor that stands out, making them perfect for gatherings or cozy nights in. Pair them with a cup of tea for an idyllic treat!

Flexible Options: Easily customize your cookies by adding nuts or swapping in oat flour, ensuring every batch fits your taste buds.

Perfect Texture: Enjoy a delightful combination of tender center and chewy edges, making these cookies a satisfying indulgence that everyone will love. Don't miss out on other cozy favorites like Eggnog Cookies Soft or Mexican Wedding Cookies!

Vegan Brown Sugar Chai Cookies Ingredients

For the Cookie Base

  • Vegan Butter – ½ cup for moisture and richness, can substitute with Earth Balance or Miyoko's butter.
  • Dark Brown Sugar – ½ cup + 2 tablespoons adds sweetness and a soft texture; light brown sugar works too.
  • Ground Cinnamon – ½ teaspoon provides warmth and flavor; feel free to adjust to taste.
  • Ground Cardamom – ¼ teaspoon enhances the chai flavor profile; optional but recommended.
  • Ground Ginger – ¼ teaspoon brings spice and depth to the cookie; fresh grated ginger can be substituted but may require adjustments.
  • Star Anise – ⅛ teaspoon for a nuanced flavor; omit if unavailable.
  • Black Pepper – ⅛ teaspoon adds mild spiciness; skip for a more subtle treat.
  • Flax Egg – 1 egg substitute for binding; mix 1 tablespoon ground flaxseed with 3 tablespoons water.
  • Vanilla Bean Paste – 1 teaspoon introduces a sweet aromatic flavor; vanilla extract can substitute.
  • All-Purpose Flour – 1 cup + 2 tablespoons forms the cookie structure; a gluten-free blend can be used for a gluten-free option.
  • Salt – ¼ teaspoon to balance sweetness and enhance flavors.
  • Baking Soda – ½ teaspoon helps the cookies rise and develop texture.
  • Granulated Sugar – 2 tablespoons for optional rolling ante, creating a lovely crinkly surface; can omit if desired.

With these ingredients, you’re just moments away from baking a batch of Vegan Brown Sugar Chai Cookies that are sure to be adored by all. Happy baking!

Step‑by‑Step Instructions for Vegan Brown Sugar Chai Cookies

Step 1: Cream the Ingredients
In a large mixing bowl, use a hand mixer or wooden spoon to cream together ½ cup of vegan butter and ½ cup plus 2 tablespoons of dark brown sugar until the mixture is light and fluffy, about 2-3 minutes. The texture should be smooth, with a slight sheen, indicating that the sugars are well incorporated. Add in ½ teaspoon of ground cinnamon, ¼ teaspoon of ground cardamom, ¼ teaspoon of ground ginger, ⅛ teaspoon of star anise, and ⅛ teaspoon of black pepper, mixing until fully blended.

Step 2: Add the Flax Egg and Vanilla
Next, introduce the flax egg—prepared by combining 1 tablespoon of ground flaxseed with 3 tablespoons of water—and 1 teaspoon of vanilla bean paste into the creamed mixture. Beat everything together until smooth, which should take about 1-2 minutes. This step is crucial for infusing moisture and flavor in your Vegan Brown Sugar Chai Cookies, making them irresistibly tender.

Step 3: Combine Dry Ingredients
Gradually sift in 1 cup plus 2 tablespoons of all-purpose flour, ½ teaspoon of baking soda, and ¼ teaspoon of salt into the bowl. Stir gently with a spatula until a thick, slightly sticky dough forms, ensuring not to overmix. The dough should stick together but not be overly wet; it should hold its shape well when you scoop it.

Step 4: Chill the Dough
Cover the mixing bowl with plastic wrap or a clean kitchen towel and place it in the refrigerator for at least 1 hour. Chilling the dough is essential as it firms up the mixture and helps prevent the cookies from spreading too much during baking. Use this time to preheat your oven.

Step 5: Preheat the Oven
After the dough has chilled, preheat your oven to 350°F (175°C). While the oven warms, prepare a baking tray by lining it with parchment paper, ensuring that your Vegan Brown Sugar Chai Cookies won’t stick and will bake evenly.

Step 6: Shape the Cookies
Once the oven reaches temperature, take the dough from the refrigerator. Using a cookie scoop or your hands, portion out 10-12 small balls of dough, rolling them gently in your palms for a smooth finish. If desired, roll each ball in 2 tablespoons of granulated sugar for a sparkling, crinkly crust that adds extra sweetness to your Vegan Brown Sugar Chai Cookies.

Step 7: Bake the Cookies
Place the cookie dough balls on the prepared baking tray, ensuring they are spaced about 2 inches apart to allow for spreading. Do not flatten the balls. Bake in the preheated oven for 11-13 minutes, or until the edges are lightly golden brown and the centers appear soft but set.

Step 8: Create Crinkly Toppings
Once baked, carefully remove the tray from the oven. Immediately tap the tray against the counter to help create those beautiful crinkly tops that make these Vegan Brown Sugar Chai Cookies so appealing. Allow the cookies to cool on the tray for about 5-10 minutes before transferring them to a wire rack to cool completely.

Step 9: Cool and Serve
After a brief cooling time, carefully move your cookies to a wire rack, letting them cool fully. Once cooled, you can store them in an airtight container or indulge immediately! Enjoy the delicious aroma and flavor that fill your kitchen with warmth, perfect for any cozy occasion.

Vegan Brown Sugar Chai Cookies Variations

Feel free to put your own spin on these delightful cookies by exploring the myriad of variations below!

  • Light Brown Sugar: Substitute dark brown sugar with light brown for a slightly crispier texture. This minor swap can body the flavors while keeping them sweet.

  • Nutty Surprise: Add chopped walnuts or pecans for an extra crunch. The nuts not only enhance the cookie's flavor but also add a delightful texture that complements the chewy base.

  • Oat Flour: Swap half of the all-purpose flour with oat flour for a unique taste and a heartier texture. You’ll experience a lovely nutty flavor that elevates each bite.

  • Chai Extract: For a more intense chai flavor, add a few drops of chai extract into the dough. It infuses the cookies with a robust spice essence sure to warm your spirits!

  • Spicy Kick: Increase the black pepper or add a pinch of cayenne for an unexpected heat. This twist beckons adventurous palates looking for that perfect synergy of sweet and spicy.

  • Chocolate Delight: Fold in vegan chocolate chips or cacao nibs for a rich, decadent treat that enhances every bite, bringing a sweet, creamy element to balance the spices.

  • Coconut Sugar: Consider using coconut sugar in place of dark brown sugar for a deep caramel flavor with slightly less sweetness. It's a fantastic alternative that syncs well with the flavors of chai.

  • Herbal Infusion: Experiment by tossing in a dash of dried lavender or mint for a refreshing herbal twist. This unexpected addition creates a beautifully aromatic cookie that intrigues the senses.

These variations allow you to explore your creativity in the kitchen, ensuring that every batch of Vegan Brown Sugar Chai Cookies becomes uniquely yours. If you enjoy these cookies, consider trying other tempting options like Vegan Cacao Nib or Matcha Cookies Soft for even more deliciousness!

How to Store and Freeze Vegan Brown Sugar Chai Cookies

Room Temperature: Store cookies in an airtight container for up to 3 days to maintain their chewy texture.

Fridge: If you prefer a longer shelf life, these Vegan Brown Sugar Chai Cookies can be refrigerated for up to 1 week in an airtight container.

Freezer: For extended storage, freeze the cookies in a single layer on a baking sheet. Once solid, transfer them to a freezer-safe bag and store for up to 3 months.

Reheating: To enjoy them warm, reheat cookies in the oven at 350°F (175°C) for about 5 minutes. This revitalizes their softness and enhances the aromatic flavors.

What to Serve with Vegan Brown Sugar Chai Cookies?

These heartwarming, spiced cookies create a delightful experience when paired with complementary dishes that enhance their flavors.

  • Chai Tea: A steaming cup of chai mirrors the cookie’s spices, creating a soothing match perfect for cozy afternoons.

  • Vanilla Ice Cream: The creamy, cold ice cream contrasts beautifully with the warm cookies, making each bite a luscious treat.

  • Fresh Berries: Juicy raspberries or strawberries add a refreshing burst that balances the sweetness of the cookies.

  • Coconut Milk Pudding: This creamy dessert adds an enjoyable, tropical twist that harmonizes with the chai spices.

  • Spiced Almond Milk: Warm spiced almond milk resonates with the chai flavors, creating a perfectly comforting drink pairing.

  • Homemade Whipped Cream: Light and airy, whipped cream adds a delightful texture and creaminess to the experience, making it indulgent.

  • Peanut Butter: A dollop of creamy peanut butter can elevate the flavor profile, adding a nutty richness that enhances each cookie’s chewy goodness.

  • Coffee: A rich cup of coffee offers a contrasting bitterness that beautifully balances the sweetness of the cookies, creating a lovely pairing for mornings or afternoon snacks.

  • Hot Chocolate: Cozy up with a cup of rich hot chocolate; its sweetness and warmth create a perfect synergy with the spiced cookie.

These suggestions will elevate your cookie experience, making any gathering feel special and cozy.

Expert Tips for Vegan Brown Sugar Chai Cookies

Cream Thoroughly: Ensure your vegan butter and dark brown sugar are well-creamed for a light, airy texture that promotes chewiness in your cookies.

Chill the Dough: Don’t skip chilling! This step helps maintain the shape of your Vegan Brown Sugar Chai Cookies, preventing excessive spreading during baking.

Parchment Paper: Always line your baking tray with parchment paper to avoid sticking and ensure evenly cooked bottoms, resulting in the perfect cookie.

Monitor Baking Time: Keep an eye on the baking time; take them out when the edges are golden but the centers are still soft for that ideal chewy bite.

Tapping Trick: Remember to tap the tray on the counter right after baking to encourage those delightful crinkly tops that make every cookie look appealing.

Make Ahead Options

These Vegan Brown Sugar Chai Cookies are perfect for busy home cooks looking to prepare ahead! You can make the dough up to 24 hours in advance by chilling it in the refrigerator. Simply follow through steps 1-4 and cover the bowl tightly to prevent drying out. When you’re ready to bake, scoop and roll the chilled dough into balls, then simply bake as instructed. If you prefer, you can also roll the cookie balls in granulated sugar up to 3 days before baking; just store them in an airtight container in the fridge. This way, you'll have fresh, chewy cookies ready for any time you crave a sweet treat!

Vegan Brown Sugar Chai Cookies Recipe FAQs

What type of brown sugar should I use for these cookies?
I recommend using dark brown sugar because it has a higher moisture content, which contributes to a softer, chewier cookie. If you’re in a pinch, light brown sugar can be used as a substitute, but the texture may be slightly crispier.

How should I store my Vegan Brown Sugar Chai Cookies?
To keep your cookies fresh, store them in an airtight container at room temperature for up to 3 days. If you'd like them to last longer, they can be refrigerated for up to 1 week, which helps maintain their chewy texture.

Can I freeze these cookies?
Absolutely! To freeze, place the baked cookies on a baking sheet to firm up individually. Once frozen solid, transfer them to a freezer-safe bag. They can be stored for up to 3 months. To enjoy them again, simply reheat them in the oven at 350°F (175°C) for about 5 minutes for that fresh-baked feel.

What should I do if my cookie dough is too sticky?
If you find your dough is very sticky, don’t worry! Simply chill it in the refrigerator for an additional 15-30 minutes. The cool temperature will firm up the dough, making it easier to handle. You might also sprinkle a little flour on your hands when shaping the cookies if it's still sticky.

Are these cookies suitable for those with allergies?
These Vegan Brown Sugar Chai Cookies are free from animal products, making them suitable for vegans. However, they do contain gluten due to the all-purpose flour. If you have gluten allergies, I recommend using a gluten-free 1:1 flour blend as an alternative, which works wonderfully in this recipe!

How can I enhance the chai flavors in my cookies?
For an even deeper chai flavor, consider increasing the spices slightly according to your taste—like adding an extra pinch of cardamom or cinnamon. You could also steep a chai tea bag in the flax egg for a twist, so its essence infuses into the cookie dough for an aromatic experience.

Vegan Brown Sugar Chai Cookies

Vegan Brown Sugar Chai Cookies for Cozy Moments

Enjoy these Vegan Brown Sugar Chai Cookies filled with warming spices, perfect for a cozy treat!
Print Recipe Pin Recipe
Prep Time 15 minutes mins
Cook Time 13 minutes mins
Chilling Time 1 hour hr
Total Time 1 hour hr 28 minutes mins
Servings: 12 cookies
Course: Dessert
Cuisine: Vegan
Calories: 120
Ingredients Equipment Method Nutrition Notes

Ingredients
  

For the Cookie Base
  • 0.5 cup Vegan Butter can substitute with Earth Balance or Miyoko's butter
  • 0.5 cup Dark Brown Sugar adds sweetness and a soft texture; light brown sugar works too
  • 0.5 teaspoon Ground Cinnamon provides warmth and flavor; feel free to adjust to taste
  • 0.25 teaspoon Ground Cardamom enhances the chai flavor profile; optional but recommended
  • 0.25 teaspoon Ground Ginger brings spice and depth to the cookie; fresh grated ginger can be substituted
  • 0.125 teaspoon Star Anise for a nuanced flavor; omit if unavailable
  • 0.125 teaspoon Black Pepper adds mild spiciness; skip for a more subtle treat
  • 1 Flax Egg Flax Egg mix 1 tablespoon ground flaxseed with 3 tablespoons water
  • 1 teaspoon Vanilla Bean Paste introduces a sweet aromatic flavor; vanilla extract can substitute
  • 1.125 cup All-Purpose Flour forms the cookie structure; a gluten-free blend can be used for a gluten-free option
  • 0.25 teaspoon Salt to balance sweetness and enhance flavors
  • 0.5 teaspoon Baking Soda helps the cookies rise and develop texture
  • 2 tablespoons Granulated Sugar for optional rolling ante; can omit if desired

Equipment

  • Mixing Bowl
  • hand mixer or wooden spoon
  • Cookie Scoop
  • Baking tray
  • Parchment Paper
  • Refrigerator

Method
 

Step-by-Step Instructions
  1. In a large mixing bowl, cream together vegan butter and dark brown sugar until light and fluffy, about 2-3 minutes.
  2. Add in ground cinnamon, ground cardamom, ground ginger, star anise, and black pepper, mixing until fully blended.
  3. Introduce the prepared flax egg and vanilla bean paste into the creamed mixture. Beat until smooth, about 1-2 minutes.
  4. Gradually sift in all-purpose flour, baking soda, and salt. Stir gently until a thick, slightly sticky dough forms.
  5. Cover the mixing bowl and chill in the refrigerator for at least 1 hour.
  6. Preheat your oven to 350°F (175°C) and prepare a baking tray lined with parchment paper.
  7. Portion out 10-12 small balls of dough, rolling them gently in your palms.
  8. Place the dough on the baking tray, spaced about 2 inches apart, and bake for 11-13 minutes.
  9. Tap the tray against the counter to create crinkly tops and allow cookies to cool on the tray for 5-10 minutes before transferring to a wire rack.
  10. Move cookies to a wire rack to cool fully and enjoy!

Nutrition

Serving: 1cookieCalories: 120kcalCarbohydrates: 15gProtein: 1gFat: 6gSaturated Fat: 1gPolyunsaturated Fat: 0.5gMonounsaturated Fat: 4gSodium: 95mgPotassium: 60mgFiber: 0.5gSugar: 5gCalcium: 1mgIron: 4mg

Notes

For best results, cream butter and sugar well, chill the dough, and line the baking tray with parchment paper to prevent sticking.

Tried this recipe?

Let us know how it was!

Seedy Quinoa Breakfast Cookies for a Nutritious Morning Boost

January 16, 2026 by Grace Snow Leave a Comment

As I was sorting through my pantry, I stumbled upon a forgotten bag of quinoa and a rainbow of seeds that sparked an idea. This moment led me to create these delightful Seedy Quinoa Breakfast Cookies, perfect for those hectic mornings when you crave something nutritious but need it quick. Not only are they vegan and gluten-free, but they’re also packed with powerful nutrition—each cookie contains a satisfying 5 grams of protein! These cookies make meal prep a breeze and satisfy both your sweet tooth and hunger, allowing you to start your day with a wholesome boost. Curious about how these goodies come together? Let’s dive into the recipe!

Why Choose Seedy Quinoa Breakfast Cookies?

Wholesome Ingredients: Packed with quinoa and nutritious seeds, these cookies offer a healthful start to your day.

Easy Meal Prep: Whip up a batch ahead of time, making busy mornings stress-free and delicious.

Vegan & Gluten-Free: Perfect for diverse dietary needs, they cater to everyone at the table.

Satisfying Crunch: Each bite delivers a delightful texture, reminiscent of your favorite granola clusters.

Naturally Sweetened: With a hint of maple syrup, you'll enjoy a touch of sweetness without the guilt.

Perfect for those on-the-go moments or as an addition to lunchboxes, these cookies are sure to win hearts. If you love easy-to-make snacks, you might also enjoy my Breakfast Egg Muffins for a savory twist!

Seedy Quinoa Breakfast Cookies Ingredients

• Looking to whip up some delightful cookies? Here’s what you’ll need!

For the Cookie Base

  • Cooked Quinoa – Provides structure and nutrition; use leftover cooked quinoa or prepare from dry.
  • Rolled Oats – Adds bulk and texture; ensure gluten-free if needed.
  • Raw Pumpkin Seeds – Contributes crunch and healthy fats; use unsalted for optimal flavor.
  • Hemp Seeds – Adds protein and omega-3 fatty acids; can substitute with more chia seeds if unavailable.
  • Chia Seeds – Functions as a binding agent and source of fiber; substitute flax seeds if preferred.

For the Wet Ingredients

  • Tahini – Serves as a creamy base and healthy fat; can use almond or sunflower seed butter as a substitute.
  • Maple Syrup – Provides natural sweetness; honey can be used in non-vegan versions.

For Flavor & Texture

  • Baking Soda – Helps the cookies rise and achieve a light texture.
  • Sea Salt – Enhances flavor; use coarse or fine based on preference.
  • Semisweet Chocolate Chips – Optional sweetness and flavor; ensure dairy-free if needed.

Get ready to enjoy these Seedy Quinoa Breakfast Cookies that not only taste fantastic but also provide a nutritious boost for your mornings!

Step‑by‑Step Instructions for Seedy Quinoa Breakfast Cookies

Step 1: Prepare Quinoa
If you don’t have leftover cooked quinoa, start by rinsing 1/3 cup of dry quinoa under cold water. Cook it in a saucepan with 2/3 cup of water over medium heat for about 15 minutes, or until the water is absorbed and the quinoa is fluffy. Allow it to cool completely, as this will help your Seedy Quinoa Breakfast Cookies hold together better.

Step 2: Preheat Oven
Preheat your oven to 350°F (176°C). While it warms up, line a baking sheet with parchment paper to prevent your cookies from sticking. This step is crucial, as a properly preheated oven ensures that your cookies bake evenly, resulting in a deliciously chewy texture.

Step 3: Mix Dry Ingredients
In a medium mixing bowl, combine the cooled quinoa, 1 cup of rolled oats, 1/3 cup of pumpkin seeds, 1/4 cup of hemp seeds, 2 tablespoons of chia seeds, 1/2 teaspoon of baking soda, and 1/4 teaspoon of sea salt. Stir well to evenly distribute the dry ingredients, creating a solid foundation for your Seedy Quinoa Breakfast Cookies.

Step 4: Incorporate Wet Ingredients
Add 1/4 cup of tahini and 1/4 cup of maple syrup to the dry mixture. Stir until everything is well combined, forming a thick cookie dough. This blend of flavors will provide the perfect sweetness and creaminess to your cookies. Make sure to scrape the sides of the bowl to capture all ingredients.

Step 5: Shape Cookies
Using a cookie scoop or your hands, portion out about 1.5 tablespoons of dough and place it on the prepared baking sheet. Gently press each cookie to flatten them slightly, creating an even surface for baking. You should have about 12 cookies, allowing space between them to expand while baking.

Step 6: Bake
Place the baking sheet in the oven and bake the Seedy Quinoa Breakfast Cookies for 14-18 minutes, until the edges turn a golden brown. Keep an eye on them towards the end for optimal doneness—golden edges mean the cookies are ready.

Step 7: Cool and Transfer
Once baked, remove the cookies from the oven and let them cool on the baking sheet for 5-10 minutes. This cooling period allows them to firm up. After that, gently transfer them to a wire rack to cool completely, ensuring a delightful chewy texture in every bite.

What to Serve with Seedy Quinoa Breakfast Cookies

Elevate your mornings with delightful pairings that complement these nutritious cookies, enriching your breakfast experience.

  • Fresh Fruit Salad: A medley of vibrant fruits adds a refreshing contrast, bringing juicy sweetness to every bite.

  • Creamy Almond Butter: Spread a layer of almond butter on these cookies for added protein and a rich, nutty flavor.

  • Smoothie Bowl: Serve alongside a creamy smoothie bowl topped with granola for a well-rounded meal that fuels your day.

The crunch of granola paired with a smoothie’s creaminess is a match made in breakfast heaven, ensuring you’re fully satisfied.

  • Herbal Tea: A warm cup of chamomile or mint tea provides a soothing complement, enhancing your relaxing morning.

  • Yogurt Parfait: Layer yogurt with fruit and a sprinkle of seeds for a decadent yet healthy treat.

This parfait not only boosts protein but offers a beautiful presentation that’s perfect for brunch.

  • Coconut Milk Latte: The rich, creamy texture of a latte made with coconut milk pairs perfectly with the subtle sweetness of the cookies.

  • Dark Chocolate: For a decadent treat, enjoy a piece of dark chocolate on the side for a delightful indulgence.

Each of these options will add a special touch, making your Seedy Quinoa Breakfast Cookies the star of the meal.

Storage Tips for Seedy Quinoa Breakfast Cookies

Room Temperature: Store cookies in an airtight container at room temperature for up to 2-3 days to maintain their chewy texture.

Fridge: If you prefer a cooler treat, refrigerate the cookies for up to 4-5 days; this can also enhance their flavor profile.

Freezer: For longer storage, freeze your Seedy Quinoa Breakfast Cookies by placing them in a freezer-safe bag or container for up to 1 month.

Reheating: Enjoy your cookies warm by microwaving them for about 10-15 seconds, bringing back that fresh-baked taste!

Expert Tips for Seedy Quinoa Breakfast Cookies

Dough Consistency: Keep dough moist: If the mixture feels too dry or crumbly, add a touch more tahini or maple syrup to achieve a better consistency.

Cooling Time: Be patient: Allow the cookies to cool completely before handling. This step helps them firm up and enhances their chewy goodness.

Portion Control: Uniform Size: Using a cookie scoop ensures evenly sized cookies, which bake consistently and maintain the perfect texture in your Seedy Quinoa Breakfast Cookies.

Flavor Boost: Experiment with add-ins: Feel free to mix in chocolate chips, dried fruit, or nuts for extra flavor and nutrition without compromising the healthy base.

Storage Tips: Keep them fresh: Store your cookies in an airtight container. They last up to 2-3 days at room temperature and even longer if refrigerated.

Variations & Substitutions for Seedy Quinoa Breakfast Cookies

Feel encouraged to play with these flavors—it’s all about creating your perfect cookie experience!

  • Sweetener Swap: Use agave syrup or date syrup in place of maple syrup for a different sweetness.

  • Seed Substitution: Replace pumpkin seeds with sunflower seeds for a nutty twist; it will still deliver that delightful crunch!

  • Add-ins: Mix in dried fruits such as raisins or cranberries to introduce bursts of flavor—your family will adore the juicy bites nestled within!

  • Chocolate Delight: Feel free to add dark chocolate chips or cacao nibs for a rich chocolatey experience; it’s a delicious way to indulge your sweet tooth while keeping things wholesome.

  • Nut Butters: Swap tahini for almond butter or peanut butter to cater to your taste buds—you’ll introduce a lovely creaminess and distinct flavor!

  • Protein Boost: For an extra protein punch, consider adding a scoop of your favorite plant-based protein powder to the mix; it’s an easy way to enhance your morning nutrition.

  • Spicy Kick: If you’re feeling adventurous, add a pinch of cinnamon or a dash of cayenne pepper for a surprising burst of warmth!

  • Flavorful Oats: Try using flavored rolled oats, like apple-cinnamon or maple, to infuse your cookies with a hint of spice and sweetness!

Creating your own variations can truly elevate your baking experience. While you're at it, why not check out my Quinoa Tabbouleh Vibrant for another delightful way to enjoy quinoa?

Make Ahead Options

These Seedy Quinoa Breakfast Cookies are a fantastic choice for meal prep, saving you precious time during busy mornings! You can prepare the cookie dough up to 24 hours in advance; simply mix all the ingredients together, scoop, and store the formed dough balls in an airtight container in the refrigerator. This prevents any browning and ensures the cookies retain their delightful texture. When you're ready to bake, just preheat your oven and place the cookies directly onto the baking sheet—no need to thaw! Enjoy the convenience of having a nutritious grab-and-go breakfast option without the last-minute rush.

Seedy Quinoa Breakfast Cookies Recipe FAQs

What is the best way to select ripe quinoa?
Absolutely! For cooking quinoa, you'll want to look for dry, unprocessed quinoa seeds. Ensure they’re free from any dark spots or signs of moisture. Store your quinoa in a cool, dry place to maintain its freshness!

How should I store my Seedy Quinoa Breakfast Cookies?
To keep those flavors intact, store your cookies in an airtight container at room temperature for up to 2-3 days. If you’d like them to last longer, refrigerate them for up to 4-5 days.

Can I freeze the Seedy Quinoa Breakfast Cookies?
Very! To freeze, let your cookies cool completely, then place them in a single layer on a baking sheet in the freezer for about 1 hour. Once firm, transfer them to a freezer-safe bag or container. They’ll keep well for up to 1 month. When ready to enjoy, you can thaw them in the fridge or pop them in the microwave for 10-15 seconds to warm.

What should I do if my cookie dough is too crumbly?
If your dough feels a bit dry, try adding a little more tahini or maple syrup, one teaspoon at a time, until the dough holds together better. Dampen your hands slightly when shaping the cookies to help with any stickiness during the process!

Are these cookies safe for people with nut allergies?
Absolutely! The Seedy Quinoa Breakfast Cookies are nut-free as long as you use tahini or sunflower seed butter instead of nut-based alternatives. However, always check that the seeds and any additional ingredients are processed in a nut-free environment to avoid cross-contamination.

Can I adjust the sweetness in this recipe?
Certainly! If you prefer a sweeter cookie, you can increase the amount of maple syrup or swap it out entirely for agave syrup. Alternatively, adding a handful of chocolate chips can provide that extra sweetness you might be craving!

Seedy Quinoa Breakfast Cookies

Seedy Quinoa Breakfast Cookies for a Nutritious Morning Boost

These Seedy Quinoa Breakfast Cookies are vegan, gluten-free, and packed with protein, perfect for a quick nutritious start.
Print Recipe Pin Recipe
Prep Time 15 minutes mins
Cook Time 18 minutes mins
Cooling Time 10 minutes mins
Total Time 43 minutes mins
Servings: 12 cookies
Course: Breakfast
Cuisine: Healthy
Calories: 150
Ingredients Equipment Method Nutrition Notes

Ingredients
  

For the Cookie Base
  • 1 cup Cooked Quinoa Use leftover cooked quinoa or prepare from dry.
  • 1 cup Rolled Oats Ensure gluten-free if needed.
  • 1/3 cup Raw Pumpkin Seeds Use unsalted for optimal flavor.
  • 1/4 cup Hemp Seeds Can substitute with more chia seeds if unavailable.
  • 2 tablespoons Chia Seeds Substitute flax seeds if preferred.
For the Wet Ingredients
  • 1/4 cup Tahini Can use almond or sunflower seed butter as a substitute.
  • 1/4 cup Maple Syrup Honey can be used in non-vegan versions.
For Flavor & Texture
  • 1/2 teaspoon Baking Soda Helps the cookies rise.
  • 1/4 teaspoon Sea Salt Enhances flavor.
  • 1/2 cup Semisweet Chocolate Chips Ensure dairy-free if needed.

Equipment

  • Oven
  • Baking Sheet
  • Mixing Bowl
  • Cookie Scoop

Method
 

Step-by-Step Instructions
  1. Prepare Quinoa: If you don’t have leftover cooked quinoa, start by rinsing 1/3 cup of dry quinoa under cold water. Cook it in a saucepan with 2/3 cup of water over medium heat for about 15 minutes, or until the water is absorbed and the quinoa is fluffy. Allow it to cool completely.
  2. Preheat Oven: Preheat your oven to 350°F (176°C). Line a baking sheet with parchment paper.
  3. Mix Dry Ingredients: Combine the cooled quinoa, rolled oats, pumpkin seeds, hemp seeds, chia seeds, baking soda, and sea salt in a mixing bowl.
  4. Incorporate Wet Ingredients: Add tahini and maple syrup to the dry mixture, stirring until well combined to form a thick cookie dough.
  5. Shape Cookies: Portion out about 1.5 tablespoons of dough and place it on the prepared baking sheet, pressing each cookie slightly to flatten.
  6. Bake: Place the baking sheet in the oven and bake for 14-18 minutes, until the edges turn golden brown.
  7. Cool and Transfer: Let the cookies cool on the baking sheet for 5-10 minutes before transferring to a wire rack to cool completely.

Nutrition

Serving: 1cookieCalories: 150kcalCarbohydrates: 14gProtein: 5gFat: 8gSaturated Fat: 1gPolyunsaturated Fat: 2gMonounsaturated Fat: 3gSodium: 50mgPotassium: 180mgFiber: 2gSugar: 3gCalcium: 3mgIron: 10mg

Notes

Keep dough moist by adding more tahini or maple syrup if necessary. Allow cookies to cool completely for optimal texture. Use a cookie scoop for uniform cookies and store in an airtight container.

Tried this recipe?

Let us know how it was!

Rosemary Cookies with Lemon Sugar: A Fresh Twist on Treats

January 16, 2026 by Grace Snow Leave a Comment

As I took a bite of these Rosemary Cookies with Lemon Sugar, the enchanting blend of herb and zest transported me straight to warm, sun-soaked afternoons. The nutty aroma of brown butter melds beautifully with fragrant rosemary, making each cookie a true testament to the magic that happens when savory meets sweet. What sets these cookies apart is their delightful texture—soft and chewy with a crunchy lemon-sugar crust that adds a bright burst of flavor. Perfect for an unexpected tea party or just a cozy evening snack, they’re the kind of treat that feels fancy yet is effortlessly simple to whip up. Can you envision the surprised smiles when you share these cookies with family and friends? Let's dive into this delightful recipe together!

Why Rosemary Cookies with Lemon Sugar?

Unique Flavor Fusion: The combination of savory rosemary and zesty lemon creates a delightful contrast that's both refreshing and comforting.
Easy to Make: This recipe requires simple steps and basic ingredients, making it ideal for bakers of any skill level.
Perfect for Any Occasion: Whether it's a tea party, family gathering, or a cozy night in, these cookies are sure to impress guests and family alike.
Texture Sensation: Enjoy the chewy center paired with a slightly crisp lemon-sugar coating, offering a satisfying bite.
Versatile Treat: Feel free to explore flavors by swapping lemon for orange or adding white chocolate chips, just like in my Matcha Cookies Soft or Thumbprint Cookies Melt.

Rosemary Cookies with Lemon Sugar Ingredients

For the Cookies

  • Unsalted Butter (1 cup + 2 tbsp) – Adds richness and moisture; using unsalted helps control the overall saltiness.
  • Fresh Rosemary (1 sprig and 2 teaspoons chopped) – Introduces a unique herbaceous flavor; substitute dried rosemary at half the amount if fresh isn't available.
  • White Granulated Sugar (1 ⅓ cups + ½ cup for lemon sugar) – Provides the sweetness these cookies crave; coconut sugar can be an interesting alternative for a twist.
  • Large Eggs (1 whole + 1 yolk) – Acts as a binder for soft and chewy cookies; ensure they're at room temperature for best results.
  • Vanilla Extract (1 teaspoon) – Enhances the overall flavor profile; can omit if you're looking for a simpler taste.
  • All-Purpose Flour (2 ½ cups, spooned and leveled) – Essential for structure; precise measurements will avoid overly dense cookies.
  • Baking Soda (1 teaspoon) – A vital leavening agent that helps create that desirable rise.
  • Baking Powder (½ teaspoon) – Works alongside baking soda to ensure a light and airy texture.
  • Salt (¼ teaspoon) – Balances the sweetness and enhances flavors; adjust to your taste preference.
  • Lemon Zest (2 teaspoons) – Provides a burst of citrus brightness; feel free to modify based on your love for lemon flavor.

For the Lemon Sugar Coating

  • Lemon Zest (from the above) – Same as before; it infuses the sugar with delightful citrus notes.
  • White Granulated Sugar (½ cup, from above) – The perfect combination with lemon zest gives these cookies their deliciously sweet and tangy crust.

Dive into this delicious Rosemary Cookies with Lemon Sugar journey and let the blending of savory and sweet enchant your taste buds!

Step‑by‑Step Instructions for Rosemary Cookies with Lemon Sugar

Step 1: Prepare Brown Butter
In a medium saucepan over medium heat, melt 1 cup and 2 tablespoons of unsalted butter, swirling it occasionally. Add a sprig of rosemary and watch for the butter to turn a deep golden brown, about 5-7 minutes, releasing a nutty aroma. Once browned, remove the rosemary and let the butter cool for 30-45 minutes in the refrigerator until slightly thickened.

Step 2: Mix Wet Ingredients
In a large mixing bowl, combine the cooled brown butter with 1 ⅓ cups of granulated sugar and use an electric mixer to beat for 2 minutes until light and fluffy. Next, add in one large egg and one egg yolk along with 1 teaspoon of vanilla extract, beating for an additional minute to ensure everything is well incorporated.

Step 3: Combine Dry Ingredients
In a separate bowl, sift together 2 ½ cups of all-purpose flour, 1 teaspoon of baking soda, ½ teaspoon of baking powder, and ¼ teaspoon of salt. Stir in 2 teaspoons of chopped fresh rosemary, creating a delightful herb-infused mix. Gradually add this dry mixture to the wet ingredients until just combined, being careful not to overmix.

Step 4: Chill the Cookie Dough
Using a 1 ¼ oz ice cream scoop, portion the dough onto a parchment-lined cookie sheet, setting them a couple of inches apart. Cover the sheet with plastic wrap and refrigerate the dough balls for at least 30 minutes to help maintain their shape while baking.

Step 5: Prepare Lemon Sugar
In a small bowl, mix together the zest of one lemon with ½ cup of white granulated sugar. Use your fingertips to rub the lemon zest into the sugar until it becomes fragrant, allowing the oils to infuse the sugar. Set this lemon sugar mixture aside to use as a coating for the cookies.

Step 6: Bake Cookies
Preheat your oven to 350°F (175°C) and line another baking sheet with parchment paper. Roll each chilled dough ball in the lemon sugar, ensuring they are well-coated, and arrange them on the prepared sheet about 2 inches apart. Bake for 12 minutes, until the edges are lightly golden, but the centers are still puffy. Allow the cookies to cool completely on a wire rack before savoring!

Make Ahead Options

These Rosemary Cookies with Lemon Sugar are perfect for meal prep, allowing you to enjoy fresh-baked cookies with minimal hassle! You can prepare the cookie dough up to 24 hours in advance by scooping it onto a parchment-lined baking sheet and covering it tightly with plastic wrap in the refrigerator. Alternatively, you can also mix and chill the brown butter and combine the wet and dry ingredients up to 3 days ahead—just store the dough in an airtight container. When you're ready to bake, simply roll the chilled dough balls in the lemon sugar and pop them into the oven. The cookies will turn out just as delicious with their delightful texture and unique flavor!

Rosemary Cookies with Lemon Sugar Variations

Feel free to explore these exciting alternatives to make the recipe truly your own!

  • Citrus Swap: Use orange or lime zest instead of lemon for a delicious twist.

  • Chocolate Chippers: Add a handful of white chocolate chips for a creamy contrast that pairs beautifully with rosemary.

  • Scone Style: Transform the cookies into scones by adding cream and baking powder for a more biscuit-like texture. They'd be fantastic for brunch!

  • Nutty Delight: Mix in chopped nuts like almonds or walnuts to introduce a lovely crunch and earthy flavor.

  • Herb Medley: Incorporate a mix of fresh herbs, such as thyme or basil, alongside rosemary for a unique garden flavor.

  • Sweet Spices: Add a pinch of cinnamon or cardamom for warmth and complexity.

  • Savory Spice: For an unexpected kick, sprinkle in a touch of black pepper; it enhances the herbaceous notes beautifully.

  • Pie-Inspired: Crumble in some raspberry or lemon zest jam to the dough for a pie-inspired treat that bursts with fruity flavor.

These variations allow you to take a classic recipe and personalize it to suit your own palate, just like you would with my Lemon Chicken Soup or Eggnog Cookies Soft for that extra special touch. Enjoy experimenting!

What to Serve with Rosemary Cookies with Lemon Sugar

Enjoy these delightful cookies alongside offerings that enhance their unique herbaceous and citrusy flavors!

  • Refreshing Herbal Tea: A cup of chamomile or mint tea provides a light and soothing contrast, enhancing the cookies' herbal notes.
  • Zesty Lemonade: Bright and tangy, a chilled glass of lemonade complements the lemon sugar coating, creating a refreshing palate cleanse.
  • Savory Cheese Plate: Pair with soft cheeses like goat cheese or brie, which balance the sweetness and create an exquisite flavor harmony.
  • Mixed Berries: A simple bowl of fresh strawberries, blueberries, and raspberries enhances the cookie experience with juicy freshness and natural sweetness.
  • Light Meringues: These airy desserts are a perfect counterpart, adding a delicate crunch that will make every bite feel like a fancy affair.
  • Vanilla Ice Cream: A scoop of creamy vanilla ice cream serves as a delightful contrast in temperature and richness, making for an indulgent treat.
  • Dark Chocolate Drizzle: A light drizzle of dark chocolate over the cookies creates a lovely balance, with the bittersweet flavor complementing the rosemary beautifully.
  • Sparkling Water with Citrus: A glass of fizzy water infused with lemon or lime gives a refreshing sip that cleanses the palate perfectly between bites.
  • Chocolate-Covered Almonds: Their nutty notes and rich chocolate add a delicious textural difference, while their crunch nicely contrasts with the chewy cookies.

Expert Tips for Rosemary Cookies with Lemon Sugar

  • Choose the Right Butter: Always use unsalted butter for these rosemary cookies; it helps to balance the flavors without unwanted saltiness.
  • Cool Brown Butter: After browning, let the butter chill properly to create a perfect cookie texture—too warm, and they'll spread too much!
  • Measure Flour Correctly: Spoon and level your flour when measuring to avoid dense cookies. An accurate measurement is key for soft and chewy results.
  • Refrigerate Dough: Chilling the dough before baking is essential to prevent spreading. Aim for at least 30 minutes in the fridge!
  • Lemon Zest Importance: Using fresh lemon zest in your sugar really elevates the flavor; don’t skip this step, as it infuses every bite of the cookies with bright zest.
  • Taste Test: Feel free to taste a bit of the dough before baking, but remember that raw eggs are involved. This will help you adjust flavors before they bake!

Storage Tips for Rosemary Cookies with Lemon Sugar

Room Temperature: Store cookies in an airtight container at room temperature for up to 5-7 days to maintain their softness and flavor.

Fridge: If you prefer a cooler treat, you can keep the cookies in the fridge for up to 10 days; just ensure they’re well-wrapped to prevent drying out.

Freezer: For longer storage, freeze the cookies in a single layer, then transfer them to a freezer-safe container for up to 2-3 months.

Thawing: When you’re ready to enjoy your frozen rosemary cookies with lemon sugar, let them thaw at room temperature for 30-60 minutes for a delicious, fresh taste!

Rosemary Cookies with Lemon Sugar Recipe FAQs

How do I choose the best fresh rosemary?
Absolutely! When selecting fresh rosemary, look for vibrant green sprigs that are fragrant and free of dark spots. Avoid any that appear dry or wilted. Fresh, aromatic rosemary will enhance the flavor of your cookies wonderfully!

What is the best way to store freshly baked rosemary cookies?
Very! To keep your rosemary cookies with lemon sugar fresh, store them in an airtight container at room temperature for up to 5-7 days. Ensure they’re completely cool before sealing to maintain their delightful softness and flavor.

Can I freeze rosemary cookies, and how do I do it properly?
Of course! To freeze your cookies, first, arrange them in a single layer on a baking sheet and place them in the freezer until firm. Once hardened, transfer them to a freezer-safe container or zip-top bag, separating layers with parchment paper. They can be stored this way for up to 2-3 months. When ready to enjoy, simply let them thaw at room temperature for 30-60 minutes.

My cookie dough turned out too sticky; what can I do?
Oh no! If your dough is too sticky, it’s likely that the butter was too warm or there was insufficient flour. To remedy this, add a tablespoon of flour at a time until the dough reaches the desired consistency. Chilling the dough for at least 30 minutes can also help to firm it up for easier handling.

Are there any allergy considerations with this recipe?
Certainly! This recipe includes common allergens such as eggs and gluten (from all-purpose flour). If you have a gluten intolerance, consider using a gluten-free flour blend designed for baking, and keep in mind that you can substitute eggs with flax eggs or chia eggs for egg-free versions. Always consult with your doctor for specific dietary needs.

Can I use dried rosemary instead of fresh, and if so, how much?
Yes, you can! Use half the amount of dried rosemary compared to fresh. So if the recipe calls for 2 teaspoons of fresh rosemary, use just 1 teaspoon of dried. Just like magic, it still brings that lovely herbal note to your cookies!

Rosemary Cookies with Lemon Sugar

Rosemary Cookies with Lemon Sugar: A Fresh Twist on Treats

These Rosemary Cookies with Lemon Sugar offer a unique flavor fusion of savory and sweet in a delightful cookie.
Print Recipe Pin Recipe
Prep Time 45 minutes mins
Cook Time 12 minutes mins
Chilling Time 30 minutes mins
Total Time 1 hour hr 27 minutes mins
Servings: 12 cookies
Course: Dessert
Cuisine: American
Calories: 150
Ingredients Equipment Method Nutrition Notes

Ingredients
  

For the Cookies
  • 1 cup + 2 tbsp cups Unsalted Butter Adds richness and moisture.
  • 1 sprig and 2 tsp sprig Fresh Rosemary Substitute dried rosemary at half amount if fresh isn't available.
  • 1 ⅓ cups + ½ cup cups White Granulated Sugar Provides sweetness; coconut sugar can be an alternative.
  • 1 whole + 1 large eggs Egg Ensure eggs are at room temperature.
  • 1 teaspoon Vanilla Extract Enhances overall flavor.
  • 2 ½ cups All-Purpose Flour Essential for structure; spooned and leveled.
  • 1 teaspoon Baking Soda Helps create a desirable rise.
  • ½ teaspoon Baking Powder Ensures light and airy texture.
  • ¼ teaspoon Salt Balances sweetness.
  • 2 teaspoons Lemon Zest Provides a burst of citrus brightness.
For the Lemon Sugar Coating
  • ½ cup cups White Granulated Sugar Infused with lemon zest.
  • Lemon Zest Lemon Zest Same as before; infuses sugar with citrus notes.

Equipment

  • Medium saucepan
  • large mixing bowl
  • Electric mixer
  • Parchment Paper
  • Ice cream scoop

Method
 

Step-by-Step Instructions
  1. In a medium saucepan over medium heat, melt 1 cup and 2 tablespoons of unsalted butter, add a sprig of rosemary and cook until it turns deep golden brown, about 5-7 minutes. Remove rosemary and let cool for 30-45 minutes in the refrigerator.
  2. In a large mixing bowl, combine the cooled brown butter with 1 ⅓ cups of granulated sugar and beat for 2 minutes until light and fluffy. Then add in one large egg, one egg yolk, and 1 teaspoon of vanilla extract, beating for an additional minute.
  3. In a separate bowl, sift together 2 ½ cups of all-purpose flour, 1 teaspoon of baking soda, ½ teaspoon of baking powder, and ¼ teaspoon of salt. Stir in 2 teaspoons of chopped fresh rosemary. Gradually add this to the wet ingredients until just combined.
  4. Using a 1 ¼ oz ice cream scoop, portion the dough onto a parchment-lined cookie sheet, cover with plastic wrap, and refrigerate for at least 30 minutes.
  5. In a small bowl, mix together the zest of one lemon with ½ cup of white granulated sugar. Rub the lemon zest into the sugar until fragrant. Set aside.
  6. Preheat your oven to 350°F (175°C) and line a baking sheet with parchment paper. Roll each dough ball in the lemon sugar and arrange them on the sheet about 2 inches apart. Bake for 12 minutes until edges are lightly golden. Cool completely on a wire rack.

Nutrition

Serving: 1cookieCalories: 150kcalCarbohydrates: 18gProtein: 2gFat: 8gSaturated Fat: 5gPolyunsaturated Fat: 0.5gMonounsaturated Fat: 2.5gCholesterol: 20mgSodium: 50mgPotassium: 30mgSugar: 10gVitamin A: 300IUVitamin C: 1mgCalcium: 15mgIron: 0.5mg

Notes

Store cookies in an airtight container to maintain softness for up to 5-7 days. Refrigerate for up to 10 days, or freeze for 2-3 months.

Tried this recipe?

Let us know how it was!

Tiramisu Crinkle Cookies that Will Wow Your Taste Buds

January 16, 2026 by Grace Snow Leave a Comment

There’s a certain magic in the air during the holidays—a scent wafting through the kitchen that makes your heart swell with joy. These Tiramisu Crinkle Cookies capture that enchantment beautifully, blending the rich and aromatic flavors of traditional tiramisu into a delightful cookie form. With their soft, chewy centers and charming powdered sugar crinkles, they are not only a show-stopping addition to your holiday dessert platter but also an indulgence that’s surprisingly quick to whip up. Whether you're sitting down with a warm cup of coffee or sharing them with friends and family, these cookies promise to bring smiles and satisfy cravings. Intrigued? Let’s dive into the sweet world of these irresistible treats!

Why Are These Cookies So Irresistible?

Decadent Flavor: The rich combination of espresso and mascarpone brings a taste of Italy that you won’t want to miss.

Impressive Visuals: Their crinkled tops and snowy powdered sugar make these cookies a showpiece on any platter.

Quick to Make: In just a few simple steps, you can whip up these delightful cookies, saving you time for all your festive activities.

Perfect Pairing: Enjoy them with a warm cup of coffee or as part of a dessert tray alongside Eggnog Cookies Soft.

Year-Round Appeal: These cookies aren't just for the holidays; they’re perfect for any gathering, ensuring all guests leave satisfied!

Tiramisu Crinkle Cookies Ingredients

For the Cookies

  • All-Purpose Flour – Provides structure; be mindful of the flour measurement to avoid cookies that spread too much or too little.
  • Granulated Sugar – Sweetens the dough without overshadowing the filling's flavors.
  • Powdered Sugar – Essential for rolling the cookies and achieving that signature crinkle effect.
  • Unsalted Butter – Creates a soft texture and allows for even cracking during baking; soften to room temperature for best results.
  • Eggs – Vital for binding the ingredients; make sure they are at room temperature for easy incorporation.
  • Salt – Enhances the cookie's flavors, balancing the sweetness perfectly.
  • Espresso Powder – Infuses the cookies with the iconic tiramisu flavor; opt for high-quality espresso for the richest taste.

For the Filling

  • Mascarpone Cheese – The star of the filling; ensure it’s at room temperature for smooth blending.
  • Heavy Cream – Helps achieve a light, airy filling; whip until glossy to avoid any graininess.
  • Powdered Sugar – Sweetens the filling; mix until just combined for the best texture.

For the Dusting

  • Cocoa Powder – Adds a beautiful finish and a hint of bitterness that balances the sweetness; dust generously!

Step‑by‑Step Instructions for Tiramisu Crinkle Cookies

Step 1: Dough Preparation
In a large mixing bowl, cream together the unsalted butter and granulated sugar until light and fluffy, about 3-5 minutes. Beat in the eggs one at a time, fully incorporating each egg before adding the next. Stir in a splash of vanilla extract for extra flavor. Gradually add the all-purpose flour, espresso powder, and salt until just combined, ensuring a rich, smooth dough for your tiramisu crinkle cookies.

Step 2: Chill Dough
Once the dough is well mixed, cover the bowl with plastic wrap and refrigerate for at least 30 minutes. This chilling step is crucial as it firms up the dough, making it easier to handle and ensuring that your cookies maintain their shape while baking. While chilling, take a moment to preheat your oven to 175°C (350°F) to prepare for the next steps.

Step 3: Form Cookies
After the dough has chilled, remove it from the refrigerator and scoop out portions using a tablespoon or cookie scoop. Roll each portion into a ball and then generously coat it with powdered sugar; this step creates the signature crinkle effect as the cookies bake. Arrange the powdered sugar-coated balls on a lined baking sheet, keeping them spaced apart for even baking.

Step 4: Bake
Place the baking sheet in your preheated oven and bake the tiramisu crinkle cookies for 10-12 minutes. Keep an eye on them; the edges should be set, and the tops will crack beautifully. Once baked, remove them from the oven and allow them to cool on the baking sheet for a moment before transferring to a wire rack to cool completely.

Step 5: Create Filling Wells
While the cookies are still warm, gently press the center of each cookie with the back of a spoon to create a small well. This step is important as it will hold the creamy mascarpone filling and enhance the overall presentation of your tiramisu crinkle cookies. Be careful not to press too hard to avoid breaking the cookie.

Step 6: Filling Preparation
In a mixing bowl, combine room temperature mascarpone cheese, heavy cream, and a bit of powdered sugar. Using a hand mixer, whip them together until the mixture becomes glossy and smooth, taking care not to overmix to maintain a light texture. This creamy filling will complement the rich flavors of the tiramisu crinkle cookies perfectly.

Step 7: Fill Cookies
Using a piping bag or a spoon, fill each well of the cookies with the mascarpone mixture, ensuring an even distribution. For an added touch, lightly dust the filled cookies with cocoa powder for a classic tiramisu finish. Don’t rush this step; a little care will make your cookies look stunning and inviting!

Step 8: Chill and Serve
To set the filling slightly, place the filled tiramisu crinkle cookies in the refrigerator for about 15-20 minutes before serving. This chilling time helps the flavors meld and firm up the filling, making each bite even more delightful. Once chilled, they’re ready to serve and share with family or friends—enjoy these irresistible treats!

What to Serve with Tiramisu Crinkle Cookies

These delightful treats are sure to be a crowd-pleaser, especially when teamed up with the perfect accompaniments that enhance their rich, coffee-infused charm.

  • Rich Espresso: A cup of freshly brewed espresso not only complements the tiramisu flavors but also enhances the cookies' coffee notes.

  • Vanilla Ice Cream: The creamy sweetness of vanilla ice cream contrasts beautifully with the chewy texture of the cookies, creating a delightful indulgence.

  • Chocolate Fondue: Dip these cookies into warm, melted chocolate for a luxurious treat that takes your dessert game to a whole new level.

  • Whipped Cream: A dollop of lightly sweetened whipped cream adds a lightness that balances the dense, rich flavors of the cookies.

  • Honey Almond Biscotti: Serve alongside these crunchy cookies for a delightful textural contrast, perfect for dipping in coffee or tea.

  • Hazelnut Liqueur: A small glass of hazelnut liqueur pairs wonderfully, enhancing the nutty undertones in the tiramisu.

  • Mini Fruit Tarts: These colorful tartlets bring a refreshing, fruity note, offering a perfect balance of sweetness and acidity that complements the cookies.

  • Spiced Chai Latte: Its aromatic spices intertwine beautifully with the coffee flavor of the cookies, creating a cozy pairing for chilly evenings.

Tiramisu Crinkle Cookies Variations

Feel free to get creative and make these delightful cookies your own—each variation will elevate your cookie game!

  • Stronger Espresso: Increase espresso powder for a bolder coffee flavor that truly sings. Perfect for coffee lovers!
  • Tiramisu Brownies: For a denser treat, make a thicker dough, skip the filling, and dust with cocoa after baking. A brownie twist that packs a punch!
  • Cream Cheese Swap: Replace mascarpone with cream cheese for a tangy spin; just remember it may alter the cookie's texture.
  • Add Chocolate Chips: Mix in dark chocolate chips to the dough for an extra layer of sweetness that complements the coffee notes beautifully.
  • Nutty Delight: Stir in chopped hazelnuts for a delightful crunch that perfectly echoes traditional tiramisu flavors.
  • Spiced Up: Stir in a pinch of cinnamon or nutmeg to the dough for cozy holiday spices that warm the heart.
  • Dairy-Free Option: Replace heavy cream and mascarpone with dairy-free alternatives to cater to lactose-intolerant friends or family.
  • Gluten-Free Variation: Use a gluten-free all-purpose flour blend to make these cookies gluten-free while still keeping the delicious taste!

For a distinct twist, try pairing these cookies with some delightful Thumbprint Cookies Melt on your dessert platter for even more options!

Expert Tips for Tiramisu Crinkle Cookies

  • Room Temperature Essentials: Ensure your mascarpone and eggs are at room temperature for smoother mixing. Cold ingredients can lead to lumps in your filling.

  • Chilling is Key: Don’t skip refrigerating the dough! This step helps the cookies hold their shape during baking, preventing excessive spreading.

  • Watch Your Baking Time: Keep an eye on the cookies; they should have set edges and cracked tops while remaining soft inside. Overbaking can lead to dryness.

  • Perfect Filling Technique: When filling, avoid overmixing the mascarpone mixture. A glossy, slightly airy texture enhances the experience of these tiramisu crinkle cookies.

  • Adjusting Flavor: For a more intense coffee flavor, feel free to up the espresso powder. Just remember, variations can affect the cookie's final texture.

Storage Tips for Tiramisu Crinkle Cookies

  • Room Temperature: Unfilled cookies can be stored at room temperature for up to 5 days. Keep them in an airtight container to maintain freshness.

  • Fridge: Filled tiramisu crinkle cookies are best consumed within 2 days and should be stored in the refrigerator in an airtight container to preserve the creamy filling.

  • Freezer: For longer storage, freeze unfilled cookies for up to one month. Wrap them tightly in plastic wrap, then place in a freezer bag for easy access later.

  • Reheating: To enjoy the cookies warm, gently microwave unfilled cookies for 10-15 seconds. Avoid overheating to keep the textures just right.

Make Ahead Options

These Tiramisu Crinkle Cookies are perfect for busy home cooks looking to save time without sacrificing flavor! You can prepare the cookie dough up to 24 hours in advance by mixing and chilling it in the refrigerator. Simply roll the chilled dough into balls and coat them in powdered sugar just before baking. Additionally, you can whip up the mascarpone filling up to 3 days ahead and store it in an airtight container in the fridge. When you're ready to serve, fill each cooled cookie with the mascarpone mixture and chill for 15-20 minutes for the ideal texture. This make-ahead approach ensures your Tiramisu Crinkle Cookies stay just as delicious while reducing your prep time on busy days!

Tiramisu Crinkle Cookies Recipe FAQs

What should I look for when selecting espresso powder?
Absolutely! For the best flavor in your Tiramisu Crinkle Cookies, choose a high-quality espresso powder. Look for finely ground options that are aromatic and rich, as this will provide the cookies with the signature coffee flavor. If you're in a pinch, you can substitute it with strong brewed coffee, though it may affect the dough's texture slightly.

How should I store leftover filled cookies?
Very important! Filled tiramisu crinkle cookies should be stored in the refrigerator and consumed within 2 days for optimal freshness. Place them in an airtight container to keep the creamy filling from becoming runny and to maintain their divine flavor. If you have unfilled cookies left, you can keep them at room temperature for up to 5 days.

Can I freeze unfilled Tiramisu Crinkle Cookies?
Certainly! Freezing is a fantastic option for these cookies. To freeze, simply let the unfilled cookies cool completely. Then, wrap each one tightly in plastic wrap and place them in a freezer-safe bag. They can be stored in the freezer for up to one month. When you’re ready to enjoy them, just let them thaw at room temperature or microwave briefly for a fresh-baked taste.

Why did my cookies not crinkle properly?
Oh no! If your Tiramisu Crinkle Cookies didn’t crinkle as expected, it could be due to a few reasons. Ensure your dough has enough chilling time—chilling for at least 30 minutes helps prevent excessive spreading. Also, coat the cookie balls generously in powdered sugar before baking; this creates the beautiful crinkle effect. Lastly, keep an eye on your baking time; pulling them out just as they begin to crack is key!

Is there a way to make these cookies dairy-free or suitable for my allergies?
Definitely! For a dairy-free version of Tiramisu Crinkle Cookies, you can substitute mascarpone cheese with a dairy-free cream cheese or a whipped coconut cream. Just ensure that all other ingredients, such as the butter, are dairy-free alternatives. Additionally, always check for allergens in your espresso powder and sugar brands to ensure they meet your dietary needs. This way, everyone can enjoy these delightful treats!

Tiramisu Crinkle Cookies

Tiramisu Crinkle Cookies that Will Wow Your Taste Buds

Experience the joy of Tiramisu Crinkle Cookies, a delightful blend of traditional tiramisu flavors in cookie form.
Print Recipe Pin Recipe
Prep Time 30 minutes mins
Cook Time 12 minutes mins
Chill Time 30 minutes mins
Total Time 1 hour hr 12 minutes mins
Servings: 24 cookies
Course: Dessert
Cuisine: Italian
Calories: 150
Ingredients Equipment Method Nutrition Notes

Ingredients
  

For the Cookies
  • 2 cups All-Purpose Flour Be mindful of the flour measurement to avoid cookies that spread too much or too little.
  • 1 cup Granulated Sugar Sweetens the dough without overshadowing the filling's flavors.
  • 1 cup Powdered Sugar Essential for rolling the cookies and achieving that signature crinkle effect.
  • 1/2 cup Unsalted Butter Creates a soft texture; soften to room temperature for best results.
  • 2 large Eggs Ensure they are at room temperature for easy incorporation.
  • 1/4 teaspoon Salt Enhances the cookie's flavors, balancing the sweetness perfectly.
  • 2 tablespoons Espresso Powder Opt for high-quality espresso for the richest taste.
For the Filling
  • 8 oz Mascarpone Cheese Ensure it’s at room temperature for smooth blending.
  • 1/2 cup Heavy Cream Helps achieve a light, airy filling.
  • 1/4 cup Powdered Sugar Mix until just combined for the best texture.
For the Dusting
  • 1 tablespoon Cocoa Powder Dust generously for a hint of bitterness that balances sweetness.

Equipment

  • Mixing Bowl
  • Baking Sheet
  • piping bag
  • Cookie Scoop

Method
 

Step‑by‑Step Instructions
  1. In a large mixing bowl, cream together the unsalted butter and granulated sugar until light and fluffy, about 3-5 minutes. Beat in the eggs one at a time.
  2. Stir in a splash of vanilla extract for extra flavor. Gradually add the all-purpose flour, espresso powder, and salt until just combined.
  3. Cover the bowl with plastic wrap and refrigerate for at least 30 minutes.
  4. Preheat your oven to 175°C (350°F) while the dough chills.
  5. Remove the dough from the refrigerator, scoop portions, and roll into balls. Coat them with powdered sugar.
  6. Arrange the balls on a lined baking sheet, spaced apart.
  7. Bake for 10-12 minutes until edges are set and tops crack.
  8. Cool briefly on the baking sheet before transferring to a wire rack.
  9. While warm, gently press the center of each cookie to create a well.
  10. In a mixing bowl, combine mascarpone, heavy cream, and powdered sugar, whipping until glossy and smooth.
  11. Fill each well with the mascarpone mixture and lightly dust with cocoa powder.
  12. Chill in the refrigerator for about 15-20 minutes before serving.

Nutrition

Serving: 1cookieCalories: 150kcalCarbohydrates: 20gProtein: 2gFat: 7gSaturated Fat: 4gPolyunsaturated Fat: 1gMonounsaturated Fat: 2gCholesterol: 30mgSodium: 50mgPotassium: 50mgSugar: 10gVitamin A: 200IUCalcium: 40mgIron: 0.5mg

Notes

Ensure your ingredients are at room temperature for best results. Chill dough to maintain shape during baking.

Tried this recipe?

Let us know how it was!

Irresistible Chocolate Covered Strawberry Cookies for Lovers

January 16, 2026 by Grace Snow Leave a Comment

As I sank my teeth into a warm cookie fresh from the oven, I was immediately transported to that magical moment of biting into a chocolate-covered strawberry—a delightful combination that feels like a hug for your taste buds. Today, I’m excited to share my recipe for Fudgy Chocolate Covered Strawberry Cookies, a decadent dessert that strikes the perfect balance between rich chocolate and tangy strawberry goodness. Not only are these cookies easy to whip up, but their uniquely chewy texture paired with an irresistible chocolate coating makes them perfect for special occasions—especially Valentine's Day! Whether you're celebrating love or simply indulging yourself, these cookies are guaranteed to bring joy to any gathering. What special moment will you create with these irresistible treats?

Why are these cookies a must-try?

Decadent Flavor: Rich chocolate and sweet strawberry flavors combine flawlessly, creating an indulgent treat that’s sure to impress your taste buds.

Chewy Texture: Soft on the inside and crispy on the outside, these cookies offer the perfect balance of textures that you won't want to miss.

Quick and Easy: Time-saving preparation means you can have these delectable cookies baked and enjoyed in no time—ideal for last-minute events.

Versatile & Fun: Customize with alternative freeze-dried fruits or toppings, making them a crowd-pleaser for any occasion, from Valentine’s Day to casual gatherings.

Memorable Presentation: Chocolate-dipped with a drizzle on top, they’re not just delicious but also visually stunning, making them the perfect centerpiece for your dessert table.

Elevate your dessert game and try these alongside delightful options like Matcha Cookies Soft or the holiday favorite Eggnog Cookies Soft.

Chocolate Covered Strawberry Cookies Ingredients

For the Cookies

  • Unsalted Butter – Adds moisture and richness; you can use salted butter but reduce any additional salt.
  • Light Brown Sugar – Sweetens the cookies with a hint of caramel flavor; substitute with granulated sugar for a lighter taste.
  • Large Egg – Vital for binding and providing structure; it helps create a chewy texture.
  • Vanilla Extract – Enhances flavor depth; choose pure vanilla for the best outcome.
  • All-Purpose Flour – Gives the cookies structure; feel free to use gluten-free flour for a tasty alternative.
  • Dutch-Processed Cocoa Powder – Delivers a rich chocolate flavor; if unavailable, regular unsweetened cocoa works well, too.
  • Baking Soda – Acts as a leavening agent, essential for the cookie's rise; don’t skip it!
  • Baking Powder – Works with baking soda for an airy texture; both are needed for the best rise.
  • Salt – Balances the sweetness and elevates overall flavor; a must-have ingredient!
  • Freeze Dried Strawberries – Introduces fruity flavor and texture to the cookies; avoid fresh strawberries for this recipe.
  • Semisweet Chocolate Chips – Add delightful chocolate chunks; consider dark or milk chocolate for a different twist.
  • Coconut Oil – Helps melt the chocolate coating smoothly and gives a glossy finish.

For the Chocolate Coating

  • Semisweet Chocolate Chips – These create a luscious chocolate shell; feel free to mix in different chocolate varieties for variety.
  • Coconut Oil – Aids in melting the chocolate perfectly; use it for a seamless dip and shine.

Experience the joy of creating these delicious Chocolate Covered Strawberry Cookies that will surely charm anyone who takes a bite!

Step‑by‑Step Instructions for Fudgy Chocolate Covered Strawberry Cookies

Step 1: Preheat Oven
Preheat your oven to 350°F (175°C) and prepare your baking sheets by lining them with parchment paper. This ensures the cookies will bake evenly and come off the sheets easily once they're done. Have your mixing bowl and the necessary measuring tools ready for the next steps to create your fudgy chocolate covered strawberry cookies.

Step 2: Mix Butter & Sugar
In a mixing bowl, combine unsalted butter and light brown sugar. Use an electric mixer to beat them together on medium speed for about 2 minutes, until the mixture is light and fluffy. This step is crucial as it creates the base for your chocolate covered strawberry cookies, helping to integrate air and ensure a tender texture.

Step 3: Add Egg & Vanilla
Once your butter and sugar mixture is fluffy, add the large egg and vanilla extract. Continue to mix for another 2 minutes until the blend becomes light in color and slightly thickens. This incorporation is important as the egg acts as a binder, holding the dough together while enhancing the flavors of your cookies.

Step 4: Combine Dry Ingredients
In a separate bowl, whisk together the all-purpose flour, Dutch-processed cocoa powder, baking soda, baking powder, and salt. Gradually add this dry mixture to the wet ingredients, mixing gently until just combined. Be careful not to overmix, as this helps keep your fudgy chocolate covered strawberry cookies wonderfully chewy.

Step 5: Fold in Add-ins
Now, gently fold in the freeze-dried strawberries and semisweet chocolate chips using a spatula. Make sure they are evenly distributed throughout the dough for bursts of fruity flavor and rich chocolate in every bite. This step adds texture and flavor complexity to the cookie dough, enhancing the experience of your chocolate covered strawberry cookies.

Step 6: Scoop Dough
Using a 1 ½ ounce cookie scoop, portion out the cookie dough onto your prepared baking sheets, spacing them about 2 inches apart. This allows room for the cookies to spread while baking. The dough should look rounded and slightly heaped, which ensures that your fudgy chocolate covered strawberry cookies will have a beautiful shape.

Step 7: Bake
Place the baking sheets in the preheated oven and bake for 10-12 minutes. Keep an eye on them—when the edges are set and the centers appear slightly gooey, you know they’re ready. These will transform into lovely fudgy chocolate covered strawberry cookies as they cool, creating that delightful chewy texture you crave.

Step 8: Cool Cookies
After baking, remove the cookies from the oven and let them cool on the sheets for about 15 minutes. This cooling period allows them to firm up slightly while retaining their chewy center. As you wait, the temptation to sample a warm cookie will surely be hard to resist!

Step 9: Prepare Chocolate Coating
While your cookies cool, melt the semisweet chocolate chips and coconut oil together in a microwave-safe bowl. Heat in 30-second intervals, stirring after each, until the mixture is completely smooth and glossy. This delectable chocolate coating will add a luxurious finish to your fudgy chocolate covered strawberry cookies.

Step 10: Dip Cookies
Once the cookies have cooled, dip the bottom of each cookie into the melted chocolate, ensuring a generous coating. Place the cookies on parchment paper to set. For an extra touch, consider drizzling any remaining melted chocolate over the tops. Let them rest for about 30 minutes until the chocolate has set to perfection.

Chocolate Covered Strawberry Cookies Variations

Get ready to personalize your cookie experience with these delightful twists that promise to elevate your baking game.

  • Berry Burst: Substitute freeze-dried strawberries with raspberries or cherries for a tangy flavor explosion. The alternate berries will bring their unique sweetness, creating an unexpected yet delightful contrast in every bite.

  • Chill for Softness: For a softer cookie, chill the dough for 30 minutes before scooping and baking. This little pause allows the flavors to meld and creates a tender, melt-in-your-mouth texture that’s a true treat.

  • Nutty Delight: Add chopped hazelnuts or walnuts to the dough for a satisfying crunch. The nutty addition complements the chocolate and strawberry flavors beautifully, adding a delightful texture to each cookie.

  • Cocoa Variations: Swap Dutch-processed cocoa powder for regular unsweetened cocoa for a lighter chocolate tone. This subtle switch will yield a slightly different flavor profile while still satisfying your chocolate cravings.

  • Drizzle Decadence: Enhance the chocolate coating by drizzling white chocolate over the tops for a visually stunning contrast. The creamy sweetness of white chocolate would pair wonderfully with the rich chocolate and tangy strawberries.

  • Spicy Surprise: Incorporate a pinch of cayenne pepper or cinnamon into the dough for a hint of warmth. This surprising addition will elevate your cookies, providing a captivating flavor twist that is sure to pique everyone’s curiosity.

  • Gourmet Touch: For added elegance, consider rolling the completed cookies in crushed freeze-dried strawberries before they set. This not only adds a burst of color but also enhances the fruity flavor profile, making them irresistible.

Now that you're inspired to experiment, why not pair these delicious cookies with a side of Thumbprint Cookies Melt or serve them alongside an indulgent slice of German Chocolate Poke? The possibilities are endless! Enjoy the delightful journey of creating your own takes on these Chocolate Covered Strawberry Cookies.

Storage Tips for Chocolate Covered Strawberry Cookies

Room Temperature: Keep cookies in an airtight container at room temperature for up to 1 week to maintain their freshness and chewy texture.

Fridge: For extended freshness, you can refrigerate the cookies in an airtight container for up to 2 weeks, but let them come to room temperature before enjoying to fully experience their fudgy goodness.

Freezer: Store in a freezer-safe bag or container for up to 3 months. Allow cookies to thaw at room temperature before indulging in your delicious chocolate covered strawberry cookies.

Reheating: If you'd like to warm them up, microwave each cookie for about 10-15 seconds. This will bring back their delightful softness—perfect for that fresh-from-the-oven feel!

What to Serve with Fudgy Chocolate Covered Strawberry Cookies

Indulging in these decadent cookies opens the door to delightful meal pairings that perfectly complement their rich flavors and textures.

  • Glass of Milk: A classic pairing, it balances the cookies' richness while enhancing the chocolatey flavors.

  • Vanilla Ice Cream: The creaminess of vanilla ice cream adds a refreshing contrast to the fudgy texture. Serve it a la mode for sweet decadence!

  • Fresh Berries: A handful of fresh strawberries or raspberries offers a pop of color and an extra burst of fruity flavor that echoes the cookies' ingredients.

  • Coffee or Espresso: The boldness of coffee enhances the chocolate notes, making for a delightful afternoon pick-me-up alongside your cookies.

  • Chocolate Fondue: For a fun twist, serve with a side of melted chocolate to dip or drizzle, elevating the cookies into a luxurious dessert experience.

  • Sparkling Wine: A bubbly drink like Prosecco or Champagne pairs wonderfully, bringing a celebratory touch to your dessert table that’s perfect for special occasions.

Elevate your dessert experience with these pairings and create moments to cherish!

Make Ahead Options

These Fudgy Chocolate Covered Strawberry Cookies are perfect for busy home cooks who love meal prep! You can prepare the cookie dough up to 24 hours in advance by mixing all the ingredients and storing the unbaked dough in an airtight container in the refrigerator. When you're ready to bake, simply scoop and bake the chilled dough directly without thawing. Additionally, once you've dipped the cookies in chocolate, they can be stored in the refrigerator for up to 3 days to maintain their freshness. Just allow them to come to room temperature before serving. With these make-ahead tips, you’ll have delicious cookies at your fingertips, making any occasion sweeter!

Expert Tips for Chocolate Covered Strawberry Cookies

  • Room Temperature Ingredients: Ensure all ingredients are at room temperature for even mixing, which leads to a consistent texture in your chocolate covered strawberry cookies.

  • Don't Overmix: Mix the dough gently and only until combined. Overmixing can lead to tough cookies instead of the tender, fudgy center you desire.

  • Even Cookie Size: Use a cookie scoop for uniform size, ensuring even baking and perfect presentation of your chocolate covered strawberry cookies.

  • Watch the Bake Time: Keep an eye on your cookies while baking. Aim for a slightly gooey center to maintain that chewy texture; they continue to cook slightly as they cool.

  • Set the Chocolate Properly: Allow the dipped cookies to rest on parchment paper until the chocolate is fully set, preventing unwanted sticky fingers and maintaining a beautiful finish.

Chocolate Covered Strawberry Cookies Recipe FAQs

How do I select ripe freeze-dried strawberries?
Absolutely! Look for freeze-dried strawberries that have a vibrant color—this indicates they were properly processed. Avoid those with dark spots all over, as it can indicate poor quality. The more intense the color, the better the fruit flavor in your cookies!

How should I store my chocolate covered strawberry cookies?
Keep your cookies in an airtight container at room temperature for up to 1 week to maintain their freshness. If you're a fan of chewy cookies, this method is perfect! For longer storage, refrigerate them for up to 2 weeks, but let them come back to room temperature before indulging to enjoy their full flavor.

Can I freeze chocolate covered strawberry cookies?
Absolutely! To freeze your cookies, simply place them in a freezer-safe bag or container and store them for up to 3 months. Make sure they're completely cooled before freezing, and separate layers with parchment paper to avoid sticking. When you're ready to enjoy, thaw the cookies at room temperature or pop them in the microwave for 10-15 seconds to regain that fresh-baked warmth.

What if my cookies are too dry or crumbly?
If your cookies feel dry, it could be due to overmixing or using too much flour. To prevent this, measure flour carefully and handle the dough gently. If you've already baked them, try adding a drizzle of chocolate or a spoonful of warm milk on top to revitalize their texture.

Are there any dietary considerations for pets or allergies?
Very! These cookies are meant for human consumption, as chocolate is toxic to dogs and other pets. Additionally, ensure that your guests are aware of potential allergens, such as eggs and nuts if you decide to add them. Always double-check ingredient labels for possible allergens when making adjustments.

How do I achieve the best chocolate coating?
For a silky smooth chocolate coating, make sure to melt the chocolate and coconut oil correctly. Heat in a microwave-safe bowl at 30-second intervals, stirring until completely smooth. After dipping, allow the cookies to set on parchment paper for about 30 minutes to achieve that lovely glossy finish. Enjoy your wonderful chocolate covered strawberry cookies!

Chocolate Covered Strawberry Cookies

Irresistible Chocolate Covered Strawberry Cookies for Lovers

Delight in these Chocolate Covered Strawberry Cookies, a perfect blend of rich chocolate and tangy strawberries, ideal for special occasions.
Print Recipe Pin Recipe
Prep Time 15 minutes mins
Cook Time 12 minutes mins
Cooling Time 15 minutes mins
Total Time 42 minutes mins
Servings: 24 cookies
Course: Dessert
Cuisine: American
Calories: 150
Ingredients Equipment Method Nutrition Notes

Ingredients
  

For the Cookies
  • 1 cup Unsalted Butter Adds moisture and richness; can use salted butter but reduce additional salt.
  • 1 cup Light Brown Sugar Sweetens with a hint of caramel flavor; substitute with granulated sugar if desired.
  • 1 large Egg Vital for binding and texture.
  • 1 teaspoon Vanilla Extract Choose pure for best results.
  • 2 cups All-Purpose Flour Feel free to use gluten-free flour.
  • 1/2 cup Dutch-Processed Cocoa Powder Delivers rich chocolate flavor; regular cocoa can be used.
  • 1 teaspoon Baking Soda Essential for the cookie's rise.
  • 1 teaspoon Baking Powder Needed for the best rise.
  • 1/4 teaspoon Salt Balances sweetness.
  • 1 cup Freeze Dried Strawberries Introduces fruity flavor and texture.
  • 1 cup Semisweet Chocolate Chips For delightful chocolate chunks.
  • 2 tablespoons Coconut Oil Helps melt chocolate smoothly.
For the Chocolate Coating
  • 1 cup Semisweet Chocolate Chips Creates a luscious chocolate shell.
  • 1 tablespoon Coconut Oil Aids in melting chocolate perfectly.

Equipment

  • Mixing Bowl
  • Electric mixer
  • Cookie Scoop
  • Baking Sheets
  • Parchment Paper
  • Microwave-safe bowl

Method
 

Step-by-Step Instructions
  1. Preheat your oven to 350°F (175°C) and prepare your baking sheets by lining them with parchment paper.
  2. In a mixing bowl, combine unsalted butter and light brown sugar. Beat until light and fluffy.
  3. Add the egg and vanilla extract, mixing until light in color and thickened.
  4. Whisk together the flour, cocoa powder, baking soda, baking powder, and salt in a separate bowl, then gradually add to the wet ingredients.
  5. Fold in the freeze-dried strawberries and chocolate chips until evenly distributed.
  6. Scoop the dough onto prepared sheets, spacing them 2 inches apart.
  7. Bake for 10-12 minutes until edges are set and centers are gooey.
  8. Cool cookies on sheets for about 15 minutes.
  9. Melt semisweet chocolate chips and coconut oil together until smooth.
  10. Dip the bottom of each cookie into the melted chocolate and place on parchment to set.

Nutrition

Serving: 1cookieCalories: 150kcalCarbohydrates: 20gProtein: 2gFat: 7gSaturated Fat: 5gPolyunsaturated Fat: 0.5gMonounsaturated Fat: 1gCholesterol: 25mgSodium: 80mgPotassium: 100mgFiber: 1gSugar: 10gVitamin A: 200IUVitamin C: 1mgCalcium: 10mgIron: 0.5mg

Notes

Ensure ingredients are at room temperature for even mixing. Do not overmix the dough.

Tried this recipe?

Let us know how it was!

Deliciously Easy Mushroom Crostini for Your Next Gathering

January 15, 2026 by Grace Snow Leave a Comment

The rich aroma of buttery caramelization wafts through my kitchen, instantly transforming the ordinary into an extraordinary culinary delight. My Mushroom Crostini, featuring jammy caramelized onions and earthy mushrooms, is an appetizer that never fails to impress at gatherings. This recipe offers the dual benefit of being quick to prep and a perfect vegetarian option, making it a go-to choice for any occasion. Imagine the warmth of toasted baguette topped with a silky, sweet mixture that invites smiles and sparks conversations—who can resist? Just wait until you see how easily you can prepare this dish ahead of time, leaving you free to mingle and enjoy your guests. Ready to elevate your next gathering with this simple yet sophisticated twist on Italian flavors?

Why is Mushroom Crostini a Must-Try?

Simplicity: This recipe is incredibly easy to make, perfect for home cooks and chefs alike.

Irresistible Flavors: The sweet caramelized onions paired with earthy shiitake mushrooms create a truly gourmet flavor profile.

Crowd-Pleaser: Ideal as an appetizer for any gathering, this dish invites compliments and sparks delightful conversations.

Versatile: Feel free to customize with different mushroom varieties or add a creamy topping like goat cheese for extra richness. And if you're looking to explore more delicious options, check out our Grilled Mushrooms Savory for another tasty twist!

Make-Ahead Ability: Prep the mushroom and onion mixture in advance; just reheat and assemble right before serving. This time-saving tip keeps you stress-free and engaged with your guests!

Mushroom Crostini Ingredients

For the Mushroom Mixture
• Vermont Creamery Cultured Unsalted Butter – Provides a rich, creamy base; swap it for any high-quality unsalted butter for versatility.
• Medium Yellow Onion – Introduces sweetness and a flavorful foundation; thinly slice for even cooking. Shallots can stand in for a milder flavor.
• Shiitake Mushrooms – Offer an earthy flavor and chewy texture; ensure they are cleaned and sliced for cooking. Cremini mushrooms can be a great alternative.
• Brown Mushrooms – Enhance volume and earthiness; cleaned and sliced for consistency. Regular white mushrooms also work well as substitutes.
• Garlic (1 clove) – Adds depth to the flavor; press or mince to release its aromatic qualities. Be cautious not to burn it, as that introduces bitterness.
• Marsala Wine (¼ cup) – Infuses richness and sweetness; consider chicken stock or grape juice if you want a non-alcoholic option.
• Fresh Thyme Leaves (2 teaspoons) – Bring a delightful herbal note; fresh is preferred for potency, but dried thyme can work—just use less.
• Kosher Salt (½ teaspoon) – Essential for enhancing flavors; adjust this to taste, especially with other salty components.
• Freshly Ground Black Pepper (¼ teaspoon) – Provides a hint of spice; feel free to adjust according to your preference.

For the Baguette
• Baguette (1 loaf) – This forms the crispy base; slice into pieces for crostini. Choosing a day-old baguette can ease slicing and enhance texture.

Enjoy the journey of crafting these delightful Mushroom Crostini — a simple yet stunning appetizer that nibbles at the heart of Italian cuisine!

Step‑by‑Step Instructions for Mushroom Crostini

Step 1: Sauté the Aromatics
In a large skillet, melt 4 tablespoons of Vermont Creamery Cultured Unsalted Butter over medium heat. Once it's bubbly and fragrant, add thinly sliced medium yellow onions and both shiitake and brown mushrooms. Cook this mixture for about 5 minutes, stirring occasionally, until the mushrooms are tender and the onions are golden-brown, filling your kitchen with a heavenly aroma.

Step 2: Incorporate Wine and Thyme
Remove the skillet from heat and pour in ¼ cup of Marsala wine along with 2 teaspoons of fresh thyme leaves. Stir well to combine, and then return the skillet to low heat. Allow the mixture to simmer for another 5-7 minutes until the juices thicken and the mixture becomes jammy, creating a delicious topping for your Mushroom Crostini.

Step 3: Prepare the Baguette
While the mushroom mixture simmers, preheat your oven to 400°F (200°C). Slice the baguette into pieces about ½ inch thick and lay them flat on a baking sheet. Brush each slice generously with the remaining melted butter, then place in the oven to toast for 8-10 minutes until they are lightly browned and crispy, inviting perfect crunch.

Step 4: Assemble Your Crostini
Once the baguette slices are toasted, remove them from the oven and let them cool for a moment. Spoon a generous mound of the savory mushroom and onion mixture onto each toasted slice. For a final touch, garnish with additional fresh thyme leaves to enhance the visual appeal and flavor of your delightful Mushroom Crostini.

Step 5: Serve and Enjoy
Present your assembled Mushroom Crostini on a beautiful serving platter for an inviting touch. This easy yet sophisticated appetizer is perfect for gatherings, offering a delightful bite of rich buttery flavor combined with the sweet earthiness of the mushrooms.

Mushroom Crostini Variations & Substitutions

Feel free to get creative with this Mushroom Crostini recipe; the possibilities are endless and delicious!

  • Non-Dairy: Use plant-based butter to make this recipe dairy-free while still achieving that creamy richness. Your guests won’t even notice the difference!

  • Different Mushrooms: Experiment with ports, oyster, or even truffle mushrooms for a unique twist. Each variety brings a special flavor profile for new culinary adventures.

  • Spicy Kick: Add a pinch of red pepper flakes or some finely chopped jalapeños to the mushroom mixture for a delightful heat that will tantalize your taste buds!

  • Hearty Greens: Fold in sautéed spinach or kale for added nutrients and vibrant color. This not only boosts the flavor but also makes the dish more satisfying.

  • Gluten-Free: Substitute the baguette with gluten-free bread or crackers to ensure everyone at your gathering can enjoy a taste of this delightful appetizer.

  • Herb Swap: While fresh thyme is divine, try rosemary or basil for a different aromatic experience. Each herb will bring its own unique charm to the dish.

  • Cheesy Delight: Top your crostini with freshly grated Parmesan or mozzarella before toasting. This extra layer of cheesy goodness melts delectably into the warm mushroom mixture.

  • Gourmet Finish: Drizzle balsamic glaze over the finished crostini for a touch of sweetness and a sophisticated finish. It adds a beautiful presentation and piquant flavor that elevates the dish.

And if you want to explore more flavor-packed options, don’t forget to check out our Grilled Mushrooms Savory for another delightful culinary creation!

Expert Tips for Mushroom Crostini

  • Make-Ahead Magic: Prepare the mushroom and onion mixture in advance and refrigerate for up to 3-4 days. Just reheat before serving for an effortless appetizer.

  • Perfect Mushroom Cuts: Cut mushrooms thick enough to maintain their shape while cooking; they will shrink as they caramelize, ensuring a hearty bite on your crostini.

  • Butter Control: Use cultured unsalted butter for better seasoning control. This enhances the rich flavor of your Mushroom Crostini without overwhelming it with salt.

  • Wine Substitutions: If you'd like a non-alcoholic version, chicken stock or grape juice can replace Marsala wine, offering a slightly different yet delicious taste.

  • Customize Your Toppings: For added creaminess and flavor, consider topping the assembled crostini with goat cheese or crème fraîche, elevating the dish even further.

How to Store and Freeze Mushroom Crostini

Fridge: Keep the caramelized mushroom and onion mixture in an airtight container for up to 3-4 days. Reheat gently before serving to restore flavors.

Freezer: For longer storage, freeze the mushroom mixture in a sealed bag for up to 2 months. Thaw overnight in the fridge and reheat before topping your crostini.

Assembled Crostini: To maintain the crunchiness of the baguette, consume the final assembled Mushroom Crostini fresh. If leftovers remain, eat them within a day for the best texture.

Reheating: To reheat, place assembled crostini on a baking sheet and pop them in a warm oven (about 350°F) for 5-7 minutes, ensuring they crisp back up nicely.

What to Serve with Savory Mushroom Crostini?

The Mushroom Crostini is a delightful appetizer that pairs beautifully with various flavors and textures, creating a memorable meal experience.

  • Fresh Arugula Salad: A vibrant mix of peppery arugula, cherry tomatoes, and a tangy vinaigrette adds a refreshing contrast to the rich crostini. This salad brightens up your plate and palate.

  • Garlic Roasted Asparagus: Tender asparagus tossed in minced garlic and olive oil, then roasted to perfection, offers a delightful crunch alongside the silky mushroom topping. The earthy asparagus complements the flavors beautifully.

  • Creamy Polenta: A smooth bed of creamy, buttery polenta serves as a hearty base that balances the textures of the crostini, lending a comforting element to your meal. Plus, it’s easy to make ahead!

  • Wine Pairing: Lightly chilled Sauvignon Blanc is a perfect match, enhancing the dish's earthy flavors while adding a refreshing citrus note that awakens the senses. A sip of this wine perfectly complements every bite.

  • Savory Cheese Platter: Include a selection of soft cheeses like goat cheese or Brie along with some assorted olives. The rich, creamy cheeses enhance the flavors of the crostini, making them an irresistible pairing.

  • Mini Stuffed Peppers: Colorful mini bell peppers filled with cheese and herbs bring a burst of flavor and color to your table, creating an eye-catching spread that your guests will adore. Their sweetness perfectly contrasts the savory crostini.

Each of these pairings will elevate your Mushroom Crostini experience, making your gathering a celebration of flavors!

Make Ahead Options

These Mushroom Crostini are perfect for meal prep aficionados looking to save time and enjoy delicious homemade food! You can prepare the mushroom and onion mixture up to 3 days in advance. Simply sauté the onions and mushrooms as instructed, then let the mixture cool before transferring it to an airtight container for refrigeration. To maintain quality, avoid adding the toasted baguette slices until just before serving, as this will keep them crispy. When you’re ready to impress your guests, reheat the mixture gently on the stove and assemble your crostini with the toasted baguette slices just before serving. This allows you to enjoy restaurant-quality results with minimal effort!

Mushroom Crostini Recipe FAQs

What type of mushrooms should I use for the best flavor?
Absolutely! Shiitake mushrooms bring an earthy richness that truly elevates the Mushroom Crostini. However, if you can't find them, cremini mushrooms are a great alternative that will still provide wonderful flavor and texture.

How long can I store the mushroom and onion mixture in the fridge?
You can keep the caramelized mushroom and onion mixture in an airtight container for up to 3–4 days. Just make sure to reheat it gently before topping your crostini to bring back its delicious flavors.

Can I freeze the mushroom and onion mixture?
Yes, you can! To freeze, place the mixture in a zip-top bag, removing as much air as possible, and store it in the freezer for up to 2 months. When you’re ready to use it, just thaw it overnight in the fridge and reheat it on the stove before serving.

What’s the best way to reheat leftover assembled crostini?
For the crispiest outcome, place any leftover assembled Mushroom Crostini on a baking sheet and reheat them in a preheated oven at 350°F (175°C) for 5–7 minutes. This will help restore that delightful crunch while warming the mushroom topping.

Are there any dietary considerations I should keep in mind?
Definitely! If you’re serving this dish to guests, be sure to check for any mushroom allergies or dietary restrictions. For a gluten-free option, you can serve the mushroom mixture on gluten-free crackers instead of baguette slices, ensuring everyone can enjoy this savory treat!

Can I prepare the crostini toppings ahead of time?
Yes! Preparing the mushroom and onion mixture ahead of time is a fantastic idea. Just make it up to 3–4 days in advance, store it in the fridge, and reheat it before serving. This way, you can spend more time enjoying your gathering with friends!

Mushroom Crostini

Deliciously Easy Mushroom Crostini for Your Next Gathering

Mushroom Crostini is a quick and impressive vegetarian appetizer perfect for gatherings.
Print Recipe Pin Recipe
Prep Time 15 minutes mins
Cook Time 20 minutes mins
Total Time 35 minutes mins
Servings: 12 crostini
Course: Appetizers
Cuisine: Italian
Calories: 120
Ingredients Equipment Method Nutrition Notes

Ingredients
  

For the Mushroom Mixture
  • 4 tablespoons Vermont Creamery Cultured Unsalted Butter Provides a rich, creamy base.
  • 1 medium Yellow Onion Thinly sliced.
  • 8 ounces Shiitake Mushrooms Cleaned and sliced.
  • 8 ounces Brown Mushrooms Cleaned and sliced.
  • 1 clove Garlic Pressed or minced.
  • 0.25 cup Marsala Wine Can substitute with chicken stock.
  • 2 teaspoons Fresh Thyme Leaves Fresh preferred.
  • 0.5 teaspoon Kosher Salt Adjust to taste.
  • 0.25 teaspoon Freshly Ground Black Pepper Adjust to taste.
For the Baguette
  • 1 loaf Baguette Slice into pieces for crostini.

Equipment

  • Skillet
  • Baking Sheet
  • Oven

Method
 

Step-by-Step Instructions for Mushroom Crostini
  1. Sauté the Aromatics: Melt butter in a skillet over medium heat, add onions and mushrooms, cook until tender.
  2. Incorporate Wine and Thyme: Add Marsala wine and thyme, simmer until the mixture is jammy.
  3. Prepare the Baguette: Preheat oven to 400°F, slice baguette, brush with melted butter, and toast until crispy.
  4. Assemble Your Crostini: Spoon mushroom mixture onto toasted baguette slices, garnish with thyme.
  5. Serve and Enjoy: Present on a platter and enjoy your Mushroom Crostini.

Nutrition

Serving: 1crostiniCalories: 120kcalCarbohydrates: 15gProtein: 3gFat: 6gSaturated Fat: 3gPolyunsaturated Fat: 0.5gMonounsaturated Fat: 2gCholesterol: 15mgSodium: 200mgPotassium: 150mgFiber: 1gSugar: 1gVitamin A: 200IUVitamin C: 2mgCalcium: 30mgIron: 0.5mg

Notes

Make ahead by preparing the mushroom mixture in advance and refrigerating. Reheat before serving for best results.

Tried this recipe?

Let us know how it was!
  • « Previous Page
  • 1
  • …
  • 44
  • 45
  • 46
  • 47
  • 48
  • …
  • 179
  • Next Page »

Welcome!

Hi, I’m Grace, a Sydney-based home cook with a passion for bold flavors and trending ingredients. Whether you’re a busy beginner or a seasoned foodie, you’ll find dishes here that are fresh, fun, and full of flavor.

More about me

Popular Recipes

  • Cheesy Chicken Garlic Bread Sandwich
    Cheesy Chicken Garlic Bread Sandwich for Cozy Family Moments
  • Easy Chicken Ranch Wraps
    Easy Chicken Ranch Wraps: Quick, Creamy & Totally Satisfying
  • Chicken Caesar Sandwiches
    Delicious Chicken Caesar Sandwiches for Quick Comfort Food
  • best Cuban sandwich
    The Best Cuban Sandwich You’ll Want Every Weeknight!

Footer

↑ back to top

About

  • Privacy Policy
  • Disclaimer
  • Terms & Conditions

Newsletter

  • Sign Up! for emails and updates

Contact

  • About me
  • Contact me

Copyright © 2025 TastyTrendIngredients