tastytrendingredients

  • Home
  • Recipes
    • Appetizers
    • Breakfast
    • Dessert
    • Dinner
    • Drinks
    • Salads
    • Snacks
    • Soups
  • About me
  • Contact me
menu icon
go to homepage
  • Home
  • Recipes
    • Appetizers
    • Breakfast
    • Dessert
    • Dinner
    • Drinks
    • Salads
    • Snacks
    • Soups
  • About me
  • Contact me
search icon
Homepage link
  • Home
  • Recipes
    • Appetizers
    • Breakfast
    • Dessert
    • Dinner
    • Drinks
    • Salads
    • Snacks
    • Soups
  • About me
  • Contact me
×

Crockpot Garlic Butter Beef Bites with Potatoes for Cozy Nights

January 28, 2026 by Grace Snow Leave a Comment

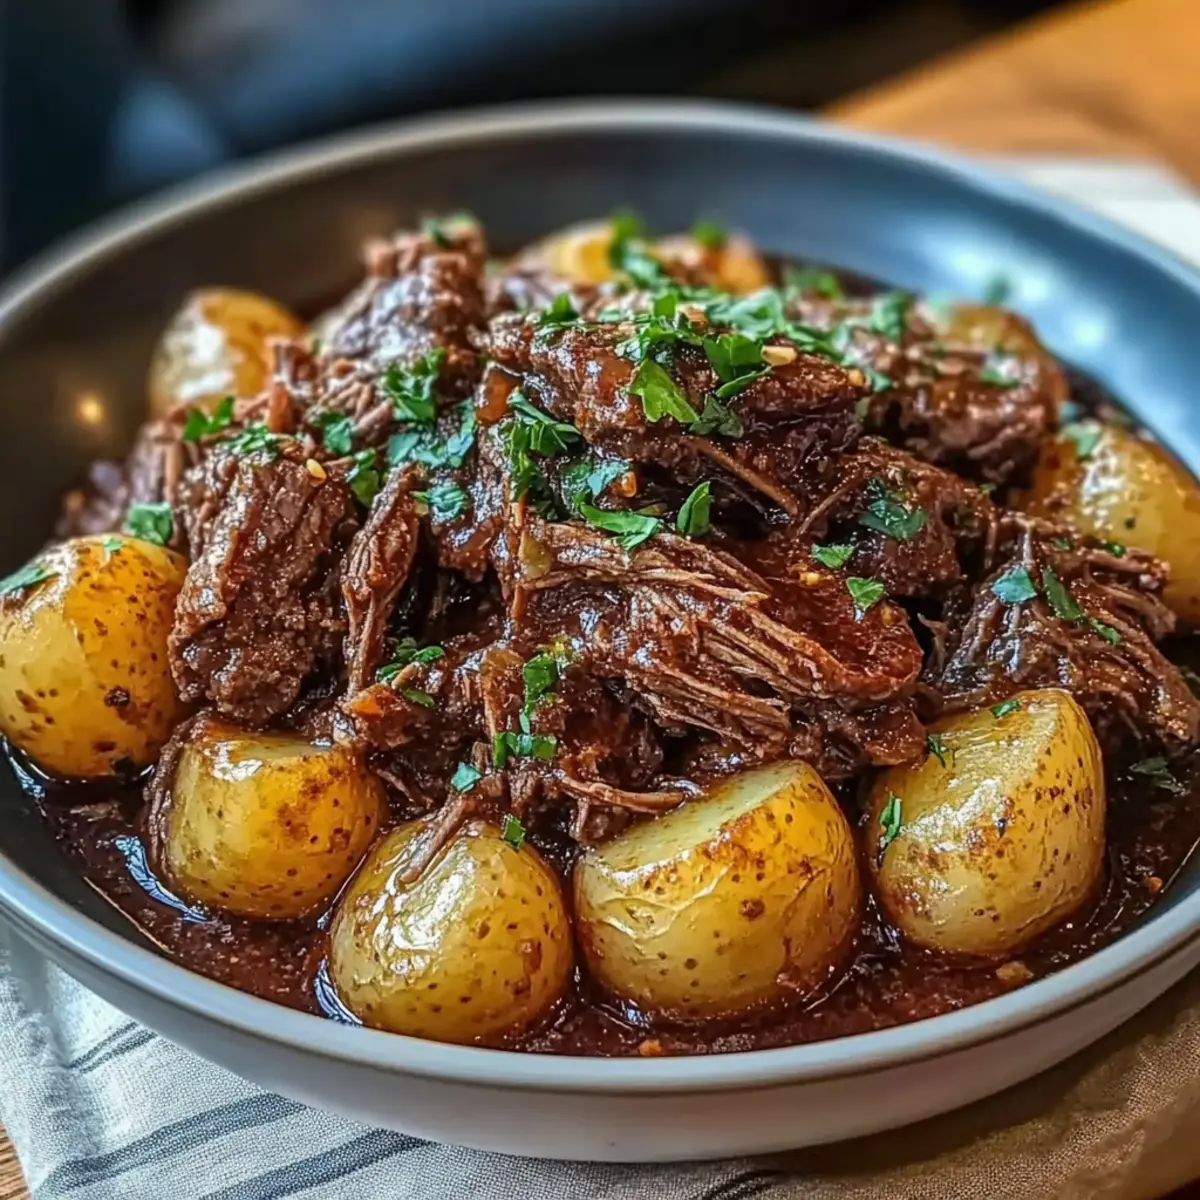
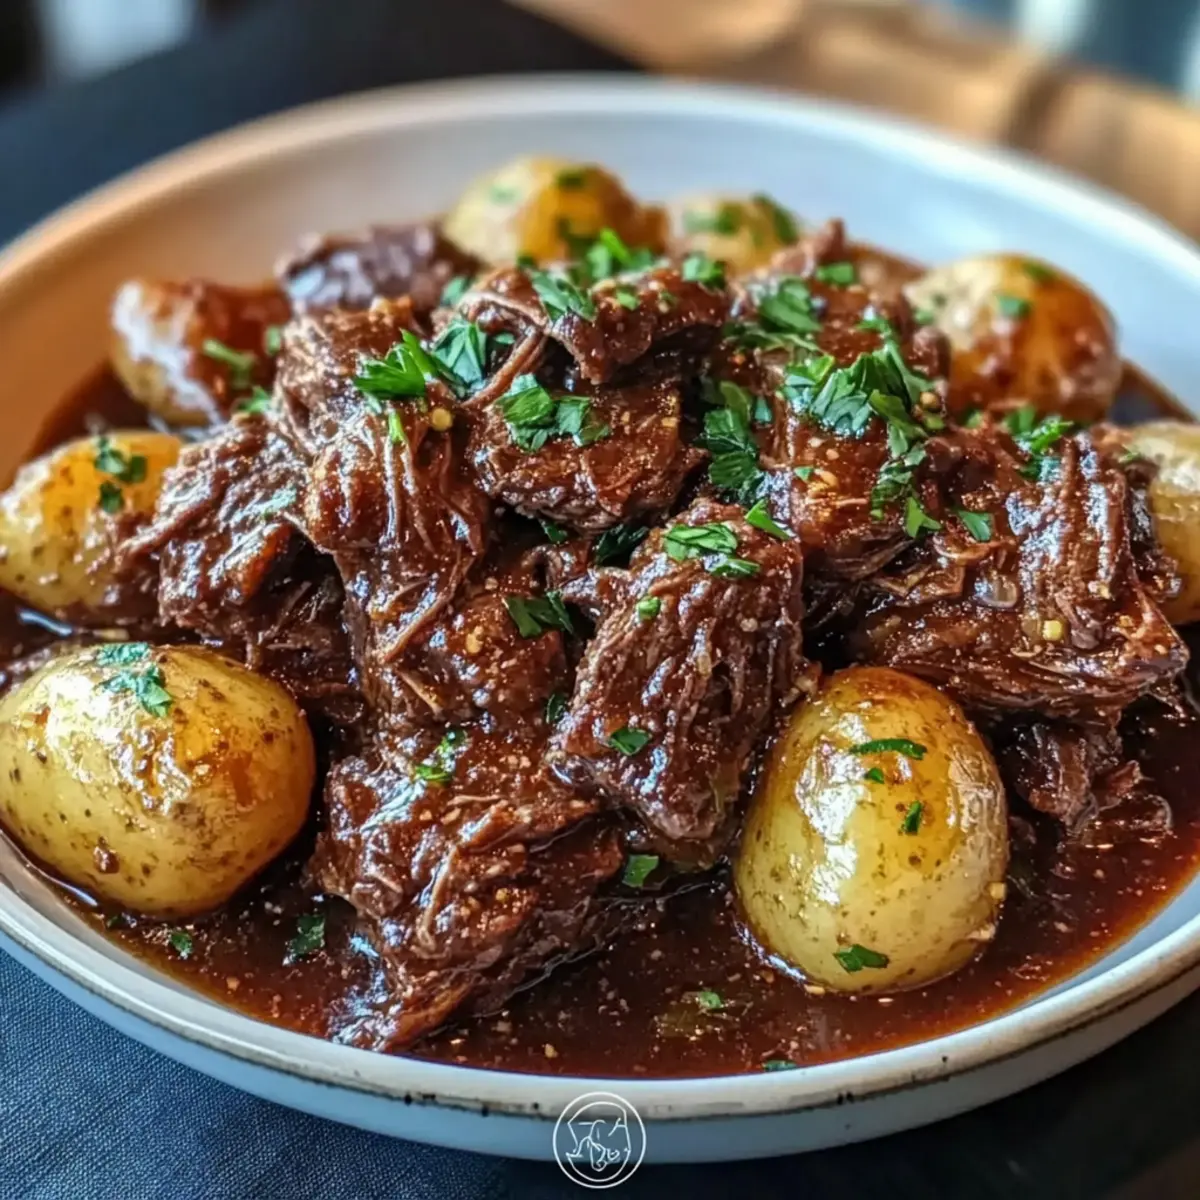
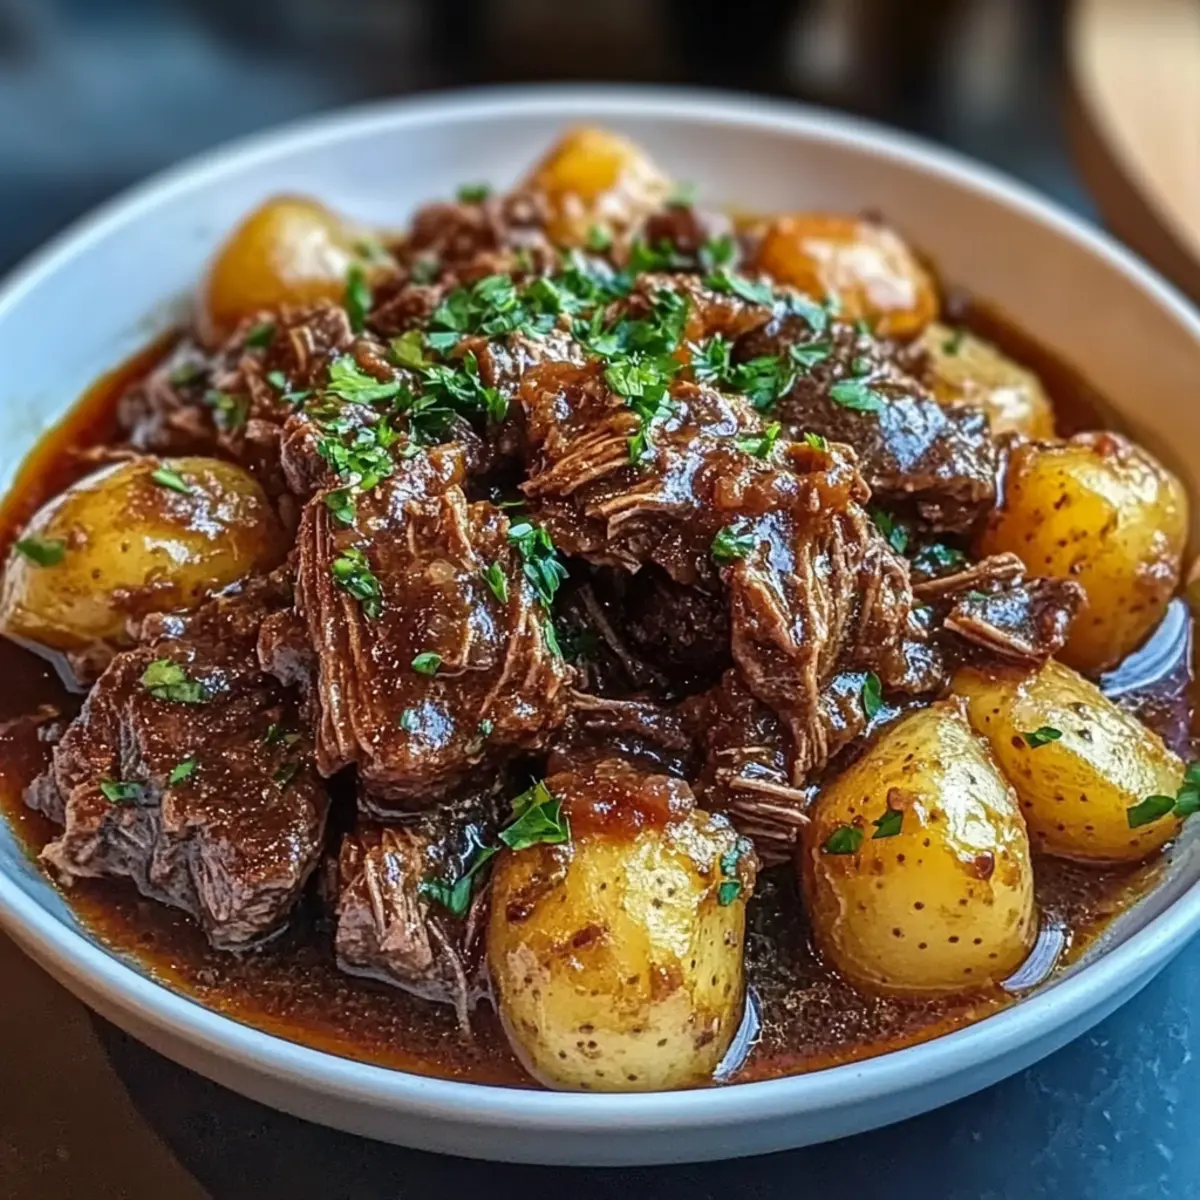
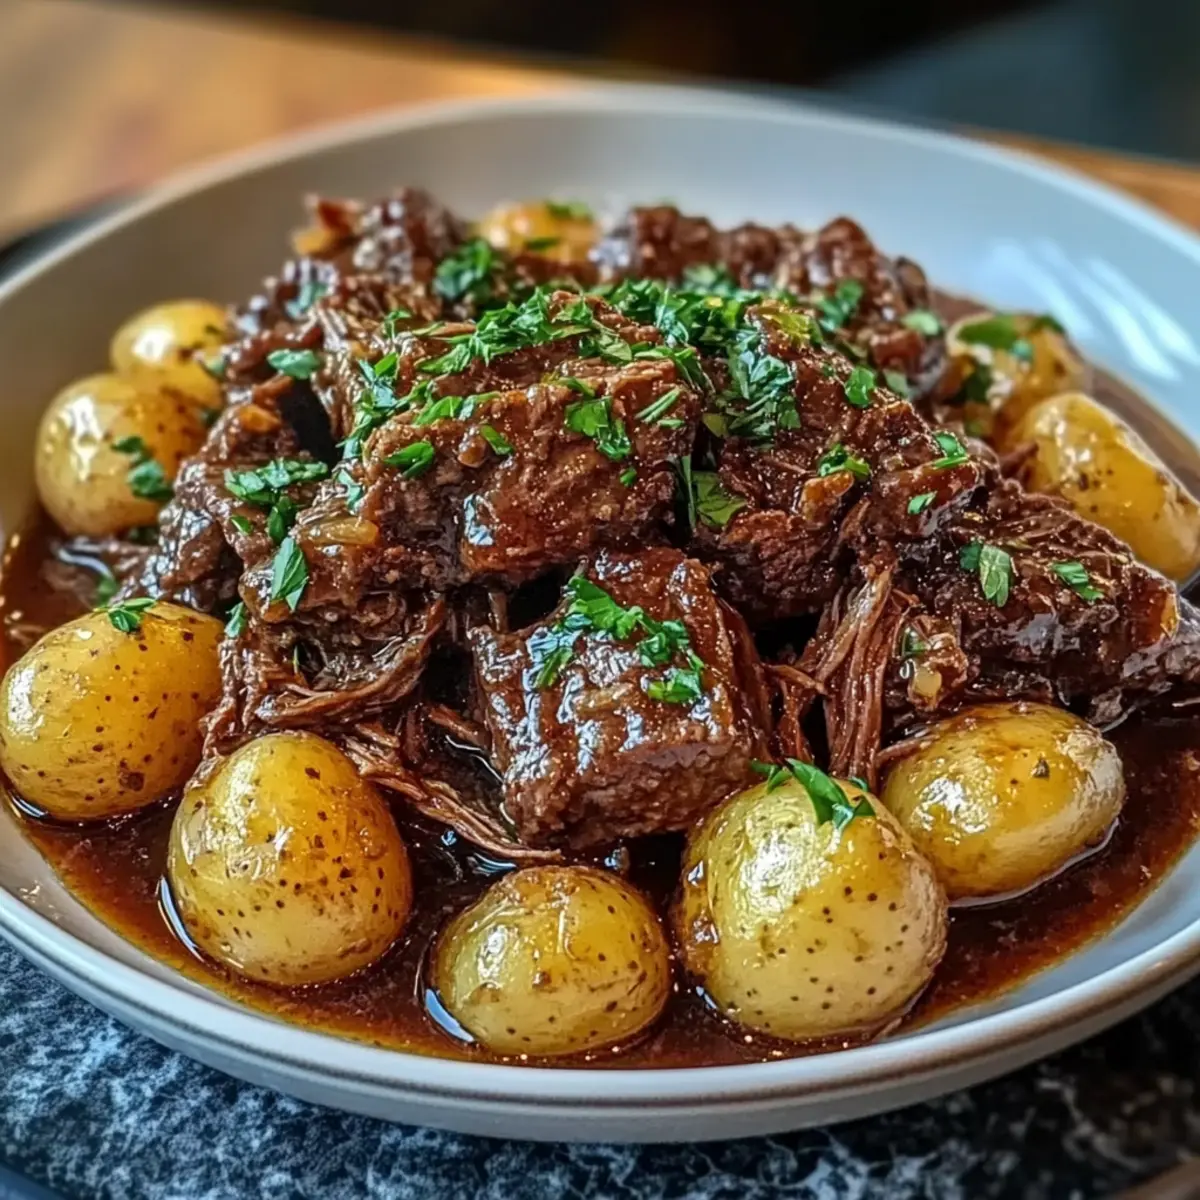
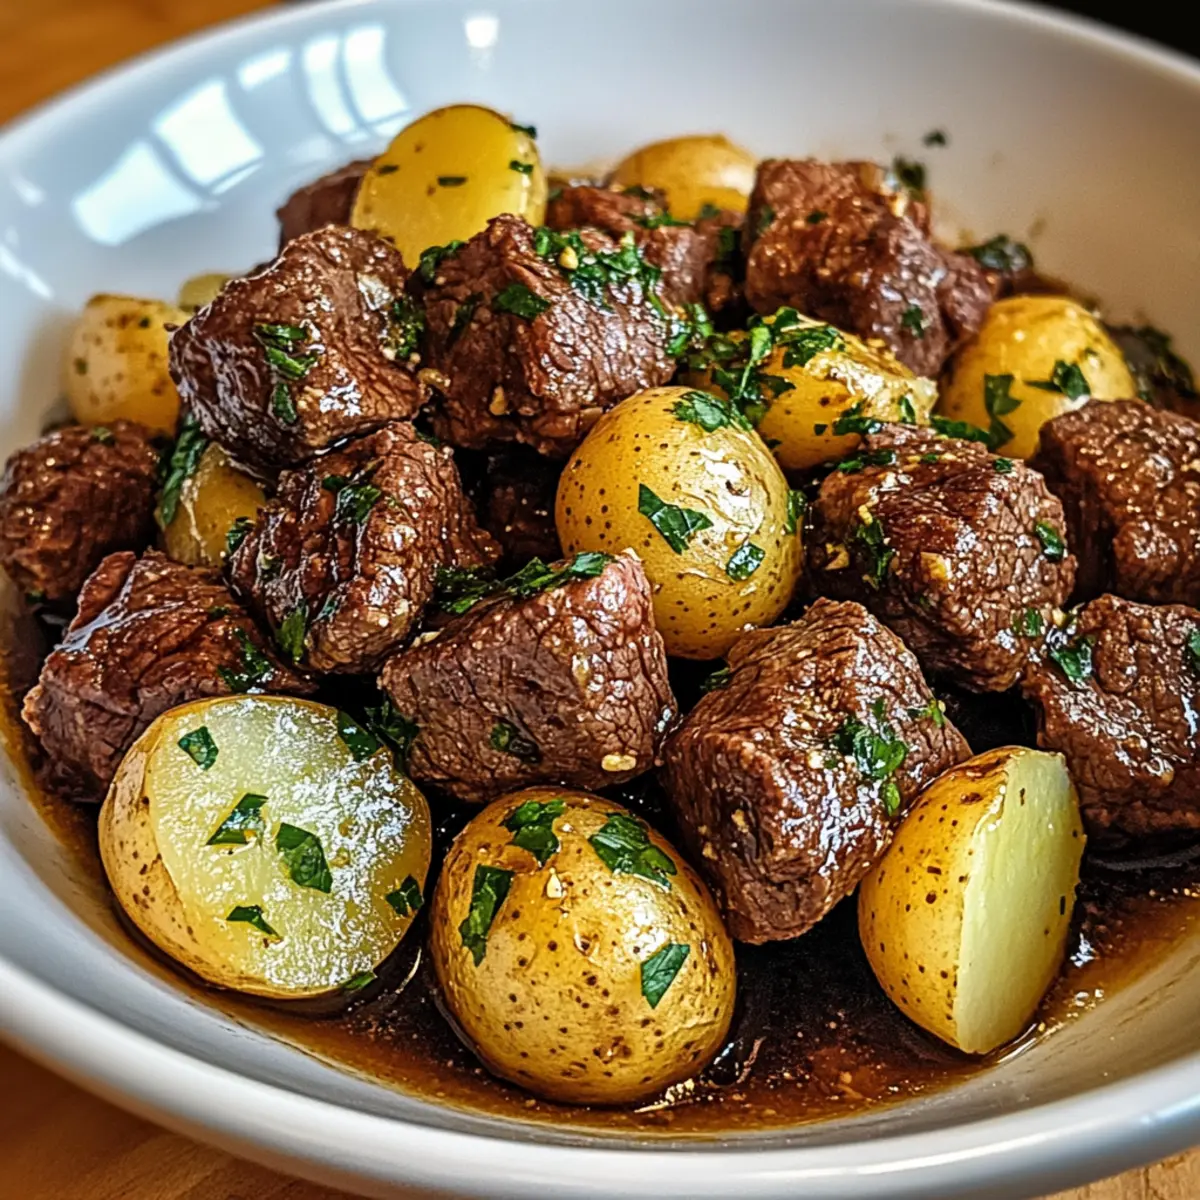
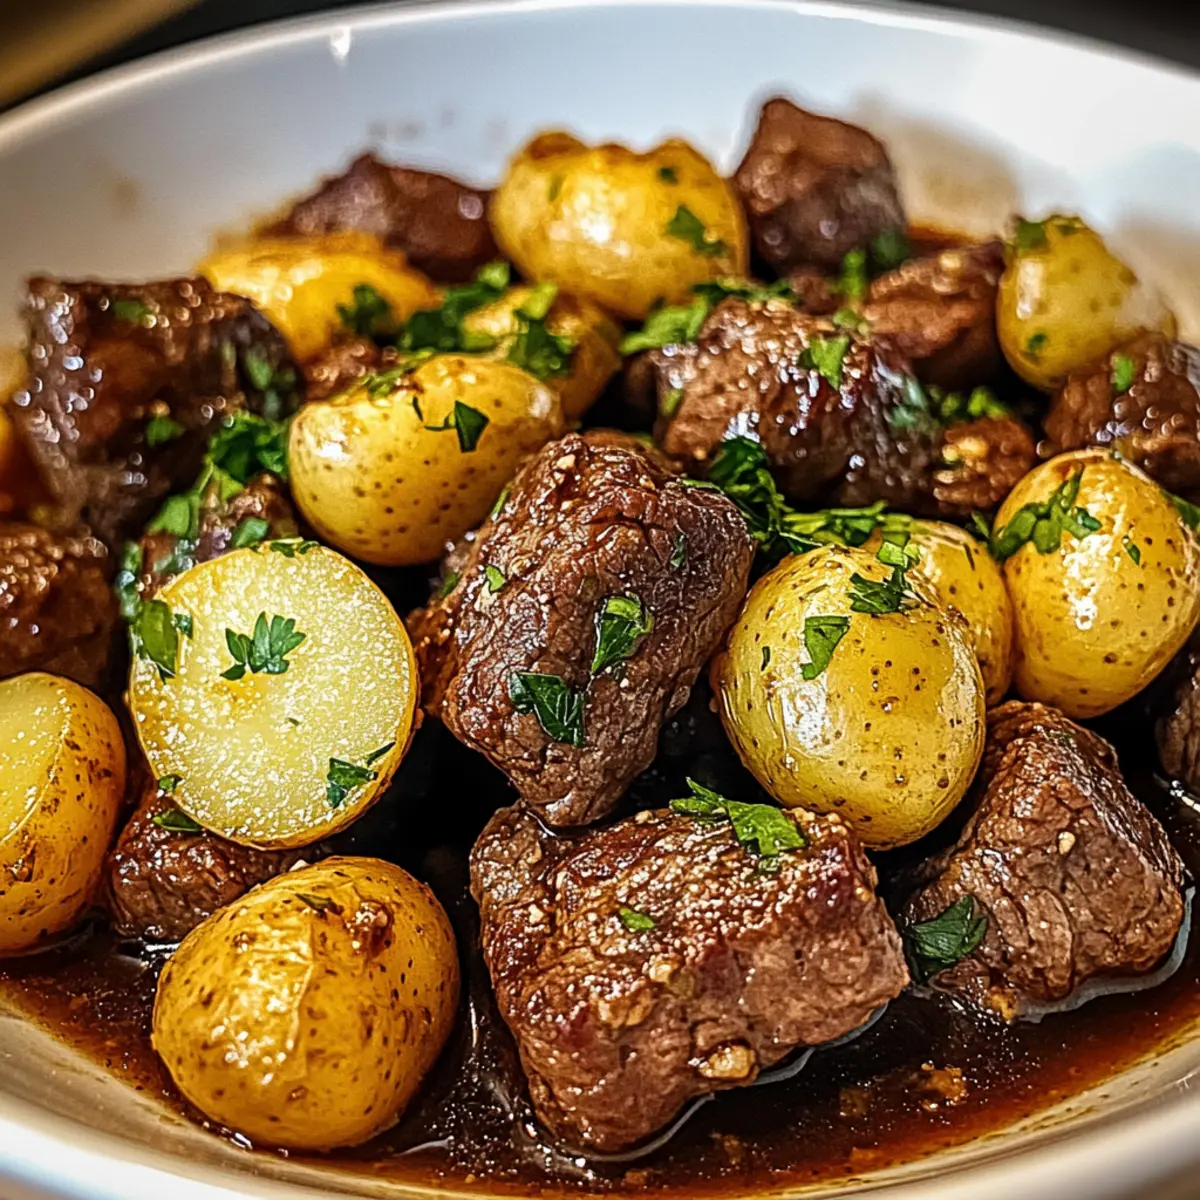
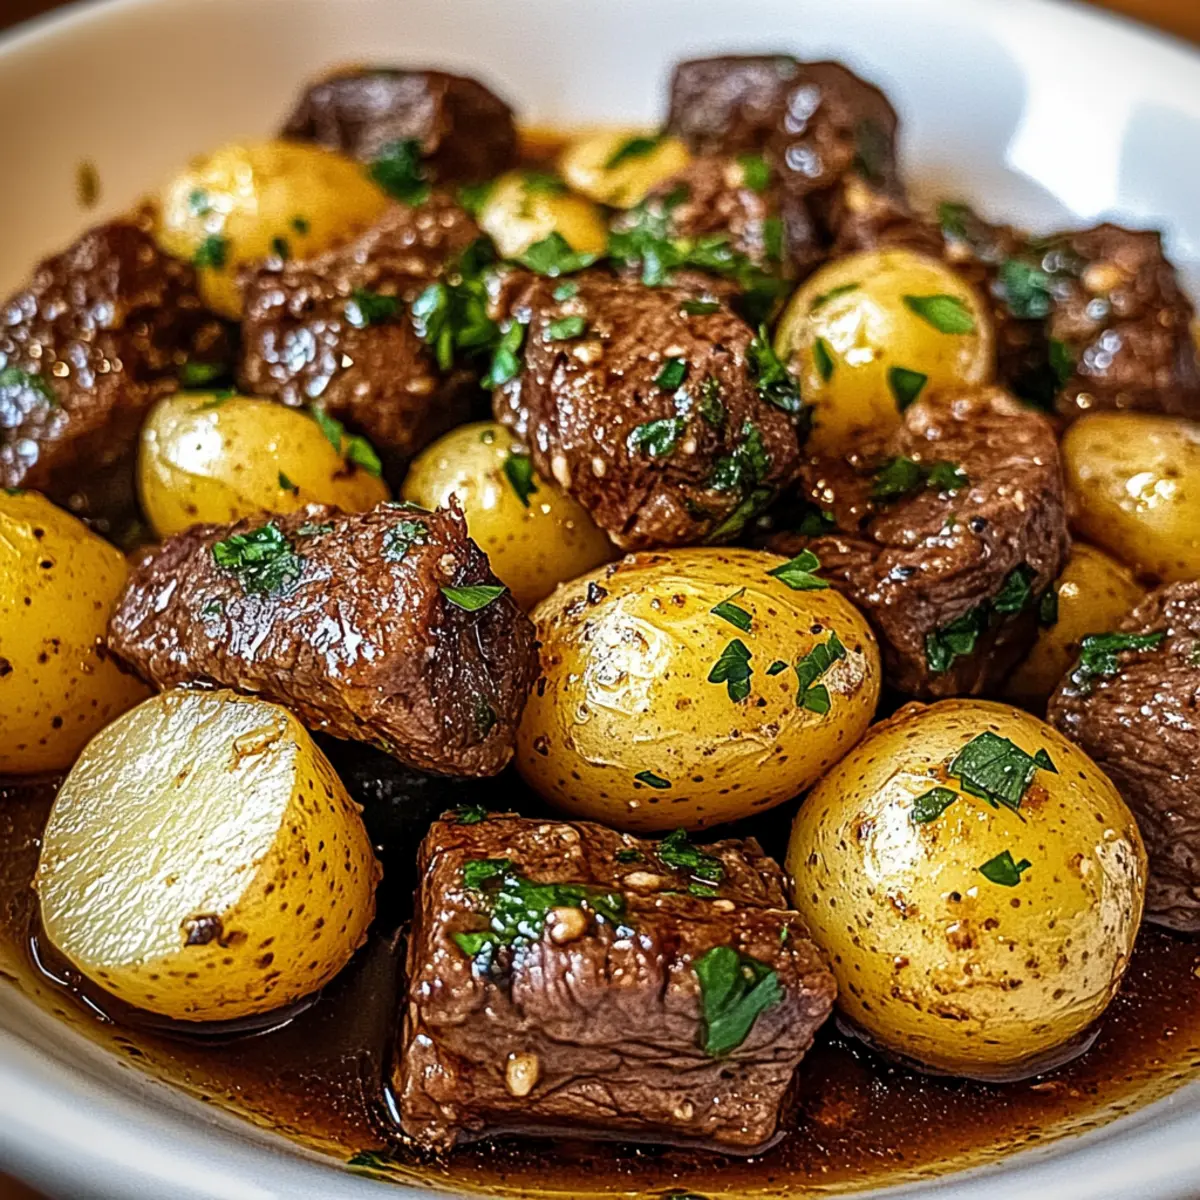
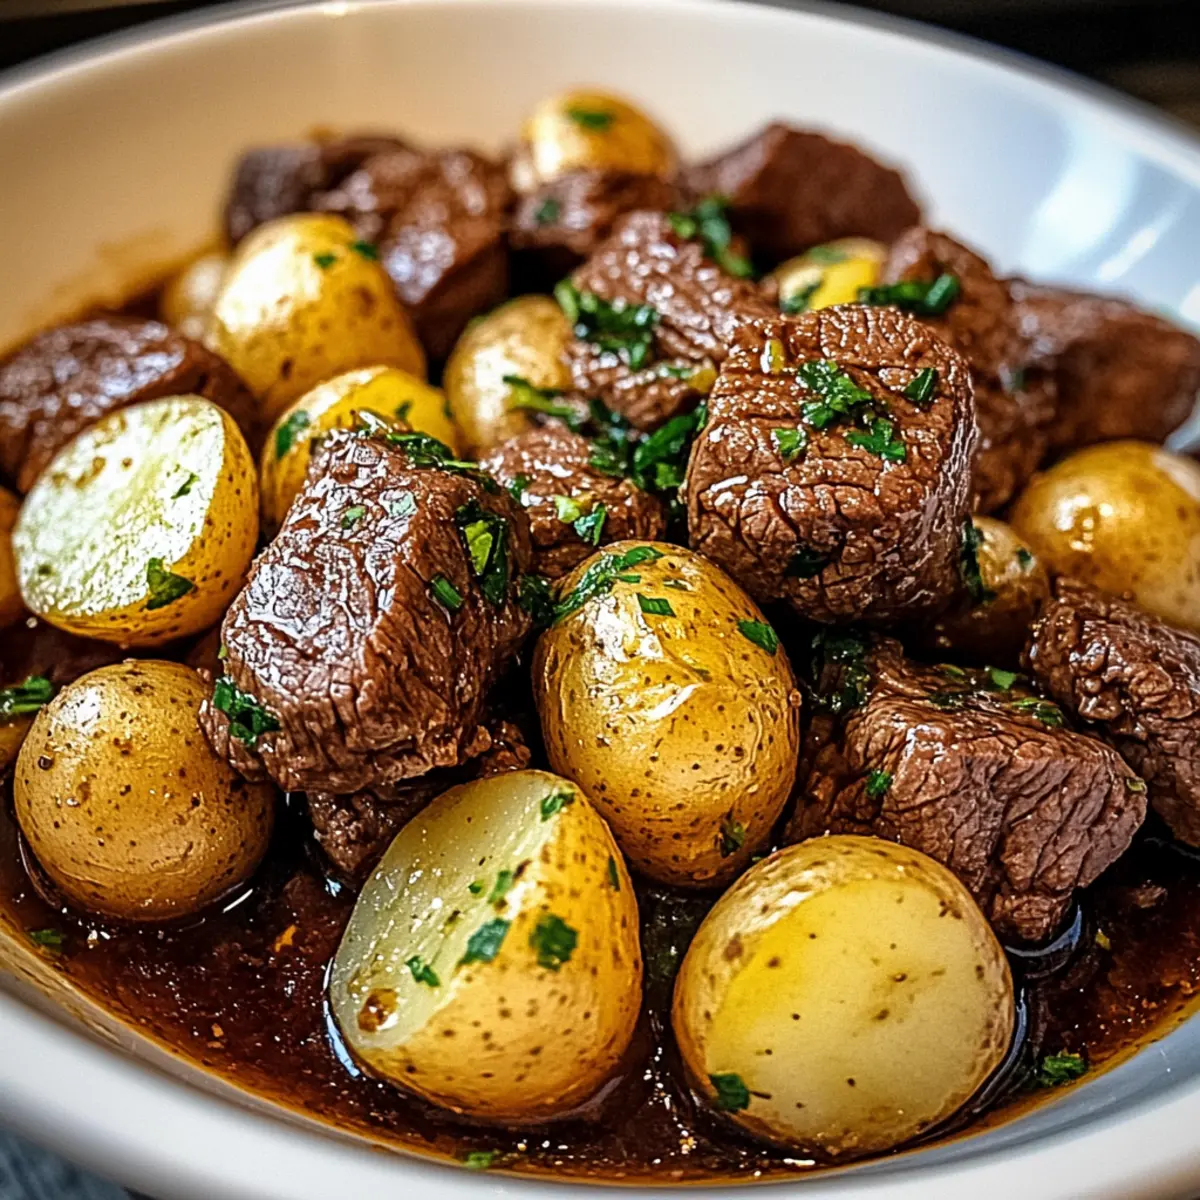
As I walked into the kitchen, the rich aroma of garlic and herbs wrapped around me like a cozy blanket, instantly making me feel at home. These Crockpot Garlic Butter Beef Bites with Potatoes are my go-to comfort food for those busy weeknights when I crave something hearty yet hassle-free. With just a handful of ingredients and minimal fuss, this beginner-friendly recipe delivers savory bites of beef that melt in your mouth, along with perfectly tender potatoes that soak up every bit of that luscious garlic butter. It's not just a meal; it's a warm hug on a plate, designed to bring joy to your home and delight to your loved ones. Are you ready to transform your dinner routine into a cozy celebration?

Why You'll Love These Beef Bites

Simplicity at its Finest: With just a few ingredients, this recipe is as easy as combining and cooking, making it perfect for beginners or busy cooks.

Mouthwatering Aromatics: The combination of garlic and herbs creates an inviting aroma that fills your home, uplifting spirits even on the busiest weeknights.

Versatile Comfort: Pair these bites with a side of crusty bread or serve alongside a fresh salad for a balanced meal. Don’t forget to check out my recipe for Cheesy Garlic Bread to soak up that delicious sauce!

Time-Saving Delight: Simply set your crockpot to work, allowing you to go about your day while this dish cooks to perfection, freeing up your evening.

Family Favorite: The savory flavor and tender texture ensure that everyone at the table will be asking for seconds, making it a surefire hit for gatherings or weeknight dinners.

Crockpot Garlic Butter Beef Bites Ingredients

For the Beef and Potatoes
• Beef Stew Meat – Provides hearty, meaty bites that become fork-tender with slow cooking; substitute with chuck roast or brisket for similar results.
• Baby Potatoes – Halved to match beef cubes in size; they soak up the garlic butter sauce, creating a creamy texture, or try any favorite potato variety instead.

For the Flavorful Sauce
• Unsalted Butter – Creates a rich, glossy base for the sauce, melting with garlic to form a velvety coating.
• Garlic (Minced) – Adds aromatic flavor; sauté until fragrant but not browned to avoid bitterness.
• Olive Oil – Aids in seasoning adherence and prevents sticking when searing beef.
• Salt – Enhances all other flavors, ensuring well-seasoned beef.
• Black Pepper – Adds mild heat to balance the butter and beef richness.

For the Herbs and Spices
• Dried Thyme – Provides herbaceous notes that perfectly complement beef flavors.
• Dried Rosemary – Adds a savory warmth that enhances the garlic and butter relationship.
• Paprika – Contributes color and mild smokiness for depth.

For Cooking Liquid
• Beef Broth – Keeps beef and potatoes moist; chicken or vegetable broth can be a valid substitute.

For Garnish
• Fresh Parsley (optional) – Adds a pop of color and fresh flavor when garnished, brightening up the dish.

These Crockpot Garlic Butter Beef Bites with Potatoes are not just a meal; they represent a delicious opportunity to bring cozy comfort into your home. Enjoy!

Step‑by‑Step Instructions for Crockpot Garlic Butter Beef Bites with Potatoes

Step 1: Prepare the Beef
Begin by placing your beef stew meat in a large mixing bowl. Drizzle with olive oil and sprinkle generously with salt, black pepper, dried thyme, dried rosemary, and paprika. Use your hands or a spoon to thoroughly toss the beef, ensuring each piece is well-coated with these seasonings. This step adds a flavor-packed foundation for your Crockpot Garlic Butter Beef Bites with Potatoes.

Step 2: Sear the Beef
In a large skillet, heat a drizzle of olive oil over medium-high heat. Once hot, add the seasoned beef cubes in batches, ensuring not to overcrowd the pan. Sear for about 3-4 minutes per side, or until the meat develops a rich, brown crust. This optional step enhances the depth of flavor, so take your time. Once browned, transfer the beef to the crockpot.

Step 3: Sauté the Garlic
In the same skillet, reduce the heat to low and add unsalted butter, allowing it to melt gently. Once melted, add the minced garlic and sauté for 1-2 minutes, stirring until fragrant but not browned, which can turn bitter. The golden, buttery garlic creates a flavorful sauce base for our dish. Pour this garlic butter mixture directly over the beef in the crockpot.

Step 4: Add the Potatoes
Next, prepare your baby potatoes by halving them to match the size of the beef cubes. Scatter these around the beef in the crockpot, ensuring even distribution throughout. The potatoes will absorb the rich flavors from the garlic butter and beef broth, giving you tender bites that complement the savory meat in your Crockpot Garlic Butter Beef Bites with Potatoes.

Step 5: Incorporate the Broth
Pour the beef broth over the contents in the crockpot, allowing it to pool at the bottom. This liquid is crucial as it keeps your beef and potatoes moist while they cook. The broth envelops everything in warmth, ensuring deliciously tender ingredients. Make sure not to stir too vigorously, keeping the potatoes intact.

Step 6: Stir Gently
With the broth added, gently stir the ingredients in your crockpot. Be careful not to crush the potatoes as you combine everything. This step ensures that all flavors meld together while preserving the integrity of the potatoes. You’re building a cozy layer of flavors for your Crockpot Garlic Butter Beef Bites with Potatoes.

Step 7: Set the Cooking Time
Now it’s time to cover the crockpot with a lid. Set the cooking on low for 6-8 hours or high for 3-4 hours, depending on your schedule. The goal is to achieve fork-tender beef and creamy potatoes. Check for doneness towards the end of the cooking time; you want everything to be beautifully tender and flavorful.

Step 8: Garnish and Serve
Once cooking is complete, taste and adjust the seasoning if needed. For a burst of freshness, consider garnishing with freshly chopped parsley before serving. Scoop generous portions of your Crockpot Garlic Butter Beef Bites with Potatoes into bowls, enjoying the warmth and comforting flavors that are just waiting to embrace you and your loved ones.

How to Store and Freeze Crockpot Garlic Butter Beef Bites

Fridge: Keep leftovers in an airtight container for up to 3 days; ensure it's completely cooled before sealing for best results.

Freezer: For longer storage, divide portions into freezer-safe containers and freeze for up to 2-3 months. Thaw overnight in the fridge before reheating.

Reheating: Reheat on the stove or in the microwave, adding a splash of beef broth to maintain moisture and enhance flavors in your Crockpot Garlic Butter Beef Bites.

Temperature Check: Always ensure reheated food reaches 165°F for safe consumption and the best taste experience.

Expert Tips for Crockpot Garlic Butter Beef Bites

• Searing Matters: Enhance the flavor by searing the beef before adding it to the crockpot; this step deepens the savory notes.

• Don’t Overcrowd: When browning the beef, avoid overcrowding the pan; it prevents proper browning and can lead to steaming instead.

• Watch the Cooking Time: Different crockpot models can vary in heat; monitor the cooking time to ensure fork-tender beef and perfectly soft potatoes.

• Customize with Veggies: Add carrots or onions for a nutritional boost and extra flavor reminiscent of a hearty stew.

• Adjust the Broth: If you’re out of beef broth, don’t worry! Chicken or vegetable broth works just as well in this comforting dish.

What to Serve with Crockpot Garlic Butter Beef Bites with Potatoes

Elevate your cozy dinner with delightful pairings that balance flavors and textures.

  • Crusty Bread: A must-have to scoop up the rich garlic butter sauce, adding a satisfying crunch to each bite.
  • Fresh Green Salad: A vibrant salad with vinaigrette complements the hearty beef, offering a refreshing contrast and lightness.
  • Creamy Mashed Potatoes: For a double dose of comfort, buttery mashed potatoes soak up the flavors and add a silky texture.
  • Roasted Vegetables: Caramelized carrots and Brussels sprouts provide a sweet and earthy balance against the savory beef bites.
  • Garlic Butter Rice: Fluffy rice cooked in garlic butter pairs beautifully, enhancing the comforting essence of the dish.
  • Red Wine: A glass of velvety red wine deepens the flavors and creates a perfect pairing for cozy evenings.
  • Homemade Coleslaw: A crunchy, tangy coleslaw balances the richness of the beef, offering a crisp bite at every turn.
  • Chocolate Cake: End on a sweet note with a slice of rich chocolate cake, making your meal feel like a celebration.

Make Ahead Options

These Crockpot Garlic Butter Beef Bites with Potatoes are perfect for meal prep aficionados! To save time during busy weeknights, you can season the beef and refrigerate it in an airtight container for up to 24 hours. Additionally, you can chop the baby potatoes and toss them with a little olive oil to prevent browning, storing them alongside the beef. When you're ready to cook, simply transfer the seasoned beef and prepped potatoes into the crockpot, pour in the garlic butter mixture, and add beef broth. Set it to cook on low for 6-8 hours or high for 3-4 hours, allowing the flavors to meld beautifully while you attend to your day. You'll enjoy heartwarming results with minimal effort!

Crockpot Garlic Butter Beef Bites with Potatoes Variations

Feel free to make this cozy dish your own with these delightful twists and swaps!

  • Vegetable Boost: Add carrots and onions to enhance nutrition and flavor. These veggies will meld beautifully with the rich sauce, creating a heartier meal that feels like a warm embrace.

  • Broth Swap: Use chicken or vegetable broth instead of beef broth for a lighter twist. The result is still flavorful and comforting, making it perfect for those who prefer a non-red meat option.

  • Herb Mix: Swap out dried thyme and rosemary for your favorite fresh herbs, such as parsley or oregano. Fresh herbs infuse a vibrant flavor that makes each bite feel like springtime.

  • Spice it Up: For a spicy kick, add a pinch of red pepper flakes or diced jalapeños. This simple addition turns up the heat and awakens your taste buds, bringing excitement to every spoonful.

  • Different Potatoes: Try sweet potatoes or Yukon golds instead of baby potatoes. Their unique flavors and textures bring a new dimension to the dish, adding a hint of sweetness that pairs beautifully with garlic butter.

  • Creamy Touch: Stir in a dollop of cream cheese or sour cream at the end for a creamy finish. It creates a rich, velvety sauce that clings to the beef and potatoes, turning comfort food into a gourmet experience.

  • Honey Glaze: Drizzle a little honey before serving for a touch of sweetness that contrasts delightfully with savory flavors. Just a teaspoon can elevate the dish to new heights, making it an enticing surprise.

  • Classic Pairing: Serve your beef bites with a side of Cheesy Garlic Bread to soak up that scrumptious sauce. It creates a classic, comforting meal that will leave everyone asking for more!

Feel free to mix and match these ideas to make this dish uniquely yours. Cooking is all about love, creativity, and sharing with those you care about!

Crockpot Garlic Butter Beef Bites with Potatoes Recipe FAQs

What type of beef is best for this recipe?
For the best results, use beef stew meat, which becomes tender during slow cooking. You can also substitute with cuts like chuck roast or brisket if you prefer. These choices ensure a hearty texture that complements the potatoes beautifully.

How should I store leftovers?
Refrigerate your leftovers in an airtight container for up to 3 days. Ensure the dish is completely cooled before sealing it to maintain freshness and prevent spoilage.

Can I freeze Crockpot Garlic Butter Beef Bites?
Absolutely! To freeze, divide the leftovers into freezer-safe containers or bags. This dish will stay fresh for up to 2-3 months. When you're ready to enjoy, just thaw in the fridge overnight and reheat gently.

What if I don’t have beef broth?
No problem at all! If you're out of beef broth, you can substitute with chicken broth or vegetable broth. Water with added seasonings can also work in a pinch, although the flavor may be less rich.

How can I prevent the beef from becoming tough?
To avoid tough beef, make sure to monitor the cooking time depending on your crockpot model, as some cook faster than others. Searing the beef before adding it to the crockpot also helps enhance tenderness and flavor, so it's worth considering if you have the time!

Is this dish suitable for anyone with dietary restrictions?
While this recipe is a comforting delight, always check for any specific allergies. It contains beef and dairy, so if you or your loved ones have allergies to those, consider alternative ingredients like dairy-free butter or a plant-based protein for a delicious twist.

Crockpot Garlic Butter Beef Bites with Potatoes

Crockpot Garlic Butter Beef Bites with Potatoes for Cozy Nights

These Crockpot Garlic Butter Beef Bites with Potatoes are a comforting, hassle-free meal perfect for busy weeknights.
Print Recipe Pin Recipe
Prep Time 15 minutes mins
Cook Time 8 hours hrs
Total Time 8 hours hrs 15 minutes mins
Servings: 6 servings
Course: Dinner
Cuisine: Comfort Food
Calories: 350
Ingredients Equipment Method Nutrition Notes

Ingredients
  

For the Beef and Potatoes
  • 2 pounds Beef Stew Meat Substitute with chuck roast or brisket for similar results.
  • 1 pound Baby Potatoes Halved to match beef cubes in size.
For the Flavorful Sauce
  • 1/2 cup Unsalted Butter
  • 4 cloves Garlic (Minced) Sauté until fragrant but not browned.
  • 2 tablespoons Olive Oil
  • 1 teaspoon Salt
  • 1/2 teaspoon Black Pepper
For the Herbs and Spices
  • 1 teaspoon Dried Thyme
  • 1 teaspoon Dried Rosemary
  • 1 teaspoon Paprika
For Cooking Liquid
  • 2 cups Beef Broth Chicken or vegetable broth can be substituted.
For Garnish
  • 1/4 cup Fresh Parsley (optional) Adds color and fresh flavor.

Equipment

  • Crockpot
  • Skillet
  • Mixing Bowl

Method
 

Step‑by‑Step Instructions
  1. Prepare the Beef by tossing it with olive oil, salt, black pepper, thyme, rosemary, and paprika.
  2. Sear the Beef in a skillet until browned, about 3-4 minutes per side.
  3. Sauté the Garlic in the same skillet with butter until fragrant.
  4. Add halved Potatoes around the Beef in the crockpot.
  5. Pour Beef Broth over the contents in the crockpot.
  6. Gently stir the ingredients to combine without crushing the Potatoes.
  7. Set the Cooking Time on low for 6-8 hours or high for 3-4 hours.
  8. Garnish with Parsley before serving.

Nutrition

Serving: 1bowlCalories: 350kcalCarbohydrates: 30gProtein: 25gFat: 15gSaturated Fat: 7gPolyunsaturated Fat: 2gMonounsaturated Fat: 6gCholesterol: 70mgSodium: 800mgPotassium: 800mgFiber: 4gSugar: 2gVitamin A: 500IUVitamin C: 30mgCalcium: 40mgIron: 3mg

Notes

For best results, allow to cool before storing leftovers in an airtight container. Can be frozen for longer storage.

Tried this recipe?

Let us know how it was!

Heavenly Crockpot French Dip Sandwiches for Ultimate Comfort

January 28, 2026 by Grace Snow Leave a Comment

As I walked into my kitchen, the inviting aroma of slow-cooked beef mingled with the scent of caramelized onions, making my mouth water in anticipation. Today, I’m sharing my go-to recipe for Crockpot French Dip Sandwiches, the ultimate comfort food that’s as easy to prepare as it is delicious. This dish not only highlights the rich flavors of tender beef and creamy melted cheese tucked in crusty rolls, but it also does all the heavy lifting while you carry on with your day. Perfect for family dinners or meal prepping, this slow-cooker marvel requires minimal effort yet delivers big on taste and satisfaction. Are you ready to indulge in a warm, hearty meal that will whisk you away to sandwich paradise? Let’s dive into the recipe!

Why Are These Sandwiches So Irresistible?

Simplicity at its finest: This Crockpot French Dip Sandwiches recipe requires minimal prep—just combine ingredients and let your slow cooker work its magic!

Heavenly Flavors: The combination of tender beef, caramelized onions, and melty cheese wrapped in crusty rolls creates a symphony of taste.

Time-Saving: Perfect for busy weekdays, it effortlessly delivers a comforting meal without constant supervision.

Crowd Pleaser: Whether for family dinners or gatherings, these sandwiches are sure to impress and satisfy everyone’s cravings.

Versatile: Mix and match cheeses or pair with sides like roasted potatoes or a fresh salad for a complete meal. If you're looking for more comfort food ideas, don't miss out on these delicious Crockpot Butter Chicken or try a sweet touch with Cherry Clafoutis French for dessert!

Indulge in a quick, comforting bite that makes you feel right at home.

Crockpot French Dip Sandwiches Ingredients

• For a delightful experience, gather these key ingredients!

For the Beef

  • Olive Oil – Adds richness and enhances the flavor during searing, though optional.
  • Beef Chuck Roast – The star of the show; slow-cooks into tender shreds that envelop flavors beautifully.
  • Kosher Salt and Freshly Ground Black Pepper – Essential seasoning to elevate the taste profile of your dish.
  • Dry Onion Soup Mix – Infuses a savory depth to the beef; can be replaced with homemade seasoning for a personal touch.

For the Broth

  • Water – Helps create the delicious broth in which the beef simmers to perfection.
  • Beef Broth – Forms the rich base for your au jus; use Better-than-Bouillon for an even bolder flavor.

For the Sandwiches

  • Crusty Rolls (Ciabatta or Hoagie) – Provides a satisfying crunch and absorbs the flavorful juices beautifully.
  • Swiss or Provolone Cheese – Melts beautifully over the beef, providing creaminess and flavor contrast; feel free to switch with your favorite cheese.

Enjoy every bite of these Crockpot French Dip Sandwiches, and let the comforting flavors take you on a culinary journey!

Step‑by‑Step Instructions for Crockpot French Dip Sandwiches

Step 1: Sear the Beef (optional)
In a skillet, heat a splash of olive oil over medium-high heat. Season the beef chuck roast generously with kosher salt and freshly ground black pepper, then sear it for about 1-2 minutes on each side, or until it's beautifully browned. This optional step enhances the flavor of your Crockpot French Dip Sandwiches and sets a rich base for the broth to come.

Step 2: Combine Ingredients
Transfer your seared beef into the slow cooker. Sprinkle on the dry onion soup mix, then pour in the water and beef broth. Make sure the beef is nicely nestled in the liquid to ensure even cooking. It’s the perfect blend of flavor that will create a decadent au jus for dipping your sandwiches.

Step 3: Cook
Set your slow cooker to HIGH for 4-6 hours or LOW for 8-10 hours. Cover it tightly and let the magic happen! You’ll know it’s ready when the beef is fork-tender and shreds effortlessly. The delightful aroma will fill your kitchen, teasing you with the promise of satisfying Crockpot French Dip Sandwiches.

Step 4: Shred the Beef
Once the cooking time is up, carefully remove the beef from the slow cooker and place it in a mixing bowl. Using two forks, shred the beef into bite-sized pieces, allowing it to soak in some of the flavorful broth. This shredded beef will become the star of your sandwiches, ensuring every bite is juicy and filled with flavor.

Step 5: Assemble Sandwiches
Slice the crusty rolls in half and load them generously with the shredded beef. Top each sandwich with a slice of Swiss or provolone cheese, allowing its creamy goodness to melt over the warm beef. This moment of assembly is where the comfort of your Crockpot French Dip Sandwiches truly begins to shine!

Step 6: Broil
Preheat your broiler to medium-high. Place the assembled sandwiches on a baking sheet and slide them under the broiler for about 2-3 minutes, or until the cheese is perfectly melted and the rolls are toasted to golden perfection. Keep a close eye on them to avoid burning; you want glorious, crispy tops.

Step 7: Serve
Ladle the flavorful broth from the slow cooker into small bowls for dipping. Serve your delicious Crockpot French Dip Sandwiches hot alongside the au jus—perfect for dipping. Each bite of tender beef, melty cheese, and crusty roll will have everyone coming back for more comfort food goodness!

Make Ahead Options

These Crockpot French Dip Sandwiches are perfect for busy home cooks looking to save time during hectic weekdays! You can prepare the beef up to 24 hours in advance, cooking it in your slow cooker as usual, and then refrigerate the shredded beef separately. The broth can also be stored in an airtight container for up to 3 days. To maintain quality, be sure to let the beef cool completely before refrigerating to prevent sogginess. When you're ready to serve, simply reheat the beef and broth. Assemble your sandwiches with fresh rolls and cheese, then broil for a few minutes until golden, ensuring each bite is just as delicious as when first made!

What to Serve with Crockpot French Dip Sandwiches

Nothing completes a meal quite like the perfect side dishes, and these sandwiches deserve an equally delicious accompaniment.

  • Crispy Sweet Potato Fries: Crispy, sweet, and slightly salty, they offer a delightful crunch alongside the tender beef, creating a delightful contrast in textures.

  • Classic Coleslaw: The freshness and crunch of coleslaw provide a refreshing balance to the rich, savory flavors of the sandwiches, enhancing each bite.

  • Garlic Butter Roasted Potatoes: Tender, buttery potatoes infused with garlic add a luxurious touch and pair beautifully with the hearty sandwiches.

  • Garden Salad with Vinaigrette: A light garden salad offers a burst of freshness and acidity, cutting through the richness of the beef and cheese.

  • Pickle Chips: Add a tangy crunch with side pickle chips, their sharp flavor complementing the rich flavors of the French dip.

  • Creamy Potato Salad: A classic favorite, its creaminess works in harmony with the robust flavors of the shredded beef, making it a crowd-pleaser.

  • Dipping Sauces: Consider adding a side of horseradish or spicy mustard for an extra kick that pairs well with the tender beef.

  • Cold Beer or Red Wine: Pair these sandwiches with a crisp lager or a robust red wine for a complete dining experience that brings out the best in flavors.

Expert Tips for Crockpot French Dip Sandwiches

  • Perfect Searing: Searing the beef adds depth to the flavor, but feel free to skip it if you're short on time—it won’t ruin your Crockpot French Dip Sandwiches!

  • Broth Balance: Adjust salt levels in the broth; the dry onion soup mix can be salty. Taste before serving to ensure balanced flavors.

  • Chunky or Shredded: For a heartier bite, cube the beef instead of shredding. This offers more texture in each delicious sandwich!

  • Watch the Broiler: When broiling, stay nearby! The high heat can quickly go from golden perfection to burnt if left unattended.

  • Storage Tips: Keep leftover beef and au jus stored separately to maintain freshness, refrigerating for up to 4 days or freezing for up to 3 months.

Indulge in the mouthwatering warmth of your homemade Crockpot French Dip Sandwiches!

Crockpot French Dip Sandwiches Variations

Feel free to unleash your creativity and make this comforting recipe your own!

  • Brisket: Substitute chuck roast with brisket for a richer, smokier flavor. The difference is remarkable and might become your new favorite!
  • Skip Searing: Save time by omitting the searing step; the beef will still be incredibly tender and tasty. Sometimes, simplicity is key to a hassle-free dinner.
  • Frozen Roast: Using a frozen roast? No problem! Just extend your cooking time by about 2 hours for the same delicious result.
  • Cheese Variety: Experiment with different cheeses like cheddar, gouda, or pepper jack for a flavorful twist. You might find a combination that surprises and delights your taste buds!
  • Add Veggies: Toss in sautéed mushrooms or bell peppers during cooking for added texture and flavor, transforming your sandwiches into a veggie-loaded delight!
  • Spice It Up: If you crave heat, add sliced jalapeños or a handful of red pepper flakes to the slow cooker. The result will infuse your French dip with delicious warmth.
  • Homemade Seasoning: Create a signature flavor by swapping dry onion soup mix for your own blend of onions, garlic powder, and herbs. Your kitchen will smell divine!
  • Different Breads: Switch up the rolls by using baguettes, kaiser rolls, or soft bread for unique textures and flavors. Have fun discovering your favorite combination!

For more comforting recipes, check out this delectable Crockpot Butter Chicken or the delightful Cherry Clafoutis French for a sweet finish!

Storage Tips for Crockpot French Dip Sandwiches

  • Fridge: Store leftover beef and au jus in airtight containers for up to 4 days. This keeps your delicious sandwiches ready for quick meals!

  • Freezer: For longer storage, freeze the shredded beef and au jus in separate airtight containers or freezer bags for up to 3 months. This ensures you can enjoy those comforting flavors anytime.

  • Reheating: Thaw frozen beef and au jus overnight in the fridge. When ready, reheat on the stove over low heat until warmed through, or microwave in short intervals, stirring occasionally.

  • Avoid sogginess: To keep your sandwiches from getting soggy, only assemble the sandwiches just before serving—keep components separate until ready to enjoy your Crockpot French Dip Sandwiches!

Crockpot French Dip Sandwiches Recipe FAQs

How do I choose the right beef for the recipe?
Absolutely! For the best flavor and tenderness, I recommend using a beef chuck roast. Look for one that has good marbling; this will ensure your meat is juicy and flavorful once it’s cooked. If you prefer a different texture, you can also substitute it with brisket. Make sure the meat has a nice red color without any dark spots or excessive fat.

What’s the best way to store leftovers?
Very! To keep your leftover beef and au jus fresh, store them separately in airtight containers. You can keep them in the refrigerator for up to 4 days. For longer storage, consider freezing the shredded beef and au jus in separate airtight freezer bags for up to 3 months. This way, you can easily reheat them for a quick meal later on!

Can I freeze the assembled sandwiches?
I often make my life easier by freezing the individual components instead of assembled sandwiches. If you do freeze them, be sure to keep the buns separate and assemble them just before serving. This prevents sogginess! Simply thaw the beef overnight in the fridge, reheat, and then assemble your sandwiches with the buns when you're ready to enjoy.

What should I do if my beef isn’t shredding easily?
Don’t worry, it happens! If your beef isn’t shredding easily, it may need more cooking time. Try covering it back up and cooking it for an additional hour on low heat. If it’s still tough, you can slice it into chunks for a different texture, or return it to the slow cooker with a bit more broth to make sure it gets tender.

Is this recipe suitable for special dietary needs?
The more the merrier! For those with dietary restrictions, feel free to swap out the beef for a plant-based alternative like jackfruit or a meat-free protein. Additionally, if you’re catering to allergies, make sure to check all packaged ingredients, especially the dry onion soup mix, which may contain gluten or other allergens. You can always make a simple homemade blend of dried onions and spices to suit your needs.

How can I avoid soggy rolls when serving?
Great question! To keep your rolls from becoming soggy, only assemble the sandwiches right before serving. Serve the shredded beef and au jus separately so everyone can build their sandwiches fresh. If you prefer, you can also toast the rolls lightly before adding the filling; this creates a barrier that helps maintain their crunchiness.

Crockpot French Dip Sandwiches

Heavenly Crockpot French Dip Sandwiches for Ultimate Comfort

Discover the mouthwatering Crockpot French Dip Sandwiches that promise ultimate comfort and flavor, perfect for family dinners.
Print Recipe Pin Recipe
Prep Time 15 minutes mins
Cook Time 8 hours hrs
Total Time 8 hours hrs 15 minutes mins
Servings: 4 sandwiches
Course: Dinner
Cuisine: American
Calories: 450
Ingredients Equipment Method Nutrition Notes

Ingredients
  

For the Beef
  • 1 tablespoon Olive Oil optional
  • 3 pounds Beef Chuck Roast
  • 1 teaspoon Kosher Salt
  • 1 teaspoon Freshly Ground Black Pepper
  • 1 packet Dry Onion Soup Mix can be replaced with homemade seasoning
For the Broth
  • 1 cup Water
  • 4 cups Beef Broth use Better-than-Bouillon for bolder flavor
For the Sandwiches
  • 4 rolls Crusty Rolls (Ciabatta or Hoagie)
  • 8 slices Swiss or Provolone Cheese or your favorite cheese

Equipment

  • Slow Cooker
  • Skillet
  • Mixing Bowl
  • Baking Sheet

Method
 

Step-by-Step Instructions
  1. In a skillet, heat a splash of olive oil over medium-high heat. Sear the beef chuck roast for 1-2 minutes on each side until browned.
  2. Transfer the seared beef into the slow cooker. Sprinkle on the dry onion soup mix, and pour in the water and beef broth.
  3. Set your slow cooker to HIGH for 4-6 hours or LOW for 8-10 hours. Cover and cook until the beef is fork-tender.
  4. Remove the beef and shred it into bite-sized pieces using two forks, soaking it in the flavorful broth.
  5. Slice the crusty rolls in half and fill them with the shredded beef and a slice of cheese.
  6. Preheat your broiler to medium-high. Place the sandwiches on a baking sheet and broil for 2-3 minutes until the cheese is melted.
  7. Serve the sandwiches hot with the broth for dipping.

Nutrition

Serving: 1sandwichCalories: 450kcalCarbohydrates: 40gProtein: 35gFat: 20gSaturated Fat: 8gPolyunsaturated Fat: 1gMonounsaturated Fat: 9gCholesterol: 100mgSodium: 900mgPotassium: 600mgFiber: 2gSugar: 1gVitamin A: 2IUCalcium: 15mgIron: 15mg

Notes

Perfect for family dinners and meal prepping, and adaptable to personal taste.

Tried this recipe?

Let us know how it was!

Tender Sweet Baby Rays Crockpot Chicken for Busy Nights

January 28, 2026 by Grace Snow Leave a Comment

As the slow cooker hums gently in the background, the rich aroma of Sweet Baby Rays Crockpot Chicken fills my kitchen, creating an inviting atmosphere that beckons everyone to the table. This easy, family-friendly recipe is a game-changer for busy weeknights when you crave delicious comfort food without spending hours in the kitchen. With just a few simple ingredients, like juicy chicken breasts and the tangy goodness of Sweet Baby Rays BBQ sauce, this dish transforms a hectic day into a culinary triumph. Plus, the slow-cooked magic ensures that your chicken turns out tender and flavorful, making it perfect for shredding and piling onto sandwiches or serving over rice. Trust me, once you try this delightful BBQ chicken, you’ll wonder how you ever lived without it. So, are you ready to dive into a world of sweet, smoky goodness?

Why is Slow-Cooked Chicken So Irresistible?

Simplicity at Its Best: With minimal prep time, this recipe is perfect for those busy evenings when you crave homemade goodness without the fuss.

Flavor Explosion: The tangy Sweet Baby Rays BBQ sauce melds beautifully with tender chicken, ensuring every bite bursts with flavor.

Family-Friendly Fun: It's a crowd-pleaser, appealing to both kids and adults alike. Serve it on sandwiches or over rice, and everyone will be asking for seconds!

Versatile Variations: Explore different BBQ sauce flavors or add veggies for a personalized twist. The adaptability keeps meals exciting, whether you’re making Chipotle Lime Chicken or adding seasonal veggies.

Time-Saving Delight: Cooked in a slow cooker, this dish allows you to set it and forget it—perfect for multitasking in the kitchen.

Heartwarming Comfort: Rich in flavor and history, this dish embodies the essence of BBQ culture, making it a go-to for gatherings or family dinners.

Sweet Baby Rays Crockpot Chicken Ingredients

For the Chicken

  • Chicken Breasts – Tender and juicy, boneless and skinless is easiest, but bone-in adds flavor.

For the Sauce

  • Sweet Baby Rays BBQ Sauce – The star of the dish, bringing a delightful sweet and tangy flavor; don’t hesitate to try different variations like honey or hickory.
  • Brown Sugar – Enhances the sweetness; adjust to your taste for a less sugary dish.
  • Apple Cider Vinegar – Adds a necessary acidity to balance the sweetness; if unavailable, white vinegar is a decent substitute.
  • Olive Oil – Keeps the chicken moist and enriches the sauce; feel free to swap with vegetable oil if preferred.
  • Garlic Powder – Brings aromatic supremacy; fresh garlic can be used for a more robust flavor.
  • Salt and Pepper – Vital for proper seasoning; add to your liking for the perfect taste.

Optional Add-Ins

  • Diced Onions and Bell Peppers – For added flavor and crunch; these veggies elevate the dish’s texture.
  • Spices – Smoked paprika or cayenne pepper can be added for those who like a spicy kick!

With these simple yet flavorful ingredients, you’re all set for a cozy, satisfying dinner. Enjoy the journey of creating your Sweet Baby Rays Crockpot Chicken!

Step‑by‑Step Instructions for Sweet Baby Rays Crockpot Chicken

Step 1: Season the Chicken
Begin by seasoning the boneless, skinless chicken breasts with garlic powder, salt, and pepper. Ensure each piece is evenly coated for maximum flavor. This initial step sets the stage for the delicious Sweet Baby Rays Crockpot Chicken. Once seasoned, set the chicken aside while you prepare the sauce.

Step 2: Whisk Together the Sauce
In a medium bowl, combine Sweet Baby Rays BBQ sauce, brown sugar, apple cider vinegar, and olive oil. Whisk these ingredients together until they form a cohesive mixture. This step is crucial as the sauce not only enhances the chicken's flavor but also helps maintain its moisture during cooking.

Step 3: Combine in the Crockpot
Place the seasoned chicken breasts into the crockpot, arranging them in a single layer for even cooking. Pour the BBQ sauce mixture over the chicken, ensuring every piece is well coated. The rich sauce will infuse the chicken with a sweet and tangy flavor as it cooks slowly.

Step 4: Set the Cooking Time
Cover the crockpot and set it to cook on low for 4 to 6 hours or on high for 2 to 3 hours. The chicken is done when it is tender and easily shredded with a fork. Make sure to check for doneness toward the end of the cooking time, as slow cooker models can vary.

Step 5: Shred the Chicken
Once the cooking time is up, carefully remove the chicken from the crockpot and place it on a cutting board. Using two forks, shred the chicken into bite-sized pieces. This step allows the sweet BBQ sauce to blend seamlessly with the chicken, creating a perfect bite of your Sweet Baby Rays Crockpot Chicken.

Step 6: Mix with Sauce
Return the shredded chicken to the crockpot and stir it into the remaining sauce. This ensures every piece is deliciously coated, enhancing the overall flavor of the dish. Allow it to sit for a few minutes on the warm setting to soak up the sauce flavors before serving.

Step 7: Serve and Enjoy
Your Sweet Baby Rays Crockpot Chicken is now ready to serve! Enjoy it hot over rice, piled high in a sandwich, or alongside your favorite side dishes. This comforting meal is perfect for busy weeknights and will surely be a hit with the whole family!

Make Ahead Options

These Sweet Baby Rays Crockpot Chicken meal prep options are perfect for busy home cooks seeking to save time! You can season the chicken and prepare the BBQ sauce mixture up to 24 hours in advance. Simply store the seasoned chicken in an airtight container or resealable bag in the refrigerator, and whisk together the sauce ingredients to keep in a separate container. When you're ready to cook, just combine them in the crockpot and set to low for 4-6 hours or high for 2-3 hours. This method not only simplifies your evening but also ensures that the flavors meld beautifully, allowing you to enjoy a delicious meal with minimal effort. Enjoy hassle-free family dinners with your flavorful Sweet Baby Rays Crockpot Chicken!

Expert Tips for Sweet Baby Rays Crockpot Chicken

Perfectly Seasoned: Ensure your chicken is seasoned evenly with garlic powder, salt, and pepper to enhance flavor throughout the dish.

Check the Sauce Consistency: If your Sweet Baby Rays BBQ sauce is too thin, simmer it on the stovetop for a few minutes to thicken it before serving.

Avoid Overcooking: Cooking times can vary depending on the crockpot model. Always check for doneness by shredding the chicken at the end of cooking.

Flavor Boost: For an extra depth of flavor, consider marinating the chicken in the sauce overnight before cooking. It’s optional but can be a delightful enhancement!

Make-Ahead Friendly: Double the recipe and freeze leftovers in portions for easy meals later; simply reheat and enjoy your Sweet Baby Rays Crockpot Chicken anytime.

Customize to Taste: Experiment with additional ingredients, like diced onions or bell peppers, for more texture and flavor variations that everyone will love!

What to Serve with Sweet Baby Rays Crockpot Chicken

As the sweet, smoky aroma fills the air, it’s time to think about the perfect accompaniments that will elevate your meal experience.

  • Creamy Coleslaw: The crisp, cool textures provide a refreshing contrast against the tender, BBQ-laden chicken, adding a delightful crunch.

  • Fluffy Rice: A perfect base to soak up the rich BBQ sauce, fluffy rice elevates your meal while bringing a comforting element. Pair it with cilantro for an added burst of flavor!

  • Buttery Cornbread: This warm, slightly sweet bread complements the savory taste of the chicken beautifully, creating a homestyle feel that warms the heart. Enjoy slices with a pat of butter melting over the top.

  • Sweet Potato Fries: The natural sweetness of the fries harmonizes with the BBQ chicken’s flavor, providing a fun and satisfying crunch. Their golden color adds a vibrant touch to your plate, and they pair well with a zesty dip.

  • Pickled Jalapeños: For those who seek a little heat, pickled jalapeños introduce a spicy kick, balancing the sweetness of the dish. Their tangy flavor can awaken your taste buds in every bite!

  • Cold Beer or Iced Tea: To wash it all down, a cold brew or refreshing iced tea complements the meal perfectly, offering a soothing contrast to the richness of the crockpot chicken.

  • Peach Cobbler: End your meal on a sweet note with this classic dessert. The warm, gooey peaches and flaky crust provide a delightful finish that feels like a warm hug!

Storage Tips for Sweet Baby Rays Crockpot Chicken

Fridge: Keep leftovers in an airtight container for up to 3-4 days. This helps maintain the flavor and moisture of your Sweet Baby Rays Crockpot Chicken.

Freezer: For longer storage, freeze portions in airtight containers or freezer bags for up to 2-3 months. Make sure to label them for easy identification later!

Reheating: Thaw frozen chicken in the fridge overnight before reheating. Reheat in the microwave or stovetop until heated through; add a splash of water if needed to maintain moisture.

Make-Ahead Meals: This dish is great for meal prep; cook in advance and store for easy weeknight dinners without the hassle of cooking from scratch each night.

Sweet Baby Rays Crockpot Chicken Variations

Feel free to make this comforting dish your own with these exciting variations!

  • Spicy Twist: Add a teaspoon of cayenne pepper or hot sauce to the BBQ sauce mix for a zesty kick. Perfect for heat lovers!

  • Sweet Citrus: Replace apple cider vinegar with freshly squeezed orange juice for a fruity tang that complements the BBQ beautifully.

  • Diced Veggies: Toss in chopped onions and bell peppers before cooking to add both flavor and texture. They’ll soften and infuse the dish with their sweetness.

  • Herb Infusion: For an aromatic twist, add fresh herbs like thyme or rosemary to the sauce. Their earthy notes will elevate the overall flavor profile!

  • Smoky Flavor: Incorporate smoked paprika into the seasoning mix to give your chicken a delightful smoky vibe without the grill. Ideal for fans of BBQ culture!

  • Creamy BBQ: Stir in a dollop of cream cheese to the shredded chicken before serving, creating a rich and creamy texture. It’s a decadent touch!

  • Healthy Swap: Use skinless chicken thighs instead of breasts for a juicier result; they hold up beautifully under slow cooking and have a richer flavor.

Feeling adventurous? Try combining different variations! For instance, you could create a zesty, creamy concoction by using orange juice and cream cheese together, similar to how you might enjoy Maple Roasted Sweet Potatoes with Pecans as a side. Whatever direction you choose, your Sweet Baby Rays Crockpot Chicken will surely be a hit!

Sweet Baby Rays Crockpot Chicken Recipe FAQs

What type of chicken is best for this recipe?
Absolutely! For the best results, boneless, skinless chicken breasts are recommended as they cook evenly and stay moist. If you prefer more flavor, bone-in chicken breasts or thighs can be used; just keep in mind to adjust the cooking time slightly longer.

How should I store leftovers of Sweet Baby Rays Crockpot Chicken?
Store any leftovers in an airtight container in the refrigerator for up to 3-4 days. This will help preserve the juiciness and flavor of the chicken. If you're not planning to eat it within that timeframe, freezing is a great option.

Can I freeze Sweet Baby Rays Crockpot Chicken?
Absolutely! To freeze, allow the chicken to cool completely, then transfer it into freezer-safe containers or bags, ensuring you remove as much air as possible. It can be frozen for up to 2-3 months. When you're ready to enjoy it again, thaw it overnight in the fridge and reheat until warmed through.

What should I do if the sauce is too thin after cooking?
If you find the sauce too thin, no worries! Simply pour it into a saucepan and simmer on medium heat for about 5-10 minutes until it thickens to your desired consistency. Stir occasionally to prevent it from burning. This step really brings out the flavor!

Is this recipe safe for people with allergies?
It's important to consider the ingredients! This recipe contains common allergens like garlic and potentially hidden ingredients in the BBQ sauce (like soy or gluten). For those with garlic or other specific allergies, feel free to skip the garlic powder and look for allergy-friendly BBQ sauce options or make your own!

Can I add vegetables to the crockpot?
Very! You can certainly add diced onions, bell peppers, or even carrots for added flavor and texture. Just chop them into bite-sized pieces and add them to the crockpot alongside the chicken and the sauce. They will cook down nicely and mix well with the flavors. This is a great way to sneak in some extra nutrients while keeping the dish hearty!

Sweet Baby Rays Crockpot Chicken

Tender Sweet Baby Rays Crockpot Chicken for Busy Nights

Sweet Baby Rays Crockpot Chicken is an easy, flavorful dish perfect for busy nights, combining juicy chicken breasts and tangy BBQ sauce.
Print Recipe Pin Recipe
Prep Time 15 minutes mins
Cook Time 4 hours hrs
Total Time 4 hours hrs 15 minutes mins
Servings: 4 servings
Course: Dinner
Cuisine: American
Calories: 300
Ingredients Equipment Method Nutrition Notes

Ingredients
  

For the Chicken
  • 2 pounds Boneless, Skinless Chicken Breasts Tender and juicy
For the Sauce
  • 1 cup Sweet Baby Rays BBQ Sauce The star of the dish
  • 1/4 cup Brown Sugar Adjust to taste
  • 2 tablespoons Apple Cider Vinegar Can substitute with white vinegar
  • 2 tablespoons Olive Oil Helps maintain moisture
  • 1 teaspoon Garlic Powder Can use fresh garlic
  • to taste Salt For seasoning
  • to taste Pepper For seasoning
Optional Add-Ins
  • 1 cup Diced Onions For added flavor and crunch
  • 1 cup Diced Bell Peppers For added flavor and crunch
  • to taste Smoked Paprika Optional spice
  • to taste Cayenne Pepper Optional spice

Equipment

  • Slow Cooker

Method
 

Step-by-Step Instructions
  1. Season the chicken breasts with garlic powder, salt, and pepper, ensuring they are evenly coated.
  2. In a bowl, whisk together the Sweet Baby Rays BBQ sauce, brown sugar, apple cider vinegar, and olive oil.
  3. Place the seasoned chicken in the crockpot and pour the sauce mixture over it, coating every piece.
  4. Cover and set the crockpot to cook on low for 4-6 hours or on high for 2-3 hours.
  5. Once done, shred the chicken using two forks.
  6. Return the shredded chicken to the crockpot, mixing it with the remaining sauce.
  7. Serve hot over rice or in sandwiches.

Nutrition

Serving: 1servingCalories: 300kcalCarbohydrates: 25gProtein: 30gFat: 10gSaturated Fat: 2gPolyunsaturated Fat: 1gMonounsaturated Fat: 6gCholesterol: 80mgSodium: 600mgPotassium: 400mgFiber: 1gSugar: 10gVitamin A: 2IUVitamin C: 5mgCalcium: 2mgIron: 8mg

Notes

For extra flavor, consider marinating the chicken overnight in the sauce. Leftovers can be stored in the fridge for 3-4 days or frozen for up to 2-3 months.

Tried this recipe?

Let us know how it was!

Tender Crockpot Orange Chicken for Effortless Family Dinners

January 28, 2026 by Grace Snow Leave a Comment

As I stirred the bubbling pot on my stove, the sweet and tangy aroma of orange wafted through my kitchen, instantly transporting me to a cozy evening filled with warmth and comfort. This moment inspired my favorite recipe: Crockpot Orange Chicken. With just five minutes of prep, this dish is not only a crowd-pleaser but also a lifesaver for busy weeknights, offering a delightful break from fast food routines. Imagine tender chicken simmering in a glossy sauce made from pantry staples, all while you can unwind or tend to other things. The best part? Minimal cleanup is required, leaving you more time to enjoy dinner with loved ones. Curious about how to whip up this deliciously effortless meal? Let’s dive into the recipe!

Why is Crockpot Orange Chicken a must-try?

Easy Preparation: With just five minutes of prep time, you can set it and forget it, making it perfect for busy evenings.

Family-Friendly: This dish is a hit with both kids and adults, transforming a typical dinner into a delightful feast that everyone will enjoy.

Rich Flavors: The sweet and tangy orange sauce is a delightful change from takeout, made with simple pantry staples that deliver big taste.

Minimal Cleanup: Utilizing a crockpot means fewer dishes to wash, giving you more precious time to spend with family or relax after a long day.

Versatile Options: Feeling adventurous? You can easily swap chicken for tofu or serve it over cauliflower rice, catering to various dietary needs.

And if you're looking for more comforting chicken recipes, you might enjoy my Crock Pot Chicken or Honey Garlic Chicken.

Crockpot Orange Chicken Ingredients

• This irresistible dish is made with simple staples!

For the Chicken
• Boneless Skinless Chicken – The heart of the dish; chicken breasts are budget-friendly, while tenders add tenderness.
• Cornstarch – Essential for creating a light, crispy coating; don't skip it for the perfect texture.

For the Sauce
• Olive Oil – Used for browning the chicken, enhancing flavor while preventing it from sticking.
• Orange Marmalade – Provides that sweet, vibrant flavor for the sauce; you can substitute with homemade orange sauce if desired.
• Reduced-Sodium Soy Sauce – Adds depth and umami without overwhelming saltiness; opt for regular soy sauce if needed, but adjust other salt as necessary.
• White Vinegar – Balances sweetness with a touch of acidity, brightening the dish.
• Sesame Oil – Infuses a nutty aroma; switch to vegetable oil if sesame isn't available.
• Ground Ginger – A pinch brings warmth and spiciness; it's a flavor bomb!
• Garlic – Fresh is best for a robust taste that enriches the dish.
• Crushed Red Pepper Flakes – An optional kick of heat; tailor it to your spice preference.
• Sesame Seeds – For garnish, adding crunch and a lovely finish to the dish.

Feel free to experiment with this easy Crockpot Orange Chicken recipe, and watch as it brings both joy and comfort to your dinner table!

Step‑by‑Step Instructions for Crockpot Orange Chicken

Step 1: Prepare the Chicken
Begin by cutting the boneless skinless chicken into bite-sized pieces and placing them in a shallow dish. Evenly coat the chicken pieces with cornstarch, ensuring each piece is well covered. This coating is essential for creating a light, crispy texture. The chicken will be lightly browned later, which adds flavor and visual appeal to your Crockpot Orange Chicken.

Step 2: Brown the Chicken
Heat a splash of olive oil in a skillet over medium-high heat. Carefully add the cornstarch-coated chicken pieces, cooking them for about 4-5 minutes until they develop a golden crust on the outside. Avoid cooking them all the way through, as they'll finish cooking in the crockpot. Once browned, use tongs to transfer the chicken to your slow cooker.

Step 3: Mix the Sauce
In a separate bowl, whisk together the orange marmalade, reduced-sodium soy sauce, white vinegar, sesame oil, ground ginger, minced garlic, and crushed red pepper flakes until the mixture is smooth and well combined. This sauce is what gives the Crockpot Orange Chicken its sweet and tangy flavor profile, so make sure to mix it thoroughly to incorporate all the flavors.

Step 4: Combine Chicken and Sauce
Carefully pour the sauce over the browned chicken in the slow cooker. Using a spatula, gently stir to ensure that all the chicken pieces are well coated with the delicious sauce. This step is crucial as it allows the chicken to soak up the flavorful orange sauce while it cooks, resulting in tender and juicy pieces of meat.

Step 5: Slow Cook the Chicken
Cover the slow cooker with its lid and set it to cook on LOW for 2-3 hours. During this time, the chicken will become incredibly tender and infused with the delightful flavors of the orange sauce. Remember to stir the mixture halfway through the cooking time to prevent the chicken from sticking to the bottom, ensuring everything cooks evenly and stays delicious.

Step 6: Garnish and Serve
Once the cooking time is complete, remove the lid and give the Crockpot Orange Chicken a gentle stir. At this stage, check for seasoning and adjust if necessary. To enhance presentation and flavor, sprinkle with additional sesame seeds and chopped scallions before serving. This step adds a lovely finishing touch, transforming your meal into a vibrant feast for the eyes as well as the palate.

Crockpot Orange Chicken Variations

Feel free to get creative with your Crockpot Orange Chicken and let your taste preferences shine through!

  • Vegetarian: Swap chicken for tofu for a hearty vegetarian option. Press the tofu to remove excess moisture for the best texture.

  • Fruit Preserves: Use apricot or peach marmalade in place of orange for a different flavor twist. Each fruit brings its own unique sweetness and charm to the dish.

  • Gluten-Free: Choose gluten-free soy sauce or tamari to accommodate gluten-sensitive diets while retaining delicious flavor. Simply substitute it in equal measure for the regular soy sauce.

  • Spicy Kick: Add more crushed red pepper flakes to spice things up, or even toss in some sliced jalapeños for a fresh heat element. Adjust to your spice tolerance for a personalized touch!

  • Citrus Twist: Experiment with a blend of orange and lime juice for the sauce. This citrus duo gives a zesty brightness that elevates the dish.

  • Serve Smart: Try serving the chicken over quinoa or brown rice instead of white rice for a healthier spin packed with more nutrients. This will enhance the dish while keeping it wholesome.

  • Crunchy Toppings: Top with slivered almonds or chopped walnuts for added crunch and an interesting texture contrast. They’ll also bring a delightful nutty flavor.

As you explore these variations, you might also enjoy other comforting recipes like my Crock Pot Chicken and Chicken Adobo Again. Celebrate creativity and tastes that make your dinners truly memorable!

Expert Tips for Perfect Crockpot Orange Chicken

  • Perfect Coating: Always ensure the chicken is evenly coated with cornstarch to achieve a light, crispy texture. This avoids toughness after browning.

  • Avoid Overcooking: Stick to LOW heat during cooking. Cooking on high for too long can dry out the chicken, making it less tender and juicy.

  • Thickening Sauce: If the sauce ends up too thin, simply mix a tablespoon of cornstarch with water and add it during the last 30 minutes of cooking for a glossy finish.

  • Adjusting Flavors: Taste the sauce before serving; you can add additional soy sauce or vinegar to balance sweetness according to your preference.

  • Storage Matters: Once you've enjoyed your delicious Crockpot Orange Chicken, refrigerate leftovers in an airtight container. They taste even better the following day!

How to Store and Freeze Crockpot Orange Chicken

Fridge: Store leftover Crockpot Orange Chicken in an airtight container for up to 4 days. Reheating will intensify the flavors, making it taste even better over time.

Freezer: Freeze the chicken in portioned airtight containers for up to 3 months. Ensure the sauce covers the chicken completely to prevent freezer burn.

Reheating: To enjoy leftovers, gently warm in the microwave or stovetop, adding a splash of broth or water if needed to maintain moisture.

Thawing: When ready to use frozen Crockpot Orange Chicken, thaw overnight in the fridge before reheating for the best texture and flavor.

Make Ahead Options

These Crockpot Orange Chicken preparations are ideal for busy weeknights! You can cut the chicken and coat it with cornstarch up to 24 hours ahead of time—just be sure to refrigerate it in an airtight container to maintain its texture. Additionally, prepare the sauce by mixing together the orange marmalade, soy sauce, vinegar, sesame oil, ginger, garlic, and red pepper flakes, and store it in the fridge for up to 3 days. When you’re ready to enjoy this delicious meal, simply brown the chicken, transfer it to the slow cooker, pour the prepared sauce over, and cook as instructed. This way, you’ll have a comforting dinner ready with minimal effort!

What to Serve with Irresistible Crockpot Orange Chicken

Elevate your dinner experience with tempting sides that perfectly complement this sweet and tangy dish.

  • Fluffy Steamed Rice: This classic pairing soaks up the delicious sauce, providing a neutral base that balances the vibrant flavors of the chicken.
  • Garlic Green Beans: Sautéed in a hint of soy sauce and garlic, these green beans add crunch and a burst of freshness to your meal.
  • Sesame Broccoli: Tender steamed broccoli tossed with sesame seeds takes a nutritious turn, adding both color and texture to the plate.
  • Cucumber Salad: A light, crisp salad drizzled with rice vinegar can cut through the sweetness of the dish while refreshing your palate.

Consider making a combination of these delicious sides—together, they create a harmonious meal that will leave everyone wanting more.

  • Chilled Sake: Serve this traditional Japanese rice wine chilled for a delightful pairing that'll enhance the Asian-inspired flavors.
  • Chocolate Fortune Cookies: For a fun dessert, pair your meal with these light, crunchy cookies to end your dinner on a sweet note.

Crockpot Orange Chicken Recipe FAQs

What type of chicken should I use for Crockpot Orange Chicken?
I recommend using boneless skinless chicken breasts for a budget-friendly option, or tenders for an even more tender texture. Both work deliciously!

How should I store leftover Crockpot Orange Chicken?
Store any leftovers in an airtight container in the fridge for up to 4 days. The flavors actually deepen and get richer over time, making it even tastier for your next meal!

Can I freeze Crockpot Orange Chicken?
Absolutely! You can freeze the chicken in portioned airtight containers for up to 3 months. To prevent freezer burn, make sure the sauce completely covers the chicken. When you're ready to enjoy it, simply thaw overnight in the fridge.

What should I do if my sauce is too thin after cooking?
If the sauce turns out thinner than you'd like, don’t worry! Mix one tablespoon of cornstarch with an equal amount of water, then stir it into the sauce during the last 30 minutes of cooking to thicken it up to the desired consistency.

Is there a vegetarian option for this recipe?
Very much so! You can substitute the chicken with tofu. Just press the tofu to remove excess moisture and cut it into appropriate sizes to make it absorb the delicious orange sauce.

What should I watch for when cooking the chicken to ensure it's tender?
To keep the chicken tender, avoid cooking on high heat for extended periods. Always stick to low for the best results, and if you stir halfway through cooking, it helps prevent any sticking!

Crockpot Orange Chicken

Tender Crockpot Orange Chicken for Effortless Family Dinners

Crockpot Orange Chicken is a sweet and tangy dish that's perfect for busy weeknights, requiring only five minutes of prep.
Print Recipe Pin Recipe
Prep Time 5 minutes mins
Cook Time 3 hours hrs
Total Time 3 hours hrs 5 minutes mins
Servings: 4 servings
Course: Dinner
Cuisine: Asian
Calories: 300
Ingredients Equipment Method Nutrition Notes

Ingredients
  

For the Chicken
  • 2 pounds Boneless Skinless Chicken Can use breasts or tenders
  • 1/4 cup Cornstarch For coating the chicken
For the Sauce
  • 2 tablespoons Olive Oil For browning the chicken
  • 1 cup Orange Marmalade Substitute with homemade orange sauce if desired
  • 1/4 cup Reduced-Sodium Soy Sauce Adjust salt levels if using regular soy sauce
  • 2 tablespoons White Vinegar Balances sweetness
  • 1 tablespoon Sesame Oil Can substitute with vegetable oil
  • 1 teaspoon Ground Ginger For warmth and spiciness
  • 4 cloves Garlic Minced
  • 1/2 teaspoon Crushed Red Pepper Flakes Optional for heat
  • 2 tablespoons Sesame Seeds For garnish

Equipment

  • Crockpot
  • Skillet
  • Mixing Bowl

Method
 

Step-by-Step Instructions
  1. Cut the boneless skinless chicken into bite-sized pieces and coat with cornstarch.
  2. Heat olive oil in a skillet and brown the chicken for 4-5 minutes.
  3. Mix orange marmalade, soy sauce, white vinegar, sesame oil, ground ginger, minced garlic, and crushed red pepper flakes in a bowl.
  4. Pour the sauce over the browned chicken in the slow cooker and stir to coat.
  5. Cover and cook on LOW for 2-3 hours, stirring halfway through.
  6. Garnish with sesame seeds and serve once cooked.

Nutrition

Serving: 1servingCalories: 300kcalCarbohydrates: 24gProtein: 25gFat: 10gSaturated Fat: 2gPolyunsaturated Fat: 1gMonounsaturated Fat: 6gCholesterol: 70mgSodium: 600mgPotassium: 400mgFiber: 1gSugar: 10gVitamin A: 500IUVitamin C: 30mgCalcium: 30mgIron: 2mg

Notes

Ensure the chicken is evenly coated with cornstarch for a crispy texture. Avoid overcooking and check seasoning before serving.

Tried this recipe?

Let us know how it was!

Loaded Hash Browns with Scrambled Eggs: Your Cozy Breakfast Fix

January 28, 2026 by Grace Snow Leave a Comment

As I stood in the kitchen, the sizzle of potatoes sizzling in butter brought an instant smile to my face. There’s something so comforting about breakfast, especially when it’s a hearty dish like Loaded Hash Browns with Scrambled Eggs. This recipe transforms simple russet potatoes into crispy golden perfection, topped with fluffy scrambled eggs and a generous sprinkle of cheese. Not only is it quick and easy to whip up, but it’s also fully customizable—perfect for using up whatever veggies or toppings you have on hand. Whether you’re aiming to impress at Sunday brunch or just want a satisfying start to your day, this dish hits the spot. What will you choose to load onto your hash browns?

Why are Loaded Hash Browns the Best?

Versatile: The possibilities are endless! Customize your hash browns with a variety of toppings like fresh herbs or different cheeses—there’s no wrong way to enjoy them.
Quick Prep: In just a few simple steps, you can whip up this comforting breakfast dish that will leave everyone asking for seconds.
Hearty & Filling: Perfect for energizing your mornings, this meal combines crispy hash browns with fluffy, creamy scrambled eggs that keep you satisfied throughout the day.
Crowd-Pleaser: Serve this at your next brunch gathering, and watch your friends and family rave about it.
Easy Cleanup: Using a non-stick skillet means less fuss when it comes to cleaning up, making breakfast stress-free! Whether you pair it with some crispy bacon or a side of fresh fruit salad, these Loaded Hash Browns with Scrambled Eggs are sure to make your mornings brighter.

Loaded Hash Browns with Scrambled Eggs Ingredients

For the Hash Browns

  • 2 large russet potatoes – Provide the base of the dish with a crispy texture; substitute with sweet potatoes for a healthier twist.
  • 2 tablespoons butter – Used for frying to achieve a golden crust; substitute with olive oil or a plant-based butter for dairy-free versions.
  • Salt and pepper to taste – Essential for flavor enhancement; adjust quantities based on preference.

For the Scrambled Eggs

  • 4 eggs – Create fluffy, creamy scrambled eggs; use egg whites for a lower-fat option.
  • 1/2 cup shredded cheddar cheese – Adds richness and flavor; substitute with mozzarella or pepper jack for a different taste.

For the Veggies

  • 1/4 cup diced bell peppers – Provides color and a fresh crunch; can be replaced with zucchini or spinach for more greens.
  • 1/4 cup diced onions – Adds savory depth; green onions or scallions make a milder alternative.

Optional Toppings

  • Salsa, avocado, sour cream – Add personal flair and additional flavor; experiment with different toppings like hot sauce or fresh herbs.

Feel the comfort of a warm breakfast with these Loaded Hash Browns with Scrambled Eggs; they’re just waiting for your personal touch!

Step‑by‑Step Instructions for Loaded Hash Browns with Scrambled Eggs

Step 1: Prepare the Hash Browns
Begin by peeling the russet potatoes and grating them using a box grater or food processor. Transfer the grated potatoes to a clean kitchen towel and squeeze out excess moisture; this step is crucial for achieving crispy hash browns. Set the prepared potatoes aside while you preheat your skillet to medium heat.

Step 2: Cook the Hash Browns
In a large non-stick skillet, melt 1 tablespoon of butter over medium heat. Once melted, add the grated potatoes evenly to the skillet, spreading them out to form a flat layer. Cook for about 5-7 minutes without stirring, until the underside is golden brown and crispy. Using a spatula, flip the hash browns and cook for an additional 5-7 minutes.

Step 3: Scramble the Eggs
While the hash browns are cooking, crack the eggs into a mixing bowl and whisk them with a pinch of salt and pepper until well combined. When the hash browns are crispy on both sides, create a space in the center of the skillet and pour the egg mixture over the top. Gently scramble the eggs with a spatula, cooking until they are softly set and slightly creamy.

Step 4: Add Cheese and Vegetables
Once the eggs are nearly cooked to your liking, sprinkle the shredded cheddar cheese, diced bell peppers, and onions evenly over the hash browns and scrambled eggs. Make sure to cover everything generously for maximum flavor.

Step 5: Melt the Cheese
To melt the cheese perfectly, cover the skillet with a lid and let it cook for an additional 1-2 minutes, or until the cheese is gooey and bubbly. This step will elevate your Loaded Hash Browns with Scrambled Eggs, bringing everything together beautifully.

Step 6: Serve and Garnish
Remove the skillet from heat, and carefully uncover it to reveal your delicious creation. Feel free to top your dish with optional salsa, avocado, or sour cream for added flavor. Serve hot, and let the delightful aromas of your Loaded Hash Browns with Scrambled Eggs fill the kitchen!

How to Store and Freeze Loaded Hash Browns with Scrambled Eggs

Fridge: Keep cooked hash browns in an airtight container in the fridge for up to 2 days. Reheat in a skillet over medium heat for the best texture.

Freezer: For long-term storage, freeze leftover hash browns without the eggs for up to 3 months. To reheat, bake in the oven or sauté in a skillet until heated through and crisp.

Make-Ahead Tips: Prep the hash browns in advance and store them in the fridge overnight before cooking, making it a quick breakfast option.

Reheating: Leftovers can be reheated in the microwave, but for extra crispiness, give them a quick sauté in a non-stick skillet. Enjoy your Loaded Hash Browns with Scrambled Eggs fresh whenever you can!

Make Ahead Options

These Loaded Hash Browns with Scrambled Eggs are perfect for meal prep enthusiasts! You can prepare the hash browns up to 24 hours in advance by grating and squeezing out the moisture from the potatoes, then refrigerating them in an airtight container. The eggs can be whisked and stored separately, making them easy to combine later. When you’re ready to serve, simply cook the hash browns in a skillet until crispy, add the eggs, top with cheese and veggies, and melt under a lid. This method ensures you enjoy a satisfying breakfast with just a few final steps, saving precious time on busy mornings while maintaining delicious flavor and texture.

Expert Tips for Loaded Hash Browns with Scrambled Eggs

  • Maximize Crispiness: Squeeze out all moisture from the grated potatoes before cooking. This simple step is essential for that perfect crispy texture in your loaded hash browns.

  • Low Heat for Eggs: Cook the scrambled eggs on low heat and stir gently to achieve a soft, creamy consistency. Avoid high heat, as it can overcook them quickly.

  • Non-Stick Advantage: Using a non-stick skillet makes a world of difference. It helps to prevent sticking and ensures easy cleanup—saving you time and hassle.

  • Customize Your Toppings: Don’t hesitate to get creative with toppings for your loaded hash browns with scrambled eggs. Experiment with different veggies, cheeses, and sauces according to your preferences!

  • Scale Up Easily: If you’re cooking for a crowd, feel free to double the recipe. Leftovers also reheat well, making this a fantastic meal prep option.

What to Serve with Loaded Hash Browns with Scrambled Eggs

Start your breakfast experience with vibrant pairs that elevate your dish from satisfying to spectacular.

  • Crispy Bacon: The savory crunch of crispy bacon perfectly complements the fluffiness of the scrambled eggs, creating a delicious contrast in each bite.
  • Fresh Fruit Salad: A refreshing medley of fruits provides a bright and fruity balance to the hearty hash browns, making your meal feel lighter and more complete.
  • Golden Toast: Slices of warm, buttery toast offer a satisfying crunch, ideal for mopping up any leftover egg or cheese. It's classic comfort food!
  • Sautéed Spinach: This light, leafy green offers a nutritious touch and earthy flavor, adding depth to the hash brown dish without overwhelming it.
  • Herbed Yogurt Dip: A dollop of tangy yogurt blended with fresh herbs brings a creamy and zesty kick, harmonizing beautifully with the flavors of the hash browns.
  • Mimosa: The bubbly freshness of a mimosa made with orange juice adds a festive touch to your brunch table, making every bite even more celebratory.
  • Avocado Toast: Creamy avocado on toasted bread adds richness while balancing the flavors of the eggs, offering a modern twist to your plate.
  • Hot Sauce: A few dashes of your favorite hot sauce can lift the dish's flavor profile, adding a delightful heat that pairs well with the other ingredients.
  • Coffee: A warm cup of freshly brewed coffee just enhances the comforting vibes of your hearty breakfast, invigorating your morning experience.

Loaded Hash Browns with Scrambled Eggs Variations

Feel free to get creative and make these Loaded Hash Browns with Scrambled Eggs your own with these delightful twists!

  • Vegetarian Boost: Add sautéed spinach, diced mushrooms, or cherry tomatoes for an abundance of colors and nutrition. A medley of fresh veggies can brighten up your dish!

  • Different Cheeses: Swap the cheddar for feta for a tangy zing or try smoked gouda for a wonderful smoky richness. Each cheese will add its unique flair to your breakfast masterpiece.

  • Spice It Up: Sprinkle paprika, red pepper flakes, or toss in jalapeños for a spicy kick. The heat will awaken your taste buds and transform your morning routine.

  • Sweet Potato Swap: For a sweeter flavor profile, substitute russet potatoes with sweet potatoes. They bring a lovely natural sweetness that complements the savory ingredients beautifully.

  • Herb Infusion: Enhance the flavors with fresh herbs like chives, parsley, or cilantro mixed right into the eggs before cooking. Fresh herbs elevate your dish and add a delightful aroma.

  • Smoky Flavor: Incorporate cooked bacon or ham for a savory, smoky experience. Crispy bits of meat add a hearty touch that pairs well with the eggs.

  • Breakfast Burrito: Roll it all up in a tortilla, add some salsa, and you’ve got a delicious breakfast burrito! This makes for a hand-held indulgence that’s perfect on-the-go.

  • Frozen Hash Browns: If you're in a rush, using frozen hash browns can save time. Just remember, fresh grated potatoes will yield the ultimate crispiness that everyone loves!

If you're looking to recreate a cozy breakfast experience at home, don’t forget to check out recipes for Turkish Eggs or even some delicious Pan Fried Shrimp to accompany your dish!

Loaded Hash Browns with Scrambled Eggs Recipe FAQs

What type of potatoes should I use for hash browns?
Absolutely! I recommend using large russet potatoes for their starchy content, which helps achieve that perfect crispiness. You can also substitute with sweet potatoes for a healthier twist if you prefer a sweeter flavor.

How long can I store cooked hash browns in the fridge?
Cooked hash browns can be stored in an airtight container in the refrigerator for up to 2 days. When you're ready to enjoy them again, reheat them in a skillet over medium heat to retain their delicious crispiness.

Can I freeze the Loaded Hash Browns with Scrambled Eggs?
Yes, you can freeze the hash browns separately from the eggs! To freeze, let the cooked hash browns cool completely, then spread them in a single layer on a baking sheet. Freeze for about 1 to 2 hours until solid, then transfer to a freezer bag for up to 3 months. When ready to eat, reheat them in the oven or sauté in a skillet.

How can I ensure my hash browns are crispy?
To achieve optimal crispiness, drain as much moisture as possible from the grated potatoes using a clean kitchen towel before cooking. This step is key! Spread them evenly in a preheated non-stick skillet and let them cook undisturbed for 5-7 minutes before flipping. The result will be beautifully crispy hash browns!

What are some dietary considerations for this recipe?
If you have dietary restrictions, you can easily customize this recipe. Opt for egg whites instead of whole eggs for a lower-fat version. Use dairy-free butter or oil instead of regular butter if you're avoiding dairy. Plus, you can swap out the cheese for a lactose-free alternative or omit it altogether for a lighter dish. Always remember to check for any allergies related to the ingredients you choose!

Loaded Hash Browns with Scrambled Eggs

Loaded Hash Browns with Scrambled Eggs: Your Cozy Breakfast Fix

Experience Loaded Hash Browns with Scrambled Eggs, a hearty, customizable breakfast perfect for any morning.
Print Recipe Pin Recipe
Prep Time 10 minutes mins
Cook Time 20 minutes mins
Total Time 30 minutes mins
Servings: 2 servings
Course: Breakfast
Cuisine: American
Calories: 450
Ingredients Equipment Method Nutrition Notes

Ingredients
  

For the Hash Browns
  • 2 large russet potatoes Substitute with sweet potatoes for a healthier twist.
  • 2 tablespoons butter Substitute with olive oil or plant-based butter for dairy-free versions.
  • Salt To taste.
  • Pepper To taste.
For the Scrambled Eggs
  • 4 eggs Use egg whites for a lower-fat option.
  • 1/2 cup shredded cheddar cheese Substitute with mozzarella or pepper jack for a different taste.
For the Veggies
  • 1/4 cup diced bell peppers Can be replaced with zucchini or spinach for more greens.
  • 1/4 cup diced onions Green onions or scallions make a milder alternative.
Optional Toppings
  • Salsa
  • Avocado
  • Sour cream

Equipment

  • non-stick skillet

Method
 

Step‑by‑Step Instructions
  1. Prepare the Hash Browns: Begin by peeling the russet potatoes and grating them using a box grater or food processor. Transfer the grated potatoes to a clean kitchen towel and squeeze out excess moisture; set aside while you preheat your skillet to medium heat.
  2. Cook the Hash Browns: In a large non-stick skillet, melt 1 tablespoon of butter over medium heat. Once melted, add the grated potatoes evenly to the skillet, spreading them out to form a flat layer. Cook for about 5-7 minutes without stirring, until the underside is golden brown and crispy. Flip and cook for an additional 5-7 minutes.
  3. Scramble the Eggs: Crack the eggs into a mixing bowl and whisk them with a pinch of salt and pepper. When the hash browns are crispy on both sides, create a space in the center of the skillet and pour the egg mixture over the top. Gently scramble the eggs with a spatula until softly set and slightly creamy.
  4. Add Cheese and Vegetables: Once the eggs are nearly cooked, sprinkle the shredded cheddar cheese, diced bell peppers, and onions over the hash browns and scrambled eggs.
  5. Melt the Cheese: Cover the skillet with a lid and let it cook for an additional 1-2 minutes, or until the cheese is gooey and bubbly.
  6. Serve and Garnish: Remove the skillet from heat, uncover, and top your dish with optional salsa, avocado, or sour cream. Serve hot.

Nutrition

Serving: 1servingCalories: 450kcalCarbohydrates: 40gProtein: 20gFat: 25gSaturated Fat: 15gCholesterol: 400mgSodium: 600mgPotassium: 800mgFiber: 3gSugar: 1gVitamin A: 15IUVitamin C: 40mgCalcium: 15mgIron: 10mg

Notes

Maximize crispiness by squeezing out all moisture from the grated potatoes. Use low heat for scrambled eggs to achieve a soft, creamy consistency.

Tried this recipe?

Let us know how it was!

Slow Cooker Garlic Butter Beef with Potatoes for Cozy Nights

January 28, 2026 by Grace Snow Leave a Comment

In the heart of a bustling kitchen, the gentle wisps of garlic intertwine with the hearty scent of beef, instantly transporting me to family dinners filled with laughter and warmth. The star of today’s recipe, Slow Cooker Garlic Butter Beef with Potatoes, beckons you to join in this cozy nostalgia. With effortless preparation and the reward of meltingly tender beef paired with creamy potatoes, this dish is perfect for those evenings when time is tight but a longing for comfort food still surfaces. It’s not just about filling plates; it’s about creating moments around the table. Whether you’re cooking for family or hosting friends, this recipe is a crowd-pleaser that invites everyone to come back for seconds. Ready to indulge in a moment of culinary bliss that’s ready when you are? Let’s dive into this delightful recipe together!

Why is this recipe so irresistible?

Comforting, homemade goodness: There’s nothing quite like the warmth of a slow-cooked meal, and this recipe delivers that in spades. Easy to prepare: Just sear, layer, and let your slow cooker do the magic while you relax or tend to other tasks. Incredible flavor: The garlic butter sauce seeps into the tender beef and potatoes, creating a harmonious blend that keeps everyone coming back for seconds. Versatile variations: Feel free to mix up the ingredients—try adding sweet potatoes or different herbs for a fresh twist. This dish is not just a meal; it’s a culinary hug that brings family and friends together. Perfectly paired with a side of Cheesy Garlic Bread, you can enjoy a delightful culinary experience!

Slow Cooker Garlic Butter Beef Ingredients

Indulge in the comforting flavors of homemade goodness with these essential ingredients.

For the Beef

  • Beef Chuck Roast – The main protein, tender when slow-cooked; brisket or sirloin tip can be used for variety.

For the Potatoes

  • Yukon Gold Potatoes – Creamy texture that beautifully complements the beef; using waxy potatoes improves texture during cooking.

For the Sauce

  • Garlic – Adds aromatic flavor; fresh garlic is preferred for intensity.
  • Butter (Kerrygold recommended) – Provides richness and enhances flavors; consider plant-based butter for a dairy-free version.
  • Beef Broth (Swanson recommended) – Adds depth to the sauce; ensure it's gluten-free for gluten-sensitive diets.

For the Garnish

  • Fresh Parsley – Adds garnish and freshness; feel free to use other herbs like rosemary or thyme for variation.

Step‑by‑Step Instructions for Slow Cooker Garlic Butter Beef with Potatoes

Step 1: Sear the Beef
In a large skillet, melt 2 tablespoons of butter over medium-high heat. Season the beef chuck roast with salt and pepper, then sear it in the skillet for about 4-5 minutes on each side until a golden crust forms. This step locks in the flavors and enhances the dish. Once browned, transfer the beef to your slow cooker.

Step 2: Prepare the Slow Cooker
In the slow cooker, arrange the seared beef at the bottom and layer the chopped Yukon Gold potatoes on top. Ensure the potatoes surround the beef to soak up all the delicious flavors. This setup will help achieve an even cooking process in the Slow Cooker Garlic Butter Beef with Potatoes.

Step 3: Add Ingredients
In a small saucepan, melt another 4 tablespoons of butter and add minced garlic, stirring for about 1 minute until fragrant. Pour this garlic butter mixture evenly over the beef and potatoes. Then pour in enough beef broth to cover the beef halfway, ensuring moisture for a tender finish.

Step 4: Cook
Cover the slow cooker and set it on low heat for 7-8 hours or high heat for 4-5 hours. The ideal cooking temperature allows the beef to become fork-tender and easy to shred. After the cooking time, the beef should reach an internal temperature of 200°F (93°C) for the perfect texture.

Step 5: Serve
Once cooking is complete, remove the beef and potatoes carefully from the slow cooker. Shred the beef using two forks and return it to the sauce, mixing gently. Spoon the garlic-butter sauce over the dish and garnish with freshly chopped parsley for a touch of brightness. Serve and watch everyone enjoy this cozy comfort food!

Slow Cooker Garlic Butter Beef Variations

Feel free to make this recipe your own and delight your family with exciting twists!

  • Different Beef Cuts: Try using brisket or sirloin tip. Each cut will deliver a unique flavor and texture experience.
  • Sweet Potato Swap: Replace half the Yukon Gold potatoes with sweet potatoes for a touch of sweetness and added nutrition. This swap not only enhances flavor but also brings a lovely color to the dish.
  • Herb Infusion: Incorporate fresh herbs like rosemary or thyme during the cooking process for an aromatic finish. The herbs mingle beautifully with the garlic butter, creating a fragrant dish that elevates your dining experience.
  • Dairy-Free Option: Swap butter with plant-based alternatives for a dairy-free version. This simple change allows everyone to enjoy this comforting meal without compromising flavor.
  • Spicy Kick: Add crushed red pepper flakes or diced jalapeños to the garlic butter sauce for an extra zing. You can easily adjust the heat level to suit your family’s taste.
  • Mushroom Addition: Toss in some sliced mushrooms for an earthy flavor boost and to enhance the sauce's richness. They'll soak up all the delicious garlic butter goodness!
  • Thicker Sauce: For a heartier sauce, mix a cornstarch slurry with the cooking liquid toward the end. This creates a luscious gravy-like texture, perfect for spooning over everything.
  • Serve with Cheesy Garlic Bread: Complement your meal with a side of Cheesy Garlic Bread for a delightful combination that’s sure to please!

How to Store and Freeze Slow Cooker Garlic Butter Beef with Potatoes

  • Room Temperature: It's best to consume this dish warm; avoid leaving it out for more than 2 hours to ensure safety and optimal flavor.
  • Fridge: Store leftovers in airtight containers for up to 3 days. This will keep the flavors fresh and the potatoes creamy.
  • Freezer: For longer storage, freeze the Slow Cooker Garlic Butter Beef with Potatoes in airtight bags or containers for up to 2 months.
  • Reheating: Thaw overnight in the fridge before reheating gently on the stovetop or microwave to preserve the texture and rich taste.

What to Serve with Slow Cooker Garlic Butter Beef with Potatoes

Transform your dinner into a delightful feast with these creative pairing ideas that enhance your cozy meal experience.

  • Creamy Mashed Potatoes: These buttery mashed potatoes provide a luscious texture that complements the savory beef, creating a perfect harmony on your plate.

  • Garlic Roasted Vegetables: Roasted carrots and green beans add vibrant colors and a touch of sweetness, elevating the overall flavors of your meal.

  • Crusty French Bread: A warm, crusty loaf is perfect for soaking up that delicious garlic butter sauce. Each bite becomes a comforting journey for your taste buds.

  • Caesar Salad: The crisp romaine and tangy dressing offer a refreshing contrast, balancing the richness of the beef dish while adding a pop of brightness.

  • Coleslaw: A crunchy, tangy slaw pairs surprisingly well, providing a delightful texture that complements the tender beef and creamy potatoes.

  • Red Wine: A glass of rich red wine enhances the dining experience, its deep flavors pairing beautifully with the savory notes of your slow cooker masterpiece.

  • Apple Crisp: Conclude your meal with a warm apple crisp, blending sweet and tart flavors that echo the comfort of home-cooked goodness, leaving everyone satisfied.

Cook up a comforting dinner that pleases both the palate and the heart, and watch the joy unfold around your dining table!

Expert Tips for Slow Cooker Garlic Butter Beef with Potatoes

  • Perfect Searing Technique: Make sure to sear the beef properly for 4-5 minutes per side. This locks in flavor and prevents dryness in your Slow Cooker Garlic Butter Beef with Potatoes.

  • Broth Level Check: Always check that the beef broth covers at least half of the beef. Insufficient liquid can lead to dry and tough meat.

  • Adjust Cooking Time: Keep in mind, different cuts of beef or potato types may require slight adjustments in cooking time for optimal tenderness. Monitor it closely!

  • Herb Customization: Experiment with different herbs like rosemary or thyme to enhance flavors. Fresh herbs elevate your Slow Cooker Garlic Butter Beef with Potatoes to a whole new level of deliciousness.

  • Leftover Magic: Store any leftovers in airtight containers for up to 2 months. Reheat gently to maintain the creamy potato texture and the rich flavor of the sauce.

Make Ahead Options

These Slow Cooker Garlic Butter Beef with Potatoes are perfect for busy weeknights! You can sear the beef and prepare the garlic butter mixture up to 24 hours in advance, storing them separately in the refrigerator. Additionally, you can chop the Yukon Gold potatoes a day ahead as well, just be sure to keep them submerged in water to prevent browning. When you're ready to enjoy this comforting dish, simply layer the seared beef and potatoes in the slow cooker, pour the garlic butter and broth over, and set it to cook. This way, you’ll have a delicious, home-cooked meal waiting for you with minimal last-minute effort!

Slow Cooker Garlic Butter Beef with Potatoes Recipe FAQs

What type of beef should I use for this recipe?
Absolutely! While beef chuck roast is the star of this recipe due to its tenderness when slow-cooked, you can also swap it for brisket or sirloin tip if preferred. Each cut will bring its unique flavors and textures to your dish, but the cooking time may need slight adjustments based on the cut.

How should I store leftovers?
You can store your Slow Cooker Garlic Butter Beef with Potatoes in airtight containers in the fridge for up to 3 days. If you're not going to eat it right away, I recommend transferring it to the freezer, where it can last up to 2 months without losing its deliciousness. Just be sure to allow it to cool completely before sealing it up!

Can I freeze this dish? If so, how?
Yes! To freeze your Slow Cooker Garlic Butter Beef with Potatoes, let it cool down completely. Then, transfer portions into freezer-safe bags or airtight containers, removing any excess air before sealing. When you're ready for a cozy meal, thaw it overnight in the fridge and reheat gently on the stove or microwave to enjoy its rich flavors again.

What should I do if my beef isn't tender after cooking?
If your beef isn't shredding easily after the designated cooking time, it likely needs more time to break down. Simply reseal the slow cooker and continue cooking on low for an additional 1-2 hours, checking for tenderness by piercing it with a fork. You want it to reach an internal temperature of 200°F (93°C) for perfect shredding.

Is this recipe gluten-free?
Certainly! To make this Slow Cooker Garlic Butter Beef with Potatoes gluten-free, simply use a certified gluten-free beef broth. All other ingredients in this recipe are inherently gluten-free, making it an excellent choice for those with gluten sensitivities or celiac disease.

Can I add different vegetables to this recipe?
Very! Feel free to experiment with adding other vegetables, such as carrots or green beans, to enhance the nutritional profile. Just be mindful of when you add them to ensure they don't get overcooked. Adding them in the last hour of cooking can provide a great balance of flavor and texture!

Slow Cooker Garlic Butter Beef with Potatoes

Slow Cooker Garlic Butter Beef with Potatoes for Cozy Nights

Slow Cooker Garlic Butter Beef with Potatoes combines tender beef and creamy potatoes for a cozy, heartwarming meal.
Print Recipe Pin Recipe
Prep Time 15 minutes mins
Cook Time 7 hours hrs 30 minutes mins
Total Time 7 hours hrs 45 minutes mins
Servings: 6 servings
Course: Dinner
Cuisine: American
Calories: 540
Ingredients Equipment Method Nutrition Notes

Ingredients
  

For the Beef
  • 3 pounds Beef Chuck Roast Brisket or sirloin tip can be used for variety.
For the Potatoes
  • 2 pounds Yukon Gold Potatoes Using waxy potatoes improves texture during cooking.
For the Sauce
  • 6 cloves Garlic Fresh garlic is preferred for intensity.
  • 6 tablespoons Butter Kerrygold recommended; consider plant-based butter for a dairy-free version.
  • 2 cups Beef Broth Swanson recommended; ensure it's gluten-free for gluten-sensitive diets.
For the Garnish
  • 1/4 cup Fresh Parsley Feel free to use other herbs like rosemary or thyme for variation.

Equipment

  • Slow Cooker
  • Skillet
  • Saucepan

Method
 

Step-by-Step Instructions
  1. In a large skillet, melt 2 tablespoons of butter over medium-high heat. Season the beef chuck roast with salt and pepper, then sear it in the skillet for about 4-5 minutes on each side until a golden crust forms. Transfer the beef to your slow cooker.
  2. In the slow cooker, arrange the seared beef at the bottom and layer the chopped Yukon Gold potatoes on top.
  3. In a small saucepan, melt another 4 tablespoons of butter and add minced garlic, stirring for about 1 minute until fragrant. Pour the garlic butter mixture evenly over the beef and potatoes. Then pour in enough beef broth to cover the beef halfway.
  4. Cover the slow cooker and set it on low heat for 7-8 hours or high heat for 4-5 hours.
  5. Once cooking is complete, remove the beef and potatoes from the slow cooker. Shred the beef using two forks and return it to the sauce. Spoon the garlic-butter sauce over the dish and garnish with freshly chopped parsley.

Nutrition

Serving: 1servingCalories: 540kcalCarbohydrates: 32gProtein: 50gFat: 24gSaturated Fat: 12gPolyunsaturated Fat: 1gMonounsaturated Fat: 7gCholesterol: 150mgSodium: 800mgPotassium: 1200mgFiber: 4gSugar: 2gVitamin A: 10IUVitamin C: 25mgCalcium: 3mgIron: 15mg

Notes

Store any leftovers in airtight containers for up to 2 months. Reheat gently to maintain the creamy potato texture and the rich flavor of the sauce.

Tried this recipe?

Let us know how it was!

Classic Ensaymada Bread: Soft, Sweet, and Simply Irresistible

January 28, 2026 by Grace Snow Leave a Comment

As the rich aroma of freshly baked bread wafts through the kitchen, there's an undeniable magic in the air—especially when I'm making Classic Ensaymada Bread. This fluffy Filipino delight not only captures my heart but also brings smiles to anyone lucky enough to taste it. With its tender, cloud-like texture and a slight hint of sweetness topped with savory cheese, it's perfect for breakfast or a cozy afternoon snack. The beauty of this recipe lies in its versatility; whether you choose the classic version or explore variations like Coconut, Ube, or even Chocolate Ensaymada, each bite takes you on a delightful journey. Not only is this bread a true comfort food, but it also comes together quickly, making it an ideal choice for both novice and seasoned bakers. Ready to impress your friends and family with a delightful twist on a beloved classic? Let’s get started!

Why is Classic Ensaymada Bread a Must-Try?

Irresistible Fluffiness: The light and airy texture of classic Ensaymada Bread is like biting into a cloud, making it an unforgettable treat.

Versatile Variations: Want to elevate your baking game? Try the Coconut, Ube, or Chocolate Ensaymada variations for added excitement and flair!

Quick and Easy: Perfect even for beginners, the recipe is straightforward, allowing you to create a stunning treat in no time.

Crowd Favorite: Whether for breakfast or an afternoon snack, this bread is sure to impress family and friends, delighting everyone with its unique sweet-savory blend.

Cultural Treat: Indulging in this Filipino classic connects you to a culture rich in flavor and tradition, making every bite a nostalgic experience.

Classic Ensaymada Bread Ingredients

For the Dough

  • All-Purpose Flour – Provides structure to the bread; whole wheat flour can be used for a denser texture.
  • Granulated Sugar – Adds sweetness and helps with browning; consider reducing if preferred.
  • Salt – Enhances flavor and balances sweetness.
  • Instant Yeast – Leavens the dough; ensure it’s fresh for proper rising.
  • Milk – Adds moisture; can substitute with plant-based milk for a lactose-free option.
  • Unsalted Butter – Provides rich flavor; use salted butter if desired, but adjust the added salt.
  • Eggs – Contributes to richness and structure; flaxseed meal or applesauce can replace eggs if needed.
  • Vanilla Extract – Adds aromatic sweetness for a lovely depth of flavor.

For the Topping

  • Melted Butter (for brushing) – Enhances flavor and creates a beautiful finish.
  • Grated Cheese (e.g., cheddar or queso de bolsa) – Adds a savory note; any soft cheese can work for a different flavor.
  • Sugar (for dusting) – Sweetens the top and gives a delightful finish to the bread.

Discover the warmth and joy of baking with Classic Ensaymada Bread—your taste buds will thank you!

Step‑by‑Step Instructions for Classic Ensaymada Bread

Step 1: Gather Your Ingredients
Start by collecting all the ingredients needed for the Classic Ensaymada Bread: all-purpose flour, sugar, salt, instant yeast, milk, unsalted butter, eggs, and vanilla extract. Having everything at hand makes the process smoother and enjoyable. Ensure your milk is warm (about 100°F or 38°C) to help activate the yeast for that perfect rise.

Step 2: Activate Your Yeast
In a small bowl, mix the warm milk with the instant yeast and 1 tablespoon of sugar. Allow this mixture to sit for 5-10 minutes. You'll know it’s ready when it becomes frothy and bubbly, which indicates that the yeast is active and ready to leaven your dough.

Step 3: Mix the Dry Ingredients
In a large mixing bowl, combine the all-purpose flour, the remaining sugar, and salt. Whisk these dry ingredients together until well blended. This step ensures an even distribution of the flavors and helps you avoid clumps, setting a solid foundation for the soft, fluffy Classic Ensaymada Bread.

Step 4: Combine Wet Ingredients
In a separate bowl, beat the eggs and whisk in the softened unsalted butter and vanilla extract. Mix until smooth and creamy. This combination adds richness to your dough, contributing to the delightful texture of the ensaymada bread.

Step 5: Create the Dough
Once your yeast mixture is frothy, pour it into the bowl with the dry ingredients, followed by the egg mixture. Stir everything together until a soft dough forms. You may need to use your hands to ensure all the flour is incorporated and to create a cohesive dough.

Step 6: Knead the Dough
Transfer the dough onto a lightly floured surface and knead it for about 8-10 minutes. You’re aiming for a smooth and elastic texture that springs back when pressed. If the dough feels too dry, add a little warm milk until it reaches the desired consistency.

Step 7: Let It Rise
Place your kneaded dough into a greased bowl, cover it with a kitchen towel, and let it rise in a warm area for 1 hour or until it doubles in size. Keep an eye on it; the dough should become puffy and airy, ready to transform into the delicious Classic Ensaymada Bread.

Step 8: Shape the Dough
After the dough has risen, punch it down gently to release the air. Divide it into smaller equal portions, shape each piece into a smooth ball, and then roll each into a spiral shape. This step is crucial for creating the signature fluffy layers of the ensaymada.

Step 9: Second Rise
Place the shaped dough spirals into greased molds or on a baking sheet. Cover them again with a towel and let rise for another 30-45 minutes. During this time, they should puff up again, becoming light and airy in preparation for baking.

Step 10: Preheat and Bake
Preheat your oven to 350°F (175°C). Once adequately heated, bake the risen dough for 20-25 minutes. Keep an eye on them; they are ready when they turn golden brown on top, and you can smell that delightful aroma wafting through the kitchen.

Step 11: Cool Down
After baking, allow the Classic Ensaymada Bread to cool in the molds for about 10 minutes. Then, gently transfer them to a wire rack to cool completely. This cooling process helps set the texture and flavor, leading to the perfect final product.

Step 12: Add Toppings
Once cool, brush each piece with melted butter, then sprinkle generously with grated cheese and a touch of sugar on top. This final touch adds a delightful sweet-savory flavor that is the hallmark of Classic Ensaymada Bread, making it irresistible to anyone who takes a bite!

Classic Ensaymada Bread: Tasty Twists Await

Get ready to unleash your creativity in the kitchen! The delightful sensory experience of creating variations of this beloved bread is sure to inspire you.

  • Coconut Ensaymada: Incorporate shredded coconut into the dough or sprinkle it on top for a tropical twist. The subtle texture adds a fun crunch along with a hint of sweetness!

  • Ube Ensaymada: Add ube extract or powder to your dough for a vibrant color and unique flavor that'll have everyone asking for the secret ingredient.

  • Chocolate Ensaymada: Stir cocoa powder into the dough and finish with velvety chocolate frosting on top for an indulgent treat that brings a touch of luxury to your bake.

  • Nutty Ensaymada: Fold in chopped walnuts or almonds for added texture and a delightful surprise in every fluffy bite. The nutty flavor enhances the overall richness of the bread.

  • Savory Mayonnaise Ensaymada: Brush with a mix of mayonnaise and hot sauce before the second rise for a spicy kick. It'll create an exciting flavor balance to the sweet elements!

  • Cheese-filled Ensaymada: Stuff the dough with a mixture of salty cheese before rolling for a cheesy surprise that melts beautifully, adding depth and flavor.

  • Fruit-Infused Ensaymada: Consider folding in dried fruits like raisins or cranberries for a fruity sweetness that contrasts beautifully with the savory cheese topping. It's a touch of nostalgic flavor!

  • Spiced Ensaymada: Add a touch of cinnamon or nutmeg to the dough for a warm, aromatic twist that evokes the coziness of festive gatherings.

Feel free to explore these variations, and while you're at it, don't forget to serve your Classic Ensaymada Bread warm with a side of Cheesy Garlic Bread or alongside a slice of Cornbread Breakfast Casserole. For a sweet finish, whip up some Mini Tropical Pavlovas to complete your feast! Enjoy the journey of flavors and creativity!

How to Store and Freeze Classic Ensaymada Bread

Room Temperature: Store classic Ensaymada Bread in an airtight container at room temperature for up to 3 days to maintain its fluffiness.

Fridge: While refrigeration is not recommended as it may dry out the bread, you can refrigerate it for up to 5 days if necessary; just make sure to wrap it well.

Freezer: For longer storage, wrap the bread tightly in plastic wrap, then place it in a freezer-safe bag. It can be frozen for up to 2 months.

Reheating: When ready to enjoy your Classic Ensaymada Bread, thaw overnight in the fridge, then reheat in the oven at 350°F (175°C) for 10-15 minutes until warmed through.

What to Serve with Classic Ensaymada Bread

As you revel in the sweet aroma of your freshly baked ensaymada, it’s time to think about the perfect companions that will elevate your meal experience.

  • Rich Coffee: The bold richness of a freshly brewed coffee enhances the sweet creaminess of the ensaymada, making it a classic way to start your day.

  • Fruity Smoothies: Refreshing fruit smoothies bring a burst of flavor and moisture, balancing the sweet, fluffy bread for a delightful contrast. Try a tropical mango or berry blend.

  • Zesty Fruit Salad: A vibrant fruit salad with citrus dressings complements the sweetness of ensaymada. The fresh acidity cuts through the richness, creating a harmonious flavor experience.

  • Creamy Hot Chocolate: Indulge in a warm mug of hot chocolate for a cozy dessert pairing. The chocolate’s sweetness harmonizes beautifully with ensaymada’s cheesy topping, creating a comforting treat.

  • Savory Cheese Platter: Serve a selection of cheeses alongside the ensaymada to amplify its savory topping. Options like sharp cheddar or a mild brie create a delightful contrast of flavors.

  • Toasted Coconut Flakes: Sprinkling some crispy toasted coconut on top adds a crunchy texture and nutty flavor that enhances the traditional experience of classic ensaymada.

  • Vanilla Ice Cream: For a decadent dessert, pairing warm ensaymada with a scoop of vanilla ice cream creates a classic combination of warm and cold that’s simply irresistible.

  • Sweet Iced Tea: A refreshing glass of iced tea, lightly sweetened with lemon, perfectly complements the rich flavors of ensaymada, rounding out your meal with a refreshing sip.

Expert Tips for Classic Ensaymada Bread

  • Room Temperature Ingredients: Ensure all ingredients, especially eggs and milk, are at room temperature for smoother mixing and better dough texture.

  • Kneading is Key: Knead the dough thoroughly for 8-10 minutes. This develops gluten, resulting in the fluffy, airy texture that characterizes Classic Ensaymada Bread.

  • Watch the Rising: Cover the dough with a kitchen towel while it rises to prevent drying out. Check on it regularly, as environmental factors can impact the rising time.

  • Check for Doneness: Ensure your bread is fully baked by looking for a golden brown color. You can also tap the bottom; it should sound hollow when done.

  • Flavor Variations: Don’t hesitate to try adding ingredients like shredded coconut or ube for a unique twist on the Classic Ensaymada Bread that adds depth to the flavor.

Make Ahead Options

These Classic Ensaymada Bread are perfect for busy home cooks looking to save time without sacrificing taste! You can prepare the dough up to 24 hours in advance by following the first six steps and then refrigerating the kneaded dough in a greased bowl covered with plastic wrap. When ready to bake, simply take it out and allow it to rise at room temperature for about 30 minutes before shaping and proceeding with the second rise. If you prefer to bake ahead, the fully baked ensaymada can be stored in an airtight container at room temperature for up to 3 days or frozen for up to 2 months. Reheat in the oven for a few minutes before serving to enjoy that freshly baked taste!

Classic Ensaymada Bread Recipe FAQs

What kind of flour is best for Classic Ensaymada Bread?
For the best results, all-purpose flour is ideal as it provides structure and a light texture to the bread. If you're looking for a different flavor profile, you can experiment with whole wheat flour, which gives a denser texture.

How should I store Classic Ensaymada Bread?
Store your ensaymada in an airtight container at room temperature for up to 3 days. This will help keep it soft and fluffy. You can refrigerate it for up to 5 days if necessary, though it's best to avoid the fridge to prevent it from drying out.

Can I freeze Classic Ensaymada Bread?
Absolutely! To freeze your Classic Ensaymada Bread, wrap it tightly in plastic wrap and then place it in a freezer-safe bag. It can be stored for up to 2 months. When you’re ready to enjoy, let it thaw overnight in the fridge, and then reheat in the oven at 350°F (175°C) for about 10-15 minutes until warmed through.

What should I do if my dough doesn’t rise properly?
If your dough isn't rising, it could be due to inactive yeast. Make sure your yeast is fresh and that you're using warm milk (around 100°F or 38°C) to activate it. If your dough feels too stiff, try adding a bit more warm milk while kneading. A warm, draft-free environment can also help the dough rise better.

Can I make Classic Ensaymada Bread without eggs?
Yes! If you have an egg allergy or prefer to make it egg-free, you can substitute eggs with 1/4 cup of unsweetened applesauce or 1 tablespoon of flaxseed meal mixed with 3 tablespoons of water. Keep in mind that this may alter the texture slightly but will still yield a tasty bread.

What cheese works best for topping Classic Ensaymada Bread?
I recommend using grated cheese such as cheddar or queso de bolsa for the topping; they melt beautifully and create that delicious sweet-savory contrast. If you want to try something different, any soft cheese like cream cheese or ricotta can work well!

Classic Ensaymada Bread

Classic Ensaymada Bread: Soft, Sweet, and Simply Irresistible

Classic Ensaymada Bread is a soft, fluffy Filipino treat that combines sweetness with savory cheese, perfect for breakfast or snacks.
Print Recipe Pin Recipe
Prep Time 30 minutes mins
Cook Time 25 minutes mins
Rising Time 1 hour hr 30 minutes mins
Total Time 2 hours hrs 25 minutes mins
Servings: 12 pieces
Course: Breakfast
Cuisine: Filipino
Calories: 250
Ingredients Equipment Method Nutrition Notes

Ingredients
  

Dough Ingredients
  • 4 cups All-Purpose Flour Whole wheat flour can be used for a denser texture.
  • 1 cup Granulated Sugar Consider reducing if preferred.
  • 1 teaspoon Salt Enhances flavor.
  • 2 teaspoons Instant Yeast Ensure it’s fresh for proper rising.
  • 1 cup Milk Can substitute with plant-based milk.
  • 1/2 cup Unsalted Butter Use salted butter if desired, adjust added salt.
  • 2 large Eggs Flaxseed meal or applesauce can replace if needed.
  • 1 teaspoon Vanilla Extract Adds aromatic sweetness.
Topping Ingredients
  • 1/4 cup Melted Butter For brushing.
  • 1 cup Grated Cheese e.g., cheddar or queso de bolsa.
  • 1 tablespoon Sugar For dusting.

Equipment

  • Mixing bowls
  • measuring cups
  • Measuring Spoons
  • Baking Sheet
  • Kitchen Towel
  • wire rack

Method
 

Preparation Steps
  1. Gather all ingredients: all-purpose flour, sugar, salt, instant yeast, milk, unsalted butter, eggs, and vanilla extract.
  2. Mix warm milk with instant yeast and 1 tablespoon of sugar; let sit for 5-10 minutes until frothy.
  3. In a large bowl, combine flour, remaining sugar, and salt; whisk until well blended.
  4. In a separate bowl, beat eggs and mix in butter and vanilla until smooth.
  5. Combine yeast mixture with dry ingredients, then add egg mixture; stir to form a soft dough.
  6. Knead the dough on a floured surface for 8-10 minutes until smooth and elastic.
  7. Place the kneaded dough in a greased bowl, cover, and let rise in a warm place for about 1 hour.
  8. After rising, punch down dough, divide into portions, shape into balls, and roll into spirals.
  9. Place shaped spirals in greased molds and cover; let rise again for 30-45 minutes.
  10. Preheat oven to 350°F (175°C) and bake for 20-25 minutes until golden brown.
  11. Allow bread to cool in molds for 10 minutes, then transfer to a wire rack.
  12. Brush cooled bread with melted butter, sprinkle with grated cheese and sugar.

Nutrition

Serving: 1pieceCalories: 250kcalCarbohydrates: 36gProtein: 5gFat: 10gSaturated Fat: 5gPolyunsaturated Fat: 1gMonounsaturated Fat: 4gCholesterol: 35mgSodium: 180mgPotassium: 90mgFiber: 1gSugar: 8gVitamin A: 200IUCalcium: 50mgIron: 1mg

Notes

Ensure all ingredients are at room temperature for best results. Knead thoroughly for fluffiness.

Tried this recipe?

Let us know how it was!

Fluffy Apple Yogurt Pancakes for a Sweet Morning Boost

January 28, 2026 by Grace Snow Leave a Comment

Every morning deserves a little magic, and that’s why I can’t wait to share my recipe for Apple Yogurt Pancakes with you. These delightful pancakes are not only fluffy and satisfying but also come with the nourishing goodness of fresh apples and creamy yogurt. Perfect for a quick breakfast that transitions smoothly into brunch, this recipe brings a healthy twist to your morning routine without sacrificing flavor. With just a few simple ingredients, you can whip up a batch that appeals to everyone around the table, whether you're serving them to kids or brunching with friends. Are you ready to awaken your taste buds and elevate your pancake game? Let’s get started!

Why are Apple Yogurt Pancakes a Must-Try?

Fluffy Texture: These pancakes are incredibly light and airy, providing the perfect base for your favorite toppings.
Natural Sweetness: Fresh apples infuse a delightful sweetness, making syrup optional for sweetness lovers.
Quick and Easy: Whip up a batch in just 30 minutes—ideal for busy mornings!
Healthier Twist: Packed with protein from yogurt, they're a nourishing alternative to traditional pancakes.
Versatile Base: Feel free to customize with mix-ins like blueberries or even swap apples for bananas!
Let these Apple Yogurt Pancakes usher in a sweet morning boost that the whole family will adore! For another delightful breakfast option, check out these Ricotta Protein Pancakes.

Apple Yogurt Pancake Ingredients

For the Batter
• All-Purpose Flour – Structure for fluffy pancakes; can substitute with whole wheat flour for added fiber.
• Plain Yogurt – Provides moisture and richness; Greek yogurt adds extra creaminess, while dairy-free yogurt is a great alternative.
• Milk – A liquid base that can be any variety; try using almond or oat milk for a dairy-free option.
• Grated Apple – Naturally sweet and flavorful; Fuji or Honeycrisp varieties are best, but feel free to use any sweet apple you love.
• Egg – Acts as a binding agent; a flax egg (1 tbsp flaxseed meal + 2.5 tbsp water) works for a vegan-friendly version.
• Sugar – Adds sweetness; adjust according to your taste or substitute with honey or maple syrup.
• Baking Powder – A leavening agent for a beautiful rise; ensure it's fresh for the best result.
• Ground Cinnamon – Enhances the flavor beautifully; consider adding a pinch of nutmeg for an aromatic spin.
• Salt – Balances sweet flavors and is essential for a well-rounded taste.
• Vegetable Oil – Adds moisture; melted butter or coconut oil can be used as alternatives.
• Optional Additions – Chopped nuts or raisins can offer extra texture and flavor, making these pancakes even more delightful.

Bring the joy of breakfast back to your mornings with these delicious Apple Yogurt Pancakes!

Step‑by‑Step Instructions for Apple Yogurt Pancakes

Step 1: Prepare Dry Ingredients
In a medium bowl, whisk together the all-purpose flour, baking powder, ground cinnamon, and salt until thoroughly combined. This step is crucial for ensuring an even distribution of the leavening agent and spices, which will help your pancakes rise beautifully. Set the bowl aside while you prepare the wet ingredients.

Step 2: Mix Wet Ingredients
In a separate large bowl, blend together the plain yogurt, milk, egg, sugar, and vegetable oil until smooth and creamy. This mixture creates a luscious base for your Apple Yogurt Pancakes. Make sure the yogurt is fully integrated, as any clumps can affect the texture of the batter.

Step 3: Add Apple
Gently fold the grated apple into the wet mixture using a spatula, ensuring the apple pieces are evenly distributed throughout the batter. This will infuse your pancakes with natural sweetness and moisture, making each bite delightful. Take a moment to appreciate the fresh aroma before moving on.

Step 4: Combine Mixtures
Gradually pour the wet mixture into the bowl with the dry ingredients. Stir gently until just combined; it’s okay if there are a few lumps. Overmixing can lead to dense pancakes, so keep it light and fluffy. At this stage, your batter should be thick and slightly lumpy, ready for cooking.

Step 5: Heat Pan
Preheat a non-stick skillet or griddle over medium heat, lightly greasing it with vegetable oil to prevent sticking. Let the pan heat for about 3-5 minutes. When it’s hot, you can sprinkle a few drops of water on it; if they sizzle, it's ready for your pancakes!

Step 6: Cook Pancakes
Pour 1/4 cup of the batter onto the skillet for each pancake, spacing them evenly apart. Cook until you see bubbles forming on the surface, which should take around 2-3 minutes. The edges will appear set, providing a visual cue that it’s time to flip.

Step 7: Flip Pancakes
With a spatula, carefully flip each pancake and cook for another 2-3 minutes until golden brown and fluffy. You want a lovely golden color on both sides, indicating they’re perfectly cooked. Be attentive; if they brown too quickly, it may be time to slightly lower the heat.

Step 8: Adjust Temperature if Needed
If you notice your pancakes are browning too fast, reduce the heat to medium-low. This allows the insides to cook thoroughly without burning the exterior. Keeping an eye on the cooking process is essential to achieve that perfect texture for your Apple Yogurt Pancakes.

Step 9: Keep Warm
Once cooked, transfer the pancakes to a plate and cover them with a clean kitchen towel to keep them warm while you finish the rest of the batch. This simple step ensures that every pancake remains fluffy and inviting when served. Enjoy the delightful aroma filling your kitchen.

Storage Tips for Apple Yogurt Pancakes

Fridge: Store leftover pancakes in an airtight container in the fridge for up to 3 days. Reheat in the microwave for 30-60 seconds or in a toaster for a crispier texture.

Freezer: Freeze pancakes in single layers separated by parchment paper in an airtight bag or container for up to 2 months. Simply reheat from frozen in the toaster or microwave until heated through.

Wrapping: For extra freshness, wrap pancakes individually in plastic wrap before placing them in a freezer bag. This prevents freezer burn and keeps your Apple Yogurt Pancakes tasting delightful.

Reheating: For best results, reheat pancakes on a skillet over low heat for a couple of minutes, flipping occasionally until warmed. Enjoy them as if they were freshly made!

What to Serve with Apple Yogurt Pancakes

These delightful pancakes invite creativity in crafting the perfect accompanying meal, ensuring every bite is a warm embrace of flavor.

  • Maple Syrup: A classic pairing that drizzles sweet warmth over the fluffy pancakes, enhancing their apple goodness.

  • Fresh Berries: Add a burst of juicy freshness with strawberries, blueberries, or raspberries; their tartness beautifully contrasts the sweetness of the pancakes.

  • Whipped Cream: Light and airy whipped cream adds a luxurious touch, perfectly complementing the rich flavor of yogurt and the crunch of apples.

  • Greek Yogurt: Serving a dollop of Greek yogurt on the side adds extra creaminess and protein, making for a satisfying brunch.

  • Sautéed Cinnamon Apples: Elevate the apple flavor with warm, cinnamon-sautéed apples that add warmth and a gourmet twist to your breakfast spread.

  • Nuts: Chopped walnuts or pecans provide a lovely crunch and additional nutrition; sprinkle them on top for texture and flavor.

  • Smoothie: A refreshing smoothie with spinach and fruit balances the meal with nutritious greens, perfect for a wholesome breakfast.

  • Coffee or Tea: Pair your pancakes with a steaming cup of coffee or herbal tea to enhance the comforting morning experience.

Let your imagination run wild, and create a breakfast spread that will make your taste buds dance with joy!

Apple Yogurt Pancakes Variations & Substitutions

Feel free to explore these exciting variations, each promising to elevate your Apple Yogurt Pancakes with delightful twists.

  • Gluten-Free: Substitute all-purpose flour with a gluten-free flour blend for a delicious alternative that everyone can enjoy.
  • Dairy-Free: Opt for coconut or almond milk and use dairy-free yogurt to make these pancakes perfect for lactose-intolerant friends.
  • Banana Twist: Replace grated apple with mashed bananas for a sweet, tropical carb that complements the fluffy texture wonderfully.
  • Spiced Delight: Add a pinch of nutmeg alongside the cinnamon for a spiced variation that'll warm your kitchen with cozy aromas.
  • Nutty Crunch: Fold in some chopped walnuts or pecans to introduce a satisfying crunch into your pancakes, making every bite exciting.
  • Berry Boost: Mix in fresh blueberries or raspberries for a burst of tartness and a gorgeous color contrast that’s pleasing to the eye.
  • Chocolate Indulgence: Stir in chocolate chips for a decadent treat that will quickly become the favorite among sweet-toothed family members.
  • Maple Infusion: Replace sugar with maple syrup in the batter for a fragrant, sweet flavor that pairs perfectly with breakfast favorites.

Whatever variation you choose, these pancakes will always be a hit! For more breakfast inspiration, check out my delightful Chicken Salad Apples for a fresh take on brunch.

Make Ahead Options

These Apple Yogurt Pancakes are perfect for busy mornings and make-ahead meal prep! You can prepare the dry ingredients (flour, baking powder, cinnamon, and salt) up to 3 days in advance and store them in an airtight container to maintain freshness. Additionally, you can mix the wet ingredients (yogurt, milk, egg, sugar, and oil) and refrigerate them overnight. When you’re ready to cook, simply combine the wet and dry mixtures, fold in the grated apple, and proceed to cook as instructed. This way, you'll enjoy fluffy pancakes with just a few moments of effort and savor every bite of the deliciousness!

Expert Tips for Apple Yogurt Pancakes

  • Don’t Overmix: To keep your pancakes fluffy, remember that some lumps in the batter are perfectly fine. Overmixing can lead to tough pancakes.

  • Fresh Baking Powder: Ensure your baking powder is fresh for the best rise. Stale baking powder can leave you with dense pancakes.

  • Uniform Size: Use a measuring cup to pour your batter onto the skillet, ensuring consistent pancake sizes for even cooking and a beautiful presentation.

  • Temperature Control: Keep an eye on your skillet's temperature. If pancakes brown too quickly, lower the heat to allow the insides to cook fully without burning.

  • Grate Apples Just Before Use: To maintain freshness, grate your apples right before adding them to the batter. This enhances flavor and moisture retention in your Apple Yogurt Pancakes.

Apple Yogurt Pancakes Recipe FAQs

How do I choose the best apples for this recipe?
Absolutely! I recommend using sweet varieties like Fuji or Honeycrisp for their flavor and moisture. You can also use Granny Smith apples if you enjoy a tart contrast—just balance it out with a touch more sugar!

How should I store leftover Apple Yogurt Pancakes?
Stored in an airtight container, leftover pancakes last up to 3 days in the fridge. Just reheat them in the microwave for about 30-60 seconds to enjoy them fresh again!

Can I freeze Apple Yogurt Pancakes?
Yes, you can! Place parchment paper between each pancake, then stack them in an airtight container or freezer bag. They’ll stay good for up to 2 months. When you’re ready to enjoy, reheat directly from the freezer in a toaster or microwave until warmed through.

What should I do if my pancakes turn out dense?
No worries! This can happen if the batter is overmixed—lumps are okay! Also, check that your baking powder is fresh, as stale powder can prevent your pancakes from rising properly. For next time, gently fold just until combined.

Are there any dietary considerations for Apple Yogurt Pancakes?
Very much so! You can make this recipe gluten-free by swapping the all-purpose flour with a gluten-free blend. Additionally, to cater to vegan diets, substitute the egg with a flax egg (1 tbsp flaxseed meal mixed with 2.5 tbsp water) and use dairy-free yogurt and milk.

Apple Yogurt Pancakes

Fluffy Apple Yogurt Pancakes for a Sweet Morning Boost

Start your morning with delicious Apple Yogurt Pancakes that are fluffy and healthy.
Print Recipe Pin Recipe
Prep Time 10 minutes mins
Cook Time 20 minutes mins
Total Time 30 minutes mins
Servings: 4 pancakes
Course: Breakfast
Cuisine: American
Calories: 100
Ingredients Equipment Method Nutrition Notes

Ingredients
  

For the Batter
  • 1 cup all-purpose flour can substitute with whole wheat flour for added fiber
  • 1 cup plain yogurt Greek yogurt adds extra creaminess
  • 1 cup milk any variety; try using almond or oat milk for a dairy-free option
  • 1 cup grated apple Fuji or Honeycrisp varieties are best
  • 1 large egg a flax egg can be used for vegan option
  • 2 tablespoons sugar adjust according to taste
  • 1 tablespoon baking powder ensure it's fresh for best results
  • 1 teaspoon ground cinnamon consider adding a pinch of nutmeg
  • 1/4 teaspoon salt balances sweet flavors
  • 2 tablespoons vegetable oil melted butter or coconut oil can be used
  • optional additions chopped nuts or raisins for extra texture

Equipment

  • medium bowl
  • large bowl
  • Whisk
  • Spatula
  • non-stick skillet
  • measuring cups
  • Measuring Spoons

Method
 

Step-by-Step Instructions
  1. In a medium bowl, whisk together the all-purpose flour, baking powder, ground cinnamon, and salt until thoroughly combined.
  2. In a separate large bowl, blend together the plain yogurt, milk, egg, sugar, and vegetable oil until smooth and creamy.
  3. Gently fold the grated apple into the wet mixture using a spatula.
  4. Gradually pour the wet mixture into the bowl with the dry ingredients. Stir gently until just combined.
  5. Preheat a non-stick skillet or griddle over medium heat, lightly greasing it with vegetable oil.
  6. Pour 1/4 cup of the batter onto the skillet for each pancake, spacing them evenly apart.
  7. With a spatula, carefully flip each pancake and cook for another 2-3 minutes until golden brown.
  8. If pancakes are browning too fast, reduce the heat to medium-low.
  9. Once cooked, transfer the pancakes to a plate and cover them with a clean kitchen towel to keep them warm.

Nutrition

Serving: 1pancakeCalories: 100kcalCarbohydrates: 15gProtein: 3gFat: 4gSaturated Fat: 1gMonounsaturated Fat: 2gCholesterol: 20mgSodium: 150mgPotassium: 120mgFiber: 1gSugar: 2gVitamin A: 100IUVitamin C: 2mgCalcium: 50mgIron: 0.5mg

Notes

To maintain freshness, grate your apples right before adding them to the batter.

Tried this recipe?

Let us know how it was!

Creamy Ramen Carbonara: A Must-Try Fusion Delight

January 28, 2026 by Grace Snow Leave a Comment

As I twirled my fork through the creamy, velvety noodles of Ramen Carbonara, I wondered why I hadn’t tried this incredible fusion before. Blending the hearty richness of classic Italian carbonara with the unique chewiness of Japanese ramen noodles, this dish is a magical harmony of flavors. In less than 30 minutes, you can transform a simple weeknight dinner into an unforgettable culinary experience right in your own kitchen. Whether you're hosting friends or simply craving a satisfying meal, Ramen Carbonara is a crowd-pleaser that adapts beautifully to various dietary preferences. Feel free to swap bacon for sautéed mushrooms for a vegetarian twist or explore different ramen styles for a personalized touch. What creative spin will you add to this delightful dish?

Why is Ramen Carbonara a Must-Try?

Fusion at Its Best: This Ramen Carbonara brilliantly marries two beloved culinary traditions, creating a dish that's as comforting as it is exciting!

Quick to Prepare: You can whip this up in under 30 minutes, making it ideal for busy weeknights.

Versatile Ingredients: Adjust it to suit your taste! Swap in sautéed mushrooms for a vegetarian option or add your favorite veggies for a colorful twist.

Creamy Indulgence: The luscious egg and cheese sauce envelops every noodle, giving you that rich, velvety texture you crave.

Crowd-Pleasing Flavor: Serve this dish to guests and watch their faces light up – it’s a guaranteed hit that transcends ordinary meals.

Experiment with variations or check out more dinner inspiration to keep your menu exciting!

Ramen Carbonara Ingredients

For the Noodles

  • Ramen Noodles – This base gives the dish its unique chewy texture; feel free to substitute with Shin Ramyun or whole-grain noodles for more flavor.

For the Sauce

  • Eggs – Essential for creating the creamy sauce; ensure they’re fresh to enhance flavor.
  • Parmesan Cheese – Adds a savory depth to the dish; you can substitute with grated cheese if you don't have parmesan.

For the Protein

  • Bacon – Provides a crispy, salty flavor that complements the creamy sauce perfectly; use sautéed mushrooms for a vegetarian version.

For Spice

  • Gochujang (optional) – Infuses a delightful spice into the dish; adjust the amount for more heat or swap with hot sauce.

For Garnishing

  • Fresh Herbs (optional) – Such as parsley or green onions, add a fresh touch; they’re perfect for enhancing the dish’s presentation and flavor.

With these essential components, you’re ready to create your very own Ramen Carbonara that’s sure to impress!

Step‑by‑Step Instructions for Ramen Carbonara

Step 1: Cook the Ramen Noodles
Begin by boiling a large pot of water over high heat. Once the water is at a rolling boil, carefully add the ramen noodles and cook according to the package instructions, usually around 3-4 minutes, until al dente. Drain the noodles, giving them a good shake to remove excess water, and then set them aside in a bowl.

Step 2: Prepare the Egg and Cheese Mixture
In a separate mixing bowl, crack open the eggs and add the grated parmesan cheese. Whisk them together vigorously for about 1-2 minutes until you achieve a smooth and uniform mixture. This egg and cheese blend will create the luscious sauce for your Ramen Carbonara, so ensure it's well combined and set aside for later use.

Step 3: Cook the Bacon
Heat a large skillet over medium heat and add the diced bacon. Cook the bacon for about 5-7 minutes, stirring occasionally, until it becomes crispy and golden brown. Once done, carefully remove the excess fat from the skillet, leaving just enough to impart flavor into your dish, then prepare for the next step.

Step 4: Combine Noodles and Bacon
With the skillet still on medium heat, add the drained ramen noodles to the pan, tossing them gently with the crispy bacon. Stir everything together for about 2-3 minutes, allowing the noodles to absorb the smoky flavors. This is the perfect moment to get your kitchen filled with that delightful aroma of Ramen Carbonara.

Step 5: Add the Egg Mixture
Remove the skillet from heat, ensuring it’s no longer on the burner. Quickly pour the egg and cheese mixture over the warm noodles, tossing them gently but quickly for about a minute. The heat from the noodles will create a creamy sauce without scrambling the eggs, ensuring every strand is beautifully coated.

Step 6: Season and Serve
To finish your Ramen Carbonara, season the dish with salt and freshly cracked black pepper to taste. If desired, sprinkle with fresh herbs like parsley or green onions for a pop of color and additional flavor. Serve hot in bowls, and enjoy this delightful fusion dish that brings together the best of Italian and Japanese cuisines!

How to Store and Freeze Ramen Carbonara

  • Room Temperature: Ramen Carbonara is best enjoyed fresh, but if left out, it should be consumed within 2 hours to ensure safety.

  • Fridge: Store any leftover Ramen Carbonara in an airtight container in the refrigerator for up to 2 days. Reheat gently on the stovetop to maintain its creamy texture.

  • Freezer: While this dish is best fresh, if you must freeze it, place it in a sealed container for up to 1 month. Thaw overnight in the fridge before reheating slowly to avoid texture changes.

  • Reheating: To reheat, add a splash of water or stock to the pan to help revive the creamy sauce, stirring continuously over low heat until warm.

Expert Tips for Ramen Carbonara

  • Prevent Scrambling: Remove the skillet from heat before adding the egg mixture. This ensures a creamy sauce without unwanted scrambled eggs.

  • Adjust Texture: If your sauce feels too thick, add a splash of reserved pasta water to achieve that silky, smooth consistency you want in Ramen Carbonara.

  • Noodle Choices: Experiment with different ramen types for unique textures. Some may provide a firmer bite, while others offer a softer experience—get creative!

  • Vegetarian Substitutes: If going meatless, sauté mushrooms in the bacon’s fat for a deliciously savory alternative. It adds depth and flavor without compromising the dish.

  • Garnish for Freshness: Don’t skip the fresh herbs! Parsley or green onions add brightness and contrast, elevating your Ramen Carbonara both visually and taste-wise.

Make Ahead Options

These Ramen Carbonara are perfect for busy home cooks looking to save time during the week! You can prepare the egg and cheese mixture up to 24 hours in advance; simply whisk the eggs and parmesan together and store it in the refrigerator. Cook the bacon (or sautéed mushrooms for a vegetarian option) ahead of time as well, keeping it in an airtight container for up to 3 days. When you’re ready to enjoy your meal, just cook the ramen noodles according to package instructions, then add the noodles and the cooked bacon to the pan. Remove from heat and quickly stir in the egg mixture for a creamy finish, ensuring it remains just as delicious and satisfying as when freshly made!

What to Serve with Ramen Carbonara

As you enjoy the creamy, dreamy flavors of this fusion dish, consider adding these delightful side dishes to create a complete and satisfying meal.

  • Sesame Green Beans: These crisp, vibrant green beans tossed in sesame oil provide a fresh contrast, balancing the richness of the ramen. The nutty flavor adds a wonderful depth, rounding out your dining experience.

  • Light Asian Salad: A refreshing salad with cucumbers, carrots, and a tangy soy dressing will cleanse your palate between bites. The crunch of fresh veggies perfectly complements the creamy textures in your dish.

  • Miso Soup: This soothing broth serves as a comforting appetizer and enhances the umami flavor profile. It’s light yet flavorful, setting the tone for an enjoyable meal.

  • Grilled Asparagus: The smoky, charred flavor of grilled asparagus adds an earthy note that pairs beautifully with rich ramen carbonara. Simply season with olive oil, salt, and pepper before grilling for the perfect side.

  • Spicy Edamame: These protein-packed pods sprinkled with sea salt or a pinch of chili flakes add a delightful kick, making them a fun finger food to enjoy alongside your creamy main dish.

  • Lychee Sorbet: For dessert, this subtly sweet and refreshing treat contrasts nicely with the richness of the carbonara. Its tropical flavor will leave your palate refreshed and satisfied.

  • Chilled Sake or Green Tea: Pair a glass of chilled sake or a cup of green tea with your meal to enhance the flavors and provide a soothing wrap-up to the dining experience.

Ramen Carbonara Variations & Substitutions

Feel free to get creative with this Ramen Carbonara recipe and tailor it to your taste buds and dietary needs!

  • Vegetarian Option: Replace bacon with sautéed mushrooms to maintain that savory, umami flavor while keeping it meat-free. The mushrooms provide a delightful meaty texture that complements the creamy noodles.

  • Vegan Swap: Use a non-dairy cheese in place of parmesan and swap the eggs with silken tofu or a vegan egg alternative for a completely plant-based version. Your taste buds won’t miss the dairy!

  • Add Greens: Toss in some fresh spinach or peas to boost nutrition and add a pop of color. They not only enhance the dish visually but also introduce a refreshing crunch.

  • Flavor Boost: Mix in some roasted garlic or shallots when cooking the bacon (or mushrooms) for an extra layer of flavor. The aromatic essence brings the dish to new heights!

  • Spice it Up: Increase the amount of gochujang for a spicier kick or swap in your favorite hot chili sauce. Bring the heat to really tantalize your taste buds!

  • Cheese Variety: Experiment with different types of cheese, such as Pecorino Romano or Asiago, for a unique flavor profile. Each cheese option gives the dish a delightful twist.

  • Texture Experiment: Swap ramen for udon noodles for a heartier, chewier experience. Udon's thickness adds a satisfying bite that pairs wonderfully with the creamy sauce.

For even more culinary ideas, check out additional dinner inspiration to keep your meals exciting!

Ramen Carbonara Recipe FAQs

What type of ramen noodles should I use for Ramen Carbonara?
Absolutely! You can use traditional ramen noodles, but I recommend experimenting with other options like Shin Ramyun or whole-grain noodles for a richer flavor. The key is to choose noodles that provide that delightful chewiness.

How should I store leftover Ramen Carbonara?
Very! Store any leftover Ramen Carbonara in an airtight container in the refrigerator for up to 2 days. Make sure to reheat gently on the stovetop to keep the creamy sauce from breaking apart.

Can I freeze Ramen Carbonara? How?
Yes, you can freeze it, though I recommend enjoying it fresh! To freeze, transfer it to a sealed container and store for up to 1 month. When you're ready to eat, thaw it overnight in the fridge, then gently reheat on the stove with a splash of water or stock to restore the creaminess.

What if my sauce is too thick?
If you find the sauce becomes too thick, don’t worry! Simply add a splash of reserved pasta water during reheating. Stir continuously over low heat until the sauce reaches your desired consistency, ensuring it remains smooth and velvety.

Are there any dietary considerations for Ramen Carbonara?
Absolutely! If you or someone you're cooking for has dietary restrictions, you can make this dish vegetarian by substituting sautéed mushrooms for bacon. Additionally, you can replace parmesan cheese with a non-dairy alternative to make it vegan-friendly. Always check ingredients for potential allergens!

How can I tell when my ramen noodles are cooked properly?
Great question! Look for the noodles to be al dente; they should be firm yet tender, typically cooking for about 3-4 minutes. Trust your instincts and taste a strand to see if it has that perfect chewy texture!

Ramen Carbonara

Creamy Ramen Carbonara: A Must-Try Fusion Delight

Ramen Carbonara is a delicious fusion of Italian and Japanese cuisines, creating a comforting yet exciting dish perfect for any occasion.
Print Recipe Pin Recipe
Prep Time 10 minutes mins
Cook Time 20 minutes mins
Total Time 30 minutes mins
Servings: 4 servings
Course: Dinner
Cuisine: Italian, Japanese
Calories: 500
Ingredients Equipment Method Nutrition Notes

Ingredients
  

For the Noodles
  • 1 package Ramen Noodles can substitute with Shin Ramyun or whole-grain noodles
For the Sauce
  • 2 large Eggs fresh eggs enhance flavor
  • 1 cup Parmesan Cheese can substitute with grated cheese
For the Protein
  • 4 slices Bacon or use sautéed mushrooms for vegetarian option
For Spice
  • 1 tablespoon Gochujang adjust for spice preference
For Garnishing
  • 1 tablespoon Fresh Herbs parsley or green onions

Equipment

  • Large pot
  • Mixing Bowl
  • Large skillet
  • Whisk

Method
 

Step-by-Step Instructions
  1. Begin by boiling a large pot of water over high heat. Once boiling, add ramen noodles and cook for 3-4 minutes until al dente. Drain and set aside.
  2. In a mixing bowl, crack the eggs and add grated parmesan. Whisk for 1-2 minutes until smooth and set aside.
  3. Heat a skillet over medium heat and add diced bacon. Cook for 5-7 minutes until crispy. Remove excess fat.
  4. Add the drained ramen noodles to the bacon in the skillet, tossing gently for 2-3 minutes.
  5. Remove from heat, pour the egg mixture over noodles, and quickly toss for about a minute to coat without scrambling eggs.
  6. Season with salt and pepper, garnish with fresh herbs, and serve hot.

Nutrition

Serving: 1servingCalories: 500kcalCarbohydrates: 70gProtein: 20gFat: 15gSaturated Fat: 5gCholesterol: 200mgSodium: 800mgPotassium: 300mgFiber: 3gSugar: 2gVitamin A: 400IUVitamin C: 2mgCalcium: 200mgIron: 2mg

Notes

To maintain creaminess, add a splash of pasta water if the sauce is too thick. Experiment with different ramen types for unique textures.

Tried this recipe?

Let us know how it was!

One-Pot Egg Roll Soup: Cozy Comfort in Every Bowl

January 28, 2026 by Grace Snow Leave a Comment

“Did you hear about the new soup that’s got everyone talking?” I overheard a friend raving about this comforting One-Pot Egg Roll Soup while browsing the local farmer’s market, and it resonated with me instantly. This delightful dish combines the best of traditional egg rolls—a savory filling of ground pork, fragrant ginger, and crisp cabbage—packed into a warm, hearty broth. What I love most is its quick prep time; in just 30 minutes, you can whip up a satisfying meal that’s low-carb and keto-friendly. Whether you're unwinding after a long day or hosting friends for dinner, this soup effortlessly satisfies cravings while offering plenty of delicious variations. Curious to hear how you can customize it to your taste? Let’s dive in!

Why Will You Love This Soup?

Simplicity at Its Finest: This One-Pot Egg Roll Soup comes together in just 30 minutes, making it a hassle-free option for busy evenings.

Flavor Explosion: The combination of savory pork, fragrant ginger, and fresh vegetables creates a soul-warming broth that’s packed with flavor.

Health-Conscious Choice: With low-carb, keto-friendly, and gluten-free options, you can enjoy a guilt-free meal without sacrificing taste.

Ultimate Versatility: Feel free to customize the recipe! Swap proteins, toss in extra veggies like bok choy or spinach, or crank up the heat with some Sriracha to suit your preferences.

Crowd-Pleasing Appeal: Whether you're serving family or friends, this soup is sure to impress with its delightful taste and comforting aroma that welcomes everyone to the table.

Pair it with a side of Pumpkin Cinnamon Roll Muffins for a complete meal!

One-Pot Egg Roll Soup Ingredients

For the Soup Base

  • Ground Pork – Provides a savory base and protein; substitute with ground chicken or turkey for a lighter option.
  • Low-Sodium Chicken Broth (6 cups) – Acts as the soup base, keeping it light; substitute with vegetable broth for vegetarian options.
  • Soy Sauce (1 tablespoon) – Enhances umami flavor; use gluten-free tamari for a gluten-free version.
  • Sesame Oil (1 tablespoon) – Offers nuttiness and richness; there's no direct substitute for flavor.
  • Rice Vinegar (1 tablespoon) – Brightens flavors; apple cider vinegar can be used as a substitute.

For the Aromatics

  • Yellow Onion (1 medium, diced) – Creates a flavorful foundation; shallots work for a milder flavor.
  • Garlic (4 cloves, minced) – Adds depth and aroma; fresh garlic is preferred, but ground garlic can work in a pinch.
  • Fresh Ginger (2 tablespoons, grated) – Contributes a zesty kick; ground ginger may be used as a substitute.

For the Vegetables

  • Green Cabbage (4 cups, thinly sliced) – Provides texture and body to the soup; Napa cabbage can be used as an alternative.
  • Shredded Carrots (1 cup) – Adds sweetness and crunch; red bell pepper can be a colorful swap.
  • Green Onions (½ cup, chopped) – For garnish and added flavor; reserve some for topping.

Extras and Seasoning

  • Salt and Pepper – Season to taste; adjust based on preference.
  • Eggs (2, beaten, optional) – Adds richness to the soup; omit for a lighter meal.
  • Red Pepper Flakes or Sriracha (optional) – For spice; adjust based on personal heat preference.

This One-Pot Egg Roll Soup takes simple ingredients to create a delightful bowl of comfort, ready in no time!

Step‑by‑Step Instructions for One-Pot Egg Roll Soup

Step 1: Brown the Pork
In a large pot or Dutch oven, heat over medium-high heat. Add the ground pork and cook for 5-7 minutes, breaking it apart as it browns. Look for a nice golden color with a bit of crispy texture. Once cooked, drain any excess fat to keep the soup light and flavorful.

Step 2: Sauté Aromatics
Add the diced yellow onion, minced garlic, and grated ginger to the pot with the browned pork. Sauté for about 3-4 minutes, stirring frequently, until the onions are translucent and fragrant. This aromatic base will enhance the overall flavor of your One-Pot Egg Roll Soup.

Step 3: Build the Soup Base
Stir in the soy sauce, sesame oil, and rice vinegar to combine with the pork mixture. Pour in the 6 cups of low-sodium chicken broth, and bring the mixture to a gentle boil over medium-high heat. Once boiling, you’ll see bubbles breaking the surface, indicating it’s time to add the vegetables.

Step 4: Add Vegetables
Carefully stir in the shredded carrots and thinly sliced green cabbage. Reduce the heat to medium-low and let the soup simmer uncovered for about 15 minutes, allowing the cabbage to become vibrant and tender. The colors will brighten, and the flavors will meld beautifully during this simmering process.

Step 5: Optional Egg Swirl
If you want to add a rich texture, slowly drizzle in the beaten eggs while gently stirring the soup with a fork. This will create delicate ribbons of egg throughout the One-Pot Egg Roll Soup. Allow it to cook for an additional 1-2 minutes until the eggs are set and incorporated into the broth.

Step 6: Finalize and Serve
Taste your soup and adjust seasoning with salt and pepper as needed. Ladle the hot soup into bowls, garnishing each serving with chopped green onions and a sprinkle of red pepper flakes or a swirl of Sriracha for those who crave a kick. Enjoy the comforting warmth that envelops you with every bite!

What to Serve with One-Pot Egg Roll Soup?

Elevate your dining experience with these delightful pairings that complement the comforting flavors of your soup.

  • Steamed Jasmine Rice: Fluffy and fragrant, it absorbs the savory broth beautifully. A classic staple for a satisfying meal.

  • Egg Foo Young: This fluffy, savory omelet filled with veggies and protein offers a delightful texture contrast to the soup's warmth.

  • Asian-Inspired Salad: A refreshing mix of crispy cabbage, carrots, and a sesame dressing brings a vibrant crunch that balances the soup’s richness.

  • Spring Rolls: Crisp and filled with fresh veggies and herbs, these are perfect for a light bite alongside your hearty soup. Dipping them in soy sauce adds an umami punch!

  • Miso Soup: A lighter, savory option that pairs perfectly, highlighting umami flavors while balancing the heavier broth of the egg roll soup.

  • Green Tea: The slight bitterness and lightness of this drink refreshes your palate, making each spoonful feel new and exciting.

  • Peanut Butter Cookies: For dessert, these soft and chewy cookies provide a sweet finish, offering a delightful contrast to your savory meal.

  • Chili Oil or Sriracha: For those who like it spicy, a drizzle over the soup adds an extra layer of heat and flavor. Just a little can elevate the dish to new heights!

Expert Tips for One-Pot Egg Roll Soup

  • Prep Ahead: The soup cooks quickly, but you can chop your veggies and brown the pork a day in advance to save time.
  • Flavor Balance: If your soup turns out too salty, consider adding unsalted broth or cooked potatoes to dilute the saltiness naturally.
  • Keep it Fresh: Store leftover soup in an airtight container for up to 3-4 days. For freezing, omit the eggs and cool completely before freezing.
  • Customize Proteins: Feel free to swap the ground pork for ground chicken or turkey for a lighter option without losing flavor in your One-Pot Egg Roll Soup.
  • Add Extra Greens: Enhance nutrition by incorporating nutritious greens like spinach or bok choy during the last few minutes of cooking.

Make Ahead Options

These One-Pot Egg Roll Soup preparations are perfect for busy weeknights! You can brown the ground pork and chop all your vegetables up to 24 hours in advance. Store the prepped ingredients in airtight containers in the refrigerator to keep them fresh. If you want to prep even further, you can assemble the soup base (excluding the eggs) and refrigerate it for up to 3 days. When you're ready to enjoy your hearty soup, just bring the broth to a simmer, add in your fresh veggies, and drizzle in the eggs if desired. This way, you’ll have all the comforting flavors of your favorite One-Pot Egg Roll Soup with minimal effort and maximum taste!

One-Pot Egg Roll Soup Variations

Feel free to customize this delightful soup to match your taste preferences and dietary needs!

  • Protein Alternatives: Swap ground pork for ground turkey or chicken to lighten up the dish.
  • Veggie Boost: Toss in spinach or bok choy for an extra nutrient kick and vibrant color.
  • Enhanced Spiciness: For those who crave heat, add diced jalapeños or a splash more of Sriracha.
  • Low-Carb Options: Replace noodles with cauliflower rice for an even more low-carb dish.
  • Sweet Elements: For a hint of sweetness, trade carrots for red bell peppers or snap peas.
  • Gluten-Free Options: Use coconut aminos or tamari in place of soy sauce for a gluten-free version.

If you're in the mood for something different, why not also try a cozy bowl of Egg Drop Soup or savor the flavors in a bright Asparagus Soup Healthy as delightful alternatives? Each variation invites you to make the recipe your own!

How to Store and Freeze One-Pot Egg Roll Soup

Room Temperature: Keep the soup at room temperature for no more than 2 hours to ensure safety and freshness.

Fridge: Store leftover One-Pot Egg Roll Soup in an airtight container for up to 3-4 days. Reheat on the stove or in the microwave until heated through.

Freezer: For long-term storage, omit the eggs before freezing. Cool the soup completely, then transfer it to freezer-safe containers for up to 3 months.

Reheating: Thaw the soup in the refrigerator overnight before reheating, bringing it to a gentle simmer on the stove to warm it evenly.

One-Pot Egg Roll Soup with Green Onions and Ginger Recipe FAQs

How do I choose the right ingredients for my One-Pot Egg Roll Soup?
Absolutely! For the ground pork, look for meat with a little fat content to ensure flavor, around 80/20 is great. Fresh veggies are a must; choose cabbage that's crisp with vibrant leaves, and for ginger, go for firm, unwrinkled roots. If the garlic has dark spots, it's past its prime, so opt for fresh cloves instead.

What’s the best way to store leftover One-Pot Egg Roll Soup?
Very simple! Store the soup in an airtight container in the fridge for up to 3-4 days. Ensure it cools to room temperature before sealing to keep the flavors fresh. You can reheat it on the stove or in the microwave, adding a splash of broth if it thickens too much.

Can I freeze One-Pot Egg Roll Soup?
Of course! To freeze, omit the eggs if you added them. Allow the soup to cool completely, and then pour it into freezer-safe containers or bags—be sure to leave some space for expansion. You can freeze it for up to 3 months. When you’re ready to enjoy, thaw it overnight in the fridge and reheat on the stovetop over medium heat until warmed through.

What should I do if my soup turns out too salty?
If you find your One-Pot Egg Roll Soup too salty, don’t worry—this is an easy fix! Add a cup of unsalted chicken broth to dilute the saltiness, or you can toss in a couple of cooked potato chunks, simmering until they soften; they’ll absorb some of that excess salt while adding another texture to your dish.

Can I customize the recipe for dietary needs, like gluten-free or vegetarian?
Absolutely! For gluten-free needs, use tamari instead of regular soy sauce. If you'd prefer a vegetarian or vegan version, simply swap out the ground pork for a protein like tempeh or mushrooms and utilize vegetable broth. You can add more vegetables like bok choy or extra carrots for a nutrient-packed twist.

How long can I keep my Egg Roll Soup in the fridge or freezer?
You can keep the One-Pot Egg Roll Soup in the refrigerator for about 3-4 days. If freezing, make sure it's stored in airtight containers for up to 3 months. Just remember to skip the eggs for the best texture when reheating!

One-Pot Egg Roll Soup

One-Pot Egg Roll Soup: Cozy Comfort in Every Bowl

A delicious One-Pot Egg Roll Soup combining savory pork, ginger, and cabbage in a warm broth.
Print Recipe Pin Recipe
Prep Time 10 minutes mins
Cook Time 30 minutes mins
Total Time 40 minutes mins
Servings: 4 bowls
Course: Soups
Cuisine: Asian
Calories: 300
Ingredients Equipment Method Nutrition Notes

Ingredients
  

For the Soup Base
  • 1 pound Ground Pork Substitute with ground chicken or turkey for a lighter option.
  • 6 cups Low-Sodium Chicken Broth Substitute with vegetable broth for vegetarian options.
  • 1 tablespoon Soy Sauce Use gluten-free tamari for a gluten-free version.
  • 1 tablespoon Sesame Oil There's no direct substitute for flavor.
  • 1 tablespoon Rice Vinegar Apple cider vinegar can be used as a substitute.
For the Aromatics
  • 1 medium Yellow Onion Diced; shallots work for a milder flavor.
  • 4 cloves Garlic Minced; fresh garlic is preferred.
  • 2 tablespoons Fresh Ginger Grated; ground ginger may be used as a substitute.
For the Vegetables
  • 4 cups Green Cabbage Thinly sliced; Napa cabbage can be used as an alternative.
  • 1 cup Shredded Carrots Adds sweetness and crunch.
  • ½ cup Green Onions Chopped, for garnish.
Extras and Seasoning
  • Salt and Pepper Season to taste.
  • 2 Eggs Beaten, optional; omit for a lighter meal.
  • Red Pepper Flakes or Sriracha Optional, for spice.

Equipment

  • Large pot or Dutch oven

Method
 

Step‑by‑Step Instructions
  1. In a large pot or Dutch oven, heat over medium-high heat. Add the ground pork and cook for 5-7 minutes, breaking apart as it browns. Drain excess fat.
  2. Add the diced yellow onion, minced garlic, and grated ginger. Sauté for about 3-4 minutes until onions are translucent.
  3. Stir in the soy sauce, sesame oil, and rice vinegar. Pour in chicken broth and bring to a gentle boil.
  4. Carefully stir in the shredded carrots and green cabbage. Reduce heat and simmer uncovered for about 15 minutes.
  5. If using, slowly drizzle in the beaten eggs while stirring gently to create ribbons. Cook for an additional 1-2 minutes.
  6. Taste and adjust seasoning with salt and pepper. Ladle into bowls and garnish with chopped green onions and red pepper flakes or Sriracha.

Nutrition

Serving: 1bowlCalories: 300kcalCarbohydrates: 12gProtein: 20gFat: 18gSaturated Fat: 5gPolyunsaturated Fat: 2gMonounsaturated Fat: 10gCholesterol: 150mgSodium: 700mgPotassium: 600mgFiber: 3gSugar: 4gVitamin A: 100IUVitamin C: 80mgCalcium: 6mgIron: 15mg

Notes

Feel free to customize with extra veggies or proteins to suit your preferences.

Tried this recipe?

Let us know how it was!
  • « Previous Page
  • 1
  • …
  • 35
  • 36
  • 37
  • 38
  • 39
  • …
  • 179
  • Next Page »

Welcome!

Hi, I’m Grace, a Sydney-based home cook with a passion for bold flavors and trending ingredients. Whether you’re a busy beginner or a seasoned foodie, you’ll find dishes here that are fresh, fun, and full of flavor.

More about me

Popular Recipes

  • Cheesy Chicken Garlic Bread Sandwich
    Cheesy Chicken Garlic Bread Sandwich for Cozy Family Moments
  • Easy Chicken Ranch Wraps
    Easy Chicken Ranch Wraps: Quick, Creamy & Totally Satisfying
  • Chicken Caesar Sandwiches
    Delicious Chicken Caesar Sandwiches for Quick Comfort Food
  • best Cuban sandwich
    The Best Cuban Sandwich You’ll Want Every Weeknight!

Footer

↑ back to top

About

  • Privacy Policy
  • Disclaimer
  • Terms & Conditions

Newsletter

  • Sign Up! for emails and updates

Contact

  • About me
  • Contact me

Copyright © 2025 TastyTrendIngredients