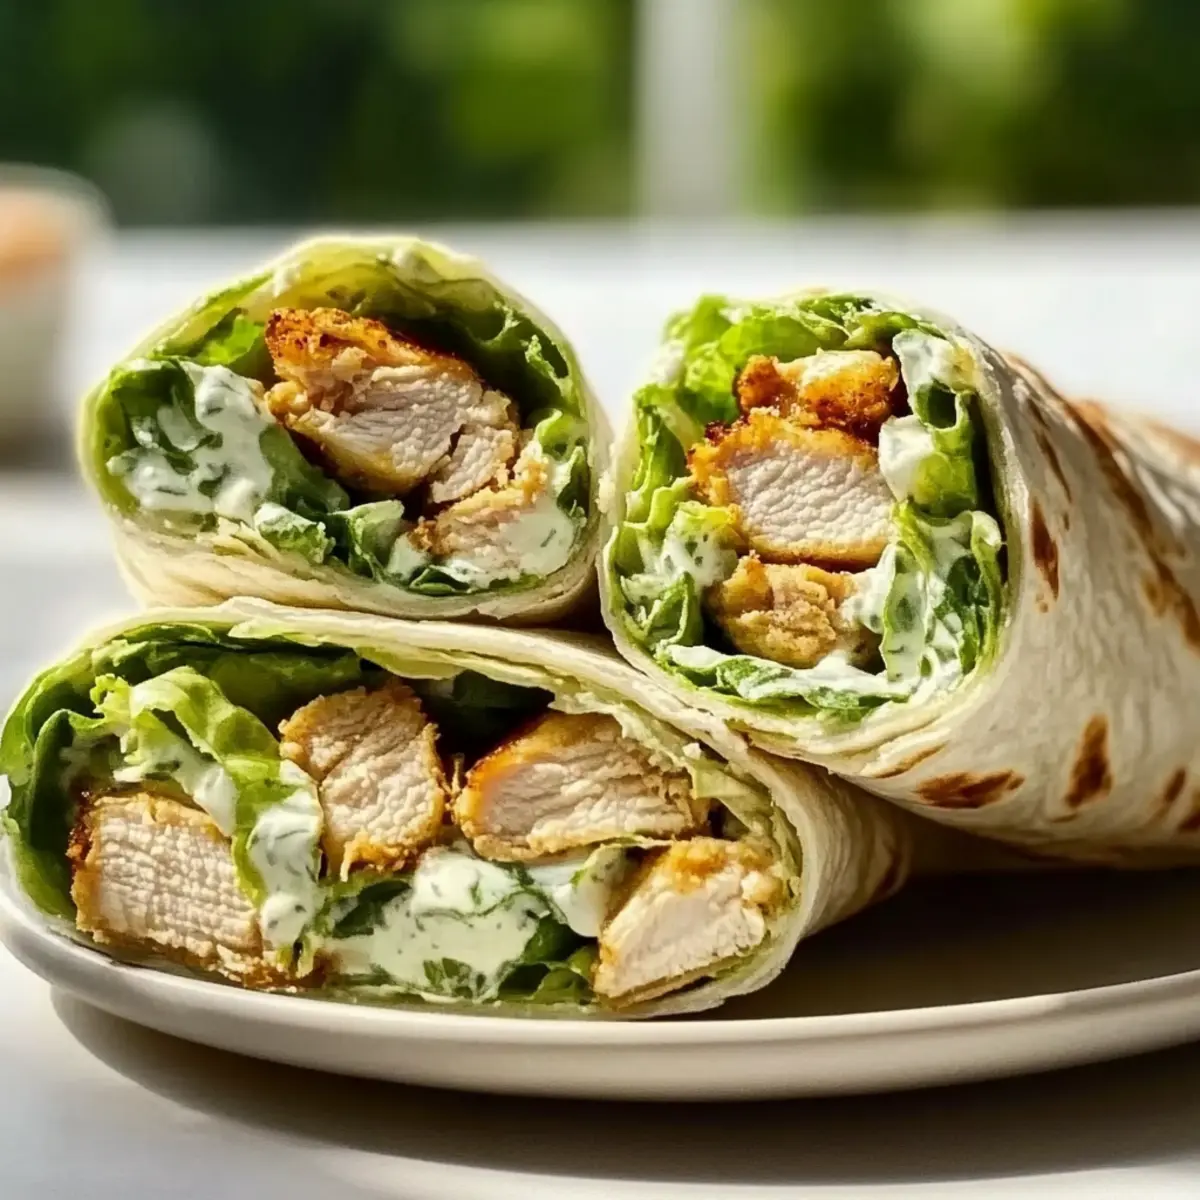
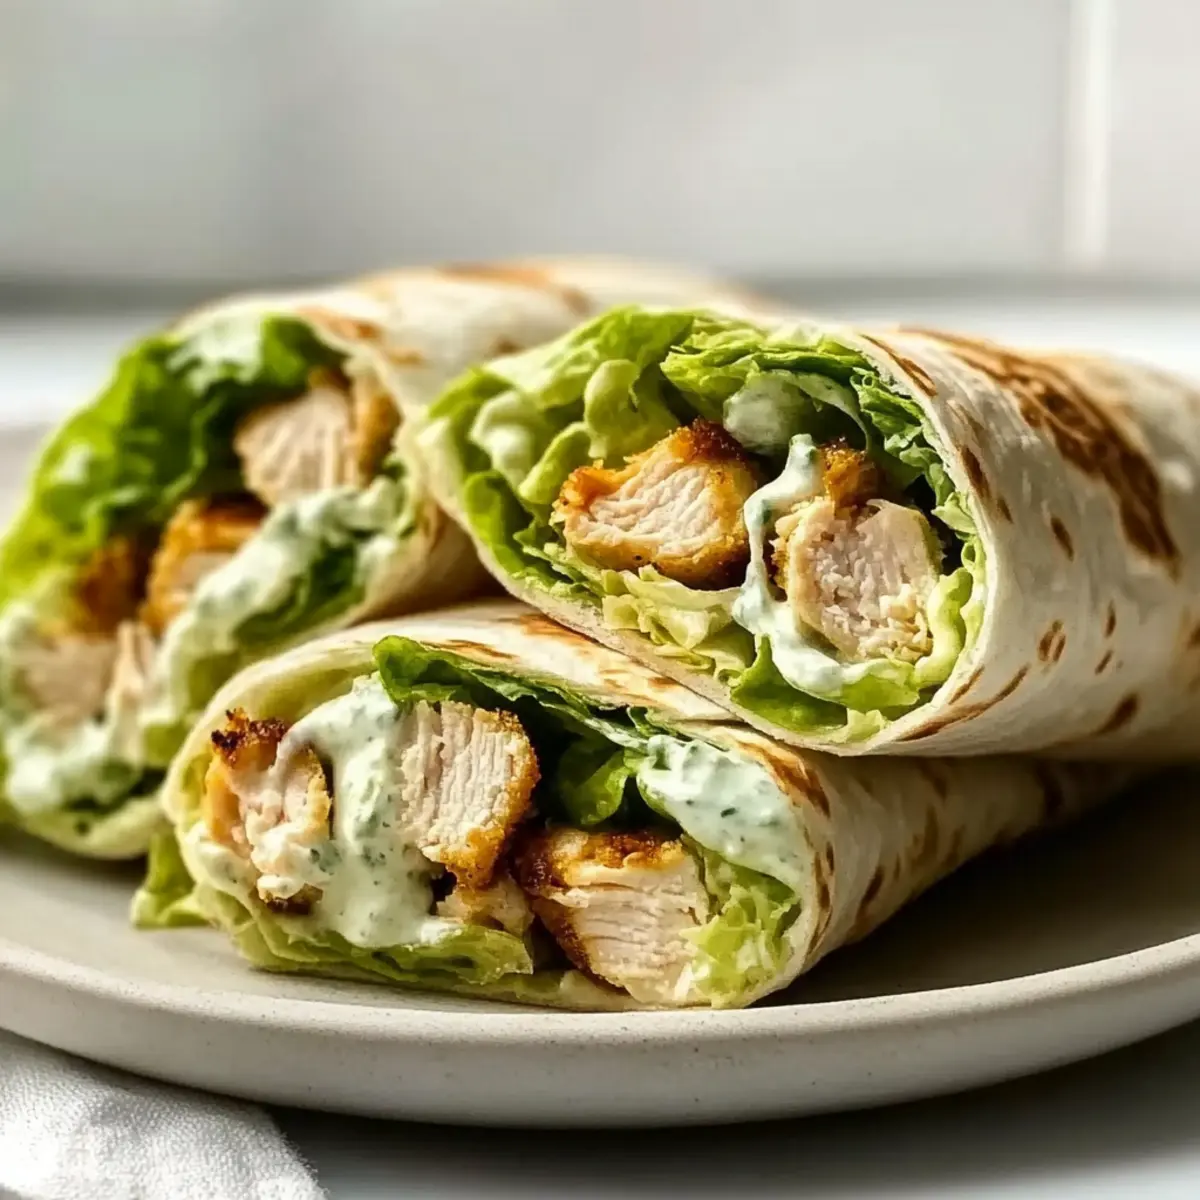
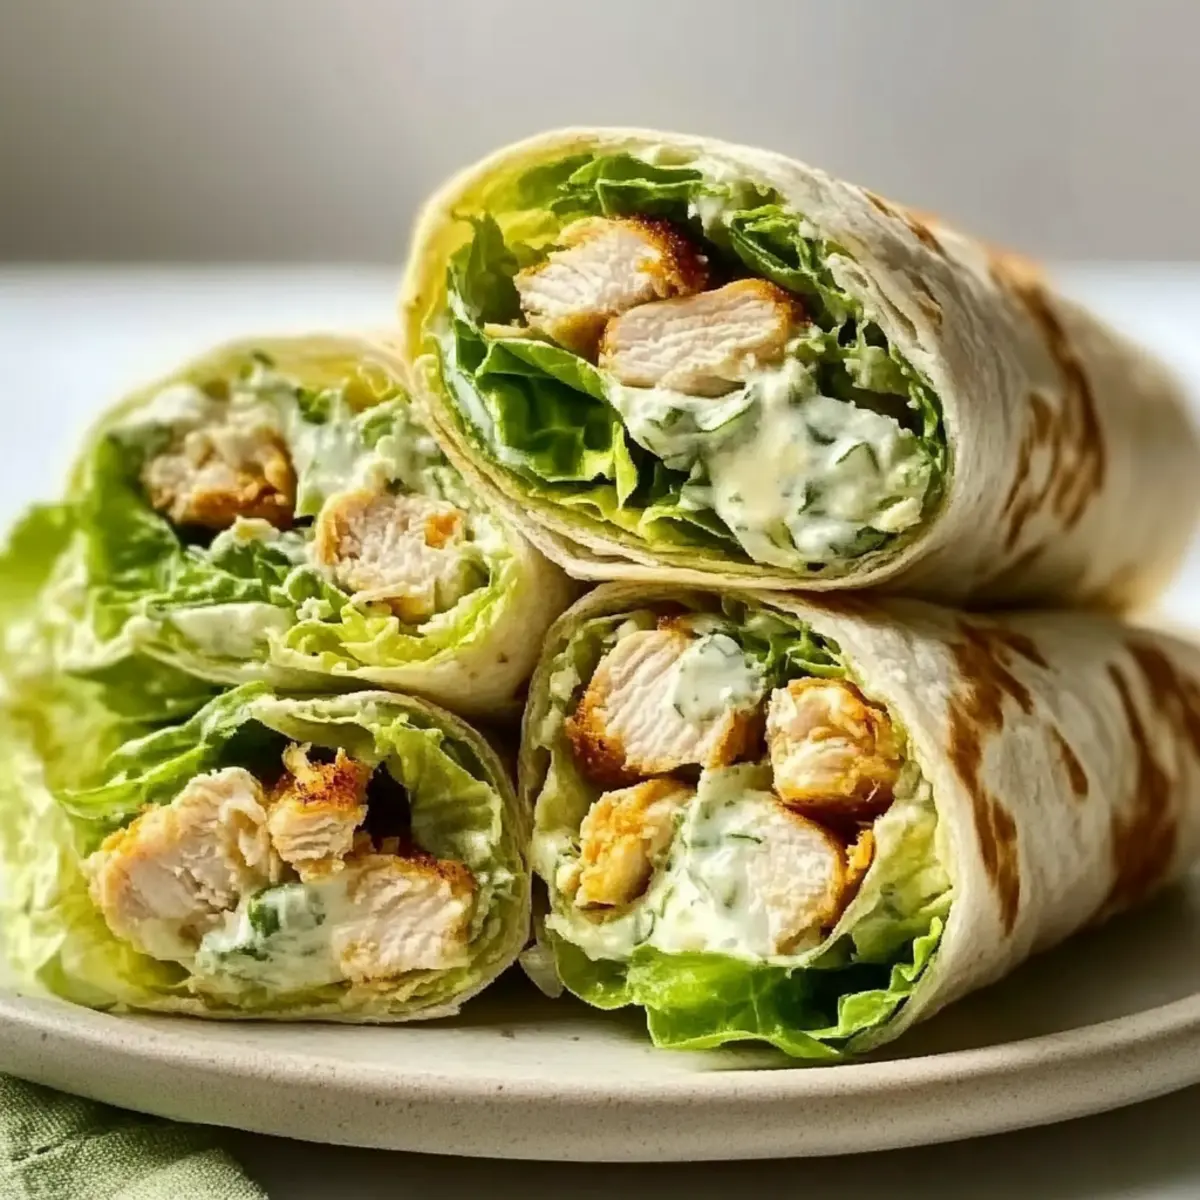
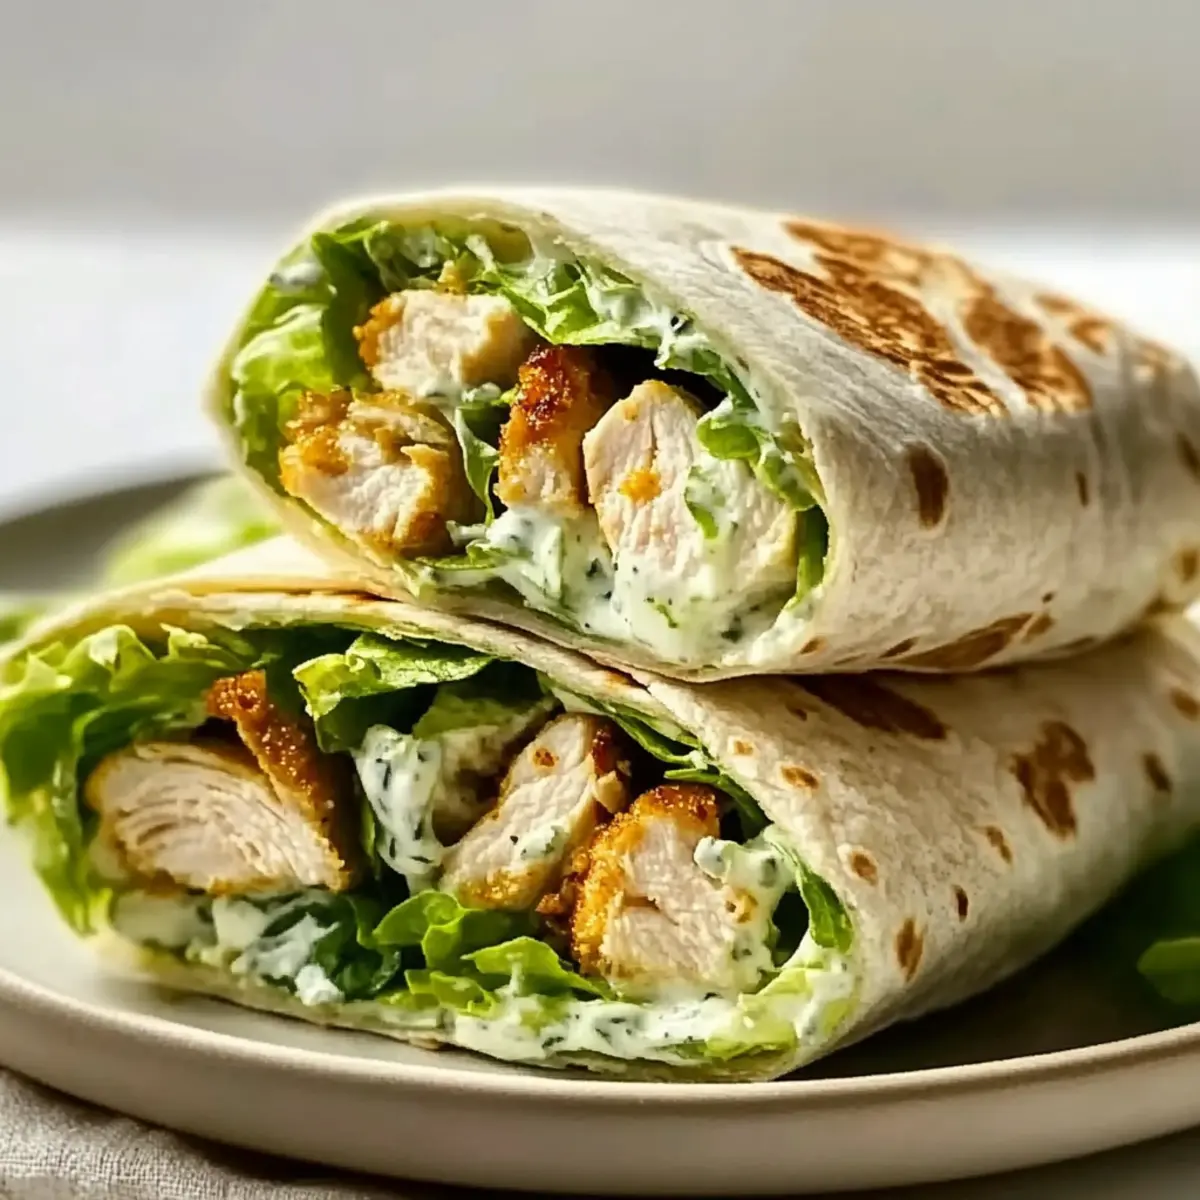
As I stood in the kitchen, the smell of sizzling chicken filled the air, instantly transporting me to cozy family dinners and fun gatherings with friends. If you’re longing for a meal that hits all the right notes of comfort and crunch, let me introduce you to my Quick Crispy Chicken Ranch Snack Wraps. These delightful wraps come together in just 20 minutes, making them perfect for those hectic weeknights when time is not on your side. Not only are they incredibly customizable—think grilled chicken or a veggie twist—but they also cater to gluten-free diets, ensuring everyone can enjoy a cozy, homemade meal. So, are you ready to wrap up the day with something that feels like a hug in food form? Let’s dive in!
Why Are These Wraps a Must-Try?
Quick and Easy: With just 20 minutes from start to finish, these Crispy Chicken Ranch Snack Wraps are your go-to for effortless weeknight dinners.
Customizable Delight: Enjoy the freedom to mix and match ingredients—swap in grilled chicken, experiment with different cheeses, or even create a satisfying vegetarian version!
Flavor Explosion: Each bite offers a perfect harmony of crunchy chicken, fresh lettuce, and zesty ranch dressing that is sure to impress taste buds of all ages.
Family-Friendly: This recipe is designed to please everyone at the table, making it ideal for family gatherings or casual get-togethers.
Healthier Alternative: Create a homemade option that rivals fast food, providing a nutritious and gluten-free meal that keeps everyone coming back for more.
For more ways to enjoy chicken, check out my recipes for Honey Garlic Chicken Thighs and Crock Pot Chicken!
Crispy Chicken Ranch Snack Wrap Ingredients
For the Wraps
• Small Flour Tortillas – The soft base for your wraps; consider whole wheat or gluten-free varieties to suit dietary needs.
• Frozen Chicken Tenders – Offers a substantial protein boost; feel free to substitute with pre-cooked grilled chicken or rotisserie for quick preparation.
• Shredded Lettuce – Provides freshness and crunch; can easily be replaced with coleslaw mix for a twist.
• Shredded Cheddar Cheese – Adds creaminess and rich flavor; try switching to Monterey Jack or pepper jack for a bit of spice.
For the Dressing
• Ranch Dressing – Brings all the flavors together with its creamy texture; honey mustard or spicy mayo can be great alternatives for a different zing.
With these ingredients, you can create Crispy Chicken Ranch Snack Wraps that will delight your family and friends!
Step‑by‑Step Instructions for Crispy Chicken Ranch Snack Wraps
Step 1: Cook Chicken
Preheat your oven to 400°F (200°C). Spread frozen chicken tenders on a baking sheet and bake for 20–25 minutes, flipping halfway, until they are golden brown and crispy. Your kitchen will soon be filled with a delightful aroma, signaling that the star of your Crispy Chicken Ranch Snack Wraps is ready!
Step 2: Warm Tortillas
While the chicken is baking, heat small flour tortillas for about 15–30 seconds in a dry skillet or microwave until they are pliable. This step makes them easier to fold and prevents tearing when you assemble your Crispy Chicken Ranch Snack Wraps, ensuring a seamless wrap every time.
Step 3: Prepare Chicken
Once the chicken tenders have cooked and cooled for a few minutes, cut them into bite-sized pieces. This allows for easier assembly and ensures that each bite of your Crispy Chicken Ranch Snack Wraps is packed with delicious chicken flavor.
Step 4: Assemble Wraps
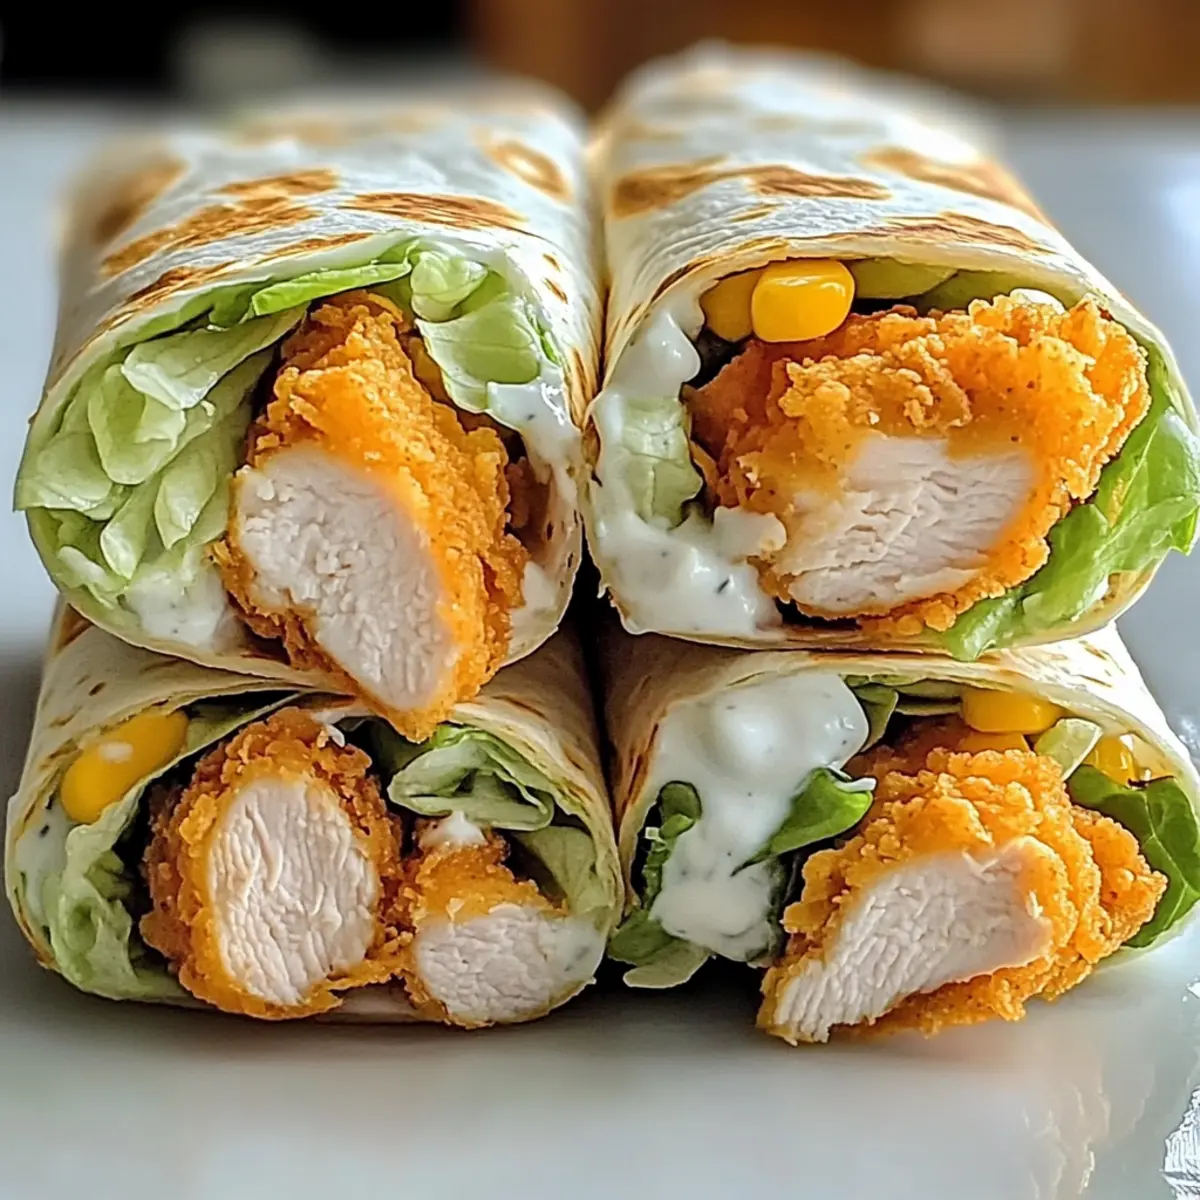
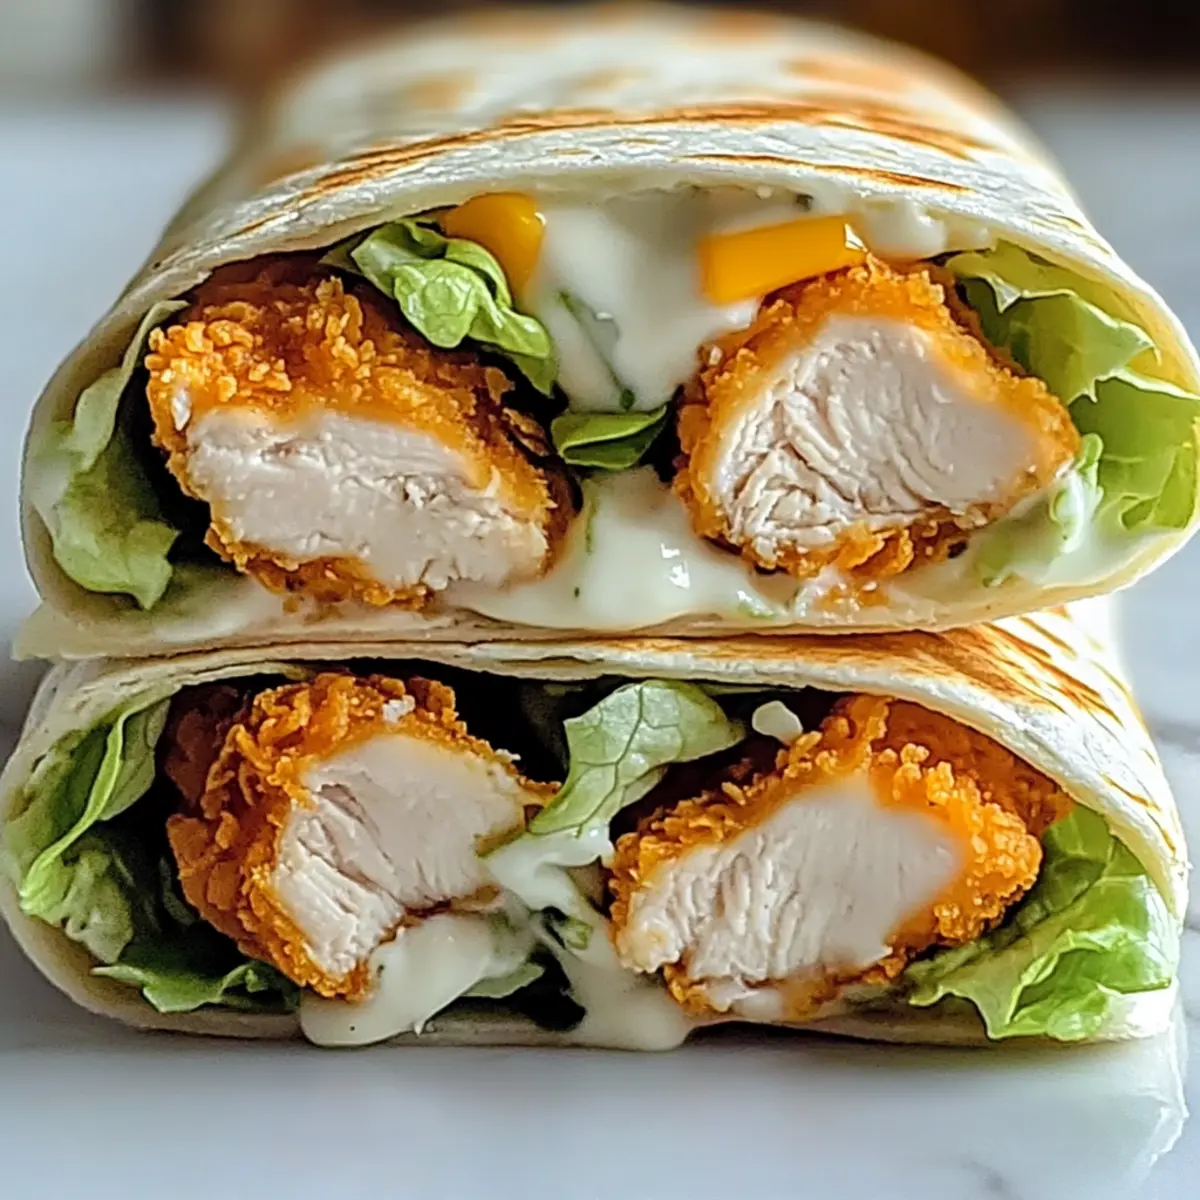
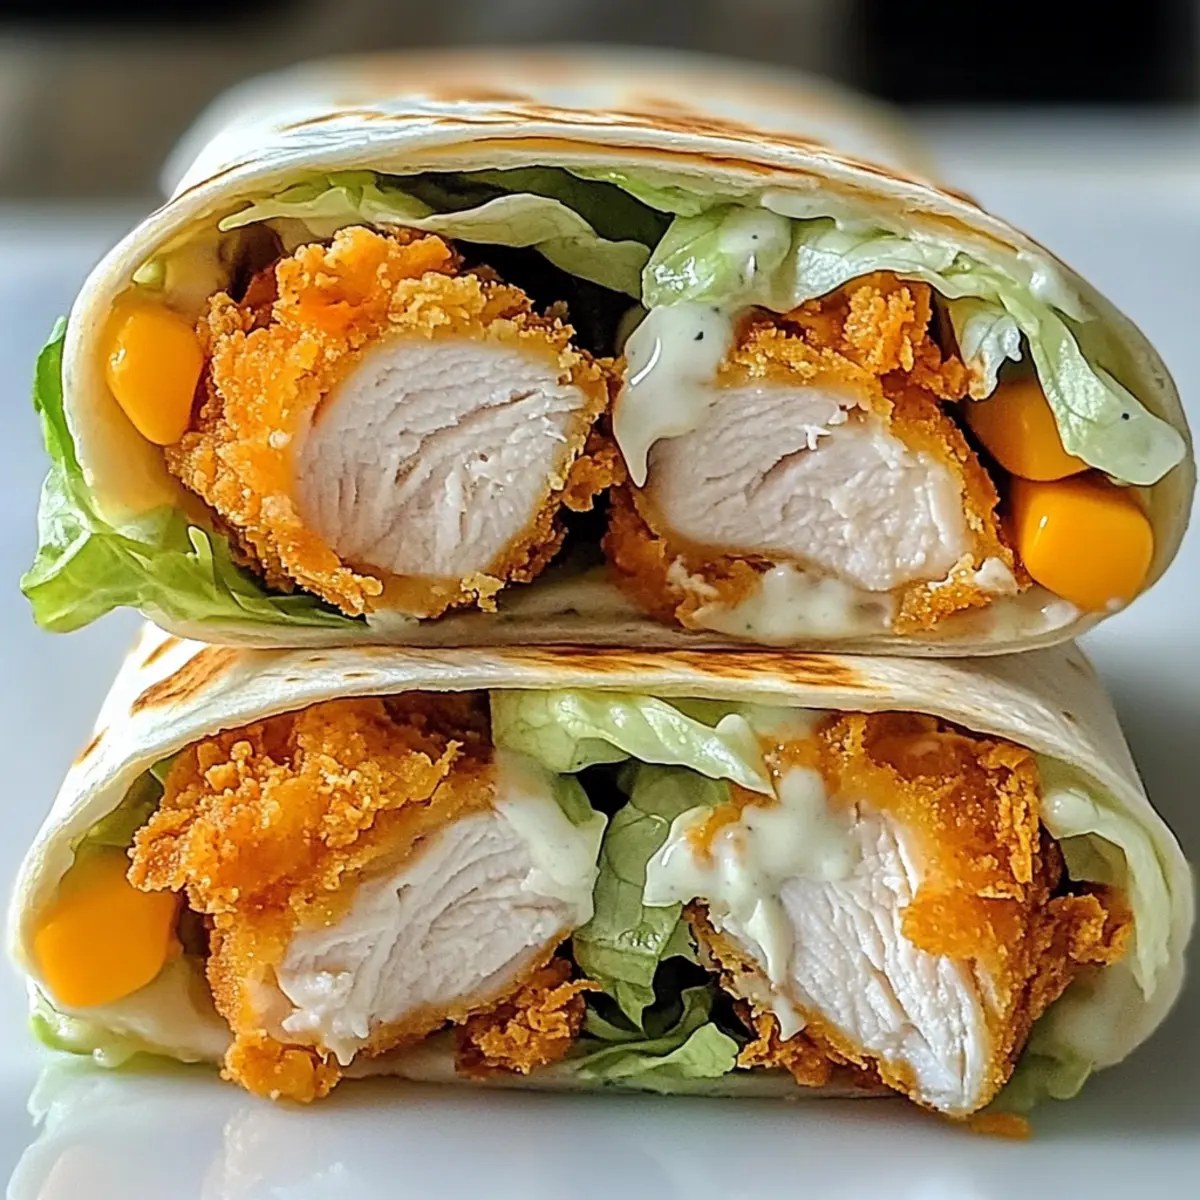
Lay a warmed tortilla flat on a clean surface and layer shredded lettuce, bite-sized chicken pieces, and shredded cheddar cheese down the center. Be generous but careful not to overfill the wrap, allowing ample space to fold and roll. This will ensure your Crispy Chicken Ranch Snack Wraps hold together beautifully.
Step 5: Add Dressing
Drizzle ranch dressing over the fillings in each tortilla, providing that creamy, zesty kick that ties everything together. Use just the right amount to enhance flavor without making the wraps soggy; this is key in achieving the perfect Crispy Chicken Ranch Snack Wraps.
Step 6: Fold and Roll
To wrap, fold the sides of the tortilla inward over the filling, then tightly roll from the bottom to the top. This method keeps all the delicious ingredients secure, resulting in neat, cohesive Crispy Chicken Ranch Snack Wraps that are ready for serving or packing.
Step 7: Serve or Pack
Slice each wrap in half for easy handling and serve immediately for the best taste and texture. If you’re prepping for later, wrap the assembled Crispy Chicken Ranch Snack Wraps in foil and store them in the fridge for up to three days, making them perfect for a quick snack or meal on the go.
Expert Tips for Crispy Chicken Ranch Snack Wraps
-
Chicken Cooling: Always let the chicken cool slightly before cutting it. This helps maintain the integrity of the wrap and prevents sogginess.
-
Drizzle with Care: Use a light drizzle of ranch dressing. Overdoing it can lead to a messy wrap, so less is often more when it comes to flavor!
-
Warm Tortillas: ensure that tortillas are adequately warmed to prevent tearing during assembly. A dry skillet works wonders to make them pliable.
-
Substitutions Made Easy: If gluten is a concern, look for certified gluten-free tortillas and chicken products to keep your Crispy Chicken Ranch Snack Wraps delicious and safe for everyone.
-
Storage Tips: Assemble wraps in an airtight container for up to three days in the fridge. For longer storage, freeze the components separately for freshness and convenience.
What to Serve with Crispy Chicken Ranch Snack Wraps
Elevate your meal experience by pairing these wraps with delightful sides and drinks that complement their vibrant flavors.
-
Garlic Breadsticks: Soft and buttery, they offer a delightful contrast to the crispy wraps and make for a comforting touch.
-
Crunchy Veggie Sticks: A medley of carrots, celery, and bell peppers adds a fresh crunch and balances the richness of the ranch dressing. Serve with a dip for added fun!
-
Creamy Potato Salad: Rich and tangy, this classic side brings a creamy texture that pairs beautifully with the savory crunch of the wraps. It’s a crowd-pleaser for family gatherings.
-
Pickle Chips: The sharp acidity of pickle chips cuts through the creamy ranch, making each bite of the wrap even more satisfying. They add a zesty kick that's simply irresistible.
-
Herbed Quinoa Salad: This light and fluffy salad offers a nutritious boost, with fresh herbs bringing brightness and flavor that perfectly complement the wraps’ hearty filling.
-
Sparkling Lemonade: A refreshing drink that brings an effervescent twist to your meal. The citrus balances the savory notes of the wraps, leaving you feeling refreshed.
-
Chocolate Chip Cookies: Conclude your meal on a sweet note with warm cookies. Their chewy texture and rich flavor will leave everyone smiling!
Make Ahead Options
These Crispy Chicken Ranch Snack Wraps are perfect for busy home cooks looking to save time! You can prepare all the ingredients up to 3 days in advance, ensuring a quick assembly when it’s time to eat. Simply cook the chicken tenders and allow them to cool before cutting into pieces, refrigerating them (along with shredded lettuce and cheese) in airtight containers. For the best results, store the ranch dressing separately to avoid sogginess. When you’re ready to serve, just warm the tortillas, assemble the wraps, and enjoy a delicious homemade meal with minimal effort! Trust me, your family will love them just as much, even when prepped ahead!
Crispy Chicken Ranch Snack Wraps Variations
Feel free to explore these delightful twists on your Crispy Chicken Ranch Snack Wraps for an exciting culinary adventure!
-
Grilled Chicken Swap: Use grilled chicken for a smokier taste that elevates the wraps. Grilled chicken adds a nice char and enhances overall flavor.
-
Rotisserie Chicken Option: Shredded rotisserie chicken can save time on busy evenings. It's pre-cooked and packed with flavor, making your wrap assembly a breeze.
-
Spicy Cheese Choice: Experiment with pepper jack for a spicy kick or gouda for an unexpected flavor twist. These cheeses can transform your wraps into a whole new experience.
-
Vegetarian Version: Swap in creamy avocado or a vibrant mix of roasted vegetables instead of chicken. It makes the wraps just as filling and incredibly flavorful.
-
Herb Infusion: Add fresh herbs like cilantro or basil to brighten up the flavor. A handful of herbs can make all the difference in transforming your wraps.
-
Different Dressings: Try honey mustard or spicy mayo for a unique taste. This simple swap can turn standard wraps into a zesty delight.
-
Crunchy Additions: Toss in some sliced bell peppers or crunchy cucumbers for added texture. This not only boosts the crunch factor but also adds a fresh element.
-
Sweet Twist: A touch of BBQ sauce in place of ranch can provide a sweet and tangy flavor. Just drizzle lightly to keep those wraps perfectly balanced!
For more delicious chicken ideas, try my Honey Garlic Chicken Thighs or indulge in Honey BBQ Chicken for a delightful twist on your meal preparation!
Storage Tips for Crispy Chicken Ranch Snack Wraps
-
Fridge: Store assembled wraps in an airtight container for up to 3 days. This keeps them fresh while ensuring that you can grab a quick meal anytime.
-
Freezer: Freeze components separately—chicken, tortillas, and veggies—for up to 1 month. This makes meal prep a breeze for busy days.
-
Reheating: To reheat, thaw frozen components in the fridge overnight, then warm tortillas in a skillet before assembling. Enjoy that crispy texture like fresh!
-
Leftover Chicken: If you have leftover cooked chicken tenders, store them in the fridge for up to 4 days, ready to toss into your next batch of Crispy Chicken Ranch Snack Wraps.
Crispy Chicken Ranch Snack Wraps Recipe FAQs
What type of tortillas should I use for these wraps?
Absolutely! Small flour tortillas are the standard base for these wraps, but feel free to experiment with whole wheat or certified gluten-free tortillas to accommodate dietary needs. Each type will add a unique touch to your Crispy Chicken Ranch Snack Wraps.
How should I store leftover wraps?
You can store assembled wraps in an airtight container for up to 3 days in the fridge. To maintain freshness, consider wrapping them individually in foil or plastic wrap. This way, they stay easily accessible for quick meals!
Can I freeze the chicken and wrap components?
Yes! For optimal convenience, freeze the wraps' components separately. The chicken can be frozen for up to 1 month, while tortillas and veggies can also join in. When you're ready to use them, thaw the components in the fridge overnight, warm the tortillas in a skillet, and then assemble your wraps!
What should I do if my wraps end up soggy?
Very common! If your wraps are soggy, it may be due to too much dressing. Always drizzle lightly, keeping it minimal to enhance flavor without overwhelming the wrap. You can also use dryer ingredients like shredded veggies for added crunch, which can help balance moisture.
Are these wraps suitable for gluten-sensitive diets?
Absolutely! Just choose gluten-free tortillas and ensure your chicken and dressing are also gluten-free labeled. This way, everyone—regardless of dietary restrictions—can enjoy these Crispy Chicken Ranch Snack Wraps without worry!

Crispy Chicken Ranch Snack Wraps That Everyone Will Love
Ingredients
Equipment
Method
- Preheat your oven to 400°F (200°C). Spread frozen chicken tenders on a baking sheet and bake for 20–25 minutes, flipping halfway, until golden brown and crispy.
- While the chicken is baking, heat small flour tortillas for about 15–30 seconds in a dry skillet or microwave until pliable.
- Once the chicken is cooked and cooled slightly, cut it into bite-sized pieces.
- Lay a warmed tortilla flat and layer shredded lettuce, bite-sized chicken pieces, and shredded cheddar cheese down the center.
- Drizzle ranch dressing over the fillings in each tortilla.
- Fold the sides of the tortilla inward, then tightly roll from the bottom to the top.
- Slice each wrap in half for easy handling and serve immediately.