tastytrendingredients

  • Home
  • Recipes
    • Appetizers
    • Breakfast
    • Dessert
    • Dinner
    • Drinks
    • Salads
    • Snacks
    • Soups
  • About me
  • Contact me
menu icon
go to homepage
  • Home
  • Recipes
    • Appetizers
    • Breakfast
    • Dessert
    • Dinner
    • Drinks
    • Salads
    • Snacks
    • Soups
  • About me
  • Contact me
search icon
Homepage link
  • Home
  • Recipes
    • Appetizers
    • Breakfast
    • Dessert
    • Dinner
    • Drinks
    • Salads
    • Snacks
    • Soups
  • About me
  • Contact me
×

Melting Sweet Potatoes: Irresistibly Crispy & Buttery Goodness

February 16, 2026 by Grace Snow Leave a Comment

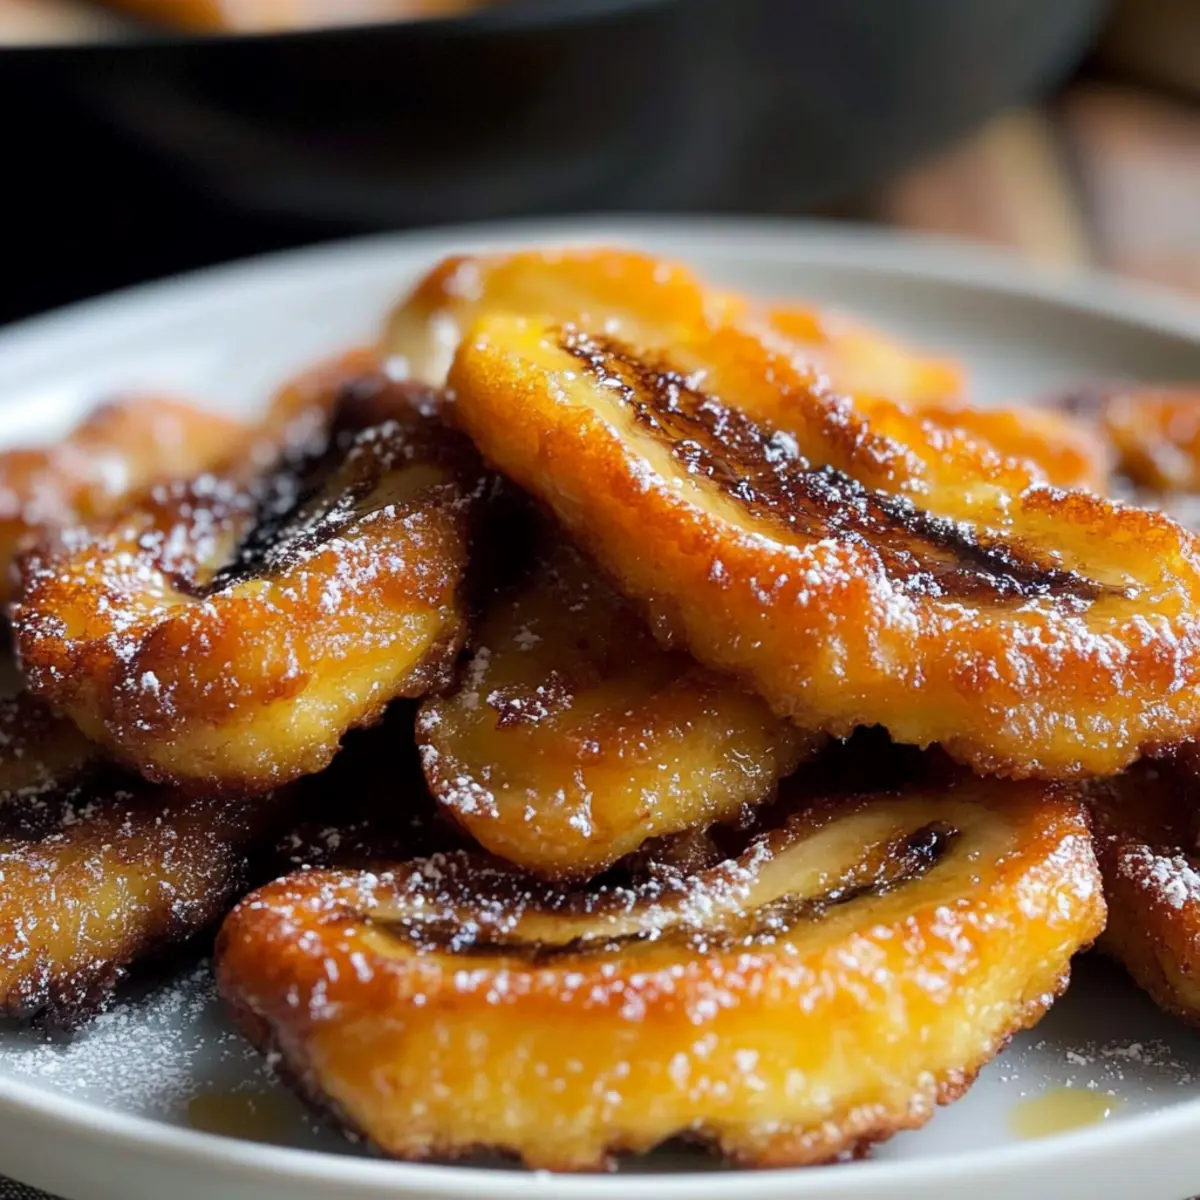
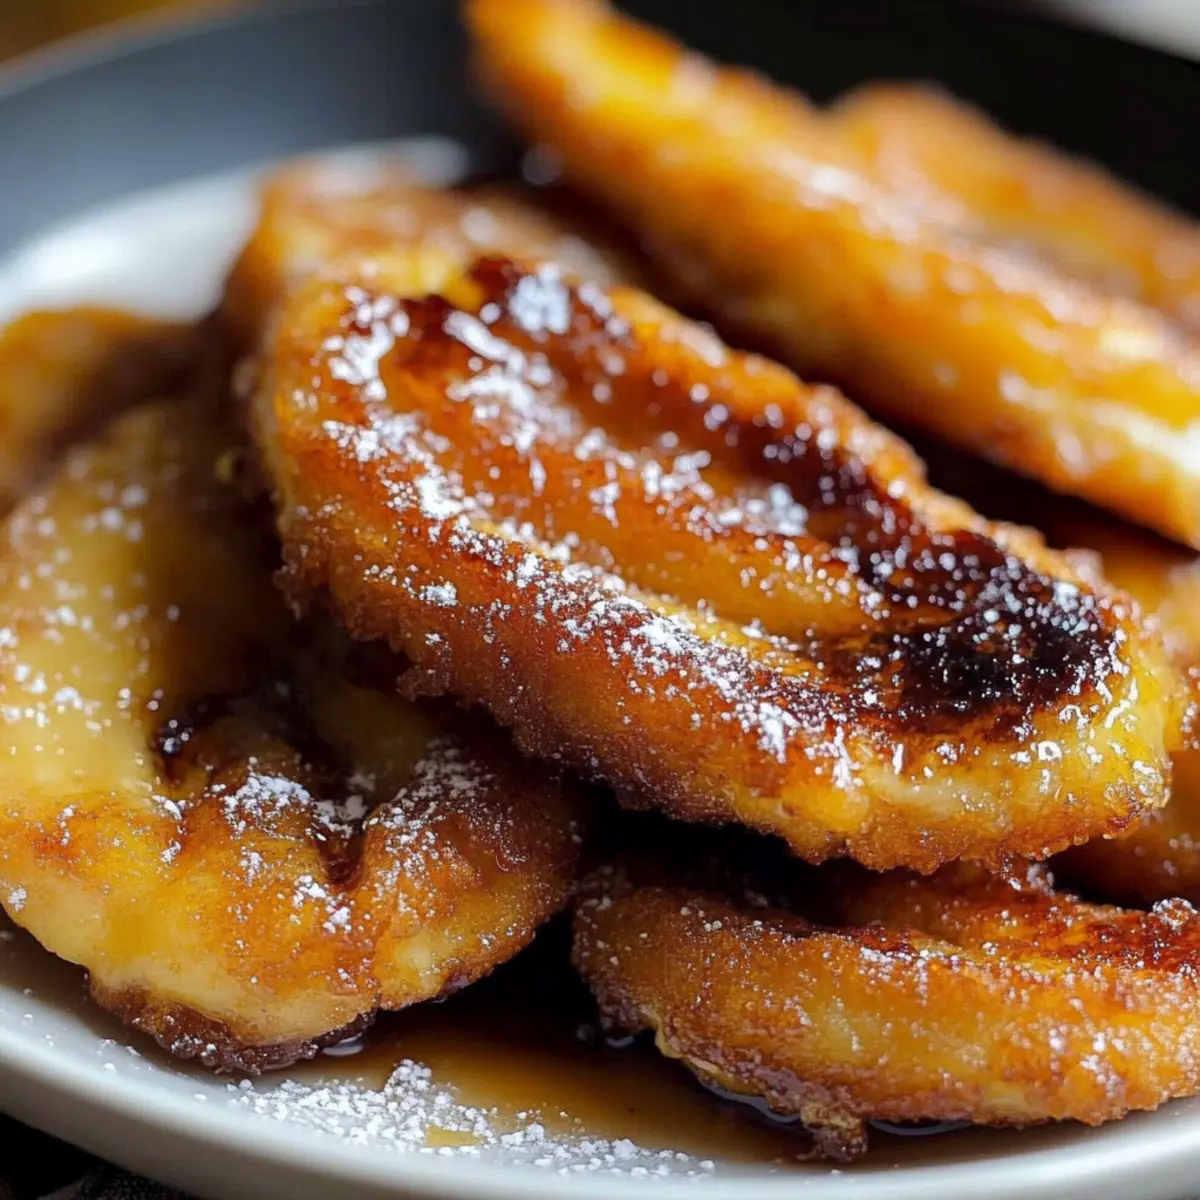
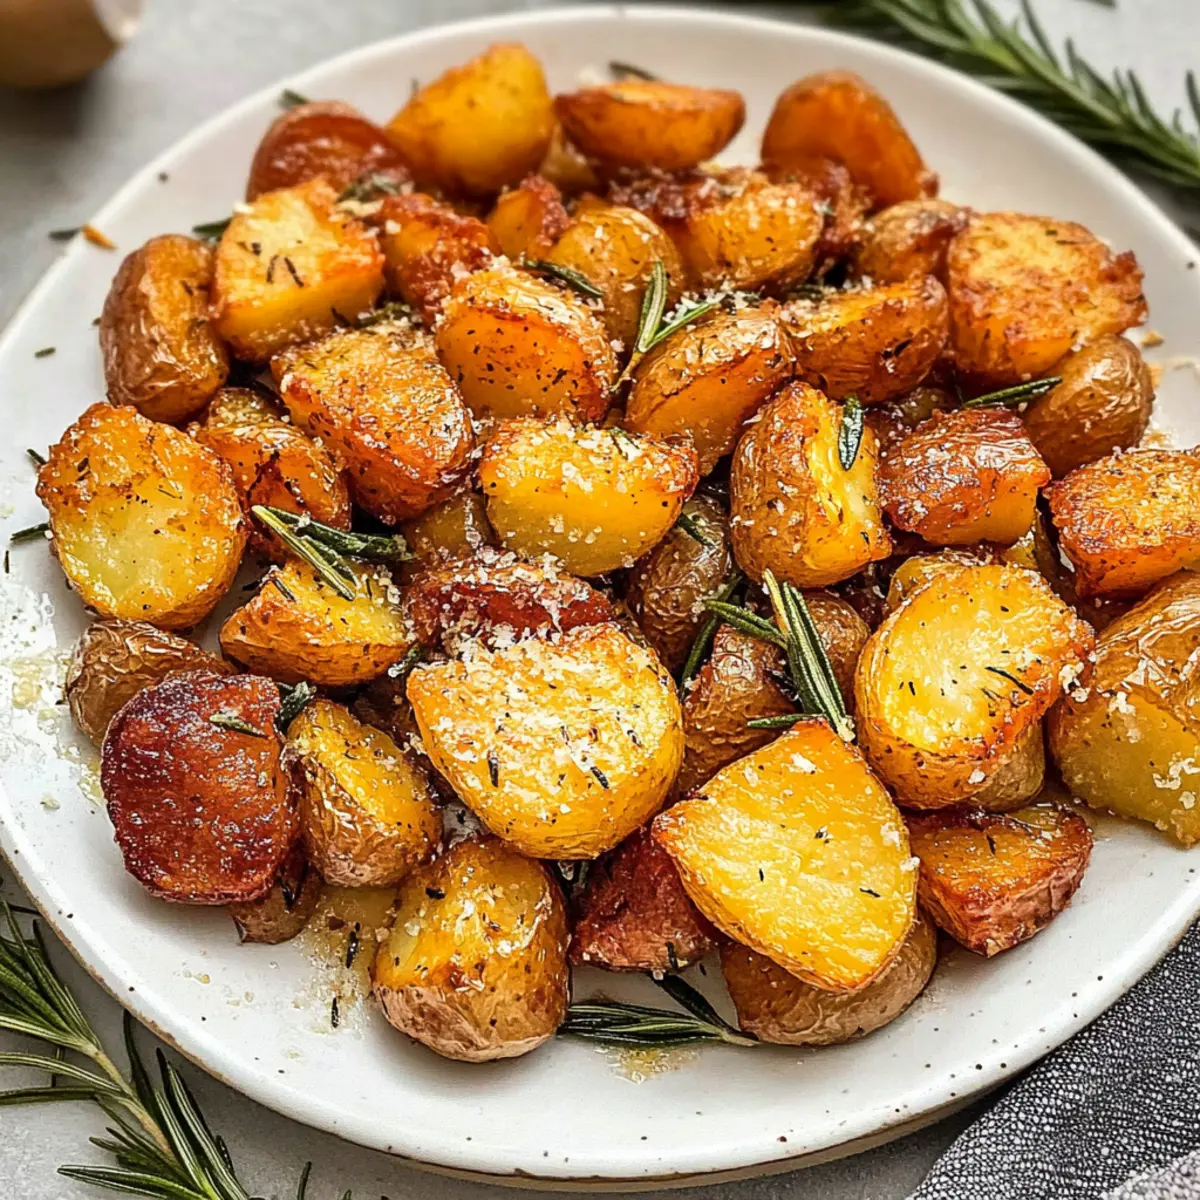
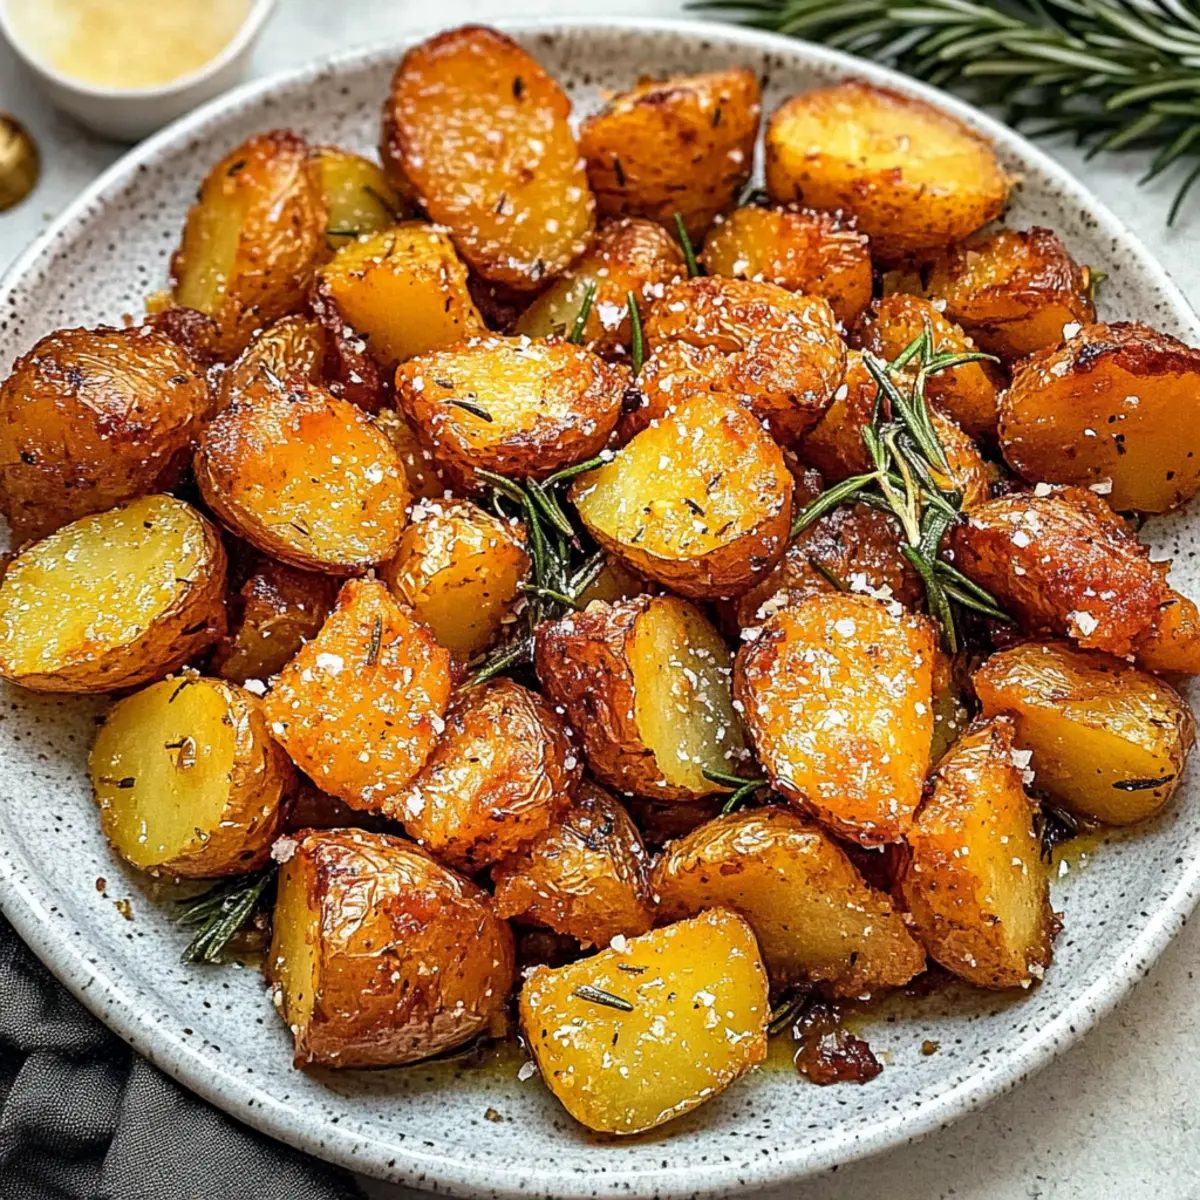
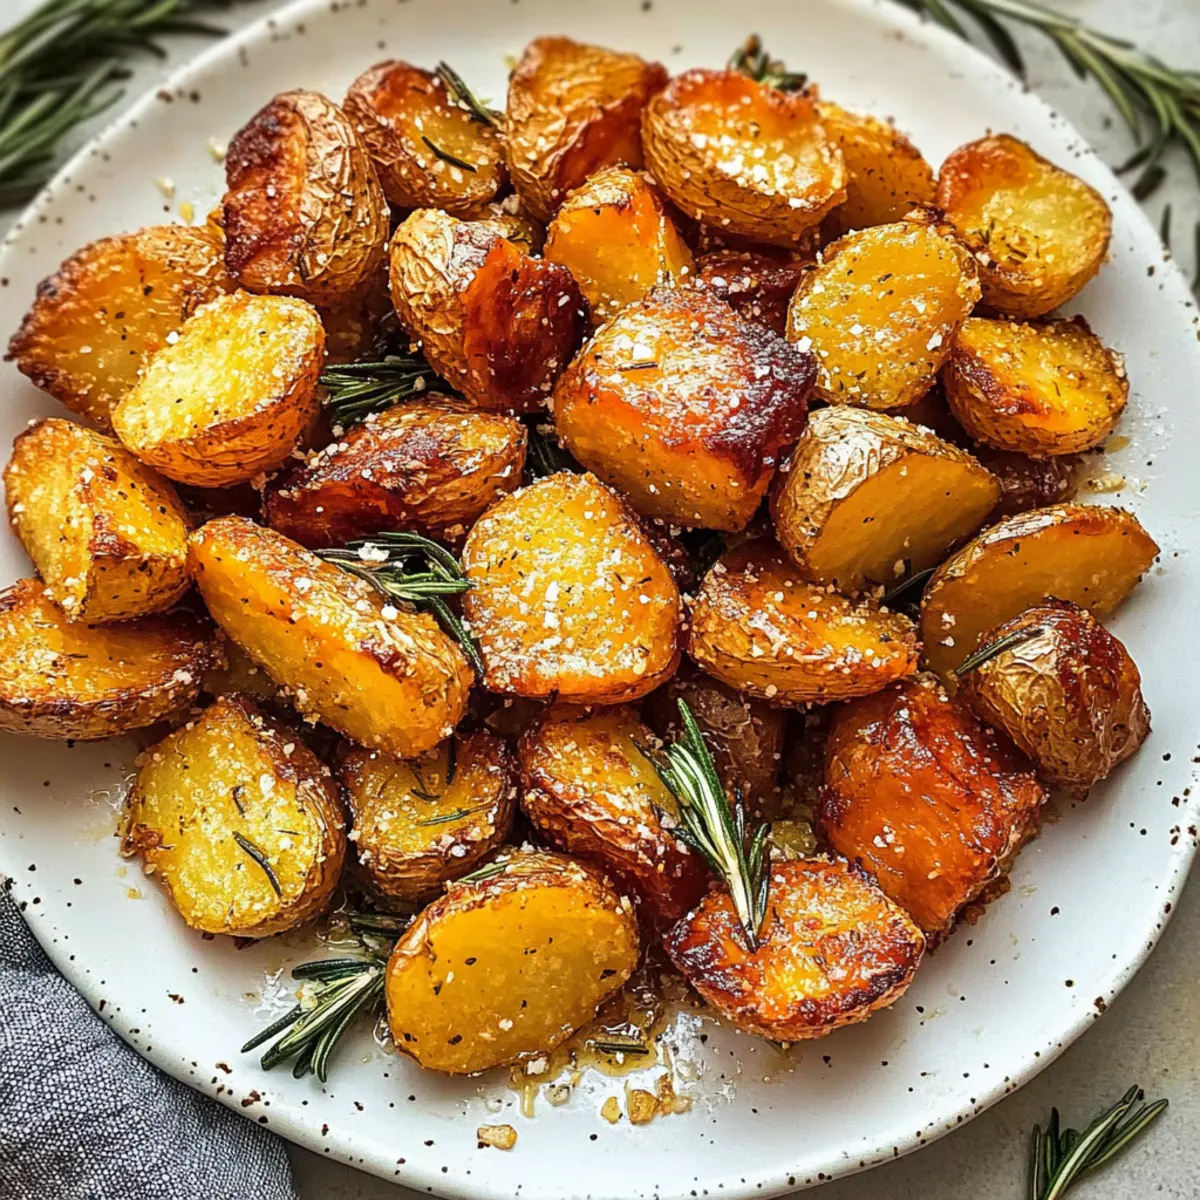
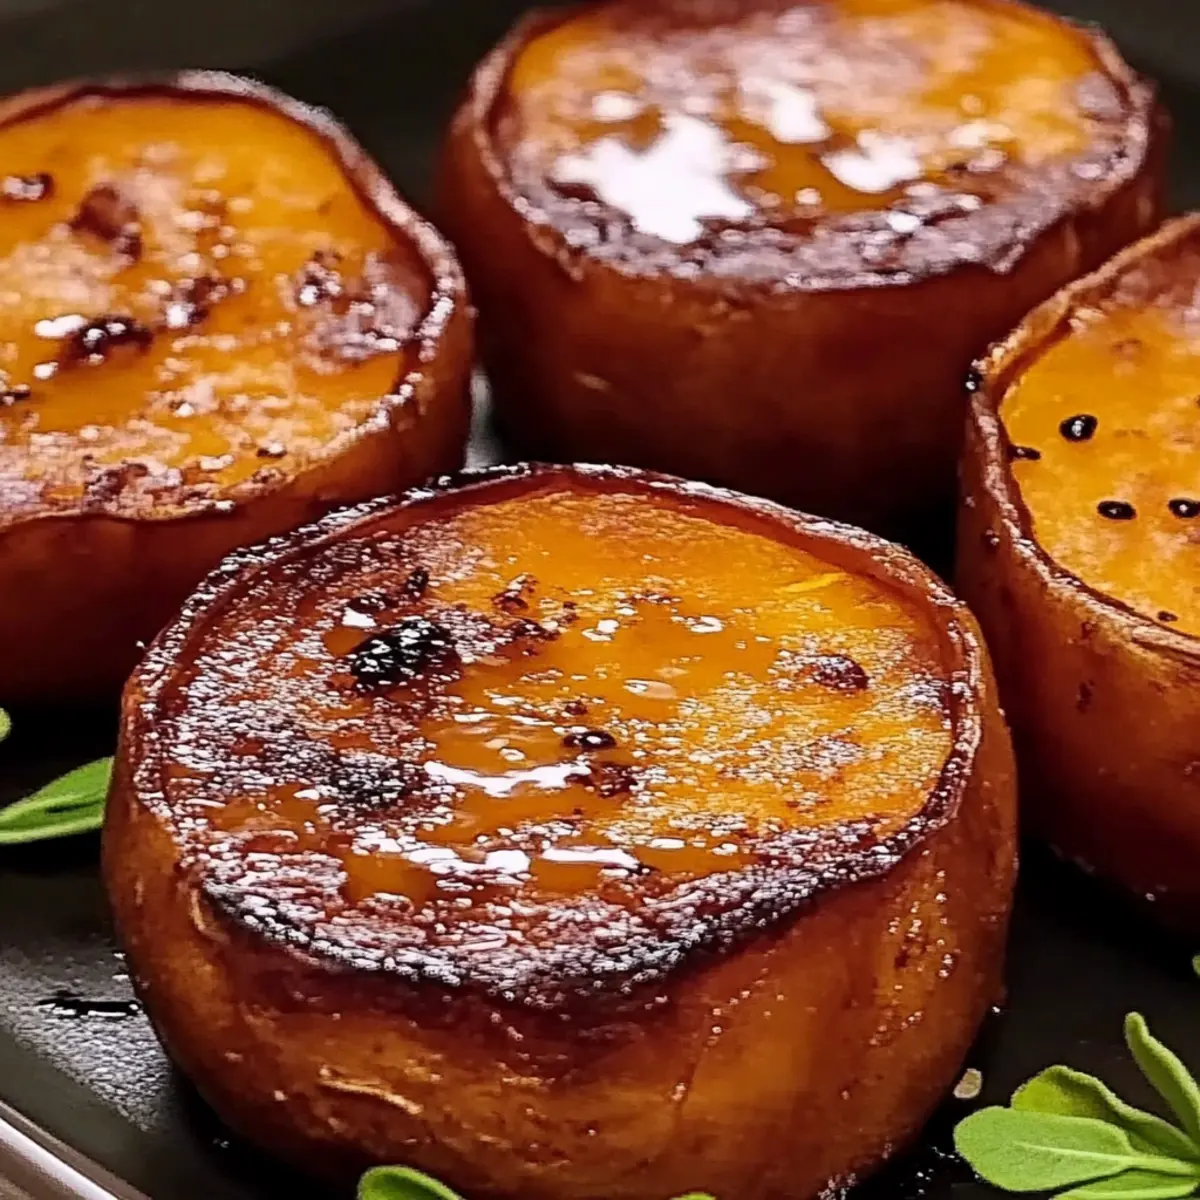
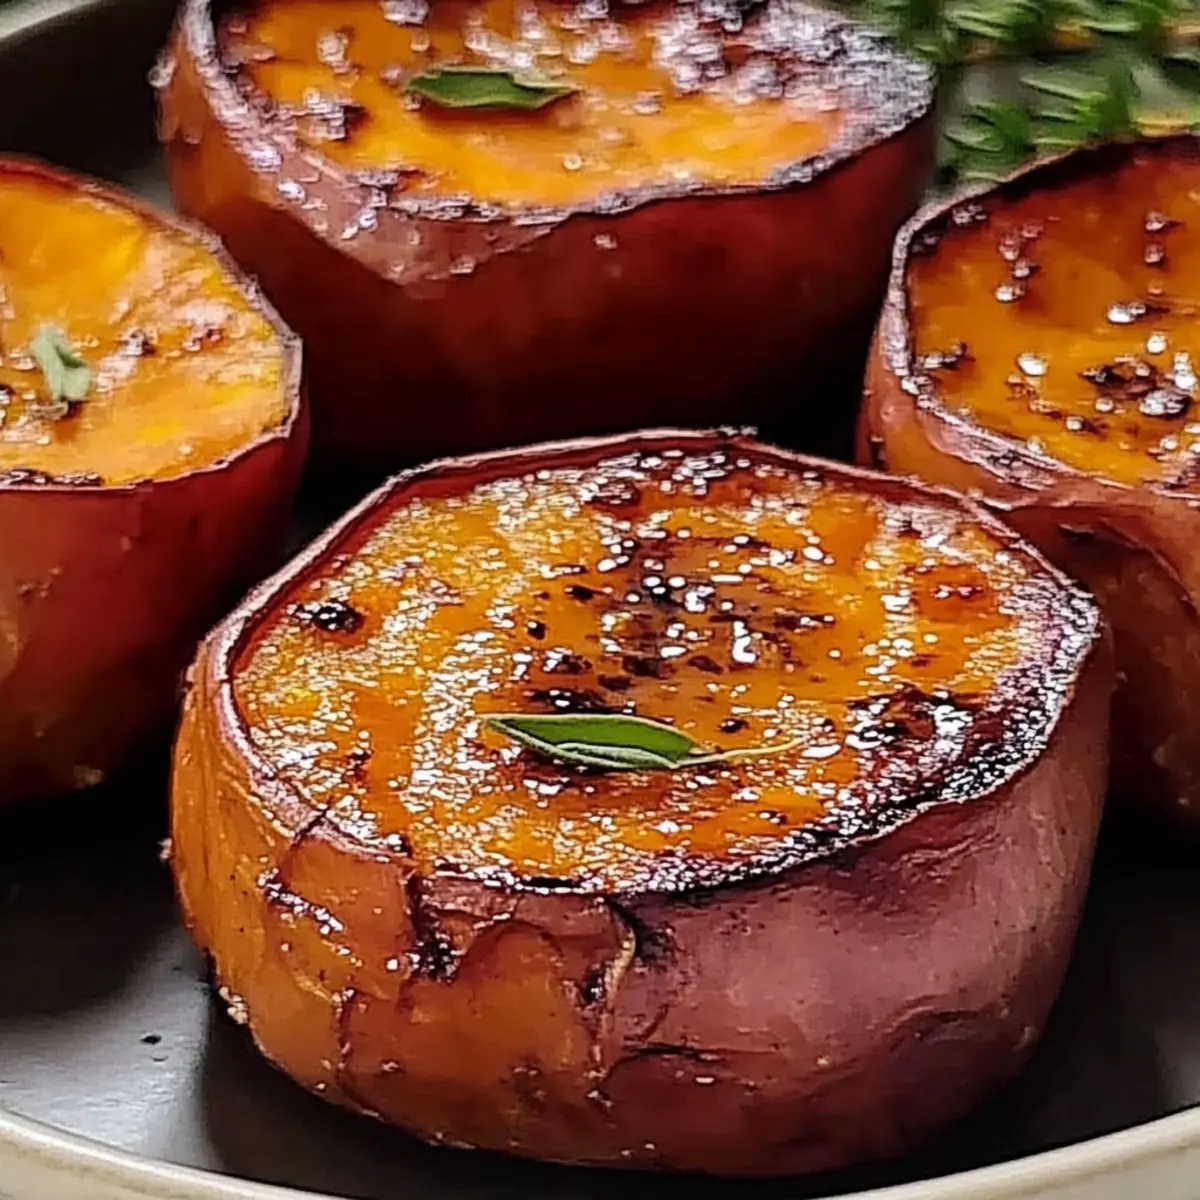
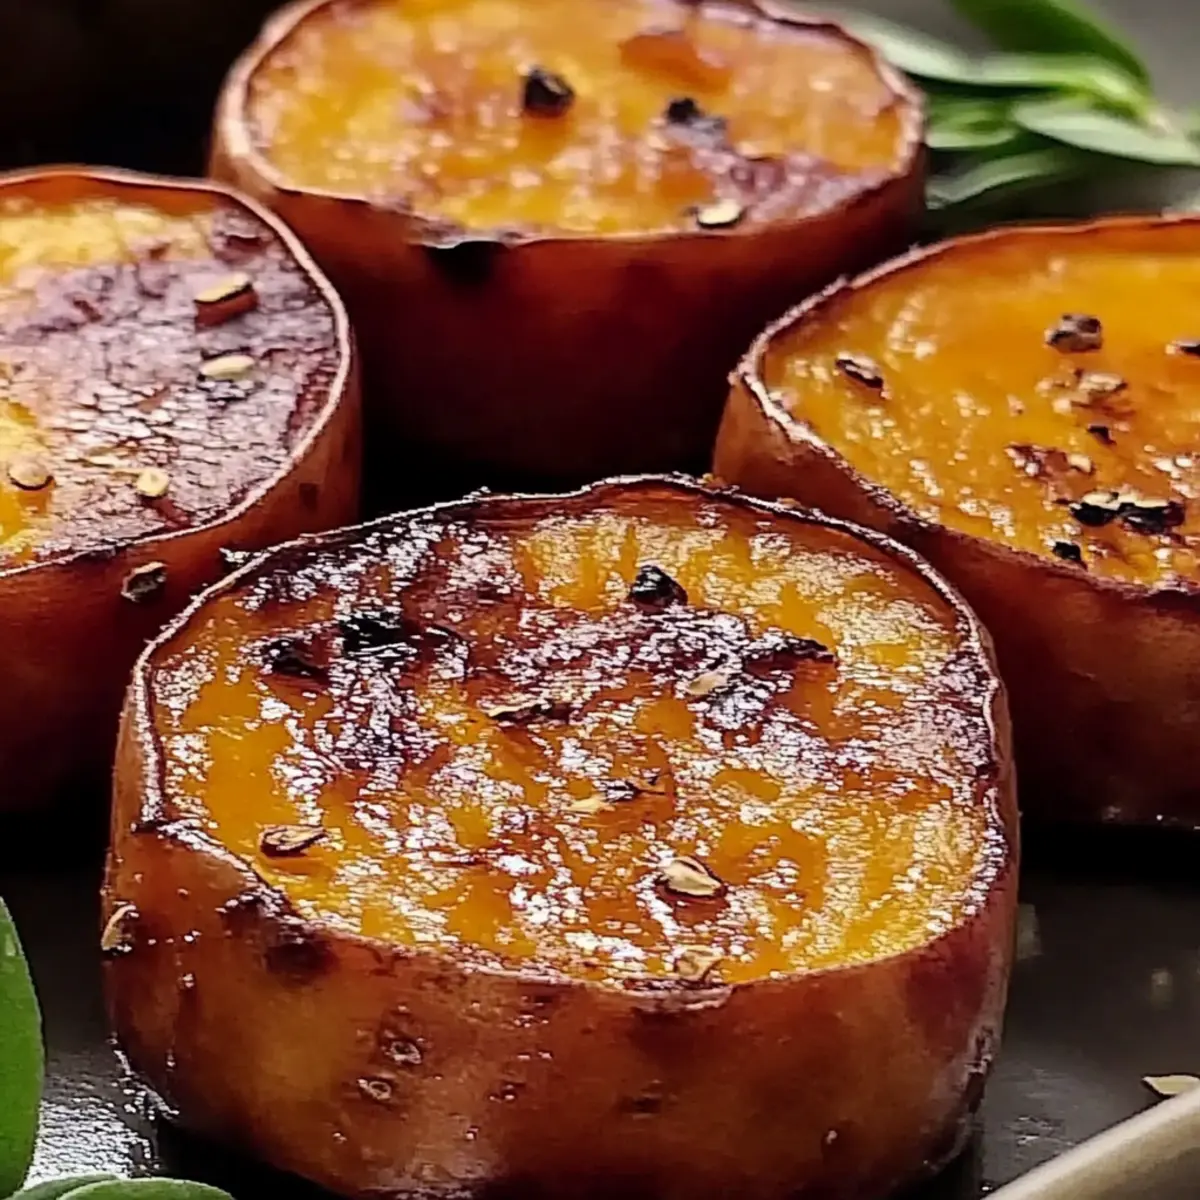
As I stood in my kitchen, the warm aroma of roasting sweet potatoes filled the air, instantly transporting me to cozy holiday gatherings. Melting Sweet Potatoes have a way of making any meal feel special, with their golden, crispy edges and luscious, buttery interiors. This vibrant side dish is not just a feast for the eyes but also a cozy comfort for the soul, perfect for both festive occasions and weeknight dinners. With unbelievably simple ingredients, you can whip up something gourmet in no time. And hey, whether you’re vegan or gluten-free, this recipe has you covered with easy substitutions. Ready to elevate your next dinner? Let’s dive into the magic of melting sweet potatoes and discover how you can impress everyone at the table!

Why Are Melting Sweet Potatoes So Irresistible?

Crispy Perfection: The golden, caramelized edges offer a delightful crunch that contrasts beautifully with the soft, buttery insides.

Versatile Ingredients: Using simple pantry staples, this recipe easily accommodates various dietary needs, making it a hit for everyone at your table, whether paired with Smoky Sweet Potatoes or Sweet Potato Casserole.

Flavorful Herbs: Fresh rosemary and thyme infuse the dish with aromatic richness, elevating its taste beyond typical side dishes.

Quick and Easy: With a straightforward prep and roasting time of just 30-35 minutes, you can have a gourmet side ready without a fuss.

Crowd-Pleasing Appeal: Whether it's a holiday feast or a casual family dinner, these melting sweet potatoes are guaranteed to impress and satisfy!

Melting Sweet Potatoes Ingredients

For the Sweet Potatoes
• Sweet Potatoes – The star ingredient, providing a deliciously sweet and creamy texture. Substitution: Try Japanese or white sweet potatoes for a different twist.

For the Richness
• Unsalted Butter – Gives a luxurious richness while enhancing flavor. Substitution: Use coconut oil or plant-based butter for a dairy-free alternative.
• Olive or Avocado Oil – Essential for achieving that crispy finish when roasting.

For the Aromatic Flavor
• Fresh Rosemary – Imparts a fragrant, earthy taste. Note: Dried herbs can work if fresh isn't available, but fresh is best.
• Fresh Thyme – Another aromatic that adds depth to the dish.
• Garlic – Brings savory complexity and richness.

For Seasoning
• Sea Salt – Brings out the natural sweetness of the melting sweet potatoes.
• Black Pepper – Adds a hint of heat to balance the flavors.

For a Flavorful Base
• Chicken Broth – Provides a savory backdrop for roasting. Substitution: Opt for vegetable broth to keep it vegan-friendly.

Optional Enhancements
• Ground Cinnamon – Adds a touch of warmth and comfort.
• Raw Pecans – Sprinkle in for a satisfying crunch.
• Maple Syrup – Drizzle over the top in the last few minutes of roasting for an extra sweet finish.

Step‑by‑Step Instructions for Melting Sweet Potatoes

Step 1: Preheat the Oven
Begin by preheating your oven to 400°F (204°C). This temperature is perfect for achieving the crispy, caramelized edges we love in melting sweet potatoes. While the oven heats up, gather all your ingredients and equipment, including a large baking sheet and a mixing bowl.

Step 2: Prepare the Sweet Potatoes
Wash and thoroughly dry the sweet potatoes to remove any dirt. Using a sharp knife, slice them into ½-inch thick rounds. This thickness ensures that each piece cooks evenly and develops that delightful, tender interior while achieving a beautiful golden exterior during roasting.

Step 3: Create the Flavorful Mixture
In a mixing bowl, melt unsalted butter, then combine it with olive or avocado oil, fresh rosemary, thyme, minced garlic, sea salt, and black pepper. Mix well until everything is blended into a luscious, aromatic mixture that will elevate the flavor of your melting sweet potatoes.

Step 4: Coat the Sweet Potatoes
Take the sweet potato slices and evenly coat them with the buttery herb mixture. You can use your hands or a spatula to ensure each slice is well-covered, allowing the flavors to infuse. This step is crucial for achieving that memorable taste and crispy texture in your melting sweet potatoes.

Step 5: Arrange on Baking Sheet
Line a 12x17-inch baking sheet with parchment paper for easy cleanup. Arrange the sweet potato slices on the sheet in a single layer, making sure not to overcrowd them. This space allows proper heat circulation, which is essential for achieving that irresistible crispiness during roasting.

Step 6: Roast to Perfection
Place the baking sheet in the preheated oven and roast the melting sweet potatoes for 30-35 minutes. Halfway through, flip the slices to ensure even browning and crispiness. When they're golden and fork-tender, you'll know they're ready to delight your taste buds.

Step 7: Optional Sweet Finish
For an added layer of flavor, consider drizzling the melting sweet potatoes with maple syrup during the last 5-7 minutes of roasting. This optional step enhances their natural sweetness and contributes to that delicious caramelized finish you’re aiming for.

Step 8: Serve & Enjoy
Once roasted to perfection, remove the sweet potatoes from the oven and allow them to cool slightly. Serve them hot as the perfect side dish alongside any meal – the vibrant look and mouthwatering aroma will have everyone eager to dig in!

Expert Tips for Melting Sweet Potatoes

• Even Slices Matter: Ensure sweet potatoes are sliced uniformly to guarantee consistent cooking and that sought-after crispy texture throughout.

• Don’t Overcrowd: Leave space between slices on the baking sheet. Overcrowding can trap steam, resulting in soggy sweet potatoes instead of the desired crispy roast.

• Flip for Evenness: Remember to flip the sweet potatoes halfway through roasting for perfectly golden and evenly cooked pieces.

• Dry Before Coating: Pat the sweet potato slices dry before seasoning. Excess moisture can hinder the crispiness of your melting sweet potatoes.

• Cornstarch Hack: For even more crispiness, lightly dust the slices with cornstarch before applying the butter mixture!

What to Serve with Melting Sweet Potatoes

Transform your meal into a comforting feast with these delightful pairings that will elevate the flavor experience.

  • Roasted Chicken: The savory juices from roasted chicken perfectly complement the sweetness of melting sweet potatoes, creating a harmonious balance on your plate.
  • Grilled Steak: A juicy steak adds a hearty touch to your meal, while its rich flavors contrast beautifully with the buttery sweet potatoes.
  • Fresh Garden Salad: Crisp, refreshing salads provide a light and vibrant counterpart, enhancing the meal's overall texture with fresh greens and colorful vegetables.
  • Maple-Glazed Brussels Sprouts: The earthy bitterness of Brussels sprouts, when glazed with maple syrup, echoes the sweet notes of melting sweet potatoes for a flavor symphony.
  • Creamy Coleslaw: The crunchiness and tangy creaminess of coleslaw create a delightful textural contrast that pairs well with the softness of sweet potatoes.

For a truly memorable dining experience, consider serving a chilled glass of white wine, like a crisp Sauvignon Blanc, which complements the sweetness while enhancing the dish's aromatic profile.

How to Store and Freeze Melting Sweet Potatoes

  • Room Temperature: Melting sweet potatoes are best enjoyed fresh, but if left at room temperature, they should be consumed within 2 hours to maintain quality and safety.

  • Fridge: Store any leftover melting sweet potatoes in an airtight container in the refrigerator for up to 5 days. Make sure they cool completely before sealing to prevent moisture buildup.

  • Freezer: To freeze, place cooked and cooled melting sweet potatoes in a freezer-friendly container or bag, separating layers with parchment paper. They can be frozen for up to 3 months.

  • Reheating: For the best results, reheat leftover melting sweet potatoes in the oven at 400°F (200°C) for 15-20 minutes covered with foil to retain moisture, or use the microwave for 2-3 minutes. The air fryer can also be a great option for restoring crispiness.

Melting Sweet Potatoes Variations & Substitutions

Feel free to get creative with these tasty variations and substitutions that can elevate your melting sweet potatoes even further!

  • Dairy-Free: Substitute unsalted butter with coconut oil or vegan butter for a creamy, non-dairy option that still delivers delicious flavor.

  • Alternative Sweetener: Try using agave syrup instead of maple syrup for a different sweet twist—this is perfect for those who enjoy a more neutral sweetness.

  • Flavor Boost: Add a sprinkle of cumin or coriander for a warm, earthy depth that pairs wonderfully with sweet potatoes.

  • Nutty Crunch: Mix in raw pecans or walnuts just before serving for added texture. Their crunch complements the softness of the sweet potatoes beautifully.

  • Herb Swap: Experiment with fresh sage or parsley if rosemary and thyme aren't available. Each herb adds a unique spin, bringing different layers of flavor.

  • Spicy Kick: For those who love heat, sprinkle in some cayenne pepper or red pepper flakes before roasting. This twist adds a delightful zing and balances the sweetness.

  • Smoky Flavor: Incorporate smoky paprika or chipotle powder into the butter mixture to infuse a rich, smoky taste with each bite.

  • Additional Layering: For a sweet-savory blend, consider drizzling with a balsamic reduction post-roasting. This not only enhances flavor but adds beautiful presentation.

In case you’d like to explore even more sweet potato ideas, you can check out Roasted Sweet Potatoes or consider a new take with Smoky Sweet Potatoes. Feel invited to mix and match these inspiring twists to create a melting sweet potato experience that celebrates your unique taste!

Make Ahead Options

Melting sweet potatoes are perfect for busy weeknights and meal prep enthusiasts! You can slice the sweet potatoes and coat them with the buttery herb mixture up to 24 hours in advance, then refrigerate in an airtight container to maintain freshness. To prevent browning, store them layered with parchment paper if stacked. When you're ready to serve, simply arrange the prepped slices on a baking sheet and roast them as instructed, adding an extra 5-10 minutes to ensure they're heated through and crispy. This way, you'll have delicious melting sweet potatoes ready with minimal effort, making it easy to enjoy a gourmet side dish any day!

Melting Sweet Potatoes Recipe FAQs

How do I choose the right sweet potatoes?
Absolutely! When selecting sweet potatoes, look for firm, smooth ones without dark spots or blemishes. The skin should be intact, and you can even give them a gentle squeeze for freshness. The sweeter the potato, the tastier your melting sweet potatoes will be!

How should I store leftover melting sweet potatoes?
Once your melting sweet potatoes are cool, transfer them to an airtight container and store them in the refrigerator for up to 5 days. To keep them fresh and flavorful, allow them to cool completely before sealing.

Can I freeze melting sweet potatoes?
Very! To freeze, first let your cooked sweet potatoes cool down. Then, place them in a freezer-safe container or bag, layering them with parchment paper to prevent sticking. They can be stored in the freezer for up to 3 months. When you're ready to enjoy them, simply reheat in the oven or microwave.

What if my melting sweet potatoes aren't getting crispy?
No worries! If your sweet potatoes are coming out soggy, check if you’re overcrowding the baking sheet. Make sure they are in a single layer with space between each slice for proper heat circulation. Also, drying the slices well before coating and flipping them halfway through roasting can greatly enhance crispiness.

Are melting sweet potatoes a good choice for special diets?
Absolutely! This recipe is vegan-friendly with easy substitutions, like using coconut oil instead of butter or vegetable broth instead of chicken broth. Plus, it's gluten-free as long as you use safe ingredients! Just be sure to check any other added ingredients for specific dietary considerations.

Melting Sweet Potatoes

Melting Sweet Potatoes: Irresistibly Crispy & Buttery Goodness

Discover the magic of Melting Sweet Potatoes, a crispy and buttery side dish perfect for any occasion.
Print Recipe Pin Recipe
Prep Time 10 minutes mins
Cook Time 35 minutes mins
Total Time 45 minutes mins
Servings: 4 servings
Course: Dinner
Cuisine: American
Calories: 200
Ingredients Equipment Method Nutrition Notes

Ingredients
  

For the Sweet Potatoes
  • 4 medium Sweet Potatoes Substitution: Try Japanese or white sweet potatoes for a different twist.
For the Richness
  • 1/4 cup Unsalted Butter Substitution: Use coconut oil or plant-based butter for a dairy-free alternative.
  • 2 tablespoons Olive or Avocado Oil
For the Aromatic Flavor
  • 2 tablespoons Fresh Rosemary Note: Dried herbs can work if fresh isn't available, but fresh is best.
  • 2 tablespoons Fresh Thyme
  • 2 cloves Garlic Minced
For Seasoning
  • 1 teaspoon Sea Salt
  • 1/2 teaspoon Black Pepper
For a Flavorful Base
  • 1/2 cup Chicken Broth Substitution: Opt for vegetable broth to keep it vegan-friendly.
Optional Enhancements
  • 1 teaspoon Ground Cinnamon
  • 1/4 cup Raw Pecans Sprinkle in for a satisfying crunch.
  • 2 tablespoons Maple Syrup Drizzle over the top in the last few minutes of roasting.

Equipment

  • Oven
  • Baking Sheet
  • Mixing Bowl
  • Sharp Knife

Method
 

Step-by-Step Instructions for Melting Sweet Potatoes
  1. Preheat your oven to 400°F (204°C). Gather all your ingredients and a large baking sheet.
  2. Wash and thoroughly dry the sweet potatoes and slice them into ½-inch thick rounds.
  3. In a mixing bowl, melt unsalted butter, then combine with olive oil, rosemary, thyme, minced garlic, sea salt, and black pepper.
  4. Coat the sweet potato slices evenly with the buttery herb mixture.
  5. Line a baking sheet with parchment paper and arrange the sweet potato slices in a single layer.
  6. Roast in the preheated oven for 30-35 minutes, flipping halfway through.
  7. For an optional sweet finish, drizzle maple syrup during the last 5-7 minutes of roasting.
  8. Remove from the oven and allow to cool slightly before serving.

Nutrition

Serving: 1servingCalories: 200kcalCarbohydrates: 30gProtein: 3gFat: 8gSaturated Fat: 3gMonounsaturated Fat: 5gCholesterol: 10mgSodium: 300mgPotassium: 500mgFiber: 4gSugar: 5gVitamin A: 250IUVitamin C: 25mgCalcium: 4mgIron: 6mg

Notes

Ensure even slicing and avoid overcrowding on the baking sheet for best results.

Tried this recipe?

Let us know how it was!

Crispy Skillet Banana Fritters for a Tropical Breakfast Treat

February 16, 2026 by Grace Snow Leave a Comment

As the morning light filters through my kitchen window, the scent of warm bananas and spices brings a rush of cheerful nostalgia. I can’t help but smile thinking about the delightful moments spent preparing Skillet Banana Fritters. They’re a quick and easy treat, ready in just 15 minutes, perfect for transforming your breakfast or ending a meal on a sweet note. Crisp on the outside with a gooey, comforting banana center, these fritters offer a taste of the tropics that never fails to impress. Plus, you can easily customize them with shredded coconut or tangy pineapple for a fun twist! Are you ready to experience this tropical indulgence for yourself?

Why are Skillet Banana Fritters a must-try?

Quick and Easy: In just 15 minutes, these fritters can transform your breakfast or dessert game. Irresistibly Flavorful: The combination of warm bananas, cinnamon, and nutmeg creates a delightful tropical taste that's hard to resist. Versatile Options: Elevate your fritters further by adding shredded coconut or diced pineapple for an extra punch of flavor. Crispy Texture: Enjoy the perfect balance of a golden, crispy exterior with a gooey center that melts in your mouth. Crowd-Pleasing Treat: These fritters will impress family and friends alike, making any meal feel like a special occasion. For more delightful recipes, check out Cheesy Corn Fritters or try a refreshing Breakfast Banana Split!

Skillet Banana Fritters Ingredients

• The perfect blend of flavors awaits!

For the Batter

  • Overripe Bananas – Provide natural sweetness and moisture; for best flavor, use overripe bananas.
  • All-Purpose Flour – Gives structure to the fritters; gluten-free flour can be a suitable substitute for a gluten-free option.
  • Milk – Enhances the batter’s consistency; almond milk works well for a dairy-free version.
  • Sugar – Adds sweetness; consider reducing or omitting if using very sweet bananas.
  • Baking Powder – Helps create a light, crispy exterior; ensure it's fresh for optimal results.
  • Vanilla Extract – Adds depth to the flavor; optional but highly recommended for a delicious twist.
  • Salt – Balances the sweetness; just a pinch elevates the overall flavor.
  • Warm Spices (Cinnamon and Nutmeg) – Boosts the flavor profile; adjust to taste or omit for a simpler variant.

Optional Flavor Boosts

  • Shredded Coconut – Adds texture and tropical flair; fold it in for a delightful surprise.
  • Diced Pineapple – Introduces tangy sweetness; a fabulous way to amp up your fritters!
  • Rum or Coconut Milk – A splash brings out the tropical notes; perfect for adventurous palates.
  • Powdered Sugar or Whipped Cream – For a dessert option, these toppings make every bite sweeter!

Experience the warmth of Skillet Banana Fritters in every delicious bite!

Step‑by‑Step Instructions for Skillet Banana Fritters

Step 1: Prepare the Bananas
Begin by peeling 2-3 overripe bananas and placing them in a mixing bowl. Use a fork to mash the bananas until they’re smooth and creamy, with only a few small lumps remaining. This step should take about 2 minutes and is crucial for achieving the gooey interior of your Skillet Banana Fritters.

Step 2: Combine the Ingredients
Add 1 cup of all-purpose flour, ½ cup of milk, 2 tablespoons of sugar, 1 teaspoon of baking powder, 1 teaspoon of vanilla extract, a pinch of salt, and a sprinkle of cinnamon and nutmeg to the mashed bananas. Stir gently until the mixture is just combined, ensuring not to overmix. This process should take around 2-3 minutes, and you’ll want a thick batter that is well incorporated.

Step 3: Rest the Batter
Allow the banana batter to rest for about 5 minutes at room temperature. This brief pause improves the batter's texture while the baking powder activates, leading to fluffier Skillet Banana Fritters. Use this time to preheat your skillet, creating a perfect environment for cooking.

Step 4: Heat the Skillet
Place a skillet over medium heat and add enough oil or butter to coat the bottom, about 2 tablespoons. Wait for the oil to shimmer, indicating it’s hot enough for frying. This should take 2-3 minutes. Ensuring the skillet is at the right temperature will give your fritters that beautiful golden color.

Step 5: Fry the Fritters
Spoon heaping tablespoons of the banana batter into the skillet, making sure to leave space between each fritter to avoid overcrowding. Cook them for about 2-3 minutes until the bottoms are golden brown and the tops start to bubble. This initial frying step is essential for achieving the desired crispy texture.

Step 6: Flip and Cook the Other Side
Carefully flip each fritter using a spatula, and cook for an additional 2-3 minutes on the other side until they are golden brown and puffed. The fritters should feel lightly firm to the touch. This step ensures that both sides are equally crispy and delicious, contributing to the overall charm of the Skillet Banana Fritters.

Step 7: Drain and Serve
Once cooked, transfer the fritters to a plate lined with paper towels to drain any excess oil. Allow them to rest for a minute while you continue frying the remaining batter. Serve your warm Skillet Banana Fritters immediately for the best texture and flavor. Enjoy them plain, or top with powdered sugar or a scoop of ice cream for a delightful twist!

What to Serve with Skillet Banana Fritters?

As you indulge in these delightful fritters, consider building a full breakfast or dessert experience that tantalizes the taste buds and warms the heart.

  • Crispy Bacon: The savory notes of crispy bacon balance the sweet and warm banana fritters, creating a delightful sweet-and-savory breakfast. Perfectly enjoyed side by side, it adds a crunchy texture that complements the soft fritters beautifully.

  • Whipped Cream: A dollop of fluffy whipped cream enhances the sweetness and offers a smooth, creamy contrast, making each bite feel luxurious. It’s an ideal pairing that elevates these fritters into a light dessert.

  • Fresh Fruit Salad: Bright, colorful slices of seasonal fruits add a refreshing touch and a burst of juicy flavor that beautifully complements the fritters’ sweetness. Think tangy berries or tropical mango for an extra tropical flair.

  • Maple Syrup: Drizzling warm maple syrup over the fritters enhances their natural sweetness while adding a rich depth of flavor. The sticky texture contrasts wonderfully with the crispy exterior of the fritters.

  • Coconut Flakes: A sprinkle of toasted coconut flakes brings a delightful crunch and a hint of the tropics, perfect for those craving a bit of adventure. This subtle addition harmonizes beautifully with the banana’s flavor.

  • Vanilla Ice Cream: For a decadent dessert experience, serve these fritters warm alongside a scoop of creamy vanilla ice cream. The cold ice cream melts into the warm fritters, creating a blissful harmony of temperatures and textures.

  • Iced Coffee: A refreshing glass of iced coffee makes a perfect beverage to wash down the fritters. The robust flavor and coolness provide a nice balance to the sweet, warm comfort of the fritters.

  • Chocolate Sauce: Drizzling rich chocolate sauce adds a sweet, indulgent finish, transforming these fritters into a delightful dessert that will please any chocolate lover. The gooey chocolate pairs beautifully with the warm banana flavors.

Skillet Banana Fritters Variations & Substitutions

Feel free to add your own flair to these delightful fritters and make them truly yours!

  • Coconut Twist: Fold in shredded coconut for a chewy texture and a hint of tropical flavor.

  • Pineapple Delight: Add diced pineapple to the batter for a sweet and tangy punch, reminiscent of a piña colada.

  • Spiced Rum: A splash of rum can elevate the tropical taste; a delightful surprise for the adventurous eater!

  • Dairy-Free Option: Substitute milk with almond or oat milk to keep the fritters creamy and delicious without dairy.

  • Healthier Sweetener: Swap out sugar for honey or maple syrup to reduce refined sugars while adding an extra layer of flavor.

  • Nutty Addition: Toss in chopped nuts, such as pecans or walnuts, to introduce a crunchy element that compliments the softness of the banana.

  • Dessert Upgrade: Dust the fritters with powdered sugar or serve with whipped cream for a decadent dessert experience.

  • Spice It Up: Increase the cinnamon and nutmeg for a bolder flavor profile that will warm your kitchen and heart.

Don’t forget, if you’re looking for more breakfast inspiration, try these delicious Breakfast Banana Split or even a savory side with Cheesy Corn Fritters. Happy cooking!

Expert Tips for Skillet Banana Fritters

  • Use Overripe Bananas: They provide the best natural sweetness and moisture. Avoid underripe bananas, which can lead to a less flavorful fritter.
  • Don’t Overmix: When combining the batter, mix just until incorporated. Overmixing can lead to tough fritters instead of the delightful texture you want.
  • Maintain Medium Heat: Cooking at the right temperature is crucial. If it’s too hot, your fritters will burn; too low, and they won’t crisp up.
  • Fry in Batches: Avoid overcrowding the skillet to ensure even cooking and that crispy exterior we all crave in Skillet Banana Fritters.
  • Serve Immediately: For the best taste and texture, serve your fritters right after frying. They are irresistibly delicious while warm!

How to Store and Freeze Skillet Banana Fritters

  • Room Temperature: Skillet Banana Fritters are best enjoyed fresh. If you have to leave them out, keep them covered for no more than 2 hours to maintain their crispiness.
  • Fridge: Store leftover fritters in an airtight container in the refrigerator for up to 2 days. Reheating gently in a skillet helps restore their delightful texture.
  • Freezer: For longer storage, freeze fritters individually on a baking sheet before transferring them to a freezer bag or container. They can be frozen for up to 2 months.
  • Reheating: When ready to enjoy, reheat frozen fritters in a skillet over medium heat for about 4-5 minutes until heated through and crispy again.

Make Ahead Options

These Skillet Banana Fritters are a fantastic choice for busy home cooks looking to save time! You can prepare the batter up to 24 hours in advance by mixing all the ingredients and storing it in an airtight container in the refrigerator. To maintain quality, it's best not to add any optional mix-ins like shredded coconut or diced pineapple until you're ready to fry them. When you're ready to enjoy, simply stir the chilled batter gently, as it may thicken slightly in the fridge, then heat your skillet and fry according to the directions. This way, you'll have warm, delicious fritters with minimal morning effort, perfect for busy weekdays or last-minute brunch gatherings!

Skillet Banana Fritters Recipe FAQs

What kind of bananas should I use for Skillet Banana Fritters?
Use overripe bananas for the best sweetness and moisture; they should be spotted with brown for optimal flavor. You can substitute with ripe bananas, but overripe ones provide that gooey texture and rich taste that’s truly irresistible.

How should I store leftover Skillet Banana Fritters?
After enjoying your fritters, store any leftovers in an airtight container in the refrigerator for up to 2 days. To keep them as crispy as possible, reheat them gently in a skillet over medium heat for about 3-4 minutes, flipping to ensure even warming.

Can I freeze Skillet Banana Fritters?
Absolutely! To freeze, first let the fritters cool completely, then arrange them in a single layer on a baking sheet and freeze until solid. Once frozen, transfer them to a freezer-safe bag or container. They can last for up to 2 months. When you're ready to enjoy them, reheat in a skillet over medium heat for about 4-5 minutes until crispy and warmed through.

What if my fritters aren't cooking evenly?
If your fritters aren't cooking evenly, it’s likely that your skillet is overcrowded. Make sure to give each fritter enough space to allow for proper hot air circulation. Also, maintain a steady medium heat, adjusting as needed; if they're browning too fast, lower the temperature for more even cooking.

Are Skillet Banana Fritters pet-friendly?
No, the ingredients in Skillet Banana Fritters are not suitable for pets. Bananas are safe in small quantities, but the sugar and any added spices (like cinnamon) or flavorings can be harmful or upset your pet's stomach. Always keep human food away from your furry friends!

Can I make Skillet Banana Fritters gluten-free?
Yes! Simply substitute the all-purpose flour with a gluten-free flour blend. Make sure the blend contains xanthan gum or any binding agent for the best texture. Doing so will ensure that everyone can enjoy these delightful fritters without worry!

Skillet Banana Fritters

Crispy Skillet Banana Fritters for a Tropical Breakfast Treat

Delight in these quick and easy Skillet Banana Fritters, perfect for breakfast or dessert, with a crispy exterior and gooey banana center.
Print Recipe Pin Recipe
Prep Time 15 minutes mins
Cook Time 10 minutes mins
Resting Time 5 minutes mins
Total Time 30 minutes mins
Servings: 4 fritters
Course: Breakfast
Cuisine: Tropical
Calories: 150
Ingredients Equipment Method Nutrition Notes

Ingredients
  

For the Batter
  • 2-3 overripe Bananas peel and mash until smooth
  • 1 cup all-purpose Flour or gluten-free flour
  • 1/2 cup Milk or almond milk for dairy-free
  • 2 tablespoons Sugar reduce if using very sweet bananas
  • 1 teaspoon Baking Powder ensure freshness
  • 1 teaspoon Vanilla Extract optional but recommended
  • 1 pinch Salt to balance sweetness
  • 1 teaspoon Warm Spices (Cinnamon and Nutmeg) adjust to taste
Optional Flavor Boosts
  • 1/4 cup Shredded Coconut optional
  • 1/4 cup Diced Pineapple optional
  • 1 tablespoon Rum or Coconut Milk optional
  • to taste Powdered Sugar or Whipped Cream for serving

Equipment

  • Mixing Bowl
  • Skillet
  • Fork
  • Spatula

Method
 

Step-by-Step Instructions
  1. Begin by peeling 2-3 overripe bananas and placing them in a mixing bowl. Mash the bananas until smooth and creamy.
  2. Add 1 cup of all-purpose flour, ½ cup of milk, 2 tablespoons of sugar, 1 teaspoon of baking powder, 1 teaspoon of vanilla extract, a pinch of salt, and a sprinkle of cinnamon and nutmeg to the mashed bananas. Stir gently until combined.
  3. Allow the banana batter to rest for about 5 minutes at room temperature.
  4. Place a skillet over medium heat and add about 2 tablespoons of oil or butter. Wait for the oil to shimmer.
  5. Spoon heaping tablespoons of the banana batter into the skillet, ensuring not to overcrowd. Cook for about 2-3 minutes until golden brown.
  6. Carefully flip each fritter and cook for an additional 2-3 minutes until golden brown and puffed.
  7. Transfer the fritters to a plate lined with paper towels to drain. Serve immediately for the best texture and flavor.

Nutrition

Serving: 1fritterCalories: 150kcalCarbohydrates: 20gProtein: 2gFat: 7gSaturated Fat: 3gPolyunsaturated Fat: 1gMonounsaturated Fat: 2gCholesterol: 10mgSodium: 50mgPotassium: 150mgFiber: 1gSugar: 5gVitamin A: 100IUVitamin C: 1mgCalcium: 50mgIron: 0.5mg

Notes

Serve with optional toppings of powdered sugar or whipped cream for added sweetness.

Tried this recipe?

Let us know how it was!

Crispy Baked Potato Skins That Will Wow Your Guests

February 16, 2026 by Grace Snow Leave a Comment

Walking into a cozy kitchen filled with the rich aroma of savory bacon and melting cheese, it’s hard not to feel instantly at home. This recipe for Ultimate Crispy Baked Potato Skins is a simple delight, transforming humble russet potatoes into a crowd-pleasing appetizer. Whether you're gearing up for a game day bash or just wanting a comforting snack, these skins deliver—crispy on the outside and loaded with cheesy goodness inside. With quick prep time and a generous serving size, they are perfect for sharing (or keeping all to yourself!). Get ready to win hearts and satisfy cravings, because who can resist a bite of these irresistible baked potato skins? What will you top yours with?

Why Are These Baked Potato Skins Irresistible?

Crunchy Perfection: The outside is perfectly crisp, while the inside remains soft and fluffy, making each bite an explosion of delightful texture.
Savory Goodness: Topped with crispy bacon and a luscious blend of two melty cheeses, they pack a flavor punch that’s hard to beat.
Quick and Easy: With simple ingredients and straightforward steps, you’ll have a fantastic appetizer ready in no time!
Game Day Essential: These skins are a must-have for any gathering, ensuring they’ll be the star of the snack table. Pair them with some German Potato Salad for a complete comfort food experience!
Satisfyingly Versatile: Customize them with your favorite toppings—think jalapeños for heat or a dollop of sour cream for creaminess! Everyone will find their perfect bite.

Baked Potato Skins Ingredients

  • For the Skins

  • Russet Potatoes – Choose small to medium for the best texture and flavor.

  • Canola or Olive Oil – Both help achieve that desired crispy skin; use olive oil for a tastier option.

  • Sea Salt – Essential for enhancing the potato's natural flavor and contributing to a perfect crunch.

  • Butter – Adds lovely richness; brush melted butter over the skins for great flavor.

  • For the Seasoning

  • Garlic Powder – Delivers a savory kick; fresh minced garlic can be used in a pinch if you prefer.

  • Onion Powder – Sweetens the dish; swap for finely minced fresh onion if desired.

  • For the Toppings

  • Finely Shredded Cheddar Cheese – Melts wonderfully, giving richness to the skins; other melting cheeses work as substitutions.

  • Finely Shredded Monterey Jack Cheese – Offers creaminess that balances the sharp cheddar; feel free to substitute more cheddar if you like.

  • Crispy Cooked Bacon – Adds irresistible smoky flavor and crisp texture; turkey bacon is a lighter alternative.

  • Green Onion – Provides freshness; use as a garnish for a pop of color and flavor.

  • Sour Cream – Optional, but it adds a cool, creamy contrast that perfectly complements the baked potato skins.

These baked potato skins are so vibrant and flavorful that they're bound to become a favorite at your gatherings!

Step-by-Step Instructions for Ultimate Crispy Baked Potato Skins

Step 1: Preheat and Prepare
Start by preheating your oven to 375°F (190°C). While it heats, give your russet potatoes a good scrub under running water to remove any dirt. Poke several holes around each potato with a fork to allow steam to escape while baking. Coat them generously with canola or olive oil, then sprinkle sea salt all over for extra flavor. Place the potatoes directly on the oven rack and bake for 50-60 minutes, or until they're tender when pierced with a fork.

Step 2: Cut and Scoop
Once the potatoes have cooled for about 10 minutes, carefully cut each baked potato in half lengthwise. Using a spoon, scoop out most of the flesh, leaving about a ¼ to ½ inch border to maintain the skin's structure. Store the removed potato flesh for another recipe such as mashed potatoes. The goal here is to create a sturdy shell for your ultimate crispy baked potato skins that will hold all those delicious toppings!

Step 3: Season the Skins
In a small bowl, melt some butter and whisk in garlic powder and onion powder until combined. Brush this savory mixture generously on the inside and outside of each potato skin. This will ensure they not only achieve a lovely golden brown color but also pick up wonderful flavors. Now, it's time to increase the oven temperature to 450°F (232°C) for the next steps.

Step 4: Bake for Crispiness
Place the seasoned potato skins back on the baking sheet, cut side up, and bake in the oven for 10 minutes. Once the edges start to look crispy, flip each skin over and bake for an additional 10 minutes until they are beautifully crispy and golden brown. Keep a close eye on them during the last few minutes to prevent burning; you'll want that perfect crisp for your baked potato skins!

Step 5: Add Cheese and Bacon
Remove the crispy potato skins from the oven and immediately sprinkle a generous amount of finely shredded cheddar and Monterey Jack cheese into each. Next, add crispy cooked bacon on top of the cheese. Return the potato skins to the oven for about 5 more minutes or until the cheese melts and bubbles. This step is crucial for ensuring each bite of your baked potato skins oozes with cheesy goodness.

Step 6: Garnish and Serve
Finally, take the baked potato skins out of the oven and let them cool for a minute. Top each one with sliced green onions for a touch of freshness and color. Serve your ultimate crispy baked potato skins immediately, alongside a bowl of sour cream for dipping. These delightful bites are sure to impress at any gathering, bringing the taste of comfort food right to your table!

How to Store and Freeze Baked Potato Skins

Fridge: Store baked potato skins in an airtight container for up to 3 days. This helps maintain their flavor and prevents them from drying out.

Freezer: If you want to keep them longer, freeze the baked potato skins individually in a freezer-safe bag for up to 2 months. Consider flash freezing before bagging to prevent sticking.

Reheating: To reheat, bake your frozen baked potato skins at 400°F (200°C) for about 15–20 minutes until heated through and crispy again. Enjoy the deliciousness just like when they were freshly made!

Expert Tips for Baked Potato Skins

  • Choose Wisely: Selecting small to medium russet potatoes ensures a perfect texture and flavor for your baked potato skins.

  • Don't Rush the Baking: Make sure to pierce the potatoes and bake them thoroughly to get that tender interior; undercooked potatoes won't hold the skins well.

  • Crisp It Up: A generous coat of oil and salt is key to achieving a crispy exterior that will make every bite delightful.

  • Save the Flesh: Use the scooped-out potato flesh to make mashed potatoes or add it to soups, so nothing goes to waste.

  • Time is Crucial: Serve the baked potato skins right out of the oven for maximum crunch and flavor; reheating doesn’t do them justice!

What to Serve with Ultimate Crispy Baked Potato Skins?

Elevate your gathering with delicious pairings that complement the heartiness of these flavorful appetizers.

  • Creamy Coleslaw: A refreshing slaw adds a crunchy texture and a hint of sweetness, balancing the rich flavors of the potato skins perfectly.
  • Spicy Chili: A warm bowl of chili brings the heat and heartiness, making it a great match for the crispy, cheesy skins. The creamy flavors contrast beautifully with the spiciness, creating a satisfying meal.
  • Garlic Bread: Soft, buttery garlic bread provides a comforting contrast to the crispiness of the potato skins and is perfect for sopping up any sauce or toppings.
  • Caesar Salad: A crisp Caesar salad introduces fresh greens and tangy dressing, creating a delightful contrast to the rich and cheesy skins.
  • Buffalo Wings: Spicy buffalo wings bring an element of bold flavor and fun to your table, making for a classic game day pairing.
  • Honey Mustard Dipping Sauce: Serve alongside a tangy honey mustard sauce for a sweet and savory experience that enhances each bite of the skins.
  • Oven-Roasted Vegetables: A side of roasted veggies offers a vibrant, nutritious element that balances the richness of the appetizer. The sweetness from the caramelized edges complements the flavors beautifully.
  • Craft Beer: A cold, crisp craft beer pairs wonderfully with the smokiness of the bacon, while its carbonation cleanses the palate between bites.
  • Chocolate Chip Cookies: For a sweet finish, offer a plate of warm chocolate chip cookies for dessert, providing a soft, gooey contrast to the crispy potato skins.

Baked Potato Skins Variations & Substitutions

Feel free to mix and match your favorite ingredients, creating a unique twist on these delightful baked potato skins!

  • Cheese Change: Swap in gouda or pepper jack cheese for a bolder flavor kick that adds depth.
  • Crunchy Additions: Try adding crispy fried onions or crumbled tortilla chips on top for an extra crunch.
  • Vegetable Boost: Top with diced tomatoes, spinach, or roasted peppers for a fresh pop of flavor and color.
  • Protein Punch: Add pulled pork or grilled chicken to your skins for a more filling, hearty appetizer.
  • Spicy Twist: Sprinkle in some sliced jalapeños for heat, balancing beautifully with the creamy toppings.
  • Dairy-Free Option: Use nutritional yeast instead of cheese for a cheesy flavor without the dairy.
  • Herb Infusion: Mix in some fresh herbs like parsley or chives with your green onion garnish for an herbal lift.

Explore these variations while enjoying your baked potato skins, and you might find a new family favorite to savor! If you love flavorful sides, check out my Roasted Sweet Potatoes or even Smoky Sweet Potatoes for more delicious ideas.

Make Ahead Options

These baked potato skins are a fantastic choice for meal prep! You can bake the russet potatoes and scoop out the flesh up to 24 hours in advance, storing the prepared skins in an airtight container in the refrigerator. To maintain their quality, brush the skins with a light layer of oil and cover them to prevent drying out. When you're ready to serve, simply brush the insides with the garlic-butter mixture and bake at 450°F (232°C) for about 20 minutes until they’re crispy. Add the cheese and bacon for the last five minutes, and you'll have deliciously satisfying baked potato skins that feel fresh and indulgent, all while saving you precious time on busy days!

Baked Potato Skins Recipe FAQs

How do I choose the right potatoes for baked potato skins?
Selecting russet potatoes is key for achieving the best texture. Look for medium-sized ones that feel firm without any dark spots all over. A smooth exterior is a great indicator of quality too!

How should I store leftover baked potato skins?
Absolutely! For best results, place leftover baked potato skins in an airtight container. They can stay fresh in the fridge for up to 3 days. Just be sure to let them cool completely before sealing them up!

Can I freeze baked potato skins?
Yes, you can! I often freeze my baked potato skins for later enjoyment. Start by letting them cool completely, then flash freeze them on a baking sheet for about an hour. This prevents them from sticking together. Once frozen, transfer them to a freezer-safe bag or container and they’ll last for up to 2 months.

What if my potato skins aren’t crispy enough?
If you find your potato skins aren’t as crispy as you'd like, don’t worry! A quick fix is to return them to a hot oven (around 450°F) for an additional 5-10 minutes, keeping a close eye on them to avoid burning. The secret to extra crispiness is ensuring they’re well-coated in oil before baking—so don’t skimp on that step!

Are baked potato skins suitable for gluten-free diets?
Absolutely! Baked potato skins can be a great gluten-free appetizer as long as you stick to gluten-free ingredients. Check labels on the cheese and bacon to ensure there are no hidden gluten ingredients. They’re a delicious option for everyone at the table!

Baked Potato Skins

Crispy Baked Potato Skins That Will Wow Your Guests

These baked potato skins are crispy on the outside and loaded with savory toppings, making them a perfect crowd-pleasing appetizer.
Print Recipe Pin Recipe
Prep Time 10 minutes mins
Cook Time 1 hour hr
Cooling Time 10 minutes mins
Total Time 1 hour hr 20 minutes mins
Servings: 4 skinned potatoes
Course: Snacks
Cuisine: American
Calories: 180
Ingredients Equipment Method Nutrition Notes

Ingredients
  

For the Skins
  • 4 medium Russet Potatoes Choose small to medium for the best texture and flavor.
  • 2 tablespoons Canola or Olive Oil Use olive oil for a tastier option.
  • 1 teaspoon Sea Salt Essential for enhancing flavor.
  • 2 tablespoons Butter Adds richness; brush melted over the skins.
For the Seasoning
  • 1 teaspoon Garlic Powder Delivers a savory kick.
  • 1 teaspoon Onion Powder Sweetens the dish.
For the Toppings
  • 1 cup Finely Shredded Cheddar Cheese Melts wonderfully.
  • 1 cup Finely Shredded Monterey Jack Cheese Offers creaminess.
  • 4 slices Crispy Cooked Bacon Adds smoky flavor.
  • 2 tablespoons Green Onion Use as a garnish.
  • 1 cup Sour Cream Optional, for dipping.

Equipment

  • Oven
  • Baking Sheet
  • Spoon
  • small bowl

Method
 

Step-by-Step Instructions
  1. Preheat your oven to 375°F (190°C). Scrub russet potatoes, poke holes, coat with oil and sprinkle with salt. Bake for 50-60 minutes until tender.
  2. Once cooled, cut each potato in half lengthwise. Scoop out flesh, leaving a ¼ to ½ inch border.
  3. Melt butter, whisk in garlic powder and onion powder. Brush mixture on inside and outside of potato skins. Increase oven temperature to 450°F (232°C).
  4. Bake potato skins cut side up for 10 minutes. Flip and bake for an additional 10 minutes until golden brown.
  5. Remove from oven, sprinkle cheeses and bacon on each skin. Return to oven for about 5 more minutes until cheese melts.
  6. Garnish with green onions and serve with sour cream for dipping.

Nutrition

Serving: 1potato skinCalories: 180kcalCarbohydrates: 15gProtein: 4gFat: 12gSaturated Fat: 6gPolyunsaturated Fat: 1gMonounsaturated Fat: 5gCholesterol: 20mgSodium: 400mgPotassium: 450mgFiber: 2gSugar: 1gVitamin A: 200IUVitamin C: 10mgCalcium: 150mgIron: 1mg

Notes

Serve immediately for maximum crunch and flavor. Save any leftover potato flesh for mashed potatoes or soups.

Tried this recipe?

Let us know how it was!

Savory Korean Beef Tacos with Crunchy Gochujang Slaw

February 16, 2026 by Grace Snow Leave a Comment

Through the steam rising from my crockpot, a wonderful aroma wafts through my kitchen—it's the kind of scent that welcomes you home and whispers, "Dinner is ready!" Today, I’m excited to share my recipe for Slow-Cooked Korean Beef Tacos with Tangy Gochujang Slaw, a delightful fusion that brings a bold twist to taco night. These Korean beef tacos are not only richly flavored with soy sauce, ginger, and garlic but also topped with a refreshing slaw that adds a perfect crunch. What I love most about this dish is how effortlessly it can fit into your busy week or casual gatherings; it requires minimal prep but promises a hearty meal that everyone will adore. Plus, they’re completely customizable—whether you need a quick weeknight dinner or an adventurous dish for entertaining, these tacos deliver. Ready to elevate your taco game? Let’s dive in!

Why You’ll Crave These Korean Beef Tacos

Bold Flavors: The combination of gochujang and savory beef delivers an irresistible profile that dances on your taste buds.

Effortless Cooking: With the magic of your crockpot, these tacos require minimal hands-on time, making them perfect for busy nights.

Customizable Delight: Mix and match toppings like fresh avocado or sriracha for a unique twist that suits everyone's palate.

Impressive Crowd-Pleaser: Whether it’s a casual gathering or family dinner, these Korean beef tacos are sure to become the showstopper on your table.

Fresh Crunch: The tangy slaw adds a delightful texture that perfectly complements the tender beef, transforming each bite into a joyous experience.

Explore more exciting recipes like Shrimp Tacos Zesty or Ground Beef Enchiladas to keep your meals fresh and fun!

Korean Beef Tacos Ingredients

• For a flavorful taco night at home!

For the Beef

  • Beef Chuck Roast – This cut becomes tender and flavorful when slow-cooked; you can substitute it with pork shoulder or chicken thighs for a different twist.
  • Soy Sauce – Adds that essential umami depth; choose low-sodium for a healthier option.
  • Gochujang – A Korean chili paste that infuses the beef with mild heat and sweetness; adjust the quantity to suit your taste preferences.
  • Ginger – Freshly grated ginger enhances the aroma and flavor significantly; always opt for fresh for the best results.
  • Garlic – Fresh cloves provide rich, savory undertones; they are a must for achieving depth in flavor.

For the Slaw

  • Cabbage – Adds the much-needed crunch; feel free to use coleslaw mix for quicker preparation.
  • Carrot – Brings sweetness and vibrant color to the slaw; easily replace with other root vegetables if desired.
  • Rice Vinegar – Provides acidity to balance flavors; you can swap it with apple cider vinegar if you prefer.
  • Sugar – Enhances the sweetness of the dressing; consider using honey or agave as a natural alternative.

These Korean beef tacos promise to elevate your next meal with bold flavors and delightful textures. Enjoy!

Step‑by‑Step Instructions for Slow-Cooked Korean Beef Tacos with Tangy Gochujang Slaw

Step 1: Sear the Beef
In a large skillet over medium-high heat, add a drizzle of oil and sear the beef chuck roast for about 4-5 minutes on each side until it's browned and caramelized. This step builds a rich flavor base for your Korean beef tacos, so aim for a golden crust without cooking it through. Once seared, place the beef directly into your crockpot.

Step 2: Combine Ingredients
In the same skillet, lower the heat and sauté minced garlic and grated ginger for about 1 minute until fragrant. Then, pour in the soy sauce and optional spices, stirring to combine. Transfer this mixture over the beef in the crockpot, allowing all the delicious flavors to meld together as they cook.

Step 3: Cook
Set your crockpot on low and let the beef slowly cook for 8 hours. When done, the beef should be fork-tender and easily shredded, maintaining its juiciness. Check for doneness toward the end of cooking; you want it tender but not mushy, preserving the perfect texture for your Korean beef tacos.

Step 4: Prepare Slaw
While the beef is cooking, combine shredded cabbage, grated carrot, gochujang, rice vinegar, and sugar in a large bowl. Toss well to evenly coat the vegetables, and place the slaw in the refrigerator for at least 30 minutes. This chilling time enhances the crunchiness and tangy flavor, making it a delightful contrast to the tender beef.

Step 5: Serve
Once the beef is ready, gently shred it with two forks in the crockpot. Warm your tortillas in a dry skillet or microwave, then fill each with a generous portion of the tender Korean beef. Top with the tangy gochujang slaw, and enjoy a delicious bite that showcases the wonderful fusion of textures and flavors!

What to Serve with Slow-Cooked Korean Beef Tacos

Elevate your taco night by exploring delightful sides and drinks that enhance the harmony of flavors in your meal.

  • Steamed Jasmine Rice: Light and fluffy, this aromatic rice soaks up any delicious juices from the beef, providing a comforting balance to your tacos.
  • Kimchi: This traditional Korean staple adds a zingy crunch and rich umami flavors that perfectly contrast the savory beef and slaw.
  • Crispy Sweet Potato Fries: The sweetness of these fries beautifully complements the savory and spicy elements of the tacos, offering a satisfying texture.
  • Avocado Slices: Creamy avocado lends a smooth richness that counteracts the spiciness of the gochujang slaw, creating a wonderfully harmonious bite.
  • Chilled Cucumber Salad: Crisp and refreshing, this salad adds a light crunch and bright flavors that cleanse the palate between bites of the hearty tacos.
  • Light Beer or Cold Seltzer: Pair your meal with a crisp light beer or sparkling lime-infused water to cleanse the palate and enhance the overall dining experience.

These pairings will create a colorful and satisfying spread that complements your delightful Korean beef tacos!

Make Ahead Options

These Slow-Cooked Korean Beef Tacos with Tangy Gochujang Slaw are perfect for meal prep enthusiasts! You can prepare the beef and store it in the refrigerator for up to 3 days before serving, ensuring maximum flavor retention. Simply cook the beef as directed and let it cool before shredding and transferring it to an airtight container. Additionally, the gochujang slaw can be made a day in advance; just mix the ingredients and refrigerate overnight to enhance the flavors and crunch. When it’s time to eat, reheat the beef gently in the crockpot or microwave until warmed through, warm your tortillas, and assemble your delicious tacos for a satisfying meal with minimal effort!

Korean Beef Tacos Variations & Substitutions

Feel free to mix things up and make this recipe truly your own with these delicious variations!

  • Dairy-Free: Swap out any creamy toppings like sour cream for avocado or a drizzle of lime juice for a fresh twist.
  • Earthy Flavor: Add a couple of mashed sweet potatoes to the beef mixture for a sweet yet savory flavor boost.
  • Vegetarian: Use firm tofu or jackfruit instead of beef, marinating them in the same gochujang sauce for tasty alternatives.
  • Flavorful Additions: Toss in some chopped cilantro or green onions to the slaw for an explosion of fresh, vibrant flavor.
  • Crunch Twist: Try using crispy fried shallots on top for an extra crunch factor; they pair wonderfully with the tender beef!
  • Spicy Kick: If you crave heat, add sliced jalapeños either into the beef mixture or as a topping to unleash your inner spice lover.
  • Asian Fusion: Take your tacos up a notch by using hoisin sauce instead of soy sauce for an exciting sweetness that complements the flavor.
  • Different Wrap: Experiment with soft bao buns instead of traditional tortillas; they wrap around the filling beautifully and add an awesome touch!

Explore more mouthwatering ideas like Roasted Corn Tacos or check out our Ground Beef Enchiladas for more culinary inspirations!

How to Store and Freeze Korean Beef Tacos

  • Fridge: Store leftover beef and slaw separately in airtight containers for up to 3 days, preserving their fresh flavors and textures without sogginess.
  • Freezer: The beef freezes well for up to 3 months. Portion it into freezer-safe bags, ensuring to remove excess air for the best quality.
  • Reheating: When ready to enjoy, thaw overnight in the fridge, then reheat the beef in a skillet over medium heat or microwave until warmed through; serve with fresh slaw.
  • Assembling: For a delightful taco experience, warm tortillas just before serving to maintain their softness and make the most of your flavorful Korean beef tacos.

Expert Tips for Korean Beef Tacos

  • Sear for Flavor: Searing the beef enhances the overall flavor significantly. Don’t skip this step to achieve that rich, caramelized crust!

  • Chill the Slaw: Refrigerate the slaw for at least 30 minutes before serving. This not only improves the crunch but also allows the flavors to meld beautifully.

  • Check Texture: While cooking, ensure the beef is fork-tender but not mushy. Checking toward the end of the cooking time helps achieve the ideal texture for your Korean beef tacos.

  • Flexible Substitutes: Feel free to switch beef with pork shoulder or tofu based on dietary preferences. Customize to your heart's content for a unique meal!

  • Serve with Style: Warm your tortillas for better flavor and texture. Soft tortillas can sometimes tear; consider using sturdy options for a mess-free experience.

Korean Beef Tacos Recipe FAQs

How do I select the right beef for my tacos?
Absolutely! For the best flavor and tenderness, choose a beef chuck roast with even marbling. Look for a cut that has some fat for moisture during cooking. If unavailable, pork shoulder or chicken thighs are great alternatives that work well in slow-cooked dishes.

How should I store leftovers?
Very simply! Store leftover beef and slaw separately in airtight containers in the fridge. They will stay fresh for up to 3 days. This helps preserve the slaw's crunchiness so it doesn’t become soggy when stored.

Can I freeze the beef for later use?
Definitely! To freeze, portion the cooked beef into freezer-safe bags, ensuring to remove excess air. It can be frozen for up to 3 months. Thaw it overnight in the fridge, then reheat in a skillet over medium heat for the best results when you’re ready to enjoy.

What if my beef doesn’t shred well?
No worries! If your beef is tough after cooking, it may not have been cooked long enough or at a low enough temperature. Ensure it cooks on low for the full 8 hours, or until it reaches a fork-tender state. If necessary, add a splash of beef broth to help it retain moisture while it cooks.

Are there any dietary considerations when making these tacos?
Absolutely! For those with gluten sensitivities, opt for gluten-free soy sauce and corn tortillas to ensure everyone can enjoy these Korean beef tacos. You can also adjust the amount of gochujang based on spice tolerance; it adds flavor but can be a bit spicy for some!

How can I reheat the slaw for serving?
You actually don’t need to reheat the slaw! It’s best served cold to contrast the warmth of the beef in your tacos. Just give it a good toss before serving to refresh the flavors!

Korean Beef Tacos

Savory Korean Beef Tacos with Crunchy Gochujang Slaw

Enjoy these Korean Beef Tacos, a fusion of bold flavors and textures, perfect for dinner.
Print Recipe Pin Recipe
Prep Time 20 minutes mins
Cook Time 8 hours hrs
Chilling Time 30 minutes mins
Total Time 8 hours hrs 50 minutes mins
Servings: 4 tacos
Course: Dinner
Cuisine: Korean, Mexican
Calories: 300
Ingredients Equipment Method Nutrition Notes

Ingredients
  

For the Beef
  • 2 pounds Beef Chuck Roast Can substitute with pork shoulder or chicken thighs.
  • 1/2 cup Soy Sauce Use low-sodium for a healthier option.
  • 3 tablespoons Gochujang Adjust quantity to taste.
  • 1 tablespoon Ginger Freshly grated for best flavor.
  • 4 cloves Garlic Fresh cloves enhance savory undertones.
For the Slaw
  • 4 cups Cabbage Shredded; coleslaw mix can be used.
  • 1 cup Carrot Grated for sweetness and color.
  • 2 tablespoons Rice Vinegar Can substitute with apple cider vinegar.
  • 1 tablespoon Sugar Consider honey or agave as alternatives.

Equipment

  • Crockpot
  • Skillet
  • Mixing Bowl

Method
 

Preparation Steps
  1. In a large skillet over medium-high heat, sear the beef chuck roast for about 4-5 minutes on each side until browned. Move to crockpot.
  2. Sauté minced garlic and grated ginger in the same skillet for 1 minute until fragrant. Stir in soy sauce.
  3. Pour the mixture over the beef in the crockpot and cook on low for 8 hours until fork-tender.
  4. Combine shredded cabbage, grated carrot, gochujang, rice vinegar, and sugar in a large bowl. Refrigerate for 30 minutes.
  5. Shred the beef in the crockpot and serve in warm tortillas topped with the gochujang slaw.

Nutrition

Serving: 1tacoCalories: 300kcalCarbohydrates: 25gProtein: 20gFat: 15gSaturated Fat: 6gPolyunsaturated Fat: 1gMonounsaturated Fat: 8gCholesterol: 80mgSodium: 600mgPotassium: 600mgFiber: 4gSugar: 5gVitamin A: 200IUVitamin C: 20mgCalcium: 40mgIron: 3mg

Notes

These Korean beef tacos are customizable with toppings like avocado or sriracha for an extra kick.

Tried this recipe?

Let us know how it was!

Crispy Roast Potatoes with Garlic and Rosemary Magic

February 16, 2026 by Grace Snow Leave a Comment

The sizzle of roasting potatoes fills the kitchen, drawing everyone closer in anticipation. Today, I’m excited to share my recipe for Crispy Roast Potatoes with Rosemary and Garlic, a side dish that promises to elevate any meal. These potatoes are not only Whole30 compliant and gluten-free; they also deliver the ultimate blend of crunchiness and fluffiness that will have your family asking for seconds. With simple ingredients and minimal prep, you can create a side that pairs beautifully with everything from roast chicken to grilled steaks. Want to discover the secrets behind achieving that perfect crispy exterior? Let’s dive into this recipe that’s bound to become a staple in your home!

Why are Crispy Roast Potatoes a Must-Have?

Irresistible Crunch: Each bite delivers a delightful crunch paired with a fluffy interior, making these potatoes incredibly satisfying.
Flavorful Aroma: Infused with garlic and rosemary, they fill your kitchen with enticing fragrances that will have everyone eagerly waiting at the table.
Easy Preparation: With just a few simple steps, these potatoes come together quickly—perfect for busy weeknights or special gatherings.
Versatile Side Dish: They complement a wide range of mains, whether it’s Fish Taco Bowls or Roasted Bratwurst Peppers, making your meals more exciting.
Crowd-Pleaser: Guaranteed to impress family and guests alike, they’re perfect for holidays or casual dinners.
Make Ahead: You can parboil them in advance, making meal prep a breeze while still achieving that coveted crispy finish when roasted fresh.

Crispy Roast Potatoes Ingredients

• Get ready to make a delightful side!

For the Potatoes

  • Yellow Potatoes – The star of the dish; cut into large chunks for the best texture.
  • Kosher Salt – Essential for enhancing flavor and achieving that perfect crispy crust.
  • Baking Soda – Helps create a wonderfully crisp exterior by breaking down the potato's surface.

For Roasting

  • Duck Fat – This rich fat elevates the flavor during roasting; feel free to swap with olive oil or ghee if needed.
  • Freshly-Cracked Black Pepper – Adds a depth of flavor that complements the dish beautifully.
  • Whole Head Garlic – Trimmed and roasted for an aromatic infusion that enhances the overall taste.
  • Chopped Fresh Rosemary – Brings a fresh herbal note, making these crispy roast potatoes truly enchanting.

For Finishing Touches

  • Extra-Virgin Olive Oil – Drizzle on at the end for a silky finish; grass-fed butter is a great alternative.
  • Flaky Sea Salt – This final sprinkle enhances both flavor and presentation for your crispy roast potatoes.

Step‑by‑Step Instructions for Crispy Roast Potatoes with Rosemary and Garlic

Step 1: Prep the Potatoes
Start by peeling the yellow potatoes and cutting them into large chunks for optimal texture; smaller potatoes can be left whole. Rinse the potatoes under cold water to remove excess starch, ensuring they will crisp up beautifully. Once prepared, set aside the potatoes while you boil water for the next step.

Step 2: Parboil the Potatoes
In a large pot, bring salted water to a rolling boil and add baking soda, which aids in achieving that coveted crispy exterior. Carefully add the potatoes and parboil for about 10 minutes until they're tender but still firm, not falling apart. Drain the potatoes in a colander and allow them to cool slightly, giving them a moment to relax.

Step 3: Coat and Season
While the potatoes are cooling, preheat your oven to 425°F (220°C). In a large bowl, toss the parboiled potatoes with duck fat, making sure each piece is well-coated. Season generously with kosher salt, freshly-cracked black pepper, chopped rosemary, and the whole head of garlic. This combination will infuse the potatoes with aromatic flavors as they roast.

Step 4: Roast the Potatoes
Spread the seasoned potatoes evenly on a large baking sheet, ensuring they’re not overcrowded for even roasting. Place them in the preheated oven and roast for 60 to 75 minutes. Keep an eye on them, turning the potatoes halfway through until they achieve a golden brown hue and a wonderfully crispy texture, bringing out that mouthwatering crunch.

Step 5: Finish and Serve
Once done, remove the crispy roast potatoes from the oven and let them cool for a few minutes. Drizzle with extra-virgin olive oil and sprinkle with flaky sea salt to enhance their flavor. Serve immediately, marveling at the crispy exteriors and fluffy insides that make these potatoes a delightful side dish to any meal.

How to Store and Freeze Crispy Roast Potatoes

Fridge: Store leftover crispy roast potatoes in an airtight container for up to 3 days. This will help retain some of their delightful flavors.

Freezer: For longer storage, freeze the parboiled potatoes before roasting. Place them in a freezer bag, and they’ll stay good for up to 3 months.

Reheating: To enjoy leftovers, reheat in a preheated oven at 400°F (200°C) for about 10-15 minutes, allowing them to regain some crispiness.

Make-Ahead Tip: Parboil and refrigerate the potatoes in advance; they can be roasted fresh when you're ready to serve crispy roast potatoes at your gathering!

Make Ahead Options

Crispy Roast Potatoes are perfect for meal prep, allowing busy home cooks to enjoy a delicious side with minimal last-minute fuss. You can parboil the potatoes up to 24 hours in advance; once cooled, simply refrigerate them in an airtight container. This step ensures they’re tender and ready for roasting without compromising their amazing texture. When you're ready to serve, toss the chilled potatoes in duck fat, rosemary, and seasoning before roasting at 425°F (220°C) for 60 to 75 minutes until crispy. This method guarantees that your potatoes will be just as delicious and satisfying, making this a fantastic solution for time-strapped weeknights!

What to Serve with Crispy Roast Potatoes with Rosemary and Garlic

Enhance your meal with a delightful medley of flavors and textures that beautifully complement your crispy roast potatoes.

  • Roasted Chicken: The juicy, tender chicken pairs perfectly with the crunch of the potatoes, creating a comforting meal that warms the heart.

  • Grilled Lamb Chops: Their rich flavor and herbaceous notes harmonize wonderfully with rosemary, making this pairing an elegant choice for gatherings.

  • Smoky Barbecue Ribs: The crispy potatoes make a wonderful contrast to the sticky sweetness of barbecue sauce, ideal for a casual feast.

  • Honey-Glazed Carrots: Sweet and tender, these vibrant carrots offer a lovely freshness that balances out the hearty potatoes beautifully.

  • Fresh Garden Salad: A crisp salad with mixed greens, cherry tomatoes, and a light vinaigrette adds a refreshing crunch to each bite, enhancing the meal.

  • Creamy Coleslaw: The tanginess of coleslaw provides a delightful contrast to the savory roast potatoes, bringing a creamy element to the table.

  • Red Wine: A silky, medium-bodied red wine like Pinot Noir will elevate your dining experience, pairing beautifully with both the potatoes and main dishes.

  • Apple Crisp: Finish with a warm apple crisp for dessert; the sweet, cinnamon flavors complement the savory theme while providing a comforting end to the meal.

Expert Tips for Crispy Roast Potatoes

Chunk Size Matters: Cut your potatoes into large, uniform chunks to prevent them from crumbling during cooking; this ensures maximum crispiness.

Perfect Parboil: Use salted water and baking soda during parboiling—this combination helps break down the potato surface for better texture.

Preheat Properly: Ensure your oven is fully preheated to 425°F (220°C) before roasting; this kick-starts the crisping process, yielding the best crispy roast potatoes.

Space Them Out: Spread the potatoes evenly on the baking sheet; overcrowding can lead to steaming instead of roasting, hindering that desired crunch.

Garnish Wisely: Finish with flaky sea salt right before serving to elevate flavor; avoid adding it too early to keep the integrity of the potatoes intact.

Crispy Roast Potatoes Variations

Feel free to get creative and tailor these crispy roast potatoes to your taste buds with these delightful twists!

  • Herb Swap: Exchange rosemary for thyme or oregano to refresh the flavor profile for a unique twist.
    Consider using a combination of these herbs to create a fragrant herb mix that captivates your senses.

  • Garlic Infusion: Enhance the garlic flavor by using roasted garlic oil instead of duck fat for a richer taste.
    Simply drizzle the oil over the potatoes while tossing, and enjoy the added depth of flavor.

  • Spicy Kick: Sprinkle crushed red pepper flakes or cayenne for a spicy variation that’ll warm your taste buds.
    This simple addition elevates the dish and adds a whole new layer of heat to savor.

  • Paprika Boost: Add smoked paprika for a hint of smokiness that can take these potatoes to another level.
    Toss the potatoes with a teaspoon of paprika before roasting to embrace a new flavor dimension.

  • Vegan Option: Substitute duck fat with avocado oil or melted coconut oil to keep the dish plant-based friendly.
    These swaps maintain delicious crunchiness while also catering to vegan diets.

  • Cheesy Flavor: Add grated Parmesan or nutritional yeast right before serving to introduce a delightful savoriness.
    This flavor enhancement not only adds richness but also an irresistible cheesy aroma.

  • Zesty Finish: A squeeze of fresh lemon juice right before serving can brighten flavors and add a refreshing zing.
    Pair it with a sprinkle of zest to make each bite burst with a delightful citrus note.

  • Twice-Roasted: For an extra crispy outer layer, roast the potatoes a second time at a higher temperature for the last 15 minutes.
    This technique adds a delightful crunch that elevates the overall texture and taste.

Enhance your dining experience by serving these crispy roast potatoes alongside Smoky Sweet Potatoes or Roasted Corn Fried for a vibrant spread that excites the palate!

Crispy Roast Potatoes with Rosemary and Garlic Recipe FAQs

How do I choose the best potatoes?
Absolutely! For crispy roast potatoes, yellow potatoes are ideal due to their creamy texture and ability to hold their shape. Look for firm potatoes without dark spots or blemishes, as these can indicate overripeness. A great selection will be smooth and evenly colored, perfect for achieving that delightful crunch.

What’s the best way to store leftover crispy roast potatoes?
After enjoying your crispy roast potatoes, let any leftovers cool down before placing them in an airtight container. They can be stored in the fridge for up to 3 days. To reheat, pop them back into a preheated oven at 400°F (200°C) for about 10-15 minutes to help restore some of that glorious crispiness.

Can I freeze parboiled potatoes instead of fully roasted ones?
Very! To freeze parboiled potatoes, first follow the parboiling steps, then drain and let them cool completely. Once cooled, spread them in a single layer on a baking sheet and freeze until solid. Transfer them to a freezer bag or airtight container, and they’ll keep well for up to 3 months. When you're ready to use them, roast straight from the freezer, adding a few extra minutes to the cooking time.

What should I do if my potatoes aren’t crispy enough?
If your crispy roast potatoes aren't as crispy as desired, check a few factors. First, ensure you’re using enough duck fat or oil to coat all potatoes evenly. Also, make sure your oven is preheated and that the potatoes are spread out on the baking sheet without overcrowding. If they are still not crisping up, increase the temperature by 25°F (about 15°C) and roast a bit longer. This will help achieve that coveted crunch.

Are crispy roast potatoes safe for pets?
While the ingredients in crispy roast potatoes are generally safe, make sure not to include any seasoning like salt or garlic if you plan to share with your pets, as these can be harmful. It's best to stick to plain, cooked potatoes for your furry friends.

Can I make this recipe in advance?
Absolutely! You can parboil the potatoes a day ahead and store them in the fridge. When you’re ready to serve, just toss them in duck fat and roast. This way, you can enjoy freshly roasted crispy potatoes without the last-minute scramble!

Crispy Roast Potatoes

Crispy Roast Potatoes with Garlic and Rosemary Magic

Crispy Roast Potatoes deliver an irresistible crunch with garlic and rosemary flavor, perfect for any meal.
Print Recipe Pin Recipe
Prep Time 15 minutes mins
Cook Time 1 hour hr 15 minutes mins
Cooling Time 5 minutes mins
Total Time 1 hour hr 35 minutes mins
Servings: 4 servings
Course: Dinner
Cuisine: American
Calories: 250
Ingredients Equipment Method Nutrition Notes

Ingredients
  

For the Potatoes
  • 2 lbs Yellow Potatoes cut into large chunks
  • 1 tbsp Kosher Salt for boiling
  • 1 tsp Baking Soda
For Roasting
  • 1/4 cup Duck Fat can swap with olive oil or ghee
  • 1 tsp Freshly-Cracked Black Pepper
  • 1 whole Head Garlic trimmed and roasted
  • 2 tbsp Chopped Fresh Rosemary
For Finishing Touches
  • 1 tbsp Extra-Virgin Olive Oil for drizzling
  • 1 tsp Flaky Sea Salt for finishing

Equipment

  • Large pot
  • Colander
  • large bowl
  • Baking Sheet

Method
 

Step-by-Step Instructions
  1. Start by peeling the yellow potatoes and cutting them into large chunks. Rinse under cold water to remove excess starch.
  2. In a large pot, bring salted water to a boil with baking soda. Add the potatoes and parboil for about 10 minutes. Drain and let cool slightly.
  3. Preheat oven to 425°F (220°C). Toss parboiled potatoes with duck fat and seasonings in a bowl. Ensure each piece is coated.
  4. Spread the seasoned potatoes on a baking sheet and roast for 60-75 minutes, turning halfway, until golden brown and crispy.
  5. Remove from the oven, let cool briefly, drizzle with olive oil, and sprinkle with sea salt. Serve immediately.

Nutrition

Serving: 1servingCalories: 250kcalCarbohydrates: 34gProtein: 3gFat: 12gSaturated Fat: 3gMonounsaturated Fat: 9gSodium: 360mgPotassium: 600mgFiber: 3gSugar: 1gVitamin C: 25mgCalcium: 2mgIron: 8mg

Notes

For best results, ensure potatoes are spaced out on the baking sheet and the oven is preheated to achieve optimal crispiness.

Tried this recipe?

Let us know how it was!

Energizing Green Protein Smoothie Bowl for a Fresh Start

February 16, 2026 by Grace Snow Leave a Comment

As I stood in my kitchen, a whirlwind of uneaten bananas and a crisper packed with greens caught my eye. What if I transformed these seemingly mundane ingredients into a vibrant bowl that could kick-start my day? Enter the Green Protein Smoothie Bowl—my go-to solution for those mornings that need a little extra energy boost. Packed with creamy avocado and sweet mango, this recipe is both gluten-free and dairy-free, ensuring that everyone can indulge in its tropical goodness. It’s exceptionally quick to whip up, making it the ideal breakfast or a refreshing snack that leaves you feeling nourished and satisfied. Excited to dive into the details of crafting this nutrient-packed delight? Let’s blend up something special!

Why is this smoothie bowl a game changer?

Vibrant Colors: This Green Protein Smoothie Bowl is not just good for you; it’s a feast for the eyes, with a bright and cheerful appearance.

Quick & Easy: Whip it up in minutes! Just blend, pour, and top—perfect for busy mornings or post-workout snacks.

Nutrient-Packed: Loaded with healthy fats, protein, and fiber, this bowl will keep you fuller longer while fueling your day.

Customizable: Feel free to mix and match fruits with options like blueberries or peaches to suit your taste or seasonal availability.

Dairy-Free Delight: It fits seamlessly into vegan, gluten-free, or dairy-free diets without compromising an ounce of flavor. Pair it with a refreshing Chocolate Cherry Smoothie for a delightful treat!

Crowd-Pleasing: Serve it to family and friends, and watch everyone enjoy this delicious and nutritious dish without any complaints!

Green Protein Smoothie Bowl Ingredients

• A deliciously vibrant mix awaits!

For the Smoothie

  • Coconut Milk – Provides creaminess and a hint of sweetness; almond milk or oat milk can also work beautifully.
  • Baby Spinach – A nutritional powerhouse that adds greens without overwhelming the flavor; kale can be a great substitute.
  • Frozen Mango – Adds a luscious sweetness and a tropical taste; try frozen pineapple or banana for a delightful twist.
  • Frozen Zucchini Slices – Enhances the creamy texture and boosts fiber; feel free to omit if you don’t have it on hand.
  • Frozen Avocado – Delivers healthy fats and a dreamy creaminess; fresh avocado can also work; adjust as needed.
  • Vanilla Protein Powder – Increases protein content, making this smoothie bowl satisfying; use plant-based protein for a vegan alternative or skip it for a lighter option.

For the Toppings

  • Chia Seeds – Boost nutrition and add a satisfying crunch; sprinkle generously!
  • Raspberries – Provide a burst of flavor and visual appeal, harmonizing wonderfully with the green base.
  • Granola – Adds a lovely crunch for texture; opt for gluten-free granola if desired.
  • Nuts – Use your favorite nuts for extra protein and a hearty feel.
  • Bananas – Slice them up for added sweetness and creaminess; they never disappoint!
  • Yogurt – Drizzle a dairy-free yogurt on top for an extra creamy element and pleasing tang.

Embrace the magic of this Green Protein Smoothie Bowl, and feel free to let your creativity shine with toppings that you love!

Step‑by‑Step Instructions for Green Protein Smoothie Bowl

Step 1: Blend the Base Ingredients
Start by adding 1 cup of coconut milk to a high-speed blender, followed by 1 cup of baby spinach, 1 cup of frozen mango, 1/2 cup of frozen zucchini slices, 1/2 cup of frozen avocado, and 1 scoop of vanilla protein powder. Secure the lid tightly and blend on high for 30-45 seconds, until the mixture is smooth and creamy, with a vibrant green hue.

Step 2: Check the Consistency
After blending, pause to check the consistency of your Green Protein Smoothie Bowl. If it's too thick for your liking, add a little more coconut milk, about 2 tablespoons at a time, then blend again for around 10 seconds. The goal is a luscious, thick texture that will hold up beautifully when poured into a bowl.

Step 3: Pour into a Serving Bowl
Once your smoothie has reached the desired creamy consistency, carefully pour it into your favorite bowl. Use a rubber spatula if necessary to scrape down the sides of the blender and ensure you don’t waste any of this delicious green goodness. The vibrant color will be a feast for the eyes as you prepare to add your toppings.

Step 4: Add Toppings for Texture and Flavor
Now comes the fun part—adding toppings to your Green Protein Smoothie Bowl! Sprinkle a tablespoon of chia seeds for a nutritional boost, followed by a handful of fresh raspberries for a pop of color and flavor. Add a generous sprinkle of granola, a few banana slices, and if desired, a dollop of dairy-free yogurt to create a delightful mix of textures.

Step 5: Serve Immediately
Your Green Protein Smoothie Bowl is ready to be savored! Enjoy it immediately to maintain the perfect texture. Grab a spoon and dig into the creamy, nutrient-packed bowl, relishing every bite of this quick and healthy meal, perfect for breakfast or a refreshing snack.

Expert Tips for the Best Green Protein Smoothie Bowl

  • Choose Quality Ingredients: Fresh, ripe fruits and high-quality protein powder make all the difference in flavor and nutrition. Opt for organic when possible!

  • Perfect Texture: To achieve a creamy consistency, ensure your blender is powerful enough to handle frozen ingredients. Don't hesitate to adjust the coconut milk amount for desired thickness.

  • Avoid Overloading: Stick to recommended quantities for each ingredient to prevent a watery smoothie bowl. Too much liquid can dilute the vibrant flavors of your green protein smoothie bowl.

  • Prep Ahead: For busy mornings, pre-portion your smoothie ingredients in freezer bags. Just grab a bag, blend, and enjoy!

  • Topping Variety: Don't be afraid to experiment with different toppings each time you make your smoothie bowl! Seasonal fruits, nuts, and seeds can give you a new experience.

  • Immediate Enjoyment: Enjoy your smoothie bowl right after preparation to maintain optimal texture and freshness. If storing leftovers, re-blend with a bit of coconut milk before serving again.

Make Ahead Options

These Green Protein Smoothie Bowls are perfect for meal prep, saving you precious time on busy mornings! You can blend the smoothie base (coconut milk, spinach, mango, zucchini, avocado, and protein powder) up to 24 hours in advance and store it in an airtight container in the refrigerator. To maintain its delicious quality, give it a good shake before serving; if it's thickened, add a splash of coconut milk and re-blend for a creamy consistency. You can also prepare and portion out your toppings, like chia seeds and granola, in advance so everything is ready to go when you're ready to indulge in this nutritious treat. Enjoying a nutritious breakfast has never been easier!

Green Protein Smoothie Bowl Variations

Feel free to get creative with your smoothie bowl to make it uniquely yours!

  • Dairy-Free Delight: Substitute the coconut milk with almond or oat milk for a different creamy flavor.

  • Tasty Greens: Swap baby spinach for kale or swiss chard for a heartier taste while keeping it nutritious.

  • Frozen Fruit Fun: Replace frozen mango with frozen pineapple or mixed berries for a different tropical vibe.

  • Zucchini Option: If frozen zucchini isn’t on hand, simply omit it; your bowl will still be delicious without it.

  • Avocado Switch: Fresh avocado can replace frozen avocado; just use more if you prefer a creamier texture.

  • Flavor Boost: Add a tablespoon of nut butter for extra creaminess and a protein punch that will keep you full longer.

  • Bowl Toppings Twist: Try topping with shredded coconut or pomegranate seeds for an unexpected crunch and vibrant flavor.

  • Protein Variation: Use your favorite plant-based protein powder or try a chocolate flavor for a delicious chocolaty twist; it pairs perfectly with the greens!

The flexibility of this recipe allows you to enjoy a different experience each time! If you're feeling adventurous, you can also check out my refreshing Pitaya Smoothie Bowl or indulge in the delightful layers of flavor from my Lemon Ricotta Protein Pancakes. Get blending for a creatively satisfying breakfast!

How to Store and Freeze Green Protein Smoothie Bowl

  • Room Temperature: It's best to avoid keeping the smoothie bowl at room temperature, as it can quickly lose its freshness and texture.

  • Fridge: Leftovers can be stored in an airtight container in the refrigerator for up to 24 hours. For best results, re-blend with a splash of coconut milk before serving to restore creaminess.

  • Freezer: If you want to extend its life, pour the smoothie mixture into ice cube trays or freezer bags and freeze for up to a month. Thaw in the fridge overnight or blend straight from frozen for a chilly treat.

  • Reheating: Since this is a cold dish, there's no need to reheat it. Just give it a good blend if it's been frozen or stored to bring back that delightful texture of your Green Protein Smoothie Bowl.

What to Serve with Creamy Green Protein Smoothie Bowl

Elevate your meal experience with delightful pairings that enhance the nourishing essence of this creamy bowl.

  • Toasted Whole Grain Bread: Its nutty flavor and crunchy texture make a perfect companion to your smoothie bowl, providing a satisfying crunch.

  • Tropical Fruit Salad: A refreshing mix of pineapple, kiwi, and passion fruit complements the smoothie’s tropical notes, adding brightness and zing.

  • Vegan Overnight Oats: Creamy oats topped with nuts and berries can add a hearty element, creating a balanced and nourishing breakfast spread.

  • Crispy Roasted Chickpeas: For a protein-packed munch, these crunchy bites bring a savory contrast that’s both satisfying and nutritious.

  • Herbal Tea: A light peppermint or chamomile tea would harmonize well, offering a soothing beverage option to balance the vibrant flavors of your bowl.

  • Nut Butter Energy Balls: These bites of goodness provide an extra energy boost, and their rich, nutty flavor perfectly complements the smoothie’s creaminess.

  • Dairy-Free Yogurt Parfait: Layered with granola and fresh fruits, this parfait adds a delightful crunch and a touch of creaminess, marrying well with the smoothie bowl’s texture.

  • Lemon Water: Infused with fresh herbs like mint, this refreshing drink cleanses the palate and harmonizes beautifully with the vibrant flavors of your smoothie.

Green Protein Smoothie Bowl Recipe FAQs

How do I choose the ripeness of my ingredients?
Absolutely! When selecting your fruits and greens, aim for bright, unblemished produce. Choose ripe avocados that yield slightly to gentle pressure, and mangoes that have a sweet aroma and give a little when pressed. For greens like baby spinach, look for crisp leaves that are vibrant without any dark spots.

What’s the best way to store leftovers?
To store leftover Green Protein Smoothie Bowl, transfer the mixture into an airtight container and refrigerate. It’s best if consumed within 24 hours to maintain flavor and texture. Just before serving, give it a re-blend with a splash of coconut milk to refresh its creamy consistency.

Can I freeze the smoothie bowl?
Yes! To freeze your Green Protein Smoothie Bowl, pour the mixture into ice cube trays or freezer-safe bags. It can be frozen for up to 3 months. When you're ready, simply thaw overnight in the fridge or blend straight from frozen if you want an ultra-cold treat!

What if the smoothie bowl is too thick?
No worries! If your smoothie mixture turns out too thick, you can easily adjust it. Begin by adding 2 tablespoons of coconut milk, then blend for another 10 seconds. Repeat this process until you reach your desired creamy consistency. Remember, a little liquid goes a long way!

Are there any ingredient substitutions for allergies?
Very much so! If you or someone you're serving has allergies, consider using nut-free milk alternatives in place of coconut milk, like oat milk or hemp milk. If nut allergies are a concern, skip the nuts in the toppings and opt for seeds such as pumpkin seeds or sunflower seeds for crunch without worry.

Is this smoothie bowl pet-friendly?
While the Green Protein Smoothie Bowl is loaded with healthy ingredients for us, it’s best not to share it with pets. Ingredients like avocado can be toxic to dogs, so stick to pet-friendly treats for your furry friends!

Green Protein Smoothie Bowl

Energizing Green Protein Smoothie Bowl for a Fresh Start

Discover a delicious Green Protein Smoothie Bowl, perfect for breakfast or a refreshing snack, packed with nutrients and energy.
Print Recipe Pin Recipe
Prep Time 5 minutes mins
Total Time 5 minutes mins
Servings: 2 bowls
Course: Breakfast
Cuisine: Vegan
Calories: 350
Ingredients Equipment Method Nutrition Notes

Ingredients
  

For the Smoothie
  • 1 cup Coconut Milk Almond milk or oat milk can also work beautifully.
  • 1 cup Baby Spinach Kale can be a great substitute.
  • 1 cup Frozen Mango Try frozen pineapple or banana for a delightful twist.
  • 1/2 cup Frozen Zucchini Slices Feel free to omit if you don’t have it on hand.
  • 1/2 cup Frozen Avocado Fresh avocado can also work; adjust as needed.
  • 1 scoop Vanilla Protein Powder Use plant-based protein for a vegan alternative or skip for a lighter option.
For the Toppings
  • 1 tablespoon Chia Seeds Boosts nutrition and adds a satisfying crunch.
  • 1 cup Raspberries Provides a burst of flavor and visual appeal.
  • 1/2 cup Granola Opt for gluten-free granola if desired.
  • 1/4 cup Nuts Use your favorite nuts for extra protein.
  • 1 banana Bananas Slice them up for added sweetness.
  • 2 tablespoons Yogurt Drizzle a dairy-free yogurt on top for creaminess.

Equipment

  • High-speed blender

Method
 

Step-by-Step Instructions
  1. Start by adding 1 cup of coconut milk to a high-speed blender, followed by 1 cup of baby spinach, 1 cup of frozen mango, 1/2 cup of frozen zucchini slices, 1/2 cup of frozen avocado, and 1 scoop of vanilla protein powder. Secure the lid tightly and blend on high for 30-45 seconds, until the mixture is smooth and creamy.
  2. After blending, check the consistency. If it's too thick, add a little more coconut milk, about 2 tablespoons at a time, and blend again for around 10 seconds.
  3. Once your smoothie has reached the desired consistency, carefully pour it into your favorite bowl.
  4. Now add toppings: sprinkle a tablespoon of chia seeds, a handful of fresh raspberries, a generous sprinkle of granola, a few banana slices, and a dollop of dairy-free yogurt.
  5. Your Green Protein Smoothie Bowl is ready to be enjoyed immediately for the best texture.

Nutrition

Serving: 1bowlCalories: 350kcalCarbohydrates: 45gProtein: 12gFat: 15gSaturated Fat: 8gPolyunsaturated Fat: 2gMonounsaturated Fat: 5gSodium: 150mgPotassium: 600mgFiber: 10gSugar: 18gVitamin A: 5000IUVitamin C: 60mgCalcium: 100mgIron: 2mg

Notes

Feel free to let your creativity shine with toppings that you love. For busy mornings, pre-portion ingredients in freezer bags to make blending easier.

Tried this recipe?

Let us know how it was!

Cinnamon Rolls Recipe - Soft, Gooey, and Irresistibly Homemade

February 16, 2026 by Grace Snow Leave a Comment

The moment I cracked open the oven door, I was greeted by the divine smell of cinnamon swirling through my kitchen—a scent that instantly transports me to my childhood. This Cinnamon Rolls Recipe is my secret weapon for turning any ordinary day into a cozy celebration, perfect for breakfast, brunch, or a sweet snack. Not only are these rolls soft, fluffy, and irresistibly gooey, but they also require minimal effort, making them a delightful treat for both novice bakers and seasoned pros. Whether you're hosting a weekend gathering or simply indulging yourself, these homemade cinnamon rolls promise a melt-in-your-mouth experience that will leave everyone asking for seconds. Ready to fill your home with that heavenly aroma? Let’s roll!

Why Are These Cinnamon Rolls Irresistible?

Unmatched Gooeyness: These cinnamon rolls are oozing with sweetness in every bite, giving you that delightful melt-in-your-mouth experience.
Simple to Make: Even if you're a beginner, this recipe makes it easy to impress friends and family with minimal fuss.
A Versatile Treat: Enjoy these rolls for breakfast, brunch, or as a sweet snack with your favorite coffee or tea!
Make-Ahead Convenience: Plan your mornings effortlessly by prepping the rolls the night before—wake up to fresh-baked bliss!
Satisfying Aroma: Just one whiff of cinnamon wafting through your home will elevate your mood and create the perfect cozy atmosphere, inviting everyone to gather around.
Don't forget to check out my Pumpkin Cinnamon Roll recipe for a festive twist on a classic!

Cinnamon Rolls Recipe Ingredients

Here’s everything you need to create the most irresistible cinnamon rolls!

For the Dough

  • Whole Milk – Provides moisture and softness to the dough; warm to about 110°F to activate yeast.
  • Active Dry Yeast – A leavening agent that helps the dough rise; ensure it blooms by sprinkling over warm milk.
  • Granulated Sugar – Sweetens the dough and filling; essential for browning during baking.
  • Eggs – Provide structure and richness; use one whole egg and an additional yolk for added tenderness.
  • Unsalted Butter – Adds flavor and moisture to the dough (melted) and filling, contributing to that gooey center.
  • All-Purpose Flour – Main structural component of the dough; can substitute with bread flour for a chewier texture.
  • Salt – Enhances flavor and strengthens the dough.

For the Filling

  • Brown Sugar – Adds rich sweetness and deeper flavor to the filling, enhancing the overall experience.
  • Ground Cinnamon – The key flavor for the filling, imbuing warmth and a characteristic taste.

For the Frosting

  • Cream Cheese – The base for the frosting; provides tanginess and creaminess to balance the sweetness.
  • Powdered Sugar – Sweetens and thickens the frosting to perfection, making it irresistible on warm rolls.

With this Cinnamon Rolls Recipe, you can create bakery-quality rolls that promise a melt-in-your-mouth experience with every bite!

Step‑by‑Step Instructions for Cinnamon Rolls Recipe

Step 1: Prepare the Dough
Warm the whole milk to about 110°F to activate the yeast, then sprinkle the active dry yeast and a tablespoon of granulated sugar over it. Allow it to bloom for 5-10 minutes until frothy. In a mixing bowl, combine the melted unsalted butter, one whole egg, an additional egg yolk, flour, and salt. Mix until combined, then knead the dough for 7-8 minutes until smooth and elastic.

Step 2: First Rise
Grease a large bowl with a little melted butter or oil and place the kneaded dough inside, turning to coat. Cover the bowl with a clean kitchen towel and let it rise in a warm area for 60-90 minutes, or until the dough has doubled in size. You’ll know it’s ready when it springs back slightly when gently poked.

Step 3: Make Filling
While the dough is rising, prepare the cinnamon filling. In a small bowl, combine melted butter, brown sugar, and ground cinnamon to form a thick paste. Mix until smooth and cohesive, making sure it's well combined to ensure each roll has that sweet, gooey center. Set this delicious mixture aside as you wait for the dough to rise.

Step 4: Shape Rolls
Once the dough has risen, punch it down gently to release air and turn it onto a lightly floured surface. Roll it out into an 18x12-inch rectangle, ensuring even thickness. Spread the prepared cinnamon filling evenly across the dough, leaving a small border around the edges. Tightly roll the dough into a log, then slice into 12 equal pieces using a sharp knife or dental floss.

Step 5: Second Rise
Grease a baking pan and place the sliced cinnamon rolls next to each other, cut sides up. Cover the pan with a towel and let the rolls rise for another 30-45 minutes until puffy. As they rise, preheat your oven to 375°F, ensuring a hot environment for baking that perfect Cinnamon Rolls Recipe.

Step 6: Bake
Once the rolls have risen and look beautifully puffy, place them in the preheated oven. Bake for 20-25 minutes, or until they are golden brown on top and the centers are cooked through. Check for doneness at around 20 minutes, and keep an eye on them to avoid overbaking.

Step 7: Prepare Frosting
While the rolls cool for a few minutes, make the frosting. In a bowl, beat together cream cheese and softened unsalted butter until smooth and creamy. Gradually add powdered sugar and a splash of vanilla extract, mixing until well combined and fluffy. This creamy topping will balance the sweetness of your cinnamon rolls perfectly.

Step 8: Frost and Serve
Once the cinnamon rolls are slightly cooled, generously spread the cream cheese frosting over the top while they're still warm. This allows the frosting to melt slightly into the rolls, creating a deliciously gooey topping. Serve your warm, frosted cinnamon rolls and watch as everyone enjoys this delightful homemade Cinnamon Rolls Recipe!

What to Serve with Ultimate Homemade Cinnamon Rolls

Elevate your cinnamon roll experience by pairing them with delightful accompaniments that will make your meal truly special.

  • Fresh Fruit Salad: A medley of vibrant fruits adds a refreshing contrast to the rich sweetness of cinnamon rolls, making for a balanced breakfast.
  • Scrambled Eggs: Fluffy, soft scrambled eggs provide protein and creaminess, pleasantly offsetting the gooeyness of the rolls.
  • Savory Breakfast Potatoes: Crispy, seasoned potatoes bring a satisfying crunch and hearty texture that complements the soft rolls perfectly.
  • Maple Syrup Drizzle: A pour of warm maple syrup over your cinnamon rolls enhances their sweetness, creating a luxurious brunch treat.
  • Coffee or Tea: A steaming cup of coffee or your favorite tea enhances the cozy ambiance, providing a delightful contrast to the sweet rolls.
  • Creamy Yogurt Parfait: Layered with granola and berries, yogurt adds a tangy twist that balances the sweetness of your gooey cinnamon rolls.
  • Whipped Cream Topping: Light and airy whipped cream, lightly sweetened, can take your cinnamon rolls to the next level of indulgence.
  • Homemade Hot Chocolate: A rich cup of hot chocolate envelops you in warmth, creating a comforting pairing with the gooey cinnamon rolls.

Storage Tips for Cinnamon Rolls Recipe

Room Temperature: Store leftover cinnamon rolls in an airtight container at room temperature for up to 3 days to maintain their softness and gooeyness.

Fridge: If you want to keep them fresh for longer, refrigerate the rolls for up to a week. Just ensure they're in an airtight container to prevent drying out.

Freezer: For longer storage, freeze the cinnamon rolls in a single layer, then transfer to a freezer bag for up to 3 months. They can be thawed overnight in the fridge before reheating.

Reheating: To enjoy your cinnamon rolls warm, simply wrap them in foil and heat in a 350°F oven for about 10-15 minutes, or microwave for 15-20 seconds until warmed through.

Cinnamon Rolls Recipe Variations

Feel free to get creative with this cinnamon rolls recipe and make it your own with these delightful twists!

  • Flavorful Dough: Swap regular sugar for brown sugar in the dough for added depth and warmth. The subtle difference will enhance the overall flavor profile beautifully.

  • Nutty Delight: Add chopped nuts like walnuts or pecans into the filling for a delightful crunch. This adds an unexpected textural element that pairs perfectly with the gooey cinnamon swirl.

  • Chocolate Chip Surprise: Sprinkle chocolate chips in the filling for a sweet, indulgent upgrade. The melty chocolate melds beautifully with the cinnamon, creating an irresistibly gooey treat.

  • Fruit Fusion: Incorporate fresh or dried fruit, such as raisins or chopped apples, into the filling. The fruity notes provide a refreshing twist that balances the rich flavors of cinnamon and sugar.

  • Decadent Frosting: Mix in a splash of maple syrup or vanilla extract into the cream cheese frosting for an extra flavor boost. This small addition will elevate the frosting, making it even more tempting!

  • Pumpkin Spice Twist: For a seasonal variation, add pumpkin puree to the dough and a sprinkle of pumpkin pie spice to the filling. Fall flavors will embrace you with every delectable bite! Speaking of pumpkin, you might also enjoy my Pumpkin Cinnamon Roll recipe for a festive treat.

  • Spicy Kick: If you love a bit of heat, add a pinch of cayenne or chili powder to the filling. This surprising twist will electrify your taste buds and leave everyone guessing!

  • Glaze Variations: Instead of traditional cream cheese frosting, drizzle the rolls with a simple glaze made from powdered sugar and milk for a lighter option. This keeps the rolls sweet without overwhelming their natural flavors.

Whatever you choose, each variation promises to enhance your homemade cinnamon rolls while satisfying your unique cravings!

Expert Tips for Cinnamon Rolls Recipe

  • Yeast Activation: Always ensure your yeast blooms properly in warm milk; a bubbly, foamy texture means it's good to use, vital for a successful rise.

  • Flour Measurement: Avoid excess flour during kneading by measuring accurately. Use the spoon and level method for soft, fluffy rolls.

  • Rolling Technique: Roll the dough tightly to lock in the filling, preventing it from spilling out during baking and creating beautiful spirals.

  • Cover Tightly: When letting dough rise, cover it well to prevent it from drying out, which can cause uneven textures in your cinnamon rolls.

  • Taste Testing: Don’t shy away from tasting your filling! Adjust sugar or cinnamon based on your preference for sweetness and spice.

  • Storage Tips: For longer freshness, store leftover cinnamon rolls in an airtight container at room temperature for up to 3 days, or refrigerate for longer enjoyment.

Make Ahead Options

These Cinnamon Rolls Recipe are perfect for busy mornings and can be easily prepared ahead of time! You can shape the rolls and refrigerate them up to 24 hours before baking. Simply follow the recipe until you've cut the rolls, then place them in a greased pan, cover tightly with plastic wrap, and refrigerate. To ensure they rise properly, remove them from the fridge and let them sit at room temperature for about 30-60 minutes before baking. This method keeps them just as delicious and fluffy while saving you time on hectic mornings, allowing you to enjoy fresh, warm cinnamon rolls with minimal effort!

Cinnamon Rolls Recipe FAQs

What type of milk is best for the cinnamon rolls?
For the best results in this Cinnamon Rolls Recipe, I recommend using whole milk. It provides the necessary moisture and richness that contributes to a soft and fluffy dough. If you don't have whole milk on hand, 2% milk will also work, though it may yield slightly less rich rolls.

How long can I store leftover cinnamon rolls?
Store leftover cinnamon rolls in an airtight container at room temperature for up to 3 days. If you want them to last longer, refrigerate them for up to a week. Just ensure the container is sealed tightly to keep them from drying out!

Can I freeze cinnamon rolls?
Absolutely! To freeze your cinnamon rolls, let them cool completely after baking. Place them in a single layer on a baking sheet and freeze until solid. Once frozen, transfer them to a freezer bag and store for up to 3 months. When you’re ready to enjoy, thaw them overnight in the fridge, then heat them gently in the oven or microwave.

What if my dough doesn’t rise?
If your dough doesn’t rise, it could be due to inactive yeast. Ensure you're using fresh, active dry yeast that blooms properly in warm milk. After sprinkling yeast over the milk, look for a foamy texture within 5-10 minutes. If it’s not frothy, you may need to start over with fresher yeast.

Can I make these cinnamon rolls ahead of time?
Definitely! You can prepare the dough and roll it into shape the night before. After cutting them into rolls, place them in a greased baking dish, cover tightly, and store in the refrigerator overnight. In the morning, let them rise at room temperature for about 30-45 minutes before baking—perfect for holiday mornings!

Are these rolls suitable for those with allergies?
This Cinnamon Rolls Recipe contains common allergens including eggs, dairy, and gluten. If you or your guests have allergies, I recommend experimenting with dairy-free milk, egg substitutes like flaxseed meal, and gluten-free flour blends. However, keep in mind that the texture and flavor may vary slightly from the original recipe.

Cinnamon Rolls Recipe

Cinnamon Rolls Recipe - Soft, Gooey, and Irresistibly Homemade

This Cinnamon Rolls Recipe delivers soft, gooey, homemade rolls that transform any day into a cozy celebration.
Print Recipe Pin Recipe
Prep Time 30 minutes mins
Cook Time 25 minutes mins
Rising Time 1 hour hr 30 minutes mins
Total Time 2 hours hrs 25 minutes mins
Servings: 12 rolls
Course: Breakfast
Cuisine: American
Calories: 250
Ingredients Equipment Method Nutrition Notes

Ingredients
  

Dough Ingredients
  • 1 cup Whole Milk Warm to about 110°F to activate yeast.
  • 2.25 teaspoons Active Dry Yeast Ensure it blooms by sprinkling over warm milk.
  • 1/4 cup Granulated Sugar Essential for browning during baking.
  • 1 large Eggs One whole egg and an additional yolk for tenderness.
  • 1/4 cup Unsalted Butter Melted.
  • 4 cups All-Purpose Flour Can substitute with bread flour.
  • 1 teaspoon Salt Enhances flavor.
Filling Ingredients
  • 1/2 cup Brown Sugar Adds rich sweetness.
  • 2 tablespoons Ground Cinnamon Key flavor for the filling.
Frosting Ingredients
  • 4 ounces Cream Cheese Softened.
  • 1 cup Powdered Sugar Sweetens and thickens the frosting.

Equipment

  • Mixing Bowl
  • Baking pan
  • Rolling Pin
  • Whisk
  • measuring cups
  • Measuring Spoons
  • Oven

Method
 

Dough Preparation
  1. Warm the whole milk to about 110°F to activate the yeast, then sprinkle the active dry yeast and a tablespoon of granulated sugar over it. Allow it to bloom for 5-10 minutes until frothy.
  2. In a mixing bowl, combine the melted unsalted butter, one whole egg, an additional egg yolk, flour, and salt. Mix until combined, then knead the dough for 7-8 minutes until smooth and elastic.
First Rise
  1. Grease a large bowl with a little melted butter or oil and place the kneaded dough inside, turning to coat. Cover the bowl with a clean kitchen towel and let it rise in a warm area for 60-90 minutes, or until the dough has doubled in size.
Filling Preparation
  1. While the dough is rising, prepare the cinnamon filling. In a small bowl, combine melted butter, brown sugar, and ground cinnamon to form a thick paste.
Rolling and Shaping
  1. Once the dough has risen, punch it down gently to release air and turn it onto a lightly floured surface. Roll it out into an 18x12-inch rectangle.
  2. Spread the prepared cinnamon filling evenly across the dough, leaving a small border around the edges. Tightly roll the dough into a log, then slice into 12 equal pieces.
Second Rise
  1. Grease a baking pan and place the sliced cinnamon rolls next to each other. Cover the pan with a towel and let the rolls rise for another 30-45 minutes until puffy.
  2. As they rise, preheat your oven to 375°F.
Baking
  1. Once the rolls have risen, place them in the preheated oven. Bake for 20-25 minutes, or until golden brown.
Frosting Preparation
  1. While the rolls cool, make the frosting by beating together cream cheese and softened unsalted butter until smooth. Gradually add powdered sugar and mix until well combined.
Frost and Serve
  1. Once the cinnamon rolls are slightly cooled, generously spread the cream cheese frosting over the top.

Nutrition

Serving: 1rollCalories: 250kcalCarbohydrates: 36gProtein: 3gFat: 11gSaturated Fat: 6gPolyunsaturated Fat: 1gMonounsaturated Fat: 4gCholesterol: 30mgSodium: 300mgPotassium: 100mgFiber: 1gSugar: 10gVitamin A: 500IUVitamin C: 1mgCalcium: 50mgIron: 1mg

Notes

For longer freshness, store leftover cinnamon rolls in an airtight container at room temperature for up to 3 days.

Tried this recipe?

Let us know how it was!

Thick and Creamy Snickers Smoothie Bowl for Guilt-Free Indulgence

February 16, 2026 by Grace Snow Leave a Comment

As I stood in my kitchen, pondering a healthier way to satisfy my sweet tooth, the idea for this Thick and Creamy Snickers Smoothie Bowl struck me like a lightbulb moment. Imagine a luscious blend of frozen bananas and ripe avocados coming together to create a decadent treat that’s not only guilt-free but also incredibly filling. This smoothie bowl is a perfect choice for breakfast, a snack, or even a dessert—offering all the sweet and salty goodness of a Snickers bar without any of the heavy hits. Plus, it’s vegan, gluten-free, and packed with protein to power your day. Who knew you could indulge in such creamy deliciousness while nourishing your body? Can you envision all the delightful toppings you could add to this delightful creation?

Why Will You Love This Smoothie Bowl?

Guilt-Free Indulgence: This Thick and Creamy Snickers Smoothie Bowl satisfies your cravings without any guilt, combining delicious flavors with wholesome ingredients.
Super Easy Prep: With just a few steps, you can whip up this delightful treat in minutes, perfect for busy mornings or lazy afternoons.
Nutrient-Packed: Filled with healthy fats from avocados and natural sweetness from bananas, it's a great way to fuel your body.
Versatile Customization: Feel free to swap in your favorite nut butter or tweak toppings to match your taste—try it with our Chocolate Cherry Smoothie for a delicious twist!
Crowd-Pleasing: Whether it's breakfast or dessert, this recipe is sure to impress everyone, making it a fantastic option for family gatherings or brunch with friends.
Thick & Creamy Texture: The smoothie bowl has a luxurious texture, providing a delightful experience that feels like soft-serve ice cream—perfect for satisfying sweet cravings!

Thick and Creamy Snickers Smoothie Bowl Ingredients

• Get ready to indulge in a delightful blend!

For the Smoothie

  • Frozen Banana Slices – Adds natural sweetness and creaminess; fresh bananas can be used, but expect a less creamy texture.
  • Frozen Avocado Chunks – Provides a rich and creamy texture along with healthy fats; thaw for 10 minutes before blending for easier mixing.
  • Plant Milk – Essential for blending; unsweetened almond, coconut, or oat milk are great for a dairy-free option.
  • Cocoa Powder – Enhances the chocolate flavor; cacao powder can be used for a raw alternative.
  • Peanut Butter (Natural) – Adds creaminess and protein; choose peanut butter with just peanuts (and salt) for the best results.
  • Pure Maple Syrup – Serves as a natural sweetener; honey or another sweetener can be substituted if desired.

For Toppings (Optional)

  • Banana Slices – Fresh banana slices add a delicious touch and enhance the smoothie bowl's visual appeal.
  • Chocolate Chips – Dark or dairy-free chocolate chips bring an extra dose of sweetness and richness.
  • Chopped Peanuts – Adds a crunchy texture and a delightful nutty flavor to complement the smoothie.
  • Peanut Butter Drizzle – A swirl of extra peanut butter on top provides additional creaminess and visual allure.

Enjoy this Thick and Creamy Snickers Smoothie Bowl to satisfy your sweet cravings while nourishing your body!

Step‑by‑Step Instructions for Thick and Creamy Snickers Smoothie Bowl

Step 1: Thaw the Avocado
Begin by removing your frozen avocado chunks from the freezer and allowing them to thaw for about 10 minutes. This slight thawing will make blending much easier and help achieve that luscious, thick texture in your Thick and Creamy Snickers Smoothie Bowl. Set them aside while you prep the other ingredients.

Step 2: Combine the Main Ingredients
In a high-powered blender, add the frozen banana slices, cocoa powder, pure maple syrup, and the slightly thawed avocado. Scoop in the natural peanut butter, ensuring everything is in there for a creamy delight. The combination of these ingredients creates the base of your smoothie bowl that mimics the taste of a Snickers bar.

Step 3: Add Plant Milk and Blend
Now it’s time to pour in the plant milk. Start with ⅓ cup and securely place the lid on the blender. Blend on high speed for about 30 seconds, or until the mixture becomes smooth and creamy. Remember to scrape down the sides occasionally to incorporate all the ingredients well. The aim is a thick, luscious consistency.

Step 4: Adjust for Flavor
After achieving a creamy mixture, taste your smoothie bowl base. If you desire a deeper chocolate flavor, add a little more cocoa powder and blend briefly again. This is your opportunity to customize the Thick and Creamy Snickers Smoothie Bowl to your preferred taste, making it even more scrumptious.

Step 5: Transfer and Top
Once blended to perfection, gently pour the mixture into a bowl. You’ll see it maintains a delectable thickness that's perfect for a smoothie bowl. Now, it’s time to get creative! Top your bowl with banana slices, chocolate chips, chopped peanuts, or a drizzle of peanut butter to make it visually appealing and even more delicious.

Step 6: Serve Immediately
To truly relish the flavors and enjoy the creamy texture, serve your Thick and Creamy Snickers Smoothie Bowl immediately. Gather your loved ones around, or savor it solo; either way, this delightful treat promises to satisfy your sweet cravings while keeping it nutritious.

Expert Tips for Thick and Creamy Snickers Smoothie Bowl

  • Consistent Thickness: Avoid adding too much liquid at once; if needed, add one tablespoon of plant milk at a time to maintain that rich, thick consistency.
  • Perfectly Thawed Avocado: Make sure to thaw your frozen avocado chunks for about 10 minutes to ensure easy blending; fresh avocado can also be used without thawing.
  • Blend It Right: A high-powered blender is key to achieving the creamy perfection of the Thick and Creamy Snickers Smoothie Bowl. Regular blenders may struggle with texture.
  • Flavor Adjustments: Always taste before serving! Adjust cocoa powder or maple syrup after blending to meet your sweetness and flavor preferences.
  • Creative Toppings: Get adventurous with your toppings! Mixing and matching different fruits, nuts, and drizzles can elevate your smoothie bowl experience.

How to Store and Freeze Thick and Creamy Snickers Smoothie Bowl

Best Enjoyed Fresh: Consume your Thick and Creamy Snickers Smoothie Bowl immediately for a fresh taste and optimal texture.

Fridge: If leftovers remain, keep them in an airtight container in the fridge for up to 1 day. The consistency may change slightly, so stirring before consumption is recommended.

Freezer: You can freeze any remaining smoothie bowl in an airtight container for up to a week. Be aware that it may require blending again to regain its creamy texture after thawing.

Reheating: To enjoy, allow it to thaw in the fridge overnight before blending with a splash of plant milk to restore creaminess.

What to Serve with Thick and Creamy Snickers Smoothie Bowl

Elevate your smoothie bowl experience with delightful sides that encourage a wholesome yet indulgent meal.

  • Granola Clusters: A sprinkle of crunchy granola adds texture and pairs perfectly with the creamy base, bringing extra nutrition and energy.

  • Fresh Berries: Bright berries like strawberries or blueberries not only add a burst of color but their tartness beautifully contrasts the creamy sweetness of the bowl.

  • Chia Seed Pudding: Creamy, protein-packed, and filled with fiber, chia seed pudding complements the bowl's rich flavors while enhancing the overall health factor.

  • Almond Butter Toast: Pairing with a slice of whole-grain almond butter toast makes for a filling combination that keeps you satisfied throughout the morning.

  • Iced Herbal Tea: A refreshing herbal tea, such as hibiscus or mint, provides a delightful contrast to the decadent flavors of your smoothie bowl while keeping you hydrated.

  • Coconut Yogurt Parfait: For a vegan-friendly dessert option, layer coconut yogurt with fruits and nuts. This satisfying treat complements the smoothie and adds a variety of textures.

  • Peanut Butter Cookies: Indulge in a couple of homemade peanut butter cookies for a sweet treat that echoes the nutty flavors of the smoothie bowl.

  • Coconut Water: Sip on coconut water for a hydrating drink that reflects the tropical vibes of the smoothie bowl while adding a touch of natural sweetness.

Make Ahead Options

These Thick and Creamy Snickers Smoothie Bowls are perfect for meal prep enthusiasts! You can prepare the ingredient components, such as slicing frozen bananas and measuring out cocoa powder, up to 24 hours in advance, storing them in airtight containers in the refrigerator to maintain freshness. Additionally, you can thaw avocado chunks overnight for easier blending before serving. When you're ready to enjoy, simply blend the prepped ingredients with plant milk, adjusting the consistency to your liking. This makes it super easy for those busy mornings, ensuring you can enjoy a nutritious and indulgent treat with minimal effort! Just remember, for the best texture, blend right before serving.

Thick and Creamy Snickers Smoothie Bowl Variations

Feel free to let your creativity flow as you customize this delightful smoothie bowl to suit your taste buds!

  • Nut Butter Swap: Replace peanut butter with almond or cashew butter for a different nutty flavor.

  • Fruit Fusion: Add a handful of spinach or kale to sneak in more greens without altering the yummy taste.

  • Sweetness Boost: Experiment with different sweeteners like agave nectar or stevia if you want a unique twist on sweetness.

  • Texture Twist: For a crunchy contrast, sprinkle some granola or seeds on top to elevate your smoothie bowl experience.

  • Protein Power: Mix in your favorite protein powder to amp up the protein content—vanilla or chocolate flavors work beautifully!

  • Cocoa Kick: Feel free to increase the cocoa or cacao powder for a more intense chocolate experience; it's all about your preference!

  • Added Spice: Sprinkle cinnamon or a pinch of cayenne for a surprising kick that beautifully complements the sweetness.

  • Serve with a Side: Pair with a refreshing green smoothie or our delicious Acai Bowl Nutritious for a complete breakfast that has something for everyone!

Embrace the fun of customizing your Thick and Creamy Snickers Smoothie Bowl!

Thick and Creamy Snickers Smoothie Bowl Recipe FAQs

What type of bananas should I use for the best texture?
Using frozen banana slices is key to achieving the creamy texture in your Thick and Creamy Snickers Smoothie Bowl. If fresh bananas are all you have on hand, they can work—just know that the smoothie won't be as thick and may be a bit less sweet.

How long can I store leftovers of the smoothie bowl?
Your smoothie bowl is best enjoyed immediately to savor that fresh taste and thick texture. However, if you have leftovers, store them in an airtight container in the fridge for up to 1 day. When ready to eat, give it a good stir as the consistency may change.

Can I freeze my Thick and Creamy Snickers Smoothie Bowl for later?
Absolutely! You can freeze the remaining smoothie bowl in an airtight container for up to a week. When you're ready to enjoy it, thaw it overnight in the fridge, then throw it back into your blender with a splash of plant milk to regain that fabulous creaminess.

What should I do if my smoothie bowl is too runny?
If you find that your smoothie bowl is too thin, don't worry! You can thicken it up by adding a few more frozen banana slices or a bit more avocado. Blend it again until it reaches your desired consistency. Remember to add any liquid gradually to avoid making it too runny!

Are there any nut-free alternatives for the peanut butter?
Yes, if you or someone in your household has a nut allergy, feel free to substitute with sunflower seed butter or pumpkin seed butter for a nut-free alternative. These options will still provide that creamy texture and delicious flavor while keeping it safe for everyone.

Can I use dairy milk instead of plant milk in this recipe?
Certainly! While the Thick and Creamy Snickers Smoothie Bowl is designed to be vegan, you can absolutely use dairy milk if you prefer. Just keep in mind that the recipe will no longer be dairy-free.

Thick and Creamy Snickers Smoothie Bowl

Thick and Creamy Snickers Smoothie Bowl for Guilt-Free Indulgence

Enjoy a Thick and Creamy Snickers Smoothie Bowl that's both indulgent and guilt-free, packed with protein and nutrients.
Print Recipe Pin Recipe
Prep Time 10 minutes mins
Total Time 10 minutes mins
Servings: 2 bowls
Course: Breakfast
Cuisine: Vegan
Calories: 300
Ingredients Equipment Method Nutrition Notes

Ingredients
  

Smoothie Ingredients
  • 2 cups Frozen Banana Slices Adds natural sweetness and creaminess; fresh bananas can be used for a less creamy texture.
  • 1 cup Frozen Avocado Chunks Provides rich texture; thaw for 10 minutes before blending.
  • ⅓ cup Plant Milk Unsweetened almond, coconut, or oat milk work well.
  • 2 tablespoons Cocoa Powder Enhances chocolate flavor.
  • 2 tablespoons Peanut Butter (Natural) Choose peanut butter with just peanuts (and salt).
  • 1 tablespoon Pure Maple Syrup Acts as a natural sweetener.
Toppings (Optional)
  • 1 banana Banana Slices Adds visual appeal and taste.
  • 2 tablespoons Chocolate Chips Dark or dairy-free for added sweetness.
  • 2 tablespoons Chopped Peanuts Adds crunchy texture and nutty flavor.
  • 1 tablespoon Peanut Butter Drizzle Extra creaminess on top.

Equipment

  • High-powered blender

Method
 

Preparation Steps
  1. Thaw the frozen avocado chunks for about 10 minutes.
  2. In a blender, combine the frozen banana slices, cocoa powder, pure maple syrup, and thawed avocado.
  3. Add the natural peanut butter and blend until smooth.
  4. Pour in the plant milk and blend again until creamy; adjust consistency if needed.
  5. Pour into a bowl and top with banana slices, chocolate chips, chopped peanuts, or a drizzle of peanut butter.
  6. Serve immediately for the best texture and flavor.

Nutrition

Serving: 1bowlCalories: 300kcalCarbohydrates: 40gProtein: 8gFat: 15gSaturated Fat: 3gPolyunsaturated Fat: 1gMonounsaturated Fat: 10gSodium: 150mgPotassium: 600mgFiber: 6gSugar: 14gVitamin A: 10IUVitamin C: 20mgCalcium: 6mgIron: 8mg

Notes

Best enjoyed fresh, but can be stored in the fridge for up to 1 day or frozen for up to a week. Re-blend with a splash of plant milk if necessary after freezing.

Tried this recipe?

Let us know how it was!

Green Protein Smoothie Bowl for a Tropical Boost of Energy

February 16, 2026 by Grace Snow Leave a Comment

As I lifted the vibrant green smoothie bowl off the counter, I could practically hear my taste buds cheering in anticipation. This Green Protein Smoothie Bowl is more than just a breakfast choice; it's a creamy tropical treat packed with the goodness of mango, avocado, and nutrient-rich greens that come together in mere minutes. Whether you're running out the door or need a midday pick-me-up, this recipe triumphs in providing an energizing, gluten-free, and dairy-free meal that won't weigh you down. Plus, it’s a fun way to sneak some superfoods into your diet without sacrificing flavor. As you explore the endless topping options, you might find yourself crafting a masterpiece that’s not only eye-catching but also delightfully delicious. What unique twist will you give your smoothie bowl today?

Why is This Smoothie Bowl a Must-Try?

Vibrant Colors: The green protein smoothie bowl bursts with colors, making it as visually appealing as it is delicious. Each ingredient contributes not only to the flavor but to a stunning presentation!

Nutrient-Packed: Every spoonful is loaded with vitamins and minerals from nutrient-dense ingredients like spinach and avocado. It's an effortless way to support your health without compromising on taste.

Quick and Easy: Prep time is minimal, taking just a few minutes. Perfect for busy mornings, you can whip up this energizing treat without any fuss!

Versatile Toppings: Get creative with toppings! From chocolate delights like cacao nibs to fresh fruits and crunch from granola, you can mix and match to suit your mood.

Energy Boosting: Thanks to the rich protein content from the added protein powder, this bowl provides a satisfying and long-lasting energy boost. Whether you snack or have it for breakfast, you'll love feeling fueled and ready for the day!

If you're looking for more refreshing options, check out my Acai Bowl Nutritious recipe that’s perfect to mix into your breakfast rotation!

Green Protein Smoothie Bowl Ingredients

  • For the Base

  • Coconut Milk – Adds creaminess and a subtle sweetness; substitute with almond or oat milk for a different flavor profile.

  • Baby Spinach – Provides vibrant color and essential vitamins; can be swapped with kale or other leafy greens, but taste may vary.

  • Frozen Mango – Offers a tropical sweetness and creamy texture; fresh mango may be used if available, but it will alter the consistency.

  • Frozen Zucchini Slices – Adds fiber and thickness without altering flavor; cauliflower may be used as a low-calorie alternative.

  • Frozen Avocado – Enhances creaminess and provides healthy fats; fresh avocado can be substituted, but frozen gives a better consistency.

  • Vanilla Protein Powder – Boosts protein content and flavor; vegan protein powder is a great alternative for those with dietary restrictions.

  • For the Toppings (optional)

  • Chia Seeds – Adds a delightful crunch and omega-3 fatty acids; these seeds can enhance the nutritional profile of your smoothie bowl.

  • Raspberries – Provide a burst of flavor and a pop of color; fresh or frozen berries work beautifully here.

  • Granola – Offers crunch and a hint of sweetness that complements the smooth textures; consider using gluten-free options to stay on theme.

Feel free to mix and match your toppings for a unique spin on the green protein smoothie bowl each time!

Step‑by‑Step Instructions for Green Protein Smoothie Bowl

Step 1: Blend Ingredients
In a high-speed blender, combine 1 cup of coconut milk, 1 cup of baby spinach, 1 cup of frozen mango, 1 cup of frozen zucchini slices, 1/2 cup of frozen avocado, and 1 scoop of vanilla protein powder. Secure the lid and pulse the ingredients together at a low speed, gradually increasing until all components are thoroughly incorporated and you see a vibrant green color, about 30 seconds.

Step 2: Achieve Consistency
Increase the blender speed to high and blend for an additional 30–45 seconds until the mixture is smooth and creamy. If the smoothie bowl appears too thick for your liking, pour in a little more coconut milk, blending briefly to reach your desired consistency. The final texture should be thick enough to hold its shape when poured into a bowl.

Step 3: Serve
Carefully pour the blended green protein smoothie mixture into a bowl, allowing it to form a beautiful mound in the center. Use a spatula to scrape down the sides of the blender for any leftover deliciousness to ensure nothing goes to waste. The rich, vibrant green color will make it an inviting sight.

Step 4: Add Toppings
Here's where the magic happens! On top of your green protein smoothie bowl, sprinkle chia seeds for a delightful crunch, add fresh raspberries to introduce a tangy flavor, and finish with a handful of granola for texture. Feel free to get creative with your choice of toppings to make your bowl truly unique and personalized.

Step 5: Enjoy Immediately
For the best flavor and freshness, dive into your green protein smoothie bowl right after preparing it. Not only does it taste great, but the bright colors and textures will also energize your day! Take a moment to appreciate the delightful presentation before savoring each spoonful of this nutritious and satisfying treat.

Storage Tips for Green Protein Smoothie Bowl

Fridge: Store any leftover smoothie bowl in an airtight container in the fridge for up to 24 hours. This will help maintain its vibrant color and flavor while keeping the nutrients intact.

Toppings: If you have added toppings, it's best to keep them separate until you're ready to enjoy your smoothie bowl again. This helps to preserve their crunch and freshness.

Reheating: While it's best enjoyed chilled, you can adjust the temperature by blending in a splash of coconut milk or warming the bowl slightly in the microwave for just a few seconds, if preferred.

Best Practices: For optimal flavor and texture, consume your green protein smoothie bowl fresh. If storing, add toppings just before serving to keep them crisp and delicious.

Expert Tips for the Best Green Protein Smoothie Bowl

  • High-Speed Blender: Ensure you use a high-speed blender for a creamy texture; less powerful blenders may leave chunks, ruining your smoothie bowl's consistency.

  • Adjust Thickness: If your smoothie bowl is too thick, add more coconut milk or a little water to reach your desired consistency without compromising flavor.

  • Freshness Matters: Enjoy your green protein smoothie bowl immediately after preparing it for the best taste and vibrant color; letting it sit can cause separation and loss of texture.

  • Experiment with Greens: While baby spinach is mild and mixes well, don’t hesitate to try different leafy greens like kale. Just remember, they will alter the flavor profile.

  • Customize Toppings: Get creative with your toppings! Mix chia seeds, nuts, or different fruits to make each bowl unique and full of textures and flavors you love.

  • Store Wisely: If you have leftovers, store them in an airtight container in the fridge for up to 24 hours, but save crunchy toppings for when you’re ready to enjoy again!

What to Serve with Green Protein Smoothie Bowl

As you prepare to dive into this refreshing bowl of goodness, consider these delightful accompaniments to create a well-rounded meal experience.

  • Whole Grain Toast: The crunchy texture pairs beautifully with the creamy smoothie bowl, offering a satisfying foundation for spreads like avocado or nut butter.

  • Fresh Fruit Salad: A medley of vibrant fruits adds extra vitamins and an inviting sweetness, making each bite of your smoothie bowl feel like a tropical escape.

  • Nuts and Seeds: Sprinkling a mix of almonds or pumpkin seeds on top adds a nutty crunch, while also boosting your bowl's protein and healthy fat content.

  • Homemade Granola: Offering an irresistible crunch, it perfectly complements the smooth textures of your smoothie bowl and brings a touch of sweetness.

  • Coconut Yogurt: This dairy-free alternative enhances creaminess while adding probiotics to your meal, balancing flavors and textures effortlessly.

  • Green Tea or Herbal Infusion: A light beverage that supports digestion and hydration, it pairs well with the fresh and cooling flavors of the smoothie bowl, ensuring harmony in your meal.

Make Ahead Options

These Green Protein Smoothie Bowls are perfect for busy home cooks looking to streamline meal prep! You can prepare the smoothie base (coconut milk, baby spinach, frozen mango, zucchini, avocado, and protein powder) up to 24 hours in advance by blending everything together and storing it in an airtight container in the refrigerator. To maintain the smooth and creamy texture, it's best to refrigerate it right after blending. When you're ready to enjoy, simply stir the mixture and pour it into a bowl. Top with your favorite toppings just before serving, and you’ll have a delicious, nutrient-packed smoothie bowl ready to fuel your day!

Green Protein Smoothie Bowl Variations

Embrace your creativity and customize your Green Protein Smoothie Bowl to make it uniquely yours with these delightful twists!

  • Choco-Boost: Add a scoop of cocoa powder or cacao nibs to introduce a rich chocolate flavor. Chocolate lovers will rejoice in this creamy combination!

  • Fruity Fusion: Swap in fresh banana or juicy pineapple for a new fruity twist. Mixing fruits not only changes flavors but adds vibrant colors to your bowl.

  • Nutty Delight: Stir in a tablespoon of nut butter, like almond or peanut butter, for an extra layer of richness and creaminess. This will also enhance the protein content!

  • Spicy Kick: Sprinkle a pinch of cayenne pepper or add a slice of fresh ginger for an unexpected heat element that refreshes the flavor profile. It’s a delightful adventure for your taste buds!

  • Texture Twist: For an added crunch, mix in some rolled oats or chia seeds into the base. This will also help keep you fuller for longer, making it a satisfying meal.

  • Herbal Infusion: Toss in a sprig of fresh mint or basil for a refreshing herbal note that will brighten your smoothie bowl. It is both aromatic and invigorating!

  • Berry Medley: Incorporate a blend of frozen mixed berries for an antioxidant boost. This colorful mix gives a gorgeous aesthetic and adds delightful sweetness.

  • Coconutty Fun: Top with shredded coconut flakes for a tropical crunch and an extra dose of healthy fats. It reminds you of island vibes with each spoonful!

For more thrilling smoothie experiences, you might enjoy my recipe for a Chocolate Cherry Smoothie or explore the nourishing bites in Coconutty Beans Greens. Now, what will you create?

Green Protein Smoothie Bowl Recipe FAQs

What type of coconut milk should I use for the Green Protein Smoothie Bowl?
Absolutely! You can use full-fat coconut milk for a rich creaminess, or light coconut milk for a lighter option. If you're looking to mix it up, almond or oat milk can work beautifully, bringing their unique flavors to the smoothie bowl without sacrificing its dairy-free nature.

How should I store leftovers of my smoothie bowl?
Great question! If you have any leftover Green Protein Smoothie Bowl, simply transfer it to an airtight container and refrigerate it for up to 24 hours. However, to maintain the best texture and flavor, it's ideal to enjoy it fresh! Keep any toppings like granola or chia seeds separate until you’re ready to dive in for a crunch that adds a delightful contrast to your creamy base.

Can I freeze the Green Protein Smoothie Bowl for later?
Certainly! To freeze your smoothie bowl, pour the blended mixture into ice cube trays or silicone molds. Once frozen solid, transfer the cubes into a freezer-safe bag for up to 3 months. When you're ready to enjoy, blend the cubes with a splash of coconut milk until smooth, and you'll have a refreshing smoothie bowl ready in no time!

What should I do if my smoothie is too thick?
If you find your Green Protein Smoothie Bowl too thick, no worries! Simply add a little more coconut milk or even some water, and blend again until you achieve your desired consistency. Remember, it’s about finding the perfect texture that works for you, so don’t hesitate to adjust until it’s just right!

Are there any allergens in this recipe?
Very important question! This smoothie bowl is naturally gluten-free and dairy-free, but if you're allergic to nuts, ensure you choose toppings that fit your dietary needs (like seeds instead of nut butter). Also, check your protein powder—some brands contain allergens like soy or dairy. Always read labels carefully to keep your smoothie bowl safe and enjoyable!

Can pets have any leftovers from the Green Protein Smoothie Bowl?
While the ingredients are wholesome, it's best not to share your smoothie bowl with your furry friends. Ingredients like spinach and avocado can be harmful to dogs in large amounts. If you'd like to treat your pets, consider veggie scraps or a little of the fruits, ensuring you stick to safe options. Always consult your vet for pet-specific dietary guidance.

Green Protein Smoothie Bowl

Green Protein Smoothie Bowl for a Tropical Boost of Energy

This Green Protein Smoothie Bowl is a delicious, energy-boosting breakfast choice packed with tropical flavors.
Print Recipe Pin Recipe
Prep Time 10 minutes mins
Total Time 10 minutes mins
Servings: 2 bowls
Course: Breakfast
Cuisine: Tropical
Calories: 350
Ingredients Equipment Method Nutrition Notes

Ingredients
  

For the Base
  • 1 cup coconut milk Substitute with almond or oat milk for a different flavor profile.
  • 1 cup baby spinach Can be swapped with kale or other leafy greens.
  • 1 cup frozen mango Fresh mango may be used but will alter consistency.
  • 1 cup frozen zucchini slices Cauliflower can be used as a low-calorie alternative.
  • 1/2 cup frozen avocado Fresh avocado can be substituted.
  • 1 scoop vanilla protein powder Vegan protein powder is a great alternative.
For the Toppings (optional)
  • 2 tablespoons chia seeds Adds crunch and omega-3 fatty acids.
  • 1/2 cup raspberries Fresh or frozen work beautifully.
  • 1/2 cup granola Consider using gluten-free options.

Equipment

  • High-speed blender

Method
 

Step-by-Step Instructions for Green Protein Smoothie Bowl
  1. In a high-speed blender, combine coconut milk, baby spinach, frozen mango, frozen zucchini slices, frozen avocado, and vanilla protein powder. Blend at low speed, gradually increasing until green and smooth.
  2. Increase blender speed to high for 30–45 seconds until smooth. Add more coconut milk if too thick.
  3. Pour the blended mixture into a bowl, ensuring a beautiful presentation.
  4. Top with chia seeds, raspberries, and granola. Get creative with your toppings!
  5. Enjoy immediately for the best flavor and freshness!

Nutrition

Serving: 1bowlCalories: 350kcalCarbohydrates: 45gProtein: 15gFat: 15gSaturated Fat: 9gPolyunsaturated Fat: 1gMonounsaturated Fat: 5gSodium: 200mgPotassium: 800mgFiber: 10gSugar: 20gVitamin A: 1500IUVitamin C: 50mgCalcium: 150mgIron: 2mg

Notes

Use a high-speed blender for a creamy texture. Store leftovers in an airtight container for up to 24 hours.

Tried this recipe?

Let us know how it was!

Decadent Chocolate Peanut Butter Smoothie Bowl Bliss

February 16, 2026 by Grace Snow Leave a Comment

As I stood in my kitchen the other morning, the enticing aroma of peanut butter wafting through the air transported me back to my childhood. I couldn’t resist whipping up a quick breakfast, and that’s when I decided on a Chocolate Peanut Butter Smoothie Bowl. This high-protein treat combines Greek yogurt, frozen banana, and creamy peanut butter for a guilt-free indulgence that’s perfect for busy days. In just 2 minutes, you can create a nutritious breakfast that’s as satisfying as it is delicious. Plus, the thick, smooth texture makes it feel like a decadent dessert rather than a regular morning meal. Why settle for boring when you can elevate your breakfast game? Curious about how to make this scrumptious bowl? Let’s dive in!

Why is this smoothie bowl irresistible?

Indulgent Flavor: The rich fusion of chocolate and peanut butter creates a heavenly taste that feels like a treat!

Quick & Easy: Ready in just 2 minutes, this recipe fits perfectly into your busy morning routine, making it a time-saver.

Healthy Breakfast: Packed with 28g of protein, this smoothie bowl is a guilt-free way to start your day with lasting energy.

Versatile Toppings: Customize with your favorite toppings like sliced bananas, granola, or even nuts for added crunch and flavor!

Satisfying Texture: Enjoy the thick, creamy consistency that not only looks amazing but tastes indulgent, like dessert!

Ready to elevate your breakfast? Try this decadent Chocolate Peanut Butter Smoothie Bowl and indulge without the guilt!

Chocolate Peanut Butter Smoothie Bowl Ingredients

• Dive into deliciousness with this healthy breakfast recipe!

For the Smoothie Base

  • Vanilla Low-Fat Greek Yogurt – Provides a luscious, creamy foundation and is packed with protein.
  • Banana (Sliced and Frozen) – Adds natural sweetness and creaminess; fresh bananas can be used, but frozen yields a thicker texture.
  • Peanut Butter – Infuses rich flavor and healthy fats; try almond or sunflower seed butter for a nut-free twist.
  • Cocoa Powder – Delivers a chocolatey essence without added sugars; opt for unsweetened for the healthiest choice.
  • Ice (Optional) – Chills the smoothie while enhancing thickness; skip if using frozen bananas.

For the Toppings

  • Sliced Bananas – Brightens the bowl with freshness and aesthetic appeal.
  • Chopped Chocolate – Elevates the chocolate experience and makes it even more indulgent.
  • Granola – Adds delightful crunch and texture; use your favorite blend for personalization.
  • Drizzled Peanut Butter – Enhances both flavor and presentation, creating a visually stunning finish.

With these ingredients, you’re just moments away from enjoying a delightful Chocolate Peanut Butter Smoothie Bowl that checks all the boxes for a healthy breakfast!

Step‑by‑Step Instructions for Chocolate Peanut Butter Smoothie Bowl

Step 1: Blend the Smoothie Base
In a powerful blender, combine 1 cup of vanilla low-fat Greek yogurt, 1 sliced frozen banana, 2 tablespoons of peanut butter, 1 tablespoon of unsweetened cocoa powder, and a handful of ice if desired. Blend on high for about 30 seconds, or until the mixture is smooth and creamy, with no chunks remaining. The consistency should be thick enough to hold your toppings beautifully.

Step 2: Pour into a Bowl
Once the smoothie base reaches that velvety consistency, carefully pour it into a bowl. Use a spatula to scrape down any remaining delicious remnants from the blender. This luscious Chocolate Peanut Butter Smoothie Bowl deserves a beautiful presentation, so aim for a generous, even layer in your bowl.

Step 3: Add Toppings
Now comes the fun part! Artfully arrange your toppings—slice up a fresh banana, chop some chocolate, and sprinkle your favorite granola over the smoothie base. Each topping adds texture and flavor, transforming your smoothie bowl into a delightful breakfast experience that looks as good as it tastes.

Step 4: Drizzle with Peanut Butter
For an extra touch of indulgence, melt a tablespoon of peanut butter in the microwave for about 10-15 seconds until it becomes pourable. Drizzle it over the top of your decorated smoothie bowl. This not only enhances the flavor profile but also provides a gorgeous visual appeal.

Step 5: Serve Immediately
Your decadent Chocolate Peanut Butter Smoothie Bowl is now ready to enjoy! Serve it immediately while it's fresh and creamy, inviting every spoonful to be savored. Feel free to get creative with additional toppings or variations according to your preference for an even more personalized breakfast experience.

What to Serve with Chocolate Peanut Butter Smoothie Bowl

Elevate your breakfast experience with delightful pairings that enhance every luxurious spoonful of your smoothie bowl.

  • Crunchy Granola: Adds a satisfying texture and extra nutty flavor that contrasts beautifully with the smoothness of the bowl.
  • Fresh Berries: Bright, tart berries like strawberries or blueberries bring a refreshing pop of acidity that balances the richness of chocolate and peanut butter.
  • Coconut Flakes: These add a light, tropical twist with a chewy texture that complements the creamy base while providing a hint of sweetness.
  • Chia Seed Pudding: Creamy and nutritious, chia puddings offer a lovely contrast, making every bite feel indulgent yet healthy and protein-packed.
  • Nutty Banana Oat Muffins: Soft and wholesome, these muffins pair wonderfully as a side, enriching your meal with fibers and hearty flavors.
  • Coffee or Cold Brew: A sip of your favorite morning brew will enhance the rich flavors of the smoothie bowl, blending beautifully for a cozy morning treat.
  • Dark Chocolate Squares: A decadent addition, these little bites provide a rich chocolate experience that will delight your taste buds alongside the smoothie.
  • Herbal Tea: A light chamomile or mint tea can cleanse the palate and balance the richness, creating a soothing morning moment.
  • Savory Toast: Try avocado or hummus toast for a contrast in flavors, bringing a savory note to your sweet breakfast for balance.

How to Store and Freeze Chocolate Peanut Butter Smoothie Bowl

Consume Immediately: Enjoy your Chocolate Peanut Butter Smoothie Bowl fresh for the best flavor and texture; it’s best served immediately after preparing.

Fridge: If you need to store it, keep the smoothie base in an airtight container in the fridge for up to 24 hours. However, the texture may not be as creamy.

Smoothie Components: You can prep smoothie ingredients in advance, such as blending the yogurt, banana, and peanut butter. Keep them separate and store in the fridge for up to 2 days before blending for freshness.

Reheating: Avoid reheating a smoothie bowl, as it’s best enjoyed cold. If you have leftovers, consider turning them into a smoothie by adding a splash of milk and re-blending.

Chocolate Peanut Butter Smoothie Bowl Variations

Feel free to get creative with your Chocolate Peanut Butter Smoothie Bowl—each twist brings encouragement to your palate!

  • Nut-Free: Swap peanut butter for sunflower seed butter, making it perfect for those with nut allergies. This substitution maintains that creamy texture while offering a deliciously unique taste.
  • Dairy-Free: Use coconut yogurt instead of Greek yogurt for a dairy-free option. This gives the smoothie a tropical vibe and a rich mouthfeel that pairs wonderfully with chocolate.
  • Extra Greens: Add a handful of fresh spinach or kale for an extra nutrient boost without sacrificing flavor. Your smoothie will still remain decadent while sneaking in those greens!
  • Banana-Free: Swap the banana for a frozen avocado to keep the creaminess but cut down on sugar—avocados add healthy fats while remaining subtle in flavor.
  • Flavor Boost: Experiment with flavored Greek yogurt, such as honey or chocolate, to elevate the overall taste even further. This provides new layers of deliciousness with each spoonful.
  • Allergy-Friendly: Mix in chia seeds or ground flax seeds for an added texture and an Omega-3 boost. This not only enhances nutrition but adds a pleasant crunch.
  • Spicy Kick: Looking for a bit of heat? Add a pinch of cayenne pepper to your blend for an unexpected twist. It creates a delightful contrast with the sweetness of the chocolate.
  • Chocolate Lovers: For an extra chocolatey treat, include chocolate protein powder or add cacao nibs as a topping. Indulgence at its finest!

Feel inspired to make your own unique version of this delightful Chocolate Peanut Butter Smoothie Bowl—your creativity will surely shine through with each delicious bite!

Make Ahead Options

These Chocolate Peanut Butter Smoothie Bowls are perfect for meal prep enthusiasts! You can prepare the smoothie base—1 cup of vanilla low-fat Greek yogurt, 1 sliced frozen banana, 2 tablespoons of peanut butter, and 1 tablespoon of cocoa powder—up to 24 hours in advance. Simply blend your ingredients as directed, pour into a bowl, cover, and refrigerate. For optimal freshness, store toppings like sliced bananas and granola separately and add them just before serving to maintain their crunchiness. When you're ready to enjoy, simply drizzle with melted peanut butter and indulge in a nutritious breakfast that’s just as delicious as when freshly made!

Expert Tips for Chocolate Peanut Butter Smoothie Bowl

  • High-Powered Blender: Use a high-powered blender for a creamy texture; this ensures the frozen banana and yogurt blend seamlessly without chunks.
  • Prep Ahead: Save time by preparing the smoothie base the night before; blend and store in the fridge, adding fresh toppings just before serving.
  • Adjusting Texture: If using fresh bananas, add a couple more ice cubes to maintain a thick consistency typical of a Chocolate Peanut Butter Smoothie Bowl.
  • Flavor Variations: For different tastes, experiment with flavored Greek yogurt or add spinach for nutty greens without altering the taste.
  • Garnishing Tips: Get creative with toppings! A sprinkle of chia seeds or a few berries can enhance flavor and nutrition beautifully.

Chocolate Peanut Butter Smoothie Bowl Recipe FAQs

What should I look for when selecting bananas for my smoothie?
Absolutely! When choosing bananas, look for ones that are slightly speckled with brown spots; this indicates they are ripe and will provide the sweetest flavor. Avoid bananas with dark spots all over, as they may be overripe and mushy.

How should I store my Chocolate Peanut Butter Smoothie Bowl?
To keep your smoothie bowl fresh, consume it immediately for the best texture and flavor! If you have leftovers, store the smoothie in an airtight container in the fridge for up to 24 hours, though keep in mind that the texture may not be as creamy.

Can I freeze the smoothie bowl for later?
Certainly! To freeze your Chocolate Peanut Butter Smoothie Bowl, pour the blended smoothie into freezer-safe containers, leaving some space for expansion, and seal tightly. It can be stored in the freezer for up to 3 months. To enjoy later, let it thaw in the fridge overnight before consuming, and if needed, re-blend with a splash of milk for a smoother consistency.

What if my smoothie bowl is too thick or too thin?
Not to worry! If your smoothie bowl is too thick, simply add a splash of milk or water and blend again until you reach your desired consistency. On the other hand, if it’s too thin, you can add a little more frozen banana or even some ice cubes to thicken it up.

Is this recipe suitable for people with nut allergies?
Very much so! If you or someone you’re serving has nut allergies, feel free to substitute the peanut butter with sunflower seed butter or another nut-free alternative. Just look for varieties that align with the dietary needs of those enjoying the dish.

Can I prep smoothie components in advance?
Absolutely! For convenience, you can prep the smoothie base components by mixing the yogurt, banana, and peanut butter in advance and storing them separately in the fridge for up to 2 days. This makes mornings less hectic, just blend before serving!

Chocolate Peanut Butter Smoothie Bowl

Decadent Chocolate Peanut Butter Smoothie Bowl Bliss

Enjoy a guilt-free Chocolate Peanut Butter Smoothie Bowl, packed with protein and deliciousness, perfect for busy mornings.
Print Recipe Pin Recipe
Prep Time 2 minutes mins
Total Time 2 minutes mins
Servings: 1 bowl
Course: Breakfast
Cuisine: American
Calories: 400
Ingredients Equipment Method Nutrition Notes

Ingredients
  

For the Smoothie Base
  • 1 cup Vanilla Low-Fat Greek Yogurt Provides a luscious, creamy foundation and is packed with protein.
  • 1 Banana (Sliced and Frozen) Adds natural sweetness and creaminess; frozen yields a thicker texture.
  • 2 tablespoons Peanut Butter Infuses rich flavor and healthy fats.
  • 1 tablespoon Cocoa Powder Delivers a chocolatey essence without added sugars.
  • 1 handful Ice Optional, enhances thickness.
For the Toppings
  • 1 Sliced Bananas Brightens the bowl with freshness.
  • 1 Chopped Chocolate Elevates the chocolate experience.
  • Granola Adds delightful crunch.
  • 1 tablespoon Drizzled Peanut Butter Enhances flavor and presentation.

Equipment

  • Blender

Method
 

Step‑by‑Step Instructions
  1. In a powerful blender, combine vanilla low-fat Greek yogurt, sliced frozen banana, peanut butter, unsweetened cocoa powder, and a handful of ice if desired. Blend on high for about 30 seconds, until smooth and creamy.
  2. Carefully pour the smoothie base into a bowl, using a spatula to scrape down any remaining mixture from the blender.
  3. Artfully arrange your toppings—slice up a fresh banana, chop some chocolate, and sprinkle your favorite granola over the smoothie base.
  4. For an extra touch, melt a tablespoon of peanut butter in the microwave until pourable, then drizzle it over the top of your smoothie bowl.
  5. Serve your Chocolate Peanut Butter Smoothie Bowl immediately while fresh and creamy.

Nutrition

Serving: 1bowlCalories: 400kcalCarbohydrates: 38gProtein: 28gFat: 18gSaturated Fat: 3gPolyunsaturated Fat: 1gMonounsaturated Fat: 8gCholesterol: 10mgSodium: 180mgPotassium: 800mgFiber: 6gSugar: 10gVitamin A: 200IUVitamin C: 10mgCalcium: 200mgIron: 2mg

Notes

Experiment with different toppings to personalize your smoothie bowl. Enjoy fresh for the best flavor and texture.

Tried this recipe?

Let us know how it was!
  • « Previous Page
  • 1
  • …
  • 20
  • 21
  • 22
  • 23
  • 24
  • …
  • 179
  • Next Page »

Welcome!

Hi, I’m Grace, a Sydney-based home cook with a passion for bold flavors and trending ingredients. Whether you’re a busy beginner or a seasoned foodie, you’ll find dishes here that are fresh, fun, and full of flavor.

More about me

Popular Recipes

  • Cheesy Chicken Garlic Bread Sandwich
    Cheesy Chicken Garlic Bread Sandwich for Cozy Family Moments
  • Easy Chicken Ranch Wraps
    Easy Chicken Ranch Wraps: Quick, Creamy & Totally Satisfying
  • Chicken Caesar Sandwiches
    Delicious Chicken Caesar Sandwiches for Quick Comfort Food
  • best Cuban sandwich
    The Best Cuban Sandwich You’ll Want Every Weeknight!

Footer

↑ back to top

About

  • Privacy Policy
  • Disclaimer
  • Terms & Conditions

Newsletter

  • Sign Up! for emails and updates

Contact

  • About me
  • Contact me

Copyright © 2025 TastyTrendIngredients