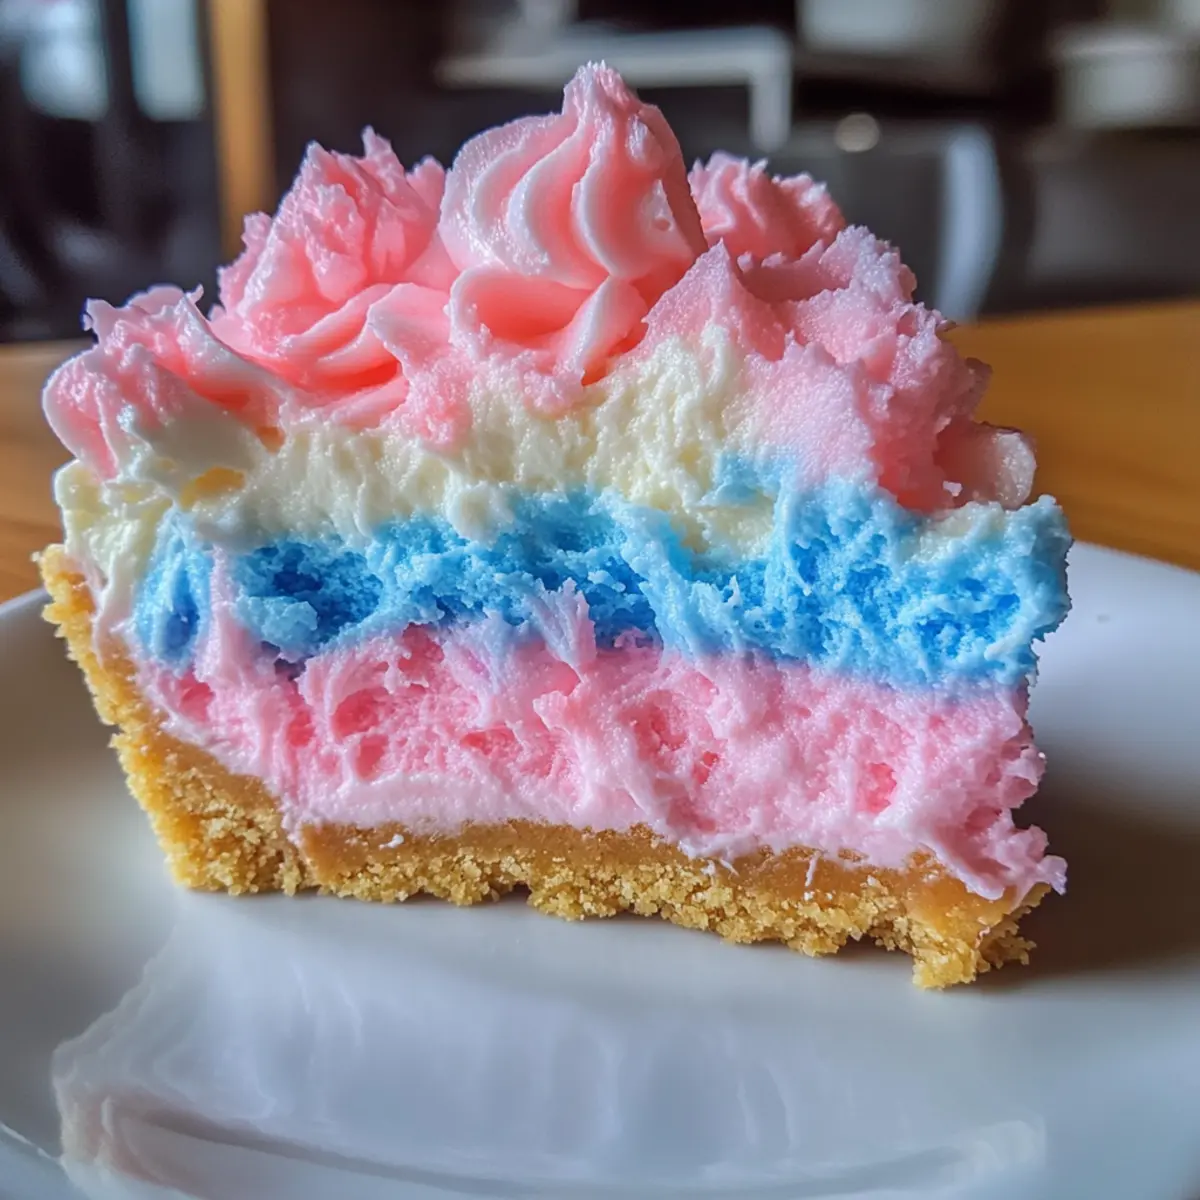
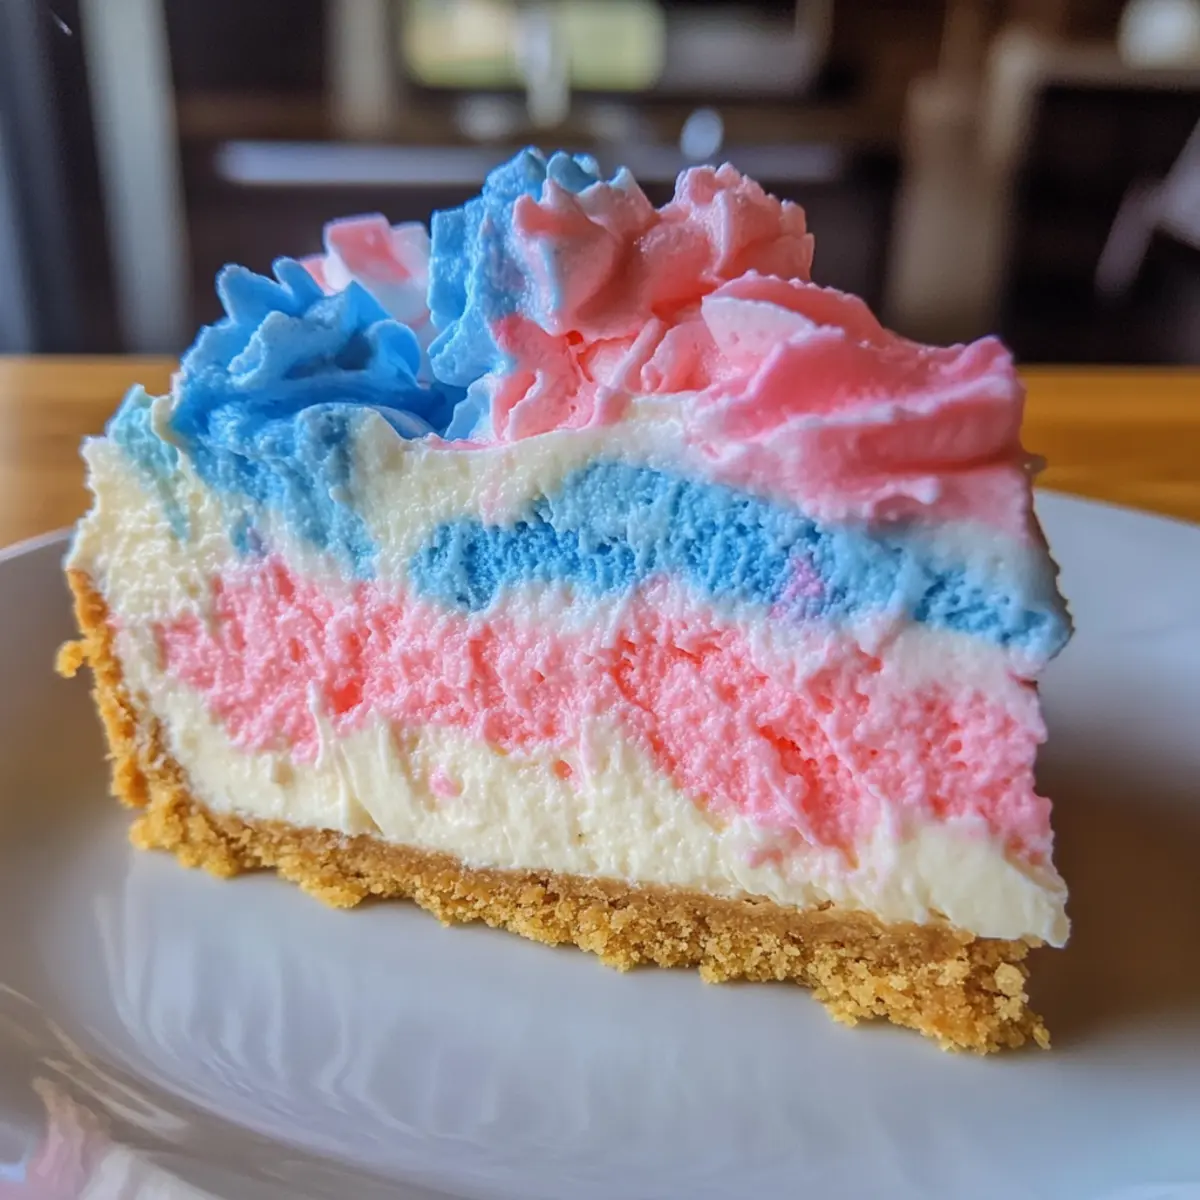
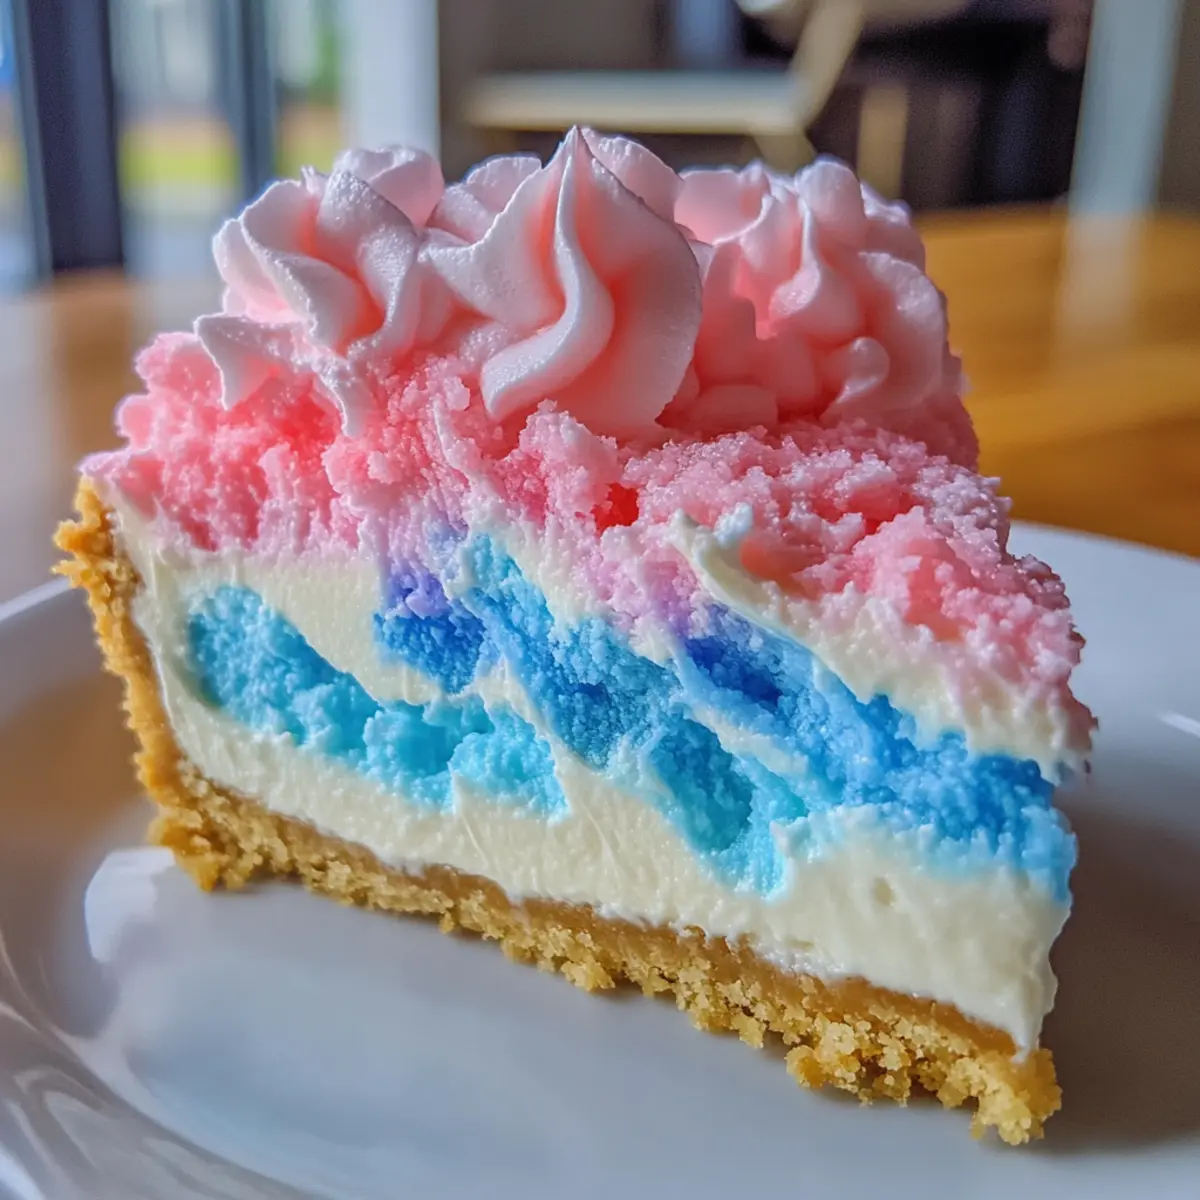
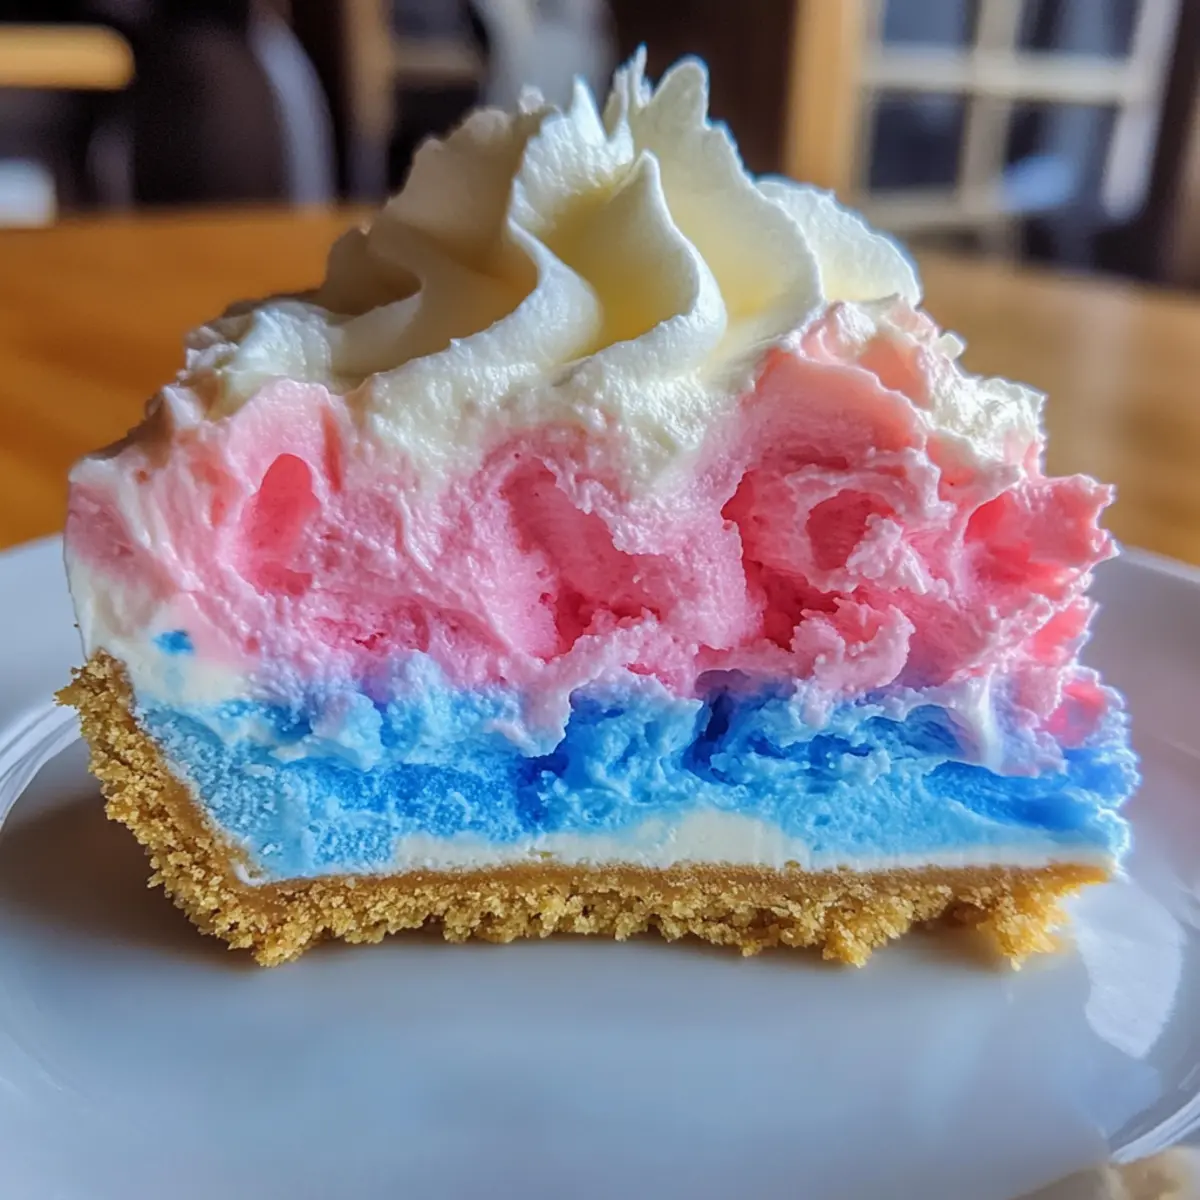
tastytrendingredients

  • Home
  • Recipes
    • Appetizers
    • Breakfast
    • Dessert
    • Dinner
    • Drinks
    • Salads
    • Snacks
    • Soups
  • About me
  • Contact me
menu icon
go to homepage
  • Home
  • Recipes
    • Appetizers
    • Breakfast
    • Dessert
    • Dinner
    • Drinks
    • Salads
    • Snacks
    • Soups
  • About me
  • Contact me
search icon
Homepage link
  • Home
  • Recipes
    • Appetizers
    • Breakfast
    • Dessert
    • Dinner
    • Drinks
    • Salads
    • Snacks
    • Soups
  • About me
  • Contact me
×

Baked Feta Potatoes: Creamy, Crispy Joy in Every Bite

August 20, 2025 by Grace Snow Leave a Comment

As I peeled back the layers of discovery in my kitchen, I found a delightful fusion of flavors waiting to be unleashed: Baked Feta Potatoes. This dish marries crispy, golden potatoes with creamy, tangy feta, brightened by zesty lemon and aromatic garlic. Inspired by the viral baked feta pasta trend, these potatoes stand out as the ultimate vegetarian side dish for any gathering or cozy dinner at home. Not only are they incredibly easy to prepare, but they also deliver an exciting twist that can transform your meals from mundane to memorable. Whether you're looking for a crowd-pleaser for a summer cookout or a comforting companion for a weeknight dinner, these Baked Feta Potatoes are sure to impress. Ready to elevate your cooking game with this irresistible recipe?

Why Baked Feta Potatoes Rock?

Simplicity: These Baked Feta Potatoes are incredibly easy to whip up, requiring just basic cooking skills.

Flavor Explosion: The creamy, tangy feta combined with roasted garlic and lemon creates a burst of flavor that elevates any meal.

Versatile Dish: Perfect as a side for Greek salads, dinner parties, or BBQ gatherings, you'll find yourself wanting to serve them on repeat.

Year-Round Enjoyment: Enjoy this dish in summer or winter; their comforting warmth makes them a seasonal favorite.

Crowd-Pleasing: Whether you're entertaining guests or enjoying a cozy dinner, these potatoes are sure to delight everyone at the table.

Unique Twist: Inspired by the trending baked feta pasta, this recipe takes familiar ingredients and transforms them into a standout side dish you won't soon forget. Want to explore more delightful pairings? Consider trying them with a refreshing Greek salad or some delicious Roasted Sweet Potatoes!

Baked Feta Potatoes Ingredients

• Create a flavor-packed experience with these Baked Feta Potatoes featuring comforting ingredients.

For the Potatoes

  • Large Baking Potatoes – Provide structure; you can swap them with sweet potatoes for a little extra sweetness.
  • Olive Oil – Essential for achieving that crispy texture; opt for extra virgin for a richer flavor.
  • Salt – Enhances all your dish’s flavors; adjust according to your feta's saltiness.
  • Black Pepper – Adds warmth and seasoning; freshly cracked is preferred for the best flavor.

For the Feta Mixture

  • Feta Cheese (200g block) – The star ingredient for creaminess and tang; feel free to substitute with goat cheese or a vegan cheese for a different spin.
  • Dried Thyme – Infuses the dish with earthy aromas; you can use dried rosemary in its place if needed.
  • Dried Oregano – Complements the Greek flavors beautifully, adding depth to your dish.
  • Red Chilli Flakes – Offers just the right amount of heat; adjust to your spice preference.

For the Zesty Finish

  • Garlic (1 head, top cut off) – Roasted to mellow its sharpness; it brings sweetness to the dish.
  • Lemon (1, quartered) – Adds brightness and acidity; squeeze over the potatoes for an uplifting flavor.
  • Honey (1 tbsp) – Optional sweetness that balances the dish; adjust to your taste.
  • Fresh Basil (¼ cup, chopped) – For a pop of freshness and vibrant color to complete your dish.

Step‑by‑Step Instructions for Baked Feta Potatoes

Step 1: Preheat Oven
Begin by preheating your oven to 200°C (390°F). This temperature ensures that your Baked Feta Potatoes will achieve that perfect crispy exterior. While your oven heats up, gather your baking dish and other ingredients, so everything is ready for a seamless cooking experience.

Step 2: Prepare Potatoes
Wash and cube your large baking potatoes into uniform pieces to ensure even cooking. Next, bring a pot of salted water to a boil and par-boil the potatoes for 6 to 10 minutes until slightly tender but not fully cooked. Drain them well and allow them to steam dry for a minute to enhance their crispiness.

Step 3: Season & Roast Potatoes
In a large baking dish, combine the drained potatoes with olive oil, dried thyme, dried oregano, salt, and black pepper. Toss everything together until the potatoes are evenly coated. Spread them out in a single layer and roast in your preheated oven for about 30-40 minutes, or until they are golden brown and crispy, turning them halfway through for even roasting.

Step 4: Add Feta and Lemon
Once your potatoes are beautifully roasted, take the baking dish out of the oven. Nestle the block of feta cheese in the center, and pour the juice of half a quartered lemon over it. The bright lemon juice will enhance the flavor of the feta and infuse it into the potatoes.

Step 5: Roast with Feta
Return the baking dish to the oven for an additional 15 minutes. During this time, the feta will soften and begin to brown slightly, adding a creamy, tangy element that pairs perfectly with the crispy potatoes. Keep an eye on it to ensure it achieves that delightful golden color without overcooking.

Step 6: Prepare Garlic
As the feta and potatoes roast, prepare your garlic. Once the garlic is cool enough to handle, squeeze the roasted garlic cloves from their skins into a bowl. Use a fork to mash the garlic into a smooth paste, releasing its sweet, mellow flavor that will blend beautifully with the final dish.

Step 7: Mix Potatoes
After the second roast, remove the baking dish from the oven. Combine the mashed roasted garlic with the Baked Feta Potatoes, along with the chopped basil and the juice of the remaining lemon. Stir gently to mix all the flavors together, ensuring every potato is coated with the creamy feta and aromatic garlic.

Step 8: Serve
To finish off your Baked Feta Potatoes, drizzle honey over the top for a touch of sweetness, if desired. Garnish with additional fresh basil to brighten the dish’s appearance. Now you’re ready to enjoy this delightful, flavor-packed side that will elevate any meal!

Expert Tips for Baked Feta Potatoes

  • Feta Attention: Keep a close eye on the feta while it bakes to prevent it from becoming rubbery. Avoid overcooking for the best creamy texture.

  • Uniform Sizes: Cut the potatoes into uniform pieces for even cooking and browning, ensuring every bite is perfectly crispy.

  • Par-Boil Properly: Don’t skip the par-boiling step! It helps to soften the potatoes, reducing the roasting time and preventing hard spots.

  • Adjust Seasoning: Remember to taste as you go! Adjust salt according to the saltiness of your feta, and feel free to modify spice levels for personal preferences.

  • Mix Gently: When combining the ingredients post-roasting, stir gently to keep the potato pieces intact while mixing the creamy feta and garlic.

Make Ahead Options

These Baked Feta Potatoes are a fantastic option for meal prep, saving you time on busy weeknights! You can prepare the potatoes by washing, cubing, and par-boiling them up to 24 hours in advance; just refrigerate them in an airtight container to maintain freshness. Also, you can mix the seasoning and pre-crumble the feta for quick access. When you're ready to enjoy, simply reheat the potatoes in a baking dish, toss them in olive oil, and roast them at 200°C (390°F) for about 30-40 minutes. Finally, add the feta and lemon, return to the oven for an additional 15 minutes, and you’ll have delightful Baked Feta Potatoes with minimal hassle!

Baked Feta Potatoes: Creative Twists

Feel free to explore these variations that will add a unique twist to your Baked Feta Potatoes, bringing your meals to new heights!

  • Sweet Potato Swap: Substitute regular potatoes with sweet potatoes for a deliciously sweet flavor; they roast beautifully and add vibrant color.
  • Dairy-Free Delight: Use a plant-based feta cheese for a vegan-friendly version that doesn’t skimp on creamy texture.
  • Herb Infusion: Experiment with fresh herbs like dill or parsley instead of basil for a fresh twist; they’ll brighten up each bite!
  • Extra Heat: For a spicy kick, add fresh jalapeños or more red chili flakes to give a lively temperature to the dish.
  • Roasted Veggie Medley: Mix in your favorite vegetables, like bell peppers or zucchini, alongside the potatoes for added nutrition and color.
  • Lemon Zest Boost: Enhance the zesty lemon flavor by adding some lemon zest; a little goes a long way in brightening the dish.
  • Creamy Garlic Sauce: Drizzle a homemade garlic yogurt sauce over the top before serving for an extra creamy finish; it harmonizes beautifully with the flavors.
  • Nutty Crust: Top with crushed walnuts or pine nuts after baking for a delightful crunch that complements the creamy potatoes.

Looking for more inspiration? Pair these Baked Feta Potatoes with a refreshing Greek salad or some irresistible Skillet Pasta Feta for a complete meal!

What to Serve with Baked Feta Potatoes?

Imagine a vibrant array of flavors and textures that perfectly complement your gooey, cheesy potatoes, creating the ultimate dining experience.

  • Greek Salad: A refreshing counterpart, this crisp salad balances the creamy feta with juicy tomatoes, cucumbers, and tangy olives for a Mediterranean delight.

  • Grilled Lemon Chicken: Tender, flavorful chicken marinated in lemon and herbs enhances the dish's overall zest while providing a hearty protein option.

  • Tzatziki Sauce: This creamy cucumber-yogurt sauce offers a cool contrast to the warmth of the potatoes and enriches your meal with a burst of flavor.

  • Roasted Vegetables: Colorful seasonal veggies roasted until tender add both nutrition and a lovely charred texture, making your plate even more inviting.

  • Quinoa Pilaf: Nutty quinoa seasoned with herbs provides a wholesome element that pairs deliciously with the crispy baked feta potatoes.

  • Chickpea Stew: A hearty, spiced stew introduces unique flavors and an excellent protein source, perfect for vegetarian diners.

  • Souvlaki Skewers: Serve skewered, marinated meats or vegetables for a flavorful grill option that adds an exciting twist to your meal.

  • White Wine Spritzer: A light and refreshing drink, this fizzy choice will cleanse your palate and enhance your feast without overwhelming it.

  • Baklava: End your meal on a sweet note with this honey-soaked pastry, which beautifully contrasts the savory flavors of your main dish.

Let each of these delightful pairings elevate your dining experience, transforming your baked feta potatoes into an extraordinary culinary celebration.

How to Store and Freeze Baked Feta Potatoes

Fridge: Store leftover Baked Feta Potatoes in an airtight container for up to 5 days. They can be enjoyed hot or cold, making them perfect for meal prep!

Freezer: For longer storage, freeze the potatoes in a single layer on a baking sheet until solid, then transfer to a freezer bag for up to 3 months. Reheat directly from frozen.

Reheating: To reheat, place in a preheated oven at 180°C (350°F) for about 20-25 minutes until heated through. You can add a drizzle of olive oil or fresh herbs to refresh their flavor.

Room Temperature: If serving at a gathering, keep the Baked Feta Potatoes out for no more than 2 hours to ensure food safety and freshness.

Baked Feta Potatoes Recipe FAQs

How do I select ripe potatoes for this recipe?
It's essential to choose large baking potatoes that feel firm and smooth to the touch. Avoid any with dark spots or blemishes, as these can indicate spoilage. If you're looking for a sweeter flavor, feel free to experiment with sweet potatoes, but remember to adjust cooking times accordingly.

How should I store leftover Baked Feta Potatoes?
Store leftovers in an airtight container in the fridge for up to 5 days. They can be enjoyed both hot and cold! If you're saving them for later, I often recommend reheating them in the oven to maintain their crispiness, as microwaving can make them soggy.

Can I freeze Baked Feta Potatoes?
Absolutely! To freeze your Baked Feta Potatoes, first let them cool completely. Arrange them in a single layer on a baking sheet and freeze until solid. Once frozen, transfer them to a freezer-safe bag or container. They can be stored this way for up to 3 months. To reheat, bake them directly from frozen at 180°C (350°F) for about 20-25 minutes until heated through.

What if my potatoes are not crispy after roasting?
If your potatoes aren't crispy, it might be due to moisture. Ensure they are well-drained after par-boiling and spread them out in a single layer on the baking sheet. Additionally, try increasing the roasting time or the oven temperature slightly, checking often to prevent burning.

Are these potatoes suitable for people with dietary restrictions?
Yes, these Baked Feta Potatoes are vegetarian! For those avoiding dairy, you can substitute feta with plant-based cheese like a vegan feta or even goat cheese. Just be mindful that some individuals may have allergies to nuts or specific grains, so always read the labels on any alternative ingredients to ensure they meet your dietary needs.

Can I use different herbs in this recipe?
Very! If you don’t have dried thyme or oregano, feel free to experiment with herbs like rosemary or Italian seasoning. Just remember that fresh herbs are usually stronger, so if you choose to use them, you may want to reduce the quantity. Enjoy the flavor exploration!

Baked Feta Potatoes

Baked Feta Potatoes: Creamy, Crispy Joy in Every Bite

Baked Feta Potatoes offer a fusion of crispy, golden potatoes and creamy feta, perfect for any gathering.
Print Recipe Pin Recipe
Prep Time 15 minutes mins
Cook Time 55 minutes mins
Total Time 1 hour hr 10 minutes mins
Servings: 4 potatoes
Course: Dinner
Cuisine: Mediterranean
Calories: 220
Ingredients Equipment Method Nutrition Notes

Ingredients
  

For the Potatoes
  • 4 large Baking Potatoes Can swap with sweet potatoes for extra sweetness
  • 2 tbsp Olive Oil Extra virgin preferred for richer flavor
  • 1 tsp Salt Adjust according to feta's saltiness
  • 1 tsp Black Pepper Freshly cracked is preferred
For the Feta Mixture
  • 200 g Feta Cheese Feel free to substitute with goat cheese or vegan cheese
  • 1 tsp Dried Thyme Dried rosemary can be used instead
  • 1 tsp Dried Oregano Adds depth to the dish
  • 1/2 tsp Red Chilli Flakes Adjust to your spice preference
For the Zesty Finish
  • 1 head Garlic Top cut off, roasted
  • 1 whole Lemon Quartered, squeeze over potatoes
  • 1 tbsp Honey Optional, adjust to taste
  • 1/4 cup Fresh Basil Chopped, for garnish

Equipment

  • Oven
  • Baking Dish
  • pot
  • Fork

Method
 

Step‑by‑Step Instructions
  1. Preheat your oven to 200°C (390°F). Gather your baking dish and ingredients.
  2. Wash and cube the potatoes. Bring salted water to a boil and par-boil for 6-10 minutes until slightly tender. Drain and steam dry.
  3. In a large baking dish, combine potatoes with olive oil, thyme, oregano, salt, and pepper. Toss to coat and roast for 30-40 minutes until golden and crispy.
  4. Add feta cheese in the center and pour the juice of half the lemon over it. Return to oven.
  5. Roast for another 15 minutes until feta softens and browns slightly.
  6. Squeeze roasted garlic into a bowl and mash into a paste.
  7. Mix together the potatoes, mashed garlic, chopped basil, and remaining lemon juice.
  8. Drizzle with honey if desired and garnish with fresh basil before serving.

Nutrition

Serving: 1potatoCalories: 220kcalCarbohydrates: 35gProtein: 5gFat: 8gSaturated Fat: 2gMonounsaturated Fat: 6gCholesterol: 5mgSodium: 400mgPotassium: 710mgFiber: 4gSugar: 2gVitamin A: 2IUVitamin C: 30mgCalcium: 5mgIron: 8mg

Notes

Store leftovers in an airtight container for up to 5 days. For longer storage, freeze for up to 3 months.

Tried this recipe?

Let us know how it was!

Coconut Crusted Fish with Mango Salsa that Dazzles Your Tastebuds

August 20, 2025 by Grace Snow Leave a Comment

As I sifted through the warm sands of a sun-kissed beach, the tantalizing aroma of grilled fish danced on the breeze, instantly whisking me back to vibrant summertime gatherings. Inspired by those tropical flavors, I couldn't wait to recreate that magic in my kitchen with this Coconut Crusted Fish with Mango Salsa. This delightful dish strikes the perfect balance between a crispy coconut coating and tender, flaky fish, making it not only a showstopper but also a quick dinner option for busy weeknights. It's gluten-free and packed with fresh ingredients, so you can feel great about serving it to loved ones. Ready to transport your taste buds to a beachside paradise with every bite? Let’s dive into this vibrant recipe that promises to be a hit at your next dinner!

Why Is Coconut Crusted Fish Irresistible?

Flavor Explosion: The combination of crispy coconut and juicy mango creates a vibrant taste experience that’s absolutely delightful.

Healthy Choice: This dish is gluten-free and utilizes fresh, whole ingredients, making it perfect for clean eating enthusiasts.

Quick and Easy: You can whip this up in under 30 minutes, making it a fantastic weeknight dinner option that doesn’t skimp on flavor.

Versatile Delight: Feel free to substitute salmon or mahi-mahi for a twist on the classic flavor profiles; the possibilities are endless!

Crowd-Pleasing Favorite: Whether it’s a summer gathering or a family dinner, this dish is sure to impress everyone at the table, just like my favorite Fiesta Lime Chicken with Avocado.

Coconut Crusted Fish with Mango Salsa Ingredients

For the Fish
• White Fish Fillets – A primary protein source; options include cod, halibut, or tilapia.
• Unsweetened Shredded Coconut – Adds natural sweetness and a delightful texture; ensure it’s unsweetened for healthier preparation.
• Panko Breadcrumbs – Provides the perfect crunch; opt for a gluten-free version if necessary.
• Eggs – Acts as a binding agent in the breading process, ensuring a crispy crust.
• Almond or Coconut Flour – Ideal for dredging the fish; can be substituted with regular flour if gluten isn’t a concern.
• Garlic Powder – Infuses depth and flavor, enhancing the overall dish.
• Smoked Paprika – Adds a subtle smoky taste that complements the fish perfectly.
• Sea Salt – Essential for enhancing the overall flavor of the dish.
• Olive Oil – Used for light frying and contributes an added richness.

For the Mango Salsa
• Ripe Mango – The star of the salsa, providing sweetness; can be replaced with pineapple, peach, or papaya if necessary.
• Red Bell Pepper – Adds crunch and vibrant color, along with sweetness to the salsa.
• Red Onion – Introduces sharpness and flavor contrast; finely diced for best texture.
• Fresh Cilantro – Essential herb for freshness and flavor in the salsa.
• Lime Juice – Offers brightness and acidity, balancing the salsa perfectly.
• Salt and Pepper – For seasoning the salsa to taste.
• Jalapeño (optional) – Adds a spice element; adjust based on your heat preference.

Feel free to gather these ingredients for the quick and delightful Coconut Crusted Fish with Mango Salsa that will surely dazzle your taste buds!

Step‑by‑Step Instructions for Coconut Crusted Fish with Mango Salsa

Step 1: Preheat the Oven
Start by preheating your oven to 425°F (220°C). While the oven heats up, prepare a baking sheet by lining it with parchment paper and giving it a light spray of olive oil. This initial step sets the stage for the Coconut Crusted Fish to bake to crisp perfection, so make sure you're ready to go when the time comes.

Step 2: Set Up Dredging Stations
Gather three shallow dishes for your dredging process. In the first, pour a light layer of almond or coconut flour; in the second, beat a couple of eggs until smooth. In the third dish, combine unsweetened shredded coconut, panko breadcrumbs, garlic powder, smoked paprika, and sea salt. This organized setup makes breading your fish seamless and efficient, ensuring even coverage of flavors.

Step 3: Bread the Fish
Now, pat your white fish fillets dry using a paper towel to remove excess moisture. First, dredge each fillet in the flour mixture, ensuring it's fully coated, then dip it into the beaten eggs to adhere. Finally, press the fish firmly into the coconut mixture, coating one side thoroughly. You want that beautiful crust to form as it bakes, so make sure to cover all edges.

Step 4: Bake the Fish
Place the breaded fish fillets on your prepared baking sheet, allowing a bit of space between them for even cooking. Lightly spray the tops with olive oil for a golden finish. Bake in the preheated oven for 16–18 minutes, flipping halfway through, until the fish is golden brown and flakes easily with a fork. This step brings your Coconut Crusted Fish to life with a delightful crunch.

Step 5: Make the Mango Salsa
While the fish is baking, it’s time to prepare the mango salsa. In a mixing bowl, combine diced ripe mango, finely chopped red bell pepper, red onion, chopped fresh cilantro, and a squeeze of lime juice. Season with salt and pepper to taste, then gently mix to combine all the vibrant flavors. Refrigerate the salsa until the fish is ready to serve, allowing the flavors to meld beautifully.

Step 6: Serve the Dish
Once the Coconut Crusted Fish is perfectly baked, remove it from the oven and top each fillet generously with your freshly made mango salsa. For an extra touch, garnish with additional cilantro. This final step elevates your dish, turning it into a tropical feast that’s as visually appealing as it is delicious. Enjoy this wonderful balance of flavors that your family will love!

Expert Tips for Coconut Crusted Fish

Dry Fish Thoroughly: Ensuring your fish fillets are completely dry before breading is essential for the coconut crust to adhere well during baking.

Use Olive Oil Spray: Lightly spray the coated fish with olive oil before baking. This helps achieve a golden, crispy exterior without the need for frying.

Flipping Fish: Be gentle when flipping the fish halfway through baking; using a spatula will help keep the crust intact while ensuring even cooking.

Fresh Ingredients: Opt for fresh, ripe mango for your salsa to maximize the fruity flavor and sweetness in your Coconut Crusted Fish with Mango Salsa.

Avoid Microwaving: If you have leftovers, reheat the fish in the oven rather than the microwave to maintain that delightful crunch instead of compromising it.

Experiment with Fish: Don’t hesitate to try different fish varieties, like salmon or mahi-mahi, to explore different flavors while keeping the dish gluten-free!

What to Serve with Tropical Coconut Crusted Fish with Mango Salsa

Transform your tropical dinner into a complete culinary experience with these delightful pairings that tantalize the senses.

  • Quinoa Salad: A light, nutrient-packed option, this dish offers a fluffy texture that complements the crispy fish beautifully. Toss it with herbs, cherry tomatoes, and a zesty dressing for a refreshing combo.

  • Steamed Asparagus: With its vibrant green color and delicate crunch, asparagus adds elegance to the meal. Simply season with lemon zest and a sprinkle of sea salt for a fresh taste.

  • Coconut Rice: This creamy, slightly sweet rice dish echoes the coconut flavors in the fish while adding a rich texture. The coconut notes enhance the tropical theme beautifully.

  • Coleslaw with Lime Dressing: A crunch-packed slaw with a tangy lime dressing balances the richness of the fish. Packed with vibrant vegetables, it adds color and freshness to your plate.

  • Mango Mojito: A refreshing beverage packed with mint and citrus complements the sweetness of the mango salsa. This drink elevates the dish’s tropical vibe, perfect for warm summer evenings.

  • Grilled Pineapple Slices: Juicy, caramelized pineapple slices serve as a sweet contrast to the savory dish. They not only taste fantastic but also make for a stunning presentation on the table.

  • Coconut Chia Pudding: For dessert, serve a light coconut chia pudding adorned with fresh fruit. This creamy treat ties back to the coconut theme and serves as a beautiful endnote to your tropical feast.

Storage Tips for Coconut Crusted Fish with Mango Salsa

Fridge: Store any leftover Coconut Crusted Fish in an airtight container in the fridge for up to 2 days. This helps maintain freshness while preventing odors from other foods.

Freezer: For longer storage, freeze the baked fish in an airtight freezer-safe container for up to 2 months. Just thaw overnight in the fridge before reheating.

Reheating: Reheat your fish in the oven at 350°F (175°C) for about 10–15 minutes, until warmed through and crispy again. This method preserves the delightful crunch of the coconut crust.

Mango Salsa Storage: Keep the mango salsa in a separate airtight container in the fridge for up to 3 days. Stir well before serving to reinvigorate flavors!

Coconut Crusted Fish with Mango Salsa Variations

Feel free to unleash your creativity in the kitchen with these delightful twists on a classic dish!

  • Salmon Substitute: Swap out white fish for salmon to enhance flavor richness and omega-3s. The combination of salmon’s buttery texture and coconut crust is simply irresistible.

  • Mango Salsa Variations: Experiment by adding diced strawberries or using pineapple in your salsa for a refreshing tropical twist. The sweetness of the fruit beautifully complements the coconut crusted fish in unexpected ways.

  • Spicy Kick: For heat lovers, incorporate diced jalapeños into your mango salsa for that extra zing. Adjust the amount based on your spice tolerance, creating a salsa that packs a punch!

  • Coconut Yogurt Topper: Trade mango salsa for a dollop of coconut yogurt mixed with lime juice and a sprinkle of cilantro. This swap creates a creamy, tangy contrast that’s just heavenly!

  • Nut-Free Options: If you’re looking for a nut-free version, replace almond or coconut flour with regular flour or ground oats. Both options still give a lovely texture to your dish, ensuring everyone can enjoy it.

  • Herb Infusion: Add fresh herbs like mint or basil to your mango salsa for an aromatic lift. These herbs can elevate the dish, offering a new level of freshness that complements the coconut perfectly.

  • Vegetable Boost: Mix in finely chopped cucumber or diced avocado to the salsa for added crunch and creaminess. This creates a chunky, satisfying topping that enhances the overall experience.

  • Quinoa or Rice Base: Serve the fish over a bed of fluffy quinoa or coconut rice instead of simply plating it alone. This not only adds a textural contrast but also makes the meal even more filling!

With these variations, your Coconut Crusted Fish with Mango Salsa will never get old. Why not try a few the next time you cook? You might discover a new family favorite! For more delicious seafood ideas, check out my Cocoa Crusted Steak or Air Fryer Fish for more culinary inspiration.

Make Ahead Options

These Coconut Crusted Fish with Mango Salsa are perfect for meal prep enthusiasts! You can bread the fish fillets up to 24 hours in advance and store them in an airtight container in the refrigerator to maintain freshness. Additionally, prepare the mango salsa up to 3 days ahead; just be sure to keep it well-covered in the fridge to prevent browning and keep it flavorful. When you’re ready to serve, simply bake the crusted fish at 425°F (220°C) for about 16–18 minutes until golden brown, and top with the chilled salsa. This way, you’ll enjoy a healthy, delicious meal with minimal effort on busy evenings!

Coconut Crusted Fish with Mango Salsa Recipe FAQs

How do I choose the best fish for this recipe?
Absolutely! For optimal flavor and texture, select fresh white fish fillets such as cod, halibut, or tilapia. When choosing fish, look for fillets that are firm and have a clean, ocean-like scent. Avoid any fish with dark spots or a fishy odor to ensure a delicious end result.

What is the best way to store leftover Coconut Crusted Fish?
Keep any leftover Coconut Crusted Fish in an airtight container in the fridge for up to 2 days. This will help preserve its flavor and texture. When reheating, I recommend using the oven at 350°F (175°C) for about 10–15 minutes to regain that delicious crunchy crust.

Can I freeze Coconut Crusted Fish?
Absolutely! To freeze the cooked Coconut Crusted Fish, let it cool completely, then place it in an airtight freezer-safe container. It can be stored for up to 2 months. When you're ready to enjoy it again, thaw overnight in the fridge and reheat in the oven for best results.

What can I do if the crust doesn’t stick to the fish?
If you find the crust isn’t adhering well, it might be due to excess moisture on the fish. To remedy this, ensure the fish fillets are thoroughly dried with a paper towel before breading. Additionally, make sure to press the coconut mixture firmly onto the fish to create a better bond.

Is this dish suitable for people with allergies?
Great question! This Coconut Crusted Fish recipe is naturally gluten-free if you use gluten-free panko breadcrumbs and flour. However, it does contain eggs and coconut, so if you have allergies to either of those, you may want to explore egg substitutes like a flaxseed mixture or aquafaba for binding, though the crust's texture may vary slightly.

How long does the mango salsa stay fresh?
The mango salsa can be stored in an airtight container in the fridge for up to 3 days. To keep flavors fresh, I recommend stirring it gently before serving, as the ingredients can settle over time. If you're preparing ahead, consider making the salsa just a few hours before serving for the best taste!

Coconut Crusted Fish with Mango Salsa

Coconut Crusted Fish with Mango Salsa that Dazzles Your Tastebuds

Coconut Crusted Fish with Mango Salsa is a gluten-free dish that perfectly balances crispy coconut and tender fish.
Print Recipe Pin Recipe
Prep Time 10 minutes mins
Cook Time 18 minutes mins
Total Time 28 minutes mins
Servings: 4 servings
Course: Dinner
Cuisine: Tropical
Calories: 300
Ingredients Equipment Method Nutrition Notes

Ingredients
  

For the Fish
  • 4 fillets White Fish (cod, halibut, or tilapia)
  • 1 cup Unsweetened Shredded Coconut Ensure it's unsweetened for health benefits
  • 1 cup Panko Breadcrumbs Gluten-free if necessary
  • 2 large Eggs Beaten
  • 1/2 cup Almond or Coconut Flour Regular flour can be substituted
  • 1 teaspoon Garlic Powder
  • 1 teaspoon Smoked Paprika
  • 1 teaspoon Sea Salt
  • 3 tablespoons Olive Oil For frying
For the Mango Salsa
  • 1 large Ripe Mango Can substitute with pineapple, peach, or papaya
  • 1 medium Red Bell Pepper
  • 1/2 medium Red Onion Finely diced
  • 1/4 cup Fresh Cilantro Chopped
  • 2 tablespoons Lime Juice
  • to taste Salt and Pepper
  • 1 tablespoon Jalapeño (optional) Adjust based on heat preference

Equipment

  • Oven
  • Baking Sheet
  • Mixing bowls
  • Shallow Dishes
  • Spatula

Method
 

Preparation Steps
  1. Preheat your oven to 425°F (220°C) and prepare a baking sheet lined with parchment paper and a light spray of olive oil.
  2. Set up three shallow dishes: one with almond or coconut flour, one with beaten eggs, and one with shredded coconut, panko, garlic powder, smoked paprika, and sea salt.
  3. Pat fish fillets dry, dredge in flour, dip in eggs, and then press into the coconut mixture, coating one side thoroughly.
  4. Place the coated fish fillets on the baking sheet, spray lightly with olive oil, and bake for 16–18 minutes, flipping halfway through.
  5. While the fish bakes, prepare the salsa by mixing diced mango, red bell pepper, red onion, cilantro, and lime juice. Season with salt and pepper to taste.
  6. Once the fish is baked, top with the mango salsa and garnish with additional cilantro before serving.

Nutrition

Serving: 1filletCalories: 300kcalCarbohydrates: 22gProtein: 25gFat: 12gSaturated Fat: 4gPolyunsaturated Fat: 2gMonounsaturated Fat: 6gCholesterol: 90mgSodium: 650mgPotassium: 500mgFiber: 3gSugar: 4gVitamin A: 200IUVitamin C: 30mgCalcium: 20mgIron: 1.5mg

Notes

Ensure fish fillets are dry before breading for best results. Lightly spray with olive oil for a crispy texture.

Tried this recipe?

Let us know how it was!

Creamy Rotel Pasta with Ground Beef for Cozy Nights

August 20, 2025 by Grace Snow Leave a Comment

As I poured the rich, creamy sauce over the twirling elbow macaroni, a wave of nostalgia washed over me—reminding me of cozy family dinners filled with laughter. This Creamy Rotel Pasta with Ground Beef is not only a delightful dish but also a swift solution for busy weeknights, combining bold flavors with the comforting essence of home-cooked food. Packed with hearty ingredients, this recipe redefines the classic pasta experience by infusing it with a zesty twist that will have your family asking for seconds. Plus, its versatility means you can easily make substitutions to cater to dietary preferences or simply use what you have on hand. What’s your favorite way to customize pasta dishes?

Why Is This Pasta Recipe So Great?

Comforting and hearty, this Creamy Rotel Pasta with Ground Beef delivers an unbeatable flavor combination that warms the soul. Quick and easy, you can whip up this dish in just 30 minutes, making it perfect for busy weeknights. Versatile options allow substitutions like ground turkey or veggies, tailoring it to your taste. Crowd-pleaser quality means it's sure to satisfy the whole family and keep everyone coming back for more. For a fresh accompaniment, consider pairing it with a fresh garden salad or enjoy it alongside warm garlic bread. This recipe is comfort food reimagined!

Rotel Pasta with Ground Beef Ingredients

• Discover the essential ingredients needed for your delicious Rotel Pasta with Ground Beef!

For the Pasta

  • Elbow Macaroni – Provides the perfect pasta base; feel free to substitute with any pasta shape or gluten-free pasta if needed.

For the Beef

  • Ground Beef – The heartiness revolves around this protein source; consider using ground turkey, chicken, or a plant-based meat alternative for a lighter option.
  • Olive Oil – Used for cooking the beef and imparting flavor; vegetable oil or butter makes a suitable substitute.

For Flavoring

  • Garlic Powder – Enhances the dish's flavor profile; fresh garlic can give you a more robust taste.
  • Onion Powder – Adds depth to the flavor; you can also sauté fresh onions with the meat for a fresher kick.
  • Salt and Pepper – Essential for seasoning; adjust these to suit your personal taste.

For the Sauce

  • Diced Tomatoes with Green Chilies (Rotel) – This adds the zesty kick and acidity crucial for the dish’s flavor; add more chilies for an extra heat level if you like!
  • Cream Cheese – Creates the rich and creamy sauce that elevates the dish; you can swap it for sour cream or Greek yogurt for a tangy twist.
  • Beef Broth – Helps create the desired sauce consistency; a vegetable or chicken broth can be used for different flavors.

For the Cheesy Finish

  • Shredded Cheddar Cheese – Infuses creaminess and more flavor; try using any melting cheese like Monterey Jack or Colby as an alternative.

Step‑by‑Step Instructions for Creamy Rotel Pasta with Ground Beef

Step 1: Cook the Pasta
Bring a large pot of salted water to a roaring boil over high heat. Add elbow macaroni and cook for 7–8 minutes until al dente, stirring occasionally to prevent sticking. Once done, drain the pasta in a colander and set it aside, allowing it to rest while you prepare the delicious sauce for your Rotel Pasta with Ground Beef.

Step 2: Brown the Beef
In the same pot, heat 1 tablespoon of olive oil over medium heat. Once shimmering, add the ground beef and break it apart with a spatula. Cook for about 5–7 minutes or until the beef is browned and no longer pink. Carefully drain any excess fat and return the pot with the browned beef to the stovetop.

Step 3: Season the Meat
Sprinkle in the garlic powder, onion powder, salt, and pepper, stirring to combine everything. Continue to cook for an additional minute, allowing the spices to toast and release their wonderful aromas. This step ensures your Rotel Pasta with Ground Beef is full of rich flavors from the very beginning.

Step 4: Prepare the Sauce
Next, add the canned Rotel, cream cheese, and beef broth to the pot with the seasoned beef. Stir well, allowing the cream cheese to melt and blend into the mix. Cook for about 3–4 minutes until the sauce is creamy and well incorporated, creating a flavorful base for your dish.

Step 5: Combine Pasta and Cheese
Add the drained elbow macaroni back into the pot, folding it gently into the creamy Rotel sauce. Then, mix in the shredded cheddar cheese and stir until everything is evenly coated and the cheese has fully melted. Continue cooking for another 2–3 minutes over low heat until everything is hot and bubbly.

Step 6: Serve and Enjoy
Once it's perfectly creamy and delicious, it's time to serve your Rotel Pasta with Ground Beef! Scoop the pasta into bowls and garnish with fresh cilantro or parsley for a pop of color. Enjoy this hearty dish hot, savoring each bite of bold flavors and comforting textures.

What to Serve with Creamy Rotel Pasta with Ground Beef

A delightful meal deserves delicious accompaniments that elevate the dining experience to new heights.

  • Garden Salad: Light and refreshing, a simple salad with crisp greens and a vinaigrette balances the creamy pasta beautifully.
  • Garlic Bread: Warm, buttery garlic bread complements the rich flavors, providing a satisfying crunch with each bite.
  • Sautéed Veggies: Brightly colored bell peppers and zucchini stir-fried in olive oil add vibrant colors and textures, while also boosting nutrition.
  • Corn on the Cob: Sweet, juicy corn pairs wonderfully with the spicy notes of the Rotel pasta, introducing a delightful sweetness to the meal.
  • Coleslaw: The crunch and tang of coleslaw create a refreshing contrast to the creamy, rich pasta, making each bite even more enjoyable.
  • Fruit Salad: A light and colorful fruit salad serves as a perfect ending to your meal, offering a sweet note to balance the savory flavors.
  • Sparkling Water or Sweet Tea: Refreshing drinks like sparkling water with a slice of lemon or sweet iced tea keep the meal light and enjoyable.

Rotel Pasta with Ground Beef Variations

Feel free to get creative with your dish—there are so many ways to customize this creamy delight!

  • Turkey Substitute: Swap ground beef for ground turkey for a healthier, lighter meal without sacrificing flavor. The dish still holds that comforting essence!
  • Veggie Boost: Toss in bell peppers, spinach, or zucchini to elevate the nutritional value and add a vibrant touch. It makes your plate look even more inviting!
  • Dairy-Free: Use plant-based cream cheese and nutritional yeast for a creamy, cheesy flavor without dairy. This is great for those with lactose intolerance!
  • Cheesy Kick: Replace cheddar with Pepper Jack cheese for a spicy twist that will tantalize your taste buds. It’s a fun way to bring more heat!
  • Gluten-Free: Substitute elbow macaroni with gluten-free pasta, ensuring everyone can enjoy this dish. The creamy sauce perfectly coats all kinds of pasta.
  • Extra Heat: If you crave spice, incorporate diced jalapeños or a dash of cayenne into the sauce to add that fiery kick. It’s the perfect way to amp up the flavor profile!
  • Creamy Alternatives: Swap cream cheese for Greek yogurt or sour cream to add a tangy richness while keeping it creamy. It’s a delightful twist that’s equally satisfying!
  • Seafood Variation: Try adding shrimp or cooked crab for a seafood twist that brings the ocean's flavor right to your plate. Pair it with Seafood Pasta Savory for more ideas!

Let's make this creamy pasta dish your own and create memories around the dinner table with your unique touches!

Make Ahead Options

These Creamy Rotel Pasta with Ground Beef are a fantastic choice for busy home cooks looking to save time during the week! You can prepare the meat sauce (brown the beef and mix in the Rotel and cream cheese) up to 3 days in advance; simply store it in an airtight container in the refrigerator. Additionally, you can cook the pasta and keep it in a separate container in the fridge for up to 24 hours. To finish the dish, reheat the sauce gently on the stovetop while you cook the pasta (if not prepped) until it's hot and creamy. Combining the sauce and pasta just before serving ensures your meal tastes just as delicious as when freshly made!

How to Store and Freeze Creamy Rotel Pasta with Ground Beef

Fridge: Store any leftovers in an airtight container for up to 3 days. The flavors will meld beautifully, but reheat gently to maintain creaminess.

Freezer: Freeze the pasta in a freezer-safe container for up to 2 months. Thaw overnight in the fridge before reheating for best results.

Reheating: To reheat, use a stovetop pan over medium heat, adding a splash of beef broth or water to restore creaminess, stirring until heated through.

Make-Ahead: Prepare the pasta and sauce separately, store in the fridge, and combine before serving to enjoy fresh Rotel Pasta with Ground Beef.

Expert Tips for Creamy Rotel Pasta with Ground Beef

  • Cook Thoroughly: Ensure the ground beef is well-cooked, browned completely to enhance flavor, preventing any raw taste in your Rotel Pasta with Ground Beef.

  • Adjust the Creaminess: For a creamier sauce, modify the amount of beef broth according to your preference, ensuring it's just as indulgent as you'd like.

  • Spice It Up: If you enjoy heat, consider adding jalapeños or cayenne pepper to elevate the spice level in your pasta dish, making it perfect for spice lovers.

  • Season Well: Taste as you go! Adjust salt and pepper according to your liking to ensure the dish is flavorful from the first bite to the last.

  • Experiment with Cheese: Mix up the type of cheese! Using varieties like Pepper Jack can add an exciting twist, enhancing texture and flavor in your pasta.

Creamy Rotel Pasta with Ground Beef Recipe FAQs

How do I select the best ripe tomatoes for this dish?
Absolutely! When choosing tomatoes, look for ones that are firm and free of dark spots or blemishes. They should be vibrant in color and have a fresh scent. Ideally, choose tomatoes that are slightly soft to the touch for the best flavor in your Creamy Rotel Pasta with Ground Beef.

What’s the best way to store leftovers?
To store your delicious Creamy Rotel Pasta with Ground Beef, transfer it to an airtight container and keep it in the fridge for up to 3 days. Just make sure to allow it to cool completely before sealing to avoid condensation. When reheating, a little splash of beef broth or water can help maintain the creamy consistency.

Can I freeze Creamy Rotel Pasta with Ground Beef?
Yes, you can absolutely freeze the leftovers! Allow the pasta to cool first, then transfer it to a freezer-safe container, ensuring it’s well sealed. You can freeze it for up to 2 months. When ready to enjoy, thaw it in the fridge overnight and reheat on the stovetop, adding a bit of water or broth to restore creaminess.

What do I do if my pasta turns out too dry?
If you notice that your pasta has become dry, don’t worry! Simply add a splash of beef broth or water while reheating, and stir well to reincorporate the sauce. This simple step can bring back the delightful creaminess and make your meal enjoyable again.

Are there any dietary considerations for this recipe?
Very! If you need to make adjustments for dietary restrictions, consider substituting ground beef with ground turkey or a plant-based meat alternative for a lighter option. Also, using gluten-free pasta ensures that everyone can enjoy this delightful Creamy Rotel Pasta with Ground Beef without worries.

Can this recipe be made vegetarian?
Absolutely! You can convert this recipe into a vegetarian option by substituting ground beef for a plant-based meat alternative and using vegetable broth instead of beef broth. Additionally, you can load it with your favorite veggies, such as bell peppers or spinach, to enhance nutrition and texture. Enjoy experimenting!

Rotel Pasta with Ground Beef

Creamy Rotel Pasta with Ground Beef for Cozy Nights

This Creamy Rotel Pasta with Ground Beef is a comforting dish perfect for busy weeknights, combining bold flavors and hearty ingredients.
Print Recipe Pin Recipe
Prep Time 10 minutes mins
Cook Time 30 minutes mins
Total Time 40 minutes mins
Servings: 4 servings
Course: Dinner
Cuisine: American
Calories: 450
Ingredients Equipment Method Nutrition Notes

Ingredients
  

For the Pasta
  • 8 oz Elbow Macaroni Feel free to substitute with any pasta shape or gluten-free pasta if needed.
For the Beef
  • 1 lb Ground Beef Consider using ground turkey, chicken, or a plant-based meat alternative for a lighter option.
  • 1 Tbsp Olive Oil Vegetable oil or butter makes a suitable substitute.
For Flavoring
  • 1 tsp Garlic Powder Fresh garlic can give you a more robust taste.
  • 1 tsp Onion Powder You can also sauté fresh onions with the meat for a fresher kick.
  • to taste Salt Adjust to suit your personal taste.
  • to taste Pepper Adjust to suit your personal taste.
For the Sauce
  • 1 can Diced Tomatoes with Green Chilies (Rotel) Add more chilies for an extra heat level if you like!
  • 8 oz Cream Cheese You can swap it for sour cream or Greek yogurt for a tangy twist.
  • 1 cup Beef Broth A vegetable or chicken broth can be used for different flavors.
For the Cheesy Finish
  • 1 cup Shredded Cheddar Cheese Try using any melting cheese like Monterey Jack or Colby as an alternative.

Equipment

  • Large pot
  • Colander
  • Spatula

Method
 

Step-by-Step Instructions
  1. Bring a large pot of salted water to a roaring boil over high heat. Add elbow macaroni and cook for 7–8 minutes until al dente. Drain and set aside.
  2. In the same pot, heat 1 tablespoon of olive oil over medium heat. Add the ground beef and break it apart. Cook for about 5–7 minutes until browned, then drain any excess fat.
  3. Sprinkle in garlic powder, onion powder, salt, and pepper. Stir to combine and cook for an additional minute.
  4. Add the canned Rotel, cream cheese, and beef broth. Stir well and cook for about 3–4 minutes until the sauce is creamy.
  5. Add the drained elbow macaroni back into the pot and mix in the shredded cheddar cheese until evenly coated.
  6. Serve the pasta in bowls and garnish with fresh cilantro or parsley.

Nutrition

Serving: 1servingCalories: 450kcalCarbohydrates: 38gProtein: 25gFat: 24gSaturated Fat: 10gPolyunsaturated Fat: 2gMonounsaturated Fat: 10gCholesterol: 80mgSodium: 600mgPotassium: 600mgFiber: 3gSugar: 5gVitamin A: 500IUVitamin C: 10mgCalcium: 250mgIron: 3mg

Notes

Consider pairing with a fresh garden salad or warm garlic bread for a complete meal.

Tried this recipe?

Let us know how it was!

Raspberry Swirl Brioche Loaf: A Sweet Festive Delight

August 20, 2025 by Grace Snow Leave a Comment

In the heart of my kitchen, the inviting aroma of freshly baked bread mingles with a hint of sweet raspberries, instantly lifting my spirits. If you're looking for a holiday baking project that combines visual appeal with delectable flavor, you have to try this Raspberry Swirl Brioche Loaf! With its tender, buttery layers and vibrant raspberry filling, this loaf is a stunning centerpiece for any festive gathering, offering both a nostalgic comfort and a delightful surprise. Not only is it naturally a crowd-pleaser, but it’s also surprisingly simple to make at home, allowing you to impress loved ones without the fuss of complex baking. Are you ready to roll up your sleeves and transform your kitchen into a bakery?

Why is this Brioche Loaf Special?

Irresistible Flavor: The perfect fusion of sweet and tangy raspberry preserves against buttery brioche makes every bite an explosion of joy.

Eye-Catching Presentation: With its vibrant swirls, it’s a show-stopper at any holiday gathering or brunch.

Versatile Pairings: Whether with coffee in the morning or as a sweet dessert, this loaf works for any occasion.

Reliable Recipe: Even novice bakers will find this easy. You can nail that perfect rise and texture every time!

Make-Ahead Friendly: Prepare it in advance and bake later, making it a time-saver on busy holiday days or gatherings.

Elevate your next celebration with this stunning Raspberry Swirl Brioche Loaf that’s sure to impress! If you love baking with fresh flavors, don’t forget to check out my tips for holiday baking to truly master your kitchen skills.

Raspberry Swirl Brioche Loaf Ingredients

For the Dough

  • All-purpose flour – Provides structure and elasticity; substitute with gluten-free flour for a gluten-free version.
  • Active dry yeast – Essential for fermentation; ensure it’s fresh for maximum rise.
  • Granulated sugar – Sweetens the dough and activates the yeast; can be replaced with a sugar alternative for fewer calories.
  • Salt – Enhances flavor and controls yeast fermentation.
  • Warm milk (about 110°F) – Activates the yeast and adds moisture; use dairy-free milk for a non-dairy option.
  • Unsalted butter – Enriches flavor and texture; substitute with margarine for dairy-free.
  • Large eggs – Provide moisture and binding; for egg-free versions, use flax eggs or applesauce.
  • Vanilla extract – Adds depth; almond extract can be used for a fun twist.
  • Lemon zest (optional) – Brightens the flavor profile; feel free to omit if desired.

For the Raspberry Filling

  • Raspberry preserves or jam – The star ingredient that provides sweet-tart excitement; try any berry jam as a substitute.
  • Cornstarch – Thickens the jam to prevent seepage; essential for maintaining loaf integrity.
  • Water – Adjusts the filling’s consistency for the perfect spreadability.

For Topping and Glaze

  • Melted butter (for brushing) – Creates a golden crust; olive oil can be used for a lighter option.
  • Powdered sugar – For the optional glaze, adding extra sweetness; substitute with powdered erythritol for a low-sugar option.
  • Lemon juice – Provides a tangy kick to the glaze, balancing the sweetness.

Dive into the joy of baking with this amazing Raspberry Swirl Brioche Loaf—the ultimate festive treat!

Step‑by‑Step Instructions for Raspberry Swirl Brioche Loaf

Step 1: Prepare the Dough
In a large mixing bowl, combine 2¼ teaspoons of active dry yeast, ½ cup of warm milk (about 110°F), and 2 tablespoons of granulated sugar. Allow this mixture to sit for about 5 to 10 minutes until it becomes frothy. Then, add 3½ cups of all-purpose flour, 1 teaspoon of salt, ½ cup of softened unsalted butter, 3 large eggs, 1 teaspoon of vanilla extract, and optional lemon zest. Mix until combined and knead the dough until smooth for about 10-12 minutes.

Step 2: First Rise
Place the dough in a lightly greased bowl, cover it with a clean kitchen towel or plastic wrap, and let it rise in a warm area for 1 to 1.5 hours. It should double in size and feel soft and pillowy. A warm oven, turned off with the light on, makes a perfect environment for this first rise.

Step 3: Make Raspberry Filling
While the dough is rising, prepare the raspberry filling. In a medium saucepan over low heat, combine 1 cup of raspberry preserves, 1 tablespoon of cornstarch, and 2 tablespoons of water. Stir continuously until the mixture thickens, which takes about 5 minutes. Once thickened, remove it from heat and let it cool to room temperature.

Step 4: Shape the Loaf
After the dough has risen, punch it down gently to release air bubbles. Roll the dough out on a lightly floured surface into a large rectangle, approximately 12x18 inches. Spread the cooled raspberry filling evenly over the surface, leaving a small border. Roll the dough tightly into a log, slice it lengthwise down the center, and twist the two halves together.

Step 5: Second Rise
Transfer the twisted loaf into a greased 9x5-inch loaf pan. Cover with a kitchen towel and let it rise again for 30-45 minutes until it has puffed up. The loaf should fill the pan and look fluffy, preparing it for the warmth of the oven.

Step 6: Bake
Preheat your oven to 350°F (175°C). Once the loaf has risen, brush the top with melted butter for a golden crust. Bake for 35-40 minutes, covering the loaf with foil for the last 10 minutes to prevent over-browning. The loaf is done when it is golden brown and sounds hollow when tapped.

Step 7: Cool and Glaze
Remove the Raspberry Swirl Brioche Loaf from the oven and allow it to cool in the pan for about 10 minutes. Then, transfer it to a wire rack. To make the glaze, mix 1 cup of powdered sugar with a splash of lemon juice and a tablespoon of milk. Drizzle this over the cooled loaf for a sweet finishing touch.

What to Serve with Raspberry Swirl Brioche Loaf

Indulge your senses by pairing this delightful loaf with complementary flavors and textures that enhance its charm.

  • Creamy Mashed Potatoes: The rich, buttery flavor of mashed potatoes creates a divine contrast to the fruity sweetness of the brioche.

  • Fresh Fruit Salad: A vibrant mix of seasonal fruits adds brightness and a refreshing sweetness, perfect for breakfast or brunch.

  • Classic Coffee: A warm, aromatic cup balances the sweet-tartness of the raspberry, making for a cozy pairing to enjoy any time of day.

  • Whipped Cream: Dollop some lightly sweetened whipped cream on the side, enhancing every bite while adding a luscious creaminess.

  • Dark Chocolate Drizzle: A simple drizzle of melted dark chocolate can elevate the brioche's flavor profile, mirroring the sweetness of the raspberries.

  • Vanilla Ice Cream: Serve each slice warm with a scoop of vanilla ice cream for a hot-and-cold dessert experience that feels indulgent and festive.

How to Store and Freeze Raspberry Swirl Brioche Loaf

Room Temperature: If you plan to enjoy your Raspberry Swirl Brioche Loaf within 2 days, store it wrapped in foil or in an airtight container at room temperature to keep it soft.

Fridge: To extend freshness, refrigerate the loaf for up to 5 days, wrapped tightly to prevent drying out. Allow it to reach room temperature before serving for the best flavor and texture.

Freezer: For longer storage, freeze the loaf after completely cooling. Wrap it tightly in plastic wrap followed by aluminum foil, and it will keep well for up to 3 months.

Reheating: Thaw overnight in the fridge and allow it to rise at room temperature before reheating. Warm gently in the oven at 350°F for about 10-15 minutes to restore its fresh-baked goodness.

Make Ahead Options

The Raspberry Swirl Brioche Loaf is a fantastic recipe for meal prep enthusiasts looking to save time on busy days! You can refrigerate the dough after the first rise for up to 24 hours, allowing the flavors to deepen. Simply punch down the dough and cover it well before refrigerating. In addition, the raspberry filling can be made in advance and kept in the fridge for up to 3 days—just ensure it’s cooled and stored in an airtight container. When ready to bake, let the dough come to room temperature before shaping and allowing it to rise again. You'll have a stunning loaf that’s just as delicious and impressive, saving you time without sacrificing quality!

Raspberry Swirl Brioche Loaf Variations

Feel free to sprinkle your own creative twist on this delightful loaf, making it truly yours!

  • Gluten-Free: Substitute all-purpose flour with a gluten-free flour blend to enjoy this treat without gluten.
  • Alternative Fillings: Swap raspberry preserves for strawberry or blackberry jam to experiment with new flavors.
  • Nutty Addition: Add chopped walnuts or pecans for a delightful crunch that complements the soft brioche.
  • Spiced Depth: Incorporate spices like cinnamon or nutmeg into the dough for a cozy, warm aroma and taste.
  • Dairy-Free: Use coconut oil instead of butter and dairy-free milk to whip up a vegan version of this wonderful loaf. Many people love the rich flavor that coconut oil adds!
  • Citrusy Brightness: Stir in orange zest along with the lemon for an extra zesty kick in both the dough and glaze.
  • Savory Twist: Include finely chopped herbs like rosemary or thyme for a unique savory brioche that pairs beautifully with cheese.
  • Decadent Topping: Top with a cream cheese glaze instead of a powdered sugar glaze for a rich, creamy finish that elevates every bite.

No matter how you choose to customize your Raspberry Swirl Brioche Loaf, each variation opens up a world of delicious possibilities. If you're eager for more fun tips and suggestions, don't miss my guide on holiday baking to elevate your culinary experience this season!

Expert Tips for Raspberry Swirl Brioche Loaf

  • Fresh Yeast: Always ensure your active dry yeast is fresh and hasn’t expired for the best rise and texture in your Raspberry Swirl Brioche Loaf.

  • Prevent Leakage: When spreading the raspberry filling, leave a small border of dough to avoid overflow during baking. This will keep the swirls intact.

  • Cooling the Filling: Chill the raspberry filling slightly after mixing; this makes it less runny and easier to handle while shaping the loaf.

  • Monitor Baking: Keep an eye on the loaf during the last 10 minutes of baking; loosely cover with foil to prevent over-browning while maintaining that perfect golden crust.

  • Flavor Twists: For variations, feel free to swap out raspberry preserves with strawberry or blueberry jam for a delightful twist on this classic loaf!

Raspberry Swirl Brioche Loaf Recipe FAQs

What kind of yeast should I use for this recipe?
I recommend using active dry yeast for the best results; just make sure it's fresh! If you’re not sure, you can activate it by combining it with warm milk and sugar to check for fizzing—this indicates it’s good to go!

How should I store my Raspberry Swirl Brioche Loaf?
For the freshest experience, store your loaf at room temperature wrapped in foil or in an airtight container for up to 2 days. If it's not going to be eaten right away, refrigeration works too—just wrap tightly and it will last up to 5 days.

Can I freeze Raspberry Swirl Brioche Loaf?
Absolutely! Once cooled, wrap your loaf tightly in plastic wrap followed by aluminum foil. It can be frozen for up to 3 months. When you're ready to enjoy it, thaw it overnight in the fridge, then let it rise at room temperature before gently reheating in the oven at 350°F for about 10-15 minutes.

What can I do if my dough isn't rising properly?
The most common reason for dough not rising is using expired yeast. Always check your yeast's expiration date and consider a warm environment for rising. If your dough hasn't doubled after 1.5 hours, try moving it to a warmer spot (like a turned-off oven with the light on) or give it a little more time.

Are there any dietary considerations for this recipe?
Yes! If you want it to be dairy-free, substitute the butter with margarine or coconut oil, and use dairy-free milk. For an egg-free version, you can swap the eggs for flax eggs (1 tablespoon ground flaxseed + 2.5 tablespoons water = 1 egg). Also, ensure your raspberry preserves are free from allergens if you have specific dietary needs.

Can I use a different fruit filling?
Very! If raspberry doesn’t suit your fancy, you can experiment with strawberry or blueberry jam instead of raspberry preserves for a delightful twist. Just make sure the consistency is similar; overly runny jam might make your loaf difficult to shape!

Raspberry Swirl Brioche Loaf

Raspberry Swirl Brioche Loaf: A Sweet Festive Delight

Experience the joy of baking with this Raspberry Swirl Brioche Loaf, a festive treat combining sweet raspberry filling and tender brioche layers.
Print Recipe Pin Recipe
Prep Time 1 hour hr
Cook Time 40 minutes mins
Rising Time 2 hours hrs
Total Time 3 hours hrs 40 minutes mins
Servings: 10 slices
Course: Dessert
Cuisine: American
Calories: 250
Ingredients Equipment Method Nutrition Notes

Ingredients
  

For the Dough
  • 3.5 cups All-purpose flour Can be substituted with gluten-free flour
  • 2.25 teaspoons Active dry yeast Ensure freshness for maximum rise
  • 0.5 cups Granulated sugar Optional sugar alternatives available
  • 1 teaspoon Salt
  • 0.5 cups Warm milk About 110°F, can use dairy-free milk
  • 0.5 cups Unsalted butter Substitutable with margarine for dairy-free
  • 3 large Eggs Alternatives include flax eggs or applesauce
  • 1 teaspoon Vanilla extract Almond extract can be used instead
  • Lemon zest Optional
For the Raspberry Filling
  • 1 cup Raspberry preserves or jam Any berry jam can be a substitute
  • 1 tablespoon Cornstarch Essential for maintaining loaf integrity
  • 2 tablespoons Water
For Topping and Glaze
  • 2 tablespoons Melted butter Olive oil is a lighter option
  • 1 cup Powdered sugar Low-sugar option can be used
  • 1 tablespoon Lemon juice

Equipment

  • Mixing Bowl
  • Loaf pan
  • Saucepan
  • wire rack

Method
 

Dough Preparation
  1. Combine active dry yeast, warm milk, and granulated sugar. Let sit for 5-10 minutes until frothy.
  2. Add flour, salt, butter, eggs, vanilla extract, and optional lemon zest. Mix and knead until smooth, about 10-12 minutes.
First Rise
  1. Place the dough in a greased bowl, cover, and let it rise in a warm area for 1-1.5 hours until doubled.
Raspberry Filling
  1. In a saucepan, combine raspberry preserves, cornstarch, and water. Stir over low heat until thickened, about 5 minutes.
  2. Remove from heat and cool to room temperature.
Shaping the Loaf
  1. Punch down the dough, roll into a rectangle, spread raspberry filling, roll tightly, slice, and twist.
Second Rise
  1. Place the twisted loaf in a greased pan, cover, and let rise for 30-45 minutes until puffy.
Bake
  1. Preheat the oven to 350°F. Brush with melted butter, bake for 35-40 minutes, covering with foil if needed.
Cool and Glaze
  1. Cool in the pan for 10 minutes, then transfer to a wire rack. Drizzle with glaze made from powdered sugar and lemon juice.

Nutrition

Serving: 1sliceCalories: 250kcalCarbohydrates: 34gProtein: 4gFat: 11gSaturated Fat: 7gCholesterol: 50mgSodium: 200mgPotassium: 160mgFiber: 1gSugar: 8gVitamin A: 500IUVitamin C: 1mgCalcium: 50mgIron: 1mg

Notes

For best results, ensure your yeast is fresh. Control filling amounts to prevent leakage during baking. Chill filling slightly for easier handling.

Tried this recipe?

Let us know how it was!

Cheese and Olive Quick Bread: Your New Favorite Comfort Food

August 20, 2025 by Grace Snow Leave a Comment

In a cozy kitchen filled with the alluring aroma of freshly baked bread, I found myself wrestling with the desire to create something unique yet familiar. Enter the Savory Cheese and Olive Quick Bread—a delightful fusion that marries the rich tang of cheese with the briny pops of olives. This recipe is not just straightforward and quick to whip up, it’s also completely customizable, allowing you to play with different cheese and olive combinations that suit your palate. Perfect for casual brunches or a comforting snack, this fluffy loaf with its golden crust is bound to elevate any occasion. Who’s ready to knead their way to comfort and flavor? Let’s dive into the details!

Why is this Cheese and Olive Quick Bread special?

Flavorful combinations bring the best of both worlds—tangy cheese meets savory olives for a burst of taste in every bite. Customizable to fit any mood, you can swap in your favorite cheeses and olives for a personalized twist. Quick and easy preparation means you can indulge in homemade goodness without hours in the kitchen. Perfectly paired with soups or as a part of a brunch spread, this bread is sure to impress guests or satisfy a craving. If you adore comforting, flexible recipes, this Savory Cheese and Olive Quick Bread will become a beloved staple in your kitchen.

Cheese and Olive Quick Bread Ingredients

For the Batter

  • All-Purpose Flour – Provides structure and texture; can substitute with whole wheat flour for added fiber.
  • Baking Powder – Acts as a leavening agent to help the bread rise.
  • Salt – Enhances the flavor of the quick bread.
  • Black Pepper – Adds mild heat and depth to the flavor profile.
  • Cayenne Pepper (optional) – Introduces a spicy kick; omit if you prefer a milder taste.
  • Shredded Cheese – Contributes moisture and flavor; cheddar or mozzarella work well, but feel free to explore other cheeses like gouda or feta.
  • Whole Milk – Moistens the dough and adds a richer flavor; almond milk can be a great dairy-free alternative.
  • Olive Oil – Adds moisture and a rich flavor; you can substitute with melted butter if desired.
  • Eggs – Provide structure and bind the ingredients together.
  • Pitted Olives – Adds a savory flavor; consider mixing green and black olives for variety or include sun-dried tomatoes for a fun twist.
  • Fresh Thyme/Dried Thyme (optional) – Provides lovely herbal notes; if fresh thyme is unavailable, use dried at one-third of the amount.

For Greasing

  • Butter/Non-Stick Cooking Spray – Used for greasing the pan to ensure easy release of your delicious bread.

Step‑by‑Step Instructions for Cheese and Olive Quick Bread

Step 1: Preheat and Prepare
Begin by preheating your oven to 375°F (190°C). Grease a 9x5 inch loaf pan with butter or non-stick cooking spray to ensure your savory Cheese and Olive Quick Bread releases smoothly once baked. Set the prepared pan aside as you move on to mixing the dry ingredients.

Step 2: Mix Dry Ingredients
In a large mixing bowl, whisk together 2 cups of all-purpose flour, 1 tablespoon of baking powder, 1 teaspoon of salt, ½ teaspoon of black pepper, and, if desired, a pinch of cayenne pepper for an extra kick. Make sure the mixture is well combined and no lumps remain, allowing the flavors to mingle and ensuring your bread rises beautifully in the oven.

Step 3: Combine Wet Ingredients
In a separate bowl, whisk together 1 cup of whole milk, ¼ cup of olive oil, and 2 large eggs until fully incorporated. The wet ingredients help create a tender dough, so give them a good mix to blend the flavors. Once combined, gradually incorporate this mixture into your dry ingredients, stirring gently to combine.

Step 4: Mix to Form Batter
Using a spatula or wooden spoon, gently fold the wet mixture into the dry ingredients until just combined; be careful not to overmix. You want to achieve a thick batter without any dry flour pockets, as overmixing can lead to denser bread. The key is a bit of lumpiness; it ensures your Cheese and Olive Quick Bread remains fluffy and light.

Step 5: Fold in Flavorful Add-ins
Now it’s time to add the star ingredients! Fold in 1 cup of shredded cheese and ¾ cup of pitted olives into the batter, along with optional fresh or dried thyme for a fragrant touch. Be sure to distribute the cheese and olives evenly throughout the batter so that each bite bursts with flavor in your delightful quick bread.

Step 6: Pour Batter into Pan
Carefully pour the batter into your greased loaf pan, spreading it evenly with the spatula. Smooth the top so the bread bakes uniformly, creating a lovely golden crust. As the batter settles, you’ll notice the delicious combinations already melding, making your kitchen smell inviting, even before the baking begins.

Step 7: Bake to Perfection
Place the loaf pan in your preheated oven and bake for 45-50 minutes, or until the top is golden brown and a wooden skewer inserted into the center comes out clean. This is an essential step in achieving a fluffy texture and that delightful crispy, golden crust we all love in a perfect Cheese and Olive Quick Bread.

Step 8: Cool and Serve
Once baked, remove the bread from the oven and let it cool in the pan for 10-15 minutes. This resting period allows the bread to firm up a bit for easier slicing. Afterward, carefully transfer it to a wire rack to cool completely. Slice and serve your warm, flavorful Cheese and Olive Quick Bread, and enjoy the tempting aroma wafting through your home!

Cheese and Olive Quick Bread Variations

Feel free to get creative with this recipe and make it your own, adding unique flavors that tickle your taste buds!

  • Vegetable-Loaded: Add sun-dried tomatoes or chopped spinach for an extra burst of color and flavor.
    These additions not only enhance the taste but also contribute beautiful visual appeal to your bread.

  • Spicy Kick: Toss in some jalapeños or crushed red pepper flakes for a fiery twist.
    This little addition can transform your quick bread into a flavor-packed experience that'll warm you up from the inside out.

  • Herb Infusion: Swap out thyme with fresh rosemary or oregano for an aromatic surprise.
    These fragrant herbs will bring a delightful freshness to your cheese and olive bread with each slice.

  • Nutty Addition: Incorporate chopped walnuts or pecans for added crunch and flavor.
    The nuttiness will complement the cheese and olives perfectly, making each bite interesting.

  • Cheese Variety: Mix different cheeses like feta, gouda, or even a sharp blue cheese for great complexity.
    The unique twists in flavor will keep your palate excited every time you bake a loaf.

  • Olive Mix: Experiment with kalamata, green olives, or even a blend of stuffed olives for a flavor adventure.
    Each mix offers a unique taste experience that can transport you to a Mediterranean getaway.

  • Garlic Lovers: Add minced garlic or garlic powder to the batter for those who crave extra flavor.
    This little twist can create a savory garlic bread experience that pairs splendidly with soups or salads.

  • Sweet Touch: For a contrasting flavor, think about adding a touch of honey or maple syrup to your batter.
    The subtle sweetness can create a delightful balance, especially if served with a cheese platter or charcuterie board.

Don’t forget, if you’re in need of some tasty side dishes, this bread pairs beautifully with a warm bowl of Cornbread Breakfast Casserole or is delicious alongside Fried Shrimp Cabbage for a delightful brunch! Let your imagination soar, and enjoy the baking journey!

Make Ahead Options

These Savory Cheese and Olive Quick Bread are perfect for meal prep enthusiasts! You can prepare the dry ingredients (flour, baking powder, salt, black pepper, and cayenne) up to 24 hours in advance. Simply store them in an airtight container to maintain freshness. The wet ingredients (milk, olive oil, and eggs) can also be combined and refrigerated for up to 3 days. When you’re ready to bake, mix the wet and dry ingredients, fold in your desired cheese and olives, and then pour the batter into the greased pan. This makes your cooking process seamless, ensuring just as delicious results with minimal effort!

Expert Tips for Cheese and Olive Quick Bread

  • Avoid Overmixing: Gently fold the wet and dry ingredients to keep the bread light and fluffy. Overmixing can create a dense texture that isn't ideal for a Cheese and Olive Quick Bread.
  • Cheese Choices: Experiment with different cheeses like feta or gouda for a unique flavor profile. Each cheese will alter the taste, giving you plenty of choices to explore!
  • Fresh is Best: Serve your quick bread fresh for maximum flavor. If you have leftovers, store them in an airtight container or freeze for later enjoyment.
  • Herb Infusion: Adding fresh thyme or other herbs can elevate the flavor. If using dried thyme, remember to use only one-third of the amount for a balanced taste.
  • Flavor Combinations: Don’t hesitate to mix up the olives! Combining green and black olives or adding sun-dried tomatoes can create fun variations you’ll love.

How to Store and Freeze Cheese and Olive Quick Bread

  • Room Temperature: Store the cooled Cheese and Olive Quick Bread in an airtight container for up to 3 days to maintain its freshness and prevent it from drying out.
  • Fridge: For longer storage, wrap the bread in plastic wrap and place it in the fridge. It can last up to a week, but the texture may change slightly.
  • Freezer: To freeze, wrap the bread tightly in plastic wrap followed by aluminum foil to prevent freezer burn. It can be frozen for up to 3 months.
  • Reheating: For the best results, slice the frozen bread and toast it in a skillet or toaster until warm and crispy. Enjoy the delightful flavors once again!

What to Serve with Cheese and Olive Quick Bread?

Savor the joy of pairing this delicious bread with dishes that complement its rich flavors and textures.

  • Creamy Tomato Soup: The acidity of the soup enhances the cheesy goodness while adding warmth to your meal. A classic pairing that warms both heart and stomach.

  • Garden Salad: Fresh greens topped with a tangy vinaigrette balance the richness of the bread. The crisp textures and vibrant flavors create a refreshing contrast.

  • Mediterranean Antipasto Platter: Serve with olives, cheeses, and cured meats for a full flavor experience. This combination makes for a delightful appetizer spread that friends will love.

  • Roasted Vegetables: Sweet roasted carrots, zucchini, or bell peppers bring a satisfying array of flavors and nutrients, grounding the dish with their earthy essence.

  • Herbed Butter: Spread a bit of herbed butter on warm slices. The richness of the butter, coupled with fragrant herbs, elevates every bite of bread.

  • Olive Oil Dipping Sauce: A simple mix of high-quality olive oil, balsamic vinegar, and Italian herbs creates a perfect dipping sauce that highlights the bread's flavor.

  • Sparkling Wine: Pairing this bread with a light sparkling wine adds a celebratory touch to any gathering. The effervescence cuts through the richness, making each sip refreshing.

  • Fruit Jam or Chutney: A sweet jam or spicy chutney on the side complements the savory notes delightfully. The contrast adds another layer of flavor excitement.

Cheese and Olive Quick Bread Recipe FAQs

What type of cheese works best for Cheese and Olive Quick Bread?
Absolutely! While cheddar and mozzarella are popular choices for a rich, creamy texture, you can customize your Cheese and Olive Quick Bread by using gouda for a smoky flavor or feta for a tangy twist. Experiment with your favorites to discover unique flavor combinations!

How should I store Cheese and Olive Quick Bread?
To keep your delicious Cheese and Olive Quick Bread fresh, store it in an airtight container at room temperature for up to 3 days. If you want to keep it longer, wrap it tightly in plastic wrap and place it in the fridge where it can last up to a week, though the texture may change. For the best preservation, use the freezer method!

Can I freeze Cheese and Olive Quick Bread?
Very much so! To freeze, wrap the cooled bread tightly in plastic wrap followed by aluminum foil to prevent freezer burn. It can be stored in the freezer for up to 3 months. When you’re ready to indulge again, simply slice and toast the frozen bread in a skillet or toaster for a warm, crispy treat!

What should I do if my bread is too dense?
If your Cheese and Olive Quick Bread turns out dense, it’s likely due to overmixing the batter. Next time, gently fold the wet and dry ingredients until just combined, keeping some lumps. Also, ensure your baking powder is fresh to achieve a good rise, giving your bread that fluffy texture we all love.

Can I make this recipe gluten-free?
Absolutely! You can substitute the all-purpose flour with a gluten-free flour blend. I recommend using a blend that includes xanthan gum to mimic the structure of wheat flour. Just make sure to measure accurately, as gluten-free flours can absorb moisture differently. Enjoy your delicious gluten-free Cheese and Olive Quick Bread!

Are there any allergy considerations for this recipe?
Yes, if you or your guests have dietary restrictions, be mindful of the dairy in this recipe. You can easily make it dairy-free by using almond milk and substituting cheese with dairy-free alternatives available on the market. Always check ingredient labels to ensure they fit your needs!

Cheese and Olive Quick Bread Recipe FAQs.

Cheese and Olive Quick Bread

Cheese and Olive Quick Bread: Your New Favorite Comfort Food

This Cheese and Olive Quick Bread is a quick, customizable recipe that combines tangy cheese and savory olives, perfect for any occasion.
Print Recipe Pin Recipe
Prep Time 15 minutes mins
Cook Time 50 minutes mins
Cooling Time 15 minutes mins
Total Time 1 hour hr 20 minutes mins
Servings: 10 slices
Course: Snacks
Cuisine: Baked Goods
Calories: 180
Ingredients Equipment Method Nutrition Notes

Ingredients
  

For the Batter
  • 2 cups all-purpose flour can substitute with whole wheat flour for added fiber
  • 1 tablespoon baking powder acts as a leavening agent
  • 1 teaspoon salt enhances flavor
  • 0.5 teaspoon black pepper adds depth to flavor
  • 0.25 teaspoon cayenne pepper optional for spice
  • 1 cup shredded cheese cheddar or mozzarella recommended
  • 1 cup whole milk almond milk for dairy-free option
  • 0.25 cup olive oil can substitute with melted butter
  • 2 large eggs binds ingredients
  • 0.75 cup pitted olives consider mixing green and black olives
  • 1 tablespoon fresh thyme or 1 teaspoon dried thyme as substitute
For Greasing
  • 1 tablespoon butter for greasing the pan

Equipment

  • Loaf pan
  • Mixing bowls
  • Whisk
  • Spatula

Method
 

Step-by-Step Instructions
  1. Preheat your oven to 375°F (190°C) and grease a 9x5 inch loaf pan.
  2. Whisk together the dry ingredients in a mixing bowl.
  3. In a separate bowl, whisk together the wet ingredients until fully incorporated.
  4. Gently fold the wet mixture into the dry ingredients until just combined.
  5. Fold in the shredded cheese and pitted olives.
  6. Pour the batter into the greased loaf pan and smooth the top.
  7. Bake for 45-50 minutes until golden brown and a skewer comes out clean.
  8. Cool in the pan for 10-15 minutes before transferring to a wire rack.

Nutrition

Serving: 1sliceCalories: 180kcalCarbohydrates: 22gProtein: 6gFat: 7gSaturated Fat: 3gPolyunsaturated Fat: 0.5gMonounsaturated Fat: 3gCholesterol: 50mgSodium: 350mgPotassium: 120mgFiber: 1gSugar: 1gVitamin A: 500IUCalcium: 100mgIron: 1mg

Notes

Avoid overmixing to keep the bread light and fluffy. Experiment with cheese and olive combinations for unique flavors.

Tried this recipe?

Let us know how it was!

Sweet & Spicy Hot Honey Feta Chicken Dish for Cozy Nights

August 20, 2025 by Grace Snow Leave a Comment

A delightful aroma wafted through my kitchen as I prepared my latest discovery: Hot Honey Feta Chicken. This dish is a game-changer, perfectly balancing sweet, spicy, and tangy notes that dine with your taste buds in a Mediterranean embrace. The best part? It comes together in less than 40 minutes, making it an ideal solution for busy weeknight dinners or impressive meals for guests. Packed with protein and cozy flavors, this recipe is not only quick to whip up but also incredibly versatile for meal prep or kitchen experiments. Whether you’re craving something comforting or looking to level up your culinary game, this Hot Honey Feta Chicken dish will leave you and your loved ones asking for seconds. What’s your favorite twist for those weeknight meals?

Why You’ll Love Hot Honey Feta Chicken

Simplicity at Its Best: This recipe requires minimal ingredients and a straightforward cooking method, making it perfect for home cooks of all skill levels.

Irresistible Flavor Combination: The fusion of sweet honey, spicy chili, and tangy feta creates an explosion of taste you won’t be able to resist.

Meal Prep Superstar: With just one pan required for cooking, this dish is an excellent choice for meal prepping—simply store leftovers to enjoy later!

Quick Cooking Time: Done in less than 40 minutes, this is the ultimate solution for busy weeknights or when unexpected guests arrive. Pair it with fluffy rice or a refreshing salad for a complete meal, similar to our delicious Crock Pot Chicken or Honey Garlic Chicken options!

Crowd-Pleasing Appeal: Whether serving family or friends, this dish guarantees compliments all around, as everyone will love the rich and savory flavors.

Hot Honey Feta Chicken Ingredients

• The secret to this delightful dish lies in its simplicity and versatility!

For the Chicken

  • Chicken (1½ lbs boneless, skinless thighs or breasts) – Main protein; thighs offer richer flavor, while breasts are leaner.
  • Olive oil (1 tbsp) – Adds moisture and richness; feel free to use another cooking oil for a different taste.

For the Marinade

  • Paprika (1 tsp) – Adds a subtle smokiness; feel free to explore different paprika varieties for more depth.
  • Garlic powder (1 tsp) – Enhances savory notes; fresh garlic can be used for a more robust flavor if preferred.
  • Onion powder (½ tsp) – Provides a sweet, savory base; adjust to taste for more intensity.
  • Cumin (½ tsp) – Adds warmth and earthiness; an excellent addition for Mediterranean flair.
  • Salt (½ tsp) – Essential for flavor; adjust according to dietary needs.
  • Black pepper (¼ tsp) – For just the right amount of heat; increase if you like it spicier.

For the Glaze

  • Lemon juice (1 tbsp) – Brings brightness; vinegar is a great substitute if you’re out of lemons.
  • Honey (¼ cup) – The star ingredient for sweetness; agave syrup offers a vegan alternative.
  • Chili flakes (1–2 tsp) – Adds a kick; adjust based on your spice preferences!
  • Apple cider vinegar (1 tbsp) – Balances sweetness with tanginess; lemon juice works as a substitute too.
  • Butter (1 tbsp) – Enriches the sauce; swap for olive oil if you're looking for a dairy-free option.
  • Garlic clove (1, finely minced) – Strengthens the savoriness of the glaze; more can be added if you adore garlic.

For the Topping

  • Feta cheese (½ cup, crumbled) – Creamy and salty; low-fat feta is an option if watching calories.
  • Fresh parsley or mint – Adds a pop of color and brightness; other herbs can be used to match your taste.
  • Lemon zest or juice – Extra brightness to elevate flavors; don’t skip this for that fresh zing!
  • Toasted sesame seeds or extra chili flakes (optional) – For added texture or heat, making this Hot Honey Feta Chicken dish even more delightful!

Step‑by‑Step Instructions for Hot Honey Feta Chicken Dish

Step 1: Marinate the Chicken
Begin by patting the chicken dry with paper towels to ensure a great sear. In a mixing bowl, combine olive oil and lemon juice, then coat the chicken evenly, followed by a generous sprinkle of the paprika, garlic powder, onion powder, cumin, salt, and black pepper. Allow the chicken to marinate for 10 to 15 minutes at room temperature, or refrigerate for up to an hour to deepen the flavors.

Step 2: Cook the Chicken
Heat a medium skillet over medium-high heat until hot. Once ready, carefully add the marinated chicken pieces to the skillet, ensuring not to overcrowd them. Sear the chicken thighs for about 5 to 6 minutes per side, or 4 to 5 minutes for breasts, cooking until they are golden brown and reach an internal temperature of 165°F (75°C). Once cooked through, transfer the chicken to a plate and keep warm.

Step 3: Make the Hot Honey Sauce
In a small saucepan over medium heat, combine the honey, chili flakes, butter, minced garlic, and apple cider vinegar. Stir continuously as the mixture heats up, bringing it to a gentle simmer. Continue to simmer for 2 to 3 minutes until the sauce becomes bubbly and thickens slightly, ensuring to watch for burning. This fragrant hot honey sauce is what will elevate your Hot Honey Feta Chicken dish.

Step 4: Assemble and Finish
Once the chicken is cooked and the hot honey sauce is ready, return the chicken to the skillet and pour the sauce over it, making sure all pieces are generously coated. Crumble the feta cheese over the top, allowing it to soften slightly in the warmth. Let the chicken sit for a couple of minutes so the flavors meld beautifully, creating a stunning presentation for your meal.

Step 5: Serve
Transfer the hot honey feta chicken to a serving platter or individual plates, garnishing it with freshly chopped parsley or mint for a pop of color. Pair this delightful dish with fluffy rice, roasted vegetables, couscous, or a crisp green salad. Spoon any remaining hot honey sauce over the chicken and sides, creating a fantastic blend of tastes to savor with every bite.

Expert Tips for Hot Honey Feta Chicken

Marinate Properly: Give the chicken enough time to absorb the marinade—10 to 15 minutes is ideal for flavor without overwhelming it.

Perfect Searing: Preheat your skillet to achieve that gorgeous golden-brown exterior on the chicken. Avoid overcrowding the pan to ensure even cooking.

Rest the Chicken: Let the cooked chicken rest for a minute before slicing; this keeps the juices intact for a moist and tender Hot Honey Feta Chicken dish.

Watch the Sauce: Simmer the hot honey sauce until just thickened—overcooking can lead to a burnt flavor. Stir continuously for the best results.

Adjust Spice Level: Feel free to modify the chili flakes based on your heat tolerance. Start with less if you're unsure, and add more as desired!

Make Ahead Options

Hot Honey Feta Chicken is a fantastic choice for meal prep! You can marinate the chicken up to 24 hours in advance, allowing the flavors to deeply infuse, and refrigerate it until you're ready to cook. The hot honey sauce can also be prepared ahead of time; simply store it in an airtight container in the fridge for up to 3 days. When you’re ready to serve, just reheat the sauce over low heat until warm and cook the chicken as instructed for perfectly juicy results. This makes assembling a delicious weeknight dinner effortless, saving you precious time while still delivering a truly satisfying meal!

What to Serve With Hot Honey Feta Chicken

To create a well-rounded meal, consider these delicious accompaniments that enhance the flavors of your dish.

  • Fluffy Basmati Rice: A light, aromatic rice that acts as a perfect canvas for soaking up the spicy honey glaze, balancing the dish beautifully.

  • Grilled Vegetables: Roasting seasonal veggies like zucchini, bell peppers, and asparagus adds a smoky char and vibrant colors to your table, elevating the presentation.

  • Refreshing Greek Salad: The crispness of cucumbers, tomatoes, and olives tossed with a lemony vinaigrette introduces a cool contrast to the rich flavors of the chicken.

  • Couscous or Quinoa Salad: These hearty grains can be mixed with herbs and citrus for a nutty and refreshing side that ties in Mediterranean elements seamlessly.

  • Garlic Naan or Pita Bread: Warm, fluffy bread is perfect for sopping up the remaining honey sauce, making every bite a heavenly delight.

  • Herbed Yogurt Sauce: A refreshing yogurt dip with mint or dill can cool your palate and provide a flavorful contrast, perfect for those who enjoy balancing heat with creaminess.

  • Light White Wine: A chilled Sauvignon Blanc or a crisp Pinot Grigio pairs wonderfully, enhancing the flavors of the hot honey feta chicken dish while refreshing your taste buds.

Storage Tips for Hot Honey Feta Chicken

Fridge: Store leftovers in an airtight container for up to 3 days. Keep chicken separate from any sides to maintain texture and flavor.

Freezer: Freeze the cooked Hot Honey Feta Chicken in a sealed freezer bag for up to 3 months. Thaw in the refrigerator overnight before reheating.

Reheating: Reheat in a skillet over medium heat until warmed through, adding a splash of water or broth to prevent drying out. Alternatively, microwave in 30-second intervals until hot.

Make-Ahead: This dish can be marinated a day in advance. Just ensure to let it sit at room temperature for about 15 minutes before cooking for best results.

Hot Honey Feta Chicken Variations

Feel free to make this dish your own by adding a personal touch to suit your preferences!

  • Alternate Protein: Use shrimp, tofu, or lamb for a different flavor experience and texture twist. Each one brings a unique taste to the dish.
  • Citrus Zest: Add orange or lime zest to the hot honey glaze for a burst of fresh flavor that will brighten every bite. Trust me, your taste buds will appreciate the citrus notes!
  • Herb Infusion: Introduce herbs like thyme or oregano into the marinade for added aromatic depth. The combination of flavors will take your dish to the next level!
  • Spice It Up: Amp up the heat by incorporating diced jalapeños or a splash of hot sauce for an extra kick. Feel the warmth comfort your soul with each bite!
  • Wrap It Up: Shred the chicken and pile it into wraps with greens, avocado, and any desired toppings for a fresh, portable meal. Perfect for lunches or picnics!
  • Grain Bowl: Transform it into a grain bowl by serving over quinoa or brown rice, topped with roasted veggies and a dollop of tzatziki for a fantastic Mediterranean fix.
  • Creamy Twist: Add a tablespoon of cream cheese or Greek yogurt to the sauce to make it richer and creamier, balancing the heat beautifully. You’ll love the silky consistency!
  • Savory Swaps: For a different base flavor, substitute honey with maple syrup or brown sugar if you're looking for a more caramelized sweetness that pairs well with the feta.

These variations can elevate your cooking experience, making each meal feel like a new adventure! Consider trying out the Chipotle Lime Chicken recipe for yet another twist on flavor concepts!

Hot Honey Feta Chicken Recipe FAQs

How do I select ripe ingredients for this dish?
Absolutely! When choosing chicken, look for boneless, skinless thighs or breasts that are firm and pink in color. Fresh herbs should be vibrant and fragrant. For honey, any variety will work, but a high-quality raw honey offers the best flavor. If using lemon, select ones that are heavy for their size, indicating juiciness.

How should I store leftovers of Hot Honey Feta Chicken?
Leftovers can be stored in an airtight container in the refrigerator for up to 3 days. I recommend keeping the chicken separate from any sides to maintain their individual textures. When you’re ready to enjoy it again, a quick reheat in the skillet brings back the glory of this dish!

Can I freeze Hot Honey Feta Chicken?
Yes, you can! Once the chicken has cooled, place it in a sealed freezer bag or airtight container. It will last for up to 3 months. To thaw, just move it to the fridge the night before you plan to eat it. When reheating, do so gently over medium heat with a splash of water to keep it moist.

What should I do if my hot honey sauce is too thick?
If your hot honey sauce turns out too thick, don't worry! Simply add a teaspoon of water or a splash of lemon juice while stirring it over low heat until you reach your desired consistency. Always taste and adjust accordingly, as the balance of sweet and spicy is important!

Is this recipe suitable for people with dietary restrictions?
Very! This Hot Honey Feta Chicken dish can easily accommodate various diets. For gluten-free options, ensure all ingredients are gluten-free, especially the sauces. If you're looking for a lower-fat meal, opt for low-fat feta cheese. Vegans can substitute chicken with tofu or chickpeas and use agave syrup instead of honey. Just remember to check all labels!

Can I use different proteins or ingredients in this recipe?
Definitely! Feel free to swap the chicken for shrimp, lamb, or even tofu to cater to different tastes. Experimenting is encouraged! Try adding citrus zest to the honey glaze for a fresh twist or incorporating seasonal vegetables into your sides. The best part of cooking at home is making it your own!

Hot Honey Feta Chicken Dish

Sweet & Spicy Hot Honey Feta Chicken Dish for Cozy Nights

Discover the delightful balance of sweet, spicy, and tangy notes in this Hot Honey Feta Chicken Dish, perfect for cozy nights.
Print Recipe Pin Recipe
Prep Time 15 minutes mins
Cook Time 25 minutes mins
Resting Time 2 minutes mins
Total Time 40 minutes mins
Servings: 4 servings
Course: Dinner
Cuisine: Mediterranean
Calories: 350
Ingredients Equipment Method Nutrition Notes

Ingredients
  

For the Chicken
  • 1.5 lbs boneless, skinless chicken thighs or breasts Thighs offer richer flavor, while breasts are leaner.
  • 1 tbsp olive oil Can substitute with another cooking oil.
For the Marinade
  • 1 tsp paprika Feel free to explore different paprika varieties.
  • 1 tsp garlic powder Fresh garlic can be used for a more robust flavor.
  • 0.5 tsp onion powder Adjust to taste for more intensity.
  • 0.5 tsp cumin Adds warmth and earthiness.
  • 0.5 tsp salt Adjust according to dietary needs.
  • 0.25 tsp black pepper Increase if you like it spicier.
For the Glaze
  • 1 tbsp lemon juice Vinegar is a great substitute.
  • 0.25 cup honey Agave syrup is a vegan alternative.
  • 1-2 tsp chili flakes Adjust based on your spice preferences.
  • 1 tbsp apple cider vinegar Lemon juice works as a substitute.
  • 1 tbsp butter Can swap for olive oil for a dairy-free option.
  • 1 clove garlic, finely minced Add more if you adore garlic.
For the Topping
  • 0.5 cup feta cheese, crumbled Low-fat feta is an option if watching calories.
  • fresh parsley or mint Adds a pop of color and brightness.
  • lemon zest or juice Extra brightness to elevate flavors.
  • toasted sesame seeds or extra chili flakes Optional for added texture or heat.

Equipment

  • medium skillet
  • Mixing Bowl
  • small saucepan

Method
 

Step-by-Step Instructions
  1. Marinate the chicken by coating it in olive oil and lemon juice, sprinkling the marinade spices, and letting it sit for 10-15 minutes.
  2. Cook the chicken in a hot skillet until golden brown and cooked through, about 5-6 minutes per side for thighs and 4-5 minutes for breasts.
  3. Make the hot honey sauce by combining honey, chili flakes, butter, garlic, and apple cider vinegar in a saucepan and simmering until thickened.
  4. Assemble by returning the chicken to the skillet, pouring the sauce over it, and topping with crumbled feta.
  5. Serve garnished with parsley or mint, alongside rice or salad.

Nutrition

Serving: 1servingCalories: 350kcalCarbohydrates: 30gProtein: 25gFat: 18gSaturated Fat: 6gPolyunsaturated Fat: 2gMonounsaturated Fat: 10gCholesterol: 90mgSodium: 750mgPotassium: 600mgFiber: 1gSugar: 15gVitamin A: 500IUVitamin C: 10mgCalcium: 150mgIron: 2mg

Notes

Ideal for meal prep; can be marinated a day in advance. Store leftovers in an airtight container for up to 3 days.

Tried this recipe?

Let us know how it was!

Irresistible Chocolate Truffles - 3 Ingredients of Pure Joy

August 20, 2025 by Grace Snow Leave a Comment

The moment I unwrapped those homemade Chocolate Truffles, a wave of nostalgia hit me. With just three simple ingredients, this recipe beckons with promises of velvety goodness and customizable delight. Whether you're preparing an indulgent treat for a cozy night in or surprising friends with a thoughtful gift, these truffles deliver on both taste and ease. They are not only incredibly quick to whip up but can also cater to various dietary preferences thanks to their adaptable ingredients. Imagine the joy of rolling these little bites of heaven in your favorite toppings, like crushed nuts or colorful sprinkles, making each batch uniquely yours. Ready to dive into a world of chocolatey bliss and creativity in the kitchen? Let’s get started!

Why are these truffles a must-try?

Simplicity at Its Best: With just three ingredients, these Chocolate Truffles are incredibly easy to make.

Customizable Delight: Tailor them to your taste by substituting the chocolate or toppings, whether you prefer vegan chocolate or a sprinkle of crushed nuts.

Crowd-Pleasing Treat: Perfect for gifting or celebrations, they’ll impress friends and family at any gathering.

Decadent Creaminess: Each truffle is rich and creamy, creating a luxurious experience that feels indulgent without a lot of effort—just wait until you try them with a side of Homemade Hot Chocolate!

Quick and Versatile: These truffles can be whipped up in no time, making them a go-to recipe for spontaneous cravings or events.

Chocolate Truffles Ingredients

For the Truffle Base
• Semi-Sweet Chocolate Chips – The star ingredient providing rich flavor and smooth texture; consider using vegan chocolate chips for a dairy-free option.
• Sweetened Condensed Milk (14 oz can) – This ingredient binds the truffles together and adds sweetness; opt for sweetened condensed coconut milk for a dairy-free twist.

For the Coating
• Walnut Pieces (¼ cup) – These offer a delightful nutty crunch; feel free to swap with chopped nuts, cocoa powder, or dried fruits for variety.

Enjoy crafting your own delicious Chocolate Truffles and don’t forget to experiment with toppings and variations to make them uniquely yours!

Step‑by‑Step Instructions for Chocolate Truffles

Step 1: Melt the Chocolate
In a microwave-safe bowl, combine 1 cup of semi-sweet chocolate chips. Heat in the microwave at 20-second intervals, stirring between each session until the chocolate is completely melted and smooth, which should take about 1-2 minutes. Be careful not to overheat, as burnt chocolate will lose its silky texture.

Step 2: Mix in Condensed Milk
Once your chocolate is melted, immediately stir in a 14 oz can of sweetened condensed milk. Mix thoroughly until the two ingredients are fully incorporated, creating a glossy mixture. The chocolate should look rich and creamy. Afterward, cover the bowl and refrigerate the mixture for at least 30 minutes, or until it firms up.

Step 3: Prepare Your Toppings
While the chocolate mixture is chilling, process ¼ cup of walnut pieces in a food processor until they resemble small crumbs. This crunchy coating will enhance your Chocolate Truffles, adding texture and flavor. Set the crushed walnuts aside for easy access once the chocolate base is ready.

Step 4: Shape the Truffles
After the mixture has cooled in the refrigerator, remove it and use a 1-ounce cookie scoop or your hands to portion out the chocolate dough. Roll each portion into a smooth ball, creating a uniform size for your truffles. The warmth from your hands will make this process easier, yielding a perfect round shape.

Step 5: Coat the Truffles
Next, gently roll each chocolate ball in the processed walnut crumbs until completely coated. Ensure that all sides are covered, allowing the truffles to gain that delightful crunchy texture. You can also have fun here by using different toppings like crushed nuts or cocoa powder if you prefer variety.

Step 6: Final Chill
Once all the truffles are rolled and coated, place them on a baking sheet lined with parchment paper. Refrigerate for an additional 15-20 minutes to set. They will firm up nicely, creating the ideal texture for your indulgent Chocolate Truffles. Once they are set, your homemade treats are ready to be shared or stored!

Expert Tips for Chocolate Truffles

• Choose Quality Chocolate: Using high-quality semi-sweet chocolate chips will elevate the flavor of your truffles significantly, making each bite a rich delight.

• Avoid Overheating: When melting the chocolate, be vigilant to avoid overheating. Stir frequently and choose shorter heating intervals to maintain a smooth texture for your Chocolate Truffles.

• Chill for Firmness: Refrigerate the chocolate mixture sufficiently before shaping. Chilling helps achieve the perfect consistency, allowing easy rolling into balls without sticking to your hands.

• Explore Toppings: Don’t hesitate to get creative with coatings! Try crushed cookies, colorful sprinkles, or shredded coconut for a fun twist on your Chocolate Truffles.

• Use Different Bindings: For a dairy-free option, substitute sweetened condensed milk with sweetened condensed coconut milk. This keeps the dessert delicious while accommodating dietary preferences.

• Keep Portions Consistent: Use a cookie scoop to ensure each truffle is the same size, allowing for even coating and a professional look that impresses everyone!

Make Ahead Options

These Chocolate Truffles are perfect for meal prep enthusiasts! You can mix the chocolate and sweetened condensed milk up to 24 hours in advance and refrigerate it until you’re ready to roll them into truffles. Additionally, if desired, you can prepare the walnut coating (or other toppings) ahead of time and store them in an airtight container for up to three days. Just remember to keep the mixture tightly covered in the refrigerator to maintain its rich flavor and creamy texture. When you’re ready to serve, simply scoop, roll, and coat the truffles as instructed, and you’ll have a delicious treat with minimal effort, ready to impress!

Chocolate Truffles Variations & Substitutions

Feel free to personalize these Chocolate Truffles, creating your own delightful versions that satisfy every sweet tooth!

  • Dairy-Free: Swap semi-sweet chocolate chips for vegan chocolate chips and sweetened condensed milk for sweetened condensed coconut milk.

  • White Chocolate Twist: Use white chocolate chips instead of semi-sweet for a creamy, sweet flavor that contrasts beautifully with the nutty coating.

  • Nut-Free Option: Replace walnuts with crushed graham crackers or cocoa powder to avoid allergens while maintaining a delightful crunch.

  • Flavor Infusion: Add a teaspoon of your favorite extract, such as mint or orange, to the chocolate mixture for an enhanced flavor experience.

  • Crunchy Alternatives: Roll the truffles in crushed pretzels or caramelized nuts instead of walnuts for a sweet-salty surprise!

  • Spicy Kick: For a bit of heat, sprinkle in a pinch of cayenne pepper or chili powder to the chocolate mixture before chilling.

  • Colorful Toppings: Experiment with fun coatings like colorful sprinkles or edible glitter to make your truffles festive and visually appealing. Picture a platter adorned with these beauties, just waiting for an eager crowd!

  • Fruit Fusion: Incorporate finely chopped dried fruits, such as cranberries or apricots, into the chocolate mix for a chewy, fruity surprise that adds a lovely burst of flavor.

Get creative and make these truffles your new go-to treat. For another delicious chocolatey delight, you might enjoy German Chocolate Poke or try incorporating some rich flavor into your adventures with Homemade Hot Chocolate!

What to Serve with 3-Ingredient Easy Chocolate Truffles

Indulge in a symphony of flavors by pairing these rich truffles with delightful accompaniments that elevate every bite.

  • Homemade Hot Chocolate: The ultimate pairing, this warm drink's chocolatey depth beautifully complements the truffles’ creamy sweetness.

  • Fresh Berries: Bright and tart, berries like raspberries or strawberries provide a refreshing contrast that balances the truffles’ richness. Their vibrant color also enhances the presentation.

  • Coffee or Espresso: The bold notes of coffee harmonize beautifully with the chocolate, enhancing the truffles’ complex flavors. Whether served hot or as an iced drink, it's a perfect match.

  • Whipped Cream: Light and airy, a dollop of freshly whipped cream adds a luscious texture that harmonizes with the truffles’ creamy ganache. Consider dusting with cocoa powder for a chic look.

  • Nutty Biscotti: Their crisp texture makes an enticing contrast, and the nutty flavors echo the walnut coating on the truffles, creating a delightful pairing.

  • Coconut Milk Ice Cream: This dairy-free dessert plays well with the chocolaty richness while offering a cool, creamy counterpoint. A scoop adds a delightful chill to your chocolate experience.

Enhance your Chocolate Truffles feast with these appetizing companions, ensuring a truly memorable dessert experience!

Storage Tips for Chocolate Truffles

Room Temperature: Store chocolate truffles in an airtight container at room temperature for up to 3-4 days, ensuring they remain fresh and flavorful.

Fridge: For extended freshness, keep the truffles in the fridge for up to 2 weeks. Just remember to let them sit at room temperature for a few minutes before enjoying for the best texture.

Freezer: If you want to save these delightful treats for later, freeze the truffles for up to 3 months. Place them in a single layer on a baking sheet until firm, then transfer to a freezer-safe bag or container.

Reheating: To thaw, simply transfer the frozen chocolate truffles to the fridge overnight before serving. This gentle thawing method retains their rich taste and decadent texture.

Chocolate Truffles Recipe FAQs

How do I choose the right chocolate for my truffles?
Absolutely! Selecting quality chocolate is key to delicious truffles. Look for semi-sweet chocolate chips with a cocoa percentage between 60-70% for rich flavor. If you want a dairy-free option, vegan chocolate chips are a great alternative. Always remember, the better the chocolate, the more indulgent your truffles will be!

How should I store leftover chocolate truffles?
For sure! Store chocolate truffles in an airtight container at room temperature for up to 3-4 days. If you want to keep them longer, refrigerate for up to 2 weeks. Just make sure to let them sit at room temperature for a few minutes before eating, as this helps them regain their texture.

Can I freeze chocolate truffles, and how do I do it?
Yes, definitely! To freeze chocolate truffles, place them in a single layer on a baking sheet until they are firm—this usually takes about 1-2 hours. Then, transfer the firm truffles to a freezer-safe bag or container, and they will keep well for up to 3 months. When you’re ready to enjoy them, simply thaw them overnight in the fridge.

What should I do if my chocolate mixture is too thick?
Not a problem! If your chocolate mixture thickens too much after chilling, gently stir in a teaspoon of warm milk or dairy-free alternative to loosen it. If you need to, you can also place it back in the microwave for a few seconds to achieve a smoother consistency. Just be cautious not to overheat!

Are there any allergy considerations with these truffles?
Very much so! This recipe typically contains chocolate and condensed milk, which can pose issues for individuals with dairy allergies. To accommodate dietary needs, opt for dairy-free chocolate and use sweetened condensed coconut milk. Always check labels for potential allergens, especially if serving to others.

Can I customize the flavors of my chocolate truffles?
The more the merrier! You can absolutely customize your chocolate truffles. Consider using white chocolate chips for a different taste or adding flavor extracts like vanilla or peppermint to the chocolate mixture. For toppings, get creative with crushed nuts, sprinkles, or even matcha powder for a unique twist!

Chocolate Truffles

Irresistible Chocolate Truffles - 3 Ingredients of Pure Joy

These Chocolate Truffles are a simple, customizable treat made with just three ingredients, perfect for any occasion.
Print Recipe Pin Recipe
Prep Time 10 minutes mins
Cook Time 2 minutes mins
Chilling Time 30 minutes mins
Total Time 42 minutes mins
Servings: 10 truffles
Course: Dessert
Cuisine: American
Calories: 80
Ingredients Equipment Method Nutrition Notes

Ingredients
  

For the Truffle Base
  • 1 cup Semi-Sweet Chocolate Chips Consider using vegan chocolate chips for a dairy-free option.
  • 1 14 oz can Sweetened Condensed Milk Opt for sweetened condensed coconut milk for a dairy-free twist.
For the Coating
  • 0.25 cup Walnut Pieces Feel free to swap with chopped nuts, cocoa powder, or dried fruits for variety.

Equipment

  • Microwave-safe bowl
  • Food Processor
  • Cookie Scoop
  • Baking Sheet
  • Parchment Paper

Method
 

Preparation Steps
  1. In a microwave-safe bowl, combine 1 cup of semi-sweet chocolate chips. Heat in the microwave at 20-second intervals, stirring until melted and smooth.
    Chocolate Truffles
  2. Once your chocolate is melted, stir in the 14 oz can of sweetened condensed milk until fully incorporated.
    Chocolate Truffles
  3. Process ¼ cup of walnut pieces in a food processor until they resemble small crumbs.
    Chocolate Truffles
  4. Use a 1-ounce cookie scoop or your hands to portion out the chocolate dough and roll each into a smooth ball.
    Chocolate Truffles
  5. Gently roll each chocolate ball in the processed walnut crumbs until completely coated.
    Chocolate Truffles
  6. Place the truffles on a baking sheet lined with parchment paper and refrigerate for an additional 15-20 minutes to set.
    Chocolate Truffles

Nutrition

Serving: 1truffleCalories: 80kcalCarbohydrates: 10gProtein: 1gFat: 4gSaturated Fat: 2gPolyunsaturated Fat: 1gMonounsaturated Fat: 1gSodium: 10mgPotassium: 40mgFiber: 1gSugar: 7gCalcium: 2mgIron: 2mg

Notes

Experiment with different toppings like crushed cookies, colorful sprinkles, or shredded coconut for unique variations.

Tried this recipe?

Let us know how it was!

Savory Cambodian Pepper Beef (Lok Lak) in 15 Minutes

August 20, 2025 by Grace Snow Leave a Comment

The sizzle of steak hitting a hot pan is music to my ears, especially when I’m whipping up Cambodian Pepper Beef (Lok Lak) for dinner. This dish captures the essence of quick cooking—delivering tender, flavorful sirloin coated in a glossy, peppery sauce that’s ready in under 15 minutes! Not only does it satisfy that craving for savory flavors, but it also provides a balanced meal perfect for busy weeknights. Imagine sinking your teeth into those juicy bites accented with caramelized onions and a zesty lime dipping sauce. It's a crowd-pleaser that'll take mealtime from mundane to memorable in a snap. Ready to transform your dinner routine? Let’s dive in!

Why is Cambodian Pepper Beef a must-try?

Quick Cooking: This dish takes less than 15 minutes to prepare, making it a perfect choice for busy weeknights.
Savory Satisfaction: The combination of tender sirloin and a glossy, peppery sauce will tantalize your taste buds.
Flavorful Balance: Caramelized onions and a refreshing lime dipping sauce create a delightful contrast.
High Protein: Each serving is packed with protein, making it a nutritious meal option.
Family-Friendly: Kids and adults alike will love the rich flavors, guaranteeing seconds at the dinner table.
Easy to Customize: Feel free to add your favorite vegetables or adjust the spice levels. For more delightful options, check out Ground Beef Enchiladas or Ricotta Stuffed Peppers, perfect for families!

Cambodian Pepper Beef Ingredients

• Discover the essential ingredients for an unforgettable meal!

For the Beef
• Sirloin/Striploin Steak (500g/1 lb) – Main protein source, tender and flavorful; substitute with flank steak if needed.
• Vegetable Oil (1 tbsp) – For searing and achieving a crispy exterior; any high-heat oil works as a substitute.

For the Vegetables
• Red Onion (1, cut into wedges) – Adds sweetness and a delightful crunch; yellow or white onions can be used.
• Tomato (1, sliced) – Provides freshness and a tangy kick; any ripe tomato is suitable.
• Lettuce Leaves – Serve as a base for the dish, adding crunch and freshness.

For the Marinade
• Oyster Sauce (1 tbsp) – Infuses umami and depth into the beef.
• Soy Sauce (1 tbsp) – Provides the essential salty flavor that balances the dish.
• Sweet Dark Soy Sauce (2 tsp) – Adds sweetness and a rich, dark color to the sauce.
• Ground Kampot Pepper (1 tsp) – Delivers aromatic heat; substitute with freshly ground black pepper if needed.
• Cornflour (cornstarch) (1 tsp) – Tenderizes the meat and creates a velvety texture.
• Baking Soda (½ tsp) – Further tenderizes the beef for a juicy bite.
• Garlic Cloves (2, finely grated) – Enhances flavor with a fragrant aroma.

For the Stir-Fry Sauce
• Oyster Sauce (2 tbsp) – Provides a luscious richness to the beef.
• Soy Sauce (1 tbsp) – Adds depth and savory notes.
• Sugar (1 tsp) – Balances the savory with a hint of sweetness.

For the Dipping Sauce
• Lime Juice (3 tbsp) – Brightens the dish with a tangy kick; essential for balancing flavors!
• Ground Kampot Pepper (1 tsp) – Adds extra spiciness; feel free to substitute if needed.
• Sea Salt (1 tsp) – Enhances the overall flavor profile of the dish.

Now that you have everything prepared, you’re ready to whip up a delightful, high-protein meal of Cambodian Pepper Beef (Lok Lak) that’s sure to impress!

Step‑by‑Step Instructions for Cambodian Pepper Beef (Lok Lak)

Step 1: Prepare Marinade
In a mixing bowl, combine the sirloin steak with oyster sauce, soy sauce, sweet dark soy sauce, ground Kampot pepper, cornflour, baking soda, and finely grated garlic. Mix well to ensure the beef is evenly coated. Cover and refrigerate for at least 30 minutes to allow the flavors to meld and to tenderize the meat for your Cambodian Pepper Beef (Lok Lak).

Step 2: Prepare Sauces
While the beef marinates, prepare the stir-fry and dipping sauces. In a small bowl, whisk together oyster sauce, soy sauce, and sugar for the stir-fry sauce. In another bowl, combine lime juice, ground Kampot pepper, and sea salt to create the dipping sauce. Set both sauces aside, ready to add depth and flavor to your meal when cooking.

Step 3: Cook Beef
Heat a wok or large frying pan over high heat and add 1 tablespoon of vegetable oil. Once the oil shimmers, add the marinated beef in a single layer. Sear the beef for about 30 seconds, toss to flip, and repeat until the beef is charred and cooked through, roughly 2-3 minutes total. The goal is to achieve a crispy exterior that enhances the overall flavor of the Lok Lak.

Step 4: Add Onion
Once the beef is nearly done, quickly toss in the red onion wedges. Stir-fry for about 30 seconds until the onions start to soften and become slightly caramelized. Then, pour in the stir-fry sauce, tossing everything together for another 30 seconds until fully coated. This combination elevates the richness of your Cambodian Pepper Beef.

Step 5: Serve
On a serving platter, layer fresh lettuce leaves at the base, top with sliced tomatoes, and then generously spoon the beef and onion mixture over the top. Serve alongside steaming rice and pour the lime dipping sauce on the side. This bright balance will complement the deep flavors of your Cambodian Pepper Beef (Lok Lak) perfectly.

Expert Tips for Cambodian Pepper Beef

  • Avoid Overcrowding: Sear beef in small batches to maintain crispiness and avoid steaming, which can lead to tough meat in your Cambodian Pepper Beef (Lok Lak).

  • Let it Rest: After cooking, let the beef sit in the pan briefly. This resting time allows it to retain its juices and ensures tender bites.

  • Fresh Ingredients Matter: Use high-quality ingredients like Kampot pepper for authentic flavor. If unavailable, opt for freshly ground black pepper for a solid substitute.

  • Customize Your Heat: Adjust the amount of ground pepper in the dipping sauce to suit your taste. Feel free to make it spicier or milder based on personal preference.

  • Prep Ahead: For easy weeknight cooking, prepare the marinade and sauces in advance and refrigerate. This little prep will save you time when you're ready to cook.

Cambodian Pepper Beef Variations & Substitutions

Feel free to play with this recipe and make it your own, creating a symphony of flavors that’s just right for you!

  • Vegetable Boost: Add bell peppers or snap peas for extra color and nutrients. Toss them in during the last minute of cooking for a delightful crunch. They not only enhance the visual appeal but add a fresh flavor that pairs wonderfully with the beef.

  • Heat Level Adjustment: Spice things up or mellow them down. Use Thai bird chilies for a fiery kick or omit them entirely for a milder taste. Tailoring the spice to suit your family's preferences can create a more enjoyable mealtime experience.

  • Low-Carb Twist: Substitute rice with cauliflower rice or quinoa for a low-carb alternative. It maintains the meal’s freshness while keeping it light and healthy. This makes for a satisfying dish without the carbs weighing you down.

  • Dairy-Free Option: To make your meal dairy-free, ensure that your sauces do not contain any hidden dairy ingredients. Most sauces are naturally dairy-free, making Lok Lak an excellent choice without compromising on flavor.

  • Herbed Delight: Add fresh herbs such as basil or cilantro to the dish just before serving. Their vibrant flavors will lift the entire meal, offering a fragrant finish that’s undeniably refreshing.

  • Richer Sauce: For a luxurious twist, add a splash of coconut milk to the stir-fry sauce. This will enrich the sauce with a creamy texture, enhancing the savory experience of your beef.

  • Marinade Variation: Experiment with the marinade by adding a splash of lime juice or a dash of fish sauce for an extra umami kick. This simple adjustment can elevate the overall flavor profile.

Whether you're in the mood for an adventure off the beaten path or just aiming to use up some vegetables, these variations will help you customize your Cambodian Pepper Beef (Lok Lak) for every occasion! If you're looking for more exciting ideas, try out Roasted Bratwurst Peppers for another crowd-pleasing dish!

What to Serve with Cambodian Pepper Beef (Lok Lak)

Elevate your dining experience with these delightful pairings that complement the rich, savory flavors of this dish.

  • Steamed Jasmine Rice: This fluffy, aromatic rice is the perfect base to soak up the glossy peppery sauce, creating a comforting bite every time.

  • Crispy Vegetable Spring Rolls: The light crunch of these rolls brings texture to your meal, while the fresh herbs inside provide a refreshing contrast to the rich beef.

  • Garlic Butter Bok Choy: Sautéed in garlic and butter, this leafy green adds a delicious touch of earthiness and a hint of sweetness, balancing the savory beef perfectly.

  • Zesty Cucumber Salad: A bright, tangy mix of cucumbers, lime, and herbs refreshes your palate, cutting through the richness of the Cambodian Pepper Beef effortlessly.

  • Creamy Mashed Potatoes: Smooth and comforting, mashed potatoes with a drizzle of gravy harmonizes beautifully with the beef, making every bite feel indulgent.

  • Lime Coconut Sorbet: Finish your meal on a sweet and refreshing note with this sorbet. The zesty lime and creamy texture cleanse the palate beautifully after the heavy flavors of beef.

  • Thai Iced Tea: This creamy, sweet beverage echoes the flavors of Southeast Asia and offers a delightful contrast to the heat and savoriness of lok lak.

  • Crusty Baguette: Serve warm slices to soak up extra sauce, adding a delightful crunch and a rustic touch to your dining experience.

These thoughtful pairings will not only enhance your Cambodian Pepper Beef (Lok Lak) but create a vibrant and satisfying meal.

How to Store and Freeze Cambodian Pepper Beef (Lok Lak)

  • Fridge: Store leftovers in an airtight container for up to 2 days. Be sure to let the beef cool to room temperature before sealing to keep it fresh.

  • Freezer: To freeze, portion the cooled Cambodian Pepper Beef into airtight freezer bags. It can be frozen for up to 3 months; just be sure to label them with the date!

  • Reheating: To reheat, thaw overnight in the fridge, then warm gently in a skillet over low heat until heated through. Avoid overcooking to maintain tenderness.

  • Make-Ahead Tips: Marinade the beef up to 24 hours in advance for richer flavor. Just remember that the fresh flavors are best enjoyed immediately after cooking!

Make Ahead Options

These Cambodian Pepper Beef (Lok Lak) components are perfect for meal prep, making weeknight dinners a breeze! You can marinate the sirloin steak and store it in the fridge for up to 24 hours; this will allow the flavors to deepen while tenderizing the meat. In addition, prepare the stir-fry and dipping sauces in advance and refrigerate them for up to 3 days. When it's time to serve, just heat the oil in a pan, toss in the marinated beef, and follow the original cooking instructions. This way, your Cambodian Pepper Beef will be just as delicious, saving you time and ensuring a satisfying meal without the last-minute rush!

Cambodian Pepper Beef (Lok Lak) Recipe FAQs

How do I select the best meat for Cambodian Pepper Beef (Lok Lak)?
Absolutely! For the best flavor and texture, choose sirloin or striploin steak, which ensures tenderness. Look for cuts with good marbling—small flecks of fat throughout the meat—as this will add flavor and juiciness. If sirloin is unavailable, flank steak is a great alternative.

What’s the best way to store leftovers?
Store your Cambodian Pepper Beef in an airtight container in the fridge for up to 2 days. Allow the beef to cool to room temperature before sealing the container to maintain its freshness. When you're ready to enjoy it again, simply reheat gently on low heat to avoid making the beef tough.

Can I freeze Cambodian Pepper Beef (Lok Lak)?
Certainly! To freeze, portion the cooled beef into airtight freezer bags, making sure to squeeze out excess air. It can be frozen for up to 3 months. To reheat, thaw in the fridge overnight, then warm slowly in a skillet over low heat, stirring occasionally to ensure even warming. This step helps maintain tenderness.

What should I do if my beef turns tough while cooking?
Very! If the beef turns out tough, it’s likely due to overcooking or not using a tender cut. Always sear the beef over high heat for a short time—about 2-3 minutes total. Also, allowing the beef to rest in the pan after cooking can help keep it juicy and tender. If using tougher cuts, marinating longer can also enhance tenderness.

Can I make Cambodian Pepper Beef (Lok Lak) gluten-free?
Yes! You can create a gluten-free version by using gluten-free soy sauce and oyster sauce. Many brands offer great alternatives that will still provide the savory depth your dish needs without compromising on flavor. Just check the labels carefully to ensure compatibility with your dietary needs.

Are there any dietary considerations for pets?
Absolutely, it’s important to keep in mind that some ingredients in this recipe may not be suitable for pets. The marinade contains soy sauce and garlic, which can be harmful to dogs. As such, it’s best to keep this dish away from furry friends. Always consult with your vet if you're unsure about any specific ingredients for your pets.

Cambodian Pepper Beef (Lok Lak)

Savory Cambodian Pepper Beef (Lok Lak)

Discover the quick and savory Cambodian Pepper Beef (Lok Lak), a flavorful dish perfect for busy weeknights.
Print Recipe Pin Recipe
Prep Time 30 minutes mins
Cook Time 15 minutes mins
Marinating Time 30 minutes mins
Total Time 1 hour hr 15 minutes mins
Servings: 4 servings
Course: Dinner
Cuisine: Cambodian
Calories: 350
Ingredients Equipment Method Nutrition Notes

Ingredients
  

For the Beef
  • 500 g Sirloin/Striploin Steak Main protein source; substitute with flank steak if needed.
  • 1 tbsp Vegetable Oil For searing; any high-heat oil works.
For the Vegetables
  • 1 Red Onion Cut into wedges; yellow or white onions can be used.
  • 1 Tomato Sliced; any ripe tomato is suitable.
  • Lettuce Leaves Serve as a base for the dish.
For the Marinade
  • 1 tbsp Oyster Sauce Infuses umami into the beef.
  • 1 tbsp Soy Sauce Provides salty flavor.
  • 2 tsp Sweet Dark Soy Sauce Adds sweetness and color.
  • 1 tsp Ground Kampot Pepper Delivers aromatic heat; substitute with black pepper.
  • 1 tsp Cornflour (cornstarch) Tenderizes meat.
  • ½ tsp Baking Soda Further tenderizes the beef.
  • 2 Garlic Cloves Finely grated.
For the Stir-Fry Sauce
  • 2 tbsp Oyster Sauce Provides richness.
  • 1 tbsp Soy Sauce Adds depth.
  • 1 tsp Sugar Balances savory with sweetness.
For the Dipping Sauce
  • 3 tbsp Lime Juice Essential for balancing flavors.
  • 1 tsp Ground Kampot Pepper Adds extra spiciness.
  • 1 tsp Sea Salt Enhances flavor.

Equipment

  • wok or large frying pan
  • Mixing Bowl
  • small bowl

Method
 

Step-by-Step Instructions
  1. In a mixing bowl, combine the sirloin steak with oyster sauce, soy sauce, sweet dark soy sauce, ground Kampot pepper, cornflour, baking soda, and finely grated garlic. Mix well and refrigerate for at least 30 minutes.
    Cambodian Pepper Beef (Lok Lak)
  2. While the beef marinates, prepare the stir-fry and dipping sauces by mixing the ingredients in separate small bowls.
    Cambodian Pepper Beef (Lok Lak)
  3. Heat a wok or large frying pan over high heat, add vegetable oil, then add the marinated beef in a single layer and sear for about 30 seconds, tossing until charred and cooked through.
    Cambodian Pepper Beef (Lok Lak)
  4. Once the beef is nearly done, quickly toss in the red onion wedges and stir-fry until softened, then pour in the stir-fry sauce, mixing everything together for another 30 seconds.
    Cambodian Pepper Beef (Lok Lak)
  5. On a serving platter, layer fresh lettuce leaves at the base, top with sliced tomatoes, then add the beef and onion mixture. Serve with rice and lime dipping sauce.
    Cambodian Pepper Beef (Lok Lak)

Nutrition

Serving: 1servingCalories: 350kcalCarbohydrates: 20gProtein: 30gFat: 15gSaturated Fat: 5gPolyunsaturated Fat: 2gMonounsaturated Fat: 8gCholesterol: 80mgSodium: 950mgPotassium: 600mgFiber: 2gSugar: 3gVitamin A: 100IUVitamin C: 15mgCalcium: 25mgIron: 3mg

Notes

Avoid overcrowding the pan to maintain crispiness. Let beef rest briefly after cooking for better juiciness.

Tried this recipe?

Let us know how it was!

Delicious Cherry Blondies: Easy Fudgy Treats for Everyone

August 19, 2025 by Grace Snow Leave a Comment

As I stood in my kitchen, the sweet aroma of browned butter wafted through the air, instantly whisking my thoughts to the cozy vibes of childhood baking. That's when I knew it was time to whip up a batch of Cherry Blondies with White Chocolate and Almonds. This simple recipe turns the classic dessert into a delightful experience, combining fudgy, chewy goodness with the sweet-tart zing of cherry pie filling. Plus, they come together in just 10 minutes of hands-on prep, making them a perfect choice for anyone looking to indulge in a homemade treat without the hassle. Whether you’re planning a gathering or just need a little something sweet for yourself, these budget-friendly bars are sure to hit the spot. Curious about how to make this easy dessert? Let’s dive right in!

Why are Cherry Blondies so irresistible?

Quick Prep Time: These blondies come together in just 10 minutes of hands-on time, making them a breeze for busy bakers.

Fudgy Texture: The chewy, fudgy consistency resembles brownies, satisfying any dessert lover's cravings.

Flavorful Bite: With white chocolate and almond notes complementing the tangy cherry pie filling, each bite is a delightful explosion of flavor!

Versatile Treat: Customize with different fruits or nuts to keep things exciting, ensuring this recipe never gets old.

Crowd-Pleaser: Whether for a family gathering or a casual get-together, these Cherry Blondies will disappear in no time. And if you’re in the mood for another fruity dish, consider making a Chocolate Cherry Smoothie to round out your dessert repertoire.

Cherry Blondies Ingredients

• Note: Get ready to gather your ingredients for these Doughy Cherry Blondies.

For the Blondie Batter

  • All-Purpose Flour – Provides structure; can be swapped with gluten-free flour for those with dietary restrictions.
  • Baking Powder – Acts as a leavening agent to give the blondies a delightful rise; don’t substitute if using self-rising flour.
  • Salt – Enhances all the flavors; feel free to reduce if you’re cutting back on sodium.
  • Large Egg – Binds ingredients and adds moisture; a flax egg can replace it for a vegan version.
  • Vanilla Extract – Infuses a warm flavor; always opt for pure vanilla extract for the best taste.
  • Almond Extract – Adds a nutty aroma; use sparingly or omit if you'd like to keep it simple.
  • Cherry Pie Filling – Provides that sweet-tart essence with zero fuss; fresh cherries work great, too—just dust them with cornstarch.
  • Salted Butter – Brings richness and moisture; unsalted butter is fine if you prefer, just add a pinch of salt.
  • Granulated Sugar – Helps sweeten and stabilize the texture; brown sugar can offer extra moisture if substituted.
  • Brown Sugar – Enhances chewiness and adds depth; you can use either light or dark brown sugar interchangeably.
  • White Chocolate Chips – Contributes sweetness and creaminess; you might swap them for dark or milk chocolate chips to change the flavor profile.
  • Slivered Almonds – Provides a crunchy texture; feel free to use any nut or skip them for nut-free blondies.

These ingredients come together to create an unforgettable batch of Cherry Blondies that will keep your taste buds dancing!

Step‑by‑Step Instructions for Cherry Blondies

Step 1: Preheat and Prepare the Dish
Begin by preheating your oven to 350°F (175°C). While it warms, take an 8x8” baking dish and grease it lightly with butter or cooking spray. For easy removal later, line the bottom and sides with parchment paper, ensuring you leave some overhang. This little step will make serving your Cherry Blondies a breeze!

Step 2: Mix the Dry Ingredients
In a medium mixing bowl, whisk together 1¾ cups of all-purpose flour, ½ teaspoon of baking powder, and ¼ teaspoon of salt. Ensure the mixture is well combined, which will help your blondies rise perfectly in the oven. Set this bowl aside as you will incorporate it later into the moist ingredients.

Step 3: Combine the Wet Ingredients
In another bowl, whisk together 1 large egg, 1 teaspoon of vanilla extract, ½ teaspoon of almond extract, and ½ cup of cherry pie filling until blended. The cherry filling will add sweetness and moisture, enhancing the overall texture of your Cherry Blondies, so give it a good mix to incorporate everything smoothly.

Step 4: Brown the Butter
Now, take a medium saucepan over medium heat and melt 1½ sticks of salted butter, stirring continuously. Keep an eye on it as it melts for about 5-8 minutes; you want to achieve a golden brown color with a nutty aroma. This step is crucial as it will deepen the flavor of your Cherry Blondies.

Step 5: Combine Butter and Sugars
Once the butter is browned, remove it from heat and pour it into a mixing bowl. Add ½ cup of granulated sugar and 1 cup of brown sugar, whisking until well combined. The sugars will dissolve into the warm butter, creating a smooth, inviting mixture that’s perfect for your Cherry Blondies.

Step 6: Mix Everything Together
Next, add the wet cherry mixture from Step 3 into the butter-sugar combination, stirring until fully combined. Gradually add the flour mixture from Step 2, using a spatula to fold it in gently. Aim for a thick batter that showcases the delicious chunks of cherry and sweetness throughout.

Step 7: Fold in Chocolate and Nuts
Gently fold in ¼ cup of white chocolate chips and ¼ cup of slivered almonds into your batter until evenly distributed. This will introduce lovely pockets of sweetness and crunch in your Cherry Blondies. Once everything is well combined, pour the batter into your prepared baking dish, spreading it evenly across the surface.

Step 8: Bake the Blondies
Place the baking dish in the preheated oven and bake for 50-55 minutes. Keep an eye on them towards the end; you want a toothpick inserted into the center to come out clean, indicating that your Cherry Blondies are ready. The edges may look slightly golden, and the center will be set yet soft.

Step 9: Cool and Slice
Once baked, remove your Cherry Blondies from the oven and let them cool in the pan for about 20 minutes. This helps them maintain their chewy texture. After cooling, use the parchment overhang to lift the blondies out of the pan, then slice them into 9 squares, revealing the gooey interior that pairs perfectly with the chewiness.

How to Store and Freeze Cherry Blondies

Fridge: Store your cooled Cherry Blondies in an airtight container for up to 3-4 days. This helps maintain their chewy texture while keeping them fresh and delightful.

Freezer: For longer storage, freeze the blondies by wrapping them individually in foil or parchment. They can last for up to 3 months, making it easy to have a sweet treat ready at any time.

Reheating: To enjoy your frozen Cherry Blondies, simply thaw them in the fridge overnight. Reheat in the microwave for a few seconds or warm in the oven for a couple of minutes to restore that fudgy goodness.

Grab-and-Go Treats: When storing, consider slicing them first for quick grab-and-go treats. This way, you can easily satisfy your sweet cravings any day!

What to Serve with Fudgy Cherry Blondies

Imagine sinking your teeth into a rich, fudgy blondie, and pairing it with delightful accompaniments that elevate the experience to heavenly.

  • Vanilla Ice Cream: The creamy sweetness of vanilla ice cream contrasts beautifully with the cherry tartness, creating a harmonious balance of flavors.

  • Whipped Cream: A dollop of whipped cream adds lightness and a delicate touch, enhancing the overall richness of your dessert. You can even sprinkle a little cinnamon or cocoa on top for an extra kick!

  • Fresh Berries: A side of fresh raspberries or blueberries provides a refreshing burst, complementing the cherry filling perfectly while adding a pop of color to your plate.

  • Chocolate Sauce: Drizzling warm chocolate sauce over each blondie intensifies the dessert's sweetness, inviting indulgence with every bite.

  • Coffee or Espresso: A warm cup of coffee or espresso pairs splendidly, the bold flavors cutting through the blondie's richness and prolonging the delightful experience.

  • Almond Milkshake: For a fun twist, blend almond milk, ice cream, and almond extract for an almond milkshake that echoes the nutty notes in the blondies.

  • Caramel Sauce: Drizzle melted caramel over your blondies for a decadent touch that introduces a luscious, buttery sweetness, making each bite even more dreamy.

  • Cheesecake Fluff: Serve a light, fluffy cheesecake dip on the side, bringing a tangy twist that pairs beautifully with the sweet, fudgy blondies.

Pairing each of these delightful sides with your Cherry Blondies can transform dessert time into a mood-lifting moment, perfect for sharing with family or savoring solo.

Make Ahead Options

These Cherry Blondies are perfect for meal prep enthusiasts looking to save time! You can prepare the blondie batter up to 24 hours in advance, storing it in an airtight container in the refrigerator. To maintain their delicious texture, be sure to cover the bowl tightly to prevent drying out. When you're ready to bake, simply follow Steps 8 and 9 of the recipe, pouring the chilled batter into the prepared baking dish and baking as instructed. This way, you'll have fresh, fudgy Cherry Blondies hot out of the oven, effortlessly ready to impress your family and friends! Enjoy the convenience without sacrificing flavor!

Expert Tips for Cherry Blondies

  • Butter Browning: Keep a close eye on the butter while browning to prevent it from burning; look for a nutty aroma and golden color.

  • Chewy vs. Cake-like: Remember, these Cherry Blondies are meant to be chewy, not cake-like. Don’t overbake for the perfect fudgy texture!

  • Cooling Time: Allow the blondies to cool in the pan for at least 20 minutes to set properly, ensuring easier slicing and that delightful gooeyness.

  • Storage Tips: Store your cooled Cherry Blondies in an airtight container in the fridge for up to 3-4 days, or freeze them for a delightful treat later on.

  • Ingredient Swaps: Feel free to experiment by substituting different nuts or fruits in the recipe; this keeps your Cherry Blondies exciting every time you make them!

Cherry Blondies Variations & Substitutions

Get ready to unleash your creativity in the kitchen! These delightful Cherry Blondies invite an array of tempting variations that will elevate your baking experience.

  • Fruit Swap: Replace cherry pie filling with fresh blueberries or raspberries for a different fruity punch.
  • Nuts Change: Use walnuts or pecans instead of slivered almonds for a new texture and flavor combination.
  • Dairy-Free Delight: Substitute the butter with coconut oil and use dairy-free chocolate chips to create a vegan version.
  • Flavor Burst: Add a tablespoon of orange or lemon zest to the batter for a refreshing citrus twist.
  • Chocolate Lovers: Swap white chocolate chips for dark chocolate or milk chocolate chips to deepen that sweet richness.
  • Gluten-Free Option: Utilize a gluten-free flour blend to make these scrumptious blondies accessible for gluten-sensitive friends.
  • Caramel Drizzle: After baking, drizzle a homemade or store-bought caramel sauce on top for added sweetness and richness.
  • Nut-Free: Omit the almonds entirely, or replace them with sunflower seeds for a nut-free treat that everyone can enjoy.

Remember, the possibilities are endless! Have fun experimenting with your own variations, and while you're at it, you might find inspiration for other delicious desserts like a warm slice of Cherry Clafoutis French or a refreshing Chocolate Cherry Smoothie. Enjoy your culinary journey!

Cherry Blondies Recipe FAQs

How do I select the best cherry pie filling?
When choosing cherry pie filling, look for a brand that uses whole cherries without too much added sugar. If you can find one with minimal preservatives, that’s even better! Alternatively, using fresh pitted cherries is delightful—just remember to coat them lightly in cornstarch to prevent excess moisture in the blondies.

What’s the best way to store Cherry Blondies?
Store your cooled Cherry Blondies in an airtight container in the fridge for up to 3-4 days. This will help maintain their soft, chewy texture while keeping them fresh. If you notice any dark spots or unusual odors, it’s best to discard them.

Can I freeze Cherry Blondies, and how?
Absolutely! To freeze your Cherry Blondies, wrap each square individually in foil or parchment paper before placing them in a freezer-safe bag or container. They can last up to 3 months in the freezer. When you're ready to enjoy them, simply thaw in the fridge overnight and heat in the microwave or oven for a few moments for that fresh-out-of-the-oven taste!

What should I do if my blondies are too dry?
If your Cherry Blondies turn out dry, it might be due to overbaking or using too much flour. To ensure a fudgier texture next time, follow the baking times closely and check for doneness using a toothpick—just a few moist crumbs will indicate they’re perfectly baked! Also, consider adding a bit more cherry filling for added moisture.

Are there any dietary restrictions with Cherry Blondies?
These Cherry Blondies can easily be made vegetarian and can be adjusted for vegan diets by using a flax egg and dairy-free butter. If you or your guests have nut allergies, simply omit the slivered almonds or replace them with seeds like sunflower or pumpkin seeds for added crunch without the risk!

Can I use different flavors or fruits in this recipe?
Very much! Feel free to swap the cherry pie filling for other fruits like blueberries or raspberries for a delightful twist. You can also mix and match nuts, using pecans or walnuts instead of slivered almonds. This versatility allows you to keep experimenting with different flavor profiles in each batch of Cherry Blondies while creating a new favorite!

Cherry Blondies

Delicious Cherry Blondies: Easy Fudgy Treats for Everyone

Cherry Blondies are a delightful dessert, combining fudgy, chewy goodness with the sweet-tart zing of cherry pie filling.
Print Recipe Pin Recipe
Prep Time 10 minutes mins
Cook Time 55 minutes mins
Cooling Time 20 minutes mins
Total Time 1 hour hr 25 minutes mins
Servings: 9 squares
Course: Dessert
Cuisine: American
Calories: 200
Ingredients Equipment Method Nutrition Notes

Ingredients
  

For the Blondie Batter
  • 1¾ cups all-purpose flour Can swap for gluten-free flour.
  • ½ teaspoon baking powder Don't substitute if using self-rising flour.
  • ¼ teaspoon salt Reduce if cutting back on sodium.
  • 1 large egg A flax egg can replace it for vegan.
  • 1 teaspoon vanilla extract Opt for pure for best taste.
  • ½ teaspoon almond extract Use sparingly or omit.
  • ½ cup cherry pie filling Fresh cherries work great, dust with cornstarch.
  • 1½ sticks salted butter Unsalted is fine; add a pinch of salt.
  • ½ cup granulated sugar Brown sugar can be used for extra moisture.
  • 1 cup brown sugar Light or dark can be used interchangeably.
  • ¼ cup white chocolate chips May substitute for dark or milk chocolate chips.
  • ¼ cup slivered almonds Use any nut or skip for nut-free.

Equipment

  • 8x8-inch baking dish
  • Mixing bowls
  • Whisk
  • Medium saucepan
  • Spatula

Method
 

Preparation Steps
  1. Preheat your oven to 350°F (175°C) and grease an 8x8” baking dish with butter or cooking spray. Line with parchment paper.
  2. In a bowl, whisk together the flour, baking powder, and salt. Set aside.
  3. In another bowl, whisk together the egg, vanilla extract, almond extract, and cherry pie filling until blended.
  4. Melt the butter in a saucepan over medium heat, stirring continuously until it turns golden brown.
  5. Remove from heat, combine with granulated sugar and brown sugar, whisking until smooth.
  6. Stir in the wet cherry mixture, then gradually fold in the flour mixture until combined.
  7. Fold in the white chocolate chips and slivered almonds, then pour the batter into the prepared dish.
  8. Bake for 50-55 minutes until a toothpick comes out clean. Edges should be slightly golden.
  9. Cool for about 20 minutes in the pan, then slice into 9 squares.

Nutrition

Serving: 1squareCalories: 200kcalCarbohydrates: 28gProtein: 2gFat: 9gSaturated Fat: 5gCholesterol: 20mgSodium: 150mgPotassium: 60mgFiber: 1gSugar: 15gVitamin A: 200IUCalcium: 15mgIron: 0.5mg

Notes

For a fudgy texture, do not overbake and ensure to cool before slicing. Experiment with different fruits or nuts to keep the recipe exciting.

Tried this recipe?

Let us know how it was!

Bang Bang Chicken Bowl: A Quick, Zesty Meal You'll Love

August 19, 2025 by Grace Snow Leave a Comment

As I stood in my kitchen one late afternoon, the alluring aroma of sautéing chicken lured me back to childhood meals filled with vibrant flavors and comforting textures. It’s moments like these that remind me why I cherish cooking at home. Enter the Bang Bang Chicken Bowl, a delightful one-bowl meal that brings together juicy chicken, colorful vegetables, and a creamy, spicy-sweet sauce that ignites the senses. This recipe is not just beginner-friendly, but it also allows for endless customization—so you can tweak the spice level or swap in your favorite veggies. Whether you’re navigating a hectic weeknight or aiming for a quick lunch, this tasty dish promises satisfaction without all the fuss. Ready to create your own culinary masterpiece that’s quick, healthy, and full of bold flavors? Let me guide you through this delicious adventure!

Why is Bang Bang Chicken Bowl a must-try?

Vibrant Colors: The Bang Bang Chicken Bowl is a feast for the eyes, featuring an array of colorful veggies that make your plate pop!

Easy to Customize: Whether you want to swap chicken for tofu or change up the vegetables, this recipe adapts effortlessly to your taste.

Ready in No Time: Perfect for those busy nights, you can whip up this flavorful bowl in under 30 minutes—ideal for quick lunches or dinners!

Deliciously Balanced: With protein, healthy carbs, and vibrant vegetables, it's a wholesome meal that keeps you feeling good. Alongside this recipe, you might enjoy Crock Pot Chicken for another effortless dinner!

Crowd-Pleaser: Whether you're serving family or friends, everyone loves the combo of creamy sauce and tender ingredients, making it a guaranteed hit at your table!

Bang Bang Chicken Bowl Ingredients

For the Chicken
• Chicken Breast – This is the primary protein source; substitute with tofu or shrimp for a vegetarian or seafood option.

For the Vegetables
• Mixed Vegetables – Adds nutrition and color, such as bell peppers and carrots; feel free to use whatever seasonal veggies or frozen blends you have on hand.

For the Base
• Rice (white or brown) – Provides a hearty base for your bowl; quinoa is a great alternative for added fiber and a gluten-free option.

For the Bang Bang Sauce
• Mayonnaise – Acts as the creamy base for the sauce; Greek yogurt can be a lighter substitute for a healthier twist.
• Sweet Chili Sauce – Brings sweetness and mild heat; honey or maple syrup work well if you're making a homemade version.
• Sriracha – This adds a kick of heat; adjust the quantity to suit your spice preference for the Bang Bang Chicken Bowl.
• Lime Juice – Enhances flavors with its zesty acidity; lemon juice can be used if lime isn't available.

Feel free to mix and match ingredients to create a bowl that best suits your palate!

Step‑by‑Step Instructions for Bang Bang Chicken Bowl

Step 1: Cook the Rice
Begin your Bang Bang Chicken Bowl by cooking the rice according to the package instructions. Typically, this means bringing water to a boil, adding the rice, and simmering for about 15-20 minutes until it's tender and fluffy. Once cooked, remove it from heat and let it sit covered to allow the steam to finish the cooking process.

Step 2: Sauté the Chicken
While the rice cooks, slice the chicken breast into thin strips. Heat a skillet over medium heat and add a splash of oil. Add the chicken strips to the skillet and sauté for about 5-7 minutes, or until the chicken is golden brown and cooked through, reaching an internal temperature of 165°F.

Step 3: Add the Vegetables
With the chicken cooked, it's time to brighten up your Bang Bang Chicken Bowl! Add your mixed vegetables to the skillet with the chicken. Stir-fry for 3-4 minutes until the vegetables are crisp-tender and vibrant in color, ensuring they retain their texture while absorbing the flavors from the chicken.

Step 4: Prepare the Bang Bang Sauce
In a small bowl, combine mayonnaise, sweet chili sauce, sriracha, and lime juice to create the delicious Bang Bang sauce. Whisk them together until the mixture is smooth and creamy, ensuring the flavors are well blended. Adjust the sriracha level if you prefer your sauce spicier for the bowl.

Step 5: Assemble the Bowl
Now it’s time to bring everything together! In serving bowls, layer the fluffy rice as the base, then top it with the sautéed chicken and colorful vegetables. Drizzle a generous amount of the Bang Bang sauce over the top, allowing it to coat the delicious ingredients beautifully, creating a vibrant and inviting dish.

Step 6: Garnish and Serve
For a final touch, consider garnishing your Bang Bang Chicken Bowl with fresh cilantro, chopped green onions, or a sprinkle of sesame seeds. These simple additions can enhance the presentation and flavor of the dish. Serve immediately and relish in the delightful combination of flavors and textures!

How to Store and Freeze Bang Bang Chicken Bowl

Fridge: Store leftovers in an airtight container for up to 3 days. Make sure to separate the sauce if you want to keep the textures fresh.

Freezer: For longer storage, freeze the chicken and vegetable mix individually in freezer-safe bags for up to 2 months. Rice can also be frozen separately.

Reheating: To enjoy, thaw overnight in the fridge and reheat in a skillet over medium heat until warmed through. Add a splash of water to prevent the mixture from drying out.

Make-Ahead Tips: Prepare the Bang Bang Chicken Bowl in advance, storing each component separately for easy assembly during the week—perfect for quick meals!

Expert Tips for Bang Bang Chicken Bowl

• Perfectly Cooked Chicken: Ensure your chicken reaches an internal temperature of 165°F to maintain tenderness and avoid dryness in your Bang Bang Chicken Bowl.

• Spice Adjustment: Start with less sriracha and sweet chili sauce, gradually adding more until you reach your desired spice level—everyone's palate is different!

• Vegetarian Swap: If you’re opting for a plant-based meal, try using tofu or tempeh instead of chicken; they absorb flavors beautifully and deliver great texture.

• Quick Veggie Tip: Use pre-chopped or frozen mixed vegetables to save time without sacrificing nutrition, making your Bang Bang Chicken Bowl even quicker to prepare!

• Storage Guidelines: Store any leftovers in an airtight container in the fridge for up to 3 days. Reheat thoroughly to maintain safety and flavor.

• Flavor Enhancements: A dash of sesame oil or a sprinkle of fresh herbs during assembly can elevate flavors and complements the creamy Bang Bang sauce beautifully!

Bang Bang Chicken Bowl Variations

Customize your Bang Bang Chicken Bowl to delight your taste buds and suit your dietary needs, all while keeping it delicious!

  • Dairy-Free: Replace the mayonnaise with avocado or a plant-based mayo for a creamy texture without dairy.

  • Spicy Kick: If you love heat, add sliced jalapeños or red pepper flakes to the sautéed veggies for an extra layer of spice.

  • Harvest Bowl: For a seasonal twist, mix in roasted butternut squash or sweet potatoes—these add a comforting sweetness that balances the heat beautifully.

  • Protein-Rich Quinoa: Use quinoa instead of rice for a gluten-free, protein-packed base; it adds a delightful nuttiness to your bowl.

  • Asian Twist: Incorporate different vegetables like bok choy or shiitake mushrooms for an authentic Asian flare. A sprinkle of sesame seeds ties it all together nicely too!

  • Meal Prep Magic: Assemble multiple bowls ahead of time for the week—just keep the sauce separate until you’re ready to enjoy, maintaining freshness.

  • Crispy Tofu: If swapping chicken, cube and pan-fry your tofu until crispy for added texture and deliciousness in every bite.

  • Herbaceous Twist: Fresh herbs like basil or mint sprinkled on top after serving add an aromatic finish that elevates your bowl.

With these ideas, your Bang Bang Chicken Bowl will be a unique reflection of your cravings—so go ahead and experiment! If you're curious about more delicious chicken recipes, don’t miss out on Honey Garlic Chicken Thighs or the mouthwatering Chipotle Lime Chicken.

Make Ahead Options

These Bang Bang Chicken Bowls are perfect for meal prep enthusiasts looking to save time during busy weeknights! You can cook the rice and sauté the chicken along with the vegetables up to 3 days in advance, allowing you to simply combine and heat everything together when you're ready to serve. Store the cooked components in airtight containers in the refrigerator to maintain their freshness and prevent unwanted dry out. The Bang Bang sauce can also be prepared and stored separately for up to 1 week to keep its vibrant flavor intact. When it's time to enjoy your meal, just reheat the chicken and veggies, assemble in bowls over freshly cooked rice, drizzle with the sauce, and garnish as desired for a satisfying and delicious dinner that feels just as fresh as when you first made it!

What to Serve with Bang Bang Chicken Bowl

With the vibrant flavors and creamy textures of this dish, you’ll want delightful companions to round out your meal experience.

  • Crispy Wontons: These crunchy bites bring a fun texture contrast to your bowl, adding an enjoyable crisp with every bite. Perfect for snacking before digging in!

  • Garlic Green Beans: Sautéed with a touch of garlic, these green beans enhance the meal with their fresh crunch and earthy flavor, providing a wonderful balance to the creamy sauce.

  • Sesame Cucumber Salad: A refreshing side that brightens the meal, this salad brings a cool, crisp element, accentuating the bold flavors of the Bang Bang Chicken Bowl. Tossed with a light sesame dressing, it’s an easy win!

  • Mango Sticky Rice: For dessert, this sweet treat is a delightful finish to your meal. The sweet coconut-infused rice pairs beautifully with the spicy notes of the bowl, making it a fulfilling ending.

  • Chilled Coconut Drink: To wash it down, a chilled coconut drink adds a tropical note, complementing the dish’s Asian-inspired flavors and keeping the meal refreshing.

  • Spicy Edamame: A warm, protein-packed appetizer that entices the palate, these lightly salted and spiced pods are perfect for an appetizer to share as everyone awaits their bowls.

Bang Bang Chicken Bowl Recipe FAQs

What type of chicken should I use for the Bang Bang Chicken Bowl?
Absolutely! I recommend using boneless, skinless chicken breasts for this recipe as they're quick to cook and tender. If you're looking for a vegetarian option, tofu or marinated tempeh can be great substitutes, absorbing the delicious flavors wonderfully.

How can I store leftovers from the Bang Bang Chicken Bowl?
For sure! Store any leftovers in an airtight container in the refrigerator for up to 3 days. To keep the textures fresh, consider separating the sauce when storing. When you're ready to enjoy, simply reheat thoroughly in a skillet over medium heat.

Can I freeze the Bang Bang Chicken Bowl?
Yes, you can! To freeze, pack the chicken and vegetable mixture in freezer-safe bags or containers, ensuring there's no excess air, and freeze for up to 2 months. You can also freeze the rice separately. Just remember to thaw overnight in the fridge before reheating!

How do I adjust the spice level in the Bang Bang sauce?
Very easily! Start with a smaller amount of sriracha, perhaps just a teaspoon, and gradually add more until you reach your desired heat. This approach allows you to customize the spiciness to suit your family's taste buds perfectly!

What vegetables work best in the Bang Bang Chicken Bowl?
The more the merrier! You can use a mix of bell peppers, carrots, broccoli, or snap peas based on what’s in season or what you have in your freezer. Just make sure to stir-fry them until they're crisp-tender for the best texture.

Can I make the Bang Bang Chicken Bowl vegan-friendly?
Absolutely! To make this dish vegan, replace the chicken with firm tofu or chickpeas, and use a plant-based mayonnaise in the sauce. You'll still get that satisfying creamy, spicy flavor while keeping it entirely plant-based!

Bang Bang Chicken Bowl

Bang Bang Chicken Bowl: A Quick, Zesty Meal You'll Love

This Bang Bang Chicken Bowl is a vibrant, customizable dish filled with juicy chicken, colorful vegetables, and a creamy, spicy-sweet sauce.
Print Recipe Pin Recipe
Prep Time 15 minutes mins
Cook Time 15 minutes mins
Resting Time 5 minutes mins
Total Time 35 minutes mins
Servings: 2 bowls
Course: Dinner
Cuisine: Asian
Calories: 550
Ingredients Equipment Method Nutrition Notes

Ingredients
  

For the Chicken
  • 2 breasts Chicken can substitute with tofu or shrimp
For the Vegetables
  • 2 cups Mixed Vegetables bell peppers, carrots, or any seasonal/frozen veggies
For the Base
  • 1 cup Rice white or brown, quinoa is a great alternative
For the Bang Bang Sauce
  • 1/2 cup Mayonnaise can substitute with Greek yogurt
  • 1/4 cup Sweet Chili Sauce or honey/maple for homemade version
  • 2 tablespoons Sriracha adjust based on spice preference
  • 1 tablespoon Lime Juice can use lemon juice if lime is unavailable

Equipment

  • Skillet
  • Cooking Pot
  • Mixing Bowl
  • Whisk

Method
 

Preparation Steps
  1. Cook the rice according to the package instructions, about 15-20 minutes until tender.
  2. Slice the chicken breast into thin strips and sauté in a skillet over medium heat for 5-7 minutes.
  3. Add mixed vegetables to the skillet and stir-fry for 3-4 minutes until crisp-tender.
  4. In a small bowl, whisk together mayonnaise, sweet chili sauce, sriracha, and lime juice.
  5. Assemble the bowl with rice, sautéed chicken, vegetables, and drizzle with Bang Bang sauce.
  6. Garnish as desired and serve immediately.

Nutrition

Serving: 1bowlCalories: 550kcalCarbohydrates: 60gProtein: 30gFat: 20gSaturated Fat: 3gPolyunsaturated Fat: 2gMonounsaturated Fat: 8gCholesterol: 85mgSodium: 600mgPotassium: 700mgFiber: 4gSugar: 10gVitamin A: 1500IUVitamin C: 80mgCalcium: 30mgIron: 2mg

Notes

Store leftovers in an airtight container for up to 3 days. Reheat thoroughly. Vegetables can be swapped for convenience. Adjust spice to taste.

Tried this recipe?

Let us know how it was!
  • « Previous Page
  • 1
  • 2
  • 3
  • 4
  • …
  • 13
  • Next Page »

Welcome!

Hi, I’m Grace, a Sydney-based home cook with a passion for bold flavors and trending ingredients. Whether you’re a busy beginner or a seasoned foodie, you’ll find dishes here that are fresh, fun, and full of flavor.

More about me

Popular Recipes

  • Burrito-Stuffed Sweet Potatoes
    Burrito-Stuffed Sweet Potatoes: A Flavorful Gluten-Free Meal
  • One-Pot Lentil and Walnut Bolognese
    One-Pot Lentil and Walnut Bolognese for Cozy Nights In
  • Vegetable Fritters with Chickpeas
    Flavor-Packed Vegetable Fritters with Chickpeas You’ll Love
  • Smashed Chickpea Avocado Sandwich
    Smashed Chickpea Avocado Sandwich: Creamy & Wholesome Delight

Footer

↑ back to top

About

  • Privacy Policy
  • Disclaimer
  • Terms & Conditions

Newsletter

  • Sign Up! for emails and updates

Contact

  • About me
  • Contact me

Copyright © 2025 TastyTrendIngredients