tastytrendingredients

  • Home
  • Recipes
    • Appetizers
    • Breakfast
    • Dessert
    • Dinner
    • Drinks
    • Salads
    • Snacks
    • Soups
  • About me
  • Contact me
menu icon
go to homepage
  • Home
  • Recipes
    • Appetizers
    • Breakfast
    • Dessert
    • Dinner
    • Drinks
    • Salads
    • Snacks
    • Soups
  • About me
  • Contact me
search icon
Homepage link
  • Home
  • Recipes
    • Appetizers
    • Breakfast
    • Dessert
    • Dinner
    • Drinks
    • Salads
    • Snacks
    • Soups
  • About me
  • Contact me
×

Mouthwatering Basic Soft Pretzels for Your Homemade Snack Joy

September 1, 2025 by Grace Snow Leave a Comment

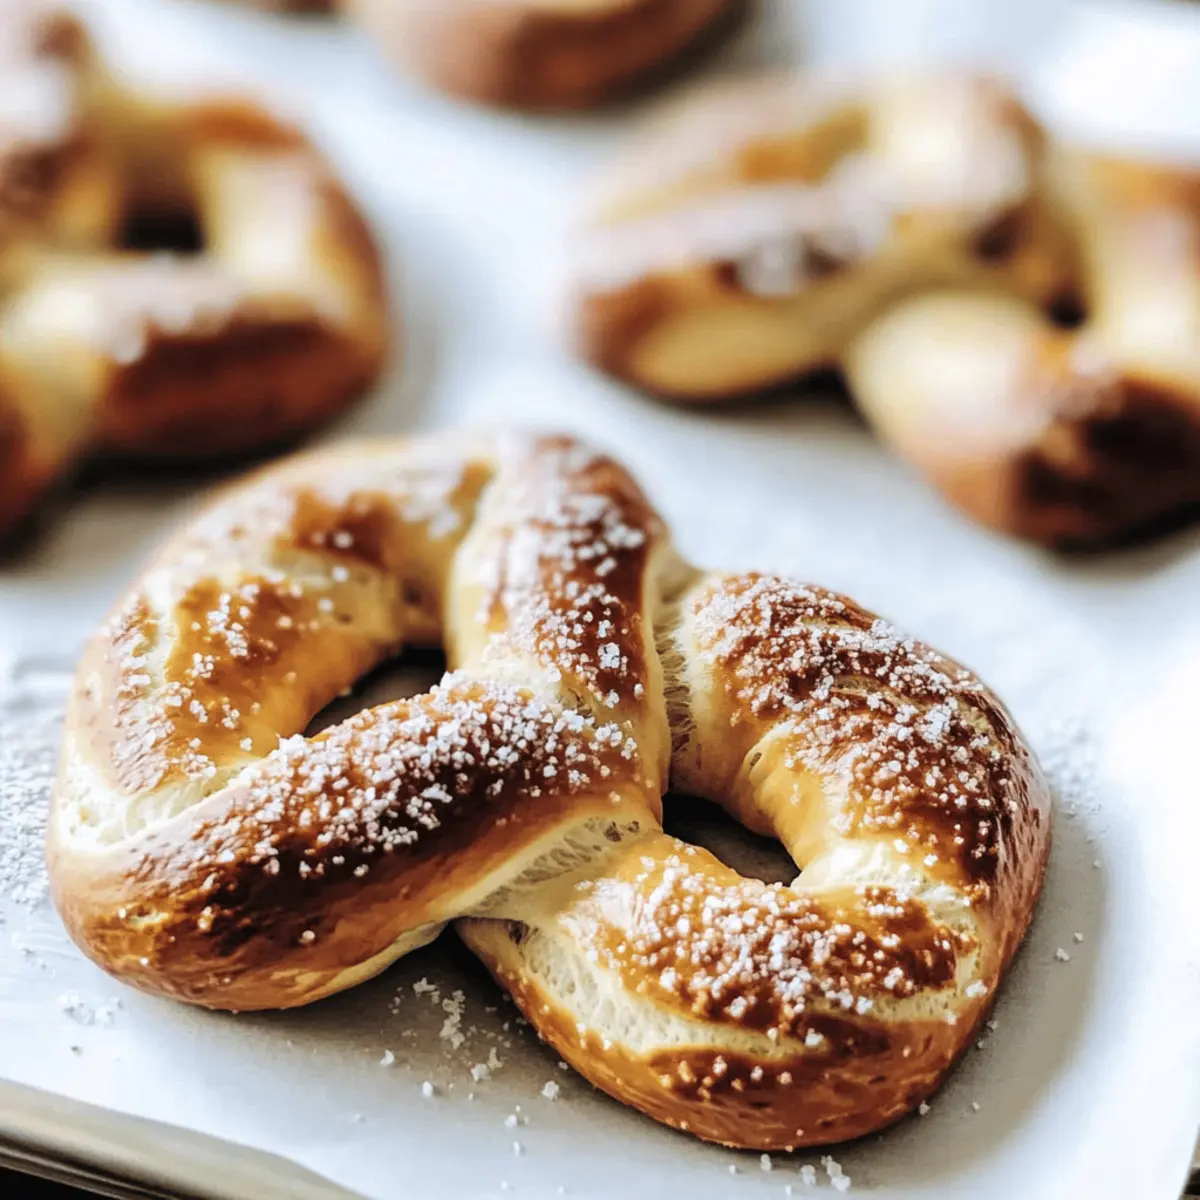
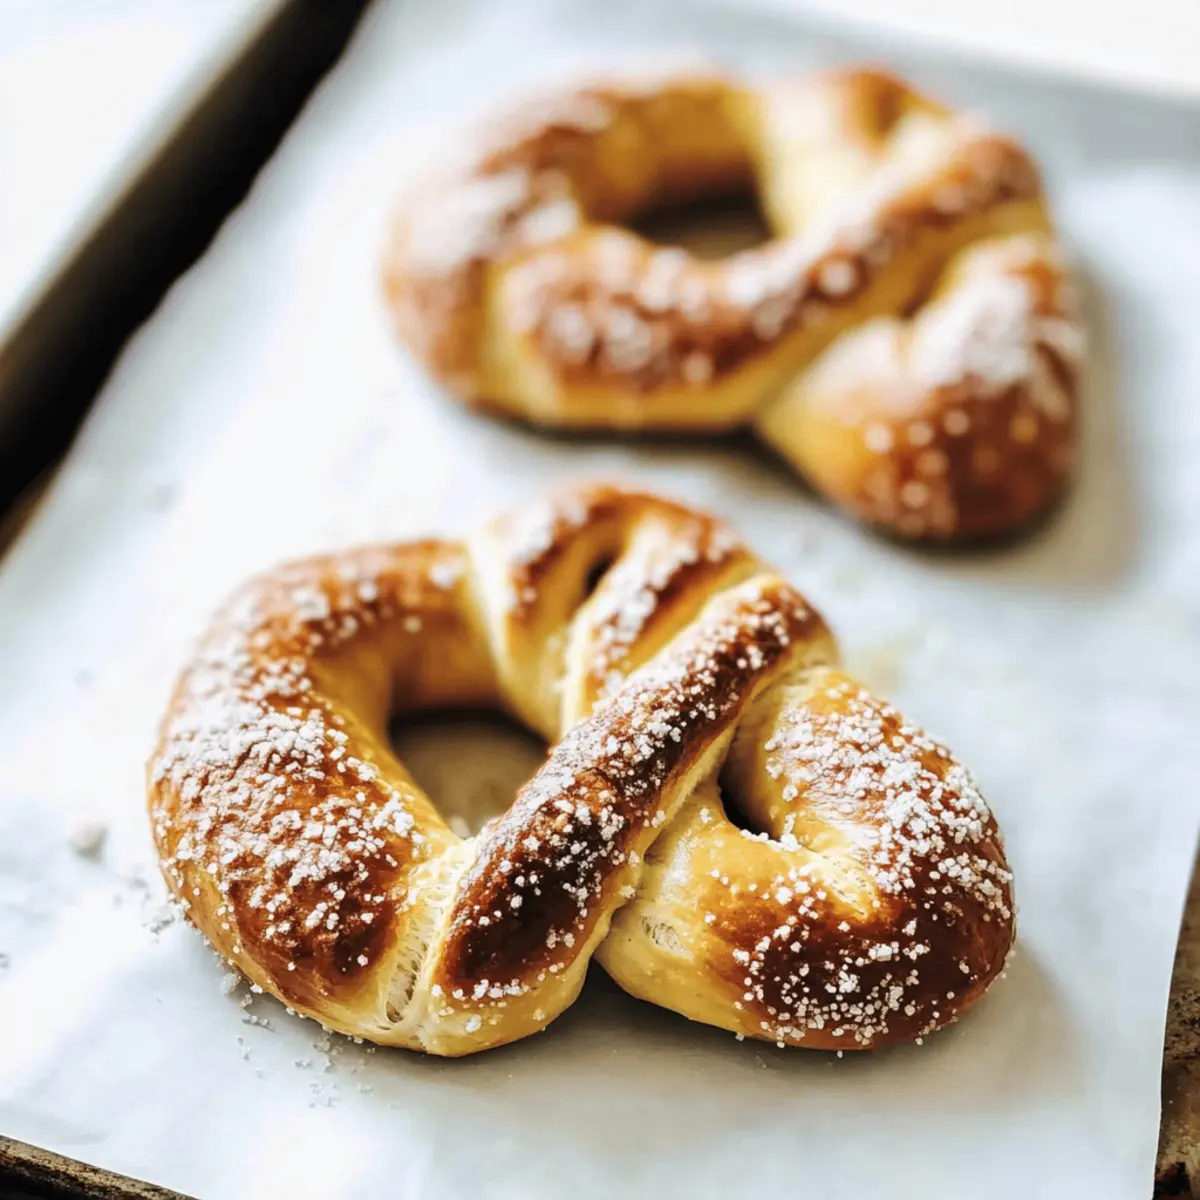
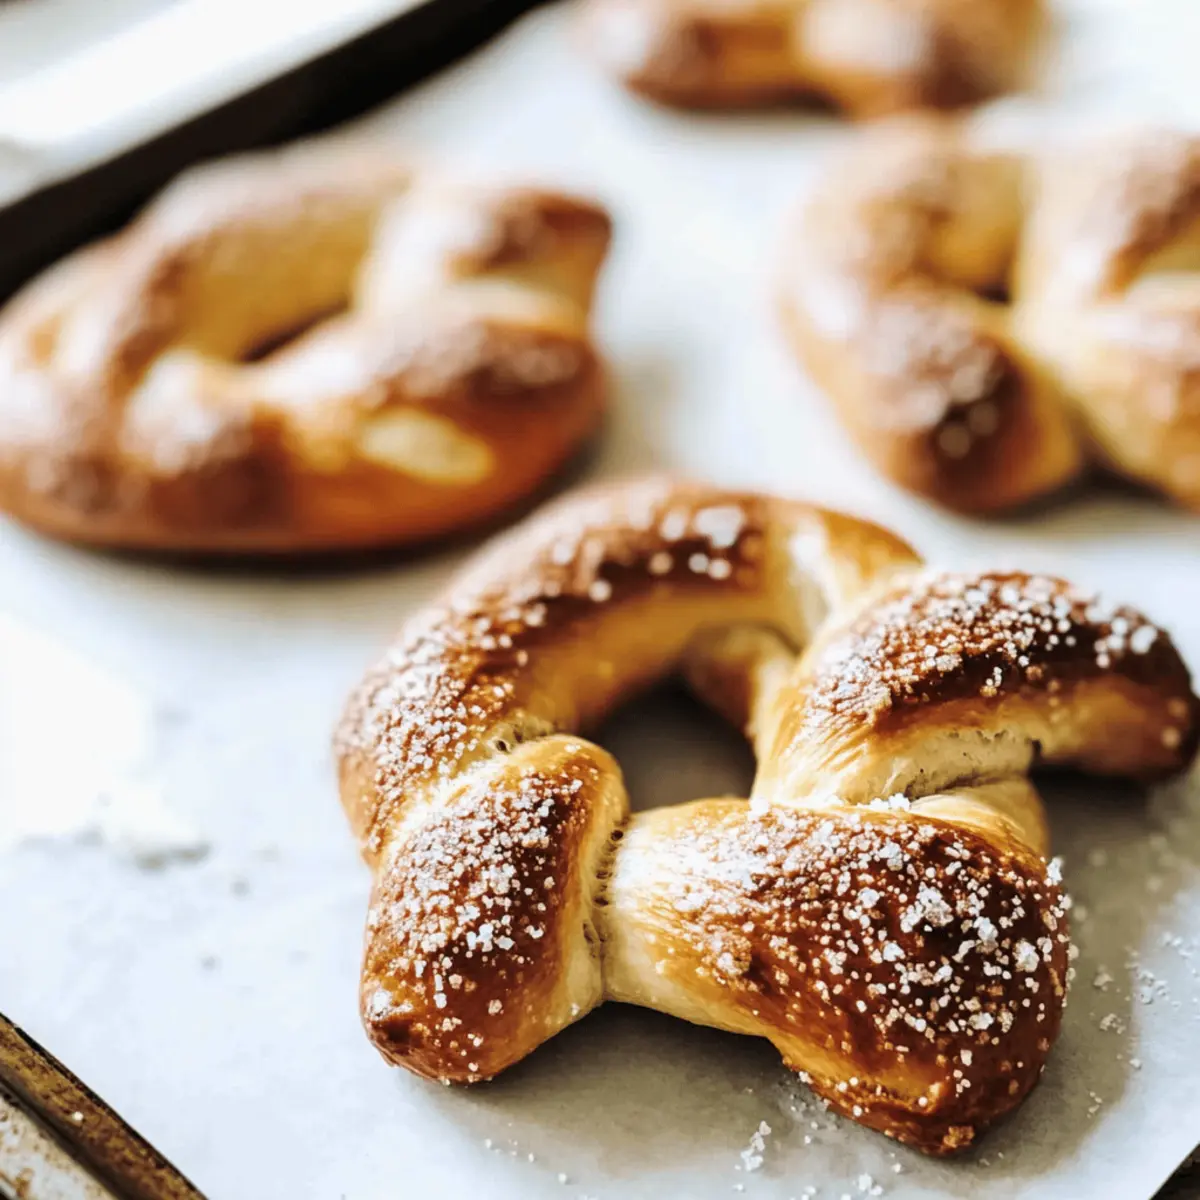
As I stood in my kitchen, the warm scent of baking dough enveloped me, instantly transporting me to bustling street fairs where vendors serve up golden-brown delights. Today, I’m excited to share my recipe for Basic Soft Pretzels—your new go-to for an impressive yet simple snack. These homemade pretzels are not only fantastically fluffy and chewy, but they also come together in a breeze, making them perfect for last-minute gatherings or cozy movie nights in. You’ll love how easy they are to whip up, and trust me, your family and friends will be asking for seconds! Want to learn the secrets to achieving that delectable crust and tender interior? Let’s dive into the magic of pretzel-making together!

Why are These Soft Pretzels Irresistible?

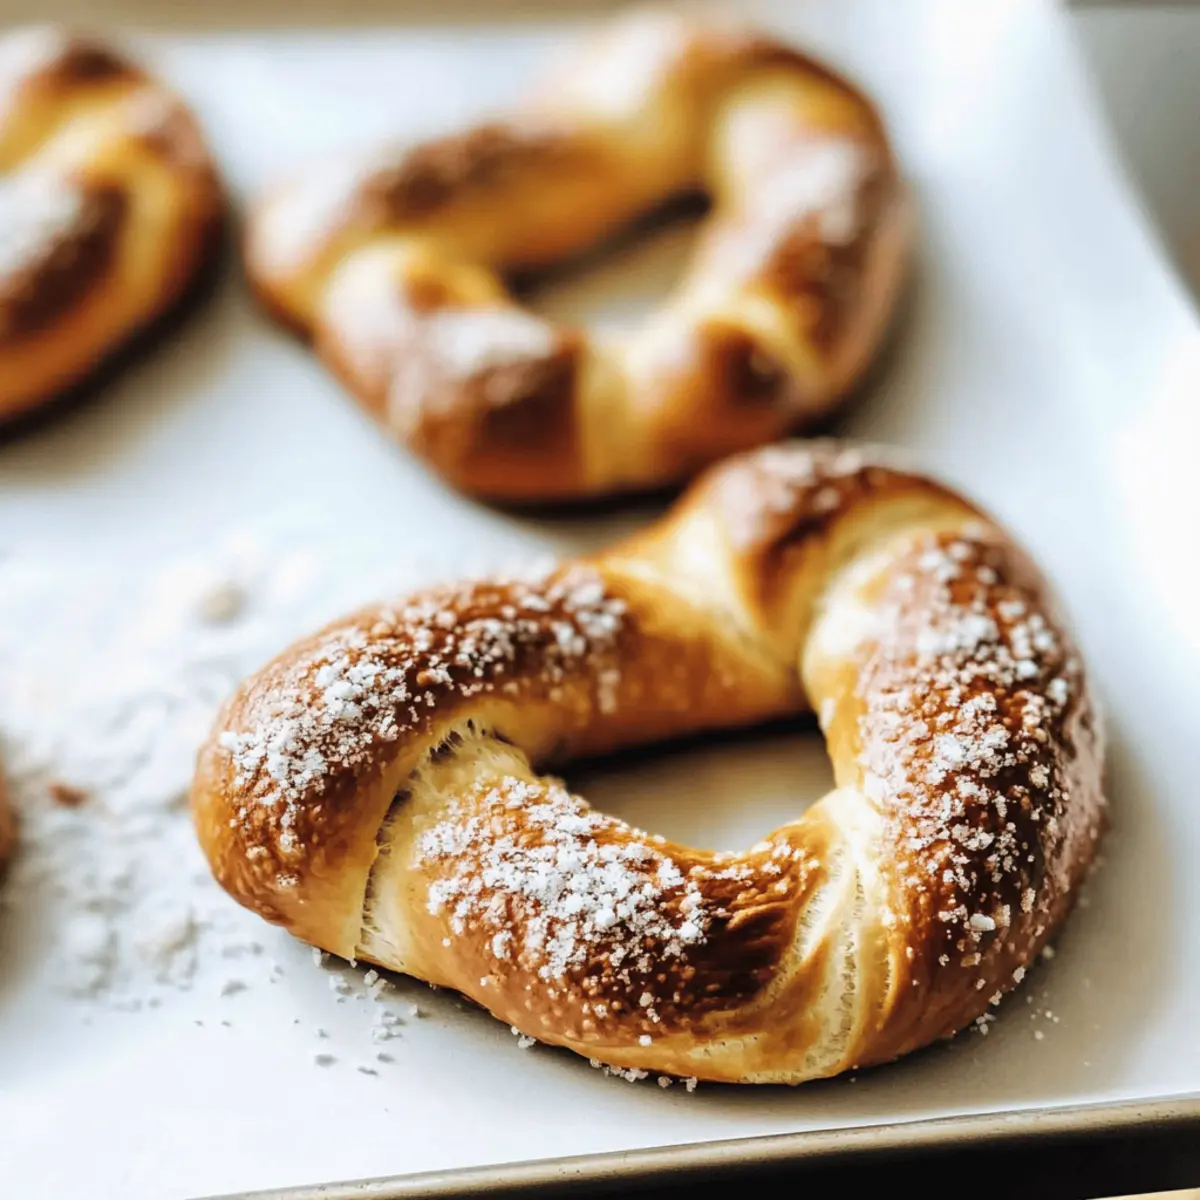
Homemade Perfection: There's nothing quite like the satisfaction of making soft pretzels from scratch—warm, fluffy, and oh-so-chewy.

Easy to Make: With simple ingredients, this recipe is perfect for beginners or anyone looking for a quick baking fix.

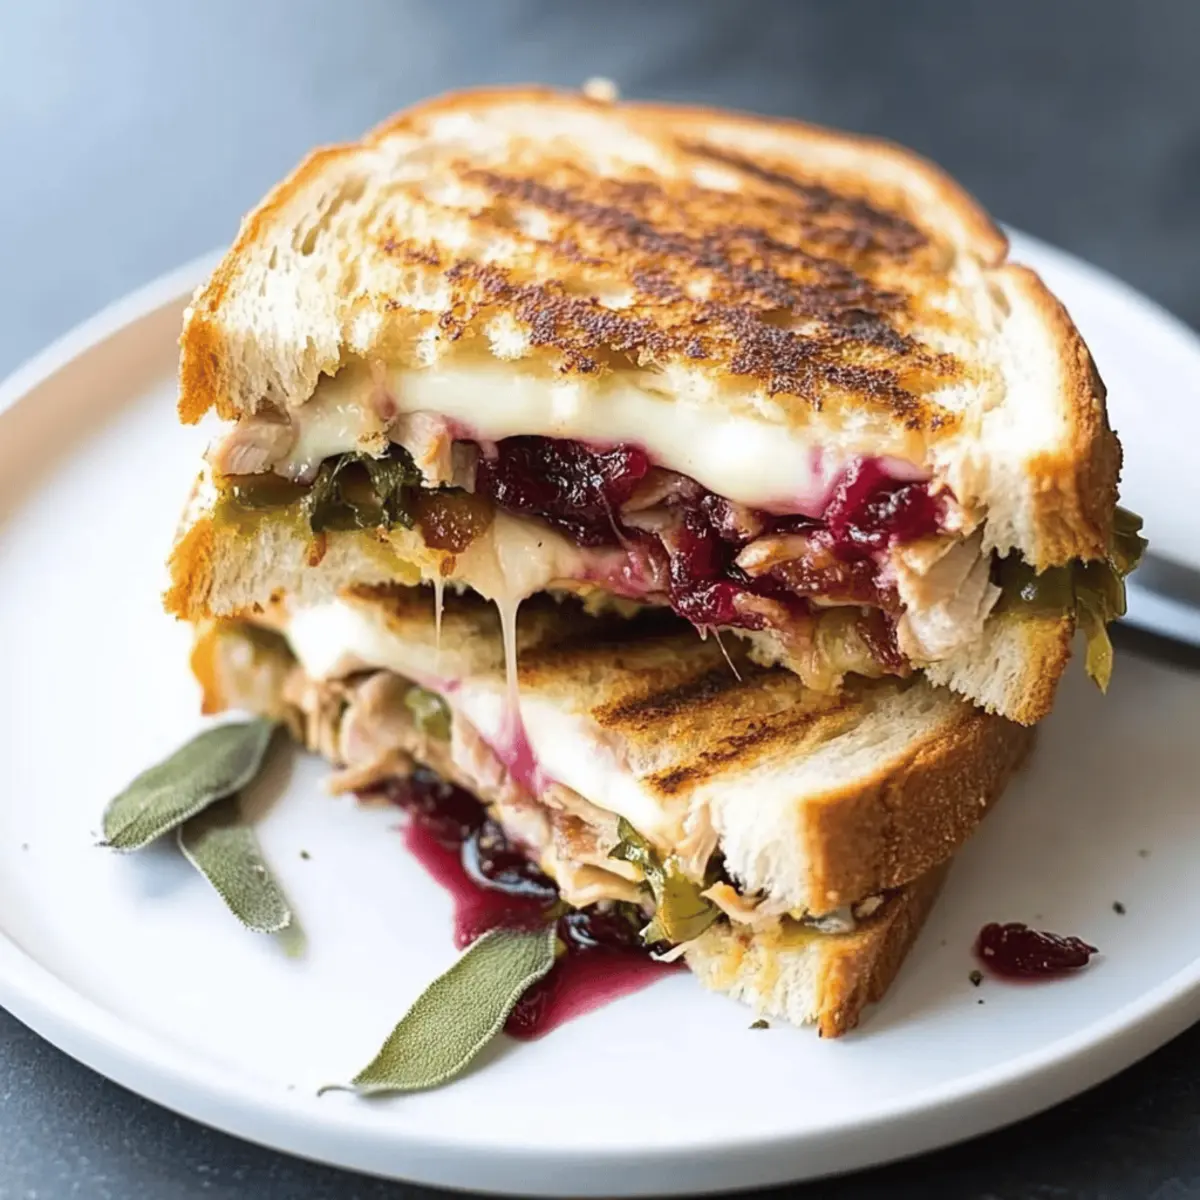
Endless Flavor Possibilities: Add toppings like coarse salt, garlic, or shredded cheese to customize your pretzels. You can even serve them with a dip, just like with Eggnog Cookies Soft!

Crowd Pleaser: Whether it's movie night or a party, these pretzels will impress your guests every time.

Homestyle Comfort: Enjoy the nostalgic flavors that remind you of street fairs, making every bite a delightful experience!

Discover the joy of homemade snacks—it's time to get baking!

Basic Soft Pretzels Ingredients

  • For the Dough
    • Warm Water – Essential for activating yeast; ensure it's not too hot to avoid killing the yeast.
    • Sugar – Adds sweetness and helps activate the yeast; use brown sugar for a hint of molasses flavor.
    • Active Dry Yeast – Leavens the dough for a fluffy texture; can substitute with instant yeast by adjusting activation time.
    • All-Purpose Flour – Provides structure and chewiness; bread flour can be used for an even chewier result.
    • Salt – Enhances flavor; sea salt or kosher salt can work well as alternatives.

  • For the Baking Process
    • Baking Soda – Used in the water bath to give pretzels their distinctive brown color and flavor; do not substitute with other ingredients.
    • Melted Butter – Adds richness and flavor; can be brushed on top for an extra buttery finish.

Dive into creating scrumptious Basic Soft Pretzels, the perfect addition to your homemade snack repertoire!

Step‑by‑Step Instructions for Basic Soft Pretzels

Step 1: Activate the Yeast
In a mixing bowl, combine 1 ½ cups of warm water (not too hot) with 1 tablespoon of sugar and 2 ¼ teaspoons of active dry yeast. Stir gently and let it sit for about 5 minutes until frothy, indicating the yeast is alive and ready to create those fluffy textures characteristic of Basic Soft Pretzels.

Step 2: Form the Dough
Once the yeast mixture is frothy, gradually add 4 cups of all-purpose flour and 1 teaspoon of salt to the bowl. Mix with a wooden spoon until a shaggy dough forms. Knead the dough on a floured surface for 10-15 minutes until it becomes smooth and elastic, which is crucial for that perfect chewy bite you want in your pretzels.

Step 3: Let the Dough Rise
Place the kneaded dough in a lightly greased bowl, covering it with a kitchen towel or plastic wrap. Let it rise in a warm spot for about 1 hour, or until it has doubled in size. This step is essential for achieving the light and airy interior of your Basic Soft Pretzels.

Step 4: Preheat the Oven
While your dough is rising, preheat your oven to 450°F (232°C). This high temperature is crucial for creating that golden-brown crust on your pretzels. Prepare a baking sheet by lining it with parchment paper to ensure your pretzels don’t stick during baking.

Step 5: Shape the Pretzels
Once the dough has risen, punch it down and divide it into 8 equal pieces. Roll each piece into long ropes, approximately 24 inches in length. Shape the ropes into classic pretzel shapes by forming a U, twisting the ends together, and folding them back to the bottom of the U. Place the shaped pretzels on your prepared baking sheet.

Step 6: Prepare the Baking Soda Bath
In a large pot, bring 4 cups of water to a gentle boil. Stir in ¼ cup of baking soda—this is what gives your Basic Soft Pretzels their signature color and flavor. Carefully lower each pretzel into the boiling water for about 30 seconds, then remove and place them back on the baking sheet.

Step 7: Sprinkle and Bake
Immediately after dipping, sprinkle each pretzel with coarse salt for that classic salty finish. Bake your pretzels in the preheated oven for 12-15 minutes, or until they are deep golden brown and your kitchen is filled with the delightful aroma of freshly baked bread.

Step 8: Brush with Butter
Once baked, remove the pretzels from the oven and allow them to cool slightly on a wire rack. For an extra touch of richness and flavor, brush the warm pretzels generously with melted butter. This final step enhances their taste, making your Basic Soft Pretzels irresistible!

Basic Soft Pretzels: Delicious Variations

Feel free to get creative with your soft pretzel adventure—these delightful variations will tantalize your taste buds!

  • Cheesy Twists: Add shredded cheese into the dough for a gooey and savory flavor. Just imagine taking a bite and pulling away that delicious cheese stretch!

  • Garlic Herb: Mix in garlic powder, dried oregano, and rosemary for a fragrant herbaceous twist. These pretzels will transport you to a cozy Italian kitchen.

  • Sweet Cinnamon Sugar: Before baking, sprinkle the shaped pretzels with a mixture of cinnamon and sugar for a sweet treat. Perfect for dessert or a cozy morning snack!

  • Spicy Kick: Incorporate cayenne pepper or crushed red pepper flakes into the dough for a hint of heat. Pair these spicy pretzels with creamy ranch dip for a fun party snack.

  • Caramelized Onions: Sauté some finely chopped onions until caramelized and fold them into your dough. The sweetness of the onions will deepen the flavor and make these pretzels stand out.

  • Dipping Delight: Serve with various dips like cheese sauce, honey mustard, or spicy ketchup for a fun dipping experience. Who doesn't love a little variety?

  • Gluten-Free Option: Substitute all-purpose flour with a gluten-free flour blend. This way, those with dietary restrictions can enjoy the same fluffy goodness!

  • Chocolate-Covered Pretzels: After baking and cooling, dip your pretzels in melted chocolate and sprinkle with crushed nuts. A decadent twist that will delight both kids and adults alike!

Explore the endless possibilities and make these Basic Soft Pretzels a unique addition to your homemade snacks. Don’t forget to check out my delightful Matcha Cookies Soft for another sweet treat!

What to Serve with Basic Soft Pretzels?

Indulging in homemade soft pretzels invites a delightful experience perfect for casual gatherings and cozy nights in.

  • Creamy Cheese Dip: This rich dip enhances the pretzels’ flavor, offering a decadent contrast to their chewy texture.

  • Mustard Medley: A zesty mustard selection gives a tangy hit, balancing the warm, fluffy pretzels perfectly. Consider a whole grain mustard for extra texture!

  • Charcuterie Board: Pairing the pretzels with cured meats and cheeses creates a fun, shareable spread that’s sure to please guests.

  • Beer Cheese Soup: The combination of soft pretzels and this creamy, savory soup makes for a comforting, satisfying meal.

  • Pickled Vegetables: A crunchy, tangy side of pickled veggies adds brightness and contrast, making your snack plate more vibrant.

  • Sweet Cinnamon Sugar: For a delightful dessert twist, sprinkle your pretzels with cinnamon sugar and serve with a side of chocolate or caramel sauce for dipping.

Let your imagination run wild with these pairings and truly elevate your soft pretzel experience!

How to Store and Freeze Basic Soft Pretzels

  • Room Temperature: Store cooked pretzels in an airtight container for up to 2 days to maintain their freshness and texture.

  • Fridge: If you want to keep them longer, you can refrigerate the pretzels for up to 5 days. Just make sure they are in a tightly sealed container to prevent drying out.

  • Freezer: For longer storage, freeze the pretzels by wrapping them individually in plastic wrap, then placing them in a freezer bag or container for up to 3 months.

  • Reheating: To reheat, simply bake from frozen at 350°F (175°C) for about 10-15 minutes until warmed through, reviving that delightful texture of your Basic Soft Pretzels!

Expert Tips for Basic Soft Pretzels

  • Knead Well: Ensure you knead the dough thoroughly to develop gluten, which gives the pretzels their desired chewy texture.

  • Watch the Water Temperature: Use lukewarm water to activate the yeast; overheated water can kill the yeast, leading to flat pretzels.

  • Dissolve Yeast First: If using active dry yeast, dissolve it in warm water before mixing; this helps activate it effectively for better results.

  • Don’t Crowded the Baking Sheet: Make sure the pretzels are spaced appropriately on the baking sheet; overcrowding can lead to uneven baking and browning.

  • Enhance Flavor: Brush your pretzels with melted butter right after baking for an extra burst of flavor that makes these Basic Soft Pretzels unforgettable!

Make Ahead Options

These Basic Soft Pretzels are truly perfect for meal prep, saving you time on busy weeknights! You can prepare the dough up to 24 hours in advance by kneading it and refrigerating it after the first rise. When you're ready to enjoy your pretzels, simply remove the dough from the fridge and let it come to room temperature for 30-60 minutes before shaping. To ensure they remain fluffy and delightful, be sure to store the dough in an airtight container. If you have leftover baked pretzels, you can keep them in an airtight container for up to 2 days and reheat them in the oven for a few minutes before serving, ensuring they taste just as delicious as when they were freshly baked!

Basic Soft Pretzels Recipe FAQs

What kind of flour should I use for the best texture?
I recommend using all-purpose flour for a classic soft pretzel, but if you're seeking extra chewiness, bread flour is an excellent alternative. It has a higher protein content, which helps to develop gluten and gives the pretzels that perfect bite.

How should I store leftover pretzels?
Store your cooked Basic Soft Pretzels in an airtight container at room temperature for up to 2 days. If you need to keep them longer, refrigerate them for about 5 days in a sealed container to prevent drying out.

Can I freeze homemade pretzels?
Absolutely! To freeze your Basic Soft Pretzels, wrap each one individually in plastic wrap and place them in a freezer bag. They can be frozen for up to 3 months. When you're ready to enjoy them, simply bake from frozen at 350°F (175°C) for 10-15 minutes until warmed through.

What should I do if my dough doesn’t rise?
If your dough doesn’t rise, it could be due to the yeast being inactive. Make sure the water is warm but not too hot, as temperatures above 120°F (49°C) can kill the yeast. If this happens, don’t worry! You can add a new packet of yeast to warm water and let it sit until frothy, then combine it with your existing dough to salvage your pretzels.

Can I make pretzels ahead of time?
Yes, you can prepare the dough the night before! After kneading, refrigerate the dough. When you're ready to shape and bake, bring it back to room temperature and then continue with the shaping and baking steps. This is a great time-saver for parties and gatherings.

Are there any dietary considerations I should keep in mind?
If you have allergies, be cautious with the ingredients. The Basic Soft Pretzels contain gluten due to the flour, and the baking soda bath should not be modified. For those watching their sodium intake, you can control the amount of coarse salt you sprinkle on top, or even leave it off entirely.

Basic Soft Pretzels

Mouthwatering Basic Soft Pretzels for Your Homemade Snack Joy

Enjoy making Basic Soft Pretzels that are fluffy, chewy, and perfect for snacks.
Print Recipe Pin Recipe
Prep Time 15 minutes mins
Cook Time 15 minutes mins
Rising Time 1 hour hr
Total Time 1 hour hr 30 minutes mins
Servings: 8 pretzels
Course: Snacks
Cuisine: American
Calories: 250
Ingredients Equipment Method Nutrition Notes

Ingredients
  

For the Dough
  • 1.5 cups warm water not too hot
  • 1 tablespoon sugar can use brown sugar
  • 2.25 teaspoons active dry yeast can substitute with instant yeast
  • 4 cups all-purpose flour can use bread flour for chewier result
  • 1 teaspoon salt can use sea or kosher salt
For the Baking Process
  • 0.25 cups baking soda do not substitute with other ingredients
  • 3 tablespoons melted butter for brushing on top

Equipment

  • Mixing Bowl
  • Wooden spoon
  • Floured surface
  • Baking Sheet
  • Parchment Paper
  • Large pot
  • wire rack

Method
 

Step-by-Step Instructions for Basic Soft Pretzels
  1. In a mixing bowl, combine warm water with sugar and yeast. Stir gently and let it sit for about 5 minutes until frothy.
  2. Gradually add flour and salt. Mix with a wooden spoon until a shaggy dough forms. Knead on a floured surface for 10-15 minutes until smooth.
  3. Place the kneaded dough in a greased bowl and cover. Let it rise in a warm spot for about 1 hour, or until doubled.
  4. Preheat your oven to 450°F (232°C) and prepare a baking sheet lined with parchment paper.
  5. Punch down the dough and divide into 8 pieces. Roll each piece into long ropes and shape into pretzel forms.
  6. Bring 4 cups of water to a gentle boil and stir in baking soda. Lower each pretzel into the boiling water for about 30 seconds.
  7. Sprinkle pretzels with coarse salt immediately after boiling. Bake for 12-15 minutes until golden brown.
  8. Allow to cool slightly on a rack, then brush with melted butter for extra flavor.

Nutrition

Serving: 1pretzelCalories: 250kcalCarbohydrates: 40gProtein: 6gFat: 8gSaturated Fat: 4gPolyunsaturated Fat: 0.5gMonounsaturated Fat: 3gCholesterol: 15mgSodium: 480mgPotassium: 200mgFiber: 2gSugar: 1gVitamin A: 200IUCalcium: 20mgIron: 2mg

Notes

Ensure to knead well and watch water temperature for best results.

Tried this recipe?

Let us know how it was!

Irresistible Blackout Chocolate Cake for Ultimate Indulgence

September 1, 2025 by Grace Snow Leave a Comment

As I stood in my kitchen, the rich aroma of melting chocolate filled the air, instantly transporting me to those joyous childhood birthdays when cake was the undisputed star of the show. Today, I'm excited to share my take on the Blackout Chocolate Cake, a decadent masterpiece that elevates any celebration. Crafted with layers of ultra-moist chocolate goodness and a luscious cream cheese frosting, it promises to be the highlight of your dessert table. Not only is this cake incredibly satisfying to make, but it's also a crowd-pleaser that caters to chocolate lovers of all ages. Whether you're whipping it up for a special occasion or simply indulging in a sweet treat on a cozy evening, this chocolate delight is bound to impress. Curious how to create this chocolate lover's dream? Let’s dive into the recipe!

Why is the Blackout Chocolate Cake irresistible?

Decadent Flavors: This cake features an intense chocolate flavor that will satisfy even the most discerning chocolate lover. Ultra-Moist Texture: Each slice melts in your mouth, thanks to the perfect combination of yogurt and oil. Creamy Frosting: Topped with a rich cream cheese frosting, it adds a delightful tang that perfectly balances the sweetness. Party-Ready: Ideal for celebrations, this cake is sure to be the star of any gathering. For more chocolate indulgence, check out my Chocolate Pudding Cake!

Blackout Chocolate Cake Ingredients

• Get ready to create a chocolate sensation!

For the Cake

  • All-Purpose Flour – Provides structure for the cake; substituting with cake flour gives a tender crumb.
  • Granulated Sugar – Sweetens the cake; consider using brown sugar for more moisture and flavor.
  • Unsweetened Cocoa Powder – Adds a deep chocolate flavor; ensure it’s high-quality for the best taste.
  • Baking Powder & Baking Soda – Leavening agents to help the cake rise; check for their freshness!
  • Salt – Enhances overall flavor; don’t skip this as it balances the sweetness.
  • Eggs – Bind the cake and add moisture; using room temperature eggs leads to a fluffier result.
  • Whole Milk Yogurt – Adds richness and moisture; sour cream is a good alternative if needed.
  • Espresso Powder – Deepens the chocolate flavor; omit it only if you prefer a milder taste.
  • Vegetable Oil – Keeps the cake moist; melted butter works well for a richer flavor.
  • Chocolate Chips – Coats the cake for added texture; a mix of semi-sweet and dark is perfect.

For the Frosting

  • Cream Cheese – Forms the base of the frosting, giving it creaminess and a slight tang; always use full-fat for the best texture.
  • Powdered Sugar – Sweetens and thickens the frosting; sifting before measuring ensures a silky consistency.
  • Vanilla Extract – Adds depth of flavor; using pure extract enhances the overall taste.

This Blackout Chocolate Cake is sure to become a beloved favorite in your home, perfect for indulging or celebrating a special moment!

Step‑by‑Step Instructions for Blackout Chocolate Cake

Step 1: Preheat the Oven
Begin by preheating your oven to 350°F (175°C). While the oven warms up, prepare two 9-inch round cake pans by greasing them with cooking spray or lining them with parchment paper. This ensures easy removal of your delicious Blackout Chocolate Cake once it's baked, allowing for a beautifully presented dessert.

Step 2: Mix the Dry Ingredients
In a large mixing bowl, whisk together the all-purpose flour, unsweetened cocoa powder, baking powder, baking soda, and salt. Make sure these dry ingredients are well combined and free of lumps, as even distribution is key to the cake’s rise and flavor. Set this mixture aside while you gather your wet ingredients.

Step 3: Combine the Wet Ingredients
In a separate medium bowl, whisk together the eggs, whole milk yogurt, vegetable oil, and pure vanilla extract until smooth and well blended. This creamy mixture adds richness and moisture to your Blackout Chocolate Cake. With the wet ingredients ready, you can now combine them with the dry ingredients for a luscious batter.

Step 4: Combine Mixtures
Gradually add the dry ingredient mixture to the wet ingredients, alternating with any water, mixing gently until just combined. Be careful not to overmix; a few flour streaks are perfectly fine. The batter will be thick and rich, promising a moist cake loaded with chocolate flavor.

Step 5: Bake the Cake
Pour the prepared batter evenly into the two greased cake pans. Smooth the tops with a spatula, then place them in the preheated oven. Bake for 30-35 minutes, or until a toothpick inserted into the center comes out clean. As the cakes bake, your kitchen will fill with an irresistible chocolate aroma.

Step 6: Cool the Cake Layers
Once baked, remove the cake pans from the oven and let them cool in the pans for about 10 minutes. This allows them to firm up slightly. Carefully transfer the cake layers to wire racks to cool completely. Patience here is essential, as a fully cooled cake is easier to frost and handle.

Step 7: Prepare the Frosting
In a mixing bowl, beat the cream cheese and butter together until light and fluffy. Gradually add in the sifted powdered sugar and unsweetened cocoa powder, mixing until well incorporated. This frosting will be creamy and rich, providing the perfect pairing for your Blackout Chocolate Cake.

Step 8: Assemble the Cake
Take one cooled cake layer and place it on a serving plate. Spread a generous layer of frosting on top, then add the second layer over it. Continue to frost the top and sides, ensuring no cake is left uncovered. For a finishing touch, roll the sides in chocolate chips for a delightful texture.

Step 9: Chill or Serve
For easier slicing, consider chilling your assembled Blackout Chocolate Cake in the refrigerator for about 30 minutes. However, it can also be served immediately at room temperature. Either way, this rich and decadent cake is bound to impress your guests and satisfy those chocolate cravings!

How to Store and Freeze Blackout Chocolate Cake

Fridge: Store your Blackout Chocolate Cake in an airtight container in the refrigerator for up to 5 days. This helps maintain its moist texture and fresh flavor.

Freezer: To freeze, wrap individual slices tightly in plastic wrap, then place them in a zip-top bag. Enjoy them within 3 months for optimal flavor.

Thawing: When ready to enjoy, thaw slices in the fridge overnight or let them sit at room temperature for about an hour.

Reheating: If desired, you can gently warm slices in the microwave for about 10-15 seconds to enhance the chocolate's richness before serving.

Blackout Chocolate Cake Variations

Feel free to let your creativity shine by customizing this cake with these delightful twists!

  • Gluten-Free: Swap all-purpose flour for a 1:1 gluten-free baking blend for a delicious alternative. Enjoying a gluten-free version of this decadent cake means no one has to miss out on the joy of chocolate!
  • Flavored Frosting: Try adding flavored extracts like mint or almond to the frosting for a unique flavor profile. These subtle hints will delight your taste buds, adding an unexpected gourmet touch.
  • Nutty Surprise: Fold in chopped walnuts or pecans between layers for a delightful crunch. These added textures create a wonderful contrast, making each bite even more enjoyable.
  • Decadent Layers: Craving a little more indulgence? Add a layer of chocolate ganache between the cake layers for an extra chocolatey experience! It’s a wonderful surprise that will leave your guests coming back for seconds.
  • Vegan Option: Use a flaxseed egg (1 tablespoon ground flaxseed mixed with 3 tablespoons water) instead of regular eggs and substitute yogurt with almond yogurt. This delicious option ensures everyone can enjoy this treat!
  • Spice It Up: Adding a pinch of cayenne or chili powder in the batter will give the cake an unexpected kick. It beautifully enhances the chocolate flavor, turning an ordinary treat into something extraordinary!
  • Fruity Twist: Layer in some fresh raspberries or strawberries between the cake layers. The fruit adds a refreshing tartness that perfectly complements the rich chocolatey goodness.
  • Ice Cream Delight: Serve slices with a scoop of ice cream or a dollop of whipped cream for an extra special dessert experience. Adding a cold element makes each bite even more heavenly.

For more delightful chocolate ideas, don’t forget to check out my Chocolate Pudding Cake or any of my other chocolate poke cake variations! Happy baking!

Expert Tips for Blackout Chocolate Cake

  • Room Temperature Eggs: Using eggs at room temperature is crucial for achieving a fluffy batter and a light texture in your Blackout Chocolate Cake.
  • Don’t Overmix: Mix until just combined to avoid a dense cake. Overmixing can lead to gluten development, impacting texture.
  • Level Layers: Use a serrated knife to level your cake layers for stable stacking and a beautiful presentation.
  • Sift Ingredients: Sifting powdered sugar and cocoa before mixing helps eliminate lumps, ensuring a silky smooth frosting.
  • Cool Completely: Let the cake layers cool completely before frosting to prevent the icing from melting and sliding off.
  • Chocolate Chip Coating: For the perfect finish, gently press chocolate chips into the frosting on the sides of your cake for added texture and a beautiful appearance.

What to Serve with Blackout Chocolate Cake

When you share this delectable dessert, elevate the experience with delightful accompaniments that dance perfectly alongside the rich flavors of chocolate.

  • Fresh Berries: The tartness of raspberries or strawberries provides a refreshing contrast to the cake's sweetness, brightening each bite.

  • Vanilla Ice Cream: A scoop of creamy vanilla ice cream adds a luscious creaminess that beautifully complements the rich chocolate flavor and cooling sensation.

  • Espresso: A rich cup of espresso can intensify the chocolate experience. The warmth of the coffee enhances the cake's decadent taste, creating a delightful pairing.

  • Whipped Cream: Light and airy whipped cream introduces a cloud-like texture that balances the cake's density, making each slice feel indulgent yet light.

  • Chocolate Ganache: Drizzling warm chocolate ganache over the cake creates an eloquent finish. The glossy shine and rich taste take the dessert to a whole new level.

  • Mint Leaves: Sprinkling mint leaves around the plate adds a lovely burst of freshness. The aromatic quality enhances the overall dessert experience and brings a bright touch.

  • Hazelnut Liqueur: For an adult twist, serve slices alongside a glass of hazelnut liqueur. The nutty flavor enhances the chocolate nuances beautifully.

  • Chocolate-Covered Strawberries: For those special occasions, garnish the plate with chocolate-covered strawberries, adding a romantic flair to your cake presentation.

  • Dessert Wine: Pairing with a sweet dessert wine creates a lovely ending to a meal, enhancing the rich flavors while offering a delightful sip to round out the experience.

Make Ahead Options

These decadent Blackout Chocolate Cake is perfect for meal prep, allowing busy home cooks to save time on special occasions. You can bake the cake layers up to 3 days in advance; simply allow them to cool completely, wrap tightly in plastic wrap, and refrigerate. For the frosting, prepare it up to 24 hours ahead and store it in an airtight container in the fridge. When you're ready to enjoy your cake, take the layers out of the fridge, let them come to room temperature, and frost as usual. This way, you'll have a stunning dessert ready to impress without any last-minute stress, just as delicious as if made fresh!

Blackout Chocolate Cake Recipe FAQs

How do I select the right cocoa powder for the Blackout Chocolate Cake?
Absolutely! Choosing high-quality unsweetened cocoa powder is crucial for achieving that deep, rich chocolate flavor. Look for brands that are labeled “Dutch process” or make sure it has a high cocoa content. You want cocoa that’s dark and aromatic—this makes all the difference in your cake's flavor profile!

How should I store leftover Blackout Chocolate Cake?
Very simply! Place your leftover cake in an airtight container and store it in the refrigerator for up to 5 days. This will keep it moist and flavorful. If you're not finishing it within that time, consider freezing slices wrapped tightly in plastic wrap and then in a zip-top bag, where they'll last for about 3 months.

Can I freeze the Blackout Chocolate Cake? If so, how?
Absolutely! To freeze your cake, let it cool completely, then wrap individual slices tightly in plastic wrap, ensuring no air pockets remain. Place the wrapped slices in a zip-top freezer bag labeled with the date. When you're ready to enjoy a slice, just thaw it in the fridge overnight or at room temperature for about an hour.

What if my cake turns out dry?
If you find your cake is dry, here are a few troubleshooting tips. First, check your oven temperature with an oven thermometer to ensure it’s baking at the right temperature. Next, also make sure to accurately measure your ingredients; too much flour can lead to a drier cake. Lastly, ensuring that you don’t overbake it is essential—start checking for doneness a few minutes before the minimum baking time.

Is the Blackout Chocolate Cake suitable for people with gluten intolerance?
The more the merrier! To make this cake gluten-free, you can substitute the all-purpose flour with a gluten-free baking blend in a 1:1 ratio. Many blends work well, but be sure to check ingredients for any hidden gluten. Additionally, avoid cross-contamination by using separate baking utensils and pans if needed.

Can I use different types of sugar in this recipe?
Definitely! If you're looking for a different flavor profile or added moisture, substituting granulated sugar with brown sugar works beautifully in the Blackout Chocolate Cake. It will enhance the caramel notes, giving the cake a richer flavor. Just remember to adjust the liquid ingredients slightly as necessary because brown sugar contains more moisture.

Blackout Chocolate Cake

Irresistible Blackout Chocolate Cake for Ultimate Indulgence

This Blackout Chocolate Cake is a decadent masterpiece that elevates any celebration.
Print Recipe Pin Recipe
Prep Time 30 minutes mins
Cook Time 35 minutes mins
Cooling Time 10 minutes mins
Total Time 1 hour hr 15 minutes mins
Servings: 12 slices
Course: Dessert
Cuisine: American
Calories: 450
Ingredients Equipment Method Nutrition Notes

Ingredients
  

For the Cake
  • 2 cups All-Purpose Flour Substituting with cake flour gives a tender crumb.
  • 1.5 cups Granulated Sugar Consider using brown sugar for more moisture and flavor.
  • 0.75 cups Unsweetened Cocoa Powder Ensure it’s high-quality for the best taste.
  • 1.5 teaspoons Baking Powder Check for freshness.
  • 1.5 teaspoons Baking Soda Check for freshness.
  • 1 teaspoon Salt Enhances overall flavor.
  • 3 Eggs Using room temperature eggs leads to a fluffier result.
  • 1 cup Whole Milk Yogurt Sour cream is a good alternative.
  • 1 teaspoon Espresso Powder Omit if you prefer a milder taste.
  • 0.5 cups Vegetable Oil Melted butter works well for a richer flavor.
  • 1 cup Chocolate Chips A mix of semi-sweet and dark is perfect.
For the Frosting
  • 8 oz Cream Cheese Always use full-fat for the best texture.
  • 4 cups Powdered Sugar Sifting before measuring ensures a silky consistency.
  • 2 teaspoons Vanilla Extract Using pure extract enhances the overall taste.

Equipment

  • Oven
  • Mixing bowls
  • Electric mixer
  • 9-inch Round Cake Pans
  • Spatula
  • wire rack

Method
 

Step-by-Step Instructions
  1. Preheat your oven to 350°F (175°C) and prepare two 9-inch round cake pans by greasing them or lining them with parchment paper.
  2. In a large mixing bowl, whisk together the all-purpose flour, unsweetened cocoa powder, baking powder, baking soda, and salt.
  3. In a separate medium bowl, whisk together the eggs, whole milk yogurt, vegetable oil, and pure vanilla extract until smooth.
  4. Gradually add the dry ingredient mixture to the wet ingredients, alternating with any water, mixing gently until just combined.
  5. Pour the prepared batter evenly into the two greased cake pans and bake for 30-35 minutes.
  6. Once baked, let the cakes cool in the pans for about 10 minutes before transferring them to wire racks to cool completely.
  7. In a mixing bowl, beat the cream cheese and butter together until light and fluffy, then gradually add the sifted powdered sugar and cocoa powder.
  8. Take one cooled cake layer and spread a generous layer of frosting on top, then add the second layer over it and frost the top and sides.
  9. For easier slicing, consider chilling your assembled cake in the refrigerator for about 30 minutes.

Nutrition

Serving: 1sliceCalories: 450kcalCarbohydrates: 55gProtein: 4gFat: 24gSaturated Fat: 10gPolyunsaturated Fat: 1gMonounsaturated Fat: 8gCholesterol: 75mgSodium: 300mgPotassium: 200mgFiber: 2gSugar: 30gVitamin A: 500IUCalcium: 80mgIron: 2mg

Notes

Let the cake layers cool completely before frosting to avoid melting icing. For a beautiful appearance, gently press chocolate chips into the frosting on the sides of your cake.

Tried this recipe?

Let us know how it was!

Creamy Tomato Risotto with Pan Fried Barramundi Bliss

September 1, 2025 by Grace Snow Leave a Comment

As the aroma of simmering garlic and onions fills the kitchen, I can feel the warmth of comfort food embracing me on a chilly evening. Today, I’m excited to share my recipe for Creamy Tomato Risotto with Pan Fried Barramundi—a dish that perfectly combines satisfying textures and sumptuous flavors. Not only is this seafood recipe a true crowd-pleaser, but it’s also a wonderful way to enjoy sustainable fish while impressing family and friends. The creamy risotto, enhanced by rich fire-roasted tomatoes, comes together effortlessly, creating a delightful meal that’s perfect for cozy dinners or special gatherings. Are you ready to dive into this Italian-inspired dish? Let’s get cooking!

Why is this risotto recipe irresistible?

Comforting Creaminess: The creamy tomato risotto brings warmth and satisfaction to your table, making it a go-to dish for chilly evenings.

Sustainable Choice: Featuring pan-fried barramundi, this recipe highlights responsible eating, allowing you to enjoy a delicious seafood meal guilt-free.

Versatile Variations: Whether you're a fan of spicy flavors or prefer a vegetarian twist, this risotto easily adapts to your taste.

Quick to Prepare: With just a few simple steps, you can create an impressive feast that comes together in under 30 minutes, saving you time without compromising on flavor.

Crowd-Pleaser: Impress friends and family with this delightful combination of rich flavors, making it a perfect dish for gatherings or cozy nights in!

Pair it with a crisp green salad or some crusty bread for an unforgettable meal experience.

Creamy Tomato Risotto Ingredients

For the Risotto
• Arborio Rice – Provides the creamy texture essential for a perfect risotto; you can substitute it with Carnaroli rice for a similar result.
• Fire Roasted Tomatoes – Adds a rich depth and sweetness; fresh tomatoes can be used, but remember to adjust cooking time!
• Parmesan Cheese – Enhances flavor and creaminess; nutritional yeast can be substituted for a dairy-free option.
• Garlic – Infuses the dish with aroma and flavor; use fresh garlic for the best results, but garlic powder works in a pinch.
• Vegetable Broth – Adds overall flavor; you can swap it with chicken broth for a heartier option.
• Onion – Provides sweetness and depth; shallots can make a fine substitute if you're out of onions.
• Butter – Offers richness to the risotto; olive oil can replace it if you prefer a dairy-free version.

For the Barramundi
• Barramundi Fish – A sustainable white fish that cooks quickly and pairs beautifully with the risotto; tilapia makes a great substitute if needed.
• Fresh Basil – Provides a delightful fresh finish; if fresh is unavailable, dried basil can be used instead.

Get ready to enjoy this divine Creamy Tomato Risotto with Pan Fried Barramundi that brightens up any cold evening!

Step‑by‑Step Instructions for Creamy Tomato Risotto with Pan Fried Barramundi

Step 1: Prepare the Risotto Base
Begin by finely chopping one medium onion and two cloves of garlic. In a large skillet, melt two tablespoons of butter over medium heat. Sauté the onion and garlic for about 5 minutes, or until softened and fragrant, stirring occasionally. This aromatic base will complement the creamy tomato risotto beautifully.

Step 2: Toast the Rice
Next, stir in one cup of Arborio rice, allowing it to cook for about 2-3 minutes, ensuring each grain gets coated in the buttery goodness. You'll notice the rice becoming slightly translucent around the edges; this is the perfect time to add depth to your creamy tomato risotto.

Step 3: Incorporate Tomatoes and Broth
Add a 14-ounce can of fire-roasted tomatoes to the skillet, mixing them thoroughly with the rice. Gradually pour in 4 cups of warm vegetable broth, about one cup at a time, stirring frequently. Allow the risotto to absorb the liquid before adding more. Continue this process for about 18-20 minutes until the risotto is creamy and the rice is al dente.

Step 4: Cook the Barramundi
While the risotto cooks, heat a tablespoon of olive oil in a separate non-stick pan over medium-high heat. Once hot, carefully place two barramundi fillets in the pan, skin side down. Sauté for about 4-5 minutes per side, or until golden brown and the fish reaches an internal temperature of 145°F, ensuring it’s flaky and cooked through.

Step 5: Finish Risotto
When the rice is tender and creamy, remove the risotto from heat and stir in half a cup of grated Parmesan cheese. Season with salt and pepper to taste, mixing thoroughly until the risotto is velvety. This enriching step will elevate your creamy tomato risotto to a whole new level of flavor.

Step 6: Plate and Serve
To serve, ladle generous portions of the creamy tomato risotto into warm bowls. Top each bowl with a crispy barramundi fillet and a sprinkle of fresh basil for a burst of color and aroma. The combination of flavors creates a delightful dish that’s both comforting and impressive.

Make Ahead Options

Making Creamy Tomato Risotto with Pan Fried Barramundi ahead of time is a fantastic way to save precious moments during your busy week! You can prepare the risotto base (steps 1 to 3) up to 24 hours in advance and store it in the refrigerator. To maintain its creamy texture, be sure to refrigerate it in an airtight container. When you’re ready to serve, simply reheat it gently over low heat, adding a splash of vegetable broth if needed to loosen it up. As for the barramundi, it’s best cooked fresh, so plan to pan fry it just before serving for the ultimate crispy finish. Enjoy the luxury of a delicious home-cooked meal with minimal stress!

Creamy Tomato Risotto Variations

Feel like putting your own spin on this recipe? Here are some inviting ways to customize your creamy creation!

  • Dairy-Free: Use a plant-based butter and nutritional yeast instead of Parmesan for a creamy and tasty option.
    Explore the wonderful world of flavors with dairy alternatives that give your risotto a new identity!

  • Vegan Delight: Omit the barramundi entirely and enjoy a hearty risotto packed with sautéed mushrooms or spinach.
    This allows the creamy risotto to take center stage while still providing incredible texture and depth to your meal.

  • Citrus Brightness: Add a splash of lemon juice or zest for a refreshing twist that balances the richness.
    The acidity of citrus will amplify the flavors and brighten up your dish beautifully!

  • Seafood Medley: Swap barramundi for shrimp or scallops to create a delightful mix of seafood flavors.
    Cooking with different seafood adds a new dimension and diversifies your risotto experience.

  • Herb Infusion: Mix in fresh herbs like dill or tarragon to elevate the dish with fragrant notes.
    Herbs can transform the flavor profile, making it feel fresh and sophisticated!

  • Nutty Texture: Stir in toasted pine nuts or walnuts for a delightful crunch alongside the creaminess.
    The extra texture will give your risotto a delightful surprise that guests will love!

  • Spicy Twist: Want to heat things up? Infuse some chopped jalapeños or a dash of sriracha for a fiery kick.
    This variation will add depth and warmth, turning your dish into a flavor-packed delight!

  • Italian Sauté: Incorporate sautéed bell peppers and zucchini for a colorful and healthy addition.
    These veggies not only enhance the visual appeal but also provide a lovely sweetness to balance the dish.

Consider pairing this risotto with dishes like Pan Fried Shrimp or a fresh salad on the side to create a wholesome meal. Enjoy exploring these variations to find your perfect creamy tomato risotto!

What to Serve with Creamy Tomato Risotto with Pan Fried Barramundi

A harmonious meal awaits your table, where each dish enhances the creamy delight of risotto and crispy fish.

  • Crispy Garlic Bread: This crunchy delight helps to soak up any extra risotto, making each bite of creamy tomato bliss even more satisfying. A touch of garlic butter enhances the flavors beautifully.

  • Simple Green Salad: A fresh salad with mixed greens, ripe cherry tomatoes, and a light vinaigrette adds a refreshing balance to the rich risotto. The crispness of the lettuce complements the creaminess perfectly.

  • Grilled Asparagus: Tender, slightly charred asparagus provides a delightful crunch and earthy flavor that balances the savory notes of the risotto. Its vibrant green color also brightens up the plate.

  • Lemon-Herb Quinoa: This fluffy, lemon-infused quinoa introduces a zesty kick while maintaining a light texture. It pairs well with the savory tomato and fish, offering a nutritious side.

  • Roasted Brussels Sprouts: These caramelized sprouts bring a nutty flavor and a hint of sweetness, complementing the creamy dish. Their crispy outsides create a pleasing contrast to the risotto.

  • White Wine Spritzer: A light and bubbly drink, such as a white wine spritzer, refreshes the palate and complements the dish's flavors without overwhelming them. Perfect for a delightful dining experience!

  • Tiramisu: Finish the meal with a classic Italian dessert that balances rich flavors with a coffee and cocoa kick. Its creamy layers make for a sweet ending to your delightful gourmet experience.

Expert Tips for Creamy Tomato Risotto

  • Constant Stirring: Always stir your risotto while cooking. This prevents the rice from sticking to the pan and ensures even cooking, achieving that perfect creamy texture.

  • Right Broth Temperature: Use warm vegetable broth during cooking. Adding cold broth can shock the rice and disrupt the creamy consistency of your tomato risotto.

  • Perfect Cheese Mix: For an even creamier risotto, combine both Parmesan cheese and a splash of cream. This adds richness and enhances the overall flavor of the dish.

  • Check Barramundi Temperature: Use a food thermometer to ensure your pan-fried barramundi reaches an internal temperature of 145°F. This guarantees it’s cooked safely while remaining flaky and tender.

  • Flavor Infusion: To boost flavors, consider adding a splash of white wine to the risotto after toasting the rice. This adds depth and complements the creamy tomato risotto beautifully.

How to Store and Freeze Creamy Tomato Risotto

Fridge: Store leftover creamy tomato risotto in an airtight container for up to 3 days. Gently reheat it on the stove or microwave, adding a splash of vegetable broth to restore creaminess.

Freezer: You can freeze risotto for up to 3 months. Allow it to cool completely, then transfer to a freezer-safe container or zip-top bag, removing as much air as possible to prevent freezer burn.

Reheating: When ready to enjoy, thaw the risotto in the fridge overnight, then reheat on the stove with a little broth or water, stirring until warmed through.

Serving Tip: The pan-fried barramundi is best enjoyed fresh, so consider cooking it separately when you're ready to serve the reheated creamy tomato risotto.

Creamy Tomato Risotto with Pan Fried Barramundi Recipe FAQs

How do I choose the best tomatoes for this risotto?
Absolutely! For the best flavor in your creamy tomato risotto, look for fire-roasted tomatoes, which add a delightful depth and sweetness. If you prefer fresh tomatoes, choose ripe, high-quality ones without dark spots or blemishes. Use about 3-4 medium-sized tomatoes, but do remember to adjust your cooking time, as fresh tomatoes need a bit longer to soften and blend into the risotto.

What’s the best way to store leftover risotto?
Very simple! Store any leftover creamy tomato risotto in an airtight container in the fridge for up to 3 days. When reheating, add a splash of vegetable broth or water to loosen it up and bring back that creamy texture. You can gently reheat it on the stovetop over low heat, stirring frequently until warmed through.

Can I freeze creamy tomato risotto?
Of course! Freezing risotto is a great option. Allow it to cool completely, then transfer it to a freezer-safe container or a zip-top bag. Be sure to remove as much air as possible to prevent freezer burn. It can be stored in the freezer for up to 3 months. When you’re ready to enjoy it, thaw in the fridge overnight and reheat on the stove with a splash of broth for the best results.

What should I do if my risotto becomes too thick while cooking?
No worries! If your risotto gets too thick, simply add a touch more warm vegetable broth or water, one tablespoon at a time, stirring frequently until it reaches that desired creamy consistency. Remember, risotto should be slightly loose when served, as it will thicken as it cools.

Is this risotto recipe suitable for those with dietary restrictions?
Absolutely! For dairy-free options, you can replace the Parmesan cheese with nutritional yeast. If you're serving someone with gluten sensitivities, ensure the vegetable broth is certified gluten-free. If you're accommodating vegetarians, simply omit the barramundi and consider adding sautéed seasonal vegetables instead to enhance the dish.

How can I add an extra kick of flavor to the risotto?
Great question! To add an extra layer of flavor, consider tossing in a splash of white wine after toasting the rice. This will enhance the overall taste of your creamy tomato risotto beautifully. Additionally, a sprinkle of fresh herbs or a dash of crushed red pepper flakes can elevate the dish with a bit of heat!

Creamy Tomato Risotto with Pan Fried Barramundi

Creamy Tomato Risotto with Pan Fried Barramundi Bliss

Creamy Tomato Risotto with Pan Fried Barramundi is a delightful dish that combines rich flavors and satisfying textures, perfect for dinner.
Print Recipe Pin Recipe
Prep Time 10 minutes mins
Cook Time 20 minutes mins
Total Time 30 minutes mins
Servings: 4 servings
Course: Dinner
Cuisine: Italian
Calories: 600
Ingredients Equipment Method Nutrition Notes

Ingredients
  

For the Risotto
  • 1 cup Arborio Rice or Carnaroli rice
  • 14 ounces Fire Roasted Tomatoes can substitute with fresh tomatoes
  • 0.5 cup Parmesan Cheese or nutritional yeast for dairy-free
  • 2 cloves Garlic fresh garlic recommended
  • 4 cups Vegetable Broth or chicken broth for a heartier option
  • 1 medium Onion or shallots as a substitute
  • 2 tablespoons Butter or olive oil for dairy-free
For the Barramundi
  • 2 fillets Barramundi Fish or tilapia as a substitute
  • to taste Fresh Basil or dried basil if fresh is unavailable

Equipment

  • Large skillet
  • Non-Stick Pan
  • food thermometer

Method
 

Step-by-Step Instructions
  1. Finely chop one medium onion and two cloves of garlic. In a large skillet, melt two tablespoons of butter over medium heat. Sauté the onion and garlic for about 5 minutes, stirring occasionally.
  2. Stir in one cup of Arborio rice and cook for about 2-3 minutes until slightly translucent. This coats the rice in butter.
  3. Add a 14-ounce can of fire-roasted tomatoes and mix with the rice. Gradually pour in 4 cups of warm vegetable broth, stirring frequently for 18-20 minutes until creamy and al dente.
  4. In a separate non-stick pan, heat one tablespoon of olive oil over medium-high heat. Cook two barramundi fillets for about 4-5 minutes per side until golden brown and cooked through.
  5. Remove the risotto from heat and stir in half a cup of grated Parmesan cheese. Season with salt and pepper, mixing thoroughly until velvety.
  6. Ladle risotto into bowls, top with crispy barramundi fillets and a sprinkle of fresh basil.

Nutrition

Serving: 1servingCalories: 600kcalCarbohydrates: 70gProtein: 25gFat: 20gSaturated Fat: 10gPolyunsaturated Fat: 2gMonounsaturated Fat: 8gCholesterol: 80mgSodium: 800mgPotassium: 800mgFiber: 4gSugar: 6gVitamin A: 10IUVitamin C: 15mgCalcium: 20mgIron: 10mg

Notes

For even creamier risotto, combine both Parmesan cheese and a splash of cream. Stir constantly to prevent sticking during cooking.

Tried this recipe?

Let us know how it was!

Indulge in Smores Waffles with Nutella and Toasted Coconut

September 1, 2025 by Grace Snow Leave a Comment

There’s something magical about combining breakfast with dessert, and that’s exactly what these Smores Waffles with Nutella and Toasted Coconut bring to the table! Imagine waking up on a chilly morning to warm, golden waffles topped with silky Nutella, gooey marshmallows, and the delightful crunch of toasted coconut. Not only are these waffles a scrumptious indulgent treat, but they’re also incredibly quick to prepare—ready in just 15 minutes! Perfect for a cozy weekend brunch or when you want to impress your family with minimal effort, these waffles offer a delightful twist on the classic s’mores experience. Curious how to whip up this delicious concoction that will surely brighten your breakfast table? Let’s dive in!

Why are these waffles so irresistible?

Decadent Flavor: These Smores Waffles burst with rich Nutella and the sweetness of marshmallows, creating a mouthwatering harmony that satisfies your sweet tooth.

Quick Preparation: Ready in just 15 minutes, these waffles are perfect for any busy morning or leisurely brunch.

Crowd-Pleaser: Serve them at gatherings, and watch everyone fall in love with their delightful charm. They’re a fantastic upgrade from traditional breakfast options!

Versatile Options: Feel free to experiment with toppings—try adding fresh fruit or even a drizzle of peanut butter for added flavor.

Unique Twist on Classic: Enjoy the nostalgic taste of s'mores in a creative waffle form, making breakfast exciting and extraordinary!

Indulge in something special—these waffles will leave your family craving more. For more delightful breakfast ideas, check out our Fried Shrimp Cabbage or Tagliatelle with Asparagus Peas for more home-cooked goodness.

Smores Waffles with Nutella Ingredients

For the Waffle Batter
• Waffle Mix – Use homemade or your favorite store-bought mix for convenience.
• Organic Honey – Sweetens the batter while mimicking the flavor of graham crackers; agave syrup works well for a vegan option.

For the Toppings
• Nutella – Adds a rich, chocolate hazelnut flavor; almond butter is a great nut-free substitution.
• Mini Marshmallows – Create that classic s’mores experience; cut larger marshmallows into smaller pieces if needed.
• Toasted Coconut – Provides a delightful crunch and subtle nuttiness; feel free to swap in chopped nuts for a different texture.

For Serving
• Organic Pancake Syrup – Perfect for drizzling on top; maple syrup can substitute for a more natural flavor.

Step‑by‑Step Instructions for Smores Waffles with Nutella and Toasted Coconut

Step 1: Prepare Waffle Batter
In a medium mixing bowl, combine your waffle mix with organic honey and the required amount of water or milk as per the package instructions. Stir the mixture gently until all ingredients are nicely combined, and the batter is smooth and free of lumps. You want a thick but pourable consistency, perfect for making delightful Smores Waffles.

Step 2: Preheat Waffle Maker
Plug in your waffle maker and set it to medium heat, allowing it to preheat as you work on the batter. A hot waffle iron is essential for achieving that golden-brown, crispy exterior of the waffles. Depending on your model, this could take around 5 minutes, so be patient and prepare for the next step in the meantime!

Step 3: Cook Waffles
Once the waffle maker is hot, pour the prepared batter into the center, making sure to cover the surface evenly. Close the lid and cook for approximately 4-5 minutes, or until the waffles puff up and turn a beautiful golden brown. You may hear a delightful sizzle; that’s the sound of deliciousness coming to life in your Smores Waffles!

Step 4: Layer Ingredients
Carefully remove each freshly cooked waffle from the waffle iron, placing them on a serving plate. Generously spread a layer of Nutella over each waffle, allowing the warm surface to melt the chocolate hazelnut goodness slightly. Then, sprinkle mini marshmallows on top, followed by a handful of toasted coconut to create that classic s’mores experience in a waffle form.

Step 5: Serve
Drizzle organic pancake syrup over the layered waffles for an extra touch of sweetness that will have everyone swooning. Serve these indulgent Smores Waffles with Nutella and Toasted Coconut piping hot, allowing your family to enjoy this scrumptious treat right away. A cozy weekend brunch awaits!

Expert Tips for Smores Waffles

• Preheat Waffle Maker: Ensure your waffle maker is hot before cooking to avoid sticking and achieve that perfect golden texture.

• Watch the Cooking Time: Check your waffles frequently. They’re best when crispy outside and soft inside—about 4-5 minutes typically does the trick.

• Perfect Nutella Spread: Spread Nutella while the waffles are still warm for an easy melt-in-your-mouth experience, enhancing the indulgent treat aspect of the Smores Waffles.

• Toast Coconut Separately: Toast your coconut flakes in a dry skillet until golden for added flavor and extra crunch—this makes a world of difference!

• Experiment with Toppings: Feel free to swap out toppings; consider adding fresh fruit or a drizzle of caramel for a unique twist on your s'mores experience!

• Check Ingredients for Dietary Needs: Always review your ingredients, especially sweeteners and toppings, to cater to any dietary restrictions and ensure everyone can enjoy these delicious waffles!

Storage Tips for Smores Waffles with Nutella and Toasted Coconut

• Room Temperature: Best enjoyed fresh, but if left out, these waffles can sit at room temperature for up to 1 hour without losing their deliciousness.

• Fridge: Place leftover waffles in an airtight container and refrigerate for up to 2 days. Reheat before serving to revive their tasty texture.

• Freezer: For longer storage, freeze the waffles individually wrapped in plastic wrap, then placed in a zip-top bag, for up to 1 month.

• Reheating: Reheat frozen or refrigerated waffles in a toaster or oven to bring back their crispy edges and warm centers. Enjoy them with an extra drizzle of Nutella and toasted coconut!

Make Ahead Options

These Smores Waffles with Nutella and Toasted Coconut are perfect for meal prep enthusiasts! You can prepare the waffle batter up to 24 hours in advance by mixing the waffle ingredients and storing them in an airtight container in the fridge. To maintain freshness, be sure to stir the batter before using it, as some separation may occur. For even quicker mornings, consider cooking the waffles ahead and refrigerating them for up to 3 days; simply reheat in a toaster or oven to restore their crunch. When ready to serve, layer with Nutella, mini marshmallows, and toasted coconut, then finish with a drizzle of syrup for that indulgent experience—just as delicious as if they were made fresh!

Smores Waffles with Nutella Variations

Feel free to customize these delectable waffles to suit your taste!

  • Dairy-Free: Substitute Nutella with dark chocolate spread and use a plant-based milk for the batter.
  • Gluten-Free: Choose a gluten-free waffle mix to keep this indulgence safe for everyone at your table.
  • Fruit-Filled: Add slices of fresh bananas or strawberries in between the layers for a fruity twist.
  • Peanut Butter Swirl: Drizzle creamy peanut butter over the top, adding a nutty flavor that balances perfectly with the sweetness.
  • Spicy Kick: Sprinkle a pinch of cayenne or chili powder into the batter for an exciting sweet and spicy flavor.
  • Nutty Crunch: Swap out toasted coconut for a mix of chopped walnuts and pecans for added texture and flavor.
  • Chocolate Drizzle: Go wild with a drizzle of melted chocolate on top before serving for an extra sweet touch!
  • Campfire Style: Toast marshmallows using a kitchen torch for that authentic campfire flavor before layering them on your waffles.

Elevate your breakfast or brunch with these delightful variations. For even more tasty recipes, don't miss our Coconutty Beans and Greens Stew or Roasted Bratwurst with Peppers and Onions. Enjoy exploring flavors!

What to Serve with Smores Waffles with Nutella and Toasted Coconut

Imagine a warm brunch table filled with sweet and savory delights, perfectly complementing your indulgent waffles.

  • Fresh Berries: Juicy blueberries, strawberries, and raspberries add a refreshing tartness that balances the sweetness of the waffles.

  • Creamy Whipped Cream: A dollop of whipped cream provides a light and airy texture that contrasts beautifully with the rich Nutella and gooey marshmallows.

  • Crispy Bacon: The salty crunch of bacon elevates this breakfast experience, offering a delightful contrast to the rich flavors of the waffles.

  • Smoothies: A berry or banana smoothie adds a fruity, nutritious boost, creating a perfect accompaniment to your decadent treat.

  • Coffee or Hot Chocolate: Sip on a smooth cup of coffee or rich hot chocolate, tying together the comforting flavors of breakfast and dessert.

  • Ice Cream: For a truly indulgent experience, a scoop of vanilla or chocolate ice cream brings an exciting twist, reminiscent of s'mores on a summer night.

Smores Waffles with Nutella and Toasted Coconut Recipe FAQs

How do I choose the best ingredients for my Smores Waffles?
Absolutely! For the perfect Smores Waffles, opt for high-quality Nutella for that luscious chocolate hazelnut flavor. Choose mini marshmallows that are fresh and fluffy—avoid any that have dark spots all over, as this indicates they may be stale. When it comes to coconut, light and crispy toasted coconut flakes provide the best crunch; you can toast shredded coconut in your skillet until golden for an extra flavor boost!

How should I store leftover Smores Waffles?
These waffles are best enjoyed fresh, but if you have leftovers, store them in an airtight container in the fridge for up to 2 days. Make sure they are fully cooled before putting them in the container to avoid any sogginess. Reheat in a toaster or oven to bring back their delightful texture and enjoy a second round of this tasty treat!

Can I freeze Smores Waffles, and how do I do it?
Yes, you can absolutely freeze Smores Waffles! To do so, allow the waffles to cool completely, then wrap each waffle individually in plastic wrap. Place the wrapped waffles in a zip-top bag, and they’ll stay fresh in the freezer for up to 1 month. When you're ready to enjoy them, simply remove from the freezer, unwrap, and reheat in a toaster or oven until heated through!

What should I do if my waffles are sticking to the waffle maker?
If you find that your waffles are sticking, it might be due to not properly preheating the waffle maker or not using enough non-stick spray. Always preheat your waffle maker according to the manufacturer's instructions, ideally for about 5 minutes. Additionally, lightly grease the plates with cooking spray before pouring in the batter to ensure easy release. If the waffles still stick, they may need a few extra minutes to cook thoroughly.

Are there any dietary considerations for these Smores Waffles?
Very! If you have dietary restrictions, there’s plenty of room for adjustments. For a nut-free version, you can substitute Nutella with almond butter or sunbutter. To keep it gluten-free, use a gluten-free waffle mix and ensure that all toppings are certified gluten-free. Always double-check ingredients like honey and marshmallows for any allergens, especially if you're serving guests with dietary needs. Enjoy experimenting with flavors while keeping everyone in mind!

Smores Waffles with Nutella and Toasted Coconut

Indulge in Smores Waffles with Nutella and Toasted Coconut

These Smores Waffles with Nutella and Toasted Coconut blend breakfast and dessert in a delightful treat.
Print Recipe Pin Recipe
Prep Time 15 minutes mins
Cook Time 5 minutes mins
Total Time 15 minutes mins
Servings: 4 waffles
Course: Breakfast
Calories: 300
Ingredients Equipment Method Nutrition Notes

Ingredients
  

For the Waffle Batter
  • 1 cup Waffle Mix Use homemade or your favorite store-bought mix.
  • 2 tablespoons Organic Honey Agave syrup can work for vegan option.
For the Toppings
  • 1/2 cup Nutella Almond butter is a great nut-free substitution.
  • 1 cup Mini Marshmallows Cut larger marshmallows into smaller pieces if needed.
  • 1/4 cup Toasted Coconut Chopped nuts can be used for a different texture.
For Serving
  • 1/4 cup Organic Pancake Syrup Maple syrup can substitute.

Equipment

  • Waffle Maker

Method
 

Step-by-Step Instructions for Smores Waffles
  1. In a medium mixing bowl, combine your waffle mix with organic honey and the required amount of water or milk as per the package instructions. Stir the mixture gently until all ingredients are nicely combined, and the batter is smooth and free of lumps.
  2. Plug in your waffle maker and set it to medium heat, allowing it to preheat as you work on the batter.
  3. Once the waffle maker is hot, pour the prepared batter into the center, making sure to cover the surface evenly. Close the lid and cook for approximately 4-5 minutes, or until the waffles puff up and turn a beautiful golden brown.
  4. Carefully remove each freshly cooked waffle from the waffle iron, placing them on a serving plate. Generously spread a layer of Nutella over each waffle, then, sprinkle mini marshmallows on top, followed by toasted coconut.
  5. Drizzle organic pancake syrup over the layered waffles and serve piping hot.

Nutrition

Serving: 1waffleCalories: 300kcalCarbohydrates: 45gProtein: 5gFat: 12gSaturated Fat: 4gPolyunsaturated Fat: 1gMonounsaturated Fat: 5gCholesterol: 20mgSodium: 250mgPotassium: 100mgFiber: 2gSugar: 15gVitamin A: 200IUCalcium: 50mgIron: 1mg

Notes

Serve these waffles immediately for the best experience. They can also be topped with fresh fruit or caramel if desired.

Tried this recipe?

Let us know how it was!

Creamy Garlic Herb Mushroom Spaghetti for Cozy Nights

September 1, 2025 by Grace Snow Leave a Comment

As I stood in my kitchen, the delightful aroma of sautéing garlic and mushrooms filled the air, promising a comforting meal ahead. That’s when I decided to whip up my favorite quick dish: Creamy Garlic Herb Mushroom Spaghetti. This recipe is a game changer—not only does it offer a luxurious, creamy texture in just 30 minutes, but it's also packed with rich, buttery flavor that even the busiest weeknights can accommodate. The beauty of this dish lies in its versatility; it’s vegetarian-friendly and can easily adapt to gluten-free or lactose-free diets without sacrificing taste. Whether you’re a seasoned home chef or just beginning your culinary journey, you’ll find joy in making this cozy pasta. Ready to savor a plate of pure comfort? Let's dive into the delightful world of garlic herb mushroom spaghetti together!

Why is this dish a must-try?

Quick Preparation: In just 30 minutes, this spaghetti dish transforms simple ingredients into a gourmet meal, perfect for busy nights.

Indulgent Flavor: Garlicky goodness and buttery textures create a taste sensation that’s hard to resist.

Vegetarian Delight: This recipe is completely meat-free, yet satisfying enough to please even the heartiest of appetites.

Versatile Options: Whether you prefer gluten-free pasta or need a lactose-free sauce, this dish adapts seamlessly to your dietary needs.

Crowd-Pleaser: Perfect for family dinners or a cozy date night, it’s a comforting option everyone will love. Pair it with some Cheesy Garlic Bread for an unforgettable meal!

Garlic Herb Mushroom Spaghetti Ingredients

• Perfectly crafted for your kitchen adventure!

For the Pasta

  • Spaghetti – This is the main carbohydrate; feel free to substitute with gluten-free pasta if needed.

For the Sauce

  • Mushrooms (e.g., baby portabella) – They provide umami flavor and can also be swapped with shiitake or cremini for varied taste.
  • Garlic – Use fresh cloves for optimal aroma; powdered can be a substitute in a pinch.
  • Butter – A rich base that creates creaminess; swap with olive oil for a dairy-free version.
  • Vegetable Broth – Adds moisture and flavor; chicken broth works for non-vegetarian versions.
  • Heavy Cream – Ensures the dish is creamy; coconut cream or cashew cream are great dairy-free alternatives.
  • Herbes de Provence – This blend enhances flavor with herbal notes; you can use Italian seasoning if needed.
  • Salt & Pepper – Essential basic seasonings; adjust to taste for ultimate flavor.

Optional Garnish

  • Fresh Herbs – Enhance presentation and flavor with a sprinkle of parsley or basil before serving.

Elevate your Garlic Herb Mushroom Spaghetti with these delightful ingredients, and let your culinary creativity shine!

Step‑by‑Step Instructions for Creamy Garlic Herb Mushroom Spaghetti

Step 1: Cook Spaghetti
Begin by bringing a large pot of salted water to a rolling boil over high heat. Add the spaghetti and cook according to package instructions until al dente, typically around 8-10 minutes. Remember to reserve about ½ cup of the pasta water before draining the spaghetti in a colander. This starchy water will help create a creamy sauce later.

Step 2: Sauté Mushrooms
In a large skillet, melt 2 tablespoons of butter over medium heat. Once melted, add sliced mushrooms and sauté for about 5-7 minutes, stirring occasionally, until they become golden brown and tender. The mushrooms should shrink and release their moisture, enhancing their flavor. Next, add minced garlic and cook for 1-2 minutes, until fragrant, stirring continuously to prevent burning.

Step 3: Create Sauce
Pour in 1 cup of vegetable broth and 1 cup of heavy cream into the skillet, stirring everything together. Increase the heat slightly and bring the sauce to a gentle simmer. Allow it to simmer for about 5 minutes, stirring occasionally until it thickens slightly and coats the back of a spoon. The creamy garlic herb mushroom spaghetti sauce should be rich and luscious.

Step 4: Combine
Add the drained spaghetti to the skillet with the sauce, tossing everything together to ensure the pasta is thoroughly coated. If the sauce seems too thick, gradually add the reserved pasta water until you reach your desired consistency. This step is vital for achieving that perfect creamy texture that clings beautifully to each strand of spaghetti.

Step 5: Season
Finally, stir in 1-2 teaspoons of herbes de Provence, along with salt and pepper to taste. Make sure to mix well, allowing all the flavors to meld together and enhance the garlic herb mushroom spaghetti. Taste and adjust the seasoning if necessary before serving, and consider garnishing with fresh herbs for an added touch of color and flavor.

Garlic Herb Mushroom Spaghetti Variations

Feel free to explore these delightful variations to customize your creamy garlic herb mushroom spaghetti experience!

  • Lactose-Free: Swap heavy cream for coconut milk or cashew cream for a rich and creamy dairy-free alternative. You'll still enjoy that delectable texture without the lactose.

  • Protein Packed: Add grilled chicken or shrimp for a protein boost. This simple twist transforms the dish into a hearty main course, perfect for satisfying those bigger appetites.

  • Mushroom Medley: Try out different mushrooms like porcini or morels for an earthy flavor upgrade. Mixing varieties will create a richer taste and fascinating texture in your pasta.

  • Herbal Infusion: Experiment with fresh herbs like basil or thyme for an added aromatic touch. Just a few fresh leaves can elevate your dish, making every bite fragrant and exciting.

  • Spicy Kick: For those craving some heat, sprinkle in red pepper flakes while sautéing. This spicy twist brings warmth and zest, perfect for elevating your pasta experience.

  • Healthy Grain: Substitute regular spaghetti with whole wheat or chickpea pasta for added nutrients. These alternatives pack in fiber and protein while maintaining familiarity in flavor.

  • Creamy Mushroom Stroganoff: Turn the dish into a stroganoff style by adding a dash of soy sauce and a splash of white wine during the sauce-making process. It’s a comforting change that packs a punch!

  • Serve with Style: Pair your spaghetti with a colorful salad or delectable grilled mushrooms for a delightful meal. With such a variety of sides, you’ll never run out of ideas for this comforting dish!

What to Serve with Creamy Garlic Herb Mushroom Spaghetti?

Elevate your dining experience by pairing this delicious pasta with delightful sides that complement its rich flavors.

  • Simple Green Salad: A crisp salad dressed with lemon vinaigrette adds brightness, balancing the creamy pasta perfectly.

  • Garlic Bread: The savory crunch of garlic bread is an irresistible accompaniment, perfect for soaking up any leftover sauce.

  • Steamed Broccoli: Lightly steamed broccoli provides a fresh, vibrant contrast and adds a delightful crunch to your meal.

  • Roasted Asparagus: Tender asparagus spears with a drizzle of olive oil serve as a sophisticated side, enhancing the dish's earthy notes.

  • Parmesan Cheese: A sprinkle of freshly grated parmesan adds an extra layer of richness, making each bite more indulgent.

  • Light White Wine: A chilled glass of Sauvignon Blanc harmonizes with the garlic herb flavors, enhancing your dining experience.

  • Lemon Sorbet: For dessert, a refreshing lemon sorbet cleanses the palate after the creamy indulgence, leaving a bright finish.

  • Crusty Italian Bread: Serve with crusty bread for a comforting touch; the texture offers a nice contrast to the silky pasta.

Make Ahead Options

These Creamy Garlic Herb Mushroom Spaghetti are perfect for busy weeknights! You can cook the spaghetti and sauté the mushrooms up to 24 hours in advance, ensuring you have a quick meal ready to go. To prep ahead, just store the cooked spaghetti in an airtight container in the refrigerator and keep the sautéed mushrooms separately; this avoids sogginess and preserves their flavor. When you’re ready to enjoy your meal, simply reheat the mushrooms, add the broth and cream to create the sauce, and toss everything together. This way, your creamy garlic herb mushroom spaghetti remains just as delicious, saving you valuable time in the kitchen!

How to Store and Freeze Garlic Herb Mushroom Spaghetti

Fridge: Store any leftovers in an airtight container for up to 3 days. Make sure the pasta has cooled down before sealing to avoid moisture buildup.

Freezer: For longer storage, place portions of garlic herb mushroom spaghetti in freezer-safe bags or containers. It can be frozen for up to 2 months.

Reheating: When ready to enjoy, thaw overnight in the fridge and reheat gently on the stove with a splash of broth to restore creaminess, ensuring it stays delectable!

Tip: If you plan to freeze, consider slightly undercooking the pasta to prevent it from becoming mushy when reheated.

Expert Tips for Garlic Herb Mushroom Spaghetti

  • Fresh is Best: Use fresh garlic and mushrooms for maximum flavor impact; dried alternatives won't deliver the same richness.

  • Pasta Water Magic: Don’t skip reserving pasta water! It’s critical for adjusting the sauce's consistency, making your garlic herb mushroom spaghetti perfectly creamy.

  • Watch the Heat: Sauté mushrooms over medium heat to avoid burning; too high a temperature can lead to bitter flavors.

  • Taste as You Go: Always taste your sauce before serving. This helps ensure the right balance of seasoning, elevating your garlic herb mushroom spaghetti.

  • Add a Kick: For a spicy twist, consider sprinkling in some red pepper flakes as you sauté the garlic and mushrooms to enhance the dish's depth.

Creamy Garlic Herb Mushroom Spaghetti Recipe FAQs

What type of mushrooms are best for this recipe?
Absolutely! For this creamy garlic herb mushroom spaghetti, I recommend using baby portobello mushrooms for their rich, umami flavor. You can also substitute them with shiitake or cremini mushrooms if you prefer. Make sure they are firm and free of dark spots, as this indicates freshness.

How should I store leftovers?
Very simply! Store any leftover creamy garlic herb mushroom spaghetti in an airtight container in the refrigerator for up to 3 days. Ensure the pasta has cooled down before sealing to prevent moisture buildup, which could make the dish soggy.

Can I freeze this spaghetti?
Of course! To freeze, place portions of your garlic herb mushroom spaghetti in freezer-safe bags or airtight containers. It can be stored in the freezer for up to 2 months. When you're ready to enjoy it, thaw it overnight in the fridge. When reheating on the stove, add a splash of vegetable broth to restore its creamy texture and ensure it's delicious.

What if my dish turns out too thick?
No worries at all! If your creamy garlic herb mushroom spaghetti ends up too thick, simply add a tablespoon or two of reserved pasta water or vegetable broth while stirring it over low heat. This will help loosen the sauce without losing its creamy goodness. Always taste as you go to maintain just the right balance of flavor!

Are there any dietary considerations for the ingredients?
Definitely! This recipe is vegetarian and can be made lactose-free by substituting the heavy cream with coconut cream or cashew cream. Always check for any allergies related to specific ingredients, such as nuts in cashew cream. If you’re cooking for pets, take care to exclude garlic and other harmful ingredients if they're part of the meal preparation.

How can I adjust this recipe for gluten-free diets?
Very easily! To make this creamy garlic herb mushroom spaghetti gluten-free, simply swap out the traditional spaghetti for gluten-free pasta. There are many delicious brands available now, and they work just as well in this recipe, ensuring that everyone can enjoy a comforting plate of pasta!

Garlic Herb Mushroom Spaghetti

Creamy Garlic Herb Mushroom Spaghetti for Cozy Nights

An indulgent and quick Garlic Herb Mushroom Spaghetti that offers a creamy texture in just 30 minutes, perfect for busy weeknights.
Print Recipe Pin Recipe
Prep Time 10 minutes mins
Cook Time 20 minutes mins
Total Time 30 minutes mins
Servings: 4 servings
Course: Dinner
Cuisine: Italian
Calories: 450
Ingredients Equipment Method Nutrition Notes

Ingredients
  

For the Pasta
  • 8 ounces Spaghetti Can substitute with gluten-free pasta
For the Sauce
  • 8 ounces Mushrooms (e.g., baby portabella) Can substitute with shiitake or cremini
  • 4 cloves Garlic Use fresh cloves for optimal aroma
  • 2 tablespoons Butter Can substitute with olive oil for dairy-free
  • 1 cup Vegetable Broth Chicken broth can be used for non-vegetarian
  • 1 cup Heavy Cream Coconut cream or cashew cream are good dairy-free alternatives
  • 1-2 teaspoons Herbes de Provence Can use Italian seasoning if needed
  • Salt & Pepper Adjust to taste
Optional Garnish
  • Fresh Herbs Sprinkle of parsley or basil before serving

Equipment

  • Large pot
  • Colander
  • Large skillet

Method
 

Cooking Instructions
  1. Cook a large pot of salted water and bring it to a rolling boil. Add the spaghetti and cook according to package instructions until al dente, about 8-10 minutes. Reserve ½ cup pasta water before draining.
  2. In a large skillet, melt butter over medium heat. Add sliced mushrooms and sauté for about 5-7 minutes until golden brown. Add minced garlic and cook for an additional 1-2 minutes.
  3. Pour in vegetable broth and heavy cream into the skillet, stir, and bring to a gentle simmer for about 5 minutes until it thickens slightly.
  4. Add drained spaghetti to the skillet, tossing to coat. If too thick, add reserved pasta water until desired consistency is achieved.
  5. Stir in herbes de Provence, salt, and pepper to taste, mixing well before serving.

Nutrition

Serving: 1servingCalories: 450kcalCarbohydrates: 60gProtein: 10gFat: 20gSaturated Fat: 12gPolyunsaturated Fat: 2gMonounsaturated Fat: 5gCholesterol: 50mgSodium: 500mgPotassium: 300mgFiber: 3gSugar: 2gVitamin A: 550IUVitamin C: 5mgCalcium: 50mgIron: 2mg

Notes

Use fresh ingredients for the best flavor. Reserve pasta water for sauce consistency.

Tried this recipe?

Let us know how it was!

Mushroom Poblano Posole Verde: A Cozy Vegan Comfort Bowl

September 1, 2025 by Grace Snow Leave a Comment

As I stirred the pot, wafts of earthy mushrooms and smoky poblano peppers danced around my kitchen, instantly warming my soul. This Mushroom Poblano Posole Verde captures the heart of Mexican comfort food while embracing a vibrant, vegan-friendly twist. Imagine cozying up with a hearty bowl of this zesty soup, loaded with nutritious hominy and a hit of tomatillo salsa that makes every spoonful a delightful experience. Not only does this recipe promise to be a crowd-pleaser, but it also comes together in no time—perfect for busy weeknights or when you're simply eager to indulge. Whether you enjoy it as is or with creative spice adjustments, I guarantee this dish will soon become a favorite in your home. So, are you ready to fill your kitchen with the irresistible aromas of posole? Let’s dive in!

Why is this Posole Verde a Must-Try?

Bold Flavors: Each bowl of this Mushroom Poblano Posole Verde bursts with the earthy richness of mushrooms and a spicy kick from poblanos, creating a flavor profile that’s both comforting and exciting.
Healthy Choice: Packed with fiber-rich hominy and nutritious bulgur, this soup is not only satisfying but also supports a healthy diet, making it a guilt-free indulgence.
Quick Preparation: Ready in just about 30 minutes, it’s the ideal recipe for busy weeknights when you want something homemade without the fuss.
Customizable Goodness: Feel free to modify the spice level or add your favorite toppings like avocado or sour cream—this dish is all about personal preference! For additional layers of flavor, consider serving it alongside some Grilled Mushrooms Savory that complement the soup perfectly.
Warm & Cozy: The zesty broth combined with the chewy hominy delivers a delightful texture that wraps you in warmth, perfect for chilly days or when cravings hit.
Crowd-Pleasing: Whether you’re serving family or hosting friends, this soup is sure to impress—each hearty spoonful is a testament to the joy of home-cooked meals!

Mushroom Poblano Posole Verde Ingredients

For the Soup
• Mushrooms – Adds umami flavor and texture; you can substitute with hearty vegetables like zucchini for variation.
• Poblano Peppers – Provides gentle heat and depth; choose milder peppers if you prefer a less spicy dish.
• Tomatillo Salsa – Acts as the base liquid and flavor enhancer; use green salsa as an alternative if tomatillos aren't available.
• Broth – Adds richness to the soup; opt for vegetable broth for a vegetarian option.
• Soft White Hominy – Creates a chewy texture that is a hallmark of posole; canned hominy is a convenient substitute.
• Bulgur – Brings a nutty flavor and additional nutrition; you can swap it for quinoa to keep it gluten-free.
• Cilantro – Offers freshness and a burst of aroma; feel free to omit or substitute with parsley for a different taste.
• Lime Juice – Brightens the soup's overall flavor; lemon juice works well as a substitute.

Optional Toppings
• Avocado Slices – Creaminess that balances the soup's spice; add for a delightful finish.
• Sour Cream – Adds richness and smoothness; can be swapped for a vegan option like cashew cream.
• Tortilla Chips – Provides a crunchy contrast; sprinkle some for added texture with each spoonful.

This Mushroom Poblano Posole Verde is destined to become a staple in your kitchen, showcasing the beauty of wholesome, homemade ingredients that anyone can enjoy.

Step‑by‑Step Instructions for Mushroom Poblano Posole Verde

Step 1: Sauté Vegetables
In a large pot, heat 2 tablespoons of olive oil over medium heat. Once hot, add 8 ounces of sliced mushrooms and 2 chopped poblano peppers. Cook for about 5-7 minutes until the mushrooms are golden and the peppers are softened, stirring occasionally. This step infuses the base of your Mushroom Poblano Posole Verde with rich, savory flavors.

Step 2: Add Salsa and Broth
Next, stir in 1 cup of tomatillo salsa and 4 cups of vegetable broth, bringing the mixture to a gentle simmer. Allow it to bubble for about 2-3 minutes, letting the flavors meld together. Watch for steam rising and make sure the broth is well incorporated with the vegetables, creating a fragrant foundation for your soup.

Step 3: Incorporate Hominy and Bulgur
Add 1 can (15 ounces) of drained and rinsed hominy along with 1 cup of bulgur to the pot. Stir well and allow the mixture to simmer for about 20 minutes. You want the bulgur to become tender and the hominy to soften slightly while absorbing all the delicious flavors of the broth in your Mushroom Poblano Posole Verde.

Step 4: Final Touches
Remove the pot from heat and stir in the juice of 1 lime and a handful of freshly chopped cilantro. Let it sit for a few minutes to allow the herbs' freshness to enhance the soup's taste. The vibrant green and zesty aroma mark the final enhancement to your hearty Mushroom Poblano Posole Verde.

Step 5: Serve
Ladle the soup into bowls and serve hot, garnishing with extra cilantro and lime wedges if desired. For added richness, consider adding toppings like avocado slices or tortilla chips. Each bowl of Mushroom Poblano Posole Verde offers warmth and comfort, making it a delightful meal for any occasion.

Storage Tips for Mushroom Poblano Posole Verde

Fridge: Store leftovers in an airtight container for up to 3 days. Make sure the soup has cooled down before sealing to maintain freshness.

Freezer: This Mushroom Poblano Posole Verde can be frozen for up to 3 months. Portion the soup into freezer-safe containers and label with the date.

Reheating: When ready to enjoy, thaw overnight in the fridge if frozen, and reheat on the stove over low heat, adding extra broth if needed to loosen.

Airtight Containers: Use glass or BPA-free plastic containers with tight-fitting lids to prevent freezer burn and keep flavors intact.

Mushroom Poblano Posole Verde Variations

Feel free to get creative and make this comforting soup your own!

  • Spicier Kick: Add chopped jalapeños or serrano peppers for an extra layer of heat. This variation enhances the warmth and flavor profile beautifully!
  • Creamy Touch: Stir in a splash of coconut milk or cashew cream for a rich, velvety texture that pairs lovely with the zesty broth.
  • Plant-Based Protein: Toss in canned black beans or lentils to boost the protein content while keeping your dish hearty and wholesome.
  • Vegetable Medley: Mix in finely chopped carrots or spinach for added nutrients and color. These veggies will not only enrich the dish but also add a delightful crunch.
  • Thick and Hearty: Blend a portion of the soup for a thicker consistency that delivers robustness in every spoonful. Perfect for those cozy days!
  • Citrusy Twist: Experiment with grapefruit or orange juice instead of lime for a unique refreshing zing that brightens up the entire dish.
  • Savory Additions: Top with your favorite cheese or serve alongside a bowl of Grilled Mushrooms Savory for an extra umami punch.
  • Herb Variations: For a fresh taste, consider adding chopped green onions or dill instead of cilantro. A delightful twist sure to engage your senses!

No matter how you choose to customize this Mushroom Poblano Posole Verde, each variation will transform your bowl into a unique experience that warms the heart and satisfies the palate. Enjoy the journey of flavor exploration!

Expert Tips for Mushroom Poblano Posole Verde

  • Spice Control: Adjust the heat level by removing seeds from the poblanos or using milder varieties for a friendly balance in your Mushroom Poblano Posole Verde.
  • Texture Boost: For a heartier feel, blend a portion of the soup before serving—it creates a thicker consistency that enhances the overall experience.
  • Fresh Herbs: Always add cilantro and lime juice just before serving. This ensures their flavors pop and keep the soup aromatic and fresh!
  • Ingredient Swaps: Don’t hesitate to use canned hominy for convenience or substitute bulgur with quinoa for a gluten-free take on this comfort dish.
  • Serving Suggestions: Elevate your bowl with toppings like creamy avocado, cheese, or a sprinkle of tortilla chips for added richness and contrast!

Make Ahead Options

This Mushroom Poblano Posole Verde is perfect for meal prep, allowing you to savor its rich flavors even on your busiest days! You can prepare the soup base—sauté the mushrooms and poblanos, add the tomatillo salsa, broth, hominy, and bulgur—up to 24 hours in advance. Simply store it in an airtight container in the refrigerator. When you’re ready to serve, reheat the mixture on the stove over medium heat until warmed through, then stir in the lime juice and cilantro just before enjoying. This way, you’ll maintain its delicious taste and texture, delivering a cozy bowl of comfort every time!

What to Serve with Mushroom Poblano Posole Verde

Elevate your dining experience with delightful accompaniments that perfectly complement the vibrant flavors of your posole.

  • Creamy Avocado Slices: Their lush creaminess balances the spicy broth beautifully, creating a harmonious spoonful of flavors.
  • Crispy Tortilla Chips: Enjoy a satisfying crunch that contrasts the soup's texture, adding an exciting element to your meal.
  • Tangy Lime Wedges: A squeeze of fresh lime elevates taste, amplifying the zesty notes in the posole with each bite.
  • Savory Grilled Corn: The sweetness of grilled corn adds a delightful pop of flavor, enhancing the overall complexity of the dish.

Imagine a warm evening with friends, gathering around as you share your Mushroom Poblano Posole Verde alongside these comforting sides.

  • Refreshing Cilantro Salad: Light and herbaceous, this salad brings a refreshing crunch that complements the richness of the posole.
  • Chilled Mexican Beer: Perfect for sipping, a light lager enhances the bold flavors while cooling your palate.
  • Rich Sour Cream or Cashew Cream: For a creamy touch, these toppings offer a soothing contrast to the vibrant spices in the soup.

Each pairing enriches your meal, creating a cozy atmosphere filled with warmth and flavor that everyone will cherish.

Mushroom Poblano Posole Verde Recipe FAQs

What should I look for when selecting mushrooms for this recipe?
Absolutely! Opt for fresh, firm mushrooms without any dark spots or slime. The ideal choice for this Mushroom Poblano Posole Verde is cremini or button mushrooms, as their umami flavor complements the soup beautifully. If you can, try to avoid any mushrooms that appear limp or soggy, as they won’t provide the needed texture for your dish.

How can I store leftover Mushroom Poblano Posole Verde?
You can store any leftovers in an airtight container in the refrigerator for up to 3 days. Make sure the soup has cooled completely before sealing to maintain its quality. If you want to enjoy it later, it can be frozen for up to 3 months. Just portion it into freezer-safe containers, label them with the date, and don't forget to leave some space at the top as the soup will expand when frozen!

What’s the best way to freeze this soup?
To freeze your Mushroom Poblano Posole Verde, first, let it cool down to room temperature. Then, ladle the soup into freezer-safe containers, leaving about an inch of space at the top of each container to allow for expansion. Seal tightly and label with the date for easy identification. When ready to enjoy, simply thaw overnight in the refrigerator and reheat on the stove, adding a splash of broth to restore its creamy goodness if needed.

How can I adjust the spice level in this recipe?
Very! You can easily control the heat by choosing milder poblano peppers or by removing the seeds and membranes from the peppers before cooking, as they contain most of the heat. If you want an extra kick, consider adding a pinch of cayenne pepper or a dash of hot sauce to your Mushroom Poblano Posole Verde while it simmers. Also, partnering it with creamy avocado or sour cream can help balance the spice for those who may be sensitive to heat.

Is this Mushroom Poblano Posole Verde suitable for a vegan diet?
Absolutely! This recipe is entirely plant-based, making it perfect for anyone following a vegan diet. It includes hearty vegetables, beans, and grains to ensure it’s satisfying and nutritious. Just be sure to use vegetable broth and avoid any non-vegan toppings like sour cream or cheese if you wish to keep it vegan-friendly.

Can I add or substitute ingredients in this recipe?
Of course! The beauty of this Mushroom Poblano Posole Verde lies in its versatility. You can substitute bulgur with quinoa for a gluten-free option or add cooked rotisserie chicken for a non-vegetarian version. Feel free to mix in additional vegetables like zucchini or even beans to customize it to your taste. The recipe welcomes creativity, so make it your own!

Mushroom Poblano Posole Verde

Mushroom Poblano Posole Verde: A Cozy Vegan Comfort Bowl

This Mushroom Poblano Posole Verde is a vibrant, vegan-friendly twist on comfort food, bursting with earthy flavors and nutritious ingredients.
Print Recipe Pin Recipe
Prep Time 10 minutes mins
Cook Time 30 minutes mins
Total Time 40 minutes mins
Servings: 4 bowls
Course: Soups
Cuisine: Mexican
Calories: 250
Ingredients Equipment Method Nutrition Notes

Ingredients
  

For the Soup
  • 8 ounces sliced mushrooms Adds umami flavor and texture; can substitute with hearty vegetables like zucchini.
  • 2 chopped poblano peppers Provides gentle heat; choose milder peppers for less spice.
  • 1 cup tomatillo salsa Acts as the base liquid; use green salsa if tomatillos aren't available.
  • 4 cups vegetable broth Adds richness to the soup.
  • 1 can (15 ounces) drained and rinsed hominy Creates a chewy texture.
  • 1 cup bulgur Provides a nutty flavor; can swap for quinoa for gluten-free.
  • 1 bunch fresh cilantro Offers freshness; can substitute with parsley.
  • 1 tablespoon lime juice Brightens the flavor; lemon juice can be used as a substitute.
Optional Toppings
  • 1 avocado slices For creaminess that balances the soup's spice.
  • 1 cup sour cream Adds richness; can be swapped for vegan options.
  • 1 cup tortilla chips Provides a crunchy contrast.

Equipment

  • Large pot

Method
 

Step-by-Step Instructions
  1. In a large pot, heat 2 tablespoons of olive oil over medium heat. Add 8 ounces of sliced mushrooms and 2 chopped poblano peppers, cooking for 5-7 minutes until golden.
  2. Stir in 1 cup of tomatillo salsa and 4 cups of vegetable broth, bringing to a gentle simmer for 2-3 minutes.
  3. Add 1 can of drained and rinsed hominy along with 1 cup of bulgur. Stir well and simmer for 20 minutes.
  4. Remove from heat and stir in the juice of 1 lime and a handful of freshly chopped cilantro. Let it sit for a few minutes.
  5. Ladle the soup into bowls, garnishing with cilantro and lime wedges. Optionally add avocado slices or tortilla chips.

Nutrition

Serving: 1bowlCalories: 250kcalCarbohydrates: 40gProtein: 10gFat: 6gSaturated Fat: 1gPolyunsaturated Fat: 2gMonounsaturated Fat: 3gSodium: 800mgPotassium: 500mgFiber: 10gSugar: 3gVitamin A: 500IUVitamin C: 20mgCalcium: 50mgIron: 2mg

Notes

This Mushroom Poblano Posole Verde showcases the beauty of wholesome, homemade ingredients, making it a staple in any kitchen.

Tried this recipe?

Let us know how it was!

Extra Fudgy Coconut Oil Brownies You’ll Want to Savor

September 1, 2025 by Grace Snow Leave a Comment

As the warm aroma of chocolate fills my kitchen, I can’t help but smile, knowing that these Extra Fudgy Coconut Oil Brownies are just moments away from being devoured. With only five simple ingredients, this recipe promises to satisfy even the most intense chocolate cravings while allowing you to enjoy a guilt-free indulgence. The melted coconut oil adds a unique richness that perfectly complements the dense fudgy texture, making these brownies a vegan crowd-pleaser that's ridiculously easy to whip up. Whether you’re hosting friends or just treating yourself, these brownies are sure to impress. Ready to discover a dessert that’s blissfully straightforward and utterly delicious? Let’s dive in!

Why Are These Brownies So Irresistible?

Unforgettable texture: These Extra Fudgy Coconut Oil Brownies offer an unparalleled chewiness, with a dense interior that rivals any gourmet fudge.
Vegan delight: Made completely plant-based, they're perfect for anyone looking to indulge without compromising on dietary choices.
Minimalist approach: With only five ingredients, this recipe is ideal for anyone who wants great taste without fuss.
Endless variations: Feel free to customize by adding nuts or chocolate chips, making each batch uniquely yours! For more delicious plant-based ideas, check out my Coconutty Beans Greens recipe.
Quick preparation: Ready in just 30 minutes, you'll never have to wait long to enjoy these scrumptious brownies after craving strikes!

Fudge Coconut Oil Brownies Ingredients

For the Brownies

  • Coconut Oil – Adds richness and moisture; substitute with any neutral oil for a lighter taste.
  • Good Quality Chocolate – Essential for deep, chocolatey flavor; opt for dark chocolate for a more intense taste.
  • Brown Sugar – Provides sweetness along with a hint of caramel; can be swapped with coconut sugar for a healthier twist.
  • All-Purpose Flour – Gives structure to the brownies; use gluten-free flour for a gluten-free option.
  • Salt – Enhances the sweetness and balances all flavors; just a pinch will do!

Optional Add-ins

  • Nuts or Chocolate Chips – Add texture and richness; they offer delightful surprises with every bite.
  • Vanilla Extract – A dash can amplify the flavor profile and add warmth, making those Fudge Coconut Oil Brownies even more irresistible!

Step‑by‑Step Instructions for Fudge Coconut Oil Brownies

Step 1: Preheat the Oven and Prepare the Pan
Begin by preheating your oven to 350°F (175°C) while you prepare your baking pan. Grease an 8x8-inch square pan with a little coconut oil or line it with parchment paper for easy removal later. This step ensures that your Fudge Coconut Oil Brownies will come out nice and easily once baked.

Step 2: Melt Coconut Oil and Chocolate
In a medium heatproof bowl, combine your coconut oil and good quality chocolate. Place the bowl over a pot of simmering water (double boiler method) or use the microwave for 30-second bursts, stirring until smooth. This mixture should be glossy and well-combined, bringing out the rich chocolate flavor essential for fudgy brownies.

Step 3: Mix in Brown Sugar
Once your chocolate mixture has cooled slightly, whisk in the brown sugar until fully incorporated. This should take about 1-2 minutes; the sugar will dissolve and blend smoothly with the chocolate. You want a thick, creamy consistency that hints at the sweetness to come, providing a delicious base for your Fudge Coconut Oil Brownies.

Step 4: Combine Flour and Salt
Next, fold in the all-purpose flour and a pinch of salt into the chocolate mixture. Use a spatula to mix gently, ensuring not to overmix—just enough to bring it together until no dry flour remains visible. This keeps your brownies dense and fudgy, which is exactly the texture we’re aiming for!

Step 5: Pour into Baking Pan
Pour the brownie batter into your prepared baking pan, spreading it evenly with a spatula. Take a moment to appreciate that shiny, chocolatey batter! This texture is what makes the Fudge Coconut Oil Brownies so delightful and decadent.

Step 6: Bake to Perfection
Bake in your preheated oven for about 25 minutes. You'll know they're done when a toothpick inserted in the center comes out with a few moist crumbs attached, indicating that the interior remains fudgy. Be careful not to overbake, as that can lead to a drier texture.

Step 7: Cool and Slice
Allow the brownies to cool in the pan for 10-15 minutes. Once slightly cooled, carefully lift the brownies out using the parchment paper or cut directly in the pan. This makes slicing them into squares easier. Enjoy those warm Fudge Coconut Oil Brownies as they are or with your favorite toppings!

Expert Tips for Fudgy Coconut Oil Brownies

  • Non-hot Oil: Ensure the coconut oil isn’t too hot when mixing with brown sugar, which could cause it to seize up, affecting texture.
  • Gentle Mixing: Avoid overmixing the batter; this is key to achieving the desired fudgy texture in your brownies.
  • Check for Doneness: Use a toothpick to test doneness—look for a few moist crumbs, not a clean pick, to retain that fudgy essence.
  • Cooling Time: Don’t skip the cooling period; letting them rest allows the brownies to set up perfectly for slicing.
  • Custom Add-ins: Feel free to personalize your Fudgy Coconut Oil Brownies with nuts or chocolate chips for added fun and flavor!

Make Ahead Options

These Extra Fudgy Coconut Oil Brownies are perfect for busy cooks looking to simplify meal prep! You can prepare the brownie batter up to 24 hours in advance by mixing all ingredients and storing it in an airtight container in the refrigerator. To prevent the batter from drying out or losing its rich flavor, make sure the container is well-sealed. When ready to bake, simply pour it into the greased pan and bake as directed—there's no need to bring the batter back to room temperature! This way, you'll have fresh, fudgy brownies with minimal effort, allowing you to indulge in a homemade treat anytime you crave it.

What to Serve with Extra Fudgy Coconut Oil Brownies

Imagine delighting your senses as you create a perfect spread that complements the rich taste of these fudgy brownies.

  • Vanilla Ice Cream: The creamy, cool contrast enhances the chocolate and coconut flavors, making each bite a delightful experience.

  • Fresh Berries: Juicy strawberries or raspberries provide a tartness that beautifully offsets the decadent sweetness of the brownies.

  • Chocolate Drizzle: A simple ganache or melted chocolate glaze adds an extra layer of indulgence and a glossy finish that invites indulgence.

  • Nutty Caramel Sauce: Drizzling a homemade or store-bought caramel infused with nuts brings a delightful crunch and a luscious sweetness.

  • Coconut Whipped Cream: Light and airy, this tropical twist echoes the coconut oil in the brownies, creating a harmonious dessert experience.

  • Mint Tea: A soothing cup of mint tea complements the chocolate perfectly, refreshing your palate while providing a lovely contrast.

  • Espresso: The rich bitterness of freshly brewed espresso highlights the chocolatey goodness, making it an elegant pairing for late-night indulgence.

How to Store and Freeze Fudge Coconut Oil Brownies

Room Temperature: Store brownies in an airtight container for up to 3 days. This keeps their fabulous fudgy texture intact while allowing you to indulge at a moment's notice.

Fridge: For longer freshness, refrigerate the brownies in a sealed container for up to a week. This slight chill can enhance their rich flavors.

Freezer: Freeze brownies by wrapping them individually in plastic wrap and then placing them in a zip-top freezer bag. They’ll stay fresh for up to 3 months, ensuring you have a sweet treat whenever the craving strikes!

Reheating: When ready to enjoy, let the brownies thaw in the fridge overnight or microwave them for a few seconds until warm. Enjoy your delightful Fudge Coconut Oil Brownies!

Fudge Coconut Oil Brownies Variations

Feel free to add your personal touch to these brownies for an even more delightful experience!

  • Oil Swap: Substitute coconut oil with vegetable or canola oil for a lighter flavor that still maintains moisture.
  • Flavor Boost: Add a splash of vanilla extract to enhance the flavor profile and create a warm, inviting aroma.
  • Nutty Crunch: Toss in chopped walnuts or pecans for an exciting texture contrast that pairs beautifully with the fudgy interior.
  • Choco-Explosion: Stir in chocolate chips before baking for an extra chocolatey goodness that every chocolate lover will adore.
  • Peanut Butter Swirl: Drop spoonfuls of creamy peanut butter on top of the batter and swirl it in for added richness and a delightful twist.
  • Sugar Substitute: Use coconut sugar instead of brown sugar for a lower glycemic option while still achieving sweetness.
  • Gluten-Free Option: Swap all-purpose flour with your favorite gluten-free flour blend to make these brownies suitable for gluten-sensitive guests.
  • Spicy Kick: For those who love a hint of heat, add a dash of cayenne pepper or some chili powder for an unexpected spicy twist!

These variations are just the beginning, and the possibilities are endless! For more inspiration, check out my fun Pumpkin Brownies Decadent recipe or whisk yourself away with a comforting bowl of Coconutty Beans Greens. Enjoy experimenting!

Fudgy Coconut Oil Brownies Recipe FAQs

How do I know if my ingredients are ripe or good to use?
Absolutely! For the best results, make sure your coconut oil is in a liquid state but not hot, as this will combine better with the other ingredients. Your chocolate should be good quality and free from any chalky texture. Look for rich dark chocolate for a more intense brownie flavor. As for the brown sugar, it should be soft, not dried out or hard. Fresh brown sugar adds a lovely caramel hint that makes these brownies truly special!

What is the best way to store leftovers, and how long do they last?
Very! Store your Fudgy Coconut Oil Brownies in an airtight container at room temperature for up to 3 days. If you want them to last longer, you can refrigerate them for up to a week. Just remember to let them come to room temperature or warm them slightly in the microwave for that fresh-baked taste again!

Can I freeze these brownies, and what's the best method?
Absolutely! To freeze your Fudgy Coconut Oil Brownies, first, let them cool completely. Then wrap them individually in plastic wrap to protect their texture and flavor. After wrapping, place them in a zip-top freezer bag and squeeze out as much air as possible. They'll keep well and delicious for up to 3 months. When you're ready to enjoy them, simply thaw in the refrigerator overnight or microwave for a few seconds to warm them up again.

What if my brownies turn out too cakey?
Oh no! If your brownies come out cakey, that usually means the batter was overmixed or they were baked too long. To achieve that fudgy texture, mix just until the dry ingredients are combined—no need to overdo it! Also, keep an eye on the baking time; they should be taken out while a toothpick inserted has a few moist crumbs. If you prefer an ultra-fudgy brownie next time, try baking them for a minute or two less!

Are these brownies safe for my pets or people with allergies?
Great question! These Fudgy Coconut Oil Brownies are vegan and free from dairy; however, they do contain chocolate, which can be toxic to dogs. Always keep brownies away from pets. For allergy considerations, ensure you check for any cross-contamination if you're using gluten-free flour. Adjust the recipe to accommodate dietary needs, like substituting brown sugar with coconut sugar for a lower glycemic option if that's a concern.

What can I do if I want to make this recipe nut-free?
No problem at all! If you want to keep these Fudgy Coconut Oil Brownies nut-free, simply skip any potential add-ins like nuts or chocolate chips. You might want to double-check your chocolate brand to ensure it's nut-free, as some chocolates could be processed in facilities with nuts. Enjoying these brownies without nuts doesn’t change their deliciousness!

Fudge Coconut Oil Brownies

Extra Fudgy Coconut Oil Brownies You’ll Want to Savor

These Extra Fudgy Coconut Oil Brownies are a vegan delight with only five simple ingredients, perfect for satisfying chocolate cravings.
Print Recipe Pin Recipe
Prep Time 10 minutes mins
Cook Time 25 minutes mins
Cooling Time 15 minutes mins
Total Time 50 minutes mins
Servings: 16 squares
Course: Dessert
Cuisine: Vegan
Calories: 150
Ingredients Equipment Method Nutrition Notes

Ingredients
  

For the Brownies
  • 1/2 cup Coconut Oil Adds richness and moisture; substitute with any neutral oil for a lighter taste.
  • 1 cup Good Quality Chocolate Essential for deep, chocolatey flavor; opt for dark chocolate for a more intense taste.
  • 1 cup Brown Sugar Provides sweetness along with a hint of caramel; can be swapped with coconut sugar for a healthier twist.
  • 1 cup All-Purpose Flour Gives structure to the brownies; use gluten-free flour for a gluten-free option.
  • 1/4 teaspoon Salt Enhances the sweetness and balances all flavors; just a pinch will do!
Optional Add-ins
  • 1/2 cup Nuts or Chocolate Chips Add texture and richness.
  • 1 teaspoon Vanilla Extract Amplifies the flavor profile and adds warmth.

Equipment

  • Oven
  • 8x8-inch baking pan
  • Medium heatproof bowl
  • Spatula
  • Mixer
  • Microwave

Method
 

Step-by-Step Instructions
  1. Preheat your oven to 350°F (175°C) and grease an 8x8-inch square pan or line it with parchment paper.
  2. Melt the coconut oil and good quality chocolate together until smooth, using a double boiler or microwave.
  3. Whisk the brown sugar into the chocolate mixture until fully incorporated.
  4. Fold in the all-purpose flour and a pinch of salt, mixing gently until no dry flour remains.
  5. Pour the brownie batter into your prepared baking pan, spreading it evenly.
  6. Bake for about 25 minutes, until a toothpick inserted comes out with a few moist crumbs.
  7. Allow to cool in the pan for 10-15 minutes before slicing.

Nutrition

Serving: 1squareCalories: 150kcalCarbohydrates: 20gProtein: 2gFat: 7gSaturated Fat: 6gPolyunsaturated Fat: 0.5gMonounsaturated Fat: 3gSodium: 50mgPotassium: 150mgFiber: 1gSugar: 10gCalcium: 1mgIron: 4mg

Notes

Stored brownies in an airtight container for up to 3 days at room temperature, or refrigerate for longer freshness.

Tried this recipe?

Let us know how it was!

Loaded Turkey Panini: A Cozy Twist on Thanksgiving Leftovers

September 1, 2025 by Grace Snow Leave a Comment

As I rummaged through my fridge, memories of Thanksgiving flooded back—family gatherings, laughter, and the unforgettable spread of food. With leftovers piled high, I felt a mini crisis unfolding: what to do with all that turkey? Enter the Loaded Turkey Panini, a delightful solution that transforms your holiday remnants into a mouthwatering sandwich. This recipe is not only a celebration of flavors but also a quick and satisfying way to repurpose your Thanksgiving feast. Crisp, golden-brown bread encases layers of savory turkey, melted cheese, sweet cranberries, and crispy bacon, turning those leftover morsels into a crowd-pleaser. Perfect for busy weeknights, it’s a hearty option that brings warmth and joy back to the table. Curious how this festive creation comes together? Let’s dive in!

Why is the Loaded Turkey Panini a Must-Try?

Simplicity, making this Loaded Turkey Panini is a breeze, requiring just a few fresh ingredients and minimal prep time!
Layer upon layer of flavor creates an indulgent experience, blending savory turkey with tangy cranberries and creamy cheese.
Versatile options mean you can mix and match leftovers to make it your own—whether it’s incorporating stuffing or swapping proteins.
Crowd-pleasing appeal makes it perfect for the whole family; even the pickiest eaters will love this twist on traditional flavors!
Comfort in every bite, the crispy, golden-brown crust wrapped around warm, gooey fillings is like a cozy hug for your taste buds!
Quick and fulfilling, you can whip this up in under 30 minutes, ideal for busy weeknights or last-minute gatherings.

Loaded Turkey Panini Ingredients

• Dive into the delightful layers of flavor with this essential ingredient list for your Loaded Turkey Panini!

For the Bread

  • Sourdough or Ciabatta – A robust bread enhances griddling and holds all the fillings neatly together.

For the Filling

  • Leftover Roasted Turkey – Provides the foundation of flavor and moisture; any cooked turkey meat will do!
  • Muenster Cheese – Melts beautifully, offering a creamy texture; try Monterey Jack or Pepper Jack for a spicy twist.
  • Cranberry Sauce – Adds a lovely sweet and tangy flavor; you can substitute with fruit jam if needed.
  • Bacon – Gives a salty crunch; for a lighter alternative, consider using turkey bacon.
  • Goat Cheese – Contributes a tangy creaminess; you can swap this for cream cheese for a milder taste.

For the Flavor Boost

  • Fresh or Dried Sage – A aromatic herb that adds depth; fry it in bacon fat for an extra flavor punch.

With these ingredients, crafting your unforgettable Loaded Turkey Panini will be as enjoyable as savoring each delightful bite!

Step‑by‑Step Instructions for Loaded Turkey Panini

Step 1: Prep Ingredients
Start by gathering all your ingredients for the Loaded Turkey Panini. Heat a skillet over medium heat and fry the bacon until crispy, about 5-7 minutes. Once done, remove the bacon and set it aside on a paper towel to absorb excess grease. This step ensures a savory crunch in your sandwich.

Step 2: Layer Sandwich
Take one slice of your chosen bread, either sourdough or ciabatta, and layer it with generous slices of roasted turkey. Next, add a slice of Muenster cheese, a spoonful of cranberry sauce, crispy bacon, and a sprinkle of fried sage. Crumble goat cheese on top for an added creamy texture, then crown it with another slice of bread.

Step 3: Grill Panini
Preheat your panini press or skillet over medium-high heat. If you're using a skillet, you may want to add a drizzle of olive oil for an extra crispy finish. Place the sandwich in the press or skillet and grill it for about 3-5 minutes, until the bread is golden brown and the cheese is nicely melted. If using a skillet, flip the sandwich halfway through for even heating.

Step 4: Serve Hot
Once your Loaded Turkey Panini is beautifully crispy on the outside, remove it from the heat. Slice the panini in half to reveal the gooey, delicious interior and serve immediately. For an extra treat, offer additional cranberry sauce on the side or a light salad to balance the flavors, making it a delightful meal option.

Expert Tips for Loaded Turkey Panini

  • Bread Choice Matters: Choose sturdy bread like sourdough or ciabatta; it holds fillings better and ensures a crispy crust without falling apart.
  • Don’t Overstuff: Less is more! Overloading the panini can prevent it from grilling evenly. Balance your ingredients for the best results.
  • Preheat for Perfection: Always preheat your panini press or skillet to achieve that golden-brown crust and melted cheese inside—no one likes a soggy sandwich!
  • Flavor Boost with Sage: For a fragrant touch, fry fresh or dried sage in the bacon fat. Just watch them closely to avoid burning!
  • Customize Your Creation: Use your favorite Thanksgiving leftovers; this Loaded Turkey Panini is versatile, so let your imagination run wild!

Loaded Turkey Panini Variations

Feel free to get creative and personalize the Loaded Turkey Panini to suit your taste buds and dietary preferences!

  • Stuffing Boost: Mix in leftover stuffing for an extra hearty sandwich that's packed with comforting flavors. The layers of turkey and stuffing create a delightful bite reminiscent of Thanksgiving dinner.

  • Chicken or Ham Swap: If turkey's not your thing, swap it out for leftover chicken or ham. Both options lend a different charm, and you can explore new flavor profiles with each choice.

  • Spicy Kick: For those who enjoy a little heat, add jalapeños or a zesty pepper jack cheese. The spiciness will complement the savory ingredients and take your panini to the next level.

  • Vegetable Delight: Roast some seasonal vegetables like butternut squash or Brussels sprouts. Their earthy sweetness pairs beautifully with the savory turkey for a wholesome, veggie-packed twist.

  • Sweet Apple Addition: Thinly slice fresh apples to add a crisp, refreshing crunch. The sweetness of the apples will balance the savory elements and create a lovely contrast in every bite.

  • Avocado Creaminess: Spread fresh avocado on the inside of the bread for added creaminess and healthy fats. This twist not only enhances the flavor but also adds a silky texture.

  • Herb Infusion: Experiment with different herbs like rosemary or thyme instead of sage for a unique aroma and flavor. Toss them into the pan to mellow out and savor the fresh essence they bring.

Curious about other delightful recipes? Check out our delicious cranberry sauce to pair with your panini or discover how to use up leftovers with our creative stuffing recipes. Enjoy the journey of culinary exploration!

Make Ahead Options

These Loaded Turkey Panini are perfect for meal prep aficionados looking to save time during busy weeknights! You can prepare the fillings (turkey, cheese, cranberry sauce, and bacon) up to 3 days in advance; simply store them in separate airtight containers in the refrigerator to maintain freshness and prevent sogginess. When you're ready to enjoy these delicious paninis, assemble the sandwich just before grilling. Preheat your panini press or skillet, then grill for about 3-5 minutes until golden brown and melty. This method ensures that every bite is just as satisfying and flavorful as when made fresh, giving you a comforting meal with minimal effort!

How to Store and Freeze Loaded Turkey Panini

Fridge: Store any leftover Loaded Turkey Panini in an airtight container for up to 3 days. This helps maintain its freshness and prevents sogginess.

Freezer: If freezing, wrap individual paninis tightly in plastic wrap or aluminum foil, then place them in a freezer-safe bag. They can last up to 2 months in the freezer.

Reheating: To enjoy, thaw if frozen, then reheat in a skillet over medium heat for 5-7 minutes, flipping occasionally, or place it in a panini press until warmed through.

Make-Ahead: If preparing in advance, consider storing the fillings separately from the bread to maintain texture until you’re ready to assemble the Loaded Turkey Panini.

What to Serve with Loaded Turkey Panini

Bring the joy of your Thanksgiving feast to the table with these delightful pairings that elevate your Loaded Turkey Panini experience!

  • Crispy Sweet Potato Fries: Their natural sweetness complements the savory flavors of the panini, adding a satisfying crunch to each bite.

  • Fresh Green Salad: A light, crisp salad provides a refreshing contrast, balancing the richness of the panini with vibrant veggies and a zesty vinaigrette.

  • Creamy Tomato Soup: This classic pairing warms the soul, with the acidity of the tomatoes cutting through the richness of the melted cheese and turkey.

  • Garlic Butter Roasted Brussels Sprouts: These tender sprouts add a nutty, caramelized flavor, harmonizing beautifully with the savory elements of the sandwich.

  • Homemade Cranberry Sauce: A side of extra cranberry sauce amplifies the sandwich’s sweetness and tang, enhancing those festive flavors with every bite.

  • Savory Stuffing Bites: Crispy on the outside, fluffy on the inside, these delightful bites echo the flavors of the holiday while adding texture to your meal.

  • Herbed Grilled Cheese: For extra indulgence, serve mini herbed grilled cheese sandwiches alongside your panini; they’re perfect for dipping and elevate comfort food to new heights!

  • Sparkling Apple Cider: This bubbly drink has the perfect balance of sweetness and tartness, making it a refreshing complement to the hearty flavors of the panini.

  • Chocolate Chip Cookies: Finish your meal on a sweet note with warm cookies that provide a delightful contrast, treating your taste buds to a nostalgic end.

Loaded Turkey Panini Recipe FAQs

What type of bread works best for a Loaded Turkey Panini?
For the best results, I recommend using a robust bread like sourdough or ciabatta. These types hold up well when grilling and provide a lovely crispy crust, ensuring your panini doesn’t fall apart. Avoid airy or soft breads, as they may get soggy and won't provide that satisfying crunch.

How should I store leftover Loaded Turkey Panini?
Store any leftover Loaded Turkey Panini in an airtight container in the refrigerator for up to 3 days. This will help to maintain its freshness and prevent sogginess. If you're slightly pressed for time, you can place the sandwich directly into the container and enjoy it swiftly later.

Can I freeze Loaded Turkey Panini?
Absolutely! To freeze, wrap individual paninis tightly in plastic wrap or aluminum foil, then place them in a freezer-safe bag. They can last up to 2 months in the freezer. When you're ready to enjoy, let them thaw in the fridge overnight, then reheat in a skillet or panini press until warmed through—about 5-7 minutes on medium heat.

How can I prevent my panini from getting soggy?
To avoid a soggy Loaded Turkey Panini, store the components separately. Keep the fillings and bread apart until you're ready to grill. That way, the bread remains crisp, and you can enjoy a delicious panini without the unwanted moisture ruining your creation.

Are there any dietary considerations I should be aware of with this recipe?
Yes! If you or your guests have dietary restrictions, you can easily adapt this recipe. Swap in turkey bacon for a lighter option or use gluten-free bread to make it suitable for those with gluten sensitivities. Additionally, while this recipe contains dairy from the cheeses, you can opt for dairy-free alternatives for a vegan-friendly version!

What do I do if my cheese isn’t melting in the panini?
If your cheese isn't melting as you’d like, ensure your panini press or skillet is preheated adequately—this is crucial! Grilling the sandwich for longer over low heat can also help achieve that gooey texture that we crave. Just keep an eye on the bread to avoid burning!

Loaded Turkey Panini

Loaded Turkey Panini: A Cozy Twist on Thanksgiving Leftovers

Transform your Thanksgiving leftovers into a delicious Loaded Turkey Panini, combining savory turkey, melted cheese, and crispy bacon for a perfect snack.
Print Recipe Pin Recipe
Prep Time 10 minutes mins
Cook Time 10 minutes mins
Total Time 20 minutes mins
Servings: 2 paninis
Course: Snacks
Cuisine: American
Calories: 600
Ingredients Equipment Method Nutrition Notes

Ingredients
  

For the Bread
  • 2 slices Sourdough or Ciabatta Robust bread for filling
For the Filling
  • 4 oz Leftover Roasted Turkey Any cooked turkey meat will do
  • 1 slice Muenster Cheese Can substitute with Monterey Jack or Pepper Jack
  • 2 tbsp Cranberry Sauce Can substitute with fruit jam
  • 2 slices Bacon Use turkey bacon for a lighter option
  • 2 tbsp Goat Cheese Can swap for cream cheese
For the Flavor Boost
  • 1 tsp Fresh or Dried Sage Fry in bacon fat for flavor

Equipment

  • Skillet
  • panini press

Method
 

Step-by-Step Instructions
  1. Gather all ingredients. Heat a skillet over medium heat and fry the bacon until crispy, about 5-7 minutes. Remove bacon and set aside.
  2. Layer one slice of bread with turkey, Muenster cheese, cranberry sauce, bacon, and fried sage. Top with goat cheese and another slice of bread.
  3. Preheat panini press or skillet over medium-high heat. Grill the sandwich for 3-5 minutes until golden brown and cheese melts.
  4. Remove from heat, slice in half, and serve immediately. Optionally, offer additional cranberry sauce on the side.

Nutrition

Serving: 1paniniCalories: 600kcalCarbohydrates: 45gProtein: 30gFat: 35gSaturated Fat: 15gPolyunsaturated Fat: 5gMonounsaturated Fat: 10gCholesterol: 80mgSodium: 900mgPotassium: 700mgFiber: 2gSugar: 6gVitamin A: 500IUVitamin C: 2mgCalcium: 200mgIron: 2mg

Notes

Customize with your favorite leftovers for a unique twist.

Tried this recipe?

Let us know how it was!

Indulge in Comfort with Smoked Salmon Chowder Tonight

September 1, 2025 by Grace Snow Leave a Comment

As I stirred the pot, the air was filled with the inviting scent of sautéing onions and herbs, drawing me closer to a moment of cozy culinary magic. This Cozy Smoked Salmon Chowder captures everything comforting about home-cooked meals, combining the rich smokiness of salmon with tender vegetables and a creamy broth. Not only is it a delight to the senses, but you'll also find that it comes together in just 30 minutes, making it perfect for busy evenings or unexpected guests. This chowder isn't just a meal; it's a warm embrace in a bowl, ideal for those chilly nights when all you want is a hug from your kitchen. Are you ready to warm up with a cozy bowl of chowder that will have everyone asking for seconds?

Why is Smoked Salmon Chowder a Must-Try?

Comforting warmth: Imagine a bowl filled with creamy goodness and the delightful smokiness of salmon, perfect for chilly nights.
Quick to make: In just 30 minutes, you can whip up this delicious dish without compromising on flavor.
Versatile ingredients: Feel free to substitute veggies or proteins; try shrimp or even crab for an exciting twist!
Crowd-pleaser: Serve it at gatherings, and watch as friends and family rave about your culinary skills.
Perfect pairing: Enjoy with crusty bread or a fresh salad for a complete meal. Dive into this cozy experience, and if you're looking for another quick dish, check out our One Pot Salmon recipe for more delicious ideas!

Smoked Salmon Chowder Ingredients

For the Chowder Base
• Smoked Salmon – Use hot smoked salmon for the best texture; cold smoked can be used but may alter flavor.
• Butter – This adds a rich flavor for sautéing; substitute with olive oil for a lighter version.
• Onion – Yellow or white onion creates an aromatic foundation; avoid red due to its strong taste.
• Carrots – These add sweetness and vibrant color; parsnips or celery can be used as alternatives.
• Celery – Adds crunch and depth; fennel can be a flavorful substitute.
• Thyme – Fresh thyme enhances aroma; dried thyme can be used in smaller amounts if fresh is unavailable.

For the Creamy Texture
• White Wine – Provides depth; if avoiding alcohol, chicken or vegetable broth works beautifully.
• Potatoes – Yukon golds create a creamy consistency; russets can be used but will break down more.
• Cream – Adds richness; half-and-half or vegan cream can substitute for a lighter chowder.
• Milk – Balances the creaminess; whole or 2% is ideal; consider non-dairy milk as an alternative.
• Fish Stock – Enhances seafood flavor; vegetable or chicken broth can be a great swap.

This Smoked Salmon Chowder is not just a meal; it’s a comforting experience waiting to be savored!

Step‑by‑Step Instructions for Smoked Salmon Chowder

Step 1: Sauté Vegetables
In a large pot over medium heat, melt 2 tablespoons of butter until foamy. Add 1 finely chopped onion, 1 diced carrot, and 1 diced celery stalk. Sauté for about 5-7 minutes, stirring regularly, until the vegetables are softened and fragrant. The onions should become translucent, creating a flavorful base for your Smoked Salmon Chowder.

Step 2: Add Wine and Thicken
Pour in 1 cup of white wine and bring to a gentle simmer. Allow the mixture to cook for 3-4 minutes, until the wine has reduced slightly, intensifying the underlying flavors. This step enhances the chowder's depth, creating a beautiful balance with the smokiness of the salmon to come.

Step 3: Incorporate Thyme and Potatoes
Stir in 2 medium Yukon gold potatoes, peeled and diced, along with 1 teaspoon of fresh thyme leaves. Pour in 4 cups of fish stock, stirring to combine all ingredients thoroughly. Increase the heat to bring the chowder to a boil, then reduce it to low heat and simmer for about 15 minutes until the potatoes are tender. They should be easily pierced with a fork when done.

Step 4: Add Cream and Salmon
Lower the heat to medium and stir in 1 cup of heavy cream, followed by 6 ounces of hot smoked salmon, torn into bite-sized pieces. Gently heat through for about 3-5 minutes without boiling, ensuring the chowder remains creamy and smooth. The salmon will warm and meld into the rich broth, contributing to your delightful Smoked Salmon Chowder.

Step 5: Season & Serve
Taste your chowder and adjust the seasoning with salt and freshly ground pepper to your liking before serving. Ladle the piping hot Smoked Salmon Chowder into bowls, garnishing with fresh herbs like dill or parsley if desired. Serve with crusty bread on the side for the perfect accompaniment to this comforting dish.

What to Serve with Smoked Salmon Chowder

Cozy up with flavors that enhance each satisfying spoonful of this delicious chowder, creating a full meal experience.

  • Crusty Bread: Perfect for dipping, crusty bread makes the ideal companion, soaking up the creamy broth and adding satisfying texture.

  • Garlic Bread: Add a fragrant touch with garlic-infused butter on toasted bread, making every bite more delectable alongside the chowder.

  • Garden Salad: A fresh green salad brings a crisp, refreshing contrast, balancing the rich flavors of the chowder beautifully.

  • Roasted Vegetables: Enhance the hearty feel of the meal with some roasted seasonal vegetables, their caramelization adding depth.

  • Herb-Infused Rice: Fluffy rice infused with herbs perfectly complements the chowder's flavors while providing a wholesome base to enjoy.

  • Chardonnay: Enjoy a glass of crisp Chardonnay to enhance the dish’s creaminess and smokiness, creating a harmonious dining experience.

  • Apple Pie: For dessert, a slice of warm apple pie offers a sweet finish to the meal, bringing comforting nostalgia to your dinner table.

Expert Tips for Smoked Salmon Chowder

  • Quality Salmon: Use hot smoked salmon for the best flavor and texture; cold smoked can lead to a less satisfying chowder.
  • Cream Care: Avoid boiling after adding cream to prevent separation; warm it gently for a silky finish to your smoked salmon chowder.
  • Seasoning Savvy: Taste and adjust seasoning at the end, as the saltiness of smoked salmon varies. This ensures perfect flavor balance.
  • Texture Troubles: If using russet potatoes, be aware they may break down more than Yukon golds. Choose wisely for the ideal chowder thickness.
  • Fresh Herbs: Enhance the aroma by using fresh thyme instead of dried when possible; it elevates the dish to a new level of comfort.

Smoked Salmon Chowder Variations

Feel free to elevate your Smoked Salmon Chowder with these creative tweaks that will surprise your taste buds!

  • Seafood Twist: Swap the smoked salmon for shrimp or crab to explore the depths of ocean flavors in your chowder. The change adds a delightful seafood medley that will impress your guests.

  • Veggie Boost: Toss in sweet corn or peas for a hint of natural sweetness. Their bright colors and texture complement the rich chowder beautifully, making it even more appealing.

  • Spicy Kick: Add red pepper flakes or diced jalapeños to inject some heat into your comforting dish. A little spice will warm your soul and elevate the experience!

  • Creamy Vegan Option: Use coconut cream or a nut-based cream alternative to substitute the heavy cream. This keeps it rich while catering to vegan diets, ensuring everyone can enjoy a bowl of comfort.

  • Herb Infusion: Experiment with fresh dill or parsley instead of thyme for a fragrant twist. Their vibrant flavors harmonize with the smoky salmon, creating a refreshing contrast.

  • Bready Bliss: Top your chowder with crispy croutons or even a flaky biscuit instead of bread for a unique texture. It's a delightful way to enjoy your soup while adding a crunchy element to each spoonful.

  • Mushroom Medley: Incorporate sautéed shiitake or cremini mushrooms for an earthy depth in flavor. Their umami richness pairs perfectly with the chowder's creamy aspect.

  • One Pot Inspiration: If you're short on time, try our One Pot Salmon recipe for a quick dinner solution that still brings lots of flavor!

With these variations, you can make your Smoked Salmon Chowder uniquely yours each time you serve it!

Make Ahead Options

These Cozy Smoked Salmon Chowder is a dream come true for meal prep enthusiasts! You can sauté the onions, carrots, and celery up to 24 hours in advance, storing them in an airtight container in the refrigerator. Additionally, chop the potatoes and keep them submerged in water to prevent browning until you're ready to cook. When you're prepared to serve, simply reheat the sautéed vegetables in your pot, add the potatoes and stock, then follow the remaining steps to incorporate cream and salmon. This will ensure you have a flavorful and comforting chowder that tastes just as delicious as when freshly made! Enjoy the time-saving benefits on those busy weeknights!

How to Store and Freeze Smoked Salmon Chowder

Fridge: Store leftovers in an airtight container for up to 3 days. Reheat gently on the stovetop over low heat to keep the creamy texture intact.

Freezer: For longer storage, freeze the chowder in freezer-friendly containers for up to 2 months. Thaw overnight in the fridge before reheating, as freezing may alter the creaminess.

Reheating: When reheating from the fridge or after thawing, do so slowly over low heat, stirring frequently to prevent separation and ensure even warming of the smoked salmon chowder.

Avoid Long Storage: It's best not to freeze the chowder if you've added milk or cream; fully cooked chowders with these ingredients may not retain their texture after freezing.

Smoked Salmon Chowder Recipe FAQs

What type of smoked salmon should I use for the best flavor?
Absolutely! I recommend using hot smoked salmon for your chowder as it provides a rich texture and deep flavor. Cold smoked salmon can work in a pinch, but it may alter the dish's overall texture and finish. If you opt for cold smoked, add it just before serving to avoid overcooking.

How should I store leftover smoked salmon chowder?
You can store your chowder in an airtight container in the refrigerator for up to 3 days. When you're ready to enjoy the leftovers, gently reheat the chowder on the stovetop over low heat. This method ensures that the creamy texture remains intact and doesn't separate, keeping your cozy meal just as comforting as when it was freshly made.

Can I freeze smoked salmon chowder?
Yes, you can freeze it! Pour the cooled chowder into freezer-safe containers and store it for up to 2 months. When you're ready to enjoy it, thaw the chowder overnight in the refrigerator. To reheat, do so gently on the stovetop over low heat, stirring often for even warming. Keep in mind that the creamy elements may slightly change in texture after freezing, so it's best to consume it fresh when possible.

What if my chowder turns out too thick?
Very! If your chowder is thicker than desired, simply stir in some additional fish stock or milk until you reach your preferred consistency. Heat gently while stirring to incorporate the liquid, and adjust the seasoning afterward as needed. Remember, perfecting consistency is key to achieving that dreamy chowder experience!

Are there any dietary considerations I should keep in mind?
Definitely! If cooking for someone with allergies, always check that your smoked salmon and other ingredients do not contain allergens. Substitute dairy with non-dairy alternatives for those who are lactose intolerant, and use vegetable broth instead of fish stock for a vegetarian version. This chowder can be beautifully adapted to fit various dietary needs while still being absolutely delicious!

Smoked Salmon Chowder

Indulge in Comfort with Smoked Salmon Chowder Tonight

This Smoked Salmon Chowder is a warming dish combining rich flavors in just 30 minutes, perfect for cozy evenings.
Print Recipe Pin Recipe
Prep Time 10 minutes mins
Cook Time 20 minutes mins
Total Time 30 minutes mins
Servings: 4 bowls
Course: Soups
Cuisine: Comfort Food
Calories: 350
Ingredients Equipment Method Nutrition Notes

Ingredients
  

Chowder Base
  • 6 ounces hot smoked salmon tear into bite-sized pieces
  • 2 tablespoons butter can substitute with olive oil
  • 1 medium onion finely chopped
  • 1 medium carrot diced
  • 1 stalk celery diced
  • 1 teaspoon fresh thyme or dried in smaller amounts
For Creamy Texture
  • 1 cup white wine can substitute with broth
  • 2 medium Yukon gold potatoes peeled and diced
  • 1 cup heavy cream or half-and-half for lighter option
  • 4 cups fish stock or vegetable/chicken broth

Equipment

  • Large pot

Method
 

Chowder Instructions
  1. Melt butter in a large pot over medium heat. Add onion, carrot, and celery. Sauté for 5-7 minutes until soft and fragrant.
  2. Pour in white wine and bring to a gentle simmer. Cook for 3-4 minutes until reduced slightly.
  3. Add potatoes and thyme; stir in fish stock. Bring to a boil, then simmer for 15 minutes until potatoes are tender.
  4. Stir in heavy cream and hot smoked salmon. Heat through gently for 3-5 minutes without boiling.
  5. Taste and adjust seasoning before serving. Ladle into bowls and garnish with fresh herbs if desired.

Nutrition

Serving: 1bowlCalories: 350kcalCarbohydrates: 30gProtein: 15gFat: 20gSaturated Fat: 12gPolyunsaturated Fat: 1gMonounsaturated Fat: 8gCholesterol: 60mgSodium: 800mgPotassium: 800mgFiber: 4gSugar: 3gVitamin A: 250IUVitamin C: 10mgCalcium: 150mgIron: 2mg

Notes

Serve with crusty bread for a complete meal. Store leftovers in an airtight container for up to 3 days. Reheat gently to maintain texture.

Tried this recipe?

Let us know how it was!

Mango Chicken Salad Sandwich: A Refreshing Lunch Delight

September 1, 2025 by Grace Snow Leave a Comment

As I bit into that warm croissant packed with a creamy, tropical filling, I knew I’d stumbled upon something special. This Mango Chicken Salad Sandwich is not just another lunch item; it's a culinary hug that offers both comfort and refreshment in every bite. The delightful contrast of tender chicken and juicy mango, uplifted by fragrant basil, makes this sandwich irresistible and quick to whip up after a busy day. Perfect for picnics or an easy meal at home, it promises to please everyone at your table. Are you ready to elevate your lunch game with this vibrant twist on an American classic? Let’s dive in!

What makes this sandwich so special?

Tropical Fusion: The vibrant combination of mango and chicken creates a refreshing taste sensation that stands out among typical lunch options.
Quick & Easy: Perfect for busy days, this recipe can be prepared in 15 minutes or less, making it a stress-free choice for any meal.
Versatile Delight: Whether it's a picnic or a cozy lunch at home, you can serve this sandwich with a side of mixed greens or fruit salad for a balanced meal.
Crowd-Pleaser: With its unique flavors, this mango chicken salad sandwich appeals to both kids and adults alike, ensuring smiles all around. Plus, if you're looking for other delicious sandwiches, don't miss out on our Chicken Adobo Again for something savory!
Nutrient-Packed: Loaded with protein and vitamins, this sandwich is not only delicious but also nutritious, fueling you for the day ahead.

Mango Chicken Salad Sandwich Ingredients

For the Chicken Salad

  • Cooked Chicken – Provides protein and structure; a convenient rotisserie chicken works beautifully here.
  • Fresh Mango – Adds sweetness and juiciness; use ripe mango for the best flavor, or frozen if fresh isn't available.
  • Mayonnaise – Acts as a creamy binder; substitute with Greek yogurt for a lighter twist, but it will alter the flavor a bit.
  • Fresh Basil – Enhances flavor with a fresh, herbal note; feel free to swap with cilantro or mint for a different spin.
  • Green Onions – Offer a mild onion flavor and crunch; red onion can be used for a sharper taste if desired.

For the Croissant

  • Croissant – The perfect base for this sandwich, providing a buttery, flaky texture; whole grain bread is a great alternative if you're looking for something different.

This Mango Chicken Salad Sandwich is sure to brighten up your lunch routine, effortlessly blending vibrant flavors into a meal that nurtures both body and soul!

Step‑by‑Step Instructions for Mango Chicken Salad Sandwich

Step 1: Prepare the Chicken Salad
In a large mixing bowl, combine the diced cooked chicken, chopped fresh mango, creamy mayonnaise, chopped basil, and sliced green onions. Using a spatula, gently mix the ingredients until they are well combined, ensuring the chicken is evenly coated. Season the mixture with salt and pepper to taste. This vibrant filling should be slightly chunky and fragrant, reflecting the fresh ingredients used.

Step 2: Slice the Croissants
Take a flaky croissant and carefully slice it in half horizontally, using a serrated knife for a clean cut. Make sure to not cut all the way through, allowing one side to stay attached. This will create a lovely pocket to hold the delicious mango chicken salad. As you slice, enjoy the warm, buttery aroma of the croissant wafting through the air—perfect for a delightful lunch experience.

Step 3: Assemble the Sandwich
Spoon a generous portion of the mango chicken salad mixture into the bottom half of each croissant. Try to fill it to the brim, allowing some of the colorful chicken and mango to peek out. For added texture, you can sprinkle in some chopped nuts or additional green onions if desired. This step combines the lush flavors of the salad with the rich, flaky croissant, creating an irresistible sandwich.

Step 4: Serve or Store
Once assembled, serve the Mango Chicken Salad Sandwich immediately for the best flavor and texture. If you’re prepping ahead, refrigerate the chicken salad mixture covered in an airtight container and assemble the sandwiches right before serving. This helps keep the croissant crisp while allowing the refreshing flavors to blend beautifully. Enjoy your lunchtime delight!

Make Ahead Options

These Mango Chicken Salad Sandwiches are perfect for busy home cooks looking to save time during the week! You can prepare the chicken salad mixture up to 24 hours in advance by combining the diced cooked chicken, fresh mango, mayonnaise, basil, and green onions in an airtight container. Simply refrigerate it until you're ready to serve. For the freshest experience, slice the croissants and assemble the sandwiches right before serving to keep the croissants flaky and crisp. This way, you'll enjoy delicious, tropical bites without the last-minute rush, making your meal prep both simple and satisfying!

Mango Chicken Salad Sandwich Variations

Feel free to mix things up and create your own unique version of this delicious sandwich!

  • Nut Crunch: Add toasted almonds to the chicken salad for an extra crunch and nutty flavor that beautifully complements the sweetness of the mango. The added texture makes each bite more satisfying!

  • Color Boost: Include diced red bell pepper for vibrant color and a subtle sweetness that enhances the tropical feel of the sandwich. This colorful addition is both visually appealing and delicious.

  • Tuna Twist: Swap chicken for canned tuna for a refreshing seafood alternative. The lightness of tuna pairs perfectly with the mango, offering a delightful variation that might just become your new favorite!

  • Citrus Splash: Incorporate a splash of lime juice for an additional tang that brightens the flavors. This simple trick elevates the dish, adding a zesty kick that will awaken your taste buds.

  • Herb Infusion: Experiment with fresh herbs like cilantro or mint instead of basil to add a unique twist to the flavor profile. Each herb brings its own character, transforming your sandwich into a new adventure.

  • Spice It Up: Add diced jalapeños or a sprinkle of chili flakes to introduce a touch of heat to your sandwich. This fiery kick makes for an exciting and bold flavor experience!

  • Greener Goodness: Toss in some baby spinach or arugula for added nutrition and a peppery flavor. This not only boosts the nutrients but also adds color and freshness to your sandwich.

  • Alternative Breads: Instead of croissants, try using whole grain bread or pita pockets for a different texture and taste. Each option will create a unique dining experience while keeping the delicious filling you love.

If you're looking for more delicious meal ideas, consider exploring our Honey Garlic Chicken Thighs for a savory option or our Crock Pot Chicken for an effortless weeknight dinner!

Storage Tips for Mango Chicken Salad Sandwich

  • Fridge: Store the mango chicken salad mixture in an airtight container for up to 3 days to maintain freshness and flavor. Assemble the sandwich just before serving for crisp croissants.

  • Freezer: While the chicken salad can be frozen, it's best to avoid freezing the croissants. If needed, freeze the mixture for up to 1 month, then thaw overnight in the refrigerator before use.

  • Room Temperature: If serving at a gathering, the sandwich can sit out for about 2 hours at room temperature. After this, store any leftovers promptly to ensure food safety.

  • Reheating: If the chicken salad has been refrigerated, allow it to reach room temperature before serving, as this enhances the flavors. Avoid reheating the croissant to keep its flaky texture intact.

Expert Tips for Mango Chicken Salad Sandwich

  • Use Ripe Mango: Ensure your mango is perfectly ripe for the best sweetness and juiciness. Overripe or underripe mangoes will alter the taste negatively.

  • Rotisserie Convenience: For a quick meal, opt for rotisserie chicken. It saves time while providing the flavor and texture needed for your mango chicken salad sandwich.

  • Herb Alternatives: Don’t hesitate to substitute fresh basil with other herbs like cilantro or mint if you want a different flavor profile that still complements the dish.

  • Chill Before Serving: Keeping the chicken salad chilled enhances the flavors and maintains a refreshing texture, making each bite of your sandwich delightful.

  • Avoid Overmixing: Be careful not to overmix the chicken salad; a chunky texture is key to a flavorful mango chicken salad sandwich.

What to Serve with Mango Chicken Salad Sandwich

There's nothing quite like complementing your colorful, flavorful sandwich with delightful sides that enhance its tropical flair.

  • Mixed Greens Salad: A light, refreshing salad brings a crisp contrast, letting the sandwich’s rich flavors shine through without overwhelming your palate.

  • Fruit Salad: Includes seasonal fruits for a sweet touch that echoes the mango’s brightness; think berries, pineapple, or citrus to keep it vibrant and fresh.

  • Chips or Crisps: The crunch of classic potato chips or pita crisps adds an enjoyable texture, creating a balanced lunch experience that is both satisfying and fun.

  • Iced Tea: A cool, refreshing iced tea enhances the tropical elements; consider a hint of citrus or mint for extra zing—perfect for hot days.

  • Chocolate Brownies: A sweet, fudgy brownie offers a deliciously rich finish to your meal, satisfying sweet cravings while complementing the sandwich's freshness.

  • Coconut Macaroons: These chewy treats echo the tropical theme beautifully, providing a sweet ending that harmonizes with the sandwich’s unique flavor profile.

Each of these pairings creates a well-rounded meal that is both enjoyable and memorable—just like your Mango Chicken Salad Sandwich!

Mango Chicken Salad Sandwich Recipe FAQs

What kind of mango should I use for this recipe?
Absolutely! For the best results, use a ripe mango that gives slightly when you press it, indicating it's perfectly sweet and juicy. Avoid mangoes with dark spots all over, as this can suggest over-ripeness. If fresh mango isn't available, frozen mango works, but make sure to thaw it and drain any excess moisture before using.

How should I store the leftover chicken salad?
Very easy! Place the mango chicken salad mixture in an airtight container and refrigerate it. It will maintain its freshness for up to 3 days. Just remember to assemble the sandwiches right before serving to keep that croissant nice and crispy!

Can I freeze the mango chicken salad?
Definitely! If you want to freeze the chicken salad, store it in a freezer-safe container for up to 1 month. When you're ready to enjoy it, thaw overnight in the refrigerator. Just keep in mind, I do not recommend freezing the croissants, as they won’t maintain their delightful flakiness.

What if I don’t have basil?
No worries at all! If you can't find fresh basil, cilantro or mint are both wonderful alternatives that will still provide a fresh, herbal note to your mango chicken salad. Just chop them finely and mix them in the same way you would with the basil, adjusting the amount to your taste.

How do I ensure the chicken is fully cooked?
Ensure your chicken is cooked to an internal temperature of 165°F (74°C) if you're cooking it yourself. If you're using rotisserie chicken, just shred it and mix it in! For quick prep, using leftover chicken is a fantastic time-saver and still tastes delicious.

Can this sandwich be made ahead of time?
Absolutely! You can prepare the chicken salad a day in advance and keep it refrigerated until you're ready to serve. I recommend assembling the sandwiches just before serving to keep the croissants flaky and fresh. This way, the vibrant flavors of the salad shine through at their best!

Mango Chicken Salad Sandwich

Mango Chicken Salad Sandwich: A Refreshing Lunch Delight

Discover a refreshing twist on lunch with this Mango Chicken Salad Sandwich, blending juicy mango and tender chicken for a delightful meal.
Print Recipe Pin Recipe
Prep Time 15 minutes mins
Total Time 15 minutes mins
Servings: 2 sandwiches
Course: Salads
Cuisine: American
Calories: 400
Ingredients Equipment Method Nutrition Notes

Ingredients
  

For the Chicken Salad
  • 2 cups Cooked Chicken Diced, rotisserie chicken works well
  • 1 cup Fresh Mango Chopped, use ripe for best flavor
  • 1/2 cup Mayonnaise Can substitute with Greek yogurt
  • 1/4 cup Fresh Basil Chopped, can substitute with cilantro or mint
  • 2 tablespoons Green Onions Sliced, can use red onion instead
For the Croissant
  • 2 pieces Croissant Buttery and flaky texture, whole grain alternative also works

Equipment

  • Mixing Bowl
  • Serrated knife
  • Spatula

Method
 

Step-by-Step Instructions for Mango Chicken Salad Sandwich
  1. In a large mixing bowl, combine the diced cooked chicken, chopped fresh mango, creamy mayonnaise, chopped basil, and sliced green onions. Mix until well combined and season with salt and pepper.
  2. Slice the croissant in half horizontally using a serrated knife, creating a pocket for the filling.
  3. Spoon a generous portion of the mango chicken salad mixture into the bottom half of each croissant.
  4. Serve immediately, or refrigerate the chicken salad mixture covered and assemble sandwiches before serving.

Nutrition

Serving: 1sandwichCalories: 400kcalCarbohydrates: 30gProtein: 25gFat: 20gSaturated Fat: 5gPolyunsaturated Fat: 2gMonounsaturated Fat: 10gCholesterol: 60mgSodium: 600mgPotassium: 500mgFiber: 3gSugar: 8gVitamin A: 500IUVitamin C: 40mgCalcium: 15mgIron: 2mg

Notes

For best flavor, use ripe mango and avoid overmixing the chicken salad for a chunky texture.

Tried this recipe?

Let us know how it was!
  • « Previous Page
  • 1
  • …
  • 157
  • 158
  • 159
  • 160
  • 161
  • …
  • 179
  • Next Page »

Welcome!

Hi, I’m Grace, a Sydney-based home cook with a passion for bold flavors and trending ingredients. Whether you’re a busy beginner or a seasoned foodie, you’ll find dishes here that are fresh, fun, and full of flavor.

More about me

Popular Recipes

  • Cheesy Chicken Garlic Bread Sandwich
    Cheesy Chicken Garlic Bread Sandwich for Cozy Family Moments
  • Easy Chicken Ranch Wraps
    Easy Chicken Ranch Wraps: Quick, Creamy & Totally Satisfying
  • Chicken Caesar Sandwiches
    Delicious Chicken Caesar Sandwiches for Quick Comfort Food
  • best Cuban sandwich
    The Best Cuban Sandwich You’ll Want Every Weeknight!

Footer

↑ back to top

About

  • Privacy Policy
  • Disclaimer
  • Terms & Conditions

Newsletter

  • Sign Up! for emails and updates

Contact

  • About me
  • Contact me

Copyright © 2025 TastyTrendIngredients