tastytrendingredients

  • Home
  • Recipes
    • Appetizers
    • Breakfast
    • Dessert
    • Dinner
    • Drinks
    • Salads
    • Snacks
    • Soups
  • About me
  • Contact me
menu icon
go to homepage
  • Home
  • Recipes
    • Appetizers
    • Breakfast
    • Dessert
    • Dinner
    • Drinks
    • Salads
    • Snacks
    • Soups
  • About me
  • Contact me
search icon
Homepage link
  • Home
  • Recipes
    • Appetizers
    • Breakfast
    • Dessert
    • Dinner
    • Drinks
    • Salads
    • Snacks
    • Soups
  • About me
  • Contact me
×

Scary Halloween Jelly That Will Thrill Your Little Goblins

September 27, 2025 by Grace Snow Leave a Comment

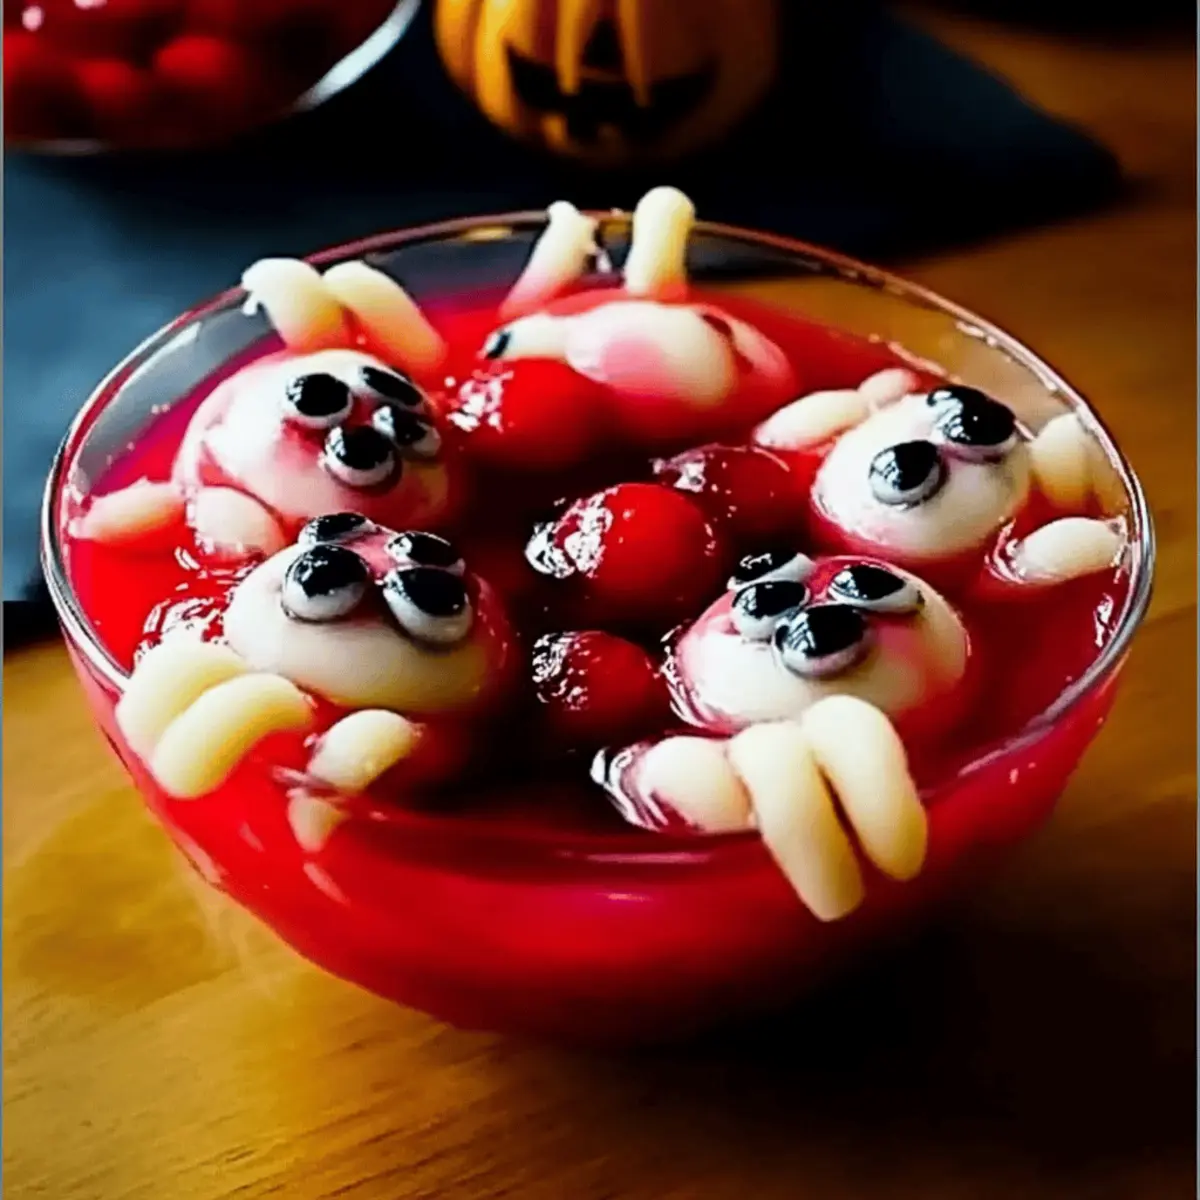
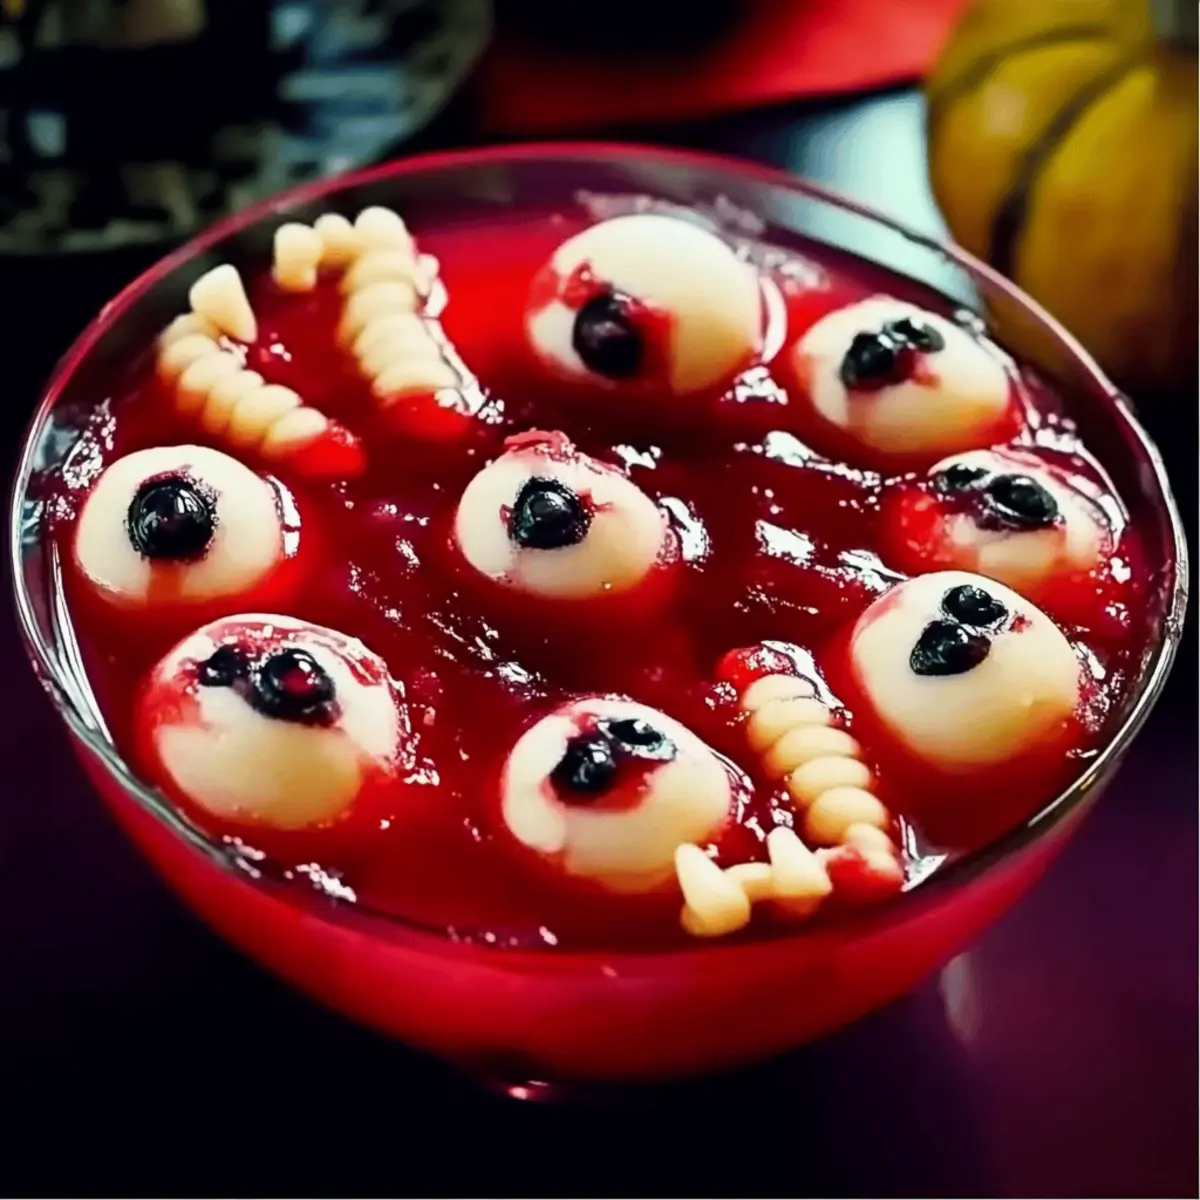
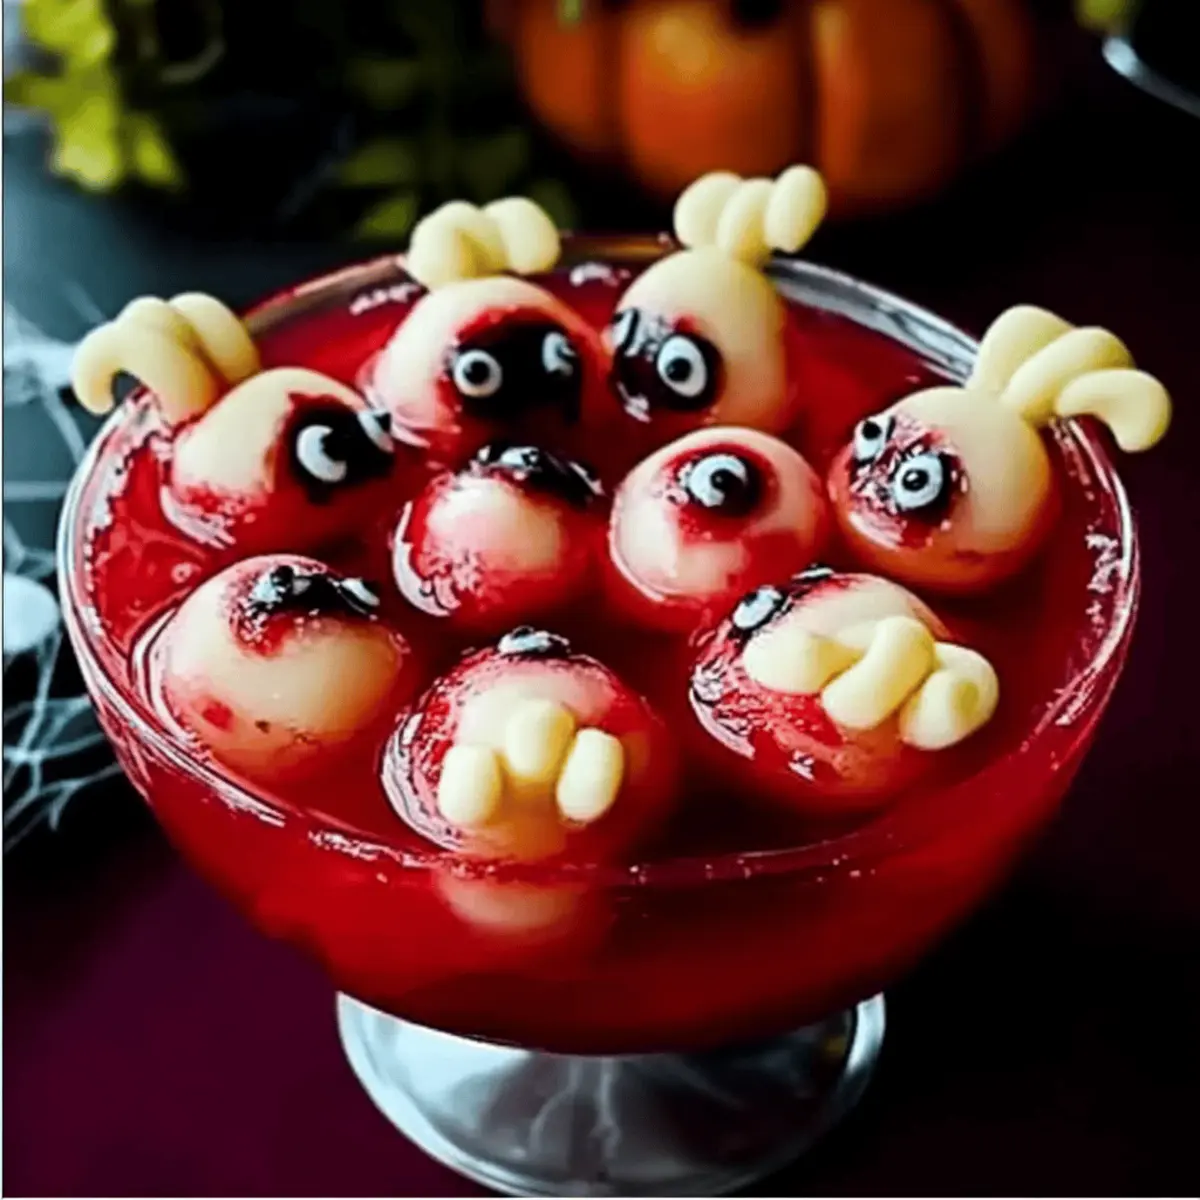
As I flipped through my favorite spooky cookbooks, I stumbled upon a delightful and chilling creation: Scary Halloween Jelly with Eyeballs and Spooky Fingers! This playful dessert is bound to be a hit at any Halloween gathering, captivating the little ones with its eerie presentation while delivering a sweet treat that’s quick and easy to make. Imagine a wobbly red jelly, hiding juicy lychee eyeballs and creepy marzipan fingers — it’s a feast for the eyes and the taste buds! With minimal prep time, this jelly is perfect for busy home chefs looking to impress with a festive flair. You won’t believe how much fun it is to bring this spooky treat to life, so why not dive in and scare up some fun for your next Halloween party? Curious about how to make it? Let’s get started!

Why Is Scary Halloween Jelly a Must-Make?

Eerie Presentation: This dessert is a showstopper, combining vibrant jelly with playful eyeballs and fingers that will thrill kids at any Halloween party.

Quick and Easy: With just a few simple ingredients and minimal prep time, you'll have a spooktacular treat ready in a flash.

Crowd-Pleaser: Perfect for children and adults alike, everyone will be excited to dig into this deliciously creepy concoction.

Customizable Fun: Feel free to switch things up—try different jelly flavors or swap out candies for unique variations that suit your taste.

Festive Atmosphere: Serve this chilling jelly in clear bowls, enhancing the spooky vibe that's sure to be a hit at your gathering!

Dive into this delightful creation and learn how to make it with my clear instructions!

Scary Halloween Jelly Ingredients

For the Jelly Base
• Strawberry or Raspberry Jelly (2 x 135g packs) – Provides a vibrant color and sweet flavor; opt for low-sugar varieties for a lighter treat.
• Lychee in Syrup (425g can) – These fruity ‘eyeballs’ complement the jelly perfectly; fresh lychees can be used for an even fresher taste.

For the Eyeballs
• Seedless Green Grapes (12-14) – Forms the core of the eyeballs, bursting with juicy flavor; small blueberries can be a fun substitute.
• Dark Coloured Jelly Beans (12-14) – Adds a sweet, chewy ‘pupil’ to each eyeball; any candy of similar size works well too.

For the Spooky Fingers
• White Marzipan (80g) – Create creepy fingers with this sweet, chewy treat; almond paste is a good alternative if marzipan isn’t available.
• Blanched Almonds (6-8) – The perfect crunchy ‘nails’ for your spooky fingers; slivered almonds can be used instead for convenience.

For Decoration
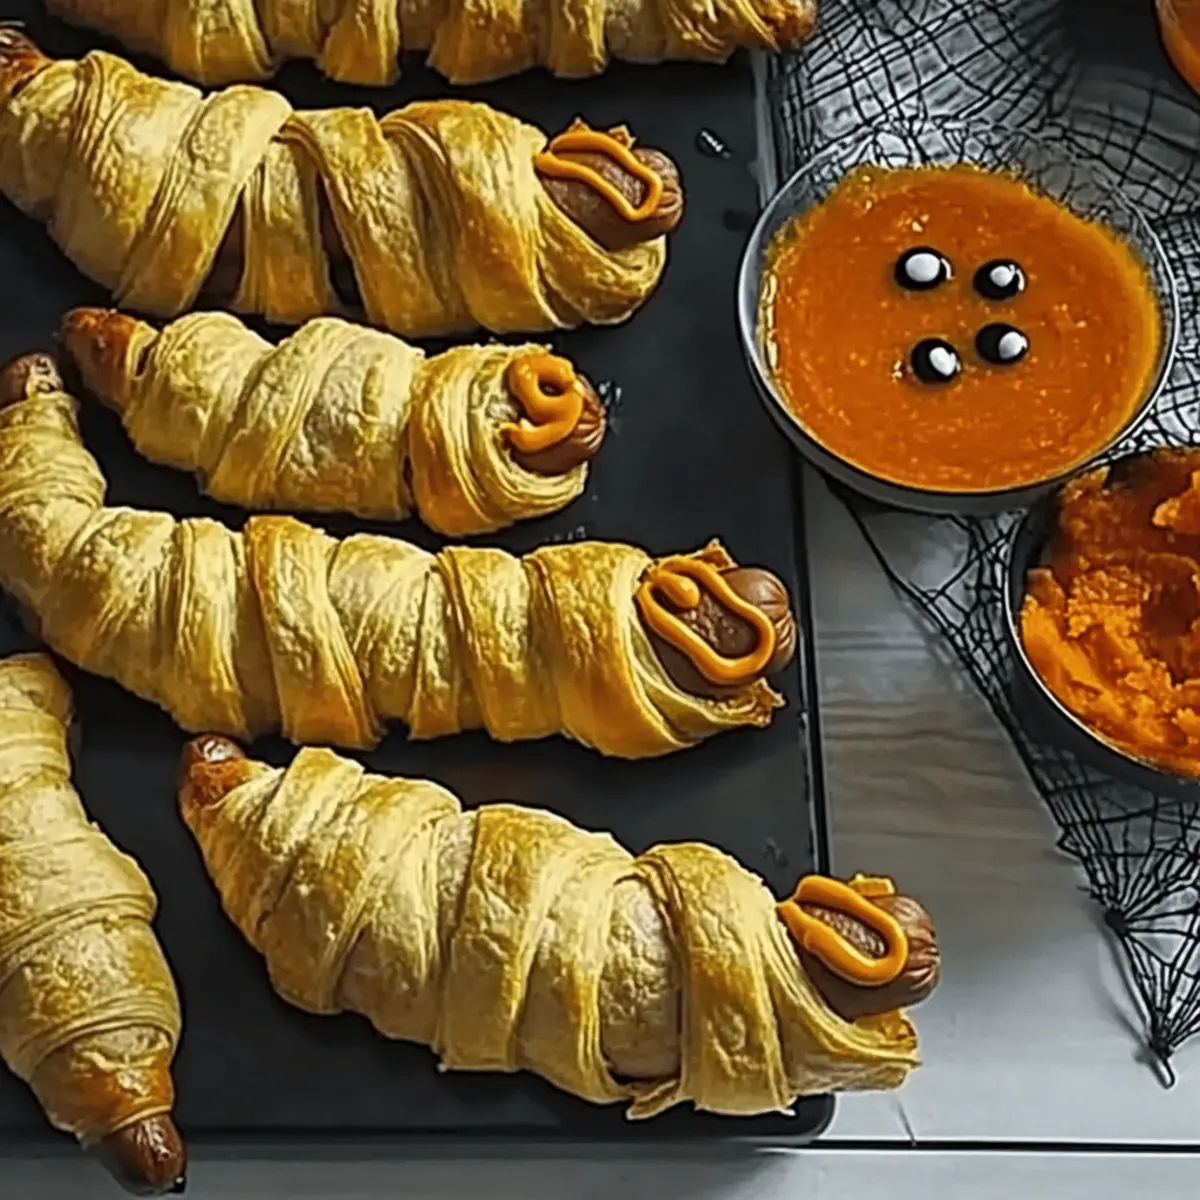
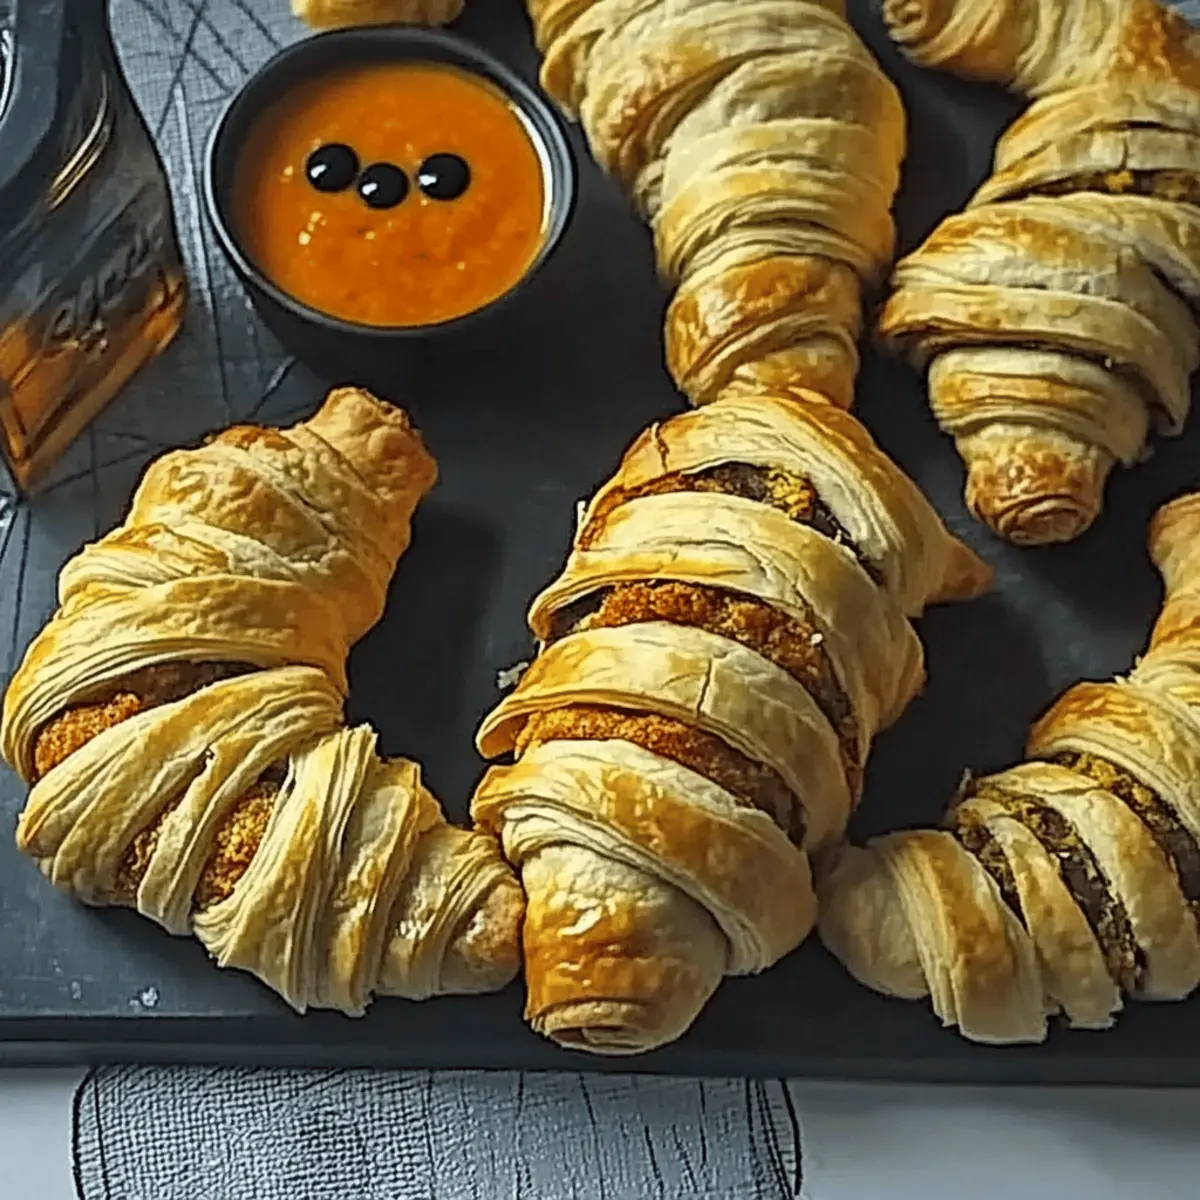
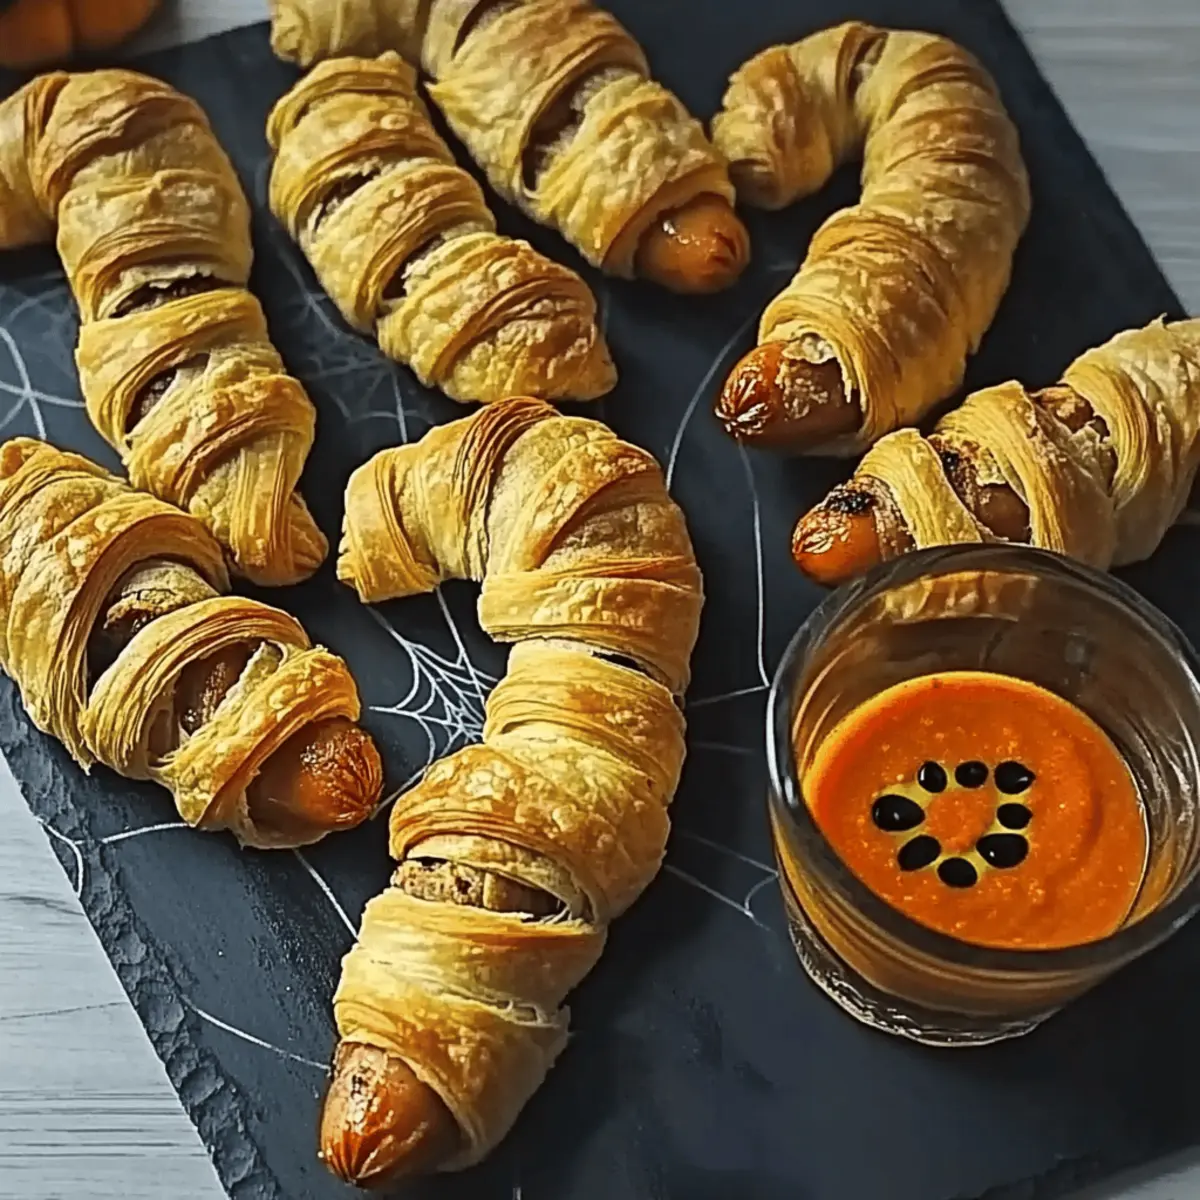
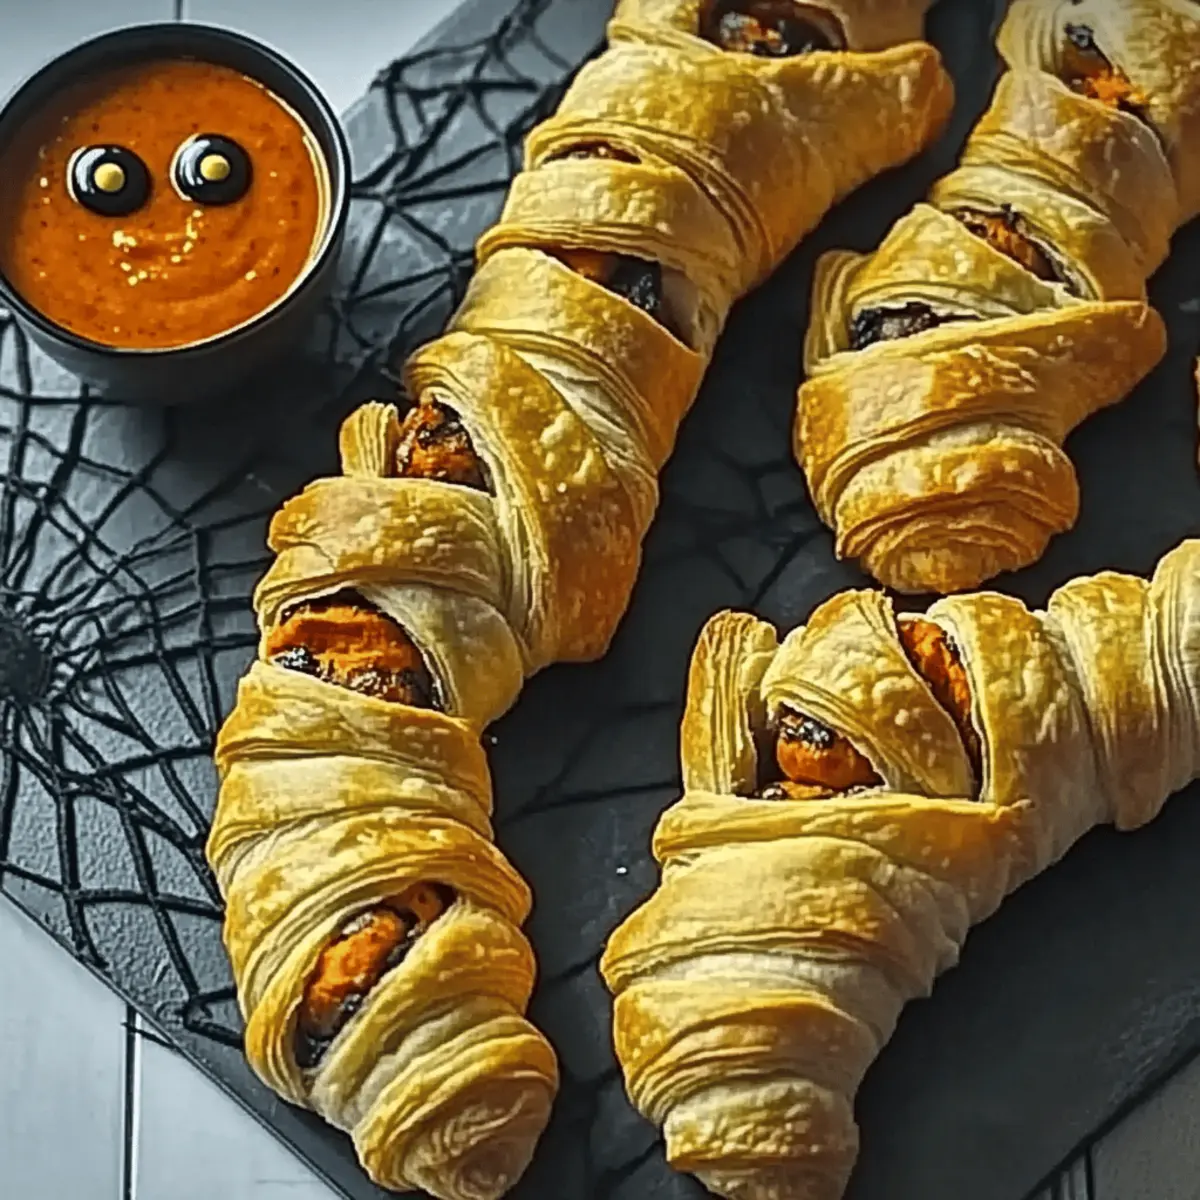
• Red Piping Gel or Icing – This gooey gel represents ‘blood', enhancing the horror factor; any red icing can add a festive touch.

Embrace the fun of making this Scary Halloween jelly and delight your little goblins with every wobbly spoonful!

Step‑by‑Step Instructions for Scary Halloween Jelly

Step 1: Prepare the Jelly Base
Begin by cutting the jelly cubes into smaller pieces for easier dissolving. In a mixing bowl, combine the jelly with 400ml of boiling water. Stir continuously for about 2-3 minutes until the jelly is completely dissolved and the mixture appears smooth and clear.

Step 2: Mix in the Liquids
Drain the lychees and reserve the syrup. In a separate container, mix the reserved lychee syrup with cold water to achieve a total of 400ml. Pour this mixture into the dissolved jelly, stirring well to combine until evenly blended and the jelly mixture is beautifully vibrant.

Step 3: Set the First Layer
Pour one-quarter of the jelly mixture into a clear dish or bowl, ensuring an even layer. Place the dish in the refrigerator for about 30-45 minutes, or until the jelly is just set but not fully firm—look for a slight jiggle in the surface that indicates readiness for the next layer.

Step 4: Create the Eyeballs
While the jelly base sets, create the eyeballs. Take the seedless green grapes and carefully insert a dark colored jelly bean into each one, pressing it gently to secure it. Then, push this grape into a lychee, making sure it’s snug and resembles an eerie eyeball ready to float atop the jelly.

Step 5: Shape the Spooky Fingers
Next, take the white marzipan and knead it until soft. Roll it into finger-sized sausages, shaping them with slight curves for realism. Decorate each finger with red piping gel to mimic blood and attach blanched almonds at the end for nails, giving them an authentic spooky touch.

Step 6: Layer the Eyeballs
Once the first jelly layer is set, carefully arrange half of the prepared eyeballs on top, ensuring they’re evenly spread. Slowly pour in another layer of the jelly mixture, covering the eyeballs, and return the dish to the refrigerator. Allow this layer to chill for another 30 minutes until it firms up slightly.

Step 7: Final Assembly
After the second layer is set, place the remaining eyeballs on the jelly’s surface, creating an eerie presentation. Line up your spooky marzipan fingers along the sides of the dish, then pour the last of the jelly mixture over everything, ensuring they are submerged. Chill the completed jelly until fully set, about 2-3 hours.

Step 8: Serve the Scary Halloween Jelly
When ready to serve, remove the dish from the refrigerator. The Scary Halloween jelly should be firm yet wobbly, showcasing the vibrant layers and spooky decorations. For the best effect, serve directly in the bowl, allowing everyone to dig in and enjoy this delightful Halloween treat!

What to Serve with Scary Halloween Jelly

Get ready to elevate your spooky dessert experience with delightful accompaniments that will thrill your little goblins!

  • Witch's Brew Punch: A bubbly, colorful punch adds a festive vibe, perfectly washing down the eerie jelly and keeping the fun flowing. Try mixing soda with some fruity juices and adding gummy eyeballs for an extra kick.

  • Crispy Spider Web Tacos: These crunchy, bite-sized tacos crafted with tortillas shaped into spider webs are a playful savory option. Kids love the crunchy texture alongside the wobbly jelly delight!

  • Halloween-themed Fruit Platter: A colorful arrangement of seasonal fruits like oranges and apples offers a fresh contrast to the sweet jelly. Add some ghostly banana ghosts to enhance the spooky theme.

  • Monster Marshmallow Pops: These easy-to-make pops covered in chocolate and decorated as monsters will surely bring smiles. The sweetness pairs beautifully with the creepy jelly, ensuring a balance of flavors.

  • Graveyard Brownies: Rich, fudgy brownies topped with crushed cookies and gummy worms create a fun dessert alongside the jelly. Their soft texture complements the jelly's wobbly form, making for a jaw-dropping display!

  • Blood Orange Mocktail: A refreshing drink that features the bright flavors of blood oranges adds a touch of sophistication. The vibrant color and sweet-tart flavors will keep everyone refreshed while indulging in the treat.

Serve these enchanting additions to create an unforgettable Halloween party spread that will leave kids and adults raving long after the spooky fun is over!

Expert Tips for Scary Halloween Jelly

• Perfect Layering: Ensure the jelly is fully cooled before layering to prevent the eyeballs from sinking. A slight jiggle indicates it’s ready for the next layer!

• Serve Fresh: For the best taste and presentation, serve the Scary Halloween jelly on the same day it’s made. This keeps the marzipan fingers from dissolving.

• Cutting Aid: Use scissors for cutting jelly cubes; it creates cleaner pieces and makes the process quicker and more efficient.

• Flavor Experimentation: Don’t hesitate to switch up flavors; different jellies like orange or grape can give your spooky treat an exciting new twist!

• Decoration Timing: Consider adding the spooky fingers right before serving to maintain their shape and freshness.

• Chilling Time: Allow ample time for the jelly to set fully. A few extra hours will ensure it achieves the perfect wobble and firmness.

Make Ahead Options

These Scary Halloween Jelly treats are perfect for busy home cooks looking to save time during the Halloween rush! You can prepare the jelly base up to 24 hours ahead of time and store it in the refrigerator. To maintain the quality, cover it tightly with plastic wrap to prevent it from absorbing other odors. The eyeballs can also be assembled a day in advance and kept chilled separately. Just wait to add the spooky fingers until just before serving to ensure they maintain their shape and texture. When ready to impress your guests, layer the released eyeballs, pour the remaining jelly over, and allow it to chill until fully set, providing a spooktacular dessert with minimal effort!

How to Store and Freeze Scary Halloween Jelly

Fridge: Store leftover Scary Halloween jelly in an airtight container in the refrigerator for up to 3 days. This keeps the flavors fresh and the texture intact.

Room Temperature: Avoid leaving the jelly at room temperature for more than 2 hours to prevent spoilage, especially if the weather is warm.

Freezer: It's not recommended to freeze Scary Halloween jelly, as the consistency will change upon thawing, compromising its delightful texture.

Make Ahead: Prepare the jelly a day in advance for convenience. Just keep it covered in the fridge, adding the marzipan fingers just before serving to maintain their shape.

Scary Halloween Jelly Variations & Substitutions

Feel free to get creative with this spooky treat, tailoring it to your taste preferences and dietary needs!

  • Flavor Twist: Experiment with orange or grape jelly for a different spooky vibe. Each flavor can lend a unique touch to the overall experience.

  • Candy Swap: Try using gummy bears instead of jelly beans for a fun, chewy design. The varied textures will add an extra level of delight!

  • Dairy-Free: Substitute marzipan with a dairy-free chocolate fondant for those with dietary restrictions. It’s just as versatile for shaping into creepy fingers!

  • Nut-Free: Replace blanched almonds with pumpkin seeds to keep it crunchy while catering to nut allergies. They’ll still add texture to your spooky fingers!

  • Fruit Substitution: Swap lychees for peeled canned peaches; they work similarly for the “eyeball” effect and provide a sweet, juicy complement.

  • All-Natural Fun: Use all-natural food coloring for a healthier version. Coupled with fresh fruits, this keeps your Halloween treat festive and vibrant!

  • Spicy Kick: Add a dash of chili powder to your syrup mix for a surprising kick that contrasts with the sweetness of the jelly.

  • Themed Toppings: Decorate with candy eyes or sprinkles for extra festivity. They’ll amp up the excitement and make your presentation even more captivating.

Don't hesitate to explore ideas like spooky Halloween cupcakes or whip up a batch of ghostly brownies as additional treats for your gathering! Let your imagination run wild with these variations, and watch the delight unfold!

Scary Halloween Jelly Recipe FAQs

How do I choose the right jelly for my Scary Halloween jelly?
Absolutely! For the best results, I recommend using strawberry or raspberry jelly as these flavors complement the fruity eyeballs beautifully. If you prefer a lighter option, opt for low-sugar varieties to keep the sweetness balanced without overwhelming the palate.

How should I store leftover Scary Halloween jelly?
To keep your Scary Halloween jelly at its best, store any leftovers in an airtight container in the refrigerator for up to 3 days. This ensures the flavors remain fresh and the jelly retains its delightful texture. Just remember to avoid leaving it at room temperature for more than 2 hours to prevent spoilage!

Can I freeze Scary Halloween jelly if I have leftovers?
It's not recommended to freeze Scary Halloween jelly, as the texture will change when thawed, leading to a less appealing consistency. If you're looking to prepare it in advance, you can make it a day ahead and store it in the fridge, adding the marzipan fingers right before serving.

What can I do if my jelly layers don’t set properly?
Don’t worry! If your jelly layers don’t seem to be setting, check that you're allowing enough chilling time between layers, typically at least 30-45 minutes. The jelly should be slightly jiggly but not completely firm when you add the next layer. If you're in a hurry, you might try placing it in the freezer for 10-15 minutes to help speed up the process.

Are there any dietary considerations for pets or allergies?
Yes, it’s wise to be cautious! This Scary Halloween jelly includes several ingredients that may not be suitable for pets, such as jelly and marzipan, which can be harmful. If you're serving it to guests with food allergies, be sure to check for sensitivities to nuts (in marzipan), gelatin, or any other components, and modify accordingly. Always communicate with your guests to ensure everyone can enjoy this spooky treat!

Can I customize the eyeballs or fingers based on what I have at home?
Very! Feel free to switch things up according to your pantry. Instead of jelly beans, try using gummy bears for the eyeballs for a different texture. You can also use modeling chocolate instead of marzipan if that's what you have on hand. The more the merrier with creativity!

Scary Halloween jelly

Scary Halloween Jelly That Will Thrill Your Little Goblins

Scary Halloween jelly with eyeballs and spooky fingers is a delightful treat perfect for any Halloween gathering.
Print Recipe Pin Recipe
Prep Time 15 minutes mins
Chilling Time 3 hours hrs
Total Time 3 hours hrs 15 minutes mins
Servings: 8 servings
Course: Dessert
Cuisine: American
Calories: 120
Ingredients Equipment Method Nutrition Notes

Ingredients
  

For the Jelly Base
  • 270 g Strawberry or Raspberry Jelly 2 x 135g packs
  • 425 g Lychee in Syrup Can use fresh lychees
For the Eyeballs
  • 12-14 Seedless Green Grapes Can substitute with small blueberries
  • 12-14 Dark Coloured Jelly Beans Any similar-sized candy works
For the Spooky Fingers
  • 80 g White Marzipan Almond paste can be used instead
  • 6-8 Blanched Almonds Slivered almonds can be used instead
For Decoration
  • 1 tbsp Red Piping Gel or Icing Represents 'blood'

Equipment

  • Mixing Bowl
  • Refrigerator
  • Clear dish or bowl

Method
 

Step-by-Step Instructions
  1. Begin by cutting the jelly cubes into smaller pieces for easier dissolving. In a mixing bowl, combine the jelly with 400ml of boiling water. Stir continuously for about 2-3 minutes until the jelly is completely dissolved and the mixture appears smooth and clear.
  2. Drain the lychees and reserve the syrup. In a separate container, mix the reserved lychee syrup with cold water to achieve a total of 400ml. Pour this mixture into the dissolved jelly, stirring well to combine until evenly blended and the jelly mixture is beautifully vibrant.
  3. Pour one-quarter of the jelly mixture into a clear dish or bowl, ensuring an even layer. Place the dish in the refrigerator for about 30-45 minutes, or until the jelly is just set but not fully firm.
  4. While the jelly base sets, create the eyeballs. Take the seedless green grapes and carefully insert a dark colored jelly bean into each one. Then, push this grape into a lychee.
  5. Next, take the white marzipan and knead it until soft. Roll it into finger-sized sausages, shaping them with slight curves. Decorate each finger with red piping gel and attach blanched almonds for nails.
  6. Once the first jelly layer is set, carefully arrange half of the prepared eyeballs on top. Slowly pour in another layer of the jelly mixture and return the dish to the refrigerator. Allow this layer to chill for another 30 minutes until it firms up slightly.
  7. After the second layer is set, place the remaining eyeballs on the jelly’s surface, creating an eerie presentation. Line up your spooky marzipan fingers along the sides of the dish, then pour the last of the jelly mixture over everything.
  8. When ready to serve, remove the dish from the refrigerator. The Scary Halloween jelly should be firm yet wobbly, showcasing the vibrant layers and spooky decorations.

Nutrition

Serving: 1servingCalories: 120kcalCarbohydrates: 28gProtein: 1gSodium: 5mgPotassium: 150mgFiber: 1gSugar: 22gVitamin C: 2mgCalcium: 1mgIron: 1mg

Notes

For best taste and presentation, serve the jelly on the same day it's made. Consider adding the spooky fingers right before serving.

Tried this recipe?

Let us know how it was!

Delightful Chocolate Spider Cookies for a Spooky Halloween Treat

September 27, 2025 by Grace Snow Leave a Comment

As the leaves fall and the air turns crisp, I find myself swept up in the enchantment of Halloween. One of my favorite ways to celebrate this spooky season is by whipping up a batch of delightful Chocolate Spider Cookies. Combining rich chocolate with the surprising chewiness of licorice, these cookies not only bring a fun twist to your Halloween festivities, but they’re also a snap to make—perfect for little hands eager to help in the kitchen. Whether you’re hosting a costume party or simply looking to add a touch of whimsy to your afternoon snack, these kid-friendly treats are sure to be a hit. Ready to create some delicious Halloween magic? Let's dive into this fun and easy recipe!

Why are Chocolate Spider Cookies a must-try?

Fun and Festive: The spooky design of these cookies adds a playful spirit to any Halloween gathering, making them a centerpiece for your dessert table.
Quick and Easy: With just a few simple ingredients and steps, you’ll have a batch ready in no time—perfect for those last-minute plans!
Kid-Friendly Fun: Involve your little ones and watch as they delight in decorating their very own spiders, creating cherished family memories along the way.
Versatile Variations: Want to mix it up? You can easily switch liquorice for pretzel sticks or get creative with different icing designs.
Crowd-Pleasing Treat: Rich chocolate and chewy textures create a tempting treat that appeals to both kids and adults alike—perfect for sharing or gifting!

Chocolate Spider Cookies Ingredients

• Get ready to create some spooky goodness!

For the Cookie Base

  • Dark or Milk Chocolate (200g) – Provides a decadent richness; substitute with white chocolate for a sweeter twist.
  • Oreo Cookies (2 packs, 154g each) – The perfect chocolatey foundation; feel free to replace with any chocolate wafer cookies if you prefer.

For the Spider Legs

  • Liquorice Catherine Wheels (113g pack) – Adds a fun, chewy texture for the legs; replace with pretzel sticks for a crunchier option if desired.

For Decoration

  • White and Black Icing Pens – Bring your spiders to life with cute eyes; you can also use colored royal icing for a different look.

Embrace the spirit of Halloween with these delightful Chocolate Spider Cookies!

Step‑by‑Step Instructions for Chocolate Spider Cookies

Step 1: Melt Chocolate
Start by breaking the dark or milk chocolate into small pieces and placing them in a heatproof bowl. Set the bowl over a pot of barely simmering water, ensuring the bowl doesn’t touch the water. Stir gently as the chocolate melts, about 5-7 minutes, until it’s completely smooth and shiny. Remove from heat, but keep warm while you prepare the other components of your Chocolate Spider Cookies.

Step 2: Prepare Legs
While the chocolate is melting, take the liquorice Catherine wheels and unroll them. Using a sharp knife or kitchen scissors, cut the liquorice into 2-3 cm lengths to create the spider legs. This should yield enough pieces for each cookie. Set the cut pieces aside and prepare your Oreo cookies for assembling the spiders.

Step 3: Assemble Spiders
To begin assembling your Chocolate Spider Cookies, take one Oreo and place about a teaspoon of melted chocolate on top. Next, position eight of the liquorice legs around the chocolate, pressing them gently into the cookie so they stay in place. Sandwich another Oreo on top to create the spider body, securing it with additional melted chocolate. Repeat this process until all cookies are assembled.

Step 4: Decorate Eyes
Once you’ve assembled your spiders, it’s time to give them life! Use the white icing pen to draw two large dots on the top Oreo for the eyes of each spider. Follow up with two smaller dots of black icing in the center of the white dots. This will create an adorable and spooky look for your Chocolate Spider Cookies, making them fun for kids to admire.

Step 5: Set
After decorating the spiders, place them on a tray or baking sheet and allow them to set in a cool area for about 15-20 minutes. This will help the chocolate firm up and secure the spider legs and eyes in place. Once set, your delightful Chocolate Spider Cookies are ready to be enjoyed or served at your Halloween celebration!

Storage Tips for Chocolate Spider Cookies

  • Room Temperature: Store your Chocolate Spider Cookies in an airtight container at room temperature for up to 5 days to maintain their delightful texture and flavor.
  • Fridge: If you prefer them chilled, you can refrigerate them for up to a week, but this may change the cookie's original consistency.
  • Freezer: For longer storage, freeze the cookies in a single layer on a baking sheet before transferring them to a freezer bag. They can last for up to 3 months but be sure to thaw them in the fridge before enjoying.
  • Reheating: If you want to savor the gooey chocolate again, warm them in the microwave for a few seconds—just enough to soften without melting!

What to Serve with Spooky Chocolate Spider Cookies?

As your delightful Chocolate Spider Cookies bring festive fun to the table, consider these perfect pairings to enhance your Halloween experience.

  • Cold Glass of Milk: A classic combination, milk perfectly balances the rich chocolate and sweet flavors of your cookies, making every bite better!
  • Warm Hot Chocolate: Cozy up your Halloween treats with a cup of silky hot chocolate, ideal for dipping your spider cookies and adding to the festive atmosphere.
  • Vanilla Ice Cream: The creamy texture of vanilla ice cream contrasts beautifully with the cookies, creating a satisfying dessert that everyone will love.
  • Caramel Dipping Sauce: Drizzle warm caramel sauce over the cookies for a luscious treat that adds a touch of indulgence and a hint of sweet sophistication.
  • Pumpkin Spice Latte: Embrace the season with a spicy, warm beverage. The flavors of pumpkin and spice complement the chocolaty goodness and enhance the Halloween spirit.
  • Gummy Worms: For a fun twist, serve gummy worms alongside—the colorful, chewy candies add a whimsical touch that's perfect for Halloween snacking.
  • Crispy Apple Slices: Slice up some fresh apples for a refreshing crunch. The natural sweetness and slight tartness pair nicely with the rich chocolate in your cookies.
  • Cupcakes with Spider Toppers: Bake up some cute cupcakes adorned with edible spider toppers for a cohesive Halloween-themed dessert experience that kids will adore.
  • Chocolate Milkshake: Blend up a rich chocolate milkshake as a deliciously decadent pairing that elevates the chocolate factor of your spooky cookies to new heights.

Make Ahead Options

These delightful Chocolate Spider Cookies are perfect for meal prep, saving you time during the busy Halloween season! You can prepare the chocolate cookie base and the liquorice legs up to 24 hours in advance by melting the chocolate and cutting the liquorice into spider legs ahead of time. Simply store the chocolate in an airtight container at room temperature to maintain its smoothness, while the legs can be kept in a separate container to avoid sticking. When you’re ready to assemble, take the prepped ingredients and sandwich them together with the Oreos, then decorate with icing pens just before serving. This way, you’ll enjoy fresh, festive treats without the last-minute rush!

Expert Tips for Chocolate Spider Cookies

  • Melt Gently: Ensure you melt chocolate slowly to avoid burning. This keeps it smooth and perfect for assembling your Chocolate Spider Cookies.
  • Cool Environment: Let the decorated cookies set in a cool, dry place—do not freeze! Freezing can make them too hard to enjoy.
  • Leg Placement: Use toothpicks or a small spatula to position the liquorice legs precisely. This will help maintain the structure and look of your spiders.
  • Creative Decorations: Allow kids to get creative with icing designs; different colors can add to the spooky appeal of your cookies.
  • Storage Tips: For best freshness, store your Chocolate Spider Cookies in an airtight container at room temperature, enjoying them within five days.

Variations & Substitutions for Chocolate Spider Cookies

Feeling creative? These easy variations will let you take your Chocolate Spider Cookies to the next level!

  • Flavored Candy Melts: Use candy melts in vibrant colors instead of chocolate for a fun, eye-catching twist that kids will adore.

  • Nutty Crunch: Adding chopped nuts or crispy rice cereal into the chocolate mixture offers delightful pops of crunch, enhancing texture and flavor.

  • Gummy Alternatives: Swap the liquorice legs for colorful gummy worms or gummy spiders to create a different, chewy texture with exciting flavors.

  • Gluten-Free Option: Replace regular Oreos with gluten-free chocolate cookies to make this festive treat accessible for everyone.

  • Dairy-Free Choice: Opt for dairy-free chocolate and icing pens to cater to dietary needs while still delivering on that rich chocolate flavor.

  • Richer Icing Decoration: Try using flavored royal icing instead of standard icing pens for a gourmet touch. Vanilla or almond flavors can elevate the cookies beautifully.

  • Dark Chocolate Dive: Go for a double chocolate treat by using chocolate-flavored Oreos as the base, which intensifies the chocolaty goodness!

Why not make a batch of these delightful Chocolate Spider Cookies and enhance your Halloween celebrations? Pair them with a cozy hot chocolate or serve alongside a plate of Eggnog Cookies Soft for an extra sweet touch!

Chocolate Spider Cookies Recipe FAQs

What type of chocolate is best for Chocolate Spider Cookies?
Absolutely! Dark chocolate offers a rich, intense flavor, while milk chocolate provides a sweeter profile. You can even use white chocolate for a fun twist! The choice really depends on your taste preference and that of your family.

How should I store Chocolate Spider Cookies?
For optimal freshness, store your cookies in an airtight container at room temperature for up to 5 days. If you prefer them chilled, refrigerating them is an option, but know that it might change the original texture a bit.

Can I freeze Chocolate Spider Cookies, and if so, how?
Yes, you can! Firstly, make sure the cookies are fully assembled with decorations. Place them in a single layer on a baking sheet to freeze them solid for about 1 to 2 hours. Once set, carefully transfer them to a freezer-safe bag or container. They can stay fresh for up to 3 months. To enjoy them later, let them thaw in the fridge for a few hours before serving!

What do I do if my chocolate isn't melting smoothly?
Very! If your chocolate starts to seize or isn't melting well, try the following: Ensure you're using low heat to melt the chocolate, as too high heat can cause it to burn. Also, you can add a teaspoon of vegetable oil or shortening to help achieve that silky texture. If using a microwave, melt in 30-second intervals, stirring between to avoid overheating.

Can these cookies be made with allergens in mind?
Certainly! If you need to avoid certain allergens, consider swapping the regular Oreo cookies for gluten-free chocolate wafers or using dairy-free chocolate to accommodate dietary restrictions. Always check ingredient labels to ensure safety for anyone with allergies.

What can I substitute for liquorice in the recipe?
If liquorice isn't your thing, no worries! You can use pretzel sticks for a crunchy spider leg alternative or swap in gummy candies for a pop of color and sweetness. Just make sure the substitute maintains the character of the cookie so that it's still fun and festive for Halloween!

Chocolate spider cookies

Delightful Chocolate Spider Cookies for a Spooky Halloween Treat

Delightful Chocolate Spider Cookies combine rich chocolate with chewy licorice, making them a perfect Halloween treat.
Print Recipe Pin Recipe
Prep Time 15 minutes mins
Cook Time 7 minutes mins
Setting Time 20 minutes mins
Total Time 42 minutes mins
Servings: 12 cookies
Course: Dessert
Cuisine: American
Calories: 150
Ingredients Equipment Method Nutrition Notes

Ingredients
  

Cookie Base
  • 200 g Dark or Milk Chocolate Substitute with white chocolate for a sweeter twist.
  • 2 packs Oreo Cookies Perfect chocolatey foundation.
Spider Legs
  • 113 g Liquorice Catherine Wheels Replace with pretzel sticks for a crunchier option.
Decoration
  • White and Black Icing Pens Use colored royal icing for a different look.

Equipment

  • Heatproof bowl
  • pot
  • Knife
  • kitchen scissors
  • Spatula

Method
 

Step-by-Step Instructions
  1. Start by breaking the dark or milk chocolate into small pieces and placing them in a heatproof bowl. Set the bowl over a pot of barely simmering water, stirring gently until melted, about 5-7 minutes.
  2. While the chocolate is melting, take the liquorice Catherine wheels and unroll them, cutting into 2-3 cm lengths for spider legs.
  3. To assemble, take one Oreo and place about a teaspoon of melted chocolate on top. Position eight liquorice legs around the chocolate, pressing gently. Sandwich another Oreo on top to create the spider body.
  4. Use the white icing pen to draw two large dots on the top Oreo for the eyes of each spider, followed by smaller dots of black icing in the center.
  5. Place the decorated cookies on a tray and allow them to set in a cool area for about 15-20 minutes.

Nutrition

Serving: 1cookieCalories: 150kcalCarbohydrates: 22gProtein: 2gFat: 7gSaturated Fat: 3gPolyunsaturated Fat: 1gMonounsaturated Fat: 2gCholesterol: 5mgSodium: 150mgPotassium: 50mgFiber: 1gSugar: 10gCalcium: 2mgIron: 6mg

Notes

Store in an airtight container at room temperature for up to 5 days. Refrigerate for up to a week, but may change consistency.

Tried this recipe?

Let us know how it was!

Mummy Hot Dogs: Spooky Treats Everyone Will Love!

September 27, 2025 by Grace Snow Leave a Comment

The aroma of freshly baked pastry wafts through the air as Halloween approaches, and I can't help but get excited about creating playful snacks for the season. Enter my Spooky Mummy Hot Dogs—an inventive twist on traditional finger foods that will charm guests of all ages! These mummy hot dogs are not only a delight to prepare but also take mere minutes to whip up, making them ideal for busy party planners. Wrapped in flaky croissant dough, each bite reveals juicy sausages hiding inside, ensuring that these treats will be the star of any Halloween gathering. Ready to add a touch of eerie fun to your snacks? Let’s dive into this creepy-cool recipe that’s perfect for your next festive celebration!

Why Are Mummy Hot Dogs a Must-Try?

Delightful Presentation: These mummy hot dogs are not only delicious but also visually captivating, making them a centerpiece on any Halloween table. Quick and Easy: You can whip them up in just 20 minutes! Perfect for your busy schedule, they’re a breeze to make. Kid-Friendly Fun: Kids love to help wrap the sausages, turning cooking time into family bonding moments. Flavorful Savory Bites: The combination of flaky croissant dough and juicy chipolatas creates a seriously satisfying treat. Don't forget to check out our Homemade Hot Chocolate for a cozy drink pairing! Versatile Dipping Options: Serve them with a variety of dips, from zesty salsa to creamy ranch, ensuring there’s something for everyone. These spooky snacks will undoubtedly become your new Halloween favorite!

Mummy Hot Dogs Ingredients

For the Hot Dogs
• Oil – Use it for greasing the baking trays to prevent sticking during baking.
• 12 Chipolatas – The star protein for this dish; opt for flavorful sausage variants that your family loves.

For the Wrappings
• Tube of 6 Ready-to-Roll Croissant Dough – This creates the perfect flaky wrappings; make sure to buy the pre-made version in the chilled aisle.

For the Brush Mixture
• 1 tbsp Honey – Adds a touch of sweetness to balance the savory flavors; you can substitute with maple syrup if needed.
• 1 tbsp Ketchup – Provides moisture and a hint of tangy flavor; feel free to use your favorite brand.
• 2 tsp Yellow Mustard – Perfect for seasoning and decorating the mummies' eyes; substitute with Dijon for a gourmet twist.

These Mummy Hot Dogs ingredients will have you on your way to creating a spooktacular snack in no time! Enjoy the prep—happy cooking!

Step‑by‑Step Instructions for Mummy Hot Dogs

Step 1: Preheat the Oven
Start by preheating your oven to 200°C (or 180°C for fan ovens), ensuring it's hot and ready for baking your Mummy Hot Dogs. While the oven heats up, take two baking trays and grease them lightly with oil to prevent sticking. This step is crucial for achieving that golden, flaky texture on your mummies.

Step 2: Prepare the Brush Mixture
In a medium-sized bowl, combine one tablespoon of honey, one tablespoon of ketchup, and two teaspoons of yellow mustard. Mix these ingredients well until uniform. This will create a flavorful glaze. Once blended, set the bowl aside for the next step, ensuring you have everything ready to generously brush your sausages.

Step 3: Season the Chipolatas
Take the 12 chipolatas and evenly coat them with the honey-ketchup-mustard mixture using a brush. Make sure to cover every inch for maximum flavor! This glaze will not only add taste but also help the pastry adhere better when wrapping. Once fully coated, it’s time to move on to the croissant dough.

Step 4: Prepare the Croissant Dough
Unroll the tube of ready-to-roll croissant dough on a clean surface. Divide it into three rectangles by pinching the seams together to create one uniform piece. From each rectangle, slice long, thin strips, about 16 per rectangle. Keep these strips handy, as they will form the spooky wrappings for your Mummy Hot Dogs.

Step 5: Wrap the Sausages
Carefully take each strip and wrap it around the chipolatas, leaving a small gap at one end to create a 'head' for the mummies. Be creative with the wrapping, as this will give your Mummy Hot Dogs their unique spooky appearance. Make sure to wrap them snugly but not too tight, allowing the dough to puff up during baking.

Step 6: Bake the Mummies
Place your beautifully wrapped Mummy Hot Dogs on the greased baking trays and transfer them to the preheated oven. Bake for approximately 20 minutes, or until the pastry turns golden brown and crisp. Keep an eye on them; you want that perfect flaky and slightly crispy texture for the ultimate Halloween treat.

Step 7: Create Mummy Eyes
Once the Mummy Hot Dogs are out of the oven, let them cool for a few minutes. Now, using your remaining mustard, dot tiny eyes on each mummy to bring them to life! This final touch adds to the fun and spooky appeal, making your hot dogs even more festive for your Halloween gathering.

Step 8: Serve and Enjoy
Serve your Mummy Hot Dogs warm with your favorite dipping sauces for an extra treat. Whether it's zesty salsa, creamy ranch, or your own concoction, these spooky snacks are perfect for sharing at your Halloween celebrations. Gather your guests and enjoy the playful and delicious spirit of Halloween!

Mummy Hot Dogs Variations & Substitutions

Get excited to personalize your Mummy Hot Dogs with these fun and delicious twists that offer something special for everyone!

  • Vegetarian Version: Swap out chipolatas for veggie sausages, perfect for plant-based diets without sacrificing flavor. These hearty alternatives still deliver on taste!
  • Cheesy Mummies: Add slices of cheese underneath the croissant dough to create gooey, melty centers. The combination of savory sausage and cheese is simply irresistible!
  • Spicy Twist: Use spicy chipolatas for a kick, or drizzle with hot sauce before serving. It’s a surefire way to spice up your Halloween feast! Don’t forget to pair it with a comforting Homemade Hot Chocolate to balance out the heat!
  • Different Pastry: For a unique twist, use puff pastry instead of croissant dough. This will provide a different texture while still being wonderfully flaky and delicious.
  • Creative Dipping Sauces: Experiment with various sauces like ranch, barbecue, or spicy mayo for dipping. Each concoction will add its own delightful flavor profile to your spooky treat!
  • Mini Mummies: Use mini sausages or cut larger sausages in half for bite-sized mummies, perfect for little hands or as delightful party appetizers.
  • Top with Seeds: Before baking, sprinkle sesame seeds on the dough for an extra crunchy texture and visual appeal. It adds a touch of surprise to each bite.
  • Ghostly Eyes: Instead of yellow mustard, use black olive slices to create spooky eyes. They add an unexpected flavor and make your mummies look even more frightful!

The creativity you inject into these Mummy Hot Dogs will ensure they are adored by all. Enjoy exploring the possibilities!

What to Serve with Mummy Hot Dogs

The festive fun doesn't have to stop with these spooky treats; enhance your Halloween spread with these delectable pairings.

  • Crispy Sweet Potato Fries: Their natural sweetness and crunch elevate the savory flavors of the mummy hot dogs, making each bite a delight.

  • Creamy Garlic Dip: This rich, zesty dip provides a perfect contrast to the flaky pastry and juicy sausage, intensifying the overall flavor experience.

  • Ghostly Guacamole: A vibrant green avocado dip not only looks great on your Halloween table but also adds fresh creaminess that complements the heat of the sausages.

  • Chilling Blood Orange Soda: The bright, tangy fizz brings a refreshing taste that cuts through the richness of the mummy hot dogs, keeping your guests refreshed!

  • Mini Pumpkin Pies: For a sweet ending, these tiny pies balance the savory with a warm spice that evokes the essence of fall festivities.

  • Veggie Skeleton Platter: A fun, colorful array of cut veggies and dips not only looks inviting but encourages healthy snacking amidst the treats.

  • Festive Candy Corn: This seasonal candy adds a touch of nostalgia and sweetness to counterbalance the savory bites, creating the ultimate Halloween candy platter.

Pair these delicious sides and drinks with your Mummy Hot Dogs, and your Halloween gathering will be both tasty and memorable!

Expert Tips for Mummy Hot Dogs

• Dough Handling: Make sure to handle the croissant dough gently, as aggressive tearing can lead to uneven wrap and a less appealing look.

• Pinch Those Seams: Don’t skip pinching the seams of the croissant dough tightly. This essential step prevents the dough from unraveling during baking, ensuring that your mummy hot dogs stay intact!

• Mind the Timing: Keep an eye on the baking time. If your mummies are browning too quickly, lower the temperature slightly to ensure a perfect bake without burnt spots.

• Customize Creatively: Feel free to get creative with the sauce and add-ins! You can incorporate spicy mustard or even different veggies for a color pop to the mummy's eyes.

• Stay Warm: These mummy hot dogs are best served warm. If you're making them ahead of time, consider briefly reheating them in the oven before serving to maintain that flaky texture.

Enjoy your Mummy Hot Dogs, a spooktacular treat sure to be a hit!

How to Store and Freeze Mummy Hot Dogs

Fridge: Store leftover Mummy Hot Dogs in an airtight container for up to 3 days. This helps keep the flaky croissant dough from becoming too soggy.

Freezer: For long-term storage, freeze the baked Mummy Hot Dogs individually wrapped in plastic wrap for up to 2 months. This ensures they stay fresh for future parties or snacking!

Reheating: To reheat, bake the frozen Mummy Hot Dogs directly from the freezer at 180°C (350°F) for about 15-20 minutes until heated through and the pastry is crispy again.

Prepping Ahead: If you want to prep ahead of time without baking, wrap the chipolatas in croissant dough and store them covered in the fridge for up to 24 hours before baking. Enjoy your Mummy Hot Dogs!

Make Ahead Options

These Mummy Hot Dogs are perfect for meal prep enthusiasts looking to save time during busy Halloween festivities! You can prepare the chipolatas wrapped in croissant dough up to 24 hours in advance; just cover them tightly with plastic wrap and refrigerate to maintain freshness. The glaze mixture can also be prepared ahead and stored in an airtight container for up to 3 days. When you're ready to bake, simply preheat your oven, brush the prepped sausage wraps with your glaze, and bake as instructed. This way, you’ll have deliciously spooky treats ready to wow your guests with minimal effort! Enjoy the extra time you save!

Mummy Hot Dogs Recipe FAQs

How do I choose the best chipolatas for my Mummy Hot Dogs?
Absolutely! Look for chipolatas with rich flavors and good quality. Avoid those with dark spots or an off-putting smell. Freshness is key, and I recommend checking the expiration date on the package for optimal taste.

How should I store leftover Mummy Hot Dogs?
To keep your leftovers fresh, store them in an airtight container in the fridge for up to 3 days. This helps maintain the flaky texture of the croissant dough, preventing it from getting soggy. When ready to enjoy, reheat them in the oven for that fresh-baked feel!

Can I freeze Mummy Hot Dogs for later?
Yes, you can! For best results, wrap each baked Mummy Hot Dog individually in plastic wrap and place them in a freezer-safe bag. They can be frozen for up to 2 months. To reheat, bake from frozen at 180°C (350°F) for 15-20 minutes until heated through and crispy.

What should I do if the croissant dough unravels while baking?
If you find the dough unravels, it likely wasn’t pinched or wrapped tightly enough. Next time, be sure to secure the seams snugly. Additionally, you can try wrapping the sausages in smaller amounts of dough, which may help them stay together better during baking.

Are Mummy Hot Dogs suitable for guests with dietary restrictions?
Very! For a vegetarian version, swap the chipolatas for your favorite veggie sausages. Always check the ingredient labels on the croissant dough and sauces for any allergens. This way, everyone can enjoy a taste of these spooky treats!

Can I prepare Mummy Hot Dogs in advance?
Definitely! You can wrap the chipolatas in croissant dough and store them in the fridge for up to 24 hours before baking. This makes party prep easier! Just remember to bake them fresh for the best texture, and enjoy the delightful aroma wafting through your kitchen as they cook!

Mummy hot dogs

Mummy Hot Dogs: Spooky Treats Everyone Will Love!

These Mummy hot dogs are a quick and playful Halloween snack that delights all ages.
Print Recipe Pin Recipe
Prep Time 10 minutes mins
Cook Time 20 minutes mins
Total Time 30 minutes mins
Servings: 12 hot dogs
Course: Snacks
Cuisine: Halloween
Calories: 180
Ingredients Equipment Method Nutrition Notes

Ingredients
  

For the Hot Dogs
  • 12 pieces Chipolatas opt for flavorful sausage variants
  • tablespoon Oil for greasing the baking trays
For the Wrappings
  • 1 tube Ready-to-Roll Croissant Dough buy the pre-made version in the chilled aisle
For the Brush Mixture
  • 1 tablespoon Honey can substitute with maple syrup
  • 1 tablespoon Ketchup use your favorite brand
  • 2 teaspoon Yellow Mustard substitute with Dijon for a gourmet twist

Equipment

  • Baking trays
  • Medium-sized Bowl
  • Brush

Method
 

Step-by-Step Instructions
  1. Preheat your oven to 200°C (or 180°C for fan ovens) and grease two baking trays lightly with oil.
  2. In a medium-sized bowl, combine honey, ketchup, and yellow mustard to create a brush mixture.
  3. Coat the chipolatas evenly with the brush mixture using a brush.
  4. Unroll the croissant dough and slice it into long, thin strips for wrapping.
  5. Wrap each strip around the chipolatas, leaving a small gap for a 'head'.
  6. Bake the wrapped Mummy Hot Dogs in the preheated oven for about 20 minutes until golden brown.
  7. Dot tiny eyes on each mummy with the remaining mustard after cooling.
  8. Serve warm with your favorite dipping sauces.

Nutrition

Serving: 1hot dogCalories: 180kcalCarbohydrates: 15gProtein: 10gFat: 9gSaturated Fat: 3gPolyunsaturated Fat: 1gMonounsaturated Fat: 4gCholesterol: 30mgSodium: 400mgPotassium: 150mgFiber: 1gSugar: 1gVitamin A: 100IUCalcium: 30mgIron: 1mg

Notes

Handle the croissant dough gently to prevent uneven wrapping. Pinch the seams tightly to avoid unraveling during baking.

Tried this recipe?

Let us know how it was!

Delight in White Peach Mascarpone Tart for Summer Celebrations

September 26, 2025 by Grace Snow Leave a Comment

The aroma of ripe white peaches hits me as I wander through the farmer's market, a fragrant reminder of summer’s fleeting beauty. There's something truly special about preparing a White Peach Mascarpone Tart—it's not just a dessert, but a celebration of warm afternoons and sunshine-filled gatherings. The silky mascarpone pastry cream contrasts elegantly with the softness of poached peaches, all resting on a flaky puff pastry crust. This recipe not only brings joy to your taste buds but is also a delightful make-ahead option, allowing for more time spent with loved ones. Ready to impress? Let’s dive into making this stunning seasonal dessert that’s sure to be the star of your next get-together! What unusual twist will you put on it?

Why is this tart a must-try?

Celebrate the best of summer with this delightful tart! Fresh white peaches and velvety mascarpone combine for a dessert that's as stunning as it is delicious. Versatile enough for any occasion, you can easily swap in your favorite fruits, like nectarines or blueberries, for a seasonal twist. Make-ahead convenience makes it perfect for gatherings—prepare it in advance and wow your guests without stress. Simple yet impressive, this White Peach Mascarpone Tart will elevate your dessert game and become a favorite. If you're seeking more seasonal inspiration, don't miss out on our Tuscan White Bean recipe or a delicious batch of Peaches Cream Cookies!

White Peach Mascarpone Tart Ingredients

• Dive into the delightful layers of this fresh dessert!

For the Pastry Cream

  • Whole Milk – A creamy base for the pastry cream; you can use any dairy milk as a substitute.
  • Vanilla Bean Paste – Infuses rich vanilla flavor; feel free to use extract for convenience.
  • White Sugar – Sweetens the pastry cream and poaching liquid; coconut sugar makes for a healthier alternative.
  • Cornstarch – Thickens the pastry cream; no substitutions are recommended for best results.
  • Salt – Enhances all the sweet flavors beautifully.
  • Egg Yolks – Provide richness and are crucial for thickening the cream.
  • Unsalted Butter – Adds a luscious creaminess to the pastry cream.

For the Diplomat Crème

  • Mascarpone – The star ingredient that delivers creamy goodness; cream cheese can be used as a substitute.
  • Heavy Cream – Whipped to perfection for lightness and flavor.
  • Powdered Sugar – Lightly sweetens the whipped mascarpone.

For the Poached Peaches

  • Peach Poaching Liquid – A mix of sugar, Chardonnay, vanilla extract, honey, lemon juice, and lemon zest for poaching delight.
  • Firm Ripe Peaches – These will bring sweet juiciness to your tart; substitute with quince or green apples if they're out of season.

For the Tart Assembly

  • Puff Pastry – The flaky base of your tart; opt for homemade pastry if you want to elevate it even more.
  • Fresh Peaches & Raspberries – Colorful and fresh toppings that add flair to your dessert.
  • Caramel Sauce – An optional touch for added sweetness that enhances the dessert's appeal.

Explore the beautiful layers of flavor with this White Peach Mascarpone Tart that celebrates the best summer fruits!

Step‑by‑Step Instructions for White Peach Mascarpone Tart

Step 1: Prepare Vanilla Pastry Cream
In a medium saucepan, heat 2 cups of whole milk over medium heat until steaming, then stir in 2 teaspoons of vanilla bean paste. In a separate bowl, whisk together ½ cup of white sugar, ¼ cup of cornstarch, and 4 egg yolks until smooth. Gradually mix in the hot milk, return the mixture to the saucepan, and cook over medium heat for about 5-7 minutes, stirring constantly until thickened. Strain through a sieve into a bowl and let it chill in the refrigerator.

Step 2: Make Poached Peaches
For the poaching liquid, combine 1 cup of sugar, 1 cup of Chardonnay, 1 teaspoon of vanilla extract, ¼ cup of honey, 2 tablespoons of lemon juice, and the zest of 1 lemon in a medium saucepan. Bring to a simmer over medium heat. Carefully add 4 firm ripe peaches, poaching them for about 4 minutes on each side until tender. Remove the peaches and allow them to cool in the liquid. Meanwhile, reduce the poaching liquid down to a syrupy consistency for about 10-15 minutes.

Step 3: Bake Puff Pastry
Preheat your oven to 400°F (200°C). Roll out a sheet of puff pastry on a lightly floured surface to fit your tart pan, gently pressing it into the pan, and trimming any excess. Prick the base with a fork and place a piece of parchment paper over the pastry, filling it with pie weights or dried beans. Bake for 20-25 minutes until golden and crispy. Once baked, remove the parchment and let the crust cool completely before adding the filling.

Step 4: Whip Mascarpone Diplomat Crème
In a large bowl, combine 1 cup of mascarpone, 1 cup of heavy cream, and ¼ cup of powdered sugar. Using an electric mixer, whip the mixture on medium-high speed until soft peaks form, taking about 3-5 minutes. Once the pastry cream is cold, gently fold it into the whipped mascarpone until fully combined, creating a luxurious diplomat crème that’s both light and creamy.

Step 5: Assemble Tart
Spread the whipped mascarpone diplomat crème evenly over the cooled puff pastry crust, creating a smooth layer. Drizzle some of the reduced poaching syrup on top for added flavor and shine. Finally, elegantly arrange sliced poached peaches and fresh raspberries over the cream, creating a vibrant display. Your stunning White Peach Mascarpone Tart is now ready to delight!

Make Ahead Options

These White Peach Mascarpone Tarts are perfect for busy home cooks looking to save time! You can prepare the vanilla pastry cream and poached peaches up to 24 hours in advance, allowing the flavors to meld beautifully. Store the pastry cream in the refrigerator, ensuring it’s completely chilled before folding it into the mascarpone to maintain its luscious texture. Bake the puff pastry crust a few hours ahead of serving and let it cool completely before assembly. When you’re ready to impress your guests, simply whip the mascarpone diplomat crème, fill the tart shell, and top with poached peaches and fresh raspberries. This way, you’ll enjoy a stunning dessert with minimal last-minute effort!

Expert Tips for White Peach Mascarpone Tart

  • Chill Thoroughly: Ensure your pastry cream is completely chilled before folding in the mascarpone; this maintains a lovely texture in your tart.

  • Select Ripe Peaches: Choose firm and ripe peaches for optimal sweetness and juiciness. Underripe peaches may lack flavor in your White Peach Mascarpone Tart.

  • Monitor Puff Pastry: Keep an eye on the puff pastry while baking to prevent over-browning. A perfectly golden crust enhances both presentation and taste.

  • Layer Balance: When assembling, be generous with the diplomat crème, as it complements the tartness of the poached peaches. A balanced layer makes each bite delightful.

  • Syrup Control: Don’t overdo the poaching syrup when drizzling on top; just a light touch adds flavor without making the tart soggy.

What to Serve with White Peach Mascarpone Tart

Imagine a sunny afternoon gathering, where each bite of tart transports you to summer bliss.

  • Creamy Vanilla Ice Cream: Adds a rich and creamy element that beautifully contrasts the tart’s sweetness and offers a delightful chill.
  • Lemon Sorbet: A refreshing palate cleanser that cuts through the creamy mascarpone and enhances the tartness of the peaches.
  • Sparkling Wine: The effervescence and lightness of a sparkling wine complement the dessert's flavors, making it a joyful pairing.
  • Fresh Mint Sprigs: Garnish with fresh mint to add a pop of vibrant color and an aromatic herbal note that elevates the entire dessert experience.
  • Shortbread Cookies: These buttery cookies provide a contrasting texture and add a sweet, crumbly element that pairs well with the creamy mascarpone.
  • Berry Compote: Drizzle a mixed berry compote over the tart for a burst of tart flavor that balances the sweetness of the peaches.
  • Almond Biscotti: Crunchy and slightly nutty, biscotti offers a delightful texture that pairs well with the smooth tart, perfect for dipping.
  • Coffee or Espresso: A warm beverage like coffee enhances the fruity flavors while providing a comforting end to your summer meal.
  • Whipped Cream: Lightly sweetened whipped cream adds an extra layer of creaminess, tying the dessert together beautifully.

Variations & Substitutions for White Peach Mascarpone Tart

Feel free to let your creativity shine by customizing this delightful tart with your favorite seasonal fruits and flavors!

  • Nectarine Swap: Replace white peaches with nectarines for a slightly tart flavor and a beautiful color.

  • Blueberry Burst: Use blueberries instead of raspberries for a sweet twist—perfect for summer picnics!

  • Apricot Addition: Try apricots to add a floral note, enhancing the overall fruity experience of the dessert.

  • Dairy-Free Option: For a dairy-free twist, substitute mascarpone with silken tofu blended with coconut cream for a creamy filling.

  • Flavored Extracts: Experiment with almond or orange extracts in the pastry cream for a unique flavor profile that surprises the palate.

In the mood for a refreshing vibe? You might consider pairing your tart with a light drizzle of honey or a spoon of homemade caramel sauce for added indulgence, just like in our recipe for Peaches Cream Cookies. And if you're feeling adventurous, a scoop of vanilla ice cream on the side could elevate your dessert experience!

  • Spicy Kick: For a fun heat element, add a dash of cayenne or black pepper to the poaching liquid for an unexpected twist!

  • Personal Touch: Personalize the crust by using crushed graham crackers or almond flour if gluten-free is a priority, keeping the flaky texture intact.

How to Store and Freeze White Peach Mascarpone Tart

Fridge: Store the tart in the refrigerator for up to 2 days. Make sure to cover it loosely with plastic wrap to keep it fresh without sticking.

Freezer: You can freeze the unassembled tart for up to 3 months. Wrap the cooled puff pastry tightly in foil and place it in an airtight container. Thaw before adding the filling.

Reheating: If you store the tart after assembling, serve chilled. If desired, you can lightly warm individual slices in the microwave for about 10-15 seconds to enhance the flavors.

Make Ahead: Prepare the pastry cream a day in advance and keep it refrigerated. Assemble the White Peach Mascarpone Tart a few hours before serving for the best texture and freshness.

White Peach Mascarpone Tart Recipe FAQs

What should I look for when selecting ripe peaches?
Absolutely! The ideal peaches for your tart should be firm yet slightly yielding to pressure, indicating ripeness. Look for peaches with a vibrant color and a sweet aroma. Avoid any fruits with dark spots all over or wrinkled skin, as they may be overripe.

How should I store the White Peach Mascarpone Tart?
You can store your tart in the refrigerator for up to 2 days. Just cover it loosely with plastic wrap to keep it fresh while allowing it to breathe. This prevents the cream from sticking while maintaining its lovely texture.

Can I freeze the tart for later use?
Yes! You can freeze the unassembled White Peach Mascarpone Tart for up to 3 months. Wrap the cooled puff pastry tightly in foil and place it in an airtight container. When you’re ready to enjoy, simply thaw it in the refrigerator overnight before adding the filling.

What if my pastry cream doesn’t thicken properly?
Don’t worry! If your pastry cream doesn’t thicken as expected, it may need a little more cooking. Return it to the heat, stirring constantly for a couple of minutes until it reaches the desired consistency. Make sure to keep the heat medium-low to prevent burning.

Is this tart suitable for those with dairy allergies?
Unfortunately, the White Peach Mascarpone Tart contains dairy ingredients, so it’s not suitable for individuals with dairy allergies. However, you can explore alternative ingredients like coconut cream or cashew cream as substitutes to create a dairy-free version, keeping in mind that the taste and texture will differ a bit.

How do I ensure my puff pastry is crispy?
To achieve that delightful flaky texture, ensure that the puff pastry is not overcrowded in the pan and that you prick the base with a fork before baking. Weigh down the pastry with parchment paper and pie weights to prevent it from puffing too much. Keep an eye on it while baking to achieve a beautiful golden crust!

White Peach Mascarpone Tart

Delight in White Peach Mascarpone Tart for Summer Celebrations

This White Peach Mascarpone Tart is a delicious dessert that celebrates summer with fresh peaches and creamy mascarpone.
Print Recipe Pin Recipe
Prep Time 30 minutes mins
Cook Time 45 minutes mins
Chilling Time 1 hour hr
Total Time 2 hours hrs 15 minutes mins
Servings: 8 slices
Course: Dessert
Cuisine: American
Calories: 450
Ingredients Equipment Method Nutrition Notes

Ingredients
  

For the Pastry Cream
  • 2 cups Whole Milk Any dairy milk can substitute.
  • 2 teaspoons Vanilla Bean Paste Extract can be used.
  • ½ cup White Sugar Coconut sugar can be healthier alternative.
  • ¼ cup Cornstarch No substitutions recommended.
  • 1 teaspoon Salt Enhances sweetness.
  • 4 units Egg Yolks Crucial for thickening.
  • 2 tablespoons Unsalted Butter Adds creaminess.
For the Diplomat Crème
  • 1 cup Mascarpone Cream cheese can substitute.
  • 1 cup Heavy Cream Whipped to perfection.
  • ¼ cup Powdered Sugar Lightly sweetens.
For the Poached Peaches
  • 1 cup Sugar For poaching.
  • 1 cup Chardonnay For poaching.
  • 1 teaspoon Vanilla Extract For poaching.
  • ¼ cup Honey For poaching.
  • 2 tablespoons Lemon Juice For poaching.
  • 1 unit Lemon Zest For poaching.
  • 4 units Firm Ripe Peaches Can substitute with quince or green apples.
For the Tart Assembly
  • 1 sheet Puff Pastry Homemade is preferred.
  • 2 units Fresh Peaches For topping.
  • 1 cup Raspberries For topping.
  • to taste Caramel Sauce Optional for added sweetness.

Equipment

  • Medium saucepan
  • tart pan
  • Mixing Bowl
  • Electric mixer

Method
 

Step-by-Step Instructions
  1. Prepare the pastry cream by heating milk and adding vanilla bean paste. Whisk sugar, cornstarch, and egg yolks together. Combine and cook until thickened.
  2. Make poached peaches by simmering sugar, Chardonnay, vanilla, honey, lemon juice, and zest. Poach peaches for 4 minutes each side.
  3. Bake puff pastry at 400°F until golden. Cool completely.
  4. Whip mascarpone, heavy cream, and powdered sugar until soft peaks form. Fold in the cooled pastry cream.
  5. Assemble by spreading diplomat crème over pastry crust, drizzle with poaching syrup, and top with sliced peaches and raspberries.

Nutrition

Serving: 1sliceCalories: 450kcalCarbohydrates: 55gProtein: 6gFat: 22gSaturated Fat: 12gCholesterol: 100mgSodium: 180mgPotassium: 200mgFiber: 3gSugar: 30gVitamin A: 500IUVitamin C: 15mgCalcium: 100mgIron: 1mg

Notes

Chill the pastry cream thoroughly. Select ripe peaches for the best flavor. Monitor puff pastry while baking to prevent over-browning. Be generous with the diplomat crème for best flavor balance. Use poaching syrup sparingly to avoid sogginess.

Tried this recipe?

Let us know how it was!

Decadent Blackberry Cream Cheese Pastry Bliss You’ll Love

September 26, 2025 by Grace Snow Leave a Comment

As I stood in my kitchen, the scent of blackberries simmering on the stove ignited a sweet nostalgia for sunny mornings spent savoring pastries. Today, I’m excited to share my recipe for a Flaky Blackberry Cream Cheese Danish with Homemade Curd, a delightful blend of rich creaminess and fruity brightness that never fails to impress. These beauties are not just a feast for the eyes; they're also surprisingly simple to whip up using store-bought puff pastry, making them perfect for a quick indulgence or a show-stopping dessert at your next gathering. With a creamy filling and a vibrant blackberry curd, they promise to be a new favorite for anyone looking for a deliciously fresh treat. Who’s ready to bring a touch of homemade bliss into their kitchen?

Why This Danish Will WOW You?

Simplicity at Its Finest: The use of store-bought puff pastry makes this recipe incredibly easy for anyone, whether you're an experienced chef or a home cook.

Bursting with Flavor: The creamy cream cheese filling paired with tangy blackberry curd creates a delightful explosion of taste in every bite.

Visually Stunning: With their golden tops and vibrant fruit accents, these Danishes are a showstopper at any gathering, sure to impress family and friends.

Versatile Pleasure: Feel free to swap blackberries with your favorite berries, like raspberries or blueberries, for a unique twist.

Perfect for Any Occasion: Whether it's brunch, an afternoon snack, or a dessert at dinner, these pastries fit seamlessly into any meal.

Get ready to elevate your dessert game! If you love fruit-filled treats, don’t miss out on my Blackberry Crisp Amp or for a cool finish, try some Vegan Cacao Cream.

Blackberry Cream Cheese Danish Ingredients

For the Blackberry Curd
• Blackberries – Fresh or frozen, they provide the core flavor for both the curd and the garnish.
• Sugar – A mixture of granulated and turbinado, it sweetens the curd and adds texture to the pastry's exterior.
• Eggs (whole and yolks) – They add structure and richness to the filling.
• Lemon Juice – Brightens the flavor of the curd, effectively balancing sweetness.
• Butter – Offers creaminess and richness to the curd for a velvety finish.

For the Cream Cheese Filling
• Cream Cheese – The main filling component with a rich and tangy taste; use softened for easy blending.
• Sugar – Adds sweetness to the cream cheese layer, enhancing the overall flavor.
• Egg Yolk – Provides added richness, improving the creaminess of the filling.
• Vanilla Extract – Introduces warm notes that complement the blackberry curd beautifully.

For the Pastry
• Puff Pastry – Forms the flaky outer layer; ensure it's thawed and rolled out for the best texture.
• Egg Wash (beaten egg with water) – Gives the pastries a golden, glossy finish that is visually appealing.
• Turbinado Sugar – A sprinkle on top adds a satisfying crunch to the flaky exterior.

For Garnish
• Fresh Blackberries – Used for garnish; they enhance visual appeal and add a burst of freshness.
• Powdered Sugar – An optional dusting for extra sweetness and a beautiful presentation.

Dive into a delightful baking adventure with these ingredients for an unforgettable Blackberry Cream Cheese Danish!

Step‑by‑Step Instructions for Blackberry Cream Cheese Danish

Step 1: Prepare Blackberry Curd
Begin by placing fresh or frozen blackberries in a blender and pureeing until smooth. Strain the blackberry puree through a fine mesh sieve into a saucepan, discarding the seeds. On medium heat, simmer the strained puree with sugar until it reduces slightly. In a bowl, whisk together eggs, egg yolks, and lemon juice, then stir into the simmering mixture until it thickens, about 5-7 minutes. Remove from heat and whisk in butter, then let the curd cool.

Step 2: Make Cream Cheese Filling
In a mixing bowl, add softened cream cheese, sugar, egg yolk, and vanilla extract. Using an electric mixer, beat the mixture until creamy and well combined, about 2-3 minutes. The cream cheese filling should be smooth and spreadable. Set aside, allowing it to stay at room temperature for easy handling when filling the pastries.

Step 3: Roll Puff Pastry
Preheat your oven to 400°F (200°C). On a lightly floured surface, unroll the thawed puff pastry sheets. Using a round cookie cutter or a glass, cut the pastry into 3 ½-inch circles. Place the circles on a parchment-lined baking sheet. Use a fork to prick the centers of each circle to prevent excessive puffing during baking, ensuring a crisp outer layer for your Blackberry Cream Cheese Danish.

Step 4: Assemble Pastries
Spoon a generous dollop of the cream cheese filling into the center of each puff pastry circle. Carefully brush the edges of the pastry with the egg wash to help create a golden crust. Sprinkle a bit of turbinado sugar on top of the filling for added texture. This step ensures that the pastries puff beautifully and have a delightful crunch once baked.

Step 5: Bake
Place the assembled pastries in the preheated oven and bake for 15-18 minutes. Keep an eye on them as they bake; they should turn golden brown and puff up nicely. Once ready, remove the pastries from the oven and let them cool on a wire rack. Allowing the pastries to cool ensures the cream cheese filling sets properly.

Step 6: Finish with Curd
Once the pastries have cooled completely, use a small spoon to fill each one with the luscious blackberry curd. For an added touch of freshness, top with fresh blackberries and, if desired, a light dusting of powdered sugar. This final presentation not only enhances visual appeal but also adds an extra layer of sweetness to your Blackberry Cream Cheese Danish.

Make Ahead Options

These Flaky Blackberry Cream Cheese Danishes are perfect for meal prep enthusiasts! You can prepare the blackberry curd up to 3 days in advance; simply refrigerate it in an airtight container to maintain freshness. The cream cheese filling can also be made ahead and stored in the fridge for up to 24 hours, ensuring it's ready for quick assembly. When you're ready to serve, just roll out the puff pastry and follow the assembly instructions before baking. This way, you can enjoy delicious, homemade pastries with minimal effort, allowing you to savor those moments you’d otherwise spend in the kitchen!

Blackberry Cream Cheese Variations

Feel free to bring your personal touch to this recipe, transforming every bite into something uniquely yours!

  • Berry Swap: Replace blackberries with raspberries or blueberries for a different fruity flavor that’s equally delightful.
  • No-Cream Cheese: Substitute with mascarpone for a lighter, creamier filling that enhances the overall pastry sweetness.
  • Crescent Dough: Use crescent roll dough instead of puff pastry for a quicker and more buttery twist.
  • Nutty Add-In: Mix chopped almonds or walnuts into the cream cheese filling for a crunchy texture that complements the fresh fruit.
  • Spicy Kick: Add a pinch of cayenne pepper or chili powder to the blackberry curd for an unexpected warming element.
  • Zesty Lemon: Substitute lemon juice with lime juice in the curd for a tropical flair that enhances the berry flavor.
  • Chocolate Drizzle: Drizzle melted chocolate over the cooled pastries for an indulgent finishing touch that elevates presentation and taste.
  • Serving Pairing: Consider serving with fresh whipped cream or a scoop of ice cream, such as Cajeta Ice Cream, for an irresistible combination.

The possibilities are endless, and these variations can create a space for your creativity to shine! If you love variations, check out these recipes for more inspirations: Ice Cream Cake or Peaches Cream Cookies.

Storage Tips for Blackberry Cream Cheese Danish

  • Room Temperature: Enjoy these pastries fresh; they are best served warm right after baking. If you have leftovers, they can sit at room temperature for up to 2 hours.

  • Fridge: Store any uneaten Blackberry Cream Cheese Danishes in an airtight container in the refrigerator for up to 3 days. The pastry may lose some crispness but will still taste delicious!

  • Freezer: For longer storage, freeze the unfilled pastries before baking. Wrap tightly in plastic wrap and then place in an airtight container for up to 2 months. Bake from frozen, adding an extra few minutes to the baking time.

  • Reheating: To reheat, simply pop the pastries in a preheated oven at 350°F (175°C) for about 10 minutes to regain their flaky texture. Enjoy warm for the best results!

Expert Tips for Blackberry Cream Cheese Danish

  • Room Temperature Cream Cheese: Ensure your cream cheese is at room temperature for easy mixing into a smooth filling, avoiding lumps in your Blackberry Cream Cheese Danish.

  • Avoid Overfilling: Be careful not to overfill pastries. This prevents the delicious filling from spilling out during baking and keeps your Danishes perfectly shaped.

  • Strain for Smooth Curd: For a silky texture in your blackberry curd, strain it after cooking to remove any solids, enhancing the overall quality of your dessert.

  • Double Boiler Method: Using a double boiler when preparing the curd can help control the temperature, reducing the risk of cooking the eggs too quickly and creating a scrambled effect.

  • Keep an Eye on Baking Time: Baking times can vary, so watch your pastries closely towards the end. Remove them when they are golden brown for the best texture.

What to Serve with Flaky Blackberry Cream Cheese Danish?

Indulging in these delectable pastries inspires a delightful gathering filled with flavors and textures that complement their rich creaminess.

  • Fresh Fruit Salad: A mix of seasonal fruits adds brightness and balances the buttery pastry's richness, elevating your brunch experience.

  • Coffee or Espresso: The bitterness of a bold brew perfectly complements the sweetness of the danish, making each bite feel like a cozy café moment.

  • Whipped Cream: A dollop of lightly sweetened whipped cream lends a cloud-like softness, enhancing the overall indulgence of this delicious treat.

  • Vanilla Ice Cream: Creamy vanilla ice cream creates a luscious contrast to the flaky layers and tart blackberry curd, making it an irresistible dessert pairing.

  • Herbal Tea: A fragrant herbal tea offers a calming companion, enhancing the berry's fruity notes while providing a refreshing sip between bites.

  • Chocolate Drizzle: For a decadent twist, a drizzle of rich chocolate sauce over the pastries adds a sweet depth and pairs deliciously with the blackberry filling.

  • Salty Charcuterie Board: The savory components of a charcuterie board provide a perfect contrast to the sweet danish, allowing guests to enjoy a well-rounded feast of flavors.

  • Mimosa: A sparkling mimosa brightens any gathering and its citrus notes pair beautifully with the berry flavors, creating a festive atmosphere.

  • Cheese Selection: A creamy brie or tangy goat cheese can enhance the flavors, introducing a savory element that beautifully rounds out the meal.

Invite your family and friends to experience the delightful harmony these pairings create with your Blackberry Cream Cheese Danish!

Blackberry Cream Cheese Danish Recipe FAQs

What type of blackberries should I use?
Absolutely! You can use fresh or frozen blackberries for your curd and garnish. If opting for fresh blackberries, choose ones that are plump, firm, and dark in color. Avoid blackberries with dark spots all over, as they may be overripe or spoil quickly.

How should I store leftover Blackberry Cream Cheese Danishes?
To keep them fresh, store any uneaten Blackberry Cream Cheese Danishes in an airtight container in the refrigerator for up to 3 days. They’re best enjoyed fresh, but even a little chill can still provide delightful flavors!

Can I freeze the Blackberry Cream Cheese Danishes?
Yes, you can definitely freeze them! To do so, wrap unfilled pastries tightly in plastic wrap and then place them in an airtight container. They can be stored in the freezer for up to 2 months. When you’re ready to bake, take them straight from the freezer and add an extra 2-5 minutes to the baking time.

Why did my pastries not puff up properly?
That can be a bit frustrating! Be sure that your puff pastry is completely thawed and rolled out properly before cutting. Also, pricking the centers of the pastry circles helps prevent excessive puffing, allowing for that classic flaky texture. Lastly, keep an eye on your baking time; pastries should be baked at 400°F for 15-18 minutes until golden brown.

Is this recipe suitable for someone with egg allergies?
Great question! Since this recipe contains eggs in both the cream cheese filling and the blackberry curd, it’s not suitable for those with egg allergies. However, you can use egg substitutes such as flaxseed meal mixed with water (1 tablespoon of flaxseed meal + 2.5 tablespoons of water per egg) to mimic the binding properties! Please adjust other ingredients accordingly for balance.

How can I ensure my blackberry curd is smooth?
For a silky-smooth blackberry curd, remember to strain the mixture after cooking to remove any solids or seeds. Begin by pureeing the blackberries, then simmer and whisk until thickened, about 5-7 minutes. After cooking, pour the mixture through a fine mesh sieve into a bowl, discarding any chunks. Whisk in the butter until melted and smooth before letting it cool. This method will transform your curd into a luscious topping!

Blackberry Cream Cheese

Decadent Blackberry Cream Cheese Pastry Bliss You’ll Love

Indulge in this Blackberry Cream Cheese Danish, a simple yet impressive dessert that combines rich cream cheese and vibrant blackberry flavors.
Print Recipe Pin Recipe
Prep Time 30 minutes mins
Cook Time 18 minutes mins
Cooling Time 20 minutes mins
Total Time 1 hour hr 8 minutes mins
Servings: 12 pieces
Course: Dessert
Cuisine: American
Calories: 250
Ingredients Equipment Method Nutrition Notes

Ingredients
  

For the Blackberry Curd
  • 2 cups Blackberries Fresh or frozen
  • 3/4 cups Sugar Mix of granulated and turbinado
  • 2 whole Eggs Whole and yolks
  • 2 tablespoons Lemon Juice Freshly squeezed
  • 2 tablespoons Butter Unsalted
For the Cream Cheese Filling
  • 8 oz Cream Cheese Softened
  • 1/4 cup Sugar
  • 1 large Egg Yolk
  • 1 teaspoon Vanilla Extract
For the Pastry
  • 1 package Puff Pastry Thawed and rolled out
  • 1 large Egg Wash Beaten egg with water
  • 2 tablespoons Turbinado Sugar For sprinkling on top
For Garnish
  • 1/2 cup Fresh Blackberries For garnish
  • 1 tablespoon Powdered Sugar Optional for dusting

Equipment

  • Blender
  • Mixing Bowl
  • Saucepan
  • Electric mixer
  • Cookie cutter
  • Baking Sheet
  • Fine-mesh sieve
  • Parchment Paper

Method
 

Preparation Steps
  1. Prepare Blackberry Curd: Puree blackberries, strain, then simmer with sugar. Whisk and cook until thick, add butter and cool.
  2. Make Cream Cheese Filling: Mix cream cheese, sugar, egg yolk, and vanilla until creamy and smooth. Set aside.
  3. Roll Puff Pastry: Unroll pastry, cut into circles, and prick centers to prevent excessive puffing.
  4. Assemble Pastries: Fill pastry circles with cream cheese mixture, brush edges with egg wash, and sprinkle turbinado sugar on top.
  5. Bake: Bake the pastries in a preheated oven at 400°F for 15-18 minutes until golden brown.
  6. Finish with Curd: Fill cooled pastries with blackberry curd, top with fresh blackberries and optional powdered sugar.

Nutrition

Serving: 1pieceCalories: 250kcalCarbohydrates: 30gProtein: 3gFat: 13gSaturated Fat: 7gPolyunsaturated Fat: 1gMonounsaturated Fat: 5gCholesterol: 50mgSodium: 150mgPotassium: 100mgFiber: 1gSugar: 15gVitamin A: 500IUVitamin C: 5mgCalcium: 50mgIron: 1mg

Notes

Ensure cream cheese is at room temperature for easy mixing. Avoid overfilling pastries to maintain shape during baking.

Tried this recipe?

Let us know how it was!

Savory Garlic Chicken Zucchini Noodles for a Fresh Twist

September 26, 2025 by Grace Snow Leave a Comment

The aroma of sizzling garlic wafts through my kitchen, instantly transporting me to a cozy bistro where flavors dance and mingle. This Savory Garlic Chicken Zucchini Noodles Stir-Fry is not just a meal; it’s a celebration of health and taste that fits seamlessly into your busy life. With tender chicken and vibrant zucchini noodles enveloped in a rich garlic sauce, this dish is a low-carb, dairy-free delight that’s quick and easy to prepare. Whether you’re looking to please a crowd or simply craving a comforting, nutritious dinner, this recipe has you covered. Are you ready to indulge in a fresh twist on your favorite stir-fry? Let's dive in!

Why love garlic chicken zucchini noodles?

Deliciously Light: This dish offers a refreshing twist, replacing traditional pasta with zucchini noodles, giving you a lighter, guilt-free meal.
Savory and Satisfying: The savory garlic sauce combined with tender chicken and colorful veggies creates layers of flavor that will please your palate.
Quick Prep Time: With a total cooking time under 30 minutes, it’s perfect for busy weeknights when you crave homemade goodness without the fuss.
Versatile Options: Feel free to mix things up by adding shrimp or tofu for a protein boost or incorporating extra veggies like broccoli for added nutrition. If you enjoy quick and flavorful dishes, check out my Honey Garlic Chicken or Chicken Teriyaki Noodles for more meal inspiration!
Healthy and Wholesome: Low in carbs yet high in protein, this dish supports your wellness goals—enjoy a comforting meal that won't derail your diet.

Garlic Chicken Zucchini Noodles Ingredients

For the Noodles

  • Zucchini – Spiralized to create a noodle-like texture; yellow squash can be a delightful alternative.

For the Chicken

  • Chicken Breasts – Tender and protein-packed; swap for turkey or tofu if desired.

For the Vegetables

  • Olive Oil – Perfect for sautéing, lending richness; coconut oil can be used for a unique twist.
  • Garlic – Provides depth of flavor; you can substitute with garlic powder (1/8 teaspoon per clove) in a pinch.
  • Onion – Adds sweetness and aroma; shallots work as a milder alternative.
  • Red Bell Pepper – Brings color and sweetness; feel free to use any sweet pepper of choice.
  • Crushed Red Pepper Flakes – Introduces a touch of heat; omit if you prefer a milder dish.

For the Sauces

  • Soy Sauce – Infuses umami flavor; tamari is a great gluten-free option.
  • Oyster Sauce – Enhances richness; substitute with hoisin sauce for a vegetarian option.

For the Garnish

  • Fresh Parsley – Adds a burst of freshness; basil can be used as an alternative.
  • Grated Parmesan Cheese – Optional for creaminess; skip for a completely dairy-free dish.

For Seasoning

  • Salt and Pepper – Essential for balancing flavors; adjust according to your taste preferences.

Indulge in these Garlic Chicken Zucchini Noodles ingredients and prepare for a delightful meal that’s easy and satisfying!

Step‑by‑Step Instructions for Garlic Chicken Zucchini Noodles

Step 1: Prepare the Zucchini
Start by spiralizing the zucchini using a spiralizer, creating long noodle-like strands. This step can take about 5 minutes. Once spiralized, set the zucchini noodles aside on a plate, ensuring they don’t release too much moisture before cooking. Visualize a pile of fresh, vibrant green noodles, ready to soak up the delicious flavors of your Garlic Chicken Zucchini Noodles.

Step 2: Sauté Aromatics
In a large skillet, heat 2 tablespoons of olive oil over medium-high heat until shimmering, which should take about 1 minute. Add 3 minced garlic cloves and ½ sliced onion, stirring them frequently. Sauté until the mixture becomes fragrant and the onions are translucent, about 2-3 minutes. The garlic should turn golden but not burnt, adding a rich base for your dish.

Step 3: Cook the Chicken
Introduce 1 pound of sliced chicken breasts to the skillet, seasoning with salt, pepper, and a pinch of crushed red pepper flakes to taste. Cook the chicken for about 5-7 minutes, stirring occasionally until it turns golden brown and is cooked through. You'll know the chicken is done when it reaches an internal temperature of 165°F and the juices run clear.

Step 4: Add the Vegetables
Once the chicken is nicely browned, add 1 sliced red bell pepper into the skillet. Cook for an additional 2 minutes, stirring often, to soften the bell pepper while maintaining its vibrant color and crunch. This step adds a sweet flavor and a beautiful pop of color to your Garlic Chicken Zucchini Noodles.

Step 5: Combine Everything
Lower the heat to medium and gently stir in the spiralized zucchini noodles, along with 2 tablespoons of soy sauce and 1 tablespoon of oyster sauce, if using. Mix everything well and cook for another 3-4 minutes until the zucchini noodles are tender but still have a slight bite, which is essential for retaining their texture.

Step 6: Garnish and Serve
Finally, remove the skillet from the heat and garnish your Garlic Chicken Zucchini Noodles with freshly chopped parsley. If desired, sprinkle some grated Parmesan cheese on top for extra richness. Serve immediately on warm plates to enjoy this vibrant and delicious meal while it's at its freshest, bringing together the fantastic flavors you’ve just created.

Expert Tips for Garlic Chicken Zucchini Noodles

  • Spiralize Properly: Make sure to spiralize the zucchini evenly to ensure it cooks at the same rate, providing a consistent texture throughout your dish.

  • Mind the Cooking Time: Avoid overcooking the zucchini noodles; cook them until just tender to maintain their pleasant crunch, enhancing the overall dish.

  • Flavor Boost: Use fresh garlic instead of garlic powder for a more vibrant flavor in your garlic chicken zucchini noodles, as it truly elevates the taste experience.

  • Quality Ingredients Matter: Invest in high-quality soy sauce and fresh vegetables; they make a noticeable difference in flavor and overall satisfaction of your dish.

  • Temperature Check: Be sure the chicken reaches an internal temperature of 165°F (75°C) before serving to ensure it's safe and perfectly cooked every time.

What to Serve with Savory Garlic Chicken Zucchini Noodles

Elevate your dining experience by pairing these flavorful noodles with delightful sides and beverages that perfectly complement their delicious essence.

  • Crispy Green Salad: A light salad with mixed greens and a tangy vinaigrette adds a refreshing crunch, perfectly balancing the richness of the garlic sauce.
  • Garlic Breadsticks: Soft, warm breadsticks infused with garlic are perfect for soaking up any leftover sauce, creating a comforting dining experience.
  • Roasted Asparagus: Seasoned with olive oil and a sprinkle of salt, the earthy flavors of roasted asparagus enhance the meal with bright colors and nutrients.
  • Cauliflower Rice: Light and fluffy, cauliflower rice is a great low-carb alternative that mirrors the textures of the zucchini noodles while adding more vegetables to your plate.
  • Chilled White Wine: A crisp Sauvignon Blanc or Pinot Grigio pairs perfectly, enhancing the savory elements while providing a refreshing sip between bites.
  • Coconut Chia Pudding: Finish the meal on a sweet note with a light, dairy-free dessert that brings together coconut and fresh fruit, balancing savory flavors with tropical sweetness.
  • Sweet Potato Fries: Roasted or air-fried, these crispy bites offer a sweet contrast to your savory main, adding a delightful crunch to every meal.
  • Herbed Quinoa: Light, fluffy quinoa cooked with herbs provides a protein-packed side that harmonizes well with the flavors of garlic chicken.
  • Lemon Sorbet: A refreshing way to cleanse the palate, this bright dessert lightens the meal and leaves you feeling satisfied.

Storage Tips for Garlic Chicken Zucchini Noodles

  • Fridge: Store leftovers in an airtight container in the refrigerator for up to 2 days. Make sure to keep the noodles separate from the sauce to maintain texture.
  • Freezer: While it's best enjoyed fresh, you can freeze the chicken mixture (without noodles) for up to 1 month. Thaw in the fridge overnight before reheating.
  • Reheating: To reheat, warm gently in a skillet over medium heat. If the zucchini noodles are included, add a splash of water to prevent them from becoming too mushy.
  • Fresh Garnish: When serving leftovers, consider adding a bit of fresh parsley or a sprinkle of Parmesan to revive the flavors of your Garlic Chicken Zucchini Noodles.

Make Ahead Options

These Garlic Chicken Zucchini Noodles are perfect for meal prep enthusiasts! You can spiralize the zucchini and store it in an airtight container in the refrigerator for up to 3 days, which helps maintain its crisp texture. Additionally, you can sauté the chicken and vegetables a day in advance, letting the flavors meld beautifully; just reheat gently before adding the zucchini and sauces. When you're ready to serve, simply toss everything together and heat for a quick, delicious dinner. This prep method ensures a fresh, vibrant dish with minimal effort, so you spend less time cooking during your busy weekdays!

Garlic Chicken Zucchini Noodles Variations

Embark on a culinary adventure by customizing your Garlic Chicken Zucchini Noodles to suit your taste!

  • Dairy-Free: Omit Parmesan cheese and use nutritional yeast for a cheesy flavor without dairy. It adds a delightful umami kick!
  • Low-Carb Enrichment: Add sautéed mushrooms for an earthy flavor that complements the dish while amplifying its low-carb profile beautifully.
  • Spicy Kick: Incorporate chopped jalapeños for a fresh burst of heat. This twist electrifies the dish with every spiralized noodle!
  • Extra Protein: Toss in cooked shrimp or chickpeas to amp up the protein content. Both offer unique textures and flavors that enhance the overall dish.
  • Vegetable Medley: Include snap peas and shredded carrots for a colorful presentation and added crunch. Kids will love the vibrant mix in every bite!
  • Citrus Zing: Squeeze fresh lemon juice over the dish just before serving for a bright flavor lift. It’s a tangy surprise in your savory concoction!
  • Gluten-Free Swap: Use tamari instead of soy sauce for a gluten-free option. It maintains the rich umami taste without compromising dietary needs.
  • Herbal Infusion: Experiment with fresh basil or cilantro instead of parsley for a herby twist that will transport your taste buds to a sunny garden.

As you explore these variations, don’t forget to check out my delicious Crock Pot Chicken for a hearty meal or try the flavorful Spatchcock Chicken Flavor when you crave something warm and comforting!

Garlic Chicken Zucchini Noodles Recipe FAQs

How do I choose the best zucchini for this recipe?
Absolutely! Look for zucchinis that are firm and shiny, with no dark spots or blemishes. Smaller zucchinis (around 6 to 7 inches) tend to be sweeter and less watery, making them ideal for spiralizing. If you notice any soft spots, it’s best to skip those, as they could negatively affect the texture of your Garlic Chicken Zucchini Noodles.

How should I store leftovers of Garlic Chicken Zucchini Noodles?
Very good question! Store leftovers in an airtight container in the refrigerator for up to 2 days. It's important to keep the zucchini noodles separate from the chicken mixture to maintain their texture. For the best results, reheat gently in a skillet over medium heat, adding a splash of water if necessary to prevent the noodles from getting mushy.

Can I freeze Garlic Chicken Zucchini Noodles?
While it’s best enjoyed fresh, you can freeze the chicken mixture (without the zucchini noodles) for up to 1 month. Here’s how to do it: let the chicken cool completely, then transfer it to a freezer-safe bag or container. When you’re ready to enjoy it again, thaw it in the fridge overnight. Reheat in a skillet and cook your zucchini noodles fresh as needed for the best outcome!

What can I do if my zucchini noodles get mushy during cooking?
Ah, the classic zucchini noodle conundrum! To prevent mushiness, be mindful of the cooking time—aim for 3-4 minutes until just tender. If you find they’ve become too soft, you could consider sautéing them separately for just a minute before combining with the chicken. This helps retain some firmness and makes for a more enjoyable texture in your dish.

Are there any dietary considerations for Garlic Chicken Zucchini Noodles?
Certainly! This recipe is both low-carb and dairy-free, making it a great option for those with dietary restrictions. If you have gluten allergies, ensure to use tamari instead of soy sauce. For those with shellfish allergies, simply omit any oyster sauce or substitute it with hoisin sauce for flavor. Remember, if you're serving this dish to pets, it’s best to keep garlic and onion away, as they’re not safe for them!

Garlic Chicken Zucchini Noodles

Savory Garlic Chicken Zucchini Noodles for a Fresh Twist

A delightful Garlic Chicken Zucchini Noodles dish that’s a low-carb, dairy-free twist on a classic stir-fry.
Print Recipe Pin Recipe
Prep Time 10 minutes mins
Cook Time 20 minutes mins
Total Time 30 minutes mins
Servings: 4 servings
Course: Dinner
Cuisine: Asian
Calories: 320
Ingredients Equipment Method Nutrition Notes

Ingredients
  

For the Noodles
  • 2 medium Zucchini Spiralized
For the Chicken
  • 1 pound Chicken Breasts Sliced
For the Vegetables
  • 2 tablespoons Olive Oil Can substitute with coconut oil
  • 3 cloves Garlic Minced
  • ½ medium Onion Sliced
  • 1 medium Red Bell Pepper Sliced
  • ¼ teaspoon Crushed Red Pepper Flakes Optional
For the Sauces
  • 2 tablespoons Soy Sauce Can substitute with tamari
  • 1 tablespoon Oyster Sauce Optional, substitute with hoisin sauce for vegetarian
For the Garnish
  • ¼ cup Fresh Parsley Chopped
  • ¼ cup Grated Parmesan Cheese Optional
For Seasoning
  • to taste Salt
  • to taste Pepper

Equipment

  • Skillet
  • Spiralizer

Method
 

Preparation Steps
  1. Spiralize the zucchini and set aside.
  2. Heat olive oil in a skillet and sauté garlic and onion until fragrant.
  3. Add sliced chicken, season, and cook until browned and cooked through.
  4. Stir in sliced red bell pepper and cook for 2 minutes.
  5. Add zucchini noodles, soy sauce, and oyster sauce; mix and cook until tender.
  6. Garnish with parsley and Parmesan before serving.

Nutrition

Serving: 1servingCalories: 320kcalCarbohydrates: 10gProtein: 30gFat: 15gSaturated Fat: 2gPolyunsaturated Fat: 1gMonounsaturated Fat: 8gCholesterol: 80mgSodium: 700mgPotassium: 800mgFiber: 3gSugar: 4gVitamin A: 1200IUVitamin C: 60mgCalcium: 80mgIron: 2mg

Notes

Store leftovers in an airtight container for up to 2 days. If freezing, exclude the noodles.

Tried this recipe?

Let us know how it was!

Raspberry Cinnamon Rolls with Zesty Lemon Glaze Delight

September 26, 2025 by Grace Snow Leave a Comment

As I whisked together the vibrant tang of lemon with the sweet aroma of cinnamon, I realized how lucky we are to experience such delightful flavor combinations. These Raspberry Cinnamon Rolls with Lemon Glaze are not just another breakfast item; they’re an indulgent escape from the ordinary, transforming your morning into a celebration. With the perfect balance of fluffy dough and a fruity filling, this recipe is an easy crowd-pleaser that’s quick to prepare, making it an ideal choice for brunch or a cozy weekend breakfast. Plus, the zesty lemon glaze adds a refreshing twist that beautifully complements the warm spices. Are you ready to elevate your baking game and bring a little sunshine to your table? Let’s dive into the world of Raspberry Cinnamon Rolls!

Why are Raspberry Cinnamon Rolls special?

Fluffy Texture: These rolls are incredibly soft and airy, giving you that warm, comforting bite you crave.
Bright Flavor: The combination of ripe raspberries and zesty lemon creates a delightful contrast that awakens your taste buds.
Easy to Prep: No complicated techniques here! This approachable recipe is perfect for both seasoned bakers and beginners alike.
Versatile Delight: Swap out raspberries for other fruits like blueberries or even a rich cream cheese glaze for a unique spin. Whether for brunch or a simple breakfast, these rolls will impress!
Crowd-Pleasing: Their beautiful appearance and delicious taste guarantee to bring smiles to the table, perfect for gatherings or cozy mornings. Treat yourself and your loved ones to these indulgent bites!

Raspberry Cinnamon Rolls Ingredients

For the Dough
• All-purpose flour – Provides the structure for the rolls; can substitute with gluten-free flour for a gluten-free version.
• Granulated sugar – Adds sweetness to the dough; try brown sugar for a deeper flavor.
• Active dry yeast – Leavening agent that helps the dough rise; ensure it’s fresh for optimal results.
• Salt – Enhances flavor and regulates yeast activity.
• Milk – Adds moisture and richness; almond milk works well as a non-dairy substitute.
• Butter – Brings tenderness and flavor; vegan butter is a great dairy-free option.
• Egg – Binds the ingredients and enriches the dough; substitute with flaxseed meal mixed with water for a vegan version.

For the Filling
• Cinnamon – Provides that classic warmth associated with cinnamon rolls.
• Raspberries – The fruity filling that adds tart sweetness; frozen raspberries can be used if thawed and drained.

For the Lemon Glaze
• Powdered sugar – Sweetens and gives a smooth texture to the glaze.
• Lemon juice and zest – Adds brightness and tanginess, enhancing the overall flavor of the Raspberry Cinnamon Rolls.

Step‑by‑Step Instructions for Raspberry Cinnamon Rolls with Lemon Glaze

Step 1: Prep Dough
In a large mixing bowl, warm 1 cup of milk until it’s lukewarm, then sprinkle in 2 teaspoons of active dry yeast and 2 tablespoons of granulated sugar. Gently stir and let this mixture sit for about 5-10 minutes until it becomes frothy, indicating that the yeast is active and ready to work its magic in your Raspberry Cinnamon Rolls.

Step 2: Combine Ingredients
Once the yeast is frothy, add in 1 large egg, 4 tablespoons of melted butter, and 1 teaspoon of salt. Gradually mix in 3 cups of all-purpose flour, a little at a time, until a soft dough forms. The dough should be slightly sticky but manageable, inviting you to get those hands working to bring the Raspberry Cinnamon Rolls to life.

Step 3: Knead
Lightly flour your work surface and turn the dough out onto it. Knead the dough for 5-7 minutes until it becomes smooth and elastic. Visual cues include a soft texture and a dough that springs back when pressed. This kneading is essential to develop the structure in your rolls, ensuring they are light and fluffy after baking.

Step 4: First Rise
Transfer the kneaded dough to a greased bowl, covering it with a clean kitchen towel. Place it in a warm, draft-free area for about 1 hour or until it doubles in size. This is the first rise, and you’ll know it’s ready when the dough feels puffy and airy, a perfect prelude to those delightful Raspberry Cinnamon Rolls.

Step 5: Prepare Filling
Once the dough has risen, turn it out onto a floured surface and roll it into a rectangle, roughly 12x18 inches. Spread a generous layer of 2 tablespoons of softened butter over the surface, followed by a mixture of 2 tablespoons of sugar and 2 teaspoons of cinnamon. Evenly scatter 1 cup of fresh or thawed raspberries on top, making this filling as vibrant as the Raspberry Cinnamon Rolls themselves.

Step 6: Roll and Cut
Starting from one long edge, carefully roll the dough tightly into a log, ensuring the filling remains intact. Use a sharp knife to cut the log into 12 equal pieces, which will form your rolls. Each piece should be plump with filling, and as you cut, imagine how scrumptious these Raspberry Cinnamon Rolls will be after baking!

Step 7: Second Rise
Place the cut rolls into a greased baking dish, arranging them close together. Cover with a kitchen towel again and allow them to rise for about 30 minutes. You want them to puff up nicely, filling the gaps between each roll and creating that beautifully soft texture we all love in Raspberry Cinnamon Rolls.

Step 8: Bake
Preheat your oven to 350°F (175°C). Once the rolls have risen, uncover them and bake for 25 minutes or until they are golden brown and fragrant. You’ll know they’re finished when the tops are lightly browned, and a gentle poke sends a tender reminder that these rolls are fluffy and ready to be devoured.

Step 9: Prepare Glaze
While the Raspberry Cinnamon Rolls are cooling slightly, whip up the zesty lemon glaze by mixing 1 cup of powdered sugar with 2 tablespoons of fresh lemon juice and the zest of one lemon. Stir until smooth, and enjoy the refreshing aroma that complements the rolls beautifully.

Step 10: Glaze Rolls
Once the rolls are warm (not hot), drizzle the luscious lemon glaze over them, allowing it to seep into the crevices. The sweet and tangy glaze adds the perfect finishing touch to your Raspberry Cinnamon Rolls, turning them into an irresistible breakfast treat that will surely delight family and friends alike.

Expert Tips for Raspberry Cinnamon Rolls

  • Warm Environment: Yeast needs warmth to activate, so ensure your kitchen is cozy. A cold environment will delay rising time and affect the texture.
  • Tight Roll: When rolling dough, keep it tight to prevent the filling from leaking during baking. This keeps your Raspberry Cinnamon Rolls intact and beautifully presented.
  • Fruity Variations: Don’t be afraid to experiment! Swap raspberries for blueberries or strawberries for a different flavor profile that complements the classic cinnamon.
  • Extra Glaze Zest: For an intensified lemon kick, add extra lemon zest to the glaze. This will elevate the freshness and add a delightful zing to your rolls.
  • Best Fresh: While leftover rolls can be stored, they are best enjoyed fresh. If you must reheat, do so gently to maintain that soft, fluffy texture.

Raspberry Cinnamon Rolls Variations

Feel free to embark on your own delightful journey by customizing these wonderful rolls to match your taste buds!

  • Berry Twist: Substitute raspberries with blueberries or strawberries for a fresh take that brightens the flavor profile. Each bite will offer a new fruit pairing that surprises and delights.

  • Creamy Indulgence: Swap the lemon glaze for a rich cream cheese frosting. This delicious option adds a luxurious creaminess that perfectly complements the warm cinnamon rolls.

  • Nutty Texture: Add chopped walnuts or pecans to the filling for an extra crunch. The nutty flavor pairs beautifully with the sweet and tart berries, giving an irresistible contrast.

  • Spicy Kick: Introduce a hint of nutmeg or ginger alongside the cinnamon for a warm, spiced flavor twist. These spices add depth that transforms the classic recipe into a festive favorite.

  • Dairy-Free Delight: For a completely dairy-free version, use coconut milk and dairy-free margarine. The light tropical flavor will balance perfectly with the tang of the raspberries.

  • Overnight Marvel: Prepare the dough the night before and refrigerate overnight. In the morning, bring to room temperature before baking for a convenient and fresh breakfast option.

  • Herbal Zing: Infuse the glaze with fresh mint or basil for a unique flavor twist. These herbs will elevate the rolls, creating an unexpected, yet refreshing taste.

  • Cinnamon Sugar Topping: Before baking, sprinkle a mixture of cinnamon and sugar on top of the rolls. This caramelizes beautifully and creates a sweet crust that adds an extra layer of indulgence.

Don’t forget to try these variations while exploring the delightful world of cinnamon rolls! For more inspiration, you might love these Pumpkin Cinnamon Roll recipes that can have their own twists too!

Storage Tips for Raspberry Cinnamon Rolls

  • Room Temperature: Keep leftover raspberry cinnamon rolls in an airtight container at room temperature for up to 2 days to maintain freshness.
  • Fridge: For extended storage, place the rolls in the refrigerator where they can last up to a week. Ensure they're well-wrapped to preserve moisture.
  • Freezer: To freeze, wrap each roll tightly in plastic wrap and then in aluminum foil. They can be stored in the freezer for up to 3 months.
  • Reheating: When ready to enjoy, thaw rolls in the fridge overnight and gently reheat in the microwave or oven until warmed through.

What to Serve with Raspberry Cinnamon Rolls with Lemon Glaze

Indulging in Raspberry Cinnamon Rolls is a delightful experience that calls for equally tempting sides to create a memorable meal.

  • Scrambled Eggs: The creamy texture and subtle seasoning of scrambled eggs provide a perfect balance to the sweet, fruity rolls.

  • Fresh Fruit Salad: A vibrant mix of seasonal fruits adds a refreshing, juicy contrast, enhancing the overall brunch experience.

  • Coffee or Tea: Pairing these rolls with a warm cup of coffee or fragrant tea enriches the indulgent morning ritual, reviving your senses.

  • Yogurt Parfait: Layers of creamy yogurt with granola and berries can create a delightful contrast in texture and flavor, making it a wholesome accompaniment.

  • Scones or Biscuits: Offering a buttery scone or biscuit alongside elevates the theme of warm, homemade goodness, adding further variety to your table.

  • Citrus Mimosas: A zesty mimosa complements the lemon glaze and adds a festive touch to brunch, making every sip a celebration!

Make Ahead Options

The delightful Raspberry Cinnamon Rolls are perfect for busy home cooks looking to save time during hectic mornings! You can prepare the dough and filling up to 24 hours in advance. Simply follow the first five steps, then tightly cover the rolled and cut rolls in your greased baking dish and refrigerate. When you’re ready to bake, let them rise for about 30 minutes at room temperature before popping them into the oven. To maintain their fluffy texture and prevent drying out, be sure to cover them well during storage. With this prep method, you’ll enjoy warm, freshly baked Raspberry Cinnamon Rolls with a zesty lemon glaze in no time!

Raspberry Cinnamon Rolls with Lemon Glaze Recipe FAQs

How do I choose ripe raspberries for this recipe?
Absolutely! When selecting raspberries, look for ones that are plump, vibrant in color, and free from dark spots or mold. The best ones will have a sweet aroma and should not be overly soft or mushy. Fresh, ripe raspberries will enhance the flavor of your Raspberry Cinnamon Rolls beautifully.

What’s the best way to store leftover Raspberry Cinnamon Rolls?
After enjoying your delicious rolls, store any leftovers in an airtight container at room temperature for up to 2 days. If you want to keep them for longer, moving them to the refrigerator can extend their shelf life to about a week. Ensure they're sealed properly to maintain their moisture and texture.

Can I freeze Raspberry Cinnamon Rolls? How?
Yes, you can! To freeze your Raspberry Cinnamon Rolls, start by allowing them to cool completely. Then, wrap each roll tightly in plastic wrap, followed by aluminum foil for double protection. They can be stored in the freezer for up to 3 months. When you're ready to enjoy them, simply thaw them in the refrigerator overnight, and then gently reheat in the microwave or oven until warm.

What should I do if my dough doesn’t rise?
Very good question! If your dough doesn't rise, it could be due to the yeast not being activated properly. Ensure your water or milk is lukewarm (not hot) when adding the yeast and sugar. If it's too cold or too hot, it won’t activate. Additionally, placing the bowl in a warm, draft-free area can help the yeast work its magic. If all else fails, consider using fresh yeast, as expired yeast can often fail to rise.

Are Raspberry Cinnamon Rolls safe for those with allergies?
If you’re accommodating allergies, be cautious with ingredients like gluten and dairy. For a gluten-free option, swap the all-purpose flour for a gluten-free blend. You can also use almond milk in place of dairy milk and vegan butter if you're avoiding dairy altogether. As always, be sure to read labels on pre-packaged ingredients to check for possible allergens.

Raspberry Cinnamon Rolls

Raspberry Cinnamon Rolls with Zesty Lemon Glaze Delight

Indulge in delightful Raspberry Cinnamon Rolls with zesty lemon glaze, a sweet breakfast treat that transforms your mornings.
Print Recipe Pin Recipe
Prep Time 30 minutes mins
Cook Time 25 minutes mins
First Rise 1 hour hr
Total Time 1 hour hr 55 minutes mins
Servings: 12 rolls
Course: Breakfast
Cuisine: American
Calories: 280
Ingredients Equipment Method Nutrition Notes

Ingredients
  

For the Dough
  • 3 cups all-purpose flour can substitute with gluten-free flour
  • 2 tablespoons granulated sugar try brown sugar for deeper flavor
  • 2 teaspoons active dry yeast ensure fresh for optimal results
  • 1 teaspoon salt
  • 1 cup milk almond milk works well as non-dairy substitute
  • 4 tablespoons butter melted; vegan butter is a great dairy-free option
  • 1 large egg substitute with flaxseed meal mixed with water for vegan version
For the Filling
  • 1 cup raspberries fresh or thawed if using frozen
  • 2 tablespoons granulated sugar for mixing with filling
  • 2 teaspoons cinnamon provides warmth and flavor
For the Lemon Glaze
  • 1 cup powdered sugar for glaze
  • 2 tablespoons lemon juice adds brightness and tanginess
  • 1 whole lemon zest enhances overall flavor

Equipment

  • Mixing Bowl
  • Baking Dish
  • Rolling Pin
  • Sharp Knife
  • Kitchen Towel

Method
 

Making the Rolls
  1. Warm 1 cup of milk until lukewarm, sprinkle in 2 teaspoons of active dry yeast and 2 tablespoons of granulated sugar. Let sit for 5-10 minutes until frothy.
  2. Add 1 large egg, 4 tablespoons melted butter, and 1 teaspoon salt into the yeast mixture. Gradually mix in 3 cups of all-purpose flour until a soft dough forms.
  3. Turn the dough onto a floured surface and knead for 5-7 minutes until smooth and elastic.
  4. Transfer to a greased bowl, cover with a kitchen towel, and let rise in a warm place for about 1 hour or until doubled in size.
  5. Once risen, roll the dough into a rectangle, spread 2 tablespoons softened butter, sprinkle a mixture of 2 tablespoons sugar and 2 teaspoons cinnamon, then add 1 cup raspberries.
  6. Roll tightly into a log and cut into 12 equal pieces. Place in a greased baking dish.
  7. Cover with a kitchen towel and let rise for 30 minutes.
  8. Preheat oven to 350°F (175°C). Bake for 25 minutes or until golden brown.
  9. For the glaze, mix 1 cup powdered sugar with 2 tablespoons fresh lemon juice and zest until smooth.
  10. Drizzle the lemon glaze over warm rolls.

Nutrition

Serving: 1rollCalories: 280kcalCarbohydrates: 44gProtein: 4gFat: 10gSaturated Fat: 6gMonounsaturated Fat: 3gCholesterol: 40mgSodium: 200mgPotassium: 100mgFiber: 1gSugar: 15gVitamin A: 400IUVitamin C: 5mgCalcium: 50mgIron: 1mg

Notes

Best enjoyed fresh. Leftovers can be stored, but reheat gently to maintain texture.

Tried this recipe?

Let us know how it was!

Irresistible Strawberry Cheesecake Sandwiches for Sweet Cravings

September 26, 2025 by Grace Snow Leave a Comment

Have you ever found yourself daydreaming about a breakfast that feels like a sweet embrace? My Fried Strawberry Cheesecake Sandwiches are that dreamy indulgence, perfectly merging the familiar comfort of a sandwich with the creamy, fruity goodness of strawberry cheesecake. With a crispy exterior and a luscious filling that spills over with fresh strawberries and rich cream cheese, this recipe is not just easy to whip up, but also a guaranteed crowd-pleaser. Whether you're serving it for an inviting breakfast, a delightful snack, or a decadent dessert, your loved ones will cherish every bite. Who can resist a warm, sugar-dusted delight? Get ready to indulge in a fabulous treat that might just become your new favorite! Ready to take your taste buds on an adventure?

Why are Fried Strawberry Cheesecake Sandwiches irresistible?

Decadent Delight: Each bite delivers a fusion of flavors, where the rich cream cheese meets sweet strawberries, harmonizing beautifully.

Crispy Perfection: The golden-brown exterior adds the perfect crunch, contrasting with the soft, creamy interior that simply melts in your mouth.

Quick & Easy: With just a few simple steps, you can create this show-stopping dish in no time—ideal for busy mornings or spontaneous snack cravings.

Crowd-Pleaser: This indulgent treat is sure to wow family and friends, making it an instant favorite for brunch gatherings or dessert celebrations.

Versatile Indulgence: Enjoy them as a breakfast, dessert, or snack—this versatile recipe fits any occasion, serving deliciousness at any hour.

Get ready to treat your loved ones to these delightful Strawberry Cheesecake Sandwiches.

Strawberry Cheesecake Sandwiches Ingredients

For the Sandwiches
• Bread – Use white or brioche bread for the best texture and flavor.
• Cream Cheese – Soften it beforehand for easy mixing to achieve a smooth filling.
• Powdered Sugar – Sweeten the cream cheese mixture; extra can be dusted on top for a finishing touch.
• Strawberries – Fresh strawberries add a burst of flavor—frozen can work if thawed properly.
• Strawberry Jam – To enhance the strawberry flavor; feel free to substitute with other fruit jams for variety.

For the Coating
• Eggs – Use large eggs to ensure a good binding and crisp coating of the sandwich.
• Milk – Mix with eggs for dipping; almond or oat milk can be used as alternatives.
• Butter – Unsalted butter is best for frying; it adds richness while controlling the saltiness.

These Strawberry Cheesecake Sandwiches are sure to impress and satisfy your sweet cravings!

Step‑by‑Step Instructions for Fried Strawberry Cheesecake Sandwiches

Step 1: Prepare the Cream Cheese Filling
In a small mixing bowl, combine softened cream cheese and 2 tablespoons of powdered sugar. Using a hand mixer or whisk, blend until the mixture is smooth and creamy. This luscious filling is the heart of your Fried Strawberry Cheesecake Sandwiches, so ensure it has no lumps for a delightful texture.

Step 2: Assemble the Sandwiches
Take one slice of bread and generously spread a thick layer of the cream cheese mixture over it. Top with freshly sliced strawberries and a spoonful of strawberry jam before closing it with another slice of bread, creating a delightful sandwich. Make sure the filling is evenly distributed for each bite of your indulgent treat.

Step 3: Prepare the Egg Mixture
In a shallow dish, whisk together 2 large eggs with ¼ cup of milk until well combined. This mixture will serve as the dipping bathe for the sandwiches, so ensure the consistency is smooth and completely mixed. You want a nice coating that will create a crispy exterior once fried.

Step 4: Dip the Sandwiches
Carefully dip each assembled sandwich into the egg and milk mixture, ensuring both sides are thoroughly coated. Allow any excess liquid to drip off to prevent soggy sandwiches. This crucial step ensures the Fried Strawberry Cheesecake Sandwiches achieve that golden-brown crust as they cook.

Step 5: Heat the Skillet
Place a skillet over medium heat and add 2 tablespoons of unsalted butter. Allow the butter to melt and bubble, creating a rich base for frying. Once the butter is hot and slightly bubbly, it's time to add the sandwiches for frying.

Step 6: Fry the Sandwiches
Gently place each sandwich in the hot skillet, frying for about 2-3 minutes per side. Keep an eye on them, and flip once they reach a beautiful golden-brown color. The sound of sizzling butter will fill the air, and the sandwiches will transform into crispy delights.

Step 7: Drain Excess Butter
Once both sides are perfectly fried and crispy, carefully remove the sandwiches from the skillet and place them on a paper towel-lined plate. This step helps absorb any excess butter, ensuring your Fried Strawberry Cheesecake Sandwiches are indulgent yet not greasy.

Step 8: Dust and Serve
Before serving, generously dust the warm sandwiches with additional powdered sugar to enhance their sweetness and create a delightful presentation. Serve immediately while they're warm, as that's when the filling is at its best—melt-in-your-mouth creamy and filled with fresh flavors.

Make Ahead Options

These Fried Strawberry Cheesecake Sandwiches are a fantastic choice for meal prep, making your mornings a breeze! You can prepare the cream cheese filling and assemble the sandwiches up to 24 hours in advance; simply store them in an airtight container in the refrigerator to maintain their freshness. To prevent the bread from becoming soggy, avoid dipping the sandwiches in the egg mixture until you’re ready to fry them. When you’re set to enjoy them, just dip those assembled sandwiches into the egg mixture and fry for a few minutes until golden brown. This way, you’ll have delicious, warm, and crispy treats ready in no time!

What to Serve with Fried Strawberry Cheesecake Sandwiches

Pairing these delightful sandwiches with complementary flavors and textures creates a full meal experience you won’t forget.

  • Fresh Fruit Salad: A colorful mix of seasonal fruits adds a refreshing brightness, balancing the richness of the cheesecake filling. The natural sweetness of the fruits harmonizes perfectly.

  • Vanilla Ice Cream: A scoop of creamy vanilla ice cream provides a cool, velvety contrast to the warm sandwiches, enhancing the indulgent experience. Drizzle some chocolate syrup for added delight.

  • Maple Syrup: A drizzle of pure maple syrup adds a touch of warmth and sweetness, elevating each bite to new heights. This classic combination is simply irresistible.

  • Chocolate-Dipped Strawberries: Juicy strawberries wrapped in silky chocolate offer a beautiful presentation and a decadent touch, echoing the flavors found within the sandwiches.

  • Coffee or Espresso: A steaming cup of coffee or espresso pairs beautifully, balancing the sweetness of the sandwich with a rich, slightly bitter element. A perfect brunch companion!

  • Sparkling Water with Lemon: The effervescence of sparkling water with a hint of lemon refreshes the palate, creating a delightful contrast to the creamy richness of the Fried Strawberry Cheesecake Sandwiches.

  • Whipped Cream: Adding a dollop of freshly whipped cream takes indulgence to the next level! It adds airiness and creaminess that complements the warm, gooey filling perfectly.

  • Coconut Milk Smoothie: A light coconut milk smoothie flavored with vanilla or banana offers a tropical twist, adding a creamy consistency that goes hand-in-hand with your sweet sandwiches.

Indulging in these pairings will elevate your mealtime, enhancing the joy of every delightful bite!

Storage Tips for Strawberry Cheesecake Sandwiches

  • Room Temperature: Best enjoyed fresh, but if needed, keep at room temperature for up to 2 hours to maintain that crispy edge.

  • Fridge: Store leftovers in an airtight container for up to 2 days. Place wax paper between layers to prevent sticking and maintain crunchiness.

  • Freezer: For longer storage, freeze the sandwiches individually wrapped in plastic wrap and then inside a freezer bag for up to 1 month. Reheat before serving.

  • Reheating: To revive the crispy texture, reheat in a skillet over medium heat for about 2-3 minutes on each side until warm and crisp again. Enjoy those delightful Strawberry Cheesecake Sandwiches just as you made them!

Strawberry Cheesecake Sandwiches Variations

Feel free to make these delicious sandwiches your own by experimenting with flavors and ingredients!

  • Berry Mix: Swap out strawberries for a mix of blueberries and raspberries for a delightful twist. Each bite will burst with juicy goodness.

  • Nutty Crunch: Add crushed nuts, like almonds or walnuts, to the cream cheese filling. The added texture contrasts beautifully with the creamy filling.

  • Chocolate Drizzle: Drizzle melted chocolate over the finished sandwiches for an extra touch of decadence. Chocolate and strawberry make a classic pairing that's hard to resist!

  • Banana Twist: Replace strawberries with bananas for a fun and fruity option. The creamy texture of bananas adds a lovely sweetness, making every bite a treat.

  • Spiced Up: Incorporate a sprinkle of cinnamon or nutmeg into the cream cheese mixture. These warm spices will elevate the flavor profile and create a cozy vibe.

  • Gluten-Free Option: Use gluten-free bread to accommodate dietary needs without sacrificing deliciousness. You won’t even notice the difference in taste!

  • Vegan Choice: Replace the cream cheese with a vegan alternative and use almond or oat milk for the dipping mixture. These substitutions make it easy to indulge while keeping things plant-based.

With these variations, you can enjoy the tasty goodness of these Fried Strawberry Cheesecake Sandwiches in so many exciting ways! Whether you go for a classic or a new twist, every version is bound to impress. What flavor are you most excited to try?

Expert Tips for Strawberry Cheesecake Sandwiches

  • Monitor Frying: Keep a close eye on the sandwiches while frying. Adjust the heat if necessary to avoid overcooking and to achieve that perfect golden-brown exterior.

  • Use Fresh Strawberries: For the best flavor, opt for fresh strawberries. If you use frozen ones, make sure to thaw and drain them to prevent excess moisture in the filling.

  • Cream Cheese Consistency: Allow the cream cheese to come to room temperature before mixing. This ensures a smooth filling that is easy to spread between the slices of bread.

  • Even Coating: When dipping the sandwiches in the egg and milk mixture, make sure to coat each side thoroughly and let excess liquid drip off to achieve a crispy texture.

  • Serving Warm: Enjoy these Strawberry Cheesecake Sandwiches immediately after frying for the best experience. They are creamier when warm and the flavors are at their peak!

Fried Strawberry Cheesecake Sandwiches Recipe FAQs

How do I select ripe strawberries for this recipe?
Absolutely! Choose strawberries that are vibrant red without dark spots or bruises. Look for those with a sweet fragrance that indicates ripeness. If using frozen strawberries, ensure they are fully thawed and drained to avoid excess moisture in your sandwiches.

How should I store leftover sandwiches?
After enjoying your Fried Strawberry Cheesecake Sandwiches, store any leftovers in an airtight container in the refrigerator for up to 2 days. I recommend placing wax paper between layers to prevent them from sticking together and maintain that delightful crunch.

Can I freeze these sandwiches?
Very! To freeze, wrap each sandwich individually in plastic wrap, then place them in a freezer-safe bag. These can be stored for up to 1 month. When you’re ready to enjoy, reheat them briefly in a skillet over medium heat for about 2-3 minutes on each side to regain their crispness.

What if my sandwiches aren't crispy after frying?
If you find your sandwiches are not achieving that golden-brown crispiness, it’s likely due to excess moisture. Make sure to thoroughly drain any strawberries if you're using frozen ones, and also ensure that the egg mixture is coating the bread evenly. Adjust frying time and heat as needed until you get that perfect crunch!

Are there any dietary considerations I should be aware of?
When making Fried Strawberry Cheesecake Sandwiches, keep in mind any allergies or dietary restrictions. Substitute cream cheese with a dairy-free alternative for those avoiding dairy. Also, consider using gluten-free bread if anyone in your group has gluten sensitivities. Always double-check ingredient labels as necessary!

How long do the flavors last in the fridge?
I often make sandwiches and find that while they can be stored in the fridge for about 2 days, flavors might mellow slightly over time. It’s best to enjoy them fresh but they will still taste great as leftovers!

Strawberry Cheesecake Sandwiches

Irresistible Strawberry Cheesecake Sandwiches for Sweet Cravings

These Fried Strawberry Cheesecake Sandwiches blend creamy cheesecake and fresh strawberries for a delightful dessert treat.
Print Recipe Pin Recipe
Prep Time 15 minutes mins
Cook Time 10 minutes mins
Total Time 25 minutes mins
Servings: 4 sandwiches
Course: Dessert
Cuisine: American
Calories: 350
Ingredients Equipment Method Nutrition Notes

Ingredients
  

For the Sandwiches
  • 4 slices white or brioche bread
  • 8 oz cream cheese softer for easy mixing
  • 2 tbsp powdered sugar plus extra for dusting
  • 1 cup fresh strawberries sliced
  • 2 tbsp strawberry jam or other fruit jams
For the Coating
  • 2 large eggs
  • 1/4 cup milk almond or oat milk can be used
  • 2 tbsp unsalted butter for frying

Equipment

  • Skillet
  • Mixing Bowl
  • Whisk

Method
 

Preparation Steps
  1. In a small mixing bowl, combine softened cream cheese and 2 tablespoons of powdered sugar. Blend until smooth and creamy.
  2. Take one slice of bread, spread a thick layer of the cream cheese, then top with sliced strawberries and strawberry jam. Close with another slice of bread.
  3. In a shallow dish, whisk together 2 large eggs with 1/4 cup of milk until well combined.
  4. Carefully dip each sandwich into the egg and milk mixture, ensuring both sides are coated. Allow excess liquid to drip off.
  5. Heat a skillet over medium heat and melt 2 tablespoons of unsalted butter.
  6. Place sandwiches in the skillet and fry for 2-3 minutes per side until golden brown.
  7. Remove from the skillet and place on a paper towel-lined plate to drain excess butter.
  8. Dust with powdered sugar before serving while warm.

Nutrition

Serving: 1sandwichCalories: 350kcalCarbohydrates: 40gProtein: 8gFat: 18gSaturated Fat: 10gPolyunsaturated Fat: 1gMonounsaturated Fat: 5gCholesterol: 100mgSodium: 300mgPotassium: 150mgFiber: 2gSugar: 12gVitamin A: 500IUVitamin C: 15mgCalcium: 100mgIron: 1mg

Notes

Best enjoyed warm for the best flavor and texture. Monitor frying to prevent overcooking.

Tried this recipe?

Let us know how it was!

Crispy Baked Asparagus Fries for a Guilt-Free Snack Indulgence

September 26, 2025 by Grace Snow Leave a Comment

I never anticipated that a simple vegetable could be transformed into a crave-worthy snack, but then I met Crispy Baked Asparagus Fries. With a golden, crunchy panko coating and a tender center, they unite health and comfort in one satisfying bite. Whether you’re looking for a quick alternative to unhealthy fast food or a fun, veggie-packed appetizer for your next gathering, this delight is ready in just 20 minutes! Ideal for those who love homemade goodness, these fries provide both a nourishing crunch and a guilt-free experience. Who knew that snacking could feel so indulgent yet wholesome? What dipping sauce will you pair with your crispy creation?

Why Are These Asparagus Fries Amazing?

Crunchy Perfection: You'll love that these Crispy Baked Asparagus Fries come out golden brown and irresistibly crunchy every time.

Quick & Easy: With just 20 minutes from prep to plate, they fit easily into any busy schedule; perfect for those looking to swap fast food for something healthier.

Nutrient-Rich Goodness: Asparagus is a fiber-packed veggie, making this snack both satisfying and guilt-free. They provide a much-needed veggie boost in your diet!

Customizable Flavor: Feel free to get creative! Add spices or experiment with Crispy Parmesan Artichoke Hearts for a unique twist that suits your palate.

Crowd-Pleasing Appeal: Serve them as appetizers at your next gathering, and watch your guests delight in this fun and tasty veggie treat! Whether you pair them with a homemade dip or serve alongside grilled meats, they're sure to impress!

Crispy Baked Asparagus Fries Ingredients

• Get ready to whip up a crunchy delight!

For the Batter

  • Asparagus – A nutrient-rich vegetable that provides a tender base for your fries.
  • Flour – Helps the egg adhere to the asparagus; you can use gluten-free flour if needed.
  • Eggs – Binds the coating to the asparagus; consider substituting with plant-based milk or yogurt for a vegan option.

For the Coating

  • Panko Breadcrumbs – Lighter than traditional breadcrumbs, they deliver a delightful crunch; gluten-free panko is available too.
  • Parmigiano Reggiano (Parmesan) – Adds a savory depth and enhances crispiness; swap with nutritional yeast for a dairy-free alternative.
  • Salt and Pepper – Essential for seasoning, enhance the flavor of your Crispy Baked Asparagus Fries.

Optional Dipping Sauce

  • Ranch Dressing, Aioli, or Spicy Mustard – A variety of dips to bring out even more flavor in your crispy treat!

Step‑by‑Step Instructions for Crispy Baked Asparagus Fries

Step 1: Preheat the Oven
Start by preheating your oven to 425°F (220°C). This temperature is ideal for giving your Crispy Baked Asparagus Fries that golden, crunchy finish. While the oven warms up, gather your baking sheet and wire rack, which will allow hot air to circulate around the fries for even baking.

Step 2: Prepare the Asparagus
Next, take your fresh asparagus and trim the tough ends about an inch from the bottom. Rinse them under cold water to clean off any dirt. Pat each asparagus spear dry with a paper towel to remove excess moisture, ensuring that the coating adheres perfectly as you move on to the next step.

Step 3: Set Up Your Breading Station
In three separate shallow bowls, create your breading station. In the first bowl, add all-purpose flour for dredging. In the second bowl, beat a couple of eggs until smooth. In the third bowl, mix panko breadcrumbs with grated Parmesan, salt, and pepper for delicious seasoning. This setup makes it easy to coat each spear as you prepare your Crispy Baked Asparagus Fries.

Step 4: Coat the Asparagus
Begin the coating process by dredging each asparagus spear in the flour, ensuring it’s lightly coated. Next, dip it into the beaten eggs, letting any excess drip off. Finally, roll the asparagus in the panko and Parmesan mixture, pressing gently to help it stick. Repeat this with all the asparagus spears until they’re all beautifully coated.

Step 5: Arrange for Baking
Once coated, place the asparagus in a single layer on a wire rack set over a baking sheet. This arrangement allows the hot air to circulate evenly, ensuring your Crispy Baked Asparagus Fries come out perfectly crispy. Make sure not to overcrowd the rack, as this can cause them to steam rather than crisp.

Step 6: Bake to Perfection
Slide the baking sheet into the preheated oven and bake for 7 to 13 minutes. Keep a close eye on the fries as they cook; you’re looking for a golden brown color and a crispy texture. When they reach that visually enticing crispiness, remove them from the oven and let them cool for a few minutes before serving.

Step 7: Serve and Enjoy
Your Crispy Baked Asparagus Fries are now ready to be enjoyed! Serve them warm with your choice of dipping sauce, such as ranch dressing or aioli. These fries make for a perfect snack or a veggie side dish that’s sure to impress family and friends alike.

Expert Tips for Crispy Baked Asparagus Fries

  • Dry Asparagus: Ensure your asparagus is completely dry after rinsing. Excess moisture can prevent the coating from adhering properly, resulting in soggy fries.

  • Even Coating: Use a light hand when dredging in flour and panko. Too much coating can lead to uneven crispiness; aim for a thin, even layer for the best Crispy Baked Asparagus Fries.

  • Avoid Overcrowding: Arrange the asparagus in a single layer, leaving space between each spear. Overcrowding can trap steam, making your fries less crispy.

  • Baking Sheet Prep: Utilize a wire rack on your baking sheet. This allows for airflow underneath, ensuring more uniform cooking and a delightful crunch.

  • Season Generously: Don’t skimp on salt and pepper in your panko mixture. Proper seasoning makes all the difference and brings out the flavor of your Crispy Baked Asparagus Fries.

  • Experiment with Flavors: Don’t hesitate to add your favorite spices or herbs to the breadcrumb mixture. A little garlic powder or paprika can elevate your fries from delightful to extraordinary!

Make Ahead Options

These Crispy Baked Asparagus Fries are truly a lifesaver for meal prep aficionados! You can prep the asparagus by coating them in flour, dipping them in beaten eggs, and rolling them in the panko and parmesan mixture up to 24 hours in advance. Simply cover the coated spears with plastic wrap and refrigerate to preserve their crunch. When you're ready to bake, just place the asparagus on a wire rack and pop them in the oven as directed. This method allows busy cooks to enjoy a delicious, healthy snack with minimal effort on the day of serving, and you can be assured they'll be just as delightful when baked!

How to Store and Freeze Crispy Baked Asparagus Fries

Fridge: Store leftover Crispy Baked Asparagus Fries in an airtight container in the fridge for up to 2 days. Reheat in the oven to restore their crunch.

Freezer: For longer storage, freeze unbaked, coated asparagus on a baking sheet until solid, then transfer them to a freezer bag. They can be stored for up to 3 months.

Reheating: To reheat, bake from frozen at 425°F (220°C) for 12-15 minutes until crispy and heated through.

Room Temperature: If serving at a gathering, enjoy the fries within 2 hours to ensure freshness and taste; otherwise, refrigerate any leftovers.

What to Serve with Crispy Baked Asparagus Fries

These delightful asparagus fries are perfect for building a well-rounded meal that pleases the palate.

  • Creamy Garlic Dip: Enjoy a rich, velvety dip that complements the crunchy texture of the asparagus, enhancing the overall experience.
  • Zesty Lemon Quinoa Salad: This refreshing salad adds bright acidity and a nutty flavor, balancing the richness of the fries.
  • Grilled Chicken Skewers: Juicy marinated chicken brings heartiness to your plate, making it a satisfying main dish alongside the fries.
  • Roasted Cherry Tomatoes: These sweet and juicy roasted treats offer a burst of flavor, pairing beautifully with the savory fries.
  • Caesar Salad: Crisp romaine, tangy dressing, and crunchy croutons create a classic pairing that elevates your snacking experience to new heights.
  • Sweet Potato Wedges: Their natural sweetness contrasts nicely with the asparagus, adding an extra layer of flavor and texture variety.
  • Crisp White Wine: A chilled Sauvignon Blanc or Pinot Grigio brings a refreshing touch to any meal featuring these Crispy Baked Asparagus Fries.
  • Chocolate Mousse: End your meal with a rich dessert that satisfies your sweet tooth, providing a delightful contrast to the savory flavors of your main dish.

Crispy Baked Asparagus Fries Variations

Feel free to explore these tasty twists that will let your creativity shine in the kitchen!

  • Garlic Infusion: Mix garlic powder into the panko breadcrumbs for a savory punch. This aromatic twist makes each bite unforgettable!

  • Zesty Lemon: Add lemon zest to the panko for a fresh, citrusy tone. It brightens the dish and pairs beautifully with the asparagus flavor.

  • Spicy Crispy: Incorporate cayenne pepper or red pepper flakes into the breadcrumb mixture for a delightful kick. Perfect for those who enjoy a bit of heat!

  • Cheesy Delight: Swap out Parmesan for crumbled feta or goat cheese. These cheeses lend a unique, tangy touch that will please your palate.

  • Mixing Veggies: Experiment with zucchini or eggplant for a colorful veggie platter. The same crispy coating will transform these veggies into an exciting side!

  • Herbaceous Twist: Toss in dried herbs like oregano or thyme into the panko for a fragrant and flavorful addition. This elevates your fries to a new level of deliciousness!

  • Nutritional Boost: Add chia or flax seeds to the panko breadcrumb mixture for an extra crunch and a healthy twist. It’s a wonderful way to sneak in some nutrition!

  • Creamy Dips: Consider pairing your crispy treats with zesty dipping sauces like aioli or spicy mustard. A variety will keep every bite exciting and enjoyable!

If you're in a mood for more deliciousness check out our Asparagus Soup Healthy or perhaps try your hand at Tagliatelle Asparagus Peas for another fresh twist!

Crispy Baked Asparagus Fries Recipe FAQs

How do I select the best asparagus for this recipe?
Absolutely! Look for fresh asparagus spears that are firm to the touch, with bright green color and closed tips. Avoid any that are limp or have dark spots all over. The thickness is a matter of preference, but medium-sized spears yield the best results for a balance of tenderness and crunch.

What’s the best way to store leftovers?
Store any leftover Crispy Baked Asparagus Fries in an airtight container in the refrigerator for up to 2 days. To maintain their crunch, reheating in the oven at 350°F (175°C) for about 10 minutes is ideal. This will help crisp them back up!

Can I freeze the asparagus fries before baking?
Definitely! Freeze unbaked, coated asparagus fries on a baking sheet until solid. Once frozen, transfer them to a freezer-safe bag and they’ll stay fresh for up to 3 months. When you're ready to enjoy them, bake directly from frozen at 425°F (220°C) for 12-15 minutes until crispy and heated through.

What if my asparagus fries aren't crisping up?
Very good question! If your fries are coming out soggy instead of crispy, it could be due to overcrowding on the baking sheet or excess moisture on the asparagus. To remedy this, ensure your asparagus is completely dried after washing, and leave some space between the pieces on the rack for airflow. Also, consider baking longer or adjusting the oven temperature slightly if needed.

Are these fries suitable for my gluten-free diet?
Yes, they are! Simply swap regular flour and panko breadcrumbs for gluten-free alternatives, and you're good to go. Many brands offer gluten-free panko, which provides that same delightful crunch without compromising on flavor!

Can I use different vegetables for this recipe?
Absolutely! Get creative with the veggies. Zucchini or eggplant can be prepared similarly for a delicious variation. Just remember to cut them into similar sizes for even cooking, and enjoy experimenting with different dips to complement the flavors!

Crispy Baked Asparagus Fries

Crispy Baked Asparagus Fries for a Guilt-Free Snack Indulgence

Transform simple vegetables into crave-worthy Crispy Baked Asparagus Fries, a guilt-free snack.
Print Recipe Pin Recipe
Prep Time 10 minutes mins
Cook Time 10 minutes mins
Total Time 20 minutes mins
Servings: 4 servings
Course: Snacks
Cuisine: American
Calories: 150
Ingredients Equipment Method Nutrition Notes

Ingredients
  

For the Batter
  • 1 bunch Asparagus
  • 1 cup Flour can use gluten-free flour
  • 2 large Eggs can substitute with plant-based milk or yogurt for a vegan option
For the Coating
  • 1 cup Panko Breadcrumbs gluten-free panko available
  • 1/2 cup Parmigiano Reggiano (Parmesan) can substitute with nutritional yeast
  • to taste Salt
  • to taste Pepper
Optional Dipping Sauce
  • 1 Ranch Dressing
  • 1 Aioli
  • 1 Spicy Mustard

Equipment

  • Oven
  • Baking Sheet
  • wire rack
  • shallow bowls

Method
 

Step‑by‑Step Instructions
  1. Preheat your oven to 425°F (220°C). Gather your baking sheet and wire rack.
  2. Trim the tough ends of the asparagus, rinse under cold water, and pat dry with a paper towel.
  3. Set up your breading station with flour, beaten eggs, and a mixture of panko, Parmesan, salt, and pepper.
  4. Dredge asparagus in flour, dip in eggs, then roll in the panko mixture. Repeat for all asparagus spears.
  5. Arrange the coated asparagus in a single layer on a wire rack over the baking sheet.
  6. Bake for 7 to 13 minutes until golden brown and crispy. Let cool slightly before serving.
  7. Serve warm with your choice of dipping sauce.

Nutrition

Serving: 1servingCalories: 150kcalCarbohydrates: 20gProtein: 6gFat: 5gSaturated Fat: 1gCholesterol: 90mgSodium: 250mgPotassium: 300mgFiber: 2gSugar: 1gVitamin A: 700IUVitamin C: 10mgCalcium: 100mgIron: 2mg

Notes

Ensure asparagus is dry for the coating to adhere. Use a wire rack for even baking and avoid overcrowding the pan.

Tried this recipe?

Let us know how it was!

Easily Whip Up Flavorful Pasta Puttanesca in 30 Minutes

September 26, 2025 by Grace Snow Leave a Comment

A vibrant, tangy tomato sauce is the heart of every great pasta dish, but there's something truly enchanting about the bold flavors found in Pasta Puttanesca. With garlic, briny capers, and olives swirling together in a mouthwatering medley, it's a dish that not only satisfies your cravings but also brings a taste of Italy right to your kitchen. This quick vegetarian version skips the anchovies while still delivering robust flavor in under 30 minutes, making it perfect for hectic weeknights or lazy weekends alike. Imagine delighting your family or friends with a hearty meal that’s easy to whip up, yet sophisticated enough to impress. Ready to dive into the delightful world of Pasta Puttanesca? Let’s explore how to bring this delectable dish to your table tonight!

Why is Pasta Puttanesca a Must-Try?

Quick Preparation: This recipe comes together in under 30 minutes, making it ideal for busy schedules.

Robust Flavor: The irresistible combination of capers, olives, and garlic creates a tangy, savory sauce that will tantalize your taste buds.

Vegetarian Delight: Perfectly embracing the essence of traditional puttanesca, but without anchovies, this vegetarian version offers full-bodied flavor that everyone will love.

Versatile Base: Feel free to customize with veggies like spinach or zucchini noodles; it’s the perfect dish to adapt to your preferences or dietary needs.

Crowd-Pleaser: Whether you’re serving family or hosting friends, this meal is sure to elicit compliments and happy bellies, truly encapsulating the spirit of Italian cuisine. Try pairing with a fresh salad or homemade garlic bread for a complete experience that will make you feel right at home.

Pasta Puttanesca Ingredients

• A classic dish with a twist awaits you!

For the Sauce

  • San Marzano Tomatoes – These whole peeled tomatoes provide the sauce's rich foundation and exceptional flavor.
  • Extra-Virgin Olive Oil – A splash of this oil adds depth; high-quality olive oil works well if needed.
  • Shallot – This mild, sweet onion enhances the sauce's base; you can use a small yellow onion if you don’t have shallots.
  • Sea Salt – Crucial for enhancing flavors; substitute with kosher or table salt as necessary.
  • Garlic – Fresh garlic is key in delivering that aromatic savoriness; avoid switching it to garlic powder.
  • Red Pepper Flakes – They add just the right heat; adjust the amount to suit your spice preference.
  • Capers – Essential for the classic briny taste of a true Pasta Puttanesca; don’t skip this ingredient!
  • Kalamata Olives – Their salty flavor complements the sauce beautifully; green olives can be used as a substitute.

For the Pasta

  • Spaghetti – The traditional choice for this dish; feel free to swap in linguine or bucatini for variety.

For Garnish

  • Fresh Parsley – Adds a pop of freshness and color; while optional, it enhances the dish’s appearance and flavor.

Explore the vibrant flavors and enjoy cooking your very own Pasta Puttanesca while creating memorable moments around the dinner table!

Step‑by‑Step Instructions for Pasta Puttanesca

Step 1: Prep the Tomatoes
Begin by draining a can of whole San Marzano tomatoes. Place them in a bowl and use your hands or a fork to crush them into a chunky consistency. This will serve as the flavorful base of your Pasta Puttanesca sauce, bringing brightness and richness to every bite.

Step 2: Cook Aromatics
In a large skillet, heat 3 tablespoons of extra-virgin olive oil over medium heat. Add 1 finely chopped shallot and a pinch of sea salt, sautéing for 4-5 minutes until tender and translucent. Mix in 2 minced garlic cloves, 1/2 teaspoon of red pepper flakes, 2 tablespoons of capers, and 1/2 cup of sliced Kalamata olives, cooking for an additional 2 minutes until fragrant.

Step 3: Make the Sauce
Stir the crushed tomatoes into the skillet and bring to a gentle simmer over medium-low heat. Allow the mixture to bubble away for 8-10 minutes, stirring occasionally. As the sauce thickens, its vibrant color will deepen, melding the flavors of garlic, olives, and capers, creating a robust sauce for your Pasta Puttanesca.

Step 4: Cook Pasta
While the sauce simmers, fill a large pot with water and bring it to a rolling boil. Once boiling, add a generous amount of salt and then the spaghetti or long pasta of your choice. Cook according to the package instructions until al dente, usually around 8-10 minutes. Don’t forget to reserve 1 cup of the starchy pasta water before draining!

Step 5: Combine & Toss
After draining the pasta, return it to the pot. Add the simmering sauce and 1/2 cup of the reserved pasta water, tossing everything together to coat the noodles evenly. If the sauce seems too thick, gradually add more pasta water until you achieve your preferred consistency for this delightful Pasta Puttanesca.

Step 6: Finish & Serve
Incorporate a handful of freshly chopped parsley into your pasta, mixing well to brighten up the dish. Taste and season with additional salt if needed, considering the saltiness of the olives and capers. Serve hot, garnished with extra parsley for a fresh pop of color, and enjoy the vibrant flavors of your Pasta Puttanesca!

Tips for the Best Pasta Puttanesca

  • Use Quality Ingredients: High-quality San Marzano tomatoes and extra-virgin olive oil make a significant difference in flavor. Avoid low-grade substitutes.
  • Don’t Skip the Salt: Adding sea salt helps elevate the flavors in your Pasta Puttanesca. Remember to adjust the salt at the end since capers and olives contribute saltiness.
  • Pasta Water Magic: Always reserve that starchy pasta water! It helps bind the sauce to the spaghetti and adds a lovely creaminess.
  • Adjust Spiciness: If you prefer a milder dish, start with less red pepper flakes. You can always add more during cooking!
  • Fresh Garnish: Finish your dish with freshly chopped parsley, which adds vibrant color and enhances the overall presentation and flavor.
  • Experiment and Customize: Feel free to incorporate your favorite vegetables like zucchini, peas, or spinach; it’s a versatile base for bringing in added nutrition!

Storage Tips for Pasta Puttanesca

  • Room Temperature: Keep Pasta Puttanesca at room temperature for no more than 2 hours to maintain safety and freshness before storing it in the fridge.

  • Fridge: Store any leftovers in an airtight container for up to 3 days. Reheat gently on the stovetop or in the microwave, adding a splash of water if needed to loosen the sauce.

  • Freezer: If you'd like to save it for later, Pasta Puttanesca can be frozen for up to 2 months. Make sure to cool it completely before transferring it to a freezer-safe container.

  • Reheating: When ready to enjoy, thaw overnight in the fridge if frozen. Reheat over low heat, stirring occasionally, until warmed through, and adjust seasoning as needed.

What to Serve with Quick Vegetarian Pasta Puttanesca

Elevate your meal experience with these delightful pairings that will complement and enhance the flavors of your vibrant dish.

  • Garlic Bread: Soft yet crispy, this beloved classic is perfect for soaking up that rich, tangy sauce, adding a comforting crunch.

  • Mixed Green Salad: A light salad with a zesty vinaigrette provides a refreshing contrast to the hearty pasta, brightening up the meal.

  • Roasted Vegetables: Seasonal veggies like bell peppers and zucchini, lightly seasoned and caramelized, add color and nutrition that harmonizes beautifully with pasta flavors.

  • Parmesan Cheese: For those who enjoy a touch of decadence, sprinkling freshly grated Parmesan on top enhances umami flavors while adding creaminess to each bite.

  • Rosé Wine: A chilled glass of rosé will complement the briny notes of capers and olives while balancing the meal with its fruity undertones.

  • Focaccia: This soft Italian bread is great for dipping into sauce or enjoying as a side dish, introducing extra textures to your dining experience.

  • Tiramisu: Cap off your meal with a classic tiramisu for a delightful end; its layers of coffee-soaked cake and creamy mascarpone will surely please your sweet tooth.

Indulge in these pairings to create a truly memorable dinner that brings everyone together around the table!

Pasta Puttanesca Variations & Substitutions

Feel free to get creative with your Pasta Puttanesca! With these simple swaps and additions, you can tailor this dish to your tastes and dietary preferences.

  • Zucchini Noodles: Swap traditional spaghetti for zucchini noodles for a low-carb, gluten-free alternative. It's light and refreshing, perfect for summer!

  • Extra Veggies: Boost nutrients by adding fresh spinach or bell peppers. Sauté them with the aromatics for added flavor and texture in every bite.

  • Creamy Twist: For a luscious side, fold in a splash of cream or a dollop of ricotta cheese just before serving. This adds a delightful richness to each forkful.

  • Spicy Kick: If you love heat, amp up the red pepper flakes or toss in a chopped fresh chili. Feel free to adjust the spice levels to suit your palate!

  • Noodle Options: While this recipe calls for spaghetti, try using whole grain pasta, linguine, or even gluten-free varieties for a different flavor profile and texture.

  • Herb Swap: Fresh parsley adds a vibrant touch, but experiment with fresh basil or even a sprinkle of oregano for an added Italian flair.

  • Seafood Variation: For those who enjoy seafood, consider adding shrimp or mussels to the puttanesca sauce as it simmers. The flavors meld beautifully with the briny olives and capers.

  • Elevated Proteins: Incorporate white beans or chickpeas for extra protein and heartiness. This is a fantastic plant-based protein boost that complements the sauce perfectly.

For even more pasta inspiration, check out Skillet Pasta Sun, or if you're looking for a change of pace, try our Cauliflower Pasta Ready. Each variation can offer a fresh twist on this beloved classic!

Make Ahead Options

Pasta Puttanesca is a fantastic choice for meal prep, ensuring you can savor delicious home-cooked flavors even on the busiest nights! You can prepare the sauce up to 3 days in advance; simply cook the sauce according to the recipe, let it cool, and store it in an airtight container in the refrigerator. To prevent the pasta from sticking together, cook it fresh just before serving—only boil the spaghetti or your preferred long pasta according to package instructions right before you plan to combine it with the sauce. Reheat the sauce gently on the stovetop, and add a splash of reserved pasta water for the perfect consistency. Enjoy restaurant-quality Pasta Puttanesca with minimal fuss!

Pasta Puttanesca Recipe FAQs

How do I choose the best San Marzano tomatoes for this recipe?
Absolutely! When selecting San Marzano tomatoes, look for whole peeled varieties packaged in a can. They should have a rich red color without dark spots or blemishes. Check the label for "San Marzano" designations; authentic ones will come from the Campania region in Italy.

What is the best way to store leftover Pasta Puttanesca?
Very! Once your Pasta Puttanesca has cooled, store it in an airtight container in the refrigerator. It will keep fresh for up to 3 days. When reheating, gently warm it on the stovetop, and consider adding a splash of reserved pasta water to bring back its original consistency.

Can I freeze Pasta Puttanesca, and how should I do it?
Absolutely! To freeze your Pasta Puttanesca, allow it to cool completely, then transfer it into a freezer-safe container. It can be frozen for up to 2 months. When you’re ready to enjoy it, thaw in the refrigerator overnight, then reheat on the stovetop over low heat, stirring often to ensure even warming.

What should I do if my sauce is too salty?
Oh no! If your sauce turns out too salty due to the capers and olives, try adding a pinch of sugar or a few slices of raw potato to the sauce while simmering. This helps absorb some of the excess salt. Allow it to cook for a few more minutes, then remove the potato and adjust seasoning as needed.

Is there a way to make this dish gluten-free?
Yes! The more the merrier! You can easily swap out traditional spaghetti with gluten-free pasta made from rice or quinoa. There are also excellent options available like legume-based pasta that offer a lovely texture while keeping it gluten-free and nutritious.

Can I give this dish to my pets?
Not really. It's best to avoid sharing Pasta Puttanesca with pets, especially due to the ingredients like garlic and onions, which can be harmful to them. Always ensure to keep your beloved furry friends safe by offering them pet-friendly treats instead!

Pasta Puttanesca

Easily Whip Up Flavorful Pasta Puttanesca in 30 Minutes

Pasta Puttanesca combines bold flavors of garlic, capers, and olives in a vibrant sauce, perfect for a quick, satisfying meal.
Print Recipe Pin Recipe
Prep Time 10 minutes mins
Cook Time 20 minutes mins
Total Time 30 minutes mins
Servings: 4 servings
Course: Dinner
Cuisine: Italian
Calories: 350
Ingredients Equipment Method Nutrition Notes

Ingredients
  

For the Sauce
  • 1 can San Marzano Tomatoes whole peeled tomatoes
  • 3 tablespoons Extra-Virgin Olive Oil high-quality works best
  • 1 medium Shallot finely chopped
  • 1 teaspoon Sea Salt or to taste
  • 2 cloves Garlic minced
  • 0.5 teaspoon Red Pepper Flakes adjust to taste
  • 2 tablespoons Capers drained
  • 0.5 cup Kalamata Olives sliced
For the Pasta
  • 12 ounces Spaghetti or long pasta of choice
For Garnish
  • 0.5 cup Fresh Parsley chopped

Equipment

  • Large skillet
  • Large pot
  • Bowl

Method
 

Step‑by‑Step Instructions for Pasta Puttanesca
  1. Prep the Tomatoes: Drain a can of whole San Marzano tomatoes and crush them in a bowl.
  2. Cook Aromatics: Heat olive oil in a skillet, add chopped shallot and salt, sauté until tender. Mix in garlic, red pepper flakes, capers, and olives, cooking until fragrant.
  3. Make the Sauce: Stir crushed tomatoes into the skillet, bring to a simmer, and let bubble for 8-10 minutes.
  4. Cook Pasta: Boil water, add salt and spaghetti, cook until al dente, reserving 1 cup of pasta water.
  5. Combine & Toss: Mix drained pasta with sauce and reserved pasta water to achieve desired consistency.
  6. Finish & Serve: Toss in parsley, season to taste, serve hot with extra parsley on top.

Nutrition

Serving: 1servingCalories: 350kcalCarbohydrates: 55gProtein: 9gFat: 12gSaturated Fat: 1.5gMonounsaturated Fat: 10gSodium: 800mgPotassium: 550mgFiber: 4gSugar: 6gVitamin A: 8IUVitamin C: 20mgCalcium: 4mgIron: 10mg

Notes

Using high-quality ingredients, like San Marzano tomatoes, significantly enhances the flavor of Pasta Puttanesca.

Tried this recipe?

Let us know how it was!
  • « Previous Page
  • 1
  • …
  • 136
  • 137
  • 138
  • 139
  • 140
  • …
  • 179
  • Next Page »

Welcome!

Hi, I’m Grace, a Sydney-based home cook with a passion for bold flavors and trending ingredients. Whether you’re a busy beginner or a seasoned foodie, you’ll find dishes here that are fresh, fun, and full of flavor.

More about me

Popular Recipes

  • Cheesy Chicken Garlic Bread Sandwich
    Cheesy Chicken Garlic Bread Sandwich for Cozy Family Moments
  • Easy Chicken Ranch Wraps
    Easy Chicken Ranch Wraps: Quick, Creamy & Totally Satisfying
  • Chicken Caesar Sandwiches
    Delicious Chicken Caesar Sandwiches for Quick Comfort Food
  • best Cuban sandwich
    The Best Cuban Sandwich You’ll Want Every Weeknight!

Footer

↑ back to top

About

  • Privacy Policy
  • Disclaimer
  • Terms & Conditions

Newsletter

  • Sign Up! for emails and updates

Contact

  • About me
  • Contact me

Copyright © 2025 TastyTrendIngredients