tastytrendingredients

  • Home
  • Recipes
    • Appetizers
    • Breakfast
    • Dessert
    • Dinner
    • Drinks
    • Salads
    • Snacks
    • Soups
  • About me
  • Contact me
menu icon
go to homepage
  • Home
  • Recipes
    • Appetizers
    • Breakfast
    • Dessert
    • Dinner
    • Drinks
    • Salads
    • Snacks
    • Soups
  • About me
  • Contact me
search icon
Homepage link
  • Home
  • Recipes
    • Appetizers
    • Breakfast
    • Dessert
    • Dinner
    • Drinks
    • Salads
    • Snacks
    • Soups
  • About me
  • Contact me
×

One-Pot Cajun Chicken Alfredo: Creamy Comfort in 30 Minutes

February 14, 2026 by Grace Snow Leave a Comment

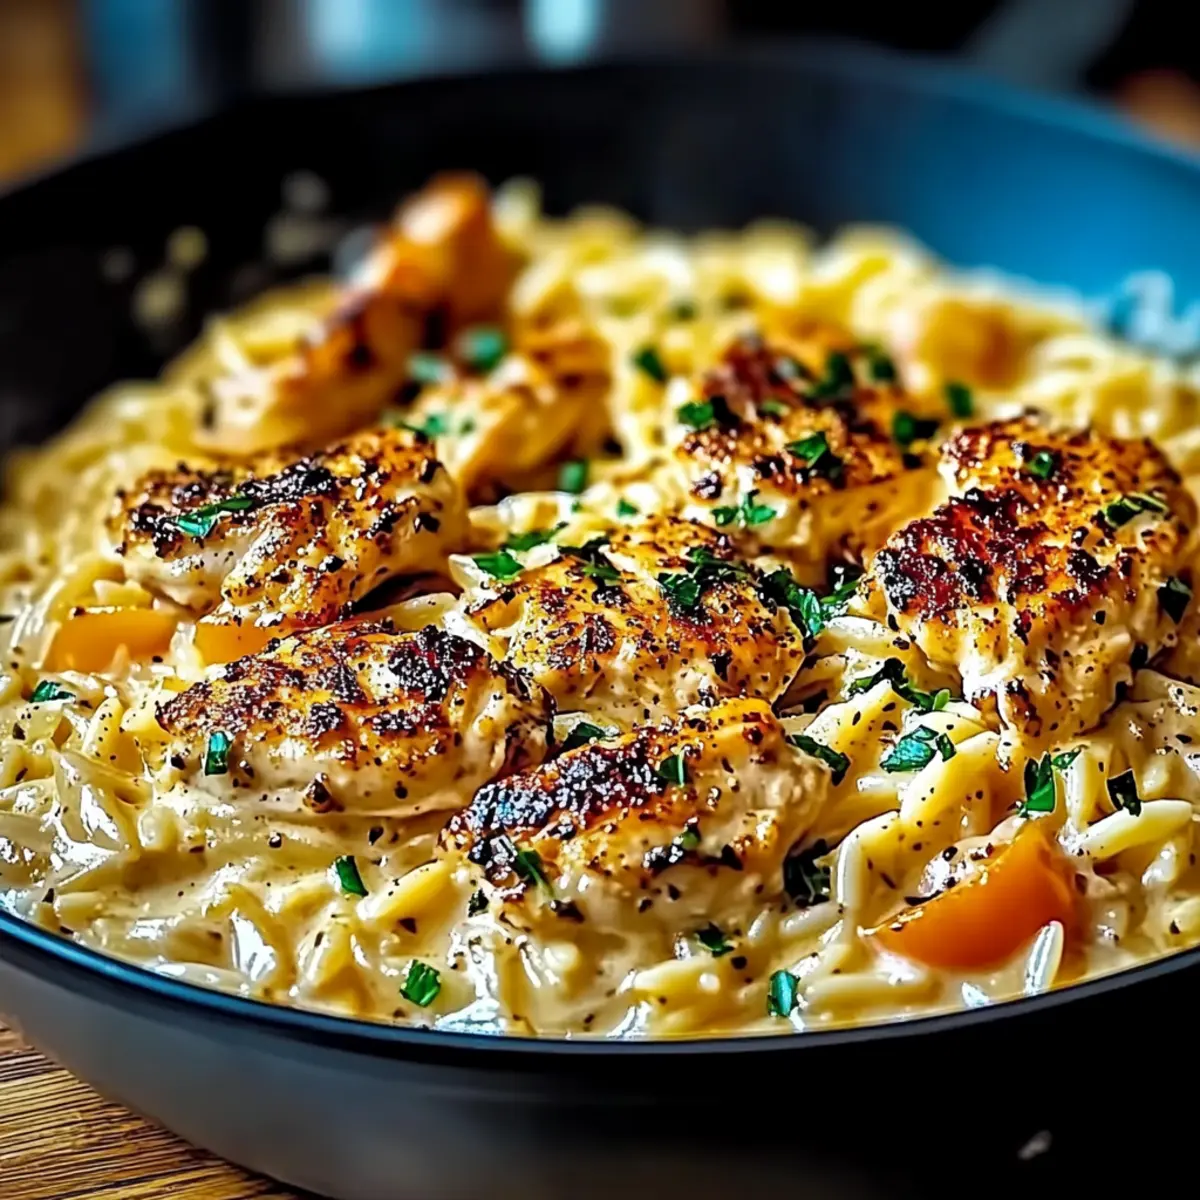
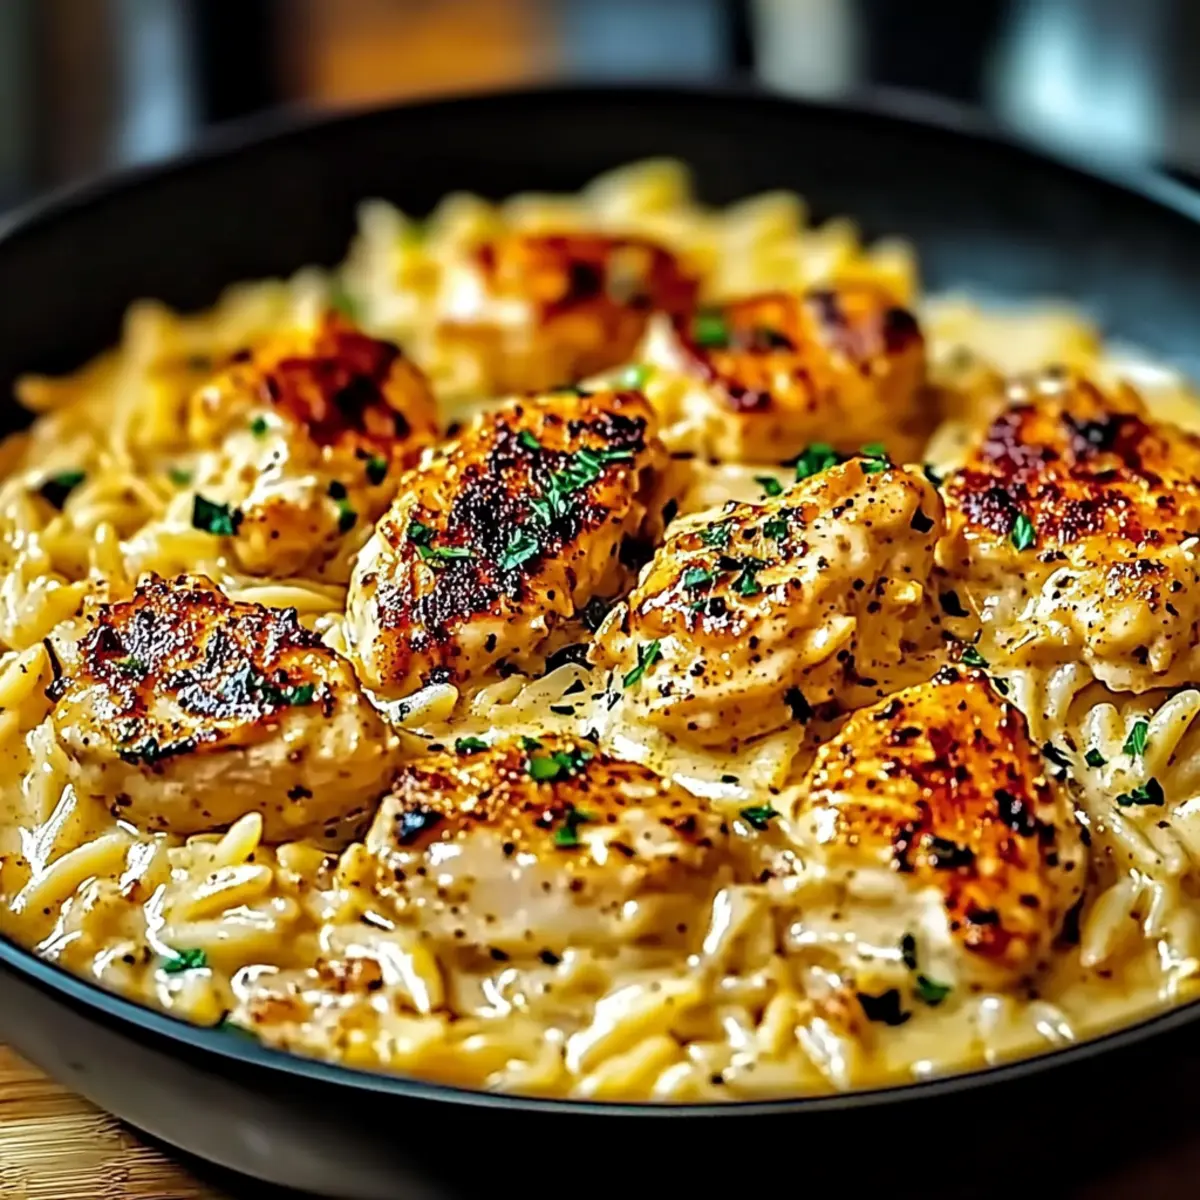
The rich, spicy aroma wafted through the air as I stirred the creamy sauce—this is the essence of a cozy night spent in the kitchen. Enter the One-Pot Cajun Chicken Alfredo Orzo, a dish that effortlessly merges the comforting flavors of Alabama with the playful kick of Cajun spice. Ready in just 30 minutes, it’s the perfect answer to those hectic weeknights when you crave something satisfying yet easy to prepare. This recipe not only simplifies your dinner prep by using just one pot, but it also wraps your taste buds in a creamy, zesty embrace that the whole family will love. So, are you ready to spice up your dinner table and create a new family favorite? Let’s get cooking!

Why is One-Pot Cajun Chicken Alfredo a Must-Try?

Simplicity at Its Finest: With just one pot, cleanup is a breeze! This recipe eliminates the fuss, making it ideal for busy evenings.

Bold Cajun Flavors: The Cajun seasoning not only adds a delightful kick but also transforms ordinary dinner into an exciting culinary experience.

Creamy Comfort: The combination of heavy cream and Parmesan creates a luscious, velvety sauce that envelops the orzo beautifully, delivering comfort in every bite.

Quick yet Delicious: Ready in just 30 minutes, this dish is the ultimate solution for those "what's for dinner?" dilemmas, allowing more time for family and fun.

Family-Friendly Appeal: Kids and adults alike will enjoy the rich flavors, making it a perfect dish for gatherings. Serve it with a fresh green salad or some crusty garlic bread to elevate the meal further. Want more easy weeknight ideas? Check out my recipes for Honey Garlic Chicken Thighs or Crock Pot Chicken Stew for wholesome flavors your family will adore!

One-Pot Cajun Chicken Alfredo Ingredients

• Discover the essentials for a flavorful experience!

For the Chicken

  • Chicken Breasts – Boneless skinless is ideal for a tender and easy meal.

For the Cajun Blend

  • Cajun Seasoning – Adjust to your preferred spice level for an exciting kick.

For Cooking

  • Olive Oil – Used for sautéing, ensuring the chicken remains flavorful.
  • Onions – Fresh, sweet onions enhance the overall flavor profile.
  • Garlic – Minced for depth; it infuses essential oils while cooking.
  • Bell Pepper (optional) – A sweet crunch that adds color; feel free to omit if desired.

For the Pasta

  • Orzo Pasta – Absorbs the rich flavors of the sauce for a comforting texture.
  • Chicken Broth – This liquid infuses the orzo with a savory richness.

For the Creamy Sauce

  • Heavy Cream – Offers a luxurious base; substitute with coconut milk for a lighter take.
  • Parmesan Cheese – Grates easily and melts into the dish, adding a nutty flavor.

For Final Touches

  • Salt & Pepper – Essential for depth of flavor, customize to your taste.
  • Fresh Parsley (optional) – Garnish that adds brightness and a beautiful finish.

Step‑by‑Step Instructions for One-Pot Cajun Chicken Alfredo Orzo

Step 1: Sauté the Chicken
In a large pot, heat 2 tablespoons of olive oil over medium heat until shimmering. Add 1 pound of diced boneless, skinless chicken breasts seasoned with Cajun seasoning, salt, and pepper. Cook for 5-7 minutes, stirring occasionally, until the chicken is golden brown and cooked through. Remove the chicken from the pot and set aside, leaving the flavorful drippings.

Step 2: Cook the Aromatics
In the same pot, add 1 diced onion and 3 minced garlic cloves. Sauté these over medium heat for 2-3 minutes, or until they become fragrant and translucent. If you're using bell pepper, stir in 1 diced bell pepper at this stage and cook for another 2 minutes until it's tender. This step builds the base of flavors for your One-Pot Cajun Chicken Alfredo Orzo.

Step 3: Combine the Orzo and Liquids
Add 1 1/2 cups of orzo pasta to the pot, stirring it with the aromatics for about one minute so it fully absorbs the flavors. Next, pour in 4 cups of chicken broth and 1 cup of heavy cream. Bring this mixture to a gentle boil while stirring occasionally. The liquid should start bubbling within 5-7 minutes, setting the stage for the orzo to cook.

Step 4: Simmer for Perfectly Tender Orzo
Once boiling, reduce the heat to low and cover the pot with a lid. Let the mixture simmer for 10-12 minutes, stirring occasionally to prevent the orzo from sticking. You’ll know it’s ready when the orzo is tender and has absorbed most of the liquid, creating a creamy texture reminiscent of traditional risotto.

Step 5: Add Chicken and Cheese
Carefully fold the cooked chicken back into the pot along with 1 cup of grated Parmesan cheese. Stir gently until the cheese melts and the entire dish becomes creamy and cohesive. Taste the One-Pot Cajun Chicken Alfredo and adjust the seasoning with additional salt and pepper as needed, ensuring a perfect balance of flavors.

Step 6: Serve and Garnish
Remove the pot from the heat and let it sit for a minute to thicken slightly. Serve the One-Pot Cajun Chicken Alfredo Orzo warm, garnished with freshly chopped parsley for a pop of color and freshness. Pair it with a side salad or crusty garlic bread to elevate your meal experience!

Storage Tips for One-Pot Cajun Chicken Alfredo

Fridge: Store leftovers in an airtight container for up to 3-4 days. Allow the dish to cool completely before sealing to maintain texture.

Freezer: This dish freezes well for up to 2 months. Portion it into freezer-safe containers, and be sure to thaw in the fridge overnight before reheating.

Reheating: To reheat, warm gently on the stovetop over low heat, adding a splash of chicken broth or cream to restore creaminess. Stir occasionally until heated through.

Leftover Use: Transform any leftover One-Pot Cajun Chicken Alfredo into a unique pasta bake by adding breadcrumbs and cheese before baking in the oven for a delightful twist!

Expert Tips for One-Pot Cajun Chicken Alfredo

Spice Control: Adjust the amount of Cajun seasoning to suit your family's taste. Start with less and increase for more heat as needed.

Fresh Ingredients: Always use fresh garlic and onions for the best flavor. Dried garlic or onion powders lack the depth that fresh ingredients provide.

Don’t Rush the Simmer: Allow the orzo to simmer with the cover on, stirring occasionally. This ensures all the flavors meld beautifully without overcooking the pasta.

Thickening Tip: If your dish seems too soupy, let it sit off the heat for a few minutes after cooking; it will thicken up nicely.

Storage Savvy: Cool leftovers thoroughly before storing in an airtight container. This helps maintain the creamy texture of your One-Pot Cajun Chicken Alfredo when reheating.

What to Serve with One Pot Cajun Chicken Alfredo Orzo

Create the perfect dining experience with delightful sides that elevate your meal!

  • Crusty Garlic Bread: A warm, buttery loaf with garlic and herbs complements the creamy dish perfectly, perfect for scooping up any remaining sauce.

  • Fresh Green Salad: A bright, crisp salad with mixed greens, cherry tomatoes, and a tangy vinaigrette adds a refreshing contrast to the richness of the orzo.

  • Roasted Vegetables: Serve with roasted seasonal veggies like zucchini and bell peppers for added crunch and health benefits, bringing color and flavor to your plate.

  • Classy White Wine: A chilled glass of Sauvignon Blanc, with its zesty notes, enhances the spice of the Cajun seasoning while balancing the creaminess.

  • Cheesy Broccoli: Tender, steamed broccoli topped with a sprinkle of Parmesan brings a subtle earthiness and is great for those craving veggies alongside comfort food.

  • Spicy Coleslaw: A tangy, spicy coleslaw provides a crunchy texture that cuts through the creamy sauce. The coolness of the slaw refreshes the palate with each bite.

Bringing together these dishes will create a well-rounded meal that's sure to please every member of your family!

Make Ahead Options

These One Pot Cajun Chicken Alfredo Orzo are perfect for busy home cooks looking to simplify their meal prep! You can easily prep the chicken and vegetables (like onions and bell pepper) up to 24 hours in advance by dicing and storing them in an airtight container in the refrigerator. You can also measure out the orzo and spices, ensuring everything is ready to go. When it’s time to cook, simply sauté the prepped ingredients, add the broth and cream, and simmer as instructed. This not only saves time but also ensures that dinner comes together effortlessly during those hectic weeknights, all while delivering the same delicious result!

One-Pot Cajun Chicken Alfredo Variations

Change things up to suit your taste and dietary needs!

  • Dairy-Free: Swap heavy cream for coconut milk or cashew cream, creating a lighter dish with subtle sweetness.

  • Vegetable Boost: Add sautéed spinach or kale for a nutrient-packed twist that enhances flavor and texture. The extra greens pair perfectly with the creamy sauce!

  • Protein Options: Substitute chicken with shrimp or diced sausage for a different protein profile, enriching the dish with their unique flavors.

  • Spice Level: Adjust Cajun seasoning to your preference or incorporate a bit of chipotle powder for a smoky heat. You’ll find that tweaking spices can elevate your dining experience!

  • Pasta Alternatives: Try using quinoa or brown rice instead of orzo for a healthier grain option that still absorbs all the rich sauce.

  • Zesty Kick: Stir in some lemon juice or zest right before serving to brighten the flavors and add a refreshing twist. The citrus will enhance the overall taste wonderfully.

  • Nutty Flavor: Top with toasted pine nuts or sliced almonds for added crunch and a distinct nutty flavor, elevating the dish to gourmet status.

  • Comfort Food Twist: Serve this dish alongside crusty garlic bread or a mixed green salad for a wholesome, well-rounded meal. For more ideas, check out my recipe for Honey BBQ Chicken that pairs beautifully with this dish!

One-Pot Cajun Chicken Alfredo Recipe FAQs

What type of chicken is best for this recipe?
I recommend using boneless, skinless chicken breasts for the One-Pot Cajun Chicken Alfredo. They're easy to cook, tender, and absorb the dish's flavors beautifully, providing a hearty base that's perfect for this creamy meal.

How should I store leftovers of One-Pot Cajun Chicken Alfredo?
Store your leftovers in an airtight container in the refrigerator for up to 3-4 days. Make sure to let the dish cool completely before sealing to maintain its creamy texture.

Can I freeze the One-Pot Cajun Chicken Alfredo?
Absolutely! This dish freezes well for up to 2 months. Portion it into freezer-safe containers for easy reheating later. Thaw overnight in the fridge, and reheat on the stovetop, adding a splash of chicken broth or cream to revive its creaminess.

What if my dish turns out too soupy?
If your One-Pot Cajun Chicken Alfredo seems overly soupy, allow it to sit off the heat for a few minutes; it will naturally thicken as it cools. You can also gently simmer it uncovered on low heat to evaporate some excess liquid until you reach your desired consistency.

Is there a way to make this dish lighter?
Certainly! Substitute heavy cream with coconut milk or cashew cream for a lighter or dairy-free version. You can also use whole grains like whole wheat orzo, which adds fiber without compromising the creaminess of the dish.

Can I make this dish with other types of pasta?
Yes, while orzo gives a lovely texture, you can experiment with other small pasta shapes like ditalini or even fusilli. Just ensure to adjust the cooking time according to the pasta type to achieve that perfect creamy consistency.

One-Pot Cajun Chicken Alfredo

One-Pot Cajun Chicken Alfredo: Creamy Comfort in 30 Minutes

One-Pot Cajun Chicken Alfredo combines creamy textures with Cajun spice, making it a quick and comforting dinner option.
Print Recipe Pin Recipe
Prep Time 10 minutes mins
Cook Time 20 minutes mins
Total Time 30 minutes mins
Servings: 4 servings
Course: Dinner
Cuisine: American, Cajun
Calories: 500
Ingredients Equipment Method Nutrition Notes

Ingredients
  

For the Chicken
  • 1 pound Boneless skinless chicken breasts
For the Cajun Blend
  • to taste Cajun seasoning
For Cooking
  • 2 tablespoons Olive oil For sautéing
  • 1 medium Onion Diced
  • 3 cloves Garlic Minced
  • 1 medium Bell pepper Diced, optional
For the Pasta
  • 1.5 cups Orzo pasta
  • 4 cups Chicken broth
For the Creamy Sauce
  • 1 cup Heavy cream Can substitute with coconut milk
  • 1 cup Parmesan cheese Grated
For Final Touches
  • to taste Salt
  • to taste Pepper
  • to taste Fresh parsley For garnish, optional

Equipment

  • Large pot

Method
 

Step-by-Step Instructions
  1. In a large pot, heat olive oil over medium heat. Add chicken seasoned with Cajun seasoning, salt, and pepper. Cook for 5-7 minutes until golden brown. Remove and set aside.
  2. In the same pot, add diced onion and minced garlic. Sauté for 2-3 minutes until fragrant. If using, add bell pepper and cook for another 2 minutes.
  3. Stir in orzo and cook for one minute, absorbing flavors. Pour in chicken broth and heavy cream. Bring to a gentle boil.
  4. Reduce heat to low, cover, and simmer for 10-12 minutes. Stir occasionally until orzo is tender and liquid is absorbed.
  5. Fold in cooked chicken and Parmesan cheese. Stir until cheese is melted and dish is creamy. Adjust seasoning as needed.
  6. Let sit for a minute before serving. Garnish with chopped parsley and serve warm.

Nutrition

Serving: 1servingCalories: 500kcalCarbohydrates: 50gProtein: 30gFat: 20gSaturated Fat: 10gPolyunsaturated Fat: 2gMonounsaturated Fat: 5gCholesterol: 70mgSodium: 800mgPotassium: 600mgFiber: 2gSugar: 3gVitamin A: 800IUVitamin C: 10mgCalcium: 300mgIron: 2mg

Notes

Adjust spice levels according to taste. Use fresh ingredients for the best flavor.

Tried this recipe?

Let us know how it was!

BBQ Brisket Melts: Ultimate Comfort Food for BBQ Lovers

February 12, 2026 by Grace Snow Leave a Comment

As I flipped through my recipe notebook, a familiar scent wafted through the air, instantly transporting me to a bustling summer barbecue. Today, I’m excited to share my go-to comfort food: BBQ Brisket Melts. These sandwiches elevate succulent smoked brisket into a gourmet delight, layered with melty cheese, crispy fried onions, and sweet caramelized onions, all tucked between slices of golden, toasted sourdough. What I love most about this recipe is its versatility—ideal for game-day gatherings or cozy family dinners—and its quick prep that leaves you with time to relax and enjoy. Who wouldn’t want to impress guests or satisfy their cravings with such a hearty, flavorful creation? Ready to dive into creating these irresistible melts? Let’s get started!

Why Are These Melts So Irresistible?

Simplicity at its finest: With just a few straightforward steps, you can whip up these BBQ Brisket Melts without any culinary fuss.

Flavor-packed goodness: The combination of smoked brisket, melty cheeses, and sweet caramelized onions creates an explosion of savory flavor.

Crowd-pleaser potential: These melts are perfect for game-day gatherings or a cozy family meal, sure to impress everyone at your table.

Versatile options: Feel free to customize your melts by adding jalapeños for heat or swapping the bread for a gluten-free version.

Make-ahead friendly: Prepare the brisket and onions in advance, allowing you to assemble and toast the sandwiches right before serving. Enjoy alongside a refreshing coleslaw or a serving of homemade Honey Bbq Chicken to round out your meal!

BBQ Brisket Melts Ingredients

For the Brisket

  • Brisket – Use a well-marbled cut for exceptional flavor and tenderness.
  • Mustard – Acts as a binder for spices; yellow mustard is a classic choice.
  • Pepper-forward brisket rub – Provides robust flavor; select a mix with black pepper, garlic powder, and paprika for best results.

For the Sandwich

  • Sourdough bread – This tangy bread gives a sturdy structure and enhances the overall taste of the BBQ Brisket Melts.
  • Fried onions – Adds a delightful crunch; you can swap for crispy shallots or skip them for a lighter option.
  • Caramelized onions – Offers a touch of sweetness to balance the savory brisket; make ahead for added convenience.
  • BBQ sauce – A must-have for moisture and rich flavor; you can use either homemade or your favorite store-bought variety.
  • Colby Jack cheese – Melts beautifully and adds rich flavor; feel free to substitute with cheddar for a sharper bite.
  • Provolone cheese – Enhances creaminess; if you prefer milder flavors, mozzarella is a great alternative.
  • Butter – Unsalted butter is best for toasting the sandwiches to golden perfection.

Step‑by‑Step Instructions for BBQ Brisket Melts

Step 1: Prepare the Brisket
Start by trimming any excess fat from a well-marbled brisket, ensuring it's ready for seasoning. Slather the brisket with yellow mustard, which acts as a binder for the spices. Generously sprinkle it with a pepper-forward brisket rub, ensuring even coverage. Wrap the seasoned brisket in plastic wrap and refrigerate it for 1-2 hours to allow the flavors to meld.

Step 2: Smoke the Brisket
Preheat your smoker to 210°F, then add hickory pellets for a rich, smoky flavor. Place the brisket on the grill grate and smoke it for 9-10 hours, or until it reaches an internal temperature of 165-170°F. Once at this stage, wrap the brisket in butcher’s paper, adding a splash of apple cider vinegar and some beef tallow. Increase the smoker temperature to 250°F, and continue smoking until the brisket hits 204-206°F.

Step 3: Rest the Brisket
After smoking, remove the brisket from the smoker and allow it to rest inside the butcher’s paper. Place it in a cooler filled with towels for 2-3 hours. This resting period is crucial for the meat to tenderize further and allows the juices to redistribute, ensuring each slice remains juicy and flavorful when you prepare your BBQ Brisket Melts.

Step 4: Assemble the Sandwich
Once the brisket has rested, slice it thinly against the grain for optimal tenderness. Take slices of sourdough bread and layer on crispy fried onions, followed by generous portions of the smoked brisket. Add sweet caramelized onions and drizzle with BBQ sauce before layering on the melty combination of Colby Jack and provolone cheese. Top with another slice of sourdough to complete your sandwich.

Step 5: Toast the Sandwich
In a large cast-iron skillet, melt a generous pat of butter over medium heat. Carefully place the assembled BBQ Brisket Melts into the skillet, toasting them for about 3-4 minutes on each side. As they cook, press down lightly with a spatula to encourage even browning, until the bread is golden brown and the cheese is irresistibly melty. Flip and repeat for the second side, then transfer to a cutting board.

Step 6: Serve and Enjoy
Once toasted to perfection, cut the BBQ Brisket Melts in half to reveal the layers of gooey cheese, tender brisket, and sweet onions. Serve them hot with your favorite side dishes, like coleslaw or baked beans, for a perfect comforting meal. Let the aromas transport you and enjoy a hearty bite of BBQ goodness!

How to Store and Freeze BBQ Brisket Melts

  • Room Temperature: BBQ Brisket Melts are best enjoyed fresh. If leftovers are left out, consume within 2 hours to ensure food safety.
  • Fridge: Store any leftover BBQ Brisket Melts in an airtight container for up to 3 days. To maintain their crispy texture, you may want to reheat them before serving.
  • Freezer: For longer storage, wrap the assembled melts tightly in plastic wrap, then foil, and freeze for up to 2 months. Thaw and reheat in a skillet for best results.
  • Reheating: To revive the melts after freezing, preheat your skillet over medium heat and toast each sandwich for about 3-4 minutes per side, until warmed through and crispy. Enjoy the savory flavors of your BBQ Brisket Melts!

Make Ahead Options

These BBQ Brisket Melts are perfect for meal prep enthusiasts looking to save time on busy weeknights! You can smoke the brisket and prepare the caramelized onions up to 3 days in advance. Simply store the sliced brisket and the caramelized onions in airtight containers in the refrigerator to maintain their flavor and moisture. When you’re ready to enjoy, assemble the sandwiches with the fried onions, BBQ sauce, and cheeses, then toast them in a cast-iron skillet for about 3-4 minutes on each side until golden brown. This way, you'll savor the same delicious experience without added stress!

What to Serve with BBQ Brisket Melts

Pairing your BBQ Brisket Melts with the right sides will elevate your meal to new heights!

  • Coleslaw: This crunchy, tangy side adds a refreshing contrast to the rich, smoky flavors of the brisket melts. It’s a classic BBQ pairing that balances the heaviness of the sandwich.

  • Baked Beans: Sweet and savory, baked beans provide a comforting, hearty side that complements the smoky elements of the brisket without overpowering them.

  • Potato Salad: Creamy and cool, this dish is perfect for BBQ feasts. The potatoes’ soft texture pairs beautifully with the chewy brisket and melted cheese.

  • Grilled Corn on the Cob: Lightly charred corn adds a lovely sweetness and vibrant color to your meal, making it visually appealing and tasty.

  • Pickles: Adding a tart crunch, pickles serve as a palate cleanser, brightening the rich flavors of the brisket. They are the perfect bite between sandwiches!

  • Iced Tea: This refreshing drink complements the savory flavors of your BBQ Brisket Melts while providing a satisfying coolness against the warmth of the sandwich.

  • Chocolate Brownies: For dessert, pair with fudgy brownies to complete your feast on a sweet note, bringing chocolatey goodness that satisfies every craving.

  • Watermelon Salad: Offering a burst of freshness, a watermelon salad with feta and mint can add a light, summery flair to your BBQ spread.

  • Sweet Potato Fries: Crispy with a hint of sweetness, these fries add an exciting texture that balances the gooeyness of the brisket melts while enhancing your meal experience.

Expert Tips for BBQ Brisket Melts

  • Choose Quality Brisket: Select a well-marbled brisket for maximum flavor and tenderness; lean cuts may result in a dry outcome.

  • Mustard Magic: Don't skip the mustard! It serves as an ideal binder for the spice rub, enhancing the overall flavor of your BBQ Brisket Melts.

  • Smoking Patience: Smoking takes time; resist the urge to rush the process. The low and slow method builds the flavor profile and creates that melt-in-your-mouth texture.

  • Avoid Overcompacting: While toasting, gently flip the sandwich without pressing down too hard to maintain the integrity of the fillings and avoid a mushy texture.

  • Prepare Ahead: For a stress-free experience, smoke the brisket and caramelize the onions a day in advance; simply assemble and toast right before serving.

  • Experiment with Cheeses: Don't hesitate to play around with different cheese combinations like gouda or pepper jack to personalize your BBQ Brisket Melts with unique flavor bursts.

BBQ Brisket Melts Variations & Substitutions

Feel free to let your culinary creativity shine by customizing these BBQ Brisket Melts to match your tastes!

  • Cheese Swap: Use gouda or pepper jack instead of Colby Jack for a unique flavor twist. Gouda’s creaminess is simply divine!

  • Gluten-Free: Swap sourdough with gluten-free bread for a delicious option that everyone can enjoy. Look for a sturdy gluten-free variety to hold up well.

  • Add Heat: Incorporate sliced jalapeños or banana peppers for a spicy kick that elevates the flavor profile. Your taste buds will appreciate the extra zest!

  • Bacon Boost: Crisp up a few bacon strips to add a smoky crunch. There’s something irresistible about that combination of flavors and textures!

  • Vegetarian Delight: Substitute brisket with grilled portobello mushrooms or marinated eggplant for a delightful meatless version. The mushrooms will soak up all those delicious BBQ flavors beautifully!

  • BBQ Sauce Variety: Experiment with different BBQ sauces—try a tangy vinegar-based sauce or a spicy habanero version for a flavor surprise. You might just find a new favorite!

  • Herb Infusion: Add fresh herbs like chopped cilantro or parsley for an aromatic punch. This fresh herby burst will brighten every bite.

  • Sweet Twist: Use a bit of apple butter or peach preserves instead of BBQ sauce for a sweet and savory melt that offers a unique twist. Pair this with sharp cheese for balance.

These suggestions will surely elevate your BBQ Brisket Melts experience, making it even more enjoyable. Plus, for a delightful side, consider pairing them with a fresh coleslaw or try out some smoky Honey Bbq Chicken to round out your meal!

BBQ Brisket Melts Recipe FAQs

What type of brisket should I use for the best flavor?
Choosing a well-marbled brisket is key to flavor and tenderness. Look for a cut with a nice fat cap, which will keep the meat moist during the long smoking process. This fat will melt away while cooking, enriching the brisket with flavor.

How should I store leftover BBQ Brisket Melts?
Store any leftover BBQ Brisket Melts in an airtight container in the refrigerator for up to 3 days. If you want to maintain that signature crispy texture, I recommend reheating them in a skillet before serving.

Can I freeze BBQ Brisket Melts?
Absolutely! To freeze, wrap the assembled melts tightly in plastic wrap, then cover them with foil. You can freeze them for up to 2 months. When you're ready to enjoy them, allow them to thaw in the refrigerator overnight, then reheat them in a skillet for that crispy finish!

What if my brisket is too dry after smoking?
If you find your smoked brisket is dry, don't fret! You can moisten it by slicing it thin and drizzling it with a bit of warm BBQ sauce before assembling your melts. Additionally, try to keep it wrapped in butcher paper during resting to maintain the juices longer for your next batch.

Can I use gluten-free bread for this recipe?
Yes! If you're looking for a gluten-free option, swapping out the sourdough for a gluten-free bread works perfectly. Just ensure it has a sturdy structure to hold all the delicious fillings, so you can still enjoy every bite without worry.

Is there a dairy-free substitute for the cheese?
Certainly! For a dairy-free alternative, look for plant-based cheese substitutes available in stores today, like cashew or coconut-based options. They can melt decently well, allowing you to enjoy your BBQ Brisket Melts without sacrificing flavor.

BBQ Brisket Melts

BBQ Brisket Melts: Ultimate Comfort Food for BBQ Lovers

BBQ Brisket Melts are the ultimate comfort food for BBQ lovers, featuring layers of smoked brisket, melty cheese, and caramelized onions.
Print Recipe Pin Recipe
Prep Time 2 hours hrs
Cook Time 10 hours hrs
Resting Time 3 hours hrs
Total Time 15 hours hrs
Servings: 4 sandwiches
Course: Dinner
Cuisine: American
Calories: 600
Ingredients Equipment Method Nutrition Notes

Ingredients
  

For the Brisket
  • 1 piece Brisket Well-marbled cut for exceptional flavor and tenderness.
  • 2 tablespoons Mustard Yellow mustard acts as a binder for spices.
  • 1 cup Pepper-forward brisket rub Mix with black pepper, garlic powder, and paprika.
For the Sandwich
  • 8 slices Sourdough bread Tangy bread for structure and taste.
  • 1 cup Fried onions Adds crunch; can substitute with crispy shallots.
  • 1 cup Caramelized onions Provides sweetness.
  • 1/2 cup BBQ sauce Use homemade or store-bought.
  • 4 ounces Colby Jack cheese Melts beautifully.
  • 4 ounces Provolone cheese Enhances creaminess; mozzarella can substitute.
  • 4 tablespoons Butter Unsalted for toasting.

Equipment

  • Smoker
  • cast iron skillet
  • plastic wrap
  • butcher's paper
  • cooler

Method
 

Prep and Cook Brisket
  1. Trim excess fat from the brisket. Slather with mustard and sprinkle with brisket rub. Wrap in plastic and refrigerate for 1-2 hours.
  2. Preheat the smoker to 210°F, add hickory pellets, and smoke the brisket for 9-10 hours until internal temperature is 165-170°F.
  3. Wrap the brisket in butcher’s paper with apple cider vinegar and beef tallow, increase smoker temperature to 250°F, and continue smoking until 204-206°F.
  4. Remove brisket from smoker, let rest in butcher's paper in a cooler for 2-3 hours.
Assemble and Toast
  1. Slice the rested brisket thinly against the grain. Layer sourdough with fried onions, brisket, caramelized onions, BBQ sauce, and cheeses.
  2. In a skillet, melt butter over medium heat. Toast sandwiches for 3-4 minutes on each side until golden and melty.
  3. Slice the BBQ Brisket Melts in half and serve hot.

Nutrition

Serving: 1sandwichCalories: 600kcalCarbohydrates: 40gProtein: 30gFat: 32gSaturated Fat: 15gCholesterol: 80mgSodium: 1200mgPotassium: 600mgFiber: 3gSugar: 6gVitamin A: 300IUCalcium: 200mgIron: 3mg

Notes

For best results, choose a quality brisket and don't rush the smoking process. Prepare brisket and caramelized onions a day ahead to simplify meal assembly.

Tried this recipe?

Let us know how it was!

Stanley Tucci’s Creamy Lemon Ricotta Pasta with Arugula Delight

February 12, 2026 by Grace Snow Leave a Comment

As I stirred the creamy mixture in the pan, the aroma of lemon and ricotta wafted through my kitchen, instantly transporting me to a sun-drenched Italian terrace. Stanley Tucci’s Creamy Lemon Ricotta Pasta with Arugula is not just a dish; it’s an experience that brings together rich, comforting flavors and a vibrant pop of freshness. This recipe is a true lifesaver for those busy weeknights, allowing you to whip up a quick meal that feels indulgent without the fuss. With its creamy base and peppery arugula, it’s equally perfect for a cozy dinner or an impressive dinner party. And if you're looking to accommodate dietary preferences, no worries—this pasta can easily be made vegan! What’s your favorite twist on classic pasta dishes?

Why is this pasta recipe so special?

Quick and Easy: This Stanley Tucci-inspired dish comes together in under 30 minutes, making it perfect for those chaotic weeknights.

Creamy Delight: The luscious ricotta and zesty lemon create a flavor explosion that dances on your taste buds.

Versatile: With simple swaps like using gluten-free pasta or plant-based ricotta, it caters to various dietary needs.

Crowd-Pleasing: Impress your friends with sophisticated flavors that feel gourmet without the hassle.

Fresh Twist: The addition of peppery arugula adds a delightful crunch, making every bite a little celebration!

Pair it with a refreshing side salad or some garlic bread for a complete meal, and don't hesitate to check out my variations for more delicious options like Herby Ricotta Stuffed Peppers or a classic Seafood Pasta if you're looking to mix things up!

Stanley Tucci’s Creamy Lemon Ricotta Pasta Ingredients

  • For the Pasta
    Pasta – Choose any pasta shape you prefer, like spaghetti or fettuccine, for a delicious base.

  • For the Cream Sauce
    Ricotta Cheese – This rich ingredient adds a creamy texture; substitute with plant-based ricotta for a vegan option.
    Lemon Zest & Juice – Infuses brightness and acidity; adjust to enhance the tangy flavor as desired.
    Olive Oil – Use high-quality olive oil to elevate the richness of your sauce.

  • For the Garnish
    Arugula – This peppery green adds freshness and crunch; feel free to replace it with spinach if preferred.
    Parmesan Cheese – Enhances umami flavors; can be omitted for a vegan version.
    Salt & Pepper – Essential for seasoning; taste and adjust as needed.

Embrace the vibrant taste with Stanley Tucci’s Creamy Lemon Ricotta Pasta, and you’ll be savoring every luscious bite!

Step‑by‑Step Instructions for Stanley Tucci’s Creamy Lemon Ricotta Pasta with Arugula

Step 1: Cook the Pasta
Begin by bringing a large pot of salted water to a rolling boil over high heat. Add your choice of pasta, such as spaghetti or fettuccine, and cook according to the package instructions until al dente, usually around 8-10 minutes. Once cooked, reserve about a cup of the starchy pasta water and drain the rest.

Step 2: Prepare the Cream Sauce
In a large skillet, combine 1 cup of ricotta cheese, the zest of one lemon, the juice from half the lemon, and a drizzle of high-quality olive oil. Heat over low to medium heat, stirring gently until the mixture is smooth and warmed through, which should take about 3-5 minutes. Be careful not to let it boil!

Step 3: Combine Pasta and Sauce
Add the drained pasta directly to the creamy sauce in the skillet. Toss everything together to ensure the pasta is well-coated. If the sauce appears thick, gradually add reserved pasta water, a few tablespoons at a time, until you reach the desired creamy consistency.

Step 4: Add the Arugula
Once combined, stir in a generous handful of fresh arugula, allowing it to wilt slightly in the warm pasta. Season the mixture with salt and freshly cracked black pepper to taste. The peppery arugula will complement the creamy texture wonderfully in your Stanley Tucci’s Creamy Lemon Ricotta Pasta.

Step 5: Serve and Garnish
To plate, serve the pasta warm, garnished with freshly grated Parmesan cheese if desired, and an extra sprinkle of lemon zest for brightness. Enjoy the creamy delight of your dish, taking in the aromatic flavors that bring a touch of Italian authenticity to your table!

How to Store and Freeze Stanley Tucci’s Creamy Lemon Ricotta Pasta

  • Room Temperature: It's best to enjoy this pasta warm and freshly cooked. If left out, consume within 2 hours to ensure safety.

  • Fridge: Store any leftover Stanley Tucci’s Creamy Lemon Ricotta Pasta in an airtight container for up to 3 days. Reheat gently on the stove, adding a splash of water or olive oil to revitalize the creaminess.

  • Freezer: For longer storage, freeze the pasta in a freezer-safe container for up to 2 months. While it may alter the texture slightly, it will still be delicious upon reheating.

  • Reheating: To reheat from frozen, let it thaw in the refrigerator overnight. Reheat in a skillet over low heat, adding a bit of reserved pasta water or olive oil to restore its creamy goodness!

What to Serve with Stanley Tucci’s Creamy Lemon Ricotta Pasta with Arugula

Elevate your dining experience with delightful pairings that complement the zesty and creamy notes of this dish.

  • Garlic Bread: The buttery, garlicky flavor perfectly balances the creamy pasta, delivering a delightful crunch in every bite.

  • Simple Green Salad: A refreshing mix of greens with a light vinaigrette cuts through the richness, providing a vibrant contrast to the creamy pasta.

  • Roasted Vegetables: Roasted zucchini and cherry tomatoes add a sweet and caramelized depth, enhancing the freshness of the arugula.

  • Lemon Vinaigrette Drizzle: A tangy dressing over your salad brightens up the dish as beautifully as a splash of lemon in the pasta.

  • Sautéed Asparagus: Tender, lightly sautéed asparagus not only adds color but also brings a satisfying texture that complements the creamy sauce.

  • Chilled White Wine: A crisp Pinot Grigio or Sauvignon Blanc offers a refreshing counterpoint to the richness of the ricotta, perfect for a dinner party setting.

  • Fresh Fruit Dessert: Finish your meal with a light fruit tart or sorbet for a sweet, refreshing end, echoing the pasta's bright flavors.

  • Pesto Bruschetta: Crunchy bread topped with pesto adds a vibrant, herbaceous twist that resonates with the arugula, making it a perfect starter.

Expert Tips for Stanley Tucci’s Creamy Lemon Ricotta Pasta

  • Fresh Ingredients Matter: Always opt for high-quality ricotta and fresh lemons. The taste difference is remarkable and elevates your pasta dish significantly.

  • Pasta Perfection: Cook your pasta until al dente; it should retain a slight bite. Overcooked pasta becomes mushy and loses its charm in Stanley Tucci’s Creamy Lemon Ricotta Pasta.

  • Adjust to Taste: Don’t skip the tasting step! Adjust the lemon juice, salt, and pepper as needed to enhance flavors according to your personal preference.

  • Consistency Control: If your sauce is too thick, use the reserved pasta water to achieve the creamy consistency you desire, ensuring everything clings beautifully to the noodles.

  • Mix it Up: Feel free to add grilled chicken, shrimp, or your favorite veggies like cherry tomatoes for a twist—making it your unique version while keeping the main essence of the dish!

Make Ahead Options

Stanley Tucci’s Creamy Lemon Ricotta Pasta with Arugula is a fantastic meal prep option for busy weeknights! You can prepare the creamy sauce (ricotta, lemon zest, lemon juice, and olive oil) up to 24 hours in advance. Just refrigerate it in an airtight container to maintain its fresh flavor. Cook the pasta separately and store it in the fridge for up to 3 days. When you’re ready to indulge, simply reheat the sauce on low heat, add the cooked pasta, and toss in the fresh arugula right before serving, which will keep its crunch intact. This way, you'll have a delicious meal without the last-minute rush!

Stanley Tucci’s Creamy Lemon Ricotta Pasta Variations

Customize your culinary adventure with your favorite twists and variations for a delightful surprise in every bite!

  • Gluten-Free: Use gluten-free pasta to accommodate dietary restrictions without compromising taste. You won't even notice the difference!

  • Dairy-Free: Swap ricotta with plant-based ricotta for a vegan version that still delivers that creamy goodness. Let this adaptation open up a whole new world of flavors.

  • Vegetable Boost: Toss in sautéed cherry tomatoes, zucchini, or bell peppers for an extra layer of color and nutrition. These vibrant additions can transform your pasta into a rainbow on your plate.

  • Herbal Infusion: Add fresh basil or parsley to the creamy sauce for an aromatic lift. Imagine the delightful medley of herbs intertwining with your favorite flavors—it's like sunshine on a plate!

  • Protein Power: Incorporate grilled shrimp or chicken for a heartier meal packed with protein. This addition makes it not just a side dish, but a complete dinner compelling enough to impress guests.

  • Spicy Kick: A pinch of red pepper flakes can take your dish to new heat levels. Just imagine the tantalizing warmth dancing on your taste buds—in perfect harmony with the creamy sauce.

  • Citrus Twist: Try adding a splash of orange juice in place of some lemon juice for a fruity surprise. The aromatic zest will add a refreshing twist that'll keep everyone guessing what's next!

Feel free to experiment with these variations, or try pairing your pasta with a fresh side salad or delicious garlic bread like my Lemon Chicken Soup or Skillet Pasta Sun. Enjoy your culinary journey!

Stanley Tucci’s Creamy Lemon Ricotta Pasta with Arugula Recipe FAQs

What kind of pasta should I use for this recipe?
You can use any pasta shape you love, such as spaghetti, fettuccine, or penne. Just make sure to cook it al dente, as the texture will hold the creamy sauce better. I often recommend using whole grain for a bit of extra fiber!

How do I store leftover pasta?
Store any leftover Stanley Tucci’s Creamy Lemon Ricotta Pasta in an airtight container in the fridge for up to 3 days. To reheat, gently warm it on the stove with a splash of water or olive oil to bring back its creamy texture!

Can I freeze this pasta dish?
Absolutely! You can freeze the pasta in a freezer-safe container for up to 2 months. Just be aware that while it might alter the sauce’s texture slightly, it will still taste delicious. To reheat, let it thaw overnight in the fridge, then warm gently in a skillet, adding reserved pasta water if needed.

What should I do if the sauce is too thick?
If your sauce turns out too thick, no worries! Gradually add reserved pasta water, a tablespoon at a time, while tossing to achieve the desired creamy consistency. This will help everything combine smoothly without compromising the flavors.

Are there any dietary considerations with this recipe?
Yes! You can easily make this dish vegan by substituting the ricotta with a plant-based version and omitting the Parmesan cheese. It’s versatile enough to cater to gluten-free diets as well by using gluten-free pasta. Just check your labels if you're cooking for someone with allergies!

How can I enhance the flavors further?
To really elevate your dish, I recommend using high-quality, fresh ricotta and ripe lemons. Adjust the lemon juice, zest, salt, and pepper to suit your taste. You might also experiment by adding sautéed vegetables like cherry tomatoes or zucchini for extra nutrition and flavor!

Stanley Tucci’s Creamy Lemon Ricotta Pasta with Arugula

Stanley Tucci’s Creamy Lemon Ricotta Pasta with Arugula Delight

Discover the rich flavors of Stanley Tucci’s Creamy Lemon Ricotta Pasta with Arugula, a quick and easy dinner option that delights the senses.
Print Recipe Pin Recipe
Prep Time 10 minutes mins
Cook Time 15 minutes mins
Total Time 25 minutes mins
Servings: 4 servings
Course: Dinner
Cuisine: Italian
Calories: 450
Ingredients Equipment Method Nutrition Notes

Ingredients
  

Pasta
  • 8 ounces pasta Any shape like spaghetti or fettuccine
Cream Sauce
  • 1 cup ricotta cheese Or plant-based ricotta for vegan option
  • 1 tablespoon lemon zest Adjust to taste
  • 2 tablespoons lemon juice From half a lemon, adjust for tanginess
  • 2 tablespoons olive oil Use high-quality for best flavor
Garnish
  • 2 cups arugula Can substitute with spinach
  • 1/2 cup Parmesan cheese Omit for vegan version
  • to taste salt Essential for seasoning
  • to taste pepper Freshly cracked preferred

Equipment

  • Large pot
  • Large skillet
  • measuring cups
  • Measuring Spoons
  • Spatula

Method
 

Cooking Instructions
  1. Bring a large pot of salted water to a rolling boil. Add pasta and cook until al dente, about 8-10 minutes. Reserve a cup of pasta water, then drain.
  2. In a large skillet, combine ricotta, lemon zest, lemon juice, and olive oil. Heat gently over low to medium, stirring until smooth, 3-5 minutes.
  3. Add drained pasta to the skillet, combining with the sauce. If too thick, add reserved pasta water gradually.
  4. Stir in arugula until slightly wilted. Season with salt and pepper.
  5. Serve warm, garnished with Parmesan and extra lemon zest if desired.

Nutrition

Serving: 1plateCalories: 450kcalCarbohydrates: 50gProtein: 15gFat: 20gSaturated Fat: 8gPolyunsaturated Fat: 2gMonounsaturated Fat: 8gCholesterol: 30mgSodium: 500mgPotassium: 300mgFiber: 3gSugar: 2gVitamin A: 20IUVitamin C: 35mgCalcium: 15mgIron: 10mg

Notes

For variations, consider adding grilled chicken or vegetables. Store leftovers in an airtight container for up to 3 days.

Tried this recipe?

Let us know how it was!

Savory Brown Butter Mushroom Pasta in Just 30 Minutes

February 12, 2026 by Grace Snow Leave a Comment

As the aroma of sizzling garlic fills my kitchen, I can’t help but feel a twinge of excitement; tonight, I’m crafting a dish that celebrates comforting flavors with the effortless elegance of Brown Butter Mushroom Pasta. In just 30 minutes, you can turn a simple gathering into a culinary delight, where the luscious, buttery sauce mingles with earthy cremini mushrooms and a crunchy breadcrumb topping. This dish not only caters to busy weeknights, but it’s also a vegetarian crowd-pleaser that will leave everyone craving more. So, whether you're looking to impress or simply enjoy a cozy meal, this pasta is ready to steal the show. Are you ready to revive your dinner routine with something truly special?

Why is This Pasta Recipe Irresistible?

Quick and Simple: In just 30 minutes, you can create a gourmet meal that feels like a cozy restaurant dinner. No need for complicated techniques or lengthy prep!

Rich, Buttery Flavor: The brown butter enriches the dish with a nutty aroma, beautifully complemented by earthy cremini mushrooms.

Textural Delight: Enjoy the perfect contrast of creamy pasta mixed with crunchy toasted breadcrumbs, taking your comfort food experience to the next level.

Vegetarian-Friendly: This dish makes for a hearty vegetarian option that can impress not only the plant-based eaters but also meat lovers at your table.

Versatile and Customizable: Want to make it heartier? Add some grilled chicken or shrimp! You can also easily toss in seasonal veggies like spinach or zucchini for added nutrition.

Elevate your weeknight dinners or impress your friends with this Brown Butter Mushroom Pasta, and for more flavorful quick recipes, check out Crockpot Butter Chicken or Seafood Pasta Savory!

Brown Butter Mushroom Pasta Ingredients

For the Pasta
• Spaghetti – This main pasta component provides structure; feel free to substitute with fettuccine or any pasta of choice.

For the Breadcrumbs
• Extra-virgin olive oil – Adds richness during breadcrumb toasting; can be replaced with any high-quality oil for a different flavor.
• French style breadcrumbs – Creates a delightful crunch; substitute with panko or Italian-style breadcrumbs if preferred.

For the Sauce
• Unsalted butter – The star of the Brown Butter Mushroom Pasta, creating a rich sauce; consider using less for a lighter version.
• Garlic, minced – Provides aromatic flavor; fresh is best, but powdered garlic can work in a pinch.
• Cremini mushrooms, thinly sliced – Adds umami and texture; feel free to opt for button mushrooms if unavailable.
• Fresh thyme, sprigs – Offers delightful herbal notes; you can use dried thyme instead, but reduce the amount.
• Kosher salt and freshly ground black pepper – Essential for enhancing the overall flavor; adjust to taste.

For Garnishing
• Chopped fresh parsley leaves – Adds a burst of freshness as a finishing touch for your dish.

Enjoy making this comforting dish that effortlessly brings warmth and flavor to your table!

Step‑by‑Step Instructions for Brown Butter Mushroom Pasta

Step 1: Cook Pasta
Start by bringing a large pot of salted water to a rolling boil. Once it’s bubbling, add your spaghetti and cook according to the package instructions until al dente, typically about 8-10 minutes. Make sure to stir occasionally to prevent sticking. When done, drain the pasta well, reserving a small cup of the pasta water for later.

Step 2: Toast Breadcrumbs
In a large skillet, heat a drizzle of extra-virgin olive oil over medium heat. Add the French style breadcrumbs and toast them, stirring frequently, for about 3-5 minutes until they are golden brown and crispy. Keep an eye on them to prevent burning. Once toasted, season with salt and pepper, then transfer the breadcrumbs to a bowl and set aside.

Step 3: Make Sauce
In the same skillet, reduce the heat to low and melt the unsalted butter slowly, allowing it to develop a rich, nutty aroma. As the butter begins to foam, add the minced garlic and sauté for about 1 minute until fragrant, stirring constantly to avoid burning. This step is crucial for enhancing the flavor of your Brown Butter Mushroom Pasta.

Step 4: Cook Mushrooms
Next, stir in the thinly sliced cremini mushrooms and fresh thyme into the butter and garlic mixture. Cook for about 3-5 minutes, allowing the mushrooms to soften and brown. Once they are tender and golden, season with kosher salt and freshly ground black pepper to taste, ensuring they absorb all that delightful butter flavor.

Step 5: Combine Pasta and Sauce
With the mushroom mixture ready, it's time to bring your Brown Butter Mushroom Pasta together. Add the drained spaghetti to the skillet and toss everything well, ensuring the pasta is fully coated in the buttery sauce. If the mixture seems too dry, stir in a splash of the reserved pasta water for creaminess and to help bind it all together.

Step 6: Serve and Garnish
Once everything is combined, serve the Brown Butter Mushroom Pasta hot, generously topping each portion with the toasted breadcrumbs for added crunch. Finish with a sprinkle of chopped fresh parsley leaves for a lovely burst of color and freshness. Enjoy this warm, comforting dish that's sure to impress!

Brown Butter Mushroom Pasta Variations

Feel free to explore and customize the delicious world of Brown Butter Mushroom Pasta just the way you love!

  • Dairy-Free: Swap unsalted butter with vegan butter or olive oil for a light, plant-based option that's still rich and satisfying.
  • Whole Wheat: Use whole wheat spaghetti or fettuccine for a heartier dish packed with additional fiber and nutrients.
  • Extra Veggies: Add sautéed spinach, asparagus, or roasted zucchini to boost the nutritional value and color of your meal.
  • Protein-Packed: Incorporate grilled chicken or shrimp for a filling addition that creates an exciting twist, making it a well-rounded meal.
  • Spicy Kick: Sprinkle in red pepper flakes while sautéing the garlic for a tantalizing kick that heat lovers will adore.
  • Cheesy Twist: Mix in freshly grated Parmesan or vegan cheese alternative right before serving for an added layer of richness and flavor.
  • Nutty Flavor Boost: Toss in some toasted walnuts or pine nuts for a lovely crunch that compliments the creamy sauce beautifully.
  • Herb Swaps: Experiment with fresh mint or basil instead of thyme for a fragrant twist that'll brighten the dish and entice your palate.

For more creamy inspirations, be sure to check out Cauliflower Pasta Ready or if you're a seafood lover, try Seafood Pasta Savory for an elegant dish that's sure to impress!

Make Ahead Options

These Brown Butter Mushroom Pasta are perfect for meal prep enthusiasts! You can cook the spaghetti and prepare the toasted breadcrumbs up to 24 hours in advance, storing them separately in your refrigerator. Additionally, you can sauté the mushrooms and garlic ahead of time, letting them cool and refrigerating them for up to 3 days. Just be sure to reheat the mushroom mixture gently before combining it with the pasta to maintain that delicious, creamy texture. When you’re ready to serve, simply cook the pasta, combine everything in the skillet, and finish with the toasted breadcrumbs for a comforting dish that's just as delightful as when freshly made!

What to Serve with Brown Butter Mushroom Pasta

Enhance your cozy dinner experience with delightful side dishes and drinks that perfectly complement the richness of this pasta.

  • Garlic Bread: A classic pairing that’s crunchy and buttery, perfect for soaking up any extra sauce and enhancing the garlic notes in the pasta.

  • Mixed Green Salad: Fresh and crisp, a light salad with lemon vinaigrette balances the richness of the pasta, adding brightness to your meal.

  • Roasted Asparagus: Tender and slightly charred, asparagus offers a delicious crispy texture and earthy flavor that harmonizes beautifully with the creamy sauce.

  • Parmesan Crisps: Crunchy and flavorful, these can add a nutty finish to your pasta dish, echoing the brown butter's richness.

  • Chardonnay: A glass of chilled Chardonnay with its crisp acidity cuts through the buttery sauce while enhancing the dish's earthy mushroom notes.

  • Chocolate Mousse: For dessert, a light and airy chocolate mousse captures sweetness without being too heavy, perfectly rounding off your meal.

Each of these sides and drinks invites you to enjoy a fuller, more satisfying dining experience, ensuring your Brown Butter Mushroom Pasta truly shines!

Storage Tips for Brown Butter Mushroom Pasta

  • Room Temperature: Serve the Brown Butter Mushroom Pasta immediately for the best flavor and texture; however, if leftovers remain, they should not sit out for more than 2 hours to prevent spoilage.
  • Fridge: Store any uneaten pasta in an airtight container in the refrigerator for up to 2 days. This helps maintain its texture and flavor, ensuring that your delicious meal stays fresh.
  • Freezer: For longer storage, freeze the pasta in a suitable container for up to 2 months. When ready to eat, thaw in the fridge overnight before reheating.
  • Reheating: Reheat gently on the stovetop over low heat, adding a splash of reserved pasta water or broth to revive the creamy sauce and keep everything buttery and luscious.

Expert Tips for Brown Butter Mushroom Pasta

  • Slowly Melt Butter: To achieve that signature nutty flavor, melt the unsalted butter gently and keep the heat low; this avoids burning.

  • Proper Pasta Cooking: Check for al dente texture before draining; overcooked pasta will create a mushy consistency in your Brown Butter Mushroom Pasta.

  • Toast Breadcrumbs Wisely: Watch the breadcrumbs closely while toasting; they can go from golden to burnt quickly if left unattended.

  • Use Fresh Ingredients: Opt for fresh garlic and herbs whenever possible; they significantly enhance the dish's overall flavor compared to dried alternatives.

  • Pasta Water Magic: Don’t forget to reserve a cup of the pasta cooking water; it helps in creating a silky sauce when mixing with the mushroom-butter blend.

  • Experiment with Add-ins: Feel free to personalize your Brown Butter Mushroom Pasta by adding seasonal veggies or your favorite protein for a unique twist!

Brown Butter Mushroom Pasta Recipe FAQs

What kind of mushrooms should I use for this recipe?
I often use cremini mushrooms for their rich umami flavor, but you can easily substitute them with button mushrooms if they are what you have on hand. Just slice them thinly to maintain the texture and cooking time!

How long can I store leftovers of Brown Butter Mushroom Pasta?
You can store any uneaten pasta in an airtight container in the refrigerator for up to 2 days. It’s best to reheat gently on the stovetop and add a splash of reserved pasta water to help restore the creamy sauce.

Can I freeze Brown Butter Mushroom Pasta?
Absolutely! To freeze, pack the pasta into a suitable container and it will keep well for up to 2 months. When you’re ready to enjoy it again, simply thaw it overnight in the refrigerator and reheat gently on the stove with a bit of water or broth to loosen the sauce.

What if my sauce is too oily?
If you find your sauce is too oily, make sure to melt the butter slowly and only add the garlic once it begins to foam to avoid excess separation. Also, reserve a little pasta water to help emulsify the sauce when combining with the pasta—a little goes a long way!

Can this recipe accommodate dietary restrictions, like vegetarian or gluten-free?
Yes! This Brown Butter Mushroom Pasta is vegetarian as is. For a gluten-free option, swap out the spaghetti with a gluten-free pasta of your choice. There are many great alternatives available that still deliver on flavor and texture.

How can I enhance the flavor of my Brown Butter Mushroom Pasta?
To elevate the dish, use fresh herbs whenever possible—thyme and parsley work wonderfully. Additionally, feel free to experiment with added flavors such as a sprinkle of freshly grated Parmesan cheese or a squeeze of lemon juice for a bright finish!

Brown Butter Mushroom Pasta

Savory Brown Butter Mushroom Pasta in Just 30 Minutes

A quick and delightful Brown Butter Mushroom Pasta that combines rich flavors and textures in just 30 minutes.
Print Recipe Pin Recipe
Prep Time 10 minutes mins
Cook Time 20 minutes mins
Total Time 30 minutes mins
Servings: 4 servings
Course: Dinner
Cuisine: Italian
Calories: 550
Ingredients Equipment Method Nutrition Notes

Ingredients
  

For the Pasta
  • 8 ounces spaghetti or any pasta of choice
For the Breadcrumbs
  • 2 tablespoons extra-virgin olive oil or any high-quality oil
  • 1 cup French style breadcrumbs or panko/Italian breadcrumbs
For the Sauce
  • 4 tablespoons unsalted butter for a richer sauce, use less for lighter
  • 3 cloves garlic, minced fresh is best
  • 8 ounces cremini mushrooms, thinly sliced or button mushrooms
  • 2 sprigs fresh thyme or dried thyme
  • to taste kosher salt
  • to taste freshly ground black pepper
For Garnishing
  • 2 tablespoons chopped fresh parsley leaves for garnish

Equipment

  • Large pot
  • Large skillet
  • strainer

Method
 

Step‑by‑Step Instructions
  1. Bring a large pot of salted water to a rolling boil. Cook the spaghetti until al dente, about 8-10 minutes. Drain the pasta, reserving a cup of pasta water.
  2. In a large skillet, heat olive oil over medium heat. Add breadcrumbs and toast for 3-5 minutes until golden brown. Season with salt and pepper; set aside.
  3. Reduce heat to low and melt the butter slowly in the same skillet. Add minced garlic and sauté for 1 minute until fragrant.
  4. Stir in sliced mushrooms and thyme. Cook for about 3-5 minutes until soft, seasoning with salt and pepper.
  5. Add the drained spaghetti to the skillet, tossing to coat in the sauce. If too dry, add reserved pasta water as needed.
  6. Serve hot, topped with toasted breadcrumbs and fresh parsley. Enjoy!

Nutrition

Serving: 1servingCalories: 550kcalCarbohydrates: 80gProtein: 12gFat: 20gSaturated Fat: 8gPolyunsaturated Fat: 2gMonounsaturated Fat: 8gCholesterol: 30mgSodium: 600mgPotassium: 400mgFiber: 4gSugar: 2gVitamin A: 15IUVitamin C: 5mgCalcium: 2mgIron: 10mg

Notes

For a heartier meal, consider adding grilled chicken or seasonal vegetables.

Tried this recipe?

Let us know how it was!

Flavorful Frito Cowboy Cabbage: A Hearty Family Favorite

February 12, 2026 by Grace Snow Leave a Comment

The tantalizing scents of childhood dinner tables fill the kitchen as I whip up a comforting batch of Flavorful Frito Cowboy Cabbage. This easy weeknight meal is a delightful fusion of savory ground beef, fresh vibrant veggies, and a satisfying crunch from the Fritos—perfect for those evenings when you're craving something hearty but want to skip the fast food guilt. What I love most about this dish is its versatility; you can easily customize it with your favorite proteins or add extra vegetables for a nutritious boost. Whether you're feeding a hungry family or hosting friends for a casual gathering, this dish offers a delicious backdrop for laughter and connection. Are you ready to impress your loved ones with this flavorful twist on comfort food? Let’s dive in!

Why is Frito Cowboy Cabbage a Must-Try?

Easy and Quick: This recipe can be whipped up in under 30 minutes, making it perfect for busy weeknights when you need something delicious without the hassle.

Customizable Delight: Packed with options, you can swap in ground turkey, mix up the vegetables, or even go vegetarian with black beans. Each version offers a unique twist!

Flavor Explosion: The savory combination of seasoned beef, fresh veggies, and crispy Fritos delivers a delightful crunch and taste that satisfies any comfort food craving.

Kid-Friendly: Even picky eaters will love this dish, as it’s not only fun to eat but also visually appealing with its colorful ingredients.

Make-Ahead Friendly: Prepare it in advance and store it in the fridge for a quick reheat later, just like how I enjoy a cozy bowl of Corn Furikake Fried rice for lunch!

With Flavorful Frito Cowboy Cabbage on the menu, your family and friends will be begging for seconds!

Flavorful Frito Cowboy Cabbage Ingredients

For the Beef Mixture

  • Ground Beef – Provides the main protein and savory flavor; substitute with ground turkey for a leaner option or black beans for a vegetarian alternative.
  • Onion – Delivers sweetness and depth of flavor; any type of onion can be used based on preference.
  • Bell Pepper – Adds color and sweetness; any color bell pepper works or substitute with diced carrots for a different taste.
  • Diced Tomatoes – Introduces moisture and acidity; canned tomatoes work well, fresh tomatoes can also be used in season.
  • Taco Seasoning – Provides the necessary spices for flavor; homemade taco seasoning can control spice levels.

For the Vegetables

  • Cabbage – Acts as the primary vegetable, offering crunch and bulk; use green cabbage or napa for different textures.

For the Crunch and Creaminess

  • Fritos – Add a crunchy texture and sweet corn flavor; substitute with corn chips or tortilla strips for variety.
  • Shredded Cheese – Melts beautifully on the dish, adding richness; choose cheddar, Monterey Jack, or a dairy-free cheese for alternatives.
  • Sour Cream – Optional garnish that adds creaminess and tang; Greek yogurt can be used as a healthier substitute.

With these Flavorful Frito Cowboy Cabbage ingredients in your kitchen, you’re well on your way to creating a deliciously comforting meal!

Step‑by‑Step Instructions for Flavorful Frito Cowboy Cabbage

Step 1: Prepare Ingredients
Start by chopping the cabbage into thin strips, dicing the onion, and slicing the bell pepper. This colorful blend of veggies will bring life to your Flavorful Frito Cowboy Cabbage. Ensure the ingredients are prepped before you begin cooking, as this will streamline your process and keep your kitchen organized.

Step 2: Cook Meat
In a large skillet over medium heat, add the ground beef and cook until browned, about 5-7 minutes, breaking it apart with a spatula. Drain any excess fat to maintain the flavors without the grease. The meat should be nicely browned, fragrant, and ready to absorb the delicious spices of the taco seasoning in the next steps.

Step 3: Sauté Vegetables
Add the diced onion and bell pepper to the skillet, stirring them into the cooked beef. Cook for about 3-4 minutes, until the vegetables soften and become fragrant. You’ll see the onion turn translucent, creating a beautiful base for your Flavorful Frito Cowboy Cabbage as the flavors begin to meld.

Step 4: Combine
Stir in the diced tomatoes and taco seasoning, mixing well to ensure that every piece of meat and vegetable is coated. Let the mixture simmer for about 5 minutes, allowing the tomatoes to release their juices and combine with the spices, creating a rich, savory filling for your dish.

Step 5: Add Cabbage
Fold in the chopped cabbage, mixing it thoroughly with the meat and tomato mixture. Cook for another 3-5 minutes, stirring occasionally, until the cabbage is slightly wilted but still retains some crunch. This step is crucial for achieving that perfect texture balance in your Flavorful Frito Cowboy Cabbage.

Step 6: Assemble
Remove the skillet from heat, and generously top the mixture with Fritos and shredded cheese. As the residual heat melts the cheese, you’ll be tempted by the delicious aroma. Let it sit for a minute to allow the cheese to melt beautifully, creating a rich, gooey topping that adds a delightful crunch.

Step 7: Serve
If desired, garnish your Flavorful Frito Cowboy Cabbage with a dollop of sour cream or Greek yogurt. Serve warm and enjoy the vibrant colors and inviting smells that will surely bring smiles to your table. This comforting dish is perfect for family gatherings or casual nights in.

Make Ahead Options

These Flavorful Frito Cowboy Cabbage preparations are perfect for busy home cooks looking to save time! You can chop the vegetables (cabbage, onion, and bell pepper) up to 24 hours in advance and store them in an airtight container in the refrigerator to keep them fresh. Additionally, you can brown the ground beef and combine it with the taco seasoning and diced tomatoes up to 3 days ahead of serving. Simply refrigerate the mixture and, when ready to enjoy, cook your prepped cabbage in the skillet, add the pre-cooked beef mix, and finish by topping with Fritos and cheese. This method ensures that your dish retains its vibrant flavors and textures, making your meal just as delicious as if you had made it fresh!

Storage Tips for Flavorful Frito Cowboy Cabbage

Fridge: Store leftovers in an airtight container for up to 3 days. Make sure the dish has cooled to room temperature before sealing it to maintain freshness.

Freezer: If you want to keep the Flavorful Frito Cowboy Cabbage for longer, freeze it in a freezer-safe container for up to 2 months. Portion it out for easy reheating later!

Reheating: Reheat on the stovetop over medium heat or in the microwave until thoroughly warmed, stirring occasionally. If it looks dry, add a splash of broth or water to restore moisture.

Make-Ahead: This dish can be prepared ahead of time. Assemble the mixture and store it in the fridge, then simply heat and top with Fritos before serving.

Expert Tips for Flavorful Frito Cowboy Cabbage

  • Cook Meat Well: Always brown the ground beef thoroughly to enhance its savory flavor. It should be nicely caramelized before adding vegetables.

  • Don’t Overcook Cabbage: Keep the cabbage slightly crunchy to maintain its texture. Remove it from heat as soon as it wilts for the best balance in your Flavorful Frito Cowboy Cabbage.

  • Spice It Up: If you like a bit of heat, add a splash of hot sauce or a pinch of cayenne pepper to the meat mixture to elevate the flavor profile.

  • Customize to Taste: Don’t hesitate to swap ingredients! Try ground turkey or black beans for different flavors, or add extra veggies like zucchini or corn for added nutrition.

  • Serve with Flair: Garnish with sour cream or a sprinkle of fresh herbs to add a creamy touch and a pop of color, enhancing the dish's visual appeal.

What to Serve with Flavorful Frito Cowboy Cabbage?

The delightful crunch and hearty flavors of this dish are perfect for pairing with sides that elevate your dining experience.

  • Creamy Mashed Potatoes: The velvety texture of mashed potatoes complements the crunchy elements of Frito Cowboy Cabbage, creating a perfect contrast.

  • Garden Salad: A fresh garden salad brightens the meal with crisp veggies and a light vinaigrette, balancing the richness of the main dish.

  • Cornbread Muffins: Soft, sweet cornbread muffins add a comforting touch, soaking up any extra savory juices from the Frito Cowboy Cabbage.

  • Guacamole: The creamy, cool guacamole enhances each bite, providing a zesty kick that pairs wonderfully with the savory flavors.

  • Mexican Street Corn: The sweetness of street corn drizzled with lime and chili contrasts nicely with the seasoned beef, adding another layer of flavor.

  • Pineapple Salsa: This refreshing side offers a vibrant, fruity complement to the savory dish, adding an unexpected twist to your plate, tantalizing the taste buds.

  • Sparkling Limeade: A fizzy limeade elevates your meal, providing a refreshing palate cleanser that balances the richness of the Cowboy Cabbage.

  • Chocolate Brownies: Round off the meal with fudgy brownies. Their sweetness contrasts with the savory main course, providing the perfect ending for a satisfying dinner.

Flavorful Frito Cowboy Cabbage Variations

Feel free to tailor this delicious dish to your cravings and pantry contents for a unique twist every time!

  • Dairy-Free: Use dairy-free cheese and coconut yogurt to keep it creamy without dairy.
  • Extra Veggies: Toss in corn or diced zucchini for additional nutrition and vibrant color.
  • Spicy Kick: Add diced jalapeños or a sprinkle of cayenne pepper to spice things up.
  • Plant-Based: Swap ground beef for black beans or lentils to create a satisfying vegetarian option.
  • Crunchy Topping: Substitute Fritos with crunchy tortilla strips or corn chips for a fun variety.
  • Flavor Boost: Mix in some fresh cilantro or parsley before serving for an invigorating herbal note.
  • Salsa Twist: Top with a scoop of your favorite salsa or guacamole for a fresh and zesty twist.
  • Savory Spin: Try adding a splash of Worcestershire sauce for extra depth and umami flavor.

And if you’re looking for more flavorful adventures, don’t miss out on my Fried Shrimp Cabbage or the delightful Dill Shrimp Stir—there's always a way to get creative in the kitchen! Happy cooking!

Flavorful Frito Cowboy Cabbage Recipe FAQs

How do I choose the right cabbage for Frito Cowboy Cabbage?
Absolutely! When selecting cabbage, look for heads that are firm and heavy with vibrant green leaves. Avoid any with dark spots or wilting. Green cabbage is traditional, but napa cabbage can add an interesting flavor and texture to your dish.

How should I store leftovers of Frito Cowboy Cabbage?
Very well! Store any leftovers in an airtight container in the fridge for up to 3 days. Be sure to let it cool to room temperature before sealing to maintain freshness. This way, you can enjoy the comforting flavors again in just a few days!

Can I freeze Frito Cowboy Cabbage? If so, how?
Yes, you can! To freeze Frito Cowboy Cabbage, allow it to cool completely after cooking. Then, place it in a freezer-safe container, leaving some space at the top for expansion, and it will keep well for up to 2 months. When ready to enjoy, thaw overnight in the fridge and reheat on the stove or microwave.

What if I have picky eaters? Any tips?
Absolutely! To cater to picky eaters, you can make the Frito Cowboy Cabbage more appealing by omitting certain ingredients or keeping the flavors milder. Introduce the dish gradually, and serve it with fun toppings like cheese or sour cream that they can customize to their liking. The colorful ingredients can also make it visually enticing!

What are some good dietary substitutions?
The more the merrier! You can substitute ground beef with ground turkey for a leaner option or use black beans or lentils for a vegetarian version. Also, for lactose-free diets, try using dairy-free cheese or skip the cheese altogether. Fresh herbs can be added for those who are looking to boost the flavor without adding extra calories.

Is Frito Cowboy Cabbage safe for pets?
While many ingredients are safe, it’s best to keep this dish away from pets, especially because of the onions and cheese, which can be harmful to them. Always check what specific foods are safe for your furry friends!

Flavorful Frito Cowboy Cabbage

Flavorful Frito Cowboy Cabbage: A Hearty Family Favorite

Experience the delightful fusion of savory ground beef and fresh veggies in this Flavorful Frito Cowboy Cabbage, perfect for a comforting meal.
Print Recipe Pin Recipe
Prep Time 10 minutes mins
Cook Time 20 minutes mins
Total Time 30 minutes mins
Servings: 6 servings
Course: Dinner
Cuisine: American
Calories: 500
Ingredients Equipment Method Nutrition Notes

Ingredients
  

For the Beef Mixture
  • 1 lb Ground Beef Substitute with ground turkey or black beans
  • 1 medium Onion Any type based on preference
  • 1 medium Bell Pepper Any color or substitute with diced carrots
  • 1 can Diced Tomatoes Canned or fresh tomatoes in season
  • 1 packet Taco Seasoning Homemade can control spice levels
For the Vegetables
  • 1 head Cabbage Green or napa for different textures
For the Crunch and Creaminess
  • 2 cups Fritos Substitute with corn chips or tortilla strips
  • 1 cup Shredded Cheese Cheddar or Monterey Jack, or dairy-free alternatives
  • 1 cup Sour Cream Can substitute with Greek yogurt

Equipment

  • Large skillet

Method
 

Preparation
  1. Chop the cabbage into thin strips, dice the onion, and slice the bell pepper. Prepare all ingredients before cooking to simplify the process.
Cooking
  1. In a large skillet over medium heat, add the ground beef and cook until browned, about 5-7 minutes. Drain excess fat.
  2. Add the diced onion and bell pepper to the skillet, stirring them into the cooked beef. Cook for about 3-4 minutes until the vegetables soften.
  3. Stir in the diced tomatoes and taco seasoning, mix well, and let simmer for about 5 minutes.
  4. Fold in the chopped cabbage, mixing thoroughly, and cook for another 3-5 minutes until slightly wilted.
  5. Remove from heat and top with Fritos and shredded cheese. Let sit for a minute to melt the cheese.
  6. Garnish with sour cream or Greek yogurt if desired, then serve warm.

Nutrition

Serving: 1servingCalories: 500kcalCarbohydrates: 40gProtein: 25gFat: 30gSaturated Fat: 12gPolyunsaturated Fat: 3gMonounsaturated Fat: 5gCholesterol: 80mgSodium: 900mgPotassium: 800mgFiber: 5gSugar: 6gVitamin A: 20IUVitamin C: 60mgCalcium: 10mgIron: 15mg

Notes

Store leftovers in an airtight container for up to 3 days or freeze for up to 2 months. Reheat on the stovetop or in the microwave.

Tried this recipe?

Let us know how it was!

Taco Potatoes: Comfort Food That Will Delight Your Family

February 12, 2026 by Grace Snow Leave a Comment

“Who says comfort food can't be fun?” When I first piled taco-inspired toppings onto a fluffy baked potato, it was a moment of culinary inspiration. These Taco Potatoes transform a humble potato into a cozy meal that’s sure to impress your family during those hectic weeknights. With seasoned ground beef, melted cheese, and a rainbow of fresh toppings, this easy dinner option checks all the boxes for being family-friendly and filling. Beyond their delightful taste, these hearty potatoes are perfect for customizing—so everyone can add their favorite fixings. Whether you choose to make them spicy or keep it classic, Taco Potatoes will become your go-to recipe. Ready to discover how this comfort dish can take your cooking to the next level? Let’s dive in!

Why Are Taco Potatoes So Appealing?

Unique Twist: Taco Potatoes take the classic baked potato and infuse it with the vibrant flavors of your favorite taco toppings.

Easy to Prepare: This dish comes together seamlessly, making it ideal for busy weeknights when time is of the essence.

Customizable Fun: Everyone can create their perfect potato! From spicy jalapeños to creamy guacamole, each person can add their favorite toppings.

Family-Friendly: With cozy and familiar flavors, this dish is a guaranteed hit that the entire family will love.

Comfort Meets Convenience: Taco Potatoes combine hearty satisfaction with quick preparation, so you can focus on family time instead of stress.

Plus, if you want to accompany this dish, consider serving it with some refreshing Smoky Sweet Potatoes or our zesty Shrimp Tacos for a complete meal experience!

Taco Potatoes Ingredients

For the Potatoes
• Medium Russet Potatoes – The perfect base for a fluffy interior that holds all the delicious fillings.

For the Beef Filling
• Lean Ground Beef – Adds protein and a rich flavor, but can be swapped with ground turkey or a meat alternative for a lighter option.
• Taco Seasoning – The key to infusing that beloved taco flavor; both store-bought and homemade versions work beautifully.

For the Toppings
• Shredded Lettuce – Provides a crisp freshness; any salad greens make a great substitute.
• Cheddar Cheese – Melts beautifully over the beef; feel free to exchange it with Monterey Jack or a dairy-free cheese for variety.
• Sour Cream – Creaminess that balances the spices; Greek yogurt serves as a healthier alternative.
• Salsa – Moisture and flavor enhancer; choose your favorite jarred salsa or fresh pico de gallo to kick up the taste.
• Guacamole – Optional, but brings an exquisite creamy richness that delights the palate.
• Green Onion – Adds a fresh garnish; can be replaced with chopped cilantro or parsley for a different kind of herbal brightness.

These Taco Potatoes are not only delicious but also your canvas for creativity in the kitchen!

Step‑by‑Step Instructions for Taco Potatoes

Step 1: Preheat and Prepare Potatoes
Begin by preheating your oven to 400°F (200°C). While the oven heats up, take medium russet potatoes, wash them under cold water, and dry thoroughly. Poke several holes in each potato with a fork to allow steam to escape. Wrap each potato in aluminum foil and place them directly on the oven rack. Bake for about 1 hour, or until they are tender and easily pierced with a fork.

Step 2: Cook Ground Beef
While the potatoes are baking, heat a skillet over medium-high heat. Add the lean ground beef and cook until it’s browned, breaking it apart with a spatula, for approximately 7–10 minutes. Drain any excess fat, then sprinkle in the taco seasoning. Follow the packet instructions by adding water and bringing the mixture to a boil before reducing the heat. Simmer for about 10 minutes, allowing the flavors to meld beautifully.

Step 3: Assemble Potatoes
Once the potatoes are fully baked and tender, remove them from the oven and carefully unwrap the foil. Slice open the tops of each potato lengthwise, being cautious of hot steam. Gently fluff the insides with a fork, then generously fill each potato with the seasoned ground beef mixture.

Step 4: Add Toppings
Now comes the fun part! Top each filled potato with your choice of shredded lettuce, cheddar cheese, and a dollop of sour cream. Feel free to get creative with additional toppings like salsa, guacamole, and sliced green onions, customizing each Taco Potato to suit your family’s taste preferences.

Step 5: Serve
Serve your delicious Taco Potatoes warm on a plate, showcasing all the vibrant toppings. Encourage everyone to add any extra toppings they love. These hearty, taco-inspired baked potatoes make for a comforting meal that will please both kids and adults alike.

Make Ahead Options

These Taco Potatoes are perfect for meal prep, making weeknight dinners easier and stress-free! You can prepare the seasoned ground beef and store it in the refrigerator for up to 3 days ahead of time. Just cook the beef mixture, let it cool, and transfer it to an airtight container. The baked potatoes can be made in advance, too—bake them, let them cool completely, and refrigerate them for up to 24 hours. When you’re ready to serve, simply reheat the potatoes in the oven at 350°F until warmed through, about 15-20 minutes, then fill with the beef and your favorite toppings. This way, you’ll have delicious Taco Potatoes ready to go, saving you valuable time without sacrificing flavor!

Taco Potatoes Customization Ideas

Who doesn’t love a little flexibility in the kitchen? Get ready to unleash your culinary creativity and tweak these delightful Taco Potatoes to cater to your taste buds.

  • Spicy Kick: Add diced jalapeños to the filling or as a topping for an extra layer of heat! The spiciness can be tempered with creamy toppings like sour cream or guacamole.

  • Vegetarian Delight: Swap ground beef for black beans or lentils seasoned with taco spices. This not only caters to vegetarians but also adds an earthy flavor. You might also want to try it with a side of Crispy Fish Taco Bowls for those who want to stick with seafood!

  • Sweet Potato Switch: Replace russet potatoes with sweet potatoes for a sweeter, nutritious twist. The sweetness complements the savory filling beautifully, making each bite an explosion of flavors.

  • Different Cheese: Change cheddar cheese to pepper jack or a vegan cheese option to suit your dietary preferences. The cheese choice can really influence the flavor profile!

  • Meat Options: For lighter variations, consider using ground turkey or chicken instead of beef. Add some herbs like cilantro for a fresh hint that brightens the dish.

  • Extra Crunch: Top with crispy tortilla strips or crushed corn chips for a satisfying crunch. This texture contrast pairs wonderfully with the comfort of creamy toppings.

  • Flavor Layers: Drizzle with hot sauce or homemade salsa verde to amplify the flavors even more. A squeeze of lime juice can really elevate the dish and tie the flavors together!

Get inspired by these variations and enjoy creating your own tailored Taco Potatoes masterpiece that makes every family member smile. And for even more options, how about trying them with Roasted Sweet Potatoes for a side dish that perfectly pairs with your delightful creation?

Expert Tips for Taco Potatoes

  • Perfectly Cooked Potatoes: Ensure your potatoes are fully baked by testing for softness with a fork; they should yield easily when pierced.

  • Flavor Boost: Don’t hesitate to mix in a bit of cheese into the ground beef while it's still in the skillet for an extra cheesy taco flavor in your Taco Potatoes.

  • Creative Toppings: Explore unique toppings like diced avocados, pickled jalapeños, or crispy bacon to elevate the flavor profile and personalize each potato.

  • Healthier Substitutions: Consider using Greek yogurt instead of sour cream, and try black beans instead of beef for a delightful vegetarian option without sacrificing taste.

  • Microwave Shortcut: If you’re in a rush, you can microwave the potatoes wrapped in a damp paper towel; cook them on high for about 8-10 minutes, flipping halfway through for even cooking.

  • Leftover Magic: Don’t let extras go to waste! Any leftover Taco Potatoes can be reheated and enjoyed for lunch or dinner the next day; simply add fresh toppings for a quick meal.

How to Store and Freeze Taco Potatoes

Fridge: Store leftover Taco Potatoes in an airtight container in the fridge for up to 3 days. Ensure they are well wrapped to maintain freshness.

Freezer: For longer storage, wrap individually in plastic wrap and then foil or place in a freezer-safe container. Freeze for up to 3 months for best quality.

Reheating: Reheat baked potatoes in the oven at 350°F (175°C) for about 20 minutes, or microwave on high for 3-4 minutes. Add fresh toppings post-heating for a delicious meal revival.

Room Temperature: If left out, ensure Taco Potatoes stay at room temperature for no longer than 2 hours to maintain food safety.

What to Serve with Taco Potatoes

Who can resist the harmony of flavors this dish brings to your dinner table?

  • Crispy Nachos: Perfect for dipping in guacamole or salsa, these add a great crunch, balancing the soft texture of the potatoes. A fun appetizer can warm everyone up for the main course!

  • Zesty Mexican Street Corn Salad: This refreshing salad blends sweet corn with lime, cilantro, and spices, mirroring the flavors in your Taco Potatoes while adding a burst of freshness.

  • Creamy Cilantro Lime Rice: Fluffy rice infused with zesty lime and fragrant cilantro complements the rich toppings of Taco Potatoes perfectly. This side adds a lightness, enhancing your meal experience.

  • Taco Salad: Combining mixed greens, salsa, and cheese, this salad is a crunchy match that echoes the flavors of the Taco Potatoes while adding a nutritious dimension to the meal.

  • Guacamole and Chips: A classic pairing, this creamy avocado dip adds richness and freshness. The crunchy chips are perfect for scooping up any delightful leftover toppings.

  • Pineapple Jalapeño Salsa: Sweet and spicy, this salsa cuts through the richness of the potatoes and adds a burst of color on your table. It’s a lively upgrade to traditional toppings!

  • Sparkling Water with Lime: For a refreshing drink choice, this simple beverage is light and enhances the meal without overshadowing the vibrant flavors of the Taco Potatoes.

  • Choco Taco Sundae: To sweeten the evening, this fun dessert mixes beloved flavors in a playful twist, wrapping up your meal with a happy note!

Embrace creativity with these pairings and watch as your Taco Potatoes shine at the center of your dining experience!

Taco Potatoes Recipe FAQs

What type of potatoes are best for Taco Potatoes?
For Taco Potatoes, medium russet potatoes are ideal due to their fluffy and starchy texture. They hold up well when baking and create a perfect base for your delicious fillings. If you prefer a sweeter flavor, you can opt for sweet potatoes instead!

How should I store leftover Taco Potatoes?
Absolutely! Store any leftover Taco Potatoes in an airtight container in the fridge for up to 3 days. Make sure they’re well-wrapped to keep them fresh. If you plan on enjoying them later in the week, you can freeze them!

Can I freeze Taco Potatoes? What’s the best method?
Yes, you can freeze Taco Potatoes for up to 3 months! For the best results, individually wrap each potato in plastic wrap and then in aluminum foil to prevent freezer burn. Place them in a freezer-safe container, and when you're ready to eat, simply thaw them in the fridge overnight before reheating.

What if my baked potatoes aren't fully cooked?
If you find your baked potatoes are still hard when you're ready to assemble, don't worry! Simply return them to the oven at 400°F (200°C) for an additional 10 to 15 minutes, checking for softness with a fork. This ensures you have that fluffy interior perfect for all your delicious fillings.

Are there any dietary substitutions I can make for Taco Potatoes?
Absolutely! For a healthier version, you can use lean turkey instead of ground beef and swap sour cream for Greek yogurt. If you prefer a vegetarian alternative, black beans or lentils, seasoned with taco spices, work perfectly, providing that satisfying protein without the meat.

Taco Potatoes

Taco Potatoes: Comfort Food That Will Delight Your Family

Taco Potatoes are a fun, customizable comfort food that transforms baked potatoes into a family-friendly meal.
Print Recipe Pin Recipe
Prep Time 15 minutes mins
Cook Time 1 hour hr
Total Time 1 hour hr 15 minutes mins
Servings: 4 potatoes
Course: Dinner
Cuisine: American, Mexican
Calories: 450
Ingredients Equipment Method Nutrition Notes

Ingredients
  

For the Potatoes
  • 4 medium Russet Potatoes The perfect base for fillings.
For the Beef Filling
  • 1 pound Lean Ground Beef Can be swapped with ground turkey or a meat alternative.
  • 2 tablespoons Taco Seasoning Store-bought or homemade.
For the Toppings
  • 1 cup Shredded Lettuce Any salad greens can be used.
  • 1 cup Cheddar Cheese Can substitute with Monterey Jack or dairy-free cheese.
  • 1/2 cup Sour Cream Greek yogurt is a healthier alternative.
  • 1/2 cup Salsa Choose your favorite variety.
  • 1/2 cup Guacamole Optional, for creamy richness.
  • 2 tablespoons Green Onion Can replace with chopped cilantro or parsley.

Equipment

  • Oven
  • Skillet
  • Aluminum Foil

Method
 

Preparation
  1. Preheat your oven to 400°F (200°C). Wash and dry the medium russet potatoes. Poke holes in each and wrap in aluminum foil. Bake for about 1 hour until tender.
  2. Heat a skillet over medium-high heat, cook the lean ground beef until browned, about 7–10 minutes. Drain excess fat, add taco seasoning, water, bring to boil, reduce heat and simmer for 10 minutes.
  3. Once baked, unwrap the potatoes. Slice open the tops, fluff the insides with a fork, and fill each potato with the beef mixture.
  4. Top each potato with shredded lettuce, cheddar cheese, sour cream, and optional toppings like salsa, guacamole, and green onions.
  5. Serve warm, encouraging everyone to customize their tacos with their favorite toppings.

Nutrition

Serving: 1potatoCalories: 450kcalCarbohydrates: 45gProtein: 28gFat: 20gSaturated Fat: 9gPolyunsaturated Fat: 4gMonounsaturated Fat: 7gCholesterol: 75mgSodium: 800mgPotassium: 800mgFiber: 7gSugar: 2gVitamin A: 500IUVitamin C: 30mgCalcium: 200mgIron: 3mg

Notes

These Taco Potatoes can be made with a variety of toppings to suit your family's preferences, and the leftovers can be reheated for a quick meal.

Tried this recipe?

Let us know how it was!

Creamy Garlic Sauce Potatoes for Comforting Flavor Bliss

February 12, 2026 by Grace Snow Leave a Comment

As I stood in my kitchen, the unmistakable aroma of garlic sizzling in butter filled the air, whisking me away to evenings spent with family, sharing laughter over hearty meals. Today, I'm inviting you to create your own cozy culinary moment with these Creamy Garlic Sauce Potatoes. This dish isn't just a side; it's a versatile comfort food that brings warmth and satisfaction to any occasion, whether you're serving it with roasted chicken or indulging in a lazy brunch alongside eggs and bacon. In under 30 minutes, you can whip up this dish that’s not only creamy and indulgent but can also easily be tailored to suit your taste preferences. Are you ready to discover the magic of a homemade garlic sauce that complements every dinner snapshot?

Why Are Creamy Garlic Sauce Potatoes Irresistible?

Comforting Warmth: This dish embraces your palate with its creamy texture and soothing flavors, making it the ultimate comfort food. Speedy Prep: Whip up these potatoes in under 30 minutes, perfect for busy weeknights or last-minute gatherings. Versatile Pairings: Serve alongside Honey Garlic Chicken or as a brunch staple with eggs and bacon for delightful combinations. Customizable Delight: Easily adjust the seasoning—add herbs or spices tailored to your taste! Family-Friendly Appeal: Loved by both kids and adults, these potatoes are bound to gather everyone around the table for a memorable meal.

Creamy Garlic Sauce Potatoes Ingredients

For the Potatoes

• Potatoes – The foundation of this dish; russet, Yukon gold, or red varieties work wonderfully.
• Butter – Adds richness; margarine can be used for a dairy-free alternative.
• Garlic (minced) – Provides the signature aromatic flavor; stick with fresh garlic for the best taste.

For the Sauce

• Heavy Cream – Creates that luxurious creamy texture; half-and-half or whole milk can lighten it up.
• Salt – Essential for enhancing flavor; adjust to your preference, with sea salt or kosher salt as great options.
• Black Pepper – Adds a hint of spice; freshly ground is preferable for depth of flavor.
• Parmesan Cheese (grated) – Thickens the sauce and adds a savory richness; use cheddar or nutritional yeast for a dairy-free option.

Optional Add-Ins

• Fresh Herbs – Consider adding thyme or chives for a bright note.
• Spices – Incorporate red pepper flakes or smoked paprika for a fun kick.
• Toppings – Elevate the dish with crispy bacon bits or a drizzle of gourmet truffle oil.

These Creamy Garlic Sauce Potatoes are so easy to make, and the delightful creaminess will charm your taste buds while making them the perfect addition to any meal!

Step-by-Step Instructions for Creamy Garlic Sauce Potatoes

Step 1: Prepare the Potatoes
Start by washing, peeling, and dicing about 2 pounds of your chosen potatoes into small, even pieces, roughly 1-inch cubes. This ensures they cook uniformly and absorb the creamy garlic sauce beautifully. Set aside the diced potatoes once finished, ready to be boiled to tender perfection.

Step 2: Boil the Potatoes
Bring a large pot of salted water to a rolling boil over high heat. Once boiling, gently add the diced potatoes and cook for about 15 minutes or until they are fork-tender and can be easily pierced. Drain the potatoes in a colander, allowing them to steam dry for a minute while you prepare the creamy garlic sauce.

Step 3: Melt the Butter
In a large skillet, melt 2 tablespoons of butter over medium heat. Keep an eye on it to prevent burning and stir gently until the butter is fully melted and begins to foam, filling your kitchen with that intoxicating buttery aroma. This will create a rich base for your creamy garlic sauce.

Step 4: Sauté the Garlic
Add 4 cloves of minced garlic to the melted butter and sauté for about 1 minute. Stir frequently until the garlic is fragrant and just starts to turn golden. Be cautious not to let it brown too much, as overcooked garlic can develop a bitter taste that interferes with the dish's overall flavor.

Step 5: Incorporate the Cream
Slowly pour in 1 cup of heavy cream into the skillet, stirring continuously to combine with the sautéed garlic and melted butter. You’ll notice the sauce starting to thicken slightly as it warms up. Allow it to simmer gently for about 2 minutes to blend the flavors while keeping the heat over medium.

Step 6: Season the Sauce
Sprinkle in salt and freshly ground black pepper to taste, stirring well to integrate the seasonings. Taste the sauce and adjust the saltiness and pepper to your preference. This step is crucial to enhance the flavors of your Creamy Garlic Sauce Potatoes, making them truly delightful.

Step 7: Combine the Potatoes and Sauce
Add the drained, cooked potatoes directly into the creamy sauce, gently stirring to coat them evenly in the luscious mixture. Be careful to not mash the potatoes; you want them to remain tender and intact while absorbing all that delicious flavor.

Step 8: Add the Parmesan Cheese
Sprinkle in 1 cup of grated Parmesan cheese, stirring until it melts completely into the sauce and thickens it. This will create a rich, creamy texture that envelops the potatoes beautifully. Feel free to adjust the amount of cheese based on your preference for creaminess.

Step 9: Final Simmer
Lower the heat and let the creamy garlic sauce potatoes simmer for an additional 2-3 minutes. Stir occasionally to ensure everything is well combined and heated through. This final simmer allows the flavors to meld perfectly, resulting in a dish that is comforting and warmly inviting.

Step 10: Serve and Enjoy
Remove the skillet from the heat and let the creamy garlic sauce potatoes sit for a couple of minutes before serving. This allows the sauce to settle a bit. Serve them warm alongside your favorite main dish or as a fabulous addition to any meal, reveling in the creamy texture and rich flavors.

Make Ahead Options

These Creamy Garlic Sauce Potatoes are perfect for busy cooks looking to save time during hectic weeknights! You can prep the potatoes—wash, peel, and dice them—up to 24 hours in advance. Store them submerged in water in the refrigerator to prevent them from browning. The creamy garlic sauce can also be made up to 3 days ahead; simply prepare as instructed and allow it to cool before storing in an airtight container. When you're ready to serve, just reheat the sauce over low heat and add the cooked potatoes, stirring gently until they’re coated in the delicious sauce. With this prep, you can enjoy creamy, comforting potatoes with minimal effort!

Creamy Garlic Sauce Potatoes Variations

Get ready to play with flavors and textures in your Creamy Garlic Sauce Potatoes, transforming them into your perfect side dish!

  • Herbaceous Twist: Sprinkle in fresh chopped parsley or chives right before serving for a delightful pop of color and freshness.
    You’ll love how the herbal notes elevate the comforting garlic flavor, making it even more inviting!

  • Spicy Kick: Add a pinch of red pepper flakes or smoked paprika to the sauce for a warmth that brings a little heat to the dish.
    This is a fun way to wake up your taste buds while keeping the overall dish comforting and delicious.

  • Crispy Topping: Consider folding in crispy bacon bits or topping your potatoes with panko breadcrumbs before baking for a crunchy contrast.
    This crunchy layer becomes a textural delight against the creamy base that everyone will adore.

  • Cheesy Variation: Swap Parmesan cheese for aged cheddar or a blend for a richer, sharper flavor that adds depth to your sauce.
    Each bite brings a delightful surprise of gooey goodness, making it a delightful twist on classic comfort food.

  • Light and Luscious: For a lighter option, replace heavy cream with half-and-half or whole milk while adding more seasoning for flavor richness.
    Your waistline will appreciate this twist, but the creamy allure will remain irresistibly intact.

  • Umami Boost: Include sautéed mushrooms or sun-dried tomatoes to infuse earthy flavors into your sauce.
    These additions will offer a layered taste experience that pairs beautifully with the creamy potatoes.

  • Vegan Delight: Opt for dairy-free butter and coconut cream while using nutritional yeast instead of cheese for a vegan-friendly version that doesn't skimp on comfort.
    You’ll be amazed at how well these flavors meld together, satisfying even non-vegan guests!

  • Zesty Option: Stir in a teaspoon of lemon juice or some zest for a tangy finish that brightens up the richness of the dish.
    This swift burst of acidity cuts through the creaminess, creating a lovely balance to every forkful.

Enhance your Creamy Garlic Sauce Potatoes adventure by trying one or more of these delightful variations, and let every bite transport you to cozy culinary bliss!

How to Store and Freeze Creamy Garlic Sauce Potatoes

Fridge: Store leftovers in an airtight container for up to 3 days to maintain freshness and flavor.

Freezer: For long-term storage, freeze the cooled creamy garlic sauce potatoes in a freezer-safe container for up to 2 months.

Reheating: Thaw in the refrigerator overnight before reheating. Gently warm on the stove over low heat, adding a splash of cream if needed to restore creaminess.

Serving Freshness: These potatoes are best enjoyed fresh, but proper storage techniques can keep them delicious for a few days, ensuring your comfort food cravings are satisfied.

Expert Tips for Creamy Garlic Sauce Potatoes

  • Perfect Potato Choice: Use Yukon gold or red potatoes for a buttery texture that complements the creamy garlic sauce beautifully. Avoid using waxy potatoes, which may not absorb the flavors well.
  • Don’t Rush the Garlic: Saute garlic just until fragrant and lightly golden; overcooking can lead to bitterness ruining the dish’s taste.
  • Cream Consistency: For a lighter version, consider using half-and-half instead of heavy cream, but be prepared for a slightly less creamy sauce.
  • Adjust to Taste: Always taste as you go; don’t forget to adjust seasoning with salt and freshly ground black pepper to enhance the flavors of the creamy garlic sauce.
  • Storage Tips: Allow leftover potatoes to cool completely before storing them in an airtight container to avoid excess moisture, which can lead to sogginess.

What to Serve with Creamy Garlic Sauce Potatoes

Picture your dinner table filled with bright colors and delightful aromas, leaving everyone eager for a satisfying meal.

  • Roast Chicken: The juicy flavors of a perfectly roasted chicken pair beautifully with the creamy texture of the potatoes, creating a classic comfort meal.
  • Steamed Green Beans: Crisp-tender green beans add a fresh crunch that balances the rich creaminess, making every bite harmonious and colorful.
  • Salmon Fillets: The light and flaky nature of salmon complements the garlic sauce's savory notes, offering a lovely contrast of textures and flavors.
  • Fresh Garden Salad: A vibrant salad with mixed greens and zesty vinaigrette lends brightness and acidity to cut through the creaminess of the dish.
  • Garlic Bread: For those who crave even more garlic goodness, serve with warm garlic bread for dipping into the creamy sauce—a true indulgence!
  • Red Wine: A glass of smooth red wine enhances the comforting meal, richening the experience and warming your spirits as you enjoy your cozy feast.
  • Chocolate Mousse: A light dessert like chocolate mousse provides the perfect sweet ending, balancing the savory flavors of the potatoes with a touch of indulgence.

Creamy Garlic Sauce Potatoes Recipe FAQs

What type of potatoes should I use for the best results?
Choose Yukon gold or red potatoes for their buttery texture, which perfectly complements the creamy garlic sauce. Avoid using waxy varieties, as they may not absorb the flavors as well.

How should I store leftover Creamy Garlic Sauce Potatoes?
Store leftovers in an airtight container in the refrigerator for up to 3 days. Make sure to let them cool completely before sealing to maintain freshness and prevent excess moisture that can make them soggy.

Can I freeze Creamy Garlic Sauce Potatoes?
Absolutely! To freeze, let them cool completely, then transfer to a freezer-safe container. They can be stored for up to 2 months. When you're ready to enjoy, thaw overnight in the refrigerator, then gently reheat on the stove over low heat, adding a splash of cream to restore creaminess if necessary.

What should I do if my garlic sauce turns bitter?
If your garlic becomes bitter, it's likely overcooked. To avoid this, sauté garlic only until fragrant and lightly golden, around 1 minute. If it does turn bitter, unfortunately, you may need to start over—fresh garlic is key to the rich flavor of your sauce.

Are there any dietary considerations for these potatoes?
For a lighter version, substitute heavy cream with half-and-half or whole milk, and for a dairy-free option, use non-dairy alternatives like almond or oat milk. Always check for individual allergies with ingredients like butter and cheese.

null

Creamy Garlic Sauce Potatoes for Comforting Flavor Bliss

Indulge in creamy garlic sauce potatoes, a comforting dish that brings warmth and joy to every meal.
Print Recipe Pin Recipe
Prep Time 10 minutes mins
Cook Time 15 minutes mins
Resting Time 2 minutes mins
Total Time 27 minutes mins
Servings: 4 servings
Course: Dinner
Cuisine: American
Calories: 425
Ingredients Equipment Method Nutrition Notes

Ingredients
  

For the Potatoes
  • 2 pounds Potatoes (russet, Yukon gold, or red)
  • 2 tablespoons Butter or margarine for dairy-free option
  • 4 cloves Garlic (minced) use fresh for best flavor
For the Sauce
  • 1 cup Heavy Cream or half-and-half for a lighter option
  • to taste Salt sea salt or kosher salt
  • to taste Black Pepper freshly ground
  • 1 cup Parmesan Cheese (grated) can substitute cheddar or nutritional yeast for dairy-free
Optional Add-Ins
  • to taste Fresh Herbs (thyme or chives)
  • to taste Spices (red pepper flakes or smoked paprika)
  • to taste Toppings (crispy bacon bits or truffle oil)

Equipment

  • Large pot
  • Colander
  • Large skillet
  • Wooden spoon

Method
 

Step-by-Step Instructions
  1. Prepare the potatoes by washing, peeling, and dicing them into small, even pieces.
  2. Boil the potatoes in salted water for about 15 minutes until fork-tender, then drain.
  3. Melt the butter in a large skillet over medium heat.
  4. Sauté the minced garlic in the melted butter until fragrant and lightly golden.
  5. Incorporate the heavy cream into the skillet and allow it to simmer for about 2 minutes.
  6. Season the sauce with salt and freshly ground black pepper to taste.
  7. Combine the cooked potatoes with the creamy garlic sauce, stirring gently to coat.
  8. Add the grated Parmesan cheese, stirring until melted into the sauce.
  9. Simmer the mixture for an additional 2-3 minutes and then serve warm.
  10. Enjoy your creamy garlic sauce potatoes with your favorite main dish!

Nutrition

Serving: 1servingCalories: 425kcalCarbohydrates: 40gProtein: 10gFat: 26gSaturated Fat: 16gCholesterol: 75mgSodium: 500mgPotassium: 800mgFiber: 3gSugar: 2gVitamin A: 800IUVitamin C: 25mgCalcium: 200mgIron: 1.5mg

Notes

Store leftovers in an airtight container for up to 3 days. For long-term storage, freeze in a container for up to 2 months.

Tried this recipe?

Let us know how it was!

Hot Honey Ricotta Pizza Delight for a Cozy Night In

February 11, 2026 by Grace Snow Leave a Comment

As I stood in my kitchen, the enticing aroma of melted cheese and spicy sweetness danced in the air, transporting me to my favorite pizzeria. This was the moment I knew I was about to create a culinary masterpiece: the Irresistible Hot Honey Ricotta Pizza Delight. This dish is not just a pizza; it’s a quick and comforting escape from the hustle of daily life. Loaded with creamy ricotta and gooey mozzarella, each slice is an invitation to revel in flavor. Perfect for casual get-togethers or cozy weeknight dinners, this vegetarian delight offers both the satisfaction of homemade comfort food and the convenience of quick prep. Are you ready to savor a slice of heaven that blends sweet heat with cheesy goodness? Let's dive into this delicious recipe!

Why is Hot Honey Ricotta Pizza Delight a Must-Try?

Flavor Explosion: This dish boasts a unique blend of sweet and spicy flavors, thanks to the hot honey drizzled over creamy ricotta and melty mozzarella.

Quick and Easy: Perfect for weeknights, this recipe comes together in just under 30 minutes—great for those busy evenings!

Vegetarian Comfort: A satisfying vegetarian option, it appeals to anyone tired of fast food and craving something homemade.

Crowd-Pleaser: Whether for a gathering or a cozy dinner, this pizza never fails to impress family and friends. Pair it with a side salad or indulge alone for a tasty treat!

Customizable: Get creative with toppings! Try adding caramelized onions or using Herby Ricotta Stuffed peppers on the side for a delightful twist.

Hot Honey Ricotta Pizza Delight Ingredients

• Get ready to impress with this delicious twist on pizza!

For the Pizza Base
• Pre-made pizza dough – Use store-bought for convenience, or make your own for a personal touch.
• Olive oil – Enhances flavor and prevents sticking; sub with melted butter for a richer taste.

For the Cheesy Topping
• Fresh ricotta cheese – Provides creaminess and richness; swap with cottage cheese if desired.
• Shredded mozzarella cheese – For that classic melty goodness; low-fat or dairy-free options work too.

For Flavoring
• Dried oregano – Adds an herbaceous kick; fresh oregano can elevate the flavor profile.
• Garlic powder – Boosts overall flavor; try fresh minced garlic for a vibrant alternative.
• Salt and pepper – Essential to taste; adjust according to your preference.

For the Finishing Touch
• Hot honey – Gives a sweet and spicy finish; adjust the amount to fit your heat tolerance.
• Fresh basil leaves – Beautiful garnishing herb; arugula or spinach can be refreshing substitutes.
• Crushed red pepper flakes – Optional for an extra heat boost; sprinkle cautiously based on your spice love!

Create your Hot Honey Ricotta Pizza Delight with these ingredients and elevate your next homemade meal into something memorable!

Step‑by‑Step Instructions for Hot Honey Ricotta Pizza Delight

Step 1: Preheat the Oven
Begin by preheating your oven to 475°F (245°C) to ensure a crispy crust for your Hot Honey Ricotta Pizza Delight. This high temperature allows for that delightful golden finish. While the oven heats up, gather your ingredients and equipment, including a baking sheet or pizza stone for baking.

Step 2: Prepare the Dough
On a floured surface, roll out the pre-made pizza dough to your desired thickness, aiming for about ¼ inch for a perfect balance between crunch and chewiness. Once rolled, transfer the dough onto the baking sheet or pizza stone, ensuring it’s centered and smooth. Aim for evenly shaped edges for a beautiful presentation.

Step 3: Add Olive Oil
Brush a generous layer of olive oil over the surface of the dough using a pastry brush. This step not only enhances flavor but also prevents sticking. The oil will give the Hot Honey Ricotta Pizza Delight a sumptuous richness and help achieve that beautiful golden crust as it bakes.

Step 4: Spread Ricotta
Evenly spoon dollops of fresh ricotta cheese over the dough, leaving at least a ½-inch border for the crust. Use the back of the spoon to smooth the ricotta into an even layer, creating a creamy base that complements the gooey mozzarella to follow. The white, luscious ricotta acts as a perfect canvas for the toppings.

Step 5: Sprinkle Mozzarella
Generously layer the shredded mozzarella cheese on top of the ricotta, covering it completely. The mozzarella will melt and create that irresistible, stretchy texture that pizza lovers adore. Ensure no spots of ricotta are visible, as the melted cheese will beautifully meld into a cohesive topping during baking.

Step 6: Season
Dust the pizza generously with dried oregano, garlic powder, salt, and pepper. This simple yet effective seasoning enhances the flavors of the Hot Honey Ricotta Pizza Delight, adding an aromatic touch. The spices will infuse the toppings as they cook, creating a savory undertone to balance the sweetness of the hot honey.

Step 7: Bake
Carefully place your pizza in the preheated oven and bake for 15-20 minutes. Keep a watchful eye on it as it bakes; look for a golden-brown crust and melted, bubbly cheese. The edges should be crispy, and the cheese should have a delightful stretch when you pull a slice away from the pie.

Step 8: Finish with Hot Honey
Once baked to perfection, remove your Hot Honey Ricotta Pizza Delight from the oven. Immediately drizzle a generous amount of hot honey over the pizza, allowing it to seep into the warm, cheesy layers. This finishing touch introduces a sweet heat that elevates the entire dish and makes for a captivating experience.

Step 9: Garnish
For an extra pop of color and flavor, top your pizza with fresh basil leaves and a sprinkle of crushed red pepper flakes, if desired. The aromatic basil adds freshness, while the red pepper flakes can intensify the heat to suit your taste. Cut the pizza into slices and savor the delight!

Hot Honey Ricotta Pizza Delight Variations

Feel free to play with these savory ideas and make this pizza your own culinary masterpiece!

  • Dairy-Free: Substitute the cheese with a blend of cashew cheese and nutritional yeast for a creamy and cheesy experience without dairy. It adds a delightful nutty flavor that complements the heat of the honey.

  • Herb-Infused: Add fresh herbs like basil or thyme into the ricotta mixture for a burst of freshness. This twist not only enhances the flavor but also brings a vibrant color to the pizza.

  • Spicy Kick: Mix in some chopped jalapeños or sliced banana peppers into the mozzarella layer to elevate the heat level. This adds a zesty flair and can became a new favorite for spice lovers.

  • Veggie-Laden: Top the pizza with sautéed spinach, mushrooms, or roasted bell peppers for a heartier meal. With each slice, you'll enjoy added texture, flavor, and nutrition that goes perfectly with the creamy cheeses.

  • Fruit Fusion: Incorporate sliced figs or pears on top of the cheese before baking for a sweet contrast that pairs beautifully with the hot honey drizzle. This unexpected fruit element will surprise and delight your taste buds.

  • Smoky Flavor: Try using smoked mozzarella or adding bits of smoked Gouda for a richer taste. The smoky notes complement the sweet heat of the hot honey and add depth to each bite.

  • Cauliflower Crust: For a lower-carb alternative, consider using a cauliflower pizza crust. This healthier spin retains the delicious flavors while making it suitable for gluten-conscious individuals.

Consider also pairing this delightful pizza with a side of Homemade Hot Chocolate to warm up those cozy nights! You can't go wrong with a sweet finish after such an amazing meal.

Expert Tips for Hot Honey Ricotta Pizza Delight

  • Even Dough Thickness: Roll the pizza dough to a consistent thickness. Uneven areas can result in unevenly cooked pizza; avoid thick edges to ensure chewier crust.

  • Watch the Baking Time: Keep an eye on the pizza while it bakes. Different ovens can vary in temperature, and monitoring helps prevent overbrowning.

  • Rest Before Slicing: Allow the pizza to rest for a minute after baking. This practice helps the cheese set, making it easier to slice without losing toppings.

  • Customize with Toppings: Feeling adventurous? Swap ricotta for feta or add toppings like caramelized onions for added flavor. Enjoy experimenting with your Hot Honey Ricotta Pizza Delight!

  • Hot Honey Control: Adjust the amount of hot honey based on your preference. Start with less if you're cautious about heat, then add more for a delightful spice kick.

What to Serve with Hot Honey Ricotta Pizza Delight?

Create the perfect meal experience that tantalizes every taste bud!

  • Refreshing Side Salad: A crisp salad with mixed greens and a tangy vinaigrette cuts through the richness of the pizza, balancing flavors beautifully.

  • Garlic Bread Sticks: These buttery delights with a sprinkle of garlic pair perfectly for a comforting side that echoes the cheesy goodness of your pizza.

  • Roasted Veggies: Seasoned roasted vegetables add a hearty element that complements the sweet heat of the hot honey, enhancing your meal with vibrant textures.

  • Soft Bread Rolls: Warm, soft rolls could be perfect for sopping up any leftover hot honey, creating a delightful way to enjoy every last bite.

  • Chilled White Wine: A glass of chilled Sauvignon Blanc perfectly complements the spicy notes of the pizza, elevating your dining experience with every sip.

  • Lemon Sorbet: Offering a sweet and citrusy contrast, this light dessert cleanses the palate after the rich flavors of your Hot Honey Ricotta Pizza Delight.

Embrace these pairings for a memorable meal that brings warmth to your dining table!

How to Store and Freeze Hot Honey Ricotta Pizza Delight

Fridge: Store any leftovers in an airtight container in the fridge for up to 3 days. Reheat in the oven for the best texture rather than the microwave.

Freezer: You can freeze the Hot Honey Ricotta Pizza Delight by wrapping it tightly in plastic wrap and then again in aluminum foil. It will stay good for up to 2 months.

Reheating: To reheat, preheat your oven to 375°F (190°C) and bake for about 10-15 minutes until heated through and the cheese is melty again.

Room Temperature: If you plan to serve your pizza immediately, let it sit at room temperature for up to 2 hours before serving for optimal flavor and texture.

Make Ahead Options

These Hot Honey Ricotta Pizza Delight preparations are perfect for busy weeknights! You can pre-assemble the pizza up to 24 hours in advance by rolling out the dough, spreading the ricotta, and sprinkling the mozzarella, then covering it tightly with plastic wrap and refrigerating. To maintain the quality, ensure the dough is well-oiled to prevent it from drying out. When you're ready to bake, simply add your seasonings, drizzle the hot honey, and pop it in a preheated oven for 15-20 minutes. This way, you’ll have a delicious, homemade pizza on the table with minimal effort—just as tasty as if you’d made it from scratch that same day!

Hot Honey Ricotta Pizza Delight Recipe FAQs

What type of pizza dough should I use for Hot Honey Ricotta Pizza Delight?
You can use store-bought pre-made pizza dough for convenience, or make your own if you want to add a personal touch. Look for dough that has a good balance of elasticity and firmness for the best results.

How should I store leftovers of Hot Honey Ricotta Pizza Delight?
For optimal freshness, store any leftovers in an airtight container in the refrigerator for up to 3 days. When you're ready to enjoy it again, simply reheat it in the oven at 375°F (190°C) for about 10-15 minutes until heated through and the cheese is delightfully melty.

Can I freeze Hot Honey Ricotta Pizza Delight?
Absolutely! To freeze, wrap the pizza tightly in plastic wrap and then again in aluminum foil. This will keep it fresh for up to 2 months. When you're ready to enjoy it, preheat your oven to 375°F (190°C) and bake it for about 15-20 minutes from frozen, checking to ensure it’s heated all the way through.

What should I do if my cheese doesn’t melt properly?
If your cheese doesn’t melt fully, it might be due to uneven oven heat or the type of cheese used. Make sure you’re using a good-quality mozzarella, and consider setting your oven to broil for the last few minutes to help achieve that perfectly gooey texture. Just keep a close eye to prevent burning!

Is Hot Honey Ricotta Pizza Delight suitable for people with dietary restrictions?
This recipe is vegetarian-friendly, but if you're concerned about allergies, always check the labels on your cheese and dough for potential allergens such as dairy or gluten. Additionally, you can customize it by using dairy-free cheese or a gluten-free pizza crust to accommodate different dietary needs.

What if I can’t find hot honey?
If hot honey is unavailable, you can make your own by mixing regular honey with a few pinches of crushed red pepper flakes—let it sit for about 30 minutes to allow flavors to meld. Alternatively, you can use regular honey and drizzle some spicy sauce on top for a similar sweet and spicy kick!

Hot Honey Ricotta Pizza Delight

Hot Honey Ricotta Pizza Delight for a Cozy Night In

Indulge in the Hot Honey Ricotta Pizza Delight, a quick and comforting vegetarian dish perfect for cozy nights in.
Print Recipe Pin Recipe
Prep Time 10 minutes mins
Cook Time 20 minutes mins
Total Time 30 minutes mins
Servings: 4 slices
Course: Dinner
Cuisine: Italian
Calories: 300
Ingredients Equipment Method Nutrition Notes

Ingredients
  

For the Pizza Base
  • 1 pre-made pizza dough Store-bought or homemade
  • 2 tablespoons olive oil Can substitute with melted butter
For the Cheesy Topping
  • 1 cup fresh ricotta cheese Can substitute with cottage cheese
  • 1 cup shredded mozzarella cheese Low-fat or dairy-free options possible
For Flavoring
  • 1 teaspoon dried oregano Fresh oregano can be used
  • 1 teaspoon garlic powder Fresh minced garlic can be used
  • to taste salt and pepper
For the Finishing Touch
  • 3 tablespoons hot honey Adjust based on heat preference
  • 1/4 cup fresh basil leaves Can substitute with arugula or spinach
  • to taste crushed red pepper flakes Optional

Equipment

  • Baking Sheet
  • Pizza stone

Method
 

Step-by-Step Instructions
  1. Preheat your oven to 475°F (245°C).
  2. On a floured surface, roll out the pre-made pizza dough to about ¼ inch thickness.
  3. Brush a generous layer of olive oil over the surface of the dough.
  4. Evenly spoon dollops of fresh ricotta cheese over the dough, leaving a ½-inch border.
  5. Generously layer shredded mozzarella cheese on top of the ricotta.
  6. Dust the pizza with dried oregano, garlic powder, salt, and pepper.
  7. Bake for 15-20 minutes until golden brown and bubbly.
  8. Remove from the oven and drizzle hot honey over the pizza.
  9. Garnish with fresh basil leaves and crushed red pepper flakes, if desired.

Nutrition

Serving: 1sliceCalories: 300kcalCarbohydrates: 35gProtein: 14gFat: 12gSaturated Fat: 6gPolyunsaturated Fat: 1gMonounsaturated Fat: 5gCholesterol: 30mgSodium: 600mgPotassium: 250mgFiber: 2gSugar: 4gVitamin A: 500IUVitamin C: 2mgCalcium: 250mgIron: 2mg

Notes

Allow the pizza to rest for a minute before slicing for easier serving. Customize toppings to your taste.

Tried this recipe?

Let us know how it was!

Savory Msmen Filled with Chicken: A Comforting Moroccan Delight

February 11, 2026 by Grace Snow Leave a Comment

As I stood in my kitchen, the aroma of spices wafted through the air, transporting me straight to the bustling streets of Morocco. Today’s culinary adventure brings us to the charming and flavorful world of Msmen Filled with Chicken. This enchanting dish is not just comfort food; it’s an experience that marries flaky flatbread with a savory, spiced chicken and gooey cheese filling. Perfect for meal prep, these crispy morsels are easily made ahead and offer both generous portions and delightful gatherings. As I rolled out the dough, my heart raced with the anticipation of the delicious results to come. Are you ready to embark on a culinary journey that promises to impress and satisfy? Let’s get started!

Why is Msmen Filled with Chicken special?

Unique Texture: The crispy, flaky layers of the Msmen wrap around a savory, spiced chicken filling, creating a satisfying bite that’s hard to resist.

Hands-On Fun: This recipe is a joyful cooking experience—perfect for involving the whole family or a fun gathering with friends.

Meal Prep Friendly: Make a batch ahead of time and enjoy them throughout the week, just reheat for a quick, satisfying meal.

Crowd-Pleasing Appeal: With their delicious combination of textures and flavors, these Msmen are sure to be a hit at any gathering, much like Fiesta Lime Chicken or Chicken Salad with Apples.

Flavors of Morocco: Experience a taste of Moroccan culture with every bite, as the blend of spices delights your palate and transports you to another place.

Msmen Filled with Chicken Ingredients

For the Dough
• Flour – Essential for forming the base structure; all-purpose or bread flour works well.
• Baking Powder – Helps achieve a light and tender dough texture that is key to Msmen filled with chicken.
• Salt – Enhances the overall flavor of the dough.
• Honey – Adds a hint of sweetness to balance the savory filling.
• Water – Hydrates the flour to create a smooth, workable dough.
• Sunflower Oil – Contributes to the dough's flakiness by coating the gluten strands.

For the Filling
• Olive Oil – Used for sautéing the onions and greasing surfaces to prevent sticking.
• Yellow Onion – Provides a rich flavor; sauté until translucent for maximum taste.
• Chicken Thighs – Juicer and more flavorful than chicken breast; this is the heart of your filling.
• Ras el Hanout – A traditional Moroccan spice blend that infuses authentic flavor.
• Turmeric – Adds an earthy taste and vibrant color to the filling.
• Cayenne – Offers a kick of heat; adjust according to your spice preference.
• Garlic Powder – Enhances the depth of the overall flavor profile.
• Dried Parsley – Adds a touch of freshness to the filling.
• Cheese (e.g., Gouda, Cheddar) – Melts beautifully, binding the filling and enhancing the taste.

Embark on this delicious journey of creating Msmen filled with chicken that’s sure to bring warmth and excitement to your table!

Step‑by‑Step Instructions for Msmen Filled with Chicken

Step 1: Prepare the Dough
In a large mixing bowl, whisk together flour, baking powder, and salt. Create a well in the center, then pour in honey and gradually add water while mixing until you form a shaggy dough. Knead the mixture for 10-12 minutes until it becomes stretchy and smooth. Add sunflower oil, knead for another minute, then cover and let the dough rest for 30 minutes at room temperature.

Step 2: Cook the Filling
While the dough rests, heat olive oil in a skillet over medium heat. Sauté the finely chopped yellow onion for about 5 minutes, or until it becomes translucent. Add diced chicken thighs along with ras el hanout, turmeric, cayenne, garlic powder, and dried parsley. Cook until the chicken is fully cooked, approximately 10-12 minutes, ensuring it's juicy and flavorful. Allow the filling to cool completely.

Step 3: Shape the Dough
After the dough has rested, gently deflate it and divide it into 9 equal portions. Roll each portion into a smooth ball and flatten it slightly. Cover the pieces with a cloth and let them rest again for another 30 minutes, allowing the gluten to relax for easier stretching later.

Step 4: Stretch the Dough
On a lightly oiled surface, take one dough piece and lightly oil your hands. Stretch the dough into a thin rectangle, aiming for about 10 inches long, making sure the edges are slightly thinner for easier folding. Repeat this process with the remaining pieces, keeping them oiled to prevent sticking.

Step 5: Fill and Cook
Place a spoonful of the cooled chicken filling in the center of each stretched dough rectangle, adding a sprinkle of cheese. Fold the dough edges over to form a sealed packet. Heat oil in a skillet over medium heat and fry each filled Msmen for about 3-4 minutes on each side, or until golden brown and crispy. Adjust the heat to ensure even cooking and prevent burning.

Expert Tips for Msmen Filled with Chicken

Kneading Magic: Don’t rush kneading or resting phases—this is crucial for achieving the flaky texture you desire in your Msmen filled with chicken.

Cooling Matters: Always let the filling cool completely before sealing the dough. This prevents sogginess and keeps your Msmen perfectly crispy.

Stretch with Care: Use generous oil when stretching the dough. This prevents sticking and helps maintain the delicate layers.

Flavor Balance: Taste your filling during cooking to ensure the spice levels align with your preference, adjusting spices like cayenne for the perfect kick.

Fry Smart: Fry on medium heat to ensure the Msmen cook evenly and achieve that golden brown crunch without burning the outside.

Msmen Filled with Chicken Variations

Feel free to get creative with your Msmen; give your taste buds something to celebrate!

  • Vegetarian Delight: Replace chicken with spiced mushrooms or chickpeas for a satisfying meatless option. The earthy flavors harmonize beautifully with the spices.
  • Cheese Lovers: Swap Gouda or Cheddar for mozzarella or feta to bring new textures and flavors to your filling. Creamy mozzarella melts luxuriously, while feta adds a briny kick.
  • Spicy Kick: Add jalapeños or red pepper flakes to your filling for a bold heat that elevates the dish. Adjust spice levels to your liking; the vibrancy will surely awake your palate!
  • Herbed Twist: Mix fresh herbs like cilantro or mint into the chicken filling for a fresh and aromatic pop. The added herbs bring a lively and fragrant contrast to the savory depth of chicken.
  • Sweet & Savory: Incorporate diced apples or raisins in your filling for a touch of sweetness that beautifully balances the savory flavors. This unexpected combo adds an exciting layer to your Msmen.
  • Whole Grain Swap: For a heartier variation, use whole wheat flour for the dough. This will give your Msmen a nutty flavor and boost their nutritional value.
  • Smoky Sensation: Incorporate smoked paprika into your filling for an irresistible depth and warmth. Just a pinch will create a cozy atmosphere in every bite—perfect for family gatherings.
  • Topping Choices: Serve with a drizzle of tahini sauce or spicy harissa yogurt to elevate your dish. Just like Lemon Chicken Soup, these garnishes will enhance flavor while adding delightful textures.

Explore and mix these variations to find your favorite twist on Msmen filled with chicken! Each version offers a unique experience that's bound to impress friends and family alike.

Make Ahead Options

These Msmen Filled with Chicken are perfect for meal prep aficionados! You can prepare the dough up to 24 hours in advance; simply mix and let it rest as instructed. Additionally, cook the filling ahead of time, storing it in the refrigerator for up to 3 days. Ensure the filling cools completely before sealing it in an airtight container to maintain its delicious juiciness. When you're ready to enjoy this comforting Moroccan treat, simply stretch the dough, fill it with the cooled mixture, and fry until golden brown. This way, you’ll have mouthwatering Msmen on hand for busy weeknights or quick gatherings!

How to Store and Freeze Msmen Filled with Chicken

Fridge: Store leftover Msmen filled with chicken in an airtight container for up to 3 days to maintain their texture and flavor.

Freezer: For longer storage, wrap each Msmen tightly in plastic wrap and place them in a freezer-safe bag. They can be frozen for up to 2 months.

Reheating: To enjoy, simply reheat the Msmen in a dry frying pan over medium heat until crispy, about 3-4 minutes per side. This method keeps that delightful crunch!

Make-Ahead Tip: Prepare the Msmen and freeze them before cooking—great for quick meals on busy days when comfort food is a must.

What to Serve with Msmen Filled with Chicken

A delightful meal composed of Msmen Filled with Chicken can be elevated with the perfect accompaniments for a truly memorable experience.

  • Cucumber and Tomato Salad: This refreshing salad adds a crisp, light crunch that balances the rich flavors of the filling, making each bite feel lighter. Pairing fresh, juicy tomatoes with cool cucumbers creates a vibrant contrast that invites second helpings.

  • Harissa Yogurt Sauce: This spicy, creamy sauce enhances the Moroccan flavor profile beautifully. A dollop of harissa yogurt offers a cool and spicy kick, complementing the savory Msmen without overpowering them.

  • Moroccan Lentil Soup: A warm bowl of lentil soup filled with fragrant spices provides a hearty base, adding warmth and depth to your meal. Serve it alongside to create a comforting and filling dining experience that warms both body and soul.

  • Roasted Vegetables: Roasted seasonal veggies bring a caramelized sweetness to the table, enhancing the savory notes of the chicken and spices. The soft, tender veggies paired with the crispy Msmen create a delightful textural variety on your plate.

  • Mint Tea: End your meal with a traditional Moroccan touch by serving sweet mint tea. Its refreshing taste helps cleanse the palate and adds a fragrant finish, leaving everyone feeling satisfied and uplifted.

  • Almond Cake: For dessert, an almond cake brings a nutty sweetness, providing a lovely contrast to the savory flavors of the Msmen. Its light, fluffy texture pairs perfectly with a warm cup of tea or coffee, creating a sweet conclusion to your Moroccan feast.

Msmen Filled with Chicken Recipe FAQs

What type of flour is best for the dough?
For the dough of Msmen filled with chicken, I recommend using all-purpose or bread flour. Both types will create a great texture, but bread flour may provide added chewiness due to its higher protein content.

How long can I store leftover Msmen in the fridge?
Leftover Msmen filled with chicken can be stored in an airtight container in the fridge for up to 3 days. To keep them fresh, be sure they are completely cooled beforehand to prevent condensation.

Can I freeze Msmen filled with chicken? How?
Absolutely! To freeze, wrap each Msmen tightly in plastic wrap and place them in a freezer-safe bag. They can be kept for up to 2 months. When you’re ready to enjoy, reheat them in a dry frying pan over medium heat for about 3-4 minutes on each side to retain their crispy texture.

What should I do if my filling is too wet?
If your filling seems too wet and could make the dough soggy, try adding a bit more cooked chicken or some breadcrumbs to absorb excess moisture. Ensure your filling is cool before sealing it inside the dough to avoid sogginess.

Are there any dietary restrictions I should consider?
If you're making Msmen filled with chicken for individuals with allergies, be aware of the potential wheat and dairy content from the flour and cheese. For a gluten-free version, you can experiment with gluten-free flour blends. Moreover, subbing chicken with spiced mushrooms or chickpeas makes it friendly for plant-based diets!

Msmen Filled with Chicken

Savory Msmen Filled with Chicken: A Comforting Moroccan Delight

Enjoy the delightful experience of making Msmen Filled with Chicken, a comforting Moroccan dish that marries flaky flatbread with savory chicken and cheese.
Print Recipe Pin Recipe
Prep Time 1 hour hr
Cook Time 20 minutes mins
Resting Time 1 hour hr
Total Time 2 hours hrs 20 minutes mins
Servings: 9 pieces
Course: Dinner
Cuisine: Moroccan
Calories: 350
Ingredients Equipment Method Nutrition Notes

Ingredients
  

Dough Ingredients
  • 3 cups All-purpose flour
  • 1 tbsp Baking powder
  • 1 tsp Salt
  • 1 tbsp Honey
  • 1 cup Water
  • 2 tbsp Sunflower oil
Filling Ingredients
  • 2 tbsp Olive oil
  • 1 large Yellow onion finely chopped
  • 1 lb Chicken thighs diced
  • 2 tbsp Ras el Hanout
  • 1 tsp Turmeric
  • 1/2 tsp Cayenne adjust to preference
  • 1 tsp Garlic powder
  • 2 tbsp Dried parsley
  • 1 cup Cheese such as Gouda or Cheddar

Equipment

  • Mixing Bowl
  • Skillet
  • Rolling Pin
  • Airtight Container

Method
 

Prepare the Dough
  1. In a large mixing bowl, whisk together flour, baking powder, and salt. Create a well in the center, then pour in honey and gradually add water while mixing until you form a shaggy dough. Knead the mixture for 10-12 minutes until it becomes stretchy and smooth. Add sunflower oil, knead for another minute, then cover and let the dough rest for 30 minutes at room temperature.
Cook the Filling
  1. While the dough rests, heat olive oil in a skillet over medium heat. Sauté the finely chopped yellow onion for about 5 minutes, or until it becomes translucent. Add diced chicken thighs along with ras el hanout, turmeric, cayenne, garlic powder, and dried parsley. Cook until the chicken is fully cooked, approximately 10-12 minutes, ensuring it's juicy and flavorful. Allow the filling to cool completely.
Shape the Dough
  1. After the dough has rested, gently deflate it and divide it into 9 equal portions. Roll each portion into a smooth ball and flatten it slightly. Cover the pieces with a cloth and let them rest again for another 30 minutes, allowing the gluten to relax for easier stretching later.
Stretch the Dough
  1. On a lightly oiled surface, take one dough piece and lightly oil your hands. Stretch the dough into a thin rectangle, aiming for about 10 inches long, making sure the edges are slightly thinner for easier folding. Repeat this process with the remaining pieces, keeping them oiled to prevent sticking.
Fill and Cook
  1. Place a spoonful of the cooled chicken filling in the center of each stretched dough rectangle, adding a sprinkle of cheese. Fold the dough edges over to form a sealed packet. Heat oil in a skillet over medium heat and fry each filled Msmen for about 3-4 minutes on each side, or until golden brown and crispy. Adjust the heat to ensure even cooking and prevent burning.

Nutrition

Serving: 1pieceCalories: 350kcalCarbohydrates: 30gProtein: 20gFat: 18gSaturated Fat: 4gPolyunsaturated Fat: 1gMonounsaturated Fat: 12gCholesterol: 75mgSodium: 600mgPotassium: 350mgFiber: 2gSugar: 1gVitamin A: 200IUVitamin C: 4mgCalcium: 150mgIron: 2mg

Notes

For best results, let the filling cool entirely before sealing in the dough to ensure crispy Msmen.

Tried this recipe?

Let us know how it was!

Delicious Nigerian Spinach Stew for a Heartwarming Meal

February 11, 2026 by Grace Snow Leave a Comment

Amid the hustle of everyday life, you might find yourself in a culinary rut, reaching for those quick takeout options instead of delving into the heart of homemade flavors. Enter Efo Riro, a vibrant Nigerian Spinach Stew that not only awakens your taste buds but also proves that leafy greens can be a delightful experience. This gluten-free, low-carb dish is quick to whip up and doesn’t skimp on flavor, making it a perfect addition to your weekly meal prep. With options to customize the protein and the opportunity to swap spinach for other greens, this recipe invites creativity while ensuring a nutritious boost. So, are you ready to transform your kitchen and enjoy a taste of Nigerian cuisine? Let’s dive into this comforting delight!

Why is Efo Riro a must-try?

Vibrant flavors: This Nigerian Spinach Stew bursts with deliciousness, transforming humble ingredients into a feast for the senses.
Quick & easy: Perfect for busy schedules, you can prepare this comforting dish in no time.
Versatile options: Customize with your favorite proteins or greens for a meal that suits any dietary need.
Health benefits: Packed with nutrients, this gluten-free recipe is low in carbs and encourages healthy eating habits.
Crowd-pleaser: Whether as a main dish or a side, Efo Riro will impress your guests and family alike. Pair it with rice or fufu for a truly authentic experience!

Nigerian Spinach Stew Ingredients

• Get ready to create a delicious Efo Riro!

For the Stew

  • Spinach – This is the star ingredient that gives the dish its vibrant green color; fresh or frozen varieties work well.
  • Cooked Meat – Adds protein and richness; goat meat is traditional, but chicken or beef are great substitutions.
  • Mushrooms – For an extra umami kick and texture; can be omitted or replaced with tofu for a vegan option.
  • Palm Oil – Essential for an authentic flavor; coconut oil can be used in a pinch, though it may change the taste.
  • Tomatoes – Provides acidity and sweetness; you can use canned tomatoes if fresh aren’t available.
  • Bell Pepper – Adds sweetness and a splash of color; any color works beautifully!
  • Habanero Pepper – Gives the stew its signature heat; feel free to adjust based on your spice tolerance.
  • Onion – A base flavor that enhances overall taste; shallots can be substituted for a subtly different flavor.
  • Water or Stock – Adjusts the stew’s consistency; vegetable broth can add even more flavor.
  • Bouillon Powder, Cayenne Pepper, Black Pepper, Ground Crayfish, Pepper Flakes, Salt – This seasoning blend is vital for boosting flavor and can be customized according to dietary restrictions.

For Serving

  • Rice, Fufu, or Cauliflower Rice – These sides make the perfect pair for your flavorful Nigerian Spinach Stew!

Step‑by‑Step Instructions for Nigerian Spinach Stew

Step 1: Blend the Base Ingredients
Start by blending together the tomatoes, red bell pepper, habanero pepper, and half of the onion in a blender until smooth. This vibrant mixture should take about 2–3 minutes to achieve a silky texture. Set this aside in a bowl while you prepare the remaining ingredients, ensuring the base flavors will infuse beautifully into your Nigerian Spinach Stew.

Step 2: Prepare Onions and Spinach
Chop the remaining half of the onion into fine pieces and set aside. If using fresh spinach, wash it thoroughly and squeeze out excess water to eliminate bitterness. For frozen spinach, microwave it until just thawed, this should take about 3–4 minutes. Proper preparation here sets the stage for a delightful Efo Riro.

Step 3: Sauté the Onions
Heat a pot over medium heat and pour in about ¼ cup of palm oil. Once the oil shimmers, add the chopped onions and sauté for approximately 2 minutes until they're translucent and fragrant. This brings out the sweetness of the onions, creating a lovely base for your Nigerian Spinach Stew.

Step 4: Introduce the Blended Mixture
Carefully add the blended tomato and pepper mixture to the pot with the sautéed onions, stirring well to combine. Cook this medley for about 1 minute, allowing the flavors to marry. You should notice a rich aroma filling your kitchen, signaling that your stew's foundation is coming together beautifully.

Step 5: Add Seasonings
Stir in the bouillon powder, cayenne pepper, black pepper, ground crayfish, and salt to the pot. Stir continuously for about 5 minutes, allowing the seasonings to cook and deepen in flavor. This step is vital for achieving the signature taste of Efo Riro, allowing all those spices to permeate the stew.

Step 6: Incorporate Fresh Spinach
If you’re using fresh spinach, pour in a bit of water or stock to adjust the consistency of the stew and bring it to a boil. Once boiling, add in your cooked meat, whether it’s goat, chicken, or beef, and let it simmer for about 5 minutes. The meat will further enrich the stew, making it hearty and delicious.

Step 7: Final Touch with Spinach
Now, stir in the prepared spinach, either fresh or microwaved frozen, and let it cook for another 5 minutes. You'll want the spinach to wilt and incorporate fully into the stew, transforming your Nigerian Spinach Stew into a lush, vibrant dish that looks as delightful as it tastes.

Step 8: Serve and Garnish
Finally, taste your Efo Riro and adjust any seasonings if necessary. For an extra kick, feel free to garnish with red pepper flakes. Serve hot alongside rice, fufu, or cauliflower rice, allowing the rich flavors of your Nigerian Spinach Stew to shine as a comforting meal full of warmth and love.

Nigerian Spinach Stew Variations & Substitutions

Feel free to let your creativity shine by customizing this recipe with unique twists and substitutions!

  • Dairy-Free: Substitute any dairy-based ingredients with coconut cream or nut-based alternatives for a creamy texture.
  • Vegetarian: Replace the meat with tofu or mushrooms for an equally hearty and satisfying stew.
  • Nut-Free: If you have allergies, avoid ground crayfish and check all spices for potential cross-contamination.
  • Low-Carb: Instead of traditional sides, serve with cauliflower rice or a low-carb coconut fufu for a wholesome meal without the carbs.
  • Additional Greens: Swap spinach for kale, Swiss chard, or a mix of greens for a twist on flavor and texture.
  • Spicy Option: Increase the heat by adding crushed red pepper flakes or chili powder to elevate the spice level to your liking.
  • Flavor Boost: Add fresh herbs like cilantro or parsley at the end for a fresh burst of flavor that brightens the dish.
  • Protein Swap: Experiment with different proteins by using shrimp or lentils, making it suitable for various dietary preferences. If you're intrigued, try the delightful flavors of Chickpea Spinach Curry for another tasty veggie option.

With these variations, you can create a personalized version of this beloved Nigerian classic!

What to Serve with Flavorful Efo Riro?

Elevate your homemade Efo Riro experience by pairing it with vibrant sides and enriching drinks that create a comforting and delightful meal.

  • Jollof Rice: A classic West African dish, its savory, spiced flavors complement the richness of the stew beautifully.

  • Fufu: With its soft and doughy texture, fufu acts as the perfect vessel to scoop up the hearty Efo Riro, enhancing each delicious bite.

  • Cauliflower Rice: For a low-carb option, this fluffy alternative adds a light touch while soaking up the rich stew without overwhelming your palate.

  • Plantains: The subtle sweetness of fried or baked ripe plantains contrasts delightfully with the spicy flavors of the Efo Riro, creating a balanced experience.

  • Cucumber Salad: A refreshing pop of freshness, this salad adds crunch and lightness, making it a perfect foil for the hearty stew.

  • Zobo Drink: This sweet and tangy hibiscus beverage is a delightful accompaniment, providing a refreshing contrast to the depth of Efo Riro.

  • Pineapple Upside-Down Cake: For dessert, this moist and fruity cake adds a decadent finish to your meal, leaving everyone satisfied and happy.

  • Cold Nigerian Beer: Pairing your meal with a chilled local lager enhances the overall flavor experience, creating a thoroughly enjoyable dining occasion.

Expert Tips for Nigerian Spinach Stew

  • Fresh Spinach Choice: Always use fresh spinach if possible for the best flavor and texture. Frozen spinach is a great backup, but may result in a slightly different stew consistency.

  • Adjusting Spice Levels: Be cautious with the habanero pepper. Start with less and gradually add more to reach your desired heat—this Nigerian spinach stew should be flavorful without overwhelming your palate.

  • Perfect Cooking Time: Don't rush the sautéing of the onions. A little patience allows the onions to caramelize, enhancing the stew's overall richness.

  • Flavor Depth: Incorporating a splash of acid, like lime or lemon juice, at the end can brighten the flavors of your Nigerian spinach stew, making it even more vibrant.

  • Storage Success: For a longer shelf life, store your stew in airtight containers. It freezes well, making future meals a breeze—just remember to thaw it overnight in the fridge before reheating!

How to Store and Freeze Efo Riro

Fridge: Keep Efo Riro in an airtight container in the fridge for up to 5 days. This allows the flavors to meld beautifully while keeping it fresh and ready for a quick meal.

Freezer: To extend storage, freeze Efo Riro in individual portions for up to 3 months. Make sure to use freezer-safe containers to prevent freezer burn and retain the dish's savory goodness.

Thawing: When ready to enjoy, thaw your Nigerian Spinach Stew overnight in the fridge. This gradual thawing helps maintain the texture and flavor of the stew.

Reheating: Reheat Efo Riro on the stove over medium heat, stirring occasionally until warmed through. A splash of water or broth can help restore the consistency if needed.

Make Ahead Options

Efo Riro is perfect for busy home cooks looking to save time during the week! You can prepare the base sauce by blending the tomatoes, bell pepper, and habanero up to 24 hours in advance; simply refrigerate it in an airtight container. The chopped onions and spinach can also be prepped ahead of time and stored separately, keeping them fresh for up to 3 days in the fridge. When you're ready to enjoy your Nigerian Spinach Stew, sauté the onions, combine the blended sauce, and finish the cooking process by adding in the spinach and cooked meat, ensuring every bite is just as delicious as when made fresh!

Efo Riro (Nigerian Spinach Stew) Recipe FAQs

What type of spinach should I use for Efo Riro?
Fresh spinach is the best option for Efo Riro, as it provides the best flavor and texture. However, if you don’t have access to fresh spinach, frozen spinach can be used as a substitute—just ensure it's properly thawed and drained of excess water before adding it to the stew.

How long can I store Efo Riro in the fridge?
You can store your Efo Riro in an airtight container in the fridge for up to 5 days. This duration allows the flavors to develop even further, making it a great option for meal prep!

Can I freeze Efo Riro, and if so, how?
Absolutely! To freeze Efo Riro, let it cool completely, then portion it into freezer-safe containers. It can be stored in the freezer for up to 3 months. Be sure to label your containers with the date for easy tracking. When ready to enjoy, thaw it overnight in the fridge before reheating on the stove.

What if my Efo Riro is too spicy?
If your Efo Riro turns out too spicy for your liking, don’t worry! You can balance the heat by adding more vegetables, such as cooked potatoes or sweet potatoes, which absorb spice, or by incorporating a bit of cream or coconut milk for a milder flavor. You can also add more spinach to help distribute the heat!

Can my pets eat Efo Riro?
It's best to keep Efo Riro away from pets, as some ingredients may not be safe for them. Onions and garlic, in particular, can be toxic to dogs and cats, so be cautious if you're sharing meals around your furry friends.

Are there any gluten-free options for Efo Riro?
Yes! This Efo Riro recipe is naturally gluten-free, as it does not contain any wheat-based ingredients. However, always ensure that any substitutes, such as bouillon powders or sauces, are labeled gluten-free to stay within dietary restrictions.

Nigerian Spinach Stew

Delicious Nigerian Spinach Stew for a Heartwarming Meal

Nigerian Spinach Stew, also known as Efo Riro, offers a vibrant and nutritious meal using fresh spinach and customizable proteins.
Print Recipe Pin Recipe
Prep Time 15 minutes mins
Cook Time 30 minutes mins
Total Time 45 minutes mins
Servings: 4 servings
Course: Dinner
Cuisine: Nigerian
Calories: 250
Ingredients Equipment Method Nutrition Notes

Ingredients
  

For the Stew
  • 4 cups fresh spinach or frozen spinach
  • 2 cups cooked meat goat, chicken, or beef
  • 1 cup mushrooms optional, or use tofu for vegan option
  • 1/4 cup palm oil or coconut oil
  • 2 cups tomatoes fresh or canned
  • 1 medium bell pepper
  • 1 medium habanero pepper adjust based on spice tolerance
  • 1 medium onion divided
  • 1 cup water or stock vegetable broth can add more flavor
  • 1 tablespoon bouillon powder
  • 1 teaspoon cayenne pepper
  • 1 teaspoon black pepper
  • 1 tablespoon ground crayfish
  • 1 teaspoon pepper flakes
  • 1 teaspoon salt
For Serving
  • 4 cups rice or fufu or cauliflower rice

Equipment

  • Blender
  • pot

Method
 

Step-by-Step Instructions
  1. Blend together tomatoes, bell pepper, habanero, and half the onion until smooth. Set aside.
  2. Chop remaining onion and prepare spinach accordingly.
  3. Heat palm oil and sauté chopped onions until translucent (about 2 minutes).
  4. Add blended mixture to pot with sautéed onions and cook for 1 minute.
  5. Stir in seasonings and cook for 5 minutes.
  6. Add water or stock, then cooked meat, and let it simmer for 5 minutes.
  7. Stir in prepared spinach and cook for another 5 minutes until wilted.
  8. Adjust seasonings if necessary and serve hot with rice, fufu, or cauliflower rice.

Nutrition

Serving: 1cupCalories: 250kcalCarbohydrates: 15gProtein: 20gFat: 15gSaturated Fat: 5gPolyunsaturated Fat: 1gMonounsaturated Fat: 3gCholesterol: 60mgSodium: 800mgPotassium: 600mgFiber: 5gSugar: 3gVitamin A: 3000IUVitamin C: 60mgCalcium: 150mgIron: 4mg

Notes

Store Efo Riro in an airtight container for up to 5 days in the fridge or freeze for up to 3 months. Thaw overnight in the fridge before reheating.

Tried this recipe?

Let us know how it was!
  • « Previous Page
  • 1
  • …
  • 5
  • 6
  • 7
  • 8
  • 9
  • …
  • 58
  • Next Page »

Welcome!

Hi, I’m Grace, a Sydney-based home cook with a passion for bold flavors and trending ingredients. Whether you’re a busy beginner or a seasoned foodie, you’ll find dishes here that are fresh, fun, and full of flavor.

More about me

Popular Recipes

  • Cheesy Chicken Garlic Bread Sandwich
    Cheesy Chicken Garlic Bread Sandwich for Cozy Family Moments
  • Easy Chicken Ranch Wraps
    Easy Chicken Ranch Wraps: Quick, Creamy & Totally Satisfying
  • Chicken Caesar Sandwiches
    Delicious Chicken Caesar Sandwiches for Quick Comfort Food
  • best Cuban sandwich
    The Best Cuban Sandwich You’ll Want Every Weeknight!

Footer

↑ back to top

About

  • Privacy Policy
  • Disclaimer
  • Terms & Conditions

Newsletter

  • Sign Up! for emails and updates

Contact

  • About me
  • Contact me

Copyright © 2025 TastyTrendIngredients