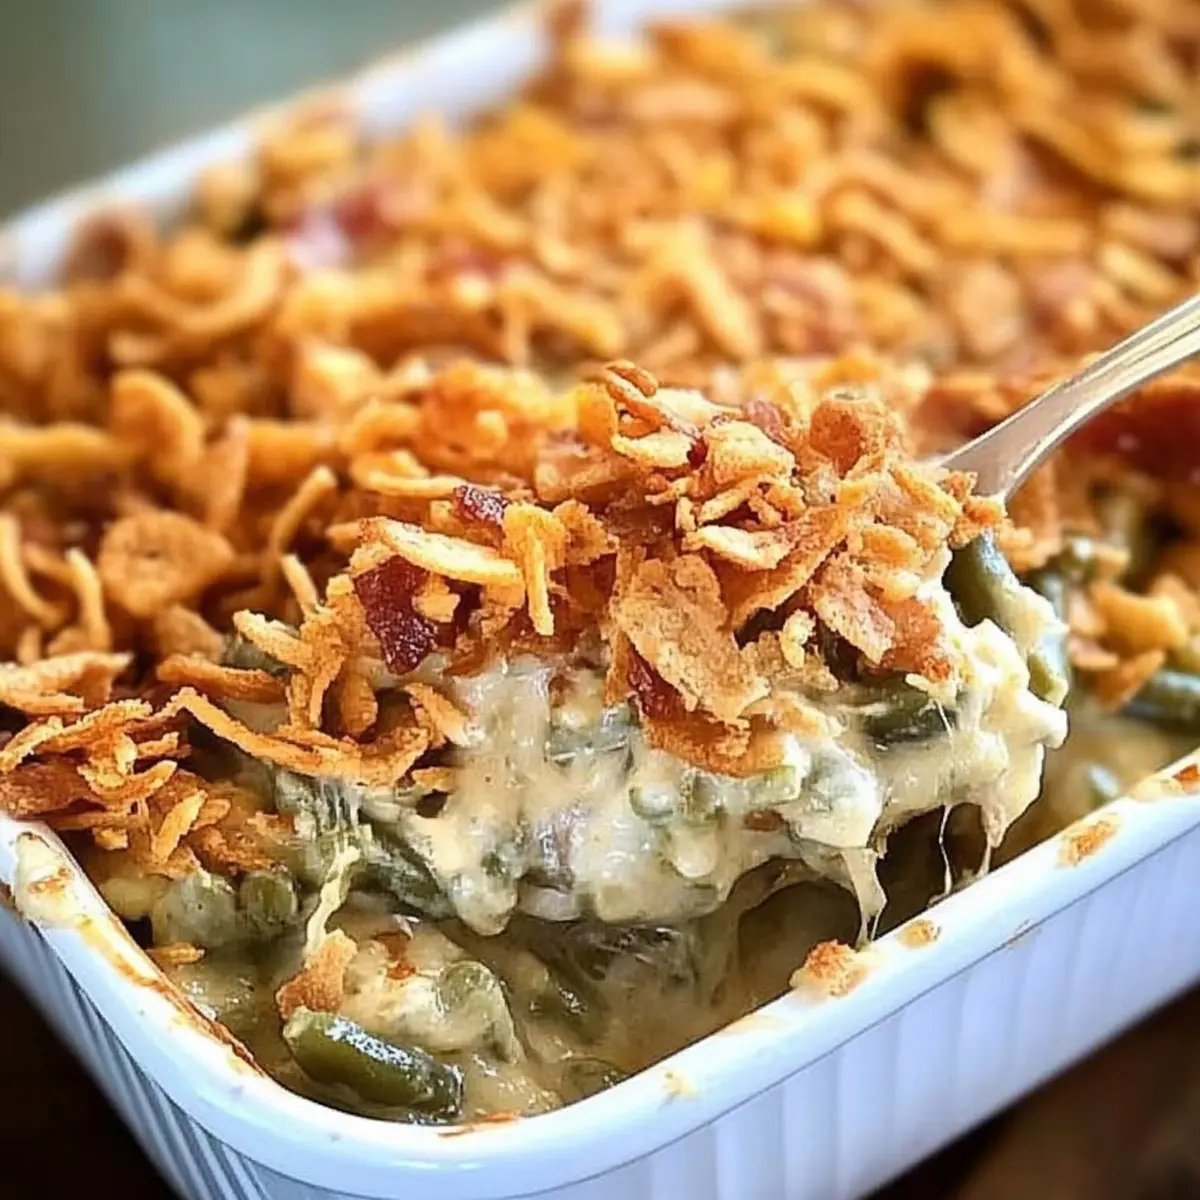
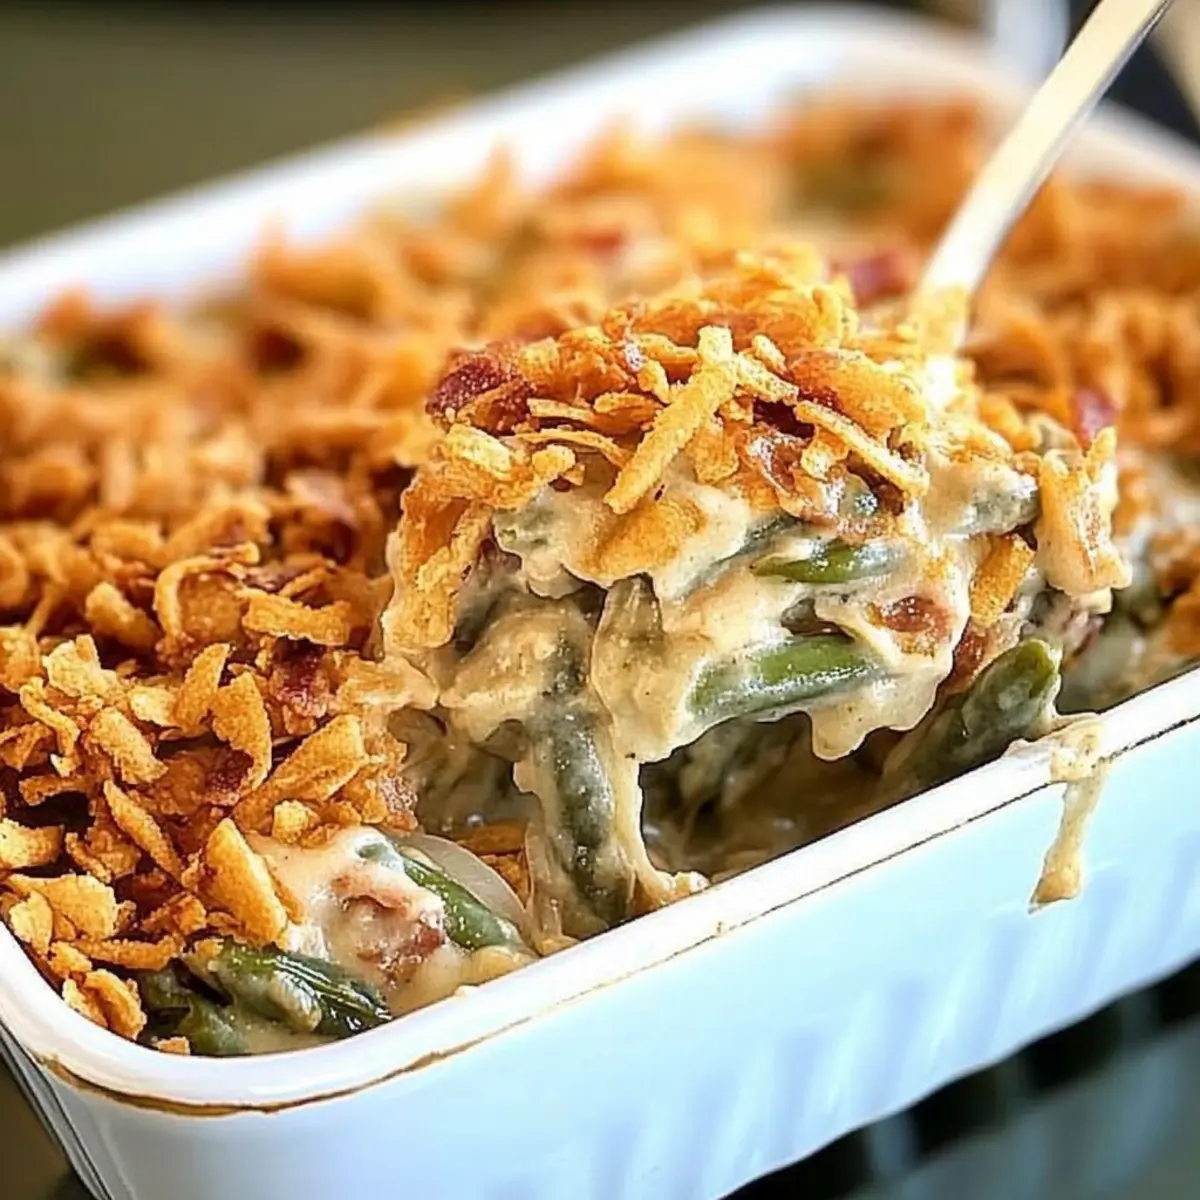
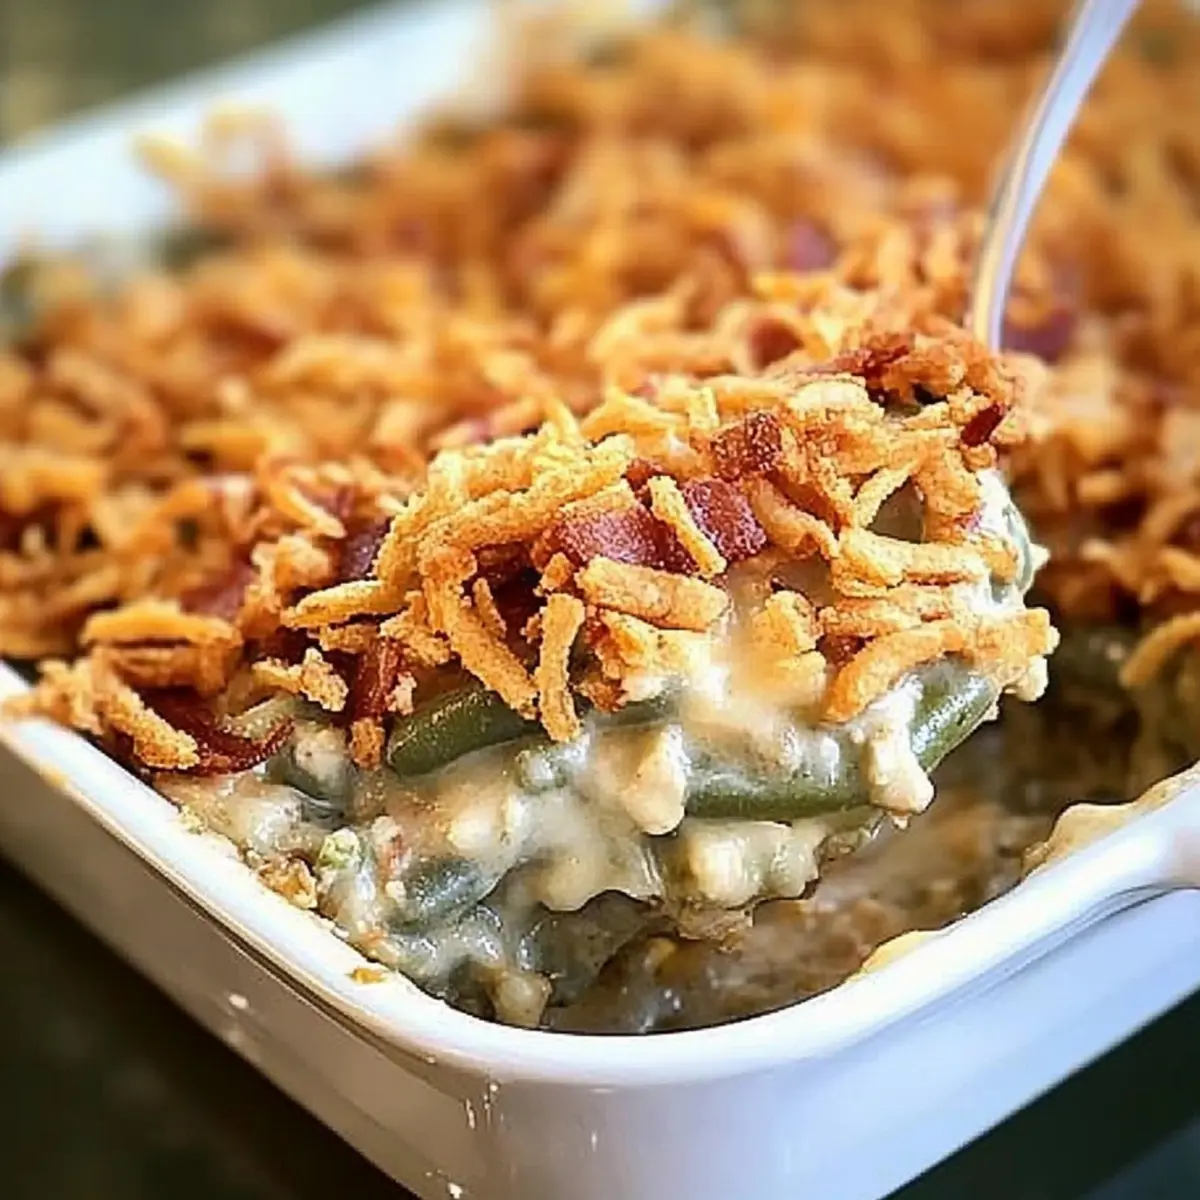
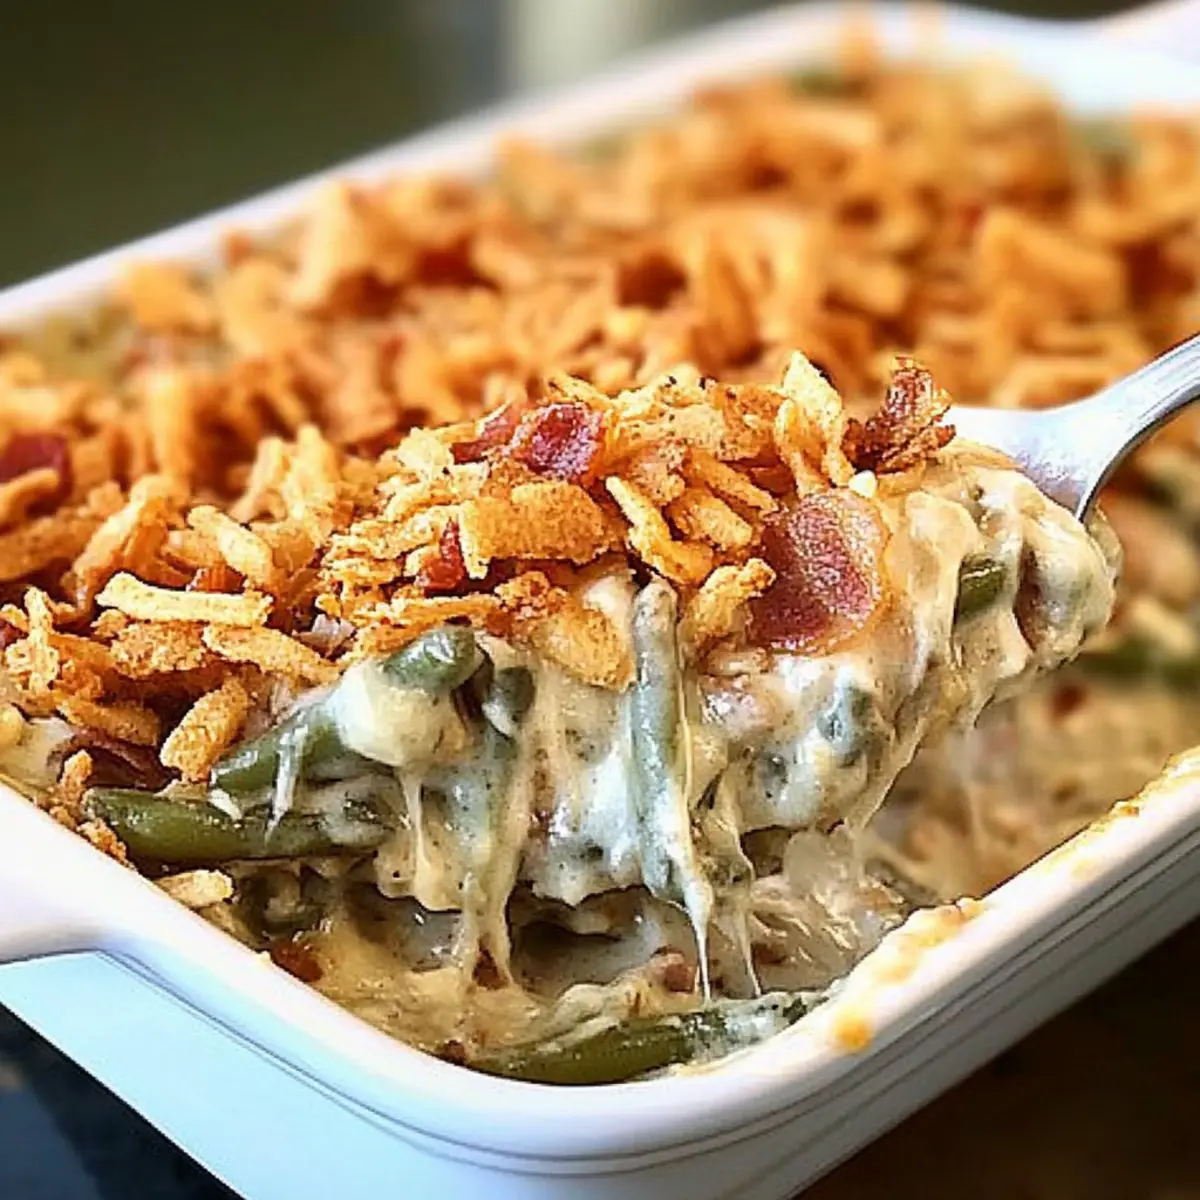
tastytrendingredients

  • Home
  • Recipes
    • Appetizers
    • Breakfast
    • Dessert
    • Dinner
    • Drinks
    • Salads
    • Snacks
    • Soups
  • About me
  • Contact me
menu icon
go to homepage
  • Home
  • Recipes
    • Appetizers
    • Breakfast
    • Dessert
    • Dinner
    • Drinks
    • Salads
    • Snacks
    • Soups
  • About me
  • Contact me
search icon
Homepage link
  • Home
  • Recipes
    • Appetizers
    • Breakfast
    • Dessert
    • Dinner
    • Drinks
    • Salads
    • Snacks
    • Soups
  • About me
  • Contact me
×

Mushroom Skulls Spooky Pasta for a Fun Halloween Feast

October 7, 2025 by Grace Snow Leave a Comment

As I rummaged through my pantry, a surprising burst of inspiration struck: Halloween was just around the corner! To celebrate this spooky season, I instantly thought of the Mushroom Skulls Spooky Pasta—an enchanting dish that’s as much fun to make as it is to eat. Made with striking squid ink spaghetti and topped with playful, carved mushroom skulls, this family-friendly recipe is perfect for fostering creativity and enjoying quality time together. Plus, its creamy, savory sauce comes together in no time, making it an ideal choice for busy weeknights when you need something both festive and quick. Just wait until you see the faces of your loved ones as they dive into this whimsical dinner. Ready to get started? Let’s make some kitchen magic!

Why is Mushroom Skulls Pasta a Must-Try?

Fun and Festive: This quirky Halloween dish adds a playful twist to your dinner table, making it a hit for family gatherings.

Quick and Easy: With simple steps and ingredients, you can whip up this eye-catching pasta in under 30 minutes, perfect for busy nights.

Creamy Delight: The rich, savory sauce coats the squid ink spaghetti beautifully, creating a satisfying flavor explosion that everyone will love.

Endless Variations: Customize it to fit dietary needs—swap out the squid ink spaghetti for whole wheat or gluten-free options, or make it vegan with coconut cream.

Crowd Winner: Everyone, from kids to adults, will be enchanted by those adorable mushroom skulls, turning mealtime into a fun adventure!

As a side note, consider serving this alongside some roasted veggies or a fresh salad for a complete meal perfect for the season.

Mushroom Skulls Spooky Pasta Ingredients

Get ready to create something truly magical for Halloween!

For the Pasta

  • Squid Ink Spaghetti – Adds a striking dark hue and a unique flavor; feel free to substitute with your favorite pasta.
  • Butter – Enhances richness and helps brown the mushrooms to perfection.
  • Olive Oil – Prevents butter from burning and adds a delightful flavor.

For the Sauce

  • Brown Onion – Serves as a fragrant base for the sauce; shallots or leeks can be great alternatives.
  • Bacon – Introduces depth and savory goodness; consider turkey bacon or shredded chicken for a healthier option.
  • Garlic – Boosts the overall flavor of the creamy sauce.
  • Dry White Wine – Contributes acidity and depth to the sauce; use vegetable broth for a non-alcoholic alternative.
  • Thickened Cream – Creates a velvety sauce; coconut cream works well for a dairy-free version.
  • Parmesan Cheese – Adds umami; it can be omitted for a vegan dish.
  • Fresh Thyme – Complements the dish with a fragrant herbal note.

For the Spooky Mushrooms

  • Button Mushrooms – Perfect for carving into spooky skull shapes; try cremini or portobello for a deeper flavor.

Now that you've gathered everything, you're one step closer to delighting your family with this Mushroom Skulls Spooky Pasta that’s not just delicious but bursting with Halloween fun!

Step‑by‑Step Instructions for Mushroom Skulls Spooky Pasta

Step 1: Prepare Mushroom Skulls
Begin by preheating your oven to 400°F (200°C). While it heats, take your button mushrooms and carve spooky faces into them using a small knife; feel free to halve them for easier cooking. Arrange the carved mushroom skulls cut side up on a baking sheet, ready to transform into adorable edible decorations for your Mushroom Skulls Spooky Pasta.

Step 2: Boil Water
Fill a large pot with salted water and bring it to a rapid boil over high heat. This will be the cooking water for your squid ink spaghetti. Once boiling, keep an eye on it, as the pasta will be added shortly—make sure you have your ingredients ready for the next steps!

Step 3: Sauté Mushrooms
In a large frying pan over medium heat, melt 2 tablespoons of butter and 1 tablespoon of olive oil together. Add your carved mushroom skulls, cut side down, and sauté for about 4–5 minutes until they are golden brown and fragrant. Remove them from the pan and set them aside, allowing the flavor to deepen while you move on to creating the sauce.

Step 4: Make Sauce
Using the same pan, add a finely chopped brown onion, 4 strips of chopped bacon, and 2 minced garlic cloves. Cook these ingredients together for about 7–8 minutes, stirring until the onions are translucent and the bacon is crispy. Pour in ½ cup of dry white wine, scraping the bottom of the pan, and let it simmer for about 5 minutes until reduced by half.

Step 5: Add Cream
Stir in 1 cup of thickened cream and ½ cup of grated Parmesan cheese into the pan. Continue to cook on low heat for about 2–3 minutes, stirring frequently, until the cheese has melted and the sauce has thickened. This creamy sauce will coat your spaghetti beautifully, making the Mushroom Skulls Spooky Pasta irresistible.

Step 6: Cook Pasta
Once the water is boiling, add your squid ink spaghetti and cook according to the package instructions, usually around 8–10 minutes for al dente. Stir occasionally to ensure the pasta doesn't stick together. Keep an eye on it, as you want the pasta to be tender but firm to the bite.

Step 7: Combine
After draining the pasta (reserve about ½ cup of pasta water), add it directly to the creamy sauce in the frying pan. Gently fold in the sautéed mushroom skulls, mixing everything together to ensure the pasta is evenly coated. If needed, add a splash of reserved pasta water to reach your desired sauce consistency.

Step 8: Serve
Plate your Mushroom Skulls Spooky Pasta with care. Garnish with fresh thyme and extra Parmesan on top for an added touch of flavor and visual appeal. Serve immediately while hot to delight your family with this festive Halloween dish that’s sure to be a hit around the dinner table!

Expert Tips for Mushroom Skulls Spooky Pasta

  • Mushroom Skull Prep: Carve mushrooms carefully to avoid breakage. Use a small knife for detailed faces and ensure even cuts for consistent cooking.

  • Sauce Thickening: Allow the sauce to simmer adequately before adding cream. If it’s too thin, create a cornstarch slurry by mixing 1 tablespoon of cornstarch with 2 tablespoons of cold water.

  • Pasta Alert: Watch the squid ink spaghetti closely while cooking. Overcooking can lead to mushy pasta. Aim for al dente for the best texture.

  • Flavor Boost: You can enhance the flavor by sautéing the garlic slightly longer until fragrant before adding other ingredients for the sauce.

  • Mushroom Variations: Switch up the types of mushrooms based on personal preference or seasonal availability to give your Mushroom Skulls Spooky Pasta a unique twist each time!

Mushroom Skulls Spooky Pasta Variations

Get ready to create your own unique twist on this festive dish with these fun and tasty variations!

  • Whole Wheat: Swap squid ink spaghetti for whole wheat pasta to add fiber and a nuttier flavor. It’s a wholesome choice that still delivers on taste!

  • Gluten-Free: Use gluten-free pasta instead to accommodate dietary needs without compromising on the enjoyment of this delightful Halloween meal.

  • Vegan: Replace the bacon with smoky tempeh and use coconut cream plus plant-based cheese for a delicious vegan version that everyone will appreciate.

  • Spicy Kick: Add a pinch of red pepper flakes to the sauce for a little heat that contrasts beautifully with the creamy texture, making it a thrilling dish!

  • Different Mushrooms: Experiment with cremini, shiitake, or portobello mushrooms for unexpected flavors and an exciting medley of textures—each brings something special to the plate!

  • Extra Veggies: Toss in some sautéed spinach or broccoli florets for a colorful boost of nutrition. It not only makes the dish pop but also adds great texture.

  • Herb Variations: Instead of thyme, try fresh basil or parsley for a bright, herbal note that complements the richness of the sauce perfectly.

  • Seafood Twist: Incorporate shrimp or scallops for a luxurious seafood variation that adds depth and elegance to your Mushroom Skulls Spooky Pasta adventure.

Consider pairing your pasta with some Garlic Bread or a light Caesar Salad to round out your festive Halloween feast!

What to Serve with Mushroom Skulls Spooky Pasta

The perfect Halloween-themed dinner deserves equally delightful accompaniments to round out your family meal.

  • Garlic Bread: A classic side that complements the creamy sauce beautifully, perfect for soaking up every drop.
  • Roasted Vegetables: Seasonal veggies like Brussels sprouts and carrots bring a healthy crunch and vibrant color to the table.
  • Caesar Salad: Crisp romaine tossed with creamy dressing and croutons offers a refreshing contrast to the richness of the pasta.
  • Pumpkin Soup: Silky and slightly sweet, this seasonal favorite adds a cozy touch to your spooky feast.
  • Apple Cider: A warm and spiced beverage that enhances the autumnal flavors and brings a festive spirit to your table.
  • Chocolate Mousse: For dessert, a light and airy mousse delicately rounds out your spooky dinner adventure with a sweet finish.

Make Ahead Options

These Mushroom Skulls Spooky Pasta are perfect for busy home cooks looking to save time! You can prepare the carved mushroom skulls and creamy sauce up to 3 days in advance, storing them in airtight containers in the refrigerator. To maintain quality, keep the mushroom skulls and sauce separate until you're ready to serve. When you’re ready to enjoy this festive dish, simply reheat the sauce on the stove over low heat and sauté the mushroom skulls for about 3-5 minutes until warm. Meanwhile, cook the squid ink spaghetti fresh, combine everything, and dinner is served with minimal effort—just as delicious and delightfully spooky!

How to Store and Freeze Mushroom Skulls Spooky Pasta

Room Temperature: It's best to avoid leaving any leftovers out. Store them promptly after serving to maintain freshness.

Fridge: Store the Mushroom Skulls Spooky Pasta in an airtight container for up to 3 days. Reheat gently on the stovetop or microwave for best results.

Freezer: You can freeze the pasta for up to 2 months. For optimal quality, separate the creamy sauce from the pasta before freezing. Thaw overnight in the fridge before reheating.

Reheating: When reheating, add a splash of milk or reserved pasta water to revive the creamy texture of the sauce. Enjoy your spooky pasta!

Mushroom Skulls Spooky Pasta Recipe FAQs

How do I choose ripe mushrooms for this recipe?
Absolutely! When selecting mushrooms, look for firm button mushrooms with a smooth surface. Avoid mushrooms that have dark spots or wrinkles, which can indicate they are past their prime. Fresh mushrooms should have a light, earthy aroma, while those with a strong, unpleasant smell should be avoided.

What’s the best way to store leftover Mushroom Skulls Spooky Pasta?
To keep your leftovers fresh, store them in an airtight container in the refrigerator for up to 3 days. When reheating, gently warm it on the stovetop or in the microwave, adding a splash of water or milk to restore the sauce's creamy texture.

Can I freeze Mushroom Skulls Spooky Pasta?
You can indeed! I recommend separating the creamy sauce from the pasta to maintain its texture when stored. Place each in airtight containers and freeze for up to 2 months. When you're ready to enjoy, thaw the pasta and sauce overnight in the fridge, then reheat gently on the stovetop.

What if my sauce doesn’t thicken?
If your sauce is still thin after simmering, don’t worry—it happens! Create a cornstarch slurry by mixing 1 tablespoon of cornstarch with 2 tablespoons of cold water. Stir this mixture into the sauce, and let it simmer for a few minutes until it thickens up nicely.

Are there any dietary considerations for my family or pets?
Very! For those with dietary restrictions, consider swapping out the bacon for turkey bacon or shredded chicken for a healthier option. Additionally, you can use coconut cream and plant-based cheese for a vegan version of the Mushroom Skulls Spooky Pasta. As for pets, avoid feeding them anything containing garlic or onions, which can be harmful to them.

Mushroom Skulls Spooky Pasta

Mushroom Skulls Spooky Pasta for a Fun Halloween Feast

Mushroom Skulls Spooky Pasta is a delicious Halloween-themed dish featuring squid ink spaghetti and playful mushroom skulls.
Print Recipe Pin Recipe
Prep Time 10 minutes mins
Cook Time 20 minutes mins
Total Time 30 minutes mins
Servings: 4 plates
Course: Dinner
Cuisine: Halloween, Italian
Calories: 600
Ingredients Equipment Method Nutrition Notes

Ingredients
  

For the Pasta
  • 12 ounces Squid Ink Spaghetti or your favorite pasta
  • 2 tablespoons Butter for richness
  • 1 tablespoon Olive Oil to prevent burning
For the Sauce
  • 1 medium Brown Onion can substitute with shallots or leeks
  • 4 strips Bacon can use turkey bacon or chicken
  • 2 cloves Garlic minced
  • 0.5 cup Dry White Wine or vegetable broth
  • 1 cup Thickened Cream or coconut cream for dairy-free
  • 0.5 cup Parmesan Cheese omit for vegan
  • 1 teaspoon Fresh Thyme for flavor
For the Spooky Mushrooms
  • 8 ounces Button Mushrooms or cremini/portobello

Equipment

  • Oven
  • pot
  • frying pan
  • Baking Sheet
  • Knife

Method
 

Preparation
  1. Preheat your oven to 400°F (200°C) and carve spooky faces into the button mushrooms.
  2. Fill a large pot with salted water and bring it to a rapid boil.
Cooking
  1. In a large frying pan, melt the butter and olive oil over medium heat and sauté the carved mushroom skulls for 4-5 minutes.
  2. In the same pan, add the chopped onion, bacon, and garlic; cook until onions are translucent and bacon is crispy.
  3. Pour in the dry white wine and simmer for 5 minutes until reduced by half.
  4. Stir in the cream and Parmesan, and cook on low until the cheese melts and the sauce thickens.
  5. Cook the squid ink spaghetti in boiling water for 8-10 minutes until al dente.
  6. Combine the drained pasta with the sauce and sautéed mushroom skulls, adding reserved pasta water as needed.
  7. Plate your Mushroom Skulls Spooky Pasta and garnish with fresh thyme and extra Parmesan. Serve immediately.

Nutrition

Serving: 1plateCalories: 600kcalCarbohydrates: 80gProtein: 15gFat: 25gSaturated Fat: 10gPolyunsaturated Fat: 5gMonounsaturated Fat: 5gCholesterol: 50mgSodium: 800mgPotassium: 600mgFiber: 4gSugar: 5gVitamin A: 500IUVitamin C: 2mgCalcium: 200mgIron: 3mg

Notes

Consider serving alongside roasted veggies or a fresh salad for a complete meal.

Tried this recipe?

Let us know how it was!

Mushroom Skulls Spooky Pasta for a Fun Halloween Feast

October 7, 2025 by Grace Snow Leave a Comment

As the autumn leaves begin to swirl, I find myself drawn into the kitchen, excited to whip up something special for Halloween. This year, I’m thrilled to share my Mushroom Skulls Spooky Pasta recipe, a delightful dish that invites both fun and flavor to the table. With its striking squid ink spaghetti and whimsical mushroom skulls, this pasta is not only a feast for the eyes but also a creamy, savory comfort food the whole family will adore. Best of all, it comes together in a snap—perfect for busy weeknights when the promise of treats lingers in the air. Ready to give your dinner a spooky twist? Let’s dive into this delicious Halloween creation!

Why is Spooky Pasta a Must-Try?

Family-Friendly Fun: This Mushroom Skulls Spooky Pasta is an exciting dish that makes dinner a memorable event for everyone, even picky eaters!

Quick and Easy: With a preparation time that fits seamlessly into your busy evening, this cheerful meal can be on the table in no time.

Unique Presentation: The spooky skull-shaped mushrooms and rich black spaghetti bring an element of surprise that’s perfect for Halloween gatherings or themed dinners.

Creamy and Savory: The luscious sauce pairs beautifully with the squid ink spaghetti, creating a dreamy plate that’s indulgent and satisfying.

Versatile Dish: Whether you choose to go with traditional ingredients or opt for gluten-free or vegan versions, this recipe can easily be tailored to fit any dietary needs.

Mix in some fun sides like roasted veggies or garlic bread for a complete meal that will keep your family and friends coming back for seconds!

Mushroom Skulls Spooky Pasta Ingredients

For the Pasta
• Squid Ink Spaghetti – Offers a striking dark hue and a unique flavor; feel free to substitute with any preferred pasta.

For the Mushroom Skulls
• Button Mushrooms – Ideal for creating spooky skull shapes; you can use cremini or portobello for a richer taste.

For the Sauce
• Butter – Adds a rich flavor and helps brown the mushrooms nicely.
• Olive Oil – Prevents butter from burning while adding a delicious depth of flavor.
• Brown Onion – Serves as an aromatic base; shallots or leeks are great alternatives.
• Bacon – Introduces depth and savory flavor; consider turkey bacon or shredded chicken for a healthier option.
• Garlic – Boosts the overall flavor profile of the sauce.
• Dry White Wine – Brings acidity and depth to the sauce; use vegetable broth as a non-alcoholic substitute if desired.
• Thickened Cream – Creates a rich and velvety sauce; for a dairy-free alternative, coconut cream works nicely.
• Parmesan Cheese – Adds umami and creaminess; can be omitted for a dairy-free version.
• Fresh Thyme – Lends a fresh herbal note, perfect for finishing the dish.

This Mushroom Skulls Spooky Pasta is sure to be a hit at your Halloween table, bringing both fun and delightful flavor!

Step‑by‑Step Instructions for Mushroom Skulls Spooky Pasta

Step 1: Prepare Mushroom Skulls
Begin by carving spooky faces into the button mushrooms to create the skulls—this will make your Mushroom Skulls Spooky Pasta a festive hit. If the mushrooms are larger, halve them to enhance cooking and ensure even browning. Set aside the carved mushrooms for later use in your creamy sauce.

Step 2: Boil Water
In a large pot, fill with salted water and bring it to a rapid boil over high heat. This salted water will be used for cooking the squid ink spaghetti, ensuring that each strand is flavorful. Once boiling, keep an eye on it as you prepare the other components of the dish.

Step 3: Sauté Mushrooms
In a frying pan over medium heat, melt together 1 tablespoon of butter and 1 tablespoon of olive oil. Once the butter is bubbling, carefully add the mushroom skulls cut-side down and sauté for 4–5 minutes until they are golden brown and crisp. After browning, remove them from the pan and set aside.

Step 4: Make Sauce
In the same pan, add another tablespoon of butter, along with chopped onions and diced bacon. Cook over medium heat until the onions become translucent and the bacon is crispy, about 5–7 minutes. Stir in minced garlic and cook for another minute until fragrant, then pour in dry white wine, allowing it to reduce by half, approximately 5 minutes.

Step 5: Add Cream
Once the wine has reduced, lower the heat and stir in the thickened cream and grated Parmesan cheese. Keep stirring until the cheese melts and the sauce thickens, which should take about 2–3 minutes. The creamy sauce is now the perfect complement for your Mushroom Skulls Spooky Pasta.

Step 6: Cook Pasta
Add the squid ink spaghetti to the boiling water and cook according to package instructions until al dente, usually about 8–10 minutes. Stir occasionally to prevent the pasta from sticking and keep an eye on it to achieve the right level of tenderness.

Step 7: Combine
Once the pasta is cooked, drain it, reserving about half a cup of the pasta water. Add the drained squid ink spaghetti directly to the creamy sauce in the frying pan, tossing gently to combine. Fold in the sautéed mushroom skulls and, if the sauce seems too thick, add in a splash of the reserved pasta water to reach your desired consistency.

Step 8: Serve
Plate the Mushroom Skulls Spooky Pasta and garnish with fresh thyme and extra Parmesan cheese for a delightful finish. Serve immediately while the dish is hot and creamy, ensuring everyone enjoys the festive flavors of this Halloween treat!

Expert Tips for Mushroom Skulls Spooky Pasta

  • Simmer for Flavor: Allow the sauce to simmer adequately before adding cream to enhance its flavor and ensure it thickens properly.

  • Thickening Aid: If your sauce remains too thin after adding cream, mix 1 tablespoon of cornstarch with 2 tablespoons of cold water and stir it into the sauce until it thickens.

  • Mushroom Prep: When carving the mushroom skulls, keep your designs simple; intricate faces can be tricky and might not hold up during cooking.

  • Pasta Timing: Always check your squid ink spaghetti a minute or two before the package instructions recommend for that perfect al dente bite!

  • Make Ahead Magic: For convenience, prepare the mushroom skulls and sauce ahead of time and refrigerate them separately. Reheat before combining with pasta for dinner.

  • Healthy Substitutions: To lighten up this Mushroom Skulls Spooky Pasta, swap out regular bacon for turkey bacon or a plant-based alternative, maintaining flavor while reducing fat content.

Mushroom Skulls Spooky Pasta Variations

Feel free to get creative with your Mushroom Skulls Spooky Pasta! Whip up something truly unique with these fun twists to enjoy.

  • Gluten-Free: Swap squid ink spaghetti for your favorite gluten-free pasta to accommodate dietary needs while maintaining flavor.
  • Vegan Delight: Use coconut cream and plant-based cheese for a fully vegan adaptation that doesn’t skimp on taste.
  • Veggie Boost: Toss in spinach or roasted red bell peppers for another layer of color and nutrition—everyone loves a bit of extra greenery!
  • Herb Infusion: Sprinkle fresh basil or parsley instead of thyme to add a different herbal note that brightens your creamy sauce.
  • Mushroom Variety: Experiment with different kinds of mushrooms such as shiitake or oyster mushrooms for an exciting mix of textures and flavors.
  • Cheesy Twist: Add a sprinkle of mozzarella on top before serving for a melty finish that takes comfort food to another level.
  • Spicy Kick: Stir in some red pepper flakes or diced jalapeños to give your dish a fiery boost—perfect for those who love some heat!

Already love your spooky pasta? You might also enjoy whipping up some Skillet Pasta Sun or trying a wholesome Cauliflower Pasta Ready as a delightful twist to your pasta nights!

Make Ahead Options

These Mushroom Skulls Spooky Pasta are perfect for busy home cooks looking to save time during Halloween festivities! You can prepare the mushroom skulls and creamy sauce up to 3 days in advance. Simply carve the spooky faces in the mushrooms and sauté them, then store them in an airtight container in the refrigerator. Prepare the sauce, allowing it to cool before refrigerating separately. When you’re ready to serve, just reheat the sauce over low heat while cooking the squid ink spaghetti—this quick approach ensures your meal is just as delicious when served! For the best quality, avoid mixing the pasta with the sauce until right before serving to keep everything fresh and flavorful.

What to Serve with Mushroom Skulls Spooky Pasta

Elevate your Halloween dining experience by pairing this spooky pasta dish with delightful sides that will enchant your family and friends.

  • Creamy Garlic Bread: Perfectly toasted, this garlic bread adds a crispy texture that beautifully complements the rich creaminess of the pasta. With each bite, you’ll enjoy the flavor meld of the buttery, garlicky crunch that pairs well with the savory mushrooms.

  • Roasted Seasonal Vegetables: Roasting brings out the natural sweetness of vegetables like squash, carrots, and Brussels sprouts. Tossed with a hint of olive oil and herbs, their earthy flavors enhance the pasta’s rich sauce, creating a balanced plate that’s both healthy and satisfying.

  • Mixed Green Salad: A light, refreshing salad with crunchy lettuce, colorful bell peppers, and a tangy vinaigrette offers a wonderful contrast to the indulgent pasta dish. The crisp greens and zesty dressing awaken the palate, ensuring your meal feels bright and lively.

  • Pumpkin Spice Muffins: Embrace the autumn spirit with these soft, flavorful muffins that introduce a hint of sweetness to the meal. Their warm spices echo the cozy feelings of the season, making them a delightful way to end your Halloween dinner.

  • Spooky Themed Drinks: Pair your meal with fun Halloween-themed drinks like a bright orange pumpkin punch or a fizzy apple cider cocktail. Their vibrant colors and festive flavors will create a fun atmosphere that complements the whimsy of your Mushroom Skulls Spooky Pasta.

These exceptional pairings will not only enhance your Halloween feast but ensure that your table is filled with warmth, flavor, and festive charm!

How to Store and Freeze Mushroom Skulls Spooky Pasta

Fridge: Store leftovers in an airtight container for up to 3 days. Be sure to let the pasta cool before sealing to maintain freshness.

Freezer: Freeze the Mushroom Skulls Spooky Pasta for up to 2 months. For best quality, separate the sauce from the pasta before freezing to avoid sogginess upon reheating.

Reheating: When ready to enjoy again, thaw overnight in the fridge, then reheat on the stovetop over low heat, adding a splash of milk or reserved pasta water to revive the creamy texture.

Make-Ahead Tip: The mushroom skulls can be prepared ahead of time and stored in the fridge, while the sauce can be made and kept for up to 3 days before using.

Mushroom Skulls Spooky Pasta Recipe FAQs

How do I select the perfect mushrooms for this dish?
Absolutely! When choosing mushrooms for your Mushroom Skulls Spooky Pasta, look for button mushrooms that are firm and devoid of dark spots or blemishes. They should feel smooth to the touch and have a fresh, earthy scent. For a more robust flavor, opt for cremini or portobello mushrooms.

What is the best way to store leftover Mushroom Skulls Spooky Pasta?
Very! Store any leftovers in an airtight container in the fridge for up to 3 days. Allow the pasta to cool completely before sealing to maintain its freshness and flavor. Reheat gently on the stovetop with a bit of water or cream to restore its creamy texture when you're ready to enjoy it again.

Can I freeze Mushroom Skulls Spooky Pasta?
Absolutely! You can freeze this dish for up to 2 months. For optimal quality, I recommend separating the sauce from the pasta before freezing. To do this, let everything cool down, then store them in airtight containers. When you're ready to feast again, thaw the sauce overnight in the fridge, then reheat it gently while cooking the pasta fresh.

What should I do if my sauce doesn’t thicken properly?
Not a problem! If your sauce fails to thicken, you can create a cornstarch slurry by mixing 1 tablespoon of cornstarch with 2 tablespoons of cold water. Stir this mixture into the sauce gradually, keeping it on low heat until it reaches your desired consistency. This method works like a charm!

Are there any dietary considerations I should keep in mind?
Absolutely! If you're catering to dietary restrictions, you can easily adapt this recipe. For a gluten-free version, choose a gluten-free pasta; for a dairy-free dish, use coconut cream and skip the Parmesan. If considering allergies, always double-check packaging to ensure that none of the ingredients contain allergens widespread in your group.

Can I prepare the Mushroom Skulls in advance?
Very! You can prepare the mushroom skulls a day ahead. Just carve spooky faces into them and store them in an airtight container in the refrigerator. This makes for a quick assembly when you’re ready to whip up your Mushroom Skulls Spooky Pasta on Halloween night!

Mushroom Skulls Spooky Pasta

Mushroom Skulls Spooky Pasta for a Fun Halloween Feast

A delightful Halloween dish featuring squid ink spaghetti and whimsical mushroom skulls, perfect for a spooky family dinner.
Print Recipe Pin Recipe
Prep Time 15 minutes mins
Cook Time 30 minutes mins
Total Time 45 minutes mins
Servings: 4 servings
Course: Dinner
Cuisine: Halloween, Italian
Calories: 450
Ingredients Equipment Method Nutrition Notes

Ingredients
  

For the Pasta
  • 8 ounces Squid Ink Spaghetti Feel free to substitute with any preferred pasta.
For the Mushroom Skulls
  • 10 ounces Button Mushrooms You can use cremini or portobello.
For the Sauce
  • 2 tablespoons Butter Adds rich flavor.
  • 1 tablespoon Olive Oil Prevents butter from burning.
  • 1 medium Brown Onion Can substitute shallots or leeks.
  • 4 slices Bacon Consider turkey bacon for a healthier option.
  • 2 cloves Garlic Boosts flavor.
  • 1/2 cup Dry White Wine Use vegetable broth as a non-alcoholic substitute.
  • 1 cup Thickened Cream Coconut cream works for a dairy-free version.
  • 1/2 cup Parmesan Cheese Can be omitted for dairy-free.
  • 1 tablespoon Fresh Thyme

Equipment

  • Large pot
  • frying pan
  • Knife
  • Cutting Board

Method
 

Preparation Steps
  1. Begin by carving spooky faces into the button mushrooms to create the skulls. Halve larger mushrooms to enhance cooking. Set aside.
  2. In a large pot, fill with salted water and bring to a rapid boil for cooking the squid ink spaghetti.
  3. In a frying pan, melt together 1 tablespoon of butter and 1 tablespoon of olive oil. Add the mushroom skulls cut-side down and sauté for 4-5 minutes until golden brown.
  4. In the same pan, add another tablespoon of butter, chopped onions, and diced bacon. Cook until onions are translucent and bacon is crispy, about 5-7 minutes. Add minced garlic and cook for another minute. Pour in dry white wine and reduce by half for about 5 minutes.
  5. Once the wine has reduced, lower the heat and stir in thickened cream and grated Parmesan cheese. Stir until cheese melts and sauce thickens, about 2-3 minutes.
  6. Add squid ink spaghetti to boiling water and cook according to package instructions until al dente, about 8-10 minutes.
  7. Drain the pasta, reserving about half a cup of pasta water. Add drained spaghetti directly to creamy sauce, tossing gently to combine. Fold in sautéed mushroom skulls and add reserved pasta water if sauce is too thick.
  8. Plate the Mushroom Skulls Spooky Pasta, garnish with fresh thyme and extra Parmesan cheese, and serve immediately.

Nutrition

Serving: 1plateCalories: 450kcalCarbohydrates: 65gProtein: 18gFat: 15gSaturated Fat: 8gPolyunsaturated Fat: 0.5gMonounsaturated Fat: 4gCholesterol: 40mgSodium: 800mgPotassium: 450mgFiber: 4gSugar: 3gVitamin A: 10IUVitamin C: 5mgCalcium: 15mgIron: 10mg

Notes

For convenience, prepare the mushroom skulls and sauce ahead of time and refrigerate them separately. Reheat before combining with pasta for dinner.

Tried this recipe?

Let us know how it was!

Ghostly Lasagna: Spooktacular Comfort Food for Family Fun

October 4, 2025 by Grace Snow Leave a Comment

As I strolled through my local farmer's market, the vibrant colors and scents of autumn embraced me. It was then that the playful idea of making Ghostly Lasagna struck—a comforting dish that would bring warmth and smiles to our Halloween gathering. Bursting with layers of tender chicken, creamy ricotta, and fresh spinach, this recipe is not just easy to prepare but is also a fantastic make-ahead option, leaving you more time to create lasting memories with loved ones. Whether you're a seasoned home chef or a kitchen beginner, this family-friendly meal invites everyone to partake, offering variation for dietary preferences like gluten-free and vegetarian options. Ready to add a little spooky fun to your dinner table? Let's dive into crafting this delightful lasagna together!

Why is Ghostly Lasagna a must-try?

Comforting and Whimsical: This delightful dish combines comforting flavors with a fun Halloween twist, making it perfect for family gatherings or spooky parties.
Easy to Prepare: With simple steps and easy-to-find ingredients, even novice cooks can create a stunning centerpiece.
Versatile: Gluten-free or vegetarian? No problem! This recipe offers variations to suit everyone's needs without sacrificing taste.
Make-Ahead Convenience: Prep it a day ahead for stress-free entertaining, allowing you to enjoy more time with your loved ones.
Crowd-Pleasing Appeal: The playful mozzarella ghosts and delicious layers ensure this lasagna is a hit among kids and adults alike. Enjoy with a side of crispy garlic bread or a refreshing caesar salad for a complete meal!

Ghostly Lasagna Ingredients

Get ready to craft the most delightful and spooky dish of the season with these key ingredients!

For the Pasta
• Lasagna Noodles – Essential for the structure of this Ghostly Lasagna; gluten-free options are available to suit dietary needs.

For the Filling
• Cooked Chicken (4 cups, shredded) – A hearty protein source; rotisserie chicken makes preparation quick and convenient.
• Spinach (4 cups, chopped) – Adds freshness and nutrients; can be switched with kale or drained frozen spinach for convenience.
• Ricotta Cheese (4 cups) – Provides creaminess and richness; you can substitute with cottage cheese for a lighter option.

For the Topping
• Shredded Mozzarella Cheese (4 cups) – Key for creating the whimsical ghosts on top; lower moisture content helps retain shape.
• Grated Parmesan Cheese (1 cup) – Enhances flavor and contributes a crispy, golden top layer.
• Black Olives – Serve as spooky “eyes” for the mozzarella ghosts; optional based on preference.

For the Sauce
• Marinara Sauce (6 cups) – The flavorful binder for all the layers; homemade is preferred for an extra touch of freshness.
• Salt and Pepper – Essential for seasoning to your taste.

Now that you have everything you need, let’s prepare to bring some spooky fun into your kitchen with this Ghostly Lasagna!

Step‑by‑Step Instructions for Ghostly Lasagna

Step 1: Preheat the Oven
Begin by preheating your oven to 375°F (190°C) to ensure it’s hot and ready for the Ghostly Lasagna. This temperature will give the cheese a perfect melt while creating a golden-brown topping. Set out a large baking dish and gather your ingredients to streamline the process.

Step 2: Cook the Noodles
In a large pot, bring water to a boil and add a generous amount of salt. Cook the lasagna noodles for about 8-10 minutes, until they are al dente—firm but tender. Once done, drain the noodles and gently lay them flat on a clean kitchen towel to prevent sticking while you prepare the filling.

Step 3: Prepare the Filling
In a medium bowl, thoroughly mix together the ricotta cheese, chopped spinach, salt, and pepper until well combined. This creamy filling is the heart of the Ghostly Lasagna, offering a delightful blend of flavors. Make sure the spinach is evenly distributed, ensuring each bite is packed with goodness.

Step 4: Create the Sauce Layer
Spread a thin layer of marinara sauce across the bottom of your baking dish—this will prevent the noodles from sticking and infuse flavor into the base. Use a spatula to ensure an even coating, creating a solid foundation for the layers to come.

Step 5: Layer the Ingredients
Start layering by placing a layer of cooked noodles over the marinara sauce. Then, add a generous scoop of the ricotta-spinach mixture, followed by the shredded chicken and a handful of shredded mozzarella. Repeat this process until you've exhausted all your ingredients, finishing with a final layer of marinara sauce topped with mozzarella to create a bubbly crown.

Step 6: Form the Mozzarella Ghosts
Use small pieces of mozzarella to fashion ghost shapes atop the last layer of cheese. Space them out to ensure a playful design and, for extra fun, press black olives into the cheese to create spooky eyes. This whimsical touch will elevate your Ghostly Lasagna to a festive masterpiece!

Step 7: Bake the Lasagna
Cover the assembled lasagna with aluminum foil to trap moisture and bake in the preheated oven for 30 minutes. This initial baking will meld the flavors beautifully. After 30 minutes, carefully remove the foil and bake for an additional 10-15 minutes until the cheese is bubbly and golden brown, giving it an inviting look.

Step 8: Rest Before Slicing
Once out of the oven, let your Ghostly Lasagna rest for 10-15 minutes. This crucial step allows the layers to set, making it easier to slice. During this time, the comforting aromas will fill the kitchen, enticing everyone to gather around the table for a delicious meal.

Expert Tips for Ghostly Lasagna

  • Dry the Spinach: Make sure to thoroughly dry your spinach after washing. Excess moisture can lead to a watery lasagna, ruining the delightful layers.

  • Layer Smartly: Stagger your ingredient layers, adding marinara sauce between each. This helps enhance flavors and keeps the lasagna well-bound.

  • Perfect Mozzarella Ghosts: Add the mozzarella ghosts during the last 5 minutes of baking to maintain their playful shape. Alternatively, broil them separately for quick melting.

  • Resting Time: Don’t skip the resting period after baking! Letting the lasagna sit for 10-15 minutes minimizes liquid loss and makes slicing easier, allowing each piece to look as great as it tastes.

  • Make-Ahead Magic: Prepare the Ghostly Lasagna a day in advance and refrigerate it. Just adjust the baking time if it’s cold from the fridge for a stress-free meal.

Ghostly Lasagna Variations & Substitutions

Feel free to personalize your Ghostly Lasagna with these delightful twists that elevate both flavor and comfort!

  • Gluten-Free: Swap in gluten-free lasagna noodles for a dish that fits your dietary needs while keeping all the delicious layers.

  • Vegetarian Delight: Eliminate the chicken and add a variety of veggies, like roasted mushrooms or zucchini, for a hearty, plant-rich option. This gives your lasagna a unique and vibrant flavor profile.

  • Spicy Kick: Stir in diced jalapeños or sprinkle crushed red pepper flakes into the marinara to bring some heat, making each bite an exciting adventure for your taste buds.

  • Plant-Based Option: Replace chicken with hearty lentils or chickpeas. This not only gives protein but also enhances the nutritional value while keeping the flavors robust.

  • Creamy Spin: For those craving richness, incorporate a dollop of mascarpone or cream cheese into the ricotta filling. This extra layer of creaminess can take the texture to a whole new level.

  • Olive Alternatives: If black olives aren't your thing, try cherry tomatoes or mozzarella pearls for the eyes. This playful substitution can bring new flavors and presentation styles that will bring a smile to your table!

When exploring these variations, don't hesitate to pair your Ghostly Lasagna with a side of roasted vegetable medley or a refreshing caesar salad to complete your festive feast. Create your own twist and make this dish truly your own!

Storage Tips for Ghostly Lasagna

Fridge: Store leftovers in an airtight container for up to 3 days. Reheat with a splash of marinara sauce to retain moisture and invigorate the flavors.

Freezer: Unbaked Ghostly Lasagna can be frozen for up to 3 months. Assemble it in advance, cover tightly, and just bake it directly from the freezer with a slight increase in cooking time.

Reheating: When reheating, warm individual portions in the microwave or re-bake in the oven at 350°F (175°C) for approximately 20 minutes until warmed through.

Make-Ahead: Prepare everything a day ahead for a stress-free gathering. Just store the assembled dish in the fridge and adjust baking times as needed.

Make Ahead Options

These Ghostly Lasagna layers are perfect for meal prep enthusiasts! You can assemble the entire dish up to 24 hours in advance, making dinnertime seamless for busy weeknights. Simply prepare the lasagna, cover it tightly with aluminum foil, and refrigerate until you’re ready to bake. When it's time to serve, preheat your oven and bake for an additional 10-15 minutes if chilled. To maintain the quality, be sure to lightly grease the baking dish and ensure your ingredients are fresh prior to assembly. You’ll savor every bite just as much as if it were freshly made, giving you the freedom to focus on what truly matters—creating spooky memories with your loved ones!

What to Serve with Ghostly Lasagna?

Enhance your Halloween feast with delightful pairings that will complement the comforting layers of ghostly goodness.

  • Crispy Garlic Bread: The crunchy texture and rich garlic flavor are the perfect contrast to the creamy lasagna, giving every bite a delightful zing.
  • Roasted Vegetable Medley: A mix of seasonal veggies brings freshness and color to your plate, while the caramelized sweetness complements the savory lasagna beautifully.
  • Caesar Salad: The crisp romaine and creamy dressing provide a refreshing balance to the rich layers of ghostly lasagna, making it a classic accompaniment.
  • Festive Sangria: This fruity drink adds a fun and colorful touch, echoing the playful spirit of Halloween while keeping things light and refreshing.
  • Pumpkin Spice Cupcakes: Finish on a sweet note with these cozy treats, their warm spices harmonizing perfectly with the comforting flavors of the lasagna.
  • Garlicky Spinach Sauté: Reinforce those fresh spinach notes with a quick sauté, offering a delightful texture and enhancing the overall plate with another layer of flavor.
  • Apple Cider: Warm or chilled, this seasonal beverage brightens up the table and pairs wonderfully with the savory elements of your Halloween spread.
  • Chocolate-Dipped Pretzels: For a crunchy, salty-sweet dessert, these treats are both fun and festive, making them a perfect conclusion to your meal that kids will love!

Ghostly Lasagna Recipe FAQs

What type of lasagna noodles should I use?
You can use regular lasagna noodles for this Ghostly Lasagna, but if you're looking for a gluten-free option, I highly recommend using gluten-free lasagna noodles. Many brands offer great alternatives that cook up beautifully, so you won't miss out on the comforting flavors.

How long can I store leftovers in the fridge?
Absolutely! Leftovers can be stored in an airtight container in the fridge for up to 3 days. I usually reheat mine with a splash of marinara sauce to keep it moist and give it a flavor boost, making each bite just as delicious as the first!

Can I freeze unbaked Ghostly Lasagna?
Yes, you can! Assemble your Ghostly Lasagna and cover it tightly with plastic wrap and then aluminum foil. It can be frozen for up to 3 months. When you’re ready to enjoy it, bake it directly from the freezer—just increase the cooking time by about 10-15 minutes.

What if my lasagna turns out watery?
Great question! To prevent a watery lasagna, make sure to dry your spinach thoroughly after washing. Excess moisture is often the culprit. Layering ingredients wisely by staggering with marinara sauce will help too, as it binds flavors and keeps everything together nicely.

Are there any allergy considerations with this recipe?
Yes, definitely! This Ghostly Lasagna contains dairy (ricotta, mozzarella, Parmesan) and gluten (unless using gluten-free noodles). If you're cooking for someone with allergies, I suggest looking for lactose-free cheese options and ensuring that your noodles are certified gluten-free.

Can I make this dish vegetarian-friendly?
Very much so! To adapt the Ghostly Lasagna for vegetarians, simply omit the chicken and amplify the veggie options—think mushrooms, zucchini, or even some delicious roasted red peppers. This way, everyone at your gathering can partake in this spooky delight!

Ghostly Lasagna

Ghostly Lasagna: Spooktacular Comfort Food for Family Fun

Ghostly Lasagna is a comforting, festive dish perfect for Halloween gatherings, featuring layers of chicken, ricotta, and whimsical mozzarella ghosts.
Print Recipe Pin Recipe
Prep Time 30 minutes mins
Cook Time 45 minutes mins
Resting Time 15 minutes mins
Total Time 1 hour hr 30 minutes mins
Servings: 8 slices
Course: Dinner
Cuisine: American
Calories: 400
Ingredients Equipment Method Nutrition Notes

Ingredients
  

For the Pasta
  • 12 oz Lasagna Noodles Gluten-free options available.
For the Filling
  • 4 cups Cooked Chicken Shredded; rotisserie chicken works well.
  • 4 cups Spinach Chopped; can substitute with kale or drained frozen spinach.
  • 4 cups Ricotta Cheese Can substitute with cottage cheese for a lighter option.
For the Topping
  • 4 cups Shredded Mozzarella Cheese Lower moisture content helps retain shape.
  • 1 cup Grated Parmesan Cheese Enhances flavor and provides a crispy top.
  • Black Olives Optional for spooky 'eyes'.
For the Sauce
  • 6 cups Marinara Sauce Homemade preferred for freshness.
  • Salt Essential for seasoning.
  • Pepper Essential for seasoning.

Equipment

  • Large baking dish
  • Large pot
  • medium bowl
  • Spatula
  • Kitchen Towel

Method
 

Step-by-Step Instructions
  1. Preheat your oven to 375°F (190°C).
  2. In a large pot, boil water and add salt. Cook lasagna noodles for 8-10 minutes until al dente, then drain and lay flat on a towel.
  3. Mix ricotta, spinach, salt, and pepper in a medium bowl until well combined.
  4. Spread a layer of marinara sauce on the bottom of the baking dish.
  5. Layer cooked noodles over sauce, add ricotta-spinach mixture, shredded chicken, and mozzarella. Repeat layers and finish with marinara and mozzarella on top.
  6. Form mozzarella ghosts on top and add olive eyes if desired.
  7. Cover with foil and bake for 30 minutes. Remove foil and bake for an additional 10-15 minutes until cheese is bubbly and golden.
  8. Let the lasagna rest for 10-15 minutes before slicing.

Nutrition

Serving: 1sliceCalories: 400kcalCarbohydrates: 40gProtein: 30gFat: 15gSaturated Fat: 8gCholesterol: 70mgSodium: 800mgPotassium: 600mgFiber: 2gSugar: 5gVitamin A: 20IUVitamin C: 15mgCalcium: 25mgIron: 10mg

Notes

For a stress-free meal, prepare Ghostly Lasagna a day prior and refrigerate. Adjust baking times as needed.

Tried this recipe?

Let us know how it was!

Spooky RAV-ear-IOLI: Delightful Meat Ravioli for Halloween

October 3, 2025 by Grace Snow Leave a Comment

As the leaves turn and a chill fills the air, spooky delights begin to dance in my thoughts—like these whimsical RAV-ear-IOLI. Shaped like ears, these meat-filled ravioli are a fun twist on your traditional pasta and guarantee a standout centerpiece for any Halloween gathering. Imagine the laughter as your guests take a suspicious yet curious bite of tender pasta enveloping a savory mix of hearty meat and cheese, all served on a vibrant and comforting tomato sauce. Not only are these homemade ravioli a fantastic conversation starter, but they also offer the satisfaction of crafted pasta paired with a delicious filling. Plus, they’re surprisingly simple to whip up, even for novice chefs. So, are you ready to impress your friends and family with this eerie culinary project? Let's dive into the magic of making RAV-ear-IOLI together!

Why Are RAV-ear-IOLI So Unique?

Unforgettable Presentation: These spooky ravioli shaped like ears will be the talk of your Halloween gathering, turning a simple meal into a memorable experience.

Homemade Goodness: Made from scratch, you can customize the filling to your taste—using ground beef, turkey, or even a vegetarian option with mushrooms!

Flavor Explosion: The savory meat combined with creamy cheeses creates a mouthwatering filling that pairs perfectly with tangy tomato sauce.

Family Fun Activity: Get the whole family involved in shaping the ravioli; it's a playful way to bond over cooking!

Time-Saving Prep: Make a batch ahead of time and freeze them for a quick meal—just cook straight from frozen!

Creative Twist: This unique version of a classic Italian dish captures the spirit of Halloween while adding a fun flair to your dinner table. Don't forget to check out more of our Halloween recipes for festive inspiration!

RAV-ear-IOLI Ingredients

• Get ready to create eerie delights!

For the Pasta Dough

  • All-Purpose Flour – Provides structure; can substitute with gluten-free flour for a lighter option.
  • Whole Egg – Binds dough and adds richness; egg whites reserved for sealing.
  • Egg Yolks – Give your dough a lovely richness and golden color.
  • Olive Oil – Adds moisture and tenderness; use vegetable or canola oil as alternatives.
  • Salt – Enhances flavor.

For the Filling

  • Ground Beef – Primary protein filling; swap with ground turkey or plant-based meat for lighter flavor.
  • Cheese (Parmesan, Romano, Asiago) – Adds depth of flavor; feel free to use a single cheese or a mix you love.
  • Ricotta Cheese – Contributes creaminess; cottage cheese makes for a lighter filling if needed.
  • Parsley – Offers a fresh twist; omit if you don't have it.
  • Garlic – Infuses aromatic flavor; garlic powder works in a pinch if fresh isn't on hand.

Get ready to craft these spooky RAV-ear-IOLI, and let the Halloween fun begin!

Step‑by‑Step Instructions for RAV-ear-IOLI

Step 1: Prep Dough
In a food processor, combine all-purpose flour, whole egg, egg yolks, olive oil, and salt. Pulse until everything is well incorporated and the mixture resembles coarse crumbs. Quickly form into a ball, wrap in plastic wrap, and let it rest for at least 1 hour at room temperature. This resting time allows the gluten to relax, making for tender RAV-ear-IOLI.

Step 2: Knead Dough
Once the dough has rested, place it on a floured surface and knead for approximately 10 minutes until smooth and elastic. You should notice a slight elasticity as you stretch it; this is a good sign! Cover the dough with a damp cloth to prevent it from drying out while you prepare the filling.

Step 3: Prepare Filling
In a large mixing bowl, combine the ground beef, ricotta cheese, grated cheeses, parsley, minced garlic, and the reserved egg whites. Mix until you achieve a paste-like consistency, ensuring all ingredients are evenly distributed. To facilitate filling your ravioli, carefully transfer the mixture into a piping bag, keeping it ready for assembly.

Step 4: Roll Out Dough
On a floured surface, roll out the rested dough until it’s about 1 mm thick—aim for a thin, translucent appearance. Use your favorite rolling pin for even results, and don’t forget to sprinkle a little flour to prevent sticking. Once rolled out, cut the dough into egg shapes with a cookie cutter, ensuring you have equal pairs for your RAV-ear-IOLI.

Step 5: Assemble Ravioli
Take one dough piece and brush its edges with egg wash to help seal it. Pipe a line of your prepared filling into a J-shape along one side, leaving space for sealing. Place another dough piece on top, pressing around the filling to push out any air bubbles and firmly sealing the edges. Gently shape the ravioli into an ear form for that spooky touch.

Step 6: Repeat Assembly
Continue the assembly process, repeating the filling and sealing steps until all the dough and filling have been used. Place the completed RAV-ear-IOLI on a parchment-lined baking sheet to prevent sticking, making sure they don’t touch each other. This fun activity can be a great way to get the whole family involved!

Step 7: Cook Ravioli
Bring a large pot of salted water to a gentle simmer over medium heat. Carefully add your RAV-ear-IOLI and let them cook for 8-10 minutes. You'll know they’re ready when they float to the surface and appear tender. Use a spider strainer to scoop them out of the pot, taking care not to break them.

Step 8: Serve with Sauce
Plate your beautifully crafted RAV-ear-IOLI on a generous bed of hot tomato sauce, allowing the vibrant colors to pop through. For a finishing touch, sprinkle grated cheese or fresh herbs on top to elevate the dish. Enjoy the delightful reactions of your guests as they dig into these spooktacular ravioli!

RAV-ear-IOLI Variations & Substitutions

Feel free to let your creativity shine as you adjust these delightful ravioli to match your taste buds and dietary needs!

  • Gluten-Free: Use a gluten-free pasta blend for a celiac-friendly version that retains the same fun shape.
  • Vegetarian Filling: Swap ground beef with a mix of sautéed mushrooms and lentils for a rich, flavorful filling. A perfect choice for meatless Mondays!
  • Cheese Lovers: Combine ricotta with mozzarella or feta for an extra cheesy experience that everyone will love. Each bite will be a gooey adventure!
  • Herb Infusion: Add fresh herbs like basil or thyme to the filling for a burst of flavor that complements the savory meat beautifully.
  • Spice It Up: Mix some red chili flakes or diced jalapeños into the filling for a kick of heat that'll surprise your guests. Spice lovers will appreciate the extra zing!
  • Pasta Swap: Experiment with other pasta shapes like tortellini or farfalle if you’re feeling playful. Each shape can create a different vibe for your dish.
  • Sauce Variations: Instead of tomato sauce, try serving with a creamy Alfredo or zesty pesto, transforming the meal into a decadent experience. Check out more sauce ideas in our sauce suggestions to match your dish perfectly!
  • Protein Boost: Incorporate finely diced vegetables or beans into the filling for added texture and nutrition—perfect for a wholesome family meal!

These variations not only allow for personalization but also ensure that every batch of RAV-ear-IOLI resonates with the unique palate of your gatherings. Happy cooking!

How to Store and Freeze RAV-ear-IOLI

Fridge: Store any leftover cooked RAV-ear-IOLI in an airtight container for up to 3 days. Reheat gently in a skillet with a splash of tomato sauce to keep the pasta moist.

Freezer: Uncooked RAV-ear-IOLI can be frozen on a parchment-lined sheet until solid, then transfer to a freezer-safe bag for up to 3 months. Cook from frozen by adding an extra 2-3 minutes to the boiling time.

Reheating: For frozen, cooked RAV-ear-IOLI, simply pop them in simmering water for about 5 minutes until heated through. Serve with fresh sauce for a delightful meal.

Make-Ahead: Feel free to prepare RAV-ear-IOLI ahead of time for hassle-free entertaining. Just follow the freezing instructions and enjoy the convenience of homemade deliciousness later!

What to Serve with Eerie RAV-ear-IOLI?

Imagine a delightful spread that enhances the whimsical charm of these spooky meat ravioli, creating a feast that dazzles both the eyes and taste buds.

  • Garlic Bread: A warm, buttery favorite; its crispy texture beautifully contrasts the tender ravioli while soaking up the tomato sauce.

  • Mixed Green Salad: Light and refreshing, this salad offers a crisp brightness with tangy vinaigrette, balancing the hearty ravioli perfectly.

  • Roasted Vegetables: Seasonal veggies like zucchini and bell peppers add a vibrant, caramelized flavor that complements the richness of the filling, elevating your meal.

  • Creamy Alfredo Sauce: Drizzle this decadent sauce over the ravioli for an indulgent twist, enveloping them in a luscious layer of creaminess.

  • Spicy Marinara: For those who enjoy a kick, a homemade spicy marinara sauce ignites the flavors, creating an exhilarating contrast to the savory meat and cheese.

  • Pumpkin Soup: The creamy, sweet nuances of pumpkin soup are the perfect appetizer, perfectly echoing the festive spirit of Halloween while warming the soul.

  • Chardonnay or Chianti: Pair with chilled Chardonnay for a refreshing sip or a bold Chianti to bring out the flavors of your sauces and fillings.

Bring your Halloween gathering to life with these pairings, transforming your Eerie RAV-ear-IOLI into a culinary celebration!

Make Ahead Options

These Eerie RAV-ear-IOLI are perfect for anyone looking to save time during the busy Halloween season! You can prepare the dough and filling up to 24 hours in advance. Simply make the dough, wrap it tightly in plastic wrap, and refrigerate it. The filling can be mixed and stored in an airtight container in the fridge, ready to be piped into the dough when you're set to create your spooky ravioli. When you're ready to serve, roll out the dough, shape your RAV-ear-IOLI, and cook them according to the instructions. This way, you'll achieve the same delicious results, allowing you to enjoy quality time with your guests instead of being stuck in the kitchen!

Expert Tips for RAV-ear-IOLI

  • Dough Thickness: Ensure your dough is rolled to about 1 mm thick. If it's too thick, the ravioli may not cook evenly, leading to a chewy texture.

  • Air Sealing: When sealing your ravioli, press out all air to prevent them from bursting during cooking. It helps achieve that perfect bite!

  • Batch Cooking: Consider making a larger batch of RAV-ear-IOLI. These freeze beautifully, allowing you to cook them directly from frozen for a quick weeknight meal.

  • Filling Variations: Feel free to customize the filling. Try adding sautéed vegetables to boost flavor and nutrition, making your meat filling even more delightful!

  • Sauce Pairing: While tomato sauce is a classic, experiment with creamy Alfredo or pesto for an unexpected twist that'll surprise your guests.

  • Family Activity: Cooking should be fun! Grab your family or friends and make it an enjoyable assembly party, defining each person's “ear” shaped ravioli along the way!

RAV-ear-IOLI Recipe FAQs

How do I select the best ingredients for RAV-ear-IOLI?
Absolutely! When choosing ingredients, opt for high-quality, fresh options. For ground beef, look for 80/20 lean-to-fat ratio to ensure flavor and moisture. Make sure your cheeses are freshly grated for the best melt and taste. If you're using fresh parsley, select bright green leaves free from wilt or browning. For the dough, all-purpose flour should feel fine and free from clumps, while eggs should be fresh with no cracks.

What’s the best way to store leftover RAV-ear-IOLI?
Very good question! For cooked RAV-ear-IOLI, store them in an airtight container in the fridge for up to 3 days. To reheat, gently warm them in a skillet with a splash of sauce or broth to keep the pasta from drying out. For uncooked, place them on a parchment-lined tray to freeze until solid, then transfer to a freezer bag. They can be kept in the freezer for up to 3 months.

Can RAV-ear-IOLI be frozen? How?
Yes, indeed! To freeze uncooked RAV-ear-IOLI, first, lay them in a single layer on a parchment-lined baking sheet, making sure they don’t touch. Freeze until solid (about 1-2 hours), then transfer to a freezer-safe bag, squeezing out as much air as possible. They can stay good in the freezer for up to 3 months. When ready to cook, drop them directly from the freezer into boiling salted water and add an extra 2-3 minutes to the cooking time.

What if my pasta dough is too dry or too sticky?
Great question! If your dough feels too dry, add a teaspoon of water or olive oil and knead until combined. It should feel soft and elastic. If it's too sticky, sprinkle a little more flour while kneading until you achieve the right texture. Aim for a smooth dough that won’t cling to your fingers.

Are there any dietary considerations for RAV-ear-IOLI?
Absolutely! For those with gluten sensitivities, substituting all-purpose flour with a gluten-free blend works beautifully. If you’re looking for a lighter meat option, ground turkey or mushrooms provide a fantastic alternative! Always check that any cheese used is suitable for those with dairy allergies, as vegan cheese can be an excellent substitute too.

How long do I need to cook RAV-ear-IOLI?
The cooking time is quite manageable! Simmer your RAV-ear-IOLI in gently boiling, salted water for about 8-10 minutes. You'll know they're perfectly done when they float to the surface and are tender to the touch. Just be gentle when scooping them out to avoid breaking their delicate shape!

RAV-ear-IOLI

Spooky RAV-ear-IOLI: Delightful Meat Ravioli for Halloween

Delight in these whimsical RAV-ear-IOLI, meat-filled ravioli shaped like ears, perfect for Halloween gatherings.
Print Recipe Pin Recipe
Prep Time 1 hour hr
Cook Time 10 minutes mins
Resting Time 1 hour hr
Total Time 2 hours hrs 10 minutes mins
Servings: 4 ravioli
Course: Dinner
Cuisine: Italian
Calories: 350
Ingredients Equipment Method Nutrition Notes

Ingredients
  

For the Pasta Dough
  • 2 cups All-Purpose Flour Can substitute with gluten-free flour.
  • 1 whole Whole Egg Egg whites reserved for sealing.
  • 2 large Egg Yolks
  • 1 tablespoon Olive Oil Use vegetable or canola oil as alternatives.
  • 1 teaspoon Salt
For the Filling
  • 1 pound Ground Beef Can swap with ground turkey or plant-based meat.
  • 1 cup Cheese (Parmesan, Romano, Asiago) Feel free to use a mix.
  • 1 cup Ricotta Cheese Cottage cheese can be used for a lighter filling.
  • 2 tablespoons Parsley Omit if not available.
  • 2 cloves Garlic Minced; garlic powder can be used if fresh isn't available.

Equipment

  • Food Processor
  • Rolling Pin
  • Cookie cutter
  • piping bag
  • pot
  • spider strainer

Method
 

Dough Preparation
  1. In a food processor, combine all-purpose flour, whole egg, egg yolks, olive oil, and salt. Pulse until everything is well incorporated and resembles coarse crumbs. Form into a ball, wrap in plastic, and let rest for at least 1 hour.
Dough Kneading
  1. Knead the rested dough on a floured surface for about 10 minutes until smooth and elastic. Cover with a damp cloth while preparing the filling.
Filling Preparation
  1. Combine ground beef, ricotta, grated cheeses, parsley, minced garlic, and egg whites in a mixing bowl. Mix until a paste-like consistency is achieved. Transfer to a piping bag.
Rolling Out Dough
  1. Roll out the rested dough to about 1 mm thick. Cut into egg shapes using a cookie cutter.
Ravioli Assembly
  1. Brush edges of one dough piece with egg wash. Pipe a line of filling in a J-shape, top with another dough piece and seal after pressing out air.
Repeating Assembly
  1. Repeat the filling and sealing steps until all dough and filling are used. Place on a parchment-lined baking sheet.
Cooking Ravioli
  1. Bring salted water to a gentle simmer, add RAV-ear-IOLI, and cook for 8-10 minutes until they float. Use a spider strainer to remove.
Serving
  1. Serve on hot tomato sauce, sprinkle with cheese or fresh herbs, and enjoy!

Nutrition

Serving: 2ravioliCalories: 350kcalCarbohydrates: 40gProtein: 25gFat: 10gSaturated Fat: 3gPolyunsaturated Fat: 1gMonounsaturated Fat: 4gCholesterol: 70mgSodium: 600mgPotassium: 300mgFiber: 2gSugar: 2gVitamin A: 500IUVitamin C: 2mgCalcium: 150mgIron: 2mg

Notes

These ravioli can be customized with different fillings or sauces. Perfect for Halloween gatherings and family activities in the kitchen.

Tried this recipe?

Let us know how it was!

Crispy Hot Honey Feta Chicken: Sweet & Spicy Perfection

October 2, 2025 by Grace Snow Leave a Comment

As I stood in my kitchen, the enticing aroma of sizzling chicken filled the air, reminding me of those special weeknight dinners that turn into comforting memories. That’s when I knew I had to share my new favorite dish: Crispy Hot Honey Feta Chicken. This recipe is a game-changer, blending crispy chicken with a sweet and spicy glaze drizzled over tangy feta cheese—it’s comfort food at its absolute best. Not only is it quick to prepare, making it a perfect weeknight meal, but it's also impressive enough to please dinner guests. Plus, with options to swap in chicken thighs or even tofu, this dish caters to everyone’s taste. Are you ready to discover a new favorite? Let’s dive in!

Why Is This Chicken Recipe a Must-Try?

Crispy, this dish boasts a perfect golden coating that creates an irresistible crunch with every bite. Sweet and Spicy, the hot honey glaze ignites your taste buds and pairs flawlessly with the tangy feta cheese. Versatile, feel free to swap chicken breasts for juicy thighs or even tofu, making it perfect for everyone at the table. Quick and Easy, this recipe comes together in just 30 minutes, ideal for busy weeknights. Crowd-Pleasing, its unique flavor profile and appealing presentation make it the star of any dinner gathering or family meal.

Crispy Hot Honey Feta Chicken Ingredients

Unlock the secrets to making this delicious dish!

For the Chicken

  • Boneless Skinless Chicken Breasts – Main protein source providing lean texture; juiciness can be enhanced by using chicken thighs instead.
  • All-Purpose Flour – Creates a dry surface for the egg coating, essential for achieving maximum crispiness; gluten-free flour can be used as a substitute.
  • Eggs (2, beaten) – Acts as a binding agent for breadcrumbs, ensuring the coating adheres well to the chicken; no substitute recommended for maintaining texture.
  • Breadcrumbs (1 cup) – Adds crunch; opt for panko breadcrumbs to enhance crispiness even further.

For the Topping

  • Crumbled Feta Cheese (1/2 cup) – Brings tangy flavor and creaminess; alternatives include goat cheese or ricotta if you're looking for varied tastes.
  • Hot Honey (1/4 cup) – Infuses the dish with sweet heat; a combination of regular honey mixed with chili flakes serves as a quick DIY replacement if needed.

Seasoning & Cooking Oil

  • Salt and Pepper – Essential for seasoning and enhancing overall flavors.
  • Olive Oil (for frying) – Adds rich flavor; vegetable oil can be used in place if preferred.

Get ready to make the Crispy Hot Honey Feta Chicken, and let each delicious bite take you on a flavor adventure!

Step‑by‑Step Instructions for Crispy Hot Honey Feta Chicken

Step 1: Preheat the Oven
Begin by preheating your oven to 375°F (190°C). This step is essential to ensure that your Crispy Hot Honey Feta Chicken cooks evenly and achieves that perfect golden brown finish. As the oven warms up, gather your ingredients and prepare the chicken for seasoning and breading.

Step 2: Prepare the Chicken
Season the boneless skinless chicken breasts generously with salt and pepper. If your chicken breasts are thick, gently pound them to an even thickness, about ¾ inch, for uniform cooking. This will help prevent any parts from being overcooked while ensuring that every bite of your Crispy Hot Honey Feta Chicken is juicy.

Step 3: Dredge the Chicken
Set up your breading station by placing flour, beaten eggs, and breadcrumbs in separate shallow dishes. Dredge each chicken breast in flour, shaking off the excess. Next, dip it into the beaten eggs, ensuring it’s well-coated, then press it into the breadcrumbs until fully covered. For an extra crispy texture, use panko breadcrumbs.

Step 4: Fry the Chicken
In a large skillet, heat a couple of tablespoons of olive oil over medium heat. Once the oil is shimmering, carefully add the breaded chicken breasts. Fry them for about 3-4 minutes on each side, until they are crisp and golden brown. Remember, the chicken does not need to be fully cooked at this stage, as it will finish baking in the oven.

Step 5: Add Toppings
Once the chicken is browned, transfer the pieces to a baking dish. Sprinkle the crumbled feta cheese generously over the top of each chicken breast. Drizzle the hot honey evenly across the chicken, allowing it to seep into the crispy coating, enhancing the flavor profile of your Crispy Hot Honey Feta Chicken.

Step 6: Bake the Chicken
Place the baking dish in the preheated oven and bake for 15-20 minutes. The chicken is ready when its internal temperature reaches 165°F (75°C) and the juices run clear. Watch as the feta melts slightly, creating a delightful topping that complements the crispy chicken.

Step 7: Rest and Serve
After baking, remove the Crispy Hot Honey Feta Chicken from the oven and let it rest for a few minutes. This resting period allows the juices to redistribute within the chicken, resulting in moist and flavorful bites. Serve warm and enjoy the delightful combination of crispy textures and sweet, spicy notes!

What to Serve with Crispy Hot Honey Feta Chicken

As you savor the sweet and spicy goodness of your chicken, consider these delightful pairings to create a memorable meal.

  • Creamy Mashed Potatoes: These rich and comforting potatoes provide a smooth contrast to the crispy texture of the chicken. A scoop of buttery goodness balances out the spice!

  • Sautéed Green Beans: Lightly sautéed with garlic, these green beans add a fresh crunch and vibrant color to your plate. They brighten the meal and provide a nutritious element.

  • Tangy Greek Salad: With crisp cucumbers, tart tomatoes, and olives, this refreshing salad complements the flavors of feta wonderfully. Each bite is a delightful mix of textures that enhances the main dish.

  • Honey-Balsamic Roasted Carrots: These sweet and sticky carrots resonate with the hot honey glaze, creating a beautiful harmony of flavors. Their caramelized edges provide an appealing contrast in texture, making them irresistible!

  • Garlic Bread: Crispy and buttery, garlic bread offers a comforting side that’s perfect for mopping up the delicious hot honey drizzles left on your plate. It’s a classic crowd-pleaser!

  • Sparkling Lemonade: A refreshing drink, sparkling lemonade cuts through the richness of the dish with its bright acidity and sweetness. It’s the perfect sip to cleanse your palate between bites.

Enhance your dining experience by choosing any of these flavorful sides to accompany your Crispy Hot Honey Feta Chicken!

Crispy Hot Honey Feta Chicken Variations

Feel free to play around with this recipe and make it your own—each adaptation is a delightful adventure waiting to happen!

  • Chicken Thighs: Swap out chicken breasts for juicy thighs for an even richer flavor. They stay tender and moist, making each bite a juicy experience.

  • Firm Tofu: For a vegetarian twist, use firm tofu instead of chicken. Just press it well to remove excess moisture, then follow the same breading and cooking method for crispy results.

  • Cauliflower Steaks: Slice cauliflower into thick "steaks" and follow the same steps for a heartier, plant-based option. The hot honey glaze pairs beautifully with the slight nuttiness of roasted cauliflower.

  • Panko Breadcrumbs: Use panko breadcrumbs for an extra-crispy texture. They create an addictive crunch that complements the tender chicken beautifully.

  • Spicy Kick: Add cayenne pepper or chili powder to the flour for those who crave a little heat. A touch of spice ramps up the flavor and excitement of the dish.

  • Different Cheeses: Experiment with different cheeses like goat cheese or ricotta for varied creaminess and flavor. Each will lend its unique character to the dish, elevating your dining experience.

  • Honey Alternatives: If you don't have hot honey, mix regular honey with a bit of sriracha or make your own with honey and chili flakes for a quick fix. This opens a world of sweet and spicy combinations at your fingertips.

You can also add a side of sizzling sautéed vegetables, much like what you might enjoy with Honey Garlic Chicken or set it against a backdrop of a fresh salad for a complete meal, reminiscent of the flavors in Crock Pot Chicken. Whatever variation you choose, your Crispy Hot Honey Feta Chicken will surely become a new favorite!

Expert Tips for Crispy Hot Honey Feta Chicken

  • Even Thickness: Ensure chicken breasts are of uniform thickness by gently pounding them. This prevents uneven cooking and guarantees juicy results.

  • Breading Boost: For an extra-crispy texture, use panko breadcrumbs instead of regular ones. This simple switch elevates your Crispy Hot Honey Feta Chicken!

  • Spice It Up: Adjust the amount of hot honey based on your spice tolerance. Feel free to start with a little and gradually add more for a customized heat level.

  • Resting Time: Allow the chicken to rest for a few minutes after baking. This crucial step helps juices redistribute, ensuring every bite is tender and flavorful.

  • Oven Ready: Make sure your oven is fully preheated before baking. This helps the chicken cook evenly and develop that perfect golden crust.

Make Ahead Options

These Crispy Hot Honey Feta Chicken cutlets are perfect for meal prep enthusiasts! You can prep the chicken by breading it up to 24 hours in advance. Simply follow the first three steps of the recipe, then transfer the coated chicken to a lined baking sheet, cover it tightly with plastic wrap, and refrigerate. This ensures the breadcrumbs stay crisp and flavorful. When you're ready to serve, just heat oil in a skillet and fry the chicken as directed, following with the baking step. Resting after baking helps maintain juiciness, resulting in just as delicious chicken as if you had made it fresh!

How to Store and Freeze Crispy Hot Honey Feta Chicken

  • Room Temperature: Let the chicken cool completely before leaving it out for up to 2 hours; this helps prevent any moisture buildup and maintains crispness.

  • Fridge: Store any leftover Crispy Hot Honey Feta Chicken in an airtight container for up to 3 days. Reheat in the oven to preserve its crunchy texture.

  • Freezer: Freeze the chicken after cooking for up to 3 months. Wrap each piece tightly in plastic wrap and then in aluminum foil, or place it in a freezer-safe bag.

  • Reheating: For the best results, reheat from frozen in a preheated oven at 375°F (190°C) for 20-25 minutes, or until thoroughly heated. This restores crispiness while keeping the chicken juicy.

Crispy Hot Honey Feta Chicken Recipe FAQs

What type of chicken is best for this recipe?
Absolutely! While boneless skinless chicken breasts are the main protein source, you can also use chicken thighs for a juicier bite. If you're looking for a vegetarian option, firm tofu or cauliflower work wonderfully as substitutes. Just ensure that your tofu is well-pressed to absorb the flavors beautifully.

How can I store leftover Crispy Hot Honey Feta Chicken?
After letting your chicken cool completely, store any leftovers in an airtight container in the refrigerator for up to 3 days. I recommend reheating it in the oven instead of the microwave to retain that delightful crispiness. Just pop it in a preheated oven at 375°F (190°C) for about 10 minutes or until heated through.

Can I freeze Crispy Hot Honey Feta Chicken, and if so, how?
Yes, you can! To freeze, wrap each piece of cooked chicken tightly in plastic wrap, followed by aluminum foil, or place it in a freezer-safe bag. This method will help prevent freezer burn. The chicken can be frozen for up to 3 months. When you're ready to enjoy it, you can reheat from frozen in a preheated oven at 375°F (190°C) for 20-25 minutes.

What should I do if the breading doesn't stick to the chicken?
If you find that the breading isn't adhering well, it may be due to a few common factors. Ensure that the chicken is well-coated in flour before dipping it into the beaten eggs. The eggs serve as a binding agent, and if they're not doing their job, you might not see an even coat of breadcrumbs. If that happens, try repeating the process: dip back into the egg and coat again in the breadcrumbs for a better stick!

Is this recipe suitable for anyone with food allergies?
While this Crispy Hot Honey Feta Chicken recipe is generally safe, do keep in mind that it includes common allergens like dairy (from the feta cheese) and gluten (from the all-purpose flour and breadcrumbs). If you're catering to dietary restrictions, you can easily substitute the feta with a dairy-free cheese alternative and use a gluten-free flour variety. Always check labels to ensure that any substitutions are safe for those with specific allergies.

Crispy Hot Honey Feta Chicken

Crispy Hot Honey Feta Chicken: Sweet & Spicy Perfection

Crispy Hot Honey Feta Chicken is a game-changing dish blending crispy chicken with sweet and spicy glaze over tangy feta cheese.
Print Recipe Pin Recipe
Prep Time 10 minutes mins
Cook Time 20 minutes mins
Resting Time 5 minutes mins
Total Time 35 minutes mins
Servings: 4 servings
Course: Dinner
Cuisine: American
Calories: 600
Ingredients Equipment Method Nutrition Notes

Ingredients
  

For the Chicken
  • 2 pieces Boneless Skinless Chicken Breasts Juiciness can be enhanced by using chicken thighs instead.
  • 1 cup All-Purpose Flour Gluten-free flour can be used as a substitute.
  • 2 Eggs (beaten) Acts as a binding agent for breadcrumbs.
  • 1 cup Breadcrumbs Opt for panko breadcrumbs to enhance crispiness.
For the Topping
  • 1/2 cup Crumbled Feta Cheese Alternatives include goat cheese or ricotta.
  • 1/4 cup Hot Honey Mix regular honey with chili flakes as a quick DIY replacement.
Seasoning & Cooking Oil
  • to taste Salt
  • to taste Pepper
  • as needed tablespoons Olive Oil Vegetable oil can be used in place if preferred.

Equipment

  • Oven
  • Skillet
  • Baking Dish
  • Shallow Dishes for Breading

Method
 

Step‑by‑Step Instructions
  1. Preheat your oven to 375°F (190°C).
  2. Season the chicken breasts generously with salt and pepper and pound them to an even thickness.
  3. Dredge each chicken breast in flour, dip in beaten eggs, and coat with breadcrumbs.
  4. Heat olive oil in a skillet and fry the breaded chicken breasts for 3-4 minutes on each side until crisp and golden brown.
  5. Transfer the chicken to a baking dish, sprinkle crumbled feta on top, and drizzle hot honey over it.
  6. Bake in the preheated oven for 15-20 minutes until the chicken reaches an internal temperature of 165°F (75°C).
  7. Let the chicken rest for a few minutes before serving.

Nutrition

Serving: 1servingCalories: 600kcalCarbohydrates: 30gProtein: 40gFat: 35gSaturated Fat: 10gPolyunsaturated Fat: 5gMonounsaturated Fat: 15gCholesterol: 150mgSodium: 800mgPotassium: 700mgFiber: 2gSugar: 8gVitamin A: 500IUCalcium: 200mgIron: 2mg

Notes

Ensure chicken breasts are of uniform thickness to avoid uneven cooking. Use panko for extra crispiness.

Tried this recipe?

Let us know how it was!

Stuffed Meatballs in Guinness Gravy: A Cozy Comfort Meal

October 2, 2025 by Grace Snow Leave a Comment

There I was, pouring rich, dark Guinness into a pot, feeling the excitement of cozy comfort food bubbling to life. The allure of Stuffed Meatballs in Guinness Gravy is hard to resist, with their tender, juicy centers and savory gravy that’s perfect for chilly evenings or gatherings with beloved friends. What I adore about this dish is not only the blissful fusion of flavors but also how quick it is to prepare, making it a fantastic option for busy weeknights. You'll also love that it's a great make-ahead meal; just pop it in the freezer for an easy indulgence later on. So, are you ready to dive into this hearty and soul-satisfying recipe that will leave everyone asking for seconds?

Why Will You Love This Dish?

Comforting Warmth: The cozy combination of flavors in Stuffed Meatballs in Guinness Gravy creates a dish that warms your heart and soul.

Rich, Robust Sauce: The use of Guinness elevates the gravy with a delightful depth, making every bite a savory experience.

Quick and Easy Prep: In under an hour, you can have this impressive dish ready for your loved ones, giving you more time to enjoy their company.

Versatile Flavor Profile: Customize your meatballs with different fillings like cheese or bacon for a personal twist.

Make-Ahead Delight: These meatballs freeze beautifully, offering you a delicious option for busy days ahead—simply reheat and savor!

Pair your meatballs with sides like creamy mashed potatoes or fresh green salad for a complete meal. Don’t forget to check out my Herby Ricotta Stuffed peppers if you're looking for another comforting dish to impress!

Stuffed Meatballs in Guinness Gravy Ingredients

Here’s everything you need to create these hearty and indulgent stuffed meatballs covered in rich Guinness gravy:

For the Meatballs

  • Ground Meat – The main component that provides protein and structure; swap for turkey or chicken for a lighter dish.
  • Breadcrumbs – Adds texture and binds the meatballs together; gluten-free breadcrumbs work beautifully as a substitute.
  • Eggs – Acts as a binder for the mixture, ensuring your meatballs retain their shape; no alternative recommended without affecting texture.
  • Onion – Adds a rich flavor to the meatballs; consider shallots for a gentler taste.
  • Garlic – Elevates the overall flavor; fresh garlic is ideal, but garlic powder can be a handy substitute in a pinch.
  • Parmesan Cheese – Infuses umami and moisture; use nutritional yeast for a dairy-free option.

For the Gravy

  • Guinness Stout – The key ingredient that delivers an incredible depth of flavor to the gravy; other stouts can work, but taste may vary.
  • Beef Broth – Creates the base of the gravy; vegetable broth is a great alternative for a lighter flavor.
  • Worcestershire Sauce – Adds a zesty umami kick; soy sauce can change up the flavor profile if needed.

For Garnish

  • Herbs (e.g., parsley) – Provides a fresh pop of color; chives or green onions make for an excellent substitute.

With these ingredients in hand, you’re well on your way to crafting an unforgettable dish of Stuffed Meatballs in Guinness Gravy that will warm your heart and satisfy your taste buds!

Step‑by‑Step Instructions for Stuffed Meatballs in Guinness Gravy

Step 1: Prepare the Meatball Mixture
In a large mixing bowl, combine the ground meat, breadcrumbs, eggs, minced onion, minced garlic, and grated Parmesan cheese. Use your hands to mix gently until all ingredients are well blended. This should take about 3-5 minutes. Once combined, form the mixture into evenly sized balls, roughly 1.5 inches in diameter, which will ensure even cooking.

Step 2: Brown the Meatballs
Heat 2 tablespoons of oil in a large skillet over medium heat. Once hot, carefully add the meatballs in a single layer, without overcrowding the pan. Brown them for about 5-7 minutes, turning occasionally until all sides are golden brown. This step is crucial for building flavor in your Stuffed Meatballs in Guinness Gravy, so don’t rush!

Step 3: Make the Gravy Base
Once the meatballs are browned, remove them from the skillet and set aside. In the same pan, pour in 1 cup of Guinness and 1 cup of beef broth, stirring to combine. Use a wooden spoon to scrape any browned bits from the bottom of the pan, which will enhance the gravy's flavor. Bring this mixture to a gentle simmer over medium heat, allowing it to reduce for about 3-4 minutes.

Step 4: Combine and Simmer
Return the meatballs to the skillet with the beer and broth mixture, making sure they are submerged in the gravy. Add 1 tablespoon of Worcestershire sauce for extra depth. Reduce the heat to low, cover the skillet, and let everything simmer for 20-30 minutes. This slow cooking will allow the flavors to meld beautifully and ensure the meatballs are cooked through.

Step 5: Serve and Enjoy
After simmering, check the meatballs to ensure they are fully cooked and tender. Serve your Stuffed Meatballs in Guinness Gravy over creamy mashed potatoes or polenta to soak up the delicious gravy. Garnish with fresh parsley or chives to add a pop of color, and enjoy the hearty comfort this dish delivers!

Stuffed Meatballs in Guinness Gravy Variations

Customize these hearty meatballs to suit your taste or dietary preferences while keeping the comfort of the original recipe!

  • Ground Meat Swap: Use ground turkey or chicken for a lighter version that maintains all the savory flavor.

  • Cheesy Surprise: Experiment with different cheese fillings inside the meatballs, such as mozzarella for melty goodness or sharp cheddar for a bold twist.

  • Smoky Flavor: Add crispy bacon bits to the meatball mixture to create a delightful smoky depth that will have everyone diving in for seconds.

  • Vegetarian Option: Swap ground meat for a combination of lentils and mushrooms for a hearty, plant-based take. The richness of the gravy will enhance the flavors beautifully.

  • Herb Infusion: Enhance the flavor by mixing in fresh herbs like basil or thyme into the meatball mixture—such a simple change can elevate the dish to new heights!

  • Heat It Up: Add a dash of red pepper flakes or a spoonful of hot sauce to the gravy for a spicy kick that warms you from the inside out.

  • Gluten-Free Delight: Use gluten-free breadcrumbs or crushed almond flour instead of traditional breadcrumbs to create a delightful texture without the gluten.

  • Gourmet Gravy: Incorporate sautéed mushrooms or caramelized onions in the gravy for an additional layer of flavor—a comforting twist you won’t want to miss.

These simple variations will help you make the dish your own! And if you’re looking for more comforting culinary experiences, don’t forget to check out my delicious Herby Ricotta Stuffed peppers as a delightful side or another cozy meal option.

Make Ahead Options

These Stuffed Meatballs in Guinness Gravy are a fantastic option for meal prep enthusiasts! You can prepare the meatball mixture and form the balls up to 24 hours in advance; simply cover and refrigerate them until you’re ready to cook. The gravy can also be made ahead and stored in the refrigerator for up to 3 days. When it’s time to serve, reheat the gravy gently on the stove and add the meatballs to simmer until warmed through and tender. This way, you’ll enjoy restaurant-quality flavors with minimal effort, making weeknight dinners a breeze!

Expert Tips for Stuffed Meatballs in Guinness Gravy

  • Achieve Perfect Browning: Ensure your meatballs are well-browned to enhance flavor. Avoid overcrowding the pan, which can lead to steaming instead of browning.

  • Monitor Gravy Thickness: For a thicker gravy, let the mixture reduce longer during simmering. Keep an eye on it to prevent it from becoming too thick.

  • Use Fresh Ingredients: Fresh garlic and onions amplify flavor significantly. Dried or powdered versions can lack the same zest, so use fresh when possible.

  • Adapt to Taste: Feel free to experiment with different cheeses for stuffing or add herbs to the meatball mix for a customized flavor. The focus keyword is stuffed meatballs in Guinness gravy, so be adventurous!

  • Make Ahead and Freeze: Prepare extra meatballs and store them in the freezer. Just reheat in gravy for an easy meal later on, making it perfect for busy days!

How to Store and Freeze Stuffed Meatballs in Guinness Gravy

  • Room Temperature: If serving immediately, keep the stuffed meatballs at room temperature for no more than 2 hours to ensure food safety.

  • Fridge: Store leftovers in an airtight container in the fridge for up to 3 days. Make sure the meatballs are fully cooled before sealing to prevent moisture buildup.

  • Freezer: For long-term storage, freeze the meatballs in an airtight container or freezer bag for up to 3 months. To prevent freezer burn, ensure all air is removed.

  • Reheating: When ready to serve, reheat the stuffed meatballs in their gravy on the stove over low heat until warmed through, about 10-15 minutes, stirring occasionally.

What to Serve with Stuffed Meatballs in Guinness Gravy

Imagine a table set with delightful flavors that beautifully complement each bite of savory delight, bringing warmth to your meal.

  • Creamy Mashed Potatoes: The buttery, smooth texture serves as the perfect base to soak up the rich gravy, enhancing every delicious morsel.

  • Garlic Bread: Golden, crunchy baguette slices add a satisfying crunch, offering a wonderful contrast to the tender meatballs, making each eruption of flavor even richer.

  • Roasted Seasonal Vegetables: Colorful, caramelized veggies introduce crispness and earthy sweetness, balancing the dish’s robust flavors and enriching your plate’s aesthetic.

  • Fresh Green Salad: A simple salad with vinaigrette provides a refreshing bite, cleansing the palate between bites of the luscious meatballs and gravy.

  • Polenta: Creamy polenta acts as a lovely alternative to mashed potatoes, bringing its own unique corn flavor that marries wonderfully with the savory sauce.

  • A Glass of Red Wine: A full-bodied red wine, like a Cabernet Sauvignon, enhances the depth of flavors in the dish and elevates your dining experience.

Serving these delightful sides transforms your stuffed meatballs in Guinness gravy into a memorable feast that will have everyone coming back for seconds!

Stuffed Meatballs in Guinness Gravy Recipe FAQs

How do I select the best ground meat for my meatballs?
Absolutely! When choosing ground meat for your stuffed meatballs, look for freshly ground meats with a good balance of fat, like 80/20 for beef. This ratio ensures juicy meatballs. If you prefer a lighter option, ground turkey or chicken is a fantastic alternative, providing lean protein without sacrificing flavor.

What’s the best way to store leftover meatballs?
Very! After enjoying your stuffed meatballs in Guinness gravy, allow them to cool completely. Store them in an airtight container in the fridge for up to 3 days. This helps maintain both taste and texture. Make sure to seal them properly to avoid moisture buildup, which can lead to sogginess.

Can I freeze the stuffed meatballs for later use?
Definitely! For freezing, place the cooked meatballs in a single layer on a baking sheet. Freeze them until firm, about 1-2 hours. Then transfer the meatballs to an airtight container or freezer bag, ensuring all air is removed. They’ll keep well for up to 3 months! When you’re ready to enjoy them, thaw overnight in the refrigerator and reheat in gravy over low heat.

Why are my meatballs falling apart while cooking?
Oh no! If your meatballs are crumbling, they might need more binding agents. Always ensure you're using enough breadcrumbs and eggs to hold everything together well. If you still find them tender, try chilling the meatball mixture before forming them to help them hold shape during cooking.

Can I make these meatballs gluten-free?
Definitely! Simply swap standard breadcrumbs with gluten-free options, such as almond flour or gluten-free breadcrumbs. You can also use gluten-free beer for the gravy. Just confirm that all your ingredients are certified gluten-free to keep everything safe and scrumptious!

Stuffed Meatballs in Guinness Gravy

Stuffed Meatballs in Guinness Gravy: A Cozy Comfort Meal

This cozy meal features stuffed meatballs in Guinness gravy, perfect for chilly evenings or gatherings.
Print Recipe Pin Recipe
Prep Time 15 minutes mins
Cook Time 30 minutes mins
Total Time 45 minutes mins
Servings: 4 meatballs
Course: Dinner
Cuisine: Irish
Calories: 350
Ingredients Equipment Method Nutrition Notes

Ingredients
  

For the Meatballs
  • 1 pound Ground Meat can substitute with turkey or chicken
  • 1 cup Breadcrumbs use gluten-free if preferred
  • 1 large Eggs acts as a binder
  • 1 medium Onion or shallots for gentler flavor
  • 2 cloves Garlic minced; or substitute with garlic powder in a pinch
  • 1/2 cup Parmesan Cheese substitute with nutritional yeast for dairy-free
For the Gravy
  • 1 cup Guinness Stout can substitute with other stouts
  • 1 cup Beef Broth or use vegetable broth for lighter flavor
  • 1 tablespoon Worcestershire Sauce can substitute with soy sauce
For Garnish
  • 1/4 cup Herbs (e.g., parsley) can use chives or green onions

Equipment

  • large mixing bowl
  • Skillet
  • Wooden spoon
  • measuring cups
  • Measuring Spoons

Method
 

Step‑by‑Step Instructions
  1. In a large mixing bowl, combine ground meat, breadcrumbs, eggs, minced onion, minced garlic, and grated Parmesan cheese. Mix gently until well blended.
  2. Heat 2 tablespoons of oil in a skillet. Add the meatballs and brown for 5-7 minutes until golden brown.
  3. Once browned, remove meatballs and pour in Guinness and beef broth, scraping browned bits from the pan. Simmer for 3-4 minutes.
  4. Return meatballs to the skillet with the gravy and add Worcestershire sauce. Cover and simmer for 20-30 minutes.
  5. Serve over creamy mashed potatoes or polenta and garnish with fresh parsley or chives.

Nutrition

Serving: 1meatballCalories: 350kcalCarbohydrates: 25gProtein: 20gFat: 15gSaturated Fat: 6gPolyunsaturated Fat: 1gMonounsaturated Fat: 8gCholesterol: 70mgSodium: 600mgPotassium: 500mgFiber: 2gSugar: 4gVitamin A: 500IUVitamin C: 3mgCalcium: 150mgIron: 3mg

Notes

Perfect for make-ahead meals; these meatballs freeze well and are easy to reheat later.

Tried this recipe?

Let us know how it was!

Savory Thai Pumpkin Curry: Comfort in Every Bite

October 2, 2025 by Grace Snow Leave a Comment

As the leaves change and the days grow shorter, there's nothing quite like the comforting aroma of a simmering pot of Authentic Thai Pumpkin Curry wafting through the kitchen. This quick curry recipe transforms simple ingredients into a vibrant, healthy dish that's perfect for a busy weeknight or a cozy gathering. With just one pot and only 30 minutes of your time, you'll create a delightful meal bursting with flavor from aromatic red curry paste and creamy coconut milk. Not only is it gluten-free, but it also makes for fantastic meal prep, allowing you to savor the warm, nourishing goodness all week long. Are you ready to explore this culinary adventure that will transport you to the bustling streets of Thailand?

Why is Thai Pumpkin Curry so special?

Comforting and full of flavor, this dish combines the perfect blend of spices and textures for an unforgettable meal. Quick and easy, you can whip it up in just 30 minutes, making it ideal for busy weeknights. Healthy and gluten-free, it offers a guilt-free indulgence with each hearty bite. Versatile, this recipe allows you to customize ingredients, whether swapping pork for chicken or adding extra veggies like bamboo shoots. Plus, serving it with jasmine rice or roti elevates the experience, soaking up all that delectable sauce. You’ll absolutely love its vibrant taste and comforting aroma!

Thai Pumpkin Curry Ingredients

For the Base

  • Pork – Thinly sliced meat adds protein and flavor; substitute with chicken or tofu for a different protein profile.
  • Pumpkin – Peeled and cut into bite-sized chunks for natural sweetness and texture; can be replaced with butternut squash or kabocha.
  • Coconut Milk – Provides creaminess and a rich base; use light coconut milk for a lower calorie option.
  • Water – Balances the coconut milk's richness; adjust the amount to reach desired sauce thickness.

For the Flavor

  • Red Curry Paste – Essential for flavor; use homemade for authenticity or trusted brands like Mae Ploy or Maesri.
  • Chili Pepper – Adds spiciness to the dish; adjust according to taste preference, using fresh or dried varieties.
  • Kaffir Lime Leaves – Impart a unique citrus aroma; substitutes include lime zest or lemon leaves if unavailable.
  • Sweet Basil – Enhances freshness and flavor; Thai basil is a great substitute for authenticity.
  • Fish Sauce – Provides umami depth; for a vegetarian version, use soy sauce or tamari.
  • Palm Sugar – Balances the curry's flavors with natural sweetness; substitute with brown sugar if needed.

This Thai pumpkin curry is not just a dish; it’s a heartfelt embrace of flavor in every bite!

Step‑by‑Step Instructions for Authentic Thai Pumpkin Curry

Step 1: Heat the Coconut Milk
In a large wok or pot, pour in 1/2 cup of coconut milk and heat it over medium heat. Stir continuously until the milk begins to bubble and thickens slightly, which should take about 3-5 minutes. This initial step ensures a rich base for your Thai pumpkin curry, enhancing flavors as you go.

Step 2: Combine with Curry Paste
Once the coconut milk is bubbly, add in the red curry paste and fish sauce. Stir them together thoroughly until completely combined, creating a vibrant and aromatic mixture. This process will only take a couple of minutes, when the flavors meld beautifully, setting the stage for the rest of the curry.

Step 3: Add Pumpkin and Liquid
Next, pour in the remaining coconut milk and the water into the pot, mixing well. Then, gently add the pumpkin chunks to the pot, making sure they’re submerged in the sauce. Lower the heat, cover the pot, and let it simmer for 10-15 minutes until the pumpkin is tender but still holds its shape.

Step 4: Incorporate the Pork
With the pumpkin now tender, introduce the thinly sliced pork alongside torn kaffir lime leaves. Stir to combine, and allow the mixture to simmer gently for an additional 7-10 minutes, ensuring the pork is fully cooked. You’ll know it’s ready when the pork is no longer pink and the aroma of your Thai pumpkin curry fills the kitchen.

Step 5: Adjust Seasoning and Final Touches
Taste the curry sauce and adjust the sweetness by stirring in palm sugar as needed. Once satisfied with the flavor, mix in sweet basil and sliced chilies, letting them wilt beautifully into the curry for an extra burst of freshness. Serve the Thai pumpkin curry hot, perfect for pairing with jasmine rice or roti to soak up that delightful sauce.

Helpful Tricks for Thai Pumpkin Curry

  • Proper Coconut Heating: Ensure the coconut milk is bubbling before adding curry paste; this maximizes flavor extraction essential for a delicious Thai pumpkin curry.
  • Adjusting Spiciness: Pay attention to the chili types; fresh chilies can vary in heat. Start with less and adjust gradually to avoid overwhelming spiciness.
  • Pumpkin Texture: Cut pumpkin into uniform chunks for even cooking. Avoid overcooking to preserve the tender yet firm texture that's delightful in every bite.
  • Flavor Balancing: Always taste your curry before serving. Add palm sugar gradually to balance flavors; too much can overpower the dish's essence.
  • Fresh Herbs: Add sweet basil and chilies toward the end to retain their vibrant flavor and freshness, enhancing the final presentation of your curry.

Thai Pumpkin Curry: Flavor Variations

Feel free to make this delightful dish your own with these simple and delicious variations!

  • Dairy-Free: Use almond milk or oat milk instead of coconut milk for a lighter, non-dairy version. The result will still be creamy while providing a unique flavor twist, perfect for a refreshing taste on warmer days.

  • Vegetable Boost: Add diced bell peppers, zucchini, or even mushrooms for extra nutrition and texture. Not only does this pack in more vegetables, but it also gives a delightful crunch to contrast the softness of the pumpkin.

  • Protein Variety: Swap pork for chicken, shrimp, or even chickpeas for a vegetarian approach. Each option will bring its own character to the curry, ensuring everyone at the table finds something to love.

  • Spicy Kick: For those who love a bit of heat, add more chili peppers or a dash of sriracha. This can turn the dish into a fiery adventure—just be cautious, as you may want a glass of water nearby!

  • Citrus Zing: Enhance the flavor profile by adding a splash of lime juice or zest at the end. This brightens the dish and adds a fresh, aromatic note that pairs beautifully with the spices.

  • Sweet Twist: Experiment with different sweeteners like maple syrup or agave instead of palm sugar. Each sweetener offers a new depth of flavor, creating a unique twist on this classic dish.

  • Noodle Addition: Serve your curry over rice noodles for a delightful twist. The noodles soak up that delicious sauce beautifully, transforming your curry into a comforting noodle bowl—perfect for those chilly evenings.

  • Herb Infusion: Instead of regular sweet basil, try using lemongrass or cilantro for a different herbal aroma. This adds freshness and elevates the overall flavor, making every bite a fragrant delight.

With these variations, you can keep the excitement in your cooking and create a dish that fits your taste. Want a taste of something sweet to finish off the meal? Don't forget to check out these delicious Pumpkin Brownies Decadent for dessert!

What to Serve with Authentic Thai Pumpkin Curry

Serving this delightful curry alongside the right dishes can turn a comforting meal into a truly memorable experience.

  • Jasmine Rice: Fluffy and fragrant, jasmine rice absorbs the rich curry sauce beautifully, making every bite a delight.
  • Roti: Enjoy the perfect vehicle for scooping up that creamy pumpkin curry; its warm, soft texture complements the dish's flavors wonderfully.
  • Thai Cucumber Salad: The crunch of fresh cucumbers and tangy dressing adds a refreshing contrast to the warmth of the curry.
  • Mango Sticky Rice: This sweet treat provides a delightful finish to your meal, balancing the savory notes of the curry with its luscious, sweet flavor.
  • Steamed Broccoli: Adding a healthy green element, steamed broccoli offers a slight crunch and vibrant color that pairs nicely with the creamy curry.
  • Thai Iced Tea: The creamy sweetness of this classic drink is a delightful match for the spiciness of the curry, soothing your palate beautifully.
  • Grilled Shrimp Skewers: Smoky and tender, shrimp skewers add a protein punch and extra flavor dimension that enhances your curry experience.
  • Peanut Sauce Spring Rolls: Light and tasty, these rolls bring a delightful texture and nutty flavor that contrasts well with the curry's creaminess.
  • Coconut Lime Sorbet: A refreshing dessert option that complements the tropical flavors of your dish while cleansing the palate.
  • Crispy Fried Tofu: A protein option that has a satisfying crunch, perfect for those looking to elevate their Thai pumpkin curry experience.

Make Ahead Options

These Thai pumpkin curry options are perfect for busy home cooks looking to save time without sacrificing flavor! You can prepare the pumpkin and pork components up to 24 hours in advance; simply chop the pumpkin and store it in an airtight container, ideally submerged in water to prevent browning. The pork can be sliced and marinated with curry paste and fish sauce, kept refrigerated until you're ready to cook. When it’s time to serve, just follow the cooking instructions, combining the prepped ingredients with coconut milk and other spices. You’ll enjoy the same mouthwatering delight—ready in a flash, just as delicious, and ideal for meal prep!

How to Store and Freeze Thai Pumpkin Curry

  • Fridge: Store in an airtight container for up to 3 days. Allow the curry to cool completely before refrigerating to maintain its flavor and texture.
  • Freezer: Freeze in individual portions for up to 2 months. Make sure to use freezer-safe containers, leaving some space for expansion.
  • Reheating: Thaw overnight in the fridge, then reheat on the stove over low heat, stirring occasionally until heated through. Add a splash of coconut milk to revive the creaminess if needed.
  • Make-Ahead Tips: This Thai pumpkin curry can be made in advance and stored for easy weeknight meals, keeping the flavors rich and developed over time.

Thai Pumpkin Curry Recipe FAQs

What type of pumpkin should I use for Thai Pumpkin Curry?
Absolutely! When selecting pumpkin, look for a firm and heavy one with smooth, unblemished skin. Varieties like sugar pumpkin or kabocha are excellent choices due to their sweetness and creamy texture. If pumpkin is not readily available, butternut squash makes a wonderful substitute, bringing a similar flavor profile.

How should I store leftover Thai Pumpkin Curry?
To keep your curry fresh, store it in an airtight container in the fridge for up to 3 days. Make sure to let it cool completely before sealing the container to prevent moisture buildup. If you’re meal prepping, it’s a great idea to portion it out beforehand!

Can I freeze Thai Pumpkin Curry?
Yes! This curry freezes beautifully. For best results, pour the cooled curry into freezer-safe containers in individual servings, making sure to leave a little space at the top for expansion. It can be stored for up to 2 months. When you’re ready to enjoy it again, thaw overnight in the refrigerator before reheating on the stove, stirring occasionally to heat through.

What should I do if my curry is too spicy?
Very! If you've added too much heat, there are a few tricks to mellow the spiciness. You can add extra coconut milk or a bit more palm sugar to balance the flavors. Another alternative is to incorporate additional pumpkin or other vegetables, which can dilute the spice level while keeping the dish robust and delicious.

Can I use alternative ingredients for dietary restrictions?
Certainly! If you're accommodating dietary considerations, there are great substitutes for various ingredients. For a vegetarian version, replace pork with tofu or tempeh, and use soy sauce instead of fish sauce. To maintain the flavors without palm sugar, try a sugar alternative like coconut sugar or agave nectar. Always feel free to customize the curry to suit your needs while enjoying every comforting bite!

How do I know when the pumpkin is cooked but not mushy?
To achieve the perfect texture, it’s important to keep an eye on the cooking time. Simmer the pumpkin pieces for about 10-15 minutes, just until they're tender but still hold their shape. A fork can help you test it; if it slides in easily but still offers some resistance, you're golden! Overcooking can lead to mushy pumpkin, so be vigilant.

Thai Pumpkin Curry

Savory Thai Pumpkin Curry: Comfort in Every Bite

Experience the warmth of Thai Pumpkin Curry, a quick and gluten-free dish perfect for busy weeknights.
Print Recipe Pin Recipe
Prep Time 10 minutes mins
Cook Time 20 minutes mins
Total Time 30 minutes mins
Servings: 4 servings
Course: Dinner
Cuisine: Thai
Calories: 350
Ingredients Equipment Method Nutrition Notes

Ingredients
  

For the Base
  • 1 lb Pork Thinly sliced; substitute with chicken or tofu.
  • 2 cups Pumpkin Peeled and cut into bite-sized chunks.
  • 1 1/2 Coconut Milk Use light coconut milk for a lower calorie option.
  • 1 cup Water Adjust to reach desired sauce thickness.
For the Flavor
  • 3 tablespoons Red Curry Paste Use homemade or trusted brands.
  • 1 to taste Chili Pepper Add according to taste preference.
  • 2 leaves Kaffir Lime Leaves Or substitute with lime zest.
  • 1 cup Sweet Basil Thai basil is a great substitute.
  • 1 tablespoon Fish Sauce Use soy sauce or tamari for vegetarian.
  • 1 tablespoon Palm Sugar Substitute with brown sugar if needed.

Equipment

  • large wok or pot

Method
 

Steps
  1. In a large wok or pot, pour in 1/2 cup of coconut milk and heat it over medium heat for 3-5 minutes until it thickens.
  2. Add in the red curry paste and fish sauce, stirring until combined.
  3. Pour in the remaining coconut milk and water, and gently add the pumpkin chunks. Cover and let it simmer for 10-15 minutes.
  4. Introduce the sliced pork and kaffir lime leaves, simmer for an additional 7-10 minutes until the pork is fully cooked.
  5. Taste and adjust with palm sugar, then mix in sweet basil and chilies.
  6. Serve hot, perfect with jasmine rice or roti.

Nutrition

Serving: 1servingCalories: 350kcalCarbohydrates: 30gProtein: 25gFat: 18gSaturated Fat: 13gPolyunsaturated Fat: 1gMonounsaturated Fat: 2gCholesterol: 70mgSodium: 800mgPotassium: 600mgFiber: 4gSugar: 5gVitamin A: 5000IUVitamin C: 15mgCalcium: 100mgIron: 3mg

Notes

Ensure the coconut milk is bubbling before adding curry paste for maximum flavor extraction. Adjust heat of chilies according to your taste preference.

Tried this recipe?

Let us know how it was!

Savory Kerry Pie: A Cozy Taste of Irish Tradition

October 2, 2025 by Grace Snow Leave a Comment

As I peeled back the golden layers of a steaming Kerry Pie, the aroma of savory lamb and fresh herbs filled the kitchen, taking me straight to the heart of Ireland. This classic Irish dish, with its tender filling tucked away in a flaky, buttery crust, is the perfect antidote to the rush of fast food. Not only does this recipe offer a comforting bite for cozy family dinners, but it also gracefully adapts to your personal preferences—use beef, chicken, or even veggies! The best part? With straightforward prep and a satisfying outcome, it’s sure to impress at any gathering. Are you ready to discover the warmth of homemade comfort food?

Why is Kerry Pie so irresistible?

Hearty Filling: Tender lamb slow-cooked to perfection, creating a flavorful centerpiece that warms the soul.
Golden Crust: A flaky, buttery pastry that cradles the filling, ensuring every bite is a delight.
Versatile Options: Easily adapt the recipe with chicken or a medley of vegetables to cater to diverse tastes.
Family Favorite: This dish is sure to bring everyone to the table, perfect for gatherings or cozy dinners.
Quick Prep: With straightforward steps, you’ll have a comforting meal ready without the fuss of fast food. For more comforting dishes, consider trying Tamale Pie Hearty or Spinach Pie Deliciously for a delightful twist on comfort food classics!

Kerry Pie Ingredients

• Curious about what makes this dish special?

For the Filling

  • Lamb (or Mutton) – The star ingredient, slow-cooked for tenderness and deep flavor; substitute with beef or chicken for variety.
  • Onions – Create sweetness in the filling; shallots can substitute for a milder taste.
  • Carrots – Bring natural sweetness and a delightful crunch; parsnips can act as a sweeter alternative.
  • Herbs (Thyme, Rosemary, Parsley) – Elevate the dish with fresh flavors; opt for fresh herbs for the best aroma and taste.
  • Savory Broth or Stock – Provides moisture to the filling; use homemade broth for a richer taste.

For the Pastry

  • Butter – Adds richness and flakiness to the crust; ensure it's cold for optimal texture.
  • Flour – Forms the base of the pastry; all-purpose flour works beautifully here.
  • Water – Binds the dough; use ice-cold water for a tender crust.

For the Egg Wash

  • Egg – Gives the pie a beautiful golden finish when baked; milk can be a healthier substitute if preferred.
  • Water – Mixed with egg for the wash; ensures a shiny crust that beckons from the oven.

With these essential ingredients, you're all set to dive into making your very own comforting Kerry Pie, embracing traditional Irish cuisine right in your kitchen!

Step‑by‑Step Instructions for Kerry Pie

Step 1: Prepare the Filling
Begin by cutting the lamb into uniform cubes for even cooking. In a large skillet over medium heat, brown the lamb pieces for about 5–7 minutes until lightly golden. Next, add chopped onions and diced carrots, stirring for another 5 minutes until the onions become translucent. Pour in savory broth and sprinkle in fresh thyme, rosemary, and parsley, letting it simmer on low for 1–1.5 hours until the lamb is tender and flavors meld beautifully.

Step 2: Make the Pastry
In a mixing bowl, combine flour and cold butter, using your fingertips to incorporate until the mixture resembles coarse crumbs. Gradually add ice-cold water, mixing just until the dough holds together. Avoid overworking the dough to maintain flakiness. Shape it into a ball, wrap in plastic wrap, and refrigerate for 30 minutes to allow it to firm up and relax.

Step 3: Assemble the Pie
Preheat your oven to 400°F (200°C). Roll out half of the pastry dough on a floured surface to fit your pie dish. Gently lay the rolled pastry into the dish, pressing it against the edges. Spoon in the savory lamb filling evenly, then roll out the second half of the pastry and cover the filling. Pinch the edges to seal and cut a few slits on top to allow steam to escape during baking.

Step 4: Bake
Before placing the Kerry Pie in the oven, prepare an egg wash by whisking together an egg and a splash of water. Brush the mixture over the top crust for a beautiful golden finish. Bake in the preheated oven for 45-50 minutes, or until the crust is golden brown and flaky. The tantalizing aroma will fill your kitchen as the pie bakes, creating an inviting atmosphere.

Step 5: Serve
Once baked, remove the Kerry Pie from the oven and let it rest for about 10 minutes. This step allows the filling to settle and makes slicing easier without losing its shape. Serve warm, perhaps alongside buttery mashed potatoes or a fresh green salad, to enjoy a comforting meal that reflects the warmth of traditional Irish cooking.

Variations & Substitutions for Kerry Pie

Feel free to explore your creativity in the kitchen with these delightful twists on the classic Kerry Pie!

  • Chicken: Swap lamb for chicken for a lighter, equally flavorful option that maintains the dish's heartiness.

  • Vegetarian Fill: Replace meat with a combination of hearty vegetables like mushrooms, peas, and carrots to create a satisfying vegetarian version.

  • Herb Infusion: Try different herbs like dill or sage to customize your pie's flavor, offering an exciting twist on the traditional taste.

  • Spicy Kick: Add a pinch of red pepper flakes or diced jalapeños to the filling for a bit of heat that elevates the overall flavor.

  • Sweet Surprise: Incorporate sweet potatoes into the filling for a touch of natural sweetness that beautifully complements the savory lamb.

  • Cheesy Goodness: Add your favorite cheese, like cheddar or feta, to the filling for a rich and indulgent flavor that will wow your taste buds.

  • Flaky Alternative: Use phyllo pastry instead of traditional pastry dough for an ultra-flaky and textured experience that adds an extra layer of crunch.

  • Dough Variations: Swap in whole wheat or gluten-free flour for the pastry for a healthier or allergy-friendly option without sacrificing flavor.

Your Kerry Pie journey is just beginning—be bold and make it your own! And if you’re in the mood to explore more comforting recipes, don’t miss out on the delightful flavors of Tamale Pie Hearty and the earthy goodness of Spinach Pie Deliciously. Happy cooking!

Helpful Tricks for Kerry Pie

  • Uniform Cuts: Ensure lamb is cut into uniform pieces for even cooking, which results in a tender filling.
  • Gentle Handling: Don’t overwork the pastry dough; handle it gently to maintain a light, flaky texture in your Kerry Pie.
  • Resting Time: Let the pie rest after baking for about 10 minutes; this prevents the filling from spilling out when sliced.
  • Temperature Check: Use an instant-read thermometer; the internal temperature should reach 145°F (63°C) for safely cooked lamb.
  • Creative Fillings: Feel free to experiment with the filling; vegetables or beef can make delicious adaptations while preserving the essence of Kerry Pie.

What to Serve with Classic Irish Kerry Pie?

Pairing the savory, heartfelt flavors of Kerry Pie with the right sides can elevate your meal into a cozy feast that comforts the soul.

  • Buttery Mashed Potatoes: Creamy and smooth, they soak up the delicious juices from the pie, enhancing each bite.
  • Crisp Green Salad: A refreshing mix of greens with a tangy vinaigrette provides a bright contrast to the rich filling.
  • Roasted Root Vegetables: Their natural sweetness pairs perfectly with the hearty lamb, bringing a balance of flavors and textures to the table.
  • Colcannon: This traditional Irish dish of mashed potatoes blended with cabbage or kale offers a delightful creaminess that complements the pie's flaky crust.
  • Homemade Gravy: Drizzling rich gravy over your pie adds an extra layer of savory goodness, making each bite even more satisfying.
  • Steamed Broccoli: A simple, vibrant green addition that adds nutrients and a slight crunch, brightening the overall meal.
  • Guinness or Stout: A smooth pint of this classic Irish beer enhances the flavors of the lamb and adds a touch of authenticity to your dining experience.
  • Apple Crumble: Finish the meal on a sweet note with warm, spiced apples beneath a buttery crumble—deliciously comforting!

Make Ahead Options

Kerry Pie is an excellent choice for meal prep aficionados! You can make the filling up to 3 days in advance, simply allowing it to cool and then refrigerating in an airtight container. The pastry dough can also be prepared ahead of time; just wrap it in plastic and refrigerate for up to 24 hours. When you’re ready to assemble, roll out the chilled dough and fill it with your prepped filling. Bake according to the original recipe instructions for a fresh, delicious pie that tastes just as satisfying as if it were made that day. This make-ahead strategy saves time on busy weeknights while delivering a comforting homemade meal!

How to Store and Freeze Kerry Pie

Fridge: Store leftover Kerry Pie in an airtight container for up to 3 days to maintain freshness and flavor.

Freezer: For longer storage, wrap the pie tightly in plastic wrap and aluminum foil, then freeze for up to 3 months.

Reheating: To enjoy, thaw the pie overnight in the fridge and reheat in the oven at 350°F (175°C) for about 25 minutes, ensuring the crust stays crispy.

Kerry Pie Recipe FAQs

What type of lamb is best for Kerry Pie?
For the best flavor and tenderness, I recommend using lamb shoulder or leg, as these cuts are ideal for slow cooking. If you prefer a milder taste, feel free to substitute with beef or chicken!

How should I store leftover Kerry Pie?
Store leftover Kerry Pie in an airtight container in the refrigerator for up to 3 days. To retain its delicious flakiness, I suggest reheating it in the oven rather than the microwave—just preheat to 350°F (175°C) and warm for about 25 minutes.

Can I freeze Kerry Pie?
Absolutely! To freeze, let the pie cool completely, then tightly wrap it in plastic wrap followed by aluminum foil. You can freeze it for up to 3 months. When you’re ready to enjoy, thaw overnight in the fridge and reheat in the oven until heated through.

What are some common issues when making Kerry Pie?
If your pastry dough is tough, it likely means it was overworked—try handling it gently next time! To ensure even cooking, cut the lamb into uniform pieces. If the filling is too watery, you can thicken it with a sprinkle of flour or cornstarch during the cooking process.

Are there any dietary considerations for Kerry Pie?
If you have dietary restrictions, consider substituting the lamb for a hearty chicken or a plant-based filling. For gluten-free needs, you can use gluten-free flour for the pastry, though it may alter the texture slightly. Always check for allergens in pre-made stock and pastry if using store-bought ingredients.

How can I enhance the flavor of my Kerry Pie?
To elevate your pie, try experimenting with different herb combinations or add a splash of red wine to the filling while it simmers. This not only deepens the flavor profile but also brings out a succulent, savory richness that’s hard to resist.

Kerry Pie

Savory Kerry Pie: A Cozy Taste of Irish Tradition

This savory Kerry Pie brings the warmth of Irish tradition to your dinner table with tender lamb and flaky crust.
Print Recipe Pin Recipe
Prep Time 30 minutes mins
Cook Time 2 hours hrs
Resting Time 10 minutes mins
Total Time 2 hours hrs 40 minutes mins
Servings: 6 slices
Course: Dinner
Cuisine: Irish
Calories: 450
Ingredients Equipment Method Nutrition Notes

Ingredients
  

Filling
  • 1 pound lamb or mutton, slow-cooked
  • 1 medium onion chopped
  • 2 medium carrots diced
  • 2 tablespoons herbs fresh thyme, rosemary, parsley
  • 2 cups savory broth or stock
Pastry
  • 1 cup butter cold, cubed
  • 2 cups flour all-purpose flour
  • 1/4 cup water ice-cold
Egg Wash
  • 1 large egg beaten
  • 1 tablespoon water

Equipment

  • Mixing Bowl
  • Skillet
  • Pie dish

Method
 

Prepare the Filling
  1. Cut the lamb into uniform cubes. In a large skillet over medium heat, brown the lamb pieces for 5–7 minutes. Add onions and carrots; stir for another 5 minutes.
  2. Pour in the savory broth and sprinkle in the herbs. Let it simmer on low for 1–1.5 hours until the lamb is tender.
Make the Pastry
  1. Combine flour and cold butter in a bowl. Mix until it resembles coarse crumbs. Gradually add ice-cold water until dough holds together.
  2. Shape the dough into a ball, wrap in plastic, and refrigerate for 30 minutes.
Assemble the Pie
  1. Preheat the oven to 400°F (200°C). Roll out half the pastry and fit it into the pie dish. Spoon the filling in evenly.
  2. Cover with the second half of the pastry, pinch edges to seal, and cut slits for steam.
Bake
  1. Prepare an egg wash by whisking egg and water. Brush over the top crust. Bake for 45-50 minutes until golden brown.
Serve
  1. Let the pie rest for 10 minutes before serving. Enjoy warm with mashed potatoes or salad.

Nutrition

Serving: 1sliceCalories: 450kcalCarbohydrates: 30gProtein: 25gFat: 25gSaturated Fat: 10gPolyunsaturated Fat: 5gMonounsaturated Fat: 5gCholesterol: 70mgSodium: 500mgPotassium: 800mgFiber: 2gSugar: 3gVitamin A: 500IUVitamin C: 5mgCalcium: 30mgIron: 3mg

Notes

Ensure lamb is cut uniformly and handle the pastry gently to maintain flakiness. Let the pie rest before slicing.

Tried this recipe?

Let us know how it was!

Irresistible Kerry Pie: Comforting Irish Lamb in Every Bite

October 2, 2025 by Grace Snow Leave a Comment

As I peeled back the layers of a freshly baked Kerry Pie, the savory aroma wrapped around me like a warm hug. This traditional Irish Lamb Pie is not just a dish; it’s comfort food that tells a story of hearty gatherings and cozy family dinners. The tender lamb filling, slow-cooked to perfection and balanced with fragrant herbs, is enveloped in a buttery, flaky crust that begs for a place at your table. It’s incredibly adaptable, allowing you the freedom to make it just as you like—whether you stick to the classic lamb or swap it for chicken or a veggie medley. Plus, the pie can be prepped ahead of time, making it as convenient as it is delicious. As you dive into the world of this comforting classic, will you take the traditional route or put your own twist on it?

Why is Kerry Pie a Must-Try?

Simplicity: This recipe is incredibly easy to follow, making it perfect for both novice cooks and seasoned chefs alike.

Rich, Comforting Flavor: The slow-cooked lamb and fragrant herbs create a mouth-watering filling that will transport you to a cozy Irish pub with every bite.

Adaptable Ingredients: While traditional, you can easily swap in chicken or even create a veggie version with a mix of seasonal vegetables. Explore your options!

Crowd-Pleasing Dish: Ideal for family gatherings, this pie is sure to impress your guests and leave them asking for seconds. For a delightful contrast, serve it alongside Tamale Pie Hearty or a slice of Spinach Pie Deliciously.

Make-Ahead Convenience: Prep your Kerry Pie in advance and simply pop it in the oven when you’re ready to serve. Perfect for busy weeknights or special occasions!

Kerry Pie Ingredients

For the Filling
• Lamb (or Mutton) – Main filling that provides a hearty base; slow-cook for maximum tenderness and flavor absorption; chicken is a lighter substitute.
• Herbs (Thyme, Rosemary, Parsley) – Essential for enhancing the flavor; fresh herbs are best for that vibrant taste.
• Onions – Adds natural sweetness and depth; shallots can be substituted for a milder flavor.
• Carrots – Contributes natural sweetness and texture; parsnips make for a sweeter alternative.
• Savory Broth or Stock – Keeps the filling moist; homemade stock is recommended for richness, but store-bought is also acceptable.

For the Pastry
• Pastry Dough (Butter, Flour, Water) – Creates a flaky, delicious crust that holds the filling together; feel free to use store-bought puff pastry for convenience.
• Egg Wash (Egg, Water) – Gives the pastry a beautiful golden finish; milk can be used as a healthier substitute.

With these ingredients, your Kerry Pie is set to shine! Whether you’ll stick to the traditional lamb filling or experiment with a twist, every bite will be a delightful nod to comforting Irish cuisine.

Step‑by‑Step Instructions for Kerry Pie

Step 1: Prepare the Filling
Begin by heating a large skillet over medium heat. Add diced lamb and brown it for about 5–7 minutes until it’s richly colored. Then, toss in chopped onions and diced carrots, cooking for an additional 4–5 minutes until they soften. Add fresh herbs like thyme and rosemary along with savory broth, then reduce the heat to low and simmer for 1–1.5 hours until the lamb is tender and flavors meld beautifully.

Step 2: Make the Pastry
In a mixing bowl, combine flour and cold, cubed butter, using a pastry cutter or your fingertips to create a crumbly texture. Gradually add cold water, mixing until the dough comes together. Knead it gently on a floured surface for about 2–3 minutes, then wrap in plastic wrap and chill in the refrigerator for at least 30 minutes. This will ensure a flaky crust for your Kerry Pie.

Step 3: Assemble the Pie
Preheat your oven to 400°F (200°C). Roll out the chilled pastry dough on a floured surface to fit your pie dish. Line the dish with half the dough, letting the edges hang over. Spoon the flavorful lamb filling into the crust, ensuring an even layer. Roll out the remaining dough to cover the top, sealing the edges by crimping with your fingers. Cut small slits in the top for steam to escape.

Step 4: Bake
Brush the top of your assembled Kerry Pie with an egg wash for a golden-brown finish. Place the pie in the preheated oven and bake for 45-50 minutes, or until the pastry is golden and flaky, and the filling bubbles slightly at the edges. Keep an eye on it to prevent over-browning, and rotate the pie halfway through for even baking.

Step 5: Serve
Once baked, remove the Kerry Pie from the oven and allow it to rest for about 10-15 minutes. This resting period helps the filling set, making it easier to slice. Serve warm, perhaps alongside buttery mashed potatoes or a simple green salad, for a truly comforting meal that warms the soul.

What to Serve with Kerry Pie

Indulge in the warm flavors of a hearty meal that comes alive with every side dish you choose.

  • Creamy Mashed Potatoes: This classic pair is the perfect canvas for gravy, complementing the pie’s rich filling with its buttery texture.
  • Simple Green Salad: A refreshing mix of crisp greens and tangy vinaigrette balances the dish’s heaviness, adding a burst of brightness. Rich and savory, the pie loves a light and zesty salad to cut its richness.
  • Steamed Seasonal Vegetables: A medley of tender, sautéed veggies like green beans and carrots provides a satisfying crunch and a colorful plate. Their natural sweetness harmonizes beautifully with the savory pie.
  • Colcannon: The traditional Irish side of mashed potatoes mixed with cabbage or kale is just what you need to elevate your Kerry Pie experience, merging flavors seamlessly.
  • Pickled Red Cabbage: The tangy crunch of pickled red cabbage adds a delightful contrast in texture and flavor, making each bite even more enjoyable.
  • Rich Brown Gravy: Pouring this over slices of Kerry Pie adds an extra layer of comfort and moistness, helping flavors meld beautifully.
  • Cider or Stout: A glass of crisp apple cider or a rich stout beer enhances the hearty flavors of the pie while rounding out your meal with a festive touch.

Storage Tips for Kerry Pie

Fridge: Store leftover Kerry Pie in an airtight container for up to 3 days. This will help keep the filling fresh and prevent the pastry from becoming too soggy.

Freezer: You can freeze the assembled pie before baking for up to 3 months. Wrap it tightly in plastic wrap and foil to protect against freezer burn.

Reheating: When ready to enjoy, bake from frozen at 375°F (190°C) for about 55–60 minutes, or until heated through. Alternatively, thaw in the fridge overnight and bake for 30–35 minutes.

Room Temperature: If serving at a gathering, keep the pie out for no longer than 2 hours to maintain good food safety practices.

Make Ahead Options

These Kerry Pies are perfect for meal prep enthusiasts looking to save time during busy weeknights! You can prepare the lamb filling up to 24 hours in advance; simply brown the meat and cook it with onions, carrots, and herbs, then let it cool completely before refrigerating. The pastry dough can also be made ahead and stored in the fridge for up to 3 days—make sure to wrap it tightly to prevent drying out. When you’re ready to enjoy your Kerry Pie, simply assemble, bake, and savor the deliciousness that’s just as comforting as if you made it fresh!

Helpful Tricks for Kerry Pie

Uniform Lamb Cuts: Ensure the lamb is cut into uniform pieces for even cooking and a harmonious texture throughout the filling.

Gentle Pastry Handling: Don’t overwork the pastry dough; handle it gently to maintain its flaky texture. Over-kneading can lead to toughness, ruining your Kerry Pie's delicate crust.

Rest Before Slicing: Allow the pie to rest for 10-15 minutes after baking. This helps the filling to set, preventing it from spilling out when you slice into the pie.

Egg Wash Timing: Brush the pastry with egg wash just before baking to achieve a beautifully golden finish. If you're using milk as a substitute, do it similarly for a lovely color.

Seasoning Check: Always taste the filling before assembling the pie. Adjust seasoning as needed to ensure a flavorful bite that shines with every mouthful of the Kerry Pie.

Kerry Pie Variations & Substitutions

Feel free to customize your Kerry Pie adventure with these delightful tweaks and twists!

  • Chicken: Replace lamb with chicken for a lighter, yet equally comforting filling. This adaptation brings a different flavor profile that’s perfect for those who prefer poultry.

  • Vegetable Medley: Go meat-free by using a mix of seasonal vegetables like peas, bell peppers, and zucchini. Sauté these colorful veggies with herbs to create a vibrant filling in place of meat.

  • Beef Swap: For those who enjoy a bolder flavor, substitute lamb with beef. This heartier option pairs beautifully with the pastry while still retaining comfort food vibes.

  • Herb Twist: Mix and match herb blends! Try dill or tarragon instead of traditional thyme and rosemary for a unique flavor burst that makes this pie your own.

  • Spicy Kick: Add a pinch of chili flakes or diced jalapeños to the filling for a greater depth of flavor and a touch of heat that makes each bite exciting.

  • Gluten-Free Crust: Use a gluten-free pastry dough or almond flour to cater to dietary restrictions while enjoying the same buttery taste that defines a good pie.

  • Cheesy Delight: Fold in some grated cheddar cheese into the filling for a rich, creamy twist. The cheese melts wonderfully during baking, offering a delightful surprise.

  • Fruit Infusion: For an unexpected touch, add diced apples or pears to the filling, balancing the savory richness with a hint of sweetness. It’s a playful nod to traditional Irish flavors!

No matter the variations you choose, each update will still keep that comforting spirit of the beloved Kerry Pie alive. Pair it with some sides like Tamale Pie Hearty for a fun dinner spread or enjoy it along with a slice of Spinach Pie Deliciously to celebrate flavors in delightful ways!

Kerry Pie Recipe FAQs

What type of lamb should I use for my Kerry Pie?
Absolutely! For the best flavor, choose a cut with a good mix of meat and fat, like lamb shoulder or leg. Lamb shoulder provides a rich, tender bite, while lamb leg is leaner but still flavorful. If you're looking for a lighter option, chicken or even a mix of hearty vegetables can create a delightful twist on the classic!

How should I store my leftover Kerry Pie?
After enjoying your delicious Kerry Pie, store any leftovers in an airtight container in the fridge. It will stay fresh for about 3 days. This will keep the filling safe and help maintain the flaky texture of the pastry. If you'd like to enjoy it later, I recommend reheating it in the oven to regain its crispness.

Can I freeze Kerry Pie for later?
Definitely! You can freeze the assembled (but unbaked) pie for up to 3 months. Simply wrap it tightly in plastic wrap, followed by aluminum foil to prevent freezer burn. When you're ready to bake it, you can pop it in the oven from frozen, cooking it at 375°F (190°C) for about 55-60 minutes until heated through and golden brown, or thaw it overnight in the refrigerator and bake for 30-35 minutes.

What if my pastry dough is tough?
Good question! If you find the pastry to be tough, it may be due to over-kneading. When making the dough, it's essential to handle it gently—just mix until it comes together. If it starts to feel overly elastic, put it away for a minute; the resting period in the fridge is vital, as it helps keep your dough flaky and tender.

Can my pets eat Kerry Pie?
I advise against sharing your Kerry Pie with pets. Ingredients such as onions and certain herbs can be harmful to them. If you want to treat your furry friends, create a pet-friendly version using cooked meat without seasoning, and leave out any harmful ingredients for a special dinner!

Kerry Pie

Irresistible Kerry Pie: Comforting Irish Lamb in Every Bite

The Kerry Pie is a comforting Irish dish featuring savory lamb and fragrant herbs wrapped in a flaky crust, perfect for gatherings.
Print Recipe Pin Recipe
Prep Time 30 minutes mins
Cook Time 1 hour hr
Resting Time 15 minutes mins
Total Time 1 hour hr 45 minutes mins
Servings: 6 slices
Course: Dinner
Cuisine: Irish
Calories: 420
Ingredients Equipment Method Nutrition Notes

Ingredients
  

Filling
  • 1 pound Lamb (or Mutton) Main filling, slow-cooked for tenderness.
  • 1 cup Onions Chopped, can substitute with shallots.
  • 1 cup Carrots Diced, parsnips can be an alternative.
  • 1 cup Savory Broth or Stock Homemade preferred for richness.
  • 1 tablespoon Herbs (Thyme, Rosemary, Parsley) Fresh herbs recommended for vibrant flavor.
Pastry
  • 1 cup Pastry Dough (Butter, Flour, Water) Flaky crust, store-bought puff pastry can be used.
  • 1 egg Egg Wash Mixed with water for a golden finish.

Equipment

  • Large skillet
  • Mixing Bowl
  • Pastry cutter
  • Pie dish

Method
 

Filling Preparation
  1. Heat a large skillet over medium heat. Brown diced lamb for 5–7 minutes.
  2. Add onions and carrots, cooking for an additional 4–5 minutes until softened.
  3. Incorporate fresh herbs and savory broth, reduce heat, and simmer for 1–1.5 hours until lamb is tender.
Pastry Preparation
  1. Combine flour and cold, cubed butter in a bowl. Create a crumbly texture.
  2. Gradually add cold water until dough forms. Knead gently, wrap in plastic, and chill for 30 minutes.
Assembly and Baking
  1. Preheat oven to 400°F (200°C). Roll out the dough to fit the pie dish, filling with lamb mixture.
  2. Cover with remaining dough, seal edges, and cut small slits on top.
  3. Brush with egg wash and bake for 45-50 minutes until golden brown.
Serving
  1. Allow the pie to rest for 10-15 minutes before slicing and serve warm.

Nutrition

Serving: 1sliceCalories: 420kcalCarbohydrates: 32gProtein: 25gFat: 22gSaturated Fat: 10gPolyunsaturated Fat: 2gMonounsaturated Fat: 8gCholesterol: 90mgSodium: 680mgPotassium: 550mgFiber: 3gSugar: 5gVitamin A: 2000IUVitamin C: 6mgCalcium: 30mgIron: 2.5mg

Notes

Ensure lamb is cut uniformly for even cooking. Handle pastry gently to maintain flakiness. Brush egg wash just before baking for a golden finish, and always taste and adjust seasoning for the filling.

Tried this recipe?

Let us know how it was!

Savory Stuffed Meatballs in Guinness Gravy for Cozy Nights

October 2, 2025 by Grace Snow Leave a Comment

The rich aroma of simmering stew wafted through the kitchen, pulling me back to the heartwarming meals of my childhood. There’s something magical about comfort food that reminds us of gatherings filled with laughter, and my Stuffed Meatballs in Guinness Gravy is no exception. This recipe not only impresses with its savory filling and thick, rich gravy but also offers a delightfully hearty meal that’s perfect for cozy dinners or festive occasions. With simple, easy-to-follow steps, you can whip up an indulgent dish that turns your kitchen into a welcoming haven. Plus, these meatballs are freezer-friendly, making them a lifesaver for busy weeknights. Are you ready to discover this satisfying twist on a classic recipe?

Why are Stuffed Meatballs a Must-Try?

Comforting and heartwarming, these stuffed meatballs bring the essence of cozy gatherings right to your table. Rich Guinness gravy envelops each tender meatball, making every bite a burst of indulgent flavor. Versatile enough to pair with mashed potatoes, polenta, or roasted veggies, you can easily customize it to suit your taste. Make-ahead friendly, these meatballs can be prepped in advance, saving you time during busy weeknights. For a twist on tradition, check out Herby Ricotta Stuffed for a fresh take on comfort food! Family-approved, they’re sure to please the crowd and keep everyone coming back for seconds.

Stuffed Meatballs in Guinness Gravy Ingredients

For the Meatballs

  • Ground Meat – This is the main component, providing substantial protein and a rich texture; you can easily substitute with turkey or chicken for a lighter flavor.
  • Breadcrumbs – These help bind the meatballs and add delightful texture; opt for gluten-free breadcrumbs if you need a gluten-free option.
  • Eggs – They act as a vital binder in the meat mixture; there are no substitutes recommended if you want to maintain the meatball structure.
  • Onion – A key flavor enhancer; shallots make a great substitute for a milder taste.
  • Garlic – Fresh garlic intensifies the flavor, but garlic powder works fine in a pinch.
  • Parmesan Cheese – This adds umami and moisture to the meatballs; for a dairy-free alternative, use nutritional yeast.

For the Gravy

  • Guinness Stout – The star ingredient for the gravy, infusing it with depth and richness; any stout beer can work, but taste may vary.
  • Beef Broth – Serves as a flavorful base for the gravy; vegetable broth offers a lighter option if preferred.
  • Worcestershire Sauce – This adds a tangy umami kick; soy sauce can be a good substitute if you're looking for a different flavor profile.

For Garnish

  • Herbs (e.g., parsley) – Fresh herbs brighten up the dish; chives or green onions make a lovely substitute for garnish.

Gather these ingredients, and you'll be ready to embark on a culinary adventure with your Stuffed Meatballs in Guinness Gravy!

Step‑by‑Step Instructions for Stuffed Meatballs in Guinness Gravy

Step 1: Prepare the Meatball Mixture
In a large mixing bowl, combine ground meat, breadcrumbs, eggs, minced onion, minced garlic, and grated Parmesan cheese. Use your hands to thoroughly mix until well combined, ensuring all ingredients are evenly distributed. Once mixed, form the mixture into golf ball-sized meatballs, about 1-2 inches in diameter, and set them aside on a baking sheet.

Step 2: Brown the Meatballs
Heat a large skillet over medium heat and add a splash of oil. Once the oil is shimmering, carefully place the meatballs in the pan, making sure not to overcrowd them. Cook for about 6-8 minutes, turning occasionally, until they are browned on all sides. Remove the meatballs and set them aside on a plate while you prepare the gravy.

Step 3: Make the Gravy Base
In the same skillet, pour in the Guinness stout, scraping the bottom of the pan with a wooden spoon to release any browned bits. Add the beef broth and Worcestershire sauce, stirring to combine. Bring the mixture to a simmer over medium heat, allowing the alcohol to cook off, which should take about 3-5 minutes, while the gravy thickens slightly.

Step 4: Combine and Simmer
Return the browned meatballs back to the skillet, ensuring they are submerged in the bubbling gravy. Lower the heat to a gentle simmer and cover the skillet. Let them cook for 20-30 minutes, turning the meatballs occasionally, until they're cooked through and bursting with flavor, ensuring the gravy thickens to your desired consistency.

Step 5: Serve Your Creation
Once the meatballs are tender and the gravy is rich and glossy, it's time to serve. Spoon the meatballs and gravy over a bed of creamy mashed potatoes or fluffy polenta. For an added touch, garnish with fresh parsley or chives, bringing brightness to your flavorful dish of Stuffed Meatballs in Guinness Gravy.

Expert Tips for Stuffed Meatballs in Guinness Gravy

  • Perfect Browning: Ensure meatballs are well-browned before adding to the gravy; this enhances flavor and creates a beautiful finish.

  • Don't Overcrowd: Avoid overcrowding the pan while browning; this allows for even cooking and prevents steaming, resulting in a more flavorful meatball.

  • Thick Gravy: For a thicker gravy, simmer the sauce longer to reduce the liquid; keep an eye on it to achieve your desired consistency without burning.

  • Quality Ingredients: Use high-quality ground meat and fresh herbs; they elevate the overall taste of your Stuffed Meatballs in Guinness Gravy.

  • Freezing Tips: Prepare meatballs in advance and freeze them; they can be reheated in sauce for a quick, satisfying meal later.

Make Ahead Options

These Stuffed Meatballs in Guinness Gravy are perfect for busy home cooks looking to save time during the week! You can prepare the meatballs up to 24 hours ahead by forming them and placing them on a baking sheet in the refrigerator (this helps prevent them from sticking together). Additionally, you can cook the gravy and refrigerate it for up to 3 days. When you’re ready to serve, simply reheat the gravy in a skillet and add the refrigerated meatballs, allowing them to simmer until warmed through and tender. This way, you'll enjoy all the delicious, comforting flavors without the last-minute rush!

Stuffed Meatballs in Guinness Gravy Variations

Customize your stuffed meatballs with these delicious twists that promise to elevate your meal to new heights!

  • Turkey Option: Use ground turkey for a leaner alternative, reducing calories while still delivering on flavor. These meatballs remain tender and juicy, perfect for health-conscious diners.

  • Cheesy Surprise: Mix in cubed mozzarella or cheddar cheese inside each meatball for a gooey, melty center that adds an exciting layer of flavor and texture. Each bite becomes an indulgent treat!

  • Bacon Boost: Incorporate finely chopped bacon into the meatball mixture for a smoky, savory taste that perfectly complements the Guinness gravy. The addition of bacon brings a hearty depth, making every bite incredibly satisfying.

  • Vegetarian Delight: Swap the meat for a blend of lentils and mushrooms, creating a delightful plant-based version of this classic comfort dish. The hearty grains combined with rich gravy will leave everyone wanting more!

  • Spicy Kick: Mix in some red pepper flakes or diced jalapeños for a fiery twist on the traditional flavors. A hint of heat can really awaken the senses, taking your meatballs to a vibrant new level!

  • Extra Gravy: For those who love sauce, double the Guinness and beef broth for an even richer, more luxurious gravy to serve over your meatballs. It’s perfect for soaking into fluffy mashed potatoes or polenta.

  • Herbed Up: Experiment with fresh herbs like thyme or rosemary in the mix, adding fragrant notes that complement the savory elements beautifully. It provides a fresh punch and brightens up the overall dish.

  • Asian-Inspired: Season the meatball mixture with ginger and soy sauce, and use a light vegetable broth for a unique twist that pairs exquisitely with jasmine rice. Explore global flavors while enjoying a comforting classic!

Feel free to experiment and make these meatballs truly your own. And if you're in the mood for another fantastic dish, check out my delicious twist on comforting meals with Herby Ricotta Stuffed for an exciting new experience!

What to Serve with Stuffed Meatballs in Guinness Gravy

Transform your meal into a comforting feast that delights every sense and brings warmth to your table.

  • Creamy Mashed Potatoes: The velvety texture of mashed potatoes perfectly soaks up the flavorful gravy, creating a harmonious blend in every bite.

  • Fluffy Polenta: This deliciously smooth base offers a delightful contrast to the hearty meatballs, adding a rustic touch to your plate.

  • Roasted Seasonal Vegetables: Caramelized veggies provide a sweet and earthy contrast, enhancing the dish's richness while adding color to your meal.

  • Garlic Bread: Toasty and fragrant, garlic bread is perfect for sopping up every drop of the luscious gravy, turning each bite into a comfort food dream.

  • Fresh Green Salad: A vibrant salad with a tangy vinaigrette cuts through the richness, balancing the flavors and providing a refreshing crunch.

  • A Glass of Guinness Stout: Pairing with the same stout used in the gravy enhances the beer-infused flavors, creating a cohesive tasting experience for beer lovers.

  • Decadent Chocolate Cake: For dessert, a rich chocolate cake complements the savory meatballs and finishes your meal with a sweet note that's sure to impress.

  • Warm Apple Crisp: Its warm, spiced flavors and crispy topping offer a delightful contrast to the savory main dish, rounding out your meal cozy and comforting.

How to Store and Freeze Stuffed Meatballs in Guinness Gravy

Fridge: Store leftover meatballs in an airtight container for up to 3 days; ensure they're submerged in gravy to keep them moist.

Freezer: Freeze meatballs separately from the gravy for up to 3 months; wrap tightly in plastic wrap and place in a freezer bag to prevent freezer burn.

Reheating: To reheat, thaw in the fridge overnight, then warm gently in a saucepan over low heat, adding a splash of water or broth to loosen the gravy.

Make-Ahead: Prepare the stuffed meatballs in advance and freeze them raw; bake or cook them straight from the freezer when you're ready for a quick, delicious meal!

Stuffed Meatballs in Guinness Gravy Recipe FAQs

How do I choose the best ground meat for my stuffed meatballs?
When selecting ground meat, look for a blend with some fat content (80/20 is ideal) to ensure the meatballs remain juicy and flavorful. Ground beef is traditional, but feel free to use ground turkey or chicken for a leaner alternative. Whichever option you choose, ensure it's fresh and from a reputable source for the best flavor.

What’s the best way to store leftover stuffed meatballs?
Store leftover Stuffed Meatballs in Guinness Gravy in an airtight container in the refrigerator for up to 3 days. Keeping the meatballs submerged in the gravy helps retain moisture, ensuring they stay tender and delicious when you're ready to enjoy leftovers.

Can I freeze stuffed meatballs, and how should I do it?
Absolutely! You can freeze stuffed meatballs for up to 3 months. First, allow them to cool completely, then wrap each meatball tightly in plastic wrap and place them in a freezer-safe bag. If you're freezing the gravy, store it in a separate airtight container. To reheat, thaw in the fridge overnight, then warm gently in a saucepan over low heat, adding a splash of broth or water to maintain creaminess.

What should I do if my meatballs fall apart while cooking?
If your meatballs are breaking apart, it might be due to insufficient binding. Ensure you’ve used enough breadcrumbs and eggs in your mixture. If they still don’t hold, try chilling them in the fridge for 30 minutes before cooking. This helps them firm up and retain their shape better during cooking.

Are there any dietary considerations I should be aware of when making this recipe?
Yes! If you're preparing these meatballs for someone with dietary restrictions, consider using gluten-free breadcrumbs for a gluten-free option. Additionally, for dairy-free versions, nutritional yeast can substitute for Parmesan cheese. Always check labels for any pre-made ingredients, as they can contain allergens like soy or gluten.

Stuffed Meatballs in Guinness Gravy

Savory Stuffed Meatballs in Guinness Gravy for Cozy Nights

Enjoy these Stuffed Meatballs in Guinness Gravy, a comforting dish perfect for cozy dinners.
Print Recipe Pin Recipe
Prep Time 30 minutes mins
Cook Time 40 minutes mins
Total Time 1 hour hr 10 minutes mins
Servings: 4 meatballs
Course: Dinner
Cuisine: Irish
Calories: 300
Ingredients Equipment Method Nutrition Notes

Ingredients
  

For the Meatballs
  • 1 lb Ground Meat beef, turkey, or chicken
  • 1 cup Breadcrumbs gluten-free option available
  • 1 large Eggs no substitutes recommended
  • 1 medium Onion can substitute with shallots
  • 2 cloves Garlic fresh minced or garlic powder
  • 1/2 cup Parmesan Cheese use nutritional yeast for dairy-free
For the Gravy
  • 1 cup Guinness Stout any stout beer can work
  • 2 cups Beef Broth vegetable broth offers a lighter option
  • 2 tbsp Worcestershire Sauce substitute soy sauce if desired
For Garnish
  • 1/4 cup Herbs (e.g., parsley) chives or green onions can be used

Equipment

  • large mixing bowl
  • Skillet
  • Baking Sheet
  • Wooden spoon

Method
 

Step-by-Step Instructions
  1. In a large mixing bowl, combine ground meat, breadcrumbs, eggs, minced onion, minced garlic, and grated Parmesan cheese.
  2. Form the mixture into golf ball-sized meatballs, about 1-2 inches in diameter, and set them aside on a baking sheet.
  3. Heat a large skillet over medium heat and add a splash of oil. Carefully place the meatballs in the pan and cook for about 6-8 minutes, turning occasionally, until browned on all sides.
  4. Remove the meatballs and set them aside on a plate while you prepare the gravy.
  5. In the same skillet, pour in the Guinness stout, scraping the bottom to release browned bits. Add beef broth and Worcestershire sauce, stirring to combine.
  6. Bring the mixture to a simmer over medium heat for about 3-5 minutes until the gravy thickens slightly.
  7. Return the browned meatballs to the skillet, making sure they're submerged in the gravy, then cover and simmer for 20-30 minutes.
  8. Serve the meatballs and gravy over mashed potatoes or polenta, garnished with fresh herbs.

Nutrition

Serving: 1meatballCalories: 300kcalCarbohydrates: 15gProtein: 20gFat: 18gSaturated Fat: 7gPolyunsaturated Fat: 2gMonounsaturated Fat: 8gCholesterol: 85mgSodium: 600mgPotassium: 250mgFiber: 1gSugar: 2gVitamin C: 2mgCalcium: 100mgIron: 2mg

Notes

Perfect for freezing and reheating for busy weeknights. For a thicker gravy, simmer longer to reduce liquid while ensuring it doesn't burn.

Tried this recipe?

Let us know how it was!
  • « Previous Page
  • 1
  • …
  • 53
  • 54
  • 55
  • 56
  • 57
  • …
  • 71
  • Next Page »

Welcome!

Hi, I’m Grace, a Sydney-based home cook with a passion for bold flavors and trending ingredients. Whether you’re a busy beginner or a seasoned foodie, you’ll find dishes here that are fresh, fun, and full of flavor.

More about me

Popular Recipes

  • Chocolate Cake Pops
    Delightful Chocolate Cake Pops for Your Sweet Cravings
  • Cottage Cheese Banana Bread
    Cottage Cheese Banana Bread: Moist, Protein-Packed Delight
  • Flourless Oat Waffles
    Flourless Oat Waffles for a Quick, Healthy Breakfast Boost
  • Cinnamon Waffles
    Fluffy Cinnamon Waffles with Dreamy Whipped Cream Bliss

Footer

↑ back to top

About

  • Privacy Policy
  • Disclaimer
  • Terms & Conditions

Newsletter

  • Sign Up! for emails and updates

Contact

  • About me
  • Contact me

Copyright © 2025 TastyTrendIngredients