tastytrendingredients

  • Home
  • Recipes
    • Appetizers
    • Breakfast
    • Dessert
    • Dinner
    • Drinks
    • Salads
    • Snacks
    • Soups
  • About me
  • Contact me
menu icon
go to homepage
  • Home
  • Recipes
    • Appetizers
    • Breakfast
    • Dessert
    • Dinner
    • Drinks
    • Salads
    • Snacks
    • Soups
  • About me
  • Contact me
search icon
Homepage link
  • Home
  • Recipes
    • Appetizers
    • Breakfast
    • Dessert
    • Dinner
    • Drinks
    • Salads
    • Snacks
    • Soups
  • About me
  • Contact me
×

Homemade S'mores Pop Tarts That Bring Back Sweet Memories

September 16, 2025 by Grace Snow Leave a Comment

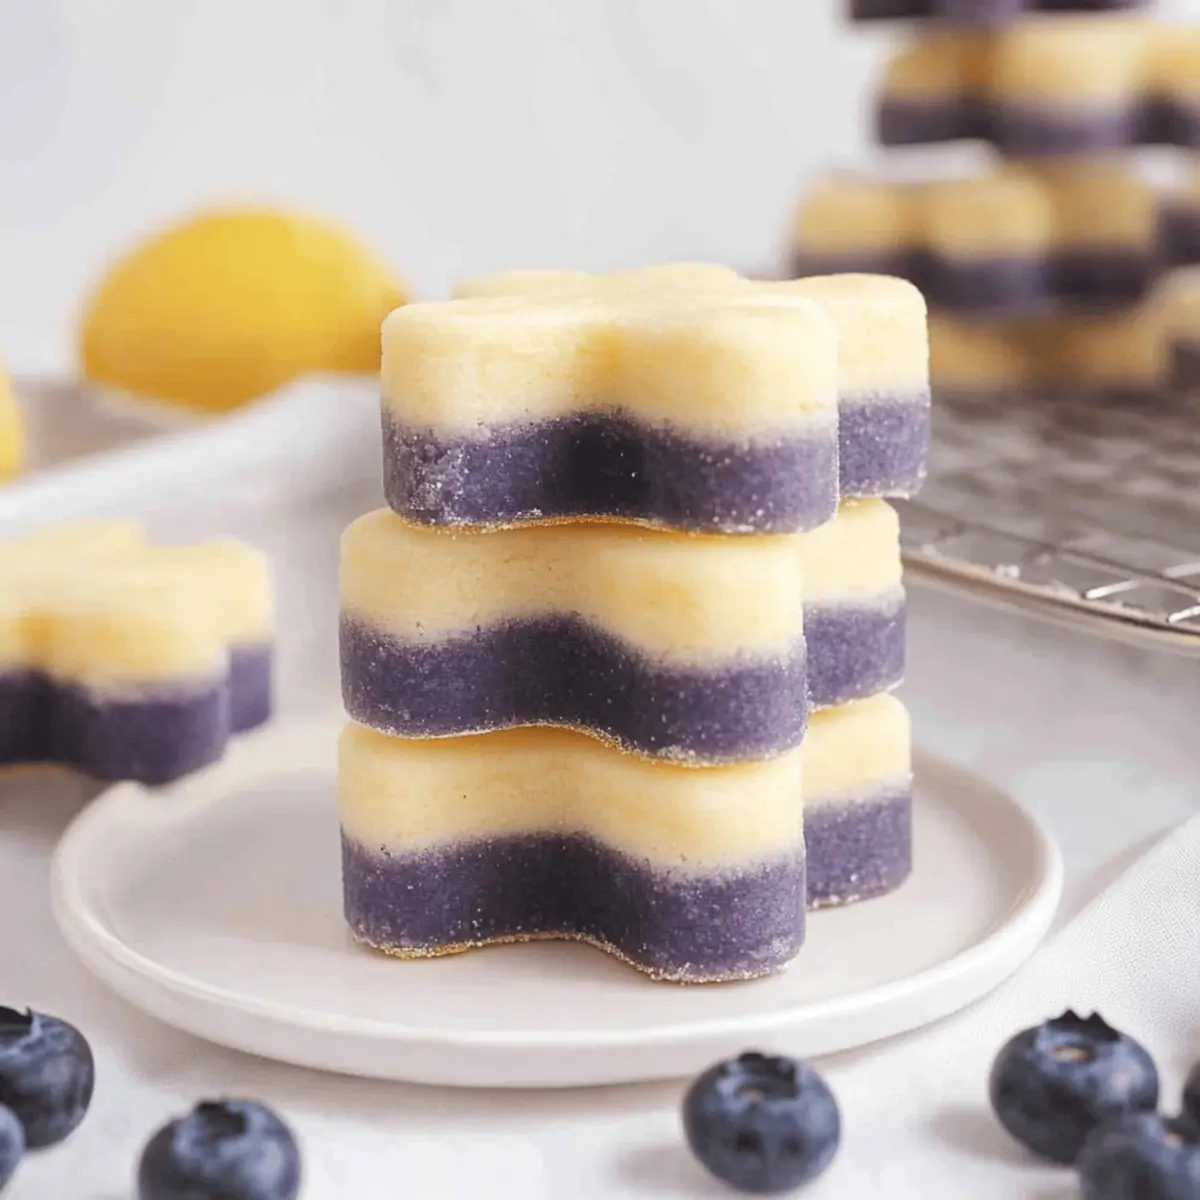
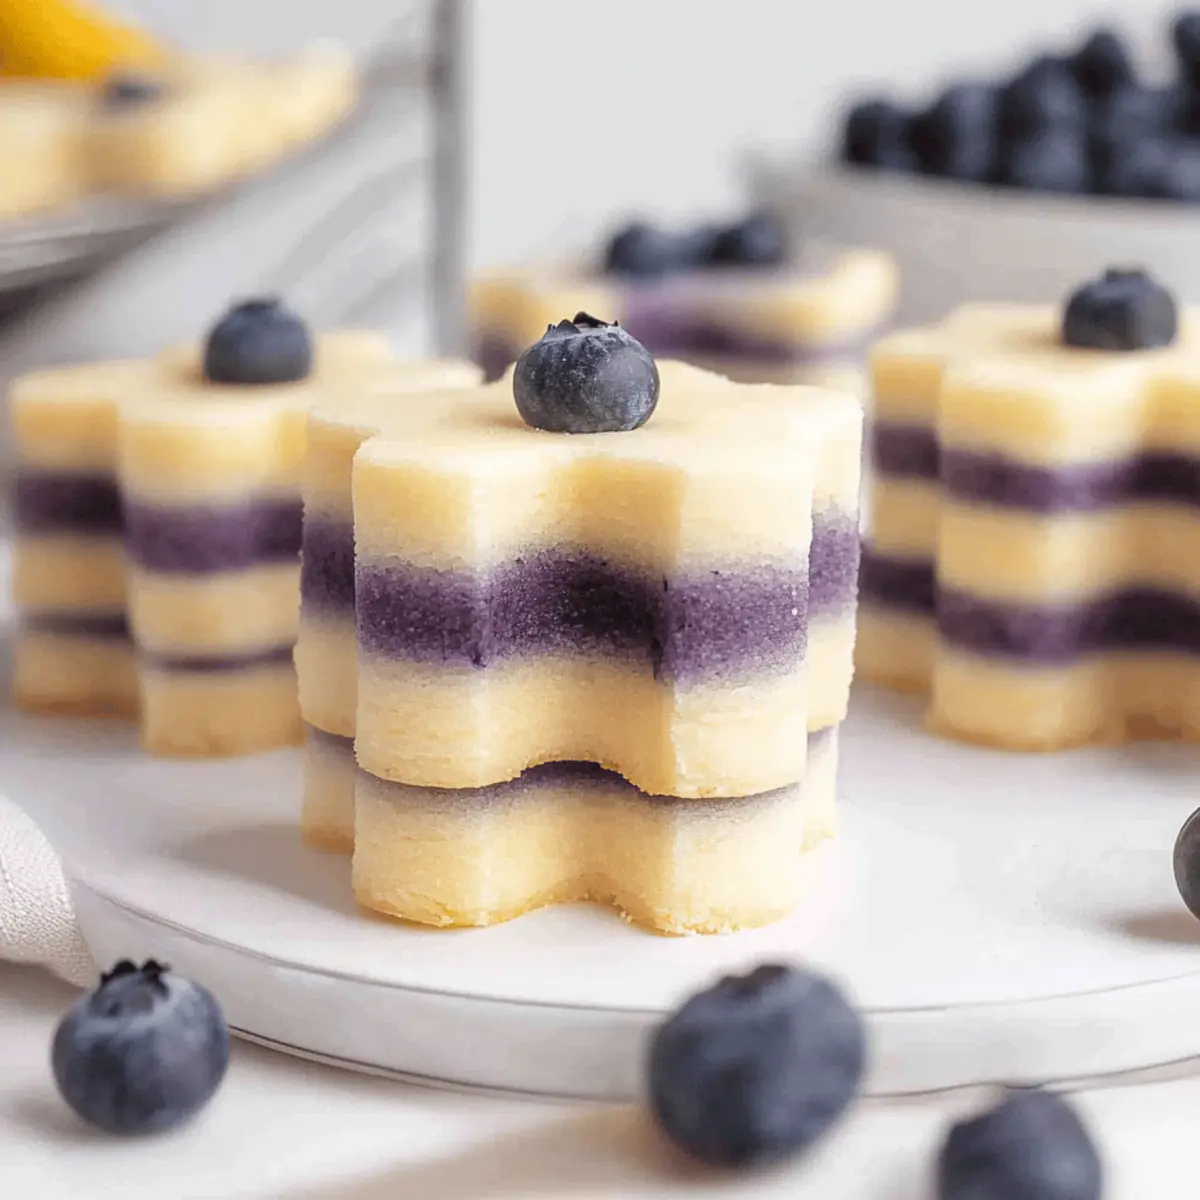
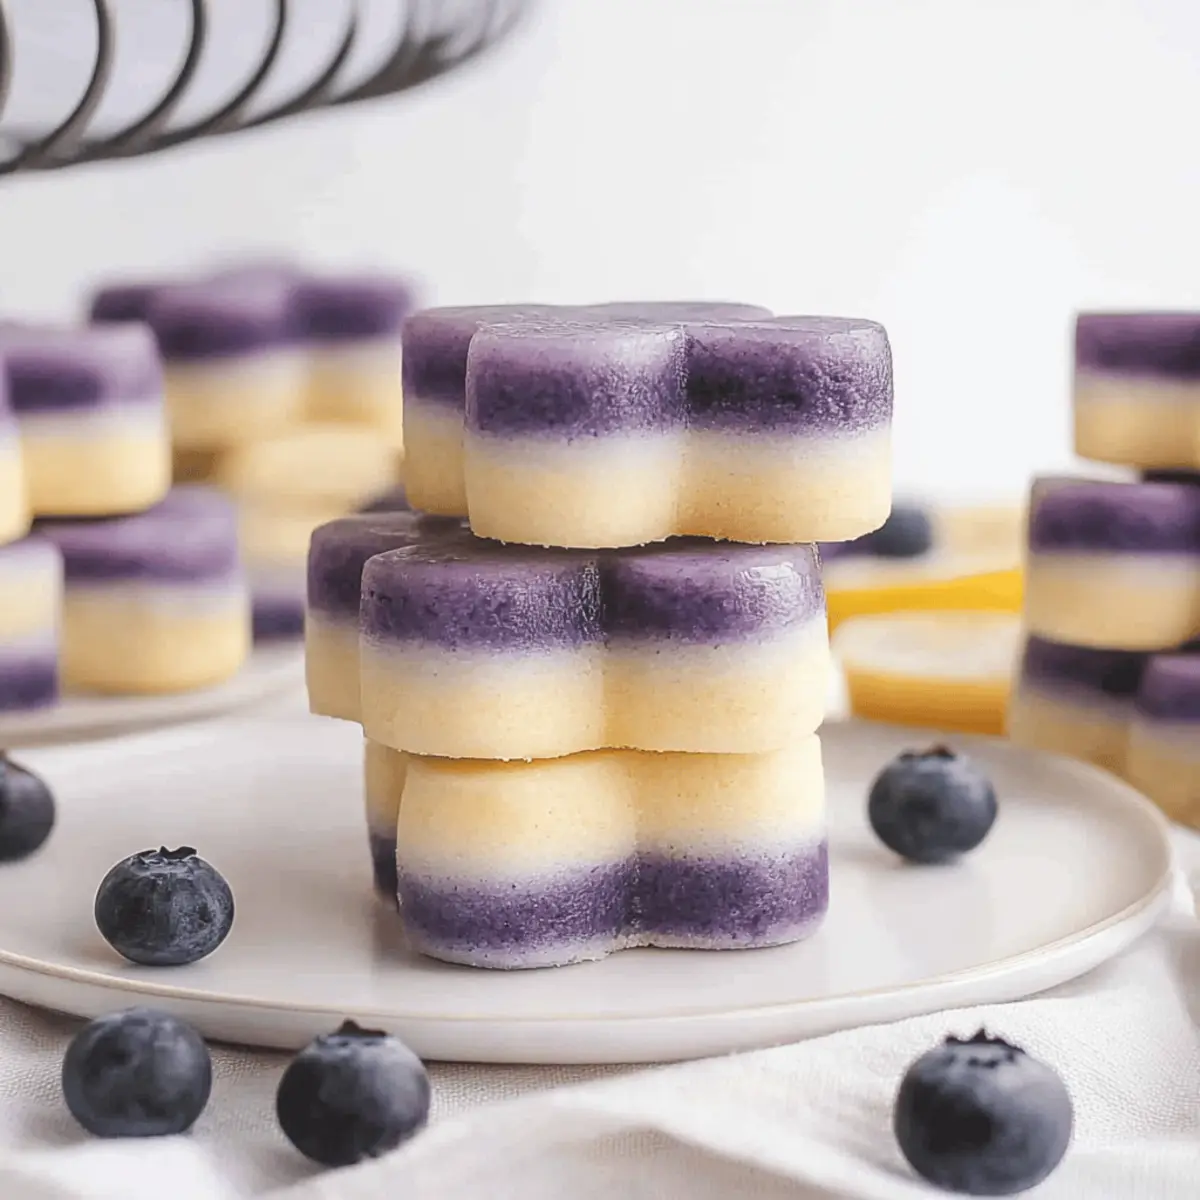
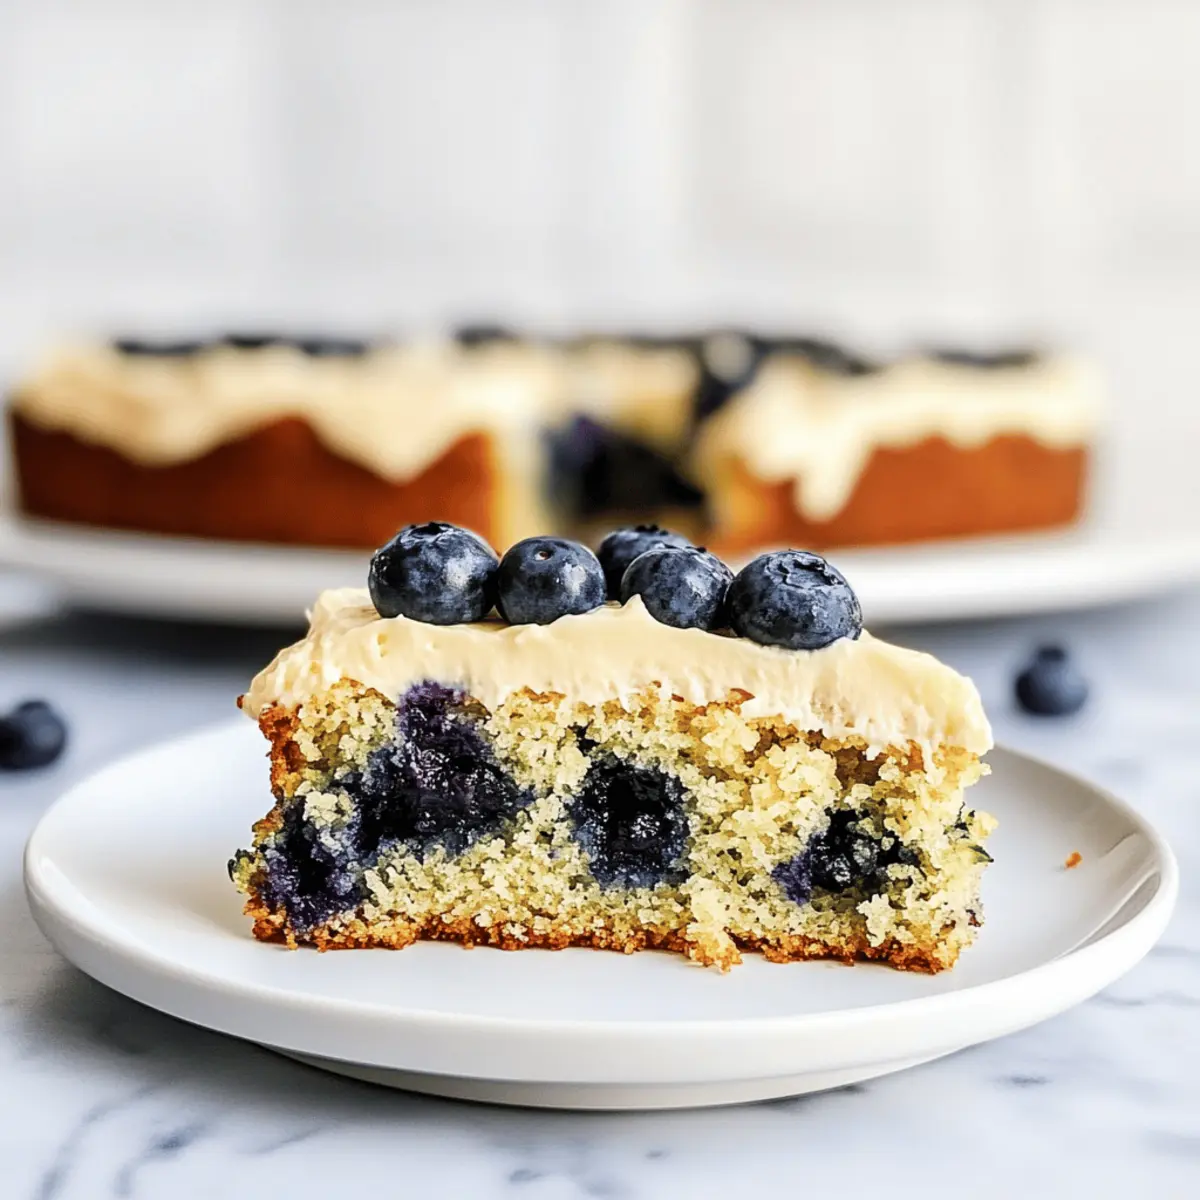
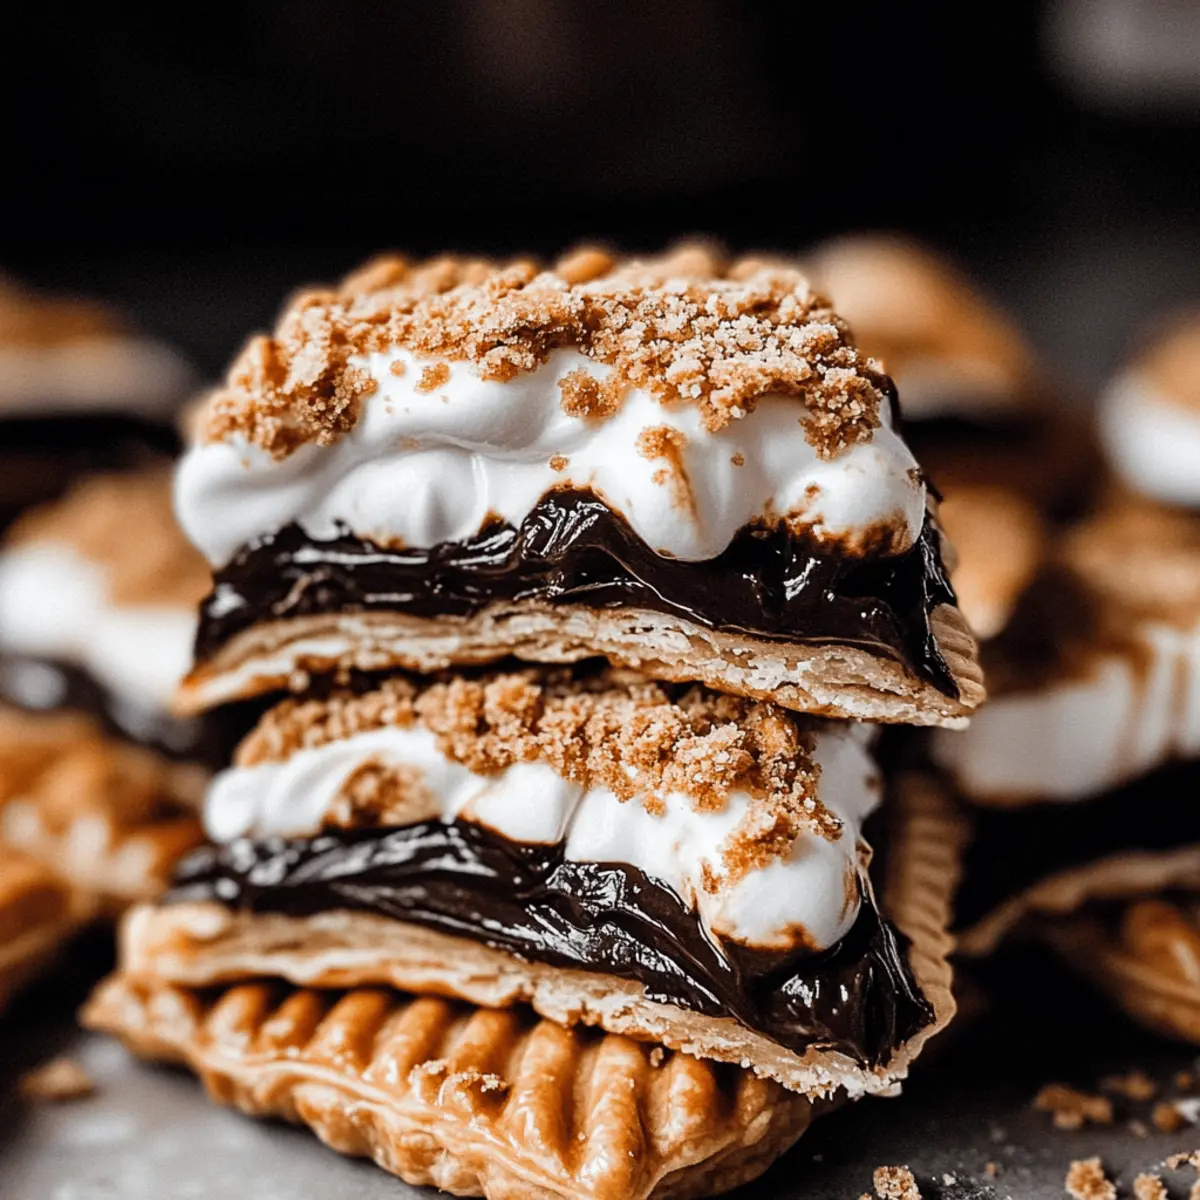
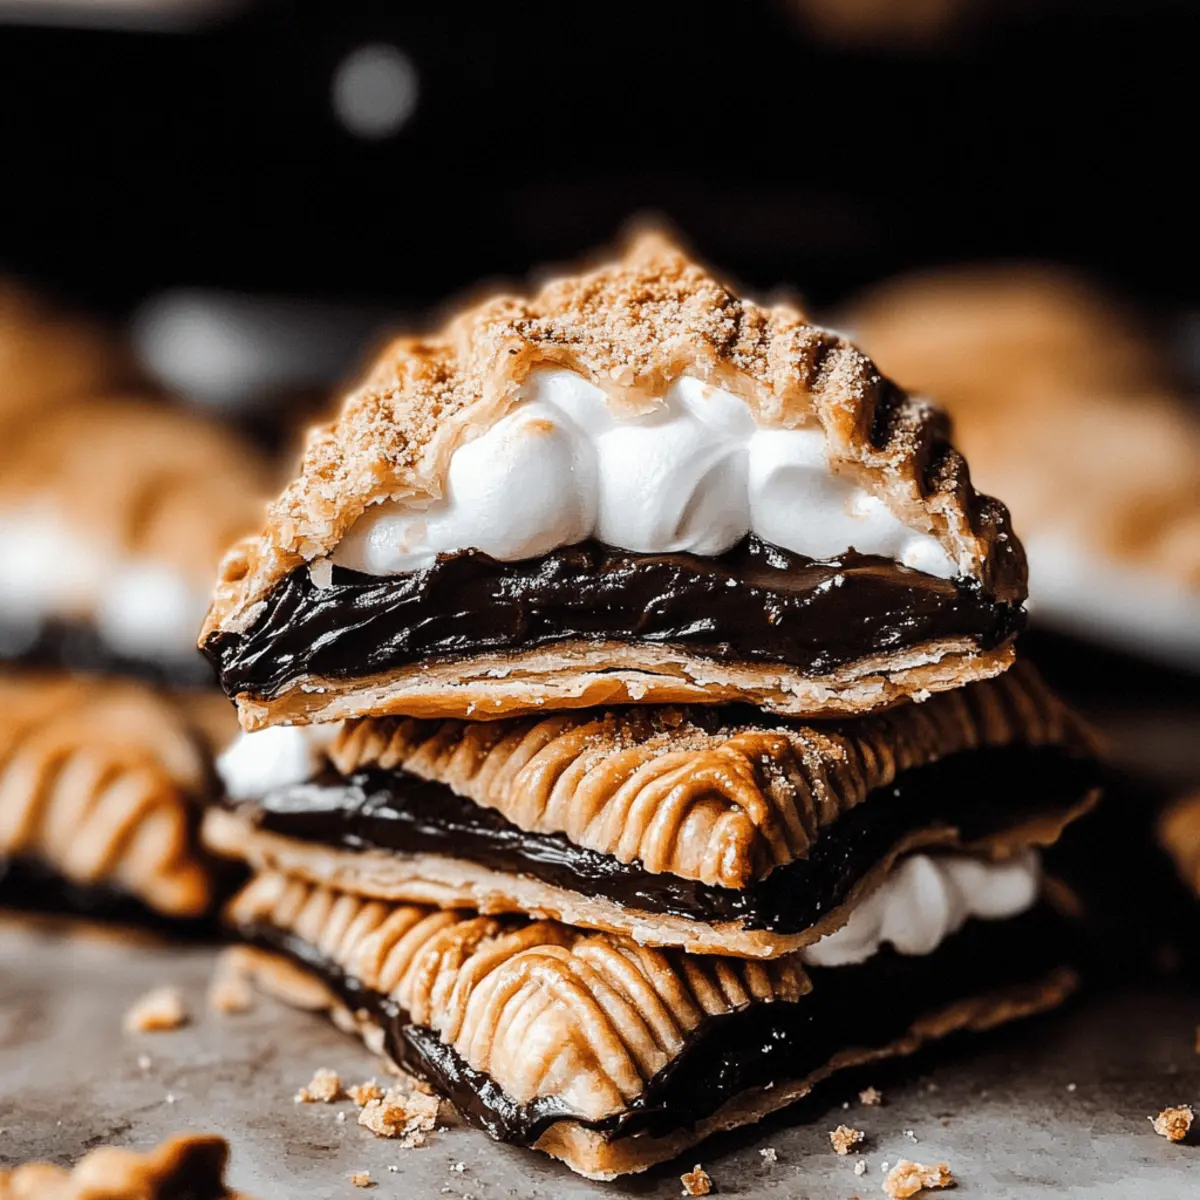
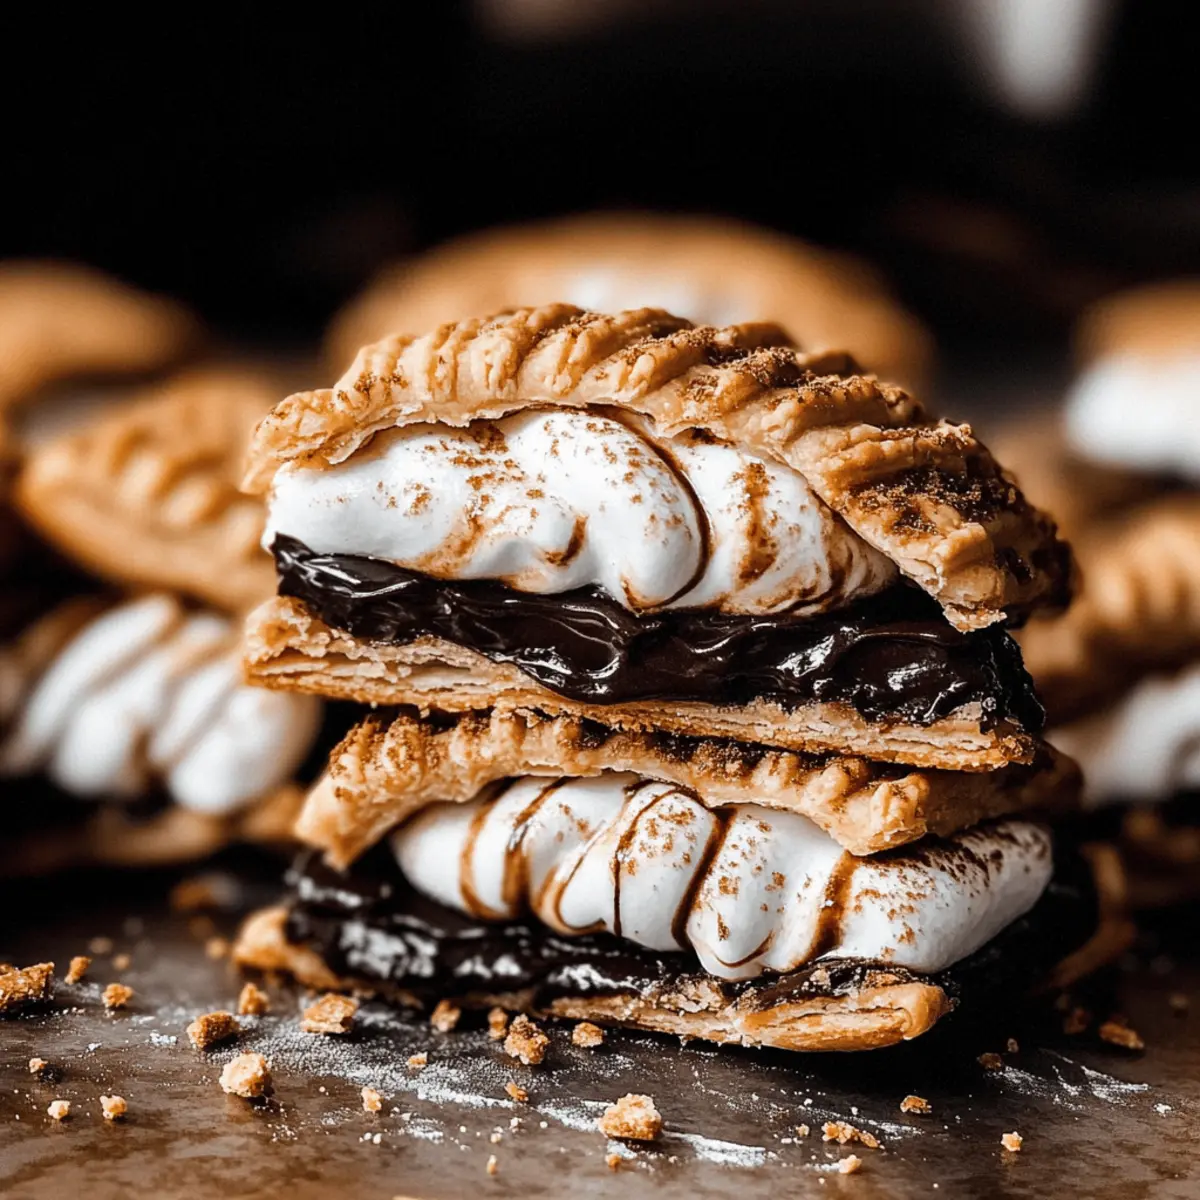
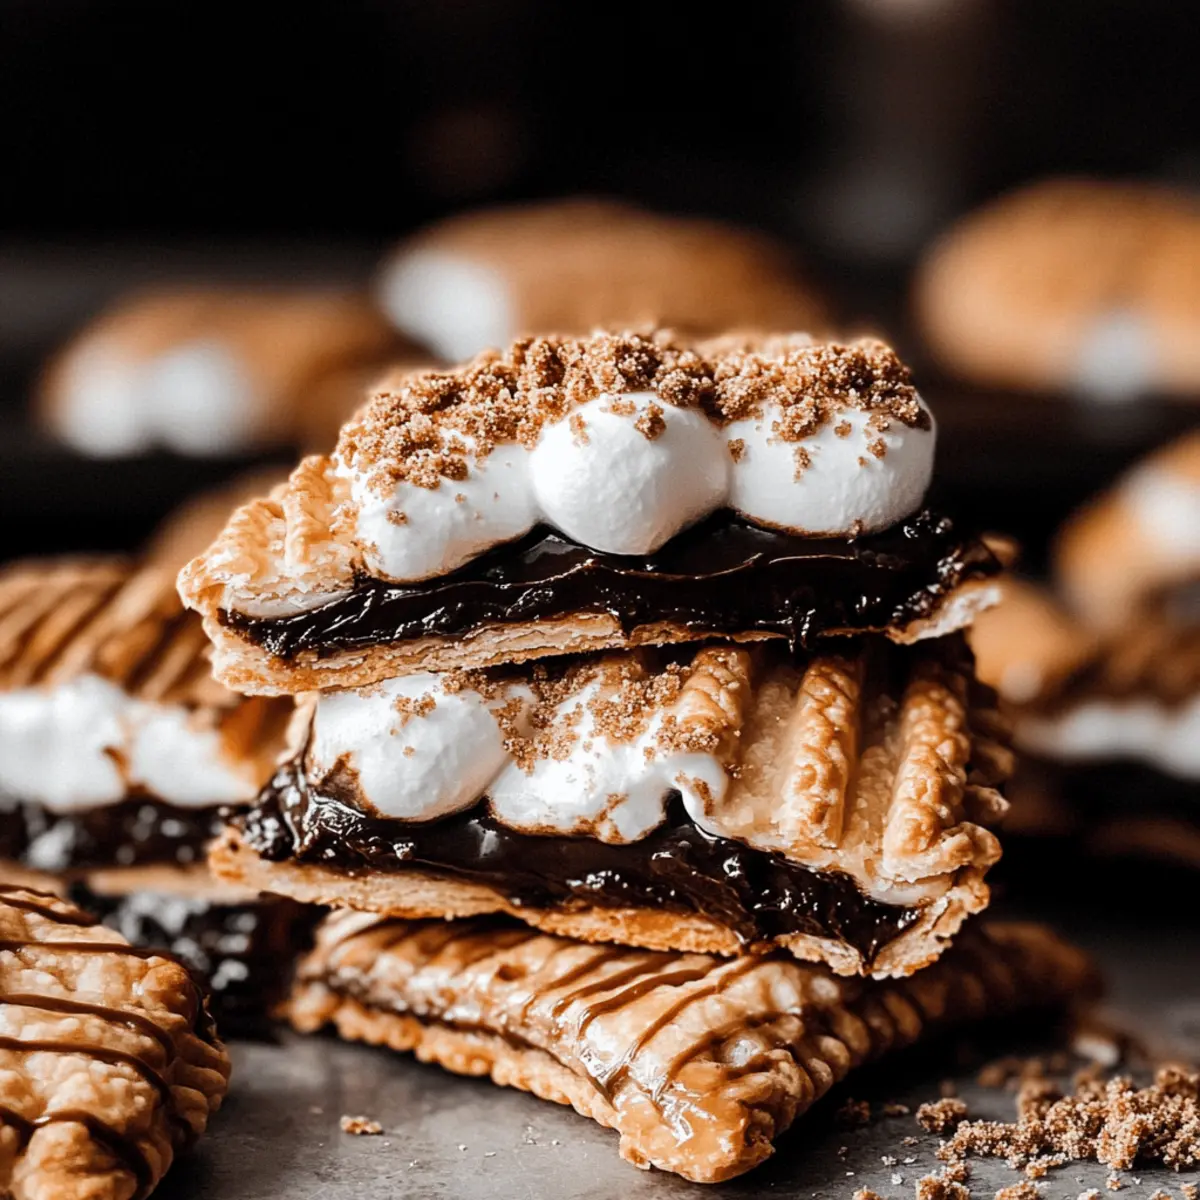
The scent of toasted marshmallows mingled with rich chocolate always takes me back to summer evenings around the campfire. Those cherished memories inspired me to create these Homemade S'mores Pop Tarts, a delightful twist on a classic that can be made right in your kitchen. With a flaky graham cracker crust encasing a gooey chocolate fudge filling, these tasty treats are not just easy to pull together—they're also a total crowd-pleaser! Whether you're enjoying them warm after school or surprising guests at your next brunch, they’ll satisfy any sweet tooth. Are you ready to discover how to capture that nostalgic flavor in a pop tart?

Why are these S'mores Pop Tarts a must-try?

Nostalgic Flavors: Enjoy the classic taste of summer s'mores in an easy-to-make pop tart.

Fabulous Homemade Touch: Experience the joy of creating your treat from scratch, making it even more special.

Versatile Dessert: Perfect as a cozy snack, a fun brunch addition, or even a sweet surprise for guests.

Quick Enjoyment: Bake and indulge in less than 30 minutes—who doesn't love fast, delicious desserts?

Endless Variations: Try swapping in dark chocolate or experimenting with flavored extracts for unique twists.

Don't forget to serve these delicacies warm with a glass of milk or hot cocoa, just like the classic campfire experience! If you're searching for more sweet treats to enjoy, check out our delightful Watermelon Popsicles Blissful for a refreshing spin!

S'mores Pop Tarts Ingredients

• Get ready to indulge in homemade goodness!

For the Crust

  • All-Purpose Flour – Provides structure to the dough; whole wheat flour can be used for a nuttier flavor.
  • Graham Cracker Crumbs – Adds that classic S'mores taste to the crust; consider using flavored crumbs for a twist.
  • Salted Butter – Offers richness; if using unsalted, just add a pinch of salt.
  • Ice Cold Water – Helps bind the dough; remember to keep it ice cold for the best texture.

For the Filling

  • Cocoa Powder – Contributes to the rich chocolate flavor; Dutch-processed cocoa will give a different taste.
  • Brown Sugar – Sweetens and adds depth; you can substitute with granulated sugar if needed.
  • Milk Chocolate Chips – Main source of chocolate in the filling; dark chocolate can be a richer alternative.
  • Milk – Adds a creamy texture; any milk variety can be used.

For the Marshmallow Cream

  • Egg Whites – Crucial for homemade marshmallow cream; ensure they are at room temperature for better volume.
  • Cream of Tartar – Stabilizes the egg whites; lemon juice works as a substitute.
  • Vanilla Bean Paste/Extract – Enhances the flavor; regular vanilla extract is an excellent alternative.

For the Topping

  • Granulated Sugar – Adds a sweet crunch to the finished pop tarts.
  • Extra Graham Cracker Crumbs – Perfect for decoration, adding extra crunch on top.

Prepare to enjoy the delightful flavors of your homemade S'mores Pop Tarts, crafted fresh and full of nostalgia!

Step‑by‑Step Instructions for Homemade S'mores Pop Tarts

Step 1: Make the Pie Dough
Begin by mixing together 2 cups of all-purpose flour and a pinch of salt in a large bowl. Then, cut in 1 cup of cold, salted butter until the mixture resembles coarse crumbs. Gradually add in ice cold water, about 5 tablespoons, until the dough comes together. Chill the dough in the refrigerator for at least 3 hours to ensure a flaky texture.

Step 2: Prepare Chocolate Fudge Filling
In a medium saucepan over medium heat, combine 1 cup of milk chocolate chips, ¼ cup of milk, ¼ cup of cocoa powder, a pinch of salt, and 1 teaspoon of vanilla extract. Stir continuously until the mixture thickens, usually about 4-5 minutes. Once thickened, remove from heat, stir in 2 tablespoons of butter until melted, and let it cool while you roll out the dough.

Step 3: Roll & Cut Dough
Once the dough is chilled, lightly flour your countertop and roll out the dough to about ¼ inch thick. Use a ruler and a sharp knife or pizza cutter to cut the dough into rectangles measuring approximately 3x4.5 inches. Place the cut pieces onto a parchment-lined baking sheet and chill them again for about 15 minutes to maintain their shape during baking.

Step 4: Assemble & Bake
Preheat your oven to 375°F (190°C). Take half of the dough rectangles and spread about 1 tablespoon of the chocolate fudge filling on the center of each. Brush the edges with an egg wash (1 beaten egg) and top with the remaining rectangles, sealing the edges by pressing down firmly. Crimp the edges with a fork, puncture a few holes in the top, and bake for 19-24 minutes until golden brown.

Step 5: Make Marshmallow Cream
While the S'mores pop tarts bake, prepare the homemade marshmallow cream. In a heatproof bowl, beat together 3 egg whites and ¾ cup of granulated sugar with cream of tartar over simmering water. Whisk continuously until sugar dissolves, then transfer to a stand mixer and beat on high until glossy peaks form. Finally, add 1 teaspoon of vanilla and mix until just combined.
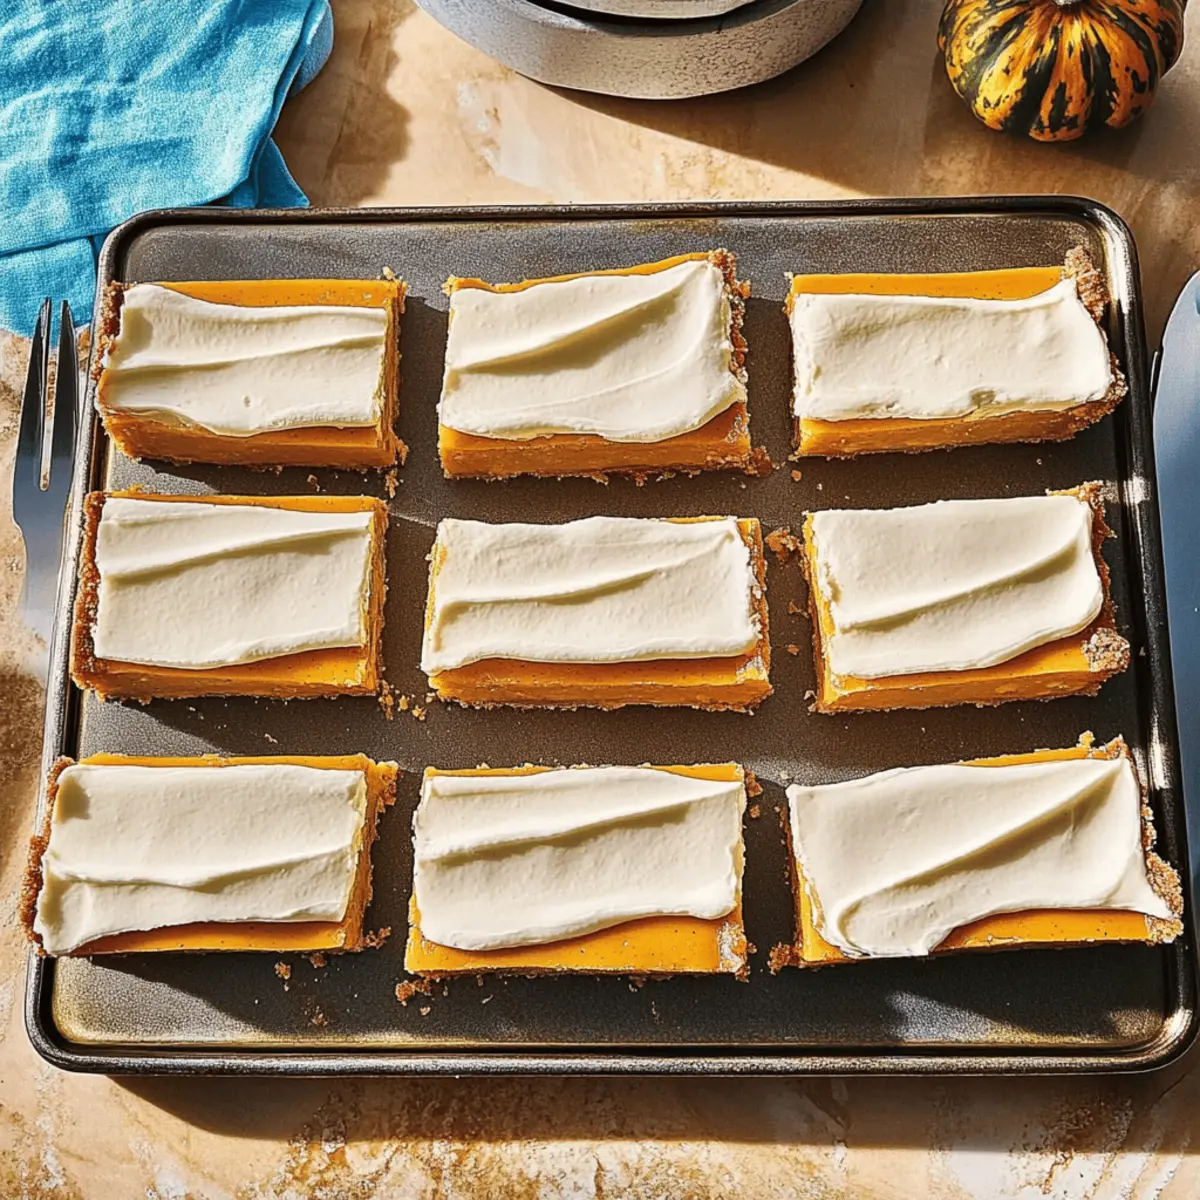
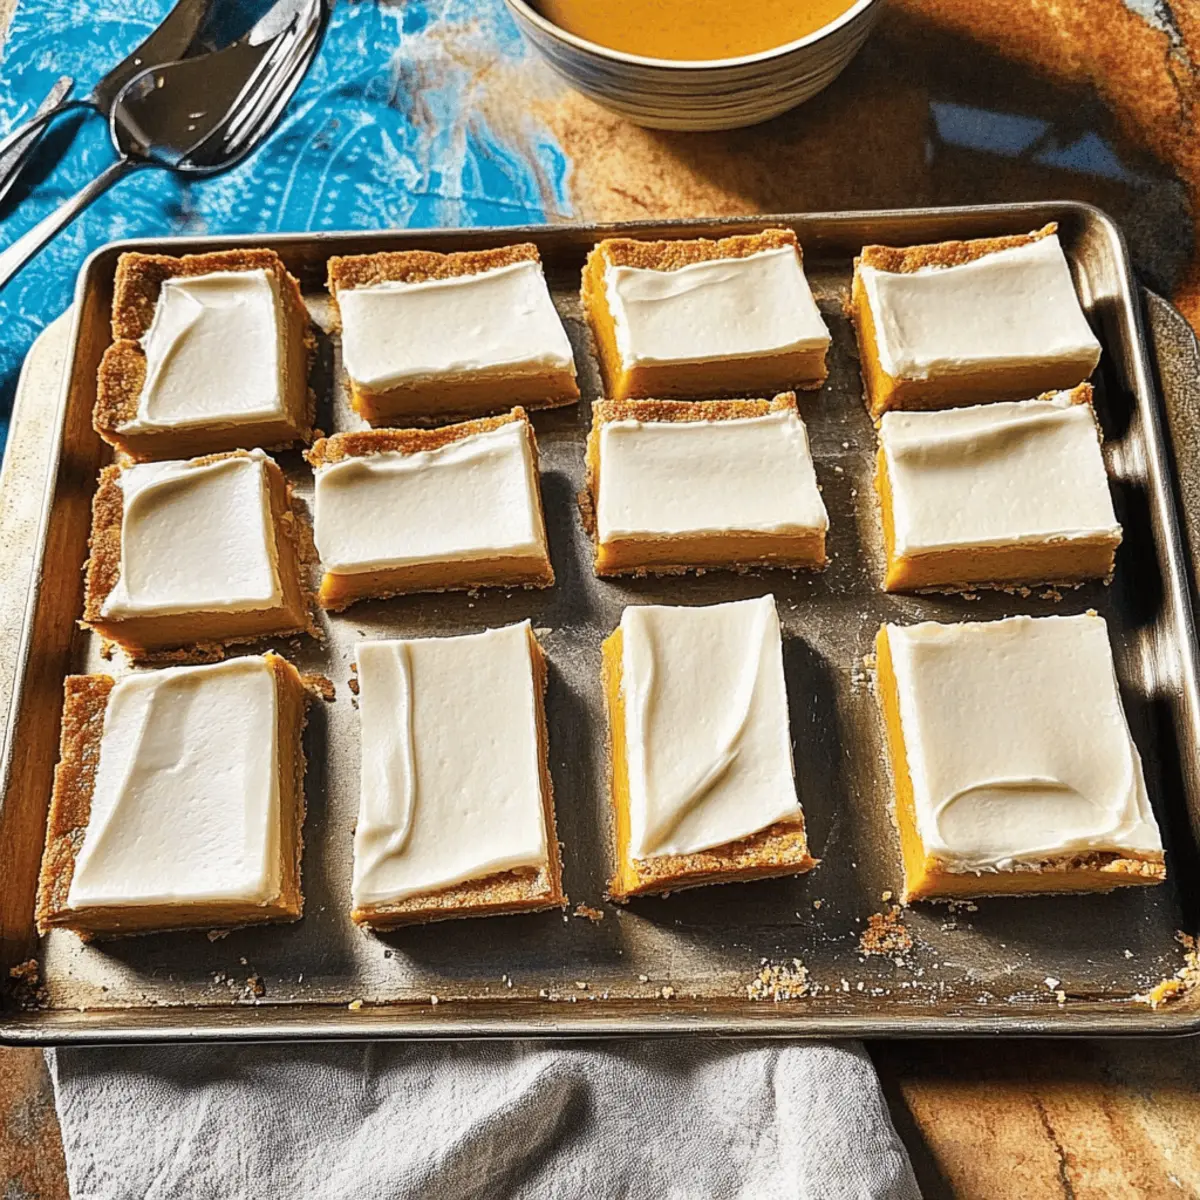
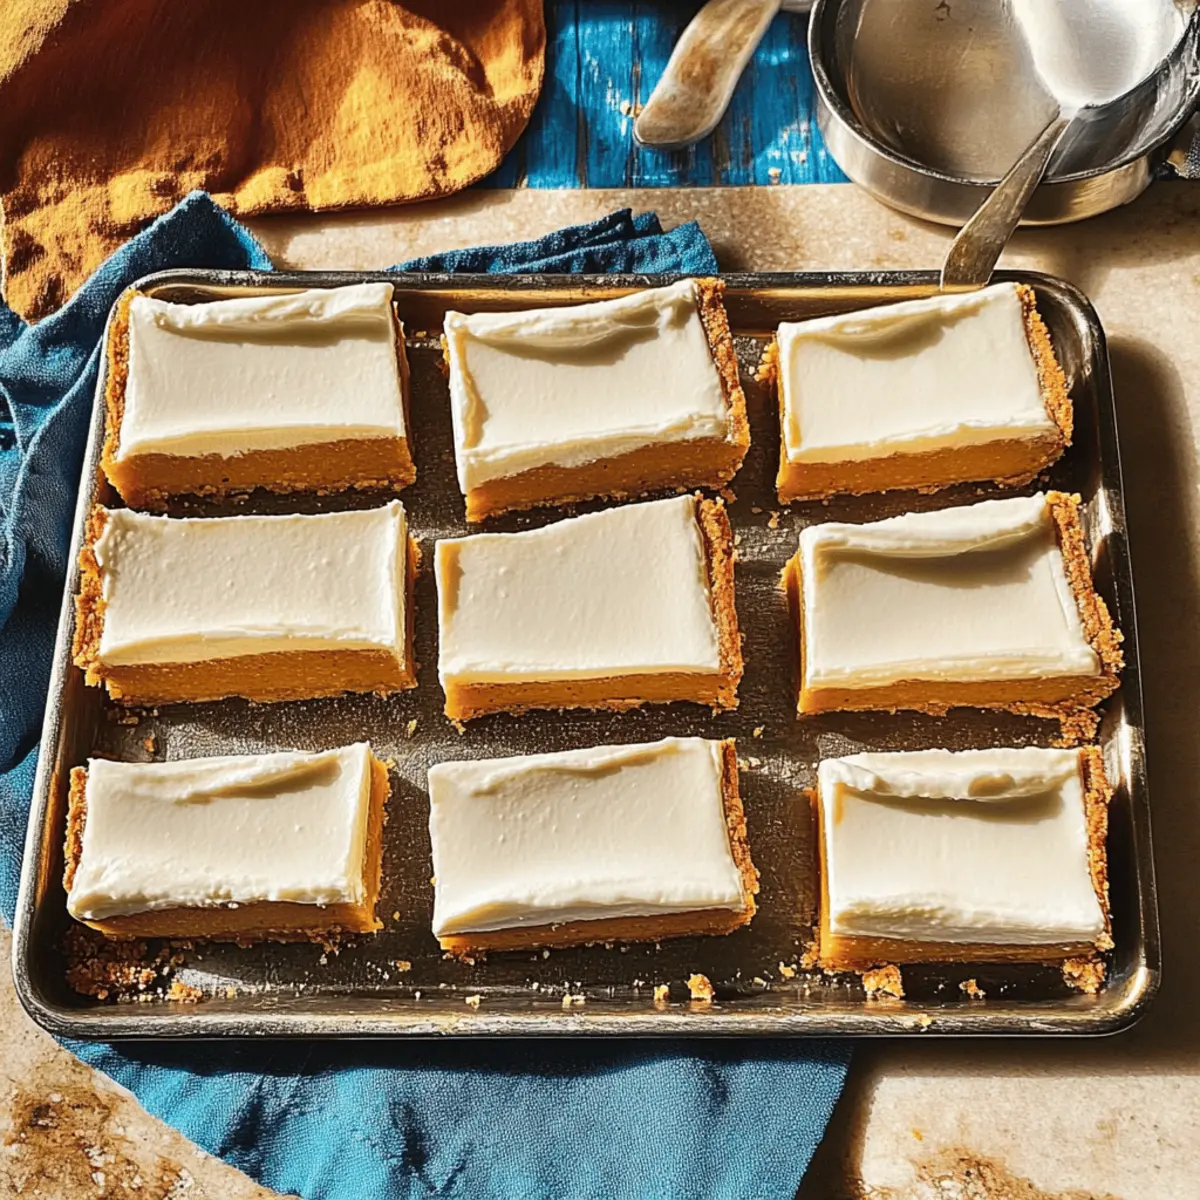
Step 6: Decorate
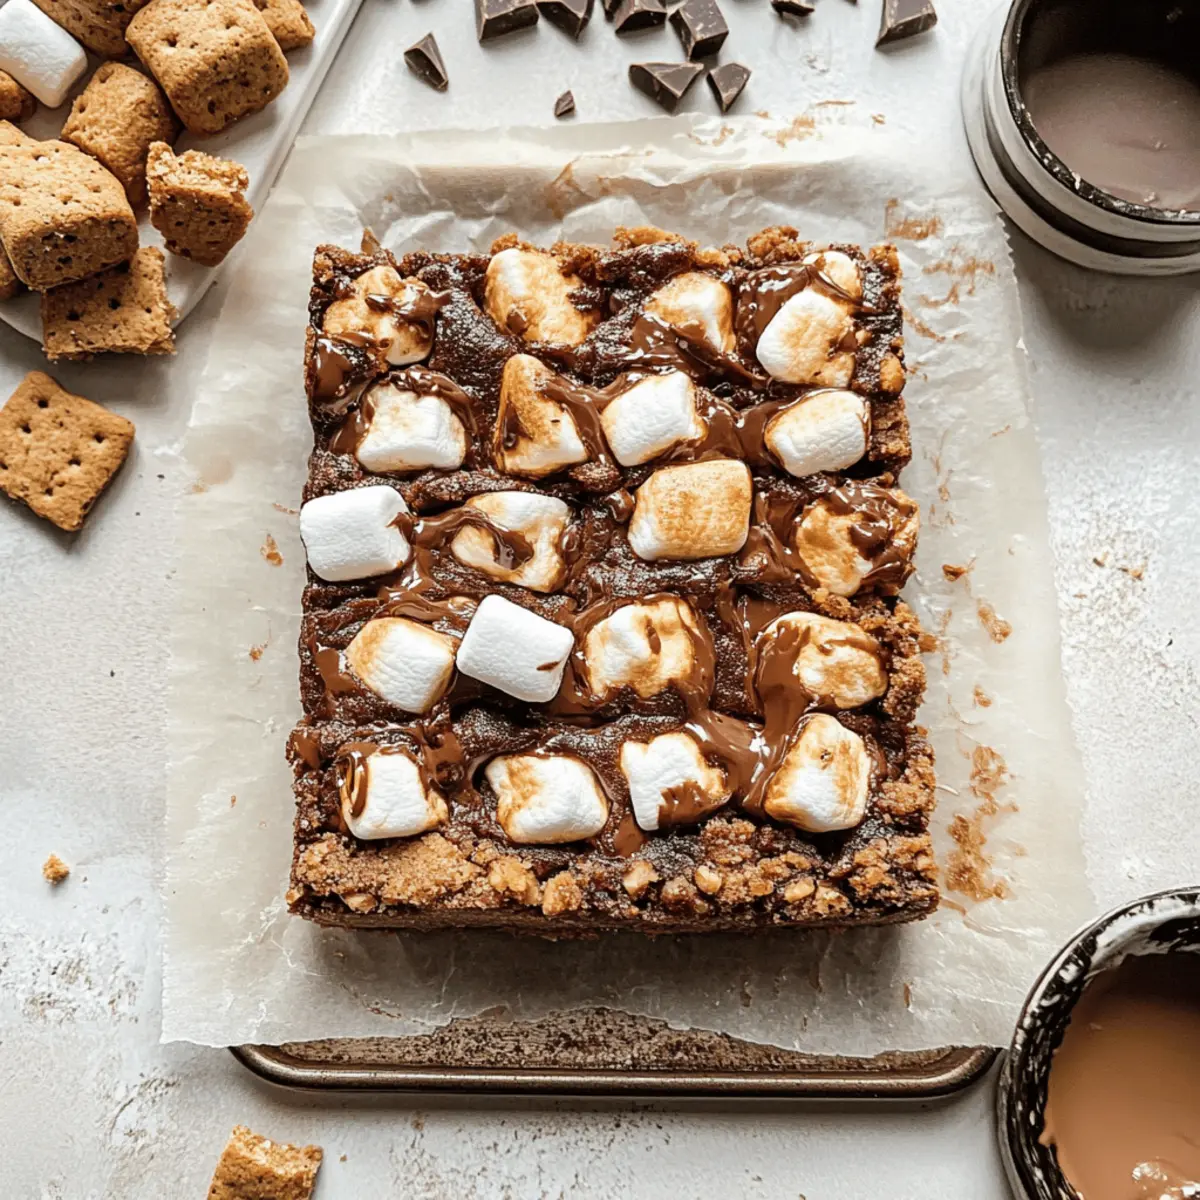
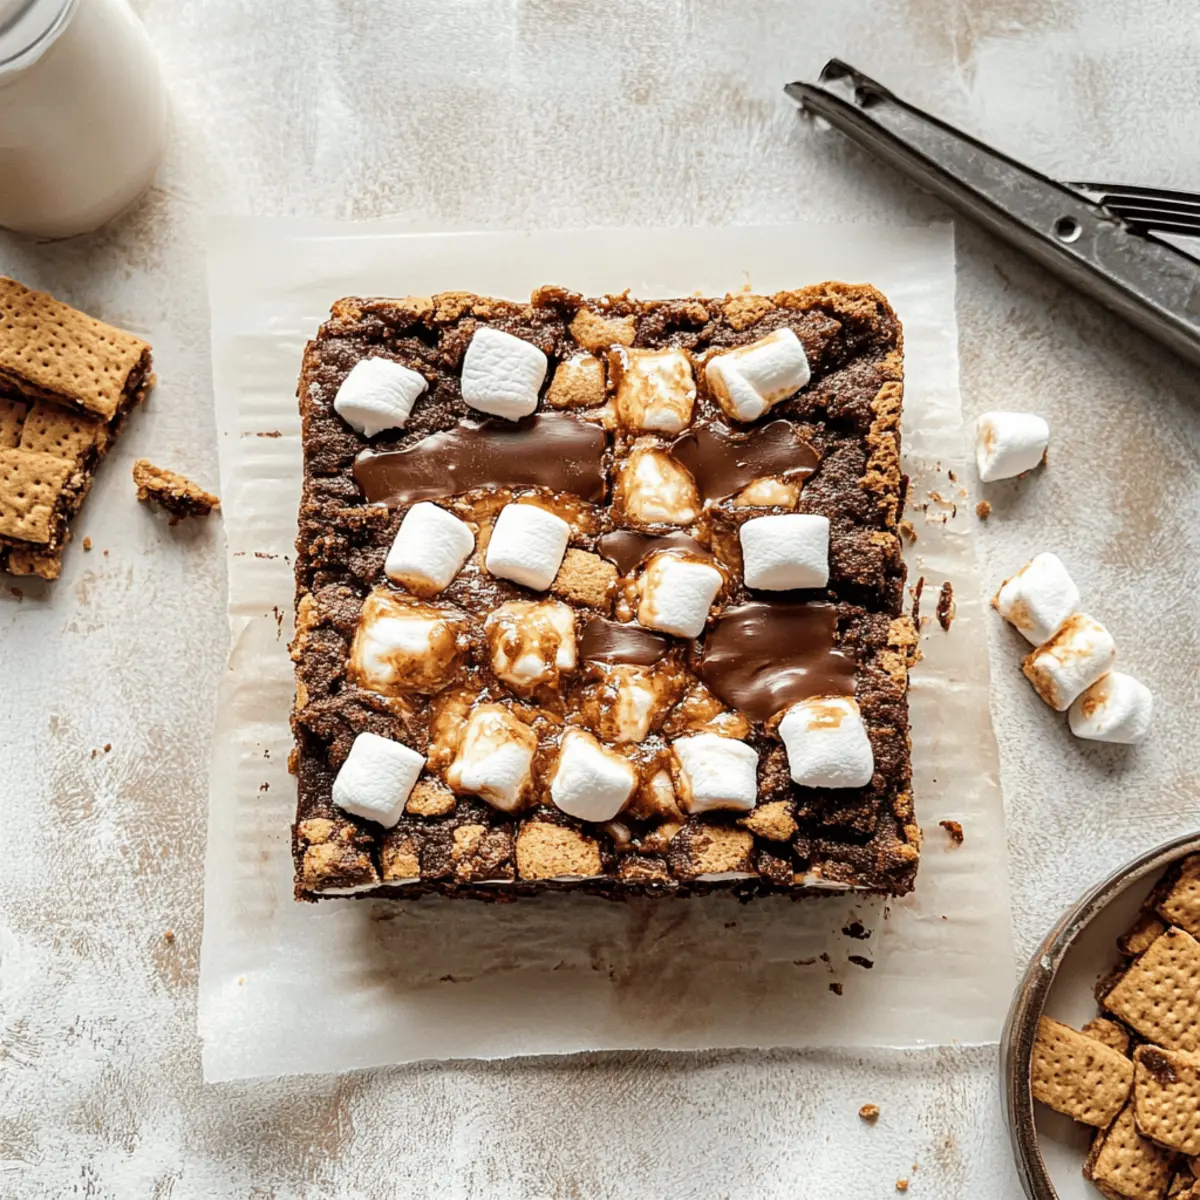
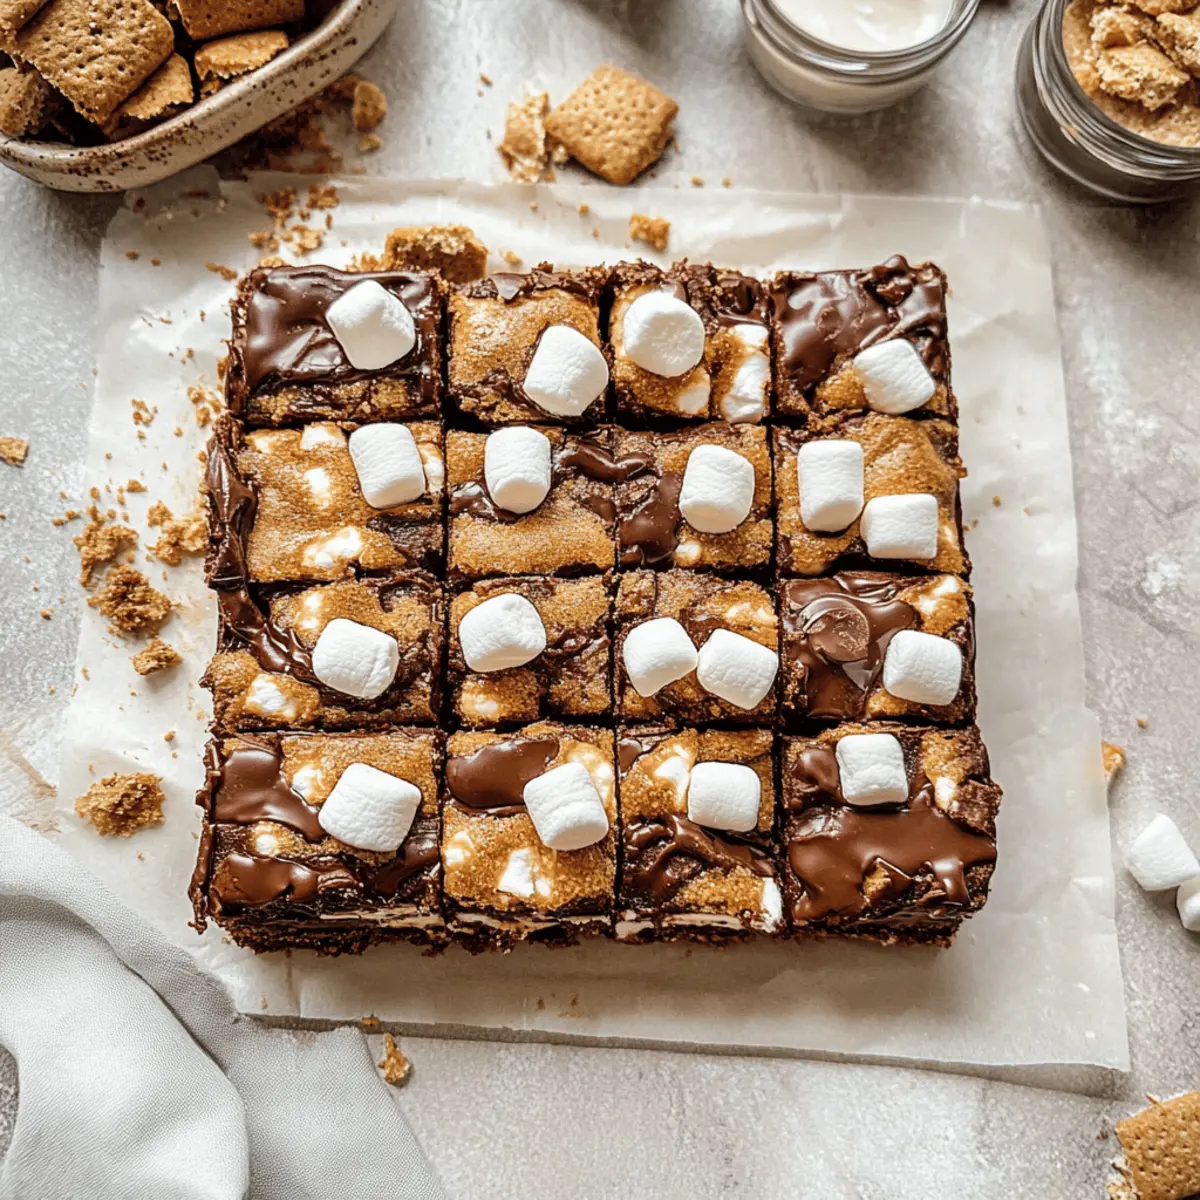
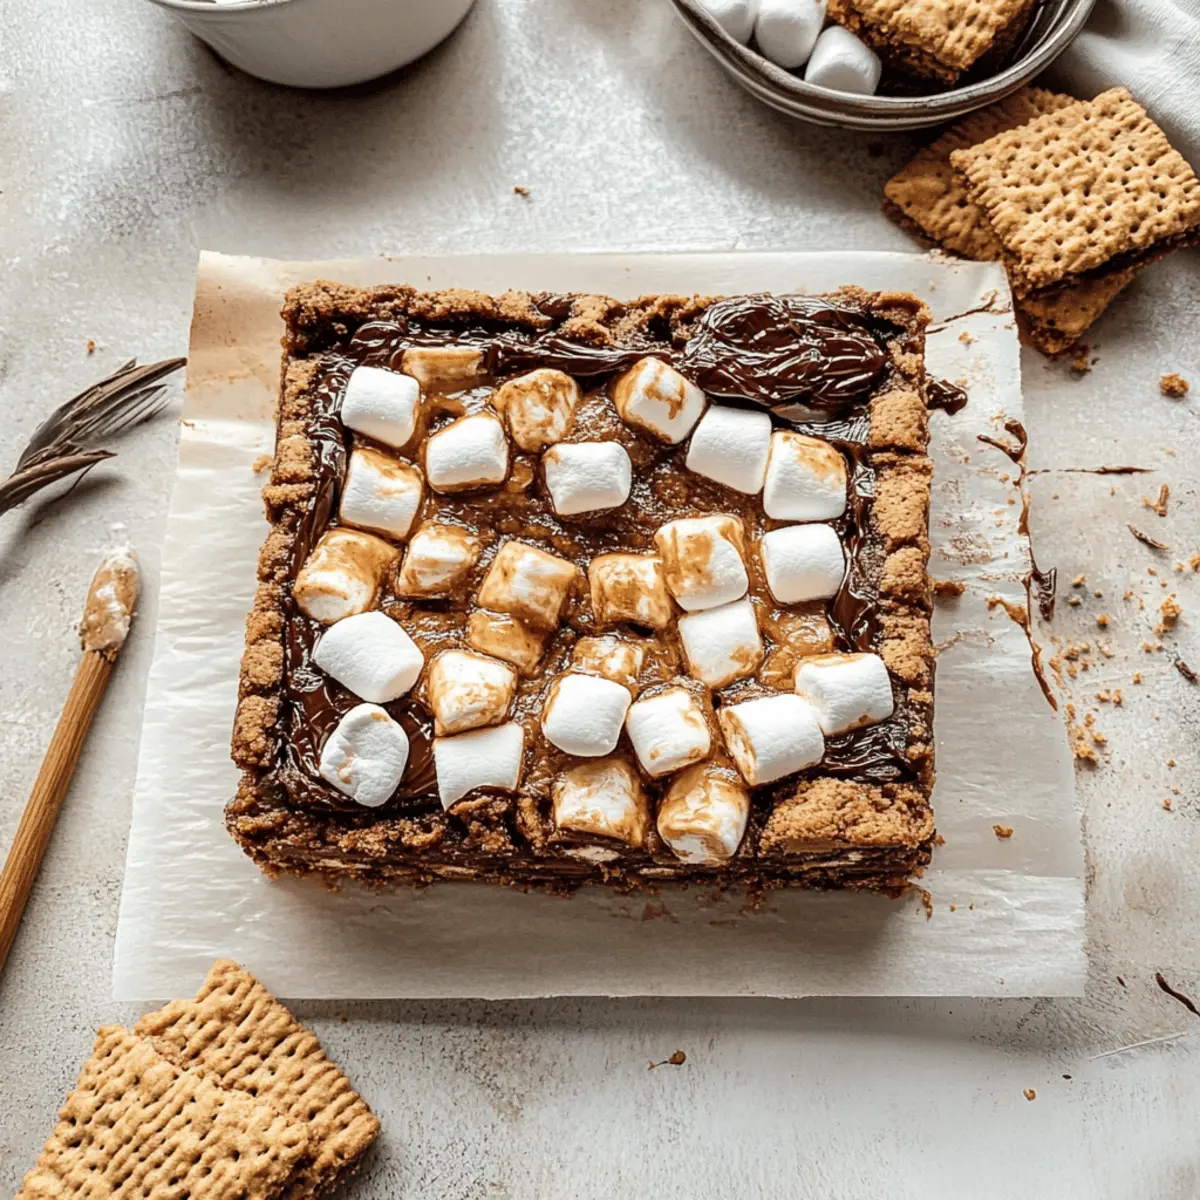
Once the pop tarts have cooled completely, spread a thin layer of reserved chocolate fudge filling on top. Pipe the homemade marshmallow cream onto each pop tart generously, ensuring every corner is covered. For the finishing touch, briefly toast the marshmallow with a kitchen torch until golden, and sprinkle extra graham cracker crumbs on top for added crunch.

How to Store and Freeze S'mores Pop Tarts

Airtight Container: Store baked S'mores Pop Tarts in an airtight container at room temperature for up to 2 days to retain their crispiness.

Fridge: If you need extra storage time, keep them in the fridge for up to 3 days, wrapped individually to prevent them from becoming soggy.

Freezing: You can freeze unbaked pop tarts, wrapped tightly in plastic wrap, for up to 2 months. Bake from frozen without thawing, adding a few extra minutes to the baking time.

Reheating: When ready to enjoy, reheat in a toaster oven or conventional oven at 350°F (175°C) for about 5-7 minutes for that fresh-out-of-the-oven taste!

Make Ahead Options

These S'mores Pop Tarts are a fantastic option for meal prep, allowing you to savor their nostalgic flavors even on your busiest days! You can prepare the pie dough and chocolate fudge filling up to 24 hours in advance. Just make sure to refrigerate the dough wrapped in plastic to keep it fresh and flaky. When you're ready to serve, roll out the dough, assemble the pop tarts with the prepared filling, and bake them as directed. For optimal taste, whip up the marshmallow cream just before decorating the baked tarts. This way, the marshmallow will stay fluffy and delightful, ensuring that your homemade S'Mores Pop Tarts are just as delicious as if they were made fresh!

Expert Tips for S'mores Pop Tarts

  • Chill Your Dough: Ensure your dough is well-chilled before rolling it out. A cold dough helps keep the pop tarts flaky and prevents melting butter during baking.

  • Watch Your Filling: Monitor the chocolate fudge filling closely to avoid burning. Stir frequently until it reaches the desired thickness for the perfect gooey center.

  • Seal Edges Well: Press down firmly on the edges when sealing the pop tarts. Well-sealed edges will keep the delicious filling from leaking during baking.

  • Careful with the Torch: When toasting the marshmallow cream, use your kitchen torch cautiously. A few seconds is often all you need for that perfect golden color!

  • Experiment with Variations: Don’t be afraid to customize your s'mores pop tarts by trying different flavored extracts or chocolates—each addition can enhance this beloved treat!

S'mores Pop Tarts Variations & Substitutions

Get ready to personalize these delightful pop tarts and add your own tasty twist!

  • Dark Chocolate: Swap milk chocolate chips with dark chocolate for a richer, more decadent flavor that elevates each bite.
  • Nut Butter: Spread a thin layer of almond or peanut butter before adding the fudge filling for a nutty crunch.
  • Flavored Extracts: Experiment with different extracts, like almond or coconut, in the marshmallow cream for an unexpected flavor profile.
  • Mini Versions: Create bite-sized pop tarts by cutting the dough into smaller rectangles—perfect for snacks or a playful brunch!
  • Fruit Addition: Incorporate diced strawberries or banana slices in the filling for a fruity surprise that complements the chocolate.
  • Spicy Kick: Add a pinch of cayenne pepper or cinnamon to the fudge filling for a warm, spicy contrast to the sweetness.
  • Graham Cracker Variations: Use chocolate or honey-flavored graham cracker crumbs for a fun flavor twist in the crust.
  • Toasted Coconut: Sprinkle shredded coconut on the marshmallow cream before toasting to add a tropical twist.

Feeling inspired? If you love cool treats too, be sure to check out our refreshing Watermelon Popsicles Blissful for something equally delightful!

What to Serve with Homemade S'mores Pop Tarts

Delight in a full meal experience that elegantly complements the gooey sweetness of these nostalgic treats.

  • Creamy Vanilla Ice Cream: A scoop of vanilla ice cream provides a cool contrast to the warmth of the pop tarts, enhancing their flavors beautifully.
  • Fresh Berries Medley: Juicy strawberries, raspberries, and blueberries bring a touch of tartness, balancing the sweetness while adding a refreshing burst of flavor.
  • Rich Hot Cocoa: Indulge in a cozy cup of hot cocoa, its velvety richness harmonizing with the chocolaty filling and providing warmth for a snug dessert evening.
  • Classic Milk: A tall glass of cold milk is the perfect pairing, offering a nostalgic comfort that beautifully complements the sweet, chocolatey flavors of the pop tarts.
  • Toasted Coconut Flakes: Add a sprinkle of toasted coconut on top for a tropical twist, bringing an extra crunch and a hint of sweetness that elevates your experience.
  • Honey-Dipped Bananas: Slice fresh bananas and drizzle them with honey for a wholesome side that adds a creamy texture and natural sweetness alongside the pop tarts.
  • Nutty Granola: Serve with a small bowl of nutty granola for a crunchy texture that contrasts with the soft filling while lending a touch of earthiness to the meal.
  • Whipped Cream: A dollop of homemade whipped cream on the side amps up the indulgence and adds a light, airy touch perfect for balancing the rich flavors.
  • Decadent Chocolate Drizzle: Elevate the pop tarts with an extra drizzle of melted chocolate on top, enhancing the dessert's presentation and deepening the chocolate experience.
  • Sparkling Water with Lime: For a refreshing drink, pair with sparkling water infused with lime for a zesty kick that cuts through the sweetness, making it a delightful finish.

S'mores Pop Tarts Recipe FAQs

How do I know if my ingredients are ripe or fresh?
Absolutely! When selecting your ingredients, particularly for the butter and marshmallow cream, ensure the butter is cold but still pliable. For optimal marshmallow cream, use room-temperature egg whites; they whisk up fluffier. As for chocolate chips, go for the freshest bag possible—avoid those with dull appearances or signs of sugar bloom.

How should I store my S'mores Pop Tarts?
To keep your S'mores Pop Tarts crispy and delicious, store them in an airtight container at room temperature for up to 2 days. If you prefer a longer shelf life, wrap them individually in plastic wrap and place them in the fridge for up to 3 days, which can help retain moisture without making them soggy.

Can I freeze these S'mores Pop Tarts?
Yes, you can easily freeze unbaked S'mores Pop Tarts! Wrap them tightly in plastic wrap, then place them in a freezer-safe bag. They can be frozen for up to 2 months. When you're ready to bake, simply take them out and bake from frozen; just add an additional 2-5 minutes to the baking time to ensure they cook through.

What if my pop tarts are leaking filling while baking?
Very! If your S'mores Pop Tarts are leaking filling, it likely means the edges weren't sealed properly or they were overfilled. To prevent this next time, make sure to press firmly when sealing the edges and use about 1 tablespoon of filling per tart. You can also crimp the edges better or use a fork to ensure a tight seal.

Are there dietary considerations for the ingredients?
Absolutely! If you're concerned about allergies, remember that this recipe contains dairy, eggs, and gluten. For a dairy-free version, swap the butter with a plant-based alternative and use dairy-free chocolate chips. Additionally, ensure that your graham cracker crumbs are gluten-free if needed, and substitute egg with a flaxseed egg for an egg-free option.

What if I can't find graham cracker crumbs?
No problem at all! If you're unable to find graham cracker crumbs, you can make your own by blending regular crackers or cookies that are similar in flavor until they resemble fine crumbs. Alternatively, crushed vanilla wafers or digestive biscuits work wonderfully as substitutes and can add a delightful twist to the flavor.

s’mores pop tarts

Homemade S'mores Pop Tarts That Bring Back Sweet Memories

These homemade s’mores pop tarts capture the nostalgic flavors of summer s'mores with a delightful twist.
Print Recipe Pin Recipe
Prep Time 1 hour hr
Cook Time 20 minutes mins
Chilling Time 3 hours hrs
Total Time 4 hours hrs 20 minutes mins
Servings: 8 tarts
Course: Dessert
Cuisine: American
Calories: 250
Ingredients Equipment Method Nutrition Notes

Ingredients
  

For the Crust
  • 2 cups all-purpose flour whole wheat flour can be used for a nuttier flavor
  • 1 cup salted butter if using unsalted, just add a pinch of salt
  • 5 tablespoons ice cold water keep it ice cold for the best texture
  • graham cracker crumbs adds classic S'mores taste to the crust
For the Filling
  • 1 cup milk chocolate chips dark chocolate can be used for a richer alternative
  • ¼ cup milk any milk variety can be used
  • ¼ cup cocoa powder Dutch-processed cocoa will give a different taste
  • 1 pinch salt
For the Marshmallow Cream
  • 3 large egg whites ensure they are at room temperature for better volume
  • ¾ cup granulated sugar
  • 1 teaspoon cream of tartar lemon juice works as a substitute
  • 1 teaspoon vanilla bean paste/extract regular vanilla extract is an excellent alternative
For the Topping
  • 1 tablespoon granulated sugar adds a sweet crunch
  • extra graham cracker crumbs for decoration

Equipment

  • large bowl
  • Medium saucepan
  • sharp knife or pizza cutter
  • Baking Sheet
  • Stand Mixer

Method
 

Step-by-Step Instructions
  1. Mix together 2 cups of all-purpose flour and a pinch of salt in a large bowl. Cut in 1 cup of cold, salted butter until it resembles coarse crumbs. Gradually add 5 tablespoons of ice cold water until the dough comes together. Chill for at least 3 hours.
  2. In a medium saucepan, combine 1 cup of milk chocolate chips, ¼ cup of milk, ¼ cup of cocoa powder, a pinch of salt, and 1 teaspoon of vanilla extract. Stir continuously until thickened, about 4-5 minutes. Remove from heat, stir in 2 tablespoons of butter until melted, and let cool.
  3. Roll out the chilled dough to about ¼ inch thick and cut into rectangles measuring 3x4.5 inches. Place on a parchment-lined baking sheet and chill again for 15 minutes.
  4. Preheat the oven to 375°F (190°C). Take half the rectangles, spread 1 tablespoon of chocolate fudge filling on each, brush edges with an egg wash, seal with remaining rectangles, crimp edges, puncture holes, and bake for 19-24 minutes until golden brown.
  5. Prepare the marshmallow cream by beating 3 egg whites and ¾ cup of granulated sugar with cream of tartar over simmering water until dissolved. Transfer to a stand mixer and beat until glossy peaks form, then add 1 teaspoon of vanilla.
  6. Once cooled, spread reserved chocolate fudge filling on top, pipe marshmallow cream generously, toast lightly with a kitchen torch, and sprinkle extra graham cracker crumbs on top.

Nutrition

Serving: 1tartCalories: 250kcalCarbohydrates: 30gProtein: 3gFat: 13gSaturated Fat: 8gPolyunsaturated Fat: 1gMonounsaturated Fat: 3gCholesterol: 30mgSodium: 150mgPotassium: 100mgFiber: 1gSugar: 12gVitamin A: 200IUCalcium: 30mgIron: 1mg

Notes

Serve warm with a glass of milk or hot cocoa for the full experience. Customize with different flavored extracts or chocolates.

Tried this recipe?

Let us know how it was!

Lemon Blueberry Cookies: A Sweet Spring Delight to Share

September 16, 2025 by Grace Snow Leave a Comment

There’s something magical about the first bite of a warm, freshly baked cookie that transports you straight to springtime bliss. My Layered Lemon Blueberry Cookies effortlessly capture this essence with their vibrant hues and a delightful mix of sweet and tart. These heavenly homemade treats not only melt in your mouth with a buttery shortbread texture but also serve as a stunning centerpiece for any dessert table or afternoon tea gathering. Best of all, you’ll love that they’re easy to prepare and perfect for impressing friends and family. Who knew creating a show-stopping dessert could be so simple and rewarding? Ready to whisk together some sunshine in cookie form? Let’s dive in!

Why Are Lemon Blueberry Cookies Amazing?

Irresistible Flavor: The tangy lemon combined with juicy blueberries creates a perfect balance of sweetness and tartness that will leave your taste buds dancing.
Stunning Presentation: With their ombre layers, these cookies are not only delicious but also visually appealing, making them a showstopper for gatherings.
Easy to Make: Don’t worry if you’re a novice baker; the process is straightforward, allowing anyone to whip up these beauties with confidence.
Versatile Enjoyment: Perfect as afternoon treats, party snacks, or even a delightful gift, these cookies effortlessly adapt to any occasion.
Make-Ahead Option: The blueberry syrup can be prepared in advance, saving you time when you’re ready to bake.
Whether you’re craving a bit of homemade goodness or looking to impress, these Lemon Blueberry Cookies are sure to please!

Lemon Blueberry Cookies Ingredients

• Start your baking adventure with these Lemon Blueberry Cookies that are as delicious as they are beautiful!

For the Blueberry Syrup
• Blueberries – fresh or frozen, they provide natural sweetness and moisture; they can be made in advance and stored.
• Lemon Juice – brings a bright citrus flavor; freshly squeezed is recommended for the best result.
• Granulated Sugar – sweetens the syrup perfectly; consider adding a pinch of citric acid for extra zing.

For the Cookie Dough
• Unsalted Butter – at room temperature, this adds richness and structure to your cookies.
• Granulated Sugar – balances the cookies' tartness; can be partially substituted with brown sugar for a caramel note.
• Powdered Sugar – contributes to a tender texture; avoid substituting directly with granulated sugar.
• Egg – binds ingredients for a good structure; use only the yolk initially and save the white for assembly.
• Vanilla Extract – enhances the flavor profile; using pure vanilla will give the best results.
• Kosher Salt – balances the sweetness; regular salt works just as well.
• Lemon Zest – adds aromatic oils and extra citrusy notes; zest it fresh for maximum flavor.
• All-Purpose Flour – the main structural component; cake flour can be used for a lighter texture.

Creating these Lemon Blueberry Cookies will not only fill your kitchen with delightful aromas but also bring a splash of color to your dessert table! Happy baking!

Step‑by‑Step Instructions for Lemon Blueberry Cookies

Step 1: Prepare Blueberry Syrup
In a saucepan, combine blueberries, lemon juice, lemon zest, granulated sugar, and a pinch of citric acid. Bring the mixture to a boil over medium heat, stirring occasionally. Once boiling, reduce the heat and let it simmer for about 10 minutes until the blueberries break down. Blend the mixture until smooth, then strain it through a fine sieve to achieve a syrupy consistency. Set aside to cool.

Step 2: Make Cookie Dough
In a large mixing bowl, cream together the softened unsalted butter and powdered sugar until light and fluffy, about 3-4 minutes. Add the egg yolk, vanilla extract, kosher salt, and freshly squeezed lemon juice and zest, mixing until smooth. Gradually incorporate the all-purpose flour into the mixture until just combined, ensuring not to overmix. The dough will be soft and slightly sticky.

Step 3: Color the Dough
Divide the cookie dough into four equal portions. In three separate bowls, add varying amounts of the cooled blueberry syrup to each dough portion to achieve different shades of purple, starting with the darkest. Leave one portion plain for contrast. Mix each portion until the color is evenly distributed and they resemble beautiful hues of spring, ensuring your Lemon Blueberry Cookies look as stunning as they taste.

Step 4: Chill Dough
Wrap each colored dough portion tightly in plastic wrap and refrigerate for at least 2 hours. Chilling the dough is crucial for maintaining the layered effect and preventing spreading during baking. When ready to proceed, the dough should be firm enough to roll out, making it easier for you to create those eye-catching layers in the Lemon Blueberry Cookies.

Step 5: Assemble Cookies
After chilling, remove the dough from the refrigerator. On a lightly floured surface, roll out each dough portion to about 1/4-inch thickness. Layer them together, applying a thin layer of egg white as glue between each color to help them adhere. Use cookie cutters to punch out your desired shapes, ensuring to press them firmly together for a beautiful finished cookie.

Step 6: Bake Cookies
Preheat your oven to 350°F (175°C). Arrange the cut cookies on a parchment-lined baking tray, making sure they’re spaced evenly. Place the tray in the freezer for about 10 minutes to set the shapes. Bake the cookies for 7 minutes, then turn off the oven and leave them inside for an additional 20 minutes to finish baking gently. Keep an eye on them; they should be lightly golden around the edges when done.

Step 7: Cool and Store
Once baked, remove the cookies from the oven and let them cool on the tray for a few minutes before transferring them to a wire rack to cool completely. This helps maintain the delicate texture and shape of your lovely Lemon Blueberry Cookies. Once cool, store them in an airtight container at room temperature for 4-5 days, and relish in their delightful flavors with family and friends!

What to Serve with Layered Lemon Blueberry Cookies

These vibrant cookies are perfect for springtime gatherings, and they pair beautifully with a range of delightful sides and beverages.

  • Fresh Fruit Salad: A medley of seasonal fruits enhances the tartness of the cookies, creating a refreshing contrast.

  • Lemonade Spritzers: A fizzy lemonade complements the citrus notes in the cookies, making for a bright, cheerful drink pairing.

  • Vanilla Ice Cream: The creamy vanilla ice cream provides a smooth richness that balances the fresh zing of lemon.

  • Herbal Tea: A hot cup of chamomile or mint tea adds soothing warmth and aromatic depth, perfect for afternoon tea.

  • Whipped Cream: A dollop of freshly whipped cream elevates the cookies with a luscious, airy texture—like a cloud of sweetness.

  • Cheesecake Dip: This rich, tangy dip brings a creamy contrast that enhances the cookies' fruity flavors; serve with graham crackers for scooping.

  • Chocolate Covered Strawberries: Juicy berries dipped in chocolate add a touch of romance while their freshness echoes the cookie’s flavors beautifully.

Pairing these ideas with your Lemon Blueberry Cookies will surely create a memorable springtime experience for your friends and family!

How to Store and Freeze Lemon Blueberry Cookies

Room Temperature: Store cookies in an airtight container at room temperature for 4-5 days to keep them fresh and delicious.

Fridge: If you'd like to keep them longer, you can refrigerate the cookies in an airtight container for up to 1 week, though they may lose some of their crisp texture.

Freezer: For longer storage, freeze the cookies in a single layer on a baking sheet. Once frozen, transfer them to a freezer-safe bag or container for up to 3 months.

Reheating: To enjoy your frozen Lemon Blueberry Cookies, simply thaw at room temperature or gently warm them in the oven at 300°F (150°C) for a few minutes, restoring their delightful taste and texture.

Make Ahead Options

These Lemon Blueberry Cookies are perfect for busy home cooks looking to save time without sacrificing flavor! You can prepare the blueberry syrup up to 3 days in advance and store it in an airtight container in the refrigerator. Additionally, you can make the colored cookie dough ahead of time; chill it for up to 24 hours before baking. To maintain quality, ensure the dough portions are well-wrapped in plastic wrap to prevent drying out. When you’re ready to serve, simply roll out the dough, layer it, and bake as directed, yielding freshly baked cookies that will impress everyone without the last-minute rush!

Tips for the Best Lemon Blueberry Cookies

  • Chill the Dough: Ensure you chill the colored dough for at least 2 hours. This prevents spreading and enhances the beautiful layers in your Lemon Blueberry Cookies.
  • Use Fresh Ingredients: Opt for fresh blueberries and lemons for the best flavor. The natural brightness will elevate your cookies and make them even more delightful.
  • Don’t Overmix: When combining your ingredients, mix until just combined. Overmixing can lead to tough cookies rather than the soft, buttery texture you want.
  • Color Gradually: When adding blueberry syrup to the dough, start with small amounts and increase gradually for desired shades. This helps maintain control over the colors in your cookie layers.
  • Proper Cooling: Allow cookies to cool completely on a wire rack before storing. This avoids moisture accumulation and keeps the texture just right for snacking.

Lemon Blueberry Cookies Variations & Substitutions

Feel free to mix things up and create your own delightful version of these tempting cookies!

  • Berry Swap: Substitute blueberries with raspberries or strawberries for a flavorful twist! Each fruit brings its unique sweetness, perfect for those who enjoy experimenting with fresh tastes.

  • White Chocolate: Add white chocolate chips for delicious sweetness contrast. The creamy texture of the chocolate complements the fruity flavor beautifully, creating an indulgence your guests won’t resist.

  • Gluten-Free Delight: Use a 1:1 gluten-free flour blend for a gluten-free version without losing any deliciousness. Now, everyone can savor the magic of these Lemon Blueberry Cookies!

  • Zesty Orange Infusion: Replace lemon juice with orange juice and zest for a vibrant sweetness. These cookies will have a lovely citrus profile, offering a refreshing alternative that's equally delightful.

  • Nutty Addition: Incorporate finely chopped almonds or walnuts into the dough for added crunch! The nuts enhance the texture and create a satisfying contrast to the buttery cookie.

  • Herbal Twist: Infuse with fresh rosemary or thyme for an unexpected herbal note! The fragrant herbs bring an aromatic quality that beautifully complements the lemon and blueberry flavors.

  • Coconut Flour Swap: Replace part of the all-purpose flour with coconut flour for a subtle tropical vibe. Just be cautious—coconut flour is very absorbent, so you may need to adjust the liquid slightly.

  • Spicy Kick: Add a pinch of cayenne pepper or ginger powder for warmth. That hint of spice livens up the flavor and adds a unique profile to your cookies, making them truly unforgettable.

If you’re looking for more colorful treats, check out my recipes for Matcha Cookies Soft or Thumbprint Cookies Melt! Remember, the joy of baking lies in the little tweaks that express your personality. Happy baking!

Lemon Blueberry Cookies Recipe FAQs

What should I look for when selecting blueberries?
Absolutely! Choose blueberries that are plump and firm, with a rich blue color. Avoid any with dark spots all over or a dull appearance, as these can indicate overripeness. If you’re using frozen blueberries, opt for those that are individually quick-frozen to ensure they retain their shape and sweetness when baked.

How should I store leftover Lemon Blueberry Cookies?
Very! Store your cookies in an airtight container at room temperature for 4-5 days to maintain their freshness. If you notice them getting a bit stale, you can refresh them by warming them in the oven at a low temperature for a few minutes before enjoying again.

Can I freeze Lemon Blueberry Cookies for later?
Absolutely! To freeze, first place baked cookies in a single layer on a baking sheet and freeze until solid (about 1-2 hours). Once frozen, transfer them to a freezer-safe bag or container, where they can be kept for up to 3 months. When ready to enjoy, thaw them at room temperature or warm them in the oven for a few minutes to restore their delightful taste and texture.

Why did my cookies spread too much during baking?
Oh no! This often happens if the dough isn’t chilled long enough or if it was overmixed, leading to melted butter before baking. Make sure to chill the dough for at least 2 hours to help maintain those beautiful layers and prevent spreading. Also, always mix until just combined to keep the texture tender.

Are these cookies safe for kids and people with allergies?
Yes, but always check! The Lemon Blueberry Cookies contain common allergens like eggs and gluten. For gluten-free versions, use a 1:1 gluten-free flour blend instead of all-purpose flour. Always check labels for any allergies if serving children or those with dietary restrictions, and I recommend making a batch of allergy-friendly cookies using substitutes if necessary.

Lemon Blueberry Cookies

Lemon Blueberry Cookies: A Sweet Spring Delight to Share

Lemon Blueberry Cookies are a delightful spring treat combining sweet and tart flavors in a visually stunning cookie.
Print Recipe Pin Recipe
Prep Time 20 minutes mins
Cook Time 27 minutes mins
Chilling Time 2 hours hrs
Total Time 2 hours hrs 47 minutes mins
Servings: 12 cookies
Course: Dessert
Cuisine: American
Calories: 150
Ingredients Equipment Method Nutrition Notes

Ingredients
  

For the Blueberry Syrup
  • 2 cups Blueberries fresh or frozen
  • 1/4 cup Lemon Juice freshly squeezed
  • 1/2 cup Granulated Sugar consider adding a pinch of citric acid
For the Cookie Dough
  • 1 cup Unsalted Butter at room temperature
  • 1/2 cup Granulated Sugar can be partially substituted with brown sugar
  • 1 cup Powdered Sugar contributes to tender texture
  • 1 large Egg use only the yolk initially
  • 1 teaspoon Vanilla Extract pure vanilla is recommended
  • 1/2 teaspoon Kosher Salt regular salt works as well
  • 1 tablespoon Lemon Zest zest it fresh for maximum flavor
  • 2 cups All-Purpose Flour cake flour can be used for lighter texture

Equipment

  • Saucepan
  • Mixing Bowl
  • plastic wrap
  • Rolling Pin
  • Cookie Cutters
  • Baking tray
  • wire rack

Method
 

Prepare Blueberry Syrup
  1. In a saucepan, combine blueberries, lemon juice, lemon zest, granulated sugar, and a pinch of citric acid. Bring to a boil over medium heat, then reduce heat and simmer for about 10 minutes. Blend until smooth and strain through a sieve.
Make Cookie Dough
  1. Cream together unsalted butter and powdered sugar until light and fluffy. Add egg yolk, vanilla extract, kosher salt, lemon juice, and zest, mixing until smooth. Gradually incorporate flour until just combined.
Color the Dough
  1. Divide the cookie dough into four portions. Color three portions with blueberry syrup to achieve different shades, and leave one portion plain. Mix until colors are evenly distributed.
Chill Dough
  1. Wrap each colored dough portion in plastic wrap and refrigerate for at least 2 hours.
Assemble Cookies
  1. Roll out each colored dough portion to about 1/4-inch thickness and layer them together. Use egg white as glue between colors and cut out desired shapes with cookie cutters.
Bake Cookies
  1. Preheat the oven to 350°F (175°C). Bake cookies for 7 minutes, then turn off the oven and leave them inside for an additional 20 minutes.
Cool and Store
  1. Let the cookies cool on the tray for a few minutes before transferring them to a wire rack to cool completely. Store in an airtight container at room temperature for 4-5 days.

Nutrition

Serving: 1cookieCalories: 150kcalCarbohydrates: 20gProtein: 1gFat: 7gSaturated Fat: 4gPolyunsaturated Fat: 1gMonounsaturated Fat: 2gCholesterol: 15mgSodium: 50mgPotassium: 50mgSugar: 8gVitamin A: 200IUVitamin C: 5mgCalcium: 20mgIron: 0.5mg

Notes

These cookies are perfect for gatherings and can be made ahead by preparing the blueberry syrup in advance.

Tried this recipe?

Let us know how it was!

Irresistible Spiced Wine Poached Pears to Elevate Your Dessert Game

September 16, 2025 by Grace Snow Leave a Comment

As the crisp air settles in and colorful leaves begin to fall, I find myself daydreaming about cozy evenings spent with warm, indulgent desserts. That’s when my mind drifts to my favorite autumn treat: Spiced Wine Poached Pears. This elegant dessert not only captures the essence of the season but also delivers a delightful surprise with every bite, as the juicy pears soak up the rich red wine and fragrant spices. It’s a perfect blend of sophistication and simplicity—ideal for both an intimate gathering and a festive celebration. With minimal prep and the ability to impress your guests, this recipe ensures you'll never look at dessert the same way again. Are you ready to elevate your fall dessert game and explore this luscious recipe?

Why are Spiced Wine Poached Pears irresistible?

Warm, Aromatic Flavors: The delightful combination of red wine and spices creates a rich, warming sensation perfect for chilly evenings. Elegant Presentation: Plated beautifully with a drizzle of syrup, these pears add a touch of sophistication to any dessert spread. Versatile Options: Use different types of pears or substitute red wine with apple cider for unique flavor variations. For a special touch, serve them alongside a scoop of vanilla ice cream or paired with a dollop of whipped cream, making them a crowd favorite. Whether you're hosting a festive dinner or simply treating yourself, these poached pears promise to impress and satisfy with every bite! For more seasonal delights, check out these Eggnog Cookies that capture the essence of the holidays.

Spiced Wine Poached Pear Ingredients

For the Poaching Liquid

  • Red Wine – A medium-bodied wine like Merlot adds depth and richness; don’t splurge on an expensive bottle.
  • Sugar – Use granulated sugar to sweeten the poaching liquid; no substitutes are necessary.
  • Cinnamon Stick – This brings a warm, spicy note; ground cinnamon may work in a pinch if you adjust the amount.
  • Orange Rind – Infuses the poaching liquid with a lovely citrus fragrance; lemon rind can work as a substitute if needed.
  • Vanilla Bean – Adds a rich vanilla flavor; you may substitute pure vanilla extract but use less due to its concentration.

For the Pears

  • Pears – Choose firm varieties like Bosc or Anjou for best results; avoid overly soft pears, like Bartlett, unless monitored closely.

For Serving

  • Vanilla Ice Cream – Optional, but it completes the dish beautifully alongside the warm pears.

Step‑by‑Step Instructions for Spiced Wine Poached Pear

Step 1: Prepare the Pears
Begin by peeling the pears carefully, ensuring to keep the stems intact for an elegant presentation. If you prefer, core the pears using a melon baller, taking care not to pierce the sides. This will allow the poaching liquid to fully infuse the pears while maintaining their shape and texture throughout the cooking process.

Step 2: Mix the Poaching Liquid
In a large, heavy-bottomed saucepan, combine the rich red wine, sugar, cinnamon stick, and the zest of an orange. Split the vanilla bean lengthwise and add it to the mixture, scraping out the seeds for maximum flavor. Heat this blend over medium heat, stirring occasionally until the sugar fully dissolves—this should take about 5 minutes, and you’ll see the liquid begin to bubble gently.

Step 3: Simmer the Pears
Once your poaching liquid is ready, gently introduce the prepared pears to the simmering mixture, laying them on their sides to ensure even cooking. Cover the pan with a lid or a sheet of parchment paper, allowing the pears to cook for 20 to 30 minutes. Turn them every five minutes, ensuring they’re evenly coated in the luscious liquid. They're done when a knife slides easily into the flesh.

Step 4: Remove the Pears
Carefully remove the pears from the saucepan using a slotted spoon and set them aside on a plate. This will keep them from becoming too soft while you reduce the poaching liquid. The spiced wine poached pears should have absorbed the flavors of the liquid and have a tender yet firm texture at this point.

Step 5: Reduce the Poaching Liquid
Increase the heat to medium-high and bring the poaching liquid to a boil. Allow it to simmer uncovered for about 10 to 15 minutes, stirring occasionally. You're aiming for a syrupy consistency that nicely coats the back of a spoon, enhancing the richness and flavor of your spiced wine poached pears.

Step 6: Finish and Serve
After reducing the syrup, discard the cinnamon stick, orange rind, and vanilla bean pod from the liquid. Allow the syrup to cool slightly to thicken further. You can serve the poached pears warm or chilled, drizzled with the aromatic syrup, and elevate the dish by adding a scoop of vanilla ice cream on the side for a delightful contrast.

Spiced Wine Poached Pear Variations

Feel free to explore creativity in your kitchen by customizing these delightful poached pears to suit your taste!

  • White Wine: Substitute red wine with a fruity white wine for a lighter, refreshing twist.

  • Apple Cider: For a non-alcoholic option, use apple cider instead of wine to infuse your pears with a comforting sweetness.

  • Spice Mix: Try adding star anise or allspice to the poaching liquid for deeper flavor complexity, making every bite an aromatic surprise.

  • Bourbon Boost: A splash of bourbon or brandy can add a hint of warmth and depth, perfect for adult gatherings.

  • Citrus Zest: Experiment with lemon or lime zest in place of orange rind for a tangy kick that lightens the syrup.

  • Nutty Flavor: Add chopped nuts like pecans or walnuts when serving, bringing an appealing crunch against the tender pears.

  • Herbed Syrup: Infuse the poaching liquid with fresh herbs like thyme or rosemary for an unexpected savory twist that balances the sweetness.

  • Vanilla Twist: Use a touch of vanilla bean paste instead of extract for a more robust vanilla flavor, enhancing the dessert's fragrance.

These variations will surely elevate your dessert game and impress your guests! For more delightful options, don't miss these delicious Eggnog Cookies perfect for the holidays!

Expert Tips for Spiced Wine Poached Pears

Firm Pears: Choose the right variety: Select Bosc or Anjou pears for the best texture; they hold up better than softer types like Bartlett during cooking.

Monitor Cooking Time: Avoid overcooking: Keep a close eye on simmering pears and check for tenderness after 20 minutes. Remove them promptly to maintain firmness.

Reduce the Syrup: Achieve perfect consistency: Let the poaching liquid boil down until syrupy, about 10-15 minutes. A syrup that coats the back of a spoon enhances your spiced wine poached pears’ flavor.

Serve Fresh: Best enjoyed immediately: Though delicious, poached pears can become too soft if soaked too long in syrup. Serve warm with syrup and ice cream.

Flavor Variations: Get creative: Swap red wine for white wine or apple cider, and try adding spices like star anise for an exciting twist on this classic dish.

Storage Tips for Spiced Wine Poached Pears

Fridge: Store poached pears in the syrup in an airtight container for up to 3 days. This helps to retain their flavor and moisture.

Freezer: If you want to keep them longer, freeze poached pears in syrup for up to 2 months. Ensure they are in a freezable container to avoid freezer burn.

Reheating: To enjoy, thaw the pears overnight in the fridge. Reheat gently in a saucepan over low heat, drizzling with some additional syrup to enhance the flavor of your spiced wine poached pears.

Syrup Storage: Store leftover syrup in a separate airtight container in the fridge for up to a week, perfect for drizzling on desserts or pancakes!

Make Ahead Options

These Spiced Wine Poached Pears are a fabulous choice for meal prep, allowing you to savor the luxurious flavors while saving time during busy weekdays or special gatherings! You can prepare the pears and poaching liquid up to 24 hours in advance. Simply follow the recipe steps up until removing the pears; then refrigerate the pears in the syrup. This helps maintain their delicious flavor and prevents browning. When you’re ready to serve, gently reheat the pears in the poaching liquid on low heat, allowing them to warm through and absorb more flavor. Drizzle the thickened syrup over the pears and serve alongside vanilla ice cream for a restaurant-quality dessert that’s just as delightful!

What to Serve with Spiced Wine Poached Pears

Looking to create a memorable meal around your sweet, elegant spiced wine poached pears? Here are some delightful pairings that will elevate your dining experience.

  • Creamy Vanilla Ice Cream: The rich, creamy texture of vanilla ice cream beautifully balances the warm spices of the pears, offering a harmonious taste experience.

  • Whipped Cream: A dollop of freshly whipped cream adds a lightness and silky texture, making each bite of poached pear even more indulgent.

  • Toasted Almonds: The nutty crunch from toasted almonds brings a lovely contrast to the tender pears, enhancing the overall flavor profile.

  • Spiced Ginger Cookies: Their bold spiciness complements the poached pears while also adding a crunchy texture for a delightful bite.

  • Crumbly Shortbread Cookies: Buttery and sweet, these cookies offer a perfect contrast to the warm and syrupy pears, making for a lovely tea-time treat.

  • Moscato Wine: This sweet, sparkling wine pairs wonderfully, echoing the aromatic notes of the poached pears while refreshing the palate.

  • Hot Apple Cider: A warm mug of spiced apple cider rounds out the meal, enhancing the fall flavors and making your evening cozy.

  • Cheese Plate: Soft cheeses like Brie or mascarpone create a sophisticated touch, while the creaminess complements the flavor of the pears.

  • Chocolate Fondue: Dip fresh fruits or bite-sized treats into warm chocolate to create a decadent dessert platter alongside the poached pears.

Spiced Wine Poached Pears Recipe FAQs

What kind of pears should I use for poaching?
For the best results, I recommend using firm varieties like Bosc or Anjou. These pears withstand the poaching process well, maintaining their shape and texture. It's best to avoid overly soft varieties, like Bartlett, unless you monitor them closely while cooking.

How should I store leftover spiced wine poached pears?
Store your poached pears in syrup in an airtight container in the refrigerator for up to 3 days. This helps to retain their delightful flavor and moisture. Just make sure the syrup covers the pears to keep them juicy!

Can I freeze spiced wine poached pears?
Absolutely! If you want to keep them longer, you can freeze the poached pears in syrup for up to 2 months. Just place them in a suitable freezer-safe container, ensuring they are submerged in syrup to avoid freezer burn. When you're ready to enjoy them, thaw overnight in the fridge and gently reheat.

What should I do if my poaching liquid isn't syrupy enough?
If your syrup hasn’t thickened after 10-15 minutes of boiling, increase the heat to medium-high and stir occasionally until it reaches the desired syrupy consistency. You’re looking for a texture that coats the back of a spoon, which enhances the flavor of your spiced wine poached pears beautifully.

Are spiced wine poached pears suitable for people with allergies?
Keep in mind the ingredients when serving! The recipe features pears, sugar, and wine, which are generally safe, but it's important to account for any wine allergies or sensitivities. If serving to guests, it can also be a good idea to provide them with an alternative by poaching fruits in juice or using non-alcoholic wine substitutes.

Can I modify the recipe to make it lighter?
Definitely! To lighten it up, consider reducing the amount of sugar you use in the poaching liquid. You can also swap red wine for apple cider for a sweeter, lower-alcohol dessert that retains the great flavors of the season.

Spiced Wine Poached Pear

Irresistible Spiced Wine Poached Pears to Elevate Your Dessert Game

Delight in the cozy flavors of Spiced Wine Poached Pears, a sophisticated dessert perfect for autumn evenings.
Print Recipe Pin Recipe
Prep Time 15 minutes mins
Cook Time 30 minutes mins
Total Time 45 minutes mins
Servings: 4 pears
Course: Dessert
Cuisine: Autumn
Calories: 150
Ingredients Equipment Method Nutrition Notes

Ingredients
  

For the Poaching Liquid
  • 1 bottle Red Wine Medium-bodied like Merlot
  • 1 cup Sugar Granulated
  • 1 stick Cinnamon Stick
  • 1 piece Orange Rind Or lemon rind as substitute
  • 1 bean Vanilla Bean Can substitute with pure vanilla extract
For the Pears
  • 4 pieces Pears Firm varieties like Bosc or Anjou
For Serving
  • 4 scoops Vanilla Ice Cream Optional

Equipment

  • Saucepan
  • slotted spoon
  • Peeler

Method
 

Step-by-Step Instructions
  1. Prepare the pears by peeling them carefully and keeping the stems intact.
  2. Combine red wine, sugar, cinnamon stick, and orange rind in a saucepan.
  3. Simmer and stir until sugar dissolves.
  4. Introduce the pears to the simmering liquid and cover.
  5. Cook for 20-30 minutes, turning pears every 5 minutes.
  6. Remove pears from the saucepan and set aside.
  7. Increase heat to boil the poaching liquid until syrupy.
  8. Discard solids and serve pears drizzled with syrup, optionally with ice cream.

Nutrition

Serving: 1pearCalories: 150kcalCarbohydrates: 35gProtein: 1gSodium: 5mgPotassium: 150mgFiber: 3gSugar: 28gVitamin A: 50IUVitamin C: 6mgCalcium: 20mgIron: 0.5mg

Notes

Store leftover syrup separately for up to a week. Best served fresh.

Tried this recipe?

Let us know how it was!

Irresistible Peach Crisp Filled Doughnuts You’ll Crave Each Bite

September 16, 2025 by Grace Snow Leave a Comment

As the crisp autumn air sweeps in, there’s nothing quite like indulging in a warm treat that captures the essence of the season. Enter my delightful Peach Crisp Filled Doughnuts, where fluffy brioche meets a luscious peach filling and a satisfying crunch on top. This recipe is not just a feast for the taste buds; it's also a crowd-pleaser that will have your friends and family raving. With quick prep time and a playful twist on traditional doughnuts, these delightful gems will elevate any gathering or festive brunch. And let me tell you, the combination of sweet peaches and a crunchy oatmeal topping is nothing short of heaven! Curious about how to make these golden beauties for yourself? Let’s dive in!

Why are these doughnuts so irresistible?

Fluffy Texture: These Peach Crisp Filled Doughnuts are incredibly light and airy, providing a delightful bite that melts in your mouth.

Flavor Explosion: With a sweet, spiced peach filling, every doughnut bursts with warm flavors, perfect for a cozy gathering.

Unique Topping: The crunchy oatmeal crisp on top adds a satisfying texture, elevating these doughnuts beyond the ordinary.

Quick Prep Time: Despite their gourmet taste, you can whip these up in no time, making them a convenient choice for unexpected guests.

Versatile Treat: Not only can you enjoy them as a brunch treat, but they're also perfect for dessert or an afternoon snack—pair them with coffee or tea for a special touch!

Peach Crisp Filled Doughnuts Ingredients

For the Dough
• Warm Water – Helps activate yeast; keep the temperature between 105-110°F for best results.
• Sugar – Provides sweetness and assists in activating yeast; honey can be substituted for a natural option.
• Active Dry Yeast – This leavening agent gives the dough its rise; ensure it bubbles properly before using, or consider fresh yeast.
• All-Purpose Flour – The structural backbone of the dough; swap for bread flour for an added chew.
• Kosher Salt – Elevates the flavor profile of the dough; sea salt works as a great substitute.
• Eggs – Introduce richness and moisture to the dough; for a vegan option, use flax eggs or unsweetened applesauce.
• Unsalted Butter – Adds richness to the brioche; salted butter can be used, just reduce added salt slightly.

For the Peach Filling
• Finely Diced Peaches – The star filling ingredient, ideal when fresh; frozen peaches can be used if diced finely.
• Peach Nectar – Enhances the flavor of your filling; water can be used as an alternative if needed.
• Cornstarch – Thickens your peach filling beautifully; arrowroot powder can act as a substitute.
• Cinnamon and Allspice – Infuse warmth and spice into the filling; nutmeg can add depth if desired.
• Plain Unflavored Gelatin – Stabilizes the filling, ensuring it remains firm; use agar-agar for a vegetarian version.

For the Crisp Topping
• Brown Sugar – Provides a sweet, caramelized flavor; white sugar can also be used if preferred.
• Large Flake Oats – Delivers a delightful texture to the topping; unlike quick oats, which will alter the texture slightly.

For the Icing
• Icing Sugar – Sweetens and glazes the doughnuts; if necessary, confectioner’s sugar can serve as a suitable substitute.

Each ingredient plays a crucial role in creating these delicious Peach Crisp Filled Doughnuts, making every bite a memorable experience!

Step‑by‑Step Instructions for Peach Crisp Filled Doughnuts

Step 1: Activate the Yeast
In a small bowl, mix 1/4 cup of warm water (105-110°F) with 1 tablespoon of sugar and 2 teaspoons of active dry yeast. Let it sit for about 5-10 minutes until it bubbles and froths, indicating that your yeast is alive and ready to work its magic in our Peach Crisp Filled Doughnuts.

Step 2: Prepare the Dough
In a stand mixer fitted with a dough hook, combine 3 cups of all-purpose flour, 1/4 cup of sugar, and 1 teaspoon of kosher salt. Slowly add the activated yeast mixture along with 2 large eggs. Mix on medium speed until a smooth dough forms. The dough should start to pull away from the sides of the bowl after about 5 minutes of mixing.

Step 3: Knead the Dough
Add 1/4 cup of softened unsalted butter to the dough, gradually kneading it for another 7 minutes. If the dough is too sticky, sprinkle in a bit more flour, just until it's slightly tacky but no longer sticks to your fingers. This kneading helps develop the dough's structure, ensuring fluffy Peach Crisp Filled Doughnuts.

Step 4: First Rise
Transfer your dough to a greased bowl and cover it with a damp cloth. Let it rise in a warm place for about 1 hour, or until it doubles in size. You'll know it’s ready when you press a finger into the dough and the indentation remains.

Step 5: Chill the Dough
After the first rise, gently punch down the dough to release air. Wrap it tightly in plastic wrap and refrigerate it overnight. This chilling process makes the dough easier to handle and deepens the flavors, setting the stage for our scrumptious Peach Crisp Filled Doughnuts.

Step 6: Make the Peach Filling
In a medium saucepan over medium heat, melt 2 tablespoons of unsalted butter. Add 2 cups of finely diced peaches and 1/4 cup of peach nectar, cooking for about 5 minutes until softened. Stir in a mix of 2 tablespoons of sugar, 2 tablespoons of cornstarch, and a pinch of cinnamon; cook until thickened. Once cool, stir in 1 tablespoon of plain gelatin, then refrigerate overnight.

Step 7: Prepare the Crisp Topping
While the filling is chilling, preheat your oven to 350°F (175°C). In a bowl, mix 1/2 cup of brown sugar, 1 cup of large flake oats, and a pinch of salt. Spread the mixture on a baking sheet and bake for 15-20 minutes, or until golden brown, stirring halfway through. Allow the crisp topping to cool completely.

Step 8: Shape the Doughnuts
After the dough has chilled, roll it out on a lightly floured surface to about 1/2 inch thickness. Use a doughnut cutter or two round cookie cutters to cut out your doughnut shapes. Place them on a floured baking sheet and cover with a cloth. Let the dough rise for 60-80 minutes until doubled in size, perfect for our Peach Crisp Filled Doughnuts.

Step 9: Fry the Doughnuts
In a deep pot, heat oil to 350°F (175°C). Fry each doughnut for about 1-2 minutes on each side, or until golden brown. Use a slotted spoon to remove them from the oil and place on a paper towel-lined plate to drain excess oil. Check the internal temperature of each to ensure it's cooked through to 180°F.

Step 10: Fill and Top the Doughnuts
Once the doughnuts have cooled slightly, use a piping bag to fill each one with the chilled peach filling, squeezing from the side. Drizzle with your prepared icing made from icing sugar and a little water for consistency, then generously sprinkle with the crisp topping. Your Peach Crisp Filled Doughnuts are now ready to be devoured!

Peach Crisp Filled Doughnuts Variations

Feel free to let your creativity shine with these delightful doughnut variations that offer enticing twists on the classic recipe!

  • Fruit Swap: Try using apples, cherries, or even berries in place of peaches to create a unique filling. Each fruit has its own charm, bringing fresh flavors to your doughnuts.

  • Flavored Icing: Experiment with vanilla, almond, or even lavender icing to add a distinctive flair. A simple change can turn your doughnuts into an entirely new sensation.

  • Cinnamon Sugar Coating: Instead of icing, roll your warm doughnuts in a mixture of cinnamon and sugar for a cozy, spiced twist. It's like autumn in every bite!

  • Nutty Crunch: Incorporate chopped nuts like pecans or walnuts into the crisp topping for an added layer of flavor and a delightful crunch. Just imagine the textures!

  • Caramel Drizzle: Elevate your doughnuts further by drizzling caramel sauce over the icing. The rich sweetness pairs beautifully with the peach filling.

  • Spice It Up: Add a hint of cayenne or black pepper to the peach filling for a surprising kick. This unexpected heat will excite your taste buds and make each doughnut memorable.

  • Vegan Alternative: Substitute eggs with flax eggs or applesauce and use plant-based butter to create a vegan version of these delightful doughnuts. They can be just as delicious!

  • Mini Doughnuts: Make bite-sized versions by using a smaller cutter! They are perfect for sharing at gatherings or satisfying that sweet craving without going overboard.

For more delicious dessert ideas, consider pairing these doughnuts with a sweet treat like Peaches Cream Cookies or a crispy delight with Parmesan Artichoke Hearts. Happy baking!

What to Serve with Peach Crisp Filled Doughnuts

These delightful treats are perfect for making any occasion sweeter and more memorable, especially when paired with complementary flavors and textures.

  • Fresh Fruit Salad: A vibrant mix of seasonal fruits adds a refreshing contrast, balancing the rich, sweetness of the doughnuts.
  • Vanilla Ice Cream: The creaminess of vanilla ice cream pairs beautifully with peach filling, creating a comforting dessert experience that's hard to resist.
  • Coffee or Tea: A warm cup of your favorite brew elevates the doughnut experience, enhancing the flavors and providing a cozy touch.
  • Whipped Cream: Light and fluffy, a dollop of whipped cream offers a creamy finish that melds wonderfully with the crisp and fruity elements.
  • Spiced Chai: The aromatic spices in chai perfectly complement the cinnamon and allspice notes in the doughnuts, providing a warm, spicy contrast.
  • Chocolate Drizzle: A rich chocolate drizzle adds an indulgent flair, enhancing the sweetness while introducing a luscious contrast to the peach filling.
  • Caramel Sauce: Drizzling warm caramel on top creates a decadent touch, harmonizing beautifully with the peach flavors and crunchy topping.
  • Almond Milk: A light and nutty drink option, almond milk is a gentle companion that allows the doughnuts' flavors to shine without overwhelming the palate.

These Peach Crisp Filled Doughnuts shine on their own, but with these suggested pairings, you can create a memorable experience that delights every sense!

Make Ahead Options

These Peach Crisp Filled Doughnuts are perfect for busy home cooks looking to save time! You can prepare the dough up to 24 hours in advance by following the first rise and then refrigerating it overnight, which not only improves its flavor but makes it easier to handle. Additionally, the peach filling can be cooked and refrigerated for up to 3 days before you fill the doughnuts, ensuring that it remains fresh and flavorful. Just remember to keep everything tightly wrapped to avoid drying out. When you’re ready to fry, allow the chilled dough to rise again before shaping and frying, ensuring each doughnut is just as delightful as if made fresh that day!

Storage Tips for Peach Crisp Filled Doughnuts

Room Temperature: Store filled doughnuts in an airtight container at room temperature for up to 2 days to keep them fresh and fluffy.

Refrigerator: If your kitchen is warm, these doughnuts can be refrigerated, but they may lose some of their delightful texture; consume them within 3 days for best flavor.

Freezer: For longer storage, freeze unfilled doughnuts in a single layer, then transfer to a resealable bag for up to 2 months. Thaw at room temperature before filling and icing.

Reheating: When ready to enjoy, reheat in a microwave for about 10-15 seconds or in a preheated oven at 350°F (175°C) for a few minutes to regain that fresh-out-of-the-oil warmth.

Expert Tips for Peach Crisp Filled Doughnuts

  • Perfect Yeast Activation: Ensure water temperature is between 105-110°F to properly activate the yeast, avoiding dough that doesn't rise.

  • Flour Matters: Use all-purpose flour for best results, but bread flour can give a lovely chewy texture in your Peach Crisp Filled Doughnuts.

  • Chill for Success: Refrigerate the dough overnight; it enhances flavor and makes it much easier to handle, resulting in delicate and fluffy doughnuts.

  • Oil Temperature Check: Maintain oil at 350°F (175°C) for even frying; too hot and they cook too quickly, too cold results in greasy doughnuts.

  • Filling Technique: Use a piping bag to fill each doughnut for a neat finish, ensuring a generous burst of peach filling in every bite!

Peach Crisp Filled Doughnuts Recipe FAQs

What kind of peaches should I use for the filling?
Absolutely! Fresh, ripe peaches will give the best flavor and texture for your filling. Look for peaches that are slightly soft to the touch but not mushy, with a fragrant aroma. If fresh peaches aren’t available, you can use frozen peaches—just be sure to dice them small to mimic the texture of fresh.

How can I store the filled doughnuts?
To keep your delicious Peach Crisp Filled Doughnuts fresh, store them in an airtight container at room temperature for up to 2 days. If your kitchen is particularly warm, you might want to refrigerate them, but consume within 3 days to maintain the ideal texture.

Can I freeze the doughnuts?
Yes, you can freeze unfilled doughnuts! Arrange them in a single layer on a baking sheet and freeze until solid. Transfer them to a resealable bag, and they’ll keep for up to 2 months. When you’re ready to enjoy, simply thaw them at room temperature and fill them with your peach filling!

Why did my doughnuts sink in the oil while frying?
Very good question! If your doughnuts sink when added to the oil, it may indicate that they didn’t rise enough before frying. Make sure to allow sufficient time for the dough to double in size during the second rise (60-80 minutes) for best results. Another culprit could be the temperature of the oil—if it’s too cold, it can cause the doughnuts to absorb too much oil and sink.

Are these doughnuts suitable for people with nut allergies?
Great inquiry! The recipe for Peach Crisp Filled Doughnuts as written is nut-free. However, always check your specific ingredient brands, especially for pre-packaged items, as cross-contamination can occur. If you or your guests have severe allergies, it’s best to avoid any potential sources.

Peach Crisp Filled Doughnuts

Irresistible Peach Crisp Filled Doughnuts You’ll Crave Each Bite

Delicious Peach Crisp Filled Doughnuts with fluffy brioche, luscious peach filling, and a crunchy oatmeal topping, perfect for any gathering.
Print Recipe Pin Recipe
Prep Time 1 hour hr
Cook Time 30 minutes mins
Chilling Time 12 hours hrs
Total Time 13 hours hrs 30 minutes mins
Servings: 12 doughnuts
Course: Dessert
Cuisine: American
Calories: 250
Ingredients Equipment Method Nutrition Notes

Ingredients
  

For the Dough
  • 1/4 cup Warm Water Temperature between 105-110°F
  • 1 tablespoon Sugar Can substitute with honey
  • 2 teaspoons Active Dry Yeast Ensure it bubbles properly before use
  • 3 cups All-Purpose Flour Can substitute with bread flour
  • 1 teaspoon Kosher Salt Sea salt is a great substitute
  • 2 large Eggs Can use flax eggs or applesauce for a vegan option
  • 1/4 cup Unsalted Butter Softened; salted butter can be used with reduced salt
For the Peach Filling
  • 2 cups Finely Diced Peaches Fresh preferred; frozen is okay if diced finely
  • 1/4 cup Peach Nectar Water can be used as an alternative
  • 2 tablespoons Cornstarch Arrowroot powder can substitute
  • 1 teaspoon Cinnamon Allspice can also be used
  • 1 tablespoon Plain Unflavored Gelatin Use agar-agar for a vegetarian version
For the Crisp Topping
  • 1/2 cup Brown Sugar Can substitute with white sugar
  • 1 cup Large Flake Oats Do not use quick oats
For the Icing
  • 1 cup Icing Sugar Can substitute with confectioner’s sugar

Equipment

  • Stand Mixer
  • Doughnut cutter
  • Deep pot for frying
  • piping bag
  • Baking Sheet

Method
 

Dough Preparation
  1. Activate the Yeast: In a small bowl, mix warm water with sugar and yeast. Let sit until it bubbles, about 5-10 minutes.
  2. Prepare the Dough: In a stand mixer, combine flour, sugar, and salt. Slowly add yeast mixture and eggs, mixing until smooth.
  3. Knead the Dough: Add softened butter and knead for another 7 minutes until the dough is slightly tacky but not sticky.
  4. First Rise: Transfer dough to a greased bowl, cover, and let rise in a warm place for about 1 hour until doubled in size.
  5. Chill the Dough: Punch down the dough, wrap it tightly, and refrigerate overnight.
Filling & Topping Preparation
  1. Make the Peach Filling: Melt butter in a saucepan, add peaches and nectar, cooking for about 5 minutes. Stir in sugar, cornstarch, and cinnamon, cook until thickened. Once cool, add gelatin and refrigerate overnight.
  2. Prepare the Crisp Topping: Preheat the oven to 350°F. Mix brown sugar, oats, and salt, spread on a baking sheet and bake for 15-20 minutes until golden brown.
Doughnut Shaping & Frying
  1. Shape the Doughnuts: Roll out the chilled dough to 1/2 inch thickness, cut out shapes and let rise for 60-80 minutes.
  2. Fry the Doughnuts: Heat oil to 350°F. Fry each for 1-2 minutes on each side until golden brown.
  3. Fill and Top the Doughnuts: Use a piping bag to fill each doughnut, drizzle with icing and sprinkle with crisp topping.

Nutrition

Serving: 1doughnutCalories: 250kcalCarbohydrates: 35gProtein: 3gFat: 11gSaturated Fat: 7gPolyunsaturated Fat: 1gMonounsaturated Fat: 3gCholesterol: 35mgSodium: 150mgPotassium: 120mgFiber: 1gSugar: 15gVitamin A: 200IUVitamin C: 2mgCalcium: 20mgIron: 0.5mg

Notes

Store filled doughnuts in an airtight container at room temperature for up to 2 days. Refrigerate for up to 3 days if necessary. Freeze unfilled doughnuts for up to 2 months.

Tried this recipe?

Let us know how it was!

Sweet and Salty Chocolate Tahini Rice Krispie Treats You’ll Love

September 14, 2025 by Grace Snow Leave a Comment

As I rummaged through my pantry one afternoon, a half-finished jar of tahini caught my eye, sparking a delicious idea. What if I could harness that creamy, nutty goodness to create a unique version of everyone's favorite treat? Enter the Sweet and Salty Chocolate Tahini Rice Krispie Treats—an exciting twist on the classic dessert that’s not just gluten-free and vegan but also ready in less than 15 minutes! These treats combine the rich flavor of dark chocolate with a satisfying crunch from crispy rice and pretzels, making them a fun indulgence for both kids and grown-ups alike. Plus, they’re perfect for anyone who craves a quick dessert without the fuss of baking. Curious how to whip up this blissful medley? Let’s dive into the recipe!

Why are these treats so irresistible?

Uniqueness: These Sweet and Salty Chocolate Tahini Rice Krispie Treats offer a delightful twist on a classic, blending creamy tahini with crispy pretzels for an exciting taste sensation.

Quick Preparation: Ready in under 15 minutes, these no-bake treats are perfect for any last-minute dessert craving, making them a lifesaver for busy days.

Kid-Friendly: With their fun textures and delicious flavors, these treats are a hit with kids and adults alike, making them a great addition to lunchboxes or after-school snacks.

Versatile: The recipe is easily customizable—swap tahini with almond butter or substitute pretzels for nuts based on your preferences.

Health-Conscious: Gluten-free and vegan, these treats cater to various dietary needs, allowing everyone to enjoy a sweet moment without compromise.

If you’re excited to try other delectable desserts, consider checking out Homemade Hot Chocolate or indulge in German Chocolate Poke Cake for more tasty ideas!

Sweet and Salty Chocolate Tahini Rice Krispie Treats

For the Base

  • Tahini – Provides creaminess and depth of flavor; substitute with almond butter or sunflower seed butter if needed.
  • Maple Syrup – Sweetens the mixture naturally; can be replaced with agave syrup or honey for non-vegan options.
  • Virgin Coconut Oil – Adds healthy fats and helps melt the chocolate; can be swapped with any neutral oil if preferred.
  • Vanilla Extract – Enhances overall flavor; use pure vanilla extract for best results.
  • Kosher Salt – Balances sweetness; adjust according to taste preference.
  • Crispy Brown Rice Cereal – Gives the bars structure and crunch; ensure gluten-free certification if necessary.

For the Topping

  • Dark (or Semi-Sweet) Chocolate Chips – Provides a rich chocolate layer on top; use dairy-free or vegan chocolate chips for dairy-free versions.
  • Pretzel Twists – Adds crunchy texture and a salty bite; can be replaced with nuts or seeds for an alternative.
  • Toasted Sesame Seeds – Offers garnish and additional texture; omit if unavailable.
  • Fancy Sea Salt (e.g., Maldon) – For sprinkling on top to boost flavor contrast; a little goes a long way!

Step‑by‑Step Instructions for Sweet and Salty Chocolate Tahini Rice Krispie Treats

Step 1: Mix the Base Ingredients
In a large mixing bowl, combine ½ cup tahini, ¼ cup maple syrup, 2 tablespoons virgin coconut oil, 1 teaspoon vanilla extract, and a pinch of kosher salt. Use a spatula or whisk to blend the ingredients until the mixture is smooth and creamy, which should take about 2-3 minutes. This base sets the foundation for your Sweet and Salty Chocolate Tahini Rice Krispie Treats.

Step 2: Incorporate the Rice Cereal
Add 3 cups crispy brown rice cereal to the tahini mixture, gently folding it in until every piece is thoroughly coated. Take your time to ensure that the cereal is evenly mixed, as this will give your treats their delightful crunch. You should see the cereal glistening with the tahini mixture after about 1-2 minutes of careful folding.

Step 3: Shape the Mixture
Line an 8x8-inch baking dish with parchment paper, allowing some overhang for easy removal. Transfer the rice cereal mixture into the prepared dish, pressing down firmly with your hands or a spatula to create an even layer. Aim for about ½ inch in thickness, ensuring the mixture is compacted well, which should take another 2-3 minutes. This step is crucial for the structure of your Sweet and Salty Chocolate Tahini Rice Krispie Treats.

Step 4: Melt the Chocolate Topping
In a microwave-safe bowl, combine 1 cup dark chocolate chips and 1 tablespoon coconut oil. Heat in the microwave in 20-second intervals, stirring in between until fully melted and smooth; this should take about 1 minute total. Be careful not to overheat as it can seize up. Once melted, pour the chocolate mixture over the pressed rice treat base, spreading it evenly with a spatula.

Step 5: Add Crunchy Toppings
Scatter about ½ cup broken pretzel twists evenly over the melted chocolate layer, gently pressing them down to ensure they stick. If you have toasted sesame seeds, sprinkle them over the top as well for added texture and flavor. This step not only enhances the visual appeal but also contributes to the sweet and salty balance for the Sweet and Salty Chocolate Tahini Rice Krispie Treats.

Step 6: Finish with Sea Salt
Sprinkle a pinch of fancy sea salt over the top of your treats, enhancing the flavors beautifully. This salty touch complements the sweetness and adds an extra layer of sophistication to your dessert. Now, cover the dish with plastic wrap or foil, and refrigerate for at least 30 minutes, or until the chocolate has fully set.

Step 7: Cut and Serve
Once set, use the parchment overhang to lift the treats out of the baking dish. Place them on a cutting board and slice into squares or rectangles using a sharp knife. Aim for even portions for a lovely presentation. Enjoy your homemade Sweet and Salty Chocolate Tahini Rice Krispie Treats, perfect for snacks or dessert!

What to Serve with Sweet and Salty Chocolate Tahini Rice Krispie Treats

Get ready to create an enticing combination that elevates your dessert experience beyond just a treat!

  • Creamy Vanilla Ice Cream: The rich creaminess of vanilla ice cream pairs beautifully with the crunchy texture of the treats, creating a delightful contrast. A scoop on the side can transform your sweet moment into a cozy celebration.

  • Fresh Berries: Bright, juicy berries like raspberries or strawberries add a tart freshness that beautifully balances the sweetness of the treats. Toss them in a bowl to create a vibrant, colorful presentation that's visually inviting.

  • Nutty Granola: A sprinkle of nutty granola on top not only enhances texture but also adds another layer of flavor, making each bite even more interesting. The contrasting crunchy elements work harmoniously together, creating a multi-dimensional dessert experience.

  • Coconut Whipped Cream: Fluffy coconut whipped cream provides a light and airy complement, offering tropical notes that pair well with the tahini and chocolate. Spread it generously for a dreamy finish that transports you to a sunny beach.

  • Chilled Almond Milk: For a refreshing drink option, serve chilled almond milk alongside your treats. Its subtle sweetness and nutty flavor enhance the overall dessert experience, combining perfectly with the flavors in your Sweet and Salty Chocolate Tahini Rice Krispie Treats.

  • Dark Chocolate Drizzle: Elevate your treats by drizzling a rich dark chocolate sauce over them. This extra layer of indulgence not only adds visual appeal but enhances the chocolate flavor, making every bite even more decadent.

  • Crunchy Trail Mix: On the side, offer a bowl of crunchy trail mix for some added flair. The varied textures and flavors will invite everyone to graze and enjoy, creating a casual yet fabulous snacking experience.

Storage Tips for Sweet and Salty Chocolate Tahini Rice Krispie Treats

Room Temperature: Store these treats in an airtight container at room temperature for up to 3 days to maintain their chewy texture and crunch.

Fridge: For fresher longer, keep them in the refrigerator for up to a week. Just make sure they’re in a sealed container to prevent drying out.

Freezer: To enjoy these Sweet and Salty Chocolate Tahini Rice Krispie Treats for a longer time, freeze them in a single layer, then transfer to an airtight container for up to 3 months.

Reheating: If desired, you can briefly microwave them for about 10 seconds to soften slightly before serving. Enjoy this delectable treat!

Expert Tips for Sweet and Salty Chocolate Tahini Rice Krispie Treats

  • Press Firmly: Ensure you press the mixture firmly into the dish; this helps the treats hold their shape and not crumble when cut.

  • Chill Properly: Allow the treats to chill for at least 30 minutes in the refrigerator; this helps the chocolate set and makes slicing easier.

  • Adjust to Taste: Feel free to tweak the salt level to suit your taste preferences; finding the right balance enhances the overall flavor of your Sweet and Salty Chocolate Tahini Rice Krispie Treats.

  • Experiment with Variations: Don’t hesitate to try different nut butters or cereals for unique twists. Almond butter or puffed quinoa could offer delightful alternatives!

  • Use Good Quality Chocolate: Opt for high-quality dark (or semi-sweet) chocolate chips for the topping. This really elevates the flavor profile of your treats.

Make Ahead Options

These Sweet and Salty Chocolate Tahini Rice Krispie Treats are a fantastic option for meal prep! You can prepare the base—mixing tahini, maple syrup, coconut oil, vanilla extract, and crispy brown rice cereal—up to 24 hours in advance. Simply store the mixture tightly covered in the refrigerator to maintain its freshness. When you’re ready to enjoy, press it into your baking dish, melt the chocolate, add your toppings, and refrigerate until set. This simple prep strategy not only saves time but ensures you have a delightful treat on hand for busy weeknights or unexpected guests, all while remaining just as delicious!

Sweet and Salty Chocolate Tahini Rice Krispie Treats Variations

Feel free to shake things up and make these treats your own with these fun and delicious variations!

  • Nut Butter Swap: Replace tahini with almond butter for a delightful nutty flavor lift that everyone will love.

  • Cereal Choices: Experiment with different cereals, like corn flakes or fruity pebbles, for added texture and a fun twist on crunch.

  • Dairy-Free Delight: Switch dark chocolate chips for dairy-free varieties, ensuring your treats remain completely vegan while still satisfying your sweet tooth.

  • Nutty Toppings: Instead of pretzels, consider chopped pistachios or almonds for a gourmet crunch that complements the sweetness beautifully.

  • Cinnamon Twist: Add a dash of cinnamon to the tahini mixture for an unexpected flavor depth, creating a warm and inviting aroma.

  • Sweetness Level: Adjust the maple syrup to your taste—use less for a less sweet treat, or add a drizzle of honey on non-vegan versions for extra sweetness.

  • Alternative Crunch: Use crispy quinoa or puffed rice instead of brown rice cereal for an interesting textural shift, making each bite a new experience.

  • Heat It Up: Try adding a pinch of cayenne pepper or crushed red pepper flakes to the chocolate layer for a surprisingly delightful spicy kick.

Curious about how you can use tahini in other dishes? Check out my recipe for Smoky Sweet Potatoes or indulge in Maple Roasted Sweet Potatoes with Pecans for more delicious ideas!

Sweet and Salty Chocolate Tahini Rice Krispie Treats Recipe FAQs

What kind of tahini should I use?
You can use any tahini, preferably one that is smooth and creamy for the best results. Look for organic options if possible. If you need a substitute, almond butter or sunflower seed butter will work well, providing a similar texture and nutty taste.

How should I store these Sweet and Salty Chocolate Tahini Rice Krispie Treats?
For optimal freshness, store the treats in an airtight container at room temperature for up to 3 days. If you want them to last longer, keep them in the refrigerator for up to a week. Make sure to seal the container tightly to prevent them from drying out.

Can I freeze these treats?
Absolutely! To freeze, cut the treats into squares and place them in a single layer on a baking sheet. Once frozen, transfer them to an airtight container or freezer bag, and they’ll last for up to 3 months. When you’re ready to enjoy them, simply thaw in the fridge overnight or microwave them for about 10 seconds to soften.

What should I do if my chocolate is seizing up?
If your chocolate starts to seize up while melting, it may have gotten too hot. To rescue it, add a small amount of coconut oil (about 1 teaspoon) to the chocolate and stir vigorously. This should help smooth it out. Make sure to melt it slowly and in short intervals next time!

Are these treats safe for people with nut allergies?
The Sweet and Salty Chocolate Tahini Rice Krispie Treats can be a safe option for those with nut allergies if tahini is safe for them. However, it’s important to double-check with your guests about their specific dietary restrictions since tahini is made from sesame seeds, which can also be a concern for some individuals. Always read labels and ensure that all ingredients are allergy-friendly.

Can I make the recipe without chocolate chips?
Certainly! If you prefer a lighter treat or want to avoid chocolate, you can skip the chocolate topping altogether. Instead, consider drizzling a little melted nut butter or a light sprinkle of coconut flakes for added flavor without the chocolate. The treats will still be deliciously sweet and salty!

Sweet and Salty Chocolate Tahini Rice Krispie Treats

Sweet and Salty Chocolate Tahini Rice Krispie Treats You’ll Love

Discover Sweet and Salty Chocolate Tahini Rice Krispie Treats—gluten-free, vegan, and ready in under 15 minutes!
Print Recipe Pin Recipe
Prep Time 15 minutes mins
Chilling Time 30 minutes mins
Total Time 45 minutes mins
Servings: 12 treats
Course: Dessert
Cuisine: Vegan
Calories: 150
Ingredients Equipment Method Nutrition Notes

Ingredients
  

For the Base
  • 1/2 cup Tahini Provides creaminess and depth of flavor; substitute with almond butter or sunflower seed butter if needed.
  • 1/4 cup Maple Syrup Sweetens the mixture naturally; can be replaced with agave syrup or honey for non-vegan options.
  • 2 tablespoons Virgin Coconut Oil Adds healthy fats and helps melt the chocolate; can be swapped with any neutral oil if preferred.
  • 1 teaspoon Vanilla Extract Enhances overall flavor; use pure vanilla extract for best results.
  • 1 pinch Kosher Salt Balances sweetness; adjust according to taste preference.
  • 3 cups Crispy Brown Rice Cereal Gives the bars structure and crunch; ensure gluten-free certification if necessary.
For the Topping
  • 1 cup Dark (or Semi-Sweet) Chocolate Chips Provides a rich chocolate layer on top; use dairy-free or vegan chocolate chips for dairy-free versions.
  • 1/2 cup Pretzel Twists Adds crunchy texture and a salty bite; can be replaced with nuts or seeds for an alternative.
  • 1 tablespoon Toasted Sesame Seeds Offers garnish and additional texture; omit if unavailable.
  • 1 pinch Fancy Sea Salt (e.g., Maldon) For sprinkling on top to boost flavor contrast; a little goes a long way!

Equipment

  • Mixing Bowl
  • Microwave-safe bowl
  • Spatula
  • Baking Dish

Method
 

Step-by-Step Instructions
  1. In a large mixing bowl, combine ½ cup tahini, ¼ cup maple syrup, 2 tablespoons virgin coconut oil, 1 teaspoon vanilla extract, and a pinch of kosher salt. Blend until smooth and creamy, about 2-3 minutes.
  2. Add 3 cups crispy brown rice cereal to the tahini mixture, gently folding it in until every piece is thoroughly coated.
  3. Line an 8x8-inch baking dish with parchment paper, transfer the mixture into the prepared dish, and press down firmly to create an even layer.
  4. In a microwave-safe bowl, combine 1 cup dark chocolate chips and 1 tablespoon coconut oil. Heat in 20-second intervals, stirring in between until fully melted.
  5. Pour the melted chocolate mixture over the pressed rice treat base, spreading it evenly with a spatula.
  6. Scatter ½ cup broken pretzel twists over the chocolate layer and sprinkle any toasted sesame seeds on top.
  7. Sprinkle a pinch of fancy sea salt over the top. Cover with plastic wrap and refrigerate for at least 30 minutes, or until the chocolate has fully set.
  8. Once set, use the parchment overhang to lift the treats out and cut into squares.

Nutrition

Serving: 1treatCalories: 150kcalCarbohydrates: 18gProtein: 2gFat: 8gSaturated Fat: 5gPolyunsaturated Fat: 1gMonounsaturated Fat: 2gSodium: 100mgPotassium: 130mgFiber: 1gSugar: 6gCalcium: 15mgIron: 1mg

Notes

Press firmly to help the treats hold their shape, and chill properly to make slicing easier. Experiment with variations using different nut butters or cereals.

Tried this recipe?

Let us know how it was!

Indulge in Ooey-Gooey Tahini S'mores Bars Everyone Will Love

September 14, 2025 by Grace Snow Leave a Comment

As I pulled a tray of these ooey-gooey tahini s'mores bars from the oven, the rich, chocolaty aroma wrapped around me like a warm hug, instantly transporting me back to sun-soaked summers spent roasting marshmallows by the campfire. These delightful bars are not just the perfect blend of melty chocolate, crunchy graham crackers, and fluffy marshmallows—they're also dairy-free and incredibly easy to whip up in just one bowl! Whether you're treating yourself after a long day or impressing guests at your next gathering, these bars promise to be a crowd-pleaser. Are you ready to elevate your dessert game and dive into a nostalgic taste of summer?

Why Are Tahini S'mores Bars Exceptional?

Irresistibly Gooey: Each bite delivers a delightful combination of rich chocolate, gooey marshmallows, and nutty tahini, creating a flavor explosion that satisfies any sweet tooth.

One-Bowl Wonder: With a simple one-bowl method, you can have these bars mixed and ready to bake in no time, making them a hassle-free dessert option.

Dairy-Free Delight: Perfect for those avoiding dairy, these tahini s'mores bars still pack in all the classic flavors, ensuring everyone can enjoy this treat.

Versatile Enjoyment: Serve them warm, chilled, or topped with your favorite ice cream for an extra special dessert moment. They shine at BBQs and summer picnics!

Crowd Favorite: Easy to make and universally loved, they’re ideal for serving at parties or keeping your family happy after dinner. For more kid-friendly treats, check out our delightful cookie recipes.

Ooey-Gooey Tahini S'mores Bars Ingredients

For the Batter

  • Eggs – Provide structure and moisture. No substitutions recommended.
  • Coconut Sugar or Brown Sugar – Adds sweetness and moisture. Coconut sugar can be substituted with packed brown sugar.
  • Tahini – Offers creaminess and nutty flavor. Can substitute with drippy almond butter, cashew butter, or sunflower seed butter for different flavor profiles.
  • Melted Coconut Oil – Introduces healthy fats. Can substitute with melted butter or vegan butter.
  • Vanilla Extract – Enhances flavor. No substitutions recommended.
  • Almond Flour – Acts as the main dry ingredient for texture. For a non-nut alternative, use all-purpose flour (not tested) or finely ground oats.
  • Crushed Graham Crackers – Provide crunch and classic s'mores flavor. Substitute with digestive biscuits if graham crackers are unavailable.
  • Baking Soda – A leavening agent for lift. No substitutions recommended.
  • Salt – Balances sweetness. No substitutions recommended.

For the Mix-ins

  • Chocolate Chips or Chunks – Adds rich chocolate flavor. Use semi-sweet chocolate for best results, as these create the essential ooey-gooey tahini s'mores bars vibe.
  • Mini Marshmallows – Contributes gooey texture. No substitutions recommended; can use regular marshmallows cut into smaller pieces.

Step‑by‑Step Instructions for Ooey-Gooey Tahini S’mores Bars

Step 1: Preheat and Prepare the Pan
Begin by preheating your oven to 350°F (175°C). While the oven warms, take an 8x8 inch baking pan and line it with parchment paper, ensuring to leave some overhang for easy removal. Lightly spray the parchment with nonstick cooking spray, which will help your ooey-gooey tahini s'mores bars come out easily after baking.

Step 2: Mix the Wet Ingredients
In a large mixing bowl, whisk together two eggs, 1 cup of coconut sugar (or packed brown sugar), ½ cup of tahini, ⅓ cup of melted coconut oil, and 1 teaspoon of vanilla extract until the mixture is smooth and well combined. This should take about 2-3 minutes, and you'll see it transform into a creamy, velvety batter.

Step 3: Combine the Dry Ingredients
Next, add in 1 cup of almond flour, 1 cup of crushed graham crackers, ½ teaspoon of baking soda, and ¼ teaspoon of salt to the wet mixture. Stir gently until the dry ingredients are fully melded into a thick dough. This process should only take about a minute; the dough should be sturdy yet slightly sticky, ready to hold all the delicious toppings.

Step 4: Fold in the Mix-ins
Carefully fold in ¾ cup of chocolate chips and 1 cup of mini marshmallows into the batter, making sure they are evenly distributed throughout. Take your time with this step, as you want to keep the marshmallows intact to maximize that gooey texture once baked in your ooey-gooey tahini s'mores bars!

Step 5: Spread and Press
Spread the thick batter evenly into the prepared baking pan, using a spatula to smooth the top. Sprinkle the remaining chocolate chips and marshmallows on top, gently pressing them into the batter to ensure they sink slightly while baking. This will give the bars that irresistible melty topping we all crave.

Step 6: Bake to Perfection
Place the pan in the preheated oven and bake for 18-25 minutes. You’re looking for a golden brown color around the edges while keeping the center slightly underbaked for that gooey texture. Keep an eye on them, as ovens may vary, and you want that perfect ooey-gooey tahini s'mores bar consistency.

Step 7: Cool and Slice
After baking, remove the pan from the oven and let it sit on a wire rack to cool for at least 30 minutes. Once cooled, use the parchment overhang to lift the bars out of the pan. Slice into 16 squares, enjoying the deliciousness of your homemade ooey-gooey tahini s'mores bars!

Storage Tips for Ooey-Gooey Tahini S'mores Bars

Room Temperature: Store the bars in an airtight container at room temperature for up to 3 days to keep them fresh and delicious.

Fridge: For longer-lasting freshness, refrigerate the bars in an airtight container for up to 1 week. Enjoy them chilled or at room temperature!

Freezer: Freeze the ooey-gooey tahini s'mores bars for up to 2 months. Wrap each bar tightly in plastic wrap and place them in a freezer-safe bag for easy access.

Reheating: To revive their gooey texture, warm the bars in the microwave for 10-15 seconds before serving. Enjoy the melty goodness!

What to Serve with Ooey-Gooey Tahini S'mores Bars

Satisfying your sweet tooth is just the beginning—create the ultimate dessert experience with these pairing ideas!

  • Vanilla Ice Cream: The creamy, cold ice cream contrasts beautifully with the warm, gooey bars, creating a delightful melt-in-your-mouth sensation.

  • Fresh Berries: A burst of sweetness from strawberries or raspberries complements the richness of the bars, offering a refreshing balance.

  • Peanut Butter Drizzle: Drizzling some creamy peanut butter on top elevates the nutty flavor of the tahini, making each bite even more indulgent and satisfying.

  • Chocolate Whipped Cream: This decadent topping enhances the chocolatey experience, adding an airy texture that playfully contrasts the bars' chewy consistency.

  • Coconut Milk Shake: Blend chilled coconut milk with ice and a touch of vanilla for a tropical drink that pairs beautifully with the s’mores flavors.

  • Nutty Granola: Sprinkle some crunchy granola on top for a delightful textural contrast that adds both flavor and nutrition, perfect for a family-friendly treat.

  • Sparkling Lemonade: The tartness of lemonade balances the sweetness of the s'mores bars, making it a refreshing drink choice for summer gatherings.

Make Ahead Options

These Ooey-Gooey Tahini S'mores Bars are perfect for meal prep enthusiasts looking to save time! You can mix the batter and keep it refrigerated for up to 24 hours before baking. Just be sure to cover the bowl tightly to maintain moisture and prevent browning of the ingredients. If you're short on time, you can also prepare the dry ingredients (almond flour, crushed graham crackers, baking soda, and salt) in advance and store them in an airtight container for up to 3 days. When you're ready to enjoy your bars, simply add the wet ingredients, fold in the chocolate chips and marshmallows, and bake as instructed. This way, you’ll achieve gooey perfection with minimal effort, making your busy weeknights a little sweeter!

Expert Tips for Ooey-Gooey Tahini S'mores Bars

Choose Quality Chocolate: Use semi-sweet chocolate for the best flavor. Chopping a chocolate bar into chunks can enhance the richness of your ooey-gooey tahini s'mores bars.

Watch the Baking Time: Keep an eye on the baking process; slightly underbake the bars to maintain their signature gooey texture. The edges should be golden brown, but the center should remain soft.

Cooling Is Key: Allow the bars to cool completely before slicing. This helps firm them up and prevents them from falling apart, ensuring each piece retains that delightful gooiness.

Experiment with Flavors: Feel free to swap out tahini for other nut or seed butters to create your own flavor twist while still enjoying the essence of these ooey-gooey tahini s'mores bars.

Perfect Presentation: For an eye-catching finish, sprinkle a few extra chocolate chips and marshmallows on top right before baking. They will create an irresistible topping once melted and golden!

Ooey-Gooey Tahini S'mores Bars Variations

Feel free to customize your ooey-gooey tahini s'mores bars with these delightful twists that’ll tickle your taste buds and spark your creativity in the kitchen!

  • Nut-Free Alternative: Replace almond flour with a gluten-free flour blend or oat flour for a nut-free delight that’s equally delicious.

  • Peanut Butter Boost: Add peanut butter chips along with chocolate chips for a mouthwatering flavor combination. The nutty sweetness will remind you of childhood treats!

  • Crunchy Texture: Incorporate crushed nuts like pecans or walnuts into the batter. The added crunch provides a wonderful contrast to the creamy bars and is sure to please.

  • Chocolate Lovers: For a richer experience, use dark chocolate instead of semi-sweet. This adds a decadent depth that chocolate aficionados will adore.

  • Marshmallow Swap: Swap mini marshmallows for a layer of Nutella spread in the center of the bars for an irresistible chocolaty surprise. It’s a silky addition that melts beautifully!

  • Spiced Up Flavor: Add a teaspoon of cinnamon or a pinch of cayenne for warmth and spice. These unexpected ingredients can elevate your s'mores bars to a whole new level!

  • Fruit Fusion: Toss in some diced strawberries or bananas along with the mix-ins. These fruity additions will bring a refreshing hint of sweetness amidst the classic flavors.

  • Coconut Craze: Add shredded coconut to the batter or on top before baking. This tropical twist will introduce an exciting texture and flavor, transporting you to sandy shores with every bite.

If you’re looking for more ways to enhance your desserts, consider trying out some delightful no-bake recipes or even some unique chocolate pairings for a more gourmet experience at home!

Ooey-Gooey Tahini S'mores Bars Recipe FAQs

What kind of tahini should I use for the bars?
Absolutely! Use high-quality tahini that’s creamy and drippy for the best results. Look for brands without additives—pure sesame paste will lend a beautiful nutty flavor to your ooey-gooey tahini s'mores bars.

How should I store leftover bars?
Store your ooey-gooey tahini s'mores bars in an airtight container at room temperature for up to 3 days. If you want to keep them longer, refrigerate them for up to 1 week. Enjoy them chilled or at room temperature!

Can I freeze these bars? How?
Yes, you can freeze these delicious bars! To freeze, wrap each bar tightly in plastic wrap and place them in a freezer-safe bag, ensuring you squeeze out any air. They’ll keep well in the freezer for up to 2 months. When you’re ready to enjoy them, just pop them in the microwave for 10-15 seconds to bring back that gooey texture!

What should I do if my bars are too crumbly after baking?
If your ooey-gooey tahini s'mores bars turned out crumbly, they might have been overbaked. Always keep an eye on them and remember that the center should be slightly underbaked for optimal gooeyness. If that happens, you can always add a scoop of dairy-free ice cream on top for a delicious fix!

Are there any allergy considerations for this recipe?
Certainly! This recipe contains eggs and almonds (from the almond flour). If you're cooking for someone with nut allergies, you can substitute the almond flour with a gluten-free flour blend or finely ground oats. Just make sure to double-check the labels on all ingredients to keep it safe for those with food allergies!

Ooey-Gooey Tahini S’mores Bars

Indulge in Ooey-Gooey Tahini S'mores Bars Everyone Will Love

A delicious blend of flavors, these ooey-gooey tahini s'mores bars are a must-try sweet treat!
Print Recipe Pin Recipe
Prep Time 15 minutes mins
Cook Time 25 minutes mins
Cooling Time 30 minutes mins
Total Time 1 hour hr 10 minutes mins
Servings: 16 squares
Course: Dessert
Cuisine: American
Calories: 200
Ingredients Equipment Method Nutrition Notes

Ingredients
  

For the Batter
  • 2 pieces Eggs No substitutions recommended.
  • 1 cup Coconut Sugar or Brown Sugar Coconut sugar can be substituted with packed brown sugar.
  • ½ cup Tahini Can substitute with drippy almond butter, cashew butter, or sunflower seed butter.
  • ⅓ cup Melted Coconut Oil Can substitute with melted butter or vegan butter.
  • 1 teaspoon Vanilla Extract No substitutions recommended.
  • 1 cup Almond Flour For a non-nut alternative, use all-purpose flour or finely ground oats.
  • 1 cup Crushed Graham Crackers Substitute with digestive biscuits if graham crackers are unavailable.
  • ½ teaspoon Baking Soda No substitutions recommended.
  • ¼ teaspoon Salt No substitutions recommended.
For the Mix-ins
  • ¾ cup Chocolate Chips or Chunks Use semi-sweet chocolate for best results.
  • 1 cup Mini Marshmallows No substitutions recommended; can use regular marshmallows cut into smaller pieces.

Equipment

  • 8x8-inch baking pan
  • Mixing Bowl
  • Spatula
  • Whisk

Method
 

Step-by-Step Instructions
  1. Preheat your oven to 350°F (175°C) and line an 8x8 inch baking pan with parchment paper.
  2. In a mixing bowl, whisk together the eggs, coconut sugar (or brown sugar), tahini, melted coconut oil, and vanilla extract until smooth.
  3. Add almond flour, crushed graham crackers, baking soda, and salt to the wet mixture, stirring gently until combined.
  4. Fold in the chocolate chips and mini marshmallows ensuring they're evenly distributed.
  5. Spread the batter evenly in the prepared baking pan and sprinkle remaining chocolate chips and marshmallows on top.
  6. Bake for 18-25 minutes until golden brown around the edges, keeping the center slightly underbaked.
  7. Allow bars to cool on a wire rack for at least 30 minutes before slicing into 16 squares.

Nutrition

Serving: 1squareCalories: 200kcalCarbohydrates: 25gProtein: 3gFat: 10gSaturated Fat: 4gMonounsaturated Fat: 6gCholesterol: 30mgSodium: 90mgPotassium: 150mgFiber: 2gSugar: 12gVitamin A: 100IUCalcium: 20mgIron: 1mg

Notes

Store in an airtight container at room temperature for up to 3 days or refrigerate for up to a week.

Tried this recipe?

Let us know how it was!

Lemon Blueberry Zucchini Cake with Lemon Frosting Bliss

September 14, 2025 by Grace Snow Leave a Comment

As I stood in my kitchen, a burst of citrusy aroma filled the air, whisking me away to sunny summer days. That’s when I knew it was time to bake a Lemon Blueberry Zucchini Cake with Lemon Frosting. This delightful dessert not only brings vibrant flavors to your table, but it also cleverly incorporates healthy zucchini, making it a guilt-free indulgence. The best part? It requires just one bowl and one pan, so cleanup is a breeze! Whether you’re looking for a sweet ending to a meal or a wholesome afternoon treat, this gluten-free cake will surely impress family and friends alike. Ready to uncover the secrets of this irresistible summer classic? Let’s dive in!

Why is this cake a must-try?

Unforgettable flavor: Each bite of this Lemon Blueberry Zucchini Cake delivers a zesty punch of freshness, perfectly complemented by juicy blueberries.

Effortless preparation: With its one-bowl method, this recipe is ideal for busy bakers, allowing you to whip up a delightful dessert without the fuss.

Healthy indulgence: Incorporating zucchini not only adds moisture but also boosts the nutrient content, making this cake a guilt-free sweet treat.

Bake it your way: Feel free to experiment! Swap in different fruits or leave off the frosting for a lighter dessert option that caters to everyone's taste.

Perfect for sharing: This cake is perfect for gatherings, sure to impress your guests while being a hit with both kids and adults. So, if you’re looking for a refreshing twist, you might also want to try my Lemon Chicken Soup or even a simpler dessert like Chocolate Pudding Cake.

Lemon Blueberry Zucchini Cake Ingredients

For the Cake

  • Shredded Zucchini – Adds moisture and a nutritious boost; remember to squeeze out excess moisture before using.
  • Eggs – These bind the ingredients together and provide structure to the cake.
  • Honey – A natural sweetener that enhances moisture; maple syrup can be used as a substitute if desired.
  • Lemon Zest & Juice – Infuses the cake with a vibrant citrus flavor that elevates every bite.
  • Almond Extract – Contributes a subtle almond flavor; vanilla extract can replace it if needed.
  • Almond Flour – This is essential for a gluten-free texture and moisture; no direct substitutes are recommended due to its unique properties.
  • Gluten-Free Oat Flour – Helps create a tender crumb; it may be substituted with gluten-free all-purpose flour, though this hasn't been tested.
  • Baking Soda – Acts as a leavening agent to help the cake rise beautifully.
  • Salt – Enhances the overall flavor of the cake.
  • Fresh Blueberries – Bursting with sweetness and tartness; toss them in flour to help prevent sinking in the batter.

For the Frosting

  • Vegan Butter – Provides creaminess and richness; can be swapped for regular butter if you prefer.
  • Powdered Sugar – Sweetens the frosting; for extra citrus punch, add a splash more of lemon juice.

This Lemon Blueberry Zucchini Cake with Lemon Frosting combines delicious flavors with healthy ingredients, setting the stage for a delightful baking adventure!

Step‑by‑Step Instructions for Lemon Blueberry Zucchini Cake with Lemon Frosting

Step 1: Preheat the Oven
Start by preheating your oven to 350°F (175°C). While it heats, prepare an 8x8 inch baking pan by lining it with parchment paper and spraying it with non-stick spray, ensuring a seamless release when it’s time to enjoy your Lemon Blueberry Zucchini Cake.

Step 2: Prepare the Zucchini
Grate the zucchini, then place it in a clean kitchen towel or cheesecloth. Squeeze out excess moisture over the sink, so your batter is not too watery. This step is crucial to achieving a moist cake without compromising its texture.

Step 3: Mix the Wet Ingredients
In a large mixing bowl, whisk together the prepared zucchini, eggs, honey, lemon zest, lemon juice, and almond extract until everything is evenly combined. The mixture should have a smooth, cohesive look and a lovely citrus aroma that hints at the freshness in your Lemon Blueberry Zucchini Cake.

Step 4: Combine the Dry Ingredients
Add the almond flour, gluten-free oat flour, baking soda, and salt to the wet mixture. Gently fold in the dry ingredients until just combined, being careful not to overmix. You want a batter that is thick yet well-mixed, ready to hold all those delightful blueberries.

Step 5: Add Blueberries
Toss the fresh blueberries in a tablespoon of gluten-free oat flour to prevent them from sinking in the batter. Carefully fold the blueberries into the mixture, ensuring they are evenly distributed throughout without smashing them; each bite should burst with blueberry flavor in your Lemon Blueberry Zucchini Cake.

Step 6: Bake the Cake
Pour the batter into your prepared baking pan, spreading it evenly with a spatula. Bake for 30-35 minutes, or until a toothpick inserted into the center comes out clean. The top should be golden brown and have a slight spring when you gently press it, signaling that your cake is perfectly baked.

Step 7: Cool & Frost
Once baked, remove the cake from the oven and let it cool in the pan for about 10 minutes. Carefully transfer it to a wire rack to cool completely. Once cooled, spread the luscious lemon frosting over the top, allowing the flavors to meld beautifully in your delicious Lemon Blueberry Zucchini Cake with Lemon Frosting.

What to Serve with Lemon Blueberry Zucchini Cake with Lemon Frosting

Looking to complement the vibrant flavors of this delightful cake? Let's build a full, mouthwatering spread together.

  • Creamy Mashed Potatoes: These buttery potatoes bring a comforting, velvety texture, offering a delightful contrast to the cake’s lightness.

  • Light Summer Salad: A refreshing mix of greens, cucumber, and a citrus vinaigrette enhances the cake's lemony notes, creating a harmonious balance.

  • Roasted Vegetables: Seasonal veggies roasted to caramelized perfection add earthy flavors, complementing the sweetness of the cake beautifully.

  • Chilled Lemonade: This classic drink with a zesty kick pairs perfectly, echoing the cake’s citrus essence while keeping things refreshingly cool.

  • Vanilla Ice Cream: A scoop of creamy ice cream melts deliciously when paired with warm slices of cake, amplifying the dessert experience to new heights.

  • Berry Compote: A tangy berry sauce drizzled over the cake heightens the fruity flavors, allowing every forkful to burst with summer freshness.

  • Sparkling Wine: A bubbly sip enhances gatherings and celebrations, and its crispness cuts through the sweetness, making each bite of cake even more enjoyable.

  • Chocolate Drizzle: Drizzling melted chocolate over slices introduces a rich element that pairs surprisingly well with the zest of lemon.

  • Almond Biscotti: This crunchy treat adds texture, while its nutty flavor harmonizes with the cake’s almond extract, creating a delightful tasting journey.

How to Store and Freeze Lemon Blueberry Zucchini Cake

  • Room Temperature: Store the cake at room temperature for 1 day, covered with a cake dome or plastic wrap to keep it moist, especially if serving soon.

  • Fridge: For longer storage, keep the Lemon Blueberry Zucchini Cake covered in the fridge for up to 3 days. This prevents drying and maintains its delightful taste.

  • Freezer: If you want to enjoy the cake later, wrap slices tightly in plastic wrap and then in aluminum foil. Freeze for up to 3 months. Thaw in the fridge overnight before enjoying!

  • Reheating: For a warm slice, reheat individual pieces in the microwave for 10-15 seconds. Enjoy it warm or at room temperature for the best experience!

Lemon Blueberry Zucchini Cake Variations

Feel free to get creative and personalize your Lemon Blueberry Zucchini Cake, making it uniquely yours!

  • Berry Swap: Replace blueberries with fresh raspberries or chopped strawberries for a delightful twist. The tartness of raspberries adds a unique zing that perfectly complements the lemon.

  • Nutty Flavor: Add chopped walnuts or pecans for a delightful crunch. The added texture will keep things interesting, almost like a surprise in every bite!

  • Omit Frosting: For a lighter option, skip the frosting and drizzle a simple glaze of lemon juice and powdered sugar instead. This keeps the flavors bright but cuts down on sweetness.

  • Vegan Version: Substitute eggs with a flax egg (1 tablespoon ground flax seeds mixed with 2.5 tablespoons water) for a plant-based twist. Enjoy the same gorgeous texture while catering to vegan friends.

  • Flour Variation: Swap gluten-free oat flour with almond flour for a denser cake. Just remember that the flavor profile will change slightly, adding more nuttiness.

  • Frozen Blueberries: Use frozen blueberries if fresh aren’t available. Make sure not to thaw them beforehand; they’ll hold their shape better, adding bursts of flavor as you bite through the cake.

  • Citrus Zing: Infuse the frosting with orange zest for an extra citrus kick. This combination of lemon and orange creates an unforgettable symphony of flavors that dances on your palate!

  • Spiced Delight: Add a pinch of cinnamon or nutmeg into the batter for a warm spice note. It’s like a cozy hug from the cake itself, perfect for enjoying with a cup of tea.

No matter which variation you choose, each option offers a unique spin on this scrumptious recipe. Don't forget to check out my favorite Cheesy Zucchini Bake for another delicious way to sneak in those zucchinis!

Expert Tips for Lemon Blueberry Zucchini Cake

  • Drain Well: Ensure you squeeze out as much moisture from the zucchini as possible; a watery batter can lead to a dense cake.

  • Use Fresh Blueberries: Fresh berries work best, but if using frozen blueberries, do not thaw them beforehand to prevent excess liquid in your Lemon Blueberry Zucchini Cake.

  • Check for Doneness: Ovens can vary; start checking for doneness a few minutes before the suggested baking time to prevent overbaking.

  • Cool Completely: Allow the cake to cool completely before frosting. If it’s warm, the lemon buttercream will melt and create a puddle rather than a beautiful frosted top.

  • Experiment with Flours: While almond flour is recommended, you can try combining different gluten-free flours to find your favorite texture, but be cautious with substitutions.

  • Store Properly: Keep the cake covered in the fridge for up to 2-3 days. This helps maintain its moisture and deliciousness for a longer time.

Make Ahead Options

These Lemon Blueberry Zucchini Cakes are perfect for meal prep enthusiasts! You can prepare the shredded zucchini and store it in the fridge for up to 3 days, ensuring it's well-drained to maintain the cake's moisture. Additionally, you can mix the dry ingredients (almond flour, oat flour, baking soda, and salt) and keep them in an airtight container for up to 24 hours. When you're ready to bake, simply combine the wet ingredients with the prepped dry mix, fold in the blueberries, and pour into the pan. Once baked and cooled, frost with the lemon buttercream, and enjoy a delightful, stress-free dessert that tastes just as delicious as if made fresh that day!

Lemon Blueberry Zucchini Cake with Lemon Frosting Recipe FAQs

How do I select the right zucchini for this cake?
Absolutely! When choosing zucchini, opt for ones that are firm and have smooth skin. Look for medium-sized zucchinis, as larger ones may contain more seeds and less flavor. I often check for those with a vibrant green hue and no dark spots. Freshly picked zucchinis are usually the sweetest and juiciest!

What’s the best way to store Lemon Blueberry Zucchini Cake?
Very! You can store the cake at room temperature for 1 day, covered with a cake dome or plastic wrap to keep it moist. For longer storage, keep it in the fridge for up to 3 days; this helps maintain its delightful taste and texture.

Can I freeze Lemon Blueberry Zucchini Cake?
Absolutely! To freeze your Lemon Blueberry Zucchini Cake, slice it first for convenience. Wrap each slice tightly in plastic wrap, then cover it with aluminum foil to prevent freezer burn. You can freeze it for up to 3 months. When you're ready to enjoy, simply thaw the slices in the fridge overnight.

What if my cake turns out too dense?
If your cake is dense, it might be due to excess moisture from the zucchini or overmixing the batter. Make sure to drain the zucchini well before adding it to your mix. When combining the dry and wet ingredients, gently fold them together until just mixed—overmixing can lead to a heavy texture.

Is this cake suitable for people with allergies?
The Lemon Blueberry Zucchini Cake is gluten-free, making it a great option for those with gluten sensitivities. However, it's worth noting that it contains eggs and may not be suitable for those with egg allergies. For a vegan version, you can replace the eggs with flax eggs (1 tablespoon ground flaxseed + 2.5 tablespoons water per egg) to maintain moisture and structure.

How long can I keep the frosting?
The lemon buttercream frosting can be stored in an airtight container in the fridge for about 1 week. If you have leftover frosting, make sure to bring it to room temperature before spreading it on your cake again for the best texture and flavor!

Lemon Blueberry Zucchini Cake with Lemon Frosting

Lemon Blueberry Zucchini Cake with Lemon Frosting Bliss

This Lemon Blueberry Zucchini Cake with Lemon Frosting is a guilt-free dessert bursting with citrus flavors and fresh blueberries.
Print Recipe Pin Recipe
Prep Time 15 minutes mins
Cook Time 35 minutes mins
Cooling Time 10 minutes mins
Total Time 1 hour hr
Servings: 12 slices
Course: Dessert
Cuisine: American
Calories: 180
Ingredients Equipment Method Nutrition Notes

Ingredients
  

For the Cake
  • 1 cup Shredded Zucchini Squeeze out excess moisture before using.
  • 3 large Eggs
  • 1/2 cup Honey Maple syrup can be used as a substitute.
  • 2 tablespoons Lemon Zest
  • 1/4 cup Lemon Juice
  • 1 teaspoon Almond Extract Can be replaced with vanilla extract.
  • 2 cups Almond Flour No direct substitutes recommended.
  • 1 cup Gluten-Free Oat Flour May substitute with gluten-free all-purpose flour.
  • 1 teaspoon Baking Soda
  • 1/2 teaspoon Salt
  • 1 cup Fresh Blueberries Toss in flour to prevent sinking.
For the Frosting
  • 1/2 cup Vegan Butter Can swap for regular butter.
  • 2 cups Powdered Sugar Add more lemon juice for extra citrus flavor.

Equipment

  • Mixing Bowl
  • 8x8-inch baking pan
  • Whisk
  • Parchment Paper
  • Spatula

Method
 

Step-by-Step Instructions
  1. Preheat your oven to 350°F (175°C). Line an 8x8 inch baking pan with parchment paper and spray with non-stick spray.
  2. Grate the zucchini and squeeze out excess moisture. This is crucial for a moist cake.
  3. In a large bowl, whisk together the zucchini, eggs, honey, lemon zest, lemon juice, and almond extract until smooth.
  4. Add almond flour, gluten-free oat flour, baking soda, and salt. Fold gently until just combined.
  5. Toss fresh blueberries in a tablespoon of gluten-free oat flour and fold into the batter carefully.
  6. Pour the batter into the prepared pan and bake for 30-35 minutes. A toothpick should come out clean.
  7. Let the cake cool in the pan for about 10 minutes, then transfer to a wire rack to cool completely before frosting.

Nutrition

Serving: 1sliceCalories: 180kcalCarbohydrates: 20gProtein: 4gFat: 8gSaturated Fat: 1gPolyunsaturated Fat: 1gMonounsaturated Fat: 5gCholesterol: 30mgSodium: 150mgPotassium: 200mgFiber: 2gSugar: 10gVitamin A: 500IUVitamin C: 5mgCalcium: 60mgIron: 1mg

Notes

Ensure to check the doneness a few minutes before the baking time is up. Allow it to cool completely before frosting for the best results.

Tried this recipe?

Let us know how it was!

Healthy Apple Pie Bars with Salted Peanut Butter Bliss

September 14, 2025 by Grace Snow Leave a Comment

As the leaves turn golden and the air becomes crisp, there’s nothing quite like the smell of fresh apples baking in the oven. That’s why I’m excited to share my Healthy Apple Pie Bars with Salted Peanut Butter Caramel—a delightful twist on a seasonal favorite. These bars combine sweet, spiced apples nestled within a buttery oat crumble, making them the perfect comfort food or snack. Not only are they gluten-free and vegan, but they also offer an easy, wholesome alternative to traditional desserts. With a rich caramel drizzle to crown each bite, these apple pie bars are sure to satisfy your cravings while keeping you on the healthy side. Have you ever tried a dessert that feels indulgent yet is actually good for you? Let’s dive in and change the way you think about fall treats!

Why Choose Healthy Apple Pie Bars?

Deliciously Unique: These apple pie bars feature a delectable combination of flavors, merging traditional apple pie with a modern health twist.
Healthy Indulgence: Enjoy the sweet satisfaction of dessert without the guilt—perfect for those mindful of their diet.
Versatile Options: Easily customized for gluten-free and vegan lifestyles, making them suitable for everyone!
Crowd-Pleasing Treat: Serve them warm or chilled; these bars are sure to impress family and friends alike. Pair with a scoop of vanilla ice cream or try these Smoky Sweet Potatoes for a complete meal!
Time-Saving Delight: With straightforward steps, you’ll have these ready in just over half an hour, letting you enjoy fall’s cozy flavors without a lengthy prep!

Apple Pie Bars Ingredients

• Dive into the wholesome goodness of Apple Pie Bars with Salted Peanut Butter Caramel!

For the Crust & Topping

  • Gluten-Free Oat Flour – Provides structure and a gluten-free base; replace with all-purpose flour if you prefer, but this will lose the gluten-free aspect.
  • Old-Fashioned Rolled Oats – Adds a chewy texture; be sure they are gluten-free for a completely gluten-free recipe.
  • Brown Sugar – Offers sweetness and moisture; coconut sugar can be a healthier swap, though texture may vary.
  • Ground Cinnamon – Infuses warmth and flavor; essential for traditional apple pie essence.
  • Baking Soda & Salt – Essential for rising and balancing sweetness; key for achieving a well-seasoned crust.
  • Butter (or Vegan Buttery Stick) – Creates richness and binds the crust together; swap with coconut oil for a dairy-free option.
  • Vanilla Extract – Enhances the overall flavor; this ingredient is non-negotiable for the best results.

For the Apple Filling

  • Honeycrisp Apples – The star ingredient! These apples lend sweetness and firmness; you can substitute with other firm varieties if needed.
  • Maple Syrup – Serves as a natural sweetener for the filling; agave syrup is a great alternative.
  • Cornstarch (or Arrowroot Starch) – Thickens the apple mixture; critical for achieving the right texture in your filling.

For the Salted Peanut Butter Caramel

  • Peanut Butter – Forms the base of your luscious caramel drizzle, adding creaminess; almond butter is a suitable alternative for different flavors or allergies.
  • Coconut Oil – Provides richness to the caramel; if you don't have it, more peanut butter or a neutral oil can work in a pinch.

Step‑by‑Step Instructions for Healthy Apple Pie Bars with Salted Peanut Butter Caramel

Step 1: Preheat the Oven
Begin by preheating your oven to 350°F (175°C). This key step sets the perfect baking environment for your Healthy Apple Pie Bars with Salted Peanut Butter Caramel. While the oven warms, you'll have time to prepare your baking pan and the crust mixture.

Step 2: Prepare the Baking Pan
Line an 8x8 inch baking pan with parchment paper, ensuring it hangs over the edges for easy removal. Lightly spray the parchment with nonstick cooking spray to prevent sticking. This preparation is crucial for achieving that clean, beautiful finish on your apple pie bars once baked.

Step 3: Make the Crust & Topping
In a large mixing bowl, combine gluten-free oat flour, rolled oats, brown sugar, ground cinnamon, baking soda, and salt. Pour in melted butter and vanilla extract, mixing everything until crumbly. Press about two-thirds of this mixture firmly into the bottom of your prepared pan and set the remaining crumble aside in the fridge to chill.

Step 4: Cook the Apple Filling
Heat a skillet over medium heat and melt butter (or a vegan buttery stick). Add sliced Honeycrisp apples, maple syrup, cinnamon, allspice, and nutmeg. Cook for 5-7 minutes until the apples soften slightly. Stir in vanilla and cornstarch, cooking until the mixture thickens and becomes syrupy—the irresistible aroma will fill your kitchen!

Step 5: Assemble the Bars
Pour the luscious apple filling evenly over the crust, spreading it out gently. Next, sprinkle the reserved crumble mixture on top, ensuring even coverage for a delightful texture. Bake in the preheated oven for 30-35 minutes, or until the edges are golden brown and the top is set.

Step 6: Prepare the Salted Peanut Butter Caramel
In a bowl, combine peanut butter, maple syrup, coconut oil, vanilla extract, and a pinch of salt. Microwave the mixture for about 30 seconds, then stir until smooth and well-blended. Allow it to cool slightly while the apple pie bars finish baking, then drizzle generously over the cooled bars for that delectable salted caramel touch.

Step 7: Slice and Serve
Once your Healthy Apple Pie Bars with Salted Peanut Butter Caramel have cooled, cut them into 16 squares. These delightful treats can be served warm or cold, making them a versatile option for snacks or dessert. Enjoy the comforting flavors and textures in every bite!

What to Serve with Healthy Apple Pie Bars with Salted Peanut Butter Caramel

As the aroma of spiced apples wafts through your kitchen, it’s easy to dream up the perfect spread to complement these delightful pie bars.

  • Vanilla Ice Cream: Creamy and cool, it perfectly melds with the warm spiced apple filling, creating a comforting contrast.
  • Whipped Coconut Cream: A light, airy topping that adds a hint of sweetness and captures the seasonal essence beautifully.
  • Homemade Granola: Sprinkle for a crunchy, nutty texture that enhances the bars’ soft, tender filling with a wholesome twist.
  • Chai Tea: The warm spices of chai enhance the flavors of the bars, making for a cozy pairing on a crisp autumn day.
  • Caramelized Pecans: Their rich, nutty flavor mirrors the peanut butter drizzle, adding a delightful crunch with each bite.
  • Maple Syrup Drizzle: A bit more sweetness elevates the flavors, giving extra depth to your already delicious dessert.
  • Cinnamon Sugar Dusting: A light sprinkle transforms the bars into an even more inviting treat, intensifying the cozy fall vibe.
  • Cider: Warm apple cider or a spiced variation brings a seasonal refreshment alongside your comforting dessert.

Apple Pie Bars with Salted Peanut Butter Caramel Variations

Feel free to let your creativity shine and customize these delightful bars to suit your taste and dietary needs!

  • Gluten-Free: Replace all-purpose flour with gluten-free oat flour to keep the bars deliciously gluten-free without sacrificing flavor.

  • Vegan: Use a vegan buttery stick and substitute maple syrup for agave syrup to ensure this treat is entirely plant-based. This way, everyone can indulge!

  • Nut-Free: Switch peanut butter for sunflower seed butter, making these deliciously safe for school lunches or nut-sensitive gatherings.

  • Fruit Swaps: Experiment with apples! Try tart Granny Smith apples for a zesty kick or sweet Fuji apples for a softer flavor profile. Mixing different varieties can bring a delightful complexity.

  • Crunchy Texture: Add chopped walnuts or pecans into the crust for extra crunch and flavor. Just remember to toast them first for a richer taste!

  • Extra Spices: Boost the flavor by adding a pinch of nutmeg or ginger to the apple filling. This warm spice twist creates a cozy, inviting aroma reminiscent of fall nights.

  • Lower Sugar: For a healthier version, reduce the maple syrup or use a stevia-based sweetener. You can still enjoy our Crockpot Butter Chicken without the added sweetness!

  • Chocolate Twist: Drizzle melted dark chocolate over the cooled bars for an indulgent touch that pairs perfectly with the salted caramel. Why not make it a little more decadent?

Explore these variations to make the recipe truly your own, and don’t hesitate to share your unique creations!

Expert Tips for Apple Pie Bars

  • Crust Consistency: Ensure to press the crust mixture firmly into the pan for a sturdy base and prevent it from crumbling.
  • Avoid Overcooking Apples: Cook the apples just until softened; overcooking can lead to mushy filling, compromising texture in your apple pie bars.
  • Dairy-Free Option: Substitute butter with coconut oil and use a vegan buttery stick to maintain the flavor while keeping the recipe vegan.
  • Check Sweetness Levels: Taste your apple filling as you cook; adjust the maple syrup to suit your sweetness preference.
  • Cool Before Slicing: Let bars cool completely before slicing to ensure clean cuts and maintain structure when serving.

How to Store and Freeze Apple Pie Bars with Salted Peanut Butter Caramel

  • Room Temperature: Store the apple pie bars in a cool, dry place for up to 2 days, wrapped in parchment paper, to keep them fresh and soft.

  • Fridge: For optimal freshness, refrigerate the bars in an airtight container for up to 5 days. This helps preserve their delightful texture and flavors.

  • Freezer: Freeze the apple pie bars for up to 3 months. Wrap them tightly in plastic wrap followed by aluminum foil, ensuring no air can affect their taste.

  • Reheating: For a warm treat, simply microwave the bars for 10-15 seconds, allowing the salted peanut butter caramel to soften and become gooey once again.

Make Ahead Options

These Healthy Apple Pie Bars with Salted Peanut Butter Caramel are perfect for meal prep enthusiasts! You can prepare the crust and topping up to 24 hours in advance by mixing the dry ingredients and refrigerating the crumbly mixture until you're ready to bake. The apple filling can also be made and stored in the refrigerator for up to 3 days—just ensure it's tightly covered to prevent browning. When you're ready to serve, simply assemble the bars by pouring the filling over the crust, topping with the reserved crumble, and baking as directed. The bars will come out just as delicious, making your busy weeknights a breeze with this delightful, make-ahead dessert!

Healthy Apple Pie Bars with Salted Peanut Butter Caramel Recipe FAQs

How do I choose the best apples for my bars?
Absolutely! For the best flavor and texture, I recommend using Honeycrisp apples, as they provide the right balance of sweetness and firmness. However, you can also try Granny Smith apples for a tart contrast or any other firm variety of apples you enjoy. Just remember to avoid soft or mealy apples!

How should I store the apple pie bars after baking?
Very! To keep your Healthy Apple Pie Bars with Salted Peanut Butter Caramel fresh, store them in an airtight container in the refrigerator for up to 5 days. If you prefer to keep them at room temperature, wrap them in parchment paper; they’ll stay soft for about 2 days.

Can I freeze the apple pie bars?
Yes, indeed! To freeze your apple pie bars, wrap them tightly in plastic wrap, then in aluminum foil to prevent freezer burn. They can be stored for up to 3 months. When you’re ready to enjoy, simply thaw them overnight in the refrigerator or reheat them directly from the freezer in the microwave for a warm treat.

What should I do if my crust is crumbly or too dry?
If your crust turns out crumbly, don’t fret! Simply add a bit more melted butter or coconut oil to the mixture, incorporating one tablespoon at a time until you achieve a moister consistency. Remember to press it firmly into the pan, as this will help give it a better structure when baked.

Can I make these bars vegan and gluten-free?
Absolutely! I’ve designed the recipe to be adaptable. You can easily keep the bars vegan by using coconut oil instead of butter and a vegan buttery stick. Also, just make sure to select gluten-free oats and oat flour to maintain the gluten-free attribute. These modifications will ensure everyone can enjoy this delicious treat!

Apple Pie Bars with Salted Peanut Butter Caramel

Healthy Apple Pie Bars with Salted Peanut Butter Bliss

Enjoy these Apple Pie Bars with Salted Peanut Butter Caramel for a wholesome yet indulgent seasonal dessert.
Print Recipe Pin Recipe
Prep Time 20 minutes mins
Cook Time 35 minutes mins
Total Time 55 minutes mins
Servings: 16 squares
Course: Dessert
Cuisine: American
Calories: 150
Ingredients Equipment Method Nutrition Notes

Ingredients
  

For the Crust & Topping
  • 1 cup Gluten-Free Oat Flour Can replace with all-purpose flour for non-gluten-free
  • 1 cup Old-Fashioned Rolled Oats Ensure gluten-free
  • 1/2 cup Brown Sugar Coconut sugar can be a substitute
  • 1 teaspoon Ground Cinnamon Essential for flavor
  • 1/2 teaspoon Baking Soda For rising
  • 1/4 teaspoon Salt Balances sweetness
  • 1/2 cup Butter (or Vegan Buttery Stick) Replace with coconut oil for dairy-free
  • 1 teaspoon Vanilla Extract Important for flavor
For the Apple Filling
  • 4 cups Honeycrisp Apples Can substitute with other firm varieties
  • 1/4 cup Maple Syrup Agave syrup is a substitute
  • 2 tablespoons Cornstarch (or Arrowroot Starch) Thickens filling
For the Salted Peanut Butter Caramel
  • 1/2 cup Peanut Butter Almond butter can be used
  • 1/4 cup Coconut Oil Use more peanut butter or a neutral oil if unavailable

Equipment

  • 8x8-inch baking pan
  • Skillet
  • Mixing Bowl
  • Microwave

Method
 

Preparation
  1. Preheat the oven to 350°F (175°C).
  2. Line an 8x8 inch baking pan with parchment paper and spray it with nonstick cooking spray.
  3. Combine oat flour, rolled oats, brown sugar, cinnamon, baking soda, and salt in a bowl. Mix in melted butter and vanilla until crumbly. Press two-thirds into the pan.
  4. In a skillet over medium heat, melt butter, add sliced apples, maple syrup, cinnamon. Cook for 5-7 mins, stir in vanilla and cornstarch, and thicken.
  5. Spread apple filling over the crust and sprinkle with remaining crumble mix. Bake for 30-35 mins until golden brown.
  6. Mix peanut butter, maple syrup, coconut oil, and salt in a bowl. Microwave for 30 seconds, stir until smooth, and cool slightly before drizzling on the bars.
  7. Once cooled, slice into squares and serve warm or cold.

Nutrition

Serving: 1squareCalories: 150kcalCarbohydrates: 20gProtein: 3gFat: 7gSaturated Fat: 2gPolyunsaturated Fat: 1gMonounsaturated Fat: 4gSodium: 50mgPotassium: 150mgFiber: 2gSugar: 8gVitamin A: 100IUVitamin C: 5mgCalcium: 30mgIron: 1mg

Notes

Press the crust firmly to prevent crumbling. Avoid overcooking apples for better texture. Use dairy-free substitutes to keep the recipe vegan. Allow bars to cool completely before slicing for clean cuts.

Tried this recipe?

Let us know how it was!

Delicious Pumpkin Pie Bars Perfect for Fall Gatherings

September 6, 2025 by Grace Snow Leave a Comment

As the leaves begin to crunch beneath my feet and the air turns crisp, I can’t help but think of cozy gatherings filled with laughter and, of course, delicious desserts. Enter my Cozy Pumpkin Pie Bars! This delightful recipe transforms the classic flavors of pumpkin pie into a portable treat that everyone will love. With a buttery brown sugar crust and a silky pumpkin filling, they bring warmth to any fall gathering. Not only are these bars easy to bake, making them perfect for busy weekends, but they also deliver a satisfying balance of textures, especially when topped with a tangy sour cream whip. Trust me, there’s nothing like sharing them with friends and family when the chill sets in. So, are you ready to bring the taste of autumn to your kitchen?

Why are Pumpkin Pie Bars a must-try?

Irresistible Comfort: These Pumpkin Pie Bars offer the traditional warmth of pumpkin pie, reimagined into a delectable, easy-to-eat format perfect for sharing.

Quick and Simple: With straightforward steps, even novice bakers can whip up these treats with just a handful of ingredients.

Delightful Flavor: The combination of creamy pumpkin spice filling and buttery crust creates a rich, festive profile that resonates with the essence of fall.

Versatile Options: Feel free to customize by adding chocolate chips or swapping sour cream for a dollop of whipped cream for varied presentations. You can also enjoy them alongside a slice of Pumpkin Cinnamon Roll for a truly indulgent experience!

Perfect for Gatherings: Whether at family dinners or friend get-togethers, these bars are a hit, ensuring there's never a crumb left behind!

Pumpkin Pie Bars Ingredients

For the Crust

  • Butter – Provides richness and flavor for the crust; can be substituted with margarine or a dairy-free alternative.
  • Light Brown Sugar – Adds sweetness and a deep caramel flavor to the crust; can be replaced with dark brown sugar for a more intense flavor.
  • All-Purpose Flour – Forms the structure of the crust; whole wheat flour can be used for a nuttier taste.
  • Salt – Enhances flavor; optional to reduce for low-sodium diets.

For the Filling

  • Pumpkin Puree – The main ingredient for the filling that adds moisture and flavor; fresh pumpkin can be used as a substitute.
  • Eggs – Provide binding and help set the filling; flax eggs can be used as a vegan alternative.
  • Pumpkin Spice – Offers classic fall flavors; can be substituted with a mix of cinnamon and nutmeg.

For the Topping

  • Sour Cream (optional) – Adds creaminess and a slight tang; can be swapped with Greek yogurt for a lower-fat option.
  • Confectioners’ Sugar – Sweetens the sour cream whip; can be replaced with maple syrup for a lower-sugar option.

Step‑by‑Step Instructions for Pumpkin Pie Bars

Step 1: Preheat the Oven and Prepare the Pan
Begin by preheating your oven to 350°F (175°C), setting the stage for your delicious Pumpkin Pie Bars. While the oven warms, grab a 9" x 13" baking pan and lightly grease it with butter or non-stick spray. For extra ease, line the bottom and sides with parchment paper, allowing for easy removal of the bars once baked.

Step 2: Make the Crust Mixture
In a large mixing bowl, cream together ½ cup of softened butter and 1 cup of light brown sugar until the mixture is smooth and well combined—this should take about 2-3 minutes. Next, sprinkle in 1 ¾ cups of all-purpose flour and a pinch of salt, mixing until the dough appears crumbly yet holds together when pressed. This forms the base of your luscious Pumpkin Pie Bars.

Step 3: Press the Crust into the Pan
Transfer the crust mixture into the prepared baking pan, using your fingers or a spatula to evenly press it down into the bottom. Make sure to create a snug, compact layer for even baking. Once pressed, take a fork and poke holes throughout the crust—this will help it bake evenly and avoid puffing up.

Step 4: Bake the Crust
Place the pan in your preheated oven and bake the crust for 28-32 minutes, or until it turns golden brown and slightly firm to the touch. Keep an eye on it, as the aroma of Pumpkin Pie Bars fills your kitchen! Once baked, remove the pan and allow it to cool slightly while you prepare the filling.

Step 5: Prepare the Pumpkin Filling
In a separate mixing bowl, whisk together 1 cup of pumpkin puree, 2 large eggs, ¾ cup of granulated sugar, and 1 tablespoon of pumpkin spice until well blended and smooth. The filling should have a velvety texture, ensuring a delightful experience when layered over the crust of your Pumpkin Pie Bars.

Step 6: Pour the Filling Over the Crust
Carefully pour the prepared pumpkin filling over the slightly cooled crust, spreading it evenly with a spatula. This contrast of the rich filling on the golden crust is simply irresistible! Gently tap the pan on the counter to release any air bubbles trapped in the filling, ensuring a silky result.

Step 7: Bake the Bars
Return the pan to the oven and bake the Pumpkin Pie Bars for an additional 32-35 minutes. You’ll know they're done when the filling is set and has a slight jiggle in the center; it should also take on a beautiful golden hue. Watch closely to prevent overbaking, as the filling should remain creamy.

Step 8: Cool and Cut the Bars
Once baked, remove the pan from the oven and let it cool on a wire rack for at least 30 minutes, allowing the flavors to meld beautifully. Carefully lift the bars out using the parchment paper, and place them on a cutting board. Cut into squares or rectangles, and feel the excitement build for serving your delightful Pumpkin Pie Bars.

Step 9: Serve with a Topping
For an extra touch, whip up a sour cream topping by mixing 1 cup of sour cream with ¼ cup of confectioners’ sugar until smooth. Serve your Pumpkin Pie Bars with a dollop of this topping on each slice or sprinkle them with a dash of pumpkin spice for that festive flair. Enjoy the cozy flavors of fall with every bite!

Make Ahead Options

These Pumpkin Pie Bars are a fantastic option for meal prep! You can make them up to 24 hours in advance, which saves you time for busy weeknights or gatherings. To prep ahead, bake the crust and let it cool, then prepare the pumpkin filling and pour it over the crust—wrap the pan tightly with plastic wrap and refrigerate until you’re ready to bake. When you're ready to serve, simply bake the bars as directed. For optimal flavor and texture, cool the bars completely before slicing; they’ll be just as delicious, providing you with a delightful treat effortlessly!

How to Store and Freeze Pumpkin Pie Bars

Fridge: Store leftover Pumpkin Pie Bars covered in plastic wrap or in an airtight container for up to 5 days to keep them fresh and moist.

Freezer: For longer storage, wrap individual bars tightly in plastic wrap and place them in a freezer-safe bag. They can be frozen for up to 3 months; just thaw overnight in the fridge before enjoying.

Reheating: Warm bars in the microwave for about 10-15 seconds or in a preheated oven at 350°F (175°C) for 5-10 minutes to revive their buttery texture and flavor.

Serving Suggestions: Incorporate a dash of pumpkin spice while serving; this enhances the cozy autumn flavor, making every bite even more delightful!

What to Serve with Pumpkin Pie Bars

As autumn's cozy embrace invites gatherings around the table, these delicious bars deserve the perfect companions to match their warm, flavorful essence.

  • Vanilla Ice Cream: A scoop melts perfectly atop the warm bars, providing a delightful contrast of temperature and rich creaminess to each bite.

  • Spiced Apple Cider: This warm, cinnamon-infused drink enhances the fall flavor profile, making it a comforting match for family and friends.

  • Whipped Cream: A dollop on top adds airiness and sweetness, complementing the dense pumpkin filling while enhancing the nostalgic vibe of classic desserts.

  • Chai Tea: With its spiced warmth, chai tea complements the pumpkin spice flavors beautifully and creates a relaxing atmosphere for autumn gatherings.

  • Ginger Snap Cookies: These crunchy treats bring a delightful spiciness and texture that harmonizes with the soft, creamy texture of the Pumpkin Pie Bars.

  • Fresh Fruit Salad: A refreshing mix of seasonal fruits, like pears and apples, adds a juicy brightness, balancing the richness of the bars.

Pumpkin Pie Bars Variations & Substitutions

Customize your Pumpkin Pie Bars to suit your taste and dietary needs—let your creativity flow with these delightful twists!

  • Dairy-Free: Use coconut oil instead of butter and almond milk yogurt in place of sour cream for a creamy texture without dairy.

  • Gluten-Free: Swap all-purpose flour with a gluten-free blend to cater to those with gluten sensitivities while maintaining that satisfying crust.

  • Vegan: Replace eggs with a flax egg (1 tablespoon flaxseed meal mixed with 2.5 tablespoons water) and use a dairy-free alternative for other ingredients.

  • Spice it Up: Try adding a dash of cayenne or black pepper to the pumpkin filling for those who enjoy a hint of heat in their desserts. This unexpected twist can surprise and delight your taste buds!

  • Nutty Flavor: Incorporate finely chopped pecans or walnuts into the crust to enhance the texture and add a delightful crunch.

  • Chocolate Lovers: Mix in a cup of semi-sweet chocolate chips into the filling for a rich and decadent variation—who can resist chocolate and pumpkin combined?

  • Fruit Fusion: Swap half of the pumpkin puree with unsweetened applesauce; this adds a natural sweetness while keeping the bars moist and flavorful.

  • Sweet Topping: Instead of sour cream, top with a dollop of whipped cream or vanilla ice cream for a delightful finish. You could even drizzle a little caramel sauce for an extra special treat! Explore more indulgent flavors like Pumpkin Brownies Decadent for your gatherings!

Expert Tips for Pumpkin Pie Bars

Even Crust: Ensure you press the crust mixture evenly into the pan to avoid uneven baking, resulting in perfectly golden bars.

Monitor Baking: Watch the bars closely during the final bake; the filling should be set but slightly jiggly in the center to ensure a creamy texture.

Cool Completely: Always let the Pumpkin Pie Bars cool fully before cutting; this helps achieve clean edges and prevents them from crumbling.

Use Room Temperature Ingredients: Bring your eggs and butter to room temperature for smoother mixing, which leads to a better overall texture in your bars.

Test for Doneness: Use a toothpick to test the filling; it should come out mostly clean, indicating that your bars are baked to perfection while maintaining that luscious filling.

Pumpkin Pie Bars Recipe FAQs

What is the best way to select pumpkin puree?
When choosing pumpkin puree, look for pure canned pumpkin without added sugars or spices. If opting for fresh pumpkin, pick a sugar pumpkin or pie pumpkin as they have a sweeter taste and smoother texture. Ensure it feels firm and heavy for its size, with no dark spots or wrinkles on the skin.

How should I store leftover Pumpkin Pie Bars?
To store leftover Pumpkin Pie Bars, cover them with plastic wrap or place them in an airtight container. They can be kept in the refrigerator for up to 5 days. For best texture, allow them to cool completely before storing to avoid excess moisture buildup.

Can I freeze Pumpkin Pie Bars?
Absolutely! To freeze your Pumpkin Pie Bars, wrap each bar tightly in plastic wrap and place them in a freezer-safe bag. They can be kept in the freezer for up to 3 months. When you’re ready to enjoy them, simply thaw overnight in the fridge, then reheat in the microwave or oven as needed.

How can I troubleshoot a watery filling?
If your filling turns out watery, it might be due to excess moisture in the pumpkin puree. Always drain fresh pumpkin before using it, or if using canned puree, choose a brand that is labeled "pure pumpkin." Additionally, make sure to measure the ingredients accurately; too much liquid can affect texture.

Can I modify this recipe for dietary restrictions?
Certainly! For a dairy-free version, substitute butter with margarine or coconut oil, and use plant-based sour cream or yogurt. If you’re avoiding eggs, flax eggs (1 tablespoon ground flaxseed mixed with 2.5 tablespoons water per egg) work well as a binding agent. Always ensure that other ingredients are free from allergens based on personal dietary needs.

How long do pumpkin bars typically last?
When stored properly, Pumpkin Pie Bars can last up to 5 days in the refrigerator, and up to 3 months in the freezer. For optimal freshness and flavor, consume them within these timeframes to enjoy the delightful taste of pumpkin spice at its best.

Pumpkin Pie Bars

Delicious Pumpkin Pie Bars Perfect for Fall Gatherings

These Pumpkin Pie Bars are a delightful and portable treat that captures the essence of fall in every bite.
Print Recipe Pin Recipe
Prep Time 30 minutes mins
Cook Time 1 hour hr 5 minutes mins
Cooling Time 30 minutes mins
Total Time 2 hours hrs 5 minutes mins
Servings: 12 bars
Course: Dessert
Cuisine: American
Calories: 200
Ingredients Equipment Method Nutrition Notes

Ingredients
  

For the Crust
  • 0.5 cups Butter softened
  • 1 cups Light Brown Sugar
  • 1.75 cups All-Purpose Flour
  • 1 teaspoon Salt optional
For the Filling
  • 1 cups Pumpkin Puree
  • 2 large Eggs
  • 0.75 cups Granulated Sugar
  • 1 tablespoon Pumpkin Spice
For the Topping
  • 1 cups Sour Cream optional
  • 0.25 cups Confectioners’ Sugar

Equipment

  • 9" x 13" baking pan
  • Mixing bowls
  • Spatula
  • Whisk
  • Parchment Paper

Method
 

Step‑by‑Step Instructions for Pumpkin Pie Bars
  1. Preheat the oven to 350°F (175°C) and prepare a 9" x 13" baking pan.
  2. In a large mixing bowl, cream together ½ cup butter and 1 cup brown sugar until smooth. Add 1.75 cups flour and a pinch of salt, mixing until crumbly.
  3. Press the crust mixture evenly into the prepared pan and poke holes with a fork.
  4. Bake the crust for 28-32 minutes until golden brown.
  5. In a separate bowl, whisk together 1 cup pumpkin puree, 2 eggs, ¾ cup granulated sugar, and 1 tablespoon pumpkin spice.
  6. Pour the pumpkin filling over the slightly cooled crust and spread evenly.
  7. Bake the bars for an additional 32-35 minutes until the filling is set.
  8. Let the bars cool on a wire rack for at least 30 minutes before cutting.
  9. For topping, mix 1 cup sour cream with ¼ cup confectioners’ sugar until smooth.

Nutrition

Serving: 1barCalories: 200kcalCarbohydrates: 28gProtein: 2gFat: 9gSaturated Fat: 5gCholesterol: 40mgSodium: 150mgPotassium: 150mgFiber: 2gSugar: 12gVitamin A: 100IUVitamin C: 2mgCalcium: 2mgIron: 6mg

Notes

These bars can be customized with chocolate chips or enjoyed with a slice of Pumpkin Cinnamon Roll. Monitor baking closely to ensure a creamy texture.

Tried this recipe?

Let us know how it was!

Delicious Pear and Almond Cake: A Simple Elegant Delight

September 6, 2025 by Grace Snow Leave a Comment

There’s something magical about the combination of juicy pears and nutty almonds that transports me to a cozy afternoon in a sun-dappled kitchen. This Pear and Almond Cake is not only a feast for the senses but is also an effortlessly elegant dessert that anyone can master, whether you’re a seasoned pro or just starting out in the world of baking. With a rich texture and a delightful sweetness from the fresh pears, this cake is the perfect solution for those looking to elevate their dessert game without spending hours in the kitchen. Plus, it’s gluten-free, making it a fabulous choice for a variety of dietary needs. Ready to impress your family and friends? Let’s dive into this simple yet irresistible recipe that will leave you craving seconds!

Why Is Pear and Almond Cake So Special?

Simplicity: This recipe is a breeze, requiring minimal ingredients and straightforward steps.

Rich, Nutty Flavor: The blend of almond extract and fresh pears creates a beautifully balanced taste that tantalizes your palate.

Versatile: Tailor it to your liking! Swap pears for apples or add a sprinkle of cinnamon for a seasonal twist.

Guilt-Free Indulgence: This cake is not just delicious but also caters to gluten-free needs, so everyone can enjoy a slice.

Crowd-Pleaser: Whether it's a family gathering or a special occasion, this cake promises to impress with its elegant appearance and delightful flavors. Imagine serving it with a scoop of vanilla ice cream or a dollop of whipped cream—it’s a guaranteed hit! If you’re interested in more delightful desserts, check out this Chocolate Pudding Cake for another simple yet indulgent treat.

Pear and Almond Cake Ingredients

• Discover the perfect mix of flavors!

For the Cake Base

  • Almond Flour – Provides a rich, buttery texture; substitute with all-purpose flour for a non-gluten-free version.
  • All-Purpose Flour – Adds structure to the cake; can be replaced with a gluten-free flour mix if needed.
  • Baking Powder – Acts as a leavening agent to help the cake rise; make sure it's fresh for best results.
  • Salt – Enhances flavor; never skip this crucial component for a balanced taste.
  • Sugar – Sweetens the cake; consider using brown sugar for a richer flavor.
  • Butter – Creates a tender crumb; unsalted butter is recommended to control sweetness.
  • Eggs – Provides moisture and structure; using room temperature eggs ensures even mixing.
  • Almond Extract – Adds distinctive almond flavor; vanilla extract can be used as a substitute.

For the Topping

  • Pears – Fresh fruit adds moisture and sweetness; apples can be used as a substitute if desired.
  • Lemon Juice – Balances the pears' sweetness; always opt for fresh lemon juice for the best result.

For Serving

  • Confectioners’ Sugar – For dusting before serving; optional but enhances the presentation beautifully.

Step‑by‑Step Instructions for Pear and Almond Cake

Step 1: Preheat the Oven and Prepare the Pan
Begin by preheating your oven to 350°F (175°C). While it heats, take a 9-inch round cake pan and line the bottom with parchment paper. Lightly butter the sides of the pan to prevent sticking. This preparation ensures your Pear and Almond Cake comes out perfectly shaped and ready for baking.

Step 2: Mix the Dry Ingredients
In a medium mixing bowl, sift together the almond flour, all-purpose flour, baking powder, and salt. Whisk these ingredients until well combined, allowing the baking powder to distribute evenly for optimal rise. This mixture lays the foundation for a light and fluffy Pear and Almond Cake, so take your time to get it just right.

Step 3: Cream the Butter and Sugar
In a stand mixer, combine the butter and sugar, beating them together on medium speed for about 2 minutes, or until the mixture is light and fluffy. You’ll know it’s ready when it has a pale color and a creamy texture. This step is crucial as it creates the cake's tender crumb and helps to incorporate air into your Pear and Almond Cake batter.

Step 4: Incorporate the Eggs and Almond Extract
Add the eggs one at a time to the creamed butter and sugar, mixing well after each addition. Then, pour in the almond extract and combine until everything is fully incorporated. This process not only adds moisture but also infuses your batter with that delicious almond flavor that makes the Pear and Almond Cake so special.

Step 5: Combine Dry and Wet Ingredients
Gradually add the dry ingredient mixture to the wet ingredients. Mix on low speed until just combined, being careful not to overmix; the batter should be smooth but slightly lumpy. Scrape down the sides of the bowl to ensure everything is well incorporated. This step creates the perfect texture for your Pear and Almond Cake.

Step 6: Transfer the Batter to the Cake Pan
Pour the batter into your prepared cake pan, using a spatula to spread it evenly across the bottom. This ensures that the cake will bake uniformly, giving you a beautiful rise and even texture. The rich mix of almond and pear will soon transform into a delightful treat.

Step 7: Prepare the Pear Topping
Chop your fresh pears and toss them gently with lemon juice and a pinch of salt. This not only enhances their flavor but also prevents browning. Distribute the pear mixture evenly over the cake batter, ensuring that each slice of your Pear and Almond Cake will be bursting with juicy sweetness.

Step 8: Sprinkle and Bake
Sprinkle a light layer of granulated sugar over the top of the pears. Place the cake in the preheated oven and bake for 40 to 45 minutes, or until a toothpick inserted into the center comes out clean. The cake should have a lovely golden color, indicating it’s baked through.

Step 9: Cool the Cake
Once baked, remove the Pear and Almond Cake from the oven and let it cool in the pan for about 20 minutes. Afterward, take it out of the pan and transfer it to a wire rack to cool completely. This cooling period helps set the cake's structure, ensuring perfect slices when you’re ready to serve.

Step 10: Final Touch and Serve
Before serving, dust the cooled cake with confectioners' sugar for an elegant finish. The light coating contrasts beautifully with the juicy pears and almond flavor. Your Pear and Almond Cake is now ready to be enjoyed—consider pairing it with a dollop of whipped cream or a scoop of vanilla ice cream for an extra special treat!

What to Serve with Pear and Almond Cake

Indulging in this luscious cake is just the beginning; the perfect accompaniments will elevate your dessert experience to new heights!

  • Whipped Cream: A dollop of freshly whipped cream adds a light, airy touch, beautifully balancing the richness of the cake with its creamy texture.

  • Vanilla Ice Cream: Serve with a scoop of classic vanilla ice cream for a delightful contrast of temperatures that enhances the sweet almond and pear flavors.

  • Fresh Berries: Bright, juicy berries provide a tart zing that cuts through the sweetness, adding a vibrant aesthetic to your dessert spread.

  • Chocolate Sauce: Drizzling a bit of warm chocolate sauce over the cake brings a luxurious decadence, taking your taste buds on a delightful journey.

  • Spiced Chai Tea: A warm cup of spiced chai tea complements the cake wonderfully, as the aromatic spices enhance the almond and pear notes.

  • Sliced Almonds: Scatter toasted almond slivers on top for an extra nutty crunch; their toasty flavor pairs beautifully with this elegant dessert.

  • Caramel Drizzle: A touch of caramel sauce adds a rich and buttery sweetness that works in harmony with the cake’s moist texture.

  • Cinnamon-Dusted Pears: Serve alongside lightly sautéed pears sprinkled with cinnamon to echo the cake’s flavors and boost the fruit's natural sweetness.

Storage Tips for Pear and Almond Cake

Room Temperature: Keep your leftover Pear and Almond Cake wrapped in plastic wrap or stored in an airtight container at room temperature for up to 3 days. This helps maintain its delightful texture and taste.

Fridge: If you wish to extend its freshness, store the cake in the fridge for up to a week. Ensure it's tightly wrapped to prevent it from drying out and absorbing any odors.

Freezer: For longer storage, freeze the cake by slicing it and wrapping each slice in plastic wrap, then placing them in a freezer-safe bag. It can be frozen for up to 3 months.

Reheating: To enjoy your frozen Pear and Almond Cake, simply thaw overnight in the fridge. Reheat in the oven at 350°F for about 10 minutes, or until warmed through, to bring back its lovely texture.

Variations & Substitutions for Pear and Almond Cake

Feel free to explore creative twists and adaptations of the Pear and Almond Cake to suit your preferences and pantry staples!

  • Dairy-Free: Substitute butter with coconut oil or vegan butter for a delightful dairy-free version.

  • Gluten-Free: Use almond flour exclusively or a gluten-free flour blend to create a cake everyone can enjoy.

  • Fruit Swap: Replace pears with apples or even peaches for a fresh take; each fruit brings its unique sweetness!

  • Nutty Addition: Fold in some chopped walnuts or pecans for an extra crunch that complements the tender cake beautifully.

  • Spice It Up: Add a touch of cinnamon or nutmeg to the batter for a warm, inviting flavor profile, perfect for cozy gatherings.

  • Chocolate Lovers: For a decadent twist, swirl melted chocolate or cocoa powder into the batter, transforming it into a rich chocolate-pear delight.

  • Zesty Touch: Incorporate lemon or orange zest into the batter for a refreshing citrusy flavor that brightens the cake.

  • Icing Finish: Elevate your cake with a thin layer of cream cheese frosting or a light glaze made from powdered sugar and almond milk for added sweetness.

Each variation offers the chance to personalize your Pear and Almond Cake experience. If you’re seeking additional dessert ideas, I recommend checking out this irresistible Chocolate Pudding Cake for another sweet delight!

Make Ahead Options

These Pear and Almond Cake preparations are perfect for busy home cooks looking to save time! You can prepare the cake batter up to 24 hours in advance by mixing the dry and wet ingredients separately, then combining them just before you're ready to bake. The chopped pears can also be prepped ahead; toss them with lemon juice and store them in the refrigerator for up to 3 days. To maintain quality, keep the batter covered tightly to prevent it from drying out. When you're ready to bake, simply pour the batter into the prepared pan, add the prepped pears, and follow the baking instructions for delightful, fresh results that taste just as good as if made on the spot!

Expert Tips for Pear and Almond Cake

  • Room Temperature Ingredients: Ensure all ingredients, especially eggs and butter, are at room temperature to achieve a smooth batter and even texture.

  • Avoid Overmixing: Mix the batter until just combined. Overmixing can result in a tough cake rather than a light and tender Pear and Almond Cake.

  • Freshness Matters: Use fresh baking powder to ensure the cake rises properly. Stale baking powder can result in a dense cake that lacks fluffiness.

  • Peel Pears Carefully: Peel and chop pears evenly to ensure they cook properly and distribute sweetness throughout the cake.

  • Cooling is Key: Allow the cake to cool completely before dusting with confectioners' sugar; warm cakes can cause the sugar to melt, diminishing visual appeal.

Pear and Almond Cake Recipe FAQs

What type of pears should I use for the Pear and Almond Cake?
I recommend using ripe but firm pears such as Bartlett or Bosc, as they add moisture and sweetness without falling apart during baking. If you see any dark spots, it's time to use them before they spoil. If pears aren't available, apples can serve as a delicious alternative.

How should I store leftover Pear and Almond Cake?
Store your leftover cake wrapped in plastic wrap or an airtight container at room temperature for up to 3 days. If you'd like to keep it longer, the cake can be refrigerated for up to a week; just be sure it's tightly wrapped to prevent drying out.

Can I freeze the Pear and Almond Cake?
Absolutely! For freezing, slice the cake and individually wrap each slice in plastic wrap, then place them into a freezer-safe bag. It can be frozen for up to 3 months. When you're ready to enjoy, simply thaw it overnight in the fridge and reheat in the oven at 350°F for about 10 minutes to restore its wonderful texture.

What should I do if my cake turns out too dense?
If your Pear and Almond Cake is dense, it may be due to overmixing the batter. Mixing until just combined is key to a light texture. Ensure your baking powder is fresh as well, as stale leavening agents can contribute to a heavy cake.

Is this Pear and Almond Cake suitable for gluten-free diets?
Yes! You can easily make this cake gluten-free by substituting the all-purpose flour with a gluten-free flour blend. Just ensure all your other ingredients, especially the baking powder, are certified gluten-free to accommodate dietary preferences.

Can my pets enjoy any part of this Pear and Almond Cake?
While dogs can have small amounts of plain cake, it’s best to keep them away from this recipe since it includes sugar and almond extract, which are not suitable for pets. Always consult with your vet if you're unsure about sharing human food with your furry friends.

Pear and Almond Cake

Delicious Pear and Almond Cake: A Simple Elegant Delight

Enjoy the delightful combination of juicy pears and nutty almonds in this Pear and Almond Cake, a simple and elegant gluten-free dessert.
Print Recipe Pin Recipe
Prep Time 15 minutes mins
Cook Time 45 minutes mins
Cooling Time 20 minutes mins
Total Time 1 hour hr 20 minutes mins
Servings: 8 slices
Course: Dessert
Cuisine: Gluten-Free
Calories: 280
Ingredients Equipment Method Nutrition Notes

Ingredients
  

For the Cake Base
  • 2 cups Almond Flour Can substitute with all-purpose flour for non-gluten-free
  • 1 cup All-Purpose Flour Can be replaced with a gluten-free flour mix
  • 2 teaspoons Baking Powder Ensure freshness for best results
  • 1/4 teaspoon Salt Enhances flavor
  • 1 cup Sugar Consider brown sugar for richer flavor
  • 1/2 cup Butter Unsalted butter recommended
  • 3 large Eggs Room temperature recommended
  • 1 teaspoon Almond Extract Vanilla extract can be a substitute
For the Topping
  • 2 cups Pears Fresh, can substitute with apples
  • 2 tablespoons Lemon Juice Use fresh for best results
For Serving
  • 1 cup Confectioners’ Sugar Optional for dusting before serving

Equipment

  • 9-inch round cake pan
  • medium mixing bowl
  • Whisk
  • Stand Mixer
  • Spatula

Method
 

Step-by-Step Instructions
  1. Preheat your oven to 350°F (175°C) and prepare the cake pan with parchment paper and butter.
  2. Sift together almond flour, all-purpose flour, baking powder, and salt in a mixing bowl.
  3. Cream the butter and sugar in a stand mixer on medium speed until light and fluffy.
  4. Incorporate the eggs one at a time followed by the almond extract until fully mixed.
  5. Gradually add the dry ingredients to the wet ingredients and mix until just combined.
  6. Transfer the batter to the prepared cake pan and spread evenly.
  7. Chop the pears and toss them with lemon juice and a pinch of salt, then distribute over the cake batter.
  8. Sprinkle sugar over the top of the pears and bake for 40-45 minutes until a toothpick comes out clean.
  9. Cool the cake in the pan for 20 minutes, then transfer to a wire rack to cool completely.
  10. Dust with confectioners' sugar before serving and enjoy with cream or ice cream.

Nutrition

Serving: 1sliceCalories: 280kcalCarbohydrates: 30gProtein: 5gFat: 15gSaturated Fat: 5gPolyunsaturated Fat: 2gMonounsaturated Fat: 8gCholesterol: 40mgSodium: 150mgPotassium: 200mgFiber: 2gSugar: 20gVitamin A: 300IUVitamin C: 5mgCalcium: 50mgIron: 1mg

Notes

Ensure all ingredients are at room temperature. Avoid overmixing to maintain cake's texture. Use fresh baking powder for best results.

Tried this recipe?

Let us know how it was!
  • « Previous Page
  • 1
  • …
  • 41
  • 42
  • 43
  • 44
  • 45
  • …
  • 49
  • Next Page »

Welcome!

Hi, I’m Grace, a Sydney-based home cook with a passion for bold flavors and trending ingredients. Whether you’re a busy beginner or a seasoned foodie, you’ll find dishes here that are fresh, fun, and full of flavor.

More about me

Popular Recipes

  • Cheesy Chicken Garlic Bread Sandwich
    Cheesy Chicken Garlic Bread Sandwich for Cozy Family Moments
  • Easy Chicken Ranch Wraps
    Easy Chicken Ranch Wraps: Quick, Creamy & Totally Satisfying
  • Chicken Caesar Sandwiches
    Delicious Chicken Caesar Sandwiches for Quick Comfort Food
  • best Cuban sandwich
    The Best Cuban Sandwich You’ll Want Every Weeknight!

Footer

↑ back to top

About

  • Privacy Policy
  • Disclaimer
  • Terms & Conditions

Newsletter

  • Sign Up! for emails and updates

Contact

  • About me
  • Contact me

Copyright © 2025 TastyTrendIngredients