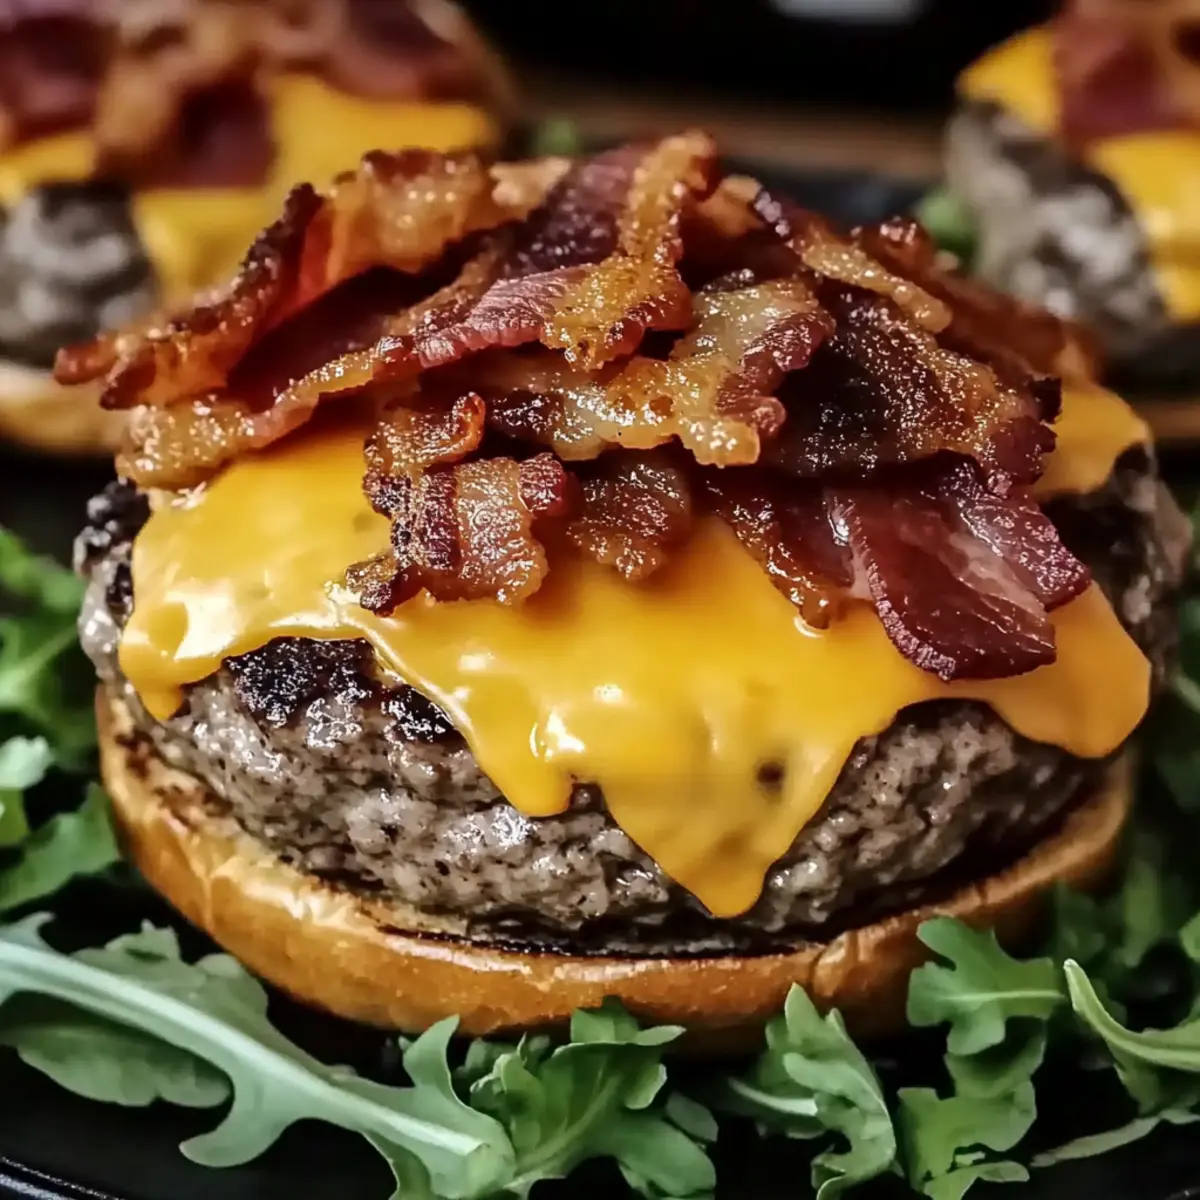
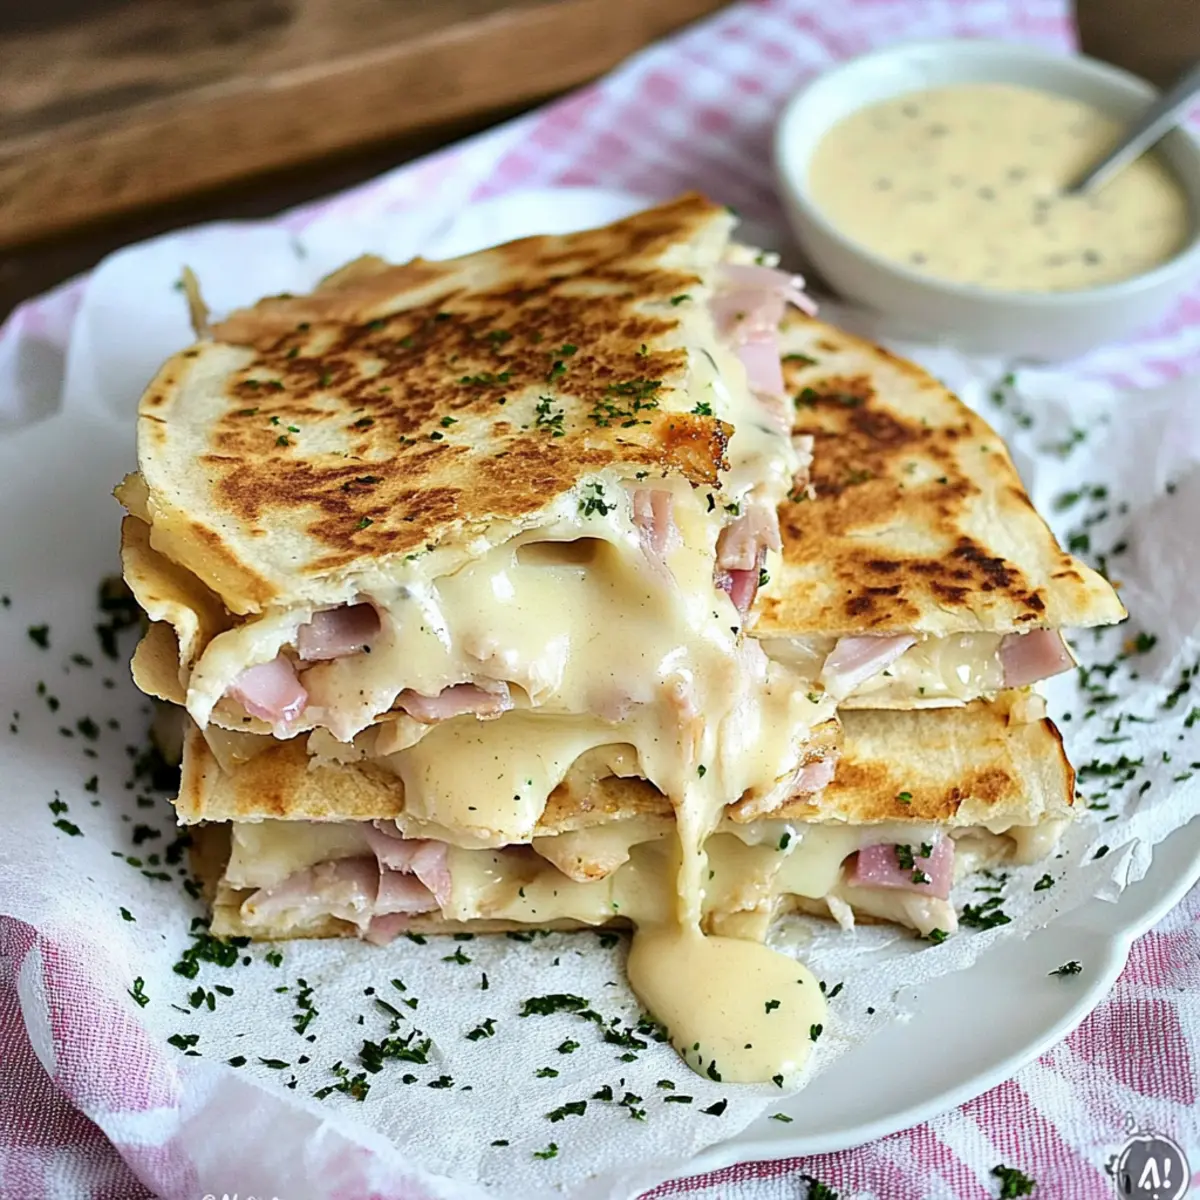
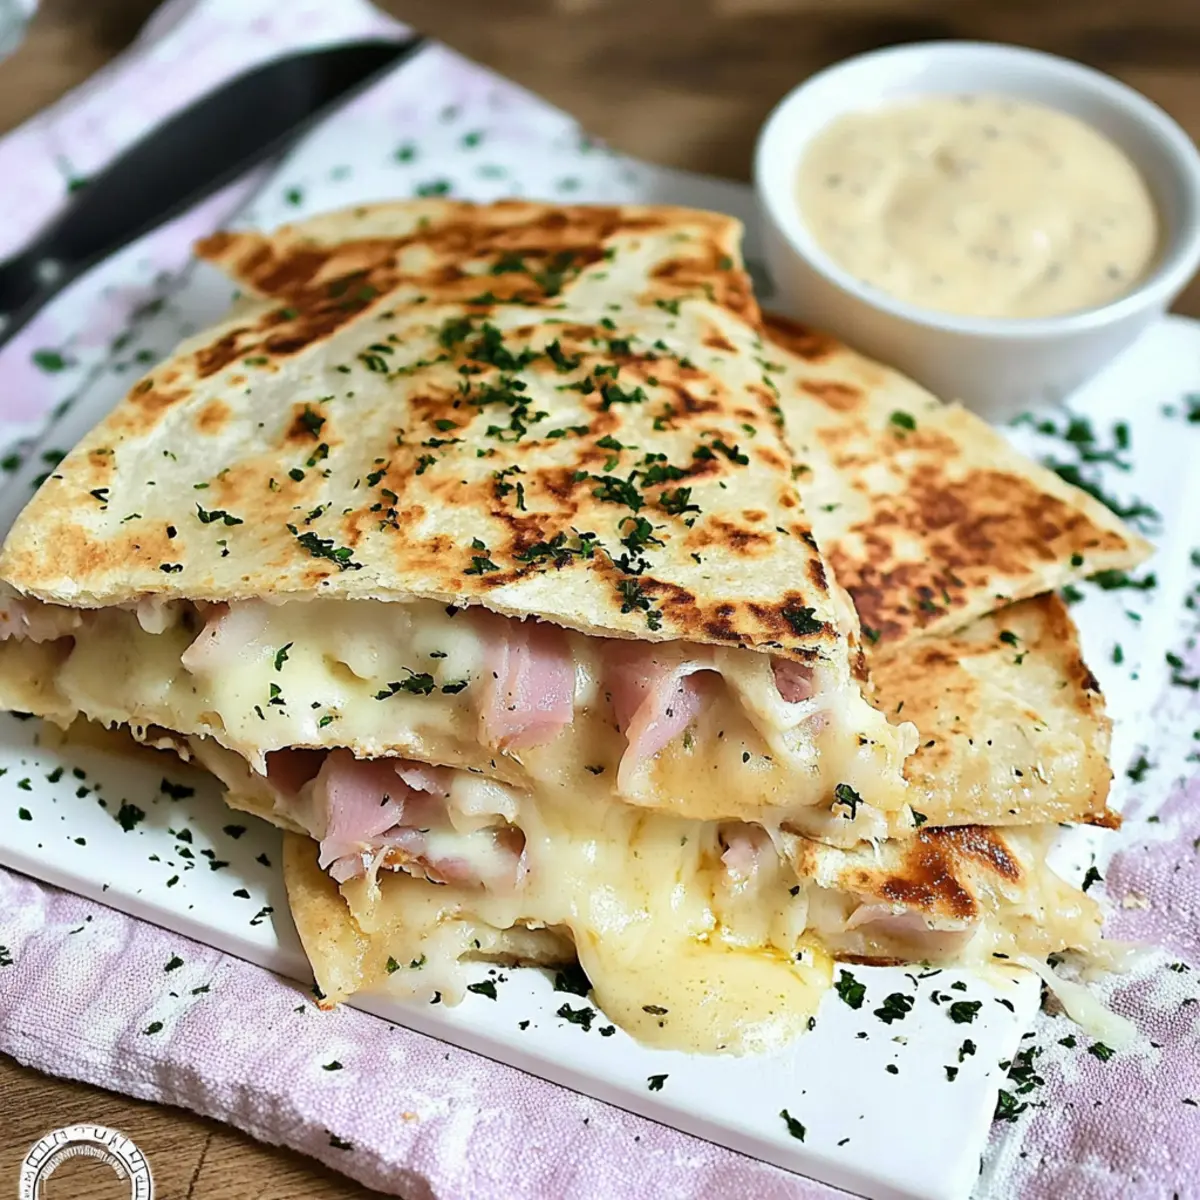
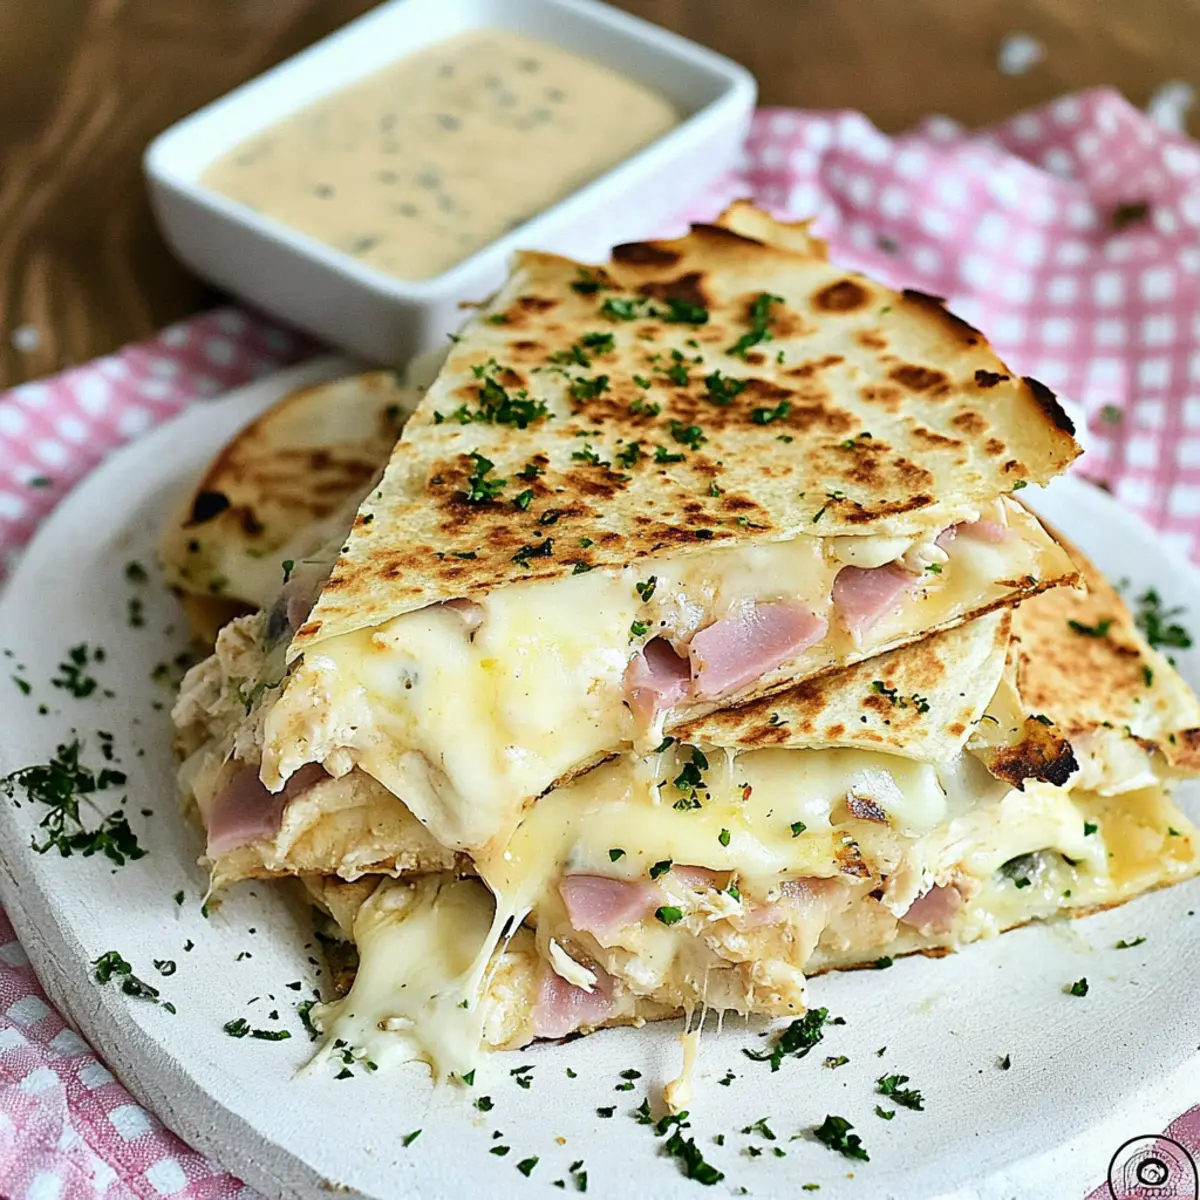
tastytrendingredients

  • Home
  • Recipes
    • Appetizers
    • Breakfast
    • Dessert
    • Dinner
    • Drinks
    • Salads
    • Snacks
    • Soups
  • About me
  • Contact me
menu icon
go to homepage
  • Home
  • Recipes
    • Appetizers
    • Breakfast
    • Dessert
    • Dinner
    • Drinks
    • Salads
    • Snacks
    • Soups
  • About me
  • Contact me
search icon
Homepage link
  • Home
  • Recipes
    • Appetizers
    • Breakfast
    • Dessert
    • Dinner
    • Drinks
    • Salads
    • Snacks
    • Soups
  • About me
  • Contact me
×

Savory Smoked Spatchcocked Turkey That Wows Every Guest

October 22, 2025 by Grace Snow Leave a Comment

As I stood by the smoker, the intoxicating aroma of a juicy smoked spatchcocked turkey enveloped me, transforming my kitchen into a haven of comfort and anticipation. This recipe is not only straightforward to prepare but creates a captivating centerpiece for your holiday feast. Infused with a delightful smoky flavor and boasting crispy golden skin, this bird guarantees to impress your guests while saving you time and hassle in the kitchen. Perfect for Thanksgiving, it allows you to savor every moment of the celebration without the stress often associated with cooking a whole turkey. Ready to dive into a world of flavor and elevate your holiday dining experience? Let’s get started on the journey to your best turkey yet!

Why is Smoked Spatchcocked Turkey a Must-Try?

Simplicity Made Delicious: This recipe takes the stress out of Thanksgiving, ensuring a stunning turkey with minimal effort.

Mouthwatering Smokiness: Infused with apple cider, your turkey will have a depth of flavor that rivals any traditional roast.

Crispy Skin Awaits: The spatchcock technique results in perfectly crispy skin while keeping the meat juicy and tender.

Crowd-Pleasing Centerpiece: Impress your guests with a show-stopping turkey that’s sure to become a holiday favorite.

Time-Saving Cooking: With just a few hours in the smoker, you can spend more time enjoying the company of loved ones.

For additional tips on creating the ideal Thanksgiving meal, check out our serving suggestions. This turkey is versatile enough to pair beautifully with classic sides, making it the perfect choice for your festive gathering!

Smoked Spatchcocked Turkey Ingredients

For the Turkey

  • 18 lb turkey – Ensure it's fully defrosted before cooking for best results.
  • Kosher salt (optional) – Enhances overall flavor; only use if your spice rub is low in sodium.
  • Black pepper (optional) – Adds a touch of spiciness; adjust according to your spice rub's profile.

For the Spice Rub

  • ⅓ cup poultry spice rub – This blend adds depth and flavor; feel free to substitute with your favorite or homemade mix for a personal touch.

For Moisture

  • 3 cups apple cider or apple juice – Provides moisture and a hint of sweetness; apple juice is a less tart alternative that works beautifully in this smoked spatchcocked turkey recipe.

Let the deliciousness begin as you prepare this incredible smoked spatchcocked turkey that’s sure to leave everyone at the table asking for seconds!

Step‑by‑Step Instructions for Juicy Smoked Spatchcocked Turkey

Step 1: Preheat the Smoker
Begin by preheating your smoker to 400°F for 15 minutes, allowing it to reach the ideal cooking temperature. This is crucial for achieving that perfect smoky flavor right from the start. Ensure the smoker's wood chips are loaded and ready to create an aromatic environment for your juicy smoked spatchcocked turkey.

Step 2: Prepare the Turkey
While the smoker heats, prepare your 18 lb turkey by spatchcocking it. Use sharp kitchen shears to remove the backbone, then flatten the turkey by pressing down firmly on the breast. Rub the poultry spice blend generously all over the turkey, ensuring to get into the crevices and underneath the skin for maximum flavor impact.

Step 3: Initial Smoking Phase
Carefully place the turkey, breast side up, directly onto the grill grates of the smoker. Smoke for the first 30 minutes at 400°F to give it a great initial sear and crispy skin. Keep an eye on the smoke—if it starts to dissipate, you may need to replenish the wood chips to maintain that luscious smokiness throughout the cooking process.

Step 4: Lower the Temperature
After the initial smoking, reduce the smoker temperature to 300°F. Continue to cook your smoked spatchcocked turkey for about 3 to 4 hours, monitoring the internal temperature. Every hour, mist with apple cider or apple juice to keep the meat moist and add subtle sweetness, ensuring that your turkey remains juicy throughout.

Step 5: Check for Doneness
As your turkey approaches cooking time, check the internal temperature at the thickest part of the breast using a meat thermometer. The turkey should reach 160°F for perfect doneness. A golden brown skin with visible juices running clear indicates that your juicy smoked spatchcocked turkey is close to being ready to rest.

Step 6: Rest Before Carving
Once your turkey hits the desired temperature, carefully remove it from the smoker. Cover it loosely with aluminum foil and allow it to rest for 20-30 minutes. Resting is essential for redistributing the juices, ensuring that every bite of your smoked spatchcocked turkey is tender and flavorful before carving and serving.

What to Serve with Juicy Smoked Spatchcocked Turkey

Creating the perfect Thanksgiving meal is all about balance and flavor, and your juicy smoked spatchcocked turkey sets the stage beautifully.

  • Creamy Truffle Parmesan Mashed Potatoes: The rich, velvety texture enhances the turkey's smoky flavor, making every bite indulgent and satisfying.

  • Classic Cranberry Sauce: The tangy sweetness of this sauce cuts through the richness of the turkey, providing a refreshing contrast that brightens the meal.

  • Green Bean Casserole: This beloved side adds creaminess and a crunchy topping, bringing a delightful texture that complements the tender turkey perfectly.

  • Savory Stuffing: Packed with herbs and spices, stuffing adds depth and a cozy element to your Thanksgiving feast.

  • Roasted Brussels Sprouts: The slight bitterness of Brussels sprouts, caramelized to perfection, offers a lovely contrast to the turkey's rich smokiness.

  • Homemade Gravy: A must-have that brings everything together, this rich and flavorful gravy can further enhance the moistness of your smoked turkey.

Serve these alongside the juicy smoked spatchcocked turkey, and you’ll have a spread that transforms your Thanksgiving into a feast of laughter, love, and unforgettable flavors!

Variations & Substitutions: Smoked Spatchcocked Turkey

Feel free to explore your culinary creativity with this smoked spatchcocked turkey recipe by making delightful tweaks to tailor it to your taste!

  • Dairy-Free: Substitute any butter-based basting with olive oil or melted coconut oil for a rich, flavorful skin without dairy.

  • Herb Infusion: Try adding fresh herbs like rosemary or thyme into the spice rub to elevate the flavor profile with aromatic freshness. The more herbs, the more aromatic the experience.

  • Spice Level: If you crave a bit of heat, incorporate cayenne pepper or a dash of hot sauce into your spice blend. Adjust the amount to reach your desired spice level, giving your turkey a tantalizing kick.

  • Citrus Twist: Squeeze fresh lemon or orange juice over the turkey before smoking for a zesty brightness that pairs wonderfully with apple cider. This adds a refreshing contrast to the smoky notes.

  • Juice Variations: Use cranberry juice or pear juice in place of apple cider for an entirely different flavor twist. Each alternative brings a unique sweetness that complements the turkey beautifully.

  • Smoky Choices: For a deeper smoky flavor, experiment with pecan or cherry wood chips instead of hickory. Each type of wood imparts its own distinct aroma and taste, perfect for those looking to customize their smoking experience.

  • Single Serve Options: Consider cutting the turkey into smaller pieces for faster cooking and easier portioning. This is especially helpful if you're preparing for a gathering with varied preferences.

For additional inspiration on side dishes, check out our serving suggestions that perfectly complement your flavorful turkey! Feel free to let your taste buds guide you on this delicious culinary journey.

Make Ahead Options

These Juicy Smoked Spatchcocked Turkey preparations are perfect for busy home cooks looking to save time! You can spatchcock the turkey and apply the poultry spice rub up to 24 hours in advance; just wrap it tightly in plastic wrap and refrigerate. To enhance flavor and moisture, mist the turkey with apple cider before you smoke it. The final cooking can be done on the same day as your gathering, ensuring it’s just as delicious as if it were freshly prepared. When ready to serve, simply smoke it as directed, and enjoy a flavorful turkey that’s sure to impress your guests while giving you more time to relax!

Expert Tips for Smoked Spatchcocked Turkey

  • Brining Benefits: Brining your turkey a few days prior enhances juiciness. Consider a simple salt-water brine to make every bite succulent.
  • Internal Temperature Check: Always ensure your turkey reaches an internal temperature of 165°F for safety. Don’t rely solely on cooking time; use a thermometer for accuracy!
  • Basting Boost: Misting your turkey with apple cider every hour not only adds flavor but also helps keep it moist. This technique is key for a juicy smoked spatchcocked turkey.
  • Resting Ritual: Allow your turkey to rest covered in foil for at least 20-30 minutes before carving. This redistributes juices, enhancing tenderness.
  • Flavor Exploration: Experiment with different spice rubs and wood chips while smoking to create unique flavor profiles that will wow your guests.

How to Store and Freeze Smoked Spatchcocked Turkey

Fridge: Store any leftover smoked spatchcocked turkey in an airtight container for up to 4 days. Ensure it's completely cooled before sealing to preserve its flavor and moisture.

Freezer: For longer storage, freeze portions of the turkey in airtight bags or containers. It can last up to 3 months; make sure to label with the date for easy tracking.

Reheating: Thaw frozen turkey in the refrigerator overnight before reheating. To keep it juicy, reheat in the oven at 325°F, covering with foil to retain moisture.

Room Temperature: Avoid leaving the turkey out for more than 2 hours. If serving at gatherings, keep it in a warming tray or covered to maintain its deliciousness.

Smoked Spatchcocked Turkey Recipe FAQs

How do I select the best turkey for smoking?
Absolutely! When selecting a turkey for smoking, look for one that is fresh or thoroughly frozen, preferably organic or free-range for more flavor. Make sure it’s fully defrosted before cooking for the best results. A weight of around 12 to 18 pounds works well for even cooking in a smoker.

What’s the best way to store leftover smoked spatchcocked turkey?
I recommend storing any leftover smoked spatchcocked turkey in an airtight container in the refrigerator. It will remain fresh for up to 4 days. Allow the turkey to cool completely before sealing to maintain its moisture and flavor. For longer storage, consider freezing; it can last up to 3 months.

Can I freeze smoked spatchcocked turkey?
Absolutely! To freeze, allow the turkey to cool completely, then carve it into portions. Place the pieces in airtight freezer bags or containers, making sure to remove as much air as possible. Label them with the date for easy reference. For the best quality, consume within 3 months, but it can be safe for longer.

What should I do if my smoked turkey isn’t cooking evenly?
If your smoked turkey isn’t cooking evenly, ensure it's properly spatchcocked to allow for even heat distribution. You might want to rotate the turkey halfway through the cooking process. Additionally, if you notice that one side is browning faster, you can cover it loosely with aluminum foil to prevent burning while the rest continues to cook.

Is this smoked spatchcocked turkey recipe pet-friendly?
While turkey itself is safe for dogs in moderation, avoid giving them any seasoned meat, especially when using spices or ingredients like onion or garlic as they can be harmful. Always remove the skin before offering turkey to your pets and consult your veterinarian if unsure.

What should I watch for while smoking turkey?
Very important! During the smoking process, keep an eye on your smoker’s temperature and the internal temperature of the turkey. The ideal temperature for doneness should reach 160°F in the thickest part of the breast. Mist the turkey with apple cider every hour to keep it moist and flavorful, making sure to monitor the smoke level and replenish wood chips if necessary.

Smoked Spatchcocked Turkey

Savory Smoked Spatchcocked Turkey That Wows Every Guest

This Smoked Spatchcocked Turkey impresses with its smoky flavor and crispy skin, making it a holiday must-try.
Print Recipe Pin Recipe
Prep Time 15 minutes mins
Cook Time 4 hours hrs
Resting Time 30 minutes mins
Total Time 4 hours hrs 45 minutes mins
Servings: 10 servings
Course: Dinner
Cuisine: American
Calories: 450
Ingredients Equipment Method Nutrition Notes

Ingredients
  

For the Turkey
  • 18 lb turkey Ensure it's fully defrosted before cooking for best results.
  • Kosher salt Enhances overall flavor; use if your spice rub is low in sodium.
  • Black pepper Adjust according to your spice rub's profile.
For the Spice Rub
  • ⅓ cup poultry spice rub Feel free to substitute with your favorite or homemade mix.
For Moisture
  • 3 cups apple cider or apple juice Provides moisture and a hint of sweetness.

Equipment

  • Smoker
  • Meat Thermometer
  • Kitchen Shears

Method
 

Step-by-Step Instructions
  1. Preheat your smoker to 400°F for 15 minutes, ensuring it's ready for optimal smoky flavor.
  2. Spatchcock the turkey by removing the backbone and flattening it by pressing down on the breast. Rub the spice blend generously.
  3. Place the turkey breast side up on the grill grates of the smoker. Smoke for the first 30 minutes at 400°F.
  4. Lower the temperature to 300°F and continue cooking for 3 to 4 hours, misting with apple cider every hour.
  5. Check the internal temperature, it should reach 160°F. Look for golden brown skin and juicy breasts.
  6. Once at the desired temperature, remove from the smoker, cover with foil, and let rest for 20-30 minutes.

Nutrition

Serving: 1lbCalories: 450kcalProtein: 60gFat: 20gSaturated Fat: 5gPolyunsaturated Fat: 1gMonounsaturated Fat: 10gCholesterol: 150mgSodium: 100mgPotassium: 700mgCalcium: 1mgIron: 4mg

Notes

Brining enhances juiciness; ensure to check the internal temperature and allow resting post-cooking for the best results.

Tried this recipe?

Let us know how it was!

Spooktacular Halloween Milkshake Bar for Kids' Fun

October 22, 2025 by Grace Snow Leave a Comment

As autumn leaves swirl outside and the scent of cinnamon fills the air, it’s time to conjure up some Halloween magic right in your kitchen. What could be more delightful than a Customizable Kid-Friendly Halloween Milkshake Bar? Creating this fun treat is not just easy—it transforms your family’s Halloween celebration into an interactive festivity, where kids can unleash their creativity with delicious mix-ins and toppings. The joy of crafting a personalized milkshake together makes it a fantastic bonding activity, plus, you'll find it’s a crowd-pleaser that guarantees smiles all around. Ready to mix up some spooky sweetness? Let’s dive into this enchanting recipe that’s sure to turn your Halloween into a creamy, dreamy delight!

Why is This Milkshake Bar So Fun?

Interactive Experience: The Halloween Milkshake Bar allows kids to unleash their creativity, customizing their own spooky drinks with endless options.
Easily Customizable: Choose from a variety of ice cream flavors and colorful toppings, making it a treat that caters to every child's taste.
Quick and Simple: With easy steps and common ingredients, you can whip up this festive delight in no time, perfect for busy families.
Makes Wonderful Memories: Working together to create personalized milkshakes turns a simple treat into a delightful bonding experience.
Perfect for Parties: Serve this at a Halloween gathering, and watch as kids get excited over crafting their unique concoctions while keeping the fun flowing!

Halloween Milkshake Bar Ingredients

For the Milkshake Base
• Ice Cream – This is the heart of your Halloween milkshake bar; choose any flavor your kids adore!
• Whole Milk – Adjusts the thickness; for a thicker shake, use less, or add more for a slushier vibe.
• Heavy Whipping Cream – Essential for that luscious homemade whipped cream topping!

For the Whipped Cream
• Vanilla Extract – A splash of this enhances the whipped cream's flavor beautifully.
• Powdered Sugar – Sweetens the whipped cream, making it an irresistible addition to every shake.

For the Toppings
• Colorful Sprinkles – These add a festive and fun touch to your milkshakes, perfect for Halloween!
• Halloween-themed Candy – Use leftover candy for mix-ins, giving every shake a spooky surprise.
• Food Coloring – A few drops can transform your milkshake into a colorful festive treat!

Enjoy concocting an unforgettable Halloween milkshake bar that’s not just delicious but also a creative activity for the little ones!

Step‑by‑Step Instructions for Customizable Kid-Friendly Halloween Milkshake Bar

Step 1: Make Whipped Cream
Begin by pouring 1 cup of heavy whipping cream into your stand mixer bowl. Add 1-2 tablespoons of powdered sugar and a splash of vanilla extract. Mix on high speed for about 1-2 minutes, watching for the whipped cream to reach stiff peaks. Once it forms, stop mixing to avoid over-whipping—this homemade whipped cream will top off your Halloween Milkshake Bar perfectly!

Step 2: Prepare Milkshake Base
In a blender, combine 3-4 generous scoops of your favorite ice cream with ¼ cup of whole milk. Blend on medium speed until smooth and creamy; this should take about 30 seconds. If your milkshake seems too thick to pour, gradually add more milk until you reach the desired consistency. Aim for a thick, luscious texture that’s ideal for sipping!

Step 3: Chill and Assemble
While blending, consider chilling your milkshake glasses ahead of time in the freezer for about 10 minutes. This keeps your Halloween Milkshake Bar treats deliciously cold. Once chilled, pour the prepared milkshake into each glass, filling them about three-quarters full, allowing room for whipped cream and toppings without spilling over.

Step 4: Decorate with Whipped Cream
Using a piping bag or a simple spoon, generously pipe or dollop the homemade whipped cream atop each milkshake. The whipped cream should peak beautifully, creating an inviting look that enhances the festive presentation of your Halloween Milkshake Bar. For added flair, don’t hesitate to experiment with the decoration technique!

Step 5: Add Festive Toppings
Now comes the fun part! Encourage kids to add a variety of colorful toppings to their milkshakes. Sprinkle vibrant Halloween-themed sprinkles, crush some leftover candies, or even drizzle chocolate syrup for an extra indulgence. Let their creativity shine as they transform their milkshake into a spooky delight, making each one truly unique!

Step 6: Serve and Enjoy
Gather around the table for the big reveal! Present the whimsical Halloween Milkshake Bar with the finished milkshakes adorned with toppings and whipped cream. Remind everyone to enjoy their delicious creations immediately for the best experience. The visual feast of colors and textures will surely bring smiles, making this a festive highlight of your Halloween celebrations!

Expert Tips for the Halloween Milkshake Bar

  • Keep It Cold: Store ice cream over ice before serving to maintain the perfect creamy texture in your Halloween milkshake bar.
  • Pre-Scoop Ice Cream: Simplify the process for kids by having ice cream pre-scooped in bowls, allowing for carefree customization.
  • Make Whipped Cream Ahead: Homemade whipped cream tastes best; make it in advance to enhance the richness of your milkshakes.
  • Chill Glasses: Before serving, chill your glasses in the freezer for 10 minutes to keep each milkshake cool and refreshing.
  • Get Creative with Add-Ins: Encourage kids to use leftover Halloween candy and food coloring for unique flavors and spooky visuals!

How to Store and Freeze Halloween Milkshake Bar

Fridge: Keep any leftover whipped cream in an airtight container in the refrigerator for up to 3 days; simply re-whip before serving.

Freezer: Ice cream can be stored in the freezer for up to 2 months. Ensure it’s tightly sealed to prevent freezer burn and maintain its creamy texture.

Prepped Components: You can prepare the milkshake base ingredients ahead of time but avoid blending until you are ready to serve.

Serving Tip: Remember, Halloween Milkshake Bar creations are best enjoyed fresh, so assemble and serve immediately for optimal taste and enjoyment!

What to Serve with Customizable Kid-Friendly Halloween Milkshake Bar

As you gather your family for this delightful Halloween treat, consider some tasty companions to elevate the celebration.

  • Crispy Bat Wings: Perfect for spooky-themed gatherings, these baked chicken wings are seasoned to perfection, creating a crunchy contrast to the creamy milkshake.

  • Silly Sandwiches: Fun, bite-sized sandwiches cut into Halloween shapes make a playful addition. Their savory flavors balance the sweet richness of the milkshake.

  • Wacky Veggie Platter: A rainbow of fresh vegetables served with a tangy dip adds a healthy crunch. This crisp freshness brightens the festive atmosphere, encourage kids to munch while creating milkshakes.

  • Ghoulish Gelatin Cups: Colorful gelatin cups grab kids' attention. Their wiggly texture complements the milkshake, making dessert feel even more playful and fun in each bite.

  • Spooky Popcorn Mix: A blend of popcorn, candy corn, and chocolate pieces creates a chewy, crunchy delight. The sweetness pairs beautifully with the milkshake's creaminess.

  • Hot Chocolate or Pumpkin Spice Lattes: For a warm drink option, consider serving hot chocolate or pumpkin spice lattes in festive mugs. These comforting beverages provide a heartwarming touch on a chilly Halloween evening.

With these fun pairings, your Halloween Milkshake Bar turns into a festive feast that delights both the young and the young at heart!

Halloween Milkshake Bar Variations

Invite your family to unleash their creativity and customize this delightful Halloween treat in so many fun ways!

  • Chocolate Delight:
    Replace whole milk with chocolate milk for a rich, chocolatey flavor that every kid will adore.

  • Fruity Fun:
    Swap the ice cream for fruity flavors like strawberry or mango. The vibrant color and fresh taste will enliven your milkshake bar!

  • Candy Crunch:
    Add chunks of leftover Halloween candy as mix-ins for unexpected sweetness and crunch in every sip. Kids will love the surprise tucked away beneath the whipped cream.

  • Nutty Addition:
    Incorporate crushed nuts or nut butter for a delightful texture twist. A hint of almond extract in the milkshake can also enhance the flavor even further.

  • Spooky Colors:
    Use food coloring to create vibrant, festive shades in your milkshakes. A dash of green or purple adds a Halloween twist that’s visually appealing.

  • Minty Fresh:
    Mix in some mint extract or garnishes like crushed mint candies for a refreshing twist. The coolness will complement the sweetness perfectly!

  • Spiced Pumpkin:
    Add some pumpkin puree and spices like cinnamon or nutmeg for a seasonal touch. This twist will give your milkshake a cozy, autumnal vibe.

Feel free to mix and match these ideas! If you want even more inspiration, consider checking out other fun dessert options like our spooky desserts or perfect side treats like Halloween-themed snacks that pair wonderfully with this milkshake bar! Enjoy making your Halloween celebration truly special!

Make Ahead Options

Preparing your Customizable Kid-Friendly Halloween Milkshake Bar in advance can save precious time on the big day! You can make the homemade whipped cream up to 3 days ahead—just store it in an airtight container in the refrigerator to keep it fresh and fluffy. The milkshake base can also be prepped up to 24 hours prior; simply blend your ice cream and whole milk, then refrigerate it in a sealed container. To serve, just give the shake a quick stir and pour it into chilled glasses before topping with the whipped cream and festive decorations, ensuring your Halloween party whips up in no time, with all the fun intact!

Halloween Milkshake Bar Recipe FAQs

What kind of ice cream should I use?
Absolutely, you can use any ice cream flavor your kids love! I recommend using classic flavors like vanilla, chocolate, or even fun fruity options to cater to every taste at your Halloween Milkshake Bar. For an extra twist, consider seasonal flavors like pumpkin or candy corn!

How should I store leftover whipped cream?
Leftover whipped cream can be stored in an airtight container in the refrigerator for up to 3 days. Before serving it again, simply give it a quick re-whip to restore its texture and fluffiness—trust me, it makes all the difference!

Can I freeze the milkshake base?
While it’s best to enjoy the milkshake fresh, you can freeze the milkshake base. To do this, blend your milkshake ingredients and pour them into an airtight container. Freeze for up to 1 month. When you're ready to enjoy, thaw it in the fridge overnight and blend it again for a creamy texture!

What if my milkshake is too thick?
No worries! If your milkshake turns out too thick, simply add a little more whole milk and give it a good blend until you reach your desired consistency. Aim for a nice, creamy pour that’s tasty for sipping!

Are there any allergy considerations for this recipe?
Yes, it’s essential to consider dietary restrictions when creating your Halloween Milkshake Bar. For dairy allergies, opt for non-dairy ice creams and plant-based whipped toppings. Always check ingredient labels on toppings, as many candies contain allergens like nuts or gluten.

Can I make this milkshake bar ahead of time?
Definitely! You can prep some components ahead of time. Scoop the ice cream and store it in the freezer, and make the whipped cream a day in advance, keeping it in the fridge. When you're ready to serve, just blend the milkshake and let the kids have fun with the toppings at your Halloween Milkshake Bar!

Halloween Milkshake Bar

Spooktacular Halloween Milkshake Bar for Kids' Fun

Create a customizable Halloween Milkshake Bar for kids to enjoy endless fun and creativity with delicious mix-ins and toppings.
Print Recipe Pin Recipe
Prep Time 10 minutes mins
Chilling Time 10 minutes mins
Total Time 20 minutes mins
Servings: 6 milkshakes
Course: Dessert
Calories: 450
Ingredients Equipment Method Nutrition Notes

Ingredients
  

For the Milkshake Base
  • 3-4 scoops Ice Cream Any flavor your kids adore
  • 1/4 cup Whole Milk Adjust for thickness
  • 1 cup Heavy Whipping Cream For whipped cream topping
For the Whipped Cream
  • 1-2 tablespoons Powdered Sugar To sweeten
  • 1 teaspoon Vanilla Extract Enhances flavor
For the Toppings
  • 1 cup Colorful Sprinkles Festive touch
  • 1 cup Halloween-themed Candy For mix-ins
  • drops Food Coloring To customize colors

Equipment

  • Stand Mixer
  • Blender
  • piping bag
  • Milkshake Glasses

Method
 

Step-by-Step Instructions
  1. Make Whipped Cream: Pour heavy whipping cream into stand mixer, add powdered sugar and vanilla extract. Mix on high until stiff peaks form.
  2. Prepare Milkshake Base: In a blender, combine ice cream and whole milk. Blend until smooth, adjusting milk for desired consistency.
  3. Chill and Assemble: Chill milkshake glasses in the freezer for 10 minutes. Pour milkshake into glasses, filling about three-quarters full.
  4. Decorate with Whipped Cream: Pipe or dollop homemade whipped cream on top of each milkshake.
  5. Add Festive Toppings: Encourage kids to add sprinkles, crushed candies, or chocolate syrup to their milkshakes.
  6. Serve and Enjoy: Present the Halloween Milkshake Bar and remind everyone to enjoy their creations immediately.

Nutrition

Serving: 1milkshakeCalories: 450kcalCarbohydrates: 60gProtein: 6gFat: 22gSaturated Fat: 14gCholesterol: 80mgSodium: 150mgPotassium: 350mgFiber: 1gSugar: 45gVitamin A: 15IUCalcium: 20mgIron: 2mg

Notes

For optimal taste, serve immediately after assembling the milkshakes.

Tried this recipe?

Let us know how it was!

Delicious Purple People Eater Halloween Punch for Everyone

October 22, 2025 by Grace Snow Leave a Comment

As I wandered through the bustling streets of October, the unmistakable hint of spooky excitement crackled in the air. This is the time of year when ghosts and goblins roam, but it's also a chance to create something magical in your kitchen. Enter the Non-Alcoholic Purple People Eater Halloween Punch—a drink that promises to enchant kids and adults alike at your Halloween gathering. With its vibrant hue and fizzy lift, this refreshing concoction is a breeze to whip up, making it a perfect choice for busy party planners. Not only does it capture the spirit of Halloween, but it also ensures everyone can indulge, regardless of age. Are you ready to add a splash of color and fun to your festivities? Let’s gather our ingredients and bring this whimsical drink to life!

Why is this punch a Halloween hit?

Vibrant hues and fizzy fun make this punch a standout at any gathering. Perfectly kid-friendly, it offers a non-alcoholic option that everyone's palate will enjoy. Easy to prepare, this recipe saves you time with minimal fuss—ideal for busy hosts! Plus, impress your guests with unique serving options like spooky floats or a dramatic "Witches Brew" presentation. Don't forget to check out our easy Halloween treats to complement your festive spread!

Purple People Eater Halloween Punch Ingredients

For the Punch Base

  • Grenadine – Adds sweetness and a bright red color, enhancing the visual appeal. Substitute: pure cranberry juice for a similar tartness.
  • Blue Gatorade – Provides a blue color base and fruity flavor. Substitute: blue Hawaiian punch for a similar taste.
  • Sprite – Adds carbonation for fizz and sweetness. Substitute: 7-Up or other lemon-lime sodas.
  • Lemon juice – Introduces tartness to balance sweetness. Freshly squeezed is preferred.
  • Violet food coloring – Enhances the purple color profile. Use gel food coloring for vibrant results.

For Optional Garnishes

  • Gummy worms – Adds a fun, playful touch to your Halloween punch.
  • Candy eyeballs – Creepy, crawly additions that delight kids and adults alike.

With these ingredients in hand, you’re all set to concoct the delightful Purple People Eater Halloween Punch that’ll be the star of your spooky festivities!

Step‑by‑Step Instructions for Purple People Eater Halloween Punch

Step 1: Combine Base Ingredients
Begin by taking a large pitcher and pour in 1 cup of grenadine, 2 cups of Blue Gatorade, and 1 cup of freshly squeezed lemon juice. Next, slowly add in 2 cups of Sprite to bring in that fizzy element. Stir the mixture gently with a wooden spoon until all ingredients are well combined and you achieve a vibrant purple base, perfect for your Purple People Eater Halloween Punch.

Step 2: Adjust the Color
Once your punch base is ready, it's time to enhance the color. Add a few drops of violet food coloring to the punch, stirring gently after each addition. Continue adding until you reach your desired shade of purple, making sure the hue is bright and eye-catching. This step not only beautifies the punch but also sets the stage for a visually stunning Halloween presentation.

Step 3: Chill the Punch
To best enjoy your Purple People Eater Halloween Punch, chill it in the refrigerator for at least 30 minutes. This cooling period allows the flavors to meld beautifully while ensuring a refreshing experience for your guests. If you’re short on time, you can skip this step, but make sure to serve it over ice to keep it cool.

Step 4: Serve the Punch
When ready to serve, pour the punch into clear cups or goblets to show off its vibrant purple color. If desired, you can add fun garnishes like gummy worms or candy eyeballs to each glass, creating an inviting and festive look. These decorative elements will surely delight the kids and make your Halloween gathering a memorable one.

Step 5: Maintain Fizz
To maintain the fizz of your punch, add the remaining Sprite just before serving. This ensures your Purple People Eater Halloween Punch stays bubbly and refreshing. Gently stir in the Sprite to avoid losing too much carbonation, allowing guests to enjoy the delightful fizz and fun flavors captured in this festive drink.

How to Store and Freeze Purple People Eater Halloween Punch

Refrigerate: Store any leftover punch in an airtight container in the fridge for up to 3 days. Wait to add the Sprite until you're ready to serve to maintain fizz.

Freezer: If you have a large batch, you can freeze the punch base (without soda) for up to 1 month. Thaw it in the fridge before serving, and then mix in the Sprite.

Garnishes: Keep gummy worms and candy eyeballs in a separate container at room temperature until ready to serve. This ensures they remain fresh and delightful for your guests.

Make-Ahead: Prepare the punch base up to 24 hours in advance. Just remember to refrigerate it and add carbonation just before serving to keep your Purple People Eater Halloween Punch sparkling and fun!

Purple People Eater Halloween Punch Variations

Feel free to get creative and make this punch your own with these delightful variations!

  • Spooky Floats: Add scoops of vanilla ice cream or lime sherbet for a creamy, dreamy twist that kids will adore.
  • Witches Brew: Serve the punch in a black cauldron, adding dry ice for a bubbling, mystical effect that will amaze your guests. Just be careful—never let dry ice come into contact with the punch.
  • Citrus Burst: Swap out some of the lemon juice for fresh lime juice to give your punch a zesty, refreshing kick that brightens up the flavors.
  • Berry Blast: Mix in fresh berries like blueberries or raspberries for added color and a delightful fruity twist that makes the punch even more visually appealing.
  • Mango Magic: Replace Blue Gatorade with mango juice for a tropical flair that adds a sweet surprise to your Halloween gathering.
  • Heat It Up: If you want to spice things up, consider adding a few dashes of cayenne pepper to the mix for a surprising little kick.
  • Minty Fresh: Toss in a handful of fresh mint leaves for a refreshing aroma and a wonderful flavor that complements the sweetness of the punch.
  • Frozen Versions: Create ice cubes with juices from the punch base and use them in place of regular ice to keep it cool without dilution. As they melt, they add more flavor!

Feel free to mix and match these ideas to create a custom experience. You can also incorporate these variations as part of your fun Halloween treats. Enjoy serving this festive punch and watch everyone be thrilled by your creativity!

Make Ahead Options

These Purple People Eater Halloween Punch preparations are perfect for busy home cooks looking to save time! You can make the punch base—comprised of grenadine, Blue Gatorade, lemon juice, and violet food coloring—up to 24 hours in advance and simply refrigerate it until it’s time to serve. To maintain its refreshing quality, add the Sprite just before serving to keep that delightful fizz intact. When your guests are ready, pour the punch into cups and add any fun garnishes like gummy worms for that spooky touch. This simple prep not only makes for a smoother serving experience but ensures everyone enjoys a vibrant and tasty drink at your Halloween gathering!

Expert Tips for Purple People Eater Halloween Punch

• Chill Wisely: Ensure your punch chills for at least 30 minutes; this melds flavors and makes each sip refreshing for your guests.

• Color Control: Adjust the violet food coloring gradually. A little goes a long way, so add drops until your punch is vibrantly purple for spellbinding appeal.

• Fizz Factor: Avoid adding Sprite too early; maintain carbonation by mixing in soda just before serving. This keeps your Purple People Eater Halloween Punch lively!

• Playful Garnishes: Enhance the Halloween spirit by using gummy worms and candy eyeballs as garnishes. They not only look spooky but also add fun surprises for kids.

• Ice Ring Tip: For a chilling effect without dilution, freeze a portion of the punch in a ring mold and place it in the bowl. It’s both decorative and practical!

What to Serve with Purple People Eater Halloween Punch

The Halloween festivities are all about fun, flavor, and a spooky flair that tickles the senses while bringing everyone together.

  • Spooky Snack Board: A mix of cheese, crackers, and themed Halloween treats adds a savory counterpoint to the refreshing punch, making it a balanced and festive display.

  • Witch's Broomsticks: Simple pretzel sticks with cheese and chives resemble witch's brooms, offering a crunchy, cheesy complement to sip alongside the tart and fizzy punch.

  • Pumpkin Spice Popcorn: Sweet and savory popcorn drizzled with pumpkin spice caramel provides delightful contrast and a cozy flavor that elevates the punch experience.

  • Bat-Shaped Sandwiches: Use cookie cutters to create bat-shaped sandwiches filled with your favorite spreads. They're fun to eat, visually appealing, and pair remarkably well with the punch.

  • Candy Corn Fruit Kabobs: Colorful fruit skewers with pineapple, orange melon, and banana resemble fun candy corn shapes and bring a refreshing bite that balances sweetness with zesty punch.

  • Creepy Crawly Gummies: Serve gummy worms in the punch bowl or alongside. They add a playful element that kids love, echoing the whimsical, fantastical essence of the drink.

  • Haunted Halloween Cookies: Decorate sugar cookies with spooky designs. Their sweetness pairs beautifully with the fizzy flavor of Purple People Eater Halloween Punch, creating a delightful treat.

  • Festive Fruit Juice Slushies: For a layered texture, serve fruit juice slushies made with berries and citrus. They provide a tangy contrast to the punch while being visually spectacular!

  • Monster Munch Trail Mix: Mix pretzels, candy eyes, and dried fruits for a crunchy, sweet snack that enhance the festivity and complements the fruity flavors in your punch.

Purple People Eater Halloween Punch Recipe FAQs

How do I choose ripe ingredients for my punch?
Absolutely! For the freshest flavors, use quality ingredients. Look for grenadine that is deep red and not overly sweet. When selecting Blue Gatorade, check for vibrant blue, as faded colors indicate it may be losing its flavor. Freshly squeezed lemon juice is best—pick lemons that feel heavy for their size and are slightly soft when gently pressed.

How long can I store leftovers of the punch?
You can store any leftover Purple People Eater Halloween Punch in an airtight container in the fridge for up to 3 days. Make sure to keep the Sprite separate until you're ready to serve, as adding it too early will cause the carbonation to fizzle out!

Can I freeze the punch? If so, how?
Yes, you can freeze the punch base for a fun storage option! Pour the mixture (without Sprite) into an airtight container and freeze it for up to 1 month. When you're ready to enjoy, thaw it in the fridge overnight, and then mix in the Sprite just before serving to maintain that fizzy freshness.

What should I do if the punch is too sweet?
Very! If you find your punch to be overly sweet, you can balance it out by adding more freshly squeezed lemon juice. Start with a tablespoon at a time until you reach your desired flavor. If you want to adjust it further, consider a dash of soda water for added tang and fizz without the sweetness.

Are there any allergy considerations for this punch?
Great question! The Purple People Eater Halloween Punch is generally kid-friendly and free from common allergens like nuts or gluten. However, always check the labels of your ingredients, especially for drinks like Gatorade where flavors can differ by brand. If serving to those with dietary concerns, opt for naturally derived food coloring and ensure the garnishes, like gummy worms, are allergen-free.

Purple People Eater Halloween Punch

Delicious Purple People Eater Halloween Punch for Everyone

This non-alcoholic Purple People Eater Halloween Punch is perfect for all ages, ensuring everyone can indulge in the festive fun.
Print Recipe Pin Recipe
Prep Time 10 minutes mins
Chilling Time 30 minutes mins
Total Time 40 minutes mins
Servings: 8 cups
Course: Drinks
Cuisine: Halloween
Calories: 120
Ingredients Equipment Method Nutrition Notes

Ingredients
  

Punch Base
  • 1 cup Grenadine Adds sweetness and a bright red color, enhancing the visual appeal.
  • 2 cups Blue Gatorade Provides a blue color base and fruity flavor.
  • 1 cup Lemon juice Introduces tartness to balance sweetness. Freshly squeezed is preferred.
  • 2 cups Sprite Adds carbonation for fizz and sweetness.
  • a few drops Violet food coloring Enhances the purple color profile.
Optional Garnishes
  • to taste Gummy worms Adds a fun, playful touch to your Halloween punch.
  • to taste Candy eyeballs Creepy, crawly additions that delight kids and adults alike.

Equipment

  • Large pitcher
  • Wooden spoon
  • clear cups or goblets

Method
 

Preparation Steps
  1. Combine base ingredients in a large pitcher: 1 cup of grenadine, 2 cups of Blue Gatorade, 1 cup of freshly squeezed lemon juice, and 2 cups of Sprite. Stir gently with a wooden spoon until well combined.
  2. Add a few drops of violet food coloring to the punch, stirring gently after each addition until the desired shade of purple is achieved.
  3. Chill the punch in the refrigerator for at least 30 minutes to meld flavors. For quick serving, use ice.
  4. Serve in clear cups or goblets, adding gummy worms or candy eyeballs as garnishes for a festive look.
  5. To maintain fizz, add the remaining Sprite just before serving and stir gently to avoid losing carbonation.

Nutrition

Serving: 1cupCalories: 120kcalCarbohydrates: 30gSodium: 10mgPotassium: 50mgSugar: 29gVitamin C: 15mgCalcium: 2mg

Notes

Store any leftover punch in an airtight container in the fridge for up to 3 days without Sprite. For longer storage, freeze the punch base without soda for up to 1 month, then mix in the Sprite before serving.

Tried this recipe?

Let us know how it was!

Hocus Pocus Punch: A Magical 3-Ingredient Delight

October 22, 2025 by Grace Snow Leave a Comment

As the leaves turn crisp and the scent of autumn fills the air, Halloween whispers its enchanting secrets, beckoning us to gather and celebrate. Enter the Hocus Pocus Punch, a 3-ingredient delight that captures the essence of the season. With the vibrant blend of mango peach juice and sparkling peach water, this drink transforms ordinary gatherings into festive occasions. In just two minutes, you can whip up a whimsical potion topped with a scoop of colorful rainbow sherbet—perfect for kids and adults alike. Whether you’re hosting a spooky movie night or a fun family gathering, this punch will surely be a hit! Curious how to make it? Let’s dive into this easy and delightful recipe!

Why Is Hocus Pocus Punch a Must-Try?

Simplicity makes this punch a win! With just three ingredients, you can effortlessly create a festive drink that dazzles without the fuss. Kid-Friendly and delightful for all ages, this non-alcoholic treat is perfect for family gatherings or Halloween parties. Versatile enough to customize, swap in your favorite juices or sparkling waters for a personal twist. Plus, time-saving—whip it up in just two minutes! Whether enjoyed during spooky movie nights or holiday celebrations, this punch is the ultimate crowd-pleaser that promises to bring smiles and joy. For more festive ideas, explore our tips on themed snacks!

Hocus Pocus Punch Ingredients

• Get ready to mix up some magic with these simple ingredients!

For the Punch

  • Mango Peach Juice – This sweet nectar is essential for that tropical flavor; V8 brand delivers just the right punch!
  • Peach Sparkling Water – Adds a delightful fizz that elevates the flavors while maintaining a fruity essence.
  • Rainbow Sherbet – This fun treat creates a creamy texture and beautiful colors; you can replace it with vanilla ice cream if you prefer!

With these three ingredients, your Hocus Pocus Punch will be a hit at any festive gathering!

Step‑by‑Step Instructions for Hocus Pocus Punch

Step 1: Prepare Your Glasses
Start by filling each glass with ice cubes to keep your Hocus Pocus Punch refreshingly chilled. Aim to fill the glasses about halfway to allow for the punch and additional ingredients. Clear, tall glasses work best for an eye-catching presentation! Set the prepared glasses aside on a stable surface to easily access them during the mixing process.

Step 2: Pour in the Juice
Carefully pour the mango peach juice over the ice-filled glasses, allowing the vibrant tropical color to sparkle. Use about 1 cup of juice per glass, and watch as it cascades beautifully over the ice, creating a delightful visual effect. The juice should fill the glasses about three-quarters full, setting a sweet stage for the next ingredient in your Hocus Pocus Punch.

Step 3: Add the Sparkling Water
Next, gently add the peach sparkling water to each glass, filling them the rest of the way while creating a delightful fizz. Aim for about 1/2 cup of sparkling water per glass, and watch as the bubbles dance to the surface. Stir the mixture gently with a long spoon to combine, ensuring the fruity flavors meld beautifully without losing all the fizz.

Step 4: Top with Sherbet
Now comes the fun part! Scoop a generous portion of rainbow sherbet and place it atop each glass of Hocus Pocus Punch. Aim for about 2-3 tablespoons of sherbet per serving, letting it sit proudly like a colorful crown. As the sherbet begins to melt, it will create a whimsical swirled effect in your punch, enhancing both its appearance and creamy texture.

Step 5: Serve and Enjoy
Finally, it’s time to serve your enchanting Hocus Pocus Punch right away! The vibrant colors and aromas will beckon your guests to dive in. For the best experience, make sure each glass retains its chilly thrill as you gather everyone for a festive toast. This quick and delightful drink will surely be a hit for Halloween gatherings and family celebrations!

How to Store and Freeze Hocus Pocus Punch

Fridge: Keep any leftover Hocus Pocus Punch covered in an airtight container in the fridge for up to 3 days.

Freezer: If you want to freeze, pour the punch into ice cube trays to create fun, punch-flavored ice cubes. These can last for up to 3 months!

Reheating: For best taste, enjoy it chilled; do not reheat as the fizz will flatten.

Sherbet Storage: Store leftover rainbow sherbet in the freezer, tightly sealed, and serve it fresh with your next batch for an irresistible punch!

Expert Tips for Hocus Pocus Punch

  • Juice Choice: Ensure you use quality mango peach juice like V8 for the best flavor; it’s sweeter and rich in fruity goodness.
  • Fizz Factor: Don’t skimp on the peach sparkling water, as it adds a refreshing fizz; pour slowly to preserve the bubbles and excitement!
  • Sherbet Scoop: Use a generous scoop of rainbow sherbet for that colorful pop; add it just before serving to keep its texture intact.
  • Make Ahead: Prepare your juice and sparkling water in advance but wait to add the sherbet until guests arrive, maintaining its delightful creaminess.
  • Spiked Option: For adult gatherings, consider adding a splash of vodka, rum, or tequila for a lively twist in your Hocus Pocus Punch!

Hocus Pocus Punch: Creative Variations

Feel free to let your imagination run wild and customize your Hocus Pocus Punch with these magical twists!

  • Dairy-Free: Swap rainbow sherbet with coconut or almond milk-based ice cream for a creamy, lactose-free alternative.
    This version keeps the vibrant flavor while accommodating those with dairy sensitivities. The light coconut flavor adds a tropical twist!

  • Spiked: Elevate your punch by adding a splash of vodka, rum, or tequila for adult gatherings.
    Just stir in 1-2 ounces per glass after pouring the juice and sparkling water for an enchanting cocktail experience!

  • Citrus Burst: Substitute mango peach juice with a bright blend of orange pineapple juice for a zesty kick.
    This swap brings a playful tang that perfectly complements the fizz of peach sparkling water.

  • Bubbles Galore: Experiment with various flavored sparkling waters, like lime or raspberry, for a new dimension of fizz.
    Each flavor infuses its essence while keeping the punch delightfully refreshing and fizzy.

  • Frozen Treats: Replace the ice with frozen fruit chunks, such as diced peaches or berries, to keep the punch chilly without watering it down.
    This not only looks stunning but adds flavor as the fruit slowly melts into the drink.

  • Herbal Infusion: Add fresh mint or basil leaves to the punch for an aromatic boost.
    Toss in a few leaves after mixing and before serving for a fragrant twist that surprises the palate.

  • Light & Crisp: Use a low-calorie or sparkling water soda version to reduce calories while maintaining the festive fizz.
    This keeps your punch lighter without sacrificing the bubbly joy, making it perfect for more health-conscious gatherings.

Feel inspired to explore the enchanting variations of your Hocus Pocus Punch? It’s all about making magic in your kitchen! For even more festive ideas, check out our serving suggestions and themed snacks to complete your Halloween experience!

What to Serve with Hocus Pocus Punch

As you conjure up this festive punch, consider some delightful pairings that’ll enchant both taste buds and spirits.

  • Witch Hat Cupcakes: These adorable treats complement the punch's sweetness with their chocolate richness, creating a playful yet indulgent pairing for your celebrations.

  • Spooky Cheese Platter: A mix of creamy brie, tangy cheddar, and seasonal fruits lends a savory contrast that balances the fruity punch beautifully.

  • Monster Eyes Cookies: Yummy sugar cookies topped with candy eyes add whimsy while their sweetness rounds out the punch's fruity essence.

  • Ghostly Popcorn Balls: Light and airy, these marshmallow-coated popcorn treats offer a crunchy contrast, making them perfect for a casual snack alongside the punch.

  • Crispy Veggie Dippers: Fresh vegetable sticks served with a tangy dip bring a refreshing crunch, enhancing the flavors of the fruity punch and keeping the balance.

  • Halloween-Themed Cheese Balls: Shaped like pumpkins or spiders, these savory bites provide a fun and savory addition to your punch, sure to delight guests of all ages.

  • Sparkling Ciders: A non-alcoholic sparkling cider pairs well with the drink, offering a different yet festive fizz to complement your Halloween festivities.

The vibrant Hocus Pocus Punch is sure to shine brighter when served alongside these fun and festive options!

Make Ahead Options

Planning ahead for your Hocus Pocus Punch can save you valuable time during your Halloween festivities! You can prepare the mango peach juice and peach sparkling water mixture up to 24 hours in advance—just mix them together in a large pitcher and refrigerate. Keep the rainbow sherbet separate until you're ready to serve; this ensures it retains its delightful texture and prevents it from melting into the punch too soon. When you're ready to wow your guests, pour the prepped juice and water mixture over ice, then add a generous scoop of sherbet for that magical finish. By prepping ahead, you'll enjoy the party without the rush!

Hocus Pocus Punch Recipe FAQs

What type of mango peach juice should I use?
Absolutely! I recommend using V8 brand mango peach juice for its rich sweetness and fruity flavor. Opting for a quality juice ensures the best taste, making your Hocus Pocus Punch truly magical!

How long can I store leftover Hocus Pocus Punch?
Very! You can keep any leftover punch in an airtight container in the fridge for up to 3 days. Just give it a gentle stir before serving as the ingredients may separate over time.

Can I freeze Hocus Pocus Punch?
Absolutely! To freeze, pour the punch into ice cube trays, creating fun, punch-flavored ice cubes that can last for up to 3 months. You can use these cubes in future punches for an added flavor boost!

What should I do if my sherbet melts too quickly?
No worries! If you find your sherbet melting faster than expected, consider adding it just before serving or using chilled glasses. This way, it maintains its texture longer, contributing to that delightful swirl in your punch!

Is Hocus Pocus Punch safe for kids?
Very! This recipe is non-alcoholic and perfect for kids and families. If there are allergy concerns, feel free to substitute juices or sherbet to ensure everyone can enjoy this festive treat!

How can I make a spiked version of Hocus Pocus Punch?
To create a spiked version, simply add a splash (about 1-2 ounces) of your favorite spirit, like vodka, rum, or tequila, to each glass. Stir gently and adjust according to your taste preference for a lively adult twist!

Hocus Pocus Punch

Hocus Pocus Punch: A Magical 3-Ingredient Delight

Hocus Pocus Punch is a delightful 3-ingredient drink perfect for Halloween gatherings, combining mango peach juice, peach sparkling water, and rainbow sherbet.
Print Recipe Pin Recipe
Prep Time 2 minutes mins
Total Time 2 minutes mins
Servings: 4 glasses
Course: Drinks
Cuisine: American
Calories: 140
Ingredients Equipment Method Nutrition Notes

Ingredients
  

For the Punch
  • 1 cup Mango Peach Juice V8 brand recommended
  • 1/2 cup Peach Sparkling Water Adds fizz
  • 2-3 tablespoons Rainbow Sherbet Can substitute with vanilla ice cream

Equipment

  • Glasses
  • Spoon

Method
 

Step-by-Step Instructions
  1. Fill each glass with ice cubes to keep the punch chilled, about halfway.
  2. Pour in the mango peach juice until the glasses are three-quarters full.
  3. Add the peach sparkling water to fill the glasses, stir gently to combine.
  4. Scoop rainbow sherbet on top of each glass for a colorful finish.
  5. Serve immediately and enjoy your enchanting punch!

Nutrition

Serving: 1glassCalories: 140kcalCarbohydrates: 35gSodium: 15mgPotassium: 150mgSugar: 30gVitamin C: 10mg

Notes

Use quality ingredients for the best flavor. Serve chilled and enjoy immediately for optimal fizz.

Tried this recipe?

Let us know how it was!

Butternut Squash and Spinach Salad with Sweet Crunchy Pecans

October 20, 2025 by Grace Snow Leave a Comment

While preparing a meal, I noticed how the autumn sun seemed to warm even the coldest of days. That's when the idea for my Butternut Squash and Spinach Salad sparked to life. This vibrant dish combines the sweetness of roasted butternut squash with the crunch of pecans, the tang of pomegranate seeds, and the freshness of baby spinach—all brought together by a zesty poppy seed honey-lime dressing. It’s not just a healthy and gluten-free option; it’s also a beautiful centerpiece for any gathering, especially as the holidays approach. Whether you serve it as a side or make it the star of your table, it offers a delicious escape from fast food fatigue. Are you ready to dive into this flavorful adventure?

Why is this salad a must-try?

Vibrant flavors: The combination of sweet roasted butternut squash and crunchy pecans brings a delightful contrast.
Nutritious and gluten-free: Packed with vitamins and fiber, it makes healthy eating enjoyable!
Quick preparation: With just a few simple steps, you can create a stunning dish in no time.
Versatile options: Enjoy it as a side or a light main course, and switch up ingredients based on your pantry! This salad would pair beautifully with a comforting Jello Salad Cottage or complement the flavors in a Tofu Caesar Salad.
Crowd-pleaser: Its eye-catching presentation and unique flavors will impress family and friends at your next gathering!

Butternut Squash and Spinach Salad Ingredients

For the Salad

  • Butternut Squash – Roasted for a sweet, caramelized flavor; acorn squash makes a great substitute.
  • Baby Spinach – Provides a fresh and vibrant base; kale or arugula can be swapped in.
  • Pecans – Add lovely crunch and nutty richness; walnuts or pumpkin seeds can be used as alternatives.
  • Dried Cranberries – Introduce a chewy sweetness; raisins or chopped dried cherries work well.
  • Pomegranate Seeds – Offer a pop of color and tartness; you can omit this if unavailable.

For the Dressing

  • Olive Oil – Used for both the roasting and dressing, adding a smooth richness; any neutral oil can substitute.
  • Lime Juice – Adds a zesty acidity that balances the sweet flavors; lemon juice serves as a suitable replacement.
  • Honey – Sweetens the dressing beautifully; opt for maple syrup or agave for a vegan alternative.
  • Dijon Mustard – Braids in depth and flavor; can be skipped for a milder taste.
  • Poppy Seeds – Supply a nice crunch and nutty essence; feel free to omit if not on hand.
  • Salt – Elevates all the flavors; adjust to taste.

Enjoy whipping up this Butternut Squash and Spinach Salad that perfectly elevates any meal!

Step‑by‑Step Instructions for Butternut Squash and Spinach Salad

Step 1: Preheat the Oven
Begin by preheating your oven to 400°F (200°C). This lovely warmth creates the perfect environment for roasting, ensuring your butternut squash becomes beautifully sweet and caramelized. As the oven heats, you can prep your ingredients, setting the stage for an enjoyable cooking experience.

Step 2: Prepare the Butternut Squash
While the oven warms, peel and cube one medium butternut squash into bite-sized pieces. In a mixing bowl, toss the squash cubes with a drizzle of olive oil and a pinch of salt, ensuring each piece is well-coated. Spread the seasoned squash evenly on a baking sheet, allowing space for even cooking, and roast for 20-25 minutes, turning halfway through, until they are fork-tender and golden.

Step 3: Make the Dressing
In a medium bowl, whisk together olive oil, fresh lime juice, honey, poppy seeds, Dijon mustard, salt, and pepper. This sweet and tangy poppy seed honey-lime dressing will perfectly complement the earthy flavors of the butternut squash and the fresh baby spinach. Take a moment to taste and adjust the seasoning if needed, ensuring this dressing is just right for your Butternut Squash and Spinach Salad.

Step 4: Combine the Salad Ingredients
Once your butternut squash is roasted to perfection, remove it from the oven and let it cool slightly. In a large salad bowl, combine the warm butternut squash with baby spinach, two-thirds of the chopped pecans, dried cranberries, and a handful of pomegranate seeds. This blend of textures and flavors will bring your salad to life, creating a colorful and appetizing dish.

Step 5: Toss with Dressing
Drizzle the prepared poppy seed honey-lime dressing over the salad mixture. Gently toss the salad to ensure all the vegetables and toppings are coated with the dressing, allowing every bite to burst with flavor. Be careful not to over-mix; you want to keep the butternut squash intact for that delightful experience in your Butternut Squash and Spinach Salad.

Step 6: Garnish and Serve
Before serving, sprinkle the remaining pecans and pomegranate seeds atop the salad for an eye-catching finish. This final touch adds an extra crunch and vibrant color, making your Butternut Squash and Spinach Salad a feast for both the eyes and taste buds. Serve immediately and enjoy the warm, comforting flavors of this nutritious dish!

Butternut Squash and Spinach Salad Variations

Feel free to get creative with this delightful salad and make it your own!

  • Sweet Potato Swap: Swap roasted sweet potatoes for butternut squash for a sweeter twist on texture and flavor.

  • Creamy Additions: Add crumbled feta or goat cheese for a creamy element that beautifully complements the sweetness of the salad.

  • Nuts & Seeds: Experiment with different nuts like walnuts or pumpkin seeds to enhance the salad's crunch and flavor profile.

  • Herb Infusion: Incorporate fresh herbs like basil or cilantro into the dressing for an aromatic depth that elevates the entire dish.

  • Spicy Kick: Sprinkle red pepper flakes or add diced jalapeños for an exciting heat that contrasts nicely with the sweet ingredients.

  • Grain Boost: Toss in cooked quinoa or farro for an additional layer of texture and a protein boost, making this salad even more filling.

  • Zesty Flavor: Replace lime juice with orange juice for a fruity tanginess that brightens the entire salad.

  • Nut-Free Option: Omit the pecans and replace them with roasted chickpeas for a delicious crunch and a satisfying protein punch.

Whether you opt for a hearty addition like grilled chicken or a nourishing side like a light soup, this Butternut Squash and Spinach Salad can easily be paired with dishes like my cherished Chicken Salad Apples for a fulfilling meal!

Make Ahead Options

These Butternut Squash and Spinach Salad preparations are perfect for busy home cooks looking to save time! You can roast the butternut squash and store it in the refrigerator up to 3 days before serving, which will keep it tender and flavorful. Additionally, the dressing can be prepped up to 24 hours in advance—just be sure to refrigerate it in an airtight container to maintain its zesty brightness. When you're ready to enjoy the salad, simply combine the spinach, roasted squash, pecans, cranberries, and pomegranate seeds in a bowl, drizzle with dressing, and toss gently. This way, you'll have a refreshing, nutritious meal ready with minimal effort!

Expert Tips for Butternut Squash and Spinach Salad

  • Uniform Cutting: Ensure the butternut squash is cut into uniform cubes for even roasting; inconsistently sized pieces may cook at different rates.

  • Avoid Soggy Spinach: Add the dressing just before serving to keep the spinach fresh and crisp. This prevents wilting and preserves some crunch.

  • Toast for Flavor: For a deeper, nuttier taste, toast the pecans in the oven for a few minutes beforehand. Just keep an eye on them to avoid burning!

  • Substitution Sensibility: Feel free to mix and match ingredients based on season or personal taste! Use different nuts or greens in your Butternut Squash and Spinach Salad as desired.

  • Make-Ahead Friendly: If prepping in advance, store the dressing separately to keep flavors fresh and the salad ingredients crisp until serving.

Storage Tips for Butternut Squash and Spinach Salad

  • Fridge: Store leftover salad in an airtight container for up to 3 days. Keep the dressing separate until ready to serve to maintain freshness.
  • Freezer: It's best to avoid freezing this salad, as the spinach and dressing do not freeze well and can become soggy after thawing.
  • Reheating: If you have roasted butternut squash leftovers, you can heat them in a microwave or oven. Toss them back lightly with fresh spinach once warmed for a refreshing salad experience.
  • Ingredient Storage: Store pecans and dried cranberries in a cool, dry place to maintain their crunchiness for longer.

What to Serve with Butternut Squash and Spinach Salad?

Enhance your dining experience by harmonizing flavors and textures alongside this delightful salad.

  • Crispy Roasted Chicken: This savory dish complements the salad’s sweetness perfectly, adding a satisfying protein to the meal. Pair it with a side of garlic mashed potatoes for a comforting touch.

  • Quinoa Pilaf: Light and fluffy, quinoa pilaf adds a nutty flavor and a chewy texture that elevates your salad. It’s a perfect balance, making each bite a delightful experience!

  • Garlic Bread: The crunchy, buttery goodness of garlic bread is an excellent foil to the fresh salad. Its indulgent texture provides a satisfying contrast to the nutritional lightness of the salad.

  • Fruit and Nut Cheese Board: A medley of cheeses with fruits and nuts mirrors the flavors in your salad, elevating your appetizer game. This could be the perfect starter that pairs beautifully with a glass of wine.

  • Honey-Lime Grilled Shrimp: Sweet and zesty shrimp bring a grill-kissed flavor that enhances the fresh elements of the salad. Serve over a bed of rice for a complete dish!

  • Pumpkin Spice Muffins: As a delightful dessert, these muffins offer a warm, comforting finish to your meal. The spicy sweetness harmonizes wonderfully with the autumn flavors of the salad.

Butternut Squash and Spinach Salad Recipe FAQs

How do I choose ripe butternut squash?
Absolutely! When selecting butternut squash, look for ones that are smooth and free from dark spots or blemishes. The skin should be a matte, tan color, and the squash should feel heavy for its size. A ripe squash is typically firm to the touch with no soft spots.

How should I store leftovers from the salad?
You can store leftover salad in an airtight container in the refrigerator for up to 3 days. It's essential to keep the dressing separate until you're ready to serve to maintain the freshness of the spinach and prevent it from becoming soggy.

Can I freeze butternut squash?
Yes, you can freeze roasted butternut squash! To do this, allow it to cool completely after roasting. Then, spread it out on a baking sheet and freeze for about 1-2 hours until solid. Once frozen, transfer the squash to a freezer-safe container or bag. It can be stored for up to 3 months. Just remember, this method is best for roasted squash; the salad itself should not be frozen.

What can I do if my salad turns out soggy?
Very good question! If your salad is soggy, first check if you dressed it too early—this can make the spinach wilt. To remedy it, gently toss the salad with a handful of fresh spinach right before serving to add a crisp texture. Additionally, you can also serve the dressing on the side for guests to add as desired, keeping everything fresher.

Are there any allergies I should consider with this salad?
Indeed! This Butternut Squash and Spinach Salad contains nuts (pecans), which could be a concern for those with nut allergies. For a nut-free option, you can substitute pumpkin seeds or simply omit nuts altogether. Always check for any other dietary restrictions among your guests to ensure everyone can enjoy this delicious dish without worry.

Butternut Squash and Spinach Salad

Butternut Squash and Spinach Salad with Sweet Crunchy Pecans

A vibrant Butternut Squash and Spinach Salad combines roasted squash, crunchy pecans, and tangy pomegranate in a zesty dressing.
Print Recipe Pin Recipe
Prep Time 15 minutes mins
Cook Time 25 minutes mins
Total Time 40 minutes mins
Servings: 4 servings
Course: Salads
Cuisine: American
Calories: 250
Ingredients Equipment Method Nutrition Notes

Ingredients
  

For the Salad
  • 1 medium butternut squash peeled and cubed
  • 5 cups baby spinach fresh
  • 1 cup pecans chopped
  • 1/2 cup dried cranberries
  • 1/2 cup pomegranate seeds optional
For the Dressing
  • 1/4 cup olive oil for dressing and roasting
  • 2 tablespoons lime juice fresh
  • 2 tablespoons honey or maple syrup for vegan
  • 1 tablespoon Dijon mustard
  • 1 tablespoon poppy seeds optional
  • to taste teaspoon salt

Equipment

  • Oven
  • Mixing Bowl
  • Baking Sheet
  • Salad Bowl

Method
 

Preparation Steps
  1. Preheat the oven to 400°F (200°C).
  2. Peel and cube the butternut squash, then toss with olive oil and salt before spreading on a baking sheet.
  3. Roast for 20-25 minutes until fork-tender and golden.
  4. In a bowl, whisk together olive oil, lime juice, honey, poppy seeds, Dijon mustard, and salt to make the dressing.
  5. Combine warm butternut squash, spinach, two-thirds of the pecans, cranberries, and pomegranate seeds in a salad bowl.
  6. Drizzle dressing over the salad and gently toss to coat.
  7. Garnish with remaining pecans and pomegranate seeds before serving.

Nutrition

Serving: 1servingCalories: 250kcalCarbohydrates: 30gProtein: 5gFat: 12gSaturated Fat: 1gPolyunsaturated Fat: 2gMonounsaturated Fat: 8gSodium: 200mgPotassium: 450mgFiber: 5gSugar: 8gVitamin A: 3000IUVitamin C: 15mgCalcium: 70mgIron: 1.5mg

Notes

Add dressing just before serving to keep spinach crisp. For a nuttier flavor, toast pecans before use.

Tried this recipe?

Let us know how it was!

Cheese Stuffed Mushrooms That Will Wow Your Guests

October 20, 2025 by Grace Snow Leave a Comment

The aroma wafting from my kitchen had my family gathering around in anticipation, and I couldn’t help but smile. Today, I’m sharing my crowd-pleasing Bacon and Cheese Stuffed Mushrooms, a delightful appetizer that’s perfect for every occasion. With just a handful of ingredients, this quick-to-prepare recipe brings together the creaminess of Parmesan and Mozzarella, all wrapped in savory bacon, and tucked inside tender mushroom caps. Not only are these cheese stuffed mushrooms gluten-free, but they also make for a great bite-sized snack that’s sure to impress both adults and kids alike. Whether it's a party or a simple family dinner, these delectable morsels will have everyone reaching for more. Curious about how to whip up this irresistible treat? Let’s dive into the recipe!

Why Are Cheese Stuffed Mushrooms So Irresistible?

Simplicity at Its Best: This quick recipe is perfect for beginners; you only need basic skills to achieve delicious results.
Flavor Explosion: The rich mix of creamy cheeses and savory bacon delivers a delightful taste with every bite.
Crowd-Pleaser: Great as an appetizer, these cheese stuffed mushrooms will have your guests raving and coming back for seconds!
Versatile Ingredients: Feel free to switch up the ingredients; try adding spinach or herbs for a customized touch!
Perfect for Any Occasion: Whether you're hosting a party or enjoying a cozy family dinner, they fit seamlessly into any setting.
Make Ahead Option: You can prep these ahead of time, freeing you up to enjoy your gathering. Pair them with other favorites like Grilled Mushrooms Savory or Herby Ricotta Stuffed for a fabulous spread!

Cheese Stuffed Mushrooms Ingredients

• The perfect blend of flavors awaits!

For the Filling

  • Mushrooms (10 oz, about 20 small whole mushrooms) – The star ingredient that provides a sturdy base filled with flavor.
  • Butter (2 oz, melted) – Richness and flavor enhancer; olive oil offers a lighter twist if preferred.
  • Cream Cheese (4 oz, slightly softened) – Creates a smooth, creamy texture that binds everything together; try Neufchâtel for a lower-fat option.
  • Parmesan Cheese (½ cup, shredded) – Brings a nutty flavor to the mix; swap for Romano cheese for an even sharper taste.
  • Mozzarella Cheese (¼ cup, shredded) – Melts beautifully for a gooey interior; you can use Gouda or Monterey Jack as creative alternatives.
  • Bacon (2 slices, cooked and finely chopped) – Delivers a savory crunch; turkey bacon or bacon bits can lighten things up.
  • Green Bell Pepper (¼, very finely chopped) – Adds a fresh touch and subtle sweetness; consider red or yellow for added sweetness.
  • Salt and Cayenne Pepper – Essential for seasoning; adjust cayenne to your heat preferences.
  • Paprika – Offers vibrant color and a hint of smokiness; smoked paprika deepens the flavor profile.
  • Fresh Lemon Juice (optional) – Brightens up the filling with acidity; lime juice provides a tangy alternative.

These cheese stuffed mushrooms are sure to be a hit at your dinner table! Enjoy the delightful combination of textures and flavors in each bite.

Step‑by‑Step Instructions for Cheese Stuffed Mushrooms

Step 1: Preheat and Prepare the Baking Dish
Begin by preheating your oven to 400°F (200°C). While the oven heats up, lightly grease a medium baking dish with melted butter. This will not only prevent sticking but also add flavor to your Cheese Stuffed Mushrooms as they bake.

Step 2: Clean and Prepare the Mushrooms
Gently wipe the mushrooms with a damp paper towel to remove any dirt, being careful not to soak them. Next, carefully break off the stems and set the caps aside. Dip the mushroom caps in the melted butter to coat them lightly, which enhances their flavor and helps them crisp up nicely in the oven.

Step 3: Bake Mushroom Caps
Place the mushroom caps upside down in the greased baking dish, ensuring they are close but not touching. Sprinkle a pinch of salt over the tops to season them. Bake the mushrooms in the preheated oven for 10-15 minutes, allowing them to reduce moisture as they soften. The caps should become slightly tender and begin to release their juices.

Step 4: Flip and Drain Excess Liquid
Once baked, carefully remove the dish from the oven and flip the mushroom caps right side up. Drain any excess liquid that may have pooled inside the caps, as this will prevent your Cheese Stuffed Mushrooms from becoming soggy. Set them aside for a moment while you prepare the filling.

Step 5: Make the Cheese Filling
In a mixing bowl, combine softened cream cheese, shredded Parmesan, and Mozzarella cheeses. Add the chopped bacon for a smoky crunch, along with the finely chopped green bell pepper for a fresh touch. Season the mixture with a dash of cayenne and salt, blending everything until smooth and creamy to create the flavorful filling for your Cheese Stuffed Mushrooms.

Step 6: Fill the Mushroom Caps
Generously spoon the cheese and bacon mixture into each mushroom cap, slightly mounding the filling for a delightful presentation. Be careful not to overfill, as this can cause the mixture to spill out during baking. Each cap should be full, showcasing the delicious filling that awaits inside.

Step 7: Add Finishing Touches
Sprinkle paprika over the filled mushroom caps for an appealing pop of color. Drizzle any remaining melted butter from your mixing bowl over the tops of the stuffed mushrooms. This extra step ensures they remain flavorful and golden brown while baking.

Step 8: Final Bake
Return the baking dish to the oven and bake for an additional 20 minutes. Watch as the Cheese Stuffed Mushrooms become hot and bubbly with golden-brown tops, indicating they are ready to serve. The aroma will be irresistible, summoning everyone to the table for a taste.

Make Ahead Options

These Bacon and Cheese Stuffed Mushrooms are perfect for meal prep enthusiasts! You can prepare the filling (cream cheese, cheeses, bacon, and bell pepper) up to 3 days in advance, storing it in an airtight container in the refrigerator. Additionally, you can pre-bake the mushroom caps for up to 24 hours, then assemble them with the filling just before baking. To maintain quality, ensure to keep the stuffed mushrooms covered until you're ready to bake, preventing them from drying out. When you’re ready to serve, simply fill the prepped mushroom caps with the delicious mixture and bake for 20 minutes, ensuring piping hot, restaurant-quality results with minimal effort!

What to Serve with Bacon and Cheese Stuffed Mushrooms

Elevate your gathering with delightful accompaniments that perfectly complement the rich flavors of these savory bites.

  • Creamy Mashed Potatoes: The smoothness of mashed potatoes offers a comforting contrast to the rich cheese and bacon filling.

  • Garlic Breadsticks: These herby, buttery breadsticks enhance the meal with a satisfying crunch, perfect for scooping up any leftover filling.

  • Fresh Garden Salad: A light, crisp salad adds a refreshing contrast, balancing the savory mushrooms with vibrant greens and dressing.

  • Wine Pairing: A chilled Sauvignon Blanc or a light-bodied Pinot Noir enhances the flavors, making each bite of bacon and cheese even more enjoyable.

  • Savory Roasted Vegetables: Roasting seasonal veggies brings out their natural sweetness, making for a delightful side that adds color to your plate.

  • Zesty Dipping Sauce: Try a tangy garlic aioli or zesty ranch dressing; the coolness serves as a great foil to the warm stuffed mushrooms.

Each of these pairings enhances the overall experience, turning your appetizers into a memorable feast.

Cheese Stuffed Mushrooms Variations

Get ready to explore some delightful twists on your Cheese Stuffed Mushrooms that will take your taste buds on a little adventure!

  • Herb-Infused:
    Add fresh herbs like basil or thyme to the cheese mixture for an aromatic boost. These flavors breathe life into your stuffing, making every bite even more delightful.

  • Spicy Kick:
    Incorporate diced jalapeños or crushed red pepper flakes into the filling for an extra layer of heat. This will give a mouthwatering contrast to the creamy cheese base!

  • Veggie Delight:
    Fold in sautéed spinach or roasted red peppers for a nutrition-packed version that’s just as indulgent. Not only do they add color, but they also infuse the mushrooms with hearty flavors that balance perfectly with the savory notes of bacon.

  • Mediterranean Twist:
    Replace bacon with crumbled feta cheese and add black olives for a Mediterranean flair. This approach brings a tangy richness to the dish that pairs beautifully with the mushrooms.

  • Gourmet Blend:
    Mix in some truffle oil or gourmet cheeses like Gruyère for a luxurious touch. A little drizzle of truffle oil elevates these stuffed mushrooms into an elegant dish that's sure to impress!

  • Sweet Heat:
    For a surprising zing, include a touch of honey or balsamic glaze incorporated into the filling. This will create a wonderful contrast with the savory bacon and cheese.

  • Alternative Cheeses:
    Swap mozzarella for crumbled goat cheese for a tangy twist. Goat cheese adds a creamy texture and a distinctive flavor profile that complements the mushrooms beautifully. If you're feeling adventurous, try out smoked cheeses from your local deli!

  • Plant-Based Option:
    Use plant-based bacon and cream cheese for a delicious vegan adaptation. This way, everyone can enjoy these cheesy bites without missing out on flavor!

Feel free to mix and match these ideas to create your very own perfect Cheese Stuffed Mushrooms! For more inspiration, consider pairing them with Potato Blue Cheese for a unique flavor journey or try out some fresh styles in Grilled Mushrooms Savory. Enjoy the deliciousness!

Expert Tips for Cheese Stuffed Mushrooms

  • Soften Cream Cheese: Ensure your cream cheese is softened but not melted for easier mixing and a smoother filling.

  • Avoid Overfilling: Be cautious not to overfill the mushrooms, as excess filling can spill out during baking and create a mess.

  • Mushroom Selection: Choose small to medium-sized mushrooms for perfect bite-sized portions. Larger mushrooms might need more cooking time.

  • Drain Liquid: After baking, remember to flip the mushrooms and drain any collected liquid to keep your cheese stuffed mushrooms from becoming soggy.

  • Add Flavor: Consider experimenting with different herbs or spices in your filling like garlic powder or Italian seasoning to elevate the taste!

  • Cool Before Serving: Allow the mushrooms to cool slightly after baking to let the flavors settle and avoid burns when enjoying these cheesy bites.

Storage Tips for Cheese Stuffed Mushrooms

Fridge: Store unbaked cheese stuffed mushrooms in an airtight container for up to 3 days. Make sure they are well-wrapped to prevent moisture loss.

Freezer: For longer storage, freeze baked cheese stuffed mushrooms on a baking sheet until firm, then transfer to a freezer bag for up to 2 months.

Reheating: To reheat, bake from frozen at 350°F (175°C) for about 25-30 minutes, or until heated through. This keeps them warm and delicious!

Make Ahead: Prepare the cheese stuffed mushrooms in advance and freeze them; this allows you to enjoy stress-free entertaining whenever you choose!

Cheese Stuffed Mushrooms Recipe FAQs

What type of mushrooms should I use for stuffing?
I recommend using small to medium whole mushrooms, such as cremini or button mushrooms, since they provide the perfect bite-sized base. If you prefer larger mushrooms, like portobello, just keep in mind that they may require a longer baking time to ensure the filling is heated through.

How should I store leftover cheese stuffed mushrooms?
Store unbaked cheese stuffed mushrooms in an airtight container in the refrigerator for up to 3 days. If they are baked, keep them in the fridge for about the same duration. Just be sure to wrap them well to avoid moisture loss.

Can I freeze cheese stuffed mushrooms?
Absolutely! To freeze, first bake the cheese stuffed mushrooms, let them cool, and then freeze them on a baking sheet until firm. Transfer them to a freezer bag and store for up to 2 months. When you're ready to enjoy them, bake from frozen at 350°F (175°C) for about 25-30 minutes, or until heated through.

What can I do if my stuffing spills out while baking?
To prevent spillage, be mindful not to overfill the mushroom caps. Also, make sure to flip the mushrooms and drain excess liquid before adding the filling. This will keep the stuffing intact and allow for a beautifully presented dish.

Are cheese stuffed mushrooms safe for people with dietary restrictions?
These cheese stuffed mushrooms can be gluten-free depending on the ingredients you choose. Always double-check labels for any allergens, especially for cheese types. You can use turkey bacon or omit bacon altogether for a vegetarian option. If you're serving them to pets, please avoid any cheese or seasonings that aren't safe for them!

How can I know when the cheese stuffed mushrooms are done?
Your cheese stuffed mushrooms are ready when they are golden brown on top and the cheese is bubbly. The aroma will be absolutely delightful, drawing everyone to the kitchen! Let them cool slightly before serving to avoid burns and enhance the flavors.

Cheese Stuffed Mushrooms

Cheese Stuffed Mushrooms That Will Wow Your Guests

Delightful Cheese Stuffed Mushrooms, filled with creamy cheeses and savory bacon, are perfect for any occasion.
Print Recipe Pin Recipe
Prep Time 15 minutes mins
Cook Time 30 minutes mins
Total Time 45 minutes mins
Servings: 20 mushrooms
Course: Appetizers
Calories: 80
Ingredients Equipment Method Nutrition Notes

Ingredients
  

For the Filling
  • 10 oz Mushrooms about 20 small whole mushrooms
  • 2 oz Butter melted
  • 4 oz Cream Cheese slightly softened
  • ½ cup Parmesan Cheese shredded
  • ¼ cup Mozzarella Cheese shredded
  • 2 slices Bacon cooked and finely chopped
  • ¼ Green Bell Pepper very finely chopped
  • Salt to taste
  • Cayenne Pepper to taste
  • Paprika
  • Fresh Lemon Juice optional

Equipment

  • Oven
  • Baking Dish
  • Mixing Bowl

Method
 

Step-by-Step Instructions
  1. Preheat your oven to 400°F (200°C) and grease a medium baking dish with melted butter.
  2. Gently wipe the mushrooms with a damp paper towel and break off the stems. Coat mushroom caps in melted butter.
  3. Place mushroom caps upside down in the baking dish, sprinkle with salt, and bake for 10-15 minutes until tender.
  4. Flip mushroom caps right side up and drain any excess liquid.
  5. Combine cream cheese, Parmesan, Mozzarella, bacon, and bell pepper in a mixing bowl. Season to taste.
  6. Fill each mushroom cap with the cheese and bacon mixture, mounding slightly.
  7. Sprinkle paprika over the caps and drizzle with remaining melted butter.
  8. Bake for an additional 20 minutes until bubbly and golden brown.

Nutrition

Serving: 1mushroomCalories: 80kcalCarbohydrates: 2gProtein: 4gFat: 7gSaturated Fat: 4gMonounsaturated Fat: 2gCholesterol: 20mgSodium: 200mgPotassium: 90mgVitamin A: 200IUVitamin C: 2mgCalcium: 100mgIron: 0.5mg

Notes

These cheese stuffed mushrooms are perfect for parties or family dinners. Try adding different herbs for variety!

Tried this recipe?

Let us know how it was!

Delicious Nutter Butter Turkey Cookies for a Fun Thanksgiving Treat

October 20, 2025 by Grace Snow Leave a Comment

As I stood in my kitchen, colorful candy melts scattered across my countertop, a burst of excitement hit me. It wasn’t just another dessert day; I was on a mission to create the cutest Nutter Butter Turkey Cookies for Thanksgiving! These adorable no-bake treats are not only easy to whip up but also bring a festive flair to any holiday gathering. Imagine the smiles on your loved ones' faces as they discover these whimsical cookies, featuring creamy peanut butter cookies as the base and vibrant candy decorations that make them irresistible to both kids and adults alike. The simple prep allows you to spend more time enjoying the festivities, making these treats a perfect addition to your Thanksgiving dessert table. So, are you ready to channel your inner holiday baker and impress your family with this fun and delightful creation? Let’s get started!

Why Nutter Butter Turkey Cookies Stand Out?

Irresistible Fun: Who can resist these charming little turkeys? They’re perfect for adding a playful spirit to your Thanksgiving celebration!

No-Bake Simplicity: No ovens necessary! Just melt, assemble, and decorate—making them a breeze for both novice and experienced bakers.

Creative Customization: Get creative! Swap candies and cookie types to make each turkey uniquely yours. Try adding a twist with colorful melts or different candies!

Crowd-Pleasing Treat: With their delightful combination of creamy and crunchy textures, these cookies are guaranteed to be a hit with everyone at your gathering—just like my Crockpot Butter Chicken for a main dish that’s equally loved!

Festive Flair: These cookies elevate your dessert table, making them not just a treat but a centerpiece that draws smiles and conversation.

Roll up your sleeves, embrace the holiday spirit, and create these delightful Nutter Butter Turkey Cookies that your family will cherish!

Nutter Butter Turkey Cookies Ingredients

• Get ready to craft these festive delights!

For the Turkey Bodies

  • Nutter Butter Cookies (regular peanut-shaped) – They serve as the main base, offering a delicious peanut flavor and sturdy structure. Substitutions: Try Golden Oreos for a fun twist!
  • Nutter Butter Cookies (large round) – Perfect for forming the turkey's head; essential for that iconic look. Notes: Ensure you use the large round ones for the best results.

For the Decorations

  • Candy Eyes – These charming little treats bring your turkey to life! Notes: A must-have for that adorable touch.
  • Candy Corn – Vibrant feathers that add color and crunch to your creations. Notes: Fresh candy corn sticks well and enhances the fun!

For Assembly

  • Candy Melts (white) – Helps hold everything together and adds a sweet coating. Notes: Melt until smooth for the best adhesion.
  • Reese’s Pieces (orange, cut in half) – Makes for delightful turkey beaks; they add a lovely oaky flavor. Substitutions: Orange M&Ms work nicely too!
  • Red Cookie Icing – Perfect for the turkey's wattle for that extra festive flair. Notes: Alternatively, melted red candy wafers can be used.

Embrace your creativity and let’s bring these adorable Nutter Butter Turkey Cookies to life this Thanksgiving! Your loved ones will be thrilled with this delicious no-bake treat!

Step‑by‑Step Instructions for Nutter Butter Turkey Cookies

Step 1: Prep the Work Area
Begin by lining a large baking sheet with parchment paper to ensure an easy cleanup later on. This will act as your workspace for assembling the Nutter Butter Turkey Cookies. It’s essential to have a clear and organized area, so gather all your ingredients and tools close by to ensure a smooth and efficient assembly process.

Step 2: Melt Candy
In a microwave-safe bowl, add the white candy melts and heat them in the microwave at 30-second intervals. Stir the melts after each interval until they are fully melted and reach a smooth consistency, which usually takes about 1-2 minutes total. Once smooth, let the melted candy cool slightly before using to ensure it can efficiently adhere the cookie components together.

Step 3: Assemble Turkeys
To create the turkey bodies, spread a small dollop of the melted candy onto the bottom half of a large round Nutter Butter cookie. Then, gently press a regular peanut-shaped Nutter Butter cookie onto the lower half of the coated cookie. Hold it in place briefly until it starts to set, ensuring your fabulous Nutter Butter Turkey Cookies have a sturdy construction.

Step 4: Add Feathers
While the melted candy is still warm and tacky, take five pieces of candy corn and swiftly press them into the top of the peanut-shaped cookie to form the turkey's colorful feathers. Position the candy corn in a fan shape, and ensure they are pushed in well enough to stick, adding a bright and festive touch to your adorable treats.

Step 5: Apply Eyes & Beak
Using a skewer, dip it into the remaining melted candy and carefully place two candy eyes on the round Nutter Butter cookie to give your turkey some personality. For the turkey's beak, position a half piece of Reese’s on the cookie, securing it in place with a dab of melted candy. The combination of eyes and beak will bring your Nutter Butter Turkey Cookies to life!

Step 6: Decorate with Icing
To finish off your whimsical turkeys, take the red cookie icing and carefully pipe a wattle or snood on the round cookie right above the beak. This decorative touch adds to the turkey's charm and makes your Nutter Butter Turkey Cookies incredibly festive, creating an appealing visual that will delight everyone at your Thanksgiving gathering.

Step 7: Set
Once all your decoration is complete, allow the assembled Nutter Butter Turkey Cookies to set for about 15-20 minutes at room temperature. For quicker results, you can refrigerate the cookies for 5-10 minutes to help the candy harden. This final step ensures that all components are firmly in place, making your cookies ready to impress your guests!

Expert Tips for Nutter Butter Turkey Cookies

  • Cool Down Candy: Allow melted candy to cool slightly before use to prevent runniness, ensuring better adherence among the layers of your Nutter Butter Turkey Cookies.

  • Preparation is Key: Gather all ingredients and tools before starting the assembly process, making it easier and faster to create your whimsical cookies.

  • Use Fresh Candy Corn: Opt for fresh candy corn to ensure they stick well in the melted candy, creating vibrant and secure feathers for your turkey cookies.

  • Quick Setting Trick: For quicker hardening of your cookies, refrigerate them for 5-10 minutes after assembly to speed up the setting process, allowing you to enjoy your creations sooner.

  • Experiment with Variations: Don’t be afraid to customize your turkey cookies by trying different candies or cookie types, making each batch truly unique and exciting for your Holiday table!

Nutter Butter Turkey Cookies Variations

Get ready to personalize your festive treat with these fun variations that add a delightful twist to your Nutter Butter Turkey Cookies!

  • Dairy-Free: Swap the candy melts for dairy-free chocolate melts to keep the flavor rich and suitable for dairy-sensitive friends.

  • Flavor Boost: Add a drizzle of chocolate icing over the turkey bodies for an extra layer of sweetness. This will create a delightful contrast to the candy decorations!

  • Nut-Free: Replace Nutter Butter cookies with crunchy digestive biscuits or graham crackers to accommodate nut allergies, keeping the fun factor intact.

  • Spicy Kick: Introduce a touch of heat by using spicy cinnamon candies in place of traditional candy corn. This will add a surprising twist to your cookies!

  • Festive Sprinkles: After decorating, generously sprinkle holiday-themed edible glitter or colorful sprinkles over the cookies. The added sparkle makes them even more festive!

Bring these variations to life and make your Nutter Butter Turkey Cookies an unforgettable part of your Thanksgiving tradition! And if you’re looking for more festive treats, don't miss out on my delightful Eggnog Cookies Soft or these charming Thumbprint Cookies Melt that are sure to impress all your holiday guests!

Make Ahead Options

These Nutter Butter Turkey Cookies are a fantastic option for meal prep, allowing you to streamline your Thanksgiving dessert preparations! You can assemble the cookie bodies (Nutter Butter cookies) and store them in an airtight container for up to 3 days at room temperature without any loss of quality. Additionally, you can melt the candy melts and keep them in the refrigerator for up to 24 hours. When you’re ready to serve, simply reheat the candy melts until smooth, assemble the turkeys with candy eyes and feathers, and let them set. This way, you can enjoy the delightful process of decorating without the last-minute rush, ensuring your adorable Nutter Butter Turkey Cookies are just as delicious and festive!

Storage Tips for Nutter Butter Turkey Cookies

  • Room Temperature: Keep your cookies in an airtight container at room temperature for up to 2 weeks. This will maintain their delightful crunch and freshness.

  • Fridge: For an extended shelf life, store your Nutter Butter Turkey Cookies in the refrigerator for up to 1 month. The cool environment helps preserve the decorations.

  • Freezer: Avoid freezing these cookies, as the thawing process can compromise the integrity of the candy decorations, making them less appealing and messier.

  • Reheating: These cookies are best enjoyed cold or at room temperature. If stored in the fridge, simply take them out a few minutes before serving for optimal texture and flavor!

What to Serve with Nutter Butter Turkey Cookies

Elevate your Thanksgiving spread by pairing these whimsical cookies with delightful accompaniments that create a memorable feast experience.

  • Pumpkin Spice Latte: Warm your guests with this seasonal favorite, enhancing the cozy flavors of Thanksgiving with every sip of rich and spicy bliss.

  • Cranberry Sauce: The tartness of this classic side offers a refreshing contrast to the sweet cookies, balancing the overall dessert experience beautifully.

  • Vanilla Ice Cream: Creamy and sweet, a scoop of vanilla ice cream provides a delightful temperature contrast to the cookies’ crunch, making every bite heavenly.

  • Apple Cider: Serve a chilled or warm glass of fresh apple cider. Its crispness complements the cookies while evoking those nostalgic autumn vibes.

  • Chocolate Dip: Melt some chocolate for a dipping option. The rich, velvety flavor of chocolate enriches the sweetness of the cookies, making them even more indulgent!

  • Pecan Pie: A slice of this Thanksgiving staple provides a textural contrast and pairs well with the cookies' festive aesthetics, creating harmony on your dessert table.

Entice your family with these complementary treats, turning your Thanksgiving dessert spread into an unforgettable celebration of flavors and joy!

Nutter Butter Turkey Cookies Recipe FAQs

What type of Nutter Butter cookies should I use?
For the body of the turkey, you'll want regular peanut-shaped Nutter Butter cookies as they provide the perfect flavor and structure. For the head, be sure to use large round Nutter Butter cookies to achieve that lovable turkey look. If you're feeling adventurous, Golden Oreos can also be a fun substitute for a different flavor profile!

How should I store leftover Nutter Butter Turkey Cookies?
To keep your cookies fresh, store them in an airtight container at room temperature for up to 2 weeks. If you want to extend their shelf life, you can refrigerate them for up to 1 month. Just be careful not to freeze these cookies, as the thawing process could ruin the delightful candy decorations.

Can I freeze Nutter Butter Turkey Cookies?
It's best to avoid freezing these adorable cookies. Freezing can cause the candy decorations to lose their shape and texture when thawed. Instead, store them in an airtight container at room temperature or in the refrigerator to maintain their festive look and flavor.

What should I do if my melted candy is too runny?
If you find your melted candy is too runny, it's usually because it hasn't cooled enough. Let it sit for a couple of minutes after melting to allow it to thicken slightly. If it’s still too runny after cooling, you could try adding a bit more candy melt and remelting it carefully. Remember, a thicker consistency will help with better adhesion when assembling your cookies!

Are Nutter Butter Turkey Cookies suitable for those with allergies?
Nutter Butter cookies contain peanut butter and can pose a risk for those with nut allergies. When preparing these fun treats, be sure to inform guests about the ingredients to ensure everyone can safely enjoy them. If you have guests with allergies, consider using nut-free alternatives or consult a list of ingredients to find suitable substitutes.

Nutter Butter Turkey Cookies

Delicious Nutter Butter Turkey Cookies for a Fun Thanksgiving Treat

Create charming Nutter Butter Turkey Cookies for Thanksgiving - a delightful no-bake treat that will impress guests!
Print Recipe Pin Recipe
Prep Time 20 minutes mins
Setting Time 20 minutes mins
Total Time 40 minutes mins
Servings: 12 cookies
Course: Dessert
Cuisine: American
Calories: 120
Ingredients Equipment Method Nutrition Notes

Ingredients
  

For the Turkey Bodies
  • 12 pieces Nutter Butter Cookies (regular peanut-shaped) Substitutions: Try Golden Oreos for a fun twist!
  • 6 pieces Nutter Butter Cookies (large round) Ensure you use the large round ones for the best results.
For the Decorations
  • 1 pack Candy Eyes A must-have for that adorable touch.
  • 1 cup Candy Corn Fresh candy corn sticks well and enhances the fun!
For Assembly
  • 1 cup Candy Melts (white) Melt until smooth for the best adhesion.
  • 12 pieces Reese’s Pieces (orange, cut in half) Substitutions: Orange M&Ms work nicely too!
  • 1 bottle Red Cookie Icing Alternatively, melted red candy wafers can be used.

Equipment

  • Microwave-safe bowl
  • Baking Sheet
  • Parchment Paper
  • skewer

Method
 

Step-by-Step Instructions
  1. Prep the Work Area: Begin by lining a large baking sheet with parchment paper to ensure an easy cleanup later on.
  2. Melt Candy: In a microwave-safe bowl, add the white candy melts and heat them in the microwave at 30-second intervals until fully melted, about 1-2 minutes.
  3. Assemble Turkeys: Spread a small dollop of the melted candy onto the bottom half of a large round Nutter Butter cookie and press a regular peanut-shaped cookie onto it.
  4. Add Feathers: While the melted candy is still warm, press five pieces of candy corn into the top of the peanut-shaped cookie to form the turkey's feathers.
  5. Apply Eyes & Beak: Use a skewer dipped in the melted candy to place two candy eyes on the round cookie, then add a half piece of Reese’s for the beak.
  6. Decorate with Icing: Pipe red icing to create a wattle on the round cookie right above the beak.
  7. Set: Allow the assembled cookies to set for about 15-20 minutes or refrigerate for 5-10 minutes for quicker results.

Nutrition

Serving: 1cookieCalories: 120kcalCarbohydrates: 15gProtein: 2gFat: 6gSaturated Fat: 2gSodium: 60mgPotassium: 30mgFiber: 1gSugar: 8gIron: 2mg

Notes

These cookies can be customized with different candies for a unique twist. Make sure to use fresh candy corn for the best results.

Tried this recipe?

Let us know how it was!

Delicious Turkey Wild Rice Casserole for Cozy Nights

October 20, 2025 by Grace Snow Leave a Comment

The aroma of a warm casserole wafting through the kitchen evokes the coziest memories, doesn’t it? My Instant Pot Leftover Turkey Wild Rice Casserole takes those holiday leftovers and transforms them into a comforting one-pot meal that your family will adore. It's a fantastic way to repurpose turkey, mixing it with hearty wild rice, vibrant veggies, and a touch of creamy goodness. One of the best parts about this recipe is how quickly it comes together—perfect for any busy home chef. Plus, it’s gluten-free friendly! So whether you’re looking to make the most of your holiday feast or simply craving a satisfying meal, this casserole will warm both your heart and your stomach. What’s your favorite way to use up leftovers?

Why Love This Turkey Wild Rice Casserole?

Versatile Delight: This recipe is perfect for transforming any leftover turkey into an exciting dish that'll please everyone's taste buds. One-Pot Wonder: Easy clean-up means more time with loved ones and less in the kitchen! Nutritious & Hearty: Packed with veggies and healthy grains, this casserole brings satisfaction without guilt. Quick Cooking: In just about 30 minutes, you have a warm, delicious meal ready to serve. You might even enjoy serving it alongside a refreshing salad or some crusty bread for an even more delightful experience. If you're looking for more ideas, check out our delicious Cornbread Breakfast Casserole for a breakfast twist, too!

Turkey Wild Rice Casserole Ingredients

For the Casserole

  • Unsalted Butter – Adds rich flavor and helps soften vegetables.
  • Garlic (2 cloves, minced) – Builds the savory base for the Turkey Wild Rice Casserole.
  • White Onion (1, diced) – Provides aromatic sweetness and depth.
  • Celery (½ cup, diced) – Classic aromatic for texture and flavor.
  • Carrots (½ cup, diced) – Adds sweetness and vibrant color.
  • Chicken Broth (3 cups) – Supplies necessary liquid for cooking and enhances flavor.
  • Wild Rice (1 cup) – Adds chewiness and earthy flavor; nutty taste.
  • Long Grain Rice (½ cup) – Complements the wild rice, enhancing the dish's texture.
  • Red Lentils (½ cup) – Cook quickly, adding protein and soft texture.
  • Corn (½ cup) – Introduces sweetness and more color.
  • Sage Stuffing (1 cup, dry) – Provides herby, season-based flavor; can use homemade or store-bought.
  • Leftover Turkey (2 cups, shredded) – The star ingredient, giving protein and heartiness to the dish.

For Seasoning

  • Salt (1 tsp) – Enhances overall flavor.
  • Black Pepper (1 tsp) – Adds warmth.
  • Dried Thyme (½ tsp) – Contributes earthy flavor.
  • Dried Rosemary (½ tsp) – Imparts a slightly piney flavor.
  • Dried Sage (1 tsp) – Complements stuffing and turkey flavor.
  • Bay Leaves (2) – Infuses subtle flavor during cooking.

For the Creamy Finish

  • Heavy Cream (½ cup) – Stirred in at the end for a creamy finish.
  • Fresh Thyme – Used as a garnish for color and freshness.

Step‑by‑Step Instructions for Turkey Wild Rice Casserole

Step 1: Sauté the Aromatics
Set your Instant Pot to sauté mode and melt 2 tablespoons of unsalted butter. Add 2 minced garlic cloves, 1 diced white onion, ½ cup diced celery, and ½ cup diced carrots. Sauté for about 2 minutes, stirring occasionally, until the vegetables are softened and fragrant, then turn off the Instant Pot to keep the base warm.

Step 2: Deglaze the Pot
Pour in 3 cups of chicken broth into the pot, using a wooden spoon to scrape up any browned bits from the bottom. This step is crucial for adding depth of flavor to your Turkey Wild Rice Casserole and avoiding the dreaded burn notice during cooking, so ensure all particles are deglazed well.

Step 3: Add the Grains and Veggies
Stir in 1 cup of wild rice, ½ cup of long grain rice, ½ cup of red lentils, and ½ cup of corn to the pot. Mix until everything is well combined, ensuring the grains are evenly distributed. This will create a hearty base for your casserole, adding both texture and nutrition to the dish.

Step 4: Layer the Turkey and Seasoning
Place 2 cups of shredded leftover turkey on top of the rice mixture without stirring. Sprinkle with 1 teaspoon of salt, 1 teaspoon of black pepper, ½ teaspoon of dried thyme, ½ teaspoon of dried rosemary, 1 teaspoon of dried sage, and add 2 bay leaves. This layering allows the flavors to meld beautifully during pressure cooking.

Step 5: Cook Under Pressure
Seal the Instant Pot lid and switch the setting to manual high pressure. Cook for 20 minutes, allowing the casserole to build pressure and cook thoroughly. The lovely aroma will entice your family while it’s cooking, making everyone eager for a cozy meal.

Step 6: Natural Pressure Release
Once the cooking time is done, let the Instant Pot naturally release pressure for 10 minutes. Afterward, carefully turn the valve to release any remaining pressure. This step helps the Turkey Wild Rice Casserole develop flavor and ensures a perfect texture for your dish.

Step 7: Final Touches
Open the lid and remove the bay leaves from the casserole. Stir in ½ cup of heavy cream to add a rich, creamy finish to your casserole. This last step enriches the flavors and gives the dish that cozy, comforting feel everyone loves.

Step 8: Garnish and Serve
Spoon the Turkey Wild Rice Casserole into bowls and garnish with fresh thyme for a pop of color and freshness. Serve warm, and watch your family enjoy every hearty, creamy bite—it’s a delightful way to turn holiday leftovers into a comforting feast.

What to Serve with Instant Pot Leftover Turkey Wild Rice Casserole?

There’s nothing quite like a cozy meal paired with delightful sides to elevate your dining experience and fill your home with warmth.

  • Simple Side Salad: A light lemon parmesan chopped salad adds a refreshing crunch that balances the creamy casserole perfectly.
  • Crusty Bread: Serve with pumpkin seed or cranberry walnut bread for a nutty contrast that complements the rich flavors of the casserole.
  • Steamed Green Beans: Their crisp-tender texture and mild flavor create a beautiful, fresh counterpart to the hearty turkey wild rice casserole.
  • Roasted Brussels Sprouts: Caramelized and slightly sweet, they add a delightful depth of flavor alongside the savory casserole.
  • Sweet Potato Mash: Creamy and slightly sweet, this side dish contrasts beautifully with the casserole’s savory notes and adds a pop of color to your plate.
  • Savory Cornbread: Perfect for soaking up the creamy sauce, cornbread adds a touch of sweetness and heartiness that rounds out the meal beautifully.
  • Cranberry Sauce: A spoonful of tart cranberry sauce brightens the flavors and celebrates the holiday spirit even after the feast is over.
  • Pumpkin Slab Pie: To finish your meal, a slice of this fall favorite adds a rich sweetness and serves as the perfect indulgence to sweeten the cozy vibe.

How to Store and Freeze Turkey Wild Rice Casserole

Fridge: Store leftover turkey wild rice casserole in an airtight container for up to 3 days. Make sure it’s cooled before sealing to prevent condensation.

Freezer: For longer storage, you can freeze the casserole for up to 3 months. Place it in a freezer-safe container and ensure it's properly sealed.

Reheating: Thaw in the fridge overnight. Reheat in the microwave or on the stovetop, adding a splash of broth or water if needed to regain creaminess.

Make-Ahead Tip: Prepare the casserole ahead of time and store it unbaked in the fridge. It can be baked fresh when you're ready to enjoy a cozy meal!

Expert Tips for Turkey Wild Rice Casserole

  • Deglaze Well: Thoroughly scrape the bottom of the pot after sautéing to prevent a burn notice. This helps your Turkey Wild Rice Casserole achieve deep, rich flavors.

  • Uniform Veggies: Cut your vegetables into similar sizes to ensure they cook evenly. This makes a big difference in texture throughout the dish.

  • Let it Rest: Allow the casserole to sit for a few minutes after cooking. This helps thicken the sauce and enhances flavor, making every bite even more delightful.

  • Creamy Finish: Stir in heavy cream just before serving for an extra layer of richness. If desired, substitute with full-fat coconut milk for a lighter touch.

  • Leftover Flexibility: Don't hesitate to use any meat or veggies you have on hand! Rotisserie chicken or even mushrooms can be excellent alternatives for a personalized twist on the classic Turkey Wild Rice Casserole.

Turkey Wild Rice Casserole Variations

Feel free to tailor this casserole to your family’s taste with these enticing variations!

  • Rotisserie Chicken: Swap out the turkey for rotisserie chicken for a quick and easy option. It’s perfect for those nights when time is of the essence but comfort food is still a must!

  • Mushroom Medley: Add diced mushrooms to the sautéed veggies for an earthy flavor boost. The mushrooms will add a delightful texture and depth, making each bite even more satisfying.

  • Lentil Alternatives: Replace red lentils with more rice, quinoa, or even chickpeas for variety. This allows you to adjust the protein and texture to suit your preferences!

  • Gluten-Free Friendly: Use gluten-free stuffing and ensure your chicken broth is gluten-free. This way, everyone at the table can enjoy this cozy casserole without worry.

  • Creamy Coconut Twist: Substitute heavy cream with full-fat coconut milk for a light, tropical flair. It adds a wonderful creaminess while being dairy-free!

  • Herb Explosion: Experiment with fresh herbs like parsley, dill, or cilantro for a freshness that elevates the flavors in your casserole. Fresh herbs can truly bring your dish to life!

  • Spice it Up: Want some heat? Stir in a teaspoon or two of red pepper flakes or your favorite hot sauce before cooking. It will add a delightful kick that'll spice things up!

  • Vegan Option: For a vegan twist, skip the turkey and use roasted vegetables along with plant-based cream. This way, you’ll make a hearty, plant-packed dish that everyone can enjoy.

If you find yourself yearning for more hearty comfort dishes, don’t miss out on our delicious recipe for Spicy Miso Casserole as your next kitchen adventure!

Make Ahead Options

These Turkey Wild Rice Casserole preparations are perfect for busy home cooks eager to save time during the week! You can prepare the base (steps 1-4) up to 24 hours in advance by storing it in an airtight container in the refrigerator. Be sure to let it cool completely before sealing to preserve quality. When ready to cook, simply add the particulate, seal the Instant Pot, and follow the pressure cooking steps. If you plan to freeze for up to three months, assemble everything but the heavy cream, and add that just before serving to maintain a rich and creamy texture. This way, you'll have a hearty, comforting meal in no time—just as delicious as if made fresh!

Turkey Wild Rice Casserole Recipe FAQs

How do I select ripe ingredients for this casserole?
Absolutely! When choosing your vegetables, look for fresh, firm carrots and celery without dark spots or blemishes. For the onion, opt for one that feels heavy for its size and has a dry skin. As for the wild rice, check for packaging that doesn’t have holes or tears to ensure you’re getting the best quality. The fresher the ingredients, the tastier your Turkey Wild Rice Casserole will be!

How should I store leftovers of the casserole?
Store leftover Turkey Wild Rice Casserole in an airtight container in the refrigerator for up to 3 days. It's crucial to let the dish cool down before sealing it to prevent condensation from making it soggy. I often separate it into portion-sized containers for easy reheating. Just pop them in the microwave when you're ready for a quick meal!

Can I freeze the Turkey Wild Rice Casserole?
Yes, you can freeze it! To do this, allow the casserole to cool completely, then transfer it to a freezer-safe container. It can be frozen for up to 3 months. To reheat, thaw it overnight in the refrigerator and reheat in the microwave or on the stovetop, adding a splash of broth or water to restore creaminess. This way, you have a hearty meal ready whenever you want it!

What should I do if my casserole is too thick after cooking?
If your Turkey Wild Rice Casserole turns out thicker than you’d like, simply add a little chicken broth or water while reheating. Stir it in gradually until you reach the desired consistency. If you find that it’s too thick right after cooking, you can add a splash of broth and stir before closing the lid to allow it to steam gently for a few more minutes.

Are there any dietary considerations for this recipe?
Very! This casserole can be made gluten-free by choosing a gluten-free stuffing and using gluten-free chicken broth. Additionally, ensure that your leftover turkey doesn’t include any elements that could trigger allergies. If you're serving this to pets, keep in mind that certain ingredients like onions and garlic can be harmful to them—so it’s best to keep this dish just for human enjoyment!

Turkey Wild Rice Casserole

Delicious Turkey Wild Rice Casserole for Cozy Nights

Transform leftover turkey into a comforting one-pot meal with this Turkey Wild Rice Casserole, perfect for busy nights.
Print Recipe Pin Recipe
Prep Time 10 minutes mins
Cook Time 30 minutes mins
Total Time 40 minutes mins
Servings: 6 servings
Course: Dinner
Cuisine: American
Calories: 350
Ingredients Equipment Method Nutrition Notes

Ingredients
  

For the Casserole
  • 2 tablespoons Unsalted Butter Adds rich flavor and helps soften vegetables.
  • 2 cloves Garlic, minced Builds the savory base for the casserole.
  • 1 count White Onion, diced Provides aromatic sweetness and depth.
  • 0.5 cup Celery, diced Classic aromatic for texture and flavor.
  • 0.5 cup Carrots, diced Adds sweetness and vibrant color.
  • 3 cups Chicken Broth Supplies necessary liquid for cooking.
  • 1 cup Wild Rice Adds chewiness and earthy flavor.
  • 0.5 cup Long Grain Rice Enhances the dish's texture.
  • 0.5 cup Red Lentils Cook quickly, adding protein.
  • 0.5 cup Corn Introduces sweetness.
  • 1 cup Sage Stuffing, dry Provides herby flavor.
  • 2 cups Leftover Turkey, shredded Gives protein and heartiness.
For Seasoning
  • 1 teaspoon Salt Enhances overall flavor.
  • 1 teaspoon Black Pepper Adds warmth.
  • 0.5 teaspoon Dried Thyme Contributes earthy flavor.
  • 0.5 teaspoon Dried Rosemary Imparts a slightly piney flavor.
  • 1 teaspoon Dried Sage Complements stuffing and turkey flavor.
  • 2 count Bay Leaves Infuses subtle flavor.
For the Creamy Finish
  • 0.5 cup Heavy Cream Stirred in at the end for a creamy finish.
  • Fresh Thyme Used as a garnish for freshness.

Equipment

  • Instant Pot

Method
 

Step‑by‑Step Instructions
  1. Set your Instant Pot to sauté mode and melt 2 tablespoons of unsalted butter. Add 2 minced garlic cloves, 1 diced white onion, ½ cup diced celery, and ½ cup diced carrots. Sauté for about 2 minutes, stirring occasionally, until softened.
  2. Pour in 3 cups of chicken broth, scraping up any browned bits from the bottom.
  3. Stir in 1 cup of wild rice, ½ cup of long grain rice, ½ cup of red lentils, and ½ cup of corn.
  4. Layer 2 cups of shredded leftover turkey on top without stirring. Sprinkle with seasonings.
  5. Seal the Instant Pot lid and cook on manual high pressure for 20 minutes.
  6. Let the Instant Pot naturally release pressure for 10 minutes.
  7. Open the lid and remove the bay leaves. Stir in ½ cup of heavy cream.
  8. Serve warm, garnished with fresh thyme.

Nutrition

Serving: 1cupCalories: 350kcalCarbohydrates: 45gProtein: 22gFat: 12gSaturated Fat: 7gPolyunsaturated Fat: 1gMonounsaturated Fat: 3gCholesterol: 85mgSodium: 720mgPotassium: 500mgFiber: 4gSugar: 2gVitamin A: 180IUVitamin C: 6mgCalcium: 50mgIron: 2mg

Notes

This casserole is flexible; use other meats or veggies if desired. Allow it to rest for better flavor and texture.

Tried this recipe?

Let us know how it was!

Craft Adorable Pine Cone Turkeys for Your Thanksgiving Decor

October 20, 2025 by Grace Snow Leave a Comment

As I rummaged through the autumn leaves, I stumbled upon an idea that combines nature's charm with our holiday spirit—adorable Pine Cone Turkeys! This delightful DIY craft not only provides a perfect way to engage kids and adults alike but also creates personalized decorations that will brighten any Thanksgiving gathering. With just a few simple materials like pinecones, acrylic paint, and pipe cleaners, you can whip up these whimsical turkeys without breaking the bank. Plus, they double as unique table centerpieces or festive gifts, adding a warm, homey touch to your holiday decor. Are you ready to unleash your creativity and embrace this fun crafting adventure? Let's dive in!

Why Make Pine Cone Turkeys?

Family Fun: This craft is perfect for both kids and adults, making it a fantastic way to bond over creativity during the Thanksgiving season.

Budget-Friendly: Using simple supplies like pinecones, acrylic paint, and pipe cleaners means you can create deliciously charming decor without overspending.

Unique Decor: Each turkey is a one-of-a-kind masterpiece, adding a personal touch to your holiday table or mantle.

Versatile Use: Not only do they serve as adorable centerpieces, but they also make perfect gifts or festive party favors to delight your guests!

Memorable Tradition: Crafting Pine Cone Turkeys can become a cherished family tradition, linking your loved ones to the joy of Thanksgiving decor.

Pine Cone Turkey Ingredients

• Gather your supplies to start crafting these delightful Pine Cone Turkeys!

For the Turkey Body

  • Pinecones – Look for medium-sized ones (about 3x3 inches) for a sturdy base; they provide rustic charm to your decorations.

For the Feathers

  • Matte Acrylic Craft Paint – Choose vibrant colors like orange, yellow, and red to brighten your turkeys' feathers; easily found at craft or dollar stores for budget-friendly fun.

For the Features

  • Craft Paper Scraps – Use colorful scraps to create beaks and wattles; orange, yellow, and red are festive color choices to match the Thanksgiving spirit.
  • Pipe Cleaners – Use these lively colors for legs and facial features; they’re flexible and can easily be shaped into charming turkey legs.
  • Googly Eyes – 15mm (0.6-inch) eyes add an adorable touch to each turkey's personality; they make your creations come alive!

Enjoy crafting these Pine Cone Turkeys and let your creativity shine as you personalize each turkey!

Step‑by‑Step Instructions for Pine Cone Turkeys

Step 1: Paint the Feathers
Begin by selecting your matte acrylic craft paint in vibrant colors like orange, yellow, and red. Using a paintbrush, apply the paint to the tips of each pinecone, making sure to cover them generously while leaving some sections natural for a charming contrast. Allow the painted feathers to dry for about 15-20 minutes before proceeding, ensuring the colors stay bold and lively.

Step 2: Make the Legs
While the feathers dry, take your pipe cleaners and cut them into lengths suited for turkey legs. Bend each piece into a U-shape to form the legs. Once shaped, secure them to the base of the pinecone by applying hot glue, making sure they are firmly attached. Ensure the legs are evenly spaced and provide a sturdy foundation for your Pine Cone Turkeys.

Step 3: Shape the Faces
Next, take a pipe cleaner and curl it into a spiral shape to create the turkey’s head. This will add whimsy and character to your Pine Cone Turkeys. Once shaped, carefully secure the spiral to the top of the pinecone using a small amount of hot glue. This step starts giving your turkey its charming personality, so have fun with the shape!

Step 4: Cut and Attach Features
Now it's time to bring your Pine Cone Turkeys to life! Cut small shapes from your craft paper scraps to form beaks and wattles, sticking with festive colors like orange and red. Use hot glue to attach these features along with googly eyes to the curled pipe cleaner. Position them to give your turkey an endearing expression, ensuring the features are securely glued.

Step 5: Assemble
Finally, attach the completed face to the front of the pinecone using a generous dab of hot glue. Hold it in place for a few moments to allow the glue to set. Once secure, step back and admire your Pine Cone Turkeys, ready to bring warmth and charm to your Thanksgiving decorations. Make sure to let your creations fully dry in a stable location before displaying them.

Pine Cone Turkeys Variations & Substitutions

Feel free to get creative and customize your Pine Cone Turkeys to make them uniquely yours!

  • Metallic Paints: Use metallic paints instead of matte for a glamorous holiday look. These shimmering turkeys will catch everyone's eye on your table.

  • Pastel Colors: Swap bright colors for soft pastels if you're aiming for a cheerful, springtime vibe rather than traditional autumn hues. This gives a fresh and fun twist!

  • Hand-Drawn Eyes: Instead of googly eyes, draw or paint faces for a personal touch. You can let kids create their own unique expressions, making every turkey truly special.

  • Patterned Paper: Integrate patterned scrapbook paper for more colorful beaks and wattles. Think polka dots or florals to add flair and personality to your turkeys.

  • Twisted Pipe Cleaners: Create spiral or braided legs using multiple colors of pipe cleaners for extra pizzazz, adding a whimsical twist to your turkey creations.

  • Felt Features: Try using felt instead of paper for the beaks and wattles. They offer a soft texture that can elevate the aesthetic of your turkey while being easy to cut and glue.

  • Natural Decor: Incorporate small pine needles or acorns as additional decorations around your turkeys, enhancing their connection to nature.

  • Spicy Touch: Add a little heat to your crafting vibe by sharing some spicy recipes or hot beverages to enjoy while creating these adorable decorations. Cozy blankets and a hot cup of pumpkin spice latte will warm up your crafting time!

Make Ahead Options

These adorable Pine Cone Turkeys are perfect for busy home cooks looking to simplify their Thanksgiving preparations! You can paint the pinecones and shape the legs up to 24 hours in advance; just store them in a cool, dry place to maintain their vibrant colors and quality. For the facial features, cut out the beaks and wattles, as well as prepare the googly eyes ahead of time—keeping them in a sealed bag will ensure they stay fresh until you’re ready to finish. When it’s time to gather your family and assemble, simply glue the features onto your painted pinecones, and you’ll have delightful decorations ready in no time, allowing you to enjoy the holiday spirit without stress!

What to Serve with Adorable Pine Cone Turkeys?

Bring your Thanksgiving table to life with delightful pairings that enhance both your meal and this charming decor.

  • Savory Stuffing: A classic walnut and sage stuffing complements the earthy flavor of your Thanksgiving feast while echoing the rustic charm of the pine cone turkeys.

  • Cranberry Sauce: This tangy, sweet sauce adds a refreshing contrast to the savory meats and side dishes, brightening your table and palate alongside your creative decor.

  • Maple Glazed Carrots: Roasted carrots tossed in maple syrup create a luscious sweetness that ties harmoniously with your holiday spread and echoes the autumn colors of your turkeys.

  • Pumpkin Pie: Nothing celebrates Thanksgiving quite like creamy pumpkin pie. Its warm spices create a comforting end to your meal, echoing the festive spirit brought by your crafted turkeys.

  • Herb Roasted Turkey: While you showcase your adorable pine cone versions, savor a succulent herb-roasted turkey, a centerpiece that ties together your crafting journey with a delicious tradition.

  • Spiced Apple Cider: Warm spiced apple cider is a perfect seasonal drink to serve guests, embracing the cozy holiday atmosphere while inviting them to sip and enjoy their surroundings.

  • Garlic Mashed Potatoes: Creamy garlic mashed potatoes provide the ultimate comfort food, enriching your meal while bringing a delightful balance to your Thanksgiving table.

  • Roasted Brussels Sprouts: Crispy Brussels sprouts with a hint of balsamic glaze engage your guests with their texture and flavor, making them an ideal side alongside your festive decor.

Each of these pairings not only blends perfectly with your homemade meal but also complements the whimsical charm of your pine cone turkeys!

Storage Tips for Pine Cone Turkeys

  • Room Temperature: Keep your Pine Cone Turkeys in a dry, stable area, away from direct sunlight to maintain their colorful appearance and structure.

  • Fridge: Not recommended; these decorations do not require refrigeration as they’re not perishable.

  • Display: Arrange turkeys on your mantel or dining table where they can be appreciated. Just ensure they are secure on the surface to prevent tipping.

  • Make-Ahead Tips: You can craft these turkeys in advance. They can be stored in a box or basket, keeping them safe until it's time for Thanksgiving display!

Expert Tips for Pine Cone Turkeys

  • Choose Dry Pinecones: Ensure your pinecones are completely dry to help glue adhere better and make painting easier.

  • Allow Drying Time: After painting, permit 15-20 minutes of drying time between applications to avoid mixing colors and maintain vibrancy.

  • Second Coat Advantage: For a deeper color, don’t hesitate to apply a second coat of paint—this enhances the brightness of your Pine Cone Turkeys.

  • Trim Legs if Necessary: If the pipe cleaner legs seem too long, gently trim them to create a better proportion for your turkey’s appearance.

  • Mix Feature Shapes: Get creative with various shapes and colors for beaks and wattles, adding a unique flair to each of your delightful turkeys.

Pine Cone Turkeys Recipe FAQs

How do I choose the right pinecones for my turkeys?
Choosing the right pinecones is essential for building sturdy Pine Cone Turkeys. Look for medium-sized pinecones, approximately 3x3 inches, that are dry and free from dark spots or mold. This ensures a solid base for decoration and makes painting easier.

How should I store my Pine Cone Turkeys after making them?
Store your Pine Cone Turkeys at room temperature in a dry, stable area, away from direct sunlight. Placing them on a mantel or a dining table where they can be admired is ideal. Just make sure they're secured on the surface to prevent them from tipping over.

Can I freeze my Pine Cone Turkeys for later use?
Freezing is not recommended for Pine Cone Turkeys, as they are decorative items and don’t require refrigeration. Keeping them in a stable environment is best to preserve their appearance and structural integrity.

What should I do if my paint is mixing on the pinecones?
If you notice your colors mixing while painting, it's likely the paint isn't dry yet. To prevent this, allow each layer of paint to dry for 15-20 minutes before applying additional coats. If you're already mixing colors, let it dry fully, then consider painting over with a second coat once it's hardened.

Are these turkeys safe for pets or children?
Yes, Pine Cone Turkeys can be safe around pets and children, but supervision is encouraged. Some materials, like googly eyes and pipe cleaners, could pose a choking hazard if removed. It's always best to keep an eye on little ones and furry friends while they’re around your festive decorations.

Pine Cone Turkeys

Craft Adorable Pine Cone Turkeys for Your Thanksgiving Decor

Create delightful Pine Cone Turkeys that add a charming touch to your Thanksgiving decor, perfect for family bonding.
Print Recipe Pin Recipe
Prep Time 20 minutes mins
Total Time 20 minutes mins
Servings: 1 turkey
Course: Uncategorized
Cuisine: Thanksgiving
Ingredients Equipment Method Nutrition Notes

Ingredients
  

For the Turkey Body
  • 1 medium-sized Pinecone About 3x3 inches for a sturdy base.
For the Feathers
  • 3 colors Matte Acrylic Craft Paint Choose vibrant colors like orange, yellow, and red.
For the Features
  • 1 pack Craft Paper Scraps Use orange, yellow, and red for beaks and wattles.
  • 2 pieces Pipe Cleaners Use for legs and facial features.
  • 2 pcs Googly Eyes 15mm (0.6-inch) for personality.

Equipment

  • Paintbrush
  • Hot glue gun
  • Scissors

Method
 

Step-by-Step Instructions
  1. Begin by selecting your matte acrylic craft paint in vibrant colors. Using a paintbrush, apply the paint to the tips of each pinecone, making sure to cover them generously while leaving some sections natural. Allow to dry for about 15-20 minutes.
  2. While the feathers dry, take your pipe cleaners and cut them to form turkey legs. Bend into a U-shape and secure to the base with hot glue.
  3. Curl a pipe cleaner into a spiral shape for the turkey’s head and secure it to the top of the pinecone with hot glue.
  4. Cut shapes from craft paper scraps for beaks and wattles. Use hot glue to attach these features along with googly eyes to the curled pipe cleaner.
  5. Attach the completed face to the front of the pinecone using hot glue. Hold in place to set. Let dry before displaying your Pine Cone Turkeys.

Nutrition

Serving: 1turkey

Notes

Pine Cone Turkeys are a fun and budget-friendly craft that can become a cherished family tradition during Thanksgiving.

Tried this recipe?

Let us know how it was!

Delicious Rice Krispie Turkey Legs for a Fun Holiday Treat

October 20, 2025 by Grace Snow Leave a Comment

As I wandered through the bustling aisles of my local market, I stumbled upon a delightful sight: a gaggle of joyful kids, eyes wide with wonder, crafting their own Thanksgiving treats. That's when it hit me—these adorable Rice Krispie Turkey Legs are just what we need to bring a sprinkle of magic to our holiday celebrations! These kid-friendly snacks not only look like mini drumsticks but are also incredibly easy to whip up using simple ingredients like marshmallows and pretzels. In no time, you’ll have a festive treat that’s perfect for both young chefs and big kids at heart. What's even better? They lend themselves to gluten-free options, making them a guilt-free indulgence for everyone at your table. Ready to impress your loved ones? Let's dive into this fun recipe that will surely become a cherished staple on your holiday dessert spread!

Why Are Rice Krispie Turkey Legs a Hit?

Kid-Friendly Fun: These delightful treats turn snack time into a creative adventure for both kids and adults. Quick to Make: With just a few easy steps, you can have a festive dessert ready in no time. Visual Appeal: Their cute, drumstick appearance will make them the star of your holiday table. Customizable: Feel free to use gluten-free pretzels or change the flavor of melting wafers to suit your taste preferences. Crowd-Pleaser: Kids and adults alike will love these sweet, crunchy creations, making them a hit at any gathering. Pair them with pumpkin s’mores cookies for an extra festive touch!

Rice Krispie Turkey Legs Ingredients

For the Turkey Legs
• Pretzel Rods – The main structure for turkey leg bones; substitute with gluten-free pretzels for dietary needs.
• Vanilla Melting Wafers – Provides a smooth coating and sweet flavor; any brand can be used.
• Vanilla Extract – Enhances the vanilla flavor; can be replaced with vanilla paste for a more intense taste.
• Salt – Balances sweetness; can reduce or omit if desired, especially if using salted butter.
• Mini Marshmallows – Used for shaping the bone ends and coating the legs; keep extra on hand for adjustments.
• Unsalted Butter – Offers richness; substitute with salted butter by halving the added salt.
• Cocoa Krispies Cereal – Gives the turkey legs an appealing brown color and crunchy texture; consider using gluten-free cereal for a gluten-free version.

Step‑by‑Step Instructions for Rice Krispie Turkey Legs

Step 1: Melt Candy Wafers
Begin by placing your vanilla melting wafers in a microwave-safe bowl. Heat in the microwave on low power for 30 seconds at a time, stirring after each interval until the mixture is smooth and glossy. This process should take about 1-2 minutes total. Set the melted wafers aside as you prepare to dip the pretzel rods.

Step 2: Dip and Shape Pretzel Rods
Take your pretzel rods and gently dip them halfway into the melted candy wafers, allowing any excess to drip off. While the coating is still soft, firmly press two mini marshmallows onto the ends of each rod to create the “bone” of your turkey leg. Place the dipped pretzel rods on a parchment-lined tray and chill in the refrigerator for about 5 minutes, or until the coating has set.

Step 3: Prepare Rice Krispie Mixture
In a large pot over low heat, melt the unsalted butter. Once melted, add the remaining mini marshmallows, stirring continuously until they are completely melted and the mixture is smooth. Remove from heat, then stir in a pinch of salt and vanilla extract for added flavor. This mixture will be the sweet base for your Rice Krispie turkey legs.

Step 4: Combine Cereal
Once the marshmallow mixture is smooth, gently fold in the Cocoa Krispies cereal with a spatula. Be careful to mix thoroughly but gently to avoid breaking the cereal pieces. Allow the mixture to cool for a few minutes, which will make it easier to shape as you prepare to form the turkey legs.

Step 5: Shape Turkey Legs
With your hands slightly greased to prevent sticking, take about ½ cup of the Rice Krispie mixture and mold it around each pretzel bone, forming the shape of a turkey leg. Ensure that the mixture adheres well to the pretzel rod. Repeat this process for all the pretzel rods and set each shaped leg on the same parchment-lined tray.

Step 6: Final Setting
Once all the turkey legs are shaped, set them aside to cool completely at room temperature for 10-20 minutes. This time allows the Rice Krispie mixture to firm up, creating a delightful crunchy texture that perfectly complements the creamy marshmallow coating. Now they're ready to serve and impress during your festive celebrations!

How to Store and Freeze Rice Krispie Turkey Legs

  • Room Temperature: Keep your Rice Krispie turkey legs in an airtight container at room temperature for up to 2-3 days to maintain their freshness and crunch.

  • Fridge: If you want to extend their shelf life, you can refrigerate them for up to 5 days. Just be aware that the texture may firm up slightly, so let them sit at room temperature for a few minutes before enjoying.

  • Freezer: For longer storage, wrap individual turkey legs tightly in plastic wrap and place them in a freezer-safe container. They can be frozen for up to 3 months. Thaw in the refrigerator overnight before serving.

  • Reheating: There's no need to reheat these treats; simply enjoy them at room temperature for the best taste and texture!

Expert Tips for Rice Krispie Turkey Legs

• Nonstick Spray: Use nonstick spray on your hands to prevent the Rice Krispie mixture from sticking while shaping the turkey legs.

• Cooling Time: Make sure the Rice Krispie mixture cools for a few minutes before molding; if it's too warm, it can become gooey and difficult to handle.

• Quick Work: After coating the pretzels in melted wafers, shape the Turkey Legs quickly to maintain the best presentation. Don't let the coating set up too much before molding.

• Texture Balance: If using salted butter, be sure to adjust the amount of added salt to maintain the sweet-salty balance in your Rice Krispie Turkey Legs.

• Customization Options: Feel free to experiment with different melting wafer flavors for unique looks and tastes; chocolate and colorful candy melts can add fun variations!

What to Serve with Thanksgiving Rice Krispie Turkey Legs

Add a delightful touch to your holiday feast by pairing these whimsical treats with complementary flavors and textures.

  • Pumpkin S’mores Cookies: The warm, spiced flavor of pumpkin cookies provides a cozy contrast to the sweet crunch of the Rice Krispie turkey legs.
  • Festive Fruit Salad: Bright, juicy fruits offer a refreshing palette cleanser, balancing the sweetness of the turkey legs while adding a burst of color to your table.
  • Whipped Cinnamon Butter: Spread this creamy, spiced butter on warm rolls for a mouthwatering side that enhances the sweet notes of your Rice Krispie legs.
  • Chocolate-Dipped Strawberries: The rich chocolate paired with tart strawberries makes for a joyful bite that pairs beautifully with the playful theme of the turkey legs.
  • Warm Apple Cider: This fragrant drink adds an aromatic warmth, echoing the delectable flavors of the season while providing a comforting sip alongside your treats.
  • Mini Pumpkin Spice Lattes: A small but flavorful coffee treat that ties in the festive spirit, offering a cozy drink option to accompany your playful dessert.
  • Marshmallow Fluff Dip: Serve this sweet and creamy dip on the side, allowing guests to dunk their turkey legs for an extra marshmallowy indulgence.

Make Ahead Options

These Rice Krispie Turkey Legs are perfect for meal prep enthusiasts looking to save time during the busy holiday season! You can prepare the pretzel rods dipped in melted wafers and shaped with marshmallows up to 24 hours in advance. Simply store them in an airtight container at room temperature to maintain their crunch. Additionally, the Rice Krispie mixture can be made ahead and stored in the refrigerator for up to 3 days; just make sure it's tightly covered. When you're ready to finish, mold the cooled mixture around the pretzel bones and allow them to set for about 10-20 minutes before serving. This way, you'll have delightful, homemade treats ready with minimal effort—just as delicious as when freshly made!

Rice Krispie Turkey Legs Variations

Feel free to get creative with these fun Rice Krispie turkey legs to match your family's preferences or dietary needs!

  • Gluten-Free: Substitute pretzel rods with gluten-free pretzels to keep this tasty treat accessible for everyone.
  • Flavorful Wafers: Use chocolate or colored melting wafers for a unique taste and festive flair that’ll wow your guests.
  • Nutty Twist: Add crushed nuts, like peanuts or almonds, to the Rice Krispie mixture for an extra crunch and delicious flavor.
  • Dipping Delight: Serve with a side of melted chocolate or caramel sauce for dipping, adding a luscious layer of flavor.
  • Marshmallow Fluff: Incorporate marshmallow fluff into the Rice Krispie mixture for an even chewier texture that kids will love.
  • Fruit Fusion: Mix in dried fruits such as cranberries or cherries to add a sweet, chewy burst that complements the treat.
  • Spicy Surprise: If you're feeling adventurous, sprinkle a little cayenne pepper on the melted wafers for a sweet-and-spicy combo that'll thrill your taste buds.
  • Crispy Coating: Roll the shaped turkey legs in crushed graham crackers or coconut for an extra layer of texture and flavor.

Feel inspired? Pair these fun Rice Krispie turkey legs with a delicious batch of pumpkin s’mores cookies or festive Lime Chicken Rice for the perfect holiday spread!

Rice Krispie Turkey Legs Recipe FAQs

How do I know when my pretzel rods are fresh?
Absolutely! Look for pretzel rods that are crisp and free from any dark spots or peculiar odors. Fresh pretzels should be firm to the touch and maintain their shape, which ensures your turkey legs will have a solid structure.

Can I store Rice Krispie turkey legs?
Yes, you can store your Rice Krispie turkey legs! Keep them in an airtight container at room temperature for up to 2-3 days. If you want to keep them longer, refrigerate them for up to 5 days, but be aware that they may become a bit firmer in texture.

How do I freeze Rice Krispie turkey legs?
Absolutely! To freeze your Rice Krispie turkey legs, first wrap each turkey leg tightly in plastic wrap to prevent freezer burn. Place them in a freezer-safe container, and they can last up to 3 months. When you're ready to enjoy them, simply thaw overnight in the refrigerator, and let them come to room temperature before serving.

What should I do if my Rice Krispie mixture is too sticky?
Very! If your Rice Krispie mixture feels sticky and hard to mold, try letting it cool for a few minutes longer. You can also lightly grease your hands with nonstick spray to prevent sticking while shaping the legs. If all else fails, add a handful of extra Cocoa Krispies to the mixture to tone down the stickiness.

Can I make Rice Krispie turkey legs gluten-free?
Absolutely! Substitute regular pretzel rods with gluten-free pretzels to make the entire treat gluten-free. Additionally, ensure you use gluten-free Cocoa Krispies, and you’re all set for a delightful, inclusive dessert that everyone can enjoy!

Are there any allergy considerations for this recipe?
Very! This recipe contains common allergens like dairy (from butter and marshmallows) and gluten (from traditional pretzels and Cocoa Krispies). If preparing for someone with allergies, opt for dairy-free butter and ensure all ingredients are certified gluten-free to keep your Rice Krispie turkey legs safe for all your loved ones!

Rice Krispie Turkey Legs

Delicious Rice Krispie Turkey Legs for a Fun Holiday Treat

Delightful Rice Krispie Turkey Legs are a fun holiday treat that kids will love making and eating.
Print Recipe Pin Recipe
Prep Time 20 minutes mins
Cook Time 10 minutes mins
Cooling Time 20 minutes mins
Total Time 50 minutes mins
Servings: 12 legs
Course: Snacks
Cuisine: American
Calories: 160
Ingredients Equipment Method Nutrition Notes

Ingredients
  

For the Turkey Legs
  • 12 pieces Pretzel Rods Substitute with gluten-free pretzels for dietary needs.
  • 12 ounces Vanilla Melting Wafers Any brand can be used.
  • 1 teaspoon Vanilla Extract Can be replaced with vanilla paste for a more intense taste.
  • 1 pinch Salt Can reduce or omit if desired.
  • 4 cups Mini Marshmallows Used for shaping the bone ends and coating the legs.
  • 4 tablespoons Unsalted Butter Substitute with salted butter by halving the added salt.
  • 6 cups Cocoa Krispies Cereal Consider using gluten-free cereal for a gluten-free version.

Equipment

  • Microwave-safe bowl
  • Large pot
  • Spatula
  • Parchment Paper

Method
 

Step-by-Step Instructions for Rice Krispie Turkey Legs
  1. Begin by placing your vanilla melting wafers in a microwave-safe bowl. Heat in the microwave on low power for 30 seconds at a time, stirring after each interval until the mixture is smooth and glossy. This process should take about 1-2 minutes total. Set the melted wafers aside as you prepare to dip the pretzel rods.
  2. Take your pretzel rods and gently dip them halfway into the melted candy wafers, allowing any excess to drip off. While the coating is still soft, firmly press two mini marshmallows onto the ends of each rod to create the 'bone' of your turkey leg. Place the dipped pretzel rods on a parchment-lined tray and chill in the refrigerator for about 5 minutes, or until the coating has set.
  3. In a large pot over low heat, melt the unsalted butter. Once melted, add the remaining mini marshmallows, stirring continuously until they are completely melted and the mixture is smooth. Remove from heat, then stir in a pinch of salt and vanilla extract for added flavor.
  4. Once the marshmallow mixture is smooth, gently fold in the Cocoa Krispies cereal with a spatula. Be careful to mix thoroughly but gently to avoid breaking the cereal pieces. Allow the mixture to cool for a few minutes.
  5. With your hands slightly greased, take about ½ cup of the Rice Krispie mixture and mold it around each pretzel bone, forming the shape of a turkey leg. Ensure that the mixture adheres well to the pretzel rod.
  6. Once all the turkey legs are shaped, set them aside to cool completely at room temperature for 10-20 minutes.

Nutrition

Serving: 1legCalories: 160kcalCarbohydrates: 24gProtein: 1gFat: 7gSaturated Fat: 4gMonounsaturated Fat: 2gCholesterol: 15mgSodium: 100mgPotassium: 30mgSugar: 10gVitamin A: 5IUCalcium: 10mgIron: 1mg

Notes

Use nonstick spray on your hands to prevent the Rice Krispie mixture from sticking while shaping the turkey legs. Store in an airtight container at room temperature for up to 2-3 days.

Tried this recipe?

Let us know how it was!
  • « Previous Page
  • 1
  • …
  • 75
  • 76
  • 77
  • 78
  • 79
  • …
  • 136
  • Next Page »

Welcome!

Hi, I’m Grace, a Sydney-based home cook with a passion for bold flavors and trending ingredients. Whether you’re a busy beginner or a seasoned foodie, you’ll find dishes here that are fresh, fun, and full of flavor.

More about me

Popular Recipes

  • Crispy Dill Chicken Sandwich Recipe
    Crispy Dill Chicken Sandwich Recipe That's a Family Favorite
  • Honey Mustard BLT Chicken Sliders
    Honey Mustard BLT Chicken Sliders for Flavor-packed Bliss
  • Sun-Dried Tomato Romesco Chickpea Salad Sandwich
    Sun-Dried Tomato Romesco Chickpea Salad Sandwich Delight
  • Spinach Artichoke White Bean Sandwich
    Savory Spinach Artichoke White Bean Sandwich Adventure

Footer

↑ back to top

About

  • Privacy Policy
  • Disclaimer
  • Terms & Conditions

Newsletter

  • Sign Up! for emails and updates

Contact

  • About me
  • Contact me

Copyright © 2025 TastyTrendIngredients