tastytrendingredients

  • Home
  • Recipes
    • Appetizers
    • Breakfast
    • Dessert
    • Dinner
    • Drinks
    • Salads
    • Snacks
    • Soups
  • About me
  • Contact me
menu icon
go to homepage
  • Home
  • Recipes
    • Appetizers
    • Breakfast
    • Dessert
    • Dinner
    • Drinks
    • Salads
    • Snacks
    • Soups
  • About me
  • Contact me
search icon
Homepage link
  • Home
  • Recipes
    • Appetizers
    • Breakfast
    • Dessert
    • Dinner
    • Drinks
    • Salads
    • Snacks
    • Soups
  • About me
  • Contact me
×

Indulgent Raspberry Vanilla Cream Crepes for Sweet Moments

December 24, 2025 by Grace Snow Leave a Comment

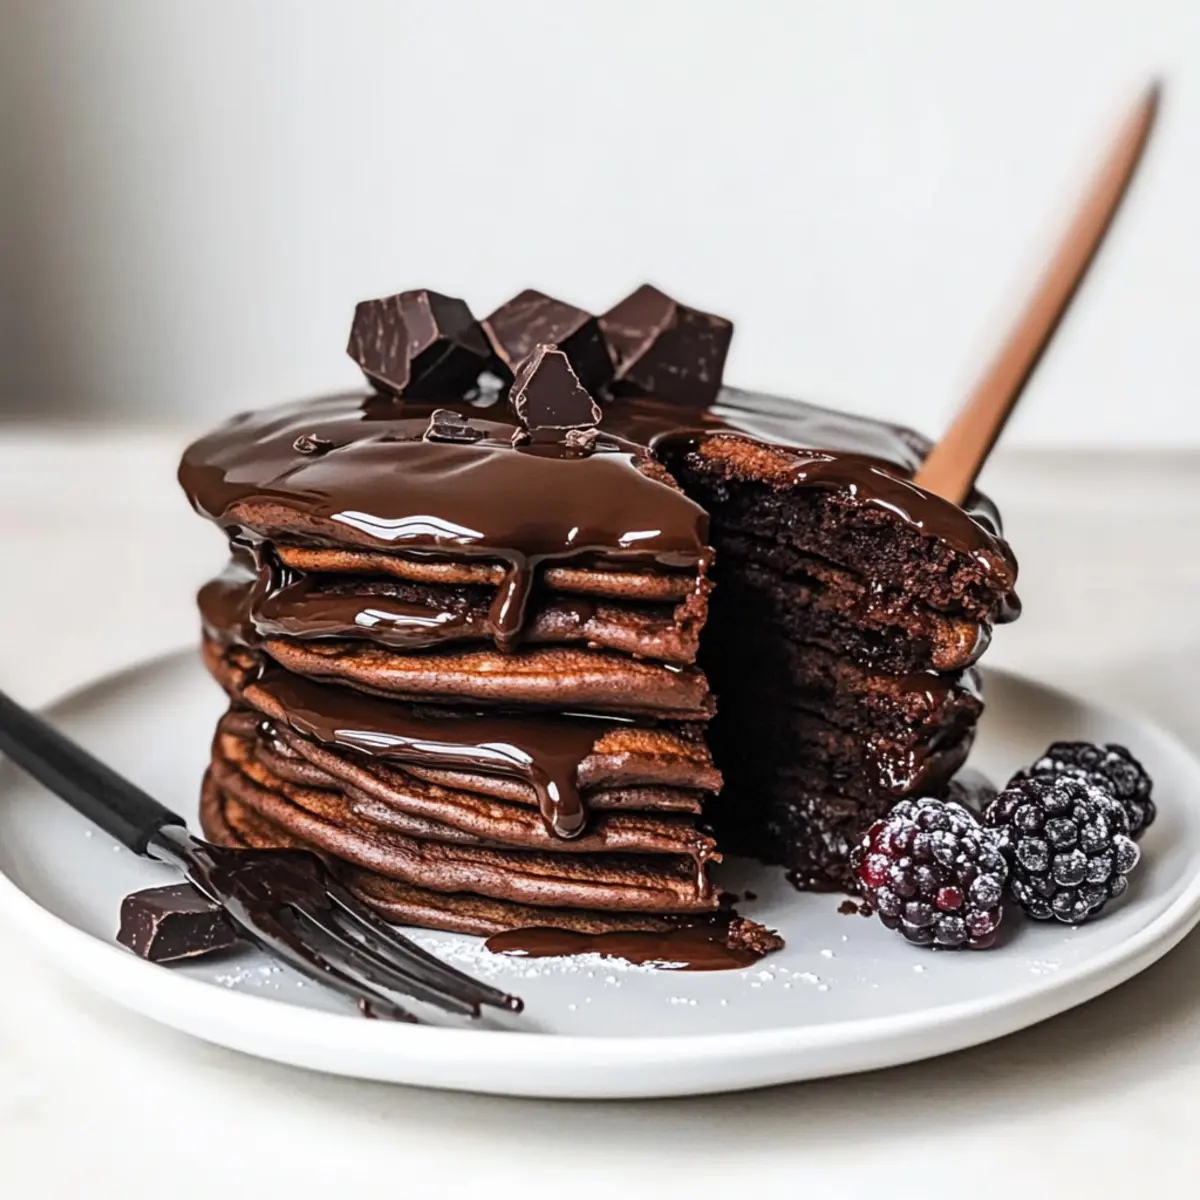
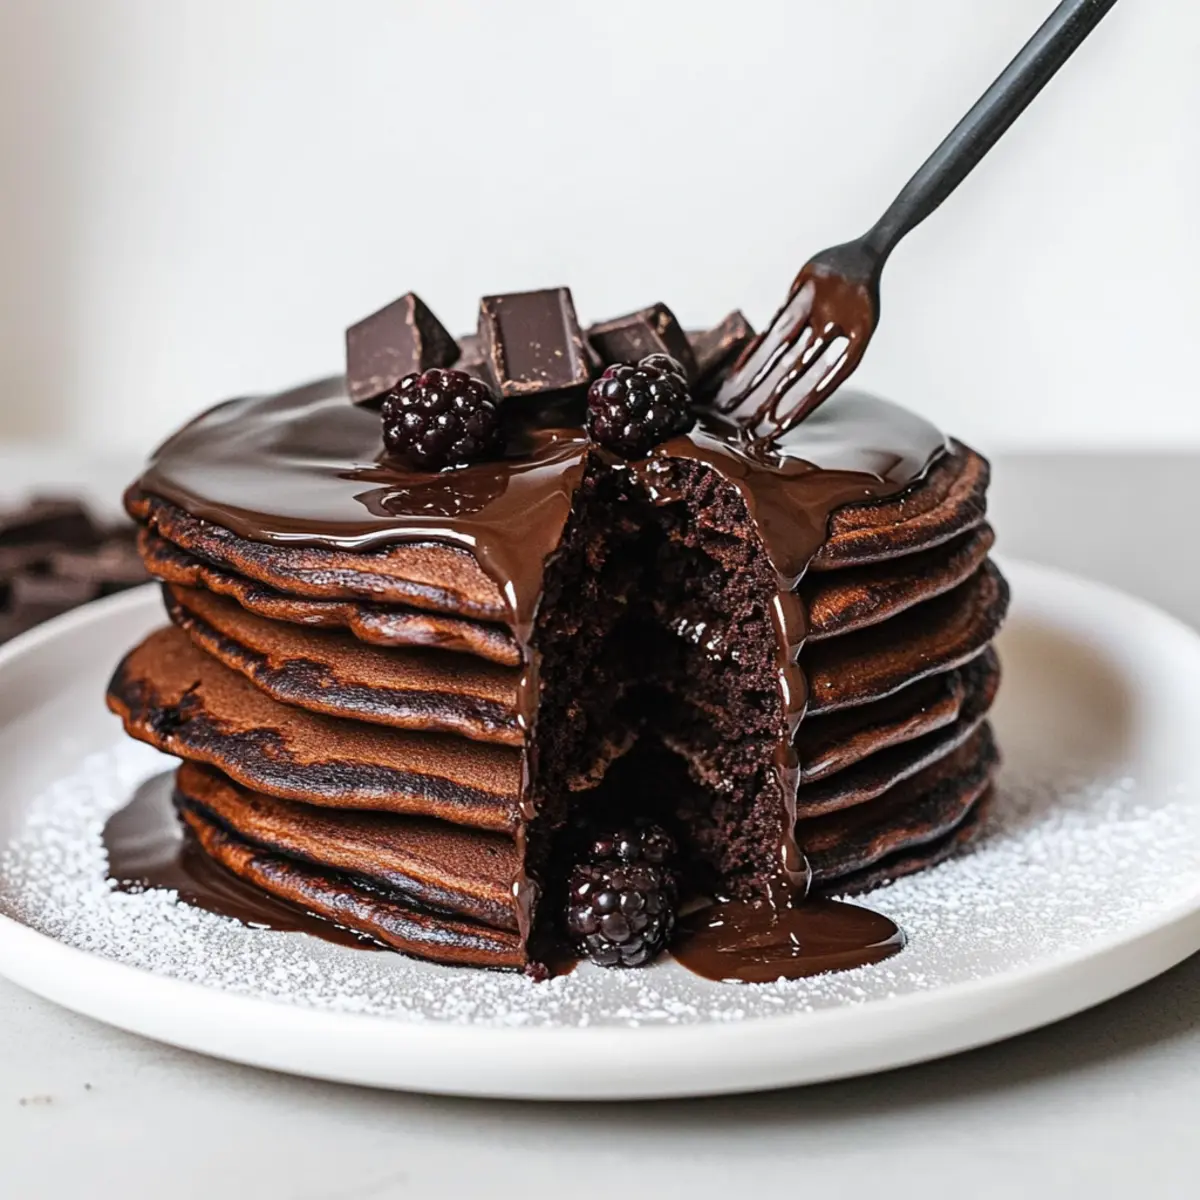
As I stood by the stove, the smell of gently cooking crepes wafted through my kitchen, taking me on a delightful journey to a quaint Parisian café. Today, I’m sharing the joy of making Raspberry Vanilla Cream Crepes, a gorgeous dessert that feels indulgent yet is surprisingly simple to whip up at home. With their light, tender texture and a luscious vanilla cream filling, these crepes make the perfect treat for brunch or an elegant finish to any meal. Plus, the vibrant raspberries add a pop of color and a refreshing tartness that balances the sweetness perfectly. If you’re ready to impress your friends and family with a show-stopping dish that’s bound to become a favorite, keep reading! How do you like your crepes—folded or rolled?

How do you like your crepes?

Indulgence awaits! These Raspberry Vanilla Cream Crepes are a delightful way to elevate your brunch game, marrying delicate sweetness with vibrant tartness. Crowd-pleaser alert! Their stunning presentation and exquisite flavors will wow your guests. Customizable deliciousness means you can swap in your favorite fruits or creamy fillings for variety. Quick and easy, these crepes come together effortlessly, making them perfect for unexpected get-togethers. Pair them with a cup of coffee or a glass of dessert wine to create an inviting dining experience. Don’t forget to check out Peaches Cream Cookies for another delightful sweet treat!

Raspberry Vanilla Cream Crepes Ingredients

For the Crepes
• All-Purpose Flour – Provides structure for the crepes; substitute with gluten-free flour for a gluten-free option.
• Large Eggs – Adds richness and aids in binding the crepe batter.
• Milk – Contributes to the tenderness of the crepes; whole milk will add extra creaminess.
• Melted Butter – Ensures the crepes are light and pliable for easy flipping.
• Pinch of Salt – Enhances the flavors in the batter for a more balanced taste.

For the Vanilla Cream Filling
• Heavy Cream – Forms the base of the vanilla cream filling, offering rich flavor and texture.
• Mascarpone or Cream Cheese – Adds a creamy, luxurious texture; Greek yogurt is a lighter alternative.
• Vanilla Extract – Infuses authentic vanilla flavor into the cream for a delightful sweetness.
• Powdered Sugar (Optional) – Sweetens the filling; can be omitted for a less sweet option.

For Topping
• Fresh Raspberries – Provide a burst of natural sweetness and tartness; ripe berries yield the best flavor.
• Optional Enhancements:

  • Lemon Zest – Brightens the flavor of the cream.
  • Raspberry Liqueur – Enhances the raspberry flavor in the cream.
  • Mint Leaves – Offers a refreshing garnish for an eye-catching finish.

Enjoy making these Raspberry Vanilla Cream Crepes and indulge in the delightful sweetness they bring to your table!

Step‑by‑Step Instructions for Raspberry Vanilla Cream Crepes

Step 1: Prepare the Batter
In a large mixing bowl, whisk together 1 cup of all-purpose flour, 2 large eggs, 1 ½ cups of milk, 2 tablespoons of melted butter, and a pinch of salt until smooth. The mixture should be thin and free of lumps. Allow the batter to rest for 30 minutes; this step is essential for achieving tender, lacy crepes that will be the star of your Raspberry Vanilla Cream Crepes.

Step 2: Cook the Crepes
Heat a non-stick skillet or crepe pan over medium heat and lightly coat it with butter. Pour ¼ cup of batter into the pan, quickly swirling it to cover the base evenly. Cook for 1-2 minutes until the edges lift and the crepe is lightly golden. Use a spatula to carefully flip and cook the other side for another 30-60 seconds. Keep the crepes warm by stacking them on a plate covered with a towel.

Step 3: Make the Vanilla Cream
In a medium bowl, combine 1 cup of heavy cream, ½ cup of mascarpone cheese (or cream cheese), 1 teaspoon of vanilla extract, and optional powdered sugar. Using a hand mixer, whip the mixture on medium speed until soft peaks form—usually about 3-5 minutes. Be careful not to overwhip, as you want a smooth, creamy texture for your Raspberry Vanilla Cream.

Step 4: Assemble the Crepes
Take a warm crepe and spoon or pipe a generous dollop of the prepared vanilla cream onto one half. Scatter a few fresh raspberries over the cream, allowing their tartness to enhance the flavor. Gently fold the crepe in half or roll it, creating a beautiful presentation. Continue this process with each crepe until everything is filled.

Step 5: Finishing Touches
Once assembled, dust the crepes lightly with powdered sugar for an elegant touch. For added flair, drizzle some raspberry coulis or melted chocolate over the top and garnish with fresh mint leaves. Serve these delightful Raspberry Vanilla Cream Crepes immediately while they’re warm and inviting, creating a perfect treat for any occasion.

Make Ahead Options

These Raspberry Vanilla Cream Crepes are perfect for meal prep! You can prepare the crepe batter and refrigerate it for up to 24 hours; this will allow the flavors to meld perfectly. Additionally, you can cook the crepes in advance and store them stacked between parchment paper in an airtight container for up to 3 days in the fridge, ensuring they remain soft. For the vanilla cream filling, whip it up a few hours in advance and store it covered in the refrigerator. When it's time to serve, simply reheat the crepes in a pan for a minute on each side and fill them with the chilled cream and raspberries. You'll have a delightful brunch or dessert ready with minimal effort!

What to Serve with Raspberry Vanilla Cream Crepes

Indulging in these delicate crepes opens the door to a delightful array of accompaniments that enhance their charm.

  • Fresh Fruit Salad: A colorful mix of seasonal fruits creates a refreshing contrast to the creamy sweetness, enhancing every bite.
  • Whipped Cream: Light and airy, a dollop of freshly whipped cream adds an extra layer of indulgence, perfect for those who love creamy textures.
  • Maple Syrup: Drizzling warm maple syrup over the crepes adds a subtle sweetness, harmonizing beautifully with the tangy raspberries.
  • Chocolate Sauce: A rich chocolate sauce elevates the dessert experience, adding a luscious chocolatey twist that delights the palate.
  • Café Au Lait: Pair these crepes with a warm café au lait for a sophisticated brunch feel; the coffee's bitterness complements the sweetness.
  • Vanilla Ice Cream: A scoop of creamy vanilla ice cream on the side transforms these crepes into an irresistible dessert, perfect for sharing.
  • Champagne: A glass of bubbly champagne brings an air of celebration, making every bite more festive and memorable.
  • Almonds or Hazelnuts: Sprinkle nuts on top to add a delightful crunch and nutty flavor, balancing the soft crepe and creamy filling.

Raspberry Vanilla Cream Crepes Variations

Feel free to let your creativity shine by customizing these delightful crepes to suit your taste buds!

  • Fruit Swap: Replace raspberries with strawberries, blueberries, or peaches for a fruity twist. Each fruit brings its own unique flavor profile that complements the creamy filling beautifully.
  • Lighter Cream: Use Greek yogurt instead of mascarpone for a healthier, tangy cream filling. You'll enjoy all the creaminess with fewer calories and more protein!
  • Chocolate Drizzle: Add a drizzle of melted chocolate to each crepe for a decadent touch. It beautifully contrasts the tartness of the berries and adds a rich flavor.
  • Herbal Infusion: Incorporate a hint of fresh mint or basil into the cream for a refreshing herbal note. This will elevate your dessert and surprise your guests.
  • Nutty Crunch: Top with crushed almonds or hazelnuts for an added layer of texture and flavor. The crunch balances the creaminess so well!
  • Zesty Kick: Mix in lemon zest for a brighter flavor in your vanilla cream. This little touch can enhance the overall taste and freshness of the dish.
  • Savory Spin: Transition to savory by adding sautéed mushrooms and spinach to the cream filling. A uniquely delicious way to enjoy crepes for brunch!
  • Liqueur Enhancement: Add a splash of raspberry liqueur into the cream for a delightful depth of flavor. It’s perfect for adding sophistication to your dessert.

Feel inspired? These variations not only keep your crepes exciting but also ensure you can enjoy them in countless ways. Don’t forget to try out these variations along with sweet treats like Vegan Cacao Cream or a rich Cajeta Ice Cream for your next gathering!

How to Store and Freeze Raspberry Vanilla Cream Crepes

Fridge: Keep leftover crepes in an airtight container in the refrigerator for up to 1-2 days. Store them separately from the cream filling to maintain their texture.

Freezer: For longer storage, freeze unfilled crepes in a stack, separated by parchment paper. They can last up to 2 months, allowing you to enjoy Raspberry Vanilla Cream Crepes whenever you desire.

Reheating: To reheat, thaw frozen crepes overnight in the refrigerator, then warm them in a non-stick pan over low heat. Fill with cream and raspberries just before serving to keep them fresh.

Make-Ahead: You can prepare the crepes in advance, which saves time during meal prep. Just assemble with the vanilla cream and raspberries right before serving for optimal freshness.

Expert Tips for Raspberry Vanilla Cream Crepes

  • Resting is Key: Allow the batter to sit for 30 minutes to ensure your crepes are light and tender; rushing this step can result in chewy crepes.
  • Mind the Heat: Cook the crepes on medium heat for even cooking. Too high heat can burn them before they’re fully cooked.
  • Flip with Care: Use a thin spatula to carefully flip the crepes when the edges lift. This helps maintain their delicate structure while cooking.
  • Avoid Overwhipping: When making the cream, whip just until soft peaks form. Overwhipping can lead to a grainy texture, ruining your creamy filling.
  • Freshness Matters: Assemble the Raspberry Vanilla Cream Crepes just before serving for the best taste and texture; the filling keeps them light and fluffy!
  • Let Your Creativity Shine: Feel free to customize the filling by gently folding raspberries into the cream or using other fruits to create your unique version of these delightful crepes.

Raspberry Vanilla Cream Crepes Recipe FAQs

How do I choose the best raspberries for this recipe?
Look for fresh raspberries that are plump, firm, and vibrant in color. Ripe raspberries should be free from dark spots or mushy areas. If possible, purchase them on the day you plan to make your Raspberry Vanilla Cream Crepes for the best flavor.

How should I store leftover crepes?
Absolutely! Keep leftover crepes in an airtight container in the refrigerator for up to 1-2 days. Make sure to store them separately from the vanilla cream filling to prevent them from becoming soggy. When you're ready to enjoy them, simply reheat the crepes in a non-stick pan and add the filling just before serving.

Can I freeze the crepes?
Yes, you can! To freeze your crepes, stack them with a bit of parchment paper between each crepe to prevent sticking, and place them in a freezer-safe bag or container. They can be frozen for up to 2 months. When you’re ready to enjoy them, thaw the crepes overnight in the refrigerator and reheat them on low heat before adding your filling.

What do I do if my crepes turn out tough or chewy?
If your crepes are tough, it may be due to overmixing the batter or not allowing it to rest. Resting the batter for at least 30 minutes is crucial for developing the right texture. Additionally, ensure you’re cooking them on medium heat so they don’t cook too quickly, which can also lead to chewiness.

Can I make these crepes gluten-free?
Very! Simply substitute the all-purpose flour with a gluten-free flour blend. Look for blends that contain xanthan gum or add a teaspoon of it to help mimic the texture of regular flour. This way, you can enjoy these delightful Raspberry Vanilla Cream Crepes without gluten concerns.

Are there any allergy considerations I should be aware of?
Definitely! The main allergens in this recipe are eggs, dairy (heavy cream, milk, and mascarpone), and gluten (if using regular flour). If you’re serving guests with allergies, you can easily substitute the cream cheese with a dairy-free alternative and use a gluten-free flour blend to keep everyone safe while enjoying this delicious treat.

Raspberry Vanilla Cream Crepes

Indulgent Raspberry Vanilla Cream Crepes for Sweet Moments

Enjoy these Raspberry Vanilla Cream Crepes, a delightful dessert perfect for brunch or finishing any meal with elegance.
Print Recipe Pin Recipe
Prep Time 30 minutes mins
Cook Time 15 minutes mins
Resting Time 30 minutes mins
Total Time 1 hour hr 15 minutes mins
Servings: 4 crepes
Course: Dessert
Cuisine: French
Calories: 250
Ingredients Equipment Method Nutrition Notes

Ingredients
  

For the Crepes
  • 1 cup All-Purpose Flour Substitute with gluten-free flour for a gluten-free option.
  • 2 large Eggs Adds richness to the batter.
  • 1.5 cups Milk Whole milk will add extra creaminess.
  • 2 tablespoons Melted Butter Ensures the crepes are light and pliable.
  • 1 pinch Salt Enhances the flavors.
For the Vanilla Cream Filling
  • 1 cup Heavy Cream Forms the base of the filling.
  • 0.5 cup Mascarpone or Cream Cheese Adds a creamy texture.
  • 1 teaspoon Vanilla Extract Infuses authentic vanilla flavor.
  • Powdered Sugar Optional for sweetness.
For Topping
  • Fresh Raspberries Ripe berries yield the best flavor.
  • Optional Enhancements Lemon Zest, Raspberry Liqueur, Mint Leaves.

Equipment

  • Mixing Bowl
  • non-stick skillet
  • Spatula
  • hand mixer

Method
 

Step-by-Step Instructions
  1. In a large mixing bowl, whisk together the flour, eggs, milk, melted butter, and salt until smooth. Allow to rest for 30 minutes.
  2. Heat a skillet over medium heat, coat with butter, and pour 1/4 cup of batter. Cook until edges lift, about 1-2 minutes, then flip.
  3. In another bowl, combine heavy cream, mascarpone, vanilla extract, and powdered sugar. Whip until soft peaks form.
  4. Take a crepe and spoon/piping the vanilla cream on one half. Add fresh raspberries and fold the crepe.
  5. Dust with powdered sugar and serve with raspberry coulis or melted chocolate, garnished with mint leaves.

Nutrition

Serving: 1crepeCalories: 250kcalCarbohydrates: 30gProtein: 5gFat: 12gSaturated Fat: 7gCholesterol: 95mgSodium: 200mgPotassium: 150mgFiber: 1gSugar: 5gVitamin A: 500IUVitamin C: 5mgCalcium: 80mgIron: 1mg

Notes

Assemble crepes just before serving for the best taste and texture. Customize with various fruit fillings as desired.

Tried this recipe?

Let us know how it was!

Cheesy Fried Egg Quesadilla for a Tasty Morning Boost

December 24, 2025 by Grace Snow Leave a Comment

As I stood in my kitchen one morning, the sizzle of eggs hitting the pan blended beautifully with the aroma of melting cheese. It struck me how a simple Fried Egg Quesadilla could transform an ordinary day into something special. Bursting with cheesy goodness and the creamy texture of ripe avocado, this zesty dish is a perfect way to kickstart your morning or enjoy a quick lunch. Not only is it a delight to make, but it also proves to be a crowd-pleaser, pleasing palates young and old alike. Plus, with minimal prep time, you can whip this up even on your busiest weekdays. Ready to see how a few ingredients can create a comforting meal that feels like a warm hug? Let’s dive into this savory delight!

Why is this quesadilla so irresistible?

Simplicity: With just a few easy-to-find ingredients, making this Fried Egg Quesadilla is a breeze—perfect for anyone, from busy home cooks to seasoned chefs.
Cheesy Delight: The combination of melty cheese and creamy avocado delivers an explosion of flavor that’s hard to resist, making it a favorite for breakfast or lunch.
Crowd-Pleaser: This dish caters to adults and kids alike, ensuring everyone leaves the table satisfied.
Versatile Options: Feel free to customize with toppings like jalapeños for a spicy twist or fresh herbs for added zing!
Quick and Easy: In less than 15 minutes, you’ll have a wholesome meal ready, rivaling any fast-food offering. If you’re in the mood for another simple delight, try serving with Breakfast Egg Muffins or a refreshing Avocado Egg Salad on the side!

Fried Egg Quesadilla Ingredients

Get ready to savor the flavors of this delightful dish!

For the Quesadilla

  • Flour tortillas – The base of the quesadilla; fresh or homemade enhances flavor and texture.
  • Large eggs – Provides protein and richness; fry until whites are set and yolks remain runny for a gooey center.
  • Shredded cheese (Cheddar or mozzarella) – Adds creaminess and flavor; freshly shredded cheese melts better than pre-packaged varieties.
  • Avocado – Offers creaminess and healthy fats; guacamole can be used as a flavorful alternative.
  • Butter – Ensures a crispy exterior when frying the tortillas.
  • Salt and pepper – Essential for seasoning the eggs; adjust to taste for the perfect balance.

Optional Toppings

  • Diced tomatoes – Adds freshness and a pop of flavor to elevate your quesadilla.
  • Jalapeños – For an exciting spicy kick that complements the cheesy goodness.
  • Fresh herbs (cilantro or green onions) – Enhances flavor and brings brightness to the dish.

Indulge in these scrumptious ingredients and prepare to create a Fried Egg Quesadilla that delights the senses!

Step‑by‑Step Instructions for Fried Egg Quesadilla

Step 1: Heat the Skillet
Begin by heating a non-stick skillet over medium heat. Add a small pat of butter and let it melt until it bubbles, ensuring the skillet is hot enough. This step is crucial for achieving that crispy exterior on your Fried Egg Quesadilla.

Step 2: Fry the First Egg
Crack one of the large eggs directly into the skillet, carefully seasoning it with salt and pepper. Cook for about 3-4 minutes, watching closely until the whites are fully set but the yolk remains runny. Once done, gently lift the egg out and set it aside on a plate before repeating the process with the second egg.

Step 3: Prepare the Tortilla Base
With the skillet still warm, lay one flour tortilla flat in the pan. Sprinkle half of the shredded cheese evenly over the tortilla, allowing it to start melting slightly. The heat from the pan will create a delicious, cheesy foundation for your Fried Egg Quesadilla.

Step 4: Add Eggs and Avocado
Carefully place the fried eggs over the melted cheese, followed by slices of creamy avocado for added richness. Top with the remaining half of the shredded cheese, ensuring a gooey, melty layer that will bind everything together beautifully.

Step 5: Top and Cook
Place the second tortilla on top of the filled quesadilla, gently pressing down. Cook for 2-3 minutes on one side, checking for a golden brown color. Once the cheese has melted and the tortilla is crisp, carefully flip the quesadilla over to cook the other side until it reaches the same golden perfection.

Step 6: Slice and Serve
Once fully cooked, remove the Fried Egg Quesadilla from the skillet and transfer it to a cutting board. Use a sharp knife to slice it into wedges, revealing the delicious layers inside. Serve immediately while hot, perhaps with your favorite salsa or sour cream for dipping.

What to Serve with Zesty Fried Egg Quesadilla

Start your day off right by creating a delightful spread that perfectly complements this cheesy dish!

  • Fresh Fruit Salad: A medley of seasonal fruits adds a burst of color and natural sweetness, balancing the richness of the quesadilla.
  • Zesty Salsa: This tangy, fresh salsa enhances the quesadilla's flavors and adds a refreshing crunch with every bite.
  • Creamy Avocado Toast: Pairing it with buttery avocado toast elevates the creamy texture, making breakfast feel extra indulgent.
  • Crispy Hash Browns: The contrast of crunch from crispy hash browns creates a satisfying texture alongside the gooey quesadilla.
  • Herb-Infused Greek Yogurt: Swirl in fresh herbs to your yogurt for a tangy dip that complements the quesadilla's richness quite nicely.
  • Refreshing Green Salad: A light salad drizzled with a zesty vinaigrette refreshes the palate, making each bite of quesadilla even more enjoyable.
  • Chilled Smoothie: A fruity smoothie provides a nourishing drink that keeps things light and flavorful while packing in nutrients.
  • Margaritas or Fresh Limeade: For something spirited, pairing it with margaritas or tangy limeade can enhance a festive brunch atmosphere!

Explore these pairings to create a balanced and satisfying meal around your Fried Egg Quesadilla!

Make Ahead Options

These Fried Egg Quesadillas are perfect for busy home cooks looking to save time during hectic weekdays! You can prep the eggs by frying them up to 24 hours in advance, and simply refrigerate them in an airtight container. Additionally, you can assemble the quesadillas (cheese, eggs, and avocado included) and store them in the fridge for up to 3 days; just be sure to add a squeeze of lemon juice on the avocado to prevent browning. When you're ready to enjoy this delightful meal, heat a skillet and cook the quesadilla for a few minutes on each side until golden brown and crispy. With these make-ahead tips, you’ll have a delicious and satisfying meal that feels just as fresh as if you made it on the spot!

How to Store and Freeze Fried Egg Quesadilla

Fridge: Store leftover Fried Egg Quesadilla in an airtight container for up to 2 days.

Freezer: If you're planning to keep them longer, wrap individual quesadillas tightly in plastic wrap and place them in a freezer-safe bag. They can last for up to 2 months.

Reheating: To reheat, place the quesadilla in a skillet over medium heat for about 5-7 minutes, flipping halfway through, until warmed through and crispy. Avoid microwaving, as this can make them soggy.

Serving: For the best taste and texture, enjoy these quesadillas fresh, but if you're storing them, these tips will help maintain their deliciousness!

Fried Egg Quesadilla Variations

Feel free to let your creativity shine by customizing your Fried Egg Quesadilla with these tasty variations!

  • Spicy Kick: Add diced tomatoes or jalapeños for a fiery punch. The heat from the jalapeños pairs beautifully with the creamy cheese.
  • Cheese Swap: Substitute the cheese with pepper jack or a vegan alternative for a different flavor experience. This can cater to a variety of dietary preferences while keeping that cheesy goodness.
  • Herb Infusion: Incorporate fresh herbs like cilantro or green onions to brighten up the quesadilla. Fresh herbs offer a burst of flavor that brings the dish to life.
  • Savory Additions: Consider throwing in sautéed bell peppers or onions for a hearty twist. These additions lend a delicious crunch while enhancing the texture and flavor profile.
  • Breakfast Twist: Include crispy bacon or sausage for an extra protein boost. This creates a satisfying quesadilla that truly feels like a breakfast feast.
  • Creamy Upgrade: Swap avocado for guacamole for an intensified flavor hit. Guacamole adds creamy, seasoned richness that can elevate the whole dish.
  • Sweet Touch: Add a drizzle of hot honey or maple syrup for a sweet-heat balance that’s delightful with the savory elements. This unexpected twist can turn breakfast into a sweet treat!
  • Quick Sides: Pair with a side of salsa or fresh pico de gallo for added freshness and flavor. Dipping into these sides enhances the experience, making each bite even better.

Explore these variations and find your favorite combination! And if you're after more breakfast ideas, don't miss out on the scrumptious Corn Fried Egg or the delightful freshness of Egg Drop Soup.

Expert Tips for Fried Egg Quesadilla

  • Fresh Tortillas Matter: Using fresh or homemade flour tortillas significantly enhances the flavor and texture of your Fried Egg Quesadilla, making it more enjoyable.

  • Perfect Egg Cook: Aim for a runny yolk by cooking the eggs until the whites are set but yolks remain slightly wobbly. This ensures the perfect gooey center when you slice into your quesadilla.

  • Cheese Choice: Always use freshly shredded cheese instead of pre-packaged for better melt and flavor. A mix of Cheddar and mozzarella works beautifully if you're looking for that perfect stretch!

  • Watch the Heat: Avoid cooking on too high a temperature to prevent burning the tortillas before the cheese melts. Medium heat is key for the crispy, golden result you desire.

  • Serve Hot: For maximum enjoyment, serve your Fried Egg Quesadilla immediately. It tastes best while hot and crispy—perfect for a fulfilling breakfast or quick lunch!

Fried Egg Quesadilla Recipe FAQs

How do I choose ripe avocados for my Fried Egg Quesadilla?
Absolutely! When selecting avocados, look for ones that yield slightly to gentle pressure. If they feel hard, they’re not ripe yet, but if they feel overly soft or have dark spots all over, they may be overripe.

How should I store leftover Fried Egg Quesadilla?
Very! Place any leftover quesadillas in an airtight container and refrigerate them. They’ll stay fresh for up to 2 days. If you want to keep them longer, consider freezing them for up to 2 months, wrapped tightly in plastic wrap.

Can I freeze Fried Egg Quesadilla? If so, how?
Yes, indeed! To freeze, first wrap each quesadilla tightly in plastic wrap, then place them into a freezer-safe bag to prevent freezer burn. Ensure to remove as much air as possible. When you’re ready to enjoy one, let it thaw in the fridge overnight before reheating.

What do I do if my cheese isn’t melting properly?
If your cheese isn’t melting well, it might be due to the temperature. Make sure your skillet isn’t too hot; medium heat is best. Additionally, avoid pre-packaged shredded cheese, as they often contain anti-caking agents. Freshly shredded cheese melts much better and will give you that cheesy goodness you desire!

Are there any dietary considerations I should keep in mind for this dish?
Absolutely! If you're sharing with others, ensure to check for allergies, especially with eggs and dairy. For guests following a vegan diet, substitute the eggs with a tofu scramble and the cheese with a plant-based alternative. Always feel free to customize ingredients to accommodate everyone’s needs!

Fried Egg Quesadilla

Cheesy Fried Egg Quesadilla for a Tasty Morning Boost

This Fried Egg Quesadilla is a simple yet delectable dish, perfect for breakfast or lunch, featuring cheesy goodness and creamy avocado.
Print Recipe Pin Recipe
Prep Time 10 minutes mins
Cook Time 5 minutes mins
Total Time 15 minutes mins
Servings: 2 quesadillas
Course: Breakfast
Cuisine: Mexican
Calories: 400
Ingredients Equipment Method Nutrition Notes

Ingredients
  

For the Quesadilla
  • 2 pieces Flour tortillas fresh or homemade enhances flavor and texture
  • 2 large Large eggs fry until whites are set and yolks remain runny
  • 1 cup Shredded cheese (Cheddar or mozzarella) freshly shredded melts better
  • 1 medium Avocado offers creaminess and healthy fats
  • 1 tablespoon Butter ensures a crispy exterior
  • to taste Salt and pepper essential for seasoning
Optional Toppings
  • 1/2 cup Diced tomatoes adds freshness
  • 1/4 cup Jalapeños for a spicy kick
  • 1/4 cup Fresh herbs (cilantro or green onions) enhances flavor

Equipment

  • non-stick skillet

Method
 

Cooking Steps
  1. Begin by heating a non-stick skillet over medium heat. Add a small pat of butter and let it melt until it bubbles.
  2. Crack one of the large eggs directly into the skillet, seasoning it with salt and pepper. Cook for about 3-4 minutes until the whites are fully set but yolk remains runny.
  3. With the skillet still warm, lay one flour tortilla flat in the pan. Sprinkle half of the shredded cheese evenly over the tortilla.
  4. Carefully place the fried eggs over the melted cheese, followed by slices of avocado. Top with the remaining half of the shredded cheese.
  5. Place the second tortilla on top of the filled quesadilla, gently pressing down. Cook for 2-3 minutes until golden brown.
  6. Once fully cooked, remove the quesadilla from the skillet and slice it into wedges. Serve immediately while hot.

Nutrition

Serving: 1quesadillaCalories: 400kcalCarbohydrates: 36gProtein: 20gFat: 22gSaturated Fat: 11gPolyunsaturated Fat: 1gMonounsaturated Fat: 8gCholesterol: 220mgSodium: 600mgPotassium: 400mgFiber: 5gSugar: 2gVitamin A: 500IUVitamin C: 10mgCalcium: 300mgIron: 2mg

Notes

For maximum enjoyment, serve your Fried Egg Quesadilla immediately while hot and crispy. Great with salsa or sour cream.

Tried this recipe?

Let us know how it was!

Irresistibly Fluffy Chocolate Pancakes to Sweeten Your Morning

December 24, 2025 by Grace Snow Leave a Comment

The sound of sizzling batter fills the kitchen, and before long, the rich aroma of chocolate dances through the air. That’s right—I'm whipping up a batch of my beloved Fluffy Chocolate Pancakes with Rich Ganache! Perfect for a cozy weekend brunch or a festive morning treat, these pancakes are a true celebration of flavor and comfort. In less than 30 minutes, you can indulge in a quick recipe that transforms an ordinary day into something special. With their airy texture and a delightful drizzle of velvety ganache, they’re guaranteed to impress both family and friends. Plus, you can easily customize them with various mix-ins or substitutes to match dietary needs. Are you ready to start flipping fluffy chocolate delights? Let's dive into the recipe!

Why Are These Chocolate Pancakes Special?

Indulgent Delight: Each bite of these fluffy chocolate pancakes is like a warm hug, packed with rich cocoa and melty chocolate chunks, perfect for chocolate lovers.
Quick & Easy: With under 30 minutes to whisk up and cook, this recipe is ideal for hectic mornings, making luxury breakfast achievable without the fuss.
Customizable Flavors: Versatility shines through! Substitute with your favorite chocolate types, or even fresh fruits like bananas or berries for a refreshing twist.
Impressive Presentation: Drizzling warm ganache over pancakes makes for a stunning presentation; your family and friends will think you’re a culinary superstar! Check out Ricotta Protein Pancakes for a lighter pancake option.
Freezer-Friendly: Make a big batch, freeze the extras, and enjoy homemade pancakes any day of the week. They are quick and fit perfectly into a busy lifestyle!

Chocolate Pancake Ingredients

• Transform your mornings with these chocolate pancakes that satisfy every sweet tooth!

For the Batter

  • All-purpose flour – Provides essential structure and texture; swap with gluten-free flour for a gluten-free version.
  • Cocoa powder – Delivers that deep chocolate flavor; try using Dutch-processed cocoa for a richer taste.
  • Baking powder – Acts as a leavening agent to ensure your pancakes are airy and fluffy.
  • Salt – Enhances the overall flavor of the pancakes.
  • Eggs – Adds moisture and helps bind the ingredients together.
  • Granulated sugar – Sweetens the batter; reduce the amount for a less sweet pancake.
  • Whole milk – Keeps the batter moist; consider almond or soy milk as dairy-free options.
  • Canola/vegetable oil (or melted butter) – Adds richness, with oil creating fluffier pancakes and butter providing extra flavor.
  • Vanilla extract – Adds depth of flavor to the batter.
  • Chocolate chips or chunks – Intensifies the chocolatey richness; totally optional but highly recommended!
  • Butter or oil, for cooking – Prevents sticking and ensures golden-brown pancakes.

For the Chocolate Ganache Sauce

  • Bittersweet or semisweet chocolate – Forms the delicious base for your ganache, perfect for drizzling.
  • Heavy cream – Contributes to a rich and smooth texture that elevates the ganache.

Step‑by‑Step Instructions for Fluffy Chocolate Pancakes with Rich Ganache

Step 1: Mix Dry Ingredients
In a large mixing bowl, sift together 1 cup of all-purpose flour, 1/3 cup of cocoa powder, 2 teaspoons of baking powder, and a pinch of salt. This step creates a light mixture that helps ensure your chocolate pancakes are fluffy. Set the bowl aside while you prepare the wet ingredients for the next delicious stage.

Step 2: Mix Wet Ingredients
In a separate bowl, whisk together 2 large eggs and 1/4 cup of granulated sugar until smooth. Then, add 1 cup of whole milk, 2 tablespoons of canola oil (or melted butter), and 1 teaspoon of vanilla extract, mixing until everything is well combined. The mixture should be creamy, creating a lovely base for your chocolate pancakes.

Step 3: Combine Mixtures
Gently pour the wet ingredients into the bowl with the dry ingredients. Stir using a spatula until just combined; it's okay if small lumps remain, as overmixing can lead to dense pancakes. Then, carefully fold in 1/2 cup of chocolate chips, which will melt slightly during cooking, adding rich pockets of chocolate flavor to your fluffy chocolate pancakes.

Step 4: Prepare Ganache
For the chocolate ganache, place 6 ounces of bittersweet or semisweet chocolate in a microwave-safe bowl. Pour in 1/2 cup of heavy cream over the chocolate. Heat in the microwave for 20-30 seconds, stirring the mixture in between heating until the chocolate has melted completely and your ganache is smooth. Set this aside to thicken while you cook the pancakes.

Step 5: Cook Pancakes
Heat a non-stick skillet or griddle over medium heat. Grease it lightly with butter or oil, then pour 1/4 cup of batter onto the skillet. Cook the pancake for 1-2 minutes, watching for bubbles to form on the surface. Once bubbly, flip it over and cook for an additional 1-2 minutes until both sides are golden brown. Repeat this process, greasing the skillet as needed for each new pancake.

Step 6: Serve
Stack your fluffy chocolate pancakes on a plate, then generously drizzle the warm ganache over the top. You can sprinkle some extra chocolate chips or fresh fruits, if desired, for added charm. Serve immediately to indulge in this delightful breakfast treat that is sure to bring smiles to everyone at the table!

Expert Tips for Fluffy Chocolate Pancakes

  • Rest the Batter: Allow the pancake batter to rest for 10–15 minutes. This helps the gluten relax, resulting in lighter chocolate pancakes.
  • Temperature Check: Make sure your skillet is preheated properly. If it’s too hot, pancakes might burn; too cool, and they won’t cook evenly.
  • Avoid Overmixing: Gently mix until just combined to maintain fluffiness in your chocolate pancakes. Overmixing can lead to a denser texture.
  • Test Pancake: The first pancake often serves as a test; adjust heat or batter as needed for perfect cooking on subsequent pancakes.
  • Add Mix-ins Wisely: Keep chocolate chips or chunks in moderation; they enhance flavor but too many can weigh down the batter.

Chocolate Pancakes Variations & Substitutions

Feel free to make these chocolate pancakes your own with these delightful adaptations that will tickle your taste buds!

  • Gluten-Free: Swap all-purpose flour with a 1:1 gluten-free blend for a deliciously fluffy pancake without the gluten.

  • Dairy-Free: Use almond or oat milk instead of whole milk, and dairy-free chocolate for a vegan-friendly treat. You'll be amazed at how tasty they still are!

  • Rich Flavor Boost: For an extra indulgent experience, substitute regular cocoa powder with Dutch-processed cocoa. It deepens the flavor for an even more luxurious bite.

  • Fruit Infusion: Fold in fresh berries or mashed bananas right into the batter to add natural sweetness and moisture—perfect for those who love fruity flavors.

  • Nutty Twist: Add a tablespoon or two of nut butter to the batter for a creamy texture and a nutty finish that pairs so well with the chocolate flavor.

  • Spicy Kick: Sprinkle in a touch of cayenne or cinnamon for a warm hint of spice, elevating your pancakes a notch and surprising your palate.

  • Mix and Match Chips: Get creative with chocolate chips—try substituting with white chocolate, peanut butter chips, or even a swirl of caramel for a unique twist.

Looking for more delicious ideas? Check out the German Chocolate Poke or try out some Ricotta Protein Pancakes for a different take on breakfasts!

What to Serve with Fluffy Chocolate Pancakes with Rich Ganache

Indulging in fluffy chocolate pancakes gives you the chance to create a delightful breakfast spread that tantalizes the senses.

  • Whipped Cream: Lusciously airy and sweet, it adds a creamy contrast to the rich chocolate, making each bite indulgent.
  • Fresh Berries: Bright and juicy, berries like strawberries or blueberries offer a refreshing tartness that perfectly balances the sweetness of the pancakes.
  • Maple Syrup: The warm, caramel notes of maple syrup complement the chocolate beautifully. Drizzle liberally for that classic breakfast feel!
  • Sliced Bananas: Sweet, creamy banana slices provide a lovely texture and natural sweetness that harmonizes with the decadent chocolate.
  • Vanilla Ice Cream: For a truly decadent treat, serve a scoop of vanilla ice cream alongside your pancakes—it becomes a delightful dessert breakfast!
  • Cocoa Dust: A light dusting of cocoa powder on top enhances the chocolate flavor and adds a touch of elegance to your plate.
  • Nutella: For chocolate lovers, serving a dollop of Nutella brings an extra layer of richness and creamy goodness to the dish.
  • Espresso or Coffee: Pair with a robust cup of coffee or espresso to balance the sweetness and awaken the palate.
  • Hot Chocolate: Keep the chocolate theme going with a warm cup of rich hot chocolate for a sweet and cozy experience.

Make Ahead Options

These Fluffy Chocolate Pancakes are perfect for meal prep enthusiasts looking to save time during busy mornings! You can prepare the batter up to 24 hours in advance; simply mix the dry and wet ingredients separately, then combine them, cover, and refrigerate. To maintain freshness, avoid folding in the chocolate chips until you're ready to cook. If you want, you can also cook and freeze the pancakes for up to 3 months—just stack them with parchment paper in between to prevent sticking. When you're ready to serve, reheat the pancakes in the toaster or microwave, then drizzle with the ganache made fresh just before enjoying. This way, you’ll have a delightful breakfast ready with minimal effort!

How to Store and Freeze Chocolate Pancakes

Fridge: Store leftover chocolate pancakes in an airtight container in the fridge for up to 3 days. Reheat in the microwave for a quick breakfast treat.

Freezer: For longer storage, freeze pancakes by placing a sheet of parchment paper between each one, then wrap tightly in plastic wrap or aluminum foil. They can be frozen for up to 2 months.

Reheating: Reheat frozen chocolate pancakes in the microwave for about 1-2 minutes, or in a toaster oven at 350°F (175°C) until heated through and fluffy again.

Make-Ahead: Prepare your chocolate pancakes ahead of time and freeze; it's a great way to enjoy homemade breakfasts any day of the week!

Chocolate Pancakes Recipe FAQs

What is the best way to select ripe ingredients for chocolate pancakes?
Absolutely! When choosing ingredients, especially for the eggs and milk, opt for fresh items—look for eggs with clean shells and check the expiration date on the milk. For cocoa powder, choose high-quality brands as they can significantly enhance flavor. Fresh baking powder is essential too; check if it bubbles when mixed with water to confirm freshness!

How should I store leftover chocolate pancakes?
Very! Store your chocolate pancakes in an airtight container in the fridge for up to 3 days. You can easily reheat them in the microwave for about 20-30 seconds or until warmed through for a quick morning delight.

Can I freeze chocolate pancakes, and how?
Definitely! To freeze your chocolate pancakes, stack them with a layer of parchment paper between each pancake. Wrap the stack tightly in plastic wrap or aluminum foil and place them in a freezer-safe bag. They can be stored for up to 3 months. When you want to enjoy them again, simply reheat in the microwave or toaster oven, and they’ll be just as fluffy!

What can I do if my pancake batter is too thick?
If you find your pancake batter too thick, don’t fret! Simply add a splash of milk, stirring gently until you reach your desired consistency. Remember, it’s better to keep it a bit thicker than too thin, as a thick batter yields fluffier pancakes.

Are chocolate pancakes safe for pets to eat?
Not at all! Chocolate is toxic to pets, especially dogs and cats. It’s essential to keep your chocolate pancakes away from your furry friends to ensure their safety. If you’re looking for a pet-friendly treat, consider plain pancakes without any chocolate or sweeteners instead.

Can I use substitutes for any of the ingredients in chocolate pancakes?
Absolutely! You can substitute all-purpose flour with gluten-free flour for a GF option. Use almond or soy milk for a dairy-free version, and replace eggs with a flaxseed meal (1 tablespoon of ground flaxseed mixed with 2.5 tablespoons of water for each egg) for a vegan alternative. The more the merrier with substitutions—explore what works for you!

Chocolate Pancakes

Irresistibly Fluffy Chocolate Pancakes to Sweeten Your Morning

Indulge in these delightful chocolate pancakes that combine fluffy texture with rich ganache, perfect for breakfast or brunch.
Print Recipe Pin Recipe
Prep Time 10 minutes mins
Cook Time 15 minutes mins
Resting Time 15 minutes mins
Total Time 30 minutes mins
Servings: 4 pancakes
Course: Breakfast
Cuisine: American
Calories: 220
Ingredients Equipment Method Nutrition Notes

Ingredients
  

For the Batter
  • 1 cup All-purpose flour Swap with gluten-free flour for a gluten-free version
  • 1/3 cup Cocoa powder Try Dutch-processed cocoa for richer taste
  • 2 teaspoons Baking powder Acts as leavening agent
  • a pinch Salt Enhances overall flavor
  • 2 large Eggs Adds moisture and binds ingredients
  • 1/4 cup Granulated sugar Reduce for less sweet pancakes
  • 1 cup Whole milk Almond or soy milk for dairy-free
  • 2 tablespoons Canola or vegetable oil Or melted butter for flavor
  • 1 teaspoon Vanilla extract Adds depth of flavor
  • 1/2 cup Chocolate chips or chunks Optional but highly recommended
  • Butter or oil for cooking Prevents sticking
For the Chocolate Ganache Sauce
  • 6 ounces Bittersweet or semisweet chocolate Forms the base for ganache
  • 1/2 cup Heavy cream Contributes to a rich texture

Equipment

  • Mixing bowls
  • Skillet
  • Whisk
  • Spatula
  • Microwave-safe bowl

Method
 

Step-by-Step Instructions
  1. In a large mixing bowl, sift together 1 cup of all-purpose flour, 1/3 cup of cocoa powder, 2 teaspoons of baking powder, and a pinch of salt.
  2. In a separate bowl, whisk together 2 large eggs and 1/4 cup of granulated sugar until smooth. Add 1 cup of whole milk, 2 tablespoons of canola oil (or melted butter), and 1 teaspoon of vanilla extract, mixing until well combined.
  3. Gently pour the wet ingredients into the bowl with the dry ingredients. Stir until just combined; fold in 1/2 cup of chocolate chips.
  4. For the ganache, place 6 ounces of chocolate in a microwave-safe bowl, pour in 1/2 cup of heavy cream, and heat in the microwave for 20-30 seconds until smooth.
  5. Heat a skillet over medium heat, grease with butter or oil, then pour 1/4 cup of batter onto the skillet. Cook for 1-2 minutes, flip, and cook for an additional 1-2 minutes.
  6. Stack pancakes on a plate, drizzle with ganache, and serve immediately.

Nutrition

Serving: 1pancakeCalories: 220kcalCarbohydrates: 30gProtein: 5gFat: 10gSaturated Fat: 4gPolyunsaturated Fat: 0.5gMonounsaturated Fat: 5gCholesterol: 35mgSodium: 150mgPotassium: 200mgFiber: 2gSugar: 10gVitamin A: 200IUCalcium: 100mgIron: 2mg

Notes

Allow batter to rest for 10-15 minutes for lighter pancakes. Ensure skillet is preheated for even cooking.

Tried this recipe?

Let us know how it was!

Nourishing Lebanese Lemon Lentil Soup for Cozy Nights

December 23, 2025 by Grace Snow Leave a Comment

As the golden sun dips below the horizon, the aroma of spices begins to fill the kitchen, welcoming the cozy vibes of the season. This Lebanese Lemon Lentil Soup is my go-to comfort dish, combining the earthiness of lentils with the bright zest of lemon and a medley of warm spices like cumin and turmeric. What I love most about this vegan, gluten-free one-pot meal is how quickly it comes together—ideal for those bustling weeknights when you crave something wholesome without spending hours in the kitchen. Plus, it’s a crowd-pleaser; whether you’re hosting a cozy gathering or looking to prep meals for the week, this soup offers nourishment that feels like a warm hug in a bowl. Ready to turn your kitchen into a delightful oasis of flavor? Let’s dive into this recipe!

Why is this soup a must-try?

Comforting, hearty flavor: This Lebanese Lemon Lentil Soup wraps you in cozy warmth with every spoonful, offering a symphony of lentils and spices that’s simply irresistible.

Quick and easy: Ready in just about 40 minutes, it's perfect for those busy weeknights when you want a nutritious meal without the fuss.

Vegan and gluten-free: Everyone can enjoy this recipe, making it an ideal choice for gatherings or meal prep, and a delightful option for all dietary preferences.

Endless customizations: Want to add a twist? Toss in veggies like spinach or swap rice for quinoa for a unique spin, keeping it fresh every time!

Nutrient-packed: Rich in protein and fiber, this soup offers a nourishing balance without the extra calories—a guilt-free comfort you can feel good about.

Looking for more comforting options? Try pairing it with a side of Egg Drop Soup or a luscious Zuppa Toscana Soup for a warm feast!

Lebanese Lemon Lentil Soup Ingredients

  • For the Base

  • Olive Oil – Adds richness and aids in sautéing; any neutral oil can be substituted.

  • Onion – Provides a savory base flavor; shallots could serve as a sweeter alternative.

  • Garlic – Enhances the flavor with aromatic depth; fresh garlic is recommended for the best taste.

  • For the Seasoning

  • Cumin – Adds earthy notes; consider coriander as an alternative for a flavor variation.

  • Turmeric – Imparts vibrant color and health benefits; fresh turmeric can also be used if available.

  • Paprika – Offers subtle smokiness; smoked paprika can add intensity.

  • For the Soup

  • Red Lentils – The main protein source providing texture; substitute with brown or green lentils, adjusting cooking time by 10-15 minutes.

  • Rice – Adds heartiness; quinoa, bulgur, or cauliflower rice are lower-carb alternatives.

  • Salt – Essential for seasoning; adjust to taste.

  • Pepper – Adds spice; adjust to taste.

  • Vegetable Broth – Forms the soup’s base, offering depth; ensure it's gluten-free if necessary.

  • Fresh Lemon Juice – Brightens flavors; lime juice can be an alternative if lemon isn’t available.

Dive into the comforting goodness of this Lebanese Lemon Lentil Soup and let it wrap you in warmth!

Step‑by‑Step Instructions for Lebanese Lemon Lentil Soup

Step 1: Heat Oil
In a medium-sized Dutch oven over medium-high heat, warm 2 tablespoons of olive oil until it shimmers. This should take about 2 minutes, at which point the oil will be ready for sautéing. You’re aiming for a glossy surface that indicates it's hot enough to start cooking.

Step 2: Sauté Aromatics
Add 1 diced onion and 2 minced garlic cloves to the hot oil. Sauté them for approximately 5 minutes, stirring frequently, until the onion is soft and translucent, and the garlic is fragrant but not browned, helping to create a flavorful base for your Lebanese Lemon Lentil Soup.

Step 3: Incorporate Spices
Stir in 1 teaspoon of cumin, 1 teaspoon of turmeric, and 1 teaspoon of paprika into the onion and garlic mixture. Cook for an additional minute, allowing the spices to bloom and release their vibrant aromas, creating a tantalizing blend that forms the heart of your soup’s flavor.

Step 4: Add Lentils and Rice
Mix in 1 cup of red lentils, 1/2 cup of rice, along with salt and pepper to taste. Continue to cook for 3-5 minutes, stirring occasionally until the lentils and rice are evenly coated with the spices, and you can smell their toasty fragrance filling the kitchen.

Step 5: Pour Broth
Pour in 6 cups of vegetable broth and stir to combine all the ingredients. Bring the mixture to a rolling boil, then reduce the heat to a simmer. Let it gently bubble for about 30-35 minutes, or until the lentils and rice are tender, creating a comforting soup texture.

Step 6: Adjust Consistency
Once cooked, if the soup is thicker than you prefer, gradually stir in a bit more broth until the desired creaminess is reached. For an extra smooth finish, consider blending part of the soup with an immersion blender for 30 seconds to create a lovely, velvety consistency.

Step 7: Add Lemon Juice
Remove the soup from heat and stir in the juice of 1 fresh lemon, adjusting the seasoning with more salt and pepper as needed. This zesty addition will brighten the flavors of your Lebanese Lemon Lentil Soup, giving it that refreshing kick that complements the earthy tones.

Step 8: Serve Warm
Ladle the soup into bowls and enjoy it warm. This comforting dish pairs beautifully with warm pita bread or crusty bread on the side, making your mealtime a cozy celebration of flavors and warmth.

How to Store and Freeze Lebanese Lemon Lentil Soup

Fridge: Store leftovers in an airtight container for up to 3 days. Allow the soup to cool completely before sealing to avoid moisture buildup.

Freezer: This Lebanese Lemon Lentil Soup freezes beautifully! Portion into airtight containers and store for up to 3 months.

Reheating: To reheat, thaw overnight in the refrigerator before warming on the stove or microwave until heated through. Adjust consistency with additional broth if desired.

Meal Prep: Make the soup in advance (without lemon juice) for easy weeknight meals. Stir in lemon juice just before serving for a refreshing burst of flavor!

Make Ahead Options

These Lebanese Lemon Lentil Soup preparations are perfect for busy home cooks looking to save time! You can prepare the soup base—sauté the onions, garlic, and spices, then add the lentils and rice—up to 24 hours in advance and refrigerate it. Just remember to omit the lemon juice until you're ready to serve, as this keeps the flavors vibrant. When the time comes, simply stir in the vegetable broth and simmer as directed. For maximum quality, allow the soup to cool before refrigerating, and store it in airtight containers for up to 3 days or freeze portions for up to 3 months. Thaw overnight in the fridge before reheating, and you'll have a delicious, nourishing meal waiting for you, just like it was freshly made!

What to Serve with Lebanese Lemon Lentil Soup

Creating a memorable meal around this soup invites warmth and flavor to your table, enhancing every cozy moment shared.

  • Warm Pita Bread: Soft, fluffy pita is perfect for dipping into the savory soup, making each bite a delightful experience. Tear off a piece to soak up the zesty flavors and enjoy the contrast of textures.

  • Greek Salad: A refreshing Greek salad, with tangy feta and crisp cucumbers, balances the richness of the soup, offering a vibrant crunch to every bite. The bright ingredients provide a burst of flavor that complements the earthy lentils beautifully.

  • Herbed Hummus: Serve a side of herbed hummus for an extra layer of flavor and creaminess. This dish adds a delightful Mediterranean touch while pairing perfectly with the soup’s zestiness.

  • Roasted Vegetables: A medley of roasted seasonal vegetables brings warmth and sweetness to your meal, and the caramelization enhances the overall flavor profile, creating a harmonious dish with the soup.

  • Quinoa Salad: A chilled quinoa salad tossed with fresh herbs and citrus offers a light, refreshing contrast that elevates your meal. Its nuttiness and fluffy texture add another dynamic layer.

  • Sparkling Water with Lemon: To drink, consider serving sparkling water with a twist of lemon. This invigorating beverage cleanses the palate and enhances the soup’s citrus notes with each sip.

  • Date and Walnut Snack: For dessert, a few bites of dates stuffed with walnuts provide a sweet finish after a savory meal. Not only are they satisfying, but they also echo the Middle Eastern theme beautifully.

  • Coconut Milk Rice: If you’d like a more adventurous side, try serving coconut milk rice. Its subtle sweetness will contrast nicely with the soup's spices, creating a delightful medley of flavors on your plate.

Lebanese Lemon Lentil Soup Variations

Feel free to unleash your culinary creativity and adapt this comforting soup to your taste preferences!

  • Vegetable Boost: Add chopped carrots, celery, or spinach for extra nutrients and vibrant colors. You could also sneak in some kale for a hearty touch!

  • Gluten-Free Grain: Replace rice with quinoa or bulgur for a gluten-free option while still maintaining a satisfying texture. Quinoa brings a nutty flavor that complements the soup beautifully.

  • Creamy Addition: Stir in a splash of coconut milk during the last few minutes of cooking for a luxuriously creamy variant. This gives your soup a tropical twist, perfect for warming up chilly evenings.

  • Spice It Up: Incorporate a sprinkle of red pepper flakes or a dash of cayenne pepper for some heat. A little kick can elevate the flavors and add excitement to each spoonful.

  • Fresh Herb Finish: Enhance the aromatic profile by adding fresh herbs like cilantro or parsley just before serving. This brightens the dish and introduces a fresh layer of flavor that contrasts nicely with the warmth of the soup.

  • Smoke & Depth: Swap regular paprika for smoked paprika to lend a deeper, more complex taste. The smokiness adds a delightful layer, reminiscent of comfort food from the hearth.

  • Citrus Twist: If you don’t have lemons on hand, lime juice works wonderfully as a substitute. It will still brighten the flavor profile but offers a slightly different citrusy zing.

Feeling inspired? Try serving with a side of Lemon Chicken Soup or a refreshing bowl of Asparagus Soup Healthy to round out your cozy meal!

Expert Tips for Lebanese Lemon Lentil Soup

  • Perfect Texture: Adjust cooking time for lentils—red lentils cook faster than brown or green. Ensure they’re tender but not mushy for the best Lebanese Lemon Lentil Soup experience.

  • Avoid Overcooking: When simmering, keep an eye on the broth. If the soup thickens too much, stir in extra broth gradually for the right consistency.

  • Fresh Spices: Use fresh spices whenever possible to elevate the aroma and flavor profile of your soup. Dried spices can lose potency over time.

  • Customize Your Veggies: Feel free to add chopped carrots, celery, or spinach for added nutrition and flavor. Just remember to adjust cooking time as needed.

  • Boost the Flavor: Lemon juice should be added right at the end to preserve its freshness and zesty kick in your Lebanese Lemon Lentil Soup.

  • Meal Prep Friendly: This soup can be stored in the fridge for up to 3 days. Just add the lemon juice before serving for maximum freshness!

Lebanese Lemon Lentil Soup Recipe FAQs

How do I choose the right lentils for this soup?
Absolutely! I recommend using red lentils, as they cook quickly and break down to create a lovely creamy texture. If you prefer a firmer bite, you can substitute them with brown or green lentils—just be sure to adjust the cooking time by an additional 10-15 minutes since they take longer to cook through.

How should I store leftover Lebanese Lemon Lentil Soup?
For the best results, let the soup cool completely before transferring it to an airtight container. You can refrigerate the soup for up to 3 days. If you’re meal prepping, consider portioning it into single servings to make reheating easy.

Can I freeze this soup, and how do I do it?
Very! To freeze your Lebanese Lemon Lentil Soup, let it cool completely before pouring it into airtight containers or freezer-safe bags. Aim for portion sizes suitable for your meals, and it will last for up to 3 months. When you’re ready to enjoy it, simply thaw in the fridge overnight before reheating on the stove or in the microwave. If the texture seems too thick, stir in a little extra broth when reheating.

What if my soup turns out too thick?
Not to worry! Soup thickness can be easily adjusted. If you find your Lebanese Lemon Lentil Soup is thicker than desired, gently stir in more vegetable broth a little at a time until you reach the consistency you love. Alternatively, using an immersion blender for about 30 seconds can also help create a smoother texture.

Is this soup safe for people with allergies?
Absolutely! This Lebanese Lemon Lentil Soup is naturally vegan and gluten-free, making it suitable for many dietary preferences. However, always double-check your vegetable broth and any additives to ensure they meet your dietary needs, especially if you’re concerned about allergies. It's a good habit to keep an eye out for added ingredients that may contain allergens.

Can I add extra vegetables or ingredients?
Of course! The more, the merrier! You can easily customize your soup by adding chopped carrots, spinach, or even diced tomatoes for added nutrition and flavor. Just remember to adjust the cooking time slightly based on the hardness of the veggies; soft greens like spinach will only need a few minutes to wilt!

Lebanese Lemon Lentil Soup

Nourishing Lebanese Lemon Lentil Soup for Cozy Nights

This Lebanese Lemon Lentil Soup is a comforting, vegan, and gluten-free dish that combines lentils, lemon, and warm spices for a wholesome meal.
Print Recipe Pin Recipe
Prep Time 10 minutes mins
Cook Time 30 minutes mins
Total Time 40 minutes mins
Servings: 4 bowls
Course: Soups
Cuisine: Lebanese
Calories: 250
Ingredients Equipment Method Nutrition Notes

Ingredients
  

For the Base
  • 2 tablespoons Olive Oil Any neutral oil can be substituted.
  • 1 medium Onion Diced; shallots could serve as a sweeter alternative.
  • 2 cloves Garlic Minced; fresh garlic is recommended.
For the Seasoning
  • 1 teaspoon Cumin Consider coriander as an alternative.
  • 1 teaspoon Turmeric Fresh turmeric can also be used.
  • 1 teaspoon Paprika Smoked paprika can add intensity.
For the Soup
  • 1 cup Red Lentils Substitute with brown or green lentils, adjusting cooking time.
  • 1/2 cup Rice Lower-carb alternatives include quinoa or cauliflower rice.
  • Salt Adjust to taste.
  • Pepper Adjust to taste.
  • 6 cups Vegetable Broth Ensure it's gluten-free if necessary.
  • 1 tablespoon Fresh Lemon Juice Lime juice can be an alternative.

Equipment

  • Dutch oven

Method
 

Directions
  1. In a medium-sized Dutch oven over medium-high heat, warm 2 tablespoons of olive oil until it shimmers, about 2 minutes.
  2. Add 1 diced onion and 2 minced garlic cloves. Sauté for about 5 minutes until soft and translucent.
  3. Stir in 1 teaspoon of cumin, 1 teaspoon of turmeric, and 1 teaspoon of paprika. Cook for an additional minute.
  4. Mix in 1 cup of red lentils, 1/2 cup of rice, along with salt and pepper to taste. Cook for 3-5 minutes.
  5. Pour in 6 cups of vegetable broth and stir to combine. Bring to a boil, then reduce heat and simmer for about 30-35 minutes.
  6. If the soup is thicker than preferred, gradually stir in more broth for desired consistency.
  7. Remove from heat and stir in the juice of 1 fresh lemon, adjusting seasoning with salt and pepper.
  8. Ladle the soup into bowls and enjoy warm.

Nutrition

Serving: 1bowlCalories: 250kcalCarbohydrates: 35gProtein: 12gFat: 7gSaturated Fat: 1gPolyunsaturated Fat: 1gMonounsaturated Fat: 5gSodium: 400mgPotassium: 500mgFiber: 10gSugar: 4gVitamin A: 500IUVitamin C: 15mgCalcium: 40mgIron: 3mg

Notes

This soup can be stored in the fridge for up to 3 days. Reheating instructions: thaw in the refrigerator before warming on the stove or microwave until heated through.

Tried this recipe?

Let us know how it was!

Hearty Ratatouille Soup: Cozy Veggie Goodness Awaits

December 23, 2025 by Grace Snow Leave a Comment

Whispers of summer evenings fill my kitchen as I prepare a warm pot of Ratatouille Soup, inspired by the enchanting world of a beloved animated film. This vibrant vegetarian delight is not just a dish; it's a comforting embrace in a bowl that encapsulates the essence of fresh, seasonal produce. With quick prep and hearty flavors, this soup is perfect for busy weeknights or cozy gatherings with loved ones. It effortlessly incorporates a medley of nutrient-rich vegetables, making it an appealing choice for even the pickiest eaters. Ready to dive into a world of flavor and warmth? Let’s create your culinary masterpiece!

Why Is This Ratatouille Soup So Special?

Comforting, hearty meal: This Ratatouille Soup wraps you in a cozy hug with every bite, making it perfect for chilly evenings.

Fresh, vibrant flavors: The colorful vegetables pack a punch, ensuring a delicious nutritious experience that excites your taste buds.

Quick and easy: With simple steps and minimal prep time, you’ll have a wholesome dish on the table in no time.

Versatile goodness: Whether you want to add Lemon Chicken Soup or toss in seasonal veggies, this recipe adapts to your preferences flawlessly.

Healthy and satisfying: Bursting with vitamins and fiber, it’s a guilt-free indulgence that even picky eaters will love.

Serve it with some crusty bread for the ultimate meal experience!

Ratatouille Soup Ingredients

• Dive into the delicious world of Ratatouille Soup with this vibrant list!

For the Base

  • Olive Oil – Adds richness and helps sauté vegetables; avocado oil works as a lighter alternative.
  • Onion – Provides a sweet base flavor, with yellow or white onions being great options.
  • Garlic – Enhances the soup's aroma and flavor depth; fresh garlic is preferred for optimal impact.

For the Vegetables

  • Red Bell Pepper – Contributes sweetness and texture; feel free to mix in any color bell pepper.
  • Yellow Bell Pepper – Adds an extra hue and balances flavor; substitute with any variant of bell pepper if needed.
  • Zucchini – Offers moisture and a mild flavor; yellow squash is a suitable substitute.
  • Eggplant – Provides a meaty texture and absorbs flavors beautifully; sliced mushrooms can be a tasty alternative.

For the Tomato Base

  • Crushed Tomatoes – Essential for the base; fresh tomatoes work beautifully when in season.
  • Tomato Sauce – Enhances the tomato flavor; use more crushed tomatoes if you're in a pinch.
  • Vegetable Broth – Acts as the soup's foundation; opt for homemade or store-bought, or chicken broth if not vegetarian.

For the Herbs and Seasoning

  • Dried Oregano – Adds earthy notes; Italian seasoning is a good swap.
  • Dried Basil – Complements the vegetable flavors; fresh basil provides a brighter taste.
  • Dried Thyme – Introduces a hint of warmth; herbes de Provence work well as a substitute.
  • Red Pepper Flakes (optional) – Adds heat; adjust to your taste or omit for a milder version.
  • Salt and Black Pepper – Essential for seasoning; use to taste.

For Garnish and Serving

  • Fresh Basil Leaves – Enhances presentation and adds a fresh element.
  • Optional: Crusty Bread – Perfect for dipping and adds a delightful texture contrast.

Step‑by‑Step Instructions for Ratatouille Soup

Step 1: Prepare Vegetables
Begin by chopping the onion and mincing the garlic. Then, cut the red and yellow bell peppers, zucchini, and eggplant into bite-sized pieces. This preparation ensures a smooth cooking process, allowing the gorgeous colors of the vegetables to shine through in your Ratatouille Soup.

Step 2: Sauté Aromatics and Vegetables
In a large pot, heat 2 tablespoons of olive oil over medium heat. Once the oil is shimmering, add the chopped onion and sauté for about 5-7 minutes, stirring occasionally until softened. Incorporate the minced garlic and cook for another minute before adding the cut bell peppers, zucchini, and eggplant. Sauté for 5-7 minutes, until the vegetables are tender and fragrant.

Step 3: Simmer the Soup
Now it’s time to build that flavorful base! Pour in 1 can of crushed tomatoes and 1 can of tomato sauce, followed by 4 cups of vegetable broth. Sprinkle in the dried oregano, basil, and thyme, then add red pepper flakes if you like some heat. Season the mixture with salt and black pepper. Bring the Ratatouille Soup to a simmer, cover the pot, and let it cook for 30 minutes to 1 hour, stirring occasionally to meld the flavors.

Step 4: Adjust and Serve
After simmering, taste the Ratatouille Soup and adjust the seasoning as necessary. For a creamier texture, you can blend a portion of the soup using an immersion blender, making it as smooth as you desire. Serve the soup hot in bowls, garnished with fresh basil leaves and paired with crusty bread. This comforting dish is a perfect way to enjoy a healthy, nutritious meal!

Helpful Tricks for Ratatouille Soup

  • Prep Ahead: Prepare all your vegetables before starting. This avoids delays and makes cooking a joy, ensuring your Ratatouille Soup comes together seamlessly.

  • Flavor Boost: Don’t rush the sautéing process. Properly caramelizing the onions adds depth, making your soup more flavorful and satisfying.

  • Vegetable Swaps: Feel free to substitute veggies based on what you have on hand or love most, but keep the Ratatouille Soup colorful for the best presentation!

  • Seasoning Wisely: Taste your soup while it simmers. Adjust salt and pepper gradually, especially if you're using store-bought broth, which may be salty.

  • Creamy Delight: For a richer texture, blend a portion of the soup or stir in a splash of cream or crème fraîche before serving; it takes the Ratatouille Soup to the next level.

  • Serve Smart: Pair your finished soup with crusty bread or a sprinkle of cheese on top for a complete meal experience that warms the heart!

What to Serve with Ratatouille Soup

Whisk your loved ones away to a cozy kitchen filled with delectable scents, as you create a delightful dining experience alongside your vibrant bowl of Ratatouille Soup.

  • Crusty Bread: The perfect partner for dipping, its crunchy exterior complements the soft, hearty soup.
  • Mixed Green Salad: A light, refreshing salad adds a burst of freshness, balancing the rich flavors of the soup beautifully. Toss in a lemon vinaigrette for an extra zing.
  • Cheesy Garlic Bread: Elevate your meal with warm, toasty bread topped with melty cheese and aromatic garlic, creating an indulgent side that your family will adore.
  • Grilled Cheese Sandwich: An all-time favorite, the gooeyness of this classic sandwich pairs well with the soup, making each bite a nostalgic delight.
  • Roasted Vegetables: A colorful platter of roasted seasonal veggies adds flavor, texture, and nutrition—perfect for enhancing the dish's vibrancy.
  • Olive Tapenade: This savory spread brings a Mediterranean twist, offering a rich and earthy contrast that enhances the veggie flavors in your Ratatouille Soup.
  • Sparkling Water with Lemon: Keep it refreshing with a bubbly drink; the citrus will uplift the flavors and cleanse the palate beautifully.
  • Fruit Tart: For a sweet finish, a light and fruity dessert echoes the flavors of summer and makes for a delightful way to end your meal.

Make Ahead Options

These Ratatouille Soup preparations are perfect for busy home cooks looking to save time! You can chop all your vegetables and refrigerate them in an airtight container up to 24 hours in advance. Additionally, feel free to prepare the soup base (excluding the fresh basil and optional crusty bread) and store it in the fridge for up to 3 days. When you're ready to serve, simply reheat the soup on the stovetop, and if it thickens too much, stir in a splash of vegetable broth to reach your desired consistency. This prepping ensures your Ratatouille Soup remains just as delicious and vibrant, making it an effortless meal option for those hectic weeknights!

How to Store and Freeze Ratatouille Soup

Fridge: Store leftover Ratatouille Soup in an airtight container for up to 4 days; this helps maintain its rich flavor and vibrant veggies.

Freezer: You can freeze the soup for up to 3 months. Allow it to cool completely before transferring it to freezer-safe containers, leaving some space for expansion.

Reheating: When ready to enjoy, thaw overnight in the fridge and reheat gently on the stovetop over medium heat until warmed through. If desired, add a splash of vegetable broth to rejuvenate the texture.

Make-Ahead Tip: Batch cooking this Ratatouille Soup is a great way to have a wholesome meal ready at a moment's notice, making weeknight dinners stress-free!

Ratatouille Soup Variations & Substitutions

Feel free to get creative and customize your Ratatouille Soup with these exciting twists that will elevate your meal.

  • Dairy-Free: Swap regular broth with coconut milk for a creamy texture while keeping it plant-based.
  • Spicy Kick: Add a pinch of red pepper flakes or some diced jalapeños for a fiery instance of flavor.

Transform your simple soup into a warming delight with just a sprinkle of heat!

  • Grain Addition: Mix in cooked quinoa or barley for a heartier soup that adds a delightful chew.
  • Seasonal Veggies: Incorporate fresh spring greens or roasted seasonal vegetables to keep things vibrant and fresh.

Mixing in seasonal produce is a fun way to celebrate what each season has to offer!

  • Herb Variations: Experiment with fresh herbs like thyme or cilantro to switch up the flavor profile.
  • Pasta Lovers: Toss in small pasta shapes or orzo for a comforting, pasta-inspired twist.

Imagine every spoonful filled with tender pasta hugging the rich tomato broth!

  • Cheesy Bliss: Stir in grated parmesan or crumbled feta for a cheesy finish that brings extra richness.
  • Creamy Indulgence: Blend in a dollop of cream cheese or crème fraîche for an irresistibly luxurious texture.

For even more comforting soup recipes, don’t miss out on trying Asparagus Soup Healthy or Zuppa Toscana Soup.

Ratatouille Soup Recipe FAQs

What type of vegetables should I use for Ratatouille Soup?
Absolutely! Fresh, vibrant vegetables are essential for this Ratatouille Soup. Aim for a mix of colorful bell peppers, zucchini, and eggplant. You can substitute based on availability or preference; for instance, yellow squash works well in place of zucchini, and mushrooms can replace eggplant for a different texture.

How long can I store Ratatouille Soup in the fridge?
Very! You can keep leftover Ratatouille Soup in an airtight container in the fridge for up to 4 days. Make sure it’s completely cooled before storing, and give it a good stir when reheating to enjoy its lively flavors again.

Can I freeze Ratatouille Soup?
Definitely! This soup freezes wonderfully for up to 3 months. To freeze, let it cool completely, then transfer to freezer-safe containers, leaving some room for expansion. When you’re ready to reheat, just thaw overnight in the fridge and warm it gently on the stovetop.

What should I do if my soup turns out too salty?
If you find your Ratatouille Soup has turned out too salty, don’t fret! You can balance the flavors by adding a splash of water or more vegetable broth to dilute it. Another quick fix is to toss in some diced raw potatoes while the soup simmers; they absorb excess salt and can be removed later.

Is Ratatouille Soup suitable for children or picky eaters?
Absolutely! This Ratatouille Soup is packed with nutrients yet is mild and flavorful, making it appealing for children and picky eaters alike. If desired, you can blend part of the soup to create a smoother texture that can be more enticing for little ones.

Can I make Ratatouille Soup ahead of time?
For sure! Making this Ratatouille Soup ahead of time is a fantastic idea. It usually gets even better as it sits and the flavors meld together. Prepare it and store it in the fridge for up to 4 days or freeze it for longer storage. Reheat it on the stove when you’re ready to serve!

Ratatouille Soup

Hearty Ratatouille Soup: Cozy Veggie Goodness Awaits

Experience the delightful comfort of Ratatouille Soup, a hearty vegetarian dish brimming with fresh flavors and nutrients.
Print Recipe Pin Recipe
Prep Time 15 minutes mins
Cook Time 1 hour hr
Total Time 1 hour hr 15 minutes mins
Servings: 4 bowls
Course: Soups
Cuisine: French
Calories: 250
Ingredients Equipment Method Nutrition Notes

Ingredients
  

For the Base
  • 2 tablespoons Olive Oil or avocado oil as a lighter alternative
  • 1 medium Onion yellow or white
  • 3 cloves Garlic minced
For the Vegetables
  • 1 medium Red Bell Pepper or any color bell pepper
  • 1 medium Yellow Bell Pepper or any variant of bell pepper
  • 1 medium Zucchini or yellow squash
  • 1 medium Eggplant or sliced mushrooms
For the Tomato Base
  • 1 can Crushed Tomatoes fresh tomatoes work beautifully when in season
  • 1 can Tomato Sauce use more crushed tomatoes if needed
  • 4 cups Vegetable Broth homemade or store-bought
For the Herbs and Seasoning
  • 1 teaspoon Dried Oregano or Italian seasoning
  • 1 teaspoon Dried Basil or fresh basil
  • 1 teaspoon Dried Thyme or herbes de Provence
  • Red Pepper Flakes optional; adjust to taste
  • Salt to taste
  • Black Pepper to taste
For Garnish and Serving
  • a handful Fresh Basil Leaves for garnish
  • to taste Crusty Bread perfect for dipping

Equipment

  • Large pot

Method
 

Step-by-Step Instructions
  1. Begin by chopping the onion and mincing the garlic. Cut the red and yellow bell peppers, zucchini, and eggplant into bite-sized pieces.
  2. In a large pot, heat olive oil over medium heat. Add the chopped onion and sauté for about 5-7 minutes until softened. Incorporate the minced garlic and cook for another minute before adding the other vegetables. Sauté until tender.
  3. Pour in crushed tomatoes and tomato sauce, followed by vegetable broth. Add dried herbs and season with salt and black pepper. Bring to a simmer and cover. Let cook for 30 minutes to 1 hour.
  4. Taste the soup and adjust seasoning. Blend for a creamier texture if desired. Serve hot, garnished with fresh basil leaves and paired with crusty bread.

Nutrition

Serving: 1bowlCalories: 250kcalCarbohydrates: 35gProtein: 5gFat: 10gSaturated Fat: 1gPolyunsaturated Fat: 2gMonounsaturated Fat: 7gSodium: 600mgPotassium: 800mgFiber: 8gSugar: 5gVitamin A: 1500IUVitamin C: 30mgCalcium: 50mgIron: 2mg

Notes

For the best flavor, allow the soup to simmer and meld together. Enjoy with crusty bread for a complete meal experience.

Tried this recipe?

Let us know how it was!

Creamy Thai Coconut Red Lentil Soup for Cozy Nights

December 23, 2025 by Grace Snow Leave a Comment

As I ladled the vibrant Thai Coconut Red Lentil Soup into my favorite bowl, the warm aroma wrapped around me like a cozy blanket on a chilly evening. This easy weeknight dinner is not just a quick fix; it transforms everyday ingredients into a nourishing feast that’s both vegan-friendly and gluten-free. Packed with protein from red lentils and the creamy goodness of coconut milk, each spoonful offers comfort and simplicity that’s hard to resist. Perfect for winding down after a long day, this soup can be easily adjusted for spice lovers or those who enjoy a milder touch. Ready to discover how this delightful recipe can brighten your dinner table? Let's dive in!

Why is this soup a must-try?

Creamy, Irresistible Bliss: The blending of coconut milk and red lentils creates a silky texture that your taste buds will adore.

Versatile Delight: Easily customize the heat level by adjusting red curry paste—perfect for family preferences!

Quick to Prepare: Ideal for busy weeknights, this comforting soup cooks in under 30 minutes.

Nutrient-Packed Goodness: With protein-rich lentils and healthy fats from coconut, you can enjoy a nourishing meal without any guilt.

Crowd-Pleasing Flavor: Whether you’re serving it to friends or family, everyone will appreciate this Thai Coconut Red Lentil Soup, making it a fantastic addition to your dinner rotation.

Thai Coconut Red Lentil Soup Ingredients

• Dive into the rich flavors of this Thai Coconut Red Lentil Soup with this simple and tasty ingredient list!

For the Soup Base

  • Red Lentils – Provides protein and a thick texture; you can substitute yellow lentils or split peas (just adjust the cooking time).
  • Coconut Milk (14 oz) – Adds creaminess and a subtle sweetness; no direct substitution recommended.
  • Vegetable Broth (4 cups) – Infuses flavor as the base of the soup; can substitute chicken broth for a non-vegan option.
  • Onion (1 medium, diced) – Adds depth of flavor; shallots can be used for a sweeter profile.
  • Garlic (2 cloves, minced) – Enhances aroma and taste; no substitutions needed.
  • Fresh Ginger (1 tbsp, minced) – Contributes a zesty bite and warmth; no substitutions needed.

For Flavoring

  • Red Curry Paste (1 tbsp) – Imparts spiciness and Thai flavor; adjust the amount for desired heat.
  • Soy Sauce (1 tbsp) – Adds umami taste and saltiness; tamari can be used for a gluten-free version.
  • Lime Juice (1 tbsp) – Brightens the flavors of the soup; lemon juice works in a pinch.
  • Olive Oil (1 tbsp) – For sautéing vegetables; coconut oil can provide an authentic Thai flavor.
  • Turmeric Powder (1 tsp) – Adds earthy notes and vibrant color; no substitutions needed.
  • Salt – Adjust to taste based on broth and sauce saltiness.

For Garnishing

  • Fresh Cilantro – For garnishing and added freshness; optional toppings include chopped peanuts and toasted coconut flakes.

Step‑by‑Step Instructions for Thai Coconut Red Lentil Soup

Step 1: Sauté Aromatics
In a medium-sized pot, heat 1 tablespoon of olive oil over medium heat. Once shimmering, add 1 medium diced onion and sauté for 3–4 minutes until it becomes translucent and fragrant. The aroma will fill your kitchen, heralding the comforting Thai Coconut Red Lentil Soup you're about to create.

Step 2: Add Garlic and Ginger
Stir in 2 minced garlic cloves and 1 tablespoon of freshly minced ginger into the pot. Cook for an additional 1–2 minutes, stirring frequently until the mixture becomes aromatic and the garlic softens, releasing its wonderful flavors. This base will add a delicious depth to your soup.

Step 3: Incorporate Spices
Next, add 1 tablespoon of red curry paste and 1 teaspoon of turmeric powder, mixing them thoroughly into the onion, garlic, and ginger mixture. Cook for about 1 minute, allowing the spices to become fragrant and blend beautifully with the aromatics. Your kitchen will be filled with a spicy warmth that promises comfort!

Step 4: Combine Base Ingredients
Add 1 cup of red lentils, 4 cups of vegetable broth, and 14 ounces of coconut milk to the pot. Stir well to combine all the ingredients, ensuring the lentils are evenly distributed. The creamy coconut milk will start to create a luscious texture for your Thai Coconut Red Lentil Soup.

Step 5: Bring to a Boil and Simmer
Increase the heat to bring the mixture to a boil. Once boiling, reduce the heat to low, cover the pot, and let it simmer for about 20 minutes. Stir occasionally and watch as the lentils cook and soften, transforming your soup into a hearty dish.

Step 6: Blend for Creaminess
After the lentils are tender, remove the pot from heat. For a smoother consistency, use an immersion blender to blend the soup until smooth, blending just until combined for a creamy texture. If you prefer chunks, skip this step to enjoy a heartier version of the Thai Coconut Red Lentil Soup.

Step 7: Season and Brighten
Stir in 1 tablespoon of soy sauce and 1 tablespoon of lime juice into the blended soup. Taste for seasoning and adjust with salt as necessary. The lime juice will brighten the flavors, making each spoonful of soup a delightful experience.

Step 8: Serve and Garnish
Pour the fragrant Thai Coconut Red Lentil Soup into bowls and garnish with fresh cilantro. You can also add optional toppings like chopped peanuts or toasted coconut flakes for added texture and flavor. Serve hot and enjoy the comforting warmth this dish brings!

Thai Coconut Red Lentil Soup Variations

Feel free to get creative with this recipe and explore exciting twists that can brighten your dinner!

  • Savory Protein Boost: Add cooked shrimp, shredded chicken, or cubed tofu just before serving for an extra protein kick.

  • Hearty Rice Addition: Serve the soup over a bed of rice for a delightful, risotto-like experience that adds substance to your meal.

  • Spicy Upgrades: Craving some heat? Incorporate extra chili paste or red pepper flakes to satisfy your spicy cravings.

  • Coconut Creaminess: For an even richer texture, swirl in a bit of coconut cream right before serving. It adds lusciousness that's completely irresistible.

  • Veggie Medley: Toss in some fresh spinach or kale towards the end of cooking for added nutrition and a pop of color.

  • Zesty Lime Variance: Experiment with different citrus by substituting lemon juice for lime—each offers a unique twist that complements the other flavors beautifully.

  • Nutty Crunch: Elevate your garnishes with toasted pumpkin seeds or chopped almonds for a delightful crunch that adds variety to each bite.

These variations will not only enhance your dish but also allow you to cater to your family's preferences. If you're ever in the mood for something different, why not try it alongside a comforting Asparagus Soup Healthy or a vibrant Santa Soup Savory? The possibilities are endless!

Expert Tips for Thai Coconut Red Lentil Soup

  • Blending Options: Use an immersion blender for a smooth texture; if you prefer a chunkier soup, simply skip this step for the Thai Coconut Red Lentil Soup.

  • Adjust for Heat: Vary the amount of red curry paste to customize spice levels. Start with less if you’re unsure and add more for a bolder flavor.

  • Avoid Sticking: When reheating, stir frequently to prevent the soup from sticking to the pot, ensuring every bite remains wonderfully smooth.

  • Broth Choices: Use low-sodium vegetable broth for a healthier option. Adjust salt according to the broth's saltiness for perfect seasoning.

  • Prep Ahead: This soup keeps well in the fridge for up to 4 days, making it a perfect make-ahead meal for busy weeks.

How to Store and Freeze Thai Coconut Red Lentil Soup

Fridge: Keep your Thai Coconut Red Lentil Soup in an airtight container for up to 4 days. Make sure it’s completely cooled before sealing to preserve freshness.

Freezer: For longer storage, freeze the soup in a sealed, freezer-safe bag or container for up to 2 months. Be sure to leave some space for expansion as the soup freezes.

Reheating: When ready to enjoy, reheat gently on the stove over low heat, stirring occasionally. If the soup thickens, add a splash of vegetable broth to restore the desired consistency.

Make-Ahead Convenience: This soup is perfect for meal prep. Cooking in advance means you can savor this comforting dish throughout the week with minimal fuss!

What to Serve with Thai Coconut Red Lentil Soup

Discover delightful pairings that elevate your meal experience!

  • Crusty Bread: Perfect for dipping, crusty bread complements the creamy texture of the soup and adds a satisfying crunch. It’s a cozy addition that makes each bite more enjoyable.

  • Steamed Bok Choy: This tender and slightly bitter green adds a fresh contrast to the richness of the soup. Lightly wilted, it enhances the vibrant flavors while introducing an eye-catching color.

  • Citrusy Quinoa Salad: A zesty quinoa salad with lime and fresh herbs provides a refreshing balance to the soup's warmth. This grain dish introduces some chew, making it a delightful contrast in texture.

  • Toasted Coconut Flakes: Sprinkle toasted coconut flakes on top for an additional layer of flavor and a crispy texture. This garnish amplifies the tropical vibes and looks gorgeous in the bowl.

  • Lime Coconut Sorbet: A refreshing dessert like lime coconut sorbet echoes the soup's flavors while cleansing the palate. It’s a light and sweet finish that leaves a lasting impression.

  • Coconut Water: Serving chilled coconut water as a drink not only pairs beautifully but also complements the tropical elements found in the soup, hydrating while enhancing the Thai culinary experience.

Make Ahead Options

This Thai Coconut Red Lentil Soup is perfect for meal prep, allowing you to enjoy comforting, homemade soup with minimal effort during your busy weeknights. You can chop the onions, garlic, and ginger up to 24 hours in advance and store them in the refrigerator to save time on cooking day. Additionally, the soup can be fully cooked and refrigerated in an airtight container for up to 4 days; just make sure to let it cool completely before sealing. For the best flavor, reheat gently on the stovetop, adding a splash of broth if the soup thickens. You'll find that prepping ahead not only saves you time but also allows the flavors to marry beautifully, making each bowl of Thai Coconut Red Lentil Soup just as delicious as when it was first made!

Thai Coconut Red Lentil Soup Recipe FAQs

What type of red lentils should I use?
Absolutely! For the best results in your Thai Coconut Red Lentil Soup, opt for standard red lentils. They cook quickly and break down to create a lovely creamy texture. If you're in a pinch, yellow lentils or split peas can work as substitutes, but adjust the cooking time as needed since they may take longer to soften.

How long can I store the soup in the fridge?
You can refrigerate your Thai Coconut Red Lentil Soup in an airtight container for up to 4 days. Make sure the soup is cooled completely before sealing it to keep it fresh and delicious. Just give it a good stir when you're ready to reheat, and enjoy!

Can I freeze the soup?
Very much so! This soup freezes beautifully for up to 2 months. To freeze, let it cool down, then ladle it into a freezer-safe container or a resealable plastic bag, leaving some space for expansion. When you're ready to enjoy it again, simply thaw in the fridge overnight, and reheat gently on the stove. If it thickens, just add a splash of vegetable broth to adjust the consistency.

What should I do if my soup is too thick after reheating?
No worries at all! If your Thai Coconut Red Lentil Soup turns out too thick after reheating, just add a little vegetable broth or water to achieve the desired consistency. Stir well and heat it gradually over low heat to prevent it from sticking to the pot. Remember, adjusting the seasoning after adding liquid is key to maintaining flavor!

Is it safe for pets or individuals with allergies?
It's always wise to consider dietary restrictions. While this soup is generally safe for most, be cautious with ingredients like soy sauce, which contains gluten. For pets, avoid feeding them any onion or garlic, as these can be harmful to dogs and cats. Always check with a healthcare provider or a vet for specific dietary concerns.

How can I adjust the soup for more or less spice?
The more the merrier! To customize the heat in your Thai Coconut Red Lentil Soup, simply adjust the amount of red curry paste. Start with the recommended tablespoon, taste, and add more if desired. If you prefer a milder flavor, you can reduce it significantly. Adding a bit of lime juice near the end also helps brighten flavors without increasing the spice level. Enjoy making it your own!

Thai Coconut Red Lentil Soup

Creamy Thai Coconut Red Lentil Soup for Cozy Nights

This Thai Coconut Red Lentil Soup is a creamy, comforting dish perfect for busy weeknights, packed with protein and vegan-friendly ingredients.
Print Recipe Pin Recipe
Prep Time 10 minutes mins
Cook Time 20 minutes mins
Total Time 30 minutes mins
Servings: 4 bowls
Course: Soups
Cuisine: Thai
Calories: 300
Ingredients Equipment Method Nutrition Notes

Ingredients
  

For the Soup Base
  • 1 cup Red Lentils Can substitute yellow lentils or split peas.
  • 14 oz Coconut Milk No direct substitution recommended.
  • 4 cups Vegetable Broth Can substitute chicken broth for a non-vegan option.
  • 1 medium Onion, diced Shallots can be used for a sweeter profile.
  • 2 cloves Garlic, minced No substitutions needed.
  • 1 tbsp Fresh Ginger, minced No substitutions needed.
For Flavoring
  • 1 tbsp Red Curry Paste Adjust for desired heat.
  • 1 tbsp Soy Sauce Tamari can be used for a gluten-free version.
  • 1 tbsp Lime Juice Lemon juice works in a pinch.
  • 1 tbsp Olive Oil Coconut oil can provide an authentic Thai flavor.
  • 1 tsp Turmeric Powder No substitutions needed.
  • Salt Adjust to taste.
For Garnishing
  • Fresh Cilantro Optional toppings include chopped peanuts and toasted coconut flakes.

Equipment

  • medium-sized pot
  • Immersion blender

Method
 

Step‑by‑Step Instructions
  1. In a medium-sized pot, heat 1 tablespoon of olive oil over medium heat. Add 1 medium diced onion and sauté for 3–4 minutes until translucent.
  2. Stir in 2 minced garlic cloves and 1 tablespoon of freshly minced ginger. Cook for an additional 1–2 minutes until aromatic.
  3. Add 1 tablespoon of red curry paste and 1 teaspoon of turmeric powder, mixing them into the aromatics. Cook for about 1 minute.
  4. Add 1 cup of red lentils, 4 cups of vegetable broth, and 14 ounces of coconut milk. Stir well to combine all ingredients.
  5. Increase heat to bring the mixture to a boil. Once boiling, reduce heat to low, cover, and let simmer for about 20 minutes.
  6. Remove from heat and use an immersion blender to blend until smooth, or leave chunky if preferred.
  7. Stir in 1 tablespoon of soy sauce and 1 tablespoon of lime juice. Adjust seasoning with salt as necessary.
  8. Pour into bowls and garnish with fresh cilantro and optional toppings like chopped peanuts or toasted coconut flakes.

Nutrition

Serving: 1bowlCalories: 300kcalCarbohydrates: 45gProtein: 12gFat: 10gSaturated Fat: 7gPolyunsaturated Fat: 1gMonounsaturated Fat: 2gSodium: 800mgPotassium: 600mgFiber: 15gSugar: 3gVitamin A: 200IUVitamin C: 5mgCalcium: 50mgIron: 3mg

Notes

This soup keeps well in the fridge for up to 4 days and can be frozen for up to 2 months.

Tried this recipe?

Let us know how it was!

Hearty Country French Garlic Soup That's Comfort in a Bowl

December 23, 2025 by Grace Snow Leave a Comment

As the wind howls outside, I crave something that wraps me in warmth and comfort like a cozy blanket. Enter my velvety Country French Garlic Soup, a delightful gem from the quaint village of Lautrec. This dish transforms simple garlic and broth into a luxurious embrace, thickened with a surprising twist—mayonnaise! Not only does it provide a smooth, creamy texture, but it also stands out as a simple, healthy option to chase away the winter blues. Whipping up this Mediterranean delight is an effortless way to impress your loved ones with minimal fuss. The best part? You can customize it with your favorite ingredients or variations, making it uniquely yours. Are you ready to explore this comforting masterpiece together?

Why Is This Soup So Special?

Velvety texture: The use of mayonnaise adds an unexpected creaminess that elevates simple broth into a luxurious experience.
Easy to make: With just a few basic ingredients, this soup requires minimal effort, making it perfect for any home cook.
Flavor-packed: Infused with garlic and fresh sage, each spoonful delivers a savory burst that warms the heart on chilly days.
Versatile options: Whether adding sautéed vegetables or a poached egg, there's room to customize this dish to suit your taste.
Crowd-pleaser: Serve this soup to family or friends, and you'll see smiles all around—it's the ultimate comfort in a bowl! If you’re looking for something equally warming, try pairing it with this Cheesy Garlic Bread for a delightful meal.

Country French Garlic Soup Ingredients

• Dive into this comforting masterpiece!

For the Soup Base

  • Chicken Stock – This flavorful base adds depth; swap for vegetable broth if you prefer a vegetarian option.
  • Fresh Sage – Provides an aromatic touch; thyme or parsley can be good substitutes.
  • Garlic – The star of this dish, offering warmth and health benefits; Lautrec pink garlic is ideal for its mild flavor.

For the Mayonnaise

  • Mayonnaise – This unique thickener gives a creamy texture to the soup and can be homemade or store-bought.
  • Olive Oil – Adds richness and is essential in making mayonnaise; feel free to use other vegetable oils if you’d like.
  • Egg – Needed for creating mayonnaise, ensuring a smooth emulsion throughout the soup.
  • Dijon Mustard – Adds a zesty flavor to the mayonnaise; other mustards can work too, depending on your preference.
  • Salt – Essential for seasoning; adjust to your taste for the perfect balance.

Enjoy making your Country French Garlic Soup!

Step‑by‑Step Instructions for Country French Garlic Soup

Step 1: Prep Ingredients
Start by heating 4 cups of chicken stock in a Dutch oven over medium heat. Add 4 sprigs of fresh sage, stirring gently to infuse the flavors into the broth. Allow it to warm for about 5-7 minutes until fragrant, but don’t let it boil. This forms a delicious base for your Country French Garlic Soup.

Step 2: Cook Garlic
While the stock simmers, peel and prepare 10 cloves of garlic. Bring a small pot of water to a boil and add the garlic cloves. Cook them for 3-4 minutes until soft, then drain the water. Use a fork or potato masher to smash the garlic until it reaches a smooth consistency, releasing its aromatic essence.

Step 3: Combine
Once your garlic is ready, stir it into the simmering chicken stock. Allow the mixture to gently simmer for about 10 minutes, letting the garlic flavor meld into the broth. You should see bubbles rising occasionally, signaling that the soup is nearing perfection. This flavorful combination is essential for a comforting bowl of Country French Garlic Soup.

Step 4: Make Mayonnaise
In a small jar, add 1 egg yolk, 1 tablespoon of Dijon mustard, and a pinch of salt. Using an immersion blender, blend these ingredients while slowly drizzling in 1 cup of olive oil. Blend until the mixture thickens into a creamy mayonnaise. If needed, you can adjust it by adding a bit of the reserved egg white for a lighter texture.

Step 5: Strain Soup (optional)
For a luxurious, velvety texture, consider straining your soup. Use a fine mesh strainer to separate the solids from the broth, pressing down gently to extract maximum flavor. This step is optional; you may want to keep some texture for a rustic feel. Either way, your Country French Garlic Soup will still be deliciously comforting.

Step 6: Incorporate Mayonnaise
Temper your freshly made mayonnaise by whisking in a few spoonfuls of the hot soup, gradually increasing the mixture’s temperature. Once combined, pour the mayonnaise back into the pot of soup while stirring gently. Heat the soup on low, ensuring it doesn't boil to prevent curdling. Watch as it transforms into a creamy, flavorful masterpiece.

Step 7: Serve
Ladle your rich and inviting Country French Garlic Soup into bowls and garnish with croutons for added crunch, a drizzle of olive oil for a touch of richness, and a sprinkle of freshly chopped parsley for color. This not only enhances the presentation but adds freshness to each spoonful, making your soup a delightful warming dish.

How to Store and Freeze Country French Garlic Soup

Fridge: Store your soup in an airtight container in the fridge for up to 3 days. Reheat gently over medium heat, stirring frequently to maintain the creamy texture.

Freezer: Pour the cooled soup into freezer-safe containers, leaving space for expansion. It can be frozen for up to 3 months. Thaw in the fridge overnight before reheating.

Reheating: For the best taste, reheat on the stovetop over low heat to prevent curdling. Stir in a splash of broth or water if the soup thickens too much after freezing.

Room Temperature: Avoid leaving the soup out at room temperature for more than 2 hours to maintain freshness and safety.

Country French Garlic Soup Variations

Feel free to elevate your soup experience with these imaginative twists that invite you to personalize each bowl just how you like it!

  • Add Protein: Stir in shredded rotisserie chicken for a heartier meal or diced tofu for a vegetarian boost.
    Combining quality protein not only enhances the soup but also keeps you feeling full and satisfied for longer.

  • Sautéed Veggies: Toss in sautéed leeks or fennel to add a sweet, aromatic depth that pairs beautifully with garlic.
    This delightful addition not only enriches the flavor but also adds texture and nutrition to your comforting dish.

  • Spicy Kick: For those craving heat, mix in a pinch of red pepper flakes or a splash of hot sauce.
    Just a small hint of spice can awaken your taste buds and create a wonderful contrast to the creamy texture of the soup.

  • Creamy Twist: Substitute half of the mayonnaise with Greek yogurt for a tangy flavor and added creaminess.
    This tweak balances richness with a delightful zing while also giving you a protein boost.

  • Earthy Greens: Fold in fresh spinach or kale just before serving for a pop of color and nutrition.
    These vibrant greens not only brighten the dish visually but also add a fresh element that complements the warmth of the soup.

  • Smoky Flavor: Roast your garlic instead of boiling to infuse the soup with a deeper, smoky flavor profile.
    You’ll be amazed at how this simple switch enhances the overall taste, transforming your soup into something uniquely comforting.

  • Carb Addition: Mix in cooked rice or quinoa for a filling, wholesome meal that offers a delightful texture.
    This hearty addition enriches the soup while providing a satisfying way to round out your dining experience!

For an equally cozy pairing, consider serving your soup with a slice of Cheesy Garlic Bread or indulging in a warm bowl of Zuppa Toscana Soup alongside it. Enjoy customizing your Country French Garlic Soup!

Make Ahead Options

These Country French Garlic Soup preparations are ideal for busy weeknights and meal planning! You can make the soup base (steps 1-3) and refrigerate it for up to 3 days; just store it in an airtight container to keep flavors intact. If you prefer, you can also make the mayonnaise (step 4) ahead of time and store it separately in the fridge for up to 2 days. When you're ready to serve, simply reheat the soup gently in a pot, then incorporate the mayonnaise (step 6) without boiling to maintain that velvety texture. By prepping these components in advance, you’ll have a comforting, homemade meal with far less fuss.

Expert Tips for Country French Garlic Soup

  • Quality Stock Matters: Use homemade or high-quality chicken stock for the best flavor. A poor stock can lead to a bland soup, so avoid budget brands.

  • Control Garlic Intensity: If sensitive to garlic, reduce the cloves used. You can also roast the garlic instead of boiling for a milder, sweeter flavor.

  • Mayonnaise Technique: Whisk your mayonnaise gently when incorporating it into the soup. Avoid boiling after adding the mayonnaise to prevent curdling, ensuring a smooth consistency.

  • Optional Straining: Consider straining the soup for a silkier texture if desired. If you prefer a heartier feel, leave it unstrained for more character in your Country French Garlic Soup.

  • Season Gradually: Taste as you go and season with salt and pepper gradually. This way, you can achieve the perfect balance without overpowering the delicate flavors of the soup.

What to Serve with Country French Garlic Soup

Cozy up and create a delightful meal experience with these mouthwatering accompaniments.

  • Crusty Baguette: Perfect for dipping, the crunchy exterior and soft interior provide a wonderful contrast to the creamy soup. Slice generously and serve warm, fresh from the oven, for an irresistible addition.
  • Simple Green Salad: A light salad with mixed greens and a lemon vinaigrette adds a refreshing touch. The acidity cleanses the palate, balancing the rich flavors of the soup beautifully. A sprinkle of nuts or cheese can elevate this pairing.
  • Sautéed Greens: Flash-cooked spinach or kale sautéed with garlic complements the soup's flavors while adding nutritious elements. The vibrant green color and slight bitterness provide an enticing flavor variation that excites the taste buds.
  • Cheese Board: A selection of soft cheeses such as Brie, goat cheese, or blue cheese brings depth to the meal. Pair it with fresh fruit and crackers for a delightful contrast, inviting bites that delight the senses.
  • Herbed Croutons: Homemade croutons sprinkled with Italian herbs add texture and a burst of flavor. Just a handful on top of the soup enhances the overall experience, turning a simple dish into something special.
  • Chardonnay: A glass of chilled Chardonnay perfectly complements the delicate garlic notes of the soup. Its crispness and subtle fruit flavors create a harmonious balance that elevates your dining experience.

Country French Garlic Soup Recipe FAQs

What type of garlic should I use?
I recommend using Lautrec pink garlic for its milder flavor, but you can use any variety available. If you're sensitive to garlic, consider reducing the number of cloves or roasting them first for a sweeter taste.

How do I store leftover Country French Garlic Soup?
Store your soup in an airtight container in the fridge for up to 3 days. When reheating, do so gently over medium heat while stirring frequently to maintain that creamy texture.

Can I freeze Country French Garlic Soup?
Absolutely! Let the soup cool completely, then pour it into freezer-safe containers, leaving some space for expansion. It can be frozen for up to 3 months. To use, thaw in the fridge overnight and reheat on the stovetop over low heat to prevent curdling.

What’s the best way to reheat frozen soup?
I suggest reheating it on the stovetop over low heat, stirring occasionally to ensure even warming. If the soup thickens too much after freezing, add a splash of broth or water to adjust the consistency.

Are there any dietary considerations I should keep in mind?
Certainly! This soup contains eggs and mayonnaise, so it's not suitable for vegans or those with egg allergies. For a vegan alternative, you can use a plant-based mayonnaise and vegetable broth. Always adjust ingredients according to dietary restrictions and preferences.

Can I add other vegetables to the soup?
The more, the merrier! You can easily incorporate shredded rotisserie chicken, sautéed leeks, or even leafy greens like spinach or kale to enhance the nutrition and flavor.

Country French Garlic Soup

Hearty Country French Garlic Soup That's Comfort in a Bowl

Prepare a comforting bowl of Country French Garlic Soup filled with garlic and chicken stock for a warming experience.
Print Recipe Pin Recipe
Prep Time 15 minutes mins
Cook Time 30 minutes mins
Total Time 45 minutes mins
Servings: 4 bowls
Course: Soups
Cuisine: French
Calories: 250
Ingredients Equipment Method Nutrition Notes

Ingredients
  

For the Soup Base
  • 4 cups chicken stock or vegetable broth for vegetarian option
  • 4 sprigs fresh sage or thyme/parsley as substitutes
  • 10 cloves garlic Lautrec pink garlic is ideal
For the Mayonnaise
  • 1 cup mayonnaise homemade or store-bought
  • 1 cup olive oil or other vegetable oils
  • 1 unit egg for making mayonnaise
  • 1 tablespoon Dijon mustard or other mustards to taste
  • to taste salt for seasoning

Equipment

  • Dutch oven
  • small pot
  • Immersion blender
  • fine mesh strainer

Method
 

Step-by-Step Instructions
  1. Start by heating 4 cups of chicken stock in a Dutch oven over medium heat. Add 4 sprigs of fresh sage, stirring gently.
  2. Peel and prepare 10 cloves of garlic. Boil them in a small pot for 3-4 minutes until soft.
  3. Stir the smashed garlic into the simmering chicken stock and let it simmer for about 10 minutes.
  4. In a small jar, combine 1 egg yolk, 1 tablespoon of Dijon mustard, and a pinch of salt, then blend while drizzling in 1 cup of olive oil.
  5. Strain the soup through a fine mesh strainer if desired for a velvety texture.
  6. Whisk in a few spoonfuls of the hot soup into the mayonnaise, then pour it back into the pot of soup while stirring gently.
  7. Ladle the soup into bowls and garnish with croutons, a drizzle of olive oil, and parsley.

Nutrition

Serving: 1bowlCalories: 250kcalCarbohydrates: 12gProtein: 6gFat: 20gSaturated Fat: 3gPolyunsaturated Fat: 2gMonounsaturated Fat: 15gCholesterol: 35mgSodium: 800mgPotassium: 300mgFiber: 1gSugar: 1gVitamin A: 100IUVitamin C: 5mgCalcium: 20mgIron: 2mg

Notes

Store soup in an airtight container in the fridge for up to 3 days or freeze for up to 3 months. Reheat gently to maintain texture.

Tried this recipe?

Let us know how it was!

Aromatic Ginger Scallion Chicken Noodle Soup Bliss

December 23, 2025 by Grace Snow Leave a Comment

On a chilly evening, the aroma wafting from my kitchen held the promise of comfort — a steaming pot of Ginger Scallion Chicken Noodle Soup was on the horizon. This recipe elevates the classic chicken noodle soup into an aromatic masterpiece, blending the warm notes of fresh ginger and garlic to create a broth bursting with depth. It’s not just quick and easy to whip up; it’s also wonderfully adaptable, inviting you to toss in extra veggies or proteins to suit your family's preferences. With tender chicken and nestled noodles embraced by a savory hug of spices, this dish becomes the ultimate weeknight pick-me-up that feels special. Are you ready to discover the magic behind this delicious bowl of joy?

Why is this soup a must-try?

Comforting warmth: This soup embodies the essence of home-cooked comfort food, perfect for cozy nights.
Simple & quick: With just a few ingredients, you can whip up this delicious soup in no time, ideal for busy weeknights.
Flavor explosion: The bold flavors of ginger and garlic create a broth that tantalizes your taste buds, making each spoonful a delight.
Versatile base: Feel free to customize your soup by adding your favorite vegetables or proteins, just like with our Chicken Teriyaki Noodles or Crock Pot Chicken.
Great for sharing: Perfect for family dinners or gatherings, everyone will love this heartwarming dish!
Healthy goodness: Packed with fresh ingredients, it’s a nourishing choice for any meal.

Ginger Scallion Chicken Noodle Soup Ingredients

• The comforting blend of flavors awaits!

For the Soup

  • Boneless Skinless Chicken Thighs – Best for a tender, juicy texture; can substitute chicken breasts but must monitor for overcooking.
  • Garlic (6 cloves, thinly sliced) – Adds depth and aroma; essential to the flavor profile and cannot substitute without losing characteristic taste.
  • Ginger (3 inches, peeled and finely chopped) – Provides warmth and tang; fresh ginger is preferred but powdered can be used, altering flavor.
  • Scallions (1 bundle, divided) – Introduces freshness; divide between white parts for cooking and green parts for garnish.
  • Kosher Salt (4 tsp) – Enhances all flavors; adjust according to taste, especially if using broth that is already salted.
  • Black or White Pepper – Adds mild heat; to taste based on preference.
  • Water (10 cups) – Forms the soup base; can use chicken broth for extra flavor.
  • Dried Ramen or Curly Noodles (8 oz) – Provides carbohydrate base; other noodles can be used, adjust cook time based on package instructions.
  • Carrot (1 cup, cut into thin matchsticks) – Offers sweetness and texture; can substitute with other vegetables like bok choy for added nutrition.
  • Black Rice Vinegar (1/4 cup) – Adds tartness; substitute with rice vinegar or white wine vinegar, adjusting to taste.
  • Soy Sauce (1/4 cup) – Provides umami and seasoning; opt for low-sodium if desired.
  • Toasted Sesame Oil (2 tbsp) – Adds a nutty flavor; optional but highly recommended for depth.
  • Crispy Chili Oil – Enhances heat and flavor; add to taste for spice lovers, or omit for a milder soup.

Enjoy each delightful ingredient in your Ginger Scallion Chicken Noodle Soup experience!

Step‑by‑Step Instructions for Ginger Scallion Chicken Noodle Soup

Step 1: Prepare the Base
In a large pot, combine boneless skinless chicken thighs, thinly sliced garlic, finely chopped ginger, white parts of the scallions, kosher salt, black or white pepper, and 10 cups of water. Heat the mixture over high heat until it reaches a rolling boil, then reduce the heat to medium-low. Allow the soup to simmer uncovered for about 15 minutes, until the chicken is tender and the broth is fragrant.

Step 2: Make the Sauce
While the soup is simmering, take a small bowl and whisk together 1/4 cup of black rice vinegar, 1/4 cup of soy sauce, and 2 tablespoons of toasted sesame oil. This flavorful sauce will add depth to your Ginger Scallion Chicken Noodle Soup. Set aside, allowing the flavors to blend while the chicken continues to cook.

Step 3: Shred the Chicken
Once the chicken is cooked through and tender, carefully remove it from the pot using tongs or a slotted spoon. Place the chicken on a cutting board and allow it to cool slightly. After a few minutes, shred the chicken into bite-sized pieces using two forks, ensuring it remains saucy and flavorful for the soup.

Step 4: Cook the Noodles
Bring the soup back up to a gentle boil on medium-high heat, then add 8 ounces of dried ramen or curly noodles along with 1 cup of thin matchstick-cut carrots. Cook according to the noodle package instructions, generally about 3-4 minutes, until the noodles are tender but still firm, adding a colorful sweetness to your Ginger Scallion Chicken Noodle Soup.

Step 5: Combine and Heat
After the noodles have finished cooking, stir the shredded chicken back into the pot. Mix everything together thoroughly, ensuring the chicken is heated through. Allow it to warm for an additional minute, ensuring the flavors meld beautifully, creating the ultimate comforting bowl of soup.

Step 6: Serve and Garnish
Ladle the warm soup into bowls, then finish with a sprinkle of the reserved green parts of the scallions for a fresh, vibrant touch. Drizzle the prepared sauce over each serving, allowing the flavors to shine through, and personalize with crispy chili oil to taste for an extra kick in your Ginger Scallion Chicken Noodle Soup.

Storage Tips for Ginger Scallion Chicken Noodle Soup

Fridge: Store leftover soup in an airtight container for up to 4 days. To maintain the best noodle texture, keep noodles separate until you're ready to reheat.

Freezer: Freeze the broth and shredded chicken in airtight containers for up to 3 months. Cook fresh noodles when you're ready to enjoy the soup again.

Reheating: To reheat, thaw frozen broth and chicken overnight in the refrigerator. Heat in a pot over medium heat, adding fresh noodles and any additional veggies until warmed through.

Expert Tips for Ginger Scallion Chicken Noodle Soup

  • Don’t Rush the Chicken: Ensure the chicken is cooked through but not overdone; check for doneness early to maintain tenderness.

  • Noodle Timing: Avoid mushy noodles by adding them only when the broth is boiling; consider cooking noodles separately if you prefer a firmer texture.

  • Aromatic Boost: Sauté garlic and ginger briefly before adding liquid to achieve a depth of flavor; be careful not to let garlic burn, as it can turn bitter.

  • Fresh Scallion Finish: Reserve the green parts of the scallions until serving to keep their crunch and vibrant color in your Ginger Scallion Chicken Noodle Soup.

  • Customize Wisely: Feel free to add more vegetables or proteins; just remember to adjust the cooking times based on what you choose for best results.

  • Spice Control: Start with a small amount of crispy chili oil for heat; you can always add more if you desire a spicier kick in your soup!

Make Ahead Options

These Aromatic Ginger Scallion Chicken Noodle Soup meal prep tips will save you valuable time during your busy week! You can prepare the soup base (chicken, garlic, ginger, scallion whites, and broth) up to 24 hours in advance and refrigerate it in an airtight container to maintain its flavor. To prevent the noodles from becoming soggy, cook them separately right before serving. Simply reheat the soup on the stove, add freshly cooked noodles and carrot matchsticks, and stir in the shredded chicken. For the best quality, reserve the scallion greens and crispy chili oil to sprinkle on top just before serving. Enjoy a warm bowl of comfort, effortlessly!

Variations & Substitutions for Ginger Scallion Chicken Noodle Soup

Feel free to let your creativity shine by customizing this delightful soup to suit your tastes!

  • Extra Greens: Add baby bok choy for additional greens. This not only boosts nutrition but also enhances the texture.

  • Protein Swap: Substitute frozen shrimp or firm tofu for the chicken. This opens up a world of flavor while keeping it family-friendly.

  • Spicy Twist: Increase the amount of crispy chili oil for that extra heat. A little goes a long way, but adjust to your spice tolerance!

  • Vegetable Medley: Incorporate other veggies like Napa cabbage or snap peas for extra nutrition. Each bite becomes a colorful adventure!

  • Noodle Variety: Instead of ramen, try soba or udon noodles for a different texture. Each noodle type brings its own unique personality to the soup.

  • Vinegar Options: Use rice vinegar or apple cider vinegar in place of black rice vinegar. Each will lend a distinct flavor while keeping the essence intact.

  • Herbal Boost: Fresh herbs like cilantro or basil can be added just before serving for an aromatic lift. A sprinkle of green can brighten an already flavorful dish!

  • Umami Enhancement: If you love umami, try adding a tablespoon of miso paste into your broth. This can deepen the flavor, making every spoonful rich and satisfying.

Get inspired and mix and match these ideas! And when you’re ready to explore more comforting chicken dishes, don’t forget to check out my Chicken Adobo Again or Spatchcock Chicken Flavor. Happy cooking!

What to Serve with Aromatic Ginger Scallion Chicken Noodle Soup

Set the stage for a comforting meal that highlights the rich, aromatic flavors of your soup while adding delightful contrasts.

  • Steamed Dumplings: Their soft, pillowy texture and savory filling complement the warmth of the soup beautifully.

  • Crispy Spring Rolls: The crunch of crispy vegetables contrasts perfectly with the tender noodles, adding an enjoyable texture balance.

  • Fresh Cucumber Salad: A bright and refreshing side that cuts through the richness of the broth, making each bite feel light and vibrant.

  • Garlic Bread: The buttery, toasted notes of garlic and herbs create a delicious pairing with the soup's savory elements.

  • Pickled Vegetables: Adding a tangy crunch, these are perfect for those who crave additional flavors and textures in each bite.

  • Chili Oil Drizzle: Elevate your soup by serving a small bowl of spicy chili oil on the side for those who like an extra kick.

Don’t shy away from blending these options together — they harmonize beautifully with the cozy embrace of your Ginger Scallion Chicken Noodle Soup!

Ginger Scallion Chicken Noodle Soup Recipe FAQs

What is the best way to choose fresh ginger for this recipe?
Absolutely! When selecting ginger, look for firm roots with smooth, unblemished skin. Avoid any that have dark spots or are shriveled. Fresh ginger should smell fragrant and spicy. You can even lightly press the skin; it should feel solid and not easily indented.

How should I store leftover Ginger Scallion Chicken Noodle Soup?
Leftovers should be stored in an airtight container in the fridge, where they can stay fresh for up to 4 days. To keep the noodles from absorbing too much broth and becoming mushy, it's best to store them separately. Simply reheat your soup on the stove over medium heat until warmed through, adding the noodles back in freshly cooked if needed.

Can I freeze this soup, and if so, how?
Yes! You can freeze the broth and shredded chicken separately for up to 3 months in airtight containers. When you're ready to enjoy the soup again, thaw the containers in the fridge overnight. To reheat, place the broth in a pot over medium heat, bring to a simmer, and add fresh noodles along with any vegetables you choose! This way, your noodles will retain their perfect texture.

What if my chicken turns out dry when cooking?
To ensure your chicken stays juicy, be sure not to overcook it, as this can lead to dryness. Check for doneness early, especially if you're using thin pieces. The ideal internal temperature for fully cooked chicken thighs is 165°F (75°C). If you do find yourself with overcooked chicken, consider shredding it finely and stirring it back into the broth to help it reabsorb some moisture.

Are there any dietary considerations for this soup?
Yes, if you or anyone you're serving has allergies, it’s essential to keep an eye on the ingredients. For a gluten-free option, use gluten-free soy sauce, and substitute the noodles with a gluten-free alternative, such as rice noodles. Additionally, if preparing for pets, always take out any onions and garlic, as they're not safe for most pets.

Can I customize the vegetables in this soup? What are some suggestions?
Very much so! This recipe is wonderfully adaptable. You can add vegetables like bok choy, bell peppers, or even baby spinach for added nutrition. To incorporate these, simply add them during the last few minutes of cooking to keep them vibrant and crisp. Enjoy experimenting with different textures and flavors!

Ginger Scallion Chicken Noodle Soup

Aromatic Ginger Scallion Chicken Noodle Soup Bliss

This Ginger Scallion Chicken Noodle Soup elevates comfort food with its aromatic blend of ginger and garlic, creating a nourishing dish perfect for any family meal.
Print Recipe Pin Recipe
Prep Time 10 minutes mins
Cook Time 30 minutes mins
Total Time 40 minutes mins
Servings: 4 bowls
Course: Soups
Cuisine: Asian
Calories: 350
Ingredients Equipment Method Nutrition Notes

Ingredients
  

For the Soup
  • 1 lbs Boneless Skinless Chicken Thighs Best for a tender, juicy texture.
  • 6 cloves Garlic Thinly sliced; essential for flavor.
  • 3 inches Ginger Peeled and finely chopped; fresh preferred.
  • 1 bundle Scallions Divided; use white parts for cooking.
  • 4 tsp Kosher Salt Enhances all flavors; adjust to taste.
  • Black or White Pepper Add to taste based on preference.
  • 10 cups Water Forms the soup base.
  • 8 oz Dried Ramen or Curly Noodles Other noodles can be used.
  • 1 cup Carrot Cut into thin matchsticks; offers sweetness.
  • 1/4 cup Black Rice Vinegar Adds tartness; adjust to taste.
  • 1/4 cup Soy Sauce Provides umami; low-sodium optional.
  • 2 tbsp Toasted Sesame Oil Adds nutty flavor; highly recommended.
  • Crispy Chili Oil To taste for extra heat; optional.

Equipment

  • Large pot

Method
 

Step-by-Step Instructions
  1. In a large pot, combine chicken thighs, garlic, ginger, white scallion parts, salt, pepper, and water. Bring to a boil, then simmer for about 15 minutes until chicken is tender.
  2. While simmering, whisk together black rice vinegar, soy sauce, and sesame oil in a small bowl. Set aside.
  3. Remove cooked chicken from pot, shred into bite-sized pieces, and set aside.
  4. Bring soup back to a boil, add noodles and carrots. Cook according to package instructions, about 3-4 minutes.
  5. Stir shredded chicken back into the pot and warm through for an additional minute.
  6. Ladle soup into bowls, garnish with the reserved green scallion parts, drizzle with sauce, and add crispy chili oil if desired.

Nutrition

Serving: 1bowlCalories: 350kcalCarbohydrates: 40gProtein: 30gFat: 10gSaturated Fat: 1gPolyunsaturated Fat: 0.5gMonounsaturated Fat: 2gCholesterol: 80mgSodium: 1200mgPotassium: 600mgFiber: 3gSugar: 2gVitamin A: 2000IUVitamin C: 5mgCalcium: 50mgIron: 2mg

Notes

Customize by adding extra vegetables or proteins as desired. Store leftovers in an airtight container for up to 4 days.

Tried this recipe?

Let us know how it was!

Hangover Cure Garlic Potato Soup That's Pure Comfort

December 23, 2025 by Grace Snow Leave a Comment

As I stirred the pot, the heavenly aroma of roasted garlic filled my kitchen, wrapping around me like a cozy blanket. This Healing Garlic Potato Soup is my go-to remedy for those days when I want something soulful and comforting. It’s perfect for anyone who’s recovering from a night out or simply needs a warm hug in a bowl. Packed with creamy potatoes and a delightful garlic punch, this soup comes together in just under 30 minutes, making it not only a breeze to prepare but also a hearty feast that’s vegetarian-friendly. Whether you're fighting off a hangover or feeling a bit under the weather, this dish promises to soothe and nourish. What’s your favorite way to enjoy comforting soups?

Why is Garlic Potato Soup a Must-Try?

Comforting Warmth: This soothing soup envelops you in a cozy embrace with its thick, creamy texture, perfect for chilly nights or recovery days.

Quick & Easy: In under 30 minutes, you’ll have a nourishing dish that’s simple enough for any home cook to master.

Loaded with Flavor: The robust garlic adds a punch, balancing beautifully with the creamy potatoes for a delightful taste experience.

Vegetarian-Friendly: It caters to everyone, making it a fantastic option for those avoiding meat but still craving comfort.

Pair it with warm crusty bread or a light salad to elevate your meal. You might also love serving it alongside a hearty dish like Honey Garlic Chicken for a delightful dinner.

Hangover Cure Garlic Potato Soup Ingredients

For the Soup Base

  • Starchy Potatoes (Russets or Idaho) – These provide the creamy texture you crave in a comforting soup; avoid waxy potatoes for best results.
  • Onion – Adds a natural sweetness and depth of flavor; you can swap in shallots for a milder note.
  • Fresh Garlic – The star of this recipe! Roast it for a deeper, sweeter flavor; garlic powder works in a pinch if fresh isn’t available.
  • Vegetable Broth – Serves as the nourishing liquid base; feel free to use chicken broth for a non-vegetarian twist.

For Cooking and Flavor

  • Olive Oil – Perfect for sautéing and adding richness; butter can be used for a different and delightful flavor profile.
  • Salt & Pepper – Essential for enhancing the soup's flavor; season to your taste.

For the Finishing Touch

  • Fresh Parsley – Adds a pop of color and brightness to your soup; chives can also provide a lovely alternative garnish.

With these ingredients, this Hangover Cure Garlic Potato Soup is just a delicious whisk away from your kitchen! Now, let’s dive into the bliss of preparation and experience the joy of home-cooked comfort food.

Step‑by‑Step Instructions for Hangover Cure Garlic Potato Soup

Step 1: Prepare Ingredients
Begin by peeling and cutting the starchy potatoes into 1-inch chunks, ensuring uniformity for even cooking. Next, dice one onion into small pieces and mince several cloves of fresh garlic. Lay everything out on your countertop, as having your ingredients prepped will streamline the process of making your Hangover Cure Garlic Potato Soup.

Step 2: Sauté Aromatics
In a large pot, heat a tablespoon of olive oil over medium heat. Once the oil glistens, add the diced onion and cook for about 8 minutes until it softens and becomes translucent, stirring occasionally to prevent burning. Then, add the minced garlic along with ½ teaspoon of salt, and sauté for an additional minute until fragrant, creating a flavorful base for your soup.

Step 3: Cook Potatoes
Pour in about 4 cups of vegetable broth and add the prepared potato chunks to the pot. Increase the heat and bring the mixture to a rolling boil, then reduce the heat to a simmer. Cover the pot and let it cook for approximately 15-20 minutes, or until the potatoes are tender and can be easily pierced with a fork, adding a comforting heartiness to your Hangover Cure Garlic Potato Soup.

Step 4: Incorporate Roasted Garlic
If you've roasted garlic in advance, it’s time to fold it into the mixture! Gently add the roasted garlic cloves to the pot, making sure to mash some of the soft potatoes against the side of the pot for added creaminess. For a smoother texture, consider blending half of the soup with an immersion blender, creating balance in your soup’s consistency.

Step 5: Season & Serve
Taste your Hangover Cure Garlic Potato Soup and adjust the seasoning with additional salt and pepper based on your preference. Once it’s perfectly seasoned, ladle the soup into warm bowls and garnish with fresh parsley, which adds a vibrant touch. Serve immediately, perhaps alongside crusty bread, for an extra comforting experience that’s sure to lift your spirits.

Expert Tips for Hangover Cure Garlic Potato Soup

  • Uniform Cuts: Ensure you cut the potatoes into even 1-inch chunks to avoid uneven cooking and achieve that perfect creamy texture in your soup.

  • Low and Slow: Sauté the onion and garlic over low heat. This prevents bitterness and allows their natural sweetness to develop, creating a more flavorful Hangover Cure Garlic Potato Soup.

  • Roasted Garlic Magic: If you roast your garlic ahead of time, it adds an incredible depth of flavor. Consider making extra to keep on hand for future recipes!

  • Blend Wisely: Decide between a chunky or smooth texture before blending. Puréeing all the soup creates a creamy consistency, while leaving some potatoes whole provides heartiness.

  • Taste Test: Always taste and adjust the seasoning near the end. A bit more salt or pepper can elevate flavors, ensuring your Hangover Cure Garlic Potato Soup is perfectly balanced.

Storage Tips for Hangover Cure Garlic Potato Soup

  • Fridge: Store the soup in an airtight container for up to 5 days. The flavors deepen over time, making it a perfect option for meal prep.

  • Freezer: You can freeze portions of the soup for up to 3 months. Be sure to leave some space in the container for expansion and add a splash of broth or water when reheating to maintain the creamy consistency.

  • Reheating: When ready to enjoy, gently reheat on the stove over low heat, stirring frequently. If it has thickened, add a little water or broth to reach your desired consistency.

  • Serving Suggestions: Revive the soup with fresh parsley or a sprinkle of cheese when serving, making your Hangover Cure Garlic Potato Soup feel like a freshly made dish every time.

Hangover Cure Garlic Potato Soup Variations

Feel free to tweak this comforting recipe to suit your taste buds and dietary needs!

  • Chicken Broth: Swap out vegetable broth for chicken broth for a heartier, non-vegetarian option that enhances the flavor.

  • Creamy Addition: Stir in a splash of heavy cream or coconut milk for extra richness and a silky texture that elevates this cozy dish.

  • Herb Infusion: Add thyme or rosemary while cooking for a fragrant twist that complements the garlic beautifully.

  • Vegetable Boost: Toss in diced carrots, celery, or spinach for added nutrition and color; they'll blend seamlessly into the comforting base.

  • Spicy Kick: Add a pinch of red pepper flakes for a gentle heat that awakens the palate, perfect for those who enjoy a bit of spice.

  • Extra Garlic: If you’re a garlic lover, don't be shy! Stir in more roasted garlic or a hint of garlic powder to amplify that savory goodness.

  • Creamy Vegan Twist: Use almond or cashew cream for a vegan-friendly version that’s just as indulgent without sacrificing flavor.

  • Garnish Galore: Top with croutons for a satisfying crunch or a dollop of Greek yogurt for creaminess and a touch of tartness to balance the flavors.

Whatever variations you choose, you're bound to create a dish that's every bit as comforting as a hug! And while you're getting creative, consider pairing it with a side of Asparagus Soup Healthy or even a hearty German Potato Salad to truly savor the flavors of home cooking.

What to Serve with Hangover Cure Garlic Potato Soup

Pair this nourishing soup with delightful accompaniments that will elevate your comforting experience.

  • Crusty Bread: The perfect vehicle for dipping; its texture contrasts beautifully with the creamy soup. Soak up every last drop for a satisfying meal.
  • Mixed Greens Salad: A fresh, crisp salad offers a light balance to the richness of the soup, adding color and nutritional value. Toss with a simple vinaigrette for brightness.
  • Grilled Cheese Sandwich: The melty cheese and crispy bread duo pairs wonderfully, adding indulgence to the simplicity of your garlic potato soup. It’s a match made in comfort food heaven!
  • Garlic Bread: Double the garlic goodness! This crunchy, buttery treat echoes the flavors in the soup and makes for an irresistible combo.
  • Roasted Vegetables: Adding a medley of roasted seasonal vegetables introduces additional textures and flavors, enriching your meal while keeping it wholesome.
  • Crispy Kale Chips: The freshness and crunch of these chips contrast nicely with the creamy soup, providing a fun and healthy side. Try sprinkling some seasoning for an extra kick!
  • Red Wine: A glass of light-bodied red wine complements the soup and creates a warm atmosphere for your meal, enhancing the flavors of both.
  • Light Dessert: A fruit sorbet or a gentle panna cotta can provide a refreshing finish, cleansing the palate after the savory garlic-infused flavors.

Make Ahead Options

These Hangover Cure Garlic Potato Soup is perfect for busy home cooks looking to simplify their meal prep! You can chop the starchy potatoes, onion, and garlic up to 24 hours in advance, keeping them stored in the refrigerator to maintain freshness. If you’d like to prep further, the soup can also be made entirely ahead and refrigerated for up to 3 days, just give it a quick stir before serving. When it’s time to enjoy, simply reheat the soup over medium heat, adding a splash of broth if the consistency thickens. Trust me, it’ll warm your heart just as deliciously on the second day!

Hangover Cure Garlic Potato Soup Recipe FAQs

What kind of potatoes should I use for the soup?
Absolutely! For the best creamy texture, go with starchy potatoes like Russets or Idaho. Avoid waxy varieties, as they can make the soup feel gluey rather than velvety.

How should I store leftover garlic potato soup?
You can store your Hangover Cure Garlic Potato Soup in an airtight container in the refrigerator for up to 5 days. The flavors will actually deepen and get even better over time!

Can I freeze this soup?
Very! To freeze, pour the cooled soup into freezer-safe containers, leaving some space for expansion; it can be kept for up to 3 months. When you're ready to enjoy, simply reheat on the stove, adding a splash of broth or water to restore its creamy consistency if needed.

What if I don't have fresh garlic?
No problem! If you don’t have fresh garlic, you can use garlic powder instead. A general rule of thumb is to use 1/8 teaspoon of garlic powder for each clove of fresh garlic called for in the recipe. It might not be quite the same, but it will still add delicious flavor!

Is this soup suitable for vegetarians?
Absolutely! This Hangover Cure Garlic Potato Soup is vegetarian-friendly since it's made with vegetable broth. If you're catering to omnivores, feel free to swap in chicken broth without sacrificing much in the flavor department.

Can I add vegetables to the soup?
Of course! You can enhance the soup's flavor and nutrition by adding other vegetables, like carrots or celery. Simply chop them and add them in with the potatoes, cooking until they’re tender. This will not only create a more vibrant dish but also add more depth to the comforting experience!

Hangover Cure Garlic Potato Soup

Hangover Cure Garlic Potato Soup That's Pure Comfort

This Hangover Cure Garlic Potato Soup is a soothing, vegetarian-friendly dish that's perfect for recovery days or chilly nights.
Print Recipe Pin Recipe
Prep Time 10 minutes mins
Cook Time 20 minutes mins
Total Time 30 minutes mins
Servings: 4 cups
Course: Soups
Cuisine: Vegetarian
Calories: 250
Ingredients Equipment Method Nutrition Notes

Ingredients
  

For the Soup Base
  • 4 cups Vegetable Broth
  • 2 large Starchy Potatoes (Russets or Idaho) peeled and cut into 1-inch chunks
  • 1 Onion diced
  • 5 cloves Fresh Garlic minced
For Cooking and Flavor
  • 1 tablespoon Olive Oil
  • 0.5 teaspoon Salt to taste
  • 0.5 teaspoon Pepper to taste
For the Finishing Touch
  • 2 tablespoons Fresh Parsley chopped

Equipment

  • Large pot

Method
 

Step-by-Step Instructions
  1. Begin by peeling and cutting the starchy potatoes into 1-inch chunks, ensuring uniformity for even cooking. Dice the onion and mince the garlic.
  2. In a large pot, heat olive oil over medium heat. Add diced onion and cook for about 8 minutes until it softens. Then, add minced garlic and sauté for an additional minute.
  3. Pour in vegetable broth and add potato chunks. Bring to a boil, then reduce to a simmer and cover, cooking for 15-20 minutes until the potatoes are tender.
  4. Fold in roasted garlic and mash some potatoes for creaminess. Blend if desired for a smoother texture.
  5. Adjust seasoning with salt and pepper, serve in bowls, and garnish with fresh parsley.

Nutrition

Serving: 1cupCalories: 250kcalCarbohydrates: 35gProtein: 5gFat: 10gSaturated Fat: 1.5gPolyunsaturated Fat: 1gMonounsaturated Fat: 5gSodium: 500mgPotassium: 600mgFiber: 4gSugar: 2gVitamin A: 5IUVitamin C: 40mgCalcium: 2mgIron: 10mg

Notes

Pair with warm crusty bread or a light salad for a complete meal.

Tried this recipe?

Let us know how it was!

Spinach Soup Bliss: A Cozy Bowl of Comfort and Health

December 23, 2025 by Grace Snow Leave a Comment

As the evening chill settles in, there's nothing quite like the rich aroma of a simmering soup to warm the heart and lift the spirit. This Bulgarian Spinach Soup, or Spanachena Supa, has been a beloved family favorite for generations, cherished not only for its comforting flavors but also for its simplicity. In just a few easy steps, you can create a nutritious and heartening meal that’s both vegetarian and gluten-free. It’s perfect for those cozy nights when you crave something wholesome yet effortless to whip up. Plus, whether you stick to frozen spinach or opt for fresh, this soup is also wonderfully adaptable for various dietary needs. Ready to explore the warm embrace of Eastern European comfort food? Let’s dive into this delightful recipe together!

Why is Spinach Soup So Loved?

Comforting Warmth: This Bulgarian Spinach Soup offers a heartwarming embrace on chilly evenings. Its rich, creamy texture is perfect for warming up after a long day.
Easy to Prepare: With just a few simple ingredients and straightforward steps, anyone can craft this delicious dish in no time!
Versatile Base: Whether using fresh or frozen spinach, this soup adapts well to your pantry staples. Try it vegan by swapping cream for coconut milk!
Nutrition Packed: Loaded with vitamins A and C, this soup is not only delicious but a healthy choice as well. Pair it with Spinach Pie Deliciously for a meal that’s both nourishing and flavorful!
Family Tradition: Spanachena Supa has been a beloved dish for generations, making it a perfect choice for bringing people together around the dinner table.

Spinach Soup Ingredients

For the Soup Base

  • Olive Oil – Provides richness and helps sauté the base vegetables; feel free to substitute with any neutral oil if desired.
  • Onion – Adds flavor and sweetness to the soup; shallots are a great alternative for a milder taste.
  • Celery – Contributes depth and aroma; can be omitted if it's not available in your pantry.
  • Carrots – Bring sweetness and vibrant color; consider using parsnips for a delightful twist.
  • Garlic – Offers a savory kick; fresh garlic is preferred, but garlic powder can work in a pinch.
  • Tomato Paste – Enhances acidity and depth; fresh tomatoes can be used if you prefer.

Main Ingredients

  • Frozen Spinach – The star of the spinach soup, thawed before use; you can swap in fresh spinach by wilting it down first.
  • Salt – Essential for flavor enhancement; adjust according to the saltiness of your broth.
  • Jasmine Rice – Adds heartiness to the soup; feel free to substitute with any short or long-grain rice you have.
  • Tomato Sauce – Provides a rich tomato flavor; either homemade or store-bought works well.
  • Vegetable Broth – The soul of the soup; for best results, use low-sodium or homemade broth.
  • Cream (optional) – Introduces creaminess; coconut cream is a fantastic dairy-free substitute or simply omit it for a lighter soup.

Every ingredient in this spinach soup contributes to the comforting and nourishing experience of Spanachena Supa!

Step‑by‑Step Instructions for Spinach Soup

Step 1: Thaw the Spinach
Begin by thawing your frozen spinach, ideally in the fridge overnight or on the counter for about an hour until it’s soft and pliable. This step is crucial because it ensures even cooking later on. If using fresh spinach, simply wash and wilt it down in a pot, then set it aside for later use.

Step 2: Sauté the Vegetables
In a large pot, heat 2 tablespoons of olive oil over medium-high heat. Once the oil is shimmering, add in diced onion, carrots, and celery. Sauté these vegetables for about 5 minutes until they become tender and the onions turn translucent, filling your kitchen with a delightful aroma.

Step 3: Add Garlic and Tomato Paste
Next, stir in 2 minced garlic cloves and 2 tablespoons of tomato paste into the pot. Cook for an additional 2-3 minutes, allowing the garlic to release its flavorful oils and the tomato paste to caramelize slightly, creating a rich base for your spinach soup.

Step 4: Incorporate the Spinach
Add your thawed spinach into the pot, mixing it with the sautéed vegetables. Cook for about 3-4 minutes, allowing the spinach to heat through and blend well with the other ingredients. Season the mixture with salt to taste, enhancing the overall flavors of the spinach soup.

Step 5: Mix in Rice and Liquids
Now, add 1 cup of rinsed jasmine rice, 1 cup of tomato sauce, and 4 cups of vegetable broth to your pot. Stir everything together, bringing the mixture to a gentle boil. This combination will create a hearty texture, making your spinach soup even more satisfying.

Step 6: Simmer the Soup
Once boiling, reduce the heat to medium-low and partially cover the pot. Allow the soup to simmer for about 20 minutes, or until the rice is tender and has absorbed the flavors. Stir occasionally to prevent the rice from sticking to the bottom of the pot.

Step 7: Finish with Cream
After the rice is cooked, take the soup off the heat and stir in a splash of cream, if desired. This optional addition gives your spinach soup a velvety finish that enhances its creaminess. Be careful not to boil the soup again after adding the cream to prevent curdling.

Step 8: Serve and Enjoy
Ladle the comforting spinach soup into bowls and serve hot. For a traditional touch, consider tempering an egg yolk with a bit of broth and adding it to enrich the soup. Garnish with fresh herbs if available, and enjoy your delightful bowl of Bulgarian Spinach Soup!

How to Store and Freeze Spinach Soup

Fridge: Store leftover spinach soup in an airtight container for up to 3 days. Allow it to cool completely before sealing to maintain its creamy texture.

Freezer: For longer storage, freeze the soup in individual portions for up to 2-3 months. It's best to omit cream before freezing; add it upon reheating for optimal taste.

Reheating: Thaw frozen soup in the fridge overnight and reheat on the stovetop over medium heat, adding a splash of broth or water to loosen the texture if necessary.

Airtight Storage: For best results, use freezer bags or containers to prevent freezer burn and preserve the flavor of your comforting spinach soup.

Spinach Soup Variations to Try

Feel free to get creative with this recipe by incorporating delightful twists that cater to your taste buds and dietary preferences!

  • Fresh Spinach: Use fresh spinach instead of frozen for a brighter, more vibrant flavor. Simply wilt it in the pot for a lighter texture.
  • Quinoa Substitute: Swap jasmine rice with quinoa for a high-protein option that's gluten-free and adds a lovely nutty taste.
  • Vegan Version: For a dairy-free delight, replace the cream with coconut cream and ensure your vegetable broth is vegan-friendly. This switch maintains creaminess without the dairy.
  • Protein Boost: Add cooked chicken or chickpeas to the soup for a protein-packed twist that transforms this dish into a heartier meal.
  • Herb Infusion: Incorporate fresh herbs like dill or parsley at the end for a burst of flavor and freshness. These herbs will elevate your spinach soup beautifully!
  • Heat It Up: Add crushed red pepper or a dash of cayenne for a spicy kick that adds depth and warmth, perfect for those chilly nights.
  • Tomato Variations: Replace the tomato paste with roasted tomatoes for a richer, sweeter flavor profile. This change deepens the overall taste experience.
  • Nutty Crunch: Top your soup with toasted pumpkin seeds or croutons for an added crunch that creates a delightful texture contrast.

As you explore these variations, consider pairing your soup with some tasty sides, like a fresh salad or a slice of homemade bread. If you enjoy vibrant dishes, check out my recipe for Asparagus Soup Healthy or indulge in a delicious Chickpea Spinach Curry. Enjoy the journey of flavor!

Make Ahead Options

Preparing this Bulgarian Spinach Soup ahead of time is a fantastic way to save precious minutes on busy weekdays! You can chop and sauté the base vegetables (onion, carrots, and celery) up to 3 days in advance, refrigerating them in an airtight container until needed. The spinach can also be thawed ahead and stored for up to 24 hours in the fridge. When it's time to serve, simply add the prepared vegetables and spinach into the pot with the other ingredients, bring to a boil, and simmer until the rice is cooked. Remember, to maintain the soup's creamy quality, stir in the cream just before serving, ensuring a delightfully luxurious finish every time!

Helpful Tricks for Spinach Soup

  • Thaw Thoroughly: Ensure your frozen spinach is completely thawed for even cooking—this prevents any cold clumps in your soup.
  • Prevent Blandness: Taste as you cook and adjust salt levels based on your broth's saltiness to avoid a bland spinach soup.
  • Avoid Curdling: When adding cream, avoid boiling the soup afterward to prevent it from curdling; gently stir in off the heat.
  • Adjust Thickness: If you prefer a thicker soup, reduce the rice or add more broth gradually until you reach your desired consistency.
  • Make Ahead Magic: Consider making the soup a day in advance to deepen the flavors; simply reheat gently before serving.

What to Serve with Bulgarian Spinach Soup

Imagine a cozy evening where every bite of your comforting soup is complemented by delightful sides that enhance its flavors and textures.

  • Crusty Bread: A warm, artisanal loaf is perfect for dipping. The crunchy exterior and soft interior create a satisfying contrast to the creamy soup.

  • Mixed Green Salad: A light salad offers freshness and a burst of color. Toss in some cherry tomatoes and tangy vinaigrette for a bright complement.

  • Roasted Veggies: Serve a side of roasted carrots and zucchini to add a sweet, caramelized note to your meal. The earthy flavors meld beautifully with spinach.

  • Cheese Flatbread: Warm flatbreads sprinkled with feta or mozzarella provide a savory richness and a delightful hand-held addition to your bowl of soup.

  • Yogurt Sauce: A cool, tangy yogurt sauce drizzled on top adds an extra layer of creaminess and balance, making each spoonful even more delicious.

  • Herbal Tea: Sipping on a fragrant herbal tea while enjoying your meal enhances the comforting experience. Choose chamomile or mint for a soothing finish.

  • Fruit Tart: For a sweet closure, serve a light fruit tart. The tartness of fresh fruits contrasts nicely with the savory flavors of the spinach soup.

Spinach Soup Recipe FAQs

What type of spinach should I use for this soup?
Absolutely! You can use either fresh or frozen spinach for this spinach soup. If using frozen, thaw it first to ensure even cooking. If you prefer fresh, simply wash and wilt it down in a pot before adding it to the soup.

How should I store leftover spinach soup?
To keep your delicious spinach soup fresh, store it in an airtight container in the fridge for up to 3 days. Make sure to let it cool completely before sealing it—this helps maintain its creamy texture.

Can I freeze spinach soup?
Very! For longer storage, freeze the soup in portions for up to 2-3 months. Just a tip: it's best to omit the cream before freezing; you can add it back in when you reheat for the best flavor and texture.

What should I do if my soup is too thick?
If your spinach soup ends up too thick, don't worry! Simply add a bit more vegetable broth or water and gently stir until it reaches your desired consistency. This way, you can easily adjust it to your liking.

Are there any dietary considerations I should keep in mind?
Certainly! This spinach soup is vegetarian and gluten-free, making it suitable for various dietary needs. If you're making it for someone with allergies, be sure to check all ingredient labels—particularly the broth and any extras you might add, like cream.

How can I enhance the flavors of the soup while cooking?
To elevate the flavors, always taste as you go. Adjust the salt levels based on the saltiness of your broth, and consider adding herbs or spices like dill or nutmeg—these can really bring your spinach soup to life!

Spinach Soup

Spinach Soup Bliss: A Cozy Bowl of Comfort and Health

Spinach Soup is a rich, creamy, and nutritious bowl of comfort perfect for chilly evenings.
Print Recipe Pin Recipe
Prep Time 15 minutes mins
Cook Time 30 minutes mins
Total Time 45 minutes mins
Servings: 4 bowls
Course: Soups
Cuisine: Bulgarian
Calories: 250
Ingredients Equipment Method Nutrition Notes

Ingredients
  

For the Soup Base
  • 2 tablespoons Olive Oil Can substitute with any neutral oil.
  • 1 medium Onion Diced.
  • 1 stalk Celery Optional.
  • 2 medium Carrots Diced.
  • 2 cloves Garlic Minced.
  • 2 tablespoons Tomato Paste
Main Ingredients
  • 10 ounces Frozen Spinach Thawed.
  • 1 teaspoon Salt Adjust to taste.
  • 1 cup Jasmine Rice Rinsed.
  • 1 cup Tomato Sauce Homemade or store-bought.
  • 4 cups Vegetable Broth Low-sodium or homemade.
  • 1/4 cup Cream Optional, can use coconut cream as a substitute.

Equipment

  • Large pot

Method
 

Preparation Steps
  1. Thaw the spinach in the fridge overnight or on the counter for about an hour until soft.
  2. Heat olive oil in a large pot over medium-high heat. Add diced onion, carrots, and celery, sautéing for about 5 minutes until tender.
  3. Add minced garlic and tomato paste to the pot, cooking for an additional 2-3 minutes.
  4. Incorporate thawed spinach, cooking for 3-4 minutes. Season with salt to taste.
  5. Mix in rinsed jasmine rice, tomato sauce, and vegetable broth. Bring to a gentle boil.
  6. Reduce heat to medium-low, partially cover, and simmer for about 20 minutes until rice is tender.
  7. Stir in a splash of cream after cooking; do not boil again to avoid curdling.
  8. Serve hot, garnished with fresh herbs and enjoy!

Nutrition

Serving: 1bowlCalories: 250kcalCarbohydrates: 35gProtein: 8gFat: 10gSaturated Fat: 2gPolyunsaturated Fat: 1gMonounsaturated Fat: 5gCholesterol: 5mgSodium: 500mgPotassium: 600mgFiber: 5gSugar: 6gVitamin A: 50IUVitamin C: 40mgCalcium: 8mgIron: 15mg

Notes

Ensure to thaw spinach thoroughly for even cooking and taste as you cook to avoid blandness.

Tried this recipe?

Let us know how it was!
  • « Previous Page
  • 1
  • …
  • 68
  • 69
  • 70
  • 71
  • 72
  • …
  • 180
  • Next Page »

Welcome!

Hi, I’m Grace, a Sydney-based home cook with a passion for bold flavors and trending ingredients. Whether you’re a busy beginner or a seasoned foodie, you’ll find dishes here that are fresh, fun, and full of flavor.

More about me

Popular Recipes

  • Butter Pecan Cookies
    Irresistibly Soft Butter Pecan Cookies for Cozy Moments
  • Decadent Turtle Bars
    Decadent Turtle Bars: Indulge in Sweet Gooey Perfection
  • Salted Caramel Butter Bars
    Decadent Salted Caramel Butter Bars You Can't Resist
  • Easy Italian Pasta Salad
    Easy Italian Pasta Salad: A Summer Delight to Share

Footer

↑ back to top

About

  • Privacy Policy
  • Disclaimer
  • Terms & Conditions

Newsletter

  • Sign Up! for emails and updates

Contact

  • About me
  • Contact me

Copyright © 2025 TastyTrendIngredients