tastytrendingredients

  • Home
  • Recipes
    • Appetizers
    • Breakfast
    • Dessert
    • Dinner
    • Drinks
    • Salads
    • Snacks
    • Soups
  • About me
  • Contact me
menu icon
go to homepage
  • Home
  • Recipes
    • Appetizers
    • Breakfast
    • Dessert
    • Dinner
    • Drinks
    • Salads
    • Snacks
    • Soups
  • About me
  • Contact me
search icon
Homepage link
  • Home
  • Recipes
    • Appetizers
    • Breakfast
    • Dessert
    • Dinner
    • Drinks
    • Salads
    • Snacks
    • Soups
  • About me
  • Contact me
×

Creamy Orzo with Roasted Butternut Squash and Spinach Bliss

September 25, 2025 by Grace Snow Leave a Comment

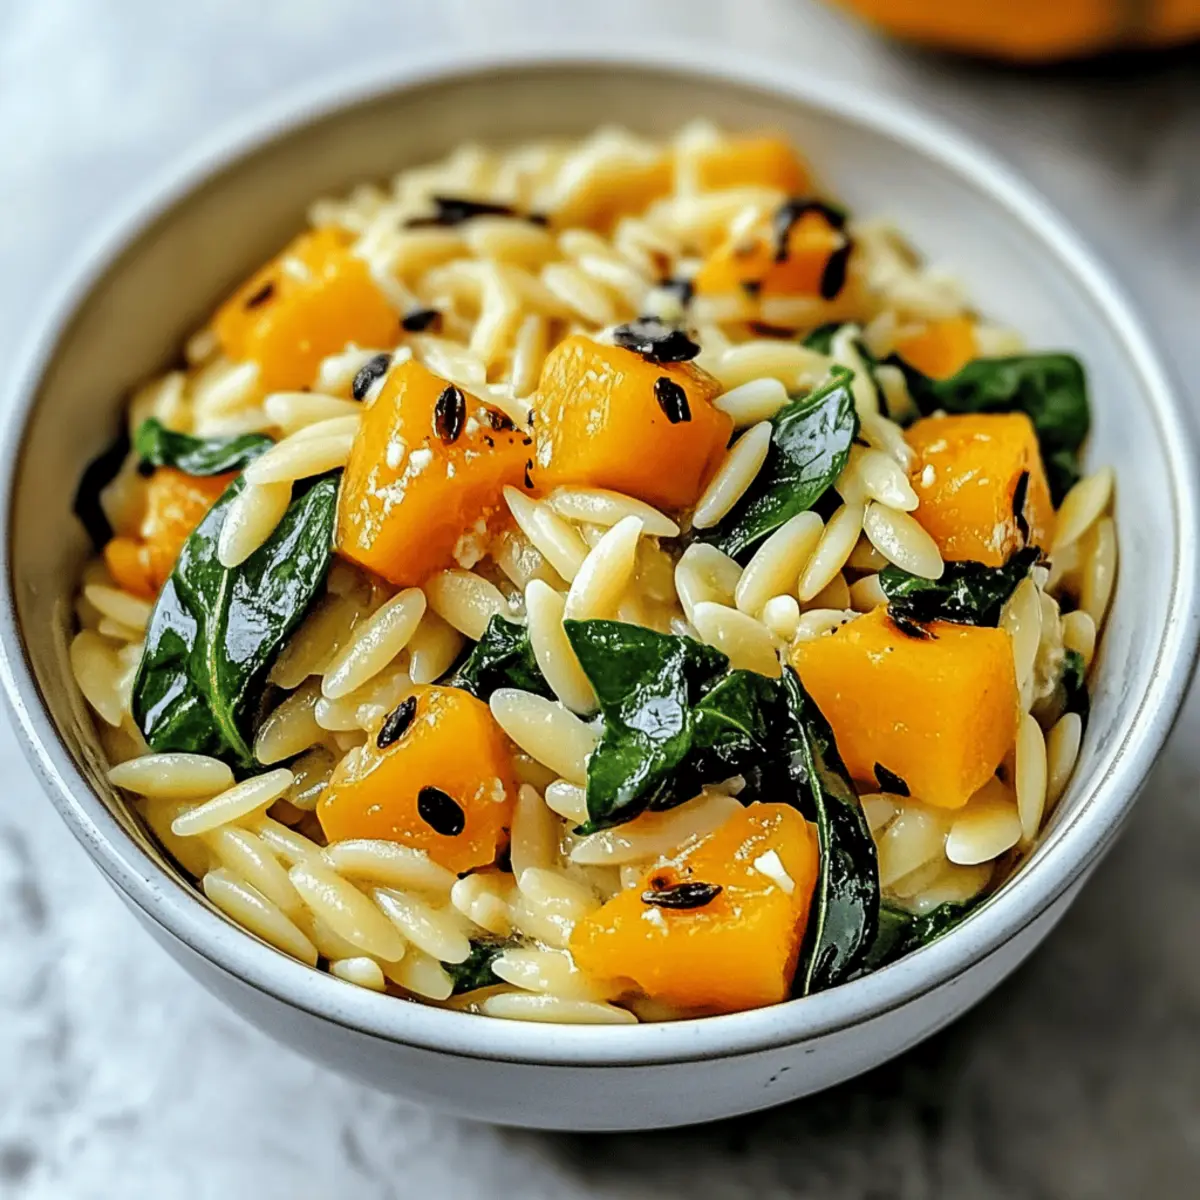
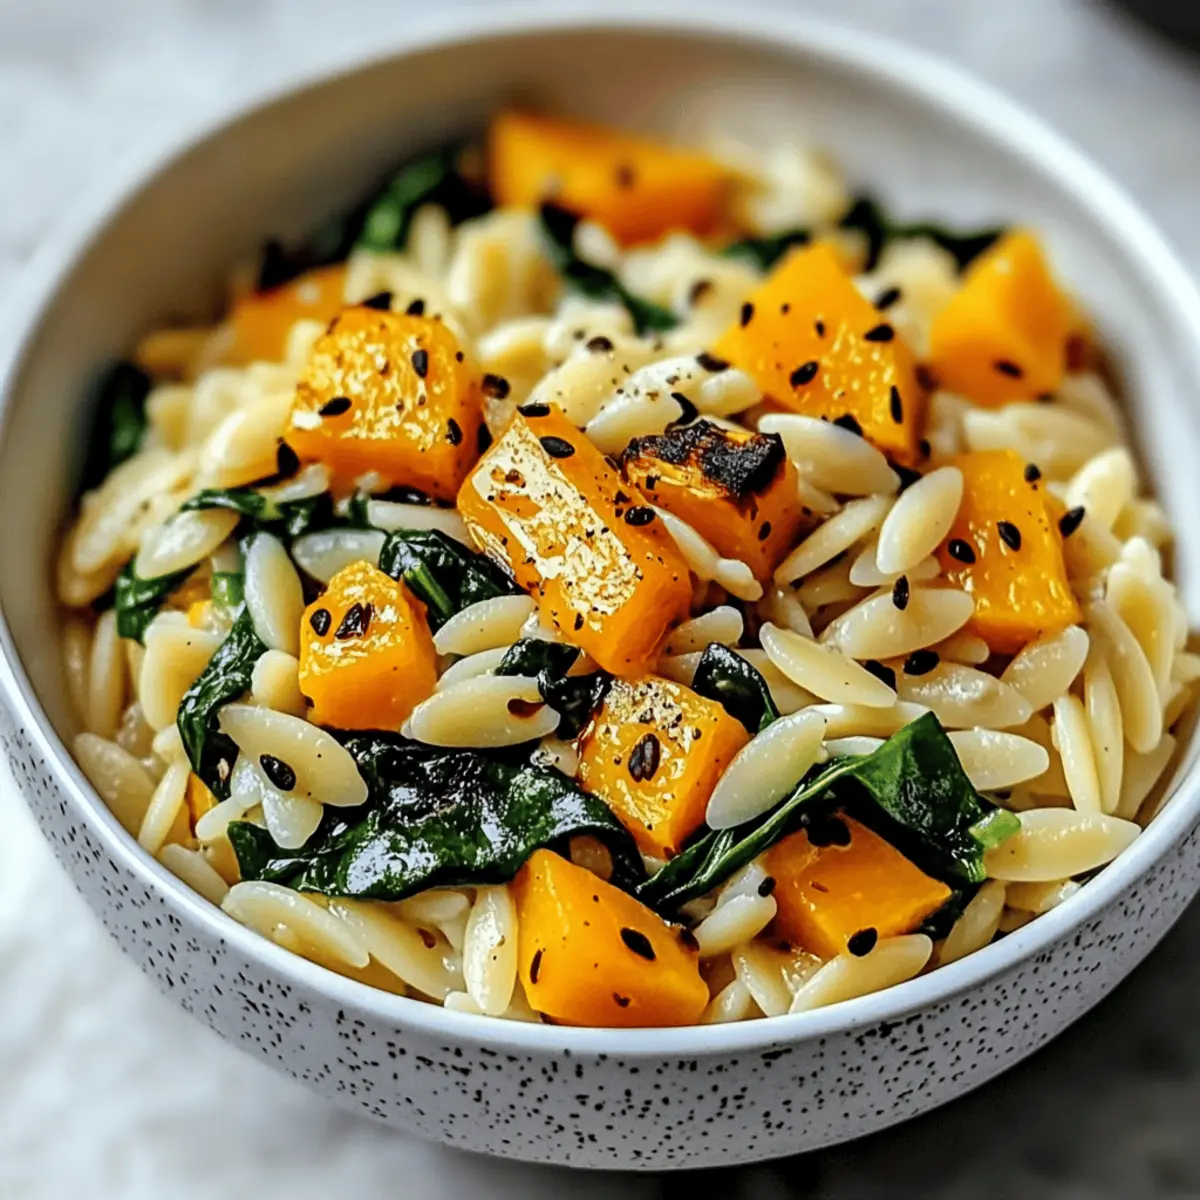
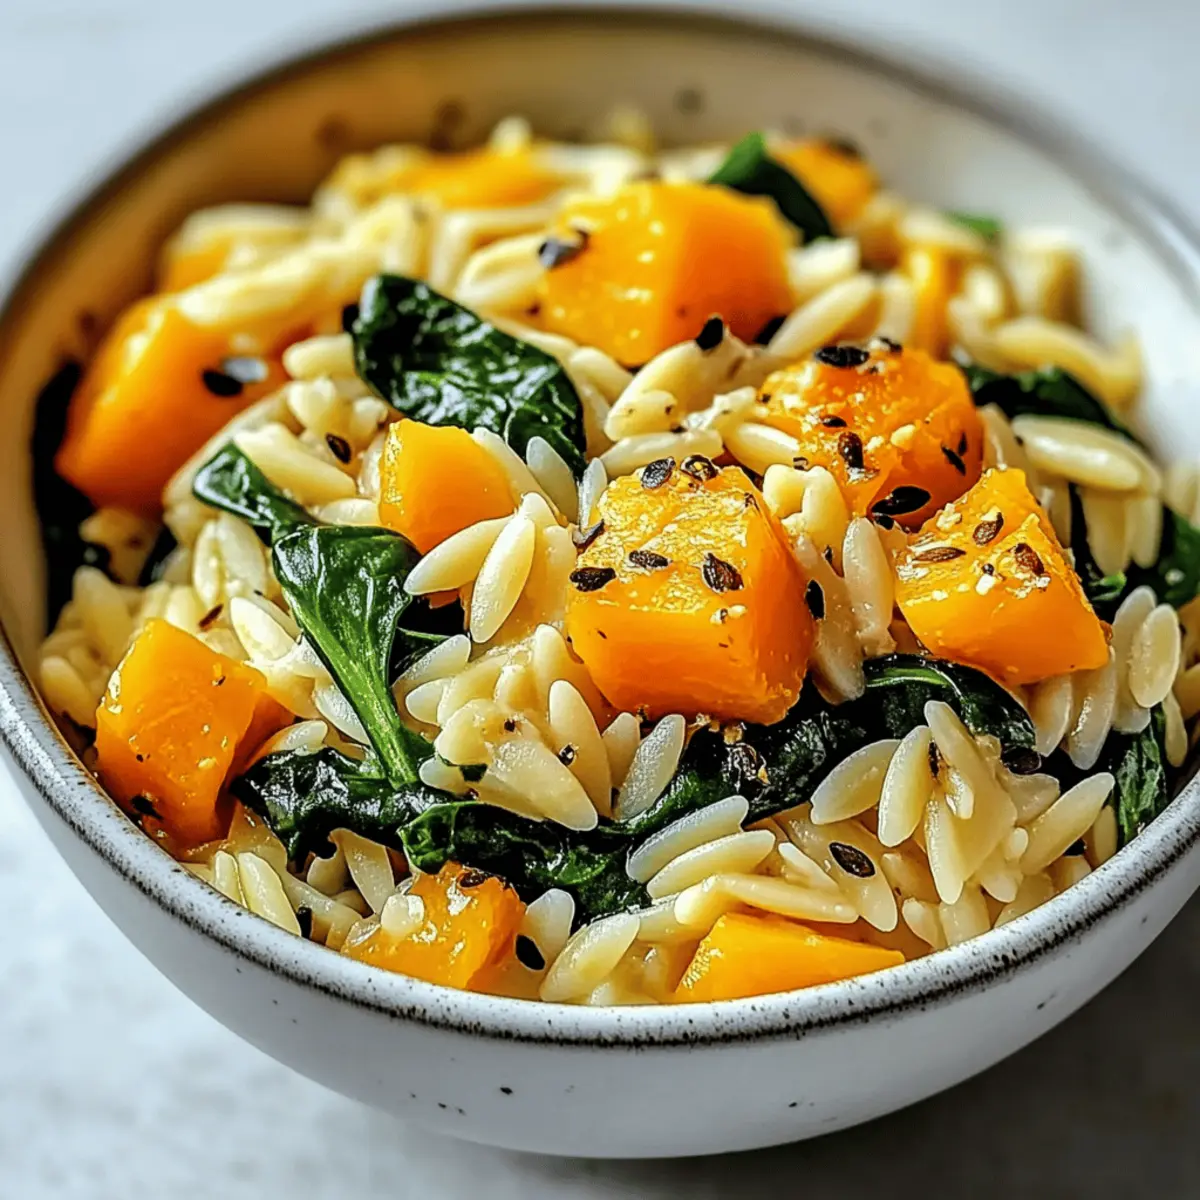
As I sliced into the vibrant butternut squash, the sweet aroma instantly transported me to my favorite autumn kitchen, where cozy dinners come alive. This Creamy Orzo with Roasted Butternut Squash and Spinach brings the warmth of home right to your table, creating a dish that envelops you like a soft blanket. It's not just a feast for the eyes with its colorful hues; it's a nourishing vegetarian option that offers both comfort and health, making it perfect for a delicious weeknight dinner or a cozy weekend gathering. The creamy texture pairs wonderfully with the tender squash and fresh spinach, promising a satisfying bite that’s simple to prepare yet impressively delicious. So, are you ready to elevate your dinner game and indulge your senses? Let’s dive into the recipe!

Why Is This Orzo Dish So Special?

Comforting textures combine creamy orzo, sweet butternut squash, and vibrant spinach, making every bite a cozy experience. Versatile ingredients let you swap veggies to suit your palate or what you have on hand, like adding zucchini or bell peppers. Quick and Easy to prepare, it’s ready in under 30 minutes, perfect for busy weeknights! Crowd-Pleasing and visually stunning, it's sure to impress guests at any dinner gathering. And if you want to round out your meal, try serving it alongside Maple Roasted Sweet potatoes or a simple salad for a delightful balance!

Creamy Orzo with Roasted Butternut Squash and Spinach Ingredients

For the Roasted Squash

  • Butternut Squash – This star ingredient provides delightful sweetness and a satisfying texture; feel free to switch it out for zucchini or bell peppers if desired.
  • Olive Oil – Essential for roasting, it adds a rich flavor; other neutral oils can be used if preferred.
  • Salt and Black Pepper – Simple yet important for enhancing flavor; adjust to your taste for the best experience.

For the Orzo Base

  • Orzo Pasta – The main carbohydrate that absorbs all the creamy goodness; consider substituting with ditalini or any small pasta for variety.
  • Vegetable Broth – Adds depth and richness to the dish; if needed, water can work as a substitute.
  • Butter – Brings richness to the dish; you can opt for plant-based butter for a vegan twist.
  • Garlic – This aromatic adds a lovely flavor; fresh garlic is recommended for the best taste.

For the Creamy Sauce

  • Parmesan Cheese – Infuses the dish with savory umami; for a vegan option, try nutritional yeast instead.
  • Heavy Cream – Provides the signature creaminess; cream cheese can serve as a substitute for a richer texture.

For the Fresh Taste

  • Baby Spinach – Brings freshness and nutrients to the dish; you can use other leafy greens as a substitute.
  • Dried Thyme – Enhances the herbal notes beautifully; feel free to omit if you don’t have it on hand.
  • Red Pepper Flakes – Offers a touch of heat; it's optional depending on your spice preference.

Step‑by‑Step Instructions for Creamy Orzo with Roasted Butternut Squash and Spinach

Step 1: Roast the Squash
Begin by preheating your oven to 400°F (200°C). While the oven warms up, toss diced butternut squash in a mixing bowl with olive oil, salt, and black pepper until every piece is well-coated. Spread the squash evenly on a baking sheet, ensuring they have room to roast. Bake for 25–30 minutes, flipping halfway through, until the squash is golden and tender.

Step 2: Cook the Orzo
In a medium saucepan, melt 2 tablespoons of butter over medium heat. Add minced garlic and sauté for about 1 minute until fragrant and lightly golden. Stir in the orzo pasta and cook for an additional 2 minutes, making sure it’s coated in butter and slightly toasted, which enhances the flavors in your Creamy Orzo with Roasted Butternut Squash and Spinach.

Step 3: Add Broth
Next, pour in 4 cups of vegetable broth and bring the mixture to a gentle simmer. Cook the orzo for 10–12 minutes, stirring occasionally, until it absorbs most of the liquid and becomes tender yet firm to the bite. Keep an eye on the texture, as you want it creamy without being mushy, setting the foundation for your creamy dish.

Step 4: Make It Creamy
Once the orzo is cooked, reduce the heat to low and stir in ½ cup of grated Parmesan cheese and ½ cup of heavy cream. This will create that deliciously creamy texture. Add in the chopped baby spinach and cook for an additional 1–2 minutes, stirring until the spinach wilts and combines beautifully into the creamy orzo mixture.

Step 5: Combine
Now it’s time to bring everything together! Gently fold in the roasted butternut squash from the oven into the creamy orzo base. Taste the mixture and season with additional salt, black pepper, dried thyme, and a pinch of red pepper flakes if you desire some heat. This final touch enhances the flavors of your Creamy Orzo with Roasted Butternut Squash and Spinach.

Step 6: Serve
Serve the dish immediately, garnishing with extra Parmesan cheese or a drizzle of olive oil for an extra touch of richness. Enjoy your hearty, comforting Creamy Orzo with Roasted Butternut Squash and Spinach, ideally paired with crusty bread or a light salad to balance its creamy goodness.

Creamy Orzo with Roasted Butternut Squash Variations

Feel free to get creative with your dish, letting your taste buds lead the way!

  • Roasted Veggies: Add color and flavor by mixing in roasted zucchini, carrots, or bell peppers alongside the squash for a more diverse veggie medley.
  • Protein Boost: For a heartier meal, toss in cooked chickpeas or white beans; they'll provide additional protein and texture that complements the creaminess beautifully.
  • Vegan Twist: Replace the butter, cream, and Parmesan cheese with plant-based alternatives like coconut cream and nutritional yeast to enjoy a creamy vegan version.
  • Nutty Flavor: Stir in a handful of toasted pine nuts or walnuts right before serving for a delightful crunch and a nutty flavor that pairs wonderfully with the other ingredients.
  • Herb Infusion: Experiment with fresh herbs like basil or parsley; adding them just before serving can enhance freshness and elevate the entire dish.
  • Cheesy Goodness: Want more cheese? Swap in fontina or gouda instead of Parmesan for a richer, creamier experience that melts beautifully.
  • Spicy Kick: Amp up the heat by incorporating diced jalapeños or a dash of cayenne pepper; this will give your dish a vibrant depth of flavor.
  • Flavor Fusion: Take your dish in a different direction by adding a splash of lemon juice or zest for brightness, pairing nicely with the sweet butternut squash.

Feel inspired? You might also enjoy pairing this dish with some Roasted Bratwurst Peppers for a hearty meal, or a side of Roasted Corn Fried for a delightful contrast!

Expert Tips for Creamy Orzo

  • Prep Ahead: Prepare all ingredients before cooking. This keeps things organized and helps you avoid burning the garlic while multitasking.

  • Use Fresh Ingredients: Fresh garlic and high-quality vegetable broth enhance flavors significantly, making your Creamy Orzo with Roasted Butternut Squash and Spinach even more delicious.

  • Achieve Perfect Texture: Remember to stir the orzo often while it cooks, ensuring it’s tender yet al dente without becoming mushy.

  • Roasting Tips: Make sure the butternut squash is well-coated in olive oil. This will help achieve that golden, caramelized flavor everyone loves!

  • Season Wisely: Taste and adjust the seasoning throughout the cooking process. Adding salt and pepper at different stages helps build layers of flavor.

  • Garnish with Love: Add fresh herbs or a sprinkle of additional Parmesan cheese before serving for a beautiful presentation that elevates the dish visually!

Make Ahead Options

These Creamy Orzo with Roasted Butternut Squash and Spinach are ideal for making ahead, saving you precious time on busy weeknights! You can roast the butternut squash up to 24 hours in advance and store it in an airtight container in the refrigerator. Additionally, you can prepare the orzo mixture (minus the cream and spinach) and refrigerate it for up to 3 days. To finish the dish, simply reheat the orzo on the stovetop, adding in the heavy cream and spinach for a fresh, vibrant touch. Keeping the components separate until serving ensures that everything stays delicious and creamy, ready to delight your taste buds with minimal effort!

What to Serve with Creamy Orzo with Roasted Butternut Squash and Spinach

Creating a memorable meal is all about pairing flavors that complement each other beautifully, and this dish sets the perfect stage.

  • Garlic Bread: A crunchy, buttery delight that pairs wonderfully with the creamy orzo’s richness, allowing for that satisfying bite.

  • Arugula Salad: The peppery freshness of arugula drizzled with lemon vinaigrette cuts through the creaminess, bringing brightness to the meal.

  • Roasted Brussels Sprouts: These caramelized veggies provide a crispy texture and earthy flavor that enhances the sweetness of the butternut squash.

  • Crispy Chickpeas: Add a fun crunch with protein-packed roasted chickpeas, balancing the dish’s creaminess while delivering a satisfying texture.

  • Stuffed Peppers: Offering a hearty, wholesome addition, stuffed peppers filled with quinoa or brown rice create a beautiful flavor harmony with the creamy orzo base.

  • Chardonnay: A glass of chilled Chardonnay perfectly complements the creamy notes of the dish, enhancing the overall dining experience.

  • Seasonal Fruit Salad: A light, colorful fruit salad with fresh berries and citrus offers a refreshing contrast, providing a sweet and zesty finish to your meal.

How to Store and Freeze Creamy Orzo with Roasted Butternut Squash and Spinach

Fridge: Store leftovers in an airtight container for up to 3 days. Reheat gently on the stovetop, adding a splash of broth or water to maintain creaminess.

Freezer: For longer storage, freeze portions in airtight containers for up to 2 months. Thaw overnight in the fridge before reheating.

Reheating: When reheating, use low heat to prevent the orzo from becoming mushy. Stir in a little extra cream or broth as needed to regain a creamy texture.

Airtight Tips: Always ensure your containers are airtight to avoid freezer burn and preserve the vibrant flavors of your Creamy Orzo with Roasted Butternut Squash and Spinach.

Creamy Orzo with Roasted Butternut Squash and Spinach Recipe FAQs

What should I look for when selecting butternut squash?
Absolutely! When choosing butternut squash, look for ones that feel heavy for their size with smooth, unblemished skin. Avoid any with dark spots or soft spots, as these can indicate spoilage. A ripe squash should feel firm and have a matte finish instead of shiny.

How can I store leftovers of this Creamy Orzo with Roasted Butternut Squash and Spinach?
Very simply! Store leftovers in an airtight container in the fridge for up to 3 days. To reheat, gently warm it on the stovetop, adding a splash of vegetable broth or water to restore its creamy texture. Enjoy it just like day one!

Can I freeze Creamy Orzo with Roasted Butternut Squash and Spinach?
Yes, you can! To freeze, divide portions of the creamy orzo into airtight containers, making sure to leave a little space at the top for expansion. It will last in the freezer for up to 2 months. To enjoy, thaw overnight in the fridge and reheat gently on low heat, stirring in a bit of broth or cream as needed to achieve that creamy consistency.

What if my orzo turns out mushy while cooking?
Don't worry, it happens! To prevent mushiness, cook the orzo according to package instructions, checking for texture at the 10-minute mark. If you're concerned, cook it a minute or two less than the recommended time and let it sit in the residual heat to finish cooking. This helps keep that perfect tender bite without losing its shape.

Is this dish suitable for those with allergies?
Absolutely! The Creamy Orzo with Roasted Butternut Squash and Spinach can be easily adjusted for various dietary needs. For nut allergies, ensure that your broth and cheese substitutes are nut-free. If you're preparing it for pets, it's best to avoid feeding them any dishes high in garlic or onion. Always check ingredient labels for any allergens.

Creamy Orzo with Roasted Butternut Squash and Spinach

Creamy Orzo with Roasted Butternut Squash and Spinach Bliss

This Creamy Orzo with Roasted Butternut Squash and Spinach is a comforting vegetarian dish that brings warmth to your dinner table.
Print Recipe Pin Recipe
Prep Time 10 minutes mins
Cook Time 25 minutes mins
Total Time 35 minutes mins
Servings: 4 servings
Course: Dinner
Cuisine: Vegetarian
Calories: 430
Ingredients Equipment Method Nutrition Notes

Ingredients
  

For the Roasted Squash
  • 1 large Butternut Squash Diced
  • 2 tbsp Olive Oil For roasting
  • to taste Salt
  • to taste Black Pepper
For the Orzo Base
  • 2 cups Orzo Pasta Can substitute with ditalini or any small pasta
  • 4 cups Vegetable Broth Can substitute with water
  • 2 tbsp Butter Can use plant-based butter for vegan option
  • 2 cloves Garlic Minced
For the Creamy Sauce
  • ½ cup Parmesan Cheese Grated, can substitute with nutritional yeast for vegan option
  • ½ cup Heavy Cream Can substitute with cream cheese
For the Fresh Taste
  • 4 cups Baby Spinach
  • 1 tsp Dried Thyme Can omit if not available
  • to taste Red Pepper Flakes Optional

Equipment

  • Oven
  • Mixing Bowl
  • Baking Sheet
  • Medium saucepan
  • Spatula
  • measuring cups
  • Measuring Spoons

Method
 

Step-by-Step Instructions
  1. Preheat your oven to 400°F (200°C). Toss diced butternut squash in a mixing bowl with olive oil, salt, and black pepper. Spread the squash evenly on a baking sheet and bake for 25–30 minutes, flipping halfway through.
  2. In a medium saucepan, melt 2 tablespoons of butter over medium heat. Add minced garlic and sauté for about 1 minute until fragrant and lightly golden. Stir in the orzo pasta and cook for an additional 2 minutes.
  3. Pour in 4 cups of vegetable broth and bring to a gentle simmer. Cook the orzo for 10–12 minutes, stirring occasionally, until it absorbs most of the liquid and becomes tender.
  4. Reduce heat to low and stir in ½ cup of Parmesan cheese and ½ cup of heavy cream. Cook for an additional 1–2 minutes until the spinach wilts.
  5. Fold in the roasted butternut squash. Taste and adjust seasoning with salt, black pepper, thyme, and red pepper flakes as desired.
  6. Serve immediately, garnished with extra Parmesan cheese or a drizzle of olive oil.

Nutrition

Serving: 1servingCalories: 430kcalCarbohydrates: 60gProtein: 12gFat: 18gSaturated Fat: 10gPolyunsaturated Fat: 1gMonounsaturated Fat: 5gCholesterol: 45mgSodium: 300mgPotassium: 650mgFiber: 5gSugar: 3gVitamin A: 3500IUVitamin C: 15mgCalcium: 200mgIron: 3mg

Notes

For optimal flavor and texture, use fresh ingredients and adjust seasoning throughout cooking.

Tried this recipe?

Let us know how it was!

Indulge in Creamy Crab and Shrimp Seafood Bisque Delight

September 25, 2025 by Grace Snow Leave a Comment

As I ladled the creamy Crab and Shrimp Seafood Bisque into bowls, the rich, savory aroma enveloped my kitchen like a warm hug. This luxurious dish is more than a meal; it’s a celebration of fresh seafood and the comfort of home cooking, perfect for impressing guests or indulging in a cozy night in. Each spoonful reveals a velvety texture, blending the delicate sweetness of crab and tender shrimp with fragrant herbs and spices. Best of all, this bisque is customizable, allowing you to tailor it to your taste with optional veggies or a spice kick. Whether served as a sophisticated starter or a hearty main alongside crusty bread, it's a recipe that caters to all occasions. Ready to discover how to create this indulgent seafood experience at home? Let’s dive in!

Why Is This Bisque a Must-Try?

Luxurious Indulgence: This Crab and Shrimp Seafood Bisque elevates any meal into a gourmet experience, showcasing fresh seafood in a rich, creamy broth.

Customizable Options: Want to make it your own? Add your favorite veggies or kick up the heat with a dash of cayenne!

Crowd-Pleasing Appeal: Perfect for dinner parties or cozy nights in, this bisque will impress family and friends alike with its flavor and elegance.

Quick and Easy: With straightforward steps, you can have a restaurant-quality meal on the table in no time. Pair it with a fresh salad or some crusty bread for a complete experience!

Nutritional Perks: Loaded with protein and omega-3 fatty acids, this dish not only tastes great but also offers essential nutrients. Just think of it as a delicious way to nourish both body and soul!

Ready for more seafood inspiration? Check out our tasty Shrimp Tacos Zesty for another crowd favorite!

Crab and Shrimp Seafood Bisque Ingredients

For the Bisque
• Fresh Shrimp – Provides sweetness and tender texture; substitute with frozen shrimp if necessary.
• Lump Crab Meat – Adds a sweet, rich flavor and luxurious feel; use fresh for best results or canned in a pinch.
• Butter – Used for sautéing vegetables and adding richness; olive oil can be used for a lighter option.
• Olive Oil – Aids in sautéing and adds healthy fats; can be replaced with additional butter.
• Onion – Base flavor for the bisque.
• Celery – Contributes to the aromatic base.
• Carrots – Adds sweetness and color, balancing the bisque's flavors.
• Garlic – Enhances flavor, providing depth.
• Tomato Paste – Adds umami and a touch of acidity; avoid if making a creamy white bisque.
• Flour – Thickens the bisque; substitute with gluten-free flour or cornstarch for a gluten-free option.
• Seafood/Chicken Broth – Provides a flavorful liquid base.
• Old Bay Seasoning – Essential for that classic seafood taste; can substitute with Cajun seasoning if unavailable.
• Paprika – Adds warmth and color.
• Bay Leaf – Enhances depth of flavor; remember to remove before serving.
• Salt and Pepper – For seasoning; adjust to taste.
• Heavy Cream – Gives the bisque its rich, creamy texture; can substitute with half-and-half for a lighter version.

For Garnish
• Fresh Parsley or Chives – Adds freshness and color on top of the bisque.
• Lemon Wedges – For serving, enhances flavors with a citrus touch in your crab and shrimp seafood bisque.

Step‑by‑Step Instructions for Crab and Shrimp Seafood Bisque

Step 1: Prepare the Seafood
Begin by peeling and deveining your fresh shrimp, ensuring all shells and veins are removed for a tender bite. Next, gently pick through the lump crab meat to eliminate any stray shells, keeping the delicate flavor intact. This preparation sets the stage for a luscious Crab and Shrimp Seafood Bisque that is both elegant and satisfying.

Step 2: Sauté the Aromatics
In a large pot, melt 2 tablespoons of butter along with 1 tablespoon of olive oil over medium heat. Once the mixture is shimmering, add diced onions, chopped celery, and carrot pieces to the pot. Sauté these vegetables for 5-7 minutes until they are softened and fragrant, creating a lovely base for your bisque.

Step 3: Add Garlic and Tomato Paste
Introduce minced garlic to the pot, stirring it in for about 1 minute. You want it to become aromatic without browning. Then, mix in 2 tablespoons of tomato paste, allowing it to cook for 1-2 minutes. This step enhances the depth of flavor in your Crab and Shrimp Seafood Bisque, balancing the sweetness of the seafood with a touch of acidity.

Step 4: Thicken the Mixture
Sprinkle ¼ cup of flour over the sautéed vegetables, stirring thoroughly to coat them evenly. This will help thicken your bisque. Cook for another minute, letting the flour absorb the flavors. Make sure the mixture is well combined before you move on; you should see a slight change in texture, indicating it’s ready for the next step.

Step 5: Add the Broth and Seasoning
Gradually pour in 4 cups of seafood or chicken broth, stirring consistently to prevent lumps from forming. Bring this mixture to a simmer over medium-high heat. Then, stir in 1 tablespoon of Old Bay seasoning, 1 teaspoon of paprika, and the bay leaf. Let the bisque simmer for about 10 minutes, allowing the flavors to meld together beautifully.

Step 6: Blend for a Creamier Texture
For a smooth bisque, use an immersion blender to partially blend the mixture directly in the pot. Blend until you achieve your desired consistency, ensuring some chunks of seafood remain for texture. This step transforms your Crab and Shrimp Seafood Bisque into a velvety soup that feels luxurious and comforting.

Step 7: Cook the Seafood
Reduce the heat to low and stir in 1 cup of heavy cream, followed by your prepared shrimp and crab meat. Simmer gently for 5-7 minutes until the shrimp are pink and cooked through, stirring occasionally. As the seafood cooks, it will infuse the bisque with its briny sweetness, elevating the dish to new heights.

Step 8: Final Touches and Serve
Taste and adjust the seasoning with salt and pepper as desired, then carefully remove the bay leaf from the pot. Ladle the warm Crab and Shrimp Seafood Bisque into bowls, garnishing with chopped fresh parsley or chives. Serve with lemon wedges on the side to amplify the flavors, and enjoy this delightful seafood experience!

How to Store and Freeze Crab and Shrimp Seafood Bisque

Fridge: Store your Crab and Shrimp Seafood Bisque in an airtight container for up to 3 days. This keeps it fresh and allows the flavors to meld beautifully.

Freezer: For longer storage, freeze the bisque in a sealed container for up to 3 months. Leave some space at the top for expansion, as liquids can swell when frozen.

Reheating: Reheat gently on the stove over low heat, stirring occasionally to maintain the creamy texture. Avoid boiling to prevent the cream from separating.

Portioning: Consider freezing in individual portions for easy meals later. This way, you can enjoy the luxurious flavors without the need for extensive cooking each time!

Make Ahead Options

These indulgent Crab and Shrimp Seafood Bisque are perfect for meal prep enthusiasts! You can sauté the vegetables and create the base of the bisque up to 24 hours in advance; simply refrigerate it in an airtight container to preserve its flavors. Additionally, you can prepare the seafood (cleaned shrimp and crab) and store it separately in the fridge for up to 3 days. When you’re ready to indulge, simply reheat the bisque base, incorporate the seafood, and stir in the heavy cream, simmering until the shrimp are cooked through. This approach not only saves time but ensures that you still enjoy that luxurious, creamy texture that makes this bisque a delectable experience.

What to Serve with Crab and Shrimp Seafood Bisque

Pairing a delightful side with your bisque can elevate your dining experience, turning an already enticing dish into a unforgettable meal.

  • Crusty Bread: This classic pairing is ideal for dipping. The crunchy exterior and soft interior of fresh bread complement the creamy texture of the bisque beautifully.

  • Fresh Green Salad: A light, crisp salad garnished with a zesty vinaigrette cuts through the richness of the bisque, balancing flavors and adding a refreshing crunch.

  • Garlic Butter Noodles: Twirl some buttery, garlic-infused noodles on your plate to create a comforting companion to your indulgent seafood bisque. The richness will play well with the flavors.

  • Roasted Asparagus: Slightly charred and drizzled with lemon, roasted asparagus adds a delightful earthy note that enhances the seafood's natural sweetness.

  • Cheesy Cornbread Muffins: The moist, sweet bite of cornbread with a cheesy twist pairs wonderfully with the bisque, adding a playful texture and a hint of sweetness.

  • White Wine: A chilled glass of Sauvignon Blanc or Chardonnay enhances the meal, complementing the delicate flavors of the crab and shrimp while providing a refreshing contrast.

Serve your Crab and Shrimp Seafood Bisque with any of these elements for a dining experience that feels both cozy and elegant!

Expert Tips for Crab and Shrimp Seafood Bisque

Fresh Ingredients: Using fresh shrimp and lump crab meat will elevate the flavor and texture of your bisque. Frozen alternatives can work, but fresh is best!

Watch the Garlic: Sauté the garlic just enough to release its aroma; burning it can lead to bitterness that may overpower your Crab and Shrimp Seafood Bisque.

Thickening Tips: Ensure you evenly sprinkle flour over the vegetables to avoid clumps, creating that rich, creamy bisque everyone loves.

Gently Simmer: Keep a close eye on the heat when cooking the seafood, as overcooking shrimp can result in a rubbery texture—just a few minutes will yield the perfect bite!

Customize with Care: Feel free to add your favorite vegetables or spices, but be cautious not to overpower the delicate seafood flavor in your bisque.

Garnish Wisely: A sprinkle of fresh herbs like parsley or chives adds a vibrant pop, and a squeeze of lemon brightens the dish beautifully.

Variations & Substitutions for Crab and Shrimp Seafood Bisque

Don’t hesitate to personalize your Crab and Shrimp Seafood Bisque; let your taste buds guide you!

  • Gluten-Free: Substitute regular flour with gluten-free flour or cornstarch for a smooth, thick texture.

  • Dairy-Free: Use coconut milk or a plant-based cream alternative instead of heavy cream to keep it creamy yet dairy-free.

  • Seafood Medley: Swap in scallops, lobster, or your favorite white fish for a different seafood flavor. Each will give a unique twist to the bisque's richness.

  • Spicy Kick: Enhance the warmth by adding a pinch of cayenne pepper or diced jalapeños for a zesty touch that complements the seafood beautifully.

  • Veggie Boost: Mix in veggies like corn, bell peppers, or even spinach to add color, nutrition, and a delightful crunch to your bisque.

  • Herb Infusion: Experiment with fresh herbs such as thyme or dill instead of parsley for a fresh twist that elevates the flavor profile.

  • Citrusy Splash: Squeeze in lime juice instead of lemon for a different take on citrus brightness that pairs well with seafood.

For more seafood inspiration, you might enjoy these tasty Seafood Pasta Savory dishes or the delightful Shrimp Ceviche Zesty. Each offers a versatile, delicious way to elevate your home-cooked meals!

Crab and Shrimp Seafood Bisque Recipe FAQs

How do I choose the freshest shrimp for my bisque?
Absolutely! When selecting shrimp, look for shells that are firm and shiny, with a mild briny scent. Fresh shrimp should have a translucent quality, and avoid any that appear dull or have dark spots. If you're purchasing frozen shrimp, make sure they're properly packaged and not showing any signs of freezer burn.

How long can I store leftover bisque in the fridge?
You can keep your Crab and Shrimp Seafood Bisque in an airtight container in the refrigerator for up to 3 days. It's a good idea to let it cool to room temperature before sealing it to prevent condensation, which can dilute the flavors.

Can I freeze the bisque for later use?
Yes, you can absolutely freeze your bisque for up to 3 months! To do this, allow the bisque to cool completely, then pour it into freezer-safe containers, leaving about an inch of space at the top for expansion. Thaw in the fridge overnight before reheating.

What should I do if my bisque turns out too thick?
If you find your bisque too thick, don't worry! Just add a bit of extra seafood or chicken broth slowly while stirring until it reaches your desired consistency. Alternatively, a splash of cream can also help lighten it up while enhancing its richness.

Are there any dietary considerations for pets or allergies with this recipe?
Very! When preparing Crab and Shrimp Seafood Bisque, keep in mind that shellfish is a common allergen. Additionally, it’s best to avoid giving any of this bisque to pets, particularly those sensitive to rich foods or shellfish.

How can I ensure my bisque remains creamy when reheating?
Reheating gently is key! When you're ready to enjoy your Crab and Shrimp Seafood Bisque again, pour it into a saucepan over low heat. Stir occasionally and avoid boiling, as high heat can cause the cream to separate. If it looks a bit thick, you can always whisk in a little extra broth or cream as you warm it up!

Crab and Shrimp Seafood Bisque

Indulge in Creamy Crab and Shrimp Seafood Bisque Delight

Enjoy a luxurious Crab and Shrimp Seafood Bisque, a perfect blend of sweetness and comfort, ideal for impressing guests or enjoying a cozy night.
Print Recipe Pin Recipe
Prep Time 20 minutes mins
Cook Time 30 minutes mins
Total Time 50 minutes mins
Servings: 4 bowls
Course: Soups
Cuisine: Seafood
Calories: 450
Ingredients Equipment Method Nutrition Notes

Ingredients
  

For the Bisque
  • 1 pound Fresh Shrimp Peel and devein before use
  • 1 pound Lump Crab Meat Use fresh for best results
  • 2 tablespoons Butter Can use olive oil for a lighter option
  • 1 tablespoon Olive Oil
  • 1 medium Onion Diced
  • 2 stalks Celery Chopped
  • 2 medium Carrots Diced
  • 3 cloves Garlic Minced
  • 2 tablespoons Tomato Paste Optional for a creamy white bisque
  • 1/4 cup Flour Substitute with gluten-free option if needed
  • 4 cups Seafood/Chicken Broth
  • 1 tablespoon Old Bay Seasoning Can substitute with Cajun seasoning
  • 1 teaspoon Paprika
  • 1 leaf Bay Leaf Remove before serving
  • to taste Salt and Pepper Adjust to taste
  • 1 cup Heavy Cream Can substitute with half-and-half
For Garnish
  • to taste Fresh Parsley or Chives Chopped
  • 2 wedges Lemon For serving

Equipment

  • Large pot
  • Immersion blender

Method
 

Step-by-Step Instructions
  1. Prepare the seafood by peeling and deveining shrimp and removing any shells from crab meat.
  2. Melt butter and olive oil in a large pot, then sauté diced onions, chopped celery, and carrots for 5-7 minutes.
  3. Add minced garlic and sauté for 1 minute, then mix in tomato paste and cook for 1-2 minutes.
  4. Sprinkle flour over the vegetables, stir to coat, and cook for another minute.
  5. Gradually add seafood or chicken broth while stirring. Stir in Old Bay seasoning, paprika, and bay leaf; simmer for 10 minutes.
  6. Use an immersion blender to blend to desired texture, leaving some seafood chunks.
  7. Lower heat, mix in heavy cream and seafood, then simmer for 5-7 minutes.
  8. Season to taste, remove bay leaf, ladle into bowls, and garnish with parsley or chives and lemon wedges.

Nutrition

Serving: 1bowlCalories: 450kcalCarbohydrates: 30gProtein: 25gFat: 30gSaturated Fat: 18gPolyunsaturated Fat: 2gMonounsaturated Fat: 8gCholesterol: 100mgSodium: 800mgPotassium: 600mgFiber: 2gSugar: 4gVitamin A: 500IUVitamin C: 6mgCalcium: 60mgIron: 2mg

Notes

Using fresh seafood elevates the flavor; avoid overcooking shrimp for the best texture.

Tried this recipe?

Let us know how it was!

Heavenly Louisiana Shrimp and Corn Bisque for Cozy Nights

September 25, 2025 by Grace Snow Leave a Comment

As the rich aroma of simmering shrimp and corn wafts through my kitchen, it feels like a little slice of Louisiana has found its way to my home. This Louisiana Shrimp and Corn Bisque is not just a recipe; it's a celebration of comforting Cajun flavors that warms the heart and soul. With its creamy texture and the delightful sweetness of corn mingling with perfectly cooked shrimp, it’s a dish that can serve as a nurturing starter or a satisfying main course for any gathering. Plus, it boasts a versatility that allows for a vegetarian twist by swapping shrimp for mushrooms or a creamy dairy-free version using coconut milk. Wondering how to make this scrumptious bisque that’s set to impress? Let’s dive in!

Why is this bisque a must-try?

Comforting, this Louisiana Shrimp and Corn Bisque wraps you in a hug of warmth, perfect for chilly nights. Transformative, it can easily cater to dietary preferences, with options for a vegetarian or dairy-free delight that never compromises on flavor. Savory depth from crisp bacon and rich sherry elevates the broth, while sweet corn whispers of summer in every bite. Easy to prepare, it's an impressive dish that looks and tastes gourmet, yet comes together effortlessly. Pair it with crusty bread or serve it over rice for a meal that’ll leave everyone craving more!

Louisiana Shrimp and Corn Bisque Ingredients

• Note: Get ready to create this creamy and comforting Louisiana Shrimp and Corn Bisque!

For the Base

  • Bacon – Adds savory depth and richness; feel free to swap for turkey bacon for a leaner option.
  • Onion – Provides a sweet and aromatic foundation; finely chop about 1 cup to enhance flavor.
  • Bell Pepper – Contributes sweetness and crunch; any color works, but green adds a more robust flavor.
  • Celery – Adds flavor and texture; finely diced for the perfect aromatics in cooking.
  • Garlic – Enhances the soup's flavor with pungent notes; minced for a stronger release of taste.
  • Sherry Cooking Wine – Adds depth and complexity to the broth; can be substituted with white wine or omitted for non-alcoholic.

For the Bisque

  • Butter – Creates a rich base for the roux; substitute with olive oil for a dairy-free option.
  • All-Purpose Flour – Thickens the bisque; key for roux; use gluten-free flour if needed.
  • Shrimp Stock – Forms the foundation of the bisque; use homemade or store-bought chicken or seafood stock as alternatives.
  • Water – Balances the mixture and adjusts consistency for that perfect bisque texture.
  • Cajun Seasoning – Provides spice and flavor; adjust to taste, using a milder blend if preferred.

For the Main Ingredients

  • Medium Raw Shrimp – The main protein, peeled and deveined; substitute with mushrooms for a delicious vegetarian version.
  • Fresh Corn or Corn Kernels – Adds sweetness and texture; frozen corn works beautifully if fresh isn’t available.
  • Heavy Cream – Enriches the bisque; replace with coconut milk for a creamy dairy-free alternative.
  • Black Pepper & Additional Cajun Seasoning – For an enhancement in taste; adjust to your personal preference.
  • Fresh Parsley – Adds freshness and makes for a lovely garnish; keep some aside for finishing touches.

With this inviting blend of ingredients, you’re set to create a delightful Louisiana Shrimp and Corn Bisque that's sure to impress!

Step‑by‑Step Instructions for Louisiana Shrimp and Corn Bisque

Step 1: Prep Ingredients
Start by gathering and preparing your ingredients for the Louisiana Shrimp and Corn Bisque. Finely chop one cup of onion, one bell pepper, and a few stalks of celery. Mince garlic cloves, chop the bacon into small pieces, and remove the kernels from fresh corn if using. Season your shrimp with Cajun seasoning and set everything aside to ensure a smooth cooking process.

Step 2: Crisp Bacon
In a large Dutch oven, cook the chopped bacon over medium heat until it turns crispy, which should take about 5-7 minutes. As the bacon sizzles, let the wonderful aroma fill your kitchen. Once cooked, use a slotted spoon to remove the bacon and drain the excess grease, leaving about a tablespoon in the pot for flavor.

Step 3: Sauté Vegetables
Using the residual bacon grease, add the chopped onion, bell pepper, and celery to the Dutch oven. Sauté these aromatic vegetables over medium heat until they soften, approximately 5-6 minutes. Stir occasionally to prevent sticking. Once softened, add the minced garlic and sauté for an additional minute, allowing the garlic’s fragrance to fill the air.

Step 4: Deglaze
Next, pour in ½ cup of sherry cooking wine to deglaze the pot, scraping up any flavorful browned bits from the bottom. This should take about 1-2 minutes as the wine simmers and reduces slightly. The deglazing step enriches the flavor profile of your Louisiana Shrimp and Corn Bisque, creating a robust base for the soup.

Step 5: Make Roux
Add ¼ cup of butter to the pot and allow it to melt over medium heat. Once melted, stir in ¼ cup of all-purpose flour to form a roux. Cook the roux for about 5 minutes, stirring continuously until it deepens in color to a light golden brown. This roux will give your bisque a creamy consistency and a rich flavor.

Step 6: Simmer Bisque
Gradually whisk in 4 cups of shrimp stock and 1 cup of water, ensuring there are no lumps. Allow the mixture to come to a boil, then add half of the chopped parsley and green onions. Reduce the heat to a simmer and let it cook uncovered for about 20 minutes, allowing flavors to meld and thicken.

Step 7: Add Shrimp and Corn
After the bisque has simmered, stir in 1 pound of medium raw shrimp and 1 ½ cups of fresh corn (or corn kernels). Follow this with 1 cup of heavy cream for a luscious finish. Simmer the mixture for an additional 5 minutes, or until the shrimp turn pink and opaque, ensuring they’re cooked through.

Step 8: Taste and Adjust
Finally, taste your Louisiana Shrimp and Corn Bisque and adjust seasoning as needed with salt, black pepper, or additional Cajun seasoning. Garnish with the remaining parsley and green onions before serving. The motivation for every spoonful is the delicious blend of creamy bisque, shrimp, and sweet corn waiting to be savored!

Expert Tips for Louisiana Shrimp and Corn Bisque

  • Perfect Roux: Stir constantly when making the roux to prevent burning. The color should be a light golden brown for optimal flavor and texture.

  • Warm the Cream: Always warm the heavy cream before adding it to the mixture to prevent curdling. This ensures a smooth and creamy Louisiana Shrimp and Corn Bisque.

  • Taste as You Go: Don’t shy away from tasting throughout the cooking process. Adjust seasonings, especially Cajun seasoning, to match your preferred spice level.

  • Fresh Corn: If using fresh corn, remove the kernels right before cooking for the sweetest flavor. If it’s out of season, frozen corn works great; just avoid canned for best results.

  • Leftover Goodness: Let any leftovers sit in the refrigerator overnight. The flavors meld beautifully, making the next day's serving even more delicious!

What to Serve with Louisiana Shrimp and Corn Bisque

Creating a cozy meal around your Louisiana Shrimp and Corn Bisque can elevate your dining experience to new heights.

  • Crusty French Bread: This warm, flaky bread pairs perfectly, ideal for dipping into the creamy bisque and soaking up every delicious drop.
  • Cajun Rice: Serve over a bed of fluffy Cajun rice for a heartier option, allowing the flavorful sauce to seep into the grains.
  • Garden Salad: A fresh garden salad with a tangy vinaigrette provides a crisp contrast, balancing the richness of the bisque with freshness.
  • Cornbread Muffins: Sweet cornbread muffins offer an enticing sweet and savory pairing, making each bite a delightful experience.
  • Sautéed Greens: Wilted garlic collard greens or spinach add a nutritious and vibrant element, enhancing the meal's overall healthfulness.
  • Chardonnay: A chilled glass of Chardonnay’s lightness complements the creamy bisque beautifully, enhancing the flavors without overpowering them.
  • Spicy Shrimp Tacos: For a fun twist, serve mini shrimp tacos on the side, tapping into those Cajun flavors while adding a lovely crunch.
  • Chocolate Mousse: Finish with a light chocolate mousse for dessert, creating a sweet ending to your hearty meal.

With these delightful pairing suggestions, your Louisiana Shrimp and Corn Bisque will shine brightly at the center of your meal!

How to Store and Freeze Louisiana Shrimp and Corn Bisque

  • Fridge: Store leftover bisque in an airtight container for up to 3 days. Reheat gently on the stove over low heat to maintain creaminess.
  • Freezer: For longer storage, freeze the bisque in freezer-safe containers for up to 3 months. Leave some space at the top for expansion and thaw in the fridge before reheating.
  • Reheating: When reheating, add a splash of water or stock to regain the creamy texture. Stir well while warming to ensure even heating and prevent curdling.
  • Serving Freshness: Always taste and adjust seasoning after reheating, as flavors may mellow during storage. Enjoy your Louisiana Shrimp and Corn Bisque made fresh again!

Make Ahead Options

These Louisiana Shrimp and Corn Bisque are perfect for busy home cooks looking to save time without sacrificing flavor! You can prep the aromatic vegetables (onion, bell pepper, celery, and garlic) up to 24 hours in advance. Simply chop and store them in an airtight container in the refrigerator to keep them fresh and crisp. Additionally, you can cook the bacon and prepare the roux ahead of time, refrigerating them separately for up to 3 days. When you're ready to enjoy your bisque, just reheat the roux and add the stock, shrimp, and corn, finishing with the cream and simmering until heated through. This way, you'll have a comforting bowl of Louisiana Shrimp and Corn Bisque without the last-minute rush!

Louisiana Shrimp and Corn Bisque Variations

Feel inspired to customize your Louisiana Shrimp and Corn Bisque for your own taste or dietary needs? Here are some delightful ideas to play around with!

  • Vegetarian Option: Replace shrimp with an equal volume of sautéed mushrooms or tofu for a savory twist. You’ll still enjoy that comforting flavor without the seafood!

  • Dairy-Free Option: Substitute butter with olive oil and cream with coconut milk. This keeps your bisque creamy while being gentle on dairy-sensitive tummies.

  • Gluten-Free Option: Use gluten-free flour in place of regular flour when making your roux. This small swap opens the gate for bisque lovers with gluten sensitivities!

  • Spicy Kick: Incorporate diced jalapeños or a pinch of cayenne pepper to elevate the heat! Adjust according to your spice preference, and feel the warm glow in every spoonful.

  • Flavor Infusion: Add a bay leaf while simmering the bisque for an added layer of depth. Don’t forget to remove it before serving—a little trick to intensify those Cajun flavors!

  • Texture Twist: For a bit of crunch, add some toasted corn or fried shallots on top as a garnish. They create a satisfying contrast to the silky soup.

  • Seafood Variations: Swap shrimp for other seafood options like crab or scallops for a luxurious touch that makes your bisque feel even more special.

For a bit more inspiration, don't forget to check out my recipe for Pan Fried Shrimp which pairs perfectly with this bisque, or explore the satisfying layers of flavor from my Corn Furikake Fried Rice for a vibrant meal idea!

Feel free to experiment and have fun making this recipe your own!

Louisiana Shrimp and Corn Bisque Recipe FAQs

What type of shrimp should I use for the bisque?
I recommend using medium raw shrimp for the best flavor and texture. Ensure they are peeled and deveined for easy preparation. If you're looking for alternatives, mushrooms can be used in a vegetarian version, providing a lovely earthiness to the bisque.

How do I know when my shrimp is cooked?
Cooked shrimp will turn a beautiful pink color and become opaque. This usually takes about 5 minutes after adding them to the simmering bisque. Just keep an eye on them to avoid overcooking, which can make them tough!

Can I store leftovers, and how long do they last?
Absolutely! Store leftover Louisiana Shrimp and Corn Bisque in an airtight container in the fridge for up to 3 days. Reheat it gently on the stove over low heat to maintain its creamy texture—this is key for optimal enjoyment!

How do I freeze Louisiana Shrimp and Corn Bisque?
To freeze your bisque, allow it to cool completely and then pour it into freezer-safe containers, leaving some space at the top for expansion. It can be frozen for up to 3 months. When you're ready to enjoy it again, thaw in the fridge overnight before reheating on the stove.

What can I substitute for heavy cream to make it dairy-free?
For a delightful dairy-free version, swap the heavy cream with coconut milk. This change will still give you that creamy texture while adding a subtle sweetness to the bisque that beautifully complements the Cajun flavors.

Are there any dietary concerns I should consider?
If you're cooking for others, be mindful of common allergies: shrimp is a shellfish, so make sure there are no allergies to shellfish. Additionally, the dish can be made gluten-free using appropriate stock and flour. Always check the labels on your ingredients!

Louisiana Shrimp and Corn Bisque

Heavenly Louisiana Shrimp and Corn Bisque for Cozy Nights

This Louisiana Shrimp and Corn Bisque is a celebratory dish of comforting Cajun flavors, perfect for any gathering.
Print Recipe Pin Recipe
Prep Time 15 minutes mins
Cook Time 40 minutes mins
Total Time 55 minutes mins
Servings: 6 cups
Course: Soups
Cuisine: Cajun
Calories: 350
Ingredients Equipment Method Nutrition Notes

Ingredients
  

Base
  • 4 slices Bacon Adds savory depth and richness; feel free to swap for turkey bacon for a leaner option.
  • 1 cup Onion Provides a sweet and aromatic foundation; finely chop.
  • 1 each Bell Pepper Contributes sweetness and crunch; any color works.
  • 2 stalks Celery Adds flavor and texture; finely diced.
  • 2 cloves Garlic Minced for a stronger release of taste.
  • 0.5 cup Sherry Cooking Wine Adds depth; substitute with white wine or omit.
Bisque
  • 0.25 cup Butter Creates a rich base for the roux; substitute with olive oil for dairy-free.
  • 0.25 cup All-Purpose Flour Thickens the bisque; use gluten-free if needed.
  • 4 cups Shrimp Stock Use homemade or store-bought alternatives.
  • 1 cup Water Balances the mixture for perfect texture.
  • 2 tablespoons Cajun Seasoning Provides spice; adjust to taste.
Main Ingredients
  • 1 pound Medium Raw Shrimp Peeled and deveined; substitute with mushrooms for vegetarian.
  • 1.5 cups Fresh Corn or Corn Kernels Sweetness and texture; frozen works beautifully.
  • 1 cup Heavy Cream Enriches the bisque; replace with coconut milk.
  • to taste Black Pepper Enhance taste; adjust as preferred.
  • to taste Additional Cajun Seasoning Adjust to your personal preference.
  • 2 tablespoons Fresh Parsley Adds freshness; keep some for garnish.

Equipment

  • Dutch oven

Method
 

Steps
  1. Start by gathering and preparing your ingredients for the Louisiana Shrimp and Corn Bisque. Finely chop onions, bell pepper, and celery. Mince garlic, chop the bacon, and remove corn kernels if using. Season shrimp with Cajun seasoning and set aside.
  2. In a large Dutch oven, cook the chopped bacon over medium heat until crispy, about 5-7 minutes. Once cooked, remove bacon and drain excess grease, leaving about a tablespoon in the pot.
  3. Using the residual bacon grease, sauté chopped onion, bell pepper, and celery over medium heat until softened, about 5-6 minutes. Stir occasionally. Add minced garlic and sauté for an additional minute.
  4. Pour in sherry cooking wine to deglaze the pot, scraping up browned bits. This should take about 1-2 minutes as the wine simmers.
  5. Add butter to the pot and melt over medium heat. Stir in flour to form a roux and cook for about 5 minutes until golden brown.
  6. Gradually whisk in shrimp stock and water, ensuring no lumps. Bring to a boil, add half of the parsley and simmer uncovered for about 20 minutes.
  7. Stir in shrimp and corn, followed by heavy cream. Simmer for an additional 5 minutes, until shrimp turn pink.
  8. Taste and adjust seasoning with salt, black pepper, or additional Cajun seasoning. Garnish with remaining parsley and serve.

Nutrition

Serving: 1cupCalories: 350kcalCarbohydrates: 30gProtein: 20gFat: 20gSaturated Fat: 10gPolyunsaturated Fat: 2gMonounsaturated Fat: 8gCholesterol: 150mgSodium: 900mgPotassium: 600mgFiber: 2gSugar: 3gVitamin A: 500IUVitamin C: 10mgCalcium: 80mgIron: 2mg

Notes

Let any leftovers sit in the refrigerator overnight for improved flavors. Reheat gently to maintain creaminess.

Tried this recipe?

Let us know how it was!

Gordon Ramsay’s Roasted Tomato Soup: Creamy Comfort in a Bowl

September 25, 2025 by Grace Snow Leave a Comment

As the chilly evenings settle in, there's nothing quite like a bowl of homemade soup to warm the soul. Today, I’m thrilled to share Gordon Ramsay’s Roasted Tomato Soup, a beautifully crafted dish that melds the rich flavors of caramelized tomatoes, savory garlic, and sweet onions into a comforting bowl of goodness. This recipe is not only healthy and gluten-free, but it’s also incredibly easy to whip up, making it a perfect weeknight meal that even the busiest home chefs can master. Plus, you’ll love how well it pairs with your favorite grilled cheese or crusty bread! Ready to dive into a creamy, dreamy hug in a bowl? Let’s get cooking!

Why is this tomato soup a must-try?

Comforting, warm flavors: This recipe offers a delightful blend of roasted tomatoes, garlic, and onions that wrap you in a cozy culinary hug.
Versatile variations: Whether you're craving an herbal twist, a spicy kick, or a vegan option, this dish easily adapts to fit your taste.
Quick and easy: With minimal prep and straightforward steps, you can conjure up this comforting bowl of goodness in no time.
Crowd-pleasing appeal: Perfect for cozy family dinners or impressing guests, you'll have everyone asking for seconds! Pair it with a crunchy grilled cheese sandwich or crusty bread for the ultimate experience. Don’t forget to check out our Asparagus Soup Healthy for another delicious option!

Gordon Ramsay’s Roasted Tomato Soup Ingredients

  • For the Soup Base

  • Ripe Tomatoes – Their sweet, rich flavor provides the essential base for the soup; fresh is best, but canned tomatoes work too.

  • Onion – This adds a lovely sweetness and depth; quarter them for roasting.

  • Garlic – Infuses the soup with aromatic richness; roast alongside the tomatoes and onions for best results.

  • For Roasting

  • Olive Oil – Drizzle over your vegetables to enhance roasting and add healthy fats.

  • Salt and Pepper – Essential for balancing flavors; don't be shy—season to your preference!

  • For the Creaminess

  • Vegetable/Chicken Broth – This is what makes your soup a delicious liquid delight; opt for low-sodium options if controlling salt intake.

  • Heavy Cream – Adds richness and creaminess; substitute with coconut milk or cashew cream for a vegan option.

  • For the Garnish

  • Fresh Basil (optional) – Sprinkle this on top for a fresh, herbal note that brightens the soup.

Dive into this Gordon Ramsay’s Roasted Tomato Soup and enjoy the cozy flavors that await you!

Step‑by‑Step Instructions for Gordon Ramsay’s Roasted Tomato Soup

Step 1: Preheat Your Oven
Begin by preheating your oven to 400°F (200°C). This temperature is perfect for roasting, allowing the tomatoes, onions, and garlic to caramelize beautifully. You’ll know it’s ready when the air feels warm and inviting, promising deliciousness ahead!

Step 2: Prepare the Vegetables
On a large baking sheet, arrange halved ripe tomatoes, quartered onion, and peeled garlic. Drizzle everything generously with olive oil, then sprinkle with salt and pepper to enhance the flavors. Toss gently to coat all the vegetables, ensuring they’re ready to roast evenly and develop a lovely caramelization.

Step 3: Roast the Mixture
Place the baking sheet in the preheated oven and roast for 30-35 minutes. Keep an eye on them as they cook; the tomatoes should become juicy and slightly charred, while the onions will soften and turn beautifully golden. This roasting step is crucial for deepening the flavors of your Gordon Ramsay’s Roasted Tomato Soup.

Step 4: Blend the Roasted Vegetables
Once roasted, remove the baking sheet from the oven and allow the mixture to cool slightly. Transfer the tomatoes, onion, and garlic into a blender, adding your broth. Blend until smooth and creamy; this is where the cozy essence of your soup begins to come together.

Step 5: Simmer to Perfection
Pour the blended soup back into a pot over medium heat. Stir in the heavy cream to achieve that luxurious, creamy texture. Allow the soup to simmer gently for about 5 minutes, giving time for the flavors to meld and for the soup to heat through fully.

Step 6: Adjust the Seasoning
Taste the soup and adjust the seasoning with more salt and pepper as needed. This final touch is essential to balance the flavors and ensure your Gordon Ramsay’s Roasted Tomato Soup is as rich and indulgent as intended.

Step 7: Serve Enjoyably
Ladle the hot soup into bowls, garnishing with fresh basil if desired. The vibrant colors and inviting aroma will surely beckon everyone to gather around this comforting dish. Serve warm alongside your favorite grilled cheese or crusty bread for the perfect cozy meal!

What to Serve with Gordon Ramsay’s Roasted Tomato Soup

There's nothing quite like the cozy experience of enjoying a warm bowl of rich soup alongside delightful accompaniments that enhance every spoonful.

  • Grilled Cheese Sandwich: The classic pairing, with its crispy exterior and gooey, melty cheese, adds a comforting crunch that complements the creamy soup perfectly.
  • Crusty Bread: A great vessel for dipping, this fresh and chewy bread brings a rustic touch to each bite, soaking up the delicious flavors of the soup.
  • Herbed Croutons: These add a delightful crunch and burst of flavor; toss in your favorite herbs for a fragrant, crunchy bite that enhances the soup's taste.
  • Side Salad: A fresh salad packed with vibrant greens and a tangy vinaigrette helps balance the richness of the soup, providing a refreshing contrast.
  • Oven-Roasted Vegetables: Simple roasted veggies, drizzled with olive oil and herbs, bring an additional layer of texture and nutritional goodness, making your meal heartier.
  • Wine Pairing: A light red like Pinot Noir perfectly balances the acidity of the tomatoes while enhancing the overall flavor experience of your meal.
  • Mini Meat Pies: These savory pastries add a hearty touch, making for a satisfying, comforting meal that pairs beautifully with the soup's smooth richness.
  • Fruit Sorbet: End your meal on a sweet note. This light dessert refreshes the palate after the creamy soup, offering a burst of fruity flavor.

Embrace the playful mix of flavors and textures that these pairings bring to your table for a delightful culinary experience!

Make Ahead Options

Gordon Ramsay’s Roasted Tomato Soup is a fantastic meal prep-friendly recipe that can save you precious time on busy weeknights. You can roast the tomatoes, onions, and garlic up to 24 hours in advance, letting their flavors develop beautifully. Simply follow the roasting steps, allow the mixture to cool, and then store it in an airtight container in the refrigerator. When you're ready to enjoy your soup, just blend the roasted mixture with the broth, stir in the cream, and simmer for 5 minutes before serving. This way, you'll have a warm, comforting bowl of soup that's just as delicious, making dinner a breeze after a long day!

Gordon Ramsay’s Roasted Tomato Soup Variations

Feel free to tailor this beloved soup to your preferences for a delightful twist on comfort!

  • Herbal Twist: Add fresh basil or thyme to the blended soup for a burst of fragrant freshness. The herbs brighten the flavors while elevating your soup experience.

  • Spicy Kick: Introduce red pepper flakes or sriracha for a bit of heat. A few dashes can transform this creamy dish into a cozy spicy delight, perfect for chilly evenings.

  • Vegan Style: Substitute heavy cream with coconut milk or cashew cream to keep it completely plant-based. You’ll achieve that luscious creaminess while catering to dairy-free preferences.

  • Extra Texture: Toss in roasted carrots or red peppers before blending for a hearty addition. Their natural sweetness enhances the flavor profile while adding delightful bits of texture.

  • Cheesy Goodness: Stir in shredded cheese like parmesan or mozzarella just before serving. This melting richness will give you a truly indulgent bowl of soup – sheer comfort!

  • Smoky Flavor: Add smoked paprika or a splash of liquid smoke for a unique depth. The smokiness offers an unexpected but welcome twist to the classic tomato flavor.

  • Nutty Addition: Blend in a spoonful of almond or tahini for extra creaminess and a subtle nutty flavor. This healthy fat boost will make your soup even more satisfying.

  • Broth Variations: Swap vegetable or chicken broth for a homemade version using leftover vegetable scraps. The depth of flavor from your homemade broth will infuse warmth into every bowl.

Don’t forget to check out our delicious Maple Roasted Sweet potatoes for a perfect side dish to accompany your cozy soup!

How to Store and Freeze Gordon Ramsay’s Roasted Tomato Soup

  • Fridge: Store leftovers in an airtight container for up to 4 days. This helps maintain the creamy texture and rich flavors of your soup.
  • Freezer: Portion the soup into freezer-safe containers or bags and freeze for up to 3 months. Thaw overnight in the fridge before reheating.
  • Reheating: To reheat, gently warm the soup on the stove over medium heat, stirring occasionally. If it's too thick, add a splash of broth to achieve your desired consistency.
  • Serving After Storing: Always taste and adjust seasoning after reheating; a dash more salt and pepper can brighten up the flavors of your Gordon Ramsay’s Roasted Tomato Soup.

Expert Tips for Gordon Ramsay’s Roasted Tomato Soup

  • Caramelization is Key: Ensure tomatoes are slightly charred for the best flavor; this enhances the natural sweetness and depth of the soup.

  • Test for Creaminess: After blending, if the soup is too thick, add more broth until you reach your desired consistency without losing that creamy vibe.

  • Season to Taste: Always taste and adjust seasoning before serving; a little extra salt and pepper can elevate your Gordon Ramsay’s Roasted Tomato Soup to new heights.

  • Storage Savvy: Store leftovers in an airtight container for up to 4 days in the fridge, or freeze portions for up to 3 months for quick future meals.

  • Add a Flavor Boost: A splash of balsamic vinegar or a sprinkle of fresh herbs right before serving can make a delightful difference in flavor!

Gordon Ramsay’s Roasted Tomato Soup Recipe FAQs

What tomatoes are best for making this soup?
Absolutely! Use ripe, fresh tomatoes when available for the best flavor. Look for tomatoes that are slightly soft to the touch, with no dark spots all over. If fresh tomatoes aren’t in season, you can substitute with 2 cans of whole tomatoes for a similar taste.

How do I store leftover Gordon Ramsay’s Roasted Tomato Soup?
Store any leftovers in an airtight container in the fridge for up to 4 days. This way, you can enjoy the same comforting flavors a few days later. Just make sure to let it cool to room temperature before sealing it up!

Can I freeze Gordon Ramsay’s Roasted Tomato Soup?
Very! To freeze, portion the soup into freezer-safe containers or even resealable bags, and pack it flat to save space. It can be stored for up to 3 months. When you're ready to enjoy it again, simply thaw overnight in the fridge and reheat gently on the stove.

What should I do if my soup turns out too thick?
No worries! If your soup ends up thicker than you'd like, simply add a bit more broth or even water a splash at a time until you reach your desired consistency. Stir well to combine, and give it a taste before serving!

Is this soup vegan-friendly?
Absolutely! To make this soup vegan, swap out the heavy cream for coconut milk or cashew cream. This will give the soup a lovely creamy texture while keeping it plant-based. Just ensure that your vegetable broth is also vegan-friendly.

Can I use frozen tomatoes for this recipe?
Yes, you can! If you have frozen tomatoes from a previous harvest, simply thaw them before roasting. They might release more liquid, so you may want to adjust the broth amount slightly during blending to maintain the desired richness of your Gordon Ramsay’s Roasted Tomato Soup.

Gordon Ramsay’s Roasted Tomato Soup

Gordon Ramsay’s Roasted Tomato Soup: Creamy Comfort in a Bowl

Gordon Ramsay’s Roasted Tomato Soup is a cozy blend of roasted tomatoes, garlic, and onions, perfect for warming chilly evenings.
Print Recipe Pin Recipe
Prep Time 10 minutes mins
Cook Time 35 minutes mins
Total Time 45 minutes mins
Servings: 4 bowls
Course: Soups
Cuisine: American
Calories: 250
Ingredients Equipment Method Nutrition Notes

Ingredients
  

Soup Base
  • 6 tomatoes Ripe Tomatoes Fresh or canned
  • 1 medium Onion Quartered for roasting
  • 4 cloves Garlic Peeled
For Roasting
  • 3 tablespoons Olive Oil For drizzling
  • to taste Salt
  • to taste Pepper
For the Creaminess
  • 4 cups Vegetable/Chicken Broth Low-sodium recommended
  • 1 cup Heavy Cream Substitute for vegan options
For Garnish
  • 1 tablespoon Fresh Basil Optional

Equipment

  • Baking Sheet
  • Blender
  • pot

Method
 

Instructions
  1. Preheat your oven to 400°F (200°C).
  2. Prepare the vegetables: Arrange halved tomatoes, quartered onions, and peeled garlic on a baking sheet. Drizzle with olive oil and season with salt and pepper.
  3. Roast the mixture for 30-35 minutes until tomatoes are juicy and slightly charred.
  4. Blend the roasted vegetables with broth until smooth and creamy.
  5. Pour the blended soup back into a pot and stir in heavy cream. Simmer gently for about 5 minutes.
  6. Adjust seasoning with salt and pepper as needed.
  7. Serve hot in bowls, garnished with fresh basil if desired.

Nutrition

Serving: 1bowlCalories: 250kcalCarbohydrates: 20gProtein: 5gFat: 18gSaturated Fat: 10gPolyunsaturated Fat: 2gMonounsaturated Fat: 5gCholesterol: 40mgSodium: 600mgPotassium: 500mgFiber: 3gSugar: 6gVitamin A: 800IUVitamin C: 15mgCalcium: 50mgIron: 2mg

Notes

Store leftovers in an airtight container for up to 4 days. Freezing is also an option for up to 3 months.

Tried this recipe?

Let us know how it was!

Deliciously Soft Breadstick Bones for a Spooky Halloween Treat

September 24, 2025 by Grace Snow Leave a Comment

As the first whispers of autumn swirl around us, it’s time to conjure up some culinary magic that brings a playful twist to your Halloween gatherings. Enter my Spooky Cheesy Breadstick Bones, a delightful homemade appetizer that’s soft, cheesy, and utterly irresistible. Perfect for dipping in marinara sauce to create a “bloody” effect, they quickly become the star of any festive spread. Not only are they a whimsical addition to your Halloween feast, but they are also quick to whip up, making them a no-stress option for busy home chefs. Whether you're hosting a Halloween party or simply looking to add some frightful fun to dinner, these breadstick bones are a crowd-pleaser that both kids and adults will adore. Ready to embrace the spooky spirit in your kitchen? Let’s dive into this fun recipe!

Why Are These Breadstick Bones a Must-Try?

Simplicity at its best: These breadstick bones require just basic skills, allowing anyone to create a spooky centerpiece for their Halloween feast.
Flavorful and cheesy: The combination of garlic salt and parmesan adds a savory twist that complements the soft texture beautifully.
Versatile for any occasion: While perfect for Halloween, these breadsticks can be shaped for any holiday or celebration, keeping your creativity flowing!
Quick to prepare: With minimal rising time and straightforward instructions, you’ll have a fun appetizer ready in no time, making it an excellent option for last-minute gatherings.
Crowd-pleasing appeal: They are sure to delight guests of all ages, making your party memorable and delicious. Serve them warm with your favorite marinara sauce for added excitement and watch them disappear!

Breadstick Bones Ingredients

For the Dough

  • Warm Water – Hydration is key; use lukewarm water (100°F max) to encourage yeast growth.
  • Active Dry Yeast – Fresh yeast is essential; it provides the perfect leavening for your breadstick bones.
  • Sugar – This little sweetener feeds the yeast; feel free to substitute with honey if desired.
  • Salt – Don’t skimp on this; it enhances flavor and controls yeast activity for perfectly risen breadsticks.
  • Canola Oil – Adds moisture; you can swap it with vegetable oil or melted butter for variation.
  • Flour (3-3¼ cups) – The backbone of your breadsticks; all-purpose flour is ideal, or use a gluten-free blend.
  • Butter – A brush of melted butter gives richness and flavor; olive oil is a great substitute.
  • Garlic Salt – Infuses flavor; fresh minced garlic works wonderfully if you're feeling adventurous.

For the Topping

  • Grated Parmesan Cheese – This delectable topping adds umami flavor; feel free to switch it with hard cheeses like pecorino.

For Serving

  • Marinara Sauce – Essential for that "bloody" dip; any tomato-based sauce will do just fine.

Step‑by‑Step Instructions for Cheesy Breadstick Bones

Step 1: Prepare Yeast Mixture
In a medium bowl, combine 1 packet of active dry yeast and 1 tablespoon of sugar with 1 cup of lukewarm water (around 100°F). Stir gently and let it sit for about 5-10 minutes until it becomes frothy, indicating that the yeast is active. This yeast mixture is critical for achieving the perfect rise in your breadstick bones.

Step 2: Mix Dough
Once the yeast is frothy, add 1 teaspoon of salt and 2 tablespoons of canola oil to the bowl. Gradually mix in 2 cups of all-purpose flour until the ingredients come together. Continue to add flour, a little at a time, until a soft, slightly tacky dough forms. This mixture will serve as the foundation for your delicious cheesy breadstick bones.

Step 3: Knead
Turn the dough out onto a lightly floured surface and knead for about 5-7 minutes, or until the dough is smooth and elastic. It should be soft but not overly sticky; if needed, sprinkle a little more flour as you knead. Once ready, place the dough in a greased bowl, cover it with a damp cloth, and let it rise in a warm spot for 1 hour or until it has doubled in size.

Step 4: Shape Bones
After the dough has risen, punch it down to release the air. Divide it into 16 equal pieces, rolling each piece into a rope about 12 inches long. To create the bone shape, cut slits into the ends of each rope, shaping them as you go. Lay the shaped breadstick bones on a parchment-lined baking sheet, ensuring they have space to expand during the second rise.

Step 5: Second Rise
Cover the shaped dough with a clean kitchen towel and let it rise for another 45 minutes in a warm location, allowing them to puff up slightly. During this time, preheat your oven to 425°F so it's ready when the dough finishes its rise. This second rise is key for achieving soft and fluffy breadstick bones.

Step 6: Bake
Once the breadstick bones have completed their second rise, place the baking sheet in the preheated oven. Bake for 12-14 minutes, or until they are golden brown and sound hollow when tapped. The heavenly aroma of the baking breadsticks will fill your kitchen—an indication that your spooky cheesy breadstick bones are almost ready!

Step 7: Finish
After baking, remove the breadsticks from the oven. Brush them with melted butter, then sprinkle with garlic salt and grated Parmesan cheese while they are still warm. This finishing touch enhances flavor and gives your breadstick bones an irresistible appeal. Serve immediately with marinara sauce for dipping and enjoy the festive playfulness!

Storage Tips for Breadstick Bones

  • Room Temperature: Store baked breadstick bones in an airtight container for up to 4-5 days to maintain their softness and flavor. Keep them in a cool, dry place for best results.
  • Freezer: For long-term storage, place cooled breadsticks in a freezer-safe bag or container; they can be frozen for up to 2 months. To enjoy, thaw and reheat directly from frozen.
  • Reheating: To revive the softness, reheat breadsticks in the oven at 350°F for about 5-7 minutes. This will ensure they are warm and slightly crispy again, ready to pair with marinara sauce!
  • Dough Preparation: If you want to make ahead, freeze pre-shaped, unbaked dough on a baking sheet first, then transfer to a Ziploc once solid. Bake directly from frozen for a quick treat!

What to Serve with Spooky Cheesy Breadstick Bones

As you prepare these delightful breadstick bones, think of complementary dishes that will enhance your Halloween feast's theme and flavor.

  • Pumpkin Chili: The rich flavors of this chunky chili offer a warm contrast to the cheesy breadstick bones, creating a hearty meal. A scoop of this hearty dish can balance the festive fun of the breadsticks perfectly.

  • Mummy Hot Dogs: These playful pastries bring a whimsical touch alongside the spooky breadsticks. Their savory taste and flaky texture are sure to excite little ghouls and goblins at the table!

  • Crispy Sweet Potato Fries: Crunchy, lightly spiced fries bring an excellent texture contrast to the soft breadsticks. They also add a vibrant color to your spread—a feast for the eyes!

  • Witch’s Brew Salad: A fresh mix of greens topped with Halloween-themed toppings, like jack-o’-lantern tomatoes and bat-shaped croutons, will brighten your meal. This salad offers a fresh and zesty balance, making every bite enjoyable.

  • Eyeball Caprese Skewers: Cherry tomatoes and mozzarella balls make fun and spooky eye-shaped snacks. Their creamy, tangy flavor contrasts beautifully with the cheesy breadstick bones, creating a delicious medley.

  • Apple Cider: A warm mug of apple cider spices up your gathering with cozy fall flavors. Perfectly complements the cheesy goodness of the breadsticks while enhancing that Halloween spirit within every sip.

  • Brownie Bites: End your meal on a sweet note with these fudgy bites. Their richness beautifully balances the savory flavors of the appetizer, making them an ideal festive treat.

Think of these pairings to create an enchanting and delightful Halloween spread that everyone will rave about!

Make Ahead Options

These Spooky Cheesy Breadstick Bones are perfect for meal prep, allowing you to enjoy stress-free entertaining! You can prepare the dough and shape it into bones up to 24 hours in advance. Simply follow the mixing and kneading instructions, then shape the bones and place them on a baking sheet. Cover and refrigerate overnight. When you're ready to bake, allow them to come to room temperature while you preheat your oven to 425°F. Bake for 12-14 minutes until golden brown, brushing with butter and topping with garlic salt and Parmesan as usual. This way, you'll have delicious homemade breadsticks with minimal last-minute fuss!

Expert Tips for Breadstick Bones

  • Perfect Yeast Activation: Always ensure your yeast is fresh and the water temperature is just right (around 100°F) for optimal dough rise.

  • Kneading Matters: Knead the dough until it’s smooth and slightly tacky, avoiding excess flour that can lead to dry breadsticks.

  • Shaping Tips: When cutting slits to create bone shapes, use kitchen scissors for precision, ensuring a fun appearance while maintaining structure.

  • Warm Rising Spot: Let your dough rise in a warm, draft-free environment. If your house is cool, place it near a warm oven or on top of a bowl of warm water.

  • Baking Insight: Keep an eye on the breadsticks in the oven; it’s easy to overbake them. They should be golden brown and sound hollow when tapped.

  • Storage Solutions: Baked breadstick bones can last 4-5 days at room temperature or be frozen for up to 2 months, perfect for quick snacking!

Breadstick Bones Variations & Substitutions

Feel free to get creative and customize your breadstick bones to match your family's taste and dietary needs!

  • Herb-Infused: Add dried Italian herbs to the dough for a savory twist, elevating the overall flavor profile.

  • Cheese-Loaded: Incorporate shredded mozzarella or cheddar directly into the dough for extra cheesiness and gooeyness. The melted cheese pulls will be a real crowd-pleaser!

  • Gluten-Free: For a gluten-free version, swap regular flour with a 1:1 gluten-free baking blend, allowing everyone to join in on the fun.

  • Spicy Kick: Mix in a pinch of red pepper flakes for a subtle heat, giving these breadsticks a delightful zing that pairs well with marinara.

  • Sweet Variation: For a fun dessert twist, add a pinch of cinnamon and a sprinkle of sugar before baking. Serve with warm chocolate sauce for dipping!

  • Toppings Mix: Instead of just garlic salt and parmesan, try topping with everything bagel seasoning or a dash of smoked paprika for a unique flavor.

  • Alternative Dips: Serve with pesto, ranch dressing, or even a caramel sauce for an unexpected taste adventure. Each option creates a unique experience!

  • Shape Flexibility: Play around with different shapes—for instance, twist them into spirals or make them into simple sticks for variation; they’ll still be delicious and fun!

For serving ideas, consider pairing your spooky breadstick bones with some of your favorite favorite Halloween dishes, like themed pizzas or pumpkin chili, for a festive feast!

Breadstick Bones Recipe FAQs

How do I choose the right ingredients for my breadstick bones?
Absolutely! For the best results, ensure your active dry yeast is fresh; check the expiration date before using. Use lukewarm water (about 100°F) to activate the yeast effectively. For flour, all-purpose is ideal, but if you’re gluten-free, a 1:1 flour blend works beautifully too. When selecting cheese, grated Parmesan adds a lovely umami flavor, but feel free to let your creativity shine with alternatives like pecorino.

What’s the best way to store leftover breadstick bones?
Very good question! Store any baked breadstick bones in an airtight container at room temperature for up to 4-5 days. If you want to keep them longer, freezing is the way to go! Simply place them in a freezer bag or container, and they can last for up to 2 months. When you’re ready to enjoy them, just thaw and reheat in a preheated oven at 350°F for 5-7 minutes for that warm, soft texture again!

Can I freeze the dough for breadstick bones before baking?
Yes, you can! To freeze the unbaked dough, first shape the bones and place them on a lined baking sheet. Freeze them until solid, then transfer to a Ziploc bag for easy storage. When you're ready to bake, pop them in the oven straight from the freezer—just add a few extra minutes to the baking time. This is a great way to make ahead for those busy days!

Why didn't my breadstick bones rise properly?
Sometimes this happens, but don’t worry, it’s fixable! Ensure your yeast is active; if it doesn't foam after mixing with warm water and sugar, it may be old or the water temperature was off. Also, make sure your dough is kneaded enough—it should be smooth and slightly tacky but not overly sticky. If your dough is too dry, adding a tiny bit of water during kneading can help; aim for a soft, elastic consistency.

Are these breadstick bones suitable for special dietary needs?
Definitely! This recipe is quite versatile. For gluten-free options, you can use a 1:1 gluten-free flour blend. If you're avoiding dairy, try using a non-dairy butter as a substitute and skip the cheese topping for your breadstick bones. Always check labels for any allergies, especially when serving to guests with dietary restrictions. Enjoy the festivities without worry!

Breadstick Bones

Deliciously Soft Breadstick Bones for a Spooky Halloween Treat

These Breadstick Bones are a fun, cheesy appetizer perfect for Halloween gatherings.
Print Recipe Pin Recipe
Prep Time 15 minutes mins
Cook Time 14 minutes mins
Rising Time 1 hour hr 45 minutes mins
Total Time 2 hours hrs 14 minutes mins
Servings: 16 pieces
Course: Appetizers
Cuisine: American
Calories: 120
Ingredients Equipment Method Nutrition Notes

Ingredients
  

For the Dough
  • 1 cup Warm Water Lukewarm (around 100°F)
  • 1 packet Active Dry Yeast Fresh yeast is essential
  • 1 tablespoon Sugar Feeds the yeast
  • 1 teaspoon Salt Enhances flavor
  • 2 tablespoons Canola Oil Can substitute with vegetable oil or melted butter
  • 3 cups All-Purpose Flour 3-3¼ cups depending on dough consistency
  • 2 tablespoons Butter Melted for brushing
  • 1 teaspoon Garlic Salt Infuses flavor
For the Topping
  • ½ cup Grated Parmesan Cheese Can substitute with hard cheeses
For Serving
  • 1 cup Marinara Sauce For dipping

Equipment

  • Mixing Bowl
  • Baking Sheet
  • Parchment Paper
  • Kitchen Towel

Method
 

Step-by-Step Instructions
  1. In a medium bowl, combine 1 packet of active dry yeast and 1 tablespoon of sugar with 1 cup of lukewarm water (around 100°F). Stir gently and let it sit for about 5-10 minutes until it becomes frothy.
  2. Once the yeast is frothy, add 1 teaspoon of salt and 2 tablespoons of canola oil. Gradually mix in 2 cups of all-purpose flour until the dough comes together.
  3. Turn the dough onto a floured surface and knead for 5-7 minutes until smooth. Place in a greased bowl, cover, and let rise for 1 hour.
  4. Punch down the dough, divide into 16 pieces, and roll each into a 12-inch rope. Cut slits into the ends to shape them like bones.
  5. Cover the shaped dough and let rise for another 45 minutes. Preheat the oven to 425°F while they rise.
  6. Bake the breadsticks for 12-14 minutes until golden brown. They should sound hollow when tapped.
  7. Brush the warm breadsticks with melted butter, sprinkle with garlic salt and Parmesan cheese. Serve with marinara sauce.

Nutrition

Serving: 1pieceCalories: 120kcalCarbohydrates: 18gProtein: 3gFat: 4gSaturated Fat: 2gPolyunsaturated Fat: 0.5gMonounsaturated Fat: 1gCholesterol: 10mgSodium: 220mgPotassium: 60mgFiber: 1gVitamin A: 200IUCalcium: 60mgIron: 0.5mg

Notes

For best results, ensure yeast is fresh and water is at the right temperature. Store baked breadsticks in an airtight container for up to 4-5 days.

Tried this recipe?

Let us know how it was!

Creepy Skewered Salami Eyeballs: Spooky Fun for Halloween

September 24, 2025 by Grace Snow Leave a Comment

“Have you ever wanted a snack that’s both playful and a little bit creepy?” That’s exactly what you’ll get with these Creepy Skewered Salami Eyeballs, a Halloween appetizer that’s sure to steal the spotlight at your next gathering. Not only are these eye-catching treats quick and easy to prepare, but they also bring a delightful twist to the classic Italian flavors we all love. Picture your guests’ reactions as they enjoy these amusing yet savory snacks - a fantastic way to bridge the gap between fun and flavor! Whether you’re hosting a Halloween party or just want to impress family with a charming surprise, these salami eyeballs will be a hit with both kids and adults. Are you ready to make your spooky spread unforgettable?

Why Are These Eyeballs So Fun?

Eye-catching: These Creepy Skewered Salami Eyeballs are not just a snack; they’re a conversation starter! Their unique presentation will leave your guests both laughing and impressed.

Quick & Easy: With simple ingredients and straightforward steps, whipping up these delightful treats takes hardly any time—perfect for busy hosts!

Savory Satisfaction: Enjoy the rich flavor of pepperoni combined with creamy mozzarella and briny olives—every bite is a tasty treat that appeals to all ages.

Festive Appeal: Ideal for Halloween parties, they can be easily served next to ghostly dips or spooky desserts, adding a playful touch to your spread.

Make-Ahead Magic: Prepare them a few hours in advance and let them chill—less stress for you before the festivities begin! Don’t forget to check out our tips for creating a spooky platter that will wow your guests.

Creepy Skewered Salami Eyeballs Ingredients

For the Eyeballs

  • Mozzarella Balls – Use fresh mozzarella for a creamy texture that forms the base of your eyeballs.
  • Kalamata Olives – Chop these to create the "eyes" that add a briny kick to each eyeball.
  • Pepperoni Stick – Adds savory flavor and structure—pre-sliced is great for convenience.

For the Decoration

  • Red Bell Pepper – This colorful addition enhances the visual appeal; you can substitute with dried chili peppers for added heat.

Assembly Essentials

  • Skewers – Use wooden or bamboo skewers to easily stack your ingredients for the creepy effect.

Get ready to delight your guests with these Creepy Skewered Salami Eyeballs, the perfect Halloween appetizer!

Step‑by‑Step Instructions for Creepy Skewered Salami Eyeballs

Step 1: Prepare Mozzarella
Begin by taking your fresh mozzarella balls and using a small knife to gently carve out indentations on one side of each ball. These will hold the kalamata olives, creating the perfect eye effect. Aim for about a thumbprint-sized indent, ensuring the cheese remains intact. Arrange the mozzarella on a platter and set aside while you prepare the rest of the ingredients.

Step 2: Make Eyes
Now it’s time to mix in the fun! Finely chop your kalamata olives and spoon them into the indentations made in the mozzarella balls. The dark color of the olives will create a striking contrast against the creamy mozzarella, giving each Creepy Skewered Salami Eyeball a lifelike appearance. Set the cheeseballs aside to allow the flavors to meld.

Step 3: Slice Pepperoni
Take your pepperoni stick and slice it into thick disks of about ¾-inch each, then make thin slices between ¼ to ½ inch thick. The variation in size will add extra intrigue to your skewers while providing bites of delightful flavor. Keep these slices handy as you prepare to assemble your skewers.

Step 4: Prepare Red Pepper
Next, grab your red bell pepper and chop it into small wedge-shaped pieces. These will serve as colorful accents between the mozzarella and pepperoni layers on your skewers. Make sure the pieces are uniform in size to ensure even assembly, and keep them close by for when you’re ready to build your Creepy Skewered Salami Eyeballs.

Step 5: Assemble Skewers
With all components ready, take your wooden or bamboo skewers and start assembling! Begin with a wedge of red bell pepper, followed by a chunk of pepperoni, then add a mozzarella ball with an olive eye. Stack a thicker slice of pepperoni next, and finish with another mozzarella ball for balance. Ensure each skewer looks appealing and is sturdy enough to hold together.

Step 6: Chill & Serve
To maximize the creepiness factor, refrigerate your assembled Creepy Skewered Salami Eyeballs for at least 1-2 hours. This chilling time allows the flavors to meld and makes the skewers refreshingly cool for your guests. When ready to serve, present them on a thematic platter that adds to the spooky ambiance of your Halloween gathering!

How to Store and Freeze Creepy Skewered Salami Eyeballs

  • Fridge: Keep leftover Creepy Skewered Salami Eyeballs wrapped in an airtight container in the refrigerator for up to 3 days. This helps maintain their freshness and visual appeal.

  • Freezer: While it's not ideal to freeze these skewers due to the cheese and other ingredients, if necessary, you can store them in a freezer-safe container for up to 1 month. Thaw in the fridge before serving.

  • Preparation Time: If making ahead, prepare the skewers a few hours in advance, allowing them to chill in the fridge to enhance flavor meld and presentation.

  • Reheating: These skewers are best served cold, but if you prefer them warm, lightly microwave them for 10-15 seconds, just enough to take the chill off without melting the cheese completely.

Make Ahead Options

These Creepy Skewered Salami Eyeballs are fantastic for meal prep, allowing you to spend less time in the kitchen on Halloween night! You can prepare the mozzarella and olives up to 24 hours in advance; simply carve the indents in the mozzarella and fill them with chopped olives, then store them in an airtight container in the refrigerator. The pepperoni and red bell pepper can also be prepped ahead, cutting them into pieces and keeping them refrigerated until assembly. When you’re ready to serve, just assemble the skewers with the prepped ingredients and chill them for at least 1-2 hours to ensure they’re refreshingly cool and visually striking. This means you can enjoy a stress-free soirée while still impressing your guests!

Creepy Skewered Salami Eyeballs Variations

Feel free to unleash your creativity and customize these spooky snacks to match your taste!

  • Cheese Twist: Swap mozzarella for feta or goat cheese for a tangy variation that adds an exciting flavor profile.
    The creaminess of goat cheese paired with the savory elements will create an intriguing balance.

  • Spicy Kick: Use spicy pepperoni or add jalapeños for an extra heat bomb in every bite.
    This twist will appeal to spice lovers and adds a daring twist to your Halloween appetizers.

  • Vegetable Medley: Replace red bell pepper with other colorful veggies like cherry tomatoes, cucumbers, or yellow bell peppers.
    Incorporating a variety of colors not only enhances your presentation but also keeps things fresh and vibrant.

  • Olive Options: Opt for green olives stuffed with pimentos for a fun, cartoonish effect instead of kalamata.
    These can give your eyeballs a lighter, whimsical feel that’s just as charming in appearance.

  • Herb Infusion: Sprinkle a touch of dried herbs like oregano or basil on your mozzarella for a flavor boost that nods to Italian cuisine.
    Enhancing the cheese will add an unexpected layer of deliciousness!

  • Meat Choices: Swap out pepperoni for alternative meats like salami, chorizo, or even prosciutto if you want a gourmet take.
    Each of these meats brings its own unique flavor that can elevate your appetizer game.

  • Sweet & Savory: Add a drizzle of balsamic glaze or honey over the finished skewers to contrast the savory elements with a hint of sweetness.
    It’s a delightful surprise that will leave your guests wanting more!

  • Garnishing Greatness: Top each skewer with fresh herbs like basil or parsley for a pop of color and freshness.
    This final touch will not only enhance the aesthetic but also provide a refreshing element to each bite.

Feel free to explore these variations and let your inner chef shine! Whether aiming for a festive look or a flavor twist, the possibilities are endless. As you create these delightful snacks, remember to pair them with other spooky treats like our spider cupcakes or themed dips for an unforgettable Halloween spread!

What to Serve with Creepy Skewered Salami Eyeballs

Delight your guests by complementing these amusing snacks with vibrant sides and enchanting flavors.

  • Spooky Spider Cupcakes: These eye-catching cupcakes add a sweet contrast, with their dark chocolate base and playful spider decorations echoing the Halloween spirit.

  • Witch's Brew Dip: A creamy spinach-artichoke dip brings a comforting yet festive element, perfect for scooping alongside your skewers.

  • Crispy Vegetable Platter: Fresh, colorful veggies like carrots and cucumbers provide a refreshing crunch, balancing the richness of the salami and mozzarella.

  • Pomegranate Salad: With its bright, jewel-like seeds, this salad adds a sweet-tart burst, beautifully contrasting the savory flavors of your Creepy Skewered Salami Eyeballs.

  • Hauntingly Good Cheese Board: Offering a mix of textures and flavors, a cheese board with assorted cheeses, crackers, and figs complements the amuse-bouche vibes of your eyeballs.

  • Chilling Fruit Punch: Serve a refreshing, spooky fruit punch infused with citrus and berries, invigorating guests while enhancing the playful mood of your gathering.

  • Ghoulish Garlic Bread: Add an irresistible savory touch with garlic bread, providing a warm and comforting pairing to the fun-filled atmosphere.

These items not only enhance the experience but also create a memorable Halloween spread that guests will rave about long after the festivities are over!

Expert Tips for Creepy Skewered Salami Eyeballs

  • Fresh is Best: Always opt for fresh mozzarella, as it ensures a creamier texture that complements the savory salami and olives beautifully.

  • Chill for Creepiness: Don’t skip the chilling step! Keeping the Creepy Skewered Salami Eyeballs refrigerated makes them visually striking and refreshing during your spooky gathering.

  • Color Contrast: Make sure to use kalamata olives for a rich color contrast with the mozzarella. If swapping for green olives, aim for vibrant, high-quality ones for visual impact.

  • Assembly Precision: To prevent skewers from falling apart, ensure each layer is stacked securely. Use thicker slices of pepperoni in the center for sturdiness and drama.

  • Time Savers: For quicker prep, buy pre-sliced pepperoni and mozzarella balls. It allows you more time to enjoy the Halloween fun rather than slaving in the kitchen!

Creepy Skewered Salami Eyeballs Recipe FAQs

What kind of mozzarella balls should I use?
I recommend using fresh mozzarella balls for the best results. They provide a creamy texture and hold up well during assembly. Look for those packed in water, which have a milder flavor and a delightful creaminess that pairs perfectly with the salami and olives.

How should I store leftover Creepy Skewered Salami Eyeballs?
Store any leftover skewers in an airtight container in the refrigerator for up to 3 days. This helps them stay fresh and maintains the visual appeal. Be sure to keep them tightly wrapped to prevent moisture loss!

Can I freeze Creepy Skewered Salami Eyeballs?
While it’s not recommended to freeze these skewers because the cheese might alter in texture, if you must, here’s how: place them in a single layer in a freezer-safe container, separated by parchment paper, and freeze for up to 1 month. To serve, thaw them in the refrigerator overnight before enjoying them!

What’s the best way to prevent the skewers from falling apart?
To ensure your Creepy Skewered Salami Eyeballs remain sturdy, start by using larger slices of pepperoni in the center and securing each ingredient well on the skewer. This way, the stronger components will hold the other ingredients in place, preventing wobbly skewers!

Can pets eat the ingredients used in these skewers?
While mozzarella and pepperoni can be enjoyed by pets in small quantities, moderation is key. Be cautious with kalamata olives, as they contain pits and can be harmful. If you have concerns about your pets and specific ingredients, please consult your veterinarian for advice.

What can I substitute for kalamata olives if I have an allergy?
If you or your guests have an olive allergy, you can substitute finely chopped pickles or capers for a similar briny kick. Green olives with pimentos can also serve as a fun alternative, giving your skewers a colorful cartoonish effect!

Creepy Skewered Salami Eyeballs

Creepy Skewered Salami Eyeballs: Spooky Fun for Halloween

Creepy Skewered Salami Eyeballs are a playful Halloween snack that combines savory flavors and eye-catching presentation.
Print Recipe Pin Recipe
Prep Time 30 minutes mins
Chilling Time 2 hours hrs
Total Time 2 hours hrs 30 minutes mins
Servings: 6 skewers
Course: Snacks
Cuisine: Italian
Calories: 90
Ingredients Equipment Method Nutrition Notes

Ingredients
  

For the Eyeballs
  • 12 oz Mozzarella Balls Use fresh mozzarella for best texture
  • 10 olives Kalamata Olives Chopped for the 'eyes'
  • 1 stick Pepperoni Stick Pre-sliced for convenience
For the Decoration
  • 1 medium Red Bell Pepper Chopped into wedges
Assembly Essentials
  • 6 pieces Skewers Wooden or bamboo

Equipment

  • Skewers

Method
 

Step-by-Step Instructions
  1. Prepare Mozzarella: Carve indentations in mozzarella balls to hold olives.
  2. Make Eyes: Fill the indentations with chopped kalamata olives.
  3. Slice Pepperoni: Cut pepperoni stick into thick and thin slices.
  4. Prepare Red Pepper: Chop red bell pepper into small wedges.
  5. Assemble Skewers: Layer red pepper, pepperoni, mozzarella with olive, and finish with more mozzarella.
  6. Chill & Serve: Refrigerate skewers for at least 1-2 hours before serving.

Nutrition

Serving: 1skewerCalories: 90kcalCarbohydrates: 3gProtein: 5gFat: 7gSaturated Fat: 3gMonounsaturated Fat: 2gCholesterol: 20mgSodium: 350mgPotassium: 140mgSugar: 1gVitamin A: 500IUVitamin C: 5mgCalcium: 150mgIron: 0.5mg

Notes

Always use fresh ingredients for the best taste and presentation. Chill the skewers to enhance flavor and appeal.

Tried this recipe?

Let us know how it was!

Pumpkin Patch Punch: Sip Fall’s Cozy Flavor All Season Long

September 24, 2025 by Grace Snow Leave a Comment

As the leaves turn crisp and the air takes on a hint of chill, there's nothing quite like cozying up with a festive drink in hand. Enter the Pumpkin Patch Punch, an easy party drink that captures the essence of autumn in every sip. Blending pumpkin spice liqueur with creamy apple cider and a splash of bourbon, this Halloween cocktail is sure to enchant your guests, whether young or young-at-heart. Not only is it a breeze to whip up for gatherings, but it also warms the soul with its comforting flavors, making every chilly evening feel just a bit more special. Ready to dive into the flavors of fall? Let's mix up a batch of this delightful punch together!

Why Is Pumpkin Patch Punch a Must-Try?

Deliciously Festive: This cocktail brings the essence of autumn right to your glass with its cozy pumpkin spice flavor.

Easy Preparation: In just a few simple steps, you can have a stunning punch ready for your guests—no advanced skills required!

Perfect for Gatherings: Whether it’s a Halloween party or a cozy fall night, this punch is a crowd pleaser that appeals to all ages.

Versatile Flavors: Customize your punch by swapping apple cider for pear cider or using spiced rum instead of bourbon. The possibilities are endless!

Inviting Aromas: The warmth of cinnamon and pumpkin wafting through your space will make everyone feel at home, just like a good autumn day.

Why not pair it with some delicious treats like Pumpkin Brownies Decadent or enjoy a sweet Pumpkin Cinnamon Roll for a delightful dessert spread? Splendid flavors await!

Pumpkin Patch Punch Ingredients

• Get ready to create the perfect festive drink with these cozy components!

For the Punch

  • Pumpkin spice liqueur – Provides a creamy, spiced flavor that embodies autumn; no direct substitution, but a different spiced liqueur can add a fun twist.
  • Apple cider – Adds a crisp, sweet base for the punch; fresh apple cider is recommended for the best flavor, or substitute with similar juice if unavailable.
  • Bourbon – Offers depth and warmth to the punch; feel free to replace it with rum or whiskey for a different taste profile.
  • Maple syrup (optional) – Enhances sweetness and complements the pumpkin flavors; omit if preferring less sweetness or substitute with agave syrup for a lighter option.

For Garnish

  • Cinnamon sticks – A beautiful garnish that adds aroma and festive flair; fresh herbs like mint can be used as a lively alternative.
  • Apple slices or pumpkin candies – Decorative elements that enhance visual appeal and add a fun Halloween theme; any seasonal fruit can work for variety.
  • Ice cubes – Essential for serving and chilling the punch; ensure you have plenty on hand for a refreshing drink.

Each of these ingredients contributes to the delightful warmth and festivity of this Pumpkin Patch Punch, making it a perfect addition to your autumn gatherings!

Step‑by‑Step Instructions for Pumpkin Patch Punch

Step 1: Mix Your Ingredients
In a large punch bowl, pour in the pumpkin spice liqueur, crisp apple cider, and robust bourbon. If you’re adding maple syrup for extra sweetness, drizzle it in now. Use a wooden spoon to stir the mixture gently for about 1–2 minutes, until everything is well combined and the flavors meld beautifully into a warm, inviting blend.

Step 2: Serve Over Ice
Take a few glasses and fill each with ice cubes, leaving enough space for the punch. Carefully ladle the Pumpkin Patch Punch over the ice, filling each glass about three-quarters full. Ensure that the punch cascades over the ice, creating a chilling effect as the vibrant liquids blend and swirl together beautifully.

Step 3: Garnish Creatively
Now it's time to make your punch visually delightful! Add a cinnamon stick to each glass for aromatic allure and a seasonal touch. For an extra festive flair, float a few apple slices or Halloween-themed candies on top. This will not only enhance the look of your Pumpkin Patch Punch but also add a delightful aroma with each sip.

Step 4: Keep It Cold
As your guests arrive, keep the fun flowing! Serve the punch immediately for the best experience. If you wish to maintain the chill throughout your gathering, place the punch bowl on a larger bowl filled with ice or add more ice to the glasses as needed. This ensures your Pumpkin Patch Punch stays refreshing and delicious for everyone to enjoy!

What to Serve with Pumpkin Patch Punch

As you sip on the warmth of fall, why not elevate your gathering with some delightful accompaniments that perfectly complement this cozy cocktail?

  • Savory Stuffed Mushrooms: These bite-sized delights are rich and flavorful, making them a perfect pairing with the spiced notes of the punch. Their earthiness balances out the sweeter elements in the cocktail.

  • Crispy Apple Chips: Light and crunchy, these chips bring a fresh touch that echoes the apple cider in your punch. They are a delightful snack that adds a healthy twist to your autumn festivities.

  • Cheese Board: A selection of soft and aged cheeses with fruits can enhance the experience. The creaminess of cheese complements the punch, creating a harmonious balance of flavors.

  • Pumpkin Bread Pudding: Embrace those autumn vibes with a warm and comforting dessert that pairs beautifully with your drink. Rich and indulgent, it will create a truly memorable ending to your meal.

  • Warm Pretzels with Mustard Dip: Their soft, chewy texture and slight saltiness contrast nicely with the sweet punch, offering a fun and interactive snack for guests to enjoy.

  • Spiced Pear Tart: A seasonal dessert that echoes the autumn flavors of your punch, this tart provides a perfect sweet and slightly tart finish to the evening, leaving everyone satisfied.

  • Mulled Wine: For an additional drink option, consider offering a warm mulled wine that resonates with the spiced notes of Pumpkin Patch Punch. This cozy drink invites conversations and merriment.

  • Pumpkin Spice Sugar Cookies: Delightfully sweet and softly spiced, these cookies can enhance everyone’s festive mood while mirroring the flavors of your punch. Perfect for holiday cheer!

Make Ahead Options

These Pumpkin Patch Punch preparations are perfect for busy home cooks wanting to save time! You can mix the punch base of pumpkin spice liqueur, apple cider, and bourbon up to 24 hours in advance and refrigerate it in an airtight container to keep it fresh. Just remember to stir it well before serving. When you're ready to enjoy your festive drink, fill glasses with ice and ladle the chilled punch over. Garnish each glass with a cinnamon stick and a slice of apple or some Halloween candies just before serving to ensure that they look inviting. This not only saves you time but also allows you to impress your guests with a ready-to-serve punch that’s just as delicious as if you made it fresh!

Pumpkin Patch Punch Variations

Feel free to make this festive cocktail your own with a few exciting twists!

  • Pear Cider: Substitute apple cider with pear cider for a unique, fruity flavor that brightens the punch. This adds a lovely twist while maintaining that cozy autumn essence.

  • Spiced Rum: Swap bourbon for spiced rum to create a sweeter, tropical note, perfect for an island-inspired autumn celebration. The warmth of spices adds depth to each sip.

  • Non-Alcoholic: For a festive mocktail, replace spirits with extra apple cider or sparkling cider for a bubbly, refreshing experience that everyone can enjoy.

  • Honey or Agave: Instead of maple syrup, use honey or agave syrup to sweeten the punch naturally. Both options provide lovely flavor variations that pair beautifully with the pumpkin.

  • Pineapple Juice: Mix in a splash of pineapple juice for a zingy twist that introduces an unexpected-but-delightful element to your punch.

  • Ginger Beer: For a spicy kick, combine with ginger beer instead of sparkling cider. This adds fizz and a bold, zingy note that beautifully complements the pumpkin spice.

  • Herb Garnishes: Instead of traditional cinnamon sticks, try fresh rosemary or thyme for an herbal twist. Their aromatic notes enhance the festive vibe and add a touch of elegance.

  • Seasonal Fruits: Experiment with garnishes like pomegranate seeds or seasonal citrus slices. They not only add vibrant color but also offer bursts of flavor with each sip.

No matter how you choose to customize your Pumpkin Patch Punch, each variation brings its unique charm. And speaking of flavor, don't forget to pair your punch with some delightful treats like Pumpkin Brownies Decadent for a truly enchanting autumn spread!

How to Store and Freeze Pumpkin Patch Punch

  • Room Temperature: Pumpkin Patch Punch is best served immediately. If left at room temperature, it should be consumed within 2 hours to ensure freshness and safety.

  • Fridge: Leftover punch can be stored in an airtight container in the refrigerator for up to 2 days. Always give it a good stir before serving again for the best flavor.

  • Freezer: While it's not recommended to freeze the entire punch due to the presence of ice and carbonation, you can freeze individual components (like apple cider) separately for up to 3 months. Just thaw and mix again when ready to serve!

  • Reheating: If the punch has been cooled, you can gently heat it on the stove over low heat, being careful not to boil, to serve warm again.

Expert Tips for Pumpkin Patch Punch

  • Mix Thoroughly: Ensure you stir the mixture well to evenly distribute the pumpkin spice flavor and sweetness throughout the punch.

  • Sweetness Control: Adjust the amount of maple syrup based on your taste preferences; a little can go a long way in enhancing the Pumpkin Patch Punch.

  • Chill Before Serving: For the best taste, prepare the punch ahead and store it in the refrigerator; add ice just before serving to avoid diluting the flavors.

  • Versatile Garnishes: Feel free to get creative with your garnishes. Use fresh herbs or different fruits to match your party's theme or personal preferences.

  • Test Before Guests Arrive: Always taste your punch before serving to ensure it's just right; small adjustments can make a big difference in the overall experience.

Pumpkin Patch Punch Recipe FAQs

What should I look for in pumpkin spice liqueur?
When selecting pumpkin spice liqueur, look for a rich and creamy texture with warm cinnamon and nutmeg aromas. I often prefer brands that include real pumpkin flavors, as they enhance the autumn vibe. Ensure the bottle is well-sealed and check the expiration date for optimal taste.

How long can I store leftover Pumpkin Patch Punch in the fridge?
Leftover Pumpkin Patch Punch can be stored in an airtight container in the refrigerator for up to 2 days. Make sure to give it a gentle stir before serving again, as some of the ingredients may settle while it rests. I recommend serving it over ice to keep it refreshing!

Can I freeze Pumpkin Patch Punch?
While freezing the entire punch isn't ideal due to potential dilution from melting ice, you can freeze individual components such as the apple cider. To freeze, pour the cider into ice cube trays or freezer-safe containers and store for up to 3 months. To enjoy, simply thaw and mix with the remaining ingredients before serving!

What if my Pumpkin Patch Punch is too sweet?
If you find your punch too sweet, there are a few simple adjustments you can make. Start by diluting it with a little more apple cider or even some soda water to balance out the sweetness. You can also add a splash of lemon juice for a tangy contrast, which can brighten the flavors beautifully!

Is Pumpkin Patch Punch suitable for dietary restrictions?
Absolutely! For a non-alcoholic version, simply replace the bourbon and pumpkin spice liqueur with extra apple cider or sparkling cider. This way, everyone can enjoy a festive drink. If you have any allergies, double-check all ingredient labels, especially for the liqueur and any garnishes you choose to use.

Pumpkin Patch Punch

Pumpkin Patch Punch: Sip Fall’s Cozy Flavor All Season Long

Pumpkin Patch Punch is a festive drink combining pumpkin spice liqueur, apple cider, and bourbon, perfect for fall gatherings.
Print Recipe Pin Recipe
Prep Time 10 minutes mins
Total Time 10 minutes mins
Servings: 8 cups
Course: Drinks
Cuisine: American
Calories: 180
Ingredients Equipment Method Nutrition Notes

Ingredients
  

For the Punch
  • 1 cup Pumpkin spice liqueur Provides a creamy, spiced flavor that embodies autumn.
  • 4 cups Apple cider Fresh apple cider is recommended for the best flavor.
  • 1 cup Bourbon Offers depth and warmth to the punch.
  • 1/4 cup Maple syrup (optional) Enhances sweetness and complements the pumpkin flavors.
For Garnish
  • 3 sticks Cinnamon sticks A beautiful garnish that adds aroma and festive flair.
  • 1 cup Apple slices or pumpkin candies Enhances visual appeal and adds a fun Halloween theme.
  • as needed Ice cubes Essential for serving and chilling the punch.

Equipment

  • Large punch bowl
  • Wooden spoon
  • Glasses

Method
 

Step-by-Step Instructions
  1. In a large punch bowl, pour in the pumpkin spice liqueur, crisp apple cider, and robust bourbon. If adding maple syrup for extra sweetness, drizzle it in now. Use a wooden spoon to stir gently for about 1–2 minutes, until well combined.
  2. Take a few glasses and fill each with ice cubes, leaving space for the punch. Ladle the Pumpkin Patch Punch over the ice, filling each glass about three-quarters full.
  3. Add a cinnamon stick to each glass for aromatic allure. Float apple slices or Halloween-themed candies on top for extra festive flair.
  4. Serve the punch immediately for the best experience. To keep it cold, place the punch bowl in a larger bowl filled with ice or add more ice to glasses as needed.

Nutrition

Serving: 1cupCalories: 180kcalCarbohydrates: 25gSodium: 5mgPotassium: 100mgSugar: 20gCalcium: 10mg

Notes

Adjust the sweetness by modifying the amount of maple syrup according to taste. Store any leftovers in the fridge for up to 2 days.

Tried this recipe?

Let us know how it was!

Chocolate Candle Cookies to Light Up Your Halloween Treats

September 24, 2025 by Grace Snow Leave a Comment

As I flipped through my favorite cookbook, a gleaming image of charming cookies shaped like candles caught my eye. Instantly, my mind was ablaze with ideas for a festive treat that could light up any Halloween gathering—enter my Spooky Candle Cookies. These delicious chocolate shortbread wonders are not just a feast for the eyes but also extremely simple to bake—no special tools required! With their rich taste and whimsical appearance, they are bound to be a hit at your table. Plus, they lend themselves beautifully to creative decorations, making them a fun project for anyone seeking to add a touch of homemade magic to their festivities. Curious about how to whip up these delightful treats? Let's dive into the recipe!

Why Are These Candle Cookies Unique?

Easy Preparation: No special tools needed—just basic kitchen essentials!

Festive Appeal: Designed for Halloween, their charming candle shape brings whimsy to your table.

Decadent Flavor: Rich chocolate shortbread delivers a satisfying treat that chocolate lovers will adore.

Creative Decorations: Unleash your imagination with colorful icing and unique toppings—try nuts or festive sprinkles!

Perfect for Sharing: These cookies are sure to impress at parties and gatherings—your guests will love them!

For a twist, pair them with Eggnog Cookies Soft or Thumbprint Cookies Melt for a delightful dessert spread!

Candle Cookies Ingredients

For the Cookies

  • All-Purpose Flour – Provides structure and body; substitute with gluten-free flour for a gluten-free option.
  • Cocoa Powder – Adds rich chocolate flavor; opt for unsweetened cocoa for the best results.
  • Salt – Enhances flavor; can be omitted or reduced for lower sodium.
  • Unsalted Butter – Creates a tender texture; use cold butter for firmer cookies if needed.
  • Confectioners Sugar – Sweetens the dough; powdered erythritol can be used for a sugar-free version.
  • Vanilla Extract – Adds depth of flavor; consider almond extract for a different twist.
  • Milk – Moistens the dough; use non-dairy milk for a vegan alternative.
  • Sliced Almonds – Used for decoration to simulate candle wicks; can be replaced with chocolate chips or nuts if preferred.

For the Icing

  • Confectioners Sugar – The base for icing; same substitutions apply as in the dough.
  • Water – Adjusts the icing consistency for the perfect drizzle.
  • Vanilla Extract – Flavors the icing; feel free to substitute with other extracts for a unique taste.
  • Red Gel Food Color – Provides a bleeding icing effect, adding a fun festive touch; use different gel colors for various holidays.

Step‑by‑Step Instructions for Candle Cookies

Step 1: Dough Preparation
In a medium bowl, whisk together 2 cups of all-purpose flour, ½ cup of unsweetened cocoa powder, and a pinch of salt until well combined. In a larger mixing bowl, beat together 1 cup of cold unsalted butter, 1 cup of confectioners sugar, and 1 teaspoon of vanilla extract until creamy and smooth. Gradually mix in the dry ingredients and 3 tablespoons of milk until the dough is crumbly and no dry flour remains.

Step 2: Shaping the Cookies
On a clean work surface, roll about 1 tablespoon of dough into a ball, then roll it into thick logs approximately 3 inches long. Place the logs on a wire rack lined with parchment paper to prevent sticking. At one end of each log, gently insert a few sliced almonds to mimic candle wicks, making sure they stay firmly attached for a festive touch.

Step 3: Chill the Dough
Cover the wire rack with plastic wrap and place it in the refrigerator to chill for at least 4 hours. This step is crucial for ensuring the Candle Cookies hold their shape during baking, resulting in beautifully formed, thick candle-like cookies that are ready for the oven.

Step 4: Baking the Cookies
Preheat your oven to 350°F (175°C) and line a baking sheet with parchment paper. Once the oven is ready, bake the chilled logs for about 25 minutes, or until they are firm to the touch and a darker shade of chocolate. Keep an eye on them to prevent over-baking, as you want that perfect shortbread texture.

Step 5: Preparing the Icing
While the cookies cool completely, prepare the icing by mixing 2 cups of confectioners sugar with 2 tablespoons of water and 1 teaspoon of vanilla extract in a small bowl. Stir until smooth, adjusting the water as necessary to achieve a thick drizzle consistency. Add red gel food coloring to create a festive bleeding effect, stirring until evenly colored.

Step 6: Icing the Cookies
Transfer the icing into a piping bag or a small plastic bag with the corner snipped off for easier drizzling. Once the Candle Cookies have completely cooled, drizzle the icing over them, allowing it to run down the sides to simulate dripping wax. Be creative and have fun with this step!

Step 7: Setting the Icing
After icing the cookies, place them on a wire rack to set for a few hours. This will allow the icing to harden properly, ensuring the stunning appearance of your Candle Cookies is preserved. Once set, they will be ready to serve and impress at your Halloween gatherings!

What to Serve with Spooky Candle Cookies

Imagine a celebration filled with laughter and joy, complemented by flavors that dance on your palate and warm your heart.

  • Warm Apple Cider: Its sweet, spiced flavors perfectly complement the rich chocolate of the Candle Cookies, making for a cozy pairing.
  • Pumpkin Pie: A classic fall dessert, its creamy texture and spiced notes enhance the festive spirit of Halloween.
  • Vanilla Ice Cream: The cool creaminess balances the cookies’ rich taste, providing a delightful contrast to every bite.
  • Chocolate Milkshake: Indulgent and nostalgic, this treat adds a delightful twist, creating a silky, sweet treat alongside the cookies.
  • Caramel Sauce: Drizzle over the Candle Cookies to enhance their festive appeal and add a luscious, gooey flavor that whispers autumn.
  • Spiced Pumpkin Bread: Its moist texture and spices evoke warm memories of fall, beautifully contrasting with the chocolatey goodness of the cookies.

Pair these delightful treats with your favorite drinks or enjoy as a decadent dessert display at your next gathering!

Make Ahead Options

These Candle Cookies are a fantastic option for busy home cooks looking to save time! You can prepare the cookie dough up to 24 hours in advance by following the first three steps: whisk together the dry ingredients, beat the butter and sugar, and mix in the dry components with milk until crumbly. Chill the formed logs in the refrigerator as directed, then simply bake them when you're ready for fresh cookies. To maintain quality, ensure that the dough is well-wrapped in plastic to prevent drying out. Once baked, let the cookies cool before icing; they can be decorated up to 3 days in advance to have a lovely festive treat ready for your Halloween festivities!

Storage Tips for Candle Cookies

  • Room Temperature: Store your Candle Cookies in an airtight container for up to 3 days. This helps maintain their delightful texture while ensuring they stay fresh.

  • Fridge: If you prefer, you can refrigerate the cookies to extend their freshness for up to 5 days, but this may alter the texture slightly—just let them come to room temperature before serving.

  • Freezer: For longer storage, freeze the baked cookies without icing in a zip lock bag for up to 2 months. When you're ready to enjoy, simply thaw at room temperature or warm them gently in the oven.

  • Reheating: If desired, reheat cookies at 300°F for about 5-10 minutes to restore their original texture before serving them again. Enjoy those delicious Candle Cookies whenever the craving strikes!

Candle Cookies Variations & Substitutions

Feel free to get creative and suit these Candle Cookies to your taste and occasion with these delightful twists!

  • Gluten-Free: Use a gluten-free flour blend in place of all-purpose flour for a deliciously accessible version.
  • Sugar-Free: Try powdered erythritol instead of confectioners sugar to make these cookies suitable for a sugar-free diet. They’ll still be sweet and delightful!
  • Dairy-Free: Substitute unsalted butter with vegan butter and replace milk with almond or oat milk for a completely dairy-free treat.
  • Flavor Infusion: Swap vanilla extract for almond extract to give your cookies a subtly unique flavor that pairs beautifully with the chocolate.
  • Nutty Variation: Use chopped walnuts or pecans instead of sliced almonds for decoration. This adds a lovely crunch and flavor twist to each bite.
  • Festive Colors: Change up the icing color by using green or orange gel food coloring for a Halloween theme, or even pastel shades for other holidays!
  • Textural Contrast: Add a handful of mini chocolate chips to the cookie dough for added richness and an extra gooey texture with each bite.
  • Hot and Spicy: For a kick, add a sprinkle of cayenne or chili powder to the dough. It’s an adventurous twist that provides a surprising heat to your cookies!

If these cookie variations inspire you, feel free to explore more festive delights like Eggnog Cookies Soft or Matcha Cookies Soft to fill your dessert platter!

Expert Tips for Candle Cookies

  • Dough Consistency Check: Roll a tablespoon of dough to ensure it holds together without cracks; if it crumbles, add a bit more milk for the perfect Candle Cookies.

  • Icing Thickness Matters: Aim for an icing consistency that's thick enough to drizzle slowly from the piping bag but not runny, ensuring a lovely dripping effect.

  • Prevent Cookie Sprawl: Chill the shaped dough for a minimum of 4 hours; this step is essential to maintain the cookies' charming candle shape during baking.

  • Choose Decor Wisely: While sliced almonds simulate wicks beautifully, feel free to experiment with chocolate chips or nuts as decoration for a fun twist on your Candle Cookies.

  • Storing Leftovers: Keep your cookies in an airtight container for up to 3 days, or freeze them without icing in a zip lock bag for a delightful treat later on!

Candle Cookies Recipe FAQs

How do I choose the right cocoa powder for my Candle Cookies?
Absolutely! For the best flavor in your Candle Cookies, opt for unsweetened cocoa powder. This variety offers a robust chocolate taste without added sweetness, enhancing the overall richness of your cookies.

What’s the best way to store my Candle Cookies?
To keep your Candle Cookies fresh, store them in an airtight container at room temperature for up to 3 days. If you want them to last longer, refrigerate them for up to 5 days, but remember to let them return to room temperature before serving for the best texture!

Can I freeze my Candle Cookies?
Very much! For longer storage, freeze the baked cookies without icing in a zip lock bag for up to 2 months. When you're ready to enjoy, simply thaw at room temperature. If you want to warm them slightly, preheat your oven to 300°F and bake for about 5-10 minutes until warm and comforting.

How can I troubleshoot crumbly dough when making Candle Cookies?
If your dough is crumbly, don’t worry! I recommend rolling about one tablespoon of the dough to check its consistency. If it cracks, try adding an extra tablespoon of milk at a time until the dough holds together smoothly without cracks. This will ensure that your Candle Cookies are perfectly shaped and delicious!

Are these Candle Cookies safe for dogs?
While the ingredients in Candle Cookies are generally safe for humans, they’re not suitable for dogs. The cocoa powder can be toxic to dogs in large amounts, so it's best to keep these delightful treats out of reach of your furry friends.

How can I decorate my Candle Cookies for different holidays?
Feel free to get creative! You can swap the red gel food coloring for green or white to celebrate other holidays. Additionally, using different nuts for decoration, such as walnuts or pecans, can give your cookies a unique twist while still maintaining the charming candle vibe!

Candle Cookies

Chocolate Candle Cookies to Light Up Your Halloween Treats

Delightful Chocolate Candle Cookies that are whimsical and easy to make, perfect for Halloween gatherings.
Print Recipe Pin Recipe
Prep Time 30 minutes mins
Cook Time 25 minutes mins
Chilling Time 4 hours hrs
Total Time 4 hours hrs 55 minutes mins
Servings: 24 cookies
Course: Dessert
Cuisine: American
Calories: 150
Ingredients Equipment Method Nutrition Notes

Ingredients
  

For the Cookies
  • 2 cups All-Purpose Flour Substitute with gluten-free flour for a gluten-free option.
  • 0.5 cups Cocoa Powder Opt for unsweetened cocoa for the best results.
  • 1 pinch Salt Can be omitted or reduced for lower sodium.
  • 1 cups Unsalted Butter Use cold butter for firmer cookies if needed.
  • 1 cups Confectioners Sugar Powdered erythritol can be used for a sugar-free version.
  • 1 teaspoon Vanilla Extract Consider almond extract for a different twist.
  • 3 tablespoons Milk Use non-dairy milk for a vegan alternative.
  • 0.5 cups Sliced Almonds Can be replaced with chocolate chips or nuts if preferred.
For the Icing
  • 2 cups Confectioners Sugar Same substitutions apply as in the dough.
  • 2 tablespoons Water Adjusts the icing consistency for the perfect drizzle.
  • 1 teaspoon Vanilla Extract Feel free to substitute with other extracts for a unique taste.
  • 1 drop Red Gel Food Color Use different gel colors for various holidays.

Equipment

  • Mixing bowls
  • Whisk
  • Rolling Pin
  • Baking Sheet
  • piping bag

Method
 

Step-by-Step Instructions
  1. In a medium bowl, whisk together 2 cups of all-purpose flour, ½ cup of unsweetened cocoa powder, and a pinch of salt until well combined.
  2. In a larger mixing bowl, beat together 1 cup of cold unsalted butter, 1 cup of confectioners sugar, and 1 teaspoon of vanilla extract until creamy and smooth.
  3. Gradually mix in the dry ingredients and 3 tablespoons of milk until the dough is crumbly and no dry flour remains.
  4. On a clean work surface, roll about 1 tablespoon of dough into a ball, then roll it into thick logs approximately 3 inches long.
  5. Place the logs on a wire rack lined with parchment paper to prevent sticking. At one end of each log, gently insert a few sliced almonds to mimic candle wicks.
  6. Cover the wire rack with plastic wrap and place it in the refrigerator to chill for at least 4 hours.
  7. Preheat your oven to 350°F (175°C) and line a baking sheet with parchment paper. Bake the chilled logs for about 25 minutes, or until they are firm to the touch.
  8. While the cookies cool completely, prepare the icing by mixing 2 cups of confectioners sugar with 2 tablespoons of water and 1 teaspoon of vanilla extract until smooth.
  9. Transfer the icing into a piping bag or a small plastic bag with the corner snipped off for easier drizzling.
  10. Once the Candle Cookies have completely cooled, drizzle the icing over them, allowing it to run down the sides.
  11. After icing the cookies, place them on a wire rack to set for a few hours.

Nutrition

Serving: 1cookieCalories: 150kcalCarbohydrates: 20gProtein: 1gFat: 7gSaturated Fat: 4gPolyunsaturated Fat: 2gMonounsaturated Fat: 1gCholesterol: 30mgSodium: 80mgPotassium: 100mgFiber: 1gSugar: 8gVitamin A: 200IUCalcium: 10mgIron: 1mg

Notes

Keep your cookies in an airtight container for up to 3 days, or freeze them without icing in a zip lock bag for a delightful treat later on!

Tried this recipe?

Let us know how it was!

Raspberry Zinger Poke Cake: A Refreshing Fruity Treat

September 24, 2025 by Grace Snow Leave a Comment

As I sifted through my collection of dessert recipes, a vibrant memory of summer picnics and family barbecues came rushing back, wrapped in the sweet aroma of a Raspberry Zinger Poke Cake. This delightful treat combines a soft white cake soaked in luscious raspberry gelatin, paired with smooth preserves and a fluffy topping, making it the ultimate easy dessert for any occasion. Not only does this poke cake deliver a delectable fruity flavor, but it also shines as a crowd-pleaser that requires minimal effort. Whether you're looking to impress guests at a festive gathering or indulge in a sweet bite after dinner, this recipe promises to delight both young and old alike. Ready to discover the simple steps to whip up this refreshing cake? Let’s dive in!

Why is Raspberry Zinger Poke Cake a Must-Try?

Irresistible Flavor: Bursting with sweet raspberry goodness, every bite offers a delightful symphony of fruitiness that your taste buds will adore.

Simple Preparation: With just a few ingredients, making this dessert is a breeze, even for novice bakers.

Perfect for Any Occasion: Whether it's a summer barbecue or a holiday gathering, this cake fits seamlessly into any menu and is sure to impress guests.

Versatile Variations: Feel free to experiment! Swap out the raspberry flavor with strawberry or peach for a new twist on this classic poke cake.

Make Ahead Convenience: You can easily prepare it the day before, allowing the flavors to meld beautifully and save you time on the day of your event.

Once you've tasted this amazing treat, you'll want to share it with friends! For more crowd-pleasing ideas, check out my delicious Ice Cream Cake for another fun dessert option!

Raspberry Zinger Poke Cake Ingredients

For the Cake
• White Cake Mix – A quality mix ensures a moist and fluffy base for the Raspberry Zinger Poke Cake.
• Hot Purified Water – Needed to dissolve the raspberry-flavored gelatin thoroughly for the perfect poke.

For the Raspberry Filling
• Raspberry-Flavored Gelatin – Adds that sweet, fruity essence essential for the poke cake effect; be sure it’s well-dissolved.
• Raspberry Preserves – Thick and luscious, these provide concentrated flavor; microwaving them for a few seconds helps with spreading.

For the Topping
• Whipped Topping – This light fluff creates a satisfying creaminess; feel free to substitute with fresh whipped cream.
• Unsweetened Shredded Coconut – Adds a delightful texture; if coconut's not your thing, try chopped nuts or white chocolate shavings.

Get ready to bring the refreshing taste of the Raspberry Zinger Poke Cake to life!

Step‑by‑Step Instructions for Raspberry Zinger Poke Cake

Step 1: Prepare the Cake
Start by preheating your oven to 350°F (175°C). In a large mixing bowl, follow the package instructions on your white cake mix to combine with water, oil, and eggs. Pour the batter into a greased 9x13-inch baking pan, spreading it evenly. Bake in the preheated oven for 25–30 minutes, or until a toothpick inserted in the center comes out clean. Allow the cake to cool for about 30 minutes at room temperature.

Step 2: Make the Holes
Once the cake has cooled, take the end of a wooden spoon and gently poke holes across the surface, about 1 inch apart and halfway deep. This step is crucial for the Raspberry Zinger Poke Cake, as it allows the gelatin to seep into the cake and infuse it with flavor. Make sure the holes are evenly distributed to ensure a delightful burst of raspberry goodness in every slice.

Step 3: Prepare and Pour the Gelatin
In a medium mixing bowl, dissolve the raspberry-flavored gelatin in 2 cups of hot purified water, stirring until fully dissolved. Carefully pour the vibrant gelatin mixture over the poked cake, ensuring that the holes fill completely. Let the cake sit for about 5 minutes to absorb the gelatin, which will give your Raspberry Zinger Poke Cake its signature moistness.

Step 4: Add Raspberry Preserves
For enhanced flavor, microwave the raspberry preserves for about 30 seconds to soften. Once warm, spread the preserves evenly over the gelatin-soaked cake using a spatula. This layer of rich raspberry preserves adds sweetness and depth to your cake. Take your time to ensure an even distribution, making the Raspberry Zinger Poke Cake both beautiful and delicious.

Step 5: Apply Whipped Topping
Next, take your whipped topping and dollop it over the layer of raspberry preserves. Using a spatula, gently spread the whipped topping to create a smooth and fluffy layer that covers the preserves completely. This light and airy topping is what makes the Raspberry Zinger Poke Cake so delightful. Make sure it’s spread evenly for a perfect finish.

Step 6: Sprinkle Coconut
To add texture and a tropical twist, evenly distribute the unsweetened shredded coconut over the whipped topping layer. This step not only enhances the flavor but also gives your Raspberry Zinger Poke Cake a visually appealing finish. You can use your hands or a spoon to sprinkle the coconut so that it covers the whipped cream generously.

Step 7: Chill the Cake
Finally, cover the cake with plastic wrap and refrigerate it for at least 4 hours, or overnight if time permits. Chilling allows the flavors to meld together beautifully, and it firms up the cake for easier slicing. When you're ready to serve, simply remove from the refrigerator, slice, and enjoy the refreshing taste of the Raspberry Zinger Poke Cake with family and friends!

How to Store and Freeze Raspberry Zinger Poke Cake

Fridge: Keep the Raspberry Zinger Poke Cake in an airtight container in the refrigerator for up to 5–7 days. This will maintain its freshness and flavor while preventing dryness.

Freezer: For longer storage, wrap portions tightly in plastic wrap and aluminum foil, then freeze for up to 3 months. Thaw in the fridge overnight before serving.

** serving:** When ready to enjoy, slice and serve chilled. Consider garnishing with fresh raspberries for a pop of color and added flavor.

Leftover Topping: If you have extra whipped topping, store it separately in the fridge, and use it within a few days to maintain its texture.

What to Serve with Raspberry Zinger Poke Cake

Creating a complete meal around this delightful dessert invites your family and friends to indulge in a lively experience filled with fresh, vibrant flavors.

  • Grilled Chicken Skewers: The smoky flavors from the grill enhance the sweetness of the cake, creating a beautiful flavor contrast.

  • Fresh Garden Salad: A crisp salad with mixed greens and balsamic vinaigrette provides a refreshing, tangy balance to the sweet poke cake.

  • Lemonade or Iced Tea: Both drinks offer a zest of citrus that complements the fruity notes of the Raspberry Zinger Poke Cake perfectly, making it a refreshing pairing.

  • Coconut Rice: The subtle sweetness and chewiness of coconut rice harmonize with the cake's coconut topping while providing a tropical theme to your meal.

  • Chocolate Chip Cookies: These classic treats serve as a delightful treat alongside the cake; their rich, buttery flavor pairs well with the delightfully fruity dessert.

  • Berries and Cream: Freshly whipped cream served with a medley of strawberries and blueberries brightens up the dessert table, echoing the raspberry flavor and adding a luxurious touch.

Invite loved ones to experience a complete feast that celebrates the joys of home-cooked flavors!

Raspberry Zinger Poke Cake Variations

Feel free to make this delicious dessert your own with fun and flavorful tweaks!

  • Nutty Flavor: Replace shredded coconut with chopped almonds for a crunchy twist that adds delightful texture.
  • Different Gelatins: Don’t hesitate to try strawberry or peach gelatin instead of raspberry for a fruity variation that’s equally refreshing.
  • Cream Cheese Layer: For a creamy surprise, mix in softened cream cheese with the whipped topping, creating a zesty flavor that balances the sweetness.
  • Chocolate Drizzle: Add a drizzle of chocolate syrup over the top for an indulgent finish that complements the fruity flavors beautifully.
  • Fruit Add-ins: Toss in fresh berries like blueberries or sliced strawberries atop the whipped topping for added taste and color.
  • No-Coconut Option: If coconut isn’t your favorite, simply substitute it with white chocolate shavings for a luscious finish.
  • Spicy Kick: For an adventurous flavor, add a pinch of cayenne pepper or jalapeño flakes to the raspberry preserves for a sweet-heat combo.
  • Layered Perfection: Create a layered dessert by serving individual portions in cups, alternating layers of cake, gelatin, and toppings for a stunning presentation.

Each of these variations introduces its own unique charm, just like this Ice Cream Cake can elevate any gathering! Explore and enjoy creating your perfect Raspberry Zinger Poke Cake!

Expert Tips for Raspberry Zinger Poke Cake

• Perfect Poking Technique: Ensure you poke holes deeply enough to let the gelatin seep into the cake, but not all the way through. This balance is key for a moist Raspberry Zinger Poke Cake.

• Gelatin Dissolving: Always use hot purified water for dissolving gelatin. This ensures it's completely mixed and will set properly, giving you that vibrant raspberry flavor.

• Preserve Warm-Up: Microwaving the raspberry preserves not only softens them for easier spreading but also enhances their flavor, allowing them to meld beautifully with the cake.

• Topping Options: Feel free to substitute whipped topping with homemade whipped cream for an extra touch. Just make sure to whip it to stiff peaks for the best texture in your Raspberry Zinger Poke Cake.

• Chill Time: For the best flavor and texture, chill the cake overnight. This allows the flavors to meld perfectly and makes for easier cutting and serving.

• Double the Recipe Cautiously: If you're making this for a crowd, consider using two pans instead of one to avoid overflow.

Make Ahead Options

These Raspberry Zinger Poke Cakes are perfect for meal prep enthusiasts! You can prepare the cake and poke the holes up to 24 hours in advance, refrigerating it to keep it fresh. Once cooled, simply cover the cake with plastic wrap and store it in the fridge. The raspberry gelatin can be made and poured over the cake just before serving to ensure it's perfectly hydrated. Additionally, you can microwave and spread the raspberry preserves ahead of time and store them separately in the fridge for up to 3 days. When you're ready to enjoy, just layer the preserves and whipped topping, sprinkle with coconut, and it's ready to impress your guests with minimal effort!

Raspberry Zinger Poke Cake Recipe FAQs

What type of white cake mix should I use?
I recommend using a high-quality white cake mix for the best results. Look for one that has a soft and fluffy texture, which will perfectly complement the fruity raspberry flavors in the Raspberry Zinger Poke Cake.

How should I store the Raspberry Zinger Poke Cake?
Store the Raspberry Zinger Poke Cake in an airtight container in the refrigerator for up to 5–7 days. This keeps it fresh and moist, ensuring that every slice is as delightful as the first. Just be sure to cover it well to prevent any dryness!

Can I freeze the leftover cake?
Absolutely! To freeze, slice the Raspberry Zinger Poke Cake into portions and wrap them tightly in plastic wrap and aluminum foil. This will prevent freezer burn and keep the cake fresh for up to 3 months. When you're ready to enjoy, thaw the slices in the refrigerator overnight.

Why is my cake not absorbing the gelatin well?
If the gelatin isn’t soaking in properly, you might not have poked the holes deep enough or evenly enough across the cake. Aim for holes that are halfway deep, about 1 inch apart, using the end of a wooden spoon. This allows the gelatin to seep in evenly, giving you that moist, flavorful texture you’re looking for in the Raspberry Zinger Poke Cake.

Are there any dietary considerations I should be aware of?
If you have guests with dietary restrictions, consider using gluten-free cake mix and whipped topping alternatives to cater to those needs. Additionally, always check the labels for potential allergens if serving to those with food sensitivities.

Can I make this cake in advance?
Yes, this cake is perfect for making ahead of time! In fact, I often prepare it a day in advance to allow the flavors to meld beautifully. Refrigerate it overnight for optimal taste and easy serving the next day.

Raspberry Zinger Poke Cake

Raspberry Zinger Poke Cake: A Refreshing Fruity Treat

This Raspberry Zinger Poke Cake is a delightful blend of fruity flavors and moist texture, perfect for summer gatherings and easy to prepare.
Print Recipe Pin Recipe
Prep Time 20 minutes mins
Cook Time 30 minutes mins
Chilling Time 4 hours hrs
Total Time 4 hours hrs 50 minutes mins
Servings: 12 slices
Course: Dessert
Cuisine: American
Calories: 300
Ingredients Equipment Method Nutrition Notes

Ingredients
  

For the Cake
  • 1 box White Cake Mix A quality mix ensures a moist and fluffy base.
  • 2 cups Hot Purified Water Needed to dissolve the raspberry-flavored gelatin.
For the Raspberry Filling
  • 1 box Raspberry-Flavored Gelatin Adds sweet, fruity essence.
  • 1 cup Raspberry Preserves Thick and luscious; microwave for easier spreading.
For the Topping
  • 1 container Whipped Topping Feel free to substitute with fresh whipped cream.
  • 1 cup Unsweetened Shredded Coconut Optional; can use chopped nuts or white chocolate shavings.

Equipment

  • 9x13-inch baking pan
  • Mixing Bowl
  • Spatula

Method
 

Preparation Steps
  1. Preheat your oven to 350°F (175°C). Combine white cake mix with water, oil, and eggs in a mixing bowl. Pour into a greased 9x13-inch baking pan and bake for 25–30 minutes, or until a toothpick comes out clean. Allow to cool for 30 minutes.
  2. Once cooled, poke holes across the surface of the cake about 1 inch apart and half deep using the end of a wooden spoon.
  3. Dissolve raspberry-flavored gelatin in 2 cups of hot purified water and pour it over the poked cake, letting it absorb for about 5 minutes.
  4. Microwave raspberry preserves for about 30 seconds to soften, then spread evenly over the gelatin-soaked cake.
  5. Dollop whipped topping over the raspberry preserves and spread evenly.
  6. Sprinkle unsweetened shredded coconut over the whipped topping layer.
  7. Cover with plastic wrap and refrigerate for at least 4 hours, or overnight, before serving.

Nutrition

Serving: 1sliceCalories: 300kcalCarbohydrates: 45gProtein: 3gFat: 12gSaturated Fat: 7gPolyunsaturated Fat: 1gMonounsaturated Fat: 3gCholesterol: 20mgSodium: 250mgPotassium: 150mgFiber: 1gSugar: 25gVitamin A: 2IUCalcium: 2mgIron: 4mg

Notes

For the best flavor and texture, chill the cake overnight. Consider garnishing with fresh raspberries for a pop of color and added flavor.

Tried this recipe?

Let us know how it was!

Easy Oreo Witch Hat Cookies: A Spooky, Fun Treat!

September 24, 2025 by Grace Snow Leave a Comment

As the leaves turn gold and the air gets crisp, there’s a certain magic in the kitchen that’s just waiting to be stirred up. I couldn’t resist diving into the festive spirit with these adorable Oreo Witch Hat Cookies—an easy, no-bake Halloween treat that’s sure to enchant kids and adults alike. With a crunchy Oreo base topped with creamy frosting and a whimsical chocolate kiss, they’re not only a visual delight but also super quick to whip up. Trust me, they’ll be a hit at any gathering or party! Plus, the best part? These cookies invite endless creativity; swap in your favorite cookies or customize frosting colors to match your Halloween theme. Are you ready to conjure up some fun? Let's get started!

Why are Oreo Witch Hat Cookies a must-make?

Quick and Easy: You only need a few simple ingredients and no baking required, making these a breeze to whip up.

Creative Customization: Whether you choose colorful frosting or festive sprinkles, the options are endless for making these treats uniquely yours.

Perfect for Parties: These cookies not only look adorable but are also a delightful treat to serve at Halloween gatherings, drawing in both kids and adults.

Delicious Textures: The combination of crunchy Oreo, smooth frosting, and rich chocolate kiss creates a delightful eating experience.

Versatile Variations: Try using other chocolate cookies like Keebler Fudge Stripes or Grasshopper Cookies for a twist!

Oreo Witch Hat Cookies Ingredients

• • Get ready to create some magic!

For the Cookies

  • Oreo cookies – The star of the show; their crunchy chocolate base is absolutely perfect for a Halloween treat.
  • Keebler Fudge Stripes – A delightful alternative that adds a unique flavor twist while still delivering deliciousness.

For the Frosting

  • Vanilla frosting – Provides the sweet creaminess that balances the chocolatey cookies; feel free to tint it with fun colors like orange or green!
  • Store-bought frosting – A quick option that saves time without sacrificing taste.

For the Decorations

  • Halloween sprinkles – These colorful toppings not only enhance presentation but also add a playful touch; highly recommended for that festive flair!
  • Chocolate kisses – These chocolatey “hats” complete the look, but you can use any chocolate-shaped candy if desired.

These Oreo Witch Hat Cookies are not only fun to make but also allow you to get creative in the kitchen this Halloween!

Step‑by‑Step Instructions for Oreo Witch Hat Cookies

Step 1: Prep the Frosting
Begin by placing your vanilla frosting in a mixing bowl. If you want to add some Halloween flair, tint it with food coloring, like orange or green, using a toothpick to achieve your desired shade. Stir until fully combined and smooth. This frosting serves as the magical glue that holds our Oreo Witch Hat Cookies together, so make sure it’s fluffy and vibrant before moving on.

Step 2: Assemble the Cookies
Grab your Oreo cookies and set them on a clean workspace. Fit a piping bag with a star or round frosting tip, then fill it with your prepared frosting. Pipe a generous dollop of frosting onto the center of each Oreo, creating a lovely, swirled mound that resembles a witch's hat. This step will give your Oreo Witch Hat Cookies their enchanting shape, so take your time for an even look.

Step 3: Add the Sprinkles
Before the frosting sets, it's time to decorate! Sprinkle Halloween-themed sprinkles over each dollop of frosting, ensuring they stick well. Use a variety of colors and shapes for added visual appeal, making your cookies festive and fun. This step not only enhances the presentation but also adds a delightful crunch to each bite of your Oreo Witch Hat Cookies.

Step 4: Finish with Kisses
Unwrap your chocolate kisses and gently press one into the center of each dollop of frosting. This chocolate “hat” will sit perfectly atop your cookies, creating that iconic witch hat shape we’re after. Be careful not to squish the frosting too much—you're aiming for a delightful balance of chocolate and creamy frosting in each delectable Oreo Witch Hat Cookie.

Step 5: Let Them Set
Once all your cookies are assembled, place them on a tray and let them set for about 15-20 minutes. This will allow the frosting to firm up slightly, ensuring that the chocolate kisses stay in place. Use this time to clean up your workspace and prepare for the fun of enjoying your finished creations. These Oreo Witch Hat Cookies are looking adorable and waiting to be devoured!

Make Ahead Options

These Oreo Witch Hat Cookies are perfect for making ahead, saving you precious time on busy party days! You can prepare both the cookies and the frosting up to 24 hours in advance. Simply assemble the cookies without the chocolate kisses and refrigerate them in an airtight container to maintain their freshness. When you’re ready to serve, simply add the kisses and sprinkles just before putting them out for your guests; this prevents any sogginess while keeping the cookies just as delicious. By prepping ahead, you’ll have a delightful treat ready to impress with minimal last-minute effort!

Expert Tips for Oreo Witch Hat Cookies

  • Frosting Technique: Use a star or round frosting tip to create different designs; this adds a fun touch to your Oreo Witch Hat Cookies.

  • Colorful Customization: Experiment with different food colors in your frosting to match your Halloween theme or your family’s favorite colors!

  • Avoid Overfilling: Don’t pipe too much frosting on the cookies as it can cause the chocolate kisses to topple over; a generous dollop is perfect.

  • Storage Solutions: Keep your cookies fresh by storing them in an airtight container, which will help maintain that delightful crunch for up to 3 days.

  • Try Other Cookies: Feel free to substitute with other chocolate cookies like Keebler Fudge Stripes or Grasshopper Cookies for a uniquely flavored twist.

How to Store and Freeze Oreo Witch Hat Cookies

Room Temperature: These cookies can be stored at room temperature in an airtight container for up to 3 days, helping maintain their crunchy texture.

Fridge: If you want to extend their freshness, store the cookies in the fridge. They will last for up to 1 week, but allow them to come to room temperature before serving for the best flavor.

Freezer: For longer storage, you can freeze the Oreo Witch Hat Cookies. Wrap them individually in plastic wrap and place them in a freezer-safe bag for up to 2 months.

Reheating: If desired, let the cookies thaw at room temperature. For a warm treat, microwave for a few seconds but be cautious to avoid melting the chocolate kiss too much.

What to Serve with Halloween Oreo Witch Hat Cookies

Delight in the festive spirit as you create the perfect spread to complement these enchanting treats.

  • Spooky Fruit Salad: A mix of seasonal fruits like oranges and blackberries, bringing a refreshing contrast to the sweet cookies.

  • Witch’s Brew Punch: This fun, spooky drink made with grape juice and soda adds a fizzy, festive touch to your Halloween gathering.

  • Mellow Marshmallow Treats: Soft marshmallow squares layered with rice cereal offer a chewy, gooey counterpart to the crunchy texture of the cookies.

  • Candy Corn Parfait: Layered candy corn with yogurt creates a colorful, tasty dessert that echoes Halloween’s iconic treats while balancing sweetness.

  • Pumpkin Spice Cupcakes: A nod to fall flavors, these cupcakes feature rich spices and a creamy frosting, perfectly pairing with the chocolaty cookies.

  • Chocolately Hot Cocoa: Warm, indulgent hot chocolate topped with whipped cream feels like a hug in a mug, complementing every bite of your Oreo Witch Hat Cookies perfectly.

  • Pumpkin Pie Milkshake: Creamy and decadent, this blend of pumpkin pie flavors with ice cream brings a delightful finish to your Halloween feast.

  • Gummy Worms Snack Cups: Create little fun cups filled with gummy worms, adding a whimsical touch to the dessert table while enhancing the spooky theme!

Oreo Witch Hat Cookies Variations

Dive into delightful tweaks for your Oreo Witch Hat Cookies that will excite your creativity and taste buds!

  • Chocolate Options: Swap Oreo cookies with Keebler Fudge Stripes or Grasshopper Cookies for a different chocolatey experience. Each bite will bring a unique twist to this classic treat.

  • Colorful Frosting: Create a festive vibe by using colored frosting to match your Halloween theme. Bright oranges, spooky greens, or ghostly purples make for eye-catching designs!

  • Crunchy Textures: For a fun twist, add crushed Halloween-themed candies or nuts atop the frosting for an extra crunch in every bite. This dimension elevates the cookie experience.

  • Non-Dairy Delight: Switch to vegan chocolate cookies and plant-based frosting for a dairy-free version that everyone can enjoy. You still get that enchanting look and taste!

  • Mini Variations: Make mini Oreo Witch Hats using mini Oreos for bite-sized fun. Perfect for sharing at gatherings or to delight little ones.

  • Spicy Kick: Add a dash of cinnamon or pumpkin spice into the frosting for a warm, autumn flavor profile that dances on your taste buds. You might just fall in love with this pumpkin-inspired twist!

  • Candy Toppers: Replace chocolate kisses with marshmallow ghosts or candy corn for a playful variation. The kids will be thrilled with these unexpected toppings!

  • Peanut Butter Lovers: Spread a thin layer of peanut butter between the Oreo and frosting for a nutty flavor boost that will delight any peanut butter fan!

If you’re in the mood for even more sweet options, why not pair your spooky cookies with some delightful Matcha Cookies Soft or try out the lovable Thumbprint Cookies Melt? Happy celebrating!

Oreo Witch Hat Cookies Recipe FAQs

How do I choose the best Oreo cookies?
Absolutely! For the best Oreo Witch Hat Cookies, look for cookies that are fresh and unbroken. If you prefer a different taste, chocolate sandwich cookies like Keebler Fudge Stripes or even homemade chocolate cookies can work beautifully. Just ensure they're not stale or overly crumbly for that perfect base!

How should I store these cookies?
Very! To keep your Oreo Witch Hat Cookies fresh, store them in an airtight container at room temperature for up to 3 days. If you want to extend their shelf life, place them in the fridge where they can last up to 1 week. Remember to let them come to room temperature before serving to enhance the flavors!

Can I freeze Oreo Witch Hat Cookies?
Of course! Freezing them is easy and a great way to keep some festive treats on hand. Wrap each cookie individually in plastic wrap and place them in a freezer-safe bag. They can be stored for up to 2 months. When you're ready to enjoy, let them thaw at room temperature. For an extra treat, microwave them for just a few seconds—just be cautious not to melt the chocolate kiss too much!

What if my frosting is too thick?
No worries! If you find your vanilla frosting too thick to pipe easily, simply add a teaspoon of milk at a time until you reach your desired consistency. Mix well after each addition to ensure it's evenly blended. This will make it much easier to pipe those perfect dollops on your cookies!

Are these cookies safe for people with allergies?
Great question! The Oreos themselves are typically safe for most, but always check the packaging for allergy information since they may contain traces of nuts or gluten. For a nut-free or gluten-free version, look for specialized cookies that meet dietary requirements. Always consider the icing and sprinkles, as some may also contain allergens.

What if I run out of frosting?
If you find yourself with less frosting than you need, no problem! You can easily whip up a small batch of homemade frosting using just butter, powdered sugar, a splash of milk, and a hint of vanilla extract. Mix until creamy and spreadable, and you’ll have just the right amount for your Oreo Witch Hat Cookies!

Oreo Witch Hat Cookies

Easy Oreo Witch Hat Cookies: A Spooky, Fun Treat!

Oreo Witch Hat Cookies are an easy, no-bake Halloween treat featuring crunchy Oreos, creamy frosting, and chocolate kisses.
Print Recipe Pin Recipe
Prep Time 20 minutes mins
Setting Time 20 minutes mins
Total Time 40 minutes mins
Servings: 12 cookies
Course: Dessert
Cuisine: American
Calories: 120
Ingredients Equipment Method Nutrition Notes

Ingredients
  

For the Cookies
  • 15 cookies Oreo cookies The star of the show
  • 15 cookies Keebler Fudge Stripes A delightful alternative
For the Frosting
  • 1 cup Vanilla frosting Can be tinted with food coloring
  • 1 cup Store-bought frosting
For the Decorations
  • 1 cup Halloween sprinkles Highly recommended for festive flair
  • 12 pieces Chocolate kisses Any chocolate-shaped candy can be used

Equipment

  • Mixing Bowl
  • piping bag
  • Star or round frosting tip

Method
 

Step-by-Step Instructions
  1. Prep the Frosting: Place vanilla frosting in a mixing bowl, tint if desired, stir until smooth.
  2. Assemble the Cookies: Pipe frosting onto the center of each Oreo, creating a swirled mound.
  3. Add the Sprinkles: Sprinkle Halloween-themed sprinkles over the frosting before it sets.
  4. Finish with Kisses: Press a chocolate kiss into the center of each dollop of frosting.
  5. Let Them Set: Place cookies on a tray and let them set for about 15-20 minutes.

Nutrition

Serving: 1cookieCalories: 120kcalCarbohydrates: 16gProtein: 1gFat: 6gSaturated Fat: 3gPolyunsaturated Fat: 1gMonounsaturated Fat: 1gCholesterol: 5mgSodium: 50mgPotassium: 50mgSugar: 10gCalcium: 2mgIron: 2mg

Notes

These cookies are customizable and can be made with various cookie types and frosting colors.

Tried this recipe?

Let us know how it was!
  • « Previous Page
  • 1
  • …
  • 138
  • 139
  • 140
  • 141
  • 142
  • …
  • 179
  • Next Page »

Welcome!

Hi, I’m Grace, a Sydney-based home cook with a passion for bold flavors and trending ingredients. Whether you’re a busy beginner or a seasoned foodie, you’ll find dishes here that are fresh, fun, and full of flavor.

More about me

Popular Recipes

  • Cheesy Chicken Garlic Bread Sandwich
    Cheesy Chicken Garlic Bread Sandwich for Cozy Family Moments
  • Easy Chicken Ranch Wraps
    Easy Chicken Ranch Wraps: Quick, Creamy & Totally Satisfying
  • Chicken Caesar Sandwiches
    Delicious Chicken Caesar Sandwiches for Quick Comfort Food
  • best Cuban sandwich
    The Best Cuban Sandwich You’ll Want Every Weeknight!

Footer

↑ back to top

About

  • Privacy Policy
  • Disclaimer
  • Terms & Conditions

Newsletter

  • Sign Up! for emails and updates

Contact

  • About me
  • Contact me

Copyright © 2025 TastyTrendIngredients