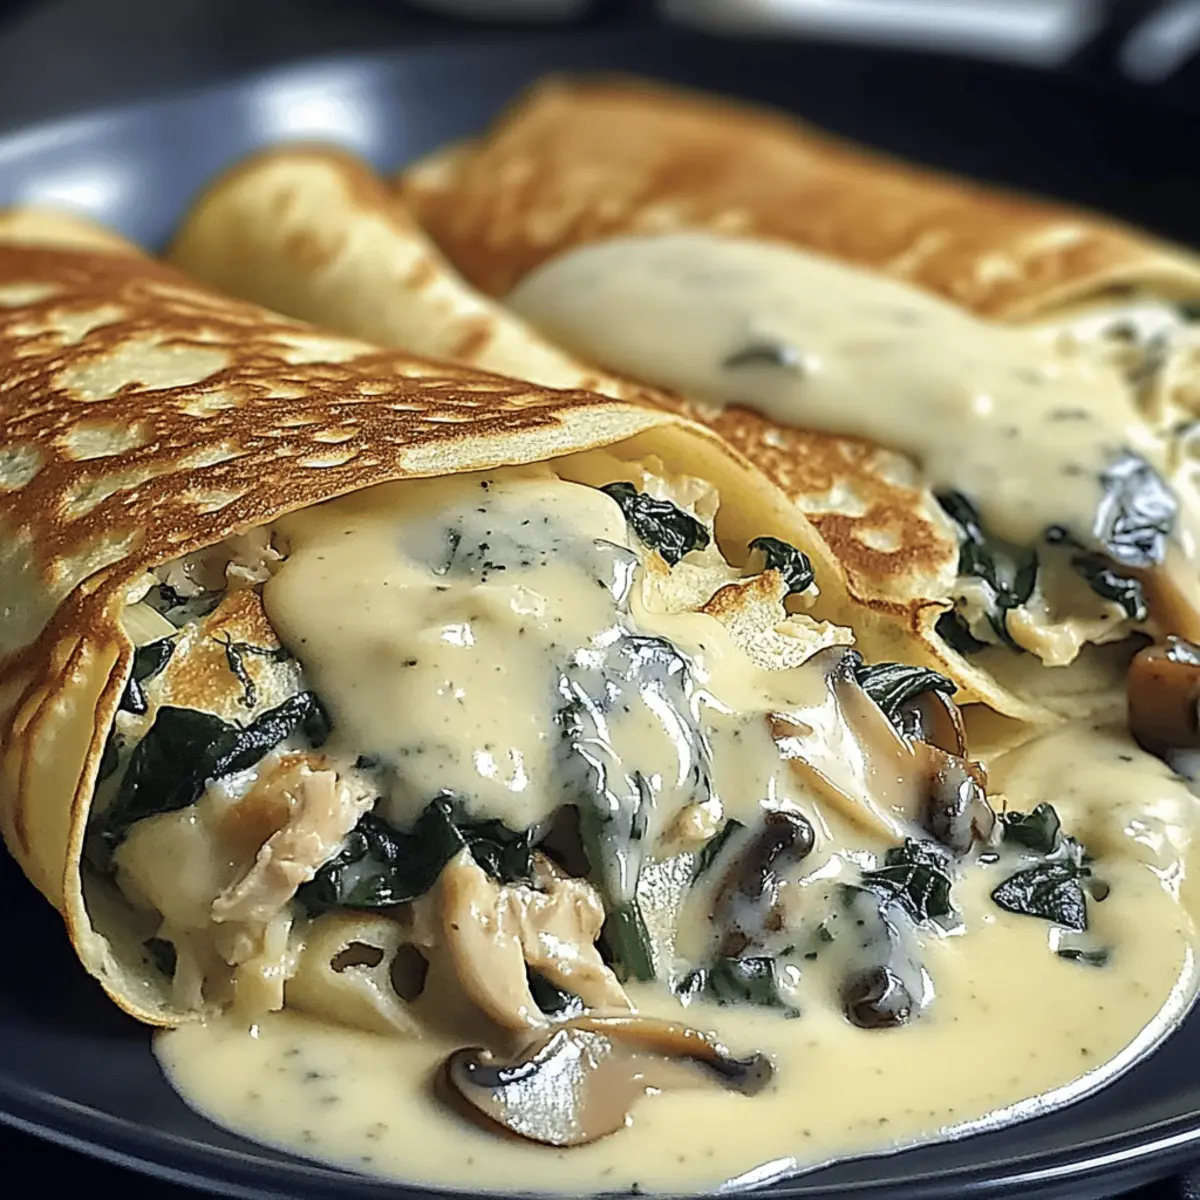
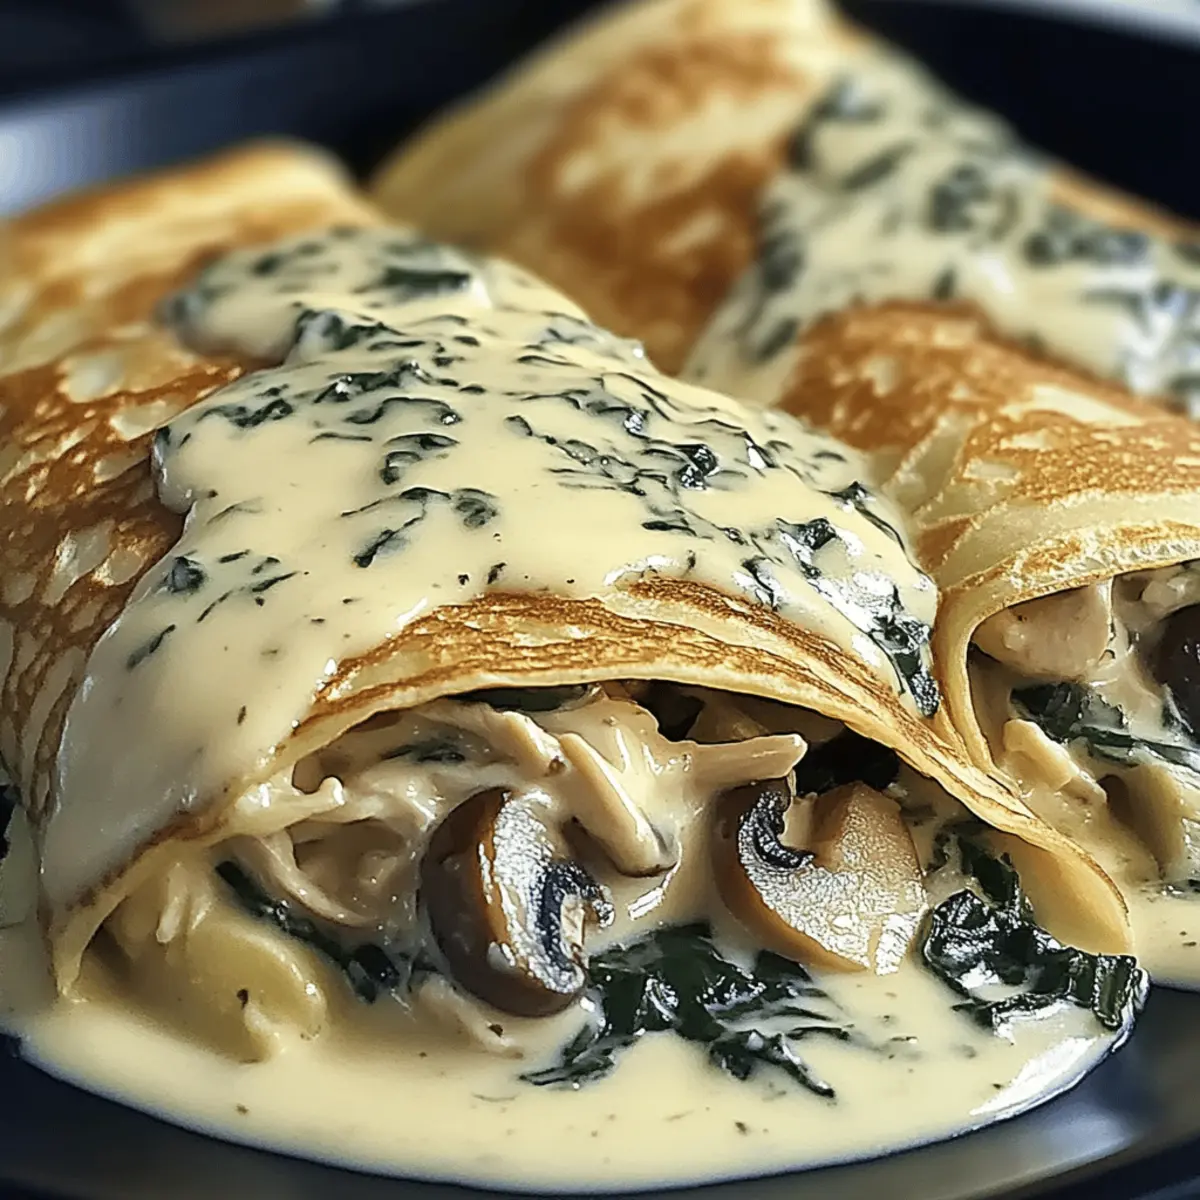
tastytrendingredients

  • Home
  • Recipes
    • Appetizers
    • Breakfast
    • Dessert
    • Dinner
    • Drinks
    • Salads
    • Snacks
    • Soups
  • About me
  • Contact me
menu icon
go to homepage
  • Home
  • Recipes
    • Appetizers
    • Breakfast
    • Dessert
    • Dinner
    • Drinks
    • Salads
    • Snacks
    • Soups
  • About me
  • Contact me
search icon
Homepage link
  • Home
  • Recipes
    • Appetizers
    • Breakfast
    • Dessert
    • Dinner
    • Drinks
    • Salads
    • Snacks
    • Soups
  • About me
  • Contact me
×

Crispy Spatchcock Chicken: Easy Recipe for Juicy Flavor

August 8, 2025 by Grace Snow Leave a Comment

As I stood in my kitchen, the tantalizing aroma of spices and roasting chicken filled the air, making my mouth water with anticipation. It’s moments like these that remind me why I love cooking so much! Today, I’m excited to share my recipe for Easy Spatchcock Chicken, a dish that not only offers juicy, tender meat with wonderfully crispy skin but also cuts down on cooking time, letting you savor a homemade meal in just about an hour. This technique, which flattens the chicken for even cooking, is my go-to for weeknight dinners. Plus, the customizable flavor options mean you can easily adjust it to suit your palate—or impress your guests! What savory twist will you put on your spatchcock chicken? Let’s dive in!

Why is Spatchcock Chicken a Game Changer?

Juiciness Guaranteed: The spatchcock method ensures a perfectly succulent chicken, with moisture sealed in and flavor boosted by high-heat roasting.

Crispy Skin: Nothing beats that glorious crunch of golden-brown skin that you achieve in just about an hour!

Quick and Easy: With minimal prep and just one hour cooking time, you can serve this restaurant-quality dish any night of the week.

Endless Customization: From herbs like rosemary to zesty lemon, you can tailor this dish to any flavor profile you love. Looking for more ideas? Check out our other chicken recipes for inspiration!

Crowd-Pleasing Appeal: Perfect for family dinners or impressing guests, this spatchcock chicken is sure to be a hit at your next gathering.

Spatchcock Chicken Ingredients

• A simple and delightful way to prepare a flavorful meal!

For the Chicken

  • Whole Chicken (4 pounds) – Choose a small to average-sized bird for the best outcome in texture and flavor.
  • Salt (1¼ tsp) – Enhances the chicken's natural flavor and ensures crispy skin; kosher salt is recommended for precision.
  • Ground Black Pepper (½ tsp) – Adds depth of flavor; consider using freshly cracked pepper for a more pronounced taste.

For the Seasoning

  • Fresh Thyme Leaves (1 tsp, chopped) – Offers a vibrant herbal aroma; if unavailable, substitute with ⅓ of dried thyme for a quicker option.
  • Garlic Powder (½ tsp) – Infuses warmth and depth; for a bolder flavor, you can swap it with fresh minced garlic.
  • Paprika (¼ tsp) – Gives a beautiful color and subtle smokiness; smoked paprika can elevate the dish even further.

For Moisture and Flavor

  • Olive Oil (2 tbsp) – Keeps the meat moist and assists with achieving that wonderfully crispy skin; regular cooking olive oil works beautifully.
  • Unsalted Butter (1 tbsp) – Adds richness and flavor; feel free to omit for a lighter dish or use more olive oil as a substitute.

Gather these ingredients for a delicious spatchcock chicken that is sure to impress during your next family dinner or get-together!

Step‑by‑Step Instructions for Spatchcock Chicken

Step 1: Preheat and Prepare
Begin by preheating your oven to 450°F (232°C). While it's heating, pat the whole chicken dry thoroughly with paper towels; this step is crucial for achieving that coveted crispy skin. Place the chicken breast-side down on a clean cutting board, ensuring it’s stable for the next steps.

Step 2: Spatchcock the Chicken
Using sharp kitchen shears, carefully cut along each side of the chicken’s backbone to remove it entirely. Once the backbone is out, flip the bird over and press down firmly on the breast to crack the breastbone. This will help the chicken lay flat, ensuring even roasting and promoting faster cooking.

Step 3: Season the Chicken
Gently separate the skin from the meat using your fingers, being careful not to tear it. This creates pockets where you’ll tuck in seasoning. In a small bowl, mix together salt, thyme, garlic powder, pepper, and paprika, then rub this spice mixture both under the skin and on the surface of the chicken, ensuring even coverage for the best flavor.

Step 4: Arrange on Baking Sheet
Transfer the seasoned spatchcock chicken to a lined baking sheet, positioning it breast-side up. Tuck the wings underneath the bird and adjust the legs inward to promote even roasting. This arrangement helps achieve that perfect golden-brown color and crispy texture.

Step 5: Add Olive Oil and Rest
Brush the surface of the chicken generously with olive oil, letting it glisten. Sprinkle any remaining spice mix on top for extra flavor. Allow the chicken to rest at room temperature for 20-30 minutes; this step not only enhances flavor but also aids in even cooking when it hits the oven.

Step 6: Roast the Chicken
Place the chicken in the preheated oven and roast it at 450°F (232°C) for 20 minutes. You’ll start to see the skin turn golden brown and crispy. After 20 minutes, lower the oven temperature to 400°F (204°C) and continue roasting for an additional 20-25 minutes until the internal temperature reaches 165°F (74°C) in the thickest part of the thigh.

Step 7: Rest and Carve
Once your spatchcock chicken is beautifully roasted, remove it from the oven and allow it to rest for 10 minutes. This resting period keeps the juices locked in, making your chicken tender and flavorful. After resting, carve the chicken and serve it warm, savoring every juicy bite.

Spatchcock Chicken Variations & Substitutions

Feel free to put your personal spin on this spatchcock chicken recipe; the possibilities are endless and oh-so-delicious!

  • Herb Variation: Add rosemary or sage for an earthy flavor. Just swap out thyme for a seasonal twist!
  • Garlic Lovers: For a more intense garlic flavor, use fresh minced garlic instead of garlic powder, tucking it under the skin.
  • Citrusy Kick: Incorporate sliced lemons or oranges under the skin for a bright, zesty flavor that pairs beautifully with roasted chicken.
  • Spice It Up: Try a Cajun spice blend or chili powder to elevate the heat level, offering a bold twist to your dish.
  • Smoky Delight: Switch the paprika for smoked paprika to infuse a deeper smokiness that elevates the overall taste.
  • Vegetable Roast: Roast seasonal vegetables like zucchini or bell peppers alongside the chicken. It makes for a vibrant, complete meal with minimal effort!
  • Marinade Option: Consider marinating the chicken in a lemon-herb vinaigrette for a few hours before roasting. This enhances flavor and tenderness in every bite.
  • Dairy-Free Richness: Use coconut oil instead of unsalted butter for a dairy-free version that still adds richness to the dish.

Whichever variation you choose, you’ll be left with an incredible dish that resonates with the warmth of home-cooked meals. Plus, don’t forget to explore other chicken recipes for even more mouthwatering ideas!

How to Store and Freeze Spatchcock Chicken

Fridge: Store leftover spatchcock chicken in an airtight container for up to 5 days to maintain freshness and flavor.

Freezer: For longer storage, shred the chicken and freeze it in airtight bags or containers for up to 2-3 months. Make sure to label them for easy identification!

Reheating: Thaw the chicken in the refrigerator overnight, and reheat gently in the oven at 350°F (175°C) until warmed through. Enjoy it on its own or toss it into salads for a quick meal!

Expert Tips for Spatchcock Chicken

Dry First: Ensure the chicken is thoroughly dried before seasoning. This step is essential for achieving that sought-after crispy skin.

Sharp Kitchen Shears: Use sharp kitchen shears to cut through the bones easily, reducing the risk of any accidents while spatchcocking.

Resting Period: Don’t skip the resting time! Letting the chicken rest after roasting allows the juices to redistribute for maximum tenderness and flavor.

Custom Spice Mix: Feel free to experiment with your favorite herbs and spices. A bit of lemon zest or fresh rosemary can elevate your spatchcock chicken to new flavor heights!

Use a Thermometer: For perfect results, use a meat thermometer to check the internal temperature at the thickest part of the chicken; aim for 165°F for juicy perfection.

Make Ahead Options

These Easy Spatchcock Chicken preparations are perfect for busy home cooks looking to save time during the week! You can season the chicken and keep it covered in the refrigerator up to 24 hours in advance. To do this, follow the initial steps of spatchcocking the chicken and then rub the seasoning mixture under and over the skin. This not only enhances flavor but allows the chicken to marinate before roasting, ensuring it's just as delicious when you cook it. When you're ready to serve, let it rest at room temperature for 20-30 minutes before roasting to achieve that crispy skin. Enjoy a homemade dish with minimal effort on a hectic evening!

What to Serve with Easy Spatchcock Chicken?

As the aroma of spices dances through your kitchen, it’s the perfect time to think about the delightful sides that can turn your spatchcock chicken into an unforgettable meal.

  • Garlic Mashed Potatoes: The creamy texture and buttery flavor perfectly complement the savory chicken, creating a comfort food classic.
  • Roasted Vegetables: A delightful combination of seasonal veggies adds color and crunch, enhancing the meal's freshness and nutritional value.
  • Crispy Brussels Sprouts: Tossed with olive oil and garlic, these add a satisfying crunch that pairs wonderfully with the tender chicken.
  • Coleslaw: A tangy, crunchy slaw provides a refreshing counterbalance to the rich flavors of the chicken, making each bite refreshing.
  • Quinoa Salad: A light and nutritious option, this salad combines quinoa with fresh herbs and lemon for a zesty accompaniment that won't overshadow the main dish.
  • Herbed Couscous: Fluffy couscous mixed with fresh parsley and lemon creates a bright side that absorbs the delicious juices from the chicken.
  • Chardonnay: A chilled glass of buttery Chardonnay enhances the meal beautifully, harmonizing with the chicken's crisp skin and savory herbs.
  • Chocolate Mousse: End your meal on a sweet note with a rich, velvety chocolate mousse that will impress guests and entice your family.

Spatchcock Chicken Recipe FAQs

How do I select the best whole chicken for spatchcocking?
When it comes to choosing the best chicken, aim for a small to average-sized bird, ideally around 4 pounds. Look for a chicken with smooth, unblemished skin and no dark spots, as these can indicate freshness issues. A plump chicken with firm breast flesh will provide you with the juiciest results.

What is the best way to store leftover spatchcock chicken?
Absolutely! Store any leftover chicken in an airtight container in the refrigerator for up to 5 days. This helps maintain its flavors and prevents it from drying out. If you find yourself with extra portions, you can also shred the chicken and freeze it for 2-3 months for later meals.

Can I freeze spatchcock chicken? If so, how?
Yes, definitely! To freeze, first let the chicken cool completely after cooking. Then, shred or cut it into servings, place the portions in airtight freezer bags or containers, and label with the date. You can keep it in the freezer for up to 2-3 months. For the best quality, try to remove as much air as possible from the bags before sealing.

What if my spatchcock chicken doesn't have crispy skin?
Don’t worry! If your chicken isn’t crispy, it may be due to excess moisture. Make sure to pat the chicken dry thoroughly before seasoning it. You can also consider salt brining it uncovered in the refrigerator for 12-24 hours prior to roasting. This not only helps crisp up the skin but also enhances the flavor.

Are there any dietary considerations I should keep in mind?
Very! If you have allergies, it’s important to check your spice ingredients. For instance, some store-bought spice mixes can contain allergens like gluten or nuts. If you have pets, keep in mind that certain seasonings like garlic and onion can be toxic to them, so make sure to keep any amounts safe for your furry friends.

How long should I rest the chicken before carving it?
Letting your chicken rest for about 10 minutes after roasting is key! This resting time allows the juices to redistribute throughout the meat, resulting in a more flavorful and succulent dish. Simply cover it loosely with foil to keep it warm, and then carve it for serving.

Spatchcock Chicken

Crispy Spatchcock Chicken: Easy Recipe for Juicy Flavor

This spatchcock chicken recipe guarantees juicy meat and crispy skin, perfect for dinner.
Print Recipe Pin Recipe
Prep Time 15 minutes mins
Cook Time 45 minutes mins
Resting Time 20 minutes mins
Total Time 1 hour hr 20 minutes mins
Servings: 4 servings
Course: Dinner
Cuisine: American
Calories: 400
Ingredients Equipment Method Nutrition Notes

Ingredients
  

For the Chicken
  • 4 pounds Whole Chicken Choose a small to average-sized bird for the best outcome in texture and flavor.
  • 1.25 tsp Salt Kosher salt is recommended for precision.
  • 0.5 tsp Ground Black Pepper Consider using freshly cracked pepper for a more pronounced taste.
For the Seasoning
  • 1 tsp Fresh Thyme Leaves Chopped; substitute with ⅓ of dried thyme if unavailable.
  • 0.5 tsp Garlic Powder Swap with fresh minced garlic for bolder flavor.
  • 0.25 tsp Paprika Smoked paprika can elevate the dish further.
For Moisture and Flavor
  • 2 tbsp Olive Oil Regular cooking olive oil works beautifully.
  • 1 tbsp Unsalted Butter Feel free to omit for a lighter dish or use more olive oil as a substitute.

Equipment

  • Oven
  • Baking Sheet
  • Sharp Kitchen Shears
  • Mixing Bowl

Method
 

Step‑by‑Step Instructions for Spatchcock Chicken
  1. Preheat your oven to 450°F (232°C) and pat the whole chicken dry thoroughly with paper towels.
  2. Using sharp kitchen shears, carefully cut along each side of the chicken’s backbone to remove it entirely.
  3. Gently separate the skin from the meat using your fingers and rub the spice mixture under the skin and on the surface of the chicken.
  4. Transfer the seasoned chicken to a lined baking sheet, breast-side up, and tuck the wings underneath.
  5. Brush the surface of the chicken with olive oil and allow to rest at room temperature for 20-30 minutes.
  6. Roast the chicken at 450°F (232°C) for 20 minutes, then lower the temperature to 400°F (204°C) and continue roasting.
  7. Once roasted, allow the chicken to rest for 10 minutes before carving and serving.

Nutrition

Serving: 1servingCalories: 400kcalCarbohydrates: 2gProtein: 32gFat: 30gSaturated Fat: 9gPolyunsaturated Fat: 2gMonounsaturated Fat: 16gCholesterol: 100mgSodium: 800mgPotassium: 500mgVitamin A: 500IUCalcium: 20mgIron: 1.5mg

Notes

Ensure the chicken is thoroughly dried before seasoning for crispy skin. Use a meat thermometer to check that it reaches 165°F internally for perfect results.

Tried this recipe?

Let us know how it was!

Taco Spaghetti: Quick and Cheesy Weeknight Delight

August 8, 2025 by Grace Snow Leave a Comment

Racing against the clock can be a recipe for chaos, but with this 30-Minute Cheesy Taco Spaghetti, you’ll feel like a culinary superhero. This dish is a mouthwatering dance of two beloved meal staples—pasta and tacos— that the whole family will adore. Packed with seasoned ground beef, zesty salsa, and melty cheddar, Taco Spaghetti comes together effortlessly, making it the perfect weeknight meal, especially when time is short. Not only is it a breeze to whip up using pantry staples, but it also caters to those picky eaters who often turn their noses up at dinner. Ready to transform your weeknight dinners into a joyous occasion? Let’s dive into this comforting recipe that promises to be a hit around your table!

Why is Taco Spaghetti a Must-Try?

Quick Preparation: This 30-minute meal is designed for busy nights, allowing you to savor delicious flavors without spending hours in the kitchen.

Family-Friendly: Even the pickiest eaters won’t be able to resist the cheesy goodness and familiar taco flavors, ensuring a stress-free dinner experience.

Pantry Staples: Utilize ingredients you probably already have on hand, making it a convenient choice for spontaneous weeknight cravings.

Versatile Options: Feel free to swap in your favorite proteins or add extra spices to tailor it to your family's preferences.

Crowd-Pleasing Appeal: Perfect for family dinners or casual get-togethers, Taco Spaghetti is a guaranteed hit with guests. Whether you're serving it at a gathering or just whipping it up for the family, this dish is bound to impress!

Taco Spaghetti Ingredients

For the Pasta
• Spaghetti Noodles – The base for this dish that holds all the flavors together; consider using any long noodle, such as bucatini or linguini, if you are out!

For the Filling
• Lean Ground Beef – Provides wholesome protein while keeping the dish flavorful; aim for 90/10 or 93/7 lean beef, or drain excess fat if using 80/20.
• Yellow Onion – Adds a gentle sweetness that enhances the overall savoriness; red onion or shallots make great substitutes, too.
• Taco Seasoning – The secret to achieving authentic taco flavors in your dish; you can opt for store-bought mixes or make your own, adjusting to taste!
• Rotel Tomatoes – Brings acidity and a delightful touch of spice; if unavailable, regular diced tomatoes with green chiles make an excellent replacement.

For the Cheesy Goodness
• Shredded Cheddar Cheese – Melts beautifully, adding creaminess and flavor depth; feel free to swap for a Mexican cheese blend or pepper jack for extra kick!

For the Fresh Touch
• Fresh Cilantro – Brightens up the dish with its vibrant aroma; flat-leaf parsley works well for those who prefer a milder flavor.

Let your taste buds explore the delightful layers and textures of this Taco Spaghetti, a dish that marries simplicity with mouthwatering flavor in a matter of minutes!

Step‑by‑Step Instructions for Taco Spaghetti

Step 1: Boil the Pasta
Begin by bringing a large pot of salted water to a rolling boil. Add spaghetti noodles and cook according to the package instructions, usually about 8-10 minutes, until al dente. Just before draining, reserve ½ cup of the pasta water to help thicken the sauce later. Drain the spaghetti in a colander and set aside.

Step 2: Cook the Beef and Onions
In a large skillet, heat a drizzle of oil over medium-high heat. Add lean ground beef and finely chopped yellow onion to the skillet, browning the meat for approximately 5 minutes. Stir frequently until the beef is fully cooked and no longer pink, and the onions become translucent. This step will create the flavorful base for your Taco Spaghetti.

Step 3: Incorporate Taco Flavors
Stir in the taco seasoning and Rotel tomatoes into the meat mixture, ensuring even distribution. Pour in the reserved pasta water, which will help create a deliciously thick sauce. Allow the mixture to simmer for about 5 minutes, stirring occasionally. The flavors will meld beautifully, creating a savory blend that's essential for your Taco Spaghetti.

Step 4: Combine with Pasta
Carefully add the drained spaghetti to the skillet with the beef and sauce mixture. Use tongs to toss everything together, ensuring that the pasta is well-coated with the flavorful sauce. The warmth of the mixture will help to bring all the delicious flavors together, setting the stage for your comforting Taco Spaghetti.

Step 5: Add the Cheesy Goodness
Sprinkle the shredded cheddar cheese over the pasta mixture, stirring continuously until the cheese melts completely and creates a creamy texture throughout. This step not only enhances the flavor of Taco Spaghetti but also makes it irresistibly cheesy and comforting. Allow it to cook for an additional minute to ensure everything is hot.

Step 6: Serve and Garnish
Once the cheese has melted and the dish is well combined, remove the skillet from heat. Serve your Taco Spaghetti in bowls, garnishing each serving with fresh cilantro and optional toppings like sour cream or salsa. This final touch adds a burst of freshness, completing your delightful weeknight meal.

Storage Tips for Taco Spaghetti

  • Fridge: Store leftover Taco Spaghetti in an airtight container for up to 5 days. Make sure it cools to room temperature first to prevent condensation.

  • Freezer: Freeze Taco Spaghetti for up to 3 months in a freezer-safe container. Label the container with the date for easy tracking.

  • Reheating: When ready to enjoy again, reheat in a skillet over medium heat. Add a splash of water or broth to prevent drying out and ensure it stays creamy.

  • Separation Tip: If you think you might have leftovers, consider storing the cheese separately to maintain its creamy texture during storage.

Expert Tips for Taco Spaghetti

  • Perfect Pasta: Use salted water when boiling spaghetti; it enhances the flavor of the noodles and prevents blandness in your Taco Spaghetti.
  • Lean Meat Choice: Opt for lean ground beef (90/10 or 93/7) to reduce grease; if using higher fat beef, always drain excess fat before adding ingredients.
  • Seasoning Adjustments: Start with less taco seasoning; you can always add more to suit your taste without overpowering the dish.
  • Cheese Strategy: For best melting, shred cheese from a block rather than using pre-shredded options, which contain anti-caking agents that hinder melting.
  • Keep It Creamy: If the sauce is too thick, splash in a bit of the reserved pasta water to reach your desired consistency, ensuring your Taco Spaghetti is perfectly saucy!

What to Serve with Taco Spaghetti

Pairing this delightful dish with complementary sides can elevate your meal experience, creating a wonderfully satisfying dining occasion.

  • Crispy Garlic Bread: A buttery, crispy side that contrasts perfectly with the creamy Taco Spaghetti, making every bite irresistible. You can never go wrong with the classic combo of pasta and fresh bread!

  • Fiesta Salad: Light and zesty with a mix of greens, tomatoes, corn, and lime dressing, this salad adds freshness and crunch that balances the richness of the pasta.

  • Refried Beans: Rich and creamy, these beans lend a comforting texture and earthy flavor that enhances the overall meal. They also bring an authentic taco experience to your table!

  • Mexican Street Corn: Grilled corn smothered in mayo, cheese, and spices, this dish brings a pop of sweetness and spice that complements the savory notes of Taco Spaghetti beautifully.

  • Avocado Slices: Creamy and buttery, fresh avocado adds a luscious finish while contributing healthy fats, making your meal feel indulgent yet wholesome.

  • Salsa and Tortilla Chips: A tangy, crunchy pairing that invites everyone to dig in. The freshness of salsa and the satisfying crunch of chips create a fiesta vibe that resonates with the Taco Spaghetti flavors.

  • Coconut Lime Rice: Light and fluffy, this subtly sweet rice offers tropical notes that can elevate your dish’s flavors, creating an exotic twist on your taco night!

  • Margaritas: A classic pairing, refreshing margaritas are perfect for cutting through the richness of the dish, adding a festive touch and complementing the taco flavors in each bite.

Taco Spaghetti Variations & Substitutions

Feel free to explore the delightful possibilities that can make your Taco Spaghetti even more personal and satisfying!

  • Spicy Twist: Add diced jalapeños to the meat mixture for an extra kick. This spicy addition elevates the dish and tantalizes the taste buds.

  • Lean Alternatives: Use ground chicken or turkey instead of beef. These lean proteins keep the flavors intact while providing a lighter option for health-conscious eaters.

  • Creamy Baked Dish: Transform your Taco Spaghetti into a baked casserole. Layer the spaghetti and meat mixture in a baking dish, top with more cheese, and bake until golden and bubbly, for a comforting twist!

  • Veggie Delight: Swap the meat for black beans or lentils for a vegetarian-friendly version. This hearty alternative enhances the dish with fiber while maintaining that desirable taco flavor.

  • Extra Zesty: Incorporate lime juice and zest into the sauce for a refreshing twist. Pairing the acidity from citrus with rich flavors creates a vibrant burst of taste.

  • Cheese Variety: Experiment with different cheese blends, such as pepper jack or queso fresco. Each variety adds a unique profile, making every bite enjoyable in a different way.

  • Herb Swaps: Substitute fresh cilantro with green onions or basil for a flavor that’s equally fresh but with a distinct twist. Each herb brings its own profile, enhancing the entire dish.

  • Garnish Galore: Top your finished dish with sour cream, avocado slices, or pico de gallo for an added layer of flavor and texture. These toppings create a colorful contrast that pleases the eyes and palate.

With these variations, your Taco Spaghetti can be a fresh and exciting meal each time you make it! Don’t forget to sprinkle on some of that delicious cheese from the cheesy goodness section for extra yum!

Make Ahead Options

These Taco Spaghetti are perfect for meal prep enthusiasts! You can brown the ground beef and sauté the onions up to 3 days in advance, storing them in an airtight container in the refrigerator to maintain their tenderness. Additionally, you can cook the spaghetti noodles up to 24 hours ahead of time; just toss them with a bit of olive oil to prevent sticking. When you’re ready to enjoy your meal, simply reheat the beef mixture and noodles in a skillet, add the taco seasoning and Rotel tomatoes, and stir in the cheese until melted. You'll have a delicious, comforting dish with minimal effort on busy weeknights!

Taco Spaghetti Recipe FAQs

How can I tell if my ingredients are ripe or good to use?
Absolutely! When selecting produce, look for firm, vibrant fruits and vegetables. For example, onions should be dry and firm, without soft spots or sprouting. When checking tomatoes, avoid those with dark spots all over or wrinkled skins. Fresh cilantro should be bright green and fragrant, while, if using ground beef, ensure it’s a bright red color with no off odors.

How should I store leftover Taco Spaghetti?
Very easy! Store your Taco Spaghetti in an airtight container in the fridge for up to 5 days. Make sure to let it cool completely to room temperature first to avoid condensation, which can make your dish watery. When reheating, I recommend using a skillet to maintain its creaminess!

Can I freeze Taco Spaghetti, and how should I do it?
Absolutely! You can freeze Taco Spaghetti for up to 3 months. To do this, first let it cool to room temperature. Then, transfer it to a freezer-safe container, making sure to leave some space for expansion. Don't forget to label the container with the date. When you’re ready to enjoy it, just thaw in the fridge overnight and reheat in a skillet, adding a splash of water or broth to keep it creamy.

What if my Taco Spaghetti turns out too dry?
If you find that your Taco Spaghetti is a bit on the dry side, don’t fret! You can add some of the reserved pasta water during reheating to loosen it up. Start with a couple of tablespoons and stir well until you reach your desired consistency. This will help rejuvenate the dish and keep it nice and saucy.

Are there any dietary considerations for Taco Spaghetti?
Yes, while Taco Spaghetti is generally a family-friendly dish, those with dietary restrictions should choose ingredients carefully. If you’re making it gluten-free, opt for gluten-free pasta. For vegan alternatives, try using lentils or chickpeas as protein substitutes, while also swapping ground beef for a plant-based alternative and using dairy-free cheese. Additionally, check taco seasoning packets for hidden gluten or allergens.

Taco Spaghetti

Taco Spaghetti: Quick and Cheesy Weeknight Delight

Enjoy a quick and tasty Taco Spaghetti that's perfect for busy weeknights with the whole family.
Print Recipe Pin Recipe
Prep Time 10 minutes mins
Cook Time 20 minutes mins
Total Time 30 minutes mins
Servings: 4 servings
Course: Dinner
Cuisine: Mexican
Calories: 450
Ingredients Equipment Method Nutrition Notes

Ingredients
  

For the Pasta
  • 8 ounces Spaghetti Noodles Any long noodle can be used
For the Filling
  • 1 pound Lean Ground Beef Aim for 90/10 or 93/7
  • 1 medium Yellow Onion Substitutes include red onion or shallots
  • 2 tablespoons Taco Seasoning Store-bought or homemade
  • 1 can Rotel Tomatoes Can substitute with regular diced tomatoes
For the Cheesy Goodness
  • 1 cup Shredded Cheddar Cheese Can use Mexican cheese blend or pepper jack
For the Fresh Touch
  • 1/4 cup Fresh Cilantro Flat-leaf parsley can be used as an alternative

Equipment

  • Large pot
  • Colander
  • Large skillet
  • Tongs

Method
 

Step‑by‑Step Instructions
  1. Boil salted water in a large pot. Add spaghetti noodles and cook according to package instructions, about 8-10 minutes. Reserve ½ cup pasta water, then drain spaghetti.
  2. Heat oil in a large skillet over medium-high heat. Brown the lean ground beef with chopped yellow onion for about 5 minutes until meat is fully cooked and onions are translucent.
  3. Stir in taco seasoning and Rotel tomatoes, then pour in reserved pasta water. Simmer for about 5 minutes, stirring occasionally.
  4. Add drained spaghetti to the skillet and toss with the beef and sauce mixture using tongs.
  5. Sprinkle in shredded cheddar cheese and stir until melted and creamy. Cook for an additional minute.
  6. Serve Taco Spaghetti hot, garnished with fresh cilantro and optional toppings like sour cream or salsa.

Nutrition

Serving: 1servingCalories: 450kcalCarbohydrates: 52gProtein: 28gFat: 18gSaturated Fat: 8gPolyunsaturated Fat: 1gMonounsaturated Fat: 8gCholesterol: 60mgSodium: 600mgPotassium: 500mgFiber: 3gSugar: 4gVitamin A: 400IUVitamin C: 2mgCalcium: 250mgIron: 3mg

Notes

Use salted water when boiling for better flavor. Store leftovers in an airtight container for up to 5 days.

Tried this recipe?

Let us know how it was!

Hello world!

August 1, 2025 by admin 1 Comment

Welcome to WordPress. This is your first post. Edit or delete it, then start writing!

frzfzrrzberb

  • « Previous Page
  • 1
  • …
  • 69
  • 70
  • 71

Welcome!

Hi, I’m Grace, a Sydney-based home cook with a passion for bold flavors and trending ingredients. Whether you’re a busy beginner or a seasoned foodie, you’ll find dishes here that are fresh, fun, and full of flavor.

More about me

Popular Recipes

  • Mediterranean Chicken Zucchini Bake
    Mediterranean Chicken Zucchini Bake: Flavorful & Easy One-Dish Delight
  • Mediterranean Chicken Zucchini Bake That's Bursting with Flavor
  • Tomato Zucchini Pasta
    Tomato Zucchini Pasta: A Vibrant Summer Classic You’ll Love
  • Cheesy Zucchini Breadsticks
    Cheesy Zucchini Breadsticks That Won’t Ruin Your Diet

Footer

↑ back to top

About

  • Privacy Policy
  • Disclaimer
  • Terms & Conditions

Newsletter

  • Sign Up! for emails and updates

Contact

  • About me
  • Contact me

Copyright © 2025 TastyTrendIngredients