tastytrendingredients

  • Home
  • Recipes
    • Appetizers
    • Breakfast
    • Dessert
    • Dinner
    • Drinks
    • Salads
    • Snacks
    • Soups
  • About me
  • Contact me
menu icon
go to homepage
  • Home
  • Recipes
    • Appetizers
    • Breakfast
    • Dessert
    • Dinner
    • Drinks
    • Salads
    • Snacks
    • Soups
  • About me
  • Contact me
search icon
Homepage link
  • Home
  • Recipes
    • Appetizers
    • Breakfast
    • Dessert
    • Dinner
    • Drinks
    • Salads
    • Snacks
    • Soups
  • About me
  • Contact me
×

Creamy Orecchiette Pasta with Broccoli in 30 Minutes

September 11, 2025 by Grace Snow Leave a Comment

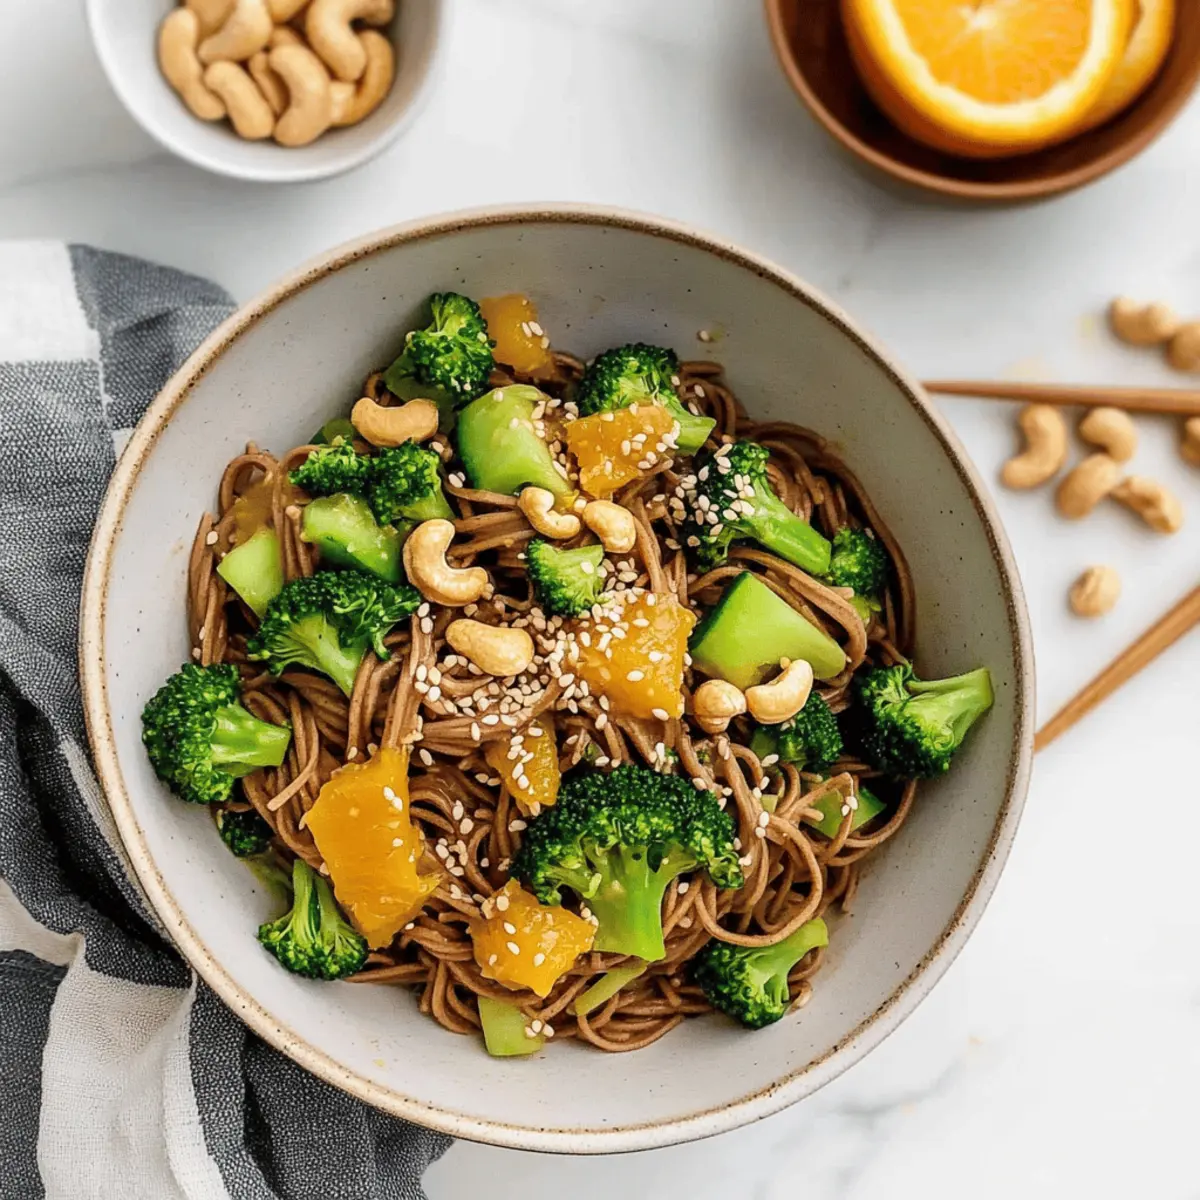
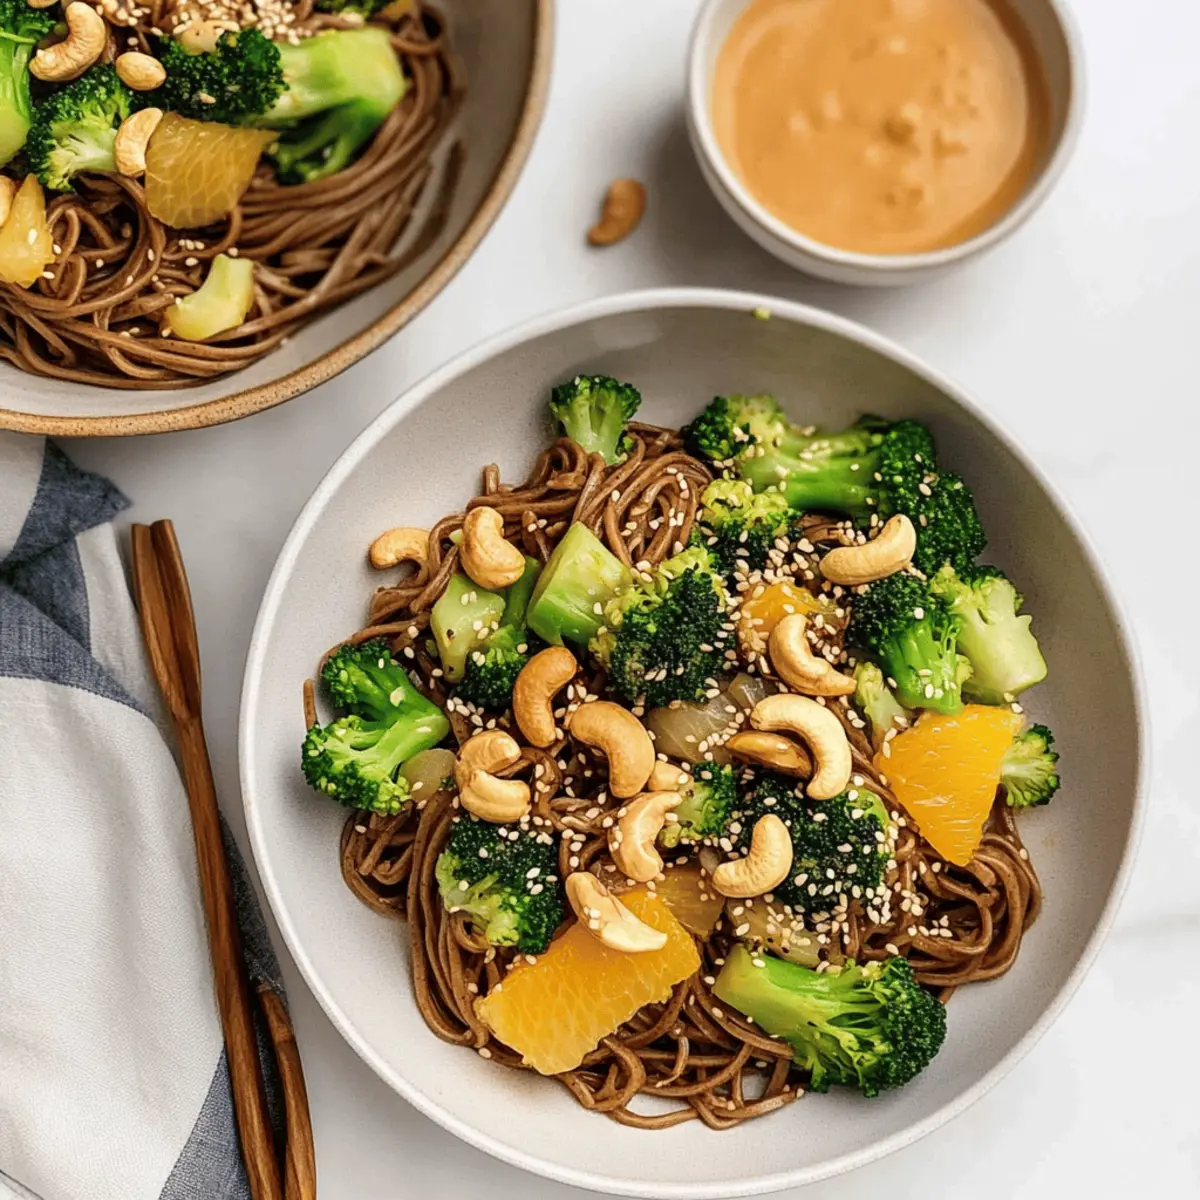
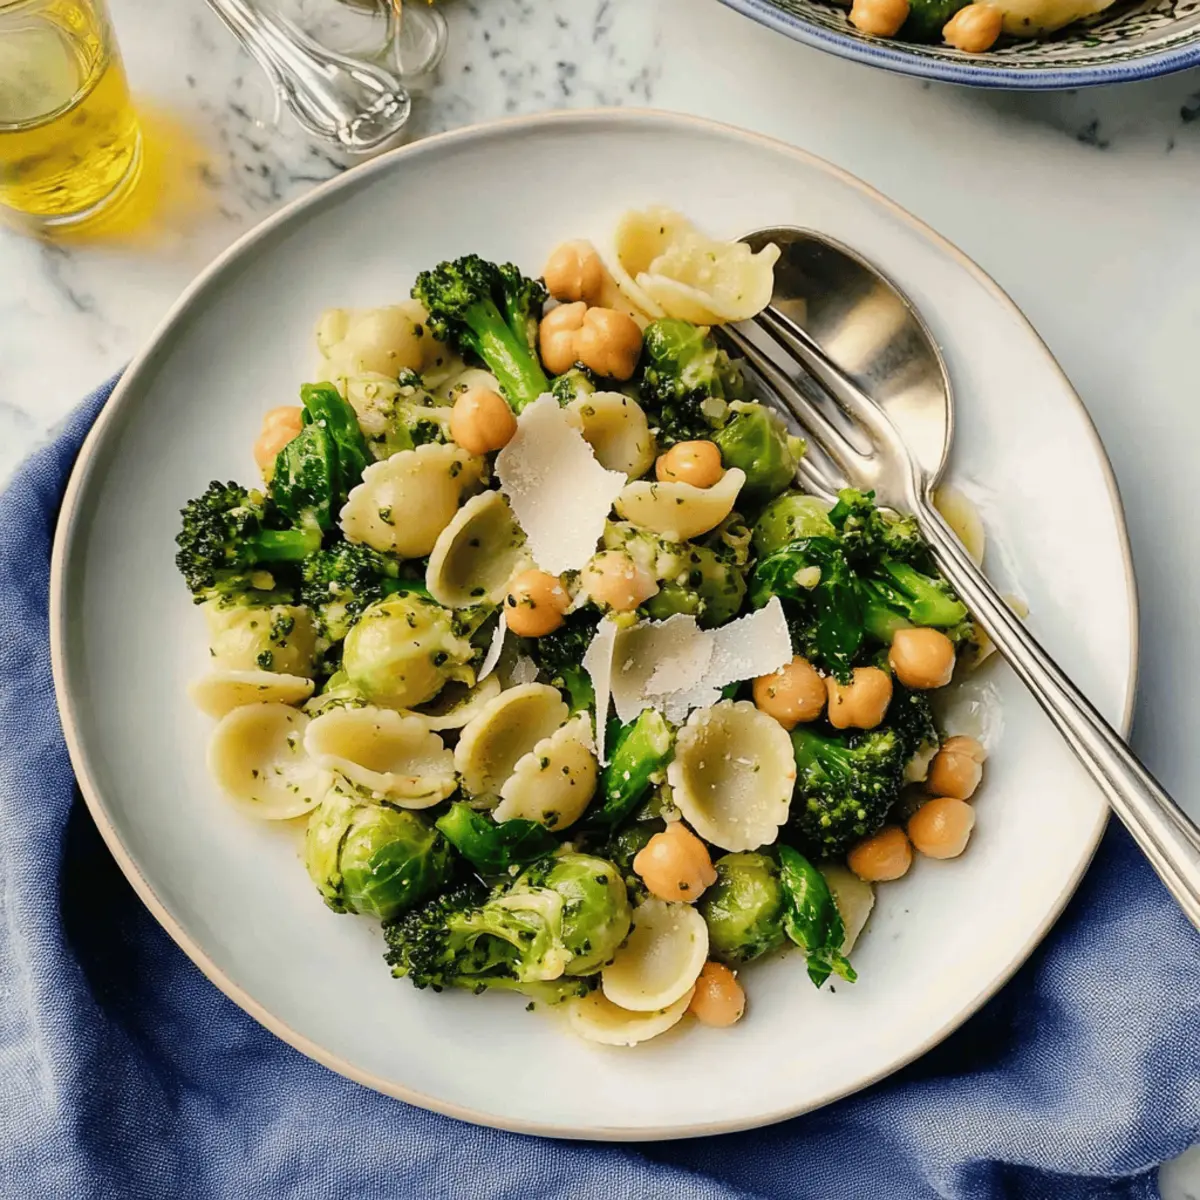
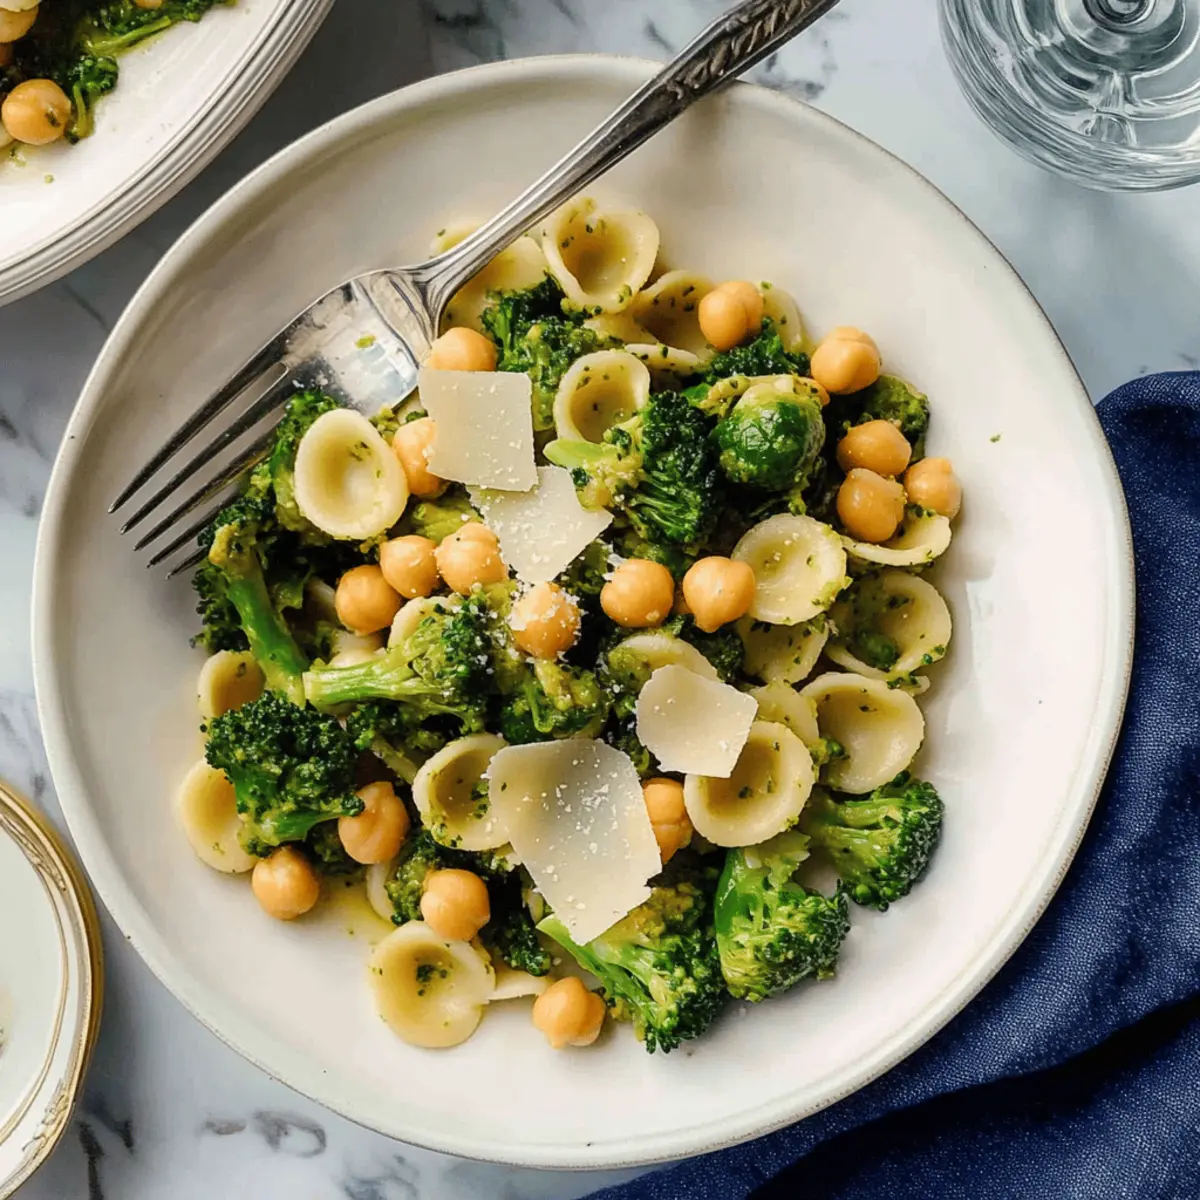
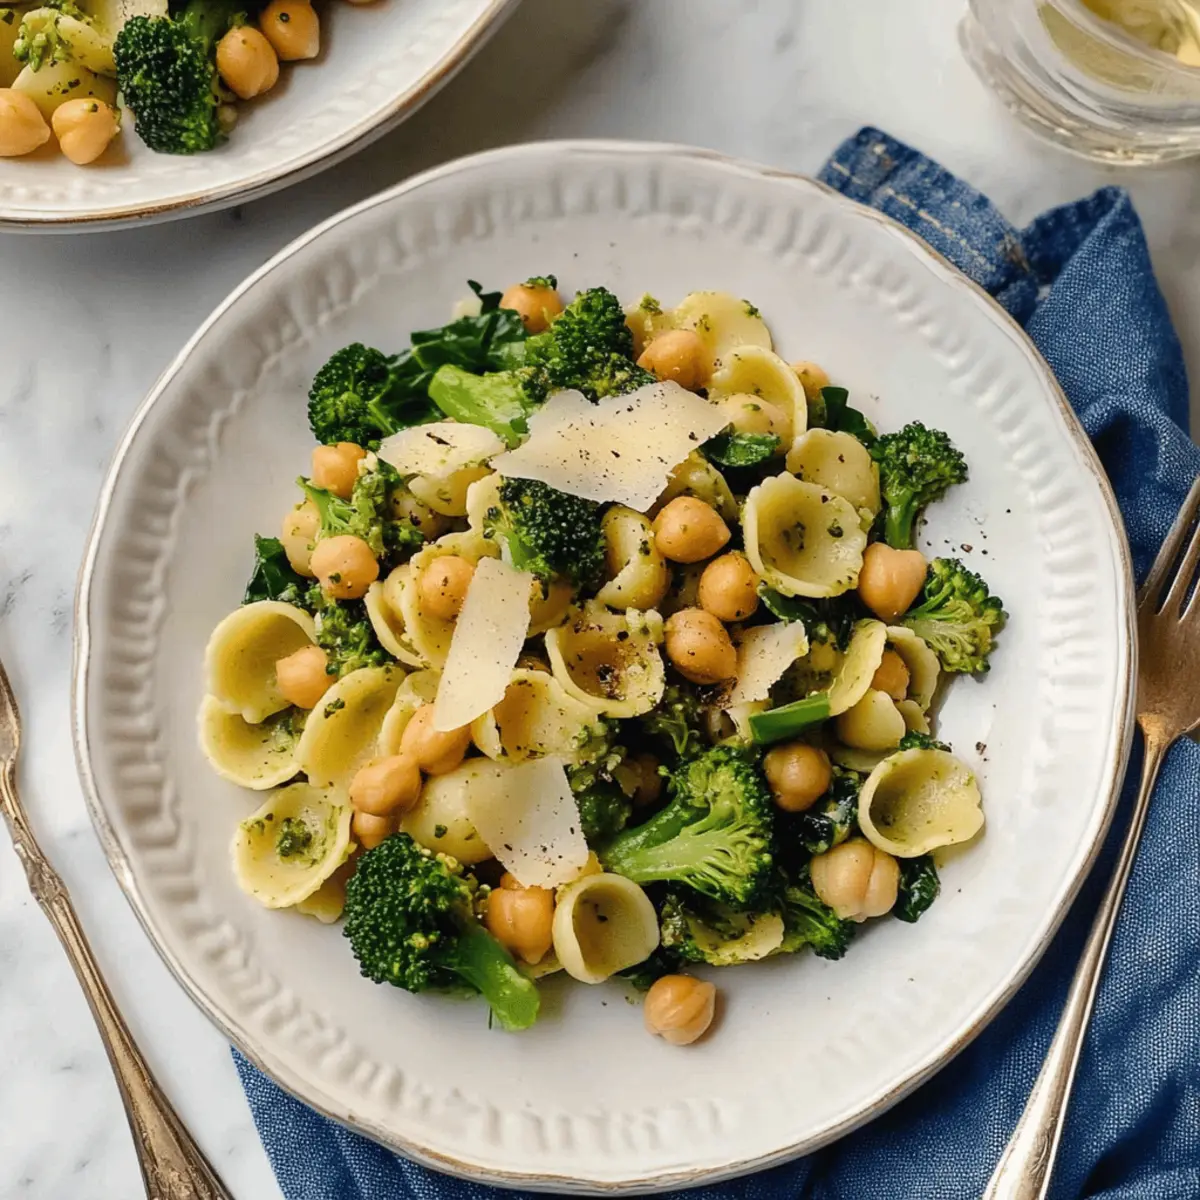
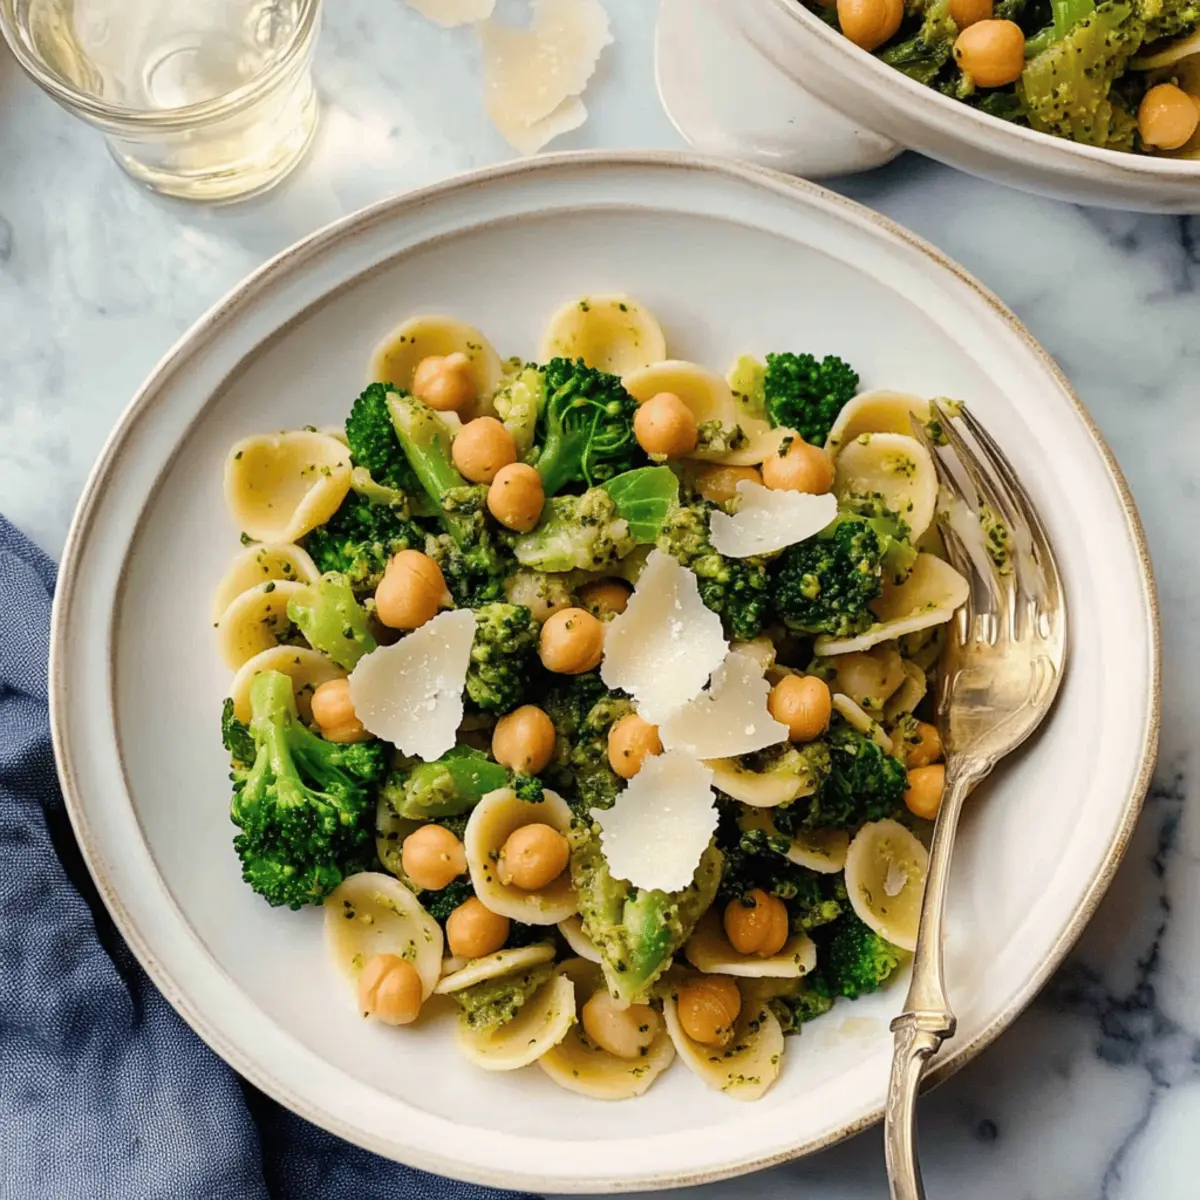
As I stirred the pot, the air filled with an inviting aroma that suddenly whisked me away to the sun-soaked coasts of Italy. This 30-Minute Orecchiette Pasta with Broccoli and Chickpeas offers a delightful escape from the mundane, transforming ordinary weeknight dinners into vibrant culinary adventures. With just 10 ingredients, this dish marries the playful shape of orecchiette with the crispness of Brussels sprouts and the hearty goodness of chickpeas, all draped in a creamy kale pepita pesto that will leave your taste buds singing. Not only is it quick to whip up—perfect for those hectic evenings—but it’s also adaptable, catering to both vegan and gluten-free diners alike. Who wouldn’t want a nourishing and satisfying meal that’s as colorful as it is delicious? Ready to dive into a bowl of pasta goodness? Let’s get cooking!

Why is This Pasta Dish a Must-Try?

Quick and Easy: In just 30 minutes, you can enjoy a delicious meal that doesn’t require hours in the kitchen.

Flavor Explosion: The rich and creamy kale pepita pesto adds a unique twist, blending beautifully with earthy Brussels sprouts and protein-packed chickpeas.

Flexible Ingredients: It’s perfect for improvisation—substitute your favorite seasonal veggies or use Cauliflower Pasta if you're in the mood for something different.

Health-conscious: With options for both vegan and gluten-free adaptations, this dish caters to various dietary preferences.

Crowd-Pleaser: This colorful plate is visually appealing and sure to impress guests or family alike, making it a fantastic choice for gatherings or quick weeknight dinners.

Orecchiette Pasta with Broccoli Ingredients

For the Pasta
• Orecchiette Pasta – A playful shape that holds sauce beautifully; essential for this dish’s heartiness.

For the Vegetables
• Brussels Sprouts – Offers crunch and sweetness; swap with green beans or zucchini for variety.
• Kale Stems – Provides a fibrous texture; any leafy green stems can be substituted.
• Broccolini – Adds mild bitterness and a nice crunch; use regular broccoli if needed.

For the Sauce
• Extra-Virgin Olive Oil – Enhances richness and prevents sticking; opt for high-quality for the best flavor.
• White Wine – Deepens the flavor profile; vegetable broth works for a non-alcoholic option.
• Creamy Kale Pepita Pesto – Enriches the dish with nutty notes; feel free to use store-bought for convenience.

For Protein & Garnish
• Chickpeas – Adds wholesome plant protein and texture; can be omitted for a lighter meal.
• Pecorino or Parmesan Cheese (optional) – Provides creamy umami; skip for a vegan-friendly dish.

For Seasoning
• Sea Salt & Black Pepper – Essential for flavor enhancement; adjust to suit your taste.

Enjoy crafting your dish for a delightful Orecchiette Pasta with Broccoli experience that beckons for seconds!

Step‑by‑Step Instructions for Orecchiette Pasta with Broccoli

Step 1: Boil the Pasta
Start by bringing a large pot of salted water to a vigorous boil over high heat. Add the orecchiette pasta and cook according to package directions, typically around 8-10 minutes, until tender yet al dente. Once cooked, drain the pasta in a colander and drizzle with extra-virgin olive oil to prevent sticking, tossing gently to coat.

Step 2: Sauté the Vegetables
In the same pot, now slightly cooled, add a splash of extra-virgin olive oil over medium heat. Toss in the Brussels sprouts, kale stems, and broccolini stems seasoned with a pinch of sea salt. Sauté for about 10 minutes, stirring occasionally, until the vegetables are nearly tender and start to caramelize, releasing their lovely aromas.

Step 3: Add Broccolini Florets
Next, introduce the broccolini florets into the pot with the other vegetables. Cook for an additional 3-5 minutes, stirring frequently, until all vegetables are vibrant and tender. The combination of colors and textures will signal that your Orecchiette Pasta with Broccoli is shaping up beautifully.

Step 4: Deglaze the Pot
Pour in a splash of white wine, stirring to deglaze the pot and combine the flavorful bits stuck to the bottom. Let it cook for about 30 seconds, allowing the alcohol to evaporate and the flavors to meld together, creating a rich base for your sauce.

Step 5: Combine Pasta and Chickpeas
Reduce the heat to low and carefully fold the drained orecchiette and chickpeas into the vegetable mixture. Stir well to ensure everything is evenly distributed and heated through for about 2-3 minutes. Season with a bit of sea salt and black pepper to taste, enhancing the vibrant flavors of the dish.

Step 6: Serve with Pesto
To finish, serve the delightful Orecchiette Pasta with Broccoli hot from the pot. Generously drizzle portions with the creamy kale pepita pesto, allowing it to coat the pasta and vegetables. If desired, sprinkle with freshly grated Pecorino or Parmesan cheese for an added layer of richness before enjoying this heartwarming meal.

Orecchiette Pasta with Broccoli Variations

Feel free to get creative and customize this dish to fit your taste and dietary needs!

  • Vegan Option: Omit the cheese and use nutritional yeast for a cheesy flavor without dairy. It's a delightful alternative that complements the pesto beautifully.

  • Gluten-Free: Swap the orecchiette for gluten-free pasta to make this dish suitable for those with gluten sensitivity. Just ensure to adjust cooking times for perfect texture.

  • Seasonal Veggies: Replace Brussels sprouts with snap peas or asparagus for a fresh twist during spring. Each vegetable brings its own vibrant crunch to the dish.

  • Leafy Greens Upgrade: Use any hearty greens you have on hand, like Swiss chard or arugula, instead of kale. Each option adds a unique flavor profile and texture.

  • Creamy Choices: For an extra creamy sauce, blend in a splash of coconut milk or cashew cream with the pesto. It lends an indulgent touch while still being plant-based.

  • Hearty Additions: Consider adding cooked sausage or crispy tofu for an added protein boost. This makes for a heartier meal that will satisfy even the hungriest diners.

  • Pasta Shape Fun: Switch things up by using other pasta shapes like fusilli or farfalle. Fun shapes can add a playful twist to the presentation!

  • Zesty Spin: Add a squeeze of fresh lemon juice or a sprinkle of red pepper flakes for a zesty kick. It brightens the flavors and adds a delightful tang!

For more inspiration, why not try a lovely Seafood Pasta or even a comforting Tagliatelle with Asparagus & Peas? Each of these variations offers a unique spin that can keep your dinner table fresh and exciting!

Expert Tips for Orecchiette Pasta with Broccoli

  • Select Quality Ingredients: Use fresh vegetables and high-quality olive oil for depth of flavor in your Orecchiette Pasta with Broccoli. Quality matters!

  • Timing is Key: Keep an eye on cooking times, especially for the pasta and vegetables. Overcooking can lead to mushy textures—aim for al dente!

  • Pasta Water Rescue: Reserve some pasta cooking water before draining. It can help loosen the sauce during mixing, ensuring everything coats perfectly.

  • Flavor Boost: Don’t skip the white wine! It adds a wonderful layer of complexity, but feel free to substitute with vegetable broth if preferred.

  • Experiment with Veggies: Feel free to customize based on what you have on hand. Seasonal veggies or leafy greens in place of kale can add unique twists!

What to Serve with Orecchiette Pasta with Broccoli

Elevate your weeknight dinner with delightful accompaniments that enhance the flavors of this vibrant pasta dish.

  • Garlic Bread: Perfect for soaking up any leftover pesto; its crispy texture complements the creamy pasta beautifully.
  • Mixed Green Salad: A fresh salad with a zesty vinaigrette adds brightness and contrast to the hearty dish—it’s a refreshing balance.
  • Roasted Vegetables: Seasonal vegetables like bell peppers or zucchini offer a smoky sweetness that pairs perfectly with the earthy notes of the orecchiette.
  • Lemon Zest: A sprinkle of fresh lemon zest just before serving brightens the dish and adds a burst of freshness that tantalizes the taste buds.
  • Sparkling Water: Serve chilled sparkling water with a slice of lemon for a light, refreshing drink that cleanses the palate between bites.
  • Chocolate Mousse: For dessert, a silky chocolate mousse provides a rich, indulgent finish that leaves everyone smiling after this delectable meal!

How to Store and Freeze Orecchiette Pasta with Broccoli

  • Fridge: Store leftovers in an airtight container for up to 3 days. Keep the creamy kale pepita pesto separate if possible to maintain freshness.

  • Freezer: For longer storage, freeze the pasta and vegetable mixture in a freezer-safe bag for up to 2 months. Leave out the cheese and pesto until ready to serve.

  • Reheating: Reheat in a skillet over low heat with a splash of olive oil or vegetable broth. Stir gently to combine, adding the pesto and cheese once heated through.

  • Make-Ahead: Prepare the pesto and sauté the vegetables ahead of time. Store them separately, then simply cook the pasta and combine when ready for a quick meal.

Make Ahead Options

These Orecchiette Pasta with Broccoli are perfect for meal prep enthusiasts looking to save time on busy weeknights! You can prepare the vegetables and the creamy kale pepita pesto up to 3 days in advance, storing them in airtight containers in the refrigerator. To keep your veggies fresh and vibrant, chop and sauté them just before serving, and only heat the pasta until warmed through for the best texture. When you're ready to enjoy this delightful dish, simply cook the pasta, combine it with the prepped ingredients, and drizzle with pesto before serving. This way, you'll have a satisfying and delicious meal ready in minutes, without sacrificing flavor or quality!

Orecchiette Pasta with Broccoli Recipe FAQs

How do I select the best ingredients for this dish?
Absolutely! When choosing your vegetables, look for bright, firm Brussels sprouts and broccolini without dark spots or wilting. For the pasta, select high-quality orecchiette for the best texture. Fresh kale should be vibrant green with no yellowing. Fresh ingredients elevate the flavor and overall enjoyment of your Orecchiette Pasta with Broccoli!

What is the best way to store leftover Orecchiette Pasta with Broccoli?
Very! Store your leftovers in an airtight container in the fridge for up to 3 days. If possible, keep the creamy kale pepita pesto separate to maintain its freshness. When you're ready to enjoy it again, a quick reheat in a skillet with a drizzle of olive oil or vegetable broth can work wonders.

Can I freeze Orecchiette Pasta with Broccoli?
Yes, you can! To freeze, ensure the pasta and vegetable mixture is completely cooled, then transfer it into a freezer-safe bag or container, removing as much air as possible. It can be stored for up to 2 months. When you’re ready to eat, thaw it overnight in the fridge, then reheat in a skillet, adding the pesto and cheese just before serving.

What can I do if my vegetables seem overcooked?
If you find that your vegetables have become mushy, don’t despair! Next time, try cutting them into larger pieces to ensure they retain a bit more texture during the cooking process. Additionally, add them to the pot in stages—adding sturdier veggies like Brussels sprouts first and introducing more tender ones like broccolini or kale later on can help maintain that crispy bite you desire in your Orecchiette Pasta with Broccoli.

What are some dietary considerations for this recipe?
This dish is wonderfully versatile for various diets! For a vegan option, simply skip the cheese or substitute it with a dairy-free alternative. If gluten is a concern, use gluten-free pasta, and ensure the pesto does not contain any cheese. Always double-check that pre-made ingredients (like store-bought pesto) align with your dietary preferences or restrictions for a stress-free meal!

Can my pets eat any ingredients from this recipe?
It's always best to prioritize pet safety! While broccoli is generally safe in small amounts, Brussels sprouts can cause gas in pets. Ensure that no cheese and spices are included in what you share with your furry friends. The ingredients in Orecchiette Pasta with Broccoli can be delightful for humans but may not be suitable for pets, so it’s safer to keep them out of the mix.

Orecchiette Pasta with Broccoli

Vibrant Orecchiette Pasta with Broccoli in 30 Minutes

A quick and healthy meal featuring orecchiette pasta with broccoli, Brussels sprouts, chickpeas, and a creamy kale pepita pesto.
Print Recipe Pin Recipe
Prep Time 10 minutes mins
Cook Time 20 minutes mins
Total Time 30 minutes mins
Servings: 4 servings
Course: Dinner
Cuisine: Italian
Calories: 450
Ingredients Equipment Method Nutrition Notes

Ingredients
  

For the Pasta
  • 2 cups Orecchiette Pasta A playful shape that holds sauce beautifully.
For the Vegetables
  • 1 cup Brussels Sprouts Offers crunch and sweetness.
  • 1 cup Kale Stems Provides a fibrous texture.
  • 1 cup Broccolini Adds mild bitterness and crunch.
For the Sauce
  • 3 tablespoons Extra-Virgin Olive Oil Enhances richness and prevents sticking.
  • 1/2 cup White Wine Deepens flavor profile.
  • 1 cup Creamy Kale Pepita Pesto Enriches the dish with nutty notes.
For Protein & Garnish
  • 1 can Chickpeas Adds wholesome plant protein.
  • 1/4 cup Pecorino or Parmesan Cheese Optional, provides creamy umami.
For Seasoning
  • to taste Sea Salt Essential for flavor enhancement.
  • to taste Black Pepper Essential for flavor enhancement.

Equipment

  • Large pot

Method
 

Step-by-Step Instructions
  1. Boil the Pasta: Bring a large pot of salted water to a vigorous boil. Add the orecchiette pasta and cook according to package directions, about 8-10 minutes. Drain and drizzle with olive oil.
  2. Sauté the Vegetables: In the same pot, add extra-virgin olive oil over medium heat. Add Brussels sprouts, kale stems, and broccolini stems seasoned with sea salt. Sauté for about 10 minutes.
  3. Add Broccolini Florets: Introduce broccolini florets into the pot. Cook for an additional 3-5 minutes until vibrant and tender.
  4. Deglaze the Pot: Pour in white wine, stir to deglaze and let it cook for about 30 seconds to meld flavors.
  5. Combine Pasta and Chickpeas: Reduce heat to low, fold in drained orecchiette and chickpeas. Stir well and season with salt and black pepper to taste.
  6. Serve with Pesto: Serve hot, drizzling with creamy kale pepita pesto and optionally topping with cheese.

Nutrition

Serving: 1servingCalories: 450kcalCarbohydrates: 60gProtein: 15gFat: 18gSaturated Fat: 3gPolyunsaturated Fat: 1gMonounsaturated Fat: 15gCholesterol: 10mgSodium: 600mgPotassium: 850mgFiber: 10gSugar: 5gVitamin A: 1500IUVitamin C: 60mgCalcium: 100mgIron: 3mg

Notes

Select quality ingredients for the best flavor. Store leftovers in an airtight container for up to 3 days.

Tried this recipe?

Let us know how it was!

Farmers Market Potato & Asparagus Pizza: Springtime Delight

September 11, 2025 by Grace Snow Leave a Comment

As I wandered through the local farmers market, the vibrant greens of fresh asparagus caught my eye, begging to be turned into something delicious. This Farmers Market Potato & Asparagus Pizza is my favorite way to celebrate spring, combining tender, seasonal produce with melty cheese and crispy crust. Not only is this recipe a breeze to whip up, but it's also a fantastic way to impress friends at your next gathering. With crunchy asparagus ribbons and comforting potatoes, you'll find every slice is a delightful reminder of sun-drenched days and outdoor feasts. Curious about how to create this fresh, veggie-packed masterpiece in your own kitchen? Let’s dive in!

Why Choose Farmers Market Pizza?

Fresh Ingredients: This pizza is brimming with seasonal vegetables sourced directly from your local farmers market, ensuring maximum flavor and nutrition.

Easy to Make: The straightforward recipe means no culinary expertise is needed—you’ll feel like a chef in no time!

Crowd-Pleasing Flavor: With the delightful combination of crisp asparagus and creamy cheese, it’s guaranteed to be a hit at any gathering or family dinner.

Versatile Variations: Feel free to customize it by swapping the asparagus with other seasonal veggies like zucchini or corn, making it perfect for any palate.

Perfect for Spring: Each bite is a savory expression of spring’s bounty, a perfect match with a glass of pale rosé or a refreshing salad. Why not pair it with a side of Sweet Potato Casserole for an extra touch?

Farmers Market Potato & Asparagus Pizza Ingredients

This recipe is a celebration of fresh flavors straight from your local market!

For the Pizza Base

  • Pizza Dough – Use store-bought for convenience or make your own for a personal touch.

For the Toppings

  • Asparagus – Provides a fresh, green flavor and crunchy texture; substitutions like zucchini or corn can brighten things up.
  • Potatoes – Adds heartiness and structure; opt for small, thinly sliced potatoes to ensure even cooking.
  • Olive Oil – Enhances flavor and helps achieve those beautifully browned edges; feel free to swap with avocado oil for a twist.
  • Garlic – Infuses the base with aromatic depth; roasting it first offers a mellower, sweeter flavor.
  • Cheese (Gruyere or White Cheddar) – Melts beautifully and adds richness; for a lactose-free option, use your favorite vegan cheese.
  • Chives – Offers freshness and a mild onion taste; consider using chive blossoms for an elegant garnish if they're available.
  • Fresh Herbs (Thyme) – Lends earthy undertones; other herbs like basil or oregano can also enhance your pizza's profile.

With these simple, fresh ingredients, you're on your way to creating a delightful Farmers Market Potato & Asparagus Pizza that's not just a meal—it's an experience bursting with springtime flavors!

Step‑by‑Step Instructions for Farmers Market Potato & Asparagus Pizza

Step 1: Preheat the Oven
Begin by preheating your oven to 475°F (245°C). This high temperature will ensure your Farmers Market Potato & Asparagus Pizza gets that perfect crispy crust. While the oven heats, gather your ingredients and prepare your workspace for a smooth cooking experience.

Step 2: Prepare the Asparagus
Using a vegetable peeler, create long ribbons from the asparagus stalks, which will make a beautiful topping. Chop any leftover bits into small pieces and set them aside for layering later. This step not only adds visual appeal but also helps to balance the flavors on your pizza.

Step 3: Set Up the Pizza Base
On a clean surface, roll out your pizza dough to your desired thickness, ensuring it's large enough to fit your baking sheet. Drizzle a generous amount of olive oil across the surface, followed by spreading minced garlic evenly. This aromatic base will elevate the flavors of your Farmers Market Pizza beautifully.

Step 4: Layer the Ingredients
Evenly sprinkle a layer of cheese, such as Gruyere or White Cheddar, across the dough. Next, gently arrange the thinly sliced potatoes and the chopped asparagus pieces on top. Make sure to overlap them slightly for even coverage, allowing the flavors to meld and create a scrumptiously satisfying bite.

Step 5: Bake the Pizza
Carefully place the assembled pizza in the preheated oven and bake for about 15-18 minutes. Keep an eye on it as it bakes, looking for a golden crust and tender potatoes. The cheese should be bubbling and slightly browned, signaling that it's ready to come out.

Step 6: Add the Finishing Touches
Once fully baked, remove the pizza from the oven and artfully place the asparagus ribbons on top, letting them wilt slightly from the residual heat. For an extra touch of elegance, scatter some chive blossoms if you have them. This step enhances both the visual appeal and flavor profile of your Farmers Market Potato & Asparagus Pizza.

Step 7: Serve and Enjoy
Slice your delicious creation into wedges and serve while warm. This spring-inspired pizza pairs wonderfully with a chilled glass of pale rosé or alongside a fresh salad, completing your meal. Each bite is a celebration of the vibrant, seasonal flavors you’ve brought together in this delightful dish!

Make Ahead Options

These Farmers Market Potato & Asparagus Pizza preparations are perfect for busy weeknights! You can prepare the pizza dough and assemble the toppings up to 24 hours in advance. Simply roll out the dough and layer it with garlic, cheese, and the sliced potatoes, then refrigerate. To maintain quality, cover it tightly with plastic wrap, preventing the crust from becoming soggy. When you’re ready to enjoy, just preheat your oven and bake the pizza straight from the fridge for 15-20 minutes until golden and bubbly. This way, you’ll have a delicious homemade pizza with minimal effort, perfect for sharing with loved ones!

Tips for the Best Farmers Market Pizza

Ingredient Freshness: Use the freshest asparagus available to ensure a burst of flavor. Check for firm, bright green stalks at the farmers market.

Even Slicing: For perfectly cooked potatoes, slice them as thinly and evenly as possible. This helps them cook through without undercooking while the pizza bakes.

Don't Rush the Bake: Allow your pizza to bake until the crust is golden and crisp. Keeping an eye on it is key to avoiding a soggy base.

Layer Wisely: Distribute toppings evenly. Overloading on ingredients can lead to uneven cooking or soggy dough, spoiling your Farmers Market Potato & Asparagus Pizza.

Finish with Freshness: Add any delicate ingredients like chives or herbs after baking for the best taste and presentation. This keeps them vibrant and flavorful!

Storage Tips for Farmers Market Potato & Asparagus Pizza

Fridge: Store leftover slices in an airtight container in the fridge for up to 2 days. Reheat in the oven at 350°F (175°C) for about 10 minutes to restore crispiness.

Freezer: For longer storage, wrap slices tightly in plastic wrap and place them in a freezer-safe bag. They will keep well for up to 2 months. Thaw in the fridge before reheating.

Reheating: To reheat, place the pizza slices in a hot skillet for a few minutes to re-crisp the crust while warming the toppings. Enjoy the flavors of your Farmers Market Potato & Asparagus Pizza with every bite!

Room Temperature: If you plan to consume within a couple of hours, you can keep the pizza at room temperature, but it's best enjoyed warm.

What to Serve with Farmers Market Potato & Asparagus Pizza

Pair your meal perfectly with delightful sides and beverages, creating a feast for the senses.

  • Crisp Green Salad: A light salad of mixed greens offers freshness that balances the richness of the pizza, making each bite feel vibrant and rejuvenating.

  • Roasted Radishes: These sweet, caramelized morsels provide a contrasting texture and delightful tang that complements the pizza beautifully.

  • Herbed Quinoa: Flavorful and nutritious, it adds a nutty element that pairs well with the fresh herbs found in the pizza. It's a wholesome addition to a springtime meal.

  • Grilled Vegetables: A colorful mix of seasonal veggies like zucchini and bell peppers provide a smoky flavor that enhances the fresh taste of asparagus.

  • Beet and Goat Cheese Salad: The earthy sweetness of beets combined with creamy goat cheese offers a rich flavor contrast, making it a sumptuous side option.

  • Chilled Pale Rosé: This light, crisp wine enhances the overall dining experience, bringing out the delicate flavors in the asparagus and cheese.

  • Fresh Fruit Tart: A sweet finale, the hint of sweetness and acidity from this dessert makes for a refreshing conclusion to your spring-inspired meal.

These pairing options elevate your Farmers Market Potato & Asparagus Pizza into a delightful dining experience that sings of spring's freshness!

Farmers Market Potato & Asparagus Pizza Variations

Feel free to explore these exciting spins on your pizza recipe that invite you to celebrate spring’s bounty in every bite!

  • Dairy-Free: Substitute regular cheese with your favorite vegan cheese for a delicious plant-based option that doesn’t skimp on flavor. This way, you can still enjoy the rich, melty texture without the dairy.

  • Herb Infusion: Swap thyme for fresh basil or oregano to bring a sweet, fragrant aroma that complements the seasonal veggies beautifully. A blend of herbs can elevate the freshness and make each bite a little adventure.

  • Texture Twist: Add a crunchy layer of panko breadcrumbs on top before baking for an irresistible crispy topping that adds extra texture. It creates a delightful crunch that contrasts perfectly with the soft, baked cheese beneath.

  • Spicy Kick: Sprinkle some red pepper flakes or sliced jalapeños on top before baking to introduce a fiery bite that will awaken your taste buds. This fiery addition can turn your pizza into a flavor explosion!

  • Flavorful Drizzle: Consider drizzling a balsamic reduction over the finished pizza for added sweetness and tang that enhances the fresh ingredients. This touch of acidity can elevate the entire dish, bringing it to new delicious heights.

  • Seasonal Veggies: Swap asparagus for seasonal favorites like zucchini, corn, or even caramelized onions for a different flavor profile. Each veggie brings its unique taste, making every pizza experience different and delightful.

  • Loaded Style: Pile on additional toppings like sundried tomatoes or olives for a Mediterranean flair that’s rich and satisfying. Combining flavors can transform this simple pizza into a gourmet dish with exciting depth.

Incorporate any of these variations into your Farmers Market Potato & Asparagus Pizza, and you'll find even more reasons to savor the charm of homemade pizzas. For more inspirations, explore hearty options like our Sweet Potato Casserole or fresh flavors in our Tagliatelle with Asparagus and Peas.

Farmers Market Potato & Asparagus Pizza Recipe FAQs

What kind of asparagus should I choose for the pizza?
Absolutely! Look for medium-to-thick asparagus spears that are bright green and firm. Avoid any that have dark spots or are soft to the touch, as these can compromise the overall freshness and crunchiness of your Farmers Market Potato & Asparagus Pizza.

How should I store leftover pizza?
For the best results, store any leftover pizza in an airtight container in the refrigerator for up to 2 days. If you prefer, you can also wrap the slices in foil or plastic wrap. When it’s time to enjoy again, reheat in a preheated oven at 375°F (190°C) for about 10-15 minutes to keep that delightful crispiness!

Can I freeze this pizza for later?
Absolutely! To freeze your Farmers Market Potato & Asparagus Pizza, tightly wrap individual slices in plastic wrap and then in aluminum foil to prevent freezer burn. These slices can be stored in the freezer for up to 3 months. When you’re ready to enjoy, simply thaw them in the refrigerator overnight and reheat in the oven to restore that wonderful texture.

What can I do if the pizza dough doesn’t cook evenly?
If you find that the pizza dough isn't cooking evenly, making sure to roll it out to an even thickness can help. Thin out any overly thick areas, and always ensure your oven is fully preheated before baking. If the edges brown too quickly, consider covering them with foil to allow the center more time to cook through without burning.

Are there any dietary considerations for this recipe?
Very! If you're cooking for someone with dairy allergies, you can easily substitute the cheese with a favorite vegan option. Always check ingredient labels for hidden dairy products. Additionally, for those on gluten-free diets, using gluten-free pizza dough is a simple and effective option to make this gorgeous pizza accommodating for all!

Can I prepare the pizza ahead of time?
Absolutely! You can assemble your Farmers Market Potato & Asparagus Pizza a day in advance without baking. Just cover it tightly with plastic wrap and refrigerate. When you’re ready to serve, pop it in the oven at the recommended temperature until everything is bubbly and perfect. This is a great time-saver for busy weeknights or gatherings!

Farmers Market Potato & Asparagus Pizza

Farmers Market Potato & Asparagus Pizza: Springtime Delight

Celebrate spring with this Farmers Market Potato & Asparagus Pizza, combining seasonal vegetables and cheese for a delightful meal.
Print Recipe Pin Recipe
Prep Time 30 minutes mins
Cook Time 20 minutes mins
Total Time 50 minutes mins
Servings: 4 slices
Course: Dinner
Cuisine: Italian
Calories: 320
Ingredients Equipment Method Nutrition Notes

Ingredients
  

For the Pizza Base
  • 1 lb Pizza Dough Use your favorite homemade or store-bought dough.
  • 2 tbsp Olive Oil Can substitute with avocado oil.
For the Toppings
  • 1 bunch Asparagus Fresh and crisp.
  • 2 medium Potatoes Thinly sliced.
  • 1 cup Cheese (Gruyere or White Cheddar) Melts beautifully.
  • 2 cloves Garlic Minced or roasted for less pungency.
  • 2 tbsp Chives Can use chive blossoms for garnish.
  • 1 tbsp Fresh Herbs (Thyme) Other herbs like basil or oregano can be used.

Equipment

  • Oven
  • Baking Sheet
  • Pizza stone
  • Vegetable Peeler
  • Rolling Pin

Method
 

Step‑by‑Step Instructions
  1. Preheat your oven to 475°F (245°C) and line a baking sheet or pizza stone with parchment paper.
  2. Using a vegetable peeler, create thin ribbons from the asparagus, discarding tough ends.
  3. Roll out pizza dough to about 1/4 inch thickness, then place on the prepared baking sheet or stone. Drizzle with olive oil and spread minced garlic.
  4. Layer cheese, followed by thinly sliced potatoes, and sprinkle reserved asparagus bits on top.
  5. Bake for 15-20 minutes, or until golden brown and potatoes are tender.
  6. Add fresh asparagus ribbons and any chive blossoms on top, returning to the oven for an additional 2-3 minutes.
  7. Slice and enjoy the pizza warm, paired with a glass of pale rosé.

Nutrition

Serving: 1sliceCalories: 320kcalCarbohydrates: 38gProtein: 10gFat: 15gSaturated Fat: 7gPolyunsaturated Fat: 2gMonounsaturated Fat: 9gCholesterol: 30mgSodium: 450mgPotassium: 500mgFiber: 3gSugar: 2gVitamin A: 500IUVitamin C: 10mgCalcium: 200mgIron: 1mg

Notes

For best results, use fresh ingredients and ensure even thickness when slicing potatoes. Leftovers can be stored in an airtight container for up to 2 days.

Tried this recipe?

Let us know how it was!

Savory Cashew Broccoli Soba Noodles for Quick Dinner Joy

September 11, 2025 by Grace Snow Leave a Comment

As I stumbled upon a beautiful farm stand the other day, the vibrant greens of fresh broccoli caught my eye, reminding me of my favorite easy vegan dish: Cashew Broccoli Soba Noodles. This quick weeknight meal brings creamy, nutty flavors together with tender soba noodles and crunchy vegetables, creating a satisfying dinner that’s not just healthy but also completely delicious. The best part? You can whip it up in about 30 minutes! Perfect for those busy evenings when you want to skip the fast food and indulge in something homemade. Plus, it’s gluten-free and can even be customized with roasted spaghetti squash for a low-carb alternative. Excited to dive in and try your hand at this dish? Let’s get cooking!

Why are these noodles so irresistible?

Quick Preparation: In just 30 minutes, you can savor a wholesome dinner that leaves fast food in the dust. Perfect for busy weeknights!

Vegan and Gluten-Free: These noodles cater to diverse dietary needs, effortlessly combining creamy cashew sauce and fresh veggies in a pleasingly light dish.

Flavor Explosion: Rich, tangy flavors from tamari, lime, and orange juice marry beautifully with crunchy cashews, elevating your meal from ordinary to extraordinary.

Versatile Enjoyment: Feel free to substitute soba noodles with roasted spaghetti squash for a low-carb twist, or swap in your favorite vegetables to keep it fresh and exciting!

Crowd-Pleasing Appeal: Whether it's a weeknight family dinner or a gathering with friends, this dish is bound to impress and satisfy everyone at the table.

Dive deeper into a world of flavor with my recipes for Gochujang Sesame Noodles and Chicken Teriyaki Noodles for more quick meal ideas!

Cashew Broccoli Soba Noodles Ingredients

For the Cashew Sauce

  • Tamari – Provides salty depth; you can substitute with gluten-free soy sauce if needed.
  • Fresh Lime Juice – Adds a bright acidity to balance the rich flavors.
  • Fresh Orange Juice – Brings a sweet tang; you can swap lime juice for a more tart profile.
  • Sesame Oil – Imparts a warm nuttiness to the sauce.
  • Garlic – Offers aromatic flavor; fresh will elevate the taste.
  • Ginger – Adds warmth and spice; fresh ginger enhances the dish.
  • Cashew Butter – Creamy base of the sauce, can be replaced with almond butter or sunflower seed butter for a nut-free option.
  • Water – Adjusts the consistency for your preferred texture.

For the Noodles and Vegetables

  • Soba Noodles – The main carbohydrate source providing texture; opt for 100% buckwheat soba for gluten-free.
  • Broccoli – Nutrient-dense and vibrant; both florets and tender stems can be utilized.
  • Scallions – Adds a mild onion flavor, perfect for freshness.
  • Carrot – Provides sweetness and crunch to the dish.
  • Baked Tofu (or protein of choice) – Essential for protein; substitute with chickpeas for a vegan alternative.
  • Toasted Cashews – For an extra crunch and nutty flavor at the finish.
  • Sriracha – Optional for those who like a bit of heat in their meal.

Savor the wonderful balance of flavors and textures in these Cashew Broccoli Soba Noodles—I promise, your taste buds will thank you!

Step‑by‑Step Instructions for Cashew Broccoli Soba Noodles

Step 1: Make the Cashew Sauce
In a medium bowl, combine 3 tablespoons of tamari, 2 tablespoons each of fresh lime juice and fresh orange juice, 1 tablespoon of sesame oil, 2 minced garlic cloves, and 1 teaspoon of grated ginger. Stir in 1/4 cup of creamy cashew butter, then gradually add water until you reach your desired sauce consistency. Set this rich, flavor-packed cashew sauce aside while you prepare the other ingredients.

Step 2: Cook Soba Noodles
Bring a large pot of water to a rolling boil over high heat. Add 8 ounces of soba noodles and cook according to package instructions—usually around 4-6 minutes—until tender but firm. Drain the noodles and rinse them under cold water to prevent clumping. Drizzle with a bit of sesame oil to keep the noodles separate and flavorful, then set aside.

Step 3: Steam Broccoli and Scallions
In a steamer basket placed over boiling water, add bite-sized pieces of 2 cups of broccoli florets and 2 chopped scallions. Steam for 2-4 minutes, until the broccoli is bright green and tender yet crisp. Alternatively, for a roasted flavor, preheat your oven to 400°F and roast the broccoli and scallions for 15-20 minutes. Either method contributes vibrant color and nutrients to your Cashew Broccoli Soba Noodles.

Step 4: Assemble the Dish
In serving bowls, layer the prepared soba noodles first, then add on top the steamed broccoli and scallions. Next, cube your baked tofu (or preferred protein) and portion it onto the bowls. Drizzle the luscious cashew sauce generously across each dish, mixing the ingredients as desired. Sprinkle with toasted cashews for an added crunch and serve immediately alongside sriracha and tamari for those who enjoy a little extra kick.

How to Store and Freeze Cashew Broccoli Soba Noodles

Fridge: Store any leftover Cashew Broccoli Soba Noodles in an airtight container for up to 3 days. To keep the noodles from clumping, add a drizzle of sesame oil before sealing.

Freezer: If you want to freeze the dish, place the noodles and vegetables in a freezer-safe container for up to 1 month. For the best texture, it’s recommended to freeze the cashew sauce separately.

Reheating: To reheat, thaw in the fridge overnight. Warm in a saucepan over low heat, adding a splash of water or more cashew sauce to regain creaminess.

Assembly Tip: To maintain freshness when storing, keep the sauce separate until you’re ready to serve your Cashew Broccoli Soba Noodles again. This helps preserve the vibrant flavors and textures!

What to Serve with Easy Vegan Cashew Broccoli Soba Noodles

Looking to elevate your meal experience with delightful companions to your creamy cashew noodles?

  • Zesty Cucumber Salad: Refreshing and crisp, it balances the rich flavors of the noodles, adding a cool crunch with each bite.

  • Roasted Sweet Potatoes: Their natural sweetness complements the tangy cashew sauce, creating a satisfying layering of flavors that warms the heart.

  • Miso Soup: This light and savory broth acts as a perfect starter, enhancing the overall Asian-inspired theme of your meal.

  • Crispy Sesame Tofu: Adding an extra protein, this dish amplifies the nuttiness while keeping everything wonderfully crunchy.

  • Steamed Edamame: Pop these bright green pods as a healthy snack or side; their light saltiness pairs deeply with the rich cashew sauce.

  • Chilled Green Tea: Sipping this subtly bitter tea helps cleanse the palate between bites, enhancing the complex flavors of your cashew noodles.

  • Fruit Sorbet: A refreshing dessert that sweetens the meal’s conclusion; its fruity notes mimic the citrus in the cashew sauce while providing a delightful cool finish.

Treat your taste buds to these exciting additions alongside your Easy Vegan Cashew Broccoli Soba Noodles for a full taste experience!

Expert Tips for Cashew Broccoli Soba Noodles

  • Smooth Sauce: Blend cashew sauce thoroughly to eliminate lumps. Adjust with additional water for a silky consistency that coats the noodles perfectly.
  • No Clumping: Always rinse your soba noodles under cold water after cooking to keep them from sticking together. This ensures each bite remains deliciously separate.
  • Add Flavor Depth: Consider letting the cashew sauce sit for a bit before serving. This resting time allows the flavors of the Cashew Broccoli Soba Noodles to meld together beautifully!
  • Vegetable Variations: Don't hesitate to switch up your veggies! Try bell peppers, snap peas, or whatever is fresh from your farmer's market for an exciting twist.
  • Protein Options: If you prefer different proteins, chickpeas or seitan make wonderful swaps for tofu, accommodating various dietary preferences in your Cashew Broccoli Soba Noodles.

Cashew Broccoli Soba Noodles Variations

Feel free to get creative with your dish—each variation brings a new twist that will tantalize your taste buds!

  • Spaghetti Squash: Swap soba noodles for roasted spaghetti squash for a delightful low-carb alternative. This twist retains the dish’s freshness while introducing a unique texture. Roasted squash adds a slightly sweet essence that pairs wonderfully with the creamy sauce.
  • Vibrant Veggies: Replace broccoli with bell peppers or snap peas for a colorful crunch. These alternatives not only boost the dish's vibrancy but also add layers of sweet flavor and crisp textures that keep it exciting every time.
  • Chickpeas or Tempeh: Use chickpeas or tempeh instead of baked tofu for a protein-packed option that’s equally satisfying. These legumes add a nutty flavor profile and enhance the heartiness, giving the dish an exciting new dimension.
  • Nut-Free Sauce: If you prefer a nut-free option, substitute cashew butter with sunflower seed butter. The resulting sauce will still be creamy and delicious while catering to those with allergies, ensuring everyone can enjoy this meal.
  • Spice It Up: Add additional sriracha or a sprinkle of crushed red pepper flakes for heat lovers. A bit of spice can bring out a whole new level of flavor, transforming your dish into a fiery experience that will leave you craving more.
  • Fresh Herbs: Garnish with fresh cilantro or basil for an aromatic finish. Fresh herbs not only elevate the visual appeal of the dish but also infuse it with a delightful burst of flavor, making your meal feel light and refreshing.
  • Sesame Seeds: For an added crunch, sprinkle toasted sesame seeds on top before serving. This tiny tweak delivers an extra layer of texture and enriches the nutty essence of the dish, leading to a well-rounded culinary experience.
  • Citrus Zest: Incorporate lime or orange zest into the cashew sauce for an extra citrusy kick. This small addition enhances the bright flavors, making the sauce shine even more and creating a fresh finish in every bite.

Enjoy exploring these variations for your Cashew Broccoli Soba Noodles, and remember, the journey in the kitchen is just as delightful as the meal itself! If you're interested in further exploring noodle dishes, check out the delightful Tagliatelle Asparagus Peas recipe for more inspiration!

Make Ahead Options

These Cashew Broccoli Soba Noodles are ideal for meal prep, making busy evenings a breeze! You can prepare the cashew sauce and store it in the refrigerator for up to 3 days; just keep it airtight to maintain that creamy texture. Similarly, the soba noodles can be cooked and stored in the fridge for up to 2 days—simply rinse them in cold water and drizzle with a little sesame oil to prevent sticking. For the vegetables, steam or roast the broccoli and scallions up to 24 hours in advance, then refrigerate. When you’re ready to serve, combine all components, warm if desired, and enjoy a deliciously effortless meal that tastes just as fresh!

Cashew Broccoli Soba Noodles Recipe FAQs

What is the best way to select fresh broccoli for this recipe?
Absolutely! When selecting broccoli, look for vibrant green florets without any dark spots or yellowing. The stalks should feel firm and crisp. This ensures the best flavor and nutritional value for your Cashew Broccoli Soba Noodles.

How should I store leftover Cashew Broccoli Soba Noodles?
To store your leftovers, place them in an airtight container and refrigerate for up to 3 days. When you’re ready to enjoy them again, simply reheat in the microwave or on the stovetop with a splash of water to ensure they don’t dry out.

Can I freeze these noodles for future meals?
Yes, you can! To freeze your Cashew Broccoli Soba Noodles, pack them tightly in an airtight container or freezer bag, ensuring you remove as much air as possible. They will stay fresh in the freezer for about 2 months. When you want to enjoy them, transfer them to the fridge overnight to thaw, then gently reheat with a little water or cashew sauce to bring back that creamy consistency.

What should I do if my cashew sauce is too thick?
If your cashew sauce is too thick, don’t worry—it’s an easy fix! Gradually whisk in more water, one tablespoon at a time, until you reach your desired consistency. Make sure to blend the sauce thoroughly to avoid any lumps, creating that nice creamy texture where each noodle can be perfectly coated.

Are there any dietary considerations I should keep in mind?
Very! This recipe is vegan and gluten-free, making it suitable for many dietary needs. If you have nut allergies, you can substitute cashew butter with sunflower seed butter. Additionally, make sure to use gluten-free tamari or soy sauce to keep the dish gluten-free for those with sensitivities. Just remember to enjoy this dish with your loved ones at home or as part of a gathering—it's a sure crowd-pleaser!

Can I use other substitutions for the key ingredients?
The more the merrier! If you want to mix things up, you can replace soba noodles with roasted spaghetti squash for a lower-carb meal. Feel free to substitute broccoli with other veggies like bell peppers or snap peas, and if you're not a fan of tofu, chickpeas or seitan can be tasty alternatives.

Cashew Broccoli Soba Noodles

Savory Cashew Broccoli Soba Noodles for Quick Dinner Joy

Enjoy quick and delicious Cashew Broccoli Soba Noodles, a healthy vegan dish ready in about 30 minutes!
Print Recipe Pin Recipe
Prep Time 10 minutes mins
Cook Time 20 minutes mins
Resting Time 10 minutes mins
Total Time 30 minutes mins
Servings: 4 servings
Course: Dinner
Cuisine: Asian, Vegan
Calories: 450
Ingredients Equipment Method Nutrition Notes

Ingredients
  

Cashew Sauce
  • 1 tablespoon Tamari or gluten-free soy sauce
  • 2 tablespoons Fresh Lime Juice
  • 2 tablespoons Fresh Orange Juice or more lime juice for tartness
  • 1 tablespoon Sesame Oil
  • 2 cloves Garlic minced
  • 1 teaspoon Ginger grated
  • 1/2 cup Cashew Butter or almond/sunflower seed butter
  • 1/2 cup Water adjust to desired consistency
Noodle Base
  • 8 oz Soba Noodles opt for 100% buckwheat for gluten-free
Vegetable Medley
  • 2 cups Broccoli both florets and stems
  • 3 stalks Scallions sliced
  • 1 medium Carrot sliced
Protein
  • 1 cup Baked Tofu or replace with chickpeas
Topping
  • 1/4 cup Toasted Cashews
  • 1 tablespoon Sriracha optional

Equipment

  • medium bowl
  • Large pot
  • Steamer basket

Method
 

Step-by-Step Instructions
  1. In a medium bowl, combine tamari, fresh lime juice, fresh orange juice, sesame oil, minced garlic, and grated ginger. Whisk in cashew butter until smooth, then gradually add water until you achieve your desired consistency. Set aside.
  2. Bring a large pot of water to a rolling boil. Add the soba noodles and cook according to package instructions, usually about 5-7 minutes. Drain and rinse under cold water.
  3. Set up a steamer basket over a pot of boiling water. Add broccoli florets and scallions, splash with a few drops of tamari, and steam for 2-4 minutes.
  4. In large serving bowls, layer the cooked soba noodles, steamed broccoli, and scallions. Top with cubed baked tofu and drizzle with cashew sauce. Scatter toasted cashews on top and serve with sriracha.

Nutrition

Serving: 1servingCalories: 450kcalCarbohydrates: 60gProtein: 15gFat: 20gSaturated Fat: 3gPolyunsaturated Fat: 5gMonounsaturated Fat: 10gSodium: 600mgPotassium: 800mgFiber: 10gSugar: 5gVitamin A: 1500IUVitamin C: 70mgCalcium: 100mgIron: 3mg

Notes

Allow the cashew sauce to rest for at least 10 minutes after mixing for richer flavor. Substitutions for vegetables and proteins can be made to suit your taste.

Tried this recipe?

Let us know how it was!

Savory Slow Cooker Chicken Thighs for Effortless Family Dinners

September 11, 2025 by Grace Snow Leave a Comment

The aroma wafting from the kitchen can transform even the busiest day into a comforting retreat. I often find myself reaching for my slow cooker when the evenings get hectic, and today, I'm excited to share my favorite recipe: Slow Cooker Chicken Thighs with Baby Potatoes and Carrots. This low-effort, family-friendly dinner is a game-changer, combining juicy chicken with tender veggies for a wholesome, satisfying meal that practically cooks itself. With just a few minutes of prep, you can toss everything into the slow cooker and let it work its magic, leaving you free to spend time with loved ones or unwind after a long day. Curious how something so simple can taste so delightful? Let’s dive into the recipe and explore!

Why Choose Slow Cooker Chicken Thighs?

Effortless Prep: With just a few minutes of prep, you can set this meal and forget it while it cooks!
Flavorful Comfort: The combination of juicy chicken, sweet carrots, and tender baby potatoes creates a warm, satisfying dish.
Family-Friendly: Perfect for busy weeknights, it's a meal that even picky eaters will love.
Versatile Cooking: Enjoy it on its own or pair it with crusty bread or over rice, just like my Honey BBQ Chicken for extra sauce absorption.
Leftovers to Love: Not only is it delicious fresh, but the leftovers also make for great next-day lunches or dinners!

Slow Cooker Chicken Thighs Ingredients

For the Chicken
• Bone-in, skin-on chicken thighs – This cut stays moist and tender during the slow cooking process.
• Olive oil – Aids in searing for added flavor and crispy skin; feel free to substitute with any high smoke point oil.

For the Vegetables
• Carrots (cut into 1-inch pieces) – Adds sweetness; using baby carrots can save you prep time.
• Baby white potatoes (halved if large) – Hearty and flavorful, they soak up the delicious broth; you can swap them for new potatoes or Yukon Golds.
• Garlic cloves (chopped) – Infuses the dish with a lovely aroma; fresh garlic is always best!
• Thyme sprigs – Imparts an herbal note to the flavours; if you have dried thyme, just use 1 teaspoon instead.
• Shallots (sliced) – Gives a subtle onion flavor; yellow or red onions are great alternatives.

For the Sauce
• Low-sodium chicken broth – Keeps the sodium low while adding moisture; homemade broth is ideal!
• Salted butter (cubed) – Enriches the sauce for a creamy texture; feel free to omit for a lighter option.
• Cornstarch (optional) – Use to thicken the sauce if desired; mix with cold water first to avoid clumping.

For Garnish
• Fresh parsley (chopped, for serving - optional) – A vibrant touch that enhances the dish's visual appeal and flavor.

This gathering of ingredients for your Slow Cooker Chicken Thighs will set you on the path to a comforting, home-cooked dinner that your whole family will adore!

Step‑by‑Step Instructions for Slow Cooker Chicken Thighs

Step 1: Sear Chicken
In a skillet, heat 2 tablespoons of olive oil over medium-high heat. Season the bone-in, skin-on chicken thighs with salt and pepper. Sear each thigh for about 5 minutes on each side, until they're golden brown and crispy. This step enhances flavor and texture, so don’t rush it!

Step 2: Layer Vegetables
While the chicken is searing, prepare your slow cooker by adding 1-inch pieces of carrots, halved baby potatoes, chopped garlic cloves, sliced shallots, and thyme sprigs. Ensure the vegetables are evenly distributed at the bottom of the cooker; they'll absorb all the delicious flavors from the chicken as it cooks.

Step 3: Add Chicken
Once the chicken thighs are nicely browned, place them directly on top of the vegetable mixture in the slow cooker. The skin side should face upwards to retain its crispiness as the chicken cooks. This arrangement allows the juices from the chicken to seep down into the vegetables, enhancing their flavor.

Step 4: Pour Broth and Add Butter
Pour in 1 cup of low-sodium chicken broth over the chicken and vegetables, ensuring that everything is nicely moistened. Next, add cubed salted butter on top of the chicken. This adds richness and depth to the sauce, making your Slow Cooker Chicken Thighs even more delectable.

Step 5: Cook
Cover your slow cooker and set it to cook on low for 6-7 hours, or on high for 4 hours. Avoid lifting the lid during cooking, as it helps maintain an optimal cooking temperature. When finished, the chicken should be tender, reaching an internal temperature of 165°F.

Step 6: Thicken Sauce
If you'd like a thicker sauce, stir together 2 tablespoons of cornstarch with a small amount of cold water in a bowl to make a slurry. About 30 minutes before serving, add this mixture to the slow cooker and let it cook uncovered; this will enhance the texture of your sauce.

Step 7: Serve
When ready, garnish your tender Slow Cooker Chicken Thighs with freshly chopped parsley to add a splash of color. This heartwarming meal is perfect served on its own or alongside crusty bread or fluffy rice, making every bite a delightful experience for you and your family.

Make Ahead Options

These Slow Cooker Chicken Thighs are perfect for meal prep enthusiasts! You can prep the chicken and vegetables (carrots, potatoes, and onions) up to 24 hours in advance by sealing them in an airtight container and refrigerating. Simply season and sear the chicken when you're ready to cook, then layer the prepped veggies in the slow cooker with the broth and butter before adding the chicken on top. This method not only saves you time but also maintains the chicken's juiciness and the vegetables' fresh flavor, allowing for an effortless dinner experience. When ready to serve, just cook as directed, ensuring a delicious, home-cooked meal awaits you at the end of a busy day!

What to Serve with Tender Slow Cooker Chicken Thighs?

Create a cozy, well-rounded meal that your family will adore with perfect pairings to accentuate each bite of chicken.

  • Crusty Bread: A fresh loaf is perfect for soaking up the rich sauce, adding a delightful crunch. The satisfaction of dipping warm bread into the savory broth is simply irresistible.

  • Fluffy Rice: Serving this dish over white or brown rice allows each grain to absorb the deep flavors of the chicken and veggies, turning every bite into a comforting experience.

  • Garlic Mashed Potatoes: Adding creamy mashed potatoes offers a smooth and buttery contrast to the tender chicken and hearty vegetables. It's a classic combination that brings warmth and joy to the dinner table.

  • Steamed Green Beans: Bright, crisp green beans add a fresh crunch and a pop of color to your plate. Toss them with a little garlic for deeper flavor, balancing the richness of the chicken.

  • Side Salad: A light arugula or spinach salad drizzled with a lemon vinaigrette provides a refreshing contrast and brightens up the meal, while adding a hint of acidity.

  • Roasted Brussels Sprouts: The charred flavor of Brussels sprouts paired with tangy balsamic glaze adds another layer of depth and enhances the sweetness of the carrots in the chicken dish.

  • Herbal Iced Tea: A glass of refreshing iced tea scented with lemon and mint complements the meal perfectly, making it not only delicious but also refreshing.

Each of these accompaniments enhances the tender slow cooker chicken thighs, inviting your loved ones to savor a feast filled with warmth and flavor!

Expert Tips for the Best Slow Cooker Chicken Thighs

  • Searing Matters: Sear the chicken thighs properly; this enhances flavor and texture, giving you that golden, crispy skin.

  • Avoid Lid-Lifting: Resist the temptation to lift the lid during cooking to maintain heat and steam, ensuring perfectly tender chicken.

  • Don’t Skip the Broth: Using low-sodium chicken broth prevents the dish from becoming overly salty while still providing essential moisture and flavor.

  • Thickness Tip: If you prefer a thicker sauce, mix cornstarch with cold water and add it toward the end of cooking for a velvety finish.

  • Temperature Check: Always check that your chicken reaches an internal temperature of 165°F for safety and optimal tenderness; a meat thermometer is invaluable for this!

  • Friendly Leftovers: Enjoy the leftovers for an easy lunch or dinner; they freeze well, making for a no-fuss meal down the road.

Slow Cooker Chicken Thighs Variations

Feel free to explore and personalize your slow cooker chicken thighs for an even more delicious experience!

  • Dairy-Free: Omit the butter and replace with olive oil for a lighter sauce and to cater to dairy sensitivities.
    Try using a flavorful cooking oil to keep the dish rich without the dairy.

  • Vegetable Swap: Incorporate parsnips or radishes for a new texture and taste profile that balances the sweetness of the carrots.
    These veggies will add a unique earthiness to your dish.

  • Spice It Up: Add red pepper flakes or your favorite hot sauce for an extra kick in flavor that brings warmth to your meal.
    This twist not only spices things up but also adds a fun layer of heat!

  • Herbal Infusion: Swap thyme for rosemary or oregano to create a different herbal atmosphere that complements the chicken beautifully.
    Each herb will give the dish an entirely new flavor profile!

  • Add Mushrooms: Toss in some sliced mushrooms to enrich the broth and add a delightful umami flavor.
    Mushrooms will absorb the juices, becoming wonderfully flavorful themselves.

  • Citrus Boost: Squeeze in some fresh lemon juice or orange zest to brighten up the dish at the end of its cook time.
    A little citrus can shift the flavors and create a refreshing contrast to the rich sauce.

  • Cooking Liquid Variation: Swap chicken broth for vegetable broth or even a splash of white wine for added depth and complexity.
    This simple change can elevate your dish with new flavors, similar to my Crock Pot Chicken Stew.

  • Chicken Variety: Substitute chicken thighs for drumsticks or even chicken breasts to suit your meat preference.
    Just remember, each cut will offer a slightly different texture.

With these variations, you can truly make these slow cooker chicken thighs your own. Happy cooking!

How to Store and Freeze Slow Cooker Chicken Thighs

Fridge: Store leftover Slow Cooker Chicken Thighs in an airtight container for up to 3 days to maintain freshness and flavor.

Freezer: Freeze the chicken and vegetables in freezer bags for up to 3 months; ensure they’re labelled with the date for easy organization.

Reheating: When ready to enjoy, thaw overnight in the fridge, then reheat in a microwave or on the stovetop with a splash of broth to keep it moist.

Leftover Tip: Incorporate any leftover chicken and veggies into soups or wraps for a delicious and convenient meal the next day!

Slow Cooker Chicken Thighs Recipe FAQs

How do I select the best chicken thighs for this recipe?
Absolutely! When choosing chicken thighs, look for bone-in, skin-on pieces for the juiciest outcome. They should have a fresh color and minimal discoloration. If you notice any dark spots or excessive liquid in the packaging, opt for another package.

How should I store leftover Slow Cooker Chicken Thighs?
Very simple! To keep your leftovers fresh, place the chicken and vegetables in an airtight container and store them in the refrigerator for up to 3 days. Make sure to seal them properly to avoid any moisture loss or contamination.

Can I freeze the Slow Cooker Chicken Thighs?
Absolutely! To freeze, allow the chicken and veggies to cool completely, then transfer them into freezer bags. Squeeze out as much air as possible and label with the date; they’ll keep well for up to 3 months. When you're ready to enjoy, thaw overnight in the refrigerator before reheating.

What’s the best way to reheat Slow Cooker Chicken Thighs?
For best results, reheat the chicken on the stovetop over low heat with a splash of broth to keep it moist, about 10-15 minutes, or you can microwave it in short bursts. Ensure that it reaches an internal temperature of 165°F to ensure it's safely reheated.

Are there any dietary considerations I should be aware of?
Very much so! If you're cooking for someone with allergies, ensure that all ingredients are safe for consumption. For a lower-sodium option, stick with homemade or low-sodium chicken broth. Also, for those who prefer a dairy-free meal, you can omit the butter or substitute it with a vegan butter alternative.

What can I do if the chicken is dry?
If the chicken turns out dry, it may be due to overcooking. Next time, try cooking on the low setting and avoid lifting the lid during cooking. Always use a meat thermometer to ensure the chicken reaches 165°F without going past it. Additionally, make sure to layer the vegetables properly to help keep moisture around the chicken as it cooks!

Slow Cooker Chicken Thighs

Savory Slow Cooker Chicken Thighs for Effortless Family Dinners

Experience the comforting flavors of Slow Cooker Chicken Thighs, featuring juicy chicken, tender vegetables, and effortless preparation.
Print Recipe Pin Recipe
Prep Time 15 minutes mins
Cook Time 6 hours hrs
Total Time 6 hours hrs 15 minutes mins
Servings: 4 servings
Course: Dinner
Cuisine: American
Calories: 450
Ingredients Equipment Method Nutrition Notes

Ingredients
  

For the Chicken
  • 4 pieces bone-in, skin-on chicken thighs Stays moist and tender
  • 2 tablespoons olive oil For searing
For the Vegetables
  • 2 cups carrots Cut into 1-inch pieces
  • 1 pound baby white potatoes Halved if large
  • 4 cloves garlic cloves Chopped
  • 4 sprigs thyme Fresh, or 1 teaspoon dried thyme
  • 2 pieces shallots Sliced
For the Sauce
  • 1 cup low-sodium chicken broth Keeps sodium low
  • 4 tablespoons salted butter Cubed
  • 2 tablespoons cornstarch Optional, for thickening
For Garnish
  • 2 tablespoons fresh parsley Chopped, for serving

Equipment

  • Slow Cooker
  • Skillet

Method
 

Step-by-Step Instructions
  1. In a skillet, heat olive oil over medium-high heat. Season chicken thighs with salt and pepper. Sear each thigh for about 5 minutes on each side until golden brown.
  2. Prepare the slow cooker by adding carrots, baby potatoes, garlic cloves, shallots, and thyme. Ensure vegetables are evenly distributed.
  3. Place the browned chicken thighs on top of the vegetable mixture in the slow cooker with the skin side facing upwards.
  4. Pour chicken broth over the chicken and vegetables, then add cubed butter on top.
  5. Cover and cook on low for 6-7 hours or on high for 4 hours. Avoid lifting the lid during cooking.
  6. If a thicker sauce is desired, mix cornstarch with cold water to create a slurry. Stir in 30 minutes before serving.
  7. Garnish with freshly chopped parsley before serving. Enjoy your meal!

Nutrition

Serving: 1servingCalories: 450kcalCarbohydrates: 32gProtein: 30gFat: 24gSaturated Fat: 10gPolyunsaturated Fat: 2gMonounsaturated Fat: 10gCholesterol: 110mgSodium: 600mgPotassium: 800mgFiber: 4gSugar: 2gVitamin A: 800IUVitamin C: 10mgCalcium: 50mgIron: 2mg

Notes

Enjoy leftovers for up to 3 days in the fridge, or freeze for up to 3 months.

Tried this recipe?

Let us know how it was!

Runner Bean Stew & Roasted Monkfish: Cozy Autumn Comfort

September 10, 2025 by Grace Snow Leave a Comment

As the air turns crisp and the leaves blur into shades of gold and amber, my kitchen transforms into a haven of warmth and comfort. Today, I've whipped up a delightful Runner Bean Stew with Roasted Monkfish that perfectly captures the essence of autumn. This healthy dish is not just a feast for the senses but also a nourishing embrace after a long day. With vibrant seasonal beans and the delicate flakiness of monkfish wrapped in smoky pancetta, this recipe shines as a quick, gluten-free option for any culinary enthusiast. Trust me, the aroma alone will make your kitchen feel like a Mediterranean retreat! Are you ready to embark on this flavorful journey?

Why is this stew so comforting?

Comforting, Hearty Dish: This Runner Bean Stew is the ultimate cozy meal, perfect for those brisk autumn evenings. Fresh Ingredients: Bursting with seasonal produce, it highlights the vibrant colors and flavors of fall. Quick Preparation: With simple steps, you can enjoy a gourmet dish in no time. Flavorful Twist: The roasted monkfish and smoky pancetta bring an unexpected depth. If you love nutritious meals, check out our Maple Roasted Sweet Potatoes with Pecans for more comforting ideas. Versatile Recipe: Adapt it with your favorite beans or veggies for endless variations!

Runner Bean Stew & Roasted Monkfish Ingredients

For the Stew Base
• Olive Oil – Adds richness and aids in sautéing; substitute with avocado oil for a neutral taste.
• Fresh Mint (½ bunch/15g) – Brightens the stew with freshness; try basil for a twist.
• Garlic (2-3 cloves) – Offers an aromatic base flavor; shallots can be used for a milder touch.
• Fresh Red Chilli (1) – Provides heat and depth; adjust the quantity for your spice preference.
• Baby Capers (1 teaspoon) – Adds a salty, tangy flavor; skip for a less salty finish.
• Anchovy Fillets (2) – Deepens flavor complexity with umami; omit for a vegetarian option.
• Leek (1) – Base for sweetness and depth of flavor; use onion as a substitute if needed.
• Fresh Borlotti Beans (400g) – Main ingredient for fiber and protein; canned borlotti beans work in a pinch.
• Rosé Wine (250ml) – Adds acidity and depth; omit for an alcohol-free version.
• Baby Potatoes (1kg) – Contributes heartiness to the stew; sweet potatoes can add a unique flavor.
• Quality Plum Tomatoes (2 tins/400g each) – Basis of the stew's rich sauce; fresh tomatoes are best when in season.
• Runner Beans (200g) – Essential for texture and flavor; green beans can be used as an alternative.
• Yellow and Green French Beans (200g) – Provides color and variety; feel free to use any available green beans.

For Garnishing and Fish
• Fresh Flat-Leaf Parsley (2 sprigs) – Finishing touch for garnish; cilantro can be substituted for a different flavor.
• Fresh Rosemary (4 sprigs) – Adds herbaceous flavor; use dried rosemary, but the taste will be milder.
• Lemon (1) – Brightens the dish when served; lime offers a delightful zingy alternative.
• Monkfish Tail Fillet (350g) – Main protein component with flaky texture when cooked; cod can serve as a substitute.
• Smoked Pancetta (11 slices) – Contributes saltiness and smokiness; omit for vegetarian or swap for turkey bacon.
• Parmesan Cheese (30g) – Optional for an umami finish; consider nutritional yeast for a dairy-free option.

This Runner Bean Stew with Roasted Monkfish promises a delightful culinary experience that will warm both your heart and your home. With seasonal ingredients and nourishing flavors, it’s a fulfilling dish worth savoring!

Step‑by‑Step Instructions for Runner Bean Stew & Roasted Monkfish

Step 1: Prep Ingredients
Start by prepping your ingredients for the Runner Bean Stew. Trim the ends of the runner beans and cut them into bite-sized pieces. Rinse the borlotti beans if using canned, and chop the leek, garlic, and fresh red chili. Prepare the monkfish by wrapping it in smoked pancetta, as this will enhance its flavor during roasting.

Step 2: Cook Base
In a large pot, heat 2 tablespoons of olive oil over medium heat. Add the chopped garlic, leek, and red chili, sautéing for about 5-7 minutes until everything is softened and fragrant. This aromatic base is essential for the depth of flavor in your stew, so stir occasionally to prevent burning.

Step 3: Add Flavors
Stir in the anchovy fillets and baby capers, cooking for another 2 minutes until they break down and meld into the mixture. Next, add the prepared borlotti beans and stir well to combine all the ingredients. The vibrant colors and scents will showcase the Mediterranean essence of this Runner Bean Stew.

Step 4: Deglaze
Pour in 250ml of rosé wine and allow it to simmer for about 3-5 minutes, reducing slightly while stirring to deglaze the pot. The wine will lift the delicious browned bits from the bottom, adding rich flavor to the stew. Keep an eye on it; the liquid should become aromatic and well-integrated.

Step 5: Combine Stew
Now it’s time to add the heartiness! Incorporate the baby potatoes, tins of plum tomatoes, runner beans, and French beans into the pot. Mix everything gently, and let it bubble away on low heat for 30-40 minutes, or until the potatoes are fork-tender and the flavors have melded beautifully.

Step 6: Prepare Monkfish
While the stew simmers, preheat your oven to 200°C (400°F). Place the pancetta-wrapped monkfish on a baking tray lined with parchment paper. Roast in the oven for 15-20 minutes until the fish is opaque and flakes easily with a fork, becoming a deliciously tender addition to your stew.

Step 7: Finish Stew
Once the potatoes are tender, stir in the freshly chopped mint and flat-leaf parsley. Taste the stew and adjust the seasoning with salt and pepper as necessary. The vibrant colors and comforting aroma will signal that your Runner Bean Stew is almost ready to serve.

Step 8: Serve
To plate, ladle a generous portion of the hearty runner bean stew into bowls. Top each portion with the roasted monkfish and garnish with lemon wedges for a fresh zing. The combination of flavors and textures will surely bring warmth to your autumn dining experience.

Runner Bean Stew & Roasted Monkfish Variations

Feel free to put your own spin on this delightful dish while keeping its comforting essence intact!

  • Vegetarian Option: Swap the monkfish with chickpeas or lentils for a hearty plant-based protein. This twist keeps the meal both filling and nutritious.

  • Spicy Kick: Enhance the heat by adding more fresh red chili or a splash of your favorite hot sauce. Adjust to your taste for an exciting flavor boost!

  • Creamy Twist: Stir in a dollop of coconut cream or crème fraîche before serving to add a rich, creamy finish to your stew. It’s a luscious touch you won’t want to miss.

  • Hearty Variation: Incorporate seasonal root vegetables like carrots or sweet potatoes for added sweetness and nutrition, making the stew even heartier.

  • Seasonal Greens: Mix in kale or spinach at the end for a vibrant green touch. They add extra flavor and a pop of color to your dish.

  • Herb Infusion: Try using fresh basil or dill instead of mint for a different herbaceous note that complements the flavors of the stew beautifully.

  • Additional Beans: Use a medley of beans such as cannellini or black beans for a varied texture and further protein boost. It adds visual appeal and nutrition!

For more comforting ideas, don’t miss our delicious Beans Greens Stew or try the Lamb Stew Hearty for an equally warming embrace.

Storage Tips for Runner Bean Stew

Fridge: Store leftover Runner Bean Stew in an airtight container for up to 3 days. Ensure it cools completely before sealing to maintain freshness.

Freezer: For longer storage, freeze the stew in portions, keeping it in airtight containers or freezer bags for up to 3 months. Thaw in the fridge overnight before reheating.

Reheating: Gently reheat on the stove or in the microwave until warmed through, stirring occasionally to ensure even heating, especially for the beans and monkfish.

Airtight Packaging: If freezing, remove as much air as possible from bags to prevent freezer burn, ensuring your stew retains its delicious flavors for when you’re ready to enjoy it again.

Expert Tips for Runner Bean Stew & Roasted Monkfish

  • Fresh Ingredients Matter: Use the freshest seasonal produce for maximum flavor. This enhances the taste and nutritional value of your runner bean stew.
  • Monitor Cooking Times: Ensure the beans are tender but not mushy. Overcooking can diminish their flavor and texture, affecting the overall stew.
  • Adjust Spice Levels: Customize the heat by adjusting the amount of fresh red chili. Taste as you go to achieve your preferred level of warmth.
  • Upgrade the Broth: For richer flavor, consider adding homemade stock instead of water when simmering the stew. This adds depth to your dish.
  • Oven Safety: Be cautious when handling the oven-roasted monkfish. Use a meat thermometer to ensure it reaches a safe internal temperature of 145°F (63°C).
  • Season to Taste: As the final step, remember to adjust the seasoning of your stew carefully, especially since pancetta and anchovies can be salty.

What to Serve with Runner Bean Stew & Roasted Monkfish

Transform your cozy autumn meal into a feast with delightful pairings that enhance every bite.

  • Crusty Bread: Perfect for dipping, it absorbs the rich broth, complementing the stew’s hearty texture. Bake your own for a freshly baked smell that will fill the kitchen.
  • Quinoa Salad: A light, nutty salad with fresh herbs offers a delightful contrast, adding a nutritious touch that balances the dish beautifully.
  • Roasted Seasonal Vegetables: Seasonally roasted carrots and parsnips will add natural sweetness, enhancing the stew’s earthy flavors with a hint of caramelization.
  • Creamy Polenta: Smooth and creamy, polenta provides a comforting base that soaks up the broth, creating a satisfying experience in every mouthful.
  • Herb-Infused Rice: Light and fluffy rice infused with herbs like rosemary or mint complements the Mediterranean influence in the stew, adding a perfect layer of flavor.
  • Lemon-Garlic Green Beans: Tender sautéed green beans with a splash of lemon and garlic add freshness and crunch, bringing brightness to each bite of the stew.
  • Spicy Tomato Chutney: A tangy chutney can provide a zesty kick that contrasts beautifully with the flavors of the stew, making your meal even more exciting.
  • Chardonnay or Sauvignon Blanc: A crisp white wine pairs wonderfully, enhancing the freshness of the dish with its acidity and fruity notes. Enjoy each sip alongside the warmth of your stew.

Make Ahead Options

These Runner Bean Stew with Roasted Monkfish ingredients are perfect for busy weeknights! You can chop and prep the vegetables and beans up to 24 hours in advance; simply refrigerate them in an airtight container to maintain freshness. The assembled stew can also be cooked a day ahead and stored in the refrigerator for up to 3 days. Just wait to roast the monkfish until you’re ready to serve, to ensure it remains flaky and tender. When it's mealtime, gently reheat the stew on the stove until warmed through, then roast the monkfish for about 15-20 minutes, and you’ll enjoy a delicious, time-saving meal that’s just as satisfying!

Runner Bean Stew with Roasted Monkfish Recipe FAQs

What should I look for when selecting fresh runner beans?
Absolutely! When choosing fresh runner beans, look for vibrant colors and a firm texture. They should be smooth without dark spots or blemishes, which can indicate age or spoilage. Ideally, they should snap easily when bent, showing their freshness.

How should I store leftover runner bean stew?
Once cooled, store your Runner Bean Stew in an airtight container in the fridge for up to 3 days. Make sure it cools completely before sealing to maintain its freshness. If you plan to savor it later, you can transfer it to the freezer.

Can I freeze runner bean stew? If so, how?
Yes! Freezing runner bean stew is a fantastic way to enjoy it later. Once cooled, portion it into airtight freezer bags or containers. Make sure to remove as much air as possible to prevent freezer burn. Properly sealed, it can stay fresh for up to 3 months. When you're ready to eat, simply thaw it in the fridge overnight and reheat on the stove or in the microwave, stirring occasionally.

What if my stew seems too thin?
Very! If your stew appears too thin, you can thicken it by reducing it further on the stove: simply simmer uncovered for a few extra minutes until it reaches your desired consistency. Alternatively, mash a handful of the beans or potatoes with a fork and stir them back into the stew, which will naturally thicken the broth without any additional ingredients.

Are there any dietary considerations I should be aware of?
Certainly! The Runner Bean Stew with Roasted Monkfish contains gluten-free ingredients and is suitable for many diets. However, keep in mind that it includes pancetta and anchovies, which may not fit vegetarian or pescatarian diets. For a completely vegetarian version, consider substituting the fish with chickpeas and omitting the pancetta, and adjusting the flavors accordingly. Always check ingredient labels if you have allergies.

How do I know when the monkfish is properly cooked?
Cooking monkfish perfectly is key! It should turn opaque and flake easily with a fork, typically when it reaches an internal temperature of 145°F (63°C). To be sure, you can use a meat thermometer to accurately check doneness while keeping the fish tender and moist.

Runner bean stew & roasted monkfish

Runner Bean Stew & Roasted Monkfish: Cozy Autumn Comfort

A healthy Runner Bean Stew & Roasted Monkfish that embodies autumn's essence with vibrant seasonal ingredients.
Print Recipe Pin Recipe
Prep Time 15 minutes mins
Cook Time 1 hour hr
Total Time 1 hour hr 15 minutes mins
Servings: 4 servings
Course: Dinner
Cuisine: Mediterranean
Calories: 450
Ingredients Equipment Method Nutrition Notes

Ingredients
  

Stew Base
  • 2 tablespoons Olive Oil Substitute with avocado oil for a neutral taste.
  • 15 grams Fresh Mint ½ bunch, try basil for a twist.
  • 2-3 cloves Garlic Shallots can be used for a milder touch.
  • 1 Fresh Red Chilli Adjust for spice preference.
  • 1 teaspoon Baby Capers Skip for a less salty finish.
  • 2 Anchovy Fillets Omit for a vegetarian option.
  • 1 Leek Use onion as a substitute if needed.
  • 400 grams Fresh Borlotti Beans Canned borlotti beans work in a pinch.
  • 250 ml Rosé Wine Omit for an alcohol-free version.
  • 1 kg Baby Potatoes Sweet potatoes can add a unique flavor.
  • 800 grams Quality Plum Tomatoes Basis of the stew's rich sauce.
  • 200 grams Runner Beans Green beans can be used as an alternative.
  • 200 grams Yellow and Green French Beans Feel free to use any available green beans.
Garnishing and Fish
  • 2 sprigs Fresh Flat-Leaf Parsley Can substitute with cilantro.
  • 4 sprigs Fresh Rosemary Use dried rosemary for a milder flavor.
  • 1 Lemon Lime offers a delightful zingy alternative.
  • 350 grams Monkfish Tail Fillet Cod can serve as a substitute.
  • 11 slices Smoked Pancetta Omit for vegetarian or swap for turkey bacon.
  • 30 grams Parmesan Cheese Consider nutritional yeast for a dairy-free option.

Equipment

  • Large pot
  • Baking tray
  • Parchment Paper
  • Knife
  • Cutting Board

Method
 

Step-by-Step Instructions
  1. Start by prepping your ingredients for the Runner Bean Stew. Trim the ends of the runner beans and cut them into bite-sized pieces. Rinse the borlotti beans if using canned, and chop the leek, garlic, and fresh red chili. Prepare the monkfish by wrapping it in smoked pancetta.
  2. In a large pot, heat 2 tablespoons of olive oil over medium heat. Add the chopped garlic, leek, and red chili, sautéing for about 5-7 minutes until everything is softened and fragrant.
  3. Stir in the anchovy fillets and baby capers, cooking for another 2 minutes until they break down and meld into the mixture.
  4. Pour in 250ml of rosé wine and allow it to simmer for about 3-5 minutes, reducing slightly while stirring to deglaze the pot.
  5. Incorporate the baby potatoes, tins of plum tomatoes, runner beans, and French beans into the pot. Mix everything gently, and let it bubble away on low heat for 30-40 minutes.
  6. Preheat your oven to 200°C (400°F). Place the pancetta-wrapped monkfish on a baking tray lined with parchment paper. Roast for 15-20 minutes until the fish is opaque.
  7. Once the potatoes are tender, stir in the freshly chopped mint and flat-leaf parsley. Adjust the seasoning with salt and pepper as needed.
  8. To plate, ladle a generous portion of the hearty runner bean stew into bowls. Top with the roasted monkfish and garnish with lemon wedges.

Nutrition

Serving: 1bowlCalories: 450kcalCarbohydrates: 60gProtein: 30gFat: 15gSaturated Fat: 4gPolyunsaturated Fat: 1gMonounsaturated Fat: 10gCholesterol: 80mgSodium: 600mgPotassium: 1200mgFiber: 12gSugar: 5gVitamin A: 20IUVitamin C: 30mgCalcium: 50mgIron: 4mg

Notes

Store leftover Runner Bean Stew in an airtight container for up to 3 days. Freeze the stew in portions for up to 3 months.

Tried this recipe?

Let us know how it was!

Delicious Katsu-Style Tofu Rice Bowls for a Healthy Meal Night

September 10, 2025 by Grace Snow Leave a Comment

The aroma of crispy tofu sizzling in a hot pan is enough to whisk me away to a cozy kitchen on a busy weeknight. It’s in moments like these that I whip up my Quick & Healthy Katsu-Style Tofu Rice Bowls—a vibrant, satisfying meal that feels indulgent without the guilt. This dish is not only a delight for the senses, featuring a harmony of warm curry powder, savory miso, and a hint of sweetness from mango chutney, but it’s also effortlessly quick and healthy, allowing me to reclaim my evenings from fast food. Plus, the colorful array of mixed vegetables and charred pineapple brings a crunch that’s simply irresistible. Are you ready to elevate your dinner game? Let’s get cooking!

Why are Katsu-Style Rice Bowls a Must-Try?

Flavor Explosion: Each bite of these katsu-style tofu rice bowls bursts with the delightful fusion of curry powder and savory miso.

Quick & Easy: Perfect for busy weeknights, this dish comes together in no time, ensuring you spend less time in the kitchen and more time enjoying your meal.

Healthier Choice: With nutrient-packed ingredients like firm tofu and mixed vegetables, you can indulge in comfort food without compromising your health.

Customizable Delight: Swap in your favorite veggies or proteins—try grilled chicken or even beans for a unique twist!

Crowd-Pleaser: Ideal for family dinners or impressing guests, these colorful bowls promise to satisfy everyone at the table. Pair it with a light green salad for a complete nutrition boost!

Katsu-Style Tofu Rice Bowls Ingredients

For the Tofu

  • Firm Tofu – A great protein source; substitute with eggplant or sweet potato for a variation.
  • Ground Turmeric – Adds vibrant color and health benefits; can omit for a less colorful dish.
  • White Miso – Provides a rich umami flavor; tahini works as a delicious alternative.
  • Rice Vinegar – Offers a tangy kick; apple cider vinegar can be used instead.
  • Mirin – Sweet rice wine adds depth; honey or agave syrup can be a non-alcoholic substitute.

For the Rice

  • Short Grain Brown Rice – The hearty base of this dish; quinoa is a great substitute if desired.

For the Crunch

  • Breadcrumbs – Gives a satisfying crunch; use panko for extra crispiness or omit for a gluten-free version.
  • Sesame Seeds – Adds a nutty flavor; crushed nuts can be a substitute.

For Cooking

  • Olive Oil – Essential for frying; vegetable oil or coconut oil can be used as alternatives.

For Seasoning

  • Curry Powder – Infuses the dish with essential flavor; garam masala is a lovely swap to try.
  • Mango Chutney – Provides sweetness and flavor enhancement; feel free to use any fruit chutney you prefer.

For Freshness

  • Pineapple – Sweet, fresh fruit to char and complement the dish; try seasonal fruits like peaches.
  • Fresh Red Chillies – Adds a kick; omit or use milder peppers for a gentler heat.
  • Spring Onions – Adds a fresh crunch; substitute with chives or scallions if needed.
  • Mixed Crunchy Veg (Carrots, Sugar Snaps, Cucumber, Cabbage) – Provides vibrant colors; feel free to swap with your favorite crunchy veggies.
  • Fresh Coriander (Cilantro) – Perfect for garnishing; parsley can be a good substitute if you’re not a fan.

For Serving

  • Hot Chilli Sauce – A fiery finishing touch; sriracha or your favorite spicy condiment is a great option.

Dive into these katsu-style tofu rice bowls and treat yourself to a nutritious, utterly delicious meal!

Step‑by‑Step Instructions for Katsu-style Tofu Rice Bowls

Step 1: Prepare the Tofu
Begin by draining and pressing the firm tofu for at least 15 minutes to remove excess moisture. Once pressed, cut the tofu into bite-sized cubes and marinate them in a mixture of turmeric, white miso, rice vinegar, mirin, and a drizzle of olive oil for about 15 minutes to absorb the flavors beautifully.

Step 2: Cook the Rice
In a medium pot, bring 2 cups of water to a boil. Add the short grain brown rice, reduce the heat to low, cover with a lid, and let it simmer for 45 minutes, or until tender and the water has evaporated. Fluff the rice with a fork, ensuring it’s light and fluffy, while you prepare the rest of the ingredients.

Step 3: Coat Tofu
Preheat your oven to 375°F (190°C). While the tofu marinates, combine breadcrumbs and sesame seeds in a shallow bowl. Toss the marinated tofu cubes in this mixture until well coated, ensuring every piece has that delicious, crunchy exterior that will make your katsu-style tofu rice bowls irresistibly delightful.

Step 4: Fry Tofu
Heat a generous amount of olive oil in a large skillet over medium-high heat. Once hot, add the coated tofu cubes to the pan in batches, being careful not to overcrowd the pan. Fry for about 4-5 minutes on each side, or until they turn golden brown and crispy, creating that perfect texture for your dish.

Step 5: Char the Pineapple
In the same skillet, add fresh pineapple slices once the tofu is done. Cook for about 2-3 minutes on each side or until they develop a beautiful char and caramelize slightly. This adds a sweet contrast to your katsu-style tofu rice bowls, enhancing the overall flavor profile of the dish.

Step 6: Assemble the Bowls
Take serving bowls and divide the cooked brown rice evenly among them. Top with a generous heap of crispy tofu, charred pineapple, and a colorful assortment of mixed crunchy vegetables. Drizzle the sweet mango chutney generously atop everything, combining flavors and textures beautifully in each bowl.

Step 7: Serve
For the finishing touch, garnish your katsu-style tofu rice bowls with fresh red chillies and coriander for a pop of color and freshness. Serve alongside a small dish of hot chili sauce, allowing everyone to spice up their meal to their liking, and enjoy a delightful and healthy meal!

Storage Tips for Katsu-Style Tofu Rice Bowls

  • Fridge: Store leftovers in an airtight container for up to 2 days. This ensures your katsu-style tofu rice bowls maintain their freshness.

  • Freezer: If you want to keep them longer, freeze the cooked tofu and rice separately for up to 2 months. Thaw in the fridge overnight before reheating.

  • Reheating: Reheat gently in a skillet or microwave, adding a splash of water if necessary to keep the tofu crisp and the rice fluffy.

  • Avoid Overpacking: When storing leftovers, leave space in your container to prevent moisture from building up, which can affect the texture of your katsu-style tofu rice bowls.

Make Ahead Options

These Katsu-Style Tofu Rice Bowls are perfect for meal prep, making weeknight dinners a breeze! You can marinate the firm tofu with turmeric, miso, rice vinegar, mirin, and olive oil up to 24 hours in advance, allowing it to soak in those delightful flavors. Additionally, you can cook the short grain brown rice and refrigerate it for up to 3 days, ensuring it's ready whenever you are. On the day you plan to serve, simply coat and fry the marinated tofu until crispy, char the pineapple in the same pan, and assemble the bowls with the crunchy mixed vegetables. This method keeps everything just as delicious while saving you precious time!

Expert Tips for Katsu-Style Tofu Rice Bowls

  • Marinate Overnight: For deeper flavor, let the tofu marinate overnight. This enhances the taste of your katsu-style tofu rice bowls beautifully.

  • Avoid Overcrowding: When frying the tofu, arrange them in a single layer in the pan. Overcrowding can lead to steaming instead of that desired crispy texture.

  • Use the Right Oil: Ensure the oil is hot enough before adding the tofu. This prevents sticking and ensures perfectly golden, crispy bites.

  • Experiment with Veggies: Don't hesitate to swap in different vegetables! Personalize your katsu-style tofu rice bowls with whatever's fresh and crunchy in your fridge.

  • Check Crispiness: Keep an eye on the tofu while frying, turning them occasionally. This ensures each side becomes evenly crispy.

  • Serve Fresh: Katsu-style tofu rice bowls are best enjoyed hot and fresh, so make sure to serve them immediately for the best experience!

What to Serve with Katsu-Style Tofu Rice Bowls

Enhance your dining experience with colorful and complementary dishes that perfectly balance the flavors of your katsu-style tofu rice bowls.

  • Crispy Green Salad: Fresh greens topped with a tangy vinaigrette add a refreshing crunch that complements the hearty rice bowls beautifully.
  • Steamed Edamame: Lightly salted edamame adds a nutty flavor and texture contrast, making it the perfect protein-packed side to round out the meal.
  • Roasted Sweet Potatoes: Their natural sweetness pairs wonderfully with the savory flavors of the tofu, creating a delightful contrast on your plate.
  • Miso Soup: A warm bowl of miso soup adds comfort and depth, enhancing the Japanese-inspired essence of the meal.
  • Sesame Noodle Salad: Cool, tangy noodles with sesame dressing provide a lovely contrast to the warm, crispy tofu and rice.
  • Grilled Asparagus: Charred asparagus spears offer a crispy bite and earthy flavor, striking the right balance with the sweet mango chutney.
  • Pickled Vegetables: A side of pickled radishes or cucumbers can add a zesty kick, brightening the flavors of your main dish.
  • Chilled Green Tea: Refreshing green tea, served iced or hot, complements the meal, enhancing both flavor and health benefits.

Katsu-Style Tofu Rice Bowls Variations

Feel free to mix things up and personalize these bowls to suit your taste buds and dietary needs!

  • Dairy-Free: Use coconut yogurt or leave out any dairy ingredients to keep it vegan-friendly.
  • Protein Swap: Try grilled chicken or chickpeas in place of tofu for a different protein profile. You can create endless variation by experimenting with different proteins!
  • Low-Carb Option: Replace short grain brown rice with cauliflower rice for a lighter, healthier base. This makes for a dish that's just as satisfying but with fewer carbs.
  • Extra Crunch: Add roasted nuts or seeds on top for added texture and flavor, enhancing the crunch factor of your meal.
  • Flavor Boost: Incorporate garlic or ginger into the marinade for an extra layer of flavor. A little bit of zing can elevate the entire dish!
  • Spicy Kick: Adjust the heat level by adding more fresh red chillies or a spicy chili oil drizzle on top. Perfect for spice lovers who crave a bit of fire!
  • Seasonal Veggies: Swap in seasonal veggies like bell peppers or zucchini to keep it fresh and exciting. You can even incorporate a mix from your local farmer's market!
  • Alternative Sauces: Use hoisin sauce or teriyaki sauce instead of mango chutney for a different sweet flavor profile that complements the savory tofu well.

For a delicious twist, you might want to try these delightful recipes: Buffalo Tofu Caesar or Furikake Fried Rice. Each offers unique flavors that pair beautifully with katsu-style tofu rice bowls.

Katsu-Style Tofu Rice Bowls Recipe FAQs

How do I choose the best tofu for this recipe?
Absolutely! For katsu-style tofu rice bowls, you’ll want to use firm tofu, which holds up well during cooking and gives that satisfying texture. Look for tofu that is sold in a sealed package without any dark spots or excessive water. If you're feeling adventurous, you can substitute firm tofu with grilled eggplant, sweet potato, or even pumpkin to shake things up!

How long can I store leftovers?
You can store any leftover katsu-style tofu rice bowls in an airtight container in the fridge for up to 2 days. Make sure to refrigerate them as soon as they cool down to retain freshness. When ready to enjoy, gently reheat them in a skillet or the microwave for the best results.

Can I freeze katsu-style tofu rice bowls?
Yes, you can! To freeze, I recommend separating the cooked tofu and rice. Place them in airtight freezer bags or containers and store for up to 2 months. When you're ready to eat, simply thaw overnight in the fridge and reheat in a skillet; you might want to add a splash of water to keep that crispy texture.

What should I do if my tofu isn't crispy?
Very! If your tofu doesn't turn out as crispy as you hoped, ensure you pressed it well to remove excess moisture before marinating. When frying, always make sure the oil is hot enough before adding the tofu. Also, avoid overcrowding the pan—fry in batches if necessary, allowing the oil temperature to remain high for that perfect golden crunch.

Is this recipe suitable for people with gluten allergies?
Definitely! To make katsu-style tofu rice bowls gluten-free, switch out standard breadcrumbs for gluten-free panko or omit them entirely for a soft option. Also, be sure to check the labels on sauces and miso paste, as some can contain gluten. Enjoy a guilt-free meal that everyone can savor!

Can I make this recipe spicier?
Absolutely! If you enjoy a little heat, consider adding extra fresh red chillies or a generous drizzle of hot chili sauce. You can also mix in some chili flakes or spicy sesame oil while frying the tofu to elevate the spice level. Adjust it to your preference for a flavorful kick in each bite!

Katsu-style tofu rice bowls

Delicious Katsu-Style Tofu Rice Bowls for a Healthy Meal Night

Enjoy the flavorful Katsu-style tofu rice bowls for a healthy yet indulgent meal night, packed with colorful vegetables and a delightful crunch.
Print Recipe Pin Recipe
Prep Time 30 minutes mins
Cook Time 45 minutes mins
Marinating Time 15 minutes mins
Total Time 1 hour hr 30 minutes mins
Servings: 4 bowls
Course: Dinner
Cuisine: Asian
Calories: 350
Ingredients Equipment Method Nutrition Notes

Ingredients
  

For the Tofu
  • 1 block Firm Tofu Can substitute with eggplant or sweet potato.
  • 1/2 teaspoon Ground Turmeric Omit for a less colorful dish.
  • 1 tablespoon White Miso Tahini works as an alternative.
  • 1 tablespoon Rice Vinegar Apple cider vinegar can be used as well.
  • 1 tablespoon Mirin Honey or agave syrup can substitute.
For the Rice
  • 1 cup Short Grain Brown Rice Quinoa is a substitute if desired.
For the Crunch
  • 1 cup Breadcrumbs Use panko for extra crispiness.
  • 2 tablespoons Sesame Seeds Crushed nuts can be a substitute.
For Cooking
  • 2 tablespoons Olive Oil Vegetable oil or coconut oil can be alternatives.
For Seasoning
  • 1 tablespoon Curry Powder Garam masala is a lovely swap.
  • 1 tablespoon Mango Chutney Any fruit chutney can be used.
For Freshness
  • 1 cup Pineapple Can substitute with seasonal fruits.
  • 2 whole Fresh Red Chillies Omit for milder heat.
  • 2 stalks Spring Onions Chives or scallions can substitute.
  • 2 cups Mixed Crunchy Veg Includes carrots, sugar snaps, cucumber, cabbage.
  • 1/4 cup Fresh Coriander (Cilantro) Parsley can substitute.
For Serving
  • 1 tablespoon Hot Chilli Sauce Sriracha or your favorite spicy condiment.

Equipment

  • Skillet
  • Medium pot
  • Shallow Bowl
  • Serving Bowls

Method
 

Step-by-Step Instructions
  1. Prepare the Tofu: Begin by draining and pressing the firm tofu for at least 15 minutes. Cut the tofu into bite-sized cubes and marinate them in a mixture of turmeric, white miso, rice vinegar, mirin, and olive oil for about 15 minutes.
  2. Cook the Rice: Bring 2 cups of water to boil in a medium pot. Add the short grain brown rice, reduce heat to low, cover, and let simmer for 45 minutes. Fluff the rice with a fork once done.
  3. Coat Tofu: Preheat your oven to 375°F (190°C). While tofu marinates, combine breadcrumbs and sesame seeds. Toss the marinated tofu cubes in this mixture until well coated.
  4. Fry Tofu: Heat olive oil in a skillet over medium-high heat. Add coated tofu cubes in batches, frying for about 4-5 minutes on each side until golden brown.
  5. Char the Pineapple: In the same skillet, add fresh pineapple slices and cook for 2-3 minutes on each side until they develop a char.
  6. Assemble the Bowls: Divide cooked brown rice among serving bowls. Top with crispy tofu, charred pineapple, and a colorful assortment of mixed crunchy vegetables. Drizzle mango chutney on top.
  7. Serve: Garnish the bowls with fresh red chillies and coriander. Serve alongside hot chili sauce for a customizable touch.

Nutrition

Serving: 1bowlCalories: 350kcalCarbohydrates: 50gProtein: 15gFat: 12gSaturated Fat: 2gPolyunsaturated Fat: 2gMonounsaturated Fat: 8gSodium: 600mgPotassium: 500mgFiber: 8gSugar: 6gVitamin A: 15IUVitamin C: 30mgCalcium: 200mgIron: 3mg

Notes

For deeper flavor, let the tofu marinate overnight. Ensure the oil is hot enough before frying to achieve a crispy texture. Serve fresh for the best experience.

Tried this recipe?

Let us know how it was!

Savory Chicken & Rice Traybake for Effortless Family Dinners

September 10, 2025 by Grace Snow Leave a Comment

“What's for dinner?” That familiar question often triggers a mini crisis in my kitchen. Between busy schedules and the lure of fast food, I craved a dish that was both comforting and easy to prepare. Enter my Spiced Chicken & Rice Traybake, a delightful one-pan meal designed to elevate your weeknight dinners without adding to the chaos. Packed with juicy chicken thighs, vibrant peppers, and fluffy rice, this recipe not only fills bellies but also brings families together in just an hour and ten minutes. Plus, it's versatile enough to suit your dietary needs with gluten-free options and a chance to play around with your favorite veggies. Ready to transform your meals and bring back the joy of cooking? Let’s dive into this culinary adventure!

Why is this chicken & rice traybake a must-try?

One-Pan Wonder: This recipe is a game-changer for busy weeknights, requiring minimal cleanup while delivering a satisfying meal.
Rich, Flavorful Experience: The combination of Cajun-style seasoning and peri-peri sauce creates a beautiful medley of tastes that excite your palate.
Healthy and Nutritious: With options for gluten-free adjustments and wholesome ingredients, you can feel good about what you’re serving.
Endless Variations: Customize this dish by swapping chicken for tofu or chickpeas, or experimenting with seasonal veggies; your family will never get bored!
Crowd-Pleasing Comfort: Each bite showcases tender chicken and fluffy rice nestled together, providing the cozy comfort everyone craves at the dinner table.
Enjoy your meal with a side of homemade Crock Pot Chicken for even more delightful possibilities!

Chicken & Rice Traybake Ingredients

Here's everything you'll need to create this mouthwatering chicken & rice traybake!

For the Base

  • 2 red onions – Adds sweetness and depth to the dish; can substitute with shallots for a milder flavor.
  • 3 mixed-colour peppers – Provides color and crunch; substitute with any bell peppers based on availability.
  • 300g long-grain rice – Forms the base of the dish; you can use basmati or jasmine rice as alternatives.

For the Chicken

  • 8 free-range chicken thighs (skin on, bone in) – Main protein source, offering flavor and moisture; skinless chicken can be used for a lighter version.
  • 2 tablespoons olive oil – Used for cooking and enhancing flavor; can replace with avocado oil if preferred.
  • 3 tablespoons Cajun-style seasoning – Adds spice and complexity; substitute with a mix of paprika, cayenne, and garlic powder.

For the Extras

  • 4 corn cobbettes – Offers a sweet crunch and pairs well with spices; frozen corn can be substituted if needed.
  • 2 tablespoons peri-peri sauce – Adds a kick of heat and flavor; adjust the quantity based on taste preferences.
  • 2 tablespoons natural yogurt – Provides creaminess to balance spices; can swap for sour cream or omit for dairy-free options.

Dive into this flavorful chicken & rice traybake, where comfort meets convenience!

Step‑by‑Step Instructions for Spiced Chicken & Rice Traybake

Step 1: Preheat and Prepare
Begin by preheating your oven to 200°C (400°F). While it warms up, grab a large baking tray and lightly grease it with olive oil. This will ensure your chicken & rice traybake doesn't stick and will help achieve that golden, crispy skin on the chicken thighs.

Step 2: Mix the Vegetables
In a large mixing bowl, combine the diced red onions and sliced mixed-colour peppers with 2 tablespoons of olive oil. Toss them thoroughly until all the veggies are well-coated, which will enhance their flavors during roasting. Their vibrant colors will make your dish visually appealing!

Step 3: Season the Chicken and Rice
Add the chicken thighs to the bowl along with 3 tablespoons of Cajun-style seasoning and 300g of long-grain rice. Using your hands or a spoon, mix everything together until the chicken is evenly coated in seasoning and the rice is distributed throughout, ensuring every bite of your chicken & rice traybake is delicious.

Step 4: Add Water and Corn
Pour in about 600ml of water, mixing it in to help the rice cook evenly. Now, gently place the corn cobbettes on top of the mixture and drizzle with 2 tablespoons of peri-peri sauce. This extra step not only adds flavor but also creates a lovely layer of texture for your traybake.

Step 5: Bake to Perfection
Transfer the whole baking tray to the preheated oven and bake for 50-60 minutes. Look for the chicken to be golden brown and cooked through, with the internal temperature reaching 75°C (165°F). The rice should be fluffy and absorb all the delicious juices from the chicken.

Step 6: Serve and Enjoy
Once your spiced chicken & rice traybake is ready, remove it from the oven and let it rest for a few minutes. Serve it directly from the tray for a rustic feel, garnishing each plate with a dollop of natural yogurt if desired. It’s a comforting meal that’s sure to impress!

Tips for the Best Chicken & Rice Traybake

  • Well-Seasoned Chicken: Ensure the chicken skin is seasoned thoroughly. This enhances flavor and gives that irresistible crispy texture.

  • Check Temperature: Use a meat thermometer to ensure the chicken reaches an internal temperature of 75°C (165°F) to confirm it's safely cooked through.

  • Stirring is Key: Stir the rice once during cooking to prevent sticking, ensuring an even texture throughout the dish.

  • Broil for Crunch: After baking, broil the traybake for an additional 2-3 minutes for a perfectly crispy top layer.

  • Cooking Duration: Keep an eye on cooking time; oven differences can affect how quickly the chicken & rice traybake cooks. Adjust as needed for the best results!

What to Serve with Spiced Chicken & Rice Traybake

Nothing completes your dining experience quite like the perfect side dishes that harmonize beautifully with this satisfying one-pan meal.

  • Garlicky Green Beans: The freshness of sautéed green beans tossed with garlic and lemon adds a light crunch, balancing the rich flavors of the traybake while elevating your meal visually and nutritionally.

  • Crispy Roasted Potatoes: Golden, crispy potatoes seasoned with rosemary or thyme provide a delightful contrast in texture. Their fluffiness when cut into pairs well with the tender chicken and rice.

  • Creamy Coleslaw: A zesty, creamy coleslaw made with crunchy cabbage and a tangy dressing complements the spiced chicken, refreshing the palate with each bite and adding a pop of color to your plate.

  • Herbed Quinoa Salad: This light, herb-infused quinoa salad offers a nutty flavor and additional protein, making it a healthful and delicious side that effortlessly plays off the spices in the chicken.

  • Sweet Potato Mash: Smooth and sweet, a dollop of mashed sweet potatoes brings comfort to your meal while contrasting the savory spices, creating a delightful harmony of taste.

  • Chilled Cucumber Soup: Refreshing and cool, a chilled cucumber soup can serve as an excellent starter, cleansing the palate before enjoying the hearty flavors found in the chicken & rice traybake.

  • Sparkling Lemonade: A bright drink like sparkling lemonade adds a bubbly zest that complements the meal's spice and richness, making it a perfect beverage choice for a cozy family dinner.

These pairs will round out your dining experience, transforming your chicken & rice traybake into a celebration of flavors!

Chicken & Rice Traybake Variations

Feel free to adapt and enhance this chicken & rice traybake to suit your taste buds and dietary needs.

  • Vegan Delight: Replace chicken with tofu or chickpeas for a wholesome plant-based option that still packs a flavor punch. Let the tofu soak up all the delightful spices for a truly satisfying dish.

  • Seasonal Veggie Medley: Swap in seasonal vegetables like zucchini or carrots for extra nutrition and a pop of color. The natural sweetness of roasted veggies makes every bite a treat!

  • Spice Switch-Up: Experiment with different spice blends like Italian herbs or curry powder for a unique flavor twist. Each variation invites a new culinary experience, ensuring your traybake never gets boring.

  • Grain Alternatives: Use quinoa or farro instead of long-grain rice for a nutritious, hearty base. These grains add a different texture and extra health benefits that the family will love!

  • Dairy-Free Creaminess: Swap natural yogurt for a dairy-free alternative such as cashew cream or omit it entirely for a lighter version. Adding a splash of coconut milk can also enhance flavor and creaminess.

  • Kick of Heat: Adjust the peri-peri sauce for your heat preference; add more for an extra fiery experience or leave it out for a milder dish. Spicy lovers will rejoice with a generous drizzle!

  • Add Sweetness: Toss in some diced sweet potatoes or butternut squash to create a sweet and savory balance that elevates your meal. Each bite will be a delicious dance of flavors on your palate.

  • Herb Infusion: Fresh herbs like coriander or parsley can instantly brighten and elevate your traybake. Sprinkle them on just before serving to add freshness and visual appeal.

Explore these variations and let the flavors of your kitchen shine! You might also love trying the zesty Lime Chicken Rice or for a change of pace, the delightful Bbq Chicken Rice.

Make Ahead Options

These Spiced Chicken & Rice Traybakes are perfect for meal prep aficionados! You can prep the chicken, rice, and vegetable mixture up to 24 hours in advance; simply combine the diced onions, sliced peppers, chicken thighs, seasoning, and rice in a large bowl, then cover and refrigerate. This not only enhances the flavors but also saves you precious time on busy weeknights. Additionally, the chicken can marinate in the seasoning overnight for even more flavor. When you're ready to cook, add the water and corn cobbettes, drizzle the peri-peri sauce, and bake as directed. This way, you’ll achieve the same delicious meal with minimal effort!

Storage Tips for Chicken & Rice Traybake

Fridge: Store leftover chicken & rice traybake in an airtight container for up to 3 days to maintain freshness and flavor.

Freezer: For longer storage, freeze the traybake in individual portions for up to 2 months. Make sure to wrap it tightly to prevent freezer burn.

Reheating: When ready to enjoy, thaw overnight in the fridge and reheat in the oven at 180°C (350°F) or microwave until heated through evenly.

Room Temperature: Avoid leaving the dish at room temperature for more than 2 hours to ensure food safety.

Chicken & Rice Traybake Recipe FAQs

What type of chicken is best for this recipe?
Absolutely! Using free-range chicken thighs (skin on, bone in) is my go-to for this dish. They provide rich flavor and moisture. If you prefer a lighter option, you can swap to skinless chicken thighs or even chicken breasts, but be sure to adjust the cooking time as they may bake faster.

How do I store leftovers from the chicken & rice traybake?
After enjoying your meal, let the leftovers cool and store them in an airtight container in the fridge for up to 3 days. This keeps all those delicious flavors intact and makes it easy for a quick meal later on!

Can I freeze the chicken & rice traybake?
Yes, you can freeze this dish for up to 2 months! To do this, portion the traybake into individual servings and wrap them tightly in plastic wrap or place them in freezer-safe containers. When you’re ready to enjoy, thaw overnight in the fridge and reheat in the oven at 180°C (350°F) or microwave until warmed through.

What should I do if the chicken isn't crispy after baking?
If you find that your chicken skin isn’t as crispy as you’d like, don’t worry! Simply turn on the broiler for an additional 2-3 minutes at the end of cooking. Keep a close eye on it to ensure it doesn’t burn; we want that delicious, golden crunch!

Are there any ingredient substitutes for this recipe?
Very! If you’re looking to customize this recipe, you can substitute chicken with tofu or chickpeas for a vegetarian option. Additionally, feel free to experiment with different vegetables based on what's in season or what you have on hand, like zucchini or green beans—perfect for keeping things interesting!

Is this chicken & rice traybake suitable for gluten-free diets?
Absolutely! To make this dish gluten-free, just ensure that your Cajun seasoning and any other seasonings you use are certified gluten-free. This way, everyone can enjoy the warmth and comfort of your chicken & rice traybake, regardless of dietary preferences!

chicken & rice traybake

Savory Chicken & Rice Traybake for Effortless Family Dinners

This chicken & rice traybake is a comforting one-pan wonder, perfect for busy weeknights and family gatherings.
Print Recipe Pin Recipe
Prep Time 10 minutes mins
Cook Time 1 hour hr
Total Time 1 hour hr 10 minutes mins
Servings: 4 servings
Course: Dinner
Cuisine: American
Calories: 450
Ingredients Equipment Method Nutrition Notes

Ingredients
  

For the Base
  • 2 red onions Adds sweetness and depth; can substitute with shallots
  • 3 mixed-colour peppers Substitute with any bell peppers based on availability
  • 300 g long-grain rice Can use basmati or jasmine rice as alternatives
For the Chicken
  • 8 free-range chicken thighs (skin on, bone in) Main protein source; skinless can be used for a lighter version
  • 2 tablespoons olive oil Can replace with avocado oil if preferred
  • 3 tablespoons Cajun-style seasoning Substitute with paprika, cayenne, and garlic powder
For the Extras
  • 4 corn cobbettes Frozen corn can be substituted
  • 2 tablespoons peri-peri sauce Adjust quantity based on taste preferences
  • 2 tablespoons natural yogurt Can swap for sour cream or omit for dairy-free

Equipment

  • Baking tray
  • Mixing Bowl

Method
 

Step-by-Step Instructions
  1. Preheat your oven to 200°C (400°F) and lightly grease a large baking tray with olive oil.
  2. Combine diced red onions and sliced mixed-colour peppers with olive oil in a large mixing bowl and toss thoroughly.
  3. Add chicken thighs, Cajun-style seasoning, and long-grain rice to the bowl and mix until evenly coated.
  4. Pour in about 600ml of water, gently place the corn cobbettes on top, and drizzle with peri-peri sauce.
  5. Bake for 50-60 minutes until chicken is golden brown and rice is fluffy.
  6. Remove from the oven, let it rest, and serve directly from the tray with a dollop of natural yogurt.

Nutrition

Serving: 1servingCalories: 450kcalCarbohydrates: 50gProtein: 35gFat: 15gSaturated Fat: 3gPolyunsaturated Fat: 1gMonounsaturated Fat: 8gCholesterol: 120mgSodium: 600mgPotassium: 700mgFiber: 3gSugar: 5gVitamin A: 500IUVitamin C: 120mgCalcium: 50mgIron: 2mg

Notes

For the best results, ensure the chicken skin is well-seasoned and check its internal temperature for safety.

Tried this recipe?

Let us know how it was!

Hearty Tater Tot Casserole with Beef and Lentils Bliss

September 9, 2025 by Grace Snow Leave a Comment

As I rummaged through my pantry one rainy afternoon, I stumbled upon a forgotten bag of lentils waiting patiently for their moment to shine. This sparked a delightful idea: a Healthy Tater Tot Casserole with Beef and Lentils! With comforting layers of flavor that everyone in the family will adore, this dish combines the decadent crunch of tater tots with the wholesome goodness of protein-rich beef and nutritious lentils. Not only is it budget-friendly and simple to whip up in under an hour, but it also brings a nutritious twist to a beloved classic. Whether you’re a culinary novice or a seasoned chef, you’ll relish the ease of this recipe—perfect for busy weeknights! Are you ready to transform your dinner routine?

Why is this casserole a must-try?

Comforting, this casserole combines childhood nostalgia with modern nutrition, making it an excellent choice for family dinners. Nutritious ingredients like lentils boost protein and fiber, ensuring everyone stays satisfied. Versatile enough to swap in personal favorites such as fresh veggies or spicy cheese variants, it's a dish for all tastes. Budget-friendly too, you can create a hearty meal without breaking the bank. And don’t forget about the delightful crunch of tater tots on top—perfect for those looking to liven up their dinner routine!

Tater Tot Casserole with Beef and Lentils Ingredients

For the Casserole
• Avocado oil – Adds healthy fats and divides into cooking increments; substitute with olive oil if needed.
• Yellow onion – Provides an aromatic base flavor; use shallots or leeks as an alternative.
• Lean ground beef (90/10 or 93/7) – Main protein source and richness to the dish; substitute with turkey or plant-based ground meat for a leaner or vegetarian option.
• Mushrooms – Adds umami flavor and texture; replace with cauliflower for a low-carb option.
• All-purpose flour (¼ cup + 1 tablespoon) – Used for thickening the sauce; opt for gluten-free flour for a gluten-free version.
• Low-sodium chicken or beef broth (3 cups) – Forms the liquid base for the casserole; vegetable broth can be used for a vegetarian variant.
• Canned lentils (15 ounces or 2 cups cooked) – Adds protein and fiber; you can use other beans like chickpeas in a pinch.
• Frozen mixed vegetables (12-ounce bag) – Convenient way to add nutrition; fresh vegetables can also be sautéed if preferred.
• Frozen cauliflower rice (1 cup) – Additional vegetable serving; omit or replace with more mixed veggies if desired.
• Shredded cheddar cheese (1 ½ cups divided) – Adds creaminess and flavor; substitute with dairy-free cheese for a vegan option.
• Frozen tater tots (28-ounce package) – The signature topping for crunch; utilize sweet potato tater tots for a sweeter variant.

For Seasoning
• Fine salt, garlic powder, onion powder, black pepper – Seasoning agents to enhance flavor; adjust to taste.

Step‑by‑Step Instructions for Tater Tot Casserole with Beef and Lentils

Step 1: Preheat and Prepare
Begin by preheating your oven to 400°F (200°C), ensuring it’s hot enough for the perfect bake. While the oven heats up, grab a 9x13 baking dish and coat it generously with cooking spray to prevent sticking. This step sets the stage for your hearty tater tot casserole with beef and lentils, ensuring everything comes out beautifully.

Step 2: Sauté Onions and Cook Beef
In a large skillet, heat 1 teaspoon of avocado oil over medium-high heat. Add the diced yellow onion, sautéing for about 2 minutes until they become translucent and fragrant. Then, toss in the lean ground beef, cooking for 8-10 minutes until it’s well browned. Drain any excess fat and transfer the mixture into your prepared baking dish, ready to layer the flavors.

Step 3: Cook Mushrooms and Make Sauce
Using the same skillet, add the remaining avocado oil and cook the chopped mushrooms for 2-4 minutes until they’re soft and releasing their juices. Stir in ¼ cup plus 1 tablespoon of all-purpose flour, mixing well to create a roux. Gradually whisk in 3 cups of low-sodium broth, and let it cook for 3-5 minutes until thickened. Season it with salt, garlic powder, onion powder, and black pepper, letting the delicious aroma fill your kitchen.

Step 4: Combine Ingredients
Pour the luscious mushroom sauce over the cooked ground beef in the baking dish. Next, fold in the drained canned lentils, the frozen mixed vegetables, and 1 cup of shredded cheddar cheese. Add 1 cup of frozen cauliflower rice as well, stirring everything together until well combined. This is where the tater tot casserole with beef and lentils starts to come together in harmonious flavor.

Step 5: Layer Tater Tots and Cheese
Spread the mixture evenly in the baking dish, smoothing out the top for even cooking. Grab the frozen tater tots and arrange them on top, pressing down gently to ensure they stay put. Finally, sprinkle the remaining ½ cup of shredded cheddar cheese over the tater tots, ready for a golden, crispy finish.

Step 6: Bake to Perfection
Place the baking dish in the preheated oven and bake for 35-40 minutes. Keep an eye on it, and look for the casserole to bubble and turn golden brown on top. Once you see that beautiful crispiness, it’s a sign that your hearty tater tot casserole with beef and lentils is ready to be served.

Tater Tot Casserole with Beef and Lentils Variations

Customize this dish to suit your family's tastes, and let your creative culinary spirit shine through every bite!

  • Sweet Potato Tater Tots: Swap regular tater tots for sweet potato ones for a sweeter twist that complements the savory filling beautifully.
  • Plant-Based Protein: Use ground turkey or lentil-based crumbles instead of beef for a lighter or vegetarian version, yet just as satisfying.
  • Vegan Cheese: Substitute traditional cheddar with dairy-free cheese to keep this dish vegan-friendly while still enjoying cheesy goodness.
  • Spicy Kick: Add diced jalapeños or a sprinkle of crushed red pepper flakes to give your casserole a zesty heat that will wake up your taste buds.
  • Creamy Spinach: Stir in a cup of chopped fresh spinach or kale into the mixture for an extra serving of greens and a pop of color.
  • Mushroom Swap: Replace mushrooms with sautéed zucchini or eggplant for different textures while retaining the umami flavor profile.
  • Cauliflower Rice Omission: Feel free to leave out the cauliflower rice and replace it with more mixed vegetables for a simpler take.
  • Herbed Topping: Sprinkle fresh or dried herbs like thyme or rosemary over the top before baking to elevate the aroma and add a beautiful layer of flavor.

Additionally, if you’re interested in other wholesome recipes, consider trying out Sweet Potato Casserole or a comforting Skillet Pasta with Sun-Dried Tomatoes to round out your meal rotation!

Make Ahead Options

These Healthy Tater Tot Casseroles with Beef and Lentils are perfect for meal prep enthusiasts! You can assemble the casserole up to 24 hours in advance by preparing everything up to the layering step. Simply store the prepared dish tightly covered in the refrigerator to maintain freshness. If you need to prep even earlier, you can prepare the filling (meat and veggies) up to 3 days ahead and refrigerate it separately; just remember to let it cool before refrigerating to prevent sogginess. When you're ready to bake, layer the tater tots and cheese right before popping it into the oven; this ensures a crispy top that's just as delicious!

Expert Tips for Tater Tot Casserole

Combine Well: Ensure all ingredients are thoroughly mixed to prevent dry spots in the casserole, enhancing its overall flavor and texture.

Fresh vs. Frozen: If you opt to use fresh vegetables instead of frozen, give them a brief blanching to maintain their crunch and prevent sogginess.

Draining is Key: To avoid a watery casserole, remember to drain excess liquid from the cooked ground beef and mushrooms before adding them to the mix.

Layer with Care: Press the tater tots down gently into the mixture to ensure they meld into the casserole while still retaining their crispy texture.

Cheese Variations: Experiment with different cheese types; adding a sharp cheddar or spicy pepper jack can elevate the flavor profile of your tater tot casserole with beef and lentils.

How to Store and Freeze Tater Tot Casserole with Beef and Lentils

Fridge: Store leftovers in an airtight container for up to 5 days, ensuring maximum freshness and flavor retention.

Freezer: For longer storage, freeze unbaked casserole components for up to 3 months. Wrap tightly in plastic wrap and aluminum foil to prevent freezer burn.

Reheating: To reheat, thaw overnight in the fridge, then bake at 350°F (175°C) for 25-30 minutes until heated through and bubbly. Enjoy the comforting flavors of your tater tot casserole with beef and lentils!

Assembly Tip: If freezing cooked casserole, let it cool completely before freezing to slightly improve preservation and texture.

What to Serve with Healthy Tater Tot Casserole with Beef and Lentils

Elevate your mealtime experience by pairing this cozy casserole with delightful sides and drinks that enhance its comforting flavors.

  • Simple Side Salad: Crisp greens drizzled with a light vinaigrette complement the richness of the casserole, offering a refreshing contrast.
  • Steamed Green Beans: Their crunchy texture provides a delightful contrast to the soft casserole, while their subtle flavor balances the dish.
  • Garlic Bread: The buttery, garlicky goodness adds a touch of indulgence and pairs beautifully with the casserole's warm, hearty flavors.
  • Roasted Brussels Sprouts: A bit of caramelization brings out their natural sweetness, creating a delicious contrast to the savory tater tot casserole.
  • Crispy Sweet Potato Fries: These add a delightful twist, enhancing the hearty theme while offering a hint of sweetness to delight your palate.
  • Homemade Coleslaw: A creamy coleslaw adds crunch and tang, both refreshing your palate and providing a satisfying texture alongside the casserole.
  • Crisp Apple Cider: A chilled glass of cider brings a sparkling contrast to your meal, balancing the richness of the dish in a stylish way.
  • Chocolate Chip Cookies: Cap off the meal with warm, gooey cookies. Their sweetness will mirror the comforting spirit of your tater tot casserole!

Tater Tot Casserole with Beef and Lentils Recipe FAQs

What is the best way to select ripe ingredients for this casserole?
Absolutely! For the best flavor, choose fresh ingredients: look for firm, unblemished mushrooms and vibrant vegetables. The onions should be firm—not soft or sprouted—and the beef should be bright red. If you're buying canned lentils, check the expiration date for freshness.

How should I store leftover tater tot casserole?
Very simply! Store any leftover casserole in an airtight container in the fridge, where it will stay fresh for up to 5 days. Just ensure it has cooled to room temperature before sealing. Reheating it gently in the oven will keep that comforting texture perfect.

Can I freeze the tater tot casserole, and how do I do that?
Yes, you can! To freeze, I recommend assembling the casserole without baking it. Wrap it tightly in plastic wrap and then in aluminum foil to prevent freezer burn. It can be frozen for up to 3 months. When you're ready to enjoy it, thaw overnight in the fridge, then bake as directed to ensure a deliciously fresh meal.

What if my casserole comes out too watery?
If you find your casserole is watery, don’t worry—this can happen! Make sure to drain the excess liquid after cooking the ground beef and mushrooms. Additionally, avoid adding too many frozen ingredients unless you plan to increase the thickness of the sauce. A quick fix is to mix in a bit more flour to the sauce mixture to absorb extra moisture.

Are there any dietary considerations I should keep in mind for my guests?
Absolutely! With this tater tot casserole with beef and lentils, you can easily adapt it to accommodate dietary restrictions. For those with gluten sensitivities, simply use gluten-free flour and check your tater tots for any gluten ingredients. For vegetarians, consider substituting the beef with a plant-based protein and ensuring the broth is vegetable-based.

How long can I store a fully baked tater tot casserole in the refrigerator?
After baking, you can store a fully cooked casserole in an airtight container in the fridge for 3 to 4 days. Remember to let it cool to room temperature before sealing it up. When reheating, aim for thorough heating to ensure it’s just as delicious as when it first came out of the oven.

Tater Tot Casserole with Beef and Lentils

Hearty Tater Tot Casserole with Beef and Lentils Bliss

A healthy and comforting Tater Tot Casserole with beef and lentils that's budget-friendly and easy to prepare.
Print Recipe Pin Recipe
Prep Time 15 minutes mins
Cook Time 40 minutes mins
Total Time 55 minutes mins
Servings: 6 servings
Course: Dinner
Cuisine: American
Calories: 480
Ingredients Equipment Method Nutrition Notes

Ingredients
  

For the Casserole
  • 1 tablespoon avocado oil or olive oil
  • 1 medium yellow onion diced
  • 1 pound lean ground beef (90/10 or 93/7) or turkey/plant-based alternative
  • 8 ounces mushrooms chopped
  • ¼ cup all-purpose flour plus 1 tablespoon
  • 3 cups low-sodium chicken or beef broth or vegetable broth
  • 15 ounces canned lentils drained
  • 12 ounces frozen mixed vegetables
  • 1 cup frozen cauliflower rice optional
  • 1 ½ cups shredded cheddar cheese divided
  • 28 ounces frozen tater tots for topping
For Seasoning
  • to taste fine salt
  • to taste garlic powder
  • to taste onion powder
  • to taste black pepper

Equipment

  • Large skillet
  • 9x13 baking dish
  • Mixing Bowl

Method
 

Step-by-Step Instructions
  1. Preheat your oven to 400°F (200°C) and coat a 9x13 baking dish with cooking spray.
  2. In a large skillet, heat 1 tablespoon of avocado oil over medium-high heat. Sauté the diced yellow onion for about 2 minutes. Add the ground beef and cook for 8-10 minutes until browned. Drain excess fat and transfer to the baking dish.
  3. Add remaining avocado oil to the skillet and cook the chopped mushrooms for 2-4 minutes until soft. Stir in flour to create a roux, then gradually whisk in broth and let thicken for 3-5 minutes. Season with salt, garlic powder, onion powder, and black pepper.
  4. Pour the mushroom sauce over the beef in the baking dish. Fold in the lentils, mixed vegetables, and 1 cup of shredded cheese. Add cauliflower rice and mix well.
  5. Spread the mixture evenly in the baking dish. Arrange tater tots on top and sprinkle with remaining cheese.
  6. Bake for 35-40 minutes, until bubbly and golden brown.

Nutrition

Serving: 1sliceCalories: 480kcalCarbohydrates: 35gProtein: 30gFat: 25gSaturated Fat: 10gPolyunsaturated Fat: 2gMonounsaturated Fat: 8gCholesterol: 70mgSodium: 800mgPotassium: 600mgFiber: 6gSugar: 3gVitamin A: 15IUVitamin C: 20mgCalcium: 20mgIron: 15mg

Notes

For best results, combine all ingredients well to avoid dry spots in the casserole. Fresh vegetables may need blanching before use, and excess liquid from meat and mushrooms should be drained to prevent a watery casserole.

Tried this recipe?

Let us know how it was!

Savory Sloppy Joe Bowls with Sweet Potatoes to Savor

September 9, 2025 by Grace Snow Leave a Comment

As I chopped the vibrant sweet potatoes, I couldn't help but feel a wave of excitement—transforming a classic Midwestern comfort food into something equally wholesome and satisfying. These High-Protein Sloppy Joe Bowls combine the savory goodness of ground beef with nourishing roasted sweet potatoes, creating a cozy dish that’s both quick to whip up and perfect for meal prep. Whether you’re trying to impress family or simply looking to elevate your weeknight dinners, this gluten-free and dairy-free bowl will surely steal the show. Plus, leftovers make a delicious lunch to pair with your favorite greens! Ready to dig into this flavor-packed twist on a classic? Let's get cooking!

Why Are These Sloppy Joe Bowls Unique?

Wholesome and Nutritious: This recipe transforms a beloved classic into a gluten-free and dairy-free feast, making it perfect for anyone looking for a healthy meal option.

High-Protein Delight: With lean ground beef as the star, these bowls pack a protein punch that keeps you satisfied longer—great for meal prep!

Versatile Base Options: Switch up the sweet potatoes with other favorites like quinoa or mashed potatoes, catering to different tastes.

Easy to Prepare: Quick to whip up, these bowls are ideal for any weeknight dinner when time is short but flavor is a must.

Crowd-Pleasing Appeal: Perfect for serving family or guests, these Sloppy Joe Bowls are sure to impress everyone at the table. Looking for more delicious dinner ideas? Check out my Fish Taco Bowls for a fresh twist!

1. Ingredients

Sloppy Joe Bowls Ingredients

For the Sweet Potatoes

  • Sweet Potatoes – The star of your bowl, bringing sweetness and nourishment; feel free to swap with mashed sweet potatoes for a creamier texture.
  • Avocado Oil – Ideal for roasting, adding healthy fats; olive oil works well if preferred.
  • Garlic Powder – Infuses the sweet potatoes with flavor; used to keep things simple!
  • Paprika – Adds a warm smokiness, enhancing the savory notes of the dish.
  • Salt and Pepper – Essential seasonings to taste; don’t be shy about adjusting to your preference.

For the Sloppy Joe Mixture

  • Yellow Onion – Sweetens up the base, providing depth; consider using shallots for a milder taste.
  • Bell Pepper – A colorful crunch; any variety can add appeal to your dish.
  • Lean Ground Beef – The heart of the bowl, offering a high-protein option; ground turkey is a lighter alternative.
  • Tomato Paste – A must for moisture and rich flavor, ensuring the mix is perfect for your Sloppy Joe Bowls.
  • Yellow Mustard or Dijon Mustard – Introduces a delightful tang; adjust to your taste.
  • Apple Cider Vinegar – Brightens the flavors while adding a touch of acidity; red wine vinegar can work instead.
  • Coconut Aminos – A fantastic soy sauce substitute, adding umami; opt for low-sodium soy sauce if needed.
  • Optional Fresh Toppings
  • Pickled Onions – Add a zesty bite that complements the savory mix beautifully.
  • Pickles – For an additional crunch and tang that elevates the overall flavor.
  • Fresh Parsley – A burst of color and a fresh finish to your bowls.

These Sloppy Joe Bowls are not just a meal; they’re a comforting, nutritious experience that brings joy to your family table!

Step‑by‑Step Instructions for Sloppy Joe Bowls

Step 1: Preheat the Oven
Begin by preheating your oven to 400℉ (200℃). This temperature is perfect for roasting the sweet potatoes, which will become caramelized and tender. As the oven heats, prepare your sweet potatoes for roasting; this way, they'll be ready to go as soon as the oven reaches the desired temperature.

Step 2: Prepare the Sweet Potatoes
Cube your sweet potatoes into even-sized pieces, about one inch, to ensure they cook uniformly. In a large bowl, toss them with avocado oil, garlic powder, paprika, salt, and pepper until well coated. Spread the sweet potato cubes on a parchment-lined baking sheet and place them in the preheated oven for 18 minutes.

Step 3: Continue Roasting Sweet Potatoes
After 18 minutes, take out the sweet potatoes and give them a gentle toss to help them brown evenly. Return them to the oven for an additional 5 to 8 minutes, or until they’re fork-tender and golden brown. This step ensures that your sweet potatoes will provide a delightful sweetness in your Sloppy Joe Bowls.

Step 4: Sauté the Vegetables
While the sweet potatoes are roasting, heat a tablespoon of avocado oil in a large skillet over medium heat. Add the chopped yellow onion and bell pepper, sautéing for about 5 minutes until they are softened and fragrant. This step will create a flavorful base for the sloppy joe mixture.

Step 5: Cook the Ground Beef
Now, add the lean ground beef to the skillet, breaking it apart with a spoon. Cook for 10 to 12 minutes, stirring occasionally, until the meat is browned and fully cooked. Watch for any liquid to evaporate; the goal is a thick and hearty mix for your Sloppy Joe Bowls.

Step 6:Combine the Sloppy Joe Mixture
Once the ground beef is browned, stir in water, tomato paste, mustard, apple cider vinegar, coconut aminos, and your desired seasonings. Reduce the heat and let this mixture simmer for 8 to 10 minutes, allowing all the flavors to meld beautifully. The result should be a thick, luscious sauce perfect for your bowls.

Step 7: Assemble the Sloppy Joe Bowls
To assemble your Sloppy Joe Bowls, divide the roasted sweet potatoes into serving dishes. Top each portion generously with the sloppy joe mixture, spreading it evenly over the sweet potatoes. For a pop of color and extra flavor, consider adding optional toppings like pickled onions, pickles, or fresh parsley.

Step 8: Serve and Enjoy
Your savory Sloppy Joe Bowls are now ready to serve! Enjoy them warm as a hearty family meal, or pack leftovers for a nutritious lunch. Witness how this comforting dish will delight everyone at the table, offering a wholesome twist to the classic flavors you know and love.

What to Serve with High-Protein Sloppy Joe Bowls?

Enjoying a comforting bowl of savory goodness is just the beginning—let's complete your meal with delightful pairings that enhance every bite.

  • Crispy Broccolini: This tender green offers a nice crunch and a slight bitterness that balances the sweetness of the roasted sweet potatoes beautifully.
  • Zesty Coleslaw: A refreshing side with a tangy dressing that provides a crisp contrast to the warm and hearty Sloppy Joe mixture.
  • Roasted Green Beans: Nutty and tender, these green beans add a vibrant color and earthy flavor that pairs perfectly with the dish.
  • Garlic Butter Corn: Juicy corn tossed in garlic butter brings sweetness and a touch of richness to every plate, making for a delightful contrast.
  • Pickled Vegetables: A medley of pickles or pickled onions adds brightness and acidity, elevating the savory flavors of your Sloppy Joe Bowls.

Completing your meal with these sides not only brings varied textures and flavors to your table but also creates an inviting atmosphere for family and friends. Enjoy!

Sloppy Joe Bowls Variations & Substitutions

Don't be afraid to tweak these Sloppy Joe Bowls to suit your taste buds and dietary needs!

  • Gluten-Free: Ensure all sauces and condiments are labeled gluten-free, or replace with your favorite gluten-free alternatives.
    Swap out the soy sauce for tamari or liquid aminos for a gluten-free version that packs the same umami punch.

  • Dairy-Free: Keep this meal free from dairy by omitting cheese and sticking to fresh herbs for flavor.
    Add a dollop of dairy-free sour cream or avocado slices to enhance creaminess without the cheese!

  • Higher Protein: For an even heartier meal, substitute half the ground beef with chopped lentils or black beans.
    This not only boosts protein levels but also introduces a delightful texture to the Sloppy Joe mix.

  • Vegetarian/Vegan: Replace ground beef with plant-based ground meat or an array of vegetables like mushrooms and lentils.
    Black beans or chickpeas can also be combined for a satisfying, protein-rich veggie option.

  • Sweet Potato Substitutes: Try using cauliflower rice or quinoa for a lighter base if sweet potatoes aren’t on hand.
    These alternatives provide a unique texture and can still absorb all those savory sloppy joe flavors.

  • Extra Veggie Boost: Toss in additional vegetables like spinach, zucchini, or corn into the sloppy joe mixture for more nutrients.
    This not only stretches the dish but adds warmth and heartiness, making it perfect for picky eaters.

  • Spice Level: For a kick, incorporate diced jalapeños or a sprinkle of cayenne pepper to the meat mixture.
    For a milder flavor, consider adding a hint of smoked paprika instead, giving your Sloppy Joe Bowls a delightful smoky essence.

  • Flavor Variations: Experiment with different mustards or add barbecue sauce for a unique twist.
    A splash of Worcestershire sauce can also enhance the savory flavor profile, bringing a delightful depth that everyone will love.

If you’re inspired to try a different meal, why not check out my Poor Man's Burrito Bowls or savor a zesty bite with my Fish Taco Bowls? Customize and create a delicious night for your family!

Make Ahead Options

These High-Protein Sloppy Joe Bowls are perfect for meal prep enthusiasts looking to save time during the week! You can roast the sweet potatoes and prepare the sloppy joe mixture up to 3 days in advance. Simply roast and cool the sweet potatoes, storing them in an airtight container in the refrigerator. Likewise, cook the sloppy joe meat and let it cool before refrigerating separately; this prevents sogginess. When you're ready to enjoy your bowls, just reheat both components in the microwave until warmed through. This makes for a deliciously easy family meal that’s just as satisfying as the day you made it!

How to Store and Freeze Sloppy Joe Bowls

Fridge: Store leftovers in an airtight container in the refrigerator for up to 4 days. Keep the roasted sweet potatoes separate from the meat mixture to maintain texture.

Freezer: For longer storage, freeze in individual portions for up to 3 months. Allow the sloppy joe mixture to cool completely before transferring to freezer-friendly bags or containers.

Thawing: To reheat, thaw overnight in the refrigerator. Warm up in the microwave or on the stovetop, adding a splash of water if needed to restore moisture.

Reheating: Heat the bowls in the microwave until hot throughout, about 2–3 minutes, stirring halfway to ensure even warming. Enjoy your hearty Sloppy Joe Bowls!

Expert Tips for Sloppy Joe Bowls

  • Uniform Cubes: Ensure even cubing of sweet potatoes for uniform cooking, which helps achieve that perfect caramelization and tenderness.

  • Avoid Sogginess: If meal prepping, store sweet potato and meat mixtures separately to keep everything fresh and prevent sogginess in your Sloppy Joe Bowls.

  • Boost Nutrition: Incorporate leftover produce by adding veggies like chopped spinach or zucchini to the beef mixture to enhance flavor and nutrition without extra effort.

  • Custom Spice Level: Adjust the amount of mustard and vinegar according to your taste; this ensures your Sloppy Joe Bowls hit that sweet-spot balance of tanginess.

  • Experiment with Toppings: Don’t hesitate to get creative with toppings! Pickled onions and fresh herbs can elevate the dish and bring freshness to each bite.

Sloppy Joe Bowls Recipe FAQs

How do I select ripe sweet potatoes?
When choosing sweet potatoes, look for firm ones with smooth skin, avoiding any with dark spots or blemishes. The sweeter and richer your sweet potatoes, the better the overall flavor of your Sloppy Joe Bowls.

How should I store leftover Sloppy Joe Bowls?
Absolutely! Store leftovers in an airtight container in the refrigerator for up to 4 days. To maintain the texture of your dish, keep the sweet potatoes separate from the meat mixture until you're ready to enjoy it again.

Can I freeze Sloppy Joe Bowls for later?
Definitely! To freeze, cool the sloppy joe mixture completely, then transfer it to freezer-safe bags or containers. Freeze for up to 3 months. Thaw it overnight in the refrigerator, then reheat in the microwave or on the stovetop. Adding a splash of water while heating helps to restore moisture!

What if my sweet potatoes are undercooked or mushy?
If your sweet potatoes are undercooked, simply return them to the oven at 400°F (200°C) for an additional 5-10 minutes until they become tender and golden. If they turn out mushy, they may have been overcooked. Balance this by adjusting your roasting technique and cutting them into larger pieces to aid even cooking in the future.

Are these Sloppy Joe Bowls suitable for a healthy diet?
Very! These Sloppy Joe Bowls are gluten-free and dairy-free, packed with protein from lean ground beef while providing essential nutrients from sweet potatoes. For those with dietary restrictions, you can easily substitute ingredients to make them fit your needs better. For example, use ground turkey for a lower fat option or swap in coconut aminos for soy sauce if you're avoiding gluten.

Can I add more vegetables to the Sloppy Joe mixture?
Absolutely! I often add chopped spinach, zucchini, or even carrots to my Sloppy Joe mixture. Simply sauté them with the onion and bell pepper, and watch how they boost both nutrition and flavor without sacrificing the classic appeal of the dish.

Sloppy Joe Bowls

Savory Sloppy Joe Bowls with Sweet Potatoes to Savor

High-protein Sloppy Joe Bowls combine savory ground beef with roasted sweet potatoes for a wholesome meal.
Print Recipe Pin Recipe
Prep Time 10 minutes mins
Cook Time 30 minutes mins
Total Time 40 minutes mins
Servings: 4 bowls
Course: Dinner
Cuisine: American
Calories: 500
Ingredients Equipment Method Nutrition Notes

Ingredients
  

For the Sweet Potatoes
  • 3 cups Sweet Potatoes cubed
  • 2 tablespoons Avocado Oil or olive oil
  • 1 teaspoon Garlic Powder
  • 1 teaspoon Paprika
  • to taste Salt
  • to taste Pepper
For the Sloppy Joe Mixture
  • 1 medium Yellow Onion chopped
  • 1 medium Bell Pepper chopped
  • 1 pound Lean Ground Beef or ground turkey
  • 2 tablespoons Tomato Paste
  • 1 tablespoon Yellow Mustard or Dijon mustard
  • 1 tablespoon Apple Cider Vinegar
  • 2 tablespoons Coconut Aminos or low-sodium soy sauce
Optional Fresh Toppings
  • 1/2 cup Pickled Onions
  • 1/2 cup Pickles
  • 1/4 cup Fresh Parsley chopped

Equipment

  • Oven
  • large bowl
  • Skillet
  • Baking Sheet

Method
 

Step-by-Step Instructions
  1. Preheat the oven to 400℉ (200℃).
  2. Cube sweet potatoes into even-sized pieces and toss with avocado oil, garlic powder, paprika, salt, and pepper.
  3. Spread sweet potato cubes on a baking sheet and roast for 18 minutes.
  4. Toss the sweet potatoes and roast for an additional 5 to 8 minutes until fork-tender and golden brown.
  5. Heat avocado oil in a skillet and sauté onion and bell pepper for about 5 minutes until softened.
  6. Add the ground beef, breaking it apart, and cook for 10 to 12 minutes until browned and cooked through.
  7. Stir in water, tomato paste, mustard, vinegar, and coconut aminos, and let simmer for 8 to 10 minutes.
  8. To assemble, divide roasted sweet potatoes into bowls and top with sloppy joe mixture. Add optional toppings as desired.
  9. Serve warm and enjoy!

Nutrition

Serving: 1bowlCalories: 500kcalCarbohydrates: 40gProtein: 30gFat: 20gSaturated Fat: 6gPolyunsaturated Fat: 2gMonounsaturated Fat: 10gCholesterol: 80mgSodium: 600mgPotassium: 800mgFiber: 6gSugar: 5gVitamin A: 18000IUVitamin C: 30mgCalcium: 50mgIron: 3mg

Notes

These bowls make a great meal prep option and can be stored separately to maintain freshness.

Tried this recipe?

Let us know how it was!

Quick & Flavorful Vegetarian Chow Mein You Can Make Tonight

September 9, 2025 by Grace Snow Leave a Comment

In a bustling kitchen filled with the enticing aroma of sizzling garlic and fresh vegetables, I often find myself savoring the thrill of a new recipe. Today, I can't wait to share my 15-Minute Vegetarian Chow Mein, a delightful dish that brings a touch of vibrant, Asian-inspired cuisine to your table. This quick dinner not only satisfies your cravings but also offers a fun twist on takeout, making it just as nourishing as it is delicious. With a rainbow of colorful veggies and a savory sauce, it’s the perfect solution for those busy weeknights when you want something hearty yet light. Ready in just 15 minutes and fully customizable, you may even find yourself making this more often than those late-night takeout runs! What veggies will you toss in to make it your own?

Why is Vegetarian Chow Mein so popular?

Quick & Easy: This dish comes together in just 15 minutes, making it an ideal choice for busy weeknights when you need a delicious meal fast.
Flavorful & Savory: Bursting with garlic and a rich sauce, every bite is a delightful treat that rivals your favorite takeout, ensuring you'll savor the experience.
Customizable: With endless vegetable options, feel free to mix and match based on your fridge's contents—try bell peppers, carrots, or even some leftover tofu to make it your own!
Healthy & Nutritious: Packed with vibrant veggies, this chow mein helps you get your daily dose of nutrients while keeping the meal light and satisfying.
Fresh & Flavorful: Unlike traditional takeout, you'll enjoy a fresher taste that only comes from sautéing up your own creation in the comfort of your kitchen.
Elevate your dinner game with this vegetarian chow mein recipe, and see how quick and delightful cooking at home can be!

Vegetarian Chow Mein Ingredients

• Perfect for a vibrant meal!

For the Stir-Fry

  • Vegetable Oil – Essential for frying the ingredients; can substitute with canola or olive oil for a lighter touch.
  • Mushrooms – Adds umami flavor and a lovely texture; feel free to swap with your favorite mushrooms or omit if preferred.
  • Garlic (minced) – Enhances the overall flavor; fresh garlic is ideal, but garlic powder works in a pinch.
  • Chow Mein Noodles (200 grams / 6 oz) – The star of this dish; if unavailable, ramen or rice noodles can be a great alternative.
  • Soy Sauce – Provides the salty, savory depth you crave; tamari is a great gluten-free option.
  • Sugar – Balances the savory elements; you can substitute with maple syrup or skip it altogether if desired.
  • White Pepper – Offers a subtle heat; adjust to your preference or swap with black pepper if you don't have it.
  • Water – Used to adjust sauce consistency if it becomes too thick.

For the Veggies

  • Bok Choy (1 large bunch) – Brings freshness and crunch; kale or spinach can be used as flavorful substitutes.
  • Bean Sprouts (1 cup) – Adds texture and crispness; you can replace them with shredded cabbage if you prefer.

Finishing Touches

  • Sesame Oil (½ tablespoon) – Imparts a delightful nutty aroma; can be replaced with extra vegetable oil if needed.
  • White Sesame Seeds (1 tsp for garnish) – Optional for a beautiful presentation; adds a slight crunch and visual appeal.

Gather these ingredients and be ready to create a delicious vegetarian chow mein that's quick, healthy, and bursting with flavor!

Step‑by‑Step Instructions for Vegetarian Chow Mein

Step 1: Prep Ingredients
Start by gathering all your ingredients for the Vegetarian Chow Mein. Chop the bok choy, slice the mushrooms, and mince the garlic. Having everything ready will streamline your cooking process, making it easier to toss ingredients into the skillet as you go.

Step 2: Heat Oil
In a large skillet or wok, pour 2 tablespoons of vegetable oil and heat it over medium-high heat. Give it about 1-2 minutes to get hot; you'll know it's ready when the oil shimmers slightly. This step ensures that your vegetables and noodles will sauté beautifully, enhancing their flavors.

Step 3: Sauté Mushrooms and Garlic
Add the sliced mushrooms and minced garlic to the hot oil. Stir-fry them for approximately 2 minutes, or until the mushrooms are soft and golden. The garlic should become fragrant, filling your kitchen with a warm aroma, which means it’s time to move to the next step.

Step 4: Cook Noodles
Stir in the chow mein noodles along with soy sauce, sugar, and white pepper. Toss everything together, ensuring the noodles are well-coated and heated through, which should take about 3-4 minutes. The noodles will absorb the flavors, creating that delicious savory essence you adore in vegetarian chow mein.

Step 5: Add Veggies
Now, gently fold in the chopped bok choy and bean sprouts. Continue cooking for another 2-3 minutes, stirring frequently until the bok choy wilts and brightens in color. This step adds a fresh crunch that perfectly complements the tender noodles and savory sauce.

Step 6: Final Touches
If you find the mixture is sticking, add a splash of water to loosen it up. Drizzle half a tablespoon of sesame oil over the stir-fry, combining everything well. This will add that rich, nutty flavor signature to your vegetarian chow mein.

Step 7: Garnish and Serve
Remove the skillet from heat and transfer your vibrant Vegetarian Chow Mein to serving plates. Sprinkle with sesame seeds for an attractive finish, and serve immediately while it's still hot. Enjoy your vibrant meal, the perfect touch of homemade goodness!

Vegetarian Chow Mein Variations

Feel free to let your creativity shine by customizing this delightful chow mein to suit your taste buds!

  • Dairy-Free: Simply ensure no dairy ingredients are used; this recipe is naturally vegan with just a few tweaks.
  • Protein Boost: Toss in cubed tofu or tempeh during the sauté for added protein and heartiness. With a crunchy exterior and a light center, tofu becomes a perfect partner for the colorful veggies.
  • Heat Level: Add sliced chili peppers or a drizzle of sriracha to crank up the spice level and make your chow mein excitingly fiery. Just remember, it’s easier to add heat than to take it away!
  • Veggie Medley: Incorporate other vegetables like colorful bell peppers, tender carrots, or even broccoli for an added nutritional punch and vibrant colors. Not only will they beautify your dish, but they’ll also enhance the crunchiness you crave.
  • Noodle Swap: If chow mein noodles aren’t on hand, ramen or rice noodles work beautifully in this recipe. They'll absorb those delicious flavors just as well.
  • Gluten-Free: Choose gluten-free soy sauce or tamari and opt for rice noodles to create a gluten-free version that doesn’t compromise on taste. You won't even miss the traditional noodles!
  • Flavor Twist: Experiment with different sauces such as hoisin or oyster sauce (vegan versions available) for a unique take that elevates your chow mein experience. A touch of hoisin brings sweetness and depth to the dish, making every bite exciting.
  • Herb Finish: For a fragrant touch, sprinkle fresh cilantro or basil on top before serving to brighten up flavors with herbaceous notes. Fresh herbs can elevate a dish from good to unforgettable!

By incorporating your favorite ingredients or using what you have on hand, this Vegetarian Chow Mein is sure to be a meal you’ll love customizing time and time again.

Make Ahead Options

Preparation is key for busy home cooks, and this Vegetarian Chow Mein is perfect for meal prep! You can chop all your vegetables (like bok choy, mushrooms, and garlic) and store them in the refrigerator up to 24 hours in advance to ensure they stay fresh and ready to go. Additionally, you can also cook the chow mein noodles ahead of time; just toss them with a bit of oil to prevent sticking. When you're ready to serve, simply heat the vegetable oil in your skillet, add the prepped ingredients, and stir-fry for about 7-10 minutes, finishing with the sesame oil right at the end. This way, you'll enjoy a homemade dish just as delicious as takeout—perfect for those hectic weeknights!

Expert Tips for Vegetarian Chow Mein

  • Prep Ahead: Organize and chop your ingredients before cooking to ensure a smooth, efficient process and avoid any last-minute scrambling.

  • Temperature Control: Keep the pan hot throughout cooking! This helps vegetables stay crispy rather than steaming, which is crucial for the perfect vegetarian chow mein.

  • Taste as You Go: Monitor the flavor by tasting during cooking. You can easily adjust the soy sauce or sugar to find your perfect balance.

  • Be Mindful of Noodles: Don’t overcook the chow mein noodles to keep them from becoming mushy. They should be tender yet firm enough to hold their shape when tossed with veggies.

  • Versatile Veggies: Feel free to use any vegetables you have on hand—watch out for favorites like carrots or bell peppers that can elevate your vegetarian chow mein!

  • Storage for Leftovers: If you have any chow mein left, store it in an airtight container in the fridge and reheat gently to maintain its texture.

How to Store and Freeze Vegetarian Chow Mein

Fridge: Store leftover vegetarian chow mein in an airtight container for up to 3 days. Ensure it’s cooled completely before sealing to prevent condensation.

Freezer: For longer storage, freeze vegetarian chow mein in a freezer-safe container for up to 2 months. Thaw in the fridge overnight before reheating.

Reheating: When reheating, add a splash of water in a skillet over medium heat to avoid sticky noodles—a few minutes should do the trick for a deliciously warm dish.

What to Serve with Vegetarian Chow Mein

Elevate your dining experience by complementing your chow mein with delightful sides and beverages that enhance the meal's vibrant flavors.

  • Crispy Spring Rolls: These savory bites add a satisfying crunch and are easy to dip into sweet chili sauce, creating a perfect appetizer.

  • Miso Soup: A warm bowl of miso soup offers a soothing contrast to the chewy noodles, making for a comforting, hearty meal.

  • Steamed Jasmine Rice: Fluffy rice brings balance, allowing the stir-fried flavors to shine while providing a satisfying, filling element.

  • Sesame Broccoli: Tender broccoli with sesame dressing adds a healthful crunch while echoing the nuttiness from the chow mein’s sesame oil.

  • Asian Cucumber Salad: A refreshing salad with a light vinegar dressing brightens every bite, offering a zesty contrast to the savory noodles.

  • Teriyaki Tofu Skewers: These skewers introduce a protein-packed option that complements the chow mein beautifully, enhancing both flavor and texture.

  • Chilled Green Tea: This mildly flavored beverage refreshes the palate, making it an ideal drink to pair with the savory and umami notes of the dish.

  • Chocolate Mochi: For dessert, indulge in these chewy rice cakes filled with rich chocolate, perfectly serving as a sweet finish to a savory dinner.

Vegetarian Chow Mein Recipe FAQs

How do I select the best vegetables for my chow mein?
Absolutely! When choosing vegetables for your vegetarian chow mein, look for vibrant colors and fresh textures. Aim for vegetables that are firm and crisp, such as bok choy, bell peppers, and mushrooms. Avoid any with dark spots or signs of wilting, as these may not be at their best flavor or texture. Fresh veggies not only add flavor but also contribute vital nutrients to your dish.

How long can I store leftover chow mein?
Your veggie masterpiece can be stored in an airtight container in the fridge for up to 3 days! Just ensure it’s cooled completely before sealing—this will help prevent condensation from making your chow mein soggy. When reheating, a splash of water in a skillet over medium heat will help restore its delightful texture.

Can I freeze vegetarian chow mein?
Definitely! You can freeze your vegetarian chow mein for up to 2 months. To do this, allow it to cool completely, then transfer it to a freezer-safe container or a heavy-duty freezer bag, making sure to remove as much air as possible. For best results, thaw it overnight in the fridge before reheating. When reheating from frozen, add a splash of water to keep the noodles from sticking.

What should I do if my chow mein is too sticky?
If your chow mein turns out a bit sticky, don’t worry—it’s an easy fix! When reheating, add a little bit of water, about 1-2 tablespoons, to the skillet over medium heat. This moisture will help loosen the noodles and make them nice and tender again. Remember to stir frequently, allowing the noodles to absorb the steam and become flavorful and non-sticky.

Is vegetarian chow mein safe for my pet?
While vegetarian chow mein is packed with vegetables, it’s best to keep it away from your pets. Ingredients like onions, garlic, and soy sauce can be harmful to them. If you want to share a delicious meal, consider making plain steamed veggies or a small portion of cooked plain noodles without seasoning as a treat for your furry friend.

Can I make this dish gluten-free?
Yes, you absolutely can! To make your vegetarian chow mein gluten-free, simply substitute regular soy sauce with tamari, which is made without wheat. Additionally, ensure that your chow mein noodles or any noodle substitute, such as rice noodles, are labeled gluten-free. Enjoy a delectable meal without the gluten worries!

Vegetarian Chow Mein Recipe FAQs

Vegetarian Chow Mein

Quick & Flavorful Vegetarian Chow Mein You Can Make Tonight

Enjoy a delightful and quick 15-Minute Vegetarian Chow Mein packed with vibrant veggies and savory sauce.
Print Recipe Pin Recipe
Prep Time 5 minutes mins
Cook Time 10 minutes mins
Total Time 15 minutes mins
Servings: 2 plates
Course: Dinner
Cuisine: Asian
Calories: 350
Ingredients Equipment Method Nutrition Notes

Ingredients
  

For the Stir-Fry
  • 2 tablespoons Vegetable Oil can substitute with canola or olive oil
  • 200 grams Chow Mein Noodles or ramen/rice noodles
  • 1 cup Mushrooms sliced, can swap with favorites or omit
  • 2 cloves Garlic minced; fresh preferred
  • 2 tablespoons Soy Sauce tamari for gluten-free
  • 1 teaspoon Sugar or maple syrup
  • 1 teaspoon White Pepper or black pepper
  • Water to adjust sauce consistency
For the Veggies
  • 1 large bunch Bok Choy or kale/spinach
  • 1 cup Bean Sprouts or shredded cabbage
Finishing Touches
  • ½ tablespoon Sesame Oil or extra vegetable oil
  • 1 teaspoon White Sesame Seeds optional for garnish

Equipment

  • Large skillet
  • Wok

Method
 

Step-by-Step Instructions
  1. Gather all your ingredients. Chop the bok choy, slice the mushrooms, and mince the garlic.
  2. In a large skillet or wok, heat 2 tablespoons of vegetable oil over medium-high heat for about 1-2 minutes.
  3. Add sliced mushrooms and minced garlic to the hot oil. Stir-fry for approximately 2 minutes.
  4. Stir in chow mein noodles, soy sauce, sugar, and white pepper. Toss everything together for about 3-4 minutes.
  5. Fold in the chopped bok choy and bean sprouts; continue cooking for another 2-3 minutes.
  6. If sticking, add a splash of water, and drizzle half a tablespoon of sesame oil over the stir-fry.
  7. Remove from heat, transfer to serving plates, sprinkle with sesame seeds, and serve immediately.

Nutrition

Serving: 1plateCalories: 350kcalCarbohydrates: 50gProtein: 10gFat: 15gSaturated Fat: 2gPolyunsaturated Fat: 3gMonounsaturated Fat: 8gSodium: 800mgPotassium: 600mgFiber: 5gSugar: 3gVitamin A: 18000IUVitamin C: 30mgCalcium: 100mgIron: 2mg

Notes

Organize and chop ingredients ahead for a smooth cooking process. Keep the pan hot to ensure crisp vegetables. Adjust flavors as needed during cooking. Store leftovers in an airtight container in the fridge for up to 3 days.

Tried this recipe?

Let us know how it was!
  • « Previous Page
  • 1
  • …
  • 47
  • 48
  • 49
  • 50
  • 51
  • …
  • 58
  • Next Page »

Welcome!

Hi, I’m Grace, a Sydney-based home cook with a passion for bold flavors and trending ingredients. Whether you’re a busy beginner or a seasoned foodie, you’ll find dishes here that are fresh, fun, and full of flavor.

More about me

Popular Recipes

  • Cheesy Chicken Garlic Bread Sandwich
    Cheesy Chicken Garlic Bread Sandwich for Cozy Family Moments
  • Easy Chicken Ranch Wraps
    Easy Chicken Ranch Wraps: Quick, Creamy & Totally Satisfying
  • Chicken Caesar Sandwiches
    Delicious Chicken Caesar Sandwiches for Quick Comfort Food
  • best Cuban sandwich
    The Best Cuban Sandwich You’ll Want Every Weeknight!

Footer

↑ back to top

About

  • Privacy Policy
  • Disclaimer
  • Terms & Conditions

Newsletter

  • Sign Up! for emails and updates

Contact

  • About me
  • Contact me

Copyright © 2025 TastyTrendIngredients