Just the other day, while sifting through old family recipes, I stumbled upon one that never fails to evoke warm memories—Beef Chile Colorado. This authentic Mexican stew warms the soul with its hearty chunks of tender beef simmered in a robust, spicy red chile sauce. What I adore about this dish is not just its ability to feed a crowd but also how it transforms into an even more delicious meal as leftovers. Picture a cozy weeknight dinner, with the tantalizing aroma wafting through your kitchen, and a table set with warm tortillas and Mexican rice—the perfect setting to rally friends and family around. If you’re tired of fast food and crave something truly comforting, my Beef Chile Colorado recipe is here to rescue dinnertime. Ready to dive into this flavorful adventure? Let’s get cooking!
Why is Beef Chile Colorado a Must-Try?
Authenticity at Its Finest: This recipe captures the essence of traditional Mexican cooking, delivering rich flavors that transport you to the heart of Mexico.
Feed a Crowd: Perfect for gatherings, this hearty stew can easily serve a large group, making it ideal for family dinners or celebrations.
Leftover Love: The flavors intensify after a day in the fridge, offering a delightful second act that’s even better than the first.
Versatile Pairings: Serve it with warm tortillas, Mexican rice, or even borracho beans for a complete, satisfying meal.
Time-Saving Simplicity: With mostly hands-off cooking, you can spend less time in the kitchen and more time enjoying the company of loved ones.
Dive into this comforting stew and rediscover what homemade meals are all about!
Beef Chile Colorado Ingredients
• Get ready to create a mouthwatering dish with these essential ingredients!
For the Stew
- Beef Chuck – A flavorful cut perfect for slow cooking; swap with brisket if you prefer.
- Kosher Salt – Essential for enhancing the dish's flavors; sea salt works too!
- Black Pepper – Adds just the right amount of spice; use a milder pepper for less heat.
- Flour – Thickens the sauce beautifully; cornstarch is a great gluten-free alternative.
- Neutral Oil – Ideal for browning beef; canola or vegetable oil will suffice.
- Yellow Onion – Boosts the stew's sweetness; red onion can be used if you like!
- Garlic Cloves – Adds delightful aromatic flavor; swap for garlic powder though taste may vary.
- Guajillo Chilies – Key to the stew's authentic flavor; pasilla chiles can be a fun alternative.
- Ancho Chilies – Brings a rich sweetness; use other dried chiles if you're missing this.
- Chiles de Arbol – For that extra heat; adjust to your spice preference.
- Ground Cumin – Infuses warmth and depth; coriander can substitute if needed.
- Ground Coriander – Complementary flavor for the spices; can be omitted without much loss.
- Dried Mexican Oregano – Enhances flavor; regular oregano can be a last-minute substitute.
- Beef Broth – The delicious base of your stew; vegetable broth works for vegetarian options.
- Bay Leaves – Adds a subtle herbal aroma; optional but highly recommended.
For Serving
- Corn Tortillas – Perfect for scooping up the stew; warm them for the best flavor.
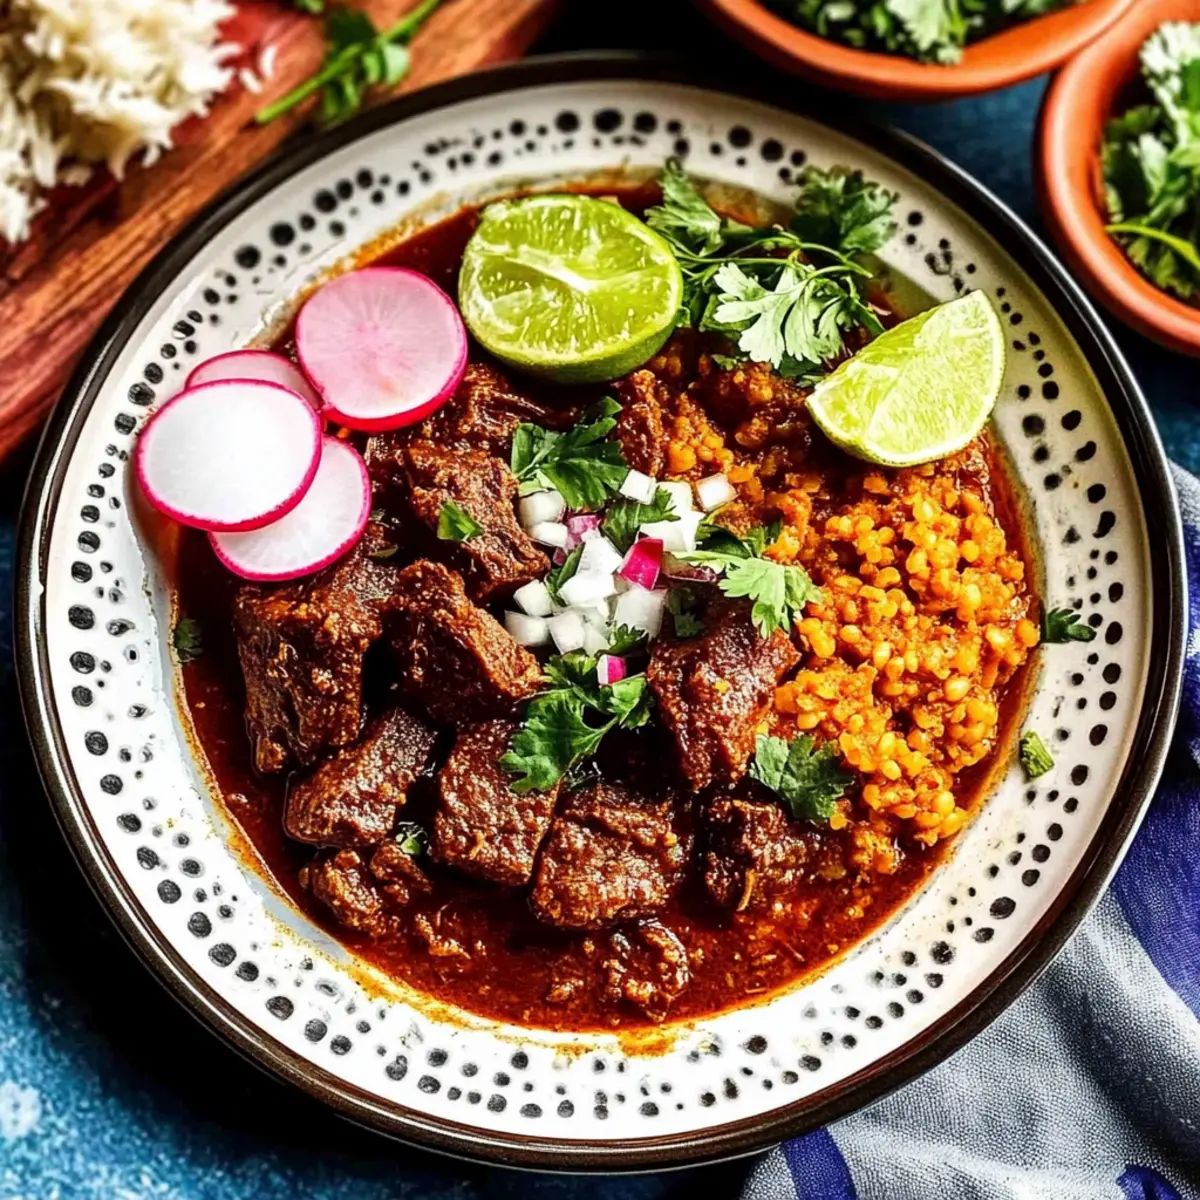
- White Onion – Adds crunch when served fresh; feel free to substitute with green onions.
- Cilantro – Freshness and color for your stew; omit if you're not a fan!
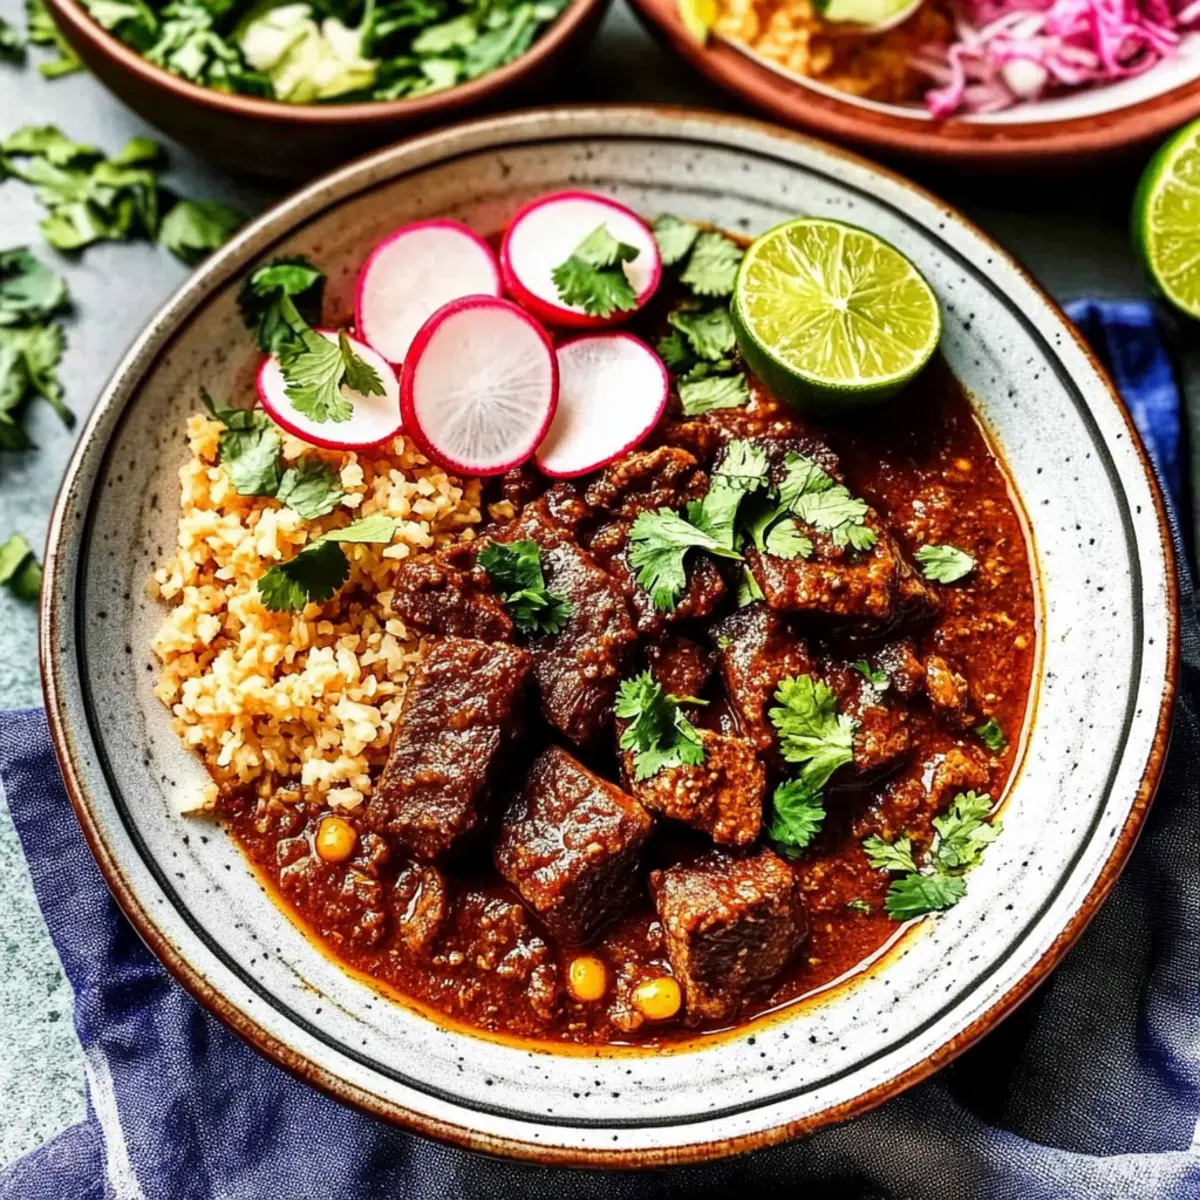
- Radishes – Crisp and refreshing, perfect for topping; they add a delightful bite.
- Lime Wedges – A squeeze enhances flavor; don’t skip this brightening touch!
Whip up this Beef Chile Colorado with these simple ingredients and enjoy the comforting embrace of a homemade Mexican stew!
Step‑by‑Step Instructions for Beef Chile Colorado
Step 1: Prepare Chilies
Begin by toasting guajillo, ancho, and chiles de árbol in a dry skillet over medium heat for 2–3 minutes. Stir constantly until they release a fragrant aroma but do not burn. Next, remove the chiles from the skillet and soak them in hot water along with chopped onion and garlic cloves for about 10 minutes, until they soften.
Step 2: Blend Sauce
Once softened, drain the chiles, onion, and garlic and transfer them to a blender. Add soaking liquid, ground cumin, ground coriander, dried Mexican oregano, and beef broth. Blend on high until smooth and velvety. This rich sauce is the heart of your Beef Chile Colorado, so ensure there are no lumps for a perfect consistency.
Step 3: Brown Beef
Cut your beef chuck into 2-inch cubes and season with kosher salt and black pepper. Lightly coat each piece with flour to help thicken the stew. In a large dutch oven, heat neutral oil over medium-high heat, then add the beef in batches; brown on all sides for about 5–7 minutes. Aim for a deep, golden color for maximum flavor.
Step 4: Combine
After browning the beef, remove any excess oil from the pot, then return the beef to the dutch oven. Pour in enough of the blended sauce to cover the meat and add bay leaves for extra aroma. Bring to a gentle simmer over low heat, cover, and let it cook for about 2 hours, stirring occasionally, until the beef is fork-tender.
Step 5: Finish and Serve
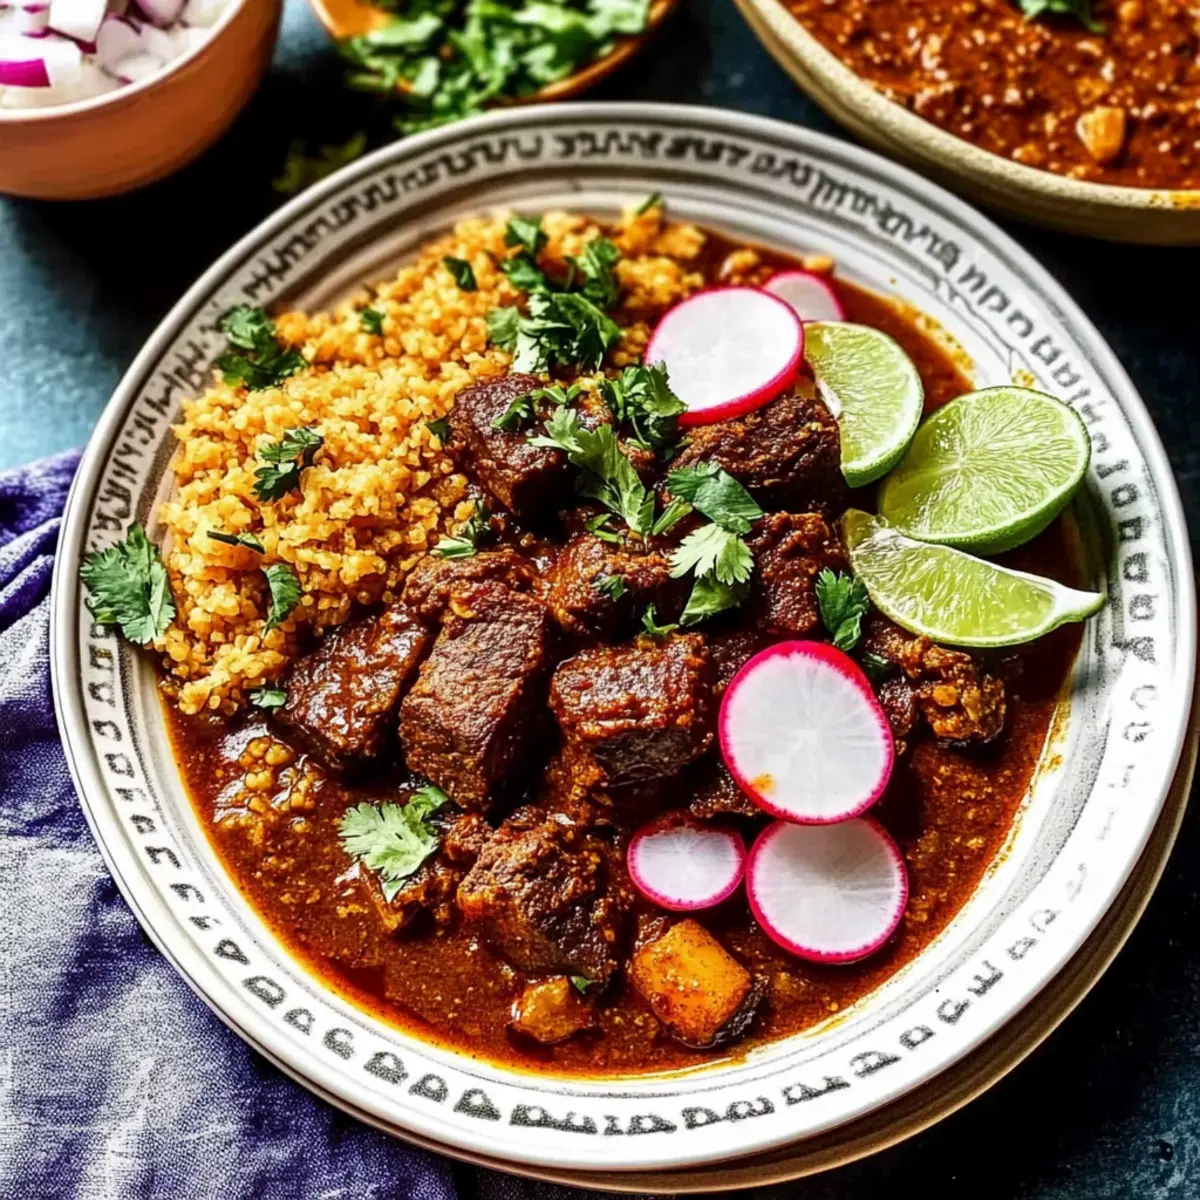
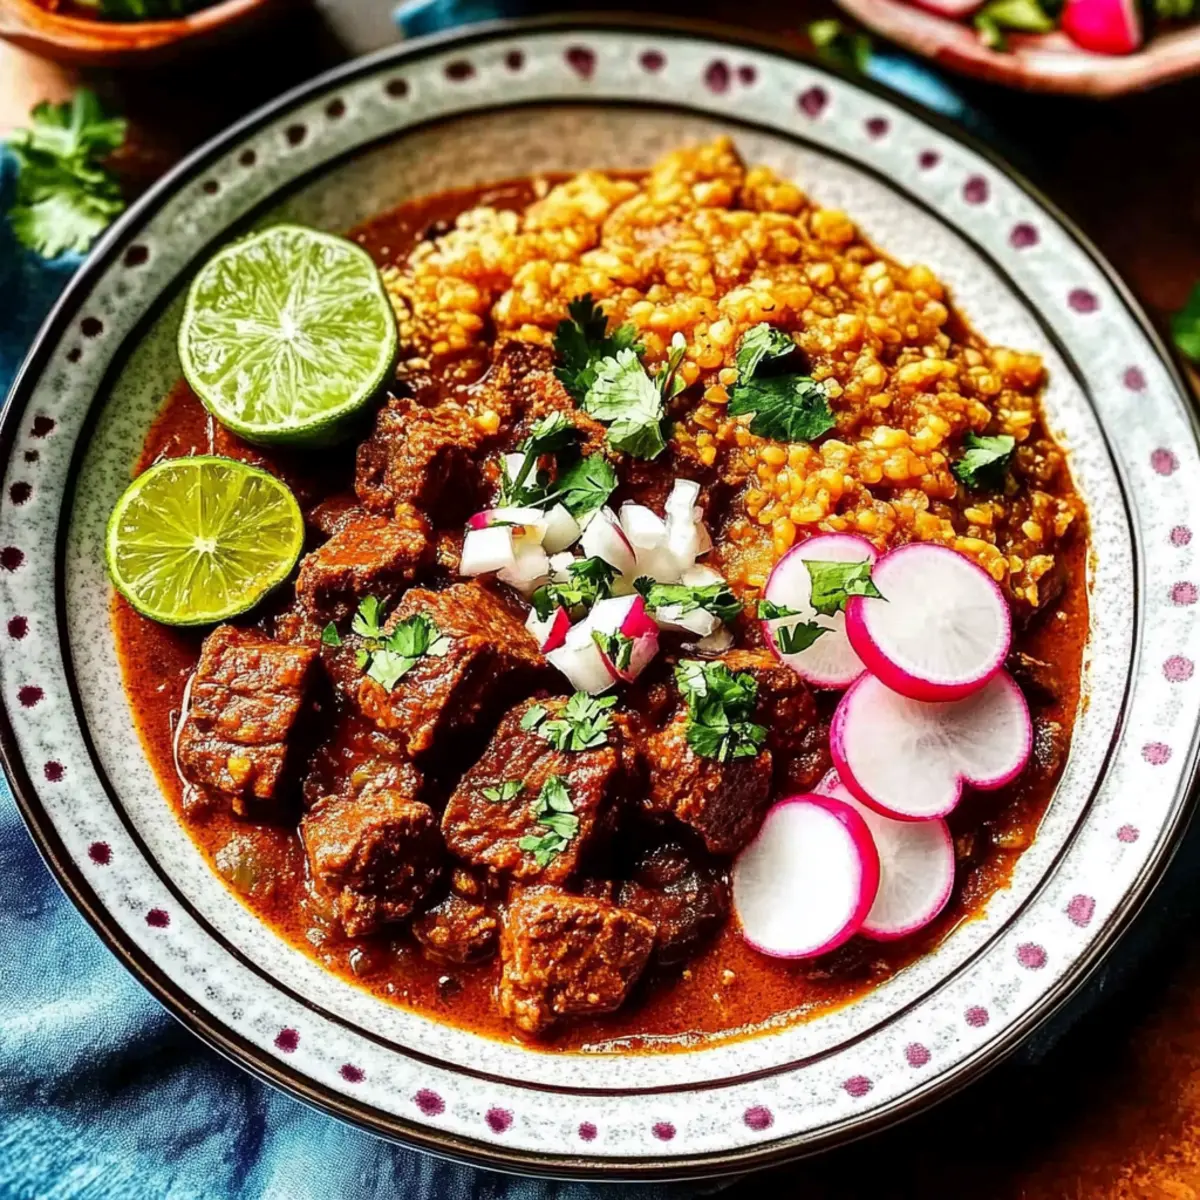
Once the beef is tender, skim any excess oil from the surface of the stew for a cleaner presentation. Serve your Beef Chile Colorado in bowls alongside warm corn tortillas. Garnish with fresh white onion, cilantro, radishes, and lime wedges for a burst of freshness that complements the stew beautifully.
Make Ahead Options
Beef Chile Colorado is a fantastic choice for meal prep, making weeknight dinners a breeze! You can prepare the sauce and brown the beef up to 24 hours in advance. Simply follow the initial steps to toast the chilies and blend the sauce, then cook the beef until browned, and store both components in airtight containers in the refrigerator. To maintain flavor and texture, be sure to cool them completely before refrigerating. When you're ready to serve, combine the beef and sauce in a pot, add bay leaves, and simmer for about 30 minutes until heated through. This way, you’ll enjoy a comforting, delicious stew with minimal effort on busy nights!
What to Serve with Beef Chile Colorado?
Building a satisfying meal around your flavorful stew can elevate your dining experience.
- Warm Corn Tortillas: These are ideal for scooping up the rich sauce, making each bite truly comforting.
- Mexican Rice: Fluffy and subtly seasoned, it absorbs the stew's flavors beautifully, enhancing every forkful.
- Borracho Beans: Rich, savory beans add a creamy texture, creating a hearty meal that's perfect for sharing.
- Guacamole: Creamy avocado dip adds freshness and a slight tang, balancing the spice of the beef stew.
- Sizzling Fajita Veggies: Caramelized onions and bell peppers add crunch and sweetness, offering vibrant textures alongside the stew.
Pair these delicious sides to create a full Mexican feast that turns your Beef Chile Colorado into a memorable meal!
How to Store and Freeze Beef Chile Colorado
Fridge: Store leftovers in an airtight container for up to 5 days. This allows the flavors to meld and intensify, making your Beef Chile Colorado even tastier on day two!
Freezer: For longer storage, freeze in airtight containers for up to 3 months. This is a great way to save portions for quick, future meals when the craving strikes.
Reheating: When ready to enjoy, thaw overnight in the fridge. Reheat gently on the stove over low heat, adding a splash of beef broth if it seems too thick, for a luscious, comforting dish.
Expert Tips for Beef Chile Colorado
-
Chili Toasting: Always toast the chilies before soaking them. This enhances the flavor, giving your Beef Chile Colorado a deeper, richer taste.
-
Browning Technique: Brown the beef in batches to prevent overcrowding. This ensures each piece gets a lovely sear, locking in flavor and moisture.
-
Simmer Time: Let the stew simmer for at least two hours. This allows the beef to become fork-tender and the flavors to meld beautifully.
-
Seasoning Adjustment: Taste the sauce before serving; if it needs more depth, adjust with additional spices or a bit of salt. This tip is crucial for perfecting your Beef Chile Colorado!
-
Resting Period: If you can, prepare the stew a day ahead. Letting it rest overnight intensifies the flavors, making it even more delicious as leftovers.
Beef Chile Colorado Variations
Feel free to explore these tempting twists that make this hearty stew even more delightful!
-
Pork Shoulder: Swap out beef for pork shoulder for a richer and slightly sweeter flavor profile. The pork will become incredibly tender, adding a whole new dimension to the dish.
-
Vegetarian Option: Use hearty vegetables like mushrooms and eggplant instead of meat, simmering them to absorb the incredible flavors of the sauce. This option invites everyone to the table without sacrificing taste!
-
Heat Levels: Adjust the amount of chiles de árbol to dial up or down the spice level. If you're in the mood for a kick, go all out; if not, a milder approach can be just as delicious.
-
Beans Addition: Add black or pinto beans to the mix for extra heartiness. This twist not only enhances the stew but also adds protein and fiber, making it a complete meal.
-
Rice Bed: Serve the stew over a bed of fluffy rice for a comforting twist. It soaks up the savory sauce beautifully, creating a satisfying dining experience.
-
Smoky Flavor: Incorporate smoked paprika for a subtle smokiness that enhances the overall depth of flavor. This unique addition can turn the ordinary into something extraordinary.
-
Herb Infusion: Toss in fresh herbs like thyme or rosemary towards the end of cooking for a fragrant lift. This brightens up the stew and adds a delightful freshness.
-
Incorporate Dark Chocolate: A small piece of dark chocolate in the final simmer can add a mysterious richness that pairs beautifully with the spices. Just a hint transforms the flavor profile to something uniquely delicious!
Each variation is designed to let your creativity shine and make this classic dish fit your taste and dietary needs. And don’t forget, leftover Beef Chile Colorado is fantastic in tacos or burritos—check out my recipe for Ground Beef Enchiladas for another delicious way to repurpose those delightful flavors!
Beef Chile Colorado Recipe FAQs
Which kind of beef is best for Beef Chile Colorado?
For Beef Chile Colorado, I recommend using beef chuck as it’s flavorful and tenderizes beautifully through slow cooking. However, if you can’t find chuck, brisket makes a nice alternative as it also has great marbling.
How should I store leftover Beef Chile Colorado?
Absolutely! Store your leftovers in an airtight container in the refrigerator for up to 5 days. The flavors will actually deepen over time, making it even more delicious on subsequent days. When you reheat it, do so gently on the stove for best results!
Can I freeze Beef Chile Colorado?
Yes, you can freeze your Beef Chile Colorado! Simply let it cool completely, then transfer it to airtight containers or freezer-safe bags. It will keep well for up to 3 months. When you’re ready to enjoy it, thaw overnight in the fridge and reheat slowly on low heat, adding a splash of beef broth if it looks too thick.
What’s the best way to adjust the spice level?
If you prefer a milder dish, you can reduce the amount of chiles de árbol or omit them entirely. Instead, enhance the flavor with extra guajillo or ancho chiles, which are sweeter and less spicy. You can always adjust the spice level to suit your family’s taste preferences!
Are there any dietary considerations for Beef Chile Colorado?
Certainly! This recipe can be modified for dietary needs. If you're looking for a gluten-free option, simply swap the flour for cornstarch to thicken the sauce. Additionally, replace beef broth with vegetable broth for a delicious vegetarian version. Just ensure all ingredients are checked for allergens!
How do I know when the beef is tender enough?
The beef should be fork-tender, which typically takes about 2 hours of slow simmering. You can check for tenderness by using a fork to see if it easily separates. If not, let it simmer a bit longer; the low and slow method is key to achieving that rich texture we all love in Beef Chile Colorado.
Beef Chile Colorado: A Heartwarming Stew You'll Love
Ingredients
Equipment
Method
- Begin by toasting guajillo, ancho, and chiles de árbol in a dry skillet over medium heat for 2–3 minutes. Stir constantly until they release a fragrant aroma but do not burn. Next, remove the chiles from the skillet and soak them in hot water along with chopped onion and garlic cloves for about 10 minutes, until they soften.
- Once softened, drain the chiles, onion, and garlic and transfer them to a blender. Add soaking liquid, ground cumin, ground coriander, dried Mexican oregano, and beef broth. Blend on high until smooth and velvety.
- Cut your beef chuck into 2-inch cubes and season with kosher salt and black pepper. Lightly coat each piece with flour. In a large dutch oven, heat neutral oil over medium-high heat, then add the beef in batches; brown on all sides for about 5–7 minutes.
- After browning the beef, remove any excess oil from the pot, then return the beef to the dutch oven. Pour in enough of the blended sauce to cover the meat and add bay leaves. Bring to a gentle simmer over low heat, cover, and let it cook for about 2 hours, stirring occasionally.
- Once the beef is tender, skim any excess oil from the surface of the stew. Serve your Beef Chile Colorado in bowls alongside warm corn tortillas. Garnish with fresh white onion, cilantro, radishes, and lime wedges.