tastytrendingredients

  • Home
  • Recipes
    • Appetizers
    • Breakfast
    • Dessert
    • Dinner
    • Drinks
    • Salads
    • Snacks
    • Soups
  • About me
  • Contact
menu icon
go to homepage
  • Home
  • Recipes
    • Appetizers
    • Breakfast
    • Dessert
    • Dinner
    • Drinks
    • Salads
    • Snacks
    • Soups
  • About me
  • Contact
search icon
Homepage link
  • Home
  • Recipes
    • Appetizers
    • Breakfast
    • Dessert
    • Dinner
    • Drinks
    • Salads
    • Snacks
    • Soups
  • About me
  • Contact
×

Coconut Toffee Bars: A Chewy Twist on Holiday Bliss

June 5, 2026 by Grace Snow Leave a Comment

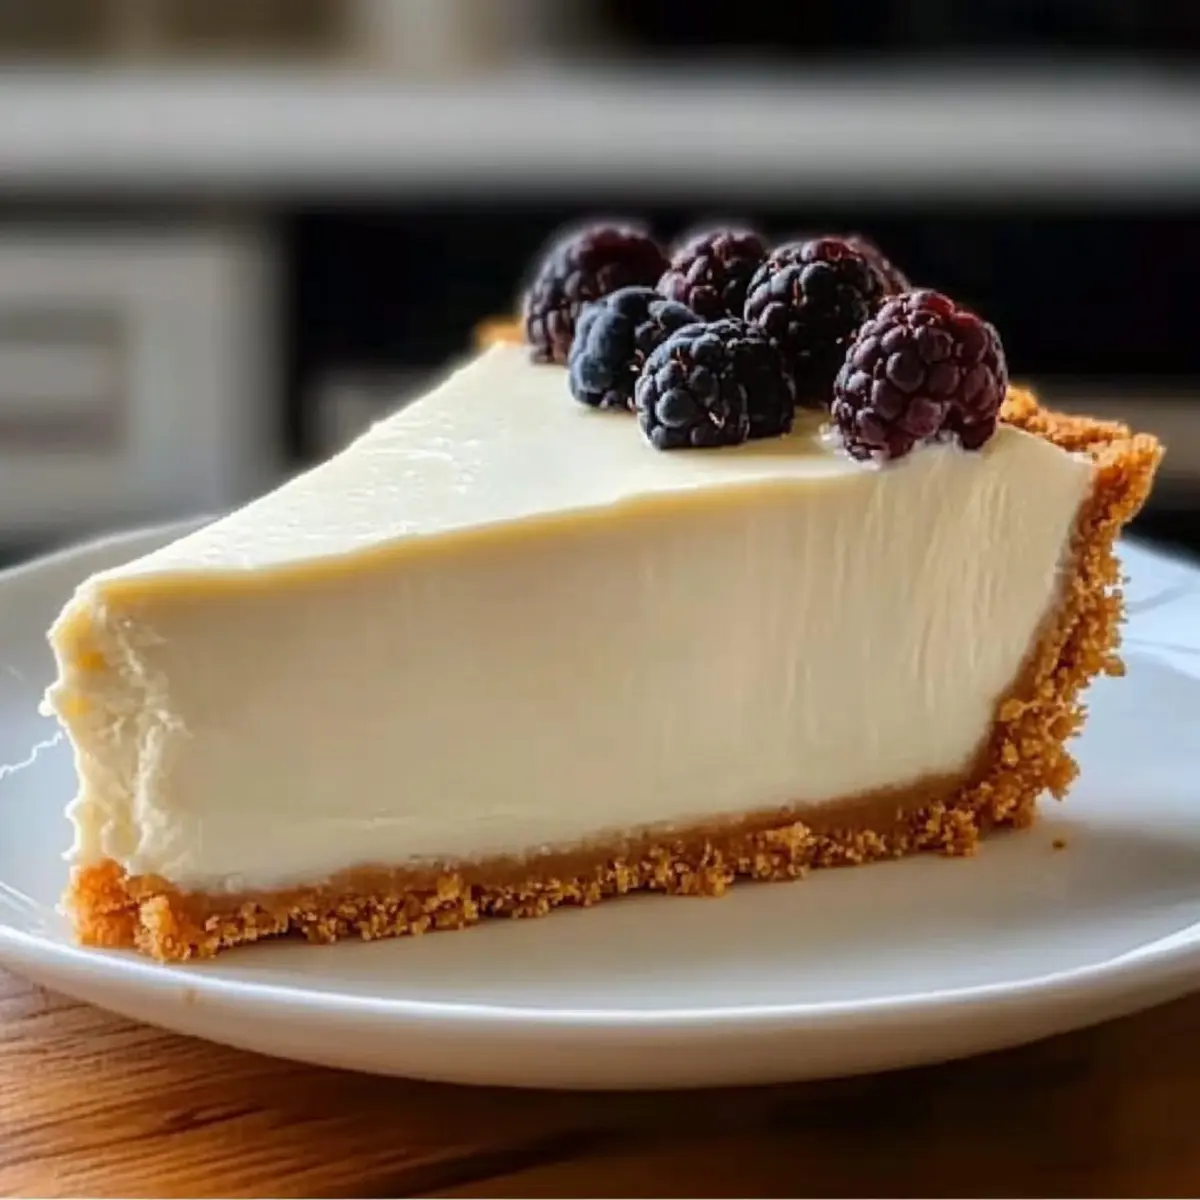
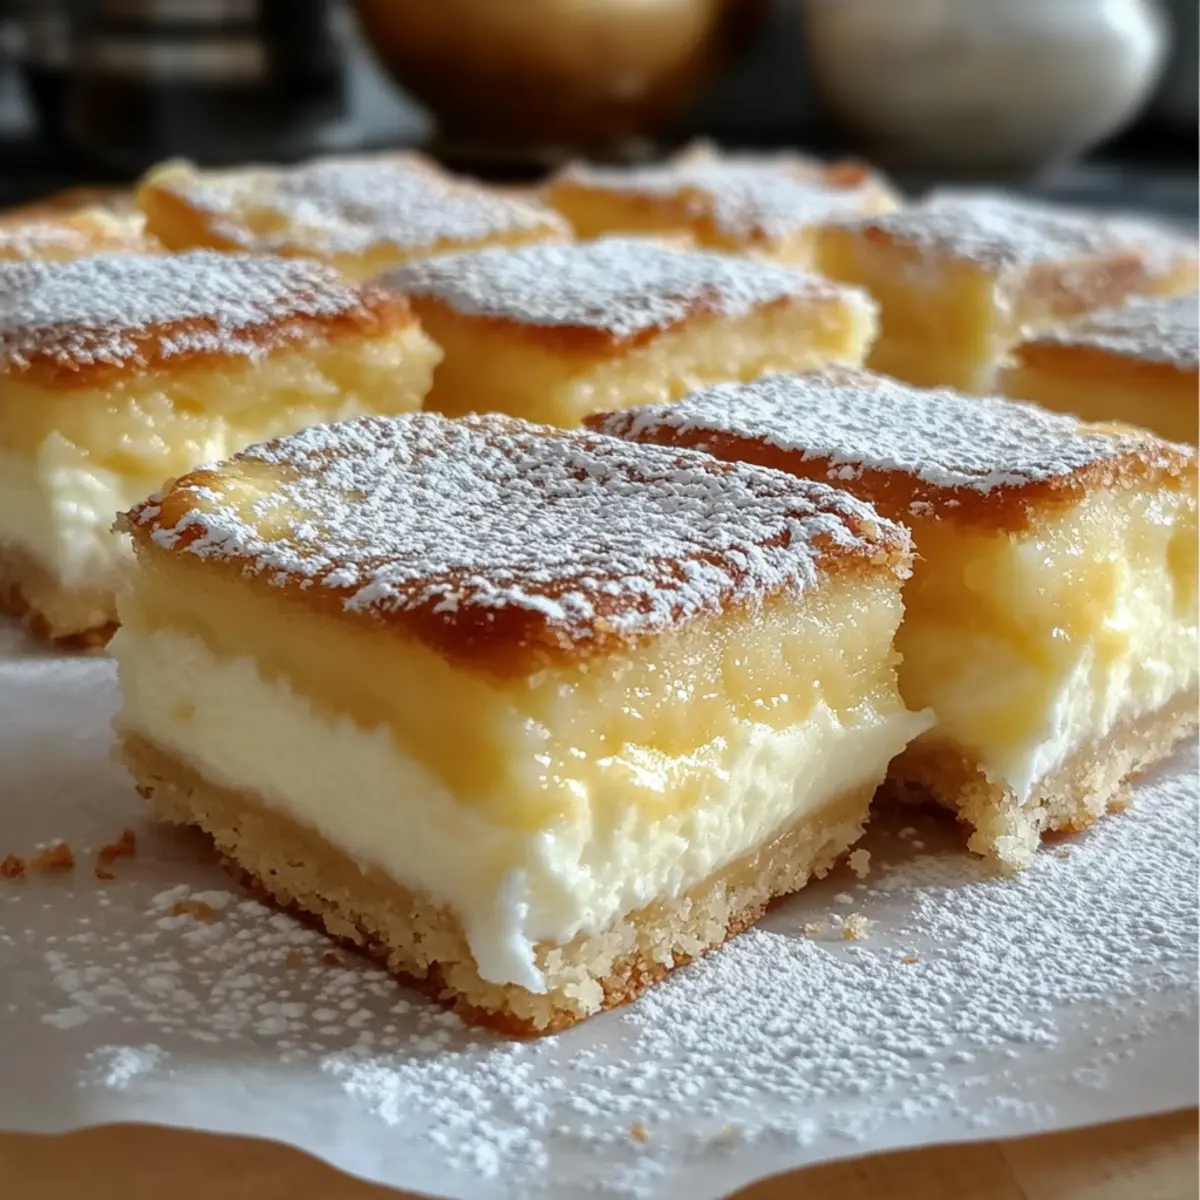
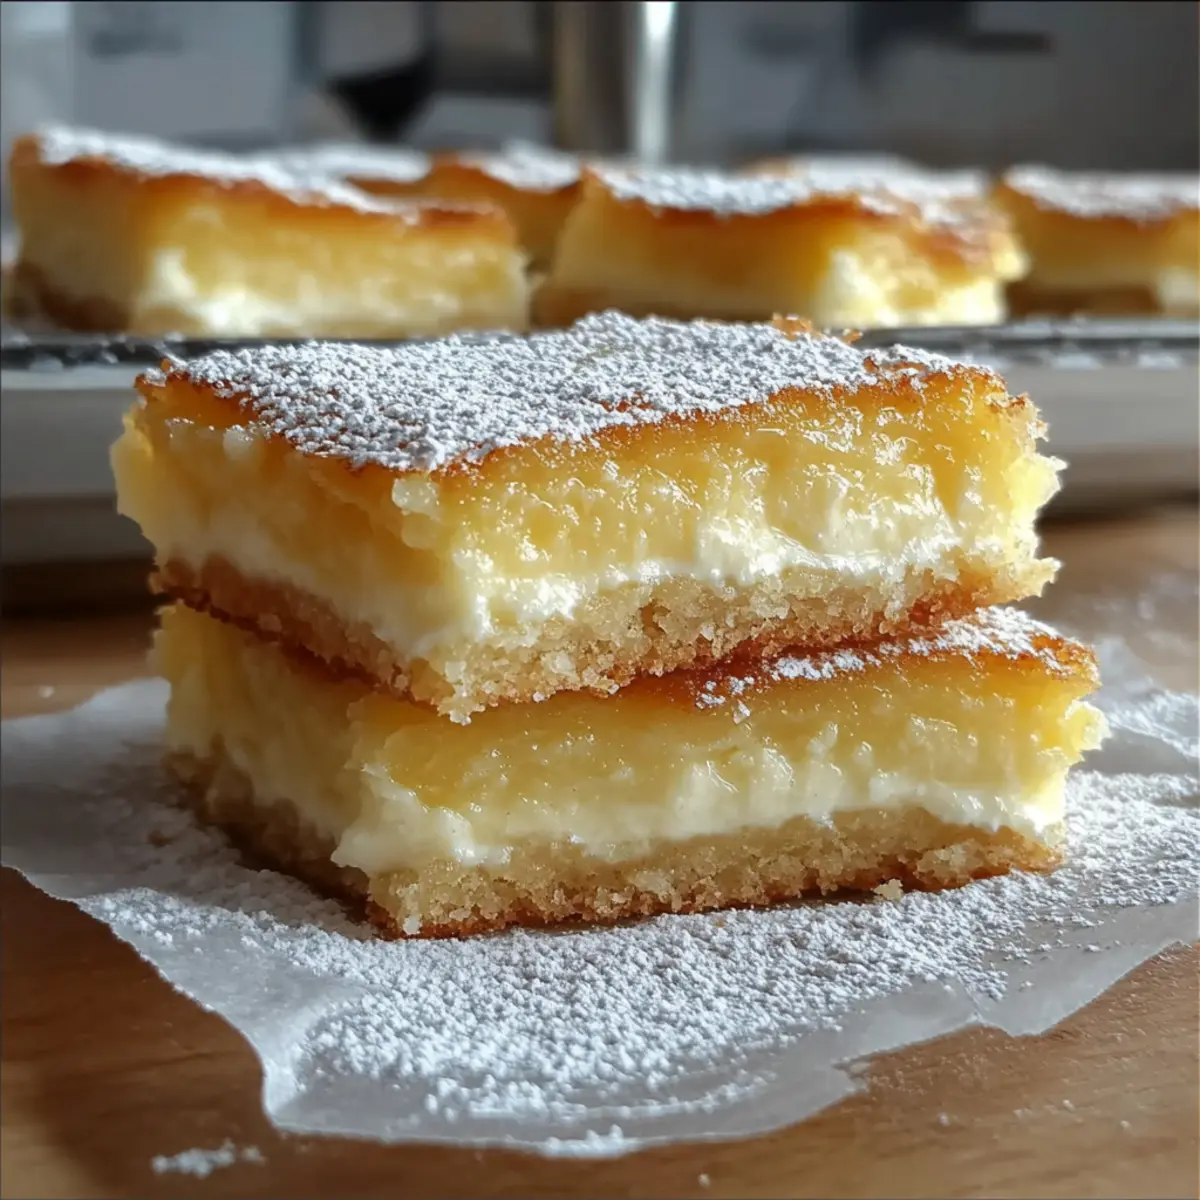
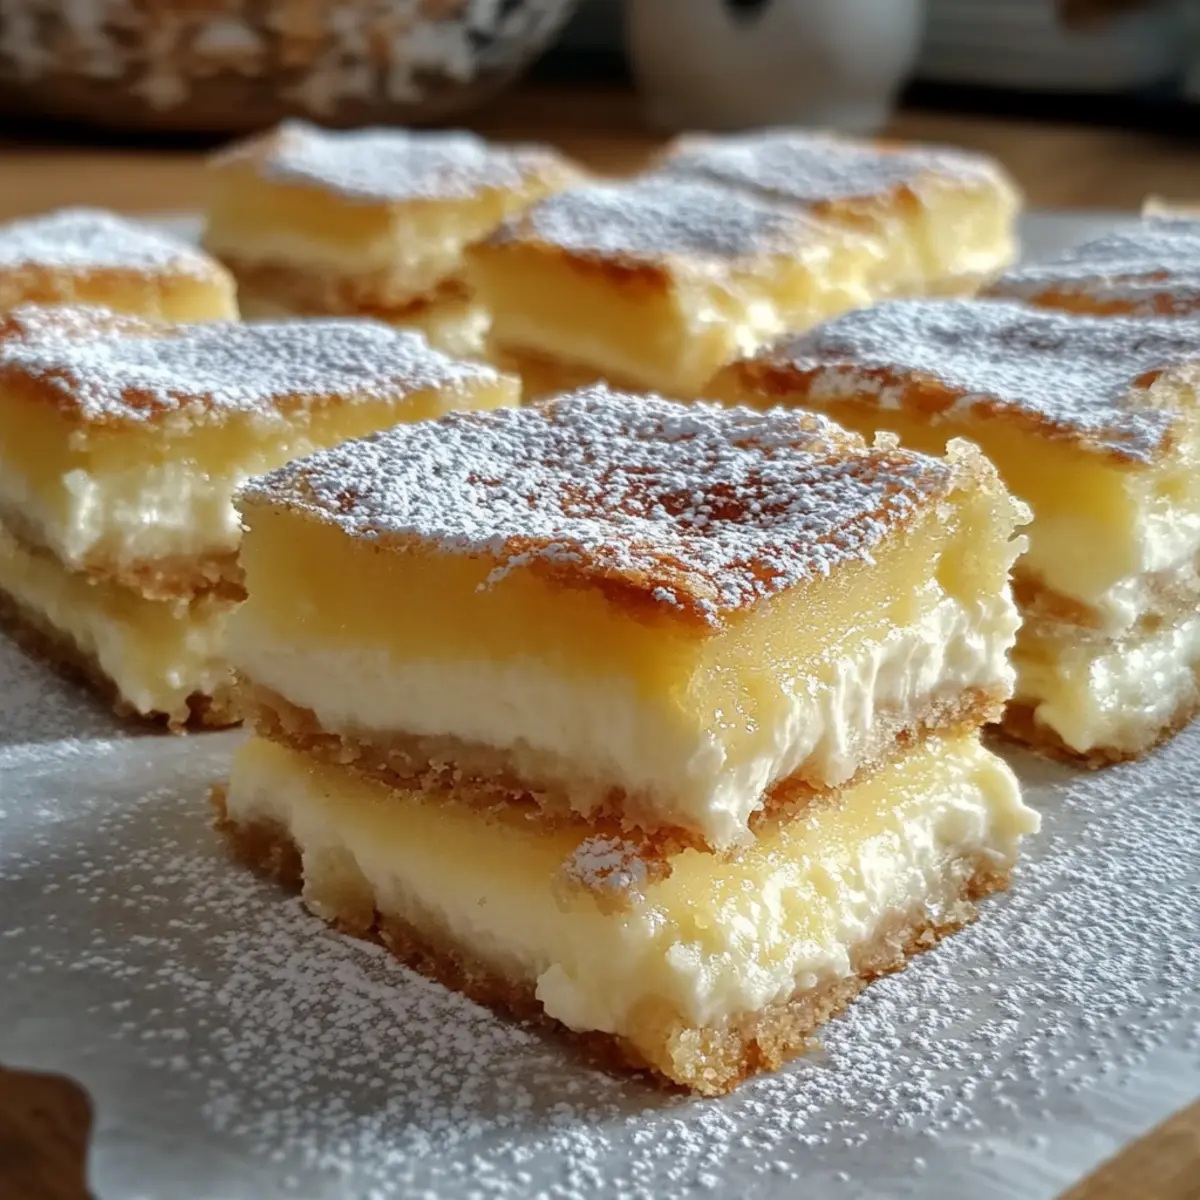
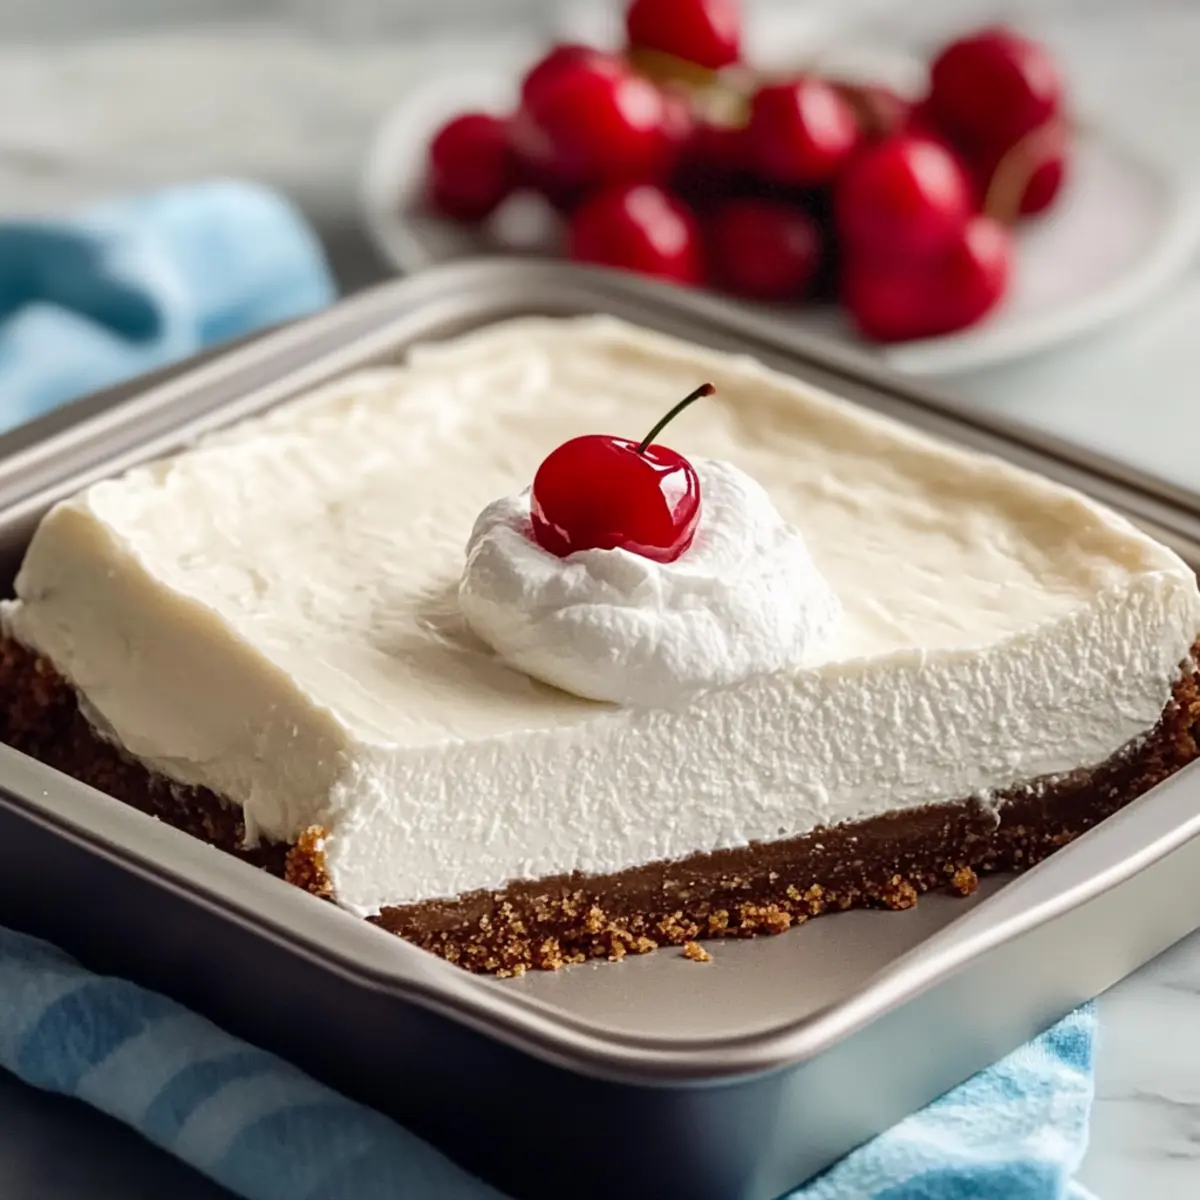
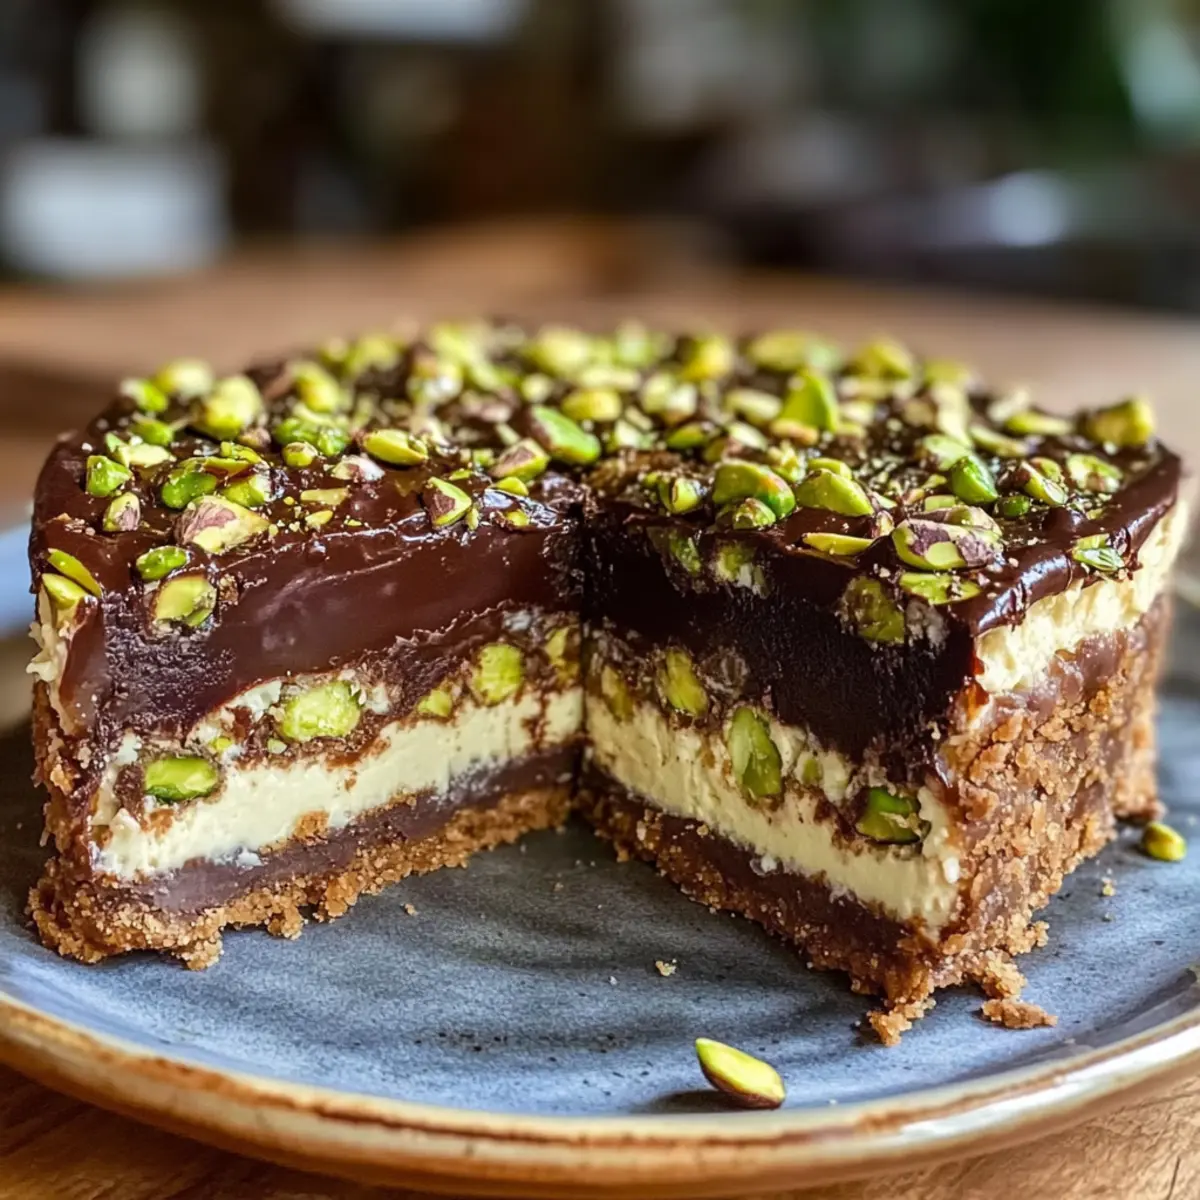
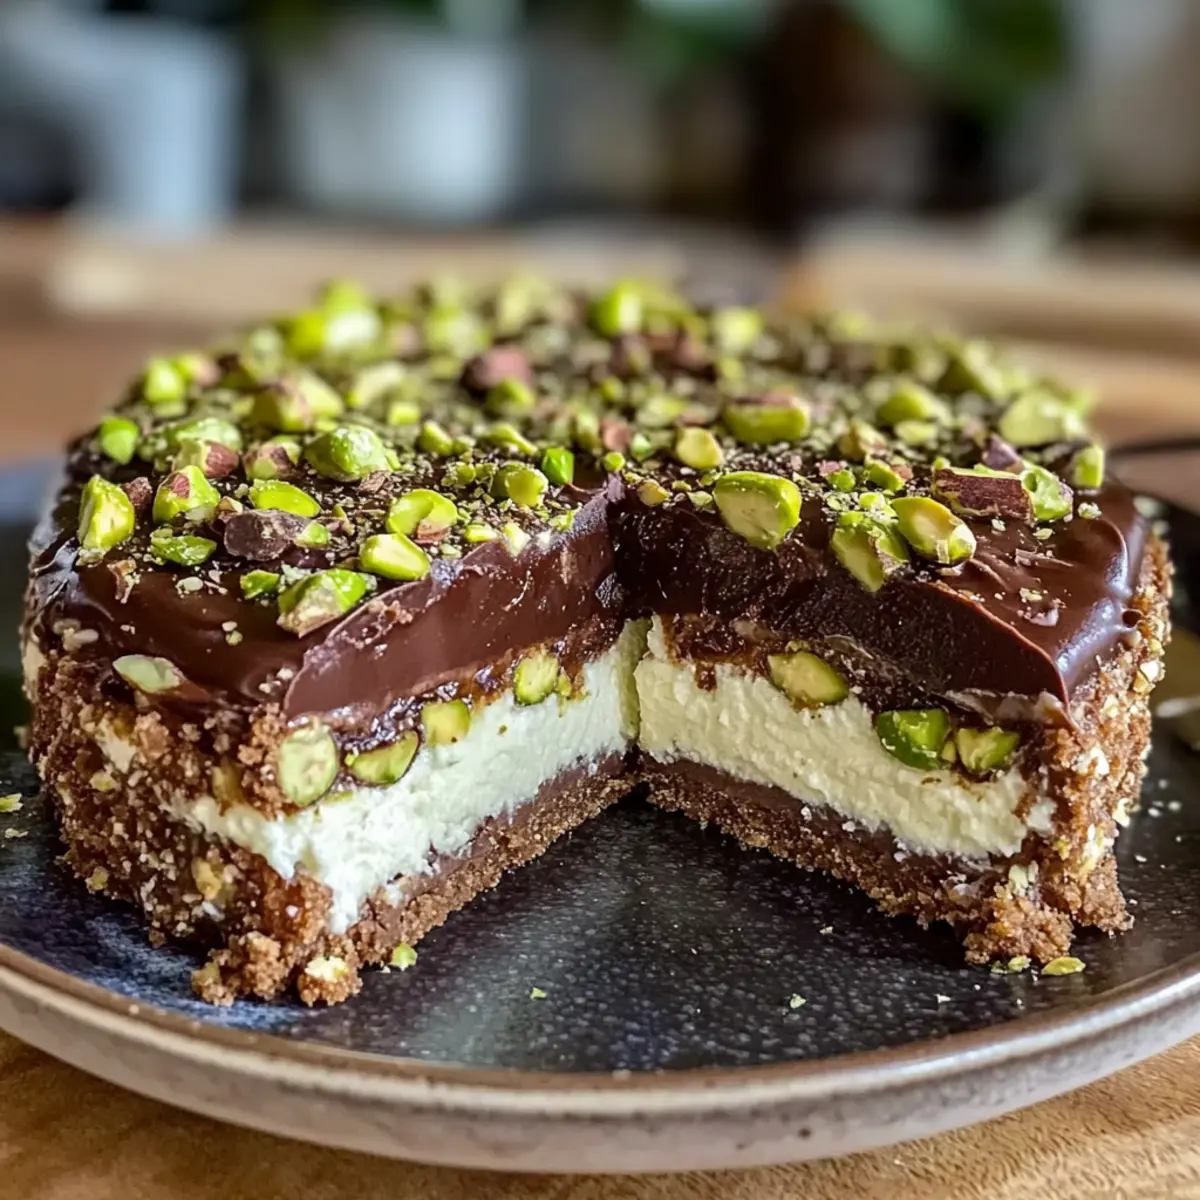
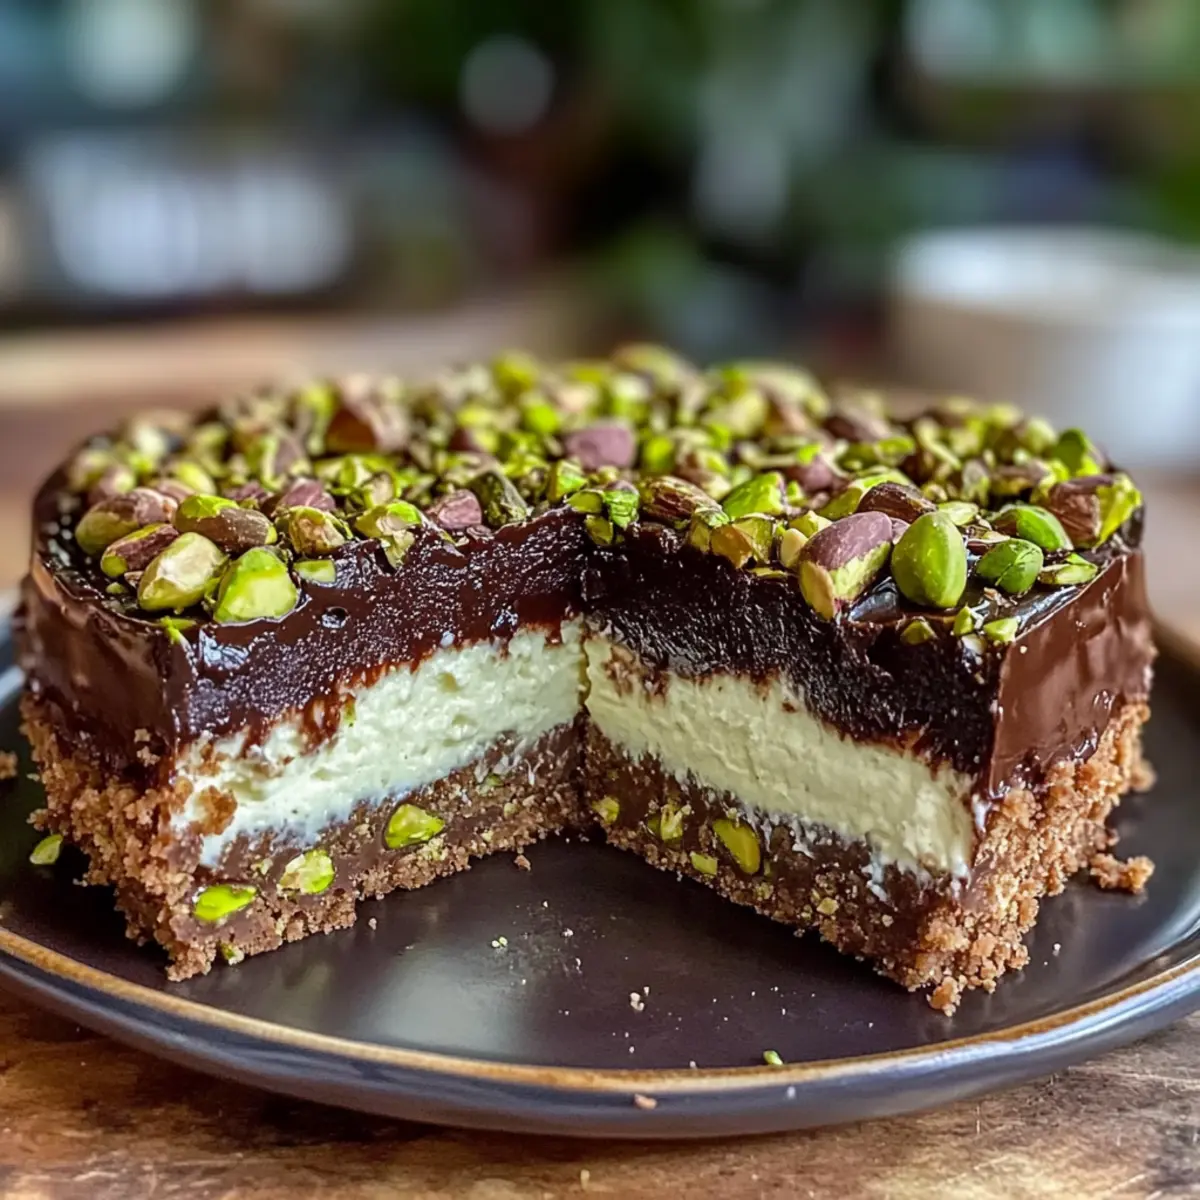
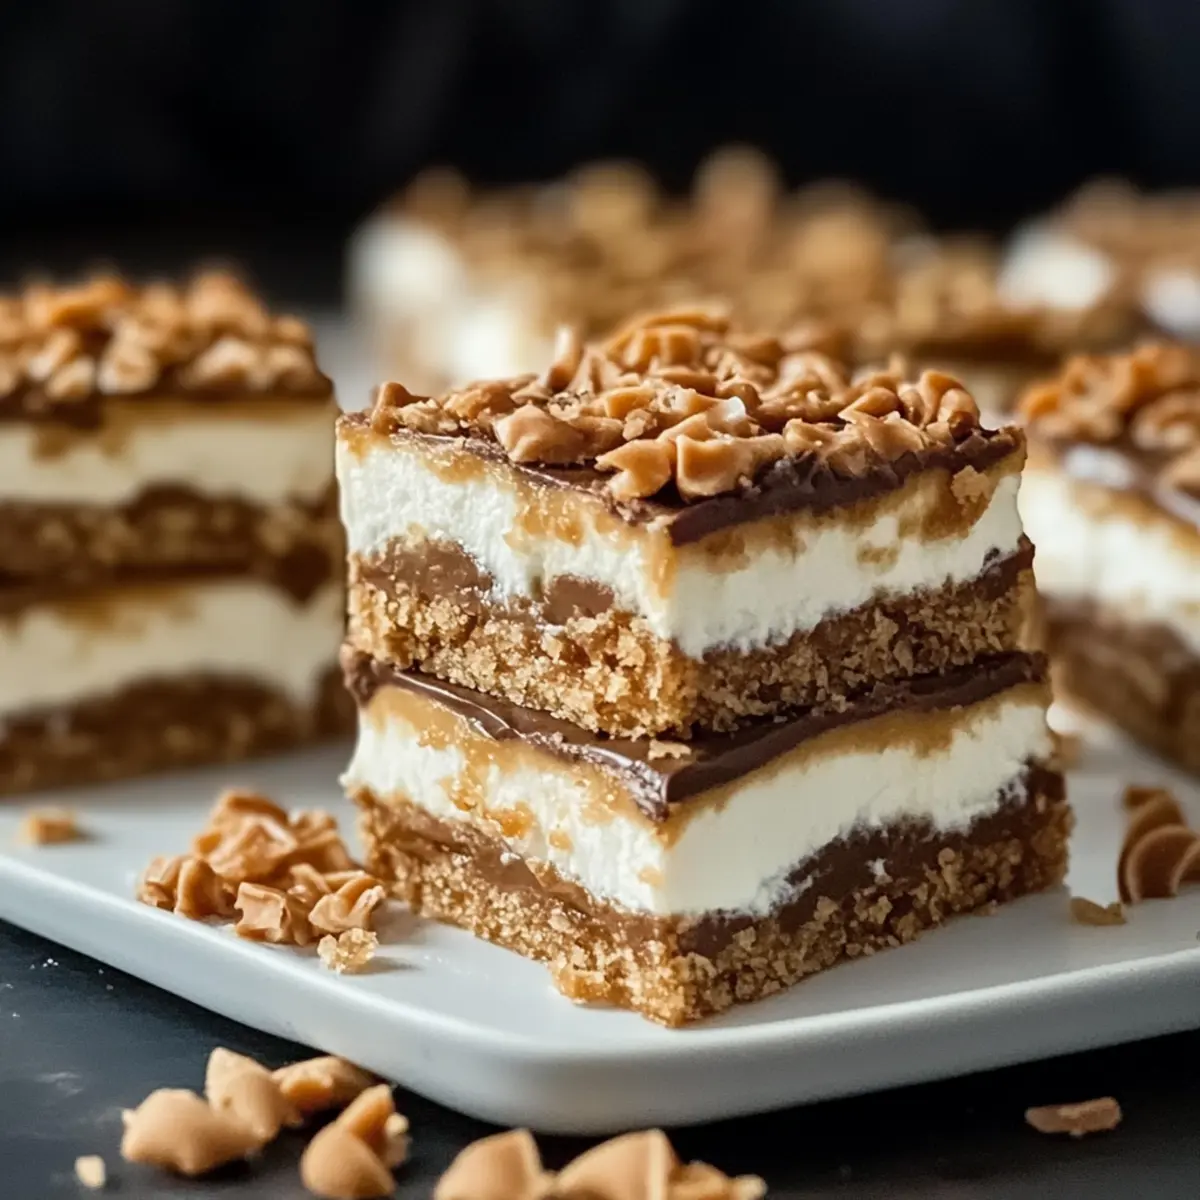
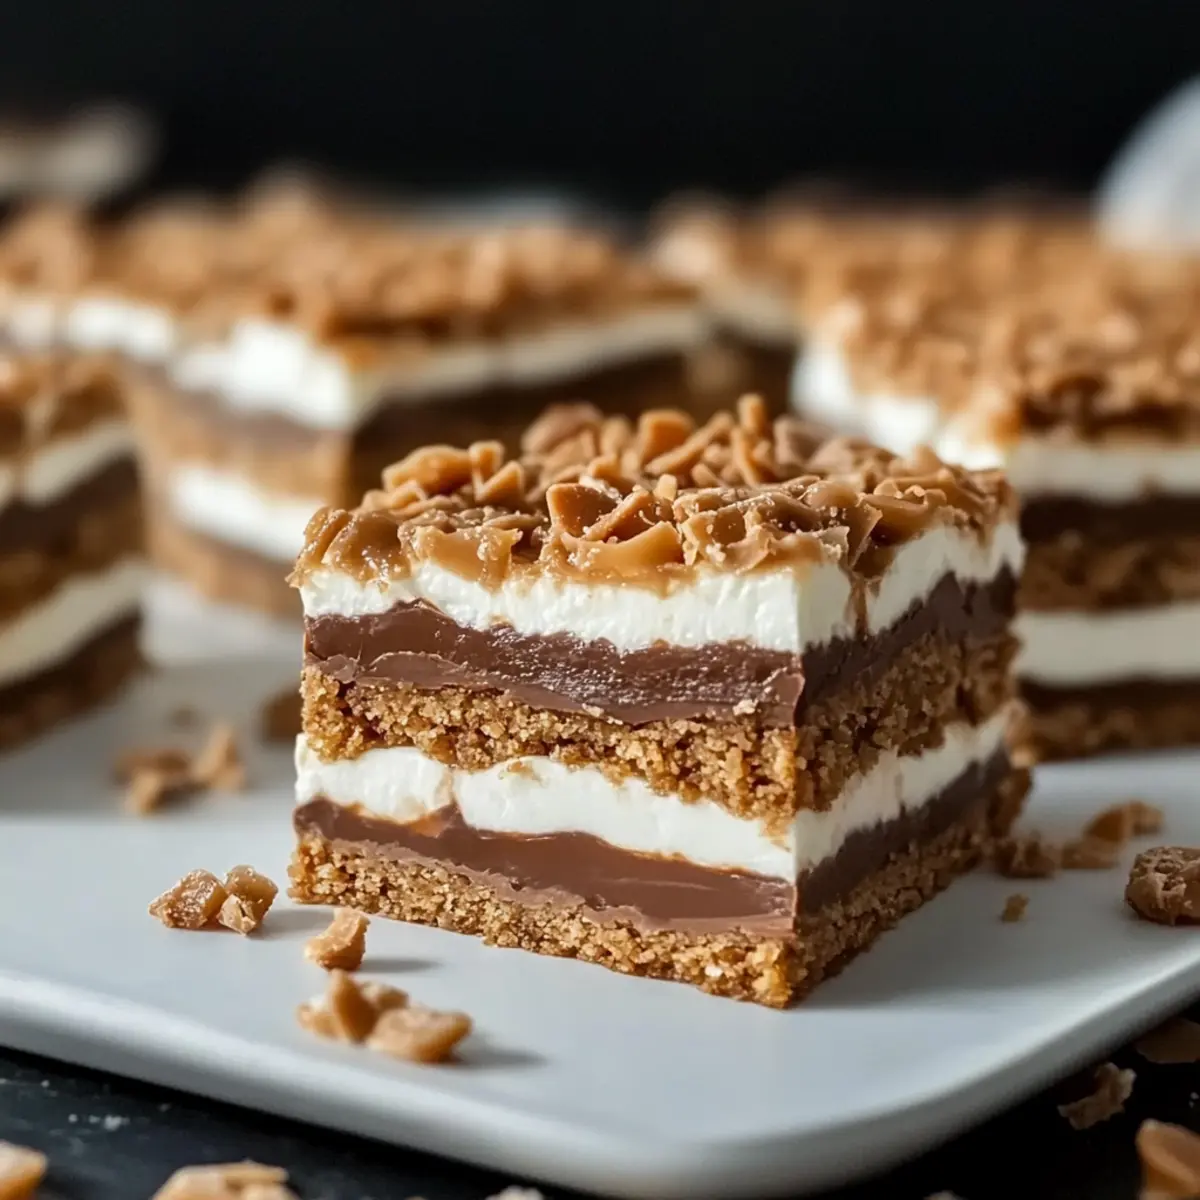
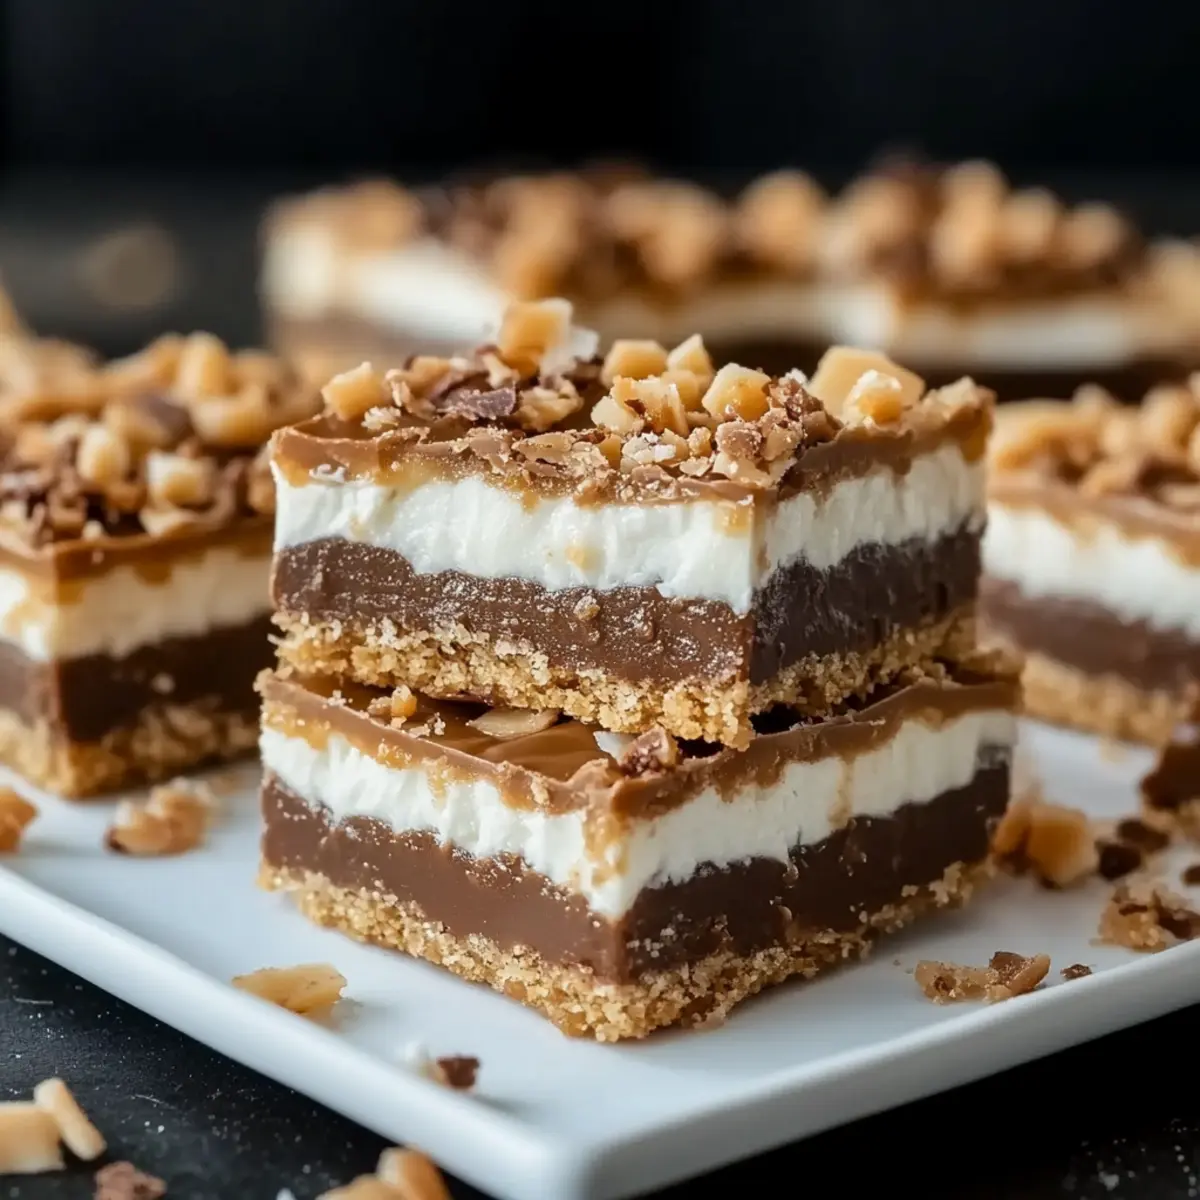
As I popped the lid off the container, the sweet, toasty scent of coconut wafted through the air, instantly transporting me to holiday gatherings filled with laughter and warmth. That’s the magic of these Coconut Toffee Bars—a festive dessert destined to become your new favorite treat. With their buttery crisp base, a luscious cream cheese filling, and a decadent toffee topping, these bars offer a delightful chewiness that contrasts beautifully with their satisfying crunch. Plus, they're no-bake, meaning you can whip them up without making a mess of your kitchen! Perfect for parties or cozy nights in, these bars are sure to bring smiles to everyone at the table. Ready to discover the joy of this special recipe?

Why Are Coconut Toffee Bars Irresistible?

Flavor Explosion: The blend of sweet coconut and rich caramel creates an explosion of flavor in every bite.

No-Bake Convenience: Forget complicated baking! These bars come together quickly, allowing you to spend more time enjoying the festivities.

Crowd-Pleasing Treat: Perfect for holiday gatherings or special occasions, they’re sure to impress friends and family, making them a go-to dessert.

Texture Harmony: Experience a perfect balance of chewy and crunchy textures that keeps everyone coming back for more!

Versatile Options: Want to mix it up? Substitute chocolate-covered toffee bits with your favorite nuts or chips for a unique spin. If you love this recipe, check out my Coconutty Beans Greens for another delightful dish!

Coconut Toffee Bars Ingredients

For the Crust
• Graham Cracker Crumbs – Provides structure to the crust; can substitute with crushed digestive biscuits or cookies for a different flavor.
• Sweetened Shredded Coconut – Adds flavor and texture to the crust; avoid unsweetened as it lacks the rich depth needed for Coconut Toffee Bars.
• Unsalted Butter – Binds the crust and creates a glossy toffee; using salted butter can disrupt the flavor balance.

For the Filling
• Powdered Sugar – Sweetens and stabilizes the cream cheese filling, ensuring it sets perfectly.
• Vanilla Extract – Enhances the flavor of the cream cheese filling; opt for pure vanilla for the best taste.

For the Toffee Layer
• Brown Sugar – Key for the toffee layer, providing rich caramel notes that elevate the overall flavor.
• Unsalted Butter – Used in the toffee, contributing to its shiny, smooth texture; make sure it’s warm, not too hot, when you pour it over the filling.

For Topping
• Chocolate-Covered Toffee Bits – Adds texture and contrast; the chocolate coating helps prevent sogginess in the topping.
• Flaky Sea Salt – A finishing touch that brightens the flavor without overwhelming saltiness; optional but highly recommended for that extra pop.

Step‑by‑Step Instructions for Coconut Toffee Bars

Step 1: Prepare the Crust
In a mixing bowl, combine graham cracker crumbs, toasted coconut, melted unsalted butter, and a pinch of salt. Mix until the texture resembles damp sand. Press this mixture firmly into the bottom of a lined 9x9-inch pan. Bake in a preheated oven at 350°F (175°C) for 10 minutes until golden brown, then set aside to cool completely.

Step 2: Make the Filling
In another bowl, beat the cream cheese until smooth using a hand mixer or stand mixer. Gradually add powdered sugar and vanilla extract, blending until the mixture is creamy and well combined. Spread this luscious filling evenly over the cooled crust, ensuring every corner is filled. Chill in the refrigerator for about 30 minutes to set.

Step 3: Prepare the Toffee
In a medium saucepan, melt unsalted butter over medium heat and stir in brown sugar. Bring the mixture to a gentle boil and allow it to bubble for 3 minutes, stirring constantly until it thickens and becomes shiny. Remove from heat and let it cool slightly until warm but not hot before pouring it over the cream cheese layer.

Step 4: Top with Toffee Bits
Once the toffee has cooled to the appropriate warmth, pour it evenly over the cream cheese filling, spreading gently with a spatula. While the toffee is still warm, press the chocolate-covered toffee bits into the surface to help them adhere. Let this sit at room temperature for about 15 minutes.

Step 5: Chill and Slice
Cover the pan with plastic wrap and refrigerate for at least 4 hours, or overnight for best results. This will allow the layers to firm up nicely. When ready to serve, use a sharp knife dipped in hot water to slice the Coconut Toffee Bars into squares, creating clean edges for a beautiful presentation.

What to Serve with Coconut Toffee Bars

Indulging in a slice of these sweet treats is a delightful experience, but pairing them with the right accompaniments elevates the moment further.

  • Fresh Berries: Sweet, juicy berries provide a refreshing contrast that balances the richness of the bars and adds a pop of color to your plate.

  • Whipped Cream: Light and airy whipped cream drizzled with a hint of vanilla complements the creamy filling beautifully, enhancing each bite's velvety texture.

  • Mint Tea: The soothing warmth of mint tea offers a fragrant note that clears the palate, making it the perfect drink pairing for this rich dessert.

  • Chocolate Ice Cream: A scoop of chocolate ice cream not only adds a creamy element but also deepens the dessert experience, bringing out the warm notes of toffee.

  • Caramel Sauce: Drizzling a bit of caramel sauce over each bar intensifies the caramel flavor and adds an extra gooey delight that everyone will love.

  • Nutty Trail Mix: A handful of crunchy trail mix provides a contrasting texture and flavor profile, perfect for those who enjoy a bit of chewiness alongside their dessert.

  • Coffee: A hot cup of coffee or espresso enhances the flavors in the bars, and the bittersweet notes come together for a comforting treat, best enjoyed with loved ones.

  • Coconut Sorbet: A light and refreshing coconut sorbet echoes the coconut flavor within the bars, making it a thematic match that cools down the sweetness.

  • Lemonade: The bright acidity of lemonade cuts through the rich toffee, providing a bright, zesty balance that pairs wonderfully with the sweet bars.

How to Store and Freeze Coconut Toffee Bars

Room Temperature: Keep Coconut Toffee Bars in an airtight container for up to 2 days if you plan to enjoy them quickly, ensuring they stay fresh and delicious.

Fridge: Store your bars in an airtight container in the refrigerator for up to 5 days. This helps maintain their crispy texture and rich flavors, perfect for regular snacking!

Freezer: To freeze for longer, wrap the bars tightly in plastic wrap and then in aluminum foil. They can be frozen for up to 2 months. Thaw in the fridge overnight before enjoying.

Reheating: If you prefer them slightly warm, microwave for 10-15 seconds—just enough to soften without losing their delightful texture!

Expert Tips for Coconut Toffee Bars

  • Butter Temperature Matters: Make sure the butter for the toffee is warm but not hot. Too hot can melt the cream cheese filling beneath.

  • Chill for Best Results: Let the bars chill overnight whenever possible. This allows the flavors to meld and the layers to firm up for easier slicing.

  • Slice with Care: For neat edges, use a long knife dipped in hot water before cutting through the bars, as this helps avoid any messy edges.

  • Coconut Choice: Always opt for sweetened shredded coconut to ensure you achieve the rich flavor signature in your Coconut Toffee Bars.

  • Customizable Toppings: Feel free to swap in crushed nuts or various chips for the chocolate-covered toffee bits, adding a unique twist to each batch.

Make Ahead Options

These Coconut Toffee Bars are perfect for making ahead, saving you time during busy holiday preparations! You can prepare the crust and filling up to 24 hours in advance. Simply follow the initial steps to bake the crust and chill the cream cheese filling, then cover tightly and refrigerate. The toffee layer can be made up to 3 days ahead; just store it in an airtight container at room temperature to maintain its texture. When you're ready to serve, pour the toffee over the cream cheese filling, press in the toffee bits, and chill for at least 4 hours to firm up. This way, you'll be enjoying festive flavors with minimal effort!

Coconut Toffee Bars Variations & Substitutions

Feel free to get creative with these Coconut Toffee Bars, as they’re perfect for customization and new flavor adventures!

  • Nutty Twist: Incorporate chopped nuts like walnuts or pecans into the crust for added crunch and depth.

  • Chocolate Lovers: Swap chocolate-covered toffee bits with a mix of dark chocolate chips for a richer flavor profile. The smooth chocolate will enhance the overall decadence.

  • Tropical Vibes: Add a touch of mango or pineapple puree to the cream cheese filling for a tropical twist that transports you to a sunny beach.

  • Dairy-Free: Use vegan cream cheese and coconut oil instead of butter to make a dairy-free version that everyone can enjoy. The flavors remain rich and comforting.

  • Salted Caramel: Drizzle some homemade salted caramel over the top before the toffee sets for an extra layer of deliciousness.

  • Spiced Up: Add a sprinkle of cinnamon or nutmeg to the crust for a warm spice that beautifully complements the coconut and toffee flavors.

  • Fruity Surprise: Toss in some finely chopped dried fruit like apricots or cranberries in the filling for a burst of fruity sweetness.

  • Crunchy Base: Substitute graham cracker crumbs with crushed shortbread cookies for a richer, more buttery base texture that pairs perfectly with the filling.

If you enjoy experimenting, these variations are sure to enhance your Coconut Toffee Bars experience. And for another delightful recipe, don’t forget to check out my Coconutty Beans Greens for a delicious medley of flavors!

Coconut Toffee Bars Recipe FAQs

How do I choose ripe ingredients for Coconut Toffee Bars?
When selecting shredded coconut, opt for sweetened varieties, as they provide the rich flavor essential for these bars. Unsweetened coconut can miss the mark and will lack the depth of taste that complements the toffee and cream cheese filling.

How should I store leftover Coconut Toffee Bars?
To keep Coconut Toffee Bars fresh, store them in an airtight container in the refrigerator for up to 5 days. This will help maintain their signature crispness and flavor so that they’re just as delightful as when you first made them!

Can I freeze Coconut Toffee Bars, and how?
Absolutely! To freeze your Coconut Toffee Bars, wrap them tightly in plastic wrap, followed by aluminum foil for extra protection. They will keep well for up to 2 months in the freezer. When you're ready to enjoy them, thaw them overnight in the refrigerator for the best results.

What should I do if the toffee layer is too hot when pouring?
If the toffee layer is too hot, it can melt the cream cheese filling underneath. Make sure to let it cool slightly after cooking, until it’s warm but not hot, ensuring a perfectly layered treat. If needed, you can pour the toffee into a separate bowl to cool it down faster.

Are Coconut Toffee Bars suitable for people with nut allergies?
While the recipe does not include nuts, always double-check your toppings. If using chocolate-covered toffee bits or any additional ingredients, make sure they’re nut-free to cater to those with allergies. If you're ever uncertain, opt for a nut-free alternative to ensure safety!

Creamy 20-Minute No Bake Cheesecake That's Pure Bliss

June 4, 2026 by Grace Snow Leave a Comment

As I stirred the creamy mixture, the kitchen filled with the sweet scent of vanilla and the promise of indulgence. There’s something magical about whipping together just a few simple ingredients for a delectable treat that requires no baking, and that's exactly what my Creamy 20-Minute No Bake Cheesecake offers. This easy dessert is perfect for those spontaneous gatherings or when you're simply craving a taste of something sweet. In only 20 minutes, you can create a rich, velvety cheesecake with a buttery graham cracker crust, all while keeping it gluten-free if you choose. It’s versatile enough to dress up with fresh fruits, a drizzle of chocolate, or even a sprinkling of cookie crumbs for an extra twist. Are you ready to impress your friends and satisfy your cravings with this delightful no-bake treat? Let’s dive in!

Why is this cheesecake a must-try?

Quick and Easy: The best part? This Creamy 20-Minute No Bake Cheesecake comes together in just 20 minutes, making it an ideal solution for unexpected guests or last-minute cravings.

Decadent Flavor: With its velvety filling and buttery graham cracker crust, every bite is a blissful indulgence that’s hard to resist.

Versatile Toppings: Dress it up with your favorite toppings, from fresh berries to a rich chocolate drizzle, allowing you to customize each serving.

Crowd-Pleasing: Whether it’s a family gathering or a dinner party, this cheesecake is sure to be the star of the dessert table, appealing to all ages.

Gluten-Free Adaptable: Want to keep it gluten-free? Simply swap in gluten-free graham cracker crumbs for a delightful treat that everyone can enjoy!

Excited to explore more delightful desserts? Check out my Matcha Baked Doughnuts or add a refreshing element with this delicious Avocado Egg Salad.

Creamy 20-Minute No Bake Cheesecake Ingredients

For the Crust
• Graham Cracker Crumbs – This forms the base for the crust; you can easily use store-bought or make your own for a personal touch.
• Sugar – Sweetens both the crust and filling; consider coconut sugar for a healthier option.
• Melted Butter – Binds the crust together; opt for coconut oil if you're looking for a lighter version.

For the Filling
• Cream Cheese – The star of the cheesecake providing that creamy texture; low-fat cream cheese works but might need extra whipped cream for fluffiness.
• Powdered Sugar – Adds sweetness to the filling; a sugar substitute can lower calories without compromising taste.
• Vanilla Extract – Enhances the overall flavor; pure vanilla extract is recommended for the best results.
• Heavy Cream – Whipped to stiff peaks, this lightens up the filling; substitute with coconut cream for a dairy-free option.

Make each bite unforgettable by whipping up this delicious Creamy 20-Minute No Bake Cheesecake to share with friends and family!

Step‑by‑Step Instructions for Creamy 20-Minute No Bake Cheesecake

Step 1: Prepare the Crust
In a mixing bowl, combine graham cracker crumbs, sugar, and melted butter until the mixture resembles wet sand. Press this mixture firmly into the bottom of a 9-inch springform pan using the back of a measuring cup to ensure it's even. Once done, place the pan in the refrigerator for about 10 minutes to help the crust set before adding the filling.

Step 2: Make the Filling
In a large mixing bowl, use an electric mixer to beat the cream cheese on medium speed until it’s completely smooth and creamy, approximately 2-3 minutes. Gradually add the powdered sugar and vanilla extract, mixing until thoroughly combined and silky. This will create a lush filling for your creamy 20-minute no bake cheesecake, setting the stage for the next delightful step.

Step 3: Whip the Cream
In a separate bowl, pour in the heavy cream and whip it using an electric mixer until you reach stiff peaks, which should take about 3-5 minutes. The whipped cream should hold its shape, adding lightness to your filling. Gently fold the whipped cream into the cream cheese mixture using a spatula, careful not to deflate the fluffy texture you’ve created.

Step 4: Assemble the Cheesecake
Retrieve the chilled crust from the refrigerator and pour the creamy filling directly over the crust. Use a spatula to spread the filling evenly and smooth out the top. The filling should appear light and airy, perfectly complementing the buttery graham cracker base. You’re building the beautiful layers of your creamy 20-minute no bake cheesecake!

Step 5: Chill to Set
Cover the cheesecake with plastic wrap or a lid and place it in the refrigerator. Allow it to chill for at least 6 hours, or ideally overnight, so it can fully set and develop its flavors. As it chills, the texture will firm up, making it easier to slice when you’re ready to serve.

Step 6: Serve and Enjoy
Once the cheesecake has chilled, gently release it from the springform pan. Slice into wedges and serve chilled. Enhancing each slice with optional toppings like fresh berries or a drizzle of chocolate can elevate this creamy 20-minute no bake cheesecake into a stunning dessert for any occasion.

Make Ahead Options

These Creamy 20-Minute No Bake Cheesecake delights are ideal for busy home cooks looking to save time. You can prepare the crust up to 24 hours in advance and simply refrigerate it, ensuring it stays firm and ready to go. Additionally, the filling can be made earlier and stored in an airtight container in the fridge for up to 3 days—just be sure to give it a quick stir before spreading it over the crust. When you're ready to serve, pour the filling into the crust, chill for at least 6 hours or overnight, and enjoy a silky, delectable dessert that tastes just as fresh as if it were made that day!

Creamy 20-Minute No Bake Cheesecake Variations

Feel free to let your creativity shine by customizing this delightful cheesecake with these fun twists!

  • Berry Burst: Top with fresh strawberries, blueberries, or raspberries for a refreshing and fruity kick that brightens every bite.

  • Chocolate Lovers: Drizzle melted chocolate or rich chocolate sauce over the top for an indulgent treat that satisfies any sweet tooth.

  • Citrus Zest: Add lemon or orange zest to the filling for a bright, zesty flavor that elevates the creamy goodness.

  • Nutty Delight: Fold in crushed nuts like walnuts or pecans into the filling for added texture and a delightful crunch.

  • Gluten-Free Option: Simply swap graham cracker crumbs for gluten-free alternatives such as almond flour or gluten-free cookies, making it accessible for everyone.

  • Savory Twist: For a unique flair, add a pinch of sea salt on top before serving, enhancing the flavors beautifully.

  • Cookie Crumble: Top the cheesecake with crushed cookies like Oreos or Digestives to give it a delightful crunch and additional layers of flavor.

If you're enjoying this recipe, you might also love trying my Cheesy Zucchini Bake or embrace a healthier twist with Avocado Egg Salad.

What to Serve with Creamy 20-Minute No Bake Cheesecake

Indulging in a luscious cheesecake is a joy in itself, but elevating it with the perfect sides can turn your dessert into a memorable feast.

  • Fresh Berries: A medley of strawberries, blueberries, or raspberries adds a vibrant burst of flavor that contrasts beautifully with the creamy filling.

  • Chocolate Sauce: Drizzle rich chocolate sauce over each slice for a decadent touch. The sweetness balances the cheesecake's tanginess, creating a delightful experience with every bite.

  • Whipped Cream: Add a dollop of freshly whipped cream on top for an ultra-rich treat. It enhances the cheesecake's airy texture, making it even more indulgent.

  • Coconut Flakes: Toasted coconut brings a tropical flair and a crunchy texture. Sprinkle these over the cheesecake for an unexpected yet tasty twist.

  • Coffee or Espresso: A chilled cup of coffee enhances each slice beautifully, providing a comforting contrast to the rich, creamy cheesecake flavor.

  • Mint Leaves: Garnish your cheesecake with fresh mint leaves for a refreshing touch. The coolness cuts through the richness, offering a delightful palate cleanser.

  • Ice Cream: Serve alongside a scoop of vanilla or a fruity sorbet. The cold creaminess pairs perfectly with the cheesecake's velvety texture.

These delightful pairings will turn a simple Creamy 20-Minute No Bake Cheesecake into a show-stopping dessert experience that your guests will talk about for weeks!

Expert Tips for Creamy 20-Minute No Bake Cheesecake

  • Room Temperature Cream Cheese: Make sure to use cream cheese that’s at room temperature for easy blending; cold cream cheese can lead to lumps in your filling.

  • Gentle Folding: When incorporating whipped cream into the cream cheese mixture, fold gently to retain volume. Over-mixing can make the cheesecake dense instead of light and airy.

  • Proper Chilling Time: Allow the cheesecake to chill for at least 6 hours, or overnight if possible, to ensure it sets perfectly and the flavors meld beautifully.

  • Springform Pan Use: If using a traditional pie pan instead of a springform, let it chill longer and be cautious when slicing to prevent the filling from spilling.

  • Creative Variations: Don’t hesitate to experiment with toppings! Fresh berries, caramel, or even crushed cookies can add a personal touch to your creamy 20-minute no bake cheesecake.

How to Store and Freeze Creamy 20-Minute No Bake Cheesecake

Fridge: Store leftovers covered in the refrigerator for up to 5 days; flavors improve as it sits. Always keep it airtight to avoid drying out.

Freezer: For longer storage, wrap individual slices in plastic wrap and place them in an airtight container. Enjoy your cheesecake frozen for up to 1 month without losing flavor.

Thawing: When ready to enjoy, simply remove from the freezer and allow to thaw in the fridge for a few hours before serving.

Reheating: This cheesecake is best served chilled and doesn't require reheating; just slice and indulge!

Creamy 20-Minute No Bake Cheesecake Recipe FAQs

What’s the best way to choose ripe ingredients for my cheesecake?
Absolutely! When selecting your cream cheese, go for a brand that’s rich and creamy. For the best texture, I recommend ensuring your cream cheese is at room temperature—this prevents lumps and keeps your filling smooth. If you're using fresh toppings like berries, look for plump, juicy ones without any dark spots or mold to elevate your cheesecake's flavor.

How should I store my cheesecake once it's made?
Very easy! You can store the leftover Creamy 20-Minute No Bake Cheesecake covered in the refrigerator for up to 5 days. Just make sure it's airtight to keep it fresh and prevent it from absorbing other odors. You'll find that the flavors develop even more after a day in the fridge—if you can resist nibbling!

Can I freeze my cheesecake for later?
Of course! For freezing, wrap individual slices tightly in plastic wrap, then place them in an airtight container. This keeps your cheesecake fresh for up to 1 month; just be sure to label it with the date! When you’re ready to enjoy a slice, simply transfer it to the fridge for a few hours to thaw. You’ll have a delightful treat at your fingertips!

What common issues might I face while making this cheesecake?
If your whipped cream collapses while folding it into the cream cheese, don’t worry! This can happen if the cream wasn’t whipped enough or if it was mixed too vigorously. Aim to achieve stiff peaks while whipping, and then gently fold it into the cream cheese mixture. This way, you’ll maintain that light, airy texture we love in this delicious cheesecake!

Is this cheesecake safe for those with dietary restrictions?
Absolutely! This delicious dessert can be adapted to suit various dietary needs. For a gluten-free version, simply swap out the graham cracker crumbs for gluten-free alternatives. If you’re looking to reduce calories, consider using low-fat cream cheese and sugar alternatives. However, always check for specific allergies, especially to dairy or sugar substitutes, before serving to your loved ones.

What are some creative topping ideas for my cheesecake?
The more the merrier! You can drape your cheesecake with fresh berries like strawberries, blueberries, or raspberries for a burst of freshness. A drizzle of chocolate or caramel sauce adds a luscious touch. For a unique twist, try folding in crushed cookies or even a sprinkle of lemon zest for a zesty surprise. Let your creativity shine!

Cream Cheese Custard Bars That Melt in Your Mouth

June 4, 2026 by Grace Snow Leave a Comment

Have you ever found yourself daydreaming about a dessert that dances on the edge of creamy and crumbly bliss? Let me introduce you to my go-to comfort dessert: Cream Cheese Custard Bars. These delectable treats feature a buttery, melt-in-your-mouth crust topped with a smooth custard layer, creating the perfect combination of textures. Not only are they incredibly easy to whip up, but they also make for a delightful crowd-pleaser, guaranteed to impress at any gathering. Chilled and lightly dusted with powdered sugar, they are a refreshing escape from the everyday hustle. Who could resist savoring a slice of this homemade sweetness? Curious how to bring this creamy dream to life? Let’s dive into the recipe!

Why are Cream Cheese Custard Bars irresistible?

Delightfully Creamy: The luscious custard filling paired with a buttery crust creates an unforgettable dessert experience.

Simple to Make: You don’t need to be a baking expert to enjoy these bars; they require minimal effort and ingredients, making them perfect for any home cook.

Versatile Flavor: Feel free to experiment with extracts or add fruit preserves for a personal twist. Whatever variation you choose, the creamy goodness remains the star!

Perfect for Sharing: These bars serve beautifully at parties, potlucks, or a cozy family gathering, delighting even the pickiest of eaters.

Chill for Refreshment: Best served cold, they make a refreshing treat on warm days, bringing a delightful end to any meal! Want more sweet inspirations? Try our Peaches Cream Cookies for another crowd-pleasing dessert.

Cream Cheese Custard Bars Ingredients

For the Crust
• Unsalted Butter – Provides rich flavor for the crust; substitute with salted butter, reducing added salt.
• Granulated Sugar – Adds sweetness; consider using a sugar substitute like stevia or erythritol for a lower-calorie option.
• All-Purpose Flour – Creates structure; use a gluten-free flour blend for a gluten-free version.
• Baking Powder – Provides leavening to the crust.

For the Custard Filling
• Full-Fat Cream Cheese – Ensures creaminess; reduced-fat is acceptable, but avoid nonfat as it won't set properly.
• Eggs – Essential for binding and structure in both custard and cream cheese layers.
• Whole Milk – Adds creaminess and moisture to the custard layer.
• Vanilla Extract – Enhances flavors in both the cream cheese and custard layers.

Indulging in these Cream Cheese Custard Bars will surely satisfy your dessert cravings!

Step‑by‑Step Instructions for Cream Cheese Custard Bars

Step 1: Preheat and Prepare the Pan
Begin by preheating your oven to 350°F (175°C). While it heats, prepare a 9x13-inch baking pan by greasing it with butter or cooking spray and lightly dusting it with flour. This step ensures that your Cream Cheese Custard Bars will come out perfectly without sticking, allowing the delicious buttery crust to shine.

Step 2: Cream the Butter and Sugar
In a medium mixing bowl, combine softened unsalted butter and 1/2 cup of granulated sugar. Use a hand mixer or sturdy spatula to cream them together until the mixture is light and fluffy, about 3–5 minutes. The fluffy texture indicates that you've incorporated enough air for a tender crust, which will then set beautifully in the oven.

Step 3: Mix the Dry Ingredients
In a separate bowl, whisk together 2 1/4 cups of all-purpose flour and 1 teaspoon of baking powder to ensure they are evenly distributed. Gradually add this dry mixture to the creamed butter and sugar, stirring gently until a crumbly dough forms. The dough should easily hold together when pressed—a sign that your crust for the Cream Cheese Custard Bars is ready to press into the pan.

Step 4: Form the Crust
Take half of the crumbly dough and evenly press it into the bottom of the prepared baking pan. Use your fingers or the back of a measuring cup to spread it out evenly, ensuring a uniform thickness of about 1/4 inch. This crust will create a sturdy base for your creamy custard filling, providing the structure needed for these delightful bars.

Step 5: Prepare the Cream Cheese Filling
In a clean mixing bowl, beat together 8 ounces of full-fat cream cheese, 1/2 cup of sugar, 1 teaspoon of vanilla extract, and 1 egg until the mixture is completely smooth and free of lumps. This luscious cream cheese mixture will layer perfectly over your crust, contributing to the overall creaminess of the Cream Cheese Custard Bars.

Step 6: Spread the Filling
Once your cream cheese filling is smooth, carefully spread it over the crust in the baking pan, ensuring an even layer across the entire surface. This step is crucial for creating a seamless blend between the crust and the custard, setting the stage for the next creamy layer to shine through after baking.

Step 7: Mix the Custard Layer
In another bowl, whisk together 3 eggs, 1 cup of whole milk, 1 teaspoon of vanilla extract, 1/4 teaspoon of salt, and 1/4 cup of granulated sugar until well combined and smooth. Pour this velvety custard mixture over the cream cheese layer, ensuring an even distribution to achieve that delightful creamy texture in the finished Cream Cheese Custard Bars.

Step 8: Crumble Remaining Dough
Take the remaining dough and crumble it over the custard layer in an even manner. This top layer acts as a delicious topping that will become golden brown and slightly crisp during baking, offering a lovely contrast to the creamy custard beneath it. The crumbly texture will enhance the overall taste and visual appeal of your dessert.

Step 9: Bake to Perfection
Place the assembled Cream Cheese Custard Bars in the preheated oven and bake for 50–60 minutes, or until the top is golden brown and the custard is set. You’ll know they are ready when the edges slightly pull away from the pan, and a toothpick inserted in the center comes out clean. This baking time lets all the flavors meld beautifully together.

Step 10: Cool and Chill
Once baked, remove the pan from the oven and allow it to cool on a wire rack for at least one hour. After it has cooled, place the bars in the refrigerator for a minimum of 2 hours to fully chill. This cooling time contributes to the perfect texture and allows the flavors to deepen in your Cream Cheese Custard Bars.

Step 11: Serve and Enjoy
When ready to serve, cut the chilled Cream Cheese Custard Bars into squares and dust them lightly with powdered sugar for an elegant touch. They are best enjoyed cold, allowing the creamy filling to melt in your mouth with each delightful bite. Whether at a gathering or just for yourself, these bars are sure to impress!

Expert Tips for Cream Cheese Custard Bars

  • Smooth Custard Magic: Whisk the eggs and sugar until fluffy before adding milk. This step helps in achieving a creamy texture for your filling.

  • Baking Time Caution: If your custard hasn’t set after 60 minutes, continue to bake in 5-minute intervals. Keep a close eye to prevent overbaking.

  • Cream Cheese Choice: Opt for full-fat cream cheese for best results. While reduced-fat is fine, avoid nonfat as it won't set properly, affecting your Cream Cheese Custard Bars.

  • Perfect Storage: Store leftovers in an airtight container in the fridge for up to 3 days. For longer storage, freeze them for up to 3 months to maintain freshness.

  • Serving Temperature: These bars taste best when served cold, so plan to chill them for at least 2 hours after baking for optimal flavor and texture.

What to Serve with Cream Cheese Custard Bars

Imagine the bliss of enjoying a slice of creaminess paired with delightful accompaniments that elevate your dessert experience.

  • Fresh Berries: Juicy strawberries, raspberries, or blueberries add a burst of tartness that beautifully contrasts the creamy sweetness, creating a balanced bite. Plus, their vibrant colors make your dessert table pop!

  • Whipped Cream: A dollop of light, airy whipped cream brings added richness and a delightful creaminess, creating layers of texture and flavor without overwhelming the bars.

  • Coffee: A steaming cup of coffee offers a perfect balancing act—a slight bitterness that harmonizes beautifully with the custard's sweetness and enhances its flavors.

  • Mint Chocolate Chip Ice Cream: The cool, refreshing mint complements the sweet custard, while the chocolate adds a hint of decadence, taking your dessert to a whole new level of indulgence.

  • Sweet Tea: A glass of iced sweet tea is a refreshing option that pairs well with the creaminess of the custard bars, providing a lovely touch of Southern charm.

  • Lemon Zest: A sprinkle of fresh lemon zest over the bars adds a citrusy brightness that cuts through the richness, making every bite a refreshing delight.

These pairings will ensure your Cream Cheese Custard Bars are a true festive celebration for your taste buds!

How to Store and Freeze Cream Cheese Custard Bars

Fridge: Store leftover Cream Cheese Custard Bars in an airtight container in the fridge for up to 3 days. This keeps them fresh and delicious.

Freezer: If you want to save them for later, freeze the bars in an airtight container for up to 3 months. Allow them to cool completely before freezing to preserve texture.

Reheating: To enjoy, simply thaw them in the fridge overnight. For a slight refresh, briefly warm in the microwave, but serve chilled for the best taste.

Tip: Always dust with powdered sugar just before serving for a beautiful finish!

Cream Cheese Custard Bars Variations

Feel free to get creative with these Cream Cheese Custard Bars, enhancing flavors and textures to suit your taste buds!

  • Reduced-Fat Filling: Use reduced-fat cream cheese for a lighter treat that still retains creaminess. It’s a simple swap that can lighten your dessert without sacrificing flavor.

  • Almond Extract: Substitute vanilla with almond extract for a delightful twist, adding a warm, nutty flavor that elevates the custard to new heights.

  • Fruit Preserve Layer: Spread a layer of your favorite fruit preserves under the cream cheese for a fruity pop that complements the creamy layers beautifully.

  • Gluten-Free Crust: Swap all-purpose flour for a gluten-free flour blend if you're catering to gluten sensitivities. You can still enjoy that delightful crumbly crust!

  • Coconut Milk: For a tropical twist, replace whole milk with canned coconut milk, giving your bars a subtle coconut flavor and even creamier texture.

  • Spicy Kick: Add a dash of cinnamon or nutmeg to the custard mixture for a hint of warm spice that wraps around the creaminess in each bite.

  • Chocolate Drizzle: Drizzle melted chocolate on top before serving to intensify the treat's decadence. A chocolate layer makes each bite feel like an indulgent dessert experience.

  • Dulce de Leche Surprise: Layer dulce de leche beneath the cream cheese layer for a rich caramel-like flavor that adds depth and a hint of sweetness to every bite.

Each variation can make your dessert unique and exciting. Explore these ideas and be sure to check out other fabulous treats like our Vegan Cacao Cream or a scrumptious Ice Cream Cake for more dessert inspiration!

Make Ahead Options

These Cream Cheese Custard Bars are ideal for busy home cooks looking to save time during the week! You can prepare the crust and the cream cheese filling up to 24 hours in advance. Simply make the crust, press it into the pan, then prepare the cream cheese layer, and spread it over the crust. Cover the assembled pan with plastic wrap and refrigerate. When ready to bake, mix the custard layer and pour it over. Finish by crumbling the remaining dough on top before baking. This method ensures they maintain that creamy texture and buttery flavor, giving you delicious bars that taste just as fresh as when you made them!

Cream Cheese Custard Bars Recipe FAQs

What type of cream cheese should I use for the best texture?
I highly recommend using full-fat cream cheese for a rich and creamy filling. Reduced-fat cream cheese can work if you're looking for a lighter version, but avoid nonfat cream cheese as it won't set properly, leading to a disappointingly runny custard layer.

How should I store my Cream Cheese Custard Bars?
Store your leftover Cream Cheese Custard Bars in an airtight container in the refrigerator for up to 3 days. This method maintains their freshness and prevents drying out, ensuring you can enjoy these delectable bars at a later date.

Can I freeze Cream Cheese Custard Bars?
Absolutely! To freeze your Cream Cheese Custard Bars, first, let them cool completely. Then, place them in an airtight container or wrap them tightly with plastic wrap. They can be frozen for up to 3 months. When you're ready to enjoy, thaw them in the refrigerator overnight and serve chilled for the best taste.

What should I do if my custard hasn’t set after baking?
If your custard hasn’t set after the initial baking time, don’t worry! Simply return the pan to the oven and continue baking in 5-minute increments. Keep an eye on it to ensure you don’t overbake. You’ll know it’s done when the edges pull away from the pan and a toothpick inserted in the center comes out clean.

Are there any ingredient substitutions for dietary restrictions?
You can make some substitutions to accommodate dietary needs! For a gluten-free version, use a gluten-free flour blend instead of all-purpose flour. If you're looking to reduce calories, you can substitute granulated sugar with a sugar alternative like stevia or erythritol, starting with less as it is sweeter. Just be sure to use full-fat cream cheese to maintain the desired texture.

Tasty Greek Yogurt No Bake Cheesecake That's Creamy & Refreshing

June 4, 2026 by Grace Snow Leave a Comment

As I shuffled through my kitchen, an unexpected craving for something light yet indulgent tugged at my heart. Enter the Tasty Greek Yogurt No Bake Cheesecake—a refreshing solution that meets both cravings without demanding hours in the kitchen. This easy, no-bake dessert features a creamy filling crafted from Greek yogurt and cream cheese, perfectly sweetened with honey and brightened with a hint of lemon. One of the best parts? It’s ready to serve in just a few short hours! Not only is this cheesecake a crowd-pleaser, but it also provides a healthier twist to your typical dessert, making it perfect for warm summer evenings and gatherings alike. Are you ready to impress your loved ones with a delightful slice of heaven?

Why is this cheesecake a must-try?

Creamy, Dreamy Texture: The combination of Greek yogurt and cream cheese creates a silky smooth filling that melts in your mouth, offering the perfect balance of creaminess and tanginess.

No Baking Required: Perfect for hot days, this no-bake cheesecake simplifies dessert prep, freeing up your time to enjoy with family and friends.

Quick and Convenient: With just a few hours in the fridge, you’ll have a refreshing treat ready to impress everyone at your gathering without the need for extensive cooking.

Versatile Flavor Profile: Whether served plain or topped with fresh berries or a drizzle of berry compote, this dessert shines in any topping combination you choose.

For another delicious treat, you might also want to check out these Cheesy Zucchini Bake or Matcha Baked Doughnuts. You can never go wrong with delightful homemade desserts!

Tasty Greek Yogurt No Bake Cheesecake Ingredients

• Get ready to whip up this luscious dessert!

For the Crust

  • Graham Cracker Crumbs – Base for crust; provides structure and texture. Use Honey Maid for best flavor.
  • Coconut Oil – Binder for crust; adds richness. Substitute with unsalted butter if preferred.
  • Sugar – Sweetens the crust; enhances flavors. Brown sugar can work as a substitute.

For the Filling

  • Cream Cheese – Main filling ingredient; adds creaminess and tang. Ensure it is fully softened for a smooth texture.
  • Greek Yogurt – Creates a light, tangy filling. Use full-fat for the best richness; Fage 5% is preferred.
  • Honey – Natural sweetener that complements the yogurt. Maple syrup can be used for a vegan option.
  • Lemon Juice – Adds acidity and brightness to balance the sweetness. Fresh lemon juice is recommended for best flavor.
  • Vanilla Extract – Enhances overall flavor profile. Pure vanilla extract is preferred over imitation.
  • Salt – Balances sweetness and enhances flavor.

For Toppings

  • Whipped Cream – Topping for serving; adds lightness and sweetness. Use freshly whipped for best results.
  • Maraschino Cherries – Garnish for a classic touch.

Step‑by‑Step Instructions for Tasty Greek Yogurt No Bake Cheesecake

Step 1: Prepare the Crust
Start by combining 1 and ½ cups of graham cracker crumbs, ⅓ cup of melted coconut oil, and ¼ cup of sugar in a mixing bowl. Stir until the mixture resembles wet sand. Firmly press this crust mixture into the bottom of a 9-inch springform pan using a measuring cup or your fingers, ensuring an even layer. Refrigerate for at least 15 minutes while you prepare the filling.

Step 2: Make the Filling
In a large bowl, beat 8 ounces of softened cream cheese with an electric mixer on medium speed until smooth and creamy, about 2 minutes. Gradually add 2 cups of Greek yogurt, ⅓ cup honey, ¼ cup of fresh lemon juice, 1 teaspoon of vanilla extract, and a pinch of salt. Continue mixing until the filling is completely smooth, which should take another 2-3 minutes.

Step 3: Assemble the Cheesecake
Once your filling is ready, pour it over the chilled crust in the springform pan. Use a spatula to spread the filling evenly across the surface, ensuring it reaches the edges. Smooth the top for an attractive finish, which will help it look professionally made.

Step 4: Chill
Cover the cheesecake with plastic wrap and refrigerator it for at least 2 hours, but ideally overnight. Chilling will firm up the cheesecake and enhance its flavor, so be patient! You’ll know it’s ready when the filling is set but still creamy to the touch.

Step 5: Serve
When you’re ready to serve your Tasty Greek Yogurt No Bake Cheesecake, remove it from the fridge. Run a knife around the edges of the pan to loosen it, then carefully remove the springform ring. Top with freshly whipped cream and maraschino cherries to add a festive touch. Slice and enjoy immediately for the best taste!

Tasty Greek Yogurt No Bake Cheesecake Variations

Feel free to get creative with your cheesecake and make it your own delightfully unique treat!

  • Mascarpone Swap: Replace Greek yogurt with mascarpone for a richer, creamier cheesecake experience that indulges the senses.
  • Fruit Fusion: Blend in fresh fruit puree like strawberry or raspberry into the filling for a refreshing burst of flavor that complements the tanginess.
  • Cocoa Twist: Stir in cocoa powder to the filling for a lovely chocolate twist, marrying the tang of yogurt with chocolatey richness.
  • Nutty Crunch: Add crushed nuts like almonds or walnuts to the crust for an extra layer of texture and a nutty flavor that contrasts beautifully with the creaminess.
  • Vegan Option: Swap out yogurt for coconut yogurt and use a plant-based cream cheese combined with maple syrup for a delicious vegan version.
  • Citrusy Burst: Experiment with lime juice in place of lemon juice for a zesty flavor twist that brightens up each bite.
  • Herbal Touch: Infuse fresh herbs, such as mint or basil, into the filling for an unexpected flavor combination that adds freshness and depth.
  • Spice it Up: Incorporate spices like cinnamon or cardamom for a warm flavor profile that can take the cheesecake to an entirely new culinary level.

For another delightful treat, don’t miss out on the Cheesy Zucchini Bake or try the Matcha Baked Doughnuts—both are sure to impress your guests!

Make Ahead Options

These Tasty Greek Yogurt No Bake Cheesecake preparations are perfect for busy home cooks looking to save time! You can prepare the crust up to 24 hours in advance by pressing it into the springform pan and refrigerating it tightly covered. The filling can also be made up to 3 days ahead; simply mix until smooth and store it in an airtight container in the fridge. When you're ready to serve, pour the filling over the crust, allowing it to set in the refrigerator for at least 2 hours or ideally overnight for best results. To maintain its quality, refrigerate any leftovers promptly and top with whipped cream and cherries just before serving to keep everything fresh and delicious!

Storage Tips for Tasty Greek Yogurt No Bake Cheesecake

Fridge: Store the cheesecake tightly covered in plastic wrap or an airtight container for up to 5 days. The flavors will deepen and improve overnight, making it even more delightful!

Freezer: For longer storage, wrap the cheesecake in plastic wrap and then in aluminum foil to protect it from freezer burn. It can be frozen for up to 2 months; just thaw in the fridge before serving.

Reheating: This cheesecake is best served cold straight from the fridge. If you have any leftovers, simply slice and enjoy—no reheating needed for this creamy treat!

Serving Tips: Consider topping the cheesecake with fresh whipped cream and cherries just before serving to maintain freshness and visual appeal.

What to Serve with Tasty Greek Yogurt No Bake Cheesecake

As you prepare to serve this delightful dessert, consider pairing it with complementary sides that will elevate your dining experience.

  • Fresh Berries: Bursting with flavor, berries like strawberries and blueberries add a vibrant, sweet-tart contrast to the creamy cheesecake.

  • Berry Compote: A warm drizzle of berry compote enhances sweetness while providing a lovely swirl of color on your plate.

  • Light Salad: A refreshing arugula salad with citrus vinaigrette balances the richness of the cheesecake, making each bite feel lighter.

  • Crushed Nuts: Chopped pistachios or almonds sprinkled on top adds an inviting crunch and a nutty flavor to each creamy slice.

  • Iced Coffee: A chilled cup of coffee offers a delightful contrast, with notes of roasted flavor that pair perfectly with the lemony cheesecake.

  • Lemon Sorbet: For a refreshing palate cleanser, a scoop of lemon sorbet adds a zesty touch that keeps the flavor profile bright.

  • Sparkling Water: A bubbly drink helps cleanse the palate, making it a refreshing option that enhances the cheesecake's lightness.

  • Chocolate Drizzle: A delicate ribbon of melted chocolate on top can enhance indulgence, creating a decadent flavor combination with the tangy cheesecake.

Expert Tips for Tasty Greek Yogurt No Bake Cheesecake

  • Chill Longer for Best Results: Allow your cheesecake to chill for at least 4 hours, or even overnight, to achieve the perfect firm texture.

  • Avoid Lumps: Make sure your cream cheese is at room temperature before mixing. This helps create a smooth filling without lumps, making your Tasty Greek Yogurt No Bake Cheesecake truly indulgent.

  • Pack the Crust: Firmly pack the graham cracker crust into the pan; otherwise, it may crumble when sliced. Use a measuring cup for even pressure.

  • Top Just Before Serving: Add whipped cream and maraschino cherries right before serving to keep them fresh and prevent them from wilting.

  • Taste as You Go: Adjust sweetness by adding more honey if desired, keeping in mind the overall balance of flavors in your cheesecake.

Tasty Greek Yogurt No Bake Cheesecake Recipe FAQs

How do I choose the right Greek yogurt?
Absolutely! For the most luxurious and creamy texture, I recommend using full-fat Greek yogurt, like Fage 5%. Full-fat yogurt will give your cheesecake that rich taste and lovely mouthfeel. If you prefer a lighter option, low-fat Greek yogurt can still work, but the cheesiness might not be as prominent.

How long can I store the cheesecake in the fridge?
Very! You can keep your Tasty Greek Yogurt No Bake Cheesecake tightly covered in plastic wrap or an airtight container for up to 5 days. The flavors actually deepen as it sits, making the next-day slice even more delicious and enjoyable for everyone!

Can I freeze this cheesecake?
Yes, indeed! To freeze your cheesecake, wrap it tightly in plastic wrap and then cover it with aluminum foil to prevent freezer burn. It can be frozen for up to 2 months. When you're ready to serve, simply transfer it to the refrigerator to thaw overnight.

Why is my cheesecake turning out lumpy?
Nothing to worry about! Lumps often come from using cold cream cheese. Always allow your cream cheese to reach room temperature before mixing. Once softened, beat it vigorously until smooth before gradually adding the Greek yogurt and other ingredients. This will give you the creamy filling you’re aiming for!

Are there any dietary considerations I should keep in mind?
The more the merrier! This cheesecake can be made suitable for many dietary preferences. For vegan diets, substitute the cream cheese with a dairy-free cream cheese alternative and replace honey with maple syrup. Additionally, always check for allergies to ensure everyone can enjoy a slice without concerns.

How do I prevent a soggy crust?
Great question! To keep the crust from becoming soggy, firmly pack the graham cracker mixture into the base of the pan. Popping it in the refrigerator while you prepare the filling helps to set it, and consider adding a thin layer of melted chocolate before you pour in the filling for extra protection and a delightful flavor twist!

Indulge in Decadence: Boston Cream Pie Cheesecake Recipe

June 4, 2026 by Grace Snow Leave a Comment

As I stood in my kitchen, the aroma of melting chocolate filled the air, instantly whisking me away to cozy family gatherings and weekend celebrations. The star of the show today is my version of Boston Cream Pie Cheesecake, where rich flavors intertwine perfectly in a layered delight that’s as beautiful as it is delicious. This recipe brings together a crunchy chocolate cookie crust, velvety vanilla and chocolate cheesecake layers, and a luscious chocolate ganache topping. Not only is it a showstopper for any special occasion, but its straightforward preparation makes it approachable enough for any home chef, whether you're a newbie or a seasoned pro. Plus, it’s a guaranteed crowd-pleaser that will banish those fast-food cravings in an instant! Curious to savor the magic of this delectable dessert? Let's dive into the recipe!

Why is Boston Cream Pie Cheesecake irresistible?

Decadent Layers: The stunning combination of creamy vanilla and chocolate cheesecake layered together makes every bite delightful.

Easy Preparation: This recipe features straightforward steps that make it accessible even for novice bakers.

Crowd-Pleaser: Perfect for any gathering, your guests will be raving about this indulgent treat!

Unique Twist: Enjoy the best of both worlds with a cheesecake that captures the essence of the classic Boston cream pie.

Time-Saving: With simple ingredients and quick baking times, you can whip this up in no time and still impress!

Elevate your dessert game with this incredible Boston Cream Pie Cheesecake, and don't forget to serve it alongside fresh berries or a dollop of whipped cream for an exquisite experience!

Boston Cream Pie Cheesecake Ingredients

Discover the essentials for your sweet adventure!

For the Crust

  • Crushed Chocolate Cookies – Adds crunch and flavor to the crust. Substitution: Use gluten-free chocolate cookies for a gluten-free version.
  • Unsalted Butter – Binds the crust ingredients together and adds richness. Use coconut oil for a dairy-free option if desired.

For the Cheesecake Filling

  • Cream Cheese – Main ingredient for cheesecake filling providing creaminess and structure. Substitution: Use low-fat cream cheese for a lighter version.
  • Granulated Sugar – Sweetens the cheesecake filling. You can use alternative sweeteners like Stevia, adjusting the quantity accordingly.
  • Vanilla Powder – Enhances flavor profile. Pure vanilla extract can be used in equal measure instead.
  • Large Eggs – Provides structure and stability to the cheesecake. Vegan alternatives can be considered for specific diets.
  • Sour Cream – Adds tanginess and creaminess. Can also be replaced with Greek yogurt or non-dairy yogurt alternatives.
  • Bittersweet Chocolate – Adds rich chocolate flavor to the cheesecake filling. Semi-sweet chocolate can be used as a substitute.

For the Ganache

  • Heavy Cream – Used in the ganache, adding richness and smoothness. Coconut cream can serve as a non-dairy option if needed.
  • Semi-Sweet Chocolate Chips – Main component for the chocolate ganache, providing sweetness and depth. No specific substitutes indicated.

Dive into making your own Boston Cream Pie Cheesecake with these wonderfully straightforward ingredients!

Step‑by‑Step Instructions for Boston Cream Pie Cheesecake

Step 1: Preheat the Oven
Begin by preheating your oven to 325°F (163°C). While it warms up, take a moment to grease a 9-inch springform pan to ensure easy release later. Visualize the warm, inviting space where your Boston Cream Pie Cheesecake will come to life!

Step 2: Prepare the Crust
In a mixing bowl, combine your crushed chocolate cookies with melted unsalted butter, stirring until the mixture resembles wet sand. Press this mixture firmly into the bottom of the prepared springform pan to form a sturdy crust, ensuring an even layer as the texture will provide satisfying crunch against the creamy filling.

Step 3: Make the Cheesecake Filling
In a large mixing bowl, beat together 24 ounces of cream cheese, 1 cup of granulated sugar, and 1 ½ teaspoons of vanilla powder until the mixture is smooth and creamy, about 3 minutes. Add the eggs one at a time, mixing well after each addition, then blend in the ½ cup of sour cream and 4 ounces of melted bittersweet chocolate until well combined and velvety.

Step 4: Bake the Cheesecake
Pour the luscious cheesecake filling over your chocolate cookie crust in the pan. Place it in the oven and bake for 50 to 60 minutes, or until the center is just slightly wobbly when gently shaken. This crucial step will ensure your Boston Cream Pie Cheesecake has that perfect creamy texture once cooled.

Step 5: Cool the Cheesecake
Once the cheesecake has baked, turn off the oven and leave the door slightly ajar. Allow the cheesecake to cool inside for about an hour to help it set and prevent cracking. The gradual cooling will maintain its beautiful appearance for serving later on.

Step 6: Chill in the Refrigerator
Transfer the cooled cheesecake to the refrigerator, preferably letting it chill for at least 6 hours or overnight. This step is vital; it allows the flavors to meld beautifully and the texture to firm up, ensuring a delightful experience when slicing into your Boston Cream Pie Cheesecake.

Step 7: Prepare the Chocolate Ganache
To make the rich chocolate ganache, heat ½ cup of heavy cream in a saucepan over medium heat until it begins to simmer. Pour the hot cream over 1 cup of semi-sweet chocolate chips in a bowl, letting it sit for a moment before stirring until smooth and glossy. This decadent topping will elevate your cheesecake!

Step 8: Assemble and Serve
Finally, spread the warm ganache over the chilled cheesecake, allowing it to cascade down the sides. If desired, sprinkle some extra chocolate chips on top for added visual appeal. Chill the cheesecake briefly in the refrigerator before slicing and serving, treating your guests to a slice of your delicious Boston Cream Pie Cheesecake!

Boston Cream Pie Cheesecake Variations

Feel free to explore your creativity with these delightful twists on the classic Boston Cream Pie Cheesecake!

  • Dairy-Free: Substitute cream cheese and sour cream with non-dairy alternatives like cashew cream or coconut yogurt for a scrumptious vegan version. This keeps it creamy while accommodating dietary preferences.

  • Gluten-Free: Use gluten-free chocolate cookie crumbs for the crust instead of regular cookies, ensuring everyone can enjoy a slice. Delight in how effortlessly it caters to those with gluten sensitivities!

  • Coffee Infusion: Add 1-2 teaspoons of instant coffee or espresso powder to the cheesecake filling for a rich coffee flavor that complements the chocolate beautifully. It adds an intriguing depth that coffee lovers will adore.

  • Nutty Crunch: Fold in some finely chopped nuts such as pecans or walnuts into the cheesecake filling for extra texture. It brings a delightful crunch that will surprise your guests with each bite.

  • Caramel Drizzle: Drizzle caramel sauce over the top of the ganache or even fold caramel bits into the filling for a sweet twist. It's a perfect addition that makes your cheesecake extra special!

  • Fruit Accents: Consider topping your cheesecake with fresh berries, such as raspberries or strawberries, for a refreshing contrast to the rich flavors. The burst of fruitiness will brighten each slice.

  • Spiced Variants: Spice things up by incorporating a pinch of cinnamon or even pumpkin spice into your cheesecake filling. This will create a unique flavor profile perfect for fall!

If you're feeling adventurous, why not check out delicious creations like Vegan Cacao Cream or whip up a light treat with Peaches Cream Cookies? Give your taste buds a thrill by exploring diverse flavors and textures!

Make Ahead Options

These Boston Cream Pie Cheesecakes are perfect for meal prep, allowing you to impress your guests with minimal last-minute effort! You can prepare the cheesecake filling and crust up to 24 hours in advance; simply cover them tightly and refrigerate. For the best results, chill the cheesecake overnight to ensure that the flavors meld beautifully. Once you're ready to serve, bake and cool the cheesecake as directed, then top it with the chocolate ganache just before serving for that freshly made taste. This way, you'll have a delicious dessert ready to enjoy without the rush, making your special occasions a little sweeter!

Storage Tips for Boston Cream Pie Cheesecake

  • Room Temperature: Keep your Boston Cream Pie Cheesecake at room temperature for up to 1 hour before serving; longer exposure may affect its texture and taste.

  • Fridge: Store leftovers in the refrigerator, covered with plastic wrap or in an airtight container, for up to 5 days to maintain freshness.

  • Freezer: If you need to freeze it, slice the cheesecake and wrap individual portions tightly in plastic wrap followed by aluminum foil. It can be frozen for up to 2 months.

  • Reheating: Thaw frozen cheesecake in the refrigerator overnight before serving. For best results, enjoy it chilled, but you can let it sit at room temperature for about 15 minutes for improved flavor.

Expert Tips for Boston Cream Pie Cheesecake

  • Chill Overnight: Allowing the cheesecake to chill overnight enhances its flavor and texture, creating a richer experience for your taste buds.
  • Monitor Baking Time: Keep a close eye on the baking time and avoid overbaking to prevent cracks from forming in your cheesecake.
  • Room Temperature Ingredients: Using room temperature cream cheese and eggs results in a smoother batter, giving your Boston Cream Pie Cheesecake a perfect consistency.
  • Springform Pan Essential: A springform pan is key for easy cheesecake removal, ensuring your presentation remains beautiful when serving.
  • Garnish Smartly: Feel free to get creative with toppings—fresh berries or a sprinkle of nuts can add delightful texture and elevate your cheesecake's look.

What to Serve with Boston Cream Pie Cheesecake

Elevate your dessert experience with delightful pairings that complement the rich flavors and textures of this indulgent treat.

  • Whipped Cream: A dollop of airy whipped cream adds lightness, balancing the dense cheesecake beautifully.

  • Fresh Berries: Bright strawberries or raspberries offer a refreshing contrast, bringing a burst of tartness that enhances the sweetness.

  • Espresso or Coffee: A warm cup of coffee or espresso pairs wonderfully, cutting through the richness while enhancing the chocolate depth.

  • Vanilla Ice Cream: Creamy vanilla ice cream provides an extra layer of indulgence and a silky texture that harmonizes with the cheesecake.

  • Chocolate Sauce Drizzle: A drizzle of rich chocolate sauce over each slice can elevate the chocolate flavor, creating a luscious finishing touch.

  • Nutty Caramel Sauce: A drizzle of caramel with a hint of saltiness balances the sweetness of the cheesecake and adds complexity.

  • Mint Tea: Herbal mint tea serves as a refreshing palate cleanser after bites of rich cheesecake, offering a soothing finish to your meal.

  • Chocolate-Covered Strawberries: Serve these on the side to echo the chocolate ganache, adding elegance and flavor that guests will adore.

With these pairings, your Boston Cream Pie Cheesecake will surely shine at any gathering!

Boston Cream Pie Cheesecake Recipe FAQs

How do I select ripe ingredients for this recipe?
Absolutely! When choosing your ingredients, particularly the cream cheese and eggs, look for smooth textures and avoid any packaging with dents or cracks. For eggs, fresh ones will have a firm yolk and a slightly elevated appearance. If you’re using sour cream, check for a clean label and expiration date; it should have a pleasant tangy aroma without any off scents.

How should I store my Boston Cream Pie Cheesecake?
Very simply! Store any leftovers in the refrigerator, covered tightly with plastic wrap or in an airtight container for up to 5 days. If you place it in the fridge, it’ll maintain its rich and creamy texture, so you can indulge in dessert for several days!

Can I freeze Boston Cream Pie Cheesecake?
Absolutely! To freeze, I recommend slicing the cheesecake into individual portions. Wrap each slice tightly in plastic wrap, then in aluminum foil to prevent freezer burn; it can be stored for up to 2 months. When you’re ready to enjoy, thaw it overnight in the refrigerator. For a revived flavor, let it sit at room temperature for about 15 minutes before indulging!

What are some common troubleshooting tips if my cheesecake cracks?
If your cheesecake cracks during baking, don’t worry! One common culprit is overbaking; keep an eye on the time. To prevent cracking, you can also try baking in a water bath to maintain moisture levels. If cracks do appear, a generous drizzle of chocolate ganache over the top can creatively hide them while adding extra flavor.

Are there any dietary considerations I should be aware of?
Definitely! If you have guests with dietary restrictions, you can use gluten-free chocolate cookies for the crust and consider egg alternatives, like flaxseed meal or applesauce, which may suit vegan diets. Always check labels on your ingredients, particularly chocolate options and sour cream, for any allergens like dairy or nuts. Happy baking!

Decadent No-Bake Dubai Chocolate Pistachio Cheesecake Delight

June 4, 2026 by Grace Snow Leave a Comment

As I stood in my kitchen last weekend, the sun streaming in, I couldn’t help but crave something dreamy yet practical—enter the No-Bake Dubai Chocolate Pistachio Cheesecake! This elegant dessert is like a hug for your taste buds, combining the richness of dark chocolate with the delightful crunch of pistachios. What I love most about this no-bake treat is how effortlessly it comes together, perfect for those days when you want something impressive without spending hours in the kitchen. Plus, it’s incredibly adaptable with gluten-free and dairy-free options for those with dietary needs. Ready to elevate your dessert game and impress your guests with a touch of Middle Eastern flair? Let's dive into this delightful recipe together!

Why Is This Cheesecake a Must-Try?

Decadent, No-Bake Delight: You’ll love how this cheesecake delivers indulgence without the hassle of baking.

Unique Middle Eastern Flair: The combination of chocolate and pistachios transports you straight to Dubai with every bite.

Versatile Options: With gluten-free and dairy-free substitutions available, it caters to various dietary preferences effortlessly.

Quick and Easy Assembly: Whip up this cheesecake without breaking a sweat—perfect for last-minute gatherings!

Crowd-Pleasing Flavor: Rich chocolate pairs beautifully with the crunch of pistachios, making it a guaranteed hit at any occasion.

Serve with Style: Elevate your dessert menu by pairing this cheesecake with fresh berries or a drizzle of honey. If you're in the mood for something warm and comforting afterward, consider giving Homemade Hot Chocolate a try!

No-Bake Dubai Chocolate Pistachio Cheesecake Ingredients

  • For the Cheesecake Filling

  • Cream Cheese – Provides a creamy base; ensure it's softened for smooth mixing.

  • Mascarpone – Enhances the creaminess and velvety texture of the cheesecake.

  • Dark Chocolate – Adds rich flavor; melt gently before incorporating.

  • Sugar – Sweetens the filling; can be adjusted based on taste preferences.

  • Whipped Cream – Lightens the filling; whip to soft peaks for the best texture.

  • Pistachios – Adds flavor and crunch; consider toasting for enhanced taste.

  • For the Crust

  • Graham Cracker Crust – Provides a sweet and crunchy base; substitute with gluten-free cookies if needed.

  • Butter – Binds the crust ingredients together; use unsalted for better control over salt levels.

  • Vanilla Extract – Enhances flavor; a few drops are sufficient.

  • Optional Dairy-Free Alternatives

  • Coconut Cream – Swap for cream cheese for a dairy-free version.

  • Coconut Yogurt – Substitute mascarpone for a creamy, dairy-free texture.

This delightful No-Bake Dubai Chocolate Pistachio Cheesecake blends rich chocolate and crunchy pistachios for a dessert experience that’s nothing short of extraordinary!

Step‑by‑Step Instructions for No-Bake Dubai Chocolate Pistachio Cheesecake

Step 1: Prepare the Crust
Start by preheating your oven to 350°F (175°C) if you choose to toast any pistachios. In a mixing bowl, combine crushed graham crackers with melted unsalted butter and a splash of vanilla extract. Press this mixture firmly into the base of a springform pan, forming an even layer. Chill the crust in the refrigerator for at least 30 minutes to firm up while you prepare the filling.

Step 2: Melt the Chocolate
Using a double boiler or microwave, carefully melt about 7 ounces of dark chocolate over low heat. If using a microwave, heat in 30-second intervals, stirring in between until fully melted and smooth. Once melted, let the chocolate cool slightly while you prepare the cream cheese filling for your No-Bake Dubai Chocolate Pistachio Cheesecake.

Step 3: Mix the Filling
In a large mixing bowl, beat together 8 ounces of softened cream cheese and 8 ounces of mascarpone until creamy and well combined, which should take about 2-3 minutes. Gradually pour the slightly cooled melted chocolate into the mixture, blending until smooth and velvety. This combination creates the rich foundation of your cheesecake, so ensure it’s well incorporated.

Step 4: Whip the Cream
In a separate medium bowl, whip about 1 cup of heavy cream until soft peaks form; this typically takes about 3-5 minutes with an electric mixer. Once ready, gently fold the whipped cream into the chocolate mixture using a spatula. This lightens the filling, making it airy and perfect for your No-Bake Dubai Chocolate Pistachio Cheesecake.

Step 5: Fold in the Pistachios
Chop about ½ cup of pistachios, toasting them in a dry skillet on medium heat for a few minutes until fragrant, if desired. Gently fold the chopped pistachios into the creamy chocolate filling, ensuring they’re evenly distributed. This delightful crunch will add texture and flavor to your cheesecake, creating a luxurious finish.

Step 6: Combine and Pour
Carefully pour the rich filling into the chilled crust, using a spatula to smooth the top evenly. This step is crucial for an appealing presentation of your No-Bake Dubai Chocolate Pistachio Cheesecake. Tap the pan lightly on the counter to remove any air bubbles and ensure a smooth surface before transferring it back to the refrigerator.

Step 7: Chill the Cheesecake
Cover the cheesecake lightly with plastic wrap and refrigerate for at least 4 hours, preferably overnight for the best texture. As it chills, the filling will set beautifully, melding flavors and making it a delightful centerpiece for your dessert table once ready to serve.

Step 8: Serve the Cheesecake
To serve, run a warm knife around the edges of the springform pan to loosen the cheesecake. Carefully release and remove the sides. Slice with a warm knife for clean edges, and serve chilled. Garnish with extra chopped pistachios or a drizzle of honey for an impressive finish to your No-Bake Dubai Chocolate Pistachio Cheesecake.

Make Ahead Options

These No-Bake Dubai Chocolate Pistachio Cheesecake delights are perfect for busy home cooks who want to save time! You can prepare the crust and filling up to 24 hours in advance. For the crust, simply mix the graham cracker crumbs with melted butter and chill it in the fridge; it holds up beautifully! For the filling, follow the recipe until it’s ready to pour over the crust, and store it in an airtight container in the fridge. This helps retain the moisture and prevents your cheesecake from drying out. When you’re ready to serve, pour the filling over the crust and chill for at least 4 hours or overnight. Trust me, this cheesecake remains just as delicious and will be a hit at any gathering!

How to Store and Freeze No-Bake Dubai Chocolate Pistachio Cheesecake

Fridge: Store your cheesecake in the refrigerator for up to 3 days in an airtight container to maintain its creamy texture and flavor.

Freezer: For longer storage, wrap individual slices in plastic wrap and foil, then freeze for up to 2 months. Thaw overnight in the refrigerator before serving.

Serving: When ready to enjoy your cheesecake, let it sit at room temperature for about 10-15 minutes to soften slightly, making for easier slicing and a delightful creamy experience!

Wrap Well: Ensure that the cheesecake is well-wrapped to prevent freezer burn and maintain that luscious flavor of your no-bake Dubai chocolate pistachio cheesecake.

Expert Tips for No-Bake Dubai Chocolate Pistachio Cheesecake

  • Soften Ingredients: Ensure your cream cheese and mascarpone are fully softened before mixing to avoid any lumps in your cheesecake.

  • Chill the Crust: It’s essential to chill the graham cracker crust well before adding the filling. This prevents it from becoming soggy and allows for a crisp texture.

  • Melt Chocolate Smoothly: When melting dark chocolate, do it gently to prevent burning. Use a double boiler or heat in short intervals in the microwave.

  • Whip Cream Properly: Whip your heavy cream to soft peaks, as over-whipping can lead to a grainy texture.

  • Toast Pistachios: For added depth of flavor, toast your pistachios in a dry skillet until fragrant. Just be sure to watch them closely to avoid burning!

  • Chill Longer for Best Results: Allow your no-bake Dubai chocolate pistachio cheesecake to chill overnight if possible. This enhances the flavor and texture, making it even more delightful!

What to Serve with Creamy No-Bake Dubai Chocolate Pistachio Cheesecake

To create a truly unforgettable dining experience, here are some delightful pairings that will enhance this rich dessert.

  • Arabic Coffee: This robust and aromatic coffee complements the cheesecake's sweetness, as its bold notes elevate the chocolatey flavors.

  • Mint Tea: The refreshing, herbal notes of mint tea create a delightful contrast to the rich cheesecake, cleansing the palate between bites.

  • Fresh Berries: A medley of ripe raspberries and strawberries adds a vibrant pop of color and a tangy burst that balances the sweetness.

  • Honey Drizzle: A touch of honey swirled on top lends a warm, floral sweetness that beautifully ties the flavors of chocolate and pistachios together.

  • Pistachio Crumble: Crushed roasted pistachios sprinkled over the cheesecake add extra crunch and enhance its flavor profile. It’s visually stunning too!

  • Coconut Sorbet: An icy, dairy-free treat that offers a light texture and a hint of tropical flavor, complementing the cheesecake’s richness beautifully.

  • Chocolate Mint Cookies: A small plate of these cookies pairs perfectly with the cheesecake, extending the chocolate experience while adding a delightful crunch.

  • Almond Milkshake: A creamy, nutty beverage to wash down that cheesecake, almond milk’s subtle sweetness offers a lovely balance to the palate.

  • Baklava Bites: Small, flaky bites of baklava enhance the Middle Eastern theme and bring an additional layer of sweetness and texture to your dessert spread.

No-Bake Dubai Chocolate Pistachio Cheesecake Variations

Feel free to get creative with this delightful cheesecake by tailoring it to your taste and dietary needs!

  • Gluten-Free: Use gluten-free cookies instead of graham crackers for the crust without sacrificing flavor or texture.

  • Dairy-Free: Swap cream cheese for coconut cream and mascarpone for coconut yogurt for a refreshing twist that's vegan-friendly. Enjoy the same creamy richness without dairy!

  • Flavor Boost: Add a pinch of cardamom or a splash of rosewater to the filling for a fragrant Middle Eastern inspired kick that elevates the flavors beautifully.

  • Nutty Delight: If you want more crunch, mix in some chopped almonds or hazelnuts along with the pistachios for an exciting texture contrast.

  • Decadent Swirls: Incorporate a layer of berry compote on top before chilling to add a fruity zing and a beautiful presentation. Combine flavors for a delightful surprise!

  • Spicy Kick: For those who love heat, sprinkle a dash of chili powder or cayenne into the chocolate layer for an unexpected, tantalizing twist.

  • Alternative Sweeteners: Experiment with maple syrup or agave nectar instead of sugar to create a more natural sweetness that aligns with your dietary preferences.

  • Chocolate Lover's Dream: Blend in chocolate chips or shaved chocolate to the filling before pouring over the crust for an extra indulgent, chocolatey experience.

Feel free to explore these options and don’t forget to enjoy your cozy dessert moments! You can also make a scrumptious side of Homemade Hot Chocolate to complement this cheesecake perfectly.

No-Bake Dubai Chocolate Pistachio Cheesecake Recipe FAQs

What type of chocolate should I use for this cheesecake?
Absolutely, I recommend using high-quality dark chocolate with at least 60% cocoa for a rich flavor. It melts beautifully and balances perfectly with the sweetness of the cheesecake. Always melt it gently to avoid burning, either in a double boiler or via short intervals in the microwave.

How do I know if my cream cheese is properly softened?
Very good question! To ensure your cream cheese is softened correctly, let it sit at room temperature for about 30-60 minutes prior to use. You want it to be spreadable, resembling a thick paste, with no lumps. This step is crucial for achieving a smooth cheesecake filling.

What's the best way to store leftover cheesecake?
For best results, store your No-Bake Dubai Chocolate Pistachio Cheesecake in the refrigerator, properly covered with plastic wrap or in an airtight container. It should last up to 3 days, keeping that creamy texture intact. Just remember to let it sit at room temperature for a few minutes before serving for easier slicing.

Can I freeze this cheesecake?
Absolutely! To freeze your cheesecake, wrap individual slices tightly in plastic wrap and then in foil to prevent freezer burn. It can be kept frozen for up to 2 months. When you're ready to enjoy, simply thaw it in the fridge overnight, and it will be as delicious as the day you made it!

What if my cheesecake cracks while chilling?
If you notice cracks forming, don't worry! This can happen due to air bubbles. To fix this, simply use a spatula to smooth the surface gently or cover it with a layer of garnished pistachios or chocolate ganache. This not only hides any imperfections but also adds a delicious extra touch.

Are there any allergens I should be aware of?
Yes, this cheesecake contains dairy and can pose a risk for those with dairy allergies. However, I often make it with coconut cream and coconut yogurt for a dairy-free option, which works beautifully! Just ensure to check all packaged ingredients for any additional allergens.

Raspberry Pistachio Cake: A Nutty, Fruity Bliss Treat

June 2, 2026 by Grace Snow Leave a Comment

As I stood in my kitchen, the soft, nutty aroma of pistachios filled the air, inviting me to create something special. Enter the Raspberry Pistachio Cake—a dessert that not only dazzles the eyes with its vibrant, naturally-colored frosting but also delivers a delightful balance of flavors. This cake is a true crowd-pleaser, easy enough for an afternoon bake and impressive enough for any celebration. Whether you're craving something indulgent or simply looking to impress at your next gathering, this recipe will surely become a favorite. And with the option for gluten-free modifications, it welcomes everyone to join in the joy of homemade desserts. Curious about how each layer comes together in this sweet symphony? Let’s dive in!

What Makes This Cake So Special?

Exquisite Flavor Combination: The blend of nutty pistachios and tart raspberries creates a mouthwatering balance that tempts your taste buds.

Naturally Colored Frosting: With its stunning pink hue from real raspberries, this cake is a feast for the eyes as much as the palate.

Versatile for Any Occasion: Whether you're hosting a birthday party or enjoying a quiet afternoon tea, the Raspberry Pistachio Cake is perfect for every celebration.

Gluten-Free Adaptability: Easy to modify for gluten-free diets while still maintaining that rich texture, so everyone can indulge.

Quick and Easy Preparation: Simple instructions make this recipe accessible even if you're new to baking.

Elevate your dessert game with this Raspberry Pistachio Cake and enjoy the compliments that come your way!

Raspberry Pistachio Cake Ingredients

For the Cake Layers
• Unsalted Pistachios – Provide nuttiness and texture. Use raw pistachios or roasted for a deeper flavor.
• All-Purpose Flour – Acts as the primary structure-building block. Can be substituted with gluten-free flour for a gluten-free option.
• Baking Powder – Leavening agent for a light texture. Ensure it's fresh for best results.
• Baking Soda – Works with acidic components to help the cake rise. Use in conjunction with baking powder for optimal fluffiness.
• Salt – Enhances overall flavor. Sea salt can be a great alternative for a different taste profile.
• Unsalted Butter – Adds moisture and richness to cake layers. Melt butter to ease mixing.
• Granulated Sugar – Sweetens the cake. Can be substituted with coconut sugar for a slightly different flavor.
• Large Eggs – Provides structure and moisture. Room temperature eggs mix better into batter.
• Greek Yogurt – Contributes moisture and tang. Can be replaced with sour cream if preferred.
• Light-Tasting Oil – Adds moisture without overpowering flavors. Vegetable or canola oil works well.
• Vanilla Extract – Enhances the flavor of the cake. Use pure vanilla extract for best results.

For the Raspberry Jam
• Raspberries (fresh or frozen) – Main ingredient for the jam filling. Frozen raspberries can be used but should be thawed before cooking.
• Granulated Sugar – Sweetens the jam. Adjust quantity based on the tartness of your berries.
• Water – Helps cook the raspberries into a jam consistency. Add as needed to achieve the desired thickness.

For the Buttercream Frosting
• Powdered Sugar – Sweetener for the buttercream. Sifted for smooth texture.
• Heavy Cream – Adjusts the consistency of the buttercream. Can be substituted with milk for a lighter frosting.
• Vanilla Extract – Adds depth of flavor to the frosting. Using pure vanilla will enhance the overall taste.

With these ingredients at your fingertips, you’re ready to create a Raspberry Pistachio Cake that will enchant your guests and fill your kitchen with delightful aromas!

Step‑by‑Step Instructions for Raspberry Pistachio Cake

Step 1: Preheat and Prepare
Begin by preheating your oven to 350°F (175°C). While that heats, prepare three 6-inch cake pans by lining the bottoms with parchment paper and greasing the sides. This ensures the layers of Raspberry Pistachio Cake come out easily and maintain their beautiful shape for stacking and frosting.

Step 2: Process the Pistachios
In a food processor, grind the unsalted pistachios until you achieve a coarse flour-like texture—be careful not to over-process, as that can turn them into butter. Once done, combine this ground pistachio flour with all-purpose flour, baking powder, baking soda, and salt in a mixing bowl. This blend will form the dry ingredient base for your cake.

Step 3: Make the Wet Mixture
In a separate large bowl, whisk together the melted butter and granulated sugar until well combined. Then, add in the large eggs one at a time, whisking well after each addition. Follow this by mixing in Greek yogurt, light-tasting oil, and pure vanilla extract until smooth and fully incorporated, creating a rich wet mixture for your Raspberry Pistachio Cake.

Step 4: Combine Wet and Dry Ingredients
Next, sift the combined dry ingredients into the bowl with your wet mixture. Gently fold these together until just combined, being careful not to overmix, as this can lead to a dense cake. You'll know you've achieved the right consistency when there are just a few streaks of flour remaining in the batter, revealing a creamy base for those beautiful cake layers.

Step 5: Bake the Cake Layers
Divide the batter evenly among the prepared cake pans. Place the pans in the preheated oven and bake for about 30-35 minutes, or until the cakes are lightly golden and a toothpick inserted into the center comes out clean. Keep an eye on them as the lovely aroma fills your kitchen, signaling they are nearly ready.

Step 6: Cool the Layers
Once baked, let the cake layers cool in the pans for about 10 minutes. Carefully invert each layer onto a wire rack to cool completely. This step is essential for ensuring a stable structure when stacking your Raspberry Pistachio Cake and frosting it later on.

Step 7: Prepare the Raspberry Jam
In a small saucepan, combine fresh or thawed raspberries with sugar and a splash of water over medium heat. Cook, stirring gently, until the mixture thickens to a jam-like consistency—this should take about 10-15 minutes. Once thickened, strain the mixture to remove seeds, then allow your raspberry jam to cool completely before using it in your cake.

Step 8: Make the Buttercream Frosting
In a mixing bowl, cream softened unsalted butter until it's pale and fluffy. Gradually add sifted powdered sugar, mixing until it's fully incorporated. Then, blend in your cooled raspberry jam and a splash of vanilla extract, adjusting the consistency with heavy cream as needed. Your buttercream frosting should be smooth and spreadable for easier application on the Raspberry Pistachio Cake.

Step 9: Assemble the Cake
To assemble your cake, place one layer on a serving plate and spread a layer of buttercream followed by a generous smear of raspberry jam on top. Add the second layer and repeat the process, finishing with the third layer. Apply a thin crumb coat of buttercream around the entire cake to seal in any crumbs, then chill for about 30 minutes to set.

Step 10: Final Frosting and Decoration
Once chilled, frost the entire cake with the remaining raspberry buttercream, smoothing the surface with a spatula or cake scraper for a professional finish. Finish by decorating the top with crushed pistachios for added texture and visual appeal. Your Raspberry Pistachio Cake is now ready to be served and celebrated!

Make Ahead Options

These Raspberry Pistachio Cakes are perfect for meal prep enthusiasts! You can bake the cake layers up to 3 days in advance and store them wrapped tightly in plastic wrap at room temperature, preserving their moisture and flavor. The raspberry jam can also be made 24 hours ahead and stored in the refrigerator to enhance its depth. Simply whip up the buttercream on the day of assembly, as it tastes best fresh. When you're ready to serve, stack the layers with the sweet jam and creamy buttercream, apply a crumb coat, chill for 30 minutes, and then finish frosting for a cake that’s just as delicious as if you made it all in one go!

Expert Tips for Raspberry Pistachio Cake

  • Perfect Pistachio Grinding: Don't over-blend the pistachios! Grind them only until coarse to avoid turning them into butter.

  • Room Temperature Eggs: Ensure your large eggs are at room temperature before mixing. This helps create a fluffier batter, essential for an airy Raspberry Pistachio Cake.

  • Sifting is Key: Always sift your dry ingredients to prevent lumps. This step ensures a smooth batter and delicate cake texture.

  • Crumb Coat Chill: After applying the crumb coat, chill the cake for a minimum of 30 minutes. This helps stabilize the layers and makes final frosting easier.

  • Test for Doneness: Use a toothpick to check if the cake is done. It should come out clean or with a few moist crumbs, preventing under- or over-baking.

  • Experiment with Flavors: Feel free to swap the raspberry jam for another fruit or even chocolate for a unique twist! Enjoy your homemade Raspberry Pistachio Cake!

How to Store and Freeze Raspberry Pistachio Cake

Room Temperature: Keep the cake at room temperature for up to 1 day if it’s unfrosted; however, in warm climates, it’s best to refrigerate to avoid melting the buttercream.

Fridge: Store your frosted Raspberry Pistachio Cake in an airtight container in the refrigerator for up to 3 days to maintain freshness and moisture.

Freezer: For longer storage, wrap individual cake layers or the whole cake tightly in plastic wrap, then place in a freezer-safe container for up to 1 month.

Reheating: If frozen, thaw the cake in the fridge overnight and allow it to come to room temperature before serving for the best texture and flavor.

What to Serve with Raspberry Pistachio Cake

Bring your dessert experience to new heights by pairing this vibrant cake with delightful side dishes and drinks.

  • Fresh Berries: A mix of strawberries, blueberries, and raspberries adds a burst of freshness and complements the cake’s flavors beautifully.
  • Whipped Cream: Light and airy, a dollop of homemade whipped cream elevates your slice, enhancing its moisture and sweetness.
  • Coffee or Tea: A robust cup of coffee or a fragrant tea balances the rich sweetness of the cake, making for a comforting experience.
  • Chocolate Ganache: Drizzling a warm chocolate ganache provides a decadent contrast to the fruity cake, appealing to chocoholics!
  • Citrus Salad: A refreshing salad with oranges and mint adds a zesty tang that brightens the dish and cuts through the richness.
  • Lemon Sorbet: The cool and tangy sorbet acts as a palate cleanser, perfectly balancing the creamy, nutty flavors of the cake.
  • Nutty Crumble Topping: Crushed pistachios or a mix of nuts as a topping can add texture and enhance the overall nutty experience.
  • Lavender Lemonade: A sweet and floral drink like lavender lemonade pairs wonderfully, highlighting the cake's lightness and subtly fragrant notes.

Raspberry Pistachio Cake Variations

Feel free to let your creativity flourish as you make this cake truly your own!

  • Nut Swap: Replace pistachios with almonds or walnuts for a delightful twist in flavor and texture. Almonds offer a slightly sweeter taste while walnuts bring a rich, earthy note that complements the raspberries beautifully.

  • Berry Jam Alternative: Use blueberries or strawberries instead of raspberries to craft a different jam flavor. The blueberries will provide a mild sweetness, while strawberries add a bright, fresh note to each bite.

  • Gluten-Free Option: Substitute all-purpose flour with a gluten-free flour blend for a gluten-free version of this cake. This ensures everyone can enjoy it without compromising on taste or texture.

  • Cream Cheese Frosting: For a richer flavor, mix things up with a cream cheese frosting instead of the raspberry buttercream. The tanginess of cream cheese pairs wonderfully with the sweetness of the frosting, providing an extra layer of indulgence.

  • Sprinkle of Spice: Add a pinch of cinnamon or cardamom to the batter for a warm, aromatic flavor profile. These spices can elevate the overall taste, creating a cake that's both comforting and exotic.

  • Chocolate Delight: Mix in some mini chocolate chips or drizzle melted chocolate over the top for a decadent addition. Who doesn’t love the combination of chocolate and raspberry? It’s a match made in dessert heaven!

  • Zesty Twist: Incorporate a teaspoon of lemon zest into the batter for a refreshing citrusy note. This adds brightness and cuts through the sweetness, balancing the overall flavors.

  • Marzipan Layer: Consider adding a layer of marzipan to add a sweet, almond-flavored surprise between the cake layers. Its nutty flavor enhances the pistachios, creating a luxurious experience.

When it comes to baking, the sky's the limit! If you’re intrigued by other delightful desserts, check out our Chocolate Poke Cake and indulge in a different rich experience. Enjoy customizing your culinary masterpiece!

Raspberry Pistachio Cake Recipe FAQs

What type of pistachios should I use?
Absolutely! You can use either raw or roasted unsalted pistachios for this cake. Raw pistachios provide a mild flavor, while roasted ones add a deeper nuttiness that can enhance the cake's overall taste.

How should I store the Raspberry Pistachio Cake?
I recommend keeping the frosted Raspberry Pistachio Cake in an airtight container in the refrigerator for up to 3 days. This helps maintain its moisture and flavor. If it's unfrosted, you can store it at room temperature for about 1 day, but in warmer climates, refrigerating is best to prevent the buttercream from melting and losing its shape.

Can I freeze Raspberry Pistachio Cake?
Absolutely! To freeze the cake, wrap individual layers or the whole cake tightly in plastic wrap, then place it in a freezer-safe container. It can be stored for up to 1 month. When ready to enjoy, simply thaw it in the fridge overnight, and let it come to room temperature before serving for the best texture.

What if my cake layers are domed?
Very! If your cake layers come out domed, don’t worry. To fix this, simply level them with a serrated knife once they are completely cooled. This step ensures perfectly even layers, making assembly easier and resulting in a more visually appealing cake.

Can I make this recipe gluten-free?
Definitely! To make a gluten-free Raspberry Pistachio Cake, you can substitute all-purpose flour with a 1:1 gluten-free flour blend. This will maintain the cake's texture and flavor while accommodating those with gluten sensitivities. Be sure to check that your other ingredients, like baking powder, are also gluten-free.

Are there any allergen considerations?
When making the Raspberry Pistachio Cake, it's important to check for allergies amongst your guests. The cake contains tree nuts (pistachios) and dairy (butter, yogurt, and cream), which could be a concern for some. Always feel free to explore alternative ingredients, like using a soy or nut-based yogurt and dairy-free butter for those with dietary restrictions.

Delightful French Butter Cake: Simple and Irresistibly Buttery

June 2, 2026 by Grace Snow Leave a Comment

As I poured the batter into the pan, the smell of melting butter filled my kitchen, instantly transporting me to a quaint Parisian café. This Classic French Butter Cake is a delightful nod to simplicity and nostalgia, boasting a rich, buttery flavor and a soft crumb that makes it an ideal dessert for tea time or a light treat after dinner. Best of all, it’s incredibly easy to whip up, requiring just a handful of ingredients and no specialized equipment. This recipe is perfect for both novice bakers looking to impress and seasoned pros wanting a comforting snack. So why not indulge in a slice of this timeless favorite? I promise it will become a cherished staple in your dessert repertoire. Are you ready to bake something delicious?

Why is this cake so irresistible?

Simplicity: This Classic French Butter Cake is exceptionally easy to make, perfect for both beginners and seasoned bakers alike. Buttery Delight: The luscious butter flavor creates a rich, indulgent treat that’s hard to resist. Versatility: Dress it up with a glaze or fresh berries, or serve it plain for a delightful experience. Gluten-Free Option: Easily adaptable using a gluten-free flour blend, this cake caters to various dietary needs. Crowd-Pleaser: Whether for a cozy tea time or a celebration, it’s sure to impress everyone at your table. Enjoy it alongside Ice Cream Cake for an unforgettable dessert spread!

French Butter Cake Ingredients

• Here’s everything you need to make this delectable French Butter Cake!

For the Batter

  • Unsalted Butter – Provides richness and moisture; substitute with salted butter by reducing added salt.
  • Granulated Sugar – Adds sweetness and structure; can be swapped with a sugar alternative if desired.
  • Eggs – Binds ingredients and adds moisture; just add one at a time to the butter-sugar mixture.
  • All-Purpose Flour – Creates structure; can be replaced with a 1:1 gluten-free flour blend for a gluten-free option.
  • Baking Powder – Acts as a leavening agent for rise; ensure it’s fresh for the best results.
  • Salt – Enhances flavor; omit if using salted butter.

For Dusting (Optional)

  • Powdered Sugar – Lightly dust before serving for a charming finish.

Indulge in this Classic French Butter Cake that will surely delight your taste buds!

Step‑by‑Step Instructions for Classic French Butter Cake

Step 1: Preheat the Oven
Preheat your oven to 350°F (175°C) to ensure it reaches the right temperature for baking. This step is crucial for the Classic French Butter Cake to rise properly. While the oven is warming up, gather your ingredients and prepare a 9-inch round cake pan by greasing it with a little butter or non-stick spray.

Step 2: Cream Butter and Sugar
In a large mixing bowl, add 1 cup of unsalted butter and 1 cup of granulated sugar. Use an electric mixer to cream them together on medium speed until the mixture is light and fluffy, about 3-5 minutes. This process incorporates air, giving your butter cake a lovely texture. Scrape down the sides of the bowl as needed to ensure everything is well combined.

Step 3: Incorporate the Eggs
Now, add 3 large eggs to the butter-sugar mixture, one at a time. Beat well after each addition until fully incorporated. This will add moisture and richness to your Classic French Butter Cake. You’ll notice the batter becoming smoother and creamier with each egg, which is a sign you're on the right track!

Step 4: Combine Dry Ingredients
In a separate bowl, whisk together 2 cups of all-purpose flour, 1 teaspoon of baking powder, and 1/2 teaspoon of salt. This step is important for evenly distributing the leavening agent throughout the flour. Ensuring your baking powder is fresh will help achieve a light and fluffy cake.

Step 5: Mix Wet and Dry Ingredients
Gradually fold the dry ingredient mixture into the wet ingredients until just combined. Use a spatula to gently mix, ensuring no flour pockets remain, but avoid overmixing to keep your Classic French Butter Cake tender and moist. The batter will be thick but smooth, ready for pouring into the cake pan.

Step 6: Pour and Bake
Carefully pour the batter into your prepared cake pan, smoothing the top with a spatula. Place it on the middle rack of your preheated oven and bake for 30-35 minutes. The cake is done when it’s golden brown and a toothpick inserted into the center comes out clean or with a few moist crumbs attached.

Step 7: Cool the Cake
Once baked, remove the pan from the oven and let it cool in the pan for about 10 minutes. Then, carefully transfer the Classic French Butter Cake to a wire rack to cool completely. This cooling process is essential for the texture, allowing it to firm up and making it easier to slice later.

Step 8: Serve and Enjoy
After the cake has cooled, you can serve it plain or dust it lightly with powdered sugar for a charming finish. Consider pairing your Classic French Butter Cake with a warm cup of tea or coffee, and for an added treat, top it with fresh berries or a dollop of whipped cream.

What to Serve with Classic French Butter Cake

There’s something truly magical about how the right accompaniments can elevate this delightful treat into a full experience of culinary comfort.

  • Fresh Berries: Juicy strawberries or raspberries add a burst of freshness and a sweet-tart contrast to the rich cake.

  • Whipped Cream: Light and airy, a dollop of homemade whipped cream enhances the buttery flavor while adding a touch of indulgence.

  • Vanilla Ice Cream: Creamy vanilla ice cream provides a luscious complement, creating a satisfying contrast between warm cake and cold scoops.

  • Lemon Glaze: Drizzling a zesty lemon glaze over the top brightens the cake’s richness, adding a refreshing twist with every bite.

  • Coffee: A steaming cup of coffee is the perfect pairing, balancing the sweetness with a rich, robust flavor that warms the soul.

  • Herbal Tea: Fragrant herbal teas, like chamomile or mint, provide a gentle, soothing pairing that enhances the cake's comforting essence.

  • Chocolate Sauce: For a decadent twist, a warm chocolate sauce drizzled over the cake turns this simple dessert into a luxurious treat.

  • Milk: A glass of chilled milk is a classic pairing that complements the cake's buttery richness, making every bite irresistible.

  • Caramel Drizzle: A drizzle of caramel sauce brings a sweet, salty contrast, enhancing the cake's flavors while adding a gourmet touch.

Expert Tips for the Best French Butter Cake

  • Room Temperature Ingredients: Ensure your butter and eggs are at room temperature. This helps create a smooth, well-emulsified batter, preventing a dense cake.

  • Don't Overmix: When combining wet and dry ingredients, mix just until incorporated. Overmixing can lead to a tough texture, which we want to avoid in a lovely French Butter Cake.

  • Use Fresh Baking Powder: Always check the freshness of your baking powder. If it’s expired, your cake may not rise properly, resulting in a dense outcome.

  • Proper Cooling: Allow the cake to cool in the pan for 10 minutes before transferring to a wire rack. This prevents it from breaking apart, ensuring beautiful slices.

  • Check for Doneness: Start checking the cake for doneness at 30 minutes. An overbaked cake can lose its moistness, so a toothpick should come out clean, not dry.

How to Store and Freeze French Butter Cake

Room Temperature: Store the cooled cake in an airtight container at room temperature for up to 2 days to maintain its delicious buttery texture.

Fridge: If you need to keep it longer, refrigerate the cake in an airtight container for up to 5 days. Bring it to room temperature before serving for the best flavor.

Freezer: To freeze, slice the cake and wrap each piece tightly in plastic wrap, then place in a freezer-safe container. It can be frozen for up to 2 months. Thaw it in the fridge overnight before enjoying.

Reheating: If desired, gently reheat individual slices in the microwave for about 10-15 seconds to enjoy a warm, comforting taste of this French Butter Cake.

French Butter Cake Variations

Feel free to let your creativity shine as you customize this delightful cake with these tempting twists!

  • Gluten-Free: Substitute all-purpose flour with a 1:1 gluten-free flour blend for a gluten-free version that everyone can enjoy.
  • Citrus Zest: Add a teaspoon of lemon or orange zest to the batter for a refreshing burst of flavor that brightens every bite.
  • Brown Butter: Replace regular butter with browned butter for a nutty depth that transforms your classic cake into something truly special.
  • Salted Caramel Drizzle: Top with a warm salted caramel glaze for an indulgent treat that perfectly complements the buttery flavor.
  • Herbal Infusion: Infuse the batter with fresh herbs like rosemary or lavender for a unique twist that takes your cake to the next level.
  • Chocolate Swirl: Fold in melted chocolate or chocolate chips into the batter before baking for an irresistible, rich touch that chocolate lovers will adore.
  • Fruit Compote: Serve slices with a homemade berry compote or fresh fruit topping, enhancing sweetness while adding a textured contrast.
  • Nutty Crunch: Stir in chopped nuts, like almonds or walnuts, for added texture and a delightful crunch in every slice.

Each of these variations allows for personal flair, making the French Butter Cake a true canvas for your baking imagination. If you’re looking for more indulgent desserts to pair it with, consider trying an exquisite Chocolate Pudding Cake or a layered Ice Cream Cake. Enjoy your baking adventure!

Make Ahead Options

These Classic French Butter Cakes are perfect for busy home cooks looking to simplify meal prep! You can prepare the batter up to 24 hours in advance; simply mix it, cover tightly, and refrigerate to maintain its freshness. Additionally, the fully baked cake can be stored at room temperature for up to 2 days or refrigerated for up to 5 days—just ensure it's in an airtight container to prevent drying out. For longer storage, freeze slices for up to 2 months. When you're ready to serve, either let the cake come to room temperature and dust with powdered sugar or warm individual slices in the microwave for just a few seconds, bringing back that delightful buttery goodness!

French Butter Cake Recipe FAQs

What type of butter should I use for the French Butter Cake?
Use unsalted butter for the best flavor, as it allows you to control the salt level in your recipe. If you only have salted butter, you can still use it; just remember to reduce the added salt to a pinch to prevent the cake from becoming overly salty.

How should I store leftover French Butter Cake?
To keep your French Butter Cake fresh, store it in an airtight container at room temperature for up to 2 days. If you plan to keep it for longer, you can refrigerate it for up to 5 days. Be sure to bring the cake to room temperature before serving to enhance its delicious flavor!

Can I freeze French Butter Cake, and if so, how?
Absolutely! To freeze your French Butter Cake, slice it into individual pieces. Wrap each slice tightly in plastic wrap and place them into a freezer-safe container or bag. It can be frozen for up to 2 months. When you're ready to enjoy, just thaw a slice in the fridge overnight for the best texture.

What should I do if my cake is dense or doesn’t rise?
If your French Butter Cake turns out dense, it could be due to overmixing the batter, which can make the cake tough. Be sure to mix just until the dry ingredients are combined. Another common cause for a cake not rising is using expired baking powder, so always check its freshness before baking.

Is this recipe suitable for people with gluten sensitivities?
Yes! You can easily make this Classic French Butter Cake gluten-free by using a 1:1 gluten-free flour blend in place of all-purpose flour. This way, you can cater to various dietary needs while still enjoying a moist and delicious cake.

Can dogs eat French Butter Cake?
While the ingredients in French Butter Cake are not toxic to dogs, it’s best to avoid giving it to them. The high sugar and butter content may not agree with their digestive systems. Instead, consider baking a dog-friendly treat specifically designed for your furry friends!

Decadent Black Forest Cake Recipe for Your Next Celebration

June 2, 2026 by Grace Snow Leave a Comment

As the aroma of chocolate wafts through the kitchen, memories of joyous celebrations rush in. Today, I’m excited to share my favorite recipe for the stunning Black Forest Cake, a classic German dessert that never fails to impress. With moist chocolate layers cradling a tart cherry filling and a cloud of fluffy whipped cream, this cake is a perfect showstopper for birthdays and gatherings. One of the best perks? It's surprisingly simple to whip up, even for those new to baking! Plus, it offers the kind of indulgence that transforms any ordinary day into a special occasion. Ready to bring this delightful creation to your table? Let’s dive into the delicious details!

Why Make a Black Forest Cake?

Indulgent, this decadent dessert combines rich chocolate with the tartness of cherries, creating an unforgettable flavor profile. Visual beauty plays a key role; the luscious whipped cream and chocolate shavings make it a stunning centerpiece for any celebration. Easy to make, even beginner bakers can master this recipe with minimal fuss. Versatile, you can swap cherries for strawberries or raspberries for a fresh twist. When you're ready to impress, you can even explore pairing it with a delightful Ice Cream Cake for double the dessert fun!

Black Forest Cake Ingredients

• Everything you need to make this classic dessert!

For the Cake Layers

  • All-purpose flour – Provides the structure of the cake; consider using cake flour for an even lighter texture.
  • Granulated sugar – Adds sweetness; reduce slightly for a less sweet cake experience.
  • Unsweetened cocoa powder – Delivers the deep chocolate flavor essential for Black Forest Cake; avoid sweetened varieties to maintain balance.
  • Baking powder & baking soda – Helps the cake rise; make sure both are fresh for the best results.
  • Salt – Enhances the overall flavor; it’s vital to balance the sweetness.
  • Large eggs – Binds all ingredients and adds moisture; you can substitute flax eggs for a vegan option.
  • Whole milk – Provides moisture; swap with nut milk for a lactose-free version.
  • Vegetable oil – Keeps the cake moist; melted butter can be used for a richer flavor.
  • Vanilla extract – Enhances the flavor profile; pure extract will yield the best taste.
  • Boiling water – Blooms the cocoa, intensifying the chocolate flavor.

For the Cherry Filling

  • Pitted cherries – Provides a tart, fruity layer; fresh or well-drained canned cherries work wonderfully.
  • Granulated sugar – Sweetens the filling; adjust according to the tartness of your cherries.
  • Cornstarch – Thickens the filling; mix well with water to prevent lumps.
  • Kirsch (cherry liqueur) – Adds depth of flavor; can be omitted for a non-alcoholic version.

For the Whipped Cream

  • Heavy cream – The base for your frosting; coconut cream works for a dairy-free option.
  • Powdered sugar – Sweetens and stabilizes the cream; adjust for your preferred level of sweetness.
  • Vanilla extract – A flavor enhancer that brings everything together beautifully.

Step‑by‑Step Instructions for Black Forest Cake

Step 1: Preheat and Prepare
Preheat your oven to 350°F (175°C) and prepare two 9-inch round cake pans by greasing them and lining the bottoms with parchment paper. This will ensure that your Black Forest Cake layers release easily after baking. Set aside while you mix the dry ingredients for the cake.

Step 2: Mix Dry Ingredients
In a large mixing bowl, whisk together the all-purpose flour, granulated sugar, cocoa powder, baking powder, baking soda, and salt. Mixing these dry ingredients ensures that your Black Forest Cake has a rich chocolate flavor and rises evenly. Look for a light, fluffy texture in the mixture before proceeding to the wet ingredients.

Step 3: Combine Wet Ingredients
Add the eggs, whole milk, vegetable oil, and vanilla extract to the bowl of dry ingredients. Using a hand mixer or whisk, blend everything together until the mixture is smooth and well-combined, about 2 minutes. The batter should be thick yet pourable, with a rich chocolate aroma wafting through your kitchen.

Step 4: Add Boiling Water
Gradually stir in 1 cup of boiling water until the batter is completely smooth. This step enhances the chocolate flavor and creates a moist cake. Be careful, as the batter will be quite thin; make sure there are no lumps, and it looks glossy and uniform.

Step 5: Bake the Cake Layers
Pour the batter evenly into the prepared cake pans. Bake in the preheated oven for 30-35 minutes, or until a toothpick inserted in the center comes out clean. You’ll know the cake is done when it springs back slightly when touched and the edges are pulling away from the sides of the pans.

Step 6: Cool the Cakes
Once baked, remove the pans from the oven and let the cakes cool in the pans for about 10 minutes. Then, carefully transfer them to a wire rack to cool completely. This ensures that your Black Forest Cake layers retain their shape and moisture while cooling.

Step 7: Prepare Cherry Filling
In a saucepan, combine the pitted cherries and granulated sugar over medium heat. Simmer until the cherries release their juices, about 5-7 minutes. Mix cornstarch with a little water before adding it to the cherries to thicken the filling. Remove from heat and let cool completely before layering on the cake.

Step 8: Whip the Cream
In a chilled mixing bowl, whip the heavy cream, powdered sugar, and vanilla extract until stiff peaks form, about 3-5 minutes. The whipped cream should be light and fluffy, perfect for layering and frosting. Keep it cool until you’re ready to assemble your Black Forest Cake.

Step 9: Assemble the Cake
Start layering your Black Forest Cake by placing one cake layer on a serving plate. Spread a generous layer of cherry filling, followed by a layer of whipped cream. Repeat this process with the second cake layer, adding more cherry filling and whipped cream.

Step 10: Frost and Decorate
Once assembled, spread the remaining whipped cream evenly over the top and sides of the cake, creating a beautiful, smooth finish. Top with chocolate shavings and fresh cherries for a stunning visual appearance. This decadent Black Forest Cake is now ready to be chilled for 2-3 hours before serving to allow the flavors to meld beautifully.

What to Serve with Black Forest Cake?

As you prepare to impress your loved ones with this delightful treat, consider these delicious pairings that create a well-rounded festive meal.

  • Rich Vanilla Ice Cream: The creamy sweetness melts beautifully alongside the cake's rich chocolate and tart cherry flavors, enhancing each bite.

  • Fresh Mint Leaves: A sprinkle of mint adds a refreshing contrast and a pop of color that elevates the presentation.

  • Chocolate-Covered Cherries: Reinforcing the cherry chocolate theme, these treats offer a deliciously indulgent munch alongside your dessert.

  • Sipping Chocolate: A warm sipping chocolate drink provides an intimate feel, perfect for cozy gatherings and complements the cake's flavor.

  • Bubbly Sparkling Wine: Light and effervescent, the bubbles cut through the richness of the cake, creating a delightful pairing for celebrations.

  • Coffee or Espresso: A fresh cup of coffee or espresso brings out the flavor notes of the chocolate, serving as an energizing finish to the meal.

Each of these pairings not only complements the Black Forest Cake but also creates a memorable experience that your guests will cherish.

Storage Tips for Black Forest Cake

  • Fridge: Store your Black Forest Cake in an airtight container in the refrigerator for up to 2-3 days. This helps maintain its freshness while keeping the whipped cream from drying out.
  • Freezer: If you want to save it for later, wrap individual slices securely in plastic wrap and place them in a freezer-safe container. It can be frozen for up to 2 months.
  • Reheating: Thaw slices in the refrigerator overnight before serving. To enjoy at room temperature, simply let it sit out for about 20-30 minutes before indulging in your delightful cake.
  • Decoration: For best results, avoid garnishing the cake with chocolate shavings or fresh cherries until you are ready to serve, as this helps preserve its visual appeal and texture.

Tips for the Best Black Forest Cake

  • Quality Ingredients: Use high-quality cocoa powder and fresh cherries for the best flavor in your Black Forest Cake. This will enhance the overall taste and impress your guests.

  • Temperature Matters: Ensure your ingredients are at room temperature before mixing. This helps create a smoother batter and results in a better texture.

  • Cool Completely: Allow the cake layers to cool completely before adding frosting and filling. This prevents the whipped cream from melting and losing its fluffy texture.

  • Layering Tips: When assembling, be sure to layer the cake evenly with whipped cream and cherry filling. This not only improves flavor distribution but also ensures stability in the structure.

  • Chill Before Serving: Refrigerate the assembled cake for a few hours to allow the flavors to meld together beautifully. Chilling will enhance the taste and maintain the whipped cream's freshness.

  • Experiment with Flavors: Don't hesitate to swap in different fruits or extracts to customize your Black Forest Cake. Adding raspberries or almond extract can give a delightful twist!

Make Ahead Options

These Black Forest Cake components are perfect for meal prep, allowing you to save time on busy days! You can bake the cake layers and store them in an airtight container in the refrigerator for up to 3 days. The cherry filling can be prepared and refrigerated up to 24 hours in advance to develop its rich flavor. Whip the cream and keep it chilled until you're ready to assemble. When the time comes to serve, simply layer the cooled cake with the cherry filling and whipped cream, then frost and decorate as desired. This way, you’ll enjoy a stunning Black Forest Cake that’s just as delicious, all with minimal last-minute effort!

Black Forest Cake Variations

Feel free to explore these delightful twists on the classic Black Forest Cake to make it your own!

  • Almond Flavor: Replace vanilla extract with almond extract for a fragrant flavor twist that elevates your cake.
  • Berry Delight: Substitute cherries with raspberries or strawberries for a berry-infused experience that bursts with summer sweetness. This variation still pairs beautifully with the chocolate layers!
  • Sugar-Free Swap: Use a sugar substitute or natural sweeteners like honey or maple syrup to cater to your dietary preferences while maintaining sweetness.
  • Gluten-Free Option: Swap all-purpose flour with a gluten-free blend or almond flour to create a cake that's indulgent yet gluten-free friendly.
  • Vegan Variation: Replace eggs with flax eggs and use plant-based milk and whipped coconut cream for a vegan delight that's just as scrumptious.
  • Added Texture: Incorporate chopped nuts such as hazelnuts or almonds into the cake batter or as a topping for an extra crunch that complements the softness.
  • Mocha Twist: Add a tablespoon of brewed espresso or instant coffee granules to the batter to create a mocha version, perfect for coffee lovers.
  • Cherry Muffins: Transform your favorite cake into delightful muffins! Use the same cherry filling and whipped cream as a topping for a fun, portable treat that’s perfect for breakfast or snacks.

Now, you can let your creativity shine and make this delightful dessert truly your own! If you're craving more indulgent recipes, check out our delicious Chocolate Pudding Cake or the festive Ice Cream Cake. The possibilities are endless!

Black Forest Cake Recipe FAQs

How do I pick the right cherries for my Black Forest Cake?
Absolutely! Opt for fresh, ripe pitted cherries that are firm and juicy, as they provide the best flavor. If you use canned cherries, ensure they are well-drained to prevent excess moisture. Look for cherries that have a vibrant color without dark spots all over – that’s a sign they’re fresh and delicious!

What is the best way to store my Black Forest Cake?
Store your Black Forest Cake in an airtight container in the refrigerator for up to 2-3 days. This keeps the whipped cream from drying out and maintains the cake's freshness. If you notice the cream starting to lose its fluffiness, you can spritz a little water over the surface before covering it again.

Can I freeze the Black Forest Cake?
Very! To freeze your Black Forest Cake, wrap individual slices securely in plastic wrap and place them in a freezer-safe container. It can be frozen for up to 2 months. When you're ready to enjoy, simply thaw in the refrigerator overnight. For best results, let it sit at room temperature for about 20-30 minutes before serving to retain its delightful texture.

What should I do if the whipped cream melts while assembling?
Oh no, melting whipped cream can be tricky! If your whipped cream isn't holding its shape, check if it was whipped to stiff peaks. If it’s too warm, try chilling it for 10-15 minutes before re-whipping. Additionally, using a stabilizer like gelatin or cornstarch can help keep it firm, especially in warmer weather. Just mix it in before whipping, and you’ll have beautiful cream that stands strong!

Can I make a vegan version of the Black Forest Cake?
Absolutely! To create a vegan Black Forest Cake, substitute regular eggs with flax eggs (1 tablespoon of ground flaxseed mixed with 2.5 tablespoons of water equals one egg) and use nut milk in place of whole milk. You can also swap heavy cream for coconut cream for the whipped topping. Just ensure everything is thoroughly mixed and maintained at the right temperature for the best results!

Are there any allergens I should consider when preparing this cake?
Yes! Be mindful of common allergens. This Black Forest Cake contains eggs, dairy, and gluten from the flour. If you have guests with allergies, consider using gluten-free flour and a vegan cream substitute to create a deliciously inclusive dessert that everyone can enjoy!

Quick Oreo Cake Recipe: A Decadent Treat You'll Love

June 2, 2026 by Grace Snow Leave a Comment

The sweet aroma of chocolate wafted through my kitchen as I faced a small dilemma—guests were arriving in less than an hour, and I needed a dessert that would wow them. Enter my Quick Oreo Cake recipe, an easy go-to that has saved me more times than I can count. It's moist and fluffy, with irresistible chunks of Oreo cookies tucked into a rich chocolate base. Not only is this cake a crowd-pleaser, but its quick prep time also makes it perfect for last-minute gatherings. Whether you're a seasoned baker or just looking for something simple yet impressive, this dessert will delight both young and old alike. Trust me, you'll want to keep this recipe close—what’s your favorite way to indulge in chocolate treats?

Why This Quick Oreo Cake Recipe?

Simplicity at Its Best: Don’t worry if you’re short on time; this cake comes together in under an hour!

Rich Chocolate Flavor: Every bite is bursting with moist chocolate goodness, enhanced by Oreo chunks that add a delightful crunch.

Customizable Options: Feel free to get creative! Use different toppings like a cream cheese frosting or layer in chocolate mousse for extra indulgence.

Perfect for Any Occasion: This dessert shines at birthdays, potlucks, or even weekday family dinners—everyone will love it!

Make-Ahead Friendly: With a quick assembly and storage that lasts, you can prepare it ahead of time, making it an ideal choice for busy schedules.

Elevate your dessert game with this divine cake—you'll love how effortlessly it impresses!

Quick Oreo Cake Ingredients

• Here’s what you need for the ultimate Oreo delight!

For the Cake

  • All-purpose flour – A key structure ingredient; can be substituted with gluten-free flour blend for a gluten-free version.
  • Sugar – Sweetens the cake and adds moisture for that perfect bite.
  • Unsweetened cocoa powder – Enhances the chocolate richness, making your Quick Oreo Cake irresistible.
  • Baking powder – Helps the cake rise, ensuring a fluffy texture.
  • Baking soda – Works with baking powder for effective leavening.
  • Salt – Balances sweetness and enhances the overall flavor profile.
  • Milk – Keeps the batter smooth and adds moisture.
  • Vegetable oil – Adds richness and moisture; can be swapped for unsweetened applesauce for a healthier option.
  • Eggs – Binds the ingredients and provides a nice richness; can be substituted with unsweetened applesauce for an egg-free version.
  • Vanilla extract – Adds a warm, aromatic flavor that enhances the overall taste.
  • Crushed Oreo cookies – Fold these into the batter for delightful chunks of cookie goodness.

For the Frosting

  • Whipped cream – Provides a light and fluffy finish for your cake.
  • Chocolate ganache – A rich, decadent topping that elevates the taste experience.
  • Extra Oreo crumbs – Use these for garnishing to add that final crunch.

With these ingredients, you're just a step away from creating a show-stopping Quick Oreo Cake that your friends and family will adore!

Step‑by‑Step Instructions for Quick Oreo Cake Recipe

Step 1: Preheat the Oven
Begin by preheating your oven to 350°F (175°C). This ensures that your Quick Oreo Cake bakes evenly and rises nicely. Prepare the cake pan by greasing and flouring a 9-inch round cake pan to prevent sticking, allowing for easy removal once baked.

Step 2: Mix Dry Ingredients
In a large mixing bowl, whisk together 1 ½ cups of all-purpose flour, 1 cup of sugar, ½ cup of unsweetened cocoa powder, 1 teaspoon of baking powder, ½ teaspoon of baking soda, and a pinch of salt. Make sure there are no lumps, as this blend forms the base for your chocolate delight. Set this dry mixture aside to combine with the wet ingredients later.

Step 3: Combine Wet Ingredients
In another bowl, whisk together 1 cup of milk, ½ cup of vegetable oil, 2 large eggs, and 1 teaspoon of vanilla extract until smooth and well combined. This creamy mixture will not only add moisture but also enrich the flavor of your Quick Oreo Cake.

Step 4: Combine Mixtures
Pour the wet ingredients into the bowl containing the dry ingredients. Gently stir with a spatula or wooden spoon until just combined, ensuring not to overmix. A few lumps are perfectly fine, and this technique will keep your cake tender and fluffy when baked.

Step 5: Fold in Oreos
Carefully fold in about 10 crushed Oreo cookies into the batter using a spatula. This will incorporate delightful chunks of cookie goodness throughout your Quick Oreo Cake, enhancing both texture and flavor. Be gentle to prevent breaking the cookies too much.

Step 6: Pour Batter into Pan
Now, pour your prepared batter into the greased and floured cake pan. Use a spatula to spread the batter evenly for uniform baking. This step sets the stage for your cake to rise beautifully in the oven.

Step 7: Bake the Cake
Place the cake pan in the preheated oven and bake for 30-35 minutes. Check for doneness by inserting a toothpick into the center of the cake; it should come out clean or with a few moist crumbs. This indicates that your Quick Oreo Cake is perfectly baked.

Step 8: Cool the Cake
Allow the cake to cool in the pan for about 10 minutes. Then, gently transfer it to a wire rack to cool completely. This cooling period is essential to avoid melting the frosting when you decorate your cake later.

Step 9: Frost and Decorate
Once the cake is completely cool, it's time to frost! Spread a layer of chocolate ganache over the top and let it drizzle down the sides. Sprinkle extra Oreo crumbs on top for an appealing finish, adding both crunch and a burst of Oreo flavor.

Step 10: Serve and Share
Slice your Quick Oreo Cake into generous portions and serve it to your friends and family. The combination of moist chocolate cake and creamy frosting paired with Oreo chunks will be a delightful treat everyone will love!

Expert Tips for Quick Oreo Cake

  • Avoid Overmixing: When combining the wet and dry ingredients, mix gently to prevent a dense texture in your Quick Oreo Cake. Aim for a few lumps!

  • Cool Before Frosting: Ensure that the cake is completely cooled before adding ganache. This will prevent the frosting from melting and sliding off.

  • Use Fresh Ingredients: Fresh baking powder and eggs are key to achieving the best rise. Always check expiration dates to ensure your cake turns out fluffy.

  • Customize Chunks: For added fun, try using mini Oreos or different flavored sandwich cookies to mix into your batter. This allows you to customize your Quick Oreo Cake.

  • Storage Tip: Keep leftover cake in an airtight container in the refrigerator for up to 5 days. This helps retain moisture and flavor for a delicious treat later on!

Make Ahead Options

These Quick Oreo Cakes are perfect for those busy weeknights when time is tight! You can prepare the batter up to 24 hours in advance; simply mix and place it in an airtight container in the refrigerator. Not only does this save time, but it also allows the flavors to meld beautifully. If you prefer, you can also bake the cake up to 3 days ahead. Once fully cooled, wrap it tightly in plastic wrap, and then store it in the fridge. To serve, simply frost your cake with chocolate ganache and sprinkle with Oreo crumbs just before enjoying. This ensures your dessert is just as delightful as the day it was made!

Quick Oreo Cake Recipe Variations

Embrace your creativity in the kitchen with these delightful twists on this beloved dessert!

  • Dairy-Free: Substitute milk with almond or coconut milk and use dairy-free whipped cream for a lactose-free treat.
  • Gluten-Free: Swap all-purpose flour with a gluten-free flour blend for a gluten-free version—every bite will still pack a punch of flavor.
  • Nutty Touch: Add chopped walnuts or pecans to the batter for a delightful crunch and added richness that pairs beautifully with the chocolate.
  • Mint Chocolate: Incorporate mint extract into the batter or frost with a mint-flavored cream for a refreshing green twist—perfect for mint-loving fans!
  • Peanut Butter Swirl: Mix in creamy or crunchy peanut butter to your batter, or layer it between the cake and frosting for a decadent surprise.
  • Chocolate Mousse Layer: Add a layer of rich chocolate mousse between the cake layers—double the chocolate means double the indulgence!
  • Cookies and Cream Frosting: Blend crushed Oreo cookies into your frosting for a cookies and cream sensation that perfectly complements the cake underneath.
  • Spicy Kick: For a surprising twist, mix in a pinch of cayenne pepper into the batter. It subtly enhances the chocolate flavor while adding a fun heat!

Finding new ways to customize the recipe keeps it exciting every time! And if you’re looking for other delicious desserts, why not try pairing your cake with a scoop of Ice Cream Cake or a luscious slice of Chocolate Pudding Cake? The possibilities are endless!

How to Store and Freeze Quick Oreo Cake

Fridge: Store your Quick Oreo Cake in an airtight container for up to 5 days. This keeps it fresh and prevents it from drying out.

Freezer: For longer storage, wrap slices tightly in plastic wrap and foil, then place them in an airtight container. This allows you to freeze it for up to 3 months.

Thawing: When you're ready to enjoy the cake, thaw it in the refrigerator overnight or warm individual slices in the microwave for 15-20 seconds.

Reheating: If you prefer a warmed slice, pop it in a preheated oven at 350°F (175°C) for about 10 minutes to enjoy that fresh-from-the-oven taste!

What to Serve with Quick Oreo Cake?

Gather around the table and delight in flavors that complement this sweet chocolaty creation, making your gathering feel even more special!

  • Vanilla Ice Cream: A classic pairing, the creamy vanilla ice cream offsets the rich chocolate flavors and adds a refreshing chill.
  • Chocolate Syrup Drizzle: Elevate each slice with a luscious drizzle of chocolate syrup, enhancing the cake's indulgent appeal.
  • Fresh Berries: Ripe strawberries or raspberries add a burst of freshness that contrasts and balances the sweetness of the cake.
  • Espresso Coffee: The bold flavor of a steaming cup of espresso perfectly complements the chocolate, creating a delightful taste experience.
  • Mint Tea: A soothing mint tea can cleanse the palate while adding an herbal note that plays beautifully with the cake’s richness.
  • Whipped Cream Topping: Light, fluffy whipped cream adds an extra layer of decadence, making each bite even more delightful.
  • Cream Cheese Frosting Variation: For an extravagant twist, consider serving a side of cream cheese frosting for guests to spread on their slices, enhancing each bite.
  • Chocolate Milkshake: For the ultimate indulgence, pair with a thick chocolate milkshake, perfect for both kids and adults alike.
  • Caramel Sauce: A warm drizzle of caramel adds a sweet, buttery note that melds wonderfully with the chocolate cake.
  • Chocolate Chip Cookies: Serve alongside homemade chocolate chip cookies for a nostalgic dessert table that everyone will love.

Embrace these delightful pairings as you share this wonderful Quick Oreo Cake recipe with loved ones!

Quick Oreo Cake Recipe FAQs

What type of Oreos should I use for the cake?
Absolutely! Classic Oreo cookies work wonderfully, but feel free to mix it up with other flavors like mint or peanut butter Oreos for a unique twist.

How long can I store the Quick Oreo Cake in the fridge?
You can store your Quick Oreo Cake in an airtight container for up to 5 days. This method keeps the cake moist and delicious, ensuring every slice is just as delightful as the first.

Can I freeze the Quick Oreo Cake?
Very! To freeze, wrap individual slices tightly in plastic wrap and then cover them in foil to prevent freezer burn. You can enjoy this cake for up to 3 months. When you're ready to indulge, simply thaw the cake in the refrigerator overnight or warm slices in the microwave for a cozy treat.

What do I do if my cake sinks in the middle?
No worries! A sinking cake can often be the result of overmixing the batter or opening the oven door too soon. To troubleshoot next time, ensure to mix until just combined and resist peeking until the baking time is up—no peeking at least until 30 minutes!

Can I make this recipe egg-free?
Certainly! You can replace the eggs in the Quick Oreo Cake with 1/4 cup of unsweetened applesauce or 1 tablespoon of flaxseed meal mixed with 3 tablespoons of water. Both options will maintain the moistness and structure of your cake, so everyone can enjoy a slice!

  • « Previous Page
  • 1
  • 2
  • 3
  • 4
  • 5
  • …
  • 62
  • Next Page »

Welcome!

Hi, I’m Grace, a Sydney-based home cook with a passion for bold flavors and trending ingredients. Whether you’re a busy beginner or a seasoned foodie, you’ll find dishes here that are fresh, fun, and full of flavor.

More about me

Popular Recipes

  • One Pot Keto Tuna Casserole
    One Pot Keto Tuna Casserole: Creamy Comfort in Minutes
  • Ultimate Jalapeno Popper Chicken Salad
    Ultimate Jalapeno Popper Chicken Salad That'll Wow Your Tastebuds
  • Green Chile Cheese Dip
    Mouthwatering Green Chile Cheese Dip for Cozy Gatherings
  • Easy Chimichurri Sauce
    Fresh and Zesty Easy Chimichurri Sauce in Just Minutes

Footer

↑ back to top

About

  • Privacy Policy
  • Disclaimer
  • Terms & Conditions

Newsletter

  • Sign Up! for emails and updates

Contact

  • About me
  • Contact me

Copyright © 2025 TastyTrendIngredients