tastytrendingredients

  • Home
  • Recipes
    • Appetizers
    • Breakfast
    • Dessert
    • Dinner
    • Drinks
    • Salads
    • Snacks
    • Soups
  • About me
  • Contact
menu icon
go to homepage
  • Home
  • Recipes
    • Appetizers
    • Breakfast
    • Dessert
    • Dinner
    • Drinks
    • Salads
    • Snacks
    • Soups
  • About me
  • Contact
search icon
Homepage link
  • Home
  • Recipes
    • Appetizers
    • Breakfast
    • Dessert
    • Dinner
    • Drinks
    • Salads
    • Snacks
    • Soups
  • About me
  • Contact
×

S'mores Cookie Bars: Your New Favorite Cozy Dessert

June 2, 2026 by Grace Snow Leave a Comment

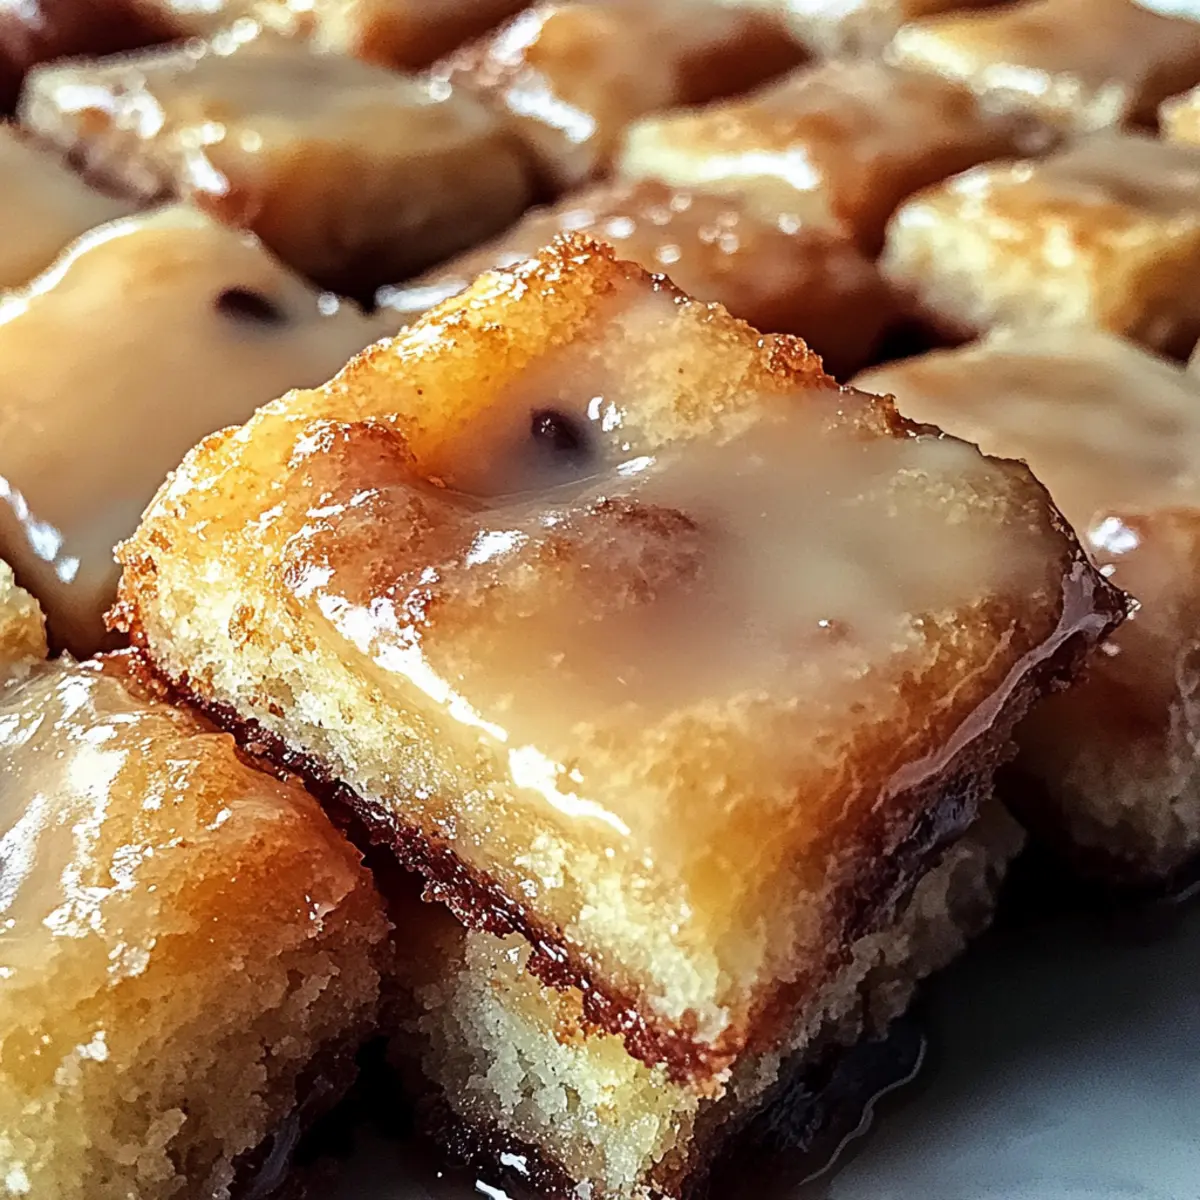
The aroma of warm cookies baking fills the air, transporting me back to lazy summer nights spent by the campfire. Those sweet memories inspired these Easy S'mores Cookie Bars, where you'll find a scrumptious chewy cookie base, gooey marshmallows, and rich chocolate all in one delightful package. Perfect for busy weeknights, this recipe takes just 30 minutes from start to finish, making it an easy choice for families craving a homemade treat. Not only are they customizable to fit your family's tastes, but they also offer a gluten-free option for those needing it. So, why not take a trip down memory lane and whip up a batch? What flavor combinations will you try in your bars?

Why Are S'mores Cookie Bars a Must-Try?

Nostalgic flavors come rushing back with every bite, evoking memories of cozy campfire moments. Quick preparation ensures you can whip these up in just 30 minutes, perfect for busy families. Customizable ingredients let you experiment, so feel free to swap in your favorite chocolate or add nuts. Plus, a gluten-free option makes these bars accessible to everyone. Whether served warm with a scoop of vanilla ice cream or enjoyed as is, these S'mores Cookie Bars are sure to be a hit at any gathering. Try them alongside other delicious treats like Eggnog Cookies Soft for added delight!

S'mores Cookie Bars Ingredients

• Customizable and family-friendly!

For the Cookie Base

  • Unsalted Butter – Adds richness and moisture; substitute with coconut oil for a dairy-free option.
  • Brown Sugar – Provides sweetness and depth of flavor; replace with coconut sugar for a unique twist.
  • Granulated Sugar – Sweetens and balances flavor; using only brown sugar can yield denser bars.
  • Large Eggs – Binds ingredients and adds structure; flaxseed meal mixed with water can serve as an egg substitute.
  • Vanilla Extract – Enhances overall flavor; use vanilla bean paste for a more intense taste.
  • All-Purpose Flour – Provides structure; can be substituted with a gluten-free flour blend for gluten-free S’mores Cookie Bars.
  • Baking Soda – A leavening agent that helps the bars rise.
  • Salt – Elevates sweetness; omit if using salted butter.

For the Flavorful Fillings

  • Graham Cracker Crumbs – Essential for classic S'mores flavor; use gluten-free graham crackers to maintain a gluten-free recipe.
  • Chocolate Chips – Adds rich chocolate flavor; swap for dark or white chocolate for different tastes.
  • Mini Marshmallows – Creates gooey pockets within the bars; use flavored marshmallows or larger ones cut down.

For the Optional Toppings

  • Extra Chocolate Chips – Optional topping for additional richness.
  • Extra Marshmallows – Optional topping for enhanced gooeyness.

Step‑by‑Step Instructions for S'mores Cookie Bars

Step 1: Preheat the Oven
Begin by preheating your oven to 350°F (175°C). Meanwhile, prepare a 9x13 inch baking pan by greasing it lightly or lining it with parchment paper. This ensures the S'mores Cookie Bars will easily release from the pan after baking, allowing for perfectly shaped squares.

Step 2: Cream Butter and Sugars
In a large mixing bowl, combine unsalted butter, brown sugar, and granulated sugar. Using an electric mixer, beat the mixture on medium speed for 2-3 minutes until it becomes light and fluffy, creating a wonderful base for your S'mores Cookie Bars. The sugars will dissolve and incorporate air, resulting in a tender texture.

Step 3: Incorporate Eggs and Vanilla
Once your butter and sugars are creamed together, add the large eggs one at a time, mixing well after each addition. Then, stir in the vanilla extract, blending everything until combined. This step adds richness and enhances the overall flavor profile, making your bars even more delicious.

Step 4: Mix Dry Ingredients
In a separate bowl, whisk together the all-purpose flour, baking soda, and salt. Gradually add this dry mixture to your wet ingredients, stirring gently until just combined. Be careful not to overmix, as this can lead to denser S'mores Cookie Bars. The dough should hold together nicely but still be soft.

Step 5: Fold in Flavorful Mix-ins
Now it's time to add the fun! Carefully fold in the graham cracker crumbs and chocolate chips into the cookie dough. These ingredients provide the classic S'mores flavor you're craving, while the chocolate adds rich, melty pockets throughout the bars. Stir until evenly distributed throughout the dough.

Step 6: Layer the Dough in the Pan
Spread half of the cookie dough evenly across the bottom of your prepared baking pan. Press it down gently to form a solid base. Next, sprinkle mini marshmallows on top, creating a gooey layer before adding the remaining cookie dough. Use your hands to cover the marshmallows with the dough.

Step 7: Add Extra Toppings
For an indulgent finish, sprinkle extra chocolate chips and mini marshmallows over the top of the final layer of dough. This step not only enhances the flavor but also makes for a beautiful presentation when you cut into your S'mores Cookie Bars after baking.

Step 8: Bake to Perfection
Place the pan in the preheated oven and bake your S'mores Cookie Bars for 25-30 minutes. Keep an eye on them towards the end; they should be golden brown on top. A toothpick inserted in the center should come out slightly moist but not with wet batter.

Step 9: Cool and Slice
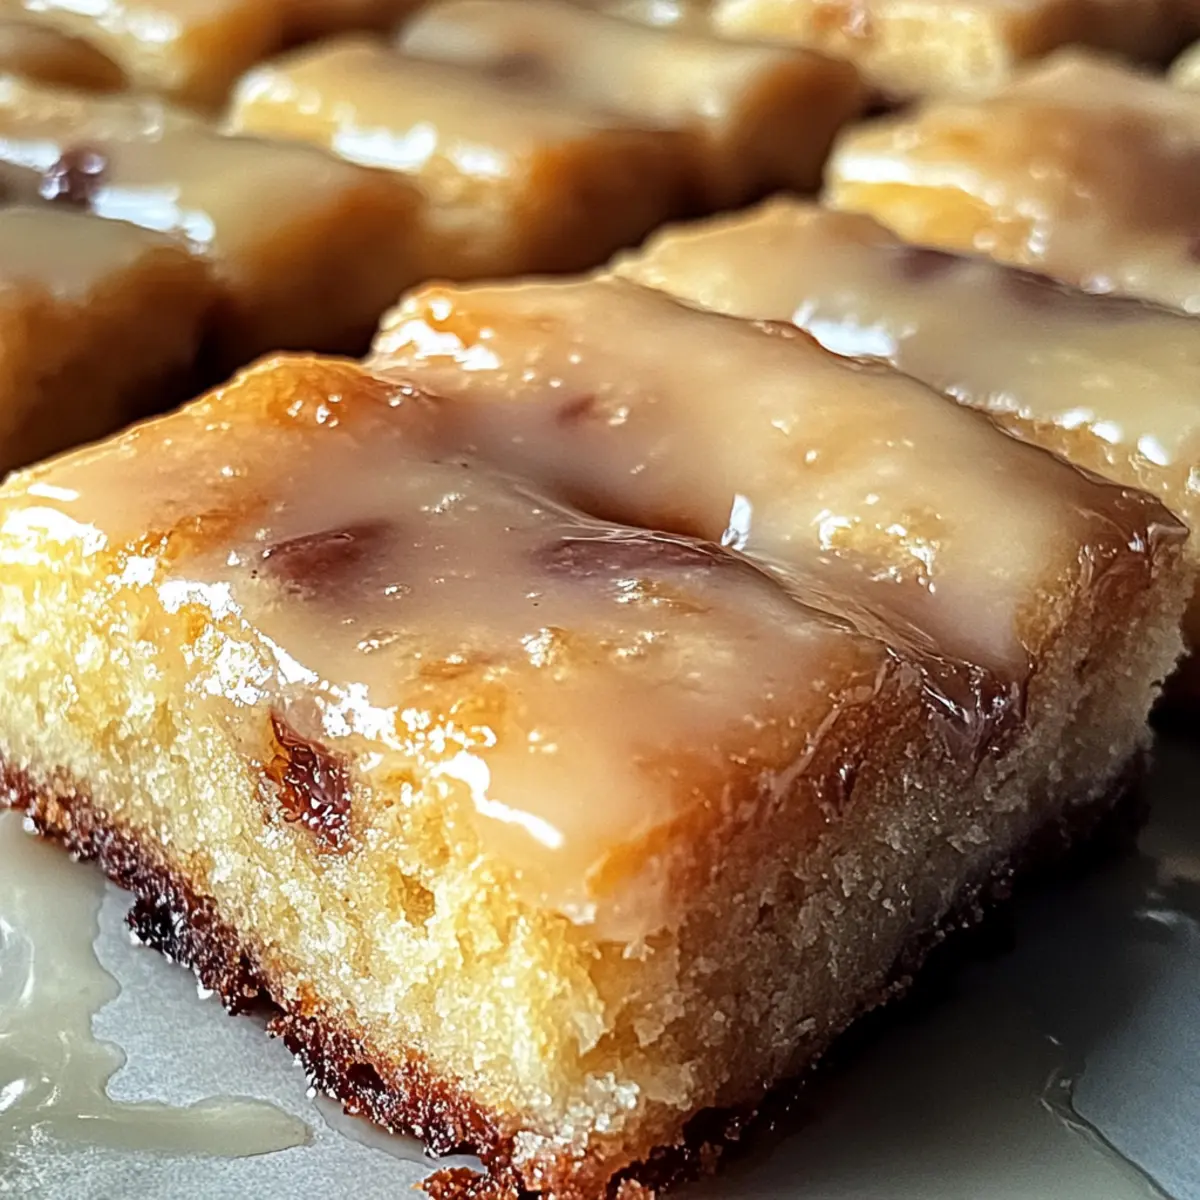
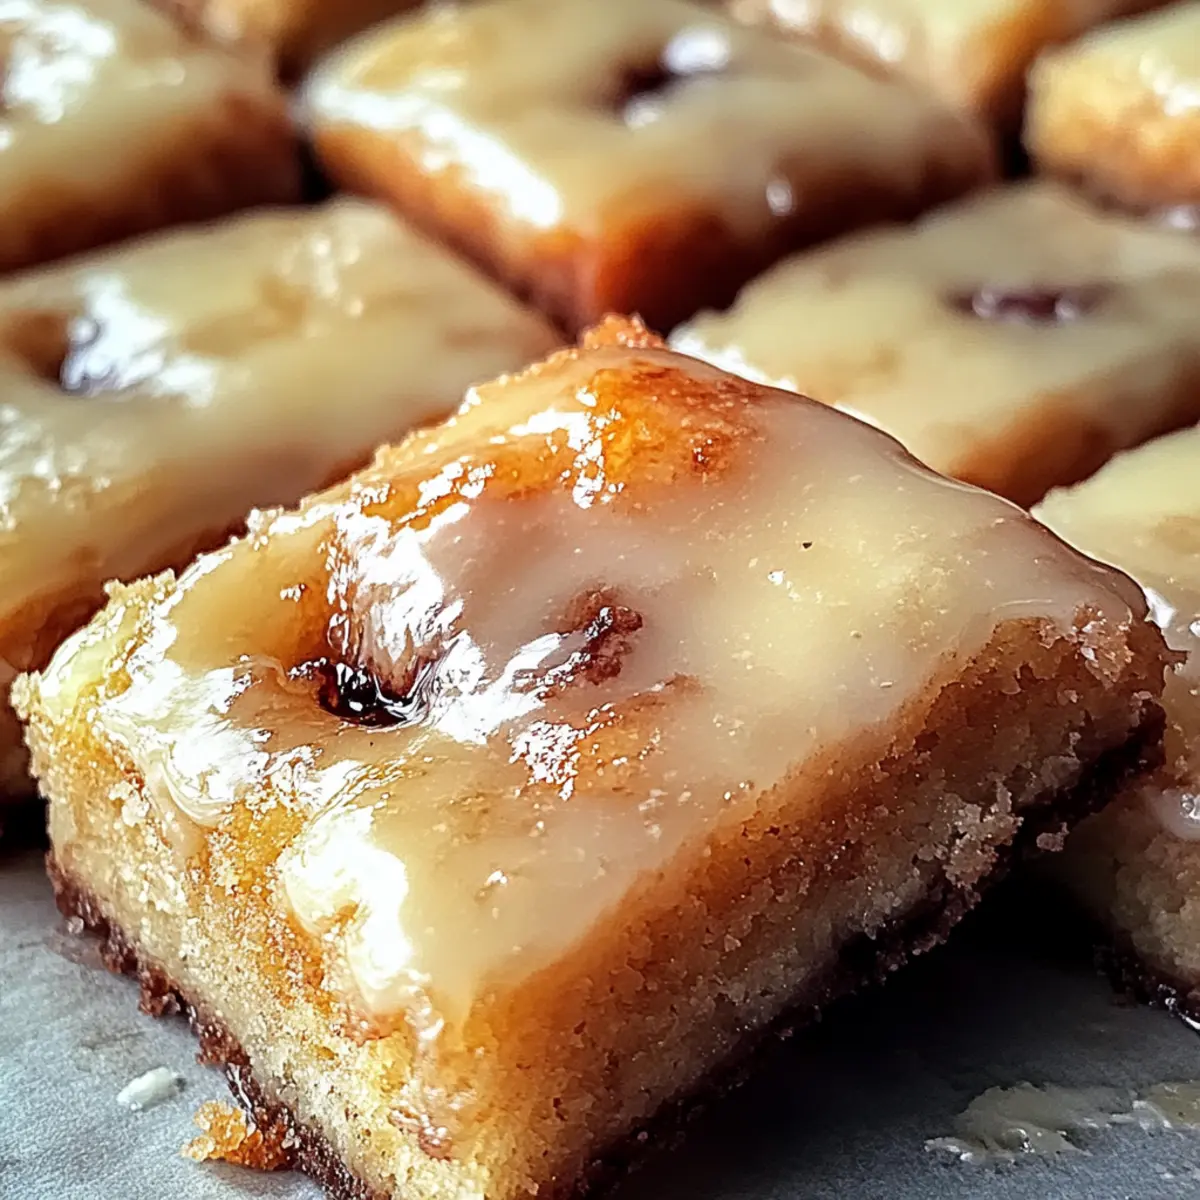
After baking, allow your S'mores Cookie Bars to cool in the pan for about 10 minutes. Then, transfer them to a wire rack to cool completely. Once cooled, slice them into squares. The bars should be chewy and filled with marshmallow and chocolate goodness, ready to be shared with family!

Expert Tips for S'mores Cookie Bars

  • Soften Butter: Ensure your unsalted butter is at room temperature for the best texture. Cold butter can lead to uneven mixing and dense bars.
  • Avoid Overmixing: Mix until just combined to keep the cookie bars chewy and soft. Overmixing develops gluten, which can make them tougher.
  • Watch the Time: Set a timer for baking; start checking the S'mores Cookie Bars at 25 minutes. Overbaking can lead to dryness, losing that gooey texture.
  • Customize Wisely: Feel free to swap chocolate types or add nuts, but remember that more mix-ins may need slight adjustments in cooking time.
  • Storage Essentials: Keep bars in an airtight container at room temperature. For longer shelf life, consider freezing them wrapped individually.

What to Serve with Easy S'mores Cookie Bars

Pair your delightful cookie bars with complementary flavors and textures that elevate this cozy dessert experience.

  • Vanilla Ice Cream: Creamy and cold, it balances the warmth of the S'mores Cookie Bars, creating a classic dessert duo.

  • Fresh Berries: Strawberries or raspberries add a bright, tart contrast to the sweet bars, enhancing both flavor and presentation.

  • Chocolate Sauce: A drizzle of rich chocolate sauce on top adds indulgence and makes each bite even more decadent.

  • Caramel Sauce: The sweetness of caramel beautifully melds with the chocolate, offering a luxurious finish alongside the bars.

  • Nutty Granola: Serve with a side of crunchy nutty granola for an exciting texture twist, making every bite uniquely delightful.

  • Mint Tea: A refreshing cup of mint tea cleanses the palate and provides a pleasant herbal contrast to the sugary bars.

  • Coconut Flavored Whipped Cream: Light and fluffy, this adds a tropical flair that pairs wonderfully with the familiar S'mores flavors.

  • Milk: Classic and refreshing, a cold glass of milk is perfect to wash down the sweetness while enhancing the nostalgic vibe of your treat.

S'mores Cookie Bars Variations

Feel free to unleash your creativity with these delightful S'mores Cookie Bars!

  • Dairy-Free: Substitute butter with coconut oil and use dairy-free chocolate chips for a wholesome twist, allowing everyone to join in the fun. Dairy-free options can still yield a rich and buttery flavor that won’t disappoint!

  • Gluten-Free: Swap out the all-purpose flour for a gluten-free flour blend and use gluten-free graham crackers. You'll enjoy the same classic S'mores taste without the gluten, making it perfect for your gluten-sensitive friends.

  • Nutty Crunch: Add a handful of chopped nuts like pecans or walnuts into the dough. Their crunch adds a delightful texture to the soft and chewy bars, elevating the flavor profile even more.

  • Chocolate Double Trouble: Replace chocolate chips with a combination of dark chocolate and white chocolate chips. This variation gives your bars an extra layer of richness and a fun contrast in flavor.

  • Marshmallow Flavors: Try using flavored marshmallows, like strawberry or caramel, to amplify the sweetness and create a fun twist on the traditional S'mores flavor. Each bite can offer an exciting surprise!

  • Peppermint Infusion: Add peppermint extract to the batter for a refreshing minty twist. This variant is especially delightful around the holidays, making your S'mores Cookie Bars festive!

  • Peanut Butter Lovers: Swirl in creamy or crunchy peanut butter into the batter before baking to create a delicious peanut butter cup effect. The combination of chocolate, graham, and peanut butter is simply irresistible!

For more sweet treats, consider baking some Peaches Cream Cookies for a fruity delight or a traditional batch of Mexican Wedding Cookies to please the crowd!

How to Store and Freeze S'mores Cookie Bars

  • Room Temperature: Store your S'mores Cookie Bars in an airtight container at room temperature for up to 5 days to maintain their chewy texture and freshness.
  • Fridge: If you prefer a chilled treat, you can refrigerate the bars, but be warned that they may become slightly firmer; enjoy within a week for the best flavor.
  • Freezer: For longer storage, wrap bars individually in plastic wrap and then place them in a freezer-safe container. They'll stay fresh for up to 2 months.
  • Reheating: To enjoy warm bars, simply microwave frozen or refrigerated portions for about 15-20 seconds, and relish that gooey goodness once more!

Make Ahead Options

These Easy S'mores Cookie Bars are perfect for meal prep enthusiasts! You can prepare the cookie dough (steps 1-5) up to 24 hours in advance. Simply cover the prepared dough tightly with plastic wrap and refrigerate it to keep it fresh. Also, feel free to layer the dough with marshmallows and chocolate chips in the pan up to 3 days ahead; just keep it covered and refrigerated. When ready to bake, let it sit at room temperature for about 15 minutes to maintain the cookie's texture, then pop it in the oven as directed in step 8. You'll have a warm, gooey treat that tastes just as delicious as if you made it fresh!

S'mores Cookie Bars Recipe FAQs

What type of chocolate is best for S'mores Cookie Bars?
Absolutely! You can use any type of chocolate you love! Semi-sweet chocolate chips are the classic choice, but feel free to get creative with dark or white chocolate chips for a unique flavor twist. Just remember that different chocolates can affect the overall sweetness, so taste as you go!

How should I store S'mores Cookie Bars?
To keep your S'mores Cookie Bars fresh, store them in an airtight container at room temperature for up to 5 days. This preserves their chewy texture beautifully. If you think they won't be eaten within that time, you can refrigerate them for a week, but they may become firmer.

Can I freeze S'mores Cookie Bars?
Yes, you can wonderfully extend their shelf life! Wrap individual bars in plastic wrap and place them in a freezer-safe container. They’ll stay delicious for up to 2 months. When you're ready to enjoy, simply microwave the frozen bars for about 15-20 seconds to regain that gooey goodness!

How do I know when my S'mores Cookie Bars are done baking?
Great question! You want to look for a golden brown top. Start checking around the 25-minute mark by inserting a toothpick into the center; it should come out slightly moist but not with wet batter. If it’s too sticky, give it a few more minutes, but don’t forget to keep an eye on them to avoid overbaking!

Can I modify the recipe for dietary restrictions?
Very! For a gluten-free version, substitute the all-purpose flour with a gluten-free flour blend and use gluten-free graham crackers. Additionally, you can replace the eggs with a flaxseed meal mix (1 tablespoon flaxseed meal + 2.5 tablespoons water per egg) to make it vegan-friendly. These swaps can still yield delicious results!

What if my bars turn out too dry?
If you find your S'mores Cookie Bars are dry, it may have been overbaked or the ingredients weren't properly measured. For next time, ensure you're using room temperature butter and avoid overmixing the dough. If you're concerned during baking, err on the side of underbaking slightly, as the bars will continue to cook while cooling!

Delightful Cookie Monster Cookies Bursting with Fun and Flavor

June 2, 2026 by Grace Snow Leave a Comment

"Look at that blue! It’s as if the sky decided to come down to our kitchen in the form of cookies." These Cookie Monster Cookies are not just a feast for the eyes; they’re a delightful blend of chewy goodness, stuffed with crispy Oreos and melty chocolate chips. Perfect for a cozy baking session with the kids or as a centerpiece for your next gathering, this vibrant cookie recipe promises fun at every bite. The best part? They’re easy to whip up, making them a fantastic choice for anyone looking to break away from the same old routine. Whether you’re celebrating a special occasion or just in need of a sweet escape, these colorful cookies are sure to bring smiles to faces young and old. So, are you ready to bring a little whimsy into your baking?

Why are Cookie Monster Cookies a must-try?

Vibrant and Fun: These cookies are a visual delight with their eye-catching blue hue, perfect for adding a pop of color to your dessert table.

Easy to Make: You'll love how simple the process is! With just a few steps, you can create these chewy masterpieces that delight the whole family.

Stuffed with Surprises: Every bite features the exciting crunch of Oreos and warm chocolate chips, making them a unique twist on traditional cookies.

Perfect for Parties: Whether it’s a birthday bash or a cozy gathering, these cookies are sure to be a hit, igniting smiles and sparking joy!

Versatile Options: Feel free to experiment with different flavors like swapping Oreos for Biscoff or changing the dough color for various themes.

Kid-Friendly Activity: Get the little ones involved in the baking process, creating lasting memories while preparing these delightful treats together.

Cookie Monster Cookies Ingredients

• Dive into the fun with these Cookie Monster Cookies!

For the Cookie Dough

  • Butter – Provides richness and moisture; make sure it's at room temperature for proper creaming.
  • Granulated Sugar – Adds sweetness and structure; can be swapped with coconut sugar for a different flavor profile.
  • Brown Sugar – Gives depth and chewiness; essential for that perfect texture.
  • Egg – Binds all the ingredients together; no substitutes recommended for best results.
  • Vanilla Extract – Enhances flavor; opt for pure vanilla to elevate the taste.
  • Blue Gel Food Coloring – Creates the cookies' signature color; gel provides a stronger hue than liquid dyes.
  • All-Purpose Flour – Essential for structure; weighing it ensures accuracy.
  • Baking Powder & Baking Soda – Leavening agents for puffiness and proper texture.
  • Salt – Balances sweetness; an essential ingredient, avoid omitting.

For the Mix-Ins

  • Chocolate Chips – Adds delightful sweetness and texture; semi-sweet or milk chocolate is excellent.
  • Oreos (for stuffing) – Introduces crunch and creaminess; you can substitute with any filled cookie or chocolate square.

Step‑by‑Step Instructions for Cookie Monster Cookies

Step 1: Creaming the Butter and Sugars
In a large mixing bowl, use a hand mixer or stand mixer to beat 1 cup of softened butter, ¾ cup of granulated sugar, and ¾ cup of brown sugar on medium speed for 1–2 minutes. The mixture should become light and fluffy, indicating that the sugars have fully incorporated into the butter. This step forms the foundation of your Cookie Monster Cookies.

Step 2: Mixing in the Wet Ingredients
Add 1 egg, 2 teaspoons of vanilla extract, and a few drops of blue gel food coloring to the creamed mixture. Mix on low speed until all ingredients are well combined and the blue dye is evenly distributed, resulting in a vibrant hue. This is where the fun begins, transforming your dough into the colorful delight that is Cookie Monster Cookies.

Step 3: Combining the Dry Ingredients
In a separate bowl, whisk together 2 ¾ cups of all-purpose flour, 1 teaspoon of baking powder, 1 teaspoon of baking soda, and ½ teaspoon of salt. Gradually fold this dry mixture into the wet ingredients using a spatula or wooden spoon until just combined. Be careful not to overmix; you want a soft dough that is ready to embrace those delicious mix-ins.

Step 4: Adding the Mix-Ins
Gently fold in 1 cup of chocolate chips and roughly chopped Oreos (about 1 cup) into the cookie dough. Ensure the chips and chunks are evenly distributed throughout, creating a exciting surprise in every bite of your Cookie Monster Cookies. The dough should be thick and chunky, ready to be shaped into those fun-loving cookie balls.

Step 5: Shaping the Cookies
Take a scoop of dough, about 2 tablespoons, and flatten it slightly in your palm. Place a whole Oreo in the center and wrap the dough around it, shaping it back into a ball. Repeat this process until all dough is used. This method ensures each Cookie Monster Cookie is a delightful surprise, packed with tasty Oreos inside.

Step 6: Chilling the Dough
Cover the cookie dough balls with plastic wrap and refrigerate them for at least 30 minutes, or freeze for 15–20 minutes if you're short on time. Chilling is crucial to prevent the cookies from spreading too much during baking, helping you achieve that thick, chewy texture that makes Cookie Monster Cookies irresistible.

Step 7: Baking the Cookies
Preheat your oven to 180°C (350°F) and prepare a lined baking sheet with parchment paper. Place the chilled cookie dough balls on the sheet, leaving enough space between them. Bake in the preheated oven for 12–15 minutes, or until the edges are golden brown but the centers still appear soft and slightly underbaked, ensuring a chewy cookie.

Step 8: Cooling the Cookies
Once baked, allow the cookies to cool on the baking sheet for 5 minutes before transferring them to a wire rack. This resting time allows them to set while maintaining their soft interior. Once fully cooled, these colorful Cookie Monster Cookies are ready to be enjoyed, showcasing their delightful textures and vibrant colors!

Make Ahead Options

These Cookie Monster Cookies are perfect for busy weeknights and meal prep! You can prepare the cookie dough up to 24 hours in advance by following the steps up to shaping the cookies. Simply chill the dough balls (wrapped tightly in plastic wrap) in the refrigerator to maintain their freshness. If you want to extend the prep time, freeze the unbaked cookie dough balls for up to 3 months in an airtight container; when ready to bake, there's no need to thaw—just add an extra minute or two to the baking time. For the best results, ensure you’re chilling the dough to keep those irresistible chewy textures intact. When you’re ready to enjoy, bake them directly from the fridge or freezer, and your colorful Cookie Monster Cookies will be just as delicious!

Expert Tips for Cookie Monster Cookies

  • Chill the Dough: Ensure the dough is chilled for at least 30 minutes to prevent excessive spreading during baking, keeping your cookies thick and chewy.

  • Measure Flour Accurately: Weighing your flour will lead to consistent results. Too much flour can result in dry cookies, so be careful!

  • Mix-Ins Variety: Feel free to add nuts, mini chocolate chips, or a sprinkle of sea salt on top for extra texture and flavor. Just remember, the focus here is on those delightful Oreos!

  • Perfect Baking Time: Keep an eye on your cookies as they bake; the ideal time is 12–15 minutes. They should be golden at the edges and soft in the center.

  • Storage Tips: Keep your cookies in an airtight container to maintain their softness and flavor for up to a week. Consider freezing the dough for a quick baking fix later!

Cookie Monster Cookies Variations

Feel free to unleash your creativity and customize these delightful treats with these fun variations!

  • Color Swaps: Experiment with different food coloring to create themed cookies for holidays like red for Valentine’s or green for St. Patrick’s Day.

  • Filled Cookie Twist: Substitute Oreos with other filled cookies like Biscoff for added flavor; you might just find a new favorite combination!

  • Nutty Crunch: Fold in chopped nuts such as walnuts or pecans for a satisfying crunch; they pair beautifully with the sweetness of chocolate and creaminess of Oreos.

  • Chocolate Lovers Delight: Boost the chocolate factor by adding mini chocolate chips along with the regular ones; double the chocolate means double the joy!

  • Spiced Up: Mix in some cinnamon or a hint of nutmeg for a warm spice twist that complements the sweetness and adds depth.

  • Healthier Options: For a healthier variation, use whole wheat flour instead of all-purpose; they’ll have a nuttier flavor and extra fiber.

  • Dairy-Free Delight: Swap butter for coconut oil and use dairy-free chocolate chips to make these cookies suitable for those with lactose intolerance.

  • Chilled Cookie Dough: For a fun twist, chill the dough for a bit longer, then scoop and roll in powdered sugar before baking for a delightful treat that looks like a snowball!

These playful variations can take your Cookie Monster Cookies to new heights, making them a versatile treat for every occasion. For more fun baking ideas, don't miss checking out these Thumbprint Cookies Melt or the festive Eggnog Cookies Soft.

How to Store and Freeze Cookie Monster Cookies

Airtight Container: Store baked Cookie Monster Cookies in an airtight container at room temperature for up to 1 week to maintain their chewy texture and delicious flavor.

Refrigeration: If you want to keep the cookies longer, place them in the fridge for up to 2 weeks. Ensure they are wrapped securely to prevent drying out.

Freezer: Freeze unbaked dough balls for up to 3 months. Just scoop, wrap tightly, and label. When ready to bake, add an extra minute or two to the baking time.

Reheating: For best results, reheat cookies in the microwave for about 10–15 seconds before serving. Enjoy them warm for that fresh-baked taste!

What to Serve with Cookie Monster Cookies?

These delightful treats are not just fun to bake; they also pair beautifully with a variety of side dishes and drinks to elevate your dessert experience.

  • Cold Glass of Milk: The classic pairing! A tall glass of chilled milk complements the sweetness, cutting through the richness of the cookies.
  • Scoop of Vanilla Ice Cream: Serve a scoop alongside for a decadent dessert. The melting ice cream beautifully contrasts the chewy cookie, creating a delightful ensemble.
  • Fresh Berries: The tartness of strawberries or raspberries adds a refreshing burst of flavor that balances the sweetness of the cookies.
  • Chocolate Milkshake: For a truly indulgent experience, blend up a thick shake. The richness of the shake enhances the cookie experience, making it a kid-friendly favorite.
  • Yogurt Parfait: Layer yogurt with granola and fresh fruit for a contrast in textures. This option provides a light, creamy counterpart to the rich sweetness of the cookies.
  • Caramel Sauce Drizzle: A drizzle of warm caramel over the cookies offers an extra layer of sweetness and a gooey texture that makes each bite even more decadent.
  • Nutty Coffee: Pair with a cup of coffee or latte to elevate your afternoon treat. The nutty flavors in the coffee can enhance the chocolate and Oreo flavors.
  • Fruit Salad: A vibrant fruit salad adds freshness, making it a delightful contrast and a healthier option alongside indulgent cookies.
  • Pour Over Hot Chocolate: Perfect for chilly days! Warm cocoa adds a comforting touch and complements the rich flavors of the Cookie Monster Cookies.

Cookie Monster Cookies Recipe FAQs

How do I choose the right butter for my Cookie Monster Cookies?
Absolutely! You’ll want to use unsalted butter at room temperature for the best results. This allows for proper creaming with the sugars, which is key to achieving that rich, chewy texture. If you only have salted butter, just omit any added salt in the recipe to balance things out.

How long can I store my baked Cookie Monster Cookies?
You can store these delightful cookies in an airtight container at room temperature for up to 1 week. For longer storage, refrigerate them for up to 2 weeks. Just be sure they’re well-wrapped to avoid any excess moisture!

Can I freeze the Cookie Monster Cookies, and how?
Yes, you can! To freeze unbaked dough, scoop the dough balls onto a baking sheet lined with parchment paper, freeze them until solid (around 1-2 hours), then transfer them to a zip-top bag or airtight container. Label and freeze for up to 3 months. When you’re ready to bake, just add an extra minute or two to your baking time.

What should I do if my cookie dough is too sticky?
Very! If your dough becomes too sticky, it may be due to the butter being too warm or humid conditions in your kitchen. Chill the dough for 15-30 minutes to firm it up before shaping. Additionally, you could add a tablespoon of flour at a time until it becomes manageable, but be cautious not to add too much to avoid drying out the cookies!

Are there any allergy considerations I should be aware of when making Cookie Monster Cookies?
Of course! Be mindful of any allergies related to the ingredients. These cookies contain gluten (from the flour) and dairy (from the butter). If you need a gluten-free option, substitute with a 1:1 gluten-free flour blend and be sure to check the labels on your Oreos and chocolate chips for any allergens!

Can I make these Cookie Monster Cookies dairy-free?
Absolutely! To create a dairy-free version, you can substitute the butter with a dairy-free alternative like coconut oil or a vegan butter substitute. Ensure that the chocolate chips are also dairy-free to keep the recipe compliant with your dietary needs.

Oreo Cookie Dirt Cup: Delightful No-Bake Fun for Everyone

June 2, 2026 by Grace Snow Leave a Comment

As I gazed into my pantry, I stumbled upon a hidden treasure: a few forgotten packages of Oreo cookies. Instantly, my mind flooded with memories of playful days filled with laughter and delicious treats. That’s when the idea struck me—why not whip up some delightful Oreo Cookie Dirt Cups? This fun and no-bake dessert not only rekindles childhood joy but is also incredibly easy to prepare, making it perfect for any gathering. With layers of velvety chocolate pudding, a creamy filling, and the tantalizing crunch of crushed Oreos, these cups are sure to be a hit with both kids and adults alike. Plus, there’s plenty of room for creativity with fun toppings and variations! Are you ready to dig in?

Why are Oreo Cookie Dirt Cups a must-try?

Nostalgic Delight: The Oreo Cookie Dirt Cups transport you straight back to childhood, invoking sweet memories with every bite.
Effortless Preparation: Just a few simple steps turn your pantry staples into an impressive dessert that requires no baking.
Customizable Fun: Experiment with toppings like gummy worms, or switch up cookie flavors for unique versions—think mint or peanut butter!
Kid-Approved: This recipe is a hit with kids, making it perfect for parties or family gatherings. Plus, adults won't be able to resist either! For more fun desserts, check out these Thumbprint Cookies Melt or Peaches Cream Cookies.
Visual Appeal: Serve in clear cups to showcase the beautiful layers, turning a simple dessert into a stunning centerpiece.

Oreo Cookie Dirt Cup Ingredients

• Everything you need for chocolatey delight!

For the Creamy Filling

  • Cream Cheese (8 oz, softened) – Adds a rich creaminess; you can use Neufchâtel for a lighter option.
  • Butter (4 tbsp, softened) – Helps bind the filling together; margarine makes a good dairy-free alternative.
  • Powdered Sugar (1 cup) – Provides sweetness and smooth texture; granulated sugar can work in a pinch but may alter the consistency.

For the Pudding Layer

  • Instant Chocolate Pudding (2 packages, 3.9 oz each) – Essential for that thick, chocolate goodness; avoid cook-and-serve varieties.
  • Milk (3 1/2 cups) – Combines beautifully with pudding mix; any plant-based milk can be used as a substitute.
  • Cool Whip (12 oz) – Gives a light, airy texture; feel free to swap with homemade whipped cream.

For the Crunchy Layers

  • Oreo Cookies – The star ingredient that adds delectable crunch; any chocolate sandwich cookie works if you want to mix it up.

For Decoration

  • Gummy Worms – Perfect for a fun touch on top; use candy flowers or chocolate insects for whimsical variations.

These Oreo Cookie Dirt Cup ingredients create a crowd-pleasing dessert that everyone will love—perfect for those seeking an easy, no-bake treat!

Step‑by‑Step Instructions for Oreo Cookie Dirt Cup

Step 1: Crush Oreos
Start by crushing Oreo cookies into fine crumbs to create the base layer for your Oreo Cookie Dirt Cups. Use a food processor for the best consistency, processing until the crumbs resemble sand. If you don’t have a processor, place the cookies in a resealable bag and crush them with a rolling pin. Set aside about 1 cup of crumbs for layering and garnish later.

Step 2: Make Cream Cheese Mixture
In a mixing bowl, combine 4 tablespoons of softened butter, 1 cup of powdered sugar, and 8 ounces of softened cream cheese. Using an electric mixer, beat the mixture on medium speed for 2-3 minutes until it becomes smooth and creamy, with no lumps remaining. This rich filling will provide a delightful contrast to the crunchy Oreo layers.

Step 3: Prepare Chocolate Pudding
In a separate bowl, whisk together 2 packages (3.9 oz each) of instant chocolate pudding mix and 3.5 cups of milk. Stir for about 2 minutes until the pudding thickens slightly, ensuring it has a smooth consistency. Once combined, gently fold in 12 ounces of Cool Whip until fully incorporated, creating a light and airy pudding layer for your Oreo Cookie Dirt Cups.

Step 4: Combine Mixtures
Carefully combine the cream cheese mixture with the chocolate pudding in a large bowl. Use a spatula to gently fold the two mixtures together until completely smooth and uniform—this should take about 1 minute. This creamy filling will sit perfectly between layers of crushed Oreos, adding richness to each delightful spoonful of your Dirt Cups.

Step 5: Layer Cups
Gather your serving cups and begin layering. Start with a layer of the chocolate pudding mixture at the bottom, followed by a sprinkle of crushed Oreos. Repeat the layering process until you've filled the cups, finishing with a generous layer of crushed Oreos on top. This will give your Oreo Cookie Dirt Cups a lovely, ‘dirt-like’ appearance, showcasing the layers beautifully.

Step 6: Garnish
To bring your Oreo Cookie Dirt Cups to life, add whimsical gummy worms on top of the final layer of crushed Oreos. You can also sprinkle more Oreo crumbs for extra texture and visual appeal. Once garnished, cover the cups with plastic wrap and place them in the refrigerator for at least 1 hour to set, allowing the flavors to meld together beautifully.

Step 7: Serve and Enjoy
After chilling, your Oreo Cookie Dirt Cups are ready to serve! Remove them from the refrigerator and present them in their clear cups, showcasing the lovely layers to your guests. These no-bake delights are perfect for parties, picnics, or satisfying your sweet tooth at home. Enjoy the creamy, chocolatey goodness with family and friends!

What to Serve with Oreo Cookie Dirt Cups

Creating a delightful meal around your sweet treat adds an extra layer of enjoyment to any gathering.

  • Vanilla Ice Cream: A scoop of creamy vanilla perfectly balances the rich chocolate layers, enhancing the overall dessert experience.
  • Fresh Fruit Salad: Light and refreshing, a fruit salad brightens up the plate and adds a pop of color, creating a beautiful contrast to the dense dessert.
  • Chocolate Milkshake: Rich, creamy, and indulgent—serve with a milkshake for a nostalgic pairing that will remind you of childhood days at the diner.
  • Chocolate-Covered Strawberries: The sweetness and tartness of juicy strawberries pairs wonderfully with the chocolate flavors, creating a delightful mix of textures.
  • Whipped Cream Topping: A dollop of homemade whipped cream adds an airy lightness that complements the dense cookie layers in each cup.
  • Coffee or Hot Cocoa: Try serving light coffee or rich hot cocoa for a warm touch alongside the chilled cups; it’s a comforting combination to enjoy.
  • Nutty Brownies: Chewy, fudgy brownies introduce a new texture and flavor dimension that complements the creamy Oreo layers beautifully.
  • Gummy Worms as Garnish: For a whimsical touch, serve alongside additional gummy worms for a playful treat that kids adore and adults appreciate!

Oreo Cookie Dirt Cup Variations

Get ready to unleash your creativity as you customize your delicious dessert experience!

  • Dairy-Free: Substitute cream cheese and Cool Whip with dairy-free options like coconut cream and dairy-free cream cheese.
  • Fruit Layers: Add fresh berries, such as strawberries or raspberries, between the layers for a refreshing fruity twist that brightens up every bite.
  • Nutty Crunch: Mix in crushed nuts—like walnuts or pecans—with the Oreo crumbs for a delightful, extra crunch that pairs wonderfully with the creaminess.
  • Seasonal Themes: Adapt flavors for the holidays by incorporating pumpkin spice in fall or peppermint extract during the winter months for a festive flair.
  • Different Cookies: Explore various flavors by using double chocolate or mint-flavored Oreos; elevate your Dirt Cups with unexpected taste adventures!
  • Syrup Swirls: Drizzle chocolate or caramel syrup between layers for an extra indulgent sweetness that promises to satisfy your sweet tooth.
  • Change Up the Topping: Instead of gummy worms, use candy flowers or chocolate insects to add whimsy and color to your dessert presentation.

For a delightful twist on another classic, be sure to check out the recipe for Eggnog Cookies Soft for seasonal inspiration, or try the unique taste of Mexican Wedding Cookies. Happy customizing!

Storage Tips for Oreo Cookie Dirt Cups

Fridge: Store any leftovers in an airtight container in the refrigerator for up to 2 days to maintain freshness and flavor.

Freezer: For longer storage, you can freeze the cups for up to 1 month; however, it’s best to enjoy these Oreo Cookie Dirt Cups fresh for the best texture.

Layering Care: If you make the filling ahead of time, it’s advisable to layer the cups just before serving to keep the Oreo crumbs from getting soggy.

Reheating: Since these are cold desserts, no reheating is necessary; simply enjoy them straight from the fridge or freezer!

Expert Tips for Oreo Cookie Dirt Cups

  • Proper Chilling: Allow the Oreo Cookie Dirt Cups to chill for at least an hour; this helps set the layers and blend the flavors for a delicious outcome.
  • Crush Smart: Ensure you crush Oreos into fine crumbs for a seamless layer; using a food processor guarantees the best texture.
  • Layer Final Touches: For prettiest presentation, layer the cups just before serving—this keeps the Oreo crumbs crunchy and inviting.
  • Clear Cups: Opt for clear cups to display the beautiful layers of your dessert, turning a simple treat into an eye-catching centerpiece.
  • Mix Carefully: When combining mixtures, fold gently to keep the light and fluffy texture of the pudding—this makes every bite heavenly!

Make Ahead Options

These Oreo Cookie Dirt Cups are perfect for meal prep, saving you time on busy days! You can prepare the creamy filling and chocolate pudding mixture up to 24 hours in advance, ensuring you have a delightful dessert ready to go. Simply crush the Oreos and store them separately in an airtight container to maintain their crunch. When you're ready to serve, layer the prepped filling with the crushed Oreos in clear cups and garnish with gummy worms. For the best results, do the assembly just a few hours before serving to keep everything fresh and delicious. With this make-ahead option, you'll enjoy restaurant-quality desserts with minimal effort!

Oreo Cookie Dirt Cups Recipe FAQs

How do I choose the right Oreos for my Dirt Cups?
Absolutely! It’s best to use classic Oreo cookies for the authentic taste and crunch that complements the other layers. However, if you want to get creative, feel free to substitute with flavored varieties like mint or peanut butter Oreos for a fun twist!

What’s the best way to store leftover Oreo Cookie Dirt Cups?
Store your Oreo Cookie Dirt Cups in an airtight container in the refrigerator for up to 2 days. This helps maintain their creamy texture and delightful crunch. If you've prepared them but only want to enjoy them later, remember to layer them just before serving to prevent sogginess!

Can I freeze the Oreo Cookie Dirt Cups?
Yes! You can freeze the cups for up to 1 month. To do so, prepare the cups and place them in a freezer-safe container. Just ensure they are tightly covered; when you're ready to enjoy, let them thaw in the refrigerator for a few hours before serving. This way, they retain their delicious texture.

What if my pudding mixture doesn't thicken properly?
No worries! If your pudding doesn't thicken after following the instructions, try whisking it a bit longer—sometimes, a quick extra minute makes all the difference. If it still seems too runny, let it chill in the fridge for about 15 minutes before folding in the Cool Whip. Chilling can help the mixture set up a bit better.

Are there any dietary considerations for Oreo Cookie Dirt Cups?
Indeed! If anyone has allergies, always check the labels on your ingredients. Oreos contain wheat and may contain traces of nuts, so they’re not suitable for individuals with those allergies. For a dairy-free option, substitute the cream cheese with a dairy-free cream cheese spread and use dairy-free whipped topping.

How long should I chill the Dirt Cups before serving?
For the best results, allow your Oreo Cookie Dirt Cups to chill for at least 1 hour in the refrigerator. This step is essential for letting the flavors meld together and ensuring the layers set properly, enhancing the overall texture and taste experience!

Indulge in Chocolate Raspberry Cheesecake Domes for Delightful Bliss

June 2, 2026 by Grace Snow Leave a Comment

In a world where desserts often blur into one another, I stumbled upon a glorious revelation: Chocolate Raspberry Cheesecake Domes. Oh, the delight in crafting individual dessert experiences that shine in both taste and presentation! These no-bake wonders transform ordinary ingredients into a beautiful medley of rich chocolate shells, creamy raspberry cheesecake, and a tender cake base. Not only are they a show-stopping centerpiece for any gathering, but they also come together with surprisingly quick prep, making them perfect for both the seasoned chef and the weekend warrior in the kitchen. Whether you’re celebrating a special occasion or simply indulging a sweet craving, I promise these domes will deliver that wow factor. Curious to dive in and create your own? Let's get started!

Why Are Chocolate Raspberry Cheesecake Domes So Irresistible?

Elevated elegance: These domes look stunning, transforming your dessert table into a gourmet display.
Easy prep: With no baking required, you can create these delectable treats with just a few simple steps.
Flavor explosion: The sweet, tart raspberry filling perfectly complements the rich chocolate shell, creating a taste sensation.
Versatile and fun: Enjoy them as is, or personalize with various fruit purees or chocolate types for a unique twist. For a comforting hug in a mug alongside, try some Homemade Hot Chocolate to satisfy your sweet tooth.
Crowd-pleaser: Perfect for any occasion, these individually portioned desserts are sure to impress your guests!

Chocolate Raspberry Cheesecake Domes Ingredients

For the Chocolate Shell
• Dark Chocolate – Use high-quality semi-sweet or dark chocolate (60-70% cocoa) for a rich shell that enhances the dessert's flavor.

For the Cheesecake Filling
• Cream Cheese – This creamy base provides the rich texture and tangy flavor that makes cheesecake irresistible.
• Heavy Cream – Helps achieve a light, mousse-like consistency in the filling.
• Powdered Sugar – Sweetens the filling effortlessly, providing a smooth texture without any grittiness.
• Vanilla Extract – Adds depth and complements the flavors of the raspberry.
• Raspberries – Fresh or frozen, they offer a burst of sweet and tart flavor that elevates the filling.
• Gelatin – Stabilizes the filling for a perfect set; opt for agar-agar as a vegetarian substitute.

For the Chocolate Cake Base
• Chocolate Cake Rounds – Adds a tender layer beneath each dome, providing structure and a delightful contrast in texture.

With these ingredients, you’re well on your way to crafting your own Chocolate Raspberry Cheesecake Domes!

Step‑by‑Step Instructions for Chocolate Raspberry Cheesecake Domes

Step 1: Melt the Chocolate
Begin by finely chopping high-quality dark chocolate and melting it in a double boiler or microwave. If using a microwave, heat in 30-second bursts, stirring in between until smooth and glossy, about 1-2 minutes. This luscious melted chocolate will form your shell, so ensure it’s completely melted before moving on.

Step 2: Coat the Molds
Once your chocolate is silky and melted, carefully coat the inside of silicone half-sphere molds with a generous layer. Use a pastry brush or spoon to ensure even coverage, then chill the molds in the refrigerator for about 10 minutes. You'll know it's ready when the chocolate is firm to the touch.

Step 3: Add a Second Coat
Retrieve the molds from the fridge and add a second layer of melted chocolate to ensure a sturdy shell. Again, coat evenly, then chill for an additional 10-15 minutes until fully set. The shells should be glossy and firm, providing a delightful contrast to the smooth filling of your Chocolate Raspberry Cheesecake Domes.

Step 4: Prepare the Gelatin
While the chocolate shells cool, bloom gelatin in a small bowl with cold water for about 5 minutes. This allows it to soften. In another bowl, beat cream cheese until it’s creamy and smooth. Gradually mix in powdered sugar, vanilla extract, and raspberry puree, creating a luscious filling.

Step 5: Dissolve the Gelatin
Once bloomed, gently heat the gelatin in a small saucepan over low heat until fully dissolved, around 1-2 minutes. Stir this melted gelatin into your cheesecake mixture, combining well to create a stable filling for the Chocolate Raspberry Cheesecake Domes. This crucial step ensures your filling will hold its shape.

Step 6: Whip the Cream
In a separate bowl, whip heavy cream until soft peaks form, about 2-3 minutes with an electric mixer. This adds a light, airy texture to your cheesecake filling. Carefully fold the whipped cream into the cheesecake mixture, ensuring it remains fluffy and light, giving the domes their decadent consistency.

Step 7: Fill the Chocolate Shells
Using a piping bag or spoon, carefully fill the chocolate shells with the cheesecake mixture, leaving a small gap at the top for the chocolate cake base. Tap the molds gently on the counter to eliminate any air bubbles, which ensures an even filling in each dome.

Step 8: Add Cake Rounds
Cut chocolate cake rounds to fit snugly on top of the cheesecake filling in each dome. Press down gently to secure them in place, creating a solid base. This delicious layer adds texture and enhances the overall experience of your Chocolate Raspberry Cheesecake Domes.

Step 9: Chill the Domes
Cover the molds with plastic wrap or transfer to the refrigerator, chilling the domes for at least 4 hours or overnight. This step is essential for setting the ingredients beautifully, ensuring each chocolate dome holds its shape and maintains a luxurious texture.

Step 10: Unmold and Serve
When you’re ready to serve, gently unmold the domes by pressing slightly on the silicone molds. Let the Chocolate Raspberry Cheesecake Domes rest at room temperature for about 10 minutes, allowing them to soften slightly for a perfect bite. Optionally, garnish with fresh raspberries or a dusting of cocoa powder for that extra touch of elegance.

What to Serve with Chocolate Raspberry Cheesecake Domes

Enjoy a delightful array of accompaniments that elevate these sweet, indulgent domes.

  • Fresh Berries: Serve with a medley of fresh raspberries, strawberries, or blueberries to enhance the fruitiness and provide a vibrant contrast to the rich flavors.
  • Whipped Cream: A dollop of lightly sweetened whipped cream adds a fluffy texture that complements the creaminess of the cheesecake filling. It also adds an elegant touch to the presentation!
  • Chocolate Sauce: Drizzle warm chocolate sauce over the domes for an extra layer of indulgence, creating a beautiful, gooey contrast against the cool cheesecake.
  • Mint Leaves: Garnish with fresh mint for a refreshing element that cuts through the richness, adding a beautiful splash of color.
  • Rosemary Lemonade: Pair with a refreshing glass of rosemary lemonade to balance the dessert's sweetness while adding a fabulous herbal note.
  • Coffee or Espresso: Serve alongside a strong cup of coffee or a shot of espresso for a perfect after-dinner pair, allowing the chocolate flavors to shine even more!
  • Mini Fruit Tartlets: Offer small fruit tartlets as a side treat to delight guests with a different texture and flavor profile, creating a lovely spread.
  • Cheese Platter: Include a simple cheese platter with brie or goat cheese to serve as a savory balance to the sweetness of the dome, making it a delightful conversation starter!

How to Store and Freeze Chocolate Raspberry Cheesecake Domes

Fridge: Store the finished Chocolate Raspberry Cheesecake Domes in an airtight container in the fridge for up to 4 days to maintain freshness.

Freezer: For longer storage, freeze the domes (before garnishing) in an airtight container for up to 1 month. Ensure they are placed in a single layer to avoid sticking.

Thawing: To enjoy, simply transfer the frozen domes to the fridge and let them thaw overnight. This will retain their delightful texture.

Reheating: There’s no need to reheat these no-bake delights; serve them chilled for the best taste experience!

Chocolate Raspberry Cheesecake Domes Variations

Feel free to let your creativity shine as you personalize these delicious domes to suit your taste and occasion!

  • Fruit Purees: Substitute raspberry puree with other fruit purees like strawberry or mango for a unique flavor twist.
  • White Chocolate Shell: Use white chocolate for the shell; it adds a different sweetness but may need a thicker layer for stability.
  • Nutty Crunch: Add crushed nuts, such as almonds or hazelnuts, to the cheesecake filling for a delightful crunch and an extra layer of flavor.
  • Chocolate Cake Alternative: Swap out the chocolate cake rounds for a vanilla or red velvet base for a colorful presentation and contrasting flavors.
  • Spice It Up: Incorporate a pinch of cinnamon or cardamom in the cheesecake filling for a warm and inviting warmth in every bite.
  • Vegan-Friendly: Create a vegan version by using coconut cream in place of cream cheese and heavy cream, and substitute gelatin with agar-agar.
  • Minty Freshness: Mix in a few drops of peppermint extract into the filling for a refreshing sensation that pairs perfectly with chocolate.
  • Heat Up the Flavor: Add a hint of cayenne pepper to the cheesecake mixture for a surprising kick that balances the sweetness beautifully.

For even more delightful recipes, consider crafting a harmonious pairing with the Chocolate Raspberry Cheesecake Domes and enjoy alongside a cup of Homemade Hot Chocolate to elevate your dessert experience!

Expert Tips for Chocolate Raspberry Cheesecake Domes

  • Quality Matters: Use high-quality dark chocolate for a shiny, firm shell. Avoid chocolate chips, as they may not melt smoothly.
  • Gelatin Check: Ensure gelatin is fully dissolved into your filling. If not, your Chocolate Raspberry Cheesecake Domes might not set properly, resulting in a runny texture.
  • Room Temperature: Let the domes sit at room temperature for 10 minutes before serving. This enhances their creamy texture and makes them more enjoyable to eat.
  • Filling Technique: When filling the chocolate shells, be gentle. Tap the molds to release any trapped air bubbles that may disrupt the smooth surface.
  • Chill Time: Don’t rush the chilling process. Allowing the domes to set for at least 4 hours helps achieve the perfect consistency and shape.

Make Ahead Options

These Chocolate Raspberry Cheesecake Domes are perfect for meal prep, allowing you to enjoy this elegant dessert with minimal last-minute effort. You can prepare the chocolate shells and cheesecake filling up to 24 hours in advance, ensuring they remain just as delicious and visually appealing. Simply melt the dark chocolate and coat the molds, allowing them to set; then, whip up the cheesecake filling and fill the shells before placing them in the refrigerator for chilling. When ready to serve, cut chocolate cake rounds and press them onto the filling, then allow the domes to rest at room temperature for 10 minutes for the best texture. This thoughtful approach saves time and guarantees you’ll impress your guests with these delightful treats!

Chocolate Raspberry Cheesecake Domes Recipe FAQs

What type of chocolate should I use for the domes?
For the best results, use high-quality semi-sweet or dark chocolate, ideally with 60-70% cocoa content. This will provide a rich flavor and ensure a firm, glossy shell. Avoid chocolate chips as they don't melt as smoothly.

How should I store the Chocolate Raspberry Cheesecake Domes?
Store the finished domes in an airtight container in the refrigerator for up to 4 days. Be sure to keep them chilled to maintain their creamy texture and prevent any melting or dripping.

Can I freeze these cheesecake domes?
Absolutely! You can freeze the domes before adding any garnishes. Place them in an airtight container in a single layer to prevent sticking, and they can last in the freezer for up to 1 month. To enjoy, thaw them overnight in the refrigerator.

How can I tell if my gelatin has dissolved properly?
When dissolving gelatin, it should become clear and fluid without any lumps remaining. If you notice any undissolved bits, gently heat it for just a minute on low heat while stirring until fully dissolved before mixing it into your cheesecake filling.

Can I make these cheesecake domes ahead of time?
Yes, these Chocolate Raspberry Cheesecake Domes are perfect for making ahead! They can be prepared a day or two in advance. Just ensure that they are stored correctly in the fridge or freezer based on when you plan to serve them, allowing adequate chilling time for perfect consistency.

Are these cheesecake domes suitable for vegetarians?
Yes, you can make these domes vegetarian-friendly by substituting gelatin with agar-agar! This plant-based alternative will help the cheesecake filling set just as effectively, allowing everyone to enjoy this delightful treat.

Delicious Baked Apple Fritter Bites for Cozy Fall Days

May 31, 2026 by Grace Snow Leave a Comment

As the crispness of autumn settles in, I can almost taste the warm, comforting flavors that define this season. Enter my Baked Apple Fritter Bites with Heavenly Cider Glaze—a perfect, guilt-free dessert that invites the essence of fall right into your kitchen. These delightful bites are not only a breeze to whip up, but they’re also an ideal alternative to heavier fried treats, making them a crowd-pleaser for gatherings or cozy evenings at home. With each nibble, you'll savor chunks of juicy apple and a sweet, tangy glaze that brings everything together beautifully. Curious how you can embrace the season’s bounty with this simple yet indulgent recipe? Let’s dive in!

Why Are Apple Fritter Bites a Must-Try?

Guilt-Free Indulgence: These baked delights offer all the festive flavors of fall without the added calories of frying. Simple Ingredients: You likely have everything needed in your pantry, making these as convenient as they are delicious. Perfect for Sharing: Whether at a family brunch or cozy gathering, they’re bound to receive rave reviews. Flavor-Packed: Fresh apple chunks and sweet cider glaze come together in every bite, awakening your taste buds. Customizable: Feel free to switch up the apple varieties or add in nuts for extra crunch, just like in my Cheesy Corn Fritters. Get ready to embrace the cozy vibes of fall with this delightful treat!

Apple Fritter Bites Ingredients

• Let's gather the essentials for delicious Apple Fritter Bites!

For the Batter

  • Nonstick Cooking Spray – Prevents sticking during baking; choose a high-quality spray for best results.
  • All-Purpose Flour (1.5 cups) – Provides structure and texture; no substitute needed for this recipe.
  • Baking Powder (2 tsp) – Acts as a leavening agent to help fritters rise.
  • Kosher Salt (1/2 tsp) – Balances flavors and enhances sweetness; standard table salt works in a pinch.
  • Ground Cinnamon (2 tsp) – Adds warm spice flavor typical for fall desserts; nutmeg can complement or replace it for variety.
  • Unsalted Butter (1/4 cup, melted) – Contributes moisture and richness; coconut oil is a great dairy-free substitute.
  • Granulated Sugar (1/4 cup) – Sweetens the batter; brown sugar can add a deeper caramel flavor.
  • Large Egg (1) – Binds the ingredients together; a flax egg can serve as a vegan alternative.
  • Vanilla Extract (1/2 tsp) – Enhances flavor; almond extract is a suitable alternative.
  • Unsweetened Applesauce (1/2 cup) – Adds moisture and natural sweetness; mashed bananas can work if desired.
  • Finely Diced Apples (1.5 cups, Honeycrisp or Gala) – Provides texture and natural sweetness; any firm, sweet apple can be used.

For the Glaze

  • Powdered Sugar (2 cups) – Sweetens and thickens the glaze to achieve that delightful finish.
  • Apple Cider or Juice (1/3 cup + 2 tbsp for glaze) – Adds tartness and a burst of apple flavor; can be replaced with another fruit juice in a pinch.

Now that you have everything ready, let's create some unforgettable Apple Fritter Bites filled with the warmth and scent of fall!

Step‑by‑Step Instructions for Apple Fritter Bites

Step 1: Preheat and Prepare
Begin by preheating your oven to 400°F (200°C) and preparing a baking sheet by coating it with nonstick cooking spray. This will ensure your Apple Fritter Bites bake evenly and easily release from the pan. While the oven heats, gather your mixing bowls and utensils for a smooth workflow.

Step 2: Mix Dry Ingredients
In a medium-sized mixing bowl, whisk together 1.5 cups of all-purpose flour, 2 teaspoons of baking powder, ½ teaspoon of kosher salt, and 2 teaspoons of ground cinnamon. This blend adds wonderful flavor and structure to your fritters. Ensure that there are no lumps for a smooth batter, and set this bowl aside as you move on to the wet ingredients.

Step 3: Combine Wet Ingredients
In a large mixing bowl, mix ¼ cup of melted unsalted butter with ¼ cup of granulated sugar until well combined and slightly frothy. Next, add in one large egg, ½ teaspoon of vanilla extract, and ½ cup of unsweetened applesauce, stirring until the mixture is smooth and creamy. This will create a rich base for your Apple Fritter Bites.

Step 4: Incorporate the Dry Mixture
Gently fold the dry ingredient mixture into the wet ingredients using a spatula until just combined. It’s important not to overmix; you want a few lumps here and there. Once blended, carefully add in 1.5 cups of finely diced apples, folding them in gently to maintain their structure and distribute them evenly throughout the batter.

Step 5: Scoop the Batter
Using a tablespoon, scoop out portions of the batter and place them on your prepared baking sheet, leaving a couple of inches between each scoop. This spacing allows the Apple Fritter Bites to expand as they bake. You should aim for about 12-15 bites on the sheet for even cooking.

Step 6: Bake the Fritters
Place the baking sheet in the preheated oven and bake for 10 minutes. At this point, your Apple Fritter Bites will begin to puff up and turn a light golden color. Keep an eye on them to ensure they don’t overcook, as different ovens may vary slightly in temperature.

Step 7: Broil for a Glaze
After 10 minutes of baking, switch your oven to the broil setting. This step is crucial for achieving that caramelized glaze. Broil the fritters for an additional 2-4 minutes, watching carefully as they can burn quickly. You want them to develop a nice golden-brown color on top for that irresistible finish.

Step 8: Prepare the Glaze
While the fritters are broiling, prepare the glaze by whisking together 2 cups of powdered sugar with ⅓ cup of apple cider or juice in a separate bowl. Stir until the mixture is smooth and creamy, ensuring there are no lumps. This glaze will add a delightful sweetness to your Apple Fritter Bites.

Step 9: Glaze the Fritters
Once the fritters have finished broiling, remove them from the oven and immediately brush them with the prepared glaze. Let the glaze drip down the sides and coat each bite generously. For added sweetness, feel free to brush on more glaze after they’ve cooled for 15 minutes.

Step 10: Let Cool and Serve
Allow your Apple Fritter Bites to cool on the baking sheet for about 15 minutes before serving. This cooling period helps the glaze set, ensuring each bite is perfectly sticky and sweet. Once cool, serve them warm as a delightful treat that captures the essence of autumn!

How to Store and Freeze Apple Fritter Bites

Room Temperature: Store leftover Apple Fritter Bites in an airtight container at room temperature for up to 3 days to maintain their delightful texture.

Fridge: If you prefer them fresher longer, you can refrigerate the bites for up to a week. Just remember to place them in an airtight container to prevent them from drying out.

Freezer: For longer storage, freeze Apple Fritter Bites in a single layer on a baking sheet, then transfer to a sealed freezer bag for up to 3 months. Thaw in the fridge before reheating.

Reheating: To reheat, place the fritters in a toaster oven for optimal crispness. Heat them for about 5-7 minutes at 350°F (175°C) until warmed through and slightly crispy again.

Expert Tips for Apple Fritter Bites

  • Finely Diced Apples: Ensure apples are finely diced for even distribution in the batter. This will enhance the texture and flavor of your Apple Fritter Bites.
  • Watch the Broiler: Use a watchful eye while broiling; it can turn from perfectly caramelized to burnt in seconds. Stay close by for best results!
  • Cooling Time: Let fritters cool slightly to allow the glaze to set before serving. This prevents a messy experience and keeps the glaze intact!
  • Batter Consistency: Be careful not to overmix the batter. A few lumps are okay; overmixing can lead to tough fritters.
  • Flavor Variations: Don't hesitate to experiment! Add nuts or substitute different apple varieties to customize your Apple Fritter Bites to your liking.

Make Ahead Options

These Baked Apple Fritter Bites are fantastic for meal prep, allowing you to savor the flavors of fall without the last-minute rush! You can prepare the batter up to 24 hours in advance by mixing all the ingredients, except the apples, and storing it in an airtight container in the refrigerator. When ready to finish, simply fold in the finely diced apples and scoop the mixture onto the baking sheet, then bake as directed. For an even quicker option, bake the fritters and refrigerate them for up to 3 days. Reheat in a toaster oven to keep that delightful crispiness, and glaze them just before serving for a fresh, delectable treat. Enjoy the convenience of this time-saving method while still delivering delicious Apple Fritter Bites!

Apple Fritter Bites Variations

Feel free to get creative and personalize your apple fritter bites—let your taste buds guide you!

  • Different Apples: Swap out Honeycrisp or Gala with Fuji or Braeburn for a unique flavor twist. Each variety brings its own character, making the fritters truly yours.
  • Nutty Crunch: Add chopped walnuts or pecans to the batter for a delightful crunchy texture. The contrast between moist fritters and nutty bites enhances each mouthful!
  • Raisin Addition: Toss in some raisins or dried cranberries for a hint of sweetness and chewiness! These fruity bits merge beautifully with spiced apple goodness.
  • Dairy-Free Delight: For a dairy-free version, substitute melted butter with coconut oil, bringing a subtle tropical flavor to your fritters. It’s an easy swap, and your taste buds will thank you!
  • Flavored Glaze: Amp up the glaze by adding a pinch of cinnamon or a splash of vanilla extract. This simple addition transforms the glaze into a flavor powerhouse!
  • Spiced Variants: Incorporate ground ginger or nutmeg into the batter for an extra layer of fall-inspired warming spices. It’s like cozying up with a spiced candle on a cool evening.
  • Savory Twist: Feeling adventurous? Try adding garlic powder and cheese for a savory version of these fritters. Pair them with a nice dipping sauce, similar to my Cheesy Corn Fritters for a fun appetizer!
  • Bite-Size Variants: Instead of traditional fritters, create mini-bite versions that are perfect for snacking or sharing at gatherings. They’ll definitely light up any festive occasion!

Let your imagination run wild with these variations! Each change celebrates seasonal flavors, making your fritters uniquely delightful.

What to Serve with Baked Apple Fritter Bites

As you savor the delightful warmth of these treats, consider pairing them with lovely side dishes that elevate your cozy fall experience.

  • Creamy Mashed Potatoes: The buttery richness offers a comforting contrast to the sweet fritters, perfect for a family gathering. Their creamy texture is a hug in a bowl.
  • Roasted Butternut Squash: The nutty sweetness of roasted squash adds a seasonal flair and complements the apple flavors beautifully. It’s a vibrant side that brings color to your table.
  • Maple Glazed Carrots: These tender carrots, infused with maple syrup, echo the sweetness of the fritters while providing a fresh, earthy note that balances the dessert.
  • Spiced Apple Cider: A warm cup of apple cider spiced with cinnamon creates the ideal drink companion, enhancing the apple notes in your fritters. It’s truly like autumn in a mug!
  • Chocolate Dipping Sauce: For those with a sweet tooth, a rich chocolate sauce transforms your fritters into a decadent dessert experience. Dip them in and revel in the combination of flavors.
  • Vanilla Ice Cream: A scoop of creamy vanilla ice cream provides a delightful creaminess that contrasts with the sweet glaze of the fritters, making each bite irresistible.
  • Candied Pecans: These sweet and crunchy additions offer a delightful texture that pairs wonderfully with the soft fritter bites while adding an extra layer of flavor.
  • Pumpkin Spice Latte: Pair these baked apple fritters with a warm pumpkin spice latte for the ultimate fall experience. The spices perfectly complement the fritters, enhancing the cozy atmosphere.

Apple Fritter Bites Recipe FAQs

How do I choose the best apples for this recipe?
Absolutely! For this recipe, sweet and firm apples like Honeycrisp or Gala work beautifully. Look for apples that are fresh, without bruises or dark spots. If you want to explore, Fuji or Braeburn are also excellent choices that add a unique sweetness to your fritters.

What’s the best way to store leftover Apple Fritter Bites?
You can store leftover Apple Fritter Bites in an airtight container at room temperature for up to 3 days. If you want to keep them longer, refrigerating them will extend their freshness to about a week. Just be sure to seal them tightly to avoid drying out!

Can I freeze these baked Apple Fritter Bites?
Absolutely! To freeze, arrange the fritters in a single layer on a baking sheet. Once frozen, transfer them to a zip-top freezer bag and store them for up to 3 months. When you're ready to enjoy, simply thaw them in the fridge overnight and reheat in a toaster oven for the best texture.

What should I do if my fritters don’t rise properly?
Very! If your fritters don't rise as expected, check your baking powder freshness; it's vital for that perfect puff. Ensure to thoroughly mix the dry ingredients before incorporating the wet ingredients, as this helps distribute the leavening agent. Also, don’t overmix the batter; a few lumps are okay.

Can I make these gluten-free?
Yes, you can definitely make gluten-free Apple Fritter Bites! Swap the all-purpose flour with a gluten-free flour blend. It’s a convenient 1:1 substitution and makes delightful bites! Just double-check that the baking powder you use is also gluten-free. Enjoy delicious gluten-free treats without missing out!

Delightful Oreo Poke Cake for Your Sweetest Celebrations

May 31, 2026 by Grace Snow Leave a Comment

What if I told you that a simple chocolate cake could become the star of your dessert table with just a few clever tweaks? This is where my beloved Oreo Poke Cake comes in, a glorious fusion of layers that’s both surprising and satisfying. With every bite, you'll experience a perfect marriage of moist chocolate cake, creamy Oreo pudding, and a fluffy whipped topping generously sprinkled with crushed Oreos. Not only is this dessert a fun and interactive treat to make, but it's also a quick fix for satisfying those chocolate cravings without the fuss. Plus, it’s a crowd-pleaser that will leave your guests raving! Ready to dive into this delectable slice of heaven? Let’s get started!

Why is Oreo Poke Cake a Must-Try?

Decadent Layers: This cake is a triple threat of flavor! With its rich chocolate base, creamy Oreo pudding, and cloud-like whipped topping, it offers a delightful contrast that will have everyone coming back for seconds.

Quick and Easy: Want a dessert in a flash? This Oreo Poke Cake comes together quickly with minimal ingredients and effort, giving you more time to enjoy with family and friends.

Perfect for Gatherings: It's a crowd-pleaser that fits any occasion, from birthdays to casual get-togethers. Trust me, your guests will rave about it!

Customize Your Way: Feeling adventurous? Try variations like adding Ice Cream Cake on warmer days, or swap in different pudding flavors for a fresh twist. The possibilities are endless!

Make-Ahead Friendly: This treat stays fresh in the fridge for up to 4 days, making it an ideal dessert to prepare ahead of time for when those sweet cravings hit.

Oreo Poke Cake Ingredients

• Dive into the delicious world of Oreo Poke Cake with these essential ingredients!

For the Cake

  • Chocolate Cake Mix – This provides a rich, indulgent flavor and structure to the cake base. Substitute for a gluten-free mix if needed!
  • Water – Hydrates the mix to create a wonderfully moist texture. No substitutions needed here!
  • Vegetable Oil – Adds vital moisture and creates a tender crumb; melted butter can be used for a richer flavor.
  • Eggs – Binds the ingredients together, ensuring a moist cake; for a vegan option, consider flaxseed meal mixed with water!

For the Pudding Layer

  • Instant Oreo Pudding Mix – Creates a creamy, dreamy, Oreo-flavored layer that keeps the cake super moist; no substitutes recommended.
  • Cold Milk – Essential for achieving a smooth, creamy pudding texture. Feel free to use any milk or dairy-free alternatives like almond or oat milk!

For the Topping

  • Whipped Topping – This light, airy finish makes the dessert irresistible; you can whip heavy cream for a homemade version too!
  • Crushed Oreos – Sprinkle these on top to enhance the Oreo flavor and add delightful crunch; other cookie options work well too!
  • Chocolate Syrup (optional) – This tasty drizzle is a perfect visual and flavor enhancement; add to taste!

Step‑by‑Step Instructions for Oreo Poke Cake

Step 1: Preheat the Oven
Begin by preheating your oven to 350°F (175°C). While it heats up, lightly coat a 9x13 inch baking pan with cooking spray to prevent sticking. This ensures your Oreo Poke Cake will come out easily after baking, ready to be filled with delicious layers of flavor.

Step 2: Prepare the Cake Batter
In a large mixing bowl, combine your chocolate cake mix, water, vegetable oil, and eggs. Using an electric mixer, blend the ingredients on medium speed until you achieve a smooth batter, about 2 minutes. The mixture should be fluffy and well combined, filled with promises of rich chocolate goodness for your cake.

Step 3: Bake the Cake
Pour the cake batter evenly into the prepared baking pan, ensuring it spreads to the edges for an even bake. Place it in your preheated oven and bake for 25 minutes, or until a toothpick inserted in the center comes out clean. The cake should rise beautifully, creating a lovely chocolate layer to soak in the pudding.

Step 4: Poke Holes in the Cake
After baking, remove the cake from the oven and allow it to cool for about 10 minutes. Once cool enough to handle, take the handle of a wooden spoon and gently poke holes about an inch apart all over the cake. These holes will allow the creamy Oreo pudding to seep in, transforming your creation into a delightful Oreo Poke Cake.

Step 5: Prepare the Pudding
In a separate medium-sized bowl, whisk together the instant Oreo pudding mix and cold milk until completely smooth and thickened, about 2-3 minutes. The texture will be creamy and luscious, perfect for layering on your cake. Pour this pudding mixture evenly over the top of the cake, making sure to fill all the holes you'll created earlier.

Step 6: Chill the Cake
Cover the cake with plastic wrap and refrigerate for at least one hour to allow the pudding layer to set properly. This chilling step is crucial as it helps meld the flavors together, making the Oreo Poke Cake even more irresistible when served.

Step 7: Add the Topping
Once the pudding has set, remove the cake from the refrigerator. Generously spread the whipped topping over the pudding layer, creating a fluffy and inviting finish. Use a spatula to smooth it out evenly, ensuring a delightful contrast with the chocolate cake beneath.

Step 8: Garnish and Serve
To finish your Oreo Poke Cake, sprinkle crushed Oreos generously over the whipped topping. For an extra touch of indulgence, you can drizzle chocolate syrup over the top. Serve immediately or keep it chilled until you’re ready to enjoy this delicious dessert with family and friends.

Oreo Poke Cake Variations & Substitutions

Get ready to unleash your creativity and customize this delightful dessert to your heart's content!

  • Gluten-Free: Use a gluten-free chocolate cake mix for a delicious alternative that maintains flavor and texture. Everyone loves a treat they can enjoy!

  • Vegan Delight: Substitute eggs with flaxseed meal mixed with water and use almond milk for the pudding to create a vegan version that’s just as scrumptious.

  • Flavored Pudding: Mix things up by trying vanilla or butterscotch pudding instead of Oreo pudding. This simple switch adds a delightful surprise to each bite.

  • Decadent Add-ins: Fold chocolate chips or mini marshmallows into the cake batter before baking. The added texture will enhance every slice – don’t shy away from the extra chocolate!

  • Layer it Up: Create a multi-layer cake by using two cake mixes and alternating layers of pudding. It's a showstopper that will impress your guests at any gathering!

  • Fruity Twist: Add fresh strawberries or bananas between the layers for a refreshing contrast to the chocolate and cookies. Picture it: the sweetness of fruit with every spoonful!

  • Cookie Crush Variation: Swap crushed Oreos for another cookie like Nutter Butter or caramel-filled cookies. It’s a fun twist that can completely change the experience.

If you're ever dreaming of another sweet creation, don’t forget to check out this Ice Cream Cake – it’s just as delightful!

What to Serve with Oreo Poke Cake?

Elevate your dessert experience by pairing this delightful sweet treat with complementary flavors and textures!

  • Vanilla Ice Cream: The creamy, cold nature of vanilla ice cream contrasts beautifully with the rich chocolate and pudding layers, enhancing the indulgence.

  • Fresh Berries: Juicy strawberries or raspberries add a refreshing element that cuts through the richness of the cake, providing a burst of natural sweetness.

  • Chocolate Drizzle: A light drizzle of chocolate syrup enhances the already decadent flavors, making the dessert experience even more luxurious.

  • Espresso or Coffee: A warm cup of brewed coffee or espresso balances the sweetness with its bold flavors, perfect for a delightful after-dinner treat.

  • Whipped Cream Cloud: Additional whipped cream on the side invites that airy texture and complements the cake’s luscious layers, creating a layered dessert experience.

For an extra special touch, consider offering a selection of toppings—like crushed candy bars or nuts—to let guests customize their servings!

Expert Tips for Oreo Poke Cake

  • Cool Before Poking: Allow the cake to cool completely before poking holes. This prevents sogginess and helps the pudding absorb perfectly.

  • Mix Pudding Well: Whisk the instant Oreo pudding mix thoroughly for a smooth consistency. Lumpy pudding can affect the cake's texture, so take your time here.

  • Chill Time Matters: Don't skip the chilling step! Refrigerating the cake for at least an hour enhances flavor and gives the pudding time to meld properly with the cake.

  • Layering Techniques: Use a knife to gently spread the whipped topping for an even, beautiful presentation. This ensures every slice looks as good as it tastes!

  • Customize Flavor Profiles: Feel free to experiment with different pudding flavors, like vanilla, to make your Oreo Poke Cake unique and exciting for your next gathering.

How to Store and Freeze Oreo Poke Cake

Fridge: Store the Oreo Poke Cake in an airtight container in the refrigerator for up to 4 days. This keeps it fresh and allows the flavors to meld beautifully.

Freezer: For longer storage, you can freeze pieces of the cake tightly wrapped in plastic wrap and aluminum foil for up to 3 months. Thaw in the fridge overnight before serving.

Reheating: If desired, slice and let the pieces sit at room temperature for about 15 minutes before enjoying. Alternatively, use the microwave for a few seconds for a slightly warm dessert experience!

Serving Tips: Add a dollop of whipped topping or a drizzle of chocolate syrup just before serving to bring back its just-made charm from the fridge or freezer.

Make Ahead Options

These Oreo Poke Cakes are perfect for busy weeknights or gatherings! You can easily prepare the chocolate cake up to 24 hours in advance by baking it, cooling it, and wrapping it tightly in plastic wrap to maintain its moisture. The Oreo pudding layer can also be mixed and refrigerated up to 3 days ahead. Ensure the cake is completely cool before poking holes and pouring the pudding to prevent sogginess. When you're ready to enjoy, simply add the whipped topping and crushed Oreos before serving. This way, you can impress your guests without the last-minute rush, delivering a dessert that’s just as delicious!

Oreo Poke Cake Recipe FAQs

How should I select the right chocolate cake mix?
Absolutely! When choosing a chocolate cake mix for your Oreo Poke Cake, look for one that is labeled "moist" or "rich" on the package. The mix should have a good balance of cocoa and sugar. Avoid ones that contain dark chocolate if you prefer a milder taste; "devil's food" mixes work wonderfully if you want a deeper chocolate flavor.

How should I store the Oreo Poke Cake?
I recommend storing your Oreo Poke Cake in an airtight container in the refrigerator, where it will stay fresh for up to 4 days. This not only preserves the flavors but also keeps the cake moist. Just make sure to cover it well, as it can absorb odors from the fridge.

Can I freeze leftover Oreo Poke Cake?
Absolutely! To freeze your Oreo Poke Cake, slice it into pieces and wrap each slice tightly in plastic wrap, then add a layer of aluminum foil to prevent freezer burn. It can be stored in the freezer for up to 3 months. When you're ready to enjoy it, thaw the pieces in the refrigerator overnight for the best texture.

What if the pudding layer is lumpy?
No worries! If your pudding layer ends up lumpy, it could be due to not mixing it long enough. Simply whisk the pudding mixture vigorously for a few more minutes until smooth. If it has already been poured over the cake and is uneven, I suggest gently spreading it with a spatula to even it out; that way, it’ll still taste delicious!

Is this dessert safe for pets with Oreo ingredients?
It's very important to keep in mind that Oreos contain chocolate and are not safe for pets. Chocolate can be toxic to dogs and cats. If you're considering sharing this delectable cake with your furry friends, remember to keep it entirely out of their reach!

Quick Creamy Garlic Sauce You Can Whip Up in 5 Minutes

May 28, 2026 by Grace Snow Leave a Comment

I’ll never forget the first time I whipped up a batch of this Quick Creamy Garlic Sauce; in just five minutes, my dinner transformed from ordinary to extraordinary. This sauce has become my go-to secret weapon in the kitchen, effortlessly elevating everything from pasta to grilled chicken with its rich, savory goodness. Best of all, it’s a breeze to make, needing just a few simple ingredients that you probably have on hand. Whether you're a busy home chef or someone looking to impress with minimal effort, this creamy delight is sure to bring warmth and comfort to your meals. Curious about how this quick masterpiece can lighten your cooking load while satisfying those taste buds? Let’s dive in!

Why Is This Sauce So Irresistible?

Quick preparation is key: In just five minutes, you can create a restaurant-quality sauce that turns any meal into a gourmet experience.

Creamy, rich flavor shines through with the perfect blend of garlic and butter, making it an instant favorite for both pasta lovers and chicken enthusiasts alike.

Versatile and easy to customize: Elevate your dish by adding sautéed veggies or fresh herbs based on what you have at home.

Perfect for meal prep: Make a larger batch and refrigerate or freeze for convenient weeknight meals, allowing you to whip up a delicious dinner in minutes, just like my favorite Cheesy Garlic Bread as a side!

Crowd-pleaser status: This sauce is a hit at family gatherings or dinner parties, ensuring everyone leaves satisfied and asking for the recipe!

Quick Creamy Garlic Sauce Ingredients

For the Sauce
• Unsalted Butter – Provides richness and helps in creating a smooth sauce; using unsalted allows for better salt control.
• Garlic – Freshly minced garlic delivers an aromatic, savory flavor that makes this sauce irresistible.
• Flour – Acts as a thickening agent, achieving that desired creamy texture; consider gluten-free flour as a substitute.
• Half and Half – Combines cream and milk for a lovely creamy consistency; swapping in heavy cream enhances the richness.
• Chicken Stock – Infuses depth into the sauce; vegetable stock or water are great substitutes for a vegetarian option.
• Fresh Parsley – Adds a pop of color and freshness; feel free to omit it if you'd like.
• Kosher Salt and Black Pepper – Elevates and balances flavors; adjust according to your taste preference.

Dive into delight with this Quick Creamy Garlic Sauce that transforms meals effortlessly!

Step‑by‑Step Instructions for Quick Creamy Garlic Sauce

Step 1: Melt the Butter
In a large skillet over medium heat, melt 2 tablespoons of unsalted butter until bubbly and slightly frothy. This should take about 1-2 minutes. Keep an eye on the butter to prevent it from browning, as you want it to create the perfect base for your Quick Creamy Garlic Sauce.

Step 2: Sauté the Garlic
Add 6 minced garlic cloves to the skillet and sauté until fragrant, approximately 30 seconds. You'll know it's ready when the garlic becomes aromatic but isn’t browned. Stir continuously to ensure the garlic cooks evenly without burning, setting a delicious foundation for the sauce.

Step 3: Incorporate the Flour
Stir in 2 tablespoons of flour, cooking for about 1-2 minutes until the mixture turns lightly golden. This step is crucial as it creates a roux that will thicken your Quick Creamy Garlic Sauce. Stir continuously to prevent clumping and ensure even cooking.

Step 4: Add the Creamy Base
Gradually whisk in 1½ cups of half and half and ½ cup of chicken stock, keeping the heat on medium. Continue to stir for about 1-2 minutes, or until the sauce thickens. Observe the sauce as it transforms into a creamy consistency, perfect for coating your favorite dishes.

Step 5: Season and Finish
Finally, incorporate 2 tablespoons of minced fresh parsley into the sauce and season with kosher salt and black pepper to taste. Stir to combine all flavors, letting the sauce heat through for another minute. Your Quick Creamy Garlic Sauce is now ready to elevate any meal you serve it with!

Make Ahead Options

These Quick Creamy Garlic Sauce preparations are perfect for busy home cooks aiming to save time during the week! You can make the sauce up to 3 days in advance; simply prepare it up to the point of seasoning, allow it to cool, and then refrigerate in an airtight container to maintain its rich flavor and creamy texture. To enhance quality, reheat the sauce gently over medium-low heat, adding a splash of half and half or chicken stock to adjust the consistency before serving. This way, you’ll have a delectable sauce ready to elevate any dish without the last-minute fuss—just perfect for those hectic weeknights!

What to Serve with Quick Creamy Garlic Sauce?

The perfect companion to your next meal, this sauce invites a world of delicious pairings that will delight your taste buds.

  • Creamy Mashed Potatoes: Silky and buttery, mashed potatoes soak up this garlic sauce, making each bite comforting and rich.

  • Grilled Chicken: The savory garlic sauce elevates juicy grilled chicken, creating a mouth-watering combination bursting with flavor and tenderness.

  • Steamed Broccoli: Fresh and crisp, steamed broccoli provides a delightful crunch, balancing the creaminess of the sauce and adding a nutritious touch to your plate.

  • Linguine Pasta: This noodle’s long strands embrace the sauce beautifully, delivering a satisfying and hearty experience for pasta lovers.

  • Crusty Bread: Use toasted slices or warm breadsticks for dipping, allowing you to savor every last bit of the garlic goodness.

  • Caesar Salad: The crispness of romaine lettuce and crunch of croutons, dressed in light Caesar flavors, pair wonderfully with the garlic sauce for a balanced meal.

  • Sparkling White Wine: A chilled glass of sparkling white wine adds a refreshing pop, perfectly complementing the richness of the sauce while enhancing your dining experience.

How to Store and Freeze Quick Creamy Garlic Sauce

Fridge: Store your Quick Creamy Garlic Sauce in an airtight container for up to 3-4 days. Reheat gently on the stovetop, adding a splash of half and half or stock for the best texture.

Freezer: You can freeze the sauce for up to 2 months. Pour it into a freezer-safe container, leaving some room for expansion, and thaw in the refrigerator overnight before reheating.

Reheating: For optimal results, reheat in a skillet over medium-low heat, stirring frequently to prevent sticking. Add a little extra liquid if needed to achieve desired creaminess.

Airtight Storage: Ensure that your storage container is completely airtight to prevent freezer burn and preserve the luscious flavor of the sauce.

Expert Tips for Quick Creamy Garlic Sauce

  • Perfect Garlic Timing: Always sauté garlic until fragrant, but not browned. Overcooked garlic can taste bitter, ruining the sauce's balance.

  • Flour Precision: Stir flour for 1-2 minutes until golden; this avoids a raw taste in your Quick Creamy Garlic Sauce.

  • Watch the Simmer: Keep an eye on your sauce as it thickens. Too much time can lead to an overly thick and sticky texture.

  • Adjust Consistency: If reheating, add a bit of stock or half and half to maintain creaminess without losing flavor.

  • Savory Substitutes: Feel free to switch chicken stock for vegetable stock for a vegetarian version while maintaining depth in flavor.

Quick Creamy Garlic Sauce Variations

Feel free to spark your creativity by customizing this delicious sauce to suit your taste preferences!

  • Heavy Cream: Swap half and half with heavy cream for an even richer taste and ultra-creamy consistency. Trust me, your pasta will thank you!

  • Herb-Infused: Mix in fresh basil or thyme for a delightful twist on flavor—try it with grilled chicken or vegetables for a seasonal touch.

  • Sautéed Veggies: Toss in sautéed mushrooms or spinach to boost nutrition and add a lovely pop of color. These additional elements elevate the sauce in a hearty way.

  • Spicy Kick: Add a pinch of red pepper flakes or a dash of hot sauce for those who enjoy a little heat. The warmth will beautifully complement the garlic's richness.

  • Lemon Zest: Stir in some freshly grated lemon zest for a zesty brightness that balances the sauce’s creaminess. This is especially refreshing over seafood dishes or light pasta sides!

  • Cheesy: Sprinkle in freshly grated Parmesan or your favorite cheese to create an irresistible cheesy sauce. Pair it with a comforting bowl of fettuccine or on top of baked chicken.

  • Veggie Stock: Replace chicken stock with vegetable stock for a vegetarian-friendly version that still packs a savory punch, perfect for pasta and veggies!

Make sure to explore these options and mix and match according to what you're serving—like pairing it with my Shrimp Tacos or slathering it on warm Cheesy Garlic Bread. Enjoy your culinary journey!

Quick Creamy Garlic Sauce Recipe FAQs

How do I choose the best garlic for this sauce?
Absolutely! When selecting garlic, look for firm, unblemished cloves with no dark spots or sprouting. Fresh garlic offers the best flavor, so avoid any that feel soft or have begun to turn green.

How should I store leftover Quick Creamy Garlic Sauce?
You can easily store your sauce in an airtight container in the refrigerator for up to 3-4 days. Make sure it cools down to room temperature before sealing to avoid condensation, which can affect the sauce's texture.

Can I freeze my Quick Creamy Garlic Sauce?
Yes! To freeze, pour the sauce into a freezer-safe container, leaving enough space at the top for it to expand. It will keep well for up to 2 months. Just thaw it overnight in the fridge when you're ready to use it, and reheat gently on the stovetop.

What should I do if my sauce is too thick?
No worries! If your sauce thickens more than desired, gradually whisk in a splash of chicken stock or half and half while reheating. This will help you achieve that perfect creamy consistency without compromising on flavor.

Is this sauce suitable for people with dairy allergies?
This Quick Creamy Garlic Sauce does contain dairy, but you can easily customize it for a dairy-free version. Swap the half and half with a non-dairy milk like almond or coconut milk, and use a plant-based butter alternative. Just be mindful to season appropriately, as non-dairy options tend to have milder flavors.

How can I enhance the flavor of my garlic sauce?
To elevate your sauce further, consider adding sautéed vegetables like spinach or mushrooms during the cooking process. Fresh herbs such as basil, parsley, or thyme can also add vibrant notes to the sauce, giving it a more complex flavor profile. The more, the merrier!

Quick Creamy Garlic Sauce

Quick Creamy Garlic Sauce You Can Whip Up in 5 Minutes

Elevate your meals effortlessly with this Quick Creamy Garlic Sauce, ready in just 5 minutes, perfect for pasta and grilled chicken.
Print Recipe Pin Recipe
Prep Time 5 minutes mins
Cook Time 5 minutes mins
Total Time 10 minutes mins
Servings: 4 servings
Course: Uncategorized
Cuisine: American
Calories: 200
Ingredients Equipment Method Nutrition Notes

Ingredients
  

For the Sauce
  • 2 tablespoons unsalted butter Provides richness and helps in creating a smooth sauce
  • 6 cloves garlic Freshly minced for an aromatic flavor
  • 2 tablespoons flour Acts as a thickening agent; consider gluten-free as a substitute
  • 1.5 cups half and half Combines cream and milk for a creamy consistency; use heavy cream for richness
  • 0.5 cups chicken stock Infuses depth; vegetable stock is a great substitute for vegetarian option
  • 2 tablespoons fresh parsley Adds color and freshness; can be omitted
  • to taste kosher salt Adjust according to taste
  • to taste black pepper Adjust according to taste

Equipment

  • Large skillet

Method
 

Step-by-Step Instructions
  1. Melt the butter in a large skillet over medium heat until bubbly and slightly frothy, about 1-2 minutes.
  2. Add minced garlic and sauté until fragrant, approximately 30 seconds, stirring continuously.
  3. Stir in flour, cooking for about 1-2 minutes until the mixture turns lightly golden, creating a roux.
  4. Gradually whisk in half and half and chicken stock, stirring continuously for about 1-2 minutes until the sauce thickens.
  5. Incorporate fresh parsley and season with kosher salt and black pepper to taste, heating through for another minute.

Nutrition

Serving: 1cupCalories: 200kcalCarbohydrates: 10gProtein: 3gFat: 15gSaturated Fat: 10gPolyunsaturated Fat: 2gMonounsaturated Fat: 5gCholesterol: 40mgSodium: 300mgPotassium: 150mgSugar: 2gVitamin A: 500IUVitamin C: 1mgCalcium: 80mgIron: 0.5mg

Notes

This easy-to-make sauce is perfect for quick dinners and meal prep, and can be stored in the fridge or freezer for later use.

Tried this recipe?

Let us know how it was!

Old-Fashioned Buttermilk Donut Bars with a Dreamy Glaze

May 26, 2026 by Grace Snow Leave a Comment

The first scent to greet you is nutmeg, a dash of warm spice that quickly transports me back to childhood mornings filled with laughter and the gentle hum of family kitchens. These Old-Fashioned Buttermilk Donut Bars with Brown Butter Maple Vanilla Bean Glaze are not just a treat; they are a slice of nostalgia that beckons to be savored. With their tender, fluffy texture and sweet, glossy glaze, these bars make for an effortless indulgence that will charm your family and friends, and they’re surprisingly easy to whip up! Perfect for brunch gatherings or a cozy snack, they also offer the delightful option of a gluten-free adaptation that you can personalize. So, are you ready to recreate a beloved classic and fill your home with delicious aromas? Let’s dive into this heartwarming recipe together!

Why are these donut bars irresistible?

Nostalgic Flavor: The warm notes of nutmeg and vanilla whisk you back to cherished childhood memories.

Effortless Indulgence: These bars are incredibly simple to prepare, making them perfect for any home cook—no fancy baking skills required!

Versatile Customization: Feel free to experiment with ingredients like nuts or fresh berries to craft your own unique version.

Perfect for Any Occasion: Whether it's a cozy family brunch or a delightful snack, these donut bars are bound to impress.

Gluten-Free Friendly: With a simple swap, everyone can enjoy this classic treat, ensuring no one feels left out!

Old-Fashioned Buttermilk Donut Bars Ingredients

Experience the joy of baking with these delightful bars!

For the Donut Bars

  • All-Purpose Flour – Provides structure and form to the donut bars. Can swap with gluten-free flour blend with xanthan gum.
  • Baking Powder – Essential for leavening, ensuring the bars rise and become fluffy.
  • Baking Soda – Works alongside the baking powder for added lift.
  • Ground Nutmeg – Imparts classic old-fashioned donut flavor and aroma. Don't skip this ingredient for authentic taste.
  • Salt – Balances sweetness and enhances overall flavor.
  • Unsalted Butter – Adds richness and moisture. Ensure it is softened for easy mixing.
  • Granulated Sugar – Sweetens the bars and contributes to texture.
  • Eggs – Provide binding and moisture, creating a tender crumb.
  • Vanilla Extract – Adds depth of flavor and aroma.
  • Buttermilk – Contributes to tenderness and tang. Can substitute with milk mixed with vinegar or lemon juice.

For the Glaze

  • Powdered Sugar – Used for glazing, providing a sweet finish.
  • Maple Syrup – Adds flavor and sweetness to the glaze.
  • Vanilla Bean Paste – Offers richness and vanilla flavor depth. Substitutable with vanilla extract if unavailable.

Step‑by‑Step Instructions for Old-Fashioned Buttermilk Donut Bars

Step 1: Preheat and Prepare
Start by preheating your oven to 350°F (175°C). While it's warming up, grease or line a 9x13-inch baking pan with parchment paper for easy removal later. This simple preparation ensures your Old-Fashioned Buttermilk Donut Bars will bake evenly and come out perfectly.

Step 2: Combine Dry Ingredients
In a medium bowl, whisk together all-purpose flour, baking powder, baking soda, ground nutmeg, and salt until well combined. This dry mixture is essential for creating the classic flavor and tender texture of your donut bars. Set this bowl aside as you move to the next step.

Step 3: Cream Butter and Sugar
In a large mixing bowl, use an electric mixer to beat the softened unsalted butter and granulated sugar together until the mixture is light and fluffy, approximately 2-3 minutes. This process incorporates air, which is key for a light texture in your Old-Fashioned Buttermilk Donut Bars.

Step 4: Add Eggs and Vanilla
Add the eggs to the butter mixture one at a time, mixing well after each addition to ensure they are fully incorporated. Then stir in the vanilla extract, blending everything smoothly. This step enriches the flavor and binds your batter together, creating a beautifully cohesive mixture.

Step 5: Mix in Dry and Wet Ingredients
Gradually add the flour mixture to the butter mixture, alternating with the buttermilk. Start and end with the flour mixture, mixing just until combined. The batter should appear thick yet smooth. Be careful not to over-mix; a gentle fold ensures tender bars in your Old-Fashioned Buttermilk Donut Bars.

Step 6: Spread and Bake
Pour the batter into the prepared baking pan, spreading it evenly with a spatula. Smooth the top to ensure uniform baking. Place in the preheated oven and bake for 22-25 minutes, or until a toothpick inserted into the center comes out clean, indicating they’re done.

Step 7: Cool Completely
Once baked, remove the pan from the oven and allow the bars to cool in the pan for about 10 minutes. Then, transfer the bars to a wire rack to cool completely. Cooling is essential to allow the glaze to adhere properly, leading to the perfect finish on your Old-Fashioned Buttermilk Donut Bars.

Step 8: Prepare the Glaze
While the bars cool, prepare the dreamy glaze. In a small saucepan, melt the butter over medium heat until it turns golden brown, releasing a nutty aroma, about 5-7 minutes. Then, whisk in the powdered sugar, maple syrup, and vanilla bean paste until the glaze is smooth and glossy. Adjust with a splash of milk if necessary.

Step 9: Glaze the Bars
Once the donut bars are completely cool, pour the glaze over the top, allowing it to drip down the sides for a beautiful finish. Let the glaze set for about 15 minutes at room temperature before slicing the bars into rectangles. Your Old-Fashioned Buttermilk Donut Bars are now ready to indulge!

Old-Fashioned Buttermilk Donut Bars Variations

Feel free to explore these delightful variations to make your donut bars even more special and suited to your taste!

  • Gluten-Free: Substitute all-purpose flour with a gluten-free blend for a delicious alternative everyone can enjoy. Just be sure to add xanthan gum if your blend doesn’t include it.

  • Spice It Up: Incorporate a teaspoon of cinnamon or cardamom to add warmth and intrigue to the flavor profile. The fragrant spices will elevate your bar experience to new heights!

  • Chocolate Lovers: Folding in semi-sweet chocolate chips or chunks adds gooey, melty bites that take these bars over the top. Imagine indulging in chocolatey goodness with each bite!

  • Nutty Crunch: Toss in a handful of toasted walnuts or pecans for a satisfying crunch and nutty flavor. The contrast between the soft bars and crunchy nuts creates a delightful texture variety.

  • Berry Freshness: Top with fresh berries like strawberries or blueberries for a burst of color and freshness. This twist brings a lovely tartness that balances the sweetness beautifully!

  • Citrus Zest: Add a tablespoon of orange or lemon zest to the glaze for a bright, zesty kick. The citrus notes will add an unexpected brightness that pairs perfectly with the sweetness.

  • Maple Bliss: For an extra boost of maple flavor, increase the maple syrup in the glaze. Let those syrupy notes dance on your palate; it’s like a sweet hug for your taste buds!

  • Spicy Kick: Add a pinch of cayenne pepper or chili powder to the batter for a surprising, gentle heat. It’s a bold twist that will certainly spark conversation around the brunch table!

Feel free to get creative! If you crave more ideas to embellish your baking, consider trying different toppings or experimenting with fillings for a unique twist on classic desserts.

Make Ahead Options

These Old-Fashioned Buttermilk Donut Bars are perfect for meal prep enthusiasts looking to save time throughout the week! You can prepare the donut bar batter up to 24 hours in advance. Simply mix the ingredients according to the recipe, then cover and refrigerate the bowl. When you're ready to bake, allow it to sit at room temperature for about 15 minutes before spreading the batter in your prepared pan and baking. You can also glaze the bars up to 3 days ahead; store them in an airtight container at room temperature. Just reheat the bars slightly before serving to ensure they are just as delicious as the day you made them!

How to Store and Freeze Old-Fashioned Buttermilk Donut Bars

Room Temperature: Keep leftover Old-Fashioned Buttermilk Donut Bars in an airtight container, where they'll stay fresh for up to 3 days without losing their delightful texture.

Fridge: If you'd like to extend their shelf life, you can refrigerate the donut bars for up to a week. Just ensure they are well-wrapped to prevent them from absorbing any odors.

Freezer: For longer storage, freeze the bars in an airtight container or wrap them tightly in plastic wrap followed by foil. They can be frozen for up to 3 months and defrosted at room temperature.

Reheating: To enjoy them warm, simply reheat the thawed bars in the microwave for 10-15 seconds or place them in a preheated oven at 350°F (175°C) for about 5 minutes.

What to Serve with Old-Fashioned Buttermilk Donut Bars

Delight in creating a well-rounded meal that elevates the sweet charm of these airy bars.

  • Fresh Fruit Salad: A medley of seasonal fruits adds a refreshing contrast and vibrant color to your brunch spread. The fruity sweetness pleasantly balances the rich glaze.
  • Creamy Yogurt Parfait: Layer Greek yogurt with granola and berries for a creamy, crunchy side that enhances the donut bars' soft texture. It's both satisfying and nutritious!
  • Warm Maple Syrup: Drizzling warm maple syrup over the bars amplifies the maple flavor while providing an extra touch of decadence. Perfect for those who love that sweet maple kick!
  • Herbal Tea: A cup of chamomile or mint tea offers a calming counterpart to the sugariness of the bars, making for a cozy afternoon treat.
  • Rich Coffee: The bold flavors of a freshly brewed coffee contrast beautifully with the sweet donut bars, making this pairing a classic to enjoy together.
  • Chocolate Chip Cookie Ice Cream Sandwich: Serve a scoop of creamy vanilla ice cream between two homemade chocolate chip cookies for an indulgent dessert to pair alongside the donut bars. Sweet and dreamy!
  • Pecan Pie Bars: For a truly decadent dessert table, introduce pecan pie bars. Their nutty, caramel flavors complement the richness of the donut bars in a sweet symphony.
  • Spiced Chai Latte: The complex spices of chai provide an aromatic experience that complements the nutmeg in the bars, enhancing that cozy feeling. Perfect for chilly mornings!
  • Mini Muffins: Consider offering a variety of mini muffins, like blueberry or banana, which invite additional flavors and textures to your brunch or snack session. Decisions, decisions!

Expert Tips for Old-Fashioned Buttermilk Donut Bars

  • Room Temperature Ingredients: Ensure all your ingredients, especially butter and eggs, are at room temperature for a smoother batter and better texture.

  • Don’t Overmix: Mix the batter just until combined. Overmixing can lead to dense bars instead of the tender Old-Fashioned Buttermilk Donut Bars you desire.

  • Check for Doneness: Start checking the bars a couple of minutes early by inserting a toothpick. They are ready when it comes out clean, preventing dryness.

  • Glaze Consistency: If the glaze appears too thick, add a small splash of milk to reach your desired pourable consistency, ensuring an even coating.

  • Cool Completely: Allow the bars to cool completely before glazing to prevent the frosting from soaking in or running off. This step is crucial for that perfect finish.

  • Store Properly: Keep leftover bars in an airtight container at room temperature for up to 3 days or refrigerate for a week, ensuring they stay fresh and delicious!

Old-Fashioned Buttermilk Donut Bars Recipe FAQs

How do I choose the right buttermilk for the recipe?
Absolutely! When selecting buttermilk, look for a fresh carton with a clean expiration date to ensure maximum flavor and acidity, which contributes to the tenderness of your donut bars. If you can't find buttermilk, mixing milk with 1 tablespoon of vinegar or lemon juice for each cup will yield a similar tangy effect.

How should I store leftover Old-Fashioned Buttermilk Donut Bars?
After enjoying your donut bars, store any leftovers in an airtight container at room temperature for up to 3 days. If you want to extend their shelf life, refrigerate them for up to a week. Just ensure they are well-wrapped to prevent them from drying out or picking up odors!

Can I freeze the donut bars, and if so, how?
Yes, you can freeze them! To do this, wrap each individual bar tightly in plastic wrap and then in aluminum foil, or place them in a freezer-safe airtight container. Frozen Old-Fashioned Buttermilk Donut Bars will keep well for up to 3 months. When you're ready to enjoy, simply thaw at room temperature or reheat briefly in the microwave or oven as described in the storage instructions.

What should I do if my donut bars turn out too dense or heavy?
If your donut bars come out too dense, it may be due to overmixing the batter, which can develop the gluten in flour and lead to a heavier texture. For next time, mix just until the dry ingredients are incorporated. Also, ensure your baking powder is still active—check the expiration date for optimal lift!

Is there a gluten-free version of Old-Fashioned Buttermilk Donut Bars?
Very much so! You can easily make these donut bars gluten-free by substituting all-purpose flour with a gluten-free flour blend. Ensure the blend contains xanthan gum for the best structure. Many brands have gluten-free all-purpose flour specifically made for baking, so check the label for best results.

Are there any allergy considerations I should know about?
Certainly! Keep in mind that this recipe contains common allergens like eggs, dairy, and gluten. To adapt for allergies, consider using egg replacers for vegans, almond or coconut milk for a lactose-free version, and gluten-free flour blends for those with celiac disease or gluten sensitivity. Always check ingredient labels to ensure safety.

Old-Fashioned Buttermilk Donut Bars

Old-Fashioned Buttermilk Donut Bars with a Dreamy Glaze

These Old-Fashioned Buttermilk Donut Bars are a nostalgic treat filled with warm spices and a sweet glaze.
Print Recipe Pin Recipe
Prep Time 15 minutes mins
Cook Time 25 minutes mins
Cooling Time 10 minutes mins
Total Time 50 minutes mins
Servings: 12 bars
Course: Dessert
Cuisine: American
Calories: 220
Ingredients Equipment Method Nutrition Notes

Ingredients
  

For the Donut Bars
  • 2 cups All-Purpose Flour Can swap with gluten-free flour blend with xanthan gum.
  • 2 teaspoons Baking Powder
  • 1 teaspoon Baking Soda
  • 1 teaspoon Ground Nutmeg Don't skip this ingredient for authentic taste.
  • 0.5 teaspoon Salt
  • 0.5 cups Unsalted Butter Ensure it is softened for easy mixing.
  • 1 cups Granulated Sugar
  • 2 count Eggs
  • 1 teaspoon Vanilla Extract
  • 0.75 cups Buttermilk Can substitute with milk mixed with vinegar or lemon juice.
For the Glaze
  • 2 cups Powdered Sugar
  • 0.25 cups Maple Syrup
  • 1 tablespoon Vanilla Bean Paste Substitutable with vanilla extract if unavailable.

Equipment

  • Oven
  • Mixing Bowl
  • Electric mixer
  • Baking pan
  • Whisk
  • Spatula
  • Saucepan
  • wire rack

Method
 

Step-by-Step Instructions
  1. Preheat your oven to 350°F (175°C) and prepare a 9x13-inch baking pan with grease or parchment paper.
  2. Whisk together flour, baking powder, baking soda, ground nutmeg, and salt in a bowl.
  3. Cream softened butter and sugar until light and fluffy, about 2-3 minutes.
  4. Add eggs one at a time, mixing well after each, then stir in vanilla extract.
  5. Gradually add the flour mixture to the butter mixture, alternating with buttermilk, mixing until combined.
  6. Pour the batter into the prepared pan, spreading evenly, and bake for 22-25 minutes until a toothpick comes out clean.
  7. Cool in the pan for about 10 minutes, then transfer to a wire rack to cool completely.
  8. Melt butter for the glaze until golden brown, then whisk in powdered sugar, maple syrup, and vanilla bean paste until smooth.
  9. Glaze the completely cooled bars and let set for about 15 minutes before slicing.

Nutrition

Serving: 1barCalories: 220kcalCarbohydrates: 30gProtein: 2gFat: 10gSaturated Fat: 6gPolyunsaturated Fat: 0.5gMonounsaturated Fat: 3.5gCholesterol: 30mgSodium: 200mgPotassium: 100mgSugar: 12gVitamin A: 200IUCalcium: 30mgIron: 1mg

Notes

Allow all ingredients to reach room temperature before mixing for better batter texture. Avoid overmixing to ensure a tender crumb.

Tried this recipe?

Let us know how it was!

Irresistible Chocolate Raspberry Cupcakes for Sweet Moments

May 25, 2026 by Grace Snow Leave a Comment

The aroma of rich chocolate wafting through the kitchen is undeniably enchanting, a scent that transports me back to my childhood baking adventures. Today, I'm excited to share my recipe for Chocolate Raspberry Cupcakes, a delightful fusion of sweet and tart that's perfect for any occasion, especially Valentine’s Day. These cupcakes are not only quick to whip up, but they also shine with an extravagant raspberry chocolate ganache center and a fluffy raspberry buttercream frosting that will impress your loved ones. Whether you're a seasoned home chef or someone new to the kitchen, this recipe is bound to become a beloved staple. Ready to indulge your senses and create something unforgettable? Let’s dive into the magic of these delectable treats!

Why are these cupcakes special?

Indulgent Flavor Explosion: These Chocolate Raspberry Cupcakes are a heavenly blend of rich chocolate and tangy raspberry, creating an irresistible flavor that's perfect for celebrating love or any sweet moment.

Effortless Preparation: With simple steps and readily available ingredients, even novice bakers can create stunning cupcakes that look and taste gourmet!

Visual Appeal: The vibrant raspberry frosting topped with fresh raspberries creates a stunning presentation that’s sure to impress.

Perfect for Sharing: Bake a batch to share with friends or family; they’re a guaranteed crowd-pleaser at parties or intimate gatherings.

Make-Ahead Friendly: Prepare them a day in advance, saving time on that special occasion while ensuring freshness. Pair with a delightful Homemade Hot Chocolate for the ultimate dessert experience!

Chocolate Raspberry Cupcake Ingredients

For the Cupcake Batter

  • All-Purpose Flour – Structure and base for the batter; measure carefully for accurate results.
  • Dutch Process Cocoa Powder – Adds rich chocolate flavor and deep color; regular cocoa can be substituted if needed.
  • Baking Powder & Baking Soda – Essential leavening agents; ensure they're fresh for the best rise.
  • Salt – Enhances the overall flavor; use the specified amount to avoid overpowering the chocolate.
  • Espresso Powder (optional) – Deepens the chocolate flavor; feel free to omit if you don't have it on hand.
  • Unsalted Butter – Provides moisture and flavor; ensure it's softened for even blending.
  • Granulated Sugar – Adds sweetness; substituting with brown sugar may require adjustments to liquids.
  • Eggs (whole & yolk) – Contributes moisture and structure; use at room temperature for optimal mixing.
  • Vanilla Extract – Boosts flavor; using pure extract yields the best taste.
  • Whole Milk & Sour Cream – Increases moisture and richness; both should be at room temperature for the smoothest batter.

For the Ganache Filling

  • Semi-sweet Chocolate – The star ingredient for a delicious ganache; choose your favorite brand for best results.
  • Heavy Cream – Perfect for achieving a smooth ganache; avoid substituting with half-and-half as it alters the texture.
  • Raspberry Preserves – Adds a delightful fruity filling for the ganache; feel free to use other fruit preserves if desired.

For the Frosting

  • Unsalted Butter (for frosting) – The base for a luscious frosting; it should be softened for easy whipping.
  • Powdered Sugar – The key sweetener for the frosting; adjust amount to achieve your desired sweetness.
  • Freeze-Dried Raspberries – Provides intense raspberry flavor and color for the frosting; do not substitute with fresh raspberries.

These Chocolate Raspberry Cupcakes are set to impress not just with their taste, but also their irresistible look—perfect for sharing or keeping all to yourself!

Step‑by‑Step Instructions for Chocolate Raspberry Cupcakes

Step 1: Prepare Oven & Pan
Preheat your oven to 350°F (175°C) and gather your 12-cup muffin pan. Line the cups with vibrant cupcake liners, ensuring they fit snugly. This initial step sets the stage for your delicious Chocolate Raspberry Cupcakes, and the aroma of chocolate will soon fill your kitchen!

Step 2: Mix Dry Ingredients
In a large mixing bowl, sift together the all-purpose flour, Dutch cocoa powder, baking powder, baking soda, salt, and optional espresso powder. This not only combines the ingredients but also aerates them, ensuring a light cupcake texture. Set the bowl aside so these dry ingredients can mingle while you prepare the wet mix.

Step 3: Cream Butter & Sugar
In a separate bowl, beat the softened unsalted butter and granulated sugar using an electric mixer until the mixture is light and fluffy, about 3-4 minutes. Add in one whole egg, an additional egg yolk, and vanilla extract, continuing to mix until everything is well-blended and creamy. This step creates the base for rich, moist Chocolate Raspberry Cupcakes.

Step 4: Combine Wet Ingredients
Pour in the whole milk and sour cream to the butter mixture, mixing gently until incorporated. The addition of these liquids enhances the richness of the batter. Ensure no lumps remain; a smooth, velvety consistency is what you're aiming for. This mixture will soon transform into delightful cupcakes!

Step 5: Incorporate Dry Ingredients
Gradually add the sifted dry ingredients into the wet mixture in three parts. Mix on low speed until just combined, being careful not to overmix to maintain fluffy cupcakes. The batter should look rich and chocolaty. Once combined, it’s time for these beauties to enter the oven!

Step 6: Bake
Fill each cupcake liner about three-quarters full with the batter. Place them in the preheated oven and bake for 17-20 minutes. The cupcakes are done when a toothpick inserted in the center comes out clean or with a few moist crumbs. Allow them to cool in the pan for 10 minutes before moving them to a wire rack to cool completely.

Step 7: Make Ganache
In a small saucepan, heat the heavy cream over medium heat until steaming, but not boiling. Pour the steaming cream over finely chopped semi-sweet chocolate in a heatproof bowl. Let it sit for 5 minutes to melt, then stir until the ganache is smooth and glossy. Mix in raspberry preserves for a delightful fruity touch, and set aside to cool slightly.

Step 8: Whip Buttercream
In a clean mixing bowl, beat softened unsalted butter until it’s light and fluffy. Gradually add the powdered sugar, mixing well after each addition. Once combined, add ground freeze-dried raspberries, raspberry preserves, and vanilla extract, mixing until the frosting is fluffy and vibrant. This raspberry buttercream will elevate your cupcakes to another level!

Step 9: Assemble Cupcakes
Once the cooled cupcakes have fully set, use a small knife or cupcake corer to remove a little piece from the center of each. Fill the centers with the luscious raspberry ganache, ensuring each bite captures that gooey goodness. Finally, pipe the raspberry buttercream frosting on top and garnish with a fresh raspberry for an elegant touch.

Tips for the Best Chocolate Raspberry Cupcakes

  • Measure Flour Properly: Spoon flour into the measuring cup rather than scooping it directly to avoid compacting and getting too much flour.

  • Use Room Temperature Ingredients: Ensure your butter, eggs, milk, and sour cream are at room temperature to promote even mixing and a lighter texture in your cupcakes.

  • Avoid Overmixing: When combining dry and wet ingredients, mix just until incorporated to maintain the fluffiness of your Chocolate Raspberry Cupcakes.

  • Cool Completely Before Filling: Let cupcakes cool down entirely before filling with ganache; this prevents the warm filling from melting your frosting.

  • Perfect Piping Technique: For beautiful buttercream swirls, use a piping bag fitted with your favorite tip and whip the frosting until fluffy for stability.

Feel free to adapt these tips to suit your style, and enjoy the process of creating these delightful treats!

Make Ahead Options

These delicious Chocolate Raspberry Cupcakes are perfect for meal prep enthusiasts! You can bake the cupcakes up to 24 hours in advance, allowing them to cool completely before storing them in an airtight container at room temperature. For the best quality, prepare the ganache and buttercream frosting a day before serving, refrigerating them until needed. When you’re ready to delight your family or guests, fill the cupcakes with ganache and pipe on the raspberry buttercream. This method not only saves you time on busy days but also ensures that each cupcake remains just as delicious and fresh as if you made them that day!

What to Serve with Decadent Chocolate Raspberry Cupcakes

These tempting treats are not only heavenly on their own, but they also pair beautifully with various accompaniments to elevate your dessert experience.

  • Fresh Berries: A mix of raspberries and strawberries enhances the cupcakes' fruity notes while adding brightness and freshness to your plate.

  • Whipped Cream: Light and fluffy whipped cream complements the richness of the cupcakes, providing a creamy contrast that balances the sweetness.

  • Hot Coffee: A warm cup of coffee perfectly offsets the chocolatey richness, creating a delightful contrast that enhances the overall flavor experience.

  • Red Wine: A glass of light-bodied, fruity red wine, like Pinot Noir, beautifully complements the chocolate and raspberry flavors, adding sophistication to your dessert.

  • Chocolate Sauce: Drizzling warm chocolate sauce over your cupcakes not only boosts the chocolate flavor but also adds an extra layer of indulgence.

  • Ice Cream: Pair the cupcakes with a scoop of vanilla or raspberry sorbet for a luscious dessert duo that offers a mix of warm and cold textures.

  • Mocha Milkshake: The combination of chocolate and raspberry with a rich mocha milkshake creates an incredible flavor explosion—a sweet treat your guests will love!

Elevate your cupcake experience by trying out these pairings that complement the decadent chocolate raspberry cupcakes beautifully.

How to Store and Freeze Chocolate Raspberry Cupcakes

Airtight Container: Store leftover Chocolate Raspberry Cupcakes in an airtight container at room temperature for up to 3 days to maintain their moistness and flavor.

Refrigeration: If you need them to last longer, they can be placed in the fridge for up to 2 weeks. Keep them in an airtight container to prevent any absorption of odors.

Freezing: For longer storage, freeze the cupcakes without frosting for up to 2 months. Wrap each cupcake tightly in plastic wrap and then place them in a freezer-safe bag.

Reheating: To enjoy, simply thaw at room temperature for a few hours or reheat in the microwave for about 15-20 seconds. Frost them just before serving for the best taste and texture!

Chocolate Raspberry Cupcakes Variations

Customize your Chocolate Raspberry Cupcakes to suit your taste or dietary needs for an even more delightful treat!

  • Berry Swap: Substitute raspberry preserves with strawberry or blueberry for a fruity twist that's just as delightful.

  • Chocolate Intensity: Use dark chocolate instead of semi-sweet for a richer, more intense chocolate experience. This will deepen the flavor and satisfy even the most ardent chocoholics.

  • Frosting Twist: Try cream cheese frosting in place of the raspberry buttercream for a tangy contrast that complements the chocolate beautifully. It adds a lovely creaminess that pairs well with the cupcake's sweet flavor.

  • Gluten-Free: Substitute all-purpose flour with a gluten-free baking blend for a gluten-free option that everyone can enjoy. Just be sure to check that your baking powder is gluten-free as well!

  • Nutty Crunch: Add chopped nuts, such as hazelnuts or almonds, to the batter for a delightful crunch. This textural contrast adds an exciting element to every bite, enhancing the flavor profile.

  • Add Spice: Incorporate a pinch of cinnamon or a dash of chili powder in the batter for a surprising yet harmonious flavor boost. The warmth will bring an unexpected depth to your cupcakes.

  • Boozy Boost: Add a splash of raspberry liqueur to the ganache for an adult twist that elevates the flavors to a whole new level of indulgence. Just a touch can make your cupcakes unforgettable!

  • Pairing Suggestion: These cupcakes are wonderful served alongside warm Homemade Hot Chocolate for a delightful dessert experience that enhances both the chocolate richness and the raspberry brightness!

Feel free to mix and match these variations to create your very own signature version of these delectable Chocolate Raspberry Cupcakes!

Chocolate Raspberry Cupcakes Recipe FAQs

How do I select ripe raspberries for the ganache and frosting?
Absolutely! Look for raspberries that are plump, firm, and vibrant in color. Avoid those with dark spots or mushiness, as they may be overripe and spoil faster. Fresh and vibrant raspberries will elevate the flavor of your Chocolate Raspberry Cupcakes!

What’s the best way to store leftover cupcakes?
You can store leftover Chocolate Raspberry Cupcakes in an airtight container at room temperature for up to 3 days. If you want them to last longer, they can be refrigerated for up to 2 weeks. Just ensure they’re kept sealed to retain moisture and flavor!

Can I freeze these cupcakes?
Very! For longer storage, you can freeze the cupcakes (without frosting) for up to 2 months. Wrap each cupcake tightly in plastic wrap, then place them in a freezer-safe bag to prevent freezer burn. When ready to enjoy, simply thaw at room temperature for a few hours.

What if my ganache is too thick?
If your ganache ends up too thick, don't worry! You can gently reheat it over a double boiler, stirring in a bit of extra heavy cream until the desired consistency is achieved. This will ensure your ganache remains smooth and pourable for filling those delectable Chocolate Raspberry Cupcakes.

Are these cupcakes safe for people with nut allergies?
Yes! This recipe does not contain any nuts, making it a safe choice for those with nut allergies. However, always check the labels on your ingredients to ensure there’s no cross-contamination, especially with processed items like chocolate or baking mixes.

How long will the cupcakes stay fresh?
When stored properly, the Chocolate Raspberry Cupcakes will be at their best for up to 3 days at room temperature or can last for about 2 weeks in the fridge. Just be sure to keep them in an airtight container to retain moisture and flavor!

Chocolate Raspberry Cupcakes

Irresistible Chocolate Raspberry Cupcakes for Sweet Moments

Delight in these Chocolate Raspberry Cupcakes, a perfect fusion of rich chocolate and tart raspberry flavors.
Print Recipe Pin Recipe
Prep Time 30 minutes mins
Cook Time 20 minutes mins
Cooling Time 10 minutes mins
Total Time 1 hour hr
Servings: 12 cupcakes
Course: Dessert
Cuisine: American
Calories: 350
Ingredients Equipment Method Nutrition Notes

Ingredients
  

For the Cupcake Batter
  • 1 1/2 cups All-Purpose Flour Measure carefully for accurate results.
  • 1/2 cup Dutch Process Cocoa Powder Regular cocoa can be substituted if needed.
  • 1 tsp Baking Powder Essential leavening agent; ensure fresh.
  • 1 tsp Baking Soda Essential leavening agent; ensure fresh.
  • 1/2 tsp Salt Enhances overall flavor.
  • 1 tsp Espresso Powder Optional; deepens chocolate flavor.
  • 1/2 cup Unsalted Butter Softened for even blending.
  • 1 cup Granulated Sugar Substituting with brown sugar may require liquid adjustments.
  • 2 large Eggs Use at room temperature.
  • 1 tsp Vanilla Extract Using pure extract yields the best taste.
  • 1/2 cup Whole Milk Room temperature for smoothest batter.
  • 1/2 cup Sour Cream Room temperature for smoothest batter.
For the Ganache Filling
  • 8 oz Semi-sweet Chocolate Choose your favorite brand.
  • 1 cup Heavy Cream Avoid substitutes as it alters texture.
  • 1/4 cup Raspberry Preserves Feel free to use other fruit preserves.
For the Frosting
  • 1/2 cup Unsalted Butter Softened for easy whipping.
  • 2 cups Powdered Sugar Adjust amount for desired sweetness.
  • 1/4 cup Freeze-Dried Raspberries Do not substitute with fresh raspberries.

Equipment

  • 12-cup muffin pan
  • Mixing bowls
  • Electric mixer
  • piping bag
  • Small knife or cupcake corer

Method
 

Step-by-Step Instructions for Chocolate Raspberry Cupcakes
  1. Preheat your oven to 350°F (175°C) and gather your 12-cup muffin pan. Line the cups with vibrant cupcake liners.
  2. In a large mixing bowl, sift together the all-purpose flour, Dutch cocoa powder, baking powder, baking soda, salt, and optional espresso powder.
  3. In a separate bowl, beat the softened unsalted butter and granulated sugar until light and fluffy, about 3-4 minutes. Add in one whole egg, an additional egg yolk, and vanilla extract.
  4. Pour in the whole milk and sour cream to the butter mixture, mixing gently until incorporated.
  5. Gradually add the sifted dry ingredients into the wet mixture in three parts, mixing on low speed until just combined.
  6. Fill each cupcake liner about three-quarters full with the batter. Bake for 17-20 minutes.
  7. In a small saucepan, heat the heavy cream over medium heat until steaming. Pour it over chopped semi-sweet chocolate and stir until smooth.
  8. In a clean mixing bowl, beat softened unsalted butter until light and fluffy. Gradually add powdered sugar, then add ground freeze-dried raspberries and vanilla extract.
  9. Once cooled, use a small knife to remove a piece from the center of each cupcake. Fill centers with raspberry ganache and pipe frosting on top.

Nutrition

Serving: 1cupcakeCalories: 350kcalCarbohydrates: 46gProtein: 4gFat: 18gSaturated Fat: 10gPolyunsaturated Fat: 1gMonounsaturated Fat: 6gTrans Fat: 0.5gCholesterol: 50mgSodium: 180mgPotassium: 200mgFiber: 2gSugar: 25gVitamin A: 300IUCalcium: 20mgIron: 2mg

Notes

These Chocolate Raspberry Cupcakes are perfect for sharing or keeping all to yourself!

Tried this recipe?

Let us know how it was!

Crispy Churro Waffles with Cinnamon Sugar for Breakfast Bliss

May 23, 2026 by Grace Snow Leave a Comment

As the smell of warm cinnamon and sugar wafts through my kitchen, I can’t help but smile—because today, I’m whipping up a batch of Churro Waffles with Cinnamon Sugar! This delightful recipe brings together the crispy charm of churros and the fluffy goodness of waffles, making it a perfect treat for breakfast or dessert. Just imagine biting into a crispy, golden waffle coated in sweet cinnamon sugar; it’s an indulgence that feels special yet is surprisingly simple to make. Plus, they’re bound to impress everyone at the table without taking hours of your time. Are you ready to elevate your breakfast game and satisfy your sweet tooth? Let’s dive into these heavenly treats!

Why Are Churro Waffles Irresistible?

Indulgent Combo: Experience the best of both worlds with crispy churros and light, fluffy waffles in one bite!

Quick & Easy: Whip them up in no time—perfect for busy mornings or spontaneous sweet cravings.

Crowd-Pleaser: They’re bound to be a hit with family and friends, making any gathering feel extra special.

Customize to Taste: Whether you prefer traditional toppings or a scoop of vanilla ice cream with caramel sauce, the possibilities are endless!

Comforting Flavor: The warm cinnamon-sugar coating brings back fond memories while creating new ones at your breakfast table.

You'll adore these Churro Waffles with Cinnamon Sugar—check out our variations for even more delicious ideas!

Churro Waffles with Cinnamon Sugar Ingredients

For the Waffle Batter

  • 1 teaspoon salt – Enhances all the sweet and spicy notes in the churro waffles.
  • 4 teaspoons baking powder – Gives the waffles a light, airy rise for that perfect texture.
  • 2 tablespoons white sugar – Adds subtle sweetness to the batter, elevating the overall flavor.
  • 2 eggs – Binds ingredients and adds richness to your waffles.
  • 2 cups all-purpose flour – The sturdy base for a tender and fluffy waffle.
  • 1 1/2 cups warm milk – Keeps the batter smooth and helps activate the baking powder.
  • 1/3 cup melted butter – Provides a luscious buttery flavor and crispy edges.
  • 1 teaspoon vanilla extract – Adds warmth and depth to the batter.
  • 3 shakes of cinnamon – Infuses the batter with a comforting spice reminiscent of churros.

For the Cinnamon Sugar Coating

  • 1 cup white sugar – Sweetness that beautifully contrasts the warm cinnamon flavor.
  • 1/4 to 1/2 cup cinnamon – Customize the amount for your preferred level of spiciness.
  • 1/2 cup melted butter – Ensures that the cinnamon sugar adheres perfectly to the warm waffles.

Dive into the delightful world of Churro Waffles with Cinnamon Sugar—your breakfast will never be the same!

Step‑by‑Step Instructions for Churro Waffles with Cinnamon Sugar

Step 1: Preheat the Waffle Iron
Begin by preheating your waffle iron according to the manufacturer’s instructions. This typically takes about 5 minutes; a ready indicator light might signal when it’s time. While it heats, lightly grease the surface with a little cooking spray or melted butter to ensure an easy release for your Churro Waffles.

Step 2: Mix the Dry Ingredients
In a large mixing bowl, whisk together 2 cups of all-purpose flour, 4 teaspoons of baking powder, 2 tablespoons of sugar, 1 teaspoon of salt, and 3 shakes of cinnamon. Blend these dry ingredients well to ensure an even distribution of flavor. This step is essential as it helps create the delightful base for your waffles.

Step 3: Combine the Wet Ingredients
In another bowl, crack 2 eggs and whisk them together with 1 1/2 cups of warm milk, 1/3 cup of melted butter, and 1 teaspoon of vanilla extract. Whisk until the mixture is well combined, and the eggs are fully incorporated. This luscious mixture will add richness to your Churro Waffles and create that wonderful, fluffy texture we all love.

Step 4: Create the Batter
Pour the wet mixture into your bowl of dry ingredients, gently folding with a spatula until just combined. Take care not to over-mix; a few lumps are perfectly fine! The goal is to maintain the airy structure, which makes these Churro Waffles so delightful. Set the batter aside for a moment as you prepare for the next step.

Step 5: Cook the Waffles
Carefully ladle the batter into the preheated waffle iron, filling it according to your model's instructions. Close the lid and let it cook for about 4 to 5 minutes, or until the waffles are golden brown and crisp. Keep an eye on the steam—once it diminishes, your Churro Waffles are likely nearing perfection!

Step 6: Add the Cinnamon Sugar Coating
Once cooked, remove the waffles from the iron and immediately brush each side with melted butter. In a separate shallow dish, combine 1 cup of white sugar with 1/4 to 1/2 cup of cinnamon to taste. Roll the warm waffles in this delightful cinnamon-sugar mixture, ensuring they’re well coated for that irresistible sweetness.

Step 7: Serve and Enjoy
Serve your Churro Waffles warm, and consider adding your favorite toppings like whipped cream, chocolate syrup, or even a scoop of vanilla ice cream for extra indulgence. Enjoy the delightful combination of flavors and textures as you share these heavenly treats with family and friends!

Make Ahead Options

These Churro Waffles with Cinnamon Sugar are perfect for meal prep enthusiasts, allowing you to enjoy a delicious treat with minimal effort! You can prepare the waffle batter up to 24 hours in advance by mixing the dry ingredients and wet ingredients separately, then refrigerating them. Just be sure to combine them just before cooking to maintain that fluffy texture. You can also freeze the cooked waffles—simply lay them flat on a baking sheet until solid, then transfer them to a freezer bag. They can be reheated directly from frozen in a toaster or oven for crispy results. When ready to serve, brush with melted butter and roll in cinnamon sugar for a warm, indulgent experience that feels freshly made!

What to Serve with Churro Waffles with Cinnamon Sugar

Imagine indulging in a plate of sweet and crispy waffles, paired perfectly with delightful accompaniments to elevate your meal experience!

  • Vanilla Ice Cream: The creamy, cold ice cream adds a luxurious contrast that complements the warmth of the churro waffles beautifully.

  • Caramel Sauce: A rich drizzle of caramel pools over the waffles, enhancing their sweetness while introducing a delightful gooey texture.

  • Fresh Berries: Juicy strawberries, raspberries, or blueberries provide a refreshing tartness that balances the sugary notes of cinnamon.

  • Whipped Cream: Light and airy, whipped cream adds a cloud-like creaminess, creating a decadent topping that feels indulgent yet light.

  • Chocolate Sauce: A drizzle of warm chocolate sauce transforms the dish, offering a rich, sweet complement to the cinnamon-sugar flavor.

  • Coffee or Espresso: Pair these waffles with a cup of coffee or espresso to cut through the sweetness, creating a blissful breakfast or dessert experience. Coffee’s rich notes elevate the overall indulgence.

Enjoy your delicious Churro Waffles with Cinnamon Sugar alongside these delightful options for a truly memorable meal!

Churro Waffles with Cinnamon Sugar Variations

Feel free to unleash your culinary creativity and customize these delightful churro waffles however you wish!

  • Coconut Sugar: Substitute coconut sugar for white sugar in the topping for a deeper, caramel flavor that enhances the overall taste.

  • Nutty Crunch: Add finely chopped toasted nuts like pecans or walnuts into the batter for added crunch and richness. You'll find this twist adds a delightful texture contrast!

  • Dairy-Free: Substitute almond or oat milk for regular milk and replace butter with coconut oil or a plant-based butter for a dairy-free option that’s just as indulgent.

  • Chocolate Drizzle: Drizzle melted dark chocolate over the finished waffles for a luxurious touch that takes them to the next level of decadence.

  • Spicy Kick: Add a pinch of cayenne pepper to the cinnamon-sugar mixture for a surprising heat that balances the sweetness beautifully—perfect for those who love a little zing!

  • Pumpkin Spice: Transform your waffles by incorporating pumpkin puree and pumpkin pie spice into the batter for a fall-inspired flavor. Serve with whipped cream and caramel for a cozy treat!

  • Fruit Toppings: Top your churro waffles with fresh berries or banana slices for a fruity burst that complements the sweetness of the cinnamon sugar.

  • Ice Cream Sandwich: Create a decadent dessert by sandwiching a scoop of vanilla ice cream between two churro waffles for an irresistible treat that will impress any guest.

For more variations and delectable recipes, check out our Pumpkin Cinnamon Roll or Pumpkin Cinnamon Roll. There are endless possibilities to explore!

Tips for the Best Churro Waffles

  • Warm Milk Matters: Warm your milk slightly before adding it to the batter. This small step helps activate the baking powder for fluffier Churro Waffles.

  • Don’t Overmix: When combining wet and dry ingredients, mix until just combined. Overmixing can lead to dense waffles instead of light, airy ones.

  • Proper Preheating: Make sure your waffle iron is thoroughly preheated before pouring in the batter. Proper heat ensures crispy edges and prevents sticking.

  • Immediate Coating: Coat the waffles in melted butter and roll in cinnamon sugar while they’re still warm. This ensures the coating sticks perfectly for maximum flavor.

  • Storing Leftovers: If you have extra Churro Waffles, store them in an airtight container for up to 2 days. Reheating in a toaster maintains their delightful crispiness.

Keep these tips in mind for perfect Churro Waffles with Cinnamon Sugar every time!

How to Store and Freeze Churro Waffles with Cinnamon Sugar

Fridge: Store leftover Churro Waffles in an airtight container for up to 2 days. This helps retain their delightful flavor and softness.

Freezer: To freeze, lay waffles flat on a baking sheet until solid, then transfer to a freezer bag. They’ll last up to 3 months and can be reheated directly from frozen.

Reheating: To restore crispiness, reheat the waffles in a toaster or oven at 350°F (175°C) for about 5-7 minutes, or until warm and crispy.

Serving Tip: For a special treat, heat and coat frozen waffles in melted butter and roll in cinnamon sugar again before serving!

Churro Waffles with Cinnamon Sugar Recipe FAQs

What type of flour should I use for Churro Waffles?
I recommend using all-purpose flour for the best texture in your Churro Waffles. It provides the perfect balance of structure and tenderness. If you want a gluten-free option, a 1:1 gluten-free flour blend can work as a substitute without sacrificing flavor.

How do I know when my Churro Waffles are cooked?
Keep an eye on the steam! Once the steam diminishes from your waffle iron, it usually means they are close to done. Check for a crisp, golden-brown exterior. Depending on your waffle iron, they typically cook for about 4 to 5 minutes.

Can I store leftover Churro Waffles?
Absolutely! Store your leftover Churro Waffles in an airtight container in the fridge for up to 2 days. To retain their delightful texture, reheat them in a toaster or oven at 350°F (175°C) for about 5-7 minutes.

What’s the best way to freeze Churro Waffles?
To freeze your Churro Waffles, lay them flat on a baking sheet and place them in the freezer until they are solid. Once they're frozen, transfer the waffles to a freezer bag. They can be stored for up to 3 months. When you’re ready to enjoy them, simply reheat directly from frozen in your toaster or oven!

How can I customize the cinnamon sugar coating?
Feel free to get creative! Start with the basic ratio of 1 cup sugar to 1/4 to 1/2 cup cinnamon and adjust according to your taste. You could also try adding a pinch of nutmeg or use coconut sugar for a richer flavor!

Are Churro Waffles safe for my pets?
No, it’s best to avoid sharing Churro Waffles with pets. The sugar and butter content can be unhealthy for them. There are plenty of pet-friendly treat recipes available if you want to spoil your furry friends!

Churro Waffles with Cinnamon Sugar

Crispy Churro Waffles with Cinnamon Sugar for Breakfast Bliss

Delight in these Churro Waffles with Cinnamon Sugar, a perfect combination of crispy churros and fluffy waffles.
Print Recipe Pin Recipe
Prep Time 15 minutes mins
Cook Time 25 minutes mins
Total Time 40 minutes mins
Servings: 4 waffles
Course: Dessert
Cuisine: American
Calories: 350
Ingredients Equipment Method Nutrition Notes

Ingredients
  

For the Waffle Batter
  • 1 teaspoon salt Enhances all the sweet and spicy notes in the churro waffles.
  • 4 teaspoons baking powder Gives the waffles a light, airy rise for that perfect texture.
  • 2 tablespoons white sugar Adds subtle sweetness to the batter, elevating the overall flavor.
  • 2 pieces eggs Binds ingredients and adds richness to your waffles.
  • 2 cups all-purpose flour The sturdy base for a tender and fluffy waffle.
  • 1.5 cups warm milk Keeps the batter smooth and helps activate the baking powder.
  • 1/3 cup melted butter Provides a luscious buttery flavor and crispy edges.
  • 1 teaspoon vanilla extract Adds warmth and depth to the batter.
  • 3 shakes cinnamon Infuses the batter with a comforting spice reminiscent of churros.
For the Cinnamon Sugar Coating
  • 1 cup white sugar Sweetness that beautifully contrasts the warm cinnamon flavor.
  • 1/4 to 1/2 cup cinnamon Customize the amount for your preferred level of spiciness.
  • 1/2 cup melted butter Ensures that the cinnamon sugar adheres perfectly to the warm waffles.

Equipment

  • waffle iron

Method
 

Step‑by‑Step Instructions
  1. Preheat your waffle iron according to the manufacturer’s instructions, typically about 5 minutes. Lightly grease with cooking spray or melted butter.
  2. In a large mixing bowl, whisk together the dry ingredients: flour, baking powder, sugar, salt, and cinnamon until evenly blended.
  3. In another bowl, crack the eggs, and whisk them with warm milk, melted butter, and vanilla extract until well combined.
  4. Pour the wet mixture into the dry ingredients, gently folding with a spatula until just combined. Set the batter aside.
  5. Carefully ladle the batter into the preheated waffle iron and cook for about 4 to 5 minutes, until golden brown and crisp.
  6. Remove the waffles from the iron, brush with melted butter, and roll in the cinnamon-sugar mixture while warm.
  7. Serve warm with your favorite toppings like whipped cream or vanilla ice cream.

Nutrition

Serving: 1waffleCalories: 350kcalCarbohydrates: 50gProtein: 6gFat: 15gSaturated Fat: 9gPolyunsaturated Fat: 0.5gMonounsaturated Fat: 4gCholesterol: 70mgSodium: 350mgPotassium: 150mgFiber: 1gSugar: 20gVitamin A: 500IUCalcium: 150mgIron: 1.5mg

Notes

To ensure the best results, warm the milk slightly before adding to the batter, don't overmix, and coat the waffles while they're still warm.

Tried this recipe?

Let us know how it was!
  • « Previous Page
  • 1
  • 2
  • 3
  • 4
  • 5
  • 6
  • …
  • 62
  • Next Page »

Welcome!

Hi, I’m Grace, a Sydney-based home cook with a passion for bold flavors and trending ingredients. Whether you’re a busy beginner or a seasoned foodie, you’ll find dishes here that are fresh, fun, and full of flavor.

More about me

Popular Recipes

  • One Pot Keto Tuna Casserole
    One Pot Keto Tuna Casserole: Creamy Comfort in Minutes
  • Ultimate Jalapeno Popper Chicken Salad
    Ultimate Jalapeno Popper Chicken Salad That'll Wow Your Tastebuds
  • Green Chile Cheese Dip
    Mouthwatering Green Chile Cheese Dip for Cozy Gatherings
  • Easy Chimichurri Sauce
    Fresh and Zesty Easy Chimichurri Sauce in Just Minutes

Footer

↑ back to top

About

  • Privacy Policy
  • Disclaimer
  • Terms & Conditions

Newsletter

  • Sign Up! for emails and updates

Contact

  • About me
  • Contact me

Copyright © 2025 TastyTrendIngredients