tastytrendingredients

  • Home
  • Recipes
    • Appetizers
    • Breakfast
    • Dessert
    • Dinner
    • Drinks
    • Salads
    • Snacks
    • Soups
  • About me
  • Contact me
menu icon
go to homepage
  • Home
  • Recipes
    • Appetizers
    • Breakfast
    • Dessert
    • Dinner
    • Drinks
    • Salads
    • Snacks
    • Soups
  • About me
  • Contact me
search icon
Homepage link
  • Home
  • Recipes
    • Appetizers
    • Breakfast
    • Dessert
    • Dinner
    • Drinks
    • Salads
    • Snacks
    • Soups
  • About me
  • Contact me
×

Delicious Pitaya Smoothie Bowl for a Refreshing Boost

August 11, 2025 by Grace Snow Leave a Comment

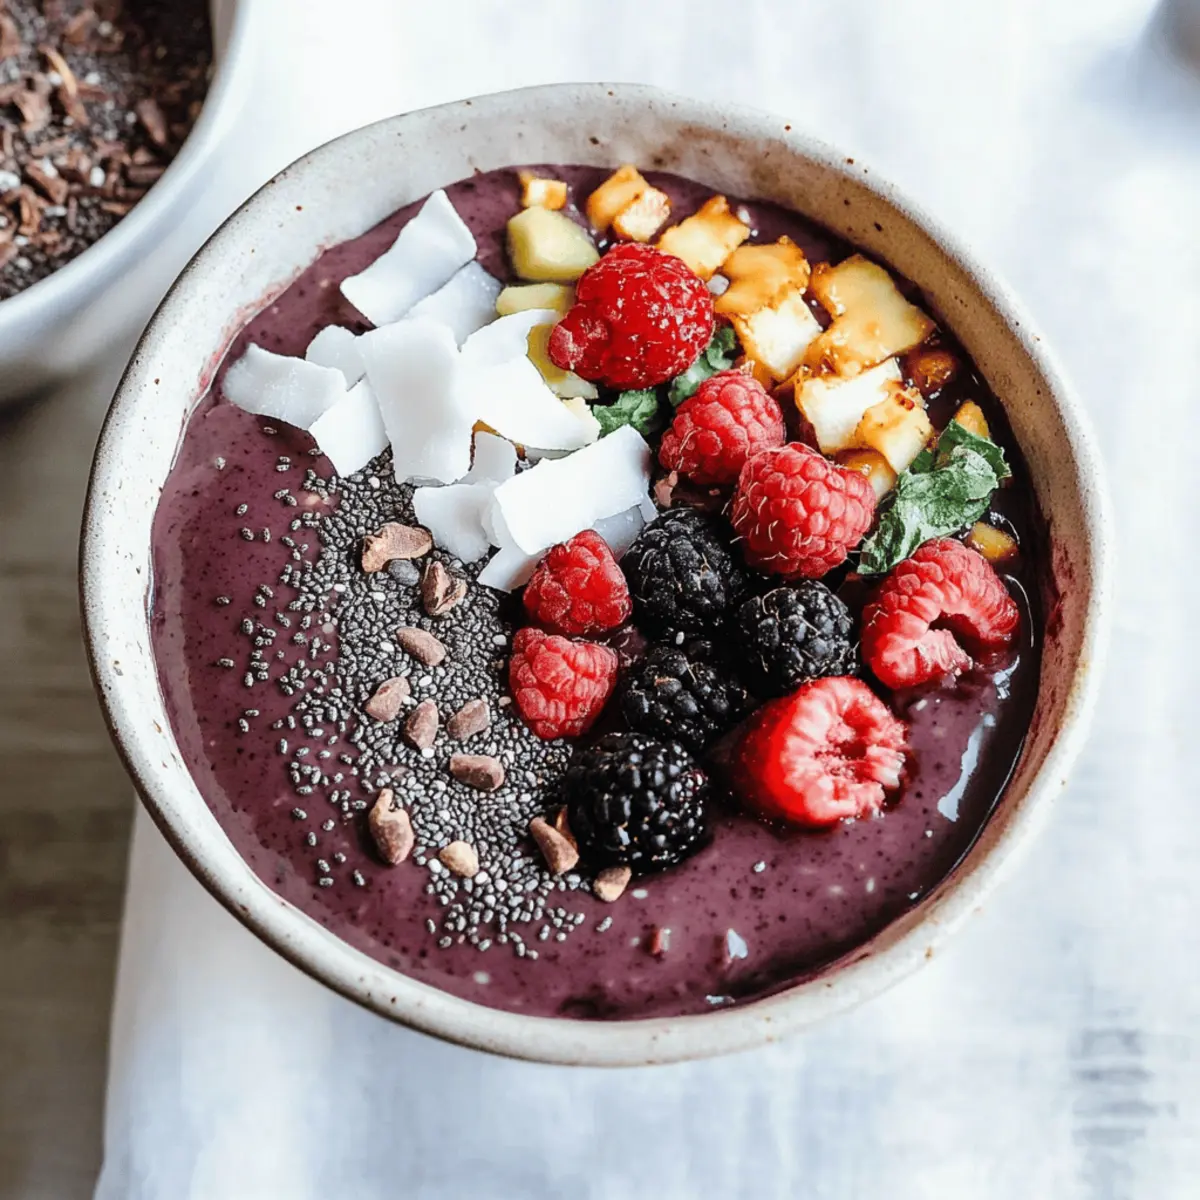
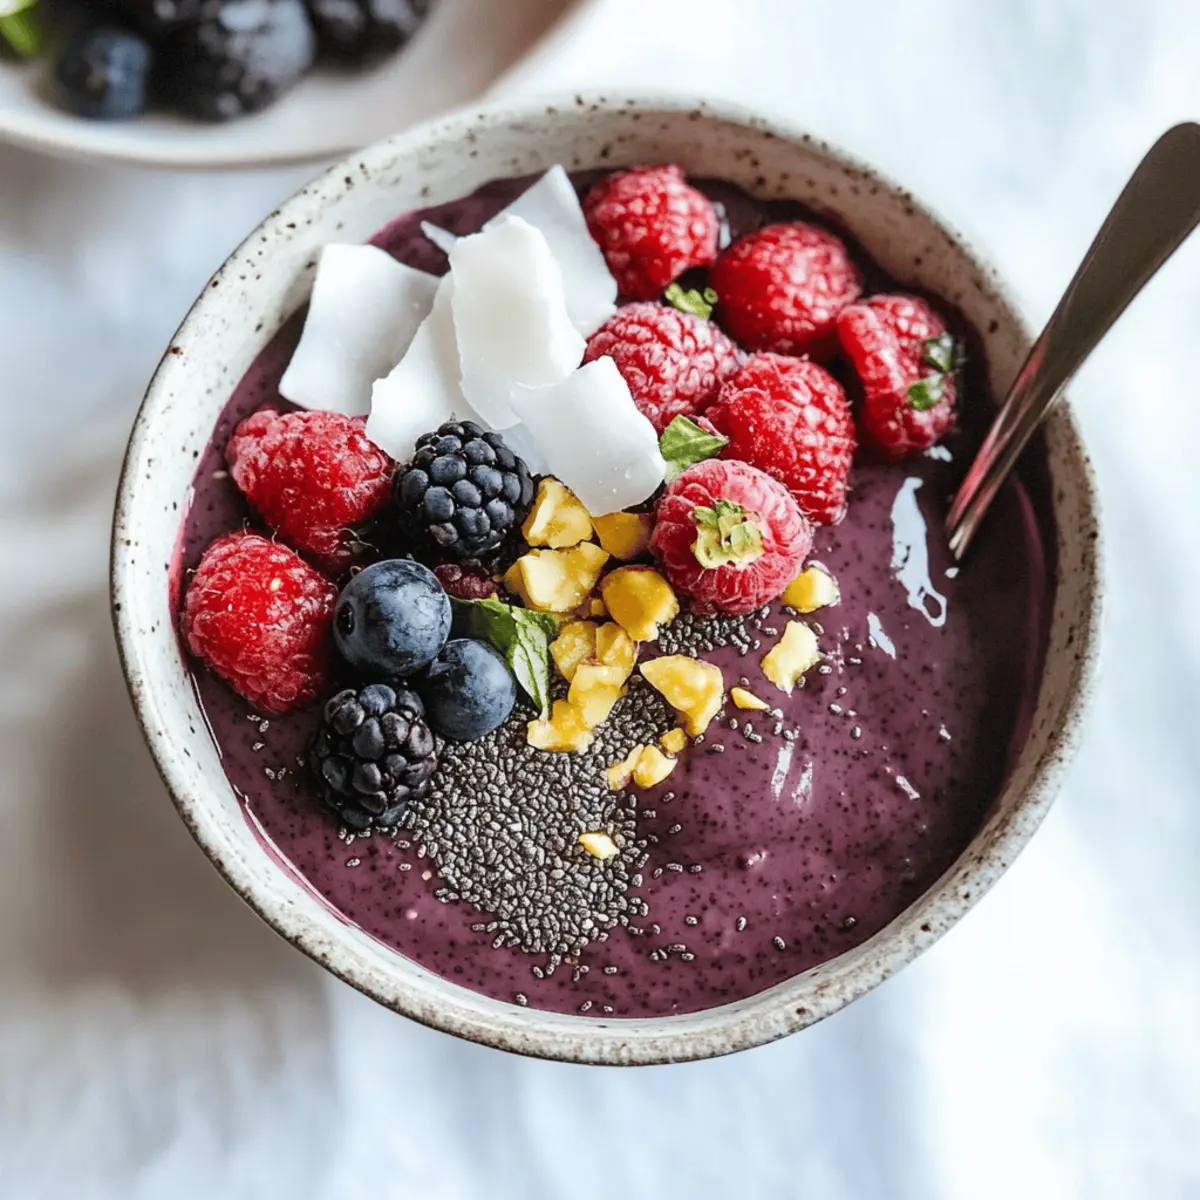
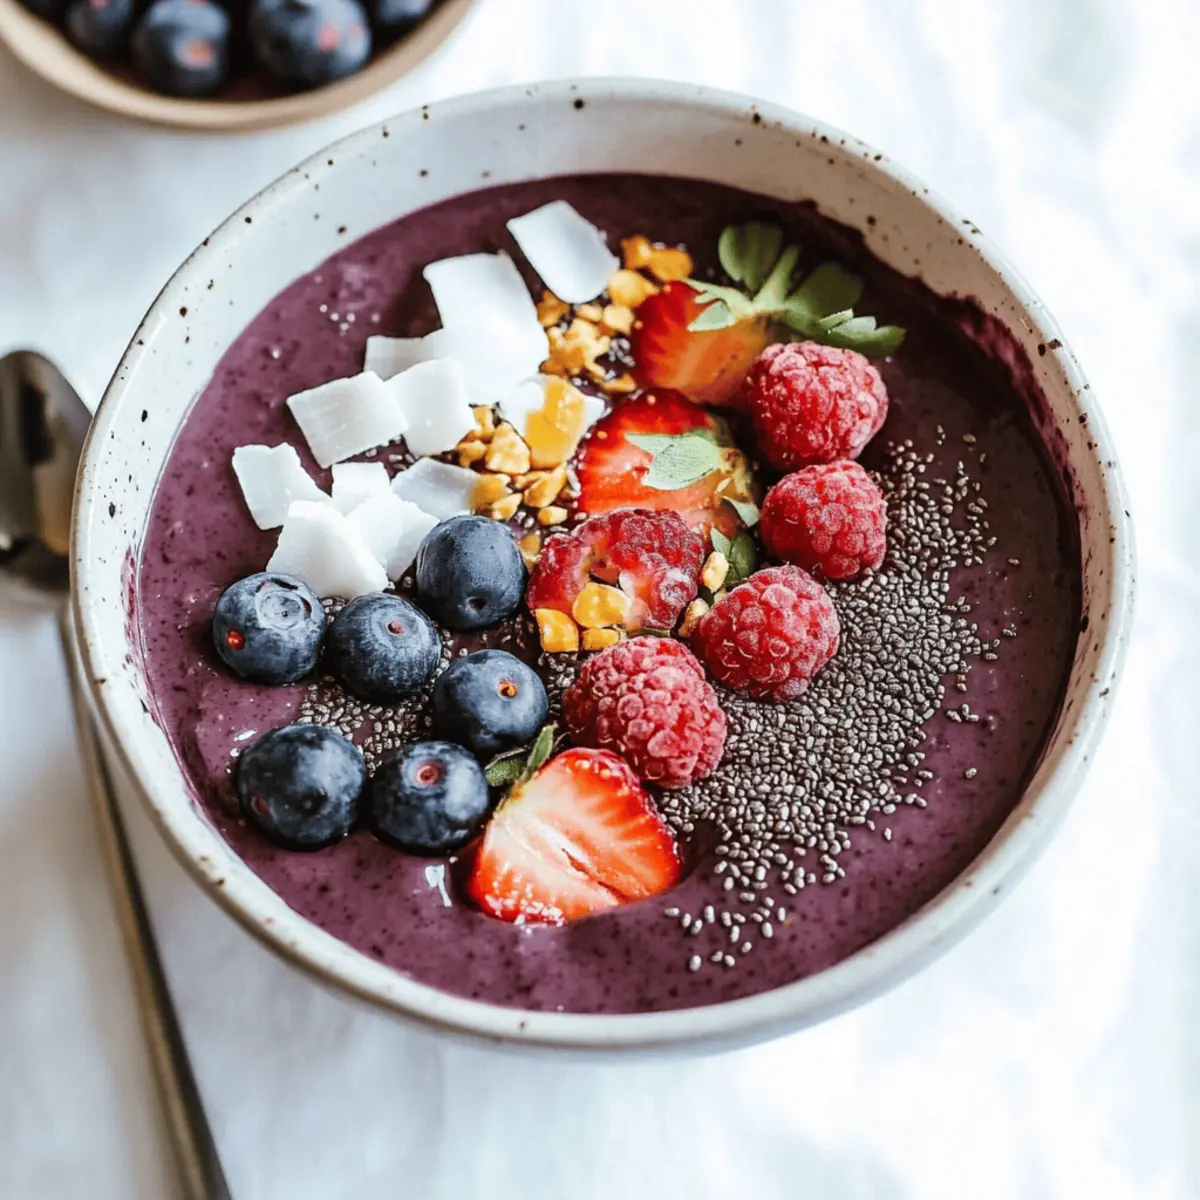
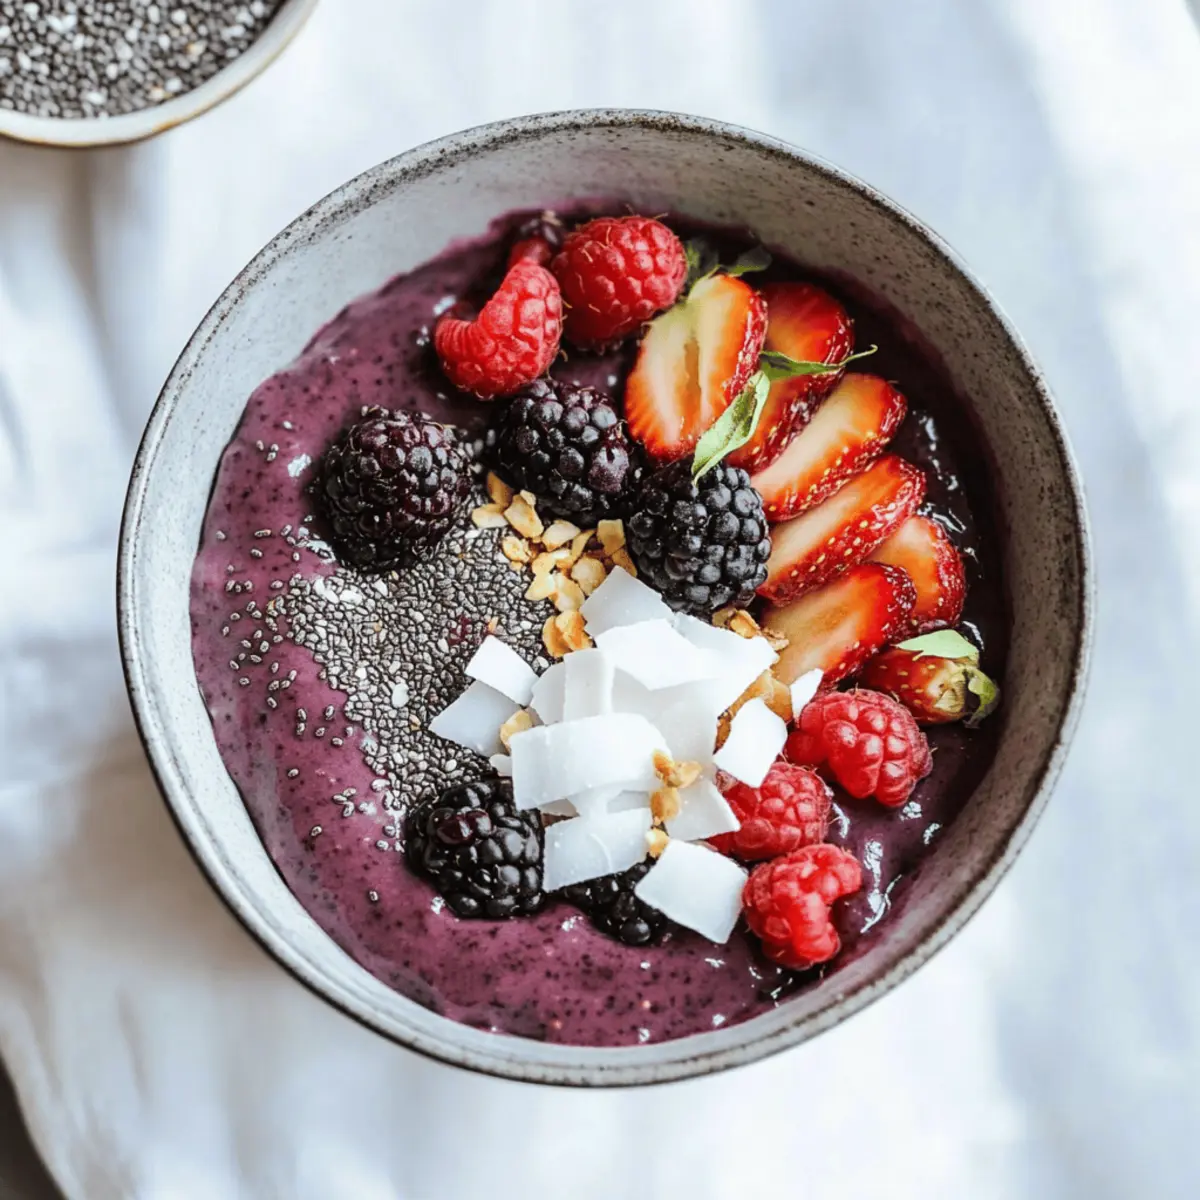
Every time I take a sip of this vibrant pitaya smoothie bowl, I’m instantly transported to a sun-soaked beach, where the colorful fruits dance with the waves in the distance. Knowing that it's packed with nutrients makes it even more satisfying. This refreshing pitaya smoothie bowl is not just a feast for the eyes; it’s a nutrient-dense superhero that can easily jazz up your morning routine or serve as a satisfying afternoon snack. With just a handful of ingredients like frozen pitaya, banana, and mixed berries, its quick preparation means you can whip it up even on the busiest mornings. Trust me, blending your way to health has never been this delicious! Ready to dive into this tropical delight? Let’s make some magic happen!

Why is the Pitaya Smoothie Bowl Special?

Vibrant Colors: The pitaya's stunning pink hue will brighten up your breakfast table, making it a feast for the eyes.

Nutrient-Packed: With its blend of fruits, this bowl is rich in antioxidants and essential vitamins, giving you a healthy boost to start your day.

Quick Prep: In just a few minutes, you can prepare this refreshing treat, perfect for hectic mornings or busy afternoons.

Versatile Toppings: Customize your smoothie bowl with various toppings like nuts or fruits, allowing you to get creative every time.

Crowd-Pleaser: Whether it’s for a family brunch or a solo snack, this pitaya smoothie bowl is sure to impress anyone looking for a deliciously healthy option. Enjoy it alone or pair it with something tasty like granola recipes for an even heartier meal!

Pitaya Smoothie Bowl Ingredients

For the Smoothie Base
• Frozen Pitaya Cubes – The key ingredient that brings vibrant color and a unique flavor to your pitaya smoothie bowl.
• Frozen Banana – This adds a creamy texture and natural sweetness essential for your smoothie.
• Frozen Mixed Berries – Packed with antioxidants, these enhance the flavor and provide additional nutrients.
• Coconut Water or Almond Milk – Choose coconut water for hydration or almond milk for a nutty twist; both will help blend the ingredients smoothly.

For Toppings
• Fresh Fruit – Sliced fruits like kiwi or strawberries not only enhance the look but also add extra vitamins.
• Nuts and Seeds – Almonds or chia seeds add crunch and healthy fats, making your pitaya smoothie bowl more filling.
• Coconut Flakes – Sprinkle on top for a tropical flair and added texture.
• Nut Butters – A dollop of almond or peanut butter can elevate the flavor and boost protein content.

Feel free to mix and match toppings to create your perfect pitaya smoothie bowl while enjoying the nutritious benefits this delightful dish has to offer!

Step‑by‑Step Instructions for Pitaya Smoothie Bowl

Step 1: Blend Base
In a high-powered blender, combine 1 cup of frozen pitaya cubes, 1 frozen banana, and 1 cup of frozen mixed berries. Pour in ½ to 1 cup of coconut water or almond milk to create a smooth blend. Start blending on high for about 30 seconds to one minute. Use a tamper if necessary to push down the ingredients until you achieve a thick, creamy texture and vibrant color.

Step 2: Check Consistency
Once blended, pause the blender and check the consistency of your pitaya smoothie bowl. If it's too thick for your liking, gradually add more coconut water or almond milk, blending again for an additional 15 seconds. Ideal consistency is thick enough to hold toppings while still being smooth and spoonable. Adjust to your taste preferences and blend for just a few more seconds if needed.

Step 3: Pour and Serve
Carefully pour the blended pitaya smoothie into a bowl, using a spatula to scrape down the sides of the blender if necessary. Aim to fill your bowl halfway to leave space for toppings. The beautiful pink hue should stand out, making it visually appealing. Take a moment to admire the vibrant color before adding your desired toppings.

Step 4: Add Toppings
Now comes the fun part! Customize your pitaya smoothie bowl with your choice of fresh fruit, nuts, seeds, or coconut flakes. Slice some kiwi or strawberries for added color and vitamins, and sprinkle a handful of almonds or chia seeds for crunch. Consider drizzling a bit of nut butter on top for extra flavor and protein.

Step 5: Enjoy Immediately
Once your toppings are in place, grab a spoon and dive into your delicious pitaya smoothie bowl! This refreshing treat is best enjoyed immediately to maintain its creamy texture and vibrant flavors. Relish every bite, knowing you’ve prepared a nutrient-dense dish that's both satisfying and healthy!

Expert Tips for Making the Perfect Pitaya Smoothie Bowl

• Frozen Fruit Focus: Ensure your fruits are fully frozen to achieve a creamy consistency in your pitaya smoothie bowl. Fresh fruit won’t yield the same texture.

• Liquid Limitation: Start with less liquid and gradually add more as needed. Too much liquid will thin your smoothie and compromise its thickness.

• Prepping Ahead: Prepare your smoothie base in advance and freeze it in portions. Thaw and stir the base before serving for an easy, quick snack.
• Taste Testing: Don’t be shy! Blend and taste as you go to adjust sweetness or thickness. You can always add a little honey or maple syrup for extra sweetness.

• Scoop and Serve: Serve the smoothie bowl right after making it to enjoy its vibrant colors and creamy texture at their best.

What to Serve with Pitaya Smoothie Bowl?

Bringing together a wholesome meal with vibrant flavors is as easy as pairing your delightful bowl with complementary dishes.

  • Granola Parfait: This crunchy treat adds a satisfying crunch and nutty flavor, enhancing the smoothie’s creaminess for a delightful contrast.

  • Coconut Yogurt: A scoop of creamy coconut yogurt on the side will amplify your tropical experience while providing additional probiotics for gut health.

  • Chia Seed Pudding: The texture of this creamy pudding perfectly balances the smoothness of the pitaya bowl, while also boosting fiber and omega-3s.

  • Avocado Toast: The rich creaminess of avocado toast adds healthy fats and is a filling addition that makes your breakfast feel more complete.

  • Fresh Citrus Salad: Bright, zesty flavors from a citrus salad can awaken your taste buds and add a refreshing element that complements the smoothie bowl’s sweetness.

  • Sparkling Lemonade: Pairing the smoothie bowl with a glass of sparkling lemonade offers a refreshing sip, balancing the smoothie’s flavors with a hint of tanginess.

  • Dark Chocolate Chips: Sprinkling a few dark chocolate chips on top provides a touch of indulgence while enhancing the healthiness with a dose of antioxidants.

  • Banana Oat Muffins: These soft muffins add a hearty, comforting element that makes for a wholesome brunch option alongside your smoothie bowl.

  • Fruit Skewers: Light and playful, a rainbow of fresh fruit skewers offers a delightful, interactive side perfect for a festive brunch or snack time.

Pitaya Smoothie Bowl Variations

Feel free to play around with this recipe and make it your own—your taste buds will thank you!

  • Fruit Swap: Try using frozen mango or pineapple instead of bananas for a tropical twist. Each fruit brings a unique sweetness that brightens the flavor profile.
  • Green Booster: Incorporate a handful of spinach or kale for an extra nutrient boost without altering the taste much. Your smoothie will remain vibrant and green, loaded with health benefits!
  • Nutty Flavor: Add a spoonful of nut butter, like almond or peanut, for creaminess and protein. The nutty flavor enhances your smoothie bowl while making it even more satisfying.
  • Creamy Texture: Use Greek yogurt as your base for added creaminess and tang. This substitution makes your smoothie bowl thicker, providing a delightful and hearty texture!
  • Coconut Milk Upgrade: Swap out coconut water for full-fat coconut milk for a richer, creamier base. This will elevate your pitaya smoothie bowl to dessert status.
  • Chia Pudding Layer: Try adding a layer of chia pudding on top of your smoothie base for added nutrition and a fun texture contrast. It’s an excellent way to introduce more fiber to your meal.
  • Heat it Up: For a spicy kick, sprinkle a pinch of cayenne pepper or ginger powder into the blend. This unexpected twist brings warmth and depth to your smoothie bowl.
  • Flavor Infusions: Blend in a few drops of vanilla extract or almond extract for an aromatic flavor boost. These subtle enhancements create layers of deliciousness that are sure to impress!

Be sure to check out my hearty granola recipes for a crunchy side to complement your delightful pitaya smoothie bowl!

How to Store and Freeze Pitaya Smoothie Bowl

Fridge: Store any leftover pitaya smoothie bowl in an airtight container in the fridge for up to 2 days. Give it a good stir before enjoying it again.

Freezer: If you want to prep ahead, freeze the smoothie base in individual portions for up to 3 months. Thaw in the fridge overnight before serving and mix well.

Reheating: Avoid reheating the smoothie bowl, as it’s best enjoyed cold. Simply blend any separated ingredients back together after thawing.

Toppings: For the best texture and flavor, add toppings like fresh fruit and nuts just before serving, rather than storing them mixed in.

Make Ahead Options

These refreshing Pitaya Smoothie Bowls are perfect for meal prep lovers! You can prepare the smoothie base by blending together the frozen pitaya, banana, and mixed berries up to 24 hours in advance. Simply store the mixture in an airtight container and refrigerate it. To maintain the creamy texture, avoid adding too much liquid at this stage. When you’re ready to serve, just give it a quick blend to revive its thick consistency, then pour it into a bowl and add your favorite toppings. This way, you’ll have a vibrant, nutrient-dense breakfast or snack ready to enjoy with minimal effort, keeping your mornings hassle-free!

Pitaya Smoothie Bowl Recipe FAQs

How do I select ripe pitaya for my smoothie bowl?
Absolutely! When choosing pitaya (dragon fruit), look for ones with vibrant skin and no dark spots. The fruit should yield slightly to gentle pressure, indicating ripeness. If you find a fruit with many dark spots or shriveling, it’s best to pass on it, as it may be overripe.

How should I store leftover pitaya smoothie bowl?
Very! You can keep any leftover pitaya smoothie bowl in an airtight container in the fridge for up to 2 days. Just remember to give it a good stir before enjoying it again to mix any separated ingredients back together.

Can I freeze the pitaya smoothie bowl for later?
Absolutely! You can freeze the smoothie base in individual portions for up to 3 months. Just pour your blended smoothie into ice cube trays or freezer-safe bags. Thaw in the fridge overnight before serving and mix well. It's best enjoyed chilled!

What can I do if my smoothie is too thick or too thin?
No worries! If your pitaya smoothie bowl is too thick, simply add a little more coconut water or almond milk – blend for another 15 seconds until you reach your desired consistency. If it’s too thin, a quick fix is just to add more frozen fruit, blending until smooth again. Always taste and adjust according to your preferences!

Are there any allergens in this recipe I should be aware of?
Definitely! This pitaya smoothie bowl is gluten-free and vegetarian, making it a healthy option for most diets. However, if you're allergic to nuts, be cautious with toppings like almond butter or nuts. Feel free to substitute with allergy-safe alternatives like sunflower seed butter or omit them entirely. Enjoy safely!

Pitaya Smoothie Bowl

Delicious Pitaya Smoothie Bowl for a Refreshing Boost

Enjoy a nutrient-packed pitaya smoothie bowl for a refreshing boost to start your day.
Print Recipe Pin Recipe
Prep Time 10 minutes mins
Total Time 10 minutes mins
Servings: 2 bowls
Course: Breakfast
Cuisine: Tropical
Calories: 220
Ingredients Equipment Method Nutrition Notes

Ingredients
  

Smoothie Base
  • 1 cup Frozen Pitaya Cubes Key ingredient for color and flavor
  • 1 unit Frozen Banana Adds creaminess and sweetness
  • 1 cup Frozen Mixed Berries Packed with antioxidants
  • ½ to 1 cup Coconut Water or Almond Milk Choose for blending
Toppings
  • 1 unit Fresh Fruit (e.g., Kiwi or Strawberries) Enhances vitamins and appearance
  • ¼ cup Nuts and Seeds (e.g., Almonds or Chia Seeds) Adds healthy fats and crunch
  • 2 tablespoons Coconut Flakes For tropical flair
  • 2 tablespoons Nut Butters (e.g., Almond or Peanut) Boosts flavor and protein

Equipment

  • High-powered blender

Method
 

Step-by-Step Instructions
  1. In a high-powered blender, combine frozen pitaya cubes, frozen banana, and frozen mixed berries. Pour in coconut water or almond milk to create a smooth blend. Blend on high for about 30 seconds to 1 minute.
  2. Check the consistency and add more coconut water or almond milk if too thick. Blend for an additional 15 seconds.
  3. Pour the blended pitaya smoothie into a bowl, leaving space for toppings. Admire the vibrant color.
  4. Customize your bowl with fresh fruits, nuts, seeds, or coconut flakes as toppings.
  5. Enjoy immediately for best texture and flavor!

Nutrition

Serving: 1bowlCalories: 220kcalCarbohydrates: 40gProtein: 4gFat: 7gSaturated Fat: 3gPolyunsaturated Fat: 1gMonounsaturated Fat: 3gSodium: 50mgPotassium: 300mgFiber: 6gSugar: 20gVitamin A: 100IUVitamin C: 30mgCalcium: 50mgIron: 1mg

Notes

Best enjoyed fresh. Store leftovers in an airtight container in the fridge for up to 2 days or freeze for longer storage.

Tried this recipe?

Let us know how it was!

Cornbread Breakfast Casserole: Your New Brunch Favorite

August 9, 2025 by Grace Snow Leave a Comment

The smell of baked cheese mingling with crispy bacon fills the kitchen, instantly transporting me to cozy Sunday mornings gathered around the table. That’s the magic of my Cornbread Breakfast Casserole, a dish that perfectly wraps together fluffy cornbread and custardy eggs for a savory breakfast experience. Not only is it a crowd-pleaser, but it’s also a fantastic make-ahead option, allowing you to savor lazy brunch moments without stress. Whether you're feeding a hungry family or prepping for a busy week, this versatile casserole suits every occasion, making it easy to enjoy homemade goodness on the go. Wouldn't you love to dig into a slice that’s as portable as it is comforting?

Why is Cornbread Breakfast Casserole a Must-Try?

Crowd-Pleasing Delight: This casserole combines comfort and flavor, a guaranteed hit for lazy Sundays or brunch gatherings.
Effortless Preparation: With simple steps, you’ll have a hearty breakfast ready in no time.
Flexible Ingredients: Customize it with your favorites—swap bacon for sausage or add fresh veggies for a nutritious twist!
Make-Ahead Convenience: Prepare it up to five days in advance, making breakfast stress-free during busy mornings.
Protein-Packed Goodness: Rich in protein and fiber, the Cornbread Breakfast Casserole fuels your day while keeping taste at the forefront. Enjoy it warm with a side of fresh fruit or a green salad for a balanced meal!

Cornbread Breakfast Casserole Ingredients

For the Casserole

  • Corn Muffin Mix – A fluffy base providing sweetness and structure; using Jiffy ensures delightful results.
  • Half-and-Half – Adds richness to the egg mixture; substitute with full-fat milk for a lighter option.
  • Eggs – Essential for binding the ingredients; large eggs yield the best texture for this Cornbread Breakfast Casserole.
  • Kosher Salt – Enhances flavor; adjust based on different ingredients you might use.

For the Add-Ins

  • Bacon – Offers a crispy texture and savory taste; swap for breakfast sausage or tempeh to accommodate dietary preferences.
  • Extra-Sharp Cheddar Cheese – Brings a rich, bold flavor; Monterey Jack or Swiss can be used for a different taste.
  • Pickled Jalapeños – Provides a spicy kick; consider roasted red peppers for a milder alternative.
  • Chives – Freshness and a gentle onion note; if unavailable, scallions can work, or simply omit.

This delightful combination of ingredients will create a breakfast experience that feels as good as it tastes!

Step‑by‑Step Instructions for Cornbread Breakfast Casserole

Step 1: Preheat the Oven and Prepare the Dish
Begin by preheating your oven to 350°F (175°C). While it warms up, take a 13x9" baking dish and spray it generously with nonstick cooking spray to ensure easy removal of your Cornbread Breakfast Casserole later. This preparation will help create a perfectly golden-brown crust that is easy to cut into squares when serving.

Step 2: Cook the Bacon
In a large skillet, cook diced bacon over medium heat until it becomes crispy, which should take about 8-10 minutes. Keep an eye on it to prevent burning, stirring occasionally for even cooking. Once done, carefully drain the bacon on paper towels and chop it into bite-sized pieces. This crispy bacon will add a delightful savory element to the casserole.

Step 3: Mix Corn Muffin Base
In a mixing bowl, whisk together one box of corn muffin mix and 1 cup of half-and-half until the mixture is smooth and combined, ensuring there are no lumps. This rich base will create a beautiful contrast to the fluffy eggs in your Cornbread Breakfast Casserole. Set this aside as you prepare the next steps.

Step 4: Add Eggs and Seasoning
Crack 6 large eggs into the mixing bowl with the corn muffin mixture. Sprinkle in 1 teaspoon of kosher salt, then whisk everything together until fully combined. The eggs will bind the ingredients and create a custardy texture, essential for the perfect Cornbread Breakfast Casserole. Ensure it's well mixed but avoid overmixing to prevent a dense outcome.

Step 5: Incorporate Add-Ins
Gently fold in the chopped bacon, 1 cup of extra-sharp cheddar cheese, 1/4 cup of pickled jalapeños, and 1/4 cup of chopped chives into the egg and corn mixture. Each ingredient adds its own unique flavor and texture, enhancing the overall dish. Mix until just combined so that the ingredients are distributed evenly throughout the mixture.

Step 6: Pour and Bake the Casserole
Pour the combined mixture into your prepared baking dish, spreading it evenly with a spatula to ensure uniform cooking. Place it in the preheated oven and bake for 25–30 minutes, or until the casserole is slightly puffed and the center has a gentle wobble. The top should be golden-brown and inviting when it’s ready!

Step 7: Cool and Slice
Once baked, carefully remove the Cornbread Breakfast Casserole from the oven and allow it to cool for about 10 minutes. This cooling period makes slicing easier and helps the flavors settle. After cooling, slice it into squares and serve warm. The comforting aroma invites everyone to enjoy a delicious piece of this make-ahead breakfast treasure.

Expert Tips for Cornbread Breakfast Casserole

  • Avoid Overmixing: Overmixing the batter can lead to a dense texture. Mix just until ingredients are combined for a light and fluffy casserole.

  • Check for Doneness: Keep an eye on your casserole towards the end of the baking time. The center should have a slight wobble indicating it's perfectly done—too firm means it may be overcooked.

  • Cool Before Refrigerating: For the best flavor and texture, let the casserole cool completely before storing. This helps meld the flavors for an even more delicious reheating experience.

  • Ingredient Substitutions: Feel free to swap ingredients based on your preferences or dietary needs! Use turkey bacon or swap in seasonal veggies for added nutrition while keeping the essence of the Cornbread Breakfast Casserole.

  • Serve with Sides: Enhance your serving experience by pairing this casserole with fresh fruit or a simple green salad for a refreshing balance to its savory flavors.

How to Store and Freeze Cornbread Breakfast Casserole

Fridge: Store any leftovers in an airtight container for up to 5 days. Allow the casserole to cool completely before refrigerating to preserve its texture.

Freezer: Freeze the baked Cornbread Breakfast Casserole for up to 3 months. Wrap it tightly in foil or plastic wrap, ensuring no air pockets remain.

Reheating: For the best results, reheat slices in the oven at 350°F (175°C) for about 15–20 minutes, or until warmed through. Avoid the microwave, as it can make the texture soggy.

Make-Ahead: You can prepare the casserole in advance and store it in the fridge overnight before baking. Just add an extra 5-10 minutes to the baking time when starting from cold.

What to Serve with Cornbread Breakfast Casserole?

The perfect accompaniment can elevate your Cornbread Breakfast Casserole into an unforgettable meal, brimming with flavor and balance.

  • Fresh Fruit Salad: A vibrant mix of seasonal fruits will add brightness and a refreshing contrast to the savory casserole.
  • Simple Green Salad: Crisp greens with a light vinaigrette complement the rich casserole, providing a delightful balance of textures.
  • Crispy Hash Browns: Golden, crunchy hash browns pair wonderfully, giving a satisfying texture that contrasts the softness of the casserole.
  • Savory Breakfast Sausages: Juicy and flavorful, they enhance the hearty experience and appeal for traditional breakfast lovers.
  • Greek Yogurt with Honey: A dollop of creamy Greek yogurt drizzled with honey adds a sweet touch, balancing out the savory flavors beautifully.
  • Mimosas: Light and bubbly mimosas provide a festive flair, making your brunch truly special while their citrus notes brighten up the meal.
  • Roasted Veggies: Mixing in seasonal roasted vegetables offers not just nutrition but also a roasted richness that complements the casserole's flavors.
  • Hot Sauce: For a kick of heat, a few dashes elevate the dish with a delightful spicy twist that pairs surprisingly well with the cornbread base.
  • Coffee or Tea: A warm drink rounds out the experience, inviting cozy conversations around the brunch table.

Cornbread Breakfast Casserole Variations

Feel free to personalize your Cornbread Breakfast Casserole and make it your own comforting masterpiece in the kitchen!

  • Dairy-Free: Use almond milk and a dairy-free cheese to keep it creamy without dairy.

  • Meatless Delight: Swap out the bacon for tempeh or chickpea crumbles for a hearty vegetarian alternative that’s packed with flavor.

  • Spice Level: Add sriracha or cayenne pepper to the egg mixture for a spicy kick that adds excitement to each bite.

  • Veggie Boost: Incorporate sautéed spinach, mushrooms, or bell peppers to increase nutrition while introducing delightful flavors that brighten up the casserole.

  • Smoky Flavor: Toss in some smoked paprika for an extra depth of flavor that will make you feel like you’re enjoying a lazy summer BBQ.

  • Herb Variations: Opt for fresh basil or parsley instead of chives to infuse a fresh, aromatic twist that compliments the savory notes beautifully.

  • Cheesy Twist: Try substituting extra-sharp cheddar with pepper jack for a melty, zesty experience that brings a new level of satisfaction to the dish.

  • Breakfast Hash: Add cooked diced potatoes or sweet potatoes into the mixture for a heartier casserole that’ll keep everyone fueled and satisfied throughout the morning.

For more delightful twists, don’t forget to explore using different combinations as you adjust to your family's taste preferences, just like you would do with a classic breakfast hash. Enjoy the process of creating a dish that brings everyone together at the table with joy!

Make Ahead Options

This Cornbread Breakfast Casserole is a fantastic meal prep option that saves time during busy mornings! You can prepare the entire casserole up to 5 days in advance. Simply follow the recipe through the mixing stage, pour it into your prepared baking dish, cover it tightly with plastic wrap, and refrigerate. On the day you plan to serve, bake it straight from the fridge; just add an extra 5-10 minutes to the baking time. For the best texture and flavor, allow the casserole to cool completely before refrigerating. You’ll be ready to enjoy a delicious, homemade breakfast with minimal effort—perfect for fueling your day!

Cornbread Breakfast Casserole Recipe FAQs

What type of corn muffin mix should I use?
For the best results, I recommend using Jiffy corn muffin mix. It provides the perfect balance of sweetness and structure that brings this Cornbread Breakfast Casserole to life. One box is all you need!

How should I store leftover Cornbread Breakfast Casserole?
Store any leftovers in an airtight container in the refrigerator for up to 5 days. Ensure the casserole has cooled completely before placing it in the fridge to maintain its texture.

Can I freeze the Cornbread Breakfast Casserole?
Absolutely! You can freeze your baked casserole for up to 3 months. Wrap it tightly in foil or plastic wrap, squeezing out any air pockets to prevent freezer burn.

How do I reheat the casserole for the best texture?
For the best texture, reheat slices in the oven at 350°F (175°C) for about 15–20 minutes. Avoid using the microwave, as it can make the casserole moist and less appealing.

What modifications can I make for dietary restrictions?
If you have dietary preferences, you can make various substitutions. Swap bacon for turkey bacon or tempeh to accommodate different diets. You can also mix in seasonal vegetables like spinach or bell peppers for added nutrition. Always check for any allergies, especially with ingredients like cheese or eggs.

What if my casserole turns out too dense?
To avoid a dense texture, be mindful not to overmix your batter. Combine ingredients just until they are incorporated, and keep an eye on your baking time. A slight wobble in the center when checking for doneness is a perfect sign—no need for a firm, overcooked texture.

Cornbread Breakfast Casserole

Cornbread Breakfast Casserole: Your New Brunch Favorite

Discover the Cornbread Breakfast Casserole, a delightful mixture of fluffy cornbread, custardy eggs, and savory bacon, perfect for any brunch gathering.
Print Recipe Pin Recipe
Prep Time 15 minutes mins
Cook Time 30 minutes mins
Cooling Time 10 minutes mins
Total Time 55 minutes mins
Servings: 8 slices
Course: Breakfast
Cuisine: American
Calories: 320
Ingredients Equipment Method Nutrition Notes

Ingredients
  

For the Casserole
  • 1 box Corn Muffin Mix Using Jiffy ensures delightful results.
  • 1 cup Half-and-Half Substitute with full-fat milk for a lighter option.
  • 6 large Eggs Essential for binding the ingredients.
  • 1 teaspoon Kosher Salt Enhances flavor.
For the Add-Ins
  • 6 slices Bacon Crispy texture and savory taste.
  • 1 cup Extra-Sharp Cheddar Cheese Rich and bold flavor.
  • 1/4 cup Pickled Jalapeños Provides a spicy kick.
  • 1/4 cup Chives Freshness and a gentle onion note.

Equipment

  • Oven
  • Large skillet
  • Mixing Bowl
  • 13x9 inch Baking Dish
  • Whisk
  • Spatula

Method
 

Step‑by‑Step Instructions
  1. Preheat your oven to 350°F (175°C) and prepare a 13x9" baking dish with nonstick spray.
  2. Cook diced bacon in a skillet over medium heat until crispy, about 8-10 minutes. Drain and chop into bite-sized pieces.
  3. In a mixing bowl, whisk together corn muffin mix and half-and-half until smooth.
  4. Add eggs and kosher salt to the mixture and whisk until fully combined.
  5. Fold in chopped bacon, cheddar cheese, jalapeños, and chives until just combined.
  6. Pour the mixture into the prepared baking dish and bake for 25–30 minutes until golden-brown.
  7. Allow to cool for about 10 minutes before slicing into squares and serving warm.

Nutrition

Serving: 1sliceCalories: 320kcalCarbohydrates: 27gProtein: 14gFat: 18gSaturated Fat: 9gPolyunsaturated Fat: 2gMonounsaturated Fat: 5gCholesterol: 150mgSodium: 800mgPotassium: 250mgFiber: 1gSugar: 3gVitamin A: 15IUVitamin C: 2mgCalcium: 20mgIron: 8mg

Notes

This make-ahead casserole can be prepared up to five days in advance. Serve with fresh fruit or a green salad for balance.

Tried this recipe?

Let us know how it was!

Hello world!

August 1, 2025 by admin 1 Comment

Welcome to WordPress. This is your first post. Edit or delete it, then start writing!

frzfzrrzberb

  • « Previous Page
  • 1
  • …
  • 22
  • 23
  • 24

Welcome!

Hi, I’m Grace, a Sydney-based home cook with a passion for bold flavors and trending ingredients. Whether you’re a busy beginner or a seasoned foodie, you’ll find dishes here that are fresh, fun, and full of flavor.

More about me

Popular Recipes

  • Sticky Chicken Rice Bowls
    Savory Sticky Chicken Rice Bowls for Effortless Weeknight Meals
  • Taco Chicken Rice Bowl
    Savor the Flavor: Taco Chicken Rice Bowl Made Your Way
  • Greek Chicken Burgers
    Greek Chicken Burgers with Creamy Tzatziki Magic
  • Chicken Mashed Potato Bowls
    Comforting Chicken Mashed Potato Bowls for Cozy Nights

Footer

↑ back to top

About

  • Privacy Policy
  • Disclaimer
  • Terms & Conditions

Newsletter

  • Sign Up! for emails and updates

Contact

  • About me
  • Contact me

Copyright © 2025 TastyTrendIngredients